Documents: Go to download!
User Manual
- User Manual - (English)
- Quick Guide - (English)
- Specifications Sheet - (English)
- Shortcuts Instructions
- Menu
- Troubleshooting
Table of contents
Owner Manual Televisions
Shortcuts Instructions
Figures and illustrations in this manual are provided for reference only and may differ from actual product appearance.
Parts of the software function changes with the system upgrade.
You can use shortcuts on the remote control for fast operation. Refer to the “ Quick Setup Guide ” for more information.
Turning your TV on or off
To turn your TV on or off :
- Plug the AC power cord into a socket outlet of AC power supply.
- When the TV is powered on, press the [
 ] button on the remote control, to turn TV on or off.
NOTES
- When your TV is in standby mode, it is still consuming power. To completely disconnect power, please remove the mains plug from the mains socket.
- If your TV does not receive an input signal for several minutes, it automatically goes into standby mode.
Selecting the Input Source
Select the Input Source depending on the video device you have connected to your TV. To select the input source:
- Turn on your TV, then press the [INPUT] button on the remote, the list of Source appears.
- Press the [ ^ / v / < / >] buttons to select the input source.
- Press the [OK] button to confirm your selection.
Using the Live TV
To view broadcast programs, press the [Live TV] button on your remote.
Channel search guide
When switching to Live TV, the TV detects the presence of the channel list information (Channel scan must have been completed). If the scan has not yet been completed, a prompt will appear to begin scanning for channels. Press the Scanning button to enter the channel search interface.
Launch Live TV
After channel tuning is done for the first time, the screen will display Live TV operating tips.
[Up] load info bar.
[OK] load Channel list.
[EPG] load Guide.
[MENU] load onscreen menu.
[Down] initiate PVR and Timeshift.
[BACK] jump to previous channel.
Viewing Channel List
After you have done an automatic channel scan (if you’re using an antenna) or receiving your channels through a cable provider, you can view your list of channels by pressing [OK] button on your remote. You will see the channel list display on the screen.
Enter the sub-menu of channel list
Press the [OK] button and the [ < ] button on your remote when viewing channels.
Introduction of the sub-menu
- Channel List
All Display the channels that have been automatically searched.
Favourite List Display favourites lists 1 to 4. (Max 4 fav lists can be added) - Filter
Select channels by content, HD, child lock, scrambled, Sort. - Search
Quick access to channels. - Edit
Edit the channel list.
Favorites List
To quickly access your most-watched channels, you can create a Favorites List.
See other models: HR6VFF280SD 65R6 24F33 55PX WDBL1014V
To create your Favorites List:
There are 2 ways to enter the edit menu:
- Press the [OK] button and the [ < ] button on your remote when viewing channels to select Channel List > Favorite List
- Press the [
 ] / [
] / [  ] button on your remote to select Settings, and then press [OK] button to enter the Settings menu, Select Channel > Channel Edit > FAV > Edit.
- Adding channels to a Favorites list
Select the + Add to add the selected channel to the favorite list. - Moving channels from a favorites list
Select channels in a favorites list, press [ < ] button to move the selected channel. - Deleting channels from Favorites list
Select channels in a favorites list, press [ > ] button to remove the selected channel.
NOTES
- These steps should be operated under TV inputs.
- Before you edit the fav lists, complete channel scan first.
- You can add channels from various reception types to the FAV list.
Viewing your Favorite list
To view channels that you’ve added to your Favorites List, press [OK] button on your remote to call out the channel list.
The channel list appears on the screen and heart-shaped icons are shown next to the channels that make up your Favorites List.
EPG
It provides convenience to check TV programs that will be available in the next 7 days. The information displayed by the EPG is made available by the commercial television networks for digital channels only. The EPG also provides a simple way to program the recording of your favorite programs and a reminder function which can switch channel automatically at scheduled time so that you do not miss programs of interest. (The availability and amount of programme information will vary, depending on the particular broadcaster).
- Press the [EPG] button on the remote control to display channel information on program guide list.

PVR/T.Shift
PVR
The PVR function allows you to easily record digital television content for later viewing. The function is only available in DTV source. To use PVR, you must connect a USB device for recording. The format of the storage disk should be NTFS, FAT32, EXT4. The PVR will not function if a data storage device has not been connected.
- Schedule Recording
Press [EPG] button, Select the programme to be played, press [OK] button to set the appointment time and period, the reservation is successful. Press [RED] button to view the schedule recording. In the schedule recording list, you can readjust the reservation information that has been set. - Instant Recording
Press [ v ] button to select PVR.
Select the partition, and the USB device speed will be tested(appear when using for the first time).
You can choose to Manual stop or automatically match the programme time. - Standby record
If you press the power button during recording, TV will go into standby mode but the recording process is still going on. If you press power button again and wake up the TV, recording process will not be affected. After recording, the recorded file will be automatically saved to the disk. - Recording List
Viewing the recorded programmes.
Press the [ v ] button on your remote to select Recording List > Recorded, You can watch or delete recorded programmes.
T.Shift
This option allows you to pause and rewind live TV. This function operates by recording temporarily to a storage device. Please ensure your storage device is connected and there is enough free disk space. Otherwise the recording will not commence.
Press the [ v ] button on the remote to select T.Shift and then the menu will appear, press the [II] button to pause the live broadcast and press the [►] button to play. Press the [  ] button to rewind and press the [
  ] button to fast forward. Press the [■] button to exit the function and watch the current broadcast.
NOTES
- When connecting a hard disk, always connect the mains adapter of the connected device to the power supply.
- If a USB 1.1 or USB2.0 device requires more than 500mA or 5V, the USB device may not be supported. Max supported current for USB 3.0 device is 1A. Exceeding the max supported current may result in damage or data loss.
- The maximum supported storage space of the hard disk is 2T.
- If you want to store the video streaming of a DTV program, the transfer rate of the USB storage device should be no less than 5MB/s.
- The schedule recording function is not available while you are watching a programme that is currently being broadcast.
- Some broadcasters may restrict to record the programme.
- During the recording progress, channels locked with Channel Lock(password needed) are disabled to watch.
- The PVR and T.Shift functions doesn’t support analogue channels.
- The PVR function is disabled for scrambled channels(CI module needed).
- The T.Shift function is disabled for channels locked with Channel Lock or scrambled channels (CI module or password needed).
- The PVR and T.Shift functions are only available on certain models in some country/region.
Menu
Using the Menu Function
To quickly access menu function, press the [  ] / [
] / [  ] button on your remote.
Headphone Volume
Adjust the volume of the headphone when the headphone is connected.
Channel List
View the Channel List and adjust channels while watching TV. (Only available for TV channels)
Guide
Enter guide function under TV mode.
It provides an overview of each digital channel’s programme lineup.
Teletext
Display the teletext mode.
NOTE: This function is only visible when the selected channel has the corresponding information.
Audio Language
Select a desired language from the list if the selected channel supports multi-audio languages. (Only available for DTV channels)
NOTE: This function is only available on certain models in specific geographical areas.
Subtitle
Select desired subtitles from the list if the selected channel supports multi-language subtitles.
Audio Only
When you select this option, the screen will not display the picture. You can only listen the audio. Press any button except the [  / VOL /
  ] buttons to restore operation.
Recording List
View recording schedule list. You can edit the settings of the selected schedule or delete it. (Only available for DTV channels)
HbbTV
The switch to enable or disable HbbTV functionality for each individual channel. (Only available for DTV channels)
NOTE: This function is only available on certain models in specific geographical areas.
Settings
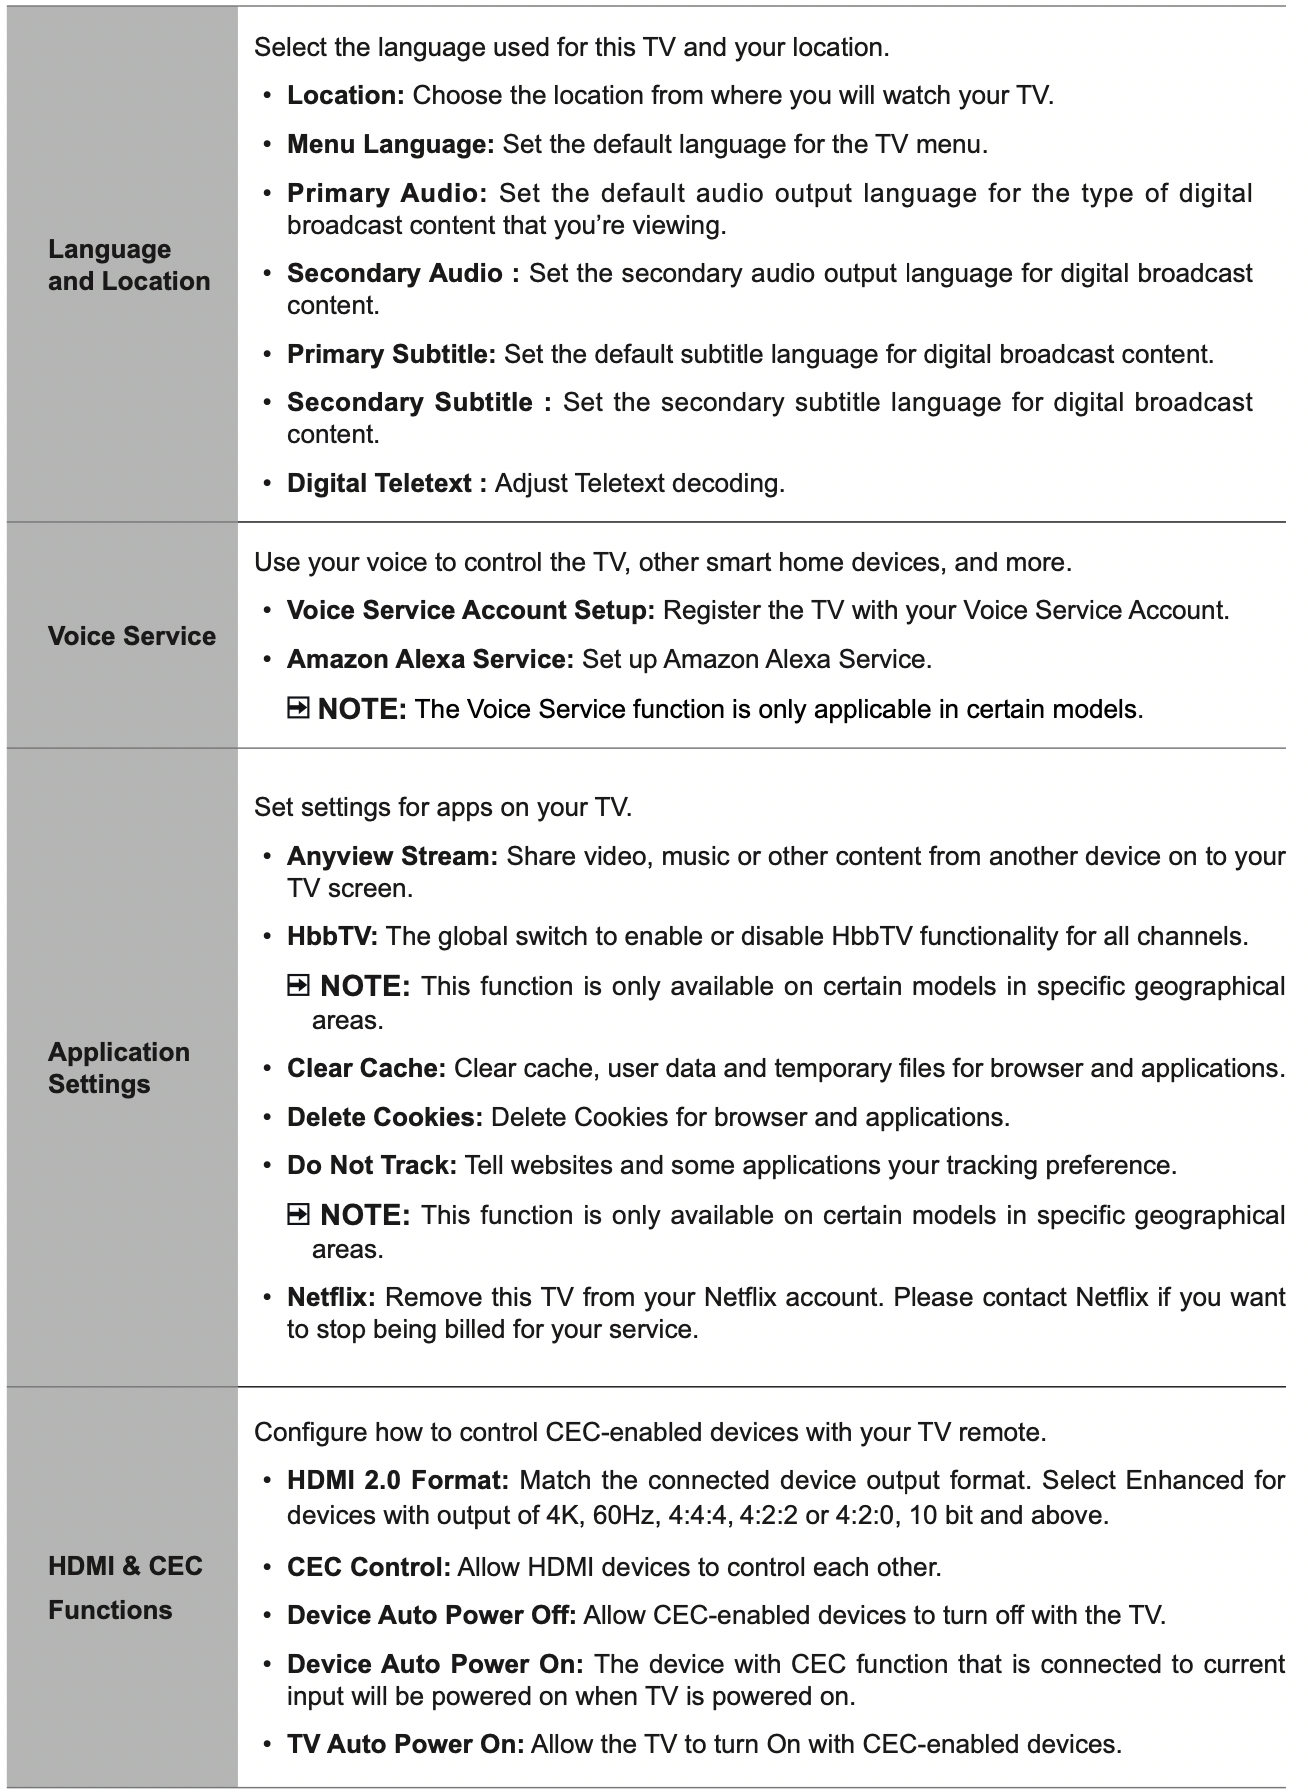
The Settings Menu consists of the following settings: Picture, Sound, Network, Channel, Accessibility, System and Support.
Using the Settings Menu
- Press the [
 ] / [
] / [  ] button on your remote to select Settings, and then press the [OK] button to enter the Settings menu.
The Settings Menu consists of the following settings:
Picture
Sound
Network
Channel
Accessibility
System
Support - In each menu, you can:
Press the [ ^ / v / < / >] buttons to select an item,
Press the [OK] button to enter the sub-menu or to set on or off,
Press the [< / >] buttons to adjust the value,
Press the [BACK] button to return to the previous menu. - Press the [EXIT] button to exit the menu.
NOTE: The menus in the user manual may vary slightly from the actual screen.
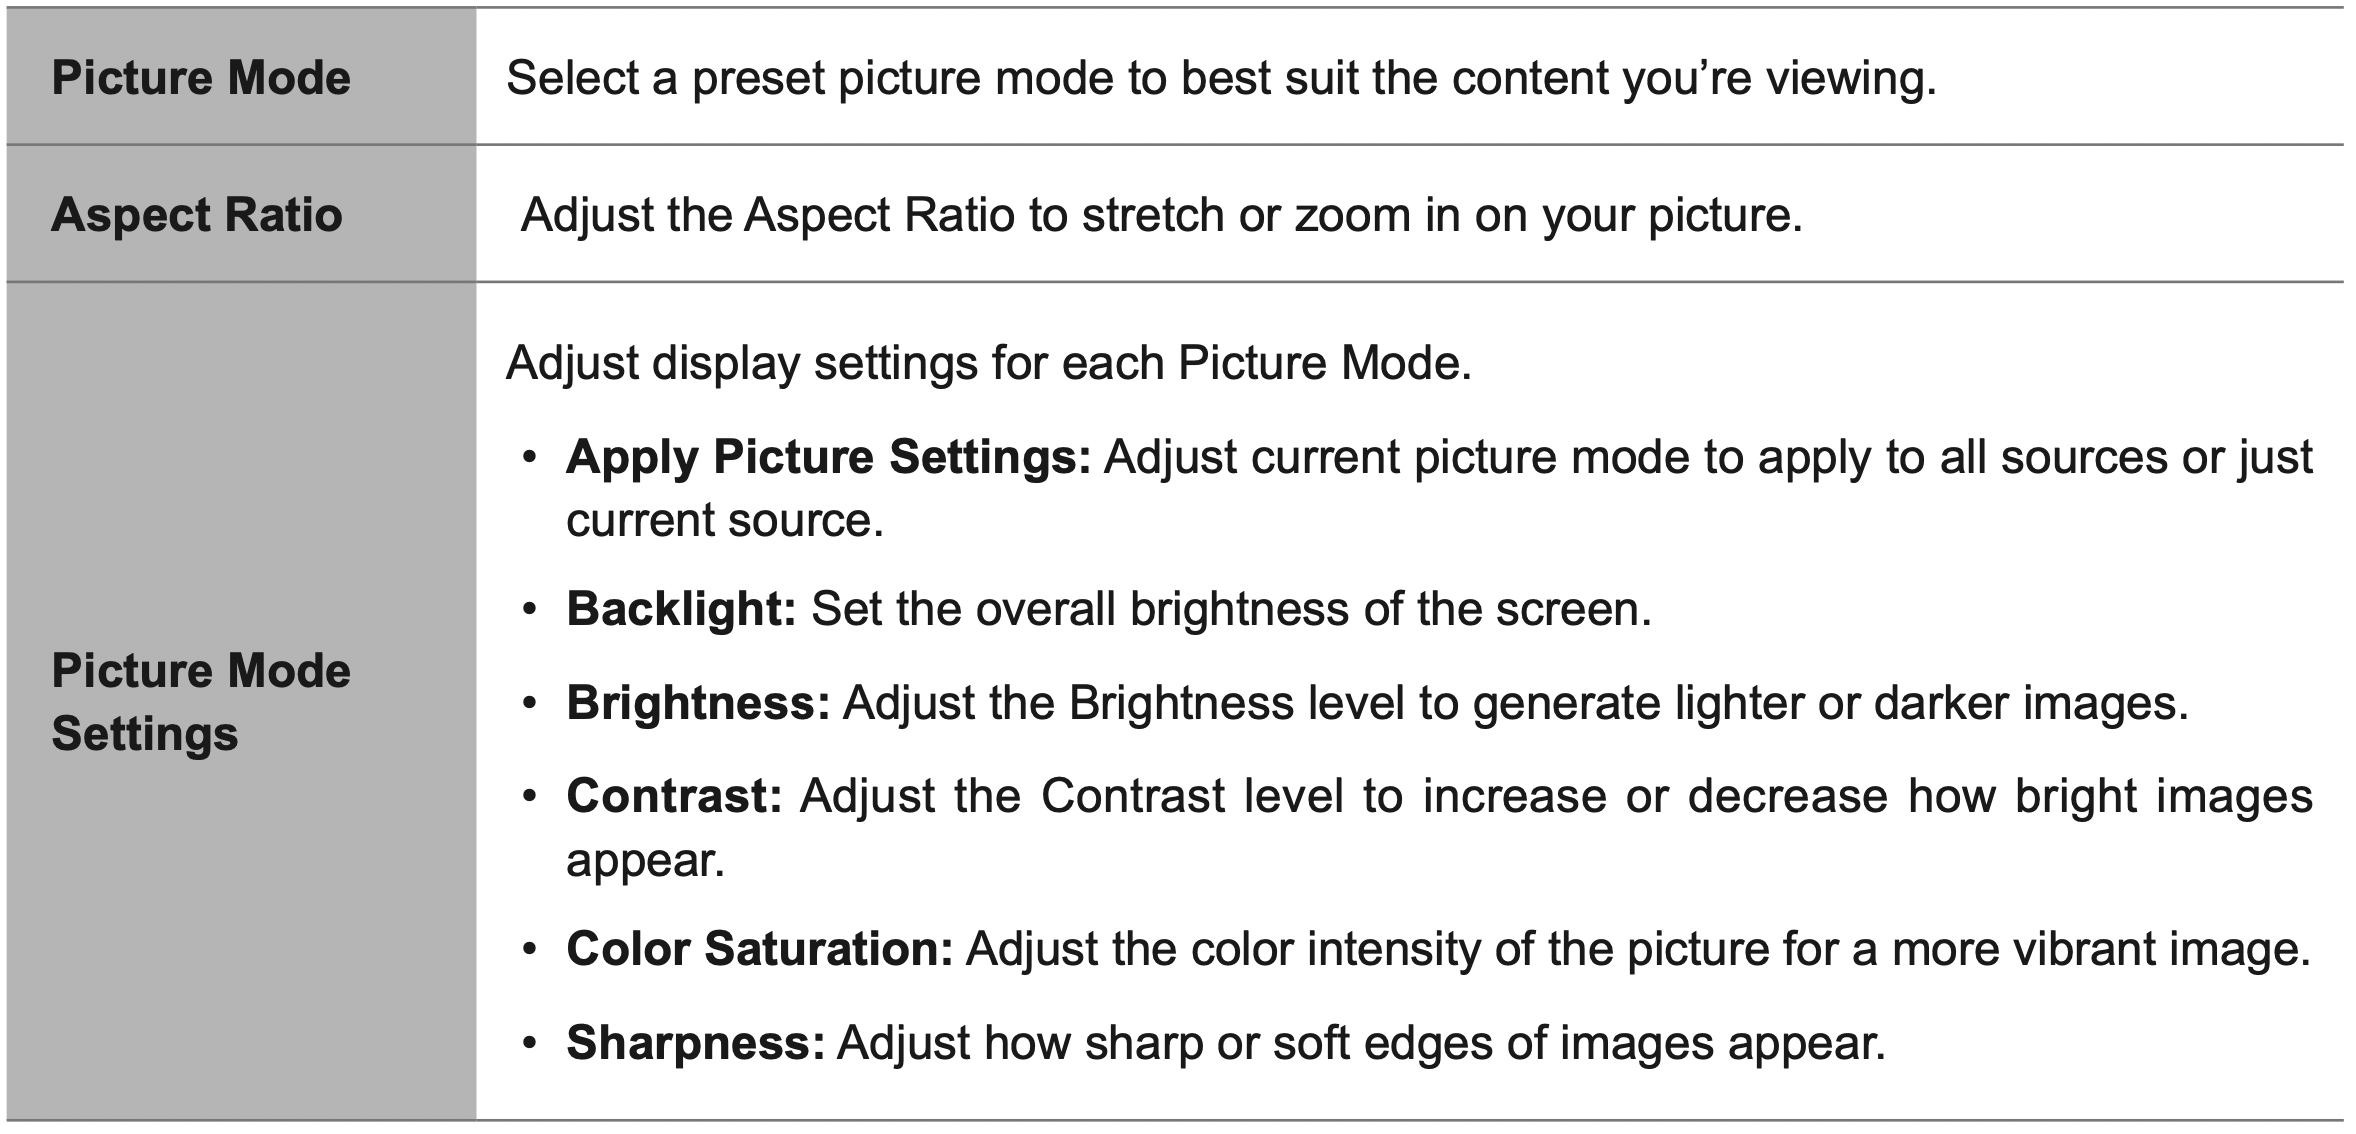
Using the Picture Menu

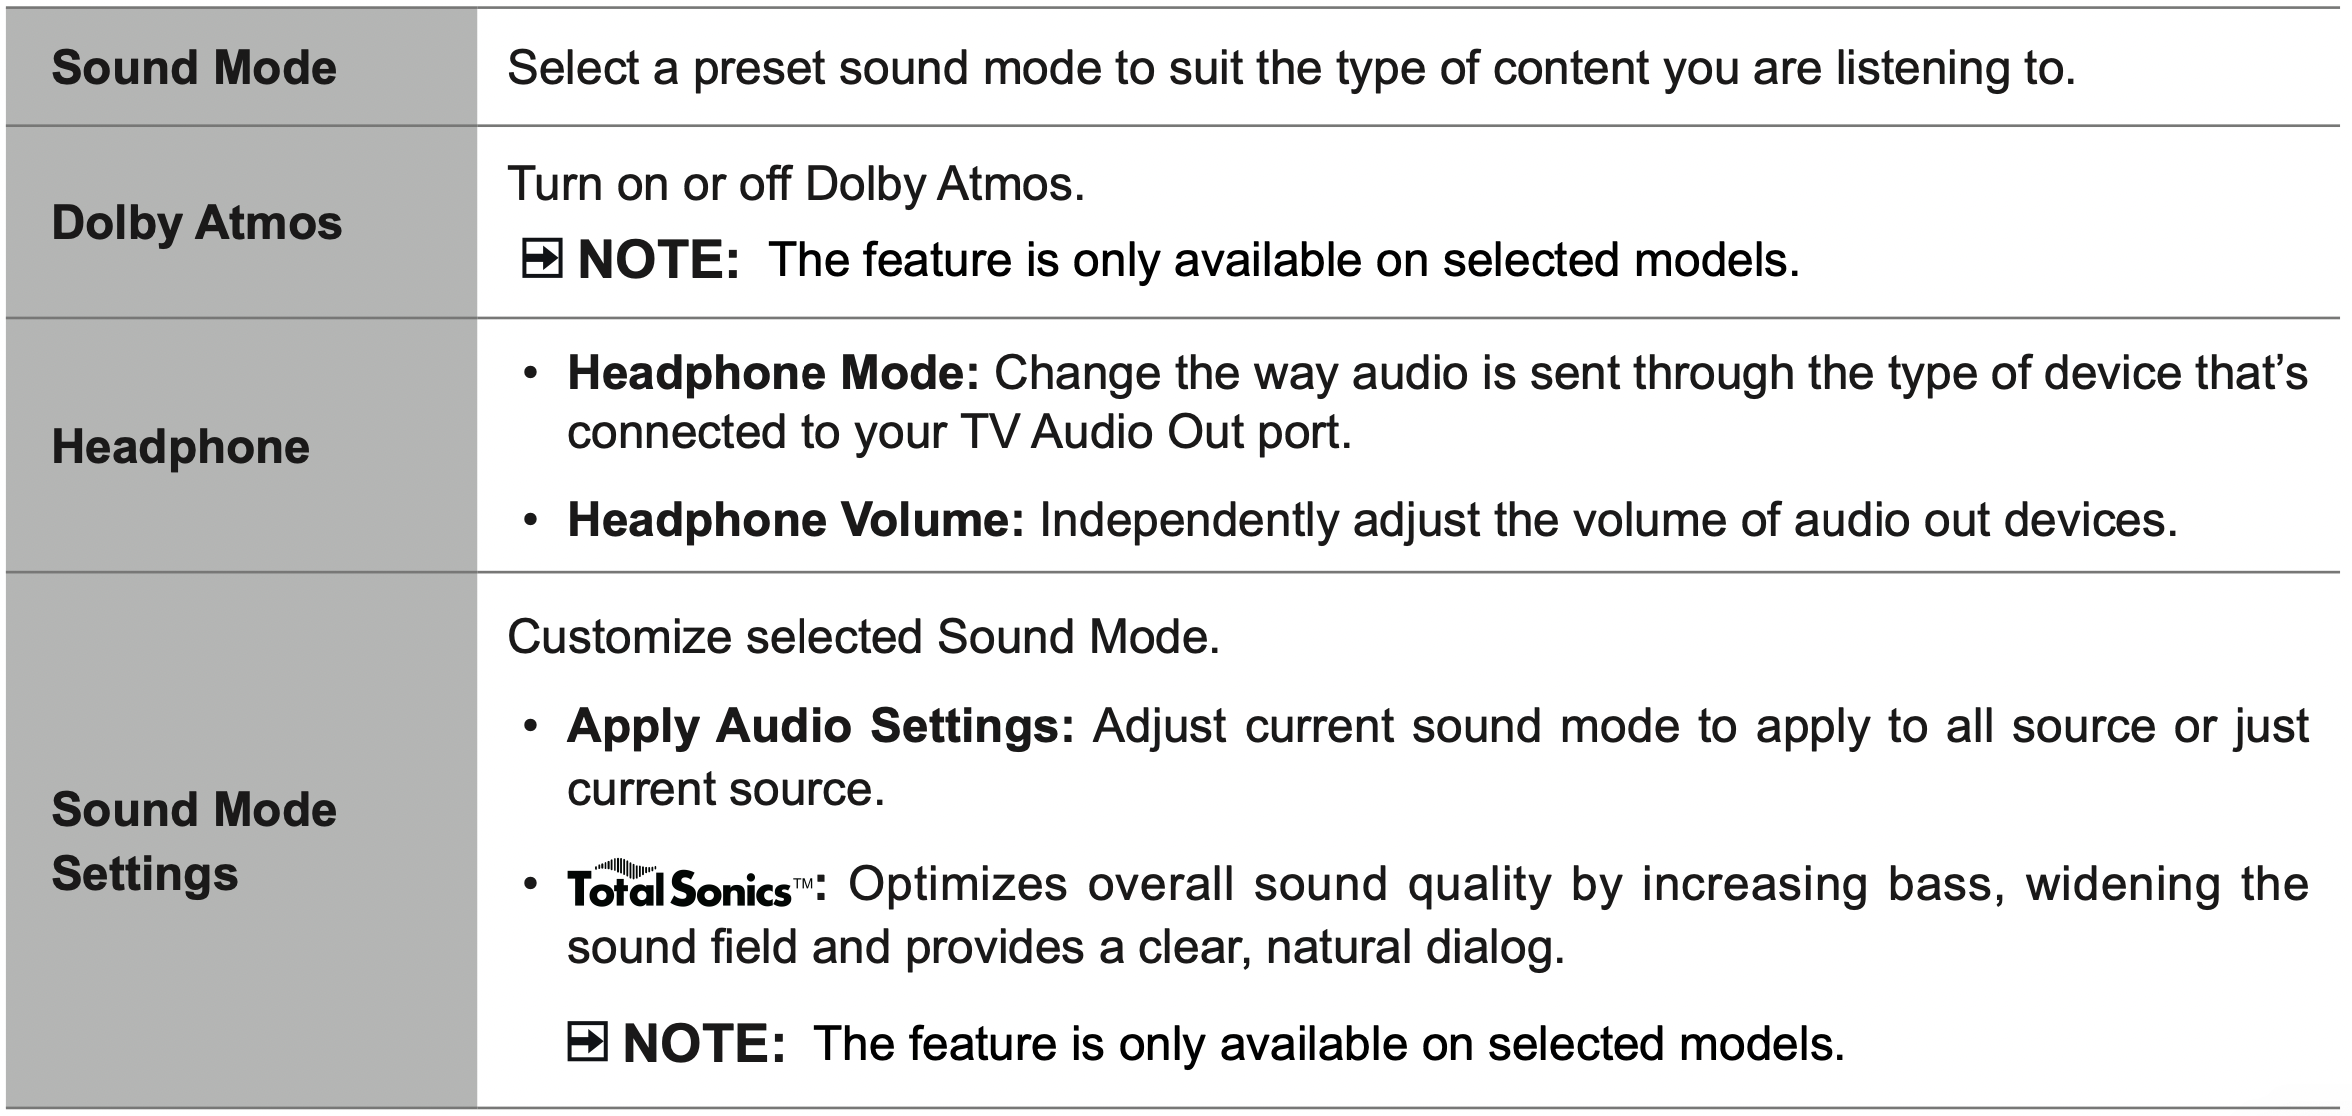
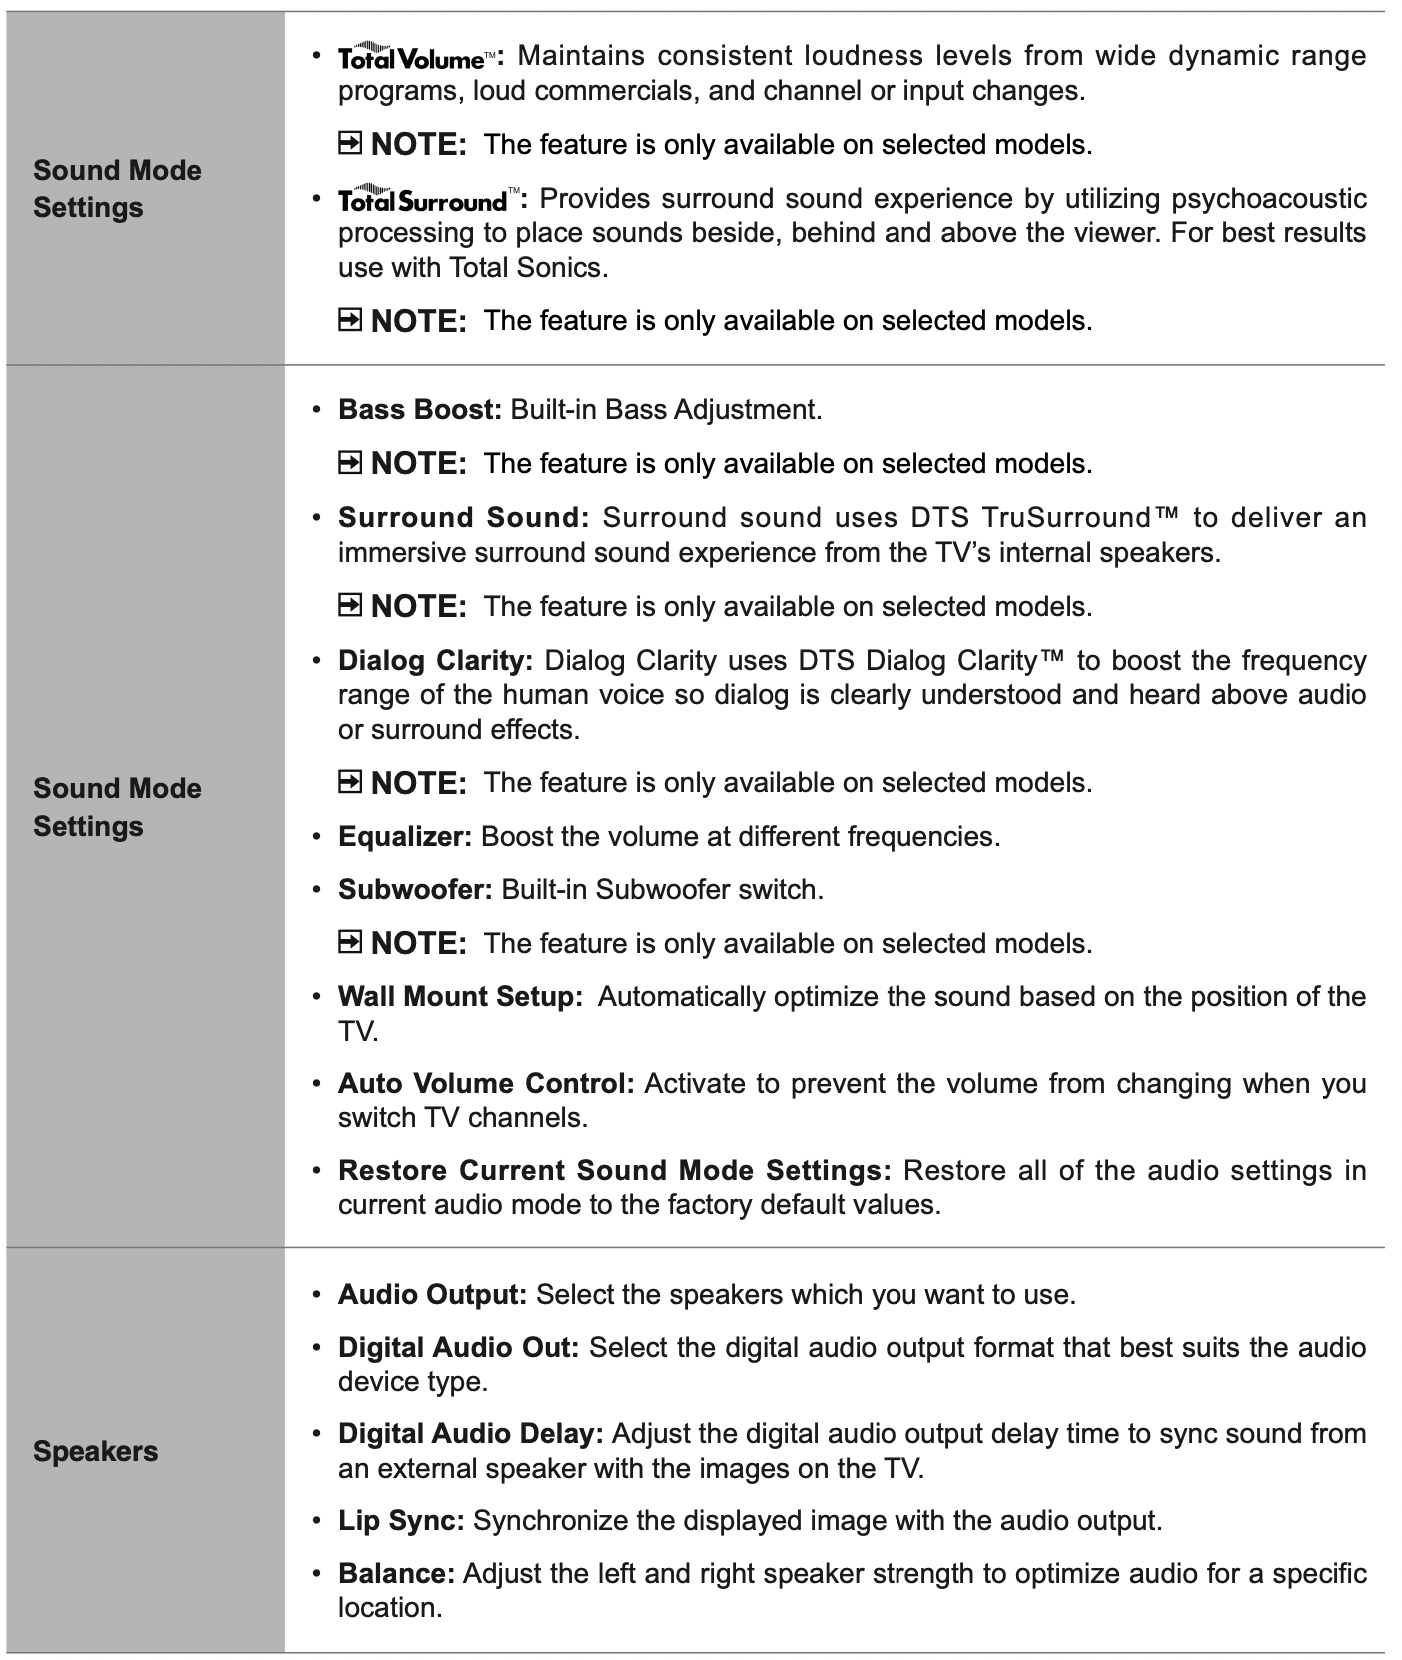
Using the Sound Menu
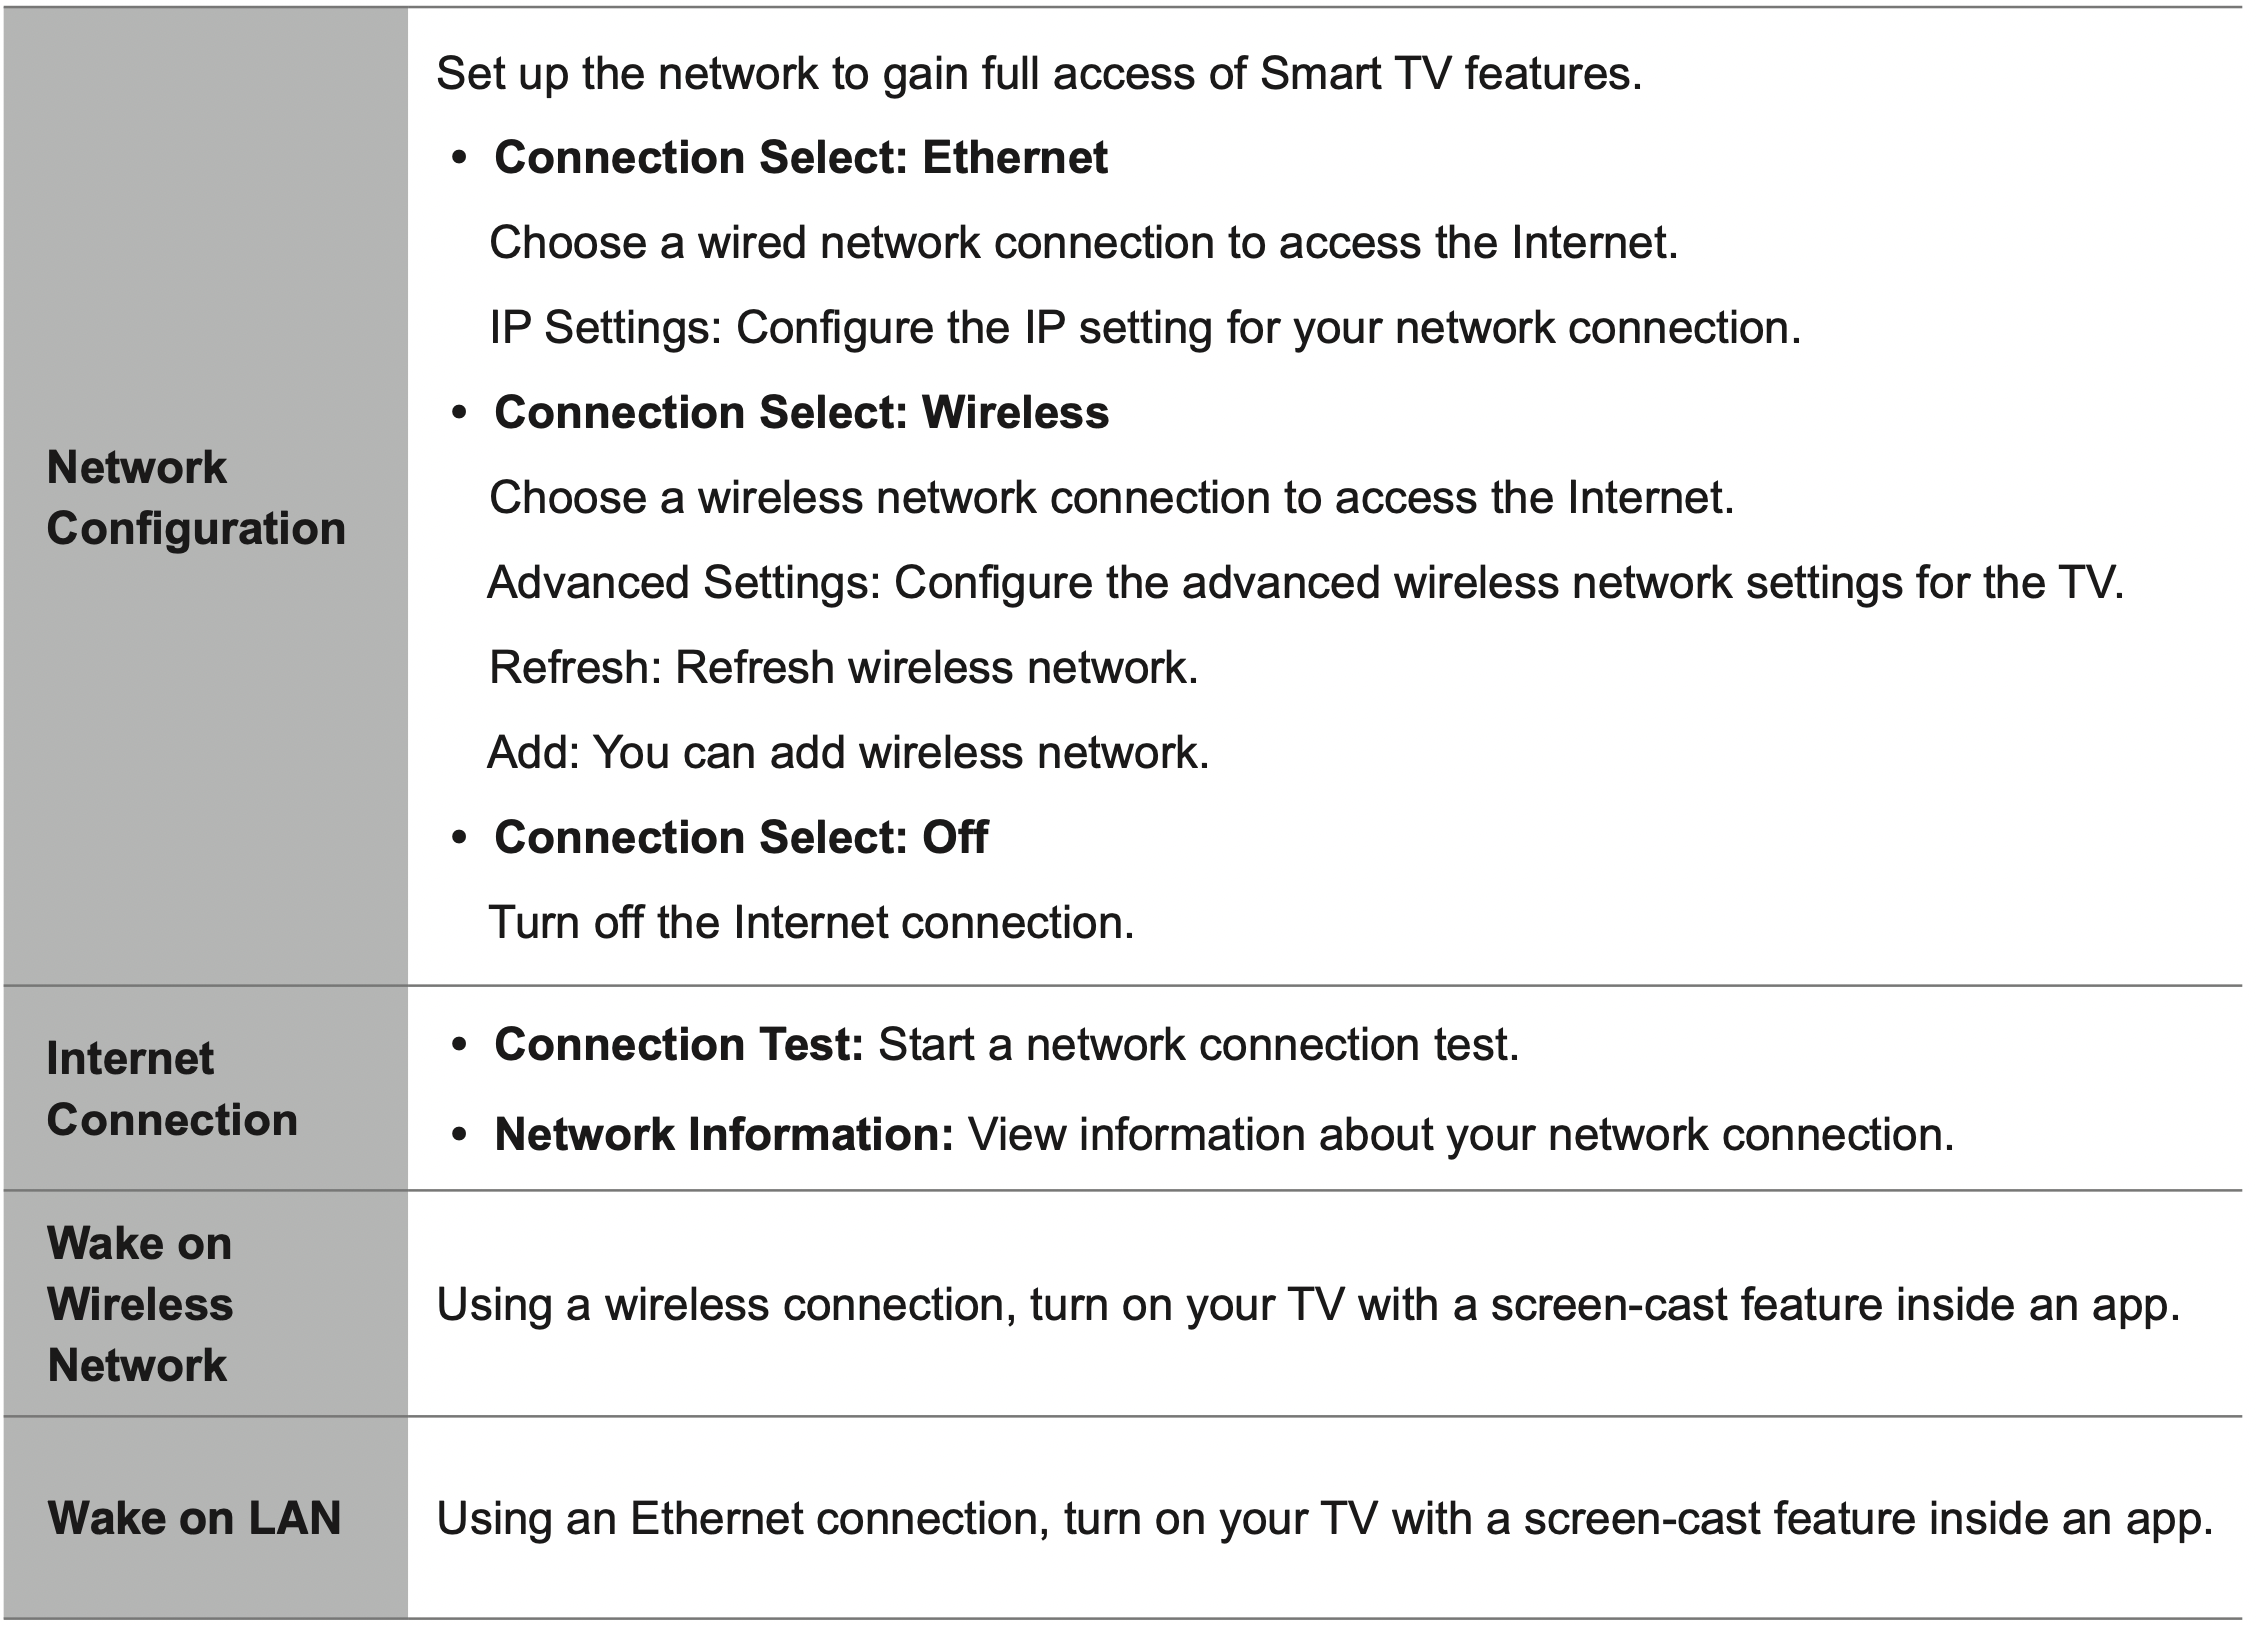
Using the Network Menu
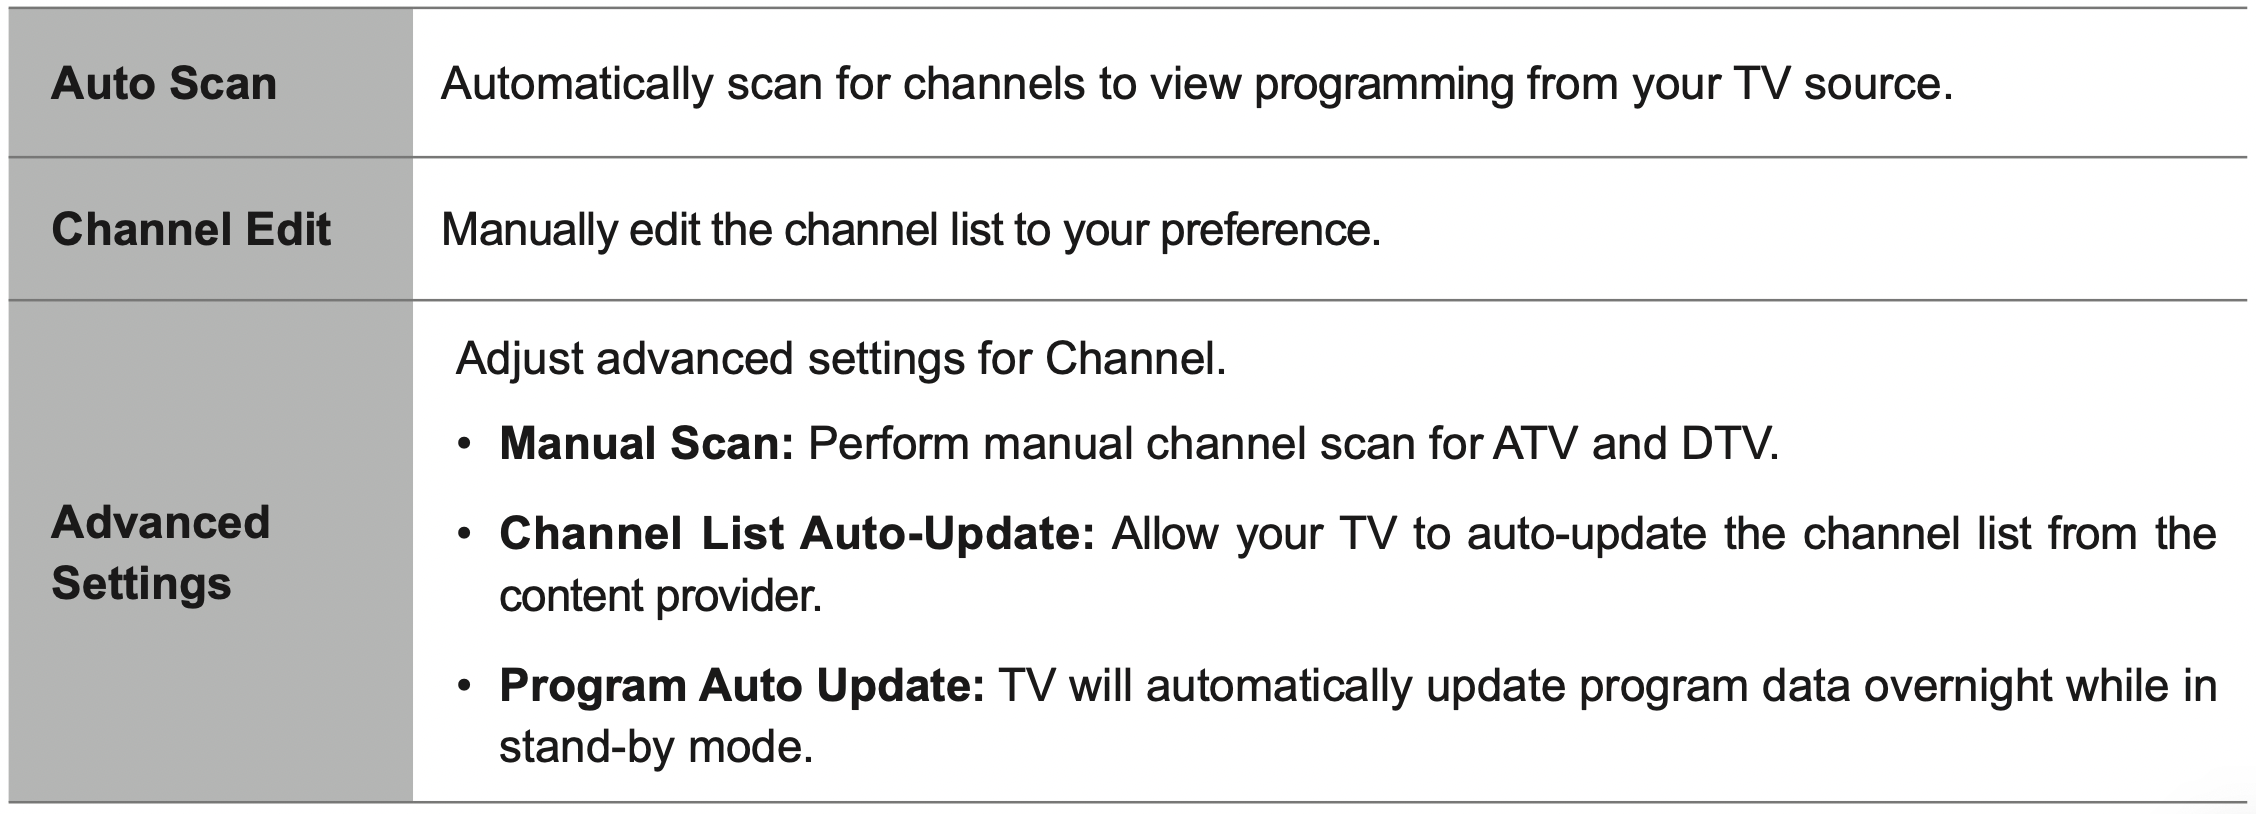
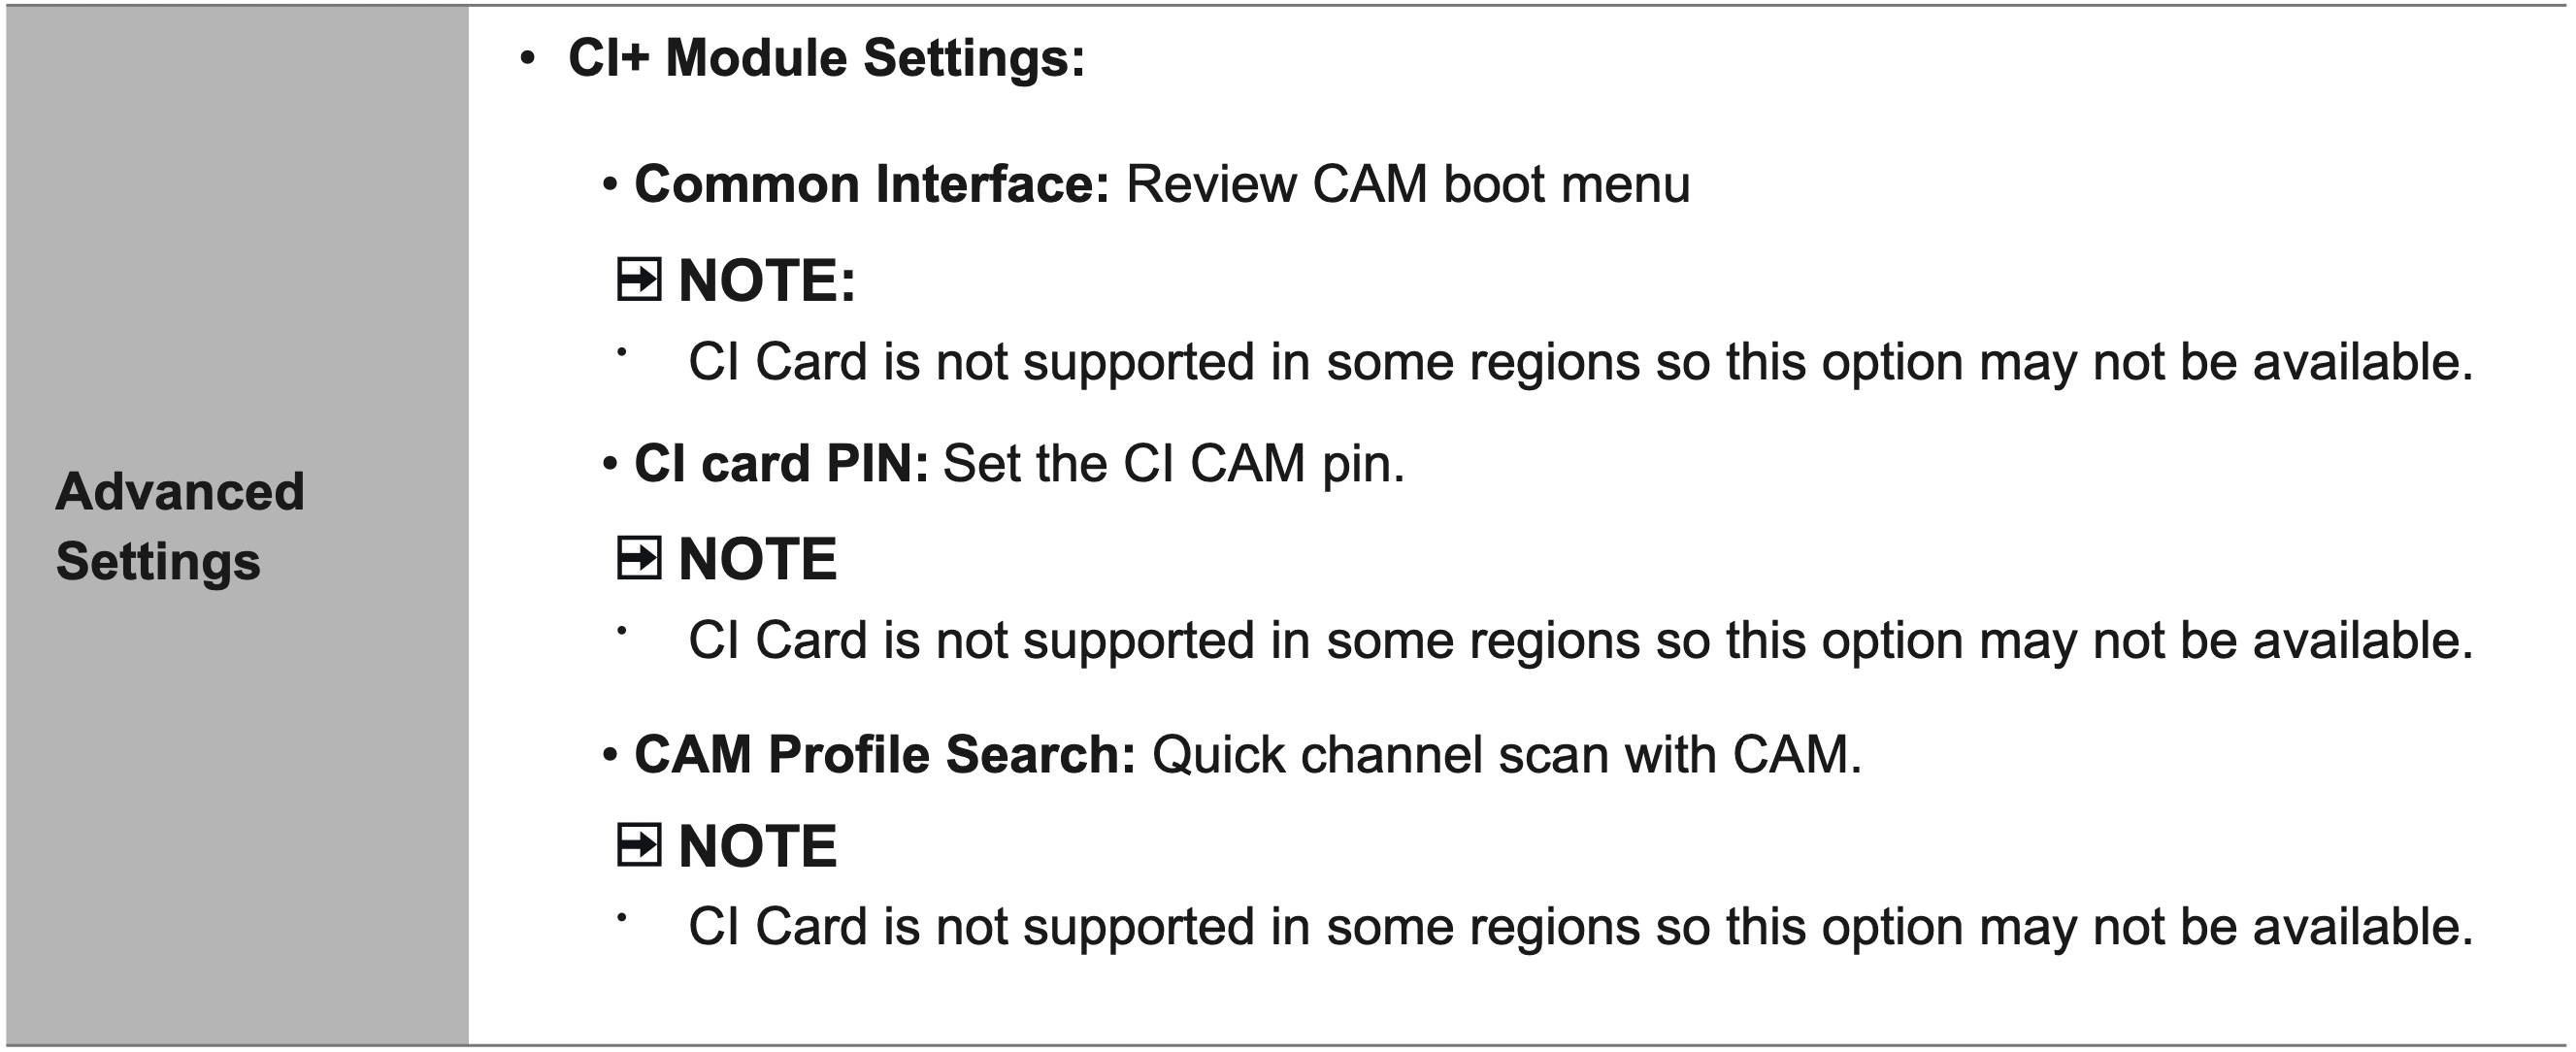
Using the Channel Menu
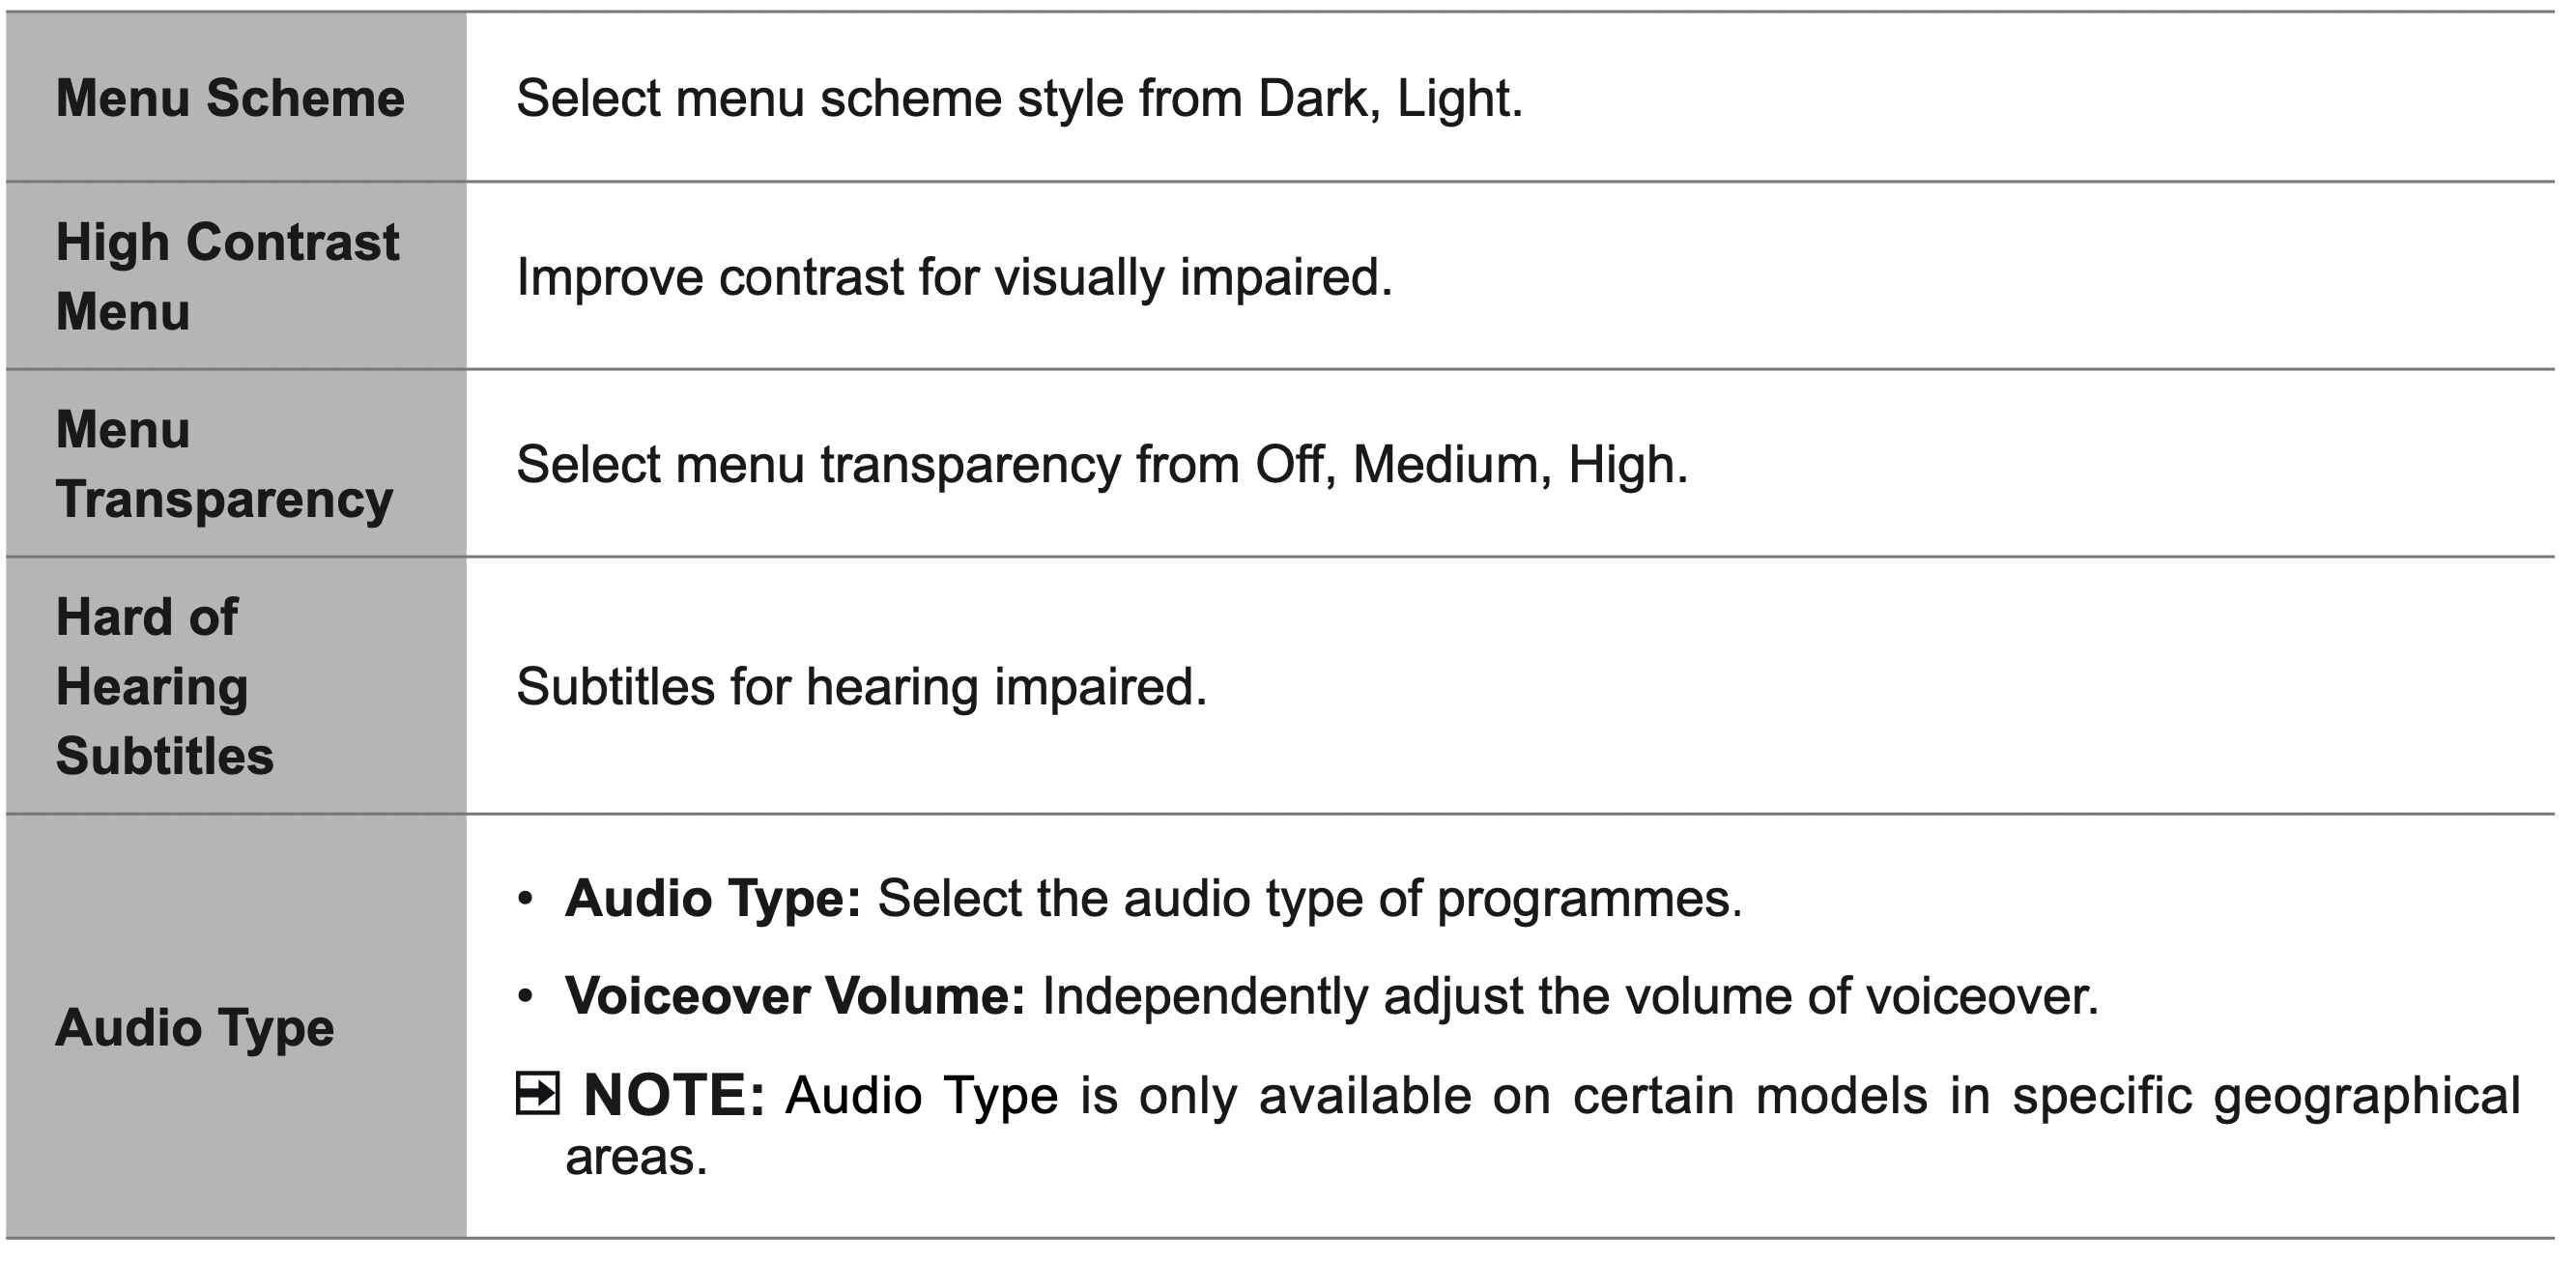
Using the Accessibility Menu
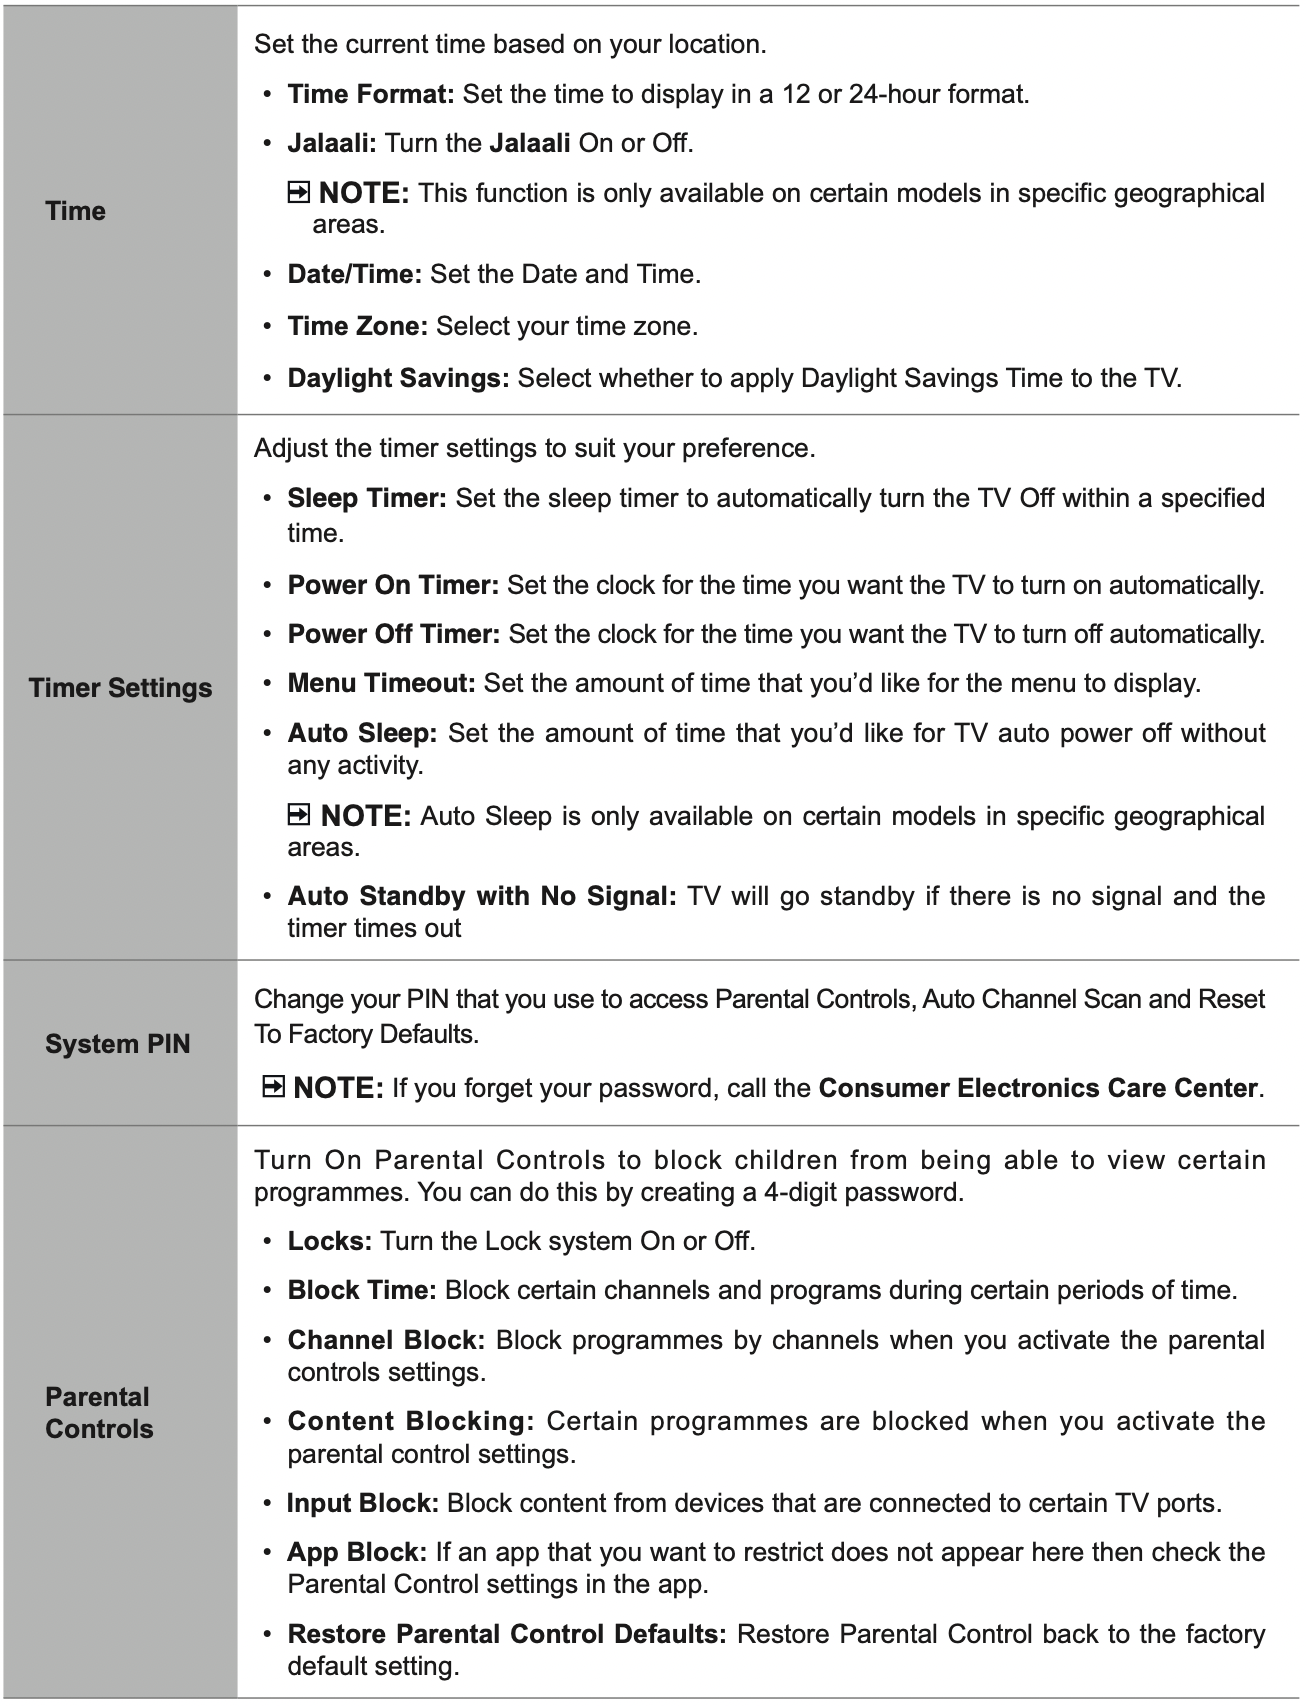
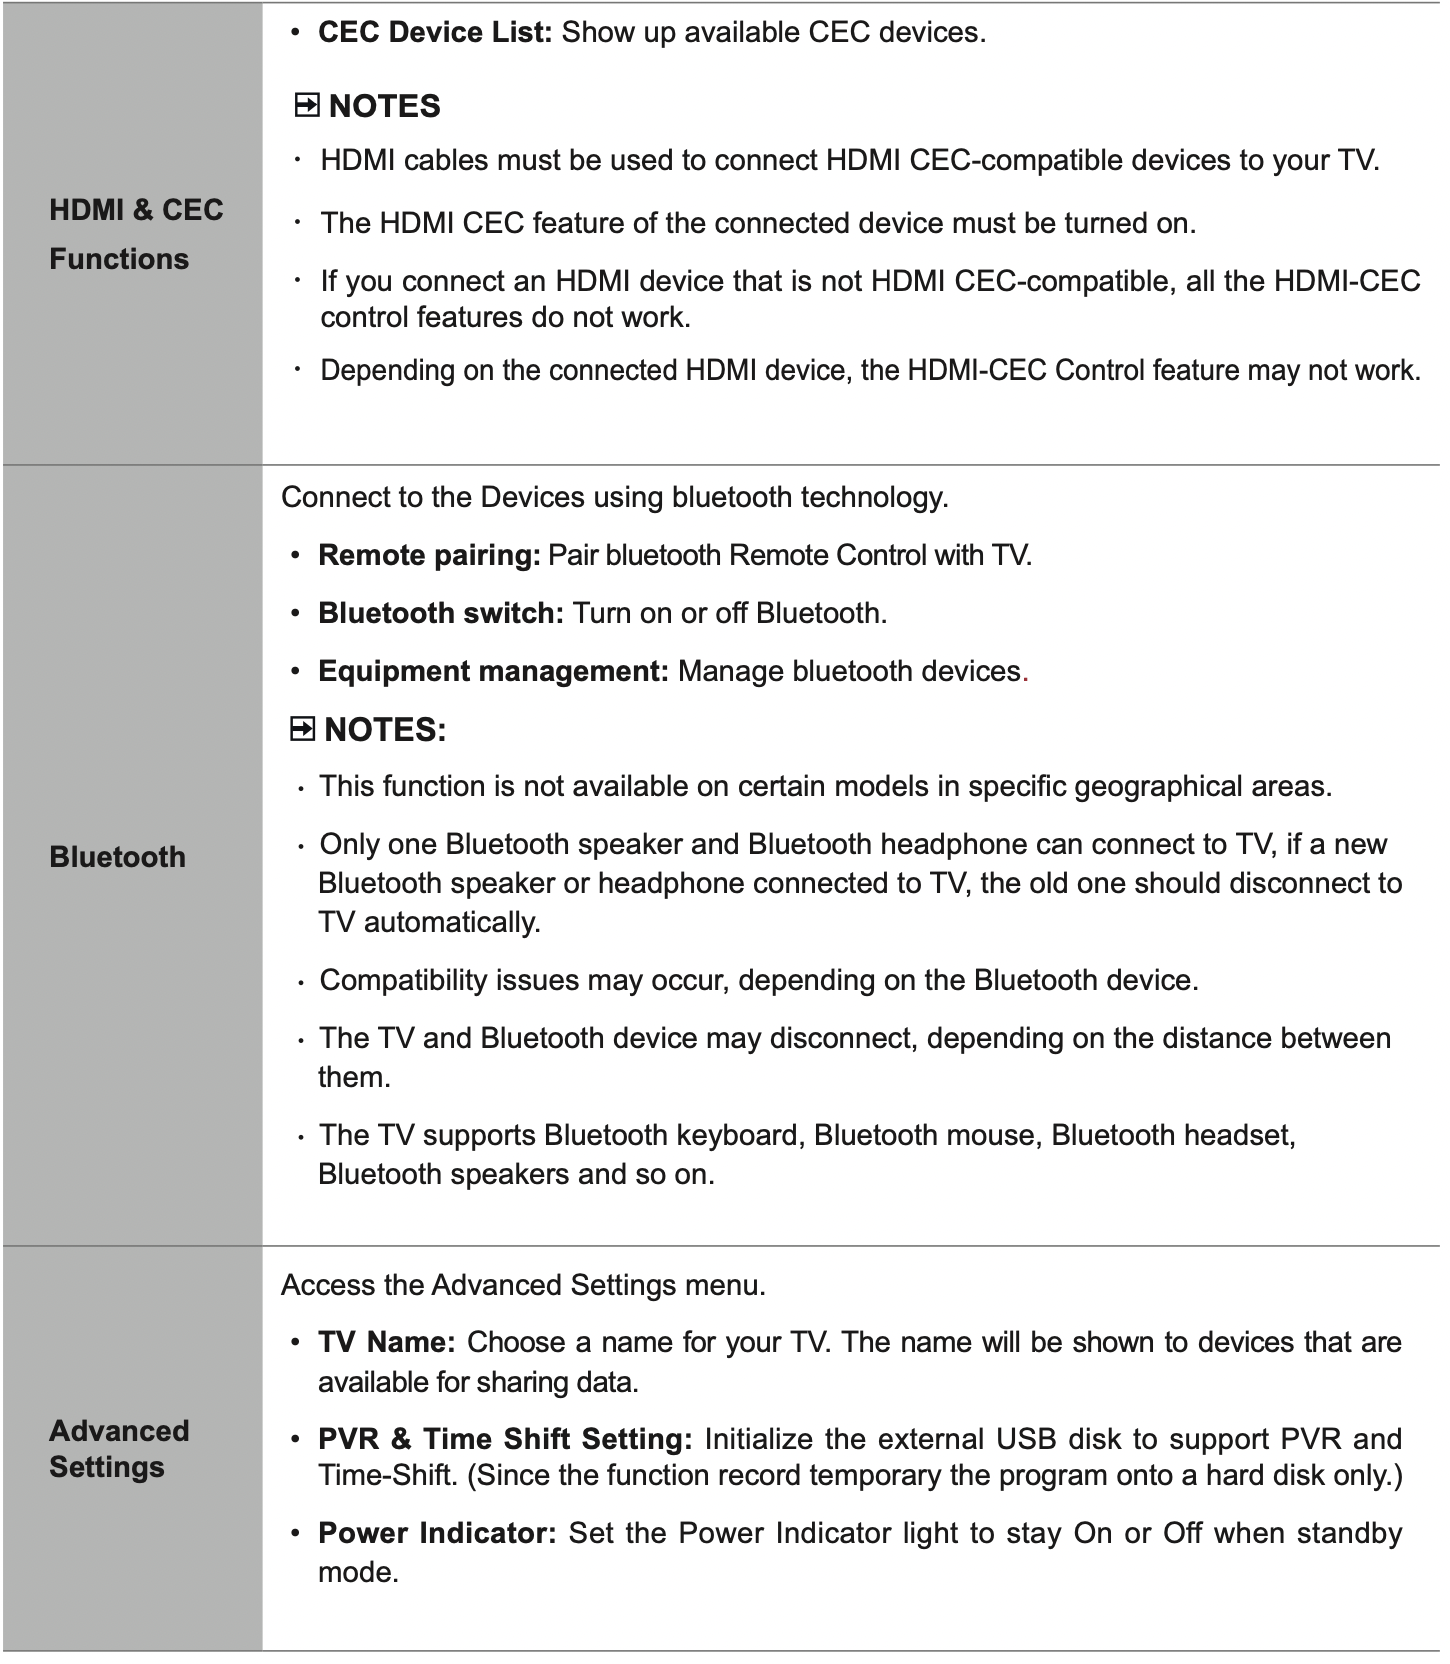
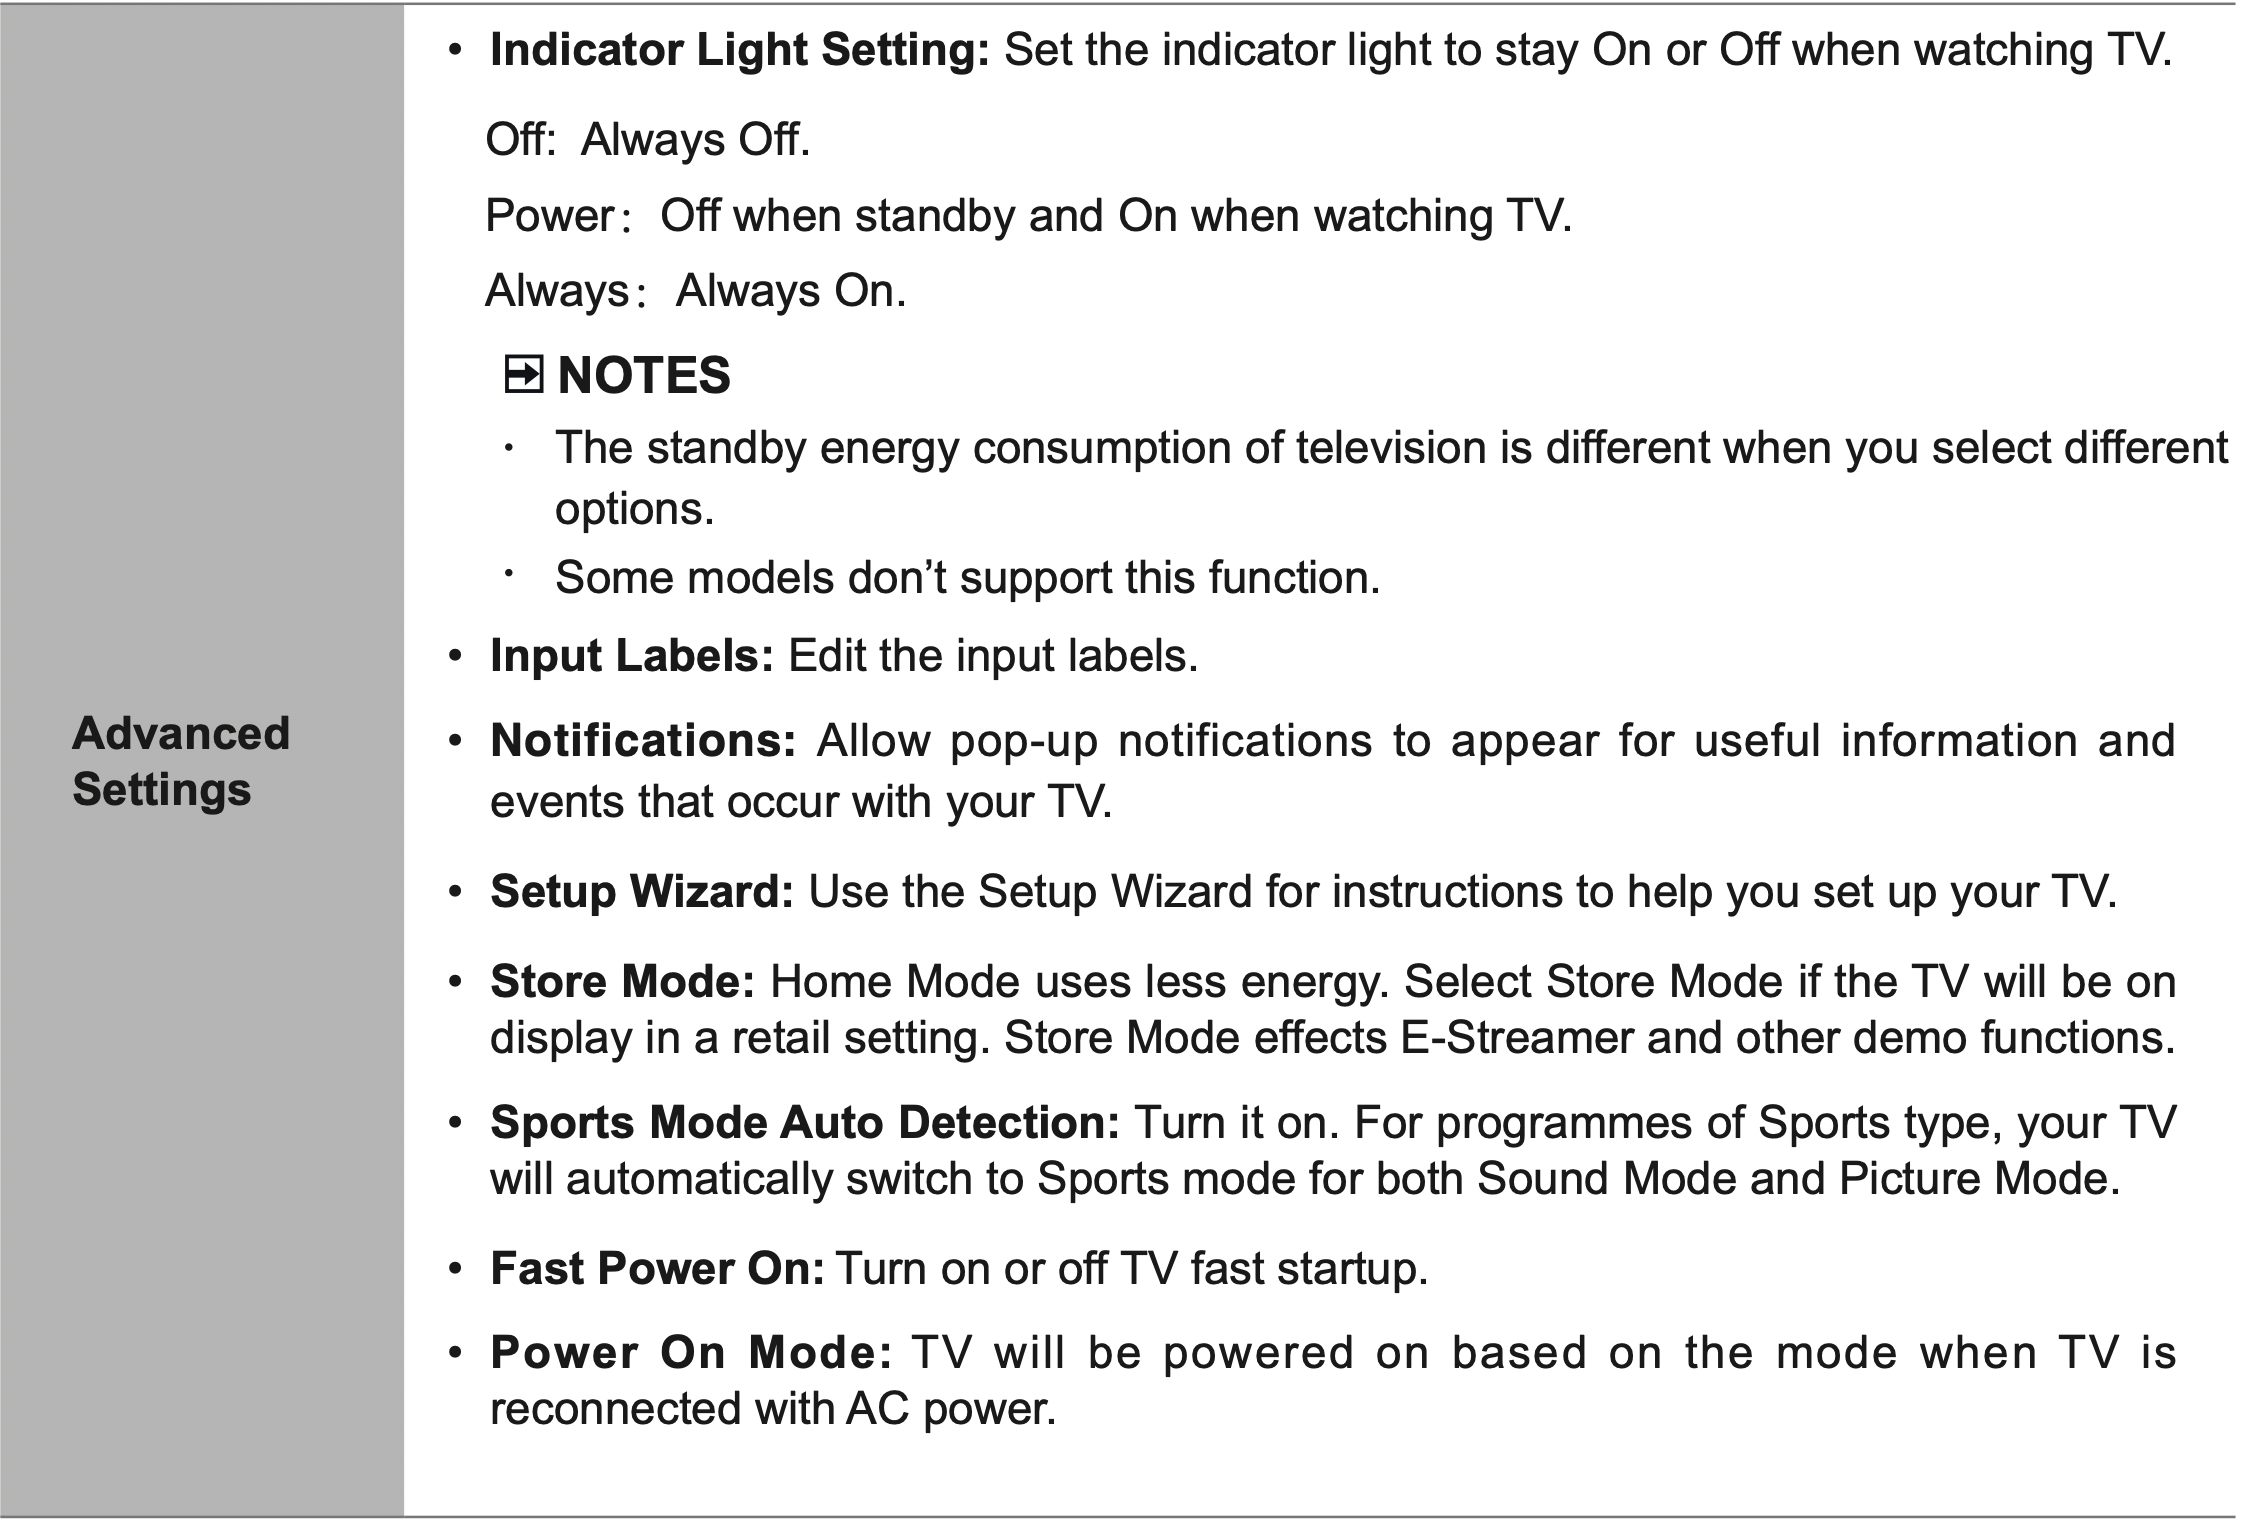
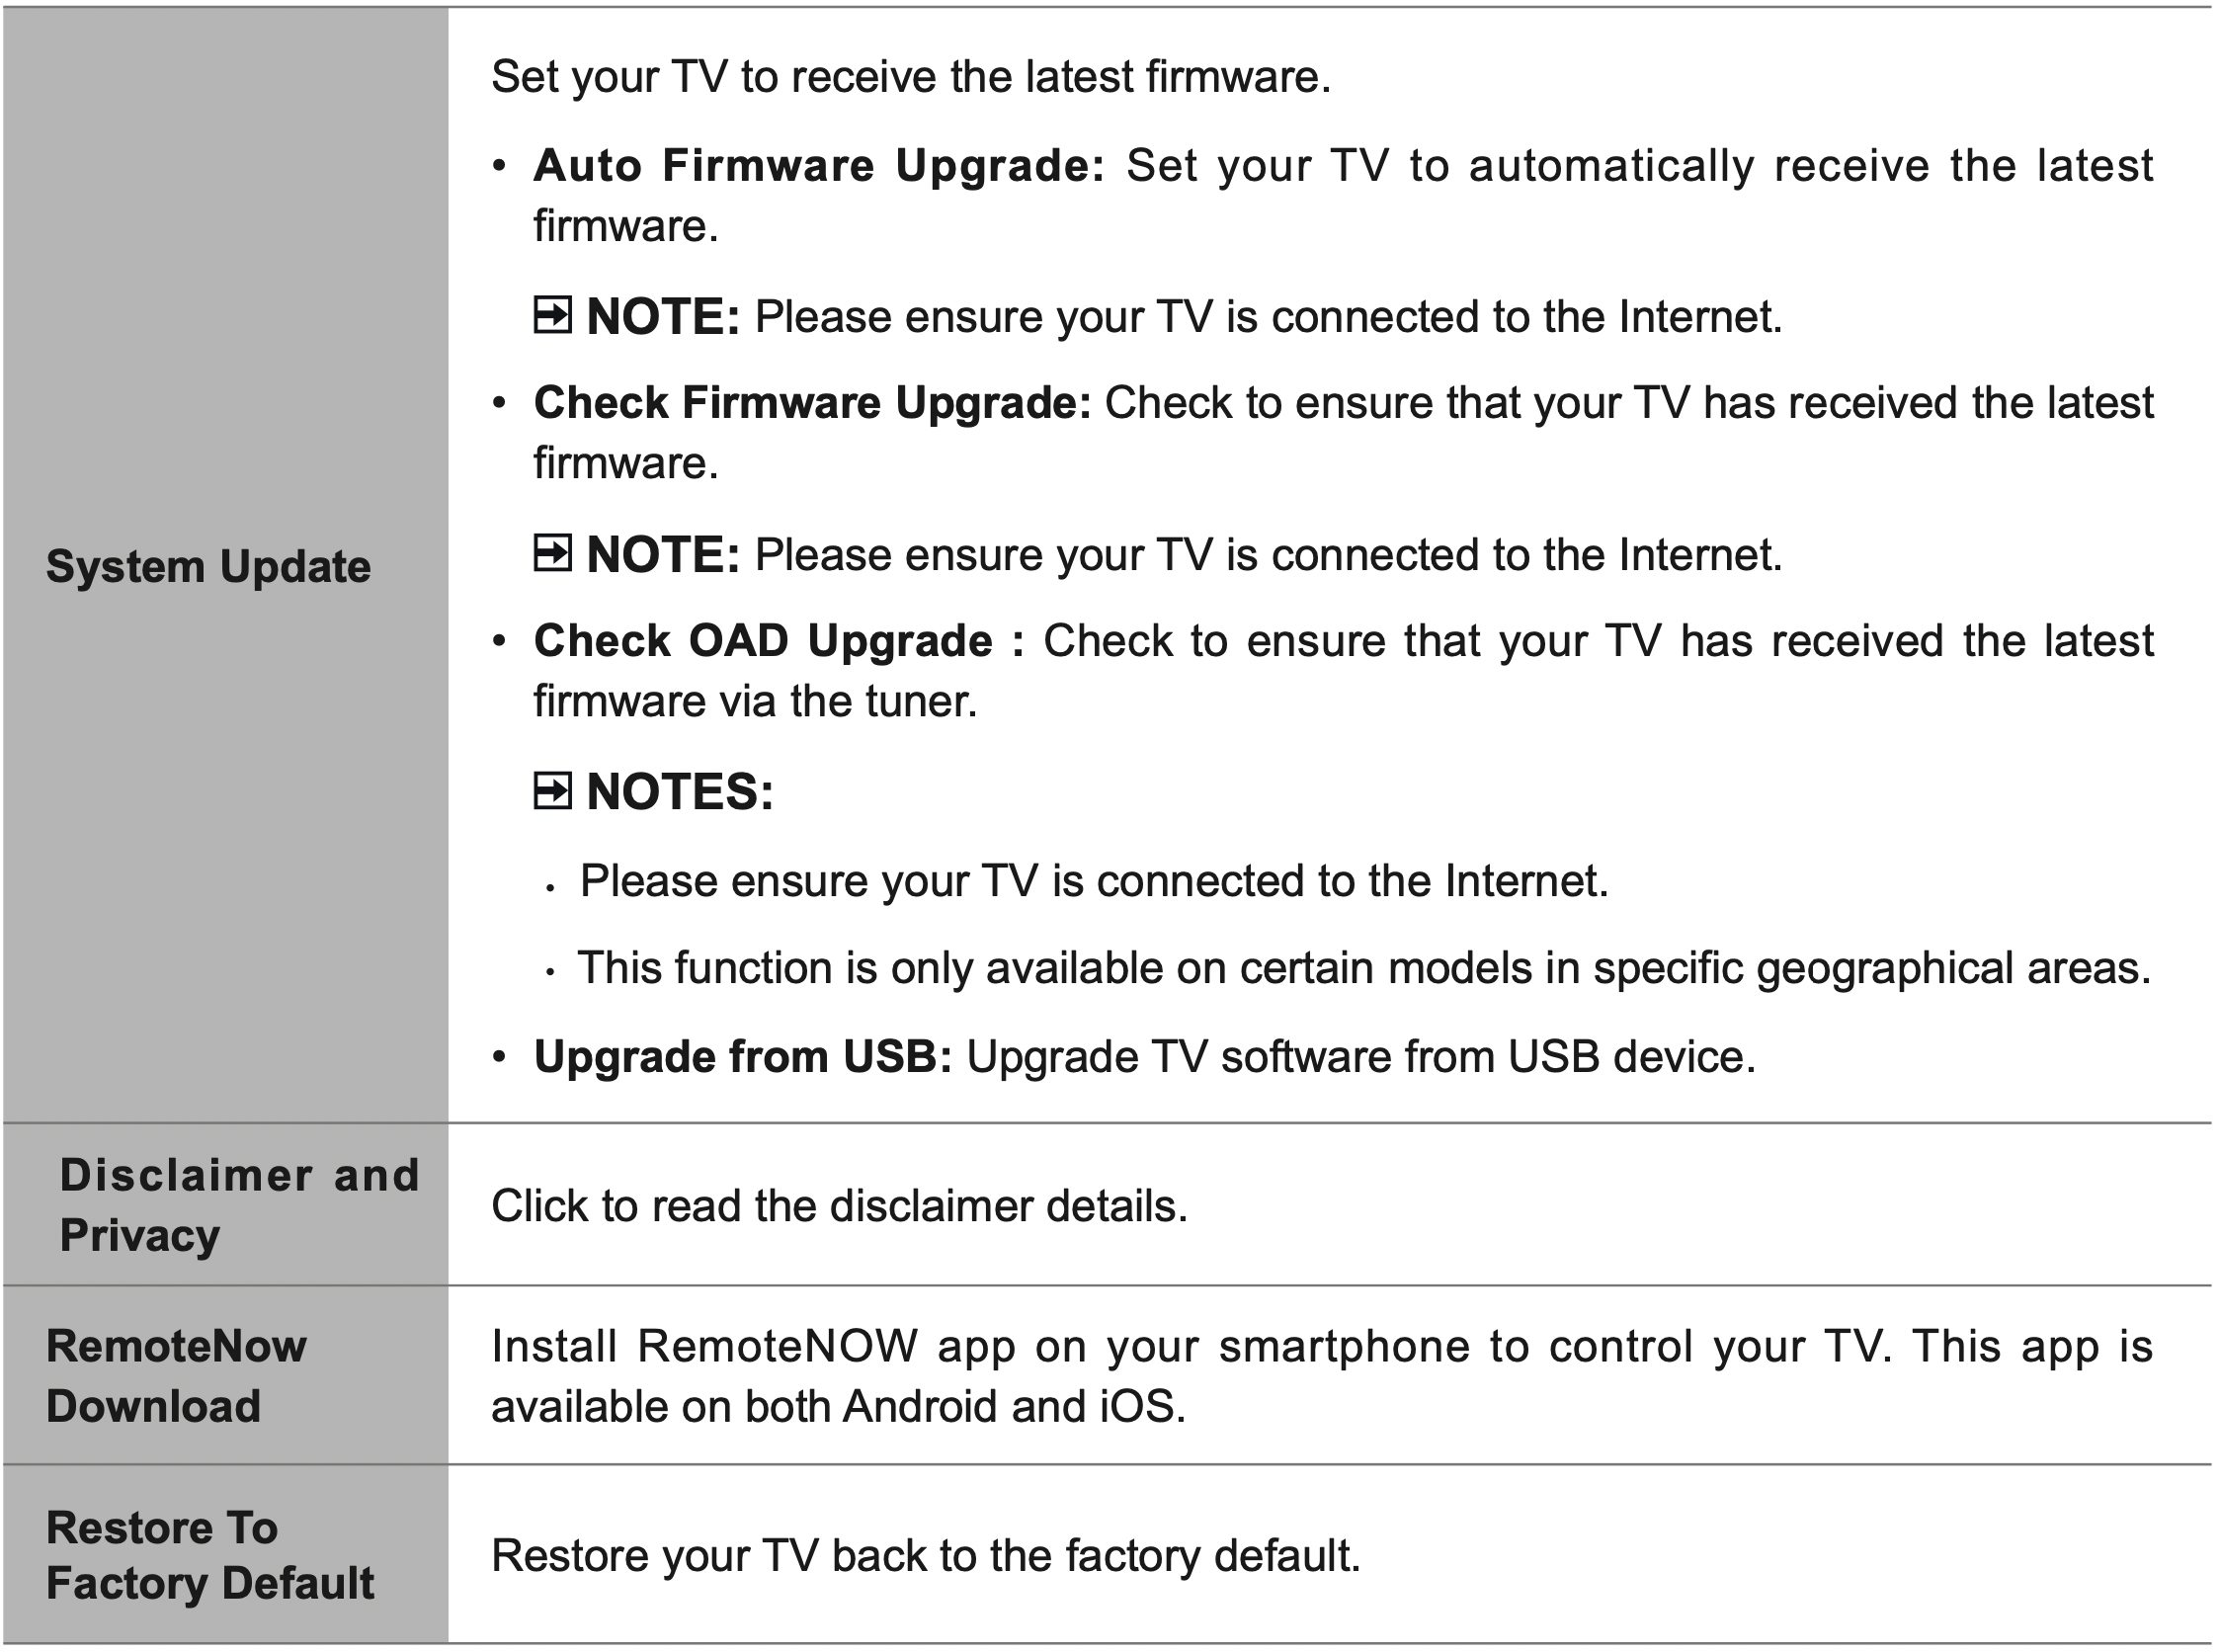
Using the System Menu
Using the Support Menu
Troubleshooting
If the TV does not operate as usual or appears to be faulty please read carefully this section. Many operational issues can be resolved by users.
It is also advisable to unplug the TV from the AC socket on the wall for 60 seconds or more, then reconnect and start again. This simple procedure helps in restoring stable conditions for electric circuits and firmware of the unit.
Please contact Manufacturer Customer Care if the problem is unresolved or you have other concerns.
|
SYMPTOMS |
POSSIBLE SOLUTIONS |
|---|---|
| No sound or picture. |
|
| I have connected an external source to my TV and I get no picture and/or sound. |
|
|
When I turn on my television, there is a few second delay before the picture appears. Is this normal? |
Yes, this is normal. That is the TV searching for previous setting information and initializing the TV. |
| Picture is normal, but no sound. |
|
| Sound but no picture or black and white picture. |
|
| Sound and picture distorted or appear wavy. |
|
| Sound and picture is blurry or cuts out momentarily. |
|
| Horizontal/vertical stripe on picture or picture is shaking. |
Check if there is interfering source nearby, such as appliance or electric tool. |
| The plastic cabinet makes a “clicking” type of sound. |
"Click" sound can be caused when the temperature of the television changes. This change causes the television cabinet to expand or contract, which makes the sound. This is normal and the TV is OK. |
| Remote control does not work. |
|
| Smart Television with wireless network capability Wi-Fi fail to join a local network. |
|
