Automatically scan for channels to view programmes from your TV source.
Antenna
Channel: Select from All channels or Free channels.
Scan Mode: Select whether you want to search digital channels only (DTV), digital and analog channels (ATV+DTV) or analog channels only (ATV).
If you receive DVB-T or DVB-T2 signal, you can use DTV.
LCN: You can switch on LCN (Logical Channel Number) if you want to use the channel list. Please note that some operators are restricted to manually change the channel order.
If you switch off LCN, then the channel list can be edited after channel scan.(This function is only applicable in some countries.)
Cable
Channel: Select from All Channels or Free Channels.
Scan Mode: Select whether you want to search digital channels only (DTV), digital and analog channels (ATV+DTV) or analog channels only (ATV).
LCN: You can switch on LCN (Logical Channel Number) if you want to use the channel list. Please note that some operators are restricted to manually change the channel order.
If you switch off LCN, then the channel list can be edited after channel scan.(This function is only applicable in some countries.)
When the DTV Manual Scan screen appears, press button to select Antenna or Cable and then press Start to commence the search of that channel. When the signal has been tuned, signal strength will be displayed on the screen.
ATV Manual Scan
Manual scan TV program in analog signals.
Frequency: Input the channel frequency that you desired.
Picture System: Select the Colour System.
Sound System: Select the Sound System.
Channel Edit
>Settings > Channel >Channel Edit
Manually edit the channel list order to your preference.
Edit the channels
Press button on the selected channel then a checkbox will appear. You can select more channels at the same time to move or delete them.
Delete: Press button to delete the selected channel.
Restore: Press button to call out the four-color menu to select the [RED] icon or press the [RED] button to enter the list of deleted channels. Press button to restore the deleted channel.
Move: Press button to move the selected channel.
NOTE
Moving the channels could be restricted by the operator. If you want to be able to move channels, we recommend not choosing an operator during channel scan and LCN should be set to Off.
Filter: Press button on the remote to call out the four-color menu to select the[YELLOW] icon or press the [YELLOW] button, the filter screen will pop up. Press button to select Options, the channel list can be updated.
Search: Press button on the remote to call out the four-color menu to select the [BLUE] icon or press the [BLUE] button to search the channel.
Edit the favorite channels
You can add favorite channels or move/remove favorite channels.
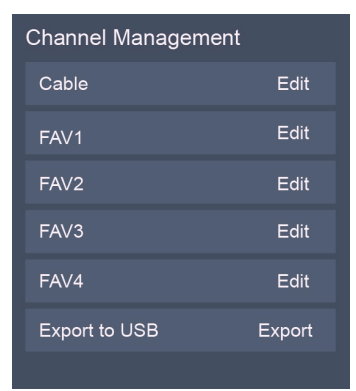
Export to USB
Allows you to export the current channel list to a USB storage device.
Import from USB
Allows you to import a previously exported channel list via a USB storage device.
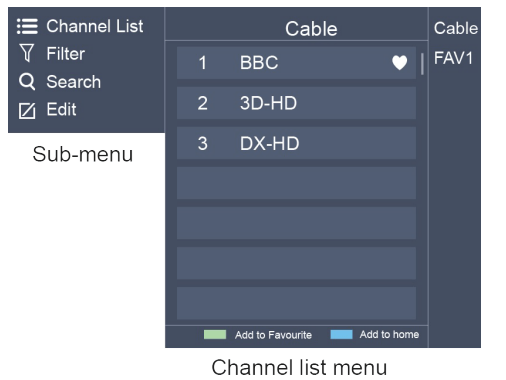
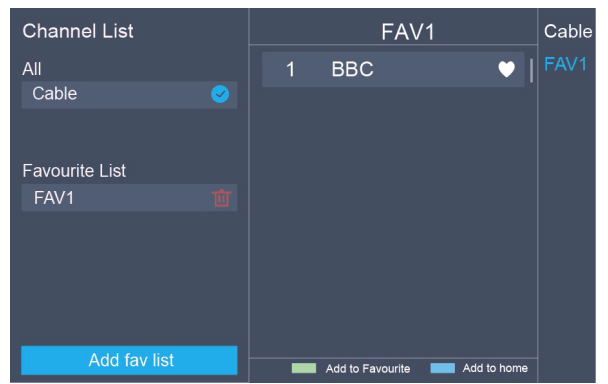
Channel List
Display the channel list
In Live TV, pressbutton on the remote control to display the Channel List menu. Enter the sub-menu of channel list
Introduction of the sub-menu 1. Channel List > Channel List
All
Displays the channels that have been automatically searched.
Favourite List
Displays favourites lists 1 to 4. (Max 4 fav lists can be added)
Add fav list
Add an additional favorite list.
2. Filter Filters channels , you can change the channels displayed in the channel lists. 3. Search Quick access to channels. 4. Edit Edit the channel list.
Favorite
Viewing your 'Favorites' list
Press button to call out the Channel list, the channel list appears on the right side of the screen, a heart-shaped icon will appear next to your favorite channel.
Edit the favorite list
There are 2 ways to enter the edit menu:
> Edit > FAV1-FAV4
or
>Settings > Channel > Channel Edit > FAV1-FAV4
The Edit Favorites screen appears.
Adding channels to a Favorites list
Select the Add channels to add the selected channel to the favorite list.
Moving channels from a favorites list
Select channels in a favorites list, press button to move the selected channel.
Deleting channels from Favorites list
Select channels in a favorites list, press button to remove the selected channel.
NOTE
These steps should be operated under TV inputs.
Before you edit the fav lists, complete channel scan first.
You can add channels from various reception types to the FAV list.
GUIDE(EPG)
It provides convenience to check TV programs that will be available in the next 7 days. The information displayed by the Guide(EPG) is made available by the commercial television networks for digital channels only. The Guide(EPG) also provides a simple way to record your favorite programs and a reminder function which can switch channel automatically at scheduled time so that you will not miss programs of interest.
(The availability and amount of programme information will vary, depending on the particular broadcaster).
NOTE
The Guide(EPG) function is only available in DTV.
Press button on the remote control to display channel information on program guide list.
Watch
When a current program is selected, press the button to switch to the channel you want to see.
PVR/Reminder
Press button to select the channels. Press / button to select program based on the time schedule.
Press button on the remote control to select PVR or Reminder.
NOTE
PVR/Reminder in the Guide(EPG) is only available for programmes that haven't been aired yet.
A storage device (space should be no less than 2G, transfer rate should be no less than 5MB/s) must be attached to the television for recording purposes.
The TV will record the program even in standby mode.
The PVR function is only applicable in some models/countries.
Schedule
To view a list of scheduled reminders and recordings.
Press button on the remote to call out the four-color menu to select the [RED] icon or press the [RED] button on the remote directly according to the actual remote in the accessory bag.
24h−
To select the yesterday programmes.
Press button on the remote to call out the four-color menu to select the [YELLOW] icon or press the [YELLOW] button on the remote directly according to the actual remote in the accessory bag.
24h+
To select the next day programmes.
Press button on the remote to call out the four-color menu to select the [BLUE] icon or press the [BLUE] button on the remote directly according to the actual remote in the accessory bag .
PVR
The PVR function allows you to easily record digital television content for later viewing. The function is only available in DTV source. To use PVR, you must connect a USB device for recording. The format of the storage disk should be NTFS, FAT32. The PVR will not function if a data storage device has not been connected.
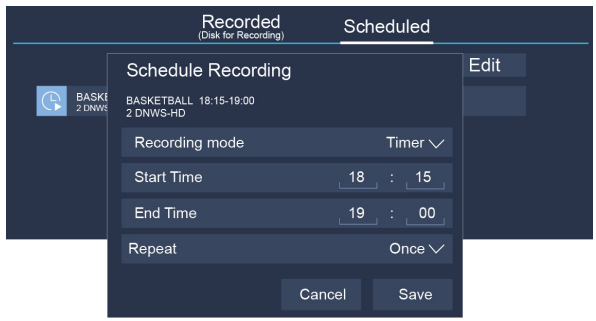
Schedule Recording
Pressbutton, select the program to be played, press button to set the appointment time and period, the reservation is successful. Press button on the remote to call out the four-color menu to select the [RED] icon or press the [RED] button on the remote to view the scheduled recording. In schedule recording list, you can readjust the reservation information that has been set.
Instant Recording
Press button to select PVR
Select the partition, and the HDD speed will be tested(appear when using for the first time).
You can choose to manually stop or automatically match the program time.
Standby record
If you press the power button during recording, TV will go into standby mode but the recording process is still going on. If you press power button again and wake up the TV, recording process will not be affected. After recording, the recorded file will be automatically saved to the disk.
NOTE
The storage space of your USB device should be no less than 2G (for 15 minutes high definition video).
If the transfer rate of your hard disk is too slow, a pop-up notice will appear, in this case, you can try another one.
The PVR function doesn't support analogue channels.
The schedule recording function is not available while you are watching a programme that is currently being broadcast.
Some broadcasters may restrict to record the program.
During the recording progress, channels locked with Channel Lock(password needed) are disabled to watch.
The PVR function is only applicable in some models/countries.
Recording List
Accessing the recording list
See the list of recorded programs and scheduled recordings.
To enter the recording list:
Recording List
Managing the recording list
Recording List > Recorded
You can watch or delete recorded programs.
Delete the recorded program
Select Edit and then select recorded program in recording list, press button to remove the recorded program.
Watch
Select recorded program in recording list, press button to watch the recorded program.
Managing the schedule recording list
Recording List > Scheduled
You can change scheduled recording information or cancel scheduled recordings.
Delete the scheduled program
Select Edit and then select scheduled program in schedule list, press button to remove the scheduled program.
Edit scheduled program
Select scheduled program in schedule list, press button to adjust the scheduled program.
NOTE
The Recording List function is only applicable in some models/countries.
Timeshift
This option allows you to pause and rewind live TV. This function operates by recording temporarily to a storage device. Please ensure your storage device is connected and there is enough free disk space. Otherwise, the recording will not commence.
Press button on the remote control to select T.Shift and then the menu will appear, press to pause the live broadcast and press to play. Press to watch reverse and press to watch advance playback rapidly. Press to exit the function and watch the current broadcast. Press to record current broadcast.
NOTE
The T.Shift function doesn't support analogue channels.
The storage space of the USB device should be no less than 1G.
The Timeshift function is only applicable in some models/countries.
Connection
Ethernet
Connecting to the Internet
NOTE
You can get access to the Internet through your TV.
We recommend using a modem or router that supports Dynamic Host Configuration Protocol(DHCP). Modems and routers that support DHCP automatically provide the IP address, subnet mask, gateway, and DNS, so you don't have to enter them manually. Most home networks already have DHCP.
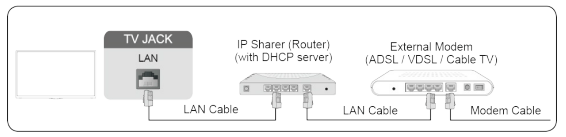
Connecting to a Wired (Ethernet) Network
Settings > Network > Network Configuration
Set the TV network by selecting Network Configuration and press button to enter the submenu.
Connection Type
Connect your TV to an Ethernet connection.
Ethernet
Display network status.
IP Settings
Configure the IP setting for your network connection.
Wireless
Connecting to the Internet
NOTE
You get access to the Internet through your TV.
Connect to an available wireless network.
Make sure that you have the wireless router's SSID and password before attempting to connect.
Connecting to a Wireless Network
Settings > Network > Network Configuration
You set the TV network by selecting Configuration and press the button to enter the submenu.
Connection Type
Connect your TV to a wireless Wi-Fi network connection
Advanced Settings
Configure the advanced wireless network settings for the TV.
Add
You can add wireless network.
Refresh
Refresh wireless network.
NOTE
If no wireless router is found, select Add and enter the network name in the SSID.
If no wireless router is found, select Refresh.
Using HDMI & CEC
Use the TV's remote control to control external devices that are connected to the TV by an HDMI cable.
The external devices need to support HDMI & CEC Function (HDMI-CEC).
Connecting an external device through HDMI & CEC Function
Settings > System > HDMI & CEC > CEC Control
Set CEC Control to On.
Connect an HDMI-CEC-compliant device to the TV.
Turn on the connected external device. The device is automatically connected to the TV. After connection is finished, you can access the menu of the connected device on your TV screen using your TV remote and control the device.
NOTE
HDMI cables must be used to connect HDMI CEC-compatible devices to your TV.
The HDMI CEC feature of the connected device must be turned on.
If you connect an HDMI device that is not HDMI CEC-compatible, all the HDMI-CEC control features do not work.
Depending on the connected HDMI device, the HDMI-CEC Control feature may not work.
The HDMI CEC feature are supported One Touch Play, Routing Control, System Standby, Device OSD
Name Transfer, Remote Control Pass Through, Give Device Power Status, System Audio Control.
HDMI 2.0 Format function
Settings > System > HDMI & CEC > HDMI 2.0 Format
Please select the Enhanced format if your HDMI device supports 4K HDR. If you are not sure or if it does not support 4K HDR, please select Standard format.
Connecting with an HDMI (ARC) cable
Connect an HDMI cable from an external digital audio system.
ARC enables the TV to directly output the digital sound through an HDMI cable. Please note that it works only when the TV is connected to the audio receiver that supports the ARC (Audio Return Channel) function.
NOTE
When this port is used as the ARC function, it can be used as signal input when DVD is connected to amplifier and the amplifier is connected to the TV at the same time. (Some amplifiers may not support series connection.)
Connecting with an HDMI cable
Connect an HDMI cable from an external AV equipment.
Some devices such as DVD player require HDMI signal to be set to output in the device's settings. Please consult your device user manual for instructions.
Please note that the HDMI connector provides both video and audio signals, it's not necessary to connect an audio cable.
Connecting with an USB cable
Connect the USB devices such as hard drives, USB sticks and digital cameras for browsing photos, listening to music.
Support the U disk 4G, 8G, 16G, 32G, 64G, 128G and other common market sizes, 8T hard drive is currently supported.
Support format: NTFS, FAT32.
Content Sharing
Share videos, music or pictures from your Android/iOS/PC device to the TV screen.
Content Sharing
Turn on the contents sharing function of your Android/iOS/PC device.
Find the TV name in the searching list of your device and select it. Wait for the connection progress to complete and select the content you want to share.
NOTE
TV and your Android/iOS/PC device need to connect to the same network.
Some devices may not support contents sharing function. If your device doesn't support contents sharing, you can download an app that supports the function
Smart Functions
Media
Playing Media contents
My Apps > Media
By default, there are Content Sharing displayed on the Media screen. If your mobile device is connected to the TV, its name also appears on the Media screen.
NOTE
For more information about Content Sharing, refer to its detailed introduction.
My Apps > Media>connected device
Select the content you want to play on the screen, like pictures, videos and music.
① Input the content name you want to play. ② Arrange the content list by Grid, list. ③ Arrange the content list by Name, Date modified, Size. ④ Filter the content list by All Media, Photo, Music, Video, Recorded. ⑤ Create a photo, music, or video playlist.
Playing background music during viewing pictures
You need to:
Choose a picture to playback.
Press button to call out playbar.
Select Background Music and choose your music to create a Music Playlist.
Play the background music during viewing pictures
App
My Apps
Removing an app in My Apps
In My Apps select the app you want to remove, and then press button to select Uninstall.
Select OK. The selected app is deleted.
Adding an app in VIDAA Store to the Home screen
In VIDAA Store select the app you want to add and then select INSTALL.
The selected app has been added to the My Apps.
Sorting apps in My Apps
In My Apps select the app you want to sort, and then press button to select Sort.
Press button to move it.
Press to store position
Picture and Sound
Adjusting the Picture Quality
Adjust current picture mode to apply to all sources or just current source.
Choosing a picture mode
Settings > Picture > Picture Mode
You can select the Picture Mode that provides the best viewing experience.
Changing the picture size
Settings > Picture > Aspect Ratio
You can change the size of the picture displayed on the TV screen.
Automatic
Automatically switch Aspect Ratio between 16:9 and 4:3 based on the signal information.
16:9
Best suited for 16:9 Widescreen content. This will also stretch 4:3 content to Widescreen.
4:3
Best suited for 4:3 content.
Panoramic
Provides a full-screen image by stretching the edges whilst leaving the middle untouched.
Movie Zoom
Provides a full-screen image by zooming in on the movie.
Direct
Point to point display also known as 1:1 Pixel Mapping.
Configuring advanced picture settings
Settings > Picture > Picture Mode Settings
You can select the Picture Mode that provides the best viewing experience.
Apply Picture Settings
Adjust current picture mode to apply to all sources or just current source.
Backlight
Set the overall brightness of the screen.
Brightness
Adjust the Brightness level to generate lighter or darker images.
Contrast
Adjust the Contrast level to increase or decrease how bright images appear.
Colour Saturation
Adjust the colour intensity of the picture for a more vibrant image.
Sharpness
Adjust how sharp or soft edges of images appear.
Adaptive Contrast
Automatically darken dark areas and lighten light areas of images to see more details.
Ultra Smooth Motion
Reduce seeing afterimages that are left on the screen when viewing fast-moving objects.(This function is only applicable in certain models.)
Clear Motion
Making motion look clearer when flicker is desired.(This function is only applicable in certain models.)
Noise Reduction
Improve how clear the picture appears by reducing noise.
MPEG Noise Reduction
Reduces MPEG block noise and provides clearer edge transitions.
Colour Temperature
Adjust how warm(red) or cool(blue) the white areas of an image appears.
Expert Setting
Adjust the colour space and Gamma to best suit the content you're viewing.
Overscan
Change the video size settings to slightly crop the edges of the displayed image.(This function is only applicable in some countries.)
Reset Current Mode
Restore all the picture settings in the current picture mode to the factory default values.
Adjusting the Sound Quality
Adjust current sound mode to apply to all sources or just current source.
Choosing a sound mode
Settings > Sound > Sound Mode
You can select a favourite sound mode suitable for the content type or the listening environment.
Configuring advanced sound settings
Settings > Sound > Sound Mode Settings
You can personalise the sound quality by adjusting the following settings.
Apply Audio Settings
Adjust current sound mode to apply to all source or just current source.
Bass Boost
Built-in Bass Ajustment. (This function is only applicable in certain models/countries.)
Surround Sound
Surround sound uses DTS TruSurround™ to deliver an immersive surround sound experience from the TV's internal speakers. (This function is only applicable in certain models/countries.)
Dialog Clarity
Dialog Clarity uses DTS Dialog Clarity™ to boost the frequency range of the human voice so dialog is clearly understood and heard above audio or surround effects. (This function is only applicable in certain models/countries.)
TruVolume
You can turn on/off. (This function is only applicable in certain models/countries.)
Wall Mount Setup
Automatically optimize the sound based on the position of the TV. (This function is only applicable in certain models/countries.)
Equalizer
Boost the volume at different frequencies.
Auto Volume Control
Activate to prevent the volume from changing when you switch TV channels.
Reset Current Mode
Restore all of the audio settings in the current audio mode to the factory default values.
Troubleshooting
Self Diagnosis
Diagnose issues with your TV.
Settings > Support > Self Diagnosis
Use the Picture Test to help diagnose video issues and the Sound Test to diagnose sound issues. You can also view signal strength information for over-the-air digital signals by using the Network Test and the
Input Connection Test. Additionally, you can view the status of the TV by using the Status Check.
Picture Problem
When the TV has trouble with the picture, these steps may help resolve the problem.
Picture Test
Settings > Support > Self Diagnosis > Picture Test
Before you review the list of problems and solutions below, use Picture Test to determine if the problem is caused by the TV. Picture Test displays a high definition picture that you can examine for flaws or faults.
The Problem
Possible Solutions
No picture, or black and white picture.
Unplug TV from AC outlet and re-plug after 60 seconds.
Check that the Colour Saturation is set to 50 or higher.
Try different TV channels.
The picture is distorted
The compression of video content may cause picture distortions, especially in fast moving pictures from sports programmes and action movies.
If the signal reception is weak or poor, screen distortion may be visible but it is not a malfunction.
Mobile phones used close to the TV (within 1 m) may cause noise on analogue and digital channels.
Sound Problem
When the TV has difficulties with sound, these steps may help resolve the problem.
Sound Test
Settings > Support > Self Diagnosis > Sound Test
If the TV plays the Sound Test melody without distortion, there may be a problem with an external device or the broadcast signal's strength
The Problem
Possible Solutions
There is no sound or the sound is too low at maximum volume.
Check the volume control of the device (cable or satellite box, DVD, Blu-ray, etc.) connected to your TV.
Picture is normal, but no sound.
Check the volume settings.
Check if 'Mute' mode is set to on.
The speakers are making an odd sound.
Make sure that the audio cable is connected to the correct audio output connector on the external device.
For antenna or cable connections, check the signal information.
A low signal level may cause sound distortions.
Picture and Sound Problem
When the TV has difficulties with sound and picture, these steps may help resolve the problem.
Picture Test
Settings > Support > Self Diagnosis > Picture Test
Sound Test
Settings > Support > Self Diagnosis > Sound Test
If the Sound Test and Picture Test are normal, there may be a problem with an external device or the broadcast signal's strength.
The Problem
Possible Solutions
No sound and picture
Check if the power cord is plugged into a powered AC outlet.
Press the button in the remote control to activate the unit from Standby.
Check to see if the LED light is on or not. If it is, then the TV is receiving power
I have connected an external source to my TV but I get no picture and/or sound.
Check the correct connection on the external source and the input connection on the TV.
Make sure you have made the correct selection for the input mode for the incoming signal.
Sound and picture distorted or appear wavy.
Some electrical appliances may affect TV set. If you turn off the appliance and the interference goes away, then move it further away from TV.
Insert the power plug of the TV set into another power outlet.
Sound and picture is blurry or cuts out momentarily
• If you use an external antenna, check the direction, position and connection of the antenna.
Adjust the direction of your antenna or reset or fine tune the channel.
Internet Problem
When the TV has difficulties connecting to the Internet, these steps may help resolve the problem.
Network Test
Settings > Support > Self Diagnosis > Network Test
If the TV network is connected, the screen will display Connected successfully
The Problem
Possible Solutions
The TV cannot connect to your network or apps.
Make sure the TV has a network connection.
Run Network Test ( Settings > Support > Self Diagnosis > Network Test).
Contact your Internet service provider
The wireless network connection failed.
Make sure your wireless modem/router is on and connected to the Internet.
The wireless network signal is too weak.
Position your wireless router, modem router, or access point in a central location. Avoid putting it in a corner.
Recording/Timeshift Function Isn't Working
When Timeshift or Schedule recording aren't working, these steps may help resolve the problem
Schedule Recording cannot be used.
Check if there is a USB device connected to the TV.
Recording will automatically stop if the signal becomes too weak.
Check the free space on the USB device. The function will not work if there isn't enough storage space on the USB device.
My File Won't Play
When files aren't playing, this may help resolve the problem.
Some files can't be played.
This problem may occur with high-bitrate files. Most files can be played back, but you might experience problems with high-bitrate files.
Other Issues
Use these procedures to resolve other issues that may occur.
The Problem
Possible Solutions
The TV is hot
Watching TV for an extended period of time causes the panel to generate heat. The heat from the panel is dissipated through internal vents running along the top of the TV. However, after extended use, you may feel hot when touching it. This heat, however, is not a defect and does not affect the TV's functionality.
The TV smells of plastic.
This smell is normal and will dissipate over time.
The plastic cabinet makes a "clicking" type of sound.
The "click" sound can be caused when the temperature of the television changes. This change causes the television cabinet to expand or contract, which makes the sound. This is normal and the TV is OK
Specific Hisense TV’s support the HD free-to-air channels which can be accessed by performing an auto scan of TV channels on your TV product
#2 The volume of the TV doesn’t seem loud, what can I do?
All Hisense TV’s have pre-set Sound Mode settings which can be adjusted by accessing the Sound Settings Menu. Audio from the TV can chang depending on the size of the room it is set up in and if there is anything blocking the TV’s built in speakers.
#3 How do I scan for TV channels if there are new ones available?
Your TV settings menu will have an option for CHANNEL, in this menu there is an AUTO CHANNEL SCAN option. Make sure your TV is connected to an outdoor antenna that supports digital receptions then select AUTO SCAN to a begin a scan for channels available.
 > Settings > Channel > Auto Scan
 button to select Antenna or Cable and then press Start to commence the search of that channel. When the signal has been tuned, signal strength will be displayed on the screen.
 button on the selected channel then a checkbox will appear. You can select more channels at the same time to move or delete them.
 button to delete the selected channel.
 button to call out the four-color menu to select the
  [RED] icon or press the
  button to restore the deleted channel.
 [YELLOW] icon or press the
 [BLUE] icon or press the
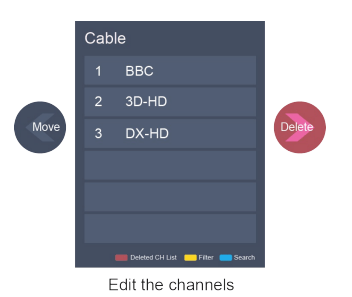
 button on the remote control to display the Channel List menu.
 Add channels to add the selected channel to the favorite list.
 button to move the selected channel.
 button to remove the selected channel.
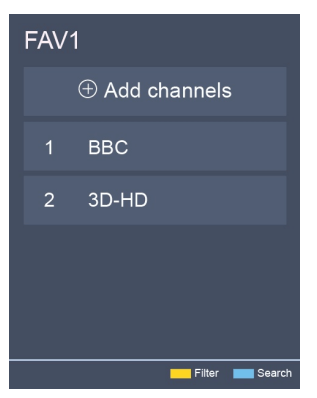
 button on the remote control to display channel information on program guide list.
 button to select the channels. Press / button to select program based on the time schedule.
 button on the remote control to select PVR or Reminder.
 button on the remote to call out the four-color menu to select the
 [RED] icon or press the
  [YELLOW] icon or press the
 [BLUE] icon or press the
  button to select PVR
 Recording List
 button to remove the recorded program.
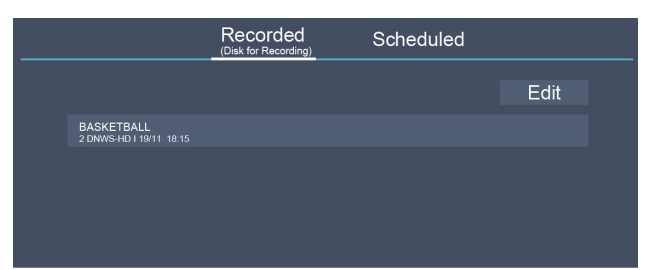
 button on the remote control to select T.Shift and then the menu will appear, press to pause the live broadcast and press
  to play. Press
  to watch reverse and press to watch advance playback rapidly. Press
  to exit the function and watch the current broadcast. Press to record current broadcast.
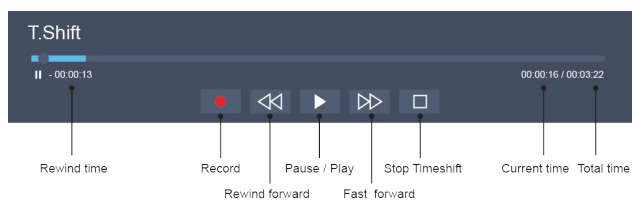
 Settings > Network > Network Configuration
 button to enter the submenu.
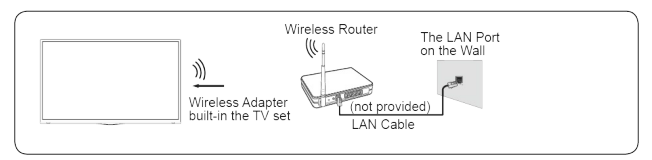


 Content Sharing
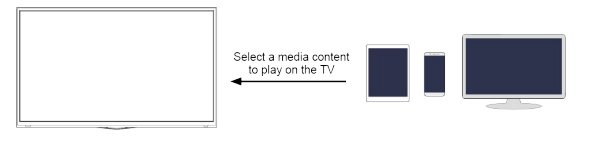
 My Apps > Media
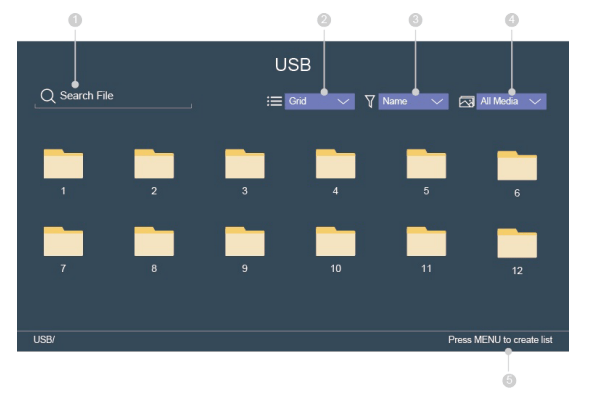
 button to call out playbar.
 button to select Uninstall.
 button to move it.
 to store position
 Settings > Picture > Picture Mode
 Settings > Sound > Sound Mode
 button in the remote control to activate the unit from Standby.