USER MANUAL Premium Hisense Android Smart TV
Live TV
Channel Scan
You can scan channels automatically or manually.
Note:
- Antenna/cable function may not be applicable in some models/countries/regions.
Auto Scan
Automatically scan for channels to view programmes from your TV source.
 > Channels
If no TV channels were saved before, you will be prompted to do a channel search.
or
In Live TV, > Channels > Auto Channel Scan
Before you select Auto Channel Scan, you can press > Channels > Tuner Mode to select Antenna or Cable.
Manual Scan
In Live TV, > Channels > Manual Scan
Type in a channel to add it manually to your TV.
Channel List
Displaying the channel list
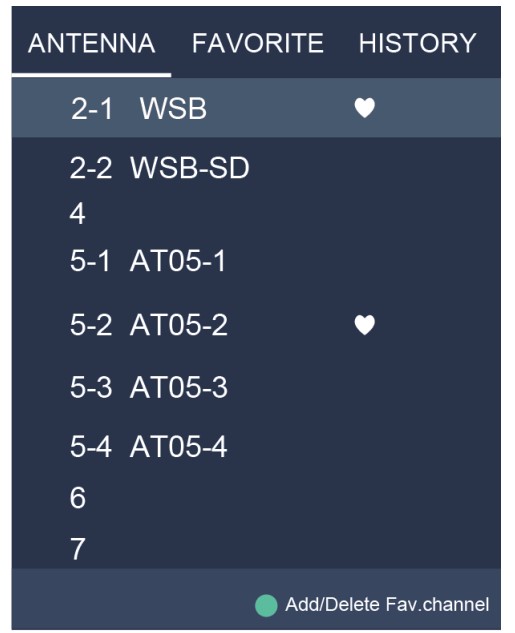
In Live TV, press button on the remote to display the Channel List menu.
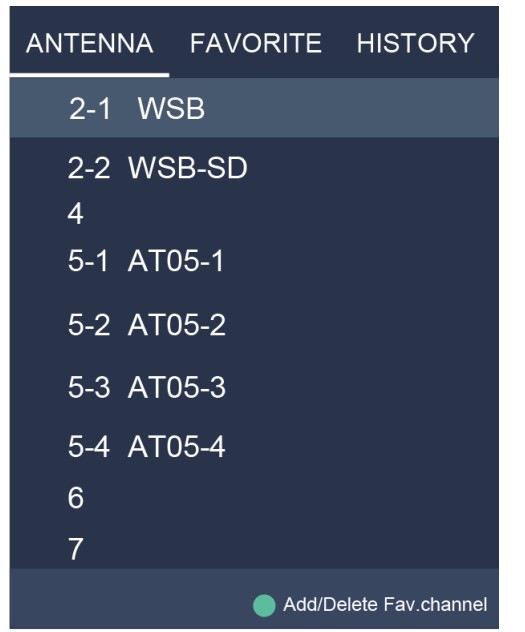
Channel list menu
Favorite
Viewing your favorite list
Press button to call out the Channel list, and the channel list appears on the right side of the screen. Press button and select green icon and then press button, a heart-shaped icon will appear next to your favorite channel on ANTENNA/CABLE list, and the favorite channel will appear in the favorite list.
Channel list menu

Channel list menu
If you want to remove favorite channels, Press button and select green icon and then press button, a heart-shaped icon will disappear on ANTENNA/CABLE list.
Note:
- These steps should be operated under TV inputs.
- Before you edit the favorite lists,complete channel scan first.
Connection
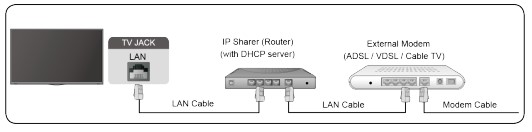
Establishing a Wired Internet Connection
Connecting to a wired (Ethernet) network
Press  button to select
  icon to enter Network & Internet.
To get access to the Internet in a wired way, it is recommended to use a modem or router that supports Dynamic Host Configuration Protocol (DHCP). Modems and routers that support DHCP automatically provide the IP address, subnet mask, gateway, and DNS, so you don't have to enter them manually. Most home networks already have DHCP
See the illustration below.
Establishing a Wireless Internet Connection
Connecting to a wireless network
Press button to select  icon, and select Network & Internet > Wi-Fi
To connect to an available wireless network, make sure that you have the wireless router’s SSID and password before attempting to connect.
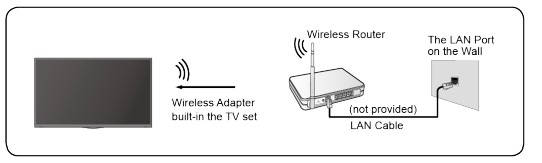
To get access to the Internet in a wireless way:
- Turn on your Wi-Fi.
- The list of networks will display automatically.
- Select a wireless network from the list, input the password.
- If the network connection does not appear in the list, select See all to display all the list, or select Add new network to input a Wi-Fi name, select the type of security mode, and enter password.
Connecting Bluetooth Devices
Connecting a Bluetooth device
To pair a Bluetooth device, such as Bluetooth headphones, speakers, keyboards, mouse or even moblie devices:
- Before pairing your Bluetooth devices, make sure they're in pairing mode and put devices within range of the TV. To put your Bluetooth devices in pairing mode, refer to the user manual of devices
- Press button to select icon, and select Remotes & Accessories > Add accessory to put the TV in pairing mode. A list of available Bluetooth devices will be displayed.
- Select the desired device from the list, then follow the onscreen instructions. If you are prompted to enter a passcode, refer to the user manual of the device. After pairing is completed, the device is connected and is stored to the TV.
Note:
- You need to unpair a paired device first if the maximum number of paired devices was reached.
Listening to the TV through Bluetooth devices
- Pair the Bluetooth audio devices using the TV’s Bluetooth function. Refer to the user manual of your audio device such as Bluetooth speaker, sound bar and headphones for detailed connection steps and usage.
- Press button to select icon, select Sound > Audio Output, and then select the Bluetooth option to listen to the audio through bluetooth devices.
Note:
- Compatibility issues may occur depending on the Bluetooth device.
- The TV and Bluetooth device may disconnect depending on the distance between them.
Using HDMI&CEC
Use the TV's remote to control external devices that are connected to the TV by an HDMI cable. The external devices need to support HDMI&CEC function
Connecting an external device through HDMI&CEC function
Press button to select icon, and select Inputs > HDMI control.
- Set HDMI control to On.
- Connect an HDMI&CEC compliant device to the TV.
- Turn on the connected external device. The device is automatically connected to the TV. After connection is finished, you can access the menu of the connected device on your TV screen using your TV remote and control the device.
Enabling device auto power off
Press button to select icon, and select Inputs > Device auto power off.
Set to On to turn off CEC compatible external devices when the TV is turned off.
Enabling TV auto power on
Press button to select icon, and select Inputs > TV auto power on.
Set to On to turn on the TV when CEC compatible external devices is turned on
Note:
- HDMI cables must be used to connect HDMI&CEC compatible devices to your TV.
- The HDMI&CEC feature of the connected device must be turned on.
- If you connect an HDMI device that is not HDMI&CEC compatible, all the HDMI&CEC control features do not work.
- Depending on the connected HDMI device, the HDMI&CEC control feature may not work.
- The HDMI&CEC feature are supported One Touch Play, Routing Control, System Standby, Device OSD Name Transfer, Remote Control Pass Through, Give Device Power Status, System Audio Control.
Connecting a Digital Audio System to Use eARC/ARC
If you’d like to use the Enhanced Audio Return Channel (eARC) / the Audio Return Channel (ARC) feature to have sound sent from the TV back down an HDMI cable to a digital sound system, you can connect to the HDMI (eARC/ARC) port of your TV.
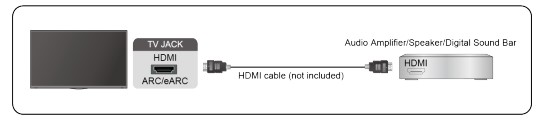
By using this feature, you will also be able to control the sound system with your TV remote instead of using multiple remotes for each device
After the connection:
- Power on the sound system.
- Press button to select icon, and select Sound > Audio Output > eARC/ARC. If the device supports eARC function, first select Sound > eARC to set it to On.
Note:
- It works only when the TV is connected to the audio receiver that supports the eARC/ARC function.
- If the device has an Input Selector feature then make sure to change it to TV.
- When this port is used as the eARC/ARC function, it can be used as signal input when a DVD is connected to amplifier and the amplifier is connected to the TV at the same time. (Some amplifiers may not support series connection.)
Connecting USB Devices
Connect the USB devices such as hard drives, USB sticks and digital cameras for browsing photos, listening to music.
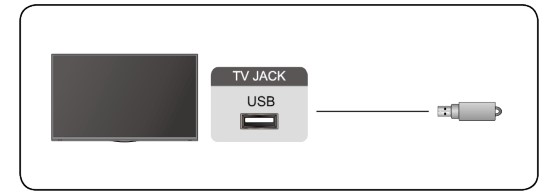
- Support the USB disk 4G, 8G, 16G, 32G, 64G, 128G and other common market size, and 8T hard drive is currently supported.
- Support format: NTFS, FAT32.
- Certain digital cameras may not be compatible with the TV.
Troubleshooting
Picture Issues
When the TV has picture problems, these steps may help resolve the problem.
| Problem |
Possible Solutions |
| No picture, or black and white picture |
- Unplug the TV power cord from AC outlet and re-plug after 60 seconds.
- Check that the Color Saturation is set to 50 or higher.
- Try different TV channels.
|
| The picture is distorted. |
- The compression of video content may cause picture distortions, especially in fast-moving pictures from sports programmes and action movies.
- If the signal reception is weak or poor, screen distortion may be visible but it is not a malfunction.
- Mobile phones used close to the TV (within 1m) may cause noise on analogue and digital channels.
|
| The picture is blurry or flickering, or cuts out momentarily. |
- >Settings > Picture > Sharpness. You can try to increase or decrease the Sharpness.
- If you use an external antenna, check the direction, position and connection of the antenna.
- Adjust the direction of your antenna, or reset or fine tune the channel.
|
| The picture appears red, purple, pink and other colors. |
- >Settings > Picture > Calibration Settings > White Balance. You can try to increase or decrease the White Balance.
|
| Picture distorted or appear wavy |
- Some electrical appliances may affect the TV. If you turn off the appliance and the interference goes away, then move it further away from TV.
- Insert the power plug of the TV into another power outlet.
|
Note:
- If the problem persists, check the signal strength or refer to the external device’s user manual.
Sound Issues
When the TV has a sound problem, these steps may help resolve the problem.
| Problem |
Possible Solutions |
| There is no sound or the sound is too low at maximum volume. |
- Check the volume control of the device (cable or satellite box, DVD, Bluray, etc.) connected to your TV.
|
| Picture is normal, but no sound. |
- Check the volume settings.
- Check if 'Mute' mode is set to on
|
| The speakers are making an odd sound |
- Make sure that the audio cable is connected to the correct audio output connector on the external device.
- For antenna or cable connections, check the signal information.
- A low signal level may cause sound distortions.
|
| Sound distorted or appears wavy. |
- Some electrical appliances may affect the TV. If you turn off the appliance and the interference goes away, then move it further away from TV.
- Insert the power plug of the TV set into another power outlet.
|
| Sound is blurry or cuts out momentarily. |
- If you use an external antenna, check the direction, position and connection of the antenna.
- Adjust the direction of your antenna or reset or fine tune the channel.
|
Note:
- This product does not support decoding of DTS CD bitstreams. Playback of this format may produce undesirable noise.
Network Issues
When the TV has difficulties in connecting to the Internet, these steps may help resolve the problem.
| Problem |
Possible Solutions |
| The TV cannot connect to your network or apps. |
- Make sure the TV has a network connection.
- Contact your Internet service provider.
|
| The wireless network connection fails. |
- Make sure your wireless modem/router is on and connected to the Internet.
|
| The wireless network signal is too weak. |
- Position your wireless router, modem router, or access point in a central location. Avoid putting it in a corner.
|
External Device Connection Issues
When the TV has difficulties with external device connection, these steps may help resolve the problem
| Problem |
Possible Solutions |
| I have connected an external source to my TV but I get no picture and/or sound. |
- Check whether the connection between the external device and your TV is correct.
- Make sure you have made the correct selection of input source.
|
| There is no signal or weak signal in the cable box |
- If there is no signal occasionally, unplug cable from TV and re-plug after 60 seconds.
- If there is always no signal, or the signal cannot be restored after plugging and unplugging, you can try Menu > HDMI Format if you select HDMI as input, to confirm whether the signal can be recognized.
- Change to another HDMI port.
- Change to another HDMI cable.
|
| There is no sound |
- Check if the Audio Out option in the menu is ARC/eARC, if not, you need to check whether the external power amplifier device is connected to the ARC port or optical port of the TV.
- > Settings > Sound > Advanced Settings > Digital Audio Out. You can try to select PCM, Dolby Digital, or Dolby Digital Plus.
- Whether the power amplifier device port is connected correctly.
- If you select HDMI as input, you can try Menu > HDMI Format
|
| The remote control does not work. |
- Confirm that TV still has power and is operational.
- Change the new batteries in the remote control.
- Check if the batteries are correctly installed.
- If some buttons don't work, but the volume buttons can work normally, it seems there is a problem with the application.
|
Apps
When some apps aren't playing, these steps help resolve the problem.
| Problem |
Possible Solutions |
| Netflix can't be played. |
- >Settings > Apps > Netflix > Force stop, then reopen to try.
- You can try to reset to the factory settings.
|
| Disney plus can't be played |
- >Settings > Apps > Disney plus > Force stop, then reopen to try.
- >Settings > Apps > Disney plus > Clear data, then reopen to try.
- You can try to reset to the factory settings.
|
Media Files
When files aren't playing, these steps may help resolve the problem.
| Problem |
Possible Solutions |
| Some files can't be played. |
- Most files can be played back, but you might experience problems with corrupted files or files with high-bitrate, unsupported resolution, unsupported container or codec formats.
|
Voice Control Issues
When Alexa and Google Assistant aren't playing, these steps may help resolve the problem.
| Problem |
Possible Solutions |
| Alexa can't be played. |
- For more information about Alexa, refer to Smart Functions > Using Voice Control > Alexa in this manual.
|
| Google assistant can't be played |
- You can try to log in Google account.
- If you receive "I don't understand" of the voice recognition, please change account or log out the account.
- After logging in to the Google account, the recognition language may be different. You need to log in to the Google account on the web page to set the voice language.
- For more information about Google Assistant, please refer to Smart Function > Using Voice Control > Google Assistant in this manual.
|
Other Issues
Use these steps to resolve other issues that may occur.
| Problem |
Possible Solutions |
| The TV is hot. |
- Watching TV for an extended period of time causes the panel to generate heat. The heat from the panel is dissipated through internal vents running along the top of the TV.
- After extended use, you may feel hot when touching it. This heat, however, is not a defect and does not affect the TV's functionality.
|
| The TV smells of plastic. |
- This smell is normal and will dissipate over time.
|
| The plastic cabinet makes a "clicking" type of sound. |
- The "clicking" sound can be caused when the temperature of the TV changes. This change causes the TV cabinet to expand or contract, which makes the sound. This is normal and the TV is OK.
|
| When I turn on my TV, there is a delay for a few seconds before the picture appears. Is this normal? |
- Yes, this is normal. The TV is initializing and searching for previous setting information.
|