To quickly access menu function, press the button on your remote.
Headphone Volume
Adjust the volume of the headphone when the headphone is connected.
Channel List
View the Channel List and adjust channels while watching TV. (Only available for TV channels)
Guide
Enter guide function under TV mode.
It provides an overview of each digital channel’s programme lineup.
Teletext
Display the teletext mode.
Audio Language
Select a desired language from the list if the selected channel supports multi-audio languages. (Only available for DTV channels)
Subtitle
Select desired subtitles from the list if the selected channel supports multi-language subtitles.
Audio Only
When you select this option, the screen will not display the picture. You can only listen the audio. Press any button except the buttons to restore operation.
Recording List
View recording schedule list. You can edit the settings of the selected schedule or delete it. (Only available for DTV channels)
HbbTV
The switch to enable or disable HbbTV functionality for each individual channel. (Only available for DTV channels)
Settings
The Settings Menu consists of the following settings: Picture, Sound, Network, Channel, Accessibility, System and Support.
Using the Settings Menu
1.Press the button on your remote to select Settings, and then press the [OK] button to enter the Settings menu.
The Settings Menu consists of the following settings:
Picture
Sound
Network
Channel
Accessibility
System
Support
2.In each menu, you can:
Press the buttons to select an item,
Press the [OK] button to enter the sub-menu or to set on or off,
Press the [< / >] buttons to adjust the value,
Press the [BACK] button to return to the previous menu.
Press the [EXIT] button to exit the menu.
Using the Picture Menu
Picture Mode
Select a preset picture mode to best suit the content you’re viewing.
Aspect Ratio
Adjust the Aspect Ratio to stretch or zoom in on your picture.
Picture Mode Settings
Adjust display settings for each Picture Mode.
Apply Picture Settings: Adjust current picture mode to apply to all sources or just current source.
Backlight: Set the overall brightness of the screen.
Brightness: Adjust the Brightness level to generate lighter or darker images.
Contrast: Adjust the Contrast level to increase or decrease how bright images appear.
Color Saturation: Adjust the color intensity of the picture for a more vibrant image.
Sharpness: Adjust how sharp or soft edges of images appear.
Game Mode: Best suited for PC or Games console. Reduces Input Lag and improves responsiveness.
Adaptive Contrast: Automatically darken dark areas and lighten light areas of images to see more details.
Ultra Smooth Motion: Reduce seeing afterimages that are left on the screen when viewing fast-moving objects.
Noise Reduction: Improve how clear the picture appears by reducing noise.
Color Temperature: Adjust how warm(red) or cool(blue) the white areas of an image appears.
Expert Setting: Adjust the colour space and Gamma to best suit the content you’re viewing.
Restore Current Picture Mode Settings: Restore all the picture settings in the current picture mode to the factory default values.
Overscan: Change the video size settings to slightly crop the edges of the displayed image.
Using the Sound Menu
Sound Mode
Select a preset sound mode to suit the type of content you are listening to.
Dolby Atmos
Turn on or off Dolby Atmos.
Headphone
Headphone Mode: Change the way audio is sent through the type of device that’s connected to your TV Audio Out port.
Headphone Volume: Independently adjust the volume of audio out devices.
Sound Mode Settings
Customize selected Sound Mode.
Apply Audio Settings: Adjust current sound mode to apply to all source or just current source.
Optimizes overall sound quality by increasing bass, widening the sound field and provides a clear, natural dialog.
Maintains consistent loudness levels from wide dynamic range programs, loud commercials, and channel or input changes.
Provides surround sound experience by utilizing psychoacoustic processing to place sounds beside, behind and above the viewer. For best results use with Total Sonics.
Sound Mode Settings
Bass Boost: Built-in Bass Adjustment.
Surround Sound: Surround sound uses DTS TruSurroundTM to deliver an immersive surround sound experience from the TV’s internal speakers.
Dialog Clarity: Dialog Clarity uses DTS Dialog ClarityTM to boost the frequency range of the human voice so dialog is clearly understood and heard above audio or surround effects.
Equalizer: Boost the volume at different frequencies.
Subwoofer: Built-in Subwoofer switch.
Wall Mount Setup: Automatically optimize the sound based on the position of the TV.
Auto Volume Control: Activate to prevent the volume from changing when you switch TV channels.
Restore Current Sound Mode Settings: Restore all of the audio settings in current audio mode to the factory default values.
Speakers
Audio Output: Select the speakers which you want to use.
Digital Audio Out: Select the digital audio output format that best suits the audio device type.
Digital Audio Delay: Adjust the digital audio output delay time to sync sound from an external speaker with the images on the TV.
Lip Sync: Synchronize the displayed image with the audio output.
Balance: Adjust the left and right speaker strength to optimize audio for a specific location.
Using the Network Menu
Network Configuration
Set up the network to gain full access of Smart TV features.
Connection Select: Ethernet
Choose a wired network connection to access the Internet.
IP Settings: Configure the IP setting for your network connection.
Connection Select: Wireless
Choose a wireless network connection to access the Internet.
Advanced Settings: Configure the advanced wireless network settings for the TV.
Refresh: Refresh wireless network.
Add: You can add wireless network.
Connection Select: Off
Turn off the Internet connection.
Internet Connection
Connection Test: Start a network connection test.
Network Information: View information about your network connection.
Wake on Wireless Network
Using a wireless connection, turn on your TV with a screen-cast feature inside an app.
Wake on LAN
Using an Ethernet connection, turn on your TV with a screen-cast feature inside an app.
Using the Channel Menu
Auto Scan
Automatically scan for channels to view programming from your TV source.
Channel Edit
Manually edit the channel list to your preference.
Advanced Settings
Adjust advanced settings for Channel.
Manual Scan: Perform manual channel scan for ATV and DTV.
Channel List Auto-Update: Allow your TV to auto-update the channel list from the content provider.
Program Auto Update: TV will automatically update program data overnight while in stand-by mode.
CI+ Module Settings:
Common Interface: Review CAM boot menu
CI card PIN: Set the CI CAM pin.
CAM Profile Search: Quick channel scan with CAM.
Using the Accessibility Menu
Menu Scheme
Select menu scheme style from Dark, Light.
High Contrast Menu
Improve contrast for visually impaired.
Menu Transparency
Select menu transparency from Off, Medium, High.
Hard of Hearing Subtitles
Subtitles for hearing impaired.
Audio Type
Audio Type: Select the audio type of programmes.
Voiceover Volume: Independently adjust the volume of voiceover.
Using the System Menu
Time
Set the current time based on your location.
Time Format: Set the time to display in a 12 or 24-hour format.
Jalaali: Turn the Jalaali On or Off.
Date/Time: Set the Date and Time.
Time Zone: Select your time zone.
Daylight Savings: Select whether to apply Daylight Savings Time to the TV.
Timer Settings
Adjust the timer settings to suit your preference.
Sleep Timer: Set the sleep timer to automatically turn the TV Off within a specified time.
Power On Timer: Set the clock for the time you want the TV to turn on automatically.
Power Off Timer: Set the clock for the time you want the TV to turn off automatically.
Menu Timeout: Set the amount of time that you’d like for the menu to display.
Auto Sleep: Set the amount of time that you’d like for TV auto power off without any activity.
Auto Standby with No Signal: TV will go standby if there is no signal and the timer times out
System PIN
Change your PIN that you use to access Parental Controls, Auto Channel Scan and Reset To Factory Defaults.
Parental Controls
Turn On Parental Controls to block children from being able to view certain programmes. You can do this by creating a 4-digit password.
Locks: Turn the Lock system On or Off.
Block Time: Block certain channels and programs during certain periods of time.
Channel Block: Block programmes by channels when you activate the parental controls settings.
Content Blocking: Certain programmes are blocked when you activate the parental control settings.
Input Block: Block content from devices that are connected to certain TV ports.
App Block: If an app that you want to restrict does not appear here then check the Parental Control settings in the app.
Restore Parental Control Defaults: Restore Parental Control back to the factory default setting.
Language and Location
Select the language used for this TV and your location.
Location: Choose the location from where you will watch your TV.
Menu Language: Set the default language for the TV menu.
Primary Audio: Set the default audio output language for the type of digital broadcast content that you’re viewing.
Secondary Audio : Set the secondary audio output language for digital broadcast content.
Primary Subtitle: Set the default subtitle language for digital broadcast content.
Secondary Subtitle : Set the secondary subtitle language for digital broadcast content.
Digital Teletext : Adjust Teletext decoding.
Voice Service
Use your voice to control the TV, other smart home devices, and more.
Voice Service Account Setup: Register the TV with your Voice Service Account.
Amazon Alexa Service: Set up Amazon Alexa Service.
Application Settings
Set settings for apps on your TV.
Anyview Stream: Share video, music or other content from another device on to your TV screen.
HbbTV: The global switch to enable or disable HbbTV functionality for all channels.
Clear Cache: Clear cache, user data and temporary files for browser and applications.
Delete Cookies: Delete Cookies for browser and applications.
Do Not Track: Tell websites and some applications your tracking preference.
Netflix: Remove this TV from your Netflix account. Please contact Netflix if you want to stop being billed for your service.
HDMI & CEC Functions
Configure how to control CEC-enabled devices with your TV remote.
HDMI 2.0 Format: Match the connected device output format. Select Enhanced for devices with output of 4K, 60Hz, 4:4:4, 4:2:2 or 4:2:0, 10 bit and above.
CEC Control: Allow HDMI devices to control each other.
Device Auto Power Off: Allow CEC-enabled devices to turn off with the TV.
Device Auto Power On: The device with CEC function that is connected to current input will be powered on when TV is powered on.
TV Auto Power On: Allow the TV to turn On with CEC-enabled devices.
CEC Device List: Show up available CEC devices.
NOTES
HDMI cables must be used to connect HDMI CEC-compatible devices to your TV.
The HDMI CEC feature of the connected device must be turned on.
If you connect an HDMI device that is not HDMI CEC-compatible, all the HDMI-CEC control features do not work.
Depending on the connected HDMI device, the HDMI-CEC Control feature may not work.
Bluetooth
Connect to the Devices using bluetooth technology.
Remote pairing: Pair bluetooth Remote Control with TV.
NOTE: The feature is only available on selected models.
Bluetooth switch: Turn on or off Bluetooth.
Equipment management: Manage bluetooth devices.
NOTES:
This function is not available on certain models in specific geographical areas.
Only one Bluetooth speaker and Bluetooth headphone can connect to TV, if a new
Bluetooth speaker or headphone connected to TV, the old one should disconnect to TV automatically.
Compatibility issues may occur, depending on the Bluetooth device.
The TV and Bluetooth device may disconnect, depending on the distance between them.
The TV supports Bluetooth keyboard, Bluetooth mouse, Bluetooth headset, Bluetooth speakers and so on.
Advanced Settings
Access the Advanced Settings menu.
TV Name: Choose a name for your TV. The name will be shown to devices that are available for sharing data.
PVR & Time Shift Setting: Initialize the external USB disk to support PVR and Time-Shift. (Since the function record temporary the program onto a hard disk only.)
Power Indicator: Set the Power Indicator light to stay On or Off when standby mode.
Indicator Light Setting: Set the indicator light to stay On or Off when watching TV.
Off: Always Off.
Power:Off when standby and On when watching TV.
Always:Always On.
NOTES
The standby energy consumption of television is different when you select different options.
Some models don’t support this function.
Input Labels: Edit the input labels.
Notifications: Allow pop-up notifications to appear for useful information and events that occur with your TV.
Setup Wizard: Use the Setup Wizard for instructions to help you set up your TV.
Store Mode: Home Mode uses less energy. Select Store Mode if the TV will be on display in a retail setting. Store Mode effects E-Streamer and other demo functions.
Sports Mode Auto Detection: Turn it on. For programmes of Sports type, your TV will automatically switch to Sports mode for both Sound Mode and Picture Mode.
Fast Power On: Turn on or off TV fast startup.
Power On Mode: TV will be powered on based on the mode when TV is reconnected with AC power.
Advanced Features
Getting familiar with the Home screen
To access the Home screen, press the button on your remote control and use the arrows on the D-pad to make your selection.
Indicators and Icons on the top of the Home screen
You can always view the current time at the top of the Home screen.
If your TV is connected to the Internet through a wireless connection or an Ethernet cable, then an icon / will display on the screen. This location makes it very convenient for you to determine if you still have Internet connectivity when you use the TV.
Editing the Home screen
1.Move an app, or an input, or a channel from the Home screen.
Select the item you want to move, press the ∧ button, and then display the tip .
Press the [< / >] buttons to move it.
2.Delete an app, or an input, or a channel from the Home screen.
Select the item you want to delete, press the [∧] button, and then display the tip .
Press the [∧] button twice constantly, and it will be deleted.
Search
Search the app you want.
Notifications
Allow pop-up notifications to appear for useful information and events that occur with your TV.
Select Notifications on the Home screen, and then display Advertising, New Arrivals, System message, Warnings And Legal Statements only when starting the TV for the first time. Choose which types of notifications you would like to receive.
Settings
Open the settings menu.
Advanced Features
Apps
Numerous factory-installed apps are available for you to choose from for your entertainment preferences.
Installing an App
Even though your TV has numerous factory-installed apps, there may be others that you’d like to download.
To install an app:
From the Home screen, click on the Apps to select the AppsNOW icon.
Use the navigation buttons of your remote to select the app that you want to install and then press the [OK] button. A page displays that shows a written description of the app.
Click on Install. The selected app has been added to the Home screen.
Removing an App
You can only delete apps that you’ve installed to the TV. Some factory-installed apps can not be deleted.
To delete an app:
Use the navigation buttons on your remote to select the app that you want to remove.
Press the ‘red’ button on your remote. A dialog message displays that asks do you want to uninstall this app.
Click on OK. The icon is removed from the Apps list screen.
Media
Media is a central location for you to upload and view or listen to different types of content (for example, your photos, music and movies) through the following methods:
A USB thumb drive or hard drive
Compatible mobile phone, tablet or other personal devices: You can stream movies, pictures and photos that are stored on Compatible personal device and play or view the content on your TV.
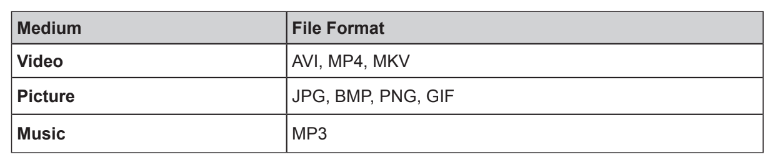
File formats that may be supported
Browsing Content
To browse through content based on the type that you wish to access:
Navigate to the appropriate menu tab on the screen and select All Media, Picture, Music or Video, also you can find the file you want through the file type: Name, Date Modified, Size.
Press the [∧ / v / < / >] buttons to select the name of the content/folder that contains your content.
Press the [OK] button to play/enter content/the folder.
If you want to close out of the Media center, press the [EXIT] button on your remote.
Creating Playlist
Press the [GREEN] button on the remote to create a playlist.
Select Picture / Music / Video that you want to play.
Press the [GREEN] button on the remote to play the list you have created.
Playing background music during viewing pictures
You need to:
Press the button when viewing pictures.
Select Background music and choose your music that you want to play.
Click Play selected to play.
Using Anyview Cast to mirror content from your device to the TV screen
The Anyview Cast is an app that enables you to share (or cast) a video, audio or image from compatible Android device to the TV.
From your tablet or phone
To mirror content from your tablet to the TV:
Press the button on your remote to select Settings, press the [OK] button to enter the Settings menu. Go to Network > Network Configuration and select Wireless.
Press the [INPUT] button on your remote and select the Anyview Cast.
Turn on the wireless display function on your Android-based device.
Find your TV in the list of devices that displays and select it.
Wait for the ‘Creating Connection’ progress bar to complete on the TV screen and the video or image will display in a moment.
Software updates for your TV
The software (also referred to as firmware) is part of what powers your TV. We will provide software updates to continuously enhance your TV and correct any issues that may impact your user experience; therefore, we recommend that you keep your TV connected to the Internet to receive updates when they are available.
You can choose to receive updates automatically or check for software updates and install them manually.
Checking for the latest firmware / OAD
To manually check for the latest firmware:
Press the button on the remote to select Settings, and then press the [OK] button to enter the Settings menu.
Go to Support > System Upgrade > Check Firmware Upgrade / Check OAD Upgrade
Other Information
Troubleshooting
If the TV does not operate as usual or appears to be faulty please read carefully this section. Many operational issues can be resolved by users.
It is also advisable to unplug the TV from the AC socket on the wall for 60 seconds or more, then reconnect and start again. This simple procedure helps in restoring stable conditions for electric circuits and firmware of the unit.
Please contact Manufacturer Customer Care if the problem is unresolved or you have other concerns.
SYMPTOMS
POSSIBLE SOLUTIONS
No sound or picture.
Check if the power cord is plugged into a powered AC outlet.
Check to see if LED light is red. If illuminated, power to TV is OK.
I have connected an external source to my TV and I get no picture and/or sound.
Check for the correct output connection on the external source and for the correct input connection on the TV.
Make sure you have made the correct selection for the input mode for the incoming signal.
When I turn on my television, there is a few second delay before the picture appears. Is this normal?
Yes, this is normal. That is the TV searching for previous setting information and initializing the TV.
Picture is normal, but no sound.
Check the volume settings.
Check if Mute mode is set “on”.
Sound but no picture or black and white picture.
If black and white picture first unplug TV from AC outlet and re- plug after 60 seconds.
Check that the Color is set to 50 or higher.
Try different TV channels.
Sound and picture distorted or appear wavy.
An electrical appliance may be affecting TV set. Turn off any appliances, if interference goes away, move appliance farther away from TV.
Insert the power plug of the TV set into another power outlet.
Sound and picture is blurry or cuts out momentarily.
If using an external antenna, check the direction, position and connection of the antenna.
Adjust the direction of your antenna or reset or fine tune the channel.
Horizontal/vertical stripe on picture or picture is shaking.
Check if there is interfering source nearby, such as appliance or electric tool.
The plastic cabinet makes a “clicking” type of sound.
"Click" sound can be caused when the temperature of the television changes. This change causes the television cabinet to expand or contract, which makes the sound. This is normal and the TV is OK.
Remote control does not work.
Confirm that TV still has power and is operational.
Change the batteries in the remote control.
Check if the batteries are correctly installed.
Smart Television with wireless network capability Wi-Fi fail to join a local network.
Configure the local wireless router or access point for WPA-PSK security before attempting to connect the TV to the Wi-Fi network.
Follow instruction in the User Manual of the television to setup a wireless connection

 button on your remote.
 buttons to restore operation.
 buttons to select an item,
 Optimizes overall sound quality by increasing bass, widening the sound field and provides a clear, natural dialog.
 Maintains consistent loudness levels from wide dynamic range programs, loud commercials, and channel or input changes.
 Provides surround sound experience by utilizing psychoacoustic processing to place sounds beside, behind and above the viewer. For best results use with Total Sonics.
 button on your remote control and use the arrows on the D-pad to make your selection.
 /
/  will display on the screen. This location makes it very convenient for you to determine if you still have Internet connectivity when you use the TV.
 .
. .
.
 button when viewing pictures.