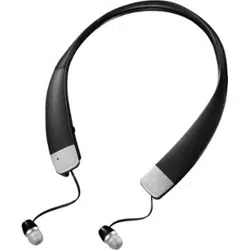
User manual Headphone
Features
- High-Performance digital wireless audio with adjustable volume control.
- Strong Wireless Signal - 33 ft. (10 m) wireless range (maximum, line-of-sight).
- Easy to Use - Easy setup, built-in rechargeable batteries with convenient docking station.
Package contents
Examine the contents of the box for your digital wireless stereo headphones. The box should contain:
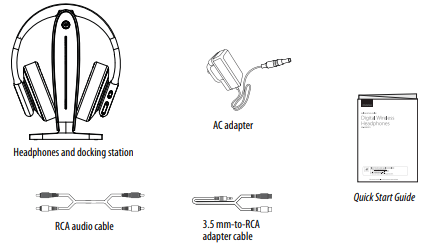
Note: The RCA audio and 3.5 mm-to-RCA adapter cables are connected together in the box.
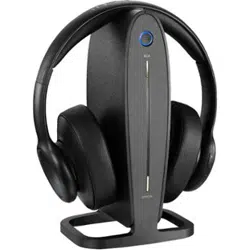
Headphones
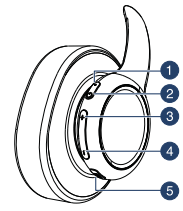
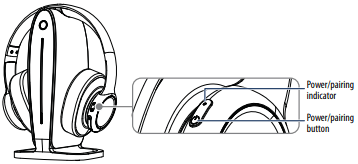
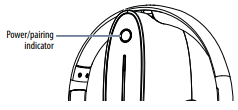
1. Power/Pairing indicator (red/blue):
Blue - blinks every second if the headphone and docking station are paired.
Blue and Red - blinks alternately if the headphone and docking station are pairing.
Red - blinks three times a minute if the headphone batteries are low. Lights when the batteries are charging.
2 Headphone  (power) button (on right earpiece). Press and release to turn the headphones on. Press and hold (for more than two seconds) to turn the headphones off.
3 Volume Up (+) button. Press to increase the volume.
4 Volume Down (–) button. Press to decrease the volume.
5 Input source button. Press to change audio sources.
Docking station
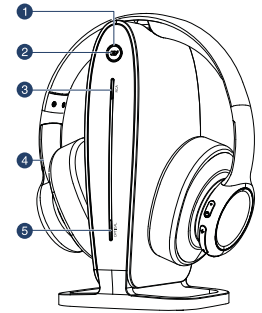
1. Charging indicator:
- Turns red when the headphones are charging.
- Turns green when the headphones are charged.
Pairing indicator (blue):
- Blinks every second if the headphones and docking station are paired.
- Blinks alternately blue and red if the headphones and docking station are pairing.
2 Input source button. Press to switch between audio input sources.
3 RCA source indicator. Lights when the RCA input source is selected.
4 Headphones.
5 OPTICAL source indicator. Lights when the digital optical source is selected.
Docking station back
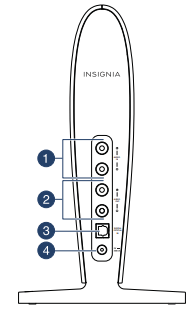
1 AUDIO IN jacks (L and R). Connect a TV or other sound source to these jacks.
2 AUDIO OUT jacks (L and R). Optional. Connect to a stereo system or other audio device.
3 DIGITAL OPTICAL IN. Connect a digital optical cable to this jack.
4 DC 5V jack. Connect the AC adapter to this jack.
Setting up your system
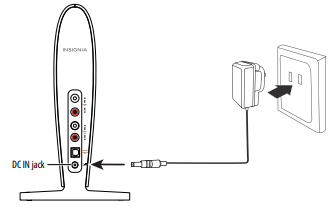
Step 1- Powering the docking station
- Connect one end of the AC adapter to the docking station’s DC IN jack and the other end to a power outlet. The PAIRING indicator blinks blue while it searches for a connection.
NOTES:
- Standby mode: Press and hold Input Source for more than 10 seconds to put the docking station in standby mode.
- Normal mode: Press Input Source to turn on the docking station. The indicators turn solid red while the headphones are charging.
Step 2 - Charging the headphones
IMPORTANT: Before using the wireless headphones for the first time, make sure that the batteries are fully charged, which can take up to four hours. The docking station’s Charging indicator turns solid green when the batteries are fully charged.
1 Make sure that the AC adapter is connected to the docking station and the docking station’s LEDs (red, blue, or green round source button and/or white source indicators) are active.
2 Place the headphones onto the docking station. Make sure that the headphone charging contacts and the docking station charging pins make contact by aligning the arrows (as shown below) when you put the headphones in the charging station.
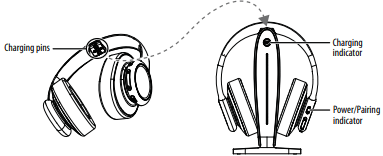
- The docking station’s Charging indicator turns solid red to indicate the headphones are charging. The headphones’ power/pairing indicator also turns red.
- When the headphones are fully charged (up to two hours), the docking station’s Charging indicator turns solid green. The headphone LED turns off.
- When the headphone battery charge is low, the Power/Pairing indicator on the headphones blinks red twice every minute. The Power/Pairing indicator on the headphones turns solid red 30 minutes prior to the batteries being exhausted.
NOTES:
- It can take up to two hours to charge the headphone batteries. When fully charged, the headphone batteries will last up to ten hours with continuous use (depending on the headphone volume level and distance from the docking station.
- The headphones cannot be charged when the docking station is turned off.
- If the charge on the headphone batteries is low, the Power/Pairing indicator on the headphones blinks red. You should charge the headphones.
- The headphones will automatically power off if the battery is not charged after emitting a low-battery warning.
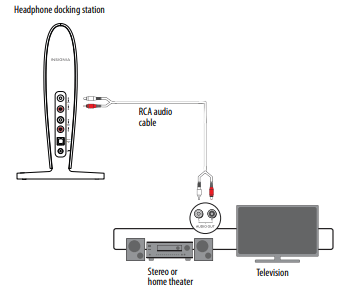
Step 3 - Connecting the headphone docking station
NOTE: Do not connect the RCA cables to the AV jacks on the back of your TV. AV jacks are for video and audio INPUT, not audio OUTPUT.
Look at the ports on your audio source device, such as a TV, stereo system, home theater, smartphone, computer, or tablet to identify your audio OUT ports. Choose the connection option below that fits your audio source device.
Jack type on audio source 
- Cable
 Digital OPTICAL cable (not included)
When to use: If your audio source device has a digital optical OUTPUT port, see “Option A - Digital OPTICAL connection” on page 11 for connection instructions.
Jack type on audio source
- Cable
 RCA cable (included)
When to use: If your audio source device has red and white audio OUTPUT ports (do not connect to audio INPUT ports), see “Option B - RCA connection” on page 12 for connection instructions.
OR
If your audio source device only has one audio output, but you want to connect it to both the docking station and a stereo system, see “Option D - Multiple Connections (Optional)” on page 14 for connection instructions.
Jack type on audio source
- Cable

When to use: If your audio source has a 3.5 mm headphone jack, see “Option C - 3.5 mm connection” on page 13 for connection instructions.
CAUTION: Turn off or unplug all devices while you are making connections.
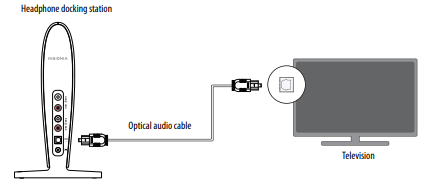
Option A - Digital OPTICAL connection
- Connect one end of a digital optical cable (not included) into the DIGITAL OPTICAL IN port on the docking station.
- Plug the other end of the digital optical cable into the digital optical output port on a TV, stereo system, home theater, or other audio source.
- Press
 (input source) on the headphones or dock to change the input to OPTICAL. The OPTICAL source indicator on the base lights white.
Note: You cannot change the input source while the headphones are on the dock.
TIP: To activate the Optical output on your TV, you may need to change the audio output settings. Refer to your TV’s user guide for more information.
Option B - RCA connection
- Connect one end of the RCA cable to the red and white AUDIO IN ports on the docking station.
- Connect the other end into the red and white AUDIO OUT ports on your audio source device.
- Press (input source) on the headphones or dock to change the input to RCA. The RCA source indicator on the base lights white.
Note: You cannot change the input source while the headphones are on the dock.
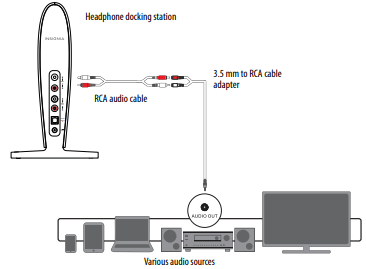
Option C - 3.5 mm connection
- Plug one end of the RCA cable (included) into the AUDIO IN ports on the docking station, red to red and white to white.
- Connect the other end of the RCA cable into the red and white connectors on the 3.5 mm-to-RCA adapter cable (included).
- Connect the 3.5 mm end of the 3.5 mm-to-RCA adapter cable into the 3.5mm headphone jack on your audio source.
- Press (input source) on the headphones or dock to change the input to RCA. The RCA source indicator on the base lights white.
Note: You cannot change the input source while the headphones are on the dock.
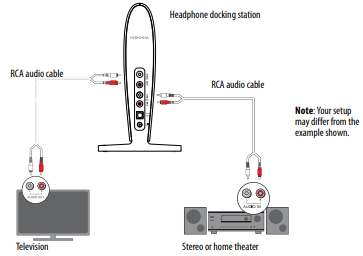
Option D - Multiple Connections (Optional)
If your audio source device (a TV in the example shown) only has one audio output, but you want to connect it to both the docking station and a stereo system or home theater, do this.
- Connect one end of the RCA cable (included) to the red and white AUDIO IN ports on the docking station.
- Connect the other end into the red and white audio out ports on your audio source device. NOTE: Use the 3.5mm-to-RCA cable adapter to connect to a headphone jack, if necessary.
- Connect one end of another RCA cable (not included) to the red and white AUDIO OUT ports on the docking station.
- Connect the other end into the red and white audio in ports on your stereo system or home theater. The audio should now play through your home theater speakers (check the manual for your home theater system to activate its RCA inputs).
- Press (input source) on the headphones or dock to change the input to RCA. The source indicator on the base lights white to show which source is selected.
Note: You cannot change the input source while the headphones are on the dock.
Using your system
Turning on and pairing the system
- The docking station is turned on by plugging in the AC adapter. The Power/Pairing indicator on the docking station blinks (blue).
- To turn on your headphones:
Press and hold (power) on the right earpiece for two seconds.
OR
If the headphones are on the base, lift them off.
The Power/Pairing indicator on headphone lights solid blue.
3 When the Power/Pairing indicator on the headphones and the Pairing indicator on the docking station both light solid blue, an active link is established between the headphones and the docking station. The system is now on and ready to use.
NOTE: Autopairing takes 5-20 seconds.
NOTE: If the charge on the headphone batteries is low, the Power/Pairing indicator on the headphones blinks red (three times a minute) and beeps (twice a minute). When this happens, you should charge the headphones. For instructions, see “Using your system“ on page 15.
If the power indicators on the headphones and docking station continue to blink once a second, they are no longer paired to each other. If this happens, follow these steps:
- Make sure that the headphones and docking station are within range of each other (ideally in the same room).
- Turn off the headphones and unplug the docking station.
- Turn on the headphones and plug in the docking station. The blue LED on the headphones and docking station will blink every five seconds when paired.
Listening to your headphones
- Turn on the headphones and docking station. Make sure that your docking station and headphones are paired. See “Turning on and pairing the system” on page 15.
- Set the headphone volume level to the minimum.
- Put your headphones on your head. Adjust the fit until you feel comfortable.
- Turn on your audio source (such as a TV or stereo system) and begin playback. You may need to turn up the volume on your audio source to hear playback.
- Adjust the headphone volume to your normal listening level.
CAUTION: Continuous use at high volume may permanently damage your hearing.
NOTES:
- If the system is connected to a TV, you may want to turn off the TV sound to prevent hearing sound from the TV speakers. Refer to your TV manual.
- If the docking station does not have audio input for more than 15 minutes, the headphones will power off automatically.
- If the headphones are unpaired from the docking station for more than 15 minutes, the headphones will power off automatically.
Turning off the system
NOTE: It’s important to turn the headphones off when not in use to conserve the battery. OR, if you prefer, you can leave them on as long as they are placed in the docking station.
1 Press and hold (more than two seconds) the (power) button on the headphones.
2 Disconnect the AC power adapter to turn off the docking station.
Understanding indicator lights
Solid blue
- The headphones are paired to the dock.
Blinks blue
- Searching for a connection.
Solid red
- The headphones are charging.
Solid green
- The headphones are fully charged.
LED off
Headphones’ power/pairing LED:
- If not on the dock, the headphones are turned off, or
- If on the dock, the headphones are fully charged.
Dock charging LED:
- The headphones are turned off and not on the dock, or
- The dock is not connected to power.
Solid white
- An input source is selected (RCA or OPTICAL). Note: You must remove the headphones from the dock to select a source.
Headphones’ LED blinks red 3 times every minute
- The headphones’ battery is low. Place your headphones on the dock to charge.
Maintaining your system
With the docking station unplugged and the headphones turned off, use a soft cloth dampened with a weak solution of mild detergent and water. Dry the device immediately afterwards with a clean cloth. Do not use abrasive cloth, thinners, alcohol, or other chemical solvents, because they may damage the finish or remove the panel lettering.
Troubleshooting
No power
- Make sure that the batteries have been charged.
- Try power cycling the docking station by unplugging it and plugging it back in.
- Try another power outlet.
My headphones are not charging
- Make sure that the headphone’s charging contacts and the docking station’s charging pins make contact. You might have to rock them back and forth to make a good connection. The docking station Charging indicator turns red to indicate the headphones are charging.
There is no sound
- Check the volume level of the headphones or audio sources connected to the docking station.
- Make sure that all of the cables are connected correctly and that the cables are not connected to the AV input jacks on your TV, or the AV Output jacks of the docking station.
- Make sure that your source device is turned on.
- Make sure that the Power/Pairing indicators of the headphones and Pairing indicator on the docking station are blinking blue (every five seconds), see “Turning on and pairing the system” on page 15.
- Make sure that the audio source has internal/ external speaker settings that allow the internal speakers to be turned off and for the sound to be heard from the external source (your headphones).
- Make sure that your audio source is not set to Mute.
- To maximize your volume level through the system, make sure that your audio source (for example, a TV or MP3 player) has its volume turned up to at least 50% of its volume level.
There is sound interference
- Move the docking station slowly to find the best reception position for your headphones.
- Shorten the distance between your headphones and the docking station. The maximum distance is 33 feet (10 m), but walls and other obstructions will limit this distance.
- Make sure that all of the cables are connected correctly.
- It is possible that other devices like cordless phones, microwaves, or wireless routers may be causing interference. Try turning one device off at a time to determine which device is causing interference.
- If your cordless phone or wireless router is causing interference, try changing the channel it is using. Also, try moving the docking station away from all WiFi routers, cordless phones, cell phones, Smart TVs, and microwave ovens. Refer to your device’s owner manual.
There is sound coming from the audio source
- Turn off the internal speakers of your audio sound source. Contact the manufacturer of the audio sound source, such as your TV, for support.
No communication between the headphones and docking station
- Make sure that the AC adapter is connected to the docking station.
- Make sure the headphone batteries are charged.
- Make sure that the Power/Pairing indicator on the headphones and Pairing indicator on the docking station are on. If they are lit solidly blue, a communication link has been successfully established between the system. If they are blinking on one or both devices, see “Turning on and pairing the system” on page 15.
Cannot pair the headphones
- Shorten the distance between the docking station and your headphones.
- Make sure that the docking station is in pairing mode. Press and hold the pairing button for five seconds to re-enter pairing mode.
- Turn on the docking station, then place the headphones onto the station. They will enter autopairing mode (this may take 2-20 seconds).
Tip: If the power indicators on the headphones and docking station continue to blink after 20 seconds, they are no longer paired to each other. If this happens, follow these steps:
- Make sure that the headphones and docking station are within range of each other (ideally in the same room).
- Turn off the headphones and the docking station.
- Turn on both the headphones and the docking station. The lights will initially blink, then they light solid blue when connected.