Listens to music from your portable device. (MP3, Notebook, etc.)
Playback effects
Listens to music with various sound and playback effects.
USB Direct Recording
Records music to your USB device.
Music Flow Bluetooth
Music Flow Bluetooth is an App designed to let you take control of some of LG’s latest Audio devices.
LG Sound Sync
Controls volume level of this unit by the remote control of your LG TV that is compatible with LG Sound Sync.
Remote control
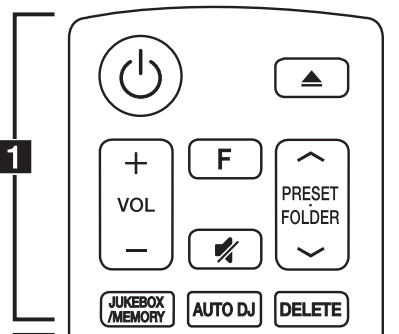
(Standby/On) : Switches the unit ON or OFF.
(Open/Close) : Opens and closes the disc tray.
VOL (Volume) +/- : Adjusts speaker volume.
F (Function) : Selects the function and input source.
(Mute): Mutes the sound.
PRESET·FOLDER ∧/∨ :
Searches for a folder of MP3/WMA files. When a CD/USB containing MP3/WMA files in several folders is being played, press PRESET·FOLDER ∧/∨ to select the folder you want to play.
Chooses a preset number for a radio station
JUKEBOX/MEMORY :
Stores radio stations.
Deletes all the saved stations.
Selects JUKE BOX mode.
Makes your favorites list.
AUTO DJ : Selects the AUTO DJ mode. (For more information refer to page 21)
DELETE :
Deletes MP3/WMA files. (USB only)
Deletes a song on the programmed list.
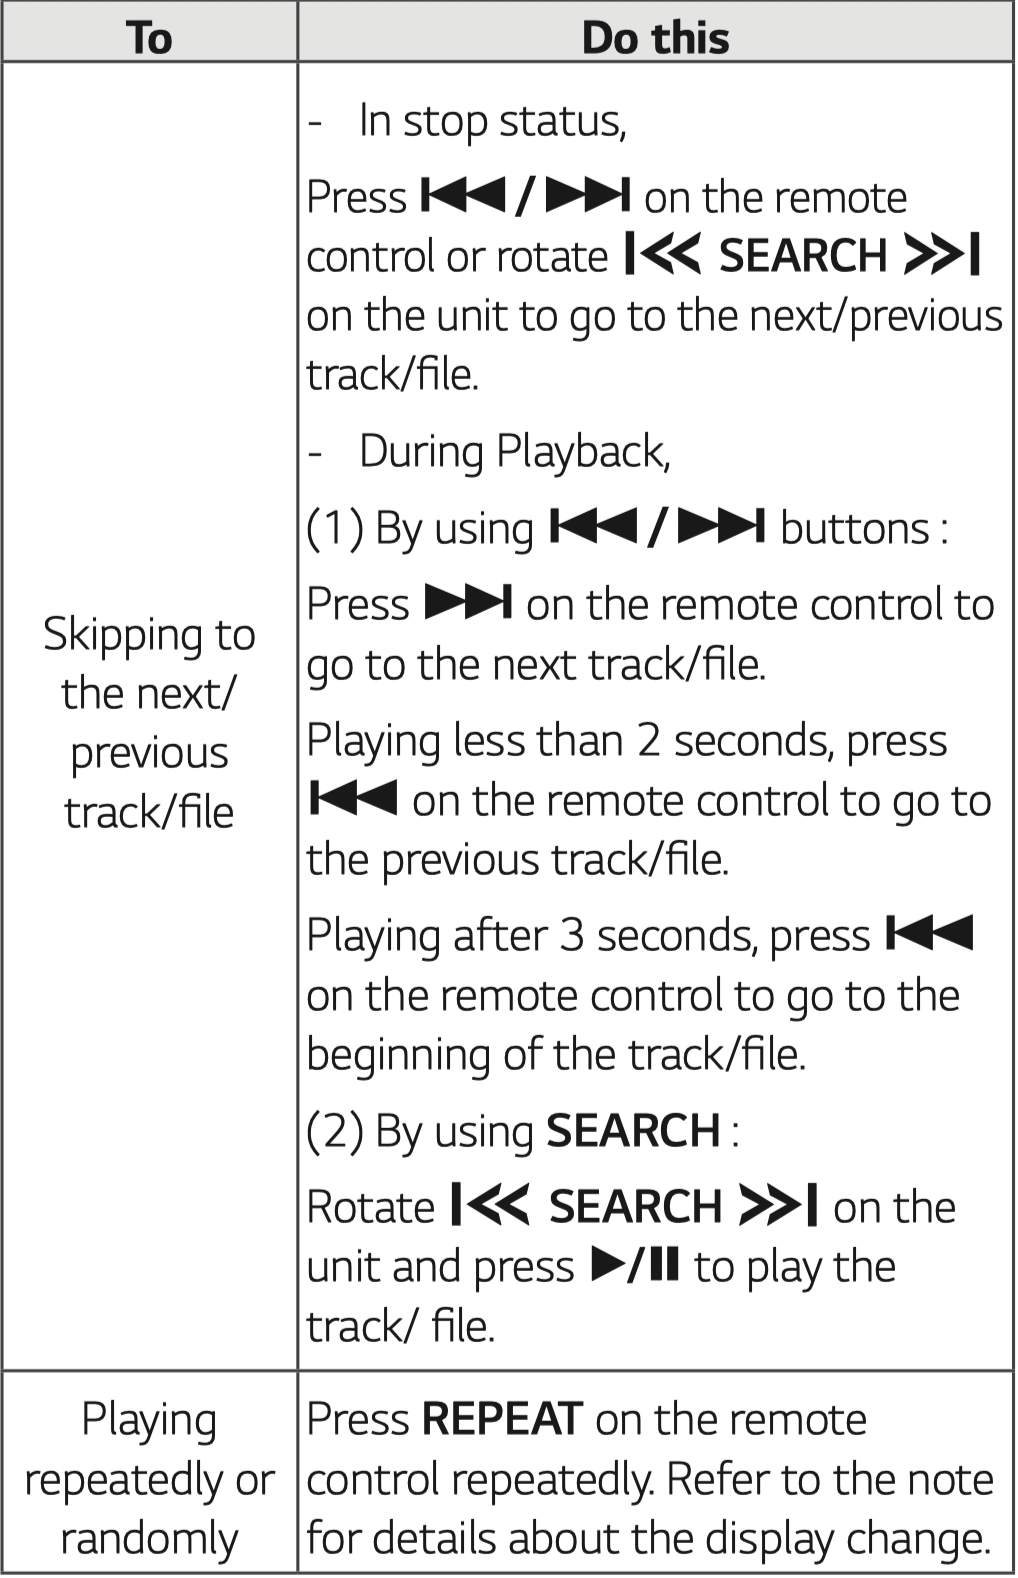
REPEAT : Listens to your tracks/files repeatedly or randomly.
TUNING-/+ : Selects the radio stations.
C/V (Skip/Search) :
Skips Fast backward or Forward.
Searches for a section within a track/file.
(Play/Pause) :
Starts or pauses playback.
Selects STEREO/MONO.
(Stop):
Stops playback or recording.
Cancels DELETE function.
SOUND EFFECT : Chooses sound impressions.
REGION EQ : Chooses region equalizer.
INFO / SLEEP
Sees informations about your music. An MP3 file often come with ID3 tag. The tag gives the Title, Artist, Album or Time information.
Sees the name of connected all Bluetooth device in Bluetooth mode.
In status of WIRELESS PARTY LINK Connection, device name of SLAVE unit appears in the MASTER unit and Device name of MASTER unit appears in the SLAVE unit.
Press and hold to set the system to turn off automatically at a specified time. (Dimmer : The display window will be darkened by half.)
0 to 9 numerical buttons : Selects numbered tracks, files, or preset number.
CLOCK : Sets a clock and checks a time.
ALARM : With the ALARM function you can turn CD, USB play and Tuner reception on at a desired time.
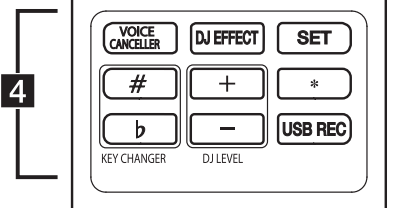
VOICE CANCELLER : You can enjoy the function while playing the music, by reducing singer vocal of music in the various source.
DJ EFFECT : Selects DJ EFFECT mode
SET : Confirms the setting.
KEY CHANGER (# / ) : Changes the key to suit your vocal range.
DJ LEVEL +/- : Adjusts the level of DJ EFFECT sound.
: This button is not available.
USB REC : USB direct recording
Replacement of battery
Remove the battery cover on the rear of the remote control, and insert the battery with + and - matched correctly
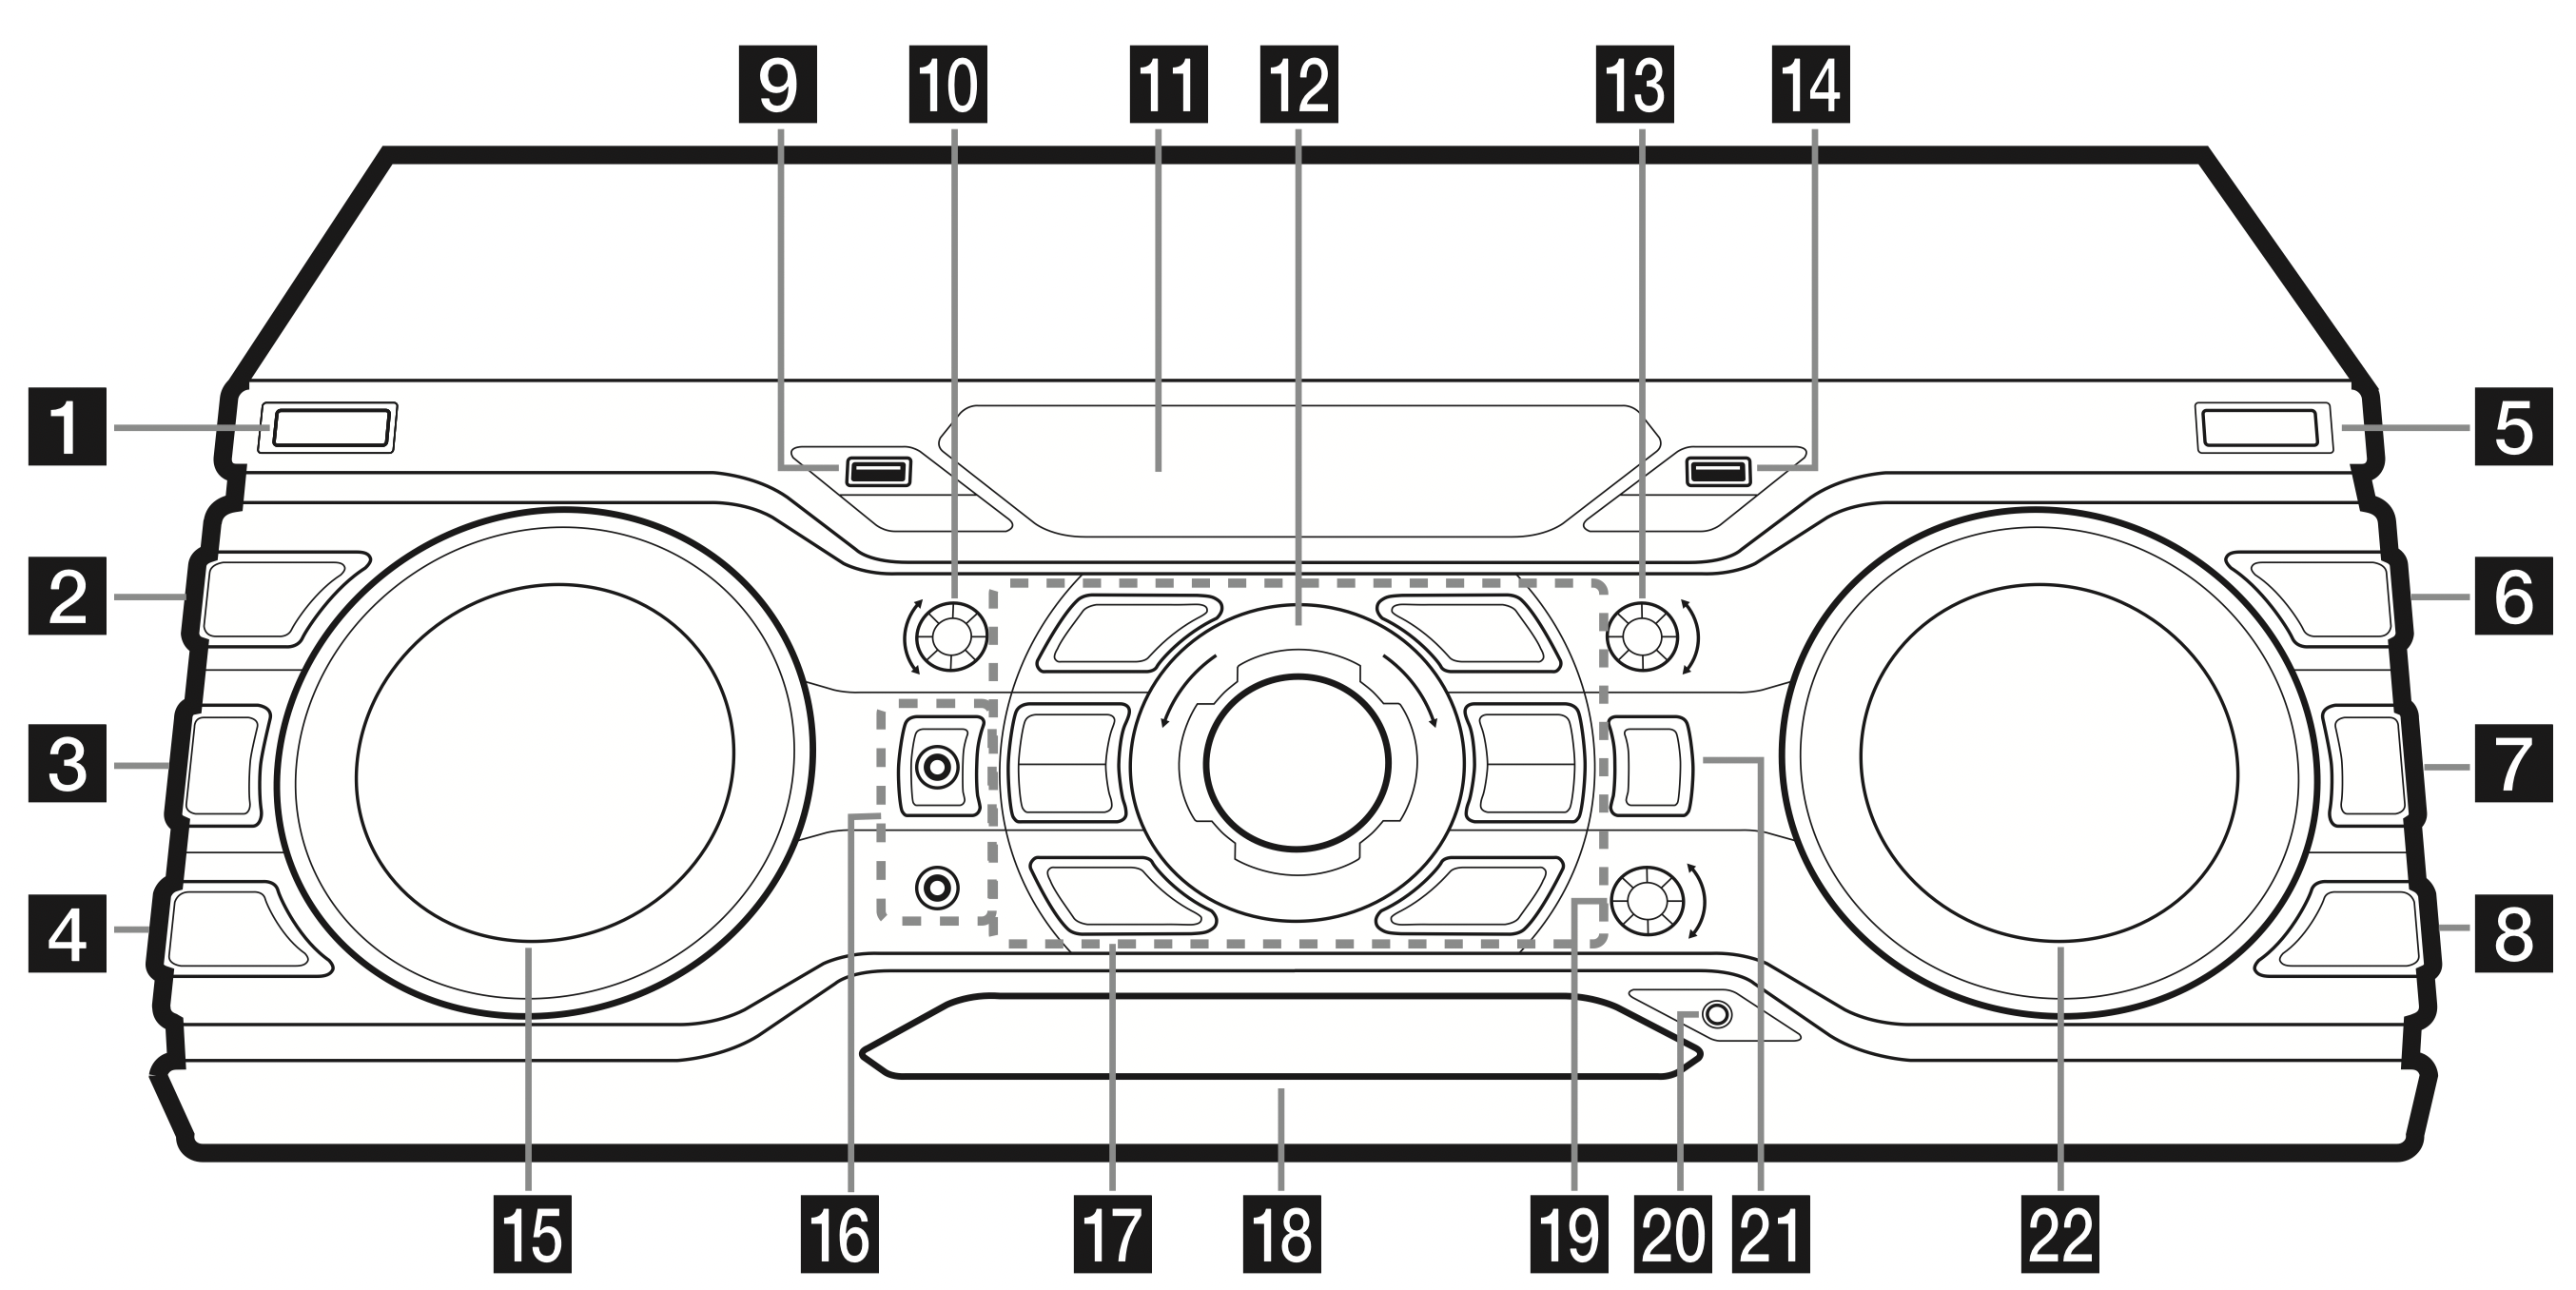
Front panel
1. (Standby/On)
2. DJ EFFECT Selects DJ EFFECT mode.
3. USER EQ Selects the sound effect created by your own.
4. REGION EQ / BASS BLAST
Chooses region equalizer.
Press and hold to select BASS effect directly.
5.USB REC / DEMO - Records to USB. / Shows Demo mode.
6.SEARCH - Moves to folder or file in selection mode.
7. OK - Selects a folder when searching a file.
8.LIGHTING / VOICE CANCELLER
Turns on/off the lighting effects.
You can enjoy the function while playing the music, by reducing singer vocal of music in the various source. Press and hold to switch this mode on or off.
9. USB 1 Port You can play or record sound files by connecting the USB device.
10.BASS - Adjusts BASS sound level when setting USER EQ.
11. Display window
12.MASTER VOLUME - Adjusts speaker volume.
13.TREBLE - Adjusts TREBLE sound level when setting USER EQ.
14. USB 2 Port - You can play or record sound files by connecting the USB device.
15. SCRATCH / DJ EFFECT CONTROL - Turn clockwise or counterclockwise to make Scratch sound. / Adjust DJ EFFECT level.
16.MIC (Microphone) 1 / 2 jack
17. (Stop) Stops playback or cancels DELETE function.
(Play/Pause): Starts or pauses playback. Selects Stereo/Mono.
(Open/Close): Opens and closes the disc tray.
KEY CHANGER - Enters vocal range adjustment mode
CLUB, DRUM, USER (DJ PRO) - Selects CLUB, DRUM or USER sound effect to mix
1, 2, 3, 4 (DJ PRO PAD) - Press a desired sound pad
18. Disc tray
19. MIC VOL (Microphone volume) / KEY CONTROL
Controls microphone’s volume.
Changes the key to suit your vocal range.
20. PORT. (Portable) IN jack
21. F (Function) / WIRELESS LINK
Selects the function and input source.
Press and hold for 3 seconds to select WIRELESS PARTY LINK mode.
22. (Skip/Search)
Searches a folder or a file.
Searches for a section within a track/file.
Selects the radio stations.
Rear panel
Caution
Connect the power cord to wall outlet directly if possible. Or when you use an extension cable, it is highly recommended to use an extension cable of 110 V / 15 A or 230 V / 15 A, otherwise the unit may not operate properly because of the lack of power supply.
Do not overload the extension cord with excessive electrical load.
Connecting
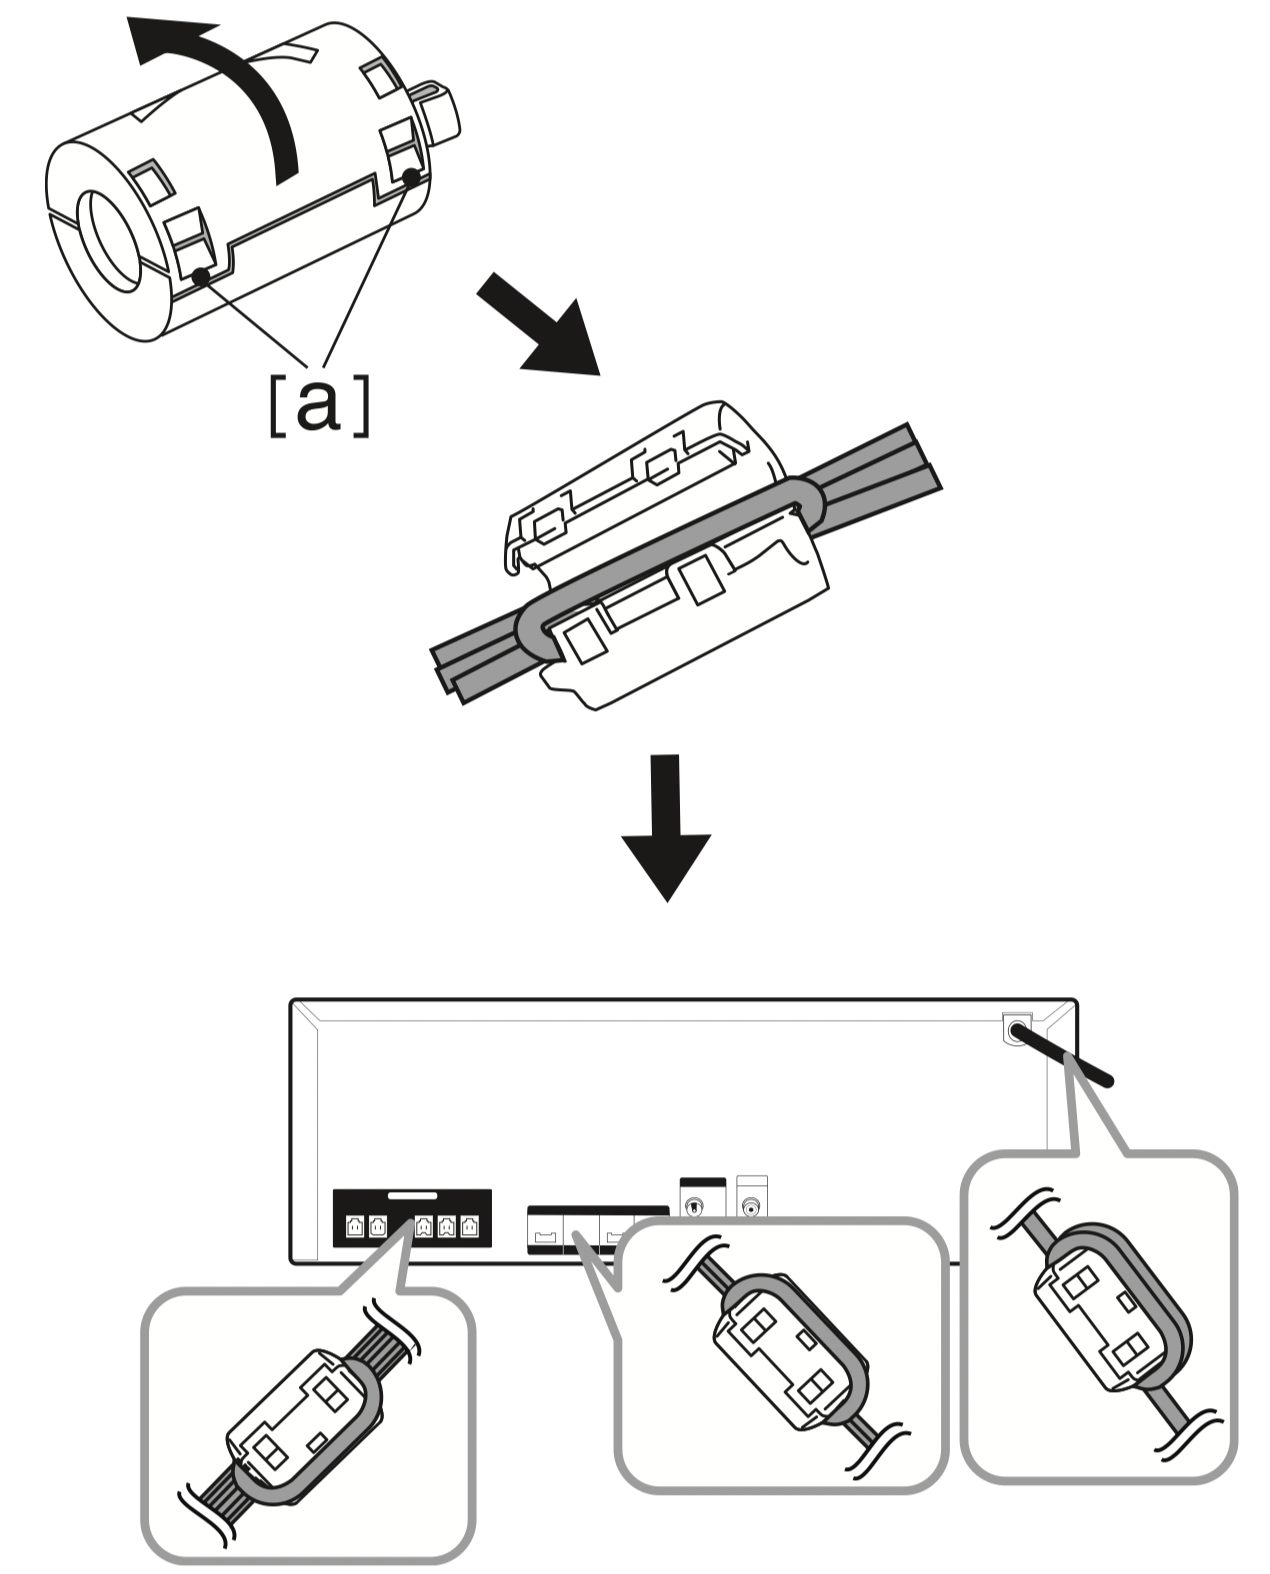
How to Affix the Ferrite Core
Ferrite core may not be provided depending on each nation’s regulations.
Affix the Ferrite Core for power cord and speaker cables
You must affix a ferrite core in order to reduce or eliminate electrical interference.
Pull the stopper [a] of the ferrite core to open.
Wind the power cord around the ferrite core once. Wind the SPEAKERS cables around the ferrite core once. Wind the SPEAKER LIGHTING SYSTEM cables around the ferrite core once.
Close the ferrite core until it clicks.
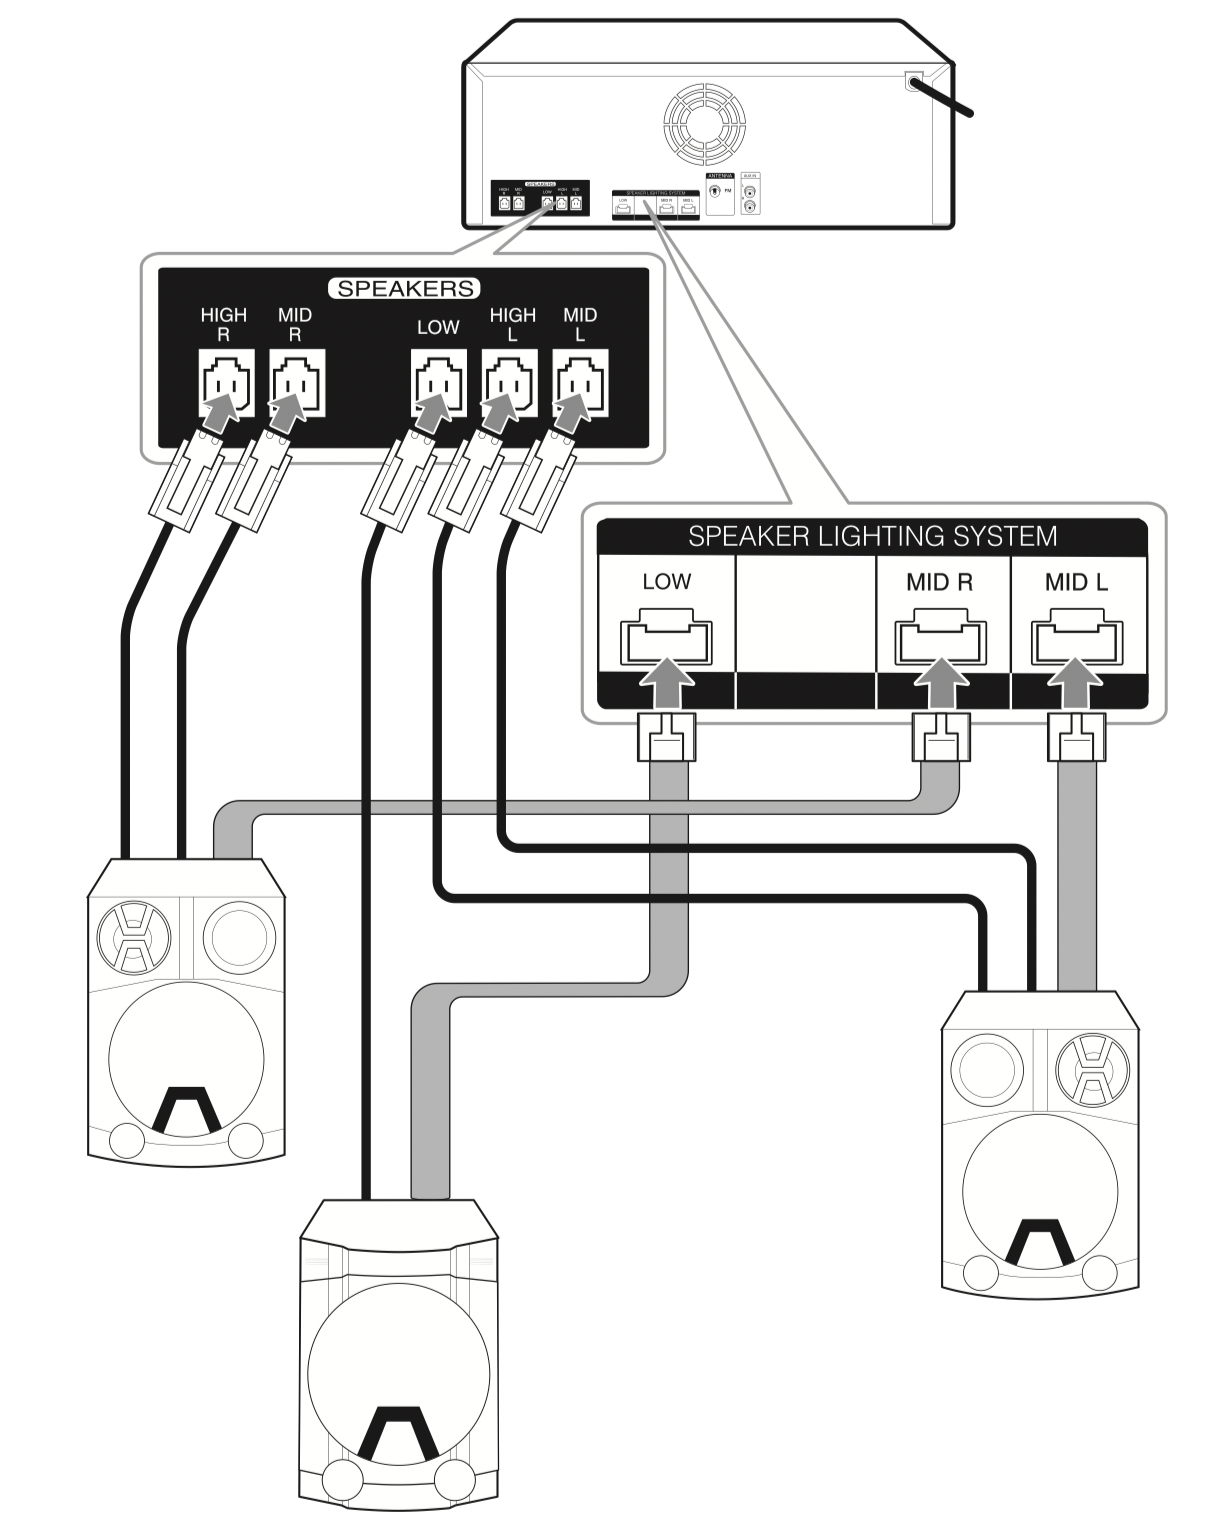
Connecting to speakers
Connect the speaker cable plugs to the SPEAKERS connector. Make sure to connect the speaker’s plug to the corresponding colored speaker connector when connecting the plug.
Attaching the speaker light cables to the unit
To connect the speaker light cable to the unit, insert the cable to SPEAKER LIGHTING SYSTEM connectors on the unit.
Caution
Make sure that the jacks and the speakers are matched correctly.
Make sure to connect the cables to connectors tightly on the unit.
Caution
Do not try to lift the speaker alone. It needs two persons to lift the speaker. Otherwise it may result in the speaker malfunction and cause personal injury and/or property damage.
When you connect the speakers to the unit, make sure to connect the speaker’s cable and plug to the corresponding speaker connector.
Check the volume level before playing music to prevent infirm, child, and pregnant women from being shocked by the sudden and loud sound from the unit.
Do not use the unit in a limited space. It may damage a person’s hearing. It is recommended to use it in a wide space.
Be careful to make sure children not to put their hands or any objects into the opening speaker duct hole.
Use the speaker supplied with this unit only. Using any other speaker may cause malfunction.
The speakers contain magnet parts, so color irregularity may occur on the TV screen or PC monitor screen. Please use the speakers far away from either TV screen or PC monitor.
Avoid looking at the speaker lights for a long time. It may cause damage to eyesight.
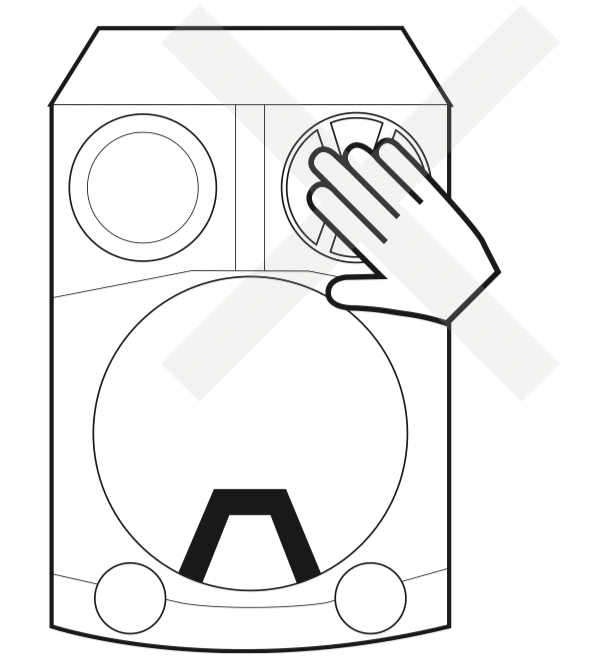
Do not press the diaphragm or the dust cap of the speaker.
Optional Equipment Connection
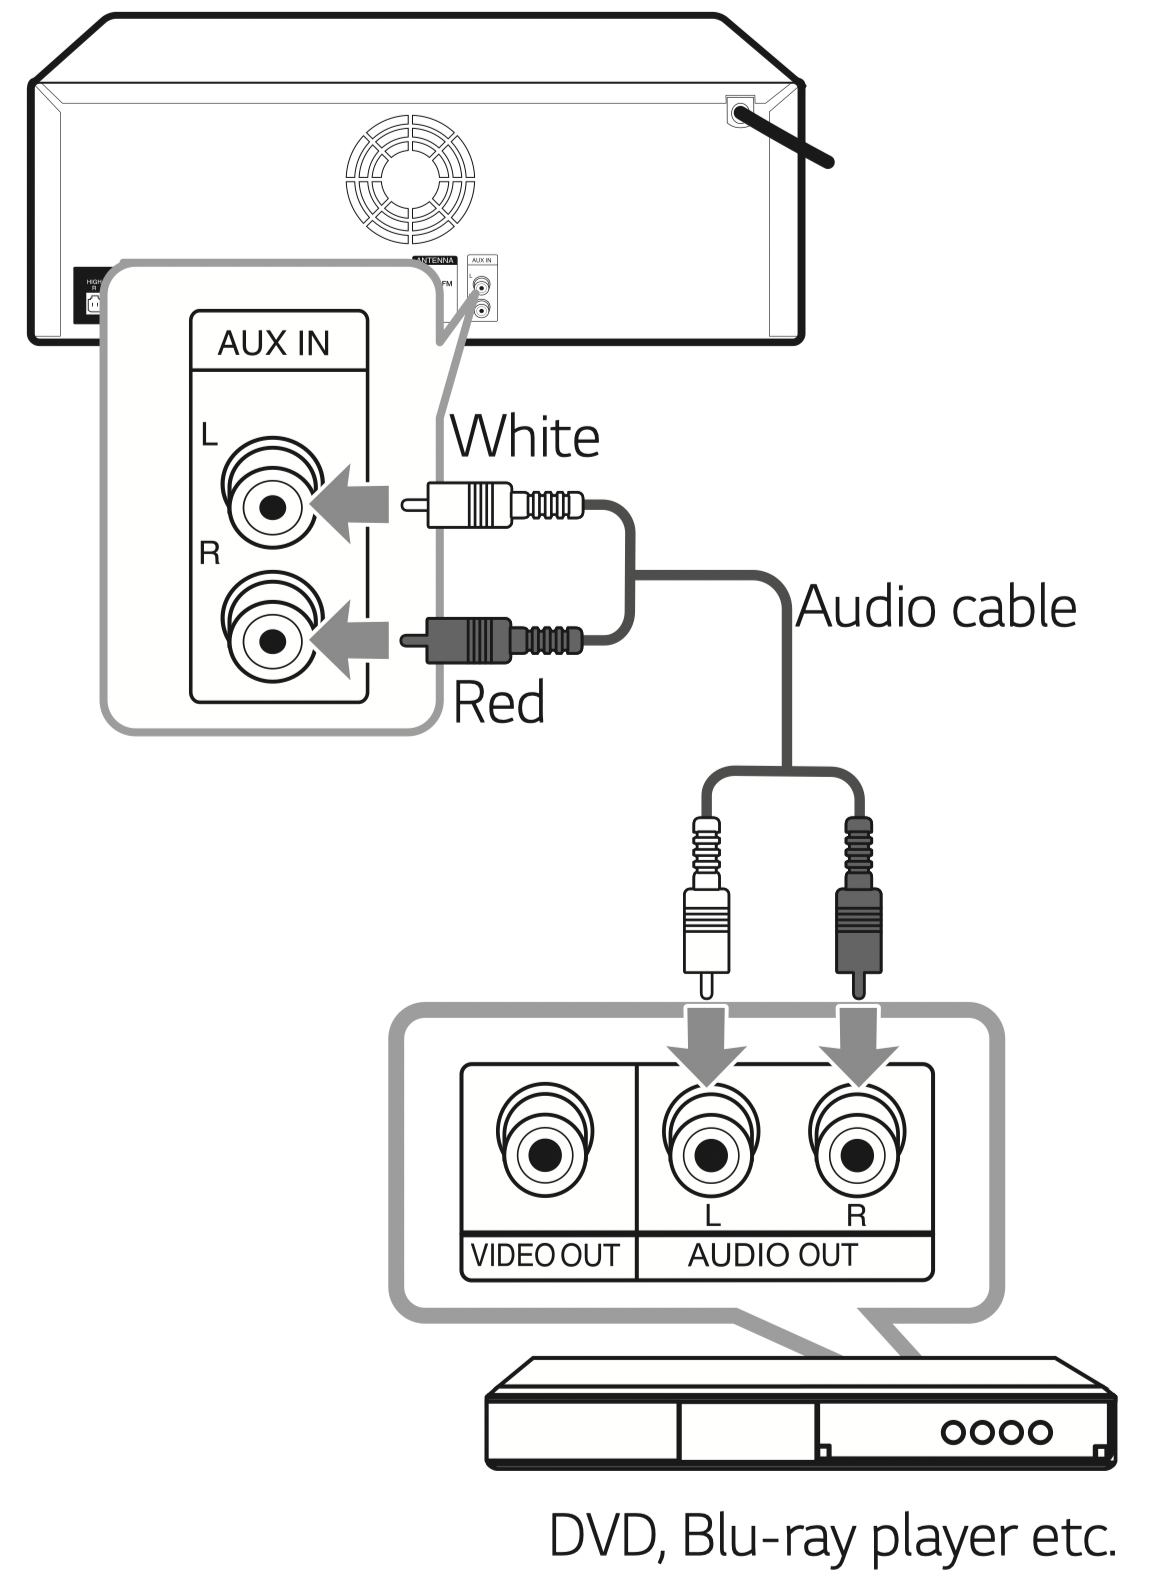
AUX IN Connection
Connect an output of auxiliary device (Camcorder, TV, Player, etc) to the AUX IN (L/R) connector.
If your device has only one output for audio (mono), connect it to the left audio jack on the unit.
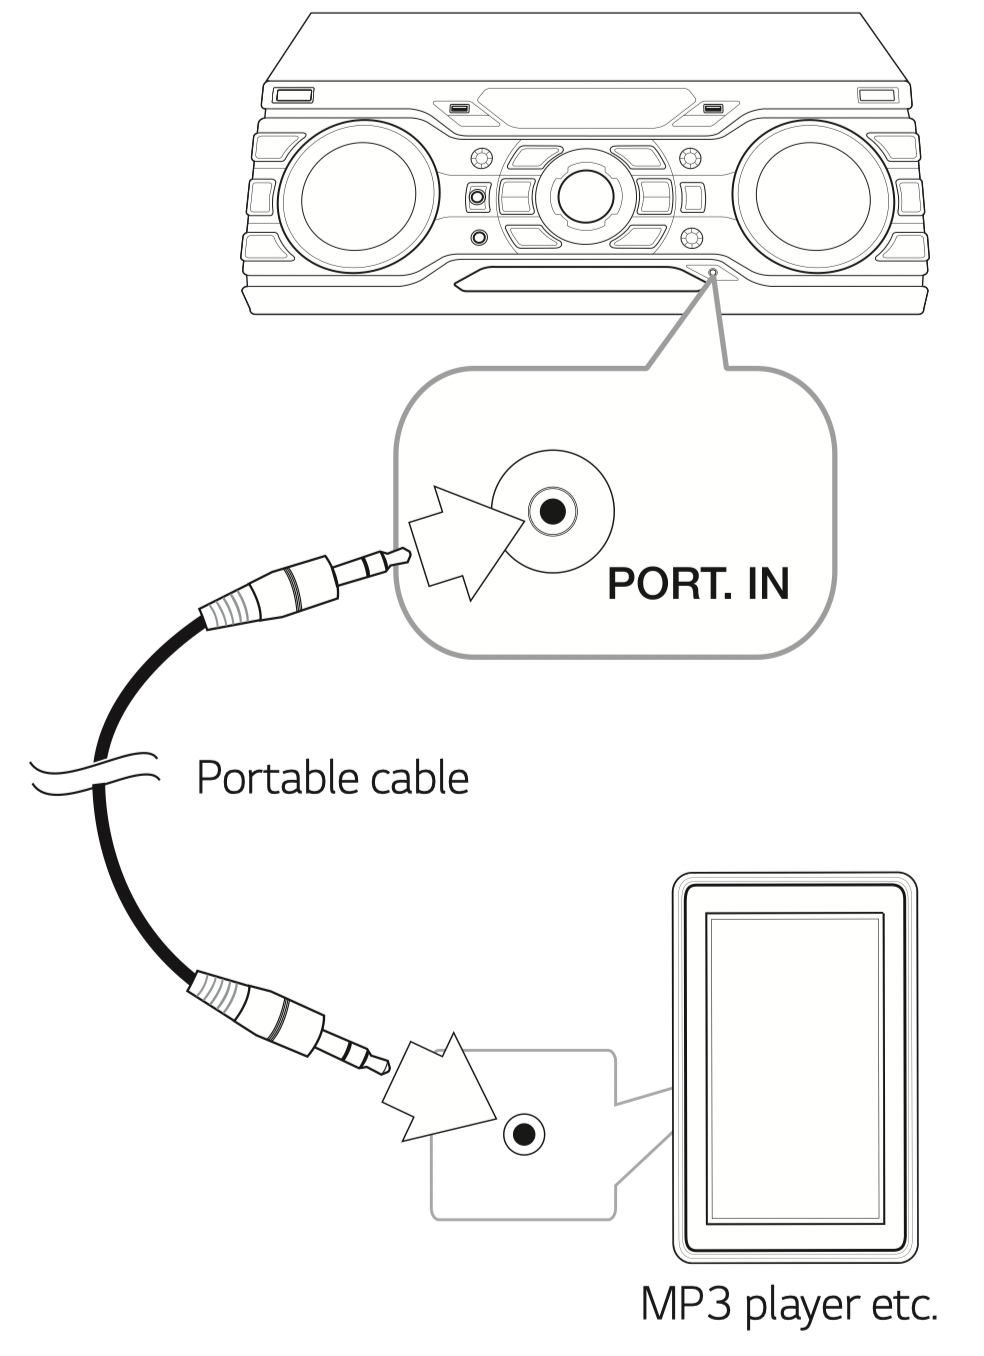
PORT. IN Connection
Connect an output (earphone or line out) of portable device (MP3 or PMP etc) to the PORT. IN connector.
Listening to music from your portable player or external device
The unit can be used to play the music from many types of portable player or external device.
1. Connect the portable player to the PORT. IN connector of the unit.
Or
Connect the external device to the AUX IN connector of the unit.
2. Turn the power on by pressing on the remote control or / on the unit
3. Press F on the remote control or F / WIRELESS LINK on the unit to select AUX or PORTABLE Function.
4. Turn on the portable player or external device and start it playing.
Note: Automatically switches to the PORTABEL function when you connect the portable device to the PORT. IN connector.
USB Connection
Connect a USB device (or MP3 player, etc.) to the USB ports on the unit.
Note
Removing the USB device from the unit :
Choose a different function/mode or press on the remote control or on the unit twice in a row.
Remove the USB device from the unit.
Antenna Connection
Connect the supplied FM antenna for listening to the radio.
Connect the FM wire antenna to the FM antenna connector.
Note: Be sure to fully extend the FM wire antenna.
Operating
Basic Operations
CD/USB Operations
Insert the disc by pressing on the remote control or on the unit. Or connect the USB device to the USB port.
Select CD or USB function by pressing F on the remote control or F / WIRELESS LINK on the unit.
Note
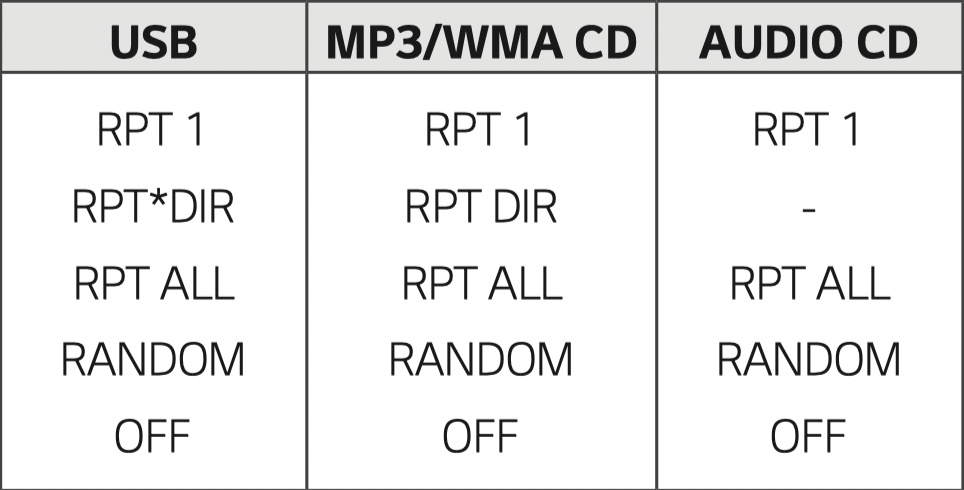
The display changes in the following order.
*DIR : Directory
When you play JUKE BOX list, only RPT 1 and RPT ALL are available.
Even after restarting the unit or switching one function to another, you can listen to music from the point where it’s last been played.
If you leave the disc tray open for 5 minutes, it will close automatically.
Auto Play
AUDIO/MP3/WMA CD is played automatically after Disc tray is open and then closed.
Automatically switches to the CD function if Disc tray is open and then closed when there is no disc in Disc tray.
Selecting a folder and an MP3/WMA file
On the unit
Press SEARCH and rotate until a desired file appears in stop status. You can also search a folder if you press SEARCH again.
Press OK or to play the selected file. When you search a folder, press OK to select a file in the folder, then press OK or again. The selected file is played.
On the remote control
Press PRESET·FOLDER / on the remote control repeatedly until a desired folder appears.
Press / to play it. The first file of folder will play
Note
CD / USB Folders/Files are recognized as below.
If there is no file in a folder, the folder will not appear.
Folders will be presented as the following order; ROOT --> FOLDER 1 --> FOLDER 3 --> FOLDER 7 --> FOLDER 8 --> FOLDER 5 --> FOLDER 6
File will be played from file No.1 to file No.14 one by one.
Files and folders will be presented in order recorded and may be presented differently according to the record circumstances.
*ROOT : The first screen you can see when a computer recognize the USB is “ROOT”.
Deleting an MP3/WMA file
You can delete file, folder or format by pressing DELETE. This function is supported only in stop status. (USB only)
1. Select the file you want to delete and press DELETE.
Select the folder you want to delete by pressing PRESET·FOLDER / on the remote control and press DELETE.
Press and hold DELETE to format the USB device.
Or
Press DELETE repeatedly during selecting the MP3/WMA file.
The display changes in the following order.
DEL FILE : Deletes file
DEL DIR : Deletes folder
FORMAT : Formats USB
2. To delete file/folder or format, press / on the remote control or press on the unit.
If you want to exit the current mode, press on the remote control or press on the unit.
Caution
Do not extract the USB device during operation. (play, delete, etc.)
Regular back up is recommended to prevent data loss.
The delete function may not be supported according to the USB status. (lock, etc.)
Using BLUETOOTH® wireless technology
About Bluetooth
Bluetooth is wireless communication technology for short range connection.
The sound may be interrupted when the connection interfered by the other electronic wave or you connect the Bluetooth in the other rooms.
Connecting individual devices under Bluetooth wireless technology does not incur any charges. A mobile phone with Bluetooth wireless technology can be operated via the Cascade if the connection was made via Bluetooth wireless technology. Available Devices : Mobile phone, MP3, Laptop, PDA.
Bluetooth Profiles
In order to use Bluetooth wireless technology, devices must be able to interpret certain profiles. This unit is compatible with following profile.
A2DP (Advanced Audio Distribution Profile)
Codec : SBC
Listening to music stored on the Bluetooth devices
Pairing your unit and Bluetooth device
Before you start the pairing procedure, make sure the Bluetooth feature is activated on your Bluetooth device. Refer to your Bluetooth device’s user guide. Once a pairing operation is performed, it does not need to be performed again.
1. Turn on the unit.
2. Operate the Bluetooth device and perform the pairing operation. When searching for this unit with the Bluetooth device, a list of the devices found may appear in the Bluetooth device display depending on the type of Bluetooth device. Your unit appears as “LG CM8460(XX)”.
Note
XX means the last two digits of Bluetooth address. For example, if your unit has a Bluetooth address such as 9C:02:98:4A:F7:08, you will see “LG CM8460(08)” on your Bluetooth device.
Depending on the Bluetooth device type, some devices may have a different pairing process. Enter the PIN code (0000) as needed.
You can connect this unit with up to 3 Bluetooth devices simultaneously using the same method as described above, only in the Bluetooth function.
The multi pairing connection is only supported on Android or iOS devices. (Multi pairing connection may not be supported depending on the connected device specifications.)
Removable/detachable Bluetooth devices (Ex: Dongle etc.) will not support multi pairing.
3. When this unit is successfully connected with your Bluetooth device, “PAIRED” appears on the display window and change to Bluetooth device name soon. Then “BT” will be appeared on the display window.
Note
"PAIRED" will momentarily appear on the display when you connect other devices for multi pairing.
If the device name is unavailable, “_” will be displayed.
4. Listen to music.
To play a music stored on your Bluetooth device, refer to your Bluetooth device’s user guide.
Note
When using Bluetooth® technology, you have to make a connection between the unit and the Bluetooth device as close as possible and keep the distance. However, it may not work well in certain situations as described below :
There is a obstacle between the unit and the Bluetooth device.
There is a device using same frequency with Bluetooth® technology such as a medical equipment, a microwave or a wireless LAN device.
You should connect your Bluetooth device to this unit again when you restart it.
Even if this unit connected up to 3 Bluetooth devices in the Bluetooth mode, you can play and control music by using only one of the connected devices.
Controls connected Bluetooth device
You can control connected Bluetooth device by the unit; play, pause, stop, skip.
Note
Only Android OS and iOS is available to use this function.
This function may not be supported depending on the Bluetooth device, or operated differently.
When this unit connected with multiple Bluetooth devices, only one device which you are playing keeps Bluetooth connection when you change the function to the others.
The sound may be interrupted when the connection has interference from other electronic devices.
You may not control the Bluetooth device with this unit.
Depending on the type of the device, you may not be able to use the Bluetooth function.
You can enjoy wireless system using phone, MP3, Notebook, etc.
The more distance between the unit and the Bluetooth device, the lower the sound quality becomes.
Bluetooth connection will be disconnected when the unit is turned off or the Bluetooth device gets far from the unit.
When Bluetooth connection is disconnected, connect the Bluetooth device to the unit again.
When a Bluetooth device is not connected, “BT READY” appears on the display window.
When you use the BT function, adjust the volume to a proper level on the Bluetooth device.
If it is not in the BT function, only one device can be connected.
If a Bluetooth device is connected when using LG TV, LG TV is disconnected and the Bluetooth device is connected.
When you connect Bluetooth device (iOS device etc.) to this unit or operate the device, the volume level can be synchronized with each other.
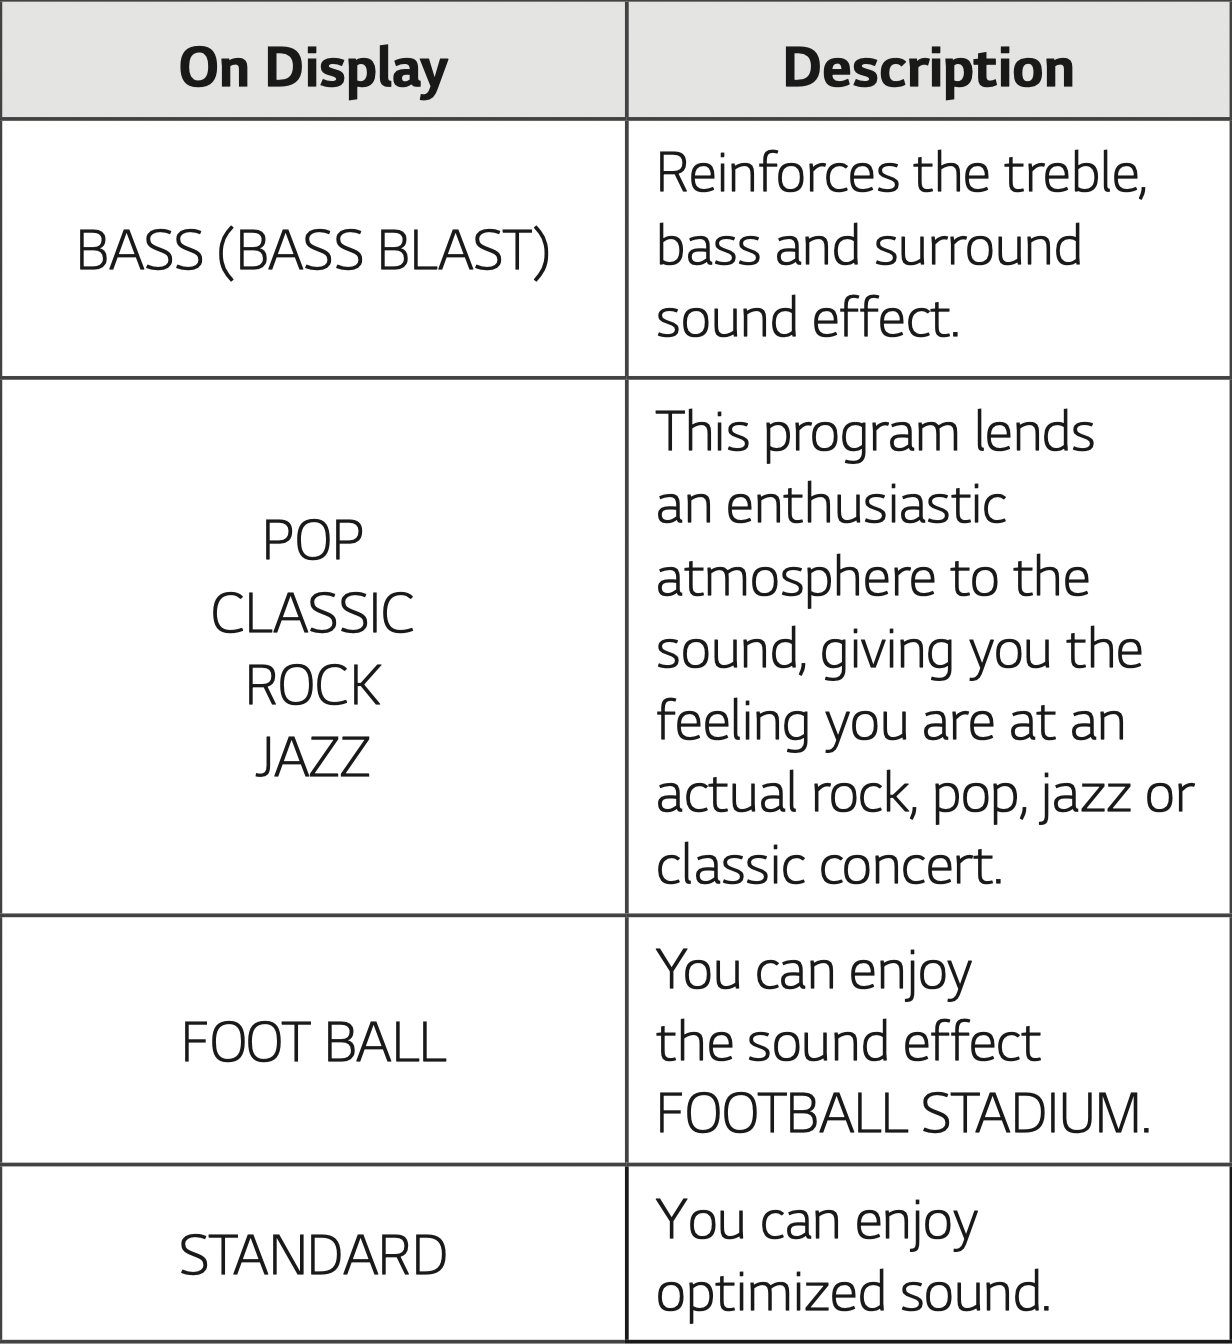
Sound adjustment
Setting the sound mode
This system has a number of pre-set surround sound fields. The displayed items for the Equalizer may be different depending on sound sources and effects.
You can select a desired sound mode by using SOUND EFFECT on the remote control.
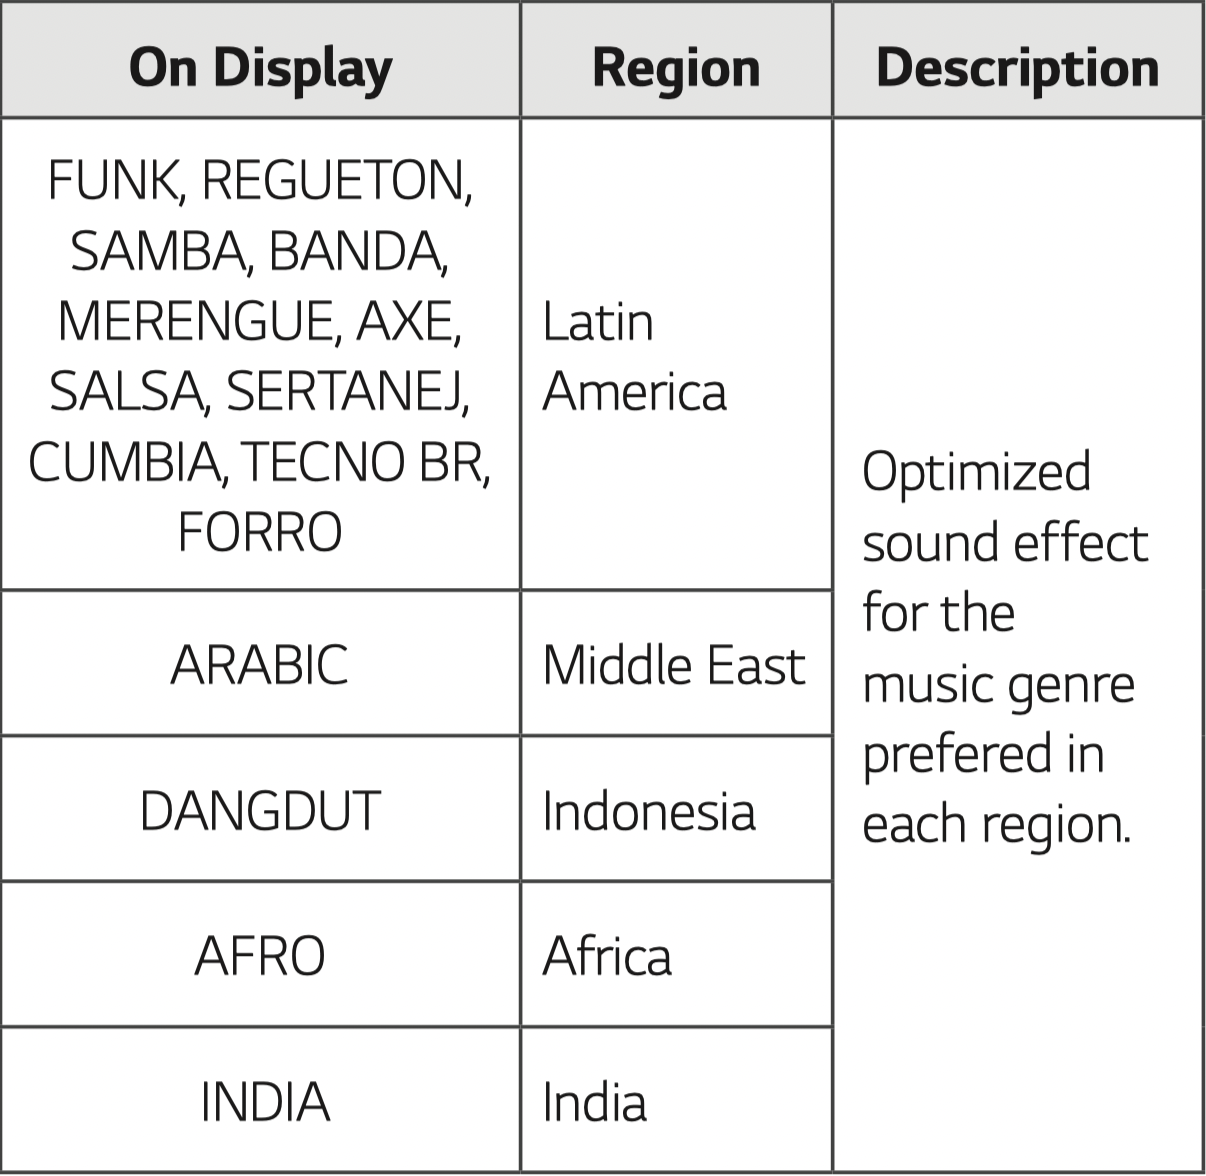
You can select a desired sound mode by using REGION EQ on the remote control.
Note
On some speakers, sound may not be heard or heard in low sound depending on the sound mode.
By pressing and holding REGION EQ / BASS BLAST for 3 seconds on the unit you can directly select BASS (BASS BLAST) effect.
Setting the USER EQ
You can adjust the sound level of Bass and Treble as your preference.
Press USER EQ on the unit. “USER EQ” is displayed.
Rotate BASS or TREBLE to adjust the sound level.
Press USER EQ to save the setting.
VOICE CANCELLER
You can enjoy the function while playing the music, by reducing singer vocal of music in the various source.
Press and hold the LIGHTING/ VOICE CANCELLER and “ON” will appear in display window.
To cancel it, Press and hold LIGHTING / VOICE CANCELLER again.
The quality of the VOICE CANCELLER may be different depending on the recording conditions of music files.
Note
This function is available CD, USB or BT (Bluetooth) Function.
If the function is not available, “NOT SUPPORT” appears in the display window.
This function is available to use only when a microphone is connected.
If a microphone is not connected, “NOT SUPPORT” appears in the display window.
It is not available on the MONO source.
To initialize it, change the Function or disconnect the microphone.
This function may not be initialized depending on the status of connected devices.
Auto power down
This unit will turn itself off to save electricity in the case were the main unit is not connected to an external device and is not used for 20 minutes.
The unit will also turn itself off after six hours if the Main unit has been connected to another device using the analog inputs.
Auto power down function is applied to only MASTER unit in case of WIRELESS PARTY LINK connection. In case of SLAVE unit, Auto power down is available after disconnection SLAVE unit and MASTER unit.
How to disconnect the wireless network connection or the wireless device.
Turn off the unit by pressing the power button for more than 5 seconds.
AUTO POWER On
This unit automatically turns on by an input source : LG TV or Bluetooth
If you try to connect your Bluetooth device, this unit turns on and connects your Bluetooth device. You can play your music.
Note
Depending on the connected device, this function may not operate.
Depending on the connected device, the unit turns on but Bluetooth function may not be connected.
If you disconnect Bluetooth connection by this unit, some Bluetooth devices try to connect to the unit continually. Therefore it is recommended to disconnect the connection before turning off the unit.
If you try to connect to the “Music Flow Bluetooth” app, Bluetooth function of this unit is turned on.
If you turn on the unit using LG TV or Bluetooth function, proper function of this unit is turned on.
If you have already paired with this unit, automatically this unit can turn on by an input source when this unit is turned off.
If you turn off the unit by pressing the power button for more than 5 seconds, Auto Power On function is disabled. To activate it, turn on the unit.
Troubleshooting
General
Problem
Cause & Solution
The unit does not work properly.
Turn off the power of this unit and the connected external device (TV, Woofer, DVD-player, Amplifier, etc.) and turn it onagain.
Disconnect the power cord of this unit and the connected external device (TV, Woofer, DVD-player, Amplifier, etc.) and then try connecting again.
Previous setting may not be saved when device power is shut off.
No Power.
The power cord is not plugged in. Plug in the power cord.
Check whether electricity failed. Check the condition by operating other electronic devices.
No sound.
Check whether you select right function. Press function button and check the selected function.
Check to see if the Speakers are connected correctly. Speaker cables connected correctly.
The unit does not start playback.
An unplayable disc is inserted. Check the playable disc.
No disc is inserted. Insert a disc.
The disc is dirty. Clean the disc. (Refer to page 42)
The disc is inserted upside down. Place the disc with the label or printed side facing upwards.
Radio stations cannot be tuned inproperly.
The antenna is positioned or connected poorly. Connect the antenna securely.
The signal strength of the radio station is too weak. Tune to the station manually.
No stations have been preset or preset stations have been cleared (when tuning by scanning preset channels). Preset some radio stations, see page 26 for details.
The remote control does not work properly.
The remote control is too far from the unit. Operate the remote control within about 23 ft (7 m).
There is an obstacle in the path of the remote control and the unit. Remove the obstacle.
The batteries in the remote control are exhausted. Replace the batteries with new ones.
No speaker light
Check whether the speaker light cables are connected to the unit correctly. Connect the speaker light cables to the unit correctly.
Check the speaker light effects by pressing LIGHTING / VOICE CANCELLER.
LG Sound Sync does not work.
Check whether your LG TV supports LG Sound Sync. y Check connection of LG Sound Sync.
 (Standby/On) : Switches the unit ON or OFF.
 (Open/Close) : Opens and closes the disc tray.
 F (Function) : Selects the function and input source.
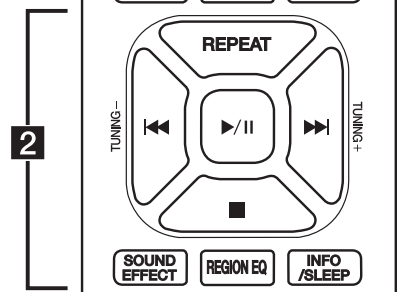
 C/V (Skip/Search) :
 (Play/Pause) :
 (Stop):
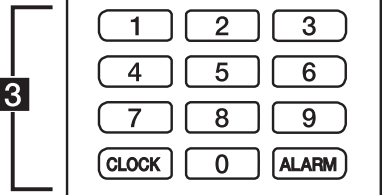
 ) : Changes the key to suit your vocal range.
 : This button is not available.
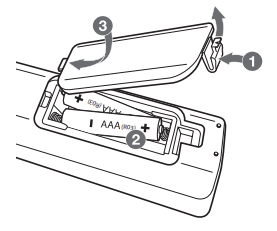
 (Standby/On)
 (Stop) Stops playback or cancels DELETE function.
 (Play/Pause): Starts or pauses playback. Selects Stereo/Mono.
 (Open/Close): Opens and closes the disc tray.
 (Skip/Search)
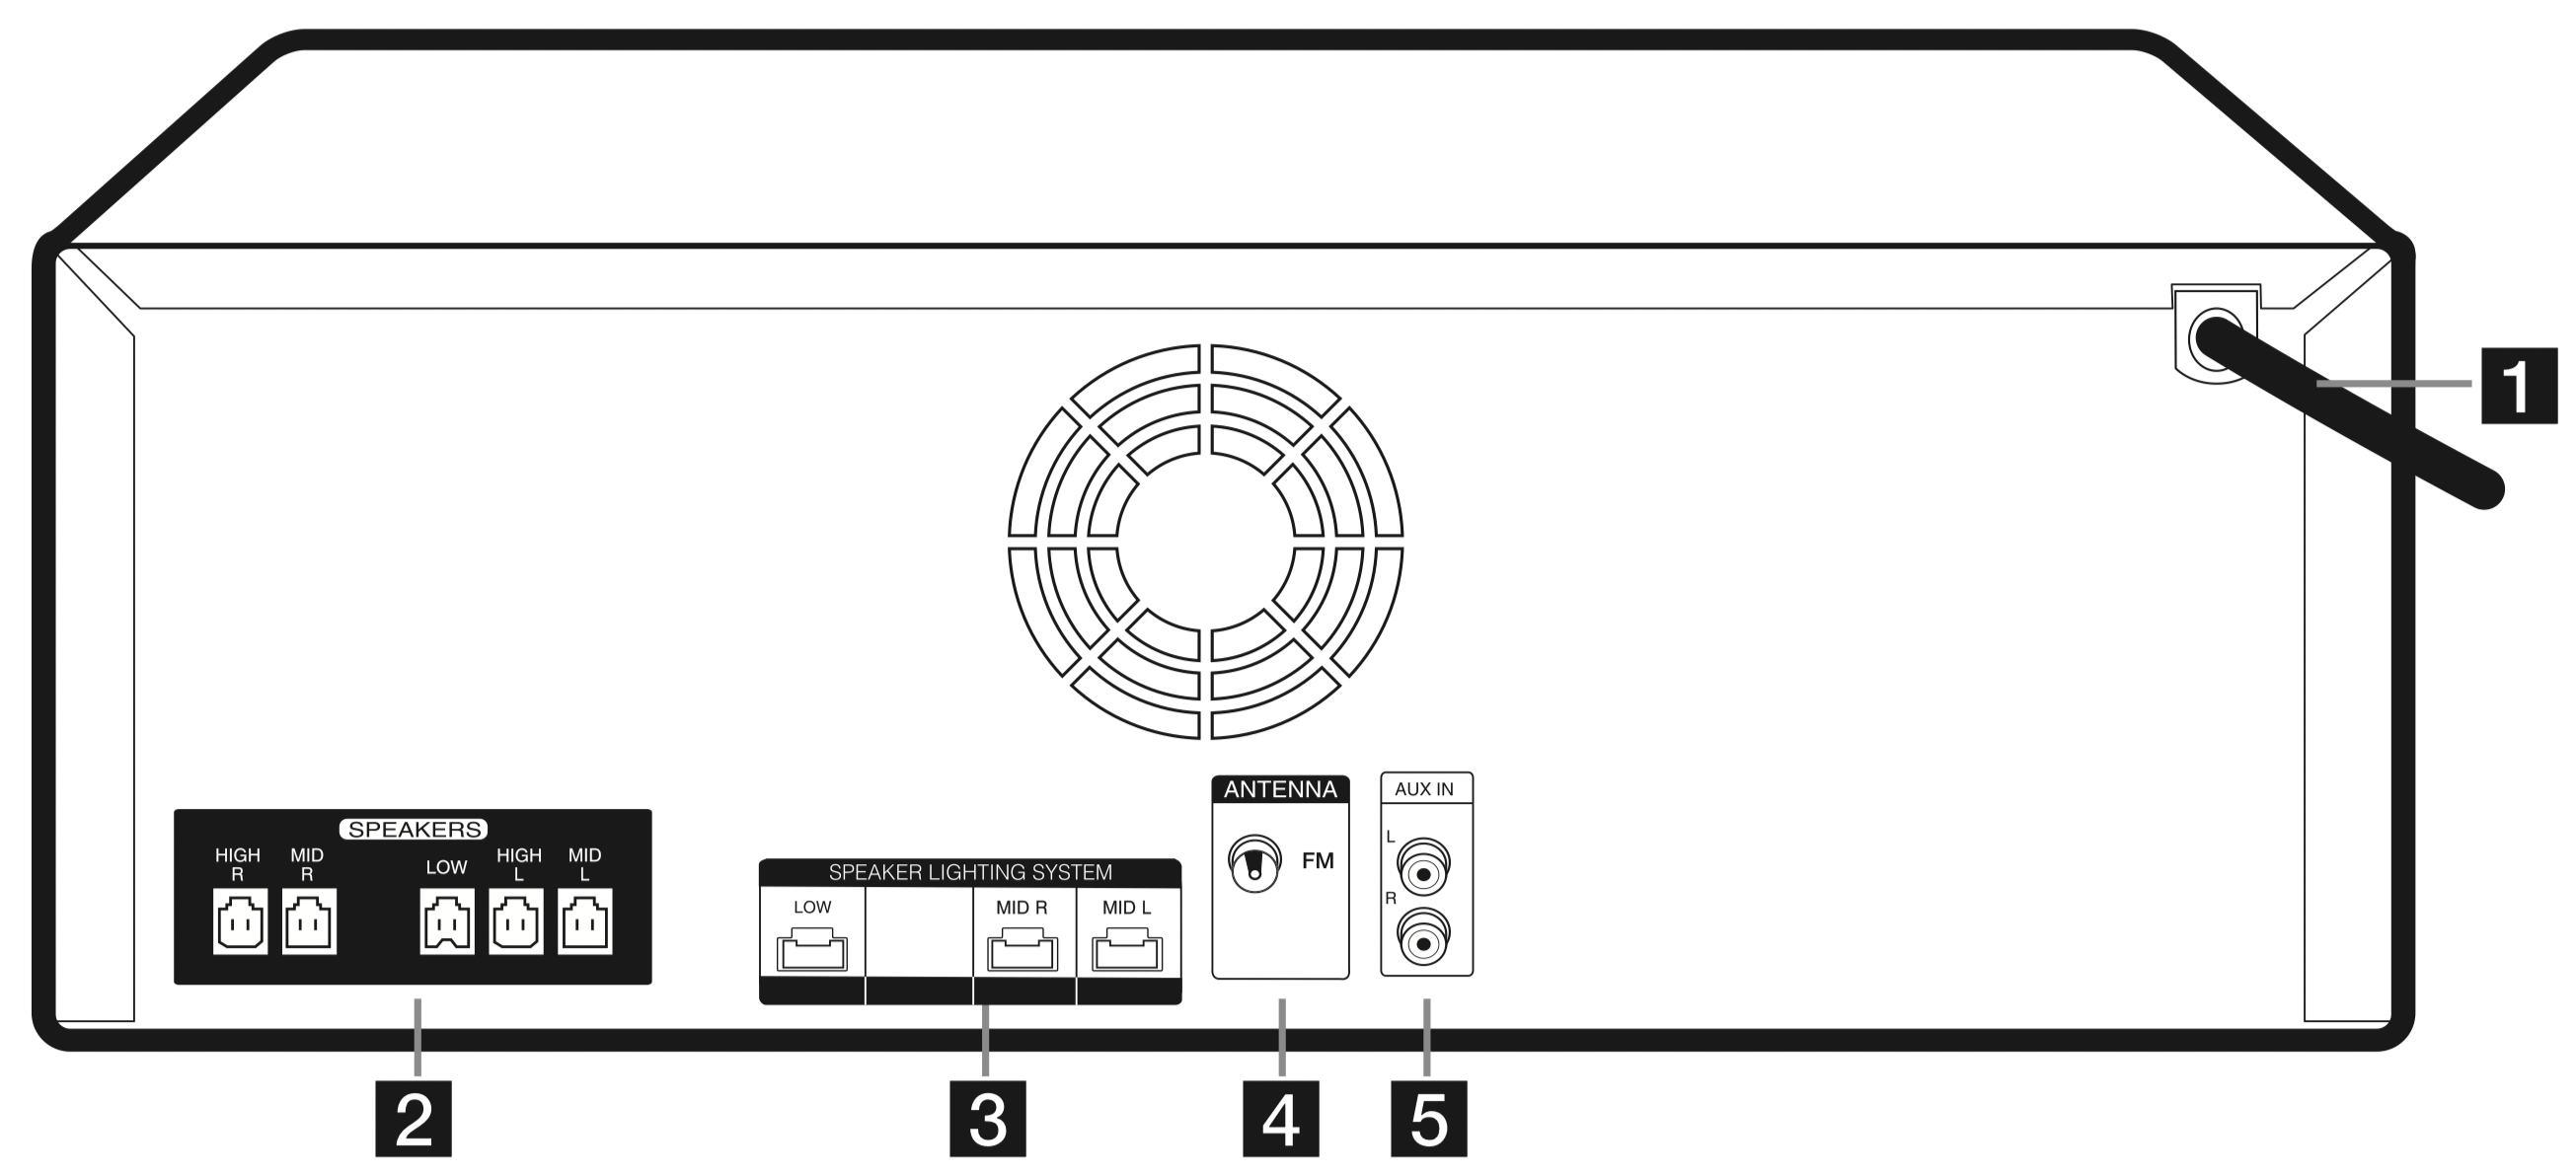

 on the remote control or
  on the unit
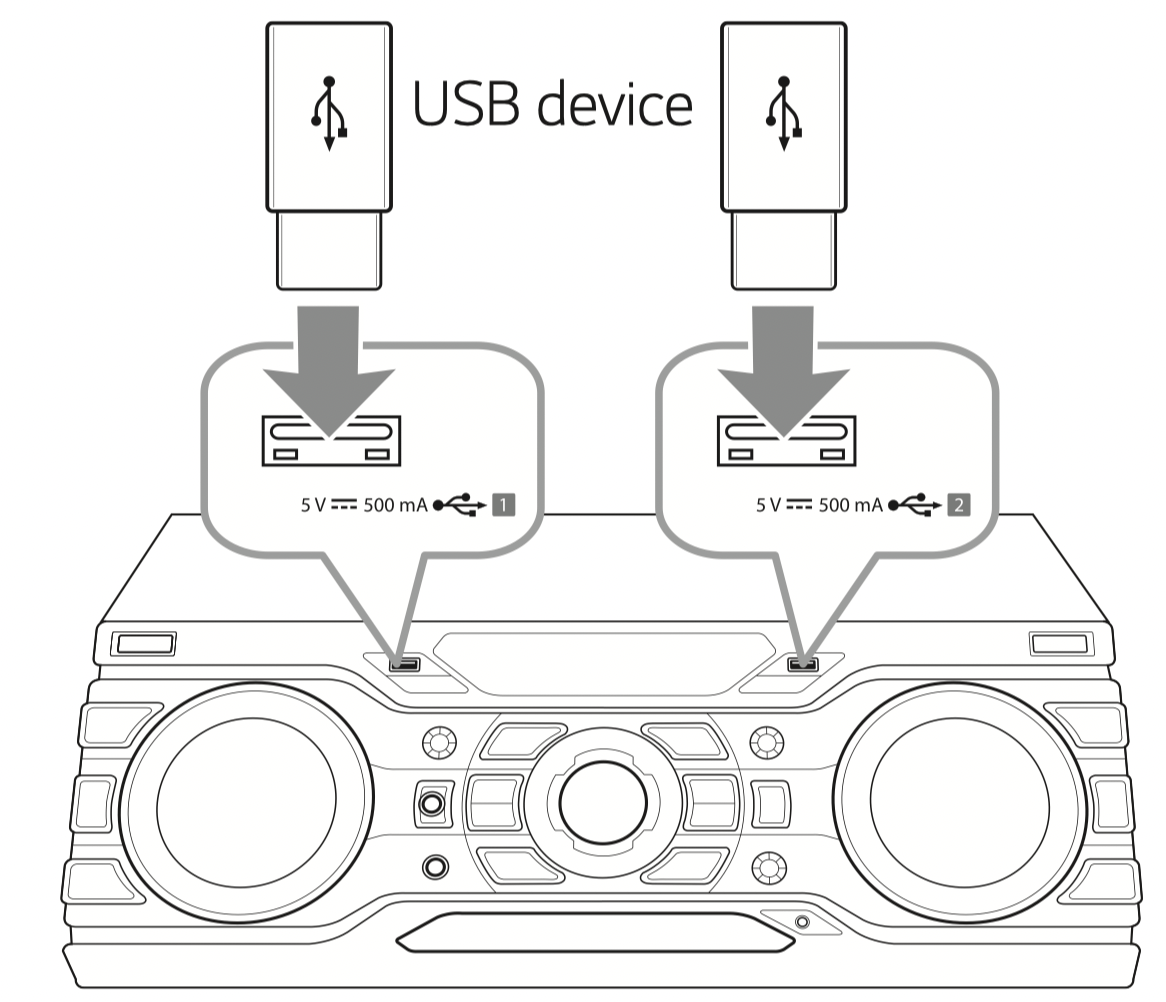
 on the remote control or
  on the unit twice in a row.
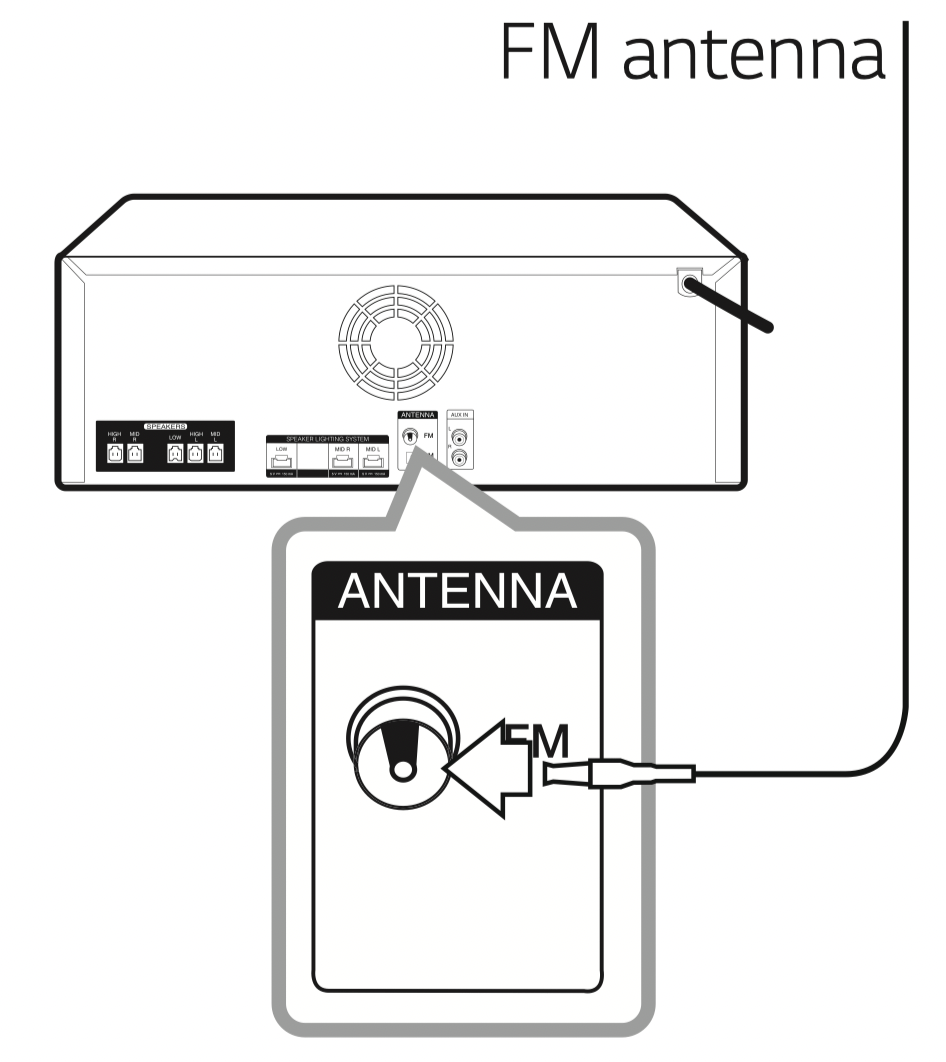
 on the remote control or
  on the unit. Or connect the USB device to the USB port.
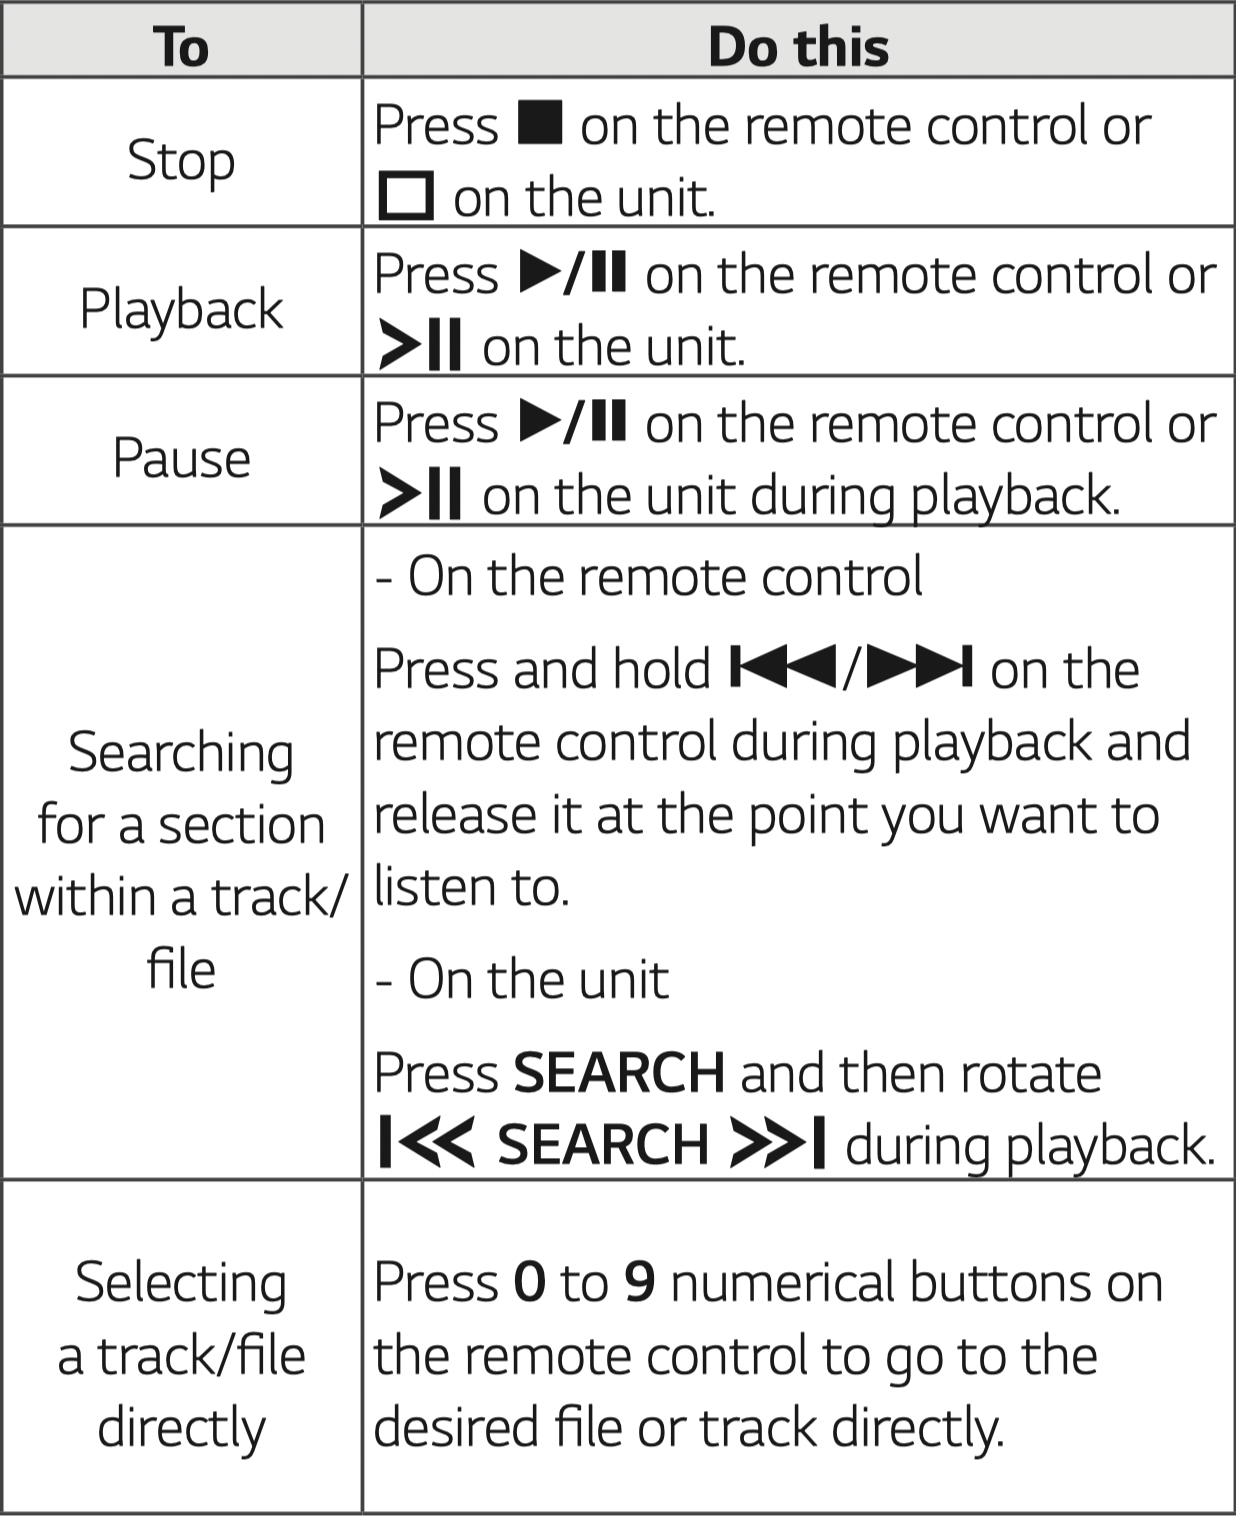
 until a desired file appears in stop status. You can also search a folder if you press SEARCH again.
 to play the selected file. When you search a folder, press OK to select a file in the folder, then press OK or
  again. The selected file is played.
 /
/  on the remote control repeatedly until a desired folder appears.
 /
/  to play it. The first file of folder will play
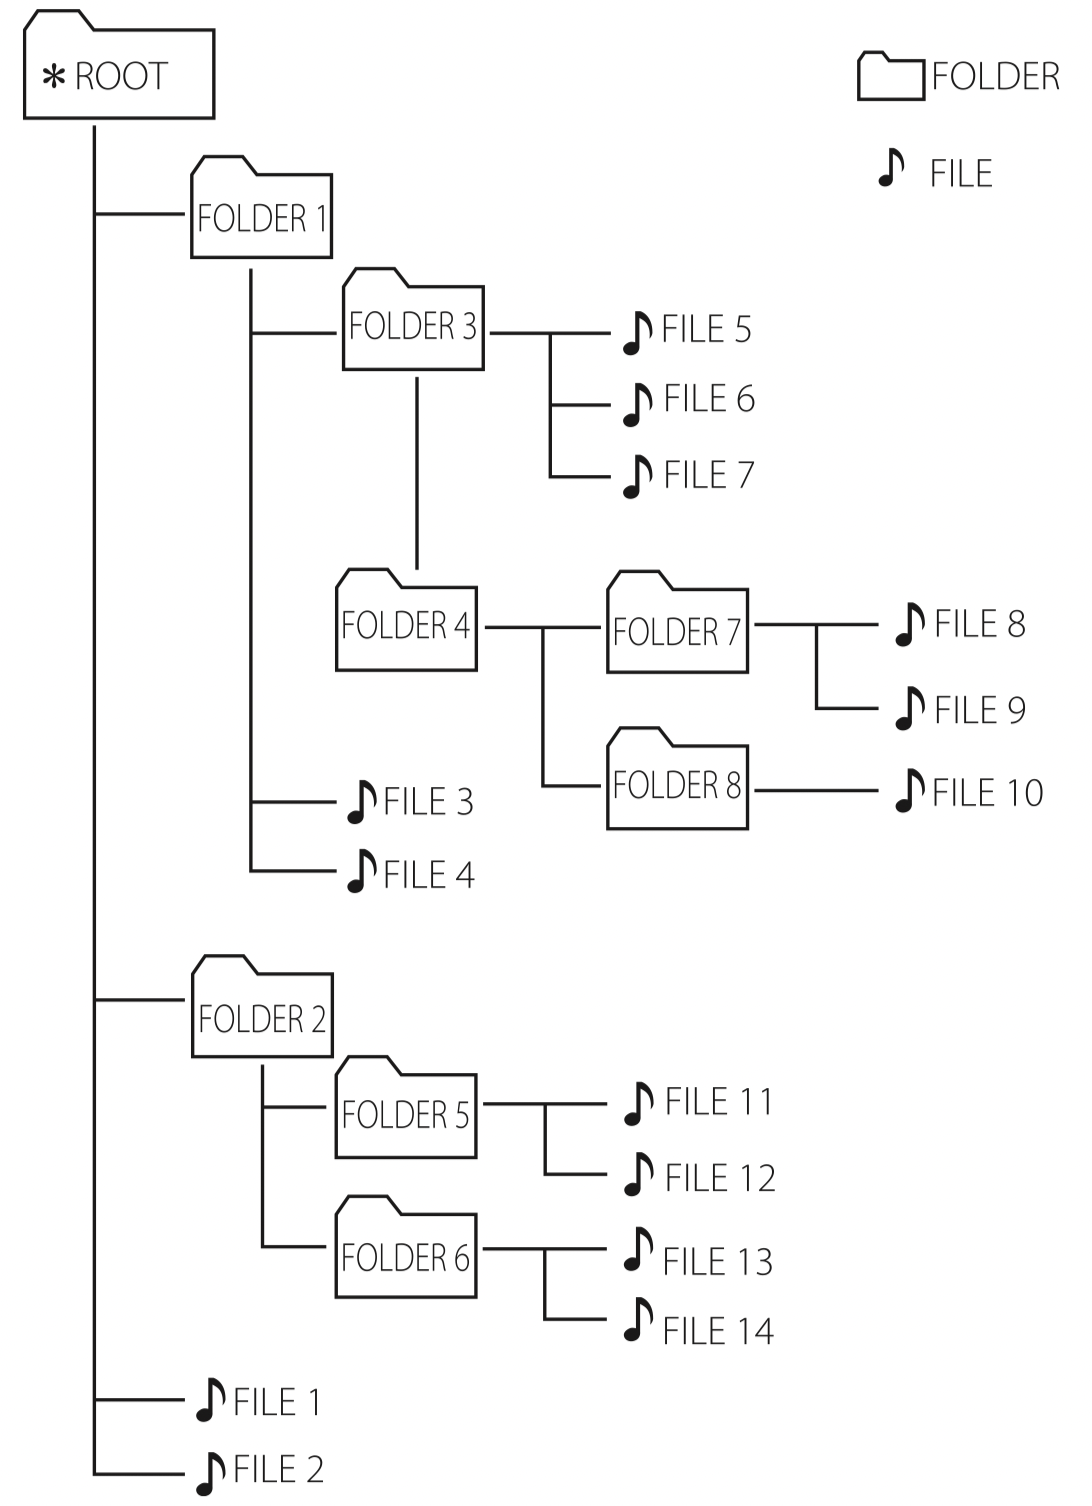
 file No.1 to