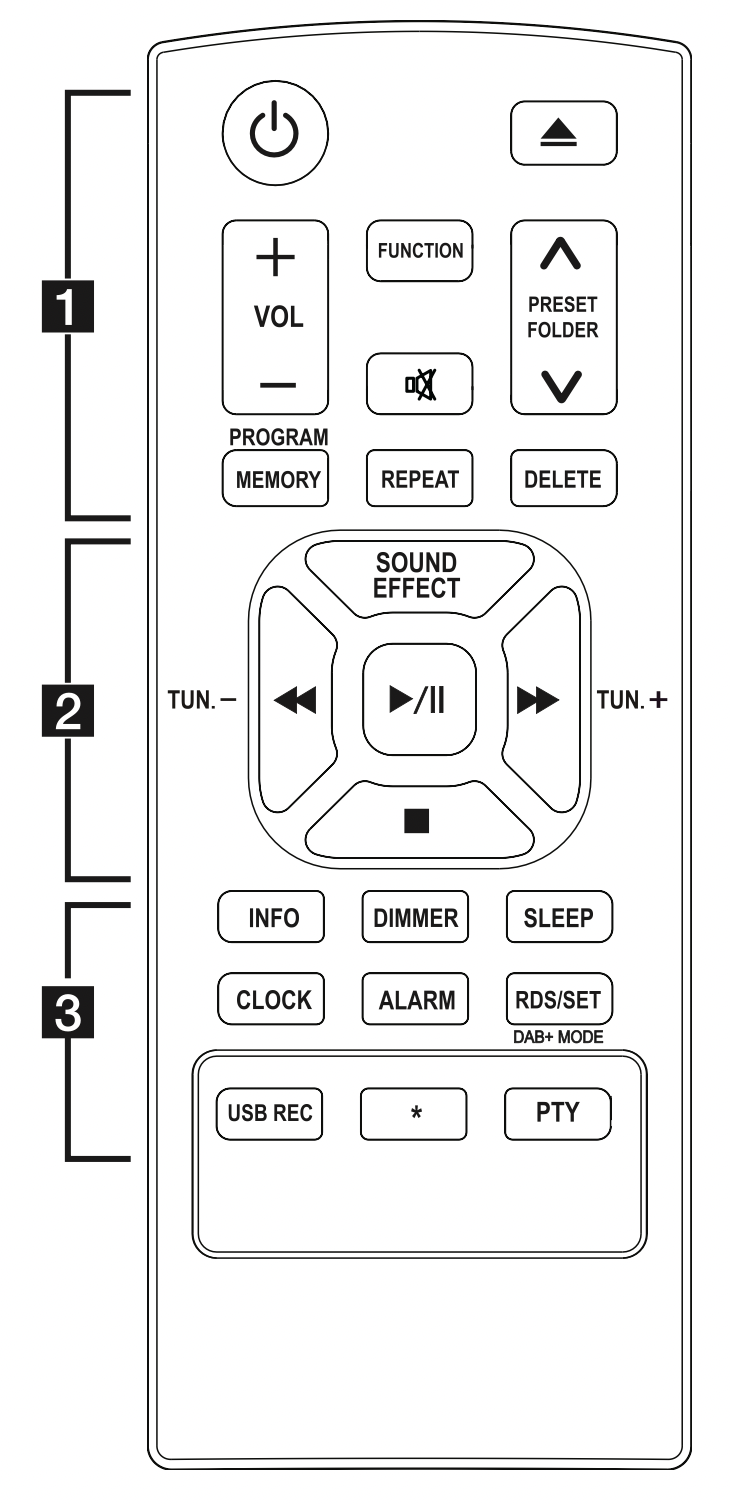
Searches for a folder of MP3/WMA/FLAC files. When a CD/USB containing MP3/WMA/FLAC files in several folders is being played, press PRESET/FOLDER to select the folder you want to play.
Chooses a preset number for a radio station.
FUNCTION : Selects the function and input source.
: Mutes the sound.
PROGRAM/MEMORY :
Stores radio stations.
Creates a programmed list you want to listen to.
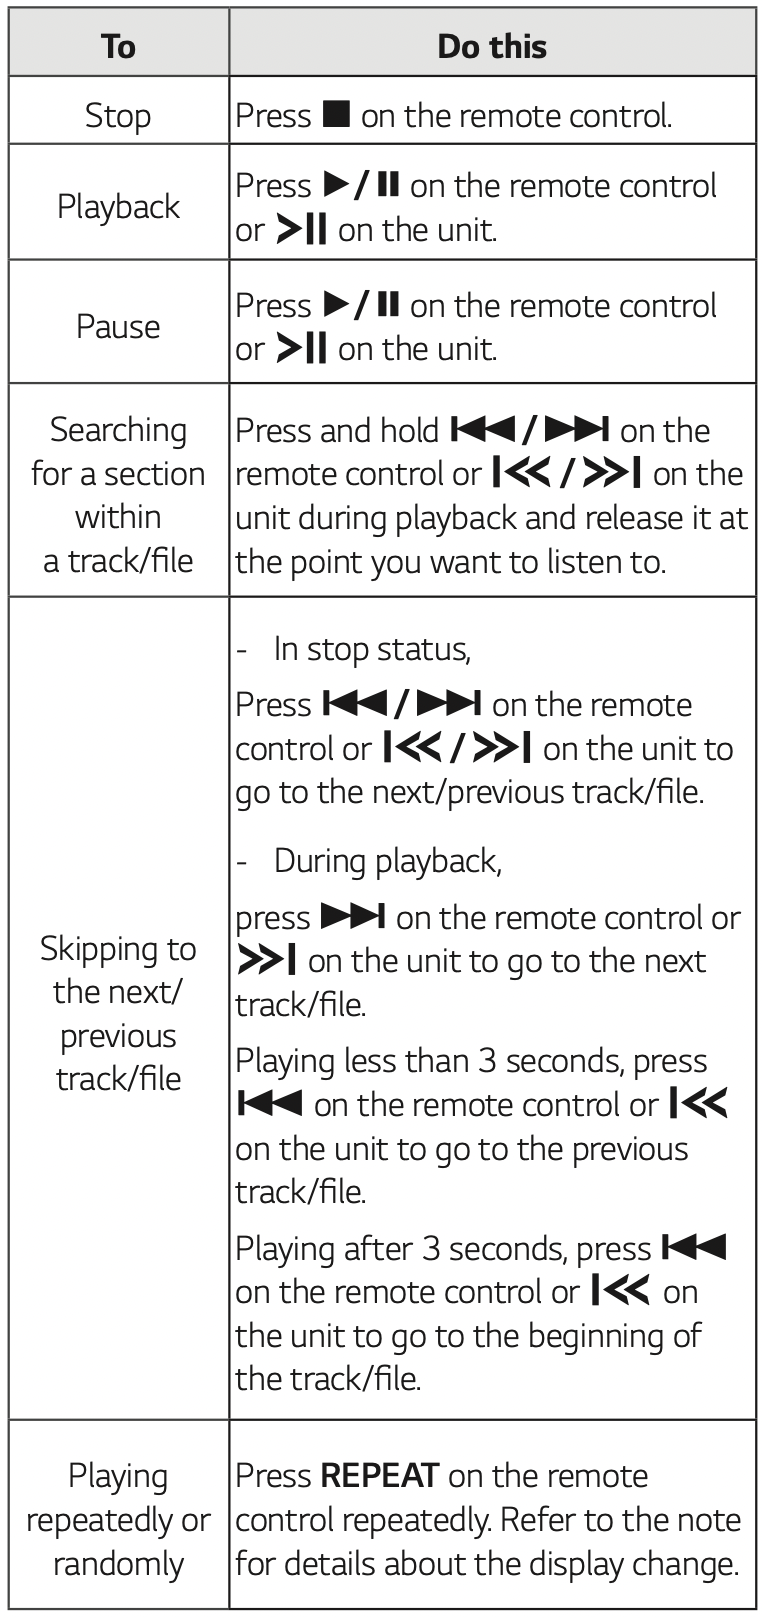
REPEAT : Plays your tracks/files repeatedly or randomly.
DELETE :
Deletes MP3/WMA/FLAC files.
Deletes a song on the programmed list.
Deletes all the saved stations.
SOUND EFFECT : Chooses sound impressions.
TUN. -/+ :
Selects the radio stations.
Scans DAB+ stations by pressing and holding.
(Skip/Search) :
Skips fast backward or forward.
Searches for a section within a track/file.
(Play/Pause) :
Starts or pauses playback.
Selects STEREO/MONO.
(Stop) :
Stops playback or recording.
Cancels DELETE function
INFO :
Sees information about your music. An MP3 file often comes with ID3 tag. The tag gives the Title, Artist, Album or Time information.
Sees the address of connected Bluetooth device in Bluetooth mode.
DIMMER : The display windows dims over few steps. SLEEP : Sets the system to turn off automatically at a specified time.
CLOCK : Sets a clock and checks a time.
ALARM : With the ALARM function you can turn CD, USB play and Tuner reception on at a desired time.
RDS/SET :
RDS (Radio Data System).
Confirms the setting.
DAB+ MODE :
DAB+ radio type
Selects a DAB+ display mode
USB REC : USB direct recording.
: The button is not available for any function.
PTY : Searches radio stations by radio type. (RDS only)
Front Panel
/ I (Power) Switches the unit ON or OFF.
F Selects the function or input source.
(Skip/Search) Searches backward or forward. Skips to the previous/next track/file. TUNING - / + Selects the radio stations. Scans DAB+ stations by pressing and holding.
(Play/Pause) Starts or pauses playback. Selects Stereo/Mono.
Opens or closes the disc tray.
Remote sensor
Display window
Volume Knob Adjusts volume of speaker.
USB Plays the audio files by connecting the USB device.
Disc tray
PORT. IN Connects to a Portable device.
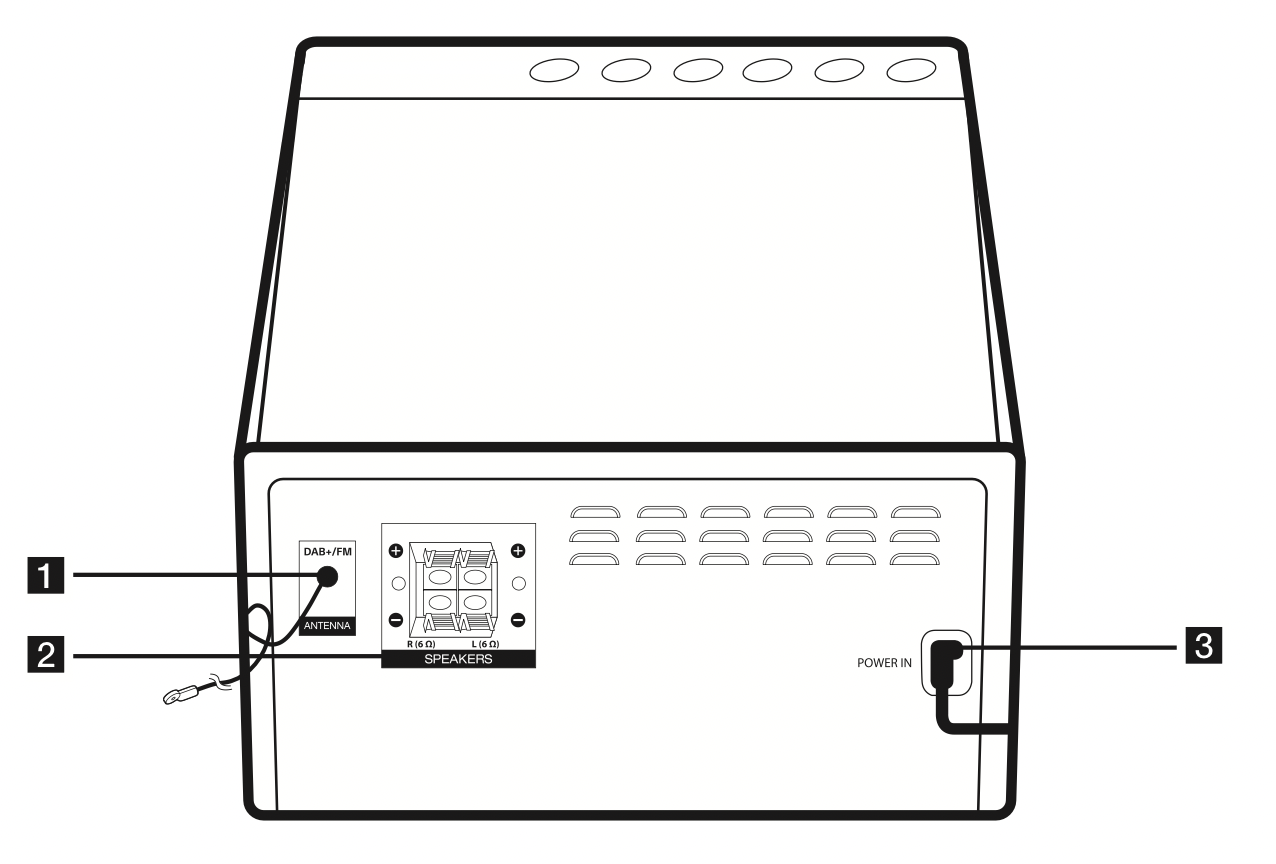
Rear Panel
DAB+/FM ANTENNA
SPEAKERS (L/R) terminals
POWER IN
Connecting
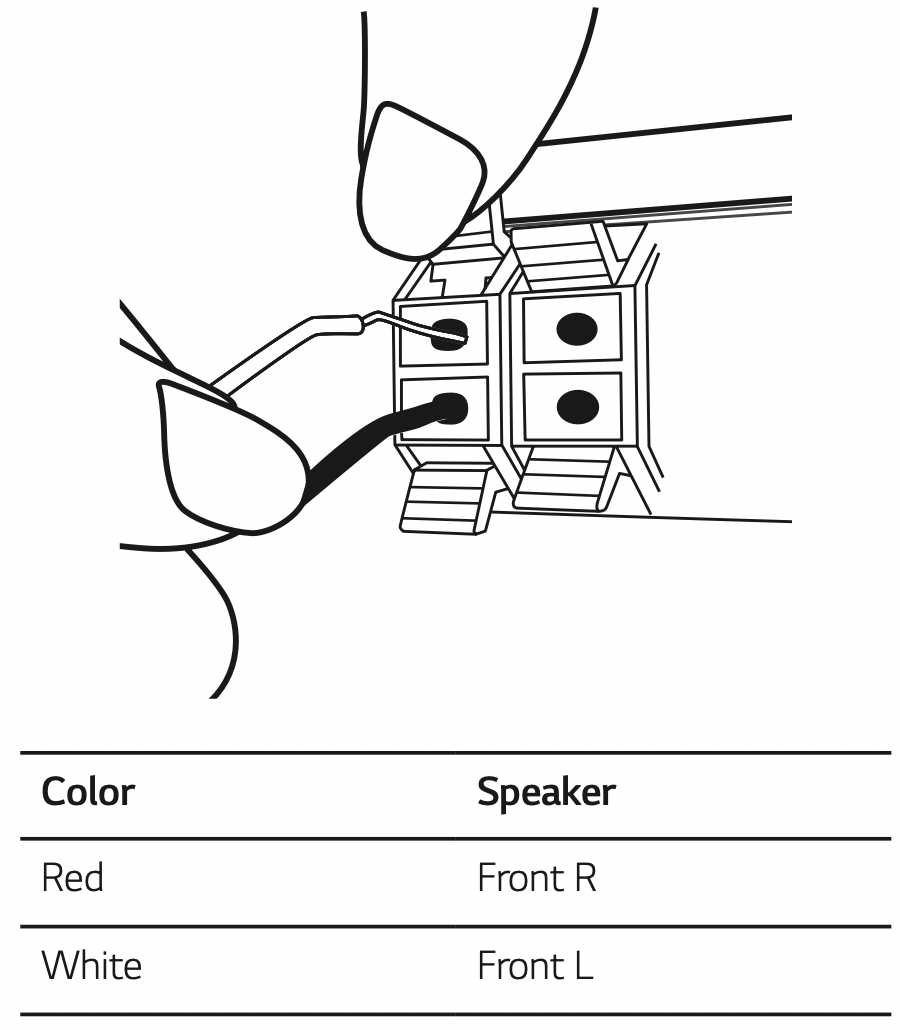
Connecting to speakers
Connecting the speakers to the unit
To connect the cable to the unit, press each plastic finger pad to open the connection terminals on the unit. Insert the wire and release the finger pad.
Connect the black of each wire to the terminals marked - (minus) and the other end to the terminals marked + (plus).
Caution
Make sure children do not put their hands or any objects into the *speaker duct. * Speaker duct : A hole for plentiful bass sound on speaker cabinet (enclosure)
Use the speaker supplied with this unit only. Using any other speaker may cause malfunction.
The speakers contain magnet parts, so color irregularity may occur on the TV screen or PC monitor screen. Please use the speakers far away from either TV screen or PC monitor.
Optional Equipment Connection
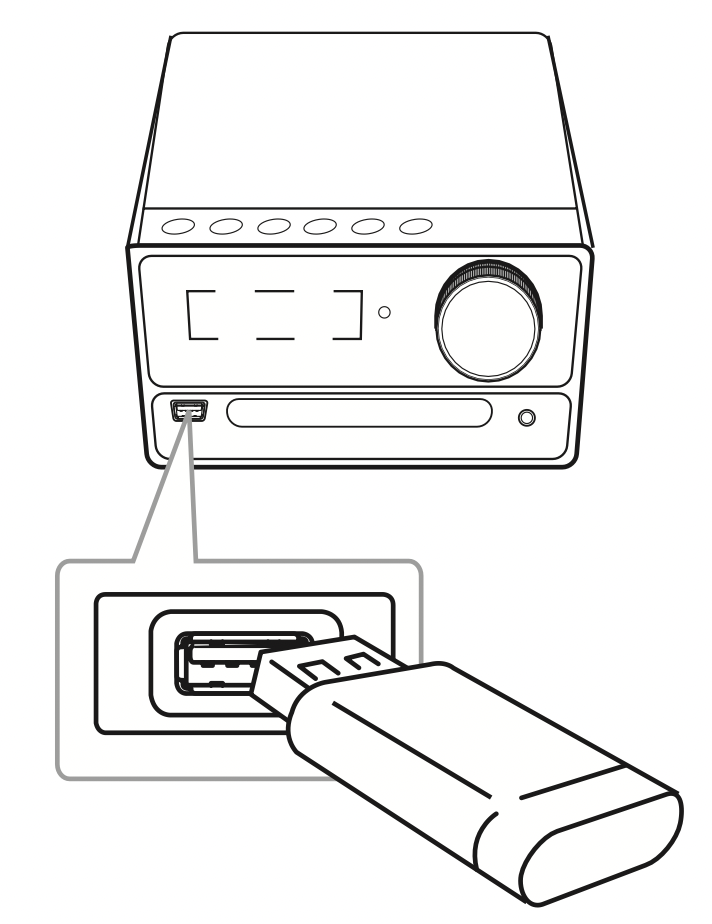
USB Connection
Connect a USB device to the USB ports on the unit.
Note: Removing the USB device from the unit.
Choose a different function/mode or press on the remote control twice in a row.
Remove the USB device from the unit.
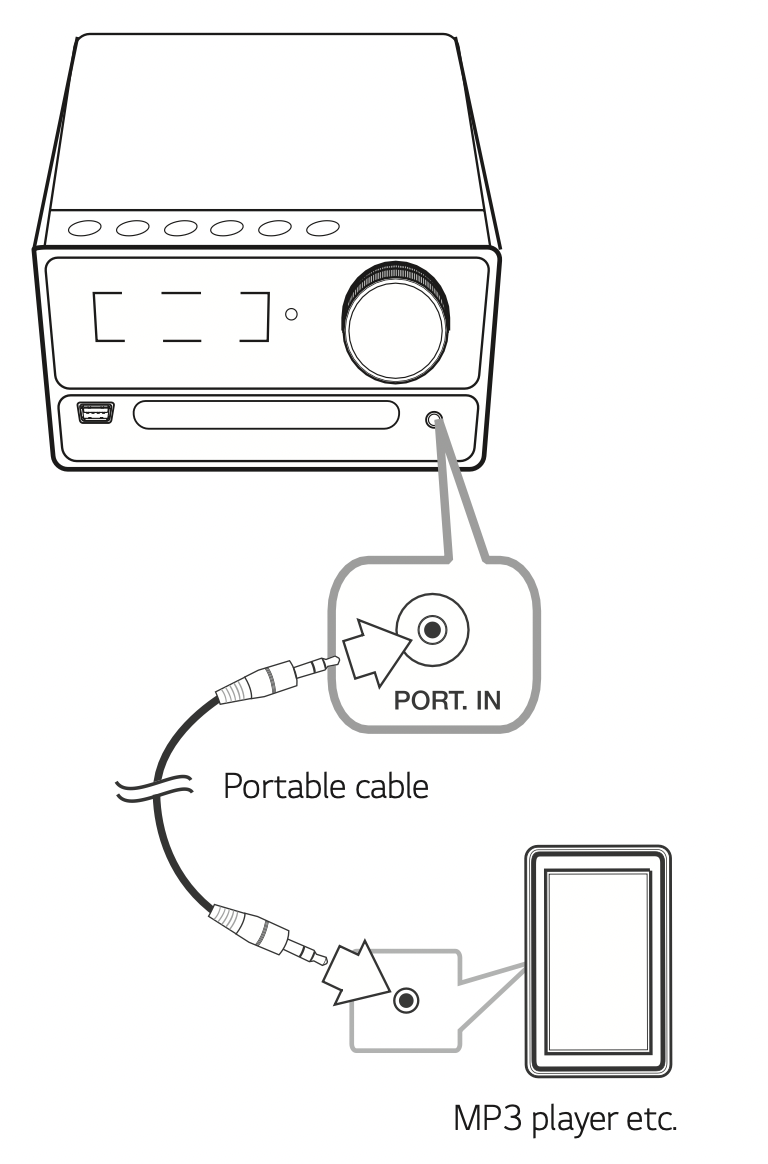
PORT. IN Connection
Connect an output (earphone or line out) of portable device (MP3 or PMP etc) to the PORT. IN connector.
Listening to music from your portable player or external device
The unit can be used to play the music from many types of portable player or external device.
Connect the portable player to the PORT. IN connector of the unit.
Turn the power on by pressing / I.
Press F to select PORTABLE function.
Turn on the portable player or external device and start it playing.
Operating
CD/USB Operations
Insert the disc by pressing on the remote control or on the unit. Or connect the USB device to the USB port.
Select CD or USB function by pressing FUNCTION on the remote control or F on the unit.
Note
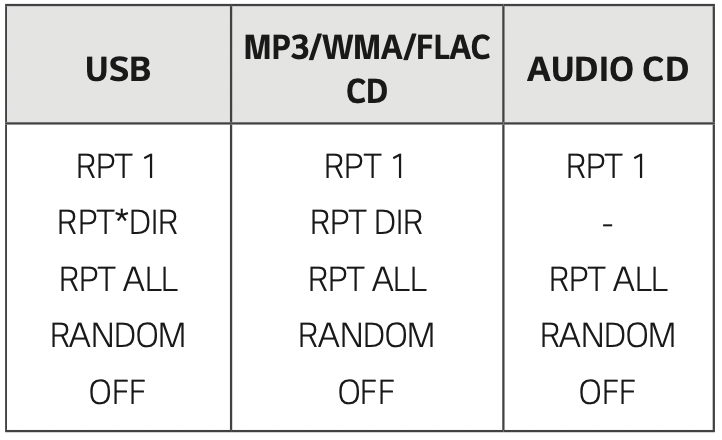
The display changes in the following order.
*DIR : Directory
When you play programmed list, only RPT 1 and RPT ALL are available.
Even after restarting the unit or switching one function to another, you can listen to music from the point where it’s last been played.
If you leave the disc tray open for 5 minutes, it will close automatically.
Auto Play
AUDIO/MP3/WMA/FLAC CD is played automatically after disc tray is open and then closed.
Automatically switches to the CD function if disc tray is open and then closed when there is no disc in tray.
Programmed Playback
The program function enables you to store your favorite files from any disc or USB device.
A program can contain 20 tracks/files for each media (CD, USB). Possible to save a total of 40 tracks/files.
Press PROGRAM/MEMORY on the remote control in stop status.
Press on the remote control to select a track/file.
Press PROGRAM/MEMORY to save and select a next track/file.
Repeat steps 2 - 3 to store other tracks/files. (You can modify the list by pressing PRESET/FOLDER to select the program number.)
Press PROGRAM/MEMORY once again.
To play the programmed list, press after you make the list.
Note: When making or modifying the programmed list, REPEAT mode is off.
Deleting Programmed list
Deleting function only works in the edit mode.
Press PROGRAM/MEMORY on the remote control in stop status.
Select a song by pressing PROGRAM/MEMORY or PRESET/FOLDER repeatedly.
Press DELETE while a song is selected.
Note
Programmed list is cleared in the case below.
Removing the disc or the USB device.
Deleting or recording music files in the USB device.
Unplugging the power cord.
Program is switched off in the case below.
Changing to a different function.
Turning off and on the unit.
Displaying file information (ID3 TAG)
While playing an MP3 file containing file information, you can display the information by pressing INFO.
Searching for a folder and an MP3/WMA/FLAC file
Press PRESET/FOLDER on the remote control repeatedly until a desired folder appears in the display window.
Press to play it. The first file of the folder will be played.
Note
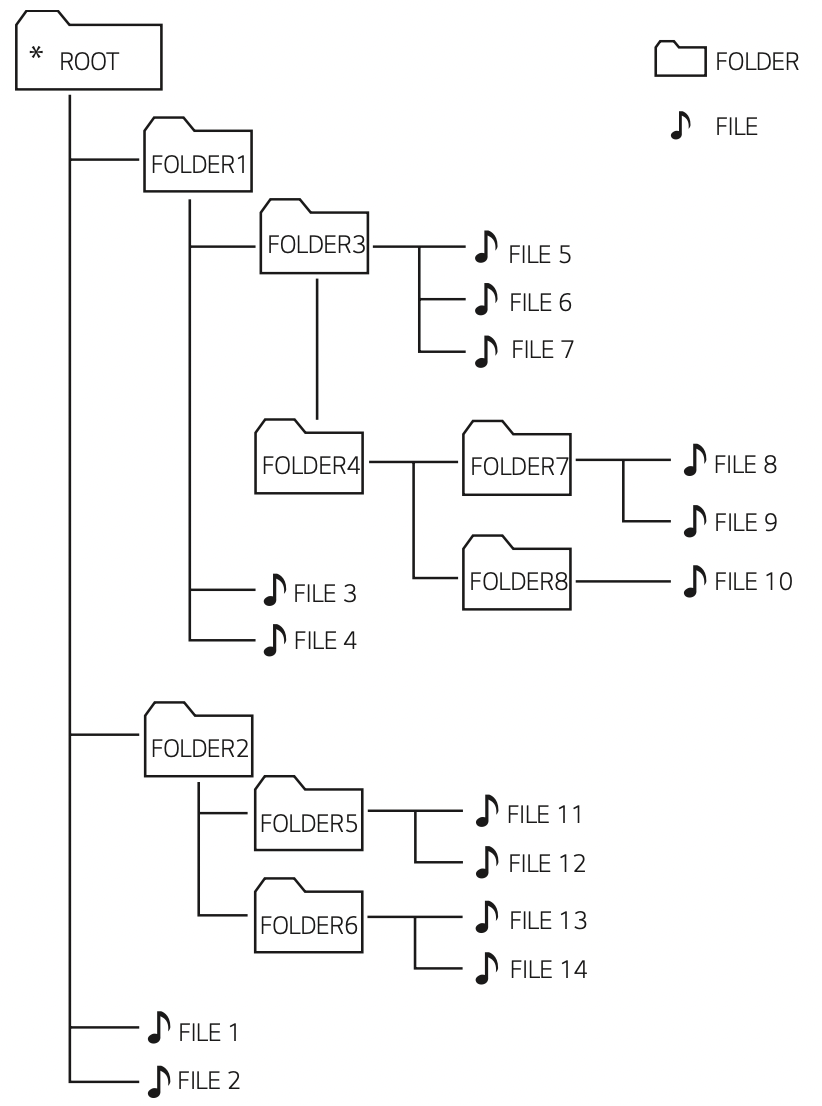
USB/CD Folders/Files are recognized as below
If there is no file in a folder, the folder will not appear.
Folders will be presented as the following order; ROOT > FOLDER1 > FOLDER3 > FOLDER7 > FOLDER8 > FOLDER5 > FOLDER6
File will be played from file No.1 to file No.14 one by one.
Files and folders will be presented in order recorded and may be presented differently according to the record circumstances.
*ROOT : The first screen you can see when a computer recognize the USB/CD is “ROOT”.
Deleting an MP3/WMA/FLAC file
You can delete file, folder or format by pressing DELETE on the remote control. This function is supported only in stop status. (USB only)
Select the file you want to delete and press DELETE on the remote control. Select the folder you want to delete by pressing PRESET/FOLDER on the remote control and press DELETE on the remote control. Press and hold DELETE on the remote control to format the USB device. Or Press DELETE on the remote control repeatedly during selecting the MP3/WMA/FLAC file. The display changes in the following order. DEL FILE : Deletes file DEL DIR : Deletes folder FORMAT : Formats USB
To delete file/folder or format, press on the remote control. If you want to exit the current mode, press on the remote control.
Caution
Do not extract the USB device during operation. (play, delete, etc.)
Regular back up is recommended to prevent data loss.
The delete function may not be supported according to the USB device.
Turn off the sound temporarily
Press on the remote control to mute your sound.
You can mute your unit, for example, to answer the telephone, the “MUTE” will appear in the display window.
To cancel it, press again or change the volume level.
Sleep Timer Setting
Press SLEEP repeatedly to select delay time between 10 and 180 minutes. After the delay time, the unit will be turned off.
To cancel the sleep function, press SLEEP repeatedly until “SLEEP 10” appears, and then press SLEEP once again.
Note
You can check the remaining time before the unit is turned off.
Press SLEEP. The remaining time appears in the display window.
Dimmer
Press DIMMER once.
The display windows dims over few steps. To cancel it, press DIMMER again.
DEMO
In the power on state, adjust the volume level of the main unit to minimum and then press and hold F on the unit for about 7 seconds.
To cancel the DEMO function, press and hold the F on the unit for about 7 seconds.
Auto power down
This unit will turn itself off to save electricity in the case were the main unit is not connected to an external device and is not used for 15 minutes.
The unit will also turn itself off after six hours if the main unit has been connected to another device using the analog inputs.
How to disconnect the wireless network connection or the wireless device
Turn off the unit by pressing the power button for more than 5 seconds.
AUTO POWER On
This unit automatically turns on by an input source : LG TV or Bluetooth
If you try to connect your Bluetooth device, this unit turns on and the unit will be connected your Bluetooth device.
Note
Depending on the connected device, this function may not operate.
Depending on the connected device, the unit turns on but Bluetooth function may not be connected.
If you disconnect Bluetooth connection by this unit, some Bluetooth devices try to connect to the unit continually. Therefore it is recommended to disconnect the connection before turning off the unit.
If you try to connect to the “Music Flow Bluetooth” app, Bluetooth function of this unit is turned on.
If you turn on the unit using LG TV or Bluetooth function, proper function of this unit is turned on.
If you have already paired with this unit, automatically this unit can turn on by an input source when this unit is turned off.
If you turn off the unit by pressing the power button for more than 5 seconds, Auto Power On function is disabled. To activate it, turn on the unit.
To use this function, the main unit must be registered in paired devices list of Bluetooth device.
Auto function change
This unit recognizes input signals such as Bluetooth and LG TV and then changes suitable function automatically.
When you try to connect Bluetooth device
When you try to connect your Bluetooth device to this unit, Bluetooth function is selected. Play your music on the Bluetooth device.
When LG TV is connected
When you turn on your LG TV connected by LG Sound Sync, this unit changes the function to LG TV. You can hear the sound from your TV.
Note
This function is not available during recording or deleting.
This function only works with devices that were previously connected.
Using a BLUETOOTH® wireless technology
About BLUETOOTH
Bluetooth is wireless communication technology for short range connection.
The sound may be interrupted when the connection has interference from other electronic devices or you connect a Bluetooth device from a different room. Connecting individual devices under Bluetooth wireless technology does not incur any charges. A mobile phone with Bluetooth wireless technology can be operated via the Cascade if the connection was made via Bluetooth wireless technology.
Available Devices : Mobile phone, MP3, Laptop, PDA.
Version: 2.1 + EDR
Codec: SBC
BLUETOOTH Profiles
In order to use Bluetooth wireless technology, devices must be able to interpret certain profiles. This unit is compatible with following profile.
A2DP (Advanced Audio Distribution Profile)
Listening to music stored on the BLUETOOTH devices
Pairing your unit and BLUETOOTH device
Before you start the pairing procedure, make sure the Bluetooth feature is activated on your Bluetooth device. Refer to your Bluetooth device’s user guide. Once a pairing operation is performed, it does not need to be performed again.
Turn on the unit.
Operate the Bluetooth device and perform the pairing operation. When searching for this unit with the Bluetooth device, a list of the devices found may appear in the Bluetooth device display depending on the type of Bluetooth device. Your unit appears as “LG CM2460DAB(XX)”. Note XX means the last two digits of Bluetooth address. For example, if your unit has a Bluetooth address such as 9C:02:98:4A:F7:08, you will see “LG CM2460DAB(08)” on your Bluetooth device. Depending on the Bluetooth device type, some devices may have a different pairing process. Enter the PIN code (0000) as needed. You can connect this unit with up to 3 Bluetooth devices simultaneously using the same method as described above, only in the Bluetooth function. The multi phone pairing connection is only supported on Android devices. (Multi phone pairing connection may not be supported depending on the connected device specifications.) Removable/detachable Bluetooth device (Ex : Dongle etc.) will not support multi pairing.
When this unit has successfully connected with your Bluetooth device, “PAIRED” will be appear on the display window. After a short amount of time, the Bluetooth device name will be displayed. Note “PAIRED” will momentarily appear on the display when you connect other devices for multi pairing If the device name is unavailable, “_” will be displayed.
Listen to music. To play a music stored on your Bluetooth device, refer to your Bluetooth device’s user guide. Note When using Bluetooth technology, you have to make a connection between the unit and the Bluetooth device as close as possible and keep the distance. However, it may not work well in certain situations as described below: There is a obstacle between the unit and the Bluetooth device. There is a device using same frequency with Bluetooth technology such as a medical equipment, a microwave or a wireless LAN device. You should connect your Bluetooth device to this unit again when you restart it. Even if this unit connected up to 3 Bluetooth devices in the Bluetooth mode, you can play and control music by using only one of the connected devices.
Note
When this unit connected with multiple Bluetooth devices, only one device which you are playing keeps Bluetooth connection when you change the function to the others.
The sound may be interrupted when the connection has interference from other electronic devices.
You cannot control the Bluetooth device with this unit.
Depending on the type of the device, you may not be able to use the Bluetooth function.
You can enjoy wireless system using phone, MP3, Notebook, etc.
The more distance between the unit and the Bluetooth device, the lower the sound quality becomes.
Bluetooth connection will be disconnected when the unit is turned off or the Bluetooth device gets far from the unit.
When Bluetooth connection is disconnected, connect the Bluetooth device to the unit again.
When a Bluetooth device is not connected, “BT READY” appears on the display window. y When you use Bluetooth function, adjust the volume to a proper level on the Bluetooth device.
If it is not in Bluetooth function, only one device can be connected.
If a Bluetooth device is connected when using LG TV, LG TV is disconnected and the Bluetooth device is connected.
When you connect Bluetooth device (iOS device etc.) to this unit or operate the device, the volume level can be synchronized with each other.
Radio Operations
Listening to the radio
Press FUNCTION on the remote control or F on the unit until FM/DAB+ appears in the display window. The last received station is tuned in.
[FM] Auto tuning : Press and hold TUN. -/+ on the remote control or on the unit for about two seconds until the frequency indication starts to change, then release. Scanning stops when the unit tunes in a station. Or Manual tuning : Press TUN. -/+ on the remote control or on the unit repeatedly. [DAB+] Manual tuning : Press TUN. -/+ on the remote control or on the unit repeatedly when the scaning is done.
Adjust the volume by rotating volume knob on the unit or by pressing VOL +/- on the remote control repeatedly.
Note: When you change the function to DAB+ and no signal is being received, this unit scans station automatically.
Improving poor FM reception
Press on the remote control or on the unit.
This will change the tuner from stereo to mono and usually improve the reception.
Presetting the Radio Stations
You can preset 50 stations for FM/DAB+.
Before tuning, make sure to turn down the volume.
Press FUNCTION on the remote control or F on the unit until FM/DAB+ appears in the display window.
[FM] Select the desired frequency by pressing TUN. -/+ on the remote control or on the unit. [DAB+] Select the desired station by pressing TUN. -/+ on the remote control or Y/U on the unit.
Press PROGRAM/MEMORY on the remote control. A preset number will blink in the display window.
Press PRESET/FOLDER on the remote control to select the preset number you want.
Press PROGRAM/MEMORY on the remote control. The station is stored.
Repeat steps 2 to 5 to store other stations.
To listen to a preset station, press PRESET/FOLDER on the remote control.
Deleting all the saved stations
Press DELETE on the remote control. “DEL ALL” will flash up on the unit display.
Press DELETE on the remote control to erase all the saved radio stations. “DELETED ALL” will scroll on the display window.
Seeing information about a Radio station
The FM tuner is supplied with the RDS (Radio Data System) facility. This shows information about the radio station being listened to. Press RDS/SET on the remote control repeatedly to cycle through the various data types:
PS
(Programme Service Name)
The name of the channel will appear in the display.
PTY
(Programme Type Recognition)
The programme type (e.g. Jazz or News) will appear in the display.
RT
(Radio Text)
A text message contains special information from the broadcast station.
This text may scroll across the display.
CT
(Time controlled by the channel)
This shows the time as broadcast by the station.
You can search the radio stations by programme type by pressing RDS/SET on the remote control. The display will show the last PTY in use. Press PTY one or more times to select your preferred programme type. Press and hold TUN. -/+. The tuner will search automatically. When a station is found, the search will stop.
Listening to the DAB+
You can change the display information of the currently broadcasting DAB+ channel.
Press DAB+ MODE on the remote control repeatedly, the display changes in the following order;
SERVICE > PTY NAME > FREQ > DLS > ENSEMBLE
The initials of the service name are displayed.
SERVICE
Displays the Name of the channel for the current broadcast.
PTY NAME
Displays the Type of the channel for the current broadcast.
FREQ
Displays the frequency of the channel for the current broadcast.
DLS
It displays the current Scroll of the channel which is selected.
ENSEMBLE
Displays the Ensemble of the channel for the current broadcast.
DAB+ scan
Press and hold TUN. -/+ on the remote control or on the unit, all of DAB+ service list and saved preset DAB+ stations will be deleted and scan DAB+ service. Then press it again, scanning will be cancelled.
Note: When moving the unit to other areas : Delete all of the saved DAB+ scanned stations.
Sound adjustment
This system has a number of pre-set surround sound fields. The displayed items for the equalizer may be different depending on sound sources and effects.
You can select a desired sound mode by using SOUND EFFECT on the remote control.
Note
On some speakers, sound may not be heard or heard in low sound depending on the sound mode.
Maybe you need to reset the sound mode, after switching the input, sometimes even after the sound track changed.
Advanced Operations
Recording to USB
You can record a various sound source to USB. (CD, FM, PORTABLE)
Connect the USB device to the unit.
Select a function by pressing FUNCTION on the remote control or F on the unit. One track/file recording - You can record to USB after playing a track/file you want. All tracks/files recording - You can record to USB after full stop status. Programmed list recording - After showing the programmed list, you can record it to USB. (Refer to page 15)
Start the recording by pressing USB REC on the remote control.
To stop recording, press on the remote control.
Pausing recording
During recording, press on the remote control or on the unit to pause recording.
Press it again to restart recording.
(Only FM, PORTABLE)
To select recording bit rate and speed
Press USB REC on the remote control for longer than 3 seconds.
Use on the remote control or on the unit to select the bit rate.
Press USB REC on the remote control again to select the recording speed.
Press on the remote control or on the unit to select a desired recording speed : (AUDIO CD only) X1 SPEED - You can listen to music while recording it. X2 SPEED - You can just record the music file.
Press USB REC on the remote control to finish the setting.
Note
You can check the recording percentage rate for the USB record on the display window during the recording. (MP3/WMA/FLAC CD Only)
During recording MP3/WMA/FLAC, there is no sound.
When you stop recording during playback, the file that has been recorded at that time will be stored. (Except MP3/WMA/FLAC files)
Do not remove the USB device or turn off the unit during USB recording. If does not, an incomplete file may be made and not deleted on PC.
If USB recording does not work, the message like “NO USB”, “ERROR”, “USB FULL” or “NOT SUPPORT” is displayed on the display window.
Multi card reader device or external HDD cannot be used for USB recording.
A file is recorded by about 512 Mbyte when you record for a long term.
You may not store more than 2000 files.
In case of the unsupported MP3/WMA/FLAC file, the file recording may be stopped.
It’ ll be stored as follows.
Tuner : The current recording frequency is shown.
Setting the Clock
Turn the unit on.
Press and hold CLOCK.
Select time mode by pressing on the remote control. AM 12:00 (for an AM and PM display) or 0:00 (for a 24 hour display)
Press RDS/SET to confirm your selection.
Select the hours by pressing on the remote control.
Press RDS/SET.
Select the minutes by pressing on the remote control.
Press RDS/SET.
Setting the Clock through “Music Flow Bluetooth” App
Install “Music Flow Bluetooth” app on your Android device. (Refer to page 21)
Your unit’s clock will be automatically synchronized with your device by activating Bluetooth connection through “Music Flow Bluetooth” app.
Using your player as an alarm clock
Turn the unit on.
Press and hold ALARM.
Press on the remote control or on the unit to change the hours and minutes and press RDS/SET to save.
Press on the remote control or on the unit to select function and press RDS/SET to save. Press to select a memory No. when you select tuner and then, press RDS/SET. If there is no memory No., this step is skipped.
Press on the remote control or on the unit to change the volume and press RDS/SET to save. The clock icon “ “ shows that the alarm is set.
Note
If you set the clock, you can check the time by pressing CLOCK even when the player is turned off.
You can set alarm after you set the clock.
If you set the clock and alarm, you can check the alarm icon ““ by pressing CLOCK even when the player is turned off.
If you set the clock and alarm, you can check the alarm icon ““ and setting information by pressing ALARM even when the unit is turned off.
You can select ALARM on/off mode by pressing ALARM.
Troubleshooting
Problem
Cause & Correction
The unit does not work properly.
Turn off the power of this unit and the connected external device (TV, Woofer, DVD-player, Amplifier, etc.) and turn it onagain.
Disconnect the power cord of this unit and the connected external device (TV, Woofer, DVD-player, Amplifier, etc.) and then try connecting again.
Previous setting may not be saved when device power is shut off.
No Power.
The power cord is not plugged in. Plug in the power cord.
Check whether electricity failed. Check the condition by operating other electronic devices.
No sound.
Check whether you select right function. Press FUNCTION and check the selected function.
Check to see if the speakers are connected to the unit correctly.
The unit does not start play back.
An unplayable disc is inserted. Insert a playable disc.
No disc is inserted. Insert a disc.
The disc is dirty. Clean the disc. (Refer to page 32)
The disc is inserted upside down. Place the disc with the label or printed side facing upwards.
Radio stations cannot be tuned in properly.
The antenna is positioned poorly. Reorient the antenna position to good reception.
The signal strength of the radio station is too weak. Tune to the station manually.
No stations have been preset or preset stations have been cleared. (when being tuned by scanning preset channels) Preset some radio stations, see page 23 for details.
The remote control does not work properly.
The remote control is too far from the unit. Operate the remote control within about 23 ft (7 m).
There is an obstacle in the path of the remote control and the unit. Remove the obstacle.
The batteries in the remote control are exhausted. Replace the batteries with new ones.
LG Sound Sync does not work.
Check whether your LG TV supports LG Sound Sync.
Check connection of LG Sound Sync.
Check sound setting of your TV and this unit.
Maintenance
Handling the Unit
When shipping the unit
Please save the original shipping carton and packing materials. If you need to ship the unit, for maximum protection, re-pack the unit as it was originally packed at the factory.
Keeping the exterior surfaces clean
Do not use volatile liquids such as insecticide spray near the unit.
Wiping with strong pressure may damage the surface.
Do not leave rubber or plastic products in contact with the unit for a long period of time.
Cleaning the unit
To clean the player, use a soft, dry cloth. If the surfaces are extremely dirty, use a soft cloth lightly moistened with a mild detergent solution. Do not use strong solvents such as alcohol, benzine, or thinner, as these might damage the surface of the unit.
Maintaining the Unit
The unit is a high-tech, precision device. If the optical pick-up lens and disc drive parts are dirty or worn, the picture quality could be diminished. For details, please contact your nearest authorized service center.
Notes on Discs
Handling Discs
Never stick paper or tape on the disc.
Storing Discs
After playing, store the disc in its case. Do not expose the disc to direct sunlight or sources of heat and never leave it in a parked car exposed to direct sunlight.
Cleaning Discs
Do not use strong solvents such as alcohol, benzine, thinner, commercially available cleaners, or anti-static spray intended for old vinyl records.
 (Power) : Switches the unit ON or OFF.
 (Open/Close) : Opens and closes the disc tray.
 :
: to select the folder you want to play.
 : Mutes the sound.
 (Skip/Search) :
 (Play/Pause) :
 (Stop) :
 : The button is not available for any function.
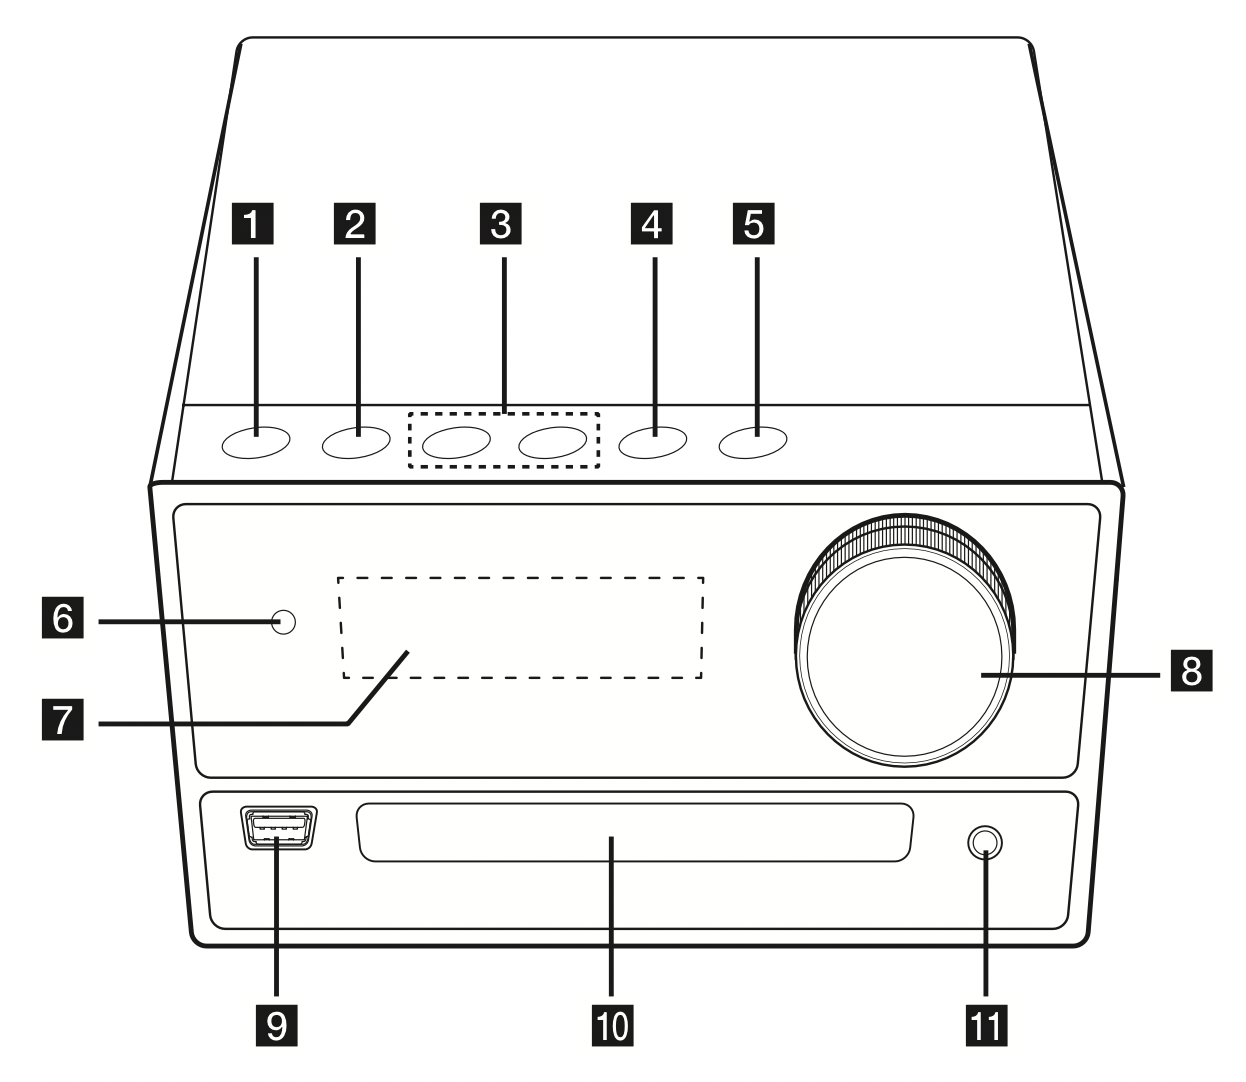
 (Skip/Search)
 (Play/Pause)
 file No.1 to
  file No.14 one by one.
 on the unit, all of DAB+ service list and saved preset DAB+ stations will be deleted and scan DAB+ service. Then press it again, scanning will be cancelled.

 “ shows that the alarm is set.