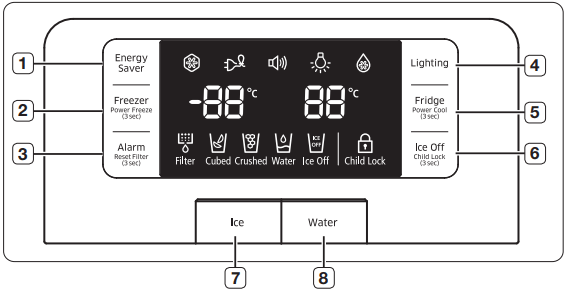
For better energy efficiency, press the Energy Saver button ().
If condensation occurs on the doors, turn the Energy Saver function off.
Freezer / Power Freeze (3 sec) Button
Press the Freezer / Power Freeze (3 sec) button () to set the Freezer to your desired temperature. You can set the temperature between -14 ºC and -22 ºC. Press and hold the Freezer / Power Freeze (3 sec) button for 3 seconds, to speed up the time needed to freeze products in the Freezer. It can be helpful if you need to quickly freeze easily spoiled items or if the temperature in the Freezer has warmed dramatically (For example, if the door was left open). When you use this function the energy consumption of the refrigerator will increase. Remember to turn it off when you don’t need it and return the freezer to your original temperature setting. When you have enough ice, just press and hold the button for 3 seconds again to cancel the Power Freeze mode. Power Freeze mode must be activated before putting large stuff in freezer compartment at least 20 hours before.
Alarm / Reset Filter (3 sec) Button
Press the Alarm button () to turn off the door open alarm. After removing the old water filter and installing a new one, reset the Indicator by pressing and holing the “Alarm” button for 3 seconds. The indicator will light again in about 6 months to let you know it is Time to change your water filter.
Alarm / Reset Filter (3 sec) Button
The filter Indicator will be Blue when you initially insert the water filter. The filter Indicator will be Light Pink when you have used your water filter for 5 months. The filter Indicator () will be Red when you have used your water filter for 6 months.
Lighting Button
Press the Lighting button () to turn on the dispenser LED lamp.
Fridge / Power Cool (3 sec) Button
Press the Fridge / Power Cool (3 sec) button () to set the fridge to your desired temperature.
You can set the temperature between 1 ºC and 7 ºC. Press and hold the Fridge / Power Cool (3 sec) button for 3 seconds, to speed up the time needed to cool products in the Refrigerator. It can be helpful if you need to quickly cool easily spoiled items or if the temperature in the fridge has warmed dramatically (For example, if the door was left open). Press and hold the button for 3 seconds again to cancel the Power Cool mode.
Ice Off / Child Lock (3 sec)
Press the Ice Off button () to turn the ice making function off. If you press and hold the Ice Off button for 3 seconds, the display and dispenser will be locked.
Ice Button
Press the Ice button to select your desired ice type. Cubed and crushed ice modes will be alternatively changed whenever you press the button. After selecting, push the dispenser Lever gently with your glass. This mode can not be used with the Water mode simultaneously.
Water Button
Press the Water button to dispense water. There is no Off mode additionally. After selecting, push the dispenser Lever gently with your glass. This button can not be used with the Ice button simultaneously. Water mode will be off if you press the Ice button.
Some functions are activated after a few second delay when the buttons are pressed, while others operate immediately. This is normal operation.
Basic temperature of Freezer and Refrigerator Compartments
The basic temperature and/or recommended temperature of Freezer and Refrigerator Compartments are -19 °C and 3 °C respectively. If the temperature of Freezer and Refrigerator Compartments are too high or low, adjust the temperature manually.
Controlling the Freezer temperature
The Freezer temperature can be set between -14 ºC and -22 ºC to suit your particular needs. Press the Freezer button repeatedly until the desired temperature is shown in the temperature display. Keep in mind that foods like ice cream may melt at -15 ºC. The temperature display will move sequentially from -22 ºC to -14 ºC. When the display reaches -14 ºC, it will begin again at -22 ºC.
Controlling the Refrigerator temperature
The Refrigerator temperature can be set between 7 ºC and 1 ºC to suit your particular needs. Press the Fridge button repeatedly until the desired temperature is shown in the temperature display. The temperature control process for the Fridge works just like the Freezer process.
Press the Fridge button to set your desired temperature. After a few seconds, the Fridge will begin adjusting towards the newly set temperature. This will be reflected in the digital display.
- The temperature of the Freezer, Refrigerator or pantry room may rise when you open the doors too frequently, or if a large amount of warm or hot food is placed inside.
- This may cause the digital display to blink. Once the Freezer and Refrigerator temperature return to their normal set temperatures, the blinking will stop.
- If the blinking continues, you may need to “reset” the Refrigerator. Try unplugging the appliance, wait for around 10 minutes and then plug the power cord back in.
- The temperature of the pantry room may be a little different according to the location inside.
- If communication between display and Main Controller errors, Pantry display light may blink. Once the pantry room return to their normal set temperatures, the blinking will stop. If the blinking continues for a long period of time, please contact to Samsung Electronics Service Center.
USING THE COLD WATER DISPENSER
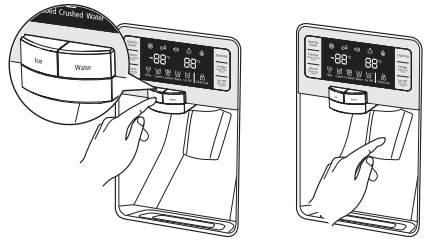
Press the Ice / Water button to select the type of you want.
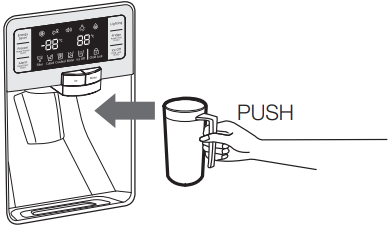
• Place a glass underneath the ice dispenser and push gently against the dispenser lever with your glass. Make sure the glass is in line with the dispenser to prevent the ice from bouncing out.
• Please wait 2 seconds before removing the glass under the dispenser to prevent spills. If the Refrigerator door opens, the dispenser does not work.
• When Cubed Ice is selected after using the Crushed Ice feature, a small amount of residual crushed ice might be produced.
• Water Dispenser Installation After installation, press the dispenser arm for at least 2 minutes to remove trapped air from the water line and to fill the water system.
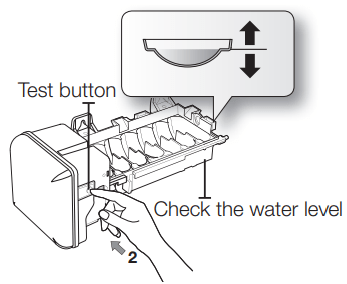
• In case ice doesn’t come out, pull out the ice bucket and press test button located on the right side of ice-maker.
• Do not press the test button continuously when the tray is filled with ice or water as illustration. Water may overflow or ice jamming may occur.
• Normal Use
To fill ice bucket to maximum capacity after installation, make sure to do the following steps.
1. Allow your refrigerator to operate and cool down for 24 hours (or 1 full day).
2. Waiting 24 hours will allow your ice maker to cool properly.
3. Dispense 4 to 6 ice cubes into the glass.
4. After 8 and 16 hours, dispense a full glass of ice at each time.
Whenever all ice is used at one time, the above step 3 and 4 must be repeated (before dispense the first 4 to 6 ice cubes, it needs waiting 8 hours).
This will replenish the ice cubes and ensure maximum ice production.
When you dump the ice from the ice bucket, you should press the dispenser lever once with ‘ICE CUBED’ or ‘CRUSHED’ function ON to get new ice faster after replacing the ice bucket in the refrigerator.
Using the water dispenser
Place a glass underneath the water outlet and push gently against the water dispenser lever with your glass. Make sure the glass is in line with the dispenser to prevent the water from splashing out. If you have just installed the refrigerator or installed a new water filter, Flush 3 L through filter before use (flush approximately 6 minutes). Make sure that water flows clearly again before drinking.
When you do not use the water dispenser for 2~3 days (especially during the summer), the dispensed water may have a funny smell or taste. If this occurs, we recommend that you discard the first 1~2 glasses for better tasting water.
Using the ice off function
When selecting the Ice Off mode, remove all ice cubes from the bucket. If you are not using the ice dispenser, the ice cubes may clump together. Pull the lock lever forward to throw away ice cubes or remove clumped ice from the bucket. Push the bucket back until you hear a click.
If you have a long vacation or business trip, close the water valve and shut off the water supply to the Refrigerator. This will help prevent accidental leakages. Do not disassemble the Ice-maker personally. It may cause disorder. Do not wash or spray the ice bucket with water. Just wipe it with a dry cloth. In order to operate the ice-maker properly, water pressure of 138~862 kPa is required.
Water clouding phenomenon
All water provided to refrigerators flows through the core filter which is an alkaline water filter. In this process, the pressure in the water that has flowed out of the filter gets increased, and oxygen and nitrogen become saturated. When this water flows out in the air, the pressure plummets and the oxygen and nitrogen get supersaturated so that they turn into gas bubbles. The water could look misty due to these oxygen bubbles. The water may look temporarily cloudy due to these oxygen bubbles. After a few seconds, the water will look clear.
Please wait 1 second before removing the cup after dispensing water to prevent spills. Do not pull out the lever dispenser after taking out ice or water. It comes back automatically. Ice is made in cubes.
When you select “Crushed”, the ice-maker grinds the ice cubes into crushed ice.
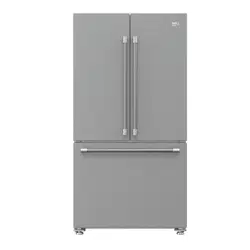
PARTS AND FEATURES
Use this page to become more familiar with the parts and features of the Refrigerator.
The Cool Select Pantry™ is a full-width drawer with adjustable temperature control. This pantry can be used for large party trays, deli items, pizza, beverages or miscellaneous items. There is a temperature control which can adjust the amount of cold air allowed into the pantry. The control is located on the right side of the pantry.
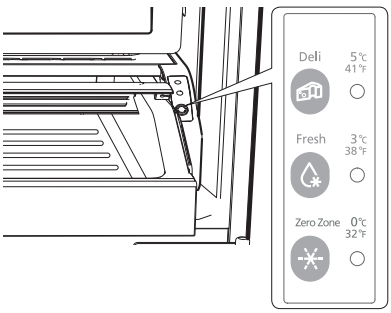
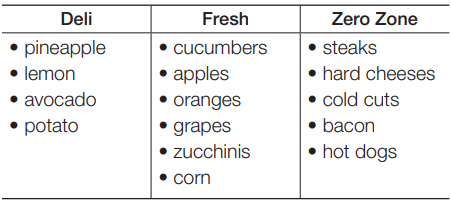
• Press the Temp button repeatedly until your desired mode is lit. The Fresh mode (3 °C), Zero Zone mode (0 °C) and Deli mode (5 °C) will be selected whenever you press the Temp button. Initially, the Fresh mode is set. Though the setting temperature is different from the current temperature, the temperature will be changed to the setting temperature automatically.
Temp
You can select your Pantry temperature from among Deli (5 °C [41 °F] ), Fresh (3 °C [38 °F] ) and Zero Zone (0 °C [32 °F] ) modes.
Selection Button
1. When “Deli” is selected, the temperature of the pantry will be kept around 5 °C (41 °F). This feature helps keep food fresh for a long time.
2. When “Fresh” is selected, the temperature of the pantry will be kept around 3 °C (38 °F). This feature helps keep food fresh for a longer time.
3. When “Zero Zone” is selected, the temperature of the pantry will be kept around 0 °C (32 °F). This feature also helps keep meat or fish fresh for a longer time.
Fruits and vegetables may be damaged under the “Zero Zone” setting. Do not store lettuce or other leafy produce in this pantry.
Do not store glass bottles in this pantry. If they are frozen, they can break and cause personal injury.
REMOVING THE REFRIGERATOR ACCESSORIES
1. Door Bins & Dairy Compartment
To remove - Simply lift the bin up and pull straight out.
To relocate - Slide it in above the desired location and push down until it stops.
Injury may occur if the door bins are not firmly assembled. Do not allow children to play with bins.
Sharp corners of the bins may cause injury.
Do not adjust a bin full of foods.
Dust removal method - Remove the guard and wash in water.
2. Tempered Glass shelves
To remove - Tilt up the front of the shelf in the direction shown and lift it up vertically . Pull the shelf out.
To relocate - Tilt the front of the shelf up and guide the shelf hooks into the slots at a desired height. Then lower the front of the shelf so that the hooks can drop into the slots.
The Tempered Glass shelves are heavy. Use special care when removing them.
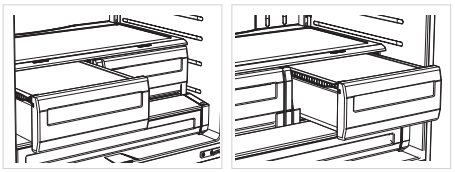
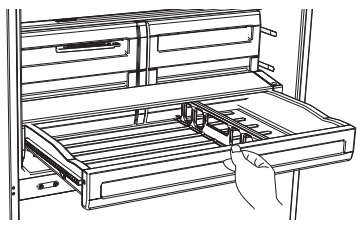
3. Vegetable & Fruit Drawers
To remove - Pull the drawer out to full extension. Tilt up the front of the drawer and pull straight out.
To relocate - Insert the drawer into the frame rails and push back into place.
The drawers need to be removed before the glass shelf above them can be lifted out. Do not open the drawers while the pantry is open. It may cause a scratch or breakage to the drawer covers.
4. Cool Select Pantry™
To remove the pantry - Pull the pantry out to full extension. Tilt up the front side of pantry and pull straight out.
To relocate the pantry - Push the rails to the back of the Refrigerator. Place the drawer onto the rails and slide the pantry back until it is in place.
To remove the divider - Pull the pantry completely out to full extension and raise the front side of the divider to unhook it from the rear wall of the pantry, then lift the divider out.
To relocate the divider - Hook the back of the divider over the rear wall of the pantry and push the divider down.
USING THE DOORS
The Refrigerator doors ensure that the doors close all the way and are securely sealed. When the Refrigerator door is only partially open, it will automatically close. The door will stay open when opened more than 76mm.
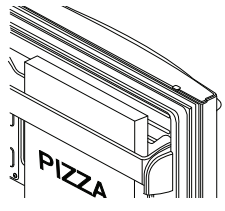
USING THE TILTING POCKET
The Tilting Pocket can be used to store up to a 406mm pizza if you place it as shown in the illustration.
REMOVING THE FREEZER ACCESSORIES
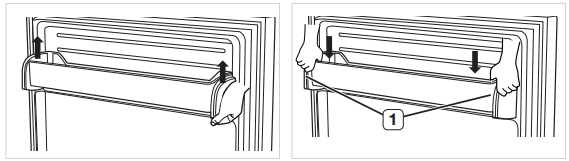
1. Tilting Pocket
To remove - Pull the brackets upward until you hear a clicking sound and remove the pocket.
To replace - Hook the ends of the pocket into both brackets and push down until it locks into place.
2. Auto Pull out Drawer
To remove - Pull the drawer out to full extension. Tilt up rear of drawer and lift straight out.
To relocate - Place the drawer onto the rails by tilting it up. Lower the drawer into place until it is horizontal and slide the drawer in.
3. Freezer Drawer
To remove the freezer drawer - Pull the freezer drawer out fully. Tilt up the rear of the bin and lift it out to remove.
To relocate the freezer drawer - Place the bin into the rail assembly.
You can scratch the side of the bin if you twist it left or right when disassembling or re-assembling it.
Do not allow babies or children go inside the freezer drawer.
They could damage the refrigerator and seriously injure themselves. Do not sit on the freezer door. The door may break. Do not allow children to climb into the freezer drawer.
Do not remove the divider.
If trapped inside, children may become injury and suffocate to death.
CLEANING THE REFRIGERATOR
Do not use benzene, thinner, or Clorox, Chloride for cleaning. They may damage the surface of the appliance and may cause a fire.
Do not spray the refrigerator with water while it is plugged in, as it may cause an electric shock.
Do not clean the refrigerator with benzene, thinner or car detergent for risk of fire.
CHANGING THE INTERIOR LIGHTS
Do not disassemble or replace the LED type Lighting. To change the LED Type Lighting contact Samsung service center or your authorized Samsung dealer.
If Users randomly exchange the LED lamp by yourself, this may result in an electric shock or personal injury.
CHANGING THE WATER FILTER
To reduce risk of water damage to your property DO NOT use generic brands of water filters in your SAMSUNG Refrigerator.
USE ONLY SAMSUNG BRAND WATER FILTERS. SAMSUNG will not be legally responsible for any damage, including, but not limited to property damage caused by water leakage from use of a generic water filter. SAMSUNG Refrigerators are designed to work ONLY WITH SAMSUNG WATER Filter.
The “Filter Indicator” light lets you know when it is time to change your water filter cartridge. To give you preparation time to get a new filter, the red light will come on just before the capacity of the current filter runs out. Changing the filter on time provides you with the freshest, cleanest water from your fridge.
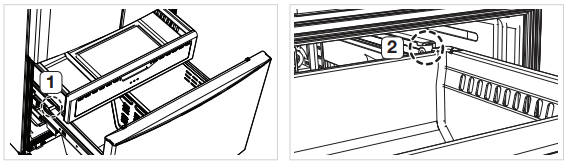
1. Take a new water filter and put a month indicator sticker on the filter as shown. The date on the sticker must be six months from the current date. For example, if you are replacing the water filter in March, put the “SEP” (September) sticker on the filter to remind you to replace in September. Normal filter life is about every 6 months.
2. Remove the new filter’s protective cap and remove the old filter.
3. Position and insert the new filter into the filter housing. Slowly turn the water filter clockwise to align with the printing mark on the cover, locking the filter in position. Make sure to align the water filter label mark with the center of cover filter printing as illustrated. Remember, do not over-tighten.
4. Once you have completed this process, press and hold the Alarm button for 3 seconds to reset the filter schedule.
5. Lastly, Flush 3L through filter before use (flush approximately 6 minutes) Make sure that water flows clearly again before drinking.
Be sure to flush the dispenser thoroughly otherwise water may drip from the dispenser.
This means that there is still air in the line. Do NOT use the water or ice dispenser without a water filter cartridge because the water line may become blocked.
TROUBLESHOOTING
PROBLEM
SOLUTION
The Refrigerator does not work at all or it does not chill sufficiently
• Check that the power plug is properly connected.
• Is the temperature control on the display panel set to the correct temperature? Try setting it to a lower temperature.
• Is the Refrigerator in direct sunlight or located near a heat source?
• Is the back of the Refrigerator too close to the wall and therefore keeping air from circulating?
The food in the Refrigerator is frozen.
• Is the temperature control on the display set to the correct temperature? Try setting it to a warmer temperature.
• Is the temperature in the room too low?
• Did you store the food with high water content in the coldest part of the Refrigerator? Try moving those items into the body of the Refrigerator instead of keeping them in the Cool Select Pantry™.
You hear unusual noise or sounds.
• Check that the Refrigerator is level and stable.
• Is the back of the Refrigerator too close to the wall and therefore keeping air from circulating?
• Was anything dropped behind or under the Refrigerator?
• A “ticking” sound is heard from inside the Refrigerator. It is normal and occurs because various accessories are contracting or expanding according to the temperature of the Refrigerator interior.
The front corners and vertical hinged section of the appliance are hot and condensation is occurring.
• Some heat is normal as anti-condensators are installed in the vertical hinged section of the Refrigerator to prevent condensation.
• Is the Refrigerator door ajar? Condensation can occur when you leave the door open for a long time.
Ice-maker is not producing ice.
• Did you wait for 12 hours after installation of the water supply line before making ice?
• Is the water line connected and the shut-off valve opened?
• Did you manually stop the ice making function?
• Is the Freezer temperature too warm? Try setting the Freezer temperature lower.
You can hear water bubbling in the Refrigerator.
• This is normal. The bubbling comes from the Refrigerator coolant liquid circulating through the Refrigerator.
There is a bad smell in the Refrigerator.
• Check for spoiled food.
• Foods with strong odors(for example, fish) should be tightly covered.
• Clean out your Freezer periodically and throw away any spoiled or suspicious food.
Frost forms on the walls of the Freezer.
• Is the air vent blocked? Remove any obstructions so air can circulate freely.
• Allow sufficient space between the foods stored for efficient air circulation.
• Is the Freezer drawer closed properly?
Water dispenser is not functioning.
• Is the water line connected and the shut-off valve opened?
• Has the water supply line tubing been crushed or kinked? Make sure the tubing is free and clear of any obstruction.
• Is the water tank frozen because the Refrigerator temperature is too low? Try selecting a warmer setting on the main display panel.

 Energy Saver Button
 ).
). Freezer / Power Freeze (3 sec) Button
 ) to set the Freezer to your desired temperature. You can set the temperature between -14 ºC and -22 ºC. Press and hold the Freezer / Power Freeze (3 sec) button for 3 seconds, to speed up the time needed to freeze products in the Freezer. It can be helpful if you need to quickly freeze easily spoiled items or if the temperature in the Freezer has warmed dramatically (For example, if the door was left open). When you use this function the energy consumption of the refrigerator will increase. Remember to turn it off when you don’t need it and return the freezer to your original temperature setting. When you have enough ice, just press and hold the button for 3 seconds again to cancel the Power Freeze mode. Power Freeze mode must be activated before putting large stuff in freezer compartment at least 20 hours before.
 Alarm / Reset Filter (3 sec) Button
 ) to turn off the door open alarm. After removing the old water filter and installing a new one, reset the Indicator by pressing and holing the “Alarm” button for 3 seconds. The indicator will light again in about 6 months to let you know it is Time to change your water filter.
 Alarm / Reset Filter (3 sec) Button
 ) will be Red when you have used your water filter for 6 months.
 Lighting Button
 ) to turn on the dispenser LED lamp.
 Fridge / Power Cool (3 sec) Button
 ) to set the fridge to your desired temperature.
 Ice Off / Child Lock (3 sec)
 ) to turn the ice making function off. If you press and hold the Ice Off button for 3 seconds, the display and dispenser will be locked.
 Ice Button
 Water Button
 Some functions are activated after a few second delay when the buttons are pressed, while others operate immediately. This is normal operation.
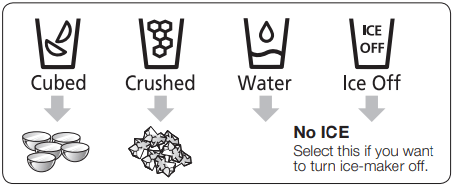

 Do not store glass bottles in this pantry. If they are frozen, they can break and cause personal injury.
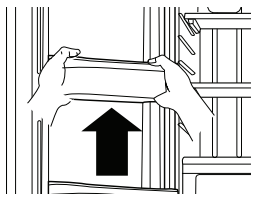
 and lift it up vertically
  . Pull the shelf out.
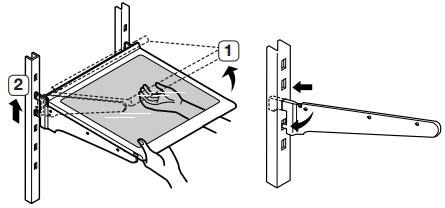
 Do not remove the divider.
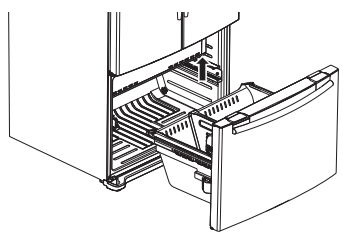
 If Users randomly exchange the LED lamp by yourself, this may result in an electric shock or personal injury.