You can watch live broadcasts by connecting a coaxial cable to your TV and can get access to the Internet by using a LAN cable or wireless access point. Using various connectors, you can also connect external devices.
Connection Guide
You can view detailed information about external devices that can be connected to the TV.
> Menu > Connected Devices > Connection Guide
It shows you how to connect various external devices, such as video devices, game consoles, and PCs using pictures. If you select the connection method and an external device, the connection details appear.
Smartphone: Screen Sharing (Smart View), SmartThings, Apple AirPlay, NFC on TV, Tap View
PC: HDMI, Screen Sharing (Wireless), Apple AirPlay
Input Device: Remote Control, Keyboard, Mouse, USB Gamepad, USB Camera, Bluetooth Device
Game Console: HDMI
External Storage: USB Flash Drive, Hard Disk Drive (HDD)
The connection method and available external devices may differ depending on the model.
Some functions may not be supported depending on the model or geographical area.
Using HDMI Troubleshooting, you can check the connection to HDMI cable and external devices (takes approximately 2 minutes)
The image on your TV may differ from the image above depending on the model and geographical area.
Connecting an Antenna
You can connect a coaxial cable to your TV.
An antenna connection is not necessary if you connect a cable box or satellite box.
The port on your TV may differ from the following files depending on the product model and region.
Connecting to the network
You can get access to the Internet through your TV
> Menu > Settings > All Settings > Connection > Network > Open Network Settings
Configure network settings to connect to an available network
Establishing a wired Internet connection
> Menu > Settings > All Settings > Connection > Network > Open Network Settings > Wired
If you connect a LAN cable, the TV automatically accesses the Internet.
If the TV does not automatically connect to the network, refer to "Network Issues" in "Troubleshooting."
To connect a LAN cable, use a CAT 7 (*STP type) cable for the connection. (100/10 Mbps)
* Shielded Twisted Pair
The TV will not be able to connect to the Internet if your network speed is below 10 Mbps.
This function may not be supported depending on the model.
Wired networks are not supported by some models.
Establishing a wireless Internet connection
> Menu > Settings > All Settings > Connection > Network > Open Network Settings > Wireless
Make sure that you have the wireless access point's name (SSID) and password settings before attempting to connect. The network name (SSID) and security key are available on the wireless access point's configuration screen. See the wireless access point's user manual for more information.
The image on your TV may differ from the image above depending on the model and geographical area.
If no wireless access point is found, select Add Network at the bottom of the list and enter the network name (SSID).
If your wireless access point has a WPS or PBC button, select Use WPS at the bottom of the list, and then push the WPS or PBC button on your access point within 2 minutes. The TV will connect automatically.
To view or delete previously connected network names (SSIDs), move the focus to Manage Saved Networks, and then press the Select button.
To disconnect Wi-Fi, select Disconnect in > Menu > Settings > All Settings > Connection > Network > Network Status.
Checking the Internet connection status
> Menu > Settings > All Settings > Connection > Network > Network Status.
View the current network and Internet status.
Resetting Your Network
> Menu > Settings > All Settings > Connection > Network > Reset Network
Turning on the TV with a mobile device
> Menu > Settings > All Settings > Connection > Network > Expert Settings > Power On with Mobile
You can turn on the TV using a mobile device connected to the same network as the TV.
This function is available with a mobile device connected to the TV through the SmartThings app or the Apple AirPlay function.
Apple AirPlay may not be supported depending on the model or geographical area.
Connecting an IP control device to the TV
> Menu > Settings > All Settings > Connection > Network > Expert Settings > IP Remote
You can connect an IP control device to the TV remotely to manage your IP device.
To use this function, Power On with Mobile must be turned on.
Turning this feature on may allow other IP control devices to control your TV. We recommend turning this feature on only if an authorized third-party custom controller is installed and specifically for a Samsung TV and if your Wi-Fi network is password protected.
This function may not be supported depending on the model.
Allowing to connect a wireless network
> Menu > Settings > All Settings > Connection > Network > Expert Settings > Wi-Fi
You can enable the connection to Wi-Fi.
To connect a wireless network, the function must be active.
Allowing to connect the Wi-Fi Direct
> Menu > Settings > All Settings > Connection > Network > Expert Settings > Wi-Fi Direct
When using Wi-Fi Direct, you can connect directly with other devices and share content without using a wireless router.
Changing the name of the TV
> Menu > Settings > All Settings > Connection > Device Name
You can change the name of the TV on the network. Select User Input at the bottom of the list and change the name.
Displaying your mobile device screen on the TV
You can watch the screen of your mobile device on the TV screen through Smart View, Apple AirPlay or Tap View.
When you start screen sharing with a mobile device (Smart View / Apple AirPlay / Tap View), the TV screen switches to the Multi View or mobile device's screen. Watch multiple contents at the same time with the Multi View screen.
Using Screen Sharing (Smart View)
For information on how to share the screen with your mobile device, refer to > Menu > Connected Devices > Connection Guide > Smartphone > Screen Sharing (Smart View)
To turn off Screen Sharing (Smart View), disconnect the mobile device or press the button on the remote control.
Using the Smart View menu on your mobile device, you can change the settings such as aspect ratio.
Using Apple AirPlay
Use AirPlay if you are an iPhone or iPad user. For more information, refer to > Menu > Settings > All Settings > Connection > Smartphone > Apple AirPlay
Using Screen Sharing (Tap View)
By tapping the mobile device on your TV, you can watch Multi View or mobile device's screen through the TV screen. When you tap a mobile device on your TV while running a music app on your mobile device, the TV screen switches to the Music Wall screen.
1 . Enable Tap View on your mobile device
2. Turn on the screen of your mobile device.
3. Tap your mobile device on the TV. The TV screen switches to Multi View or mobile device's screen.
4. Watch Multi View or mobile device's screen on the TV screen.
Enabling Tap View
Enable Tap View in the SmartThings app.
Depending on the SmartThings app version, you may need to register the TV with your mobile device.
This function may not be supported depending on the model.
1. Launch the SmartThings app on your mobile device.
2. Select Settings (> ) in SmartThings app on your mobile device.
3. Set Tap View to on.
Upon connection for the first time, select Allow on a pop-up window of the TV.
Connection Cables for External Devices
You can view detailed information about the connection cables for external devices that can be connected to the TV.
Each cable simultaneously transmits digital video and audio signals from an external device to the HDMI port on the TV. Cables are divided into various types according to the types of input or output ports on external devices.
Switching between external devices connected to the TV
You can switch between TV programs and the content of external devices.
> Menu > Connected Devices
When you select a connected external device on the Source screen, the output of the selected device is displayed on the TV's screen.
To control a device (Blu-ray player, game console, etc.) that supports universal remote control with the TV's remote control, connect the device to an HDMI port on the TV, and then turn on the device. The output displayed on the TV is automatically switched to the output of the device or you can configure universal remote control for the device automatically. For more information, refer to "Controlling External Devices with a Samsung Remote Control - Using the Universal Remote."
When a USB device is connected to the USB port, a pop-up message appears that lets you switch easily to the media content listed on the device.
This function may not be supported depending on the device and geographical area.
Editing the name and icon of an external device
> Menu > Connected Devices
You can change the port name for a connected external device or add it to the Home Screen.
The image on your TV may differ from the image above depending on the model and geographical area.
1. Move the focus to a connected external device.
2. Press the up directional button. The following functions become available:
Available functions may differ depending on the port type.
1. Universal Remote
You can control external devices connected to the TV using a Samsung remote control. To control external devices, register them by following the instructions on the screen.
This function may not be supported depending on the model or geographical area.
For more information, refer to "Controlling External Devices with a Samsung Remote Control - Using the Universal Remote."
2. Edit
You can rename the input ports and change the device icons.
3. Information
You can view detailed information about an external device.
4. Add to Home
You can add the port of an external device to the Home Screen for quick switching.
Using additional functions
You can use the following features on the Source screen.
Camera
Connect a USB camera, or use the SmartThings app on your mobile phone to connect a camera. Connect a camera to use video call, home workout, and other new features.
PC on TV
Use the TV to access your PC via remote PC or Screen Sharing (Wireless).
Connection Guide
Displays device connection instructions.
Remote Key Guide
You can view how to use the remote control.
Universal Remote
Lets you register external devices to your Samsung remote control and control them using the Remote.
Connection Notes
When connecting an external device, note the following:
The number of connectors, and their names and locations may differ with the model.
Refer to the external device's operating manual when connecting it to the TV. The number of external device connectors, and their names and locations may differ with the manufacturer.
Connection notes for HDMI
The following types of HDMI cables are recommended:
High Speed HDMI Cable
High Speed HDMI Cable with Ethernet
Premium High Speed HDMI Cable
Premium High Speed HDMI Cable with Ethernet
Ultra High Speed HDMI Cable
Use an HDMI cable with a thickness of 0.66 inches (17 mm) or less.
Using a non-certified HDMI cable may result a blank screen or a connection error.
Some HDMI cables and devices may not be compatible with the TV due to different HDMI specifications.
This TV does not support HDMI Ethernet Channel. Ethernet is a Local Area Network (LAN) built with coaxial cables standardized by the IEEE.
Use a cable shorter than 10 feet (3 m) to get the best UHD viewing quality.
Many computer graphics adaptors do not have HDMI ports, but have DVI or DisplayPort ports instead. If your PC does not support HDMI video out, connect your PC with a DVI to HDMI or HDMI to DisplayPort cable.
When the TV is connected to an external device, such as a DVD/BD player or a set-top box via HDMI, power sync mode will be automatically activated. In the power sync mode, the TV continues to detect and connect external devices via HDMI cable. This function can be deactivated by removing the HDMI cable of the connected device.
This function may not be supported depending on the model.
Connection notes for audio devices
For better audio quality, it is good to use an AV receiver.
If you connect an external audio device using an optical cable, the Sound Output setting automatically changes to the connected device. However, to make this happen, you must turn on the external audio device before connecting the optical cable. To manually change the Sound Output setting, do one of the following
This function may not be supported depending on the model.
- Use the Quick Settings screen to change to the connected device:
Use the Select button to select Optical on the Sound Output menu. ( > Menu > Settings > down directional button > Sound Output).
- Use the Settings screen to change to the connected device:
Select Optical on the Sound Output menu. ( > Menu > Settings > All Settings > Sound > Sound Output).
Refer to the sound bar's user manual when connecting it to the TV.
An unusual noise coming from a connected audio device while you are using it, may indicate a problem with the audio device itself. If this occurs, ask for assistance from the audio device's manufacturer.
Digital audio is only available with 5.1 channel broadcasts.
Connection notes for computers
For the resolutions supported by the TV, refer to "Read Before Connecting a Computer (Supported Resolutions)."
If you want to connect your PC and TV wirelessly, both of them must be connected to each other on the same network.
When sharing content with other network-based devices, such as those in an IP (Internet Protocol) storage system, sharing may not be supported due to the network’s configuration, quality, or functionality, for example, if the network has an NAS (Network-Attached Storage) device.
Connection notes for mobile devices
To use the Smart View function, the mobile device must support a mirroring function, such as Screen Mirroring or Smart View. To check whether your mobile device supports the mirroring function, refer to the mobile device's user manual.
The Screen Sharing (Smart View) feature may not operate smoothly in a 2.4GHz environment. For better experience, 5.0GHz is recommended. 5GHz may not be available depending on the model.
To use Wi-Fi Direct, the mobile device must support the Wi-Fi Direct function. To check whether your mobile device supports Wi-Fi Direct, refer to the mobile device's user manual.
The mobile device and your Smart TV must be connected to each other on the same network.
Use AirPlay if you are an iPhone or iPad user. For more information, refer to > Menu > Connected Devices > Connection Guide > Smartphone > Apple AirPlay.
This function may not be supported depending on the model or geographical area.
The video or audio may stop intermittently, depending on network conditions.
When sharing content with other network-based devices, such as those in an IP (Internet Protocol) storage system, sharing may not be supported due to the network’s configuration, quality, or functionality, for example, if the network has an NAS (Network-Attached Storage) device.
Remote Control and Peripherals
You can control TV operations with your Samsung Smart Remote. Pair external devices, such as a keyboard, for ease of use.
About the Samsung Smart Remote (QLED TV/The Frame (43-inch or larger models)/The Serif/OLED TV)
About the Samsung Smart Remote (The Frame (32LS03B model)/BU8 Series)
About the Samsung Smart Remote (Q6*A/Q7*A/QN9*A Series)
Learn about the buttons on the Samsung Smart Remote.
About the Samsung Smart Remote (AU8 Series)
Learn about the buttons on the Samsung Smart Remote.
About the Samsung Smart Remote (The Sero)
Connecting the Samsung Smart Remote to the TV
Connect the Samsung Smart Remote to your TV to operate the TV.
When you turn on the TV for the first time, the Samsung Smart Remote pairs to the TV automatically. If the Samsung Smart Remote does not pair to the TV automatically, point it at the front of the TV, and then press and hold the and buttons simultaneously for 3 seconds or more.
Controlling External Devices with a Samsung Remote Control - Using the Universal Remote
Control the TV and connected external devices with a Samsung remote control.
> Menu > Connected Devices > Universal Remote
You can control external devices connected to the TV using a Samsung remote control. To control external devices, register them by following the instructions on the screen.
This function may not be supported depending on the model or geographical area.
You can also use the Anynet+ (HDMI-CEC) function to operate external Samsung devices with your TV's remote control without any additional setup. For more information, refer to "Using Anynet+ (HDMI-CEC)."
Specific external devices connected to the TV may not support the universal remote feature.
Do not place any obstacles in front of an external device and TV's logo. It may cause improper transmitted signals from the remote control.
The TV memorizes both the external device and its connection port (HDMI 1, HDMI 2, etc.).
If you have difficulty controlling external devices with the Universal Remote, try adjusting the positions of the external devices.
This function may not operate properly depending on the TV installation environment and the features of external devices.
Learn how to use Samsung Smart Remote
You can learn how to use Samsung Smart Remote.
> Menu > Settings > Support > Remote Button Guide
Find details on how to use the Samsung Smart Remote.
Press the menu to use a variety of functions of the Samsung Smart Remote.
Using Anynet+ (HDMI-CEC)
Control an external device connected via Anynet+ (HDMI-CEC) with the remote control.
You can use the TV's remote control to control external devices that are connected to the TV by an HDMI cable and that support Anynet+ (HDMI-CEC). Note that you can only set up and operate Anynet+ (HDMI-CEC) with the remote control.
Connecting an external device through Anynet+ and using their menus
> Menu > Settings > All Settings > Connection > External Device Manager > Anynet+ (HDMI-CEC)
Set Anynet+ (HDMI-CEC) to On.
Connect an HDMI-CEC-compliant device to the TV.
Turn on the connected external device.
The device is automatically connected to the TV. After the connection process is finished you can access the menu of the connected device using your TV remote and control the device.
The connecting process can take up to 2 minutes to complete.
Read before connecting an Anynet+ (HDMI-CEC) device
Anynet+ (HDMI-CEC)-enabled devices must be connected to the TV with an HDMI cable. Note that some HDMI cables may not support Anynet+ (HDMI-CEC).
You can configure the TV's Universal Remote to control third-party cable boxes, Blu-ray players, and home theaters that do not support HDMI-CEC. For more information, refer to "Controlling External Devices with a Samsung Remote Control - Using the Universal Remote."
Anynet+ cannot be used to control external devices that do not support HDMI-CEC.
The TV remote control may not work under certain circumstances. If this occurs, set up the device as an Anynet+ (HDMICEC)-enabled device again.
Anynet+ (HDMI-CEC) works only with external devices that support HDMI-CEC, and when those devices are either in standby mode or turned on.
Anynet+ (HDMI-CEC) can control up to 12 compliant external devices (up to 3 of the same type) except for home theaters.
Anynet+ (HDMI-CEC) can control only one home theater system.
To listen to 5.1 channel audio from an external device, connect the device to the TV via an HDMI cable and connect a 5.1 home theater system directly to the external device's digital audio output connector.
If an external device has been set up for both Anynet+ and a universal remote control, the device can be controlled only with the universal remote control.
Controlling the TV with a Keyboard, Mouse, or Gamepad
Connecting a keyboard, mouse, or gamepad to make it easier to control the TV.
> Menu > Settings > All Settings > Connection > External Device Manager > Input Device Manager
You can connect a keyboard, mouse, or gamepad to control the TV easily.
Connecting a USB keyboard, mouse, or gamepad
Plug the keyboard, mouse or gamepad cable into the USB port.
If you connect a mouse, it is available only in the Internet app and PC on TV function.
XInput USB gamepads are supported.
For more information, refer to Input Device in Connection Guide ( > Menu > Connected Devices > Input Device)
Connecting a Bluetooth keyboard, mouse, or gamepad
> Menu > Settings > All Settings > Connection > External Device Manager > Input Device Manager > Bluetooth Device List
If your device was not detected, position the keyboard close to the TV, and then select Refresh. The TV scans for available devices again.
If you connect a mouse, it is available only in the Internet app.
For more information, refer to the Bluetooth device's user manual.
This function may not be supported depending on the model or geographical area.
Using the keyboard and mouse
Setting up the input devices
> Menu > Settings > All Settings > Connection > External Device Manager > Input Device Manager
Keyboard Settings
You can set up the keyboard with the Keyboard Language and Keyboard Type functions.
Mouse Settings
You can set up the mouse with the Primary Button and Pointer Speed functions.
Entering Text using the On-Screen Virtual Keyboard
Use the virtual keyboard to enter text on your TV
The image on your TV may differ from the image above depending on the model and geographical area.
1.Recommended text
When you type a word you want to use as a search term, this function displays related suggestions from which you can choose one.
2.Editing Buttons
By selecting any of pop-up Editing Buttons after entering characters on the virtual keyboard, you can quickly perform the editing function.
3.Options
Select on the virtual keyboard screen. The following options are available:
The options available may differ depending on the function running currently.
Recommended text
Reset Recommended Text Memory
Accented Character Preview
Predict Next Character (when using direction buttons)
Language
Entering Text using the remote control's microphone and the on-screen virtual keyboard
When the virtual keyboard is on the screen, press and hold the button on the Samsung Smart Remote, speak into the microphone on the Samsung Smart Remote, and then release the button. What you say appears on the screen as text.
Entering text with your voice may not be supported for some functions.
This function may not be supported depending on the model or geographical area.
The Samsung Smart Remote may not be supported depending on the model or geographical area.
Smart Features
Using Ambient Mode
> left directional button > Ambient Mode
Set your TV to display a photo or content you desire when the TV is not used.
1.Getting to Know Ambient Mode
Press View Help to briefly view information about Ambient Mode, including functions
2.Function and content preview
Select a preferred content and a preferred background and set them as your Ambient Mode. While in Ambient Mode, press the Select button on the remote control to view the content details.
Changing art work
Change the artwork to display in Ambient mode. Press the Up button on the remote control to move the focus to an artwork. Use the left or right directional button to move to the desired art work, and then press Select button on the remote control.
View Details
View detailed information about the selected image.
Favorite
Add or delete specific images in Favorite by pressing Select on the remote control. To view items that are set as Favorites, navigate to My Page > Favorite.
– Favorite: The item is not set as favorite
– Favorite: The item is set as favorite
Style & Settings
Customize the style and settings to suit your preferences.
– Weather Filter
You can add a weather effect to content.
– Time Filter
You can select any background time format for content.
– Color
Changes the color of the content.
– Vibes
Selects a mood that matches the content.
– Backgrounds
Changes the background of the content.
– Shadow Effects
Applies a shadow effect that you select to the content.
– Filter
You can select a image filter effect to content.
– BGM Mode
You can add a background music to content.
Style & Settings
Customize the style and settings to suit your preferences.
– Weather Filter
You can add a weather effect to content.
– Time Filter
You can select any background time format for content.
– Color
Changes the color of the content.
– Vibes Selects a mood that matches the content.
– Backgrounds
Changes the background of the content.
– Shadow Effects
Applies a shadow effect that you select to the content.
– Filter
You can select a image filter effect to content. – BGM Mode You can add a background music to content.
Screen Settings
You can adjust the settings such as content brightness, saturation, and color tone.
– Brightness
Adjusts the brightness of the content.
– Saturation
Adjusts the saturation of the content.
– Color Tone
Adjusts the colors of the content.
– Red Tone / Green Tone / Blue Tone
Adjusts the red, green, blue contrast.
Selecting Content Category
Favorite
While in Ambient Mode, press the Select button on the remote control and press Favorite to save the displayed content to Favorite.
Special Edition
Allows you to enjoy creative artwork and interior design content created by the world's finest artists and designers.
Cinemagraph
Adds a looping animation to a specific part of the photo to make it more attention-grabbing.
My Album
Allows you to set a photo stored in your mobile device or Samsung Cloud as the wallpaper of the Ambient Mode screen
Q Collection
Provides content that is dedicated to Samsung QLED.
Mood
Enjoy a range of options to create the right ambience to suit your mood.
Relaxation
Relax with a selection of calming content inspired by nature to soothe your mood.
Décor
Allows you to select content with a sensible and beautiful design.
Info
Allows you to select essential real-time information, such as weather, temperature, time, and news
Artwork
Allows you to select content such as world famous photos and artwork.
Background
Theme Allows you to select a background theme provided by Samsung
Routine
Enjoy a range of routines, each displaying content to suit each part of your day or create your very own routines via the SmartThings app.
3.Ambient Screen Options
Following Ambient Mode options are configurable:
Auto Brightness
Changes the auto brightness setting for Ambient Mode.
Sleep After
Sets the time when the Ambient Mode screen turns off automatically.
Entering the TV viewing screen from Ambient Mode
To enter the TV viewing screen from Ambient Mode, press the button, or button to redirect to the Ambient Mode Home Screen, press the left directional button on the remote control, and then select either or Media.
Using Art Mode
> left directional button > Art
You can use Art mode function to display image content such as artworks or photos when you are not watching TV in full screen mode.
Press the button on the remote control to switch to TV mode or Art mode.
Press the button in Art mode to enter to Media Home.
Press the button in Art mode to switch to TV mode.
To turn off the TV completely, press and hold the button on the remote control, or press the TV Controller button at the lower right rear corner of the TV.
In Art mode, the brightness and color tone of your TV are automatically adjusted depending on the ambient, and the TV can be automatically turned off.
Configure the motion sensor settings by using Art Mode Options ( > left directional button > Art > Art Mode Options) at the bottom of the Art home displayed on the TV or using the mobile SmartThings app. The TV may automatically turn on or off by detecting user motions and other visual changes.
While in Art mode, use the SmartThings app on your mobile device to save photos on the device to the TV.
About the Art Home screen
> left directional button > Art
1.Useful Information
View information and promotions related to the Art home.
2.List of image categories
From the displayed list of categories, select an image and press the Select button to view details about the image. Select Preview to preview the image in full screen for 30 seconds. If you like the image, you can keep it as an artwork by purchasing it or subscribing to the Membership. If you select a saved image, the TV goes into Art mode. In Art mode, press Select on the remote control to use the following menu options:
Changing art work
Change the artwork to display in Art mode. Press the Up button on the remote control to move the focus to an artwork. Use the left or right directional button to move to the desired art work, and then press Select button on the remote control.
View Details
View detailed information about the selected image.
Favorite
Add or delete specific images in Favorite by pressing Select on the remote control. To view items that are set as Favorites, navigate to My Page Favorite.
– Favorite: The item is not set as favorite
– Favorite: The item is set as favorite
Mat
Customize the border style and color to suit your preferences. To save changes, select the desired mat style and color, and press either the Select or button.
Screen Settings
Customize the Art mode screen settings to suit your preferences.
– Brightness
Adjust the screen brightness. Press the Select button to save the change.
– Color Tone
Adjust the image colors.Press the Select button to save the change.
– Brightness Reset
Reset the screen brightness to the default value.
3.My Page
Recents
Manage recently displayed images
Favorites
Manage images saved in Favorite
– Slideshow
Play images in Favorite as a Slideshow. If a Slideshow is playing and you want to change the slide playback mode and image transition interval, press Select on the remote control and select Slideshow Options.
– Delete
Select and delete multiple images in Favorite simultaneously.
Membership
If you sign up for Membership, you can use artwork without any restrictions. You can also replace it with new artwork periodically to suit your preference.
Follow the on-screen instructions to proceed with the payment.
Payment Info
View artwork purchase details, and easily purchase artworks by entering required payment information.
Purchased
Once you purchase artworks from the Art Store, you will see them here.
4.Art Mode Options
Configure options related to the Art mode screen.
Sleep After
The TV automatically turns off if no motion is detected around the TV for a specified period of time. Press the Select button to specify a time period.
Night Mode
The TV automatically turns off if no light is detected around the TV. This mode detects lights around the TV to automatically turn on or off the TV depending on the presence of light. Press the Select button to turn the mode on or off.
Motion Detector
Set the Motion Detector for the motion sensor. Press the Select button to set the sensitivity level
Import images from USB memory
1. Connect the USB memory device storing images to the TV.
2. The USB memory is automatically recognized, and the screen displays a list of image, music, and video files that are stored in the USB memory.
3. Navigate to the folder that contains the image file you want to save to the TV, and then select Options Send to Art Mode.
4. Select the image and press Send. The image, stored in the USB memory, is saved under Art mode.
Using Art mode with the SmartThings app
Once you have installed the SmartThings app on your mobile device, you can use the following functions:
You can download the SmartThings app from Google Play Store, Samsung Apps, or the App Store.
If the TV is not registered in your SmartThings app, press (Add Device) and register the TV before using the mode.
Selecting images.
Saving photos from a mobile device to the TV: Use the Add picture function to save photos on a mobile device to the TV.
Add Picture > select 2 to 3 images > Create Mat: Combine the 2 to 3 images to create a single image.
My Album > select content, such as Dynamic Filter or Auto Gallery, and then press Select Photo to set the content as mobile photos.
Subscribing to The Art Store Membership.
Applying border styles and colors to images
(more) Art Mode Settings.
Setting the brightness for Art mode.
Setting Sleep After: When no motion is detected for the time specified in Art mode, the TV turns off automatically.
Setting Motion Detector Sensitivity: Set the sensor sensitivity so that the TV turns on automatically when motion is detected in Art mode.
Setting Night Mode: Set The Frame to turn off automatically if no light is detected in the room.
About the Media Home Screen
View a variety of TV programs. Install various apps offered by Smart Hub, such as video, music, sports and game apps, and use the apps from the TV
> left directional button > Media
1. APPS
Install a variety of apps offered by Smart Hub, such as video, music, sports and game apps, and use the apps from the TV
2.Moving an item on the Home Screen
From the end of the APPS list, select List Edit. Move the focus to the app to relocate, and press the down directional button on the remote control. Select Move from the option menu. Use the left or right button to reposition the app and then press Select. This repositions the app on the Home Screen. An alternative way to move an app is to move the focus to the app to move and then press and hold the Select button.
3.Removing an item on the Home Screen
From the end of the APPS list, select List Edit. Move the focus to the app to uninstall, and press the down directional button on the remote control. Select Remove from the option menu. This removes the app from the Home Screen list.
4.Recent
Access your last watched TV program or last used input source.
5.On Now
Display a list of TV programs currently being aired. This function may not be supported, depending on the input signal and settings.
6.Universal Guide
Universal Guide is an app that allows you to search for and enjoy various content, such as TV shows, dramas, and movies, in one place. Universal Guide can recommend content tailored to your preferences.
You can use this feature on your mobile device with the Samsung SmartThings app.
Media Options
Preferences: Select a preferred service to receive content recommendations to suit your preference.
Continue Watching: Choose content providers or continue watching.
Parental Lock: Redirect to the Parental Lock menu. Turn all parental control settings on or off.
About the Menu Home Screen
Manage external devices connected to the TV, and configure settings for various functions available on the TV.
> left directional button > Menu
1.Samsung Account
Go to the Samsung Account screen to create a new account or sign out of your account.
2. Notification
You can view a list of notifications for all events that occur on your TV. A notification appears on the screen when it is time to schedule viewing, schedule recording, etc.
If you move the focus to Notification, and then press the Select button, a notification window appears on the right and the following functions are available:
Delete All
You can delete all your notifications.
Settings
You can select services you want to be notified about. When you select Allow sound, notifications are displayed with a notification sound.
3.Settings
Move the focus to the Settings menu to display quick setting options below the menu. Quick Settings can be used to quickly configure frequently used features.
All Settings
Displays the Settings menu for configuring specific settings.
Support
Displays the Support settings menu.
Network
Check your network connection. To check your network connection or change the connection settings, press the down directional button, and select either Network Status or Network Settings.
Picture Mode
Change the picture mode for the optimal viewing experience. Press the Select button to change the Picture Mode
Intelligent Mode
Improves your viewing experience by recognizing your content, usage patterns and the environment around your TV.
Picture Setup
Easily configure the screen settings: Brightness, Contrast, Sharpness, Color and Tint (G/R).
Sound Mode
You can select a sound mode to optimize your listening experience. To change the sound mode, press the Select button. To make fine adjustments, press the down directional button, and then select Equalizer Setup.
Sound Output
You can select which speakers the TV uses for audio output. To change the audio output, press the Select button.
Bluetooth Speaker List
Connect your TV to Bluetooth speakers. This can be done by selecting Bluetooth Speaker List to automatically search for Bluetooth audio devices. Connecting Bluetooth speaker may not be supported depending on the model or geographical area.
Game Mode
You can set the Game Mode to optimize the TV screen for better gaming performance. To turn Game Mode on or off, press the Select button. To set the detailed options, press the down directional button, and then select Go to Game Mode Settings.
Input Device Manager
Configure the connection settings for an input device connected to the TV. This can be done by selecting the Select button to display the menu that allows you to view the list of connected devices and to set options.
Caption
You can watch TV broadcasts with captions. To activate or deactivate the Caption function, press the Select button. To run Accessibility Shortcuts, press the down directional button, and then select Accessibility Shortcuts.
Sleep Timer
You can turn off the TV automatically at a specific time. To change the sleep time, press the Select button. To set the specific time at which the TV turns off automatically, press the down directional button, and then select Set Up Off Timer.
Color Tone
You can select a color tone suitable for your viewing preferences. To change to a color tone that you want, press the Select button.
Picture Clarity
You can optimize pictures that contain a lot of motions. To turn this function on or off, press the Select button. To set the detailed options, press the down directional button, and then select Picture Clarity Settings.
Digital Output Audio Format
You can select an output format for digital audio. Note that the Dolby Digital+ option is only available via HDMI (eARC) for external devices that support the Dolby Digital+ format.
Power and Energy Saving
Display the Power and Energy Saving menu. Reduce energy consumption by changing your power preferences and other energy-saving options.
4. Connected Devices
Select an external device that is connected to the TV.
5. Multi View
While watching the TV, you can simultaneously view multiple screens that are split.
Using a Samsung account
Create and manage your own Samsung account.
> Menu > Settings > All Settings > General & Privacy > System Manager > Samsung Account
Signing in to a Samsung account
> Menu > Settings > All Settings > General & Privacy > System Manager > Samsung Account > Sign In
Creating a new account
> Menu > Settings > All Settings > General & Privacy > System Manager > Samsung Account > Create Account
Managing your Samsung account
> Menu > Settings > All Settings > General & Privacy > System Manager > Samsung Account > My Account
Sign Out
When multiple people share the TV, you can sign out of your account to prevent others from using it
Edit Profile
You can edit your account information.
PIN Setting
Set or change your PIN.
Payment Info
You can view or manage your payment information.
Back up
You can back up the TV settings to your Cloud storage. When resetting or replacing the TV, you can also restore its settings with the backed-up settings.
Product Registration
You can register the current TV or see the registered information. You can easily receive services after product registration
Sync Internet
Once you sign in to your Samsung account and configure the Sync Internet settings, you can share the favorites and website bookmarks that you registered on other devices.
Remove Account
You can delete an account from the TV. Although you have deleted your Samsung account from the TV, you are not unsubscribed.
Terms & Conditions, Privacy Policy
You can view the user agreement and privacy policy.
Using PC on TV
Use the TV to access your PC via Screen Sharing (Wireless), Remote PC or Cloud Service.
> Menu > Connected Devices > PC on TV
Connect a Windows PC, Mac, or mobile device to the TV to easily use the device.
Using Screen Sharing (Windows PC) / AirPlay (Mac)
> Menu > Connected Devices > PC on TV > Windows PC > Screen Sharing
> Menu > Connected Devices > PC on TV > Mac > Screen Mirroring
Follow the instructions on the screen to adjust the PC settings and wirelessly connect the TV to the PC.
Using Easy Connection to Screen
> Menu > Connected Devices > PC on TV > Windows PC > Easy Connection
You can easily use remote access function after installing Easy Connection to Screen on your PC. Follow the instructions on the screen to download and install the Easy Connection to Screen PC app. Then you can easily connect a remote PC
1. Download the Easy Connection to Screen PC app from http://smsng.co/easy and then install it on your PC.
2. Log in with the same Samsung Account for both TV and PC.
3. When the PC is turned on and connected via the network, PC on TV's Home Screen displays the PC.
Connecting a Remote PC
> Menu > Connected Devices > PC on TV > Windows PC > Manual Connection
> Menu > Connected Devices > PC on TV > Windows PC > Mac > Remote Login
Provides Remote Desktop Connection (RDP) for remotely connecting to a PC running on Windows and Virtual Network Computing (VNC) for a PC running on Mac. To remotely connect to a PC, you must enter the IP address of the remote PC or select a saved profile. Enter a correct username and password. If there is any computer that can be accessed via the same network, the found IP is displayed.
1. Configure your computer’s settings to use the PC on TV function.
Windows OS:
Right-click the My PC icon on Desktop or Windows Explorer and then click Properties
Click Remote Desktop and select Activate Remote Desktop.
Mac OS:
Select Menu System Preferences and then click Sharing.
Select the Screen Sharing and Remote Login check box.
Run the resolution changing app downloaded from App Store and then change the resolution to 1440 x 900 or lower
2. Enter the required settings for connecting the computer remotely.
1.PC/Profile
Enter the IP address or profile of the PC you want to connect to.
In case of Windows, when the computer to connect is within the same network (router/AP), run “cmd" command in Settings > Network and Internet > View Network Properties or in Start > Run, and then run “ipconfig” to check the IPv4 address of the computer.
In case of Mac, you can check the IP address in Settings > Remote Access.
When the TV and computer are not within the same network, it is required to know the public IP and configure the router and AP. Check whether the router connected to the computer supports port forwarding. When the company provides additional security features such as firewall, seek help from a security officer.
2.Username
Enter the Username of the computer. How to check the Username:
Windows OS: Control Panel > User Account Control
Mac OS: System Preferences > Users & Groups
3.Password
Enter the password for the login account
Playing Multimedia Content on a Remote PC
When you move the mouse cursor to the top of the screen after accessing a remote computer, the top bar appears. When the sharing folder icon is clicked in the top bar, the folders shared on Windows or Mac OS appear. You can play back any media content in a folder.
For more information, refer to "Playing pictures/video/music."
To use this function, the folder sharing option on the computer to access must have been enabled as shown below:
Windows OS
1. Run Windows Explorer and then move to the folder to share.
2. Right-click the folder and then click Properties.
3. After the Properties window appears, click the Sharing tab and then click Advanced Sharing.
4. After the Advanced Sharing window appears, select the Share this folder check box.
Mac OS:
1. Select Menu > System Preferences and then click Sharing.
2. Select the File Sharing check box.
3. To add a folder to share, click the Add+ button at the bottom.
4. Select a folder and then click Add+.
It is recommended to connect the wired network because the screen or sound may be interrupted depending on the network condition.
When playing a video files via a remote computer, the screen or sound breaking may be encountered.
Using Samsung DeX
Samsung DeX can be connected from the TV via wireless network.
When the mobile device does not appear on the screen, select Mobile Connection Guide and then follow the screen instructions. Some models may not be searched when connecting the TV from a mobile device through Samsung DeX. In this case, access the DeX Guide on the screen in which you can perform connection by following the screen instructions.
Using Microsoft 365
You can read or create a document after accessing the Microsoft 365 website.
Run the browser in full-screen mode.
URL modification is impossible in the Microsoft 365 page.
Adding the Cloud Service
Select the Add Cloud Service icon. Use the bookmarking function of the browser, you can add or delete the cloud service link to or from PC on TV.
Using Web Service
You can access the web service by selecting the web service icon added to PC on TV
The web service supports the following keyboard shortcuts:
F1: Returns to PC on TV's Home Screen.
F5: Refresh.
F8: Mutes the sound.
F9/F10: Adjusts the volume.
F11: Switches between full screen or default screen
Using the Apps Service
Download and run various apps from Smart Hub
> Media > APPS
You can enjoy a wide range of content, including news, sports, weather, and games by installing the corresponding apps on your TV.
To use this feature, the TV must be connected to the Internet.
When Smart Hub is launched for the first time, the default apps are automatically installed. The default apps may differ depending on the model or geographical area.
1. Samsung Account
Go to the Samsung Account screen to create a new account or sign out of your account.
If you are signed out of your Samsung account, select Sign In to sign in.
If you want to download new apps using Apps, sign in to your Samsung account.
2. App Search
You can search for available apps
3. . Settings
You can manage the installed apps.
Installing an app
1. Move to the app you want to install, and then press the Select button. The detailed information screen appears.
2. Select Install. When the installation is complete, the Open menu appears.
3. Select Open to run the app immediately.
Launching an app
You can run the app desired from Downloaded App.
The icons below appear within the selected app's icon and indicate the following:
: The app is installed on a USB device.
: The app has a password
: The app needs to be updated
: The app supports the mirroring function.
Managing installed apps
Select Settings on Apps. You can manage installed app
1.Removing an app
Select an app to delete
Select Delete.
The selected app is deleted.
2.Adding apps to the Home Screen
Select an app to add.
Select Add to Home.
After the Home Screen appears, move the selected app to the desired location.
Press the Select button
The selected app is added to the Home Screen.
3.Locking and unlocking apps
Select an app to lock or unlock.
Select Lock/Unlock
The selected app is locked or unlocked.
4.Moving apps
Select an app to move.
Select Move.
Move the app to the desired location.
Press the Select button.
The selected app is moved.
5.Reinstalling an app
Select the app to install again
Select Reinstall
Reinstallation starts
6.Checking the app information details
Select the app to check.
Select View Details
The app information screen appears
7.Automatically updating apps
To automatically update the installed apps, set Auto Update to ON
Using the e-Manual
Control and read the manual embedded in your TV.
Launching the e-Manual
> Menu > Settings > Support > Open e-Manual
You can view the embedded e-Manual that contains information about your TV's key features.
Using the buttons in the e-Manual
1. (Search)
Select an item from the search results to load the corresponding page.
2. (Recently Viewed Topics)
Select a topic from the list of recently viewed topics.
3. (Sitemap)
It displays the lists for each item in e-Manual.
4. (Index)
Select a keyword to navigate to the relevant page
This function may not be supported depending on the model or geographical area.
5. Device Care
Optimize and diagnose the condition of your TV. You can check and clean your storage space, diagnose problems or request technical support
6. (Try Now)
Allows you to access the corresponding menu item and try out the feature right away.
7. (Link)
Access an underlined topic referred to on an e-Manual page immediately
Using the Internet
Surf the Internet on your TV.
> Media > Internet
When you run Internet, you can see recently viewed websites or featured recommendations. When you select a desired website, you can get immediate access to it.
You can use the Internet function more easily after connecting a keyboard and mouse.
You can scroll web pages with the directional pad on the Samsung Smart Remote.
The web pages may differ from those on a PC.
Before using the Internet, refer to "Read Before Using the Internet Function."
The Internet app has an embedded Samsung Pass Settings (> Media > Internet> Internet Menu > Settings > Samsung Pass). With Samsung Pass, you can log into the website easily and securely. When you visit the website again, you can log in with Samsung Pass Biometrics Authentication on your mobile device without entering your ID and password. However, this Samsung Pass login may not work depending on the website policy. For this purpose, you must have been logged in the mobile device with a Samsung account registered in Samsung Pass.
SmartThings screen layout
> Menu > Connected Devices > SmartThings
1.Device list category
Place
Displays all places connected via the SmartThings app
Devices near TV
Displays all the detected devices that can be connected and controlled. You can run the control options after selecting a desired device
2.Add Device
Displays the list of devices that can be registered on your TV. You can register any by selecting a device.
3. Samsung Account
Go to the Samsung Account screen to create a new account or sign out of your account.
4. Settings
Configure notification settings for devices connected via SmartThings. Turn on the SmartThings Hub feature.
5. List View / Map View
Displays the detected devices in a map or list. In Map View mode, you can move the position of a device to create a custom map and check the device status
List of devices compatible with the TV
Using the SmartThings Hub function
Use the SmartThings Hub feature on the TV to connect IoT devices (e.g., light bulbs, plugs, or sensors) that require SmartThings Hub.
Turn on SmartThings Hub on the TV, and then use the mobile app to register IoT devices
Turning on SmartThings Hub from the TV: > Menu > Connected Devices > SmartThings > Settings > SmartThings Hub > Using SmartThings Hub
To use the ZigBee protocol, purchase a SmartThings dongle (USB type) separately.
Playing pictures/video/music
Play media content stored on your TV, USB devices, mobile devices, cameras, PCs, etc.
> Menu > Connected Devices > Connected Device
You can play media content saved on storage devices, such as USB devices, mobile devices, and cameras on the TV.
1 Filter By
Filters the media content by type of media.
2 Sort By
Sorts the content list by Title or Date.
3 Options
Deletes or plays the selected media content in the media content list. When you select Refresh, the content list is reloaded.
You can delete only the recorded content. To delete content, change the Filter By option to Recorded.
Recorded may not be supported depending on the geographical area.
Playing multimedia content on a PC or mobile device
1. Select a device with media content in > Menu > Connected Devices > Source . The media content list in the device appears.
2. Select a media content item from the list.
The selected content is played.
The content may not be played depending on the encoding method or file format. Furthermore, several functions may be restricted.
Content on devices connected to the TV via your network may not play smoothly due to network communication problems. If this occurs, use a USB device.
Playing multimedia content on a USB device
1. Connect a USB device to the USB port.
2. When a pop up message appears on the screen, select Browse to easily move to the list of multimedia content stored on the device.
If a USB device that contains the content you want to play is already connected to the TV, select the USB device in the > Menu > Connected Devices > Source screen.
3. Select a content item to play from the list.
The selected content is played.
Listening to your mobile device sound through the TV speaker using Sound Mirroring
1. Search for and connect to your TV from the (Bluetooth) device list on your mobile device.
2. Select media content to play on your mobile device.
The selected contents media is played through the TV speaker
Some models enter Ambient Mode or Art mode automatically, and then play the selected media contents.
This function may not be supported depending on the TV model.
If the TV and the sound bar are connected wirelessly, the operation may be restricted.
Buttons and functions available while playing multimedia content
Press the Select button while playing any video, photo, or recorded content. The following buttons appear.
The provided buttons and functions may not be supported depending on the model or geographical area.
The available buttons and functions may differ with the content you are viewing or playing.
Pause / Play
Pauses or plays the multimedia content.
Jump Backward / Jump Forward
Press the up directional button to move the focus to the playback control bar, and then select the left or right directional button in the playback control bar to move backward or forward by 10 seconds in the video.
Move to a specific playback section, move up the focus on the playback bar, and then select one of the five thumbnails.
Stop
Stop the contents being played.
Previous / Next
Displays the previous or the next multimedia content file
If video playback time is 3 seconds or shorter and you press the button, the video starts from the beginning.
Rewind / Fast Forward
Rewinds or fast forwards the multimedia content. To increase the rewind or fast forward speed up to 3 times faster than normal, select the button repeatedly. To return to normal speed, select the option or press the button.
You can use the following functions when the video is paused. Note that with the video paused, the TV does not play audio.
– Slow Rewind or Slow Forward: Allows you to play a video slowly backward or forward by selecting the or option. There are 3 playback speeds. To change the playback speed, press the option repeatedly. To return to normal speed, select the option or press the button
360 Mode
Provides a 360-degree view for videos and photos.
360 Auto Rotation
Auto Rotation Automatically adjusts the video's viewing angle by analyzing the amount of image changes during playback of a video file that provides a 360-degree view.
When this function is started, the rotation starts in a short time. When 360 Auto Rotation is focused, press the Select button to change to the following modes:
– General
– Dynamic
– Natural
Repeat
Plays the current multimedia content repeatedly or all multimedia content files in the same folder repeatedly.
Shuffle
Plays music files in random order.
Picture Off
Plays music files with the screen off.
Screen Fit
Fits a photo to the screen.
Rotate left / Rotate right
Rotates a photo left or right.
Zoom
Zooms in a photo.
Background Music
Pauses or resumes the background music while the TV displays photos.
Options
Set Voice Assistant to Bixby. Speak into the microphone on your Samsung Smart Remote or TV to control your TV.
Using Multi View
> Menu > Multi View
To start Multi View, navigate to > Menu > Multi View, Select the item you want from the Add View list. Or select Make My Own to configure a custom layout and screen.
When Multi View is running, press the Select button to configure the following menus.
Select content from this app/source.
You can select from the content list displayed above
Change app/source.
You can change the content for the selected window.
(Change screen size.)
Selects the desired size of Multi View.
(Set Picture-in-Picture.)
Selects the position of a small screen on the full screen. The focusing left or right screen appears as small window.
(Listen to the sound from two screens.)
You will hear the sound of both screens at the same time by adjusting the ratio of each screens sound
(Connect Bluetooth Speaker.)
You can hear the sound by connecting the Bluetooth speaker
(Delete screen.)
You can delete the selected screen.
(Exit to full screen.)
Multi View is ended and then the full screen appears
To close Multi View, press either or on the Samsung Smart Remote
Using Bixby
Set Voice Assistant to Bixby. Speak into the microphone on your Samsung Smart Remote or TV to control your TV.
This function is available only if Voice Assistant is set to Bixby > Menu > Settings > All Settings > General & Privacy > Voice > Voice Assistant)
Bixby is available only when the TV is connected to the Internet.
To use Bixby, you must register and sign in to your Samsung account. Some functions may not be supported if you are not signed in to your Samsung account.
Bixby only supports some languages, and the supported functions may differ depending on the geographical area.
Bixby may not be supported depending on the model or geographical area.
Starting Bixby with voice
You can immediately start a conversation with Bixby by saying "Hi, Bixby." Say "Hi, Bixby", and the Bixby icon at the bottom of the TV screen is activated in Listen mode. Continue speaking.
For best results, you need to be within 10 feet (3-4 m) of your TV.
For more information, refer to "Voice Assistant Issues" These functions may not be supported depending on the model or geographical area.
Starting Bixby using buttons on the Samsung Smart Remote
You can also have a conversation with Bixby using the Samsung Smart Remote buttons. Press and hold the button on your Samsung Smart Remote, say a command, and then release the button
To view the Bixby guide, press the button once:
When you press the button, the Explore Now button appears at the bottom of the screen. Press the Select button to go to the Explore Bixby screen.
Learning about the Explore Bixby Screen
1 My Profile
Go to the My Profile screen to create a new account or register a voice ID. Sign in to your account with your voice, that is, your registered voice ID.
2. Tutorials
The pop-up window on using Bixby appears
3 Settings
You can change the settings for using Bixby.
These functions may not be supported depending on the model or geographical area.
These functions can be set in Bixby Voice Settings ( > Menu > Settings > All Settings General & Privacy > Voice >Bixby Voice Settings).
Language
You can change Bixby's language.
Voice response
You can change or turn off Bixby's voice.
Voice Wake-up
You can configure this function to make Bixby respond to your voice. If Bixby does not respond to your voice, turn on the Voice Wake-up function, and then try again ( > Explore Now > Settings > Voice Wake-up)
Sound feedback
Play a sound when Bixby starts and stops listening.
Privacy
You can permit or prohibit Bixby from utilizing your personal information when you are using Bixby services.
About Bixby Voice
Displays the detailed terms and conditions.
4 Recommended commands
Displays recommended commands you can use to control the TV with Bixby given the current context.
If you do not want to see the recommended commands, set Voice Hint to Off ( > Menu > Settings > All Settings > General & Privacy > Voice > Voice Hint).
5 All Services
You can learn the voice commands that let you use Bixby in various situations. Use the directional buttons to move to the desired command, and then press the Select button. You can operate the TV with various voice commands.
Read Before Using Bixby
The supported voice interaction languages and features may differ depending on the geographical area.
If the language set differs from the language of your country, some features are not available.
Bixby is available only when the TV is connected to the Internet.
Even if the TV is connected to the Internet, there may be no response due to a Bixby server error.
The existing functional specifications may be changed if Bixby is updated.
Bixby is available only on TVs that support it and come with remote controls that have a microphone.
Symbols including "-" and special characters are not supported. Consequently, if a word or sentence contains numeric values or symbols, the function may not operate properly.
Searched results may not provide complete results.
You may be required to pay for some apps. Consequently, you may encounter a service application or contract.
To change the current channel by saying channel names as voice commands, you must finish Service Provider Settings. Service Provider Settings can be set in > Menu > Settings > All Settings Broadcasting > Service Provider Settings. If Set Up Your Service Provider is not completed, you can complete it using Reset ( > Menu > Settings > All Settings > General & Privacy > Reset)
To use the voice text input function and the search function, you must consent to provisions allowing third parties to collect and use your voice data.
To use the Bixby function, you must:
Agree to Smart Hub's Terms of Use
Agree to a guidance regarding the collection and use of personal information for the Smart Hub service.
Consent to the collection and use of personal information for the voice interaction-based service.
Provisions for using Bixby
The voice interaction rate differs with the volume/tone, pronunciation, and ambient sound environment (TV sound and ambient noise).
Using the Game Bar
Control the Game Settings Monitoring and Game Enhancer Settings easily by using the Game Bar.
Starting the Game Bar
When Game Mode ( > Menu > Settings > All Settings > Connection > Game Mode Settings > Game Mode) is On or Auto, press and hold the button on your Samsung Smart Remote to start the Game Bar
Learning about the Game Bar
1.Input Lag
Set the Input Lag status for playing games. If you select Fastest, the Game Motion Plus mode is turned off.
2.Game Picture Mode
Specify the Game Picture Mode according to the current game genre. To customize the picture quality, select Custom.
3.Screen Ratio
You can change the screen ratio from 16:9 (previous setting) to Ultra wide (21:9 or 32:9)
4.Minimap Zoom
Use the directional buttons and Select button on the remote control to zoom in on specific areas of the game screen and adjust the zoom rate.
For the Minimap supported resolution, refer to the table below
5.Sound Output
Change the sound output device. (e.g. TV Speaker, Sound bar, Bluetooth headset, etc.)
6.Help Guide
View details on how to use each menu item.
7.Game Settings
Moves the menu to Game Mode Settings.
8.Current status display
FPS: Shows the number of frames per second in real time. If VRR is active, the frame rate changes.
HDR: Shown as ON when an HDR game is running.
VRR: Shows the variable refresh rate.
Using FreeSync
The FreeSync feature allows you to play seamless games without video interruption or delay. To use the FreeSync feature, activate the FreeSync feature from the external device.
Models that support FreeSync Premium Pro
– The Frame (55-inch or larger models)
– QLED TV (except for Q6*B Series, QN75B Series, 50Q80B model and QN700B Series)
Models that support FreeSync Premium
– The Serif (55LS01B, 65LS01B model)
Models that support FreeSync
– QN700B Series
Setting the Super Ultra Wide Game View
Set your PC Screen resolution to match the selected Screen Ratio in the Game Bar before activating the Super Ultra Wide Game.
Check if the game supports Ultra Wide resolution (21:9 or 32:9)
If you set the resolution on your PC for the first time, you can change the Screen Ratio through the Game Bar on your TV
While you are playing a game, the screen ratio cannot be changed. Before running a game, first select the desired screen ratio on the Game Bar
Changing the Super Ultra Wide Screen position
When playing a game at the Super Ultra Wide resolution, you can adjust the game screen position to the height of your eyes.
At the Super Ultra Wide resolution, use the (channel) buttons to move the screen position to the top, center, or bottom.
Configuring 144 Hz game settings
If the TV is a model that supports 144 Hz, you can play 144 Hz games.
Models that support 144 Hz: QN900B/QN95B/QN90B (50-inch and smaller models)
Resolutions that support 144 Hz are as follows:
Troubleshooting of the game screen and audio problems
After changing the Screen Ratio on the Game Bar, if the game screen and sound are not output properly, try to solve the problems as shown below.
Check to see if the game supports Ultra Wide or your PC supports the Ultra Wide resolution.
Restart the game after exiting it.
Select the same resolution as that of the Game Bar
When the Screen Ratio changes properly, the screen appears as shown below.
TV Viewing and Recording
You can use convenient features while watching TV. Additionally, you can edit the channel list or create favorite channel lists.
Using the Guide
See the programming schedules of different channels on a single screen.
Press the (channel) button to access the Guide
In the Guide, you can see the daily program schedules for each station, see program information, choose a program to watch, and set up a schedule viewing or recording.
About the Guide screen
1.Channel Filter
View channels and programs classified by type.
2.Edit Channels
Edit channels stored on the TV.
3.Additional options related to broadcast programs
Navigate to the desired program and press and hold the Select button to access the following options:
Schedule Viewing
You can schedule the viewing of a broadcast scheduled program.
Cancel Scheduled Viewing
You can cancel scheduled viewings
View Details
You can see detailed information about the selected program. The information may differ or may not be provided depending on the broadcast signal.
Record
You can make a recording of a current program.
Stop
You can stop the recording function that is currently running.
Edit Recording Time
You can change the start and end times of scheduled program recordings.
Schedule Viewing
You can schedule the viewing of a broadcast scheduled program.
Cancel Scheduled Recording
You can cancel scheduled recordings.
Using additional features from the Guide
From the Guide, press either the or button to use additional features.
Channel Filter
You can view channels and programs categorized by the types defined in Channel List.
Schedule Manager
You can see the Recording & Schedule Manager or Schedule Manager screen.
Antenna Type
You can change the type of broadcast signals the TV receives.
Recording Programs
Record a current or upcoming program using a USB device instead of a video recorder.
The Instant and Timer Recording options from the Guide
Record
1. Select a program that is currently being broadcast and press the Select button.
2. Select Record from the pop-up menu to start recording.
Schedule Recording
1. Select a program scheduled to be broadcast, and press the Select button.
2. Select Schedule Recording from the pop-up menu to schedule recording.
Recording while watching a broadcast
Record
1. On the remote control, press the or button.
2. Use the directional buttons to navigate to the control pad.
3. Select Record to start recording.
Schedule Recording
1. Press the Select button while watching a broadcast to load the program details window.
2. Use the left or right directional button to navigate to a program scheduled to be broadcast, and press the Select button.
3. Select Schedule Recording to schedule the recording of the program.
Using the recording schedule management screen
1. On the remote control, press the or button.
2. Use the directional buttons to navigate to the control pad.
3. Select either Schedule Manager or Recordings to access the Recording & Schedule Manager screen.
The following options are available on the Recording & Schedule Manager screen:
Recordings
Watch Recordings
Schedule Recording
Navigate to Schedules and press Schedule Recording. Add, edit, or cancel a program recording schedule.
– Edit
Configure the Start Time and End Time settings of a scheduled recording. If a scheduled recording event has been created after selecting a program from Guide, Start Time and End Time can be set as up to ten minutes before and ten minutes after, respectively.
– Delete
Remove a scheduled recording.
– View Details
See detailed information about a scheduled recording.
Settings
– Start Recording Early
Change this setting so that the recording starts slightly earlier than the program start time shown in the Guide.
– Continue Recording After
Change this setting so that the recording ends slightly later than the program end time shown in the Guide
Setting Up Schedule Viewing
Using the schedule viewing options from the guide screen
On the Guide screen, select a program you would like to view, press the Select button, and then select Schedule Viewing in the pop-up menu that appears.
Using the schedule viewing options while watching a program
Press the Select button while watching TV. The Program Info window appears. Select a program that will be broadcast using the left or right directional buttons. Press the Select button, and then select Schedule Viewing to schedule viewing of that program.
Using the viewing schedule management screen
1. On the remote control, press the or button.
2. Use the directional buttons to navigate to the control pad.
3. Select either Schedule Manager or Recordings to access the Recording & Schedule Manager screen.
Schedule Viewing
Navigate to Schedules and press Schedule Viewing. Add, edit, or cancel a program viewing schedule.
Edit
You can set the start time of a scheduled viewing. If you choose a program from the Guide, the Start Time can be set to up to 10 minutes before the program.
– Delete
You can delete scheduled viewings.
– View Details
You can view detailed information about scheduled viewings.
Using Timeshift
Watch scenes you missed and rewind to specific points of the program using Time Shift.
To activate Timeshift while watching a broadcast, press either the or button, and then use the directional buttons on the remote control to select Timeshift or press the button.
Save the current broadcast program you are watching to a USB device to pause at specific scenes, view missed scenes, or rewind to specific points in the timeline.
Getting to know Recording and Timeshift controls and options
These are the controls and options available while recording broadcasts and using Timeshift.
Press the down directional button to display the control pad with the following options:
Pause / Play
You can use the following functions when the video is paused. Note that with the video paused, the TV does not play audio.
– Slow Rewind or Slow Forward: Use or button to slow rewind or slow forward. Available speeds are 1/8, 1/4 and 1/2. Press the corresponding repeatedly to quickly increase the speed in slow mode by up to 3 times. To resume playback at normal speed, select button
Jump Backward / Jump Forward
Press the up directional button to move the focus to the playback control bar, and then select the left or right directional button in the playback control bar to move backward or forward by 10 seconds in the video
Rewind / Fast Forward
Stop Recording / Stop Timeshift
Ends the recording or Timeshift function.
Record
You can switch from the Timeshift function to the recording function. When switching to the recording function, you can include the content recorded by the Timeshift function in the new recording
Edit Recording Time
You can set for what period of time the program will be recorded
Go to Live TV
While using Timeshift to view a previous scene, select Go to Live TV to return to live TV.
Info
Loads a window containing information about the program being recorded or Time Shift has been activated for.
Schedule Viewing / Schedule Recording
Add a viewing or recording schedule.
Using the Channel List
Change the channel or check programs on other digital channels.
Use the Channel List screen to change channels or see what programs are being broadcast on other digital channels.
Accessing the channel list
Press and hold the (Channel) button to open the Channel List.
Using the functions on the channel list screen
The Channel List screen icons indicate the following:
: A favorite channel.
: A locked channel.
The following options are accessible from the top left of the Channel List screen.
Air / Cable
Select Air or Cable as your preferred channel method
Press the left button while in the Channel List screen to access the following options:
All Channels
Displays all saved channels.
Samsung TV
Plus While the TV is connected to the Internet, you can watch popular programs or highlights for each theme through a virtual channel at any time. As with regular channels, the TV provides the daily program schedules for Samsung TV Plus.
Favorites
Displays favorite channels from Favorites 1 through Favorites 5.
Using the channel edit function
Edit the channels stored on your TV.
Accessing the channel edit screen
1. Access the Channel List or Guide.
2. Press Edit Channels to access the channel edit screen.
Using the functions on the channel list screen
The Channel List screen icons indicate the following:
: A favorite channel.
: A locked channel.
Select a channel from the Edit Channels screen to access the following options:
Channel Lock / Unlock
Restrict access to channels that require parental guidance. Locked channels can only be accessed by entering the PIN
Delete / Restore
Remove or recover a registered channel. Once a channel is removed, it will not appear on Channel List. On the Edit Channels screen, the removed channel will appear in grey. A recovered channel will once again be visible on Channel List.
Rename Channel
From Edit Channels, select the channel you wish to rename and then select Rename Channel.
Save and Exit
Save the changes made under Edit Channels and exit.
Using a Personal Favorites List
Designate frequently watched channels as favorite channels.
Favorite channels are highlighted in the Edit Channels and Channel List screens with thesymbol. You can create up to five favorites lists so that your family members can create their own personal favorites list.
Creating a Favorites List
1. Access the Edit Channels screen. For details on how to access the channel edit screen, refer to "Accessing the channel edit screen."
2. Press the left directional button on the remote control to select the desired Favorites.
3. Press the right directional button to select Add Channels.
4. Select the desired channel in the list on the screen.
5. Press Add to add the selected channel to the favorites list.
Select Favorites 1 - Favorites 5 on the Edit Channels screen and the following functions are available. Up to five Favorites can be created, which allows each member of the family to create their own favorites list.
Add Channels
In the channel list, select one or more channels to add in the favorite list and then select Add Channels
Remove
Removes one or more channels from a favorites list.
Change order
Changes the order of one or more channels selected in a favorites list.
Rename Favorites
Renames a favorites list.
Save and Exit
Saves and closes the Edit Channels screen
TV-Viewing Support Functions
Use the functions that are available while watching TV.
Scanning for available channels
> Menu > Settings > All Settings > General & Privacy > Parental Settings > Program Rating Lock Settings
This function is useful for controlling what programs children can watch on the TV based on their ratings. Program Rating Lock Settings does not, however, block programs originating from external sources, such as Blu-ray players, DVD players, or USB files.
Every time you access Program Rating Lock Settings, you must enter the security PIN. You must also enter this PIN to watch a blocked program. The default PIN is "0000." To change the PIN, go to > Menu > Settings > All Settings > General & Privacy > System Manager > Change PIN.
Watching blocked / restricted programs
To watch a blocked program, enter the PIN when requested. When initially showing a restricted program or movie, the screen is blank because the Program Rating Lock Settings blocks it. Enter the PIN to unblock the program when a message appears requesting the code.
Enable Data Service
Enable Data Service
> Menu > Settings > All Settings > Broadcasting > Data Service
Access services from entertainment providers, online providers, and CE manufactures through Data Service.
You can use the following functions:
Data Service
Enable or disable data services.
Do Not Track
Ask apps and services not to track your browsing activity.
Private Browsing
Enable Private Browsing to stop the browser from saving your Internet history.
Delete Browsing Data
Delete all saved cookies.
If you want this function enabled or disabled, use the Data Service menu item to turn it on or off.
Configuring advanced broadcasting audio settings
> Menu > Settings > All Settings > Broadcasting > Audio Options
Audio Options functions differently for analog and digital channels.
Preferred Language
This is the language you will hear while watching TV if the language is included in the broadcast signal.
Multi-Track Sound
You can select the multi-track sound function depending on broadcasting signal.
Preferred Object Audio
Configure the audio properties of the broadcast to your preferred configuration.
Setting the functions for the service provider
> Menu > Settings > All Settings > Broadcasting > Service Provider
Viewing broadcast service provider info
> Menu > Settings > All Settings > Broadcasting > Service Provider Info & Settings
Find out who the current broadcast service provider is and look up related information.
Using Secure Channel Viewing
> Menu > Settings > All Settings > Broadcasting > Secure Channel Viewing
Checking digital channel signal info and strength
> Menu > Settings > Support > Self Diagnosis > Signal Information
If your TV is attached to a separate, over-the-air antenna, you can use the signal strength information to adjust the antenna for increased signal strength and improved HD channel reception.
This function is only available for digital channels.
This function may not be supported depending on the geographical area
Picture and Sound
You can change the settings for the picture and the sound according to your preference.
Using Intelligent Mode
Let the TV analyze the surrounding and the content you are watching so that it can provide an upgraded viewing experience
> Menu > Settings > All Settings > General & Privacy > Intelligent Mode Settings
In Intelligent Mode, the TV recognizes and analyzes the surroundings, the content, and your usage patterns to provide the best viewing experience. You can turn the options below on or off. Create your preferred viewing environment.
Because this function is specific to QLED TV (except for Q50R model), The Frame and The Serif, it may not be supported depending on the model.
Intelligent Mode
Turn Intelligent Mode on or off.
Adaptive Brightness
Automatically adjusts the backlight brightness of the screen by detecting the ambient light level using ambient light sensors.
Adaptive Sound
Provides optimized sound quality by analyzing the viewing environment and the acoustic components of the content
Adaptive Volume
Automatically adjusts to a specific volume level while you are watching TV. The TV analyzes your volume usage history by time period to automatically adjust the volume when you use an app or switch to an external input source.
Adjusting the Picture Quality
Change the Picture Mode and adjust Expert Settings.
Choosing a picture mode
> Menu > Settings > Picture > Picture Mode
You can select the Picture Mode that provides the best viewing experience.
Dynamic
Makes the picture brighter and clearer in bright viewing environments.
Standard
Is the default mode suitable for general viewing environments.
Natural
Reduces eye strain for a comfortable viewing experience.
Movie
Is suitable for watching TV or movies in a dark room.
FILMMAKER MODE
You can watch the source content (e.g., movie) as it is. The image defined as FILMMAKER MODE automatically switches to FILMMAKER MODE while watching.
Configuring advanced picture settings
> Menu > Settings > All Settings > Picture > Expert Settings
Configure the screen settings to your taste by using the following functions:
Brightness
Adjust the overall picture brightness. The closer to 50, the brighter the picture.
Contrast
Adjust the difference between the darkest and brightest areas between objects and their background. The closer to 50, the larger the difference.
Sharpness
Adjust the outline sharpness of objects. The closer to 20, the sharper the object outlines.
Color
Adjust the chroma of a video. The closer to 50, the deeper the colors.
Tint (G/R)
Adjust the color tone. The higher either value, the redder or greener the video.
Apply Picture Settings
Apply the selected picture settings to the current input source or all input sources.
Picture Clarity Settings
Optimize a video that has many dynamic scenes.
Local Dimming
Maximize the contrast ratio by automatically adjusting brightness for each section of the picture.
Contrast Enhancer
Automatically adjust the contrast to prevent excessive brightness differences between brighter and darker areas.
Film Mode
Touch up an old video to improve the picture quality for a better viewing experience.
Color Tone
Select an appropriate color tone, according to the viewing situation.
White Balance
Adjust the brightness of the colors red, green and blue so that the brightest area of the picture becomes white.
Gamma
Adjust the medium brightness of a video.
Shadow Detail
Adjust the brightness of a dim picture. The closer to 5, the brighter the dim picture.
Color Space Settings
Select a range of colors that can be expressed on the picture
Smart Calibration
Automatically adjust the picture quality of a movie to obtain the quality intended by the movie producer.
Peak Brightness
Adjust the maximum peak brightness for a brighter screen
Reset Picture
Reset the picture settings to the default values.
Changing the Picture Size and Position
Change the picture size and position for your TV.
Changing the picture size settings
> Menu > Settings > All Settings > Picture > Picture Size Settings
Picture Size
You can change the size of the picture displayed on the TV screen to 16:9 Standard, Custom, or 4:3.
Fit to Screen
Fitting the picture to the screen.
Zoom and Position
Adjusting the picture size and/or position.
Setting the Viewing Environment for External Devices
You can optimize the TV for viewing specific video formats.
Playing games on an optimized screen
> Menu > Settings > All Settings > Connection > Game Mode Settings > Game Mode
You can set the Game Mode to optimize the TV screen for better gaming performance. When you connect a video game console such as PlayStation and Xbox, Game Mode is set to Auto. When you connect the other game source such as PC, set the Game Mode to On through the above path. You can also set the Game Mode quickly from Home Screen ( > > Menu > Settings > up directional button > Game Mode ).
This function may not be supported depending on the model.
The game mode is not available for normal TV viewing.
The screen may shake somewhat.
When you press and hold the button on the Samsung Smart Remote for 1 second or more in Game Mode, the Game Bar appears. This function may not be supported depending on the model
When Game Mode is enabled, Picture Mode and Sound Mode are switched to Game automatically. Sound Mode may not be automatically switched depending on the selected audio device on the Sound Output menu.
When Game Mode is set to On, some functions are not available.
To use a different external device on the same port, remove the game console connection, set Game Mode to Off, and then connect the external device to the port.
The Game Mode functions used for Nintendo Switch™ are subject to change without prior notice.
Setting the Game Mode details
> Menu > Settings > All Settings > Connection > Game Mode Settings
These functions may not be supported depending on the model.
Surround Sound
You can make your games more immersive by using intense, three-dimensional sound optimized for games
Dynamic Black Equalizer
You can easily detect items or hidden enemies lurking in dark corners by improving visibility and object details in dark scenes without washing out colors and contrast in brighter scenes.
Game Motion Plus Settings
You can configure the Game Motion Plus settings
– Game Motion Plus
Turn on this function to obtain a softer and clearer picture quality when playing a role-playing game (RPG) or adventure game which involves many dynamic scenes.
– Blur Reduction
Reduce game screen blur to optimize fast-moving images. This function may not be supported depending on the model or geographical area.
– Judder Reduction
Remove flicker from a game video to play the game with a clearer picture quality.
– LED Clear Motion
Turn on this function to adjust the LED backlight to make dynamic scenes look clearer
– Clear motion
Turn on this function to make dynamic scenes look clearer.
Game HDR
In accordance with the HGiG (HDR Gaming Interest Group) standard, it sets the optimal image quality for HDR games according to the brightness information of the contents.
HDR Tone Mapping
Configures tone mapping options for Gaming HDR technologies.
– HDR10+ GAMING
Basic mode provides the most accurate representation of the game’s original creative intent. Advanced mode provides enhanced representation of game content to maximize visual impact.
– Game HDR
In accordance with the HGiG standard, optimal image quality is set for HDR games according to the content’s brightness information.
Using Cable Box IP Remote
> Menu > Settings > All Settings > Connection > External Device Manager > Cable Box IP Remote
Set the cable box that supports IP control to be controlled with Samsung remote control.
This function may not be supported depending on the model.
Using Input Signal Plus
> Menu > Settings > All Settings > Connection > External Device Manager > Input Signal Plus
Expands the input signal range for HDMI connections.
When you select the HDMI connector you want to use for Input Signal Plus, and then press the Select button to set the Input Signal Plus function to On, the TV screen may flicker.
When you connect the TV to an external device that supports only the UHD 24 Hz or UHD 30 Hz frequency, or any FHD frequency, the Input Signal Plus function may not be available. In this case, turn off the Input Signal Plus function.
For more information about the supported UHD resolutions, refer to "Supported Resolutions for UHD Input Signals."
For more information about the Q900RB model, refer to "Resolutions for Input Signals supported by Q900RB model."
Using HDMI black level
> Menu > Settings > All Settings > Connection > External Device Manager > HDMI Black Level
Use HDMI Black Level to adjust the black level to compensate for low black levels, low contrast, or dull colors generated by external devices connected to the TV via an HDMI cable.
Changing the Picture Size and Position
Change the picture size and position for your TV.
Configuring a Sound Mode and Expert Settings
Change the Sound Mode and adjust Expert Settings.
Choosing a sound mode
> Menu > Settings > All Settings > Sound > Sound Mode
You can select the available sound mode - Standard or Amplify - that you prefer for a content type or your listening environment.
When an external device is connected, Sound Mode may change accordingly.
This function may not be supported depending on the model.
Configuring advanced sound settings
> Menu > Settings > All Settings > Sound > Expert Settings
You can personalize the sound quality by adjusting the following settings.
Balance
Adjust the volumes of the left and right speakers to balance the sound levels.
Equalizer
Customize the TV sound by adjusting the volume of high-pitched and low-pitched sounds.
HDMI-eARC Mode
You can connect an audio device that supports eARC via HDMI-eARC. Muting occurs temporarily during device connection.
Digital Output Audio Format
Select the digital audio output format. If you select the Auto option, the audio device outputs automatically in a supported format.
If you select the Pass-Through option, audio data is output with no processing
Digital Output Audio Delay
Adjust the output delay time for digital audio.
Dolby Atmos
Set to On if the audio device connected via the HDMI (eARC) port supports Dolby Atmos. When the option is set to On, Dolby Digital+ with Atmos stream, sent from an external device, can be received. If you change the setting when the input source is set to HDMI, the screen may flicker. If this function is on, set Digital Output Audio Format to Auto.
When watching TV using the embedded speakers, the virtual surround sound effect of Dolby Atmos can be turned on or off. If the TV has been installed in portrait mode by using separate accessories, the virtual surround sound effect through the TV speakers does not work.
Auto Volume
Automatically adjusts the sound to a certain level when changing channels or switching to another external input.
Sound Feedback
Plays the notification sound when manipulating a menu or selecting an option.
Simultaneous Optical Output
The device connected via optical always outputs sound.
Reset Sound
Reset changed sound settings.
Using the Sound Support Functions
Configure the sound settings for your TV.
Selecting speakers
> Menu > Settings > All Settings > Sound > Sound Output
You can select which speakers the TV uses for audio output.
External speakers may not be controlled with the Samsung Smart Remote. When an external speaker is enabled, some sound menus are not supported.
Samsung TV supports the Q-Symphony function.
This function may not be supported depending on the model
This function is unavailable when using The Frame 43LS03A vertically. To use the product horizontally, set the function again.
This function works synchronized with the Samsung Soundbar that supports Q-Symphony so that your TV speaker and Soundbar simultaneously output the sound for best surround effects.
When a Samsung Soundbar that supports Q-Symphony is connected, the menu name such as "TV + Soundbar" appears under Sound Output ( > Menu > Settings > All Settings > Sound > Sound Output). Select the menu.
Example) TV + [AV] Soundbar series name (HDMI) or TV + Optical
It works based on the Codec supported by your TV. For more information about Codec information, refer to "Read Before Playing Photo, Video, or Music Files."
This function is supported only when connected via HDMI or optical cable.
This function is available only in some Samsung TVs and Soundbars released in 2021.
Refer to the sound bar's user manual when connecting it to the TV.
Listening to the TV through Bluetooth devices
> Menu > Settings > All Settings > Sound > Sound Output > Bluetooth Speaker List
You can connect Bluetooth audio devices to the TV. They must be paired using the TV's Bluetooth function. For more information on pairing, refer to the Bluetooth audio device's operating manual.
If the TV fails to find a Bluetooth audio device, place the device closer to the TV, and then select Refresh.
When you turn on a paired Bluetooth audio device, the TV detects it automatically, and then displays a pop-up window. Use this pop-up window to activate/deactivate the Bluetooth audio device.
The sound quality may be affected by the condition of the Bluetooth connection.
Before using a Bluetooth audio device, refer to “Read Before Using Bluetooth Devices.
Listening to the TV through a Samsung audio device that supports the Wi-Fi function
For more information about how to connect and use a Samsung audio device that supports the Wi-Fi function, refer to its user manual.
> Menu > Settings > All Settings > Sound > Wi-Fi Speaker Surround Setup
If you've connected one or more Samsung wireless audio devices that support the Wi-Fi function to the TV, you can create an optimal sound set up by configuring the surround effect settings. You can select any of the surround sound configurations, with or without a sound bar.
A surround sound configuration can be used if all of the following conditions are met:
Two or more Samsung wireless speakers of the same type must be connected to the same wireless network.
The Samsung audio devices that support the Wi-Fi function must be connected to the same wireless network as the TV
For more information about how to connect and use a Samsung audio device that supports the Wi-Fi function, refer to its user manual
Surround sound configurations with a sound bar may not be supported depending on the product.
If you activate the Screen Mirroring function while using Samsung audio devices that support the Wi-Fi function, the Wi-Fi connection is disconnected.
Mismatched video and audio lip-syncing may occur depending on the device type.
System and Support
You can configure system and support settings such as clock, timers, energy usage and software updates.
Using the Time Functions and the Timers
Set the current time and use the timer function.
> Menu > Settings > All Settings > General & Privacy > System Manager > Time
You can set the Clock manually or automatically. Once the Clock is set, you can view the current time on the TV anytime.
You must set the clock in the following cases:
The power cable is disconnected and then connected.
The Clock Mode is changed from Auto to Manual.
The TV is not connected to the Internet.
No broadcast signals are received.
Setting the clock automatically
> Menu > Settings > All Settings > General & Privacy > System Manager > Time > Clock > Clock Mode > Auto
This function works only when the TV is connected to the Internet or is receiving digital broadcasts through a connected antenna.
The accuracy of the time information received may differ with the channel and signal.
If you get your TV signal from a cable broadcast receiver/set-top box or a satellite receiver/satellite set-top box connected to an HDMI or Component port, you must set the current time manually
Adjusting the clock for DST and time zone
> Menu > Settings > All Settings > General & Privacy > System Manager > Time > Clock
Sets the right time by setting Daylight Savings Time (DST) and your local time zone.
Time Zone
Selects your time zone.
DST
Automatically adjusts for Daylight Saving Time (DST).
Changing the current time
> Menu > Settings > All Settings > General & Privacy > System Manager > Time > Clock > Time Offset
Time Offset adjusts the time through a network connection.
This function is available only when Clock Mode is set to Auto, the TV fails to receive time information through normal broadcast signals, and the TV is connected to the Internet through a local area network
Setting the clock manually
> Menu > Settings > All Settings > General & Privacy > System Manager > Time > Clock > Clock > Mode Manual
When Clock Mode is set to Manual, you can directly enter the current time. Select the Date and Time by using the directional buttons on the remote control.
Using the sleep timer
> Menu > Settings > All Settings > General & Privacy > System Manager > Time > Sleep Timer
You can use this function to automatically shut off the TV after a pre-set period of time. You can set the sleep timer for up to 180 minutes after which it will turn off the TV.
This function may not be supported in some viewing modes
Turning on the TV using the on timer
> Menu > Settings > All Settings > General & Privacy > System Manager > Time > On Timer
You can set On Timer to shut off the TV automatically at a specific time. Off Timer is only available if the Clock has been set.
To use this function, first set the Clock ( > Menu > Settings > All Settings > General & Privacy > System Manager > Time > Clock ).
This function may not be supported in some viewing modes.
This function may not be supported depending on the model or geographical area
Turning off the TV using the off timer
> Menu > Settings > All Settings > General & Privacy > System Manager > Time > Off Timer
You can set Off Timer to shut off the TV automatically at a specific time. Off Timer is only available if the Clock has been set.
To use this function, first set the Clock ( > Menu > Settings > All Settings > General & Privacy > System Manager > Time > Clock ).
This function may not be supported in some viewing modes.
This function may not be supported depending on the model or geographical area.
Using the Auto Protection Time and Energy Saving Functions
Set the Auto Protection Time and reduce the TV's energy consumption.
Reducing the energy consumption of the TV
> Menu > Settings > All Settings > General & Privacy > System Manager > Power and Energy Saving
Reduce energy consumption by changing your power preferences and other energy-saving options.
Brightness Optimization
Automatically adjust the picture brightness based on the ambient light leve
Minimum Brightness
When Ambient Light Detection is turned on, you can manually adjust the minimum brightness of the TV screen. This function acts only when the value is less than the setting in > Menu > Settings > All Settings > Picture > Expert Settings > Brightness.
Brightness Reduction
Reduce power consumption by adjusting brightness settings.
Motion Lighting
Adjusts the brightness in response to on-screen movements to reduce power consumption.
Auto Power Off
Automatically turns off the TV to reduce unnecessary power consumption if the TV Controller and the remote control are not used for the set period of time.
Available Remote Battery
You can check the Samsung Smart Remote's remaining amount of the battery.
Using the Panel Care Functions
Adjusts settings to protect the screen.
Setting the Panel Care
> Menu > Settings > All Settings > General & Privacy > Panel Care
Pixel Shift
Moves pixels at regular intervals to prevent screen issues.
Adjust Logo Brightness
Prevents screen issues by lowering the brightness of fixed images, such as logos and banners.
Pixel Refresh
Adjusts pixels to provide a clearer screen. Some features, such as reservation, recording, and voice recognition, do not work during Pixel Refresh.
Updating the TV’s Software
View your TV's software version and update it if necessary.
DO NOT turn off the TV’s power until the update is complete. The TV will turn off and on automatically after completing the software update. Video and audio settings will be reset to their defaults after a software update.
> Menu > Settings > Support > Software Update
Updating through the Internet
> Menu > Settings > Support > Software Update > Update Now
Updating from the Internet requires an active Internet connection.
Updating through a USB device
> Menu > Settings > Support > Software Update > Auto Update
After downloading the update first from the Samsung website and storing it on a USB device, connect the USB device to the TV to update
To update using a USB device, download the update package from Samsung.com to your computer. Then, save the update package in the USB device's top-level folder. Otherwise, the TV will not be able to locate the update package.
Updating the TV automatically
> Menu > Settings > Support > Software Update > Auto Update
If the TV is connected to the Internet, you can have the TV's software update itself automatically while you are watching the TV. When the background update is completed, it is applied the next time the TV is turned on.
If you agree to the Smart Hub terms and conditions, Auto Update is set to On automatically. If you want this function disabled, use the Select button to turn it off.
This function may take a longer time if another network function is running concurrently.
This function requires an Internet connection.
Using the Parental Settings function
Configure content or app security settings.
> Menu > Settings > All Settings > General & Privacy > Parental Settings
Parental Lock
Enable or disable all Parental Settings.
Program Rating Lock Settings
This function is useful for controlling what programs children can watch on the TV based on their ratings
App Lock Settings
Set the installed app to lock or unlock.
Audio and Video Functions for the Visually or Hearing Impaired
You can configure the functions for the visually or hearing impaired.
Running the accessibility functions
> Menu > Settings > All Settings > General & Privacy > Accessibility
Running Accessibility Shortcuts
The Accessibility Shortcuts provide easy access to the accessibility functions. To display the Accessibility Shortcuts, press and hold the Volume button for 1 second or more. You can easily turn on or turn off the functions such as Voice Guide, Video Description, Caption, High Contrast, Enlarge, Grayscale, Color Inversion, Learn TV Remote, Learn Menu Screen, Multi-output Audio, Sign Language Zoom, Slow Button Repeat, etc.
On the standard remote control, press the CC/VD button or press and hold the MUTE button.
Even if the Voice Guide is set to Off or muted, the voice guide for Accessibility Shortcuts is enabled.
The shortcut menus may not appear depending on the model or geographical area.
Enabling voice guides for the visually impaired
> Menu > Settings > All Settings > General & Privacy > Accessibility > Voice Guide Settings
You can activate voice guides that describe the menu options aloud to aid the visually impaired. To activate this function, set Voice Guide to On. With Voice Guide on, the TV provides voice guides for channel change, volume adjust, information on current and upcoming programs, schedule viewing, other TV functions, and various content in the Internet, and in Search.
You can go to Voice Guide, and then press the Select button to turn the function on or off.
The Voice Guide is provided in the language that is specified on the TV Language. However, some languages are not supported by Voice Guide even though they are listed in the TV Language. English is always supported.
For more information about the TV Language settings, refer to "Changing the menu language.
Changing the volume, speed, and pitch of the Voice GuideChanging the volume, speed, and pitch of the Voice Guide
You can configure the volume, speed, and pitch of the voice guide.
The TV screen is turned off but audio continues
> Menu > Settings > All Settings > General & Privacy > Accessibility > Picture Off
Turn off the TV screen and provide only sound to reduce overall power consumption. When you press a button on the remote control other than Volume and Power while the screen is off, the TV screen turns back on.
Enlarge the screen
> Menu > Settings > All Settings > General & Privacy > Accessibility > Graphic Zoom
Enlarge the screen to make the picture or text bigger. You can adjust the zoom level or move the zoom area.
Enabling audio for the audio (video) description function
> Menu > Settings > All Settings > General & Privacy > Accessibility > Audio (Video) Description
You can activate an audio guide that provides an audio description of video scenes for the visually impaired. This function is only available with broadcasts that provide this service.
White text on black background (high contrast)
> Menu > Settings > All Settings > General & Privacy > Accessibility > High Contrast
You can change Smart Hub and setting menu screens to white text on a black background and change the transparent TV menus to opaque automatically so that text can be more easily read.
Setting the screen to black and white
> Menu > Settings > All Settings > General & Privacy > Accessibility > Grayscale
You can change the color of the TV screen to black and white to sharpen blurred edges caused by colors.
Inverting the screen color
> Menu > Settings > All Settings > General & Privacy > Accessibility > Color Inversion
You can invert the colors of the text and background for the setting menus displayed on the TV screen to make it easier to read them
If Color Inversion is on, some Accessibility menus are not available.
This function may not be supported depending on the model or geographical area
Enlarging the font (for the visually impaired)
> Menu > Settings > All Settings > General & Privacy > Accessibility > Enlarge
You can enlarge the size of the font on the screen. To activate, set Enlarge to On.
Learning about the remote control (for the visually impaired)
> Menu > Settings > All Settings > General & Privacy > Accessibility > Learn TV Remote
This function helps individuals with a visual impairment to learn the positions of the buttons on the remote control. When this function is activated, you can press a button on the remote control and the TV will tell you its name. Press the button twice to exit Learn TV Remote.
This function is only available when Voice Guide is enabled.
Learning about the TV menu
> Menu > Settings > All Settings > General & Privacy > Accessibility > Learn Menu Screen
Learn the menus on the TV screen. Once enabled, your TV will tell you the structure and features of the menus you select.
This function is only available when Voice Guide is enabled
Showing captions
> Menu > Settings > All Settings > General & Privacy > Accessibility > Caption Settings
Set Caption to On to watch programs with the captions displayed.
Captions are not displayed by programs that do not support captions.
This function has no relationship with the features for controlling sub-titles of DVD or Blu-ray players. To control DVD or Blu-ray subtitles, use the sub-title feature of the DVD or Blu-ray player and the player's remote control
Selecting the caption language
> Menu > Settings > All Settings > General & Privacy > Accessibility > Caption Settings > Caption Mode
Default / CC1 ~ CC4 / Text1 ~ Text4
(Analog channels only) Operates in either analog TV channel mode or when a signal is supplied from an external device to the TV. (Depending on the broadcast signal, the analog caption function may or may not work with digital channels.)
(Digital channels only) Works with digital channels. These functions may not be available in digital caption mode depending on the broadcast.
Setting the digital caption related options
> Menu > Settings > All Settings > General & Privacy > Accessibility > Caption Settings > Digital Caption Options
You can change the font color, background color, and size settings, etc.
The foreground and background colors and opacity settings cannot be the same.
The Position function is activated only for programs that support broadcast captions.
Listening to the TV through Bluetooth devices (for the hearing impaired)
> Menu > Settings > All Settings > General & Privacy > Accessibility> Caption Settings
Set Caption to On to watch programs with the captions displayed.
Captions are not displayed by programs that do not support captions.
This function has no relationship with the features for controlling sub-titles of DVD or Blu-ray players. To control DVD or Blu-ray subtitles, use the sub-title feature of the DVD or Blu-ray player and the player's remote control.
Enlarging the sign language screen for the hearing impaired
> Menu > Settings > All Settings > General & Privacy > Accessibility > Sign Language Zoom Settings
You can zoom in the sign language screen when the program you are watching provides it. First, set Sign Language Zoom to On, and then select Edit Sign Language Zoom to change the position and magnification of the sign language screen.
Configuring the repeat settings for remote control buttons
> Menu > Settings > All Settings > General & Privacy > Accessibility > Remote Button Repeat Settings
You can configure the operation speed of the remote control buttons so that they slow down when you continually press and hold them. First, set Slow Button Repeat to On, and then adjust the operation speed in Repeat Interval.
App for the Visually Impaired (SeeColors App)
You can download SeeColors app in > Media > Apps.
This application helps color blind people feel rich colors on TV through a simple self-check. Through self-check, colors are changed to be suitable so that each person can experience a richer view of colors.
When the SeeColors app is run, specific menus are disabled.
This function may not be supported depending on the model.
Using Voice Assistants on the TV
You can change the settings of a Voice Assistant after selecting it.
Select the Voice Assistant
> Menu > Settings > All Settings > General & Privacy > Voice > Voice Assistant
Select which Voice Assistant you would like to help control your TV.
To use this function, the TV must be connected to the Internet.
This function may not be supported depending on the model or geographical area.
Voice Assistant only supports some languages, and the supported functions may differ depending on the geographical area.
The Voice Wake-up function may not be supported depending on the model, Voice Assistant or geographical area.
Bixby / Amazon Alexa / Google Assistant
To use the Voice Assistant, follow the instructions on the TV screen to enable the selected Voice Assistant.
To change the settings for Voice Assistant, run the Settings menu under each Voice Assistant ( > Menu > Settings > All Settings > General & Privacy > Voice > Voice Assistant).
To enable the Settings menus for each Voice Assistant, log in each Voice Assistant.
For an example of Voice command, see the Settings menus for each Voice Assistant.
Using Other Functions
You can view other functions.
Changing the menu language
> Menu > Settings > All Settings > General & Privacy > System Manager > Language
Setting up a password
> Menu > Settings > All Settings > General & Privacy > System Manager > Change PIN
The PIN input window appears. Enter a PIN. Enter it again to confirm it. The default PIN is "0000."
If you forget your PIN, you can reset it with your remote control. With the TV turned on, press the following buttons on the remote control in the order shown to reset the PIN to "0000."
Press +/– (Volume) button. Volume Up >
Volume Down >Volume Up >
Setting up the Button Lock
> Menu > Settings > All Settings > General & Privacy > System Manager > Button Lock
You can set the TV Controller button lock. If this function is On, you cannot use TV Controller button.
This function may not be supported depending on the model.
Setting up the USB Lock
> Menu > Settings > All Settings > General & Privacy > System Manager > USB Lock
You can block connection to any external USB device
This function may not be supported depending on the model.
Selecting Usage or Retail Mode
> Menu > Settings > All Settings > General & Privacy > System Manager > Usage Mode
You can set the TV for retail environments by setting Usage Mode to Retail Mode.
For all other uses, select Home Mode.
Use Retail Mode only in a store. With Retail Mode, some functions are disabled, and the TV settings automatically reset after a preset amount of time.
This function may not be supported depending on the model.
Managing External Devices
> Menu > Settings > All Settings > General & Privacy > External Device Manager > Device Connect Manager
When you connect external devices, such as mobile devices or tablets connected to the same network as the TV so you can share content, you can view the list of allowed devices and connected devices
Access Notification
Set whether to display a notification when an external device such as a mobile device or tablet attempts to connect to the TV.
Device List
Manage a list of external devices registered to the TV
Using AirPlay
> Menu > Settings > All Settings > Connection > Apple AirPlay Settings
You can use AirPlay to view content from your iPhone, iPad, or Mac on the TV screen.
This function may not be supported depending on the model
Restoring the TV to the factory settings
> Menu > Settings > All Settings > General & Privacy > Reset
You can restore all TV settings to the factory defaults.
1. Select Reset. The security PIN entry window appears.
2. Enter the security PIN, and then select Reset. All settings are then reset. The TV turns off and on again automatically and displays the Initial Setup screen.
For more information on Reset, refer to the user manual that came with the TV
If you skipped some steps in the initial setup, run Set Up TV ( > Menu > Connected Devices > down directional button > Set Up TV)), and then configure the settings in the steps you skipped.
Troubleshooting
If you have a problem with your TV, you can access various solutions while watching TV. If your problem is not addressed in the Troubleshooting section, contact the Samsung Call Center.
Picture Issues
When the TV has trouble with the picture, these steps may help resolve the problem.
The screen is flashing or has become dark
If your TV is flickering or dimming sporadically, you may need to disable some of the energy efficiency features.
Disable Brightness Optimization, Brightness Reduction, Motion Lighting, or Contrast Enhancer.
> Menu > Settings > All Settings > General & Privacy > Power and Energy Saving > Brightness Optimization
> Menu > Settings > All Settings > General & Privacy > Power and Energy Saving > Brightness Reduction
> Menu > Settings > All Settings > General & Privacy > Power and Energy Saving > Motion Lighting
> Menu > Settings > All Settings > Picture > Expert Settings > Contrast Enhancer
Run Picture Test. When the tested image quality is normal, check the signal of the connected device.
> Menu > Settings > Support > Device Care > Self Diagnosis > Picture Test
The picture is not bright, or the picture colors do not look clear
If the screen appears too dim, try changing the settings under Reset Picture or disabling Brightness Optimization, Brightness Reduction.
> Menu > Settings > All Settings > Picture > Expert Settings > Reset Picture
> Menu > Settings > All Settings > General & Privacy > Power and Energy Saving > Brightness Optimization
> Menu > Settings > All Settings > General & Privacy > Power and Energy Saving > Brightness Reduction
Go to Picture and adjust the Picture Mode, Contrast, Brightness, and Sharpness settings.
> Menu > Settings > All Settings > Picture > Picture Mode
> Menu > Settings > All Settings > Picture > Expert Settings > Contrast
> Menu > Settings > All Settings > Picture > Expert Settings > Brightness
> Menu > Settings > All Settings > Picture > Expert Settings > Sharpness
> Menu > Settings > All Settings > Picture > Expert Settings > Color
> Menu > Settings > All Settings > Picture > Expert Settings > Tint (G/R)
The picture colors are black and white or do not look the way they should look
If the product’s colors or absolute whites/blacks seem to be off, launch Picture Test.
If the test results indicate that the problem is not caused by the TV, do the following: When using the One Connect Box, confirm that its video input connectors are connected to the correct external device video output connectors.
If using a component cable, ensure that the green (Y), blue (Pb), and red (Pr) cables are connected properly. Incorrect connections may cause color problems or a blank screen.
Check whether Grayscale is set to On.
> Menu > Settings > All Settings > General & Privacy > Accessibility > Grayscale
The TV automatically turns off by itself
If your TV appears to turn off by itself, try disabling some of the TV's energy efficiency functions.
See if Sleep Timer has been enabled. The Sleep Timer automatically turns the TV off after a specified period of time.
> Menu > Settings > All Settings > General & Privacy > System Manager > Time > Sleep Timer
If the Sleep Timer has not been enabled, see if Auto Power Off or Off Timer has been enabled and disable it.
> Menu > Settings > All Settings > General & Privacy > Power and Energy > Saving Auto Power Off
> Menu > Settings > All Settings > General & Privacy > System Manager > Time > Off Timer
TV (The Frame TV) cannot be turned off.
If your TV is The Frame model, you can turn off the TV by long-pressing the Power button. To switch from Art mode to TV mode or vice versa, short-press the Power button when the TV is on.
Unable to power on
If you are having problems powering on your TV, there are a number of things to check before calling the service department.
Confirm that the TV's power cord is connected correctly at both ends and that the remote control is operating normally. Make sure that the antenna cable or cable TV cable is firmly connected.
If you have a cable box or satellite box, confirm that it is plugged in and turned on.
In case of a model that supports One Connect Box, check the One Invisible Connection or One Connect Cable between the TV and One Connect Box.
The TV remains on or does not turn on automatically.
If the surrounding area is too dark or bright, the motion sensor may not work normally. The performance of the motion sensor may be affected by the installation environment (height, tilt, obstacles). If the clothes you wear or your skin color is similar to the surrounding shading, the motion sensor may not work properly.
The TV responds to all visual changes around it (lights, displays, dogs, out-of-window changes, and other occurrences). You can adjust the response level by adjusting the sensitivity of the motion detector.
> left directional button > Art > Art Mode Options > Motion Detector
Unable to find a Channel
If your TV is not connected to a cable box or satellite box, run Auto Program.
> Menu > Settings > All Settings > Broadcasting > Auto Program
When using a broadcast receiver such as set-top box and IPTV, check the connection to the TV.
> Menu > Connected Devices > Connection Guide
When the symptom persists, contact your service provider.
The TV image does not look as good as it did in the store
Store displays are tuned to a digital UHD channel or HD channel. Change the output resolution of your devices, such as digital broadcast receiver, IPTV, and set-top box to UHD or HD.
Be sure to use an HDMI cable to enjoy high quality videos
> Menu > Connected Devices > Video Device > HDMI
To connect the TV with your PC, make sure that your PC's graphic card supports UHD resolutions. For more information about the supported UHD resolutions, refer to "Supported Resolutions for UHD Input Signals." For more information about the supported 8K resolutions, refer to "Resolutions for Input Signals supported by 8K models (QN7**B series or higher)."
Displayed video looks blurry
If you notice blurring or juddering on the screen, use the Picture Clarity Settings function to resolve the issue.
> Menu > Settings > All Settings > Picture > Expert Settings > Picture Clarity Settings
The picture is distorted
The compression of video content may cause picture distortions, especially in fast moving pictures from sports programs and action movies.
Remove and reconnect the power cord, and check the remote control battery.
If the signal reception is weak or poor, screen distortion may be visible but it is not a malfunction. Mobile phones used close to the TV (within 3.2 ft) may cause noise on analog and digital channels.
There is a dotted line on the edge of the screen
Change Picture Size to 16:9 Standard.
> Menu > Settings > All Settings > Picture > Picture Size Settings > Picture Size
Change the output resolution of your external device.
The picture won’t display in full screen
HD channels will have black bars on either side of the screen when displaying upscaled SD (4:3) content.
Black bars will appear at the top and bottom of the screen when you watch movies that have aspect ratios different from your TV
Adjust the picture size options on your external device or set the TV to full screen.
> Menu > Settings > All Settings > Picture > Picture Size Settings >Picture Size
The Caption function in the TV menu is deactivated
When an external device is connected with an HDMI or Component cable, the Caption function is unavailable. Adjust the caption setting on the external device.
Captions appear on the TV screen
Turn off the Caption function in Caption Settings.
> Menu > Settings > All Settings > Connection > External Device Manager > Input Signal Plus
Sound and Noise Issues
When the TV has difficulties with sound, these steps may help resolve the problem.
How can I connect an audio device to the TV?
The connection method may differ depending on the audio device, such as HDMI (eARC), Optical, Bluetooth, and Wi-Fi.
For more information about how to connect an audio device, run Connection Guide
> Menu > Connected Devices > Audio Device
There is no sound or the sound is too low at maximum volume.
Check the volume control of your TV, and then check the volume control of the external device (cable box or satellite box, DVD, Blu-ray, etc.) connected to your TV. Check the cable connection between an external device and the TV and then try cable connection again.
The picture is good but there is no sound.
Check the Sound Output setting. If it is set to TV Speaker, check the volume setting.
> Menu > Settings > All Settings > Sound > Sound Output
If you are using an external device, check the device’s audio output option.
For example, you may need to change your cable box’s audio option to HDMI if the box connected to your TV is using an HDMI cable.
To listen to computer sound, connect an external speaker to the computer’s audio output connector. If your TV has a headphone jack, make sure there is nothing plugged into it.
Reboot the connected device by disconnecting and then reconnecting the device’s power cable. With a set-top box or cable box, check the cable connection and reboot the external device.
When the symptom persists, contact your service provider.
HDMI (eARC) is connected, and there is no sound.
Check whether Digital Output Audio Format is set to Pass-Through.
If a sound bar or A/V receiver that does not support Dolby Digital+ is used and Pass-Through is selected, there is no sound when a Dolby Digital+ source is received.
It is recommended to set Digital Output Audio Format to Auto if only limited audio format is supported depending on the performance of the connected sound bar or A/V receiver.
> Menu > Settings > All Settings > Sound > Expert Settings > Digital Output Audio Format > Auto
The speakers are making an odd sound.
Run Sound Test.
> Menu > Settings > Support > Device Care > Self Diagnosis > Sound Test
Make sure that the audio cable is connected to the correct audio output connector on the external device.
For antenna or cable connections, check the Signal Information. A low signal level may cause sound distortions
> Menu > Settings > Support > Device Care > Self Diagnosis > Signal Information
The sound is interrupted.
Sound quality may become affected if the wireless router is close to the Bluetooth speaker. Place the Bluetooth speaker as close as possible to the TV without obstacle between them. Do not place the wireless router close to the Bluetooth speaker body.
To minimize interruptions, we recommend a wireless access point that uses a 5 GHz frequency. 5 GHz may not be available depending on the model. When the symptom persists, it is recommended to use wired connection such as HDMI (eARC) and Optical.
Whenever a function is used on the TV or the channel is changed, the TV voices the activity. The TV explains in voice-over the video scenes displayed on the screen.
Turn off the Voice Guide function in Voice Guide Settings.
> Menu > Settings > All Settings > General & Privacy > Accessibility > Voice Guide Settings > Voice Guide
The TV audio is not being played through the Sound bar or A/V receiver.
Check the Sound bar or A/V receiver's power supply and its settings.
When connecting the optical cable between the TV and Sound bar or A/V receiver, make sure that the sound output is set Optical on your TV.
In case of HDMI eARC connection, make sure that it is connected to the eARC dedicated HDMI port on your TV. However, the eARC can be used only when the Sound bar or A/V receiver supports the eARC feature
The sound is not heard clearly.
Change to an appropriate sound mode.
> Menu > Settings > All Settings > Sound > Sound Mode
When Intelligent Mode and Adaptive Sound+ are turned on, the sound effects are automatically adjusted to the surroundings
> Menu > Settings > All Settings > General & Privacy > Intelligent Mode Settings > Intelligent Mode
To optimize the sound depending on the surroundings, select Adaptive Sound+.
> Menu > Settings > All Settings > General & Privacy > Intelligent Mode Settings > Adaptive Sound+
The volume of the external device cannot be adjusted.
Check the cable connection between the TV and the external device.
When connecting an external speaker such as home theater via HDMI, make sure it is connected to the HDMI (eARC) port on the TV. Make sure that the > Menu > Settings > All Settings > Connection > External Device Manager > Anynet+ (HDMI-CEC) is active on your TV
I want to turn the TV and audio device off and on at the same time.
When you connect the Samsung Soundbar to the TV via Bluetooth, the power turns off and on together. It may not be supported depending on the Samsung Soundbar model.
When you connect an audio device that supports HDMI eARC to the HDMI (eARC) port on the TV, the power turns off and on together.
Channel and Broadcast Issues
"Weak or No Signal" displayed in TV mode or cannot find channel.
Make sure that the external device is connected securely and turned on. Move to Connected Devices to switch to other input sources
> Menu > Connected Devices > Sources
When using a set-top box or cable box, check the broadcast signals or the network that is connected to the external device.
The TV is not receiving all channels.
Confirm that the coaxial cable is securely connected to the TV.
Run Reset or Auto Program.
> Menu > Settings > All Settings > General & Privacy > Reset
> Menu > Settings > All Settings > Broadcasting > Auto Program
The captions are not provided on a digital channel.
When watching channels with the antenna cable connected, run Caption Settings.
> Menu > Settings > All Settings > General & Privacy > Accessibility > Caption Settings
Some channels may not have caption data. When watching a channel on an external device such as a set-top box and cable box, turn on the caption function on the device. For more information, contact your service provider.
Broadcasting is deactivated.
Broadcasting is only available when Source is set to TV.
Broadcasting cannot be accessed while you watch TV using a cable box or satellite box.
Broadcasting cannot be accessed while a recording is in progress or the Timeshift function is running
External Device Connectivity Issues
The "Mode Not Supported" message appears.
Adjust the output resolution of the external device to a resolution supported by the TV.
The video is OK but there is no audio.
If you are using an HDMI connection, check the audio output setting on your PC.
If you are using a DVI to HDMI cable, a separate audio cable is required.
To listen to the computer sound, connect external speakers to the audio output connection of the computer.
I want to connect to a PC and mobile device via screen mirroring.
To wirelessly connect the TV to your PC, read the instructions at PC Screen Sharing (Wireless) in Connection Guide, and then try to connect
> Menu > Connected Devices > PC > Screen Sharing (Wireless)
Confirm that the TV and your PC are connected to the same network.
To wirelessly connect the TV to your mobile device, read the instructions at Smartphone Screen Sharing (Smart View) in Connection Guide, and then try to connect.
Confirm that the TV and your PC are connected to the same network.
To wirelessly connect the TV to your mobile device, read the instructions at Smartphone Screen Sharing (Smart View) in Connection Guide, and then try to connect.
If the TV has difficulties connecting to your PC or mobile device due to surrounding radio interferences, change the frequency of the wireless access band, and then try to connect.
No screen appears when connecting the TV to an external device.
For more information about how to connect an external device, run Connection Guide.
> Menu > Connected Devices > Connection Guide
Make sure that the external device is connected securely and turned on. Move to Sources to switch to other input sources.
> Menu > Connected Devices > Sources
Using HDMI Troubleshooting, you can check the connection to HDMI cable and external devices (takes approximately 2 minutes).
> Menu > Connected Devices > Video Device HDMI >Troubleshooting
When using a set-top box or cable box, check the broadcast signals or the network that is connected to the external device.
I want to connect to a Bluetooth speaker.
For more information on how to connect a Bluetooth speaker, see Audio Device Bluetooth in Connection Guide.
> Menu > Connected Devices > Audio Device > Bluetooth
The PC screen does not appear or it flickers.
When the PC screen does not appear or the PC is not recognized, check the power supply of the PC and then reconnect the HDMI cable between the PC and TV. When the symptom persists, check that the PC is in Sleep mode and then set Input Signal Plus to On.
> Menu > Settings > All Settings > Connection > External Device Manager > Input Signal Plus
When the set resolution is not matched, it may cause a blank or flickering screen. For the PC supported resolution, see "Read Before Connecting a Computer (Supported Resolutions)."
Network Issues
Wireless network connection failed. Unable to connect to a wireless access point. Unable to connect to the network.
> Menu > Settings > Support > Device Care > Self Diagnosis > Smart Hub Connection Test
Ensure that the network cable is connected and the router is powered on.
Connect your mobile device to the router via Wi-Fi.
Turn the router off and back on again. (Requires 2 to 3 minutes)
If a security key is required, make sure it has been entered correctly.
Unplug the TV’s power cord and plug it back in or long-press the power button for at least 3 seconds.
Make sure that there is no electromagnetic wave generating device placed between the TV and router.
If unable to establish a wireless internet connection, connect the TV to the wireless router via an LAN cable.
If the TV is able to connect to the internet normally via the cable connection, there might be a problem with the wireless router. In this case, try using a different wireless router.
Wired network connection failed.
Check if the LAN cable is plugged in on both ends. If it is plugged in, check if the access point is turned on. If it is on, turn it off, wait 1 or 2 minutes, and then turn it on
Connected to a local network, but not to the Internet.
1. Check if the Internet LAN cable is connected to the access point's external LAN port.
2. Check the DNS setting in IP Settings.
> Menu > Settings > All Settings > Connection > Network > Network Status > IP Settings
Anynet+ (HDMI-CEC) Issues
What is Anynet+?
You can use the TV's remote control to control external devices that support Anynet+ (HDMI-CEC) and that are connected to the TV via an HDMI cable. For example, if a connected external device supports Anynet+, you can have the connected device turn on or off when you turn the TV on or off
Anynet+ does not work. The connected device is not displayed.
Make sure the device is an Anynet+ (HDMI-CEC) device. From the settings menu on the device, check and confirm that the HDMI-CEC option is enabled.
From the TV, check and confirm that the Anynet+ (HDMI-CEC) feature is set to On.
> Menu > Settings > All Settings > Connection > External Device Manager > Anynet+ (HDMI-CEC)
Check and confirm that the device’s power cable is securely plugged in.
Check the device's HDMI cable connection. Anynet+ (HDMI-CEC) cannot function under specific circumstances. (when the TV is scanning channels or performing Reset)
When connecting or disconnecting an HDMI cable, turn the TV off and then back on again.
I want to start Anynet+. I also want the connected devices to turn on when the TV is turned on.
Move the focus to the Anynet+ device at > Menu > Connected Devices >
Sources, press the down directional button to move to Anynet+ (HDMI-CEC), and then press the Select button.
Check if the Anynet+ device is properly connected to the TV, and then select Anynet+ (HDMI-CEC) menu to see if Anynet+ (HDMI-CEC) is set to On.
> Menu > Settings > All Settings > Connection > External Device Manager > Anynet+ (HDMI-CEC)
I want to exit Anynet+. It is inconvenient to turn on other devices because the TV also turns on. It is inconvenient because the connected devices (e.g. set-top box) turn off together.
To turn off the Anynet+ function of a device connected to the TV, turn off the Anynet+ (HDMI-CEC) function of the device
> Menu > Settings > All Settings > Connection > External Device Manager > Anynet+ (HDMI-CEC)
When Anynet+ (HDMI-CEC) is turned off, the sound bar connected via the HDMI (eARC) port does not turn off and on together with the TV. To prevent a specific device connected to the TV from turning off automatically, turn off the HDMI-CEC function on a specific device connected to the TV
The message "Connecting to Anynet+ device..." or "Disconnecting from Anynet+ device" appears on the screen.
You cannot use the remote control when the TV is configuring Anynet+ or switching to the TV viewing screen. Use the remote control after the TV has completed the Anynet+ configuration or has switched to the TV viewing screen.
The Anynet+ device won't play.
You cannot use the play function when Reset is in progress.
Remote Control Issues
The remote control does not work.
The connection between the remote control and the TV may be lost
Point the Samsung Smart Remote at the front of the TV, and then press and hold the and buttons simultaneously for 3 seconds or more.
Also, if the remote control does not work properly or its response is very slow, the battery might be low or dead.
Charge the remote control by using the USB port (C-type) on the bottom, or turn over the remote to expose the solar cell.
You can check remaining battery of Samsung Smart Remote with solar cell in > Menu > Settings > All Settings > General & Privacy > Power and Energy Saving > Available Remote Battery
If the remote control has batteries, replace them with new ones.
External devices cannot be operated with the TV remote control.
Check the cable connection between the TV and external devices
> Menu > Connected Devices > Universal Remote.
Recording Issues
The Timeshift or recording function cannot be used
Check if there is a storage device connected to the TV. Recording will automatically stop if the signal becomes too weak. Check the free space on the storage device.
The function will not work if there isn't enough storage space on the USB device. Before using the recording function, be sure to read all precautions.
For more information, refer to "Before Using the Recording and Timeshift Functions."
Cannot record videos received from an external device or Samsung TV Plus.
The recording function is only available for digital broadcast channels received by the TV. You cannot record videos received from an external device or Samsung TV Plus.
The "Format Device" message appears when the Timeshift or recording function is used.
To use the recording function, the storage device connected to the TV must have been already formatted.
Formatting the storage device deletes all data from it, and the storage device is formatted in NTFS.
The recorded files on the TV are not played back on a PC.
The recorded files on the TV can only be played back on the same TV. Those video files cannot be played back on a PC or other TV.
Playback may not work properly if the recording file has a problem. If the problem persists, check the recording file
Apps
I launched an app, but it's in a different language. How can I change the language?
Languages supported by an app may be different from the TV Language set in the menu. The ability to change the language depends on the app's provider. Change the language from the settings menu in the app
The app does not work properly. Its image quality is poor.
Check the network connection. When the network speed is slow, the app may not work or its image quality may be poor.
Uninstall and reinstall the app. For more information about app uninstallation, refer to "Managing installed apps."
The services of your application are not provided by the TV but by the application service provider. Refer to the Help section on the application service provider's website.
The Smart Hub Home Screen keeps appearing whenever you turn on the TV.
Turn off the Autorun Smart Hub function in Start Screen Option.
> Menu > Settings > All Settings > General & Privacy > Start Screen Option > Autorun Smart Hub
Media Files
Some files are interrupted during playback.
This problem may occur with unsupported files or high-bitrate files. Most files can be played back, but some files may not play smoothly.
Some files can't be played.
Some files that use an unsupported codec may not be played back.
Make sure that the codec is supported by the TV. For more information, refer to "Read Before Playing Photo, Video, or Music Files."
Voice Assistant Issues
The voice commands do not work well.
Voice commands may differ depending on the Voice Assistant. Refer to the command examples for each Voice Assistant
Bixby: > Explore Now
Amazon Alexa: > Menu > Settings > All Settings > General & Privacy > Voice > Amazon Alexa Settings
Google Assistant: > Menu > Settings > All Settings > General & Privacy > Voice > Google Assistant Settings
Bixby/Alexa answers although I did not call it.
The TV may recognize an ambient noise or everyday conversation as a call to Voice Assistant.
Turn off the Voice Wake-up function or set the Wake-Up Sensitivity to Low
> Explore Now > Settings > Voice Wake-up
I spoke "Hi, Bixby/Alexa" but Bixby/Alexa does not answer.
When the TV is far from you or the ambient noise is so loud, the TV may be unable to recognize your voice.
For best results, you need to be within 10 feet (3-4 m) of your TV. Please look at your TV screen and speak. Turn on the Voice Wake-up function
> Explore Now > Settings > Voice Wake-up
Voice recognition does not work with the Samsung Smart Remote unlike other features. There is no response even if the Voice Assistant button is pressed
The connection between the remote control and the TV may be lost. Try pairing the remote control with the TV. Point the Samsung Smart Remote at the front of the TV, and then press and hold the and buttons simultaneously for 3 seconds or more.
Also, if the remote control does not work properly or its response is very slow, the battery might be low or dead.
Charge the remote control by using the USB port (C-type) on the bottom, or turn over the remote to expose the solar cell.
You can check remaining battery of Samsung Smart Remote with solar cell in > Menu > Settings > All Settings > General & Privacy > Power and Energy Saving
> Available Remote Battery
If the remote control has batteries, replace them with new ones.
During voice recognition, the heavy load message appears and the function does not work.
Unplug and then plug the TV power cable and then try again after 1 minute and 30 seconds. It may take a while if the voice recognition server is being inspected.
I want to see weather information of the desired area.
Say with the area name included.
Other issues
The TV is hot.
Watching TV for an extended period of time causes the panel to generate heat. The heat from the panel is dissipated through internal vents running along the top of the TV.
The bottom, however, may feel hot to the touch after extended use.
Children watching TV need constant adult supervision to prevent them from touching the TV.
This heat, however, is not a defect and does not affect the TV's functionality.
The TV smells like plastic.
This smell is normal and will dissipate over time.
The settings are lost after 5 minutes or every time the TV is turned off.
If Usage Mode is set to Retail Mode, the TV's audio and video settings are automatically reset every 5 minutes. Change Usage Mode to Home Mode.
> Menu > Settings > All Settings > General & Privacy > System Manager > Usage Mode > Home
The TV is tilted to the side.
Remove the base stand from the TV and reassemble it.
The stand is wobbly or crooked.
Refer to the Quick Setup Guide and make sure that the stand is assembled correctly.
A POP (TV’s internal banner ad) appears on the screen.
Change Usage Mode to Home Mode.
> Menu > Settings > All Settings > General & Privacy > System Manager > Usage Mode > Home
The TV is making a popping noise.
The expansion and contraction of the TV's outer casing may cause a popping noise.
This does not indicate a product malfunction.
The TV is safe to use.
The TV is making a humming noise.
Your TV utilizes high-speed switching circuits and high levels of electrical current. Depending on the TV's brightness level, the TV may seem slightly noisier than a conventional TV.
Your TV has undergone strict quality control procedures that meet our demanding performance and reliability requirements.
Some noise coming from the TV is considered normal and is not an acceptable cause for an exchange or refund.
The TV narrates the screen events in voice-over.
To turn off Voice Guide, move the focus from Accessibility Shortcuts to Voice Guide and then press the Select button. You can turn on or off Voice Guide. To run Accessibility Shortcuts, see the following:
Press and hold the +/— (Volume) button on your Samsung Smart Remote or Remote Control.
Diagnosing TV operational issues
Self Diagnosis
> Menu > Settings > Support > Device Care > Self Diagnosis
You can use the Picture Test to help diagnose video issues and the Sound Test to diagnose sound issues. You can also view signal strength information for over-the-air digital signals, test the Smart Hub network connection, and run the Smart Hub and TV factory reset functions.
Video Test
Picture Test
Sound Test
HDMI Troubleshooting
Signal Information
Smart Hub Connection Test
Reset Smart Hub
Cannot select Signal Information in Self Diagnosis.
Verify that the current channel is a digital channel.
Signal Information is only available for digital channels.
> Menu > Settings > Support > Device Care > Self Diagnosis > Signal Information
Reset Smart Hub
Resets all Smart Hub settings to their factory defaults and deletes all information related to Samsung accounts, linked service accounts, Smart Hub service agreements, and Smart Hub applications.
> Menu > Settings > Support > Device Care > Self Diagnosis > Reset Smart Hub
Reset picture
Resets current picture settings to the default settings.
> Menu > Settings > All Settings > Picture > Expert Settings > Reset Picture
Reset sound
Resets current sound settings to the default settings.
> Menu > Settings > All Settings > Sound > Expert Settings > Reset Sound

 >
>  Menu >
  Connected Devices > Connection Guide

 Settings > All Settings > Connection > Network > Open Network Settings


 button on the remote control.
 >
>  ) in SmartThings app on your mobile device.


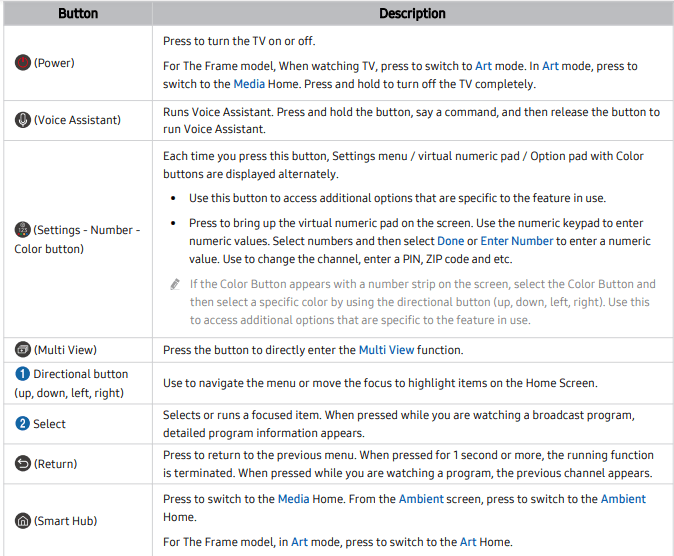
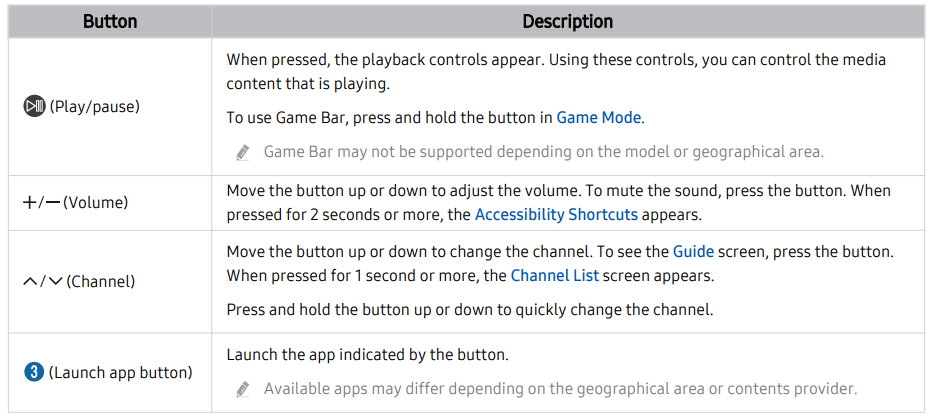


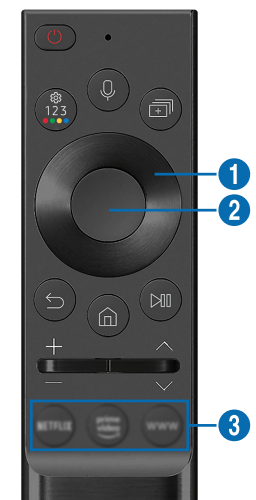
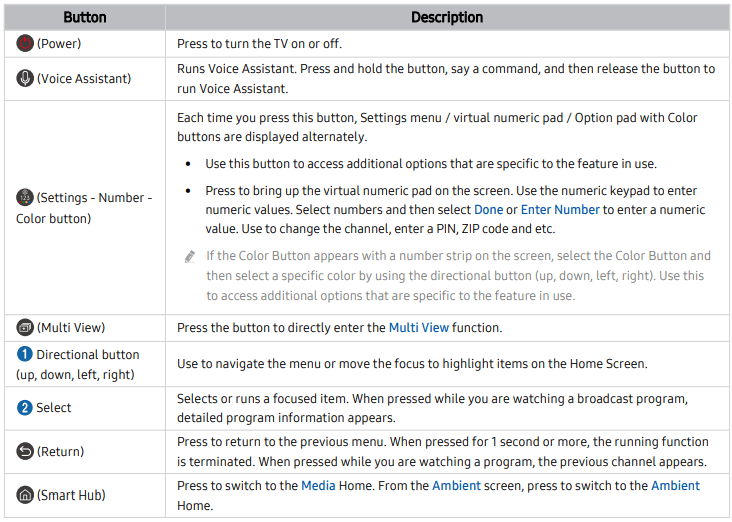
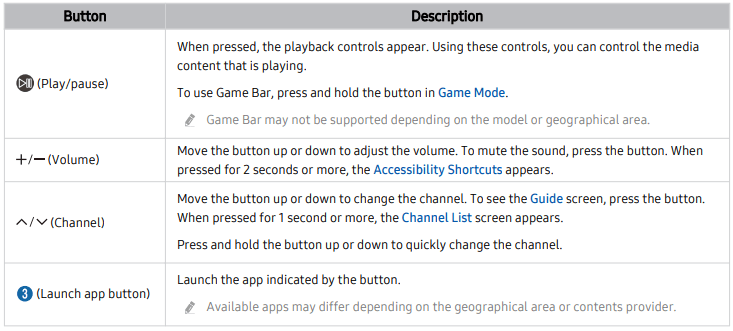
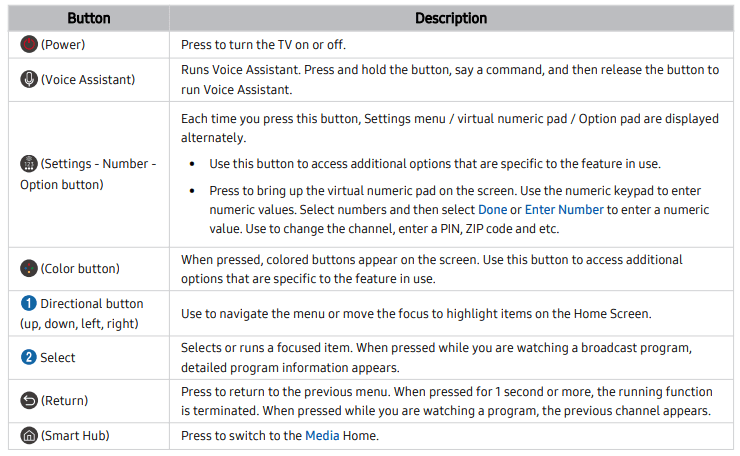
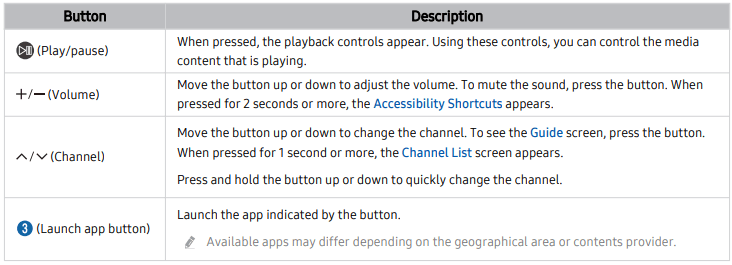


 and
and  buttons simultaneously for 3 seconds or more.
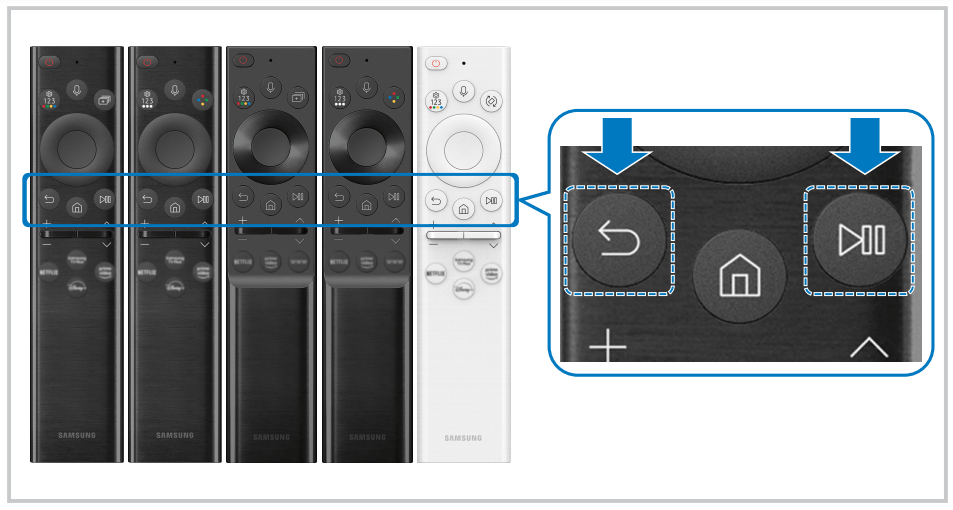


 on the Samsung Smart Remote, speak into the microphone on the Samsung Smart Remote, and then release the button. What you say appears on the screen as text.
 Ambient Mode
 Favorite: The item is not set as favorite
 Favorite: The item is set as favorite
 button, or
  Media.
 Art
Art button on the remote control to switch to TV mode or Art mode.
 Favorite: The item is not set as favorite
 Favorite: The item is set as favorite
 (more) Art Mode Settings.
 APPS
APPS

 Notification
 Delete All
 Connected Devices
 Multi View

 APPS
APPS
 Samsung Account
 Sign In to sign in.
 App Search
 : The app is installed on a USB device.
 : The app has a password
 : The app needs to be updated
 : The app supports the mirroring function.

 (Recently Viewed Topics)
 (Sitemap)
 (Index)
 (Try Now)
 (Link)
 SmartThings
 Samsung Account

 the option or press the
  button.
 or
or  option. There are 3 playback speeds. To change the playback speed, press the option repeatedly. To return to normal speed, select the
  General
 Dynamic
 Natural
 Multi View
 Change app/source.
 (Change screen size.)
 (Set Picture-in-Picture.)
 (Listen to the sound from two screens.)
 (Connect Bluetooth Speaker.)
 (Delete screen.)
 (Exit to full screen.)
 the button on your Samsung Smart Remote, say a command, and then release the

 Tutorials
 button on your Samsung Smart Remote to start the Game Bar


 (channel) buttons to move the screen position to the top, center, or bottom.

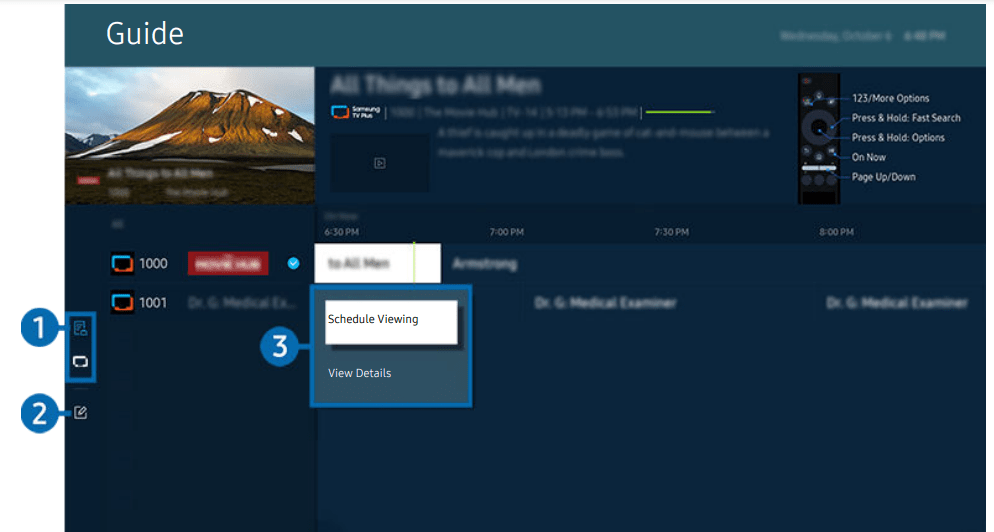
 or
or  button to use additional features.
 or
or  button to slow rewind or slow forward. Available speeds are 1/8, 1/4 and 1/2. Press the corresponding repeatedly to quickly increase the speed in slow mode by up to 3 times. To resume playback at normal speed, select
  button
 : A locked channel.
 ).
).