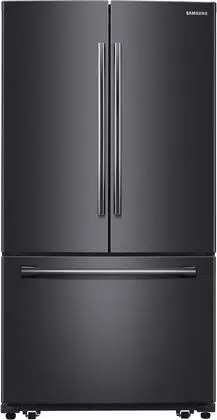
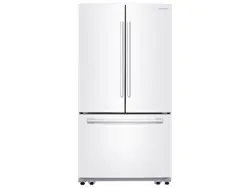
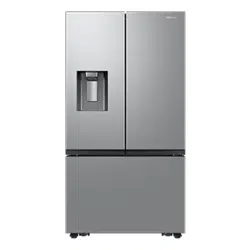
User manual Refrigerator
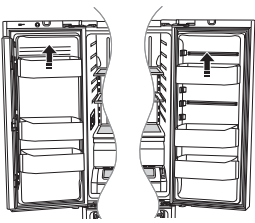
Setting up your French Door Refrigerator
FLOORING
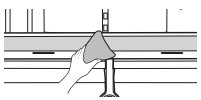
For proper installation, you must place this refrigerator on a level, hard surface that is the same height as the rest of the floor. This surface should be strong enough to support a fully loaded refrigerator, or approximately 335lbs (152kg).
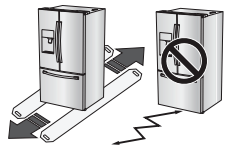
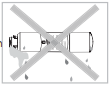
To protect the finish of the flooring, cut a large section of the cardboard carton and place it under the refrigerator where you are working. When moving the refrigerator, you need to pull and push it straight forwards or back. Do not wiggle it from side to side.
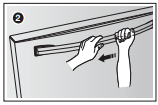
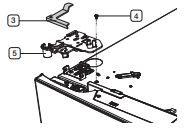
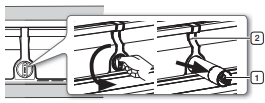
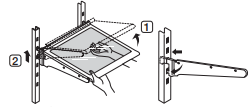
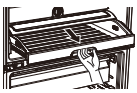
HOW TO ASSEMBLE THE HANDLE
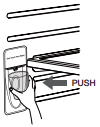
Orient each handle so that the end with the sticker attached is at the top and the holes with the tightening screws are facing each other.
Then, follow the directions below to install each handle.
By using Phillips screwdriver, fix the screw (optional) and then put the handle on the fixer by sliding them down firmly.
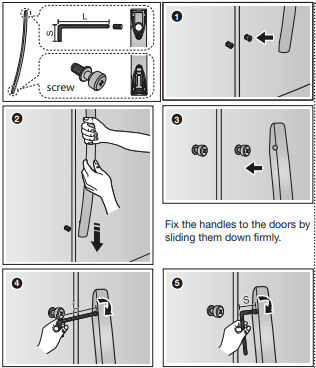
Tighten with wrench
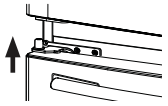
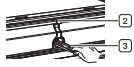
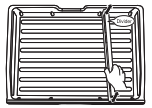
Drawer door handle assembly
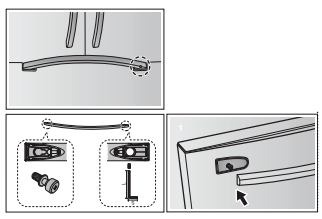
Check the direction of Handle assembly
Fix the handles to the doors by sliding them left side firmly
Fix the handles to the doors by sliding them left side firmly

Tilt up the Handle bar and tighten with wrench firmly
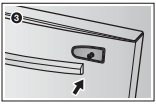
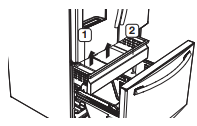
Disassemble the refrigerator doors
1. Remove 3 screws holding down the TOP TABLE ( 1 ) and turn it with wires connected.
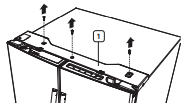
Disconnect two connector ( 2 ) on the left side door. To remove the water coupler from the WARNING 2 1 hinge, twist and pull it from the hinge.
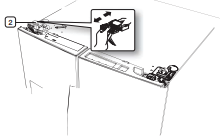
3. Pull and remove the hinge lever ( 3 ). Remove the ground screw ( 4 ) attached to the upper left door hinges with a philips screwdriver (+). Remove the upper left and right door hinges ( 5 ).
4. Lift the door straight up to remove.
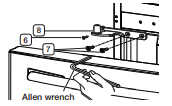
5. Remove the screw ( 6 ) attached to the lower left and right door hinges with a philips screwdriver (+). Remove the 2 hex head bolts ( 7 ) attached to the lower left and right door hinges with an allen wrench (3/16”). Remove the lower left and right door hinges ( 8 ).
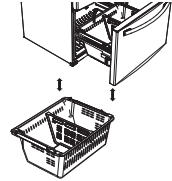
DISASSEMBLE THE FLEX DOOR
1. Take out the upper drawer by lifting it up.
2. Take out the lower basket ( 1 ) by lifting the basket up from the rail system.
3. Press the fi xing hook of rail system.
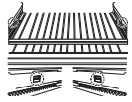
4. Holding the top of the Freezer Drawerpull it out all the way and then remove it from the rail system.
 Be careful not to scratch or dent the sliding rail by letting it strike the floor.
Make sure that you mount the freezer basket in the right position when removing / installing the freezer door. Failing to do so may result in the door not opening or closing properly
Do not overload the bottom basket or the top drawer. Overloading prevents the Freezer drawer from closing properly and will eventually cause frost build-up.
ASSEMBLE THE FREEZER DRAWER
To reattach the drawer after you have moved the fridge to its final location, assemble the parts in reverse order.
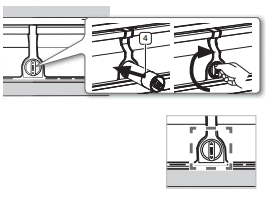
ADJUSTING THE LEVEL
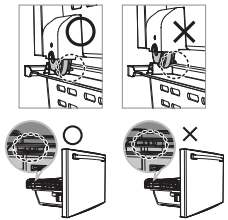
Make sure the refrigerator is level so that you can make final adjustments. Use a level to test if the refrigerator is level both side to side and back to front. If the refrigerator is not level, it will not be possible to get the doors perfectly even, which may cause moisture condensation and increased energy bills. Below is an example of how to level the refrigerator if the left side of the refrigerator is lower than the right side.
How to adjust the level
1. Open the freezer drawer and remove the lower basket.
2. Insert a flat-blade screwdriver (-) into a notch on the left control lever, and turn it counter clockwise to level the refrigerator. (You turn the lever clockwise to lower the refrigerator and counterclockwise to raise it.)
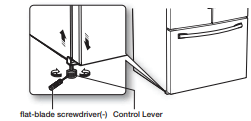
Both control levers must be touching the floor to avoid possible personal injury or property damage because of tipping.
 If the right side is lower, perform the same procedure, but with the right control lever.
It is difficult to remove the cover leg front from the refrigerator, so we do not recommend making small adjustments with the control lever. Instead, refer to the next page for the best way to make minor adjustments to the doors.
MAKING MINOR ADJUSTMENTS BETWEEN DOORS
Remember, a leveled refrigerator is necessary for getting the doors perfectly even. If you need help, review the previous section on leveling the refrigerator.
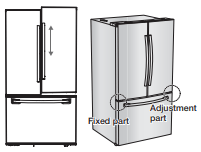
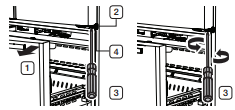
The left door is fixed. To make minor adjustments between doors, adjust only the right door.
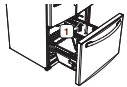
1. Pull out the freezer drawer (1) ,then you can see the lower hinge (2).
2. Insert a philips screwdriver (+) (3) into the shaft (4) of the lower hinge.
3. Adjust the height by turning a philips screwdriver (+) (3)clockwise ( ) or counterclockwise (
 ).
).
When you turn a philips screwdriver (+) counterclockwise (), the door will move up.
INSTALLING THE WATER DISPENSER LINE
A water dispenser with a filter is one of the helpful features on your new refrigerator. To help promote better health, the water filter removes unwanted particles from your water. However, it does not sterilize or destroy microorganisms. You may need to purchase a water purifying system to do that. The water line also connects to the ice maker.
For the ice maker to operate properly, water pressure of 20~125psi ( 138~862kPa) is required.
If the refrigerator is installed in an area with low water pressure (below 20psi), you can install a booster pump to compensate for the low pressure.
After you have connected the water line, make sure the water storage tank inside the refrigerator is properly filled. To do this, press the water dispenser lever until the water runs from the water outlet.
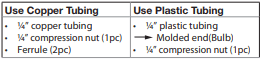
Water line installation kits are available at extra cost from your dealer. We recommend using a water line installation kit that contains copper tubing and ¼” compression nut.
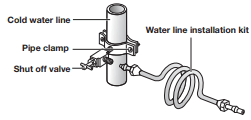
Connecting to the water supply line
1. First, shut off the main water supply.

2. Locate the nearest cold water drinking line and install the pipe clamp and shut off valve.
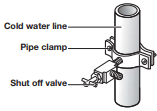
3. Connect the water line installation kit to the shut off valve
Connecting the water supply line to the refrigerator.
There are several items that you need to purchase to complete this connection.
You may find these items sold as a kit at your local hardware store.
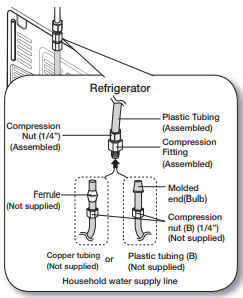
1. Connect the household water line to the assembled compression fitting.
- If you are using copper tubing, slip the compression nut ( B ) (not supplied) and ferrule (not supplied) on the copper tubing (not supplied) as shown.
- If you are using plastic tubing ( B ), insert the molded end (Bulb) of the plastic tubing ( B ) into the compression fitting.
Do not use without the molded end (Bulb) of the plastic tubing ( B ).
1. Tighten the compression nut ( B ) onto the compression fitting. Do not over-tighten the compression nut ( B ).
2. Turn water on and check for any leakage. If you find water drops or leakage in the connection areas, turn off the main water supply. Check the connections and, if necessary, tighten.
3. Flush 1 gallon of water through the filter before drinking or using the water from the refrigerator. (Flush approximately 6 minutes.) To flush, press a large glass or cup against the water dispenser lever. Fill the glass, empty it into the kitchen sink after it is filled, and then repeat
4. After you turn on the refrigerator, let the ice maker make ice for 1 to 2 days. Over that period of time, throw out the fi rst 1 or 2 buckets of ice the freezer makes to ensure all impurities have been removed from the water line.
Only connect the water line to a drinkable water source.
If you have to repair or disassemble the water line, cut off 1/4" of the plastic tubing to make sure you get a snug, leak-free connection.
You can test the water line quickly using a paper cup. Under normal conditions, the water dispenser can till a 5.75 oz. ( 170cc) cup in about 10 seconds.
COMPLETING THE SET UP
Now that you have your new refrigerator installed in place, you are ready to set up and enjoy the features and functions of the appliance.
By completing the following steps, your refrigerator should be fully operational.
1. Make sure your refrigerator is in an appropriate location with reasonable clearance between it and the wall. Refer to installation instructions in this manual.
2. Once the refrigerator is plugged in, make sure the interior light comes on when you open the doors.
3. Set the Temperature control to the coldest temperature and wait for an hour. The freezer will get slightly chilled and the motor will run smoothly. Reset the refrigerator and freezer to the temperatures you want.
4. After you plug the refrigerator in, it will take a few hours to reach the appropriate temperature. You can store food and drinks in the refrigerator after the temperature is sufficiently cool.
Under normal conditions, a 170 cc (5.75 oz.) cup can be filled in about 10 seconds.
Operating your French Door Refrigerator
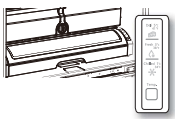
USING THE CONTROL PANEL
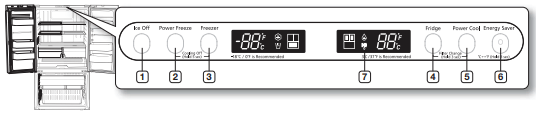
( 1 ) Ice Off Button
Press the Ice off button if you want to turn the ice-maker off.
( 2 ) Power Freeze Button
Speeds up the time needed to freeze products in the Freezer. It can be helpful if you need to quickly freeze easily spoiled items or if the temperature in the Freezer has warmed dramatically (for example, if the door was left open).
( 3 ) Freezer Button
Press the Freezer button to set the Freezer to your desired temperature. You can set the temperature between 5°F (-15°C) and -8°F(-23°C) .
( 4 ) Fridge Button
Press the Fridge button to set the fridge to your desired temperature.
You can set temperature between 34°F(1°C) and 44°F(7°C) .
( 5 ) Power Cool Button
Speeds up the time needed to cool products in the Refrigerator. It can be helpful if you need to quickly cool easily spoiled items or if the temperature in the fridge has warmed dramatically (For example, if the door was left open).
( 6 ) E. Saver Button
For better energy efficiency, press E.Saver button. However, if condensation occurs on the door, turn the E.Sasver function off.
Press this button for 3 seconds to switch the temperature units between °C and °F.
( 7 ) Filter Indicator
When the filter indicator light is on, it is time to change the filter. Typically this happens about every 6 months.
The filter Indicator will be Red when you have used your water filter for 6 months.
The icon will blink red for several seconds when you open or close the door.
The filter indicator will be Off when you insert the new water filter.
COOLING OFF MODE (“OF & OF” CODE ON THE DISPLAY)
This function is for store display refrigerators. It is not for customer use.
In Cooling Off Mode, the refrigerator works but doesn’t make cool air. To cancel this mode, press the Power Freeze and Freezer buttons at the same time for 5 seconds until a “Ding-dong” sound is heard and the unit will now cool.
CHANGING THE WATER FILTER
 To reduce risk of water damage to your property DO NOT use generic brands of water filters in your SAMSUNG Refrigerator.
USE ONLY SAMSUNG BRAND WATER FILTERS. SAMSUNG will not be legally responsible for any damage, including, but not limited to property damage caused by water leakage from the use of a generic water filter. SAMSUNG Refrigerators are designed to work ONLY WITH SAMSUNG Water Filter.
The Filter light turns red to let you know when it is time to change your water filter cartridge.

To give you time to get a new filter, the red light comes on just before the capacity of the current filter runs out. Changing the filter on time provides you with the freshest, cleanest water from your refrigerator.
1. Shut off the water supply. Then, Turn the water filter ( 1 ) about 1/4 turn, counter-clockwise.
2. Pull the water filter (1) from the case filter ( 2 ).
- To change the water filter more easily, shut off the water supply valve.
- Sometimes it is hard to disassemble the water filter because impurities in the water cause it to stick. If you are having difficulties, grip the water filter firmly and pull it hard.
- When you pull the water filter, a little water can leak from the opening. This is normal. To minimize the water leaks, keep the filter cartridge horizontal when you pull it.
- To prevent overflow, empty the water filter tray ( 3 ) and dry around the filter case ( 2 ).
3. Insert the new filter into the filter case ( 4 ).
4. Push the filter, and then turn it clockwise until it locks.
5. After removing the old water filter and installing a new reset the indicator by pressing the “Fridge” and “Power Cool” button simultaneously for about 3 seconds.
6. if you turned off the water supply, turn it back on.
Removing any residual matter inside the water supply line after installing the water filter.
1. Turn ON the main water supply and supply water to the refrigerator.
2. Run 1 Gal of water through the dispenser until the water runs clear (approx. 6 to 7 minutes). This will clean the water supply system and remove air from the lines.
3. If after pour 1 Gal the water doesn’t turn clear is possible an additional flushing in the household lines.
4. Open the Refrigerator door and make sure there are no water leaks coming from the water filter.
Be sure to flush the dispenser system thoroughly, otherwise water may drip from the dispenser. This means that there is still air in the line.
Reverse Osmosis Water Supply
IMPORTANT:
The pressure of the water supply coming out of a reverse osmosis system going to the water inlet valve of the refrigerator needs to be between 35 and 120 psi (241 and 827 kPa).
If a reverse osmosis water filtration system is connected to your cold water supply, the water pressure to the reverse osmosis system needs to be a minimum of 40 to 60 psi (276 to 414 kPa.) If the water pressure to the reverse osmosis system is less than 40 to 60 psi (276 to 414 kPa):
- Check to see whether the sediment filter in the reverse osmosis system is blocked. Replace the filter if necessary.
- Allow the storage tank on the reverse osmosis system to refill after heavy usage.
- If your refrigerator has a water filter, it may further reduce the water pressure when used in conjunction with a reverse osmosis system. Remove the water filter.
If you have questions about your water pressure, call a licensed, qualified plumber.
CONTROLLING THE TEMPERATURE
Basic temperature of Freezer and Refrigerator Compartments
The basic temperature and recommended temperatures of the Freezer and Refrigerator Compartments are 0°F and 37°F(or -18°C and 3°C) respectively. If the temperature of the Freezer and Refrigerator Compartments are too high or low, adjust the temperature manually
CONTROLLING THE TEMPERATURE
Controlling the Freezer temperature
The Freezer temperature can be set between 5°F(-15°C) and -8°F(-23°C) to suit your particular needs. Press the Freezer button repeatedly until the desired temperature is shown in the temperature display. Keep in mind that foods like ice cream may melt at 4°F(-15°C).
The temperature display will move sequentially from -8°F(-23°C) to 5°F(-15°C). When the display reaches 5°F, it will begin again at -8°F(-23°C).
Five seconds after the new temperature is set, the display will again show the actual current freezer temperature until the new temperature is reached.
Controlling the Refrigerator temperature
The Refrigerator temperature can be set between 44°F(7°C) and 34°F(1°C) to suit your particular needs. Press the Fridge button repeatedly until the desired temperature is shown in the temperature display.
The temperature control process for the Fridge works just like the Freezer process.
Press the Fridge button to set your desired temperature. After a few seconds, the Fridge will begin adjusting towards the newly set temperature. This will be reflected in the digital display.
The temperature of the Freezer or the Refrigerator may rise from opening the doors too frequently, or if a large amount of warm or hot food is placed in either side. This may cause the digital display to blink. Once the Freezer and Refrigerator temperature return to their normal set temperatures, the blinking will stop. If the blinking continues, you may need to “reset” the Refrigerator. Try unplugging the appliance, wait for around 10 minutes and then plug the power cord back in.
USING THE COLD WATER DISPENSER
Using the Water dispenser (RF261B, RF26H)
Place a glass underneath the water outlet and push gently against the water dispenser lever with your glass. Make sure the glass is in line with the dispenser to prevent the water from splashing out.
If you have just installed the refrigerator or installed a new water filter, Flush 3 gallons through fi filter before use (flush approximately 6 minutes). Make sure water flows cleanly before drinking.
If you have a long vacation or business trip, close the water valve and shut off the water supply to the Refrigerator. This will help prevent accidental leakages.
Water clouding phenomenon
All water provided to refrigerators flows through the core filter which is an alkaline water filter. In this process, the pressure in the water that has flowed out of the filter gets increased, and oxygen and nitrogen become saturated. When this water flows out in the air, the pressure plummets and the oxygen and nitrogen get supersaturated so that they turn into gas bubbles. The water could look misty due to these oxygen bubbles. The water may look temporarily cloudy due to these oxygen bubbles. After a few seconds, the water will look clear.
The water tank’s capacity is approximately one third (1/3) of a gallon.
Please wait 1 second before removing the cup after dispensing water to prevent spills.
PARTS AND FEATURES
Use this page to become more familiar with the parts and features of the refrigerator
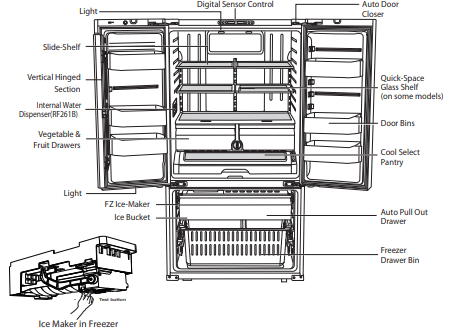
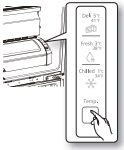
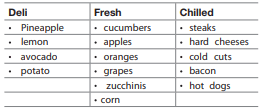
USING THE COOL SELECT PANTRY
The Cool Select Pantry is a full-width drawer with adjustable temperature control. This pantry can be used for large party trays, deli items, pizza, beverages or miscellaneous items.
There is a temperature control which can adjust the amount of cold air allowed into the pantry. The control is located on the right side of the pantry
- The Pantry has three modes: The Fresh mode, Chilled mode, and Deli mode. Fresh mode is the default. Press the Temp button repeatedly until the mode you want is lit. Once you select a mode, the temperature will change to match the mode you selected.
- The Pantry temperature may change depending on the number of items inside and where they are located, the ambient temperature, and how often the door is opened.
The Pantry Selection Button
1. When you select “Deli”, the temperature of the pantry will be kept around 41°F (or 5°C). This feature helps keep food fresh for a long time.
2. When you select “Fresh”, the temperature of the pantry will be kept around 38°F (or 3°C). This feature helps keep food fresh for a longer time.
3. When you select “Chilled”, the temperature of the pantry will be kept around 34°F (or 1°C). This feature also helps keep meat or fish fresh for a longer time. The table below lists the Pantry modes and the kinds of foods that can be stored safely for each mode.
Fruits and vegetables may be damaged when the “chilled” mode is set. Do not store lettuce or other leafy produce in this pantry.
Do not store glass bottles in this pantry. If they are frozen, they can break and cause personal injury.
In case you put a water bowl without its ild into the pantry, condensation may form around surrounding parts.
REMOVING THE REFRIGERATOR ACCESSORIES
1. Door Bins & Dairy Compartment
Door Bins
To remove - Simply lift the bin up and pull straight out.
To relocate -Slide it in above the desires location and push down until it stops.
Injury may occur if the door bins are not firmly assembled. Do not allow children to play with the bins. Sharp corners of the bins may cause injury.
Do not adjust a bin full of food. Remove the food first. To remove dust from the bins - Remove the guard and wash in water.
2. Tempered Glass shelves
To remove - Tilt up the front of the shelf in the direction shown ( 1 ) and lift it up vertically ( 2 ). Pull the shelf out.
To relocate - Tilt the front of the shelf up and guide the shelf hooks into the slots at a desired height. Then lower the front of the shelf so that the hooks can drop into the slots.
The Tempered Glass shelves are heavy. Use special care when removing them.
3. Vegetable & Fruit Drawers
To remove - Pull the drawer out to full extension. Tilt up the front of the drawer and pull straight out.
To relocate - Insert the drawer into the frame rails and push back into place.
The drawers need to be removed before the glass shelf above them can be lifted out.
4. Cool select pantry
To remove the Cool select pantry – Pull the pantry out to full extension. Tilt up the front side of the pantry and pull straight out.
To relocate the Cool select pantry – Push the rails to the back of the refrigerator. Place the drawer onto the rails and slide the pantry back until it is in place.
To remove the divider – Pull the pantry completely out to full extension and raise the front side of the divider to unhook it from the rear wall of the pantry, then lift the divider out.
To relocate the divider - Hook the back of the divider over the rear wall of the pantry and push the divider down.
Using the doors
Ensure that the doors close all the way and are securely sealed.
When the refrigerator door is only partially open, it will automatically close. But, the door will stay open when opened more than the auto close range and you must close it manually.
REMOVING THE REFRIGERATOR ACCESSORIES
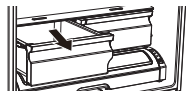
1. ICE BUCKET
To remove - Lift the ice bucket ( 1 ).
To relocate - Place the ice bucket into the Super extended drawer ( 2 ).
2. Super Extended Drawer
To remove - Pull the drawer out to full extension. Tilt up the rear of the drawer and lift straight out.
To relocate - Place the drawer onto the rails ( 4 ) by tilting it up. Lower the drawer into place until it is horizontal and slide the Drawer ( 3 ) in.

3. Freezer Drawer
To remove the freezer drawer - Pull the freezer drawer out fully. Tilt up the rear of the bin and lift it out to remove.
To relocate the freezer drawer - Place the bin into the rail assembly.
Do not allow babies or children go inside the freezer drawer. They could damage the refrigerator and seriously injure themselves. Do not sit on the freezer door. The door may break. Do not allow children to climb into the freezer drawer.
Do not remove the divider.
If trapped inside, children may be injured or suffocate to death.
CLEANING THE REFRIGERATOR
Caring for your Samsung French Door Refrigerator prolongs the life of your appliance and helps keep the refrigerator free of odor and germs.
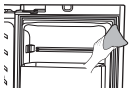
Cleaning the Interior
Clean the inside walls and accessories with a mild detergent and then wipe dry with a soft cloth. You can remove the drawers and shelves for a more thorough cleaning. Just make sure to dry drawers and shelves before putting them back into place.
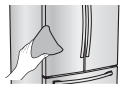
Cleaning the Exterior
Wipe the control panel and digital display with a damp, clean, soft cloth. Do not spray water directly on the surface of the refrigerator.
The doors, handles and cabinet surfaces should be cleaned with a mild detergent and then wiped dry with a soft cloth. To keep your appliance looking its best, polish the exterior once or twice a year.
Do not spray water directly on the refrigerator. Use a clean, damp cloth to clean.
Do not use benzene, thinner, or Clorox for cleaning. They may damage the surface of the appliance and may cause a fi re.
You can erase the printed letters on the display if you apply stainless cleaner directly to the area where the letters are printed.

If the rubber door seals are dirty, the doors may not close properly, and the refrigerator will not operate effi ciently. Keep the door seals free of dust or stains by cleaning the doors with a mild detergent and damp cloth. Wipe dry with a clean, soft cloth.
Do not clean the refrigerator with benzene, thinner or car detergent. These substances could cause a fire.
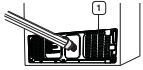
Cleaning the rear side of the refrigerator
To keep cords and exposed parts free of dust and dirt accumulation.
Vacuum the rear side of the appliance once or twice a year.
Do not remove the back cover ( 1 ). You could suffer an electric shock.
Troubleshooting
The refrigerator does not work at all or it does not chill suffi ciently
- Check if the power plug is properly connected.
- Check if the set temperature on the digital display is warmer than the freezer or fridge inner temperature. If it is, set the refrigerator colder.
- Is the refrigerator in direct sunlight or located near a heat source?
- Is the back of the refrigerator too close to the wall, preventing proper ventilation?
The food in the fridge is frozen.
- Check if the set temperature on the digital display is too low.
- Try setting the refrigerator to a warmer temperature.
- Is the temperature in the room too low? Set the refrigerator warmer.
- Did you store the food which is juicy in the coldest part of the refrigerator? Try moving those items to the other shelves in the fridge instead of keeping them in the colder areas or bins.
You hear unusual noise or sounds.
- Check if the refrigerator is level and stable.
- Is the back of the refrigerator too close to the wall, preventing proper ventilation?
- Try moving the back of the refrigerator at least 2 inches from the wall.
- Was anything dropped behind or under the refrigerator?
- A “ticking” sound is heard from inside the refrigerator. This is normal and occurs because various accessories are contracting or expanding according to the temperature of the refrigerator interior.
- If it sounds as if something is hitting something else inside the refrigerator, this is normal. The sound is caused by the compressor operating at high capacity.
The cabinet-door sealing area of the appliance is hot and condensation is occurring.
- Some heat is normal as anti-condensators are installed in the vertical hinged section of the refrigerator to prevent condensation.
- Is the refrigerator door ajar? Condensation can occur when you leave the door open for a long time.
Ice Maker is not producing ice.
- Did you wait for 12 hours after installation of the water supply line before making ice?
- Is the water line connected and the shut-off valve opened?
- Did you manually stop the ice making function?
- Is the freezer temperature too warm? Try setting the freezer temperature lower.
You can hear water bubbling in the refrigerator.
- This is normal. The bubbling comes from refrigerant circulating through the refrigerator.
There is a bad smell in the refrigerator.
- Check for spoiled food.
- Foods with strong odors (for example, fish) should be tightly covered.
- Clean out your freezer periodically and throw away any spoiled or suspicious food.
Frost forms on the walls of the freezer.
- Is the air vent blocked? Remove any obstructions so air can circulate freely.
- Allow suffi cient space between the stored foods for effi cient air circulation.
- Is the freezer drawer closed properly?
Water dispenser is not functioning.
- Is the water line connected and the shut-off valve opened?
- Has the water supply line tubing been crushed or kinked?
- Make sure the tubing is free and clear of any obstruction.
- Is the water tank frozen because the fridge temperature is too low? Try selecting a warmer setting on the Digital display.
Auto close system does not work with the freezer door.
- Is there an imbalance between the right and left parts of the door?
- Open and close the door smoothly 1~2 times. After you do this, the auto close system usually works properly again.
- Try opening the door smoothly to avoid unbalancing the right part and the left part of the door.