
Warming Drawer
User & installation manual
NL20J7100W*
NL20T8100W*
NL20T9100W*
Warming Drawer
- Instruction Manual
EN
- Manuel d'instructions
FR
Wärmeschublade
- Bedienungsanleitung
DE
IT

3
EN
Contents
Safety Information .............................................................................................................................. 2
Appliance Description ........................................................................................................................ 5
Main Components ............................................................................................................................ 5
How the warming drawer works ........................................................................................................ 5
Use ....................................................................................................................................................... 6
Before using for the first time ............................................................................................................ 6
Control Panel .................................................................................................................................... 6
Using the warming drawer ................................................................................................................ 6
Selecting temperature ...................................................................................................................... 6
Cleaning and Maintenance ................................................................................................................. 8
Appliance front and control panel ..................................................................................................... 8
Interior of the warming drawer .......................................................................................................... 8
Mat with non-slip surface .................................................................................................................. 8
What should I do if the warming drawer doesn’t work? .................................................................. 9
Technical Characteristics ................................................................................................................ 10
Environmental protection ................................................................................................................ 10
Installation instructions ................................................................................................................... 11
Before installation ........................................................................................................................... 11
Installation ...................................................................................................................................... 11
Electrical Connection ...................................................................................................................... 11
Installation ......................................................................................................................................... 45
Combination possibilities ................................................................................................................ 45
We ask you to read the instructions in this booklet very carefully as this will allow you to get the best
results from using your warming drawer.
KEEP THE DOCUMENTATION OF THIS PRODUCT FOR FUTURE REFERENCE.

2
EN
Safety Information
Carefully read the instructions before installing and using the
equipment. The manufacturer is not liable for improper installation
and use of the equipment that may cause injuries and damage.
Always keep the instructions at hand, so they can be easily referred
to during use.
This appliance complies with current safety standards. Improper use
of the appliance may put the user at risk.
Children and Vulnerable People Safety
Warning! Risk of suffocation, injury or permanent disability.
• This appliance can be used by children aged from 8 years and
above and persons with reduced physical, sensory or mental
capabilities or lack of experience and knowledge if they are
supervised by an adult or a person who is responsible for their
safety.
• Children should be supervised to ensure that they do not play with
the appliance.
• Keep all packaging away from children.
• WARNING: The appliance and its accessible parts become hot
during use. Care should be taken to avoid touching heating
elements. Children less than 8 years of age shall be kept away
unless continuously supervised.
• Cleaning and user maintenance shall not be made by children
without supervision.
General Safety
• This appliance is intended to be used in household applications
and not in hotels, shops, offices and other similar environments.
• Internally the appliance becomes hot when in operation. Do not
touch the heating elements that are in the appliance.
• Always use oven gloves to remove or put in accessories or
ovenware.
• Do not sit or hang on the drawer. The telescopic runners will be
damaged. The maximum load capacity of the drawer is 25 kg.

3
EN
Safety Information
• Do not store synthetic containers or easily inflammable objects
inside the crockery warmer. When you switch on the appliance
such containers and objects may melt or catch fire. Fire danger!
• Do not use the appliance to heat up the air temperature in the
kitchen. The high temperatures reached may cause easily
inflammable objects close to the appliance to catch fire.
Installation
• The electric system must be equipped with a means for
disconnection, with a contact separation in all poles that provides
full disconnection under overvoltage category III.
• If a plug is used for the electric connection, then it must be
accessible after installation.
• The installation must comply with current regulations.
• Protection against electric shock must be provided by the electrical
installation.
• WARNING! The appliance must be earthed.
• WARNING! The appliance is intended to be built in. Please refer to
the last pages of this user manual for detailed information on the
installation dimensions.
Cleaning and Maintenance
• WARNING! Cut the power supply before cleaning and
maintenance.
• Failure to maintain the appliance in a clean condition could lead to
deterioration of the surface that could adversely affect the life of
the appliance and possibly result in a hazardous situation.
• Do not use harsh abrasive cleaners or sharp metal scrapers to
clean the glass door since they can scratch the surface, which may
result in shattering of the glass.
• Do not use a steam cleaner to clean the appliance.
• Please follow the instructions regarding cleaning in the section
"Cleaning and Maintenance".

4
EN
Safety Information
Service and Repair
• WARNING! Cut the power supply before repair.
• If the power cable is damaged it should be substituted by the
manufacturer, authorized agents or technicians qualified for this
task in order to avoid dangerous situations.
• Repair and maintenance work, especially of current carrying parts,
can only be carried out by technicians authorized by the
manufacturer.
5
EN
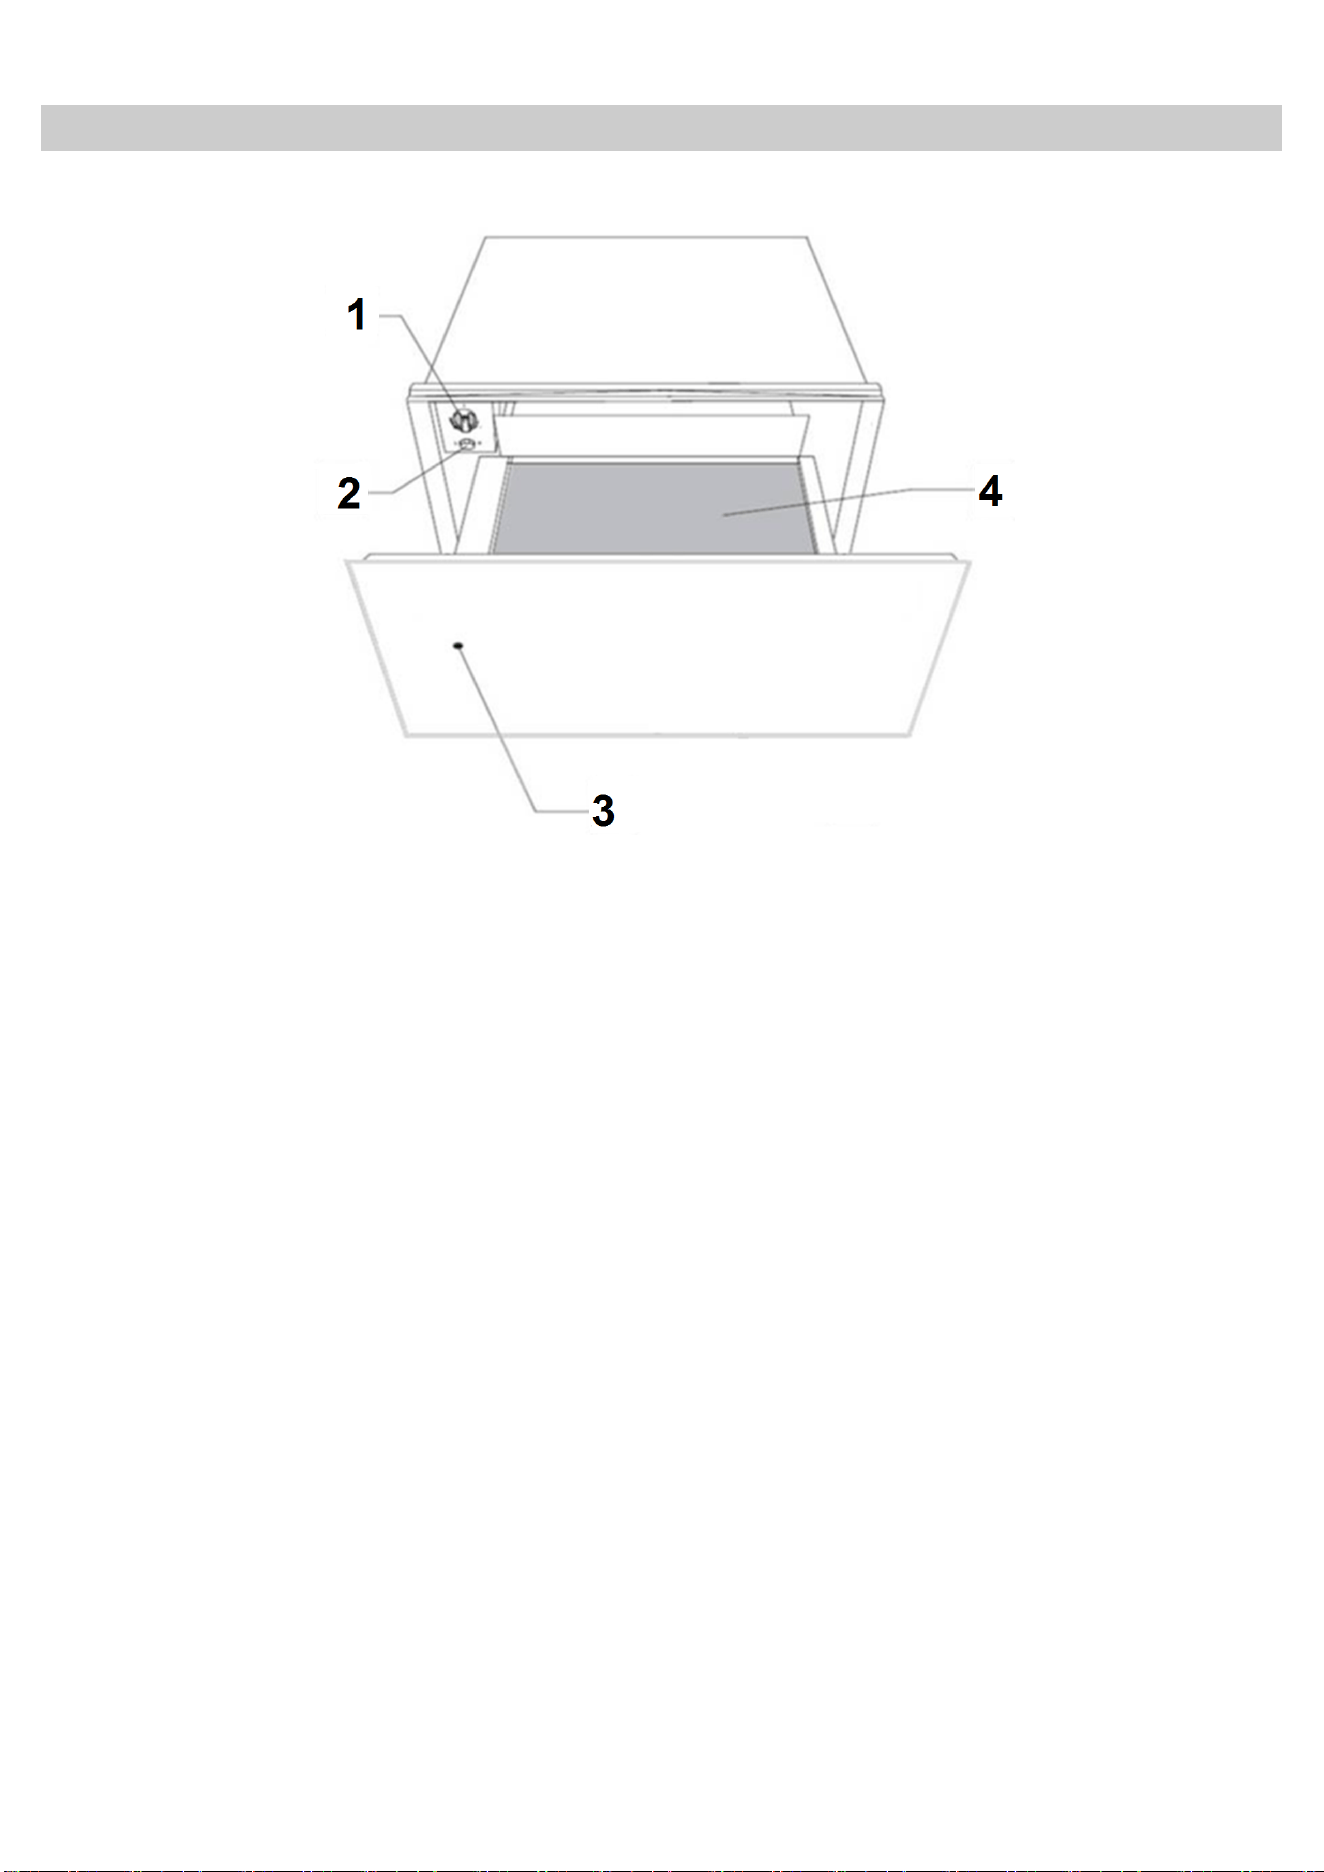
Appliance Description
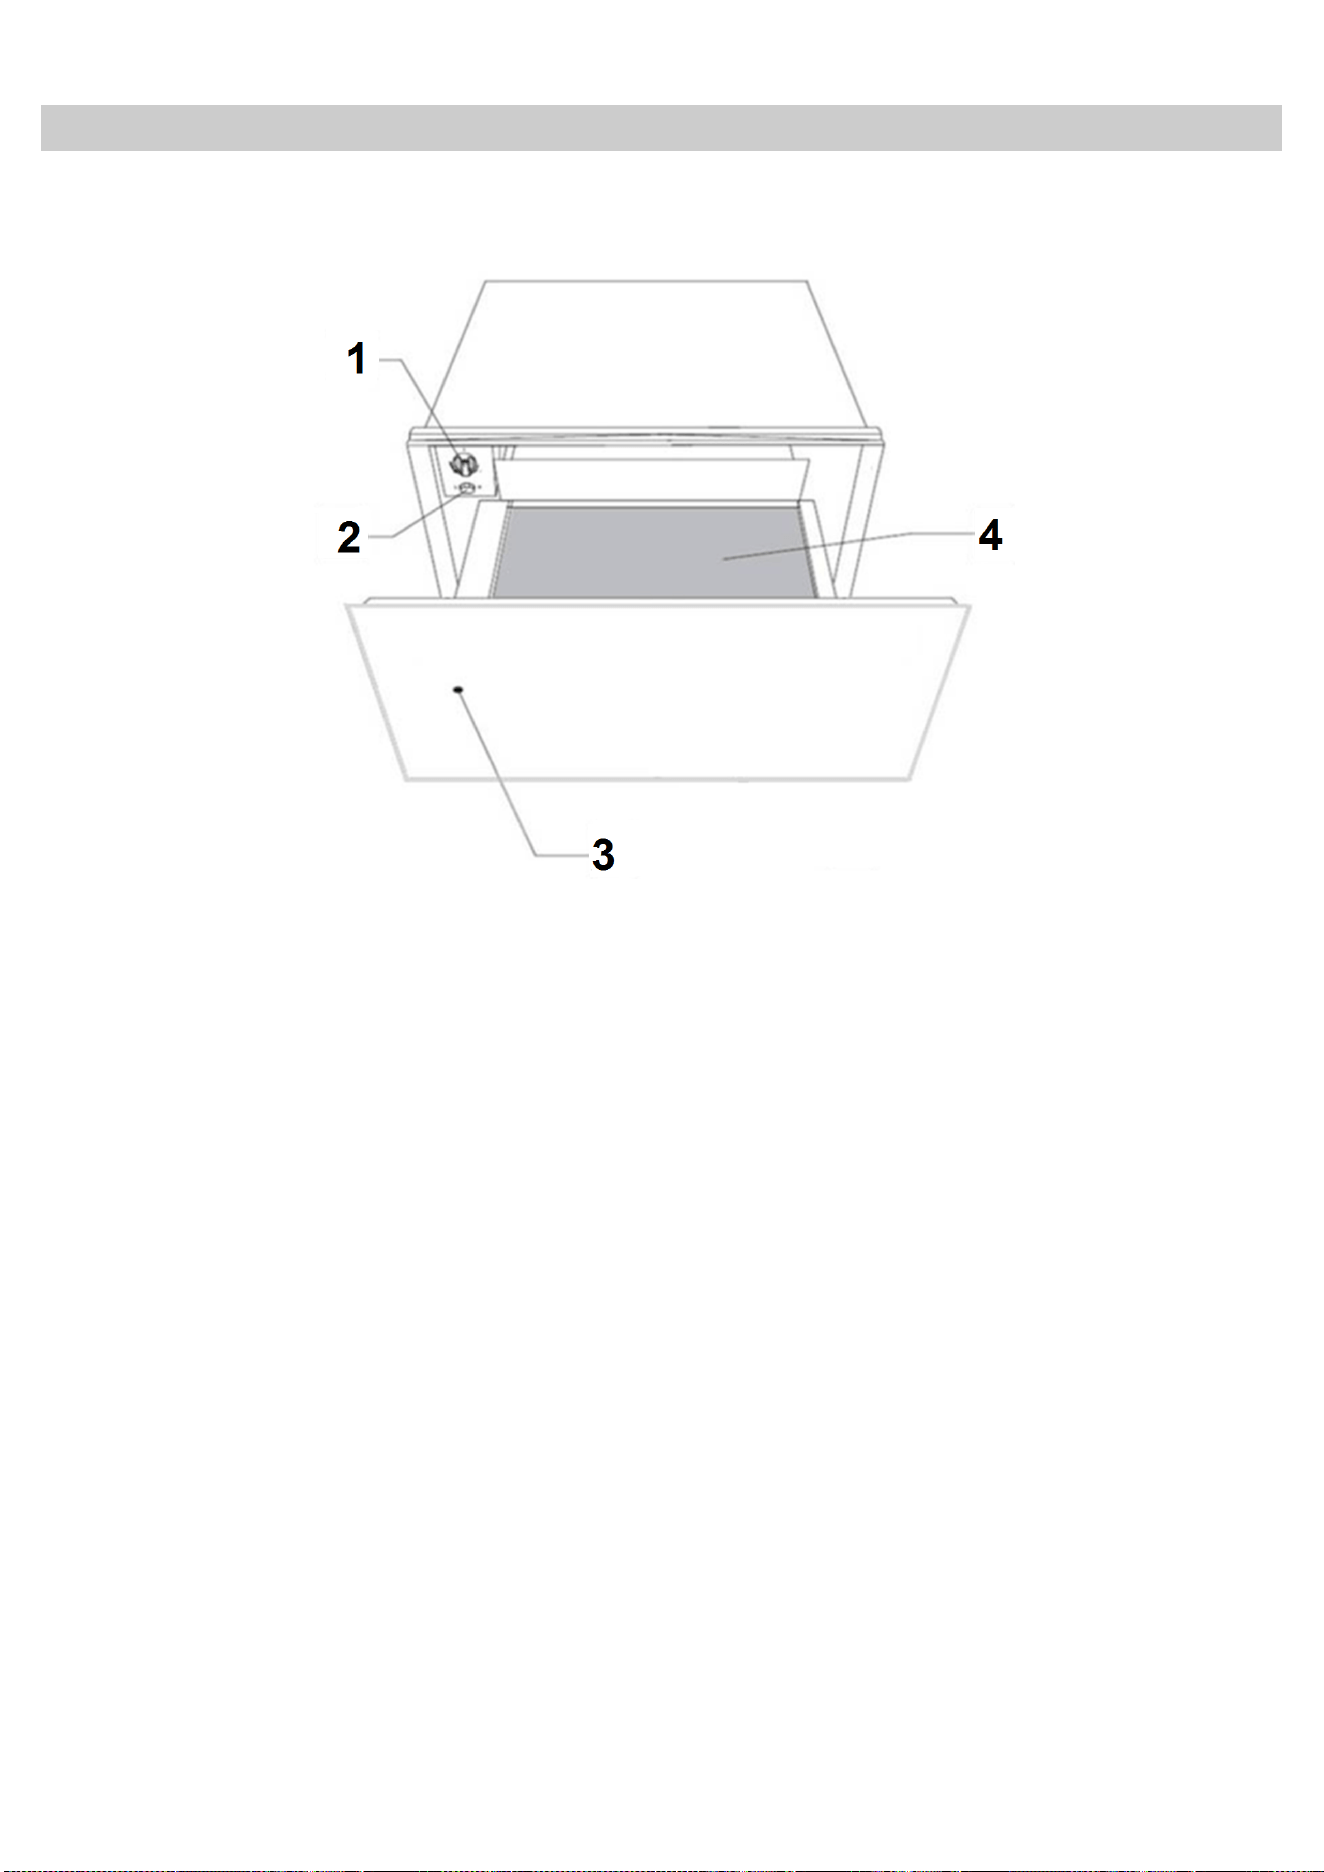
Main Components
1. Temperature selector (thermostat)
2. On/Off switch (lights up)
3. Operating light
4. Anti-slip mat
How the warming drawer works
This appliance is equipped with a warm air
circulation system. A fan distributes the heat
generated by an electrical heating element
throughout the interior of the appliance.
The thermostat allows the user to define and
control the temperature wanted for the crockery.
The circulating hot air that is generated heats up
the crockery quickly and evenly.
A metal grille protects both the heating element
and the fan.
The base of the drawer is fitted with a non-slip
mat to prevent plates and dishes sliding around
when the drawer is opened and closed.
6
EN
Use
Before using for the first time
Before using the appliance for the first time you
should clean the interior and the exterior,
following the cleaning instructions given in the
section “Cleaning and Maintenance”.
Then heat the warming drawer for at least 2
hours. For this, turn the temperature control to the
maximum position (see section ‘Selecting
temperature”).
Make sure the kitchen is well-ventilated when you
are doing this.
The appliance’s parts are protected by a special
product. For this reason, during the first heating
an odour will be released. Both the odour and any
smoke that may form will disappear after a short
time and neither signifies that there is anything
wrong with the connection or the appliance.
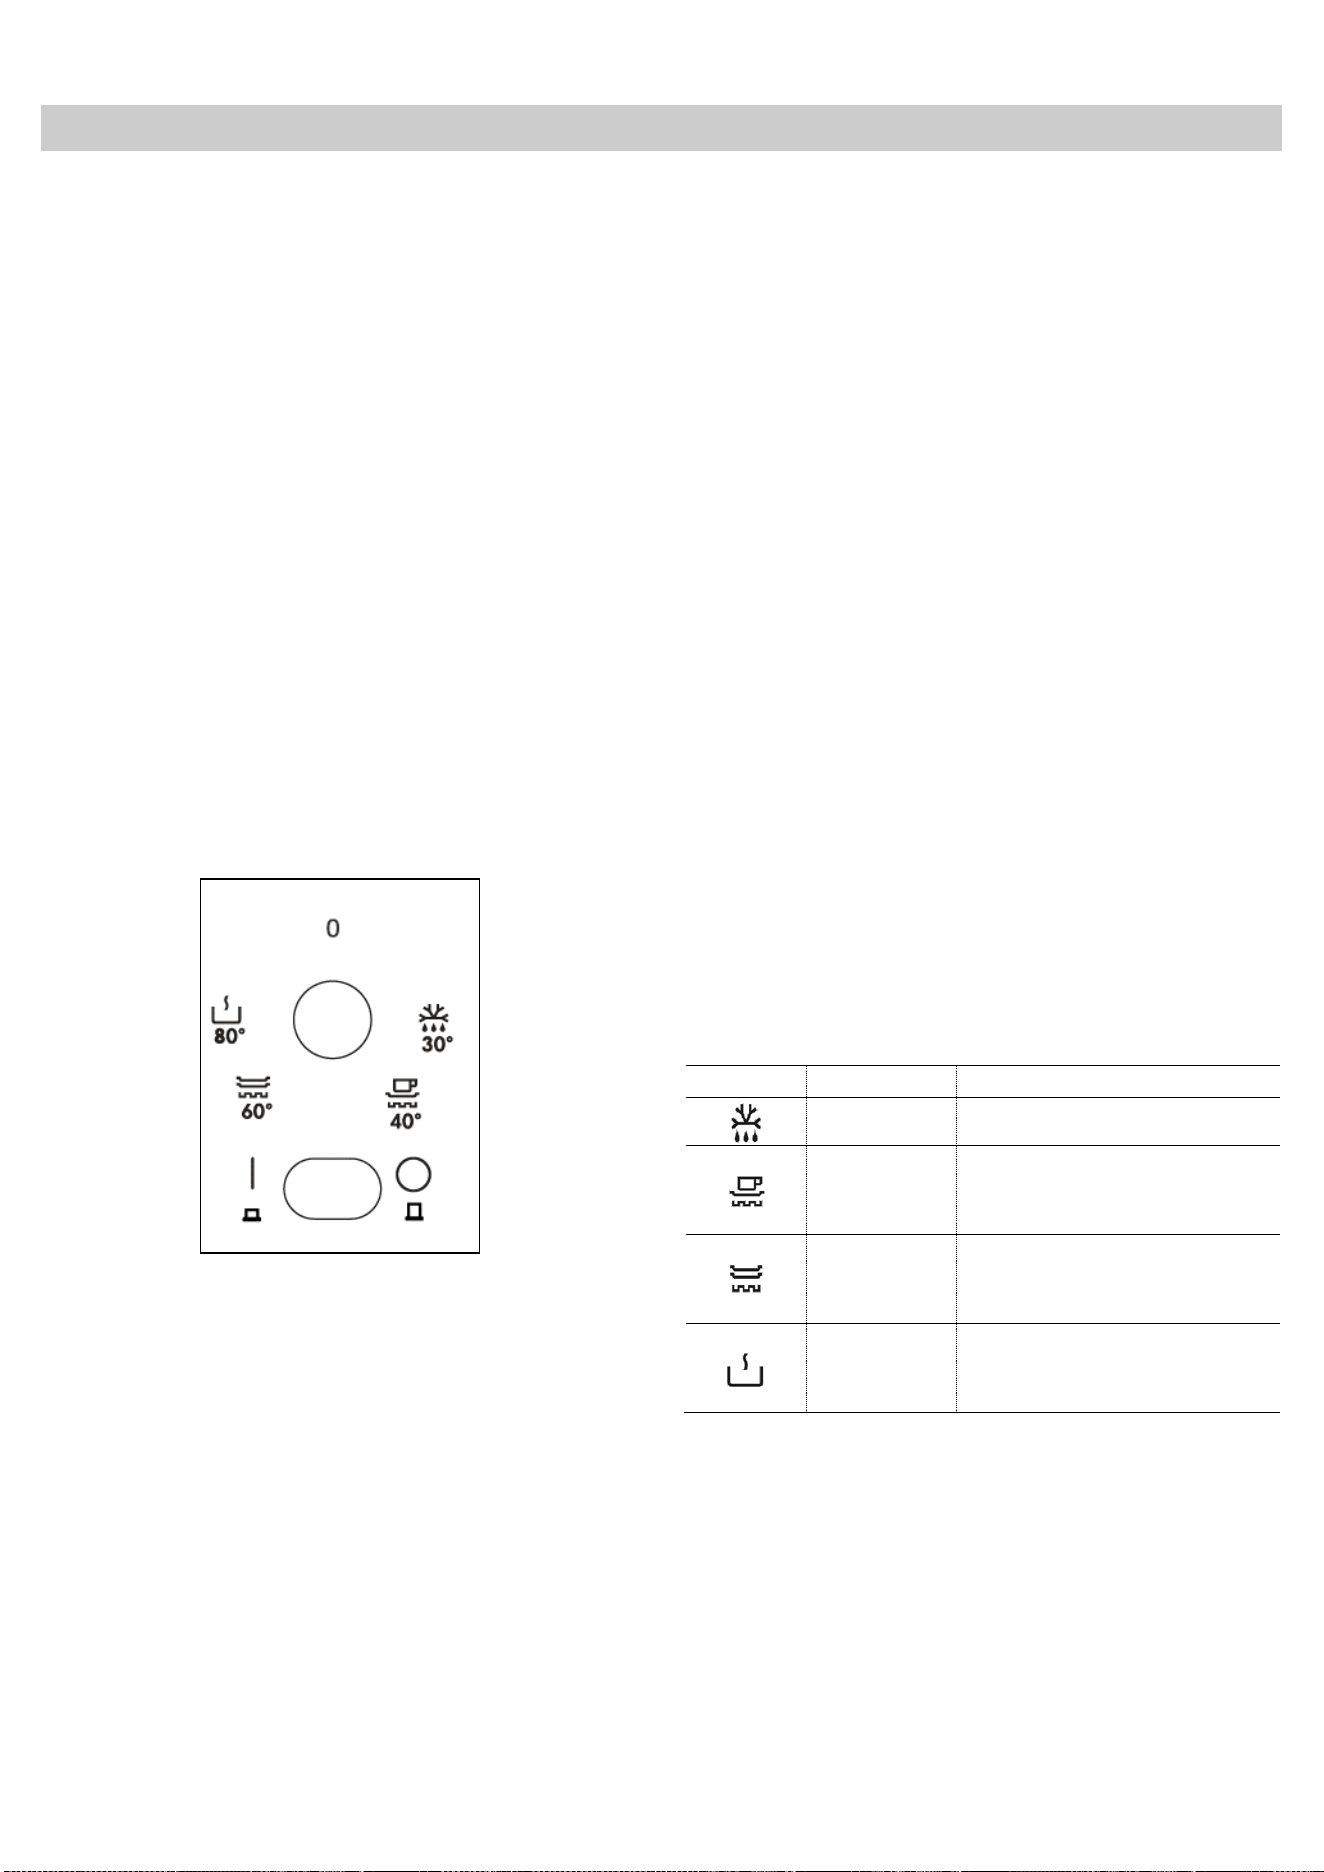
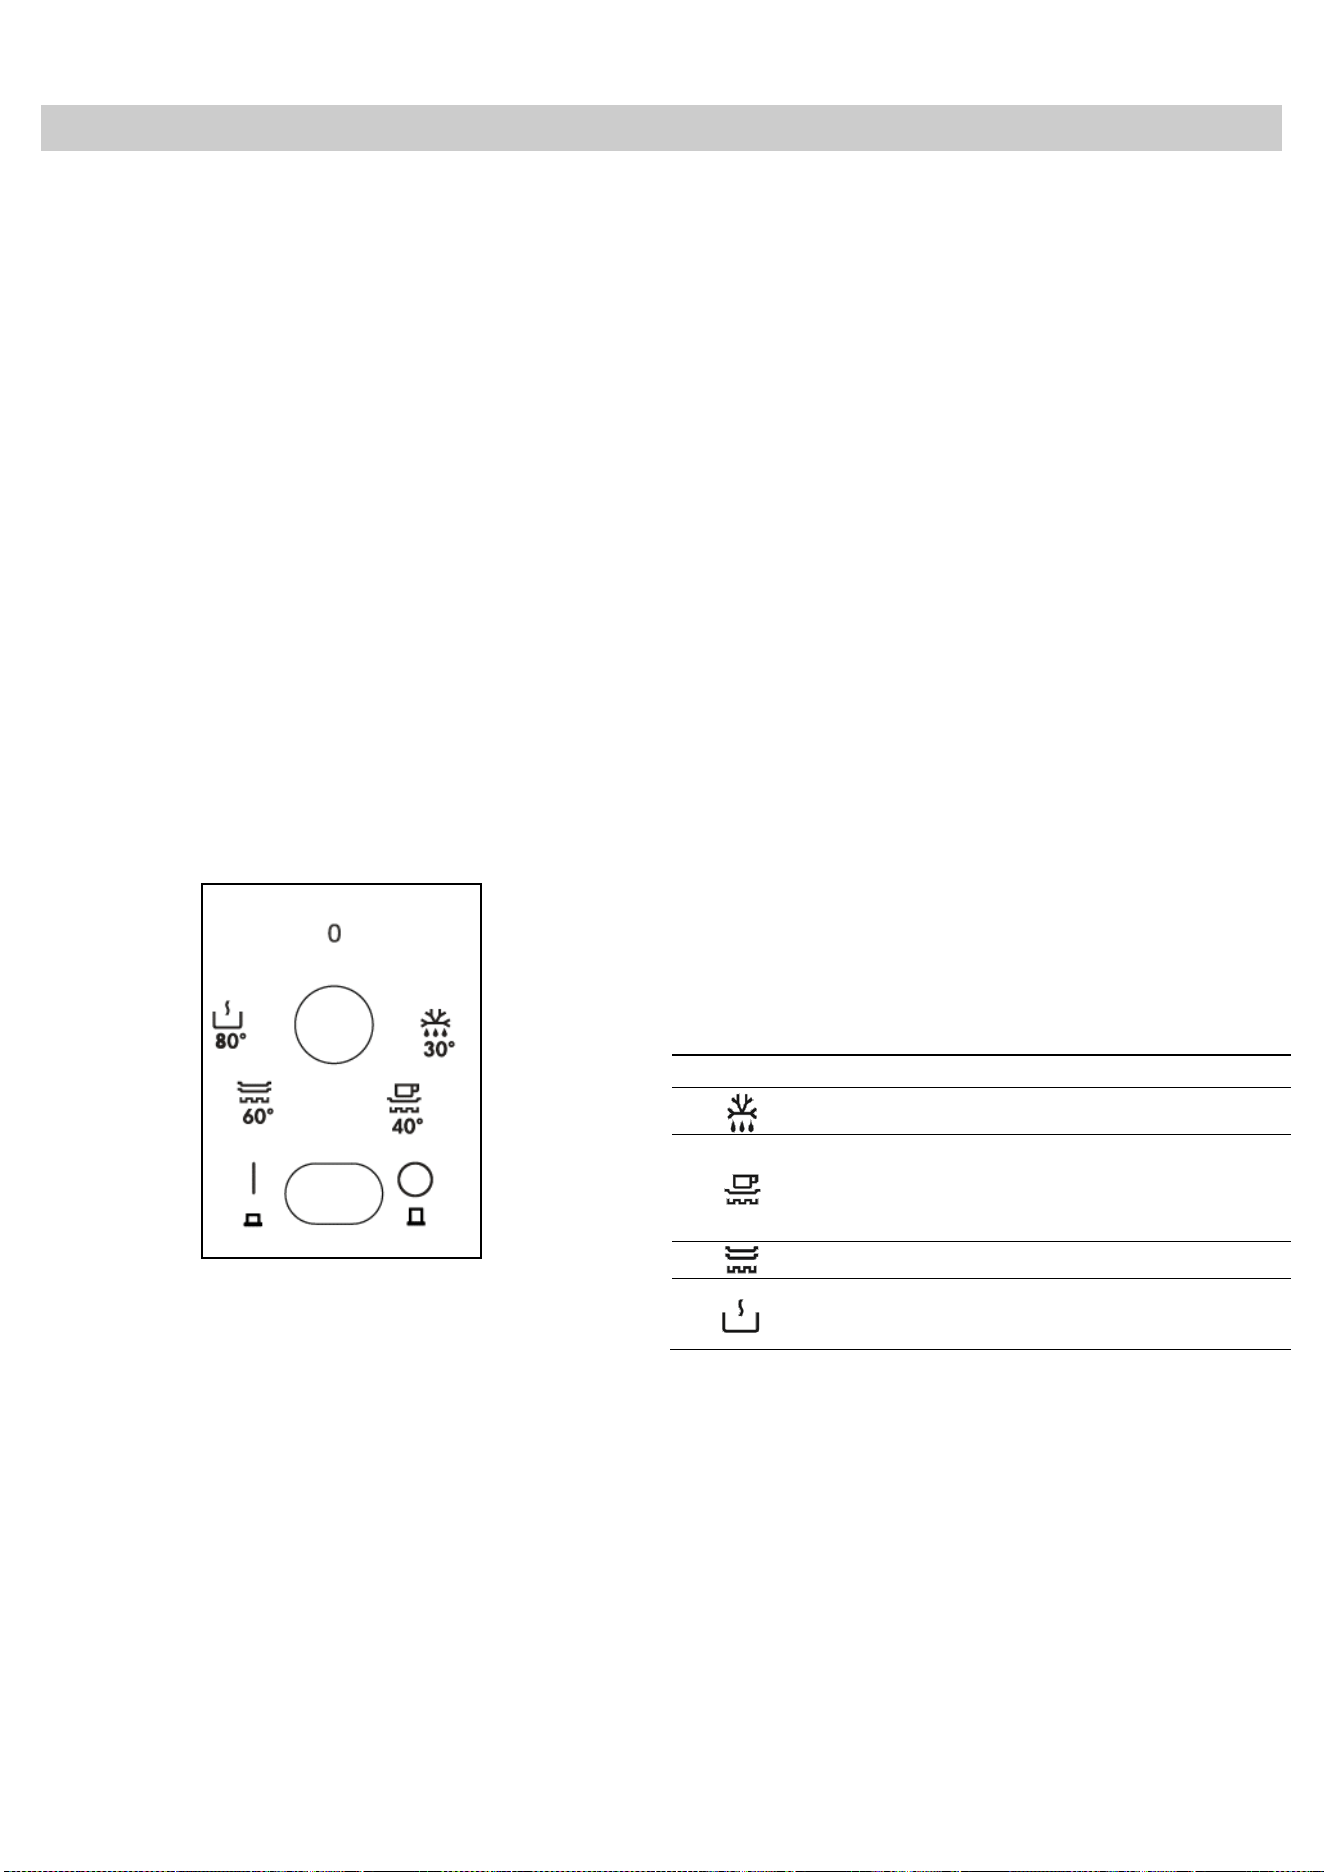
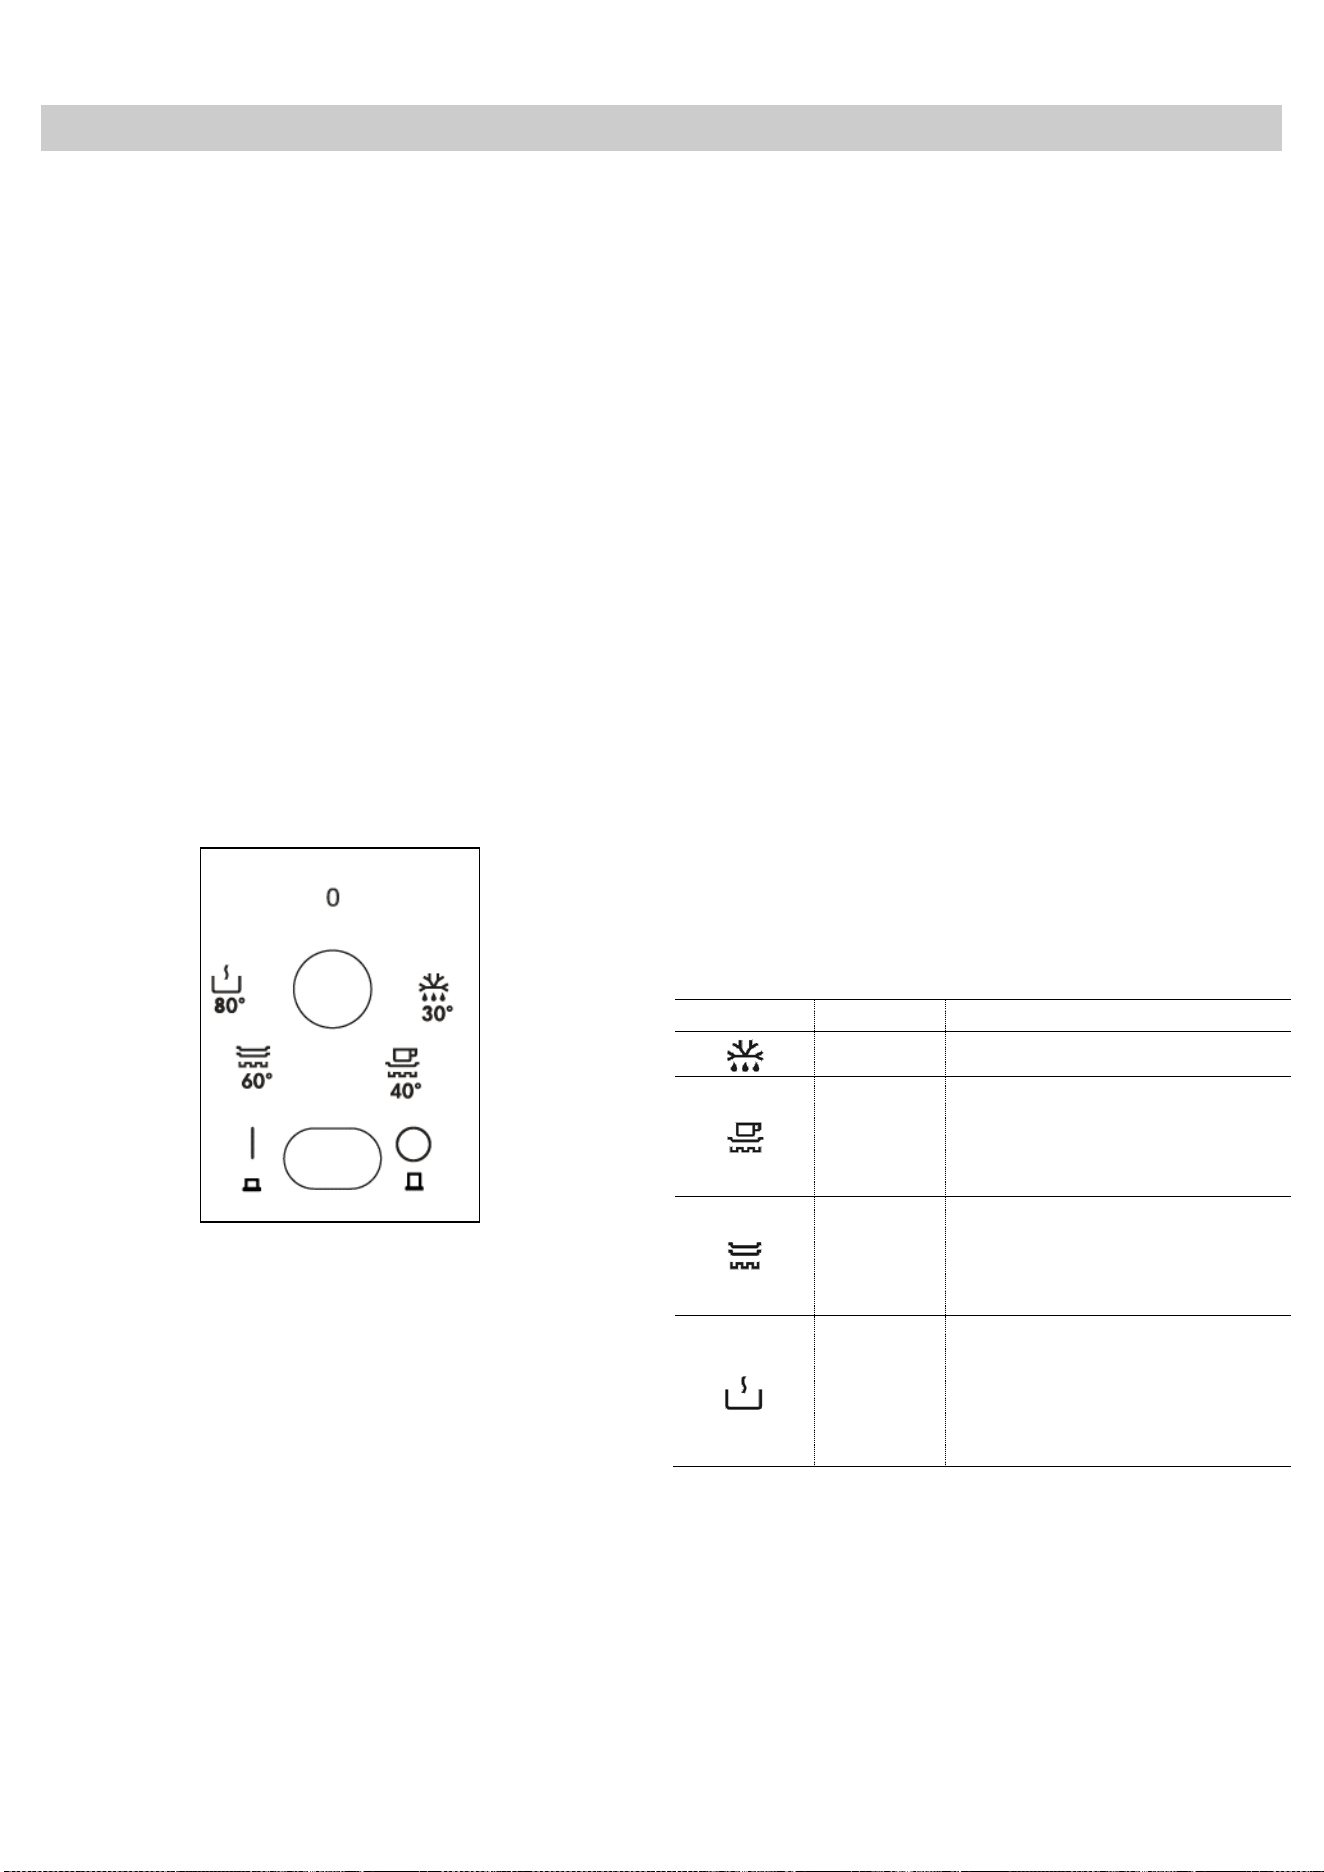
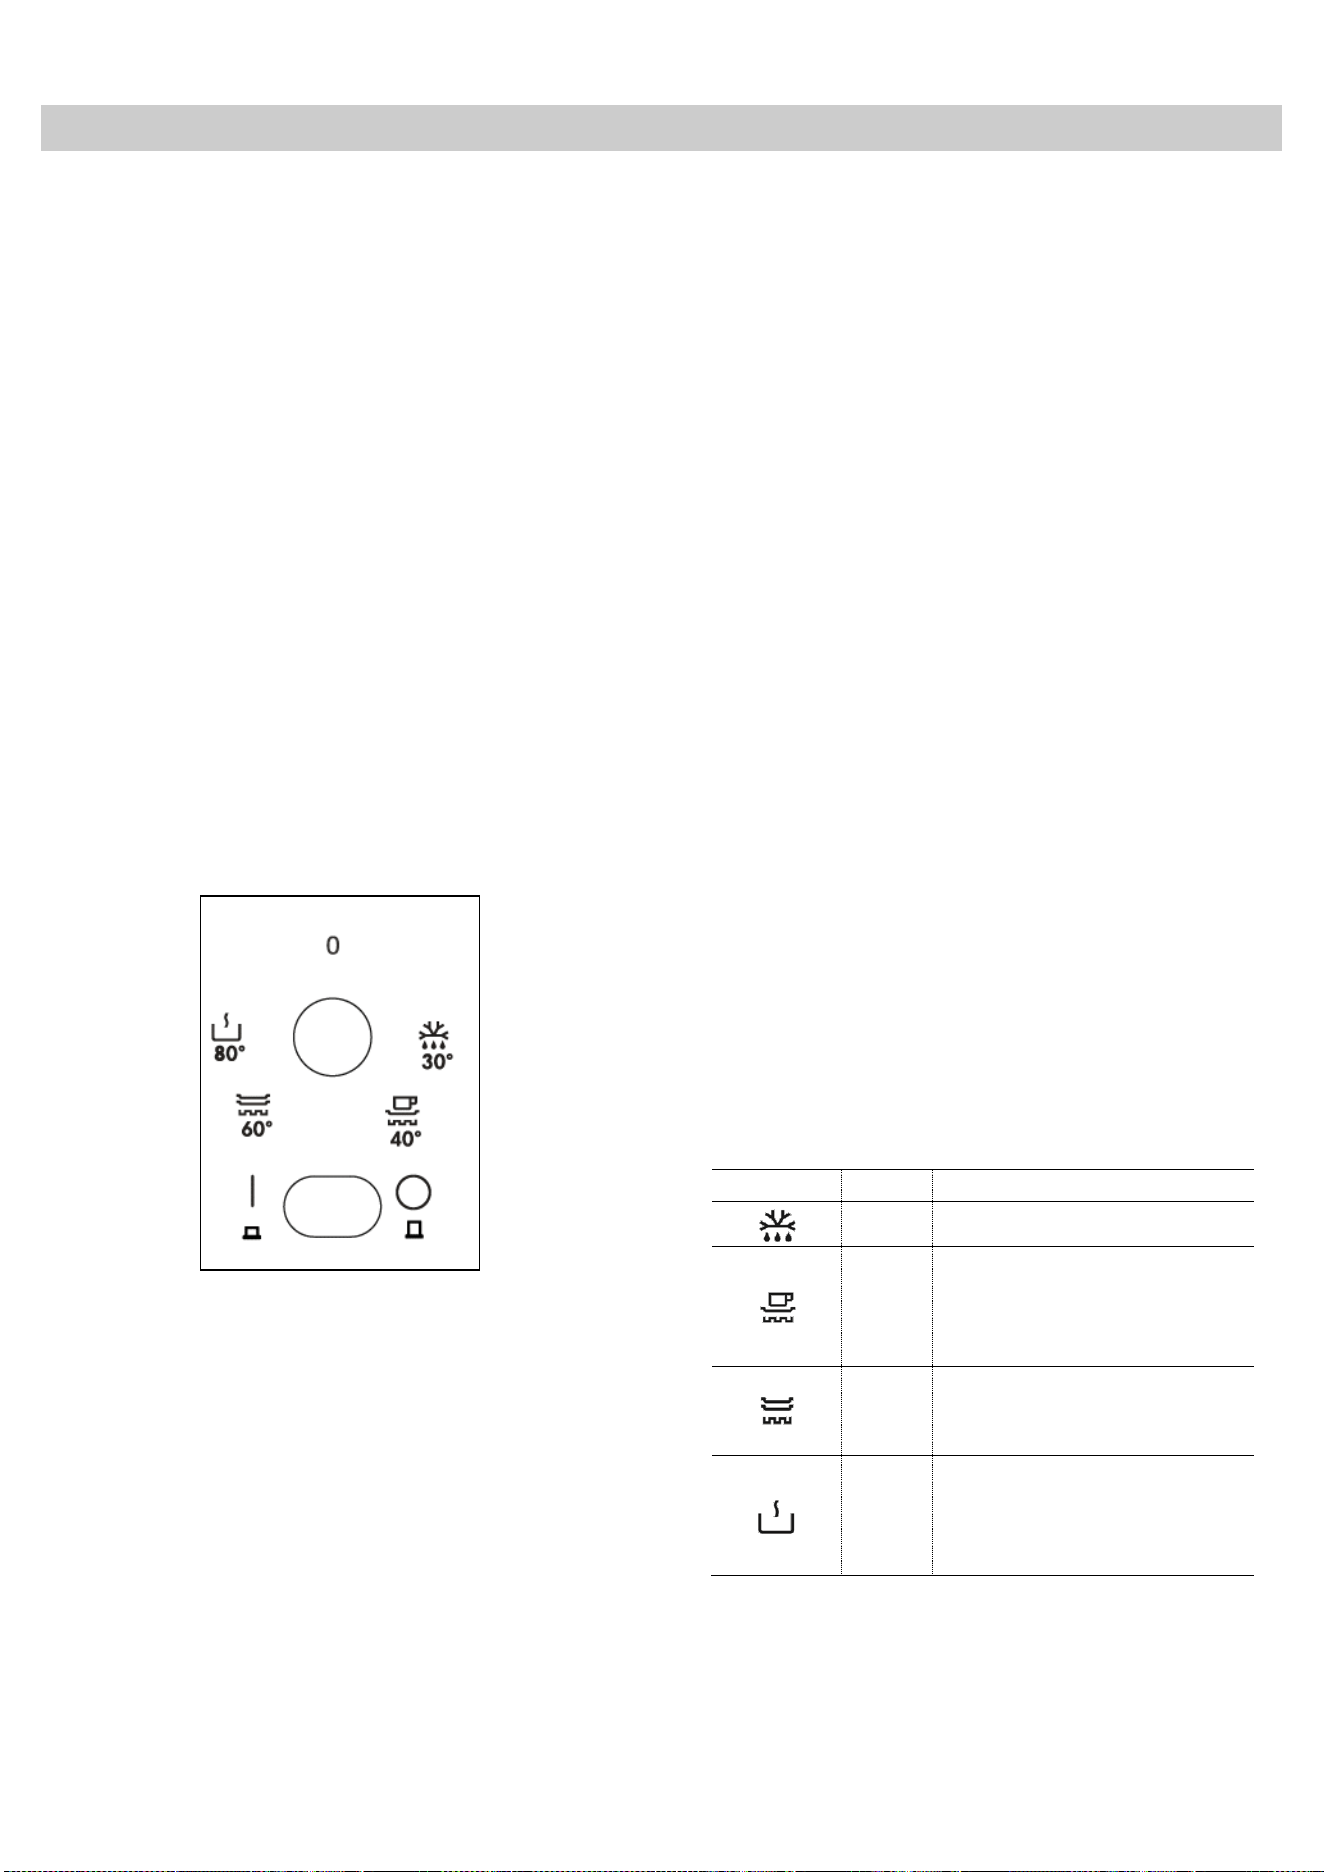
Control Panel
The control panel has a temperature selector and
the on/off switch. The control panel is only visible
when the drawer is open.
When the drawer is closed you can check
whether the warming drawer is switched on by
looking through the viewing port on the front of
the appliance.
Using the warming drawer
To use the warming drawer, proceed as follows:
• Push the center of the front face to open the
warming drawer.
• Put the crockery in the drawer.
• Select the temperature you want by turning the
thermostat control to the desired position.
• Switch on the appliance by pressing the switch,
which will light up.
• Close the drawer.
Be careful not to use too much force when closing
the drawer since it may open up again.
Before taking out the warm crockery you must
switch off the warming drawer by pressing the
switch again.
Selecting temperature
By turning the thermostat control you can select
temperatures between 30 and 80 °C.
Do not force the thermostat control to the left
of the “0” position or to the right of the
maximum position since this may damage the
appliance.
As soon as the temperature selected is reached,
the heating is turned off. When the temperature
drops to a value below that selected, the heating
is turned back on.
The temperature scale is not marked with
absolute temperatures in ºC but instead has
symbols which correspond to the optimum
temperatures for groups of crockery:
Symbol
ºC
Function
30ºC
Defrosting
40ºC-50ºC
Proving dough
Cups / glasses warming
60ºC-70ºC
Crockery warming
Keep food warm
80ºC
Low temperature cooking
Food Warming
7
EN
Use
Heating times
Various factors affect heating times:
• Material and thickness of the crockery
• Load quantity
• How the crockery is arranged
• Temperature setting
It is therefore not possible to give any precise
heating times.
However, as a guide, the following times are given
for the thermostat setting and for uniform
heating of the crockery:
Load
Time (min)
Crockery for 6 people
30 – 35
As you use the warming drawer more and more
you will learn the best settings for your crockery.
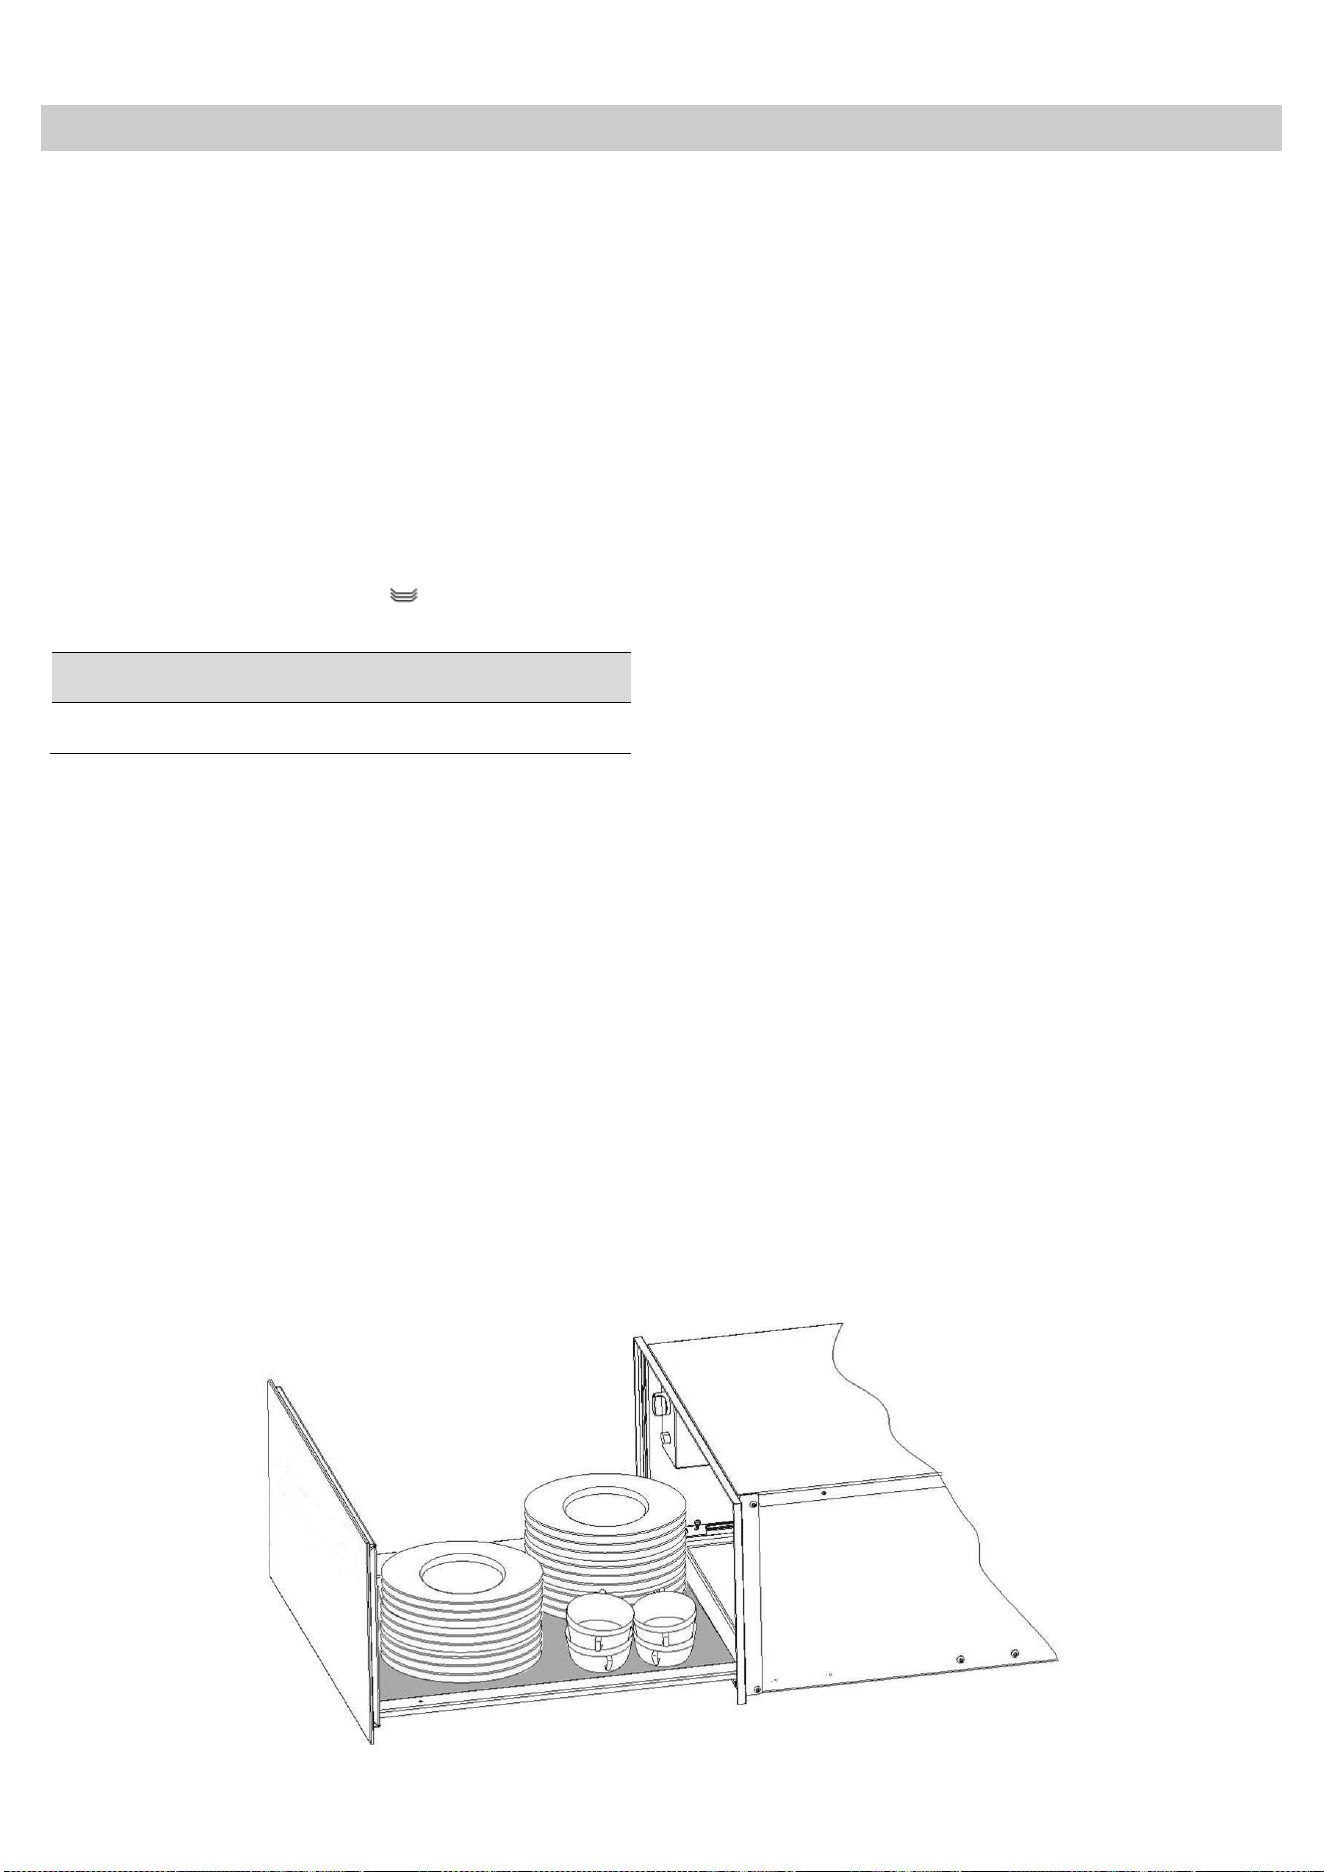
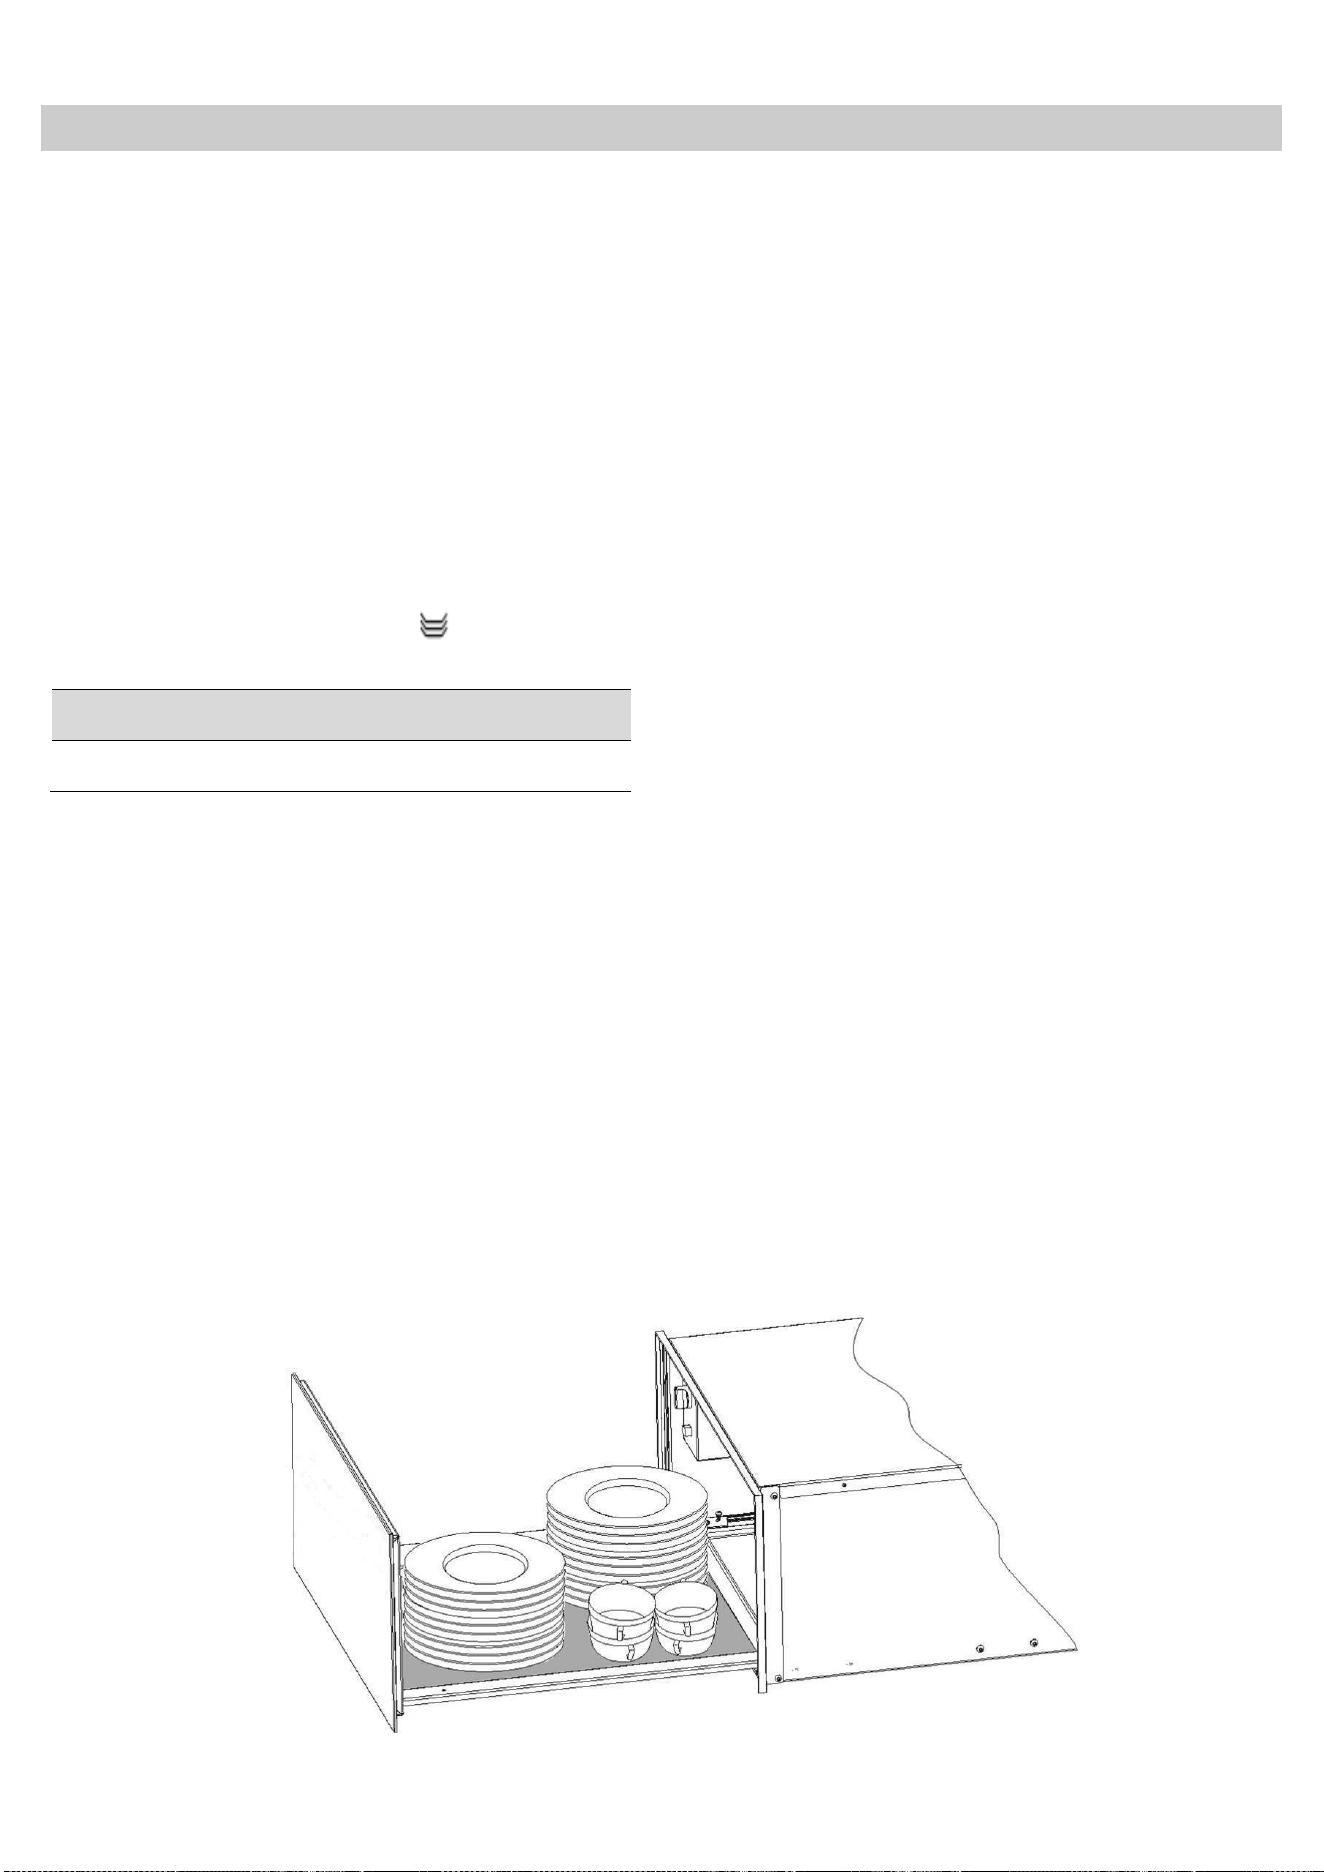
Load capacity
Load capacity depends on the size of the items of
crockery. The warming drawer can be loaded
with a maximum of 25 kg.
Below we give you some crockery arrangements
as examples:
• Crockery for 6 people:
- 6 dinner plates Ø 28 cm
- 6 soup bowls Ø 10cm
- 1 dish Ø 22 cm
- 1 dish Ø 19 cm
- 1 dish Ø 17 cm
- 2 large plates Ø 36 cm
or one of the following
• 20 dinner plates Ø 28 cm
• 36 soup bowls Ø 22 cm
• 30 soup bowls Ø 10cm
• 10 dinner plates Ø 28cm
• 10 soup bowls Ø 22 cm
• 10 pizza plates Ø 36 cm
• 80 expresso cups
• 40 cappuccino cups
• 30 glasses
• 18 soup bowls Ø 22 cm;
2 soup tureens 21 cm x 18 cm
• etc.

8
EN
Cleaning and Maintenance
Cleaning is the only maintenance action that is
required normally.
Warning! Cleaning must be done with the
warming drawer disconnected from the
electrical power supply. Remove the plug from
the power socket or disconnect the warming
drawer power supply circuit.
Do not use aggressive or abrasive cleaning
products, abrasive sponges or pointed
objects since stains or abrasion marks may
appear.
Do not use high pressure or steam jet
cleaning appliances.
Appliance front and control panel
The warming drawer can be cleaned using just a
damp cloth. If it is very dirty, add a few drops of
washing-up liquid to the washing water.
Wipe the surfaces dry using a dry cloth.
For stainless steel fronted warming drawer,
special products for treatment of stainless steel
surfaces can be used. These products prevent
the surfaces becoming dirty again for some time.
Apply a thin layer of such a product on the
surface using a soft cloth.
On aluminium fronted warming drawer use a
gentle glass cleaning product and a soft cloth that
does not release fluff. Wipe horizontally without
pressing on the surface since aluminium is
sensitive to scratches and cuts.
For glass fronted warming drawer If there are
fingerprints, grease, or stains on the exterior
(such as the front panel surface) clean with a soft
cloth with a glass cleaner or neutral detergent,
and then wipe dry with soft, clean, dry cloth.
Interior of the warming drawer
Clean the inside of the warming drawer regularly
using a damp cloth. If it is very dirty add a few
drops of washing-up liquid to the washing water.
Wipe the surfaces dry using a dry cloth.
Avoid water entering through the air circulation
opening.
Only use the warming drawer again when it is
completely dry.
Mat with non-slip surface
The non-slip surface mat can be removed to
facilitate cleaning of the drawer.
The mat can be cleaned by hand using hot water
with a few drops of washing-up liquid.
Dry thoroughly.
The non-slip mat should only be replaced when it
is completely dry.

9
EN
What should I do if the warming drawer doesn’t work?
WARNING! Any type of repair must only be
done by a specialised technician. Any repair
done by a person not authorised by the
manufacturer is dangerous.
Before contacting Technical Assistance, check on
the following:
• The crockery doesn’t heat up enough.
Check whether:
- The appliance has been switched on.
- The appropriate temperature has been
selected.
- The air circulation orifices are covered by
the crockery.
- The crockery was left to heat up for
sufficient time.
Heating time depends on several factors, such as,
for example:
- Crockery material type and thickness.
- Quantity of crockery.
- How the crockery is arranged.
• The crockery doesn’t heat up at all. Check
whether:
- You can hear the noise of a fan.
If the fan is operating then the heating element
is broken; if the fan is not operating then the
fan is broken.
- The switchboard fuses / circuit breakers
have fused / tripped out.
• The crockery is heating up too much.
- The temperature selector is broken.
• The on/off switch does not light up.
- The switch’s pilot light has blown.
• There is some noise when the drawer is
opened and closed:
- This is normal and comes from the latching
mechanism.
After checking the points and if non of them
matches your problem, please contact our
Technical Assistance.
10
EN
Technical Characteristics
Technical Data
SAMSUNG strives to improve its products at all times. Both the design specifications and these user
instructions are thus subject to change without notice.
Model
NL20J7100WM/UR
NL20T8100WK/UR
NL20T9100WD/UR
Power source
220-240 V / 50-60 Hz
Power consumption
Maximum Power
420W
Dimensions (WxDxH)
Outside
Drawer Cavity
595x522x140
485x490x110
Volume
25 ltr
Weight
Net
14,2 kg
Environmental protection
Disposal of the packaging
The packaging bears the Green Point mark.
Dispose of all the packaging materials such as
cardboard, expanded polystyrene and plastic
wrapping in the appropriate bins. In this way you
can be sure that the packaging materials will be
re-used.
Please keep all packaging materials away from
small children as there is a choking / suffocation
risk.
Disposal of equipment no longer used
According to European Directive 2012/19/EU on
the management of waste electrical and
electronic equipment (WEEE), home electrical
appliances should not be put into the normal
systems for disposal of solid urban waste.
Outdated appliances should be collected
separately to optimise component material
recovery and re-cycling rates and to prevent
potential harm to human health and the
environment. The symbol of a rubbish container
superimposed by a diagonal cross should be put
on all such products to remind people of their
obligation to have such items collected
separately.
Consumers should contact their local authorities
or point of sale and request information on the
appropriate places to leave their old home
electrical appliances.
Before disposing of your appliance, render it non-
usable by pulling out the power cable, cutting this
and disposing of it.
For information on Samsung’s environmental commitments and product specific regulatory obligations
e.g. REACH visit:
samsung.com/uk/aboutsamsung/samsungelectronics/corporatecitizenship/data_corner.html
11
EN
Installation instructions
Before installation
Check that the input voltage indicated on the
characteristics plate is the same as the voltage of
the power outlet you are going to use.
Open the drawer and take out all the
accessories and remove the packing material.
Attention! The front surface of the crockery
heater may be wrapped in a protective film.
Before using the warming drawer for the first
time, remove this film carefully.
Make sure that the warming drawer is not
damaged in any way. Check that the drawer
opens and closes correctly. If you find any
damage, contact the Technical Assistance
Service.
Attention: the power socket should be easily
accessible after the warming drawer has been
installed.
The warming drawer should only be built-in in
combination with those appliances indicated by
the manufacturer. If it is fitted in combination
with other appliances, the guarantee is no
longer valid since it is impossible to
guarantee that the warming drawer will work
correctly.
Installation
To build-in the warming drawer in combination
with another appliance there must be a fixed,
interim shelf in the housing unit to support the
weight of both appliances.
The appliance to be combined with the warming
drawer will be placed directly on the latter without
any need to have a separating shelf.
To build-in the appliance which is combined with
the warming drawer, follow the instructions set
out in the respective instructions and fitting
booklet.
The relevant installation dimensions are indicated
in mm in the diagrams shown at the end of
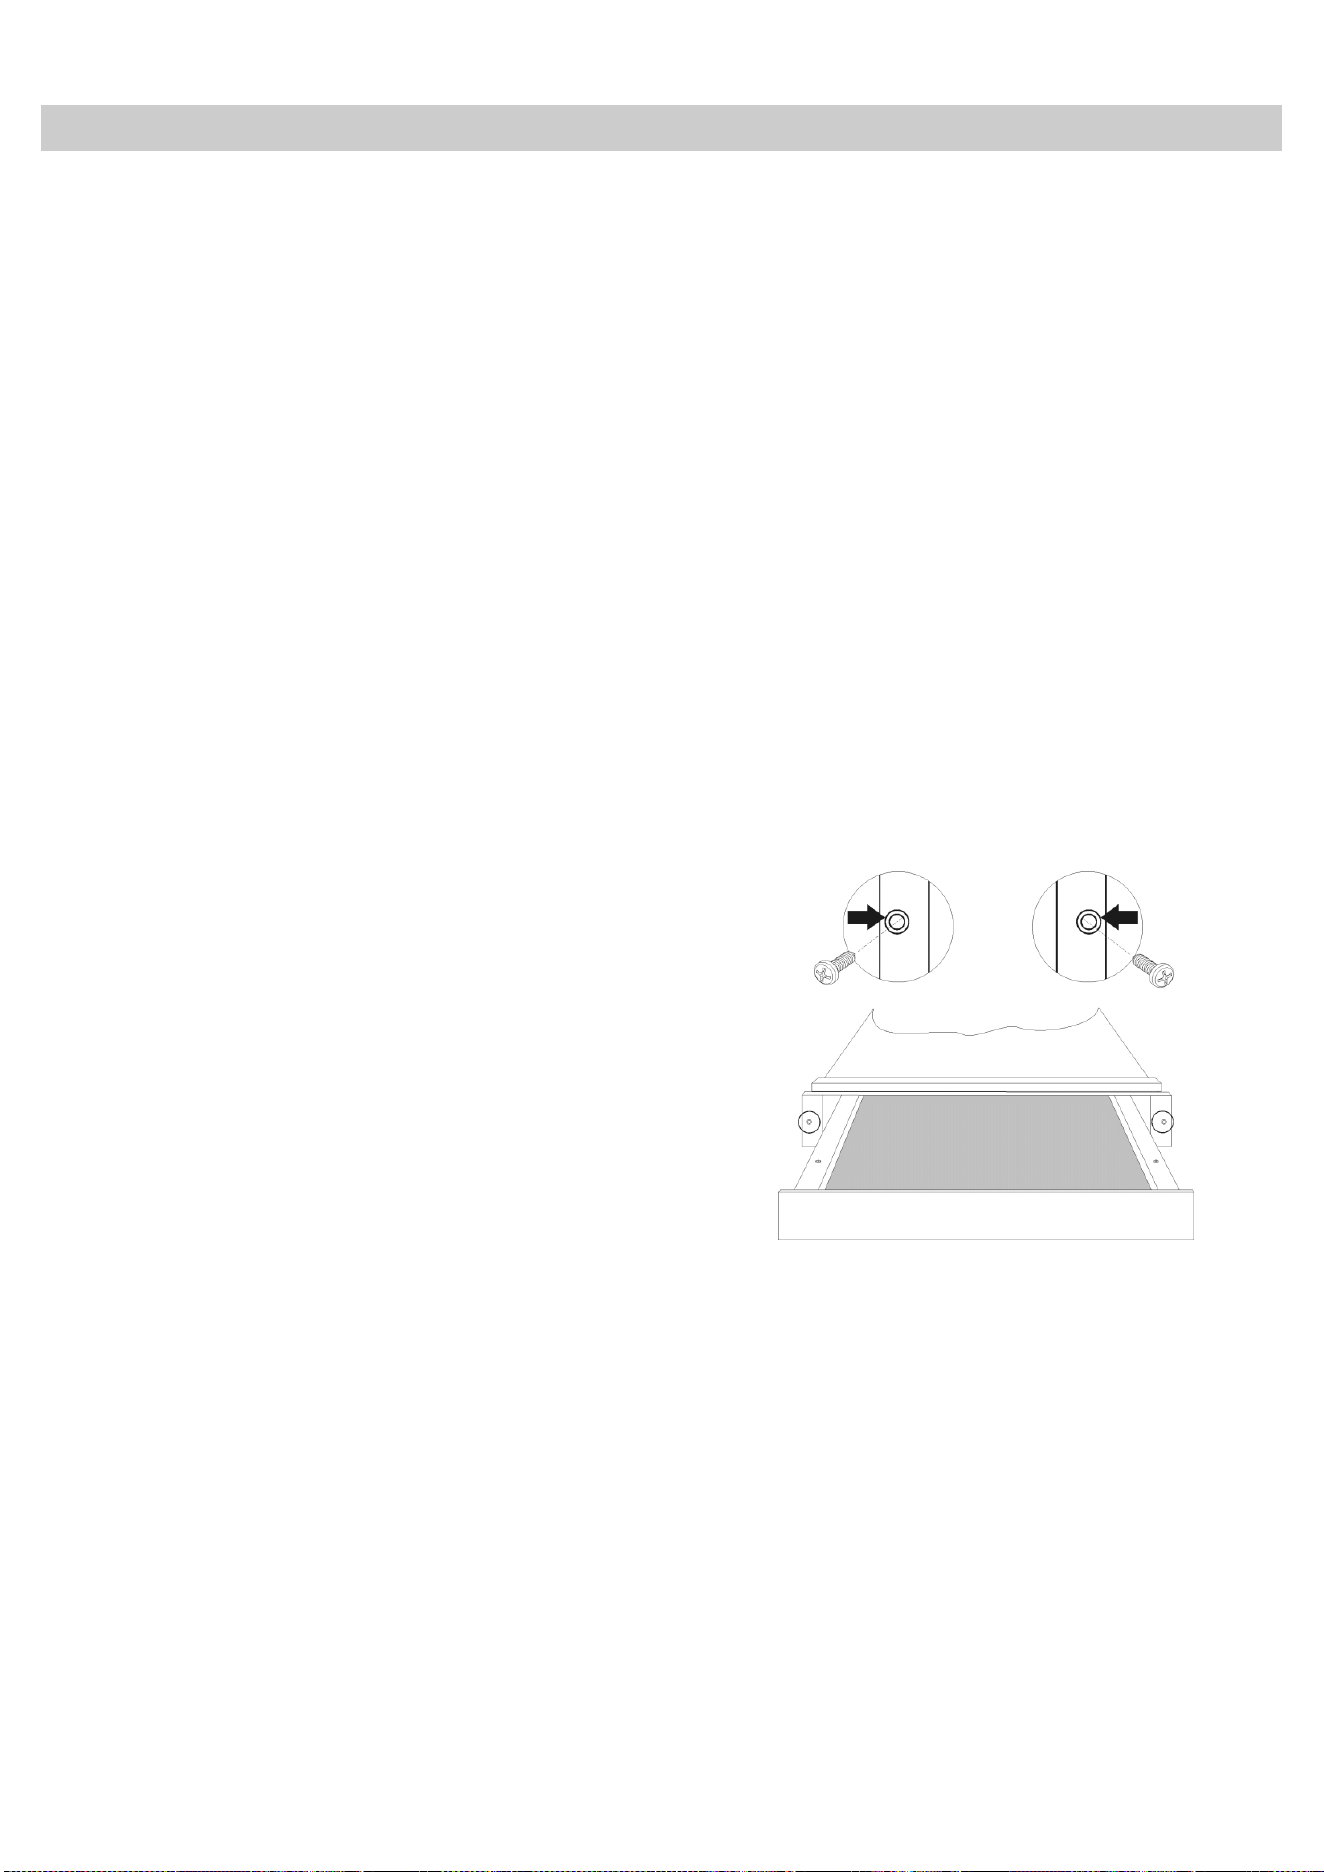
this booklet. Proceed as follows:
1. Place the warming drawer on the shelf and
slide it towards the interior of the niche in
such a way that it is centred and completely
lined up with the front of the unit.
2. Check that the warming drawer frame is
properly levelled and is sitting evenly on the
shelf.
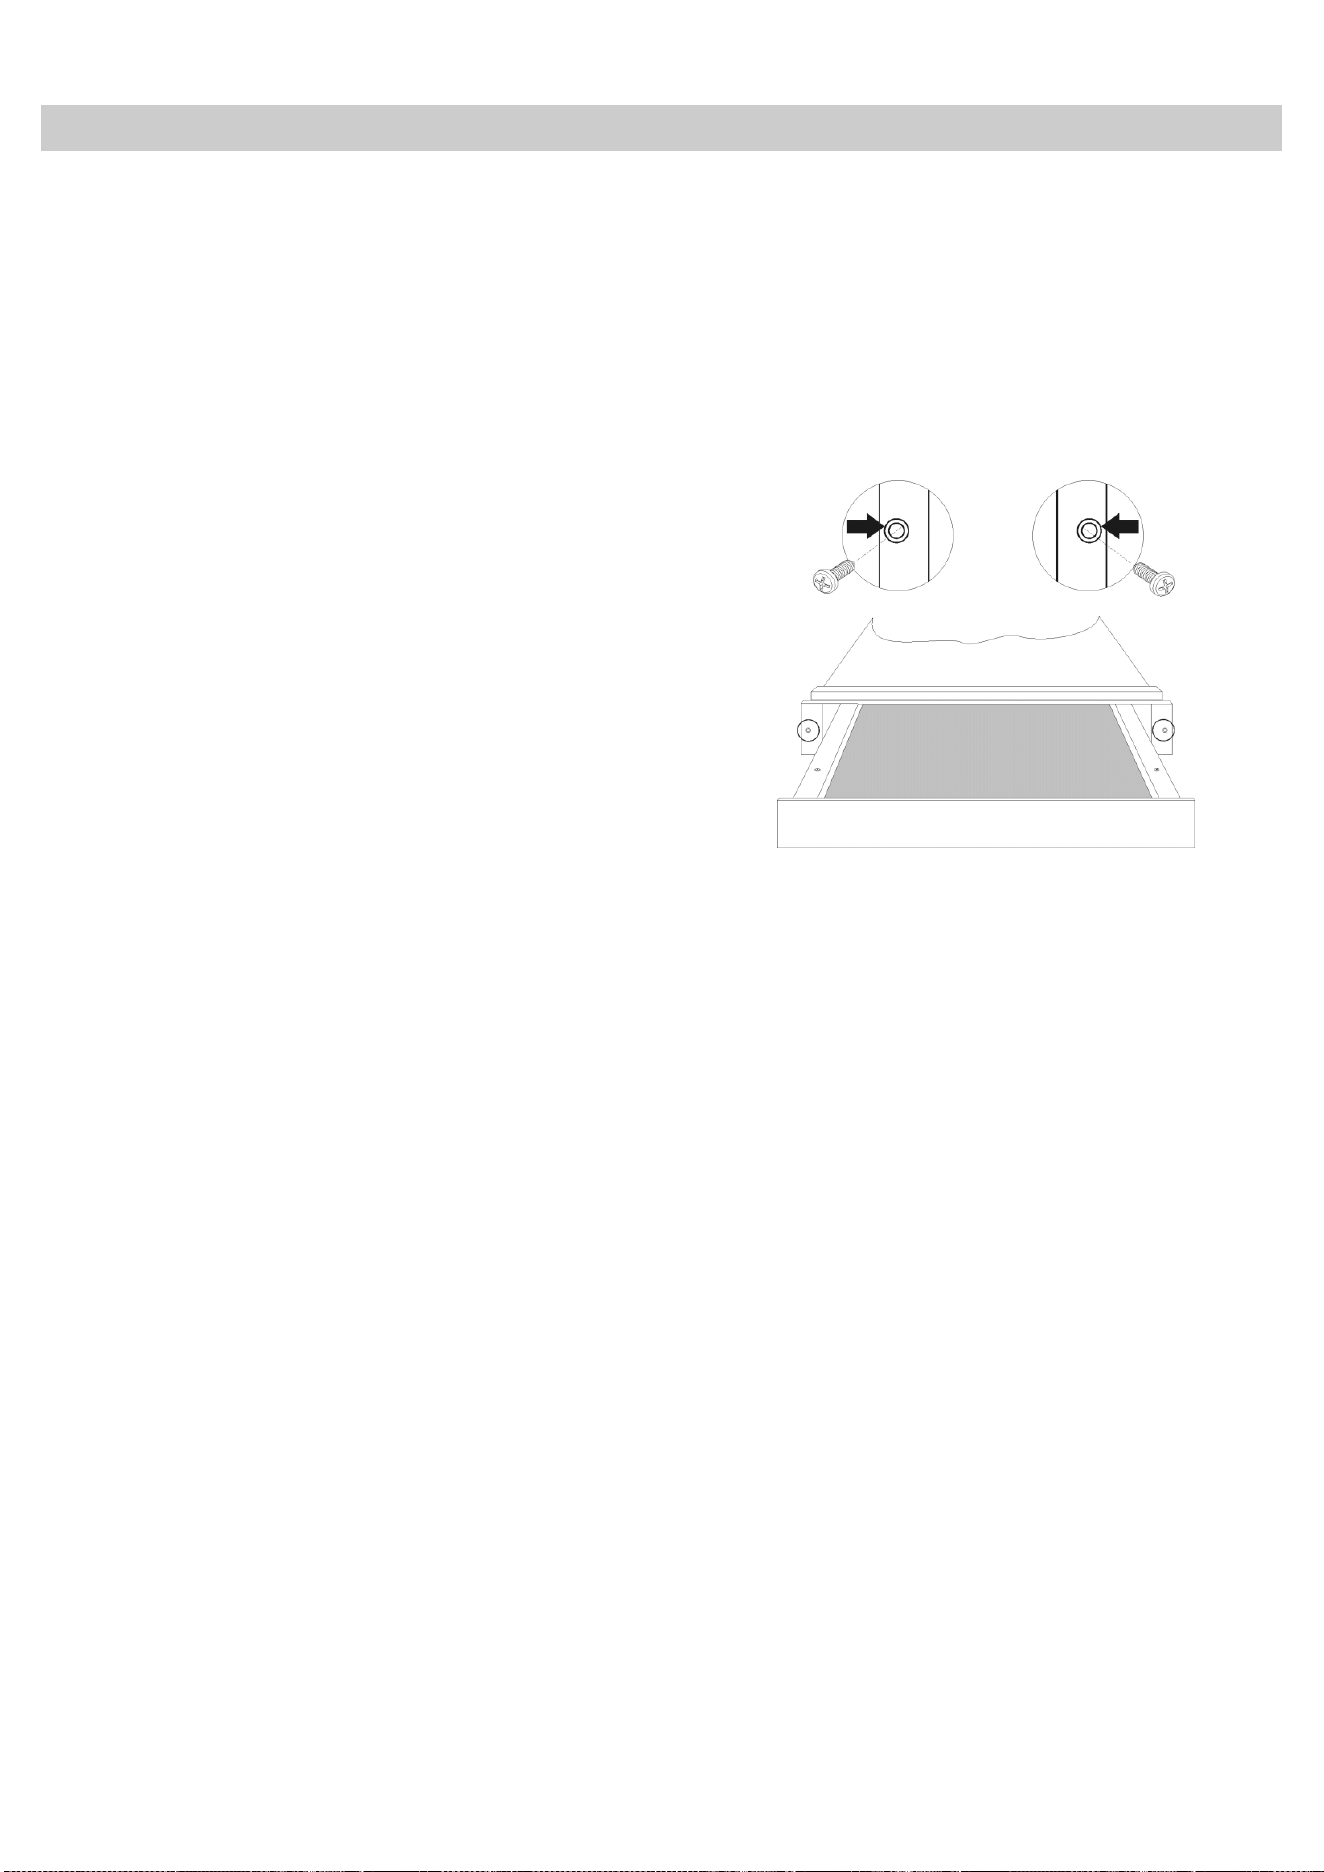
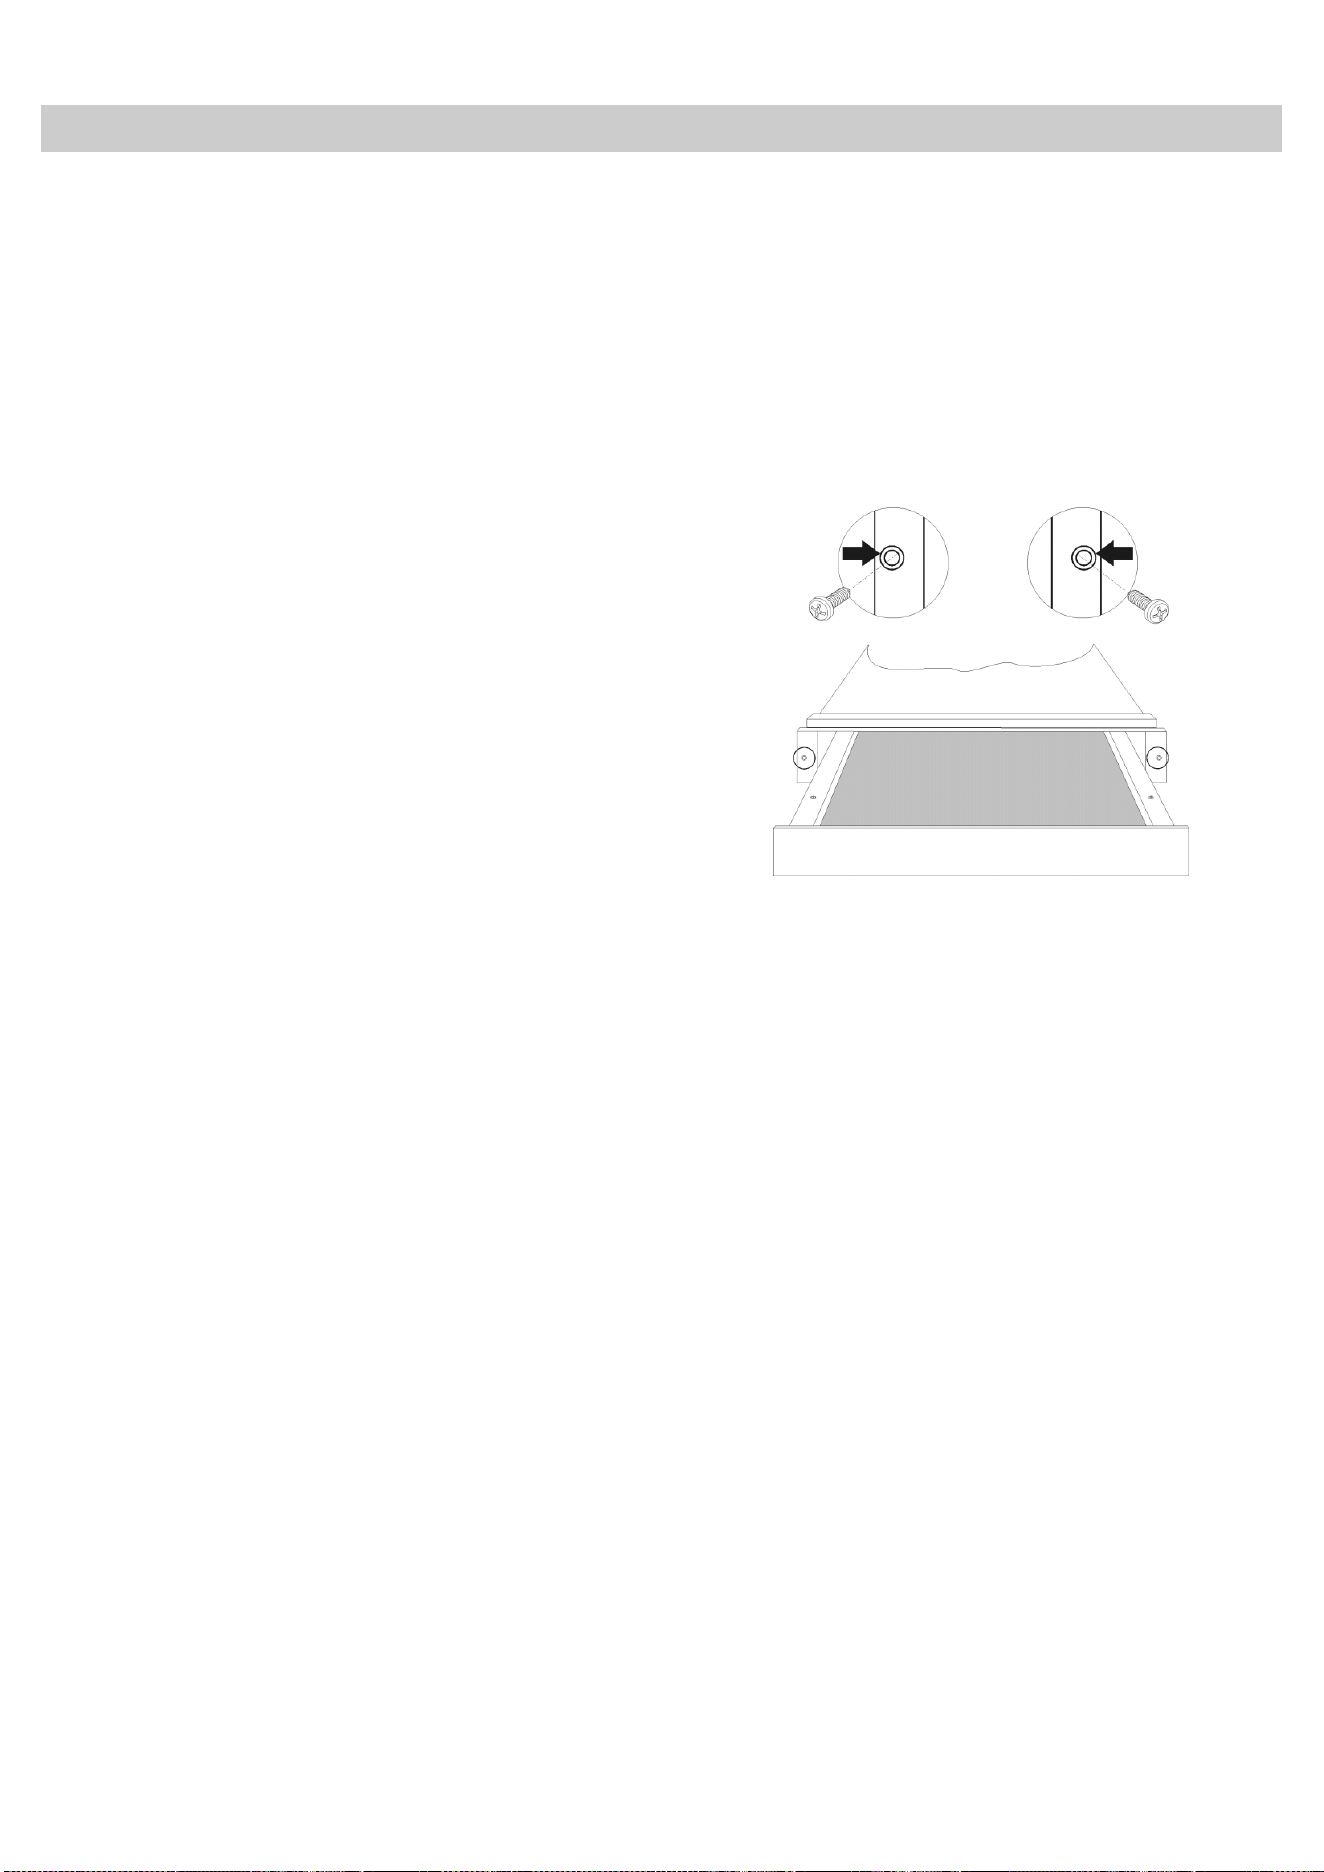
3. Open the drawer and fix the warming
drawer to the sides of the unit using the two
screws provided.
Electrical Connection
The warming drawer is equipped with a power
cable and plug for single phase current. We
advise that the plug is connected to a socket
that is easily accessible after installation.
If the warming drawer is to be installed on a
permanent basis it should be installed by a
qualified technician. In such a case, the
appliance should be connected to a circuit with
an all-pole circuit breaker with a minimum
separation of 3 mm between contacts.
The data necessary for the electrical connection
are described on the warming drawer
characteristics plate and these must be
compatible with those of the power outlet you are
going to use.
WARNING: THE WARMING DRAWER MUST
BE CONNECTED TO EARTH.
The manufacturer and retailers do not accept
responsibility for any damage that may be
caused to people, animals or property if these
installation instructions are not observed.

12
DE
Inhaltsverzeichnis
Informationen zur Sicherheit ........................................................................................................... 13
Gerätebeschreibung ......................................................................................................................... 16
Hauptkomponenten ........................................................................................................................ 16
Vorinformationen ............................................................................................................................ 16
Bedienung ......................................................................................................................................... 17
Vor dem ersten Gebrauch .............................................................................................................. 17
Bedienelemente .............................................................................................................................. 17
Bedienprinzip .................................................................................................................................. 17
Temperatur wählen ......................................................................................................................... 17
Aufheizzeiten .................................................................................................................................. 18
Fassungsvermögen ........................................................................................................................ 18
Reinigung und Pflege ....................................................................................................................... 19
Stirnseite und Bedienblende ........................................................................................................... 19
Innenraum ...................................................................................................................................... 19
Antirutschauflage ............................................................................................................................ 19
Was ist im Falle einer Funktionsstörung zu tun? .......................................................................... 20
Technische Eigenschaften ............................................................................................................... 21
Hinweise zum Umweltschutz ........................................................................................................... 21
Installationsanleitung ....................................................................................................................... 22
Vor der Installation .......................................................................................................................... 22
Einbau ............................................................................................................................................ 22
Elektroanschluss ............................................................................................................................ 22
Einbau ................................................................................................................................................ 45
Kombinationsmöglichkeiten ............................................................................................................ 45
Wir bitten Sie, die in diesem Buch enthaltenen Anweisungen aufmerksam durchzulesen, die Ihnen
ermöglichen werden, bei der Nutzung Ihrer Wärmeschublade bessere Ergebnisse zu erzielen.
BEWAHREN SIE DIE DOKUMENTATION DIESES GERÄTES AUF, UM KÜNFTIG IN IHR
NACHSCHLAGEN ZU KÖNNEN.

13
DE
Informationen zur Sicherheit
Lesen Sie die Anweisungen sorgfältig vor der Installation und
bevor Sie Ihr Gerät in Betrieb setzen. Der Hersteller haftet nicht für
unsachgemäße Installation und Nutzung der Geräte, die
Verletzungen und Schäden verursachen können. Halten Sie die
Anweisungen griffbereit, so dass sie während des Gebrauchs leicht
konsultierbar sind. Dieses Gerät entspricht den vorgeschriebenen
Sicherheits-bestimmungen. Ein unsach-gemäßer Gebrauch kann
jedoch zu Schäden an Personen und Sachen führen.
Sicherheit von Kindern und Schutzbedürftigen Personen
WARNUNG! Es besteht Erstickungsgefahr, das Risiko von
Verletzungen oder permanenten Behinderungen.
• Dieses Gerät kann dann von Kindern ab 8 Jahren, von Personen
mit eingeschränkten körperlichen, sensorischen oder geistigen
Fähigkeiten sowie von Personen ohne bisherige Erfahrung im
Umgang mit solchen Geräten bedient werden, wenn sie dabei von
einer Person, die für ihre Sicherheit verantwortlich ist, beaufsichtigt
werden.
• Kinder sollten während der Benutzung beaufsichtigt sein, um
sicher zu gehen, dass sie nicht mit dem Gerät spielen.
• Halten Sie das Verpackungsmaterial von Kindern fern.
• WARNUNG: Das Gerät und die zugänglichen Elemente werden
heiß, während das Gerät in Betrieb ist. Bitte achten Sie darauf, die
erhitzten Elemente nicht zu berühren. Kinder unter 8 Jahren sollten
vom Gerät ferngehalten werden, es sei denn sie werden
durchgängig beaufsichtigt.
• Reinigung und Wartung des Geräts darf nicht von Kindern ohne
Aufsicht erfolgen.
Allgemeine Sicherheit
• Dieses Gerät ist für den Haushaltsbedarf und nicht für die Nutzung
in Hotels, Geschäften, Büros oder anderen, ähnlichen
Einrichtungen, bestimmt.

14
DE
Informationen zur Sicherheit
• Der Geräteinnenraum wird während des Betriebs heiß. Berühren
Sie nicht die Heizelemente im Geräteinnern. Verwenden Sie zum
anfassen des zubehörs und der Töpfe wärmeisolierende
Handschuhe.
• Stellen oder setzen Sie sich nicht auf die geöffnete Geschirr-
schublade. Der Teleskopauszug wird beschädigt. Die Belastbarkeit
der Geschirrschublade beträgt max. 25kg.
• Bewahren Sie keine Kunststoff-behälter oder brennbare
Gegenstände im Gerät auf. Beim Einschalten können sie
schmelzen oder sich entzünden. Brandgefahr!
• Benutzen Sie das Gerät nicht zum Beheizen von Räumen. Durch
die Temperaturentwicklung können leicht entzündbare
Gegenstände in der Nähe zu brennen beginnen.
Installation
• Die Elektronik muss mit einer Einrichtung zur Abschaltung
ausgestattet sein, womit das Gerät sich von jedem Pol vom Netz
ausschalten lässt und die vollständige Trennung unter der
Überspannungskategorie III bietet.
• Wenn ein Stecker für die elektrische Verbindung verwendet wird,
dann muss er nach der Installation zugänglich sein.
• Die Installation des Gerätes muss nach aktuellen Vorschriften
erfolgen.
• Schutz gegen elektrischen Schlag muss durch den Einbau
gewährleistet sein (Erdung).
• Achtung: Das Gerät muss unbedingt geerdet werden.
• WARNUNG: Das Gerät ist für den Einbau bestimmt. Bitte
beziehen Sie sich auf die letzten Seiten der Bedienungsanleitung,
für detaillierte Informationen und Maßzeichnungen.
Reinigung und Instandhaltung
• WARNUNG: Trennen Sie vor reinigung und instandhaltung das
Gerät von der Stromversorgung.

15
DE
Informationen zur Sicherheit
• Wird das Gerät nicht regelmäßig gereinigt, können die Oberflächen
beschädigt werden; dies kann sich nachteilig auf die Lebensdauer
des Geräts auswirken und zu gefährlichen Situationen führen.
• Benutzen Sie keine Scheuermittel oder Metallschwämmchen zum
Reinigen der Ofenglastür; sie können die Glasfläche verkratzen
und zum Zersplittern der Scheibe führen.
• Benutzen Sie zum Reinigen des Geräts keinen Dampfreiniger.
• Bitte beachten Sie die Hinweise bezüglich der Sauberkeit unter
dem Punkt “Reinigung und Wartung“.
Service und Reparatur
• WARNUNG: Trennen Sie vor Service und Reparatur das Gerät
von der Stromversorgung.
• Falls das Netzkabel beschädigt wird, ist es vom Hersteller, von
autorisierten Vertretern oder von für diese Aufgabe qualifizierten
Technikern zu ersetzen, um gefährliche Situationen zu vermeiden.
Denn dazu sind Spezialwerkzeuge notwendig.
• Reparaturen und Wartungsarbeiten, besonders an unter Strom
stehenden Teilen, dürfen nur durch vom Hersteller autorisierten
Technikern ausgeführt werden.
16
DE
Gerätebeschreibung
Hauptkomponenten
1. – Bedienblende
3. – Gerätefront
2. – Temperaturknebel
4. – Antirutschauflage
Vorinformationen
Dieses Gerät verfügt über ein Heißluftsystem. Ein
Gebläse verteilt die Wärme des Heizkörpers
optimal in der Schublade.
Das Thermostat ermöglicht die Bestimmung und
Überwachung der gewünschten
Geschirrtemperatur.
Durch die entstehende Luftzirkulation wird das
Geschirr gleichmäßig und schnell erwärmt.
Ein Schutzgitter verhindert die Berührung mit
Heizkörper und Gebläse.
Der Boden der Geschirrschublade ist mit einer
Antirutschauflage ausgelegt, die das Verrutschen
des Geschirrs beim Öffnen und Schließen der
Schublade verhindert.
17
DE
Bedienung
Vor dem ersten Gebrauch
Vor dem ersten Benutzen sollten Sie wie folgt
vorgehen:
Wischen Sie Ihr Gerät mit einem feuchten Tuch
ab und trocken Sie es anschließend. Siehe
Kapitel „Reinigung und Pflege“.
Heizen Sie die leere Schublade mindestens 2
Stunden lang auf. Stellen Sie dazu den
Temperaturknebel auf Maximum (siehe Kapitel
"Temperatur wählen").
Sorgen Sie dabei für eine gute Belüftung der
Küche.
Die Bauteile sind mit einem Pflegemittel
geschützt. Deshalb kommt es beim ersten
Aufheizen vorübergehend zur Geruchsbildung.
Die Geruchsbildung und eventuell auftretender
Dunst vergehen nach kurzer Zeit und weisen nicht
auf einen Falschanschluss oder Gerätedefekt hin.
Bedienelemente
Die Bedienelemente bestehen aus dem
Temperaturknebel und dem Ein-/Aus- Schalter.
Sie sind nur sichtbar, wenn die Geschirrschublade
geöffnet ist. Bei geschlossener Schublade kann
man durch das Kontrollfeld in der Gerätefront
sehen, ob das Gerät eingeschaltet ist.
Bedienprinzip
Um die Wärmeschublade zu verwenden verfahren
wie folgt:
• Drücken Sie die Front der Wärmeschublade um
diese zu öffnen.
• Stellen Sie das Geschirr in die Schublade.
• Um die Temperatur zu wählen, bitte drehen Sie
denn Schalter auf die gewünschte Position.
• Schalten Sie das Gerät durch drücken des
• Knopfes ein. Der Knopf leuchtet auf.
• Schließen Sie die Schublade.
Beachten Sie, dass sich die Schublade wieder
öffnen kann, wenn sie mit übermäßigem Schwung
geschlossen wird.
Schalten Sie das Gerät aus, bevor Sie das
erwärmte Geschirr entnehmen.
Temperatur wählen
Der Temperaturknebel ermöglicht die stufenlose
Einstellung der Temperatur zwischen ca. 30 und
80 °C.
Den Temperaturknebel nur linksherum bis zur
Position “0“drehen oder nach rechts bis zum
Anschlag, den sonst wird der Knebel zerstört.
Ist die gewählte Temperatur erreicht, schaltet sich
die Heizung ab. Sobald die Temperatur unter den
eingestellten Wert sinkt, schaltet sich die Heizung
wieder ein.
Auf der Temperaturskala sind keine absoluten
Temperaturwerte in °C markiert, sondern
Symbole, die die optimale Temperatur für die
jeweilige Geschirrgruppe darstellen:
Symbol
ºC
Funktion
30ºC
Antauen
40ºC-
50ºC
Teig gehen lassen
Tassen/Gläser
vorwärmen
60ºC-70ºC
Geschirr vorwärmen
80ºC
Speisen warm halten
Speisen Erhitzen

18
DE
Bedienung
Aufheizzeiten
Unterschiedliche Faktoren beeinflussen die
Aufheizzeit:
• Material und Dicke des Geschirrs
• Beladungsmenge
• Beladungsanordnung
• Temperatureinstellung
Absolute Angaben sind daher nicht möglich.
Bei der Einstellung auf der Position und um
eine gleichmäßige Erwärmung zu erreichen
können folgende Werte als Anhaltspunkte
genannt werden:
Geschirr
Zeit (Minuten)
Menügeschirr für 6 Personen
30 – 35
Bitte ermitteln Sie im praktischen Gebrauch die
optimalen Einstellungen für Ihren Haushalt.
Fassungsvermögen
Das Fassungsvermögen ist abhängig von den
Geschirrmaßen; die Schublade darf mit maximal
25 kg belastet werden.
Die folgenden Bestückungsbeispiele sind
Anhaltspunkte:
• Menügeschirr für 6 Personen:
- 6 Teller Ø 28 cm
- 6 Suppentassen Ø 10cm
- 1 Schüssel Ø 22 cm
- 1 Schüssel Ø 19 cm
- 1 Schüssel Ø 17 cm
- 2 Teller Ø 36 cm
oder
• 20 Teller Ø 28 cm
• 36 Suppenteller Ø 22 cm
• 30 Suppentassen Ø 10cm
• 10 Teller Ø 28cm
• 10 Suppenteller Ø 22 cm
• 10 Pizzateller Ø 36 cm
• 80 Espressotassen
• 40 Cappuccinotassen
• 30 Gläser
• 18 Suppenteller Ø 22 cm; 2 Suppenterrinen 21
cm x 18 cm
• usw.

19
DE
Reinigung und Pflege
Die Reinigung stellt die einzige, normalerweise
erforderliche Wartung dar.
Achtung! Die Reinigung muss an dem von der
Stromversorgung getrennten Gerät
durchgeführt werden. Ziehen Sie den Stecker
aus der Steckdose oder schalten Sie den
Stromversorgungskreis des Gerätes ab.
Benutzen Sie keine aggressiven Reinigungs-
oder Scheuermittel, keine kratzenden
Scheuertücher noch spitze Gegenstände,
denn es können Flecken entstehen.
Stirnseite und Bedienblende
Es reicht, das Gerät mit einem feuchten Lappen
zu reinigen. Geben Sie, falls es sehr verschmutzt
sein sollte, einige Tropfen Geschirrspülmittel ins
Waschwasser. Wischen Sie danach das Gerät mit
einem trockenen Lappen ab.
Für Wärmeschubladen mit
Edelstahlvorderseite können Spezialmittel für
Edelstahloberflächen verwendet werden. Diese
Mittel vermeiden dass die Oberflächen schnell
wieder schmutzig werden. Tragen Sie das Mittel
mit einem weichen Tuch flächig und sparsam auf.
Benutzen Sie bei Wärmeschubladen mit einer
Aluminiumvorderseite ein mildes
Glasreinigungsmittel und einen weichen,
fusselfreien Lappen. Wischen Sie diese in
horizontaler Richtung ab, ohne Druck auf die
Oberfläche auszuüben.
Für glasfrontierte Wärmeschublade Wenn sich
Fingerabdrücke, Fett oder Flecken auf der
Außenseite (z. B. auf der Frontplattenoberfläche)
befinden, reinigen Sie diese mit einem weichen
Tuch mit einem Glasreiniger oder einem
neutralen Reinigungsmittel, und wischen Sie sie
dann mit einem weichen, sauberen und trockenen
Tuch trocken.
Innenraum
Reinigen Sie nach jeder Nutzung die Innenwände
mit einem feuchten Lappen. Geben Sie, falls sie
sehr verschmutzt sein sollten, einige Tropfen
Geschirrspülmittel ins Waschwasser.
Wischen Sie danach die Oberflächen mit einem
trockenen Lappen ab.
Verhindern Sie das Eindringen von Wasser in die
Belüftungslöcher.
Nutzen Sie die Wärmeschublade nur nachdem
sie trocken ist.
Antirutschauflage
Die Antirutschauflage kann zur Reinigung des
Schubladenbodens herausgenommen werden.
Die Auflage reinigen Sie am besten von Hand mit
warmem Wasser und einem milden Spülmittel.
Trocknen Sie sie im Anschluss gut ab. Legen Sie
die Antirutschauflage erst wieder in die
Schublade, wenn sie ganz trocken ist.

20
DE
Was ist im Falle einer Funktionsstörung zu tun?
ACHTUNG! Jegliche Art von Reparatur darf
nur von spezialisierten Fachleuten ausgeführt
werden. Jeder Eingriff, der durch nicht vom
Hersteller autorisierte Personen
vorgenommen wird, ist gefährlich.
Folgende Probleme können behoben werden,
ohne den Kundendienst zu benachrichtigen:
• Das Geschirr erwärmt nicht
ausreichend?
Prüfen Sie, ob:
– das Gerät eingeschaltet ist.
– die richtige Temperatureinstellung gewählt
wurde.
– die Warmluft-Austrittsöffnungen durch große
Platten oder Schüsseln verdeckt sind.
– das Geschirr lange genug erwärmt wurde.
Unterschiedliche Faktoren beeinflussen die
Aufheizzeit, zum Beispiel:
– Material und Dicke des Geschirrs
– Beladungsmenge
– Beladungsanordnung
– Temperatureinstellung
• Das Geschirr erwärmt nicht? Prüfen Sie,
ob:
– Sie ein Gebläsegeräusch hören.
Falls das Gebläse läuft, ist der Heizkörper
defekt. Falls das Gebläse nicht läuft ist das
Gebläse defekt.
– die Sicherung der Hausinstallation ausgelöst
hat.
• Das Geschirr wird zu heiß?
– Der Temperaturregler ist defekt.
• Beim Einschalten des Gerätes leuchtet
der Ein-/Aus-Schalter nicht?
– Die Kontrollleuchte des Schalters ist defekt.
21
DE
Technische Eigenschaften
Technische Eigenschaften
SAMSUNG bestrebt sich, seine Produkte die ganze Zeite zu verbessern. Somit können die
Spezifikationen für die Auslegung und diese Bedienungsanleitung jederzeit ohne vorherige Ankündigung
geändert werden.
Modell
NL20J7100WM/UR
NL20T8100WK/UR
NL20T9100WD/UR
Betriebsspannung
220-240 V / 50-60 Hz
Stromverbrauch
Maximale Leistung
420W
Außen Abmessung
Hohlraum - Schublade
595x522x140
485x490x110
Volumen
25 ltr
Netto Gewicht
14,2 kg
Hinweise zum Umweltschutz
Entsorgung der Verpackung
Die Verpackung ist mit einem Grünen Punkt
gekennzeichnet.
Benutzen Sie geeignete Behältnisse, um alle
Verpackungsmaterialien, wie Pappe, Styropor und
Folien, zu entsorgen. Auf diese Weise wird die
Wiederverwertung der Verpackungsmaterialien
gewährleistet.
Entsorgung von stillgelegten Geräten
Die europäische Richtlinie 2012/19/EU über
Elektro- und Elektronik-Altgeräte (WEEE) sieht
vor, dass die elektrischen Haushaltgeräte nicht im
normalen Abfallfluss des festen Stadtmülls
entsorgt werden dürfen.
Die außer Betrieb gesetzten Geräte müssen
getrennt abgeholt werden, um den Anteil der
Rückgewinnung und Wiederverwendung der
Werkstoffe, aus denen sie bestehen, zu
optimieren und um potentielle Schäden für die
Gesundheit der Menschen und die Umwelt zu
vermeiden. Das Symbol, welches aus einem mit
einem Kreuz durchgestrichenen Müllcontainer
besteht, ist auf sämtlichen Erzeugnissen
anzubringen, um so an die Verpflichtung der
separaten Abholung zu erinnern.
Die Verbraucher haben sich mit den lokalen
Behörden bzw. den Verkaufsstellen in Verbindung
zu setzen, um Informationen über den Ort
einzuholen, der zur Lagerung der alten
elektrischen Haushaltsgeräte geeignet ist.
Machen Sie Ihr Gerät unbrauchbar, bevor Sie es
entsorgen. Ziehen Sie das Netzkabel heraus,
schneiden Sie es ab und entsorgen Sie es.
Weitere Informationen zum Engagement von Samsung für die Umwelt und zu produkspezifischen
Auflagen wie z. B. REACH finden Sie unter:
samsung.com/uk/aboutsamsung/samsungelectronics/corporatecitizenship/data_corner.html
22
DE
Installationsanleitung
Vor der Installation
Überprüfen Sie, dass die
Versorgungsspannung, die auf dem
Typenschild angegeben ist, mit Ihrer
Netzspannung übereinstimmt.
Öffnen Sie die Schublade und entnehmen Sie alle
Zubehörteile sowie das Verpackungsmaterial.
Achtung! Die Vorderseite der Schublade kann
mit einer Schutzfolie versehen sein. Ziehen Sie
diese Folie vor der ersten Benutzung des Gerätes
vorsichtig ab, indem Sie an deren Unterseite
beginnen.
Vergewissern Sie sich, dass die
Wärmeschublade nicht beschädigt ist.
Überprüfen Sie, ob die Schublade richtig schließt
Benachrichtigen Sie den Kundendienst im Falle
von vorhandenen Schäden.
Achten Sie darauf, dass die Steckdose nach
Einbau des Gerätes leicht zugänglich ist.
Der Geschirrwärmer darf ausschließlich in
Kombination mit den vom Hersteller angegeben
Geräten eingebaut werden. Bei Kombination mit
anderen Geräten erlischt der
Garantieanspruch, da die Gewähr für einen
ordnungsgemäßen Betrieb nicht mehr
gegeben ist.
Einbau
Für den Einbau von Geschirrwärmer und
Kombinationsgerät muss ein fest eingebauter
Zwischenboden vorhanden sein, der die
erforderliche Tragfähigkeit für beide Geräte
gewährleistet.
Das Kombinationsgerät wird ohne weiteren
Zwischenboden direkt auf den eingebauten
Geschirrwärmer gestellt.
Beachten Sie für den Einbau des
Kombinationsgerätes unbedingt die Informationen
der jeweiligen Gebrauchs- bzw.
Montageanweisung.
Die wichtigen Masse für den Einbau werden in
“mm” auf den letzten Seiten dargestellt. Wie
folgt vorgehen:
1. Stellen Sie das Gerät bis zur Schwadenleiste
in den Umbauschrank und richten Sie es
aus.
2. Achten Sie darauf, dass das Gehäuse des
Gerätes rechtwinklig ausgerichtet wird.
3. Öffnen Sie die Schublade und befestigen Sie
das Gerät mit den 2 mitgelieferten
Schrauben an den Seitenwänden des
Schrankes.
Elektroanschluss
Die Wärmeschublade ist mit einem Netzkabel und
einem Stecker für Einphasenstrom ausgestattet.
Es wird empfohlen, das Gerät über eine
Steckdose an das Elektronetz anzuschließen.
Dadurch wird der Kundendienst erleichtert.
Im Falle eines Daueranschlusses ist das Gerät
von einem qualifizierten Techniker zu installieren.
In diesem Falle hat der Anschluss an einen
Stromkreis mit einem Unterbrecher für sämtliche
Pole, mit einem Mindestabstand von 3 mm
zwischen den Kontakten, zu erfolgen.
Die erforderlichen Anschlussdaten finden Sie auf
dem Typenschild. Diese Angaben müssen mit
denen des Netzes übereinstimmen.
ACHTUNG: DIE WÄRMESCHUBLADE MUSS
UNBEDINGT GEERDET WERDEN.
Der Hersteller und die Wiederverkäufer lehnen
jegliche Haftung für eventuelle Schäden ab, die
Personen, Tieren oder Sachen zugefügt werden,
falls die Nichtbeachtung der vorliegenden
Installationsanleitung festgestellt wird.

23
FR
Sommaire
Consignes de sécurité...................................................................................................................... 24
Description de l'appareil .................................................................................................................. 27
Composants principaux .................................................................................................................. 27
Principe de fonctionnement ............................................................................................................ 27
Utilisation .......................................................................................................................................... 28
Avant la première utilisation............................................................................................................ 28
Tableau de commandes ................................................................................................................. 28
Principe d'utilisation ........................................................................................................................ 28
Nettoyage et entretien ...................................................................................................................... 30
Partie avant de l'appareil et tableau de commandes ...................................................................... 30
Intérieur du tiroir chauffant .............................................................................................................. 30
Revêtement antidérapant ............................................................................................................... 30
Que faire en cas de mauvais fonctionnement? .............................................................................. 31
Caractéristiques techniques ............................................................................................................ 32
Protection de l'environnement ........................................................................................................ 32
Instructions d'installation ................................................................................................................ 33
Avant l'installation ........................................................................................................................... 33
Installation ...................................................................................................................................... 33
Installation ......................................................................................................................................... 45
Possibilités de combinaison ............................................................................................................ 45
Nous vous demandons une lecture attentive des instructions de ce manuel. Vous pourrez ainsi utiliser
votre tiroir chauffant en obtenant les meilleurs résultats.
CONSERVEZ TOUTE LA DOCUMENTATION DE CE PRODUIT POUR LA CONSULTER
ULTÉRIEUREMENT.

24
FR
Consignes de sécurité
Avant d'installer et d'utiliser cet appareil, lisez soigneusement
les instructions fournies. Le fabricant ne peut être tenu pour
responsable des dommages et blessures liés à une mauvaise
installation ou utilisation. Conservez toujours cette notice avec votre
appareil pour vous y référer ultérieurement. Votre appareil est aux
normes de sécurité en vigueur. Une utilisation inadéquate peut
constituer un danger pour l'utilisateur.
Sécurité des enfants et des personnes vulnérables
AVERTISSEMENT! Risque d'asphyxie, de blessure ou
d'invalidité permanente.
• Cet appareil peut être utilisé par des enfants de plus de 8 ans,
ainsi que des personnes dont les capacités physiques,
sensorielles et mentales sont réduites ou dont les connaissances
et l'expérience sont insuffisantes, à condition d'être surveillés par
une personne responsable de leur sécurité.
• Les enfants devraient être surveillés pour s'assurer qu'ils ne jouent
pas avec l'appareil.
• Ne laissez pas les emballages à la portée des enfants.
• AVERTISSEMENT : En cours de fonctionnement, l'appareil et ses
parties accessibles deviennent chauds. Éviter de toucher les
éléments de chauffage. Les enfants de moins de 8 ans doivent
être tenus à l'écart, ou surveillés en permanence.
• Les enfants ne doivent pas nettoyer ni entreprendre une opération
de maintenance sur l'appareil sans surveillance.
Sécurité générale
• Cet appareil est destiné à un usage domestique, et n'est pas
adapté aux hôtels, magasins, bureaux ou autres environnements
similaires.
• L'intérieur de l'appareil devient chaud lorsqu'il est en
fonctionnement. Ne touchez pas les éléments chauffants se
trouvant dans l'appareil. Utilisez toujours des gants de cuisine pour
retirer ou enfourner des accessoires ou des plats allant au four.

25
FR
Consignes de sécurité
• Le tiroir peut supporter un poids maximum de 25 kg. Prenez garde
de ne pas le surcharger, cela endommagerait les rails
télescopiques.
• Les récipients et objets synthétiques ou qui prennent facilement
feu ne doivent pas être rangés dans le chauffe-vaisselle. Si
l'appareil est mis en marche, ils peuvent fondre ou brûler. Danger
d'incendie.
• N'utilisez pas votre appareil comme chauffage de maison. Les
hautes températures peuvent mettre le feu à des objets facilement
inflammables situés près de l'appareil.
Installation
• Le système électrique doit être équipé d'un moyen de
déconnexion, avec une séparation de contact sur tous les pôles
assurant une coupure complète de la catégorie de surtension III.
• Si une fiche est utilisée pour la connexion électrique, alors la
même doit être accessible après l'installation.
• L'installation doit respecter les réglementations en vigueur.
• L’encloisonnement doit être assurer de façon a proteger des chocs
électriques.
• Attention: L'appareil doit être obligatoirement relié à la terre.
• AVERTISSEMENT! Il s'agit d'un appareil encastrable. Veuillez
vous reporter aux dernières pages de cette notice pour en savoir
plus sur les dimensions nécessaires à son installation.
Nettoyage et Maintenance
• Avertissement: Avant toute opération de nettoyage et
maintenance, déconnectez l'alimentation électrique.
• Si vous ne nettoyez pas régulièrement l'appareil, sa surface peut
se détériorer, ce qui pourrait réduire sa durée de vie et provoquer
des situations dangereuses.
• N'utilisez pas de produits abrasifs ni de racloirs pointus en métal
pour nettoyer la porte en verre car ils peuvent rayer sa surface, ce
qui peut briser le verre.

26
FR
Consignes de sécurité
• N'utilisez pas de nettoyeur vapeur pour nettoyer l'appareil.
• S'il vous plaît, soyez attentif aux indications concernant le
nettoyage, figurant au point "Nettoyage et entretien".
Entretien et réparation
• Avertissement: Avant toute opération de réparation, déconnectez
l'alimentation électrique.
• Si le câble d'alimentation est endommagé, il ne doit être remplacé
que par un professionnel qualifié afin d'éviter tout danger.
• Les réparations ou opérations de maintenance, en particulier des
pièces sous tension, ne peuvent être réalisées que par des
techniciens certifiés par le fabricant.

27
FR
Description de l'appareil
Composants principaux
1. Sélecteur de température (thermostat)
2. Bouton marche/arrêt (voyant lumineux)
3. Pilote de fonctionnement
4. Revêtement antidérapant
Principe de fonctionnement
Votre appareil est équipé d'un système de
circulation d'air chaud. Un ventilateur distribue la
chaleur, générée par une résistance électrique,
dans tout l'intérieur de l'appareil.
Le thermostat permet de définir et de contrôler la
température souhaitée pour la vaisselle.
La circulation de l'air chaud fait que la vaisselle
est chauffée rapidement et uniformément.
La résistance ainsi que le ventilateur sont
protégés par une grille métallique.
La base du tiroir est équipée d'un revêtement
antidérapant pour empêcher la vaisselle de glisser
quand vous ouvrez ou fermez le tiroir.
28
FR
Utilisation
Avant la première utilisation
Avant d'utiliser l'appareil pour la première fois,
vous devez en laver l'intérieur et l'extérieur en
suivant les indications sur le nettoyage figurant au
chapitre « Nettoyage et entretien ».
Ensuite, chauffez le tiroir chauffant pendant au
moins 2 heures en tournant le sélecteur de
température sur la position maximum (consultez
le chapitre « Sélectionner la température »).
Veillez à aérer correctement la cuisine.
Les pièces de l'appareil sont protégées par un
produit spécial qui peut éventuellement, lors de la
première mise en marche, dégager une odeur et
un peu de fumée qui disparaissent très vite. Ni
l'une ni l'autre ne constituent une anomalie de
fonctionnement de l'appareil.
Tableau de commandes
Le tableau de commandes n'est visible que
lorsque le tiroir est ouvert. Il comporte un bouton
sélecteur de température et l'interrupteur
marche/arrêt.
Lorsque le tiroir est fermé, le voyant lumineux
situé sur l'avant de l'appareil indique si le tiroir
chauffant est en marche.
Principe d'utilisation
Pour utiliser le tiroir chauffant, procédez de la
façon suivante :
• Appuyez sur le centre de la face avant pour
ouvrir le tiroir chauffant.
• Placez la vaisselle dans le tiroir.
• Sélectionnez la température en tournant le
thermostat sur la position désirée.
• Mettez l'appareil en marche en appuyant sur
l'interrupteur dont le voyant s'allume.
• Fermez le tiroir.
Prenez garde que le tiroir peut se rouvrir si vous
le fermez trop fort.
Avant de retirer la vaisselle chaude, vous devez
éteindre le tiroir chauffant en appuyant de
nouveau sur l'interrupteur.
Sélectionner la température
Vous pouvez sélectionner des températures entre
30 et 80 ºC en tournant le thermostat.
Ne forcez pas le bouton du thermostat, ni vers
la gauche de la position « 0 » ni vers la droite
de la position maximum, car cela pourrait le
détériorer.
Dès que la température sélectionnée est atteinte,
le chauffage s'éteint. Il se rallume
automatiquement si la température redescend.
Au lieu de températures absolues en ºC, des
symboles sont indiqués. Ils correspondent à la
température optimisée pour un groupe de
vaisselle :
Symbole
ºC
Function
30ºC
Décongélation
40ºC-
50ºC
Prouver la pâte
Réchauffement Tasses /
verres
60ºC-
70ºC
Réchauffement vaisselle
Gardez les aliments
chauds
80ºC
Cuisson à basse
température
Réchauffement des
aliments
29
FR
Utilisation
Temps de chauffage
Le temps de chauffage dépend de plusieurs
facteurs :
• Matériel et épaisseur de la vaisselle
• Quantité de charge
• Disposition de la vaisselle
• Température sélectionnée
Il est dès lors impossible d'indiquer des temps de
chauffage rigoureusement exacts.
Les temps ci-dessous sont donnés à titre indicatif
pour le thermostat en position et pour obtenir
un chauffage uniforme de la vaisselle :
Charge
Temps (mn)
Vaisselle de table pour 6 pers.
30 – 35
La pratique vous aidera à sélectionner les temps
appropriés à votre vaisselle.
Capacité de charge
La capacité de charge dépend de la taille de la
vaisselle. Le tiroir chauffant peut recevoir une
charge maximum de 25 kg.
Quelques exemples de rangement sont fournis ci-
après à titre indicatif :
• Vaisselle de table pour 6 personnes :
- 6 assiettes Ø 28 cm
- 6 bols à soupe Ø 10cm
- 1 Récipient Ø 22 cm
- 1 Récipient Ø 19 cm
- 1 Récipient Ø 17 cm
- 2 assiettes Ø 36 cm
ou
• 20 assiettes Ø 28 cm
• 36 assiettes à soupe Ø 22 cm
• 30 bols à soupe Ø 10cm
• 10 assiettes Ø 28cm
• 10 assiettes à soupe Ø 22 cm
• 10 assiettes à pizza Ø 36 cm
• 80 tasses à café
• 40 tasses à cappuccino
• 30 verres
• 18 assiettes à soupe Ø 22 cm ; 2 terrines à
soupe 21 cm x 18 cm
• Etc.

30
FR
Nettoyage et entretien
Le nettoyage est l'unique entretien normalement
nécessaire.
Attention ! Le nettoyage doit être effectué
quand le tiroir chauffant est débranché de
l'alimentation électrique. Retirez la prise du
mur ou débranchez le circuit d'alimentation du
tiroir chauffant.
N'utilisez pas de produits de nettoyage
agressifs ou abrasifs, ni frottoirs ni objets
pointus qui peuvent provoquer des rayures.
N'utilisez pas d'appareils de nettoyage à haute
pression ou qui projettent de la vapeur.
Partie avant de l'appareil et tableau de
commandes
Il suffit de nettoyer le tiroir chauffant avec un
chiffon humide. S'il est très sale, ajoutez quelques
gouttes de produit vaisselle à l'eau de lavage.
Essuyez ensuite les surfaces avec un chiffon sec.
Les tiroirs chauffants dont l'avant est en acier
inoxydable peuvent être nettoyés avec des
produits spéciaux pour ce type de surface. Ces
produits évitent que les surfaces ne se resalissent
rapidement. Appliquez une fine couche de produit
sur toute la surface avec un chiffon doux.
Les tiroirs chauffants dont l'avant est en
aluminium peuvent être nettoyés avec un produit
léger pour les vitres et un chiffon doux qui ne
laisse pas de fibres. Nettoyez dans le sens
horizontal sans appuyer car l'aluminium est un
métal mou qui se raye ou se coupe facilement.
Pour tiroir chauffant vitré. S'il y a des traces de
doigts, de la graisse ou des taches sur l'extérieur
(comme la surface du panneau avant), nettoyez
avec un chiffon doux et un nettoyant pour vitres
ou un détergent neutre, puis essuyez avec un
chiffon doux, propre et sec.
Intérieur du tiroir chauffant
Nettoyez régulièrement l'intérieur du tiroir
chauffant avec un chiffon humide. S'il est très
sale, ajoutez quelques gouttes de produit
vaisselle dans l'eau de lavage.
Nettoyez ensuite les surfaces avec un chiffon sec.
Évitez de faire entrer de l'eau dans les orifices par
où circule l'air.
Attendez que votre tiroir chauffant soit bien sec
avant de le réutiliser.
Revêtement antidérapant
Vous pouvez retirer le revêtement antidérapant
pour nettoyer plus facilement le tiroir.
Le revêtement peut être lavé à la main avec de
l'eau chaude et quelques gouttes de produit
vaisselle.
Séchez-le bien pour finir.
Vous ne devez remettre en place le revêtement
antidérapant que lorsque le tiroir est bien sec.

31
FR
Que faire en cas de mauvais fonctionnement?
ATTENTION ! Seuls des techniciens
spécialisés sont à même d'effectuer les
réparations, de quelque type que ce soit.
Toute réparation effectuée par des personnes
non agréées par le fabricant est dangereuse.
Avant d'appeler l'assistance technique, vérifiez
les cas suivants :
• La vaisselle ne chauffe pas suffisamment ?
Vérifiez les points suivants :
- L'appareil est bien branché et en marche.
- Vous avez sélectionné la température
adéquate.
- Les orifices par où circule l'air sont obstrués
par de la vaisselle.
- La vaisselle a chauffé pendant un temps
suffisant ?
Le temps de chauffage dépend de divers
facteurs, en particulier :
- Matière et épaisseur de la vaisselle.
- Quantité de vaisselle.
- Rangement et disposition de la vaisselle.
• La vaisselle ne chauffe pas ?
Vérifiez les points suivants :
- Le ventilateur fonctionne (il fait du bruit).
C'est peut-être alors la résistance qui est en
panne ; si le ventilateur ne fait pas de bruit,
c'est lui qui doit être en panne.
- Les plombs ont sauté ou le tableau
électrique a disjoncté.
• La vaisselle est trop chaude ?
Le sélecteur de température ne marche pas
correctement.
• L'interrupteur marche/arrêt ne s'allume
pas ?
Le pilote de l'interrupteur a fondu.
32
FR
Caractéristiques techniques
Caractéristiques techniques
SAMSUNG s'efforce d'améliorer ses produits en tout temps. Les spécifications techniques de
conception et ces instructions d'utilisation sont donc susceptibles de changer sans préavis.
Modèle
NL20J7100WM/UR
NL20T8100WK/UR
NL20T9100WD/UR
Source d’alimentation
220-240 V / 50-60 Hz
Consommation d’energie
Puissance maximum
420W
Dimensions (WxDxH)
L’exterieur
Cavité du tiroir
595x522x140
485x490x110
Volume
25 ltr
Pois net
14,2 kg
Protection de l'environnement
Protection de l'environnement
Élimination de l'emballage
L'emballage est signalé d'un Point vert.
Veuillez utiliser les conteneurs adéquats pour
vous défaire de tous les matériaux d'emballage
comme le carton, le polystyrène expansé et le film
plastique. Ils seront réutilisés pour d'autres
emballages.
Élimination des appareils hors d'usage
La directive européenne 2012/19/EU, concernant
la gestion des résidus d'appareils électriques et
électroniques (RAEE), prévoit que les appareils
électroménagers ne doivent pas être éliminés de
la même façon que les résidus urbains solides.
Les appareils hors d'usage doivent être recueillis
séparément afin d'optimiser la récupération et le
recyclage des matériaux qui les composent et
pour prévenir d'éventuelles atteintes à la santé
publique et à l'environnement. Le symbole
représentant une grande poubelle barrée d'une
croix doit être apposé sur tous les produits de
façon à rappeler l'obligation d'une collecte à part.
Les consommateurs doivent entrer en contact
avec les autorités locales ou les points de vente
pour se renseigner sur le local approprié où ils
peuvent déposer les appareils hors d'usage.
Avant de vous défaire de votre appareil, tirez le
câble d'alimentation, coupez-le et éliminez-le.
Pour obtenir des informations sur les engagements environnementaux de Samsung et sur les
obligations réglementaires spécifiques à l'appareil (par ex. la réglementation REACH), rendez-vous sur :
samsung.com/uk/aboutsamsung/samsungelectronics/corporatecitizenship/data_corner.html
33
FR
Instructions d'installation
Avant l'installation
Vérifiez que la tension d'alimentation de
l'appareil, indiquée sur la plaque des
caractéristiques, correspond à celle de votre
installation.
Ouvrez le tiroir et retirez tous les accessoires
ainsi que le matériel d'emballage.
Attention ! Le devant du tiroir chauffant peut être
enveloppé d'une pellicule de protection. Retirez
soigneusement cette pellicule avant la première
utilisation.
Vérifiez que le tiroir chauffant n'est pas
endommagé. Assurez-vous que le tiroir s'ouvre
et se ferme correctement. En cas de
détérioration, appelez le Service d'assistance
technique.
Attention : la prise de courant doit rester
facilement accessible après l'installation du
tiroir chauffant.
Le tiroir chauffant ne peut être encastré et
combiné qu'avec les appareils indiqués par le
fabricant. La garantie n'est pas valable s'il est
monté et combiné avec d'autres appareils, car
il n'est alors pas possible de garantir un
fonctionnement correct.
Installation
Pour encastrer le tiroir chauffant et le combiner
avec un autre appareil, vous devez utiliser une
étagère intermédiaire fixe, capable de supporter
le poids des deux appareils.
L'appareil combiné avec le tiroir chauffant devra
être placé directement sur le tiroir chauffant. Une
étagère de séparation n'est pas nécessaire.
Pour encastrer l'appareil combiné avec le tiroir
chauffant, suivez les indications figurant dans le
manuel d'instructions et de montage de cet
appareil.
Les dimensions à prendre en considération pour
l'installation sont indiquées en millimètres dans
les croquis présentés dans les dernières
pages. Procédez de la façon suivante :
1. Placez le tiroir chauffant sur l'étagère et
poussez-le vers le fond de façon à ce qu'il
soit bien centré et bord à bord avec l'avant
du meuble.
2. Assurez-vous que la structure du tiroir
chauffant est bien à niveau et bien stable
sur l'étagère.
3. Ouvrez le tiroir pour fixer le tiroir chauffant
sur les côtés du meuble avec les deux vis
fournies.

34
IT
Indice
Informazioni per la sicurezza ........................................................................................................... 35
Descrizione dell'apparecchio........................................................................................................... 38
Elementi principali .......................................................................................................................... 38
Informazioni preliminari .................................................................................................................. 38
I comandi ........................................................................................................................................... 39
Prima del primo uso ........................................................................................................................ 39
Elementi di comando ...................................................................................................................... 39
Selezionare la temperatura............................................................................................................. 39
Tempi di riscaldamento .................................................................................................................. 40
Capacità ......................................................................................................................................... 40
Pulizia e manutenzione .................................................................................................................... 41
Frontale e pannello comandi .......................................................................................................... 41
Vano interno ................................................................................................................................... 41
Base antiscivolo .............................................................................................................................. 41
Guasti, cosa fare? ............................................................................................................................. 42
Dati tecnici ......................................................................................................................................... 43
Salvaguardia dell'ambiente .............................................................................................................. 43
Istruzioni di montaggio .................................................................................................................... 44
Prima dell'installazione ................................................................................................................... 44
Incasso ........................................................................................................................................... 44
Allacciamento elettrico .................................................................................................................... 44
Installazione ...................................................................................................................................... 45
Possibilità di combinazione............................................................................................................. 45
Vi invitiamo a leggere con attenzione le presenti istruzioni per l'uso, che vi permetteranno di raggiungere
i migliori risultati utilizzando lo scaldastoviglie.
CONSERVARE CON CURA QUESTE ISTRUZIONI PER L'USO PER UN'EVENTUALE FUTURA CONSULTAZIONE

35
IT
Informazioni per la sicurezza
Leggere attentamente le istruzioni fornite prima di installare e
utilizzare l'apparecchiatura. Il produttore non è responsabile se
un'installazione ed un uso non corretto dell'apparecchiatura
provocano lesioni e danni. Tenere sempre le istruzioni a portata di
mano in caso di necessità durante l'utilizzo.
SICUREZZA DEI BAMBINI E DELLE PERSONE VULNERABILI
AVVERTENZA! Rischio di soffocamento, lesioni o invalidità
permanente.
• Questa apparecchiatura può essere usata da bambini a partire
dagli 8 anni e da adulti con limitate capacità fisiche, sensoriali o
mentali o con scarsa esperienza o conoscenza sull'uso
dell'apparecchiatura, se sorvegliati o se sono stati istruiti
relativamente all'uso dell'apparecchiatura e hanno capito i rischi
coinvolti.
• I bambini devono essere sorvegliati onde evitare che giochino con
l’elettrodomestico.
• Tenere i materiali di imballaggio al di fuori della portata dei
bambini.
• AVVERTENZA: L’apparecchiatura e le sue componenti accessibili
si surriscaldano durante l’uso. Fare attenzione ed evitare di toccare
gli elementi riscaldanti. I bambini di età inferiore agli 8 anni
dovrebbero essere tenuti lontani a meno che non siano
supervisionati su base continua.
• La pulizia e gli interventi di manutenzione non devono essere
eseguiti dai bambini senza supervisione.
AVVERTENZE DI SICUREZZA GENERALI
• Questa apparecchiatura è stata pensata per essere usata in
applicazioni domestiche e non in hotel, negozi, uffici e altri ambienti
simili.
• All'interno l'apparecchiatura si scalda mentre è in funzione. Non
toccare le resistenze dell'apparecchiatura. Servirsi sempre degli
appositi guanti da forno per estrarre o inserire accessori o pentole
resistenti al calore.

36
IT
Informazioni per la sicurezza
• Non appoggiarsi né sedersi sul cassetto, si potrebbero
danneggiare le guide telescopiche. La portata massima del
cassetto è di 25 kg.
• Non conservare contenitori in plastica oppure oggetti infiammabili
nello scaldastoviglie. Questi oggetti potrebbero infatti fondersi o
incendiarsi quando si accende l'apparecchio. Pericolo di incendio!
• Non utilizzare l'apparecchio per riscaldare l’ambiente della cucina.
Oggetti facilmente infiammabili posti nelle sue vicinanze potrebbero
prendere fuoco a causa dell'elevata temperatura.
INSTALLAZIONE
• L'impianto elettrico deve essere dotato di un interruttore onnipolare
di protezione con apertura minima tra i contatti della categoria di
sovratensione III.
• Se per il collegamento elettrico si usa una spina, quest'ultima deve
essere accessibile dopo l'installazione.
• L’installazione deve rispettare le regolamentazioni correnti.
• La protezione contro il contatto diretto deve essere garantita dal
modo di integrazione.
• AVVERTENZA! L'apparecchio deve essere assolutamente
collegato a terra.
• AVVERTENZA! L’apparecchiatura è stata pensata per
un’installazione a incasso. Rimandiamo alle ultime pagine del
presente manuale utente per informazioni dettagliate sulle
dimensioni dell’installazione.
PULIZIA E MANUTENZIONE
• AVVERTENZA: Prima di eseguire qualsiasi intervento di pulizia o
manutenzione, scollegare l'apparecchiatura dalla rete elettrica.
• Non mantenendo l'apparecchiatura in condizioni pulite si può
provocare il deterioramento della superficie, pregiudicare la durata
dell'apparecchiatura e si possono creare delle situazioni di pericolo
• Non utilizzare detergenti abrasivi o raschietti di metallo per pulire il
vetro della porta per non rigare la superficie e causare la rottura del
vetro.

37
IT
Informazioni per la sicurezza
• Non usare una pulitrice a vapore per pulire l'apparecchiatura.
• Seguire le istruzioni per la pulizia fornite nella sezione "Pulizia e
manutenzione".
ASSISTENZA E RIPARAZIONE
• AVVERTENZA: Prima di eseguire qualsiasi intervento di
riparazioni, scollegare l'apparecchiatura dalla rete elettrica.
• Se il cavo di alimentazione è danneggiato, deve essere sostituito
dal produttore, da un tecnico autorizzato o da una persona
qualificata per evitare situazioni di pericolo.
• Le operazioni di riparazione e manutenzione, in particolare quelle
relative ai componenti elettrici, possono essere eseguite solo da
tecnici autorizzati dal fabbricante.
38
IT
Descrizione dell'apparecchio
Elementi principali
1. – Pannello di controllo
3. – Base antiscivolo
2. – Maniglia
4. Foro di controllo sul frontale
dell'apparecchio
Informazioni preliminari
L'apparecchio è dotato di un sistema di
ventilazione ad aria calda. Una ventola
distribuisce il calore della resistenza di
riscaldamento in modo ottimale all'interno del
cassetto.
Il termostato permette di determinare e controllare
la temperatura desiderata per le stoviglie inserite.
La circolazione dell'aria riscalda le stoviglie in
modo uniforme e rapido.
Una griglia di protezione impedisce che si
possano toccare accidentalmente la resistenza di
riscaldamento e la ventola.
La base del cassetto è rivestita con materiale
antiscivolo per impedire che le stoviglie possano
spostarsi quando si apre o chiude il cassetto.
39
IT
I comandi
Prima del primo uso
Prima di utilizzare l'apparecchio per la prima
volta, pulirlo con un panno umido ed asciugarlo
quindi accuratamente come descritto al capitolo
"Pulizia e manutenzione".
Riscaldare il cassetto vuoto per almeno 2 ore.
Spostare la manopola della temperatura sulla
posizione massima (vedi capitolo "Selezionare la
temperatura").
Assicurarsi durante questo periodo di
riscaldamento che la cucina sia ben areata.
Gli elementi in metallo sono stati trattati con un
apposito prodotto protettivo. Questo prodotto
potrebbe essere la causa di cattivi odori al primo
riscaldamento del cassetto. Questi odori ed
eventuali fumane scompaiono velocemente e non
sono da attribuire ad un allacciamento non a
norma o ad un difetto dell'apparecchio.
Elementi di comando
Gli elementi di comando sono la manopola della
temperatura e l'interruttore on/off. Questi elementi
sono visibili solo quando il cassetto è aperto.
Quando invece il cassetto è chiuso un piccolo
foro di controllo situato sul frontale
dell'apparecchio permette di controllare se il
cassetto è accesso.
Principio di funzionamento
Procedere come descritto qui di seguito per
utilizzare il cassetto scaldastoviglie:
• Premere il centro della faccia anteriore per
aprire il cassetto scaldavivande.
• Disporre le stoviglie nel cassetto.
• Per selezionare la temperatura, girare la
manopola sulla posizione desiderata.
• Accendere l'apparecchio premendo il relativo
interruttore. La spia dell'interruttore si accende.
• Chiudere il cassetto.
Se il cassetto viene chiuso con troppa forza, si
potrebbe riaprire.
Spegnere l'apparecchio prima di rimuovere le
stoviglie che si sono riscaldate.
Selezionare la temperatura
La manopola della temperatura consente di
impostare la temperatura linearmente tra 30 e 80
°C.
Ruotare la manopola solo verso sinistra fino
alla posizione "0" oppure completamente
verso destra, perché altrimenti la si potrebbe
danneggiare.
Raggiunta la temperatura selezionata, il
riscaldamento si disinserisce. Non appena la
temperatura scende sotto il valore impostato, il
riscaldamento si riattiva.
Sulla scala delle temperature non sono
contrassegnati i valori assoluti in °C, ma i simboli
che rappresentano la temperatura ottimale per i
rispettivi gruppi di stoviglie.
Simbolo
ºC
Funzione
30ºC
Scongelamento
40ºC-
50ºC
Lievitazione pasta
Riscaldamento Tazze /
bicchieri
60ºC-
70ºC
Stoviglie riscaldamento
Tenere in caldo i cibi
80ºC
Temperatura di cottura a
bassa
Scaldavivande
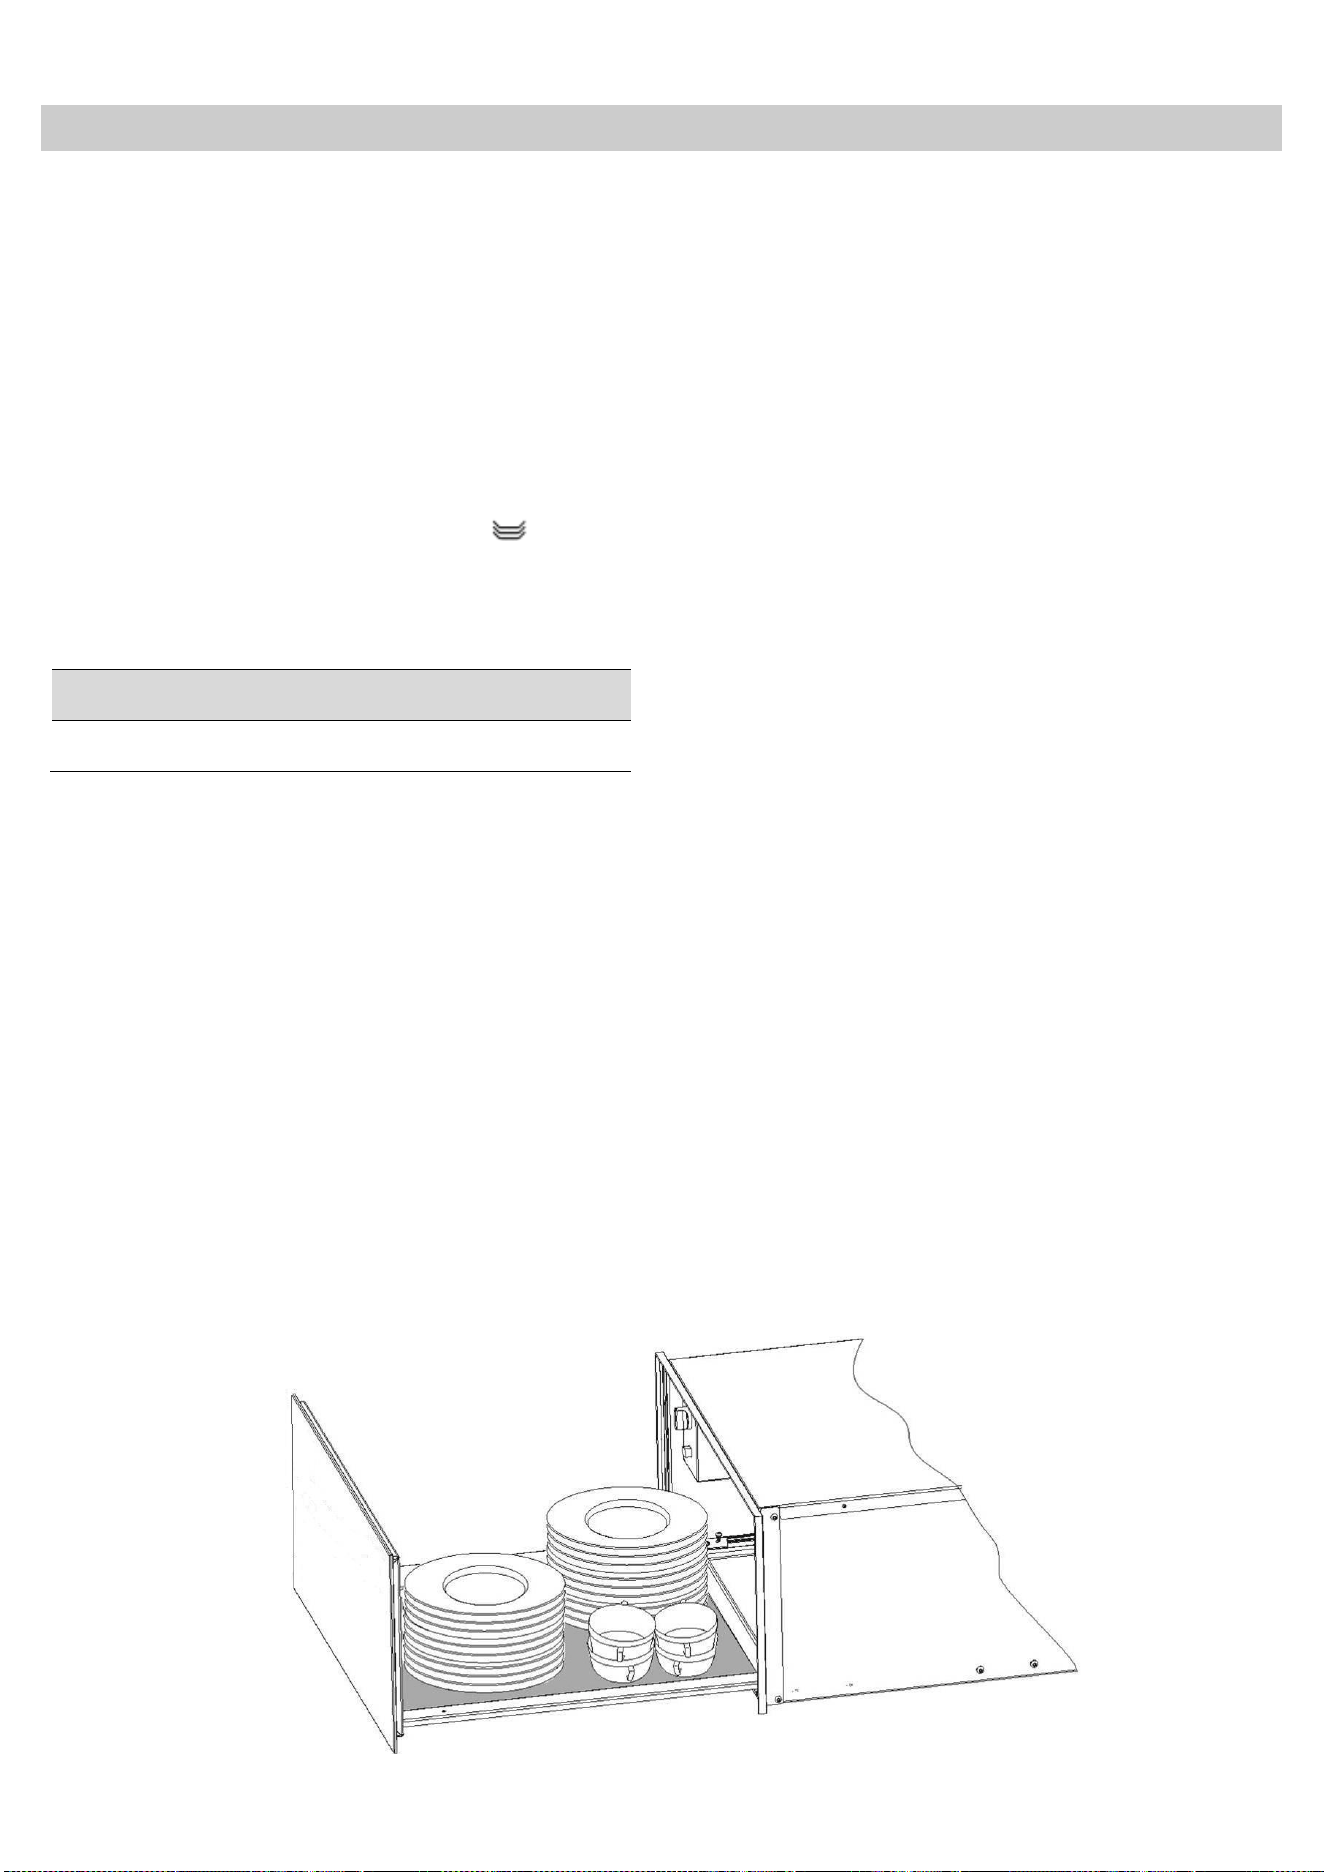
40
IT
I comandi
Tempi di riscaldamento
Diversi fattori influenzano i tempi di riscaldamento:
• materiale e spessore delle stoviglie;
• quantità di stoviglie caricate;
• disposizione delle stoviglie caricate;
• impostazione della temperatura.
Non è quindi possibile fornire indicazioni assolute.
Impostando la temperatura su e per
raggiungere un riscaldamento omogeneo,
possono essere considerati indicativi i seguenti
valori:
Stoviglie
Tempo in minuti
Stoviglie per 6 persone
30 – 35
Potete dedurre dall'esperienza pratica quali siano
le impostazioni ottimali per le Vostre esigenze.
Capacità
La capacità dipende dalle dimensioni
dell'apparecchio e il cassetto può sopportare un
peso massimo di 25 kg.
I seguenti esempi di carico sono indicativi:
• Stoviglie per 6 persone
- 6 piatti Ø 28 cm
- 6 scodelle per minestra Ø 10cm
- 1 ciotola Ø 22 cm
- 1 ciotola Ø 19 cm
- 1 ciotola Ø 17 cm
- 2 piatti Ø 36 cm
oppure
• 20 piatti Ø 28 cm
• 36 piatti per minestra Ø 22 cm
• 30 scodelle per minestra Ø 10cm
• 10 piatti Ø 28cm
• 10 piatti per minestra Ø 22 cm
• 10 piatti per pizza Ø 36 cm
• 80 tazzine da caffè
• 40 tazze
• 30 bicchieri
• 18 piatti per minestra Ø 22 cm; 2 ciotole per
minestra 21 cm x 18 cm
• ecc.

41
IT
Pulizia e manutenzione
La pulizia rappresenta generalmente l'unico tipo
di manutenzione necessaria.
Attenzione! Prima di iniziare la pulizia
staccare l'apparecchio dall'alimentazione di
rete. Togliere la spina dalla presa o disattivare
il circuito di alimentazione dell'apparecchio.
Non utilizzare detergenti aggressivi o prodotti
abrasivi, spugne abrasive e neppure oggetti
appuntiti, perché potrebbero macchiare
l'apparecchio.
Frontale e pannello comandi
È sufficiente pulire l'apparecchio con un panno
umido. Nel caso dovesse essere particolarmente
sporco, aggiungere un paio di gocce di
detergente all'acqua di pulizia. Asciugare quindi
l'apparecchio con un panno asciutto.
I frontali in acciaio inossidabile degli
scaldastoviglie possono essere puliti con
detergenti speciali appositi. Questi prodotti
rallentano la formazione dello sporco sulla
superficie del cassetto. Applicare una minima
quantità del prodotto con un panno morbido su
tutta la superficie da trattare.
Per la pulizia di cassetti con frontale di
alluminio utilizzare un detergente delicato non
abrasivo ed applicarlo con un panno morbido e
senza pelucchi. Pulire la superficie in senso
orizzontale e non facendo pressione.
Per cassetto riscaldante con parte frontale in
vetro In presenza di impronte di dita, grasso o
macchie sull’esterno (ad esempio sulla superficie
del pannello anteriore), pulire con un panno
morbido e un detergente per vetri oppure neutro e
successivamente asciugare con un panno
asciutto, pulito e morbido.
Vano interno
Pulire il vano interno con un panno umido dopo
ogni uso. Nel caso dovesse essere
particolarmente sporco, aggiungere un paio di
gocce di detergente all'acqua di pulizia.
Asciugare quindi le superfici con un panno
asciutto.
Evitare che defluisca acqua nei fori di
ventilazione.
Riutilizzare il cassetto solo quando si è asciugato
completamente.
Base antiscivolo
La base antiscivolo può essere tolta per pulire il
fondo del cassetto.
Pulire la base preferibilmente a mano con acqua
calda e un detersivo delicato. Infine asciugarla
bene. Reinserire la base antiscivolo nel cassetto
solo quando è completamente asciutta.

42
IT
Guasti, cosa fare?
ATTENZIONE! Qualsiasi tipo di riparazione
deve essere eseguito solo da personale
specializzato. Qualsiasi riparazione che non
viene eseguita da personale autorizzato dalla
casa produttrice potrebbe rivelarsi
pericolosa.
I seguenti guasti possono essere rimossi
dall'utente senza che sia necessario l'intervento
del Servizio Assistenza.
• Le stoviglie non si riscaldano a
sufficienza?
Verificare se
– l'apparecchio è acceso;
– è stata impostata la temperatura giusta;
– le aperture di ventilazione sono state ostruite
da piatti o fondine di grandi dimensioni;
– le stoviglie sono state riscaldate per un
periodo sufficientemente lungo.
Diversi fattori influenzano i tempi di
riscaldamento:
– materiale e spessore delle stoviglie;
– quantità di stoviglie caricate;
– disposizione delle stoviglie caricate;
– impostazione della temperatura.
• Le stoviglie non si riscaldano? Verificare se
– si sente un rumore di ventola;
Se la ventola è in funzione, significa che la
resistenza di riscaldamento è difettosa. Se
la ventola non funziona, significa che è
difettosa.
– il fusibile dell'impianto domestico è scattato.
• Le stoviglie si riscaldano troppo?
Il regolatore di temperatura è difettoso.
Quando si aziona l'apparecchio la spia
dell'interruttore on/off non si accende?
La spia di controllo è difettosa.
43
IT
Ç
Dati tecnici
Dati tecnici
SAMSUNG sforza di migliorare i propri prodotti in qualsiasi momento. Le specifiche di progettazione e di
queste istruzioni per l'uso sono quindi soggetti a modifiche senza preavviso.
Modello
NL20J7100WM/UR
NL20T8100WK/UR
NL20T9100WD/UR
Alimentazione elettrica
220-240 V / 50-60 Hz
Consumo de energia
Potenza massima
420W
Dimensioni (LxPxH)
al di fuori
cassetto cavità
595x522x140
485x490x110
Volume
25 ltr
Peso netto
14,2 kg
Salvaguardia dell'ambiente
Smaltimento dell'imballaggio
L'imballaggio è contrassegnato dal logo "Punto
Verde".
Utilizzare i contenitori appositi per smaltire tutti i
materiali dell'imballaggio come cartone, polistirolo
espanso e pellicole protettive. In questo modo si
assicura il riciclaggio dei materiali d'imballaggio.
Smaltimento di apparecchiature
dismesse
La norma europea 2002/96/EC su apparecchi
elettrici ed elettronici dismessi (WEEE, Waste
Electrical and Electronic Equipment) vieta lo
smaltimento di elettrodomestici come rifiuti
residuali.
Gli apparecchi in disuso devono pertanto essere
recuperati separatamente dagli altri rifiuti per
ottimizzare la percentuale di recupero e riciclaggio
dei materiali di cui sono composti e per evitare
possibili danni alla salute delle persone e
all'ambiente. Il simbolo del cassonetto barrato
deve essere applicato su tutti i prodotti per
ricordare che devono essere smaltiti
separatamente.
L'utilizzatore deve mettersi in contatto con gli enti
locali competenti o con i punti vendita per
informarsi sul luogo di raccolta per vecchi
elettrodomestici più vicino.
Prima di procedere allo smaltimento rendere
sicuro l'apparecchio, staccando il cavo di
alimentazione, tagliandolo e smaltendolo quindi, a
sua volta, adeguatamente.
Per informazioni sull'impegno di Samsung ai fini della salvaguardia ambientale e sugli obblighi normativi
relativi a ciascun prodotto, come per esempio il REACH, vogliate visitare il sito:
samsung.com/uk/aboutsamsung/samsungelectronics/corporatecitizenship/data_corner.html
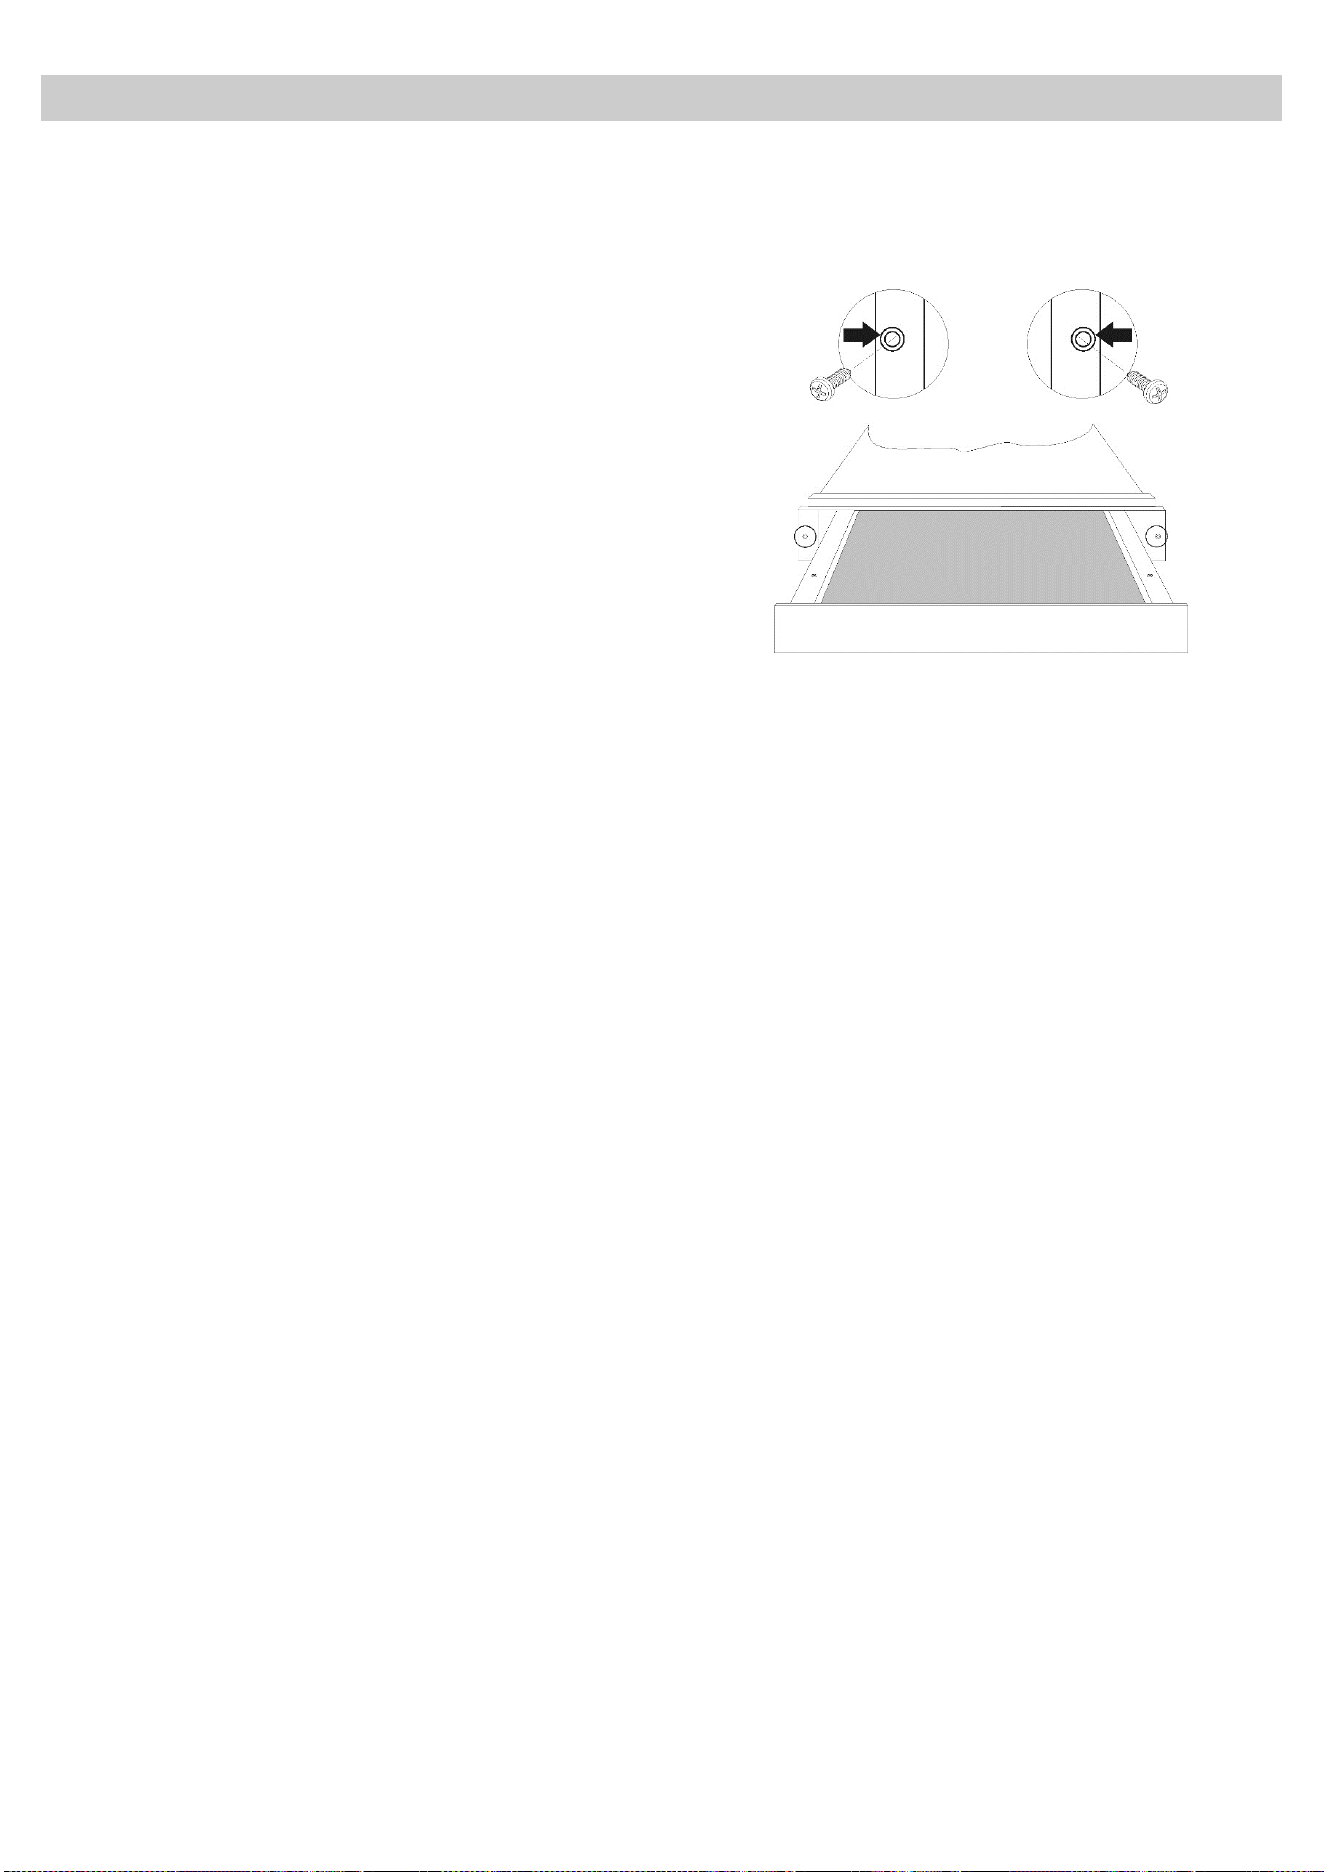
44
IT
Ç
Istruzioni di montaggio
Prima dell'installazione
Assicurarsi che la tensione di alimentazione
indicata sulla targhetta dati corrisponda a quella della
vostra rete elettrica.
Aprire il cassetto, rimuovere tutti gli accessori e il
materiale d'imballaggio.
Attenzione! Il frontale del cassetto potrebbe essere
ricoperto da un film protettivo. Rimuovere la
protezione con cautela prima del primo utilizzo
dell'apparecchio cassetto scaldastoviglie, iniziando a
staccarla partendo dal basso.
Assicurarsi che il cassetto non sia danneggiato.
Controllare che il cassetto si chiuda correttamente. In
presenza di danni informare il Servizio Assistenza.
Accertarsi che la presa sia facilmente accessibile
anche dopo che il cassetto è stato incassato.
Il cassetto scaldastoviglie può essere incassato solo
sugli apparecchi che sono stati indicati dal produttore.
La casa produttrice non garantisce il corretto
funzionamento del cassetto se combinato con
apparecchi non da lei indicati e non risponde per
eventuali danni causati da un tale uso improprio.
Incasso
Prima di procedere al montaggio dello scaldastoviglie
e dell'apparecchio a lui combinato, predisporre un
piano intermedio fisso nel mobile, il quale assicuri la
portata necessaria per entrambi gli apparecchi.
L'apparecchio combinato viene invece posizionato
senza ulteriori piani intermedi direttamente sul
cassetto scaldastoviglie incassato.
Per l'incasso dell'apparecchio combinato attenersi
assolutamente alle indicazioni contenute nelle relative
istruzioni per l'uso e per il montaggio.
Le dimensioni principali per l'incasso sono indicate in
mm e riportate nelle ultime pagine di queste istruzioni.
Per il montaggio proseguire come indicato:
1. sistemare il cassetto nel mobile da incasso fino
al listello devia fumane e registrarlo;
2. assicurarsi che l'involucro del cassetto sia
registrato ad angolo retto;
3. aprire il cassetto e fissare l'involucro alle pareti
laterali del mobile con le due viti in dotazione.
Allacciamento elettrico
Il cassetto scaldastoviglie è dotato di un cavo di
alimentazione e di una spina per corrente monofase.
Si consiglia di collegare l'apparecchio alla rete
elettrica servendosi di una presa.
Si facilita in questo modo l'intervento del Servizio di
assistenza in caso di necessità.
Qualora la presa non dovesse essere accessibile,
l'installazione deve essere eseguita da un tecnico
specializzato.
In questo caso il collegamento ad un circuito
d'alimentazione deve avvenire con l'ausilio di un
ruttore per tutti i poli con una distanza minima di 3 mm
tra i contatti.
I dati necessari per l'allacciamento si trovano sulla
targhetta dati. Queste indicazioni devo corrispondere
con quelle della rete elettrica locale.
ATTENZIONE! IL PRESENTE SCALDASTOVIGLIE
DEVE ESSERE ASSOLUTAMENTE COLLEGATO A
TERRA.
Il produttore e il rivenditore declinano ogni
responsabilità per eventuali danni a persone, animali
o cose, dovuti alla mancata osservanza delle presenti
istruzioni di montaggio.
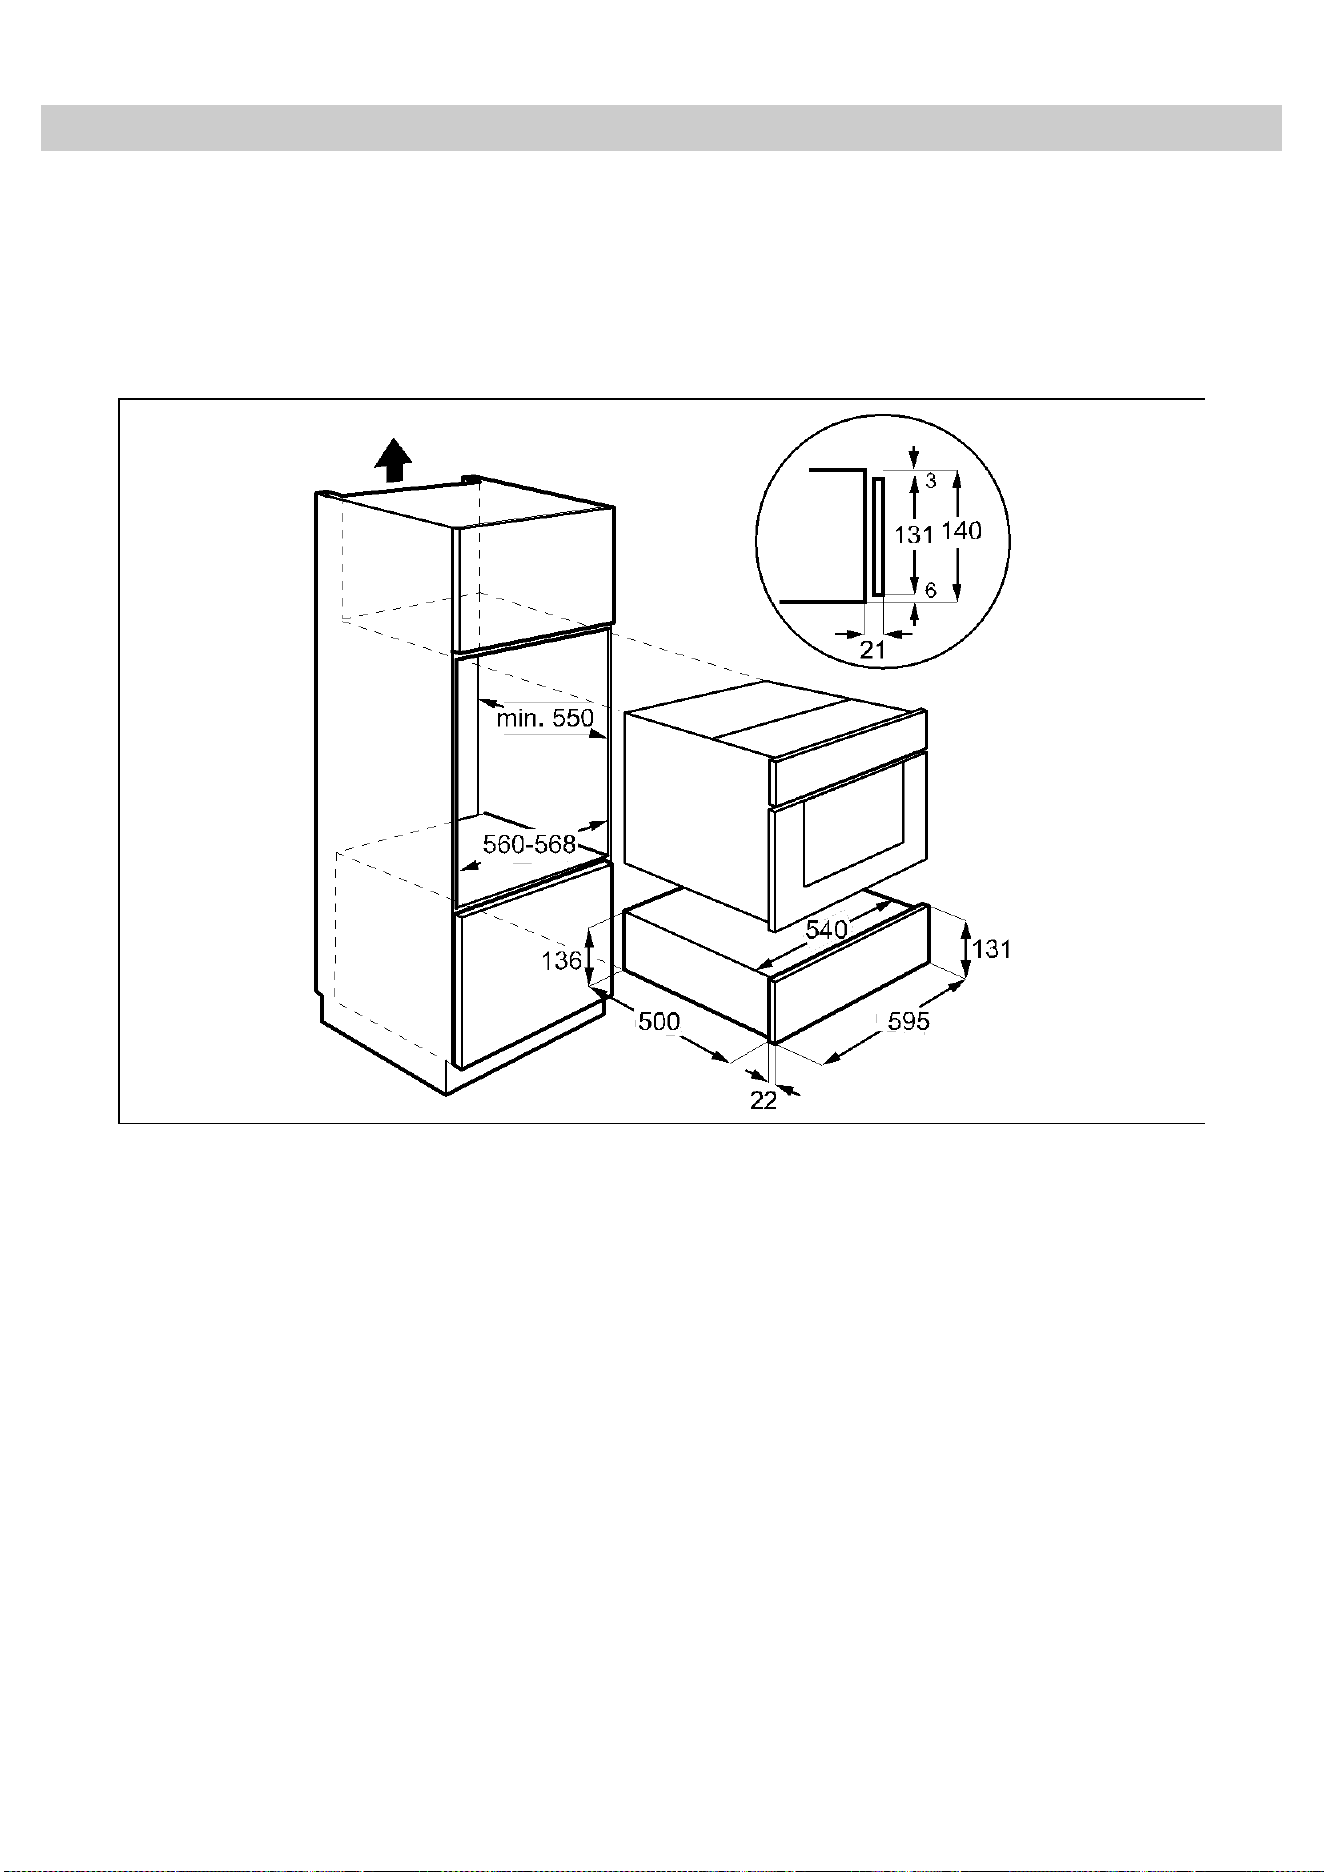
45
Installation / Installation / Einbau / Installazione
Possibilités de combinaison / Combination possibilities / Kombinationsmöglichkeiten / Possibilità di
combinazione

Country
Contact Center
Web Site
UK
0330 SAMSUNG (7267864)
www.samsung.com/uk/support
GERMANY
06196 77 555 77
www.samsung.com/de/support
FRANCE
01 48 63 00 00
www.samsung.com/fr/support
ITALIA
800-SAMSUNG (800.7267864)
www.samsung.com/it/support
NETHERLANDS
088 90 90 100
www.samsung.com/nl/support
DENMARK
707 019 70
www.samsung.com/dk/support
FINLAND
030-6227 515
www.samsung.com/fi/support
SWEDEN
0771 726 786
www.samsung.com/se/support
POLAND
801-172-678* lub +48 22 607-93-33*
Dedykowana infolinia do obsługi zapytań dotyczących
telefonów komórkowych:
801-672-678* lub +48 22 607-93-33*
* (koszt połączenia według taryfy operatora)
http://www.samsung.com/pl/support/
943993