Documents: Go to download!
- Owner's manual - (English)
- PRODUCT OVERVIEW
- CONNECTING THE SOUNDBAR
- CONNECTING TO YOUR TV
- CONNECTING AN EXTERNAL DEVICE
- CONNECTING A USB STORAGE DEVICE
- CONNECTING A MOBILE DEVICE
- USING THE REMOTE CONTROL
- SOFTWARE UPDATE
- TROUBLESHOOTING
Table of contents
User manual Soundbar
PRODUCT OVERVIEW
Front Panel / Top Panel of the Soundbar
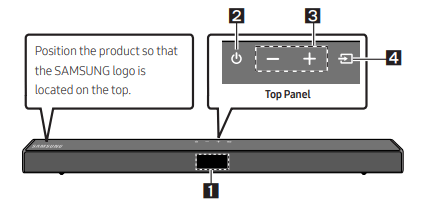
| 1 | Display Displays the product’s status and current mode. |
| 2 |
Turns the power on and off. • Auto Power Down Function The unit turns off automatically in the following situations: – In D.IN / HDMI / BT / USB Mode : If there is no audio signal for 20 minutes. |
| 3 | -/+ (Volume) Button Adjusts the volume. • When adjusted, the volume level appears on the Soundbar’s front display. |
| 4 |
Selects the source input mode.  • To turn on “BT PAIRING” mode, change the source to “BT” mode, and then press and hold the |
• When you plug in the AC cord, the power button will begin working in 4 to 6 seconds.
• When you turn on this unit, there will be a 4 to 5 second delay before it produces sound.
• If you want to enjoy sound only from the Soundbar, you must turn off the TV’s speakers in the Audio Setup menu of your TV. Refer to the owner’s manual supplied with your TV.
Bottom Panel of the Soundbar
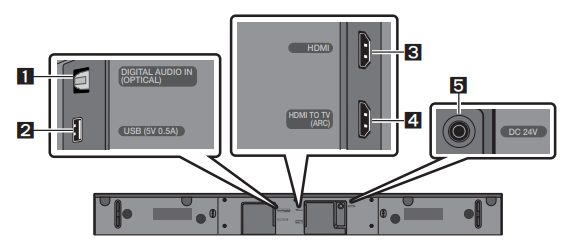
| 1 | DIGITAL AUDIO IN (OPTICAL) Connect to the digital (optical) output of an external device. |
| 2 | USB (5V 0.5A) Connect a USB device here to play music files stored on the USB device through the Soundbar. |
| 3 | HDMI Inputs digital video and audio signals simultaneously using an HDMI cable. Connect to the HDMI output of an external device. |
| 4 | HDMI TO TV (ARC) Connect to the HDMI (ARC) jack on a TV. |
| 5 | DC 24V (Power Supply In) Connect the AC/DC power adapter. |
• When disconnecting the power cable of the AC/DC power adaptor from a wall outlet, pull the plug. Do not pull the cable.
• Do not connect this unit or other components to an AC outlet until all connections between components are complete.
CONNECTING THE SOUNDBAR
Connecting Electrical Power
Use the power components to connect the Subwoofer and Soundbar to an electrical outlet in the following order:
- Connect the power cord to the Subwoofer.
- Connect the power output cable to the power adapter, and then to the Soundbar.
- Connect the power cord to a wall socket.
See the illustrations below.
- For more information about the required electrical power and power consumption, refer to the label attached to the product. (Label: Bottom of the Soundbar Main Unit)
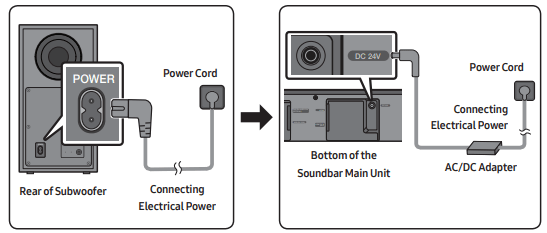
• Make sure to rest the AC/DC Adapter flat on a table or the floor. If you place the AC/DC Adapter so that it is hanging with the AC cord input facing upwards, water or other foreign substances could enter the Adapter and cause the Adapter to malfunction.
Connecting an SWA-8500S (Sold Separately) to your Soundbar
Expand to true wireless surround sound by connecting the Samsung Wireless Rear Speaker Kit (SWA-8500S, sold separately) to your Soundbar.
1. Connect the Wireless Receiver Module to 2 Surround Speakers.
– The speaker cables are colour coded.
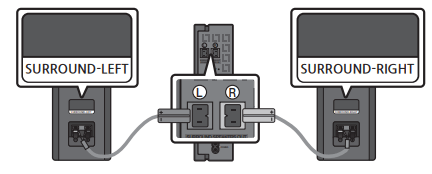
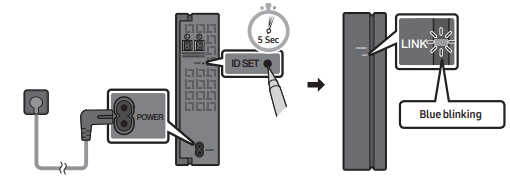
2. Check the standby status of the Wireless Receiver Module after plugging it into an electrical outlet.
• The LINK LED indicator (blue LED) on the Wireless Receiver Module blinks. If the LED does not blink, press the ID SET button on the back of the Wireless Receiver Module with a pen tip for 5~6 seconds until the LINK LED indicator blinks (in Blue). For more about the LED, please refer to the SWA-8500S user manual.
3. Press and hold the Up button on the remote control for at least 5 seconds.
• The ID SET message appears on the display of the Soundbar for a moment, and then it disappears.
• The Soundbar will automatically power on when ID SET is complete.

CAUTION If your Soundbar was playing music when it connects to the SWA-8500S, you may hear some stuttering from the woofer as the connection finalises.
4. Check if the LINK LED is solid blue (connection complete).
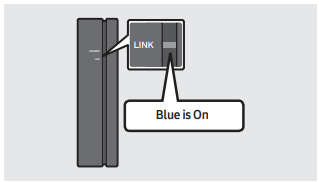
The LINK LED indicator stops blinking and glows a solid blue when a connection is established between the Soundbar and the Wireless Receiver Module.
5. If the SWA-8500S is not connected, repeat the procedure from Step 2.
CONNECTING TO YOUR TV
Hear TV sound from your Soundbar through wired or wireless connections.
• When the Soundbar is connected to selected Samsung TVs, the Soundbar can be controlled using the TV’s remote control.
– This feature is supported by 2017 and later Samsung Smart TVs that support Bluetooth when you connect the Soundbar to the TV using an optical cable.
– This function also allows you to use the TV menu to adjust the sound field and various settings as well as the volume and mute.
Method 1. Connecting with a Cable
When the audio in a broadcast is encoded in Dolby Digital and the “Digital Output Audio Format” on your TV is set to PCM, we recommend that you change the setting to Dolby Digital. When the setting on the TV is changed, you will experience better sound quality. (The TV menu may use different words for Dolby Digital and PCM depending on the TV manufacturer.)
Connecting a TV using an HDMI Cable
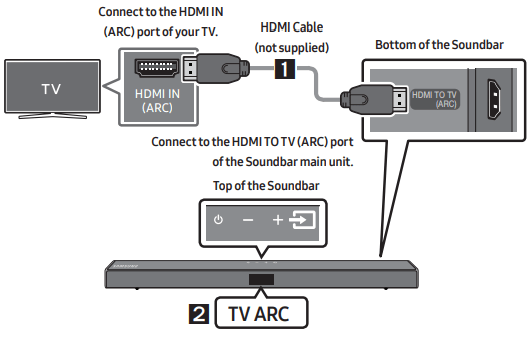
1. With the Soundbar and TV turned on, connect the HDMI cable (not supplied) as shown in the figure.
2. “TV ARC” appears in the display window of the Soundbar main unit and the Soundbar plays TV sound.
• If TV sound is inaudible, press the  (Source) button on the remote control or on the top of the Soundbar to switch to “D.IN” mode. The screen displays “D.IN” and “TV ARC” in sequence, and TV sound is played.
• If “TV ARC” does not appear in the display window of the Soundbar main unit, confirm that the HDMI cable (not supplied) is connected to the correct port.
• Use the volume buttons on the TV’s remote control to change the volume on the Soundbar.
NOTES
• HDMI is an interface that enables the digital transmission of video and audio data with just a single connector.
• If the TV provides an ARC port, connect the HDMI cable to the HDMI IN (ARC) port.
• We recommend you use a coreless HDMI cable if possible. If you use a cored HDMI cable, use one whose diameter is less than 14 mm.
• This function is not available if the HDMI cable does not support ARC.
Connecting using an Optical Cable
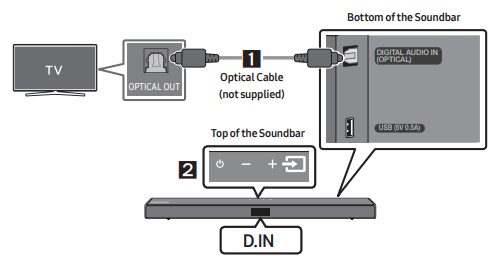
1. Connect the DIGITAL AUDIO IN (OPTICAL) jack on the Soundbar to the OPTICAL OUT jack of the TV with a digital optical cable (not supplied).
2. Press the  (Source) button on the top panel or remote control, and then select the “D.IN” mode.
CONNECTING AN EXTERNAL DEVICE
Connect to an external device via a wired connection or Bluetooth connection to play the external device’s sound through the Soundbar.
Connecting using an HDMI Cable
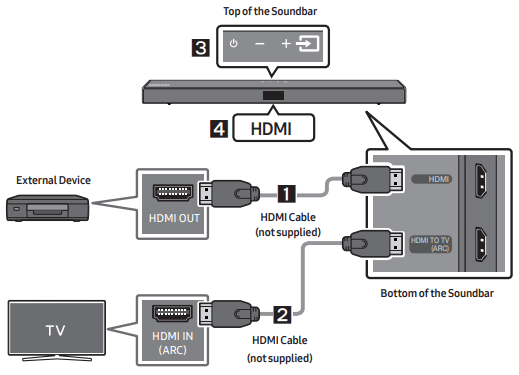
1. Connect an HDMI cable (not supplied) from the HDMI jack on the back of the product to the HDMI OUT jack on your digital device.
2. Connect an HDMI cable (not supplied) from the HDMI TO TV (ARC) jack on the back of the product to the HDMI IN jack on your TV.
3. Press the  (Source) button on the top panel or on the remote control, and then select “HDMI”.
4. “HDMI” mode is displayed on the Soundbar display panel and sound plays.
Connecting using an Optical Cable
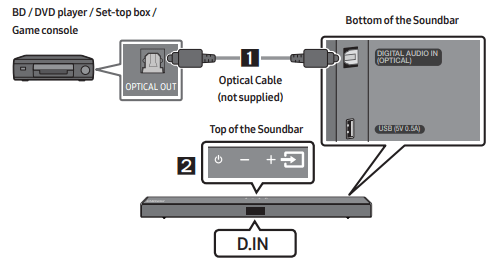
1. Connect DIGITAL AUDIO IN (OPTICAL) on the main unit to the OPTICAL OUT jack of the Source Device using a digital optical cable (not supplied).
2. Select “D.IN” mode by pressing the (Source) button on the top panel or on the remote control.
CONNECTING A USB STORAGE DEVICE
You can play music files located on USB storage devices through the Soundbar.

1. Connect the USB device to the USB port on the bottom of the product.
2. Press the  (Source) button on the top panel or on the remote control, and then select “USB”.
3. “USB” appears in the display screen.
4. Play music files from the USB storage device through the Soundbar.
• The Soundbar automatically turns off (Auto Power Down) if no USB device has been connected for more than 20 minutes.
File Format Type Compatibility list
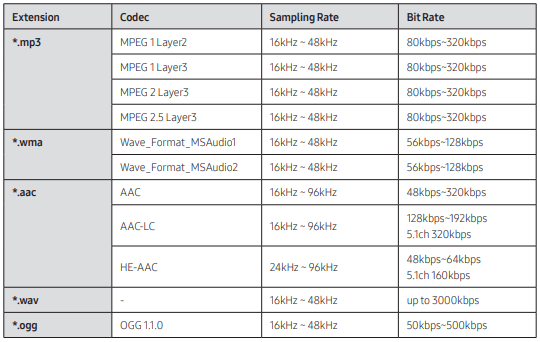
• If there are too many folders and files stored on the USB device, it may take the Soundbar some time to access and play files.
CONNECTING A MOBILE DEVICE
Connecting via Bluetooth
When a mobile device is connected using Bluetooth, you can hear stereo sound without the hassle of cabling.
• The connection is limited to one TV or two Bluetooth devices at the same time.

The initial connection
1. Press the  PAIR button on the remote control to enter the “BT PAIRING” mode.
(OR)
a. Press the  (Source) button on the top panel and then select “BT”. “BT” changes to “BT PAIRING” in a few seconds automatically or changes to “BT READY” if there is a connect record.
b. When “BT READY” appears, press and hold the  (Source) button on the top panel of the Soundbar for more than 5 seconds to display “BT PAIRING”.
2. On your device, select “[AV] Samsung Soundbar T5-Series” from the list that appears.
• When the Soundbar is connected to the Bluetooth device, [Bluetooth Device Name] → “BT” appears in the front display.
3. Play music files from the device connected via Bluetooth through the Soundbar.
If the device fails to connect
• If a previously connected Soundbar listing (e.g. “[AV] Samsung Soundbar T5-Series”) appears in the list, delete it.
• Then repeat steps 1 and 2.
NOTE After you have connected the Soundbar to your mobile device the first time, use the “BT READY” mode to reconnect.
What is the difference between BT READY and BT PAIRING?
• BT READY : In this mode, you can search for previously connected TVs or connect a previously connected mobile device to the Soundbar.
• BT PAIRING : In this mode, you can connect a new device to the Soundbar. (Press the  PAIR button on the remote control or press and hold the
  (Source) button on the top of the Soundbar for more than 5 seconds while the Soundbar is in “BT” mode.)
NOTES
• If asked for a PIN code when connecting a Bluetooth device, enter <0000>.
• In Bluetooth connection mode, the Bluetooth connection will be lost if the distance between the Soundbar and the Bluetooth device exceeds 10 m.
• The Soundbar automatically turns off after 20 minutes in the Ready state.
• The Soundbar may not perform Bluetooth search or connection correctly under the following circumstances:
– If there is a strong electrical field around the Soundbar.
– If several Bluetooth devices are simultaneously paired with the Soundbar.
– If the Bluetooth device is turned off, not in place, or malfunctions.
• Electronic devices may cause radio interference. Devices that generate electromagnetic waves must be kept away from the Soundbar main unit - e.g., microwaves, wireless LAN devices, etc.
• The Soundbar supports SBC data (44.1kHz, 48kHz).
• Connect only to a Bluetooth device that supports the A2DP (AV) function.
• You cannot connect the Soundbar to a Bluetooth device that supports only the HF (Hands Free) function.
• Once you have paired the Soundbar to a Bluetooth device, selecting “[AV] Samsung Soundbar T5-Series” from the device’s scanned devices list will automatically change the Soundbar to “BT” mode.
– Available only if the Soundbar is listed among the Bluetooth device’s paired devices. (The Bluetooth device and the Soundbar must have been previously paired at least once.)
• The Soundbar will appear in the Bluetooth device’s searched devices list only when the Soundbar is displaying “BT READY”.
Bluetooth Power On (SOUND MODE)
If a previously paired Bluetooth device tries to pair with the Soundbar when the Bluetooth Power On function is on and the Soundbar is turned off, the Soundbar turns on automatically.
1. Press and hold the SOUND MODE button for more than 5 seconds on the remote while the Soundbar is turned on.
2. “ON-BLUETOOTH POWER” appears on the Soundbar’s display
Disconnecting the Bluetooth device from a Soundbar
You can disconnect a Bluetooth device from the Soundbar. For instructions, see the Bluetooth device’s user manual.
• The Soundbar will be disconnected.
• When the Soundbar is disconnected from the Bluetooth device, the Soundbar will display “BT DISCONNECTED” on the front display
Disconnecting the Soundbar from the Bluetooth device
Press the  (Source) button on the top panel or on the remote control, and then change to any mode except “BT”.
• Disconnecting takes time because the Bluetooth device must receive a response from the Soundbar. (Disconnection time may differ, depending on the Bluetooth device)
• When the Soundbar is disconnected from the Bluetooth device, the Soundbar will display “BT DISCONNECTED” on the front display.
NOTES
• In Bluetooth connection mode, the Bluetooth connection will be lost if the distance between the Soundbar and the Bluetooth device exceeds 10 m.
• The Soundbar automatically turns off after 20 minutes in the Ready state.
USING THE REMOTE CONTROL
How to Use the Remote Control

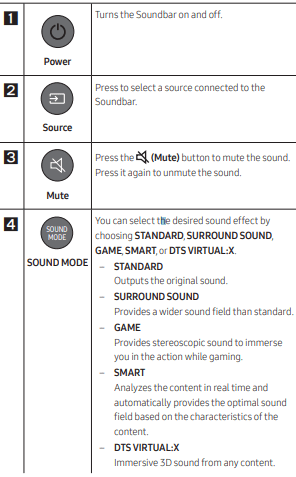
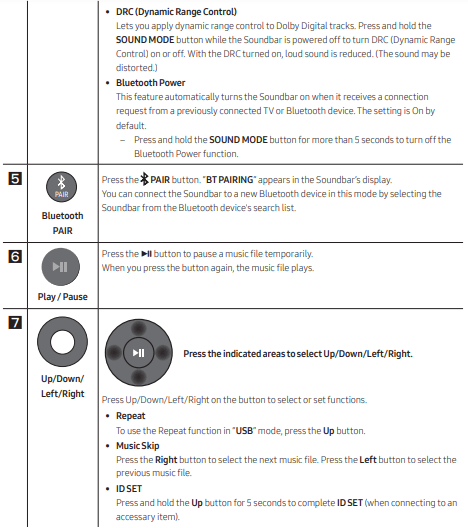
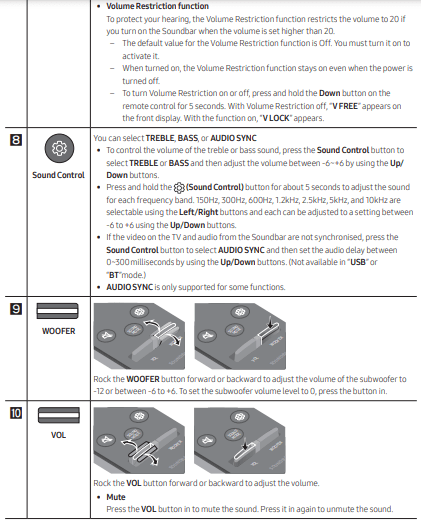
Adjusting the Soundbar volume with a TV remote control
If you have a Samsung TV, you can adjust the Soundbar’s volume using the IR remote control that came with your Samsung TV
First use the TV menu to set the TV audio on your Samsung TV to external speakers, then use your Samsung remote to control the Soundbar’s volume. For more information, see the TV’s user manual. The default mode for this function is control by a Samsung TV remote. If your TV is not a Samsung TV, follow the directions below to change the settings of this function.
1. Turn Off the Soundbar.

2. If you do not want to use this function, push up and hold the WOOFER button for 5 seconds repeatedly until “OFF-TV REMOTE” appears in the display.
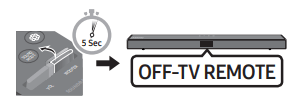
3. If you want to control the Soundbar with your TV’s remote, push up and hold the WOOFER button for 5 seconds repeatedly until “ALL-TV REMOTE” appears in the display. Then, use your TV’s menu to select external speakers.
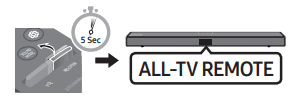
4. If you want to return the Soundbar to the default mode (control by a Samsung TV remote), push up and hold the WOOFER button for 5 seconds repeatedly until “SAMSUNG-TV REMOTE” appears in the display.
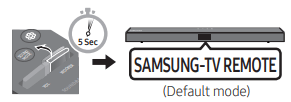
– Each time you push the WOOFER button up and hold it for 5 seconds, the mode switches in the following order: “SAMSUNG-TV REMOTE” (Default mode) → “OFF‑TV REMOTE” → “ALL‑TV REMOTE”.
– This function may not be available, depending on the remote control.
– Manufacturers supporting this function: VIZIO, LG, Sony, Sharp, PHILIPS, PANASONIC, TOSHIBA, Hisense, RCA
SOFTWARE UPDATE
Samsung may offer updates for the Soundbar’s system firmware in the future.
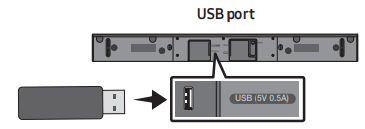
If an update is offered, you can update the firmware by connecting a USB device with the firmware update stored on it to the USB port on your Soundbar. For more information about how to download update files, go to the Samsung Electronics website.
Then, select the product type or enter the model number of your Soundbar, select the Software & Apps option, and then Downloads. Note that the option names can vary.
How to check the Firmware version
1. Turn off the Soundbar.
2. Press and hold the  (Sound Control) button for about 5 seconds on the remote control.
3. Each version appears in the following order on the Soundbar display.
(Software version → HDMI → Tx → Rx )
• Tx : Wireless Tx module in the Soundbar.
• Rx : Wireless Rx module in the Subwoofer.
• R2 VERSION DISPLAY
– No connect rear R2---
– Connected rear R2xxx
Update Procedure
Important: The updating function erases all user settings. We recommend you write down your settings so that you can easily reset them after the update. Note that updating the firmware resets the subwoofer connection too.
1. Connect a USB thumb drive to the USB port on your computer. Important: Make sure there are no music files on the USB thumb drive. This may cause the firmware update to fail.
2. Go to the Samsung website at (samsung.com) → select Enter Model Number and enter the model of your Soundbar. Select manuals and downloads and download the latest software file.
3. Save the downloaded software to a USB stick and select “Extract Here” to unzip the folder.
4. Turn off the Soundbar and connect the USB stick containing the software update to the USB port.
5. Turn on the Soundbar and source change to “USB” mode. Within 3 minutes, “UPDATE” is displayed and updating begins. When the update finishes, the Soundbar turns off.
6. Turn on the Soundbar and press the -/+ (Volume) button on the top panel for 5 seconds. “INIT” appears on the display and then the Soundbar turns off. The update is complete.
• This product has a DUAL BOOT function. If the firmware fails to update, you can update the firmware again.
7. Restore your settings on the Soundbar.
If UPDATE is not displayed
1. Turn off the Soundbar, disconnect and then reconnect the USB storage device that contains the update files to the Soundbar’s USB port.
2. Disconnect the Soundbar’s power cord, reconnect it, and then turn on the Soundbar.
NOTES
• The firmware update may not work properly if audio files supported by the Soundbar are stored in the USB storage device.
• Do not disconnect the power or remove the USB device while updates are being applied. The main unit will turn off automatically after completing the firmware update.
• After the update is completed, the user setup in the Soundbar is initialised so you can reset your settings. We recommend you write down your settings so that you can easily reset them after the update. Note that updating firmware resets the subwoofer connection too.
If the connection to the subwoofer is not re-established automatically after the update, refer to page 6.
If the software update fails, check if the USB stick is defective.
• Mac OS users should use MS-DOS (FAT) as the USB format.
• Updating via USB may not be available, depending on the USB storage device manufacturer.
TROUBLESHOOTING
Before seeking assistance, check the following.
The unit will not turn on.
Is the power cord firmly plugged into the wall outlet and power adapter?
Unplug and reconnect the power cord to the wall outlet and the power adapter to make sure the connection is secure.
Is the power adapter firmly connected to the main unit?
Disconnect the power adapter from the Soundbar, and reconnect to make sure the connection is firm and secure.
A function does not work when the button is pressed.
Is there static electricity in the air?
Disconnect the power plug and connect it again.
Sound dropouts occur in BT mode.
See the Bluetooth connection sections on pages 12 and 17.
Sound is not produced.
Is the Mute function on?
Press the  (Mute) button to cancel the mute function.
Is the volume set to minimum?
Adjust the Volume.
The remote control does not work.
Are the batteries drained?
Replace with new batteries.
Is the distance between the remote control and Soundbar main unit too far?
Move the remote control closer to the Soundbar main unit.
The red LED on the subwoofer blinks and the subwoofer is not producing sound.
This issue can occur if the subwoofer is not connected to the Soundbar main unit.
Try to connect your subwoofer again. (See page 6.)
The subwoofer drones and vibrates noticeably.
Try to adjust the vibration of your subwoofer.
Rock the WOOFER button on your remote control forward or backward to adjust the subwoofer level. (to -12, or between -6 ~ +6).
See other models: RL40B4SBAB1/SA SM-N970UZKATMB SM-A705YZKNXSA DV22K6800EW/AC QA65Q800TAWXXY
 (Power) Button