Installation and User Manual Refrigerator
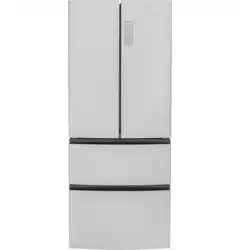
PARTS AND FEATURES
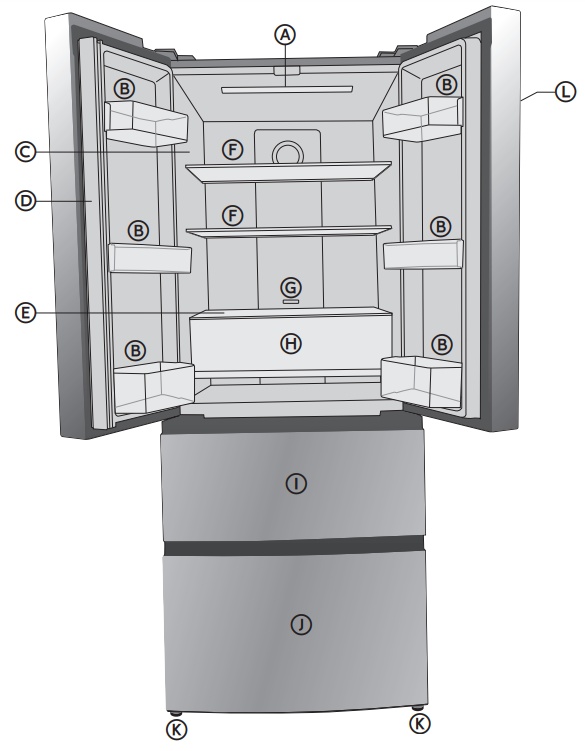
A LED Lights
B Door Bin
C Model and Serial # Plate
D Vertically-Hinged Bar
E Cool Zone Glass Cover
F Glass Shelf
G Cool Zone Control
H Cool Zone Drawer
I Upper Freezer Storage Drawer
J Lower Freezer Storage Drawer
K Leveling Legs
L Control Panel
INSTALLATION REQUIREMENTS
LOCATION REQUIREMENTS
IMPORTANT: This refrigerator is designed for indoor, household use only.
To ensure proper ventilation for your refrigerator, allow for 1" (2.54 cm) of space on each side, 2" (5.08 cm) of space behind the refrigerator, and open at the top.
NOTE: This refrigerator is intended for use in a location where the temperature ranges from a minimum of 55°F (13°C) to a maximum of 110°F (43°C). The preferred room temperature range for optimum performance, which reduces electricity usage and provides superior cooling, is between 60°F (15°C) and 90°F (32°C). It is recommended that you do not install the refrigerator near a heat source, such as an oven or radiator.
ELECTRICAL REQUIREMENTS
Before you move your refrigerator into its final location, it is important to make sure you have the proper electrical connection.
Recommended Grounding Method: A 115 volt, 60 Hz, AC only 15- or 20-amp fused, grounded electrical supply is required. It is recommended that a separate circuit serving only your refrigerator be provided. Use an outlet that cannot be turned oƪ by a switch. Do not use an extension cord.
NOTE: Before performing any type of installation or cleaning, disconnect the refrigerator from the electrical source. When you are finished, reconnect the refrigerator to the electrical source and reset the temperature controls to the desired setting.
INSTALLATION INSTRUCTIONS
STEP 1 - UNPACK REFRIGERATOR
REMOVE PACKAGING
- Remove tape and glue residue from surfaces before turning on the refrigerator. Rub a small amount of liquid dish soap over the adhesive with your fingers. Wipe with warm water and dry. NOTE: Do not use sharp instruments, rubbing alcohol, flammable fluids, or abrasive cleaners to remove tape or glue. These products can damage the surface of your refrigerator. For more information, see “Refrigerator Safety.”
- Dispose of/recycle all packaging materials.
When Moving Your Refrigerator: Your refrigerator is heavy. When moving the refrigerator for cleaning or service, be sure to cover the floor with cardboard or hardboard to avoid floor damage. Always pull the refrigerator straight out when moving it. Do not wiggle or “walk” the refrigerator when trying to move it, as floor damage could occur.
CLEAN BEFORE USING
After you remove all of the packaging materials, clean the inside of the refrigerator before using it. See the cleaning instructions in “Refrigerator Care.”
Important information to know about glass shelves, covers and door panels (on some models):
- Do not clean glass shelves or covers with warm water when they are cold. Shelves and covers may break if exposed to sudden temperature changes or impact, such as bumping. Glass shelves and covers are heavy. Use special care when removing them to avoid impact from dropping.
- Do not hit the glass door panels with pots, pans, furniture, toys or other objects. Scratching, hitting, jarring or stressing the glass may weaken its structure, causing an increased likelihood of breakage at a later date.
- For your protection, tempered glass is designed to shatter into many small, pebble-size pieces. This is normal.
STEP 2 - MAKE ELECTRICAL CONNECTION
- Plug into a grounded 3 prong outlet.
NOTE: This refrigerator begins operating as soon as it is connected to the power supply.
STEP 3 - LEVELING AND DOOR ADJUSTMENT (IF NEEDED)
LEVELING
- Move the refrigerator to its final location.
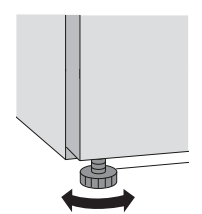
- Turn the leg on the bottom, front of the cabinet to raise or lower that side of the refrigerator until the refrigerator is level side-to-side.
- Turn both front legs, by the same amount, to slightly raise the front of the refrigerator. This will make it easier for the doors to close. NOTE: Having someone push against the top of the refrigerator takes some weight off the leveling screws. This makes it easier to turn the screws.
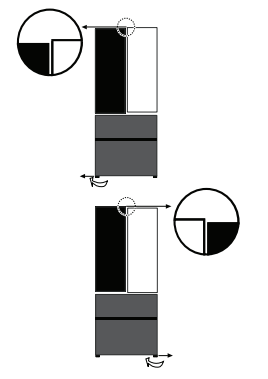
ALIGNING DOORS - If the edges of the refrigerator doors do not align with each other, you can make adjustments:
Adjust the Leveling Legs: Turn the leveling leg to raise or lower that side of the refrigerator.
- Clockwise - to raise
- Counterclockwise - to lower
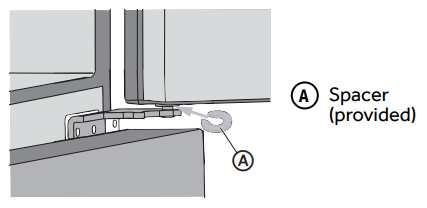
Using Spacers (provided):
- Open the door. With the door open, lift the door upward.
- By hand or using pliers, clip the spacer (provided) onto the center hinge pin.
REFRIGERATOR USE
OPENING AND CLOSING DOORS
There are two refrigerator compartment doors. The doors can be opened and closed either separately or together.
- There is a vertically-hinged bar on the left-hand refrigerator door.
- When closing the left-hand refrigerator door, the hinged bar folds behind the right-hand door, joining the two refrigerator doors.

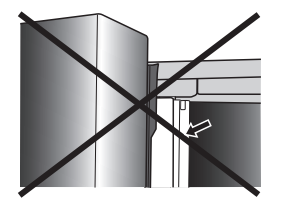
NOTE: Before closing the left-hand door, make sure the vertically-hinged bar is folded inward. If the bar is pulled outward it may become damaged when you try to close the door.
USING THE CONTROLS
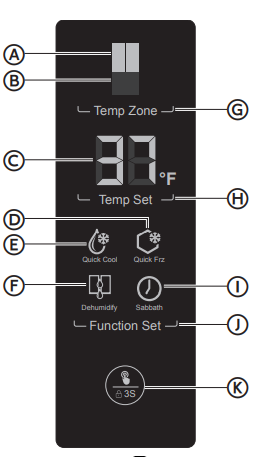
A Refrigerator Compartment Indicator
B Freezer Compartment Indicator
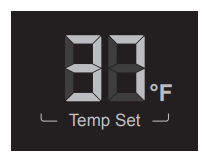
C Temperature Indicator
D Quick Freeze Indicator
E Quick Cool Indicator
F Dehumidify Indicator
G Temp Zone Button
H Temp Set Button
I Sabbath Indicator
J Function Set Button
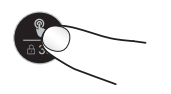
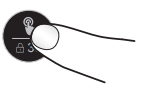
K Confirm Selection Button
- When the refrigerator is powered on for the first time, the indicator for the refrigerator compartment lights up and the temperature is displayed. The control lock is active. See Control Panel Lock later in this section to unlock the controls.
TOUCH PADS
The controls are touch pads, which respond when lightly touched.
CONTROL PANEL DISPLAY
When no buttons or doors are operated for 30 seconds, all the LEDs on display panel turn off
When a button is pressed or a door opened, the LEDs on display panel illuminate.
CONTROL PANEL LOCK
The control panel is automatically locked after 30 seconds. To change any settings the control panel must be unlocked.
To unlock the control panel:
- Press and Hold the Confirm Selection buttom for 3 seconds. NOTE: The light around the Confirm Selection button will illuminate to indicate that the control panel is locked.
To lock the control panel:
- Press and Hold the Confirm Selection button for 3 seconds.
DOOR ALARM
When the refrigerator door is open for more than 2 minutes, the Door Open alarm will sound. The alarm can be silenced by closing the door. If the door is left open for longer than 7 minutes, the light inside the refrigerator will automatically switch off.
TEMPERATURE CONTROLS
The temperature range for the refrigerator compartment is 34°F to 42°F (1°C to 6°C). The temperature range for the freezer compartment is -6°F to 4°F (-21°C to -16°C).
The refrigerator compartment is preset to the recommended temperature of 37°F (5°C) and the freezer compartment is preset to the recommended temperature of 0°F (-18°C). When the refrigerator is first plugged in, the display will show the recommended temperature settings.
IMPORTANT:
- The recommended setting should be correct for normal household refrigerator use.
- When the refrigerator is first turned on, it may take up to 12 hours to cool to the preset temperatures. Wait 24 hours for your refrigerator to cool completely before adding food. If you add food before the refrigerator has cooled completely, your food may spoil.
- If the temperature is too warm or too cold in the refrigerator or freezer, first check the air vents to be sure they are not blocked before adjusting the controls.
ADJUSTING CONTROLS
Except when starting the refrigerator, do not adjust either control more than one setting at a time. Wait 24 hours between adjustments for the temperature to stabilize.
To adjust the refrigerator temperature:
1. If locked, unlock the control panel by pressing and holding the Confirm Selection button for 3 seconds.
2. Press TEMP ZONE until the Refrigerator Compartment Indicator lights up.
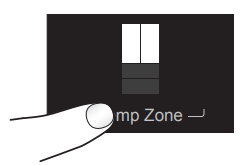
The current temperature setting is displayed.
3. Press TEMP SET to adjust the temperature.
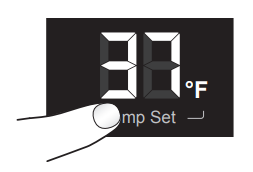
The temperature increases by one degree with each press of Temp Set.
4. Press Confirm Selection button. If you do not press the Confirm Selection button after 5 seconds the control will return to the previous set temperature.
To adjust the freezer temperature:
1. If locked, unlock the control panel by pressing and holding the Confirm Selection button for 3 seconds.
2. Press Temp Zone until the Freezer Compartment Indicator lights up.
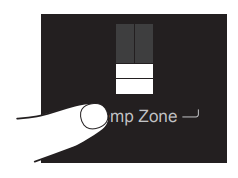
The current temperature setting is displayed.
3. Press TEMP SET to adjust the temperature. Temp Set °F
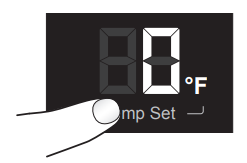
The temperature increases by one degree with each press of Temp Set.
4. Press Confirm Selection button. If you do not press the Confirm Selection button after 5 seconds the control will return to the previous set temperature.
QUICK COOL
The Quick Cool function accelerates the cooling of fresh food and protects the foods already stored from undesirable warming.
1. If locked, unlock the control panel by pressing and holding the Confirm Selection button for 3 seconds.
2. Press FUNCTION SET until the Quick Cool Indicator starts to blink.
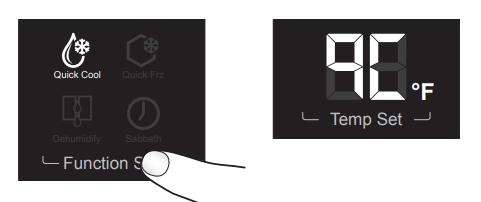
3. Press Confirm Selection button.
4. The temperature display will read qC to indicate Quick Cool is activated.
5. Repeat steps 1-3 to deselect Quick Cool.
NOTE: Quick Cool will automatically turn oƪ after 3 hours.
QUICK FRZ (QUICK FREEZE)
The Quick Freeze function accelerates the freezing of fresh food and protects the foods already stored from undesirable warming. If you need to freeze a large amount of food, it is recommended you set the Quick Freeze function a few hours in advance.
1. If locked, unlock the control panel by pressing and holding the Confirm Selection button for 3 seconds.
2. Press FUNCTION SET until the Quick Freeze Indicator starts to blink.
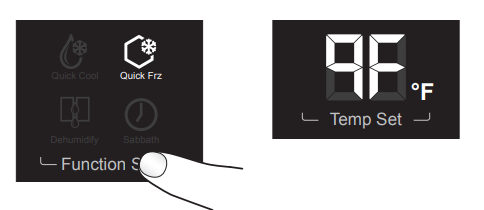
3. Press Confirm Selection button.
4. The temperature display will read qF to indicate Quick Freeze is activated.
5. Repeat steps 1-3 to deselect Quick Freeze.
NOTE: Quick Freeze will automatically turn off after 24 hours.
DEHUMIDIFY
If moisture appears on the vertically-hinged bar on the lefthand refrigerator door, select the Dehumidify function.
1. If locked, unlock the control panel by pressing and holding the Confirm Selection button for 3 seconds.
2. Press FUNCTION SET until the Dehumidify Indicator starts to blink.
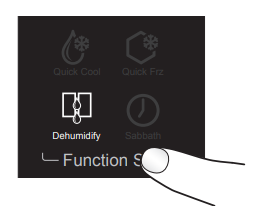
3. Press Confirm Selection button.
4. Repeat steps 1-3 to deselect Dehumidify.
SABBATH
The Sabbath function is designed for those whose religious observances require turning oƪ the lights. All interior lights and alarms will be disabled.
1. If locked, unlock the control panel by pressing and holding the Confirm Selection button for 3 seconds.
2. Press FUNCTION SET until the Sabbath Indicator starts to blink.
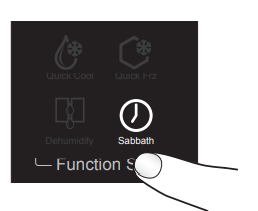
3. Press Confirm Selection button.
4. To deselect the Sabbath function, press and hold the Confirm Selection button for 5 seconds.
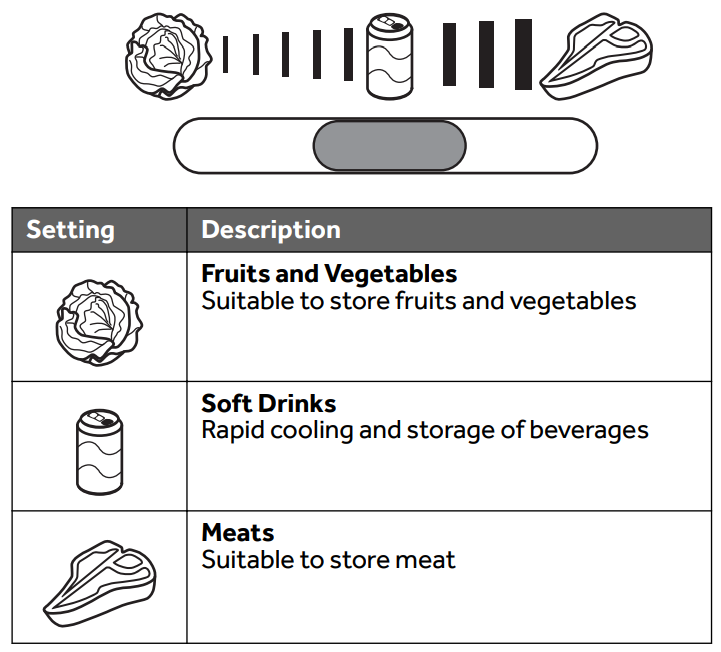
COOL ZONE DRAWER
The refrigerator compartment is equipped with a Cool Zone drawer which allows you to store food at the proper temperature, to ensure its optimal nutritional value.
- Slide the control to the desired setting.
FEATURES
Important information to know about glass shelves and covers: Do not clean glass shelves or covers with warm water when they are cold. Shelves and covers may break if exposed to sudden temperature changes or impact, such as bumping. Tempered glass is designed to shatter into many small, pebble-size pieces. This is normal. Glass shelves and covers are heavy. Use both hands when removing them to avoid dropping.
ADJUSTABLE SHELVES
The height of the shelves can be adjusted to fit your storage needs.
1. To remove a shelf, lift up on both the front and back edge to disengage the shelf hooks from the shelf supports along the refrigerator wall and pull it out.
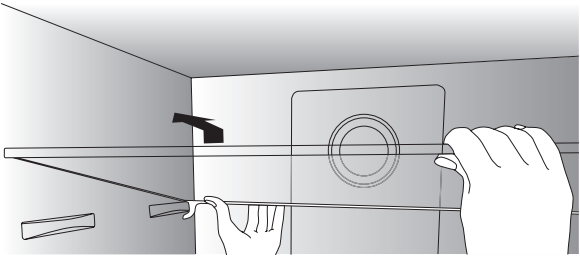
2. To reinstall a shelf, rest the shelf on both the front and rear supports. Push the shelf toward the rear of the refrigerator until the back of the shelf hooks around the rear shelf supports.
REMOVABLE DOOR BINS
The door bins can be removed for cleaning:
- Place hands on both sides of the bin and lift upward.
- Pull the door bin out.

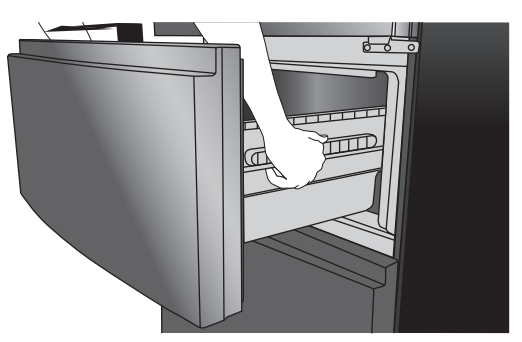
REMOVABLE FREEZER STORAGE DRAWER
IMPORTANT: Do not overload the drawers. Max. load of each drawer is 77 lbs (35 kg).
- Remove the freezer draw by extending the drawer fully, and then lift up on the drawer and pull out to remove.
REFRIGERATOR CARE
CLEANING
Both the refrigerator and freezer sections defrost automatically. However, clean both sections about once a month to avoid buildup of odors. Wipe up spills immediately.
Because air circulates between both sections, any odors formed in one section will transfer to the other. You must thoroughly clean both sections to eliminate odors. To avoid odor transfer and drying out of food, wrap or cover foods tightly.
IMPORTANT:
- Do not use harsh chemicals, ammonia, chlorine bleach, concentrated detergent, solvents, abrasives or metal scouring pads to clean your product inside or out. They can damage and/or discolor the refrigerator finish.
- Do not use warm water to clean glass shelves while they are still cold. Glass may break when exposed to sudden temperature changes or impact.
1. Unplug refrigerator or disconnect power.
2. Clean the interior. Hand wash, rinse, and dry removable parts and interior surfaces thoroughly. Use a clean sponge or soft cloth and a mild detergent in warm water.
3. Clean the exterior surfaces.
For painted metal, glass and stainless steel finishes:
- Wash surfaces using a clean, soft cloth or sponge, and a solution of mild detergent and warm water.
- Rinse surfaces with clean, warm water, and then dry immediately with a soft cloth to avoid water spots.
NOTE:
- If cleaning a model with glass door panels, do not hit the glass with pots, pans, furniture, toys, or other objects. Scratching, hitting, jarring or stressing the glass may weaken its structure, causing an increased likelihood of breakage at a later date.
- Paper towels scratch and may dull a painted finish. To avoid possible damage, use only soft, clean cloths to polish and wipe the door.
- When cleaning stainless steel, always wipe in the direction of the grain to avoid cross-grain scratching.
4. Plug in refrigerator or reconnect power.
LIGHTS
The interior lights of the refrigerator turn oƪ when the doors are open for longer than 7 minutes.
IMPORTANT: Your refrigerator is equipped with LED lighting. These lights are designed to last for the life of your refrigerator. However, if the lights stop operating, please contact a qualified technician for replacement.
VACATION AND MOVING
VACATION
If You Choose to Leave the Refrigerator On While You’re Away:
- Use up any perishables and freeze other items.
If You Choose to Turn Off the Refrigerator Before You Leave:
- Remove all food from the refrigerator and freezer.
- Unplug refrigerator or disconnect power.
- Clean refrigerator. Rinse and dry thoroughly.
- Tape rubber or wood blocks to the top of the lid or door(s) to allow air to circulate inside. This stops odor and mold from building up.
MOVING
When you are moving your refrigerator to a new home, follow these steps to prepare it for the move.
- Remove all food from the refrigerator and pack all frozen food in dry ice.
- Unplug refrigerator.
- Clean refriigerator. Rinse, and dry thoroughly.
- Take out all removable parts, wrap them well, and tape them together so they don’t shift and rattle during the move.
- Raise the leveling legs so they don’t scrape the floor, See “Leveling.”
- Tape the doors closed and tape the power cord to the back of the refrigerator. When you get to your new home, see “ReInstalling/Using Refrigerator Again” to prepare the refrigerator for use.
TROUBLESHOOTING
OPERATION
Refrigerator does not run
- Possible Cause:
- Refrigerator is unplugged.
- The circuit breaker is tripped/turned oƪ or the fuse is blown.
- Refrigerator is in defrost mode.
- Solution:
- Plug into a grounded 3 prong outlet.
- Reset / Turn on circuit breaker or replace fuse.
- Wait approximately 40 minutes for defrost cycle to end, and the cooling system to restart.
Refrigerator compressor runs frequently or for long periods of time. NOTE: This refrigerator is designed to run for longer periods of time at a lower energy usage.
- Possible Cause:
- Refrigerator is first plugged in.
- Warm food or large amounts of food added.
- Door is blocked open.
- Hot weather or frequent openings
- Temperature control set to coldest setting.
- Solution:
- This is normal. Allow 24 hours for the refrigerator to cool down.
- This is normal.
- Rearrange or remove items that are keeping the door from closing completely.
- This is normal. Limit door openings
- Adjust temperature to a warmer setting.
Refrigerator has an odor
- Possible Cause:
- Food is not sealed or packaged properly.
- Interior needs to be cleaned.
- Food stored too long.
- Solution:
- Reseal packaging. Place an opened box of baking soda in the refrigerator, replace every 3 months.
- Clean the interior. See “Cleaning.“
- Dispose of spoiled food.
Light does not come on
- Possible Cause:
- Refrigerator is unplugged.
- LED light is burned out.
- Solution:
- Plug into a grounded 3 prong outlet.
- Contact a qualified technician to replace the burned out LED.
Doors do not close properly
- Possible Cause:
- Refrigerator is not level.
- Door is blocked open.
- Solution:
- Level the refrigerator. See “Leveling.“
- Rearrange or remove items that are keeping the door from closing completely.
Vibration or rattling
- Possible Cause:
- Refrigerator is not resting firmly on floor.
- Solution:
- Level the refrigerator. See “Leveling.“
It sounds like water is flowing from the refrigerator.
- Possible Cause:
- Refrigerant flowing in the lines will make this sound when the compressor starts and stops.
- The refrigerator has an automatic defrosting system. The defrosted water will make this sound.
- Solution:
Humming or buzzing sounds
- Possible Cause:
- The compressor and fans for cold air circulation can make this sound.
- Solution:
- This sound is normal. If the refrigerator is not level, the sound will be louder.
Cracking or clicking sounds
- Possible Cause:
- The interior parts will make this sound as they contract and expand in response to temperature changes.
- Solution:
TEMPERATURE AND MOISTURE
Refrigerator or freezer is too warm.
- Possible Cause:
- Temperature control is not set cold enough.
- Door opened frequently or left ajar.
- Warm food added recently.
- Not enough space between the back of the refrigerator and the wall for the air to circulate properly.
- Items against rear interior wall are blocking airflow
- Solution:
- Adjust the compartment to a colder setting; allow 24 hours for the temperature to adjust.
- Limit door openings. Check for items keeping the door from closing completely.
- Allow time for food and refrigerator to cool.
- Allow 2" (5 cm) space between the back of the refrigerator and the wall.
- Store items only inside the trim of the glass shelves; don’t place items against sides of the compartments or directly in front of any vents.
Refrigerator or freezer is too cold.
- Possible Cause:
- Temperature control is set too cold.
- Solution:
- Adjust temperature to the next less cold setting. Allow 24 hours for temperature to stabilize.
Moisture on exterior/ interior of refrigerator
- Possible Cause:
- High humidity This is normal during times of high humidity.
- Door opened frequently or left ajar.
- Open container of liquid in refrigerator
- Solution:
- Dry surface and adjust temperature to slightly colder setting.
- Limit door openings. Check for items keeping the door from closing completely.
- Cover or seal container
Frost or ice crystals on frozen food
- Possible Cause:
- Door opened frequently or left ajar.
- Items blocking freezer air vents are preventing proper air flow
- Solution:
- Limit door openings. Check for items keeping the door from closing completely.
- Move items away from rear interior wall.
Food freezing in refrigerator
- Possible Cause:
- Items placed too close to the air vents.
- Temperature control set too cold.
- Solution:
- Move items away from back and top of the refrigerator.
- Adjust the temperature to a less cold setting.