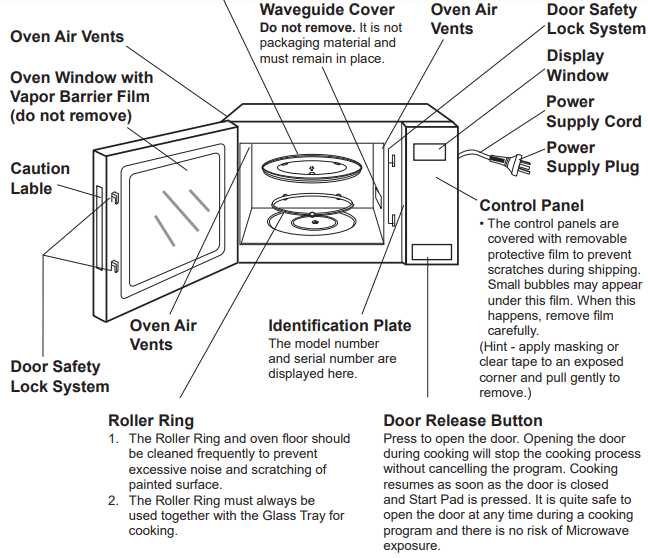
Do not operate the oven without the Roller Ring and Glass Tray in place.
Only use the Glass Tray specifically designed for this oven. Do not substitute another Glass Tray.
If Glass Tray is hot, allow to cool before cleaning or placing in water.
Do not cook directly on Glass Tray. Always place food on a microwave-safe dish, or on a rack set in a microwave-safe dish.
If food or utensil on Glass Tray touches oven walls, causing the tray to stop moving, the tray will automatically rotate in opposite direction. This is normal.
Glass Tray can rotate in either direction.
Oven Light:
Oven Light will turn on during cooking and also when door is opened.
NOTE:
The above illustration is for reference only.
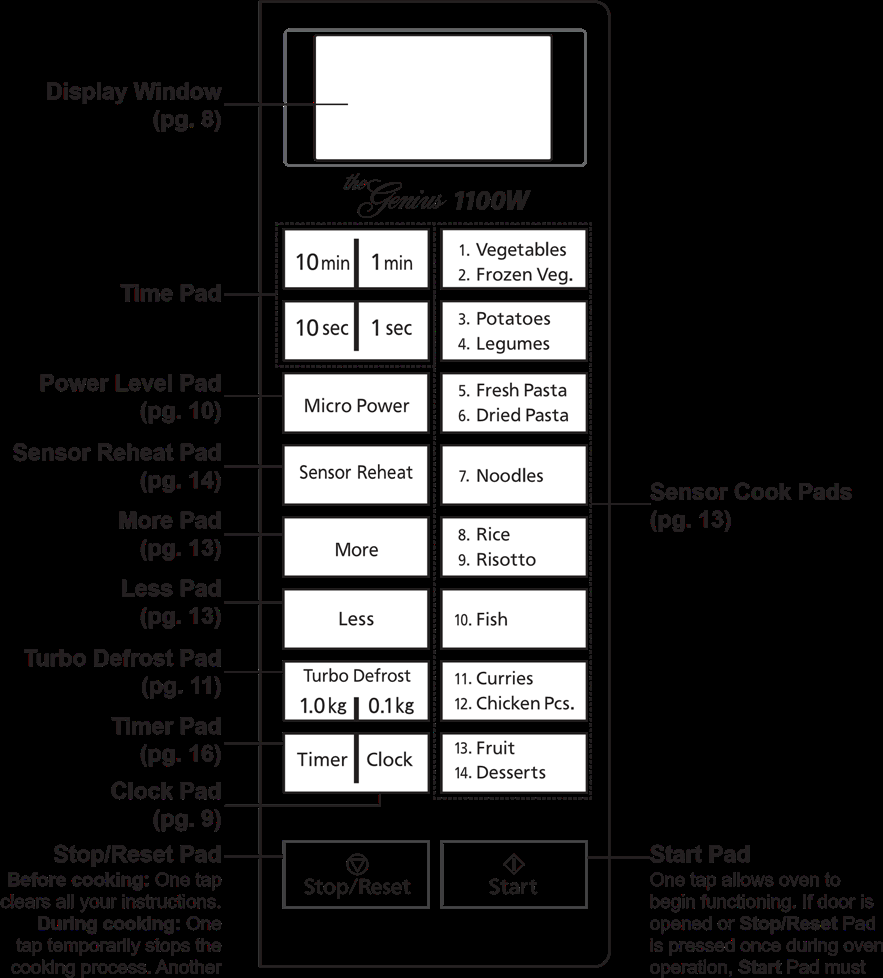
Control Panel
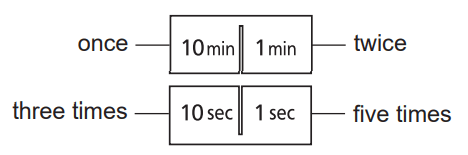
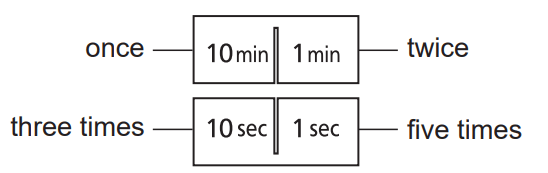
Beep Sound
When pad is pressed correctly, a beep sound will be heard. If a pad is pressed and no beep is heard, the unit does not or cannot accept the instruction. The oven will beep twice between programmed stages. At the end of any complete programme, the oven will beep five times.
NOTE:
If an operation is set and Start Pad is not pressed, after 6 minutes, the oven will automatically cancel the operation. The display will revert back to clock or colon mode.
Let’s Start To Use Your Oven!
1. Plug in
Plug into a properly earthed electrical outlet.
2. Open Door
Open the door and place container with food in a dish on Glass Tray in the oven. Then close the door.
3. Select Power Level
eg. P7
Press Power Level Pad four times.
(see page 10 for Micro Power chart)
4. Set Time
e.g. 12 minute 35 seconds
Press Time Pads
5. Press
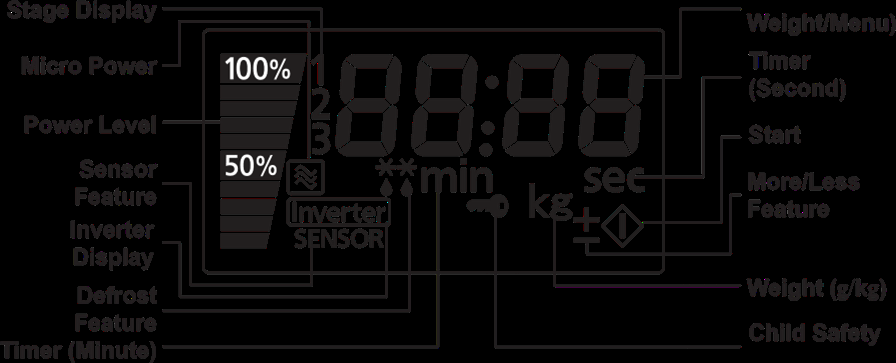
Operation and Hints
Display Window
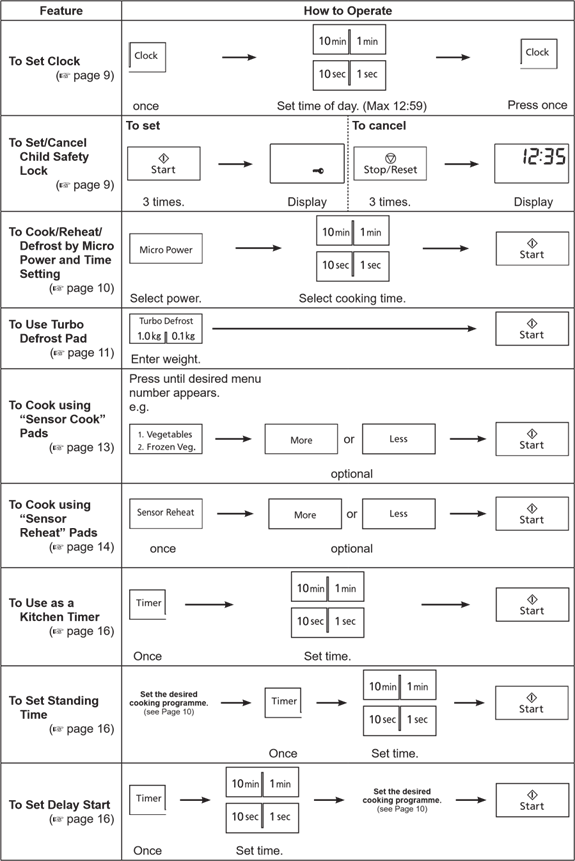
To Set Clock
1. Press once
Colon will blink in Display Window.
2. Enter Time of Day
Enter time of day using Time Pads e.g. 12:35 Clock is a 12 hour display. There isn’t a.m. or p.m. setting.
Time appears in the Display Window, colon is blinking. Verify time of day in the Display Window.
3. Press
Colon stops blinking; time of day is entered and locked into Display Window.
NOTES:
Oven will not operate while colon is still blinking.
To reset time of day, repeat step 1 through 3.
The clock will keep the time of day as long as oven is plugged in and electricity is supplied.
Maximum time available is 12:59. Clock is 12 hour only. One o’clock will be displayed as 1:00 not 13:00.
To Use Child Safety Lock
This feature allows you to prevent operation of the oven by a young child; however, the door will open. You can set Child Safety Lock when colon or time of day is displayed.
To set
To cancel
NOTE: To set or cancel child safety lock, Start pad or Stop/Reset pad must be pressed 3 times within 10 seconds.
To Cook/Reheat/Defrost by Micro Power and Time
1. Select Power Level
Press Micro Power pad until your desired power level appears in the Display Window.
(see chart below)
Note: When selecting P10 on the first stage, you can start from step 2.
2. Set Cooking Time
(P10: up to 30 minutes, other powers: up to 99 minutes and 59 seconds for a single stage)
e.g. 5 minutes
3. Press
Cooking will start.
The time in the Display Window will count down.
For more than one stage cooking,
Repeat steps 1 & 2 above then press Start. The maximum number of stages for cooking is 3. The oven will beep twice between stages. (For further information, refer to page 15)
Micro Power:
The Power Level Pad gives you a selection of different power levels representing decreasing amounts of microwave energy, used for cooking foods at different speeds.
e.g.The lower the micro power setting, the more evenly the food cooks, although it will take a little longer.
To select the correct power level for cooking different foods, refer to the chart below.
Press
POWER LEVEL
WATTAGE
DISPLAY
EXAMPLE OF USE
1x
P10
1100W
Boil water. Cook vegetables, rice, pasta and noodles. Reheating.
Simmer soups, stews and casseroles (less tender cuts).
10x
P1
100W
Keep cooked foods warm, simmer slowly.
NOTE:
After using the oven, the fan may rotate to cool the electric components and “COOL” appears in the display window. If you cook using microwave, “COOL” will appear after micro cooking over 3 minutes. This is perfectly normal, and you can take out the food from the oven while the fan operates.
To Defrost
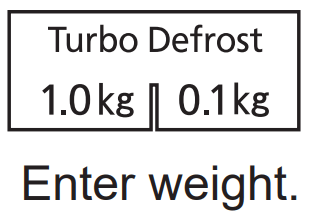
To Defrost using Turbo Defrost
This feature allows you to defrost meat, poultry and seafood automatically by just setting the weight of the food.
1. Set Weight
The shape and size of the food will determine the maximum weight the oven can accommodate. The recommended maximum weight of food depends on the oven cavity size. Weight must be programmed in kilograms and tenths of a kilogram (0.1 kg ~ 3.0 kg). For best results, the minimun recommended weight is 0.2 kg.
2. Press
Defrost time appears in the Display Window and begins to count down.
NOTE:
The oven will beep once or twice during the total defrosting time. This indicates that food should be turned, broken apart or removed. After attending to food, close door and press Start to resume defrosting.
For further information, refer to next page.
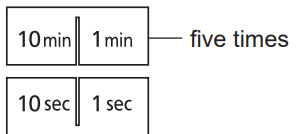
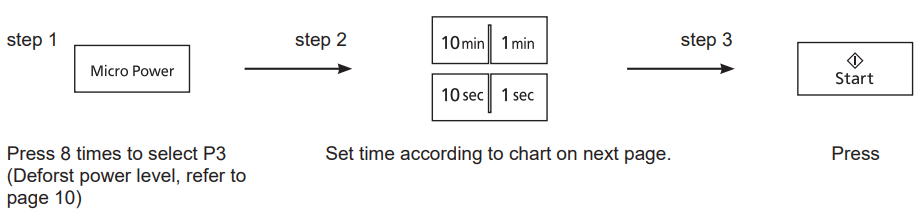
To Defrost by Micro Power and Time Setting
This feature allows you to defrost meat, poultry and seafood by P3 Power and time.
Defrosting Tips and Techniques
Preparation for Freezing:
Heavy-duty plastic wraps, bags and freezer wrap are suitable.
Freeze meats, poultry and fish in packages with only 1 or 2 layers of food. To aid in separating layers, place two pieces of wax paper between them.
REMOVE ALL AIR and seal securely.
LABEL package with type and cut of meat, date and weight.
Defrosting times given in the charts are for thoroughly frozen foods (i.e. at least 24 hours in freezer maintained at -18°C or lower).
Defrosting Technique:
Remove from wrapper and set on a defrosting rack in a dish on Glass Tray.
On Turbo Defrost, the oven will beep during the defrosting time. At “beep”, turn over all meat, poultry, fish and shellfish. Break apart stewing meat, chicken pieces and minced meat. Separate chops and hamburger patties. Shield thin ends of roasts, poultry legs and wings, fat or bones with foil.
Throughout the defrosting time, remove any defrosted portions of mince or cubed meat, etc.
After defrosting, large roasts may still be icy in the centre. Let stand, 15 to 30 minutes, in refrigerator to complete defrosting.
Halfway through the defrost cycle, break apart minced beef, separate chops and remove meat that is defrosted.
Turn meat over two to three times during defrosting.
Shield edges and unevenly shaped ends of roasts halfway through the defrost cycle.
Large roasts may still be icy in centre. Let stand.
POULTRY
Chicken whole pieces
fillets
Duck
Turkey
8 - 10 7 - 9 7 - 9 7 - 9 8 - 10
Turn poultry over two to four times during defrosting. Halfway through the defrost cycle, shield end of drumsticks, wings, breast bones and ends of poultry with foil.
Break apart chicken pieces and remove small pieces such as wings, which may be defrosted before larger pieces.
Rinse poultry under cold water to remove ice crystals. Let stand 5 to 10 minutes, before cooking.
FISH & SHELLFISH
Fish Fillets
Whole Fish
Crabmeat
Lobster Tails
Sea Scallops
Green Prawns
8 - 10 7 - 9 6 - 8 6 - 8 6 - 8 6 - 8
Halfway through the defrost cycle, turn whole fish or blocks of fillets over. Also, break apart prawns or scallops. Remove any pieces that are defrosted.
Let stand, 5 to 10 minutes, before cooking.
To Cook Using Sensor Cook
Sensor Cook allows you to cook foods without selecting times and power levels. The sensor detects the heat and humidity generated by the food and cooks your food automatically.
Place food into an appropriate sized dish for the volume of food you are cooking. Cover securely with plastic wrap or a securely fitting lid (do not use any snap closing lids). Plastic dishes are not suitable as a secure seal cannot be achieved and inaccurate cooking may result.
1. Select desired menu number
Select the appropriate pad for the food you are cooking.
The menu number will appear in the display window. (see the chart on next page)
eg.:
Note:
For information on individual categories refer to each chapter in the cookbook section.
More Pad /Less Pad :
Preferences for food doneness varies with each individual. After having used Sensor Cook a few times, you may decide you prefer your food cooked to a different doneness. By using the More Pad/Less Pad, the Auto Sensor programmes can be adjusted to cook food for a longer or shorter time. Press More Pad/Less Pad before pressing Start Pad.
Press More Pad : “+” will display in display window. If you want to return to average cooking result, press Less Pad.
Press Less Pad : “-” will display in display window, If you want to return to average cooking result, press More Pad.
If you are satisfied with the result of the SENSOR COOK programme, you don’t have to use this pad.
2. Press
The menu number you have selected remains in the display window. Do not stop the oven or open the door during this part of the cooking stage as inaccurate cooking may result. After the heat humidity is detected by the SENSOR, the remaining time appears in the Display Window and begins to count down.
For best results, follow these recommendations:
The door should not be opened before the time appears in the Display Window.
Do not use plastic dishes as a secure seal cannot be achieved and inaccurate cooking may occur.
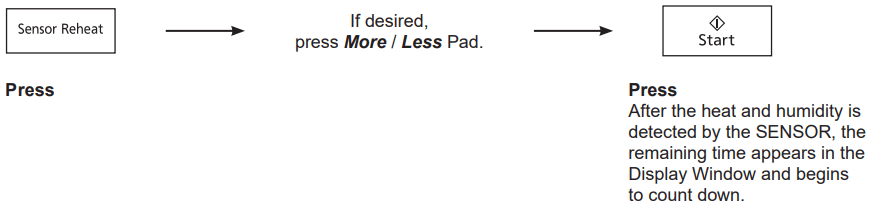
To Reheat Using Sensor Reheat
For best results on Sensor Reheat, follow these recommendations:
Food being reheated should weigh between 125 g and 1.0 kg. For foods weighing less than 125 g and more than 1.0 kg, use a manual micro power setting.
All foods must be previously cooked and at room or refrigerator temperature or frozen at -18°C for at least 24 hours.
Foods should always be covered loosely, but completely, with plastic wrap. (Do not use any snap closing lids.)
All foods should have a covered stand time of at least 3 to 5 minutes.
Do not reheat bread or pastry products (raw or uncooked), or beverages.
Do not use if oven cavity is warm (from previously cooked foods).
Consult the following Recipe Chapters for Sensor
Cooking Instructions for Each Category on your oven.
Menu
Recommended Weight Range
Sensor Reheat
125 g - 1.0 kg
1 Vegetables
125 g - 500 g
2 Frozen Veg.
125 g - 1.0 kg
3 Potatoes
125 g - 1.0 kg
4 Legumes
1-4 cups
5 Fresh Pasta
125 g - 625 g
6 Dried Pasta
125 g - 500 g
7 Noodles
150 g - 800 g
8 Rice
1 cup - 21/2 cups
9 Risotto
1/2 cup - 3 cups
10 Fish
125 g - 500 g
11 Curries
250 g - 750 g
12 Chicken Pcs.
400 g - 1.0 kg
13 Fruit
150 g - 1.5 kg
14 Desserts
375 g - 1.5 kg
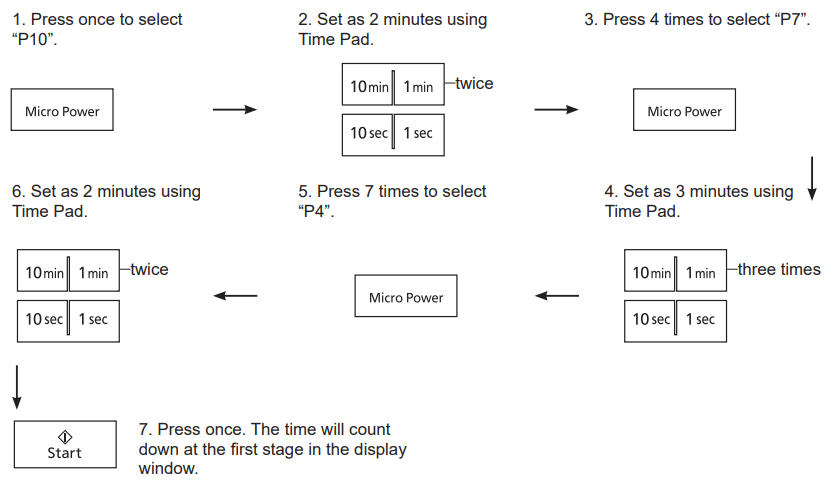
3-Stages Setting
This feature allows you to program 3 Stages of cooking continuously.
E.g.: Continually set [P10] 2 minutes, [P7] 3 minutes and [P4] 2 minutes.
NOTES:
When operating, two beeps will sound between each stage.
This feature is not available for Turbo Defrost, Sensor Cook and Reheat function.
INGREDIENT CONVERSION CHART
INGREDIENT CONVERSION CHART
1⁄4 cup
60 ml
1⁄4 teaspoon
1 ml
1⁄3 cup
85 ml
1⁄2 teaspoon
2 ml
1⁄2 cup
125 ml
1 teaspoon
5 ml
2⁄3 cup
165 ml
2 teaspoons
10 ml
3⁄4 cup
190 ml
3 teaspoons
15 ml
1 cup
250 ml
1 tablespoon
20 ml
11⁄4 cups
310 ml
11⁄2 tbs
30 ml
11⁄2 cups
375 ml
2 tbs
40 ml
2 cups
500 ml
3 tbs
60 ml
3 cup
750 ml
4 tablespoons
80 ml
31⁄2 cups
875 ml
4 cups
1 litre
6 cups
1.5 litre
8 cups
2 litre
All recipes are tested using standard measurement that appear in the above chart.
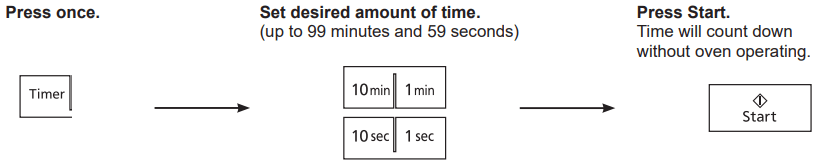
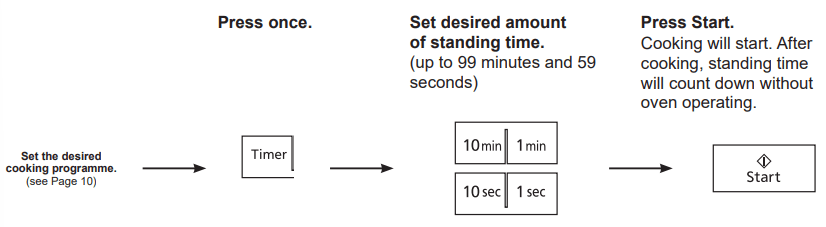
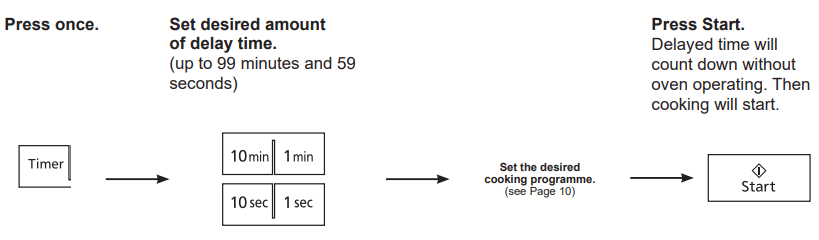
To Use Timer
This feature allows you to program standing after cooking is completed and to program the oven as a minute or a second timer or program delay start.
To Use as a Kitchen Timer
To Set Standing Time
To Set Delay Start
NOTES:
If oven door is opened during the Standing Time, Delay Start or Kitchen Timer, the time in the Display Window will continue to count down.
Delay Start/Standing Time cannot be programmed before/after any Auto Control function. This is to prevent the standing temperature of the food from rising before defrosting or cooking begins. A change in the starting temperature could cause inaccurate results and/or food may deteriorate.
When using Standing time or Delay Start, it’s up to 2 Power stages.
Quick Guide to Operation
Maintenance
Before Requesting Service
THESE THINGS ARE NORMAL
The oven causes interference with my TV
Some radio and TV interference might occur when you cook with the . microwave oven. This interference is similar to the interference caused by small appliances such as mixers, vacuums, hair dryers, etc. It does not indicate a problem with your oven.
Steam accumulates the oven door and warm air comes from the oven vents.
During cooking, steam and warm air are given off from the food. Most on of the steam and warm air are removed from the oven by the air which circulates in the oven cavity. However, some steam will condense on cooler surfaces such as the oven door. This is normal.
I accidentally ran my microwave oven without any food in it.
Running the oven empty for a short time will not damage the oven. However, we do not recommend this.
PROBLEM
POSSIBLE CAUSE
REMEDY
Oven will not turn on.
The oven is not plugged in securely.
Remove plug from outlet, wait 10 seconds and re-insert.
Circuit breaker or fuse is tripped or blown.
Reset circuit breaker or replace fuse.
There is a problem with the outlet.
Plug another appliance into the outlet to check if the outlet is working.
Oven will not start cooking
The door is not closed completely
Close the oven door securely.
Start Pad was not pressed after programming
Press Start Pad.
Another program has already been entered into the oven.
Press Stop/Reset Pad to cancel the previous program and program again.
The program has not been entered correctly.
Program again according to the Operating Instructions.
Stop/Reset Pad has been pressed accidentally.
Program oven again.
When the oven is turning on, there is noise coming from Glass Tray
The roller ring and oven bottom are dirty
Clean these parts according to care of your oven (See next page)
“” appears in the Display Window.
The Child Lock was activated by pressing Start Pad 3 times.
Deactivate Lock by pressing Stop/Reset Pad 3 times.
“H97”, “H98” or “H00” appears in the display window.
The display indicates a problem with microwave generation system
Contact the specified service centre.
If it seems there is a problem with the oven, contact an authorized Service Centre.
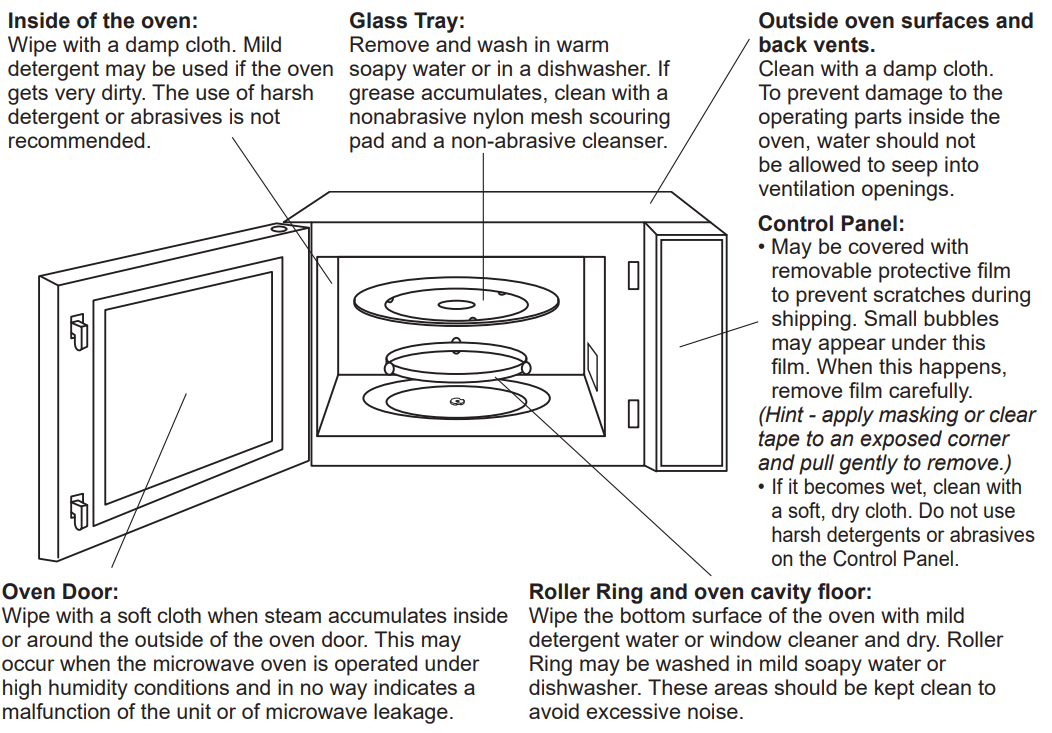
Care of your Microwave Oven
Note: The oven should be cleaned regularly and any food deposits removed. Failure to maintain the oven in a clean condition could lead to deterioration of the surface that could adversely affect the life of the appliance and possibly result in a harzardous situation.
BEFORE CLEANING:
Unplug at socket of the oven. If impossible, leave oven door open to prevent oven from accidentally turning on.
AFTER CLEANING:
Be sure to replace the Roller Ring and Glass Tray in the proper position and press Stop/Reset Pad to clear the Display Window.
Technical Specifications
Power Supply:
230 - 240 V, 50 Hz
Power Consumption*:
4.4 A 1,000 W
Output*:
1,100 W
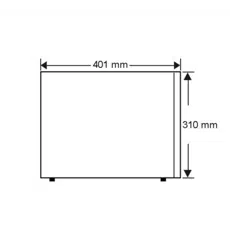
Outside Dimensions (W x H x D):
525 mm (W) x 310 mm (H) x 388 mm (D)
Oven Cavity Dimensions (W x H x D):
355 mm (W) x 251 mm (H) x 365 mm (D)
Overall Cavity Volume:
32 L
Glass Tray Diameter:
Ø340 mm
Operating Frequency:
2,450 MHz
Uncrated Weight:
Approx. 11.5 kg
Trim Kit
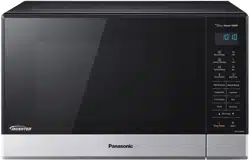
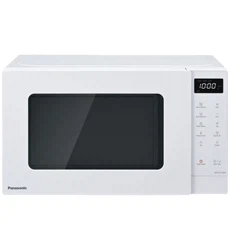
Model Name
NN-ST671S
NN-ST651W
Model Number
NN-TK611SS
NN-TK611SW
Outside Dimensions
596 mm (W) x 410 mm (H)
Cabinet Opening
562 mm (W) x 395 mm (H) x 480 mm (D)
* IEC Test Procedure
Specifications subject to change without notice.
As for the voltage requirement, the production month, country and serial number, please refer to the identification plate on the microwave oven.
Cooking Guide
Microwave Recipe Techniques
Microwaves penetrate the surface of the food to a depth of about two to three centimetres and then the heat is gradually conducted in a random pattern. Some parts of food matter cook faster than others.
Special microwave techniques are used to promote fast and even cooking. Some of these techniques are similar to those used in conventional cooking, but because microwaves produce heat very quickly the following techniques are extremely important. It’s a must for you to be familiar with the following tips.
Food Characteristics
Size and Quantity
Small portions cook faster than large portions. As you increase the quantity of food you put into the microwave oven, you must also increase your cooking time. The microwave oven has the same power regardless of quantity; thus the power is divided between more items and so it takes longer to cook. As a general guide, if you double the quantity of food suggested in the recipe, add half the time suggested again.
Liquid Content
Low moisture foods take a shorter time to cook than foods with a lot of moisture.
Shape
Uniform sizes cook more evenly. To compensate for irregular shapes, place thin pieces towards the centre of the dish and thicker pieces towards the outer edge of the dish.
Bone and Fat
Bones conduct heat and cause the meat next to them to be heated more quickly. Large amounts of fat absorb microwave energy and the meat next to these areas may overcook.
Starting Temperature
Food which has been sitting at room temperature takes less time to cook than refrigerated or frozen food.
Density and Composition
Porous, airy foods (cakes and breads) take less time to cook than heavy compacted foods (meat and vegetables). Recipes high in fat and sugar content cook more quickly.
Techniques for Preparation
Timing
A range of cooking times is given in each recipe for two reasons. First, to allow for the uncontrollable differences in food shapes, starting temperatures and personal preferences. Secondly, these allow for the differences in electrical voltage input which changes during peak load periods. Always remember that it is easier to add time to undercooked food. Once the food is overcooked, nothing can be done. For each recipe, an approximate cooking time is given.
Stirring
Stirring is often necessary during microwave cooking. We have noted when stirring is helpful in the recipes. Always bring the outside edges towards the centre and the centre portions to the outside.
Rearranging or Turning
Some foods should be turned in the container during cooking. For example, because of the different thicknesses in the breast and back sections of poultry, it is a good idea to turn poultry over once to ensure more even cooking.
Rearranging or turning over uneven shaped food in the dish should be done as suggested to ensure a satisfactory result. Rearrange small items such as chicken pieces, prawns, hamburger patties, nuts or potatoes. Rearrange pieces from the centre to the edge of the dish.
Cooking in Layers
This microwave oven is not designed to cook more than 1 layer of food. Cooking in 2 layers may not always be successful, it takes longer and may be uneven. You can successfully reheat two dinner plates of food at one time but remember to increase the reheating time and use a microwave warming rack.
Piercing of Foods
Pierce the skin or membrane of foods such as eggs, tomatoes and jacket potatoes when cooked whole in the microwave oven. This allows steam to escape. If the skin has not been pierced, food may burst.
Cured Meats
Cured meats may overcook in some areas due to the high concentration of salts used in the curing process. So take care when cooking different brands of bacon as cooking times may vary slightly.
Techniques for Preparation
Covering
Covering food minimizes the microwave cooking time. Because microwave cooking is done with time and not direct heat, the rate of evaporation cannot be easily controlled. However, this can be corrected by using different materials to cover dishes. Plastic wrap is the best substitute for a lid as it creates a tighter seal and so it retains more heat and steam. Wax paper and paper towels hold the heat in but not the steam. These materials also prevent splattering. Use a paper towel, wax paper or no cover when steam is not needed for tenderising.
Browning
Meats and poultry, when cooked longer than 10 to 15 minutes, will brown from their own fat. Foods cooked for shorter periods of time can be aided with the help of a browning sauce, worcestershire sauce or soy sauce. Simply brush one of these sauces over meat or poultry before cooking. Baked goods do not need long cooking time and therefore, do not brown. When cakes or cupcakes are iced, no one will notice the visual difference. For cakes or cupcakes, brown sugar can be used in the recipe in place of caster sugar or the surface can be sprinkled with dark spices before baking.
Standing Time
The moisture molecules continue to vibrate in the food when the microwave oven has turned itself off. After all, the molecules were vibrating at 2,450,000,000 times per second during cooking. So cooking continues even after the food is no longer being exposed to the microwaves whether in or outside your microwave oven.
Standing time refers to the time it takes (after the microwave time is completed) to allow the interior of the food to finish cooking.
The amount of standing time varies with the size and density of the food. In meat cookery, the internal temperature will rise between 5°C and 10°C if allowed to stand covered for ten to fifteen minutes. Rice and vegetables need shorter standing time, but this time is necessary to allow foods to complete cooking in the centre without overcooking on the edges.
The power level used in microwave cooking also determines the standing time. For example, when using a lower power level the standing time is shorter because of a lower concentration of heat in the food. Foods should always be kept covered while standing in order to retain the heat. If a longer standing time is required (while you cook another food to serve with the first, for instance), cover with aluminum foil.
Converting Your Favourite Conventional Recipes for Microwave Cooking
When adapting conventional recipes for microwave cooking, time are reduced considerably. For example, a chicken which takes 1 hour to cook in a moderate oven will take 15 to 20 minutes on P7 Power in your microwave oven.
Use similar microwave recipes to help you adapt conventional recipes. Remember, it is always best to undercook a recipe and then add an extra minute or two to finish it off.
Here are some other tips that may help:
Reduce liquids in a conventional recipe by one half to two thirds, e.g. 1 cup (250 ml) should be reduced to 1⁄2 cup (125 ml).
Add more thickening such as flour or cornflour to sauces and gravies if you do not reduce the liquid.
Reduce seasonings slightly in a recipe where ingredients do not have time to simmer by microwave.
Do not salt meats, poultry or vegetables before cooking; otherwise, they will toughen and dry out.
If one ingredient takes longer to cook than the others, pre-cook it in the microwave oven first. Onion, celery and potato are examples.
When cooking meat or vegetables, omit any oil or fat that would have been used in a conventional recipe for browning.
Reduce leavening agents for cakes by one quarter and increase liquids by one quarter.
Biscuits require a stiff dough. Increase flour by about 20 percent. Substitute brown sugar for white sugar and use biscuit recipes that have dark spices or require icing. Because of the short cooking time, biscuits don’t have time to brown. Chill dough for half an hour before baking. This produces a crisper biscuit. Bake biscuits on a glass tray lined with greaseproof paper.
Since microwaves penetrate foods about two centimetres from the top, bottom and sides, mixtures in round shapes and rings cook more evenly. Corners receive more energy and may overcook.
Items with a lot of water, such as rice and pasta, cook in about the same time as they would on a conventional stove. (Refer to Rice and Pasta chapter.)
Select recipes that convert easily to microwave cooking such as casseroles, stews, baked chicken, fish and vegetable dishes. The results from foods such as grilled meats, cooked souffles or two-crust pies could be less than satisfactory. Never attempt to deep fry in your microwave oven.
Menu Planning for Microwave Cooking
How to Keep Everything Hot at The Same Time
Plan your meals so that the food will not all need last minute cooking or attention at the same time. The special features of microwave cookery make it easy to serve meals with everything piping hot. Cooking of some foods may be interrupted while you start others, without harming the nutritional value or flavour of either.
A recipe which requires standing time can be microwaved first and another food cooked while it stands. Dishes prepared in advance can be reheated briefly before serving.
It does take some experience and time to cook with confidence. Microwaves are fast so you will have to do some experimenting. You might find you will use your conventional range in conjunction with your microwave oven. For example, while cooking the roast in the microwave oven, you can be cooking the vegetables and gravy on the range top. This can also be done the other way around. Prepare your meals as follows.
Firstly, cook the most dense item (roast or casserole). Drain and retain meat juice from joints then cover with foil.
Cook the potatoes, rice or pasta.
Cover with foil for standing.
Cook greens and other vegetables.
Cover with foil for standing.
Cook the gravy with the retained meat juices, stock and thickening.
Carve the roast and serve the vegetables and gravy.
While you are learning to plan meals, you may get a bit behind time. Don’t worry. Dinner servings may be suitably reheated on P7, for 1 to 2 minutes per serving.
If you prefer not to use foil, cover food with saucepan lids. A metal lid will retain the heat for at least 15 minutes.
Meanwhile, how can you cook all the vegetables at the same time? Simply place potatoes and pumpkin in one dish and less dense vegetables such as broccoli, cabbage, cauliflower, beans and peas in another.
Sprinkle greens with water. Cover with a lid or plastic wrap. Cook on P10 for cooking times refer to vegetable cooking chart on page 40. Fresh and frozen vegetables can be mixed on a vegetable platter, but remember frozen vegetables are not as dense as fresh vegetables, as they have been blanched before freezing.
If vegetables are cut to a similar size, they can be cooked in separate ramekins or small dishes at the same time.
Increasing & Decreasing Recipes
Increasing
To increase a recipe from 4 to 6 servings, increase each ingredient listed by half.
To increase a recipe from 4 to 8 servings, double each ingredient listed.
For larger quantities of a recipe, a large dish should be used. Make sure that the dish is deep enough to prevent the recipe from boiling over during cooking.
Make sure to cover, stir or rearrange food as directed in the recipe and always check the food during cooking.
Increase standing times by 5 minutes per 500g.
Use the same Power Level recommended in the original recipe.
Increase the cooking times by: 1⁄3 of original cooking time for 6 servings; and an extra 1⁄2 of original cooking time for 8 servings.
Decreasing
To decrease a recipe from 4 to 2 servings, decrease each ingredient listed by half.
For small quantities, a small dish should be used. Make sure that the dish is large enough to prevent the recipe from boiling over during cooking.
Use the same Power Level recommended in the original recipe.
Decrease the cooking times by 1⁄2 to 2⁄3 of the original cooking time.
Cooking for One
To decrease a recipe from 4 to 1 serving, quarter each ingredient listed.
A smaller dish should be used, making sure that the dish is still large enough to prevent the recipe from boiling over.
Use the same Power Level recommended in the original recipe.
Quarter the original cooking times, then add extra time, if needed.
Make sure to cover, stir or rearrange food as directed in original recipe and always check the food during cooking.
Converting Recipes from Other Sources
When the recipe is written with a wattage different than your oven, adjust the cooking time by approximately 10% per 100 watts, e.g. 6 minutes would be adjusted by 36 seconds. Alternately, adjust the power level by one level. If your wattage is higher than the recipe: (1) Adjust time downward or (2) Adjust power level downward. If your wattage is lower than the recipe:
(1) adjust time upward or (2) adjust power level upward (when possible).
Converting Recipes from Other Sources
One of the most common uses for a microwave oven is to reheat food. Your Panasonic microwave allows you to either reheat by placing food into the oven and you choose the micro power level and length of heating time or you may reheat automatically by using the SENSOR REHEAT Pad on your microwave. Following are some directions for reheating pre-cooked foods from either frozen refrigerator temperature or room temperature.
General rules for reheating foods by Micro Power
Many convenience foods contain heating instructions on the packaging. It is best to follow these instructions, being sure to check the wattage of the oven they used and adjust the cooking time if necessary (decrease cooking time by 10% for every 100watts more powerful your oven is).
If package directions are not available, follow the recommendations in the charts on the following pages.
All foods must be pre-cooked; raw foods will not cook through during reheating times and if consumed may cause illness.
Do not reheat in foil containers, cans or plastic containers as incorrect heating times will result. Place foods into microwave safe bowls or onto dinner-plates before heating.
Most foods can be heated on P10 but consider if the food is delicate in structure like baked custard or you have a large quantity, a lower power level for slightly longer may be gentler.
Cover foods with plastic wrap if you require a steamed effect or leave uncovered for a drier surface, e.g. Crumbed foods.
Note: when cooking by Sensor Cook all food must be covered.
Stir or re-arrange foods during heating as this will help food heat evenly. Stir after heating and let stand for 2 to 3 minutes. Check temperatures before adding extra heating time and ensure food is hot. If food is not heated enough, consumption may cause illness.
Caution:
Pastry items which have a filling that is high in fat., sugar or moisture will become hotter in the centre and the pastry may only feel warm. Ensure you allow it to stand for several minutes before eating.
Reheating by Sensor Cook (125 g - 1.0 kg)
Reheating by Sensor is suitable for pre-cooked foods. There is a setting for frozen and refrigerator temperature or room temperature foods. It is suitable for casseroles, plated meals, soup, stews, pasta dishes (except lasagne) and canned foods.
Do not reheat bread or pastry products, raw uncooked food or beverages on Sensor Reheat.
Foods greater than 1 kg or smaller than 125 g should be cooked by micro power and time.
Follow general directions for heating as above.
Cover foods securely with plastic wrap.
During the heating time, the oven will ‘beep' and prompt you to stir/rearrange the food. There is no need to recover if not required.
After heating, stir the food, check it is hot and allow standing for 2 to 3 minutes.
To Operate:
Press Sensor Reheat, then Press Start.
Reheating by Micro Power - Frozen Pre-cooked Foods
FROZEN ITEM (Pre-cooked)
POWER
TIME
(in minutes)
SPECIAL INSTRUCTIONS
BREAD &
BAKED PRODUCT
Bread 1 slice
1 loaf
6 rolls
P7
P7
P6
10 - 15 sec
1 - 3
1 - 2
Do not let bread get hot, or it will become rubbery and dry out. Remove whole loaf from original wrapper.
Place on paper towel to absorb moisture.
Cheesecake (450 g)
P3
5 - 7
Remove from container. Defrost on plate.
Muffins - 4 (400 g)
P7
11⁄2 - 2
Place onto paper towel lined plate.
Scones - 6 (400 g)
P6
11⁄2 - 2
Defrost on paper lined plate. Stand 2 minutes.
PIES
Fruit Pie (600 g)
P3
then
P7
5 - 7
5 - 7
Remove from foil container and place uncovered into a pie dish.
Meat Pie (175 g)
P7
4 - 5
Place onto paper towel lined plate.
Pizza (350 g)
P10
5 - 7
Remove from package and place onto paper towel or follow manufacturer’s instructions.
FROZEN MEAL
Fish in Sauce (200 g)
P5
5 - 7
Pierce corner of bag. Heat on a plate.
Frozen Casserole (500G)
P10
9 - 11
Pierce pouch.
Heat on a plate or bowl.
Lasagne (500 g)
P9
11 - 13
Remove from foil container, place into serving dish.
Plated style dinner (320 g)
P5
8 - 10
Remove foil cover and replace with plastic wrap.
Vegetables & Sauce (in the bag) (500 g)
P7
6 - 8
Pierce corner of bag. Heat on a plate.
MISCELLANEOUS Chicken Pieces (500 g)
Chicken Nuggets (12)
P7
P7
8 - 10
3 - 4
Place onto paper towel lined plate.
Croissants - 4 (200 g)
P3
1 - 11⁄2
Place onto paper towel lined plate.
Fish Fingers - 8 (200 g)
P3
then
P10
2 - 4
2 - 3
Place onto paper towel lined plate.
Sausage Rolls (225 g)
P5
2 - 3
Place onto paper towel lined plate.
IMPORTANT POINTS TO CONSIDER WHEN REHEATING COLD FOODS
STARTING TEMPERATURE —
Foods taken from the refrigerator will take longer to reheat than foods from room temperature.
Quantity —
One serving heats faster than several servings. When heating large quantities, stir food to ensure even heating. It is quicker to heat individual plates of food than large quantities in a casserole dish.
Plated Dinners —
Arrange foods with the most dense items towards the outside of the plate. Cover meats with sauces/ gravies if desired, spread out mashed potatoes or rice so it heats more evenly. When assembling plates of leftover foods, use foods which have a similar starting temperature.
Covering Foods —
Most foods need to be covered with one sheet of absorbent paper towel to hold in the heat and prevent splattering without steaming. When more moisture is desired, cover with plastic wrap.
Heating —
Reheating is usually done on P10, however, if food has a more delicate texture, like a baked custard, a lower power setting should be used. P7 for a little longer will be gentler on the food. An average plate of food would generally take 1 to 3 minutes to heat depending on the density of the food. Place it in for the minimum time and add extra heating time if required.
Ensure food is hot by feeling the bottom of the plate in the centre. If the plate is cool, food may be warm but will lose heat quickly as the plate will absorb the heat and taste cold when served. If food is not heated enough, consumption may cause illness.
Elevation —
Elevate pastries and breads on a small plastic rack with paper towel under the food to prevent it from becoming soggy.
Caution:
Pastry items which have a filling that is high in fat., sugar or moisture will become hotter in the centre and the pastry may only feel warm. Ensure you allow it to stand for several minutes before eating.
IMPORTANT POINTS TO CONSIDER WHEN REHEATING FOODS FROM THE FREEZER
VOLUME —
The greater the volume and the more dense the item, the longer it takes to reheat. E.g. frozen cake will take less time than frozen casserole.
LARGE VOLUME —
Large, dense, frozen precooked foods are best thawed on defrost until icy in the centre then heated on P7. This prevents overcooking of the edges. Stirring is often needed to distribute heat evenly.
Commercial frozen foods —
These foods should be removed from their foil containers if possible and placed into suitable microwave safe containers. If a foil container is used in the microwave oven it shouldn’t be more than 4 cm high and must not touch the interior of the microwave oven. Remove the cover from the tray and replace with paper towel or plastic wrap to prevent splattering.
Foods to be served at room temperature —
For best results, defrost for a short time and allow to stand to complete thawing, e.g. frozen cake.
Vacuum sealed pouches —
Pierce pouches, bags before heating to allow steam to escape. This prevents bursting.
Containers —
Use dishes about the same volume of the food or slightly larger to allow for stirring. Remove or release snap seal lids other wise they will pop during heating and may disfigure.
Pies and pastries —
Pies and pastries that contain raw pastry and filling cannot be cooked in the microwave oven. Precooked products can be thawed and heated. Place them on a sheet of paper towel and elevate on plastic rack for best results. For added crispness place under the grill or in a hot oven for few minutes. Pastry items can become tough and rubbery if overheated, remember to allow 5 minutes standing

 once
once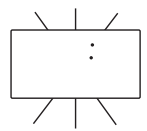


 /Less Pad
  :
:
 ” appears in the Display Window.