Owner Guide Microwaves
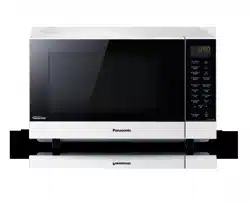
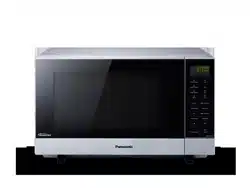
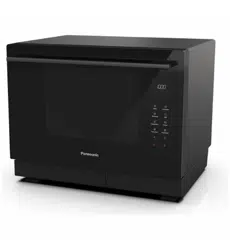
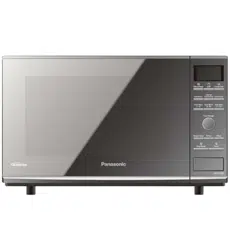
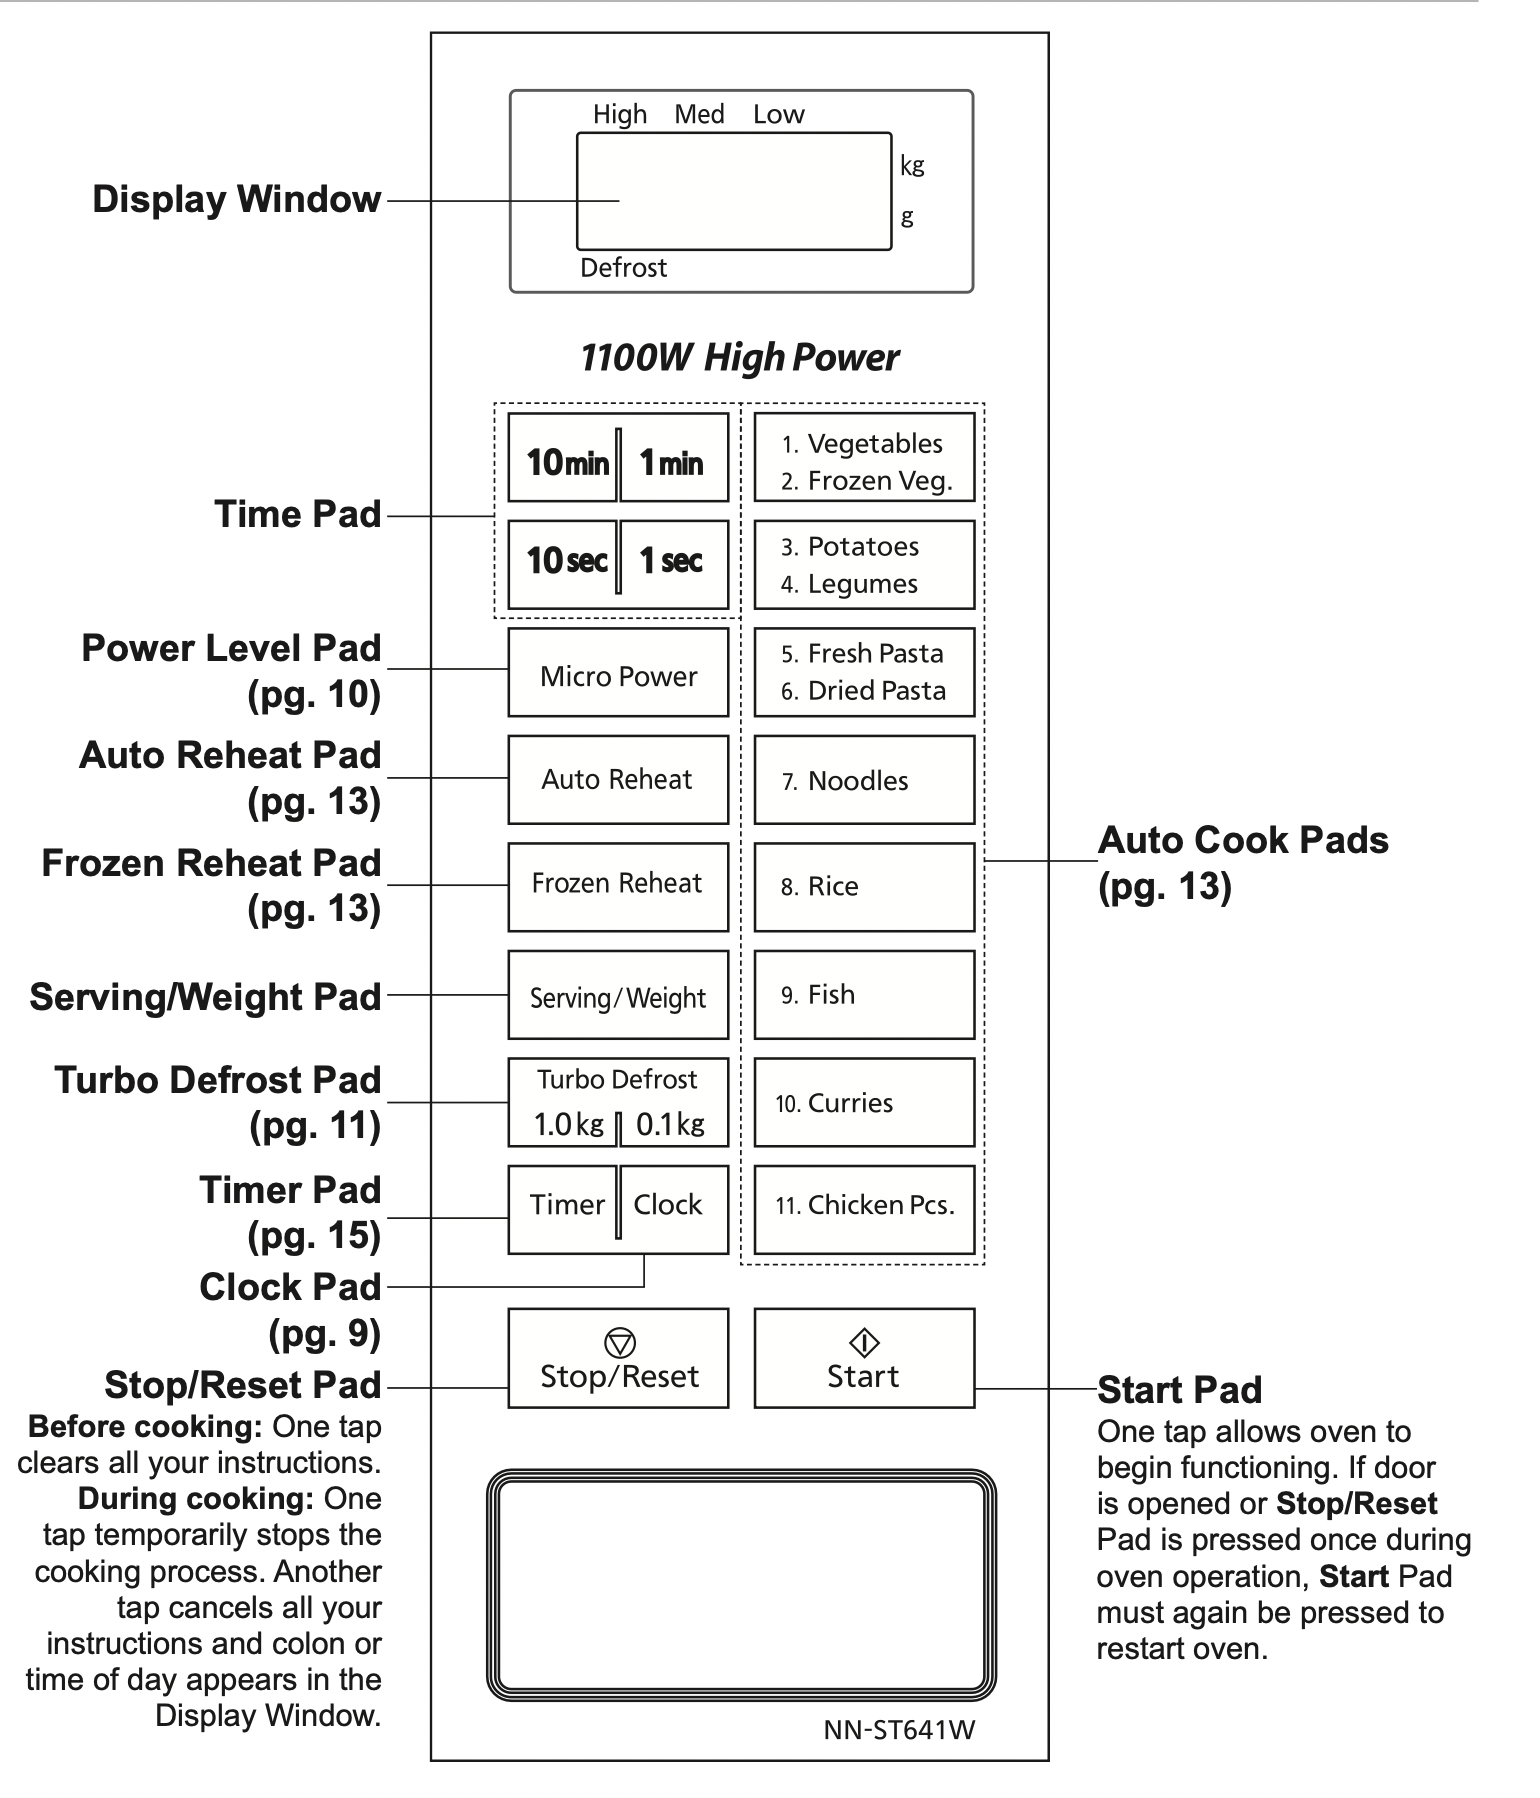
Feature Diagram
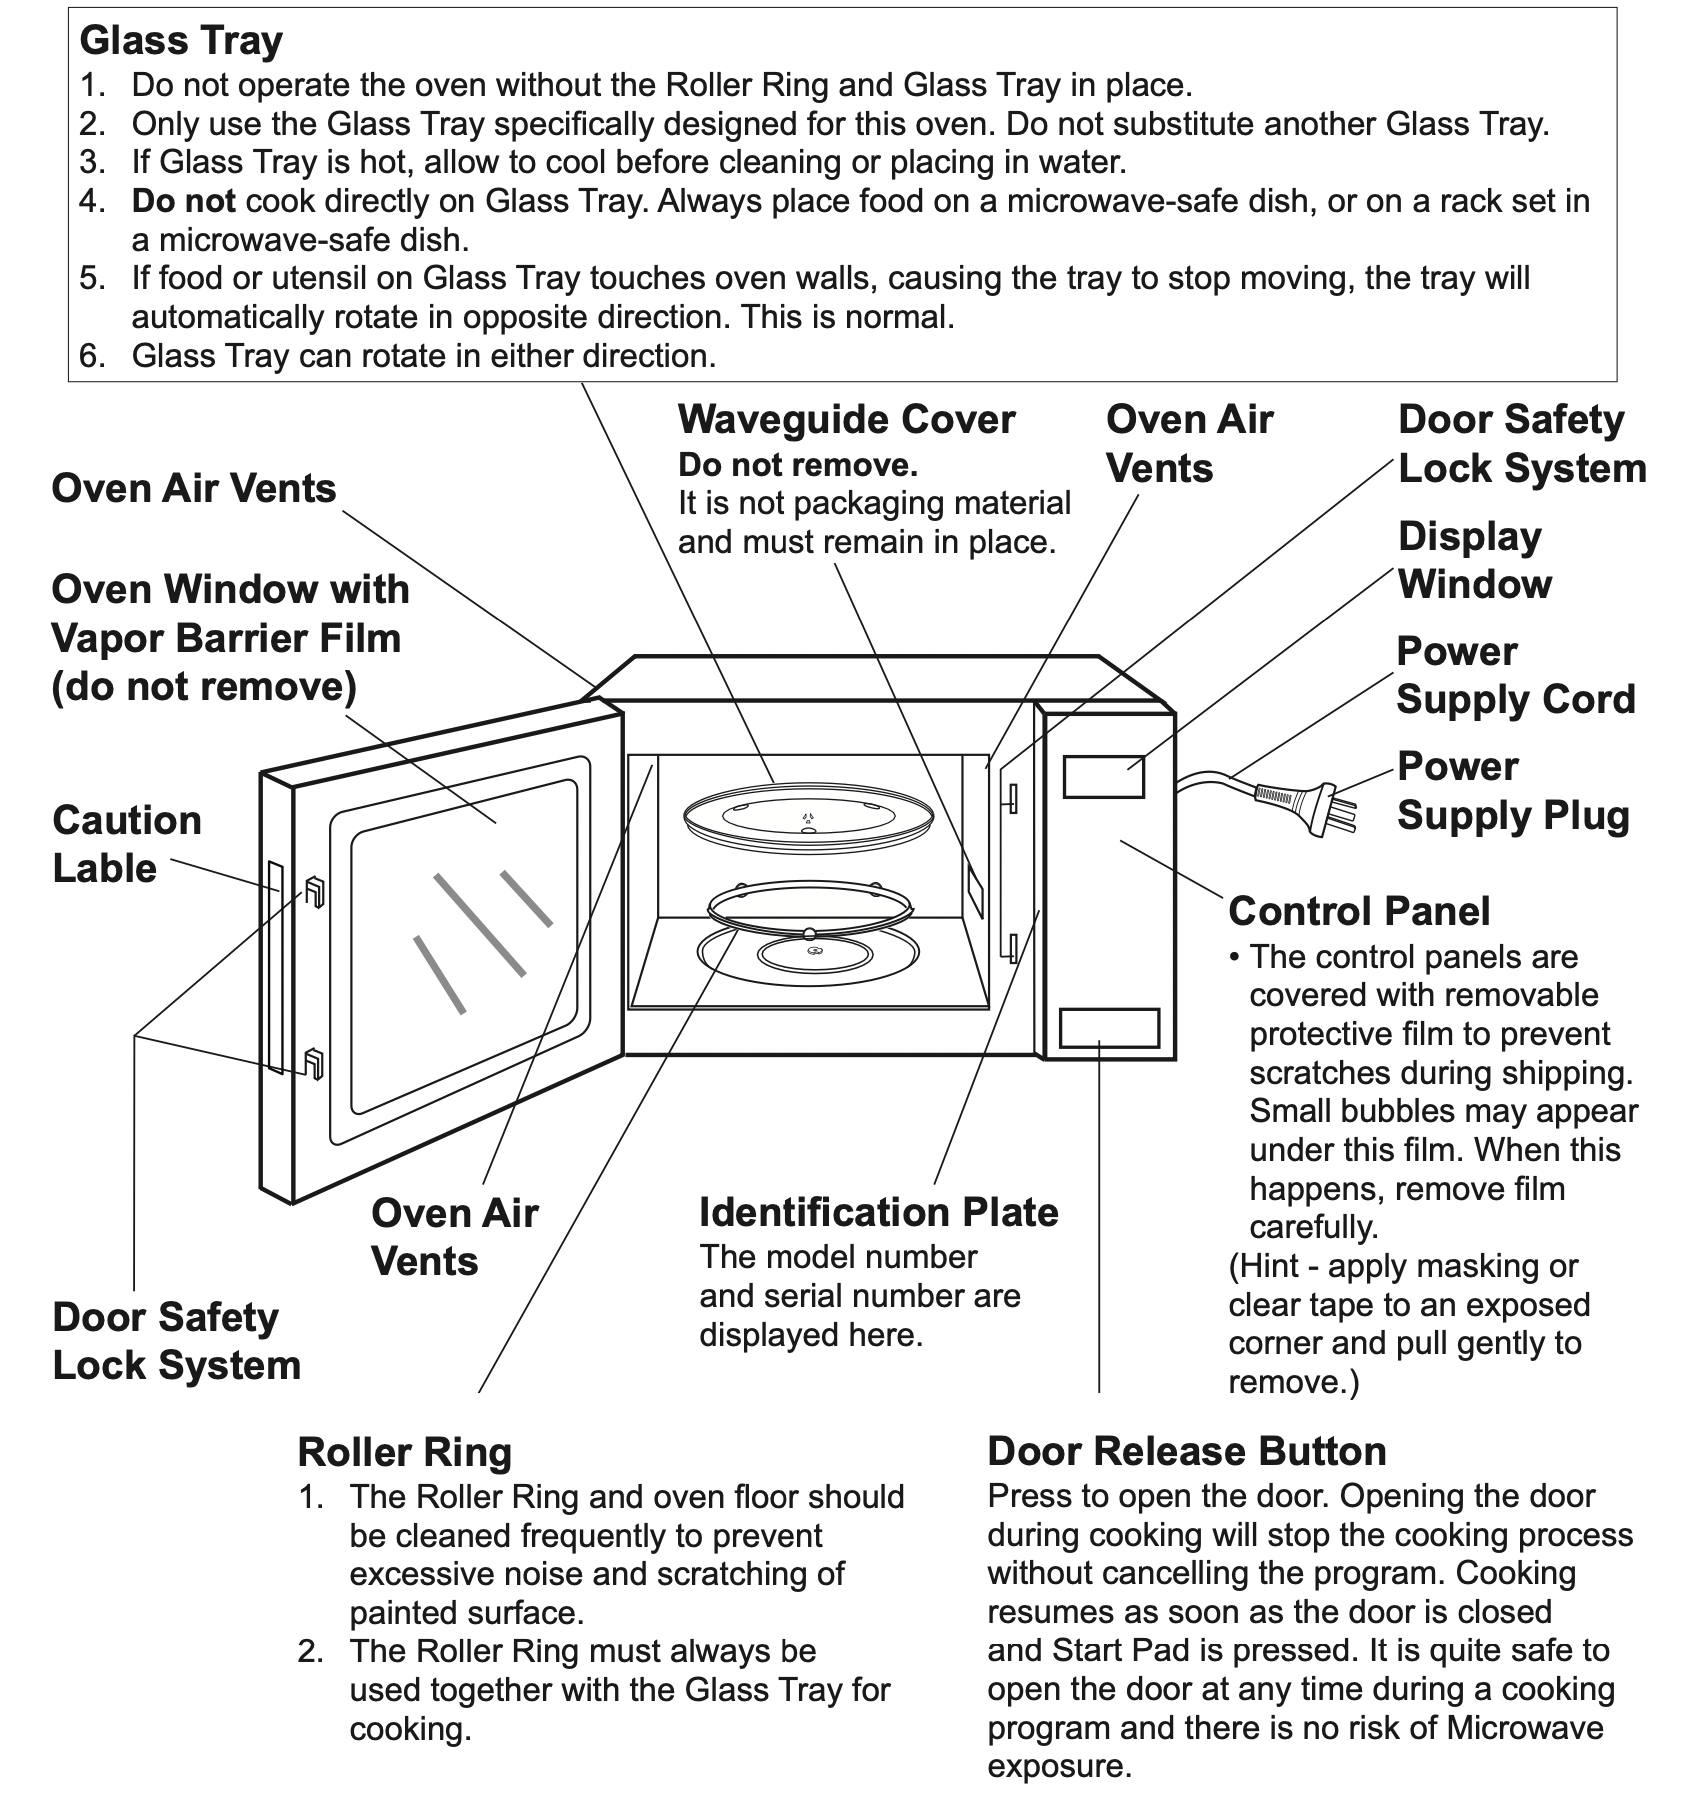
Oven Light: Oven Light will turn on during cooking and also when door is opened.
NOTE: The above illustration is for reference only.
Control Panel
Beep Sound
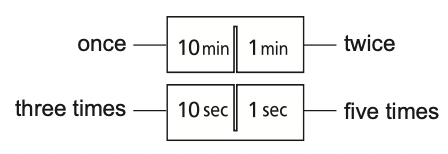
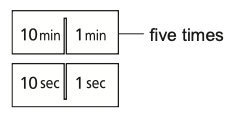
When pad is pressed correctly, a beep sound will be heard. If a pad is pressed and no beep is heard, the unit does not or cannot accept the instruction. The oven will beep twice between programmed stages. At the end of any complete programme, the oven will beep five times.
NOTE: If an operation is set and Start Pad is not pressed, after 6 minutes, the oven will automatically cancel the operation. The display will revert back to clock or colon mode.
Let’s Start To Use Your Oven!
- Plug in
Plug into a properly earthed electrical outlet.
- Open Door
Open the door and place container with food in a dish on Glass Tray in the oven. Then close the door.
- Select Power Level
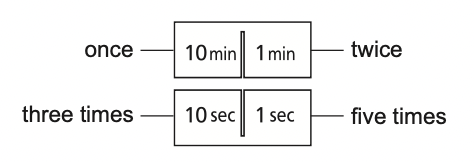
eg. Meduim Press Power Level Pad three times. (see page 10 for Micro Power chart)
- Set Time
e.g. 12 minute 35 seconds
Press Time Pads
- Press
To Set Clock
You can use the oven without setting the clock.
- Press
 once
once
Colon will blink in Display Window.
- Enter Time of Day
Enter time of day using Time Pads e.g. 12:35
Clock is a 12 hour display. There isn’t a.m. or p.m. setting.
Time appears in the Display Window, colon is blinking.
Verify time of day in the Display Window.
- Press

Colon stops blinking; time of day is entered and locked into Display Window.

NOTES:
1. Oven will not operate while colon is still blinking.
2. To reset time of day, repeat step 1 through 3.
3. The clock will keep the time of day as long as oven is plugged in and electricity is supplied.
4. Maximum time available is 12:59. Clock is 12 hour only. One o’clock will be displayed as 1:00 not 13:00.
To Use Child Safety Lock
This feature allows you to prevent operation of the oven by a young child; however, the door will open. You can set Child Safety Lock when colon or time of day is displayed.
To set

Colon or time of day is displayed
To cancel

NOTE: To set or cancel child safety lock, Start pad or Stop/Reset pad must be pressed 3 times within 10 seconds.
To Cook/Reheat/Defrost by Micro Power and Time
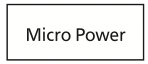
- Select Power Level
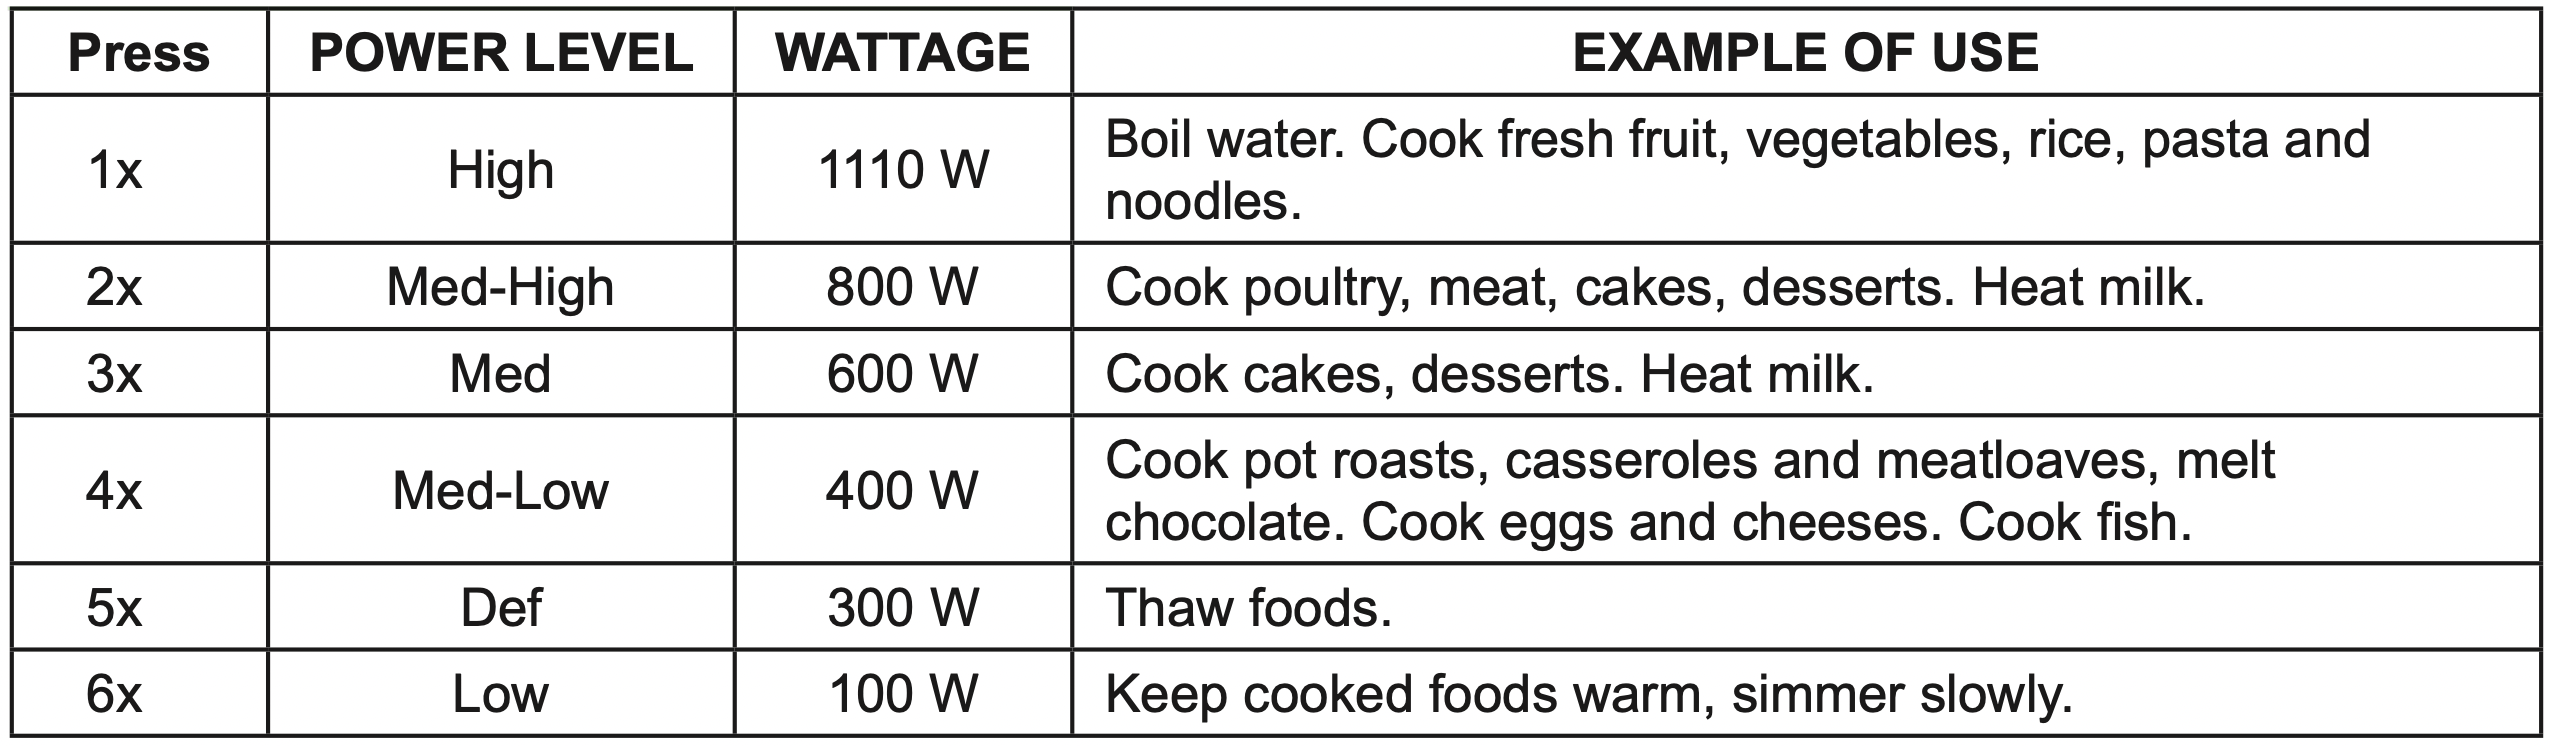
Press Micro Power pad until your desired power level appears in the Display Window. (see chart below)
Note: When selecting High on the first stage, you can start from step 2.
- Set Cooking Time
(High: up to 30 minutes, other powers: up to 99 minutes and 59 seconds for a single stage)
e.g. 5 minutes
- Press

Cooking will start.
The time in the Display Window will count down.
For more than one stage cooking, Repeat steps 1 & 2 above then press Start. The maximum number of stages for cooking is 3. The oven will beep twice between stages. (For further information, refer to page 14)
Micro Power:
The Power Level Pad gives you a selection of different power levels representing decreasing amounts of microwave energy, used for cooking foods at different speeds.
e.g.The lower the micro power setting, the more evenly the food cooks, although it will take a little longer. To select the correct power level for cooking different foods, refer to the chart below.
NOTE: After using the oven, the fan may rotate to cool the electric components and “COOL” appears in the display window. If you cook using microwave, “COOL” will appear after micro cooking over 3 minutes. This is perfectly normal, and you can take out the food from the oven while the fan operates.
To Defrost
To Defrost using Turbo Defrost
This feature allows you to defrost meat, poultry and seafood automatically by just setting the weight of the food.
- Set Weight
The shape and size of the food will determine the maximum weight the oven can accommodate. The recommended maximum weight of food depends on the oven cavity size. Weight must be programmed in kilograms and tenths of a kilogram (0.1 kg ~ 3.0 kg). For best results, the minimun recommended weight is 0.2 kg.
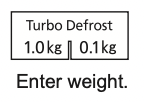
- Press

Defrost time appears in the Display Window and begins to count down.
NOTE: The oven will beep once or twice during the total defrosting time. This indicates that food should be turned, broken apart or removed. After attending to food, close door and press Start to resume defrosting.
For further information, refer to next page.
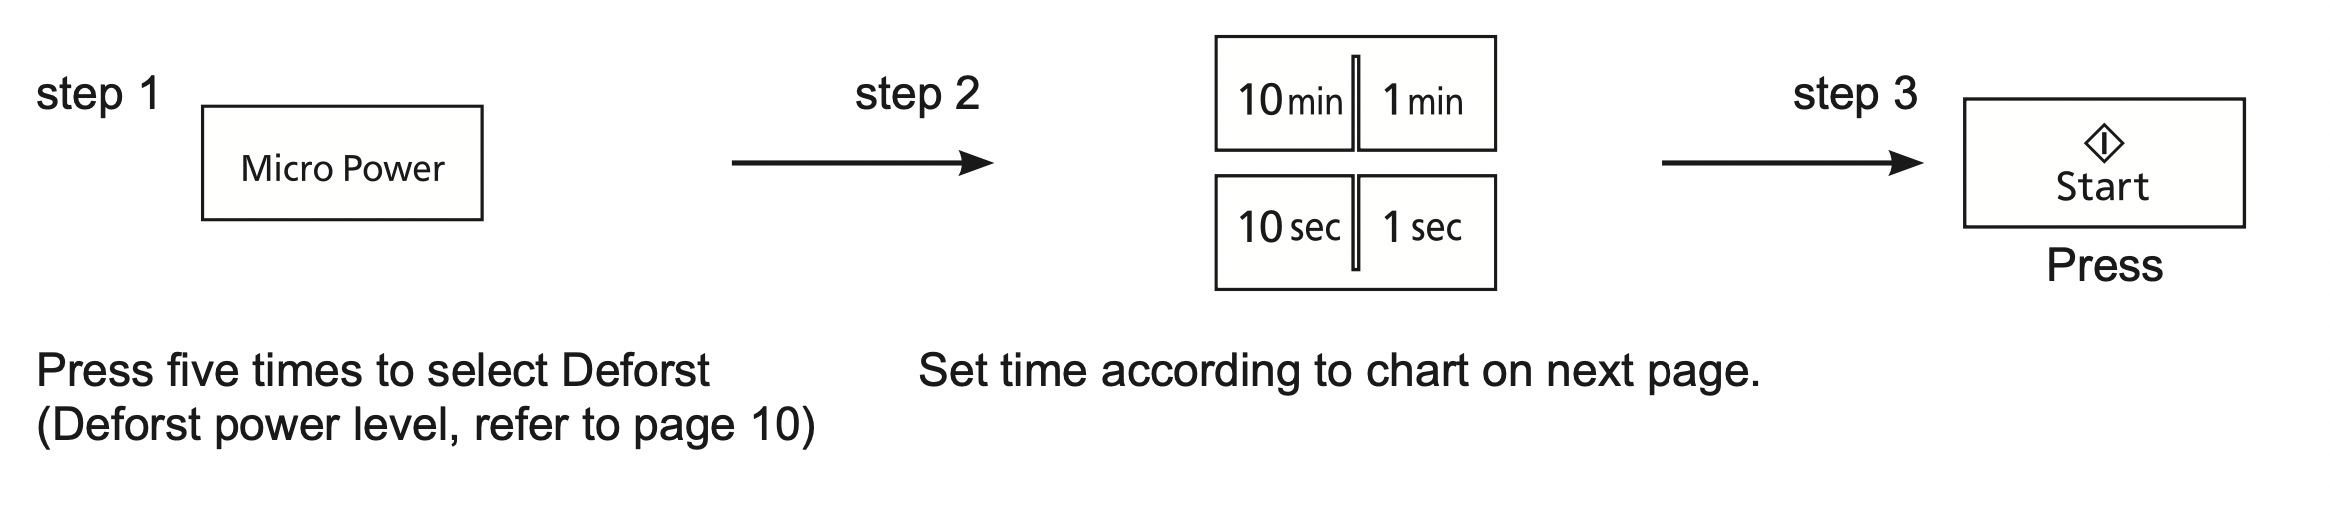
To Defrost by Micro Power and Time Setting
This feature allows you to defrost meat, poultry and seafood by Deforst and time.
Defrosting Tips and Techniques
Preparation for Freezing:
- Heavy-duty plastic wraps, bags and freezer wrap are suitable.
- Freeze meats, poultry and fish in packages with only 1 or 2 layers of food. To aid in separating layers, place two pieces of wax paper between them.
- REMOVE ALL AIR and seal securely.
- LABEL package with type and cut of meat, date and weight.
- Defrosting times given in the charts are for thoroughly frozen foods (i.e. at least 24 hours in freezer maintained at -18°C or lower).
Defrosting Technique:
- Remove from wrapper and set on a defrosting rack in a dish on Glass Tray.
- On Turbo Defrost, the oven will beep during the defrosting time. At “beep”, turn over all meat, poultry, fish and shellfish. Break apart stewing meat, chicken pieces and minced meat. Separate chops and hamburger patties.Shield thin ends of roasts, poultry legs and wings, fat or bones with foil.
- Throughout the defrosting time, remove any defrosted portions of mince or cubed meat, etc.
- After defrosting, large roasts may still be icy in the centre. Let stand, 15 to 30 minutes, in refrigerator to complete defrosting.
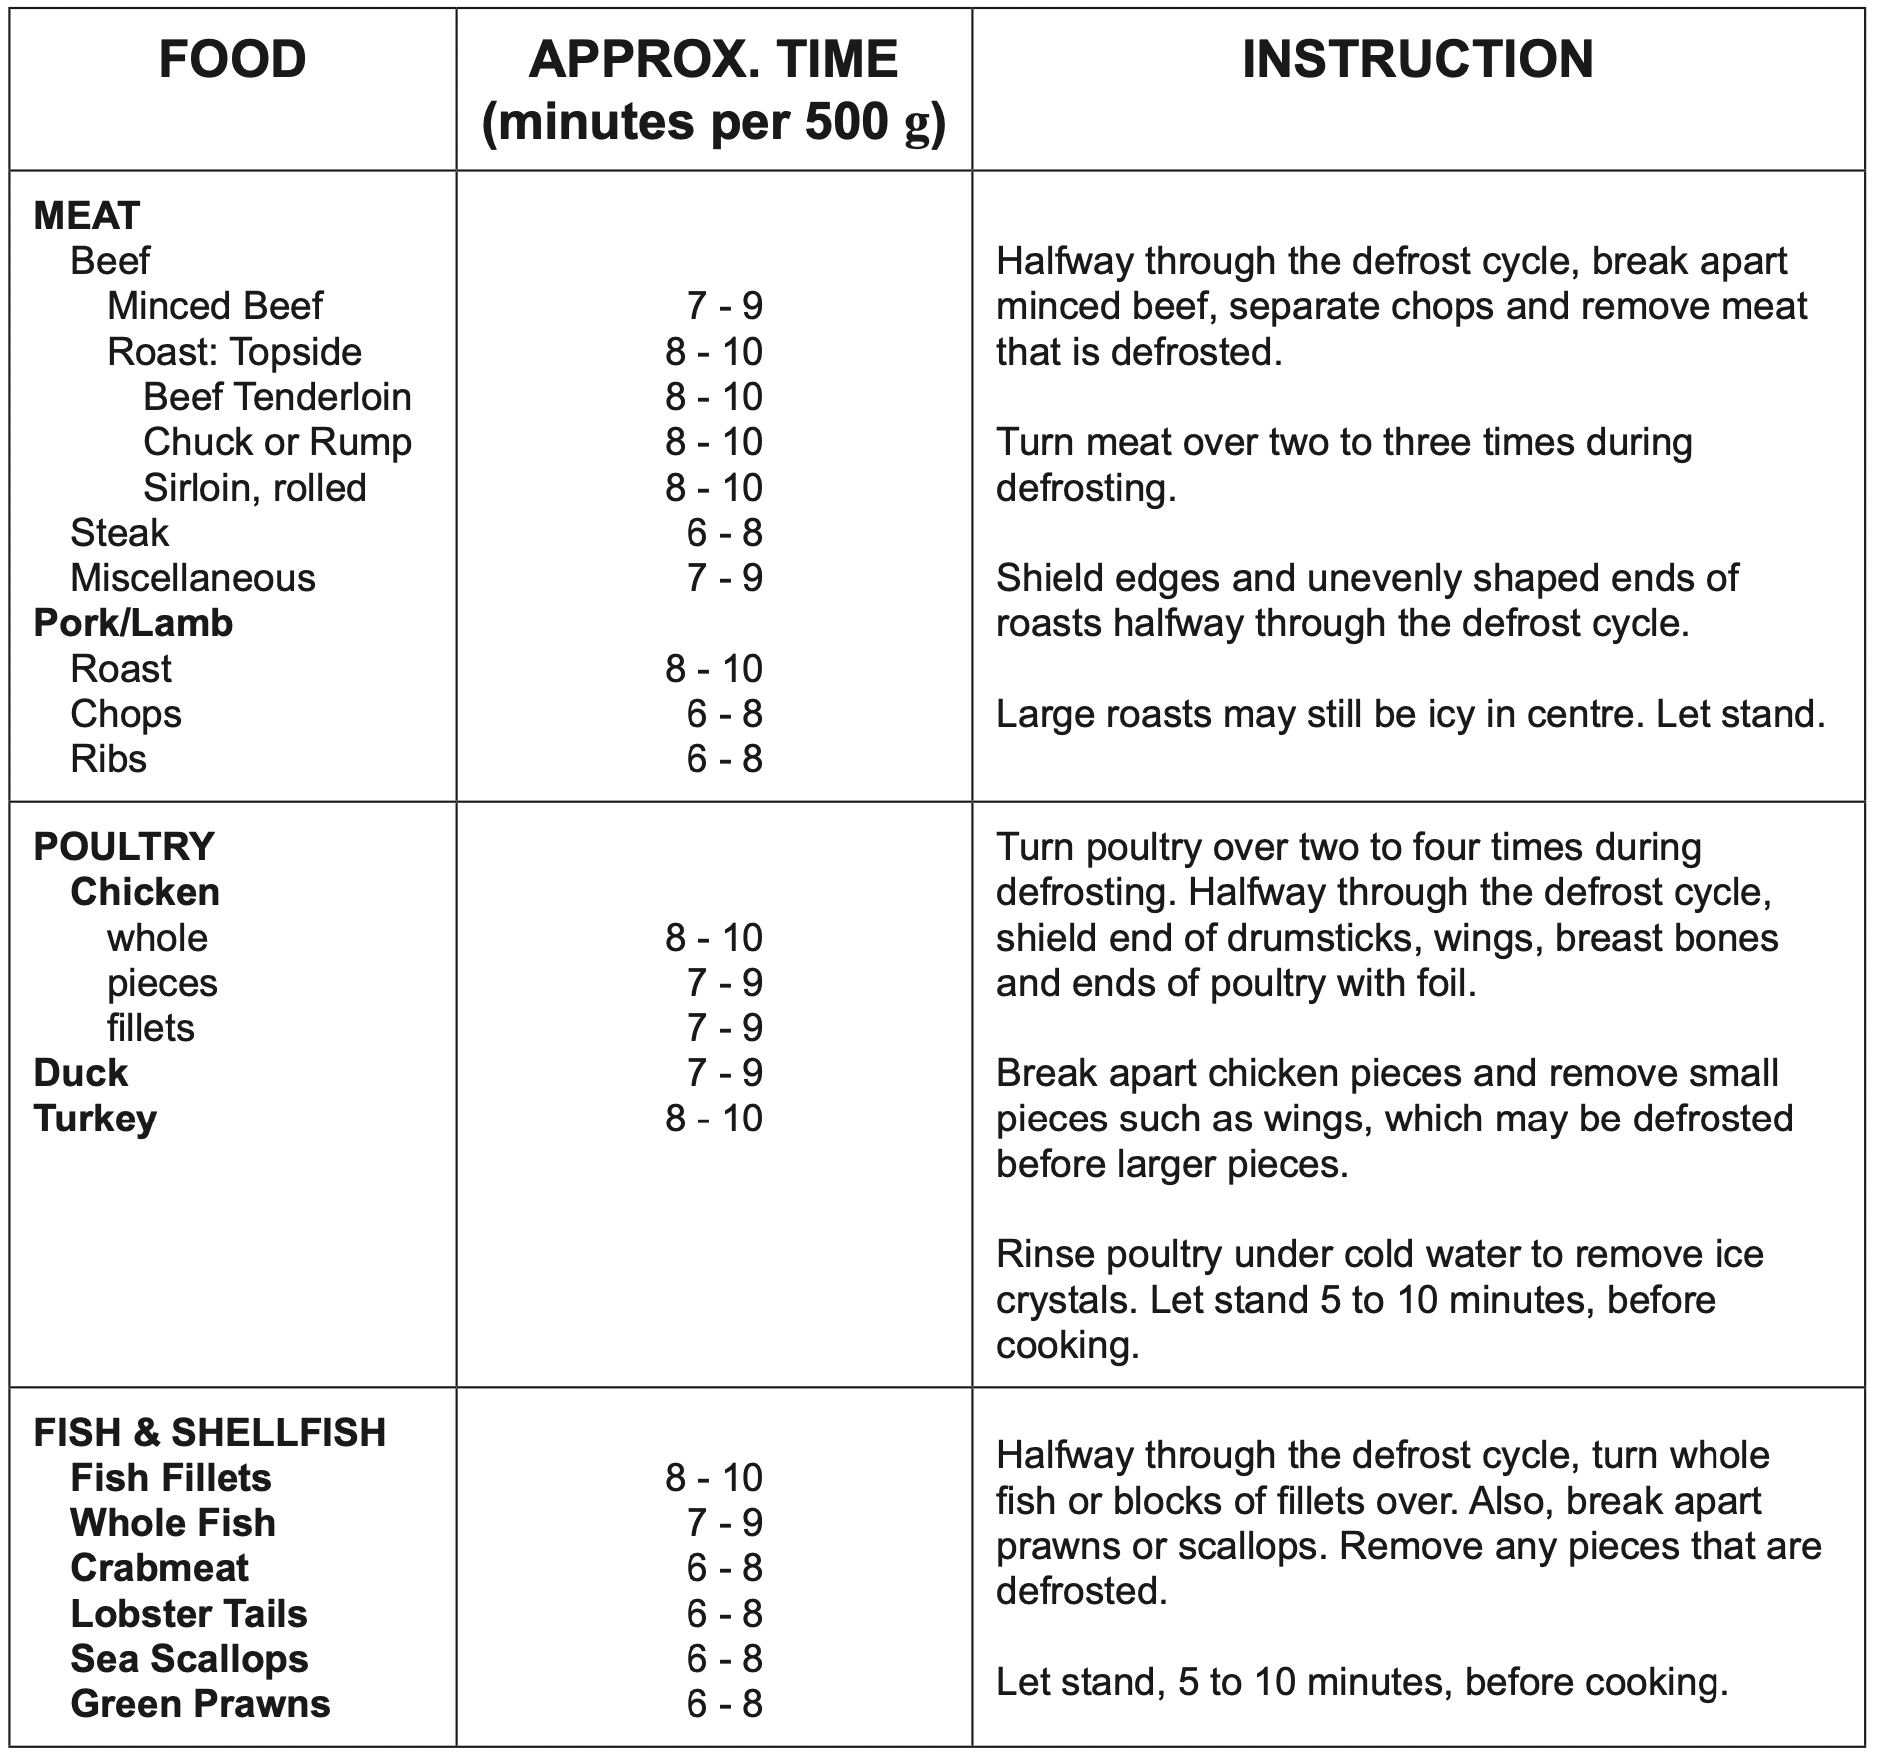
Defrosting Chart by setting Micro Power at Deforst:
To Cook Using Auto Reheat / Auto Cook
Auto Reheat and Auto Cook allows you to cook foods without selecting times and power levels. Only set desired menu number and Serving/Weight, the oven will cook your food automatically.
To Cook Using Auto Reheat or Frozen Reheat
- Press
 or
or 
until the desired weight appears in the Display Window.
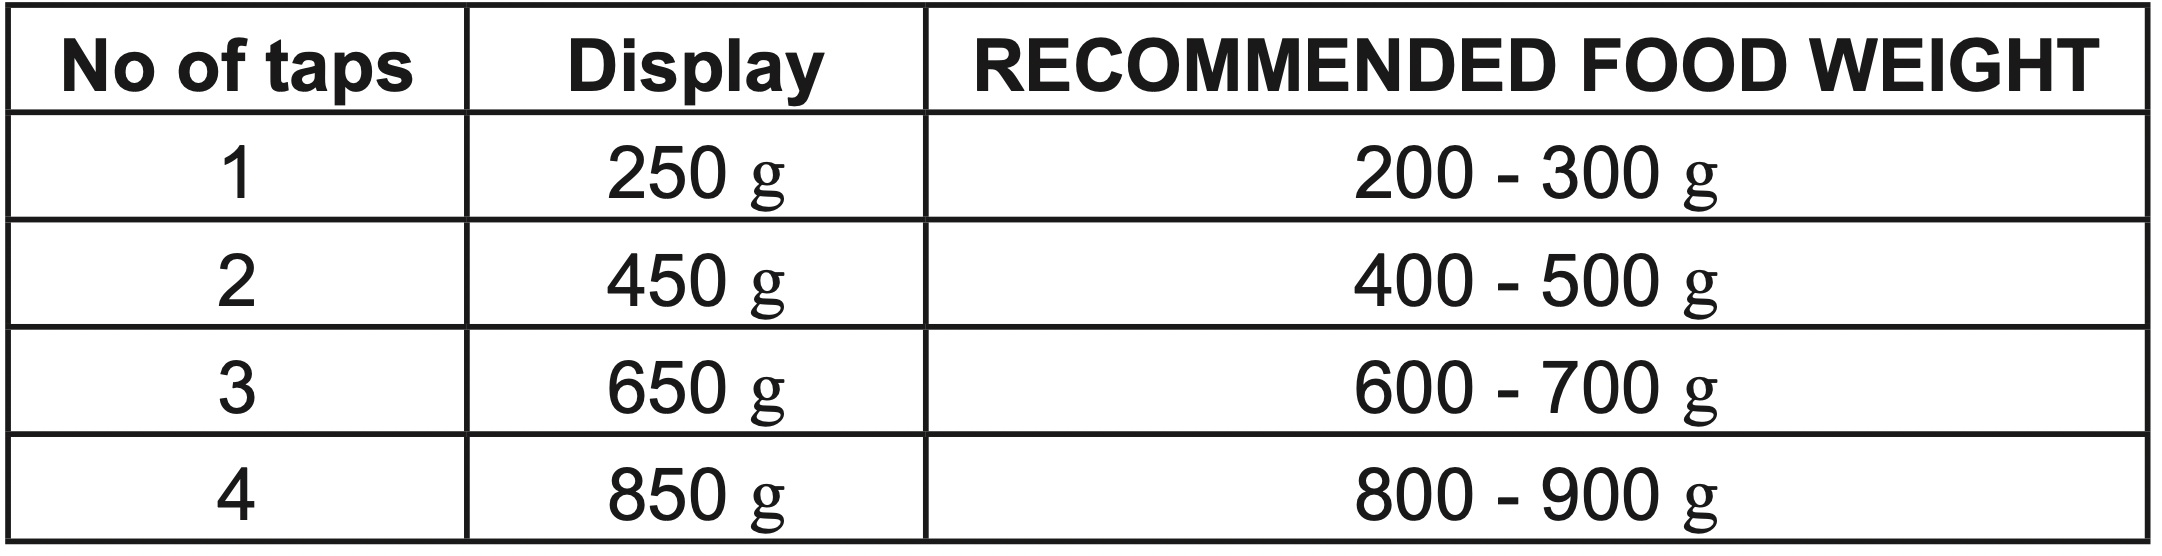
- Press

Reheating time appears in the Display Window and begins to count down.
To Cook Using Auto Cook
- Select desired menu number
Press the appropriate pad until the desired menu number appears in the display window. (see below chart) eg.:

- Select desired Serving/Weight
Press the Serving/Weight pad until the desired number of weight appears in the display window. (see below chart)
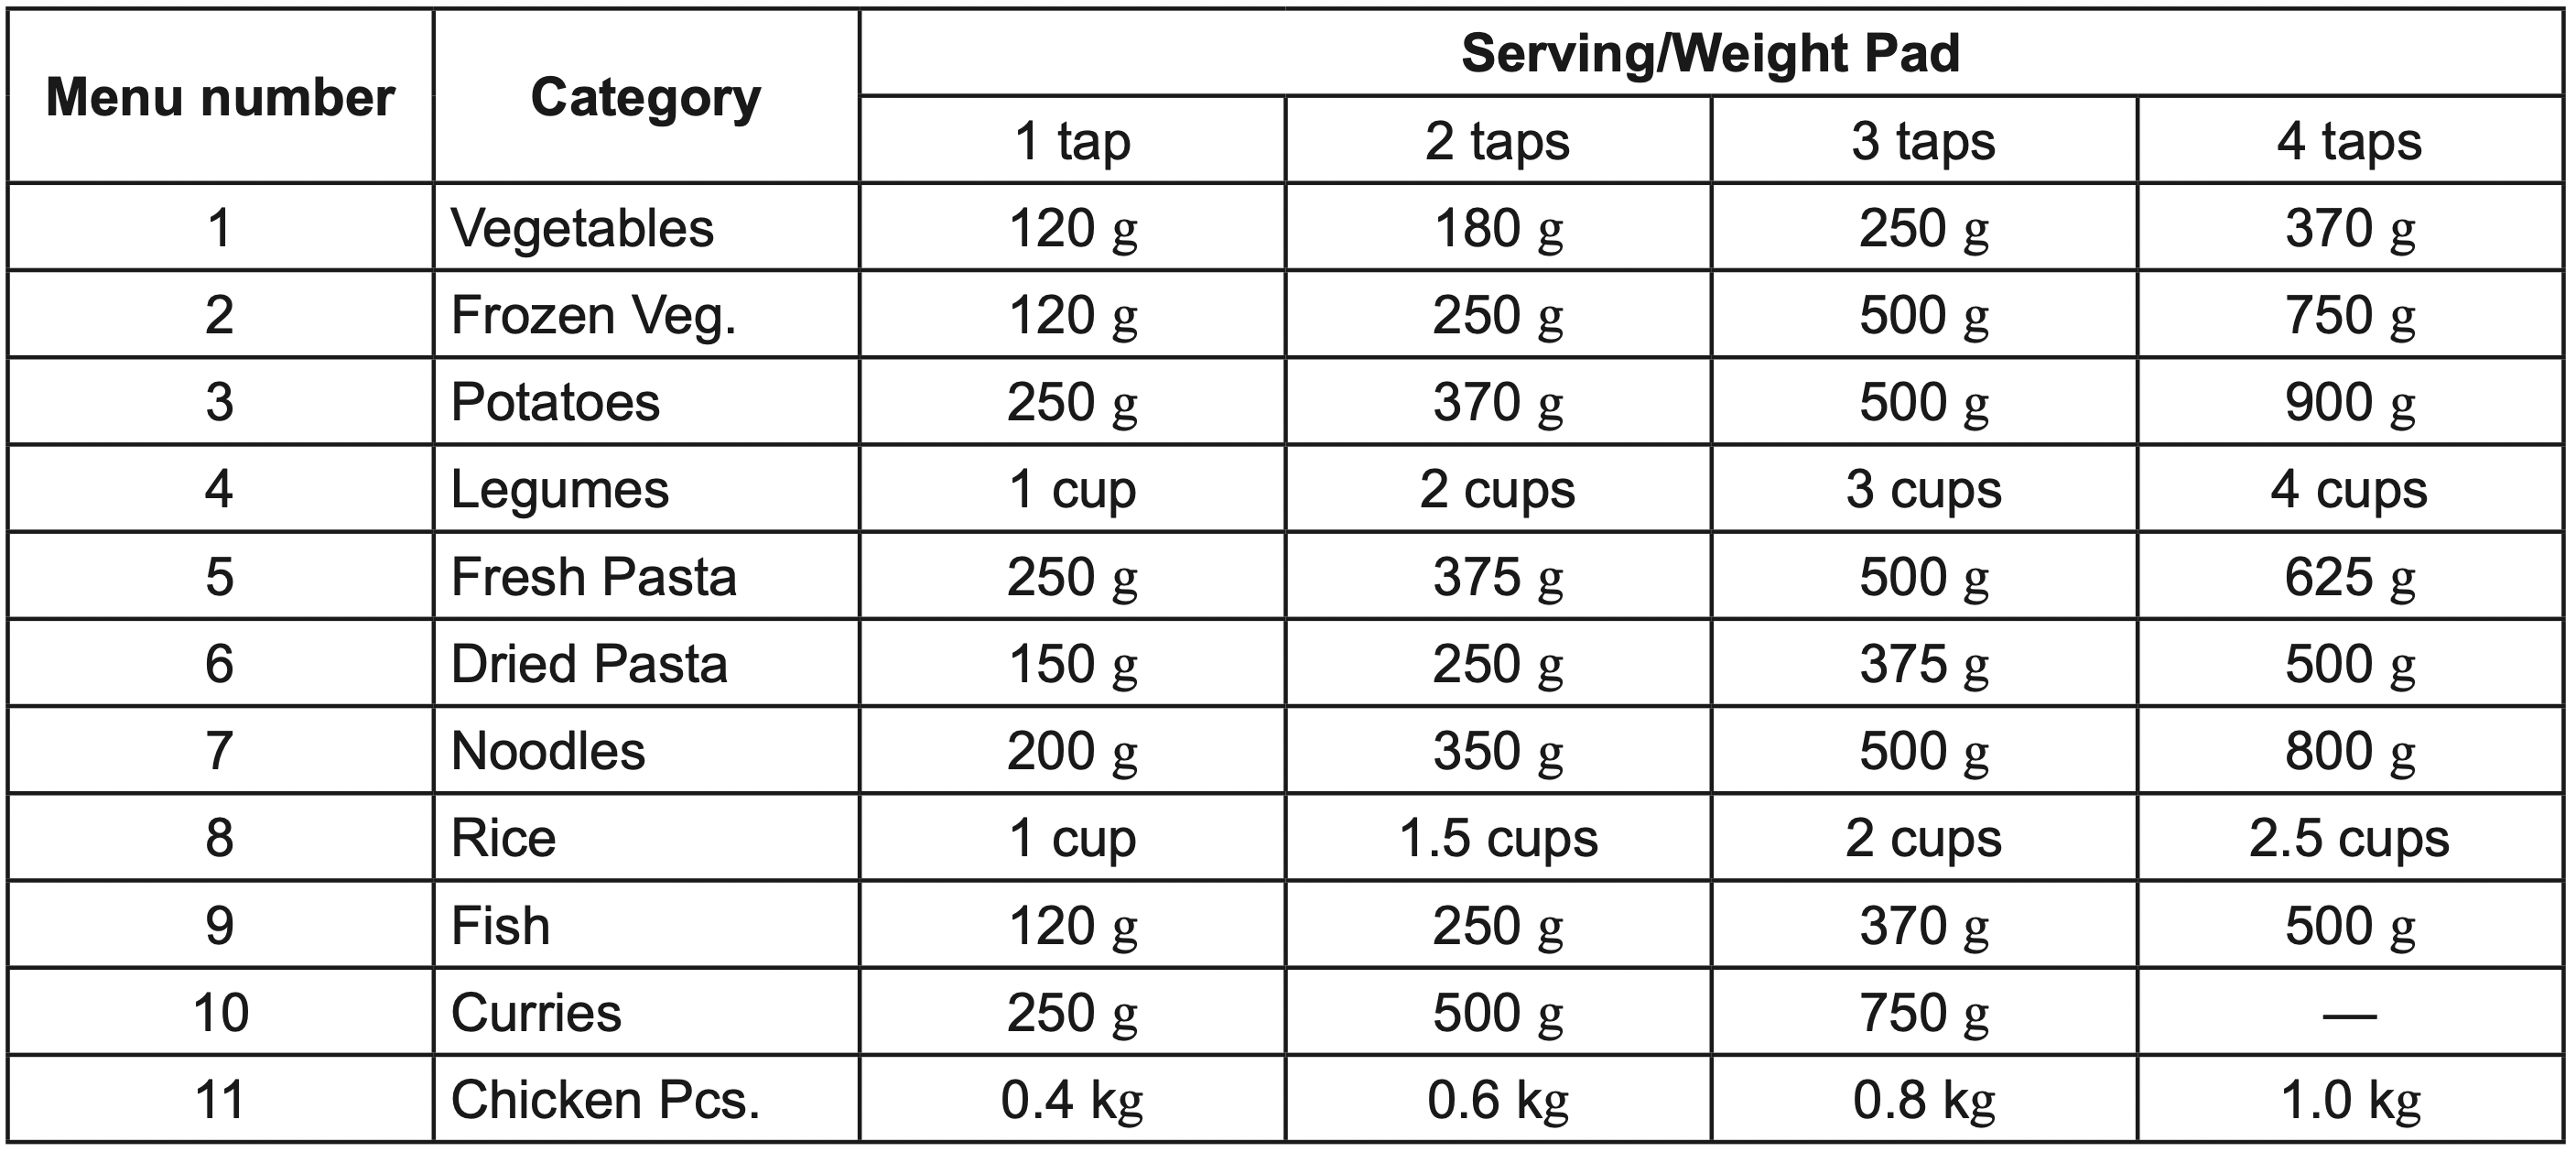
- Press

The time appears in the Display Window and begins to count down.
Note: For information on individual categories refer to each chapter in the cookbook section.
3-Stages Setting
This feature allows you to program 3 Stages of cooking continuously.
E.g.: Continually set [High] 2 minutes, [Med] 3 minutes and [Low] 2 minutes.
- Press once to select “High”.
- Set as 2 minutes using Time Pad.
- Press 3 times to select “Med”.
- Set as 3 minutes using Time Pad.
- Press 6 times to select “Low”.
- Set as 2 minutes using Time Pad.
- Press once. The time will count down at the first stage in the display window.

NOTES:
- When operating, two beeps will sound between each stage.
- This feature is not available for Turbo Defrost, Auto Cook and Reheat function.
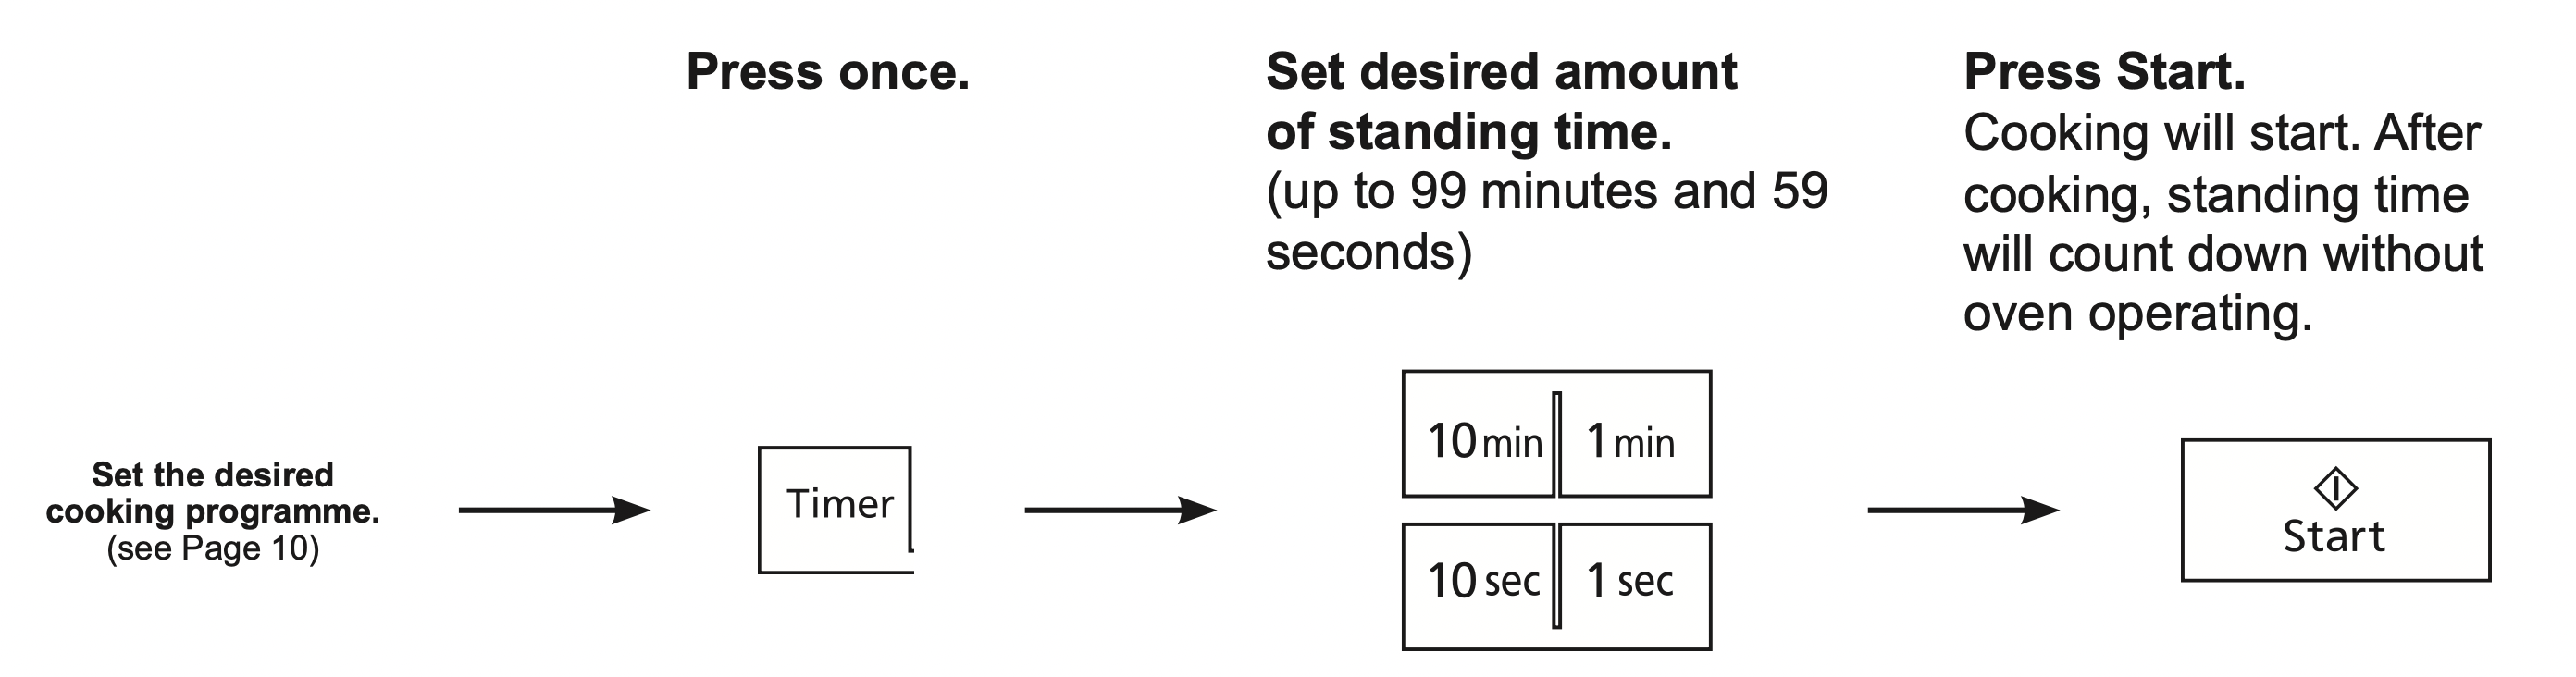
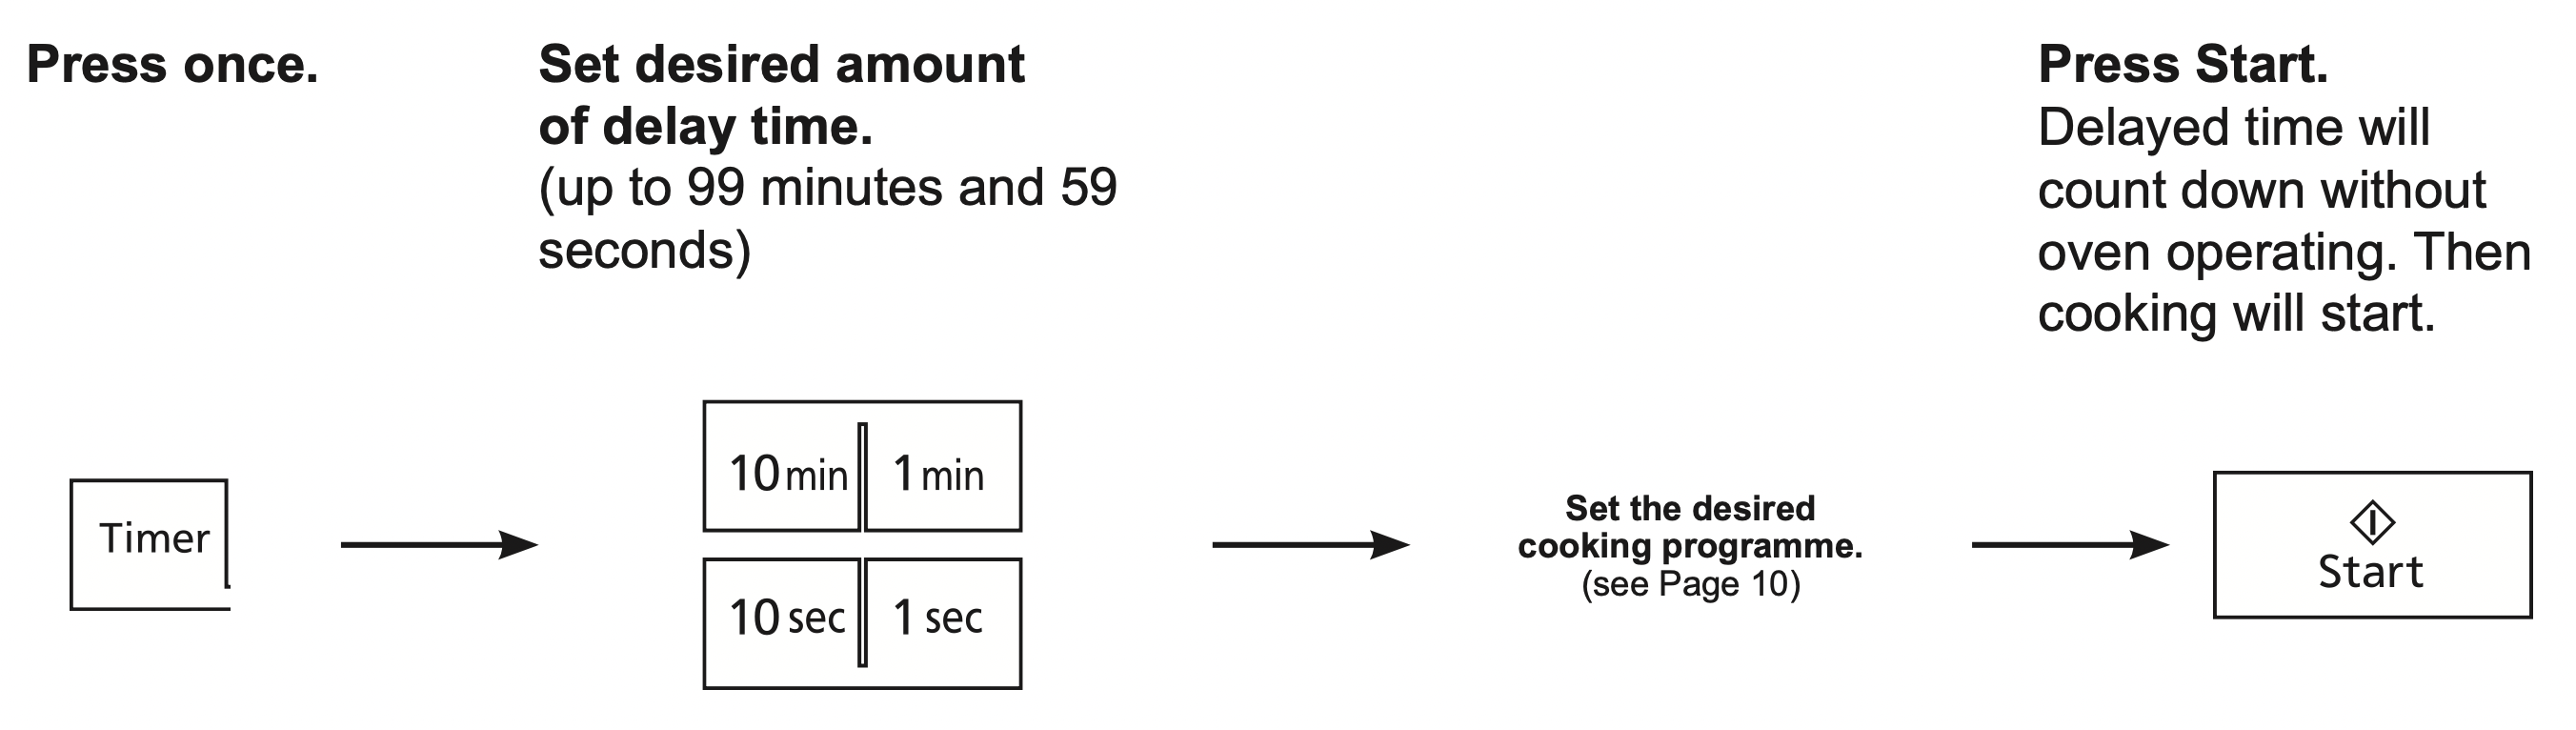
To Use Timer
This feature allows you to program standing after cooking is completed and to program the oven as a minute or a second timer or program delay start.
To Use as a Kitchen Timer

To Set Standing Time
To Set Delay Start
NOTES:
- If oven door is opened during the Standing Time, Delay Start or Kitchen Timer, the time in the Display Window will continue to count down.
- Delay Start/Standing Time cannot be programmed before/after any Auto Control function. This is to prevent the standing temperature of the food from rising before defrosting or cooking begins. A change in the starting temperature could cause inaccurate results and/or food may deteriorate.
- When using Standing time or Delay start, it’s up to 2 Power stages.
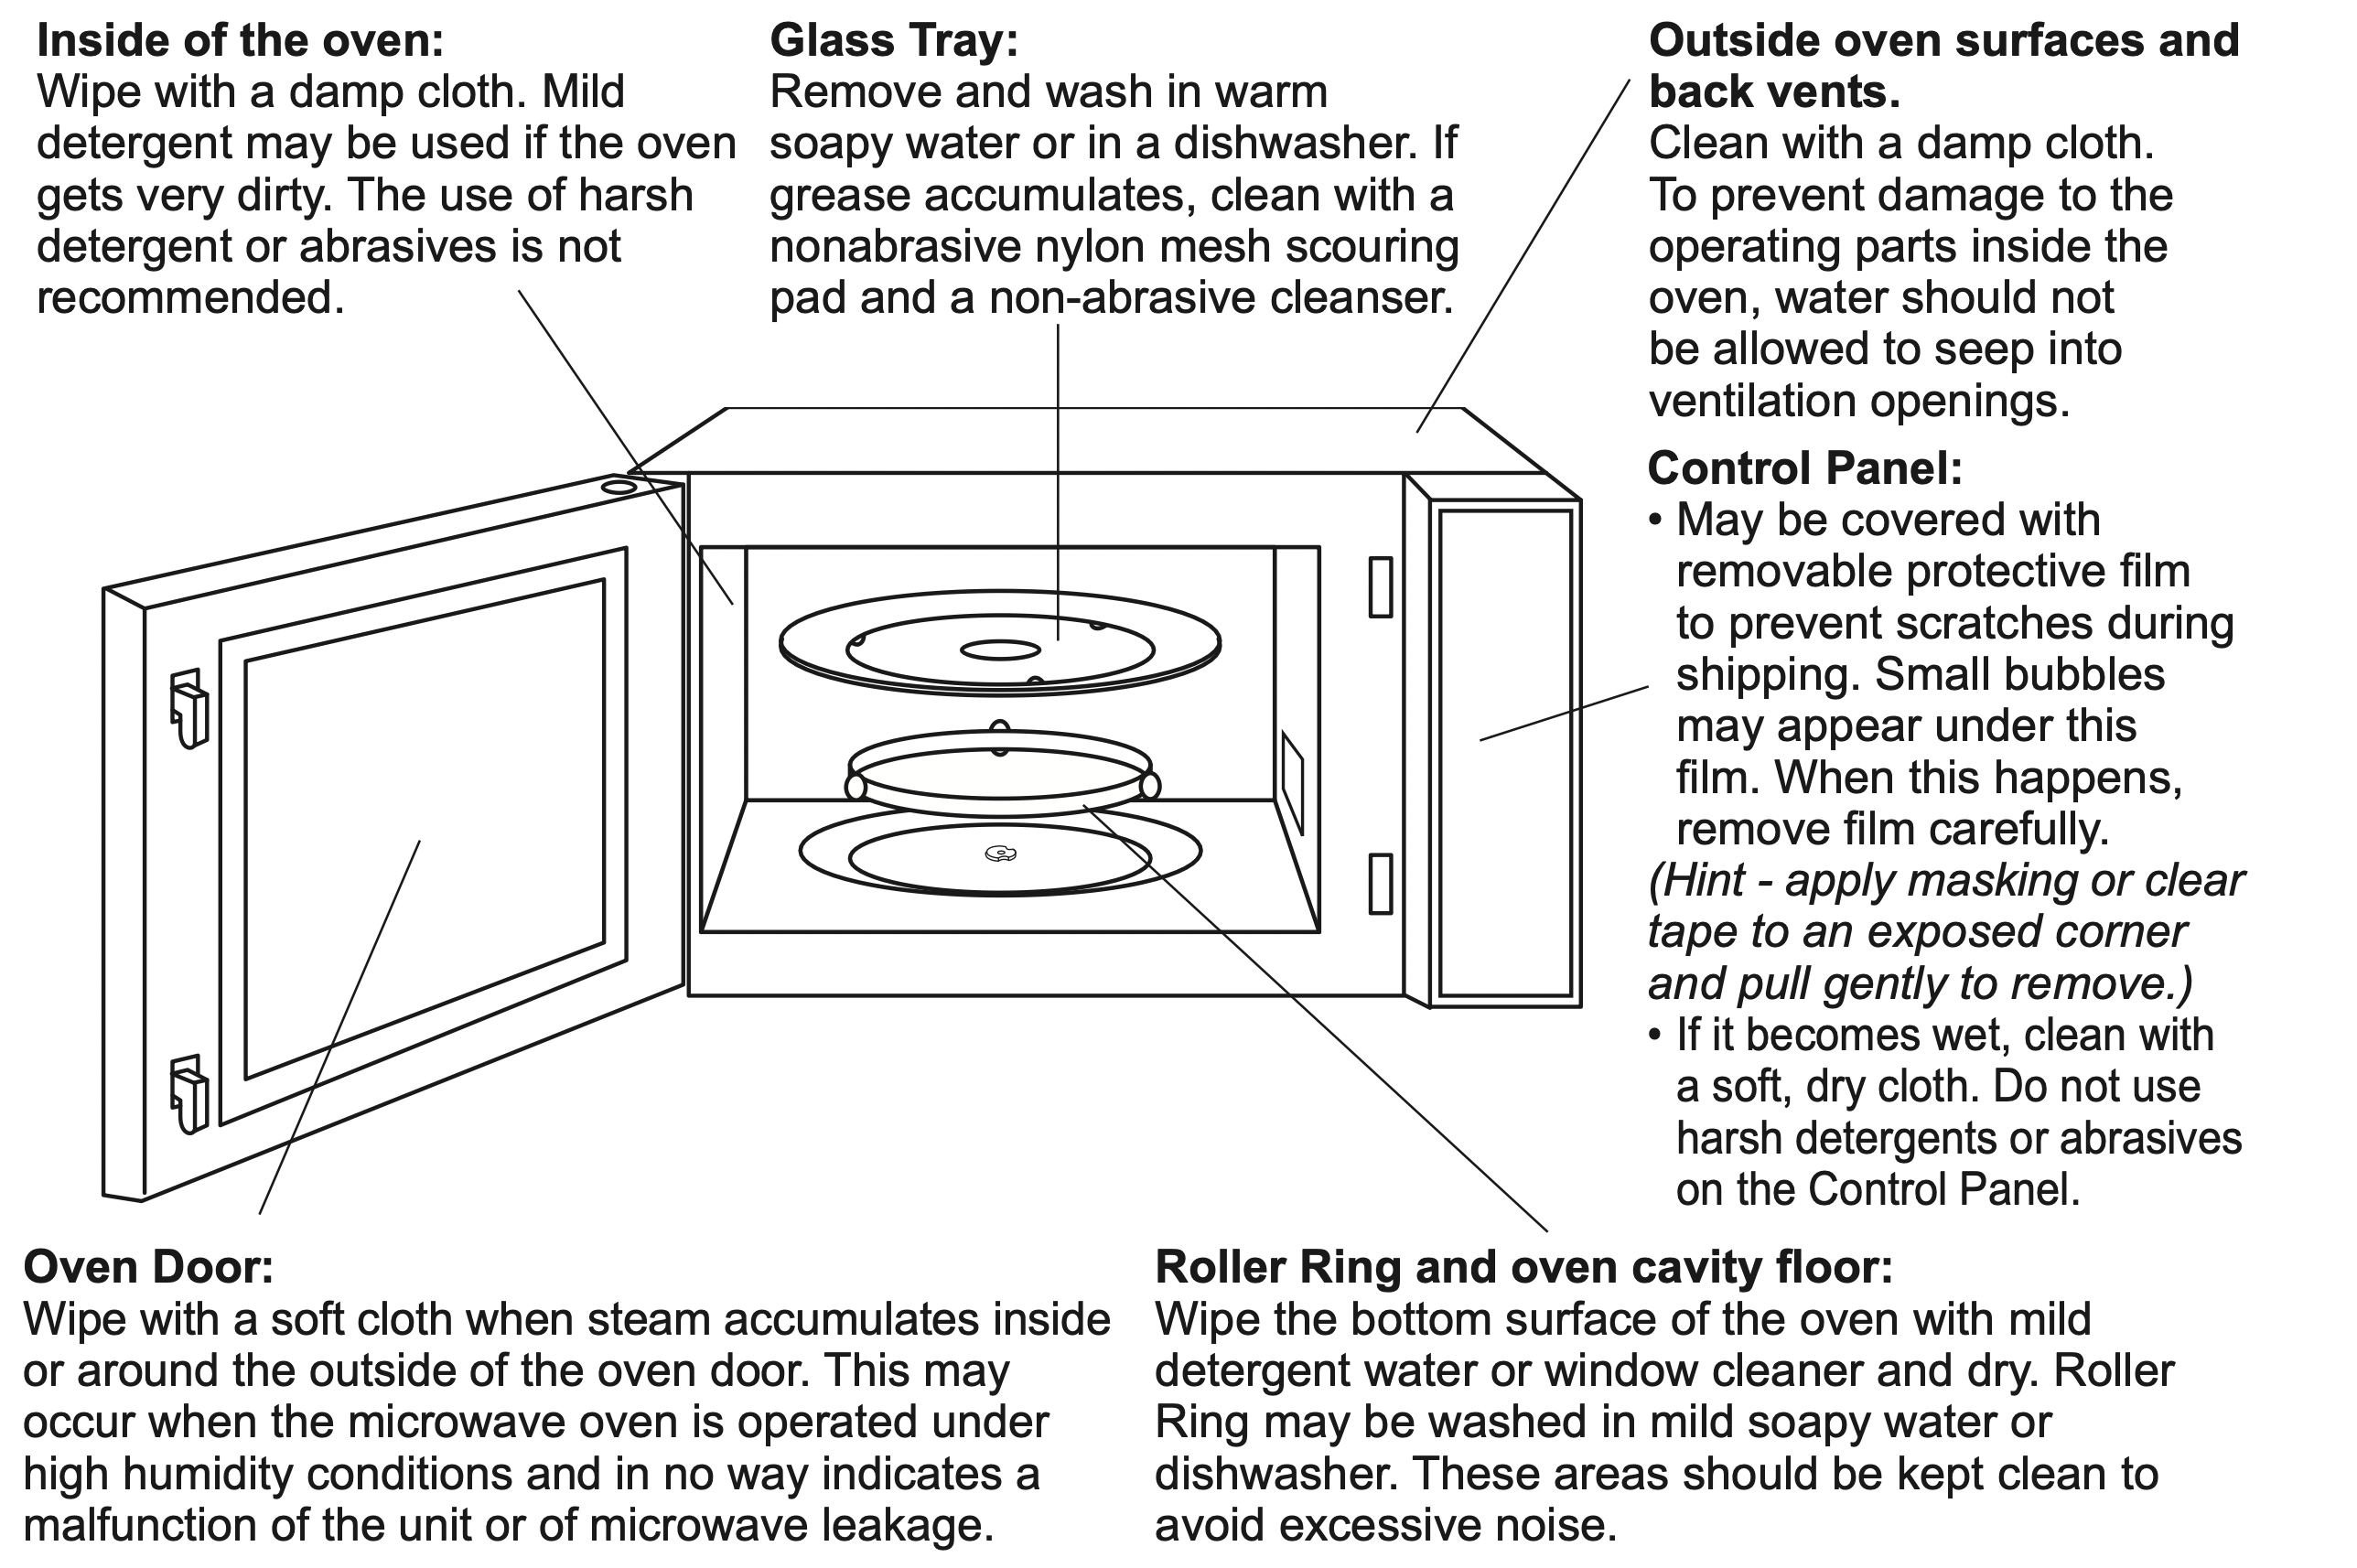
Care of your Microwave Oven
Note: The oven should be cleaned regularly and any food deposits removed. Failure to maintain the oven in a clean condition could lead to deterioration of the surface that could adversely affect the life of the appliance and possibly result in a harzardous situation.
BEFORE CLEANING: Unplug at socket of the oven. If impossible, leave oven door open to prevent oven from accidentally turning on.
AFTER CLEANING: Be sure to replace the Roller Ring and Glass Tray in the proper position and press Stop/Reset Pad to clear the Display Window.
Before Requesting Service
THESE THINGS ARE NORMAL
|
The oven causes interference with my TV.
|
Some radio and TV interference might occur when you cook with the microwave oven. This interference is similar to the interference caused by small appliances such as mixers, vacuums, hair dryers, etc. It does not indicate a problem with your oven.
|
|
Steam accumulates on the oven door and warm air comes from the oven vents.
|
During cooking, steam and warm air are given off from the food. Most of the steam and warm air are removed from the oven by the air which circulates in the oven cavity. However, some steam will condense on cooler surfaces such as the oven door. This is normal.
|
|
I accidentally ran my microwave oven without any food in it.
|
Running the oven empty for a short time will not damage the oven. However, we do not recommend this.
|
|
PROBLEM
|
POSSIBLE CAUSE |
REMEDY |
| Oven will not turn on. |
The oven is not plugged in securely. |
Remove plug from outlet, wait 10 seconds and re-insert.
|
| Circuit breaker or fuse is tripped or blown. |
Reset circuit breaker or replace fuse.
|
| There is a problem with the outlet. |
Plug another appliance into the outlet to check if the outlet is working.
|
| Oven will not start cooking. |
The door is not closed completely. |
Close the oven door securely.
|
| Start Pad was not pressed after programming |
Press Start Pad.
|
| Another program has already been entered into the oven. |
Press Stop/Reset Pad to cancel the previous program and program again.
|
| The program has not been entered correctly. |
Program again according to the Operating Instructions.
|
| Stop/Reset Pad has been pressed accidentally. |
Program oven again.
|
| When the oven is turning on, there is noise coming from Glass Tray. |
The roller ring and oven bottom are dirty. |
Clean these parts according to care of your oven (See next page).
|
| The word “Child” appears in the Display Window. |
The Child Lock was activated by pressing Start Pad 3 times.
|
Deactivate Lock by pressing Stop/Reset Pad 3 times.
|
| “H97”, “H98” or “H00”, appears in the display window. |
The display indicates a problem with microwave generation system.
|
Contact the specified service centre.
|
If it seems there is a problem with the oven, contact an authorized Service Centre.