Use & Care Guide for Filtration System
Parts and Material Included
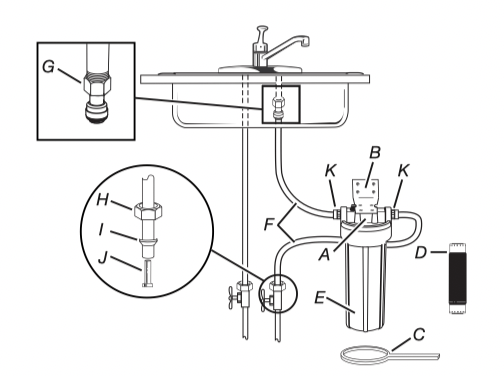
A. Filter Head
B. Filter Head Bracket and eight Phillips head screws
C. Housing Wrench
D. Filter Cartridge
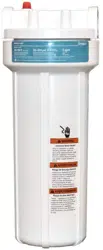
E. Opaque Housing
F. 5' of 3/8" Tubing
G. 3/8" Fitting x 1/2" Faucet Adapter
H. 3/8" Compression Hex Nut
I. 3/8" Ferrule
J. 3/8" Tube Insert
K. Two 3/8" x 3/8" Push-In Fittings
Kit contains components necessary to connect 3/8" outlet tube to 1/2" faucet fitting and 3/8" water supply. If you have any other size faucet connection, you may need additional parts to complete installation. Additional parts sold separately.
Gather the required tools before starting installation. Read and follow the instructions provided with any tools listed here.
- Phillips Head Screwdriver
- Adjustable Wrench
- Teflon ® Tape
- Utility Knife or Tube Cutter for copper piping
Installation Requirements
- Properly tighten all fittings to ensure a leak-free assembly.
- Install in a location that is not susceptible to freezing temperatures as damage to the housing could occur.
- Install away from direct sunlight as prolonged exposure to light can weaken plastic components.
- Some local codes may require the use of a licensed plumber or certified installer when disrupting a potable water line. Determine and follow any and all local codes and requirements.
- Allow room to operate housing wrench and a minimum of 2 1/2" clear space below the unit to facilitate changing of the filter.
This filter can be used at any sink where water is used for drinking.
Installation Instructions
For Use With Cold Water Only
NOTE: Remove items from under the sink. Place a catch basin there to collect small amounts of water that may run out when disconnecting water supply lines.
1. Turn off cold water supply valve and remove existing fitting and/or tubing from cold water side of faucet.
2. Loosely assemble sump to filter head and attach filter bracket. Use this assembly to mark a location under the sink that is not in the way but allows for easy access to change filter. Allow room to operate housing wrench and a minimum of 2 1/2" clear space below the unit to facilitate changing cartridge. Once this is done disassemble components for installation.
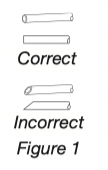
3. Determine length of tubing required from filter head/bracket to faucet and from water supply line to filter head/bracket by holding tubing in place ensuring it is of appropriate length. Do not kink tubing as this will impede water flow. If necessary, loop tubing around to avoid it being kinked. Cut tubing straight with a utility knife or tube cutter (for copper piping) (see Figure 1).
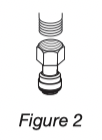
4. Install faucet adapter fitting to faucet (see Figure 2). Do not overtighten to prevent damage to fitting. Referring to section “Using Push-In Fittings”, insert a section of plastic tubing into fitting, making sure end of tubing is firmly seated to backstop.
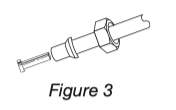
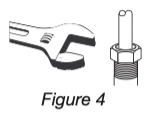
5. Onto one end of the remaining section of tubing, slide the compression hex nut and ferrule onto the tubing and put in the tube insert (see Figure 3). Fasten this assembly onto 3/8" water supply outlet. Do not overtighten (see Figure 4). Overtightening will cause tubing to separate from fitting.
“Using Push-In Fittings”
To Attach Tubing
Push tubing in as far as it will go. Tubing must be inserted past o-ring and hit backstop. Pull tube to ensure it is secured.
To Release Tubing
Push in grey collet to release tubing. With collet held, pull tubing straight out.

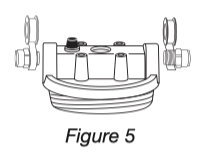
6. Wrap Teflon ® tape (2-1/2 wraps) around the 3/8" fitting in a clockwise direction and fasten to filter head (see Figure 5). Do not usepipe sealant (dope), as solvents in some types of pipe dope may cause damage to plastic fittings.
7. Insert water supply line to port marked “IN” (see Figure 6, A) and insert faucet line to port marked “OUT” (see Figure 6, B). Referring to section “Using Push-in Fittings,” insert plastic tubing into fittings, making sure end of tubing is firmly seated to backstop.

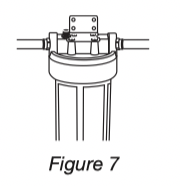
8. Fasten bracket to filter head with four Phillips head screws provided (see Figure 7). Fasten bracket to wall with four Phillips head screws provided. If pre-drilling holes, bracket may be used as a template for making screw hole locations.
9. Lubricate housing o-ring with water.
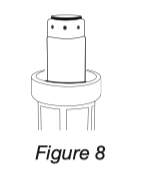
10. Place filter into housing (see Figure 8). Align housing to filter head and screw onto filter head. Tighten with wrench to seal.
11. Slowly turn water supply on while depressing red air release button on filter head and check for leaks. Then run water for 5 minutes with an open faucet to flush out air.
Filter Replacement
The contaminants or other substances removed or reduced by this water filter are not necessarily in all users’ water.
Filter life varies depending on local water conditions and the volume of water used. We recommend that you change your filter every 6 months. However, it can be replaced earlier if there is a drop in flow rate at the faucet.
You can use a variety of Whirlpool filters with this housing: WHKF-GAC, WHKF-DB1 and WHKF-DB2.
To purchase replacement cartridiges please contact Whirlpool at 1-866-363-9472.
To reduce chlorine taste and odor use replacement filter: WHKF-GAC.
Do not use with water that is microbiologically unsafe or of unknown quality without adequate disinfection before or after the system.
Systems certified for Cyst reduction may be used on disinfected water that may contain filterable cysts.
Filter Cartridge Replacement Instructions
NOTE: Before changing cartridge, turn off incoming water supply. Place a bucket under filter to catch the small amount of water that will run out after housing removal.
1. Shut off water.
2. Relieve pressure in housing by pushing red vent button.
3. Unscrew housing and remove old cartridge. Wash housing thoroughly with mild soap and water.
4. Insert new cartridge and re-install housing. Be sure cartridge is seated in the housing before tightening onto head.
5. Use filter wrench to fully seat the cartridge. Tighten to make a water tight seal.
6. Turn on water. If any leaks appear, tighten housing as needed.
7. For WHKF-DUF, flush system for five (5) minutes. For WHKF-DUF-DB1 and WHKF-DUF-DB2, flush system for ten (10) minutes.
Troubleshooting Guide
Water Leaks at Fittings:
- Tighten slightly more until leak stops.
Water leaks at Push-in Connections:
- Push tubing in as far as it will go. If leaking continues, shut off water at the original valve and remove water line by pushing in on the connector collar while pulling the tubing away. (See Push-in Fittings Section) Inspect tubing for cracks and scratches. If tubing is cracked or scratched, simply cut that portion away and reinsert tubing into fitting. Make sure tubing is cut straight. If not, recut.
Accessories
To order accessories, ask for the appropriate part number listed below:
- WHKF-GRND Grounding kit for metallic piping
- WHKF-B6 Bracket for pipe support and contact the customer service toll free in the U.S.A. and Canada 1-866-363-9472 Monday to Friday 8:00 a.m. to 6:00 p.m. (EST)
or write us at:
Whirlpool Water Products Customer eXperience Center 553 Benson Road Benton Harbor, MI 49022-2692
Please include a daytime phone number in your correspondence.
 WHKF-DUF tested and certified by NSF International against NSF/ANSI 42 for Chlorine Taste and Odor.
 WHKF-DUF-DB1 tested and certified by NSF International against NSF/ANSI Standard 42 for the reduction of Chlorine Taste and Odor and Particulate Class I and against NSF/ANSI 53 for the reduction of Cyst.
 WHKF-DUF-DB2 tested and certified by NSF international against NSF/ANSI standard 42 for the reduction of Chlorine Taste and Odor, Particulate Class I and against NSF/ANSI Standard 53 for the reduction of Asbestos, Cyst, Lead, Mercury and MTBE.
1 Year Limited Warranty
KEMFLO INTERNATIONAL warrants the original purchaserconsumer of its Product that is free of defects in materials and workmanship. Any defect, malfunction, or other failure of the Product to conform to this warranty will be remedied by Warrantor in the manner provided below. This Warranty, together with any warranties implied by law, shall be limited to a duration of one (1) year from the original date of purchase by the consumer. This Warranty does not apply to defects that result from abuse, misuse, alteration or damage not caused by KEMFLO INTERNATIONAL. THIS WARRANTY DOES NOT COVER, AND IS INTENDED TO EXCLUDE ANY LIABILITY ON THE PART OF WARRANTOR, WHETHER UNDER THIS WARRANTY OR UNDER ANY WARRANTY IMPLIED BY LAW, FOR ANY INDIRECTOR CONSEQUENTIAL DAMAGES FOR BREACH HEREOF OR THEREOF. Note: Some states prohibit limitations on the duration of implied warranties and on the exclusion of indirect or consequential damages; and so the limitation on implied warranties and on incidental and consequential damages may not be applicable to you.
RESPONSIBILITY OF WARRANTOR
KEMFLO INTERNATIONAL’s responsibility under this warranty shall be to repair at its expense, at no charge to the original purchaser-consumer any product that is actually defective, malfunctioning or otherwise in violation of this warranty. If KEMFLO INTERNATIONAL for any reason cannot repair a Product covered hereby within two (2) weeks after receipt of the original purchaser-consumer’s notification of a Warranty claim and the Product, then KEMFLO INTERNATIONAL’s responsibility shall be, at its option, either to replace the defective Product with a comparable new unit at no charge to the consumer or to refund the full purchase price. KEMFLO INTERNATIONAL’s obligations of repair, replacement, or refund are conditioned upon the return of the defective product to KEMFLO INTERNATIONAL. If any Product hereby is actually defective within the terms of this Warranty, then KEMFLO INTERNATIONAL will bear all the reasonable and proper shipping and mailing charges actually incurred in the consumer’s return of the Product set forth herein. If the Product proves not to be defective within the terms of this Warranty, then all costs and expenses in connection with the processing of the consumer’s claim hereunder shall be borne by the consumer.
RESPONSIBILITY OF THE CONSUMER
The original purchaser-consumer’s sole responsibility in the instance of a warranty claim shall be to notify KEMFLO INTERNATIONAL of the defect, malfunction or other manner in which the terms of this Warranty are violated. You may secure performance or obligations hereunder by (in writing):
1. Identifying the Product involved (by model or serial number or other sufficient description that will allow Warrantor to determine which product is defective).
2. Specifying where, when and from whom the Product was purchased.
3. Describing the nature of the defect, malfunction or other violation of this Warranty.
4. Return the Product, with the above information to:
KEMFLO NORTH AMERICA 6400 Corporate Ave.
Portage, MI 49002, U.S.A.
THIS WARRANTY GIVES YOU SPECIFIC LEGAL RIGHTS, AND YOU MAY ALSO HAVE OTHER RIGHTS, WHICH VARY FROM STATE TO STATE.