
EN Instructions for use
DE Betriebsanleitung
FR Mode d’emploi
NL Gebruiksaanwijzingen
IT Istruzioni per l’uso
ES Instrucciones de uso
PT Instruções de uso
BG Ръководство за употреба
CS Návod k použití
DA Brugsanvisning
FI Käyttöohje
HU Használati útmutató
NO Brugsanvisning
PL Instrukcja obsługi
RO Informaţii pentru utilizator
RU Инструкция по зксплуатации
SK Návod na používanie
SV Bruksanvisning
UK Інструкції з використання
AR لامعتسﻻا قرط

9
EN
GENERAL SAFETY
• Before any cleaning or maintenance operation, disconnect hood from the mains by
removing the plug or disconnecting the mains electrical supply.
• Always wear work gloves for all installation and maintenance operations.
• This appliance can be used by children aged from 8 years and above and persons with
reduced physical, sensory or mental capabilities or lack of experience and knowledge if they
have been given supervision or instruction concerning use of the appliance in a safe way
and understand the hazards involved.
• Children shall not be allowed to tamper with the controls or play with the appliance.
• Cleaning and user maintenance shall not be made by children without supervision.
• The premises where the appliance is installed must be sufficiently ventilated, when the
kitchen hood is used together with other gas combustion devices or other fuels.
• The hood must be regularly cleaned on both the inside and outside (AT LEAST ONCE A
MONTH).
• This must be completed in accordance with the maintenance instructions provided. Failure
to follow the instructions provided regarding the cleaning of the hood and filters will lead to
the risk of fires.
• Do not flambé under the range hood.
• Do not remove filters during cooking.
• For lamp replacement use only lamp type indicated in the Maintenance/Replacing lamps
section of this manual.
The use of exposed flames is detrimental to the filters and may cause a fire risk, and must
therefore be avoided in all circumstances.
Any frying must be done with care in order to make sure that the oil does not overheat and
ignite.
CAUTION: Accessible parts of the hood may become hot when used with cooking
appliances.
• Do not connect the appliance to the mains until the installation is fully complete.
• With regards to the technical and safety measures to be adopted for fume discharging it is important to closely follow the regulations provided
by the local authorities.
• The air must not be discharged into a flue that is used for exhausting fumes from appliance burning gas or other fuels.
• Do not use or leave the hood without the lamp correctly mounted due to the possible risk of electric shocks.
• Never use the hood without effectively mounted grids.
• The hood must NEVER be used as a support surface unless specifically indicated.
• Use only the fixing screws supplied with the product for installation or, if not supplied, purchase the correct screws type.
• Use the correct length for the screws which are identified in the Installation Guide.
• In case of doubt, consult an authorized service assistance center or similar qualified person.
WARNING!
• Failure to install the screws or fixing device in accordance with these instructions may result in electrical hazards.
• Do not use with a programmer, timer, separate remote control system or any other device that switches on automatically.
Very young children(0-3years)should be kept away from the appliance.Young children (3-8 years)should be kept away from the appliance
unless continuously supervised.
10
CAUTION:The appliance is not intended to be operated by means of an external switching device, such as a timer,or separate remote
controlled system.
This appliance is not for professional use. Do not use the appliance outdoors.
The appliance must be handled and installed by two or more persons-risk of injury.
Installation, including water supply (if any),electrical connections and repairs must be carried out by a qualified technician.
Once installed,packaging waste (plastic,styrofoam parts etc.) must be stored out of reach of children – risk of suffocation.
Do not use the appliance when you are wet or barefoot.
Never use steam cleaning equipement – risk of electric shock.
The packaging material is 100% recyclable and is marked with the recycle symbol
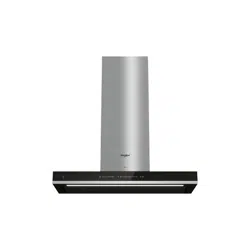
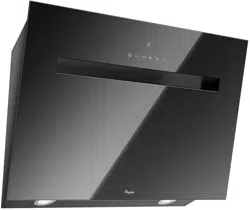
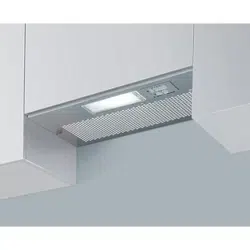
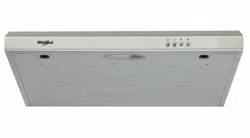
The hood can look different to that illustrated in the drawings in this booklet. The instructions for use, maintenance and installation,
however, remain the same.
Closely follow the instructions set out in this manual. All responsibility, for any eventual inconveniences, damages or fires caused by not
complying with the instructions in this manual, is declined. This appliance is intended to be used in household and similar application such as: -
staff kitchen areas in shop, offices and other working environments; - farm houses; - by clients in hotels, motels and other residential type
environments; - bed and breakfast type environments.
• It is important to conserve this booklet for consultation at any moment. In the case of sale, cession or move, make sure it is together with
the product.
• Read the instructions carefully: there is important information about installation, use and safety.
• Do not carry out electrical or mechanical variations on the product or on the discharge conduits.
• Before proceeding with the installation of the appliance verify that there are no damaged all components. Otherwise contact your dealer
and do not proceed with the installation.
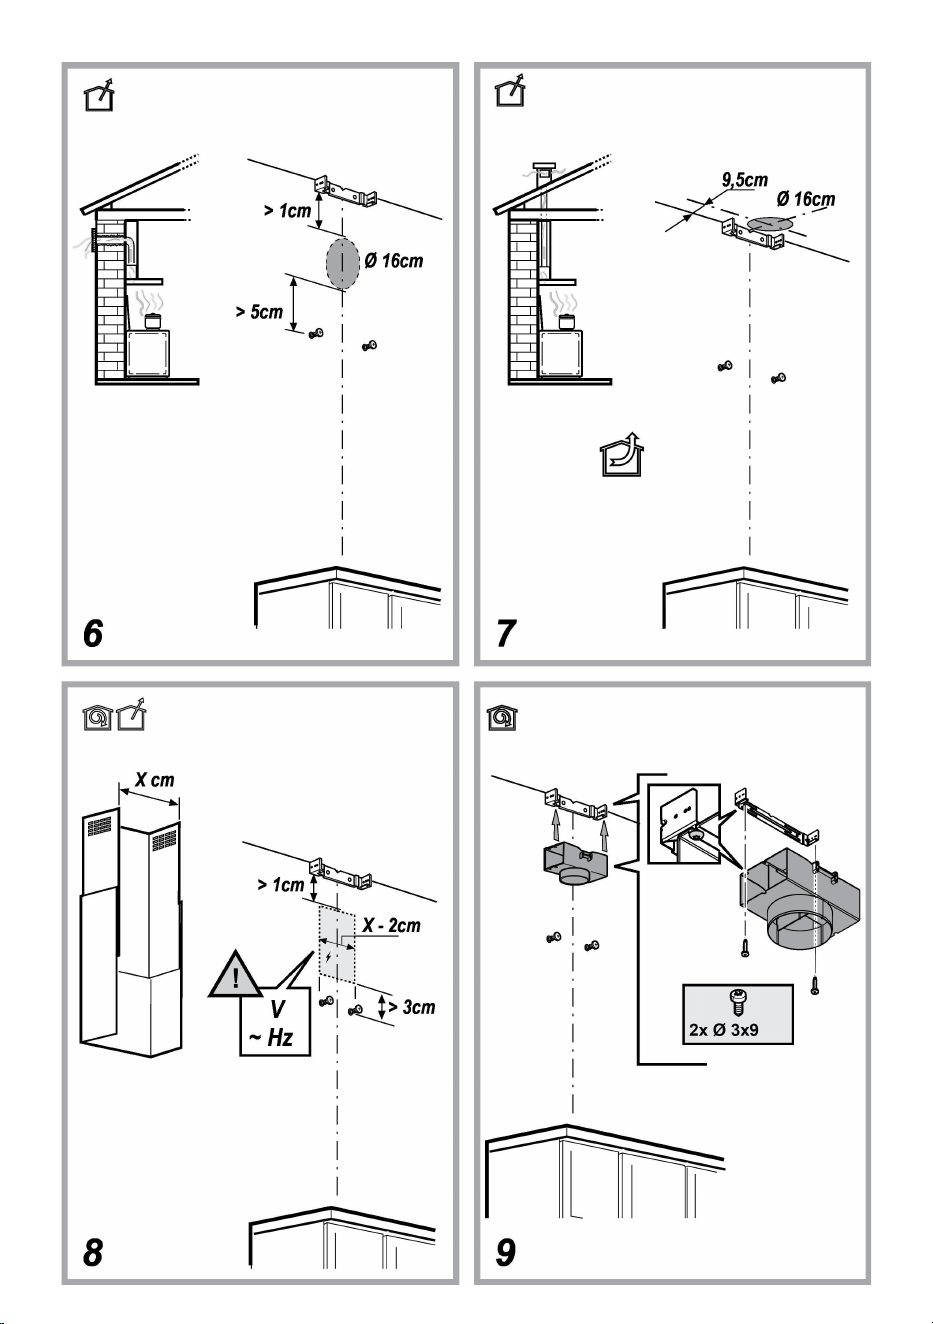
The minimum distance between the supporting surface for the cooking equipment on the hob and the lowest part of the range hood must be
not less than 50cm from electric cookers and 65cm from gas or mixed cookers.
If the instructions for installation for the gas hob specify a greater distance, this must be adhered to.
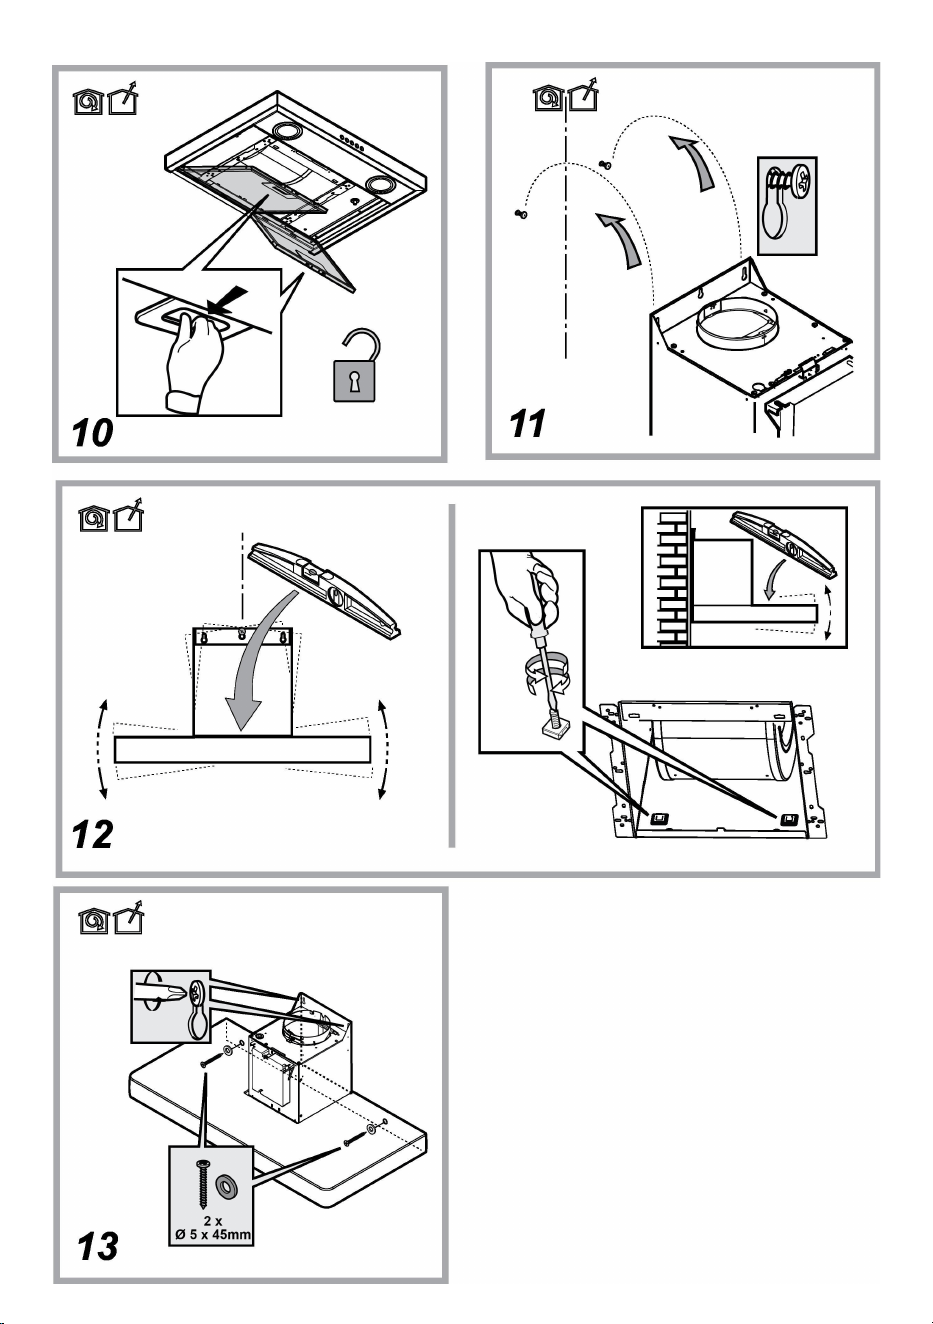
ELECTRICAL CONNECTION
The mains power supply must correspond to the rating indicated on the plate situated inside the hood. If provided with a plug connect the hood
to a socket in compliance with current regulations and positioned in an accessible area, after installation. If it not fitted with a plug (direct mains
connection) or if the plug is not located in an accessible area, after installation, apply a double pole switch in accordance with standards which
assures the complete disconnection of the mains under conditions relating to over-current category III, in accordance with installation
instructions.
WARNING!
Before re-connecting the hood circuit to the mains supply and checking the efficient function, always check that the mains cable is correctly
assembled.
If the cable is not fitted with a plug, connect the wires according to the following table:
Mains voltage and frequency
Wire connection
Refer to the rating indicated on the plate inside of the hood
: yellow/green
N : blue
L
: brown
Replacing the power cable
The hood is provided with a special power cable ; if the cable is damaged, request a new one from Technical Service.

11
AIR VENT
(for the suction versions)
Connect the hood and discharge holes on the walls with a diameter equivalent to the air outlet (connection flange).
Using the tubes and discharge holes on walls with smaller dimensions will cause a diminution of the suction performance and a drastic
increase in noise.
Any responsibility in the matter is therefore declined.
! Use a duct of the minimum indispensable length.
! Use a duct with as few elbows as possible (maximum elbow angle: 90°).
! Avoid drastic changes in the duct cross-section.
! The company declines any responsibility whenever these regulations are not respected.
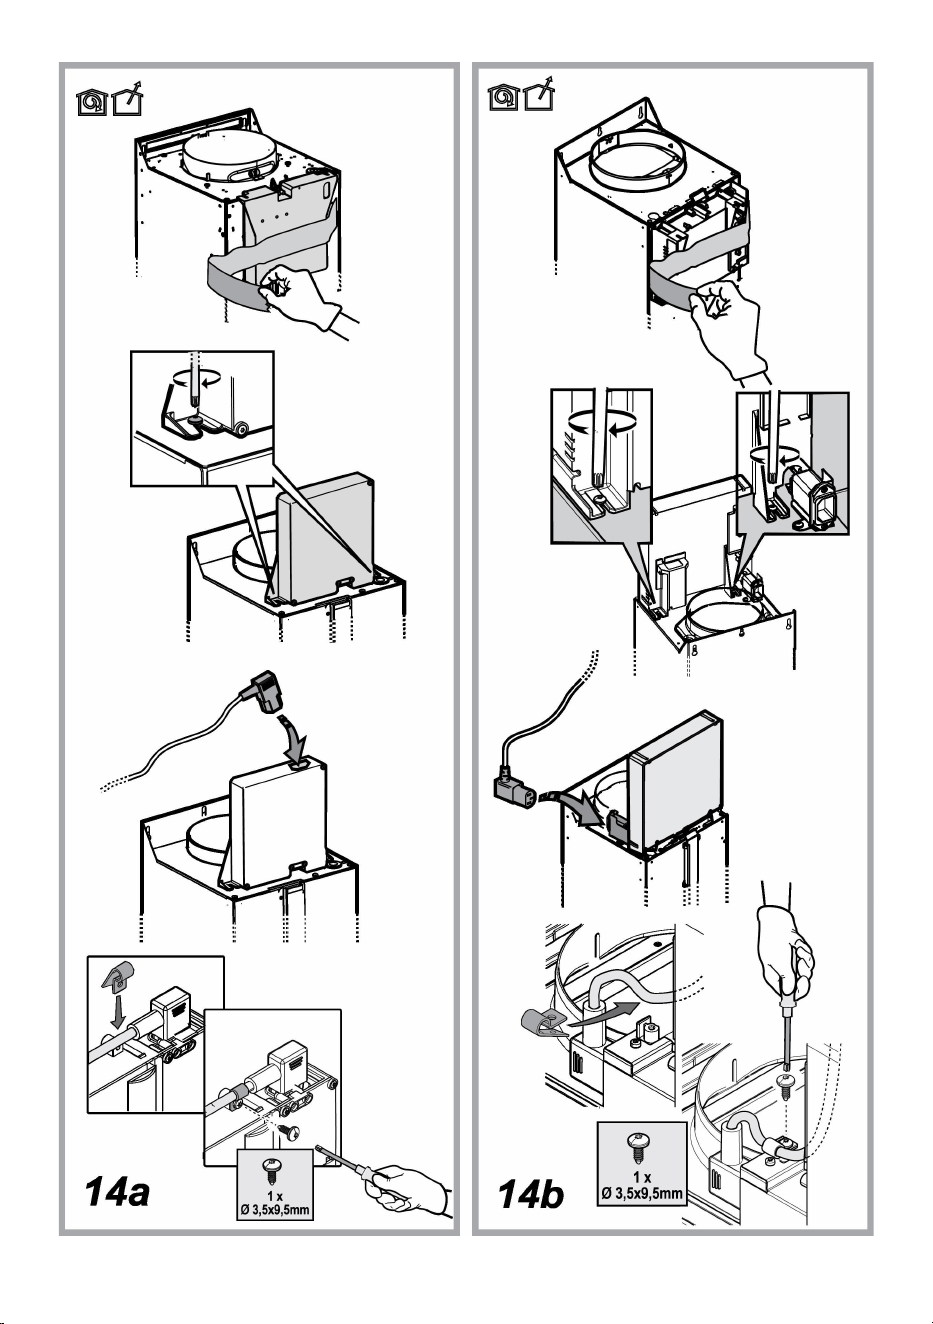
FILTERING OR DUCTING ?
! Your cooker hood is ready to be used in suction version.
To use the hood in filtering version the special ACCESSORY KIT must be installed.
Check on the first pages of this manual if the ACCESSORY KIT is furnished or must be bought separately.
Note: If furnished, in certain cases, the additional activated carbon filtering system may be installed on the hood.
Information about the conversion of the hood from suction version to filtering version is present in this manual.
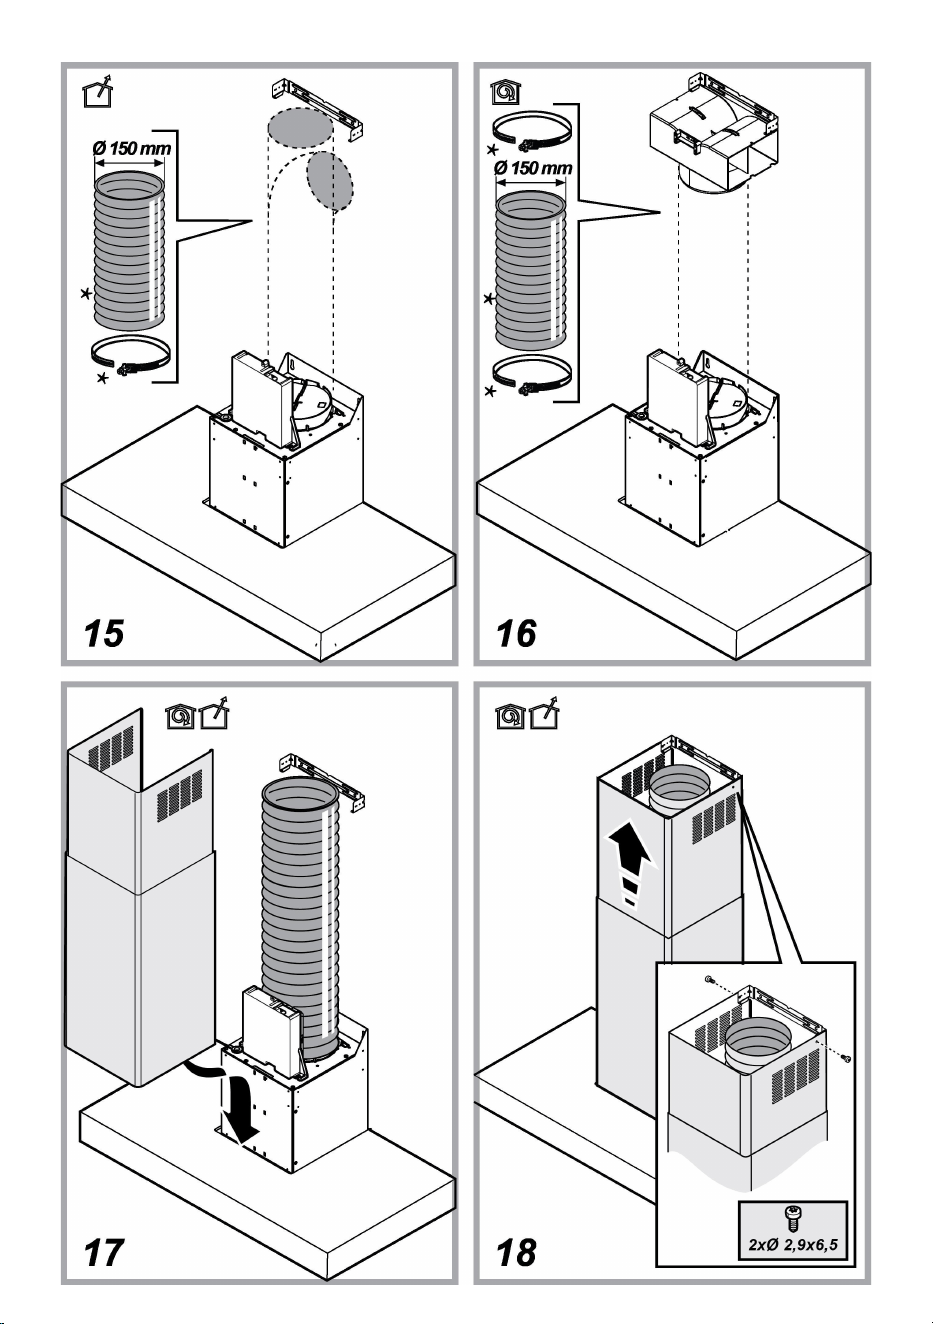
Ducting version
In this case the fumes are conveyed outside of the building by means of a special pipe connected with the connection ring located on top of
the hood.
CAUTION!
The exhausting pipe is not supplied and must be purchased apart.
Diameter of the exhausting pipe must be equal to that of the connection ring.
CAUTION!
If the hood is supplied with active charcoal filter, then it must be removed.
Filter version
The aspirated air will be degreased and deodorised before being fed back into the room.
In order to use the hood in this version, you have to install a system of additional filtering based on activated charcoal.
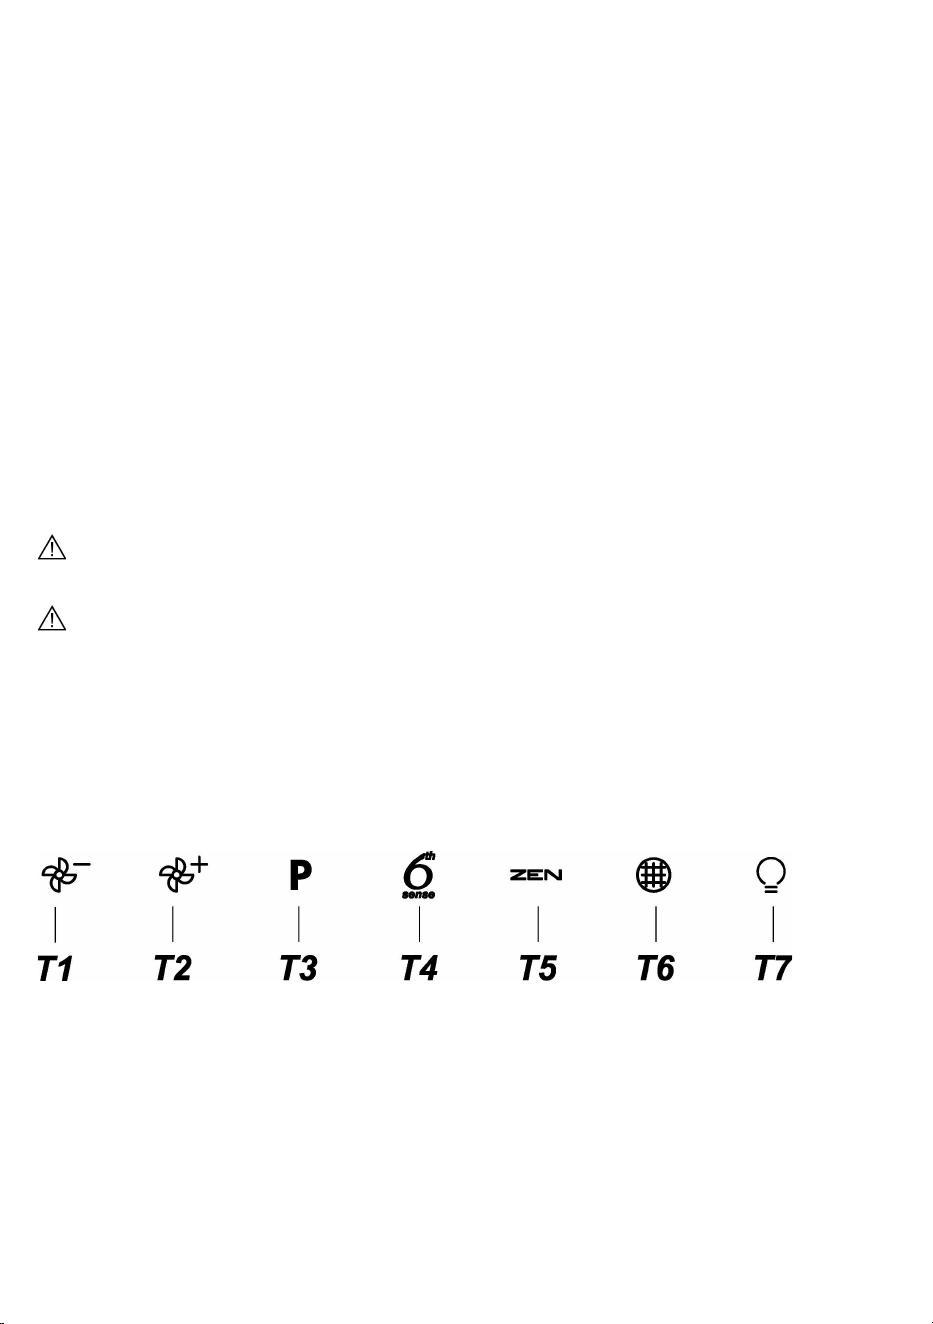
CONTROLS
The hood is fitted with a control panel with aspiration speed selection control and a light switch to control cooking area lights.
T1. Fan motor OFF / Decrease speed
T2. Fan motor ON / Increase speed
T3. “POWER BOOST “ Function
T4. 6th sense function (AUTO mode) ON/OFF
T5. Operation “ZEN Mode”
T6. Grease/charcoal filter alarm/reset
T7. Main light ON / OFF
CAUTION! This hood has an automatic operation system (see below “T4. 6th sense function (AUTO mode) ON/OFF”).
Calibration occurs automatically each time the hood is reconnected to the electrical network (e.g.: the first time it is installed after a blackout).

12
It can also be performed manually (see paragraph “Sensor set up”).
During calibration, which lasts for 5 minutes, T4 will flash and lights can be used.
T1. FAN MOTOR OFF / DECREASE SPEED
Press to decrease speed and switch the extraction motor OFF. Press and hold to directly switch the extraction motor OFF.
T2. FAN MOTOR ON / INCREASE SPEED
Press to switch the extraction motor ON and increase speed. Press and hold to set 3th speed directly.
T3. “POWER BOOST “ FUNCTION
Press T3 to activate the “POWER BOOST 1” intensive extraction speed (time-controlled).
Please note: the hood will go back to running at the 3th speed, after five minutes.
With the extraction motor on, in “POWER BOOST1”, press again T3 to activated the “POWER BOOST 2” additional intensive extraction
speed (time-controlled).
Please note: the hood will go back to running at the 3th speed, after five minutes.
Please note: press again T3, during the five minutes, the hood will go back to running in “POWER BOOST 1”
T4. 6TH SENSE FUNCTION (AUTO MODE) ON/OFF
The hood set the extraction speed automatically if the sensor in the hood detects changing on ambient conditions.
Please note: to make sure this function is used correctly first configure sensor (see “Sensor set up” below).
Please note: if you change any other functions that control the speed, the “6th sense” function will switch off.
Sensor set up
This can be done when the hood is OFF.In normal ambient conditions press T4 for 5secs, T4 flashes for 5 mins to indicate hood is performing
sensor calibration, then switches off to indicate the calibration has ended.
Setting cooktop: Press and hold T1 and T2 simultaneously. Both lit to indicate hood is ready to accept cooktop parameter calibration.
Press T1 to choose Gas hob (T1 starts to flash for 3 secs to indicate hood parameters are set for gas hob).
Press T2 to choose Induction hob (T2 starts to flash for 3 secs to indicate hood parameters are set for induction hob).
T5. OPERATION “ZEN MODE”
Press to activate or deactivate the “ZEN” extraction mode.
This function makes it possible to activate an extraction speed with the perfect balance between quietness and extraction efficiency.
T6. GREASE/CHARCOAL FILTER ALARM/RESET
At regular intervals, the hood signals the need to perform filter maintenance.
Please note: The indicators will only work when the hood is on.
T6 lit: Carry out maintenance on the grease filter.
T6 flashing: carry out maintenance of the charcoal filter.
Resetting the filter saturation indicators:
Please note: This must be done with the hood switched on.
Press and hold T6
Please note: T6 and hood switch off, to indicate alarm reset is done.
The reset of the Grease Filter and Charcoal Filter is performed using the same key. If both filters alarms are active, the reset procedure will
reset the counter one by one, with priority to the Charcoal.
Activating the carbon filter saturation indicator
Please note: This must be done with the extraction motor switched off.
This indicator is usually deactivated – press and hold T3 and T7 simultaneously to activate the function: Both will lightup to indicate activation.
To deactivate the function, press and hold the same buttons again: Both will flash briefly and then switch off to indicate deactivation.
T7. MAIN LIGHT ON/OFF
Press to switch the hob lights on or off.

13
MAINTENANCE
Cleaning
Clean using ONLY a cloth dampened with neutral liquid detergent.
DO NOT CLEAN WITH TOOLS OR INSTRUMENTS. Do not use
abrasive products. DO NOT USE ALCOHOL!
Maintenance of the anti-grease filters
Traps cooking grease particles.
This must be cleaned once a month (or when the filter saturation
indication system – if envisaged on the model in possession –
indicates this necessity) using non aggressive detergents, either
by hand or in the dishwasher, which must be set to a low
temperature and a short cycle.
When washed in a dishwasher, the grease filter may discolor
slightly, but this does not affect its filtering capacity.
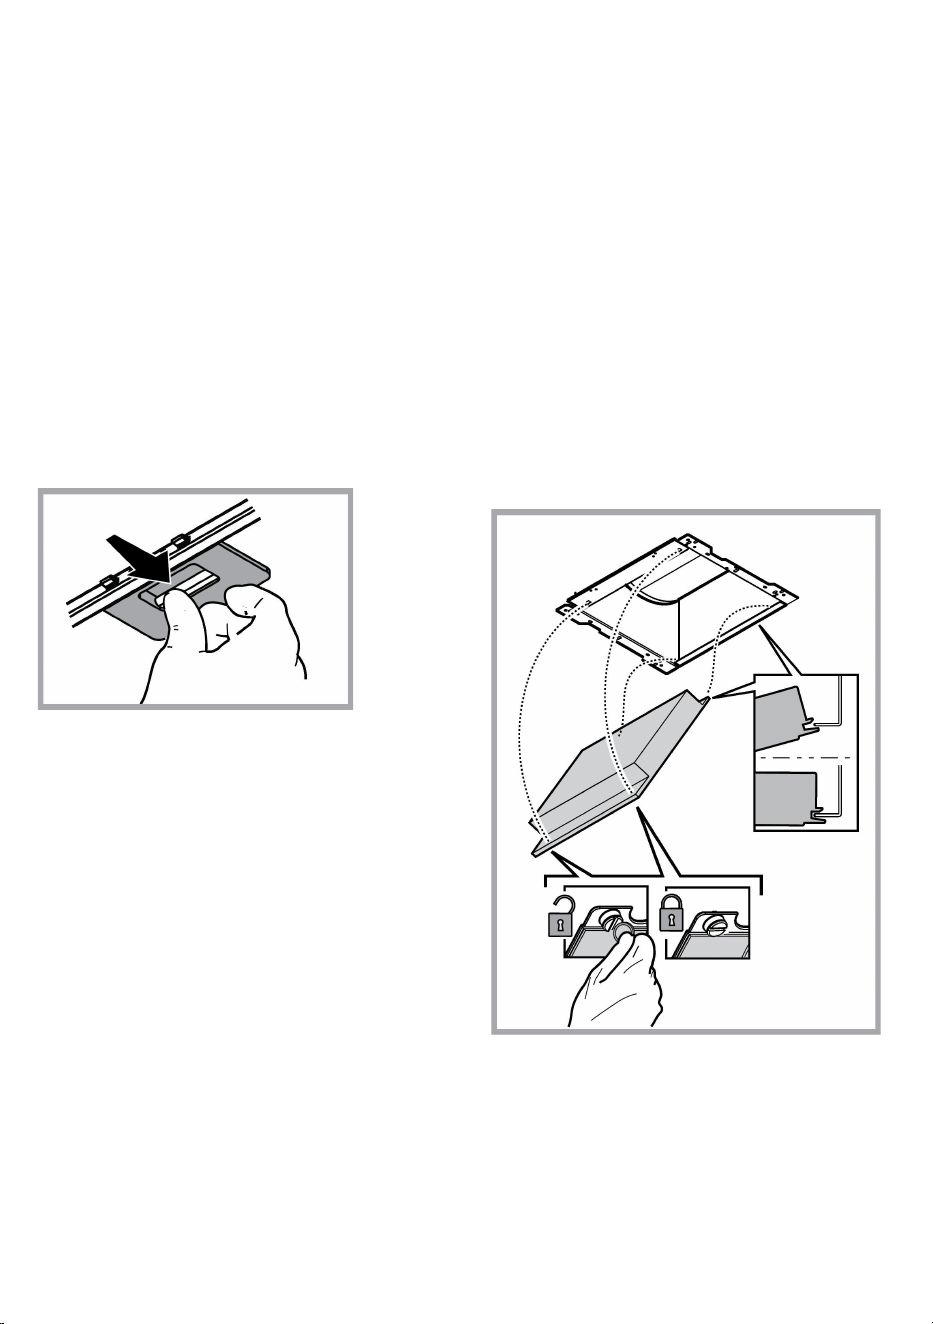
To remove the grease filter, pull the spring release handle.
Maintenance of the charcoal filter
It absorbs unpleasant odors caused by cooking.
The saturation of the charcoal filter occurs after more or less
prolonged use, depending on the type of cooking and the regularity
of cleaning of the grease filter.
In any case it is necessary to replace the cartridge at least every
four mounths (or when the filter saturation indication system – if
envisaged on the model in possession – indicates this
necessity).The charcoal filter may NOT be washed or regenerated.
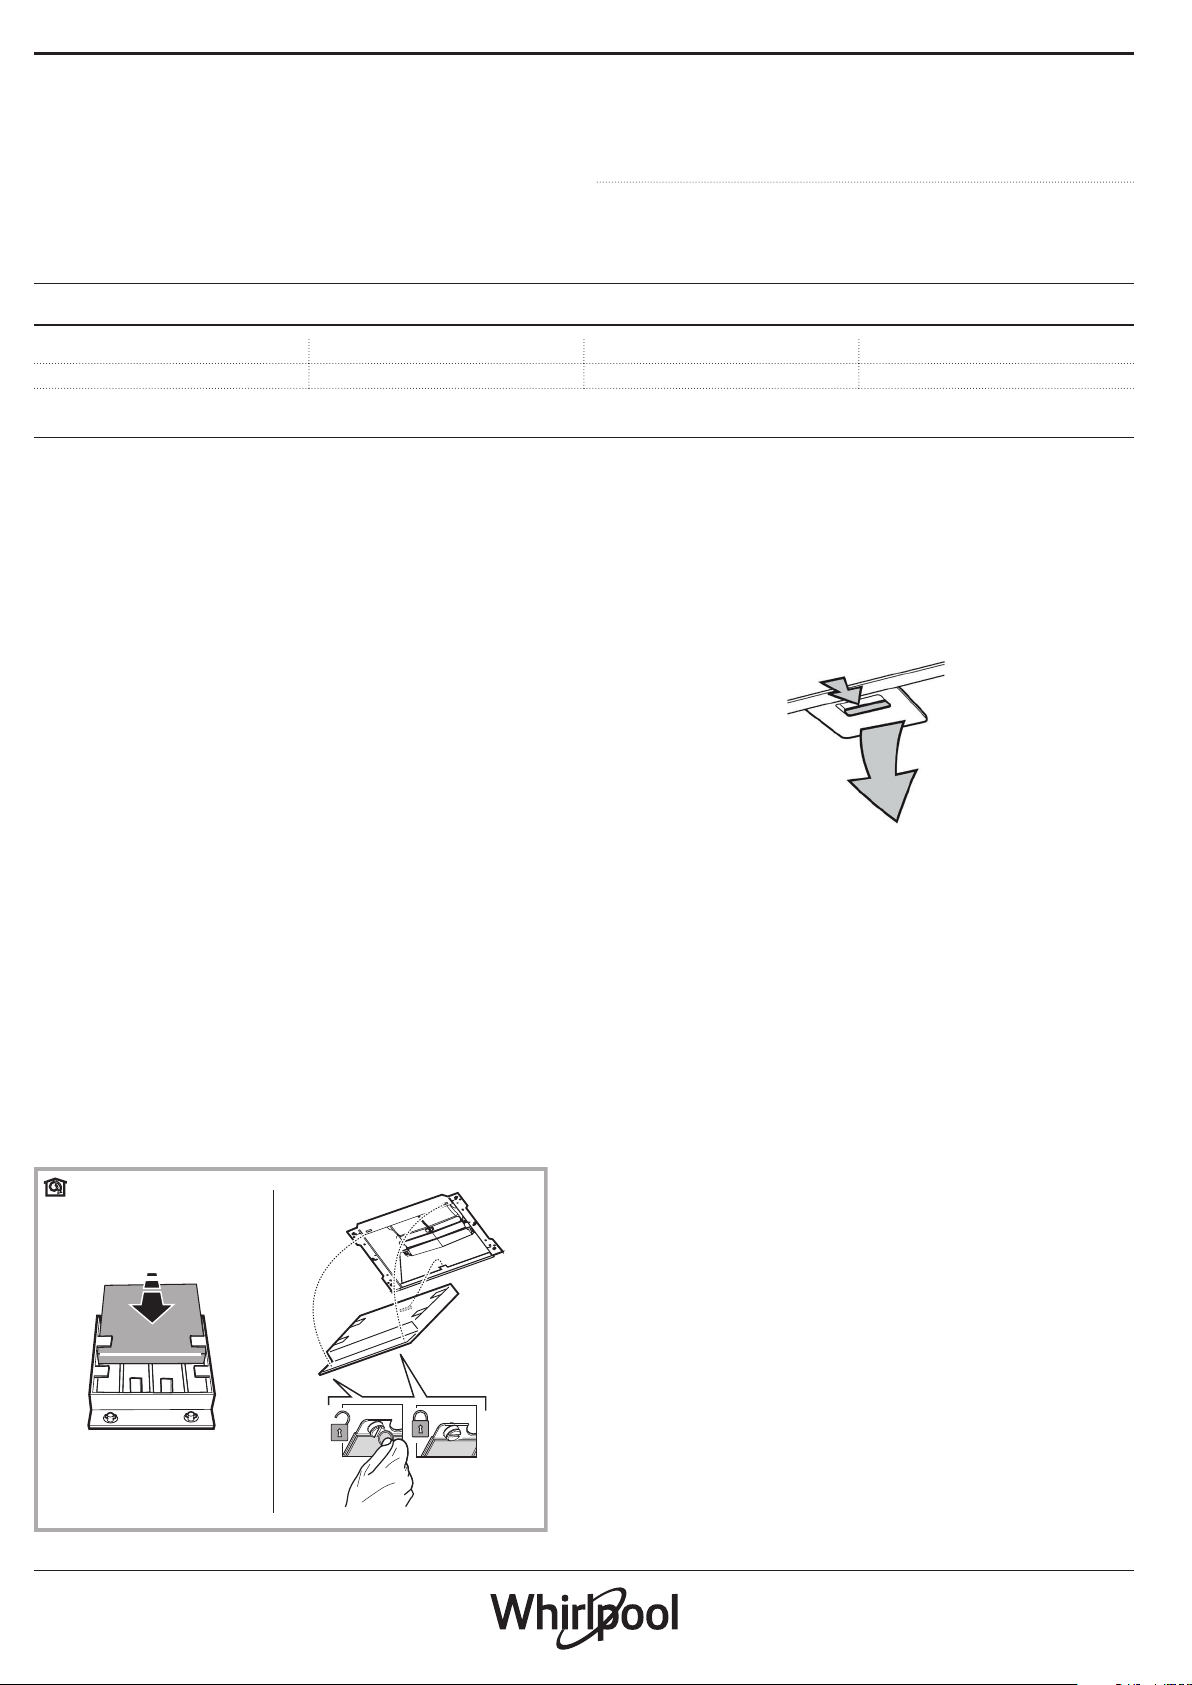
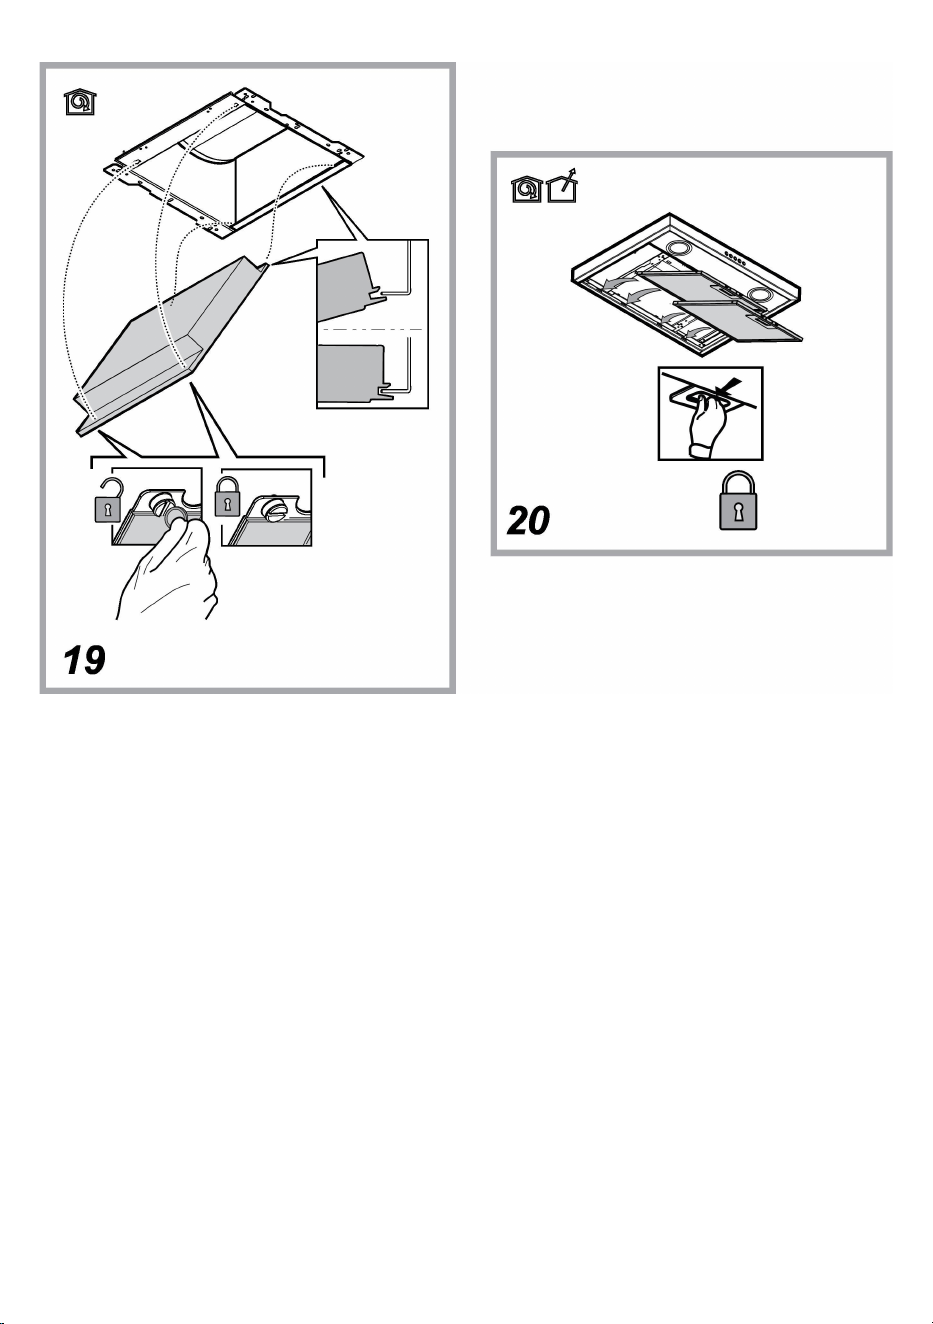
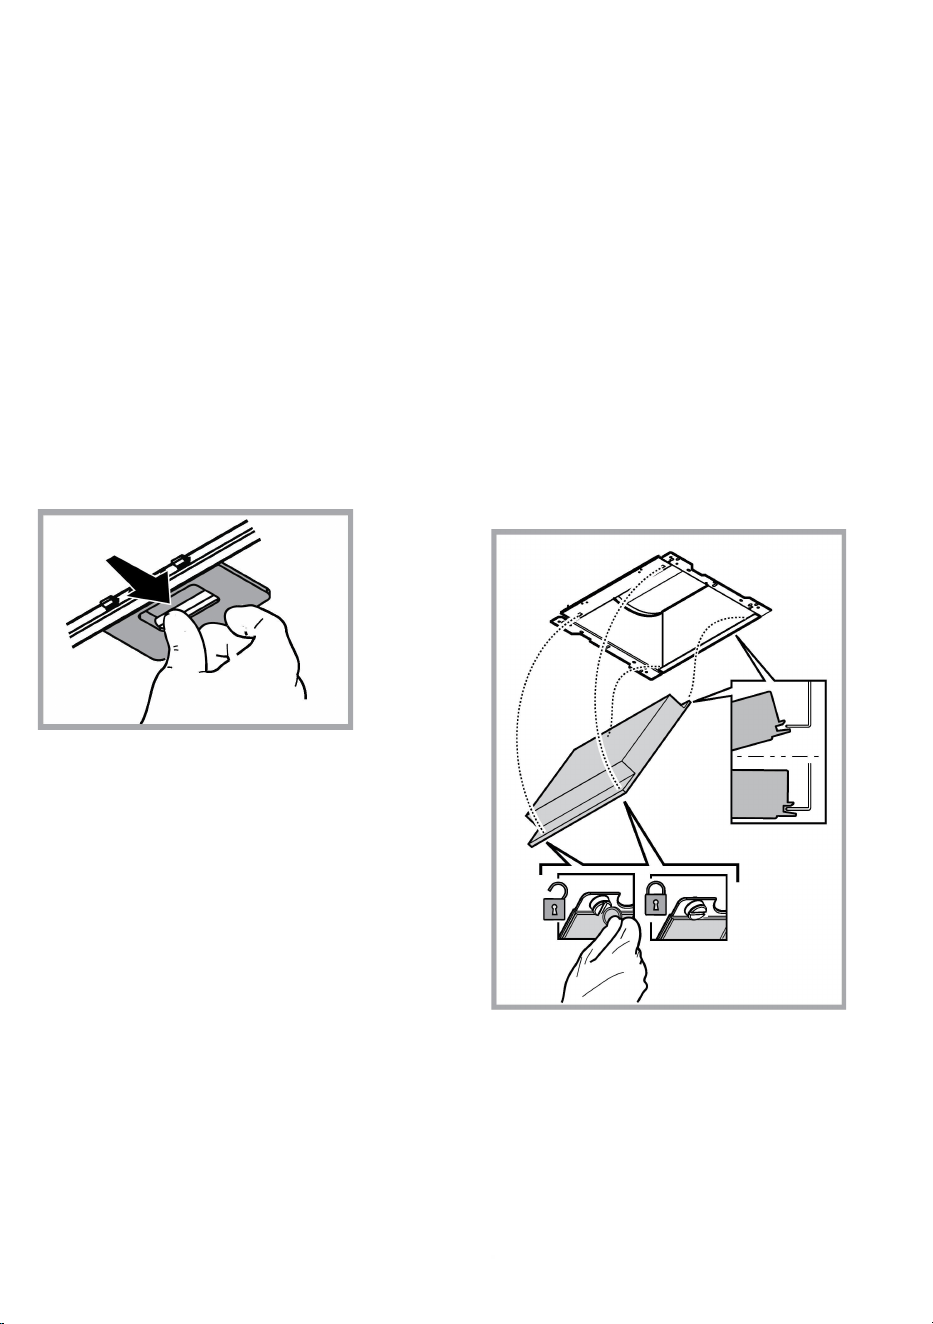
Assembly
Hook the charcoal filter at the back on the metal tongue of the
hood first, then on the front with the two knobs.
Disassembly
Remove the charcoal filter by turning the knobs fixing it to the hood
by 90°.
Replacing lamps
The hood is equipped with a lighting system based on LED
technology.
The LEDs guarantee an optimum lighting, a duration up to 10
times longer than the traditional lamps and allow to save 90%
electrical energy.
To replace lights, contact authorised spare part center.

14
DISPOSAL
• This appliance is marked according to the European directive 2012/19/EC on Waste Electrical and Electronic Equipment (WEEE).
• By ensuring this product is disposed of correctly, you will help prevent potential negative consequences for the environment and human
health, which could otherwise be caused by inappropriate waste handling of this product.
• The symbol on the product, or on the documents accompanying the product, indicates that this appliance may not be treated as
household waste. Instead it should be taken to the appropriate collection point for the recycling of electrical and electronic equipment. Disposal
must be carried out in accordance with local environmental regulations for waste disposal.
• For further detailed information regarding the process, collection and recycling of this product, please contact the appropriate department of
your local authorities or the local department for household waste or the shop where you purchased this product.
Appliance designed, tested and manufactured according to:
• Safety: EN/IEC 60335-1; EN/IEC 60335-2-31, EN/IEC 62233.
• Performance: EN/IEC 61591; ISO 5167-1; ISO 5167-3; ISO 5168; EN/IEC 60704-1; EN/IEC 60704-2-13; EN/IEC 60704-3; ISO 3741; EN
50564; IEC 62301.
• EMC: EN 55014-1; CISPR 14-1; EN 55014-2; CISPR 14-2; EN/IEC 61000-3-2; EN/IEC 61000-3-3. Suggestions for a correct use in order to
reduce the environmental impact: Switch ON the hood at minimum speed when you start cooking and kept it running for few minutes after
cooking is finished. Increase the speed only in case of large amount of smoke and vapor and use boost speed(s) only in extreme situations.
Replace the charcoal filter(s) when necessary to maintain a good odor reduction efficiency. Clean the grease filter(s) when necessary to
maintain a good grease filter efficiency. Use the maximum diameter of the ducting system indicated in this manual to optimize efficiency and
minimize noise.
MALFUNCTIONS
If something appears not to be working properly, do the following simple checks before calling Technical Service:
• If the hood is not working:
Check that:
- The power has not been disconnected.
- A speed has been selected.
• If the hood performs inefficiently:
Check that:
- The motor speed selected is sufficient for the amount of smoke and vapours released.
- The kitchen is sufficiently ventilated to allow air intake.
- The charcoal filter is not worn (hood in filtering version).
• If the hood has turned off during normal functioning:
Check that:
- The power has not been disconnected.
- the omnipolar disconnection device has not tripped.
If the hood fails to operate correctly, briefly disconnect it from the mains power supply for almost 5 sec. Then connect it in again and try once
more before contacting the Technical Assistance Service.

15
TECHNICAL DATA
Height (cm)
Width (cm)
Depth (cm)
Ø of the exhaust tube (cm)
62-114
71
-
114
89,8 45,5 15
62-114
71
-
114
59,8 45,5 15
Components not provided with the product
You can download the Safety Instructions, User
Manual, Product Fiche and Energy data by:
• Visiting our website docs.whirlpool.eu
• Using QR Code
• Alternatively, contact our After-sales Service
(See phone number in the warranty booklet). When
contacting our After-
sales Service, please state the
codes provided on your product's identification plate.

16
DE
ALLGEMEINE SICHERHEIT
• Vor jeglicher Reinigung bzw. Wartung muss das Gerät vom Stromnetz getrennt werden,
indem man den Stecker herauszieht bzw. den Hauptschalter ausschaltet.
• Alle Installations- und Wartungarbeiten sind mit Arbeitshandschuhen durchzuführen.
• Das Gerät kann von Kindern ab 8 Jahren, sowie von Menschen mit verringerten
physischen, sinnlichen oder psychischen Fähigkeiten (oder ohne Erfahrung und Kenntnisse)
benutzt werden, sofern sie entsprechend überwacht werden bzw. in die Benutzung des
Geräts sicher eingewiesen wurden und sich der damit verbundenen Gefahren bewusst sind.
• Darauf achten, dass Kinder mit dem Gerät nicht spielen. Kinder dürfen bei Reinigung und
Wartung nur dann helfen, wenn sie dabei beaufsichtigt werden.
• Der Raum muss ausreichend belüftet sein, wenn die Dunstabzugshaube zusammen mit
anderen Gas- bzw. Brennstoffgeräten verwendet wird.
• Die Dunstabzugshaube muss regelmäßig von innen und außen gereinigt werden
(MINDESTENS EINMAL IM MONAT), außerdem sollten die Anweisungen zur Wartung
befolgt werden. Das nicht befolgen der Normen zur Reinigung der Dunstabzugshaube, das
nicht befolgen der Hinweise zur Reinigung und zum Austausch von Filtern führt zu
Brandgefahr.
• Es ist streng verboten, Speisen auf Kochstellen mit offener Flamme unter der
Dunstabzugshaube zu kochen.
• Für den Lampenersatz verwenden Sie nur den Lampentyp, der in dem Absatz
Lampenwartung / Ersatz des vorliegenden Handbuchs angegeben wird.
Die Verwendung von offener Flamme schadet den Filtern und kann zu Brandgefahr führen,
daher ist sie in jedem Fall zu vermeiden.
Das Frittieren muss mit Vorsicht durchgeführt werden, um zu vermeiden, dass das
überhitzte Öl Feuer fängt.
ACHTUNG: Ist das Kochfeld in Betrieb, können zugängliche Teile der Dunstabzugshaube
heiß werden.
• Das Gerät nicht an das Stromnetz anschließen, bis die Installation vollständig
abgeschlossen ist.
Für das Ableiten der Küchengerüche halten Sie sich an die Voschriften der örtlichen Behörde.
• Bei gleichzeitigem Betrieb der Dunstabzugshaube im Abluftbetrieb und gas- oder brennstoffbetriebenen Geräten darf im Aufstellraum der
Geräte der Unterdruck nicht größer als 4 Pa (4 x 10
-5
bar) sein.
• Die Abluft darf nicht in einen Kamin geleitet werden, der zugleich Abgase von der Verbrennung von Gas oder anderen Brennstoffen führt.
• Benutzen Sie die Haube nicht ohne korrekt montierte Lampen, um Stromschlaggefahr zu vermeiden.
• Die Dunstabzugshaube niemals ohne richtig installiertes Gitter verwenden!
• Die Dunstabzugshaube darf NIEMALS als Auflagefläche verwendet werden, sofern es nicht ausdrücklich angegeben ist.
• Verwenden Sie nur die mit dem Produkt für die Installation mitgelieferten Schrauben, oder, falls nicht im Lieferumfang enthalten, kaufen Sie
den richtigen Schraubentyp.
• Die Länge für die Schrauben verwenden, die im Installationshandbuch angegeben wird.
• Im Zweifelsfall, fragen Sie Ihren autorisierten Kundendienst oder ein ähnliches Fachpersonal.
ACHTUNG!
• Schrauben und Befestigungselemente, die nicht in Übereinstimmung mit diesen Hinweisen sind, können zur elektrischen
Gefährdung führen.
17
• Nicht mit einem externen Timer, einer Schaltuhr oder einer Fernbedienung oder jeglicher anderer Vorrichtung, die sich automatisch
aktiviert, verwenden.
Halten Sie Kinder unter 3 Jahren fern vom Gerät. Ohne die ständige Aufsicht eines Erwachsenen Kinder unter 8 Jahren nicht in Reichweite
des Geräts lassen.
ACHTUNG: Das Gerät darf nicht über ein externes Gerät oder mit einer Fernbedienung in Betrieb gesetzt werden.
Dieses Gerät ist nicht für den professionellen Gebrauch. Das Gerät nicht im Freien benutzen.
Um Verletzungen zu vermeiden, muss das Gerät von zwei oder mehreren Personen bewegt und installiert werden.
Die Installation, die auch Anschlüsse an das Wasserversorgungsnetz (wenn vorgesehen) und an das Stromnetz beinhaltet, und
Reparaturen müssen von Fachpersonal ausgeführt werden.
Nach abgeschlossener Installation das Verpackungsmaterial (Plastik, Polystyrol usw.) außerhalb der Reichweite von Kindern aufbewahren,
um Erstickungsgefahr zu vermeiden. .
Das Gerät nicht benutzen, wenn man nass oder barfuß ist.
Das Gerät niemals mit Dampf reinigen - Stromschlaggefahr.
Das Verpackungsmaterial ist 100% recycelbar und mit dem Recycling-Zeichen gekennzeichnet .
Die Dunstabzugshaube kann anders aussehen als auf den Abbildungen in der vorliegenden Bedienungsanleitung. Die
Bedienungsanleitungen, die Wartung und die Installation sind aber gleich.
Die Anweisungen, die in diesem Handbuch gegeben werden, müssen strikt eingehalten werden. Es wird keinerlei Haftung
übernommen für mögliche Mängel, Schäden oder Brände der Dunstabzugshaube, die auf die Nichtbeachtung der Vorschriften in diesem
Handbuch zurückzuführen sind. Die Dunstabzugshaube wurde für die Absaugung der beim Kochen entstehenden Dünste und Dämpfe
entwickelt. Sie ist nur für den Hausgebrauch geeignet.
• Die Bedienungsanleitung muss aufbewahrt werden, damit jederzeit ein Nachschlagen möglich ist. Bei Verkauf, Abtretung oder Umzug
muss die Bedienungsanleitung immer beim Produkt bleiben.
• Die Bedienungsanleitung muss aufmerksam gelesen werden, da sie wichtige Informationen über Installation, Gebrauch und Sicherheit
enthält.
• Es dürfen keine elektrischen oder mechanischen Änderungen am Gerät oder an den Abluftleitungen vorgenommen werden.
• Vergewissern Sie sich vor der Installation, dass das Gerät keine Transportschäden aufweist. Bei auftretenden Problemen setzen Sie sich
bitte mit Ihrem Händler in Verbindung.
Der Abstand zwischen der Abstellfläche auf dem Kochfeld und der Unterseite der Dunstabzugshaube darf 50 cm im Fall von elektrischen
Kochfeldern und 65 cm im Fall von Gas- oder kombinierten Herden nicht unterschreiten.
Wenn die Installationsanweisungen des Gaskochgeräts einen größeren Abstand vorgeben, ist dieser zu berücksichtigen.
ELEKTRISCHER ANSCHLUSS
Die Netzspannung muss der Spannung entsprechen, die auf dem Typenschild im Innern der Haube angegeben ist. Sofern die Haube einen
Netzstecker hat, ist dieser an zugänglicher Stelle an eine den geltenden Vorschriften entsprechende Steckdose nach der Montage
anzuschließen. Bei einer Haube ohne Stecker (direkter Netzanschluss) oder falls der Stecker nicht zugänglich ist, ist ein normgerechter
zweipoliger Schalter nach der Montage anzubringen, der unter Umständen der Überspannung Kategorie III entsprechend den
Installationsregeln ein vollständiges Trennen vom Netz garantiert.
HINWEIS!
Vor der Inbetriebnahme muss sichergestellt werden, dass die Netzversorgungleitung (Steckdose) ordnungsgemäß montiert wurde.
Wenn das Kabel keinen Stecker hat,die Drähte entsprechend der folgenden Tabelle verbinden:
Netzspannung und Frequenz Verdrahtung
Lesen Sie den Wert auf dem Aufkleber mit den Geräteeigenschaften
auf der Innenseite der Kappe.
:gelb/grün
N : Blau
L : Braun
Austausch des Netzkabels
Die Dunstabzugshaube ist mit einem Spezialkabel ausgestattet. Sollte das Kabel beschädigt werden, muss beim Kundendienst Ersatz
angefordert werden.
18
ABLEITUNG DER ABLUFT
(bei Abluftversionen)
Die Dunstabzugshaube an Abluftrohre und Abluftöffnungen in der Wand anschließen, die den gleichen Durchmesser haben wie der
Abluftstutzen (Anschlussflansch).
Die Benutzung von Rohren und Abluftöffnungen mit geringerem Durchmesser verursacht eine Verringerung der Abluftleistung und eine
drastische Zunahme der Geräuschentwicklung.
Bei Nichtbeachtung der Anweisungen übernimmt der Hersteller keine Haftung.
! Ein möglichst kurzes Rohr verwenden.
! Ein Rohrsystem mit einer möglichst geringen Anzahl von Krümmungen verwenden (max. Winkel der Krümmung: 90°).
! Starke Änderungen des Rohrdurchmessers sind zu vermeiden.
! Jegliche Verantwortung wird von der Firma abgelehnt, sollten diese Normen nicht respektiert werden.
UMLUFT- ODER ABLUFTBETRIEB ?
! Ihre Haube wird als Abzugshaube geliefert.
Um die Abzugshaube in der Umluftversion verwenden zu können, braucht der AKTIVKOHLE-FILTERSYSTEM installiert zu werden.
Stellen Sie in den ersten Seiten dieser Gebrauchsanleitung fest, ob das AKTIVKOHLE-FILTERSYSTEM mitgeliefert oder separat
erhältlich ist.
Anmerkung: Wenn das Aktivkohle-Filtersystem mitgeliefert wird, kann es schon in der Haube installiert worden sein.
Die Informationen über den Umbau der Abzugshaube in Umlufthaube sind in dieser Gebrauchsanleitung enthalten.
Abluftbetrieb
Die Luft wird mit Hilfe eines Rohrs ins Freie geleitet, das am Abluftstutzen angebracht wird.
HINWEIS!
Das Abluftrohr wird nicht mitgeliefert und muss separat erworben werden.
Das Abluftrohr muss den gleichen Durchmesser wie der Abluftstutzen aufweisen.
HINWEIS!
Sollte die Dunstabzugshaube mit Aktivkohlefilter versehen sein, so muss dieser entfernt werden.
Umluftbetrieb
Die angesaugte Luft wird zuvor entfettet und desodoriert werden, bevor sie wieder in den Raum zugeführt wird.
Um die Abzugshaube in dieser Version zu verwenden, müssen Sie ein zusätzliches Filtersystem, welches auf Aktivkohle basiert, installieren.
BEDIENELEMENTE
Die Dunstabzugshaube ist mit einer Bedienungsblende ausgestattet, die mit einer Steuerung für die Ansaugstärke bzw. -geschwindigkeit,
sowie einer Steuerung zur Einstellung der Arbeitsplatzbeleuchtung versehen ist.
T1. Lüftermotor AUS / Geschwindigkeit verringern
T2. Lüftermotor AN / Geschwindigkeit erhöhen
T3. “POWER BOOST “-FUNKTION
T4. 6th sense Funktion (AUTOMATIK-Modus) EIN/AUS
T5. Betrieb im “ZEN-Modus”
T6. Fett/Aktivkohlefilter Alarm/Rücksetzen
T7. Haupt-Kontrollleuchte EIN/AUS
VORSICHT! Diese Dunstabzugshaube hat ein automatisches Betriebssystem (siehe unten “T4. 6th sense Funktion (AUTOMATIK-Modus)
EIN/AUS”).
Die Kalibrierung erfolgt automatisch, jedes Mal wenn die Dunstabzugshaube wieder an das Stromnetz angeschlossen wird (z.B. bei der
ersten Installation nach einem Stromausfall). Die Kalibrierung kann auch manuell erfolgen (siehe
Abschnitt “Sensoreinstellung”). Während der Kalibrierung, die 5 Minuten dauert, blinkt T4 und die Beleuchtung kann verwendet werden.

19
T1. LÜFTERMOTOR AUS / GESCHWINDIGKEIT VERRINGERN
Drücken, um die Geschwindigkeit zu verringern und den Absaugmotor Auszuschalten. Drücken und gedrückt halten, um den Absaugmotor
direkt Auszuschalten.
T2. LÜFTERMOTOR AN / GESCHWINDIGKEIT ERHÖHEN
Drücken, um den Absaugmotor Einzuschalten und die Geschwindigkeit zu erhöhen. Drücken und gedrückt halten, um die 3.
Geschwindigkeitsstufe direkt einzustellen.
T3. “POWER BOOST “-FUNKTION
Drücken Sie T5, um die "POWER BOOST 1" intensive Absauggeschwindigkeit zu aktivieren (zeitgesteuert).
Bitte beachten: Die Dunstabzugshaube kehrt nach fünf Minuten zur 3.
Geschwindigkeitsstufe zurück.
Drücken Sie bei eingeschaltetem Absaugmotor in "POWER BOOST1", erneut T3, um die zusätzliche "POWER BOOST 2" intensive
Absauggeschwindigkeit zu aktivieren (zeitgesteuert).
Bitte beachten: Die Dunstabzugshaube kehrt nach fünf Minuten zur 3.
Geschwindigkeitsstufe zurück.
Bitte beachten: Drücken Sie erneut T3, während der fünf Minuten kehrt die Dunstabzugshaube zurück zu “POWER BOOST 1”
T4. 6TH SENSE FUNKTION (AUTOMATIK-MODUS) EIN/AUS
Die Dunstabzugshaube stellt die Absauggeschwindigkeit automatisch ein, wenn der Sensor in der Dunstabzugshaube eine Änderung der
Umgebungsbedingungen erfasst.
Bitte beachten: Um sicherzustellen, dass diese Funktion richtig verwendet wird, zuerst den Sensor konfigurieren (siehe “Sensoreinstellung”
unten). Bitte beachten: Wenn Sie eine andere Funktion zur Geschwindigkeitskontrolle ändern, schaltet sich die “6th sense”-Funktion aus.
Sensoreinstellung
Dies kann durchgeführt werden, wenn die Dunstabzugshaube ausgeschaltet ist. Unter normalen Umgebungsbedingungen 5 Sekunden lang
T4 drücken, T4 blinkt 5 Minuten lang, um anzuzeigen, dass die Dunstabzugshaube die Sensorkalibrierung durchführt, dann schaltet sie sich
aus, um anzuzeigen, dass die Kalibrierung abgeschlossen ist.
Einstellung des Kochfelds: T1 und T2 gleichzeitig drücken und gedrückt halten. Beide leuchten auf, um anzuzeigen, dass die
Dunstabzugshaube bereit ist, um die Kalibrierung des Kochfeldparameters zu akzeptieren.
T1 drücken, um Gas-Kochfeld auszuwählen (T1 beginnt 3 Sekunden lang zu blinken, um anzuzeigen, dass die Parameter der
Dunstabzugshaube auf Gas-Kochfeld eingestellt sind).
T2 drücken, um Induktions-Kochfeld auszuwählen (T2 beginnt 3 Sekunden lang zu blinken, um anzuzeigen, dass die Parameter der
Dunstabzugshaube auf Induktions-Kochfeld eingestellt sind).
T5. BETRIEB IM “ZEN-MODUS”
Drücken, um den "ZEN" Absaugmodus zu aktivieren oder zu deaktivieren.
Diese Funktion ermöglicht es, eine Absauggeschwindigkeit mit dem perfekten Ausgleich zwischen Stille und Absaugleistung zu aktivieren.
T6. FETT/AKTIVKOHLEFILTER ALARM/RÜCKSETZEN
In regelmäßigen Abständen zeigt die Dunstabzugshaube an, dass eine Wartung des Filters durchgeführt werden muss.
Bitte beachten: Die Anzeigen sind nur aktiviert, wenn die Dunstabzugshaube eingeschaltet ist.
T6 leuchtet: Die Wartung des Fettfilters durchführen.
T6 blinkt: die Wartung des Aktivkohlefilters durchführen;.
Die Filtersättigungsanzeigen zurücksetzen:
Bitte beachten: Dies muss bei ausgeschalteter Dunstabzugshaube erfolgen.
T6 drücken und gedrückt halten
Bitte beachten: T6 und Dunstabzugshaube ausgeschaltet, um anzuzeigen, dass die Alarmrückstellung erfolgt ist.
Das Rücksetzen des Fettfilters und Aktivkohlefilters erfolgt mit derselben Taste. Wenn beide Filteralarme aktiv sind, setzt das
Rücksetzungsverfahren den Zähler einzeln zurück, mit Priorität auf den Aktivkohlefilter.
Aktivieren der Aktivkohle-Sättigungsanzeige
Bitte beachten: Dies muss bei ausgeschaltetem Abzugsmotor erfolgen.
Diese Anzeige ist normalerweise deaktiviert – T3 und T7 gleichzeitig drücken und gedrückt halten, um die Funktion zu aktivieren: Bei leuchten
auf, um die Aktivierung anzuzeigen.
Zum Abschalten der Funktion die gleichen Tasten erneut drücken und gedrückt halten: Beide blinken kurz und schalten sich dann aus, um die
Deaktivierung anzuzeigen.
T7. HAUPT-KONTROLLLEUCHTE EIN/AUS
Drücken zum Ein- oder Ausschalten der Kochstellenbeleuchtung.
20
WARTUNG
Reinigung
Zur Reinigung AUSSCHLIESSLICH ein mit flüssigem
Neutralreiniger getränktes Tuch verwenden. KEINE
WERKZEUGE ODER GERÄTE FÜR DIE REINIGUNG
VERWENDEN! Keine Produkte verwenden, die Scheuermittel
enthalten. KEINEN ALKOHOL VERWENDEN!
Wartung der Fettfilter
Diese dienen dazu, die Fettpartikel, die beim Kochen frei
werden, zu binden.
Dieser muss einmal monatlich gewaschen werden (oder wenn das
Sättigungsanzeigesystem der Filter – sofern bei dem jeweiligen
Modell vorgesehen – dies anzeigt). Das kann mit einem milden
Waschmittel von Hand, oder in der Spülmaschine bei niedriger
Temperatur und einem Kurzspülgang erfolgen. Der Metallfettfilter
kann bei der Reinigung in der Spülmaschine verfärben, was seine
Filtermerkmale jedoch in keiner Weise beeinträchtigt.
Zwecks Demontage der Fettfilter den Aushakgriff ziehen.
Wartung des Aktivkohlefilters
Dieser Filter bindet die unangenehmen Gerüche, die beim
Kochen entstehen.
Je nach der Benetzungsdauer des Herdes und der Häfigkeit der
Reinigung des Fettfilters tritt nach einer mehr oder weniger langen
Benutzungsdauer die Sättigung des Aktivkohlefilters auf. Auf jeden
Fall muß der Filtereinsatz mindestens alle 4 Monate (oder wenn
das Sättigungsanzeigesystem der Filter – sofern bei dem
jeweiligen Modell vorgesehen – diese Notwendigkeit anzeigt)
ausgewechselt werden.
Er kann NICHT gereinigt oder erneut aktiviert werden.
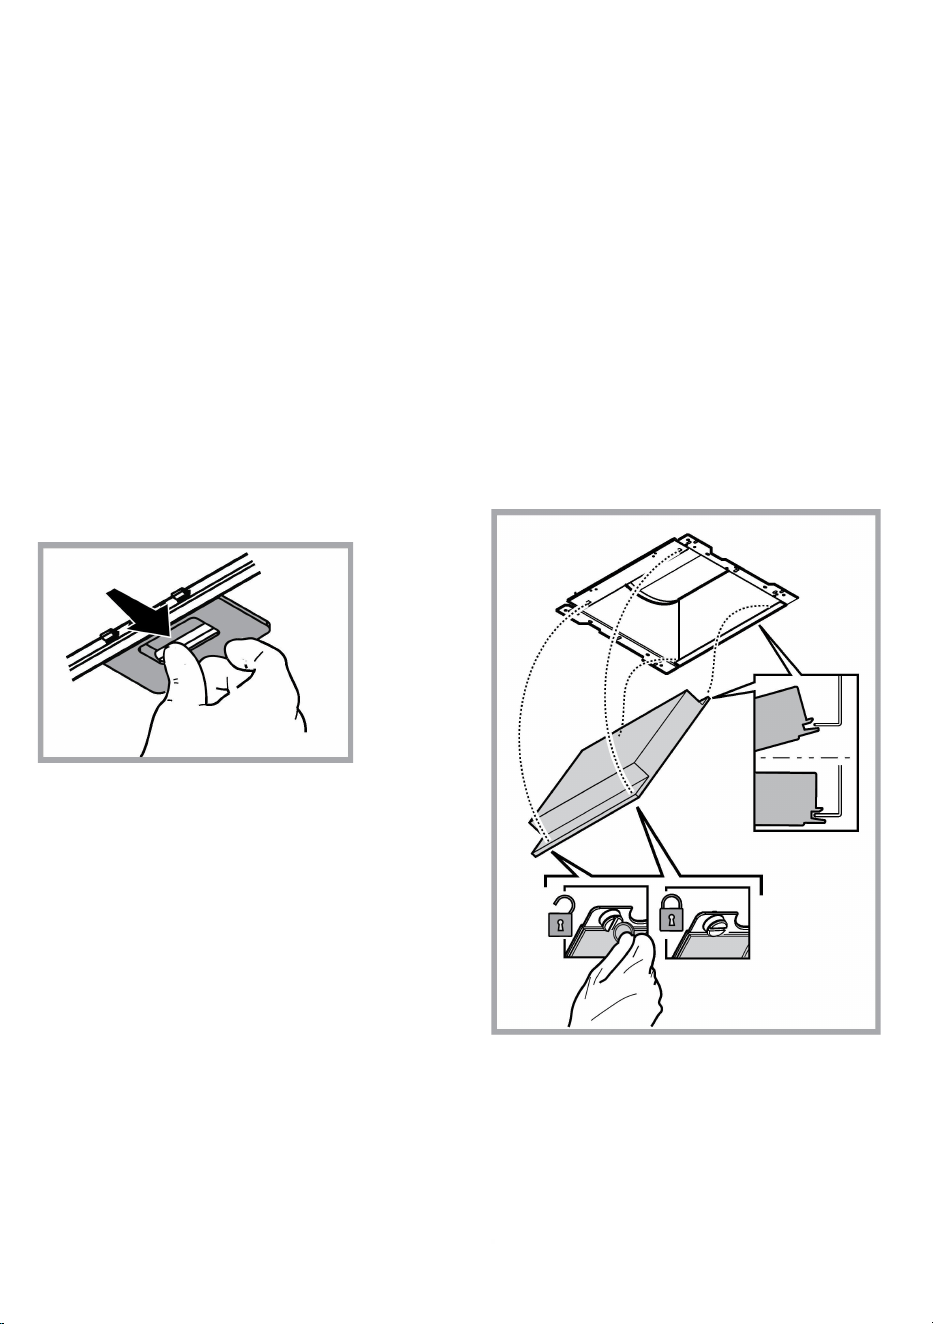
Montage
Den Aktivkohlefilter zuerst von hinten auf der metallischen Feder
der Saugkappe anhängen, dann von vorne mit den zwei Knöpfen.
Demontage
Den Aktivkohlefilter entnehmen, in dem man die Knöpfe, die an
der Saugkappe fixiert sind, auf 90° dreht.
Ersetzen der Lampen
Die Haube ist mit einem auf der Leuchtdiodentechnologie
basierten Beleuchtungssystem ausgestattet.
Die LEDs ermöglichen eine optimale Beleuchtung der Kochfläche.
Sie haben eine Leistungsdauer, die das Zehnfache deren der
traditionellen Lichter ist und bieten eine Energieersparnis bis zu
90%.
Für den Wechsel der Lampen kontaktieren Sie das zuständige
Zentrum für den Austausch.
21
ENTSORGUNG
In Übereinstimmung mit den Anforderungen der Europäischen Richtlinie 2012/19/EC über Elektro- und Elektronik-Altgeräte (WEEE) ist
vorliegendes Gerät mit einer Kennzeichnung versehen.
Sie leisten einen positiven Beitrag für den Schutz der Umwelt und die Gesundheit des Menschen, wenn Sie dieses Gerät einer gesonderten
Abfallsammlung zuführen. Im unsortierten Siedlungsmüll könnte ein solches Gerät durch unsachgemäße Entsorgung negative Konsequenzen
nach sich ziehen.
Auf dem Produkt oder der beiliegenden Produktdokumentation ist folgendes Symbol einer durchgestrichenen Abfalltonne abgebildet.
Es weist darauf hin, dass eine Entsorgung im normalen Haushaltsabfall nicht zulässig ist. Entsorgen Sie dieses Produkt im Recyclinghof mit
einer getrennten Sammlung für Elektro- und Elektronikgeräte. Die Entsorgung muss gemäß den örtlichen Bestimmungen zur
Abfallbeseitigung erfolgen.
Bitte wenden Sie sich an die zuständigen Behörden Ihrer Gemeindeverwaltung, an den lokalen Recyclinghof für Haushaltsmüll oder an den
Händler, bei dem Sie dieses Gerät erworben haben, um weitere Informationen über Behandlung, Verwertung und Wiederverwendung dieses
Produkts zu erhalten.
Gerät entwickelt, getestet und hergestellt nach:
•Sicherheit: EN/IEC 60335-1; EN/IEC 60335-2-31, EN/IEC 62233.
•Leistungsfähigkeit/Gebrauchstauglichkeit: EN/IEC 61591; ISO 5167-1; ISO 5167-3; ISO 5168; EN/IEC 60704-1; EN/IEC 60704-2-13; EN/IEC
60704-3; ISO 3741; EN 50564; IEC 62301.
•EMC: EN 55014-1; CISPR 14-1; EN 55014-2; CISPR 14-2; EN/IEC 61000-3-2; EN/IEC 61000-3-3. Empfehlungen für eine korrekte
Verwendung, um die Umweltbelastung zu verringern: Schalten Sie die Haube beim Kochbeginn bei kleinster Geschwindigkeit EIN und lassen
Sie die Haube einige Minuten nachlaufen, wenn Sie mit dem Kochen fertig sind. Erhöhen Sie die Geschwindigkeit nur bei großen Mengen
von Kochdunst und Dampf und benutzen Sie die Intensivstufe(n) nur bei extremen Situationen. Wechseln Sie die Kohlefilter, wenn
notwendig, um eine gute Geruchsreduzierung zu gewährleisten. Säubern Sie die Fettfilter, wenn notwendig, um eine gute
Fettfilterungseffizienz zu gewährleisten. Verwenden Sie den in der Gebrauchsanweisung angegebenen grössten Durchmesser des
Luftaustrittssystems, um die Leistungsfähigkeit zu optimieren und die Geräuschentwicklung zu minimieren.
BETRIEBSSTÖRUNGEN
Wenn etwas nicht zu funktionieren scheint, folgende Kontrollen durchführen, bevor der Kundendienst gerufen wird:
• Wenn die Abzugshaube nicht funktioniert:
Prüfen, ob:
- ein Stromausfall vorliegt.
- eine Geschwindigkeit gewählt wurde.
• Wenn die Leistung der Abzugshaube mangelhaft ist:
Prüfen, ob:
- die gewählte Motorgeschwindigkeit für die freigesetzte Menge an Rauch und Dämpfen ausreicht.
- die Küche ausreichend belüftet ist, um eine Luftansaugung zuzulassen.
- der Kohlefilter verbraucht ist (bei Umluftversion).
• Wenn sich die Haube im Laufe des normalen Betriebs selbst ausgeschaltet hat.
Prüfen, ob:
- ein Stromausfall vorliegt.
- die allpolige Trennvorrichtung ausgelöst wurde.
Die Dunstabzugshaube oder die Bedienungselemente funktionieren nicht: Für mindestens 5 Sekunden die Stromversorgung der
Dunstabzugshaube unterbrechen und dann die Haube erneut einschalten. Kann die Störung nicht behoben werden, kontaktieren Sie bitte den
Kundendienst.

22
TECHNISCHE DATEN
Höhe (cm)
Breite (cm)
Tiefe (cm)
Ø des Abluftrohrs (cm)
62-114
71
-
114
89,8 45,5 15
62-114
71
-
114
59,8 45,5 15
Teile, die nicht zum Lieferumfang des Produkts gehören
Sie können die Sicherheitshinweise,
Bedienungsanleitung, Technischen Daten und
Energiedaten wie folgt herunterladen:
• Besuchen Sie unsere Internetseite
docs.whirlpool.eu
• Verwenden Sie den QR-Code
• Alternativ können Sie unserer Kundendienst
kontaktieren (Siehe Telefonnummer in dem
Garantieheft). Wird unser Kundendienst kontaktiert,
bitte die Codes auf dem Typenschild des Produkts
angeben.

23
FR
SÉCURITÉ GÉNÉRALE
• Avant tout entretien ou nettoyage du produit débranchez l'alimentation électrique en retirant
la fiche électrique ou en coupant l'interrupteur général.
• Utilisez des gants de travail pour toute opération de nettoyage ou d'entretien.
• Cet appareil peut être utilisé par des enfants âgés d’au moins 8 ans et par des personnes
ayant des capacités physiques, sensorielles ou mentales réduites ou dénuées d’expériences
ou de connaissances, sauf si ces personnes sont correctement surveillées ou si des
instructions relatives à l'utilisation correcte de l'appareil permettant d'éviter tout danger leur
ont été communiquées.
• Les enfants ne doivent pas jouer avec l’appareil.
• Le nettoyage et l’entretien par l’usager ne doivent pas être effectués par des enfants sans
surveillance.
• La pièce doit avoir une aération suffisante lorsque la hotte est utilisée conjointement avec
d'autres appareils fonctionnant au gaz ou autres combustibles.
• La hotte doit être régulièrement nettoyée à la fois à l'intérieur et à l'extérieur (AU MOINS
UNE FOIS PAR MOIS); cela devrait se faire en conformité avec les instructions d'entretien.
Le non respect des instructions expressément fournies concernant le nettoyage de la hotte
et des filtres peut provoquer des risques d'incendie.
• Ne pas flamber d’aliments sous la hotte.
• Pour le remplacement de la lampe, utilisez uniquement le type de lampe spécifié dans la
section remplacement/maintenance lampe dans ce manuel.
L'utilisation d'une flamme nue est dommageable pour les filtres et peut causer un incendie,
par conséquent, il est déconseillé de l'utiliser.
La friture doit être faite avec soin afin de s’assurer que l’huile surchauffée ne prenne pas feu.
AVERTISSEMENT: Lorsque la table de cuisson est en fonctionnement, les parties
accessibles de la hotte peuvent devenir très chaudes.
• Ne pas brancher l'appareil au réseau électrique avant que l'installation ne soit
complètement terminée.
• En ce qui concerne les mesures techniques et de sécurité à prendre pour l'évacuation des fumées, respectez strictement les dispositions
des règlements locales.
• L’air ne doit pas être envoyé dans un conduit utilisé pour évacuer les fumées d’appareils utilisant du gaz ou un autre combustible.
• Ne pas utiliser ou laisser la hotte sans les lampes correctement montées, car un éventuel risque de choc électrique est possible.
• N’utilisez jamais la hotte sans la grille montée correctement!
• La hotte ne doit JAMAIS être utilisée comme une surface d'appui, sauf indication expresse.
• Utilisez uniquement les vis de fixation fournies avec le produit pour l'installation, ou, si non fournies, acheter le type correct de vis.
• Utilisez la longueur correcte pour les vis qui sont identifiées dans le Guide d'installation.
• En cas de doute, consultez votre centre de service agréé ou du personnel qualifié.
ATTENTION !
• Le défaut d'installer les vis et les dispositifs de fixation conformément à ces instructions peut entraîner des risques électriques.
• Ne pas mettre en marche au moyen d’un programmateur, d’une minuterie, ou d’un système de commande à distance séparé ou tout
autre dispositif qui met l’appareil sous tension automatiquement.
Les enfants de moins de 3 ans ne doivent pas s’approcher de l’appareil. Sans la surveillance constante d’un adulte, garder l’appareil hors de
24
la portée des enfants de moins de 8 ans.
ATTENTION : l’appareil ne peut être mis en marche par le biais d’un dispositif externe ou d’un système de commande à distance séparé.
Cet appareil n’est pas destiné à un usage professionnel. Ne pas utiliser l’appareil à l’extérieur.
Pour éviter le risque de lésions personnelles, l’appareil doit être déplacé et installé par deux ou plusieurs personnes.
L'installation, comprenant éventuellement aussi les raccords pour l’alimentation hydriques (si prévus) et les branchements électriques , et
les interventions de réparation doivent être effectués par un personnel qualifié.
Après avoir complété l’installation, conserver le matériel d’emballage (plastique, polystyrène, etc.) hors de la portée des enfants pour éviter le
risque d’étouffement. .
Ne jamais utiliser l’appareil pieds nus ou mouillés.
Ne jamais utiliser d’appareils de nettoyage à vapeur pour éviter le risque de choc électrique.
Comme indiqué par le symbole, le matériel d’emballage est 100 % recyclable
La hotte peut avoir des configurations esthétiques différentes par rapport à ce qui est illustré dans les dessins de ce manuel,
cependant les instructions pour l’utilisation, l’entretien et l’installation restent identiques.
Suivre impérativement les instructions de cette notice. Le constructeur décline toute responsabilité pour tous les inconvénients,
dommages ou incendies provoqués à l’appareil et dûs à la non observation des instructions de la présente notice. Cet appareil est destiné à
être utilisé dans des applications domestiques et analogues telles que : - des coins cuisines réservés au personnel dans des magasins,
bureaux et autres environnements professionnels ; - des fermes ; - l’utilisation par les clients des hôtels, motels et autres environnements à
caractère résidentiel ; - des environnements du type chambre d’hôtes.
• Il est important de conserver ce livret pour pouvoir le consulter à tout moment. En cas de vente, de cession ou de déménagement,
assurez-vous que la notice d'utilisation l'accompagne.
• Veuillez lire attentivement les instructions, vous trouverez des informations importantes sur l'installation, le mode d'emploi et la sécurité.
• Ne pas effectuer des modifications électriques ou mécaniques sur le produit ou sur les conduits d’évacuation.
• Avant d'installer l'appareil, vérifiez qu’il n’y a aucun composant endommagé. Sinon, contactez votre revendeur et ne continuez pas
l'installation.
La distance minimum entre la superficie de support des récipients sur le dispositif de cuisson et la partie la plus basse de la hotte de cuisine ne
doit pas être inférieure à 50cm dans le cas de cuisinières électriques et de 65 cm dans le cas de cuisinières à gaz ou mixtes.
Si les instructions d’installation du dispositif de cuisson au gaz spécifient une plus grande distance, il faut en tenir compte.
BRANCHEMENT ÉLECTRIQUE
La tension électrique doit correspondre à la tension reportée sur la plaque signalétique située à l’intérieur de la hotte. Si une prise est présente,
branchez la hotte dans une prise murale conforme aux normes en vigueur et placée dans une zone accessible également après l’installation.
Si aucune prise n’est présente (raccordement direct au circuit électrique), ou si la prise ne se trouve pas dans une zone accessible également
après l’installation, appliquez un disjoncteur normalisé pour assurer de débrancher complètement la hotte du circuit électrique en conditions de
catégorie surtension III, conformément aux règlementations de montage.
ATTENTION!
Avant de rebrancher le circuit de la hotte à l’alimentation électrique et d’en vérifier le fonctionnement correct, contrôlez toujours que le câble
d’alimentation soit monté correctement.
Si le câble n'est pas équipé d'une fiche,branchez les fils selon le tableau suivant:
Tension principale et fréquence
Branchement des fils
Se référer à la valeur indiquée sur l’étiquette des caractéristiques à
l’intérieur de la hotte.
: jaune/vert
N : bleu
L
: brun
Changement du câble d'alimentation
La hotte est pourvue d'un câble d'alimentation spécial; en cas de détérioration du câble, en demander un neuf au service d'assistance
technique.

25
ÉVACUATION DE L'AIR
(pour les versions aspirantes)
Relier la hotte aux tubes et trous d’évacuation de la paroi d’un diamètre équivalent à la sortie de l’air (collier de raccord).
L’utilisation de tubes et des trous d'évacuation à paroi avec un diamètre inférieur entraînera une diminution des performances d’aspiration et
une nette augmentation du bruit.
Nous déclinons toute responsabilité à cet égard.
! Utiliser un tuyau de la longueur strictement nécessaire.
! Les coudes du tuyau doivent être en nombre minime (angle maxi du coude: 90°).
! Éviter les variations excessives de section du tuyau.
! La société décline toute responsabilité si ces normes ne sont pas respectées.
FILTRANTE OU ASPIRANTE ?
! Votre hotte est prête pour être utilisée en version aspirante.
Pour utiliser la hotte en version filtrante, il faut installer le KIT ACCESSOIRES prévu.
Vérifier dans les premières pages de ce manuel si le KIT ACCESSOIRES est déjà fourni ou s’il faut l’acheter à part.
Remarque: Si fourni dans le kit, dans certains cas, le système de filtration supplémentaire à base de charbon actif pourrait déjà être
installé dans la hotte.
Les informations pour la transformation de la hotte de version aspirante à version filtrante sont déjà contenues dans ce manuel.
Version aspirante
Les vapeurs sont évacuées vers l'extérieur à travers un conduit d'évacuation fixé à la bride de raccord qui se trouve au-dessus de la hotte.
ATTENTION!
Le tuyau d’évacuation n’est pas fourni et doit être acheté à part.
Le diamètre du tuyau d'évacuation doit être égal à celui de la bride de raccord.
ATTENTION!
Si la hotte est équipée d'un filtre à charbon, ce dernier doit être enlevé.
Version filtrante
L'air d'aspiration sera dégraissé et désodorisé avant d'être renvoyé dans la pièce.
Pour utiliser la hotte dans cette version, vous devez installer un système de filtrage supplémentaire basé sur charbon actif.
COMMANDES
La hotte est équipée d’un panneau de contrôle doté d’une commande de vitesse d’aspiration et d’une commande d’éclairage du plan de
cuisson.
T1. Arrêt moteur ventilateur / diminution de vitesse
T2. Marche moteur ventilateur / augmentation de vitesse
T3. FONCTION « POWER BOOST »
T4. MARCHE/ARRÊT Fonction 6th sense (mode AUTO)
T5. Fonctionnement en « Mode ZEN »
T6. Alarme/réinitialisation du filtre à graisse/charbon
T7. Témoin principal ALLUMÉ/ÉTEINT
MISE EN GARDE ! Cette hotte dispose d'un système de fonctionnement automatique (voir ci-dessous “T4. Fonction 6th sense (mode
AUTO) ON/OFF”).
L'étalonnage survient automatique à chaque fois que la hotte est rebranchée au réseau électrique (par ex.: la première fois qu'elle est installée
après une coupure de courant). Il peut également être effectué manuellement (voir paragraphe « Paramétrage du capteur »). Pendant

26
l'étalonnage, qui dure 5 minutes, T4 clignotera et les témoins peuvent être utilisés.
T1. ARRÊT MOTEUR VENTILATEUR / DIMINUTION DE VITESSE
Appuyez pour diminuer la vitesse et éteindre le moteur d'extraction. Appuyez et maintenez enfoncé pour éteindre directement le moteur
d'extraction.
T2. MARCHE MOTEUR VENTILATEUR / AUGMENTATION DE VITESSE
Appuyez pour allumer le moteur d'extraction et augmenter la vitesse. appuyez et maintenez enfoncé pour régler la 3ème vitesse directement.
T3. FONCTION « POWER BOOST »
Appuyez sur T3 pour activer la vitesse d'extraction intensive « POWER BOOST 1 » (contrôlée en temps).
Veuillez noter : la hotte reprendra la 3ème vitesse, après cinq minutes.
Avec le moteur d'extraction allumé, appuyez sur « POWER BOOST1 », rappuyez sur T3 pour activer la vitesse d'extraction intensive
supplémentaire « POWER BOOST 2 » (contrôlée en temps).
Veuillez noter : la hotte reprendra la 3ème vitesse, après cinq minutes.
Veuillez noter : rappuyez sur T3, pendant les cinq minutes, la hotte recommencera à fonctionner en « POWER BOOST 1 »
T4. MARCHE/ARRÊT FONCTION 6TH SENSE (MODE AUTO)
La hotte règle automatiquement la vitesse d'extraction si le capteur dans la hotte détecte des changements des conditions ambiantes.
Veuillez noter : pour vous assurer que cette fonction est utilisée correctement, commencez par configurer le capteur (voir « Paramétrage du
capteur» ci-dessous).
Veuillez noter : si vous changez d'autres fonctions qui contrôlent la vitesse, la fonction «6th sense» s'éteindra.
Paramétrage du capteur
Cela peut se faire quand la hotte est éteinte. Dans des conditions ambiantes normales, appuyez sur T4 pendant 5 secs, T4 clignote pendant 5
minutes pour indiquer que la hotte effectue un étalonnage du capteur, puis s'éteint pour indiquer que l'étalonnage est terminé.
Réglage surface de cuisson : Appuyez et maintenez enfoncés T1 et T2 simultanément. Les deux témoins allumés indiquent que la hotte est
prête à accepter l'étalonnage des paramètres de la surface de cuisson.
Appuyez sur T1 pour choisir une plaque à gaz (T1 commence à clignoter pendant 3 sec pour indiquer que les paramètres de la hotte sont
réglés pour une plaque à gaz).
Appuyez sur T2 pour choisir une table de cuisson à induction (T2 commence à clignoter pendant 3 sec pour indiquer que les paramètres de la
hotte sont réglés pour une table de cuisson à induction).
T5. FONCTIONNEMENT EN « MODE ZEN »
Appuyez pour activer ou désactiver le mode d'extraction « ZEN ».
Cette fonction permet d'activer une vitesse d'extraction avec l'équilibre parfait entre le calme et l'efficacité d'extraction.
T6. ALARME/RÉINITIALISATION DU FILTRE À GRAISSE/CHARBON
À intervalle régulier, la hotte indique le besoin d'effectuer l'entretien du filtre.
Veuillez noter : Les voyants fonctionnent lorsque la hotte est allumée.
T6 allumé : Effectuer l'entretien du filtre de graisse.
T6 clignotant : effectuer un entretien du filtre au charbon actif .
Réinitialisation des indicateurs de saturation du filtre :
Veuillez noter : Cela doit être fait avec la hotte allumée.
Appuyez et maintenez enfoncé T6
Veuillez noter : T6 et l'interrupteur de la hotte éteints, pour indiquer que la réinitialisation de l'alarme est effectuée.
La réinitialisation du Filtre à graisse et du filtre à charbon est effectué en utilisant la même touche. Si les deux alarmes de filtres sont actives, la
procédure de réinitialisation remettra le compteur à zéro, un par un,
avec la priorité au filtre à charbon.
Activation de l'indicateur de saturation du filtre à charbon actif
Veuillez noter : Cela doit être fait avec le moteur d'extraction éteint.
Cet indicateur est habituellement désactivé - appuyez et maintenez enfoncés T3 et T7 simultanément pour activer la fonction : Tous deux
s'allumeront pour indiquer qu'elle est activée.
Pour désactiver cette fonction, appuyez une nouvelle fois sur le bouton : Les deux clignoteront brièvement puis s'éteindront pour indiquer la
désactivation.
T7. TÉMOIN PRINCIPAL ALLUMÉ/ÉTEINT
Appuyez pour allumer ou éteindre l'éclairage de la plaque de cuisson.
27
ENTRETIEN
Nettoyage
Pour le nettoyage, utiliser EXCLUSIVEMENT un chiffon
humidifié avec des détergent liquides neutres. NE PAS
UTILISER D'OUTILS OU D'INSTRUMENTS POUR LE
NETTOYAGE ! Éviter l'usage de produits abrasifs, NE
PAS UTILISER D'ALCOOL!
Entretien des filtres anti-graisses
Il retient les particules de graisse issues de la cuisson.
Le filtre doit être nettoyé une fois par mois (ou lorsque le système
d’indication de saturation des filtres – si prévu sur le modèle –
indique cette nécessité) avec des détergents non agressifs, à la
main ou dans le lave-vaisselle à faibles températures et cycle
rapide.
Le lavage du filtre anti-graisse métallique au lave-vaisselle peut en
provoquer la décoloration. Toutefois, les caractéristiques de filtrage
ne seront en aucun cas modifiées.
Pour démonter le filtre anti-graisse, tirer la poignée de
décrochement à ressort.
Entretien des filtres au charbon
Retient les odeurs désagréables de cuisson.
La saturation du charbon actif se constate aprés un emploi plus ou
mois long, selon le type de cuisiniére et de régularité du nettoyage
du filtre à graisses. En tout cas, il est nécessaire de changer le
filtre aprés, au maximum, quatre mois (ou lorsque le système
d’indication de saturation des filtres – si prévu sur le modèle
possédé – indique cette nécessité).
IL NE PEUT PAS être nettoyé ou régénéré.
Montage
Accrocher le filtre au charbon actif d’abord à l’arrière de la
languette métallique de la hotte, puis à l’avant avec les deux
pommeaux.
Démontage
Enlever le filtre au charbon actif en tournant de 90° les pommeaux
qui le fixent à la hotte.
Remplacement des lampes
La hotte est dotée d’un système d’éclairage basé sur la
technologie LED.
Les LEDS garantissent un éclairage optimal, une durée jusqu’à 10
fois supérieures aux ampoules traditionnelles et permettent une
épargne de 90% en énergie électrique.
Pour remplacer les lampes, contactez le centre service agréé pour
pièces de rechange.
28
ÉLIMINATION
Cet appareil porte le symbole du recyclage conformément à la Directive Européenne 2012/19/EC concernant les Déchets d’Équipements
Électriques et Électroniques (DEEE ou WEEE).
En procédant correctement à la mise au rebut de cet appareil, vous contribuerez à empêcher toute conséquence nuisible pour
l’environnement et la santé de l’homme.
Le symbole présent sur l’appareil ou sur la documentation qui l’accompagne indique que ce produit ne peut en aucun cas être traité
comme déchet ménager. Il doit par conséquent être remis à un centre de collecte des déchets chargé du recyclage des équipements
électriques et électroniques.
Pour la mise au rebut, respectez les normes relatives à l’élimination des déchets en vigueur dans le pays d’installation.
Pour obtenir de plus amples détails au sujet du traitement, de la récupération et du recyclage de cet appareil, veuillez vous adresser au
bureau compétent de votre commune, à la société de collecte des déchets ou directement à votre revendeur.
Appareil conçu, testé et fabriqué conformément aux normes suivantes :
• Sécurité : EN/IEC 60335-1; EN/IEC 60335-2-31, EN/IEC 62233.
• Performances : EN/IEC 61591; ISO 5167-1; ISO 5167-3; ISO 5168; EN/IEC 60704-1; EN/IEC 60704-2-13; EN/IEC 60704-3; ISO 3741; EN
50564; IEC 62301.
• EMC: EN 55014-1; CISPR 14-1; EN 55014-2; CISPR 14-2; EN/IEC 61000-3-2; EN/IEC 61000-3-3. Suggestions pour une utilisation correcte
afin de réduire l’impact environnemental : Allumer la hotte à la vitesse minimum pendant la cuisson et la laisser fonctionner pendant quelques
minutes après la fin de la cuisson. Augmenter la vitesse uniquement en présence d’une grande quantité de fumée ou de vapeur et n’utiliser
la/les vitesse(s) accélérées que dans les cas extrêmes. Remplacer le(s) filtre(s) au charbon lorsque cela est nécessaire afin de maintenir une
réduction efficace des odeurs. Nettoyer le(s) filtres à graisse lorsque cela est nécessaire afin de maintenir un filtrage efficace des graisses.
Utiliser un système de tuyauterie du diamètre maximum indiqué dans ce manuel afin d’optimiser le rendement et de minimiser le bruit.
ANOMALIES DE FONCTIONNEMENT
En cas d'anomalie de fonctionnement, avant de faire appel au service d'assistance, effectuer les contrôles suivants:
• Si la hotte ne fonctionne pas:
S'assurer:
- de l'absence de coupure de courant.
- qu'une vitesse a été sélectionnée.
• Si la hotte a un faible rendement:
S'assurer:
- que la vitesse du moteur sélectionnée est suffisante pour la quantité de fumée et de vapeurs libérées.
- que la cuisine est insuffisamment aérée pour assurer une prise d'air.
- que le filtre à charbon n'est pas usé (hotte en version filtrante).
• Si la hotte s'éteint durant son fonctionnement normal:
S'assurer:
- de l'absence de coupure de courant.
- que le dispositif d'interruption omnipolaire ne s'est pas déclenché.
Si la hotte ne fonctionne pas correctement, débranchez la prise pendant environ 5 secondes, puis rebranchez-la. Si le problème persiste,
contactez le service de réparation compétent.

29
DONNÉES TECHNIQUE
Hauteur (cm) Largeur (cm) Profondeur (cm)
Ø de tube d'évacuation
(cm)
62-114
71
-
114
89,8 45,5 15
62-114
71
-
114
59,8 45,5 15
Éléments non fournis avec la hotte
Vous pouvez télécharger les consignes de
sécurité, le manuel de l’utilisateur, la fiche
produit et les données énergétiques en :
• Visitant notre site internet docs.whirlpool.eu
• Utilisant le Code QR
• Vous pouvez également
contacter notre service
après-vente
(voir numéro de téléphone dans le livret
de garantie). Lorsque vous contactez notre Service
Après-vente, ve
uillez indiquer les codes visibles sur
la plaque signalétique de l’appareil.

30
NL
ALGEMENE VEILIGHEID
• Zorg voordat u de afzuigkap schoonmaakt of onderhoudt eerst dat hij geen stroom heeft
door de stekker uit het stopcontact te halen, de tweepolige schakelaar uit te zetten of de
betreffende elektriciteitsgroep geheel uit te schakelen.
• Draag tijdens installatie en onderhoud altijd werkhandschoenen.
• Dit apparaat is geschikt voor bediening door kinderen vanaf 8 jaar, personen met
lichamelijke, zintuiglijke of verstandelijke beperkingen, onervaren personen en degenen die
over onvoldoende kennis beschikken, onder voorwaarde dat ze hierbij eerst worden
begeleid en geïnstrueerd over veilig gebruik en bediening van het apparaat, en voldoende
inzicht hebben in de bijbehorende gevaren.
• Laat kinderen niet aan de knoppen zitten of met het apparaat spelen.
• Schoonmaken en onderhoud door kinderen van voor de gebruiker toegankelijke
onderdelen mag alleen onder toezicht van een volwassen.
• Wanneer de afzuigkap wordt gebruikt voor apparaten die op gas of een andere brandstof
werken, moet de ruimte waar de apparaten zijn geïnstalleerd voldoende worden
geventileerd.
• De afzuigkap moet regelmatig van binnen en van buiten worden schoongemaakt
(MINSTENS 1 KEER PER MAAND).
• Hierbij moeten de verstrekte onderhoudsinstructies worden opgevolgd. Als de verstrekte
instructies voor het reinigen van de afzuigkap en de filters niet worden opgevolgd, ontstaat
de kans op brand.
• U mag niets flamberen onder de afzuigkap.
• Vervang de lampen uitsluitend door het type dat staat aangegeven onder "Onderhoud >
Lampjes vervangen" van deze gids.
Blootstellen aan vlammen is slecht voor de filters en kan tot brand leiden. Dit moet dus onder
alle omstandigheden worden vermeden. Werk bij bakken en braden dus extra zorgvuldig en
zorg dat vet of olie niet oververhit raakt en in brand vliegt.
LET OP: het is mogelijk dat toegankelijke onderdelen van de afzuigkap heet worden tijdens
het afvoeren van kookdampen.
• Sluit het apparaat niet op het lichtnet aan voordat de installatie is voltooid.
• Bij technische maatregelen en veiligheidsmaatregelen voor installaties die kookdampen afvoeren, is het belangrijk dat de lokale wet- en
regelgeving nauwkeurig wordt gevolgd.
• De afgezogen lucht mag niet worden afgevoerd naar een uitvoer voor dampen van apparaten die op gas of andere brandstoffen werken.
• Zorg dat de lamp op de juiste manier is geplaatst omdat anders de kans ontstaat op elektrische schokken, zelfs als de kap niet wordt
gebruikt.
• Gebruik de afzuigkap nooit zonder op de juiste manier geplaatste roosters.
• Laat NOOIT andere zaken op de afzuigkap rusten, tenzij specifiek aangegeven.
• Gebruik voor de installatie alleen de meegeleverde schroeven, of koop schroeven van het juiste type.
• Raadpleeg de installatiegids voor de correcte afmetingen van de schroeven.
• Raadpleeg bij twijfel een geautoriseerd service center of iemand met vergelijkbare kwalificaties.
WAARSCHUWING!
• Wanneer niet de in deze instructies vermelde schroeven worden gebruikt of als het apparaat niet volgens deze instructies wordt bevestigd,
kunnen elektrische risico's ontstaan.
31
• Sluit het product niet aan op een (programmeerbare) timer, externe afstandsbediening of ander apparaat waardoor het product automatisch
wordt ingeschakeld.
Houd kinderen jonger dan 3 jaar uit de buurt van het apparaat. Zonder het voortdurende toezicht van een volwassene moeten kinderen jonger
dan 8 jaar uit de buurt van het apparaat gehouden worden.
OPGELET: het apparaat is niet bedoel om in werking te worden gesteld door middel van een extern apparaat of een afzonderlijk
afstandsbedieningssysteem.
Dit apparaat is niet bedoeld voor een professioneel gebruik. Gebruik het apparaat niet in de open lucht.
Om het risico op persoonlijk letsel te voorkomen, moet het apparaat verplaatst en geïnstalleerd worden door twee of meer personen.
De installatie, waaronder ook de eventuele aansluiting op de watervoorziening (indien voorzien) en de elektrische aansluitingen, evenals
de reparatie-ingrepen moeten worden uitgevoerd door gekwalificeerd personeel.
Na het voltooien van de installatie moet het verpakkingsmateriaal (plastic, polystyreen, enz.) buiten het bereik van kinderen bewaard worden
om verstikkingsgevaar te voorkomen. .
Gebruik het apparaat niet wanneer u nat bent of op blote voeten.
Gebruik voor de reiniging nooit stoomreinigers - gevaar voor elektrische schokken.
Het verpakkingsmateriaal is 100% recycleerbaar en is gemarkeerd met het betreffende symbool
De afzuigkap kan er anders uitzien dan de afbeeldingen in dit boekje. De instructies voor bediening, onderhoud en installatie blijven
echter hetzelfde.
Houd u altijd aan de instructies in deze gids. Wij aanvaarden geen enkele aansprakelijkheid voor problemen, schade of brand die
voortvloeien uit nalatigheid, zoals het niet opvolgen van de instructies in deze gids. Dit apparaat is bedoeld voor huishoudelijk gebruik en
vergelijkbare toepassingen zoals: - personeelskeukens in winkels, kantoren en andere werkomgevingen; - boerderijen; - gebruik door klanten
in hotels, motels en andere verblijfsomgevingen zoals bed and breakfast.
• Het is belangrijk om dit boekje goed te bewaren zodat u er altijd dingen in kan opzoeken. Zorg dat het boekje bij verhuizing, verkoop of
overdracht met het apparaat meegaat.
• Lees de instructies zorgvuldig: het gaat hier om belangrijke informatie over installatie, bediening, onderhoud en veiligheid.
• Voer nooit zelf elektrische of mechanische veranderingen uit op het product of de afvoerbuizen.
• Controleer alle onderdelen op beschadigingen voordat u verder gaat met de installatie van het apparaat. Neem bij beschadiging contact op
met uw leverancier, en begin niet aan de installatie.
De minimale afstand tussen het kookoppervlak en de onderkant van de afzuigkap is 50cm bij een elektrische kookplaat en 65 cm, in geval van
een gas- of gemengd fornuis.
Als in de installatie-instructies van een gaskookplaat een grotere afstand wordt genoemd, moet de grotere afstand worden gebruikt.
ELEKTRISCHE AANSLUITING
De aansluiting op het lichtnet moet overeenkomen met de waarde op het plaatje aan de binnenkant van de afzuigkap. Als de afzuigkap een
stekker heeft, moet deze in een stopcontact dat aan de nieuwste regelgeving voldoet en ook na de installatie bereikbaar blijft. Als het product
geen stekker heeft (rechtstreekse aansluiting op lichtnet), of als de stekker na de installatie niet meer bereikbaar is, moet gebruik worden
gemaakt van een tweepolige aan/uitschakelaar, zodat het product (bijvoorbeeld bij een te hoge stroomsterkte, categorie III) geheel kan
worden losgekoppeld van het lichtnet.
WAARSCHUWING!
Controleer eerst of het netsnoer correct is gemonteerd voordat de afzuigkap op het lichtnet wordt aangesloten om de juiste werking te
controleren.
Als de kabel niet is voorzien van een stekker,sluit u de kabels aan overeenkomstig de volgende tabel:
Spanning en frequentie net Aansluiting draden
Verwijs naar de waarde aangegeven op het typeplaatje dat is
aangebracht in de afzuigkap.
: geel/groen
N : blauw
L : bruin
Vervanging van de voeding
De afzuigkap wordt geleverd met een speciaal netsnoer. Als dit snoer beschadigd is, moet u een nieuw exemplaar aanvragen bij de
technische dienst.

32
LUCHTAFVOER
(afzuigend apparaat)
Sluit de afzuigkap aan op een buis met dezelfde doorsnede als de luchtafvoer van de kap (aansluitflens). Deze diameter geldt ook voor
eventuele doorvoeropeningen voor de afvoerbuis.
Een doorvoeropening en/of buis met een kleinere doorsnede verlaagt de zuigkracht en leidt tot een enorme toename van de geluidsproductie.
Wij aanvaarden in dit verband dan ook geen enkele verantwoordelijkheid.
• Houd de buis zo kort mogelijk.
• Gebruik zo weinig mogelijk elleboogkoppelingen (maximale hoek hiervan: 90°).
• Vermijd grote variaties in de doorsnede van de afvoerbuis.
! Het bedrijf wijst iedere aansprakelijkheid af indien deze voorschriften niet in acht worden genomen.
FILTEREND OF AFZUIGEND APPARAAT ?
! Uw afzuigkap is ingesteld om als afzuigend apparaat te worden gebruikt.
Om de kap als filterend apparaat te gebruiken dient de betreffende TOEBEHOREN SET gemonteerd te worden.
Controleer op de eerste pagina’s van deze handleiding of de TOEBEHOREN SET wordt meegeleverd of gekocht moet worden.
Opmerking: Indien de set meegeleverd wordt, kan, in enkele gevallen, het extra actieve koolstoffilter reeds op de kap gemonteerd zijn.
De inlichtingen om de kap van afzuigend apparaat in filterend apparaat om te zetten zijn in deze handleiding te vinden.
Uitvoering als afzuigend apparaat
Hierbij wordt de afgevoerde lucht uit het pand gevoerd via een speciaal hiervoor geconstrueerde buis die gekoppeld is aan de aansluitring aan
de bovenkant van de afzuigkap.
LET OP!
De afvoerbuis wordt niet meegeleverd en moet afzonderlijk worden aangeschaft. De afvoerbuis moet dezelfde doorsnede hebben als de
aansluitring.
LET OP!
Als de afzuigkap is geleverd met een actief koolfilter, moet dit worden verwijderd.
Filtrerende versie
De verwijderde lucht wordt ontvet en ontgeurd en vervolgens weer teruggeleid naar de betreffende ruimte.
Om de afzuigkap in deze vorm te gebruiken, moet een extra filtersysteem op basis van geactiveerde kool zijn geïnstalleerd.
BEDIENINGSELEMENTEN
De kap is voorzien van een bedieningspaneel met een schakelaar voor de snelheid van afzuiging en een schakelaar voor de verlichting van
het fornuis.
T1. Ventilatormotor UIT / Snelheid verlagen
T2. Ventilatormotor AAN / Snelheid verhogen
T3. “POWER BOOST”-functie
T4. 6th sense function (AUTO-modus)
T5. Werking in “ZEN” afzuigmodus
T6. Vet/koolstoffilter alarm/reset
T7. Hoofdverlichting AAN/UIT
VOORZICHTIG! Deze kap heeft een automatisch werkingssysteem (zie “T4. 6th sense function (AUTO-modus) AAN/UIT”).
De ijking wordt automatisch uitgevoerd telkens als de kap opnieuw wordt aangesloten op het stroomnet (bijv.: de eerste maal dat het wordt
geïnstalleerd na een stroomuitval). Het kan ook handmatig uitgevoerd worden (zie paragraaf “Instelling van sensor”). Tijdens de ijking, die 5
minuten duurt, knippert T4 en de lichten kunnen gebruikt worden.

33
T1. VENTILATIEMOTOR UIT / SNELHEID VERLAGEN
Druk om de snelheid te verlagen en de afzuigmotor UIT te schakelen.
Druk en blijf drukken om de afzuigmotor direct UIT te schakelen.
T2. VENTILATIEMOTOR AAN / SNELHEID VERHOGEN
Druk om de afzuigmotor IN te schakelen en de snelheid te verhogen.
Druk lange tijd in om de 3de snelheid direct in te stellen.
T3. “POWER BOOST”-FUNCTIE
Druk op T3 om de intensieve afzuigsnelheid VERMOGENSOPVOERING1 (tijdgestuurd) te activeren.
Let op: de kap keert na vijf minuten terug naar de derde snelheid.
Druk, terwijl de afzuigmotor draait op "VERMOGENSOPVOERING 1", nogmaals op T3 om de extra intensieve afzuigsnelheid
VERMOGENSOPVOERING 2 (tijdgestuurd) te activeren.
Let op: de kap keert na vijf minuten terug naar de derde snelheid.
Let op: als u nogmaals op T3 drukt tijdens de vijf minuten, gaat de kap terug naar "VERMOGENSOPVOERING 1"
T4. 6TH SENSE FUNCTION (AUTO-MODUS) AAN/UIT
De kap stelt de afzuigsnelheid automatisch in als de sensor in de kap veranderingen in de omgevingscondities detecteert.
Let op: om er zeker van te zijn dat deze functie correct gebruikt wordt, configureert u eerst de sensor (zie “Instelling van sensor” hieronder).
Let op: als u andere functies die de snelheid regelen verandert, wordt de "6th sense“ function uitgeschakeld.
Instelling van sensor
Dit kan gedaan worden als de kap UIT staat. Druk bij normale omgevingscondities op T4 gedurende 5 seconden T4 knippert gedurende 5
minuten om aan te geven dat de kap de sensorkalibratie
uitvoert en schakelt dan uit om aan te geven dat de kalibratie is beëindigd.
Kookplaat instellen: Druk op T1 en T2 tegelijkertijd en houd ze ingedrukt. Beide branden om aan te geven dat de kap klaar is om de ijking
van de kookplaatparameter te accepteren.
Druk op T1 om gaskookplaat te kiezen(T1 begint 3 seconden te knipperen om aan te geven dat de kap-parameters ingesteld zijn voor een
gaskookplaat).
Druk op T2 om inductiekookplaat te kiezen (T2 begint 3 seconden te knipperen om aan te geven dat de kap-parameters ingesteld zijn voor
een inductiekookplaat).
T5. WERKING IN “ZEN-MODUS”
Druk om de "ZEN" afzuigmodus in of uit te schakelen.
Deze functie dient om een afzuigsnelheid in te schakelen die perfect gebalanceerd is tussen stilte en efficiëntie.
T6. VET/KOOLSTOFFILTER ALARM/RESET
De kap signaleert regelmatig de behoefte om de filter te onderhouden.
Let op: De indicators functioneren alleen wanneer de kap aangezet is.
T6 brandt: Voer onderhoud uit aan de vetfilter.
T6 knippert: voer onderhoud uit aan het koolstoffilter.
De indicatoren van filterverzadiging resetten:
Let op: Dit moet uitgevoerd worden als de kap ingeschakeld is.
Druk op T6 en houd ingedrukt
Let op: T6 en kap worden uitgeschakeld om aan te geven dat het alarm is gereset.
De reset van de vetfilter en van de koolstoffilter wordt uitgevoerd met dezelfde toets. Als beide filteralarmen geactiveerd zijn, voert de
resetprocedure de reset van de tellers na elkaar uit, met prioriteit van de koolstoffilter.
De indicator van de verzadiging van het koolstoffilter activeren
Let op: Dit moet uitgevoerd worden als de afzuigmotor uitgeschakeld is.
Deze indicator is gewoonlijk uitgeschakeld – houd de toetsen T3 en T7 tegelijkertijd ingedrukt om de functie in te schakelen: Beide zullen
oplichten om activering aan te geven.
Om de functie uit te schakelen houdt u dezelfde toetsen opnieuw ingedrukt: Beide knipperen even en gaan vervolgens uit om de uitschakeling
aan te geven.
T7. HOOFDVERLICHTING AAN/UIT
Druk om de kookplaatverlichting aan of uit te schakelen.
34
ONDERHOUD
Schoonmaak
ALLEEN reinigen met een doek die is bevochtigd met een
neutraal vloeibaar schoonmaakmiddel. GEBRUIK BIJ HET
REINIGEN GEEN GEREEDSCHAPPEN OF ANDERE
VOORWERPEN. Gebruik geen schuurmiddelen. GEBRUIK
GEEN ALCOHOL!
Onderhoud van de vetfilters
Vangt vetdeeltjes op uit de kookdampen.
Moet één keer per maand worden gereinigd (of als de aanwijzer
verzadigde filters – indien aanwezig op het model in Uw bezit –
deze noodzaak aangeeft) met neutrale reinigingsmiddelen, met de
hand of in de vaatwasmachine op lage temperaturen en met een
kort programma. Door hem in de vaatwasmachine te wassen kan
het metalen vetfilter ontkleuren, maar dit is niet van invloed op de
eigenschappen, die beslist niet veranderen.
Trek aan de verende hendel om het vetfilter te verwijderen.
Onderhoud van het koolstoffilter
Absorbeert ongewenste kookgeurtjes. De verzadiging van de
koolstoffilter vindt plaats na een min of meer geprolongeerd
gebruik en hangt af van het soort koken en de regelmaat waarmee
de vetfilter wordt gewassen. In ieder geval moet de filter minstens
om de 4 maanden (of als de aanwijzer verzadigde filters – indien
aanwezig op het model in Uw bezit – deze noodzaak aangeeft)
vervangen worden. Het kan NIET gewassen of opnieuw gebruikt
worden
Montage
Haak eerst het koolfilter aan de achterkant van de metalen lip van
de afzuigkap, en zet het daarna vast met de twee knoppen aan de
voorkant.
Demontage
Verwijder het koolfilter door de bevestigingsknoppen op de
afzuigkap een kwartslag te draaien.
Vervanging lampjes
De kap is voorzien van een verlichtingssysteem gebaseerd op de
LEDDEN technologie.
De Ledden zorgen voor een optimale verlichting, voor een 10 maal
langere tijdsduur ten opzichte van de traditionele lampjes en een
elektriciteitsbesparing van wel 90%.
Om de lampen te vervangen, neem contact op met de erkende
assistentie service voor de reserveonderdelen.

35
VERWIJDERING
Dit toestel is gemarkeerd in overeenstemming met Europese richtlijn 2012/19/EC betreffende afgedankte elektrische en elektronische
apparatuur (AEEA).
Zorg aan het einde van de levensduur van het apparaat dat het op de juiste manier wordt afgevoerd en verwerkt. Zo voorkomt u negatieve
gevolgen voor volksgezondheid en milieu.
Het pictogram op het product en/of in de bijbehorende documenten geeft aan dat dit apparaat niet als normaal huishoudelijk afval
mag worden behandeld.Het product dient te worden afgegeven bij een officieel innamepunt voor elektrische en elektronische apparatuur om
gerecycled te worden. Afvoer en verwerking moet worden uitgevoerd volgens plaatselijke milieu-regelgeving.
Neem voor nadere informatie over inzamelen, verwerken en recyclen van dit product contact op met de betreffende afdeling van de lokale
overheid, of de afdeling van uw leverancier die verantwoordelijkheid draagt voor afvalverwerking.
Toestel ontworpen, getest en gefabriceerd volgens:
• Veiligheid: EN/IEC 60335-1; EN/IEC 60335-2-31, EN/IEC 62233.
• Prestaties: EN/IEC 61591; ISO 5167-1; ISO 5167-3; ISO 5168; EN/IEC 60704-1; EN/IEC 60704-2-13; EN/IEC 60704-3; ISO 3741; EN
50564; IEC 62301.
• EMC: EN 55014-1; CISPR 14-1; EN 55014-2; CISPR 14-2; EN/IEC 61000-3-2; EN/IEC 61000-3-3. Suggesties voor correct gebruik om
impact op het milieu te verkleinen: zet de afzuigkap aan op de laagste snelheid wanneer u gaat koken en laat hem na afloop nog een paar
minuten doorlopen. Kies alleen een hogere snelheid bij grote hoeveelheden damp of rook en gebruik de hoge snelheid/snelheden (Boost)
alleen voor extreme omstandigheden. Vervang tijdig de koolfilter(s) om de afzuiging van kookgeurtjes zo effectief mogelijk te houden. Vervang
tijdig vetfilter(s) om de gevolgen van vetafzetting zo effectief mogelijk tegen te gaan. Gebruik buizen van de maximale doorsnede zoals
vermeld in deze gids, voor optimale efficiëntie en minimale geluidsproductie.
STORINGEN
Bij een storing van de afzuigkap, voer de volgende controles uit alvorens de Technische Dienst te raadplegen:
• Als de afzuigkap niet functioneert:
Controleer of: Controleer dat:
- er geen stroomonderbreking is.
- er een snelheid is geselecteerd.
• Bij een laag rendement van de afzuigkap:
Controleer of: Controleer dat:
- de ingestelde snelheid volstaat voor de afgegeven hoeveelheid rook en dampen.
- de keuken is voldoende geventileerd voor een correcte luchttoevoer.
- de koolstoffilter niet is verzadigd (i.g.v. recirculatie).
• het uitvallen van de afzuigkap tijdens de normale werking heeft plaatsgevonden.
Controleer of: Controleer dat:
- er geen stroomonderbreking is.
- de omnipolaire schakelaar niet is opgetreden.
In geval van storingen, voordat U zich tot de assistentie service wendt, minstens 5 seconden het apparaat van de elektrische voeding doen,
door de stekker uit te trekken, en daarna weer invoeren. In het geval dat de storing blijft voortbestaan, wendt U zich tot de assistentie service.

36
TECHNISCHE GEGEVENS
Højde (cm)
Bredde (cm)
Dybde (
cm)
Ø på udsugningsrør (cm)
62-114
71
-
114
89,8 45,5 15
62-114
71
-
114
59,8 45,5 15
Niet meegeleverde onderdelen
U kunt de Veiligheidsinstructies, de Handleiding,
de Productfiche en de Energiegegevens
downloaden:
• Op onze website docs.whirlpool.eu
• Gebruik makend van de QR-code
• Anders, contacteer onze Klantenservice
(Het
telefoonnummer staat in het garantieboekje).
Wanneer u contact neemt met de Klantenservice,
gelieve de codes te vermelden die op het
identificatieplaatje van het apparaat staan.
37
IT
SICUREZZA GENERALE
• Prima di qualsiasi operazione di pulizia o manutenzione, disinserire la cappa dalla rete
elettrica togliendo la spina o staccando l’interruttore generale dell’abitazione.
• Per tutte le operazioni di installazione e manutenzione utilizzare guanti da lavoro.
• L’apparecchio può essere utilizzato da bambini di età non inferiore a 8 anni e da persone
con ridotte capacità fisiche, sensoriali o mentali, o prive di esperienza o della necessaria
conoscenza, purché sotto sorveglianza oppure dopo che le stesse abbiano ricevuto
istruzioni relative all’uso sicuro dell’apparecchio e alla comprensione dei pericoli ad esso
inerenti.
• I bambini devono essere controllati affinché non giochino con l’apparecchio.
• La pulizia e la manutenzione non deve essere effettuata da bambini senza sorveglianza.
• Il locale deve disporre di sufficiente ventilazione, quando la cappa da cucina viene utilizzata
contemporaneamente ad altri apparecchi a combustione di gas o altri combustibili.
• La cappa va frequentemente pulita sia internamente che esternamente (ALMENO UNA
VOLTA AL MESE), rispettare comunque quanto espressamente indicato nelle istruzioni di
manutenzione. L’inosservanza delle norme di pulizia della cappa e della sostituzione e
pulizia dei filtri comporta rischi di incendi.
• E’ severamente vietato fare cibi alla fiamma sotto la cappa.
• Per la sostituzione della lampada utilizzare solo il tipo lampada indicato nella sezione
manutenzione /sostituzione lampada di questo manuale.
L’impiego di fiamma libera è dannoso ai filtri e può dar luogo ad incendi, pertanto deve
essere evitato in ogni caso.
La frittura deve essere fatta sotto controllo onde evitare che l’olio surriscaldato prenda fuoco.
ATTENZIONE: Quando il piano di cottura è in funzione le parti accessibili della cappa
possono diventare calde.
• Non collegare l’apparecchio alla rete elettrica finché l’installazione non è totalmente
completata.
• Per quanto riguarda le misure tecniche e di sicurezza da adottare per lo scarico dei fumi attenersi strettamente a quanto previsto dai
regolamenti delle autorità locali competenti.
• L’aria aspirata non deve essere convogliata in un condotto usato per lo scarico dei fumi prodotti da apparecchi a combustione di gas o di altri
combustibili.
• Non utilizzare o lasciare la cappa priva di lampade correttamente montate per possibile rischio di scossa elettrica.
• Mai utilizzare la cappa senza griglia correttamente montata!
• La cappa non va MAI utilizzata come piano di appoggio a meno che non sia espressamente indicato.
• Utilizzare solo le viti di fissaggio in dotazione con il prodotto per l'installazione o, se non in dotazione, acquistare il tipo di viti corretto.
• Utilizzare la lunghezza corretta per le viti che sono identificati nella Guida all'installazione.
• In caso di dubbio, consultare il centro di assistenza autorizzato o personale qualificato similare.
ATTENZIONE!
• La mancata installazione di viti e dispositivi di fissaggio in conformità di queste istruzioni può comportare rischi di natura elettrica.
• Non utilizzare con un programmatore, timer, telecomando separato o qualsiasi altro dispositivo che si attiva automaticamente.
Tenere i bambini di età inferiore a 3 anni lontani dall'apparecchio. Senza la sorveglianza costante di un adulto, tenere l'apparecchio fuori dalla
portata dei bambini di età inferiore a 8 anni.
ATTENZIONE: l'apparecchio non è destinato ad essere messo in funzione mediante un dispositivo esterno o un sistema di comando a

38
distanza separato.
Questo apparecchio non è destinato all'uso professionale. Non utilizzare l'apparecchio all'aperto.
Per evitare il rischio di lesioni personali, l'apparecchio deve essere movimentato e installato da due o più persone.
L'installazione, comprendente anche eventuali raccordi per l'alimentazione idrica (se previsti) e i collegamenti elettrici, e gli interventi di
riparazione devono essere eseguiti da personale qualificato.
A installazione completata, conservare il materiale di imballaggio (parti in plastica, polistirolo, ecc.) fuori della portata dei bambini per evitare il
rischio di soffocamento.
Non utilizzare l'apparecchio quando si è bagnati oppure a piedi nudi.
Mai utilizzare apparecchi per pulizia a vapore – rischio di shock elettrico.
Il materiale dell'imballo è riciclabile al 100% ed è contrassegnato con il simbolo del riciclo
La cappa può avere estetiche differenti rispetto a quanto illustrato nei disegni di questo libretto, comunque le istruzioni per l'uso, la
manutenzione e l'installazione rimangono le stesse.
Attenersi strettamente alle istruzioni riportate in questo manuale. Si declina ogni responsabilità per eventuali inconvenienti, danni o
incendi provocati all'apparecchio derivati dall'inosservanza delle istruzioni riportate in questo manuale. La cappa è concepita per l'aspirazione
dei fumi e vapori della cottura ed è destinata al solo uso domestico.
• E' importante conservare tutti i manuali che accompagnano il prodotto per poterli consultare in ogni momento. In caso di vendita, di
cessione o di trasloco, assicurarsi che restino insieme al prodotto.
• Leggere attentamente le istruzioni: ci sono importanti informazioni sull'installazione, sull'uso e sulla sicurezza.
• Non effettuare variazioni elettriche o meccaniche sul prodotto o sulle condotte di scarico.
• Verificare l'integrità della cappa prima di procedere con l’installazione. In caso contrario contattare il rivenditore e non proseguire con
l'installazione.
La distanza minima fra la superficie di supporto dei recipienti sul dispositivo di cottura e la parte più bassa della cappa da cucina deve essere
non inferiore a 50 cm in caso di cucine elettriche e di 65 cm in caso di cucine a gas o miste.
Se le istruzioni di installazione del dispositivo di cottura a gas specificano una distanza maggiore, bisogna tenerne conto.
COLLEGAMENTO ELETTRICO
La tensione di rete deve corrispondere alla tensione riportata sull’etichetta caratteristiche situata all’interno della cappa. Se provvista di spina
allacciare la cappa ad una presa conforme alle norme vigenti posta in zona accessibile anche dopo l’installazione. Se sprovvista di spina
(collegamento diretto alla rete) o la spina non è posta in zona accessibile, anche dopo installazione, applicare un interruttore bipolare a norma
che assicuri la disconnessione completa della rete nelle condizioni della categoria di sovratensione III, conformemente alle regole di
installazione.
ATTENZIONE!
Prima di ricollegare il circuito della cappa all’alimentazione di rete e di verificarne il corretto funzionamento, controllare sempre che il cavo di
rete sia stato montato correttamente.
Se il cavo non è provvisto di spina,collegare i fili attenendosi alla tabella seguente:
Tensione e frequenza della rete
Collegamento fili
Fare riferimento al valore indicato nella etichetta caratteristiche
all'interno della cappa.
: giallo/verde
N : blu
L
: marrone
Sostituzione del cavo di alimentazione
La cappa è provvista di un cavo alimentazione speciale; in caso di danneggiamento del cavo, richiederlo al servizio assistenza tecnica.
SCARICO DELL'ARIA
(per le versioni aspiranti)
Collegare la cappa a tubi e fori di scarico a parete con diametro equivalente all'uscita d'aria (flangia di raccordo).
L'utilizzo di tubi e fori di scarico a parete con diametro inferiore determinerà una diminuzione delle prestazioni di aspirazione ed un drastico
aumento della rumorosità.
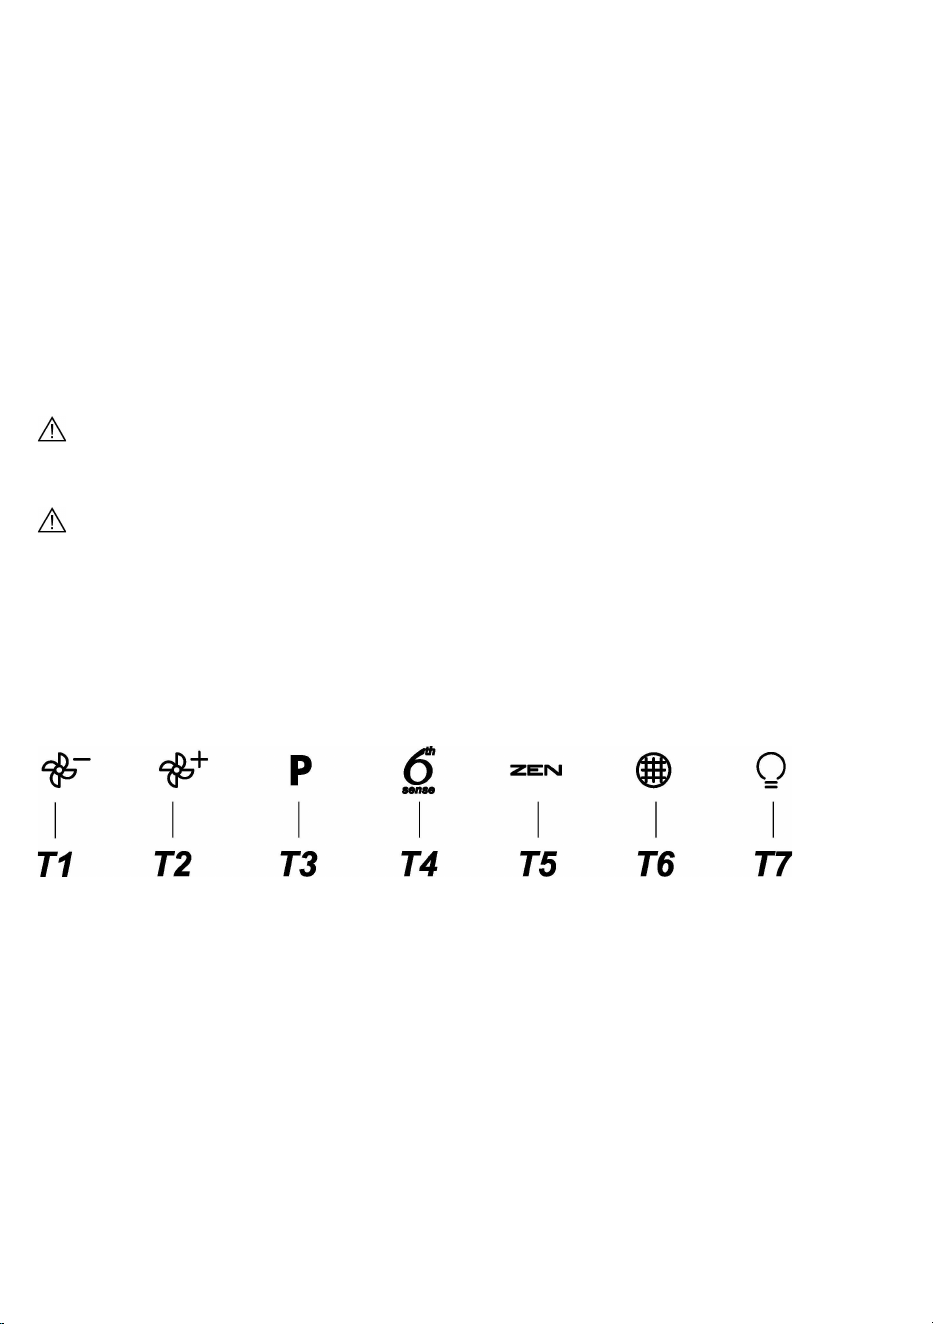
39
Si declina perciò ogni responsabilità in merito.
! Usare un condotto lungo il minimo indispensabile.
! Usare un condotto con minor numero di curve possibile (angolo massimo della curva: 90°).
! Evitare cambiamenti drastici di sezione del condotto.
! L'azienda declina ogni responsabilità qualora queste norme non vengano rispettate.
FILTRANTE O ASPIRANTE?
! La vostra cappa è pronta per essere utilizzata in versione aspirante.
Per utilizzare la cappa in versione filtrante va installato l’apposito KIT ACCESSORIO.
Verificate nelle prime pagine di questo manuale se il KIT ACCESSORIO è già fornito a corredo o va acquistato a parte.
Nota: Se fornito a corredo, in alcuni casi, il sistema di filtraggio aggiuntivo a base di carboni attivi potrebbe essere già installato sulla
cappa.
Le informazioni per la trasformazione della cappa da versione aspirante a versione filtrante sono già contenute in questo manuale.
Versione aspirante
I vapori vengono evacuati verso l’esterno tramite un tubo di scarico fissato alla flangia di raccordo.
ATTENZIONE!
Il tubo di evacuazione non è fornito e va acquistato.
Il diametro del tubo di scarico deve essere equivalente al diametro dell'anello di connessione.
ATTENZIONE!
Se la cappa è provvista di filtro/i a carbone, questo/i deve/devono essere rimosso/i.
Versione filtrante
L’aria aspirata verrà sgrassata e deodorata prima di essere riconvogliata nella stanza. Per utilizzare la cappa in questa versione è necessario
installare un sistema di filtraggio aggiuntivo a base di carboni attivi.
COMANDI
La cappa è fornita di un pannello comandi con un controllo delle velocità di aspirazione ed un controllo di accensione della luce per
l'illuminazione del piano di cottura.
T1. Spegnimento / riduzione di velocità del motore della ventola
T2. Accensione / aumento di velocità del motore della ventola
T3. Funzione “POWER BOOST”
T4. Attivazione/disattivazione della funzione 6th sense (modalità AUTO)
T5. Funzionamento in “modalità ZEN”
T6. Allarme/reset del filtro antigrasso/filtro al carbone
T7. Accensione/spegnimento della luce principale.
ATTENZIONE Questa cappa dispone di un sistema di azionamento automatico (vedere il punto “T4. Attivazione/disattivazione della
funzione 6th sense (modalità AUTO)”.
La cappa viene tarata automaticamente ogni volta che viene ricollegata alla rete elettrica (ad esempio, alla prima installazione dopo un
blackout).
La taratura può anche essere eseguita manualmente (vedere il paragrafo “Configurazione del sensore”). Durante la taratura, che ha una
durata di 5 minuti, il simbolo T4 lampeggia ed è possibile usare le luci.
T1. SPEGNIMENTO / RIDUZIONE DI VELOCITÀ DEL MOTORE DELLA VENTOLA

40
Premere questo tasto per ridurre la velocità e spegnere il motore di aspirazione. Una pressione prolungata produce direttamente lo
spegnimento del motore di aspirazione.
T2. ACCENSIONE / AUMENTO DI VELOCITÀ DEL MOTORE DELLA VENTOLA
Premere questo tasto per accendere il motore di aspirazione e per aumentarne la velocità. Una pressione prolungata permette di attivare
direttamente la 3° velocità.
T3. FUNZIONE “POWER BOOST”
Premere T3 per attivare la velocità di aspirazione intensiva “POWER BOOST 1” (temporizzata).
Nota: dopo 5 minuti la cappa tornerà alla 3° velocità.
Con il motore di aspirazione acceso in “POWER BOOST1”, premere nuovamente T3 per attivare la successiva velocità di aspirazione
intensiva, “POWER BOOST 2” (temporizzata).
Nota: dopo 5 minuti la cappa tornerà alla 3° velocità.
Nota: premere nuovamente T3; dopo cinque minuti, la cappa tornerà in modalità “POWER BOOST 1”
T4. ATTIVAZIONE / DISATTIVAZIONE DELLA FUNZIONE 6TH SENSE (MODALITÀ AUTO)
La cappa imposta automaticamente la velocità di aspirazione se il sensore rileva una variazione nelle condizioni ambiente.
Nota: per usare correttamente questa funzione è prima necessario configurare il sensore (vedere “Configurazione del sensore”).
Nota: la modifica di altre funzioni che controllano la velocità causerà la disattivazione della funzione “6th sense”.
Configurazione del sensore
Questa procedura può essere eseguita a cappa spenta. In condizioni ambiente normali, premere T4 per 5 secondi; l'indicazione T4
lampeggerà per 5 minuti per segnalare che la cappa sta eseguendo la taratura del sensore, quindi si spegnerà per indicare che la taratura è
terminata.
Impostazione del piano cottura: Premere a lungo simultaneamente T1 e T2. Entrambi i simboli si accenderanno per indicare che la cappa è
pronta per accettare i parametri relativi al piano di cottura.
Premere T1 per scegliere un piano di cottura a gas (T1 lampeggerà per 3 secondi per indicare che i parametri della cappa sono impostati per
un piano di cottura a gas).
Premere T2 per scegliere un piano di cottura a induzione (T2 lampeggerà per 3 secondi per indicare che i parametri della cappa sono
impostati per un piano di cottura a induzione).
T5. FUNZIONAMENTO IN “MODALITÀ ZEN”
Premere per attivare/disattivare la modalità di aspirazione “ZEN”.
Questa funzione permette di attivare una velocità di aspirazione che risulti il miglior compromesso fra silenziosità ed efficienza di aspirazione.
T6. ALLARME/RESET DEL FILTRO ANTIGRASSO O DEL FILTRO AL CARBONE
Ad intervalli regolari la cappa segnala la necessità di eseguire la manutenzione dei filtri.
Nota: gli indicatori si attivano a cappa accesa.
T6 acceso: eseguire la manutenzione del filtro grassi.
T6 lampeggiante: eseguire la manutenzione del filtro carbone.
Reset indicatori saturazione filtri:
Nota: questa operazione deve essere eseguita a cappa accesa.
Premere a lungo T6
Nota: T6 e la cappa si spengono per indicare che il reset dell'allarme è stato eseguito.
Il reset del filtro antigrasso e del filtro al carbone può essere eseguito con lo stesso tasto. Se sono attivi gli allarmi di entrambi i filtri, la
procedura di reset ripristina i contatori uno a uno, dando la priorità al filtro al carbone.
Attivazione indicatore saturazione filtro al carbone
Nota: questa operazione va eseguita a motore di aspirazione spento.
Questo indicatore è normalmente disattivato – premere a lungo simultaneamente T3 e T7 per attivarlo: Entrambe le indicazioni si
accenderanno per indicare l'attivazione.
Per disattivare la funzione, premere nuovamente a lungo gli stessi tasti:
entrambi lampeggeranno brevemente e quindi si spegneranno per indicare che la funzione è stata disattivata.
T7. ACCENSIONE/SPEGNIMENTO DELLA LUCE PRINCIPALE
Premere per accendere/spegnere l’illuminazione del piano cottura.
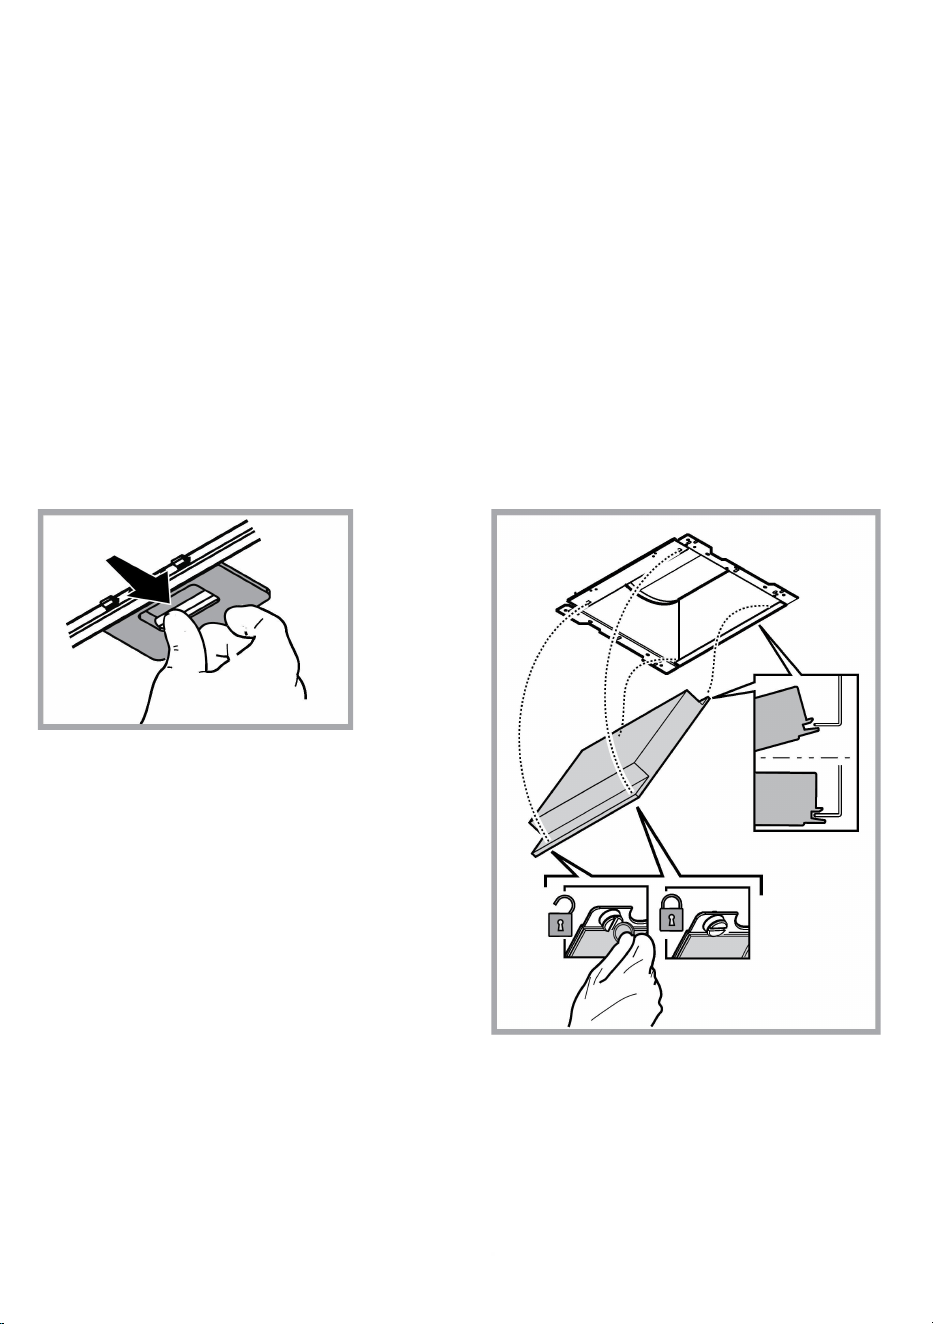
41
MANUTENZIONE
Pulizia
Per la pulizia usare ESCLUSIVAMENTE un panno inumidito con
detersivi liquidi neutri. NON UTILIZZARE UTENSILI O
STRUMENTI PER LA PULIZIA!
Evitare l’uso di prodotti contenenti abrasivi. NON UTILIZZARE
ALCOOL!
Manutenzione dei filtri antigrasso
Trattiene le particelle di grasso derivanti dalla cottura.
Deve essere pulito una volta al mese (o quando il sistema di
indicazione di saturazione dei filtri - se previsto sul modello in
possesso- indica questa necessità), con detergenti non aggressivi,
manualmente oppure in lavastoviglie a basse temperature ed a
ciclo breve.
Con il lavaggio in lavastoviglie il filtro antigrasso metallico può
scolorirsi ma le sue caratteristiche di filtraggio non cambiano
assolutamente.
Per smontare il filtro grassi tirare la maniglia di sgancio a molla.
Manutenzione del filtro al carbone
Trattiene gli odori sgradevoli derivanti dalla cottura.
La saturazione del filtro carbone si verifica dopo un uso più o meno
prolungato a seconda del tipo di cucina e della regolarità della
pulizia del filtro grassi. In ogni caso è necessario sostituire la
cartuccia al massimo ogni quattro mesi (o quando il sistema di
indicazione di saturazione dei filtri - se previsto sul modello in
possesso- indica questa necessità).
NON può essere lavato o rigenerato
Montaggio
Agganciare il filtro ai carboni attivi prima posteriormente sulla
linguetta metallica della cappa, poi anteriormente con i due
pomelli.
Smontaggio
Rimuovere il filtro ai carboni attivi girando di 90° i pomelli che lo
fissano alla cappa.
Sostituzione delle lampade
La cappa è dotata di un sistema di illuminazione basato sulla
tecnologia LED.
I LED garantiscono una illuminazione ottimale, una durata fino a
10 volte maggiore delle lampade tradizionali e consentono di
risparmiare il 90% di energia elettrica.
Per la sostituzione delle lampade, contattare il centro autorizzato
per i ricambi.

42
SMALTIMENTO
Questo apparecchio è contrassegnato in conformità alla Direttiva Europea 2012/19/EC, Waste Electrical and Electronic Equipment (WEEE).
Assicurandosi che questo prodotto sia smaltito in modo corretto, l'utente contribuisce a prevenire le potenziali conseguenze negative per
l'ambiente e la salute.
Il simbolo sul prodotto o sulla documentazione di accompagnamento indica che questo prodotto non deve essere trattato come rifiuto
domestico ma deve essere consegnato presso l'idoneo punto di raccolta per il riciclaggio di apparecchiature elettriche ed elettroniche.
Disfarsene seguendo le normative locali per lo smaltimento dei rifiuti. Per ulteriori informazioni sul trattamento, recupero e riciclaggio di questo
prodotto, contattare l'idoneo ufficio locale, il servizio di raccolta dei rifiuti domestici o il negozio presso il quale il prodotto è stato acquistato.
Apparecchiatura progettata, testata e realizzata nel rispetto delle norme sulla:
• Sicurezza: EN/IEC 60335-1; EN/IEC 60335-2-31, EN/IEC 62233.
• Prestazione: EN/IEC 61591; ISO 5167-1; ISO 5167-3; ISO 5168; EN/IEC 60704-1; EN/IEC 60704-2-13; EN/IEC 60704-3; ISO 3741; EN
50564; IEC 62301.
• EMC: EN 55014-1; CISPR 14-1; EN 55014-2; CISPR 14-2; EN/IEC 61000-3-2; EN/IEC 61000-3-3. Suggerimenti per un corretto utilizzo al
fine di ridurre l’impatto ambientale: Quando iniziate a cucinare, accendere la cappa alla velocità minima, lasciandola accesa per alcuni minuti
anche dopo il termine della cottura. Aumentare la velocità solo in caso di grandi quantità di fumo e vapore, utilizzando la funzione booster solo
in casi estremi. Per mantenere ben efficiente il sistema di riduzione degli odori, sostituire, quando è necessario, il/i filtro/i carbone. Per
mantenere ben efficiente il filtro del grasso, pulirlo in caso di necessità. Per ottimizzare l’efficienza e minimizzare i rumori, utilizzare il diametro
massimo del sistema di canalizzazione indicato in questo manuale.
ANOMALIE DI FUNZIONAMENTO
Se qualcosa non sembra funzionare, prima di chiamare il Servizio Assistenza effettuare i seguenti semplici controlli:
• Se la cappa non funziona:
Verificare che:
- non c’è interruzione di corrente.
- è stata selezionata una velocità.
• Se la cappa ha un rendimento scarso:
Verificare che:
- La velocità motore selezionata è sufficiente per la quantità di fumo e di vapori liberata.
- La cucina è sufficientemente areata per permettere una presa d’aria.
- Il filtro carbone non è consumato (cappa in versione filtrante).
• Se la cappa si è spenta nel corso del normale funzionamento:
Verificare che:
- non c’è interruzione di corrente.
- il dispositivo di interruzione omnipolare non è scattato.
In caso di eventuali anomalie di funzionamento, prima di rivolgerVi al servizio assistenza scollegate per almeno 5 sec. l’apparecchio
dall’alimentazione elettrica estraendo la spina e collegatelo poi nuovamente. Nel caso in cui l’anomalia di funzionamento dovesse perdurare,
rivolgersi al servizio d’assistenza.

43
DATI TECNICI
Altezza (cm)
Larg
hezza (cm)
Profondità (cm)
Ø del tubodi scarico (cm)
62-114
71
-
114
89,8 45,5 15
62-114
71
-
114
59,8 45,5 15
Componenti non in dotazione con il prodotto
Per scaricare le istruzioni di sicurezza, il manuale
d’uso, la scheda tecnica e i dati energetici:
• Visitare il sito web docs.whirlpool.eu
• Usare il codice QR
• Oppure, contattare il Servizio Assistenza
(al
numero di telefono riportato sul libretto di garanzia).
Quando si contatta il Servizio Assistenza, forn
ire i
codici presenti sulla targhetta matricola del prodotto.

44
ES
SEGURIDAD GENERAL
• Antes de llevar a cabo cualquier operación de limpieza o mantenimiento, desconectar la
campana de la alimentación eléctrica desenchufando la clavija o desconectando el
interruptor general de la vivienda.
• Para todas las operaciones de instalación y mantenimiento utilizar los guantes de trabajo.
• El aparato puede ser usado por niños mayores a 8 años y por personas con
discapacidades físicas, sensoriales o mentales, o con falta de experiencia o de
conocimiento necesario, previsto que estén bajo vigilancia o después de que las mismas
hayan recibido instrucción relacionada con el uso seguro del aparato y de la comprensión
de los peligros inherentes a éste.
• Los niños deben ser supervisados para asegurarse de que no jueguen con el aparato.
• La limpieza y el mantenimiento no deben ser realizados por niños sin debida supervisión.
• La habitación debe estar suficientemente ventilada cuando la campana se utiliza
contemporáneamente con otros dispositivos a combustión de gas u otros combustibles.
• La campana debe ser limpiada con frecuencia, tanto internamente como externamente
(POR LO MENOS UNA VEZ AL MES), en todo caso seguir lo que se indica expresamente
en las instrucciones de mantenimiento.
• La inobservancia de las normas de limpieza de la campana y del cambio y la limpieza
puede comportar riesgo de incendios.
• Es estrictamente prohibido flamear los alimentos bajo la campana.
• Para la sustitución de la lámpara sólo utilizar el tipo de lámpara indicado en la sección de
mantenimiento/sustitución de este manual.
El uso de una llama libre es perjudicial para los filtros y puede provocar incendios, por lo
tanto, debe evitarse en cualquier caso.
Los fritos debe realizarse con cuidado para evitar que el aceite caliente prenda fuego.
ATENCIÓN: Cuando la placa de cocción está funcionando las partes accesibles de la
campana pueden calentarse.
• No conectar la unidad a la red eléctrica hasta que la instalación sea totalmente
completada.
• En cuanto a las medidas técnicas y de seguridad a adoptar para la descarga de los humos, seguir estrictamente lo previsto por los
reglamentos de las autoridades locales competentes.
• El aire aspirado no debe ser transportado en un conducto usado para la descarga de humos producidos por dispositivos de combustión a
gas u otros combustibles.
• No utilizar ni dejar la campana sin las luces correctamente instaladas debido al posible riesgo de descarga eléctrica.
• No utilizar nunca la campana sin la rejilla montada correctamente!
• La campana NUNCA debe utilizarse como una superficie de apoyo a menos que así se indique específicamente.
• Utilizar sólo los tornillos para fijación suministrados con el producto para su instalación, o, si no se suministran, comprar el tipo correcto de
tornillos. Utilizar la longitud correcta para los tornillos que se identifican en la Guía de instalación.
• En caso de duda, consultar el centro de asistencia autorizado o un similar personal calificado.
¡ATENCIÓN!
• Si no se instalan los tornillos y elementos de fijación de acuerdo con estas instrucciones se puede incurrir en riesgos de naturaleza
eléctricos.
• No utilizar con un programador, temporizador, mando a distancia separado o cualquier otro dispositivo que se active
automáticamente.
45
Mantener a los niños menores de 3 años alejados del equipo. Sin la vigilancia constante de un adulto, mantener el equipo alejado del alcance
de niños menores de 8 años.
ATENCIÓN: el equipo no está destinado para ser puesto en funcionamiento mediante un dispositivo externo o un sistema de mando a
distancia separado.
Este equipo no está destinado al uso profesional. No utilizar el equipo al abierto.
Para evitar el riesgo de lesiones personales, el equipo debe ser movilizado e instalado por dos o más personas.
La instalación, incluye además eventuales empalmes para la alimentación hídrica (si están previstos) y las conexiones eléctricas, y las
intervenciones de reparación deben ser realizadas por personal cualificado.
Al finalizar la instalación, conservar el material de embalaje (partes en plástico, polistireno, etc.) fuera del alcance de los niños para evitar el
riesgo de asfixia. .
No utilizar el equipo cuando se está mojado o descalzo.
Nunca utilizar equipos para limpieza a vapor – riesgo de descarga eléctrica.
El material del embalaje es reciclable al 100% y está marcado con el símbolo de reciclaje
La campana puede ser diferente con respecto a los dibujos de este manual, aunque las instrucciones para su uso, la manutención
y la instalación son las mismas.
Aténgase estrictamente a las instrucciones del presente manual. Se declina cada responsabilidad por eventuales inconvenientes, daños
o incendios provocados al aparato originados por la inobservancia de las instrucciones colocadas en este manual. La campana extractora ha
sido ideada para la aspiración de humos y vapores producidos durante la cocción y para el uso doméstico.
• Es importante guardar este manual para poder consultar si fuera necesario.En el caso de venta,de inutilidad o de mudanza, asegurarse
que quede junto al producto.
• Leer atentamente las instrucciones:contiene importantes informaciones sobre la instalación,el uso y la seguridad.
• No realizar variaciones electricas o mecanicas en el producto o en el tubo de escape.
• Antes de instalar el aparato,controlar que todas sus partes no estèn dañadas. En caso contrario llamar al revendedor y no realizar la
instalaciòn.
La distancia mínima entre la superficie de cocción y la parte más baja de la campana no debe ser inferior a 50cm en el caso de cocinas
electricas y de 65cm en el caso de cocinas a gas o mixtas.
Si las instrucciones para la instalación del dispositivo para cocinar con gas especifican una distancia mayor, hay que tenerlo en
consideración.
CONEXIÓN ELÉCTRICA
La tensión de red debe corresponder con la tensión indicada en la etiqueta colocada en el interior de la campana.Si es suministrada con un
enchufe, conectar la campana a un enchufe conforme a las normas en vigor y colocarlo en una zona accesible, aun después de la
instalación. Si no es suministrada con enchufe (conexión directa a la red) o clavija y no es posible situarla en un lugar accesible, aun después
de la instalación, colocar un interruptor bipolar de acuerdo con las normativas, para asegurarse la desconexión completa a la red en el caso
de la categoria de alta tensión III, conforme con las reglas de instalación.
ATENCIÓN!
Antes de reconectar el circuito de la campana a la red y de verificar el correcto funcionamiento, controlar siempre que el cable de red fue
montado correctamente.
Si el cable no dispone de enchufe,conecte los cables tal como indica la siguiente tabla:
Tensión y frecuencia de la red eléctrica
Conexión por cable
Consultar el valor indicado en la etiqueta de características dentro de
la campana.
: amarillo/verde
N : azul
L
: marrón
Sustitución del cable de alimentación
La campana está provista de un cable de alimentación especial; si el cable se daña, solicite uno nuevo al Servicio de Asistencia Técnica.

46
EXTRACCIÓN DE AIRE
(Para las versiones aspirantes)Conectar la campana en los tubos y en los orificios de escape de pared con diámetro equivalente a la salida
del aire (brida de empalme).
El uso de tubos u orificios de escape de pared con diámetro inferior, determinará una reducción de los rendimientos de la aspiración y un
drástico aumento del ruido.
Se deslinda responsabilidad.
! Utilice un conducto cuya longitud sea la mínima indispensable.
! Utilice un conducto con el menor número posible de curvas (ángulo máximo de la curva: 90°).
! Evite los cambios drásticos en la sección del conducto
! La empresa declina cada responsabilidad en caso de que estas normas no sean respetadas!
¿ FILTRANTE O ASPIRANTE ?
! Su campana extractora está lista para ser usada en versión aspirante.
Para utilizar la campana en versión filtrante se instala el KIT ACCESORIO.
Controle en las primeras paginas de este manual si el KIT ACCESORIO ya está proveido o si hay que comprarlo.
Nota: Si proveido, en algunos casos, el sistema de filtración añadido a base de carbones activos podria estar ya instalado en la
campana.
Las informaciones para la transformación de la campana en versión aspirante a versión filtrante ya están presentes en este manual.
Versión aspirante
El vapor es evacuado hacia el exterior a traves de un tubo de escape introducido en el aro de sujeción que se encuentra arriba de la
campana.
ATENCIÓN!
El diametro del tubo de escape debe ser igual al diametro del aro de sujeción.
ATENCIÓN!
Si la campana está provista de filtro de carbón, hay que sacarlo.
Versión filtrante
El aire aspirado vendrá desgrasado y desodorizado antes de ser alimentado de nuevo en la habitación.
Para utilizar la campana en esta versión es necesario instalar un sistema de filtración adicional a base de carbón activado.
MANDOS
La campana está dotada de un panel de mandos con control de las velocidades de aspiración y control de encendido de la luz para la
iluminación del plano de cocción.
T1. APAGAR motor ventilador / Reducir velocidad
T2. ENCENDER motor ventilador / Aumentar velocidad
T3. Función «POTENCIA BOOST»
T4. Función 6th sense (modo AUTO) ENCENDIDO/APAGADO
T5. Funcionamiento en «Modo ZEN»
T6. Alarma/reinicio filtro grasa/carbón
T7. Luz principal ENCENDIDA/APAGADA
PRECAUCIÓN! Esta campana tiene un sistema de funcionamiento
automático (véase abajo «T4. Función 6th sense (modo AUTO)
ENCENDIDO/APAGADO»).
La calibración se llevará a cabo automáticamente cuando el producto
se conecte al suministro eléctrico por primera vez (p. ej.: la primera
vez que se instale después de un apagón). También se puede realizar

47
manualmente (véase el párrafo «Configuración del sensor»). Durante la
calibración, que dura 5 minutos, T4 parpadeará y se puede usar las luces.
T1. APAGAR MOTOR VENTILADOR / REDUCIR VELOCIDAD
Pulse para reducir la velocidad y apagar el motor de extracción.
Mantenga pulsado para apagar directamente el motor de extracción.
T2. ENCENDER MOTOR VENTILADOR / AUMENTAR VELOCIDAD
Pulse para encender el motor de extracción y aumentar la velocidad.
Mantenga pulsado para poner la velocidad 3 directamente.
T3. FUNCIÓN «POTENCIA BOOST»
Pulse T3 para activar la velocidad «POTENCIA BOOST 1» extracción intensiva (controlada por tiempo).
Nota: la campana volverá a funcionar a la velocidad 3 pasados cinco minutos.
Con el motor de extracción encendido, en «POTENCIA BOOST 1», pulse T3 para activar la velocidad «POTENCIA BOOST 2» extracción
intensiva (controlada por tiempo).
Nota: la campana volverá a funcionar a la velocidad 3 pasados cinco minutos.
Nota: pulse nuevamente T3, durante los cinco minutos, la campana volverá a funcionar en «POTENCIA BOOST 1»
T4. FUNCIÓN 6TH SENSE (MODO AUTO) ENCENDIDO/APAGADO
La campana determina automáticamente la velocidad de extracción si el sensor de la campana detecta un cambio en las condiciones
ambientales.
Nota: para asegurarse de que esta función se utilice correctamente, primero configure el sensor (véase «Configuración del sensor»
abajo).
Nota: si cambia alguna otra función que controla la velocidad, la función «6th Sense» se apagará.
Configuración del sensor
Esto se puede hacer cuando la campana está APAGADA. En condiciones ambientales normales, pulse T4 durante 5 s, T4 parpadea durante
5 min para indicar que la campana está haciendo la calibración del sensor, después se apaga para indicar que la calibración ha terminado.
Configuración de la placa de cocción: Mantenga pulsado T1 y T2 simultáneamente. Ambos se iluminan para indicar que la campana está
lista para aceptar la calibración del parámetro de la placa de cocción.
Pulse T1 para elegir placa de Gas (T1 empieza a parpadear durante 3 s para indicar que los parámetros de la campana están configurados
para la placa de gas).
Pulse T2 para elegir placa de Inducción (T2 empieza a parpadear durante 3 s para indicar que los parámetros de la campana están
configurados para la placa de inducción).
T5. FUNCIONAMIENTO EN «MODO ZEN»
Púlselo para activar o desactivar el modo de extracción «ZEN».
Esta función permite activar una velocidad de extracción con el equilibrio perfecto entre silencio y eficacia de extracción.
T6. ALARMA/REINICIO FILTRO GRASA/CARBÓN
A intervalos regulares, la campana indica la necesidad de realizar tareas de mantenimiento de los filtros.
Nota: Los indicadores solo funcionarán cuando la campana esté encendida.
T6 encendido: Realizar mantenimiento del filtro de grasa.
T6 parpadea: llevar a cabo el mantenimiento del filtro de carbón.
Restablecer los indicadores de saturación del filtro:
Nota: Esto debe realizarse con la campana apagada.
Mantenga pulsado T6.
Nota: T6 y campana se apagan, para indicar que se ha reiniciado la alarma.
El reinicio del filtro de grasa y del filtro de carbón se realiza con el mismo botón. Si ambos filtros están activados, el procedimiento de reinicio
reiniciará el contador de uno en uno, con prioridad para el de carbón.
Activar el indicador de saturación de filtro de carbón
Nota: Esto debe realizarse con el motor de extracción apagado.
Este indicador suele estar desactivado: mantenga pulsados los botones T3 y T7 simultáneamente para activar la función: Ambos se
iluminarán para indicar la activación.
Para desactivar la función, vuelva a pulsar los mismos botones:
Ambos parpadearán brevemente y luego se apagarán para indicar la desactivación.
T7. LUZ PRINCIPAL ENCENDIDA/APAGADA
Púlselo para encender o apagar las luces de la placa.
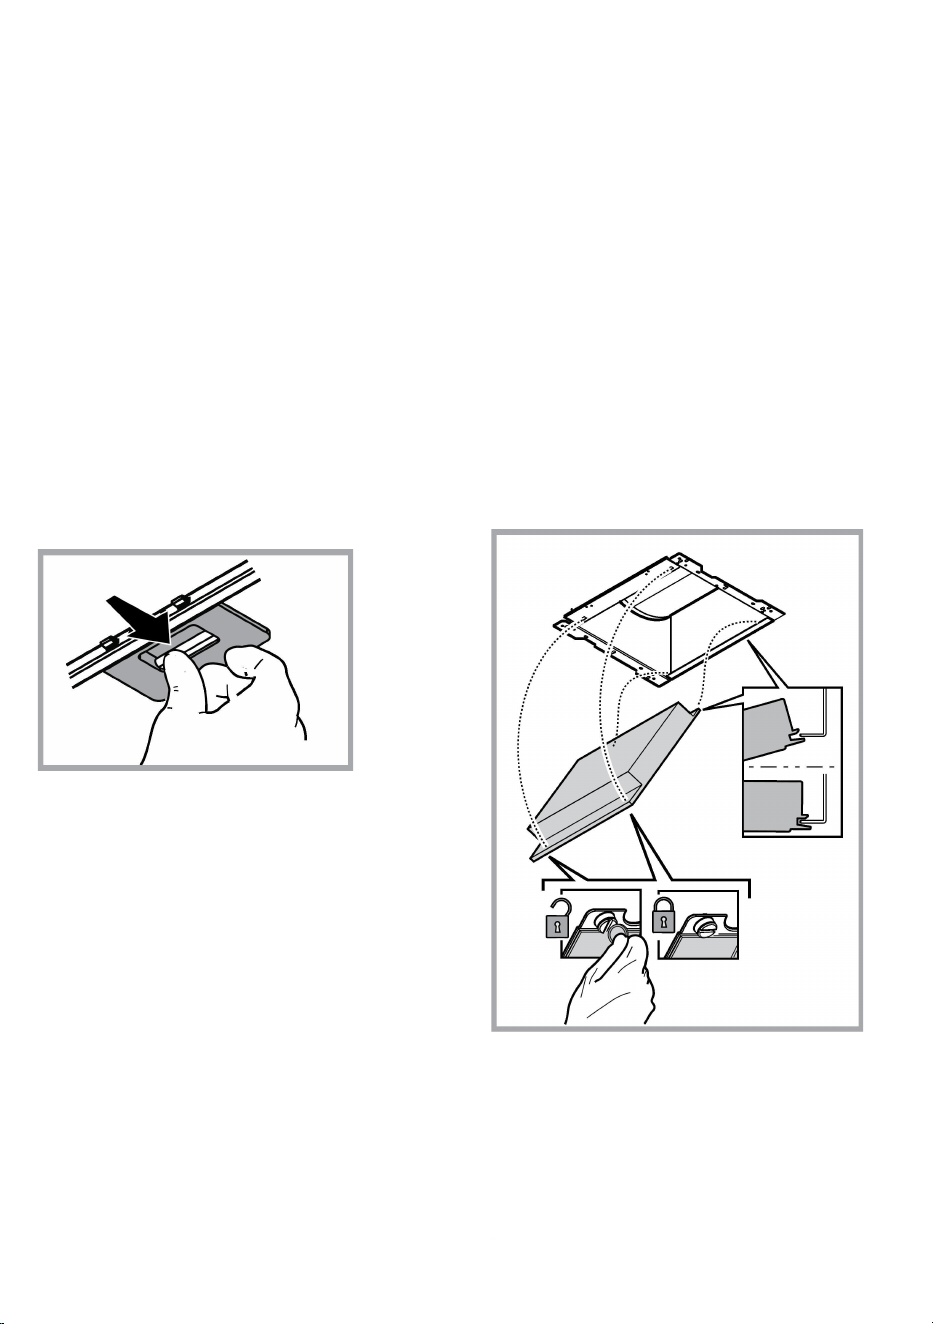
48
MANTENIMIENTO
Limpieza
Para la limpieza, utilice EXCLUSIVAMENTE un paño impregnado
de detergente líquido neutro. ¡NO UTILICE UTENSILOS O
INSTRUMENTOS PARA LA LIMPIEZA! No utilice productos que
contengan abrasivos. ¡NO UTILICE ALCOHOL! ¡NO UTILICE
DESINFECTANTES NI PRODUCTOS QUE CONTENGAN
CLORO!
Mantenimientos de los filtros antigrasa
Retiene las partículas de grasa producidas cuando se cocina.
Debe limpiarse una vez al mes (o cuando el sistema de indicación
de saturación de los filtros - si está previsto en el modelo que se
posee - indica esta necesidad) con detergentes no agresivos,
manualmente con un cepillo de cerdas suaves o bien en
lavavajillas a bajas temperaturas y con ciclo breve.
Con el lavado en el lavavajilla el filtro antigrasa metálico puede
desteñirse pero sus características de filtrado no cambian
absolutamente.
Para desmontar el filtro antigrasa, tirar de la manija de
desenganche de muelle.
Mantenimiento del filtro al carbón
Retiene los olores desagradables producidos por la cocción
de alimentos.
El filtro de carbón activado se satura después de un tiempo de
uso, dependiendo del tipo de cocción de alimentos y la regularidad
con que se limpia el filtro de grasa. En cualquier caso es necesario
sustituir el cartucho al menos cada 4 meses (o cuando el sistema
de indicación de saturación de los filtros - si está previsto en el
modelo que se posee - indica esta necesidad).
NO puede lavarse o reciclarse.
Montaje
Enganchar el filtro de carbón activo primero, posteriormente sobre
la pestaña metálica de la campana, y después en la parte anterior
con las dos perillas.
Desmontaje
Quitar el filtro de carbón activo girando 90° grados las perillas que
lo fijan a la campana.
Sustitución de la lámpara
La campana viene provista de un sistema de iluminación basado
en la tecnología LED.
Los LEDS garantizan una óptima iluminación, una duración hasta
10 veces mayor de las lámparas tradicionales y permiten aborra
el 90% de energía eléctrica. .
Para reemplazar las lámparas, contactar el centro de servicio
autorizado para los repuestos.

49
ELIMINACIÓN
Este aparato lleva el marcado CE en conformidad con la Directiva 2012/19/EC del Parlamento Europeo y del Consejo sobre residuos de
aparatos eléctricos y electrónicos (RAEE).
La correcta eliminación de este producto evita consecuencias negativas para el medioambiente y la salud.
El símbolo en el producto o en los documentos que se incluyen con el producto, indica que no se puede tratar como residuo
doméstico. Es necesario entregarlo en un punto de recogida para reciclar aparatos eléctricos y electrónicos.
Deséchelo con arreglo a las normas medioambientales para eliminación de residuos.
Para obtener información más detallada sobre el tratamiento, recuperación y reciclaje de este producto, póngase en contacto con su
Municipalidad, con el servicio de eliminación de residuos urbanos o la tienda donde adquirió el producto.
Aparato diseñado, probado y fabricado de acuerdo con:
• Seguridad: EN/IEC 60335-1; EN/IEC 60335-2-31, EN/IEC 62233.
• Prestación: EN/IEC 61591; ISO 5167-1; ISO 5167-3; ISO 5168; EN/IEC 60704-1; EN/IEC 60704-2-13; EN/IEC 60704-3; ISO 3741; EN
50564; IEC 62301.
• EMC: EN 55014-1; CISPR 14-1; EN 55014-2; CISPR 14-2; EN/IEC 61000-3-2; EN/IEC 61000-3-3. Sugerencias para un uso correcto con el
fin de reducir el impacto ambiental: Encienda la campana a la velocidad mínima cuando empiece a cocinar y mantenga en marcha durante
unos minutos después de haber acabado de cocinar. Aumente la velocidad solo si se produjera una gran cantidad de humo y vapor y use la
velocidad o velocidades turbo solo en situaciones extremas. Cambie el filtro o filtros de carbón cuando sea necesario para mantener un buen
rendimiento en la reducción de los olores. Limpie el filtro o filtros de grasa cuando sea necesario para mantener un buen rendimiento del filtro
de grasa. Utilice el diámetro máximo del sistema de conductos indicado en este manual, para optimizar el rendimiento y minimizar el ruido.
ANOMALÍAS DE FUNCIONAMIENTO
Si alguna pieza parece no funcionar, realice los siguientes controles antes de llamar al Servicio de Asistencia:
• Si la campana no funciona:
Compruebe que:
- no haya interrupciones de corriente.
- se haya seleccionado una velocidad.
• Si la campana presenta un rendimiento escaso:
Compruebe que:
- La velocidad del motor seleccionada es suficiente para la cantidad de humo y vapores emitida.
- La cocina está suficientemente ventilada para permitir una toma de aire.
- el filtro de carbón no está gastado (campana en versión filtrante).
• Si la campana se ha apagado durante el funcionamiento normal:
Compruebe que:
- no haya interrupciones de corriente.
- el dispositivo de interrupción omnipolar no se ha disparado.
En caso de eventuales anomalías en el funcionamiento, antes de dirigirse al servicio de asistencia, desconectar el aparato de la alimentación
eléctrica, extrayendo el enchufe al menos durante 5 segundos, y después conectarlo nuevamente. Si la anomalía de funcionamiento no
desaparece, dirigirse al servicio de asistencia.

50
DATOS TÉCNICOS
Alto (cm)
Ancho (cm)
Fondo (cm)
Ø del tubo de salida (cm)
62-114
71
-
114
89,8 45,5 15
62-114
71
-
114
59,8 45,5 15
Componentes no suministrados con el producto
Puede descargarse las Instrucciones de
seguridad, el Manual del usuario, la Ficha del
producto y los Datos de energía:
• Visitando nuestra página web docs.whirlpool.eu
• Usando el código QR
• También puede, ponerse en contacto con
nuestro Servicio postventa
(Consulte el número
de teléfono en el folleto de la garantía). Cuando se
ponga en contacto con nuestro Servicio Postventa ,
deber
á indicar los códigos que figuran en la placa de
características de su producto.

51
PT
SEGURANÇA GERAL
• Antes de fazer qualquer operação de limpeza ou de manutenção, deve-se desligar o
exaustor da rede elétrica retirando a tomada ou desligando a alimentação da rede elétrica.
• Usar sempre luvas de trabalho para todas as operações de instalação e manutenção.
• Este aparelho pode ser usado por crianças a partir de 8 anos de idade e por pessoas com
reduzidas capacidades físicas, sensoriais e mentais, ou falta de experiência e
conhecimento, desde que sejam supervisionadas ou se tiverem recebido as necessárias
instruções relativas ao uso em segurança do aparelho e que tenham conhecimento dos
riscos envolvidos.
• As crianças não devem ser autorizadas a manipular os comandos ou a brincar com o
aparelho.
• A limpeza e a manutenção não devem ser feitas por crianças sem supervisão.
• O local onde o aparelho será instalado, deve ser suficientemente ventilado, quando o
exaustor for utilizado em conjunto com outros dispositivos de combustão de gás ou outros
combustíveis.
• O exaustor deve ser limpo regularmente, interna e externamente (PELO MENOS UMA
VEZ POR MÊS), respeitando expressamente as indicações no manual, nas instruções de
manutenção.
• A inobservância das normas de limpeza do aparelho e da substituição e limpeza dos filtros
comporta riscos de incêndio.
• É severamente proibido colocar alimentos diretamente na chama, sob o exaustor.
• Para a substituição da lâmpada, utilizar apenas o tipo de lâmpada indicado na secção de
Manutenção/Substituição de lâmpadas deste manual.
O uso de chama livre causa danos aos filtros e pode originar incêndios, portanto, deve ser
evitado em quaisquer circunstâncias.
Os alimentos fritos devem ser feitos sob controle, para evitar que o óleo sobreaqueça e se
incendeie.
CUIDADO: Peças acessíveis do exaustor podem queimar quando utilizado com a placa de
fogão.
• Não ligar o aparelho à rede elétrica até que a instalação esteja totalmente concluída.
• Relativamente às medidas técnicas e de segurança a serem adotadas para a descarga de fumos, é importante respeitar rigorosamente os
regulamentos fornecidos pelas autoridades locais.
• O sistema de condutas deste aparelho não pode ser conectado a outro sistema de ventilação já existente que esteja a ser usado para
qualquer outra finalidade, como descarga de fumos de aparelhos a gás ou outros combustíveis.
• Não utilizar ou deixar o exaustor sem lâmpadas corretamente montadas, devido ao possível risco de choques elétricos.
• Nunca utilizar o exaustor sem as grades montadas corretamente.
• O exaustor NUNCA deve ser utilizado como uma superfície de apoio, a menos que seja especificamente indicado.
• Usar somente os parafusos de fixação fornecidos com o aparelho, para a instalação, ou, se não for fornecido, comprar o tipo de parafuso
correto.
• Usar o comprimento correto para os parafusos que são identificados no Guia de Instalação.
• Em caso de dúvida, consultar um centro de assistência autorizado ou técnico qualificado.
ATENÇÃO!
• A falta de instalação de parafusos ou dispositivos de fixação em conformidade com estas instruções, pode resultar em riscos
elétricos.
52
• Não utilizar com um programador, temporizador, telecomando separado ou qualquer outro dispositivo que se ativa automaticamente.
Manter as crianças menores de 3 anos afastadas do aparelho. Quando não vigiadas por um adulto, as crianças menores de 8 anos devem
ser mantidas afastadas do aparelho.
ATENÇÃO: o aparelho não deve ser operado mediante um dispositivo externo ou através dum sistema de comando à distância
separado.
Este aparelho não se destina ao uso profissional. Não utilizar o aparelho ao ar livre.
Para evitar o risco de ferimentos pessoais, o aparelho deve ser movido e instalado por duas ou mais pessoas.
A instalação - incluindo também quaisquer conexões para fornecimento de água (caso previsto) e as ligações elétricas - e as operações
de reparação devem ser realizadas por pessoal qualificado.
Uma vez concluída a instalação, o material de embalagem (peças de plástico, poliestireno, etc.) deve ser mantido fora do alcance das
crianças para evitar o risco de asfixia. .
Não utilizar o aparelho quando estiver molhado ou descalço.
Nunca utilizar um aparelho de limpeza a vapor para limpar o aparelho - risco de choque elétrico.
O material de embalagem é 100% reciclável e está marcado com o símbolo da reciclagem
O exaustor pode ser esteticamente diferente do modelo ilustrado neste manual, no entanto as instruções de uso, manutenção e
instalação são as mesmas.
Siga especificamente as instruções indicadas neste manual. Declina-se qualquer responsabilidade por eventuais inconvenientes, danos
ou incêndios provocados ao aparelho, derivantes da inobservância das instruções indicadas neste manual. O exaustor foi concebido para a
aspiração de fumos e vapores de cozedura e é destinado exclusivamente para uso doméstico.
• É importante conservar este manual para eventuais consultas futuras.
Em caso de venda ou mudança, certifique-se que o manual acompanha o produto.
• Leia cuidadosamente as instruções: apresentam importantes informações sobre a instalação, uso e segurança.
• Não efectue variações elétricas ou mecânicas no produto ou nos tubos de fuga.
• Antes de prosseguir com a instalação do aparelho, verifique se todos os componentes não estão danificados. Caso contrário, contacte o
seu fornecedor e não prossiga com a instalação.
A distância mínima entre a superfície de suporte dos recipientes sobre o fogão e a parte mais baixa do exaustor não deve ser inferior a 50cm
no caso de fogões elétricos e 65 cm no caso de fogões a gás ou combinados.
Se as instruções de instalação do fogão a gás especificarem uma distância maior, deve-se levar em conta esta indicação.
CONEXÃO ELÉTRICA
A voltagem da rede elétrica deve corresponder com a voltagem indicada na etiqueta das características, situada no interior do exaustor. Se
dotado de ficha, conectar o exaustor a uma tomada, em conformidade com as normas vigentes, posta em zona acessível, mesmo depois da
instalação. Se não tiver ficha (conexão direta à rede) ou a tomada não se encontrar numa zona acessível, mesmo depois da instalação,
aplicar um interruptor bipolar, em conformidade com a norma que assegure a desconexão completa da rede nas condições da categoria de
sobretensão III, de acordo com as regras de instalação.
ATENÇÃO!
Antes de conectar novamente o circuito do exaustor com a alimentação elétrica, verificar o seu funcionamento, e verificar se o cabo de rede
está montado corretamente.
Se o cabo não estiver equipado com uma ficha,ligue os cabos de acordo com a tabela seguinte:
Tensão da rede elétrica e frequência Ligação de cabo
Consultar o valor indicado na etiqueta de caracte
rísticas no interior do
exaustor.
: amarelo/verde
N : azul
L : castanho
Substituição do cabo de alimentação
O exaustor está equipado com um cabo de alimentação especial; no caso do cabo ficar danificado, efetuar um pedido ao serviço de
assistência técnica.
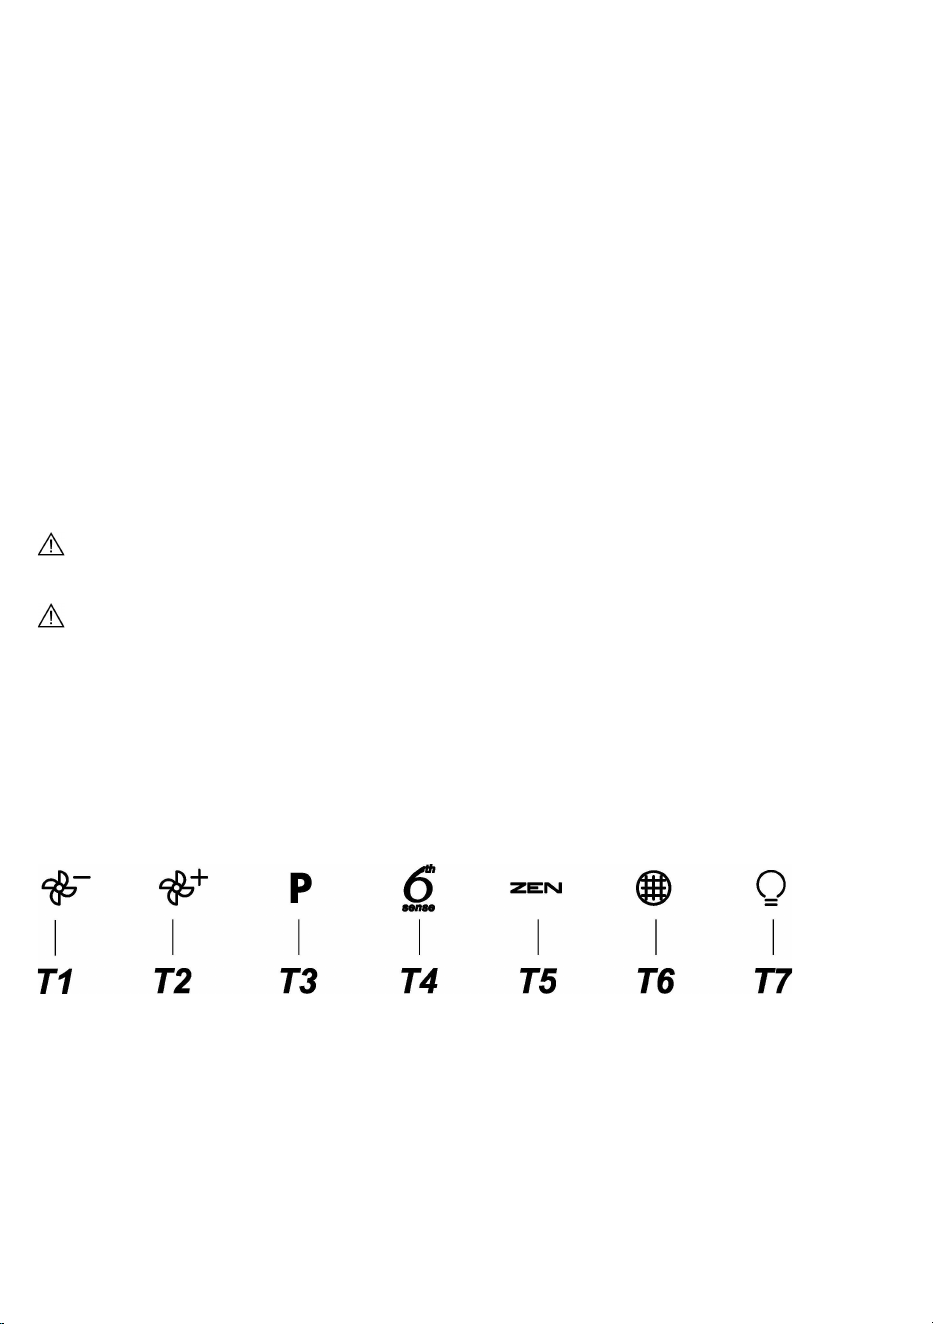
53
SAÍDA DO AR
(para as versões apsirantes)
Conectar o exaustor aos tubos e orifícios de descarga da parede com diâmetro equivalente à saída de ar (falange de união).
O uso de tubos ou orifícios de descarga de parede com diâmetro inferior, pode provocar a diminuição do desempenho de aspiração e um
drástico aumento do ruído.
Não nos responsabilizamos a este respeito.
! Utilizar um tubo condutor com comprimento não inferior ao indicado.
! Utilizar um tubo condutor com o menor número possível de curvas (ângulo máximo da curva: 90ºC).
! Evitar alterações drásticas da seção do tubo (diâmetro).
! Caso estas normas não sejam respeitadas a empresa declina qualquer responsabilidade.
FILTRANTE OU ASPIRANTE ?
! O seu exaustor está pronto para ser utilizado na versão aspirante.
Para utilizar o exaustor na versão filtrante deve ser instalado um KIT ACESSÓRIO apropriado.
Verifique nas primeiras páginas deste manual se o KIT ACESSÓRIO já vem fornecido ou se deve ser comprado separadamente.
Nota: Se for fornecido com o equipamento, em alguns casos, o sistema de filtragem adjunta à base de carvão activo pode já estar
instalado no exaustor.
As informações para a transformação do exaustor da versão aspirante à versão filtrante já estão contidas neste manual.
Versão aspirante
Os vapores são evacuados para o exterior, por meio de um tubo de descarga fixado à falange de conexão que se encontra sobre o exaustor.
ATENÇÃO!
O diâmetro do tubo de descarga deve ser equivalente ao diâmetro do anel de conexão.
ATENÇÃO!
Se o exaustor for dotado de filtros de carvão ativo, estes deverão ser retirados.
Versão filtrante
O ar aspirado será desengordurado e desodorizado antes de ser recanalizado de volta para o ambiente.
Para usar o exaustor nesta versão é necessário instalar um sistema de filtragem adicional à base de carvão ativado.
COMANDOS
O exaustor vem equipado com um painel de comandos com um controlo de velocidade de aspiração e um controlo para acender a luz de
iluminação do plano de cozedura.
T1. Motor da ventoinha desligado / Diminuir a velocidade
T2. Motor da ventoinha ligada / Aumentar a velocidade
T3. Função “POWER BOOST“
T4. Função 6th sense (modo AUTO) ON/OFF
T5. Operação "ZEN Mode"
T6. Alarme/Reconfiguração dos filtros de gordura/carvão
T7. LIGAR/DESLIGAR Luz principal
ATENÇÃO! Este exaustor tem um sistema de funcionamento automático (consulte abaixo "T4. Função 6th sense (modo AUTO) ON/OFF”).
A calibragem é efetuada automaticamente cada vez que o exaustor volta a ser ligado à corrente elétrica (p.ex.: a primeira vez que é instalado
após uma falha elétrica). Também pode ser realizada manualmente (consulte o parágrafo "Configuração do sensor").
Durante a calibração, que deverá demorar 5 minutos, T4 irá piscar e as luzes podem ser utilizadas.

54
T1. MOTOR DA VENTOINHA DESLIGADO / DIMINUIR A VELOCIDADE
Prima para diminuir a pressão e desligue o motor de extração. Prima e mantenha premido para desligar diretamente o motor de extração.
T2. MOTOR DA VENTOINHA LIGADA / AUMENTAR A VELOCIDADE
Prima para ligar o interruptor do motor de extração e aumentar a velocidade.
prima e mantenha premido para configurar diretamente a 3.ª velocidade.
T3. FUNÇÃO “POWER BOOST “
Prima T3 para ativar a velocidade de extração intensiva (temporizada) “POWER BOOST 1”.
Lembre-se: o exaustor voltará à 3.ª velocidade após cinco minutos.
Com o motor de extração ligado, em “POWER BOOST1”, prima novamente T3 para ativar a velocidade de extração intensiva (temporizada)
adicional “POWER BOOST 2”.
Lembre-se: o exaustor voltará à 3.ª velocidade após cinco minutos.
Lembre-se: prima novamente T3, durante cinco minutos, o exaustor irá voltar a funcionar em “POWER BOOST 1”
T4. FUNÇÃO 6TH SENSE (MODO AUTO) ON/OFF
O exaustor configura automaticamente a velocidade de extração se o sensor do exaustor detetar qualquer mudança nas condições do
ambiente.
Lembre-se: certifique-se de que esta função está a ser utilizada corretamente, primeiro configure o sensor (consulte a secção
"Configuração do sensor" abaixo).
Lembre-se: se alterar quaisquer outras funções que controlem a velocidade, a função "6th sense" será desativada.
Configuração do sensor
Tal poderá ser efetuado com o exaustor desligado. Em condições normais de ambiente, prima T4 durante 5 s.; o T4 piscará durante 5 min.
para indicar que o exaustor está a realizar a calibragem, de seguida, desliga-se para indicar que a calibragem terminou.
Configurar a placa: Prima e mantenha premido simultaneamente T1 e T2. Ambas acendem para indicar que o exaustor está preparado
para aceitar os parâmetros de calibragem da placa.
Prima T1 para escolher a placa a gás (T1 começa a piscar durante 3 s. para indicar que os parâmetros de calibragem do exaustor estão
configurados para a placa a gás).
Prima T2 para escolher a placa de indução (T2 começa a piscar durante 3 s. indicando que os parâmetros de calibragem do exaustor estão
configurados para a placa de indução).
T5. OPERAÇÃO “ZEN MODE”
Prima para ativar ou desativar o modo de extração "ZEN".
Esta função permite ativar uma velocidade de extração que oferece o equilíbrio ideal entre silêncio e eficiência de extração.
T6. ALARME/RECONFIGURAÇÃO DOS FILTROS DE GORDURA/CARVÃO
A intervalos regulares, o exaustor sinaliza a necessidade de se efetuar a manutenção dos filtros.
Nota: Os indicadores apenas funcionam quando o exaustor está ligado.
T6 aceso: Realize a manutenção do filtro de gordura.
T6 intermitente: efetuar a manutenção do filtro de carvão.
Reposição dos indicadores de saturação do filtro:
Nota: esta operação deve ser realizada com o exaustor ligado.
Prima e mantenha premido o T6
Lembre-se: o T6 e o exaustor desliga-se, indicando que a reconfiguração do alarme foi terminada.
A reconfiguração do filtro de gordura e do filtro de carvão é realizada através da mesma tecla. Se ambos os alarmes dos filtros estiverem
ativados, o procedimento de reconfiguração irá reiniciar o contador um por um, dando prioridade ao filtro de carvão.
Ativação do indicador de saturação do filtro de carvão
Nota: esta operação deve ser realizada com o motor de extração desligado.
Normalmente, este indicador está desativado – prima e mantenha premidos os botões T3 e T7 em simultâneo para ativar esta função:
Ambos iluminar-se-ão para indicar que foram ativados.
Para desativar a função, prima e mantenha premidos os mesmos botões novamente: Ambos irão piscar brevemente e, em seguida, apagar-
se, indicando a desativação.
T7. LIGAR/DESLIGAR LUZ PRINCIPAL
Prima para ligar ou desligar as luzes da placa.

55
MANUTENÇÃO
Limpeza
Para a limpeza, utilizar um pano humedecido com detergentes
líquidos neutros. Evitar o uso de produtos contendo abrasivos.
NÃO UTILIZE ÁLCOOL!
Manutenção dos filtros anti-gordura
Capta as partículas de gordura provenientes da cozedura.
O Filtro de gordura deve ser limpo uma vez por mês (ou quando o
sistema de indicação da saturação dos filtros - se previsto no
modelo adquirido – indicar esta necessidade), com detergentes
não agressivos. O filtro pode ser lavado manualmente ou em
máquina de lavar louça a baixas temperaturas e com ciclo breve.
O filtro metálico para a gordura pode perder cor com as lavagens
na máquina da louça, mas suas características de filtração não se
alteram.
Para desmontar o filtro antigordura puxe o puxador de libertação
com mola.
Manutenção do filtro a carvão
Retém os odores desagradáveis produzidos durante a
preparação de alimentos.
A saturação do filtro de carvão activado se verifica após um uso
mais ou menos prolongado em função do tipo de cozinha e da
regularidade da limpeza do filtro de gorduras. Em todo caso, é
necessário substituir o cartucho no máximo cada 4 meses (ou
quando o sistema de indicação da saturação dos filtros - se
previsto no modelo que se possui – indicar esta necessidade).
NÃO pode ser lavado ou regenerado.
Montagem:
Coloque o gancho do filtro de carvão ativo, primeiro na parte de
trás da lingueta metálica do exaustor e depois na parte dianteira
com os dois botões.
Desmontagem:
Remova o filtro de carvão ativo rodando 90º os botões que o fixam
ao exaustor.
Substituição das lâmpadas
A coifa è dotada de um sistema de iluminação baseada na
tecnologia LED.
Os LED garantem uma iluminação melhor e uma duração de até
10 vezes maior que as lâmpadas tradicionais e economizam 90%
de energia elétrica.
Para a substituição das lâmpadas, contatar o centro de serviço
autorizado de peças de reposição.
56
ELIMINAÇÃO
Este aparelho está classificado de acordo com a Diretiva Europeia 2012/19/EC sobre Resíduos de equipamento elétrico e eletrónico (REEE).
Ao garantir a eliminação adequada deste produto, estará a ajudar a evitar potenciais consequências negativas para o ambiente e para a
saúde pública, que poderiam derivar de um manuseamento de dispersão inadequada deste produto.
O símbolo no produto ou nos documentos que acompanham o produto, indica que este aparelho não pode receber um tratamento
semelhante ao de uma dispersão doméstica.
Pelo contrário, deverá ser depositado no respectivo centro de recolha para a reciclagem de equipamento elétrico e eletrónico.
A eliminação deverá ser efetuada em conformidade com as normas ambientais locais para a eliminação de desperdícios.
Para obter informações mais detalhadas sobre o tratamento, a recuperação e a reciclagem deste produto, contate o Departamento na sua
localidade, o seu serviço de eliminação de desperdícios domésticos ou a loja onde adquiriu o produto.
Aparelho projetado, testado e fabricado de acordo com:
• Segurança: EN/IEC 60335-1; EN/IEC 60335-2-31, EN/IEC 62233.
• Desempenho: EN/IEC 61591; ISO 5167-1; ISO 5167-3; ISO 5168; EN/IEC 60704-1; EN/IEC 60704-2-13; EN/IEC 60704-3; ISO 3741; EN
50564; IEC 62301.
• EMC: EN 55014-1; CISPR 14-1; EN 55014-2; CISPR 14-2; EN/IEC 61000-3-2; EN/IEC 61000-3-3. Sugestões para uma utilização correta,
de modo a reduzir o impacto ambiental: LIGUE o exaustor na velocidade mínima quando começar a cozinhar e mantenha-o em função por
mais alguns minutos após ter terminado. Aumente a velocidade somente em caso de muito fumo ou vapor e use as velocidades altas
somente em situações extremas. Substitua o(s) filtro(s) a carvão quando necessário, para manter uma boa eficiência na redução dos odores.
Limpe o(s) filtro(s) de gordura quando necessário para manter uma boa eficiência. Use o diâmetro máximo do sistema de condutas indicado
neste manual para otimizar a eficiência e minimizar o ruído.
ANOMALIAS DE FUNCIONAMENTO
Se algo parece não funcionar, antes de contactar o Serviço de Assistência efectuar seguintes controlos simples:
• Se o exaustor não funcionar:
Verificar que:
- não há interrupção de corrente.
- foi seleccionada uma velocidade.
• Se o exaustor tiver uma performance fraca:
Verificar que:
- A velocidade do motor seleccionada é suficiente para a quantidade de fumo e vapores libertada.
- O fogão é suficientemente arejado para permitir uma tomada de ar.
- O filtro de carvão não está gasto (exaustor em versão filtrante).
• Se o exaustor desligar durante o funcionamento normal:
Verificar que:
- não há interrupção de corrente.
- o dispositivo de corte omnipolar não disparou.
Se o exaustor não funcionar correctamente, retirar a ficha para desligá-lo por um breve período da rede eléctrica principal (pelo menos 5
seg.). Em seguida colocar novamente a ficha e experimentar mais uma vez antes de contactar o Serviço de assistência técnica. Se o
problema de funcionamento persistir, contacte o serviço de assistência.
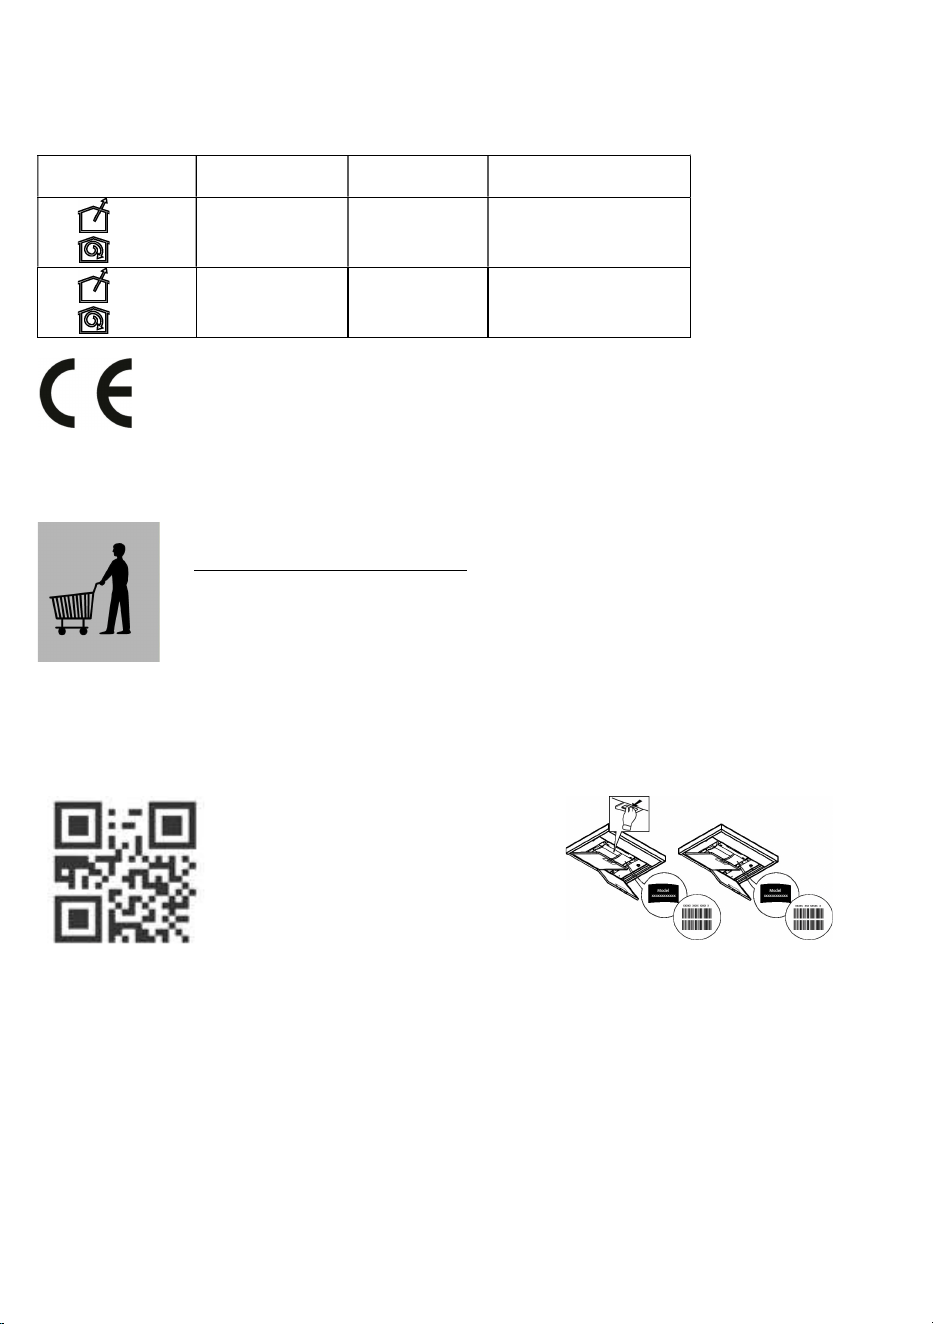
57
DADOS TÉCNICOS
Altura (cm) Largura (cm)
Profundidade
(cm)
Ø do tubo de escape (cm)
62-114
71
-
114
89,8 45,5 15
62-114
71
-
114
59,8 45,5 15
Componentes não fornecidas com o produto.
Pode transferir as Instruções de Segurança, o
Manual do Utilizador, a Ficha do Produto e os
Dados Energéticos:
• Visitando o nosso website docs.whirlpool.eu
• Utilizando o código QR
• Em alternativa, contacte o nosso Serviço Pós-
venda (através do número de telefone contido no
livrete da garantia). Ao contactar o nosso Serviço
Pós-
Venda, indique os códigos fornecidos na placa
de identificação do seu produto.

58
BG
ОБЩА БЕЗОПАСНОСТ
• Преди каквато и да било операция, свързана с почистването или поддръжката,
изключете аспиратора от ел. мрежата, като извадите щепсела от контакта или
изключите главния прекъсвач в жилището.
• При извършване на всички операции свързани с инсталирането и поддръжката,
използвайте работни ръкавици.
• Уредът може да бъде използван от деца на възраст не по-ниска от 8 години и от
лица с ограничени физически, сетивни или умствени възможности или хора без опит
или необходимите познания, но при условие че са под наблюдение или след като са
получили необходимите инструкции за безопасно използване на уреда и свързаните с
него опасности.
• Не позволявайте на децата да си играят с уреда!
• Почистването и поддръжката не трябва да се извършва от деца без набюдението на
възрастен.
• Помещението трябва да разполага с достатъчна вентилация когато аспираторът се
изпозва едновременно с други уреди на газ или друг вид гориво.
• Аспираторът трябва да се почиства често както отвътре така и отвън (ПОНЕ
ВЕДНЪЖ В МЕСЕЦА).
• Придържайте се към инструкциите посочени в наръчника за поддръжка!
• Неспазването на инструкциите за почистване на аспиратора и за подмяна и
почистване на филтрите води до риск от пожар.
• Строго забранено е приготвянето на ястия фламбе под аспиратора.
• За да подмените лампите, използвайте само тези, които са посочени в раздел
„Поддръжка/подмяна на лампите“, както е посочено в настоящия наръчник за
експлоатация.
Използването на открит пламък е вредно за филтрите и може да предизвика пожар,
затова трябва на всяка цена да се избягва.
Приготвянето на пържени храни трябва да се извършва под наблюдение, тъй като
сгорещеното олио може да се възпламени.
ВНИМАНИЕ: Когато готварският плот работи, достъпните части на аспиратора могат
да се нагорещят.
• Не свързвайте уреда към ел. мрежата докато не сте приключили окончателно с
монтажа.
• Що се отнася до техническите размери и мерките за безопасност, които трябва да предприемете за отвеждането на димните
газове навън, Ви препоръчваме да се придържате стриктно към правилата, предвидени в регламентите на компетентните местни
власти.
• Аспирираният въздух не трябва да се насочва към тръбопроводите, които се използват за отвеждане на димните газове, отделящи
се при използването на уреди работещи с газ или друг вид гориво.
• Не използвайте и не оставяйте аспиратора без правилно монтирани лампички поради евентуален риск от токов удар.
• Никога не използвайте аспиратора без правилно монтирана решетка!
• Аспираторът не трябва НИКОГА да се използва като опорен плот освен ако това не е специално указано.
• При монтажа изполвайте само фиксиращите болтове, които са доставени заедно с уреда или ако няма такива, закупете
подходящи болтове.
59
• Използвайте болтове с подходяща дължина, както е посочено в наръчника за инсталиране.
• При наличие на съмнения, моля свържете се с оторизирания сервиз за техническо обслужване или квалифициран персонал.
ВНИМАНИЕ!
• Неисталирането на болтовете и механизмите за фиксиране в съотвествие с настоящите инструкции може да доведе до
рискове от електрическо естество.
• Не използвайте с програматор, таймер, отделно дистанционно управление или каквото и да е друго устройство, което се
активира автоматично.
Дръжте децата под 3 годишна възраст далеч от уреда. Без непрекъснато наблюдение на възрастен, съхранявайте уреда далеч от
деца на възраст под 8 години.
ВНИМАНИЕ: уредът не е предназначен да функционира чрез външно устройство или отделна система за дистанционно
управление.
Този уред не е предназначен за професионална употреба. Не използвайте уреда на открито.
За да избегнете риск от нараняване на хора, този уред трябва да бъде преместван и инсталиран от двама или повече човека.
Инсталирането, включващо евентуални съединения за водно захранване (ако е предвидено), електрически свързвания, и
операциите, свързани с ремонт трябва да се извършват от квалифициран персонал.
Като приключи инсталирането, съхранявайте опаковъчния материал (пластмасови части, полистирол и т.н.) далеч от деца, за да се
избегне риск от задушаване. .
Не използвайте уреда, когато сте мокри или с боси крака.
Никога не използвайте парочистачки за почистване – риск от токов удар.
Опаковъчният материал се рециклира на 100% и е маркиран със символа за рециклиране
Аспираторът може да се различава външно от чертежите поместени в настоящото упътване, но независимо от това
инструкциите за употреба, поддръжката и инсталирането са абсолютно същите.
Придържайте се стриктно към тук посочените инструкции. Фирмата не носи отговорност за евентуални неизправности, повреди или
възпламеняване на уреда, възникнали в резултат на неспазване на инструкциите в настоящото упътване. Аспираторът е
проектиран за аспириране на дима и парата, които се отделят при готвене, и е предназначен само за битова употреба.
• Съветваме Ви да съхранявате настоящото упътване за да може да го използвате във всеки един момент. При продажба,
отдаване под наем или преместване, упътването за употреба трябва да остане заедно с продукта.
• Прочетете внимателно инструкциите! Те съдържат важна информация относно инсталирането, употребата и мерките за
безопасност.
• Забранено е нанасянето на електрически или механически изменения върху продукта и върху въздуховодните тръби!
• Преди да пристъпите към инсталирането на уреда, уверете се, че няма увредени части. Ако има такива, свържете се с
търговския представител и не пристъпвайте към инсталиране.
Минималното разстояние между повърхността, на която се поставят съдовете за готвене и най-ниската част на кухненския
аспиратор, трябва да бъде не по-малко от 50cm в случай на електрически печки и не по-малко от 65cm, в случай на газови или
комбинирани печки.
Ако в инструкциите на газовия уред за готвене е посочено по-голямо разстояние, то трябва да се има предвид.
ЕЛ. СВЪРЗВАНЕ
Напрежението в ел.мрежата трябва да отговаря на напрежението, което е посочено върху етикета с данните за аспиратора,
поставен от вътрешната му страна. Ако е снабден с щепсел свържете аспиратора към контакт, съответстващ на действащите норми
и намиращ се на лесно достъпно място дори и след приключване на монтажа. Ако не е снабден с щепсел (директно свързване към
мрежата), или щепселът не е на достъпно място след приключване на монтажа, използвайте двуполюсен прекъсвач според
нормите, така че да се осигури пълно изключване на мрежата при свръхнапрежение ІІІ, в съответствие с правилата за монтиране.
ВНИМАНИЕ!
Преди да свържете отново аспиратора към мрежата и да проверите дали функционира правилно, проверете дали кабелът е
монтиран както трябва.
60
Ако кабелът не е оборудван с щепсел,свържете проводниците съгласно следната таблица:
Напрежение и честота на мрежата
Свързване на кабелите
Направете справка със стойността, посочена на етикета с
характеристики вътре в аспиратора.
: жълт/зелен
N : син
L
: кафяв
Подмяна на захранващия кабел
Аспираторът е снабден със специален кабел за захранване; в случай, че кабелът бъде увреден обърнете се към гаранционния
сервиз за да получите нов.
ОТВЕЖДАНЕ НА ВЪЗДУХА
(за аспирираща версия)
Свържете аспиратора към въздуховодни тръби и отвори в стената. Диаметърът на тръбите трябва да съответства на диаметъра на
съединителния фланец за отвеждане на въздуха.
Свързването към въздуховодни тръби и отвори с по-малък диаметър намалява капацитета на аспириране и увеличава значително
шума по време на работа.
В тези случаи фирмата не поема никаква отговорност.
! Използвайте тръба с необходимата дължина.
! Използвайте тръба с възможно най-малко тръбни колена (с максимален ъгъл на извивка: 90°).
! Не променяайте рязко сечението на тръбите!
! Фирмата не поема никаква отговорност в случай на неспазване на настоящите норми.
ФИЛТРИРАЩА ИЛИ АСПИРИРАЩА ВЕРСИЯ?
! Аспираторът е готов за употреба във вариант на аспирираща версия.
За да използвате аспиратора във вариант на филтрираща версия е необходимо да инсталирате специалния ДОПЪЛНИТЕЛЕН
КОМПЛЕКТ.
В началото на настоящия наръчник е посочено дали ДОПЪЛНИТЕЛНИЯТ КОМПЛЕКТ е доставен или трябва да бъде закупен
отделно.
Бележка: Ако комплектът е вече доставен, имайте предвид, че в някои случаи допълнителната филтрираща система на базата
на филтри с активен въглен може вече да е инсталирана върху аспиратора.
Информацията относно трансформирането на аспиратора от аспирираща във филтрираща версия се съдържа в настоящото
ръководство.
Аспирираща версия
Парата се отвежда навън посредством въздуховодна тръба свързана със съединителния фланец.
ВНИМАНИЕ!
Въздуховодната тръба не е включена към аксесоарите и трябва да бъде закупена отделно.
Диаметърът на въздуховодната тръба трябва да отговаря на диаметъра на съединителния пръстен.
ВНИМАНИЕ!
Ако аспираторът е снабден с филтри с активен въглен, въпросните трябва да бъдат отстранени.
Филтрираща версия
Аспирираният въздух се пречиства и освежава преди да влезе отново в обръщение в помещението. За да използвате аспиратора в
този вариант на работа трябва да инсталирате допълнителна филтрираща система на базата на филтри с активен въглен.
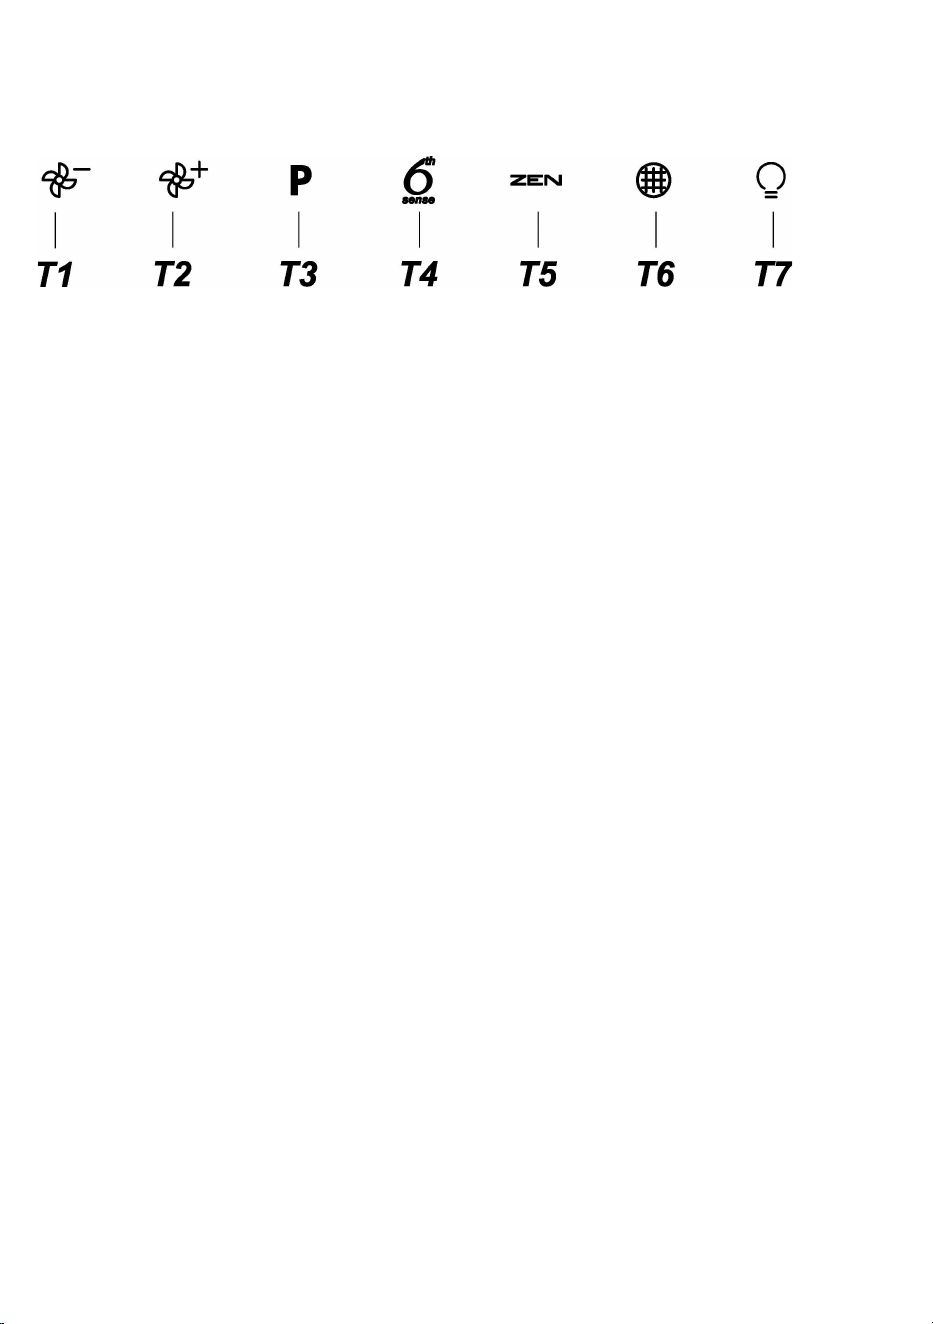
61
КОМАНДИ
Аспираторът е снабден с командно табло с възможност за регулиране скоростта на аспириране и превключвател на осветлението
на готварския плот.
T1. ИЗКЛ. на мотора на вентилатора / Намаляване на скоростта
T2. ВКЛ. на мотора на вентилатора / Увеличаване на скоростта
T3. Функция “POWER BOOST “
T4. ВКЛ./ИЗКЛ. на функцията 6th sense (режим AUTO)
T5. Работен режим “ZEN”
T6. Нулиране на алармата за филтъра за мазнини/филтъра с активен въглен
T7. ВКЛ./ИЗКЛ. на основното осветление
ВНИМАНИЕ! Този аспиратор разполага със система за автоматична работа (вижте по-долу “T4. ВКЛ./ИЗКЛ. на функцията 6th
sense (режим AUTO)”).
Калибрирането се извършва автоматично всеки път когато аспираторът бъде свързан отново към електрическата мрежа (напр.: при
първоначалния монтаж или спиране на захранването). Калибрирането може също така да се извърши автоматично (вижте раздел
“Настройване на датчика”).
По време на калибрирането, което трае 5 минути, T4 ще премигва и осветлението може да се използва.
T1. ИЗКЛ. НА МОТОРА НА ВЕНТИЛАТОРА / НАМАЛЯВАНЕ НА СКОРОСТТА
Натиснете, за да намалите скоростта и да изключите мотора за екстракция.
Натиснете и задръжте, за да изключите директно мотора за екстракция
.
T2. ВКЛ. НА МОТОРА НА ВЕНТИЛАТОРА / УВЕЛИЧАВАНЕ НА СКОРОСТТА
Натиснете, за да включите мотора за екстракция и за да увеличите скоростта. натиснете и задръжте, за да зададете директно 3-та
скорост.
T3. ФУНКЦИЯ “POWER BOOST “
Натиснете T3, за да активирате функцията за интензивна екстракция “POWER BOOST 1” (управлявана с таймер).
Моля, имайте предвид: след пет минути аспираторът ще заработи отново на 3-та скорост.
С включен мотор за екстракция, докато сте на “POWER BOOST1”, натиснете отново T3, за да активирате функцията за
допълнителна интензивна екстракция “POWER BOOST 2” (управлявана с таймер).
Моля, имайте предвид: след пет минути аспираторът ще заработи отново на 3-та скорост.
Моля, имайте предвид: в рамките на тези пет минути натиснете отново
T3, аспираторът ще заработи отново на “POWER BOOST 1”
T4. ВКЛ./ИЗКЛ. НА ФУНКЦИЯТА 6TH SENSE (АВТОМАТИЧЕН РЕЖИМ)
Аспираторът задава автоматично скоростта на екстракция, ако датчикът засече промяна в заобикалящите го условия.
Моля, имайте предвид: за да сте сигурни, че функцията се използва правилно, първо конфигурирайте датчика (вижте
“Настройване на датчика” по-надолу).
Моля, имайте предвид: ако промените някоя от останалите функции, които управляват скоростта, функцията "6th sense" ще се
изключи.
Настройване на датчика
Настройването се извършва при изключен аспиратор. При нормални условия на заобикалящата среда натиснете и задръжте за 5
секунди T4, T4 мига в продължение на 5 минути, за да укаже, че аспираторът в момента извършва калибриране на датчика, след
което изгасва, за да укаже, че калибрирането е завършило.
Настройване на готварския плот: Натиснете и задръжте едновременно T1 и T2. И двата светват, за да укажат, че аспираторът е
готов да приеме калибрирането на параметрите на готварския плот.
Натиснете T1, за да изберете газов плот за готвене (T1 мига в продължение на 3 секунди, за да укаже, че параметрите на
аспиратора са зададени за газов плот).

62
Натиснете T2, за да изберете индукционен плот за готвене (T2 мига в продължение на 3 секунди, за да укаже, че параметрите на
аспиратора са зададени за индукционен плот).
T5. РАБОТЕН РЕЖИМ “ZEN”
Натиснете за активиране/деактивиране на режима на екстракция "ZEN".
Тази функция включва скорост на екстракция с перфектен баланс между безшумна работа и ефективност на екстракцията.
T6. НУЛИРАНЕ НА АЛАРМАТА ЗА ФИЛТЪРА ЗА МАЗНИНИ/ ФИЛТЪРА С АКТИВЕН ВЪГЛЕН
На равни интервали от време аспираторът сигнализира за нужда от обслужване на филтъра.
Моля, имайте предвид: Индикаторите ще работят само ако аспираторът е включен.
T6 свети: Извършете обслужване на филтъра за мазнини.
T6 премигва: необходимо е обслужване на филтъра с активен въглен.
Нулиране на индикаторите за насищане на филтрите:
Моля, имайте предвид: Този процес се извършва само при работещ аспиратор.
Натиснете и задръжте T6
Моля, имайте предвид: T6 и аспираторът се изключват, за да укажат, че нулирането на алармата е завършило.
Нулирането на филтъра за мазнини и на филтъра с активен въглен се извършва с един и същи бутон. Ако алармите и на двата
филтъра са активни, процедурата по нулиране ще извърши нулиране на броячите един по един, с предимство за филтъра с активен
въглен.
Активиране на индикатора за насищане на въгленовия филтър
Моля, имайте предвид: Този процес се извършва само при изключен мотор за екстракция.
Обикновено този индикатор е деактивиран – натиснете едновременно и задръжте бутони T3 и T7, за да активирате функцията:
Двата бутона ще светнат, за да потвърдят активирането.
За да деактивирате функцията, отново натиснете и задръжте същите бутони: И двата ще премигнат еднократно и ще изгаснат,
което потвърждава деактивирането.
T7. ВКЛ./ИЗКЛ. НА ОСНОВНОТО ОСВЕТЛЕНИЕ
Натиснете за включване/изключване на светлините на плочата за готвене.
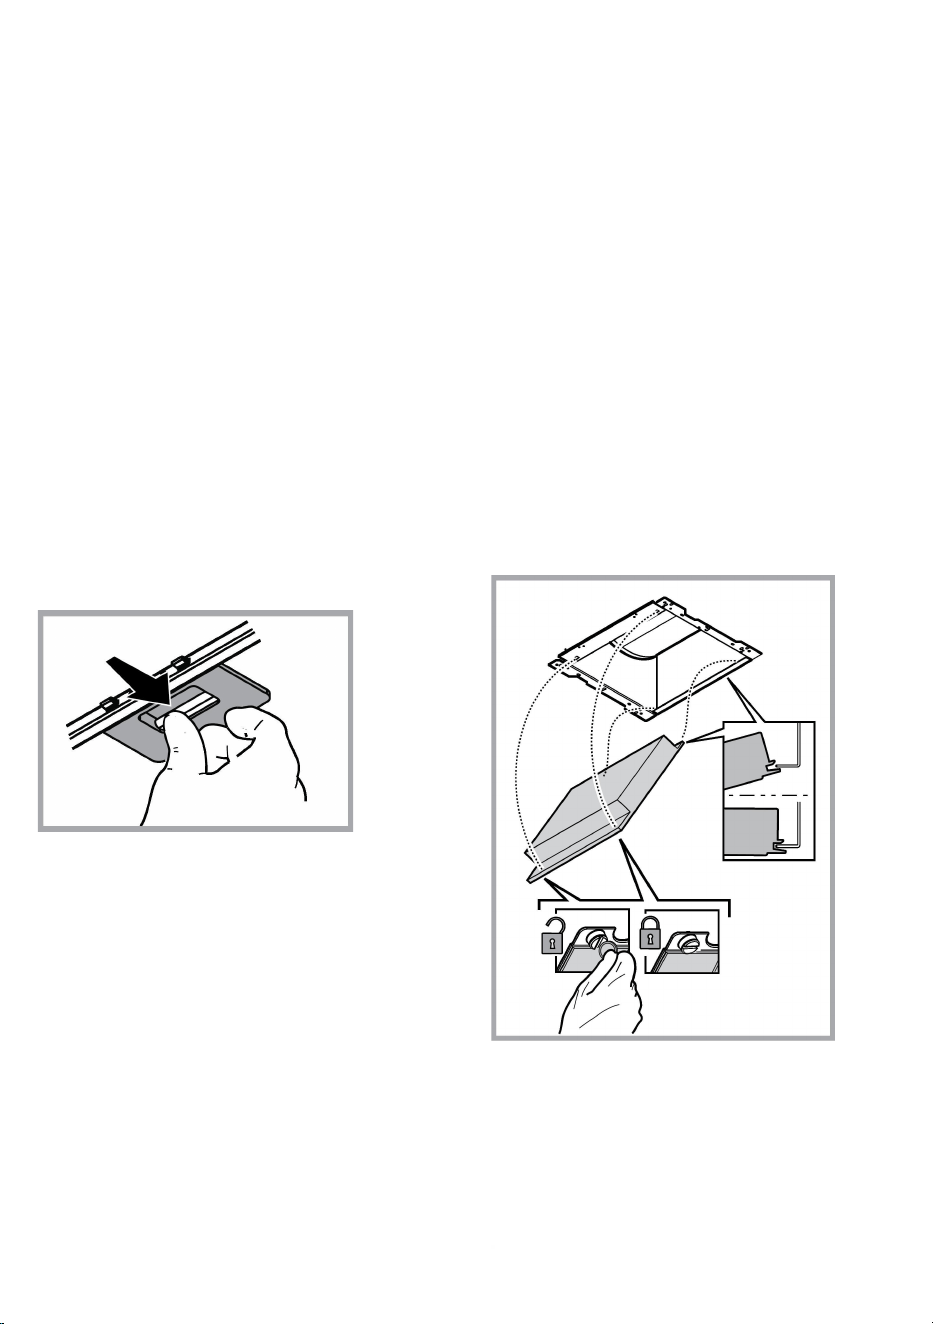
63
ПОДДРЪЖКА
Почистване
За почистването използвайте ЕДИНСТВЕНО кърпа,
навлажнена с неутрални течни почистващи препарати. НЕ
ИЗПОЛЗВАЙТЕ ИНСТРУМЕНТИ ИЛИ ПРИБОРИ ЗА
ПОЧИСТВАНЕ!
Избягвайте препарати, които съдържат абразивни частици.
НЕ ИЗПОЛЗВАЙТЕ СПИРТ!
Поддръжка на филтрите за мазнини
Филтърът задържа мазните частици, отделяни при
готвене.
Да се почиства веднъж месечно или когато индикаторът за
пренасищане на филтрите го показва (разбира се в случай, че
моделът, който сте закупили е снабден с такъв индикатор).
Използвайте не много силни миялни препарати и почиствайте
ръчно или в съдомиялна машина, но на ниска температура и
кратък режим на измиване.
При миене на металния филтър за мазнините в
съдомиялната машина е възможно той да се обезцвети, но
това по никакъв случай не намалява възможностите му за
филтриране.
За да разглобите филтъра за мазнините, дръпнете дръжката
с пружинен механизъм.
Поддръжка на филтъра с активен
въглен
Задържа неприятните миризми, които се отделят при
пържене.
Филтърът с активен въглен се запушва приблизително след
дълъг период на използване в зависимост от начина на
готвене и от това колко често почиствате филтъра .
Във всеки случай е необходимо да подменяте филтъра с
активен въглен на всеки четири месеца или когато
индикаторът за засищане на филтрите (разбира се ако
вашият модел разполага с такъв) показва, че е необходимо.
Не се мие нито може да се използва повторно.
Монтиране
Фиксирайте филтъра с активен въглен най-напред от задната
страна върху металното езиче на аспиратора и след това от
лицевата страна с помощта на двете кръгли ръкохватки.
Демонтиране
Филтърът с активен въглен се демонтира като се завъртят на
90º кръглите ръкохватки, които го придържат към аспиратора.
Подмяна на лампите
Аспираторът разполага с осветителна система със
СВЕТОДИОДИ.
СВЕТОДИОДИТЕ гарантират оптимално осветление, до 10
пъти по-силно от традиционните лампи и позволяват 90%
икономия на електроенергия.
За да подмените лампите, моля свържете с оторизирания
сервиз за резервни части.

64
РЕЦИКЛИРАНЕ
Този уред отговаря на изискванията на :
- Европейската директива 2012/19/EC
- Waste Electricаl and Electronic Equipment (WEEE).
Уверявайки се, че този уред ще бъде рециклиран по подобаващият за това начин, Вие допринасяте за опазването на околната
среда и вашето здраве.
Символът върху уреда или в придружаващата го документация посочва, че този продукт не трябва да бъде считан за
домашен отпадък, а трябва да бъде предаден в специално предназначените за това пунктове за рециклиране на електрическа и
електронна техника. Придържайте се към местните нормативи за преработка на отпадъци. За по-подробна информация във връзка
с предаването, събирането и рециклирането на този продукт ви съветваме да се обърнете към компетентните местни служби,
службите за събиране на домашни отпадъци или магазинът, в който сте закупили този ел. уред.
Уредът е проектиран, тестван и произведен в съответствие с:
• Безопасност: EN/IEC 60335-1; EN/IEC 60335-2-31, EN/IEC 62233.
• Работни характеристики: EN/IEC 61591; ISO 5167-1; ISO 5167-3; ISO 5168; EN/IEC 60704-1; EN/IEC 60704-2-13; EN/IEC 60704-3; ISO
3741; EN 50564; IEC 62301.
• EMC - Електромагнитна съвместимост: EN 55014-1; CISPR 14-1; EN 55014-2; CISPR 14-2; EN/IEC 61000-3-2; EN/IEC 61000-3-3.
Предложения за правилна употреба, за да се намали въздействието върху околната среда: Включете (ON) аспиратора на
минимална скорост, когато започнете да готвите и го оставете да работи няколко минути след приключване на готвенето.
Увеличавайте скоростта само в случай на голямо количество дим и пари и използвайте увеличените скорости само в екстремни
ситуации. Сменяйте филтъра/филтрите с активен въглен, когато е необходимо, за да поддържате добра ефективност на
намаляване на миризмата. Почиствайте филтъра/филтрите за мазнини, когато е необходимо, за да поддържате добра ефективност
на филтъра за мазнините. Използвайте максималния диаметър на системата за отвеждане на въздуха, посочен в това ръководство
за оптимизиране на ефективността и за намаляване на шума.
НЕИЗПРАВНОСТ ВЪВ ФУНКЦИОНИРАНЕТО
Ако нещо не функционира както трябва, преди да се свържете с Техническото обслужване, направете някои семпли проверки:
• Ако аспираторът не функционира:
Проверете дали:
- не е прекъснал тока;
- е зададена някаква скорост.
• Ако аспираторът не засмуква достатъчно:
Проверете дали:
- Избраната скорост е подходяща в зависимост от отделеното количество дим и пара.
- Дали кухнята се проветрява достатъчно, за да се осигури обмяна на въздуха.
- Филтърът с активен въглен не е износен (филтрираща версия).
• Ако аспираторът е изгаснал по време на работа:
Проверете дали:
- не е прекъснал тока;
- многополюсният прекъсвач не е изключил.
В случай на неизправност във функционирането, преди да се обърнете към техническия сервиз, изключете аспиратора от мрежата
най-малко за 5 секунди, като извадите щепсела, след което го свържете отново. В случай, че неизправността все още е налице,
обърнете се към гаранционния сервиз.

65
ТЕХНИЧЕСКИ ДАННИ
Височина (cm) Широчина (cm) Дълбочина (cm)
Ø на изпускателната
тръба (cm)
62-114
71
-
114
89,8 45,5 15
62-114
71
-
114
59,8 45,5 15
Компоненти, които не са включени към продукта
Можете да свалите инструкциите за
безопасност, ръководството за потребителя
и листовката с енергийните показатели на
уреда, като:
• Посетите нашия уебсайт docs.whirlpool.eu
• Използвате QR кода
• Освен това можете да се свържете с отдела
за следпродажбено обслужване
(вижте
телефонния номер в книжката за гаранцията).
При контакт с отдела за следпродажбено
обслужване на клиенти съобщавайте кодовете,
посочени на заводската табелка на Вашия уред.

66
CS
VŠEOBECNÁ BEZPEČNOSTNÍ OPATŘENÍ
• Před jakýmkoli čištěním či údržbou odpojte digestoř z elektrické sítě odpojením ze zásuvky
nebo vypnutím hlavního domovního vypínače.
• Při jakýchkoli úkonech spojených s instalací či údržbou používejte ochranné rukavice.
• Tento přístroj mohou používat děti starší 8 let a osoby se sníženými tělesnými, smyslovými
či duševními schopnostmi nebo osoby bez patřičných zkušeností a znalostí, pouze pokud
jsou pod neustálým dozorem nebo byly poučeny o bezpečném použití výrobku a jsou si
vědomy rizik spojených s jeho použitím.
• Je nutné se ujistit, zda si děti nehrají se zařízením.
• Čištění a údržba nesmí být prováděna dětmi bez dozoru.
• Místnost musí být dostatečně větraná, pokud je digestoř používána společně s jinými
spalovacími zařízeními na plyn či jiná paliva.
• Vnitřní a vnější části digestoře musí být často čištěny (NEJMÉNĚ JEDNOU ZA MĚSÍC), za
dodržení výslovných pokynů uvedených v návodu k údržbě.
• Při nedodržení pokynů pro čištění digestoře a výměnu a čištění filtrů hrozí nebezpečí
požáru.
• Je přísně zakázáno připravovat pod digestoří pokrmy na ohni.
• Při výměně žárovky používejte pouze typ žárovky uvedený v tomto návodu, v části
věnované údržbě/výměně žárovek.
Použití otevřeného ohně může poškodit filtry a způsobit požáry, proto oheň nesmí být nikdy
používán.
Zvýšenou pozornost je nutné věnovat smažení, protože přehřátý olej by se mohl vznítit.
POZOR: Pokud je varná deska v provozu, přístupné části digestoře se mohou stát velmi
teplými.
• Nepřipojujte přístroj k elektrické síti, dokud instalace nebude zcela ukončena.
• Nepřipojujte přístroj k elektrické síti, dokud instalace nebude zcela ukončena.
• Co se týče technických a bezpečnostních opatření pro odvod kouře, postupujte přesně podle předpisů příslušných místních orgánů.
• Odsávaný vzduch musí být odváděn do potrubí používaného pro odtah kouřů vznikajících při použití spalovacích zařízení na plyn či jiná
paliva.
• Nepoužívejte a nenechávejte digestoř bez správně instalovaných žárovek, jelikož hrozí nebezpečí úrazu elektrickým proudem.
• Nikdy nepoužívejte digestoř bez správně namontované mřížky!
• Digestoř nesmí být NIKDY používána jako opěrná plocha, pokud pro tento účel není výslovně určena.
• Při instalaci používejte pouze úchytné šrouby dodané z výrobkem.
• Pokud šrouby nejsou součástí vybavení, zakupte správný typ šroubů. Používejte šrouby se správnou délkou, podle pokynů v Návodu pro
instalaci.
• V případě pochyb se obraťte na pověřený servis nebo se poraďte s odborným personálem.
POZOR!
• V případě chybějící instalace šroubů a úchytných prvků dle pokynů uvedených v tomto návodu může dojít k vzniku nebezpečí
elektrické povahy.
• Nepoužívejte s programátorem, časovým spínačem, samostatným dálkovým ovládáním nebo jiným zařízením, které se aktivuje
automaticky.
Uchovávejte spotřebič mimo dosah dětí mladších 3 let. Bez stálého dohledu dospělé osoby uchovávejte mimo dosah dětí mladších 8 let.
67
UPOZORNĚNÍ: spotřebič není určen ke spuštění externím zařízením nebo odděleným dálkovým ovládáním.
Tento spotřebič není určen pro profesionální použití. Nepoužívejte spotřebič na otevřeném prostranství.
Aby nedošlo k poranění osob, musí být spotřebič přemístěn a nainstalován dvěma nebo více osobami.
Instalace, včetně případných přípojek na vodu (pokud jsou k dispozici) a elektrických přípojek, jakož i opravy musí provádět kvalifikovaný
personál.
Po dokončení instalace uložte obalový materiál (plastové díly, polystyren, atd) mimo dosah dětí, aby se zabránilo riziku udušení. .
Nepoužívejte přístroj, pokud jste mokří nebo naboso.
Nikdy nepoužívejte parní čistící přístroje - nebezpečí úrazu elektrickým proudem.
Obalový materiál je 100% recyklovatelný a je označen symbolem recyklace
Digestoř může mít odlišný vzhled od ilustrací na výkresech této příručky, nicméně návod k použití, údržba a montáž zůstávají
nezměněny.
Výrobce odmítá převzít jakoukoliv odpovědnost za případné závady, škody nebo vznícení digestoře, které byly způsobeny nedodržením
těchto předpisů. Digestoř je projektována pro odsávání dýmů a par při vaření a je určena pouze k domácím účelům.
• Je důležité uchovat si tuto příručku, abyste ji mohli konzultovat v jakémkoliv okamžiku. V případě prodeje, postoupení či stěhování si
zajistěte, aby zůstala společně s přístrojem.
• Přečtěte si pozorně návod: obsahuje důležité informace o instalaci, užití a bezpečnosti.
• Neměňte elektrickou či mechanickou úpravu výrobku anebo vývodního zařízení.
• Před instalací zařízení zkontrolujte, zda některá ze součástí není poškozena. V opačném případě kontaktujte prodejce a nepokračujte v
instalaci.
Minimální vzdálenost mezi podporou nádoby na varné ploše a nejnižší částí digestoře nesmí být menší než 50cm v případě elektrických
sporáků 65cm v případě plynových či smíšených sporáků.
Pokud návod na instalaci varného zařízení na plyn doporučují větší vzdálenost, je třeba se tímto pokynem řídit.
NAPOJENÍ NA ELEKTRICKOU SÍŤ
Síťové napětí musí odpovídat napětí uvedenému na štítku s charakteristikami umístěného uvnitř krytu. Pokud je kryt vybaven přípojkou, stačí
jej zapojit do zásuvky odpovídající stávajícím normám, která se nachází ve snadno dosažitelném prostoru i po provedené montáži. Pokud kryt
není vybaven přípojkami (přímé připojení k síti) nebo se zásuvka nenachází ve snadno dosažitelném prostoru i po provedené montáži , je
třeba použít dvojpólový vypínač odpovídající normám, který zaručí úplné odpojení od sítě v podmínkách kategorie přepětí III, v souladu
s pravidly instalace.
POZOR!
Dříve než opět napojíte obvod digestoře na síťové napájení a ověříte správné fungování, zkontrolujte si vždy, že síťový kabel byl správně
namontován.
Pokud není kabel opatřen zástrčkou,připojte vodiče podle informací v následující tabulce:
Síťové napětí a frekvence
Připojení vodičů
Viz hodnota uvedená na technickém štítku s vlastnostmi uvnitř
digestoře..
: žluto/zelená
N : modrá
L
: hnědá
Výměna napájecího kabelu
Digestoř je vybavena speciálním napájecím kabelem; v případě poškození kabelu vyžádejte si ho u servisní služby.
VÝVOD VZDUCHU
(pro odsávací verze)
Napojte digestoř na odtahového potrubí se stejným průměrem jako vývod vzduchu (spojovací příruba).
Použití odtahového potrubí s menším průměrem způsobí snížení výkonu a zvýšení hluku.
Za to výrobce odmítá jakoukoliv zodpovědnost.
! Používejte co nejkratší odtahové potrubí.
! Používejte odtahové potrubí s co nejmenším počtem záhybů (maximální úhel záhybu: 90°).
! Vyhněte se zásadním změnám sekce vedení odtahu.
! Výrobce odmítá veškerou zodpovědnost v případě, že tyto předpisy nebudou dodržovány.
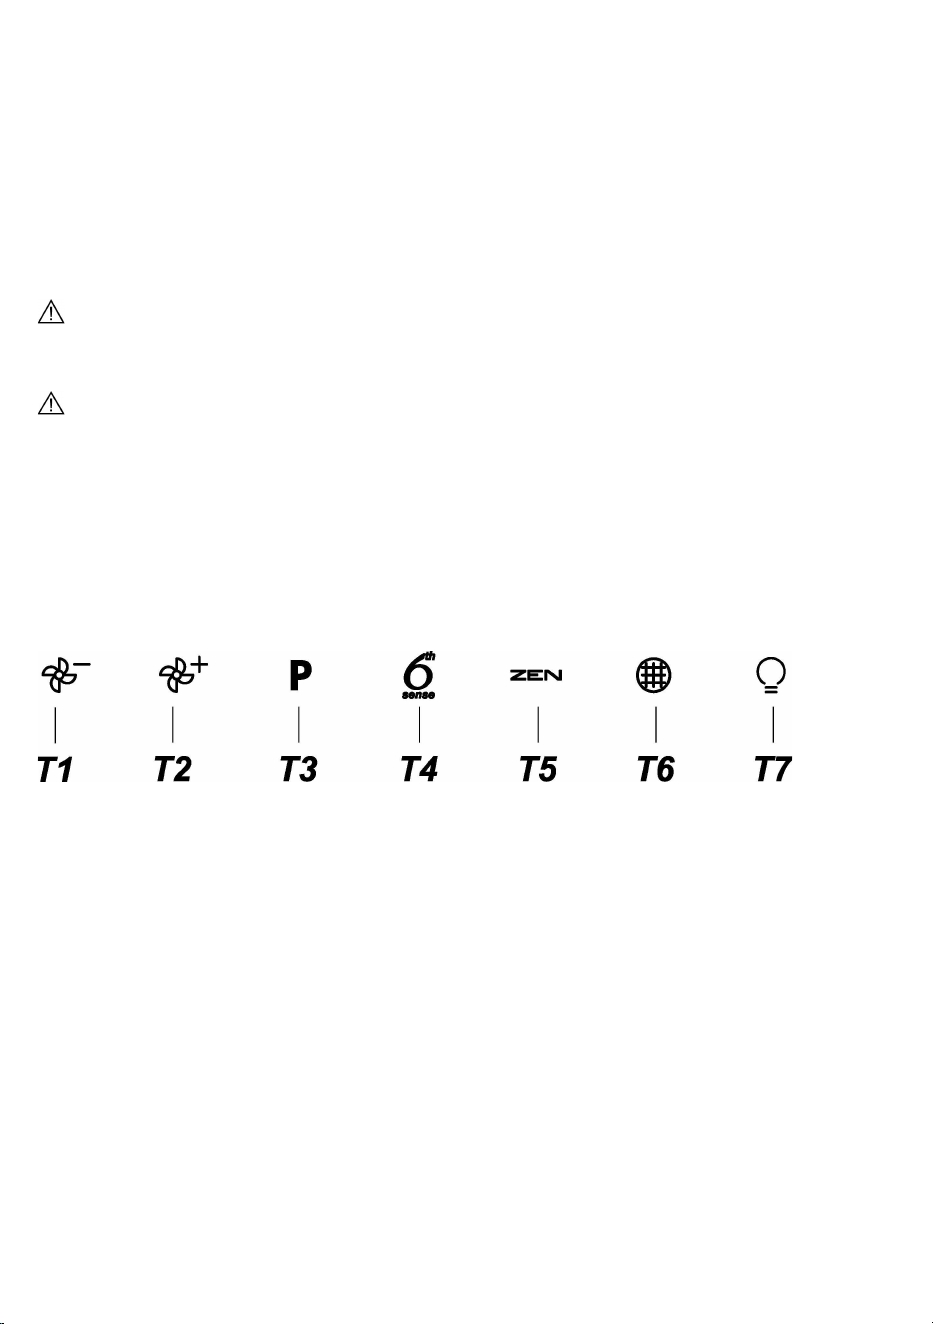
68
FILTRUJÍCÍ ANEBO ODSÁVACÍ?
! Vaše digestoř je připraven k použití v odsávací verzi.
K použití ve filtrující verzi je třeba instalovat příslušný KIT PŘÍSLUŠENSTVÍ.
Ověřte si na prvních stránkách této příručky, zda KIT PŘISLUSENSTVI je součástí vybavení přístroje anebo zda je třeba ho zakoupit.
Poznámka: Pokud je součástí vybavení, v některých případech dodatkový filtrační systém založený na aktivních uhlících by již mohl být
nainstalován na digestoři.
Informace týkající se přeměny digestoře z odsávací verze na verzi filtrující jsou obsaženy v této příručce.
Odsávací verze
Páry jsou vyváděny mimo místnost odtahovím potrubím upevněného na spojovací přírubě.
POZOR!
Odtahové potrubí není součástí vybavení a je třeba ho zakoupit.
Průměr odtahového potrubí se musí rovnat průměru spojovacího prstence.
POZOR!
Jestliže je digestoř vybavena filtry s uhlíkem, musejí být vyňaty.
Filtrující verze
Odsávaný vzduch bude před návratem do místnosti zbaven tuku a pachů. K použití digestoře v této verzi je nutné instalovat dodatečný
systém filtrování na základě aktivních uhlíků.
OVLÁDÁNÍ
Odsavač je vybaven ovládacím panelem s ovládáním rychlosti odsávání a zapínáním osvětlení pracovní plochy.
T1. Ventilátor motoru VYPNUTÝ / Snížení rychlosti
T2. Motor ventilátoru ZAPNUTÝ / Zvýšení rychlosti
T3. Funkce „POWER BOOST“
T4. Funkce šestého smyslu 6th sense (automatický režim) – ON/OFF (ZAPNUTO/VYPNUTO)
T5. Ovládání režimu „ZEN“
T6. Uhlíkový filtr/filtr pro zachycování mastnoty – alarm/reset
T7. ZAPNUTÍ/VYPNUTÍ hlavního osvětlení
UPOZORNĚNÍ! Tato digestoř má automatický systém ovládání (viz níže „T4. Funkce šestého smyslu 6th sense (automatický režim AUTO
– ON/OFF (ZAPNUTO/VYPNUTO)“).
Systém automaticky provádí kalibraci pokaždé, když je digestoř znovu připojena k elektrické síti (např.: při první instalaci po výpadku proudu).
Lze ji provést i manuálně (viz odstavec „Nastavení snímače“). Během kalibrace, která trvá 5 minut, T4 bliká a lze používat osvětlení.
T1. VENTILÁTOR MOTORU VYPNUTÝ / SNÍŽENÍ RYCHLOSTI
Stiskněte pro snížení rychlosti a VYPNĚTE motor s odtahem. Stiskněte a podržte pro přímé VYPNUTÍ motoru s odtahem.
T2. MOTOR VENTILÁTORU ZAPNUTÝ / ZVÝŠENÍ RYCHLOSTI
Stiskněte pro ZAPNUTÍ motoru s odtahem a zvyšte rychlost. Stiskněte a podržte pro přímé nastavení rychlosti 3.
T3. FUNKCE „POWER BOOST“
Stiskněte „T5“ pro aktivaci stupně rychlosti „POWER BOOST 1“ – intenzivní odsávání (časově řízeno).
Upozornění: Po pěti minutách se digestoř vrátí na třetí stupeň rychlosti.

69
Se zapnutým motorem odsávání při stupni „POWER BOOST 1“ znovu stiskněte T3“ pro aktivaci stupně rychlosti „POWER BOOST 2“ –
doplňkové intenzivní odsávání (časově řízeno).
Upozornění: Po pěti minutách se digestoř vrátí na třetí stupeň rychlosti.
Upozornění: Pokud během těchto pěti minut znovu stisknete T3, vrátí se digestoř zpět na stupeň rychlosti „POWER BOOST 1“.
T4. FUNKCE ŠESTÉHO SMYSLU 6TH SENSE (AUTOMATICKÝ REŽIM) – ON/OFF (ZAPNUTO/VYPNUTO)
Pokud snímač instalovaný v digestoři detekuje změnu okolních podmínek, digestoř automaticky nastaví rychlost odsávání.
Upozornění: abyste měli jistotu, že tuto funkci používáte správně, nejprve nakonfigurujte snímač (viz „Nastavení snímače“ níže).
Upozornění: Pokud změníte jakékoli další funkce, které slouží k ovládání rychlosti, funkce šestého smyslu „6th sense“ se vypne.
Nastavení snímače
Nastavení je možné provádět, když je digestoř vypnutá. Za běžných okolních podmínek stiskněte T4 na 5 sekund. T4 bude po dobu 5 minut
blikat jako indikace, že digestoř právě provádí kalibraci snímače.
Následně zhasne, což indikuje, že proces kalibrace byl ukončen.
Nastavení varné desky: Stiskněte a podržte současně T1 a T2.
Rozsvícení obou indikuje, že digestoř je připravena přijmout kalibraci parametrů varné desky.
Stiskněte T1 pro výběr možnosti „Plynová varná deska“ (T1 se na 3 sekundy rozbliká jako indikace, že parametry digestoře jsou nastaveny na
plynovou varnou desku).
Stiskněte T2 pro výběr možnosti „Indukční deska“ (T2 se na 3 sekundy rozbliká jako indikace, že parametry digestoře jsou nastaveny pro
indukční varnou desku).
T5. OVLÁDÁNÍ REŽIMU „ZEN“
Stisknutím aktivujete nebo deaktivujete režim odsávání „ZEN“.
Tato funkce umožňuje aktivovat rychlost odsávání s dokonalým vyvážením tichosti a účinnosti odsávání.
T6. UHLÍKOVÝ FILTR / FILTR PRO ZACHYCOVÁNÍ MASTNOTY – ALARM/RESET
Digestoř v pravidelných intervalech signalizuje, že je zapotřebí provést údržbu filtru.
Upozornění: Indikátory fungují pouze pokud je odsavač zapnutý.
T6 – svítí: Proveďte údržbu tukového filtru.
T6 – bliká: proveďte údržbu uhlíkového filtru.
Vynulování indikátorů stavu zanesení filtru:
Upozornění: Tato činnost musí být provedena se zapnutou digestoří.
Stiskněte a podržte T6.
Upozornění: Tlačítko T6 zhasne a digestoř se vypne na znamení, že je reset alarmu dokončen.
Resetování filtru pro zachycování mastnoty a uhlíkového filtru se provádí pomocí stejného klíče. Pokud jsou aktivní alarmy obou filtrů,
resetovací postup vynuluje jedno počitadlo po druhém, přičemž prioritu má uhlíkový filtr.
Aktivace indikátoru zanesení uhlíkového filtru
Upozornění: Tato činnost musí být provedena s vypnutým motorem odsávání.
Tento indikátor je obvykle deaktivován. Funkci aktivujete současným stiskem a podržením tlačítek T3 a T7: Obě tlačítka se rozsvítí na
znamení toho, že došlo k aktivaci funkce.
Funkci vypnete dalším stisknutím stejných tlačítek: Obě tlačítka krátce zablikají a poté zhasnou, což indikuje deaktivaci.
T7. ZAPNUTÍ/VYPNUTÍ HLAVNÍHO OSVĚTLENÍ
Stisknutím zapnete nebo vypnete osvětlení varné desky.

70
ÚDRŽBA
Čištění
Pro čištění je třeba použít VÝHRADNĚ látku navlhčenou
neutrálními tekutými čistícími prostředky. NEPOUŽÍVEJTE
ŽÁDNÉ NÁSTROJE NEBO POMŮCKY NA ČIŠTĚNÍ.
NEPOUŽÍVEJTE ALKOHOL!
Údržba tukových filtrů
Zadržuje částice tuku uvolňující se při vaření.
Tukový filtr se musí 1x do měsíce vyčistit (vyprat), anebo jestliže
systém vyznačování saturace filtru - pokud je součásti vybavení
vlastněného modelu - vyznačuje tuto potřebu. Je možné jej čistit
ručně jemným mycím prostředkem nebo v kuchyňské myčce při
nejnižší teplotě a kratším programu.
Demontáž tukového filtru je znázorněna - zatlačte na západku
filtru.
Úržba filtrů s uhlíkem
Tento filtr pohlcuje nepříjemné pachy vznikající při vaření.
Saturace filtru s uhlíkem nastane po více či méně dlouhém užití, tj.
závisí na typu kuchyně a pravidelném čištění filtru proti
mastnotám. V každém případě je nutné nahradit patronu
maximálně jednou za 4 měsíce (anebo jestliže systém
vyznačování saturace filtrů – pokud je součástí vybavení
vlastněného modelu – vyznačuje tuto potřebu).
NEMŮŽE být umýván či regenerován.
Montáž
Zavěste nejdříve filtr s aktivním uhlíkem vzadu, na kovový jazýček
digestoře, pak vepředu, dvěma dvěma držadly.
Demontáž
Vyjměte filtr s aktivním uhlíkem tak, že budete otáčet o 90°
držadla, která ho upevňují na digestoř.
Výměna svítidel
Digestoř je vybavena osvětlovacím systémem založeným na
technologii DIOD.
DIODY zaručují optimální osvětlení, s trvanlivostí až 10 krát delší
než tradiční svídtila a umožňují úspory 90% elektrické energie.
Pro výměnu žárovek kontaktujte servisní středisko, pověřené
prodejem náhradních dílů.

71
LIKVIDACE ODPADU
Tento spotřebič je označený v souladu s evropskou směrnicí 2012/19/EC o likvidaci elektrického a elektronického zařízení (WEEE).
Zajištěním správné likvidace tohoto výrobku pomůžete zabránit případným negativním důsledkům na životní prostředí a lidské zdraví, ke
kterým by nevhodnou likvidací tohoto výrobku mohlo dojít.
Symbol na výrobku nebo na dokumentech přiložených k výrobku udává, že tento spotřebič nepatří do domácího odpadu. Spotřebič je
nutné odvézt do sběrného místa pro recyklaci elektrického a elektronického zařízení.
Likvidace musí být provedena v souladu s místními předpisy o ochraně životního prostředí, které se týkají likvidace odpadu.
Podrobnější informace o zpracování, rekuperaci a recyklaci tohoto výrobku zjistíte u příslušného místního úřadu, služby pro likvidaci
domovního odpadu nebo v obchodě, kde jste výrobek zakoupili.
Přístroj byl navržen, testován a vyroben v souladu s:
• Bezpečnost: EN/IEC 60335-1; EN/IEC 60335-2-31, EN/IEC 62233.
• Výkonnost: EN/IEC 61591; ISO 5167-1; ISO 5167-3; ISO 5168; EN/IEC 60704-1; EN/IEC 60704-2-13; EN/IEC 60704-3; ISO 3741; EN
50564; IEC 62301.
• EMC: EN 55014-1; CISPR 14-1; EN 55014-2; CISPR 14-2; EN/IEC 61000-3-2; EN/IEC 61000-3-3.
(Osobitý mezinárodní výbor pro rádiové rušení, pozn. překl)
Doporučení pro správné použití s cílem snížit dopad na životní prostředí:
Zapněte digestoř na minimální rychlost, když začnete s vařením a nechte ji běžet několik minut poté, co jste vaření ukončili. Zvyšte rychlost
pouze v případě nadměrného množství kouře nebo páry a použijte podpornou rychlost (i) jenom v extrémních situacích. Vyměňte uhlíkový filtr
(y), je-li to nutné pro udržování účinnosti snižování zápachu. Vyčistěte tukový filtr (y), je-li to nutné pro udržování jeho účinnosti. Použijte
maximální průměr potrubního systému, jak je uvedeno v tomto návodu, pro optimalizaci účinnosti a minimalizaci hluku.
TECHNICKÉ PORUCHY
Pokud máte dojem, že něco správně nefunguje, dříve než se obrátíte na servisní službu, proveďte následující jednoduchá kontrolní opatření:
• jestliže digestoř nefunguje:
Ověřte si, zda:
- nedošlo k přerušení elektrického proudu.
• jestliže digestoř má nedostatečný výkon:
Ověřte si, zda:
- zvolená rychlost motoru je postačující pro uvolněné množství dýmu a par.
- zda je kuchyně dostatečně větrána, aby v ní bylo možno umístit přívod vzduchu.
- zda filtr s uhlíkem není opotřebován (pokud je digestoř ve filtrující verzi).
• Pokud se digestoř při normálním provozu vypne:
Ověřte si, zda:
- nedošlo k přerušení elektrického proudu.
- zda nezasáhl multipólový jistič
V případě eventuálních technických poruch dříve než se obrátíte na servisní službu, odpojte přístroj alespoň na 5 vteřin z elektrické sítě,
vyjměte zásuvku ze zástrčky a pak ho opět napojte na síť. V případě, že technická porucha trvá, obraťte se na servisní službu.

72
TECHNICKÉ ÚDAJE
Výška (cm)
Šířka (cm)
Hloubka (cm)
Ø pot
rubí odtahu (cm)
62-114
71
-
114
89,8 45,5 15
62-114
71
-
114
59,8 45,5 15
Komponenty, které nejsou součástí vybavení výrobku
Bezpečnostní pokyny, návod k použití, štítek
výrobku a energetické údaje si můžete stáhnout
pomocí:
• naší webové stránky docs.whirlpool.eu
• naskenování QR kódu
• případně kontaktujte náš poprodejní servis
(telefonní číslo najdete v
záručním listě). Při
kontaktování našeho poprodejního servisu prosím
uveďte kódy na identifikačním štítku p
roduktu.

73
DA
GENEREL SIKKERHED
• Før deres foretages nogen form for indgreb i forbindelse med rengøring og vedligeholdelse
skal forbindelsen til strømforsyningen afbrydes ved at trække stikket ud eller ved at slukke
for boligens hovedafbryder.
• For indgreb i forbindelse med installation og vedligeholdelse skal der bruges
arbejdshandsker.
• Apparatet må kun anvendes af børn under 8 år eller af personer med nedsatte fysiske eller
mentale evner, eller som ikke har den nødvendige erfaring og kendskab til det, hvis de er
under opsyn, eller såfremt de har modtaget de nødvendige anvisninger til sikker brug af
apparatet og kender de dermed forbundne risici.
• Det er nødvendigt at holde øje med, at børnene ikke leger med opladeren.
• Rengøring og vedligeholdelse må ikke udføres af børn uden opsyn.
• Lokalet skal være udstyret med tilstrækkelig ventilation, hvis emhætten bruges samtidig
med andre forbrændingsapparatet , der drives af gas eller andre brændstoffer.
• Emhætten skal rengøres med hyppige mellemrum, både indvendigt og udvendigt (MINDST
EN GANG OM MÅNEDEN).
• Overhold under alle omstændigheder anvisningerne i vedligeholdelsesvejledningen.
Manglende overholdelse af emhættens rengøringsforskrifter og af filtrenes udskiftning og
rengøring medfører fare for brand. Det er strengt forbudt at tilberede mad under åben ild
under emhætten.
• Ved udskiftning af pæren må du kun anvendes den type lyspære, der er angivet i afsnittet
om vedligeholdelse/udskiftning af pære i denne manual.
Brug af åben ild er skadeligt for filtrene og kan medføre en brand, og det skal derfor for
enhver pris undgås.
Friturestegning skal udføres under overvågning for at undgå, at olien overophedes og
antændes.
PAS PÅ! Når kogepladen er i brug, kan emhættens tilgængelige dele blive meget varme.
• Apparatet må ikke tilsluttes strømforsyningen, før installationen er helt fuldført.
• Hvad angår de anviste tekniske og sikkerhedsmæssige forholdsregler til udledning af røg, skal du omhyggeligt overholde de lokale
myndigheders forskrifter.
• Den udsugede luft må ikke tilføres en skakt, der bruges til udledning af røg fra forbrændingsapparater, der fungerer med gas eller andre
brændstoffer.
• Du må ikke bruge eller efterlade emhætten uden korrekt monterede pærer for at undgå en risiko for elektrisk stød.
• Brug aldrig emhætten uden en korrekt monteret rist!
• Emhættens overflade må ALDRIG anvendes som afsætningsplade, med mindre dette er udtrykkeligt angivet.
• Brug kun de medfølgende fastspændingsskruer til produktet i forbindelse med installationen eller – såfremt de ikke medfølger – skal du
indkøbe den korrekte type skruer.
• Brug skruer af korrekt længde, som anført i installationsvejledningen.
• I tvivlstilfælde bør du kontakte dit autoriserede servicecenter eller en kvalificeret tekniker.
ADVARSEL!
• Hvis der ikke monteres de skruer og fastspændingsanordninger som angivet i disse anvisninger, kan der opstå risiko for elektriske
problemer.
• Brug ikke sammen med en programmeringsenhed, timer, separat fjernbetjening eller andre enheder, der aktiveres automatisk.
74
Børn under 3 år skal holdes langt væk fra apparatet. Hold apparatet utilgængeligt for børn under 8 år, med mindre de konstant overvåges af
en voksen.
ADVARSEL: Apparatet er ikke beregnet til at blive idriftsat ved hjælp af en ekstern enhed eller et separat fjernbetjeningssystem.
Dette apparat er ikke beregnet til professionel brug. Apparatet må ikke anvendes i det fri.
For at undgå risiko for kvæstelser skal apparatet håndteres og installeres af to eller flere personer.
Installationen, herunder også eventuelle vandforsyningsforbindelser (hvis relevant), og de elektriske tilslutninger, og reparationsarbejde
skal udføres af kvalificeret personale.
Når installationen er færdig, skal emballagen (plastikdele, polystyren osv.) opbevares uden for børns rækkevidde for at undgå kvælningsrisiko.
.
Brug aldrig apparatet, når du er våd eller barfodet.
Brug aldrig damprensningsapparater – risiko for elektrisk stød.
Emballagen er 100% genanvendelig og er markeret med genbrugssymbolet
Emhætten kan have et andet udseende i forhold til modellen på tegninerne i denne vejledning. Vejledningen til brug,
vedligeholdelse og installering er dog uændret.
Overhold venligst alle instruktioner i denne vejledning. Fabrikanten frasiger sig ethvert ansvar for eventuelle fejl, skader eller brande
forårsaget af apparatet, men afledt af manglende overholdelse af instruktionerne i denne vejledning. Emhætten er beregnet til udsugning af
røg og damp fra madlavning, og må kun benyttes til almindelig husholdning.
• Det er vigtigt at opbevare denne vejledning, så man får mulighed for at læse den senere. Ved viseresalg, overdragelse eller flytning skal
man sørge for, at vejledningen følger emhætten.
• Læs instruktionerne omhyggeligt: der findes vigtige oplysninger om installering, brug og sikkerhed.
• Der må ikke udføres elektriske eller mekaniske ændringer på emhætten eller på udslipsrørene.
• Undersøg at ingen komponenter er beskadiget, før apparatet installeres. Kontakt forhandleren og undlad at fortsætte med installeringen,
hvis der påvises beskadigelser.
Minimumsafstanden mellem kogegrejets støtteoverflade på komfuret og den nederste del af emhætten må ikke være under 50cm ved
elektriske kogeplader, og ikke under 65cm ved gasblus eller komfurer med både gasblus og elektriske kogeplader.
Hvis gaskomfurets vejledning angiver en større afstand, skal dette overholdes.
ELEKTRISK TILSLUTNING
Netspændingen skal svare til spændingen vist på typeskiltet internt i emhætten. Hvis emhætten er udstyret med et stik, skal emhætten
tilsluttes en let tilgængelig stikkontakt, der er i overensstemmelse med de gældende standarder. Stikkontakten skal også være let tilgængelig
efter installeringen. Hvis emhætten ikke er udstyret med et stik (direkte tilslutning til elnettet), eller hvis stikket ikke findes i et område, der også
er let tilgængeligt efter installeringen, skal der monteres en topolet afbryderkontakt i overensstemmelse med standarderne, der sørger for fuld
afbrydelse fra elnettet i tilfælde af forhold i overspændingskategori III, og i overensstemmelse med reglerne for elektriske installationer.
OBS!
Undersøg altid, at netkablet er blevet monteret rigtigt, før emhættens kredsløb tilsluttes forsyningsnettet og der udføres kontrol af korrekt
funktion.
Hvis kablet ikke er udstyret med et stik,skal ledningerne forbindes i overensstemmelse med den følgende tabel:
Ledningsnettets spænding og frekvens
Ledni
ngsforbindelse
Se den angivne værdi på etiketten med tekniske data inde i
emhætten.
: gul/grøn
N : blå
L
: brun
Udskiftning af forsyningskabel
Emhætten er udstyret med en speciel forsyningsledning; hvis denne ledning beskadiges, skal den bestilles hos den tekniske service.
UDLEDNING AF LUFT

75
(til versioner med udsugningi)
Tilslut emhætten til aftræksrør og aftrækshullet i væggen, som skal have en diameter, der passer til luftudsugningen (studsflange).
Hvis rør og hul har en mindre diameter, forringes udsugningskapaciteten og støjen øges betydeligt.
Producenten fralægger sig ethvert ansvar i forbindelse hermed.
! Benyt et rør, der er så kort som muligt.
! Benyt et rør, der har så få kurver som muligt (max. vinkel på kurven: 90°).
! Undgå drastiske ændringer i rørets tværsnit.
! Fabrikanten fralægger sig ethvert ansvar, hvis disse regler ikke overholdes.
FILTRERENDE ELLER SUGENDE ?
! Emhætten er parat til brug i den sugende udgave.
For at benytte emhætten i den filtrerende udgave, skal det specielle SÆT MED UDSTYR installeres.
Undersøg på de første sider i denne vejledning, om SÆTTET MED UDSTYR allerede er leveret med emhætten, eller om det skal købes
separat.
Bemærk: Hvis sættet leveres med emhætten, er det supplerende filtreringssystem baseret på aktivt kul eventuelt allerede installeret i
emhætten.
Oplysningerne til forvandling af emhætten fra den sugende udgave til den filtrerende udgave findes allerede i denne vejledning.
Sugende udgave
Dampen ledes udenfor vha. et aftræksrør fastgjort til samleflangen.
OBS!
Udledningsrøret leveres ikke, og skal købes.
Aftræksrørets diameter skal svare til diameteren på forbindelsesringen.
OBS!
Hvis emhætten er udstyret med kulfiltre, skal disse filtre fjernes.
Filtrerende udgave
Den indsugede luft affedtes og lugten fjernes, før luften sendes tilbage i lokalet. For at benytte emhætten i denne udgave skal der monteres et
supplerende filtreringssystem baseret på aktivt kul.
BETJENINGSANORDNINGER
Emhætten er udstyret med et betjeningspanel med mulighed for regulering af sugestyrken og lys til oplysning af kogeområdet.
T1. Ventilatormotor OFF / Reducer hastighed
T2. Ventilatormotor ON / Øg hastighed
T3. “POWER BOOST“ funktion
T4. 6th sense funktion (AUTO tilstand) ON/ OFF
T5. Betjening af “ZEN tilstand”
T6. Smøre-/kulfilter alarm/nulstil
T7. Hovedlys ON / OFF
FORSIGTIG! Denne emhætte har et automatisk betjeningssystem (se nedenfor “T4. 6th sense funktion (AUTO tilstand) ON/OFF”).
Kalibrering sker automatisk hver gang emhætten genforbindes til strømforsyningen (f.eks.: den første gang den installeres efter en strømsvigt).
Den kan også udføres manuelt (se afsnit “Sensor opsætning”). Under kalibreringen, som varer 5 minutter, vil T4 blinke og lyset kan
anvendes.

76
T1. VENTILATORMOTOR OFF / REDUCER HASTIGHED
Tryk for at reducere hastigheden og sluk for udsugningsmotoren. Tryk og hold for at slukke direkte for udsugningsmotoren.
T2. VENTILATORMOTOR ON / ØG HASTIGHED
Tryk for at tænde for udsugningsmotoren og øge hastigheden. Tryk og hold for at indstille den 3. hastighed direkte.
T3. “POWER BOOST” FUNKTION
Tryk T3 for at aktivere “POWER BOOST 1” intensiv udsugningshastighed (tidsstyret).
Bemærk: Emhætten vil returnere til den 3. hastighed efter fem minutter.
Med udsugningsmotoren tændt i “POWER BOOST1”, skal du igen trykke på T3 for at aktivere “POWER BOOST 2” med yderligere intensiv
udsugningshastighed (tidsstyret).
Bemærk: Emhætten vil returnere til den 3. hastighed efter fem minutter.
Bemærk: Tryk igen på T3, inden for fem minutter vil emhætten returnere til “POWER BOOST 1”
T4. 6TH SENSE FUNKTION (AUTO TILSTAND) ON/OFF
Emhætten angiver automatisk udsugningshastigheden, hvis sensoren i emhætten registrerer en ændring i de omkringliggende forhold.
Bemærk: for at sørge for at denne funktion anvendes korrekt, skal man først konfigurere sensoren (se “Sensor opsætning” nedenfor).
Bemærk: Hvis du ændrer andre funktioner der kontrollerer hastigheden, vil "6th sense" funktionen slukke.
Sensor opsætning
Dette kan udføres når emhætten er OFF. Under normale omkringliggende forhold skal du trykke på T4 i 5 sek., derefter vil T4 blinke i 5
minutter for at indikere at emhætten udfører en sensorkalibrering, derefter slukker den, for at indikere at kalibreringen er afsluttet.
Indstilling for kogeplader: Tryk og hold T1 og T2 på samme tid.
Begge vil lyse for at indikere, at emhætten er klar til at modtage parameterkalibrering for kogepladerne.
Tryk på T1 for at vælge gas kogesektion, derefter begynder (T1 at blinke i 3 sek. for at indikere, at emhættens parametre er indstillet til gas
kogesektion).
Tryk på T2 for at vælge induktions-kogesektion, derefter begynder (T2 at blinke i 3 sek. for at indikere, at emhættens parametre er indstillet til
induktions-kogesektion).
T5. BETJENING AF “ZEN TILSTAND”
Tryk for at aktivere eller inaktivere tilstanden "ZEN" udsugning.
Denne funktion giver mulighed for at aktivere en udsugningshastighed med den perfekte balance mellem støjsvaghed og udsugningens
styrke.
T6. SMØRE-/KULFILTER ALARM/NULSTIL
Ved regelmæssige intervaller signalerer emhætten behovet for at vedligeholde filteret.
Bemærk: Indikatorerne virker kun, når emhætten er tændt.
T6 tændt: Udfør vedligeholdelsen af fedtfilteret.
T6 blinker: Udfør vedligeholdelse af kulfilteret.
Nulstilling af filtermætningsindikatorer:
Bemærk: Dette skal gøres for tændt emhætte.
Tryk og hold T6
Bemærk: T6 og emhætten slukker for at indikere, at nulstilling af alarmen er udført.
Nulstillingen og smørefilter og kulfilter udføres via den samme tast.
Hvis begge filteralarmer er aktive, vil nulstillingsproceduren nulstille tælleren, en efter en, med prioritet for kulfilteret.
Aktivering af kulfilterets mætningsindikator
Bemærk: Dette skal gøres for slukket udsugningsmotor.
Denne indikator er sædvanligvis deaktiveret - tryk og hold T3 og T7 på samme tid, for at aktivere funktionen: Begge vil lyse for at indikere
aktivering.
For at deaktivere funktionen, trykkes og holdes de samme knapper igen: Begge vil blinke kortvarigt, og derefter slukke, for at indikere
deaktivering.
T7. HOVEDLYS ON/OFF
Tryk, for at tænde eller slukke for arbejdslyset.
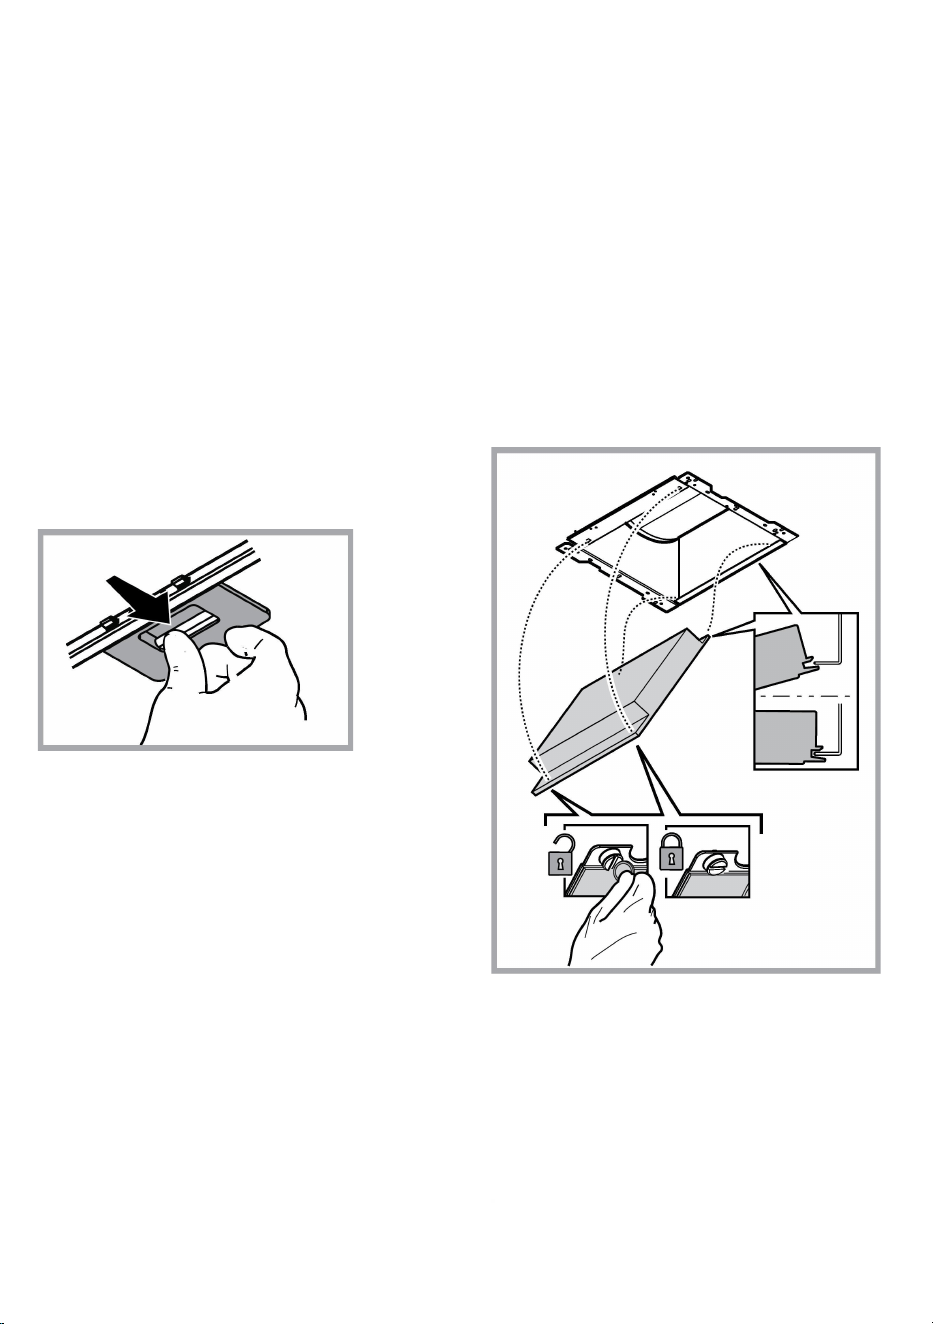
77
VEDLIGEHOLDELSE
Rengøring
Ved rengøring må der UDELUKKENDE anvendes en klud fugtet
med neutrale, milde rengøringsmidler i flydende form. ANVEND
IKKE VÆRKTØJ ELLER ANDET UDSTYR TIL RENGØRING.
Undgå brug af produkter indeholdende slibemidler BENYT
ALDRIG SPRIT!
Vedligeholdelse af fedtfiltre
Tilbageholder de fedtpartikler, der dannes under tilberedning
af mad.
Fedtfilteret skal rengøres med milde vaskemidler en gang om
måneden (eller når signaleringssystemet for filtermætning angiver
behovet – hvis denne funktion findes på den købte model); filteret
kan også vaskes i opvaskemaskine ved lave temperaturer og med
en kort opvaskecyklus.
Ved vask i opvaskemaskinen kan metal-fedtfilteret blive misfarvet,
men dette vil ikke have negativ indflydelse på dets filtrerende
egenskaber.
Træk i fjederhåndtaget for at afmontere fedtfilteret.
Vedligeholdelse af kulfilter
Filteret opfanger lugt fra madlavning.
Kulfilteret mættes efter længere tids brug alt efter typen af komfuret
og hyppigheden for rengøring af fedtfilteret. Filterpatronen skal dog
under alle omstændigheder skiftes hvert fjerde måned (eller når
indikatoren for mætning af filteret angiver det, hvis en sådan
indikator findes på modellen).
Kulfilteret kan IKKE vaskes eller genanvendes.
Montering
Fastgør først filteret med aktivt kul til emhættens metalflap bagpå,
og derefter foran vha. de to runde håndtag.
Afmontering
Fjern filteret med aktivt kul ved at dreje de runde håndtag, der
fastgør til emhætten, i et omfang på 90°.
Udskiftning af pærer
Emhætten er udstyret med et belysningssystem baseret på
lysdiode-teknologi.
Lysdioderne sikrer optimal belysning, holdbarhed op til 10 gange
længere end almindelige pærer, og de giver mulighed for at spare
90% elektricitet.
Til udskiftning af lamperne, ret henvendelse til det godkendte
reservedelscenter.
78
BORTSKAFFELSE
Dette apparat er mærket i overensstemmelse med det Europæiske Direktiv 2012/19/EC, Waste Electrical and Electronic Equipment (WEEE).
Elektrisk og elektronisk udstyr indeholder materiale, komponenter og stoffer, der kan være skadelige for menneskers sundhed og for miljøet,
hvis kasseret elektrisk og elektronisk udstyr ikke håndteres korrekt.
Elektrisk og elektronisk udstyr er mærket med nedenstående overkrydsede skraldespand . Den symboliserer, at elektrisk og elektronisk
udstyr ikke må bortskaffes sammen med usorteret husholdningsaffald, men indsamles særskilt.
Alle kommuner har etableret indsamlingsordninger, hvor elektrisk og elektronisk udstyr gratis kan afleveres af borgerne på genbrugsstationer
og andre indsamlingssteder eller bliver afhentet direkte fra husholdningerne. Nærmere information kan fås hos kommunens tekniske
forvaltning.
Produktet er designet, testet og produceret i henhold til:
• Sikkerhed: EN/IEC 60335-1; EN/IEC 60335-2-31, EN/IEC 62233.
• Kapacitet: EN/IEC 61591; ISO 5167-1; ISO 5167-3; ISO 5168; EN/IEC 60704-1; EN/IEC 60704-2-13; EN/IEC 60704-3; ISO 3741; EN
50564; IEC 62301.
• EMC: EN 55014-1; CISPR 14-1; EN 55014-2; CISPR 14-2; EN/IEC 61000-3-2; EN/IEC 61000-3-3. Forslag til korrekt anvendelse til
reducering af miljøbelastning: Indstil ON på emhættens laveste hastighed, når du begynder at lave mad og sluk den først et par minutter efter
endt madlavning. Forhøj kun hastigheden ved meget røg og damp. Anvend kun boost hastigheden i tilfælde, hvor det er nødvendigt. Udskift
kulfilteret/kulfiltrene, når det er nødvendigt for at bibeholde udsugningseffektiviteten. Rens fedtfilteret/fedtfiltrene, når det er nødvendigt for at
bibeholde filtereffektiviteten. Anvend det største kabelsystemdiameter til optimering af effektiviteten og til minimering af støjen.
FUNKTIONSFEJL
Hvis der opstår funktionsfejl, bør man foretage nedenstående kontrol før man ringer til Servicecenteret.
• Hvis emhætten ikke fungerer:
Kontroller følgende:
- at der ikke er strømsvigt.
- at der er valgt en hastighed.
• Hvis emhætten ikke renser luften korrekt:
Kontroller følgende:
- at den valgte motorhastighed er tilstrækkelig til mængden af røg og damp.
- at køkkenet er korrekt ventileret af hensyn til luftindtaget.
- at kulfilteret ikke er slidt (emhætter i filtrerende udgaver).
• Hvis emhætten slukkes under normal funktion:
Kontroller følgende:
- at der ikke er strømsvigt.
- om den flerpolede afbryderkontakt har grebet ind.
Hvis der opstår funktionsfejl, bør man inden henvendelse til Servicecenteret, afbryde emhætten fra elforsyningen i mindst 5 sekunder ved at
trække stikket ud, og derefter tilslutte emhætten igen. Hvis funktionsfejlen stadig er til stede bedes man kontakte Servicecenteret.

79
TEKNISKE DATA
Højde (cm)
Bredde (cm)
Dybde (cm)
Ø på udsugningsrør (cm)
62-114
71
-
114
89,8 45,5 15
62-114
71
-
114
59,8 45,5 15
Komponenter der ikke leveres med emhætten
Du kan downloade Sikkerhedsanvisningerne,
Brugsvejledningen, Databladet og
Energidataene, ved at:
• Besøge vores website docs.whirlpool.eu
• Ved hjælp af QR-koden
• Eller som alternativ
kontakte vores
serviceafdeling
(Telefonnummeret findes
i
garantihæftet). Når du kontakter vores
serviceafdeling, bedes du angive koderne på dit
produkts identifikationsskilt.

80
FI
YLEINEN TURVALLISUUS
• Ennen minkään asennustoimenpiteen aloittamista laite tulee kytkeä irti sähköverkosta
irrottamalla liitäntäjohto tai katkaisemalla virta huoneiston pääkytkimestä.
• Käytä kaikkien asennus- ja huoltotöiden aikana työkäsineitä.
• Yli 8-vuotiaat lapset sekä henkilöt, joiden fyysinen, aistien tai mielen terveys on heikentynyt
tai joilla ei ole tarpeellista kokemusta ja tietoa, saavat käyttää tätä laitetta, jos käyttöä
valvotaan tai jos heille on annettu laitteen turvallista käyttöä koskevat ohjeet ja he
ymmärtävät mahdolliset vaarat.
• Valvo, että lapset eivät pääse leikkimään laitteella.
• Lapset eivät saa puhdistaa laitetta tai tehdä kunnossapitotoimenpiteitä ilman valvontaa.
• Huoneisto on aina tuuletettava hyvin, kun tuuletinta käytetään yhtäaikaisesti kaasulla tai
muilla polttoaineilla toimivien laitteiden kanssa.
• Tuuletin on puhdistettava säännöllisesti sisä- ja ulkopuolelta (VÄHINTÄÄN KERRAN
KUUKAUDESSA), noudata kuitenkin tämän käyttöohjeen neuvoja.
• Tuulettimen puhdistusta ja suodattimien vaihtoa ja puhdistusta koskevien määräysten
noudattamatta jättäminen voi aiheuttaa tulipalovaaran.
• Tuulettimen alla liekittäminen on ehdottomasti kielletty.
• Käytä ainoastaan lamppujen huolto/vaihto-ohjeessa ilmoitettuja vaihtolamppuja.
Avotulen käyttö vahingoittaa suodattimia ja voi aiheuttaa tulipalon, siksi sitä on vältettävä
joka tapauksessa.
Älä jätä paistumassa olevaa ruokaa ilman valvontaa, jotta kuumentunut öljy ei syty
palamaan.
HUOMIO: Liesituulettimen esillä olevat osat voivat kuumentua keittotason käytön aikana.
• Älä yhdistä laitetta sähköverkkoon ennenkuin asennus on täysin valmis.
• Noudata huolellisesti paikallisten viranomaisten antamia savunpoiston teknisiä ja turvatoimenpiteitä koskevia määräyksiä.
• Poistoilmaa ei saa johtaa kaasulla tai muilla polttoaineilla toimivien laitteiden savunpoistohormiin.
• Älä käytä liesituuletinta, jos lamppu ei ole paikallaan tai jos lamppuja ei ole asennettu oikein, sillä seurauksena voi olla sähköisku.
• Älä koskaan käytä tuuletinta, jos sen verkkoa ei ole asennettu oikealla tavalla!
• Tuuletinta ei saa KOSKAAN käyttää tukipintana, jollei niin ole erikseen mainittu.
• Käytä vain laitteen mukana tulevia asennukseen tarkoitettuja kiinnitysruuveja, tai hanki oikeanlaisia ruuveja jos ne eivät kuulu varustukseen.
• Käytä Asennusohjeen mukaisia oikean pituisia ruuveja.
• Epäselvissä tapauksissa ota yhteys tekniseen tukeen tai vastaavaan asiantuntijaan.
VAROITUS!
• Kiinnitysruuvien ja –laitteiden ohjeiden vastainen asennus voi vaikuttaa sähköturvallisuuteen.
• Älä käytä ohjelmointilaitteen, ajastimen, erillisen kaukosäätimen tai minkä tahansa laitteen kanssa, joka aktivoituu automaattisesti.
Pidä alle 3-vuotiaita lapsia loitolla laitteesta. Pidä laitetta pois alle 8-vuotiaiden lasten ulottuvilta ellei heidän toimintaansa valvo jatkuvasti
aikuinen henkilö.
VAROITUS: laitetta ei ole tarkoitettu otettavaksi käyttöön ulkoisen laitteen avulla tai käyttämällä erillistä kauko-ohjausjärjestelmää.
Tämä laite ei ole tarkoitettu ammattimaiseen käyttöön. Älä käytä laitetta ulkona.
Loukkaantumista koskevien vaarojen välttämiseksi, laitetta on liikutettava ja se on asennettava kahden tai useamman henkilön toimesta.
Asennus, joka koskee myös mahdollisia vesijohtoliitoksia (mikäli kuuluu asennukseen) ja sähköliitäntöjä sekä korjaustoimenpiteet on
suoritettava pätevän henkilöstön toimesta.
81
Kun asennus on valmis, säilytä pakkausmateriaaleja (muovi- ja polystyreeniosat tms.) pois lasten ulottuvilta tukehtumisvaaran välttämiseksi. .
Älä käytä laitetta kun olet märkä tai paljain jaloin.
Älä koskaan käytä höyrypuhdistimia - sähköiskun vaara.
Pakkausmateriaali on 100 % kierrätettävä ja se on merkitty kierrätysmerkillä
Tuuletin voi olla ulkonäöltään erilainen kuin käyttöohjeen kuvissa näkyvä malli. Käyttöohjeet, asennus ja huolto ovat kuitenkin
muuttumattomat.
Noudata käyttöohjetta huolellisesti. Valmistaja ei vastaa käyttöohjeen noudattamattajättämisestä aiheutuneista haitoista, vahingoista tai
tulipaloista. Tuuletin imee savun ja höyryn ja se on tarkoitettu ainoastaan kotitalouskäyttöön.
• On tärkeää säilyttää ohjekirja tulevaa tarvetta varten.
Mikäli laite myydään tai siirretään uudelle omistajalle tai jos laitteen käyttäjä muuttaa, on varmistettava että käyttöohje jää uuden käyttäjän
saataville.
• Lue käyttöohjeet huolellisesti: ne sisältävät tärkeää tietoa laitteen asennuksesta, käytöstä ja turvallisuudesta.
• Älä tee muutoksia laitteen sähköliitäntöihin, mekaanisiin osiin tai poistoputkiin.
• Tarkista ennen laitteen asennusta, että kaikki osat ovat vahingoittumattomia. Jos laitteessa on viallisia osia, ota yhteys jälleenmyyjään ja
keskeytä asennus.
Lieden keittotason tukipinnan ja keittiötuulettimen alimman osan välinen minimietäisyys on oltava vähintään 50cm sähköliesien osalta ja 65cm
kaasu- ja sekaliesien osalta.
Jos kaasulieden käyttöohjeissa vaaditaan suurempi etäisyys, on se otettava huomioon.
SÄHKÖLIITÄNTÄ
Verkon jännitteen on oltava sama kuin tuulettimen sisäpuolella olevassa tyyppikilvessä ilmoitettu jännite. Jos laitteessa on pistoke, liitä tuuletin
voimassaolevien normien mukaiseen pistorasiaan, joka sijaitsee sellaisessa paikassa, että siihen pääsee käsiksi myös asennuksen jälkeen.
Jos laitteessa ei ole pistoketta (suora liitos verkkoon) tai pistoke ei ole sellaisessa paikassa että siihen pääsee käsiksi myös asennuksen
jälkeen, käytä normien mukaista kaksinapaista katkaisijaa, jolla varmistetaan että laite saadaan kokonaan irti sähköverkosta, jos ylijännite
kategoria on III, asennussääntöjen mukaisesti.
HUOMIO!
Tarkista aina, että verkkokaapeli on asennettu oikealla tavalla ennen kuin yhdistät tuulettimen sähköverkkoon ja tarkistat että se toimii oikein.
Jos kaapelissa ei ole pistoketta,kytke johdot seuraavan taulukon mukaisesti:
Verkon jännite
ja taajuus
Johtojen kytkentä
Viittaa liesituulettimen sisällä olevaan ominaisuudet sisältävään
tarraan.
: keltainen/vihreä
N : sininen
L
: ruskea
Virtajohdon vaihto
Tuulettimessa on erityinen sähköjohto; jos johto rikkoutuu, pyydä uusi johto tekniseltä tuelta.
ILMANPOISTO
(imukupuversiossa)
Liitä liesituuletin poistoputkiin sekä seinän poistoaukkoihin, joiden halkaisija on yhtä suuri kuin ilman ulostuloaukossa (liitäntälaipassa).
Halkaisijaltaan pienempien poistoputkien ja seinän poistoaukkojen käyttö aiheuttaa imutehon pienentymistä ja meluisuuden huomattavan
lisäyksen.
Kieltäydytään siten kaikesta vastuusta kyseisessä tapauksessa.
! Käytä mahdollisimman lyhyttä putkea.
! Käytä putkea, jossa on mahdollisimman vähän mutkia ( max taivutus: 90°)
! Älä tee suuria muutoksia putkiston alueella.
! Valmistaja ei ole vastuussa käyttöohjeiden vastaisesta käytöstä

82
SUODATIN- VAI IMUKUPUVERSIO?
! Tuulettimenne on valmis käytettäväksi imukupuversiona.
Jos tuuletinta käytetään suodatinversiona, on asennettava tarvittavat LISÄVARUSTEET.
Tarkistakaa käyttöohjeen ensimmäisiltä sivuilta sisältyvätkö LISÄVARUSTEET toimitukseen vai onko ne ostettava erikseen.
Huomio: Jos aktiivihiilisuodatin sisältyy toimitukseen lisävarusteena, on mahdollista että se on jo asennettu tuulettimeen.
Le informazioni per la trasformazione della cappa da versione aspirante a versione filtrante sono già contenute in questo manuale.
Ohjeet tuulettimen vaihtamiseksi imukupuversiosta suodatinversioksi sisältyvät jo tähän käyttöohjeeseen
Imukupuversio
Höyry poistuu ulos liitoslaippaan kiinnitetyn poistoputken kautta.
HUOMIO!
Poistoputki ei kuulu varustukseen ja se on ostettava erikseen.
Poistoputken on oltava halkaisijaltaan samankokoinen kuin liitosrengas.
HUOMIO!
Jos tuulettimessa on hiilisuodattimet, ne on irrotettava.
Suodatinversio
Suodatetusta ilmasta poistuu rasva ja pahat hajut ennen kuin se palautuu takaisin huoneistoon. Kun tuuletinta käytetään tässä
toimintamallissa, siihen on asennettava aktiivihiili lisäsuodatinjärjestelmä.
OHJAIMET
Liesituuletin on varustettu ohjauspaneelilla, josta voidaan säätää imun nopeuksia ja kytkeä valo, joka valaisee keittotasoa.
T1. Tuulettimen moottori POIS PÄÄLTÄ / vähennä nopeutta
T2. Tuulettimen moottori PÄÄLLE / kasvata nopeutta
T3. “TEHON LISÄYS “ -TOIMINTO
T4. 6th sense -toiminto (AUTO-tila) PÄÄLLÄ/POIS
T5. ”ZEN” -toiminnon käyttö
T6. Rasva-/hiilisuodattimen hälytys/nollaus
T7. Päävalo PÄÄLLÄ / POIS PÄÄLTÄ
HUOMIO! Tässä liesituulettimessa on automaattinen käyttöjärjestelmä (katso alla oleva kohta “T4. 6th sense -toiminto (AUTO-tila)
PÄÄLLÄ/ POIS”).
Kalibrointi tapahtuu automaattisesti jokaisella kerralla, kun liesituuletin yhdistetään uudelleen sähköverkkoon (esim.: ensimmäisen
asennuskerran ja sähkökatkon jälkeen). Toimenpide voidaan suorittaa myös manuaalisesti (katso kappale “Anturin asettaminen”). 5
minuuttia kestävän kalibroinnin aikana T4 vilkkuu ja valoja voidaan käyttää.
T1. TUULETTIMEN MOOTTORI POIS PÄÄLTÄ / VÄHENNÄ NOPEUTTA
Tällä painikkeella vähennetään poistomoottorin nopeutta ja kytketään se POIS PÄÄLTÄ. Voit kytkeä poistomoottorin suoraan POIS PÄÄLTÄ
painamalla painiketta ja pitämällä sitä painettuna.
T2. TUULETTIMEN MOOTTORI PÄÄLLE / KASVATA NOPEUTTA
Tällä painikkeella kasvatetaan poistomoottorin nopeutta ja kytketään se PÄÄLLE. Voit asettaa suoraan nopeuden 3 painamalla painiketta ja
pitämällä sitä painettuna.

83
T3. “TEHON LISÄYS “ -TOIMINTO
Painamalla T3-painiketta aktivoit “TEHON LISÄYS 1” tehostetun poistonopeuden (aikasäädelty).
Huomaa: liesituuletin palauttaa nopeuden 3. nopeudelle viiden minuutin kuluttua.
Kun poistomoottori on käynnissä “TEHON LISÄYS 1” -toiminnolla, T3- painikkeen painaminen uudelleen aktivoi “TEHON LISÄYS 2” lisätyn
tehopoistonopeuden (aikasäädelty).
Huomaa: liesituuletin palauttaa nopeuden 3. nopeudelle viiden minuutin kuluttua.
Huomaa: jos painat uudelleen T3, näiden viiden minuutin aikana, liesituuletin palaa toimimaan “TEHON LISÄYS 1” -toiminnolla.
T4. 6TH SENSE -TOIMINTO (AUTO-TILA) PÄÄLLÄ/POIS
Liesituuletin asettaa poistonopeuden automaattisesti, jos liesituulettimen anturi havaitsee muutoksia ympäristöolosuhteissa.
Huomaa: jotta voit varmistaa, että tämä toiminto toimii oikein, määritä ensin anturi (katso alla oleva kohta "Anturin asettaminen").
Huomaa: Jos muutat mitään muita nopeutta ohjaavia toimintoja, "6th sense" -toiminto kytkeytyy pois päältä.
Anturin asettaminen
Tämä voidaan tehdä kun liesituuletin on POIS päältä. Paina normaaleissa ympäristöolosuhteissa T4-painiketta 5 sekunnin ajan, T4 ilmoittaa
anturin kalibroimisesta vilkkumalla 5 minuutin ajan ja sammuu sitten, kun kalibrointi on päättynyt.
Keittolevyn asettaminen: Paina T1- ja T2-painikkeita samanaikaisesti ja pidä niitä painettuina. Molemmat syttyvät ilmaistakseen, että
liesituuletin on valmis hyväksymään keittolevyn parametrien kalibroinnin.
Valitse kaasuliesi painamalla T1 . (T1 vilkkuu 3 sekuntia ilmaistakseen, että liesituulettimen parametrit on asetettu kaasuliedelle).
Valitse induktioliesi painamalla T2 . (T2 vilkkuu 3 sekuntia ilmaistakseen, että liesituulettimen parametrit on asetettu induktioliedelle).
T5. “ZEN”-TOIMINNON KÄYTTÖ
"ZEN" -poistotapa laitetaan päälle tai pois päältä painamalla tätä painiketta.
Tämä toiminto mahdollistaa imunopeuden käynnistämisen siten, että hiljaisuus ja ilmanpoiston tehokkuus pysyvät ihanteellisessa
tasapainossa.
T6. RASVA-/HIILISUODATTIMEN HÄLYTYS/NOLLAUS
Liesituuletin ilmoittaa säännöllisin väliajoin, että on tullut aika suorittaa suodattimen huolto.
Huomaa: Ilmaisimet toimivat ainoastaan liesituulettimen ollessa päällä.
T6 palaa: Suorita rasvasuodattimen huolto.
T6 vilkkuu: suorita hiilisuodattimen huolto.
Suodattimen täyttymisen ilmaisimien palauttaminen normaalitilaan:
Huomaa: Tämä on tehtävä liesituulettimen ollessa päällä.
Paina T6-painiketta ja pidä sitä painettuna
Huomaa: T6 ja liesituuletin sammuvat, mikä tarkoittaa, että hälytyksen nollaus on suoritettu.
Rasva- ja hiilisuodattimen nollaus suoritetaan samalla näppäimellä. Jos molempien suodatinten hälytykset ovat aktiivisina, nollaustoiminto
nollaa laskurin yksi kerrallaan ja prioriteetti on hiilisuodattimella.
Hiilisuodattimen täyttymisen ilmaisimen aktivoiminen
Huomaa: Tämä on tehtävä poistomoottorin ollessa poissa päältä.
Tämä ilmaisin on yleensä poissa päältä – paina T3- ja T7-painikkeita samanaikaisesti, jos haluat käynnistää toiminnon: Molempiin syttyy valo,
joka ilmoittaa aktivoinnin tapahtumisesta.
Toiminto poistetaan käytöstä painamalla samoja painikkeita uudelleen:
Molemmat vilkkuvat lyhyesti ja sammuvat sitten; tämä on merkkinä toiminnon käytöstä sulkemisesta.
T7. PÄÄVALO PÄÄLLÄ / POIS PÄÄLTÄ
Lieden valot sytytetään ja sammutetaan katkaisinta painamalla.
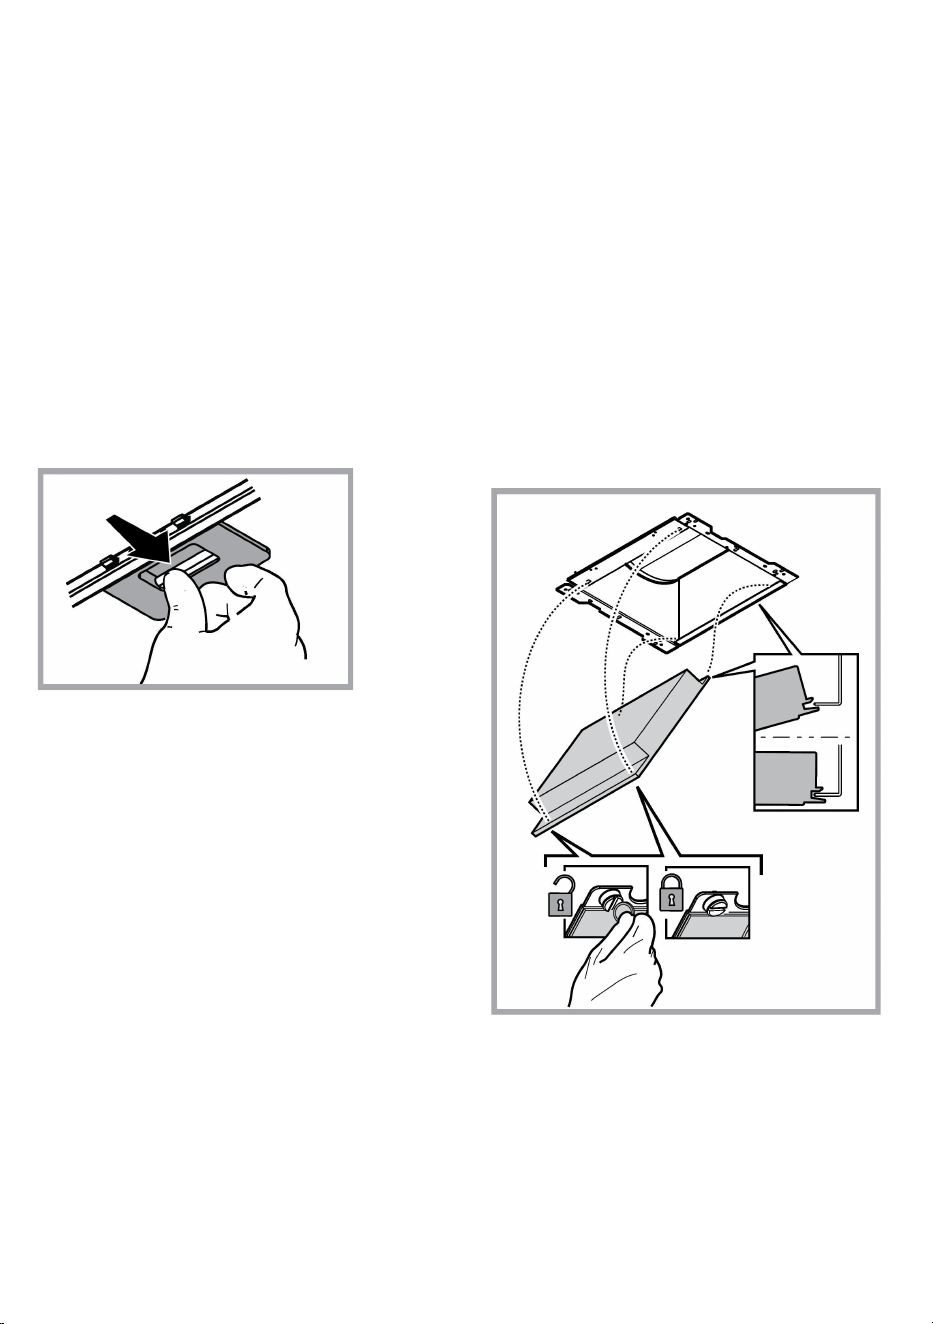
84
HUOLTO
Puhdistus
Puhdistusta varten käytä YKSINOMAAN neutraaleihin
pesuaineisiin kostutettua liinaa. ÄLÄ KÄYTÄ PUHDISTUKSESSA
TYÖKALUJA TAI VÄLINEITÄ!
Vältä hankaavien tuotteiden käyttöä. ÄLÄ KÄYTÄ ALKOHOLIA!
Rasvasuodatin
Se pidättää ruuanlaitosta syntyvät rasvahiukkaset.
Rasvasuodatin on puhdistettava kerran kuukaudessa ( tai kun
suodattimien kyllästyksen merkkijärjestelmä ilmoittaa puhdistuksen
tarpeesta – jos laitteessa on tämä järjestelmä), miedolla
pesuaineella, käsin tai astianpesukoneessa alhaisella lämpötilalla
ja lyhyellä pesuohjelmalla.
Metallinen rasvasuodatin voi haalistua astianpesukoneessa, mutta
tämä ei vaikuta sen suodatustehoon millään tavalla.
Rasvasuodatin irrotetaan vetämällä jousikahvasta.
Hiilisuodattimen huolto
Imee ruoanlaitosta aiheutuvat epämiellyttävät hajut.
Hiilisuodatin kyllästyy ajanjaksossa, jonka pituus riippuu
keittotason käyttötavoista ja rasvasuodattimen puhdistuksen
säännöllisyydestä. Joka tapauksessa kasetti tulee vaihtaa joka
neljäs kuukausi (tai kun suodattimien kyllästymistä osoittava
järjestelmä – mikäli olemassa omistettavassa mallissa – osoittaa
vaihdon tarpeellisuuden)
Sitä EI voi pestä eikä käyttää uudestaan
Asennus
Kiinnitä aktiivihiilisuodatin ensin takaosastaan tuulettimen
metalliosaan ja sen jälkeen etupuolelta kahdella nupilla.
Purkaminen
Irrota aktiivihiilisuodatin kiertämällä 90° nuppeja, joilla se on
kiinnitetty tuulettimeen.
Lamppujen vaihto
Tuulettimessa on LED teknologiaan perustuva
valaistusjärjestelmä.
LED valot takaavat parhaan mahdollisen valaistuksen, lamppujen
kesto on 10 kertaa parempi kuin perinteisten lamppujen ja niiden
avulla säästetään 90% energiaa.
Jos lamppu on vaihdettava, ota yhteys valtuutettuun
huoltoliikkeeseen.
85
HÄVITTÄMINEN
Tämä laite on valmistettu EU-direktiivin 2012/19/EC, Waste Electrical and Electronic Equipment (WEEE) mukaisesti.Hävittämällä laitteen
asianmukaisesti käyttäjä voi ehkäistä mahdolliset ympräristölle ja ihmisten terveydelle haitalliset seuraukset
Tuotteesta tai tuoteasiakirjoista löytyvä merkki ilmoittaa, että tuotetta ei saa käsitellä talousjätteenä ja että se on toimitettava sähkö- ja
elektronisten laitteiden kierrätyspisteeseen. Laite on hävitettävä paikallisten jätteenkäsittelysäännösten mukaisesti. Jos tarvitset lisätietoja
laitteen käsittelystä, palautuksesta ja kierrätyksestä, ota yhteys paikalliseen viranomaiseen, jätehuoltoon tai liikkeeseen josta tuote on ostettu.
Laitteisto suunniteltu, testattu ja valmistettu seuraavien standardien mukaisesti:
• Turvallisuus: EN/IEC 60335-1; EN/IEC 60335-2-31, EN/IEC 62233.
• Suorituskyky: EN/IEC 61591; ISO 5167-1; ISO 5167-3; ISO 5168; EN/IEC 60704-1; EN/IEC 60704-2-13; EN/IEC 60704-3; ISO 3741; EN
50564; IEC 62301.
• EMC: EN 55014-1; CISPR 14-1; EN 55014-2; CISPR 14-2; EN/IEC 61000-3-2; EN/IEC 61000-3-3. Suositukset oikeaa käyttöä varten
ympäristövaikutusten vähentämiseksi: Kytke liesikupu päälle miniminopeudelle, kun aloitat kypsentämisen, ja pidä sitä päällä muutama
minuutti kypsennyksen jälkeen. Nosta nopeutta vain, jos tilassa on runsaasti savua tai höyryä, ja käytä tehostettua/-ja nopeutta/nopeuksia vain
erityistarpeessa. Vaihda aktiivihiilisuodatin/-suodattimet, kun haluat säilyttää hyvän hajujenpoistotehokkuuden. Puhdista rasvasuodatin/-
suodattimet, kun haluat säilyttää hyvän rasvansuodatustehokkuuden. Käytä tässä oppaassa annetun kanavointijärjestelmän
maksimiläpimittaa tehokkuuden parantamiseksi ja melun vähentämiseksi.
TOIMINTAHÄIRIÖT
Jos liesituuletin ei tunnu toimivan, tarkista seuraavat
seikat ennen kuin soitat huoltopalveluun:
• Jos tuuletin ei toimi:
Tarkista että:
sähkönsyöttö ei ole katkennut
on valittu tietty nopeus
• Jos liesituuletin vetää huonosti:
Tarkista että:
Valittu moottorin nopeus on riittävä poistamaan kertyneen savun ja
höyryn.
Keittiön tuuletus on riittävän hyvä, jotta ilma poistuu ulos.
Hiilisuodatin ei ole kulunut (suodatinversiossa).
• Jos tuuletin on sammunut normaalin toiminnan aikana:
Tarkista että:
sähkönsyöttö ei ole katkennut
että moninapainen katkaisinlaite ei ole lauennut.
Ennen kuin otat yhteyttä tekniseen tukeen mahdollisten toimintahäiriöiden yhteydessä katkaise laitteesta virta vähintään 5 sekunnin ajaksi
vetämällä töpseli irti seinästä ja kytke virta uudestaan päälle. Jos laite ei vielä toimi, ota yhteys tekniseen tukeen
86
TEKNISET TIEDOT
Korkeus (cm) Leveys (cm) Syvyys (cm))
Poistoputken halkaisija
(cm)
62-114
71
-
114
89,8 45,5 15
62-114
71
-
114
59,8 45,5 15
Toimitukseen kuulumattomat osat
Voit ladata itsellesi turvaohjeet, käyttöoppaan,
tuoteselosteen ja energiatiedot seuraavalla
tavalla:
• Verkkosivustolta docs.whirlpool.eu
• Käyttämällä QR-koodia
• Vaihtoehtoisesti
ottamalla yhteyttä
huoltopalveluumme (katso puhelinnumero
takuuvihkosesta). Kun otat yhteyttä huoltopalveluun,
ilmoita tuotteen tunnistekilvessä olevat koodit.

87
HU
ÁLTALÁNOS BIZTONSÁGI ELŐÍRÁSOK
• Bármilyen tisztítási és karbantartási művelet megkezdése előtt, a készüléket le kell
választani az elektromos hálózatról! Húzza ki a készülék villásdugóját, vagy áramtalanítsa a
háztartási elosztódoboz főkapcsolóját lekapcsolva!
• Minden beszerelési és karbantartási munkálathoz használjon munkavédelmi kesztyűt!
• A készüléket 8 éven felüli gyerekek, valamint a csökkent fizikális, érzékszervi és szellemi
képességekkel bíró személyek, illetve azok, akik nem rendelkeznek megfelelő tudással és
tapasztalattal, kizárólag megfelelő felügyelet mellett használhatják, illetve abban az esetben,
ha megfelelő útmutatást kaptak a készülék biztonságos használatát illetően és megértették
a készülék használatával járó veszélyeket!
• Ne engedje, hogy a gyermekek játsszanak a készülékkel!
• A készülék tisztítását és karbantartását gyermekek csak felügyelet mellett végezhetik!
• Az elszívó más, gáz- vagy egyéb tüzelőanyagú készülékkel való egyidejű használata
esetén biztosítani kell a helyiség megfelelő szellőzését!
• Az elszívót mind belül, mind kívül (LEGALÁBB HAVONTA EGYSZER) rendszeres
gyakorisággal tisztítani kell!
• A kézikönyvben feltüntetett karbantartási utasításokat minden esetben tartsa be!
• Az elszívó tisztítási előírásainak, valamint a szűrők cseréjének és tisztításának figyelmen
kívül hagyása tűzveszélyt okoz! Az elszívó alatt szigorúan tilos nyílt lángon készíteni ételt!
• Az izzó cseréjéhez kizárólag az e kézikönyv „karbantartás - izzó cseréje” c. részben
megadott típusú izzót használjon!
A nyílt láng használata károsítja a szűrőket és tűzveszélyt okozhat, emiatt minden esetben
kerülni kell a nyílt láng használatát!
Ne hagyja őrizetlenül a sütést, mert a túlhevült olaj meggyulladhat!
FIGYELEM! A főzőlap működése közben az elszívó hozzáférhető részei felforrósodhatnak!
• Ne csatlakoztassa a készüléket az elektromos hálózatra, amíg a beszerelést teljesen el
nem végezte!
• A füstelvezetéshez szükséges műszaki és biztonsági intézkedéseket illetően, az illetékes helyi hatóságok vonatkozó rendeleteit szigorúan
tartsa be!
• A keringetett levegőt nem szabad a gáz- vagy egyéb égéstermék üzemű készülékek füstjének elvezetéshez használt csőben szállítani!
• Ne használja az elszívót helytelenül felszerelt lámpával, illetve ne hagyja azt lámpa nélkül, mert áramütést okozhat!
• Soha ne használja az elszívót felszerelt rostély nélkül!
• Az elszívót SOHA ne használja tárolófelületként, hacsak az ilyen célra való használata nincs egyértelműen jelezve!
• Beszereléshez kizárólag a készülékhez mellékelt csavarokat használja! Amennyiben a csavar nem része a csomagnak, ügyeljen a
megfelelő típusú csavarok beszerezésére!
• A beszerelési útmutatóban feltüntetett, megfelelő hosszúságú csavarokat használjon!
• Kétség esetén kérjen tájékoztatást a szakszerviztől, vagy hasonló képesítésű személyzettől!
FIGYELEM!
• A csavarok és rögzítő elemeknek nem az útmutató szerinti felhelyezése áramütés-veszélyt okozhat!
• Ne használja programozóval, időzítővel, különálló távirányítóval vagy bármilyen más olyan eszközzel, amelyik automatikusan kapcsol
be.
A 3 évesnél fiatalabb gyermekeket tartsa távol a készüléktől. Felnőtt állandó felügyelete nélkül a készüléket 8 évesnél fiatalabb gyermekektől
tartsa távol.
88
FIGYELEM: a készüléket ne üzemeltesse külső eszközzel vagy külön távirányítóval.
Ez a készülék nem professzionális használatra készült. Ne használja a készüléket a szabadban.
A személyi sérülés elkerülése érdekében a készüléket két vagy több embernek kell mozgatnia és telepítenie.
A telepítést, beleértve a vízellátó csatlakozásokat (ha vannak) és az elektromos csatlakozásokat, valamint a javítási műveleteket,
szakképzett személyzetnek kell elvégeznie.
A telepítés befejezése után tartsa a csomagolóanyagot (műanyag részeket, polisztirolt stb.) gyermekektől távol, hogy elkerülje a fulladást. .
Ne használja a készüléket vizes testrészekkel vagy mezítláb.
Soha ne használjon gőztisztító berendezéseket - áramütés veszélye.
A csomagolóanyag 100% -ban újrahasznosítható és újrahasznosítási szimbólummal van ellátva
Az elszívó esztétikai megjelenésében eltérhet a jelen kézikönyv ábráin szereplőtől, de a használati, karbantartási és felszerelési
utasítások nem változnak.
Ezen kézikönyv utasításait szigorúan be kell tartani. Az itt feltüntetett utasítások be nem tartásából származó bármilyen hiba, kár vagy
tűzesettel kapcsolatban a gyártó felelősséget nem vállal. A páraelszívó a főzési pára és füst elszívására szolgál, kizárólag háztartási
használatra.
• Fontos, hogy ezt a kézikönyvet megőrizze, hogy bármikor tájékozódhasson belőle. Eladás, átadás vagy költözés esetén gondoskodjon
arról, hogy a kézikönyv a terméket kísérje.
• Az útmutatásokat figyelmesen olvassa el: fontos tájékoztatások találhatók köztük a telepítésre, a használatra és a biztonságra
vonatkozóan.
• Ne módosítsa a termék elektromos vagy mechanikai rendszerét, vagy a kivezető csöveket.
• A berendezés beszerelésének megkezdése előtt győződjön meg róla, hogy minden alkatrész sérülésmentes-e. Ellenkező esetben
forduljon a viszonteladóhoz és ne szerelje fel a berendezést.
A főzőkészülék felülete és a konyhai szagelszívó legalsó része közötti minimális távolság nem lehet kisebb, mint 50cm elektromos főzőlap, és
65cm gáz vagy vegyes tüzelésű főzőlap esetén.
Ha a gázfőzőlap beszerelési utasításában ennél nagyobb távolság szerepel, azt kellfigyelembe venni.
ELEKTROMOS CSATLAKOZÁS
A hálózati feszültségnek azonosnak kell lennie a konyhai páraelszívó belsejében elhelyezett műszaki adattáblán feltüntetett feszültséggel. Ha
az elszívó rendelkezik villásdugóval, csatlakoztassa egy hozzáférhető helyen elhelyezett, az érvényben lévő szabványoknak megfelelő
dugaszoló aljzathoz, akár a beszerelést követően is. Ha nem rendelkezik csatlakozódugóval (közvetlen csatlakozás a hálózathoz) vagy a
dugaszoló aljzat nem hozzáférhető, szereljen fel egy szabványos, kétpólusú megszakítót akár a beszerelést követően is, amely III. túláram-
kategória esetén biztosítja a hálózatról való teljes leválasztását, a telepítési szabályoknak megfelelően.
FIGYELEM!
Mielőtt az elszívó áramkörét visszaköti a hálózatba és ellenőrzi, hogy az elszívó helyesen működik-e, mindig ellenőrizze azt is, hogy a hálózati
vezeték beszerelése szabályos-e.
H a kábel nem rendelkezik csatlakozódugóval,csatlakoztassa a vezetékeket az alábbi táblázat szerint:
Hálózati feszültség és frekvencia Vezetékek
Lásd a páraelszívó belsejében található, a jellemzőket felsoroló
címkén feltüntetett értéket.
: sárga/zöld
N : kék
L : barna
Elektromos vezeték cseréje
Az elszívó speciális kábellel rendelkezik, melynek sérülése esetén cseréjét kérje a szakszervíz szolgálattól.
LÉGKIVEZETÉS
(kivezetett verziónál)
Csatlakoztassa a páraelszívót a levegőkimenettel (csatlakozó karima) azonos átmérőjű kivezető csőhöz.
A kisebb átmérőjű cső használata az elszívás hatásfokának csökkenését és a készülék zajszintjének drasztikus növekedéséhez vezet.

89
Ezért ezzel kapcsolatban felelősséget nem vállalunk.
! Minimális hosszúságú csővezetéket használjon.
! A csővezeték a lehető legkevesebb hajlattal rendelkezzen (maximális hajlásszög: 90°).
! Kerülje a cső deformálódását.
! A gyártó nem vállal felelősséget a fent leírt előírások be nem tartása esetén.
KERINGETETT VAGY KIVEZETETT ?
! Az Ön álal vásárolt elszívó kivezetett változatban való alkalmazásra készült
Amennyiben a páraelszívót keringetett verzióban szeretné használni, úgy a megfelelő KELLÉK KÉSZLETET be kell szerelnie.
Ellenőrizze ezen kézikönyv első oldalain, hogy a KELLÉK KÉSZLET a csomag része-e, vagy külön szükséges-e megvásárolnia.
Megjegyzés: Amennyiben a készlet része, előfordulhat, hogy az aktív szénfilter alapú kiegészítő szűrőrendszer a páraelszívóba már
beépítésre került.
A páraelszívó kivezetett verzióból keringetett verziójúvá való átalakításához szükséges információkat ebben a kézikönyvben megtalálja.
Kivezetett verzió
A gőzök kivezetése a gyűjtőkarimához rögzített elvezető csövön történik.
FIGYELEM!
Kivezetőcső nincs a csomagban, külön kell azt megvennie.
Az elvezetőcső átmérője az összekötő gyűrű átmérőjével azonos kell legyen
FIGYELEM!
Amennyiben az elszívó szénfilteres, szükséges annak kiemelése.
Keringetett verzió
Az elszívott levegő zsírtalanításra, majd szagtalanításra kerül, mielőtt a terembe visszaáramoltatásra kerülne. Az elszívó ilyen üzemmódban
való használatához szükséges további, aktív szén alapú szűrőrendszer installálása.
VEZÉRLŐGOMBOK
Az elszívó szíváserősség-szabályozóval és főzőlapvilágítás-kapcsolóval ellátott kezelőpanellel rendelkezik.
T1. Ventilátormotor KI / Sebesség csökkentése
T2. Ventilátormotor BE / Sebesség növelése
T3. "POWER BOOST" funkció
T4. 6th sense funkció (AUTO üzemmód) BE/ KI
T5. „ZEN üzemmód”
T6. Zsír-/szénszűrő riasztás/visszaállítás
T7. Fő világítás ON/OFF
FIGYELEM! Az elszívó automata operációs rendszerrel rendelkezik (lásd alább, „T4. 6th sense funkció (AUTO üzemmód) BE/KI”).
A készülék kalibrációja minden egyes alkalommal automatikusan megtörténik, amikor a készüléket az elektromos hálózatra csatlakoztatják
(azaz az első üzembe helyezéskor vagy áramkimaradás után). A kalibráció manuálisan is elvégezhető (lásd „Az érzékelő beállítása” fejezet).
Az 5 percig tartó kalibráció közben a T4 villog, és a fények használhatóak.
T1. VENTILÁTORMOTOR KI / SEBESSÉG CSÖKKENTÉSE
Nyomja meg ezt a sebesség csökkentéséhez és az elszívómotor KIKAPCSOLÁSÁHOZ. Tartsa hosszan nyomva az elszívómotor azonnali
KIKAPCSOLÁSÁHOZ.

90
T2. VENTILÁTORMOTOR BE / SEBESSÉG NÖVELÉSE
Nyomja meg ezt az elszívómotor BEKAPCSOLÁSÁHOZ és a sebesség növeléséhez. Tartsa hosszan lenyomva a 3. sebesség azonnali
beállításához.
T3. "POWER BOOST" FUNKCIÓ
Nyomja meg a T3 gombot a "POWER BOOST 1" intenzív elszívási sebesség (idővezérelt) bekapcsolásához.
Ne feledje: az elszívó öt perc múlva visszalép a 3. sebességre.
Ha az elszívó motor be van kapcsolva, a "POWER BOOST1" üzemmódban nyomja meg újra a T3gombot, hogy bekapcsolja a “POWER
BOOST 2 intenzív elszívási sebességet (idővezérelt).
Ne feledje: az elszívó öt perc múlva visszalép a 3. sebességre.
Ne feledje: nyomja meg ismét a T3 gombot, az öt perc alatt az elszívó visszatér a "POWER BOOST 1”-be
T4. 6TH SENSE FUNKCIÓ (AUTO ÜZEMMÓD) BE/KI
Az elszívó automatikusan beállítja az elszívás sebességét, ha az érzékelő úgy érzékeli, hogy megváltoztak a környezeti feltételek.
Ne feledje: Ahhoz, hogy ez a funkció megfelelően működjön, először be kell állítani az érzékelőt (lásd alább „Az érzékelő beállítása”
fejezetet).
Ne feledje: Ha bármely más olyan funkciót megváltoztat, amely a sebességet befolyásolja, a „6th sense” funkció kikapcsol.
Az érzékelő beállítása
Ez megtehető, ha az elszívó KI van kapcsolva. Normál környezeti feltételek mellett tartsa nyomva a T4 gombot 5 másodpercig; ekkor a T4 5
percig villog, jelezve, hogy az elszívó az érzékelő kalibrációját végzi, majd kikapcsol, jelezve, hogy a kalibráció befejeződött.
A tűzhely beállítása: Tartsa nyomva egyszerre a T1 és T2 gombokat.
Mindkettő kigyullad, jelezve, hogy indulhat a tűzhely paramétereinek megadása.
Nyomja meg a T1 gombot gáztűzhely kiválasztásához (ekkor a T1 3 másodpercig villog, jelezve, hogy a tűzhelyet gáztűzhelyre állította be).
Nyomja meg a T2 gombot indukciós tűzhely kiválasztásához (ekkor a T2 3 másodpercig villog, jelezve, hogy a tűzhelyet indukciós tűzhelyre
állította be).
T5. „ZEN ÜZEMMÓD”
Nyomja meg a „ZEN” elszívás üzemmód be- és kikapcsolásához.
Ezzel a funkcióval olyan elszívási fokozat állítható be, amely biztosítja a tökéletes egyensúlyt a halk működés és a hatékony elszívás között.
T6. ZSÍR-/SZÉNSZŰRŐ RIASZTÁS/VISSZAÁLLÍTÁS
Az elszívó rendszeres időközönként jelzi, hogy a szűrő karbantartása szükséges.
Ne feledje: A jelzőfények csak bekapcsolt elszívónál működnek.
Ha a T6 kigyullad: Végezze el a zsírszűrő karbantartását.
Ha a T6 villog: Végezze el a szénszűrő karbantartását.
A szűrő telítettségjelzőjének nullázása:
Ne feledje: Ehhez a művelethez be kell kapcsolni az elszívót.
Tartsa nyomva a T6 gombot
Ne feledje: T6 és az elszívó kikapcsolása, hogy jelezze a riasztás törlését.
A zsírszűrő és a szénszűrő visszaállítását ugyanazzal a gombbal lehet elvégezni. Ha mindkét szűrő riasztása egyszerre kapcsol be, a
visszaállítási folyamat egyesével állítja vissza a számlálót úgy, hogy a szénszűrővel kezdi.
A szénszűrő telítettségjelzőjének bekapcsolása
Ne feledje: Ehhez a művelethez ki kell kapcsolni az elszívómotort.
Ez a jelzőfény általában ki van kapcsolva – tartsa nyomva egyszerre a T3 és T7 gombokat a funkció aktiválásához: Mindkettő világít az
aktiválás jelzésére.
A funkció kikapcsolásához ismét tartsa hosszabban nyomva ugyanezeket a gombokat: Mindkettő röviden felvillan, majd kikapcsol, jelezve,
hogy sikerült kikapcsolni a funkciót.
T7. FŐ VILÁGÍTÁS ON/OFF
Nyomja meg a főzőlap világításának be- és kikapcsolásához.
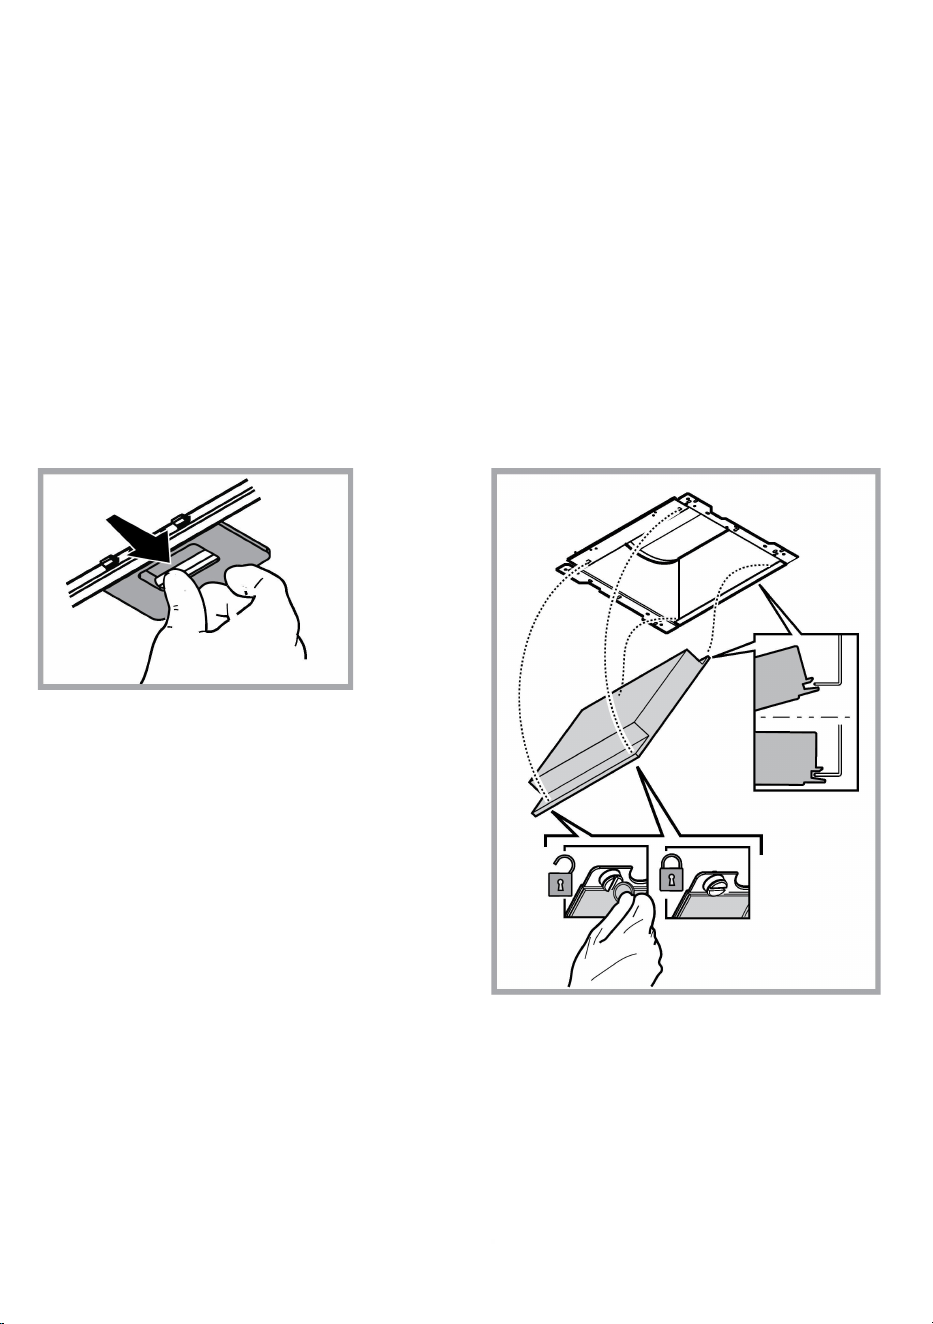
91
KARBANTARTÁS
Tisztítás
A tisztításhoz KIZÁRÓLAG semleges folyékony mosószerrel
átitatott nedves ruhát használjon. A TISZTÍTÁSHOZ NINCS
SZÜKSÉG SEMMMILYEN ESZKÖZRE. Kerülje a súrolószert
tartalmazó mosószerek használatát. NE HASZNÁLJON
ALKOHOLT!
Zsírszűrők karbantartása
Visszatartja a főzésből eredő zsírrészecskéket.
Havonta egyszer (vagy amikor a filter telítődésjelző rendszere - ha
a megvásárolt modell rendelkezik ilyennel - jelzi, hogy szükség van
rá) nem agresszív tisztítószerrel, kézzel vagy mosogatógépben,
alacsony hőfokon és rövid ciklussal el kell mosogatni.
Mosogatógépben történő mosogatás a zsírszűrő elszíneződését
okozhatja, de ez nem változtat hatékonyságán.
A zsírszűrő filter leszereléséhez húzza meg a rugós horgot.
Szénfilter karbantartása
Magában tartja a főzésből származó kellemetlen szagokat.
A szénfilter telítődése többé vagy kevésbé hosszú idő alatt történik
meg, a tűzhely típusától és a zsírszűrő tisztogatásának
rendszerességétől függően. Mindenképpen cserélni kell a betétet
legalább négyhavonként (vagy amikor a filterek telítődését jelző
rendszer – ha a birtokunkban lévő modellnél van ilyen - ennek
szükségességét jelzi.
NEMÔŽE byť umývaný alebo regenerovaný.
Szerelés
Helyezze be az aktív szénszűrőt, annak hátsó részét az elszívó
fém nyelveire akasztva, az első részét a két gombbal rögzítve.
Az aktív szénszűrő kiemelése a szűrőt az elszívóhoz rögzítő
gombok 90°-os elforgatásával lehetséges.
Izzók cseréje
Az elszívó LED technológiára épülő világítási rendszerrel van
felszerelve.
A LEDEK optimális megvilágítást biztosítanak, a hagyományos
lámpák élettartamánál 10-szer nagyobb élettartammal
rendelkeznek, mindemellett 90%-os elektromos energia
megtakarítást tesznek lehetővé.
Az izzó cseréjéhez vegye fel a kapcsolatot a hivatalos alkatrész
kereskedőkkel!
92
HULLADÉK KEZELÉS
A készüléken található jelzés megfelel az elektromos és elektronikus berendezések hulladékairól szóló 2012/19/EC európai irányelvben
(WEEE) foglalt előírásoknak.
A hulladékká vált termék szabályszerű elhelyezésével Ön segít elkerülni a környezettel és az emberi egészséggel kapcsolatos azon esetleges
negatív következményeket, amelyeket a termék nem megfelelő hulladékkezelése egyébként okozhatna.
A terméken vagy a termékhez mellékelt dokumentumokon feltüntetett
jelzés arra utal, hogy ez a termék nem kezelhető háztartási hulladékként. Ehelyett a terméket a villamos és elektronikus berendezések
újrahasznosítását végző telephelyek valamelyikén kell leadni.
Kiselejtezéskor a hulladékeltávolításra vonatkozó helyi környezetvédelmi előírások szerint kell eljárni.
A termék kezelésével, hasznosításával és újrahasznosításával kapcsolatos bővebb tájékoztatásért forduljon a lakóhelye szerinti polgármesteri
hivatalhoz, a háztartási hulladékok kezelését végző társasághoz vagy ahhoz a bolthoz, ahol a terméket vásárolta.
A berendezést a következő szabványoknak megfelelően tervezték, gyártották, és ellenőrizték:
• Biztonság: EN/IEC 60335-1; EN/IEC 60335-2-31, EN/IEC 62233.
• Teljesítmény: EN/IEC 61591; ISO 5167-1; ISO 5167-3; ISO 5168; EN/IEC 60704-1; EN/IEC 60704-2-13; EN/IEC 60704-3; ISO 3741; EN
50564; IEC 62301.
• Elektromágneses összeférhetőség EMC: EN 55014-1; CISPR 14-1; EN 55014-2; CISPR 14-2; EN/IEC 61000-3-2; EN/IEC 61000-3-3.
A megfelelő használatot és a környezetre gyakorolt káros hatás mérséklését elősegítő javaslatok: Az elszívót a minimum sebességen
kapcsolja be akkor, amikor a főzést megkezdi, és hagyja néhány percig üzemelni még azt követően is, hogy a főzést befejezte. A berendezést
csak akkor kapcsolja nagyobb sebességfokozatra, ha a főzés közben nagy mennyiségű füst vagy gőz keletkezik, és csak akkor használja az
intenzív sebességet, ha arra ténylegesen szükség van. Cserélje ki a szénszűrőket akkor, amikor a berendezés jelzi ennek szükségességét,
így biztosíthatja, hogy a készülék hatékonyan nyeli el a szagokat. A megfelelő szűrőképesség biztosítása érdekében cserélje ki a zsírszűrőt
akkor, amikor a berendezés erre figyelmeztet. A hatékonyság növelése és a zajszint csökkentése érdekében tanácsos a jelen útmutató által
megadott maximális csőátmérőket alkalmazni.
MŰKÖDÉSI HIBÁK
Amennyiben úgy tapasztalja, hogy valami nem működik, mielőtt a Szervíz szolgálathoz fordulna, próbálja elvégezni az alábbi egyszerű
ellenőrzéseket:
• Ha az elszívó nem működik
Ellenőrizze, hogy:
- nincs-e áramkimaradás.
- be van-e állítva a sebesség.
• Ha az elszívó alacsony teljesítményű
Ellenőrizze, hogy:
- A kiválasztott motorsebesség megfelelő-e a keletkezett füst- és gőz elvezetésére
- A konyha megfelelően szellőzött-e a működéshez szükséges levegő biztosításához.
- A szénfilter nem használódott-e el (kivezetett verziójú páraelszívó).
• Ha az elszívó normál működés közben állt le:
Ellenőrizze, hogy:
- nincs-e áramkimaradás.
- a biztosíték nem kapcsolódott-e le.
Az esetleges működési hibák esetén, mielőtt a szakszervízhez fordulna, húzza ki a készülék villásdugóját az elektromos hálózatból legalább 5
másodpercre, majd próbálja újra áram alá helyezni. Amennyiben a hiba továbbra is fennáll, forduljon a szakszervízhez.
93
MŰSZAKI ADATOK
Magasság (cm)
Szélesség (cm)
Mélység (cm)
Kivezetőcső átmérője (cm)
62-114
71
-
114
89,8 45,5 15
62-114
71
-
114
59,8 45,5 15
Készletben nem mellékelt termékek
A Biztonsági útmutatót, a Használati útmutatót, a
termékspecifikációt és az energiafogyasztási
adatokat letöltheti:
• a docs.whirlpool.eu honlapról
• a QR-kód segítségével
• Vagy vegye fel a kapcsolatot a vevőszolgálattal
(a telefonszámot lásd a garanciafüzetben). Amikor a
vevőszolgálatot hívja, ké
rjük, hogy készítse elő a
termék azonosító lemezén látható adatokat.
94
NO
ADVARSEL
• Før det utføres et hvilket som helst vedlikehold eller rengjøring må hetten kobles fra
strømmen, enten ved å dra ut støpselet eller ved å kutte strømmen i hele huset.
• Bruk alltid arbeidshansker under hele installasjonen og når det utføres vedlikehold.
• Dette apparatet kan benyttes av barn fra 8 år og oppover og av personer med svekkede
fysiske, følelsesmessige eller mentale egenskaper, eller manglende erfaring og kjennskap,
hvis de overvåkes eller hvis de er opplært til å ta apparatet i bruk på en sikker måte og er
informert om tilhørende farer.
• Pass på at barn ikke leker med apparatet.
• Rengjøring og vedlikehold må ikke utføres av barn, med mindre de overvåkes.
• Rommet må være tilstrekkelig ventilert hvis hetten anvendes sammen med andre
apparater som forbrenner gass eller annet brensel.
• Hetten må rengjøres ofte både innvendig og utvendig (MINST EN GANG I MÅNED), ta
hensyn til informasjonene skrevet i bruksanvisning og vedlikehold håndbok.
• Manglende overholdelse av rengjørings indikasjon samt som erstatning og rengjør av filter
kan føre til brann fare.
• Det er strengt forbudt å lage flambert mat under hetten.
• Bruk kun samme type lyspære som indikeres i avsnittet vedlikehold/utbytting av lyspære i
denne veiledningen når lyspæren skal byttes ut.
Frie flammer kan skade filtrene og medføre brann og må derfor alltid unngås.
Frityrsteking må overvåkes for å unngå at oljen blir for varm og antennes.
VÆR OPPMERKSOM: Hettens tilgjengelige deler kan bli varme når koketoppen er i drift.
• Ikke kobl apparatet til strømnettet før installasjonen er helt ferdig.
• Når det gjelder tekniske mål og sikkerhet for røykuttak, følg nøye alle lokale forskrifter og regler.
• Oppsugd luft må ikke føres inn i et rør som benyttes som uttak for apparater med gassforbrenning eller annen brensel.
• Ikke bruk hetten uten lyspære eller med feilmontert lyspære, da det finnes fare for elektriske støt.
Ikke bruk hetten med feilmontert rist!
Hetten må ALDRI brukes som støtteflate, med mindre dette er uttrykkelig indikert.
• Bruk kun de festeskruene som leveres sammen med apparatet for å utføre installasjonen eller, hvis de ikke utleveres, kjøp riktige skruer.
• Bruk riktig lengde på skruene som er oppført i Installasjonsveiledningen.
• Vennligst ta kontakt med et autorisert servicesenter eller lignende kvalifisert personell hvis man er i tvil.
VÆR OPPMERKSOM!
• Manglende installasjon av skruer og festeanordninger i samsvar med disse instruksjonene kan føre til elektriske farer.
• Ikke bruk tidsmåler, timer, separat fjernkontroll eller andre typer anordninger som aktiveres automatisk.
Barn under 3 års alder må holdes på avstand fra apparatet. Barn under 8 års alder må holdes på avstand fra apparatet dersom de ikke holdes
under konstant oppsyn av en voksen.
OBS! Apparatet er ikke utviklet for å styres av eksterne enheter eller separate fjernstyrte systemer.
Dette apparatet er ikke utviklet for profesjonell bruk. Ikke bruk apparatet under åpen himmel.
For å motvirke risikoen for personskader må apparatet flyttes og installeres av to eller flere personer.
Installasjonen innbefatter også eventuelle opplegg for vannforsyning og elektriske forbindelser, og reparasjonsinngrep må derfor utføres
av kvalifisert personell.
Når installasjonen er fullført må alt emballasjemateriell (plast, styrenplast osv.) holdes på avstand fra barn. Dette for å unngå kvelningsrisiko. .
95
Apparatet må ikke brukes av våte personer eller personer med våte føtter.
Ikke bruk apparatet til dampvask - risiko for elektriske støt.
Emballasjemateriell er 100% resirkulerbart og avmerket med gjenvinningssymbol
Ventilatorhetten kan se annerledes ut enn det som vises på tegningene i denne håndboken. Bruksanvisningen, vedlikehold og
installasjon forblir allikevel de samme.
Instruksjonene i denne håndboken må følges nøye. Produsenten fraskriver seg ethvert ansvar for eventuelle uhell, skader eller brann på
apparatet som skyldes at bruksanvisningen i denne håndboken ikke har blitt overholdt. Ventilatoren er ment for avtrekk av røyk og damp fra
matlaging og er kun til husholdningsbruk.
• Det er viktig å oppbevare denne håndboken for å kunne konsultere den i ethvert øyeblikk. Ved salg, overdragelse eller flytting av
produktet, må man forsikre seg om at den følger med.
• Les bruksanvisningen nøye: den inneholder viktige informasjoner om installasjon, bruk og sikkerhet.
• Ikke utfør elektriske eller mekaniske endringer på produktet eller på avtrekksrørene.
• Før man fortsetter med installasjon av apparatet, skal man undersøke at ingen komponenter er skadet. Hvis det skulle være skade på
komponentene, skal man ta kontakt med forhandleren og ikke fortsette med installasjonen.
Minimumsavstanden mellom koketoppen og undersiden av kjøkkenventilatoren må ikke være på mindre enn 50cm når det gjelder elektriske
kokeplater og 65cm når det gjelder gassbluss og kombinerte koketopper.
Dersom bruksanvisningen for et gasskokeapparat opererer med en større avstand, må denne overholdes.
ELEKTRISK TILKOBLING
Nettspenningen må være i samsvar med den elektriske spenningen som angis på typeskiltet inne i ventilatoren. Hvis det følger med støpsel,
kobles ventilatoren til en lett tilgjengelig stikkontakt som er godkjent i henhold til gjeldende normer. Stikkontakten må være lett tilgjengelig også
etter installasjonen. Hvis det ikke følger med støpsel (direkte kobling til strømnettet), eller stikkontakten selv etter installasjonen ikke er lett
tilgjengelig, må man sette på en godkjent topolet bryter som garanterer fullstendig frakobling fra strømnettet i situasjonene som oppstår i
kategorien overspenning III, i henhold til installasjonsreglene.
MERK!
Før man kobler ventilatorens strømkrets til strømnettet og fastslår at alt fungerer korrekt, må man alltid kontrollere at strømledningen er korrekt
montert.
Dersom det ikke er montert et støpsel på ledningen,må du gå fram i henhold til tabellen nedenfor:
Nettets spenning og frekvens Kopling av ledning
Vær oppmerksom på verdien på merkeetiketten innenfor
avtrekkshetten.
: gul/grønn
N : blå
L : brun
Utbytte av strømforsyning ledning
Ventilatoren har en spesiell strømledning; dersom denne skades, skal man henvende seg til kundeassistansen for kjøp av en ny.
AVTREKK AV LUFT
(for sugende versjoner)
Koble ventilatoren til rør og avtrekksåpning i veggen med en diameter tilsvarende luftuttaket (koblingsflensen).
Bruk av rør og avtrekksåpning på veggen med en mindre diameter, vil medføre en minsking i avtrekksytelsene og en drastisk økning av
støyen.
Ethvert ansvar gjeldende dette fraskrives derfor.
! Bruk et så kort rør som mulig.
! Bruk et rør med færrest mulig vinkler (vinkelen må aldri være skarpere enn 90°).
! Unngå drastiske endringer i rørets tverrsnitt.
! Selskapet fratar seg eventuelt ansvar dersom slike veiledelser ikke blir tatt i bruk.

96
FILTRERENDE ELLER SUGENDE?
! Din hetten er klar for å bli tatt i bruk med sugende funksjon.
For å bruke hetten i med filtrerings funksjon må man ta i bruk tilsvarende EKSTRA UTSTYR.
Vær oppmerksom ved første sider av denne bruksanvisning dersom nødvendig EKSTRA UTSTYR er allerede gitt ved salget eller
dersom den må bli kjøpt separat.
Merk: Dersom den er utdelt ved salget i noen tilfeller, filtrering anlegget basert på bruk av aktiv kull kan vær installert på forhånd på
hetten. Informasjonene for forandring av hetten fra sugende bruk til filtrerings bruk er allerede skrevet i denne bruksanvisning.
Sugende versjon
Dampene føres ut i friluft gjennom et avløpsrør som er festet til koblingsflensen.
MERK!
Avløpsrøret er ikke medlevert, men må kjøpes separat.
Diameteren i avløpsrøret må tilsvare diameteren på tilslutningsringen.
MERK!
Hvis ventilatoren er utstyrt med kullfiltre, må disse fjernes.
Filtrerende versjon
Luften som suges opp blir renset, og fett og lukter fjernes før den føres tilbake i rommet. Hvis man vil bruke ventilatoren i denne versjonen, er
det nødvendig å installere et ekstra filtersystem basert på aktivt kull.
FUNKSJONER
Viften er utstyrt med et kontrollpanel med viftehastighetsvalg og en lysbryter for å kontrollere kokeområdets lys.
T1. Viftens motor AV / Senk hastigheten
T2. Viftemotoren AV / Øke hastigheten
T3. “POWER BOOST “ Funksjon
T4. 6th sense funksjon (AUTO modus) PÅ/AV
T5. Operasjon “ZEN Modus”
T6. Fett/kullfilter alarm/nullstilling
T7. Hovedlys PÅ / AV
PASS PÅ! Denne hetten har et automatisk driftssystem (se under “T4. 6th sense funksjon (AUTO modus) PÅ/AV”).
Hver gang hetten kobles til strømnettet igjen vil en kalibrering automatisk utføres (f.eks.: første gang den er installert etter et strømbrudd). Det
kan også utføres manuelt (se avsnitt “Sensorenhet opp”). I løpet av kalibreringen som varer i 5 minutter, vil T4 blinke og lampene kan brukes.
T1. VIFTENS MOTOR AV / REDUSER HASTIGHETEN
Trykk for å senke hastigheten og skru avtrekksmotoren AV. Trykk og hold nede for direkte å skru avtrekksmotoren AV.
T2. VIFTENS MOTOR PÅ / ØK HASTIGHET
Trykk for å skru avtrekksmotoren PÅ og øke hastigheten. trykk og hold nede for å stille inn 3. hastighet direkte.
T3. “POWER BOOST “ FUNKSJON
Trykk T3 for å aktivere den intensive utsugingshastigheten “POWER BOOST 1” (tidskontrollert).
Merk: hetten vil gå tilbake til den tredje hastigheten etter fem minutter.
Med utsugingsmotoren på, i “POWER BOOST1”, trykk igjen T3 for å aktivere “POWER BOOST 2” ekstra intensiv utsugingshastighet

97
(tidskontrollert).
Merk: hetten vil gå tilbake til den tredje hastigheten etter fem minutter.
Merk: trykk igjen T3, i løpet av de fem minuttene, vil hetten gå tilbake å fungere i “POWER BOOST 1”
T4. 6TH SENSE FUNKSJON (AUTO MODUS) PÅ/AV
Hetten vil stille inn avtrekkshastighet automatisk hvis sensoren i hetten oppdager endringer i miljøforholdene.
Merk: for å være sikker på at funksjonen fungerer korrekt skal man først konfigurere sensoren (se “Innstilling av sensoren” nedenfor).
Merk: hvis du endrer på noen av de andre funksjonene som kontrollerer hastigheten, vil “6th sense” funksjonen slå seg av.
Innstilling av sensoren
Dette kan gjøres når hetten er AV. Under normale omgivelsesforhold, trykk T4 i 5 sek, T4 blinker i 5 min for å indikere at hettene går igjennom
en sensorkalibrering, deretter slukker den for å indikere at kalibreringen er avsluttet.
Innstilling av platetoppen: Trykk og hold nede T1 og T2 samtidig.
Begge lyser for å indikere at hetten er klar for kalibrering av platetoppens parameter.
Trykk T1 for å velge gasskokeplate, (T1 begynner å blinke i 3 sekunder for å indikere at hettens parametre er stilt inn for gasskokeplate).
Trykk T2 for å velge induksjonsplate, (T2 begynner å blinke i 3 sekunder for å indikere at hettens parametere er stilt inn for induksjonsplate).
T5. OPERASJON “ZEN MODUS”
Trykk for å aktivere eller deaktivere “ZEN” ekstraksjonsmodus.
Denne funksjonen gjør det mulig å aktivere en avtrekkshastighet med en perfekt balanse mellom lydløshet og avtrekkseffektivitet.
T6. FETT/KULLFILTER ALARM/RESET
Ved jevne mellomrom varsler hetten at vedlikehold må utføres.
Merk: Indikatorene fungerer kun når hetten står på.
T6 slått på: Utfør vedlikehold på fettfilteret.
T6 blinker: utfør vedlikehold på kullfilteret.
Tilbakestilling av indikatoren for mettet filter:
Merk: Dette må gjøres når hetten er slått på.
Trykk og hold nede T6
Merk: T6 og hetten slår seg av for å indikere at tilbakestilling av alarm er gjort.
Nullstilling av fettfilteret og kullfilteret utføres med samme nøkkel.
Hvis begge filteralarmene er aktive vil nullstillingsprosedyren nullstille telleren en etter en, med prioritering av kullfilteret.
Aktivering av det aktive karbonfilterets metningsindikator
Merk: Dette må gjøres når avtrekksmotoren er slått av.
Denne indikatoren er vanligvis deaktivert – trykk og hold nede T3 og T7 samtidig for å aktivere denne funksjonen: Begge vil tennes for å
indikere aktivering.
For å deaktivere funksjonen, trykk på de samme knappene igjen:
Begge knappene vil blinke kort og deretter slå seg av for å indikere deaktivering.
T7. HOVEDLYS PÅ/AV
Trykk for å slå ovnslyset på eller av.

98
VEDLIKEHOLD
Rengjøring
Til rengjøring skal det KUN benyttes en klut fuktet med et nøytralt
rengjøringsmiddel. VERKTØY ELLER APPARATER SKAL
IKKE BRUKES TIL RENGJØRING!
Unngå bruk av slipende eller etsende produkter. ALKOHOL
SKAL IKKE BRUKES!
Vedlikehold av motfettet filteret
Fanger kokefettpartikler.
Dette må rengjøres en gang i måneden (eller når det elektroniske
systemet viser at filteret er skittent – hvis din modell har denne
funksjonen), med milde (ikke aggressive) rengjøringsmidler, for
hånd eller i oppvaskmaskin ved lav temperatur og med kort syklus.
Ved vask i oppvaskmaskin kan fettfilteret i metall miste fargen,
men dets filterkarakteristikker endres absolutt ikke.
For å demontere fettfilteret må man dra i fjærhåndtaket.
Vedlikehold av kull filter
Holder tilbake ubehagelige lukter fra matlaging.
Kullfilteret mettes etter en mer eller mindre lang tidsperiode,
avhengig av typen matlaging og hvor regelmessig filteret
rengjøres.
I alle tilfeller er det nødvendig å skifte ut patronen minst hver 4.
måned (eller når indikatoren for metning av filteret viser at det er
nødvendig, hvis det er en slik indikator på modellen).
Det kan IKKE vaskes eller benyttes om igjen
Montering
Hekt først kullfilteret bak på ventilatorens metallhekte, og fest det
deretter foran med de to kulehåndtakene.
Demontering
Fjern kullfilteret ved å dreie kulehåndtakene som fester det til
ventilatoren 90°.
Utbytting av lyspære
Ventilatoren er utstyrt med et belysningssystem basert på LED-
teknologi.
LED-lysene garanterer optimal belysning, har opptil 10 ganger
lengre varighet enn tradisjonelle lyspærer og tillater en
strømsparing på 90 %.
Vennligst ta kontakt med autorisert kontor for reservedeler for å
bytte ut lyspæren.

99
KASSERING
Dette apparatet er merket i konformitet med EU-direktivet 2012/19/EC, Waste Electrical and Electronic Equipment (WEEE). Ved å forsikre seg
om at dette produktet kasseres forskriftsmessig, bidrar brukeren med å forebygge mulige negative miljø- og helsekonsekvenser.
Symbolet på produktet eller på papirer som følger med viser at dette produktet ikke må behandles som vanlig husholdningsavfall, men
må leveres til et egnet gjenvinningssenter for elektrisk og elektronisk avfall. Produktet må kasseres i henhold til lokale normer for kassering av
avfall. For videre informasjon om behandling, gjenvinning og resirkulering av dette produktet kan du kontakte egnet lokalt kontor,
renovasjonskontoret for husholdningsavfall eller butikken hvor du kjøpte produktet.
Apparatet er utformet, testet og produsert i henhold til:
• Sikkerhet: EN/IEC 60335-1; EN/IEC 60335-2-31, EN/IEC 62233.
• Kapasitet: EN/IEC 61591; ISO 5167-1; ISO 5167-3; ISO 5168; EN/IEC 60704-1; EN/IEC 60704-2-13; EN/IEC 60704-3; ISO 3741; EN
50564; IEC 62301.
• Elektromagnetisk kompatibilitet EMC: EN 55014-1; CISPR 14-1; EN 55014-2; CISPR 14-2; EN/IEC 61000-3-2; EN/IEC 61000-3-3.
Forslag til riktig bruk for å redusere miljøpåvirkning: Skru PÅ ventilatorhetten på minimum hastighet når du starter matlagingen og lå den
holdes i gang i noen minutter etter at matlagingen er ferdig. Øk hastigheten kun ved store mengder røyk og damp og bruk boost-hastighet(er)
kun i ekstreme situasjoner. Skift ut kullfilter når det er nødvendig for å opprettholde optimal effektivitet for odørreduksjon. Rengjør fettfilter når
det er nødvendig for å opprettholde optimal effektivitet for fettfilter. Bruk maksimum diameter på kanalsystemet som er angitt i denne
bruksanvisningen for å optimalisere effektivitet og minimere støy.
FEIL VED BRUK
Dersom feil oppstår ved bruk før du tar kontakt med Kunde Service se etter følgende kontroll:
• Dersom hetten ikke virker:
Verifiser at:
- Brudd i strøm forsyning ikke har tatt sted.
- Det har blitt valgst en hastighet.
• Dersom hetten har en lav kapasitet:
Verifiser at:
- Motor hastighet som har blitt valgt er i stand til å fjerne mengden på røyk og damp som er til stede
- Kjøkkenet er ventilert nok for å bidra til et luft oppsuging.
- Kull filter ikke er oppbrukt (ved hetten i filtrerings funksjon.
• Dersom hetten har slott seg av ved vanlig bruk:
Verifiser at:
- Brudd i strøm forsyning ikke har tatt sted.
- Omnipolar av sperre system ikke har aktivert seg.
Dersom det oppstår feil ved vanlig idrifsettelse før du tar kontakt med Kunde Service slå av for minst 5 sec. Strøm forsyning ved å ta ut strøm
kontakt og deretter ved å koble den på igjen. Dersom feilet fortsetter ta kontakt med Kunde Service.

100
TEKNISKE DATA
Høyde (cm)
Bredde (cm)
Dybde (cm)
Ø ved uttaksrøre
t (cm)
62-114
71
-
114
89,8 45,5 15
62-114
71
-
114
59,8 45,5 15
Utstyr som ikke følger ved kjøpet
Du kan laste ned Sikkerhetsinstruksene,
Brukerhåndboken, Produktkortet og Energidata
ved:
• Besøke vårt nettsted docs.whirlpool.eu
• Ved å benytte QR-koden
• Alternativt kan du kontakte vår Ettersalgsservice
(se telefonnummeret i garantiheftet). Når du
kontakter vår Ettersalgsservice, vennligst oppgi
kodene du finner på produktets typeskilt.

101
PL
OGÓLNE BEZPIECZEŃSTWO
• Przed każdym rozpoczęciem czyszczenia lub konserwacji należy odłączyć okap od
zasilania elektrycznego poprzez wyciągnięcie wtyczki lub odłączenie głównego bezpiecznika
pomieszczenia.
• W trakcie wykonywania wszystkich prac instalacyjnych i konserwacyjnych należy używać
rękawice robocze.
• Urządzenie może być używane przez dzieci w wieku nie niższym niż 8 lat oraz osoby o
ograniczonej zdolności fizycznej, czuciowej lub psychicznej lub pozbawione doświadczenia
czy niezbędnej wiedzy, pod warunkiem, że pozostaną pod nadzorem lub zostaną
poinstruowane o bezpiecznym używaniu urządzenia i zrozumieją niebezpieczeństwa z nim
związane. Dzieci powinny być pilnowane, aby nie bawiły się urządzeniem.
• Czyszczenie i konserwacja nie może być wykonywana przez dzieci pozostawione bez
opieki.
• Pomieszczenie, w którym zainstalowany jest okap powinno posiadać odpowiednią
wentylację, kiedy jest on używany jednocześnie z innymi urządzeniami zasilanymi gazem
lub innymi paliwami.
• Okap powinien być często czyszczony zarówno wewnętrznie jak i na zewnątrz
(PRZYNAJMNIEJ RAZ NA MIESIĄC), należy bezwzględnie przestrzegać wskazówek
zawartych w instrukcji konserwacji. Nieprzestrzeganie zasad czyszczenia okapu oraz
wymiany i czyszczenia filtrów może spowodować ryzyko powstania pożaru.
• Jest surowo zabronione przygotowywanie posiłków z płomieniem pod okapem.
• Aby wymienić lampkę należy użyć wyłącznie ten rodzaj lampki, który został wskazany w
rozdziale konserwacja/wymiana lampki w niniejszej instrukcji.
Używanie wolnego płomienia jest szkodliwe dla filtrów i może spowodować pożary, dlatego
należy tego unikać w każdym przypadku.
Smażenie musi być wykonywane pod kontrolą, aby uniknąć zapalenia się rozgrzanego
oleju.
UWAGA: Kiedy powierzchnia do gotowania jest włączona dostępne części okapu mogą sią
rozgrzać.
• Nie podłączać urządzenia do sieci elektrycznej dopóki instalacja nie zostanie całkowicie
zakończona.
• Jeśli chodzi o normy techniczne i bezpieczeństwa, których należy przestrzegać podczas wydalania oparów należy rygorystycznie
przestrzegać zasad przewidzianych w regulaminie właściwych organów lokalnych.
• Zasysane powietrze nie może być przekazane do kanału używanego do wydalania oparów wytworzonych przez urządzenia spalania gazów
lub innych paliw.
• Nie należy używać ani pozostawiać okapu pozbawionego poprawnie zamontowanych lampek w związku z możliwością porażenia prądem.
• Nigdy nie używać okapu bez poprawnie zamontowanej kratki!
• Okap nie może być NIGDY używany, jako płaszczyzna oparcia, o ile nie zostało to wyraźnie wskazane.
• Należy używać do instalacji wyłącznie śrub mocujących będących na wyposażeniu z produktem lub jeśli ich nie ma na wyposażeniu, zakupić
właściwy rodzaj śrub.
• Używać śrub o odpowiedniej długości, które są opisane w Przewodniku do instalacji.
• W razie wątpliwości, skontaktować się z odnośnym autoryzowanym centrum obsługi lub z wykwalifikowanym personelem.
102
UWAGA!
• Niezainstalowanie śrub i urządzeń mocujących zgodnie z instrukcją może spowodować zagrożenia natury elektrycznej.
• Nie stosować w połączeniu z oddzielnym programatorem, timerem, zdalnym sterowaniem lub każdym innym urządzeniem, które
uaktywnia się automatycznie.
Trzymać dzieci poniżej 3 roku życia z dala od urządzenia. Bez ciągłego nadzoru osoby dorosłej, trzymać urządzenie z dala od dzieci poniżej 8
roku życia.
UWAGA: urządzenie nie jest przeznaczone do uruchamiania za pomocą urządzenia zewnętrznego lub oddzielnego systemu zdalnego
sterowania.
Omawiane urządzenie nie jest przeznaczone do użytku profesjonalnego. Nie używać urządzenia na zewnątrz.
Aby uniknąć ryzyka obrażeń, urządzenie powinny instalować i przenosić dwie osoby.
Montaż, który obejmuje również ewentualne połączenia do zasilania wodą (jeżeli przewidziane) oraz podłączenia elektryczne jak również
interwencje naprawcze może być wykonywany wyłącznie przez wykwalifikowany personel.
Po zainstalowaniu, przechowywać materiał opakowaniowy (plastikowe elementy, styropian itd.) poza zasięgiem dzieci, aby uniknąć ryzyka
uduszenia. .
Nie używać urządzenia, gdy ciało i ręce są mokre lub w gołych stopach.
Nigdy nie używać parowych urządzeń czyszczących – ryzyko porażenia prądem.
Materiał opakowaniowy nadaje się w 100% do recyklingu i jest oznaczony symbolem
Okap może różnić się pod względem wyglądu od okapu przedstawionego na rysunkach niniejszej instrukcji, ale zalecenia
dotyczące obsługi, konserwacji i montażu pozostają niezmienione.
Przy przeprowadzaniu instalacji urządzenia należy postępować według wskazówek podanych w niniejszej instrukcji. Producent
uchyla się od wszelkiej odpowiedzialności za uszkodzenia wynikłe na skutek instalacji niezgodnej z informacjami podanymi w niniejszej
instrukcji. Okap służy do zasysania oparów kuchennych i jest przeznaczony wyłącznie do użytku domowego.
• Należy zachować instrukcję obsługi aby móc z niej skorzystać w każdej chwili. W przypadku sprzedaży urządzenia lub przeprowadzki,
należy upewnić się, że dołączono do niego instrukcję obsługi.
• Uważnie zapoznać się z treścią instrukcji obsługi, która dostarcza dokładne informacje dotyczące instalacji, użytkowania i pielęgnacji
urządzenia..
• Nie dokonywać zmian elektrycznych czy mechanicznych w urządzeniu lub na przewodach odprowadzających.
• Przed przystąpieniem do montażu urządzenia należy sprawdzić czy któraś z jego części składowych nie jest uszkodzona. Jeśli tak,
należy skontaktować się ze sprzedawcą i zaprzestać kontynuowania instalacji.
Minimalna odległość między powierzchnią, na której znajdują się naczynia na urządzeniu grzejnym a najniższą częścią okapu kuchennego
powinna wynosić nie mniej niż 50cm w przypadku kuchenek elektrycznych i nie mniej niż 65cm w przypadku kuchenek gazowych lub typu
mieszanego.
Jeżeli w instrukcji zainstalowania kuchni gazowej podana jest większa odległość, należy dostosować się do takich wskazań.
POŁĄCZENIE ELEKTRYCZNE
Napięcie sieciowe musi odpowiadać napięciu wskazanemu na tabliczce umieszczonej w wewnętrznej części okapu. Jeśli okap jest
wyposażony we wtyczkę, należy ją podłączyć do gniazdka zgodnego z obowiązującymi normami i umieszczonego w łatwo dostępnym
miejscu, również po zakończonej instalacji.
Jeśli okap nie jest wyposażony we wtyczkę (bezpośrednie podłączenie do sieci) lub wtyczka nie znajduje się w łatwo dostępnym miejscu,
również po zakończonej instalacji, należy zastosować znormalizowany wyłącznik dwubiegunowy, który umożliwi całkowite odcięcie od sieci
elektrycznej w warunkach nadprądowych kategorii III, zgodnie z zasadami instalacji.
UWAGA!
Przed ponownym podłączeniem obwodu okapu do zasilania i sprawdzeniem poprawności jego działania należy się zawsze upewnić, czy
przewód zasilający jest prawidłowo zamontowany.
Jeżeli kabel nie jest wyposażony we wtyczkę,należy podłączyć przewody zgodnie z poniższą tabelą:
Napięcie sieciowe i jego częstotliwość Podłączenie przewodu
Sprawdzić wartość wskazaną na tabliczce danych, znajdującej się
wewnątrz okapu.
: żółty/ zielony
N : niebieski
L : brązowy
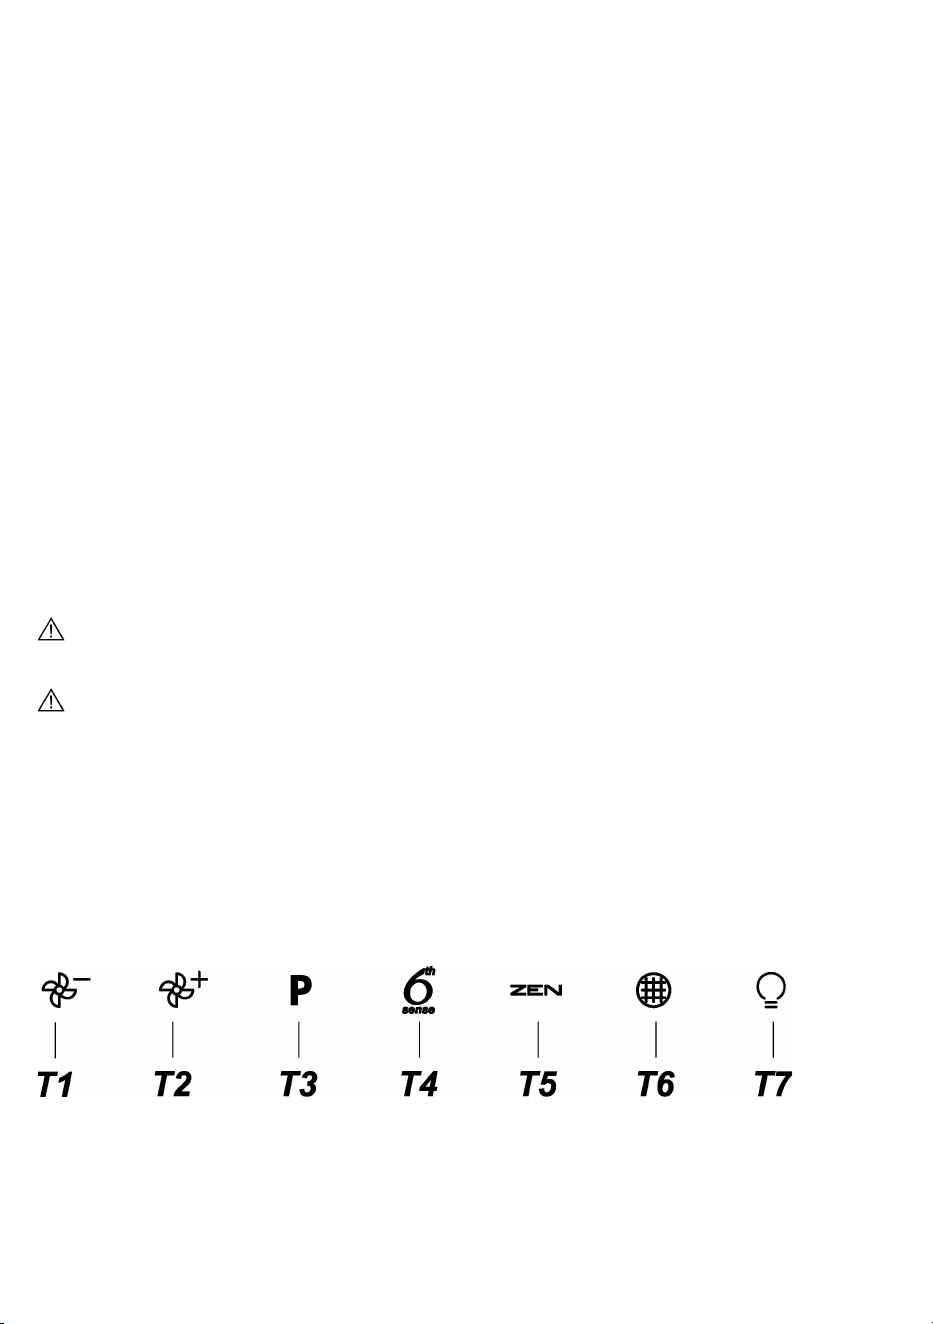
103
Wymiana kabla zasilającego
Okap jest wyposażony w specjalny przewód zasilający.
W razie uszkodzenia tego przewodu, należy go zamówić w biurze obsługi serwisowej.
ODPROWADZANIE POWIETRZA
(dla wersji zasysających)
Podłączyć okap do przewodu wentylacyjnego rurą odprowadzającą o średnicy odpowiadającej rozmiarowi wylotu z okapu (kołnierz
łączeniowy).
Użycie przewodów o mniejszym przekroju powoduje zmniejszenie zdolności zasysania oraz drastyczne zwiększenie hałaśliwości okapu.
Producent, zatem, nie ponosi żadnej odpowiedzialności za ten stan.
! Używać jak najkrótszego przewodu.
! Używać przewodu o jak najmniejszej liczbie zagięć (maksymalny kąt zagięcia: 90°).
! Unikać radykalnych zmian przekroju przewodu.
! Producent nie ponosi żadnej odpowiedzialności w przypadku nie przestrzegania powyższych norm.
FILTRUJĄCY CZY ZASYSAJĄCY?
! Wasz okap gotowy jest do użytkowania w wersji zasysającej.
Aby używać okapu w wersji filtrującej należy zainstalować odpowiedni KOMPLET AKCESORIÓW.
Sprawdzić na pierwszych stronach niniejszej instrukcji czy KOMPLET AKCESORIÓW jest dostarczany na wyposażeniu czy też należy
go zakupić oddzielnie.
Uwaga: Jeśli znajduje się na wyposażeniu, to w niektórych przypadkach, dodatkowy system filtrowania na bazie aktywnego węgla
mógłby być już zainstalowany na okapie.
Informacje dotyczące transformacji okapu z wersji zasysającej na wersję filtrującą zostały umieszczone w niniejszej instrukcji.
Wersja zasysająca
Opary są usuwane na zewnątrz rurą odprowadzającą zamocowaną do kołnierza łączeniowego.
UWAGA!
Rura odprowadzająca nie jest dostarczona w komplecie z urządzeniem i należy ją zakupić.
Średnica rury odprowadzającej musi być równa średnicy kołnierza łączeniowego.
UWAGA!
Jeśli okap jest zaopatrzony w filtry węglowe, to muszą one zostać zdjęte.
Wersja filtrująca
Aby używać okapu w tej wersji należy zainstalować filtr węglowy.
Można go kupić u sprzedawcy.
Zasysane powietrze jest oczyszczane z tłuszczu i zapachów zanim zostanie zwrócone do pomieszczenia przez kratki w górnej osłonie
komina.
KOMENDY
Okap jest wyposażony w panel sterowania z regulacją prędkości turbiny zasysającej oraz włącznikiem oświetlenia przestrzeni roboczej pod
okapem.
T1. Silnik wentylatora WYŁ. / Zmniejszona prędkość
T2. Silnik wentylatora WŁ. / Zwiększona prędkość
T3. Funkcja „POWER BOOST ”
T4. Funkcja 6th sense (tryb AUTO) WŁ./WYŁ.
T5. Obsługa w "Trybie ZEN"
T6. Alarm/reset filtra przeciwtłuszczowego i węglowego
T7. Główne oświetlenie WŁ./WYŁ.

104
UWAGA! Ten okap jest wyposażony w automatyczny system obsługi (patrz poniżej “T4. Funkcja 6th sense (tryb AUTO) WŁ./WYŁ.”).
Kalibracja odbywa się automatycznie przy każdym ponownym podłączeniu okapu do sieci elektrycznej (np.: przy pierwszym montażu po
wyłączeniu zasilania). Można ją również wykonać ręcznie (patrz paragraf „Ustawianie czujnika”). Podczas kalibracji, która trwa 5 minut, T4
miga. W tym czasie można również używać lamp.
T1. SILNIK WENTYLATORA WYŁ. / ZMNIEJSZONA PRĘDKOŚĆ
Nacisnąć, aby zmniejszyć prędkość i wyłączyć silnik zasysania. Nacisnąć i przytrzymać, aby natychmiast wyłączyć silnik zasysania.
T2. SILNIK WENTYLATORA WŁ. / ZWIĘKSZONA PRĘDKOŚĆ
Nacisnąć, aby włączyć silnik zasysania i zwiększyć prędkość. Nacisnąć i przytrzymać, aby natychmiast ustawić 3. prędkość.
T3. FUNKCJA „POWER BOOST ”
Nacisnąć przycisk T3, aby włączyć prędkość intensywnego zasysania „POWER BOOST 1” (sterowana czasowo).
Uwaga: okap powróci do 3. prędkości po upływie pięciu minut.
Przy włączonym silniku zasysania ponownie nacisnąć T3, aby włączyć dodatkową prędkość intensywnego zasysania „POWER BOOST 2”
(sterowana czasowo).
Uwaga: okap powróci do 3. prędkości po upływie pięciu minut.
Uwaga: ponownie naciskać T3 przez pięć sekund, okap powróci ponownie do pracy z prędkością “POWER BOOST 1”
T4. FUNKCJA 6TH SENSE (TRYB AUTO) WŁ./WYŁ.
Okap automatycznie ustawia prędkość odsysania, jeśli czujnik w okapie wykryje zmiany w zależności od warunków otoczenia.
Uwaga: aby upewnić się, że funkcja jest używana prawidłowo, należy najpierw skonfigurować czujnik (patrz „Ustawianie czujnika”
poniżej).
Uwaga: w przypadku zmiany innych funkcji sterujących prędkością funkcja, „6th sense” wyłączy się.
Ustawianie czujnika
Ta operacja może zostać wykonana, gdy okap jest WYŁĄCZONY.
Przy normalnych warunkach otoczenia nacisnąć T4 przez 5 sekund, wówczas T4 będzie przez 5 minut migać, sygnalizując, że okap
przeprowadza kalibrację czujnika, a następnie wskaźnik wyłączy się, sygnalizując zakończenie kalibracji.
Ustawianie płyty kuchennej: Równocześnie nacisnąć i przytrzymać przyciski T1 i T2. Oba zaświecą się, sygnalizując, że okap jest gotowy
na zaakceptowanie kalibracji parametrów płyty kuchennej.
Nacisnąć T1, aby wybrać płytę gazową (T1 będzie migać przez 3 sekundy, sygnalizując ustawienie parametrów okapu dla płyty gazowej).
Nacisnąć T2 , aby wybrać płytę indukcyjną (T2, będzie migać przez 3 sekundy, sygnalizując ustawienie parametrów okapu dla płyty
indukcyjnej).
T5. OBSŁUGA W „TRYBIE ZEN”
Nacisnąć, by włączyć lub wyłączyć tryb zasysania „ZEN”.
Ta funkcja umożliwia uruchamianie prędkości zasysania przy zachowaniu doskonałej równowagi między niskim poziomem głośności, a
wydajnością działania.
T6. ALARM/RESET FILTRA PRZECIWTŁUSZCZOWEGO/ WĘGLOWEGO
W regularnych odstępach czasu okap sygnalizuje konieczność konserwacji filtra.
Uwaga: Wskaźniki będą działać wyłącznie przy włączonym okapie.
T6 świeci się: Wymagana konserwacja filtra przeciwtłuszczowego.
T6 miga: wymagana konserwacja filtra węglowego.
Resetowanie wskaźników nasycenia filtra:
Uwaga: Ta operacja musi być wykonana przy wyłączonym okapie.
Nacisnąć i przytrzymać T6
Uwaga: T6 i okap wyłączają się, wskazując, że reset alarmu został wykonany.
Reset filtra przeciwtłuszczowego i filtra węglowego odbywa się za pomocą tego samego przycisku. Jeśli oba alarmy filtrów są aktywne,
procedura resetu wyzeruje licznik jeden po drugim, zaczynając od filtra węglowego.
Uruchamianie wskaźnika nasycenia filtra z węglem aktywnym
Uwaga: Tę czynność należy wykonywać przy wyłączonym silniku zasysania.
Ten wskaźnik jest zwykle wyłączony – aby włączyć tę funkcję, nacisnąć i przytrzymać równocześnie przyciski T3 i T7: Oba zaświecą się,
sygnalizując włączenie.
Aby wyłączyć tę funkcję, ponownie nacisnąć i przytrzymać te same przyciski: Oba przyciski będą przez krótki czas migać, a następnie
przestaną świecić, sygnalizując dezaktywację.
T7. GŁÓWNE OŚWIETLENIE WŁ./WYŁ.
Nacisnąć, aby włączyć lub wyłączyć oświetlenie płyty grzejnej.
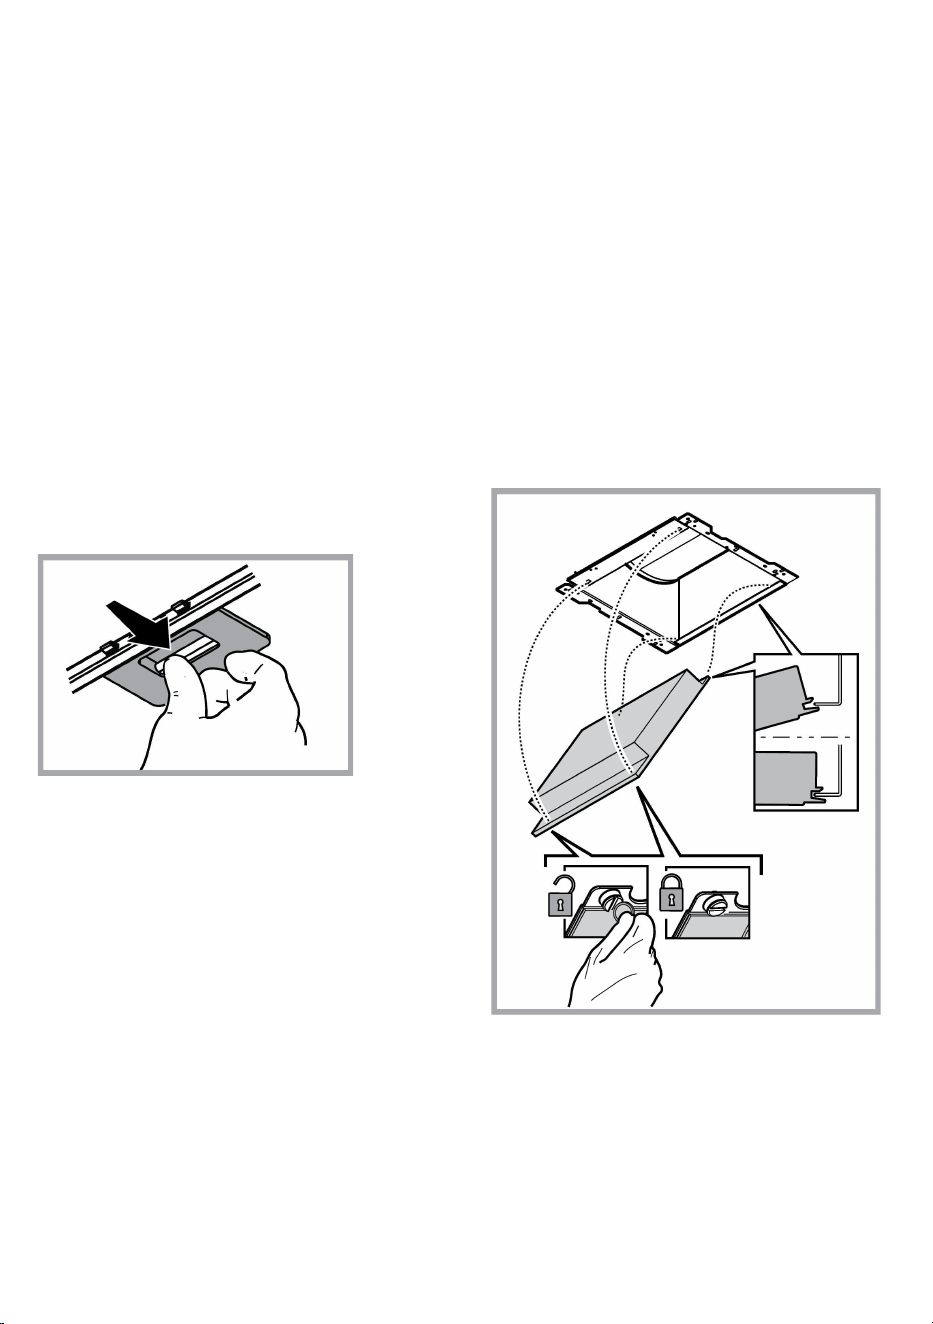
105
KONSERWACJA
Czyszczenie
Do czyszczenia używać WYŁĄCZNIE szmatki nawilżonej
płynnymi neutralnymi środkami czyszczącymi. DO
CZYSZCZENIA NIE NALEŻY UŻYWAĆ NARZĘDZI ANI
PRZYRZĄDÓW! Unikać stosowania produktów zawierających
środki ścierne. NIE STOSOWAĆ ALKOHOLU!
Konserwacja filtrów
przeciwtłuszczowych
Zatrzymuje cząstki tłuszczu pochodzące z gotowania.
Musi być czyszczony co najmniej raz w miesiącu (lub gdy
wskaźnik zanieczyszczenia filtrów – jeżeli wasz model okapu
posiada wskaźnik – informuje o konieczności jego wymiany), za
pomocą nieagresywnego środka czyszczącego, ręcznie lub
w zmywarce w niskiej temperaturze i krótkim cyklu mycia.
Podczas mycia w zmywarce metalowy filtr tłuszczowy może się
odbarwić, ale nie zmienią się jego charakterystyczne cechy
filtrujące.
Aby wyjąć filtr tłuszczowy należy pociągnąć za klamkę
sprężynową.
Konserwacja filtra węglowego
Zatrzymuje przykre zapachy pochodzące z gotowania.
Nasycenie filtra następuje po mniej lub bardziej długim okresie
użytkowania w zależności od rodzaju kuchenki i od regularności z
jaką jest wykonywane czyszczenie filtra przeciwtłuszczowego.
Wkład filtra powinien być w ka żdym razie wymieniony po upływie
nie więcej niż czterech miesięcy (lub, gdy wskaźnik nasycenia filtra
sygnalizuje konieczność wymiany filtra – jeżeli posiadany model
jest wyposażony w taki wskaźnik).
NIE wolno myć lub regenerować filtra.
Montaż
Włożyć filtr węglowy najpierw z tyłu do metalowej kasety okapu, a
następnie zamocować z przodu, za pomocą dwóch pokręteł.
Demontaż
Wyjąć filtr węglowy obracając pokrętła mocujące do okapu o 90°.
Wymiana żarówek
Okap zaopatrzony jest w system oświetlenia, który bazuje się na
technologii LED.
LED gwarantują optymalne oświetlenie, trwałość 10 razy większą
od lamp tradycyjnych i pozwalają zaoszczędzić 90% energii
elektrycznej.
Aby wymienić lampy, należy skontaktować się z autoryzowanym
centrum obsługi w sprawie części zamiennych.
106
ZŁOMOWANIE
Niniejsze urządzenie posiada oznaczenia zgodnie z Dyrektywą Unijną 2012/19/EC w sprawie zużytego sprzętu elektrycznego i
elektronicznego (WEEE).
Zapewniając prawidłowe złomowanie niniejszego urządzenia, przyczynią się Państwo do ograniczenia ryzyka wystąpienia negatywnego
wpływu produktu na środowisko i zdrowie ludzi, które mogłoby zaistnieć w przypadku niewłaściwej utylizacji urządzenia.
Symbol na urządzeniu lub opakowaniu oznacza, że tego produktu nie można traktować jak innych odpadów komunalnych. Należy
oddać go do właściwego punktu zbiórki i recyklingu sprzętów elektrycznych i elektronicznych.
Właściwa utylizacja i złomowanie pomaga w eliminacji niekorzystnego wpływu złomowanych urządzeń na środowisko oraz zdrowie. Aby
uzyskać szczegółowe dane dotyczące możliwości recyklingu niniejszego urządzenia, należy skontaktować się z lokalnym urzędem miasta,
służbami oczyszczania miasta lub sklepem, w którym produkt został zakupiony.
Urządzenie zostało zaprojektowane, przetestowane i wyprodukowane zgodnie z następującymi warunkami:
• Bezpieczeństwo: EN/IEC 60335-1; EN/IEC 60335-2-31, EN/IEC 62233.
• Wydajność: EN/IEC 61591; ISO 5167-1; ISO 5167-3; ISO 5168; EN/IEC 60704-1; EN/IEC 60704-2-13; EN/IEC 60704-3; ISO 3741; EN
50564; IEC 62301.
• EMC: EN 55014-1; CISPR 14-1; EN 55014-2; CISPR 14-2; EN/IEC 61000-3-2; EN/IEC 61000-3-3.
Sugestie dotyczące prawidłowego użytkowania w celu zmniejszenia wpływu na środowisko:
Włączyć okap na minimalne obroty w momencie rozpoczęcia gotowania i zostawić go włączony przez kilka minut po zakończeniu gotowania.
Zwiększać obroty jedynie w przypadku dużej ilości dymu i pary oraz używać wysokich obrotów tylko w ekstremalnych sytuacjach. W razie
potrzeby wymienić filtr/filtry węglowe, aby utrzymać dobrą skuteczność redukcji zapachów. W razie konieczności wyczyścić filtr/filtry smaru,
aby utrzymać dobrą wydajność filtra smaru. Używać maksymalnej średnicy systemu wentylacyjnego wskazanej w niniejszej instrukcji, w celu
optymalizacji wydajności i minimalizacji hałasu.
NIEPRAWIDŁOWOŚCI FUNKCJONOWANIA
Jeśli wydaje się, że coś nie działa prawidłowo, przed wezwaniem Serwisu Technicznego, należy wykonać następujące proste kontrole:
• Jeśli okap nie działa:
Sprawdzić czy:
- nie nastąpiło przerwanie dopływu prądu.
- została wybrana jakaś prędkość działania.
• Jeśli okap ma słabą wydajność:
Sprawdzić czy:
- Wybrana prędkość silnika jest wystarczająca dla uwolnionej ilości dymu i oparów.
- Kuchnia jest wystarczająco przewietrzona pozwalając na pobór powietrza.
- Filtr węglowy nie jest zużyty (okap w wersji filtrującej).
• Jeśli okap wyłączył się w trakcie normalnego funkcjonowania:
Sprawdzić czy:
- nie nastąpiło przerwanie dopływu prądu.
- nie wyskoczył główny wyłącznik.
W przypadku ewentualnych nieprawidłowości działania, przed wezwaniem Serwisu Technicznego, należy przez przynajmniej 5 sekund
odłączyć urządzenie od zasilania elektrycznego poprzez wyciągnięcie wtyczki a następnie ponownie je podłączyć. Jeśli nieprawidłowości dalej
będą miały miejsce, należy zwrócić się do Serwisu Technicznego.
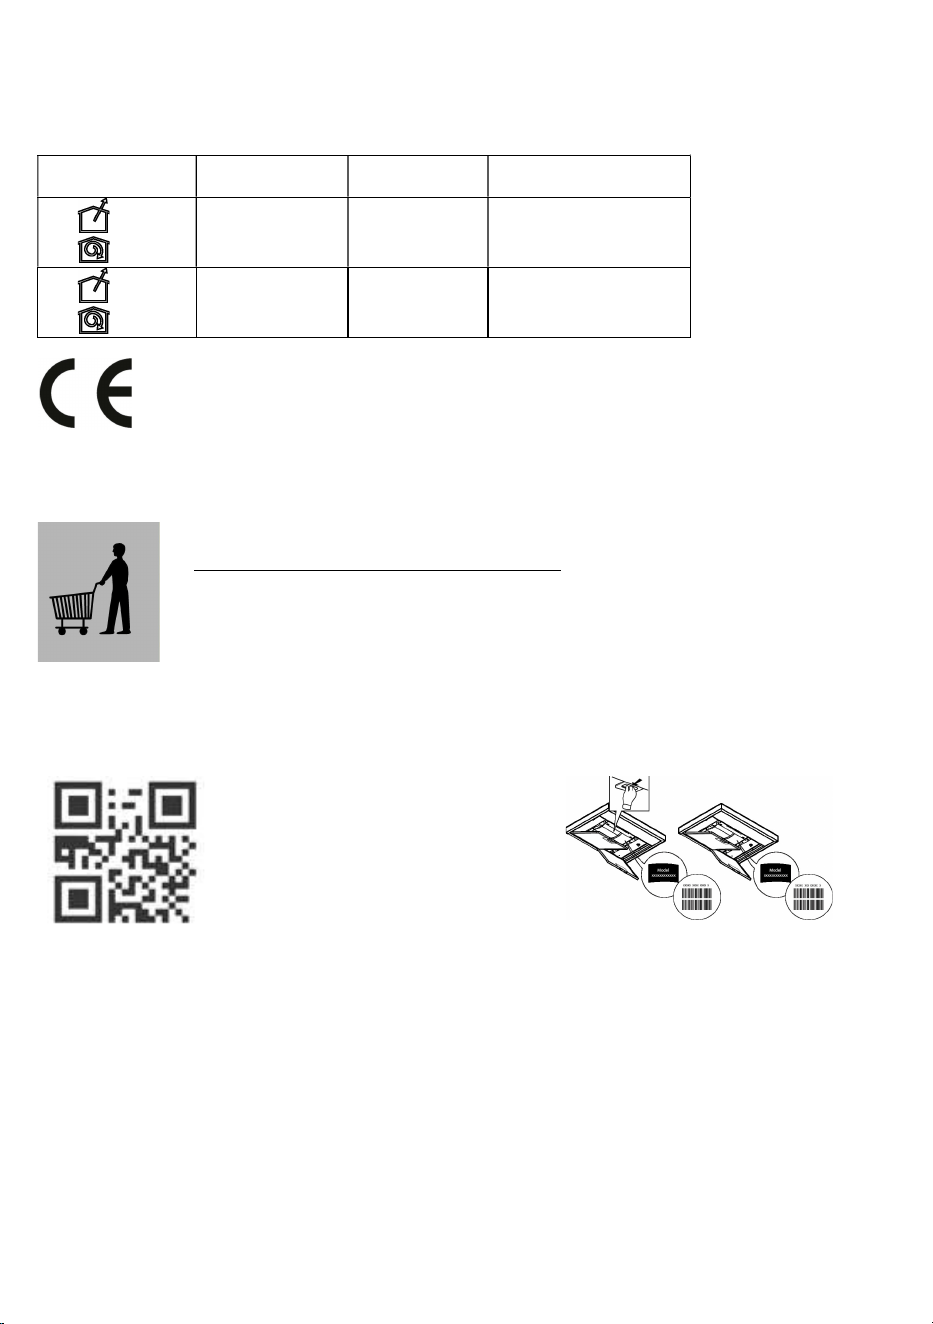
107
DANE TECHNICZNE
Wysokość (cm) Szerokość (cm) Głębokość (cm)
Średnica przewodu
odprowadzającego (cm)
62-114
71
-
114
89,8 45,5 15
62-114
71
-
114
59,8 45,5 15
Komponenty niebędące na wyposażeniu razem z produktem
Instrukcje bezpieczeństwa, instrukcję obsługi,
karta produktu oraz parametry poboru energii
można pobrać:
• Odwiedzając naszą stronę internetową
docs.whirlpool.eu
• Używając kodu QR
• Można również
skontaktować się z Centrum
pomocy technicznej
(Patrz numer telefonu
na
karcie gwarancyjnej). Kontaktując się z naszym
serwisem technicznym, należy podać kody z
tabliczki
znamionowej urządzenia.

108
RO
SIGURANŢĂ GENERALĂ
• Înainte de orice operaţiune de curăţare sau de întreţinere, deconectaţi hota de la reţea prin
scoaterea ştecherului sau deconectaţi sursa de alimentare cu energie.
• Purtaţi întotdeauna mănuşi de lucru pentru toate operaţiunile de instalare şi întreţinere.
• Acest aparat poate fi folosit de copii cu vârsta peste 8 ani şi persoane cu capacităţi fizice,
senzoriale sau mentale reduse sau lipsite de experienţă şi cunoştinţe, dacă sunt sub
supravegheate şi au fost instruite cu privire la utilizarea aparatului în condiţii de siguranţă şi
înţeleg riscurile implicate.
• Copiiilor nu trebuie să li se permită să manipuleze comenzile sau să se joace cu aparatul.
• Curăţarea şi întreţinerea nu se face de către copii fără supraveghere.
• Locul în care este instalat aparatul trebuie să fie ventilat suficient, în cazul în care hota de
bucătărie se utilizează împreună cu alte dispozitive de ardere a gazelor sau a altor
combustibili.
• Hota trebuie să fie curăţată în mod regular atât în interior cât şi în exterior(cel puţin o dată
pe lună).
• Trebuie să se respecte in mod expres ceea ce este indicat în Instrucţiunile de întreţinere.
• Defectarea capotei de curăţare a aparatului, schimbarea şi curăţarea filtrelor poate provoca
incendii.
• Gătirea alimentelor cu foc cu flacără direct sub hotă este strict interzisă.
• Pentru înlocuirea becurilor, utilizati numai tipul de becuri indicat în secţiunea
Întreţinere/Înlocuirea becurilor din acest manual.
Utilizarea flăcării este dăunătoare filtrelor şi poate provoca risc de incendiu; prin urmare,
trebuie evitată în orice situaţie. Orice prăjire trebuie să se facă cu grijă, pentru a se asigura
că uleiul nu se supraîncălzeste şi aprinde.
AVERTISMENT: Părţile accesibile ale hotei pot deveni fierbinti pe durata utilizării.
• Nu conectaţi aparatul la reţeaua electrică până când instalarea este până când instalarea
nu este complet complet terminată.
• În ceea ce priveşte măsurile tehnice şi de siguranţă care trebuie adoptate pentru evacuarea fumului, este important să se urmărească
îndeaproape normele locale.
• Sistemul de evacuare a fumului pentru acest aparat nu trebuie să fie conectat la nici un sistem de ventilaţie existent care este folosit în alte
scopuri, cum ar fi evacuarea gazelor de ardere rezultate de la aparatele consumatoare de gaz sau alţi combustibili.
• Nu folosiţi şi nu lăsaţi hota fără bec montat corect din cauza riscului de electrocutare.
• Nu folosiţi niciodată hota fără ca aceasta să aibă grilele montate în mod eficient.
• Hota nu trebuie utilizată NICIODATĂ ca suprafaţă de sprijin dacă acest lucru nu este precizat in mod expres.
• Folosiţi numai şuruburile de fixare furnizate împreună cu produsul pentru instalare sau, în cazul în care nu sunt incluse, achiziţionaţi tipul
corespunzător de şuruburi.
• Utilizați lungimea corectă pentru șuruburile identificate în Ghidul de instalare.
• În caz de incertitudine, consultaţi un centru de asistenţă service autorizat sau o persoană cu calificare corespunzătoare.
ATENŢIE!
• Neinstalarea şuruburilor sau a dispozitivul de fixare în conformitate cu aceste instrucţiuni poate duce la pericolelor de natură electrică.
• Nu utilizaţi cu un temporizator, timer, o telecomandă separată sau orice alt dispozitiv care este activat automat.
Nu permiteți copiilor cu vârstă sub 3 ani să se apropie de aparat. Nu lăsați aparatul la îndemâna copiilor cu vârstă sub 8 ani, decât sub
supravegherea continuă a unui adult.
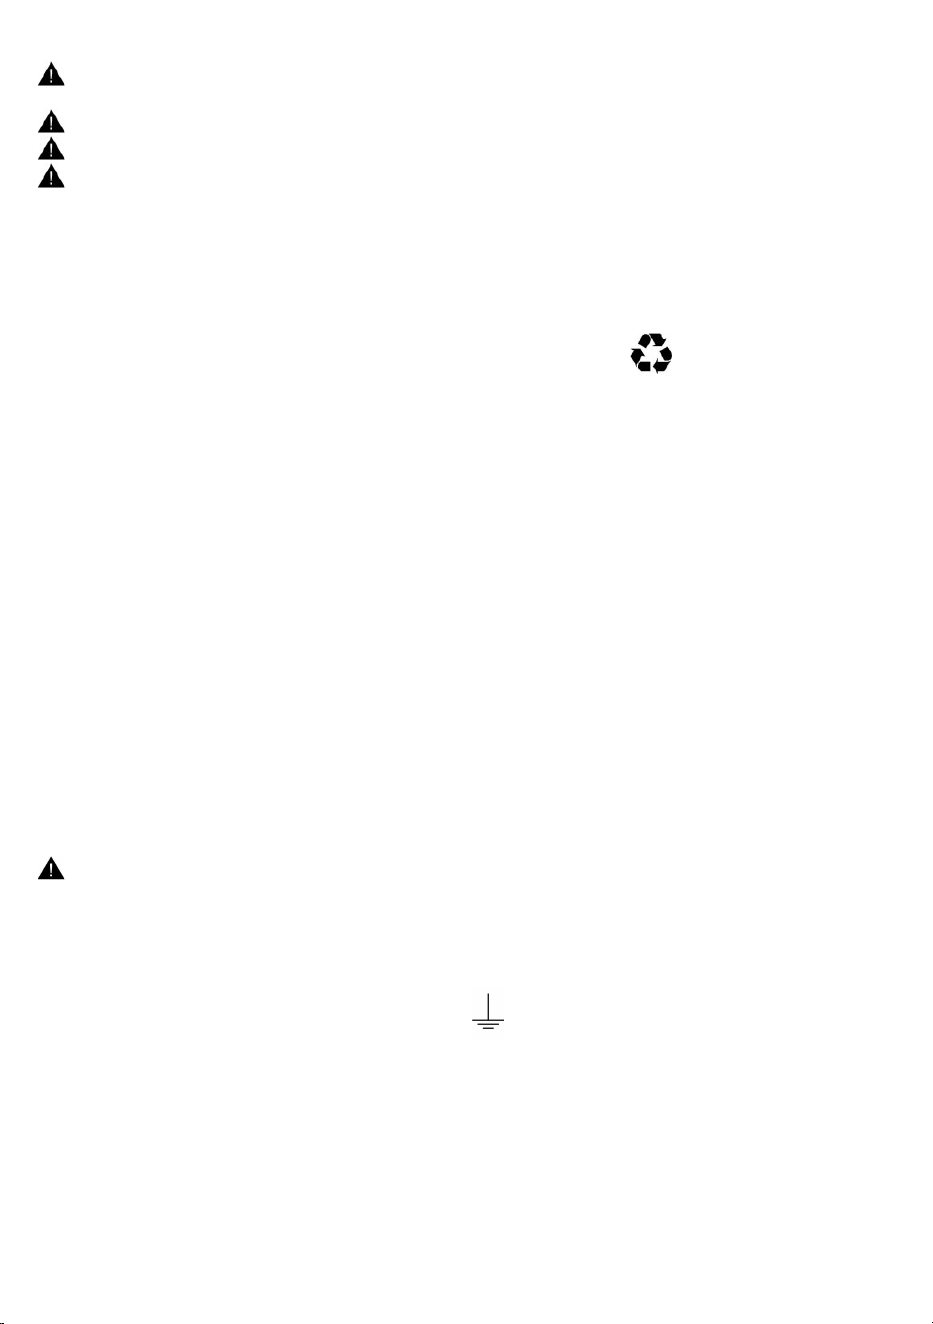
109
ATENȚIE: aparatul nu este destinat punerii în funcțiune prin intermediul unui dispozitiv extern sau al unui sistem separat de comandă de
la distanță.
Acest aparat nu este destinat uzului profesional. Nu utilizați aparatul în aer liber.
Pentru a evita pericolul de accidentare, aparatul trebuie să fie manevrat și instalat de două sau mai multe persoane.
Operațiunile de instalare, inclusiv eventualele racordări la linia de alimentare cu apă (dacă sunt prevăzute) și legăturile electrice, precum
și lucrările de reparație trebuie să fie efectuate de personal calificat.
După terminarea operațiunilor de instalare, nu lăsați materialele folosite pentru ambalare (bucăți din plastic, polistiren etc.) la îndemâna
copiilor, pentru a evita pericolul de sufocare. .
Nu folosiți aparatul dacă aveți părți ale corpului umede sau dacă sunteți desculți.
Nu folosiți niciodată aparate de curățat cu aburi - pericol de electrocutare.
Materialele folosite pentru ambalare sunt 100% reciclabile și sunt marcate cu simbolul de reciclare
Hota poate fi din punct de vedere estetic diferită faţă de cea ilustrată în desenele acestui manual, totuşi instrucţiunile de utilizare,
întreţinere şi instalare rămân aceleaşi.
Urmăriţi îndeaproape instrucţiunile conţinute în acest manual. Producătorul îşi declină orice responsabilitate în cazul daunelor sau
incendiilor provocate aparatului şi derivate dintr-o utilizare incorectă şi din nerespectarea instrucţiunilor conţinute în acest manual. Hota a fost
proiectată pentru aspirarea gazelor arse şi vaporilor rezultaţi în urma gătirii alimentelor şi este destinată doar utilizării casnice.
• Este important să păstraţi acest manual pentru a-l putea consulta în orice moment. În caz de vânzare, cesiune sau mutare, asiguraţi-vă
că acesta rămâne împreună cu produsul.
• Citiţi cu atenţie instrucţiunile: există informaţii importante privind instalarea, utilizarea şi siguranţa.
• Nu efectuaţi modificări de tip electric sau mecanic asupra produsului sau asupra ţevilor de evacuare.
• Înainte de instalarea aparatului, verificați dacă toate componentele nu sunt deteriorate.În caz contrar, contactați furnizorul și nu continuați
cu instalarea.
Distanţa minimă între suprafaţa suportului recipientelor pe dispozitivul de gătit şi partea de jos a hotei nu trebuie să fie mai mică de 50cm în
cazul maşinilor de gătit electrice şi de 65cm în cazul maşinilor de gătit cu gaz sau mixte.
Dacă instrucţiiunile dispozitivului de gătit cu gaz specifică o distanţă mai mare, este necesar să ţineţi cont de aceasta.
CONEXAREA ELECTRICĂ
Tensiunea din reţea trebuie să corespundă cu tensiunea la care se referă eticheta situată în interiorul hotei. Dacă este prevăzută cu ştecher
conectaţi hota la o priză conform cu normele în vigoare, poziţionată într-o zona accesibilă şi după instalare. Dacă nu este prevăzută cu ştecher
(conexiunea este direct la reţea) sau ştecherul nu este poziţionat într-o zonă accesibilă şi după instalare, aplicaţi un întrerupător bipolar la
normă care să asigure deconectarea completă de la reţea în condiţiile categoriei de supratensiune III, conform regulilor de instalare.
ATENŢIE!
Înainte de a efectua conectarea circuitului hotei la alimentaţia din reţea şi de a verifica funcţionarea corectă, controlaţi întotdeauna dacă cablul
a fost montat în mod corect.
În cazul în care cablul nu este prevăzut cu unştecher,conectaţi-l respectând datele din următorul tabel:
Tensiunea și frecvenţa reţelei electrice Conexiune cablu
Consulta
ți valoarea indicată pe eticheta cu caracteristici, aplicată în
interiorul hotei.
: galben/verde
N : albastru
L : maro
Inlocuirea cablului de alimentare
Hota este prevăzută cu un cablu de alimentare special; în cazul deteriorării acestuia, apelaţi la serviciul de asistenţă tehnică.
EVACUAREA AERULUI
(pentru versiunile cu ventilaţie)
Racordaţi hota la cablurile şi orificiile de evacuare prin perete cu diametru egal cu ieşirea aerului (flanşa de record).

110
Utilizarea tuburilor şi orificiilor de evacuare la perete cu diametrul mai mic va determina o diminuare a prestaţiilor de aspirare şi o creştere
drastică a zgomotului.
Se declină însă orice responsabilitate în acest sens.
! Folosiţi un tub de lungime minimă indispensabilă.
! Folosiţi un tub cu un număr cât mai mic de curbe posibil (unghiul maxim al curbei: 90°).
! Evitaţi schimbările drastice de secţiune ale tubului.
! Producătorul şi declină orice responsabilitate dacă aceste măsuri de siguranţă nu sunt respectate.
FILTRANTA SAU CU VENTILATIE ?
! Hota dumneavoastră este gata pentru a fi folosita in versiunea cu ventilaţie.
Pentru a utiliza hota in versiune filtrantă, se instalează SETUL DE ACCESORII corespunzător.
Verificaţi primele pagini ale acestui manual, dacă SETUL DE ACCESORII este deja furnizat sau trebuie să fie achiziţionat separat.
Notă: Dacă este furnizat, în unele cazuri, sistemul de filtrare suplimentar pe bază de cărbune activ poate să fie deja instalat pe hotă.
Informaţiile referitoare la trecerea hotei din versiunea cu ventilaţie in cea filtrantă sunt deja conținute în acest manual.
Versiunea aspirantă
Vaporii sunt evacuaţi către exterior prin intermediul unui tub de evacuare fixat la flanşa de racord.
ATENŢIE!
Tubul de evacuare nu se furnizează din dotare; acesta trebuie achiziţionat.
Diametrul tubului de evacuare trebuie să fie echivalent cu diametrul inelului de conexiune.
ATENŢIE!
Dacă hota este prevăzută cu filtre de carbon, acestea trebuie să fie scoase.
Versiunea filtrantă
Aerul aspirat va fi degresat şi dezodorizat înainte de a fi reintrodus în cameră. Pentru a utiliza hota în această versiune este necesar să
instalaţi un sistem de filtrare suplimentar pe bază de carbon activ.
COMENZI
Hota este dotată cu un panou de comandă, de la care se modifică viteza de aspiraţie şi se declanşează aprinderea becurilor pentru iluminarea
blatului de aragaz.
T1. Motorul ventilatorului OPRIT / reducere turaţie
T2. Motorul ventilatorului PORNIT / creştere turaţie
T3. Funcţia „PUTERE AUXILIARĂ”
T4. PORNIRE/OPRIRE funcţie 6th sense (mod AUTOMAT)
T5. Funcţionarea în „Mod ZEN”
T6. Alarmă filtru de carbon/pentru grăsime/ resetare
T7. APRINDEREA/STINGEREA luminii principale
ATENŢIE! Această hotă are un sistem de funcţionare automat (consultaţi paragraful de mai jos „T4. PORNIRE/OPRIRE funcţie 6th sense
(mod AUTOMAT)”).
Calibrarea are loc automat de fiecare dată când hota este reconectată la reţeaua de alimentare electrică (de exemplu: la prima instalare, după
o pană de curent). De asemenea, poate fi efectuată manual (consultaţi paragraful „Configurarea senzorului”). În timpul calibrării, care
durează 5 minute, T4 va clipi şi luminile pot fi utilizate.
T1. MOTORUL VENTILATORULUI OPRIT / REDUCERE TURAŢIE
Apăsaţi pentru a reduce turaţia şi OPRIŢI motorul de aspiraţie. Apăsaţi şi menţineţi apăsat pentru a OPRI direct motorul de aspiraţie.

111
T2. MOTORUL VENTILATORULUI PORNIT / CREŞTERE TURAŢIE
Apăsaţi pentru a PORNI motorul de aspiraţie şi pentru a creşte turaţia.
Apăsaţi şi menţineţi apăsat pentru a seta direct a 3-a treaptă de viteză.
T3. FUNCŢIA „PUTERE AUXILIARĂ”
Apăsaţi pe T3 pentru a activa viteza pentru aspiraţia intensivă „PUTERE AUXILIARĂ 1” (controlată în timp).
Vă rugăm să reţineţi: hota va reveni la treapta a 3-a de viteză după cinci minute.
Cu motorul de aspiraţie pornit, fiind selectată viteza „PUTERE AUXILIARĂ 1”, apăsaţi din nou pe T3 pentru a activa viteza pentru aspiraţia
intensivă „PUTERE AUXILIARĂ 2” (controlată în timp).
Vă rugăm să reţineţi: hota va reveni la treapta a 3-a de viteză după cinci minute.
Vă rugăm să reţineţi: apăsaţi din nou pe T3 timp de cinci minute, iar hota va reveni la „PUTERE AUXILIARĂ 1”
T4. PORNIRE/OPRIRE FUNCŢIE 6TH SENSE (MOD AUTOMAT)
Hota setează automat viteza de aspiraţie dacă senzorul hotei detectează schimbarea condiţiilor ambientale.
Vă rugăm să reţineţi: pentru a vă asigura că această funcţie este utilizată corect, mai întâi configuraţi senzorul (consultaţi paragraful
„Configurarea senzorului” de mai jos).
Vă rugăm să reţineţi: în cazul în care schimbaţi alte funcţii care controlează viteza, funcţia „6th sense” se va opri.
Configurarea senzorului
Această procedură poate fi efectuată atunci când hota este OPRITĂ.
În condiţii ambientale normale, apăsaţi pe T4 timp de 5 secunde; T4 va clipi timp de 5 minute pentru a indica faptul că hota efectuează
calibrarea senzorului, apoi se stinge pentru a indica faptul că procedura de calibrare s-a încheiat.
Setarea plitei: Apăsaţi şi menţineţi apăsate butoanele T1 şi T2 simultan. Ambele se aprind pentru a indica faptul că hota este pregătită pentru
calibrarea parametrilor plitei.
Apăsaţi pe T1 pentru a alege plita pe gaz (T1 începe să clipească timp de 3 secunde pentru a indica faptul că parametrii hotei sunt setaţi
pentru o plită pe gaz).
Apăsaţi pe T2 pentru a alege plita cu inducţie (T2 începe să clipească timp de 3 secunde pentru a indica faptul că parametrii hotei sunt setaţi
pentru o plită cu inducţie).
T5. FUNCŢIONAREA ÎN „MOD ZEN”
Apăsaţi pentru a activa sau dezactiva modul de aspiraţie „ZEN”.
Această funcţie permite activarea unei viteze de aspiraţie care reprezintă echilibrul perfect dintre silenţiozitate şi eficienţă a aspiraţiei.
T6. ALARMĂ FILTRU PENTRU GRĂSIME/DE CARBON/RESETARE
La intervale regulate, hota semnalizează necesitatea de a efectua întreţinerea filtrului.
Vă rugăm să reţineţi: Indicatorii vor funcţiona atunci când hota este pornită.
T6 aprins: Efectuaţi întreţinerea filtrului pentru grăsime.
T6 clipeşte: efectuaţi întreţinerea filtrului de carbon.
Resetarea indicatorilor de semnalizare a saturaţiei filtrului:
Vă rugăm să reţineţi: Această operaţie trebuie efectuată cu hota pornită.
Apăsaţi şi menţineţi apăsat T6
Vă rugăm să reţineţi: T6 se stinge şi hota se opreşte, pentru a indica faptul că resetarea alarmei a avut loc.
Resetarea filtrului pentru grăsime şi a filtrului de carbon este efectuată utilizând aceeaşi tastă. Dacă sunt active ambele alarme ale filtrelor,
procedura de resetare va reseta câte un contor pe rând, cel aferent filtrului de carbon având prioritate.
Activarea indicatorului de semnalizare a saturaţiei filtrului de carbon
Vă rugăm să reţineţi: Această operaţie trebuie efectuată cu motorul de aspiraţie oprit.
Acest indicator este, de regulă, dezactivat – apăsaţi şi menţineţi apăsate butoanele T3 şi T7 simultan pentru a activa funcţia: Ambele se vor
aprinde pentru a indica activarea.
Pentru a dezactiva funcţia, apăsaţi şi menţineţi apăsate aceleaşi butoane din nou: Ambele vor clipi pentru scurt timp, apoi se vor stinge pentru
a indica dezactivarea.
T7. APRINDEREA/STINGEREA LUMINII PRINCIPALE
Apăsaţi pentru a aprinde sau stinge luminile plitei.
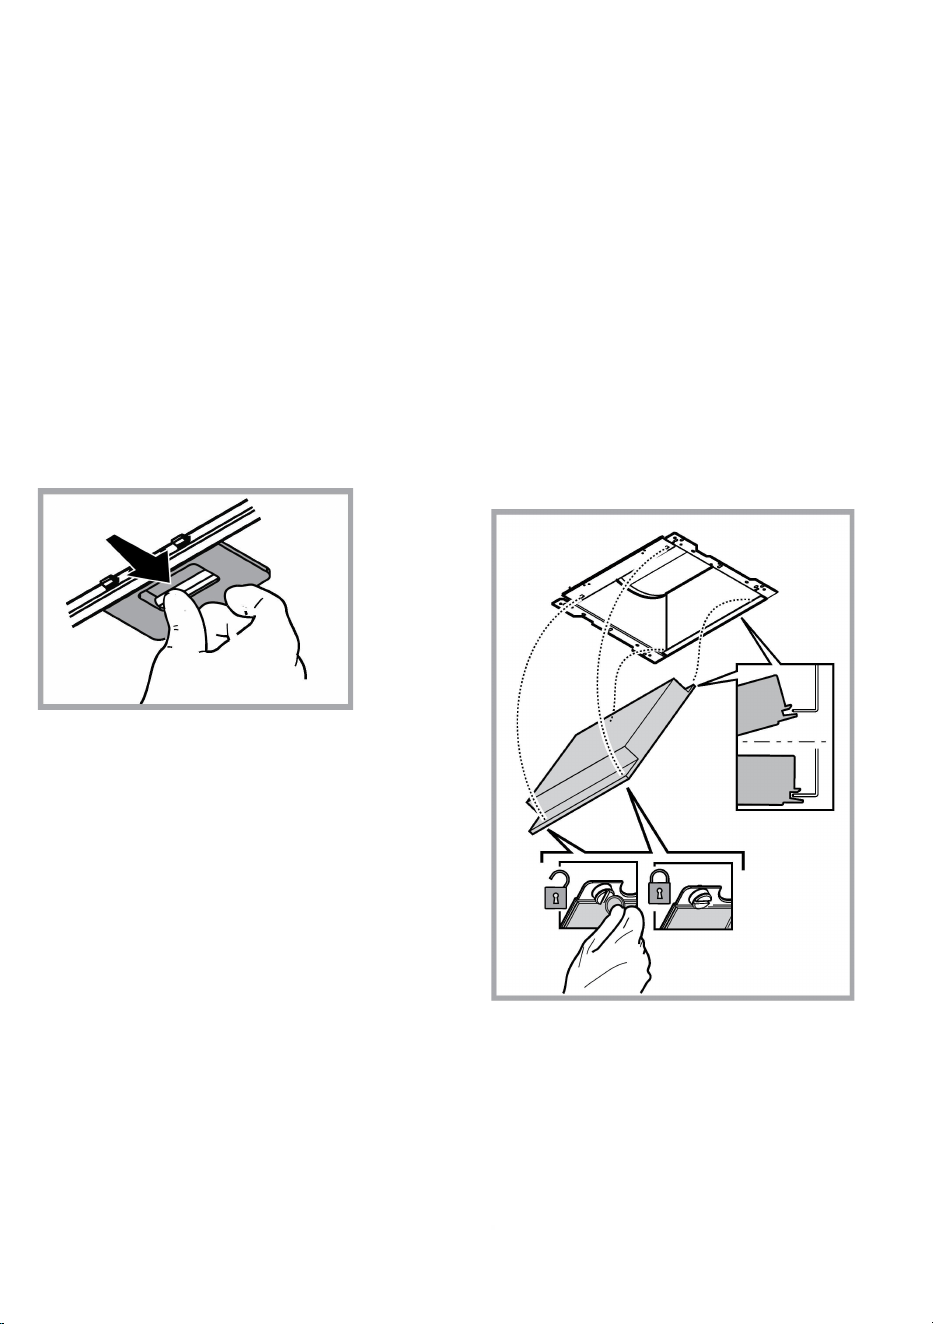
112
ÎNTREŢINEREA
Curăţarea
Pentru curăţare folosiţi EXCLUSIV un material îmbibat cu
detergenţi lichizi neutri. NU UTILIZAȚI UNELTE SAU
INSTRUMENTE PENTRU CURĂȚARE! Evitaţi folosirea
produselor pe bază de abrazivi NU FOLOSIŢI ALCOOL!
Intreţinere filtri antigrăsimi
Captează particulele de grăsime care apar în timpul pregătirii
alimentelor.
Trebuie să fie curăţat o dată pe lună (sau când sistemul de
semnalare a saturaţiei filtrelor – dacă modelul dvs. este prevăzut –
indică această necesitate), cu detergenţi neabrazivi, manual sau
utilizând maşina de spălat vase, la temperaturi scăzute şi folosind
un program scurt.
Filtrul metalic anti-grăsimi, spălat cu maşina de spălat vase se
poate decolora, dar nu-şi va pierde caracteristicile de filtrare.
Pentru demontarea filtrului trageţi mânerul de prindere cu resort.
Intreţinere filtru cu cărbune activ
Reţine mirosurile neplăcute, derivate în urma procesului de
gătire a alimentelor.
Saturarea filtrului de carbon apare după un anumit timp de
utilizare, care variază în funcţie de tipul aragazului şi de
regularitatea curăţării filtrului degresant. În orice caz, este necesar
să înlocuiţi cartuşul la maxim patru luni (sau când sistemul
indicator vă semnalează saturarea filtrelor – dacă este prevăzut pe
modelul dvs).
NU-l spălaţi sau refolosiţi
Montare
Agăţaţi filtrul de cărbune activ mai întâi posterior pe dispozitivul
metalic al hotei, apoi anterior cu cele două mânere.
Demontare
Îndepărtaţi filtrul de cărbune activ rotind 90° mânerele ce îl fixează
la hotă.
Înlocuirea becurilor
Hota este dotată cu un sistem de iluminare bazat pe tehnologia
LED.
LEDURILE garantează o iluminare optimă, o durată de până la 10
ori mai mare faţă de becurile tradiţionale şi permit economisirea a
90% de energia electrică.
Pentru înlocuirea becurilor, contactați centrul de service autorizat
pentru piese de schimb.
113
ELIMINARE
Acest aparat este marcat în conformitate cu Directiva Europeană 2012/19/EC referitoare la Deşeurile de Echipament Electric şi Electronic
(WEEE).
Asigurându-vă că acest produs este eliminat în mod corect, contribuiţi la prevenirea potenţialelor consecinţe negative asupra mediului
înconjurător şi sănătăţii persoanelor, consecinţe care ar putea fi provocate de aruncarea necorespunzătoare la gunoi a acestui produs.
Simbolul de pe produs, sau de pe documentele care însoţesc produsul, indică faptul că acesta nu poate fi aruncat împreună cu
deşeurile menajere. Trebuie predat la punctul de colectare corespunzător, pentru reciclarea echipamentului electric şi electronic.
Aruncarea la gunoi a aparatului trebuie făcută în conformitate cu normele locale pentru eliminarea deşeurilor.
Pentru informaţii mai detaliate privind eliminarea, valorificarea şi reciclarea acestui produs, vă rugăm să contactaţi administraţia locală, serviciul
de eliminare a deşeurilor menajere sau magazinul de unde aţi cumpărat produsul.
Aparat proiectat, testat şi fabricat în conformitate cu:
• Siguranţă: EN/IEC 60335-1; EN/IEC 60335-2-31, EN/IEC 62233.
• Randament: EN/IEC 61591; ISO 5167-1; ISO 5167-3; ISO 5168; EN/IEC 60704-1; EN/IEC 60704-2-13; EN/IEC 60704-3; ISO 3741; EN
50564; IEC 62301.
• EMC: EN 55014-1; CISPR 14-1; EN 55014-2; CISPR 14-2; EN/IEC 61000-3-2; EN/IEC 61000-3-3.
Recomandări pentru o utilizare corespunzătoare în scopul reducerii impactului asupra mediului: Când începeţi să gătiţi, porniţi hota la viteză
minimă şi lăsaţi-o să funcţioneze timp câteva minute după ce aţi terminat de gătit. Măriţi viteza în cazul cantităţilor mari de fum sau vapori şi
utilizaţi viteza/ele sporită/e doar în cazuri extreme. Înlocuiţi filtrul/ele de carbon, atunci când este necesar, pentru a menţine o eficienţă optimă
de reducere a mirosului. Curăţaţi filtrul/ele de grăsime, atunci când este necesar, pentru a menţine o eficienţă optimă a filtrului. Utilizaţi
diametrul maxim al sistemului de conducte indicat în acest manual pentru a optimiza eficienţa şi pentru a reduce la minimum nivelul de
zgomot.
ANOMALII DE FUNCTIONARE
Dacă ceva nu pare să funcţioneze, înainte de a face un apel la Serviciul de Asistenţă, efectuaţi următoarele verificări simple:
• Dacă hota nu funcţionează:
Verificaţi dacă:
- nu este vorba de o pană de curent.
- a fost selecţionată o viteză.
• Dacă hota are un randament redus: Verificaţi dacă:
- Viteza selecţionată pentru motor este suficientă pentru cantitatea de fum si vapori care este eliberată.
- Bucătăria este aerată suficient pentru a permite priza de aer.
- Filtrul cu cărbune nu este consumat (hota in versiunea filtrantă).
• Dacă hota s-a oprit in timpul funcţonării normale: Verificaţi dacă:
- nu este vorba de o pană de curent.
- dispozitivul de comutare nu s-a decuplat.
În caz de defecţiuni, înainte de a contacta Serviciul de Asistenţă Tehnică, deconectaţi timp de cel puţin 5 sec. aparatul trăgând de ştecher şi
apoi conectaţi-l din nou. În cazul în care defecţiunea persistă, contactaţi Serviciul de asistenţă.
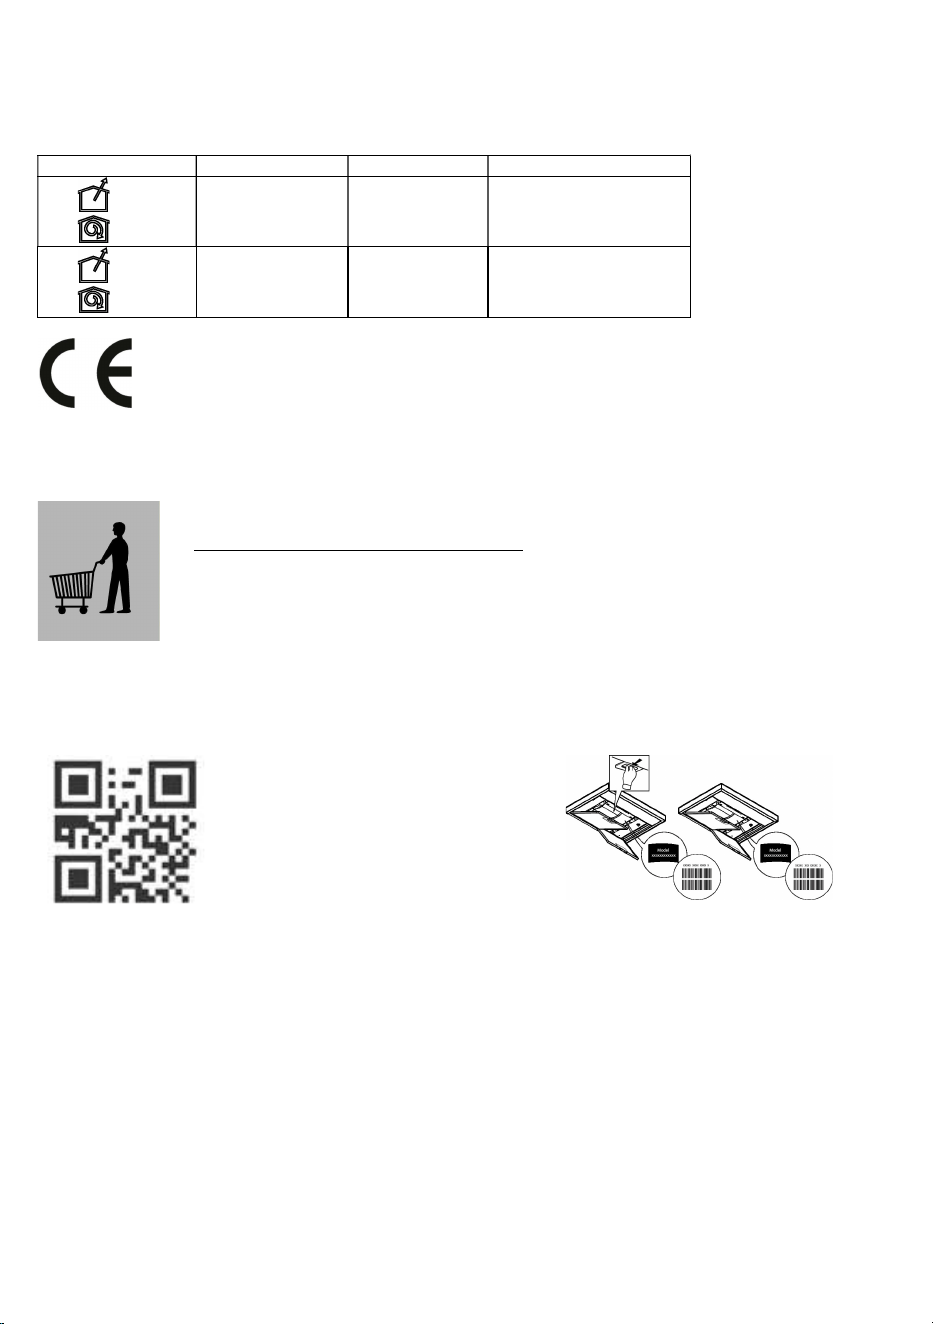
114
CARACTERISTICI TEHNICE
Înălţime (cm)
Lăţime (cm)
Adâncime
(cm)
Ø tubului de evacuare (cm)
62-114
71
-
114
89,8 45,5 15
62-114
71
-
114
59,8 45,5 15
Componentele nu sunt furnizate împreună cu produsul
Puteţi descărca instrucţiunile privind siguranţa,
manualul de utilizare, fişa tehnică a produsului
şi datele energetice:
• Vizitând site-ul nostru web docs.whirlpool.eu
• Utilizând codul QR
• Ca alternativă,
contactaţi serviciul nostru de
asistenţă tehnică post-vânzare (consultaţi numărul
de telefon din certificatul de garanţie). Când
contactaţi serviciul nostru de asistenţă tehnică post-
vânzare, vă rugăm să precizaţi coduri
le specificate
pe plăcuţa cu date de identificare a produsului
dumneavoastră.

115
RU
ОБЩИЕ ПРАВИЛА ТЕХНИКИ БЕЗОПАСНОСТИ
• Перед началом какой либо операции по чистке или обслуживанию, отключить
вытяжку от электрической сети, вынимая вилку из розетки или отключая общий
выключатель помещения. Для всех операций по установке и обслуживанию
использовать рабочие рукавицы.
• Прибор может быть использован детьми не младше 8 лет и лицами со сниженными
физическими, сенсорными или умственными способностями, или же с недостаточным
опытом, если находятся под контролем, или если были обучены использовать прибор
безопасным образом и если понимают связанные с этим опасности.
• Дети должны быть под контролем и не должны играть с прибором.
• Операции по чистке и обслуживанию не должны проводиться детьми без надзора
• Помещение должно иметь достаточную вентиляцию, когда кухонная вытяжка
используется одновременно с другими приборами, работающими на газе или других
топливах.
• Вытяжка должна часто очищаться как внутри, так и снаружи (ХОТЯ БЫ ОДИН РАЗ В
МЕСЯЦ), придерживаясь того, что указано в инструкциях по обслуживанию.
• Несоблюдение норм чистки вытяжки и замены и чистки фильтров увеличивает риск
возгорания.
Строго запрещено приготовление еды на открытом огне под вытяжкой.
• Для замены лампочки освещения использовать только тип лампочки указанный в
разделе обслуживания/замены лампочки этого руководства.
Использование открытого пламени наносит ущерб фильтрам и может привести к
загораниям, поэтому должно избегаться в любом случаи.
Жаренье должно проводиться под надзором, чтобы избежать возможности
возгорания раскаленного подсолнечного масла.
ВНИМАНИЕ: Когда варочная поверхность работает, доступные части вытяжки могут
нагреваться.
• Не подключать прибор к электрической сети до тех пор, пока установка полностью не
закончена.
• То что касается технических мер и мер безопасности в применении до сброса паров строго придерживаться того что
предусматривается по нормам локальных компетентных органов.
• Всасываемый воздух не должен выпускаться в трубу, используемую для выбросов дымов приборами, работающими на газе или
других топливах.
• Не использовать или оставлять вытяжку без лампочек правильно установленных с риском получить удар электрическим током.
• Никогда не использовать вытяжку без правильно установленной решётки!
• Вытяжка НИКОГДА не должна использоваться, как опорная поверхность, если только не указано иначе.
• Использовать только винты для фиксирования в комплекте с продуктом для установки или, если нет в комплекте, приобрести
винты правильного типа.
• Использовать правильную длину винтов, указанную в руководстве по установке.
• В случае сомнений, консультироваться в авторизированном центре по обслуживанию или с квалифицированным персоналом.
ВНИМАНИЕ!
• Неустановка соответствующих винтов и приспособлений для фиксирования в соответствии с этими инструкциями может
привести к рискам электрического происхождения.
116
• Не используйте устройство с программатором, таймером, отдельным пультом дистанционного управления или любым
другим устройством, которое включается автоматически.
Не подпускайте к прибору детей младше 3 лет. Без постоянного надзора со стороны взрослых к прибору нельзя допускать детей
младше 8 лет.
ВНИМАНИЕ: прибор не предназначен для включения при помощи внешних устройств или отдельного дистанционного
управления.
Этот прибор не предназначен для профессионального применения. Не используйте прибор вне помещений.
Во избежание травм, прибор должен перемещаться и устанавливаться силами не менее двух человек.
Установка, включая подключение водопроводной сети (если такое предусмотрено) и электрические соединения, а также
ремонтные операции, должны выполняться квалифицированными специалистами.
По завершении установки, храните упаковочные материалы (пластиковые, полистироловые детали и т.п.) в недоступном для детей
месте во избежание инцидентов с удушьем. .
Не пользуйтесь прибором, будучи мокрыми или с босыми ногами.
Никогда не применяйте прибор для чистки паром - риск удара электрическим током.
Упаковочный материал может на 100% использоваться вторично и маркирован соответствующим значком вторпереработки
Вытяжка может иметь дизайн, отличающийся от вытяжки показанной на рисунках данного руководства, тем не менее,
руководство по эксплуатации, техническое обслуживание и установка остаются те же.
Изделие хозяйственно-бытового назначения. Производитель снимает с себя всякую ответственность за неполадки, ущерб или
пожар, которые возникли при использовании прибора вследствие несоблюдения инструкций, приведенных в данном руководстве.
Вытяжка служит для всасывания дыма и пара при приготовлении пищи и предназначена только для бытового использования.
• Очень важно сохранить эту инструкцию, чтобы можно было обратиться к ней в любой момент. Если изделие продается,
передается или переносится обеспечить, чтобы инструкция всегда была с ним.
• Внимательно прочитайте инструкцию. В ней находится важная информация по установке, эксплуатации и безопасности.
• Запрещается выполнять изменения в электрической или механической части изделия или в трубах рассеивания.
• Перед началом установки оборудования убедитесь в целостности и сохранности всех компонентов. При наличии любых
повреждений обратитесь к поставщику и ни в коем случае не начинайте монтаж оборудования.
Расстояние нижней грани вытяжки над опорной плоскостью под сосуды на кухонной плите должно быть не менее 50cm – для
электрических плит, и не менее 65 cm для газовых или комбинированных плит.
Если в инструкциях по установке газовой плиты оговорено большее расстояние, то учтите это.
ЭЛЕКТРИЧЕСКОЕ СОЕДИНЕНИЕ
Напряжение сети должно соответствовать напряжению, указанному на табличке технических данных, которая размещена внутри
прибора. Если вытяжка снабжена вилкой, подключите вытяжку к штепсельному разъему. Он должен отвечать действующим
правилам и быть расположен в легкодоступном месте. Включить в розетку можно после установки. Если же вытяжка не снабжена
вилкой (прямое подключения к сети), или штепсельный разъем не расположен в доступном месте, также и после установки, то
используйте надлежащий двухполюсный выключатель, обеспечивающий полное размыкание сети при возникновении условий
перенапряжения 3-ей категории, в соответствии с инструкциями по установке.
ВНИМАНИЕ!
прежде чем подключить к сети питания электрическую систему вытяжки и проверить исправное функционирование ее убедитесь в
том, что кабель питания правильно смонтирован.
Есликабельнеоснащенвилкой,подсоединитепроводавсоответствиисоследующейтаблицей:
Напряжение и частота сети Цвет жилы
См. величины, указанные в наклейке с техническими
характеристиками внутри колпака.
: желтый/зеленый
N : синий
L
: коричневый
Замена электрокабеля
Вытяжка имеет специальный кабель электропитания; в случае повреждения кабеля, необходимо заказать его в службе по
техническому обслуживанию.
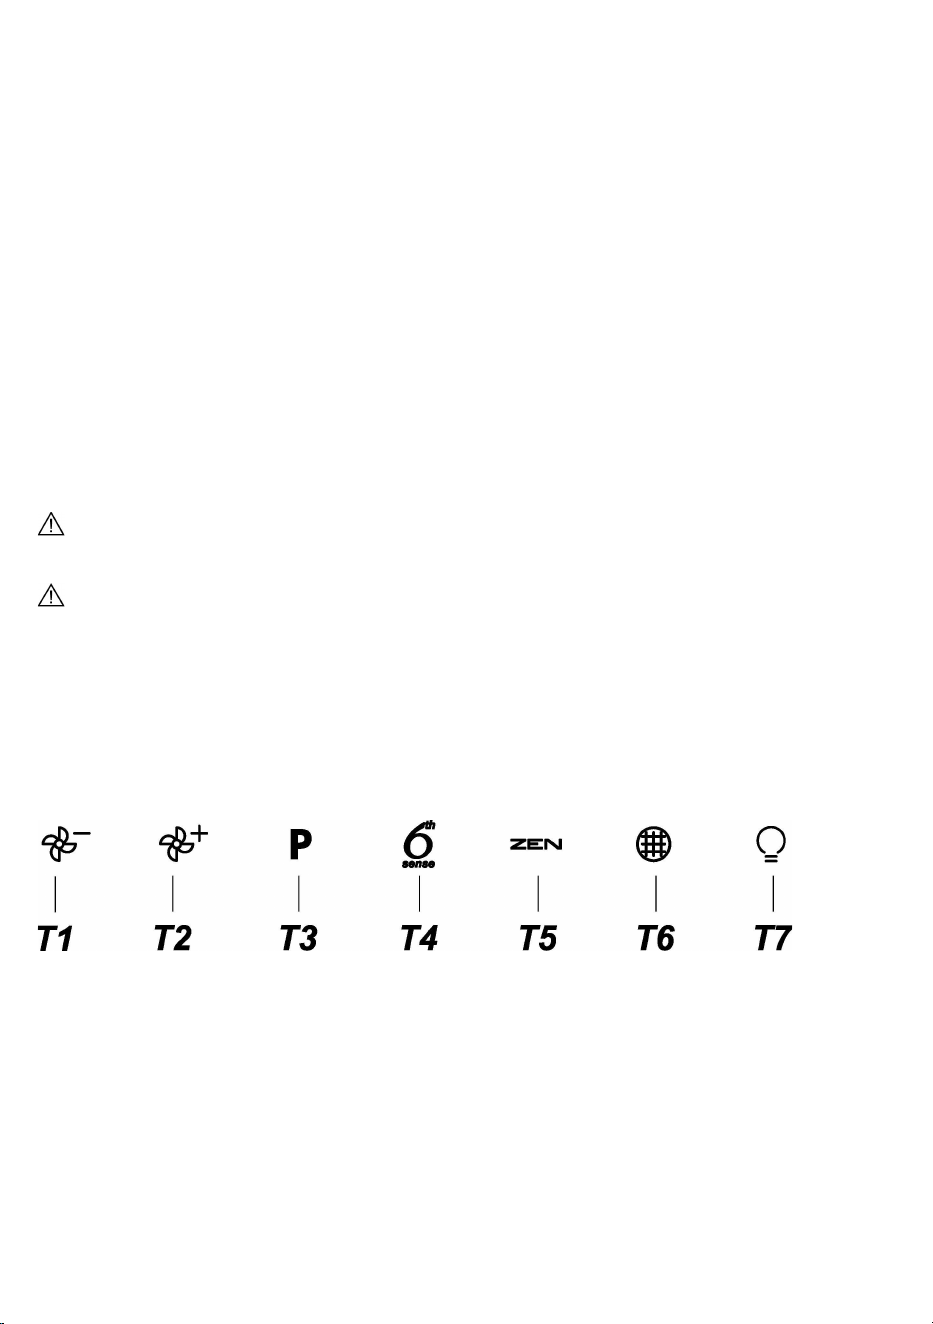
117
ВЫБРОС ВОЗДУХА
(для исполнения с отводом воздуха)
Подсоедините вытяжку к выводной трубе с диаметром соответствующим отверстию выхода воздуха (соединительный фланец).
Установка труб с меньшим диаметром даст уменьшение мощности всасывания воздуха и резкое увеличение уровня шума.
Производитель снимает с себя всякую ответственность по отношению выше сказанного.
! Использовать трубу с минимально необходимой длиной.
! Использовать трубу с наименьшим количеством изгибов (максимальный угол изгиба: 90°).
! Избегать резкого изменения сечения трубы.
! Предприятие снимает с себя какую-либо ответственность если данные правила не выполняются.
С РЕЦИРКУЛЯЦИЕЙ ИЛИ С ВЫВОДОМ ?
! Ваша вытяжка готова к использованию в режиме отвода.
Для того чтобы использовать вытяжку в режиме рециркуляции необходимо установить ДОПОЛНИТЕЛЬНЫЙ КОМПЛЕКТ.
Проверьте на первых страницах данного руководства, входит ли ДОПОЛНИТЕЛЬНЫЙ КОМПЛЕКТ в поставку или его
необходимо приобрести отдельно.
Примечание: Если входит в поставку оборудования, в некоторых случаях, дополнительный комплект угольных фильтров
может уже быть установлен на вытяжке.
Информация по переводу вытяжки из режима отвода в режим рециркуляции уже входит в данное руководство.
Исполнение с рециркуляцией
В этом режиме испарения выводятся наружу через гибкий трубопровод, подсоединенный к соединительному кольцу.
ВНИМАНИЕ!
Выводная труба не входит в комплект и должна быть приобретена отдельно.
Диаметр выводной трубы должен соответствовать диаметру соединительного кольца.
ВНИМАНИЕ!
Если вытяжка снабжена угольным фильтром, то уберите его.
Исполнение с отводом воздуха
Должен использоваться угольный фильтр, имеющийся в наличии у вашего дистрибутора. Втягиваемый воздух обезжиривается и
дезодируется перед тем, как вновь возвращается в помещение через верхнюю решетку.
КОМАНДЫ
Вытяжка оснащена панелью управления для контроля скорости вытяжного вентилятора и включения света для освещения рабочей
поверхности плиты.
T1. Двигатель вентилятора BЫКЛ / Уменьшение скорости
T2. Двигатель вентилятора ВКЛ / Увеличение скорости
T3. Режим «POWER BOOST»
T4. Функция 6th sense (АВТО режим) ВКЛ/BЫКЛ
T5. Режим «ZEN»
T6. Аварийный сигнал жирового/угольного фильтра/ сброс
T7. Главный выключатель подсветки
ОСТОРОЖНО! Данная вытяжка имеет автоматическую систему управления (см. ниже «T4. функция 6th sense function (АВТО
режим) ВКЛ/BЫКЛ»).
Калибровка происходит автоматически при каждом подключении вытяжки к электрической сети (например: при первом включении
после отключения электроэнергии). Ее также можно выполнить вручную (см. раздел «Настройка датчика»). Во время калибровки,
которая длится 5 минут, T4 начнет мигать и индикаторы можно будет использовать.

118
T1. ДВИГАТЕЛЬ ВЕНТИЛЯТОРА BЫКЛ / УМЕНЬШЕНИЕ СКОРОСТИ
Нажмите, чтобы уменьшить скорость и BЫКЛ двигатель вытяжки.
Нажмите и удерживайте, чтобы BЫКЛ двигатель вытяжки.
T2. ДВИГАТЕЛЬ ВЕНТИЛЯТОРА ВКЛ / УВЕЛИЧЕНИЕ СКОРОСТИ
Нажмите, чтобы ВКЛ двигатель вытяжки и увеличить скорость.
нажмите и удерживайте, чтобы сразу установить 3-ю скорость.
T3. РЕЖИМ «POWER BOOST»
Нажмите T3, чтобы активировать скорость интенсивной вытяжки «POWER BOOST 1» (регулируемой по времени).
Примечание: вытяжка вернется к 3-ей скорости через пять минут.
При включённом двигателе вытяжки в режиме «POWER BOOST1» повторно нажмите T3, чтобы активировать скорость интенсивной
вытяжки «POWER BOOST 2» (регулируемой по времени).
Примечание: вытяжка вернется к 3-ей скорости через пять минут.
Примечание: повторно нажмите T3, через пять минут вытяжка вернется в режим «POWER BOOST 1»
T4. ФУНКЦИЯ 6TH SENSE (АВТО РЕЖИМ) ВКЛ/BЫКЛ
Вытяжка автоматически устанавливает скорость работы, если датчик в вытяжке определяет изменение окружающих условий.
Примечание: чтобы убедиться, что эта функция используется правильно, сначала настройте датчик (см. раздел «Настройка
датчика» ниже).
Примечание: если изменить любые другие функции, регулирующие скорость, функция «6th sense» отключится.
Настройка датчика
Ее можно выполнить, когда вытяжка находится в состоянии BЫКЛ.
В нормальных условиях окружающей среды нажимайте T4 в течение 5 секунд, T4 будет мигать 5 минут, показывая, что вытяжка
выполняет калибровку датчика, а затем выключится, показывая, что калибровка закончилась.
Настройка варочной панели: Одновременно нажмите и удерживайте кнопки T1 и T2. Обе кнопки загораются, указывая на то, что
вытяжка готова принять калибровку параметров варочной панели.
Нажмите T1, чтобы выбрать газовую варочную панель (T1 будет мигать в течение 3 секунд, показывая, что параметры вытяжки
установлены для газовой варочной панели).
Нажмите T2, чтобы выбрать индукционную варочную панель (T2 будет мигать в течение 3 секунд, показывая, что параметры
вытяжки установлены для индукционной варочной панели).
T5. РЕЖИМ «ZEN»
Нажмите, чтобы активировать или деактивировать режим вытяжной вентиляции «ZEN».
Этот режим позволяет активировать скорость вытяжной вентиляции с идеальным балансом между бесшумностью и
эффективностью.
T6. АВАРИЙНЫЙ СИГНАЛ ЖИРОВОГО/УГОЛЬНОГО ФИЛЬТРА/ СБРОС
С регулярными интервалами вытяжка сигнализирует о необходимости технического обслуживания фильтров.
Примечание: Индикаторы работают только при включённой вытяжке.
T6 горит: Выполните техническое обслуживание жирового фильтра.
T6 мигает: выполните обслуживание угольного фильтра.
Сброс индикаторов засорения фильтра:
Примечание: Это нужно делать при включённой вытяжке.
Нажмите и удерживайте T6
Примечание: T6 и выключение вытяжки для индикации аварийного сигнала / сброса.
Сброс настроек жирового и угольного фильтра выполняется с использованием того же ключа. Если оба аварийных сигнала фильтра
активны, один за другим произойдет сброс счетчиков, в первую очередь угольного.
Активация индикатора засорения угольного фильтра
Примечание: Это нужно делать при выключенном двигателе вытяжки.
Обычно этот индикатор не активен – нажмите и удерживайте кнопки T3 и T7 одновременно, чтобы активировать функцию: Обе
кнопки загорятся, что означает активацию.
Чтобы деактивировать функцию, снова нажмите и удерживайте те же самые кнопки: Они замигают часто и затем отключатся, что
означает деактивацию.
T7. ГЛАВНЫЙ ВЫКЛЮЧАТЕЛЬ ПОДСВЕТКИ
Нажмите, чтобы включить или выключить подсветку варочной панели.
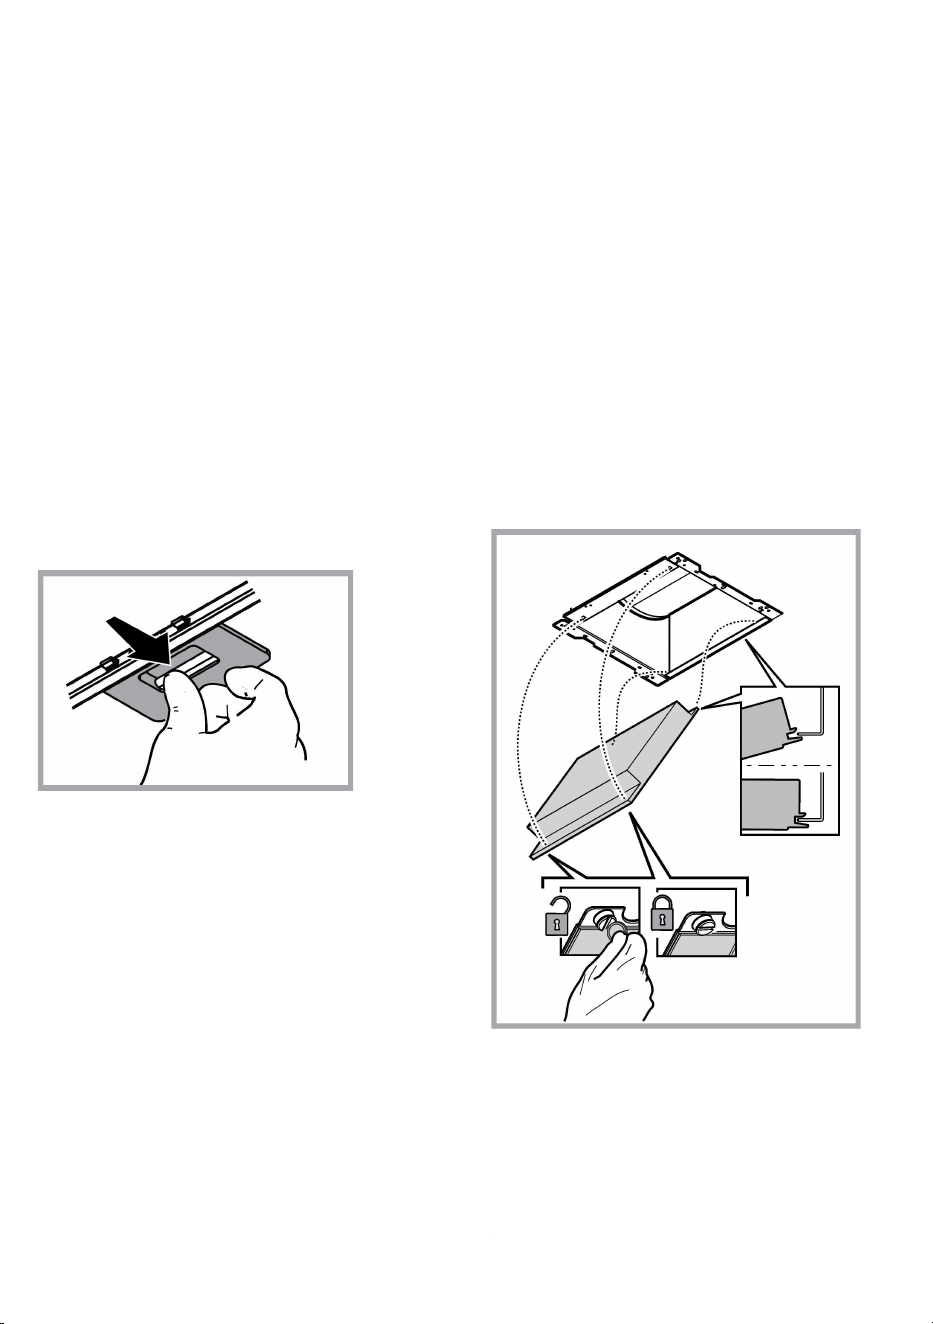
119
ТЕХНИЧЕСКОЕ ОБСЛУЖИВАНИЕ
Очистка
Для очистки используйте ТОЛЬКО специальную тряпку,
смоченную нейтральным жидким моющим средством. НЕ
ИСПОЛЬЗУЙТЕ НИКАКИЕ ИНСТРУМЕНТЫ ДЛЯ ОЧИСТКИ.
Не применяйте средства, содержащие абразивные
материалы. НЕ ПРИМЕНЯЙТЕ СПИРТ!
Обслуживание жировых фильтров
Удерживает частицы жира, исходящие от плиты.
Фильтр следует чистить ежемесячно (или когда система
индикации насыщения фильтров, если она имеется в Вашей
модели, указывает на данную необходимость )
неагрессивными моющими средствами, вручную или в
посудомоечной машине при низкой температуре и
экономичном цикле мытья.
При мытье в посудомоечной машине может иметь место
некоторое обесцвечивание фильтра задержки жира, но его
фильтрующая характеристика остается абсолютно
неизменной.
Для снятия жирового фильтра потяните к себе
подпружиненную ручку отцепления фильтра.
Обслуживание угольного фильтра
Удаляет неприятные запахи кухни.
Насыщение угольного фильтра происходит по истечении
более или менее длительного периода эксплуатации,
предопределяемого типом кухни и периодичностью очистки
фильтров задержки жира. В любом случае, заменяйте
картридж по крайней мере через каждые 4 месяца (или когда
система индикации насыщения фильтров, если она имеется в
Вашей модели, указывает на данную необходимость).
Угольный фильтр НЕ подлежит мойке или регенерации.
Установка
Навесить угольный фильтр сначала задней стороной на
металлический язычок вытяжки, потом переднюю часть
закрепить двумя рукоятками.
Демонтаж
Снять угольный фильтр, поворачивая на 90° рукоятки,
которые фиксируют его с вытяжкой.
Замена ламп
Вытяжка оборудована освещением на светодиодах LED.
Светодиоды обеспечивают оптимальное освещение, их срок
службы в 10 раз превышает срок работы традиционных
лампочек, и позволяют экономить 90% электроэнергии.
Для замены светодиодов обратитесь в авторизированный
сервисный центр.
120
УТИЛИЗАЦИЯ
Данное изделие промаркировано в соответствии с Европейской директивой 2012/19/EC по утилизации электрического и
электронного оборудования (WEEE).
Обеспечив правильную утилизацию данного изделия, Вы поможете предотвратить потенциальные негативные последствия для
окружающей среды и здоровья человека.
Символ на самом изделии или сопроводительной документации указывает, что при утилизации данного изделия с ним
нельзя обращаться как с обычными бытовыми отходами. Вместо этого, его следует сдавать в соответствующий пункт приемки
электрического и электронного оборудования для последующей утилизации.
Сдача на слом должна производиться в соответствии с местными правилами по утилизации отходов.
За более подробной информацией о правилах обращения с такими изделиями, их утилизации и переработки обращайтесь в
местные органы власти, в службу по утилизации отходов или в магазин, в котором Вы приобрели данное изделие.
Устройство разработано, испытано и изготовлено в соответствии с:
• Безопасность: EN/IEC 60335-1; EN/IEC 60335-2-31, EN/IEC 62233.
• Эксплуатационные характеристики: EN/IEC 61591; ISO 5167-1; ISO 5167-3; ISO 5168; EN/IEC 60704-1; EN/IEC 60704-2-13; EN/IEC
60704-3; ISO 3741; EN 50564; IEC 62301.
• EMC: EN 55014-1; CISPR 14-1; EN 55014-2; CISPR 14-2; EN/IEC 61000-3-2; EN/IEC 61000-3-3. Предложения для правильного
использования в целях снижения воздействия на окружающую среду: Включите вытяжной колпак на минимальной скорости, когда
начинаете готовить, и оставьте его работать в течение нескольких минут после того, как закончите готовить. Увеличивайте скорость
только в случае большого количества дыма и пара, и прибегайте к использованию повышенных скоростей только в экстремальных
ситуациях. Заменяйте угольный фильтр(ы), когда это необходимо, для поддержания хорошей эффективности уменьшения запахов.
Очищайте жировой/ые фильтр(ы), когда это необходимо, для поддержания хорошей эффективности жирового фильтра.
Используйте максимальный диаметр системы воздуховодов, указанный в данном руководстве, для оптимизации эффективности и
минимизации уровня шума.
АНОМАЛИИ В РАБОТЕ
Если что-то не работает должным образом, перед тем как обратиться в Службу по техническому обслуживанию, выполните
следующие простые проверки:
• Если вытяжка не работает:
Проверить:
- что бы не была прервана подача тока.
- что бы была выбрана скорость.
• Если вытяжка плохо работает:
Проверить:
- что выбранная скорость двигателя достаточна для выработанного количества дыма и пара.
- что кухня достаточно проветрена для того, чтобы вытяжка могла выполнить забор воздуха.
- что угольный фильтр не отработан (вытяжка в режиме с рециркуляцией воздуха).
• Если вытяжка выключилась в ходе нормальной работы:
Проверить:
- что не прервана подача тока.
- что не сработал однополюсный выключающий аппарат.
В случае возможных аномалий в работе, перед тем как обратиться в службу технического обслуживания отключить от
электропитания аппарат минимум на 5 секунд, вынимая вилку и потом подсоединить его снова. Если аномалия в работе
продолжает существовать обратиться в службу техобслуживания.

121
ТЕХНИЧЕСКИЕ ДАННЫЕ
Высота (см)
Ширина (с
м)
Глубина (см)
Ø
вытяжной трубы (см)
62-114
71
-
114
89,8 45,5 15
62-114
71
-
114
59,8 45,5 15
Комплектующие, не входящие в комплект деталей к изделию
Чтобы загрузить инструкции по
безопасности, руководство по эксплуатации,
технический лист изделия и показатели
энергоэффективности:
• Посетите наш веб-сайт docs.whirlpool.eu
• Используйте QR-код
• Или обратитесь в наш Сервисный центр
(Номер телефона указан в гарантийном талоне).
При обращении в наш Сервисный центр
сообщите коды, указанные на паспортной
табличке изделия.
122
SK
VŠEOBECNÁ BEZPEČNOSŤ
• Pred každým čistením alebo údržbou, odpojte odsávač pár od elektrickej siete vytiahnutím
zástrčky alebo vypnutím hlavného vypínača bytu.
• Pre všetky inštalačné a údržbové operácie používajte pracovné rukavice.
• Zariadenie môže byť používané deťmi vo veku nie menej ako 8 rokov a osobami so
zníženými fyzickými, zmyslovými alebo duševnými schopnosťami, alebo nedostatkom
skúseností a potrebných znalostí, pokiaľ sú pod primeraným dozorom, alebo dostali pokyny
o bezpečnom užívaní zariadenia a keď si uvedomujú s ňou spojené nebezpečenstvo.
• Deti musia byť kontrolované, aby sa nehrali so zariadením.
• Čistenie a údržbu nesmú vykonávať deti bez dozoru.
• Miestnosť musí mať dostatočné vetranie, keď kuchynský odsávač pár sa používa súčasne
s inými zariadeniami spaľujúce plyn alebo iných palív.
• Odsávač pár sa musí pravidelne čistiť ako vnútorne tak zvonka (ASPOŇ RAZ ZA
MESIAC), v každom prípade rešpektujte ako je výslovne uvedené v návode na údržbu.
• Nedodržiavanie noriem čistenia odsávača pár a výmeny a čistenia filtrov môže spôsobiť
požiare. Je prísne zakázané pod odsávačom pár robiť jedlá na plameni.
• Pri výmene lampy používajte len typ lampy uvedený v sekcii údržba/výmena lampy v tejto
príručke.
Používanie otvoreného ohňa poškodzuje filtre a môže spôsobiť požiar a preto sa mu treba
v každom prípade vyhnúť.
Vyprážanie musí byť vykonané pod kontrolou, aby prehriaty olej sa nezapálil.
POZOR: Keď je varná doska v prevádzke, prístupné časti odsávača pary sa môžu zahriať.
• Nepripájajte zariadenie do elektrickej siete, kým inštalácia nie úplne dokončená.
• Pokiaľ ide o technické a bezpečnostné opatrenia, ktoré sa majú prijať pre vypúšťanie výparov, prísne sa dodržujte nariadeniam
ustanovenými príslušnými miestnymi úradmi .
• Odsávaný vzduch nesmie byť dopravený do potrubia používaného pre vypúšťanie výparov produkovaných zariadeniami spaľujúcimi plyn
alebo iné palivá.
• Nepoužívajte alebo nechajte odsávač pár bez správne namontovaných lámp kvôli možnému riziku úrazu elektrickým prúdom.
• Nikdy nepoužívajte odsávač pár bez správne namontovanej mriežky!
• Odsávač pár sa nesmie NIKDY používať ako nosný povrch, pokiaľ nie je výslovne uvedené
• Používajte len upevňovacie skrutky dodávané s výrobkom pre inštaláciu alebo, ak nie sú súčasťou dodávky, kúpte správny typ skrutiek.
• Používajte správnu dĺžku skrutiek, ktorá je označená v Návode na inštaláciu.
• Ak si nie ste istí, poraďte sa s autorizovaným servisným strediskom alebo podobným kvalifikovaným personálom.
POZOR!
• Chýbajúca inštalácia upevňovacích skrutiek alebo prostriedkov v súlade s týmito pokynmi môže spôsobiť úraz elektrickým prúdom.
• Nepoužívajte s programovacím zariadením, časovačom, samostatným diaľkovým ovládaním alebo s akýmkoľvek iným zariadením,
ktoré sa aktivuje samostatne.
Uchovávajte zariadenie mimo dosahu detí vo veku do 3 rokov. Uchovávajte zariadenie mimo dosahu detí vo veku do 8 rokov, pokiaľ nie sú
pod nepretržitým dozorom dospelej osoby.
UPOZORNENIE: zariadenie nie je určené na to, aby sa spúšťalo pomocou externého zariadenia alebo samostatného diaľkového
ovládacieho systému.
Toto zariadenie nie je určené na profesionálne použitie. Nepoužívajte zariadenie v exteriéri.
Aby sa predišlo riziku zranenia osôb, zariadenie musia premiestňovať a inštalovať minimálne dve osoby.
123
Inštaláciu, vrátane prípadných vodovodných prípojok a elektrického vedenia, a opravy smú vykonávať iba kvalifikovaní pracovníci.
Po dokončení inštalácie uchovávajte obalové materiály (plastové časti, polystyrén atď.) mimo dosahu detí, aby ste predišli riziku udusenia. .
Nepoužívajte zariadenie, keď ste mokrí alebo bosí.
Nikdy nepoužívajte prístroje na tlakové čistenie – riziko úrazu elektrickým prúdom.
Obalové materiály sú 100 % recyklovateľné a sú označené značkou pre recykláciu
Odsávač pary môže mať odlišný výzor ako je zobrazené na nákrese v tejto knižke, ale napriek tomu návody pre použitie, údržba
a montáž ostanú rovnaké.
Prísne dodržiavajte pokyny uvedené v tomto návode. Výrobca odmieta prevziať akúkoľvek zodpovednosť za prípadné poškodenie,
poruchy, škody, alebo vznietenie odsávača, ktoré bolo spôsobené nedodržaním týchto predpisov. Odsávač pár slúži výhradne na odsávanie
pár, dymu, pachov vzniknutých pri varení a je určený výhradne pre domáce použitie.
• Je dôležité uchovať si túto príručku, aby ste ju mohli Použiť v akomkoľvek okamihu. V prípade predaje, postúpení či sťahovaní zaistite,
aby zostala spoločne s odsávačom pár.
• Pozorne si prečítajte návod: obsahuje dôležité informácie o inštalácii, použití a bezpečnosti.
• Nemeňte elektrickú či mechanickú úpravu výrobku alebo potrubie na odvod pár.
• Skôr než budete pokračovať s inštaláciou zariadenia, overte, všetky súčiastky či nie sú poškodené. V opačnom prípade obráťte sa na
predajcu a nepokračujte v inštalácii.
Minimálna vzdialenosť medzi podporou nádoby na varnej ploche a najnižšou časťou digestora nesmie byť menšia než 50cm v prípade
elektrických sporákov, 65cm v prípade plynových či kombinovaných/zmiešaných sporákov.
Pokiaľ návod na inštaláciu varného zariadenia na plyn odporúča väčšiu vzdialenosť, je treba sa týmto pokynom riadiť.
ELEKTRICKÉ PRIPOJENIE
Sieťové napätie musí zodpovedať napätiu uvedenému na štítku s charakteristikami umiestnenom vo vnútri odsávača. Pokiaľ je odsávač
vybavený prípojkou/vidlicou, stačí ju zapojiť do zásuvky zodpovedajúcej aktuálnym normám, ktorá sa nachádza v ľahko dosiahnuteľnom
priestore aj po prevedenej montáži. Pokiaľ odsávač nie je vybavený prípojkami/vidlicou (priame pripojenie k sieti) alebo sa zásuvka
nenachádza v ľahko dosiahnuteľnom priestore aj po prevedení montáže, je nutné použiť dvojpólový vypínač zodpovedajúci normám, ktorý
zaručí úplné odpojenie od siete v podmienkach kategórie prepätí III, v súlade s pravidlami inštalácie.
UPOZORNENIE!
Skôr než opäť napojíte obvod digestora na sieťové napájanie a overíte správne fungovanie, skontrolujte si vždy, že sieťový kábel bol správne
namontovaný.
Pokiaľniejekábelopatrenýzástrčkou,pripojtevodičepodľainformáciívnasledujúcejtabuľke:
Sieťové napätie a
frekvencia
Pripojenie vodičov
Uvedenú hodnotu si overte na štítku s vlastnosťami zariadenia,
umiestnenom vo vnútri zariadenia.
: žlto/zelený
N : modrý
L
: hnedý
Výmena napájacieho kábla
Digestor je vybavený špeciálnym napájacím káblom; v prípade poškodenia káblu si ho vyžiadajte u servisnej služby.
VYPÚŠŤANIE VZDUCHU
(iba pre odsávacie verzie)
Napojte digestor na odťahové potrubie s rovnakým priemerom ako vývod vzduchu (spojovacia príruba).
Použitie odvodových trubíc a otvorov do steny s menším priemerom má za následok zníženie odsávadsej výkonnosti e drastické zvýšenie
hlučnosti.
V tejto zásluhe sa vyhýba každej zodpovednosti.
! Používajte čo najkratšie odťahové potrubie.
! Používajte odťahové potrubie s čo najmenším počtom záhybov (maximálny uhol záhybu: 90°).
! Vyhnite sa zásadným zmenám sekcie vedenia odťahu.
! Spoločnosť sa vyhýba akejkoľvek zodpovednosti, pokiaľ tieto normy sa nedodržujú.
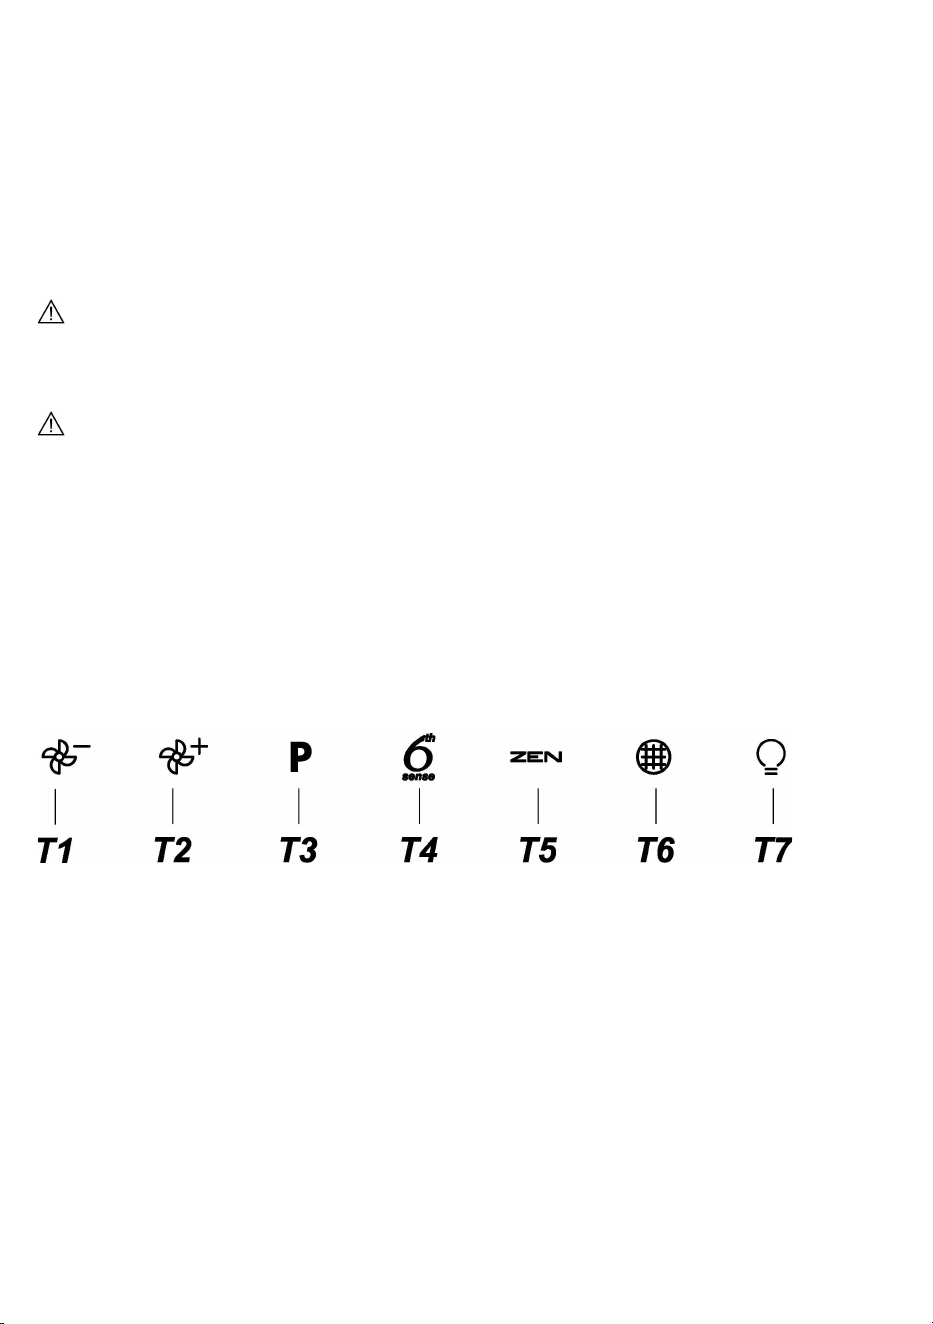
124
FILTRČNÁ ALEBO ODSÁVACIA ?
! Váš odsávač pary je pripravený pre použitie v odsávacej verzii.
Pre použitie odsávača pary vo filtračnej verzii, nainštaluje sa príslušná SADA PRÍSLUŠENSTVA.
Overiť si na prvých stranách tejto príručky, či SADA PRÍSLUŠENSTVA je dodaná vo výbave alebo je ju potrebné zakúpiť.
Poznámka: Ak je dodaná vo výbave, doplnkový filtračný systém na základe aktívneho uhlia, mohol už by byť nainštalovaný na odsávači
pary.
Informácie pre transformáciu odsávača pary z odsávacej verzii na filtračnú verzi sú už zahrnuté v tejto príručke.
Odsávacia verzia
Výpary sú vypúšťané von prostredníctvom výfukového potrubia upevneného na spojovacej prírube.
UPOZORNENIE!
Odťahové potrubie nie je súčasťou výbavy a je nutné ho zakúpiť.
Priemer výfukového potrubia sa musí zhodovať s priemerom spojovacieho prstenca.
UPOZORNENIE!
Ak odsávač pary je vybavený uhlíkovými filtrami, tak tie musia byť vybraté.
Filtračné verzia
Odsávaný vzduch bude pred návratom do miestnosti zbavený tukov a pachov. K použitiu digestora v tejto verzii je nutné inštalovať dodatočný
systém filtrovania na základe aktívnych uhlíkov.
Nasatý vzduch sa pred znovu privodením do miestnosti najprv odmastí a sa zbaví zápachu. Aby sa mohol odsávač pary používať v takejto
verzii, je potrebné nainštalovať doplňujúci filtračný systém na základe aktívneho uhlia.
RIADENIA
Odsávač pary je vybavený ovládacím panelom s kontrolou odsávacej rýchlosti a s kontrolou zapínania svietidla na osvetlenie varnej pracovnej
plochy.
T1. Vypnutie motora ventilátora/ Zníženie rýchlosti
T2. Zapnutie motora ventilátora/ Zvýšenie rýchlosti
T3. Funkcia „POWER BOOST “
T4. Zapnutie/Vypnutie funkcie 6th sense (AUTO režim)
T5. Činnosť v režime „ZEN mode“
T6. Alarm/resetovanie filtra mastnoty/uhlíkového filtra
T7. Zapnutie/Vypnutie hlavného svetla
UPOZORNENIE! Tento digestor má automatický operačný systém (pozri ďalej „T4. Zapnutie/Vypnutie funkcie 6th sense (AUTO režim)“).
Kalibrácia sa vykonáva automaticky, zakaždým, keď sa digestor pripojí do elektrickej siete (napr.: pri prvej inštalácii po výpadku prúdu). Možno
ju vykonať aj manuálne (pozri odsek „Nastavenie senzora“). Počas kalibrácie, ktorá trvá 5 minút, T4 bude blikať a svetlá možno použiť.
T1. VYPNUTIE MOTORA VENTILÁTORA/ ZNÍŽENIE RÝCHLOSTI
Stlačením znížte rýchlosť a vypnite motor odsávania. Stlačením a podržaním priamo vypnite motor odsávania.
T2. ZAPNUTIE MOTORA VENTILÁTORA/ ZVÝŠENIE RÝCHLOSTI
Stlačením zapnite motor odsávania a zvýšte rýchlosť. Stlačením a podržaním nastavíte priamo 3. rýchlosť.

125
T3. FUNKCIA „POWER BOOST “
Stlačením T3 aktivujte intenzívnu rýchlosť odsávania „POWER BOOST 1“ (Zosilnenie výkonu) (s časovou reguláciou).
Upozornenie: Digestor sa po piatich minútach vráti na 3. rýchlosť.
Keď je motor odsávania zapnutý s „POWER BOOST1“, znovu stlačte T3 , čím aktivujete ďalšiu intenzívnu rýchlosť odsávania „POWER
BOOST 2“ (s časovou reguláciou).
Upozornenie: Digestor sa po piatich minútach vráti na 3. rýchlosť.
Upozornenie: Znovu stlačte T3, počas piatich minút sa digestor vráti na výkon “POWER BOOST 1”.
T4. ZAPNUTIE/VYPNUTIE FUNKCIE 6TH SENSE (AUTO REŽIM
Rýchlosť odsávania sa na digestore nastaví automaticky, ak senzor v digestore zistí zmenu okolitých podmienok.
Upozornenie: aby ste si boli istí, že táto funkcia sa používa správne, najprv nakonfigurujte snímač (pozri ďalej „Nastavenie snímača“).
Upozornenie: ak zmeníte ktorékoľvek ďalšie funkcie, ktoré regulujú rýchlosť, funkcia „6th sense“ sa vypne.
Nastavenie snímača
Nastavenie možno urobiť na vypnutom digestore. Za normálnych okolitých podmienok na 5 sekúnd stlačte T4, T4 5 minút bliká, kým digestor
vykonáva kalibráciu snímača, potom zhasne, čo znamená, že kalibrácia sa skončila.
Nastavenie varného panela sporáka: Stlačte a podržte T1 a T2
naraz. Obidve sa rozsvietia, čo znamená, že digestor je pripravený prijať kalibráciu parametra varného panela sporáka.
Stlačte T1 pre výber plynového varného panela (T1 začne na 3 sekundy blikať, čo znamená, že parametre digestora sú nastavené na plynový
varný panel).
Stlačte T2 pre výber indukčného varného panela (T2 začne na 3 sekundy blikať, čo znamená, že parametre digestora sú nastavené na
indukčný varný panel).
T5. ČINNOSŤ V REŽIME „ZEN“
Stlačením aktivujte alebo deaktivujte režim odsávania „ZEN “.
Táto funkcia umožňuje aktivovať rýchlosť odsávania s dokonalou rovnováhou medzi tichom a účinnosťou odsávania.
T6. ALARM/RESETOVANIE FILTRA MASTNOTY/UHLÍKOVÉHO FILTRA
V pravidelných intervaloch digestor signalizuje potrebu vykonať údržbu filtra.
Upozornenie: Ukazovatele fungujú, iba keď je digestor zapnutý.
T6 svieti: Vykonajte údržbu filtra mastnoty.
T6 bliká: Vykonajte údržbu uhlíkového filtra.
Vynulovanie ukazovateľov nasýtenia filtra:
Upozornenie: Musí sa urobiť, keď je digestor zapnutý.
Stlačte a podržte T6.
Upozornenie: T6 a digestor sa vypnú, čo znamená, že alarm je vynulovaný.
Resetovanie filtra mastnoty a uhlíkového filtra sa vykonáva pomocou toho istého kľúča. Ak sú aktívne alarmy oboch filtrov, proces resetovania
vynuluje počítadlá, pričom prednosť má uhlíkový filter.
Aktivovanie ukazovateľa nasýtenia uhlíkového filtra
Upozornenie: Musí sa urobiť, keď je motor odsávania vypnutý.
Tento ukazovateľ je zvyčajne deaktivovaný – stlačte a podržte tlačidlá T3 a T7 naraz, čím funkciu aktivujete. Obe sa rozsvietia, čo znamená
aktiváciu.
Ak chcete funkciu deaktivovať, ešte raz stlačte a podržte to isté tlačidlo.
Obe tlačidlá nakrátko bliknú a potom sa vypnú, čo znamená, že funkcia je deaktivovaná.
T7. ZAPNÚŤ/VYPNÚŤ HLAVNÉ SVETLO
Stlačením zapnite alebo vypnite svetlá varnej dosky.

126
ÚDRŽBA
Čistenie
Pri čistení je treba použiť VÝLUČNE látku navlhčenú neutrálnymi
tekutými čistiacimi prostriedkami.
NEPOUŽÍVAJTE ŽIADNE NÁSTROJE ALEBO POMOCKY NA
ČISTENIE. NEPOUŽÍVAJTE ALKOHOL!
Údržba protitukových filtrov
Udržuje častice tukov pochádzajúcich z varenia.
Musí byť čistený jedenkrát za mesiac (alebo keď upozorňovací
systém nasýteľnosti filtrov – ak je s ním príslušný model vybavený
– upozorňuje túto nevyhnutnosť), nedráždivými čistiacími
prostriedkami ručne alebo v umývačke s nízkou teplotou vody
a krátkym cyklusovým programom.
Umývaním v umývačke, protitukový filter sa môže odfarbiť, ale
jeho filtračná cherakteristika sa tým vôbec nezmení.
Na odpojenie protitukových filtrov potiahnite za pružinový háčik.
Údržba uhlíkového filtra
Udržuje nepríjemné zápachy pochádzajúce z varenia.
Nasýteľnosť uhoľného filtru sa odhaľuje iba po viac-menej
predľženom použití, na základe typu kuchyne a pravidelnosti
čistenia filtra tukov. V každom prípade je nevyhnutné vymeniť
zásobník maximálne každé štyri mesiace (alebo keď upevňovací
systém nasýteľnosti filtrov – ak je s ním príslušný model vybavený
– upozorňuje túto nevyhnutnosť).
NEMÔŽE byť umývaný alebo regenerovaný.
Montáž:
Zavesiť uhoľno-aktívny filter najprv zozadu na kovový háčik
odsávača pary, potom zpredu s dvoma rúčkami.
Odmontovanie:
Vybrať uhoľno-aktívny filter otočením ručiek, ktoré ho upevňujú
o odsávač pary o 90°.
Výmena žiaroviek
Odsávač pary je vybavený systémom osvetlenia založenom na
technoloógii LED.
Kontrolky LED zaručujú optimálne osvetlenie, trvanie až 10 krát
dhlhšie ako tradičné žiarovky a umožňujú ušetriť 90% elektrickej
energie.
Pre výmenu lámp kontaktujte autorizované servisné stredisko
náhradných dielov.
127
LIKVIDÁCIA
Tento spotrebič je označený v súlade s európskou smernicou 2012/19/EC o likvidácii elektrického a elektronického zariadenia (WEEE).
Uistením sa, že tento výrobok bol po svojej životnosti odstránený správnym spôsobom, užívateľ prispieva k predchádzaniu možným
negatívnym následkom pre životné prostredie a zdravie.
Symbol výrobku alebo na jeho sprievodnej dokumentácii, upozorňuje, že s týmto výrobkom sa nesmie zaobchádzať ako s domácim
odpadom, ale musí byť odovzdaný do príslušné miesta zberu pre recykláciu elektrických a elektronických prístrojov. Zbaviť sa ho riadením sa
podľa miestnych zákonov o odstránení odpadkov. Kvôli dokonalejším informáciám o zaobchádzaní, znovuzískaní a recyklácii tohto výrobku,
kontaktujte príslušné miestne úrady, služby pre zber domáceho odpadu alebo predajňu , v ktorej výrobok bol zakúpený.
Prístroj bol navrhnutý, testovaný a vyrobený v súlade s:
• Bezpečnosť: EN/IEC 60335-1; EN/IEC 60335-2-31, EN/IEC 62233.
• Výkonnosť: EN/IEC 61591; ISO 5167-1; ISO 5167-3; ISO 5168; EN/IEC 60704-1; EN/IEC 60704-2-13; EN/IEC 60704-3; ISO 3741; EN
50564; IEC 62301.
• EMC: EN 55014-1; CISPR 14-1; EN 55014-2; CISPR 14-2; EN/IEC 61000-3-2; EN/IEC 61000-3-3.
(CISPR - Osobitný medzinárodný výbor pre rádiové rušenie, pozn. prekl.)
Odporúčania pre správne použitie s cieľom znížiť dopad na životné prostredie: Zapnite digestor na minimálnu rýchlosť, keď začnete s
varením a nechajte ho bežať niekoľko minút po ukončení varenia. Zvýšte rýchlosť len v prípade veľkého množstva dymu a pary a použite
podpornú rýchlosť (rýchlosti) len v extrémnych situáciách. Vymeňte uhlíkový filter (filtre), ak je to potrebné na udržiavanie dobrej účinnosti
zníženia zápachu. Vyčistite tukový filter (filtre), ak je to potrebné na udržiavanie jeho účinnosti. Použite maximálny priemer potrubného
systému, ako je uvedené v tomto návode, na optimalizáciu účinnosti a minimalizáciu hluku.
PREVÁDZKOVÉ PORUCHY
Ak sa zdá, že niečo nefunguje, skôr než sa zavolá servis, vykonať nasledujúce jednoduché kontroly.
• Ak odsávač pary nefunguje:
Skontrolovať, že:
- nedošlo k výpadku elektrického prúdu.
- bola zvolená jedna rýchlosť.
• ak odsávač pary má slabý výkon:
Skontrolovať, že:
- zvolená rýchlosť motora je dostačujúca pre množstvo uvoľnených dymov a pár.
- Kuchyňa je dostatočne vzdušná pre možnosť príjem vzduchu.
- uhlíkový filter nie je spotrebovaný (odsávač pary vo filtračnej verzii).
• ak odsávač pary sa vypol počas normálnej prevádzky:
Skontrolovať, že:
- nedošlo k výpadku elektrického prúdu.
- vyplo sa zariadenie poistky.
V prípade eventuálnych porúch v prevádzke, skôr ako sa obrátite na zákaznícky servis, odpojiť zariadenie na 5 sekúnd od elektrického
napojenia, vytiahnutím zástrčky a znovu ho pripojiť. V prípade, že porucha prevádzky pretrváva, obrátiť sa na zákaznícky servis.

128
TECHNICKÉ ÚDAJE
Výška (cm)
Šírka (cm)
Hĺbka (cm)
Ø odsávacej rúry (cm)
62-114
71
-
114
89,8 45,5 15
62-114
71
-
114
59,8 45,5 15
Komponenty, ktoré nie sú dodané s výrobkom
Bezpečnostné pokyny, Návod na používanie,
Technické a energetické údaje spotrebiča
si môžete stiahnuť:
• Na našej webovej stránke docs.whirlpool.eu
• Pomocou QR kódu
• Prípadne sa obráťte na náš popredajný servis
(Telefónne číslo nájdete v
záručnej knižke). Pri
konta
ktovaní nášho popredajného servisu uveďte,
prosím, kódy z
výrobného štítku vášho spotrebiča.
129
SV
ALLMÄN SÄKERHET
• Gör alltid fläkten strömlös innan någon typ av underhållsarbete eller rengöring inleds
genom att dra ur kontakten eller slå av bostadens huvudströmbrytare.
• Använd alltid skyddshandskar vid installation och underhållsingrepp.
• Apparaten får inte användas av barn från 8 års ålder eller personer med reducerad
rörelseförmåga eller mental kapacitet, eller personer som saknar erfarenhet och kännedom
om apparaten, såtillvida inte användandet övervakas eller instruktioner ges av erfaren
person som ansvarar för säkerheten.
• Barn får inte lämnas utan uppsikt för att förhindra att de leker med apparaten.
• Rengörings- och underhållsingrepp får inte utföras av barn utan uppsikt.
• Lokalen skall vara ordentligt ventilerad när köksfläkten används tillsammans med andra
apparater vilka drivs med gas och andra typer av bränsle.
• Fläktkåpan ska rengöras regelbundet både invändigt och utvändigt (MINST EN GÅNG I
MÅNADEN), anvisningarna i instruktionerna för skötsel måste emellertid följas.
• Om reglerna för rengöring av fläktkåpan samt utbyte och rengöring av filtren inte
observeras kan detta medföra brandrisk.
• Det är strängt förbjudet att flambera mat under fläkten.
• Använd endast den typ av lampor som anges i denna handbok i kapitles Underhåll/Byte av
lampa när lampan skall bytas ut.
Öppna lågor skadar filtren och kan orsaka brand och skall därför undvikas i alla lägen.
Frityrkokning skall ske under uppsikt för att undvika att överhettad olja fattar eld.
VARNING: När spishällen är i funktion kan tillgängliga delar av fläkten hettas upp.
• Anslut inte apparaten till elnätet innan installationen är helt slutförd.
• Vad beträffar de tekniska föreskrifter och säkerhetsåtgärder som skall vidtas för avledning av utblåsningsluften, skall de föreskrifter som
utfärdats av lokala myndigheter noga efterlevas.
• Utblåsningsluften får inte ledas in i rökkanal som används för avledning av rökångor som kommer från apparater vilka matas med gas eller
andra typer av bränsle.
• Använd eller lämna aldrig fläkten utan korrekt imonterade lampor för att undvika risken för elektriska stötar.
• Fläkten får aldrig användas utan att gallret är korrekt monterat!
• Fläkten får ALDRIG användas som avställningsyta om inte detta är uttryckligen angivet.
• Använd endast de medlevererade fixeringsskruvarna eller införskaffa skruvar av korrekt typ.
• Använd skruvar med rätt längd enligt föreskrifterna i Installationsguiden. I händelse av tvivel, kontakta Servicekontoret eller behörig personal.
VARNING!
• I det fall skruvar och fixeringsanordningar inte installeras enligt dessa instruktioner kan elektriska risker uppstå.
• Använd inte med en separat programmeringsenhet, timer, fjärrkontroll eller någon annan anordning, som aktiveras automatiskt.
Håll barn under 3 år borta från apparaten. Apparaten måste förvaras utom räckhåll för barn under 8 år, som inte är under konstant uppsikt av
en vuxen.
VARNING: apparaten är inte avsedd att sättas i drift med hjälp av en extern enhet eller ett separat fjärrstyrningssystem.
Denna apparat är inte avsedd för professionell användning. Använd inte apparaten utomhus.
För att undvika risk för kroppsskador måste förflyttning och installation av apparaten utföras av två eller flera personer.
Installationen, inklusive eventuell anslutning till vattenförsörjning (om sådan föreskrivs), samt elektriska anslutningar och
reparationsåtgärder, måste utföras av kvalificerad personal.
När installationen har slutförts förvaras förpackningsmaterialet (plastdelar, frigolit etc.) utom räckhåll för barn för att undvika kvävningsrisk. .
130
Använd inte apparaten om du är blöt eller barfota.
Använd aldrig apparaten för ångrengöring – risk för elstöt.
Förpackningsmaterialet är 100 % återvinningsbart och är märkt med symbolen för återvinning
Fläktens utseende kan skilja sig från illustrationen i ritningarna i denna handbok men alla anvisningar för användning, underhåll
och installation förblir desamma.
Följ noga instruktionerna i denna manual. Tillverkaren frånsäger sig allt ansvar för eventuella funktionsfel, skador eller bränder som uppstår
på apparaten på grund av att instruktionerna i denna manual inte har respekterats. Fläkten har tillverkats för utsugning av matos och ånga
som bildas vid matlagning och är endast ämnad för privat bruk.
• Det är viktigt att spara denna manual så att den när som helst är tillgänglig för framtida konsultationer. I händelse av försäljning,
överlåtelse eller flytt skall manualen alltid följa med produkten.
• Läs instruktionerna noga: dessa tillhandahåller viktig information beträffande installation, användning och säkerhet.
• Utför inga elektriska eller mekaniska ändringar på produkten eller avledningskanalerna.
• Kontrollera innan apparen installeras att inga komponenter är skadade. Kontakta i sådant fall återförsäljaren innan installationen utförs.
Minsta tillåtna avstånd mellan kokkärlens stödyta på spishällen och köksfläktes underkant är 50cm om det är frågan om en elektrisk spis och
65cm om det är frågan om gasspis eller kombinerad gashäll.
Om spishällens instruktioner anger ett större avstånd skall detta respekteras.
ELANSLUTNING
Nätspänningen skall motsvara spänningen som anges på märkplåten som sitter inne i fläkten. Om fläkten är utrustad med stickkontakt skall
denna anslutas till ett uttag som är lättillgängligt även efter installationen och som uppfyller gällande föreskrifter. I det fall fläkten saknar
stickkontakt (direktanslutning till nätet), eller om uttaget är placerat på en svåråtkomlig plats skall en godkänd tvåpolig strömbrytare installeras
som garanterar en fullkomlig frånkoppling från nätet i samband med överspänningsklass III, i enlighet med installationsbestämmelserna.
VARNING!
Kontrollera innan fläktens krets ansluts med nätspänningen att den fungerar korrekt och är korrekt monterad.
Om kabeln inte är försedd med stickpropp ska kablarna anslutas enligt följande tabell:
Nätspänning och frekvens Trådanslutning
Hänvisa till det värde som anges på etiketten på insidan av fläkten.
: gul/grön
N : blå
L : brun
Utbyte av matarkabel
Fläkten är försedd med en speciell elkabel, kontakta därför vårt tekniska servicekontor om kabeln skadats.
LUFTUTSLÄPP
(för utsugsversioner)
Rören och utloppsöppningarna i väggen med vilka fläkten skall anslutas bör ha samma diameter som luftutsläppet (anslutningsflänsen).
I det fall man använder rör och utloppsöppningar i väggen med mindre diameter medför detta en lägre utblåsprestanda och en drastisk
förhöjning av bullernivån.
Vi avsäger oss därför allt ansvar gällande denna typ av problem.
! Använd ett så kort rör som möjligt.
! Röret skall vara så rakt som möjligt (högsta tillåtna vinkel på böjarna 90°).
! Undvik stora skillnader i rörets tvärsnittsarea.
! Företaget frånsäger sig allt ansvar om dessa förordningar inte respekteras.
MED FILTER ELLER UTSUG?
! Er fläktfläkt är klar att användas i utsugsversionen.
För att använda fläkten med filterversionen ska det tillhörande TILLBEHÖRSKITTET installeras.
Kontrollera på de första sidorna i denna manual om TILLBEHÖRSKITTET levererats eller om det inköps separat.
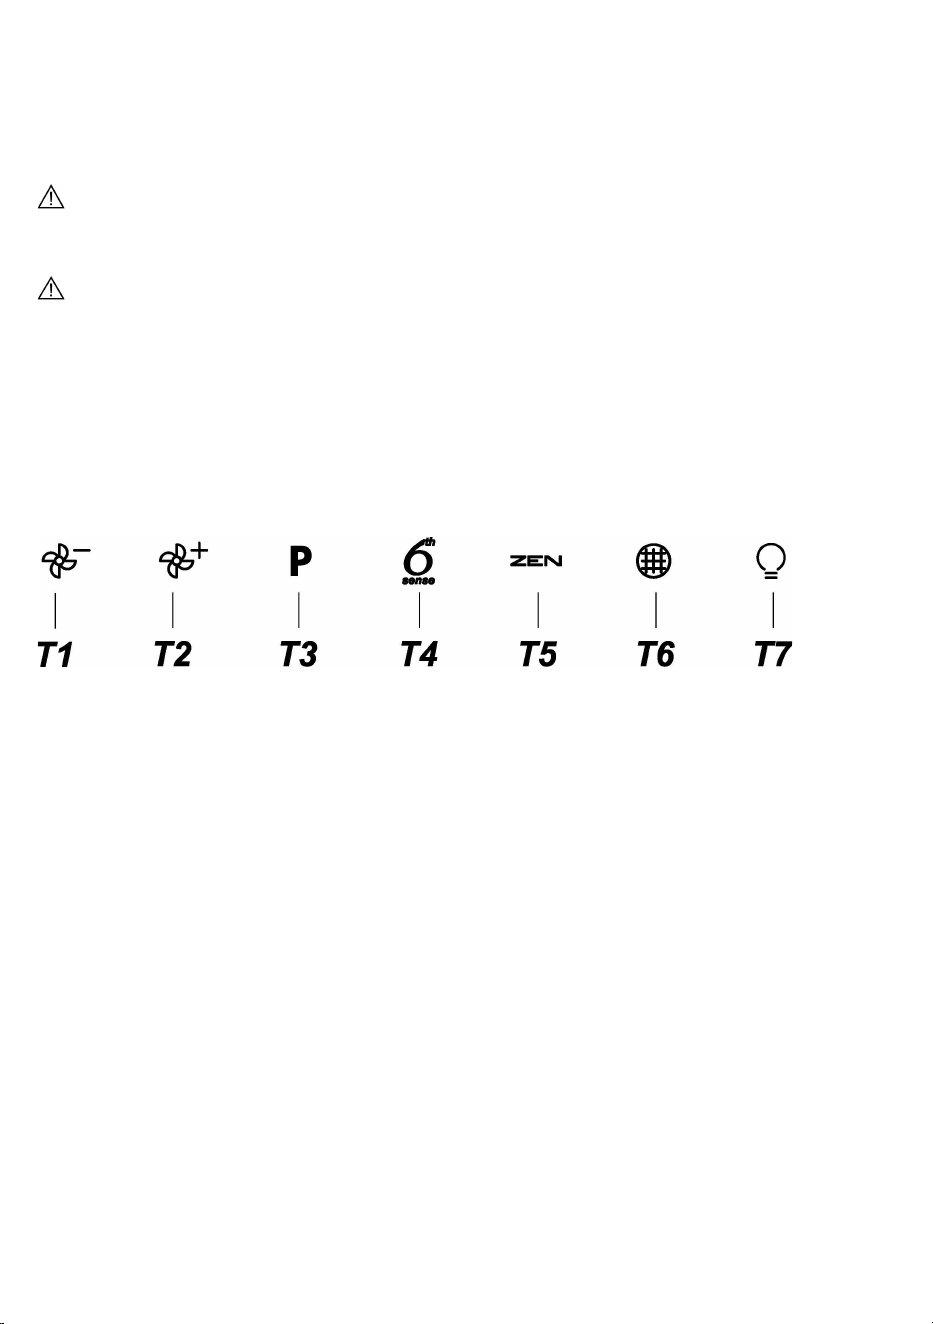
131
Observera: Om det levereras med maskinen, kanske det extra filtersystemet i vissa fall redan är installerat på fläkten.
Informationen för omvandling av fläkten från utsugsversion till filterversion finns i denna manual.
Utsugsversion
Matoset leds ut ur lokalen med hjälp av ett avledningsrör som är fixerat på anslutningsflänsen.
VARNING!
Avledningsröret medlevereras inte och skall införskaffas separat.
Avledningsröret skall ha samma diameter som anslutningsflänsen.
VARNING!
I det fall fläkten är försedd med kolfilter skall dessa tas ur.
Filterversion
Den utsugna luften avfettas och befrias från odörer innan den leds ut i lokalen igen. När fläkten används med denna version är det nödvändigt
att installera ett extra aktivt kolfiltersystem.
KOMMANDON
Fläkten är utrustad med en manöverpanel med en hastighetskontroll och en strömbrytare för spishällens belysning.
T1. Fläktmotor AV / Minska hastighet
T2. Fläktmotor PÅ / Öka hastighet
T3. “POWER BOOST“-funktion
T4. 6th sense-funktion (AUTO-läge) PÅ/AV
T5. ZEN-driftläge
T6. Fett-/kolfilterlarm/återställning
T7. Huvudljus PÅ / AV
VARNING! Denna spisfläkt har ett automatiskt funktionssystem (se nedan “T4. 6th sense-funktion (AUTO-läge) PÅ/AV”).
Kalibrering utförs automatiskt varje gång som spisfläkten återansluts till elnätet (t.ex.: första gången den installeras efter ett strömavbrott).
Det kan också göras manuellt (se paragraf “Sensorinställning”). Under kalibrering, som räcker i 5 minuter, kommer T4 att blinka och ljusen
kan användas.
T1. FLÄKTMOTOR AV / MINSKA HASTIGHETEN
Tryck för att minska hastigheten och stänga AV frånluftsmotorn. Tryck och håll in för att genast stänga AV frånluftsmotorn.
T2. FLÄKTMOTOR PÅ / ÖKA HASTIGHETEN
Tryck för att slå PÅ frånluftsmotorn och öka hastigheten. Tryck och håll in för att slå på hastighet 3 genast.
T3. FUNKTIONEN “POWER BOOST ”
Tryck på T3 för att aktivera det intensiva frånluftsläget “POWER BOOST 1” (tidsstyrt).
Observera: fläkten går tillbaka till föregående hastighet (hastighet 3) efter fem minuter.
Med frånluftsmotorn på, i läget “POWER BOOST1”, tryck igen på T3 för att aktivera det intensiva frånluftsläget “POWER BOOST 2” (tidsstyrt).
Observera: fläkten går tillbaka till föregående hastighet (hastighet 3) efter fem minuter.
Observera: Tryck igen på T3 under de fem minuterna för att få spisfläkten att återgå till läget “POWER BOOST 1”
T4. 6TH SENSE-FUNKTIONEN (AUTO-LÄGE) PÅ/AV
Spisfläkten ställer in hastigheten på frånluftsutsuget automatiskt om sensorn i spisfläkten upptäcker förändrade omgivningsförhållanden.

132
Observera: för att säkerställa att denna funktion används korrekt konfigurera sensor först (se “Sensorinställning” nedan).
Observera: om du ändrar några andra funktioner, som kontrollerar hastigheten kommer “6th sense” -funktionen att stängas av.
Sensorinställning
Detta kan göras när fläkten är AV. I normala omgivningsförhållanden, tryck på T4 i 5 sek., T4 blinkar i 5 min. för att indikera att spisfläkten utför
sensorkalibrering och slocknar sedan för att indikera att kalibreringen har avslutats.
Ställa in spishällen: Tryck och håll in T1 och T2 på samma gång.
Båda lyser upp för att indikera att spisfläkten är redo att acceptera kalibrering av spishällen.
Tryck T1 för att välja gashäll (T1 börjar blinka i 3 sek. för att indikera att spishällsparametrarna är inställda för gashäll.
Tryck T2 för att välja induktionshäll (T2 börjar blinka i 3 sek. för att indikera att spishällsparametrarna är inställda för induktionshäll.
T5. ZEN-DRIFTSLÄGE
Tryck på symbolen för att aktivera eller avaktivera ”ZEN”-frånluftsläge.
Funktionen aktiverar ett frånluftsläge med perfekt balans mellan ljudnivå och fläkteffektivitet.
T6. FETT-/KOLFILTERALARM/ÅTERSTÄLLNING
Med jämna mellanrum indikerar fläkten att filterunderhåll krävs.
Observera: Indikeringarna visas bara när fläkten är på.
T6 upplyst: Utför underhåll på fettfiltret.
T6 blinkar: utför underhåll på kolfiltret.
Återställning av indikeringar för mättat filter:
Observera: Åtgärden kan bara utföras när fläkten är på.
Tryck på och håll in T6
Observera: T6 och spisfläkten stängs av för att indikera att larmet har återställts.
Återställning av fettfiltret och kolfiltret görs genom att använda samma nyckel. Om båda filterlarmen är aktiva kommer återställningsproceduren
att återställa räknaren en och en med prioritet för kolfiltret.
Aktivera indikering för mättat kolfilter
Observera: Åtgärden kan bara utföras när frånluftsmotorn är avstängd.
Denna indikator är vanligtvis deaktiverad – tryck och håll in T3 och T7 på samma gång för att aktivera funktionen: Båda kommer att lysa upp
för att indikera aktivering.
För att deaktivera funktionen, tryck och håll in samma knappar igen: Båda kommer att blinka kort och sedan slockna för att indikera
deaktivering.
T7. HUVUDBELYSNING PÅ/AV
Tryck på symbolen för att tända eller släcka spisbelysningen.
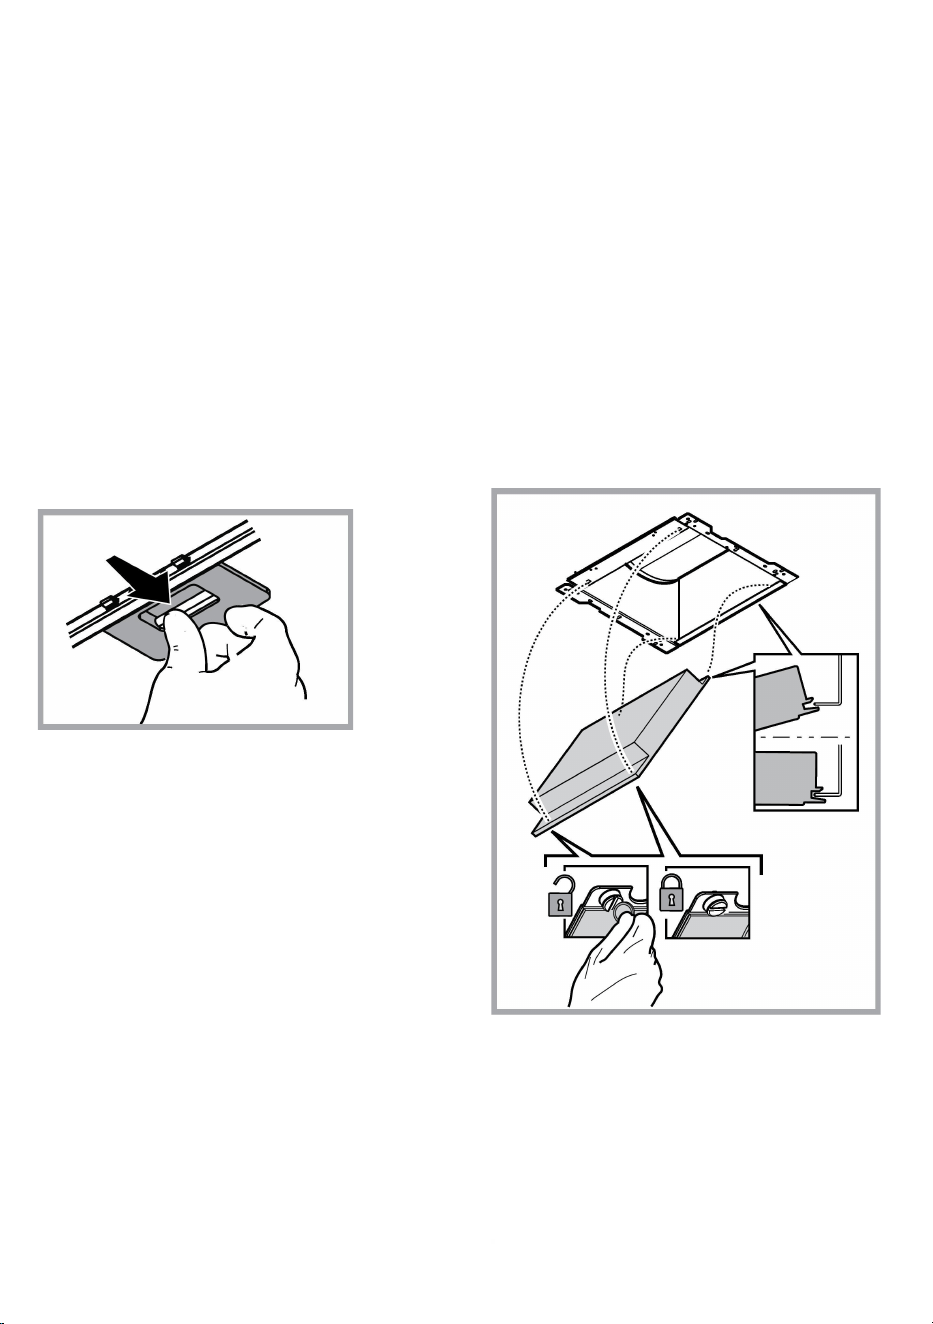
133
UNDERHÅLL
Rengöring
Använd endast en trasa fuktad med neutrala rengöringsmedel vid
rengöring. Använd inte några verktyg eller instrument för
rengöringen!
Undvik produkter som innehåller slipmedel. ANVÄND INTE
ALKOHOL!
Skötsel av avfettningsfilter
Detta suger upp fettpartiklar som bildas i samband med
matlagningen.
Filtret skall rengöras en gång i månaden (eller när indikatorn för
filtrets mättning – om sådan finns på er modell – anger att detta är
nödvändigt), med ett milt rengöringsmedel, för hand eller i
diskmaskin, med låg temperatur och kort program.
Vi tvätt i diskmaskin kan fettfiltret av metall missfärgas utan att
detta på något sätt påverkar filtrets uppsugningsförmåga.
När filtret skall monteras ur drar man i handtaget som lossas med
hjälp av en fjäder.
Skötsel av kolfilter
Kolfiltret fångar upp obehagliga odörer som uppstår i
samband med matlagningen.
Kolfiltret mättas efter en mer eller mindre lång tidsperiod beroende
på i vilken utsträckning fläkten används, på typen av matlagning
och hur regelbundet fettfiltren rengörs. Det är under alla händelser
nödvändigt att ersätta kolfilterpatronen minst var 4 månad (eller när
indikatorn för filtrets mättning – om sådan finns på er modell -
anger att detta är nödvändigt).
Filtret kan INTE rengöras eller återanvändas.
Montering
Haka först fast det aktiva kolfiltret baktill på fläktens metallflik och
därefter framtill med de båda rattarna.
Nedmontering
Ta ur det aktiva kolfiltret genom att vrida de båda rattarna med
vilka det är fixerat i fläkten 90°.
Utbyte av lampor
Fläkten är utrustad med ett belysningssystem som bygger på
lysdiodsteknologi.
Lysdioderna garanterar optimal belysning, upptill 10 gånger längre
livslängd jämfört med konventionella lampor och möjliggör en
energibesparing på 90%.
Kontakta den auktoriserade reservdelsåterförsäljaren vid byte av
lampor.

134
BORTSKAFFNING
Denna produkt är märkt enligt EG-direktiv 2012/19/EC beträffande elektriskt och elektroniskt avfall (Waste Electrical and Electronic Equipment,
WEEE).
Genom att säkerställa en korrekt kassering av denna produkt bidrar du till att förhindra potentiella, negativa konsekvenser för vår miljö och vår
hälsa, som annars kan bli följden om produkten inte hanteras på rätt sätt.
Symbolen på produkten, eller i medföljande dokumentation, indikerar att denna produkt inte får behandlas som vanligt hushållsavfall.
Den skall i stället lämnas in på en lämplig uppsamlingsplats för återvinning av elektrisk och elektronisk utrustning. Produkten måste kasseras
enligt lokala miljöbestämmelser för avfallshantering.
För mer information om hantering, återvinning och återanvändning av denna produkt, var god kontakta de lokala myndigheterna, ortens
sophanteringstjänst eller butiken där produkten inhandlades.
Apparat utformad, testad och tillverkad i enlighet med:
• Säkerhet: EN/IEC 60335-1; EN/IEC 60335-2-31, EN/IEC 62233.
• Prestanda: EN/IEC 61591; ISO 5167-1; ISO 5167-3; ISO 5168; EN/IEC 60704-1; EN/IEC 60704-2-13; EN/IEC 60704-3; ISO 3741; EN
50564; IEC 62301.
• EMC: EN 55014-1; CISPR 14-1; EN 55014-2; CISPR 14-2; EN/IEC 61000-3-2; EN/IEC 61000-3-3. Råd för en korrekt användning för att
minska miljöpåverkan: Sätt PÅ fläkten på minsta farten när du börjar att laga mat och låt den vara på i några minuter efter att du är färdig. Öka
farten bara om det skulle uppstå mycket rök och ånga och använd ökad fart bara i extrema fall. Byt ut kolfiltret(en) vid behov för att bevara en
god lukt och effektivitet. Rengör fettfiltret vid behov för att bevara fettfiltrets effektivitet. Använd den maximala diametern på ventilationssytemet
som indikeras i denna manualen för att förbättra effektiviteten och minimera oljudet.
FUNKTIONSFEL
Om något inte verkar fungerar, utför först följande enkla kontrollera innan servicekontoret kontaktas:
• Om fläkten inte fungerar:
Kontrollera att:
- inget strömavbrott förekommer.
- en hastighet valts.
• Om fläktens prestanda är dålig:
Kontrollera att:
- Den valda motorhastigheten är tillräcklig för mängden rök och avgas som släpps ut.
- Köket är tillräckligt ventilerat för ett luftuttag.
- Kolfiltret inte är förbrukat (fläkt i filterversion).
• Om fläkten släckts under normal funktion:
Kontrollera att:
- inget strömavbrott förekommer.
- den omnipolära öppningsanordningen inte utlösts.
Vid eventuella funktionsfel, koppla först ifrån apparaten ur elnätet i cirka 5 sekunder genom att dra ur kontakten och sedan ansluta apparaten
igen, innan servicekontoret kontaktas. Om ett funktionsfel kvarstår, kontakta servicekontoret.

135
TEKNISKA SPECIFIKATIONER
Höjd (cm)
Bredd (cm)
Djup (cm)
Ø på frånluftsrör (cm)
62-114
71
-
114
89,8 45,5 15
62-114
71
-
114
59,8 45,5 15
Komponenter som inte medföljer produkten
Du kan ladda ner Säkerhetsinstruktioner,
Bruksanvisning, Produktblad och Energidata
genom att:
• Besöka vår webbsida docs.whirlpool.eu
• Använda QR-koden
• Eller kontakta vår kundservice (Se telefonnumret
i garantihäftet). När du kontaktar vår
kundservice,
ange koderna som står på produktens typskylt.

136
UK
Загальні ПРАВИЛА З ТЕХНІКИ БЕЗПЕКИ
Перед початком будь якої операції по очищенню або обслуговуванню, відключіть
витяжку від електричної сітки витягуючи вилку з розетки або відключаючи загальний
вимикач приміщення.
• Для усіх операцій по установці та обслуговуванню використовуйте робочі рукавиці.
• Пристрій може використовуватися дітьми не молодшими 8 років та особами із
зниженими фізичними, сенсорними або розумовими здібностями, або з недостатнім
досвідом якщо знаходяться під контролем, або були навчені використовувати пристрій
в безпечній спосіб та якщо розуміють пов'язані з тим небезпеки.
• Діти повинні бути під контролем і не повинні гратися з пристроєм.
• Операції по чищенню та обслуговуванню не повинні проводитися дітьми без нагляду.
• Приміщення повинно мати достатню вентиляцію коли витяжка використовується
одночасно з іншими пристроями що працюють на газі або інших паливах.
• Витяжку необхідно часто чистити як в середині, так і ззовні (ХОЧА Б ОДИН РАЗ НА
МІСЯЦЬ), дотримуватися в будь якому випадку того, що вказується в інструкціях по
обслуговуванню.
• Не дотримання норм очищення та заміни і очищення фільтрів збільшує ймовірність
ризику загоряння.
• Суворо заборонено приготування їжі на відкритому вогні під витяжкою.
• Для заміни лампочки освітлення використовувати тільки тип лампочки вказаний в
розділі обслуговування/заміна лампочки цього посібника.
Використання відкритого полум’я наносить збиток фільтрам і може призвести до
загорання, тому потрібно уникати в будь якому випадку.
Смаження повинно проводитися під наглядом щоб уникнути загоряння розлитої олії.
УВАГА: Коли варильна поверхня працює, доступні частини можуть нагріватися.
• Не підключати пристрій до електричної сітки до тих пір, поки не буде повністю
закінчена установка.
• Що стосується технічних мір та мір безпеки у використанні що відноситься до викидів парів, суворо дотримуйтеся норм місцевих
компетентних органів.
• Повітря що втягується, не повинно випускатися в трубу яка використовується для викиду димів пристроями що працюють на газі та
інших паливах.
• Не використовувати або залишати витяжку без правильно встановлених лампочок з ризиком отримати удар електричним струмом.
• Ніколи не використовувати витяжку без правильно встановленої решітки!
• Витяжка НІКОЛИ не повинна використовуватися як опорна поверхня, якщо тільки не вказується.
• Використовувати гвинти для фіксування в наборі з продуктом для установки, якщо немає в наборі, придбати гвинти правильного
типу.
• Використовувати правильну довжину гвинтів яка вказується в посібнику по встановленню.
• У випадку сумнівів, консультуватися в авторизованому центрі або з кваліфікованим персоналом.
УВАГА!
• Не встановлювання відповідних гвинтів і пристроїв для фіксування у відповідності з цими інструкціями може привести до
ризиків електричного походження.
• Не слід використовувати з програматором, таймером, окремим пультом керування або з будь-яким іншим пристроєм, який
приводиться в дію автоматично.
137
Тримати прилад подалі від дітей до 3 років. Зберігайте прилад у недоступному місці для дітей до 8 років, що не перебувають під
постійним наглядом дорослих.
УВАГА: прилад не призначений для роботи із зовнішнім пристроєм або окремою системою дистанційного керування.
Цей прилад не призначений для професійного використання. Не використовуйте пристрій на відкритому повітрі.
Щоб уникнути ризику травмування, прилад повинен переміщатися та встановлюватися двома або більше людьми.
Установка, включаючи також будь-які підключення водопостачання (якщо є) та електричні з'єднання, а також ремонтні роботи
повинні виконуватися кваліфікованим персоналом.
Після завершення установки відкладіть пакувальний матеріал (пластмасові деталі, полістирол тощо) поза досяжністю дітей, щоб
уникнути ризику удушення. .
Не використовуйте прилад, якщо у вас вологі руки або босоніж.
Ніколи не використовуйте парові прилади для чищення - ризик ураження електричним струмом.
Пакувальний матеріал на 100% піддається переробці і позначений символом переробки
Кухонна витяжка може мати дизайн, що відрізняється від витяжки зображенної на малюнках цієї інструкції але в будь-
якому випадку інструкції з монтажу, технічного обслуговування та експлуатації залишаются без змін.
Чітко дотримуйтеся приведених в даному керівництві інструкцій. Виробник знімає з себе будь-яку відповідальність за
несправності, збитки або пожежу, що може мати місце при використанні пристрою внаслідок невиконання інструкцій, приведених в
даному керівництві. Витяжний ковпак спроектований для всмоктування диму та пару, що утворюється під час приготування їжі та
призначений лише для побутового використання..
• Важливо зберегти ці інструкції для того, щоб можна було звернутися до них в будь-який час. У випадку продажу, передачі чи
переїзду, переконатися в тому щоб інструкції були разом з виробом.
• Уважно прочитати інструкції: В них міститься важлива інформація з встановлення, використання та безпеки.
• Заборонено виконувати електричні чи механічні зміни у виробі чи у вивідних каналах.
• Перш ніж приступити до монтажу виробу перевірте чи всі компоненти без дефектів та не є пошкодженими. У протилежному
випадку зверніться в місце продажу та зупиніть монтування виробу.
Відстань нижньої відчастини витяжки до посуду на кухонній плиті має бути не менше 50cm, у випадку електричних плит, та 65 cm, у
випадку газових та комбінованих плит.
Необхідно приймати до уваги відстані, які вказуються в інструкції з інсталяції газової плити.
ЕЛЕКТРИЧНЕ ПІД’ЄДНАННЯ
Напруга в електромережі має відповідати вказаним характеристикам на етикетці, яка знаходиться всередині витяжки. Якщо в
комплект входить вилка під’єднання в електромережу, то слід під’єднати витяжку до розетки, що відповідає існуючим нормам та
знаходиться в доступному місці, що можна виконати й після інсталяції. Якщо ж вилка не входить в комплект (пряме під’єднання в
електромережу), або розетка не знаходиться в доступному місці, також і після інсталяції, то слід вмонтувати належний двох-
полюсний вимикач, який забезпечить повне відключення від мережі в умовах перенапруги III категорії, в повній відповідності з
правилами інсталяції.
УВАГА!
перед тим як знову підключити витяжку до електромережі і перевірити правильність роботи, завжди контролюйте щоб шнур мережі
був змонтований вірно.
Якщо кабель не оснащений вилкою, підключіть дроти згідно з наступною таблицею:
Напруга і частота мережі Підключення дротів
Дивіться значення, вказане на табличці з даними всередині
витяжки.
: жовтий/зелений
N : синій
L : коричневий
Заміна електрокабеля
Витяжний ковпак має спеціальний провід живлення; у випадку пошкодження проводу, замовте його у службі технічного
обслуговування.
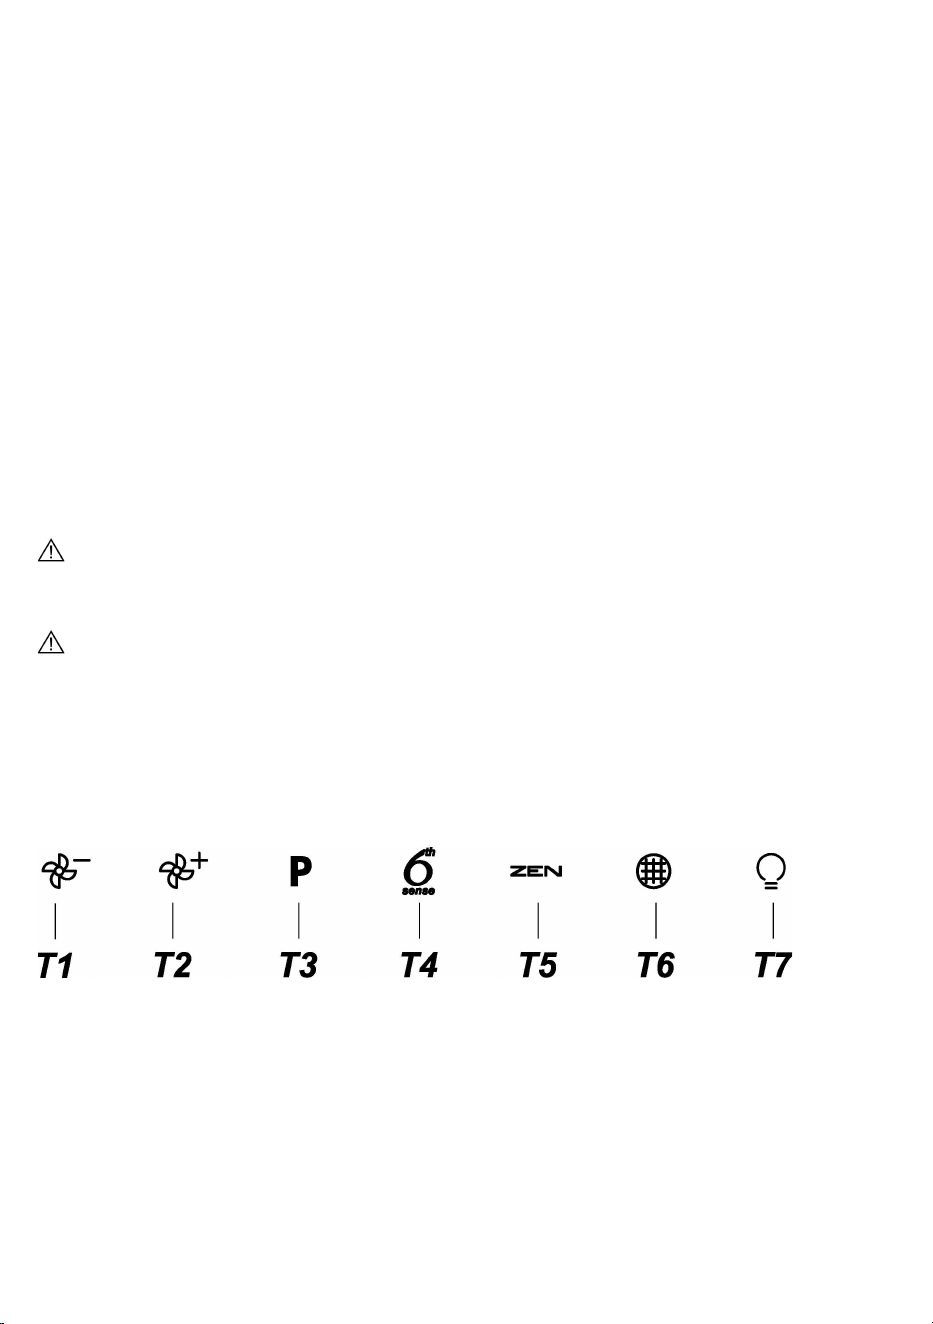
138
ВИВІД ПОВІТРЯ
(для виконання з відводом)Під’єднати ковпак до настінної вивідної труби та вивідного отвору з однаковим діаметром виходу повітря
(з’єднуючий фланець).
Використання настінних вивідних труб та отворів з меншим діаметром приведе до зменшення ефективності всмоктування та значне
збільшення рівня шуму.
Тому ми знімаємо з себе будь-яку відповідальність по вищесказаному.
! Використовуйте найкоротший витяжний канал.
! Використовуйте витяжний канал з найменшою кількістю поворотів (максимальний кут повороту: 90°).
! Уникайте різких змін площі перерізу витяжного каналу.
! Підприємство знімає з себе будь-яку відповідальність, якщо дійсні
З РЕЦИРКУЛЯЦІЄЮ ЧИ З ВІДВОДОМ
! Ваша витяжка готова до використання в режимі відводу.
Для того щоб використовувати витяжку в режимі рециркуляції необхідно встановити ДОДАТКОВИЙ КОМПЛЕКТ.
Перевірте на перших сторінках даного посібника, чи входить ДОДАТКОВИЙ КОМПЛЕКТ у поставку або його необхідно
придбати окремо.
Примітка: Якщо входить в поставку обладнання, в деяких випадках, додатковий комплект вугільних фільтрів може вже бути
встановлений на витяжці.
Інформація щодо переведення витяжки з режиму відведення в режим рециркуляції вже входить у даний посібник.
Виконання з відводом
Пари виводяться назовні через вивідну трубу закріплену до фланця з'єднання.
УВАГА!
Вивідна труба не постачається і тому необхідно її придбати окремо.
Діаметр вивідної труби повинен відповідати діаметру з’єднувального кільця.
УВАГА!
Якщо витяжний ковпак має вугільні фільтри, то їх треба зняти.
Виконання з рециркуляцією
Втягнуте повітря знежирюється та очищується та знову повертається в приміщення. Для того, щоб використовувати ковпак у цьому
режимі, необхідно встановити додаткову систему фільтрів з активованим вугіллям.
КОМАНДИ
Витяжка обладнана панеллю команд з контролем швидкості витягування та контролем світла для освітлення варильної поверхні.
T1. Двигун вентилятора ВИМК/зменшення швидкості
T2. Двигун вентилятора УВІМК/збільшення швидкості
T3. Функція «POWER BOOST»
T4. Функція 6th Sense (АВТО режим) УВІМК/ВИМК
T5. Режим «ZEN»
T6. Попереджувальний сигнал жирового/ вугільного фільтра/скидання
T7. УВІМК/ВИМК основного освітлення
ОБЕРЕЖНО! Ця витяжка має автоматичну операційну систему (див. нижче «T4. Функція 6th sense (АВТО режим) УВІМК/ВИМК»).
Калібрування відбувається автоматично при кожному підключенні витяжки до електричної мережі (напр.: під час першого увімкнення
після збою електропостачання). Його також можна встановити вручну (див. розділ «Налаштування датчика»). Під час калібрування,
яке триває 5 хвилин, T4 почне блимати, і світло можна використовувати.

139
T1. ДВИГУН ВЕНТИЛЯТОРА ВИМК/ЗМЕНШЕННЯ ШВИДКОСТІ
Натисніть, щоб зменшити швидкість та ВИМК витяжну вентиляцію.
Натисніть та утримуйте, щоб ВИМК витяжну вентиляцію.
T2. ДВИГУН ВЕНТИЛЯТОРА УВІМК/ЗБІЛЬШЕННЯ ШВИДКОСТІ
Натисніть, щоб УВІМК витяжну вентиляцію та збільшити швидкість.
Натисніть та утримуйте, щоб відразу встановити 3-ю швидкість.
T3. ФУНКЦІЯ «POWER BOOST»
Натисніть T3, щоб активувати швидкість інтенсивної витяжної вентиляції «POWER BOOST 1» (регульована за часом).
Зверніть увагу: через п'ять хвилин витяжка повернеться до роботи на 3-й швидкості.
При увімкненій витяжній вентиляції в режимі «POWER BOOST1» знову натисніть T3, щоб активувати швидкість інтенсивної витяжної
вентиляції «POWER BOOST 2» (регульована за часом).
Зверніть увагу: через п'ять хвилин витяжка повернеться до роботи на 3-й швидкості.
Зверніть увагу: знову натисніть T3, протягом п'яти хвилин витяжка повернеться до роботи у режимі «POWER BOOST 1»
T4. ФУНКЦІЯ 6TH SENSE (АВТО РЕЖИМ) УВІМК/ВИМК
Витяжка автоматично встановлює швидкість відведення повітря, якщо датчик у витяжці виявляє зміну навколишніх умов.
Зверніть увагу: щоб переконатися, що ця функція правильно використовується, спочатку налаштуйте датчик (див
«Налаштування датчика» нижче).
Зверніть увагу: якщо ви зміните будь-які інші функції, які контролюють швидкість, функція «6th sense» вимкнеться.
Налаштування датчика
Його можна виконати, коли витяжка вимкнена. У звичайних умовах роботи натискайте T4 протягом 5 секунд, T4 почне блимати
протягом 5 хвилин, щоб показати, що витяжка виконує калібрування датчика, після чого вимикається, щоб вказує на завершення
калібрування.
Налаштування варильної поверхні: Натисніть та утримуйте T1 і T2 одночасно. Обидві кнопки починають світитися, вказуючи на те,
що витяжка готова прийняти калібрування параметрів варильної поверхні.
Натисніть T1 для вибору газової варильної поверхні (T1 почне блимати протягом 3 секунд, вказуючи на те, що параметри витяжки
налаштовані для газової варильної поверхні).
Натисніть T2 для вибору індукційної варильної поверхні (T2 почне блимати протягом 3 секунд, вказуючи на те, що параметри
витяжки налаштовані для індукційної варильної поверхні).
T5. РЕЖИМ «ZEN»
Натисніть, щоб активувати або деактивувати режим витяжної вентиляції «ZEN».
Ця функція дозволяє активувати швидкість витяжної вентиляції з ідеальним балансом між безшумністю та ефективністю.
T6. ПОПЕРЕДЖУВАЛЬНИЙ СИГНАЛ ЖИРОВОГО/ВУГІЛЬНОГО ФІЛЬТРА/СКИДАННЯ
З регулярними інтервалами витяжка повідомляє про необхідність виконати технічне обслуговування фільтра.
Зверніть увагу: Індикатори працюватимуть, лише коли увімкнено витяжку.
T6 світиться: проведіть технічне обслуговування жирового фільтра.
T6 блимає: проведіть технічне обслуговування вугільного фільтра.
Скидання індикаторів насиченості фільтра:
Зверніть увагу: Це потрібно виконувати з увімкненою витяжкою.
Натисніть і утримуйте T6
Зверніть увагу: T6 і витяжка вимикаються, вказуючи на те, що скидання попереджувального сигналу завершено.
Скидання налаштувань жирового та вугільного фільтрів здійснюється за допомогою того ж ключа. Якщо попереджувальні сигнали
обох фільтрів активні, один за іншим стається збій лічильників, в першу чергу вугільного.
Активація індикатора насиченості вугільного фільтра
Зверніть увагу: Це потрібно виконувати з вимкненою витяжною вентиляцією.
Цей індикатор зазвичай деактивований - одночасно натисніть та утримуйте T3 і T7, щоб активувати функцію: Обидва індикатори
почнуть світитися, що вкаже на активацію.
Щоб деактивувати функцію, натисніть та утримуйте ті ж кнопки:
Обидві кнопки почнуть короткочасно блимати, а потім вимкнуться, що вкаже на деактивацію.
T7. УВІМК/ВИМК ОСНОВНОГО ОСВІТЛЕННЯ
Натисніть, щоб увімкнути або вимкнути освітлення варильної поверхні.
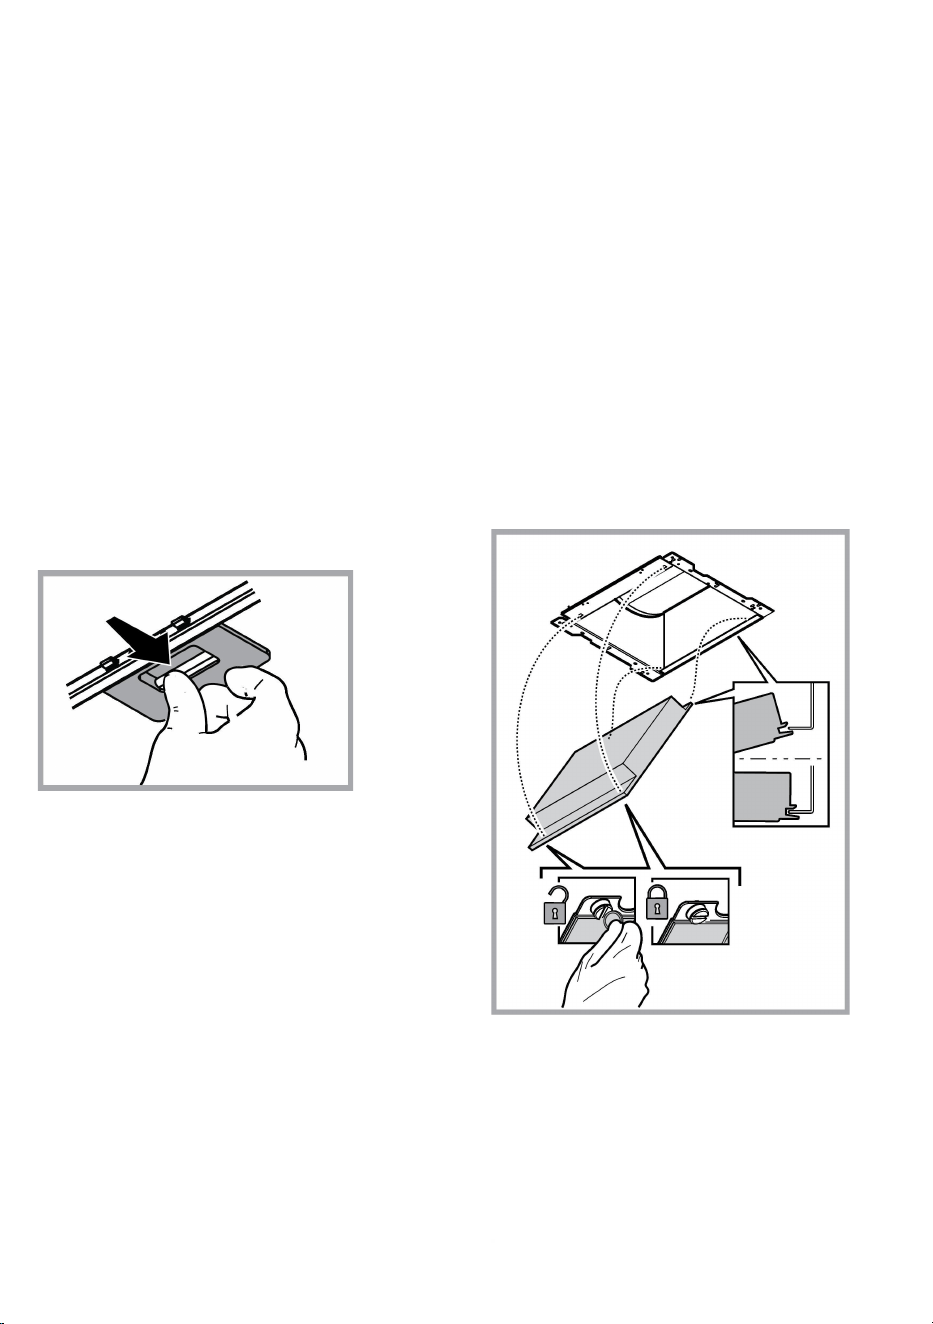
140
ТЕХНІЧНЕ ОБСЛУГОВУВАННЯ
Чищення
Для чистки використовуйте ЛИШЕ спеціальну серветку,
намочену нейтральним рідким миючим засобом. НЕ
ВИКОРИСТОВУЙТЕ ЗАСОБІВ АБО ІНСТРУМЕНТІВ ДЛЯ
ОЧИЩЕННЯ!
Не використовуйте засоби що мають абразивні матеріали. НЕ
ВИКОРИСТОВУЙТЕ СПИРТ!
Обслуговування жирових фільтрів
Затримує жировi сполучення, що виникають під час
приготування їжі.
Повинен чиститися один раз в місяць (або коли система
індикації переповнення фільтрів, якщо є у вашій моделі, вказує
на дану необхідність), з використанням неагресивних миючих
засобів вручну або в посудомиючій машині при низькій
температурі і короткому циклі.
При митті в посудомиючій машині може мати місце деяке
знебарвлення фільтру,проте його фільтруючі характеристики
залишаються незмінними.
Для зняття фільтру затримки жиру потягніть на себе пружинну
ручку відчеплення фільтру.
Обслуговування вугільного фільтру
Вбирає неприємні запахи кухні.
Насиченість вугільного фільтру перевіряється після більш або
менш довгого використання в залежності від типу плити та
регулярності чищення жиропоглинаючого фільтру. У будь-
якому випадку необхідно заміняти картридж принаймнi через
кожні чотири місяці (або коли система індикації насиченості
фільтрів – якщо така передбачена у вашій моделі - вказує на
таку необхідність)
НЕ підлягає миттю чи поновленню.
Встановлення
Підвісити вугільний фільтр спочатку задньою стороною на
металевий язичок ковпака, потім передню частину закріпити
двома ручками.
Зняття
Зняти вугільний фільтр повертаючи ручки на 90° що фіксують
його до ковпака.
Заміна лампочок
Витяжка обладнана системою освітлення на основі технології
діодів (LED).
ДІОДИ забезпечують оптимальне освітлення, тривалість їх в
10 раз вища від звичайних лампочок та дають 90% економії
електроенергії.
Для заміни ламп контактувати авторизований сервісний центр
запасних частин.
141
УТИЛІЗАЦІЯ
Даний виріб промаркований відповідно до Європейської директиви 2012/19/EC, утилізація електричного і електронного обладнання
(WEEE). Забезпечуючи вірну утілізацію цього виробу, Ви допоможете попередити потенційні негативні наслідки для оточуючого
середовища і здоров’я людини, котрі могли б мати місце в протилежному випадку.
Символ на самому виробі або на супроводжуючому його документі вказує, що при утилізації цього виробу з ним не можна
поводитися як зі звичайними побутовими відходами. Він має здаватися у відповідний пункт прийому електричного і електронного
обладнання для подальшої утилізації. Здавання на злам повинно виконуватися згідно з місцевими правилами по утилізації відходів.
Для більше детальної інформації про правила поводження з такими виробами, їх утилізації і переробки звертайтесь в місцеві органи
влади, в службу по утилізації відходів, або в магазин, в якому Ви придбали даний виріб.
Прилад спроектовано, випробувано і виготовлено згідно з:
• Безпека: EN/IEC 60335-1; EN/IEC 60335-2-31, EN/IEC 62233.
• Експлуатаційні якості: EN/IEC 61591; ISO 5167-1; ISO 5167-3; ISO 5168; EN/IEC 60704-1; EN/IEC 60704-2-13; EN/IEC 60704-3; ISO
3741; EN 50564; IEC 62301.
• EMC: EN 55014-1; CISPR 14-1; EN 55014-2; CISPR 14-2; EN/IEC 61000-3-2; EN/IEC 61000-3-3. Поради для правильної експлуатації
та для зниження впливу на середовище: Вмикайте витяжку на мінімальну швидкість перед початком приготування їжі, і залишайте її
працювати на декілька хвилин після закінчення приготування. Збільшуйте швидкість тільки у разі великої кількості диму і пару та
використовуйте наддув тільки у крайніх випадках. Для підтримання високої ефективності видалення запахів, за необхідності,
виконуйте заміну вугільного(-их) фільтру(-ів). Для підтримання високої ефективності фільтру жирів, за необхідності, виконуйте чистку
фільтру(-ів) жирів. Використовуйте максимальний діаметр системи повітроводів, що вказаний у інструкції для оптимізації
ефективності та мінімізації шуму.
ЗБОЇ У ФУНКЦІОНУВАННІ
Якщо щось не працює належним чином, перед тим як звернутися в Службу по технічному обслуговуванню, виконайте наступні прості
перевірки:
• Якщо витяжка не працює:
перевірити:
- Чи не було перервано подачу струму.
- Чи було обрано будь-яку швидкість.
• Якщо витяжка погано працює:
перевірити:
- чи обрана швидкість двигуна достатня для виробленої кількості диму і пари.
- Чи кухня достатньо провітрена для того, щоб витяжка могла виконати забір повітря.
- Чи вугільний фільтр не відпрацьований (витяжка в режимі з рециркуляцією повітря).
• Якщо витяжка вимкнулася в ході нормальної роботи:
перевірити:
- Чи не було перервано подачу струму.
- Чи не спрацював однополюсний вимикач апарату.
У разі можливих збоїв у роботі, перед тим як звернутися до служби технічного обслуговування відключити від
електроживлення апарат мінімум на 5 секунд, виймаючи вилку і потім знову під'єднати його. Якщо аномалія в роботі
продовжує існувати звернутися в службу техобслуговування.
142
ТЕХНІЧНІ ДАНІ
Висота (см)
Ширина (см)
Глибина (см)
Ø
випускної т
руби (см)
62-114
71
-
114
89,8 45,5 15
62-114
71
-
114
59,8 45,5 15
Комплектуючі, не входять у комплект деталей до виробу
Щоб завантажити інструкції з техніки безпеки,
посібник користувача, технічний паспорт та
енергетичні показники:
• Зайдіть на веб-сайт docs.whirlpool.eu
• Використовуйте QR-код
• Або, зверніться до Сервісної служби
(за
номером телефону, вказаним у гарантійному
талоні). При зверненні до служби
післяпродажного обслуговування вкажіть коди,
що містяться на заводській табличці виробу.
8
ةينقتلا تانايبلا
)مس( عافترا )مس( ضرعلا)مس( قمعلا)مس( فرصلا بوبنأ Ø
114-62
114-71
89.845.515
114-62
114-71
59.845.515
زاهجلا عم ةدوزم ريغ تانوكم
ةينفلا ةقيثولاو استخدامليلدو ةمسلا تاميلعت ليزنت لجأ نم
:ةقاطلا تانايبو
docs.whirlpool.eu ينورتكلا انعقوم اوروز •
QR عيرسلا فشكلا زمر مدختسا •
ىلع دراولا فتاهلا مقر ىلع( ينفلا معدلا ةمدخب لصتا ,وأ •
مهديوزتب مق ،ينفلا معدلا زكرمب لاصتا دنع .)نامضلا بيتك
.جتنملل لسلسملا مقرلا ةحول ىلع ةدوجوملا داوكاب
7
زاهجلا نم صلختلا
ةــ
ينورتكلاو ةــ
يئابرهكلا ةزــهجاو تادــعملا تاــيافنب صاــخلاو ،19/EC/ 2012 يــبوروا هــيجوتلا عــم قــفاوتلا ةــمع زاــهجلا اذــه لــمحي
ةــيأ ثودــح كرادــت يــف مهــس
ُ
ي كــلذب هــنإف ،حــيحصلا لكــشلاب يليغــشتلا هرــمع ءاــهتنا دــعب زاــهجلا نــم صــلختلاب مدختــسملا ماــيق دــنع .)WEEE(
.ةــحصلا ىــلعو ةــئيبلا ىــلع رارــضأ وأ ةيبلــس بــقاوع
ىــلع يليغــشتلا هرــمع ةــياهن يــف هــعم لــماعتلا بــجي جــتنملا اذــه نأ ىــلإ ةــقفرملا قــئاثولا ىــلع وأ جــتنملا ىــلع دوــجوملا زــمرلا ريــشي
صــ
لخت .اــهريودت ةداــعإو ةــينورتكلاو ةــيئابرهكلا ةزــهجا عــيمجتب صــتخم زــكرم ىــلإ هميلــست بــجي نــكلو ةــيداعلا ةــيلزنملا تاــيافنلا دــحأ هــنأ
ةداــعإو همادختــسا ةداــعإو جــ
َ
تنملا اذــه ةــجلاعم لوــح تاــمولعملا نــم دــيزمل .تاــيافنلا نــم صــلختلا نأــشب ةــ
يلحملا نــيناوقلل اــ
ً
قفو زاــهجلا اذــه نــم
.زاــهجلا اذــه هــنم تيرتــشا يذــلا رــجتملاب وأ ،ةــ
يلزنملا تاــيافنلا عــمج ةــمدخب وأ ،صــتخملا يــلحملا بــتكملاب لاــص
ِ
ّ
تا ىــ
َ
جر
ُ
ي ،هرــيودت
:ةيلاتلا تافصاوملل ا
ً
قفو ا
ً
يليغشت هرابتخاو هعينصتو زاهجلا اذه ميمصت مت
.EN/IEC 62233 و EN/IEC 60335-2-31 ؛EN/IEC 60335-1 :ةمسلاو نما •
EN/IEC 61591; ISO 5167-1; ISO 5167-3; ISO 5168; EN/IEC 60704-1; EN/IEC 60704-2-13; :يليغشتلا ءادا •
EN/IEC 60704-3; ISO 3741; EN 50564; IEC 62301.
EN 55014-1; CISPR 14-1; EN 55014-2; CISPR 14-2; EN/IEC 61000-3-2; EN/IEC 61000- :يسيطانغمورهكلا •
دــحلا ىــلع طا
فــشلا دــ
ِ
قوأ ،يــهطلا ةــ
يلمع ءدــب دــنع :هــل يــئيبلا رــثا لــيلقت ضرــغب حــيحصلا لكــشلاب زاــهجلا مادختــسا ةــيفيكل تاــحارتقا3-3.
ةرــيبكلا تاــيمكلا ةــلاح يــف إ ةعرــسلا ةداــيزب مــقت .يــهطلا ةــ
يلمع نــم ءاــهتنا دــعب قــئاقد عــضبل
ً
اــضيأ لــمعي هــكرت عــم ،ةعرــسلل ىــندا
ضــيفخت زاــهجل ةدــيجلا ةــيلاعفلا ىــلع ظاــفحلا لــجأ نــم .طــقف ىوــصقلا تاــحلا يــف ززــعملا زاــهجلا ةــفيظو مادختــسا عــم ،راــخبلاو ناــخدلا نــم
ةــلاح يــف هــفيظنتب مــق ،نوــهدلا حــشرمل ةدــيجلا ةــيلاعفلا ىــلع ظاــفحلا لــجأ نــم .نوــبركلا تاحــشرم/حشرم ،مزــلي اــمدنع ،لدبتــسا ،حــئاورلا
اذــه يــف هــيلإ راــشملا بــيبانا ماــظنل رــطق ىــصقأ مدختــسا ،ىــندا دــحلل ءاــضوضلا لــيلقتو لــثما دــحلل ةــيلاعفلا نيــسحت لــجأ نــم .ةرورــضلا
.بــيتكلا
ليغشتلا لطع وأ للخ
:ةيلاتلا ةطيسبلا تاصوحفلا ذيفنتب مق ينفلا معدلا ةمدخب لاصتا لبق ،لمعي هنأ ودبي ام
ٌ
ءيش ناك نإ
:لمعي طافشلا ناك اذإ •
:هنأ نم ققحت
.رايتلا يف عاطقنا دجوي -
.ةعرس رايتخا مت -
:ةضفخنم طافشلا ةءافك تناك اذإ •
:هنأ نم ققحت
.ةرداصلا ةرخباو مداعلا ةيمكل ةيفاك ةراتخملا كرحملا ةعرس -
.ءاوهلا ديدجتب حمست يكل ةيفاك خبطملا ةيوهت -
.)حيشرتلا رادصإب طافشلا( كلهتسم ريغ نوبركلا حشرم -
:يداعلا ليغشتلا ءانثأ طافشلا أفطنا اذإ •
:هنأ نم ققحت
.رايتلا يف عاطقنا دجوي -
.ل
عف
ُ
م ريغ بطقلا يداحأ عطقلا زاهج -
قــيرط نــع ةــيئابرهكلا ةــيذغتلا نــم
ٍ
ناوــث 5 ةدــمل زاــهجلا اوــلصفا يــنفلا مــعدلا ةــمدخ ىــلإ مــكهجوت لــبق ،ةــلمتحملا ليغــشتلا لاــطعأ ةــلاح يــف
.يــنفلا مــعدلا ةــمدخ ىــلإ هــجوت ،ليغــشتلا لــطع رارمتــسا ةــلاح يــف .دــيدج نــم هــليصوت اودــيعأ مــث ســباقلا عزــن
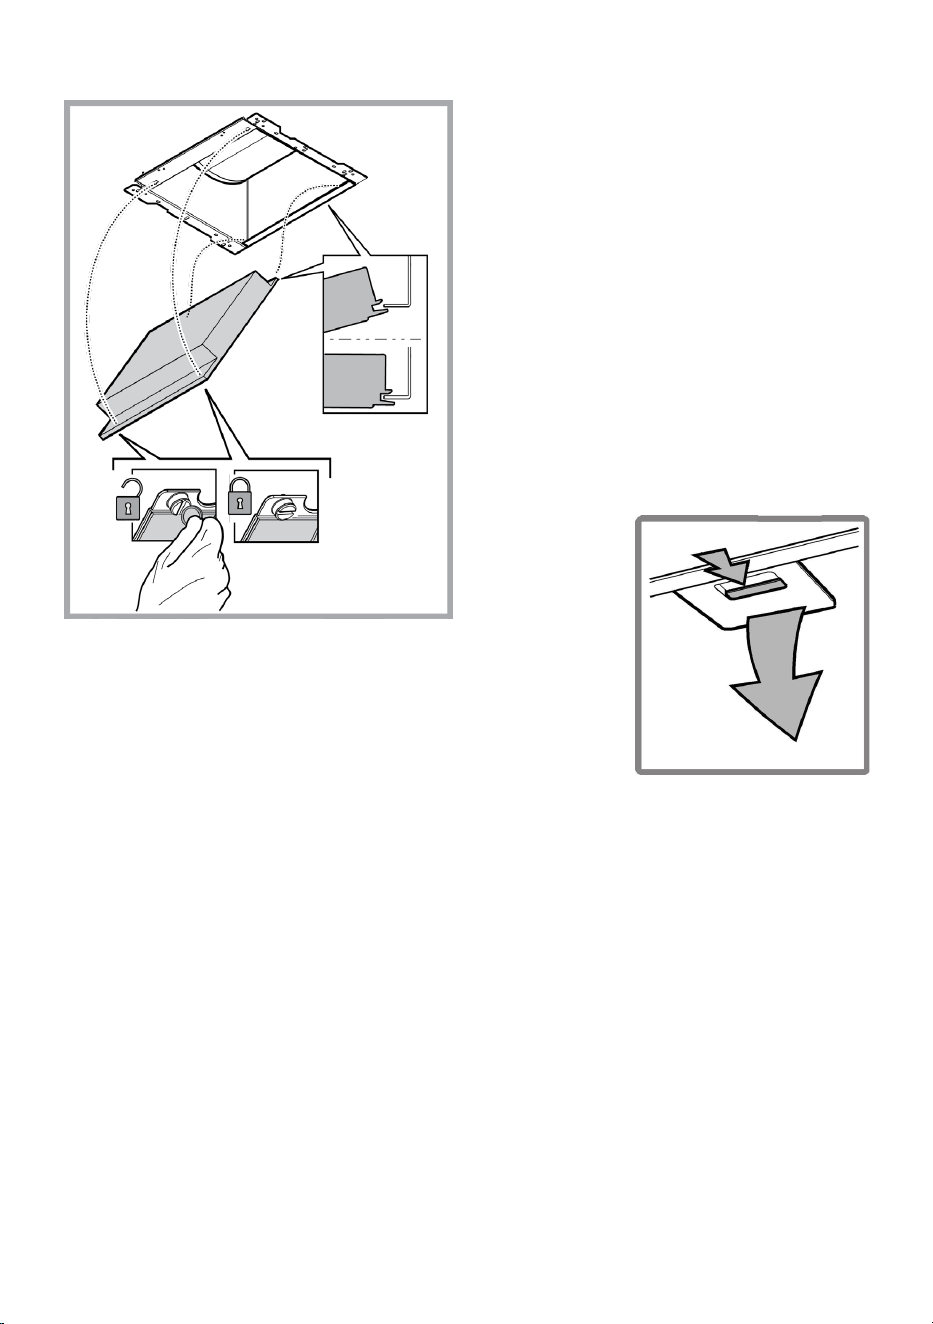
6
ةنايصلا
فيظنتلا
ةــل
لبم شاــمق ةــعطق اــ
يرصحو طــقف م
ِ
دختــسا فــيظنتلا ةــ
يلمعب ماــيقلل
ماــيقلل تا
دــعم وأ تاودأ ةــ
يأ م
ِ
دختــست .ةدــياحم ةلئاــس تاــف
ِ
ّ
ظنمب
!فــيظنتلاب
م
ِ
دختــست .ةطــشاك داوــم ىــلع ةــيوتحملا تاــجتنملا مادختــسا بــنجت
!لوــحكلا
نوهدلل ةلازإ تاحشرم ةنايص
.يهطلا ةيلمع نع ةجتانلا ةهيركلا حئاورلا زجحي
هــيبنتلا ماــظن ريــش
ُ
ي اــمدنع وأ( رهــش لك ةدــحاو ةرــم هــفيظنت بــجي
لــيدوملا يــف كــلذ ىــلع
صــ
ُ
ن اــم اذإ - تاحــ
ّ
شرملا ع
بــشتب صاــخلا
مادختــساب ،)اــهفيظنتب ماــيقلا ةرورــض ىــلإ ريــشي هــنإف – كوــلممملا
قاــبطا ةلاــ
ّ
سغ يــف وأ يودــي لكــشب ءاوــس ،ةــ
ّ
يناودع رــيغ تاــف
ّ
ظنم
.ةرــيصق فــيظنت ةرودــبو ةــضفخنم ةرارــح تاــجردب
يــندعملا نوــهدلا ةــلازإ حــشرم نإــف قاــبطا ةلاــ
ّ
سغ يــف ليــسغلا دــنع
ةــيلمعب ةــق
ِ
ّ
لعت
ُ
ملا هــتافصاومو هــصئاصخ نــكلو هــنول دــقفي نأ نــكمي
.اــ
ً
قلطم رــيغتت حيــشرتلا
.ضبانلا يذ كفلا ضبقم دشب مق نوهدلا ح
ّ
شر
ُ
م ةلاز
نوبركلا حشرم ةنايص
.يهطلا ةيلمع نع ةجتانلا ةهيركلا حئاورلا زجحي
ةــيعونل اــقفو ةــليوط مادختــسا ةرــتف دــعب نوــبركلا حــ
ِ
ّ
شر
ُ
م ع
بــشت ثدــحي
بــجح تاحــشرم لــسغو فــيظنت تارــم ددــعو ةــعيبطو خــبطملا
لك ةــشوطرخلا لادبتــسا لاوــحا عــيمج يــف بــجي .نوــهدلا ةــلازإو
عبــشت نــع هــيبنتلا ماــظن ريــشي اــمدنع وأ( ىــصقأ دــحك رهــشا ةــعبرأ
ىــلإ -مــكتزوحب يذــلا لــيدوملا يــف ادوــجوم ناك اذإ - تاحرــشملا
.)لادبتــسا ةرورــض
همادختسا ةداعإ وأ هلسغ زوجي
بيكرتلا
ةــيفلخلا ةــيحانلا نــم ةــيادبلا يــف طــشنلا نوــبركلا حــشرم تــيبثتب مــق
ةــيحانلا نــم كــلذ دــعب مــث ،طا
ّ
فــشلا يــف يــندعملا بــيكرتلا ناــسل ىــلع
.نــيضبقملا مادختــساب ةــيماما
ةلازاو كفلا
حــشرملا ناــتبثي ناذــللا نــيضبقملا فــلب طــشنلا نوــبركلا حــشرم عزــنا
.ةــجرد 90 ةبــسنب طافــشلاب
حيباصملا لادبتسا
.LED ـلا ايجولونكت ىلع موقي ةءاضإ ماظنب طا
ّ
فشلا ديوزت مت
،ةــيلاثمو ةزاــتمم ةءاــضإ رــيفوت نــمضت LED ةءاــضا حــيباصم
ةــيديلقتلا ةــيداعلا حــيباصملا نــم لوــطأ تارــم 10 ىــتح رمتــستو
ةمدختــسملا ةــيئابرهكلا ةــقاطلا نــم %90 ىــتح رــيفوتب حمــستو
.ةــيديلقتلا حــيباصملل
.رايغلا عطقل دمتعملا زكرملاب لصتا ،حيباصملا لادبتس

5
.)يــسيطانغمورهكلا ثــحلاب حطــسم يــهط دــقومك لــمعلل ح
طــسملا ىــهطلا دــقوم ليغــشت رــيياعم طــبض
»ZEN ةقيرط« يف ليغشتلا .T5
ZEN”.« طفشلا ةقيرط فاقي/ليعفتل طغضا
.طفشلا ةءافكو ليغشتلا تمص نيب ةقيرط لضفأب عمجت يتلا طفشلا ةعرس ليعفتب ةيصاخلا هذه حمست
نوبركلا حشرم وأ نوهدلا ةلازإ حشرم طبض ةداعإ/يليغشتلا راذنا .T6
.تاحشرملا ةنايصب مايقلا ةرورضب ةمظتنم تارتف ىلع طافشلا هبني
.دقوم طافشلاو تارشؤملا ليعفت متيس :ةظحم
.نوهدلا ةلازإ حشرمل ةنايص ءارجإب مق :دقوم T6
.نوبركلا حشرمل ةنايص ءارجإب مق :ضموي T6
:تاح
ّ
شرملا عبشتو ءتماب هيبنتلا تارشؤم RESET طبض ةداعإ
.دقوم طافشلاو ةيلمعلا هذه ذيفنت بجي :ةظحم
T6 ىلع ةليوط ةرتفل طغضا
.يليغشتلا راذنا طبض ةداعإ مت هنأ ىلإ ةراشل نائفطني طافشلاو T6 :ةظحم
كــل ةيليغــشتلا تاراذــنا لــيعفت ةــلاح يــف .رزــلا اذــه ســفن مادختــساب نوــبركلا حــشرمو نوــهدلا ةــلازإ حــشرم طــبض ةداــعإ ةــيلمع مــتت نأ نــكمي
.نوــبركلا حــشرمل ةــيولوا ءاــطعإ عــم رــخا وــلت ا
ً
دــحاو تادادــعلا ةداعتــساب موــقي طــبضلا ةداــعإ ءارــجإ نإــف نيحــشرملا
نوبركلا حشرم عبشت رشؤم ليعفت
.أفطم طفشلا كرحمو ةيلمعلا هذه متت نأ بجي :ةظحم
ىــلإ ةراــشل نيرــشؤملا ك دقويــس :هــليعفتل T7 و T3 ىــلع دــحاو
ٍ
تــقو يــف
ً
ــيوط طــغضا - يداــيتعا لكــشب رــشؤملا اذــه لــمع فاــقيإ مــتي
.لــيعفتلا ءدــب
:ةرزا هذه سفن ىلع ةليوط ةرتفل ديدج نم طغضا ،ةيليغشتلا ةيصاخلا هذه فاقي
.ةيصاخلا لمع فاقيإ ىلإ ةراشل نائفطنيس مث ةريصق ةرتفل ناضمويس نيرشؤملا ك
ةيسيئرلا ةءاضا ءافطإ/داقيإ .T7
.ح
طسملا ىهطلا دقوم ةءاضإ ءافط/داقي طغضا
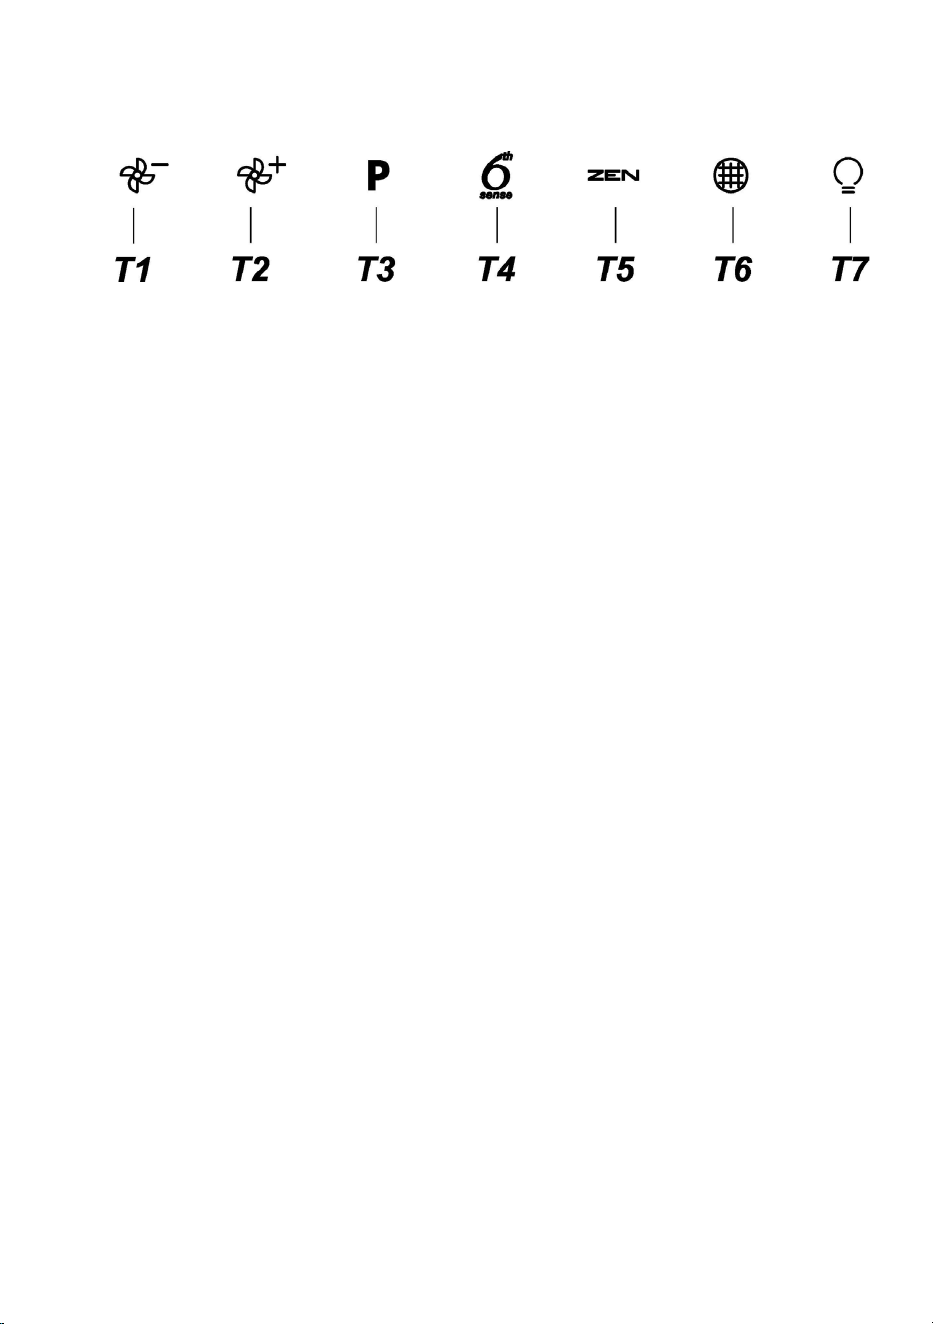
4
مكحتلا رماوأ
.حطسملا يهطلا دقوم ةرانإ حيباصم ةءاضإو طفشلا تاعرس يف مكحتلا متي اهلخ نم ليغشت حيتافمو رماوأ ةحولب طا
ّ
فشلا ديوزت مت
ةحورملا كرحم ةعرس ليلقت/ءافطإ .T1
ةحورملا كرحم ةعرس ةدايز / لاعشإ . T2
»POWER BOOST« ةيصاخ .T3
)AUTO ةقيرط( »6th sense« ةيصاخ ليعفت فاقيإ/ليعفت .T4
»ZEN ةقيرط« يف ليغشتلا . T5
نوبركلا حشرم/نوهدلا ةلازإ حشرم طبض ةداعإ/يليغشتلا راذنا .T6
.يسيئرلا ءوضلا ءافطإ/لاعشإ .T7
ةــقيرط( »6th sense« ةــيصاخ لــيعفت فاــقيإ/ليعفت .T4« ةــطقنلا رــظنا( يــكيتاموتوأ ليغــشت ماــظن ىــلع ةــيصاخلا هذــه يوــتحت هــبتنا
.»)AUTO
عاــطقنا دــعب ةرــم لو هــبيكرت دــنع ،لاــثملا ليبــس ىــلع( يــبرهكلا راــيتلاب هــليصوت اــهيف مــتي ةرــم لك يــف طافــشلا ةرــياعم طــبض اــ
ً
يئاقلت مــتي
.)يــبرهكلا راــيتلا
زــمرلا ضــموي ،قــئاقد 5 رمتــست يــتلا ،ةرــياعملا ءاــنثأ .)»رعــشتسملا ةــئيهتو طــبض« ةرــقفلا رــظنا( يودــي لكــشب ةرــياعملا ةــيلمع مــتت نأ نــكمي
.ءاوــضا مادختــسا نــكميو T4
ةحورملا كرحم ةعرس ليلقت/ءافطإ .T1
.طفشلا كرحم ءافطإ ىلإ رشابم لكشب ةليوط ةرتفل طغضلا يدؤي .طفشلا كرحم ءافطإو ةعرسلا ليلقتل رزلا اذه ىلع طغضا
ةحورملا كرحم ةعرس ةدايز / ليغشت .T2
.ةثلاثلا ةعرسلل رشابملا ليعفتلاب رزلا اذه ىلع ل
وطملا طغضلا حمسي .هتعرس ةدايزلو طفشلا كرحم ليغشتل رزلا اذه ىلع طغضا
»POWER BOOST« ةيصاخ .T3
.)تقولا ةددحم( »POWER BOOST 1« فثكملا طفشلا ةعرس ةيصاخ ليعفتل T3 ىلع طغضا
.ةثلاثلا ةعرسلا ىلإ قئاقد 5 دعب طافشلا دوعيس :ةظحم
POWER« فــثكملا طفــشلل ةــيلاتلا ةعرــسلا لــيعفتل T3 دــيدج نــم طــغضا ،POWER BOOST1”« ةــيصاخ يــف لــمعي طفــشلا كرــحمو
.)تــقولا ةددــحم( »BOOST 2
.ةثلاثلا ةعرسلا ىلإ قئاقد 5 دعب طافشلا دوعيس :ةظحم
POWER BOOST 1”« ةقيرطب لمعلا ىلإ طافشلا دوعيس ،قئاقد سمخ دعب ؛T3 ىلع ديدج نم طغضا :ةظحم
)AUTO ةقيرطلا( »6TH SENSE« ةيصاخ فاقيإ/ليعفت .T4
.ةيليغشتلاو ةيخانملا فورظلا يف ريغت نع رعشتسملا فشك اذإ طفشلا ةعرس طبضب ا
ً
يكيتاموتوأ طافشلا موقي
.)»رعشتسملا ةئيهتو طبض« رظنا( رعشتسملا تادادعإ ةئيهتو طبض ةرورضلاب
ً
وأ بجي ،ةيصاخلا هذهل حيحصلا مادختسل :ةظحم
6th sense”.»ةيصاخلا لمع فاقيإ ىلإ ةعرسلا يف مكحتت يتلا ةيليغشتلا فئاظولا ليدعت يدؤيس :ةظحم
رعشتسملا ةئيهتو طبض
5 ةدــمل T4 ةراــشا ضموتــس ؛ناوــث 5 ةدــمل T4 ىــلع طــغضا ،ةــيداعلا ةيليغــشتلا فورــظلا يــف .أــفطم طافــشلاو ءارــجا اذــه مــتي نأ نــكمي
.ةرــياعملا ةــيلمع ماــمتإ ىــلإ ةراــشل ئفطنتــس مــث ،رعــشتسملا ةرــياعم ةــيلمعب موــقي طافــشلا نأ ىــلإ ةراــشل قــئاقد
ا
ً
زــهاج حــبصأ طافــشلا نأ ىــلإ ةراــشل نــيزمرلا ك دقويــسT2. و T1 ىــلع دــحاو
ٍ
تــقو يــف ةــليوط ةدــمل طــغضا :ح
طــسملا ىــهطلا دــقوم طــبض
.حطــسملا يــهطلا دــقومب ةــصاخلا ليغــشتلا رــيياعم يــقلتل
ليغــشت رــيياعم طــبض مــت هــنأ ىــلإ ةراــشل ناوــث 3 ةدــمل ضموتــس T1( زاــغلاب لــمعي يذــلا ح
طــسملا ىــهطلا دــقوم راــيتخ T1 ىــلع طــغضا
.)زاــغلاب حطــسم يــهط دــقومك لــمعلل ح
طــسملا ىــهطلا دــقوم
مــت هــنأ ىــلإ ةراــشل ناوــث 3 ةدــمل ضموتــس T2( يــسيطانغمورهكلا ثــحلا ماــظنب لــمعي يذــلا ح
طــسملا ىــهطلا دــقوم راــيتخ T2 ىــلع طــغضا
3
ءاوهلا فرص
)طفشلا تيدومل(
.)ةلصولا ةفاح( ءاوهلا جرخمل يواسم نوكي نأ بجي اهرط
ُ
ق يتلاو ةيطئاحلا غيرفتلا تاحتفو بيبانأب طا
ّ
فشلا ليصوتب مق
ةداــيز ىــلإ يدؤــيو طفــشلا ةــيلمعل يليغــشتلا ءادا ىوتــسم لــيلقت يــف ببــستي نأ نــكمي لــقأ رــط
ُ
قب ةــيطئاح غــيرفت تاــحتف وأ بــيبانأ مادختــسا
.ءاــضوضلا ىوتــسم يــف ةــظوحلمو ةرــيبك
.نأشلا اذه يف تناك ة
يلوؤسم ة
يأ ةعنصملا ةكرشلا ل
محتت
.يرورض لوط لقأب بوبنأ مدختسا !
.)ةجرد 90 وه عاوكا ءانحن ىصقا دحلا( ليصوتلا عاوكأ نم نكمم ددع لقأ هب بوبنأ مدختسا !
.بوبنا رط
ُ
قل ةفينعلا تارييغتلا بنجت !
.تاهيجوتلا هذهب مازتلا مدع ةلاح يف ةيلوئسم ةيأ ةكرشلا لمحتت !
؟طفشلا ليدوم وأ حيشرتلا ليدوم
.طفشلا رادصإب مدختسي يكل زهاج مكب صاخلا طافشلا !
.كلذل صصخملا تاقحلملا مقط بيكرت بجي هنإف حيشرتلا رادصإب طافشلا مادختسا لجأ نم
.
ً
صفنم هؤارش بجي هنأ وأ لعفلاب دراو تاقحلملا مقط ناك اذإ ليلدلا اذه نم ىلوا تاحفصلا يف اودكأت
ىــلع لــعفلاب
ً
اــبكرم نوــكي دــق طــشنلا نوــبركلا نــم نوــكملا يــفاضا حيــشرتلا ماــظن نإــف ،تاــحلا ضــعب يــف ،هدــيروت مــت نإ :ةــظحم
.طافــشلا
.ليلدلا اذه لعفلاب اهنمضتي حيشرتلا رادصإ ىلإ طفشلا رادصإ نم طافشلا ليوحتب ةصاخلا تامولعملا
طفشلا ليدوم
.ةلصولا ةفاح ىلع ت
ّ
بثملا غيرفتلا بوبنأ قيرط نع جراخلا ىلإ ةرخبا درط متي
!هبتنا
.هءارش بجيو زاهجلا عم يتأي غيرفتلا بوبنأ
.ليصوتلا ةقلح رط
ُ
قل يواسم نوكي نأ بجي غيرفتلا بوبنأ رط
ُ
ق
!هبتنا
.تاحشرملا / حشرملا اذه ةلازإ بجي ،نوبرك تاحشرم / حشرمب د
ّ
وزم طا
ّ
فشلا ناك اذإ
حيشرتلا ليدوم
حيرــشتلا لــيدومب طا
ّ
فــشلا مادختــسا لــبق .ةــفرغلا يــف هــخض ةداــعإ لــبق هــنم ةــهيركلا حــئاورلا ةــلازإ مــث نوــهدلا نــم طوفــشملا ءاوــهلا صــيلخت مــتي
.طــشنلا نوــبركلاب لــمعي يــفاضإ حيــشرت ماــظن بــيكرت بــجي
2
.دعب نع لصفنم مكحت زاهج وأ يجراخ زاهج ةطساوب ليغشتلل صصخم ريغ زاهجلا :هبتنا
.حوتفم ناكم يف زاهجلا مدختست .ينهملا مادختسل صصخم ريغ زاهجلا اذه
.رثكأ وأ نيصخش ةطساوب هبيكرتو زاهجلا كيرحت بجي ،ةيصخشلا تاباصا رطخ بنجت لجأ نم
،ةــيئابرهكلا تــيصوتلاو )تدــجو نإ( ءاــملاب ةــيذغتلل تــيصوت ةــيأ
ً
اــضيأ كــلذ يــف اــمب ،لــهؤم لــمع مــقاط لــب
ِ
ق نــم بــيكرتلا ءارــجإ بــجي
.حصا تاــيلمعو
. .قانتخا رطخ بنجتل لافطا لوانتم نع ا
ً
ديعب )خلا ،نيرتسيلوبلا ،ةيكيتسبلا ءازجا( فيلغتلا داومب ظفتحا ،بيكرتلا لامتكا دنع
.نيمدقلا يفاح وأ
ً
تبم نوكت امدنع زاهجلا مدختست
.ةيئابرهك ةمدصل ضرعتلا رطخ دجوي – راخبلاب فيظنتلا ةزهجأ ا
ً
دبأ مدختست
ريودتلا ةداعإ زمر لمحتو 100% ةبسنب ريودتلا ةداع ةلباق فيلغتلا داوم
نإــف كــلذ نــم مــغرلاب نــكلو ،لــيلدلا اذــه يــف ةدراوــلا تاطا
ّ
فــشلا تاــميمصت نــع فــلتخي نأ ةــيلامجلا ةيلكــشلا ةــيحانلا نــم طا
ّ
فــشلل نــكمي
.اهــسفن لــظت بــيكرتلاو ةــنايصلاو اســتخدامتاميلعت
ةــيأ نــع تــناك
ً
اــيأ ةيلوؤــسم ةــيأ ةــع
ّ
نصملا ةكرــشلا لــمحتت .اــهب ماــتلا مازــتلاو لــيلدلا اذــه يــف ةدراوــلا تاداــشراو تاــميلعتلا عاــبتإ ىــجري
ةــنخدا طفــشل طا
ّ
فــشلا اذــه مــيمصت مــت .لــيلدلا اذــه يــف ةدراوــلا تاــميلعتلا ةاــعارم مدــعل ةــجيتن زاــهجلاب قــحلت قــئارح وأ رارــضأ وأ لكاــشم
.يــلزنملا مادختــسل طــقف صــصخم وــهو يــهطلا تاــيلمع نــع ةــجتانلا ةرــخباو
وأ لزاــنتلا وأ عــيبلا ةــلاح يــف .كــلذ ىــلإ ةــجاحلا دــنع
ً
بقتــسم اــهيلع عــ
ّ
طا نــم نــ
كمتلل جــتن
ُ
ملل ةــقفار
ُ
ملا تاــب
ِ
ّ
يت
ُ
كلا عــيمج ظــفح مــهملا نــم •
.جــتنملا عــم ىــقبت تاــبيتكلا نأ نــم دــكأت ،لــقنلا
.ناماو مادختساو بيكرتلا نأشب ةماه تامولعم دجوت :تاميلعتلا ةيانعب أرقا •
.فرصلا بيبانأ ىلع وأ جتنملا ىلع ةيكيناكيم وأ ةيئابرهك تيدعت ذفن
ُ
ت •
فاــقيإ بــجيو عــيزوتلا لــيكوب لاــص
ِ
ّ
تا بــجي كــلذ فــخ .التركيــب عمليــة فــي الشــروع قبــل ناتــهّمكو واكتمــال اطّالشــف ســمة مــن تحقــق •
.بــيكرتلا ةــ
يلمع
دــقاوملا ةــلاح يــف مــس 50 نــع لــقت أ بــجي دــقوملا طافــش نــم يلفــسلا ءزــجلاو دــقوملا ىــلع يــناوا ةــماعد حطــس نــيب ىرــغصلا ةفاــسملا
.ةــطلتخملا وأ زاــغلاب لــمعت يــتلا دــقاوملا ةــلاح يــف مــس 65 و ةــيئابرهكلا
.رابتعا يف كلذ ذخأ بجي ه
نإف ،ربكأ ةلصاف ةفاسم د
ِ
ّ
دحت زاغلاب لمعي يذلا يهطلا زاهج بيكرتب ةصاخلا تاميلعتلا تناك ام اذإ
يئابرهكلا ليصوتلا
روــكذملاو طا
ّ
فــشلا ليغــشتل ددــحملا راــيتلا ةــيطلوفو ددرــت عــم ةــيلزنملا يــئابرهكلا راــيتلا ةكبــش يــف دوــجوملا راــيتلا ةــيطلفو ددرــت قــفاوتي نأ بــجي
قــباطم راــيت ذــخأمب طا
ّ
فــشلا لــيصوتب مــق راــيت ســباق دوــجو ةــلاح يــف .طا
ّ
فــشلا لــخاد ةدوــجوملا تاــفصاوملاو ةــيفيرعتلا تاــنايبلا ةــحول ىــلع
.بــيكرتلا ةــيلمع ماــمتإ دــعب
ً
اــضيأ اــهيلإ لوــصولا ةلهــس ةــبيرق ةــقطنم يــف هدــجاوت بــجي يذــلاو نأــشلا اذــه يــف اــهب لوــمعملا نــيناوقلاو دــعاوقلل
،هــيلإ لوــصولا بــعص دــيعب ناكــم يــف دوــجوم راــيتلا ســباق نأ ةــلاح يــف وأ )راــيتلا ةكبــشب رــشاب
ُ
ملا لــيصوتلل( راــيتلا ســباق دوــجو مدــع ةــلاح يــف
راــيتلل لــماكلا لــصفلا نــمضت يــتلا تاــفصاوملل قــباطم باــطقا يــئانث راــيت لــيصوتو عــطق حاــتفم عــضوب مــق ،بــيكرتلا ةــيلمع ماــمتإ دــعب ىــتح
.بــيكرتلا طورــشو دــعاوق عــم قــباطتي يذــلا لكــشلاب ،III ةــئفلا نــم ةدــئازلا ةــيئابرهكلا توــمحلا تاــح يــف يــبرهكلا
!هبتنا
ةكبــش لــباك نأ نــم
ً
وأ دــكأتلا
ً
اــمئاد بــجي ،حــيحصلا لكــشلاب هــلمع نــم دــكأتلا لــبقو يــبرهكلا راــيتلا ةكبــشب طا
ّ
فــشلا ةرــئاد لــيصوت ةداــعإ لــبق
.حــيحصلا لكــشلاب هــبيكرت مــت دــق راــيتلا
:يلاتلا لودجلل ا
ً
قفو كسا ليصوتب مق ،سباقب
ً
ادوزم لباكلا نكي مل نإ
ةكبشلا ددرتو دهجكسا ليصوت
لــخاد تاــفصاوملا قــصلم يــف اــهيلإ راــشملا ةــميقلا ىــلإ عوــجرلا ىــجر
ُ
ي
.طافشلا
رضخأ/رفصأ :
قرزأ : N
ينب : L
يئابرهكلا رايتلا لباك لادبتسا
.ينفلا معدلا ةمدخ نم هبلطا ،لباكلا فلت ةلاح يف ؛صاخ ةيذغت لباكب دوزم طافشلا

1
AR
ماعلا ناماو ةمسلا
عزــن قــيرط نــع ةــيئابرهكلا ةكبــشلا نــع طافــشلا لــصفا ،ةــنايص وأ ةــفاظن ةــيلمع ةــيأ لــبق •
.لزــنملل ماــعلا حاــتفملا لــصف وأ ســباقلا
.لمع تازافق مدختسا ةنايصلاو بيكرتلا تايلمع ةفاك ءارجإ لجأ نم •
نــيذلا صاخــشاو تاونــس 8 نــس نــم رــبكا لاــفطا لــب
ِ
ق نــم زاــهجلا اذــه مادختــسا نــكمي •
يــف صــقن مــهيدل نــيذلا وأ ،ةــيلقعلا وأ ةيــ
ّ
سحلا وأ ةــيندبلا مــهتاردق يــف روــصق نــم نوــناعي
ةــظحم تــحت اوــنوكي نأ ةطيرــش زاــهجلا اذــه مادختــس ةــيرورضلا ةــفرعملا وأ ةــمزلا ةرــبخلا
حــيحصلا مادختــسل ةــمزلا تاــميلعتلاو تاداــشراب مــهفيرعت دــعب وأ غــلاب
ٍ
صخــش فارــشإو
.ةــل
ِ
صلا تاذ راــطخاب مــهتيعوت دــعبو زاــهجلا اذــهل
.زاهجلاب اوبعلي ىتح لافطا ةبقارم بجي •
.ةبقارم نود لافطأ لب
ِ
ق نم ةنايصلاو ةفاظنلا ذفن
ُ
ت نأ بجي •
ســفن يــف خــبطملا طا
ّ
فــش مادختــسا دــنع ةــصاخ بــيكرتلا ناكــم يــف ةــيفاك ةــيوهت رــيفوت بــجي •
.ىرــخأ تاــقورحم يأــب وأ زاــغلاب لــمعت ىرــخأ ةزــهجأ لــمع تــقو
ةرــم لــقا ىــلع( جراــخلا نــم وأ لــخادلا نــم ءاوــس ةررــكتم ةــفصب طافــشلا فــظن
ُ
ي نأ بــجي •
ةاــعارم مدــع .ةــنايصلا تاــميلعت
ً
ةــحارص هــيلإ ريــشت اــمب لاوــحا عــيمج يــف مزــتلا ،)
ً
ايرهــش
.قــئارحلا راــطخأ ببــسي تاحــ
ِ
ّ
شرملا فــيظنتو لادبتــسا تاــ
يلمعو طا
فــشلا فــيظنت دــعاوق
.طا
فشلا تحت بهللاب ماعطلا يهط ا
ً
تاب ا
ً
عنم عونمم •
\ةــنايص مــسق يــف ةروــكذملاو ةددــحملا ةــيعونلا نــم حــيباصم مدختــسا حــيباصملا لادبتــس •
.لــيلدلا اذــه يــف حــيباصملا لادبتــسا
بــ
نجت بــجي كــلذل ،قــئارحلا ب
ِ
ّ
بــسي نأ نــكميو تاحــ
ِ
ّ
شرملاب ةــياغلل
ٌ
راــض رــ
ُ
حلا بــهللا مادختــسا
.لاوــحا عــيمج يــف كــلذب ماــيقلا
.نخاسلا تيزلا لعتشي نأ بنجت لجأ نم ةبقارم تحت يلقلا متي نأ بجي
.ةنخاس طافشلا نم ةبيرقلا ءازجا ح
ِ
بص
ُ
ت نأ نكمي يهطلا دقوم مادختسا دنع :هبتنا
.بيكرتلا ةيلمع نم ا
ً
مامت ءاهتنا دعب إ يئابرهكلا رايتلا ةكبشب زاهجلا ل
ِ
ّ
صوت •
صــنت اــم ىــلإ اــ
ً
مئاد عوــجرلا بــجي ،ةــنخدا درــطو طفــشل اــهذاخ
ّ
تا بــجي يــتلاو ةمــسلاو نــماب ةــصاخلا كــلتو ةــينفلا تاءارــجا صــخي اــميف •
.اهب مازــتلاو نأــشلا اذــهب ةــينعملا ةــيلحملا تاطلــسلا نــيناوقو حــئاول هــيلع
يــتلا قارــتحا ةزــهجأ نــع ةــجتانلا ةــنخدا درــطو غــيرفتل ةمدختــسملا بــيبانا يــف طافــشلا نــم بوحــسملا ءاوــهلا درــطو هــيجوت بــجي •
.ىرــخأ تاــقورحم يأــب وأ زاــغلاب لــمعت
.لمتحملا يئابرهكلا قعصلا رطخ بنجتل حيحص
ٍ
لكشب ةبكرم حيباصم نود طافشلا كرتت وأ مدختست •
!ديج
ٍ
لكشب ةبكرم ةكبش نود طافشلا مادختساب ا
ً
دبأ مقت •
.
ً
ةحارص كلذ ىلإ راش
ُ
ي نأ إ دانسإ حطسك
ً
ادبأ طافشلا مادختسا بجي •
.حيحصلا ريماسملا عون رتشا ،ةقفرم نكت مل نإ وأ ،بيكرتلا لجأ نم جتنملا عم ةقفرملا تيبثتلا ريماسم إ مدختست •
.بيكرتلا ةيلمع ليلد يف اهديدحت مت يتلاو ةحيحصلا لاوطا تاذ يغاربلا مدختسا •
.ةلثامملا ةلهؤملا ةلامعلا وأ دمتعملا ينفلا معدلا زكرم رشتسا ،كشلا ةلاح يف •
!هبتنا
.ةيئابرهك راطخ كض
ِ
ّ
رع
ُ
ي نأ نكمي ليلدلا اذه يف ةدراولا تاداشرا يف د
دحملا لكشلاب تيبثتلا ةزهجأو يغارب بيكرت مدع •
.ايئاقلت هطيشنت متي زاهج يأ وأ لصفنم دعب نع مكحت زاهج وأ تقؤم وأ ةجمرب ةادأ عم زاهجلا مدختست •
،تاونــس 8 نــع مــهرامعأ لــقت نــيذلا لاــفطا نــع
ً
ادــيعب زاــهجلا قــبأ .زاــهجلا نــع نــيديعب تاونــس 3 نــع مــهرامعأ لــقت نــيذلا لاــفطا
ِ
قــبأ
.نــيغلابلا دــحأ نــم ةرمتــسم ةــبقارم دوــجو مدــع ةــلاح يــف


LIB0157667 Ed. 06/19