User manual Filtration System
Parts and Material Included
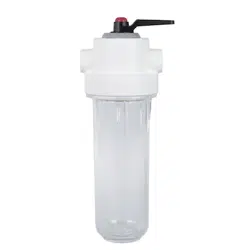
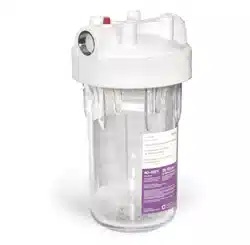
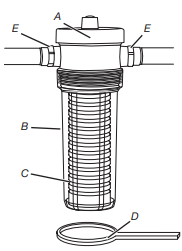
A. Filter Head
B. Clear Housing
C. Sediment Filter
D. Wrench
E. Two 3/4" *MNPT x 3/4" Fitting for Copper Pipe
Gather the required tools before starting installation. Read and follow the instructions provided with any tools listed here.
- Teflon® Tape
- Adjustable Wrench
Installation Requirements
- Properly tighten all fittings to ensure a leak-free assembly.
- Filter housing is intended for use on cold water line.
- Install in a location that is not susceptible to freezing temperatures as damage to the housing could occur.
- Install away from direct sunlight as prolonged exposure to light can weaken plastic components.
- Allow a minimum of 2" (5.1 cm) clear space below unit to facilitate filter change.
- Some local codes may require the use of a licensed plumber or certified installer when disrupting a potable water line. Determine and follow any and all local codes and requirements.
- Pipe and filter need to be properly supported with pipe hangers.
- For metal water piping systems a grounding connection is required (Whirlpool Grounding Kit WHKF-GRND).
Installation Instructions
For Use With Cold Water Only
1. Shut off main water supply. Drain water from water lines.
2. Remove opaque housing from filter head and set aside.
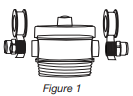
3. Wrap Teflon® tape (2 1/2 wraps) around the 3/4" MNPT x 3/4" fitting for copper pipe in a clockwise direction (see Figure 1) and firmly assemble into filter head. Do not use pipe sealant (dope), as solvents in some types of pipe dope may cause damage to plastic fittings. Do not overtighten, overtightening can cause damage to filter head.
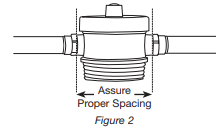
4. Calculate proper spacing of components (approximately 3/4" of existing pipe inserts into each fitting) (see Figure 2).
Install Whirlpool Grounding Kit WHKF-GRND, sold separately, in metal water piping systems (see Figure 3). IMPORTANT: Metal water piping systems are required to be connected to the electrical ground. To maintain the ground connection, obtain and install kit WHKF-GRND by contacting the store where the filter head was purchased or contact Whirlpool at 1-866-363-9472.
Ground Kit Installation:
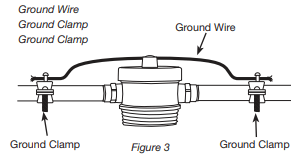
a. Install one ground clamp on the incoming metal water pipe section and one on the outgoing metal water pipe section. Be sure that the filter head, fittings and valves are between the two ground clamps.
b. Connect the ground wire to the two ground clamps, using the wire screw terminal on each grounding clamp. Tighten securely.
6. Cut pipe and clean ends of pipe. Ensure there are no burrs, sharp edges or deep scratches.
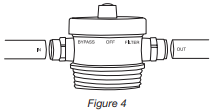
7. Referring to “Using Push-In Fittings” section, insert pipe into filter head fitting making sure end of pipe is firmly seated to backstop. Connect pipe from water supply to “IN” port (see Figure 4).
8. Repeat Step 7 for the pipe leading from the “OUT” port to the house. It may be necessary to carefully spread pipe apart in order to connect pipes. Keep filter head horizontal.
9. Lubricate housing o-ring with water. Firmly screw housing, with filter inside, to filter head. Tighten with wrench to seal properly.
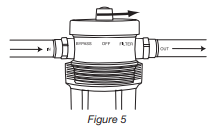
10. Turn filter head valve to “FILTER” mode (see Figure 5) and slowly turn on main water supply and check for leaks. Run water for 5 minutes with an open faucet to flush out air.
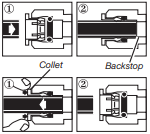
“Using Push-In Fittings”
To Attach Tubing
- Push tubing in as far as it will go. Tubing must be inserted past o-ring and hit backstop. Pull tube to ensure it is secured.
To Release Tubing
- Push in grey collet to release tubing. With collet held, pull tubing straight out.
Filter Replacement
The contaminants or other substances removed or reduced by this water filter are not necessarily in all users’ water.
Filter life depends on local water conditions and the volume of water used. We recommend you change the WHKF-GD05 filter every 6 months. However, it can be replaced earlier if there is a drop in water pressure.
Do not use with water that is microbiologically unsafe or of unknown quality without adequate disinfection before or after the system.
Filter Cartridge Replacement Instructions
NOTE: Before changing cartridge, turn off or bypass incoming water supply. Place a bucket under filter to catch the small amount of water that will run out after housing removal.
- Shut off water by turning valve on filter head to the “OFF” or “BYPASS” position.
- Unscrew housing and remove old cartridge. Wash housing thoroughly with mild soap and water.
- Insert new cartridge and re-install housing. Be sure cartridge is seated in the housing before tightening onto head.
- Use filter wrench to fully seat the cartridge. Tighten to make a water tight seal.
- Turn on water by turning valve on filter head to the “FILTER” position. If any leaks appear, tighten housing as needed.
- Flush system for five (5) minutes.
Troubleshooting Guide
Water Leaks at Fittings: Tighten slightly more until leak stops. Water leaks at connections: Refer to section “Using Push-In Fittings.” Push pipe in as far as it will go. If leaking continues, shut off water at the incoming valve and remove water line by pushing in on the connector collar while pulling the pipe away. Inspect pipe for cracks and scratches. If pipe is cracked or scratched, simply cut that portion away and reinsert pipe into fitting.