Documents: Go to download!
User Manual
- User Manual - (English, French, Spanish)
- Specification Sheet - (English)
- Warranty Information - (English)
- Stand Mixer Features
- Assembling Your Bowl Lift Stand Mixer
- Mixing Time
- Mixer Use
- Speed Control Guide – 10 Speed Stand Mixers
- Beater to Bowl Clearance
- Using the Bowl Guard*
- Mixing Tips
- Care and Cleaning
Table of contents
USER MANUAL STAND MIXER
Stand Mixer Features
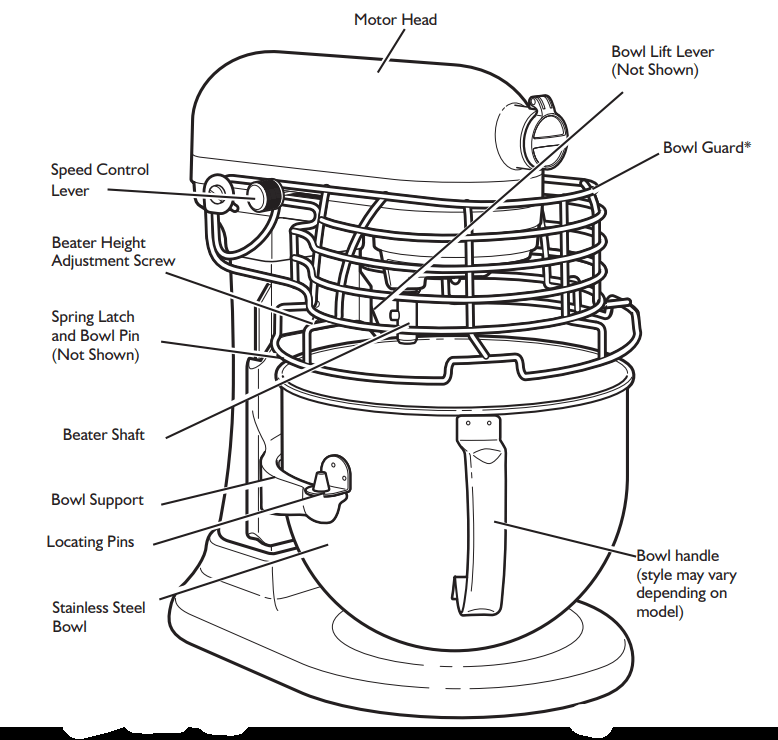
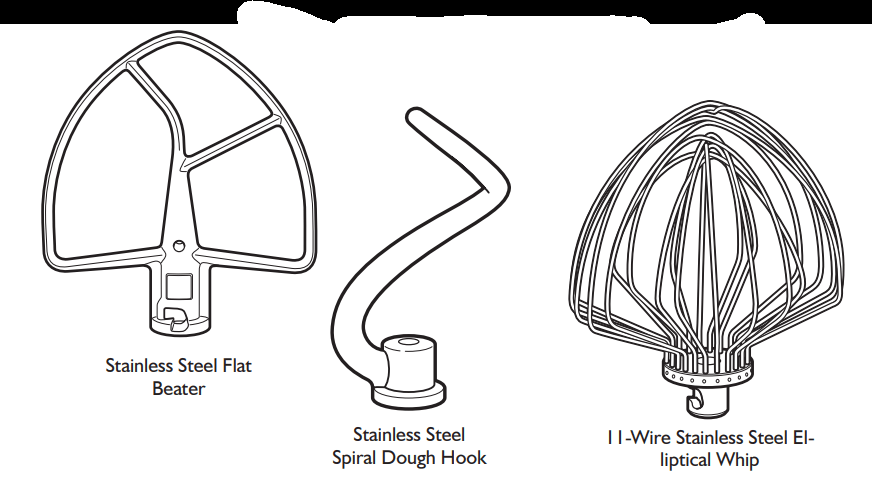
*Included with select models. Picture may vary from product depending on model.
Assembling Your Bowl Lift Stand Mixer
To Attach Bowl
- Turn speed control to OFF.
- Unplug Stand Mixer or disconnect power.
- Place bowl lift lever in down position.
- Fit bowl supports over locating pins.
- Press down on back of bowl until bowl pin snaps into spring latch.
- Raise bowl before mixing.
- Plug into a grounded 3 prong outlet or reconnect power.
To Remove Bowl
- Turn speed control to OFF.
- Unplug Stand Mixer or disconnect power.
- Place bowl lift lever in down position
- Remove flat beater, wire whip, or dough hook.
- Grasp bowl handle and lift straight up and off locating pins.
To Raise Bowl
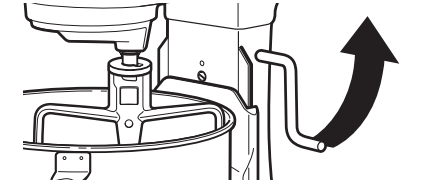
- Rotate lever to straight-up position.
- Bowl must always be in raised, locked position when mixing.
To Lower Bowl
- Rotate lever back and down.
To Attach Flat Beater, Wire Whip, or Dough Hook
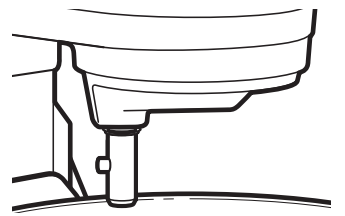
- Turn speed control to OFF.
- Unplug Stand Mixer or disconnect power.
- Slip flat beater on beater shaft and press upward as far as possible.
- Turn beater to right, hooking beater over the pin on shaft.
- Plug into a grounded 3 prong outlet or reconnect power.
To Remove Flat Beater, Wire Whip, or Dough Hook
- Turn speed control to OFF.
- Unplug Stand Mixer or disconnect power.
- Press beater upward as far as possible and turn left.
- Pull beater from beater shaft.
- Plug into a grounded 3 prong outlet or reconnect power.
Commercial Stand Mixer SPEED Control and Lever Guard

The Soft Start™ feature minimizes splash-out by starting the mixer slowly before increasing to the selected speed. To further reduce the potential for splash-out, always begin mixing using the STIR speed, then gradually move to higher speeds as needed. See “Speed Control Guide”.
Auto-Reset Motor Protection
If the Stand Mixer stops due to overload, slide the speed control lever to OFF. After a few minutes, the stand mixer will automatically reset. Slide the Speed Control Lever to the desired speed and continue mixing. If the Stand Mixer does not restart, see “Troubleshooting Problems”.
Mixing Time
Your KitchenAid® Stand Mixer will mix faster and more thoroughly than most other electric stand mixers. Therefore, the mixing time in most recipes must be adjusted to avoid overbeating. With cakes, for example, beating time may be half as long as with other stand mixers.
Mixer Use
NOTE: Do not scrape bowl while Stand Mixer is operating
The bowl and beater are designed to provide thorough mixing without frequent scraping. Scraping the bowl once or twice during mixing is usually sufficient. Turn Stand Mixer off before scraping.
The Stand Mixer may warm up during use. Under heavy loads with extended mixing time, you may not be able to comfortably touch the top of the Stand Mixer. This is normal.
If the Stand Mixer becomes overloaded, it will automatically shut off to prevent damage. See “Auto-Reset Motor Protection”.
Speed Control Guide – 10 Speed Stand Mixers
All speeds feature Soft Start™ operation, which minimizes splash-out and flour puff. The mixer will start slowly before increasing to the selected speed.
| Number of Speed | ||
| Speed | ||
| Stir | STIR | For slow stirring, combining, mashing, starting all mixing procedures. Use to add flour and dry ingredients to batter, and add liquids to dry ingredients. Do not use STIR speed to mix or knead yeast doughs. |
| 2 | SLOW MIXING | For slow mixing, mashing, faster stirring. Use to mix and knead yeast doughs, heavy batters and candies; start mashing potatoes or other vegetables; cut shortening into flour; mix thin or splashy batters. |
| 4 | MIXING, BEATING | For mixing semi-heavy batters, such as cookies. Use to combine sugar and shortening and to add sugar to egg whites for meringues. Medium speed for cake mixes. |
| 6 | BEATING, CREAMING | For medium-fast beating (creaming) or whipping. Use to finish mixing cake, doughnut, and other batters. High speed for cake mixes. |
| 8 | FAST BEATING, WHIPPING | For whipping cream, egg whites, and boiled frostings. |
| 10 | FAST WHIPPING | For whipping small amounts of cream, egg whites or for final whipping of mashed potatoes. |
NOTE: Use speed 2 to mix or knead yeast dough or fondants. Use of any other speed with heavy doughs may cause mixer to stop rotating to limit mixer damage. This is normal operation. If this occurs, turn the speed selector to off, and then turn back on to a lower speed.
Beater to Bowl Clearance
Your Stand Mixer is adjusted at the factory so the flat beater just clears the bottom of the bowl. If, for any reason, the flat beater hits the bottom of the bowl or is too far away from the bowl, you can correct the clearance easily
1. Unplug Stand Mixer or disconnect power.
2. Place bowl lift lever in down position.
3. Attach flat beater.
4. Adjust so flat beater just clears bottom surface of bowl when in lifted position by turning screw (A) counterclockwise to raise the bowl and clockwise to lower the bowl. Just a slight turn is all that is required: the screw will not rotate more than 1/4 turn (90 degrees) in either direction. (The full range of adjustment is 1/2 turn, or 180 degrees.)
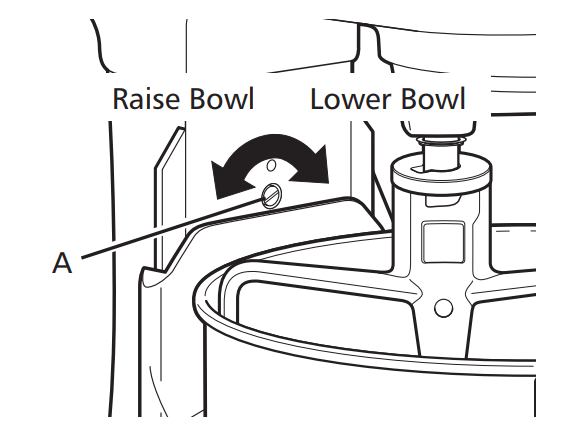
5. Place bowl lift lever in up position to check clearance.
6. Repeat steps 4 and 5 if necessary.
NOTE: When properly adjusted, the flat beater will not strike on the bottom or side of the bowl. If the flat beater or the wire whip is so close that it strikes the bottom of the bowl, the beater or whip may wear.
Using the Bowl Guard*
| If your Stand Mixer comes with a bowl guard, make sure that the guard is returned to the down position before beginning to use the Stand Mixer. The Stand Mixer will not run if the bowl guard is not in the proper position. | 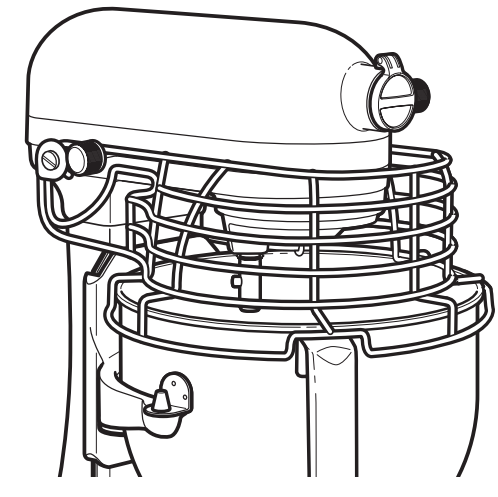 |
*Included with select models. Picture may vary from product depending on model.
Mixing Tips
Using Your Recipes with the Mixer
There are a number of methods that can be used for making cake with your KitchenAid® Stand Mixer.
For example, the “quick mix” method (sometimes referred to as the “dump” method) is ideal for simple cakes, such as yellow cake and white cake. This method calls for combining dry ingredients with most or all liquid ingredients in one step.
More elaborate cakes, such as a torte, should be prepared using the traditional cake mixing method. With this method, sugar and the shortening, butter, or margarine are thoroughly mixed (creamed) before other ingredients are added. For all cakes, mixing times may change because your KitchenAid® Stand Mixer works more quickly than other mixers. In general, mixing a cake with the KitchenAid® Stand Mixer will take about half the time called for in most cake recipes.
To help determine the ideal mixing time, observe the batter or dough and mix only until it has the desired appearance described in your recipe, such as “smooth and creamy.”
To select the best mixing speeds, see “Speed Control Guide”.
Adding Ingredients
Always add ingredients as close to side of bowl as possible, not directly into moving beater.
NOTE: If ingredients in very bottom of bowl are not thoroughly mixed, then the beater is not far enough into the bowl. See “Beater to Bowl Clearance”.
Cake Mixes
When preparing packaged cake mixes, use Speed 2 for low speed, Speed 4 for medium speed, and Speed 6 for high speed. For best results, mix for the time stated on the package directions.
Adding Nuts, Raisins, or Candied Fruits
In general, solid materials should be folded in the last few seconds of mixing on Stir Speed. The batter should be thick enough to prevent the fruit or nuts from sinking to the bottom of the pan during baking. Sticky fruits should be dusted with flour for better distribution in the batter.
Liquid Mixtures
Mixtures containing large amounts of liquid ingredients should be mixed at lower speeds to avoid splashing. Increase speed only after mixture has thickened.
Care and Cleaning
• Unplug the Stand Mixer before cleaning or disconnect power.
• Stainless steel bowl, flat beater, wire whip, and spiral dough hook may be washed in an automatic dishwasher. Or, clean them thoroughly in hot sudsy water and rinse completely before drying. Do not store beaters on shaft.
• The bowl is dishwasher-safe. It can also be hand-washed in hot sudsy water, rinsed thoroughly, and dried.
• Wipe the Stand Mixer with a clean damp cloth. Do not use abrasive cleansers or scouring pads and do not immerse the Stand Mixer in water.
• Wipe the beater shaft frequently, removing any residue that may accumulate.
To remove the Bowl Support for cleaning
1. Unplug Stand Mixer or disconnect power.
2. Remove the Stand Mixer base by removing the 3 screws located on the bottom of the mixer. Remove the vent screen and the mixer base.
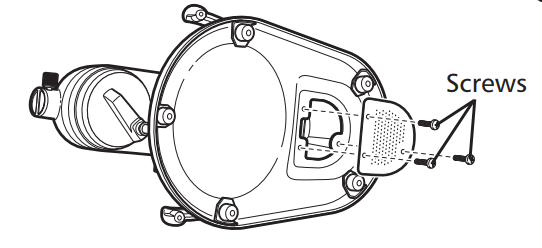
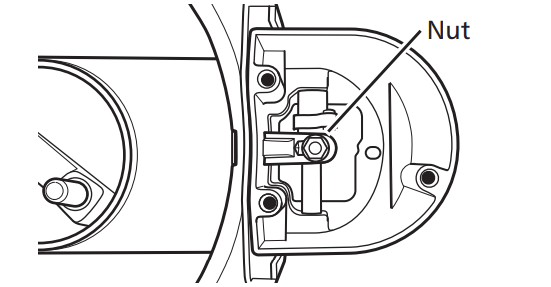
3. Remove the nut from the lifter rod located inside the column, then remove the washer and spring.
NOTE: Note the order that they were assembled (the washer goes between the spring and nut), for reassembly.
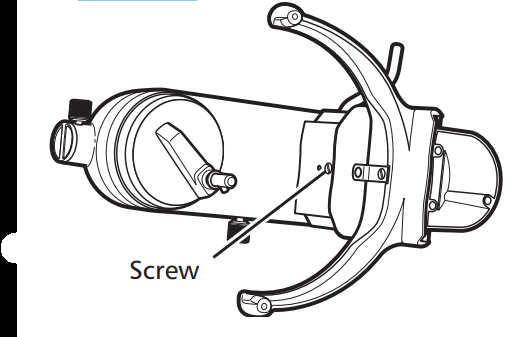
4. Loosen the screw holding the bowl clip to the front of the bowl support – it is not necessary to remove the screw all of the way. This allows the bowl support to slide down.
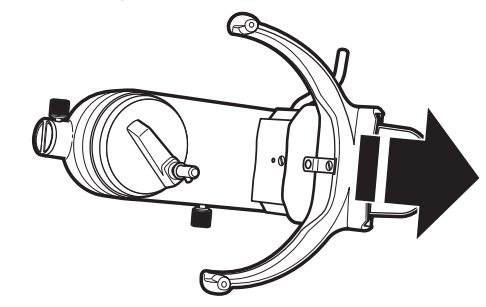
5. Slide the bowl support down so that the tabs on the back of the bowl support line up with the slots in the column. Remove the bowl support by passing the tabs through the slots.
6. Clean the bowl support and column with the mild detergent and a wash cloth. Do not use abrasive cleansers or scouring pads.
7. To reassemble, reverse steps 1 through 6.
Planetary Cleaning Instructions
1. Unplug the Stand Mixer or disconnect the power.
2. Remove the retaining ring with retaining ring pliers, slide the ring and the washer down the shaft.
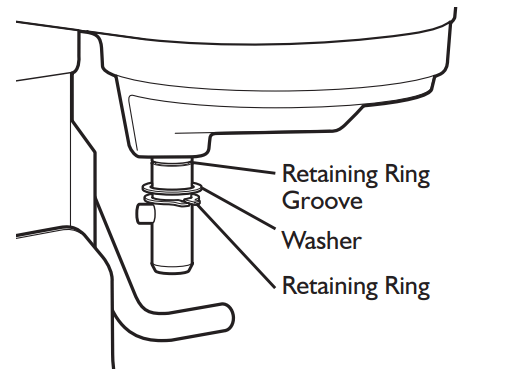
3. Clean the shaft, retaining ring, and washer with a mild detergent and wash cloth. Do not use abrasive cleaners or scouring pads. Do not immerse the stand mixer in water.
4. To reassemble, reverse steps 1 through 4, making sure retaining ring is fully seated into groove.
Flat Beater Cleaning Instructions
1. To clean the drain hole in the flat beater, use a small round brush, toothpick, or skewer to run through the hole.
See other models: KSM3316XWH KSM75SL KSM7588PCP KMC4241CA KSM150FEOB
