Operating instructions Robot vacuum cleaner
Mode d'emploi du robot aspirateur
M.-Nr. 09 860 910
en, fr - US, AUS, NZ, CA
HS17


IMPORTANT SAFETY INSTRUCTIONS.................................5
Guide to the appliance .............................................9
Functions and features of the robot vacuum cleaner ...................11
Accessories supplied .............................................11
Preparing for use .................................................11
Insert the side brushes .............................................11
Remove the protective foil ...........................................11
Place the batteries in the remote control ................................11
Switch on the robot vacuum cleaner ...................................11
Connect the base station............................................12
Charge the rechargeable battery .....................................12
Set the clock .....................................................13
Define the area to be vacuumed ......................................13
Use ............................................................13
Switching on and off ...............................................13
Starting vacuuming ................................................13
Finishing vacuuming ...............................................14
Manually controlled vacuuming.......................................14
Interrupting vacuuming .............................................14
Manual navigation (without vacuuming) ................................14
Directing the robot vacuum cleaner to the base station ....................14
Finishing vacuuming manually .......................................15
Vacuuming modes.................................................15
Selecting the vacuuming mode .......................................15
Setting the timer...................................................16
Deactivating the timer ..............................................17
Deactivating the acoustic signals .....................................17
Reducing the maximum crossing over height ............................17
en - Contents
3

Maintenance .....................................................18
Purchasing accessories ............................................18
Ordering the correct accessories .....................................18
When to empty and clean the dust box.................................18
How to empty the dust box ..........................................18
How to clean the dust box ...........................................18
When to replace the exhaust filter .....................................19
How to replace the exhaust filter ......................................19
Cleaning the roller brush ............................................19
Cleaning the side brushes...........................................20
Cleaning the seal on the dust box .....................................20
Replacing the seal on the dust box ....................................21
Cleaning the front wheel ............................................21
Cleaning the sensors ...............................................21
Changing the batteries in the remote control ............................22
Replacing the rechargeable battery ...................................22
Storage .........................................................22
Maintenance .....................................................23
Problem solving guide ............................................23
Fault messages ..................................................24
After sales service ................................................25
Warranty ........................................................25
Electrical connection AU, NZ .......................................25
Caring for the environment.........................................25
Copyright and licences ............................................26
LIMITED WARRANTY - VACUUM CLEANERS USA .................27
LIMITED WARRANTY - Australia / New Zealand ........................29
en - Contents
4

This robot vacuum cleaner complies with statutory safety
requirements. Improper use can, however, lead to personal injury
and damage to property.
To avoid the risk of accidents and damage to the robot vacuum
cleaner, please read these instructions carefully before using it
for the first time. They contain important information on its safety,
operation and maintenance.
Keep these instructions in a safe place and ensure that new users
are familiar with the content. Pass them on to any future owner.
Correct application
~
This robot vacuum cleaner is intended for cleaning flooring in
domestic households and similar working and residential environ-
ments.
~
The robot vacuum cleaner is not intended for outdoor use.
~
The robot vacuum cleaner must only be used for domestic
household purposes to vacuum dry floor surfaces. Any other usage,
modification or alteration is not supported by the manufacturer and
could be dangerous.
~
The robot vacuum cleaner can only be used by people with
reduced physical, sensory or mental capabilities, or lack of
experience or knowledge, if they are supervised whilst using it or
have been shown how to use it in a safe way and understand and
recognise the consequences of incorrect operation.
Safety with children
~
The robot vacuum cleaner is not a toy.
~
Children must not be allowed to clean or maintain the robot
vacuum cleaner unsupervised.
en - IMPORTANT SAFETY INSTRUCTIONS
5

~
Please supervise children in the vicinity of the robot vacuum
cleaner and do not let them play with it.
~
Keep the rechargeable battery and the batteries for the remote
control out of the reach of children.
Technical safety
~
Before using the robot vacuum cleaner and the accessories
supplied, check for any visible signs of damage. Do not use a
damaged appliance or damaged accessories.
~
Ensure that the connection data on the data plate of the robot
vacuum cleaner and the base station (voltage and frequency) match
the mains electricity supply exactly.
~
The wall socket must be protected against short circuit by a delay
fuse 16 A or 10 A (AUS).
~
Repairs during the warranty period should only be performed by
an authorized service agent in accordance with national and local
safety regulations. Unauthorized repairs could cause injury or
machine damage and may void the warranty.
~
Repairs should only be carried out by a Miele authorised service
technician. Repairs and other work by unqualified persons can
cause considerable danger to users.
~
Make sure that the mains electrical cable is not damaged, bent or
twisted. Do not place any heavy items on top of it.
~
Do not let the robot vacuum cleaner travel over the power cord or
other cords in the operational area.
~
Switch the robot vacuum cleaner off with the OFF switch on the
side before cleaning / maintaining it. Also switch it off in this way if it
is operating unusually.
~
Only use the parts supplied (mains cable, power supply unit and
base station) to charge the rechargeable battery.
en - IMPORTANT SAFETY INSTRUCTIONS
6

~
If the supply cord is damaged, it must be replaced by the
manufacturer, its service agent or similarly qualified persons in order
to avoid a hazard.
~
Batteries can leak corrosive fluids. Avoid contact with the eyes
and skin. In the event of contact, rinse thoroughly with water and
seek medical advice.
~
Do not stick any labels on the base station infrared transmitter. Do
not place any items in front of it.
~
Do not cover the robot vacuum cleaner's sensors or the camera
in the display.
~
Do not immerse the robot vacuum cleaner or the parts supplied in
water. Clean all parts with a dry or slightly damp cloth only.
Correct use
~
Do not use the robot vacuum cleaner without the exhaust filter fitted.
~
Remove all breakable or lightweight items from the floor and
make sure that the robot vacuum cleaner cannot become entangled
in cords, curtains, fringes or similar.
~
Animals must be kept away from the robot vacuum cleaner. Do
not allow animals to stand or sit on the robot vacuum cleaner.
~
Do not use the robot vacuum cleaner to vacuum up anything
which has been burning or is still glowing e.g. cigarettes, ashes or
coal, whether glowing or apparently extinguished. Do not use it in
the vicinity of a fireplace.
~
Do not use the robot vacuum cleaner to vacuum up any water,
liquid or damp dirt. Wait until any freshly cleaned or shampooed
carpets or floor coverings are completely dry before attempting to
vacuum.
en - IMPORTANT SAFETY INSTRUCTIONS
7

~
Do not use the robot vacuum cleaner to vacuum toner dust.
Toner, such as that used in printers and photocopiers, can conduct
electricity.
~
Do not use the robot vacuum cleaner to vacuum up any
inflammable or combustible liquids or gases and do not use it in
areas where such substances are stored.
~
Do not allow loosely fitting clothes or hair near the roller brush or
other moving parts of the robot vacuum cleaner.
~
Important information on handling the rechargeable battery and
remote control batteries:
– Do not short circuit the rechargeable battery and the remote
control batteries, throw them into a fire, or recharge the remote
control batteries.
– Disposing of batteries: Remove the rechargeable battery from the
robot vacuum cleaner and the batteries from the remote control.
Recycle the rechargeable battery and the batteries from the
remote control. Battery packs may be considered hazardous
waste by your local municipality. Please dispose of them
responsibly and in accordance with your local recycling program.
Do not dispose of them with the normal household waste.
–
The battery pack must be removed before disposal.
Accessories
~
Only use genuine accessories with the "Original Miele" logo on
them. Otherwise the manufacturer cannot guarantee the safety of
the product.
SAVE THESE INSTRUCTIONS
en - IMPORTANT SAFETY INSTRUCTIONS
8

The three illustrations for the "Guide to the appliance" section are on the pull-out
pages in the back of these operating instructions.
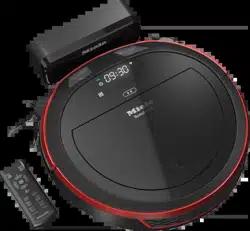
1. Robot vacuum cleaner and base station
Top of the robot vacuum cleaner
a Camera
b Display
c Sensors (collision protection)
d Impact protection
e ON/OFF switch
f Power supply unit socket
g Dust box
h Dust box release button
Bottom of the robot vacuum cleaner
i Side brushes
j Battery compartment
k Front wheel
l Sensors (toppling protection)
m Charging contacts
n Drive wheels
o Data plate
p Roller brush holder
q Roller brush
r Dust box seal
Base station
a Power supply unit storage compartment
b Power supply unit socket (not visible)
c Infrared transmitter
en - Guide to the appliance
9

d Charging contacts
e Cleaning brush storage compartment
f Contact indicator
2. Remote control
a Start / Pause button (~ II)
b Timer button
c Spot vacuuming mode button
d Corner vacuuming mode button
e Base button
f OK confirmation button with direction buttons around it
g Turbo vacuuming mode button
h Auto standard vacuuming mode button
i Clock button
j Power button
k Battery compartment cover
3. Display
a Camera
b Rechargeable battery status indicator
c Clock display
d Spot vacuuming mode indicator
e Corner vacuuming mode indicator
f Vacuuming mode selection sensor
g Start / Pause sensor
h Turbo vacuuming mode indicator
i Auto standard vacuuming mode
j Timer indicator
en - Guide to the appliance
10
Functions and features of the
robot vacuum cleaner
The robot vacuum cleaner is suitable
for the daily cleaning of short pile
carpets, fitted carpets and hard
flooring.
Please observe the flooring
manufacturer's cleaning and care
instructions.
The robot vacuum cleaner is fitted with
a camera and various sensors. At the
start of cleaning and during operation,
the room plan as well as the items
present in the room are stored in
memory for the next time the room is
vacuumed. The robot vacuum cleaner
uses this data to create an efficient
vacuuming plan of the surfaces to be
vacuumed, which it can then vacuum
autonomously.
Accessories supplied
–
Two side brushes
–
Two replacement exhaust filters
–
Remote control / two batteries
–
Base station, including a cleaning
brush
–
Power supply unit with connector
–
Power cord with plug
–
Magnetic strip
Preparing for use
Diagrams a - m for the "Preparing
for use" section are at the end of
these operating instructions.
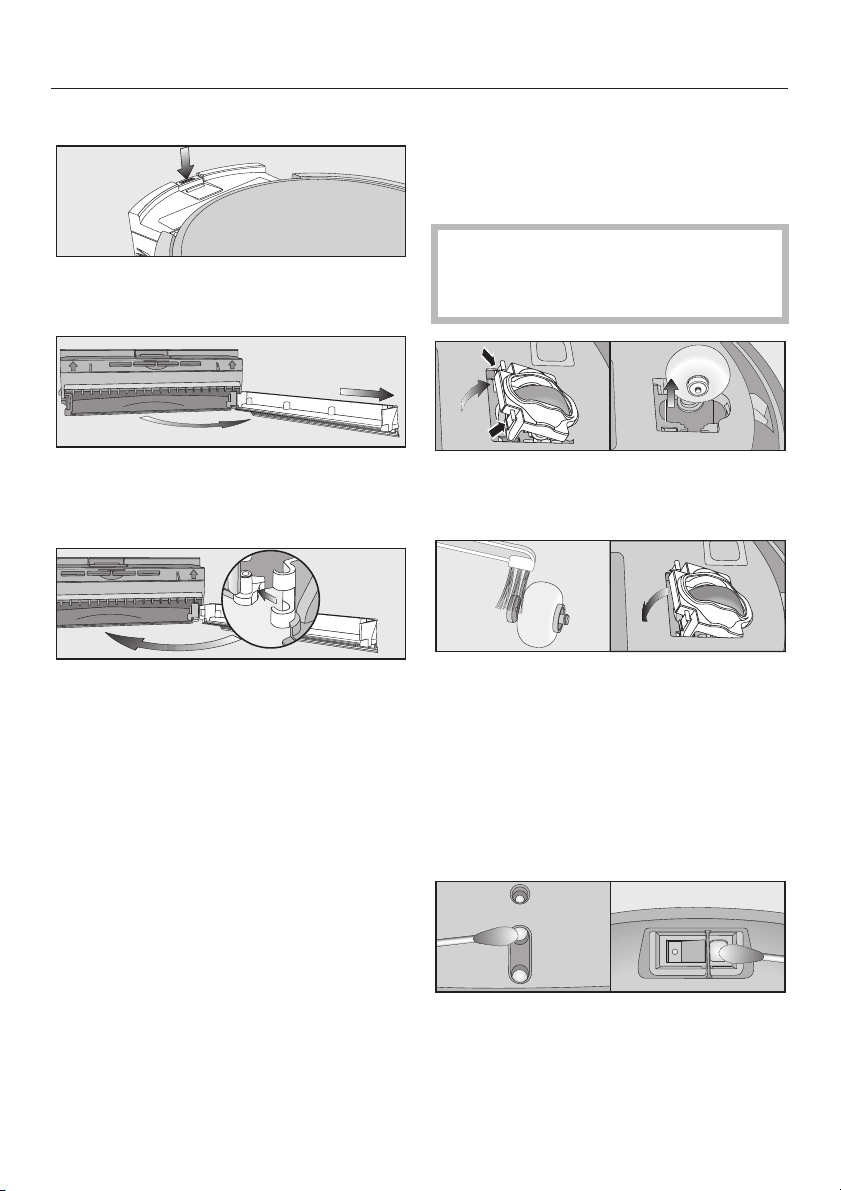
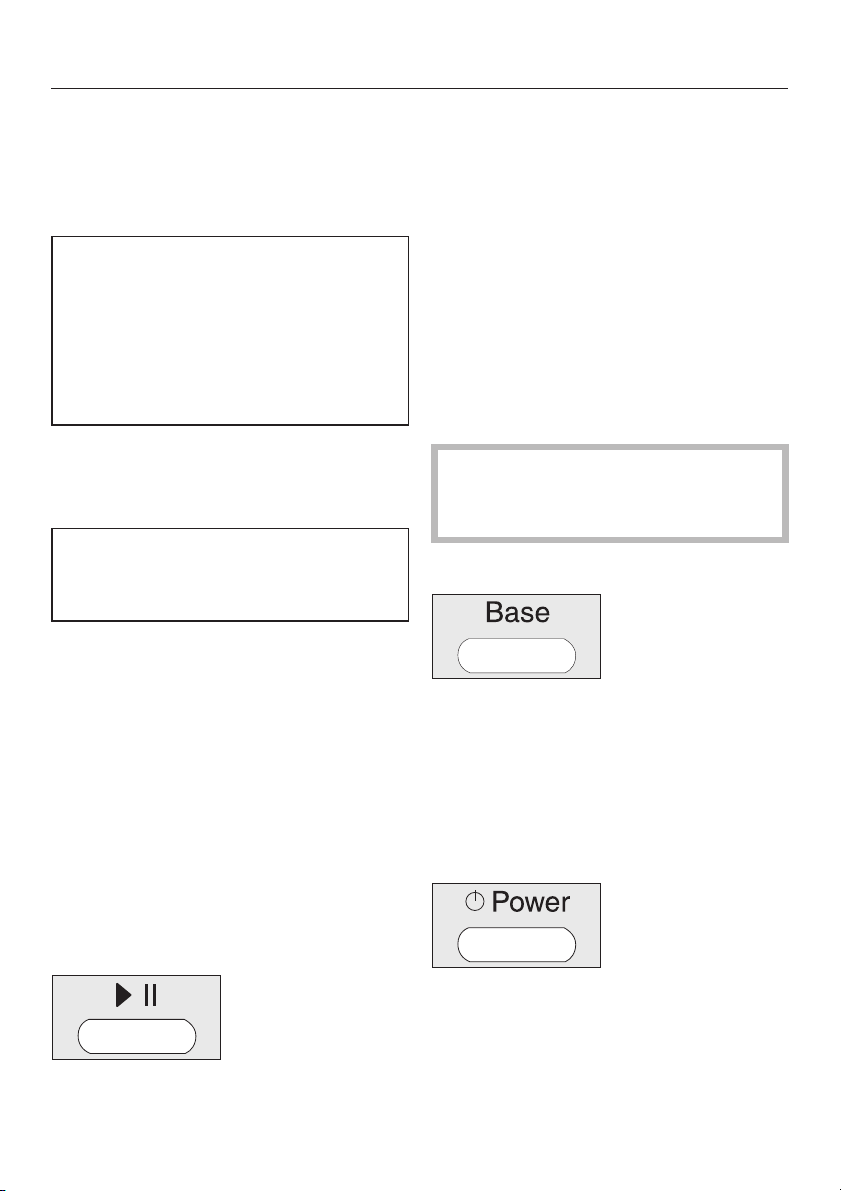
Insert the side brushes (dia. 1)
^
Place the robot vacuum cleaner
upside down on a level, clean
surface.
Do not lift the robot vacuum cleaner
by the area around the dust box as
it can come loose.
^ Press the two side brushes supplied
firmly but carefully onto the pins
provided. Ensure that they match up
correctly with the L and R markings.
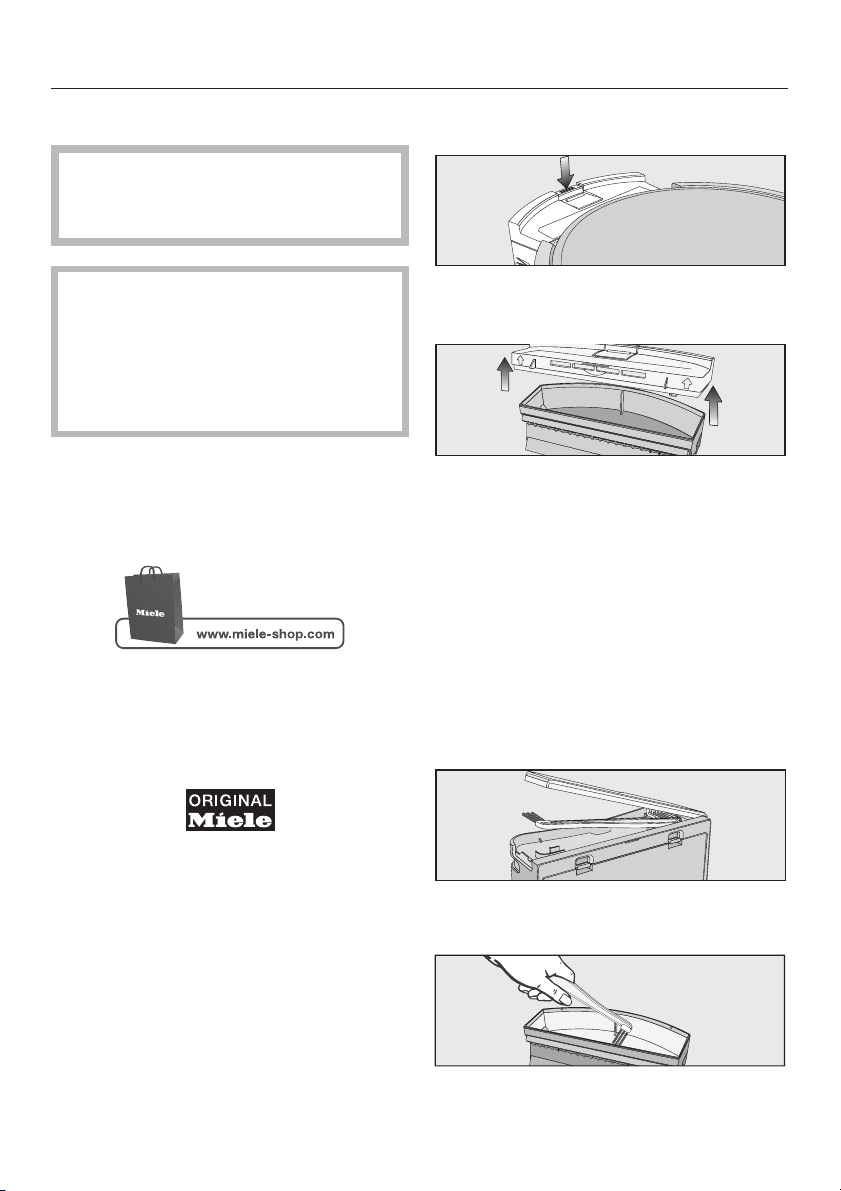
Remove the protective foil (dia. 2)
^ Remove the protective foil from the
base station and from the top of the
robot vacuum cleaner.
Place the batteries in the remote
control (dia. 3)
^
Remove the battery compartment
cover.
^
Insert the two batteries supplied,
making sure the polarity is correct.
Switch on the robot vacuum cleaner
(dia. 4)
^
Press the ON switch on the side of
the robot vacuum cleaner.
The rechargeable battery status and
the Auto standard vacuuming mode
indicators will light up in the display.
en
11
After approx. 60 seconds the robot
vacuum cleaner will switch to standby.
The battery status indicator will continue
to light up.
The robot vacuum cleaner is reactivated
by pressing any button on the remote
control or one of the two sensors in the
display.
Connect the base station (dia.5-9)
^
Open the storage compartment at the
back of the base station.
^
Insert the power unit connector
supplied into the socket.
^ Connect the mains connection cable
supplied to the power supply unit
and the mains plug to an electrical
socket. The contact indicator on the
base station will light up red.
^ Stow the power supply unit in the
storage compartment in the base
station.
^ Place the base station on a level sur-
face against a wall. Ensure that there
is an obstacle free distance of at least
5' (1.5 m) in front and 1' 8" (0.5 m) to
the right and left of the base station.
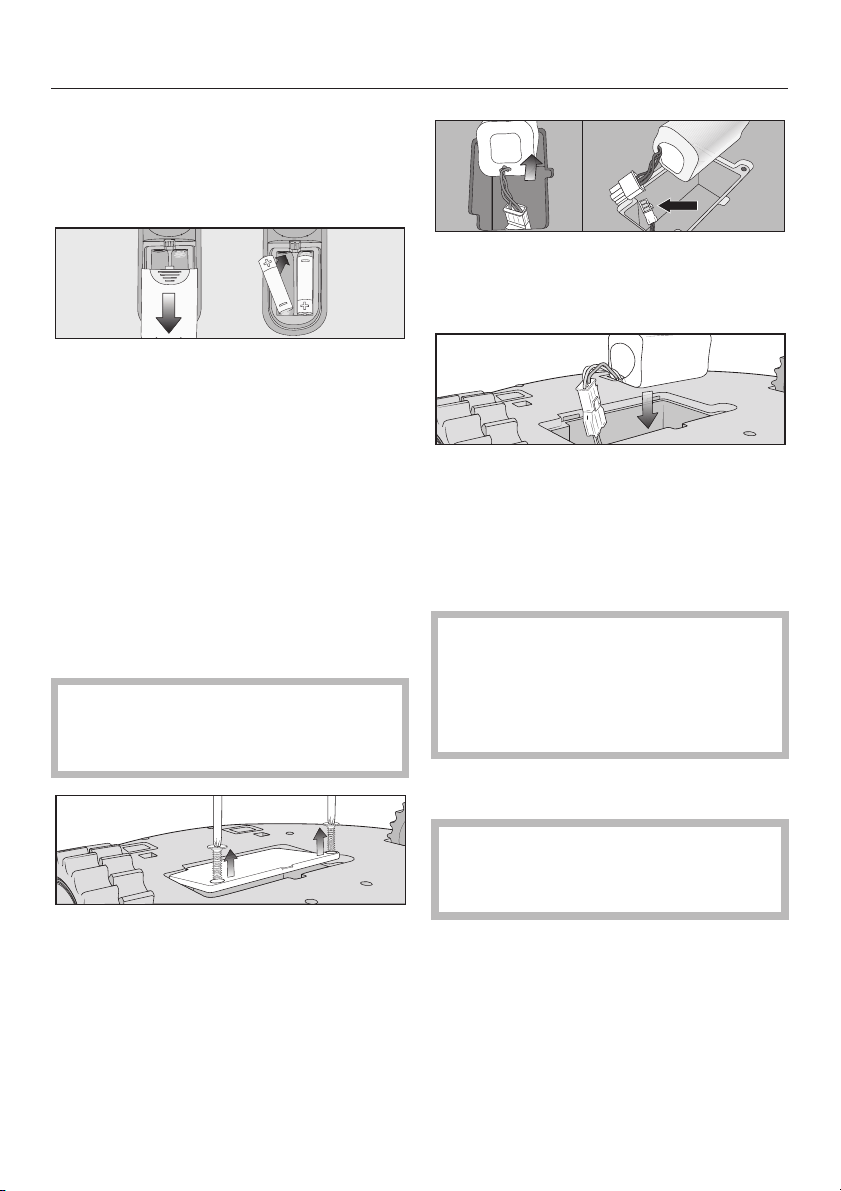
Charge the rechargeable battery
(dia. 10)
The rechargeable battery is supplied
not fully charged. It needs to be
charged fully before first use.
The battery can also be charged
when the robot vacuum cleaner is
switched off (OFF switch). In this
case, the vacuum cleaner indicators
will not react.
^
Connect the robot vacuum cleaner to
the charging contacts on the base
station.
Do not lift the robot vacuum cleaner
by the area around the dust box as
it can come loose.
The base station contact indicator will
go out as soon as the robot vacuum
cleaner has been positioned correctly.
The battery will charge and the battery
status indicator will flash in the display.
The charging process takes up to
120 minutes and is complete when the
battery status indicator in the display
lights up green. You can then vacuum
for up to two hours.
You can also charge the battery without
using the base station directly via the
power supply unit.
^ Insert the power supply unit
connector into the socket on the side
of the robot vacuum cleaner (dia. 11).
^
Connect the mains connection cable
to the power supply unit and the
mains plug to an electrical socket
(dia. 7).
Rechargeable battery status
indicator in the display
red charged capacity
approx. 0% - 20%
orange charged capacity
approx. 20% - 50%
green charged capacity
approx. 50% - 100%
en
12
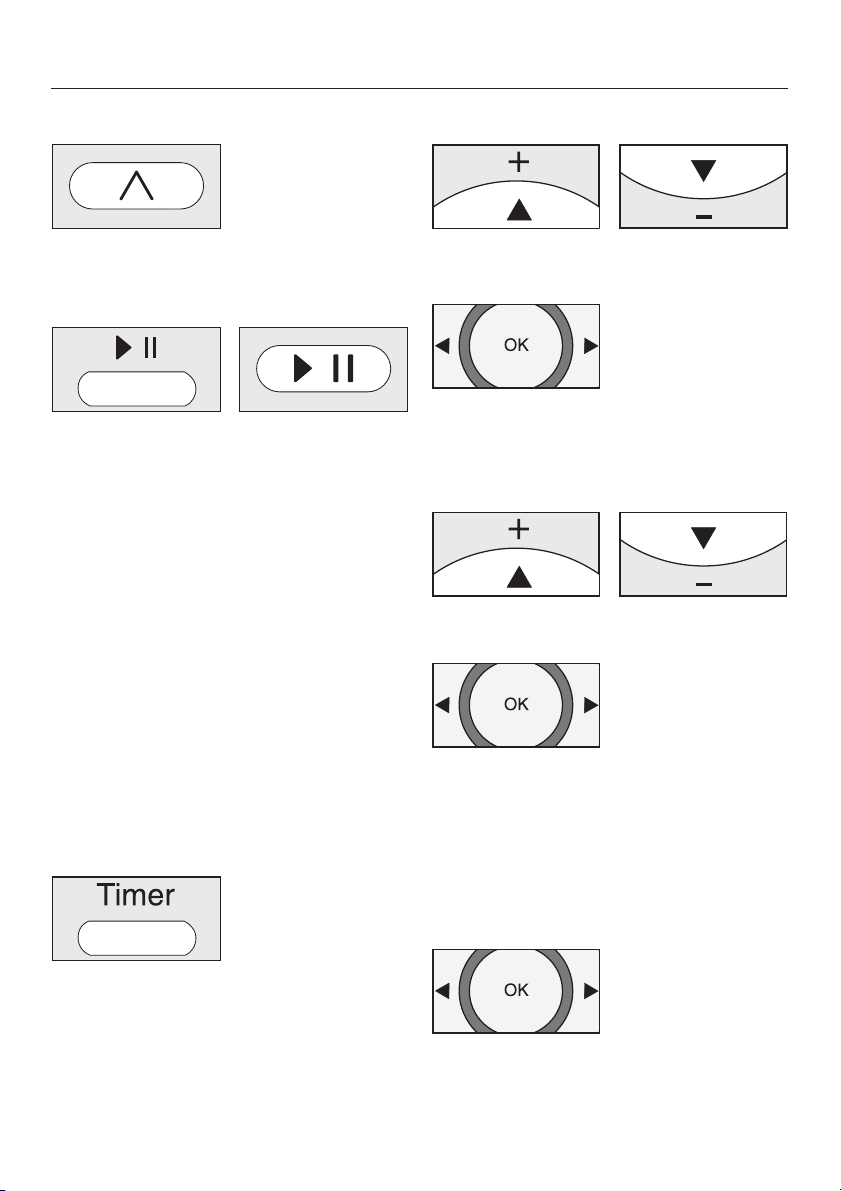
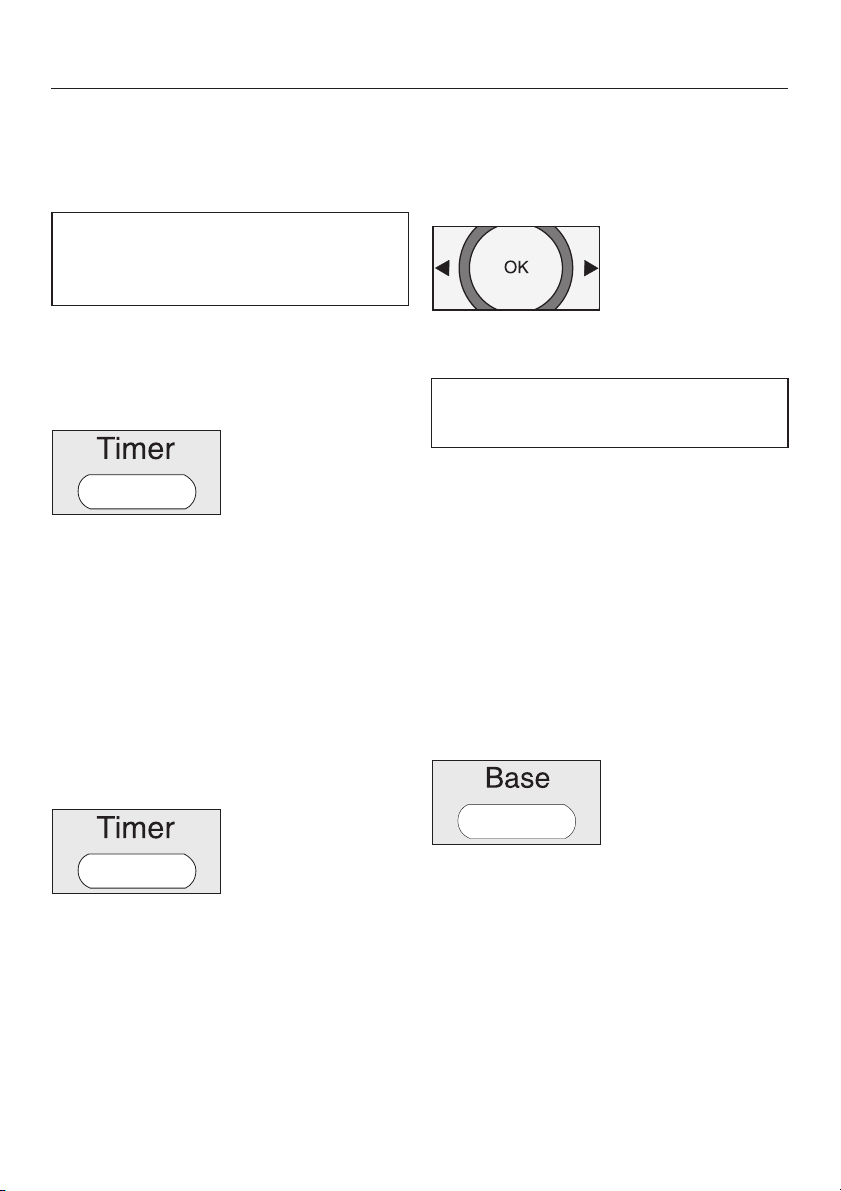
Set the clock (dia. 12)
Use the remote control to set the clock.
^
Press the Clock button for three
seconds.
The hour indicator will flash in the clock
display on the robot vacuum cleaner.
^
Press the + or - direction button to set
the current hour.
^
Press the OK button to confirm your
selection.
The minutes indicator will flash in the
clock display on the robot vacuum
cleaner.
^ Press the + or - direction button to set
the current minutes.
^ Press the OK button to confirm your
selection.
If you want to alter the time of day,
proceed as described above.
Define the area to be vacuumed
(dia. 13)
You can define any areas which the
robot vacuum cleaner should not have
access to.
^
Place the magnetic strip supplied
with the groove facing downwards on
the floor.
The robot vacuum cleaner will not cross
over the magnetic strip.
Adhesive strips are supplied for
permanent fixing.
Additional magnetic strips are available
to order from Miele.
Use
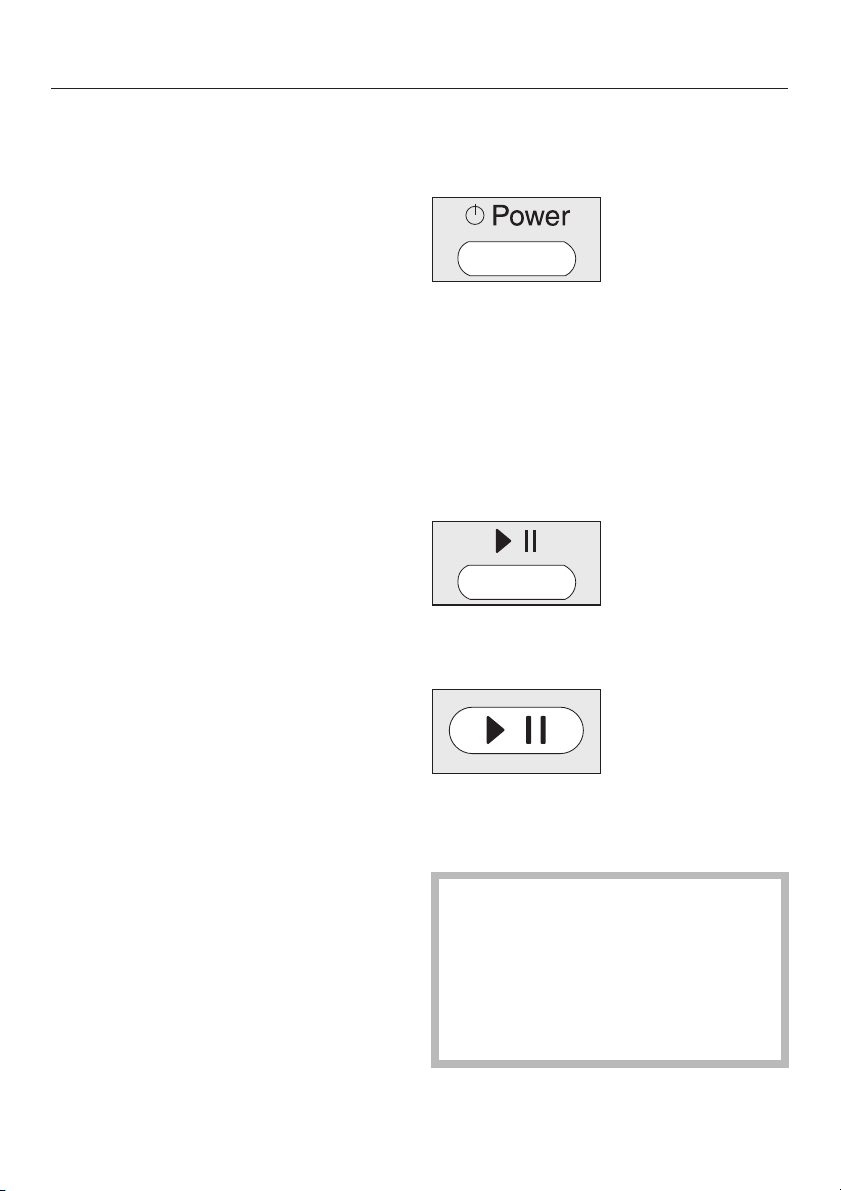
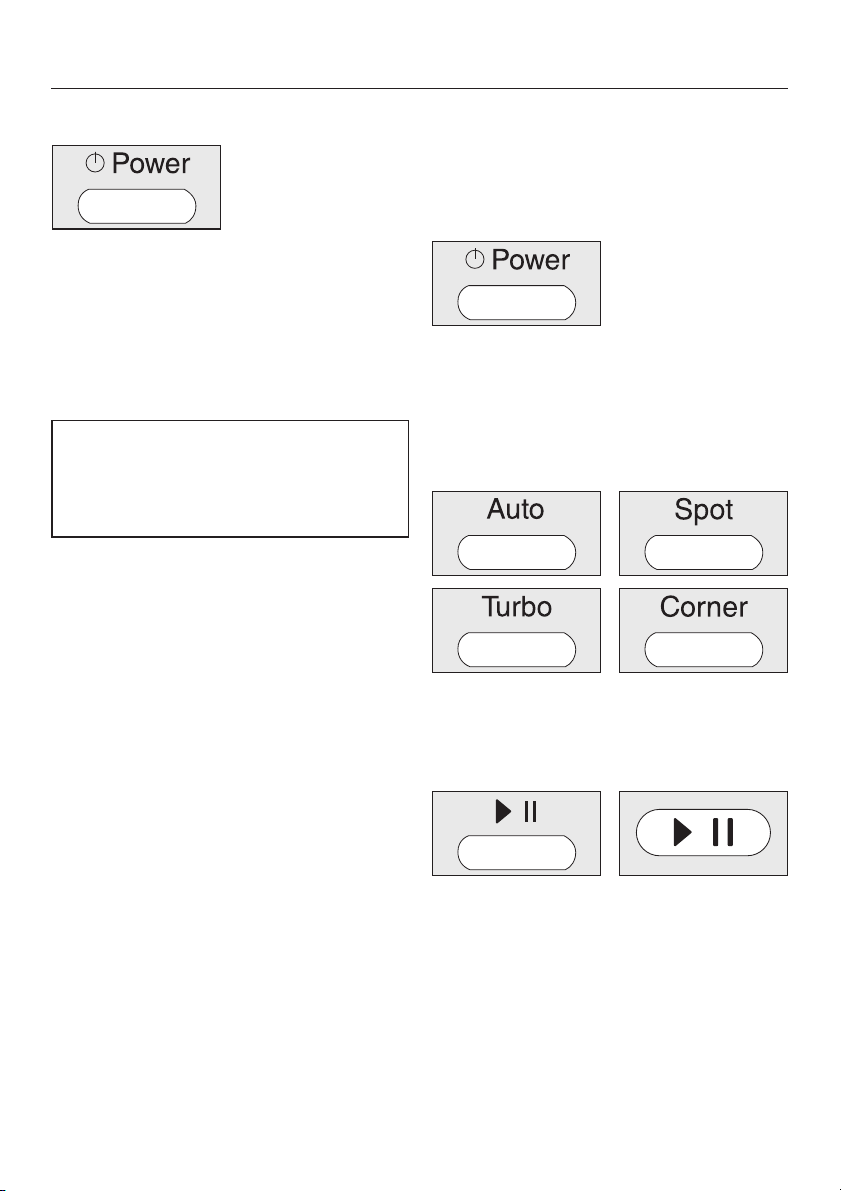
Switching on and off
^
Press the Power button on the
remote control.
The display will be activated.
Starting vacuuming
There are two ways to start vacuuming
in the Auto standard vacuuming mode.
Option 1 (Remote control)
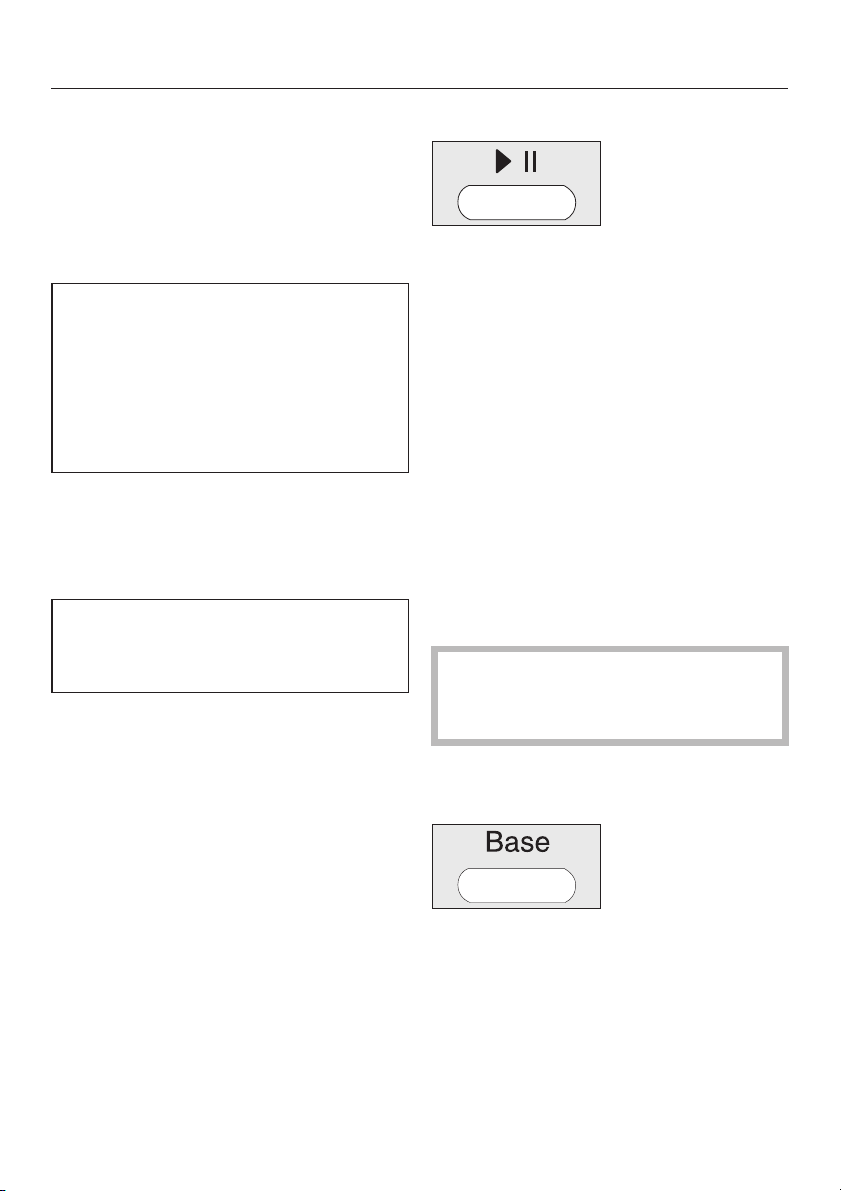
^ Press the ~ II button.
Option 2 (Display)
^
Press the ~ II sensor in the display.
The room to be vacuumed will be
cleaned.
,
Watch the robot vacuum cleaner
whenever it is vacuuming new
surroundings for the first time. This
way you will be able to detect and
remove any problematic obstacles
or define the area they are in with
the magnetic strip.
en
13
Finishing vacuuming
–
if vacuuming started from the base
station
The robot vacuum cleaner will return to
the base station automatically and
recharge.
The robot vacuum cleaner will also
return to the base station and
recharge when there is low battery
capacity.
II will appear in the clock indicator in
the display. The robot vacuum
cleaner will then continue vacuuming.
– if vacuuming started from
somewhere in the room
The robot vacuum cleaner will return to
its starting point and switch to standby.
The robot vacuum cleaner will stand
still when there is low battery capacity.
You should then recharge it.
Manually controlled vacuuming
You can use the direction buttons on
the remote control to vacuum a
particular area of the room.
^
While the robot vacuum cleaner is
vacuuming, press and hold one of
the direction buttons.
The robot vacuum cleaner will travel in
the desired direction and continue to
vacuum.
Interrupting vacuuming
^
Press the ~ II button on the remote
control.
Press the button again to continue
vacuuming.
Manual navigation (without
vacuuming)
You can use the direction buttons on
the remote control to direct the robot
vacuum cleaner to a specific area of
the room.
^ Press and hold one of the direction
buttons.
The robot vacuum cleaner will travel in
the desired direction without vacuuming.
You cannot direct the robot vacuum
cleaner manually to the base station
in order to recharge it.
Directing the robot vacuum cleaner
to the base station
^
Press the Base button on the remote
control.
The robot vacuum cleaner will travel to
the base station and recharge. The base
station contact indicator will go out.
en
14
Finishing vacuuming manually
^
Press the Power button on the
remote control.
The robot vacuum cleaner will switch to
standby automatically after approx.
60 seconds. The display will be
deactivated. The battery capacity
status indicator will continue to light up.
You can switch the robot vacuum
cleaner to standby before 60 seconds
is up by pressing the Power button
again.
You can reactivate the robot vacuum
cleaner by pressing any button on the
remote control or one of the two sensors
in the robot vacuum cleaner display.
Vacuuming modes
There are four different vacuuming
modes.
Auto Standard vacuuming mode
for vacuuming normally
soiled flooring.
Spot For targeted vacuuming of a
surface approx. 5' 11" x 5' 11"
(1.8 m x 1.8 m) around the
selected starting point of the
robot vacuum cleaner.
Corner For vacuuming normally
soiled flooring (see Auto).
Additional edge vacuuming
after returning to the starting
point.
Turbo For vacuuming lightly soiled
flooring with a short
vacuuming duration.
Selecting the vacuuming mode
^
Press the Power button on the
remote control.
There are two ways of selecting the
vacuuming mode.
Option 1 (Remote control)
^ Press the button for the vacuuming
mode you want. The corresponding
vacuuming mode symbol will light up
in the display.
^
To start vacuuming, press the ~ II
button on the remote control or the
~ II sensor in the display.
en
15
Option 2 (Display)
^
Press the Y sensor repeatedly until
the symbol for the vacuuming mode
you want lights up.
^
To start vacuuming, press the ~ II
button on the remote control or the
~ II sensor in the display.
Setting the timer
(only possible if the clock has been set)
If you would like the robot vacuum
cleaner to start at the same time every
day, you can save the start time and
vacuuming mode you want to memory.
You can also use the robot vacuum
cleaner to vacuum in the dark.
However, please be aware that
vacuuming may be less thorough. The
camera needs light to enable it to
navigate without restriction.
Use the remote control to set the timer.
^
Press the Timer button for at least
three seconds.
The Timer m and the hour indicators
will flash in the display.
^
Press the + or - direction button to set
the hour you want.
^
Press the OK button to confirm your
selection.
The Timer m and minutes indicators will
flash in the display.
^ Press the + or - direction button to set
the minutes you want.
^
Press the OK button to confirm your
selection.
^
On the remote control, press the but
-
ton for the vacuuming mode you want
or the direction buttons until the
symbol for the vacuuming mode you
want flashes.
^
Press the OK button to confirm your
selection.
en
16
The settings will be displayed for
approx. three seconds.
The robot vacuum cleaner will now start
to vacuum at the same time each day.
The Timer indicator m lights up to
show that the timer has been
activated.
To alter the entries, proceed as
described previously.
Deactivating the timer
^ Press the Timer button on the remote
control briefly.
The Timer indicator m will go out.
Pressing the Timer button again will
reactivate the timer. The Timer indicator
m will light up and the robot vacuum
cleaner will begin vacuuming at the set
start time.
Displaying a set start time
^
Press the Timer button on the remote
control briefly.
The set start time will appear in the
display.
Please remember that doing this will
deactivate the Timer. Press the Timer
button again to reactivate it.
Deactivating the acoustic signals
The acoustic signals are activated as
standard. You can deactivate and then
reactivate them.
^
Press the OK button on the remote
control for at least three seconds.
Acoustic signals for fault messages
cannot be deactivated.
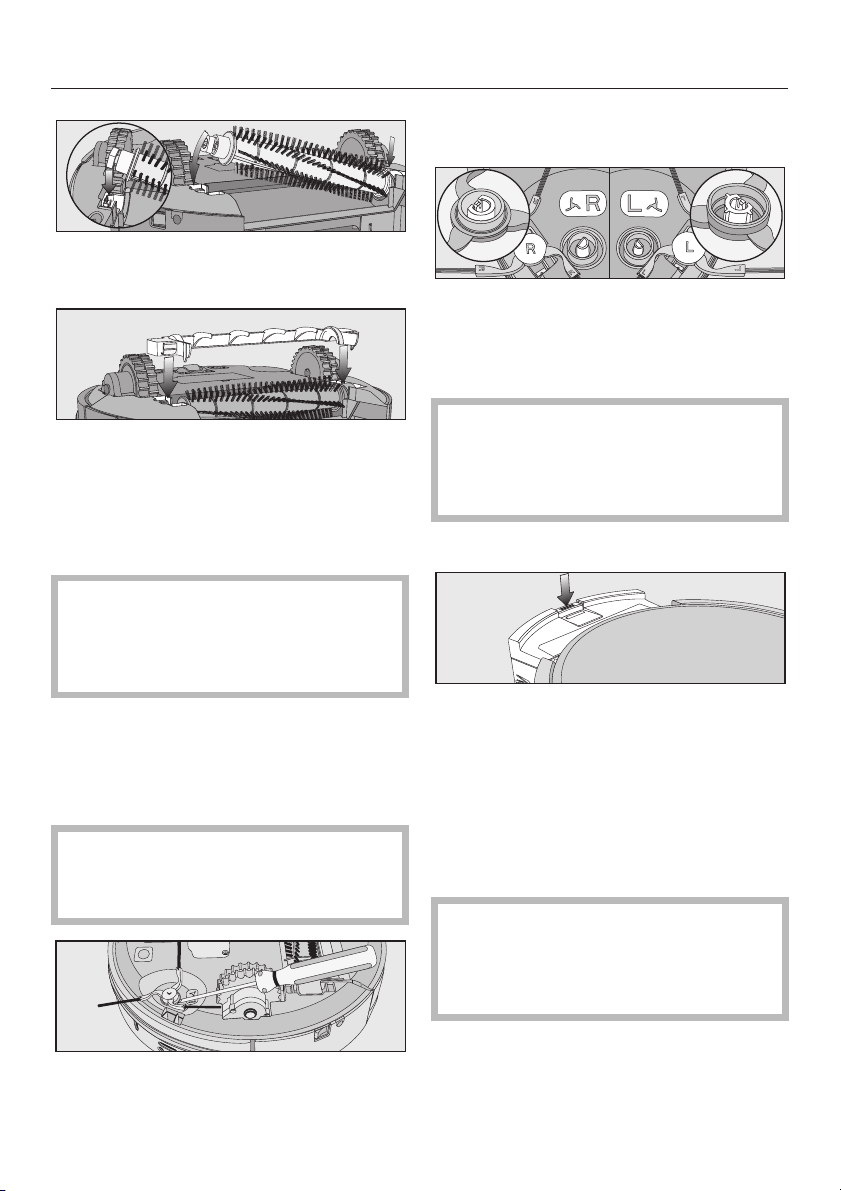
Reducing the maximum crossing
over height
The robot vacuum cleaner is set as
standard so that it can negotiate a
height of up to 3/4" (20 mm).
This allows it to vacuum carpets, cross
over thresholds, etc.
If you would like to reduce this height in
order to protect chair or table legs, or
lamps for example, you can deactivate
the factory default setting.
^
Press the Base button on the remote
control for at least three seconds.
"LO" will appear in the clock indicator in
the display.
Press the Base button again for at least
three seconds if you want to reactivate
the maximum crossing over height of
3/4" (20 mm). "HI" will appear in the
clock indicator in the display.
en
17
Maintenance
,
Before any maintenance work
switch the robot vacuum cleaner off
with the OFF switch on the side.
Only use genuine accessories with
the "Original Miele" logo on them.
This will ensure that the suction
power of the robot vacuum cleaner
is maintained, giving the best
possible cleaning results.
Purchasing accessories
Original Miele accessories can be
ordered from Miele, your Miele retailer
or online (depending on country) at:
Ordering the correct accessories
Original Miele accessories are
identified by the "Original Miele" logo on
the packaging.
When to empty and clean the dust
box
Empty and clean the dust box of the
robot vacuum cleaner after each use.
How to empty the dust box
^
Press the dust box release button
and remove the dust box.
^ Remove the lid from the dust box.
^ Empty the dust box.
The contents of the box can be
disposed of with the normal household
waste, providing it contains general
household dust only.
How to clean the dust box
There is a storage compartment for the
cleaning brush on the top of the base
station.
^
Open the storage compartment and
remove the cleaning brush.
^
Clean the dust box with the brush
end of the cleaning brush.
en
18
^
Clean the bottom of the lid and also
the filter grille using the brush end of
the cleaning brush.
^ Close the lid of the dust box making
sure it clicks into place.
^ Replace the dust box in the robot
vacuum cleaner, making sure it clicks
into position.
When to replace the exhaust filter
Replace the exhaust filter in the robot
vacuum cleaner after approx. three
months. Two replacement exhaust
filters are supplied.
How to replace the exhaust filter
There is an exhaust filter in the bottom
of the dust box lid.
^
Unclip the filter grille and replace the
exhaust filter.
^
Close the filter grille making sure it
clicks into position.
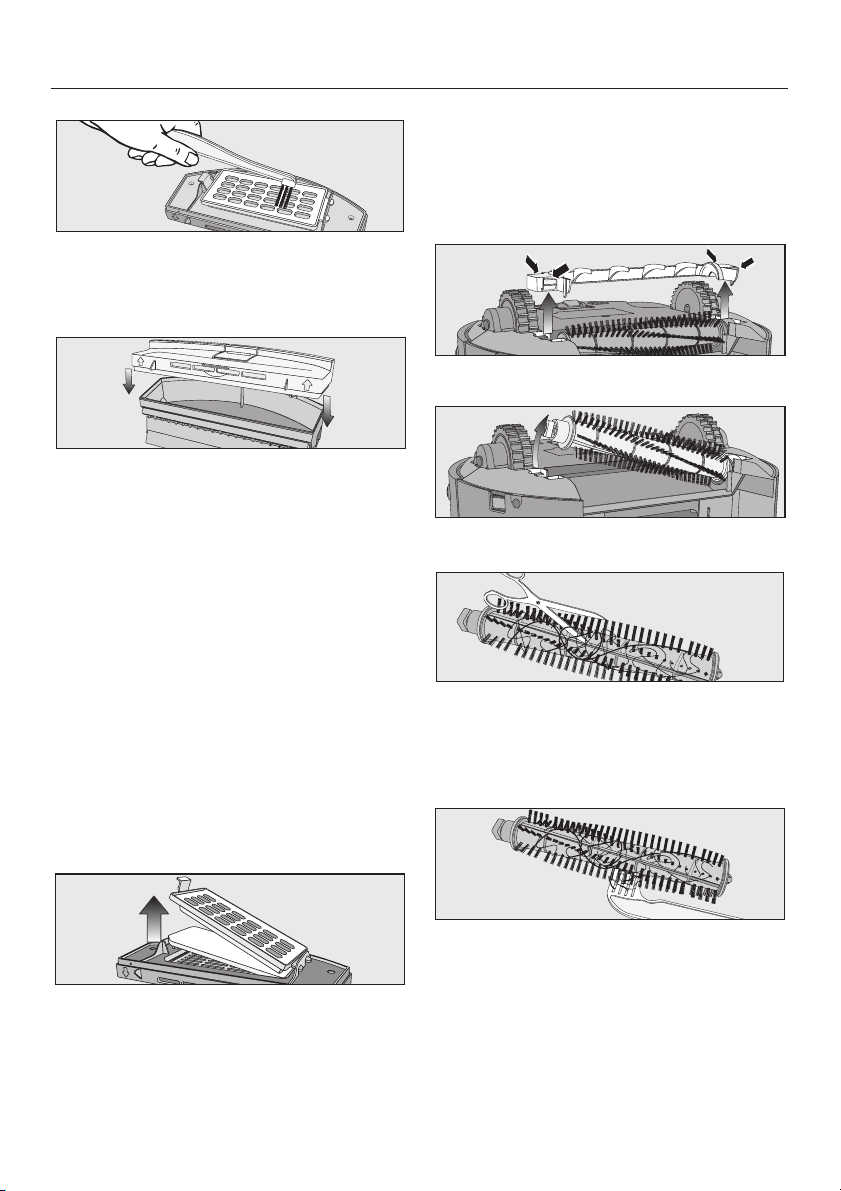
Cleaning the roller brush
^
Remove the dust box and empty it.
^
Place the robot vacuum cleaner
upside down on a level, clean surface.
^
Remove the roller brush cover.
^ Remove the roller brush.
^ Use scissors to cut any threads or
hairs which have wound around the
roller brush. There is a groove on the
roller to guide you.
^
Remove the threads and hairs with
the comb end of the cleaning brush.
en
19
^
Replace the roller brush. Make sure
you position it carefully.
^
Lock the cover making sure it clicks
into position.
^ Replace the dust box in the robot
vacuum cleaner, making sure it clicks
into position.
In order to continue to achieve the
best possible cleaning results
replace the roller brush with a new
one after approx. two years.
Cleaning the side brushes
^
Place the robot vacuum cleaner
upside down on a level, clean
surface.
Do not lift the robot vacuum cleaner
by the area around the dust box as
it can come loose.
^
Lift off the side brushes using a flat
head screwdriver, for example.
^
Remove the threads and hairs with
the comb end of the cleaning brush.
^
Press the two side brushes firmly but
carefully onto the pins provided.
Ensure that they match up correctly
with the L and R markings.
In order to continue to achieve the
best possible cleaning results
replace the side brushes with new
ones after approx. one year.
Cleaning the seal on the dust box
^
Press the dust box release button
and remove the dust box.
^
Clean the seal on the bottom of the
dust box with a damp cloth.
^
Replace the dust box in the robot
vacuum cleaner, making sure it clicks
into position.
In order to continue to achieve the
best possible cleaning results
replace the seal with a new one after
approx. one year.
en
20
Replacing the seal on the dust box
^
Press the dust box release button
and remove the dust box.
^ Unclip the seal from the bottom of the
dust box and carefully swing it out
until it detaches from the dust box.
^ Attach the new seal to the side and
clip it into position.
^
Replace the dust box in the robot
vacuum cleaner, making sure it clicks
into position.
Cleaning the front wheel
^
Place the robot vacuum cleaner
upside down on a level, clean
surface.
Do not lift the robot vacuum cleaner
by the area around the dust box as
it can come loose.
^ Unclip the cover.
^ Remove the front wheel.
^ Remove any threads and hairs and
clean the front wheel with the brush
end of the cleaning brush.
^
Replace the front wheel and close
the cover making sure it clicks into
position.
Cleaning the sensors
^
Carefully clean the sensors on the
side and the bottom of the robot
vacuum cleaner using a dry cotton
wool bud.
en
21
Changing the batteries in the remote
control
The remote control requires two AAA
(1.5 V) batteries.
^
Remove the battery compartment
cover.
^
Replace the batteries making sure
the polarity is correct.
Replacing the rechargeable battery
Replace it with an original Miele
lithium-ion rechargeable battery type
4S1P (14.8 V / 2.2 Ah / 32.5 Wh).
^ Place the robot vacuum cleaner
upside down on a level, clean
surface.
Do not lift the robot vacuum cleaner
by the area around the dust box as
it can come loose.
^
Unscrew the cover of the rechargeable
battery compartment on both sides
with a cross-headed screwdriver.
^
Carefully remove the rechargeable
battery, pressing the lug on the
contact to release it.
^ Insert the new rechargeable battery.
^ Replace the cover of the rechargeable
battery compartment.
^ Dispose of the old rechargeable
battery in your recycling bin.
Battery packs may be considered
hazardous waste by your local
municipality. Please dispose of them
responsibly and in accordance with
your local recycling program.
Storage
,
Before storing the robot vacuum
cleaner, switch it off with the OFF
switch on the side.
If the robot vacuum cleaner is not going
to be used for a long period of time,
make sure it is stored in a well
ventilated, cool place.
en
22
Maintenance
Maintaining the robot vacuum
cleaner and accessories
,
Before cleaning the robot
vacuum cleaner, switch it off with
the OFF switch on the side.
The robot vacuum cleaner and all
plastic accessories can be cleaned
with a dry or a slightly damp cloth, or
with a proprietary cleaner suitable for
plastic.
,
Do not use abrasive cleaning
agents, glass cleaning agents,
all-purpose cleaners or oil-based
conditioning agents.
,
Do not immerse the robot
vacuum cleaner or any accessories
supplied with it in water.
Problem solving guide
,
Before trying to solve any
problems with the robot vacuum
cleaner, switch it off with the OFF
switch on the side.
The robot vacuum cleaner switches
itself off after it has been switched
on using the Power button.
The rechargeable battery is not
charged sufficiently. Recharge it.
The robot vacuum cleaner does not
react.
The robot vacuum cleaner is switched
off. Switch it on (press the ON switch on
the side).
The batteries in the remote control have
been inserted incorrectly. Make sure
the polarity is correct.
The batteries in the remote control are
flat. Replace the batteries.
The connection from the infrared
transmitter on the vacuum cleaner to
the remote control is broken. Clean
both parts carefully with a soft, dry cloth
and make sure that no items disrupt the
connection.
The remote control is too near to the
robot vacuum cleaner or too far away
from it. Increase or decrease the
distance and when using the remote
control direct it towards the robot
vacuum cleaner.
The cleaning result is poor.
The dust box is full. Empty and clean
the dust box.
The roller brush is dirty. Clean it.
The exhaust filter is dirty. Replace it.
The roller brush and side brushes have
worn out. Replace them.
en
23

The robot vacuum cleaner is not
charging.
The base station / robot vacuum
cleaner is not connected to the
electricity supply correctly. Connect the
base station exactly as described in
these operating instructions. Do the
same for the robot vacuum cleaner, see
"Preparing for use - Charge the
rechargeable battery").
The robot vacuum cleaner does not
return to the base station after
vacuuming.
The Auto standard vacuuming mode
was started somewhere else in the
room. The robot vacuum cleaner will
return to its starting point.
When the Spot vacuuming mode is
selected the robot vacuum cleaner
returns to its starting point.
The base station is not connected
correctly. Connect the base station
exactly as described in these operating
instructions.
The sensors on the robot vacuum
cleaner are dirty. Clean them carefully
using a dry cotton wool bud.
The connection from the infrared
transmitter on the base station to the
vacuum cleaner is broken. Clean both
parts carefully with a soft, dry cloth and
make sure that no items disrupt the
connection.
Fault messages
,
Before resolving any faults with
the robot vacuum cleaner, switch it
off with the OFF switch on the side.
Fault messages are shown in the clock
indicator of the robot vacuum cleaner's
display.
F1"Wheel raised" fault
Place the robot vacuum cleaner
on a level floor surface.
F2"Floor not defined" fault
Place the robot vacuum cleaner
on a level floor surface.
F3"Dust box" fault
Insert the dust box into the robot
vacuum cleaner making sure it
clicks into position.
F4"Drive wheels overloaded" fault
Check whether the drive wheels
have become dirty.
Remove any threads and hairs.
F5"Brushes overloaded" fault
Check whether the roller brush
and the side brushes have
become dirty. Clean the roller
brush and the side brushes.
F6"Motor overloaded" fault
Empty and clean the dust box.
Replace the exhaust filter.
F7Internal system fault
Switch the robot vacuum cleaner
off and then back on again (press
the ON/OFF switch on the side).
F8"Front wheel dirty" fault
Check the front wheel for debris.
Remove any threads and hair and
clean the front wheel.
en
24

After sales service
In the event of a fault that you cannot
easily remedy, please contact
–
your Miele Dealer
or
–
Miele (see back of manual for
contact details)
Warranty
For information on the appliance
warranty specific to your country please
contact Miele. See back of manual for
contact details.
The battery pack must be removed
before disposal. Battery packs may be
considered hazardous waste by your
local municipality. Please dispose of
them responsibly and in accordance
with your local recycling program.
Electrical connection AU, NZ
All work should be carried out by a
suitably qualified and competent
person in strict accordance with
national and local safety regulations.
The voltage and rated load are given
on the data plate located underneath
the vacuum cleaner. Please ensure that
these match the household mains
supply. The fuse rating is quoted on the
plug.
The appliance is supplied with a cable
and moulded plug ready for connection
toa230V/50HzACsingle phase
supply.
Test Marks Electrical safety
RCM Mark
Electrically suppressed according to
AS/NZS CISPR 14
Caring for the environment
Disposal of the packing material
The cardboard box and packaging
protect the vacuum cleaner during
shipping. These materials are
recyclable. Please recycle.
Ensure that any plastic wrappings,
bags etc. are disposed of safely and
kept out of the reach of children.
Danger of suffocation!
Disposal of an old machine
Old vacuum cleaners may contain ma-
terials that can be recycled. Please
contact your local recycling authority
about the possibility of recycling these
materials.
en
25

Copyright and licences
Miele uses software to operate and control the robot vacuum cleaner.
The copyright authorisation from Miele and other relevant software suppliers must
be respected.
Miele and their suppliers reserve the rights to the software components.
In particular the following are prohibited:
–
copying and distribution,
–
modifications and derivations,
–
decompilation, reverse engineering, disassembling and other such reductions
of software.
Components which fall under GNU General Public Licence and further Open
Source licences are integrated into the software.
An overview of the integrated Open Source components and a copy of the current
licence can be obtained at www.miele.com/device-software-licences.
Miele will provide the source code for all components of software licensed under
the GNU General Public Licence and comparable Open Source licences.
en
26

What The Warranty Covers And For What Period The Coverage Extends
Miele, Inc. (hereinafter "Miele") warrants to the original purchaser of this product,
living in the United States of America, who purchased their vacuum from a Miele
authorized distributor or dealer:
a. That this product, including all of its Miele authorized parts is free of defects
in material and workmanship.
b. That this product, if found to be defective within the stated warranty period,
will be repaired free of charge to the consumer (both parts and labor) by an
authorized Miele service agent.
c. The warranty period for vacuum cleaners and accessories, excluding
vacuum cleaner motors, and vacuum cleaner casings (body), is one (1) year
from the date of purchase.
d. For vacuum cleaner casings (body), the warranty period will be as follows:
- The structural integrity of the vacuum cleaner casing (body) will be
covered for seven (7) years from the date of purchase against defects in
material and workmanship on the S2xxx, S4xxx, S5xxxx, S6xxx, S7xxx,
S8xxx and S190 product series.
e. For vacuum cleaner motors, the warranty period will be as follows:
- Vacuum motors will be covered for seven (7) years from the date of
purchase on the S2xxx, S4xxx, S5xxx, S6xxx, S7xxx, S8xxx and S190
product series.
Vacuum cleaners used for commercial purposes, except for their motors, will be
warranted for a period of six (6) months from the date of purchase. The motors of
commercially used upright vacuums will be warranted for one (1) year and the
motors of all other commercially used vacuum cleaners will be warranted for two
(2) years. Thereafter this Limited Warranty shall be null and void.
This warranty only applies while the product remains within the United States, and
shall be null and void in any other US territories, possessions, or foreign countries.
What is not covered by this Warranty
This warranty does not cover damage or defects caused by or resulting from
repairs, service or alterations to the product or any of its parts or accessories
which have been performed by service centers or repairmen not authorized by
Miele, or damage or defects caused by negligence, accident, abuse, misuse,
improper or abnormal usage or maintenance of the product, its parts or
accessories. Ordinary wear and tear or cosmetic damage (scuffs, scratches,
gauges, dents, etc.) shall not be considered a defect in materials or workmanship.
LIMITED WARRANTY - VACUUM CLEANERS USA
27

Exclusion of Other Warranties
Except for the limited warranty provided herein, Miele disclaims any and all other
express warranties with respect to the product. Any warranty of merchantability or
fitness for a particular purpose is limited in its duration to the term of the limited
warranty provided herein.
Some states do not allow limitations on how long an implied warranty lasts, so the
above limitation may not apply to you.
Limitation of Liability for Special, Incidental or Consequential Damages
Miele will assume no liability, or other obligation with respect to any personal injury
or property damage resulting from the use of a vacuum cleaner, or its
accessories, replacement parts, etc., which has not been purchased from, or
serviced by an Authorized Miele Dealer. Any purchaser who obtains a vacuum
cleaner, accessories, replacement parts, etc., from someone other than an
Authorized Miele dealer proceeds at their own risk.
Miele specifically disclaims any and all liability, whether directly or by way of
indemnity, for special incidental, consequential or other damages, whether based
on breach of contract, tort, strict or product liability, or any other legal theory.
Some states do not allow the exclusion or limitation of incidental or consequential
damages, so the above limitation may not apply to you.
Special State Laws
This Limited Warranty gives you specific legal rights; you may have other rights,
which vary, from state to state.
Service
For service under this Limited Warranty, or for information you may need about the
product, please contact Miele at the US address listed on the back of this booklet,
or visit us at www.mieleusa.com.
Authorized Miele Dealers
To find an authorized Miele dealer in your area, please visit our website
www.mieleusa.com.
Effective Date: August 20, 2013
©2013 Miele, Inc.
LIMITED WARRANTY - VACUUM CLEANERS USA
28

Miele Australia Pty Ltd. ACN 005 635 398 ABN 96 005 635 398 of 1 Gilbert Park
Drive Knoxfield VIC 3180.
Miele New Zealand Limited. IRD 98 463 631 of Unit L, 10-20 Sylvia Park Road
Mt Wellington 1060 Auckland New Zealand
Warranty
1.1 Miele domestic products are subjected to rigorous testing and assessment
as to their quality and fitness.
1.2 Our goods come with guarantees that cannot be excluded under the
Australian Consumer Law. You are entitled to a replacement or refund for a
major failure and for compensation for any other reasonably foreseeable loss
or damage. You are also entitled to have the goods repaired or replaced if
the goods fail to be of acceptable quality and the failure does not amount to
a major failure.
1.3 Warranties and conditions as to the merchantability and fitness for purpose
of Miele domestic products are implied under Australian and New Zealand
consumer protection legislation. This warranty is independent of, and does
not exclude or limit, any non-excludable statutory warranties and conditions
implied by such legislation.
1.4 Miele warrants that the product/s will be free from defects in materials and
workmanship for a period of 24 months from the date of purchase.
1.5 Miele does not make any further representation or warranties as to the
merchantability of its domestic product range.
1.6 Miele reserves the right to inspect and test the product/s for the purpose of
determining the extent of any defect and the validity of any claim made under
this warranty. All defective parts/products replaced by Miele under this
warranty will be deemed to be the property of Miele.
LIMITED WARRANTY - Australia / New Zealand
29

1.7 This Miele warranty will not apply if the product/s is rendered faulty by a
factor other than a defect in materials and workmanship. Such factors
include but are not limited to:
i. damage through misuse (including failure to maintain, service or use
with proper care), neglect, accident or ordinary wear and tear (including
deterioration of parts and accessories and glass breakage);
ii. use for a purpose for which the product was not sold or designed;
iii. in the case of household appliances and vacuum cleaners, commercial
use;
iv. use or installation (where applicable) which is not in accordance with
any specified instructions for use or installation;
v. use or operation after a defect has occurred or been discovered
vi. damage through freight, transportation or handling in transit (other than
when Miele is responsible);
vii. damage through exposure to chemicals, dusts, residues, excessive
voltage, heat, atmospheric conditions or other forces or environmental
factors (including vermin damage) howsoever outside Miele's control;
viii. repair, modification or tampering with by the purchaser or any person
other than Miele or an authorised Miele Service Agent; or
ix. use of parts, components or accessories which have not been supplied
by or specifically approved by Miele (including use of a dustbag other
than a genuine high performance Miele dustbag).
This warranty does not apply to consumables such as batteries, filters or globes.
1.8 Customer must retain proof of purchase (receipt) in order to be eligible to
make a warranty claim.
1.9 The Miele warranty provided under this clause is a transferable right.
HOW TO MAKE A WARRANTY CLAIM
2.1 Conduct a basic check of the product i.e. to establish if it is appropriately
connected. It is also a good idea to check the Miele user manual. If the
problem persists follow our simple claims process:
For Australian Residents
A. Notify Miele who will arrange at no cost to you a warranty repair or service,
LIMITED WARRANTY - Australia / New Zealand
30

B. Provide and make available the warranty card or a copy of the purchase
receipt to show that the warranty applies to the product at the date of the
claim.
For New Zealand Residents
A. Notify Miele who will arrange at no cost to you a warranty repair or service,
B. Provide and make available the warranty card or a copy of the purchase
receipt to show that the warranty applies to the product at the date of the
claim.
Please note that Miele may engage other persons or parties to assist it in fulfilling
its obligations under this contract. We always try to complete repairs in the shor
-
test amount of time possible.
SERVICE & SPARE PARTS
3.1 While Miele will use reasonable commercial endeavours to have all necessary
spare parts available for the purpose of repair or service, Miele is not liable for
delays due to sourcing of unusual parts which are required, or due to
circumstances beyond the control of Miele.
3.2 Miele has a policy of assuring the availability of spare parts and service for
all Miele products for a period of not less than five (5) years following the
cessation of production of the applicable product. After this period,
availability of spare parts and service will depend upon the particular Miele
product. Please contact Miele for more details in relation to availability of
spare parts and service.
COMPLAINTS / CUSTOMER CARE
4.1 We take our customer service seriously and want to hear about any problems
that you may have had or the level of service you have been provided.
LIMITED WARRANTY - Australia / New Zealand
31

To notify us of these issues, please collect all the relevant information on your que
-
ry and direct it to:
For Australian Residents
The Complaints Officer
Miele Australia Pty. Ltd. 1 Gilbert Park Drive
Knoxfield VIC 3180
For New Zealand Residents
The Complaints Officer
Miele New Zealand Ltd. Unit L, 10-20 Sylvia Park Rd
Mt Wellington Auckland 1060
PRIVACY
For Australian Residents
Miele will collect and deal with the customer's personal information (including
name, address, telephone contact or personal details) only in accordance with
Miele's Privacy Charter, the Privacy Act 1988 (Cth) and the Privacy Amendment
(Enhancing Privacy Protection) Act 2012 (Cth). A copy of the Privacy Charter is
available from Miele or www.miele.com.au.
Miele may disclose personal information to its related companies and to organisa
-
tions which provide services (including delivery services) to Miele or which assist
Miele in providing services (including repair / warranty services) to its customers.
For New Zealand Residents
Miele will collect and deal with the customer's personal information (including
name, address, telephone contact or personal details) only in accordance with
Miele's Privacy Charter and the Privacy Act 1993 (NZ). A copy of the Privacy
Charter is available from Miele or www.miele.co.nz.
Miele may disclose personal information to its related companies and to organisa
-
tions which provide services (including delivery services) to Miele or which assist
Miele in providing services (including repair / warranty services) to its customers.
LIMITED WARRANTY - Australia / New Zealand
32

Prescriptions de sécurité et mises en garde...........................35
Description de l'appareil ...........................................39
Fonctionnement et caractéristiques du robot aspirateur ................41
Accessoires fournis...............................................41
Avant utilisation ..................................................41
Monter les brosses latérales .........................................41
Retirer les protections ..............................................41
Installer les piles de la télécommande .................................41
Allumer le robot aspirateur ..........................................41
Brancher la station de base..........................................42
Charger la batterie.................................................42
Régler l'heure.....................................................43
Délimiter un périmètre d'aspiration ....................................43
Utilisation .......................................................43
Allumer et éteindre.................................................43
Commencer à aspirer ..............................................43
Terminer l'aspiration ...............................................44
Navigation télécommandée (avec aspiration)............................44
Interrompre l'aspiration .............................................44
Navigation télécommandée (sans aspiration) ............................44
Objectif station de base.............................................44
Fin de navigation télécommandée (avec aspiration) ......................44
Modes d'aspiration ................................................45
Sélectionner un mode d'aspiration ....................................45
Régler la minuterie.................................................46
Désactiver la minuterie .............................................47
Désactiver la signalisation sonore .....................................47
Abaisser la hauteur du dénivelé ......................................47
fr - Table des matières
33

Entretien ........................................................48
Comment me procurer les accessoires dont j'ai besoin ? ..................48
De quels accessoires ai-je besoin ? ...................................48
Quand dois-je vider et nettoyer le bac à poussières ? .....................48
Comment vider le bac à poussières ? ..................................48
Comment nettoyer le bac à poussières ? ...............................48
Quand dois-je remplacer le filtre d'évacuation ?..........................49
Comment remplacer le filtre d'évacuation ? .............................49
Nettoyer la brosse cylindrique........................................49
Nettoyer les brosses latérales ........................................50
Nettoyer la lèvre d'étanchéité du bac à poussières .......................51
Changer la lèvre d'étanchéité du bac à poussières .......................51
Nettoyer la roue avant ..............................................51
Nettoyer les capteurs...............................................52
Changer les piles de la télécommande.................................52
Changer la batterie ................................................52
Rangement ......................................................53
Entretien ........................................................53
Anomalies.......................................................53
Messages d'anomalies ............................................54
Service après-vente ...............................................55
Conditions de garantie ............................................55
Protection de l'environnement ......................................55
Droits d'auteur et licences .........................................56
Limited Warranty Canada ..........................................57
Garantie Limitée Canada...........................................59
fr - Table des matières
34
Ce robot aspirateur répond aux réglementations de sécurité en
vigueur. Toute utilisation non conforme peut entraîner des dom
-
mages corporels et matériels.
Lisez le mode d'emploi avant d'utiliser votre appareil pour la pre
-
mière fois. Vous y trouverez des informations importantes sur la
sécurité, l'utilisation et l'entretien du robot aspirateur. Vous assu
-
rez ainsi votre protection et évitez d'endommager votre appareil.
Conservez ce mode d'emploi et remettez-le au futur propriétaire
en cas de cession de cet appareil.
Utilisation conforme
~
Ce robot aspirateur est destiné à une utilisation à la maison ou de
type domestique.
~
Ce robot aspirateur ne convient pas à une utilisation en extérieur.
~
Utilisez ce robot aspirateur dans le cadre domestique unique-
ment, pour aspirer des poussières sèches. N'utilisez pas ce robot
aspirateur sur les hommes et les animaux. Toute autre application,
adaptation ou modification de cet appareil est interdite.
~
Les personnes qui en raison de déficiences physiques, sensoriel
-
les ou mentales, de leur inexpérience ou de leur ignorance, ne peu
-
vent pas utiliser ce sèche-linge en toute sécurité ne doivent pas l'uti
-
liser sans la surveillance et les instructions d'une personne respon
-
sable.
Précautions à prendre avec les enfants
~
Tenez les enfants de moins de huit ans éloignés de l'appareil à
moins qu'ils ne soient sous étroite surveillance.
fr - Prescriptions de sécurité et mises en garde
35

~
Les enfants à partir de huit ans sont autorisés à utiliser l'appareil
sans surveillance uniquement si vous leur avez expliqué comment
l'utiliser sans danger. Les enfants doivent être en mesure d'appré
-
hender et de comprendre les risques encourus en cas de mauvaise
manipulation.
~
Les enfants ne sont pas autorisés à procéder au nettoyage ou à
l'entretien de l'appareil hors de la surveillance d'un adulte.
~
Ne laissez pas les enfants sans surveillance à proximité de l'ap
-
pareil. Ne les laissez pas jouer avec l'appareil.
~
Ne laissez pas les enfants manipuler les piles de la télécomman-
de ou la batterie.
Sécurité technique
~
Au moment de la livraison, vérifiez que ni votre robot aspirateur ni
ses accessoires ne présentent de dommage apparent. N'utilisez ja-
mais un appareil qui présente des dommages.
~
Comparez les données de raccordement indiquées sur la plaque
signalétique de l'appareil (tension et fréquence) avec celles du ré-
seau. Ces données doivent absolument coïncider.
~
La prise électrique doit être protégée par un fusible 10 A ou 16 A.
~
Pendant la période de garantie, seul un service après-vente
agréé par le fabricant est habilité à réparer le robot aspirateur, faute
de quoi tout bénéfice de la garantie est perdu en cas de panne ulté
-
rieure.
~
La réparation des appareils électriques ne doit être effectuée que
par un professionnel agréé par Miele. Une réparation non conforme
peut faire courir un danger considérable à l'utilisateur.
~
N'abîmez, ne pliez et ne tordes jamais les câbles électriques. Ne
posez jamais d'objets lourds dessus.
fr - Prescriptions de sécurité et mises en garde
36

~
Ne passez pas le robot aspirateur sur les câbles électriques.
~
Eteignez le robot aspirateur avant chaque opération d'entretien
ou de nettoyage en appuyant sur le bouton OFF situé sur le côté.
Procédez de même en cas de disfonctionnement.
~
Pour recharger la batterie, utilisez exclusivement les accessoires
fournis (câble électrique, bloc d'alimentation et station de base).
~
Le liquide corrosif qui se trouve dans les piles est susceptible de
s'écouler. Evitez tout contact de ce liquide avec les yeux et la peau !
En cas d'urgence, rincez à l'eau claire puis appelez aussitôt les se
-
cours !
~
Ne collez aucun autocollant sur le capteur à infrarouge et n'inter-
calez aucun objet susceptible de gêner la transmission.
~
Ne couvrez jamais les capteurs du robot aspirateur ou l'appareil
photo.
~
Ne plongez jamais le robot aspirateur ou les accessoires dans l'eau.
Nettoyez tous les éléments avec un chiffon sec ou légèrement humide.
Utilisation
~
N'utilisez jamais le robot aspirateur sans filtre.
~
Enlevez du sol tous les objets fragiles ou susceptibles de se ren
-
verser et veillez à ce que le robot aspirateur ne se prenne pas dans
des rideaux, cordages, franges ou autres obstacles susceptibles de
le bloquer.
~
Empêchez les animaux de s'approcher du robot aspirateur. Ne
les laissez pas monter ou s'asseoir dessus.
~
Le robot aspirateur ne soit jamais aspirer des objets incande
-
scents voire qui semblent éteints tels que des mégots, des cendres
ou du charbon. N'utilisez pas votre appareil à proximité d'une che
-
minée.
fr - Prescriptions de sécurité et mises en garde
37
~
Le robot aspirateur ne doit pas aspirer de liquides ou de poussiè
-
res contenant de l'humidité ! Laissez sécher complètement les tapis
et moquettes shampouinés avant que le robot aspirateur se déplace
dessus.
~
N'aspirez pas de toner !
Le toner utilisé pour les imprimantes et les photocopieurs par exem
-
ple peut être conducteur.
~
N'aspirez pas de produits ni de gaz inflammables ou explosifs.
N'utilisez pas le robot aspirateur dans les locaux où sont stockés
ces produits.
~
Attention aux vêtements amples et aux cheveux longs qui ris-
quent de s'emmêler dans la brosse cylindrique ou autres éléments
mobiles du robot aspirateur.
~
Important ! A savoir avant de manipuler la batterie du robot aspi-
rateur et les piles de la télécommande :
– ne jetez jamais la batterie et les piles au feu et ne les faites jamais
court-circuiter. Ne mettez jamais les piles à charger.
– pour vous débarrasser de la batterie et des piles de la télécom-
mande, sortez-les du robot aspirateur puis déposez-les dans un
point de collecte dédié de votre commune. Ne jetez jamais les pi
-
les ou la batterie avec vos ordures ménagères.
Accessoires
~
N'utilisez que des sacs à poussières, des filtres et des accessoi
-
res portant le logo "Original Miele". Le fabricant peut garantir votre
sécurité dans ces conditions exclusivement.
Miele ne peut être tenu pour responsable des dommages qui ré
-
sulteraient d'une mauvaise utilisation ou non conforme aux pres
-
criptions de sécurité et mises en garde.
fr - Prescriptions de sécurité et mises en garde
38

Les croquis mentionnés au chapitre "Description de l'appareil" se trouvent dans
le dépliant placé en fin de mode d'emploi.
1. Robot aspirateur et station de base
Partie supérieure du robot aspirateur
a Appareil photo
b Ecran
c Capteurs (protection anti-collisions)
d Protection anti-chocs
e Bouton Marche/Arrêt (ON / OFF)
f Prise du bloc d'alimentation
g Bac à poussières
h Touche de déverrouillage du bac à poussières
Partie inférieure du robot aspirateur
i Brosses latérales
j Compartiment de rangement des piles
k Roue avant
l Capteurs (protection anti-chûtes)
m Contacts du chargeur
n Roues motrices
o Plaque signalétique
p Support de brosse
q Brosse cylindrique
r Lèvre d'étanchéité du bac à poussières
Station de base
a Compartiment de rangement du bloc d'alimentation
b Prise du bloc d'alimentation (non visible)
c Emetteur infrarouge
fr - Description de l'appareil
39

d Contacts du chargeur
e Compartiment de rangement des brosses de nettoyage
f Signal de contact
2. Télécommande
a Touche Départ / Pause (~ II)
b Touche Timer
c Touche du mode d'aspiration Spot
d Touche du mode d'aspiration Corner
e Touche Base
f Touche de confirmation OK avec flèches de navigation
g Touche du mode d'aspiration Turbo
h Touche du mode d'aspiration standard Auto
i Touche Clock
j Touche Power
k Couvercle de protection des piles
3. Écran
a Appareil photo
b Témoin de charge de la batterie
c Affichage horaire
d Affichage d'activation du mode Spot
e Affichage d'activation du mode Corner
f Zone tactile de choix du mode d'aspiration
g Zone tactile Start / Pause
h Affichage d'activation du mode Turbo
i Affichage d'activation du mode standard Auto
j Affichage de la minuterie
fr - Description de l'appareil
40
Fonctionnement et
caractéristiques du robot
aspirateur
Le robot aspirateur est conçu pour net
-
toyer les tapis et les moquettes à poil
ras ainsi que les sols durs.
Veuillez vous conformer aux con
-
seils de nettoyage et d’entretien du
fabricant du revêtement de sol.
Ce robot aspirateur est équipé d'un ap
-
pareil photo et de plusieurs capteurs
qui lui permettent d'enregistrer la confi
-
guration de la pièce (superficie, angles,
obstacles, etc.) avant de démarrer mais
aussi en temps réel pendant qu'il aspi-
re. Il est donc capable d'élaborer une
véritable stratégie de nettoyage de tou-
tes les surfaces à sa portée.
Accessoires fournis
– 2 brosses latérales
–
2 filtres d'évacuation de rechange
–
Télécommande / 2 piles
–
Station de base avec goupillon
–
Bloc d'alimentation avec fiche
–
Câble électrique avec fiche
–
Bande magnétique
Avant utilisation
Les croquis a à m mentionnés au
chapitre "Avant utilisation" se trouvent
sur la dernière page rabattable en fin
de mode d'emploi.
Monter les brosses latérales
(croquis 1)
^
Installez le robot aspirateur sur le dos
sur une surface plane et propre.
Quand vous soulevez le robot aspi
-
rateur, ne l'attrapez pas du côté du
bac à poussières. Ce dernier risque
de se détacher et le robot aspirateur
de tomber.
^
Insérez les deux brosses latérales
sur les supports prévus à cet effet en
appuyant bien Respectez les lettres
indiquant la gauche L et la droite R.
Retirer les protections (croquis 2)
^ Retirez le film plastique qui recouvre
la station de base et le robot aspira-
teur.
Installer les piles de la
télécommande (croquis 3)
^ Retirez le couvercle de protection du
compartiment à piles.
^
Installez les deux piles ci-joint en re
-
spectant bien la polarité.
Allumer le robot aspirateur
(croquis 4)
^
Appuyez sur ON sur le côté du robot
aspirateur.
Les messages du niveau de charge
-
ment de la batterie et du mode d'aspi
-
ration standard Auto s'affichent à
l'écran.
Au bout de 60 secondes, le robot aspi
-
rateur se met en mode veille et le ni
-
veau de chargement de la batterie con
-
tinue de s'afficher.
fr
41
Vous pouvez réactiver le robot aspira
-
teur en appuyant sur n'importe quelle
touche de votre télécommande ou en
effleurant une des zones tactiles de
l'écran.
Brancher la station de base
(croquis5à9)
^
Ouvrez le compartiment de range
-
ment situé derrière la station de
base.
^
Insérez la fiche du bloc d'alimentati
-
on (fourni) dans la prise de la station
de base.
^ Enfoncez le câble électrique (fourni)
dans le bloc d'alimentation puis bran-
chez la fiche dans la prise murale. Le
signal de contact de la station de
base s'allume en rouge.
^ Rangez le bloc d'alimentation dans le
compartiment de rangement de la
station de base.
^ Installez la station de base contre un
mur sur un support plan. Aucun ob
-
stacle ne doit gêner ses capteurs sur
1,50 mètre à l'avant et sur 50 cm de
chaque côté.
Charger la batterie (croquis 10)
A la livraison, la batterie n'est pas com
-
plètement chargée. Chargez-la com
-
plètement avant d'utiliser votre robot
aspirateur pour la première fois.
Vous pouvez charger la batterie,
même si le robot aspirateur est éteint
(bouton OFF). Toutefois le cas éché
-
ant, aucun message ne s'affiche à
l'écran.
^
Posez le robot aspirateur sur les con
-
tacts du chargeur de la station de
base branchée.
Quand vous soulevez le robot aspi
-
rateur, ne l'attrapez pas du côté du
bac à poussières. Ce dernier risque
de se détacher et le robot aspirateur
de tomber.
Une fois le robot aspirateur bien en pla
-
ce, l'affichage lumineux de la station de
base s'éteint. La batterie se met à char
-
ger et le niveau de chargement scintille.
Le chargement dure 120 minutes envi-
ron. Vous disposez ensuite de 2 heures
d'autonomie sur votre robot aspirateur.
Vous pouvez aussi charger la batterie
sans la station de base en branchant
cette dernière directement sur le bloc
d'alimentation.
^ Enfoncez la fiche du bloc d'alimenta-
tion dans la prise située sur le côté
du robot aspirateur (croquis 11).
^
Enfoncez ensuite le câble électrique
dans le bloc d'alimentation puis la fi
-
che dans la prise murale (croquis 7).
Témoin de charge à l'écran
rouge niveau de charge
d'environ 0% à 20%
orange niveau de charge
d'environ 20% à 50%
vert niveau de charge
d'environ 50% à 100%
fr
42
Régler l'heure (croquis 12)
Réglez l'heure à l'aide de la télécom
-
mande.
^
Appuyez sur la touche Clock pen
-
dant 3 secondes.
A l'écran, l'affichage des heures cligno
-
te.
^
Appuyez sur les touches + ou - pour
régler les heures.
^
Appuyez sur la touche OK pour con
-
firmer votre choix.
A l'écran, l'affichage des minutes cli
-
gnote.
^ Appuyez sur les touches + ou - pour
régler les minutes.
^ Appuyez sur la touche OK pour con-
firmer votre choix.
Si vous souhaitez de nouveau modifier
l'affichage horaire, recommencez com-
me précédemment.
Délimiter un périmètre d'aspiration
(croquis 13)
Si par exemple il y a une zone que le
robot aspirateur doit éviter, vous pou
-
vez délimiter un périmètre d'aspiration.
^
Posez la bande magnétique (fournie)
au sol, rainures vers le bas.
Le robot aspirateur ne franchira pas
cette bande magnétique.
Si vous souhaitez délimiter durablement
une zone, utilisez les rubans adhésifs
(fournis).
Vous pouvez aussi vous procurer des
bandes magnétiques auprès de notre
boutique en ligne
(www.miele-shop.com).
Utilisation
Allumer et éteindre
^
Appuyez sur la touche Power de la
télécommande.
L'écran s'allume.
Commencer à aspirer
Il existe deux options de démarrage du
mode d'aspiration standard Auto.
Option 1 (télécommande)
^ Appuyez sur la touche ~ II.
Option 2 (Ecran)
^
Effleurez la zone ~ II affichée à
l'écran.
Le robot aspirateur commence à net
-
toyer le périmètre d'aspiration.
,
Observez toujours votre robot
aspirateur la première fois que vous
l'utilisez dans un nouvel environne
-
ment. Vous détectez ainsi les obsta
-
cles éventuels et pouvez soit les en
-
lever soit délimiter un périmètre à
l'aide de la bande magnétique.
fr
43
Terminer l'aspiration
–
Démarrage de la station de base
Le robot aspirateur rentre tout seul à la
station de base pour se recharger.
Si son niveau de charge est insuffi
-
sant, le robot aspirateur rentre aussi
à la station de base pour se rechar
-
ger.
Le cas échéant, l'heure II s'affiche à
l'écran puis une fois rechargé, le ro
-
bot repart aspirer.
–
Démarrage libre dans la pièce
Le robot aspirateur revient tout seul à son
point de départ et repasse en mode veille.
En cas de charge insuffisante de la
batterie, le robot aspirateur s'arrête et
attend que vous le rechargiez.
Navigation télécommandée (avec
aspiration)
Vous pouvez utiliser la télécommande
et diriger votre robot aspirateur à l'aide
des flèches de navigation.
^
Maintenez la flèche enfoncée pen
-
dant que le robot aspirateur se net
-
toie cette zone.
Le robot aspirateur se déplace dans la
direction indiquée tout en continuant
d'aspirer.
Interrompre l'aspiration
^
Appuyez sur la touche ~ II de la télé
-
commande.
Pour reprendre l'aspiration, appuyez de
nouveau sur cette touche.
Navigation télécommandée (sans
aspiration)
Si vous souhaitez mettre le cap sur une
des zones de la pièce, utilisez les tou
-
ches de navigation de la télécomman
-
de prévues à cet effet.
^
Maintenez les flèches de navigation
enfoncées.
Le robot se déplace dans la direction
souhaitée sans aspirer.
La télécommande ne peut pas de-
mander au robot aspirateur de re-
joindre la station de base.
Objectif station de base
^ Appuyez sur la touche Base de la té-
lécommande.
Le robot aspirateur rentre à la station de
base pour se recharger et l'affichage de
contact de cette dernière s'éteint.
Fin de navigation télécommandée
(avec aspiration)
^
Appuyez sur la touche Power de la
télécommande.
Le robot aspirateur passe en mode veil
-
le au bout de 60 secondes. L'écran est
désactivé mais l'affichage du niveau de
charge reste éclairé.
fr
44
Pour mettre le robot aspirateur en
veille avant que les 60 secondes soi
-
ent écoulées, appuyez de nouveau
sur Power.
Pour réactiver le robot aspirateur, ap
-
puyez sur une des touches de la télé
-
commande ou sur une zone tactile de
l'écran.
Modes d'aspiration
Quatre modes d'aspiration vous sont
proposés :
Auto Le mode d'aspirations
tandard pour aspirer les sols
normalement sales
Spot pour une aspiration ciblée
d'un périmètre d'environ
1,80 m sur 1,80 m autour
d'un point de départ dans
la pièce
Corner pour aspirer des sols
normalement sales (cf Auto).
Une fois revenu au point de
départ, aspiration des
bordures
Turbo pour aspirer des sols peu
sales avec une durée
d'aspiration raccourcie
Sélectionner un mode d'aspiration
^
Appuyez sur la touche Power de la
télécommande.
Il y a deux façons de sélectionner un
mode d'aspiration.
Option 1 (télécommande)
^
Appuyez sur la touche qui corre
-
spond au mode d'aspiration de votre
choix. L'écran affiche le symbole cor
-
respondant.
^ Pour démarrer l'aspiration, appuyez
sur la touche ~ II de la télécomman-
de ou sur la zone tactile ~ II à
l'écran.
Option 2 (Ecran)
^
Effleurez la zone tactile Y jusqu'à ce
que le symbole correspondant au
mode d'aspiration de votre choix s'af
-
fiche à l'écran.
^
Pour démarrer l'aspiration, appuyez
sur la touche ~ II de la télécomman
-
de ou sur la zone tactile ~ II à
l'écran.
fr
45
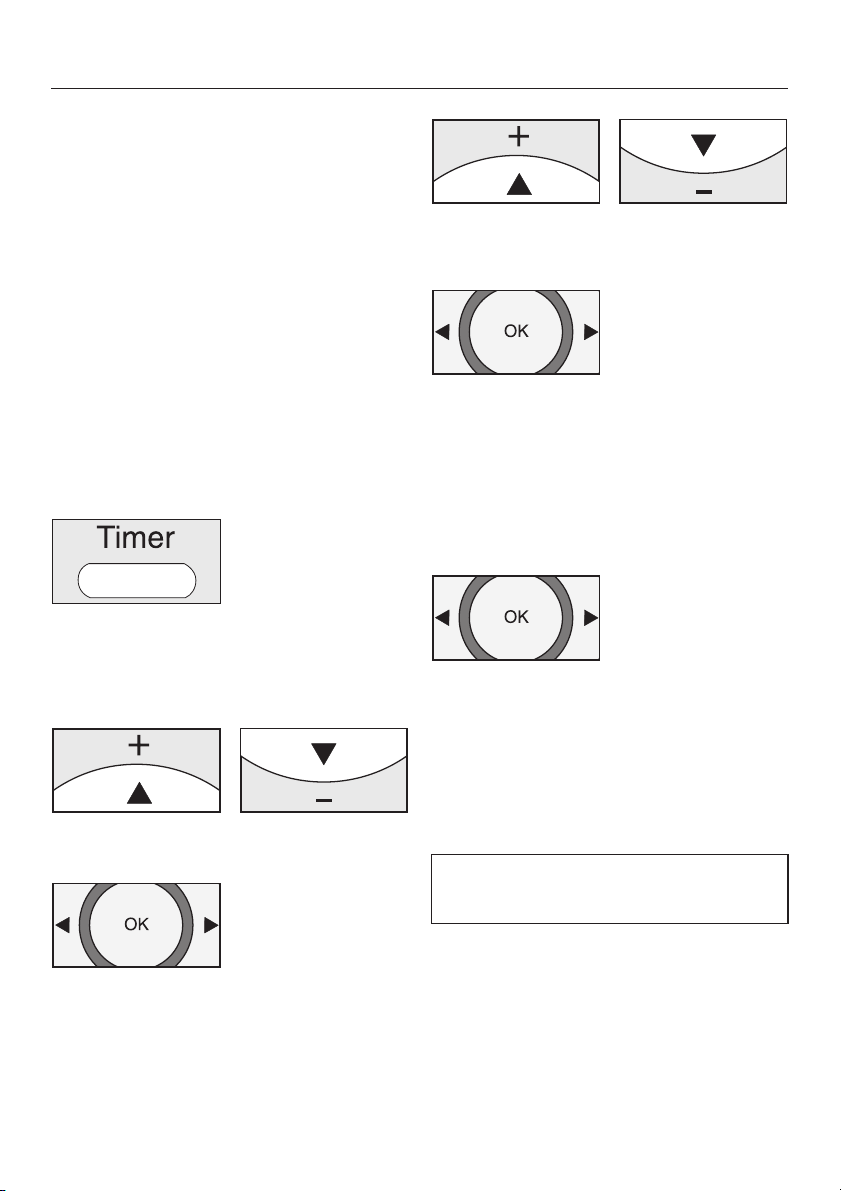
Régler la minuterie
(disponible uniquement si vous avez ré
-
glé l'heure)
Si vous souhaitez par exemple utiliser
votre robot aspirateur tous les jours à la
même heure, vous pouvez programmer
l'heure de démarrage et le mode
d'aspiration souhaités.
Votre robot est capable d'aspirer dans
l'obscurité mais naturellement la qualité
d'aspiration sera un peu moindre, l'ap
-
pareil photo ayant besoin de lumière
pour naviguer de manière optimale.
Pour régler la minuterie, utilisez la télé-
commande.
^ Appuyez sur la touche Timer pen-
dant au moins trois secondes.
Le symbole m et l'affichage des heures
clignotent à l'écran.
^
Pour régler les heures, actionnez les
touches + ou -.
^
Appuyez sur la touche OK pour con
-
firmer votre choix.
Le symbole m et l'affichage des minu
-
tes clignotent à l'écran.
^
Pour régler les minutes, actionnez les
touches + ou -.
^
Appuyez sur la touche OK pour con
-
firmer votre choix.
^
Appuyez sur un des modes d'aspira
-
tion ou une des touches de navigati-
on proposés par votre télécommande
jusqu'à ce que le symbole corre-
spondant se mette à clignoter.
^ Appuyez sur la touche OK pour con-
firmer votre choix.
Le réglage que vous venez d'effectuer
reste affiché pendant trois secondes
environ.
Dorénavant, votre robot aspirateur dé
-
marrera tous les jours à la même heure.
L'affichage de la minuterie m indique
que cette dernière est activée.
Pour modifier ces données, recommen
-
cez comme précédemment.
fr
46
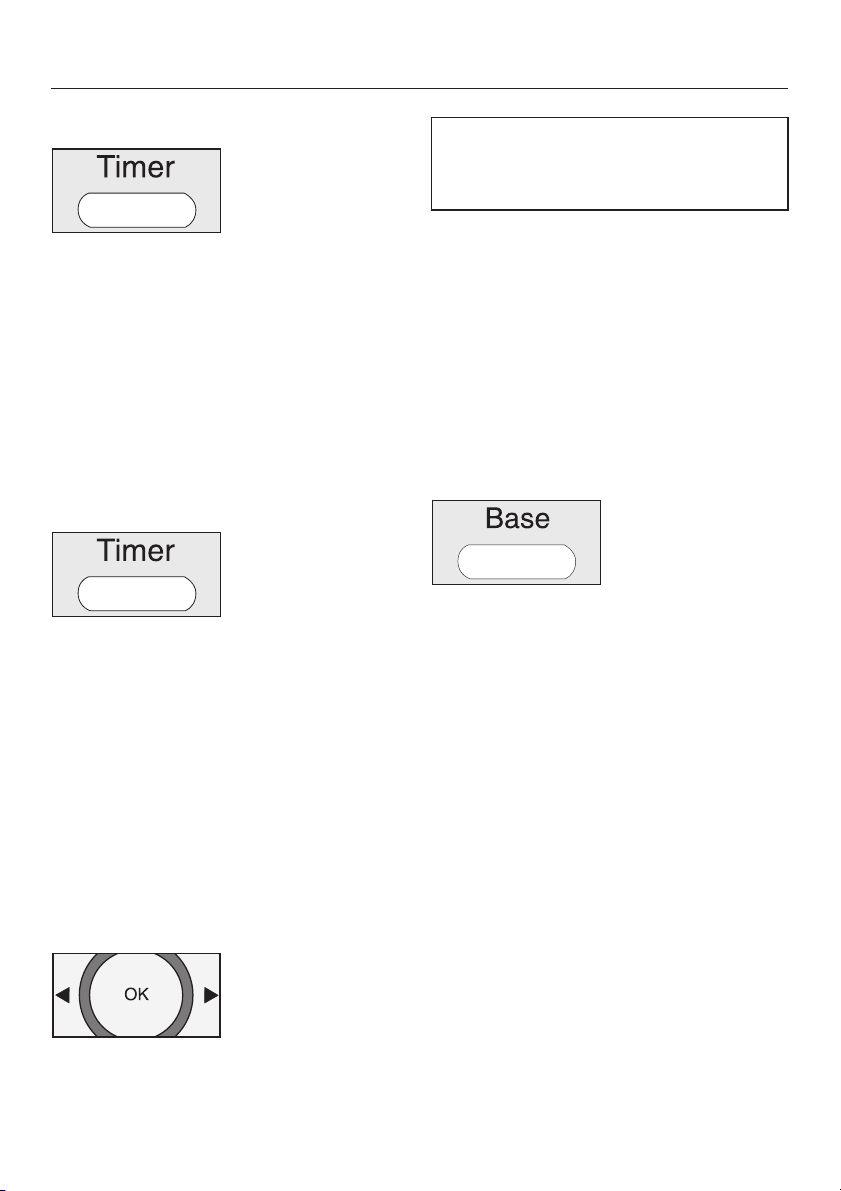
Désactiver la minuterie
^
Appuyez brièvement sur la touche
Timer de la télécommande.
L'affichage de la minuterie m disparaît.
Pour réactiver la minuterie, appuyez de
nouveau sur la touche Timer.Lesym
-
bole de la minuterie m s'allume et le ro
-
bot aspirateur est prêt à démarrer à
l'heure programmée.
Afficher l'heure du démarrage pro-
grammé
^ Appuyez brièvement sur la touche
Timer de la télécommande.
La dernière heure de démarrage pro-
grammé s'affiche.
Pensez qu'en faisant cela, vous désac
-
tivez la minuterie. Pour la réactiver, ap
-
puyez de nouveau sur la touche Timer.
Désactiver la signalisation sonore
La signalisation sonore a été activée à
l'usine. Vous pouvez la désactiver ou
l'activer selon vos besoins.
^
Appuyez sur la touche OK de la télé
-
commande pendant au moins trois
secondes.
Vous ne pouvez pas désactiver les
avertissements sonores en cas
d'anomalie.
Abaisser la hauteur du dénivelé
Le robot aspirateur est réglé de telle
sorte qu'il puisse franchir des dénivelés
de 20 mm et ainsi aspirer tapis, seuils
de portes, etc.
Toutefois si vous souhaitez abaisser la
hauteur de dénivelé pour protéger les
pieds de chaises, de lampadaires ou
de tables par exemple, vous pouvez
désactiver cette fonction.
^ Appuyez sur la touche Base de la té-
lécommande pendant au moins trois
secondes
"LO" s'affiche à l'écran dans la zone
d'affichage de l'heure.
Pour réactiver la hauteur du dénivelé
de 20 mm, appuyez de nouveau sur la
touche Base pendant au moins trois
secondes. "HI" s'affiche à l'écran dans
la zone d'affichage de l'heure.
fr
47
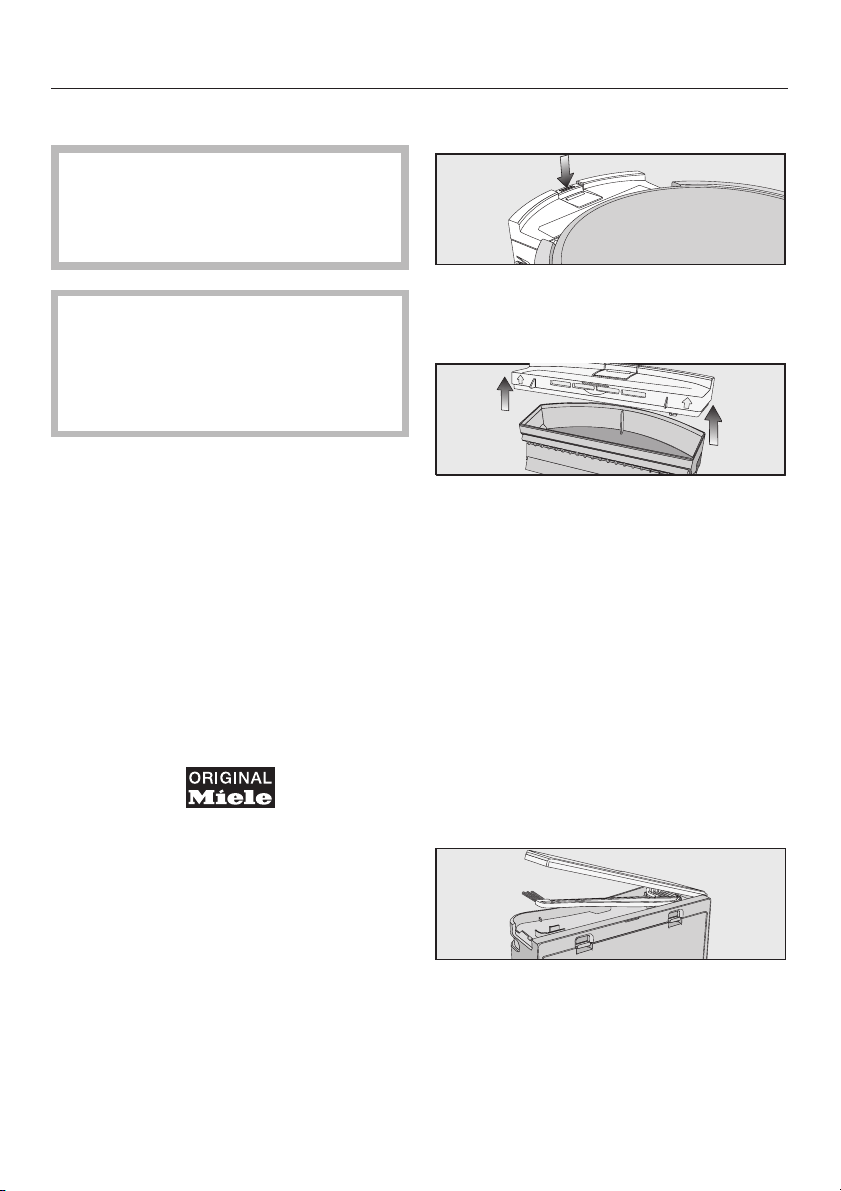
Entretien
,
Eteignez le robot aspirateur
avant chaque opération de mainte-
nance : appuyez sur le bouton OFF
situé sur le côté.
Pour garantir des performances op
-
timales au robot aspirateur et le
meilleur résultat possible, n'utilisez
que des accessoires portant le logo
"Original Miele".
Comment me procurer les
accessoires dont j'ai besoin ?
Les accessoires portant le logo "Original
Miele" sont disponibles auprès de votre
revendeur, du SAV Miele et sur la bouti-
que en ligne www.boutique.miele.fr
De quels accessoires ai-je besoin ?
Vous reconnaitrez les accessoires Ori-
ginal Miele au logo "Original Miele" qui
figure sur l'emballage.
Quand dois-je vider et nettoyer le bac
à poussières ?
Videz et nettoyez le bac à poussières
après chaque utilisation du robot.
Comment vider le bac à poussières ?
^
Appuyez sur la touche de déverrouil
-
lage du bac à poussières puis sor
-
tez-le.
^ Soulevez le couvercle du bac à
poussières.
^ Videz le bac à poussières.
Vous pouvez jeter le contenu du bac à
poussières avec vos ordures ménagè-
res, sous réserve qu'il ne contienne pas
de substances qui y sont interdites.
Comment nettoyer le bac à
poussières ?
Sur le dessus de la station de base,
vous trouverez un compartiment qui per
-
met de ranger les différentes brosses.
^
Ouvrez-le et sortez le goupillon.
fr
48
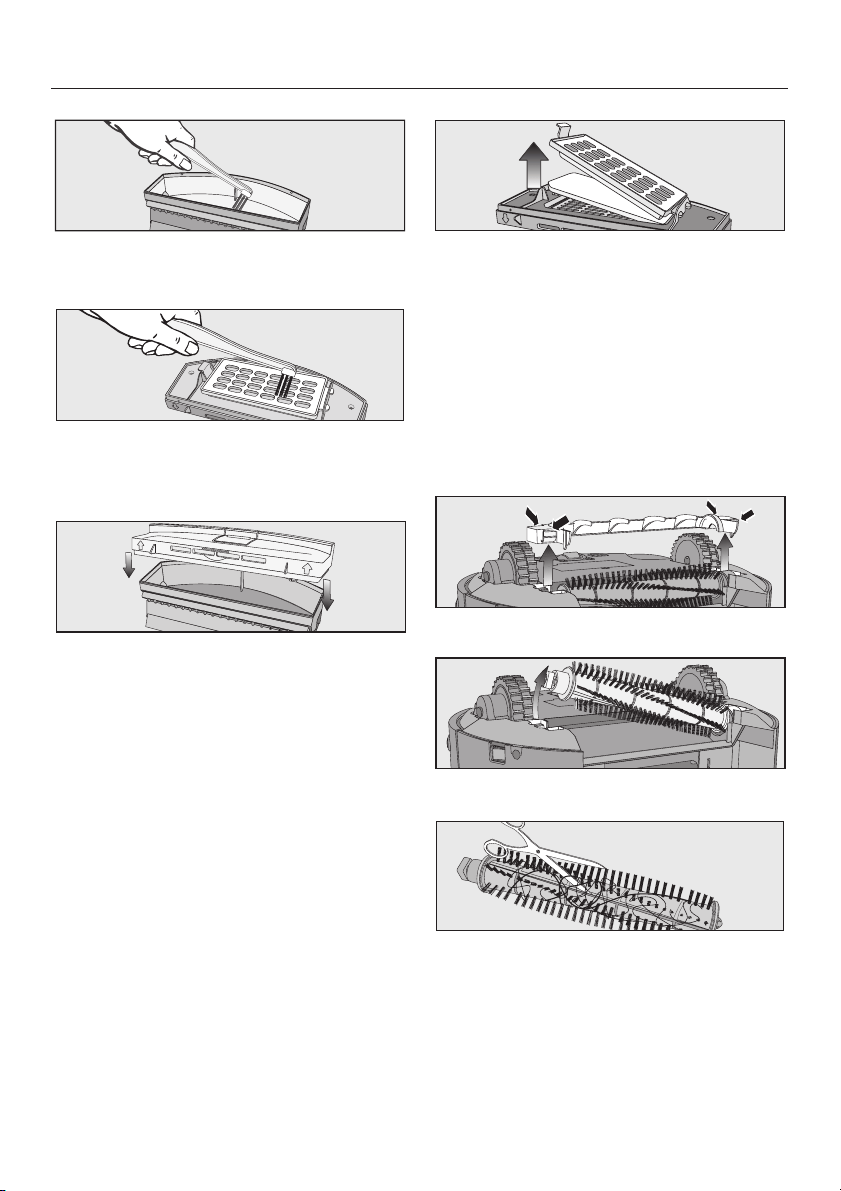
^
Nettoyez le bac à poussières avec
l'extrémité du goupillon.
^
Avec l'extrémité du goupillon, nettoy
-
ez l'intérieur du couvercle qui con-
tient la grille de protection du filtre.
^ Refermez le couvercle du bac à
poussières jusqu'à ce que vous en-
tendiez un déclic.
^
Replacez le bac à poussières dans le
robot aspirateur jusqu'à ce que vous
entendiez un déclic.
Quand dois-je remplacer le filtre
d'évacuation ?
Remplacez le filtre d'évacuation tous les
trois mois environ. Deux filtres de rechan
-
ge ont été livrés avec votre appareil.
Comment remplacer le filtre
d'évacuation ?
Une grille de filtre se trouve à l'intérieur
du couvercle du bac à poussières.
^
Déverrouillez la grille qui protège le fil
-
tre puis changez le filtre d'évacuation.
^
Refermez la grille jusqu'à ce que
vous entendiez un déclic.
Nettoyer la brosse cylindrique
^
Sortez le bac à poussières puis in
-
stallez le robot aspirateur sur le dos
sur une surface propre et plane.
^ Retirez le protège-brosse.
^
Sortez la brosse cylindrique.
^
Avec des ciseaux, coupez les fils, les
poils et les cheveux qui se sont en
-
roulés autour de la brosse cylindri
-
que. Une rainure de guidage dans la
longueur vous indique où passer les
ciseaux.
fr
49
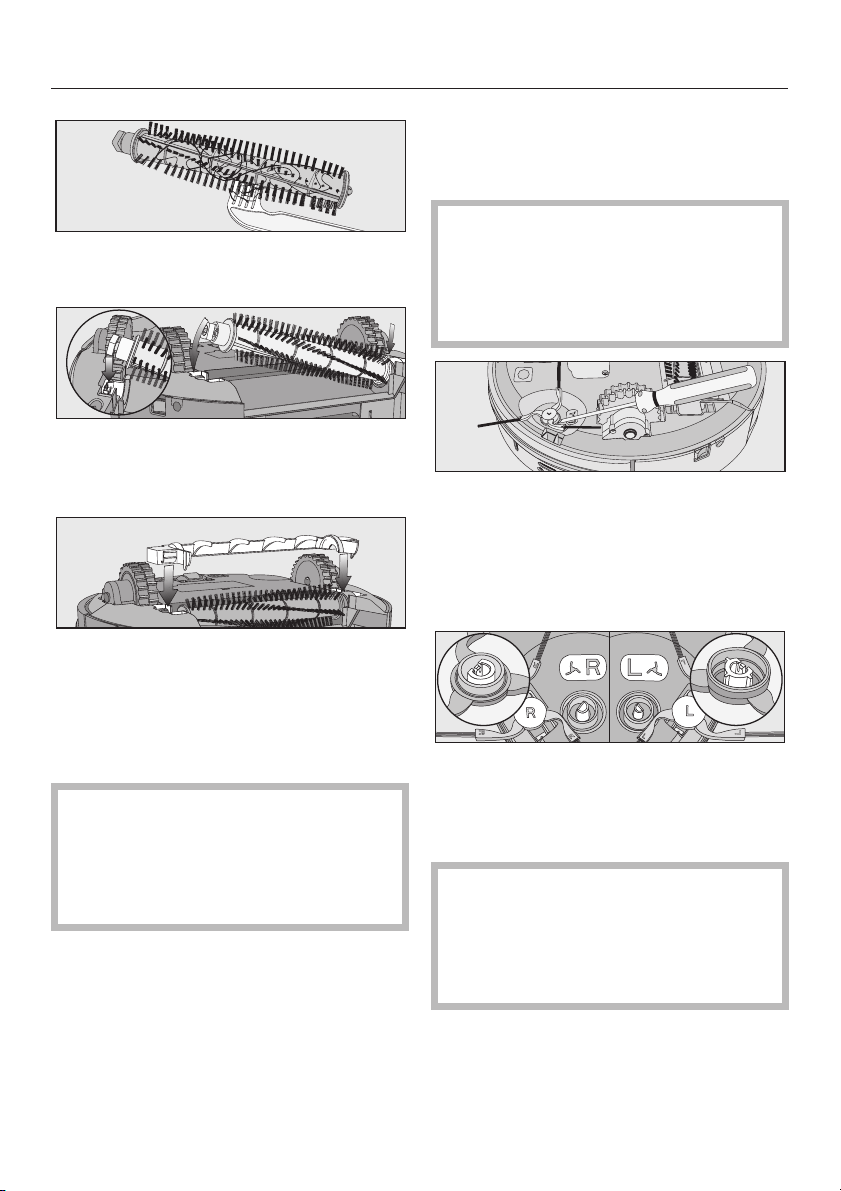
^
Retirez tous les fils et cheveux avec
l'extrémité du goupillon.
^
Replacez la brosse cylindrique dans
son habitacle en la positionnant cor-
rectement.
^ Verrouillez le couvercle jusqu'à ce
que vous entendiez un déclic.
^
Replacez le bac à poussières dans le
robot aspirateur jusqu'à ce que vous
entendiez un déclic.
Pour une qualité de nettoyage opti
-
male, nous recommandons de rem
-
placer la brosse cylindrique usagée
par une nouvelle au bout de deux
ans environ.
Nettoyer les brosses latérales
^
Installez le robot aspirateur sur le dos
sur une surface plane et propre.
Quand vous soulevez le robot aspi
-
rateur, ne l'attrapez pas du côté du
bac à poussières. Ce dernier risque
de se détacher et le robot aspirateur
de tomber.
^ Soulevez les brosses latérales en
vous aidant d'un tournevis plat par
exemple.
^ Retirez tous les fils et cheveux avec
l'extrémité du goupillon.
^
Insérez les deux brosses latérales
sur les supports prévus à cet effet en
appuyant bien. Respectez les lettres
indiquant la gauche L et la droite R.
Pour une qualité de nettoyage opti
-
male, nous recommandons de rem
-
placer les brosses latérales par de
nouvelles brosses au bout d'un an
environ.
fr
50
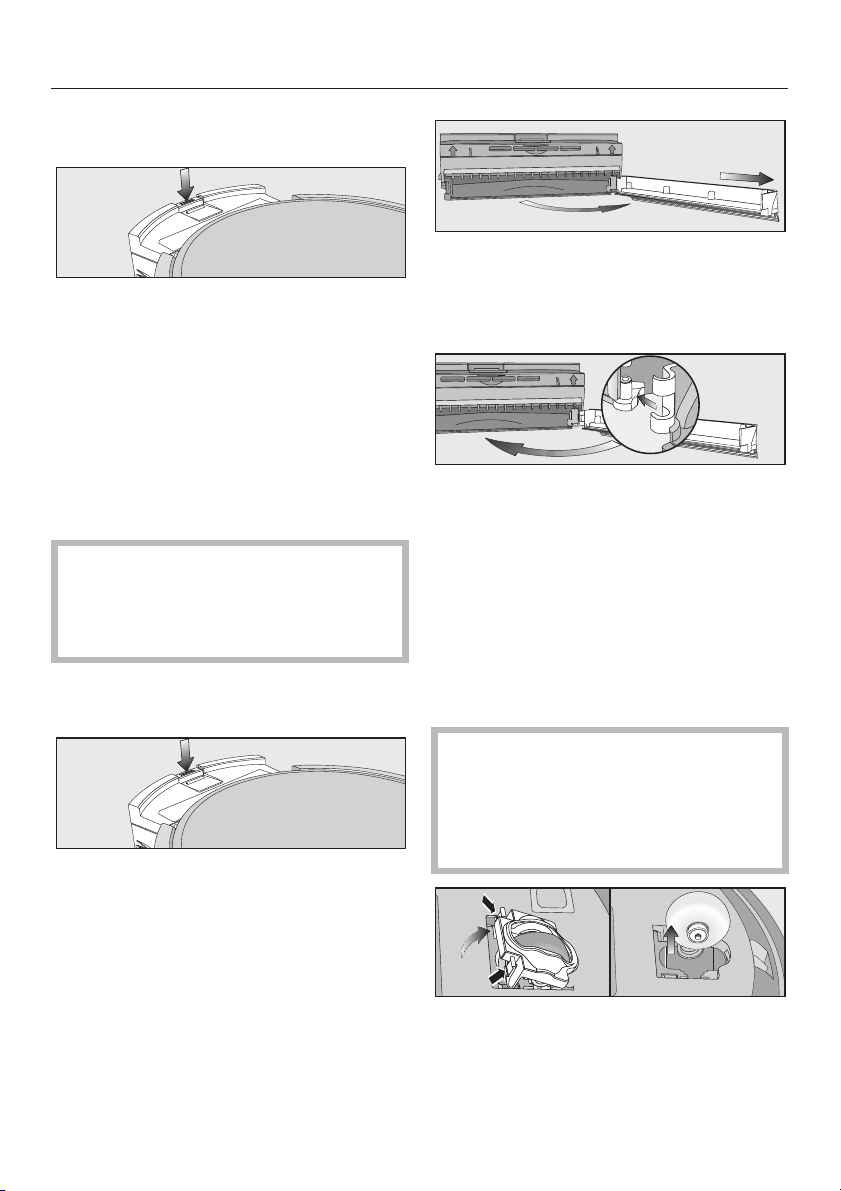
Nettoyer la lèvre d'étanchéité du bac
à poussières
^
Appuyez sur la touche de déverrouil
-
lage du bac à poussières puis sor
-
tez-le.
^
Nettoyez la lèvre d'étanchéité sous le
bac à poussières avec un chiffon hu
-
mide.
^ Replacez le bac à poussières dans le
robot aspirateur jusqu'à ce que vous
entendiez un déclic.
Pour une qualité de nettoyage opti-
male, nous recommandons de rem-
placer la lèvre d'étanchéité par une
nouvelle au bout d'un an environ.
Changer la lèvre d'étanchéité du bac
à poussières
^
Appuyez sur la touche de déverrouil
-
lage du bac à poussières puis sor
-
tez-le.
^
Déverrouillez la lèvre d'étanchéité
sous le bac à poussières puis faites la
basculer doucement jusqu'à ce qu'el
-
le se détache du bac à poussières.
^ Installez la nouvelle lèvre d'étanchéi-
té par le côté puis verrouillez-la.
^ Replacez le bac à poussières dans le
robot aspirateur jusqu'à ce que vous
entendiez un déclic.
Nettoyer la roue avant
^ Installez le robot aspirateur sur le dos
sur une surface plane et propre.
Quand vous soulevez le robot aspi
-
rateur, ne l'attrapez pas du côté du
bac à poussières. Ce dernier risque
de se détacher et le robot aspirateur
de tomber.
^
Déverrouillez le couvercle.
^
Sortez la roue avant.
fr
51
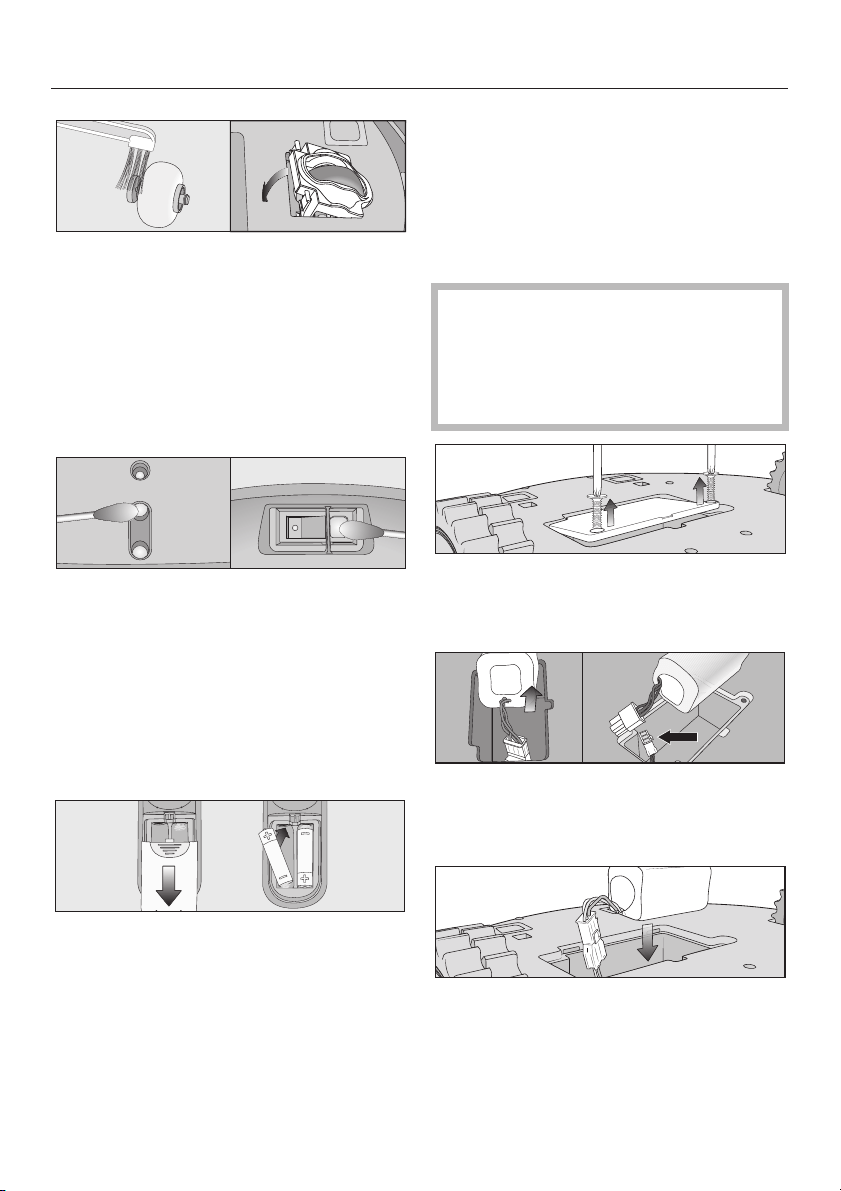
^
Retirez les fils et les cheveux puis
nettoyez la roue avant avec l'extrémi
-
té du goupillon.
^
Replacez la roue avant puis refermez
le couvercle jusqu'à ce que vous en
-
tendiez un déclic.
Nettoyer les capteurs
^ Nettoyez les capteurs situés sur les
côtés et sous le robot aspirateur avec
un coton-tige sec en faisant bien at-
tention.
Changer les piles de la
télécommande
Préparez deux piles de 1,5 V (type AAA).
^
Retirez le couvercle de protection du
compartiment à piles.
^
Changez les piles en veillant à leur
polarité.
Changer la batterie
Gardez toujours une batterie Original
Miele Lithium-Ion de type 4S1P
(14,8 V / 2,2 Ah / 32,5 Wh) en réserve.
^
Installez le robot aspirateur sur le dos
sur une surface plane et propre.
Quand vous soulevez le robot aspi
-
rateur, ne l'attrapez pas du côté du
bac à poussières. Ce dernier risque
de se détacher et le robot aspirateur
de tomber.
^ Déverrouillez le couvercle du comp-
artiment à piles des deux côtés en
vous aidant d'un cruciforme.
^
Sortez la batterie avec précaution puis
appuyez sur l'ergot du branchement de
la fiche pour détacher cette dernière.
^
Installez la nouvelle batterie.
^
Refermez le couvercle du comparti
-
ment à piles.
^
Déposez l'ancienne batterie dans un
point de collecte de votre commune.
fr
52
Rangement
,
Avant de le ranger, éteignez tou
-
jours votre robot aspirateur en ap
-
puyant sur le bouton OFF situé sur
le côté.
Si vous prévoyez de ne pas utiliser vote
robot aspirateur pendant quelques
temps, rangez-le dans un endroit frais
et bien aéré.
Entretien
Entretenir le robot aspirateur et ses
accessoires
,
Avant de le nettoyer, éteignez
toujours votre robot aspirateur en
appuyant sur le bouton OFF situé
sur le côté.
Vous pouvez nettoyer le robot aspira-
teur et tous les accessoires en plasti-
que avec un nettoyant pour plastique
classique, vendu dans le commerce.
,
N'utilisez jamais de produit ab
-
rasif, à vitres, multi-usages ou con
-
tenant des corps gras !
,
Ne plongez jamais le robot aspi
-
rateur ou les accessoires fournis
dans l'eau !
Anomalies
,
Eteignez le robot aspirateur
avant de chercher à résoudre l'ano
-
malie : appuyez sur le bouton OFF
situé sur le côté.
Le robot aspirateur s'éteint bien que
vous ayez appuyé sur la touche
Power ?
La batterie n'est pas assez chargée :
chargez-la.
Le robot aspirateur ne réagit pas ?
Le robot aspirateur est éteint : allumez-
le en appuyant sur le bouton ON situé
sur le côté.
Les piles sont mal placées : vérifiez leur
polarité.
Les piles de la télécommande sont dé-
chargées : changez-les.
Il n'y a plus aucune transmission entre
l'émetteur infrarouge du robot aspira
-
teur et la télécommande : passez un
chiffon doux sur toutes les surfaces et
vérifiez qu'aucun objet n'interfère.
La télécommande est trop proche ou
trop éloignée du robot aspirateur corri
-
gez la distance et orientez toujours la
télécommande vers le robot aspirateur.
Le robot aspire mal ?
Le bac à poussières est plein : videz-le
et nettoyez-le.
La brosse cylindrique est sale : nettoyez-
la.
Le filtre d'évacuation est sale: nettoyez-
le.
fr
53

La brosse cylindrique et les brosses la
-
térales sont usagées : remplacez-les.
Le robot aspirateur ne se recharge
pas ?
La station de base et / ou le robot aspi
-
rateur sont mal branchés : branchez la
station de base comme indiqué au
mode d'emploi. Procédez de même
avec le robot aspirateur (cf. chapitre
"Avant utilisation - Charger la batterie").
Le robot aspirateur ne rentre pas à la
station de base après avoir nettoyé la
pièce ?
Vous avez activé le mode d'aspiration
standard Auto au milieu de la pièce :
le robot aspirateur revient à son point
de départ.
Vous avez sélectionné le mode d'aspi-
ration Spot : le robot aspirateur revient
tout seul à son point de départ.
La station de base est mal raccordée :
veuillez procéder comme indiqué au
mode d'emploi.
Les capteurs du robot aspirateur sont
sales : nettoyez-les doucement avec un
coton-tige sec.
Il n'y a plus aucune transmission entre
l'émetteur infrarouge du robot aspira
-
teur et la télécommande : passez un
chiffon doux sur toutes les surfaces et
vérifiez qu'aucun objet n'interfère.
Messages d'anomalies
,
Eteignez le robot aspirateur
avant de chercher à résoudre l'ano
-
malie : appuyez sur le bouton OFF
situé sur le côté.
Les messages qui signalent les anoma
-
lies sont affichés à l'écran à côté de
l'affichage de l'heure.
F1Anomalie "roue mal installée" :
posez le robot aspirateur sur un
sol plan.
F2Anomalie "sol non identifié":
posez le robot aspirateur sur un
sol plan.
F3Anomalie "bac à poussières" :
insérez le bac à poussières
jusqu'à ce que vous entendiez un
déclic.
F4Anomalie "enrayement des roues
motrices" :
vérifiez que des salissures ne se
sont pas accumulées au niveau
des roues motrices. Retirez bien
les fils et les cheveux.
F5Anomalie "enrayement des
brosses" :
vérifiez que des salissures ne se
sont pas accumulées sur la
brosse cylindrique et les brosses
latérales.
F6Anomalie "surcharge moteur" :
videz et nettoyez-le bac à
poussières puis changez le filtre
d'évacuation.
fr
54

F7Problème interne au système :
éteignez le robot aspirateur puis
rallumez-le (bouton ON/OFF sur le
côté du robot aspirateur).
F8Anomalie "salissures sur la roue
avant" :
vérifiez que des salissures ne se
sont pas accumulées au niveau
de la roue avant. Retirez bien les
fils et les cheveux puis nettoyez la
roue.
Service après-vente
Si vous ne pouvez résoudre certains
problèmes, veuillez communiquer avec
le Service technique Miele au numéro
indiqué au verso de la présente bro-
chure.
^ Veuillez préciser le modèle de votre
appareil.
Ce renseignement figure sur la plaque
signalétique située en-dessous de l'as-
pirateur.
Conditions de garantie
La garantie est accordée pour ce robot
aspirateur selon les modalités de vente
par le revendeur ou par Miele pour une
période de 24 mois.
Pour plus d'informations sur les condi
-
tions de garantie ou si souhaitez rece
-
voir une version écrite des conditions
de garantie, veuillez contacter le numé
-
ro de téléphone ci-dessus.
Protection de l'environnement
Élimination des produits d'emballage
La boîte de carton et l'emballage protè
-
gent l'aspirateur durant le transport.
Ces matériaux sont recyclables. Veuil
-
lez les recycler.
Pour prévenir les risques de suffocati
-
on, débarrassez-vous des emballages,
sacs et autres produits en plastique en
toute sécurité et gardez-les hors de la
portée des enfants. Ces éléments pré
-
sentent un risque de suffocation.
Mise au rebut de votre ancien appa-
reil
Les anciens aspirateurs peuvent conte-
nir des matériaux recyclables. Veuillez
communiquer avec le centre de recy-
clage de votre localité pour savoir com-
ment les recycler.
fr
55

Droits d'auteur et licences
Miele utilise un logiciel de commande pour ce robot aspirateur.
Les droits d'auteur détenus par Miele et d'autres fournisseurs de logiciels concer
-
nés doivent être respectés.
Miele et ses fournisseurs se réservent tout droit relatif aux composants logiciels.
Sont interdites notamment les actions suivantes :
–
reproductions et diffusions
–
modifications et dérivations
–
décompilations, rétro-ingénierie, décompositions et autres désassemblements
du logiciel.
Le logiciel comprend aussi des composants faisant l'objet d'une licence publique
générale GNU et d'autres licences libres.
Afin obtenir un aperçu des composants libres intégrés ainsi qu'une copie de la li-
cence correspondante, allez sur www.miele.de/device-software-licences.
Miele vous communiquera sur demande le code source qui permet l'accès aux
composants du logiciel faisant l'objet d'une licence publique générale GNU ou de
licences ouvertes comparables.
Pour obtenir ce code source, envoyez un message électronique à l'adresse
fr
56

Limited WarrantyCanada
The following warranty conditions are valid in Canada only.
Miele Limited, (hereinafter "Miele") warrants to the original purchaser that this product, including all of it’s Miele
authorized parts and accessories, is free of defects in material and workmanship.
1. Duration of Warranty
This warranty is valid during the following time periods:
a) Domestic appliances in normal, non-commercial, household use:
–
One (1) year. Parts and labour.
–
RemoteVision® Modules: Please refer to Miele's "Limited Warranty - RemoteVision® Module - Canada".
–
Additional 5 and 10 Year Limited Warranty on Sealed Refrigeration Systems: The Warranty for the Sealed
Refrigeration System includes all original compressors, condensers, evaporators, driers, the original
refrigerant and the original connecting tubing.
–
Five (5) Year Warranty - If a claim regarding a defect in material or workmanship relating to the Sealed
Refrigeration Systems used in Miele Refrigerators, Wine Coolers, and Freezers is received by Miele within
five (5) years from the date of purchase, then any warranted failures of the Sealed Refrigeration System
shall be repaired at no cost to you (including parts & labour).
–
Ten (10) Year Warranty - If a claim of such a defect is received at any time during the period starting from
the sixth (6th) year and ending on the last day of the tenth (10th) year after the date of purchase, this
Warranty shall cover the replacement or repair of all parts of the Sealed Refrigeration System covered by
the Warranty that is found to be defective in material or workmanship but shall not include labour. Upon
request, such labour shall be provided by Miele and at the customary charge to the Miele Customer.
b) Domestic appliances in commercial use:
–
Six (6) months, for parts and labour.
c) Vacuums in normal, non-commercial, household use:
– One (1) year, upright and canister vacuums. Parts and labour.
– Two (2) years, motor for S170 - S189 upright units. Parts and labour.
– Seven (7) years, Vortex
TM
motor for canister and upright units, except S170 - S189 upright units for which
the motor warranty is two (2) years. Parts and labour.
d) Vacuums in commercial use:
– Six (6) months, for products used commercially. Parts and labour.
– One (1) year for motor for canister and upright models. Parts and labour.
e) Commercial appliances.
– One (1) year. Parts and labour.
2. Commencement Date
Warranty coverage begins on the date of purchase. If a product under warranty is replaced by Miele, the original
warranty period is not extended but continues from the date of original purchase.
3. Warranty Preconditions
3.1 Miele assumes warranty responsibility subject to the following preconditions having been fulfilled:
a) You are the original purchaser and did not obtain the product through resale;
b) The product was purchased from Miele or an authorized Miele dealer in Canada;
c) If applicable, the product was installed by a person designated by Miele as qualified to do so and in
accordance with applicable installation instructions; and
d) The product is located in Canada.
3.2 Warranty claims will only be honoured provided that any failure to conform to this warranty is reported in writing
and the product is returned together with proof of purchase date to Miele or to a Miele authorized dealer, as
applicable, within the time period stated in Section 1 above.
4. Extent of Warranty
In the event of defect in material or workmanship occurring within the time period stated in I. above, Miele will
repair, or at its option replace, within a reasonable period of time, the product or any Miele authorized part or
accessory discovered to be defective in workmanship or materials. Defective products and parts become the
property of Miele upon replacement.
Limited Warranty Canada
57

5. Exclusions
Warranty coverage excludes any product, including its parts and accessories, that:
a) was not installed according to Miele's installation instruction;
b) was damaged by negligence, accident, abuse, misuse, improper or abnormal usage, maintenance or transportation;
c) contains non-authentic Miele accessories or replacement parts, including filters, dust bags and other
non-Miele products; and
d) was repaired, serviced, altered or modified by someone other than a Miele authorized service centre or technician.
6. Ordinary Wear and Tear
Ordinary wear and tear shall not be considered a defect in workmanship or materials.
7. Limitation of Liability
7.1 Unless you purchase extended warranty coverage from Miele prior to the expiry of this warranty, this warranty is the sole
warranty offered by Miele to you. Miele disclaims any and all other warranties to the fullest extent permitted by law,
whether express or implied, including any warranty of merchantability or fitness for a particular except as provided herein.
7.2 Your sole remedies under this warranty are those described herein. Unless otherwise stated, Miele's liability for actual
damage from any cause whatsoever is limited to the amount paid by you for the product. Miele disclaims any and all
liability and consequential or other damage whether based on breach of contract, tort (including negligence), product
liability or any other legal theory. In no event will either party be responsible for any lost profits or savings, incidental
damage or other economic damages.
8. Special Provincial laws
This warranty gives the purchaser specific legal rights. The purchaser may also have other rights which may vary
from Province to Province in Canada. Some provinces do not allow limitation or exclusion of implied warranties,
therefore, certain limitations and exclusions may not apply.
9. Customer Care
9.1 For service under this warranty or for further information please contact Miele at:
Miele Limited Toll free: 1-800-565-6435
Vaughan, Ontario
Canada L4K 4V8
9.2 Service may require that the appliance be removed and taken, by authorized Miele personnel, to an authorized
Miele Service Centre. If service is requested by you in a remote geographical area, as determined by Miele in its
sole discretion from time to time, you will, at Miele's option, be responsible for either:
a) the travel expenses incurred by Miele to attend your premises; or
b) the cost of removal and shipment of the appliance from your premises to the nearest authorized Miele Service Centre.
Miele Limited
Headquarter and Showroom
161 Four Valley Drive
Vaughan, ON L4K 4V8
Canada
Phone: 800-643-5381
905-660-9936
Fax: 905-535-2290
www.miele.ca
MieleCare National Service
Phone: 800-565-6435
905-532-2272
Fax: 905-532-2292
Limited Warranty Canada
58

Garantie LimitéeCanada
Les conditions de la garantie suivante sont valides au Canada seulement.
Miele Limitée, (ci-après nommée "Miele") garantit à l’acheteur original que ce produit, y compris tous ses accessoires
et pièces autorisés par Miele, est libre de tout défaut de matériel et de fabrication.
1. Entrée en vigueur et durée de la garantie
Cette garantie est valide durant la période de temps suivante :
a) Appareils électroménagers aux fins d’utilisation domestique normale et non commerciale :
–
Un (1) an, pièce et main-d’oeuvre.
–
Modules RemoteVision® : Veuillez vous reporter à la "Garantie restreinte - Module RemoteVision® - Canada"
de Miele.
–
Garantie supplémentaire de 5 et 10 ans sur les systèmes scellés de réfrigération : la garantie sur le
système scellé de réfrigération couvre tous les compresseurs, les condensateurs, les évaporateurs et les
déshydrateurs-filtres d'origine, ainsi que le fluide frigorigène et les tuyaux de raccordement d'origine.
–
Garantie de cinq (5) ans - Si une plainte concernant un matériau défectueux ou un défaut de fabrication
lié au système scellé de réfrigération utilisé dans les réfrigérateurs, les caves à vin et les congélateurs
Miele est adressée à Miele dans les cinq (5) ans suivant la date d'achat de l'appareil, les défauts du
système scellé de réfrigération couverts par la garantie seront réparés gratuitement (pièces et
main-d'œuvre comprises).
–
Garantie de dix (10) ans - Si une plainte concernant les défauts susmentionnés est adressée à Miele à
partir de la sixième (6
e
) année et jusqu'au dernier jour de la dixième (10
e
) année suivant la date d'achat
de l'appareil, la garantie couvrira le remplacement ou la réparation de tous les éléments du système
scellé de réfrigération présentant un défaut matériel ou un défaut de fabrication couvert par la garantie,
excepté les frais de main-d'œuvre. Si le client en fait la demande, Miele se chargera de la réparation ou
du remplacement des pièces, mais aux frais du client.
b) Appareils électroménagers aux fins d’utilisation commerciale :
– Six (6) mois, pour pièces et main-d’oeuvre.
c) Aspirateurs destinés à une utilisation domestique, non commerciale dans des conditions normales :
– Un (1) an, pour les aspirateurs verticaux et les aspirateurs-traîneaux pièces et main-d’oeuvre.
– Deux (2) ans, pour le moteur des aspirateurs verticaux S170 - S189 pièces et main-d’oeuvre.
– Sept (7) ans, pour le moteur Vortex
TM
des aspirateurs-traîneaux, excepté pour les modèles d’aspirateurs
verticaux S170-S189 dont le moteur est garanti deux (2) ans pièces et main-d’oeuvre.
d) Aspirateurs aux fins d’utilisation commerciale :
– Six (6) mois, pour les produits à utilisation commerciale. Pièce et main-d’oeuvre.
– Un (1) an, pour le moteur des aspirateurs verticaux et des aspirateurs-traîneaux. Pièces et main-d’oeuvre.
e) Appareils commerciaux.
–
Un (1) an, pièces et main-d’oeuvre.
2. Date d’entrée en vigueur
La garantie entre en vigueur à la date de l'achat. En cas de remplacement par Miele d'un produit couvert par une
garantie, la période de garantie initiale n'est pas prolongée; sa date d'entrée en vigueur correspond à la date de
l'achat initial.
3. Conditions préalables liées à la garantie
3.1 Miele assume la responsabilité en vertu de la garantie à la condition que les conditions suivantes aient été respectées :
a) vous êtes l'acheteur initial et votre produit ne provient pas d'une revente;
b) le produit a été acheté auprès de Miele ou auprès d'un détaillant Miele autorisé au Canada;
c) le cas échéant, le produit a été installé par une personne compétente, autorisée par Miele, conformément aux
instructions d'installation en vigueur;
d) le produit se trouve au Canada.
3.2 Les réclamations en vertu de la garantie seront honorées uniquement si la non-conformité aux dispositions de la
garantie est signalée par écrit et si le produit est retourné à Miele ou à un détaillant Miele autorisé accompagné
d'une preuve de la date d'achat, pendant la période prévue à l'article 1 ci-dessus.
4. Étendue de la garantie
En cas de matériaux défectueux ou de défaut de fabrication pendant la période prévue à l'article 1 ci-dessus,
Miele réparera ou, à son choix, remplacera dans un délai raisonnable le produit ou toute pièce ou tout accessoire
Miele dont la fabrication ou les matériaux sont défectueux. Les produits ou les pièces défectueux deviennent la
propriété de Miele lorsqu'ils sont remplacés.
Garantie Limitée Canada
59

5. Exclusions de la garantie
La garantie ne couvre pas les produits, y compris les pièces et les accessoires de ces produits, qui :
a) n'ont pas été installés conformément aux instructions d'installation de Miele;
b) ont été endommagés par négligence, à la suite d'un accident ou d'une utilisation mauvaise, inappropriée ou
anormale, ou encore en raison de l'entretien ou du transport inapproprié ou anormal;
c) contiennent des accessoires ou des pièces de rechange non fabriqués par Miele, y compris les filtres, les sacs
à poussière et tout autre produit non fabriqué par Miele;
d) ont été réparés, entretenus ou modifiés par une personne autre qu'une personne du centre de services ou un
technicien autorisé par Miele.
6. Usure normale
L'usure normale ne constitue pas un défaut de fabrication ni un défaut de matériaux.
7. Limitation de responsabilité
7.1 À moins d'acheter une garantie prolongée auprès de Miele avant l'échéance de la présente garantie, celle-ci est
la seule garantie que vous offre Miele. Miele se désiste de toute autre garantie maximale permise par la loi,
expresse ou implicite, y compris toute garantie de qualité marchande ou d'usage à une fin particulière, à
l'exception de la présente garantie.
7.2 Les recours décrits dans le présent document constituent vos seuls recours en vertu de la présente garantie. À
moins d'une autre mention, la responsabilité de Miele pour les dommages réels, quelle que soit leur nature, est
limitée au montant que vous avez payé pour le produit. Miele se dégage de toute responsabilité, de tout
dommage indirect ou de tout autre dommage, qu'il soit attribuable à la violation du contrat, à la responsabilité
délictuelle (y compris la négligence), à la responsabilité du fait du produit ou à toute autre théorie juridique. En
aucun cas les deux parties ne seront tenues responsables de toute perte de bénéfices ou d'économies, de
dommage consécutif ou de tout autre dommage financier.
8. Lois provinciales particulières
La présente garantie accorde à l'acheteur des droits légaux particuliers. L'acheteur peut également exercer d'autres
droits qui peuvent varier d'une province à l'autre au Canada. Certaines provinces interdisent la restriction ou l'exclusion
des garanties implicites. Par conséquent, il est possible que certaines restrictions et exclusions ne s'appliquent pas.
9. Service à la clientèle
9.1 Pour faire exécuter des travaux d'entretien couverts en vertu de la présente garantie ou pour obtenir de plus
amples renseignements, veuillez communiquer avec Miele à l'adresse ou aux numéros suivants :
Miele Limited, No sans frais : 1 800 565-6435
Vaughan (Ontario)
Canada L4K 4V8
9.2 Si des travaux d'entretien sont nécessaires, l'appareil devra peut-être être déplacé par une personne autorisée
par Miele et emporté à un centre de services Miele autorisé. Si vous demandez un entretien et que vous habitez
une région éloignée, tel qu'il a été déterminé par Miele, à sa seule discrétion, à l'occasion, vous devrez, selon le
choix de Miele, assumer certains frais :
a) soit les frais de déplacement qu'engage Miele pour se présenter à votre lieu de résidence;
b) soit les frais de déplacement et d'envoi de l'appareil, de votre lieu de résidence au centre de
services Miele autorisé le plus près.
Miele Limitée
Siège social au Canada
161 Four Valley Drive
Vaughan, ON L4K 4V8
Canada
Téléphone : (800)-643-5381
(905)-660-9936
Télécopieur : (905)-535-2290
www.miele.ca
Service à la clientèle – MieleCare (Canada)
Téléphone : (800) 565-6435
(905) 532-2272
Télécopieur : (905) 532-2292
Garantie Limitée Canada
60

61

62
Tous droits réservés
LES RENSEIGNEMENTS FOURNIS PEUVENT ÊTRE MODIFIÉS. VEUILLEZ CONSULTER NOTRE SITE
WEB POUR CONNAÎTRE LES CARACTÉRISTIQUES LES PLUS RÉCENTES DES PRODUITS AINSI
QUE LES DERNIERS RENSEIGNEMENTS TECHNIQUES ET L'INFORMATION MISE À JOUR
CONCERNANT LA GARANTIE.
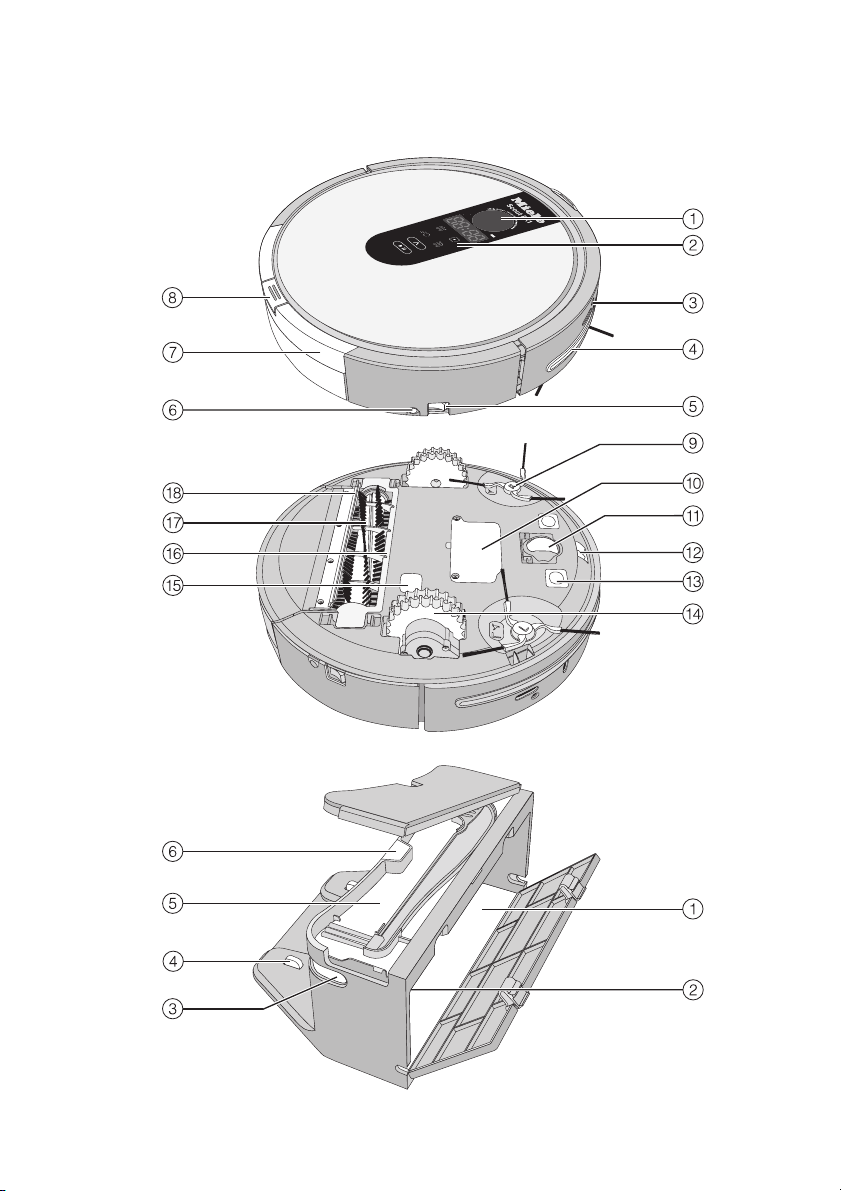
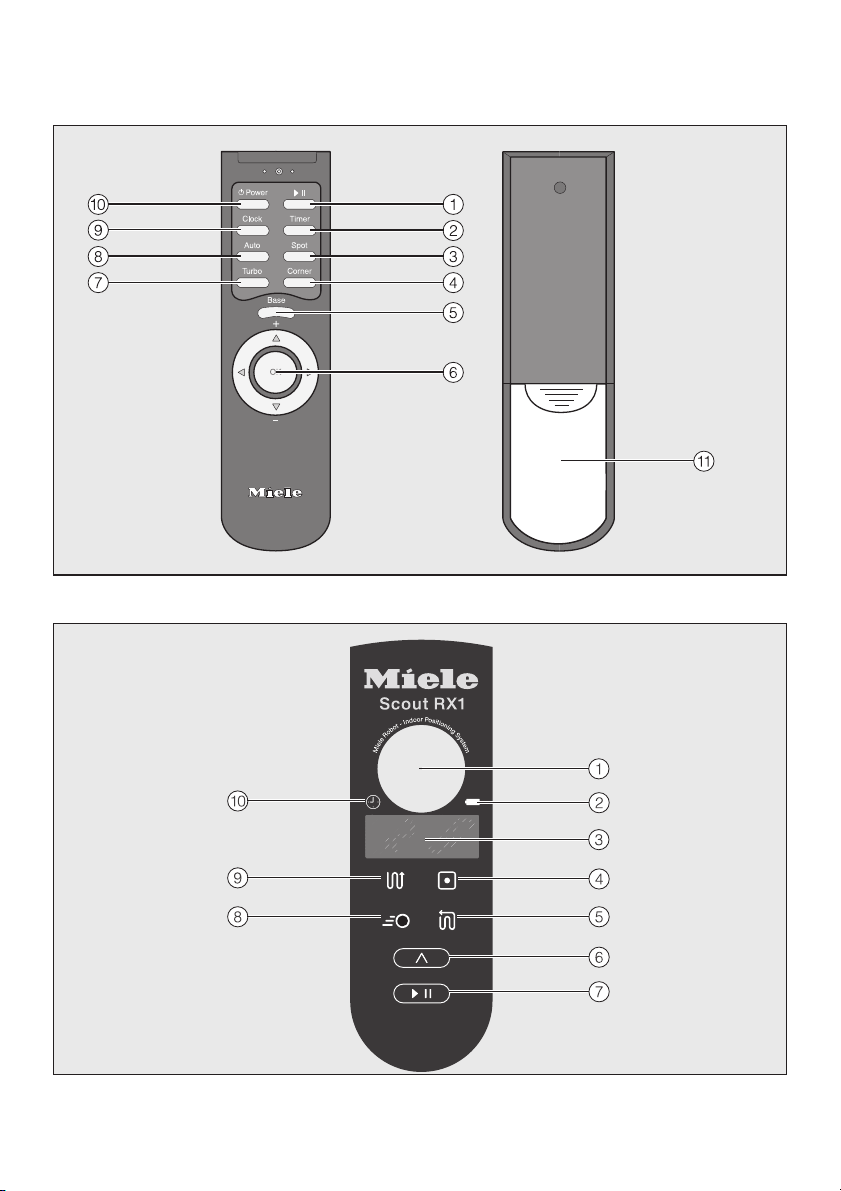
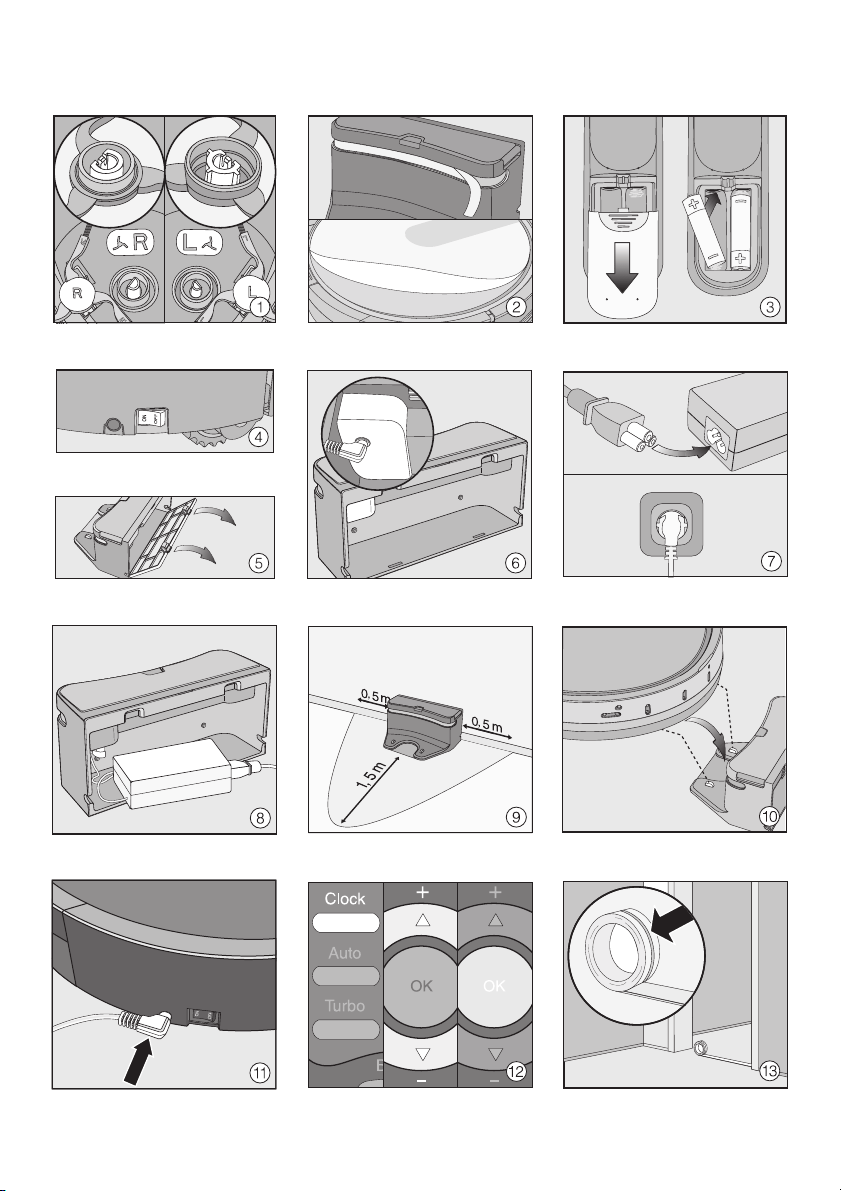

Alteration rights reserved
ZZZPLHOHFRPDX
A]Y`Y7YbhYfUbX<YUXCZZ]WYAY`VcifbY.
'ILBERT0ARK$RIVE
+NOXFIELD6)#
A]Y`Y7YbhYfUbXCZZ]WYAY`VcifbY.
#OVENTRY3TREET
3OUTH-ELBOURNE6)#
A]Y`Y7YbhYfUbXCZZ]WYGmXbYm.
3KYLINE0LACE
&RENCHS&OREST.37
A]Y`Y7YbhYfUbXCZZ]WY6f]gVUbY.
(ARVEY3TREET.ORTH
%AGLE&ARM1,$
A]Y`Y7YbhYfUbXCZZ]WY5XY`U]XY.
3IR$ONALD"RADMAN$RIVE
(ILTON3!
3TIRLING(IGHWAY
#LAREMONT7!
A]Y`Y7YbhYfUbXCZZ]WYDYfh\.
!".
0LHOH$XVWUDOLD3W\/WG
0LHOH1HZ=HDODQG/LPLWHG
5NIT,3YLVIA0ARK2OAD
-T7ELLINGTON!UCKLAND
A]Y`Y7YbhYf5iW_`UbX.
#OLLEGE(ILL
&REEMANS"AY!UCKLAND
4ELEPHONE
-)%,%
WWWMIELECONZ
0LHOH*OREDO+HDGTXDUWHUV
*HUPDQ\
0LHOH&LH.*
#ARL-IELE3TRAE
'àTERSLOH
&EDERAL2EPUBLICOF'ERMANY
<YUXCZZ]WY.
Alteration rights reserved Scout RX1 - 5113
INFORMATION IS SUBJECT TO CHANGE. PLEASE REFER TO OUR WEBSITE TO OBTAIN THE MOST
CURRENT PRODUCT SPECIFICATIONS, TECHNICAL & WARRANTY INFORMATION.
M.-Nr. 09 860 910 / 01