Owner's Guide Vacuum Cleaner
Appliance overview
llustrations A, B and C for this section are on the pull-out pages in the back of these operating instructions.
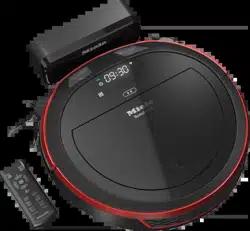
A – Robot vacuum cleaner top and bottom

- Display
- Wi-Fi display
- Video function display (for Scout RX2 Home Vision)
- Time mode display (am/pm)
- Start/Pause sensor field (
 )
)
- Cameras
- Impact protection
- On/Off switch (I/0)
- Depression to open the storage compartment
- Silent vacuuming mode sensor field
- Turbo vacuuming mode sensor field
- Base sensor field
- Spot vacuuming mode sensor field
- Auto standard vacuuming mode sensor field
- Timer indicator
- Rechargeable battery status indicator
- Side brushes for hard flooring / universal side brushes / side brushes for carpeted flooring and rugs
- Roller brush
- Front wheel
- Sensors (toppling protection)
- Charging contacts
- Roller brush cover
- Drive wheels
- Suction nozzle with sealed unit
- Back wheel
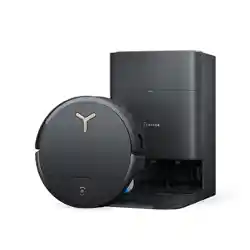
B – Base station and remote control

Base station
- Cord rewind
- Cord guides
- Socket for the power supply plug (not visible in the figure)
- Charging contacts
Remote control
- Power button (switch on and off)
- Base button (direct vacuum cleaner to base station)
- OK confirmation button with direction buttons around it
- Start/Pause button () (start/stop vacuuming)
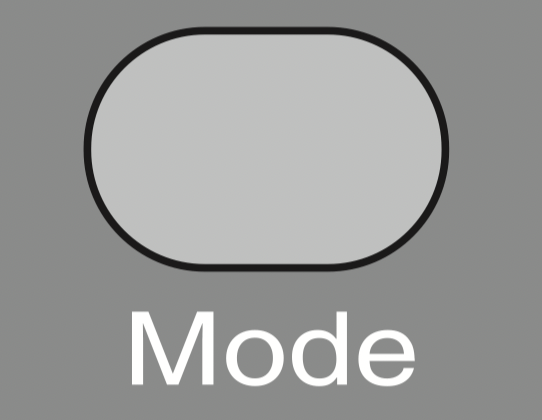
- Mode button (select the vacuuming mode)
- WIFI button (activate/deactivate Wi-Fi)
- Clock button (set time of day)
- Timer button (set the timer)
- Mute button (activate/deactivate acoustic signals)
- Climb button (reduce crossing over height)
- Battery compartment (at the back)
C – Dust box

- Handle
- Cleaning tool with wiper
- Wiper button
- Lid
- Release buttons for the lid
- Dust compartment
- Pre-filter
- Exhaust filter
- Exhaust filter compartment lid
Caring for the environment
Disposal of the packing material
The cardboard box and packing materials protect the appliance during shipping. They have been designed to be biodegradable and recyclable.
Ensure that any plastic wrappings, bags, etc. are disposed of safely and kept out of the reach of children. Danger of suffocation!
Disposal of your old appliance
Electrical and electronic appliances contain valuable materials. They also contain certain substances, compounds and components which were essential for the proper functioning and safe use of the equipment. Handling these materials improperly by disposing of them in your household waste can be harmful to your health and the environment. Therefore, please do not dispose of your old appliance with regular household waste and follow local regulations on proper disposal.
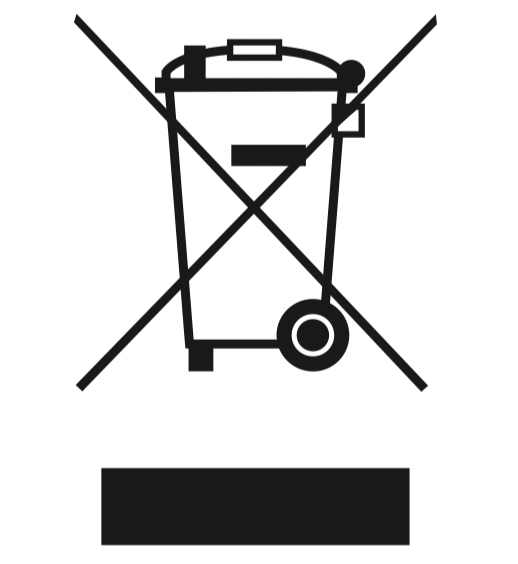
Consult with local authorities, dealers or Miele in order to dispose of and recycle electrical and electronic appliances. Miele assumes no responsibility for deleting any personal data left on the appliance being disposed. Please ensure that your old appliance is kept away from children until removal. Observe safety requirements for appliances that may tip over or pose an entrapment hazard.
Disposal of old batteries and power packs
Electrical and electronic appliances often contain batteries and power packs which must not go into household waste after use. Please remove all accessible batteries and take them to a suitable collection site where they can be collected free of charge. Batteries and power packs may contain substances which are harmful to your health and the environment.
The labeling on the battery or power pack gives further information. The crossed-out waste bin means that you must never put batteries and power packs into household waste. If the crossed-out waste bin has one or more of the listed chemical symbols, it contains lead (Pb), cadmium (Cd) and/or mercury (Hg).
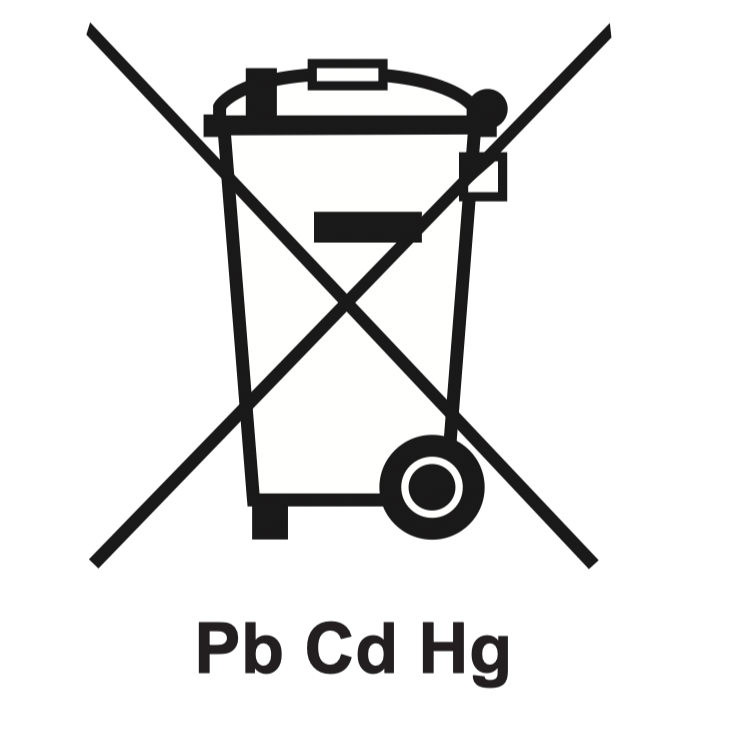
Old batteries and power packs contain important raw materials and can be recycled. Separately collecting old batteries and power packs facilitates handling and recycling.
Functions and features of the robot vacuum cleaner
The robot vacuum cleaner is suitable for the daily cleaning of short pile carpets and fitted carpets, as well as hard flooring.
Please observe the flooring manufacturer's cleaning and care instructions.
The robot vacuum cleaner is fitted with cameras and sensors. It continually saves room plans as well as information regarding areas it can access freely. The robot vacuum cleaner uses this data to create an efficient vacuuming plan of the surfaces to be vacuumed, which it can then vacuum autonomously.
Included accessories
- Remote control / two batteries
- Two side brushes
- Power supply unit with plug
- Power adapter
- Base station
- Magnetic strip
Preparing for use
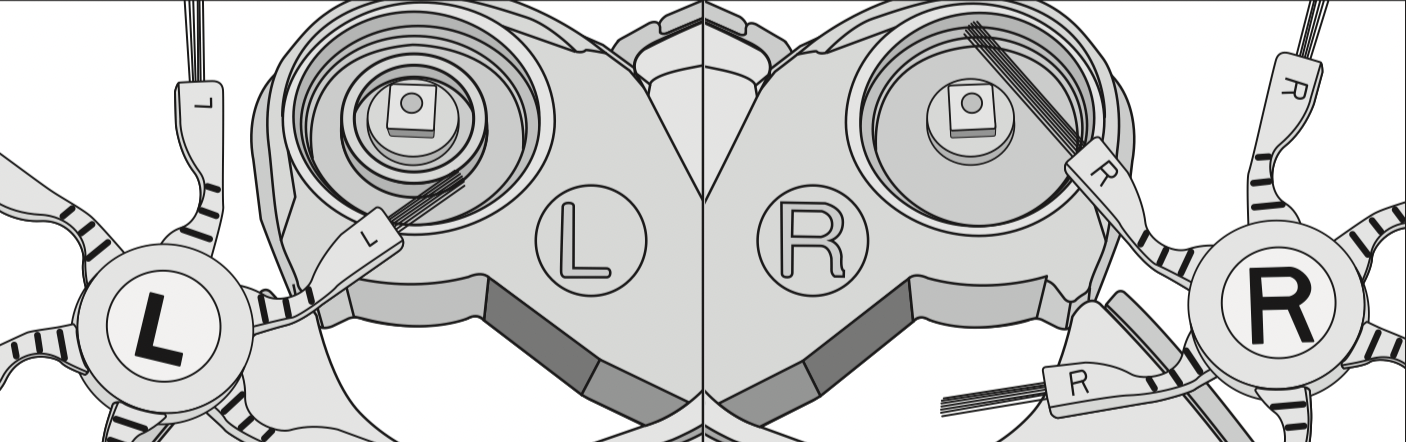
Insert the side brushes (Fig. 01)

- Place the robot vacuum cleaner upside down on a level, clean surface.
- Press the two side brushes carefully onto their pins until they audibly engage. Take care to comply with the markings L and R.
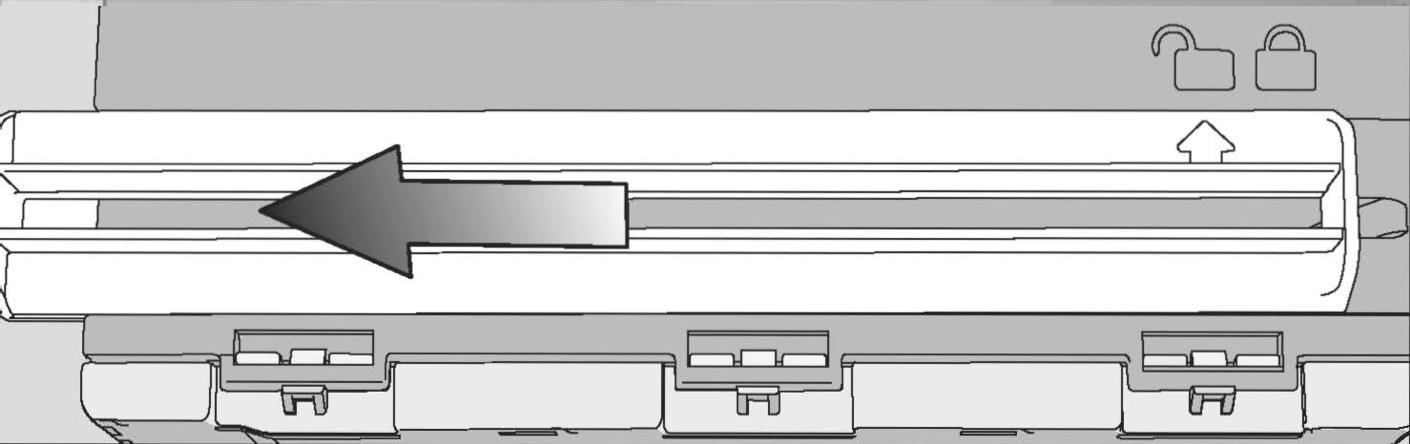
Removing the protective foil (Fig. 02)

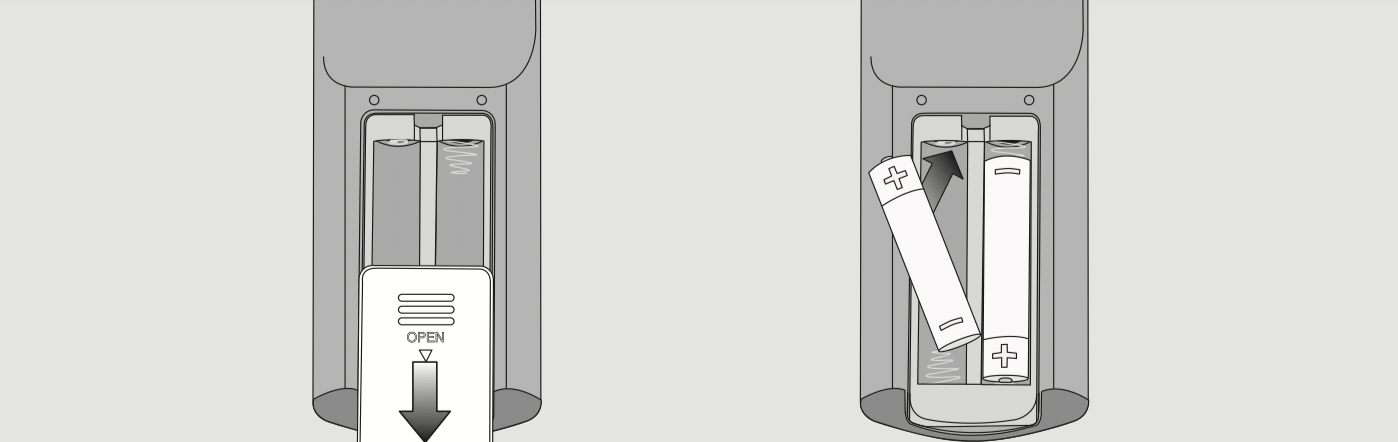
Placing the batteries in the remote control (Fig. 03)

- Remove the battery compartment cover.
- Insert the two batteries supplied. Make sure the polarity is correct.
- Close the battery compartment cover.
Switching on the robot vacuum cleaner (Fig. 04)

- Slide the I/0 switch on the side of the robot vacuum cleaner to the I position.
The rechargeable battery status indicator lights up in the display.
After approx. 60 seconds, the robot vacuum cleaner will switch into standby. The battery status indicator will continue to light up.
The robot vacuum cleaner is reactivated by pressing any button on the remote control or one of the sensor fields in the display.
Connecting the base station (Figs. 05 - 07)
- Place the base station on a level surface against a free wall within easy access of a power socket. Ensure that there is an obstacle-free distance of at least 5 ft in front and 1.5 ft to the right and left of the base station (Fig. 05).

- Insert the supplied power supply plug into the socket at the back of the base station. You can wind excess cord around the cord rewind. Guide the cord through one of the two cord guides (Fig. 06).

- Insert the power adapter into the power supply until it audibly engages and then plug it into the selected power outlet (Fig. 07).

Charging the rechargeable battery (Fig. 08)

The rechargeable battery is supplied not fully charged. Before using for the first time, it must be fully charged while the robot vacuum cleaner is switched on (switch I/0 to I).
The battery can also be charged when the robot vacuum cleaner is switched off (switch I/0 to 0). In this case, the vacuum cleaner indicators will not react.
- Connect the robot vacuum cleaner correctly to the charging contacts on the connected base station.
As the rechargeable battery charges, the status indicator flashes in the display.
The charging process takes up to 150 minutes for the Scout RX2 and up to 180 minutes for the Scout RX2 Home Vision. The process is finished when the rechargeable battery status indicator lights up green permanently in the display.
You can then vacuum for up to one hour with the Scout RX2 and up to two hours with the Scout RX2 Home Vision.
Rechargeable battery status indicator in the display
| Red |
Charged capacity approx. 0 % - 20 %
|
| Orange |
Charged capacity approx. 20 % - 50 %
|
|
Green
|
Charged capacity approx. 50 % - 100 % |
Setting the time of day (Fig. 09)

Use the remote control to set the time of day.
The default factory setting for the robot vacuum cleaner is the 24-hour time display.
- Press the Clock button for at least three seconds.
The indicator field flashes in the display.
The hour display flashes in the indicator field.
- Press the + or - direction button to set the current hour.
- Press the OK button to confirm your selection.
The minute display flashes in the indicator field.
- Press the + or - direction button to set the current minutes.
- Press the OK button to confirm your selection.
If you want to alter the time of day, proceed as described above.
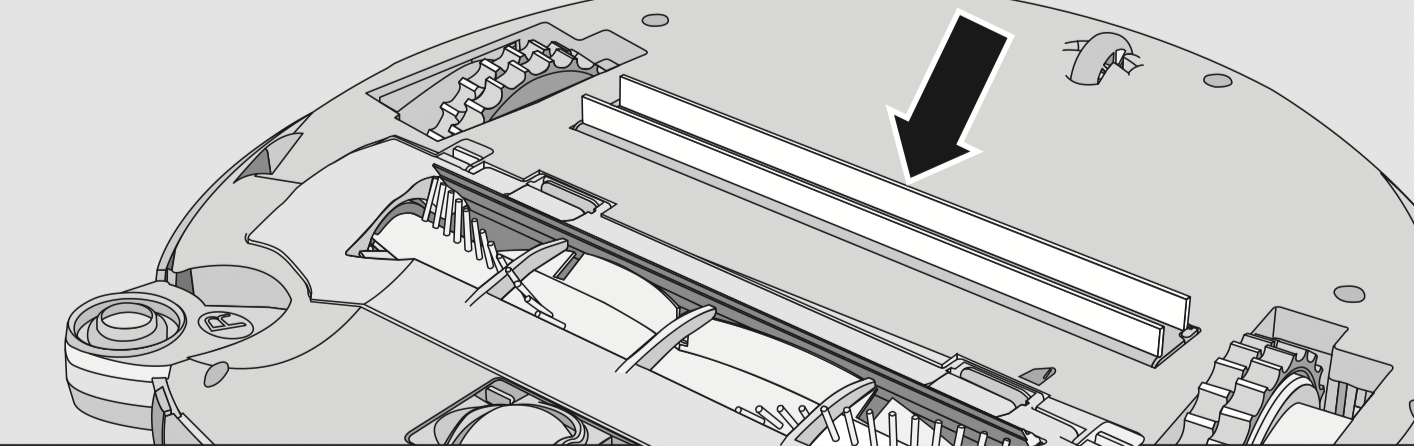
Defining the area to be vacuumed (Fig. 10)

The robot vacuum cleaner is 3 3/8" high. Any items that will be vacuumed under should have a minimum clearance of 3 7/16".
You can define any areas which the robot vacuum cleaner should not have access to.
The robot vacuum cleaner will not cross over the magnetic strip.
Adhesive strips are supplied for permanent fixing. Additional magnetic strips are available to order from the Miele webstore.
Use
Always observe the robot vacuum cleaner during the first cleaning session in a new environment and after making changes in your home. This way you will be able to detect and remove any problematic obstacles or section off the relevant areas with the magnetic strip. You must also check whether steps and drops in height are recognized properly.
Your robot vacuum cleaner is equipped with an integrated Wi-Fi module. You can view status information or execute control commands using a mobile device (tablet PC or smartphone).
If you would like to control the robot vacuum cleaner using a mobile device, please read the section "MobilControl" app.
The operation of the robot vacuum cleaner via remote control and the display will be described later in this "Use" section.
Switching on and off

Starting vacuuming
There are two ways to start vacuuming.
Option 1 (remote control)

- Press the button.
Option 2 (display)
- Press the sensor field.
The area to be vacuumed will be cleaned.
The robot vacuum cleaner always cleans for at least five minutes, regardless of the size of the surface to be vacuumed.
Finishing vacuuming if vacuuming started from the base station
The robot vacuum cleaner will return to the base station and recharge.
If the battery is low, the robot vacuum cleaner will return to the base station and recharge.  will appear in the indicator field. The robot vacuum cleaner will then continue vacuuming in the location where it had stopped.
Finish vacuuming if vacuuming started from somewhere in the room
The robot vacuum cleaner will return to its starting point and switch into standby after approx. 60 seconds.
The robot vacuum cleaner will stand still when there is low battery capacity. You should then recharge it.
Manually controlled vacuuming
You can use the direction buttons on the remote control to vacuum a particular area of the room.
- While the robot vacuum cleaner is vacuuming, press and hold one of the direction buttons.
The robot vacuum cleaner will turn in the desired direction until you let go of the direction button.

- Press and hold the + direction button.
The robot vacuum cleaner will travel in the desired direction and continue to vacuum.
The original vacuuming process will continue running.
Interrupting vacuuming
The robot vacuum cleaner stops.
Press the button or the sensor field again to continue vacuuming.
Manual navigation (without vacuuming)
You can use the direction buttons on the remote control to direct the robot vacuum cleaner to a specific area of the room.
- Press and hold one of the direction buttons.
The robot vacuum cleaner will travel in the desired direction without vacuuming.
You cannot direct the robot vacuum cleaner manually to the base station in order to recharge it.
Directing the robot vacuum cleaner to the base station
(only possible when vacuuming was started from the base station)

- Press the Base button on the remote control or the Base sensor field on the display.
The robot vacuum cleaner will travel to the base station and recharge.
Finishing vacuuming manually

- Press the Power button on the remote control.
The robot vacuum cleaner will switch into standby after approx. 60 seconds. The display is deactivated, the rechargeable battery status indicator continues to light up.
You can switch the robot vacuum cleaner into standby before 60 seconds is up by pressing the Power button again.
The robot vacuum cleaner is reactivated by pressing any button on the remote control or one of the sensor fields in the display.
Operating modes
There are five different operating options.
Auto
Standard vacuuming for normally soiled flooring.

Spot
Targeted vacuuming of an area approx. 59' x 59' (1.8 x 1.8 m) around the selected starting point of the robot vacuum cleaner.
Base
Directing the robot vacuum cleaner to the base station.
Turbo
For vacuuming lightly soiled flooring with a short vacuuming duration.

Silent
Vacuuming with low noise development.

Selecting the vacuuming mode
- Press the Power button on the remote control.
There are two ways of selecting the vacuuming mode.
Option 1 (remote control)
- Press the button to start vacuuming.
Option 2 (display)
- Press the sensor field of the desired vacuuming mode.
- Press the sensor field in order to start vacuuming.
Setting the timer
(only possible if the clock has been set)
If you would like the robot vacuum cleaner to start at the same time every day, you can save the desired start time and vacuuming mode to memory.
The robot vacuum cleaner can also vacuum in the dark. However, please be aware that vacuuming may be less thorough. The cameras require light in order to navigate unobstructed.
Use the remote control to set the timer.
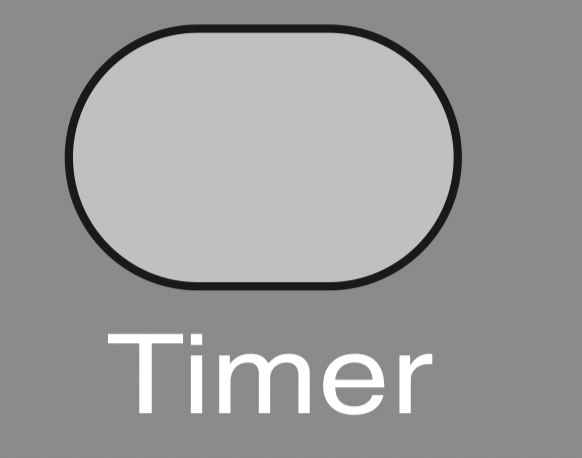
- Press the Timer button for at least three seconds.
The timer  indicator flashes in the display and the hour display flashes in the indicator field.
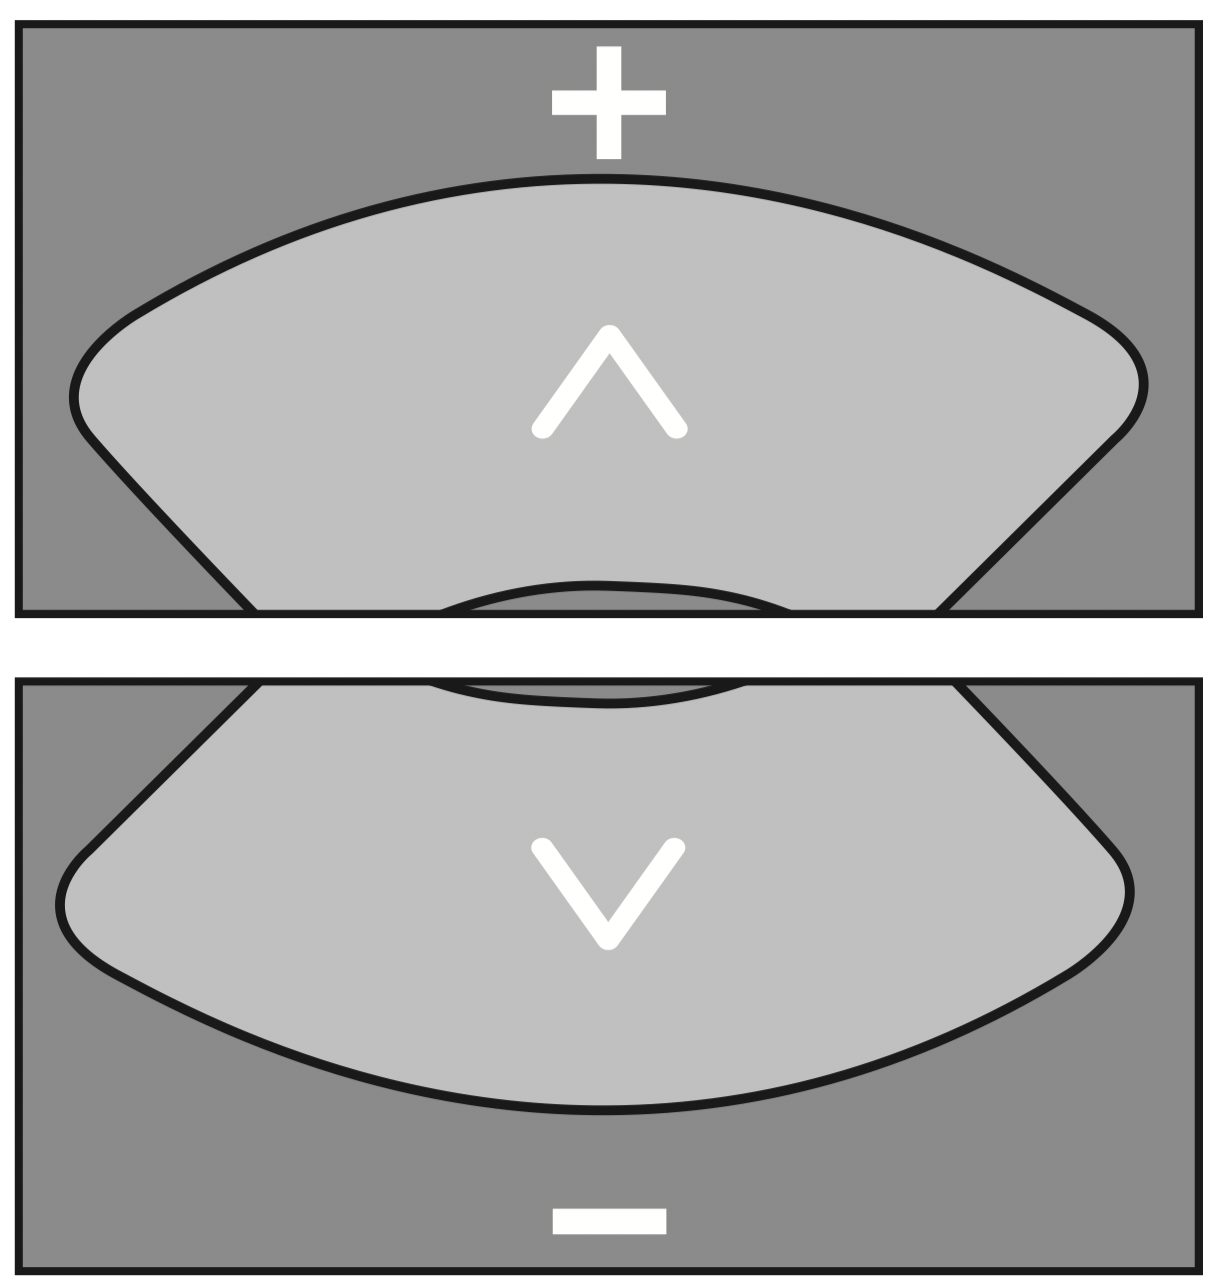
- Press the + or - direction button to set the hour you want.

- Press the OK button to confirm your selection.
The timer indicator flashes in the display and the minute display flashes in the indicator field.
- Press the + or - direction button to set the minutes you want.
- Press the OK button to confirm your selection.
- Press the Mode button repeatedly until the symbol for the vacuuming mode you want flashes on the display.
- Press the OK button to confirm your selection.
The settings are shown for approx. three seconds on the display. The robot vacuum cleaner will now start to vacuum at the same time each day.
If the timer indicator is lit up in the display, then the timer is activated.
To alter the entries, proceed as described above.
Tip: You can save up to seven individual combinations for the "start time vacuuming mode" if you set the timer using a mobile device, see section "MobilControl App".
Please note that the robot vacuum cleaner always follows the save commands which were set most recently, regardless of whether the settings were configured using the remote control or with a mobile device.
Deactivating the timer
- Press the Timer button on the remote control briefly.
The timer indicator goes out on the display.
Activating the timer / displaying a set start time
- Press the Timer button on the remote control briefly.
The timer indicator lights up in the display and the set start time is shown briefly in the indicator field. The robot vacuum cleaner will start to vacuum at the set time.
Deactivating the acoustic signals
Acoustic signals are set as standard. You can deactivate and then reactivate them.
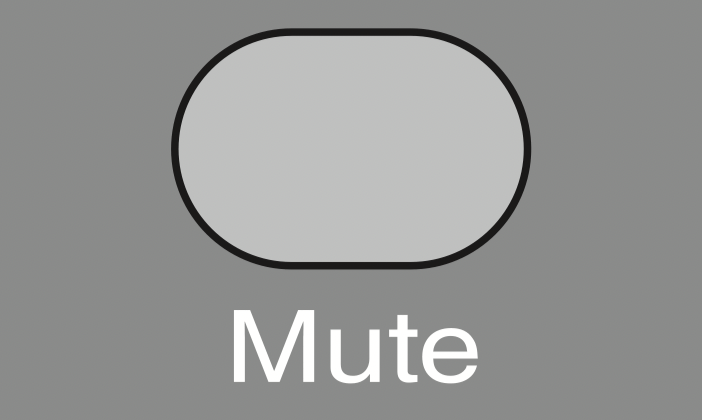
- Press the Mute button on the remote control briefly.
OFF will appear in the indicator field briefly.
Acoustic signals for fault messages cannot be deactivated.
Reducing the maximum crossing over height
The robot vacuum cleaner is set to overcome height differences of up to 3/4" as standard. It is therefore able to vacuum carpets, move over door thresholds, etc.
If you would like to reduce this height (down to approx. 1/4" (6 mm)) in order to protect the legs of chairs, tables, or lamps, for example, you can deactivate the factory default setting.
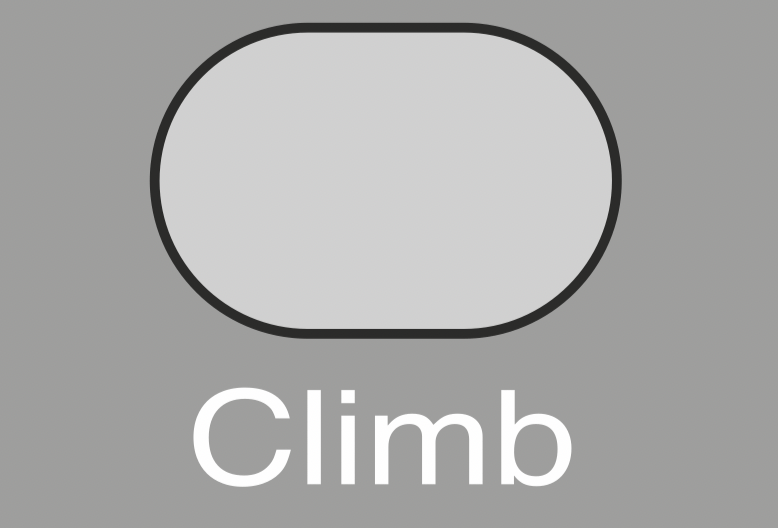
- Press the Climb button on the remote control briefly.
LO will appear in the indicator field.
Press the Climb button again briefly if you want to reactivate the maximum crossing over height of 3/4". HI will appear in the indicator field.
Maintenance
Purchasing accessories
Original Miele accessories are available from the Miele Web store, Miele and your Miele dealer.
Caution: Switch the robot vacuum cleaner off before doing any maintenance work. To switch it off, slide the I/0 switch on the side of the robot vacuum cleaner to the 0 position.
We recommend using only genuine Miele accessories bearing the "ORIGINAL Miele" logo on the packaging. Only these will guarantee the optimum performance of your robot vacuum cleaner and the best possible cleaning results.
Ordering the correct accessories
Original Miele accessories are identified by the "ORIGINAL Miele" logo on the packaging.

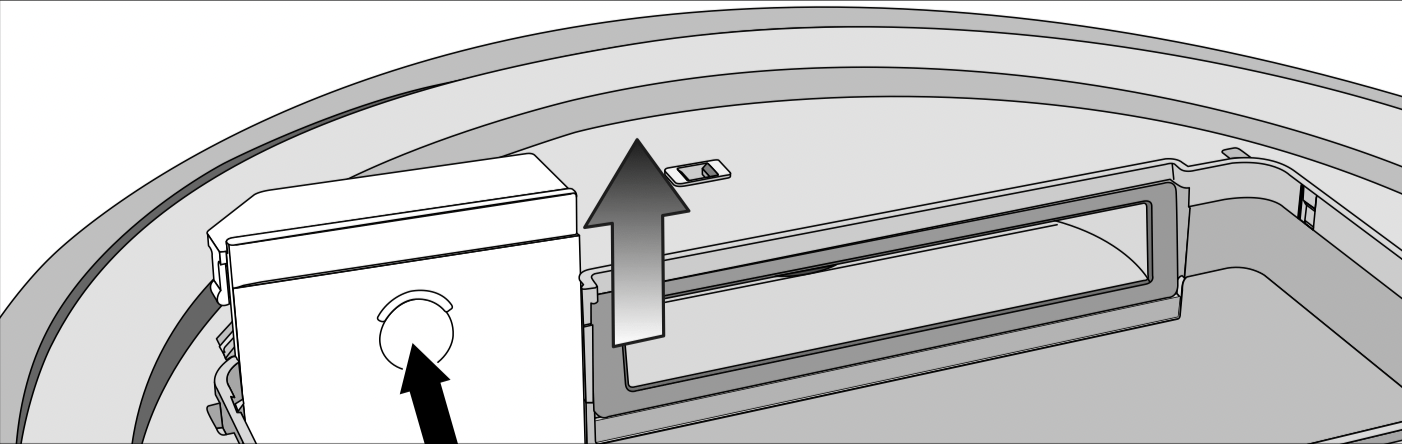
Emptying the dust box
Empty the dust box of the robot vacuum cleaner after each use in order to achieve the best possible cleaning results.
At the very latest, you must empty the dust box when "l_ _l" appears in the indicator field running from bottom to top.
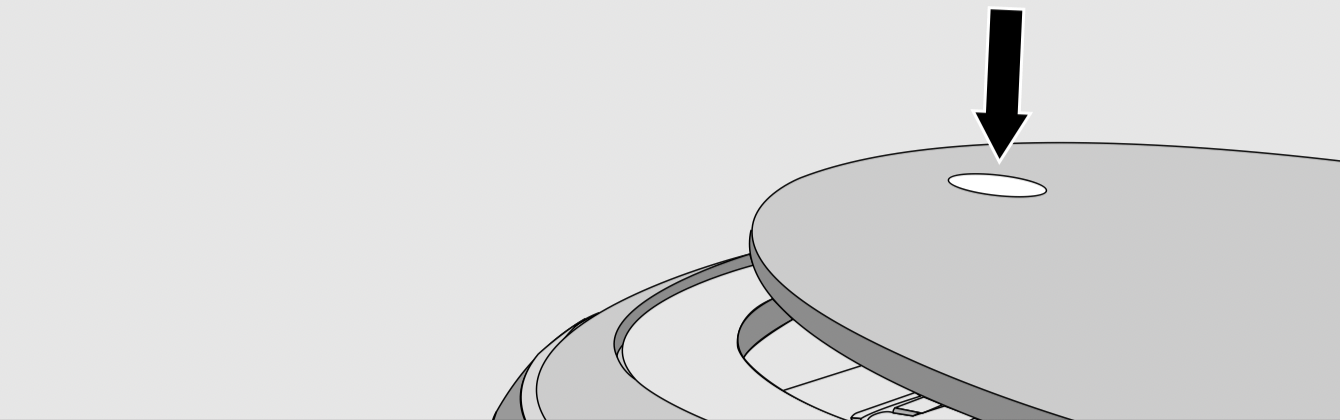
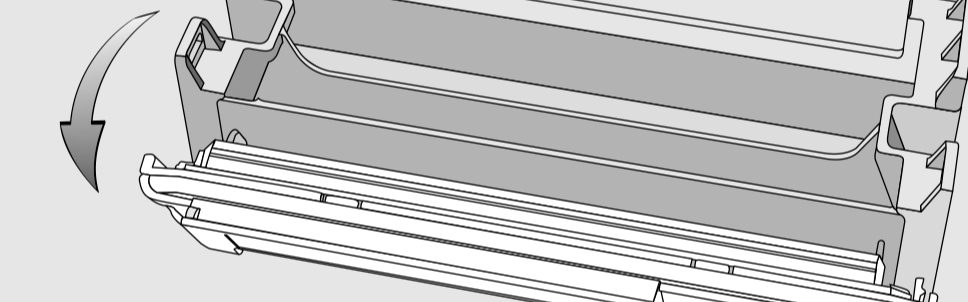
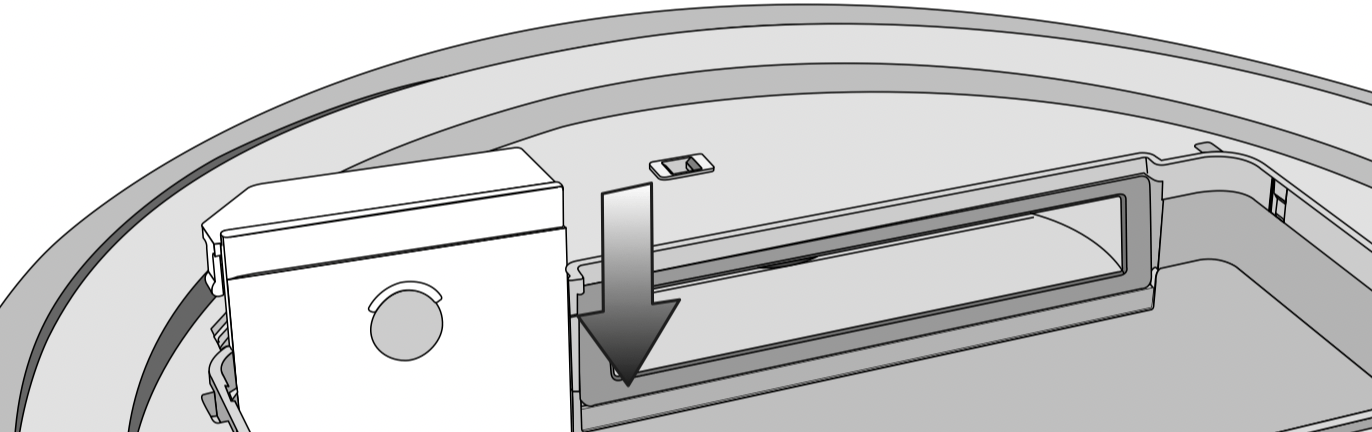
- Press the depression at the top of the robot vacuum cleaner.
The lid of the storage compartment will open.
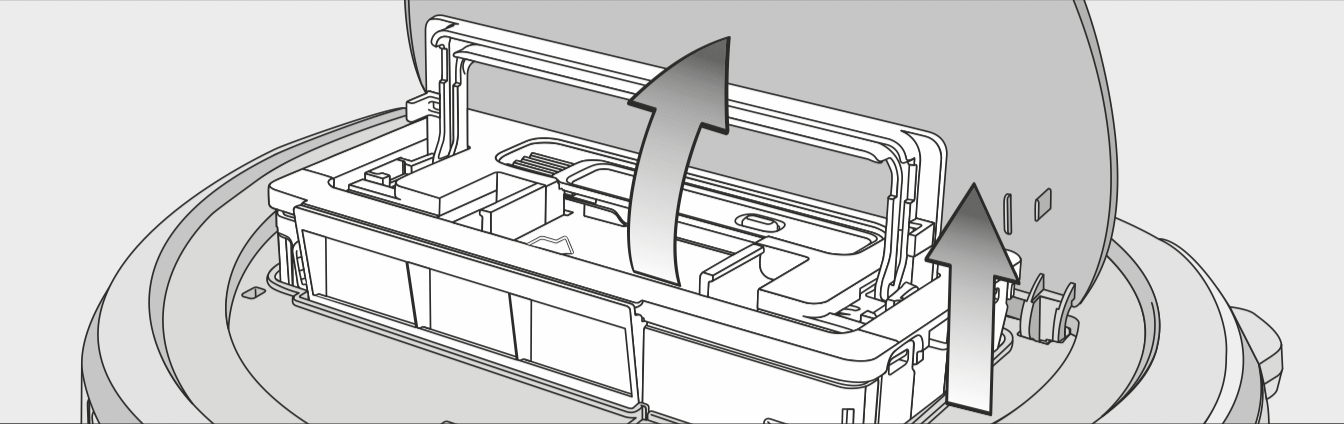
- Unlatch the dust box by lifting the handle upwards.
- Remove the dust box.
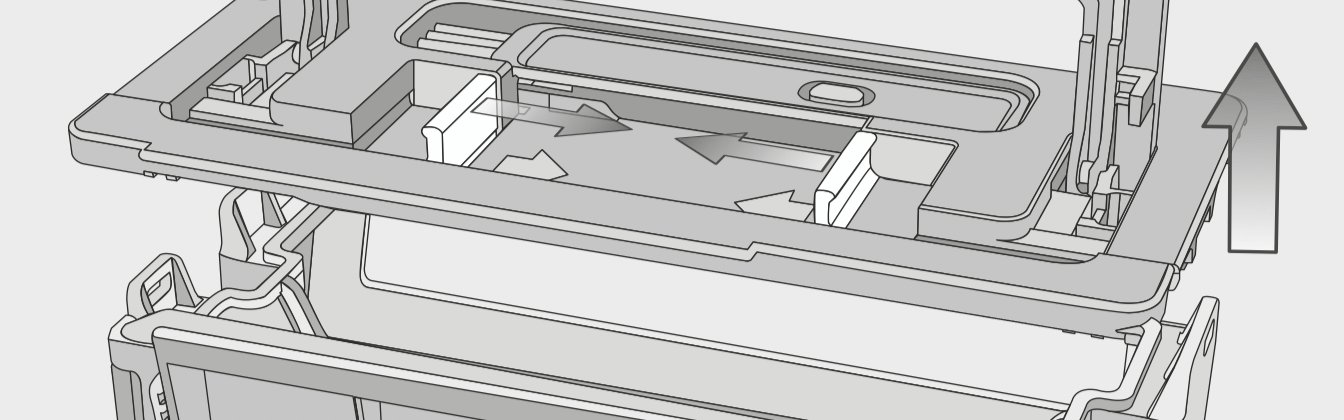
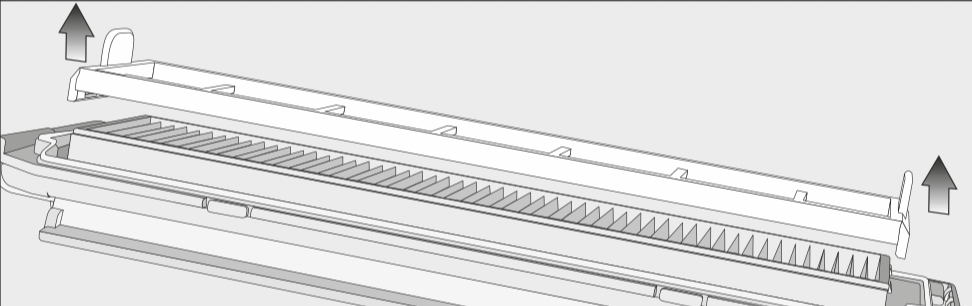
- Press one or both release buttons in the direction of the arrow and remove the dust box lid.
- Empty the dust box.
The contents of the box can be disposed of with the normal household waste, providing it contains general household dust only.
- Refit the lid and close the dust box making sure it clicks into place.
- Place the dust box into the robot vacuum cleaner with the handle lifted up and latch it into place by pushing the handle back down.
- Close the storage compartment lid and press down on the depression in order to lock it.
Cleaning the dust box
Clean the dust box as required.
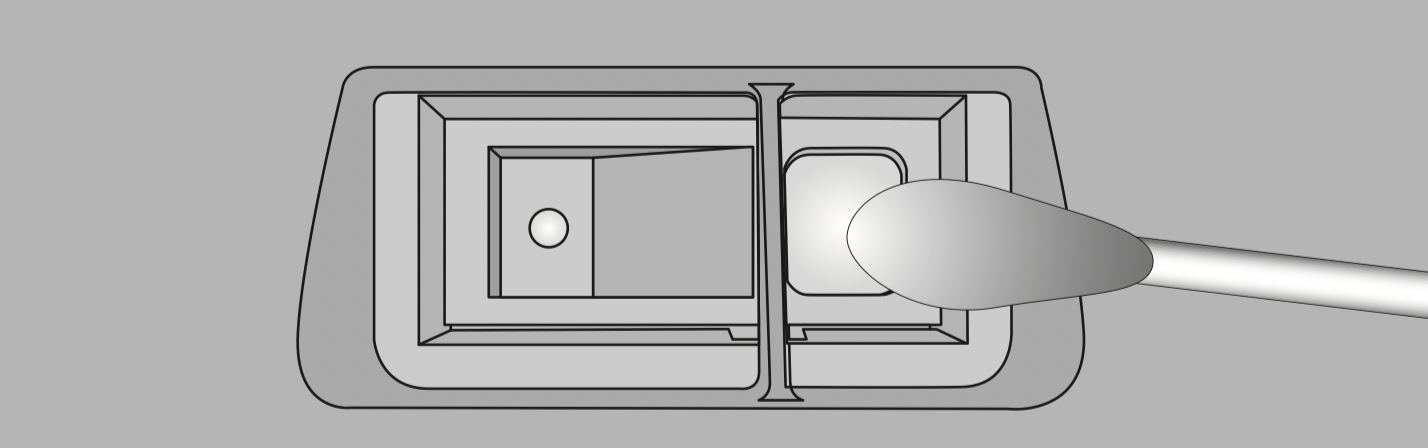
A cleaning tool is located at the top of the dust box lid.
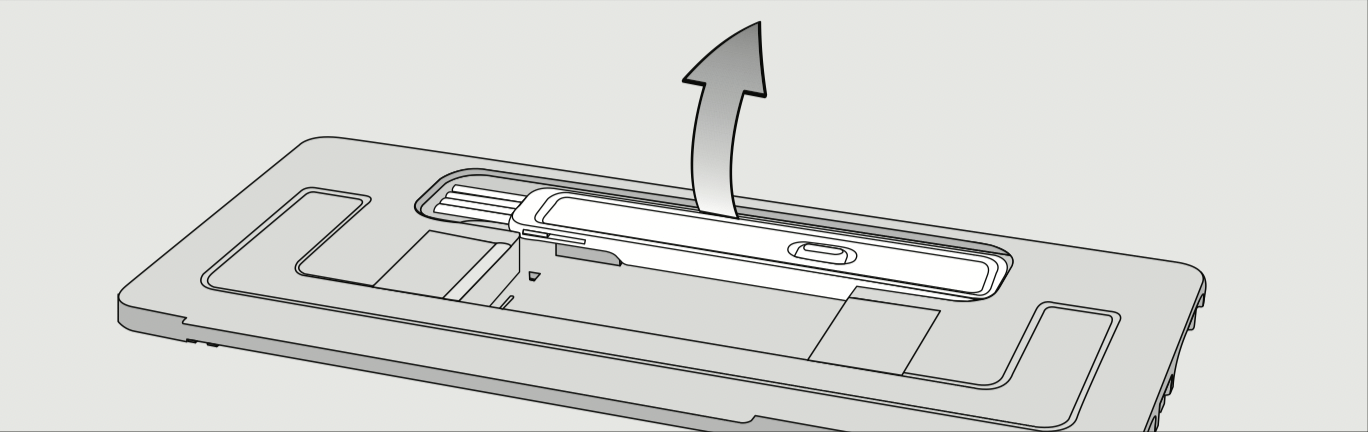
- Clean the dust box and the underside of the lid using the cleaning tool.
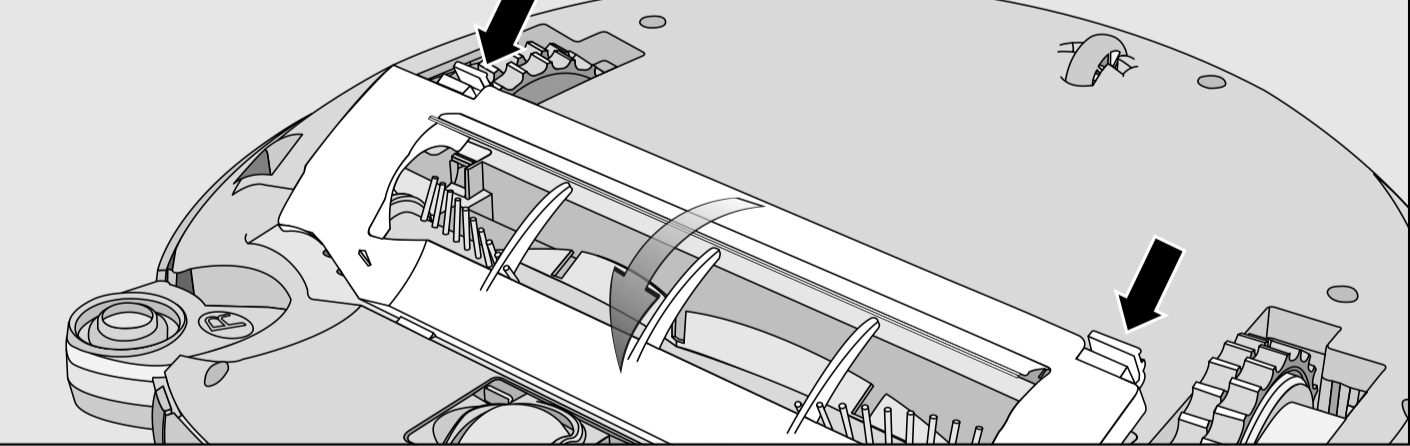
Cleaning the exhaust filter
Clean the exhaust filter as required.
The exhaust filter compartment is located in the dust box.
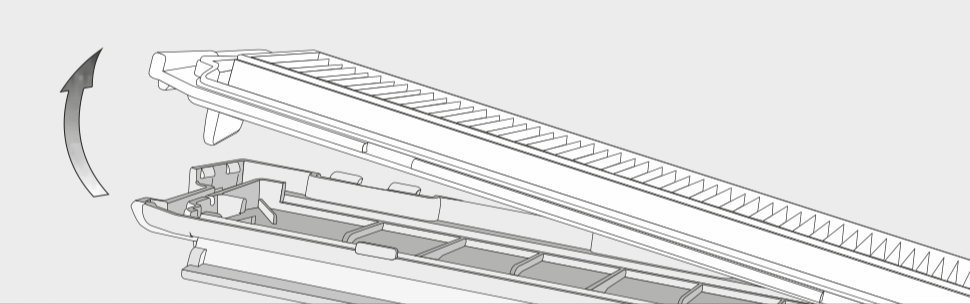
- Remove the lid from the dust box.
- Fold out the filter unit from the dust box.
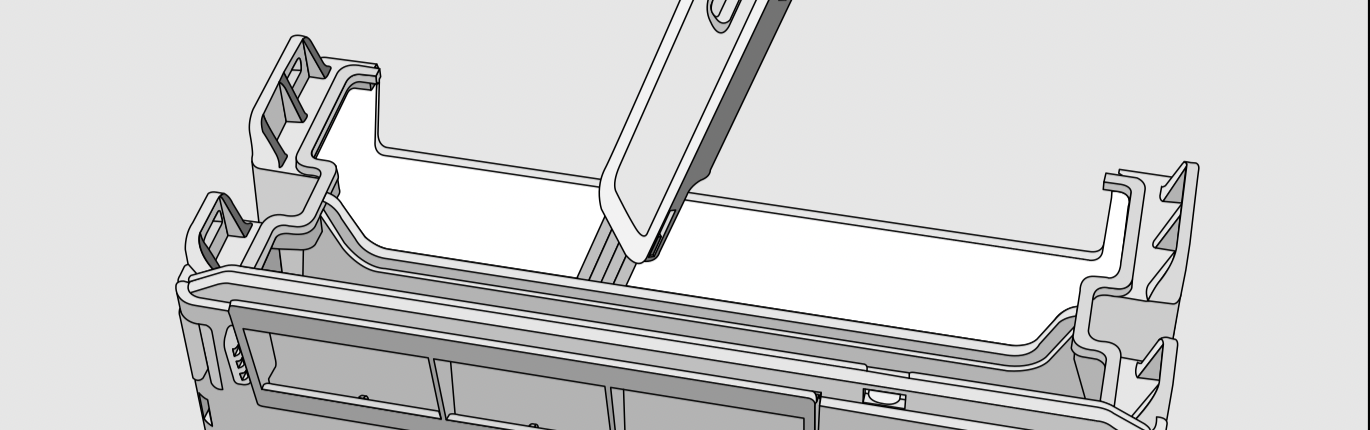
- Remove the pre-filter and clean it as required using the cleaning tool.
- Unlatch the exhaust filter, remove it, and clean it using the cleaning tool.
- Refit the exhaust filter into the cover.
- Place the pre-filter onto the exhaust filter.
The filter unit is complete.
- Carefully refit the filter unit and clip it into position.
The exhaust filter must be replaced with a new one after approx. six months in order to achieve the best possible cleaning results.
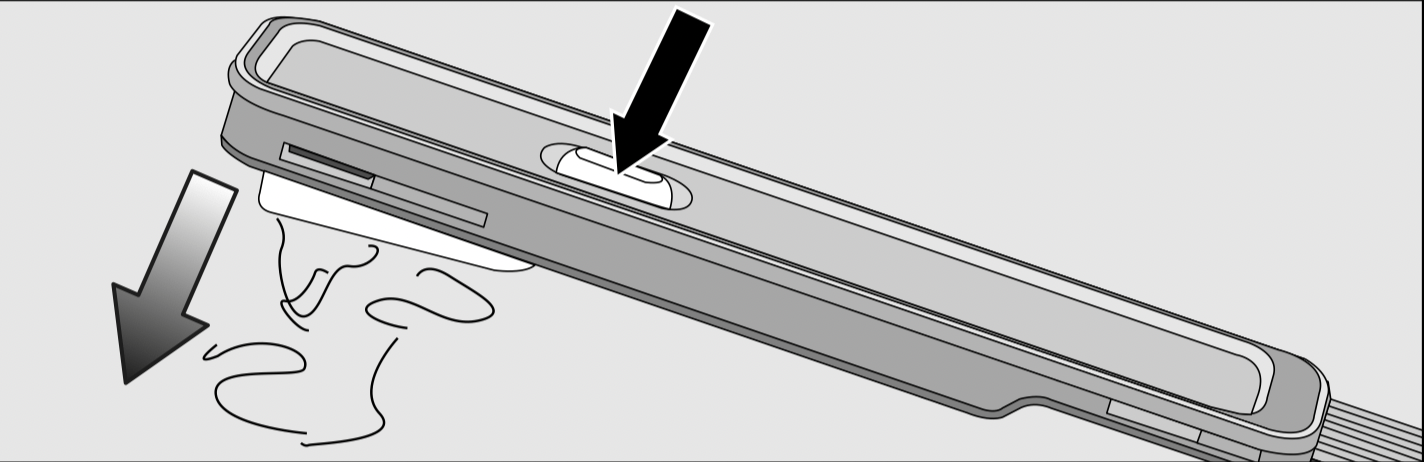
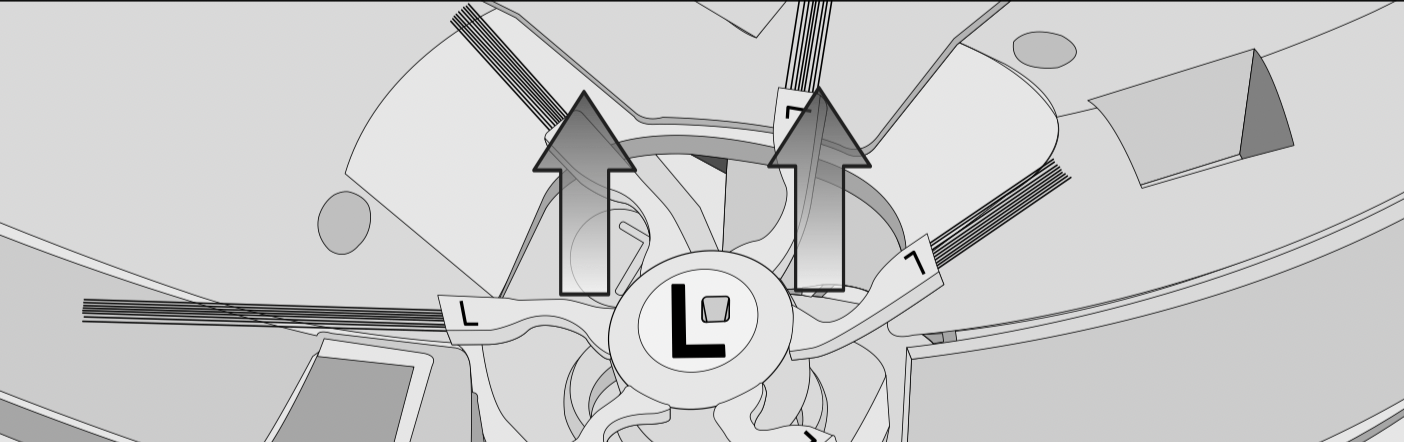
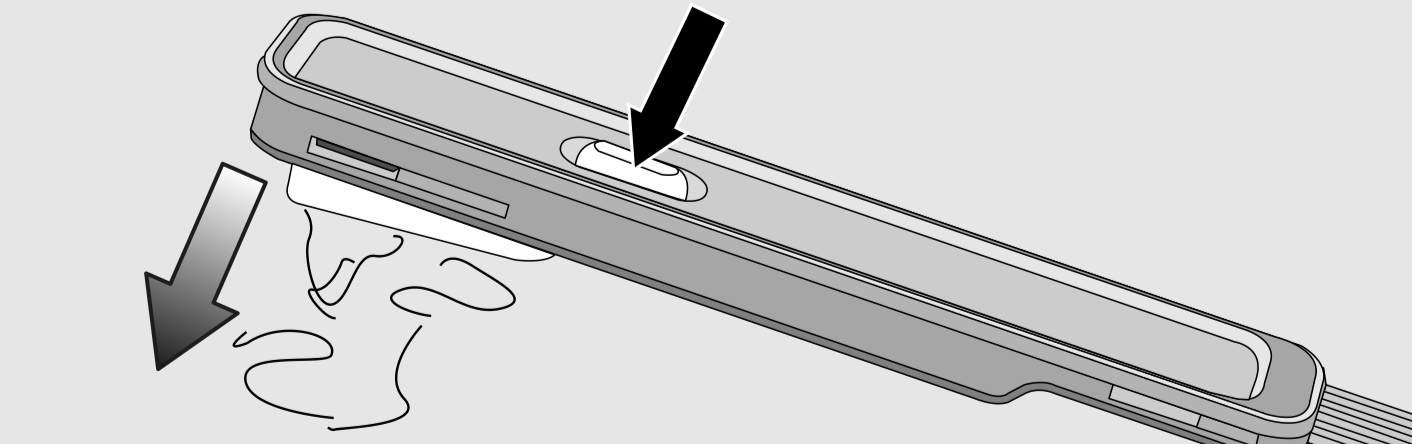
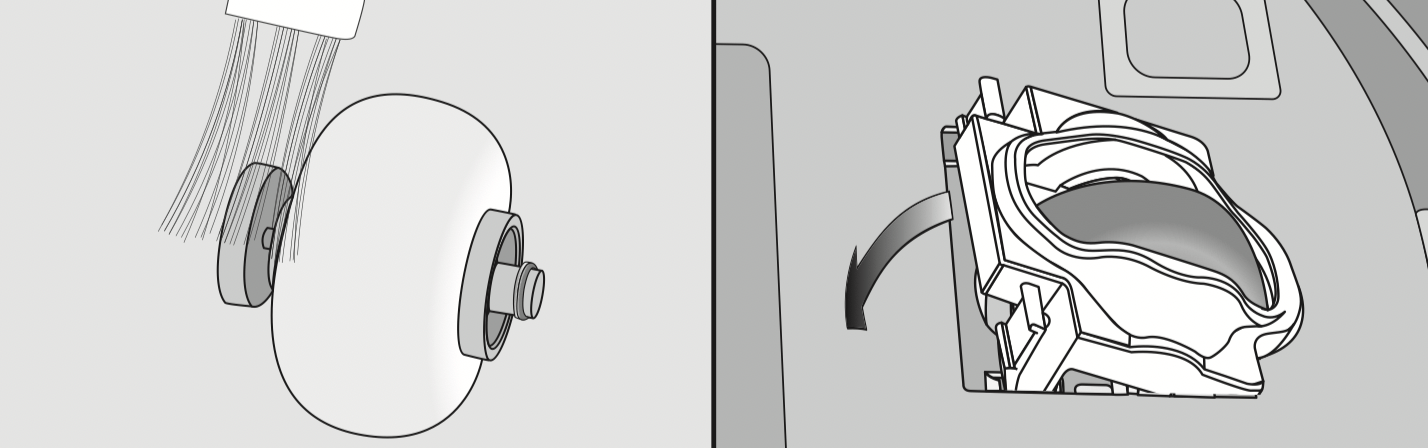
Cleaning the side brushes
Clean the side brushes as required. For this you will require the cleaning tool which is located at the top of the dust box lid.
- Place the robot vacuum cleaner upside down on a level, clean surface.
- Use both hands to grip two opposite bunches of the side brushes and pull them out.
- Remove threads and hair using the wiper which is located on the bottom of the cleaning tool.
- Hold the wiper over a garbage can.
In order to continue to achieve the best possible cleaning results, replace the side brushes with new ones after approx. one year.
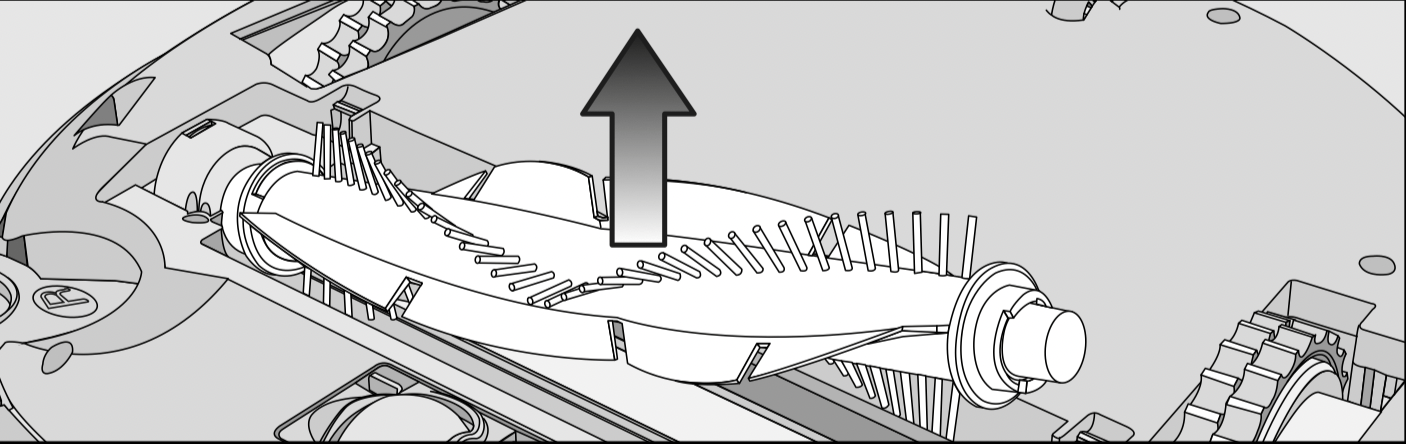
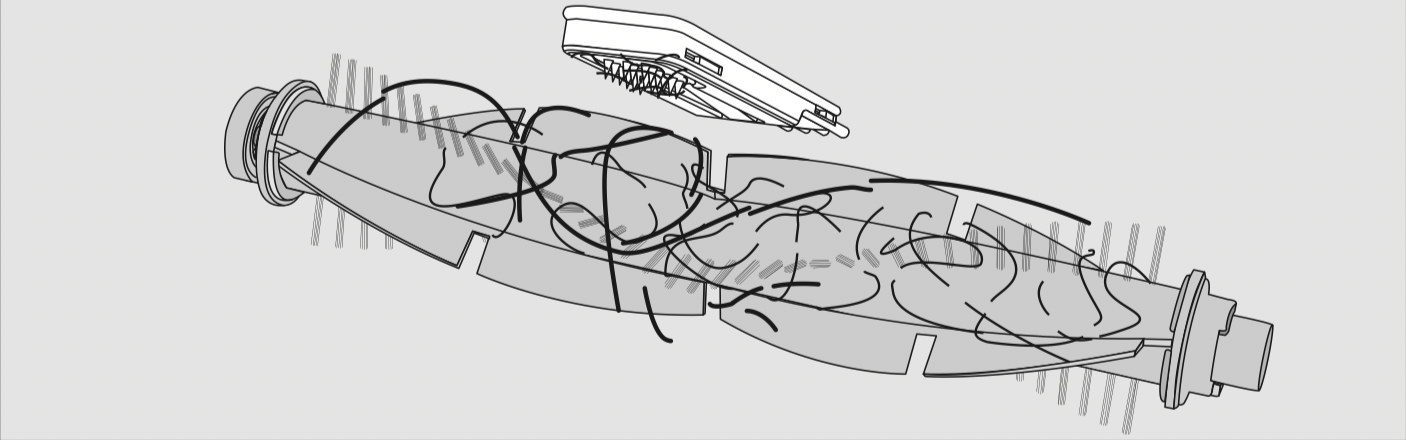
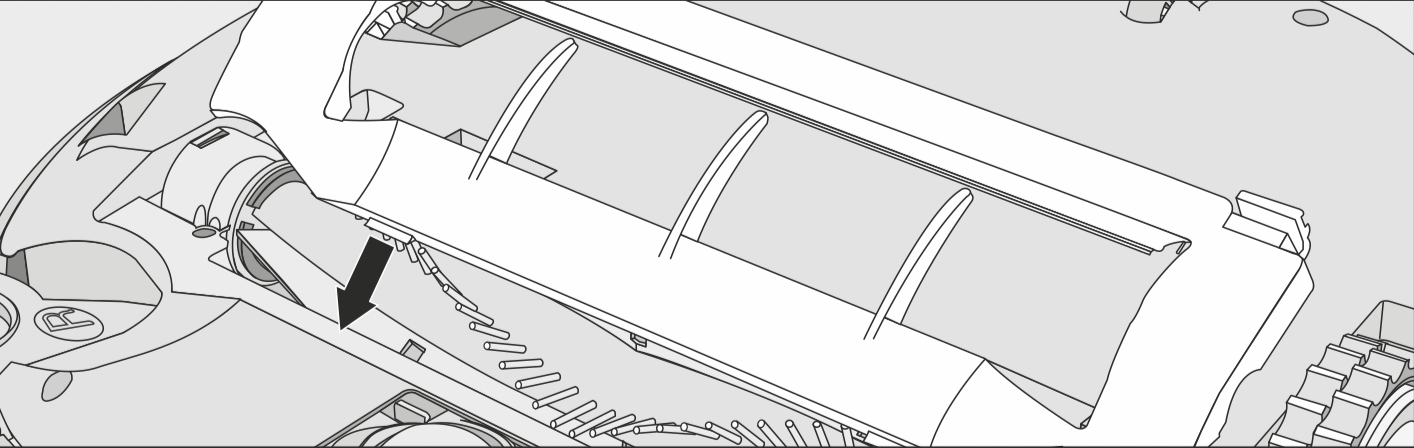
Cleaning the roller brush
Clean the roller brush as required. For this you will require the cleaning tool which is located at the top of the dust box lid.
- Place the robot vacuum cleaner upside down on a level, clean surface.
- Remove both side brushes, see previous description "Cleaning the side brushes".
- Unlatch the roller brush cover and remove the cover.
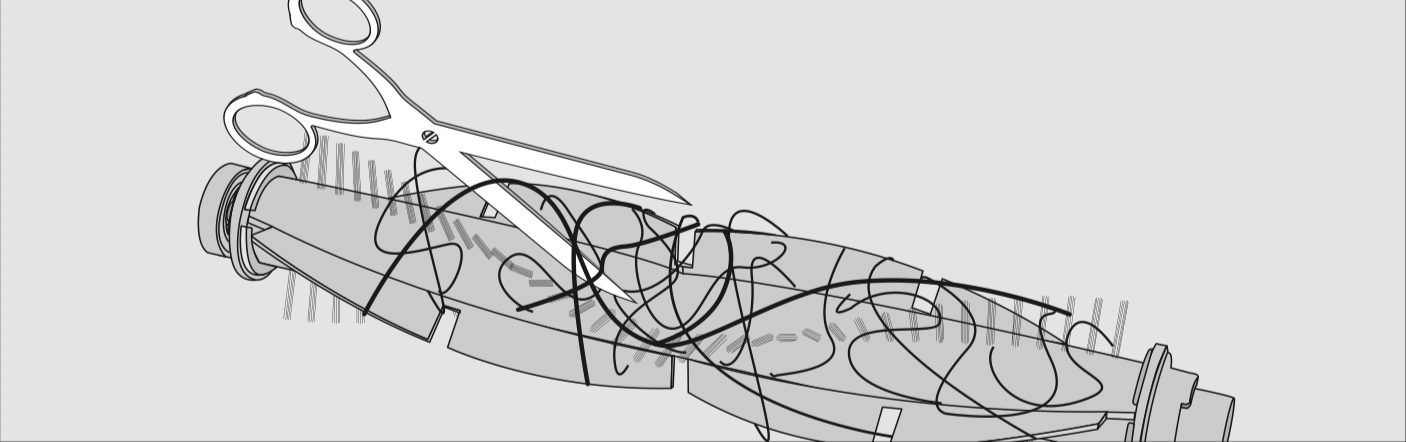
- Remove the threads and hair using the wiper which is located on the bottom of the cleaning tool.
- Hold the wiper over a garbage can.
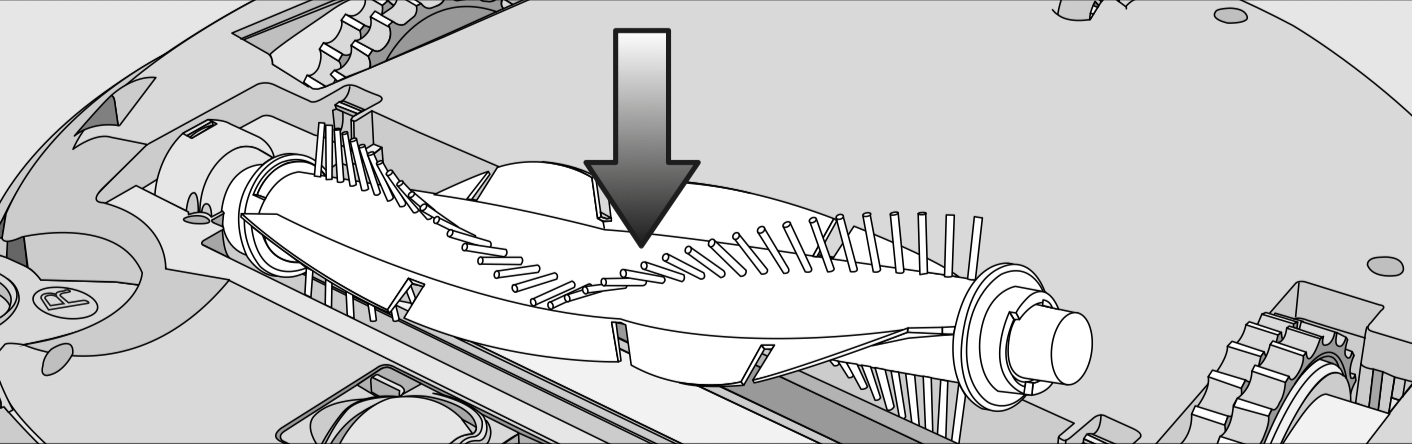
- Refit the roller brush. Make sure that the side with the pointed end is inserted into the corresponding slot.
- Carefully refit the roller brush cover making sure it clicks into position.
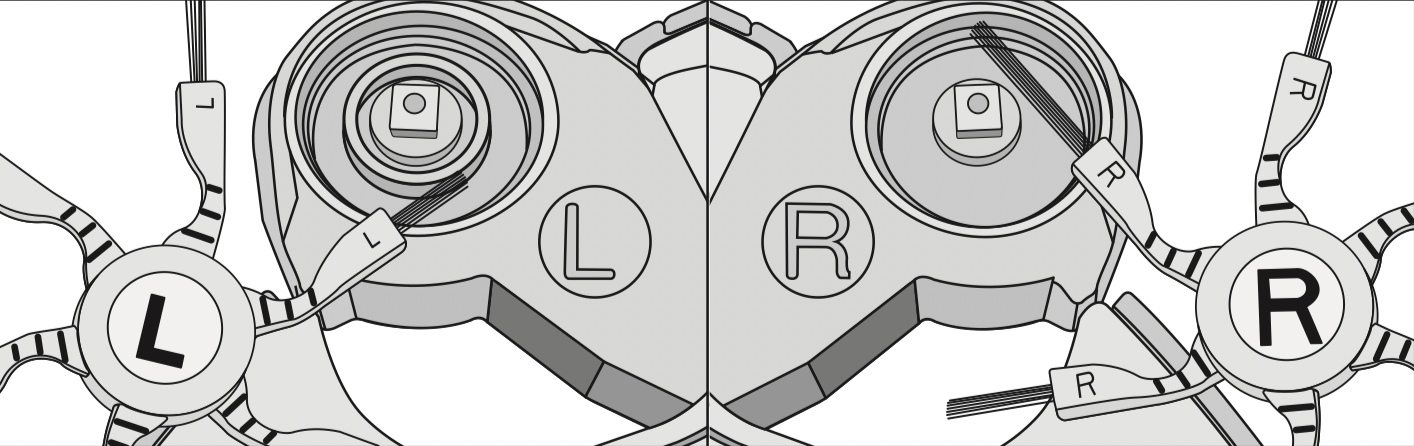
- Refit both identical side brushes, see previous description "Cleaning the side brushes".
In order to continue to achieve the best possible cleaning results, replace the roller brush with a new one after approx. one year.
Cleaning the dust box seals
Clean the seals on the bottom of the dust box as required.
- Place the robot vacuum cleaner upside down on a level, clean surface.
- Wipe the seals with a damp cloth to clean them.
In order to continue to achieve the best possible cleaning results, replace the seal unit with a new one after approx. one year.
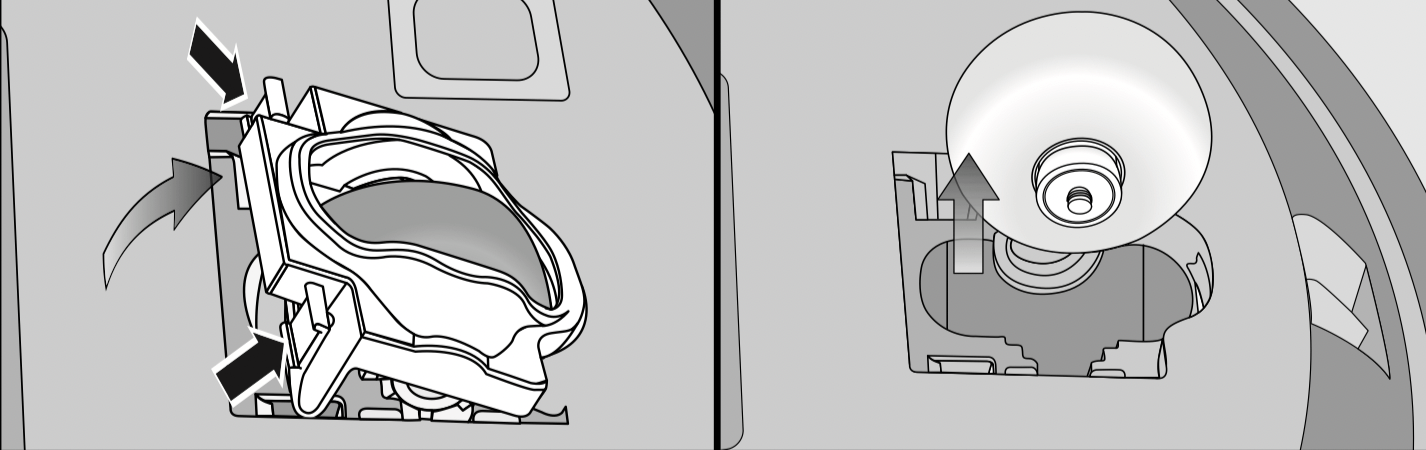
Replacing the dust box seal unit
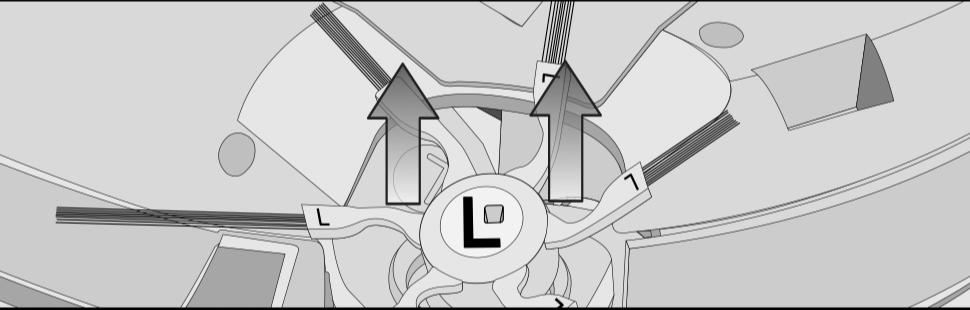
- Unlatch the seal unit from the underside of the dust box so that the arrow points to the
 symbol.
- Remove the seal unit.
- Insert the new seal unit so that the arrow points to the symbol.
- Lock the seal unit, making sure it clicks into position.
The arrow points to the  symbol.
Cleaning the front wheel
Clean the front wheel as required. For this you will require the cleaning tool which is located at the top of the dust box lid.
- Place the robot vacuum cleaner upside down on a level, clean surface.
- Unclip the cover.
- Remove the front wheel.
- Remove any threads and hair and clean the front wheel, the cover, and the slot depression using the cleaning tool.
- Refit the front wheel and close the cover making sure it clicks into position.
Cleaning the sensors
Clean the sensors as required.
- Place the robot vacuum cleaner upside down on a level, clean surface.
- Clean the sensors carefully using a dry cotton wool bud.
Changing the batteries in the remote control
The remote control requires two AAA (1.5 V) batteries.
- Remove the battery compartment cover.
- Replace the batteries. Make sure the polarity is correct.
- Close the battery compartment cover.
- Observe the special instructions regarding the handling and disposal of batteries found in the sections "IMPORTANT SAFETY INSTRUCTIONS" and "Caring for the environment" at the beginning of these operating instructions.
Replacing the rechargeable battery
You will require an original Miele lithiumion rechargeable battery:
- YCR-M05 for Scout RX2
- YCR-MT12 for Scout RX2 Home Vision
The rechargeable battery compartment is located in the robot vacuum cleaner's storage compartment.
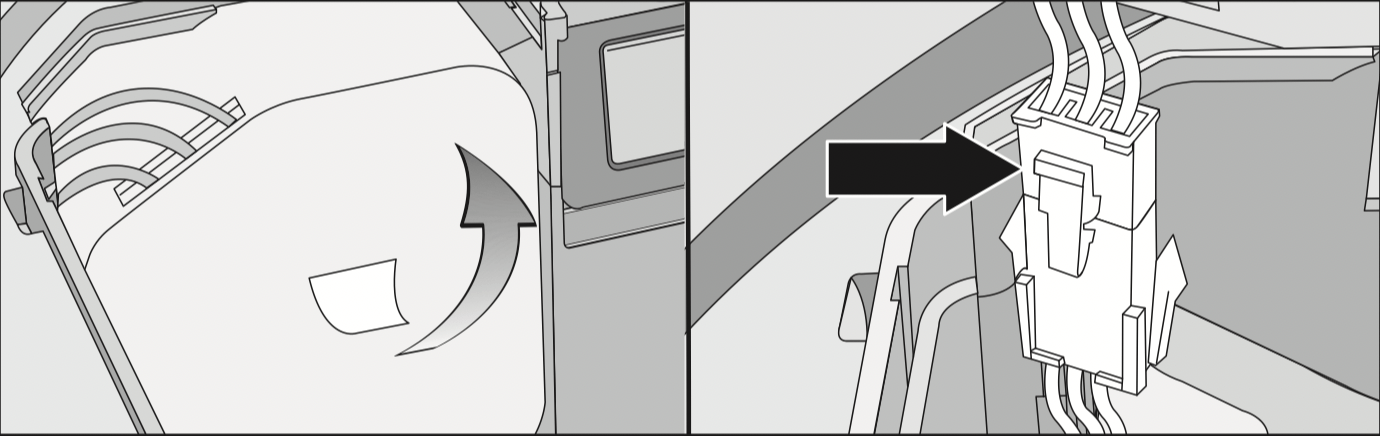
Scout RX2 (YCR-M05)
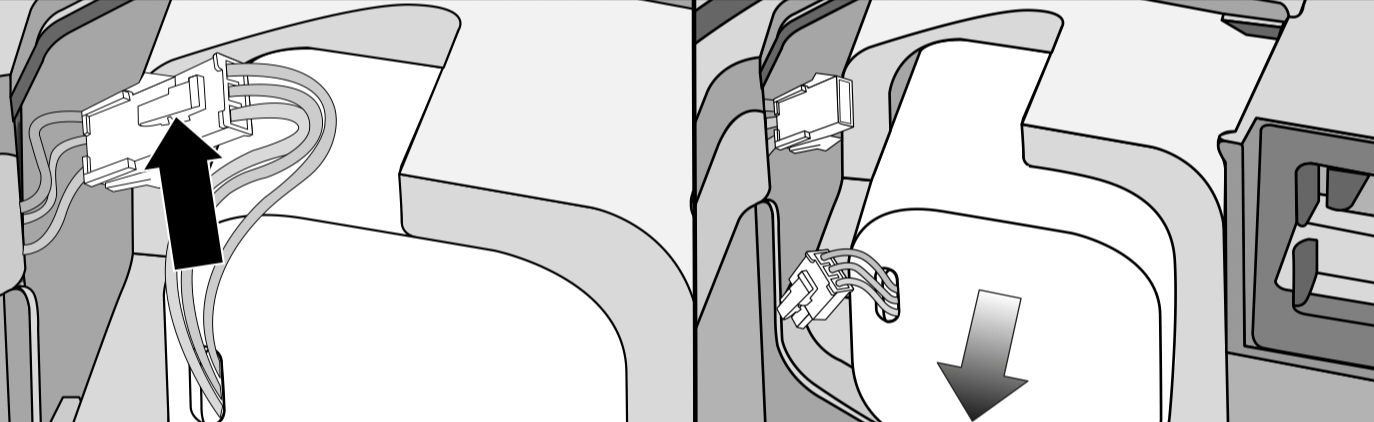
- Carefully pull the cables so that the plug connection is pulled out of the slot.
- Press the latch on the plug connection in order to release the plug.
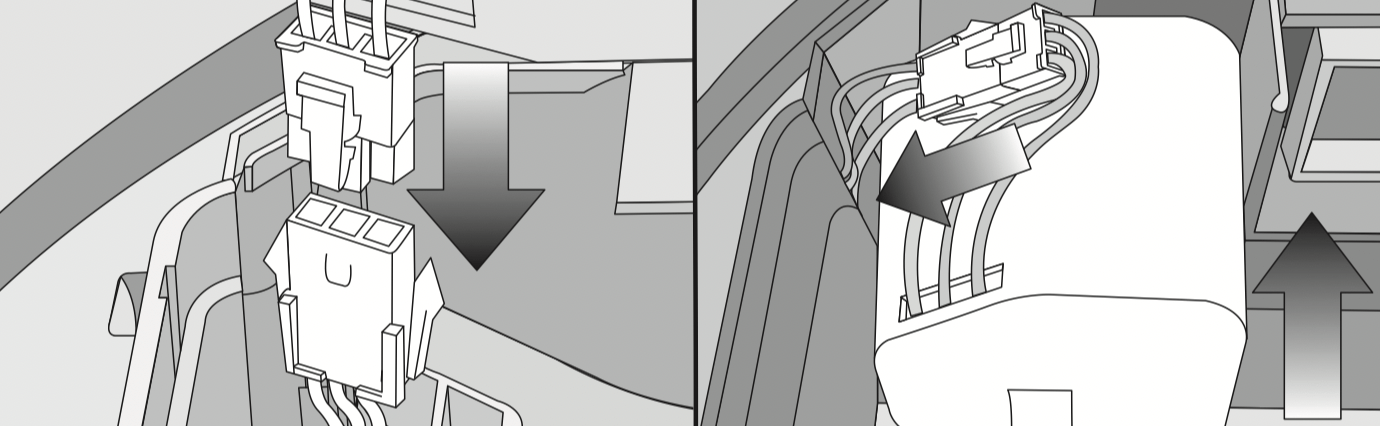
- Remove the rechargeable battery.
- Insert the plug of the new rechargeable battery into the counterpart, making sure it clicks into place.
- Insert the rechargeable battery carefully, making sure it is properly positioned (see right-hand side of picture).
- Store the plug connection in the slot at the side.
- Carefully refit the cover of the rechargeable battery compartment and close it, making sure it clicks into place.
- Observe the special instructions regarding the handling and disposal of the old rechargeable battery found in the sections "IMPORTANT SAFETY INSTRUCTIONS" and "Caring for the environment" at the beginning of these operating instructions.
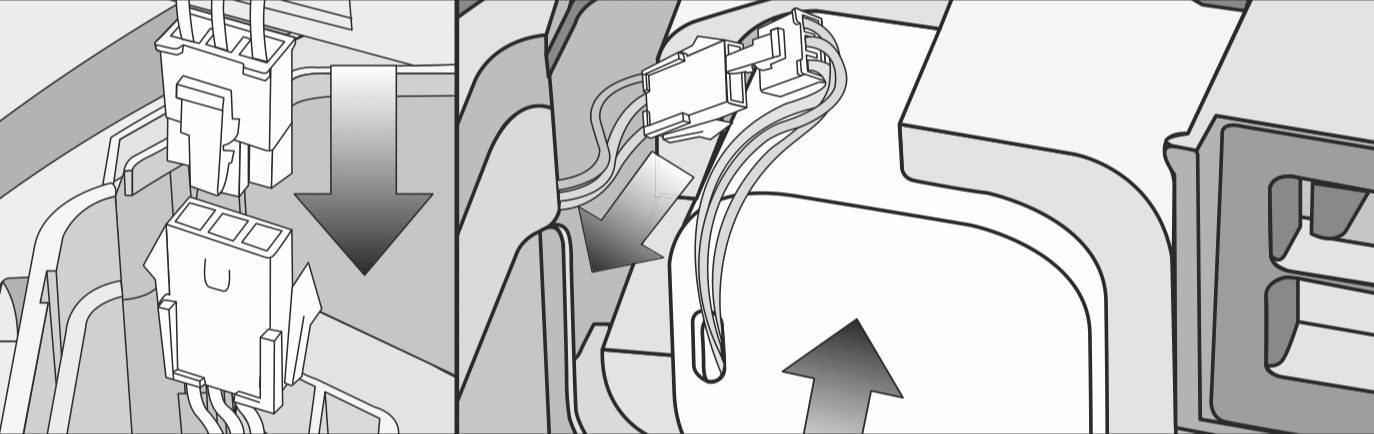
Scout RX2 Home Vision (YCR-MT12)
- Carefully remove the rechargeable battery until the plug connection is exposed.
- Press the latch on the plug connection in order to release the plug.
- Insert the plug of the new rechargeable battery into the counterpart, making sure it clicks into place.
- Store the plug connection in the side recess.
- Insert the rechargeable battery carefully, making sure it is properly positioned (see right-hand side of picture).

- Carefully refit the cover of the rechargeable battery compartment and close it, making sure it clicks into place.
- Observe the special instructions regarding the handling and disposal of the old rechargeable battery found in the sections "IMPORTANT SAFETY INSTRUCTIONS" and "Caring for the environment" at the beginning of these operating instructions.
Storage
Caution: Switch the robot vacuum cleaner off if it is not going to be used for a long period of time. To switch it off, slide the I/0 switch on the side of the robot vacuum cleaner to the 0 position.
If the robot vacuum cleaner is not going to be used for a long period of time, make sure it is stored in a well ventilated, cool place.
For optimum care, store the robot vacuum cleaner at half charge capacity (rechargeable battery status indicator in the display is orange).
Cleaning and care
Maintaining the robot vacuum cleaner and accessories
Caution: Switch the robot vacuum cleaner off before doing any maintenance work. To switch it off, slide the I/0 switch on the side of the robot vacuum cleaner to the 0 position.
The robot vacuum cleaner and all plastic accessories can be cleaned with a dry or a slightly damp cloth, or with a proprietary cleaner suitable for plastic.
Caution: Do not use abrasive cleaning agents, glass cleaning agents, all-purpose cleaners, or oil-based conditioning agents!
Caution: Do not immerse the robot vacuum cleaner or any accessories supplied with it in water!
TROUBLESHOOTING
TROUBLESHOOTING
With the help of the following guide minor faults in the performance of the machine, some of which may result from incorrect operation, can be remedied without contacting the Service Department. Time and money will be saved because a service call will not be needed.
This guide may help you to find the reason for the fault, and how to correct it.
Caution: Switch the robot vacuum cleaner off before dealing with any problems. To switch it off, slide the I/0 switch on the side of the robot vacuum cleaner to the 0 position.
| Problem |
Possible cause and solution |
|
The robot vacuum cleaner switches itself off after it hasbeen switched on using the Power button.
|
The rechargeable battery is not sufficiently charged.
- Connect the robot vacuum cleaner correctly to the charging contacts on the connected base station.
|
|
The robot vacuum cleaner does not react.
|
The robot vacuum cleaner is switched off.
- Switch it on (slide I/0 to I).
|
|
The batteries in the remote control have been inserted incorrectly.
- Make sure the polarity is correct.
|
|
The batteries in the remote control are dead.
|
|
The signal between the infrared transmitter on the vacuum cleaner and the remote control is broken.
- Clean the front of the robot vacuum cleaner and the top of the remote control carefully with a soft, dry cloth and make sure that no items disrupt the signal.
|
|
The remote control is too near to the robot vacuum cleaner or too far away from it.
- Increase or decrease the distance and when using the remote control direct it towards the robot vacuum cleaner.
|
|
The cleaning performance is poor.
|
The dust box is full.
- Empty and clean the dust box.
|
|
The roller brush is dirty or worn out.
- Clean the roller brush.
- Replace the roller brush.
|
|
The seals on the dust box are dirty or worn out.
- Clean the seals and the suction channel between them.
- Replace the seal unit.
|
|
The exhaust filter is dirty.
- Clean the exhaust filter.
- Replace the exhaust filter.
|
|
The side brushes have worn out.
- Replace the side brushes.
|
|
The robot vacuum cleaner is not charging.
|
The base station is not connected correctly.
- Connect the base station exactly as described in these operating instructions, see section "Preparing for use – Connecting the base station".
|
|
The robot vacuum cleaner does not return to the base station after vacuuming.
|
The Auto standard vacuuming mode was started somewhere in the room.
- The robot vacuum cleaner will return to its starting point.
|
|
The Spot vacuuming mode has been selected.
- The robot vacuum cleaner will return to its starting point.
|
|
There is insufficient light for the robot vacuum cleaner to navigate.
- Provide sufficient lighting.
|
|
The base station is not connected correctly.
- Connect the base station exactly as described in these operating instructions, see section "Preparing for use – Connecting the base station".
|
|
Obstacles on the floor which is to be vacuumed can impede navigation.
- Watch the robot vacuum cleaner during vacuuming.
- Remove any problematic obstacles.
- Section off the problematic area with the magnetic strip.
- Reduce the maximum crossing over height, see "Use - Reducing the maximum crossing over height".
|
Fault messages
Caution: Switch the robot vacuum cleaner off before dealing with any faults. To switch it off, slide the I/0 switch on the side of the robot vacuum cleaner to the 0 position.
Fault messages are shown in the indicator field in the display.
If "l_ _l" - "l- -l" appears running from bottom to top, you must empty and clean the dust box.
| Problem |
Possible cause and solution |
|
F1
|
"Wheel raised" fault
- Place the robot vacuum cleaner on a level floor surface.
|
|
F2
|
"Dirty sensors" fault
- Clean the sensors. This fault message is also shown when you start up the robot vacuum cleaner and the collision sensor is located above empty space. Remove the robot vacuum cleanerfrom the edge.
|
|
F3
|
"Filter not recognized" fault
- Insert the dust box into the robot vacuum cleaner with an exhaust filter inserted.
|
|
F4
|
"Drive wheels overloaded" fault
- Check whether the drive wheels have become dirty. Remove any threads or hair. This fault mes- sage is also shown if the robot vacuum cleaner is stuck.
|
|
F5
|
"Brushes overloaded" fault
- Check whether the roller brush and the side brushes have become dirty. Clean the roller brush and side brushes. This fault message is also shown if objects become caught in the robot vac-uum cleaner.
|
|
F6
|
"Fan motor overloaded" fault
- Empty and clean the dust box. Clean or replace the exhaust filter.
|
|
F7
|
Internal system fault
- Switch the robot vacuum cleaner off and on again (I/0 switch).
|
|
F8
|
"Front wheel dirty" fault
- Check whether the front wheel, the cover, or the slot depression have become dirty. Remove any threads and hair,and clean the front wheel, the cover, and the depression.
|
| Resetting the fault message after fixing the problem |
You can reset the fault messages described above in the following ways |
| |
- Switch the robot vacuum cleaner off and on again (I/0 switch).
|
- Press the Power button on the remote control.
|
- Press the sensor field in the display for at least three seconds.
|