M.-Nr
. 11 846 510
HS18
en -
US
Operating Instructions Robot Vacuum Cleaner
en -
CA
Operating Instructions Robot Vacuum Cleaner
fr - CA
Mode d’emploi Aspirateur robot

2
en-US ................................................................................................................. 5
en-CA ................................................................................................................. 44
fr-CA .................................................................................................................. 86

en-US - Contents
3
IMPORTANT SAFETY INSTRUCTIONS ............................................................ 5
Caring for the environment .............................................................................. 13
Appliance overview ........................................................................................... 14
Functions and features of the robot vacuum cleaner.................................... 16
Included accessories ........................................................................................ 16
Connection......................................................................................................... 16
Use...................................................................................................................... 19
Switching on and off ........................................................................................... 19
Starting cleaning ................................................................................................. 19
Finishing vacuuming if vacuuming started from the base station....................... 19
Finishing vacuuming if vacuuming started from somewhere in the room........... 19
Vacuuming manually ........................................................................................... 20
Interrupting vacuuming ....................................................................................... 20
Manual navigation (without vacuuming).............................................................. 20
Directing the robot vacuum cleaner to the base station ..................................... 21
Operating modes................................................................................................. 21
Selecting the operating mode ............................................................................. 21
Quitting the current operating mode ................................................................... 22
Setting the timer.................................................................................................. 22
Deactivating the timer ......................................................................................... 23
Activating the timer/displaying a set start time ................................................... 23
Deactivating the acoustic signals........................................................................ 23
Reducing the maximum crossing over height..................................................... 24
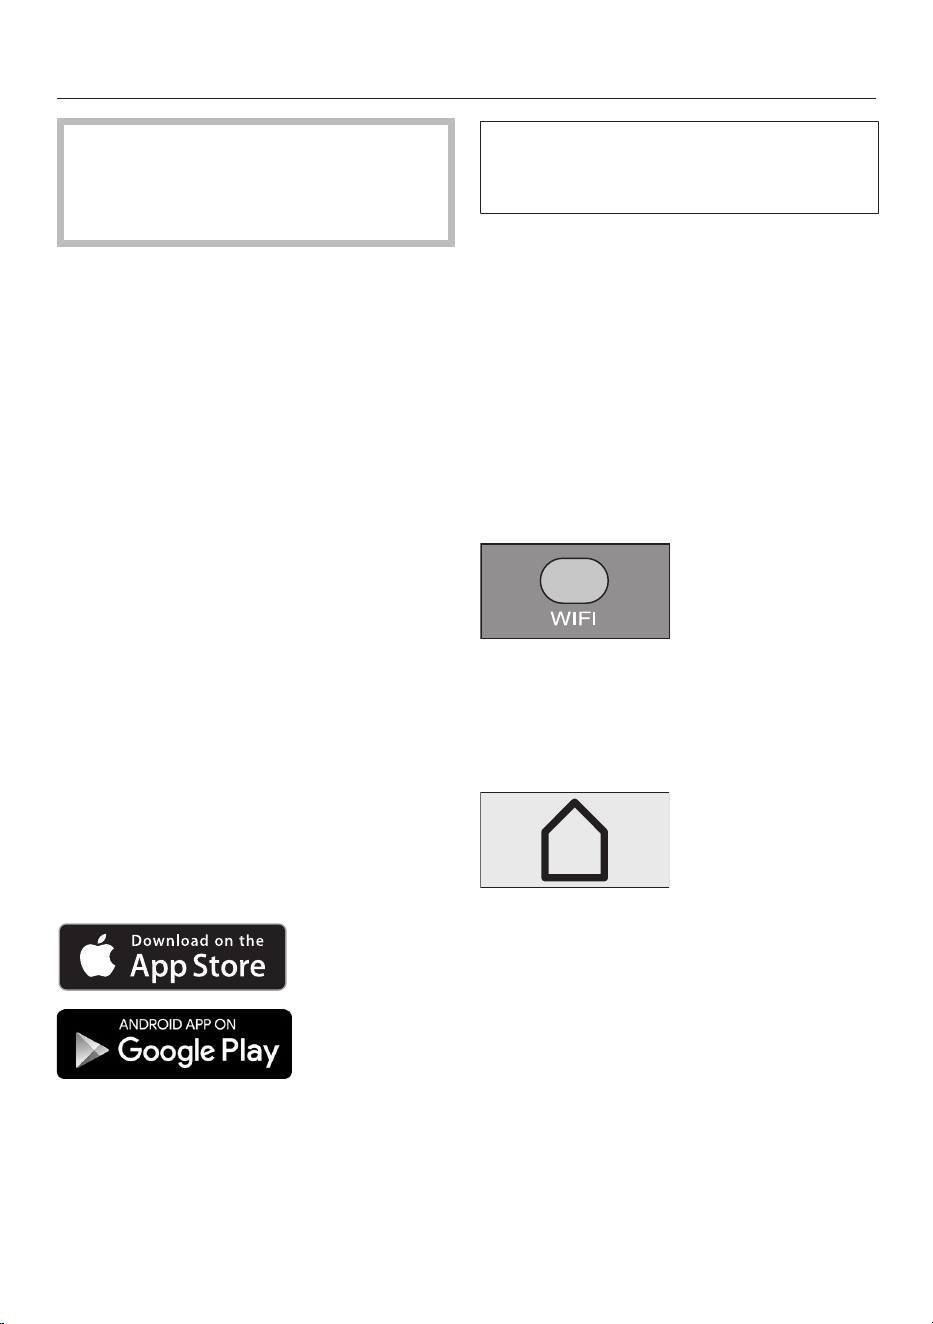
Miele@home* ..................................................................................................... 24
Downloading the Miele Scout app ...................................................................... 25
Activating the network function of the robot vacuum cleaner ............................ 25
Video function ..................................................................................................... 26
Removing the WiFi module ................................................................................. 26
Maintenance ...................................................................................................... 27
Emptying the dust box ........................................................................................ 27
Cleaning the dust box ......................................................................................... 28
Cleaning the exhaust filter................................................................................... 28
Cleaning the side brushes................................................................................... 28
Cleaning the roller brush ..................................................................................... 29
Cleaning the dust-box seals................................................................................ 30
Replacing the seal unit on the dust box.............................................................. 31
Cleaning the front wheel...................................................................................... 31

en-US - Contents
4
Cleaning the sensors........................................................................................... 31
Replacing batteries in the remote control ........................................................... 31
Replacing the rechargeable battery .................................................................... 32
Cleaning and care ............................................................................................. 33
Storage/factory default settings ...................................................................... 34
Customer Service.............................................................................................. 34
Contact in case of fault ....................................................................................... 34
Warranty .............................................................................................................. 34
Frequently Asked Questions ............................................................................ 35
Fault messages.................................................................................................. 38
Technical data.................................................................................................... 39
Declaration of conformity................................................................................. 39
Copyright and licenses ..................................................................................... 40
LIMITED WARRANTY - Vacuum Cleaners USA .............................................. 41
en-US - IMPORTANT SAFETY INSTRUCTIONS
5
READ ALL INSTRUCTIONS BEFORE USING THIS APPLI-
ANCE
This robot vacuum cleaner complies with all current local and na-
tional safety requirements. Improper use can lead to personal in-
jury and damage to property.
Please read the operating instructions before using the robot vac-
uum cleaner for the first time. They contain important information
on the safety, use, and maintenance of the robot vacuum cleaner.
This prevents both personal injury and damage to the appliance.
In accordance with standard IEC60335-1, Miele expressly and
strongly advises that you read and follow the instructions and
safety notes in the “Connection” chapter as well as the IMPOR-
TANT SAFETY INSTRUCTIONS.
Miele cannot be held liable for injury or damage caused by non-
compliance with these instructions.
Keep these operating instructions in a safe place and pass them
on to any future user.
Switch the robot vacuum cleaner off before any maintenance work
and cleaning or if it is not going to be used for a longer period of
time. It should also be switched off when dealing with problems.
To do so, slide the switch I/0 on the side of the robot vacuum
cleaner to the 0 position. The same should be done if you notice
any unusual behavior with your robot vacuum cleaner.
Correct use
This robot vacuum cleaner is intended for cleaning flooring in do-
mestic households and similar residential environments. This robot
vacuum cleaner is not suitable for use on construction sites.
The robot vacuum cleaner is not intended for outdoor use.

en-US - IMPORTANT SAFETY INSTRUCTIONS
6
The robot vacuum cleaner must only be used for domestic house-
hold purposes to vacuum dry floor surfaces. Any other usage, modi-
fication or alteration is not supported by the manufacturer and could
be dangerous.
The packaging material protects the robot vacuum cleaner from
transport damage. We recommend you keep the packaging for
transport purposes.
Persons which lack physical, sensory or mental abilities or experi-
ence with the machine should not use it without supervision or in-
struction by a responsible person.
Safety with children
Danger of suffocation! Ensure that any plastic wrappings, bags,
etc. are disposed of safely and kept out of the reach of children.
Children must be kept away from the robot vacuum cleaner unless
they are constantly supervised.
Please supervise children in the vicinity of the robot vacuum
cleaner and do not let them play with it.
WARNING
To reduce the risk of fire, electric shock or injury:
Check the voltage rating of the vacuum cleaner before connecting
the power cord to an electrical outlet. Your power source should cor-
respond with the voltage rating plate located on the underside of the
vacuum. Use only household AC outlets. Never use DC power
sources. If you are not sure of your home’s voltage supply, consult a
qualified electrician. Connecting the vacuum cleaner to a higher volt-
age than indicated in these instructions may result in damage to the
vacuum cleaner or injury.
en-US - IMPORTANT SAFETY INSTRUCTIONS
7
To reduce the risk of electric shock, this appliance has a polarized
plug (one blade is wider than the other.) This plug will fit in a polar-
ized outlet only one way. If the plug does not fit fully in the outlet, re-
verse the plug. If it still does not fit, contact a qualified electrician to
install the proper outlet. Do not alter the plug in any way.
Technical safety
The robot vacuum cleaner operates at 14.4V.
It is classified as a Class III appliance.
This appliance is supplied by a safety extra-low voltage (SELV)
power source where the voltage is low enough to protect users from
the risk of electrical shock. A Class II plug-in power supply is used
for supplying power to charge the robot vacuum cleaner.
Before each use of the robot vacuum cleaner, check both the vac-
uum cleaner and all of the accessories supplied with it for any visible
signs of damage. Do not use a damaged robot vacuum cleaner or
accessory.
The power socket for connecting the base station must be fitted
with a 15A breaker or fuse in accordance with all local codes.
Compare the connection data on the data plate of the robot vac-
uum cleaner and the power supply (voltage and frequency) with that
of the electricity supply. This data must match exactly.
Store the robot vacuum cleaner at an ambient temperature be-
tween 32°F and 140°F (0°C and 60°C).
While the vacuum cleaner is under warranty, repairs should only
be performed by a Miele-authorized service technician. Otherwise
the warranty may be void.
Repairs should only be carried out by a Miele-authorized service
technician. Repairs and other work by unqualified persons can cause
considerable danger to users.

en-US - IMPORTANT SAFETY INSTRUCTIONS
8
Ensure that you do not damage the power cord and avoid me-
chanical stress. Do not place heavy objects on the power cord.
The robot vacuum cleaner is fitted with sensors to detect steps
and drops in height. Do not cover these sensors or the camera, and
ensure that the function of the sensors is not hindered by obstacles
while the cleaner is moving.
Do not let the robot vacuum cleaner travel over the power cord or
other cords.
Do not drop the robot vacuum cleaner or any of the accessories
supplied with it. Items that have been dropped or damaged should
not be used for safety reasons.
Miele can only guarantee the safety of the appliance when gen-
uine Miele replacement parts are used. Faulty components should
only be replaced with genuine Miele parts.
Cleaning
Do not immerse the robot vacuum cleaner or the parts supplied in
water. Clean all parts with a dry or slightly damp cloth only.
Proper use
Do not use the robot vacuum cleaner without the dust box, pre-fil-
ter, and exhaust filter fitted.
Remove all breakable or lightweight items from the floor and make
sure that the robot vacuum cleaner cannot become entangled in
cords, curtains, fringes, cords, or similar.
Animals must be kept away from the robot vacuum cleaner. Do
not allow animals to stand or sit on the robot vacuum cleaner.
Take appropriate measures to prevent the robot vacuum cleaner
falling down large drops, e.g., from galleries or balconies. This can
be done, for instance, by setting up physical barriers.

en-US - IMPORTANT SAFETY INSTRUCTIONS
9
Do not allow the robot vacuum cleaner to move any movable
items, e.g., rugs, doormats, etc. Secure any movable items.
Do not use the robot vacuum cleaner to vacuum up anything
which has been burning or is still glowing e.g., cigarettes, ashes, or
coal, whether glowing or apparently extinguished. Do not use the ro-
bot vacuum cleaner in the vicinity of a fireplace.
Do not use the robot vacuum cleaner to vacuum up any water, liq-
uid or damp dirt. Wait until any freshly cleaned or shampooed car-
pets or floor coverings are completely dry before attempting to vac-
uum.
Do not use the robot vacuum cleaner to vacuum toner dust. Toner,
such as that used in printers and photocopiers, can conduct elec-
tricity.
Do not use the robot vacuum cleaner to vacuum up any in-
flammable or combustible liquids or gases and do not use it in areas
where such substances are stored.
Do not sit or lie on the surface being cleaned while the robot vac-
uum cleaner is running. This is to prevent the risk of loosely fitting
clothes or long hair coming into contact with the roller brush or other
moving parts of the robot vacuum cleaner.
Caution: Be aware that the robot vacuum cleaner moves au-
tonomously. Exercise caution when walking in the area that the robot
vacuum cleaner is operating in, to avoid stepping on or tripping over
it.
Accessories
Only use genuine accessories with the “ORIGINAL Miele” logo on
the packaging. The manufacturer cannot otherwise guarantee the
safety of the product.

en-US - IMPORTANT SAFETY INSTRUCTIONS
10
IMPORTANT SAFETY INSTRUCTIONS and safety notes for
rechargeable battery, base station, power-supply unit, and
remote-control batteries
Safety with children
Keep the rechargeable battery and the batteries for the remote
control out of the reach of children.
Children must be kept away from the base station and the power-
supply unit unless they are constantly supervised.
Technical safety
Charge the robot vacuum cleaner at an ambient temperature be-
tween 50°F and 115°F (10°C and 45°C).
The battery and the base station are designed for use with this
Miele Robot Vacuum Cleaner. For safety reasons, the robot vacuum
cleaner must not be used with a battery or base station produced by
another manufacturer.
Only use the parts supplied for charging the robot vacuum cleaner
(base station, power-supply unit, power adapter).
Temporary or permanent operation on an autonomous power sup-
ply system or a power supply system that is not synchronized with
the grid power supply (e.g., island networks, back-up systems) is
possible. A prerequisite for operation is that the power supply sys-
tem complies with the specifications of EN50160 or an equivalent
standard.
The function and operation of the protective measures provided in
the domestic electrical installation and in this Miele product must
also be maintained in isolated operation or in operation that is not
synchronized with the grid power supply, or these measures must be
replaced by equivalent measures in the installation. As described, for
example, in the current version of VDE-AR-E 2510-2.

en-US - IMPORTANT SAFETY INSTRUCTIONS
11
Do not attach any adhesive labels to the front of the base station
as this conceals an infrared transmitter. Do not place any items in
front of it.
Stop using the rechargeable battery immediately if you notice an
unusual smell from it, if liquid is leaking from it, if it is significantly
overheating, or if it is discolored or deformed. Dispose of the battery
immediately (see safety note “Disposing of the battery” at the end of
this chapter as well as “Caring for the environment – Disposing of
old batteries”).
Batteries and rechargeable batteries will deplete over time. They
can then leak corrosive fluids. Avoid contact with the eyes and skin.
In the event of contact, rinse thoroughly with water and seek medical
advice.
Please contact Customer Service before sending the rechargeable
battery.
Proper use
Do not drop or throw the rechargeable battery. For safety reasons,
do not continue to use a rechargeable battery which has been dam-
aged.
Keep the rechargeable battery or the batteries away from open
flames or other heat sources. Do not heat the rechargeable battery
or the batteries. Do not expose them to direct sunlight.
Do not dismantle the rechargeable battery.
Do not cause a short circuit by bridging the contacts of the
rechargeable battery or the batteries, either unintentionally or delib-
erately.
Do not allow the rechargeable battery or the batteries to come
into contact with liquids.
Do not attempt to recharge the remote-control batteries provided.
en-US - IMPORTANT SAFETY INSTRUCTIONS
12
Disposing of the batteries and the rechargeable battery: remove
the rechargeable battery from the robot vacuum cleaner and the bat-
teries from the remote control. Insulate the metal contacts with ad-
hesive tape to prevent short circuits. Dispose of the batteries and the
rechargeable battery in a municipal recycling facility. Do not dispose
of batteries or the rechargeable battery with normal household
waste.
California Proposition 65
WARNING
This product can expose you to chemicals mineral oils
1
, Nickel
(Metallic)
1
, Diisononyl phthalate (DINP)
1
and Di-isodecyl phthalate
(DIDP)
2
, which are known to the State of California to cause
1
can-
cer and
2
birth defects or
2
other reproductive harm.
For more information go to www.P65Warnings.ca.gov.
FCC Declaration of Conformity
These devices comply with FCC Rules Part15. This equipment
has been tested and found to be in compliance with the limits for a
ClassB digital device, pursuant to Part15 of the FCC Rules of Oper-
ation and is subject to the following conditions:
These devices may not cause harmful interference.
These devices must accept any interference received, including in-
terference that may cause undesired operation.
SAVE THESE INSTRUCTIONS
en-US - Caring for the environment
13
Disposing of sales packaging
The packaging material protects the ro-
bot vacuum cleaner from transport
damage. The packaging materials used
are selected from materials which are
environmentally friendly for disposal
and can therefore be recycled.
Recycling the packaging material re-
duces the use of raw materials in the
manufacturing process and also re-
duces the amount of waste in landfill
sites. Make sure the packaging is dis-
posed of in the proper manner for your
area.
Disposing of your old ma-
chine
Before disposing of your robot vacuum
cleaner, remove the exhaust filter and
the pre-filter and dispose of them with
your household waste.
Electrical and electronic appliances
contain many valuable materials. They
also contain certain materials, com-
pounds, and components which were
essential for their correct functioning
and safety. These could be hazardous
to your health and to the environment if
disposed of with household waste or if
handled incorrectly. Please do not,
therefore, dispose of your old appliance
with household waste.
Instead, please make use of officially
designated collection and disposal lo-
cations to dispose of and recycle elec-
trical and electronic appliances. By law,
you are solely responsible for deleting
any personal data from the appliance
prior to disposal.
Ensure that your old appliance presents
no danger to children while being
stored for disposal.
Disposing of old batteries
In many cases, electrical and electronic
appliances contain batteries which
must not be disposed of with house-
hold waste after use. You are legally
obliged to remove any old batteries
which are not securely enclosed by the
vacuum cleaner and to take them to a
suitable collection point (e.g., retailer)
where they can be handed in free of
charge. Insulate the metal contacts with
adhesive tape to prevent short circuits.
Batteries may contain substances
which can be hazardous to human
health and the environment.
The labeling on the battery will provide
further information. The bin symbol with
a cross through it means that the bat-
teries must not be disposed of in
household waste. A bin with a cross
through it which also has one or more
chemical symbols on it indicates that
the battery contains lead (Pb), cadmium
(Cd), and/or mercury (Hg).
3E&G+J
Old batteries contain valuable raw ma-
terials which can be recycled. Dispos-
ing of batteries separately makes them
easier to handle and recycle.

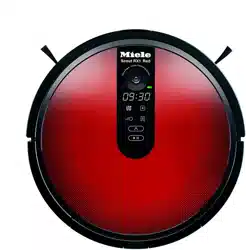
en-US - Appliance overview
14
Illustrations A, B and C for this section are on the pull-out pages in the back of
these operating instructions.
A – Robot vacuum cleaner top and bottom
a
Display
b
WiFi display
c
Video function indicator (for Scout RX3 Home Vision HD)
d
Clock mode display (am/pm)
e
Cameras
f
Start/pause () sensor control
g
Impact protection
h
On/Off switch (I/0)
i
Depression to open the storage compartment
j
Silent cleaning mode sensor control
k
Turbo cleaning mode sensor control
l
Base sensor control
m
Spot cleaning mode sensor control
n
Auto standard vacuuming mode sensor control
o
Timer indicator
p
Rechargeable-battery status indicator
q
Side brushes (20 arms and 6 arms, supplied loose)
r
Roller brush
s
Charging contacts
t
Front wheel
u
Anti-fall sensors (toppling protection)
v
Roller-brush cover
w
Drive wheels
x
Suction aperture with seal unit
y
Back wheel

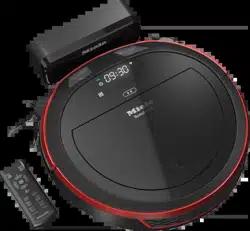
en-US - Appliance overview
15
B – Base station and remote control
Base station
a
Cable rewind
b
Cord guides
c
Electrical plug socket (not visible in illustration)
d
Charging contacts
Remote control
a
Power button (switch on and off)
b
Base button (direct vacuum cleaner to base station)
c
OK confirmation button with arrows
d
Start/pause button (start/stop vacuuming)
e
Mode button (select the cleaning mode)
f
WIFI button (activate/deactivate WiFi)
g
Clock button (set time of day)
h
Timer button (set the timer)
i
Mute button (activate/deactivate acoustic signals)
j
Climb button (reduce crossing-over height)
k
Battery compartment (at the back)
C – Dust box
a
Handle
b
Cleaning tool with wiper
c
Wiper button
d
Lid
e
Release buttons for the lid
f
Dust compartment
g
Pre-filter
h
Exhaust filter
i
Exhaust filter compartment lid

en-US
16
Functions and features of the
robot vacuum cleaner
The robot vacuum cleaner is suitable for
the daily cleaning of hard floors, wall-
to-wall carpets, and short-pile rugs and
can also be used on deep-pile rugs.
Please observe the flooring manufac-
turer’s cleaning and care instructions.
The robot vacuum cleaner is equipped
with cameras and sensors. It can vac-
uum all accessible areas efficiently and
independently.
Included accessories
- Remote control/2 batteries
- 2 universal side brushes with 20 arms
(for hard floors and short-pile rugs)
- 2 carpet side brushes with 6 arms
(for deep-pile rugs)
- Power-supply unit with electrical plug
- Country-specific power adapter
- Base station and adhesive holder
- Magnetic strip
Connection
Illustrations 1–12 for this section are
on the last fold-out page at the end of
these operating instructions.
Inserting the side
brushes(Figs.01+02)
Place the robot vacuum cleaner up-
side down on a level, clean surface.
If the area to be vacuumed with hard
floors, carpeted flooring, and short-
pile rugs, use the two 20-arm univer-
sal side brushes. For deep-pile rugs,
the two 6-arm carpet side brushes are
more suitable.
Select the appropriate pair of side
brushes.
Press the two side brushes carefully
onto their pins until they audibly en-
gage. Pay attention to the L and R
markings.
Removing the protective film(Fig. 03)
Remove the protective film from the
base station and from the robot vac-
uum cleaner display.
Remove the protective strip from the
depression of the storage compart-
ment.
Placing the batteries in the remote
control(Fig. 04)
Observe the instructions and safety
notes regarding the handling of batter-
ies found in the “IMPORTANT SAFETY
INSTRUCTIONS” section at the begin-
ning of these operating instructions.
Remove the battery-compartment
cover.
en-US
17
Insert the 2 batteries supplied. Make
sure the polarity is correct.
Close the battery-compartment
cover.
Switching on the robot vacuum
cleaner(Fig. 05)
Slide the I/0 switch on the side of the
robot vacuum cleaner to the I posi-
tion.
The rechargeable battery status indica-
tor lights up in the control field. The ro-
bot vacuum cleaner will switch into
standby after approx. 60seconds. The
robot vacuum cleaner is reactivated by
pressing any button on the remote con-
trol or one of the sensor controls in the
control field.
Connecting the base station
(Fig. 06–09)
Observe the instructions and safety
notes regarding the handling of the
base station and the power-supply
unit found in the “IMPORTANT
SAFETY INSTRUCTIONS” section at
the beginning of these operating in-
structions.
Place the base station on a level sur-
face against a free wall within easy
access of a power socket. Ensure
that there is an obstacle-free distance
of at least 5 ft (1.5m) in front and 1
1/2 ft (0.5m) to the right and left of
the base station (Fig. 06).
Insert the supplied electrical plug into
the socket at the back of the base
station. You can wind excess cord
around the cable rewind. Guide the
cord through one of the two cord
guides(Fig. 07).
Insert the country-specific power
adapter into the power-supply until it
audibly engages and then plug it into
the selected power outlet (Fig. 08).
An adhesive holder is included to per-
manently secure the base station to the
floor, preventing it from sliding around
(Fig. 09).
Insert the adhesive holder into the re-
cess provided on the underside of the
base station until the adhesive holder
clicks into place.
Remove the blue protective film from
the adhesive strips.
Place the base station in its chosen
location and press down firmly on the
base station.
You can remove the base station at
any time; the adhesive holder remains
on the floor.
If you want to remove the adhesive
holder from the floor, pull on the two
pulling-off devices.
Charging the battery(Fig. 10)
The rechargeable battery is supplied
not fully charged. Before using for the
first time, it must be fully charged while
the robot vacuum cleaner is switched
on (switch I/0 to I).
The battery can also be charged when
the robot vacuum cleaner is switched
off (switch I/0 to 0). In this case, the
robot vacuum cleaner indicators will
not react.
Connect the robot vacuum cleaner
correctly to the charging contacts on
the connected base station.
en-US
18
As the rechargeable battery charges,
the status indicator flashes in the con-
trol field.
The charging process takes up to
3hours for the Scout RX3 and up to
4hours for the Scout RX3 Runner and
Scout RX3 Home Vision HD.
You can then vacuum for up to 85min-
utes* with the Scout RX3 and up to
170minutes* with the Scout RX3 Run-
ner and Scout RX3 Home Vision HD.
* measured in the Silent cleaning mode,
in a standard environment according to
IEC62929:2014
Rechargeable-battery status indica-
tor in the control field
Red Charged capacity
approx. 0–20%
Orange Charged capacity
approx. 20–50%
Green Charged capacity
approx. 50–100%
Setting the time of day(Fig. 11)
(also possible via a mobile device; see
“Miele@home”)
You can choose between a 24-hour
clock and a 12-hour a.m./p.m. clock.
Use the remote control to set the time
of day.
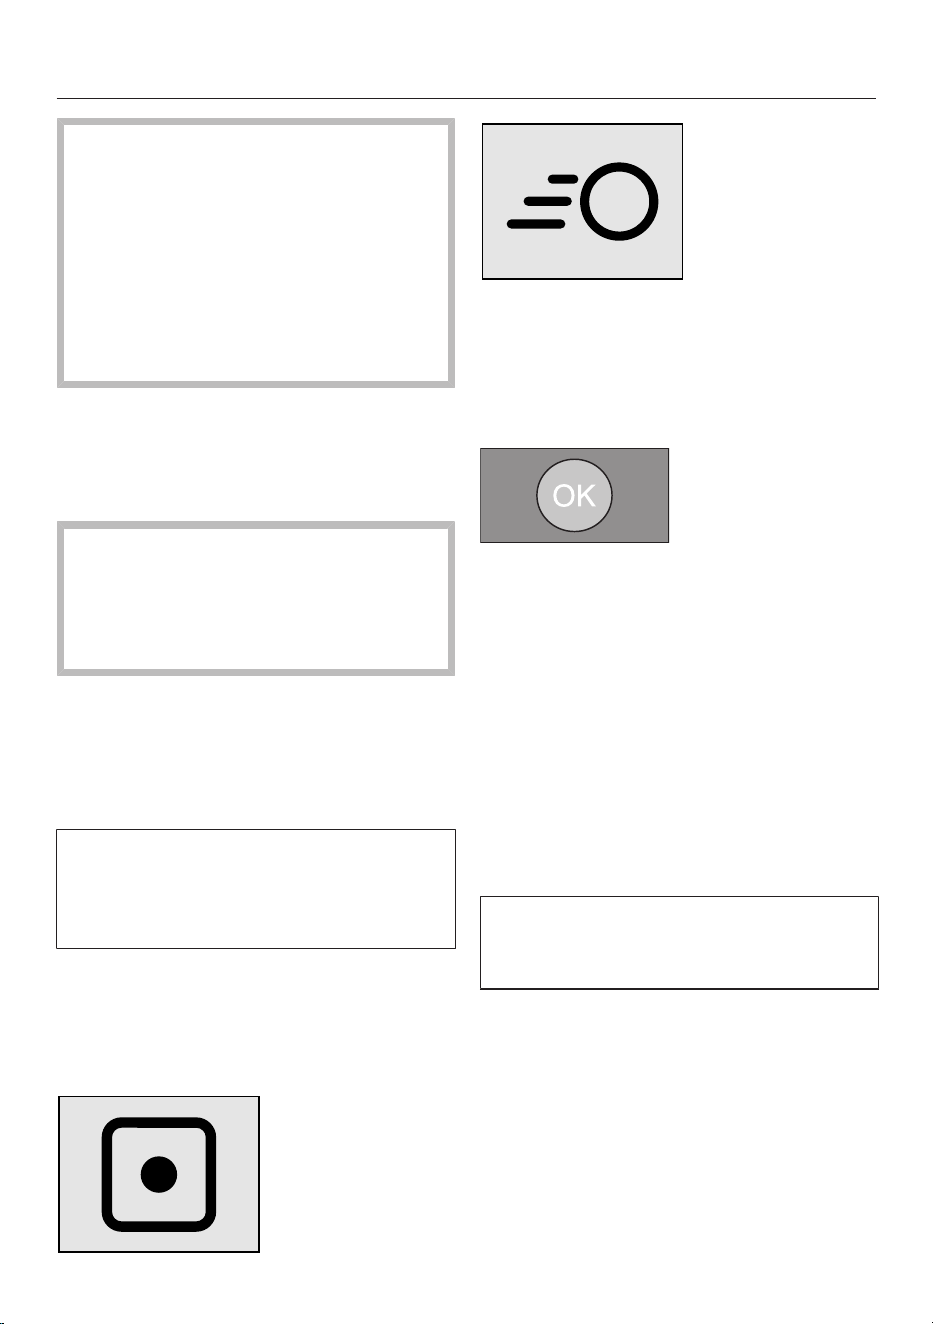
Briefly press the Clockbutton.
24h will appear in the display.
Press the OKbutton if you want a 24-
hour clock.
Press the + button if you want a 12-
hour a.m./p.m. clock and confirm
12h with OK.
The hour display flashes in the display.
Press the + or - direction button to
set the current hour.
Press the OK button to confirm your
selection.
The minute display flashes in the dis-
play.
Press the + or - direction button to
set the current minutes.
Press the OK button to confirm your
selection.
If you want to alter the time of day, pro-
ceed as described above. Press the
Clockbutton for 3seconds.
Defining the area to be vacuumed
(Fig. 12)
(also possible via a mobile device; see
“Miele@home”)
You can define any areas which the ro-
bot vacuum cleaner should not have
access to.
The robot vacuum cleaner is 3
1/3" (85mm) high.
Any items under which vacuuming is
required should have a minimum
clearance of 3 7/16" (87mm).
Place the magnetic strip supplied
with the groove facing downward on
the floor.
The robot vacuum cleaner will not cross
over the magnetic strip.

en-US
19
Adhesive strips are supplied for perma-
nent fixing. Additional magnetic strips
are available to order from the Miele
webstore.
Use
Always observe the robot vacuum
cleaner during the first cleaning ses-
sion in a new environment and after
making changes in your home. Re-
move any problematic obstacles or
section off the relevant areas with
the magnetic strip or using the con-
troller on a mobile device (see “Con-
nection – Defining the area to be
vacuumed”). Check whether steps
and drops in height are recognized
properly.
Your robot vacuum cleaner is equipped
with an integrated WiFi module. You
can view status information or execute
control commands using a mobile de-
vice (tablet PC or smartphone).
If you would like to control the robot
vacuum cleaner using a mobile device,
please read “Miele@home”.
Operation of the robot vacuum cleaner
via remote control and the control field
is described later in this section.
Switching on and off
Press the Powerbutton on the re-
mote control or any sensor control in
the control field.
Starting cleaning
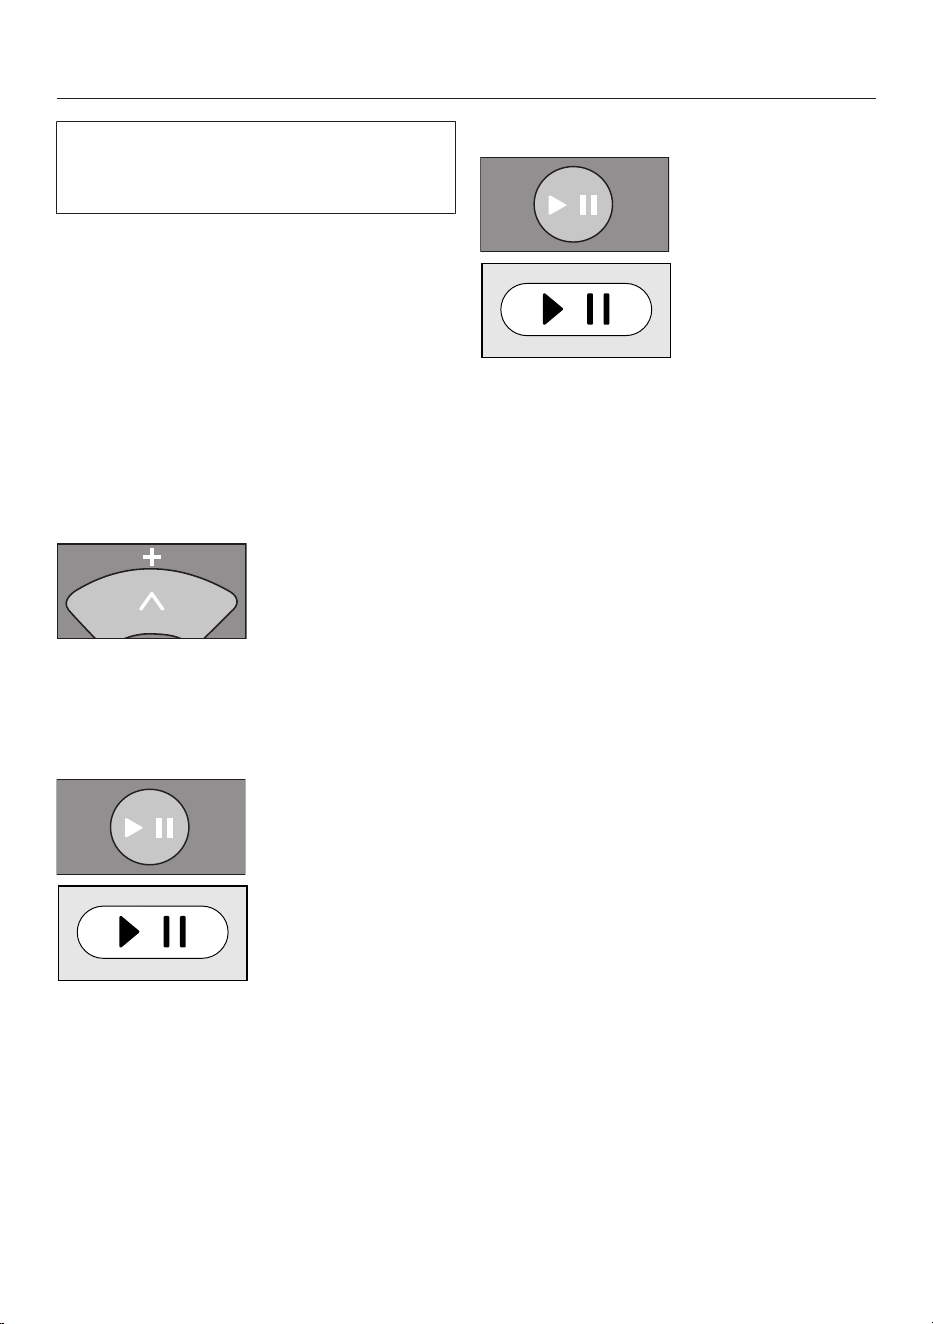
There are 2 ways to start vacuuming:
Option 1 (remote control)
Press the button.
Option 2 (control field)
Press the sensor field.
The area to be vacuumed will be
cleaned.
The robot vacuum cleaner always
cleans for at least 5minutes, regardless
of the size of the surface to be vacu-
umed.
Finishing vacuuming if vacuuming
started from the base station
The robot vacuum cleaner will return to
the base station and recharge.
If the battery is low, the robot vacuum
cleaner will return to the base station
and recharge. II will appear in the dis-
play. The robot vacuum cleaner will
then carry on vacuuming.
Finishing vacuuming if vacuuming
started from somewhere in the room
The robot vacuum cleaner will return to
its starting point and switch into
standby after approx. 60seconds.
en-US
20
The robot vacuum cleaner will stand
still when there is low battery capacity.
Charge the robot vacuum cleaner.
Vacuuming manually
You can use the direction buttons on
the remote control to vacuum a particu-
lar area of the room.
While the robot vacuum cleaner is
vacuuming, press and hold one of the
direction buttons.
The robot vacuum cleaner will turn in
the desired direction until you let go of
the direction button.
Press and hold the + direction button.
The robot vacuum cleaner will travel in
the desired direction and continue to
vacuum.
Press the button on the remote
control or the sensor control in the
control field.
The original vacuuming process will
continue running.
Interrupting vacuuming
Press the button on the remote
control or the sensor control in the
control field.
The robot vacuum cleaner stops.
Press the button or the sensor control
again to continue vacuuming.
If you lift the robot vacuum cleaner off
the floor during a pause and then place
it down somewhere else, rLOC will ap-
pear in the display when you activate it
again. The robot vacuum cleaner will
turn around and compare its new loca-
tion with its saved map data.
If the data is compatible, the robot vac-
uum cleaner will start cleaning and not
go over surfaces that have already been
cleaned.
If the data is not compatible, the robot
vacuum cleaner will not move.
rLOC in the display can only be can-
celed by pressing the button or the
sensor control several times.
Manual navigation (without vacuum-
ing)
You can use the direction buttons on
the remote control to direct the robot
vacuum cleaner to a specific area of the
room.
Press and hold one of the direction
buttons.
en-US
21
The robot vacuum cleaner will travel in
the desired direction without vacuum-
ing.
You cannot direct the robot vacuum
cleaner manually to the base station in
order to recharge it.
Directing the robot vacuum cleaner
to the base station
(only possible when vacuuming was
started from the base station)
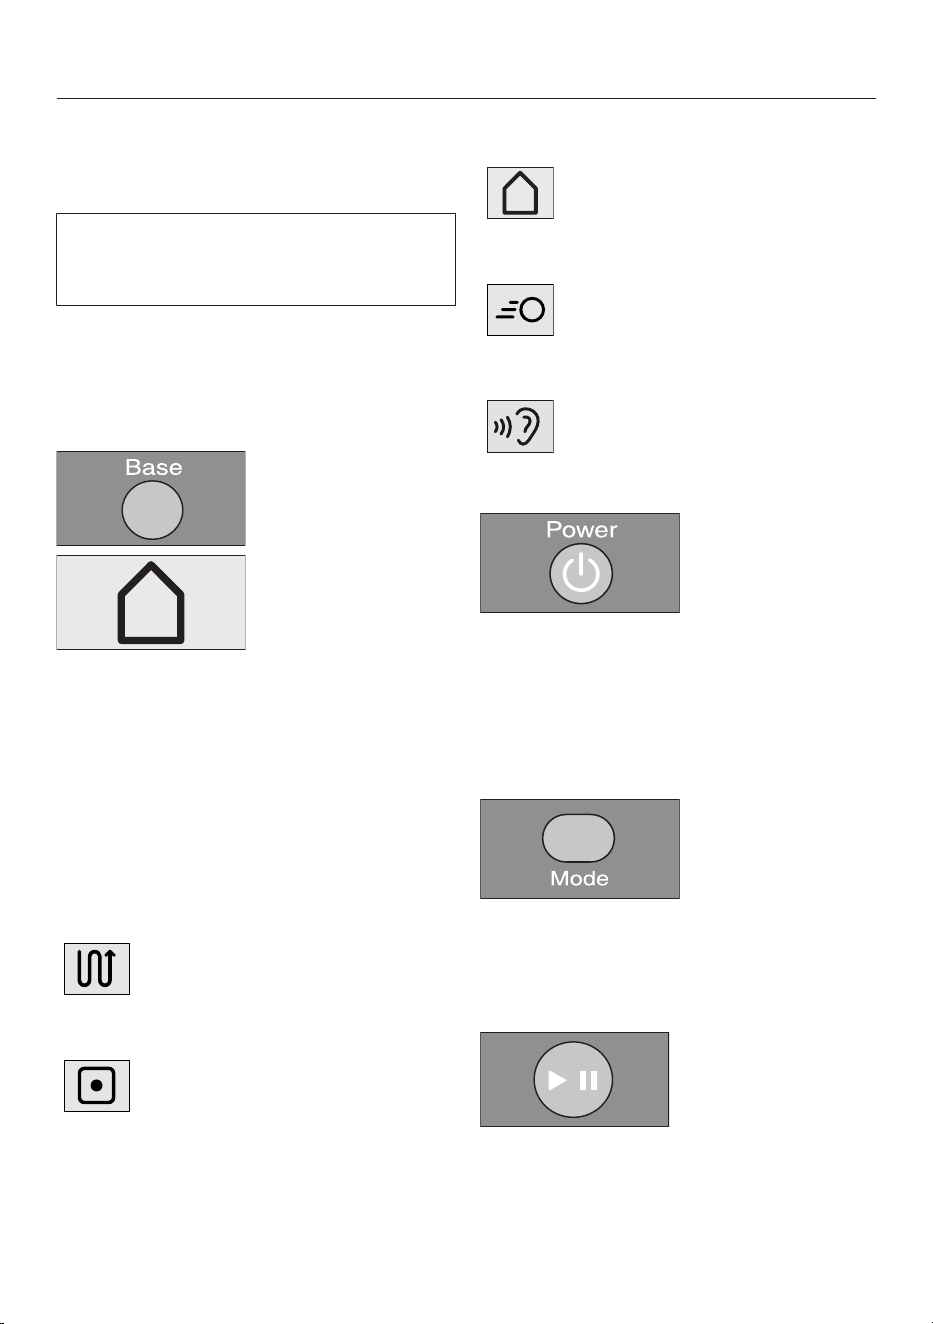
Press the Basebutton on the remote
control or the Basesensor control in
the control field.
The robot vacuum cleaner will travel to
the base station and recharge.
Operating modes
There are 5 operating options:
Auto
Standard vacuuming for nor-
mally soiled flooring.
Spot Vacuuming of an area approx.
6 ft x 6 ft (1.8mx1.8m)
around the selected starting
point of the robot vacuum
cleaner.
Base
Directing the robot vacuum
cleaner to the base station.
Turbo
For vacuuming lightly soiled
flooring with a short vacuum-
ing duration.
Silent
Energy-saving vacuuming
with low noise.
Selecting the operating mode
Press the Power button on the re-
mote control.
There are 2 ways of selecting the oper-
ating mode:
Option 1 (remote control)
Press the Modebutton repeatedly
until the symbol for the operating
mode you want lights up in the con-
trol field.
Press the button to start vacuum-
ing.
Option 2 (control field)
en-US
22
Press the sensor control for the oper-
ating mode you want to use.
Press the sensor control in order to
start vacuuming.
Quitting the current operating mode
Press the Powerbutton on the re-
mote control or the sensor control
in the control field for at least 3sec-
onds.
The robot vacuum cleaner will switch
into standby after approx. 60seconds.
You can switch the robot vacuum
cleaner into standby before 60sec-
onds is up by pressing the Power but-
ton again.
The robot vacuum cleaner is reactivated
by pressing any button on the remote
control or one of the sensor controls in
the control field.
Setting the timer
(only possible if the clock has been set)
If you would like the robot vacuum
cleaner to start at the same time every
day, you can save the start time and the
operating mode you want to memory.
The robot vacuum cleaner can also
vacuum in the dark. However, please be
aware that vacuuming may be less thor-
ough. The cameras require light in order
to navigate unobstructed.
Use the remote control to set the timer.
Press the Timerbutton briefly.
The timerindicator flashes in the
control field and the hour display
flashes in the display.
Press the + or - direction button to
set the hour you want.
Press the OK button to confirm your
selection.
The timerindicator flashes in the
control field and the minute display
flashes in the display.
en-US
23
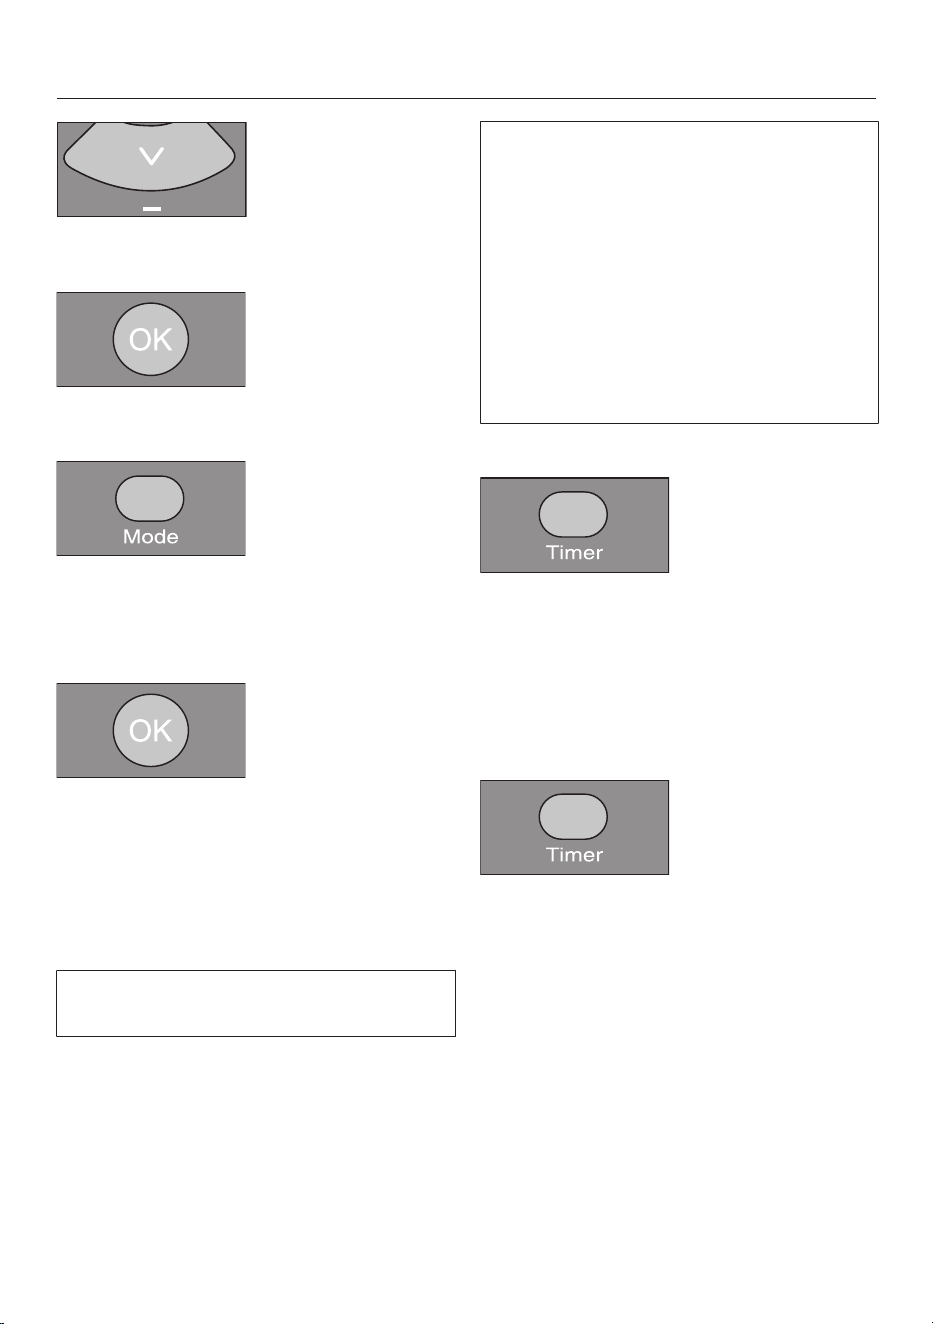
Press the + or - direction button to
set the minutes you want.
Press the OK button to confirm your
selection.
Press the Modebutton repeatedly
until the symbol for the operating
mode you want flashes in the control
field.
Press the OK button to confirm your
selection.
The settings are shown for approx.
3seconds in the control field. The robot
vacuum cleaner will now start to vac-
uum at the same start time each day.
If the timerindicator is lit up in the
control field, the timer is activated.
To alter the entries, proceed as de-
scribed above. Then press the
Timerbutton for 3seconds.
Tip: you can save up to 7 individual
“start time – operating mode” combi-
nations if you set the timer using a
mobile device; see “Miele@home”.
Please note that the robot vacuum
cleaner always follows the saved com-
mands which were set most recently,
regardless of whether the settings
were configured using the remote con-
trol, control unit, or with a mobile de-
vice.
Deactivating the timer
Press the Timer button on the remote
control briefly.
The Timer indicator goes out in the
control field.
Activating the timer/displaying a set
start time
Press the Timer button on the remote
control briefly.
The timerindicator lights up in the
control field and the set start time is
shown briefly in the display. The robot
vacuum cleaner will start to vacuum at
the set start time.
Deactivating the acoustic signals
Acoustic signals are set as standard.
You can deactivate and then reactivate
them.

en-US
24
Press the Mute button on the remote
control briefly.
OFFwill appear in the display briefly.
Acoustic signals for fault messages
cannot be deactivated.
Reducing the maximum crossing
over height
The robot vacuum cleaner is set to
overcome height differences of up to
3/4" (17mm) as standard. It is therefore
able to vacuum carpets, move over
door thresholds, etc.
If you would like to reduce this height
(down to approx. 1/4" (6mm)) in order
to protect the legs of chairs, tables, or
lamps, for example, you can deactivate
the factory default setting.
Press the Climb button on the remote
control briefly.
LO will appear in the display.
Press the Climbbutton again briefly if
you want to reactivate the maximum
crossing over height of 3/4" (17mm).
HIwill appear in the display.
Miele@home*
Your robot vacuum cleaner is
equipped with an integrated WiFi
module for this purpose.
Please note that, despite the manufac-
turer’s extremely high security stan-
dards, there may be data security
risks for the user whenever networked
appliances are used. For this reason,
we offer you the option of removing
the WiFi module from the robot vac-
uum cleaner. You can find instructions
for this at the end of this section; see
“Removing the WiFi module”.
* Additional digital offer from Miele & Cie. KG. All smart
applications are made possible with the Miele@home
system. The range of functions can vary depending on
the model and the country.
To use this feature, you will need:
- a WiFi network
- the Miele Scout app
- a Miele user account You can create
a user account via the Miele Scout
app.
The Miele Scout app will guide you as
you connect your robot vacuum cleaner
to your home WiFi network.
Once your robot vacuum cleaner is
connected to your WiFi network, you
can use the Miele Scout app for a num-
ber of actions, including the following:
- controlling your robot vacuum
cleaner remotely
- accessing status information
- using the video function (for Scout
RX3 Home Vision HD)
Connecting your robot vacuum cleaner
to your WiFi network will increase en-
ergy consumption, even when the robot
vacuum cleaner is switched off.
en-US
25
Make sure that you have sufficient
signal strength for your WiFi network
in the rooms where the robot vac-
uum cleaner will be vacuuming.
Availability of the WiFi connection
The WiFi connection shares a frequency
range with other appliances (including
microwave ovens and remote control
toys). This can cause sporadic or even
complete connection failures. There-
fore, the availability of featured func-
tions cannot be guaranteed.
Miele@home availability
The ability to use the Miele Scout app
depends on the availability of the
Miele@home service in your country.
The Miele@home service is not avail-
able in every country.
For information about availability,
please visit www.miele.com.
Downloading the Miele Scout app
The Miele Scout app app is available to
download free of charge from the Apple
App Store
®
or from the Google Play
Store™.
Download the Miele Scout app to a
mobile device (tablet PC or smart-
phone).
For data protection reasons, you have
to connect each mobile device to the
robot vacuum cleaner individually.
Activating the network function of
the robot vacuum cleaner
In order to connect your robot vacuum
cleaner to your WiFi network, you must
first activate the network function. The
network function is deactivated at the
factory.
There are 2 ways to activate the net-
work function:
Option 1 (remote control)
Press the WIFI button.
The WiFiindicator lights up in the
control field.
Option 2 (control field)
Press the Basesensor control for at
least 2seconds.
The WiFiindicator lights up in the
control field.
Start the Miele Scout app and set up
a Miele user account.
You can connect your mobile device di-
rectly to the robot vacuum cleaner or
connect via your WiFi network.
en-US
26
Note
You can connect the robot vacuum
cleaner directly to a mobile device
without a WiFi network.
To do this, connect the mobile device
to the robot vacuum cleaner’s WiFi.
Use the robot vacuum cleaner’s serial
number as the WiFi password. You
can find the serial number on a sticker
in the storage compartment and on
the data plate on the underside of the
robot vacuum cleaner. Follow the in-
structions in the Miele Scout app.
Follow the user-navigation instruc-
tions in the Miele Scout app.
Please note that the robot vacuum
cleaner always follows the save com-
mands which were set most recently,
regardless of whether the settings
were configured using the remote con-
trol, control field, or with a mobile de-
vice.
Video function
(for Scout RX3 Home Vision HD, use
the Miele Scout app)
The camera on the right at the front of
the robot vacuum cleaner sends en-
crypted images in real time to the se-
lected mobile device. Transmission
quality is dependent upon the speed of
the Internet connection in your home
and the speed of your mobile device.
The video-function indicator in the con-
trol field flashes red when images are
being sent.
The live video is only shown in the Miele
Scout app; it is not saved.
The privacy and personal living space
of third parties must be respected
when using the video function. The ro-
bot vacuum cleaner with video func-
tion should therefore only be used in
your own home. Anyone else present
should be informed before you start to
use the video function.
We recommend cleaning both cameras
regularly with a soft, dry cloth.
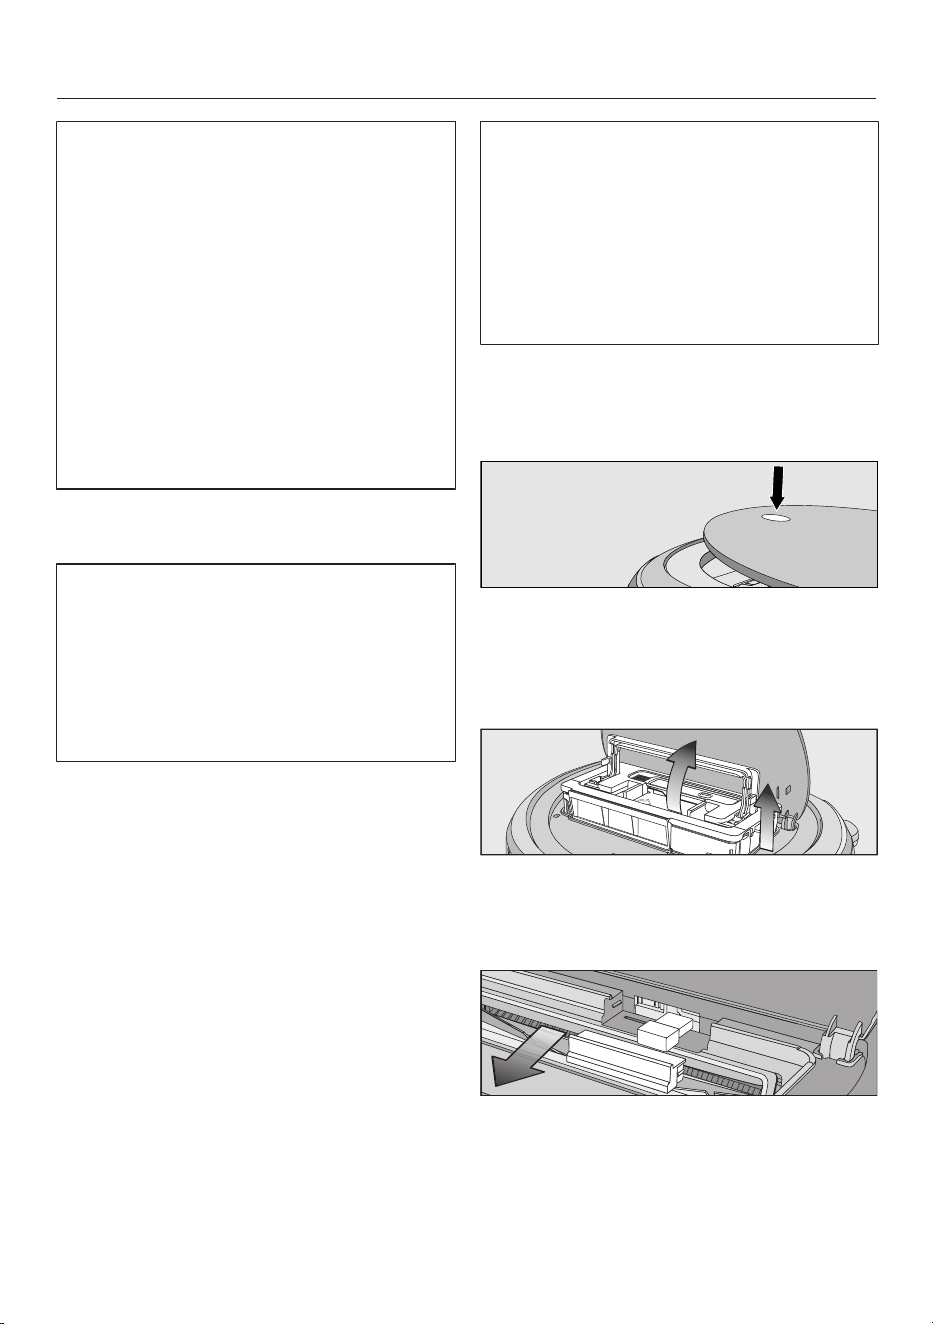
Removing the WiFi module
Press the depression at the top of the
robot vacuum cleaner.
The lid of the storage compartment will
open.
Unlatch the dust box by lifting the
handle upward.
Remove the dust box.
Pull the cover out from the front.
Remove the WiFi module.
Put the cover back on.
en-US
27
Maintenance
Risk of injury caused by rotating
roller brush.
The robot vacuum cleaner may start
without warning while maintenance
work is being carried out.
Switch the robot vacuum cleaner off
before doing any maintenance work.
To switch it off, slide the I/0 switch
on the side of the robot vacuum
cleaner to the 0 position.
It is recommended to use only genuine
Miele accessories bearing the “ORIGI-
NAL Miele” logo on the packaging.
Only these will guarantee the optimum
suction power of your robot vacuum
cleaner and the best possible cleaning
results.
Please note that faults and damage
caused by use of accessories which
do not bear the “ORIGINAL Miele”
logo on their packaging are not cov-
ered by the robot vacuum cleaner
warranty.
Optional accessories
Original Miele accessories are available
from the Miele Webshop, Miele Cus-
tomer Service, and your Miele dealer.
Original Miele accessories are identified
by the “ORIGINAL Miele” logo on the
packaging.
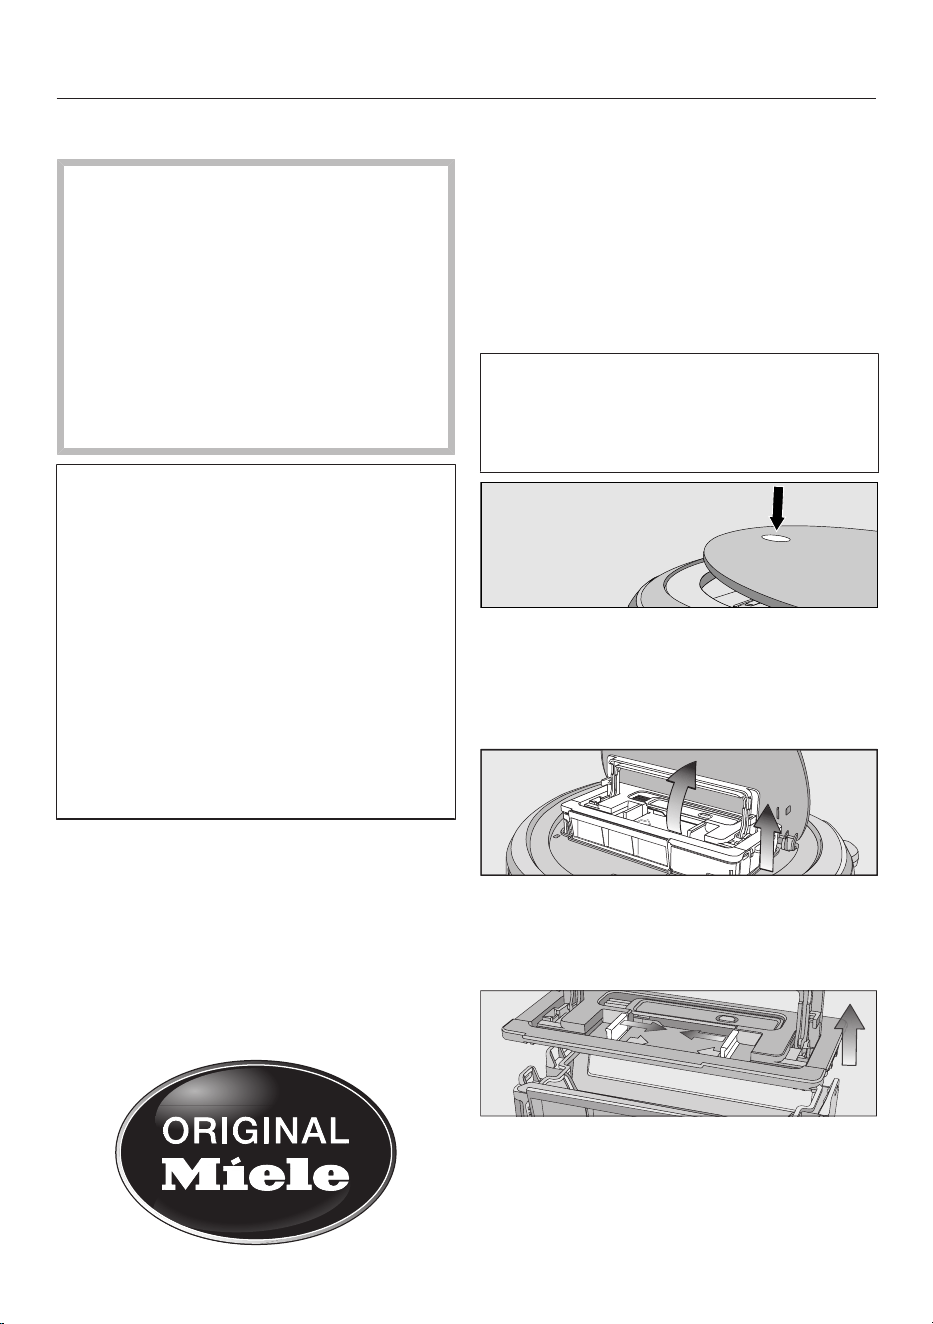
Emptying the dust box
Empty the dust box of the robot vac-
uum cleaner after each use in order to
achieve the best possible cleaning re-
sults.
At the very latest, you must empty the
dust box when “l_ _l” appears in the
display running from bottom to top.
The contents of the dust box can be
disposed of with normal household
waste, providing they consist of gen-
eral household dust only.
Press the depression at the top of the
robot vacuum cleaner.
The lid of the storage compartment will
open.
Unlatch the dust box by lifting the
handle upward.
Remove the dust box.
Press one or both release buttons in
the direction of the arrow and remove
the dust-box lid.
Empty the dust box.

en-US
28
Replace the lid and close the dust
box, making sure it clicks into place.
Place the dust box into the robot vac-
uum cleaner with the handle lifted up
and latch it into place by pushing the
handle back down.
Close the storage-compartment lid
and press down on the depression in
order to lock it.
Cleaning the dust box
Clean the dust box as required.
A cleaning tool is located at the top of
the dust box lid.
Remove the cleaning tool.
Clean the dust box and the underside
of the lid using the cleaning tool.
Cleaning the exhaust filter
Clean the exhaust filter as required.
The exhaust-filter compartment is lo-
cated in the dust box.
Remove the lid from the dust box.
Fold out the filter assembly from the
dust box.
Remove the pre-filter and clean it as
required using the cleaning tool.
Release the exhaust filter and clean it
using the cleaning tool.
Reinstall the exhaust filter in the
cover.
Place the pre-filter on the exhaust fil-
ter.
The filter assembly is now complete.
Carefully reinstall the filter unit on the
dust box and clip the filter unit into
position.
The exhaust filter must be replaced
with a new one after approx.
6months in order to achieve the best
possible cleaning results.
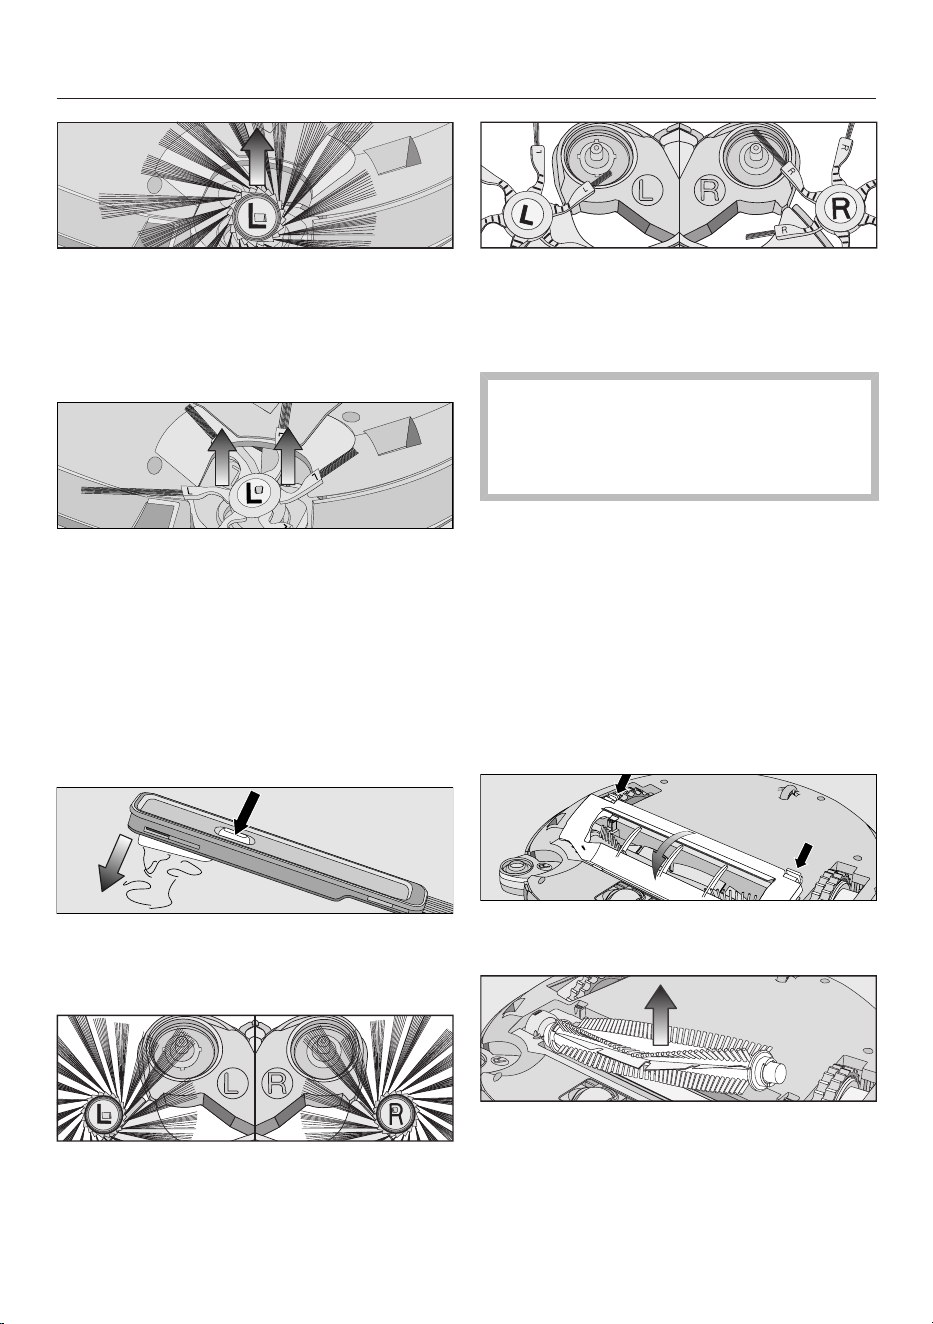
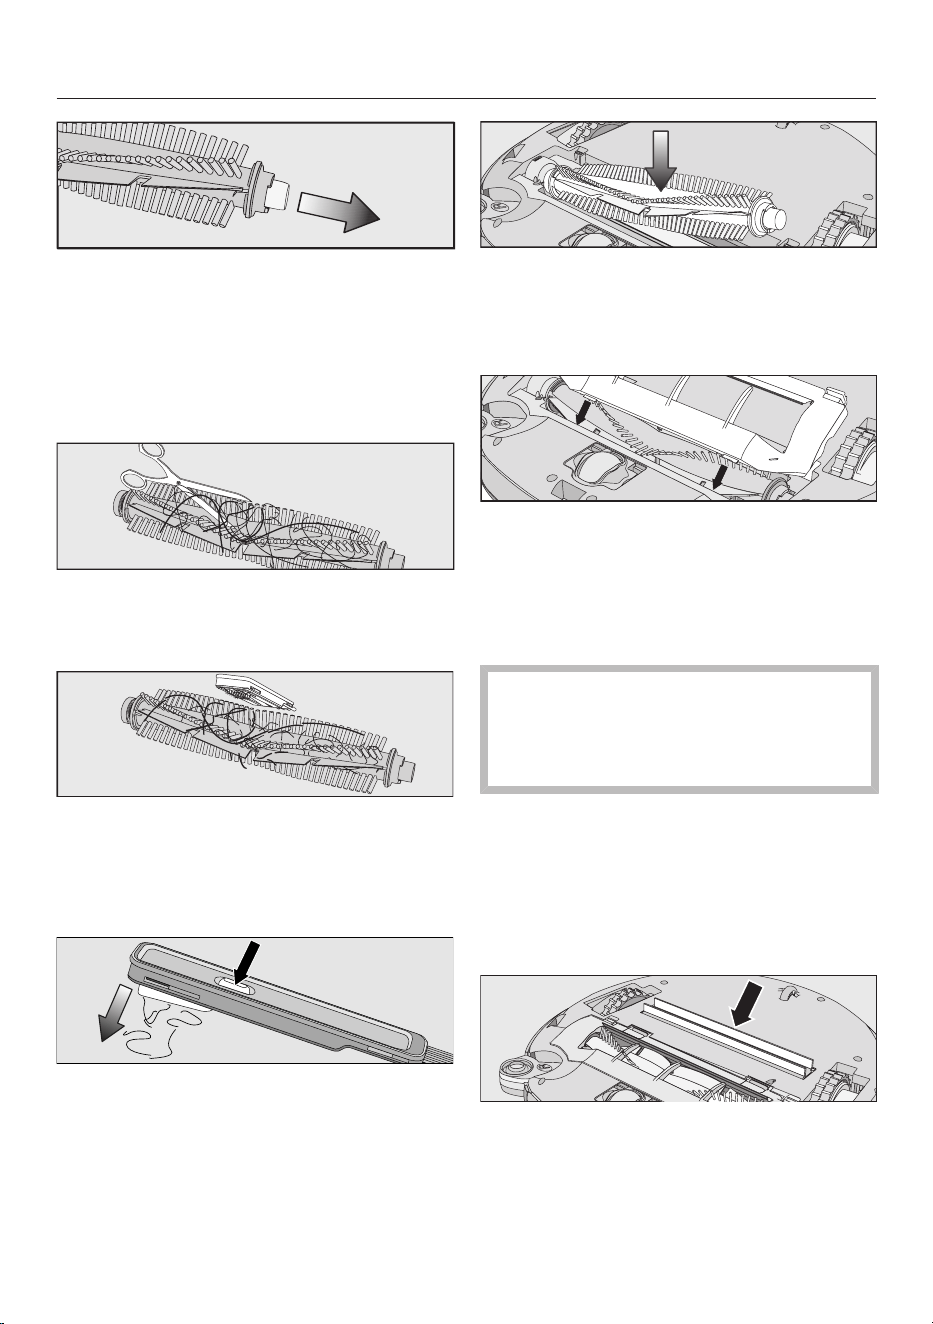
Cleaning the side brushes
Clean the side brushes as required. For
this you will require the cleaning tool
which is located at the top of the dust
box lid.
Place the robot vacuum cleaner up-
side down on a level, clean surface.
en-US
29
20-arm universal side brushes: take
hold of opposing side brushes (one
long and one short bunch per hand)
and pull them upward to remove
them.
6-arm carpet side brushes: take hold
of opposing elastic side-brush hold-
ers (one holder per hand) and pull
them upward to remove them.
Remove threads and hair using the
wiper which is located on the bottom
of the cleaning tool.
Hold the wiper over a garbage can.
Press the button at the top of the
wiper several times until all threads
and hair have fallen out.
Press the two cleaned side brushes
carefully onto their pins until they au-
dibly engage. Take care to comply
with the markings L and R.
In order to continue to achieve the
best possible cleaning results, re-
place the pair of side brushes after
approx. 1year.
Cleaning the roller brush
Clean the roller brush as required. This
will require the cleaning tool which is lo-
cated at the top of the dust-box lid.
Place the robot vacuum cleaner up-
side down on a level, clean surface.
Remove both side brushes; see
“Cleaning the side brushes”.
Unlatch the roller-brush cover and re-
move the cover.
Remove the roller brush.
en-US
30
Pull the bearing cover off the roller
brush and remove any threads or
hairs that have wound themselves
around the bearing.
Reinstall the bearing cover, making
sure it clicks into position.
Use a pair of scissors to cut any
threads or hairs that have wound
themselves around the roller brush.
Remove the threads and hair using
the wiper which is located on the bot-
tom of the cleaning tool.
Hold the wiper over a garbage can.
Press the button at the top of the
wiper several times until all threads
and hair have fallen out.
Reinstall the roller brush with the
bearing cover attached. Make sure
that the side with the pointed end is
inserted into the corresponding slot.
Carefully reinstall the roller-brush
cover on both sides, making sure it
clicks into position.
Reinstall the side brushes; see
“Cleaning the side brushes”.
In order to continue to achieve the
best possible cleaning results, re-
place the roller brush with a new one
after approx. 1year.
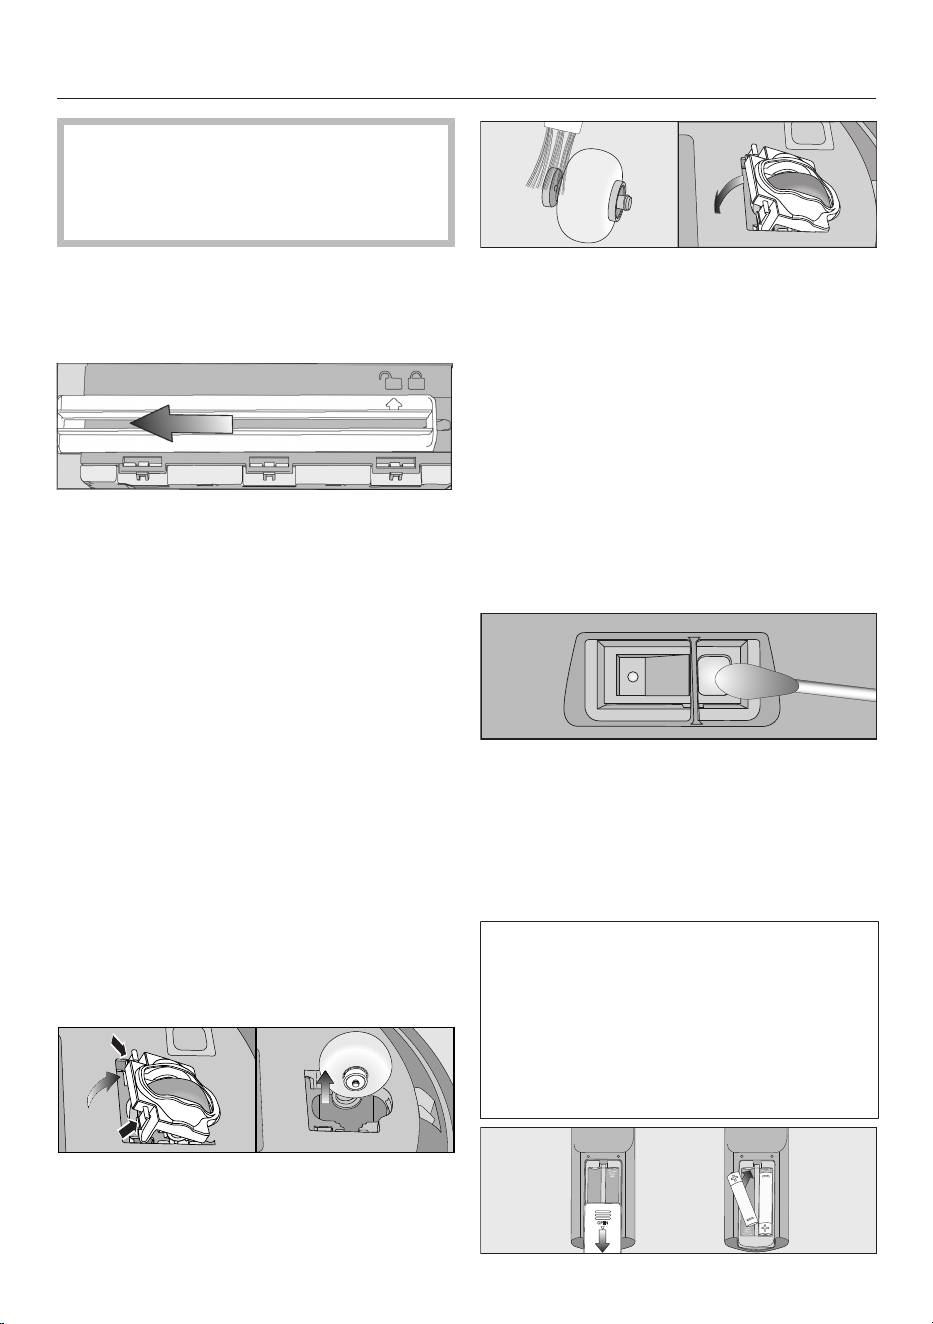
Cleaning the dust-box seals
Clean the seals on the bottom of the
dust box as required.
Place the robot vacuum cleaner up-
side down on a level, clean surface.
Wipe the seals with a slightly damp
cloth to clean them.
en-US
31
In order to continue to achieve the
best possible cleaning results, re-
place the seal unit with a new one af-
ter approx. 1year.
Replacing the seal unit on the dust
box
Remove the dust box.
Unlatch the seal unit from the under-
side of the dust box so that the arrow
points to the symbol.
Remove the seal unit.
Insert the new seal unit so that the ar-
row points to the symbol.
Lock the seal unit, making sure it
clicks into position.
The arrow points to the symbol.
Cleaning the front wheel
Clean the front wheel as required. For
this you will require the cleaning tool
which is located at the top of the dust
box lid.
Place the robot vacuum cleaner up-
side down on a level, clean surface.
Unclip the cover.
Remove the front wheel.
Remove any threads and hair and
clean the front wheel, the cover, and
the slot depression using the cleaning
tool.
Refit the front wheel and close the
cover making sure it clicks into posi-
tion.
Cleaning the sensors
Clean the sensors as required.
Place the robot vacuum cleaner up-
side down on a level, clean surface.
Clean the sensors carefully using a
dry cotton swab.
Replacing batteries in the remote
control
2 batteries (AAA, 1.5V) are required.
Observe the instructions and safety
notes regarding the handling and dis-
posal of batteries found in the “IM-
PORTANT SAFETY INSTRUCTIONS”
and “Caring for the environment” sec-
tions at the beginning of these operat-
ing instructions.
en-US
32
Remove the battery-compartment
cover.
Replace the batteries. Make sure the
polarity is correct.
Close the battery-compartment
cover.
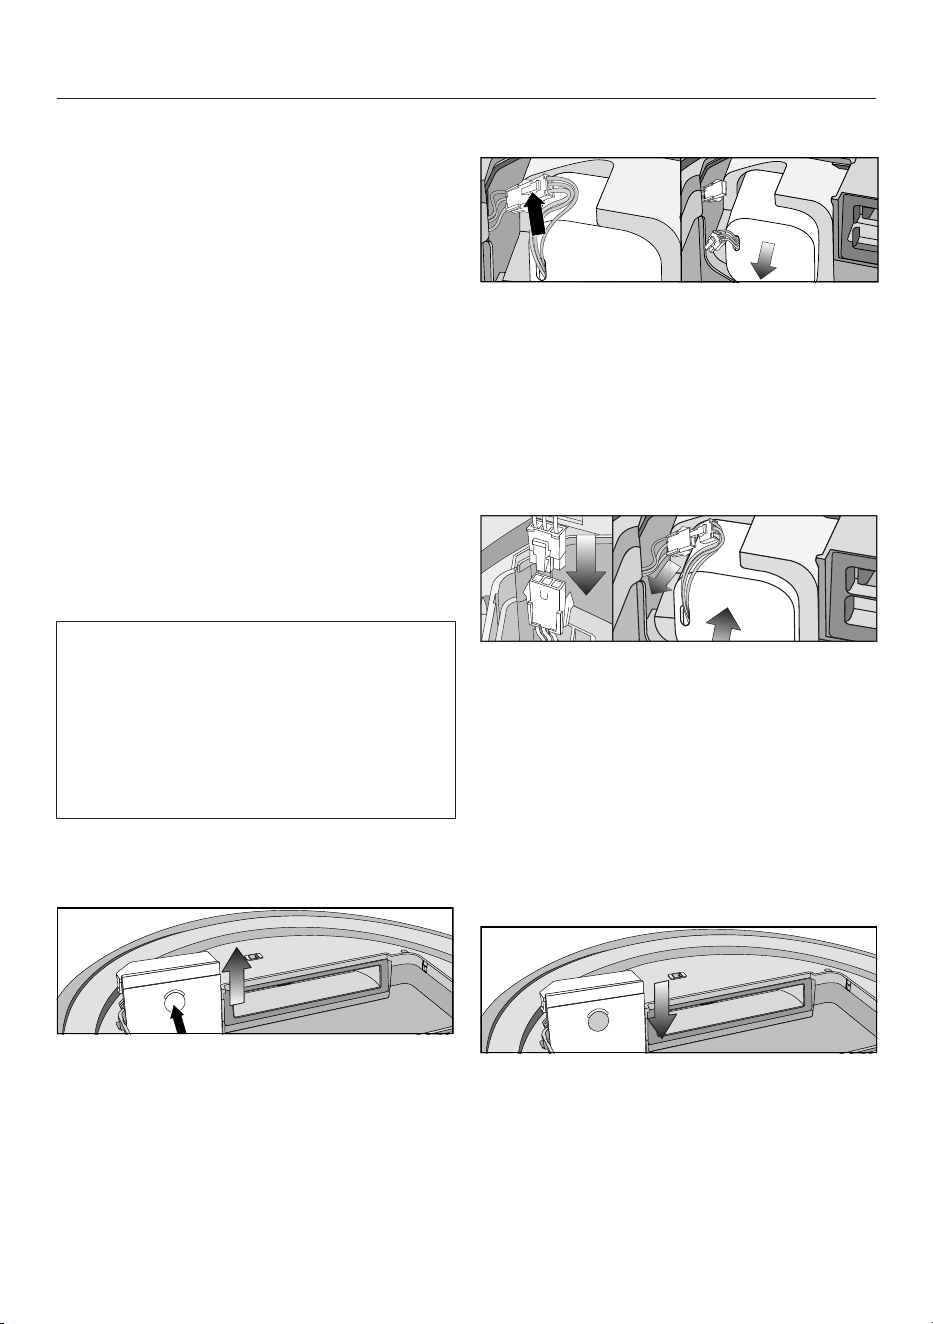
Replacing the rechargeable battery
An original Miele lithium-ion recharge-
able battery is required:
- YCR-M05 for Scout RX3
- YCR-MT12 for Scout RX3 Runner
and Scout RX3 Home Vision HD
The rechargeable-battery compartment
is located in the robot vacuum cleaner’s
storage compartment.
Observe the instructions and safety
notes regarding the handling and dis-
posal of rechargeable batteries found
in the “IMPORTANT SAFETY IN-
STRUCTIONS” and “Caring for the en-
vironment” sections at the beginning
of these operating instructions.
Open the storage compartment.
Remove the dust box.
Open the rechargeable-battery com-
partment by unlatching the cover up-
ward.
Scout RX3 (YCR-M05)
Carefully pull the cords so that the
plug connection is pulled out of the
slot.
Press the latch on the plug connec-
tion in order to release the electrical
plug.
Remove the rechargeable battery.
Insert the electrical plug of the new
rechargeable battery into the counter-
part, making sure it clicks into place.
Insert the rechargeable battery care-
fully, making sure it is properly posi-
tioned (see right-hand side of pic-
ture).
Store the plug connection in the side
slot.
Carefully reinstall the cover of the
rechargeable-battery compartment
and close it, making sure that it clicks
into place.
en-US
33
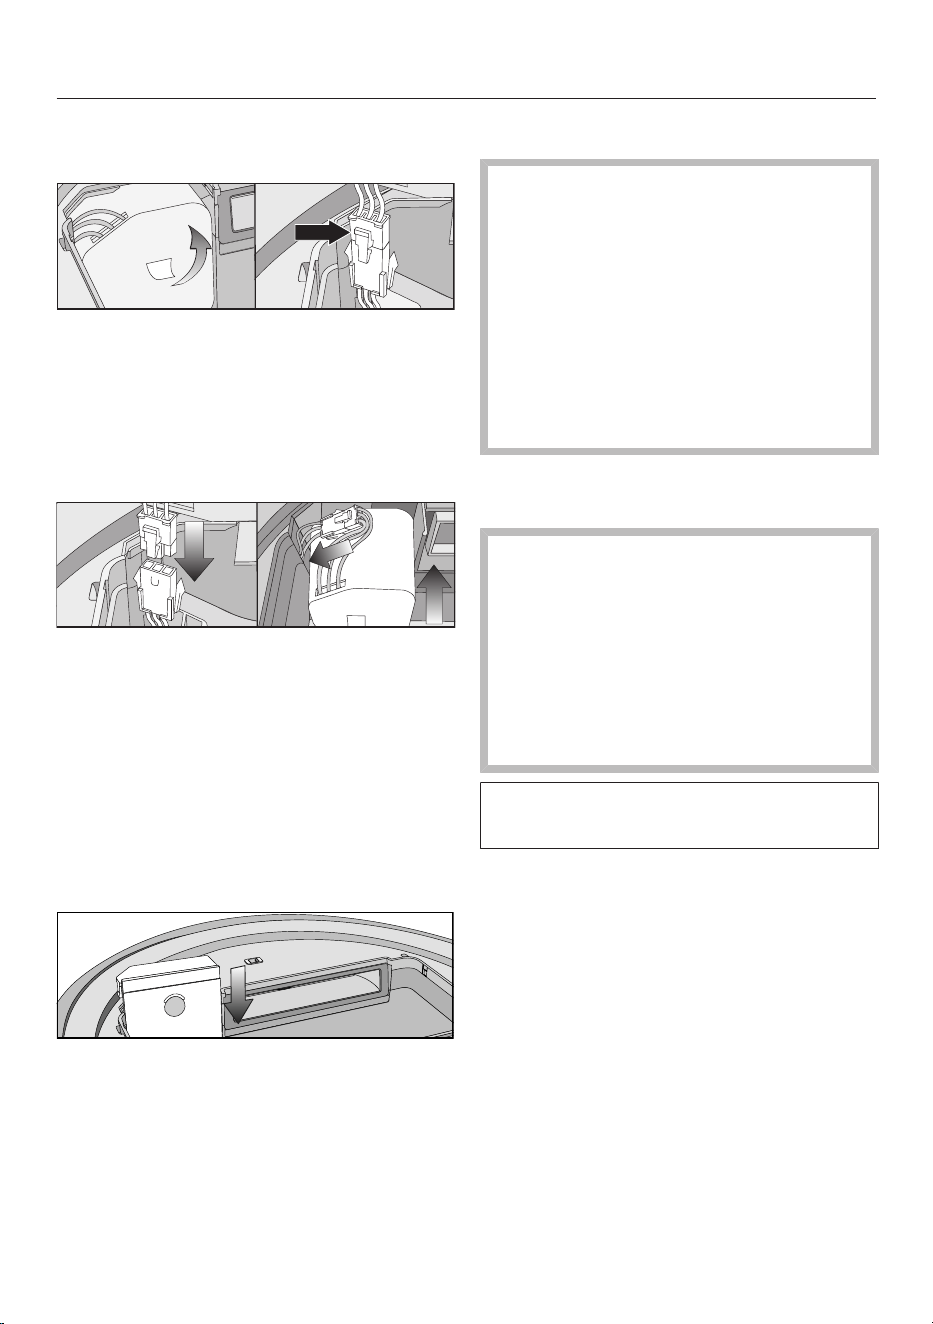
Scout RX3 Runner and Scout RX3
Home Vision HD (YCR-MT12)
Carefully remove the rechargeable
battery using the tab until the plug
connection is exposed.
Press the latch on the plug connec-
tion in order to release the electrical
plug.
Insert the electrical plug of the new
rechargeable battery into the counter-
part, making sure it clicks into place.
Store the plug connection in the side
recess.
Insert the rechargeable battery care-
fully, making sure it is properly posi-
tioned (see right-hand side of pic-
ture).
Carefully reinstall the cover of the
rechargeable-battery compartment
and close it, making sure that it clicks
into place.
Cleaning and care
Risk of injury caused by rotating
roller brush.
The robot vacuum cleaner may start
without warning while maintenance
work is being carried out.
Switch the robot vacuum cleaner off
before doing any maintenance work.
To switch it off, slide the I/0 switch
on the side of the robot vacuum
cleaner to the 0 position.
Robot vacuum cleaner and acces-
sories
Risk of electric shock from volt-
age.
If moisture gets into the robot vac-
uum cleaner and accessories, there
is a risk of electric shock.
Do not immerse the robot vacuum
cleaner or any accessories supplied
with it in water.
Observe the special cleaning instruc-
tions in the “Maintenance” section.
Clean the robot vacuum cleaner and all
plastic accessories with a commercially
available cleaner suitable for plastic.
Static charge can cause a build-up of
dust on the robot vacuum cleaner. This
should be removed using a soft, dry
cloth.
en-US
34
Damage due to unsuitable clean-
ing agents.
All surfaces are susceptible to
scratching. Contact with unsuitable
cleaning agents can alter or discolor
the external surfaces.
Do not use abrasive cleaning agents,
glass cleaning agents, all-purpose
cleaners, or oil-based care products.
Storage/factory default set-
tings
Storage
Switch the robot vacuum cleaner off
if it is not going to be used for a long
period of time. To switch it off, slide
the I/0 switch on the side of the ro-
bot vacuum cleaner to the 0 position.
If the robot vacuum cleaner is not going
to be used for an extended period of
time, make sure it is stored in a well
ventilated, cool place, but not at an am-
bient temperature below 0°C.
For optimum care, store the robot vac-
uum cleaner at half charge capacity
(rechargeable-battery status indicator
in the control field is orange).
Factory defaults
The robot vacuum cleaner can be reset
to its factory default settings. Have the
remote control in hand.
Press and hold the Spot and
Turbosensor controls in the control
field at the same time for at least
5seconds.
r:St will appear in the display.
Within the next 2seconds, press the
OKbutton on the remote control until
F:tr appears in the display.
The robot vacuum cleaner will restart
with its default factory settings restored.
Customer Service
Contact in case of fault
In the event of a fault which you cannot
remedy yourself, please contact your
Miele dealer or Miele Service.
Contact information for Miele Service
can be found at the end of this docu-
ment.
Warranty
For more information about warranty
conditions, please contact Miele Ser-
vice.
en-US
35
Frequently Asked Questions
With the help of the following guide minor faults in the performance of the ma-
chine, some of which may result from incorrect operation, can be remedied with-
out contacting the Service Department.
This guide may help you to find the reason for the fault, and how to correct it.
Risk of injury caused by rotating roller brush.
The robot vacuum cleaner may start without warning while problems are being
dealt with.
Switch the robot vacuum cleaner off before dealing with any problems. To
switch it off, slide the I/0 switch on the side of the robot vacuum cleaner to the
0 position.
Problem Possible cause and solution
The cleaning perfor-
mance is poor.
The dust box is full.
Empty and clean the dust box.
The roller brush is dirty or worn out.
Clean the roller brush.
Replace the roller brush, if necessary.
The seals on the dust box are dirty or worn out.
Clean the seals and the suction channel between
them.
Replace the seal unit.
Check whether the roller-brush cover is installed
properly and is locked into place on both sides;
see “Maintenance” – “Cleaning the roller brush”.
The exhaust filter is dirty.
Clean the exhaust filter.
Replace the exhaust filter, if necssary.
The side brushes have worn out.
Replace the side brushes.
The robot vacuum
cleaner switches itself
off after it has been
switched on using the
Power button.
The rechargeable battery is not sufficiently charged.
Connect the robot vacuum cleaner correctly to the
charging contacts on the connected base station.
en-US
36
Problem Possible cause and solution
The robot vacuum
cleaner does not return
to the base station after
vacuuming.
It had started vacuuming from somewhere in the
room.
The robot vacuum cleaner will return to its starting
point.
There is insufficient light for the robot vacuum
cleaner to navigate.
Provide sufficient lighting.
The base station is not connected correctly.
Connect the base station exactly as described in
these operating instructions; see “Connection” –
“Connecting the base station”.
The signal between the infrared transmitter on the
base station and the robot vacuum cleaner is broken.
Clean the front of the base station and the front of
the robot vacuum cleaner carefully with a soft, dry
cloth and make sure that no items are disrupting
the signal.
Obstacles on the floor to be vacuumed can impede
navigation.
Watch the robot vacuum cleaner during vacuum-
ing.
Remove any problematic obstacles.
Section off the problematic area with the magnetic
strip.
Reduce the robot vacuum cleaner’s maximum
crossing-over height; see “Use” – “Reducing the
maximum crossing-over height”.
The robot vacuum
cleaner is not charging.
The base station is not connected correctly.
Connect the base station exactly as described in
these operating instructions; see “Connection” –
“Connecting the base station”.
en-US
37
Problem Possible cause and solution
The robot vacuum
cleaner does not react.
The robot vacuum cleaner is switched off.
Switch it on (slide I/0 to I).
The batteries in the remote control have been in-
serted incorrectly.
Make sure the polarity is correct.
The batteries in the remote control are dead.
Replace the batteries.
The signal between the infrared transmitter on the
vacuum cleaner and the remote control is broken.
Clean the front of the robot vacuum cleaner and
the top of the remote control carefully with a soft,
dry cloth and make sure that no items disrupt the
signal.
The remote control is too near to the robot vacuum
cleaner or too far away from it.
Increase or decrease the distance and when using
the remote control direct it towards the robot vac-
uum cleaner.
“l_ _l” appears in the
display
running from bottom to
top.
The dust box is full.
Empty and clean the dust box.
rLOC appears in the
display.
Vacuuming was interrupted; the robot vacuum
cleaner was moved during the pause.
Proceed as described in “Use” – “Interrupting vac-
uuming”.

en-US
38
Fault messages
Risk of injury caused by rotating roller brush.
The robot vacuum cleaner may start without warning while errors are being
dealt with.
Switch the robot vacuum cleaner off before dealing with any faults. To switch it
off, slide the I/0 switch on the side of the robot vacuum cleaner to the 0 posi-
tion.
Fault messages are shown in the display.
Your robot vacuum cleaner is supplied with a sticker that lists all fault messages.
You can stick this sticker to the underside of the storage-compartment lid.
Problem Possible cause and solution
F 1 “Wheel raised” fault
Place the robot vacuum cleaner on a level floor
surface.
F 2 “Dirty sensors” fault
Clean the sensors. This fault message is also
shown when you start up the robot vacuum
cleaner and the collision sensor is located above
empty space. Remove the robot vacuum cleaner
from the edge.
F 3 “Filter not recognized” fault
Insert the dust box with exhaust filter into the robot
vacuum cleaner.
F 4 “Drive wheels overloaded” fault
Check whether the drive wheels have become
dirty. Remove any threads or hair. This fault mes-
sage is also shown if the robot vacuum cleaner is
stuck.
F 5 “Brushes overloaded” fault
Check if the roller brush and side brushes have
become dirty. Clean the roller brush and side
brushes. This fault message is also shown if ob-
jects become caught in the robot vacuum cleaner.
F 6 “Fan motor overloaded” fault
Empty and clean the dust box. Clean or replace
the exhaust filter.
en-US
39
Problem Possible cause and solution
F 7 Internal system error or fault “Robot vacuum cleaner
outside of its permitted ambient operating tempera-
ture”
Switch the robot vacuum cleaner off and on again
(I/0 switch).
F 8 “Front wheel dirty” fault
Check if the front wheel, the cover, or the slot de-
pression have become dirty. Remove any threads
or hair, and clean the front wheel, the cover, and
the depression.
Resetting the fault
message after fixing
the problem
You can reset the fault messages described above
in the following ways
- Switch the robot vacuum cleaner off and on again
(I/0 switch).
- Press the Power button on the remote control.
- Press the sensor control in the control field of
the robot vacuum cleaner for at least three sec-
onds.
Technical data
(for the WiFi module)
Frequency range 2.412–2.472GHz
Maximum transmission power <100mW
Declaration of conformity
Miele hereby declares that this robot vacuum cleaner complies with Directive
2014/53/EU.

en-US
40
Copyright and licenses
For the purpose of operating and controlling the robot vacuum cleaner, Miele uses
proprietary or third-party software that is not covered by open-source licensing
terms. This software/these software components are protected by copyright. The
copyrights held by Miele and third parties must be respected.
In addition, the robot vacuum cleaner contains software components which are
distributed under open-source licensing terms. The open-source components con-
tained in the appliance along with the corresponding copyright notices, copies of
the licensing terms valid at the time, and any further information can be accessed
locally by IP via a web browser (http://<IP address>/Licenses). The liability and
warranty arrangements for the open-source licenses displayed in this location only
apply in relation to the respective rights holders.
In particular, the robot vacuum cleaner contains software components licensed by
the copyright holders under the GNU General Public License, Version2, or the
GNU Lesser General Public License, Version2.1. For a period of at least 3years
from the date of purchase or delivery of the robot vacuum cleaner respectively,
Miele offers to provide you or third parties with a machine-readable copy of the
source code of the open-source components contained in the robot vacuum
cleaner and licensed under the terms of the GNU General Public License, Ver-
sion2, or the GNU Lesser General Public License, Version2.1, on a data carrier
(CD-ROM, DVD, or USB stick). To obtain this source code, please contact us via e-
mail ([email protected]) or the postal address below quoting the product name, the
serial number, and the date of purchase:
Miele & Cie. KG
Open Source
GTZ/TIM
Carl-Miele-Straße 29
33332 Gütersloh, Germany
Please note the limited warranty in favor of the rights holders under the terms of
the GNU General Public License, Version2 and the GNU Lesser General Public Li-
cense, Version2.1:
This program is distributed in the hope that it will be useful, but WITHOUT ANY
WARRANTY, without even the implied warranty of MERCHANTABILITY of FITNESS
FOR A PARTICULAR PURPOSE. See the GNU General Public License and GNU
Lesser General Public License for more details.
You can obtain detailed instructions for the use of test modes from Miele Cus-
tomer Service.

en-US - LIMITED WARRANTY - Vacuum Cleaners USA
41
What This Warranty Covers and For What Period The Coverage Extends
Miele, Inc. (hereinafter "Miele") warrants to the original purchaser of this product, living in the United States of
America, who purchased their vacuum from a Miele Authorized Dealer:
a. That this product, including all of its Miele authorized parts is free of defects in material and workmanship.
b. That this product, if found to be defective within the stated warranty period, will be repaired free of charge to the
consumer (both parts and labor) by an authorized Miele service agent.
c. The warranty period for vacuum cleaners, with the exception of “HomeCare” sub-models, is as follows:
Vacuum Series Term
Classic Series Canister Vacuums 1 year
Swing Series H1 Vacuums 1 year
Compact Series Canister Vacuums 2 years
Scout Robotic Vacuums 2 years
Triflex HX1 Series Cordless Vacuums 2 years
Complete Series Canister Vacuums 3 years
Dynamic Series Upright Vacuums 3 years
Blizzard Bagless Series Canister Vacuums 3 years
d. The warranty period for all “HomeCare” sub-model types is 5 (five) full years from the date of purchase, while the
Triflex HX1 HomeCare is 3 (three) full years from the date of purchase.
e. This warranty only applies while the product remains within the United States, and is null and void in any other US
territories, possessions, or foreign countries.
Commercial Use
Vacuum cleaners other than the Scout RX1 and Scout RX2 used for commercial purposes will be warranted for a
period of six (6) months from the date of purchase. There is no warranty for the Scout RX1 or Scout RX2 used for
commercial purposes. Thereafter this Limited Warranty shall be null and void.
What is not covered by this Warranty
This warranty does not cover damage or defects caused by or resulting from repairs, service or alterations to the
product or any of its parts or accessories which have been performed by service centers or repairmen not authorized
by Miele, or damage or defects caused by negligence, accident, abuse, misuse, improper or abnormal usage or
maintenance of the product, its parts or accessories, or damages caused by the use or installation of non-genuine
Miele parts Ordinary wear and tear or cosmetic damage (scuffs, scratches, gouges, dents, etc.) shall not be
considered a defect in materials or workmanship.
Exclusion of Other Warranties
Except for the limited warranty provided herein, Miele disclaims any and all other express warranties with respect to
the product. Any warranty of merchantability or fitness for a particular purpose is limited in its duration to the term of
the limited warranty provided herein.
Some states do not allow limitations on how long an implied warranty lasts, so the above limitation may not apply to
you.
Some states do not allow limitations on how long an implied warranty lasts, so the above limitation may not apply to
you.
Limitation of Liability for Special, Incidental or Consequential Damages
Miele will assume no liability, or other obligation with respect to any personal injury or property damage resulting
from the use of a vacuum cleaner, or its accessories, replacement parts, etc., which has not been purchased from,
or serviced by an Authorized Miele Dealer. Any purchaser who obtains a vacuum cleaner, accessories, replacement
parts, etc., from someone other than an Authorized Miele dealer proceeds at their own risk.
Miele specifically disclaims any and all liability, whether directly or by way of indemnity, for special incidental,
consequential or other damages, whether based on breach of contract, tort, strict or product liability, or any other
legal theory.
Some states do not allow the exclusion or limitation of incidental or consequential damages, so the above limitation
may not apply to you.
Special State Laws
This Limited Warranty gives you specific legal rights; you may have other rights, which vary, from state to state.
Service
For service under this Limited Warranty, or to find an Authorized Miele Dealer in your area, please visit the “Find a
Miele Partner Near You” section at Mieleusa.com.
Effective Date: July 20, 2020
©2020 Miele, Inc.

en-CA - Contents
42
Warning and Safety instructions...................................................................... 44
Caring for the environment .............................................................................. 52
Appliance overview ........................................................................................... 54
Functions and features of the robot vacuum cleaner.................................... 56
Included accessories ........................................................................................ 56
Connection......................................................................................................... 56
Use...................................................................................................................... 59
Switching on and off ........................................................................................... 59
Starting vacuuming ............................................................................................. 59
Finishing vacuuming if vacuuming started from the base station....................... 59
Finishing vacuuming if vacuuming started from somewhere in the room........... 59
Vacuuming manually ........................................................................................... 60
Interrupting vacuuming ....................................................................................... 60
Manual navigation (without vacuuming).............................................................. 60
Directing the robot vacuum cleaner to the base station ..................................... 61
Operating modes................................................................................................. 61
Selecting the operating mode ............................................................................. 61
Quitting the current operating mode ................................................................... 62
Setting the timer.................................................................................................. 62
Deactivating the timer ......................................................................................... 63
Activating the timer/displaying a set start time................................................. 63
Deactivating the acoustic signals........................................................................ 64
Reducing the maximum crossing over height..................................................... 64
Miele@home* ..................................................................................................... 64
Downloading the Miele Scout app ...................................................................... 65
Activating the network function of the robot vacuum cleaner ............................ 65
Video function ..................................................................................................... 66
Removing the Wi-Fi module................................................................................ 66
Maintenance ...................................................................................................... 67
Emptying the dust box ........................................................................................ 67
Cleaning the dust box ......................................................................................... 68
Cleaning the exhaust filter................................................................................... 68
Cleaning the side brushes................................................................................... 68
Cleaning the roller brush ..................................................................................... 69
Cleaning the dust box seals................................................................................ 70
Replacing the seal unit on the dust box.............................................................. 71
Cleaning the front wheel...................................................................................... 71

en-CA - Contents
43
Cleaning the sensors........................................................................................... 71
Replacing batteries in the remote control ........................................................... 72
Replacing the rechargeable battery .................................................................... 72
Maintenance ...................................................................................................... 74
Storage/factory default settings .................................................................... 74
Technical Service............................................................................................... 75
Contact in case of a fault .................................................................................... 75
Warranty .............................................................................................................. 75
Frequently Asked Questions ............................................................................ 76
Fault messages.................................................................................................. 79
Technical data.................................................................................................... 80
Declaration of conformity................................................................................. 80
Copyright and licenses ..................................................................................... 81
Limited Warranty - Vacuums Canada.............................................................. 82

en-CA - Warning and Safety instructions
44
READ ALL INSTRUCTIONS BEFORE USING THIS
APPLIANCE
This robot vacuum cleaner complies with all current local and
national safety requirements. Improper use can lead to personal
injury and damage to property.
Please read the operating instructions before using the robot
vacuum cleaner for the first time. They contain important
information on the safety, use, and maintenance of the robot
vacuum cleaner. This prevents both personal injury and damage to
the appliance.
In accordance with standard IEC60335-1, Miele expressly and
strongly advises that you read and follow the instructions in
“Connection”, as well as in the “Safety notes and warnings”.
Miele cannot be held liable for injury or damage caused by non-
compliance with these instructions.
Keep these operating instructions in a safe place and pass them
on to any future owner.
Switch the robot vacuum cleaner off before any maintenance work
and cleaning and if it is not going to be used for an extended
period of time. It should also be switched off when dealing with
problems. To do so, slide the switch I/0 on the side of the robot
vacuum cleaner to the 0 position. The same should be done if you
notice any unusual behaviour with your robot vacuum cleaner.
Correct use
This robot vacuum cleaner is intended for cleaning flooring in
domestic households and similar residential environments. This
robot vacuum cleaner is not suitable for use on construction sites.
The robot vacuum cleaner is not intended for outdoor use.

en-CA - Warning and Safety instructions
45
The robot vacuum cleaner must only be used for domestic
household purposes to vacuum dry floor surfaces. Any other usage,
modification or alteration is not supported by the manufacturer and
could be dangerous.
The packaging material protects the robot vacuum cleaner from
transport damage. We recommend you keep the packaging for
transport purposes.
Persons which lack physical, sensory or mental abilities or
experience with the machine should not use it without supervision or
instruction by a responsible person.
Safety with children
Danger of suffocation! Ensure that any plastic wrappings, bags,
etc. are disposed of safely and kept out of the reach of children.
Children under 8 years of age must be kept away from the robot
vacuum cleaner unless they are constantly supervised.
Children aged 8 and older may only use the robot vacuum cleaner
without supervision if they have been shown how to use it in a safe
manner. Children must be able to understand and recognize the
possible dangers caused by incorrect operation.
Children must not be allowed to clean or maintain the robot
vacuum cleaner unsupervised.
Please supervise children in the vicinity of the robot vacuum
cleaner and do not let them play with it.

en-CA - Warning and Safety instructions
46
WARNING
To reduce the risk of fire, electric shock or injury:
Check the voltage rating of the vacuum cleaner before connecting
the power cord to an electrical outlet. Your power source should
correspond with the voltage rating plate located on the underside of
the vacuum. Use only household AC outlets. Never use DC power
sources. If you are not sure of your home’s voltage supply, consult a
qualified electrician. Connecting the vacuum cleaner to a higher
voltage than indicated in these instructions may result in damage to
the vacuum cleaner or injury.
To reduce the risk of electric shock, this appliance has a polarized
plug (one blade is wider than the other.) This plug will fit in a
polarized outlet only one way. If the plug does not fit fully in the
outlet, reverse the plug. If it still does not fit, contact a qualified
electrician to install the proper outlet. Do not alter the plug in any
way.
Technical safety
The robot vacuum cleaner operates at 14.4V.
It is classified as a Class III appliance.
This appliance is supplied by a safety extra-low voltage (SELV)
power source where the voltage is low enough to protect users from
the risk of electrical shock. A Class II plug-in power supply is used
for supplying power to charge the robot vacuum cleaner.
Before each use of the robot vacuum cleaner, check both the
vacuum cleaner and all of the accessories supplied with it for any
visible signs of damage. Do not use a damaged robot vacuum
cleaner or accessory.
The electrical outlet for connecting the base station must be fitted
with a 16A or 10A slow-blow fuse.

en-CA - Warning and Safety instructions
47
Compare the connection data on the data plate of the robot
vacuum cleaner and the power supply unit (mains voltage and
frequency) with that of the domestic electrical supply. This data must
match exactly.
Store the robot vacuum cleaner at an ambient temperature
between 0°C and 60°C.
While the vacuum cleaner is under warranty, repairs should only
be performed by a Miele-authorized service technician. Otherwise
the warranty will be void.
Repairs should only be carried out by a Miele-authorized service
technician. Repairs and other work by unqualified persons can cause
considerable danger to users.
Ensure that you do not damage the power supply cable and avoid
mechanical stress. Do not place heavy objects on the power supply
cable.
The robot vacuum cleaner is fitted with sensors to detect steps
and drops in height. Do not cover these sensors or the camera, and
ensure that the function of the sensors is not hindered by obstacles
while the cleaner is moving.
Do not let the robot vacuum cleaner travel over the power cord or
other cords.
Do not drop the robot vacuum cleaner or any of the accessories
supplied with it. Items that have been dropped or damaged should
not be used for safety reasons.
Miele can only guarantee the safety of the appliance when
genuine Miele replacement parts are used. Faulty components
should only be replaced with genuine Miele parts.
Cleaning
Do not immerse the robot vacuum cleaner or the parts supplied in
water. Clean all parts with a dry or slightly damp cloth only.

en-CA - Warning and Safety instructions
48
Proper use
Do not use the robot vacuum cleaner without the dust box, pre-
filter, and exhaust filter fitted.
Remove all breakable or lightweight items from the floor and make
sure that the robot vacuum cleaner cannot become entangled in
cords, curtains, fringes, power supply cables, or similar.
Animals must be kept away from the robot vacuum cleaner. Do
not allow animals to stand or sit on the robot vacuum cleaner.
Take appropriate measures to prevent the robot vacuum cleaner
falling down large drops, e.g., from galleries or balconies. This can
be done, for instance, by setting up physical barriers.
Do not allow the robot vacuum cleaner to move any movable
items, e.g., rugs, doormats, etc. Secure any movable items.
Do not use the robot vacuum cleaner to vacuum up anything
which has been burning or is still glowing e.g., cigarettes, ashes, or
coal, whether glowing or apparently extinguished. Do not use the
robot vacuum cleaner in the vicinity of a fireplace.
Do not use the robot vacuum cleaner to vacuum up any water,
liquid or damp dirt. Wait until any freshly cleaned or shampooed
carpets or floor coverings are completely dry before attempting to
vacuum.
Do not use the robot vacuum cleaner to vacuum toner dust. Toner,
such as that used in printers and photocopiers, can conduct
electricity.
Do not use the robot vacuum cleaner to vacuum up any
inflammable or combustible liquids or gases and do not use it in
areas where such substances are stored.

en-CA - Warning and Safety instructions
49
Do not sit or lie on the surface being cleaned while the robot
vacuum cleaner is running. This is to prevent the risk of loosely fitting
clothes or long hair coming into contact with the roller brush or other
moving parts of the robot vacuum cleaner.
Caution: Be aware that the robot vacuum cleaner moves
autonomously. Exercise caution when walking in the area that the
robot vacuum cleaner is operating in, to avoid stepping on or
tripping over it.
Accessories
Only use genuine accessories with the “ORIGINAL Miele” logo on
the packaging. The manufacturer cannot otherwise guarantee the
safety of the product.
Safety notes and warnings for rechargeable battery, base
station, power supply unit, and remote control batteries
Safety with children
People (including children) with reduced physical, sensory, or
mental capabilities, or lack of experience or knowledge, who are
unable to use the robot vacuum cleaner safely, may only use the
robot vacuum cleaner if they are supervised while using it, or have
been shown how to use it in a safe way and understand and
recognize the consequences of incorrect operation.
Keep the rechargeable battery and the batteries for the remote
control out of the reach of children.
Children must be kept away from the base station and the power
supply unit unless they are constantly supervised.

en-CA - Warning and Safety instructions
50
Technical safety
Charge the robot vacuum cleaner at an ambient temperature
between 10°C and 45°C.
The battery and the base station are designed for use with this
Miele Robot Vacuum Cleaner. For safety reasons, the robot vacuum
cleaner must not be used with a battery or base station produced by
another manufacturer.
Only use the parts supplied for charging the robot vacuum cleaner
(base station, power supply unit, power adapter).
Temporary or permanent operation on an autonomous power
supply system or a power supply system that is not synchronized
with the grid power supply (e.g. island networks, back-up systems)
is possible. A prerequisite for operation is that the power supply
system complies with the specifications of EN50160 or an
equivalent local standard.
The function and operation of the protective measures provided in
the domestic electrical installation and in this Miele product must
also be maintained in isolated operation or in operation that is not
synchronized with the grid power supply, or these measures must be
replaced by equivalent measures in the installation. As described, for
example, in the current version of VDE-AR-E 2510-2 or an equivalent
local standard.
Do not attach any adhesive labels to the front of the base station
as this conceals an infrared transmitter. Do not place any items in
front of it.
Stop using the rechargeable battery immediately if you notice an
unusual smell from it, if liquid is leaking from it, if it is significantly
overheating, or if it is discoloured or deformed. Dispose of the
battery immediately (see safety note “Disposing of the battery” at the
end of this chapter as well as “Caring for the environment –
Disposing of old batteries”).

en-CA - Warning and Safety instructions
51
Batteries and rechargeable batteries will deplete over time. They
can then leak corrosive fluids. Avoid contact with the eyes and skin.
In the event of contact, rinse thoroughly with water and seek medical
advice.
Please contact Miele Service before sending the rechargeable
battery.
Proper use
Do not drop or throw the rechargeable battery. For safety reasons,
do not continue to use a rechargeable battery which has been
damaged.
Keep the rechargeable battery or the batteries away from naked
flames or other heat sources. Do not heat the rechargeable battery
or the batteries. Do not expose them to direct sunlight.
Do not dismantle the rechargeable battery.
Do not cause a short circuit by bridging the contacts of the
rechargeable battery or the batteries, either unintentionally or
deliberately.
Do not allow the rechargeable battery or the batteries to come
into contact with liquids.
Do not attempt to recharge the remote control batteries provided.
Disposing of the batteries and the rechargeable battery: remove
the rechargeable battery from the robot vacuum cleaner and the
batteries from the remote control. Insulate the metal contacts with
adhesive tape to prevent short circuits. Dispose of the batteries and
the rechargeable battery in a municipal recycling facility. Do not
dispose of batteries or the rechargeable battery with normal
household waste.
SAVE THESE INSTRUCTIONS

en-CA - Caring for the environment
52
Disposing of sales packaging
The packaging material protects the
robot vacuum cleaner from transport
damage. The packaging materials used
are selected from materials which are
environmentally friendly for disposal
and can therefore be recycled.
Recycling the packaging material
reduces the use of raw materials in the
manufacturing process and also
reduces the amount of waste in landfill
sites. Make sure the packaging is
disposed of in the proper manner for
your area.
Disposing of your old
appliance
Before disposing of your robot vacuum
cleaner, remove the exhaust filter and
the pre-filter and dispose of them with
your household waste.
Electrical and electronic appliances
contain many valuable materials. They
also contain certain materials,
compounds, and components which
were essential for their correct
functioning and safety. These could be
hazardous to your health and to the
environment if disposed of with
household waste or if handled
incorrectly. Please do not, therefore,
dispose of your old appliance with
household waste.
Instead, please make use of officially
designated collection and disposal
points to dispose of and recycle
electrical and electronic appliances. By
law, you are solely responsible for
deleting any personal data from the old
appliance prior to disposal.
Ensure that your old appliance presents
no danger to children while being
stored for disposal.
en-CA - Caring for the environment
53
Disposing of old batteries
In many cases, electrical and electronic
appliances contain batteries which
must not be disposed of with
household waste after use. You are
legally obliged to remove any old
batteries which are not securely
enclosed by the vacuum cleaner and to
take them to a suitable collection point
(e.g., retailer) where they can be handed
in free of charge. Insulate the metal
contacts with adhesive tape to prevent
short circuits. Batteries may contain
substances which can be hazardous to
human health and the environment.
The labeling on the battery will provide
further information. The bin symbol with
a cross through it means that the
batteries must not be disposed of in
household waste. A bin with a cross
through it which also has one or more
chemical symbols on it indicates that
the battery contains lead (Pb), cadmium
(Cd), and/or mercury (Hg).
3E&G+J
Old batteries contain valuable raw
materials which can be recycled.
Disposing of batteries separately makes
them easier to handle and recycle.

en-CA - Appliance overview
54
Illustrations A, B and C for this section are on the pull-out pages in the back of
these operating instructions.
A – Robot vacuum cleaner top and bottom
a
Display
b
WiFi display
c
Video function indicator (for Scout RX3 Home Vision HD)
d
Time mode indicator (am/pm)
e
Cameras
f
Start/Pause sensor control ()
g
Impact protection
h
On/Off switch (I/0)
i
Depression to open the storage compartment
j
Silent cleaning mode sensor control
k
Turbo cleaning mode sensor control
l
Base sensor control
m
Spot cleaning mode sensor control
n
Auto standard vacuuming mode sensor control
o
Timer indicator
p
Rechargeable battery status indicator
q
Side brushes (20 arms and 6 arms, supplied loose)
r
Roller brush
s
Charging contacts
t
Front wheel
u
Sensors (toppling protection)
v
Roller brush cover
w
Drive wheels
x
Suction aperture with seal unit
y
Back wheel

en-CA - Appliance overview
55
B – Base station and remote control
Base station
a
Cable rewind
b
Cable guides
c
Socket for the power supply unit plug (not visible in the illustration)
d
Charging contacts
Remote control
a
Power button (switch on and off)
b
Base button (direct vacuum cleaner to base station)
c
OK confirmation button with direction buttons around it
d
Start/Pause button () (start/interrupt vacuuming)
e
Mode button (select the cleaning mode)
f
WI-FI button (activate/deactivate Wi-Fi)
g
Clock button (set time of day)
h
Timer button (set the timer)
i
Mute button (activate/deactivate acoustic signals)
j
Climb button (reduce crossing over height)
k
Battery compartment (at the back)
C – Dust box
a
Handle
b
Cleaning tool with wiper
c
Wiper button
d
Lid
e
Release buttons for the lid
f
Dust compartment
g
Pre-filter
h
Exhaust filter
i
Exhaust filter compartment lid
en-CA
56
Functions and features of the
robot vacuum cleaner
The robot vacuum cleaner is suitable for
the daily cleaning of hard floors, fitted
carpets, and short-pile rugs and can
also be used on deep-pile rugs.
Please observe the flooring
manufacturer’s cleaning and care
instructions.
The robot vacuum cleaner is fitted with
cameras and sensors. It can vacuum all
accessible areas efficiently and
independently.
Included accessories
- Remote control/2 batteries
- 2 universal side brushes with 20 arms
(for hard floors, fitted carpets, and
short-pile rugs)
- 2 carpet side brushes with 6 arms
(for deep-pile rugs)
- Power supply unit with plug
- Country-specific power adapter
- Base station and adhesive holder
- Magnetic strip
Connection
Illustrations 1–12 for this section are
on the last fold-out page at the end of
these operating instructions.
Inserting the side brushes
(Figs.01+02)
Place the robot vacuum cleaner
upside down on a level, clean
surface.
If the area to be vacuumed features
hard floors, carpeted flooring, and
short-pile rugs, use the two 20-arm
universal side brushes. For deep-pile
rugs, the two 6-arm carpet side
brushes are more suitable.
Select the appropriate pair of side
brushes.
Press the two side brushes carefully
onto their pins until they audibly
engage. Take care to comply with the
markings L and R.
Removing the protective film(Fig. 03)
Remove the protective film from the
base station and from the robot
vacuum cleaner display.
Remove the protective strip from the
depression of the storage
compartment.
Placing the batteries in the remote
control(Fig. 04)
Observe the instructions regarding the
handling of batteries found in the
“Safety notes and warnings” section
at the beginning of these operating
instructions.
en-CA
57
Remove the battery compartment
cover.
Insert the 2 batteries supplied. Make
sure the polarity is correct.
Close the battery compartment cover.
Switching on the robot vacuum
cleaner(Fig. 05)
Slide the I/0 switch on the side of
the robot vacuum cleaner to the I
position.
The rechargeable battery status
indicator lights up in the control field.
The robot vacuum cleaner will switch to
standby after approx. 60seconds. The
robot vacuum cleaner is reactivated by
pressing any button on the remote
control or one of the sensor controls in
the control field.
Connecting the base station
(Figs. 06–09)
Observe the instructions regarding the
handling of the base station and the
power supply unit found in the “Safety
notes and warnings” section at the
beginning of these operating
instructions.
Place the base station on a level
surface against a free wall within easy
access of a power socket. Ensure
that there is an obstacle-free distance
of at least 1.5m in front and 0.5m to
the right and left of the base
station(Fig. 06).
Insert the plug of the supplied power
supply unit into the socket at the
back of the base station. You can
wind excess cable around the cable
rewind. Guide the power supply cable
through one of the two cable
guides(Fig. 07).
Insert the country-specific power
adapter into the power supply unit
until it audibly engages and then plug
it into the selected power socket (Fig.
08).
An adhesive holder is included to
permanently fix the base station to the
floor (Fig. 09).
Insert the adhesive holder into the
recess provided on the underside of
the base station until the adhesive
holder clicks into place.
Remove the blue protective foil from
the adhesive strips.
Place the base station in its chosen
location and press down firmly on the
base station.
You can remove the base station at
any time; the adhesive holder remains
on the floor.
If you want to remove the adhesive
holder from the floor, pull on the two
pulling-off devices.
Charging the battery(Fig. 10)
The rechargeable battery is supplied
not fully charged. Before using for the
first time, it must be fully charged while
the robot vacuum cleaner is switched
on (switch I/0 to I).
The battery can also be charged when
the robot vacuum cleaner is switched
off (switch I/0 to 0). In this case, the
vacuum cleaner indicators will not
react.
en-CA
58
Connect the robot vacuum cleaner
correctly to the charging contacts on
the connected base station.
As the rechargeable battery charges,
the status indicator flashes in the
control field.
The charging process takes up to
3hours for the Scout RX3 and up to
4hours for the Scout RX3 Runner and
Scout RX3 Home Vision HD.
You can then vacuum for up to
85minutes* with the Scout RX3 and up
to 170minutes* with the Scout RX3
Runner and Scout RX3 Home Vision
HD.
* measured in the Silent cleaning mode,
in a standard environment according to
IEC62929:2014
Rechargeable battery status
indicator in the control field
Red Charged capacity approx.
0–20%
Orange Charged capacity approx.
20–50%
Green Charged capacity approx.
50–100%
Setting the time of day(Fig. 11)
(also possible via a mobile device; see
“Miele@home”)
You can choose between a 24-hour
clock and a 12-hour a.m./p.m. clock.
Use the remote control to set the time
of day.
Briefly press the Clockbutton.
24h will appear in the display.
Press the OKbutton if you want a 24-
hour clock.
Press the + button if you want a 12-
hour a.m./p.m. clock and confirm
12h with OK.
The hour display flashes in the display.
Press the + or - direction button to
set the current hour.
Press the OKbutton to confirm your
selection.
The minute display flashes in the
display.
Press the + or - direction button to
set the current minutes.
Press the OKbutton to confirm your
selection.
If you want to alter the time of day,
proceed as described above. Press the
Clockbutton for 3seconds.
Defining the area to be
vacuumed(Fig. 12)
(also possible via a mobile device; see
“Miele@home”)
You can define any areas which the
robot vacuum cleaner should not have
access to.
The robot vacuum cleaner is 85mm
high.
Any items under which vacuuming is
required should have a minimum
clearance of 87mm.
Place the magnetic strip supplied
with the groove facing downward on
the floor.
The robot vacuum cleaner will not cross
over the magnetic strip.
en-CA
59
Adhesive strips are supplied for
permanent fixing. Additional magnetic
strips are available to order from the
Miele webshop.
Use
Always observe the robot vacuum
cleaner during the first cleaning
session in a new environment and
after making changes in your home.
Remove any problematic obstacles
or section off the relevant areas with
the magnetic strip or using the
controller on a mobile device (see
“Connection – Defining the area to
be vacuumed”). Check whether
steps and drops in height are
recognized properly.
Your robot vacuum cleaner is equipped
with an integrated Wi-Fi module. You
can view status information or execute
control commands using a mobile
device (tablet PC or smartphone).
If you would like to control the robot
vacuum cleaner using a mobile device,
please read “Miele@home”.
Operation of the robot vacuum cleaner
via remote control and the control field
is described later in this section.
Switching on and off
Press the Powerbutton on the
remote control or any sensor control
in the control field.
Starting vacuuming
There are 2 ways to start vacuuming:
Option 1 (remote control)
Press the button.
Option 2 (control field)
Press the sensor control.
The area to be vacuumed will be
cleaned.
The robot vacuum cleaner always
cleans for at least 5minutes, regardless
of the size of the surface to be
vacuumed.
Finishing vacuuming if vacuuming
started from the base station
The robot vacuum cleaner will return to
the base station and recharge.
If the battery is low, the robot vacuum
cleaner will return to the base station
and recharge. II will appear in the
display. The robot vacuum cleaner will
then carry on vacuuming.
Finishing vacuuming if vacuuming
started from somewhere in the room
The robot vacuum cleaner will return to
its starting point and switch to standby
after approx. 60seconds.

en-CA
60
The robot vacuum cleaner will stand
still when there is low battery capacity.
Charge the robot vacuum cleaner.
Vacuuming manually
You can use the direction buttons on
the remote control to vacuum a
particular area of the room.
While the robot vacuum cleaner is
vacuuming, press and hold one of the
direction buttons.
The robot vacuum cleaner will turn in
the desired direction until you let go of
the direction button.
Press and hold the + direction button.
The robot vacuum cleaner will travel in
the desired direction and continue to
vacuum.
Press the button on the remote
control or the sensor control in the
control field.
The original vacuuming process will
continue running.
Interrupting vacuuming
Press the button on the remote
control or the sensor control in the
control field.
The robot vacuum cleaner stops.
Press the button or the sensor control
again to continue vacuuming.
If you lift the robot vacuum cleaner off
the floor during a pause and then place
it down somewhere else, rLOC will
appear in the display when you activate
it again. The robot vacuum cleaner will
turn around and compare its new
location with its saved map data.
If the data is compatible, the robot
vacuum cleaner will start cleaning and
not go over surfaces that have already
been cleaned.
If the data is not compatible, the robot
vacuum cleaner will not move.
rLOC in the display can only be
cancelled by pressing the button or
the sensor control several times.
Manual navigation (without
vacuuming)
You can use the direction buttons on
the remote control to direct the robot
vacuum cleaner to a specific area of the
room.
Press and hold one of the direction
buttons.
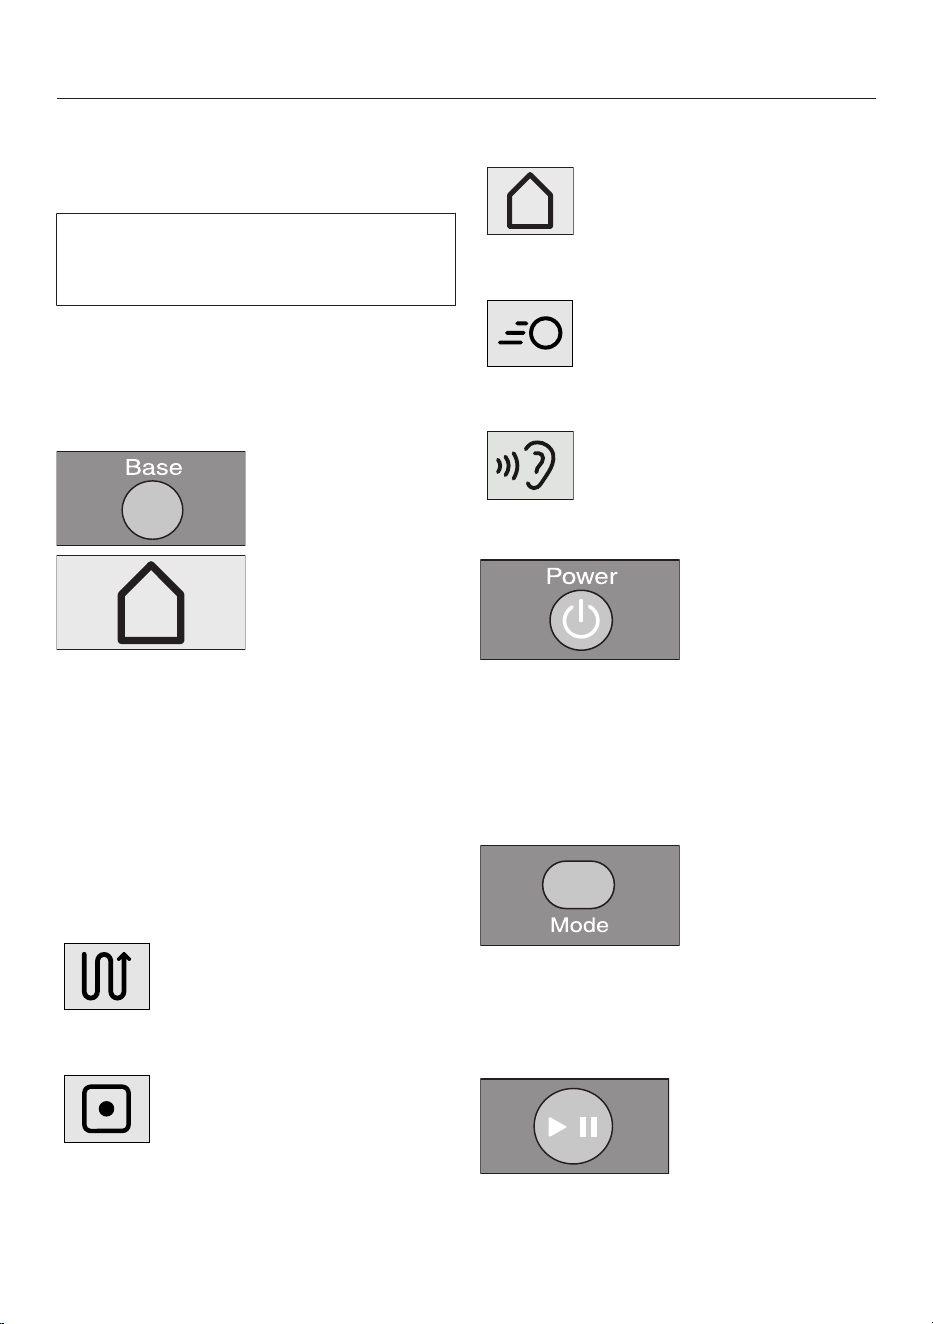
en-CA
61
The robot vacuum cleaner will travel in
the desired direction without
vacuuming.
You cannot direct the robot vacuum
cleaner manually to the base station in
order to recharge it.
Directing the robot vacuum cleaner
to the base station
(only possible when vacuuming was
started from the base station)
Press the Basebutton on the remote
control or the Basesensor control in
the control field.
The robot vacuum cleaner will travel to
the base station and recharge.
Operating modes
There are 5 operating options:
Auto
Standard vacuuming for
normally soiled flooring.
Spot Vacuuming of an area
approx. 1.8mx1.8m
around the selected starting
point of the robot vacuum
cleaner.
Base
Directing the robot vacuum
cleaner to the base station.
Turbo
For vacuuming lightly soiled
flooring with a short
vacuuming duration.
Silent
Energy-saving vacuuming
with low noise development.
Selecting the operating mode
Press the Powerbutton on the
remote control.
There are 2 ways of selecting the
operating mode:
Option 1 (remote control)
Press the Modebutton repeatedly
until the symbol for the operating
mode you want lights up in the
control field.
Press the button to start
vacuuming.
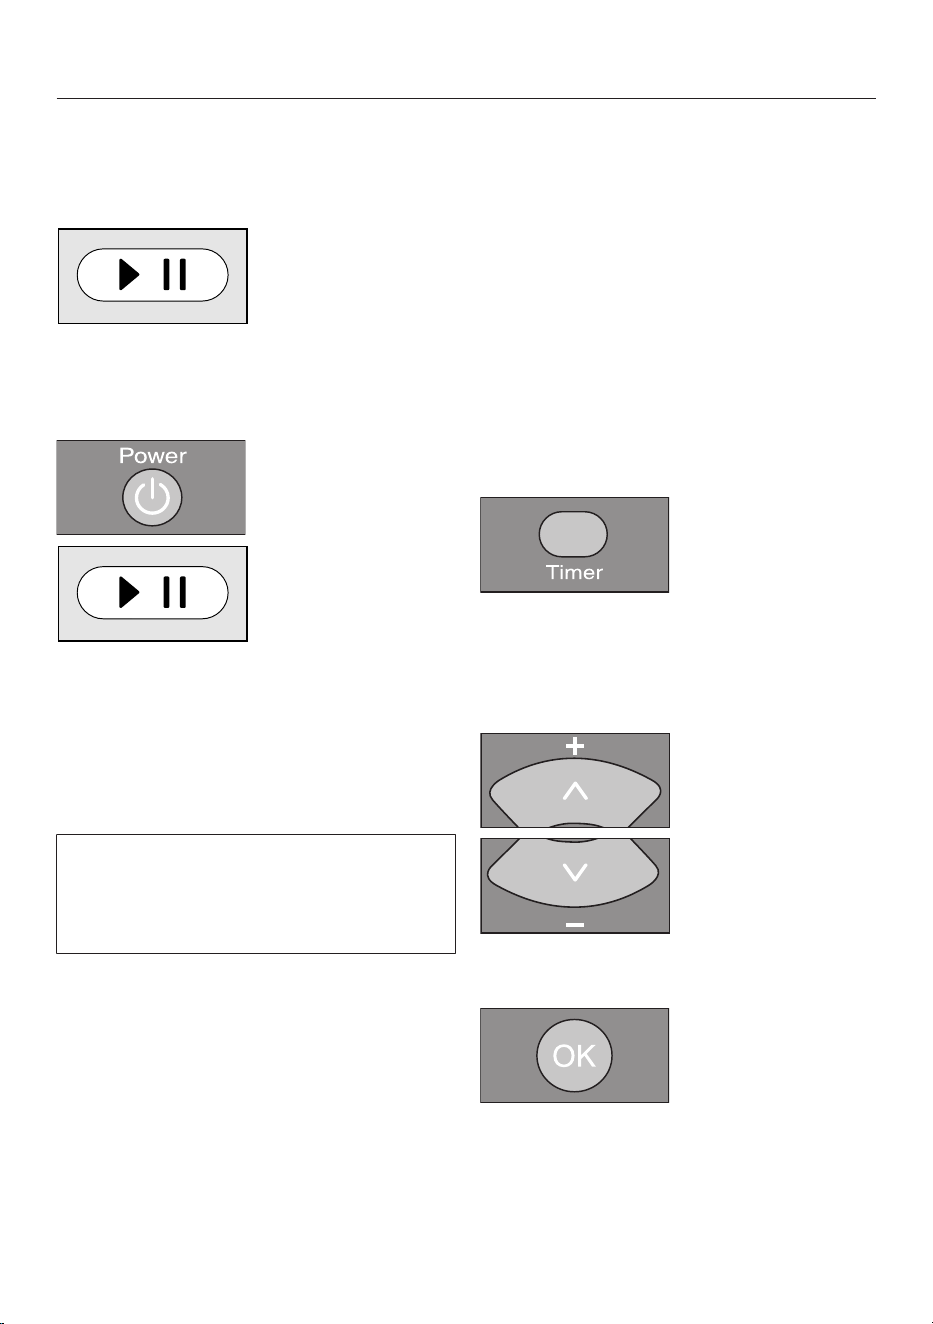
en-CA
62
Option 2 (control field)
Press the sensor control for the
operating mode you want to use.
Press the sensor control to start
vacuuming.
Quitting the current operating mode
Press the Powerbutton on the
remote control or the sensor
control in the control field for at least
3seconds.
The robot vacuum cleaner will switch to
standby after approx. 60seconds.
You can switch the robot vacuum
cleaner to standby before 60seconds
is up by pressing the Powerbutton
again.
The robot vacuum cleaner is reactivated
by pressing any button on the remote
control or one of the sensor controls in
the control field.
Setting the timer
(only possible if the clock has been set)
If you would like the robot vacuum
cleaner to start at the same time every
day, you can save the start time and the
operating mode you want to memory.
The robot vacuum cleaner can also
vacuum in the dark. However, please be
aware that vacuuming may be less
thorough. The cameras require light in
order to navigate unobstructed.
Use the remote control to set the timer.
Press the Timerbutton briefly.
The timerindicator flashes in the
control field and the hour display
flashes in the display.
Press the + or - direction button to
set the hour you want.
Press the OKbutton to confirm your
selection.
The timerindicator flashes in the
control field and the minute display
flashes in the display.
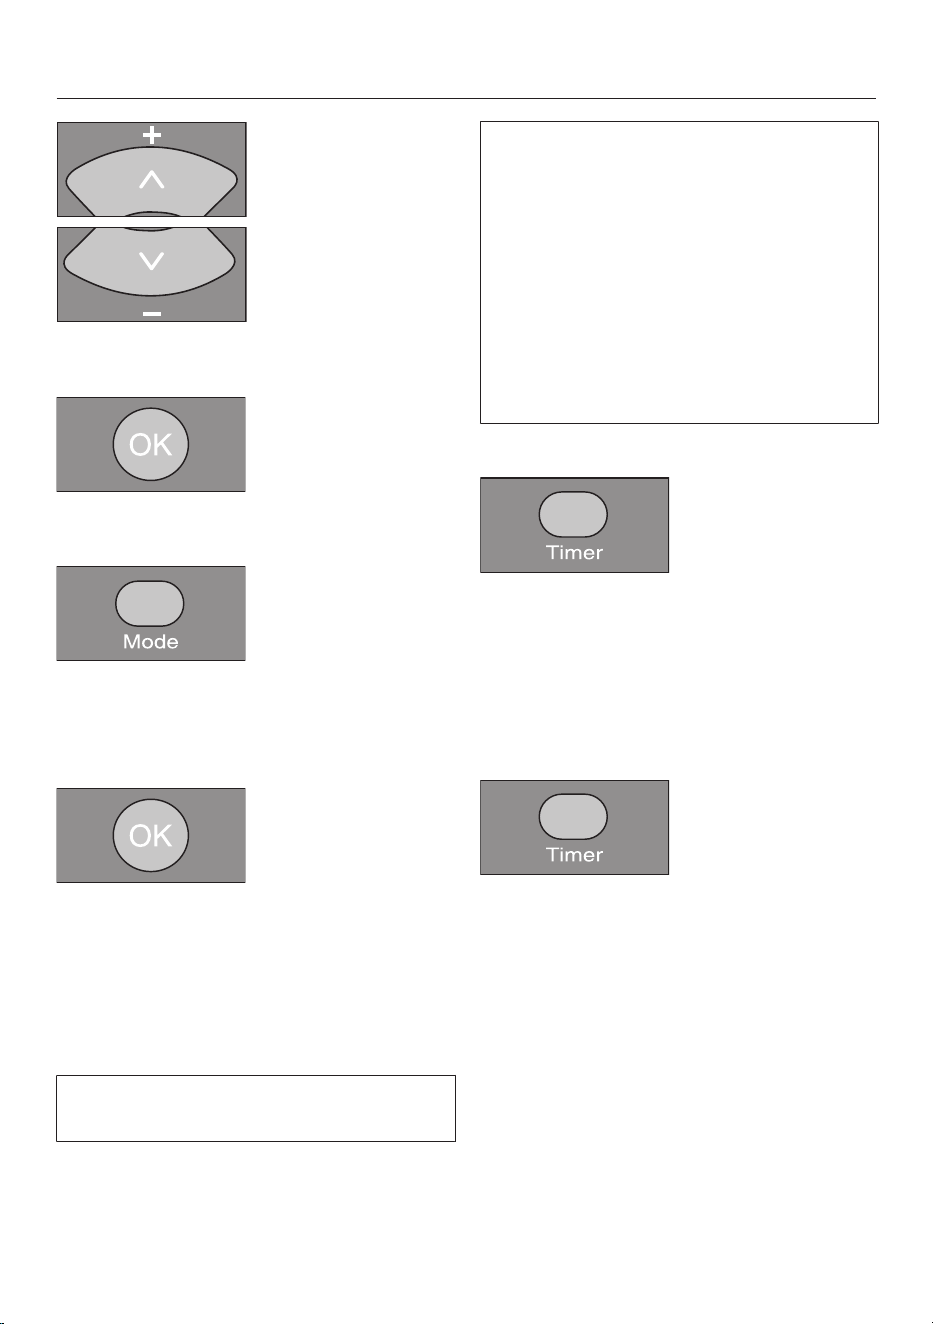
en-CA
63
Press the + or - direction button to
set the minutes you want.
Press the OKbutton to confirm your
selection.
Press the Modebutton repeatedly
until the symbol for the operating
mode you want flashes in the control
field.
Press the OKbutton to confirm your
selection.
The settings are shown for approx.
3seconds in the control field. The robot
vacuum cleaner will now start to
vacuum at the same time each day.
If the timerindicator is lit up in the
control field, the timer is activated.
To alter the entries, proceed as
described above. Then press the
Timerbutton for 3seconds.
Tip: you can save up to 7 individual
“start time – operating mode”
combinations if you set the timer using
a mobile device; see “Miele@home”.
Please note that the robot vacuum
cleaner always follows the saved
commands which were set most
recently, regardless of whether the
settings were configured using the
remote control, control unit, or with a
mobile device.
Deactivating the timer
Press the Timerbutton on the remote
control briefly.
The Timer indicator goes out in the
control field.
Activating the timer/displaying a set
start time
Press the Timerbutton on the remote
control briefly.
The timerindicator lights up in the
control field and the set start time is
shown briefly in the display. The robot
vacuum cleaner will start to vacuum at
the set start time.
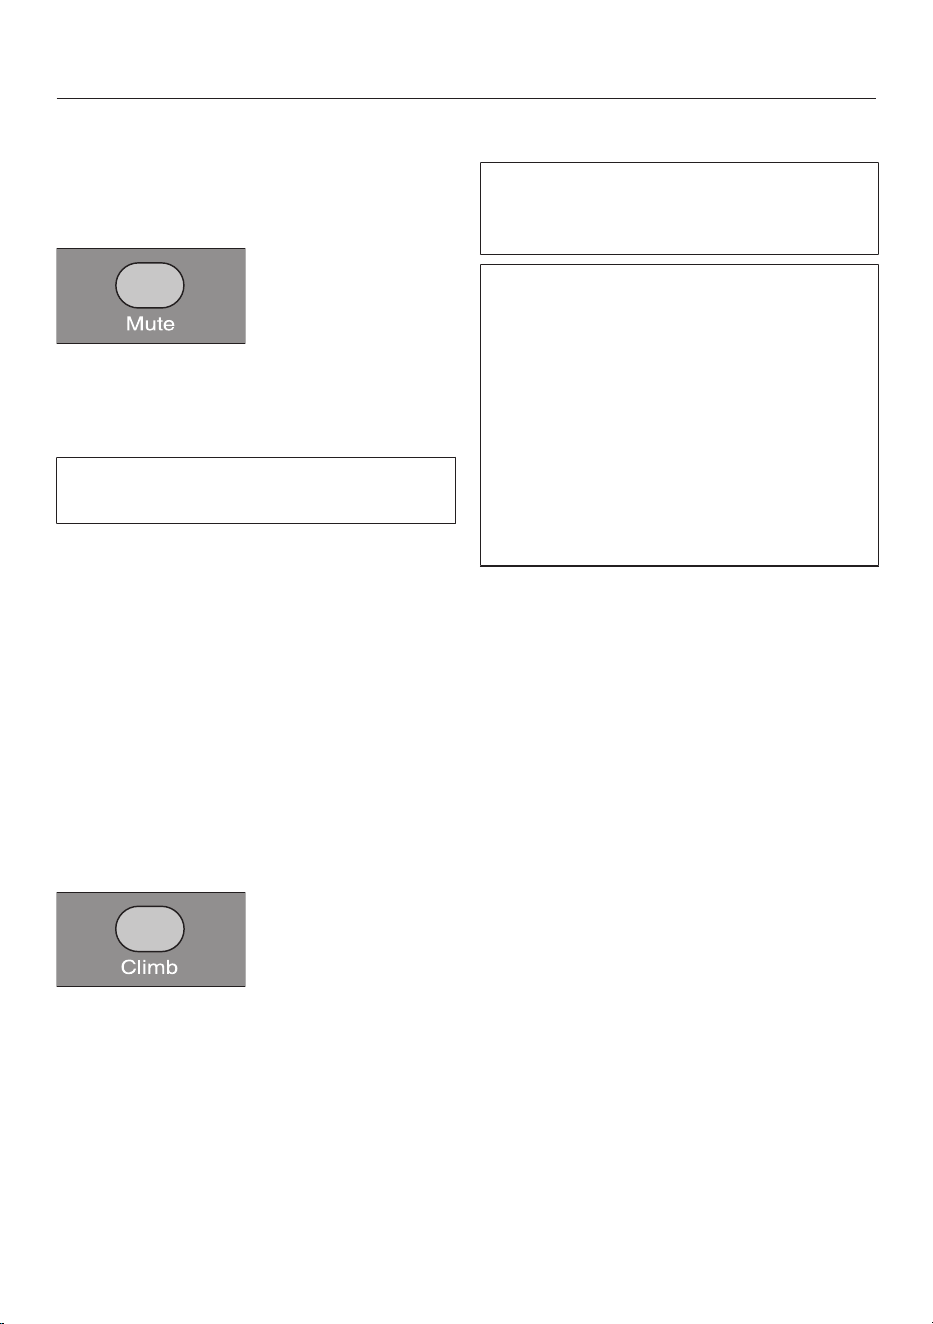
en-CA
64
Deactivating the acoustic signals
Acoustic signals are set as standard.
You can deactivate and then reactivate
them.
Press the Mutebutton on the remote
control briefly.
OFFwill appear in the display briefly.
Acoustic signals for fault messages
cannot be deactivated.
Reducing the maximum crossing
over height
The robot vacuum cleaner is set to
overcome height differences of up to
17mm as standard. It is therefore able
to vacuum carpets, move over door
thresholds, etc.
If you would like to reduce this height
(down to approx. 6mm) in order to
protect the legs of chairs, tables, or
lamps, for example, you can deactivate
the factory default setting.
Press the Climbbutton on the remote
control briefly.
LO will appear in the display.
Press the Climbbutton again briefly if
you want to reactivate the maximum
crossing over height of 17mm. HIwill
appear in the display.
Miele@home*
Your robot vacuum cleaner is
equipped with an integrated Wi-Fi
module for this purpose.
Please note that, despite the
manufacturer’s extremely high security
standards, there may be data security
risks for the user whenever networked
appliances are used. For this reason,
we offer you the option of removing
the Wi-Fi module from the robot
vacuum cleaner. You can find
instructions for this at the end of this
section; see “Removing the Wi-Fi
module”.
* Additional digital offer from Miele & Cie. KG. All smart
applications are made possible with the Miele@home
system. The range of functions can vary depending on
the model and the country.
To use this feature, you will need:
- a Wi-Fi network
- the Miele Scout app
- a Miele user account You can create
a user account via the Miele Scout
app.
The Miele Scout app will guide you as
you connect your robot vacuum cleaner
to your home Wi-Fi network.
Once your robot vacuum cleaner is
connected to your Wi-Fi network, you
can use the Miele Scout app for a
number of actions, including the
following:
- controlling your robot vacuum
cleaner remotely
- accessing status information
- using the video function (for Scout
RX3 Home Vision HD)
en-CA
65
Connecting your robot vacuum cleaner
to your Wi-Fi network will increase
energy consumption, even when the
robot vacuum cleaner is switched off.
Make sure that you have sufficient
signal strength for your Wi-Fi
network in the rooms where the
robot vacuum cleaner will be
vacuuming.
Availability of the WiFi connection
The WiFi connection shares a frequency
range with other appliances (including
microwave ovens and remote control
toys). This may result in sporadic or
even complete connection failures.
Therefore, the availability of featured
functions cannot always be guaranteed.
Miele@home availability
The ability to use the Miele Scout app
depends on the availability of the
Miele@home service in your country.
The Miele@home service is not
available in every country.
For information about availability,
please visit www.miele.com.
Downloading the Miele Scout app
The Miele Scout app app is available to
download free of charge from the Apple
App Store
®
or from the Google Play
Store™.
Download the Miele Scout app to a
mobile device (tablet PC or
smartphone).
For data protection reasons, you have
to connect each mobile device to the
robot vacuum cleaner individually.
Activating the network function of
the robot vacuum cleaner
In order to connect your robot vacuum
cleaner to your Wi-Fi network, you must
first activate the network function. The
network function is deactivated as
standard.
There are 2 ways to activate the
network function:
Option 1 (remote control)
Press the WI-FIbutton.
The Wi-Fiindicator lights up in the
control field.
Option 2 (control field)
Press the Basesensor control for at
least 2seconds.
The Wi-Fiindicator lights up in the
control field.
Start the Miele Scout app and set up
a Miele user account.
You can connect your mobile device
directly to the robot vacuum cleaner or
connect via your Wi-Fi network.
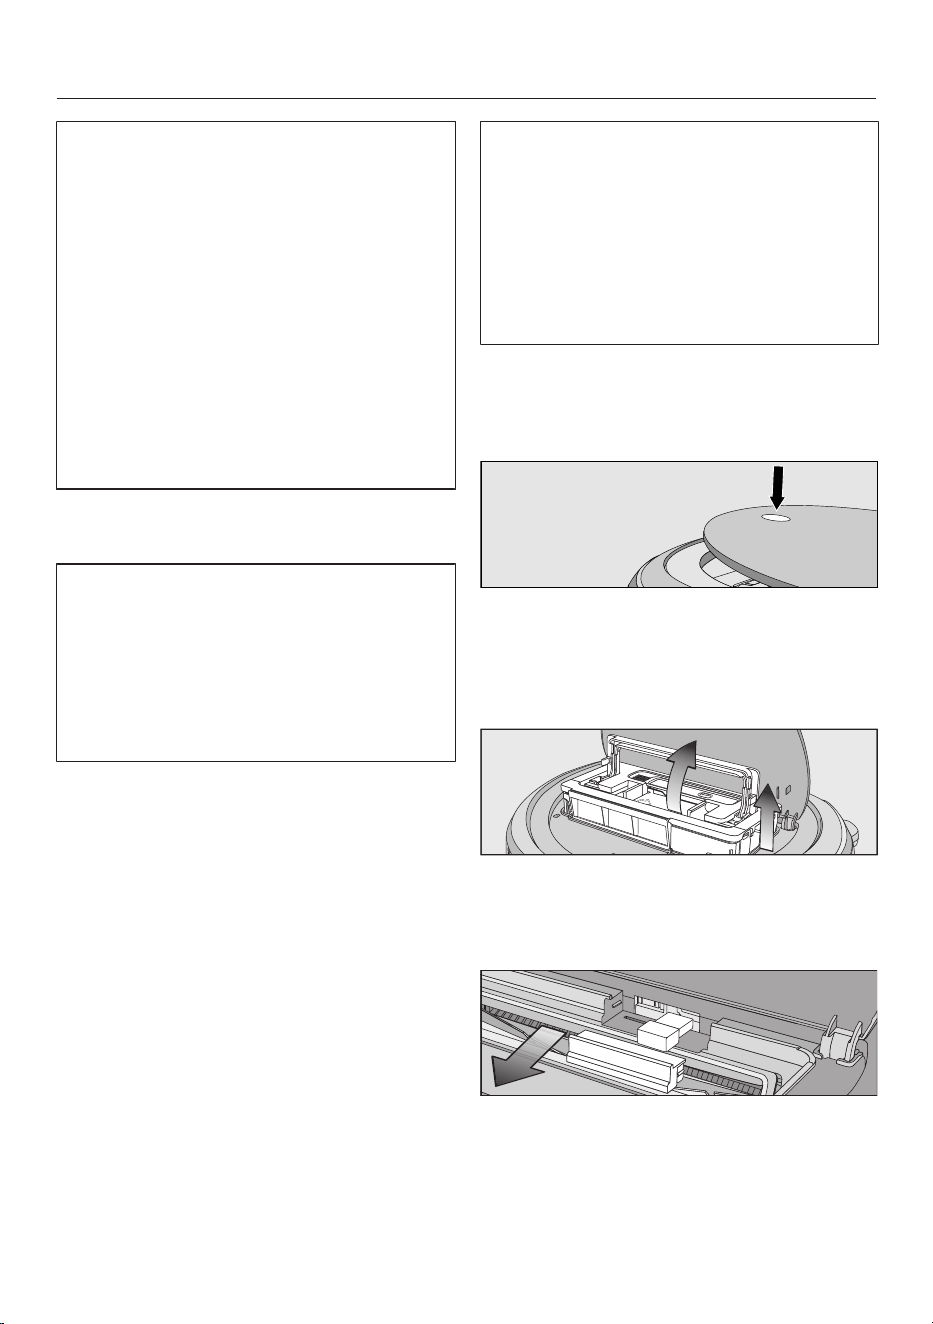
en-CA
66
Note for dealers
You can connect the robot vacuum
cleaner directly to a mobile device
without a Wi-Fi network.
To do this, connect the mobile device
to the robot vacuum cleaner’s Wi-Fi.
Use the robot vacuum cleaner’s serial
number as the Wi-Fi password. You
can find the serial number on a sticker
in the storage compartment and on
the data plate on the underside of the
robot vacuum cleaner. Follow the
instructions in the Miele Scout app.
Follow the user navigation
instructions in the Miele Scout app.
Please note that the robot vacuum
cleaner always follows the save
commands which were set most
recently, regardless of whether the
settings were configured using the
remote control, control field, or with a
mobile device.
Video function
(for Scout RX3 Home Vision HD, use
the Miele Scout app)
The camera on the right at the front of
the robot vacuum cleaner sends
encrypted images in real time to the
selected mobile device. Transmission
quality is dependent upon the speed of
the Internet connection in your home
and the speed of your mobile device.
The video function indicator in the
control field flashes red when images
are being sent.
The live video is only played back in the
Miele Scout app; it is not saved.
The privacy and personal living space
of third parties must be respected
when using the video function. The
robot vacuum cleaner with video
function should therefore only be used
in your own home. Anyone else
present should be informed before
you start to use the video function.
We recommend cleaning both cameras
regularly with a soft, dry cloth.
Removing the Wi-Fi module
Press the depression at the top of the
robot vacuum cleaner.
The lid of the storage compartment will
open.
Unlatch the dust box by lifting the
handle upward.
Remove the dust box.
Pull the cover out from the front.
Remove the Wi-Fi module.
Put the cover back on.

en-CA
67
Maintenance
Risk of injury caused by rotating
roller brush.
The robot vacuum cleaner may start
without warning while maintenance
work is being carried out.
Switch the robot vacuum cleaner off
before doing any maintenance work.
To switch it off, press the I/0 switch
on the side of the robot vacuum
cleaner to the 0 position.
It is recommended to use only genuine
Miele accessories bearing the
“ORIGINAL Miele” logo on the
packaging. Only these will guarantee
optimum suction power for your robot
vacuum cleaner and the best possible
cleaning results.
Please note that faults and damage
caused by use of accessories which
do not bear the “ORIGINAL Miele”
logo on their packaging are not
covered by the robot vacuum cleaner
warranty.
Purchasing accessories
Original Miele accessories are available
from the Miele web store, Miele Service,
and your Miele dealer.
Original Miele accessories are identified
by the “ORIGINAL Miele” logo on the
packaging.
Emptying the dust box
Empty the dust box of the robot
vacuum cleaner after each use in order
to achieve the best possible cleaning
results.
At the very latest, you must empty the
dust box when “l_ _l” appears in the
display running from bottom to top.
The contents of the dust box can be
disposed of with normal household
waste, providing they consist of
general household dust only.
Press the depression at the top of the
robot vacuum cleaner.
The lid of the storage compartment will
open.
Unlatch the dust box by lifting the
handle upward.
Remove the dust box.
Press one or both release buttons in
the direction of the arrow and remove
the dust box lid.
Empty the dust box.
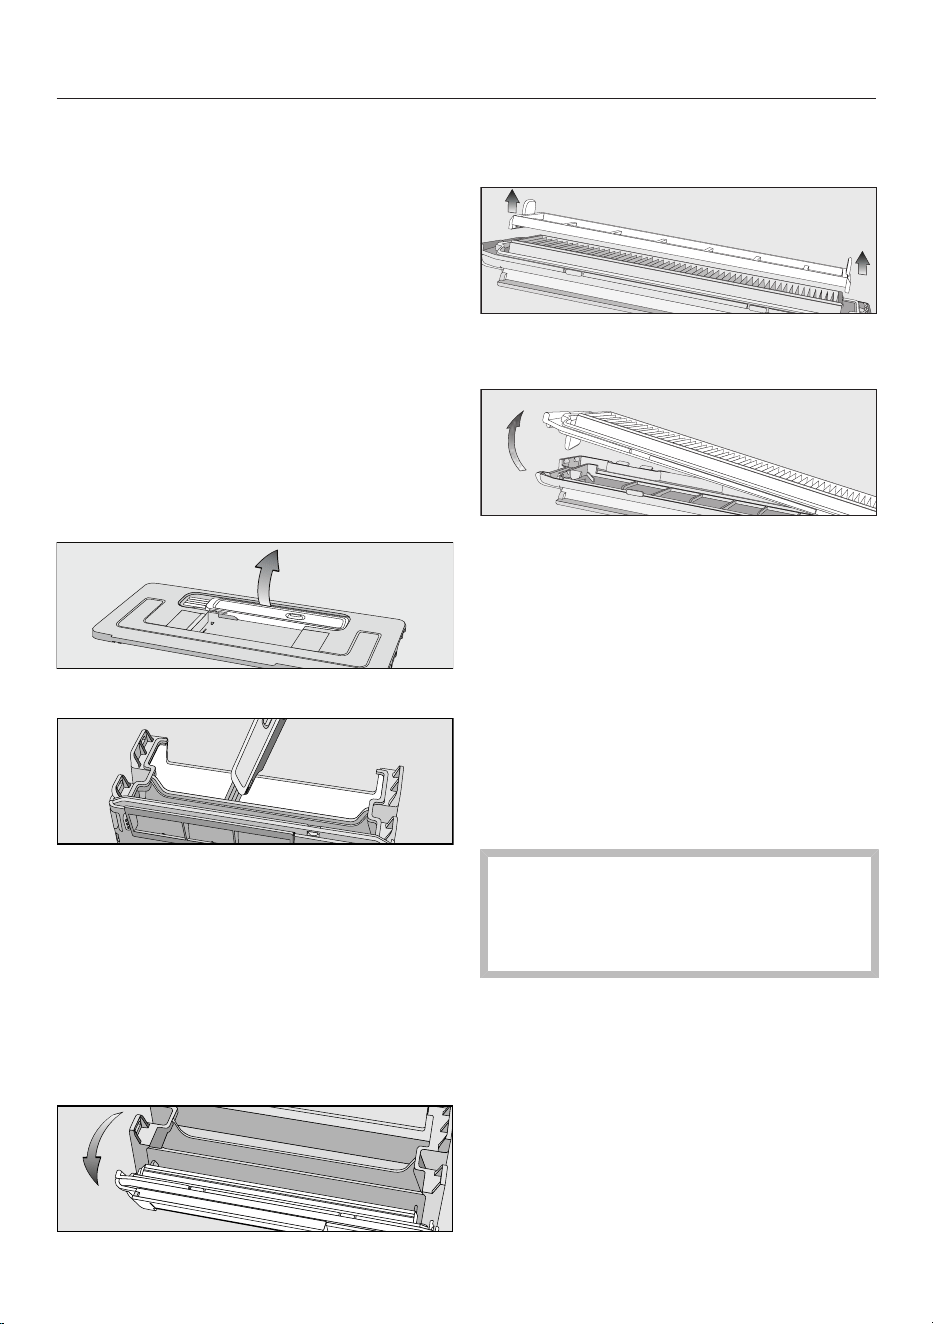
en-CA
68
Replace the lid and close the dust
box, making sure it clicks into place.
Place the dust box into the robot
vacuum cleaner with the handle lifted
up and latch it into place by pushing
the handle back down.
Close the storage compartment lid
and press down on the depression in
order to lock it.
Cleaning the dust box
Clean the dust box as required.
A cleaning tool is located at the top of
the dust box lid.
Remove the cleaning tool.
Clean the dust box and the underside
of the lid using the cleaning tool.
Cleaning the exhaust filter
Clean the exhaust filter as required.
The exhaust filter compartment is
located in the dust box.
Remove the lid from the dust box.
Fold out the filter assembly from the
dust box.
Remove the pre-filter and clean it as
required using the cleaning tool.
Release the exhaust filter and clean it
using the cleaning tool.
Reinstall the exhaust filter in the
cover.
Place the pre-filter onto the exhaust
filter.
The filter assembly is complete.
Carefully refit the filter assembly on
the dust box and clip the filter
assembly into position.
The exhaust filter must be replaced
with a new one after approx.
6months in order to achieve the best
possible cleaning results.
Cleaning the side brushes
Clean the side brushes as required. For
this you will require the cleaning tool
which is located at the top of the dust
box lid.
Place the robot vacuum cleaner
upside down on a level, clean
surface.
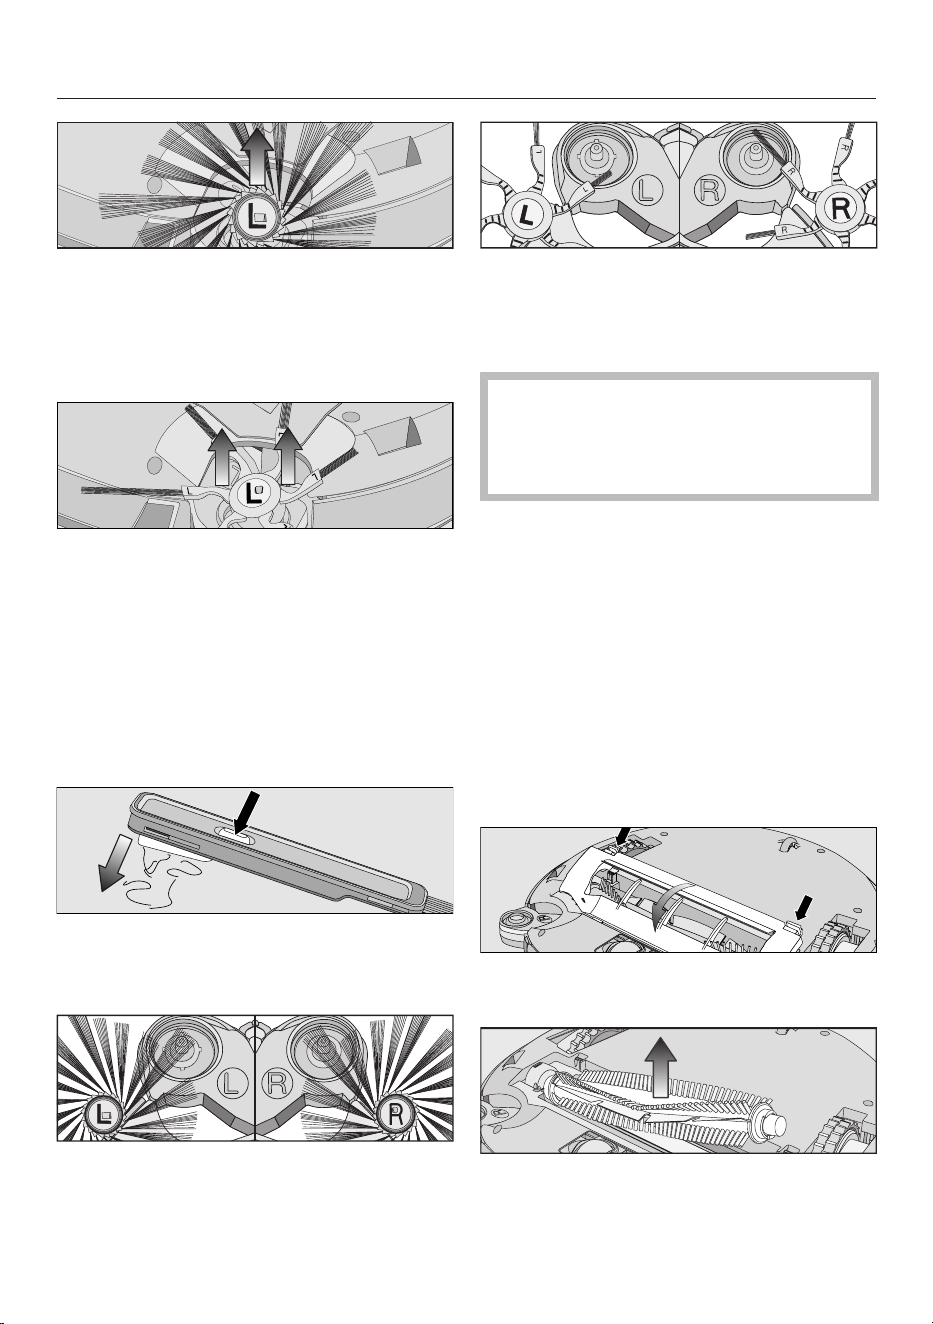
en-CA
69
20-arm universal side brushes: take
hold of opposing side brushes (one
long and one short bunch per hand)
and pull them upward to remove
them.
6-arm carpet side brushes: take hold
of opposing elastic side-brush
holders (one holder per hand) and
pull them upward to remove them.
Remove threads and hair using the
wiper which is located on the bottom
of the cleaning tool.
Hold the wiper over a bin.
Press the button at the top of the
wiper several times until all threads
and hair have fallen out.
Press the two cleaned side brushes
carefully onto their pins until they
audibly engage. Take care to comply
with the markings L and R.
In order to continue to achieve the
best possible cleaning results,
replace the pair of side brushes after
approx. 1year.
Cleaning the roller brush
Clean the roller brush as required. For
this, you will require the cleaning tool
which is located at the top of the dust
box lid.
Place the robot vacuum cleaner
upside down on a level, clean
surface.
Remove both side brushes; see
“Cleaning the side brushes”.
Release the roller brush cover and
remove the cover.
Remove the roller brush.
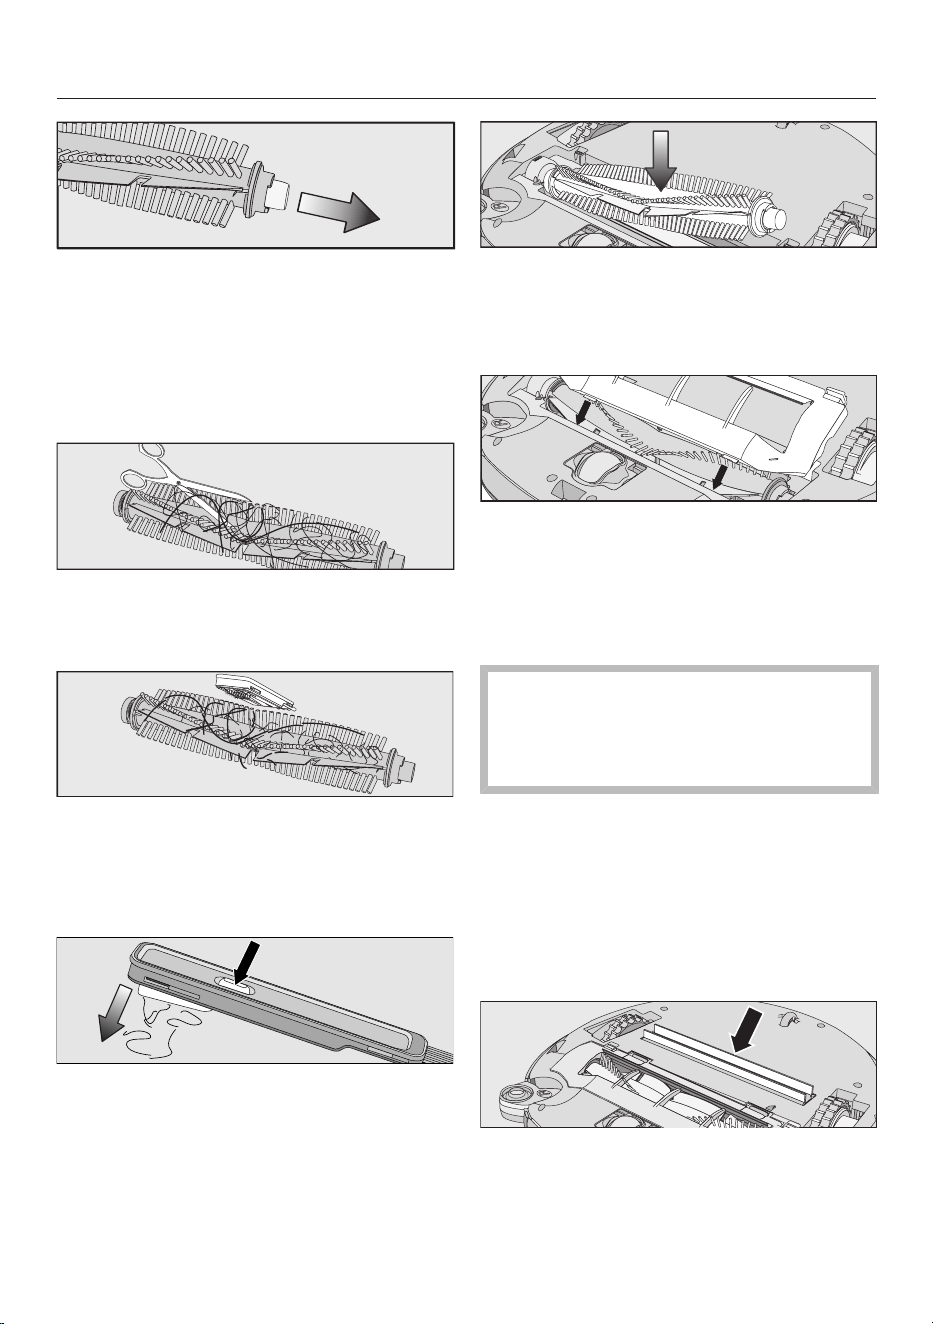
en-CA
70
Pull the bearing cover off the roller
brush and remove any threads or
hairs that have wound themselves
around the bearing.
Reinstall the bearing cover, making
sure it clicks into position.
Use a pair of scissors to cut any
threads or hairs that have wound
themselves around the roller brush.
Remove the threads and hair using
the wiper which is located on the
bottom of the cleaning tool.
Hold the wiper over a bin.
Press the button at the top of the
wiper several times until all threads
and hair have fallen out.
Reinstall the roller brush with the
bearing cover attached. Make sure
that the side with the pointed end is
inserted into the corresponding slot.
Carefully reinstall the roller brush
cover on both sides, making sure it
clicks into position.
Reinstall the side brushes; see
“Cleaning the side brushes”.
In order to continue to achieve the
best possible cleaning results,
replace the roller brush with a new
one after approx. 1year.
Cleaning the dust box seals
Clean the seals on the bottom of the
dust box as required.
Place the robot vacuum cleaner
upside down on a level, clean
surface.
Wipe the seals with a slightly damp
cloth to clean them.
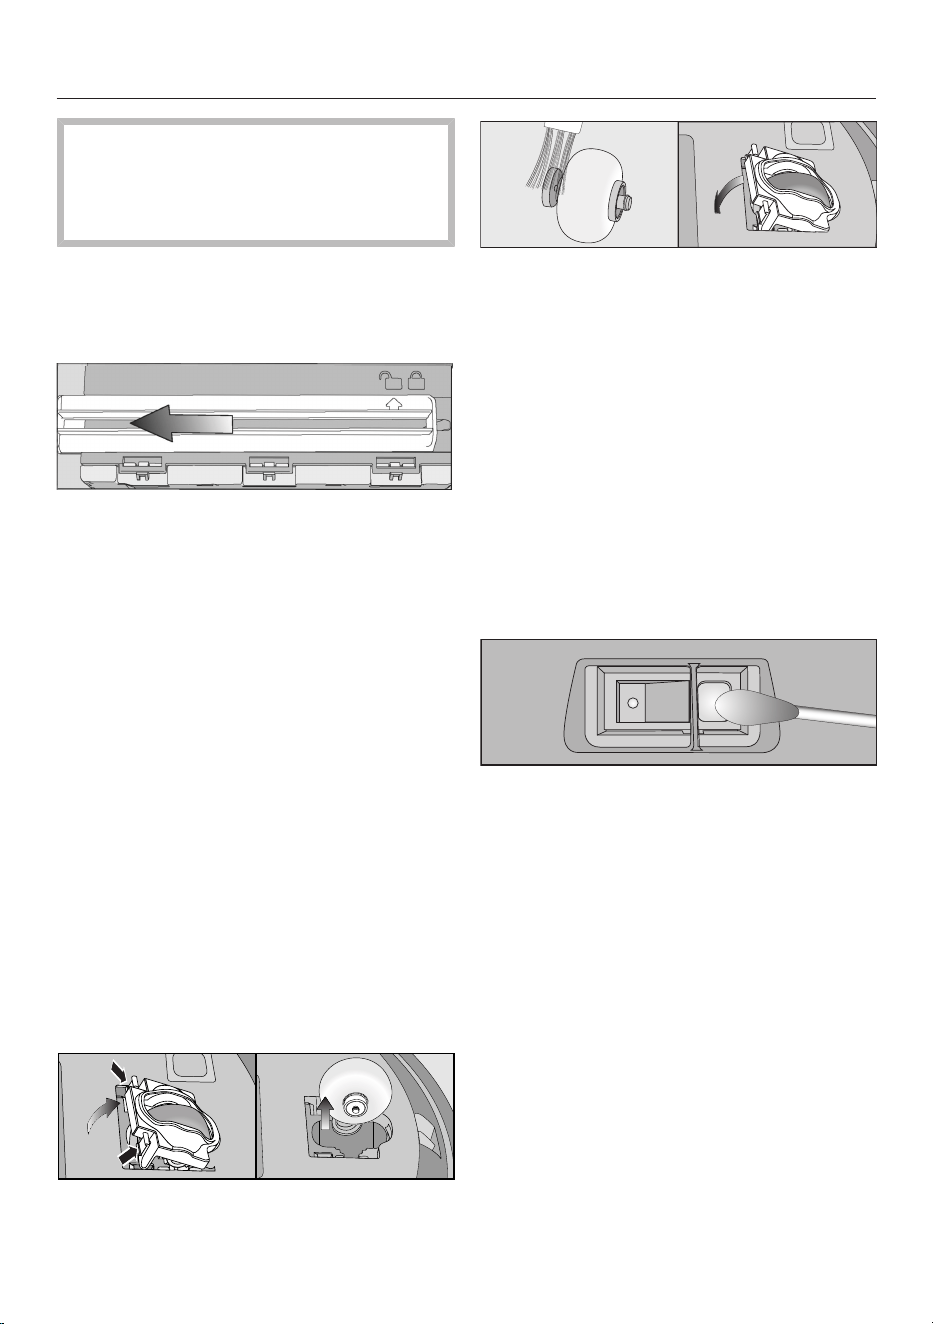
en-CA
71
In order to continue to achieve the
best possible cleaning results,
replace the seal unit with a new one
after approx. 1year.
Replacing the seal unit on the dust
box
Remove the dust box.
Unlatch the seal unit from the
underside of the dust box so that the
arrow points to the symbol.
Remove the seal unit.
Insert the new seal unit so that the
arrow points to the symbol.
Lock the seal unit, making sure it
clicks into position.
The arrow points to the symbol.
Cleaning the front wheel
Clean the front wheel as required. For
this you will require the cleaning tool
which is located at the top of the dust
box lid.
Place the robot vacuum cleaner
upside down on a level, clean
surface.
Unclip the cover.
Remove the front wheel.
Remove any threads and hair and
clean the front wheel, the cover, and
the slot depression using the cleaning
tool.
Refit the front wheel and close the
cover making sure it clicks into
position.
Cleaning the sensors
Clean the sensors as required.
Place the robot vacuum cleaner
upside down on a level, clean
surface.
Clean the sensors carefully using a
dry cotton wool bud.
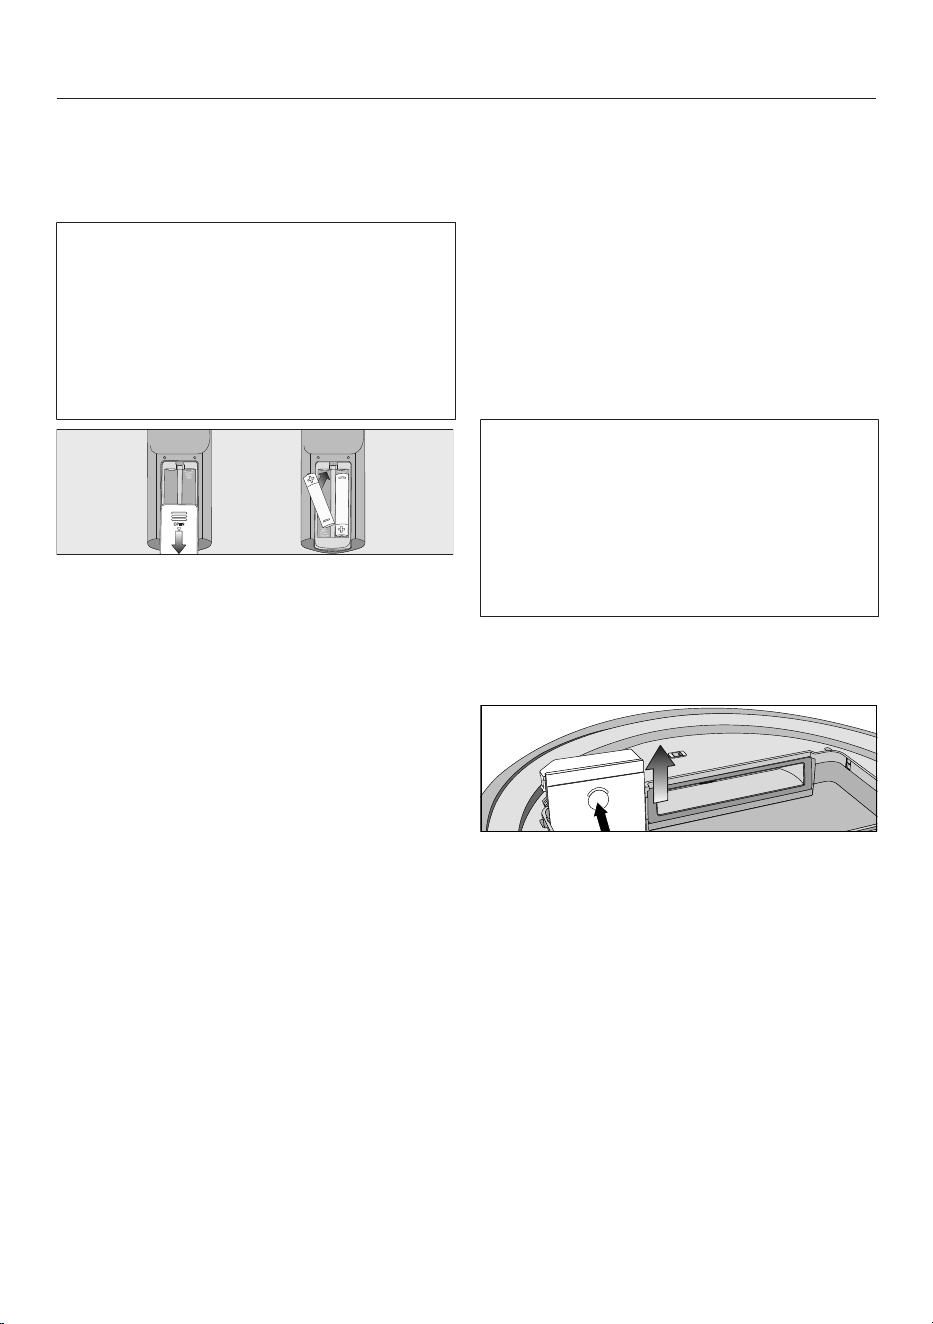
en-CA
72
Replacing batteries in the remote
control
2 batteries (AAA, 1.5V) are required.
Observe the instructions regarding the
handling and disposal of batteries
found in the “Safety notes and
warnings” and “Caring for the
environment” sections at the
beginning of these operating
instructions.
Remove the battery compartment
cover.
Replace the batteries. Make sure the
polarity is correct.
Close the battery compartment cover.
Replacing the rechargeable battery
An original Miele lithium-ion
rechargeable battery is required:
- YCR-M05 for Scout RX3
- YCR-MT12 for Scout RX3 Runner
and Scout RX3 Home Vision HD
The rechargeable battery compartment
is located in the robot vacuum cleaner’s
storage compartment.
Observe the instructions regarding the
handling and disposal of rechargeable
batteries found in the “Safety notes
and warnings” and “Caring for the
environment” sections at the
beginning of these operating
instructions.
Open the storage compartment.
Remove the dust box.
Open the rechargeable battery
compartment by unlatching the cover
upward.
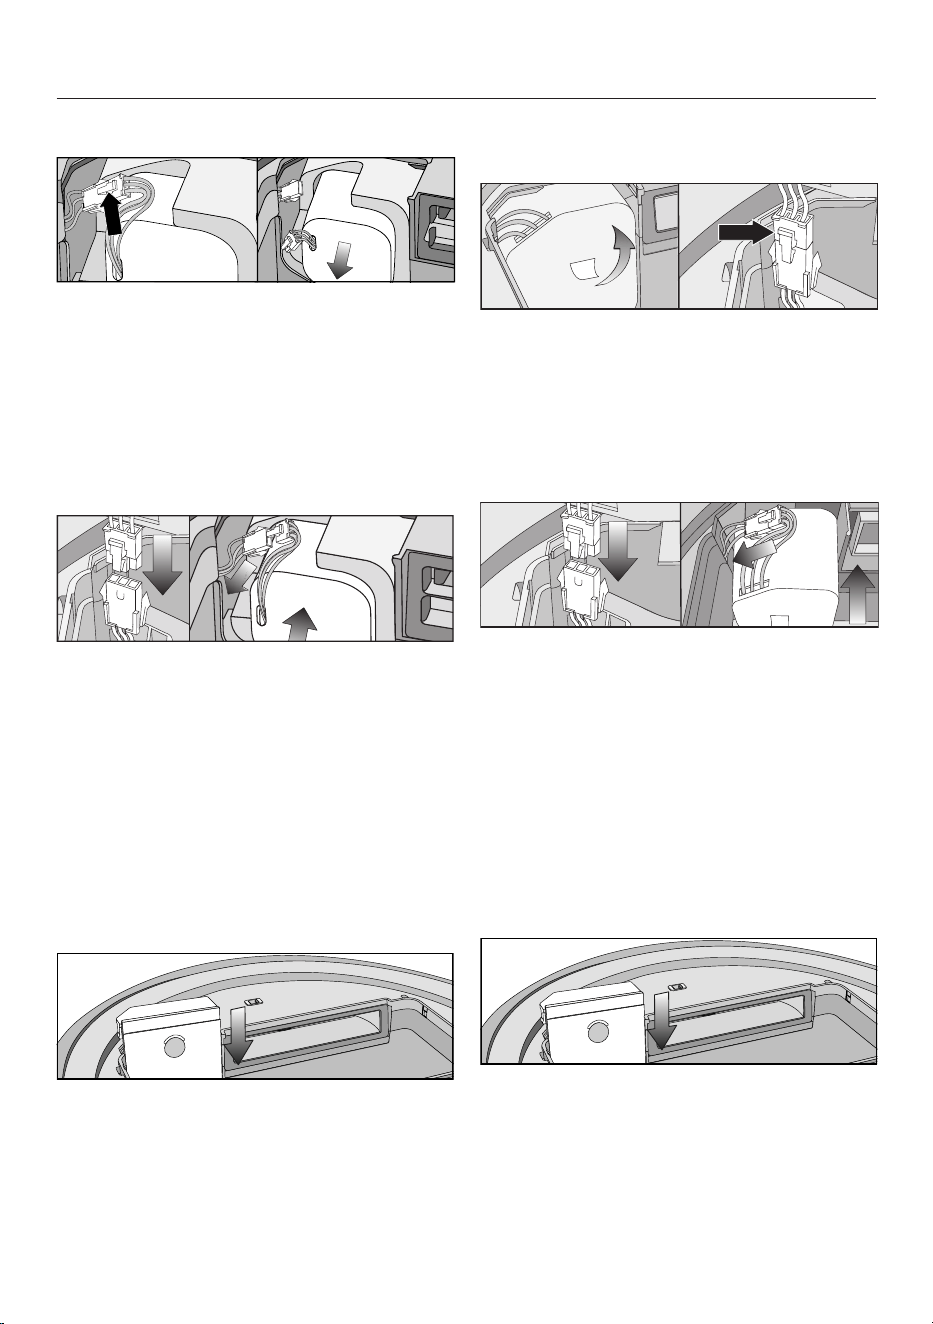
en-CA
73
Scout RX3 (YCR-M05)
Carefully pull the power supply
cables so that the plug connection is
pulled out of the slot.
Press the latch on the plug
connection in order to release the
plug.
Remove the rechargeable battery.
Insert the plug of the new
rechargeable battery into the
counterpart, making sure it clicks into
place.
Insert the rechargeable battery
carefully, making sure it is properly
positioned (see right-hand side of
picture).
Store the plug connection in the slot
at the side.
Carefully reinstall the cover of the
rechargeable battery compartment
and close it, making sure that it clicks
into place.
Scout RX3 Runner and Scout RX3
Home Vision HD (YCR-MT12)
Carefully remove the rechargeable
battery using the tab until the plug
connection is exposed.
Press the latch on the plug
connection in order to release the
plug.
Insert the plug of the new
rechargeable battery into the
counterpart, making sure it clicks into
place.
Store the plug connection in the side
recess.
Insert the rechargeable battery
carefully, making sure it is properly
positioned (see right-hand side of
picture).
Carefully reinstall the cover of the
rechargeable battery compartment
and close it, making sure that it clicks
into place.
en-CA
74
Maintenance
Risk of injury caused by rotating
roller brush.
The robot vacuum cleaner may start
without warning while maintenance
work is being carried out.
Switch the robot vacuum cleaner off
before doing any maintenance work.
To switch it off, press the I/0 switch
on the side of the robot vacuum
cleaner to the 0 position.
Robot vacuum cleaner and
accessories
Risk of electric shock from mains
voltage.
If moisture gets into the robot
vacuum cleaner and accessories,
there is a risk of electric shock.
Do not immerse the robot vacuum
cleaner or any accessories supplied
with it in water.
Observe the special cleaning
instructions in the “Maintenance”
section.
Clean the robot vacuum cleaner and all
plastic accessories with a commercially
available cleaner suitable for plastic.
Static charge can cause a build-up of
dust on the robot vacuum cleaner. This
should be removed using a soft, dry
cloth.
Damage due to unsuitable
cleaning agents.
All surfaces are susceptible to
scratching. Contact with unsuitable
cleaning agents can alter or
discolour the external surfaces.
Do not use abrasive cleaning agents,
glass cleaning agents, all-purpose
cleaners, or oil-based care products.
Storage/factory default
settings
Storage
Switch the robot vacuum cleaner off
if it is not going to be used for a long
period of time. To switch it off, press
the I/0 switch on the side of the
robot vacuum cleaner to the 0
position.
If the robot vacuum cleaner is not going
to be used for an extended period of
time, make sure it is stored in a well
ventilated, cool place, but not at an
ambient temperature below 0°C.
For optimum care, store the robot
vacuum cleaner at half charge
capacity (rechargeable battery status
indicator in the control field is orange).
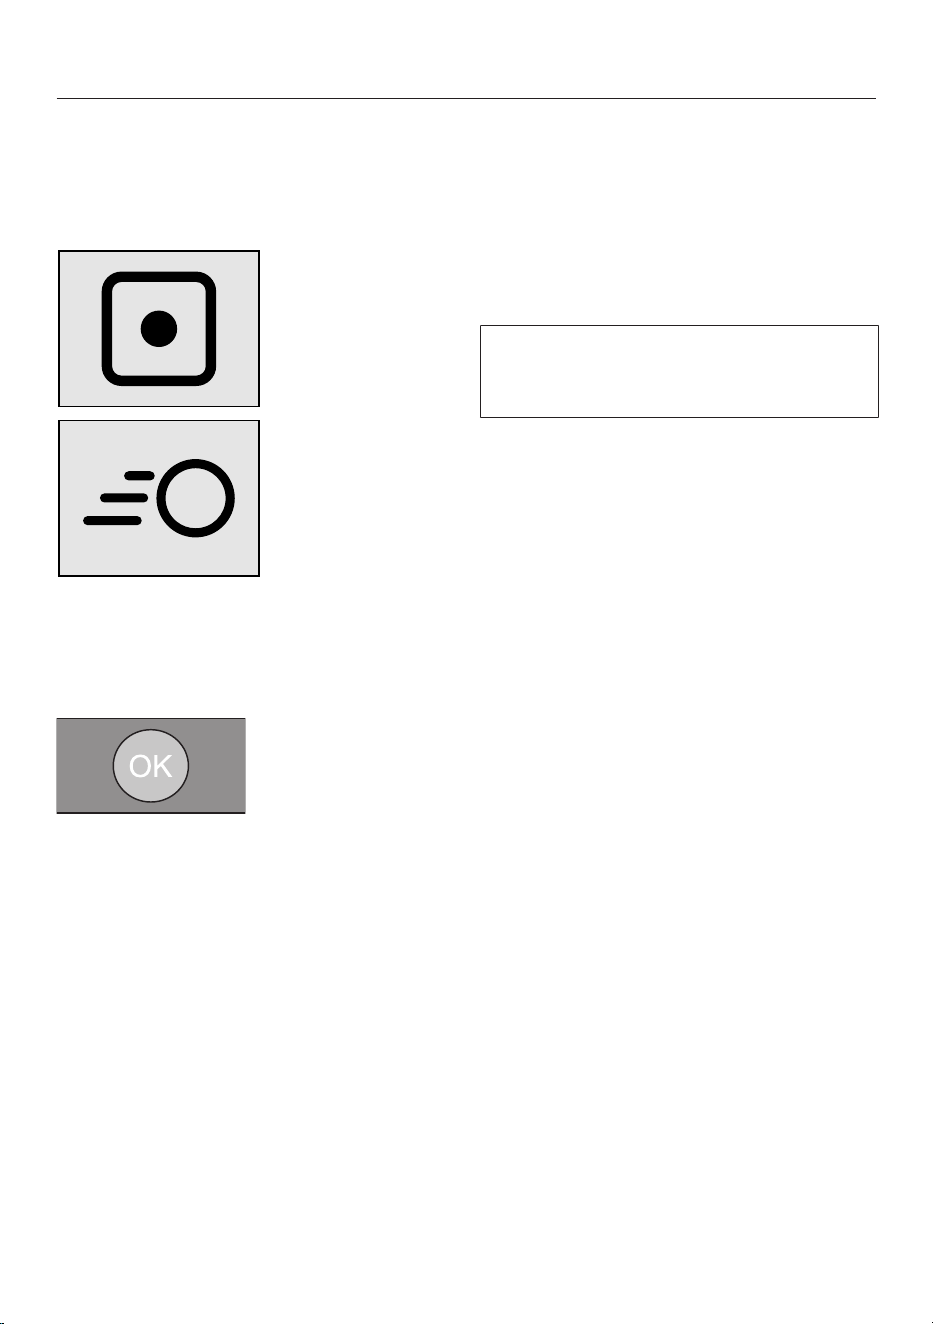
en-CA
75
Factory default settings
The robot vacuum cleaner can be reset
to its factory default settings. Have the
remote control to hand.
Press and hold the Spot and
Turbosensors in the control field at
the same time for at least 5seconds.
r:St will appear in the display.
Within the next 2seconds, press the
OKbutton on the remote control until
F:tr appears in the display.
The robot vacuum cleaner will start
again with its factory default settings
restored.
Technical Service
Contact in case of a fault
In the event of any faults which you
cannot remedy yourself, please contact
your Miele Dealer or the Miele Service
Department.
Contact information for Miele Service
can be found at the end of this
document.
Warranty
For more information on country-
specific warranty terms and conditions,
please contact Miele Customer Service.
en-CA
76
Frequently Asked Questions
With the help of the following guide, minor faults in the performance of the
machine, some of which may result from incorrect operation, can be remedied
without contacting the Service Department. This will save you time and money
because you won't need a service call.
This guide may help you find the reason for the fault and help you correct it.
Risk of injury caused by rotating roller brush.
The robot vacuum cleaner may start without warning while problems are being
dealt with.
Switch the robot vacuum cleaner off before dealing with any problems. To
switch it off, press the I/0 switch on the side of the robot vacuum cleaner to
the 0 position.
Problem Possible cause and solution
The cleaning
performance is poor.
The dust box is full.
Empty and clean the dust box.
The roller brush is dirty or worn out.
Clean the roller brush.
Replace the roller brush.
The seals on the dust box are dirty or worn out.
Clean the seals and the suction channel between
them.
Replace the seal unit.
Check whether the roller brush cover is installed
properly and is locked into place on both sides;
see “Maintenance” – “Cleaning the roller brush”.
The exhaust filter is dirty.
Clean the exhaust filter.
Replace the exhaust filter.
The side brushes have worn out.
Replace the side brushes.
The robot vacuum
cleaner switches itself
off after it has been
switched on using the
Power button.
The rechargeable battery is not sufficiently charged.
Connect the robot vacuum cleaner correctly to the
charging contacts on the connected base station.

en-CA
77
Problem Possible cause and solution
The robot vacuum
cleaner does not return
to the base station after
vacuuming.
It had started vacuuming from somewhere in the
room.
The robot vacuum cleaner will return to its starting
point.
There is insufficient light for the robot vacuum
cleaner to navigate.
Provide sufficient lighting.
The base station is not connected correctly.
Connect the base station exactly as described in
these operating instructions; see “Connection” –
“Connecting the base station”.
The signal between the infrared transmitter on the
base station and the robot vacuum cleaner is broken.
Clean the front of the base station and the front of
the robot vacuum cleaner carefully with a soft, dry
cloth and make sure that no items disrupt the
signal.
Obstacles on the floor which is to be vacuumed can
impede navigation.
Watch the robot vacuum cleaner during
vacuuming.
Remove any problematic obstacles.
Section off the problematic area with the magnetic
strip.
Reduce the robot vacuum cleaner’s maximum
crossing over height, see section “Use” –
“Reducing the maximum crossing over height”.
The robot vacuum
cleaner is not charging.
The base station is not connected correctly.
Connect the base station exactly as described in
these operating instructions; see “Connection” –
“Connecting the base station”.

en-CA
78
Problem Possible cause and solution
The robot vacuum
cleaner does not react.
The robot vacuum cleaner is switched off.
Switch it on (slide I/0 to I).
The batteries in the remote control have been
inserted incorrectly.
Make sure the polarity is correct.
The batteries in the remote control are dead.
Replace the batteries.
The signal between the infrared transmitter on the
vacuum cleaner and the remote control is broken.
Clean the front of the robot vacuum cleaner and
the top of the remote control carefully with a soft,
dry cloth and make sure that no items disrupt the
signal.
The remote control is too near to the robot vacuum
cleaner or too far away from it.
Increase or decrease the distance and when using
the remote control direct it towards the robot
vacuum cleaner.
“l_ _l” appears in the
display
running from bottom to
top.
The dust box is full.
Empty and clean the dust box.
rLOC appears in the
display.
Vacuuming was interrupted; the robot vacuum
cleaner was moved during the pause.
Proceed as described in “Use” – “Interrupting
vacuuming”.
en-CA
79
Fault messages
Risk of injury caused by rotating roller brush.
The robot vacuum cleaner may start without warning while faults are being dealt
with.
Switch the robot vacuum cleaner off before dealing with any faults. To switch it
off, press the I/0 switch on the side of the robot vacuum cleaner to the 0
position.
Fault messages are shown in the display.
Your robot vacuum cleaner is supplied with a sticker that lists all fault messages.
You can stick this sticker to the underside of the storage compartment lid.
Problem Possible cause and solution
F 1 “Wheel raised” fault
Place the robot vacuum cleaner on a level floor
surface.
F 2 “Dirty sensors” fault
Clean the sensors. This fault message is also
shown when you start up the robot vacuum
cleaner and the collision sensor is located above
empty space. Remove the robot vacuum cleaner
from the edge.
F 3 “Filter not recognized” fault
Insert the dust box with exhaust filter into the robot
vacuum cleaner.
F 4 “Drive wheels overloaded” fault
Check whether the drive wheels have become
dirty. Remove any threads or hair. This fault
message is also shown if the robot vacuum
cleaner is stuck.
F 5 “Brushes overloaded” fault
Check if the roller brush and side brushes have
become dirty. Clean the roller brush and side
brushes. This fault message is also shown if
objects become caught in the robot vacuum
cleaner.
en-CA
80
Problem Possible cause and solution
F 6 “Fan motor overloaded” fault
Empty and clean the dust box. Clean or replace
the exhaust filter.
F 7 Internal system error or fault “Robot vacuum cleaner
outside of its permitted ambient operating
temperature”
Switch the robot vacuum cleaner off and on again
(I/0 switch).
F 8 “Front wheel dirty” fault
Check if the front wheel, the cover, or the slot
depression have become dirty. Remove any
threads or hair, and clean the front wheel, the
cover, and the depression.
Resetting the fault
message after fixing
the problem
You can reset the fault messages described above
in the following ways
- Switch the robot vacuum cleaner off and on again
(I/0 switch).
- Press the Powerbutton on the remote control.
- Press the sensor control in the control field of
the robot vacuum cleaner for at least three
seconds.
Technical data
(for the Wi-Fi module)
Frequency range 2.412–2.472GHz
Maximum transmission power <100mW
Declaration of conformity
Miele hereby declares that this robot vacuum cleaner complies with Directive
2014/53/EU.

en-CA
81
Copyright and licenses
For the purpose of operating and controlling the robot vacuum cleaner, Miele uses
proprietary or third-party software that is not covered by open source licensing
terms. This software/these software components are protected by copyright. The
copyrights held by Miele and third parties must be respected.
In addition, the robot vacuum cleaner contains software components which are
distributed under open source licensing terms. The open source components
contained in the appliance along with the corresponding copyright notices, copies
of the licensing terms valid at the time and any further information can be
accessed locally by IP via a web browser (http://<IP address>/Licenses). The
liability and warranty arrangements for the open source licenses displayed in this
location only apply in relation to the respective rights holders.
In particular, the robot vacuum cleaner contains software components licensed by
the copyright holders under the GNU General Public License, Version2, or the
GNU Lesser General Public License, Version2.1. For a period of at least 3years
from the date of purchase or delivery of the robot vacuum cleaner respectively,
Miele offers to provide you or third parties with a machine-readable copy of the
source code of the open source components contained in the robot vacuum
cleaner and licensed under the terms of the GNU General Public License,
Version2, or the GNU Lesser General Public License, Version2.1, on a data carrier
(CD-ROM, DVD, or USB stick). To obtain this source code, please contact us,
specifying the product name, serial number, and purchase date, by sending us an
e-mail ([email protected]) or writing to the following address:
Miele & Cie. KG
Open Source
GTZ/TIM
Carl-Miele-Straße 29
33332 Gütersloh, Germany
Please note the limited warranty in favour of the rights holders under the terms of
the GNU General Public License, Version2, and the GNU Lesser General Public
License, Version2.1:
This program is distributed in the hope that it will be useful, but WITHOUT ANY
WARRANTY, without even the implied warranty of MERCHANTABILITY of FITNESS
FOR A PARTICULAR PURPOSE. See the GNU General Public License and GNU
Lesser General Public License for more details.
You can obtain detailed instructions for the use of test modes from Miele Service.

en-CA - Limited Warranty - Vacuums Canada
82
The following warranty conditions are valid in Canada only.
Miele Limited, (hereinafter "Miele") warrants to the original purchaser that this product, including all of it’s Miele
authorized parts and accessories, is free of defects in material and workmanship.
1. Duration of Warranty
This warranty is valid during the following time periods:
a) Domestic appliances in normal, non-commercial, household use:
– One (1) year. Parts and labour.
– RemoteVision® Modules: Please refer to Miele's "Limited Warranty - RemoteVision® Module - Canada".
– Additional 5 and 10 Year Limited Warranty on Sealed Refrigeration Systems: The Warranty for the Sealed
Refrigeration System includes all original compressors, condensers, evaporators, driers, the original
refrigerant and the original connecting tubing.
– Five (5) Year Warranty - If a claim regarding a defect in material or workmanship relating to the Sealed
Refrigeration Systems used in Miele Refrigerators, Wine Coolers, and Freezers is received by Miele within
five (5) years from the date of purchase, then any warranted failures of the Sealed Refrigeration System
shall be repaired at no cost to you (including parts & labour).
– Ten (10) Year Warranty - If a claim of such a defect is received at any time during the period starting from
the sixth (6th) year and ending on the last day of the tenth (10th) year after the date of purchase, this
Warranty shall cover the replacement or repair of all parts of the Sealed Refrigeration System covered by
the Warranty that is found to be defective in material or workmanship but shall not include labour. Upon
request, such labour shall be provided by Miele and at the customary charge to the Miele Customer.
b) Domestic appliances in commercial use:
– Six (6) months, for parts and labour.
c) Vacuums in normal, non-commercial, household use:
– One (1) year, upright, cordless stick and canister vacuums. Parts and labour.
– Two (2) years, motor for S170 - S189 upright units. Parts and labour.
– Two (2) years, Varta battery on cordless stick vacuums. Parts and labour.
– Seven (7) years, Vortex
TM
motor for canister, cordless stick and upright units, except S170 - S189 upright
units for which the motor warranty is two (2) years. Parts and labour.
d) Vacuums in commercial use:
– Six (6) months, for products used commercially. Parts and labour.
– One (1) year for motor for canister and upright models. Parts and labour.
e) Commercial appliances.
– One (1) year, parts and labour within Miele Direct Service Area (MDSA).
– One (1) year, parts only outside Miele Direct Service Area (MDSA).
Contact Miele Professional to determine if you are within a MDSA.
2. Commencement Date
Warranty coverage begins on the date of purchase. If a product under warranty is replaced by Miele, the original
warranty period is not extended but continues from the date of original purchase.
3. Warranty Preconditions
3.1 Miele assumes warranty responsibility subject to the following preconditions having been fulfilled:
a) You are the original purchaser and did not obtain the product through resale;
b) The product was purchased from Miele or an authorized Miele dealer in Canada;
c) If applicable, the product was installed by a person designated by Miele as qualified to do so and in
accordance with applicable installation instructions; and
d) The product is located in Canada.
3.2 Warranty claims will only be honoured provided that any failure to conform to this warranty is reported in
writing and the product is returned together with proof of purchase date to Miele or to a Miele authorized
dealer, as applicable, within the time period stated in Section 1 above.
4. Extent of Warranty
In the event of defect in material or workmanship occurring within the time period stated in I. above, Miele will
repair, or at its option replace, within a reasonable period of time, the product or any Miele authorized part or
accessory discovered to be defective in workmanship or materials. Defective products and parts become the
property of Miele upon replacement.

en-CA - Limited Warranty - Vacuums Canada
83
5. Exclusions
Warranty coverage excludes any product, including its parts and accessories, that:
a) was not installed according to Miele's installation instruction;
b) was damaged by negligence, accident, abuse, misuse, improper or abnormal usage, maintenance or
transportation;
c) contains non-authentic Miele accessories or replacement parts, including filters, dust bags and other non-
Miele products; and
d) was repaired, serviced, altered or modified by someone other than a Miele authorized service centre or
technician.
6. Ordinary Wear and Tear
Ordinary wear and tear shall not be considered a defect in workmanship or materials.
7. Limitation of Liability
7.1 Unless you purchase extended warranty coverage from Miele prior to the expiry of this warranty, this warranty
is the sole warranty offered by Miele to you. Miele disclaims any and all other warranties to the fullest extent
permitted by law, whether express or implied, including any warranty of merchantability or fitness for a
particular except as provided herein.
7.2 Your sole remedies under this warranty are those described herein. Unless otherwise stated, Miele's liability for
actual damage from any cause whatsoever is limited to the amount paid by you for the product. Miele disclaims
any and all liability and consequential or other damage whether based on breach of contract, tort (including
negligence), product liability or any other legal theory. In no event will either party be responsible for any lost profits
or savings, incidental damage or other economic damages.
8. Special Provincial laws
This warranty gives the purchaser specific legal rights. The purchaser may also have other rights which may vary
from Province to Province in Canada. Some provinces do not allow limitation or exclusion of implied warranties,
therefore, certain limitations and exclusions may not apply.
9. Customer Care
9.1 For service under this warranty or for further information please contact Miele at:
Miele Limited Toll free: 1-800-565-6435
Vaughan, Ontario
Canada L4K 4V8
9.2 Service may require that the appliance be removed and taken, by authorized Miele personnel, to an
authorized Miele Service Centre. If service is requested by you in a remote geographical area, as determined
by Miele in its sole discretion from time to time, you will, at Miele's option, be responsible for either:
a) the travel expenses incurred by Miele to attend your premises; or
b) the cost of removal and shipment of the appliance from your premises to the nearest authorized Miele
Service Centre.
Miele Limited
Headquarter and Miele Centre
161 Four Valley Drive
Vaughan, ON L4K 4V8
Canada
www.miele.ca
customercar[email protected]
[email protected] (commercial enquiries)
Customer Care Centre
Phone: 800-565-6435
customercar[email protected] (general and technical enquiries)

fr-CA - Table des matières
84
CONSIGNES DE SÉCURITÉ IMPORTANTES................................................... 86
Protection de l’environnement......................................................................... 94
Vue d'ensemble de l'appareil ........................................................................... 96
Fonctions et fonctionnalités de l'aspirateur robot ......................................... 98
Accessoires fournis........................................................................................... 98
Raccordement ................................................................................................... 98
Utilisation ........................................................................................................... 101
Mise en marche et arrêt....................................................................................... 101
Début du nettoyage............................................................................................. 101
Fin du nettoyage si l’aspiration a commencé de la station d’accueil ................. 101
Fin du nettoyage si l’aspiration a commencé de n’importe où dans la pièce..... 102
Nettoyage manuel ............................................................................................... 102
Interruption du nettoyage.................................................................................... 102
Navigation manuelle (sans nettoyage)................................................................. 103
Retour de l’aspirateur robot à la station d’accueil .............................................. 103
Modes de fonctionnement .................................................................................. 103
Sélection du mode de fonctionnement ............................................................... 103
Sortie du mode de fonctionnement en cours...................................................... 104
Réglage de la minuterie....................................................................................... 104
Désactivation de la minuterie .............................................................................. 106
Activation de la minuterie/Affichage de l’heure de début réglée......................... 106
Désactivation des signaux sonores..................................................................... 106
Réduction de la hauteur maximale pouvant être franchie................................... 106
Miele@home* ..................................................................................................... 107
Téléchargement de l’application MieleScout ..................................................... 107
Activation de la fonction réseau de l’aspirateur robot......................................... 108
Fonction vidéo..................................................................................................... 108
Retrait du module Wi-Fi ...................................................................................... 109
Entretien............................................................................................................. 109
Vidage du bac à poussière.................................................................................. 110
Nettoyage du bac à poussière ............................................................................ 111
Nettoyage du filtre d’évacuation ......................................................................... 111
Nettoyage des brosses latérales ......................................................................... 111
Nettoyage de la brosse cylindrique..................................................................... 112
Nettoyage des joints d’étanchéité du bac à poussière ....................................... 113
Remplacement de l’unité de joints d’étanchéité du bac à poussière ................. 114
Nettoyage de la roue avant ................................................................................. 114

fr-CA - Table des matières
85
Nettoyage des capteurs...................................................................................... 114
Remplacement des piles de la télécommande ................................................... 115
Remplacement de la batterie rechargeable ........................................................ 115
Nettoyage et entretien ...................................................................................... 117
Rangement/Réglages d’usine.......................................................................... 117
Service technique.............................................................................................. 118
Contact en cas d'anomalies................................................................................ 118
Garantie............................................................................................................... 118
Foire aux questions ........................................................................................... 119
Messages d’erreur ............................................................................................ 122
Données techniques ......................................................................................... 123
Déclaration de conformité................................................................................ 123
Droit d'auteur et licences ................................................................................. 124
Garantie restreinte – Aspirateurs Canada....................................................... 12
5
fr-CA - CONSIGNES DE SÉCURITÉ IMPORTANTES
86
LISEZ ATTENTIVEMENT TOUTES LES INSTRUCTIONS
AVANT D'UTILISER L'APPAREIL
Cet aspirateur robot est conforme à l’ensemble des exigences ré-
glementaires locales et nationales en vigueur en matière de sécu-
rité. Une utilisation inappropriée de l’appareil peut entraîner des
blessures corporelles et des dommages matériels.
Veuillez lire le mode d’emploi avant d’utiliser l’aspirateur robot pour
la première fois. Il contient des renseignements importants sur la
sécurité, l’utilisation et l’entretien de l’appareil. Vous éviterez ainsi
de vous blesser et d’endommager l’appareil.
Conformément à la norme CEI60335-1, Miele vous conseille ex-
pressément et vivement de lire et de suivre les instructions du cha-
pitre «Raccordement», ainsi que celles contenues dans la section
«Consignes de sécurité et mises en garde».
Miele ne peut pas être tenue pour responsable des blessures et
des dommages causés par le non-respect de ces instructions.
Conservez ce mode d’emploi en lieu sûr afin de pouvoir le consul-
ter au besoin et remettez-le au prochain propriétaire éventuel.
Mettez l’aspirateur robot hors tension avant d’entreprendre son en-
tretien et de le nettoyer, et si vous n’allez pas l’utiliser pendant une
période prolongée. Vous devez également l’éteindre avant de ré-
soudre une anomalie quelconque. Pour cela, glissez le bouton I/0
sur le côté de l’aspirateur robot à la position 0. Procédez de même
si vous constatez un comportement inhabituel de votre aspirateur
robot.
Utilisation conforme
Conçu pour nettoyer les planchers, cet aspirateur robot est prévu
pour un usage domestique ou dans un environnement similaire. Cet
aspirateur robot n’est pas adapté à une utilisation sur les chantiers
de construction.
Ce robot aspirateur n'est pas conçu pour être utilisé à l'extérieur.

fr-CA - CONSIGNES DE SÉCURITÉ IMPORTANTES
87
Le robot aspirateur ne doit être utilisé que pour des applications
domestiques pour aspirer les planchers secs. Ne l'utilisez pas pour
aspirer sur les personnes ou les animaux. Toute autre utilisation ou
modification n'est pas recommandée par le fabricant et pourrait être
dangereuse.
L’emballage protège l’aspirateur robot contre d’éventuels dégâts
pendant le transport. Nous vous recommandons de le conserver
pour l’utiliser lors d’un éventuel transport.
Les personnes qui ne possèdent pas les capacités physiques,
l'expérience ou les connaissances requises pour utiliser cet appareil
doivent être supervisées ou formées par une personne responsable.
Sécurité des enfants
Risque de suffocation! Jetez les emballages, sacs et autres pro-
duits en plastique et gardez-les en tout temps hors de la portée des
enfants.
Ne laissez pas les enfants de moins de 8ans s’approcher de l’as-
pirateur robot à moins d’être supervisés.
Les enfants de 8ans et plus peuvent utiliser l’aspirateur robot
sans surveillance uniquement s’ils ont appris à l’utiliser en toute
sécurité. Les enfants doivent être capables de comprendre et de re-
connaître les dangers potentiels liés à une utilisation inadéquate.
Les enfants ne doivent pas procéder au nettoyage ou à l’entretien
de l’aspirateur robot sans surveillance.
Ne laissez pas d'enfants sans surveillance à proximité de l'aspira-
teur robot et ne les laissez pas jouer avec celui-ci.
fr-CA - CONSIGNES DE SÉCURITÉ IMPORTANTES
88
AVERTISSEMENT
Pour diminuer le risque d'incendie, de décharge électrique
ou de blessure, respectez les instructions ci-après:
Vérifiez la tension nominale de l’aspirateur avant de brancher le
cordon d’alimentation dans une prise électrique. Votre source d’ali-
mentation doit correspondre à la tension indiquée sur la plaque si-
gnalétique située en dessous de l’aspirateur. N’utilisez que les prises
de courant domestiques. N’utilisez jamais de sources d’alimentation
en courant continu. Consultez un électricien professionnel si vous
avez des doutes sur votre source d’alimentation. Le branchement de
l’aspirateur à une tension supérieure à celle indiquée dans ces ins-
tructions peut endommager l’appareil ou causer des blessures.
Pour réduire le risque de décharge électrique, cet appareil est
équipé d’une fiche polarisée (une lame est plus large que l’autre.)
Cette fiche ne s’insère dans une prise polarisée que dans un seul
sens. Si elle ne s’insère pas complètement dans la prise de courant,
inversez la fiche. Si elle ne s’insère toujours pas, appelez un électri-
cien professionnel pour installer la prise appropriée. Ne modifiez en
aucun cas la fiche.
Sécurité technique
L’aspirateur robot fonctionne sur 14,4V.
Il s’agit d’un appareil de la classe de protectionIII.
Doté d’une source d’alimentation à très basse tension de sécurité
(TBTS), cet appareil protège les utilisateurs des risques de décharge
électrique. Un bloc d’alimentation de classeII est utilisé pour rechar-
ger l’aspirateur robot.
Avant chaque utilisation, vérifiez que ni l’aspirateur robot ni les ac-
cessoires fournis ne présentent de signes visibles de dommages.
N’utilisez pas un aspirateur robot ou un accessoire endommagé.
La prise électrique permettant de raccorder la station d’accueil
doit être équipée d’un fusible à action lente de 16A ou 10A.

fr-CA - CONSIGNES DE SÉCURITÉ IMPORTANTES
89
Comparez les données de raccordement indiquées sur la plaque
signalétique de l’aspirateur robot et sur le bloc d’alimentation (fré-
quence et tension du secteur) avec celles du réseau électrique do-
mestique. Elles doivent absolument être les mêmes.
Entreposez l’aspirateur robot à une température ambiante com-
prise entre 0°C et 60°C.
Durant la période de garantie de l'aspirateur, les réparations
doivent être effectuées seulement par un technicien autorisé de
Miele. Sinon, la garantie sera invalidée.
Les réparations doivent être effectuées exclusivement par des
techniciens autorisés par Miele. Une réparation ou des travaux réali-
sés par une personne non compétente peut mettre les utilisateurs en
danger.
Veillez à ne pas endommager le câble d’alimentation et à éviter
toute contrainte mécanique. Ne placez pas d’objets lourds sur le
câble d’alimentation.
L'aspirateur-robot est doté de capteurs pour détecter les escaliers
et les changements de niveau du sol. Ne couvrez pas ces capteurs
ou l'objectif de la caméra, et assurez-vous que la fonction des cap-
teurs n'est pas entravée par des obstacles pendant le déplacement
de l'appareil.
Ne laissez pas l'aspirateur robot passer au-dessus du cordon
d'alimentation ou d'autres cordons.
Ne laissez pas tomber l'aspirateur-robot ni aucun des accessoires
fournis avec celui-ci. Pour des raisons de sécurité, il ne faut pas utili-
ser les accessoires tombés ou endommagés.
Miele ne peut garantir la sécurité de l’appareil que si des pièces
de rechange d’origine Miele sont utilisées. Les composants défec-
tueux ne doivent être remplacés que par des pièces d’origine Miele.
fr-CA - CONSIGNES DE SÉCURITÉ IMPORTANTES
90
Nettoyage
N'immergez pas l'aspirateur robot ou les pièces fournies dans de
l'eau. Nettoyez toutes les pièces uniquement avec un chiffon sec ou
légèrement humide.
Utilisation correcte
N'utilisez pas l'aspirateur-robot sans le bac à poussière, le pré-
filtre et le filtre d'évacuation.
Enlevez du sol tous les objets fragiles ou susceptibles de se ren-
verser et veillez à ce que l’aspirateur robot ne se prenne pas dans
des rideaux, cordages, franges, câbles d’alimentation ou autres obs-
tacles.
Les animaux doivent être maintenus à l'écart de l'aspirateur robot.
Ne permettez pas aux animaux de se tenir debout sur l'aspirateur ou
de s'asseoir sur celui-ci.
Prenez les mesures appropriées pour éviter que l’aspirateur robot
ne chute de hautes chutes, parex. depuis une passerelle ou un
balcon. Vous pouvez ainsi installer des barrières physiques.
Ne laissez pas l’aspirateur robot déplacer des objets mobiles,
comme des tapis, des paillassons, etc. Fixez tous les objets mobiles.
N’utilisez pas l’aspirateur robot pour aspirer un objet qui a brûlé,
qui est incandescent ou apparemment éteint (cigarettes, cendres,
charbon, etc.). N’utilisez pas l’aspirateur robot à proximité d’une
cheminée.
N'utilisez pas l'aspirateur robot pour aspirer de l'eau, des liquides
ou des poussières humides. Attendez que des tapis ou des revête-
ments venant d'être nettoyés ou traités au shampoing aient complè-
tement séché avant de tenter de passer l'aspirateur.
N'utilisez pas l'aspirateur robot pour aspirer la poudre d'impri-
mante. Cette poudre, utilisée pour les imprimantes et les photoco-
pieurs, peut être conductrice.

fr-CA - CONSIGNES DE SÉCURITÉ IMPORTANTES
91
N’utilisez pas l’aspirateur robot pour aspirer de liquides ou de gaz
inflammables ou combustibles, et ne le passez pas dans les zones
où ces substances sont stockées.
Ne vous asseyez pas ou ne vous couchez pas sur la surface à
nettoyer pendant le fonctionnement de l'aspirateur pour éviter tout
risque de contact de vêtements amples ou de cheveux longs avec la
brosse cylindrique ou d'autres parties mobiles de l'aspirateur-robot.
Mise en garde : Sachez que l'aspirateur robot se déplace de manière
autonome. Soyez prudent lorsque vous marchez dans la zone où
l'aspirateur robot fonctionne, pour éviter de marcher dessus ou de
trébucher dessus.
Accessoires
Utilisez uniquement des accessoires d’origine portant le logo
«ORIGINAL Miele» sur l’emballage. Sinon, le fabricant ne peut pas
garantir la sécurité de ce produit.
Consignes de sécurité et mises en garde concernant la bat-
terie rechargeable, la station d’accueil, le bloc d’alimenta-
tion et les batteries de la télécommande
Sécurité des enfants
Les personnes (y compris les enfants) dont les capacités phy-
siques, sensorielles ou mentales sont réduites, ou qui manquent
d’expérience ou de connaissances, et qui ne sont pas en mesure
d’utiliser l’aspirateur robot en toute sécurité ne peuvent utiliser cet
aspirateur robot que si elles sont surveillées pendant son utilisation
ou si on leur a montré comment l’utiliser en toute sécurité et qu’elles
comprennent et reconnaissent les conséquences d’une utilisation in-
correcte.
Maintenez la batterie rechargeable et les piles de la télécommande
hors de la portée des enfants.
Ne laissez pas les enfants s’approcher de la station d’accueil et
du bloc d’alimentation sans surveillance.

fr-CA - CONSIGNES DE SÉCURITÉ IMPORTANTES
92
Sécurité technique
Chargez l’aspirateur robot à une température ambiante comprise
entre 10°C et 45°C.
La batterie et la station d’accueil sont conçues pour être utilisées
avec cet aspirateur robot de Miele. L’utilisation de l’aspirateur robot
avec une batterie ou une station d’accueil d’une autre marque n’est
pas autorisée pour des raisons de sécurité.
Pour recharger l’aspirateur robot, utilisez exclusivement les acces-
soires fournis (station d’accueil, bloc d’alimentation, adaptateur).
Un fonctionnement permanent ou temporaire est possible sur un
système d’alimentation électrique autonome ou un système d’ali-
mentation qui n’est pas synchronisé avec l’alimentation électrique
du réseau (parex. réseaux insulaires, systèmes auxiliaire). Pour faire
fonctionner l’appareil, le système d’alimentation électrique doit être
conforme aux spécifications de la norme EN50160 ou d’une norme
locale équivalente.
La fonction et le fonctionnement des mesures préventives fournies
dans l’installation électrique domestique et dans ce produit Miele
doivent être conservés en fonctionnement ponctuel ou en fonction-
nement non synchronisé avec l’alimentation électrique du réseau, ou
alors les mesures doivent être remplacées par des mesures équiva-
lentes dans l’installation. Comme le décrit par exemple la version ac-
tuelle de la norme VDE-AR-E 2510-2 ou une norme locale équiva-
lente.
Ne collez aucune étiquette sur la station d'accueil pour ne pas gê-
ner la transmission des capteurs à infrarouge. Ne placez pas d'ob-
jets devant la station.
Cessez immédiatement d’utiliser la batterie rechargeable si vous
sentez une odeur inhabituelle, si du liquide s’en échappe, si elle sur-
chauffe considérablement, ou si elle est décolorée ou déformée. Éli-
minez immédiatement la batterie (voir la consigne de sécurité «Éli-
mination de la batterie» à la fin de ce chapitre, ainsi que «Protection
de l’environnement–Élimination des batteries usagées»).

fr-CA - CONSIGNES DE SÉCURITÉ IMPORTANTES
93
Les batteries et les piles rechargeables s’épuisent au fil du temps.
Le liquide corrosif qui s’y trouve est alors susceptible de fuir. Évitez
tout contact de ce liquide avec les yeux et la peau. En cas de
contact avec les yeux, rincez immédiatement à grande eau et
consultez un médecin.
Veuillez contacter le service technique Miele avant d’envoyer la
batterie rechargeable.
Utilisation correcte
Ne faites pas tomber ou ne jetez pas la batterie rechargeable. Pour
des raisons de sécurité, cessez d’utiliser une batterie rechargeable
qui a été endommagée.
Maintenez la batterie rechargeable ou les piles loin d’une flamme
nue ou de toute autre source de chaleur. Ne réchauffez pas la batte-
rie rechargeable ou les piles. Ne les exposez pas aux rayons directs
du soleil.
Ne démontez pas la batterie rechargeable.
Ne causez pas un court-circuit en faisant le pontage des contacts
de la batterie rechargeable ou des piles, de façon accidentelle ou
délibérée.
Ne permettez pas à la batterie rechargeable ni aux piles d’entrer
en contact avec des liquides.
Ne tentez pas de recharger les piles de la télécommande fournies.
Élimination des piles et des batteries rechargeables: retirez la bat-
terie rechargeable de l’aspirateur robot et les piles de la télécom-
mande. Isolez les contacts métalliques avec du ruban adhésif pour
éviter tout court-circuit. Déposez les piles et la batterie rechargeable
dans un point de collecte dédié de votre quartier. Ne les jetez pas
dans les ordures ménagères normales.
CONSERVEZ CES INSTRUCTIONS
fr-CA - Protection de l’environnement
94
Élimination de l’emballage
L’emballage protège l’aspirateur robot
contre d’éventuels dégâts pendant le
transport. Les matériaux d’emballage
utilisés sont sélectionnés en fonction de
critères écologiques pour en faciliter le
recyclage.
Le recyclage de l’emballage permet
d’économiser les matières premières
lors de la fabrication et de réduire le vo-
lume des déchets dans les sites d’en-
fouissement. Assurez-vous que l’embal-
lage est éliminé conformément à la ré-
glementation de votre région.
Mise au rebut de votre an-
cien appareil
Avant de mettre au rebut votre aspira-
teur robot, retirez le filtre d’évacuation
et le pré-filtre, puis jetez-les avec les or-
dures ménagères.
Les appareils électriques et électro-
niques contiennent des matériaux pré-
cieux. Ils contiennent également des
substances, des composés et des élé-
ments essentiels pour leur fonctionne-
ment adéquat et sécuritaire. Une mani-
pulation ou la mise au rebut inadéquate
de ces matériaux dans vos ordures mé-
nagères peut poser un risque pour votre
santé et l’environnement. C’est pour-
quoi il est important de ne pas mettre
au rebut votre ancien appareil avec vos
ordures ménagères.
Utilisez plutôt des points de collecte et
de mise au rebut officiellement dési-
gnés pour jeter et recycler les appareils
électriques et électroniques. Selon la
loi, vous êtes responsable de la sup-
pression des données personnelles sur
l’ancien appareil avant sa mise au re-
but.
Assurez-vous que votre ancien appareil
ne pose pas un risque pour les enfants
lorsqu’il est entreposé avant sa mise au
rebut.
fr-CA - Protection de l’environnement
95
Élimination des batteries usa-
gées
Dans de nombreux cas, les appareils
électriques et électroniques contiennent
des batteries qui ne doivent pas être je-
tées avec les ordures ménagères après
utilisation. Vous êtes légalement tenu
d’enlever les batteries usagées qui ne
sont pas scellées dans l’aspirateur et
de les remettre gratuitement à un point
de collecte approprié (détaillant, etc.).
Isolez les contacts métalliques avec du
ruban adhésif pour éviter tout
court-circuit. Les batteries peuvent
contenir des substances qui peuvent
être dangereuses pour la santé et l’envi-
ronnement.
L’étiquetage de la batterie fournira de
plus amples renseignements. Le sym-
bole de la poubelle barrée signifie que
les batteries ne doivent pas être jetées
avec les ordures ménagères. Une pou-
belle barrée d’une croix qui porte égale-
ment un ou plusieurs symboles
chimiques indique que la batterie
contient du plomb (Pb), du cadmium
(Cd) et/ou du mercure (Hg).
3E&G+J
Les batteries usagées contiennent des
matières premières précieuses qui
peuvent être recyclées. L’élimination
des batteries de façon séparée facilite
leur manipulation et leur recyclage.

fr-CA - Vue d'ensemble de l'appareil
96
Les illustrations A, B et C de cette section figurent sur les pages dépliables à l'ar-
rière de ces instructions d'utilisation.
A - Parties supérieure et inférieure de l'aspirateur-robot
a
Écran
b
Écran Wi-Fi
c
Témoin de la fonction vidéo (pour ScoutRX3HomeVisionHD)
d
Témoin du mode Heure (matin/après-midi)
e
Caméras
f
Touche sensitive Start/Pause ()
g
Protection anti-chocs
h
Bouton Marche/Arrêt (I/0)
i
Touche de déverrouillage du compartiment de rangement
j
Touche sensitive du mode de nettoyage Silencieux
k
Touche sensitive du mode de nettoyage Turbo
l
Touche sensitive Station
m
Touche sensitive du mode de nettoyage Spot
n
Touche sensitive du mode de nettoyage standard Auto
o
Témoin de la minuterie
p
Témoin du niveau de charge de la batterie rechargeable
q
Brosses latérales (20bras et 6bras, fournies non montées)
r
Brosse cylindrique
s
Contacts de recharge
t
Roue avant
u
Capteurs (protection anti-chutes)
v
Protège-brosse
w
Roues motrices
x
Bouche d’aspiration avec joint d’étanchéité
y
Roue arrière

fr-CA - Vue d'ensemble de l'appareil
97
B - Station d'accueil et télécommande
Station d’accueil
a
Enrouleur
b
Guides de câble
c
Prise de la fiche du bloc d’alimentation (non visible sur l’illustration)
d
Contacts de recharge
Télécommande
a
Touche Mise en marche (Marche/Arrêt)
b
Touche Station (retour de l’aspirateur à la station d’accueil)
c
Touche de confirmation OK avec flèches de navigation
d
Touche Départ/Pause () (départ/interruption du nettoyage)
e
Touche Mode (sélection du mode de nettoyage)
f
Touche WI-FI (activation/désactivation du Wi-Fi)
g
Touche Heure (réglage de l’heure)
h
Touche Minuterie (réglage de la minuterie)
i
Touche Sourdine (activation/désactivation des signaux sonores)
j
Touche Montée (réduit la hauteur de franchissement)
k
Compartiment à piles (à l’arrière)
C - Bac à poussière
a
Poignée
b
Outil de nettoyage avec balai
c
Bouton de balai
d
Couvercle
e
Boutons de déverrouillage de couvercle
f
Réservoir à poussières
g
Pré-filtre
h
Filtre d’évacuation
i
Couvercle du compartiment du filtre d’évacuation
fr-CA
98
Fonctions et fonctionnalités de
l'aspirateur robot
L’aspirateur robot convient au net-
toyage quotidien de planchers durs, de
tapis décoratifs et de moquettes à poils
courts. De plus, il peut également être
utilisé sur les moquettes à poils épais.
Veuillez vous conformer aux conseils
de nettoyage et d’entretien du fabri-
cant du revêtement de sol.
L’aspirateur robot est doté de plusieurs
caméras et capteurs. Il peut aspirer
toutes les zones accessibles de ma-
nière efficace et autonome.
Accessoires fournis
- Télécommande/2piles
- 2brosses latérales universelles à
20bras (pour planchers durs, tapis
décoratifs et moquettes à poils
courts)
- 2brosses latérales de tapis à 6bras
(pour moquettes à poils épais)
- Bloc d’alimentation avec fiche
- Adaptateur d’alimentation propre au
pays
- Station d’accueil et support adhésif
- Bande magnétique
Raccordement
Les illustrations1 à12 mentionnées
dans cette section figurent sur la der-
nière page dépliante à la fin de ce
mode d’emploi.
Insertion des brosses latérales (fi-
gures 01 + 02)
Placez l’aspirateur robot à l’envers
sur une surface plane et propre.
Si la zone à aspirer comporte des
planchers durs, des tapis décoratifs et
des moquettes à poils courts, utilisez
les 2 brosses latérales universelles à
20bras. Pour les moquettes à poils
épais, les 2brosses latérales à 6bras
sont plus adaptées.
Sélectionnez la paire de brosses laté-
rales appropriée.
Poussez doucement les 2brosses la-
térales sur les axes jusqu’à ce
qu’elles s’enclenchent avec un clic.
Respectez les lettres indiquant la
gauche L et la droite R.
Retrait de la pellicule protectrice (fi-
gure 03)
Retirez la pellicule protectrice qui re-
couvre la station d’accueil et l’écran
de l’aspirateur robot.
Retirez la bande protectrice de la
touche de déverrouillage du compar-
timent de rangement.
Insertion des piles de la télécom-
mande (figure 04)
Respectez les instructions concernant
la manipulation des piles, qui se
trouvent dans la section «Consignes
de sécurité et mises en garde» au dé-
but de ce mode d’emploi.
Retirez le couvercle du compartiment
à piles.
Insérez les 2piles fournies. Assurez-
vous de respecter la polarité.
fr-CA
99
Fermez le couvercle du compartiment
à piles.
Mise en marche de l’aspirateur robot
(figure 05)
Glissez le bouton I/0 sur le côté de
l’aspirateur robot à la position I.
Le témoin du niveau de charge de la
batterie rechargeable s’allume sur le
panneau de commande. L’aspirateur ro-
bot passe en mode Veille au bout d’en-
viron 60secondes. Pour réactiver l’aspi-
rateur robot, il suffit d’appuyer sur une
des touches de la télécommande ou sur
une des touches sensitives du panneau
de commande.
Connexion à la station d’accueil (fi-
gures 06 - 09)
Respectez les instructions concernant
la manipulation de la station d’accueil
et du bloc d’alimentation, qui se
trouvent dans la section «Consignes
de sécurité et mises en garde» au dé-
but de ce mode d’emploi.
Placez la station d’accueil contre un
mur sur un plancher dur, avec un ac-
cès facile à une prise électrique. As-
surez-vous de l’absence totale d’obs-
tacles au moins 1,5m à l’avant et
0,5m sur chaque côté de la station
d’accueil (figure 06).
Insérez la fiche du bloc d’alimentation
fourni dans la prise à l’arrière de la
station d’accueil. Vous pouvez enrou-
ler l’excédent de câble autour de l’en-
rouleur. Guidez le câble d’alimenta-
tion à travers l’un des 2guides de
câble (figure 07).
Insérez l’adaptateur d’alimentation
propre au pays dans le bloc d’alimen-
tation électrique jusqu’à ce qu’il s’en-
clenche, puis branchez-le dans la
prise murale (figure 08).
Un support adhésif est inclus pour fixer
durablement la station d’accueil au sol
(figure 09).
Insérez le support adhésif dans la
fente prévue à cet effet sur le côté in-
férieur de la station d’accueil jusqu’à
ce qu’il s’enclenche.
Retirez la pellicule protectrice bleue
des bandes adhésives.
Placez la station d’accueil à l’endroit
choisi et appuyez fermement dessus.
Vous pouvez retirer la station d’accueil
à tout moment. Le support adhésif
reste sur le sol.
Si vous voulez décoller le support ad-
hésif du sol, tirez sur les 2éléments
d’arrachage.
Recharge de la batterie rechargeable
(figure 10)
À la livraison, la batterie rechargeable
n’est pas complètement chargée. Elle
doit être complètement rechargée avant
la première utilisation, pendant que l’as-
pirateur robot est allumé (bouton I/0 sur
I).
Vous pouvez charger la batterie,
même si l’aspirateur robot est éteint
(bouton I/0 sur 0). Toutefois, dans ce
cas, aucun message ne s’affiche à
l’écran.
Branchez correctement l’aspirateur
robot aux contacts de recharge de la
station d’accueil déjà branchée.
fr-CA
100
Le témoin du niveau de charge clignote
sur le panneau de commande à mesure
que la batterie se recharge.
La recharge dure environ 3heures pour
le ScoutRX3 et jusqu’à 4heures pour
les ScoutRX3Runner et Scout RX3
Home Vision HD.
Vous pourrez ainsi utiliser le ScoutRX3
pendant environ 85minutes* et les
ScoutRX3Runner et Scout RX3 Home
Vision HD pendant 170minutes*.
* durée mesurée en mode de nettoyage
Silencieux, dans un environnement
standard selon la norme
CEI62929:2014
Témoin du niveau de charge de la
batterie rechargeable sur le panneau
de commande
Rouge Niveau de charge d’envi-
ron 0% à 20%
Orange Niveau de charge d’envi-
ron 20% à 50%
Vert Niveau de charge d’envi-
ron 50% à 100%
Réglage de l’heure (figure 11)
(également possible via un terminal mo-
bile; voir la section «Miele@home»)
Vous pouvez choisir entre une heure sur
24heures ou sur 12heures (matin (a.m.)
et après-midi (p.m.)).
Réglez l’heure à l’aide de la télécom-
mande.
Appuyez brièvement sur la touche
Heure.
24h s’affiche à l’écran.
Appuyez sur la toucheOKpour pas-
ser à une heure sur 24heures.
Appuyez sur la touche+ pour passer
à une heure sur 12heures matin/
après-midi, puis confirmez 12h en
appuyant sur OK.
L’affichage des heures clignote à
l’écran.
Appuyez sur la touche+ ou- pour ré-
gler l’heure actuelle.
Appuyez sur la touche OK pour
confirmer votre choix.
L’affichage des minutes clignote à
l’écran.
Appuyez sur la touche+ ou- pour ré-
gler les minutes.
Appuyez sur la touche OK pour
confirmer votre choix.
Si vous souhaitez modifier l’heure, pro-
cédez comme décrit précédemment.
Appuyez sur la touche Heure pendant
3secondes.
Délimitation de la zone de nettoyage
(figure 12)
(également possible via un terminal mo-
bile; voir la section «Miele@home»)
S’il y a une zone que l’aspirateur robot
doit éviter, vous pouvez délimiter un pé-
rimètre de nettoyage.
L’aspirateur robot mesure 85mm de
haut.
Les objets sous lesquels il doit net-
toyer doivent donc se situer à au
moins 87mm du sol.
Posez la bande magnétique fournie
au sol, rainure vers le bas.
fr-CA
101
L’aspirateur robot ne franchira pas cette
bande magnétique.
Pour délimiter une zone de façon per-
manente, utilisez les rubans adhésifs
fournis. Vous pouvez aussi vous procu-
rer des bandes magnétiques auprès de
la boutique en ligne Miele.
Utilisation
Observez toujours votre aspirateur
robot la première fois que vous l’utili-
sez dans un nouvel environnement et
après avoir modifié la disposition des
meubles. Retirez tous les obstacles
éventuels ou délimitez les zones à
nettoyer à l’aide de la bande magné-
tique ou du contrôleur sur un termi-
nal mobile (voir la section «Raccor-
dement–Délimitation de la zone de
nettoyage»). Vérifiez également si les
escaliers et les changements de ni-
veau du sol sont détectés correcte-
ment.
Votre aspirateur robot est équipé d’un
module Wi-Fi intégré. Vous pouvez affi-
cher les informations de statut ou
contrôler l’aspirateur à l’aide d’un termi-
nal mobile (tablette ou téléphone intelli-
gent).
Pour contrôler l’aspirateur robot à l’aide
d’un terminal mobile, veuillez lire la sec-
tion «Miele@home».
Le fonctionnement de l’aspirateur ro-
bot via la télécommande et le panneau
de commande est décrit plus loin
dans cette section.
Mise en marche et arrêt
Appuyez sur la toucheMise en
marche de la télécommande ou sur
le panneau de commande.
Début du nettoyage
Il y a deuxfaçons de commencer à as-
pirer:
Option1 (télécommande)
Appuyez sur la touche.
Option2 (panneau de commande)
Appuyez sur la touche sensitive.
L’aspirateur robot commence à nettoyer
la zone définie.
Il aspire toujours pendant au moins
5minutes, peu importe la superficie à
nettoyer.
Fin du nettoyage si l’aspiration a
commencé de la station d’accueil
L’aspirateur robot rentre tout seul à la
station d’accueil pour se recharger.
L’aspirateur robot rentre aussi à la sta-
tion d’accueil pour se recharger si la
charge de la batterie est faible. II s’af-
fiche alors à l’écran. L’aspirateur robot
reprendra ensuite son nettoyage.
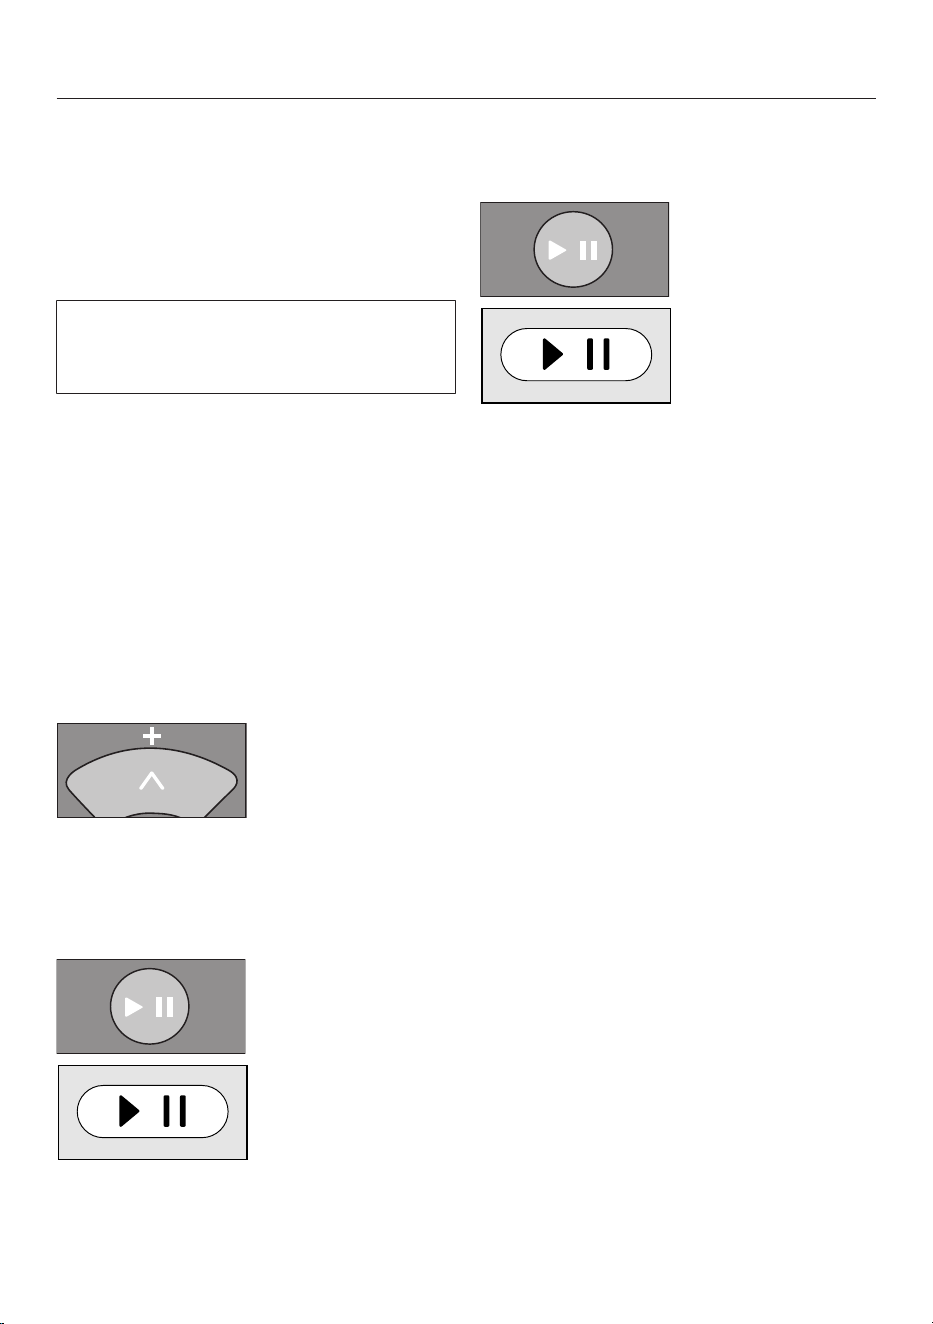
fr-CA
102
Fin du nettoyage si l’aspiration a
commencé de n’importe où dans la
pièce.
L’aspirateur robot revient tout seul à
son point de départ et passe en mode
Veille après environ 60secondes.
En cas de charge insuffisante de la
batterie, l’aspirateur robot s’arrête. Re-
chargez-le.
Nettoyage manuel
Vous pouvez utiliser les flèches de navi-
gation sur la télécommande pour aspi-
rer une zone particulière de la pièce.
Maintenez l’une des flèches de navi-
gation enfoncée pendant que l’aspi-
rateur robot fonctionne.
L’aspirateur robot se dirige vers la di-
rection indiquée jusqu’à ce que vous re-
lâchiez la touche.
Maintenez la touche+ enfoncée.
L’aspirateur robot se déplace dans la
direction indiquée tout en continuant de
nettoyer.
Appuyez sur la touche de la télé-
commande ou sur la touche sensi-
tive du panneau de commande.
Le nettoyage programmé reprendra.
Interruption du nettoyage
Appuyez sur la touche de la télé-
commande ou sur la touche sensi-
tive du panneau de commande.
L’aspirateur robot s’arrête.
Pour reprendre le nettoyage, appuyez
de nouveau sur la touche de la télé-
commande ou sur la touche sensitive
du panneau de commande.
Si vous soulevez l’aspirateur robot du
sol pendant une pause et le posez en-
suite ailleurs, rLOC s’affichera à l’écran
lorsque vous le réactiverez. L’aspirateur
robot fait demi-tour et compare sa nou-
velle position avec ses données carto-
graphiques enregistrées.
Si les données sont compatibles, l’aspi-
rateur robot commencera à nettoyer et
ne passera pas sur les surfaces déjà
nettoyées.
Si les données ne sont pas compa-
tibles, l’aspirateur robot ne bougera
pas.
rLOC à l’écran peut uniquement être
annulé en appuyant sur la touche ou
sur la touche sensitive plusieurs fois.
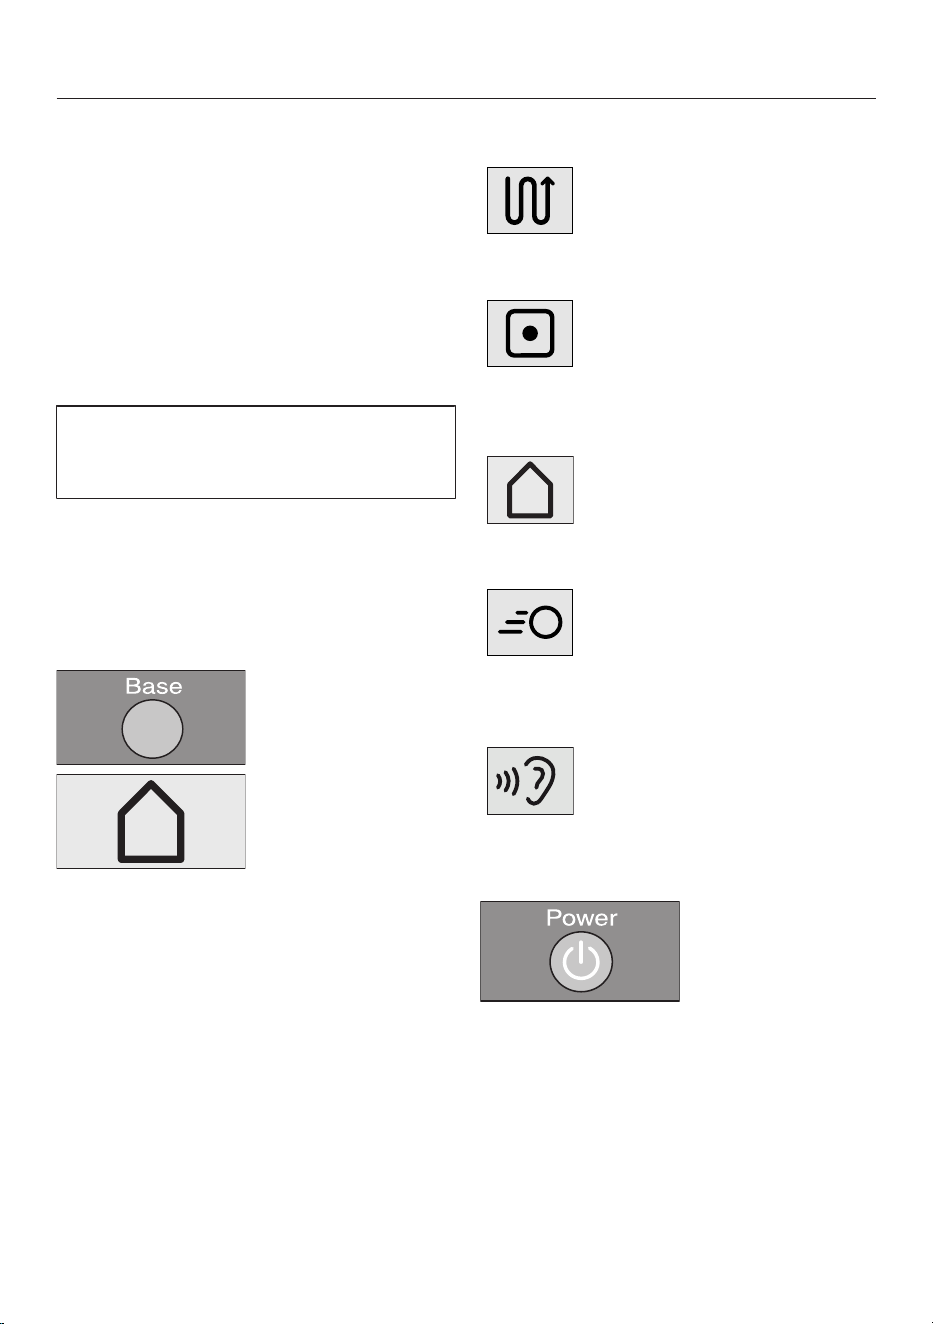
fr-CA
103
Navigation manuelle (sans nettoyage)
Vous pouvez utiliser les flèches de navi-
gation de la télécommande pour diriger
l’aspirateur robot vers une zone précise
de la pièce.
Appuyez et maintenez l’une des
flèches de navigation enfoncée.
L’aspirateur robot se déplace dans la
direction souhaitée sans nettoyer.
L’aspirateur robot ne peut pas re-
joindre en mode manuel la station
d’accueil pour se recharger.
Retour de l’aspirateur robot à la sta-
tion d’accueil
(n’est possible que lorsque le nettoyage
a commencé à partir de la station d’ac-
cueil)
Appuyez sur la toucheStation d’ac-
cueil de la télécommande ou sur la
touche sensitive Station d’accueil du
panneau de commande.
L’aspirateur robot se déplace tout seul
vers la station d’accueil pour se rechar-
ger.
Modes de fonctionnement
5modes de fonctionnement sont pro-
posés:
Auto
Mode de nettoyage stan-
dard pour nettoyer les plan-
chers normalement sales.
Spot Nettoyage ciblé par l’aspira-
teur robot d’un périmètre
d’environ 1,8m sur 1,8m
autour d’un point de départ
dans la pièce.
Station
Retour de l’aspirateur robot
à la station d’accueil.
Turbo
Nettoyage des planchers
peu sales avec une durée
d’aspiration raccourcie.
Silen-
cieux
Nettoyage à faible consom-
mation d’énergie et faible
niveau de bruit.
Sélection du mode de fonctionne-
ment
Appuyez sur la touche Mise en
marche de la télécommande.
Il existe deuxfaçons de sélectionner le
mode de fonctionnement:
Option1 (télécommande)
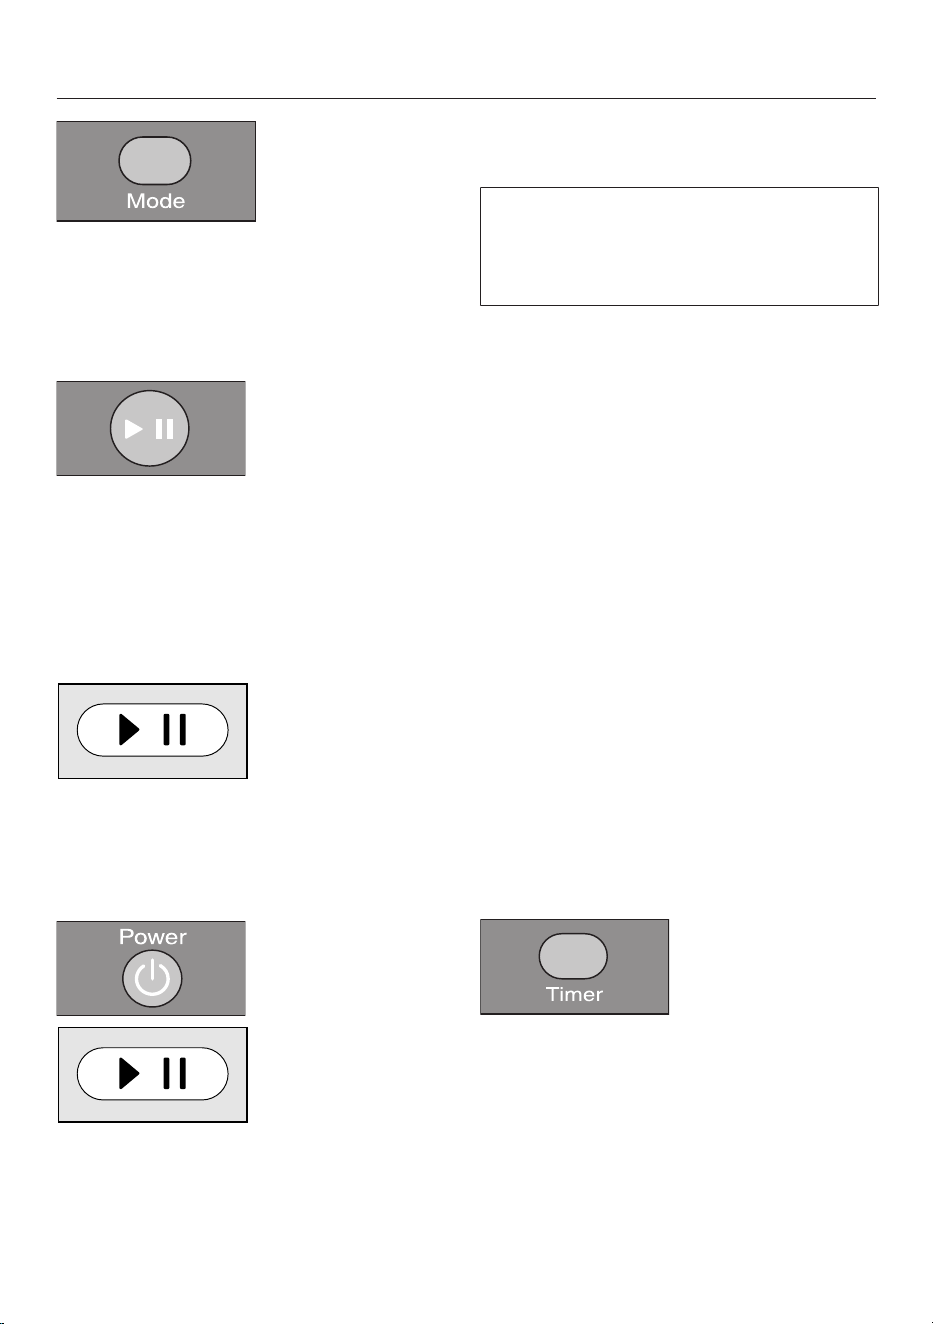
fr-CA
104
Appuyez sur la touche Mode à plu-
sieurs reprises jusqu’à ce que le sym-
bole du mode de fonctionnement
souhaité s’allume sur le panneau de
commande.
Appuyez sur la touche pour com-
mencer le nettoyage.
Option2 (panneau de commande)
Appuyez sur la touche sensitive du
mode de fonctionnement que vous
voulez utiliser.
Appuyez sur la touche sensitive
pour commencer le nettoyage.
Sortie du mode de fonctionnement
en cours
Appuyez sur la toucheMise en
marche de la télécommande ou sur
la touche sensitive du panneau de
commande pendant au moins 3se-
condes.
L’aspirateur robot passe en mode Veille
au bout d’environ 60secondes.
Pour mettre l’aspirateur robot en veille
avant que les 60secondes s’écoulent,
appuyez de nouveau sur la
toucheMise en marche.
Pour réactiver l’aspirateur robot, il suffit
d’appuyer sur une des touches de la té-
lécommande ou sur une des touches
sensitives du panneau de commande.
Réglage de la minuterie
(uniquement possible si vous avez réglé
l’heure)
Si vous souhaitez utiliser votre aspira-
teur robot tous les jours à la même
heure, vous pouvez programmer l’heure
de démarrage et le mode de nettoyage
souhaités.
L’aspirateur robot peut également net-
toyer dans le noir. Toutefois, veuillez no-
ter que l’aspiration peut être moins effi-
cace. En effet, les caméras nécessitent
de la lumière pour que l’appareil puisse
se déplacer sans encombre.
Utilisez la télécommande pour régler la
minuterie.
Appuyez brièvement sur la
toucheMinuterie.
Le témoin de la minuterie clignote
sur le panneau de commande et l’heure
clignote à l’écran.
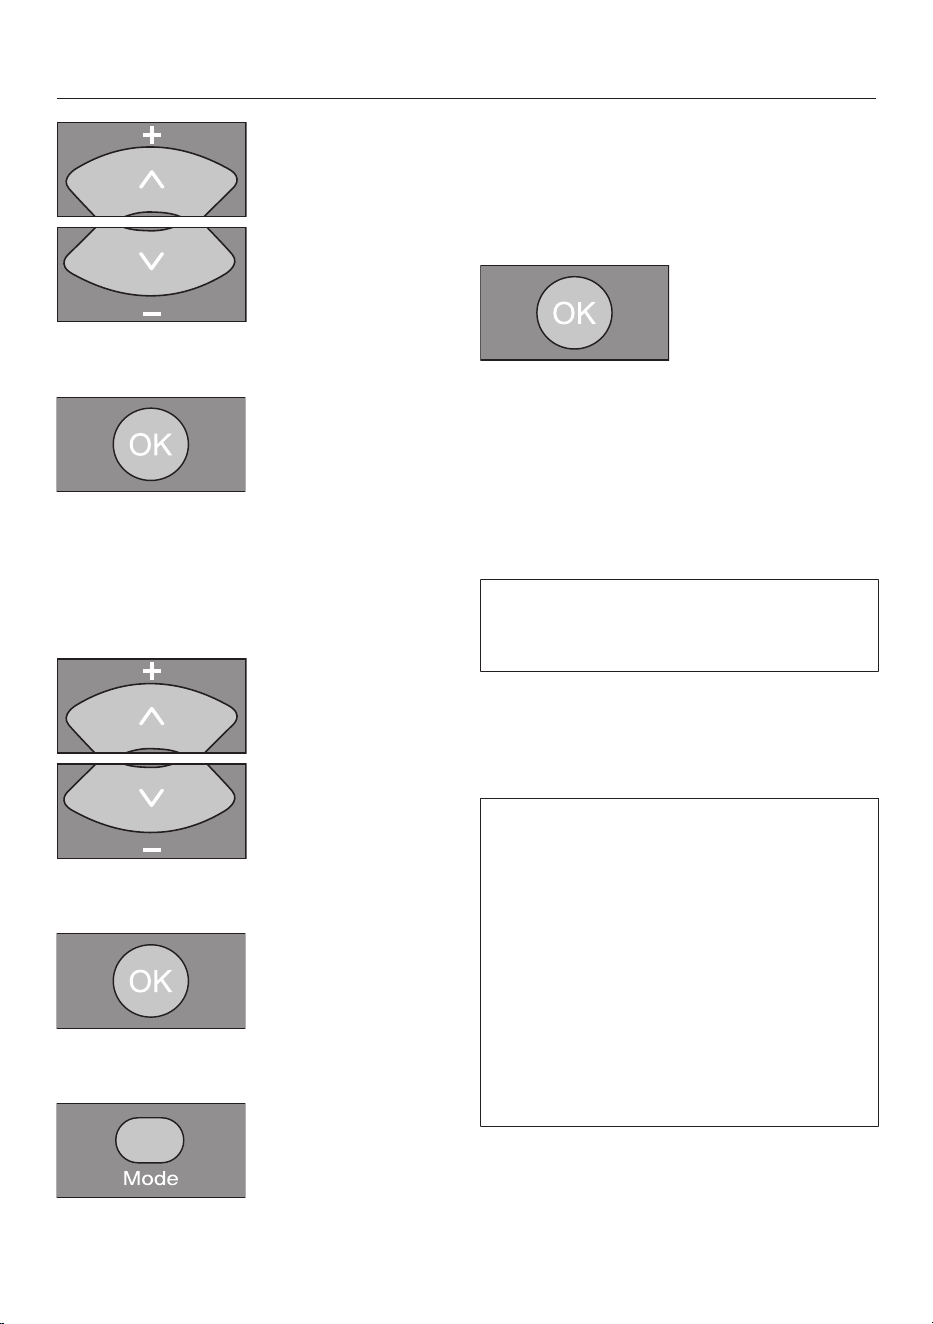
fr-CA
105
Appuyez sur la touche+ ou- pour ré-
gler l’heure souhaitée.
Appuyez sur la touche OK pour
confirmer votre choix.
Le témoin de la minuterie clignote
sur le panneau de commande et les mi-
nutes clignotent à l’écran.
Appuyez sur la touche+ ou- pour ré-
gler les minutes souhaitées.
Appuyez sur la touche OK pour
confirmer votre choix.
Appuyez sur la toucheMode à plu-
sieurs reprises jusqu’à ce que le sym-
bole du mode de fonctionnement
souhaité clignote sur le panneau de
commande.
Appuyez sur la touche OK pour
confirmer votre choix.
Les réglages s’affichent pendant envi-
ron 3secondes sur le panneau de com-
mande. Dorénavant, votre aspirateur ro-
bot démarrera tous les jours à la même
heure.
Si le témoin de la minuterie est allu-
mé dans le panneau de commande,
cela confirme qu’elle est activée.
Pour modifier ce réglage, procédez
comme décrit précédemment. Appuyez
ensuite sur la toucheMinuterie pen-
dant 3secondes.
Astuce: vous pouvez programmer
jusqu’à 7combinaisons de «temps de
départ–mode de fonctionnement» si
vous réglez la minuterie à l’aide d’un
terminal mobile. Consultez la section
«Miele@home».
Veuillez noter que l’aspirateur robot
suit toujours les plus récentes com-
mandes enregistrées, peu importe si
les réglages ont été configurés à l’aide
de la télécommande, du panneau de
commande ou d’un terminal mobile.
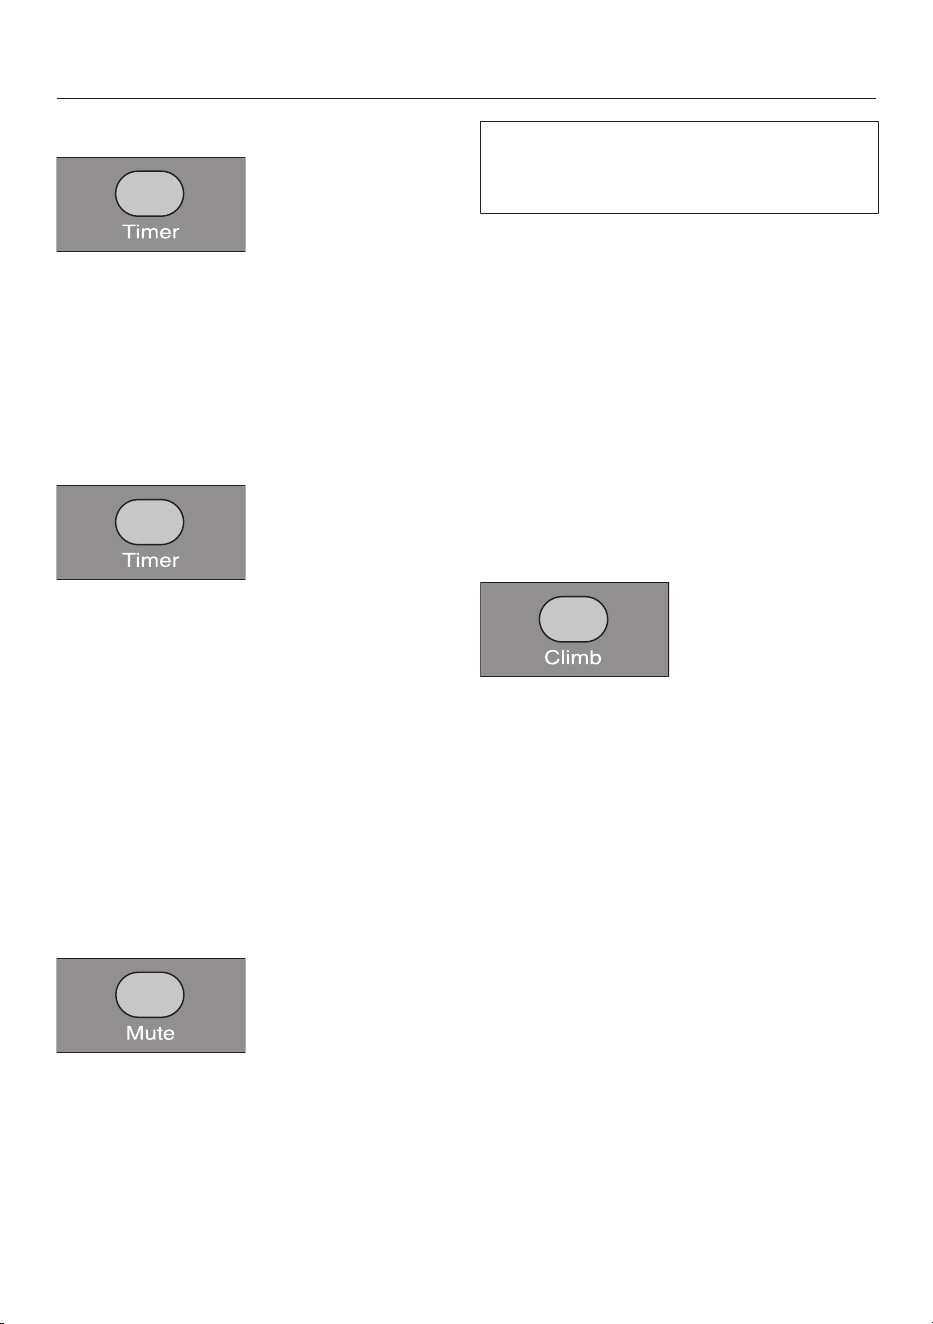
fr-CA
106
Désactivation de la minuterie
Appuyez brièvement sur la
toucheMinuterie de la télécom-
mande.
Le témoin de la minuterie s’éteint
sur le panneau de commande.
Activation de la minuterie/Affichage
de l’heure de début réglée
Appuyez brièvement sur la
toucheMinuterie de la télécom-
mande.
Le témoin de la minuterie s’allume
dans le panneau de commande, et
l’heure réglé s’affiche brièvement à
l’écran. L’aspirateur robot démarrera à
l’heure réglée.
Désactivation des signaux sonores
Les signaux sonores sont activés à
l’usine. Il est possible de les désactiver
ou les réactiver selon vos besoins.
Appuyez brièvement sur la
toucheSourdine de la télécom-
mande.
OFF s’affichera brièvement à l’écran.
Les signaux sonores des messages
d’anomalie ne peuvent pas être dé-
sactivés.
Réduction de la hauteur maximale
pouvant être franchie
L’aspirateur robot est réglé de sorte
qu’il puisse franchir des différences de
hauteur de 17mm. Il peut ainsi nettoyer
des tapis, franchir seuils de portes, etc.
Toutefois, si vous souhaitez abaisser
cette hauteur (à environ 6mm) pour
protéger, parex., les pieds de chaises,
de lampadaires ou de tables, vous pou-
vez désactiver ce réglage paramétré par
défaut en usine.
Appuyez brièvement sur la
toucheMontée de la télécommande.
LO s’affiche alors à l’écran.
Pour réactiver la hauteur maximale
d’usine de 17mm, appuyez de nouveau
brièvement sur la toucheMontée. HI
s’affiche alors à l’écran.
fr-CA
107
Miele@home*
À cette fin, votre aspirateur robot est
équipé d’un module Wi-Fi intégré.
Veuillez noter que, malgré les normes
de sécurité extrêmement strictes du
fabricant, des risques de sécurité des
données pourraient persister pour
l’utilisateur chaque fois que des péri-
phériques réseau sont utilisés. Pour
cette raison, nous vous offrons la pos-
sibilité de retirer le module Wi-Fi de
l’aspirateur robot. Vous trouverez des
instructions à cet égard à la fin de
cette section. Consultez la section
«Retrait du module Wi-Fi».
* Offre numérique supplémentaire de Miele&Cie. KG.
Toutes les applications intelligentes sont accessibles
grâce au système Miele@home. La gamme de fonctions
peut varier selon le modèle et le pays.
Pour utiliser cette fonctionnalité, il vous
faut:
- un réseau Wi-Fi;
- l’application Miele Scout;
- un compte utilisateur Miele que vous
pouvez créer via l’application
MieleScout.
L’application MieleScout vous guidera
lors de la connexion de votre aspirateur
robot à votre réseau Wi-Fi domestique.
Une fois que votre aspirateur robot est
connecté à votre réseau Wi-Fi, vous
pouvez utiliser l’application MieleScout
pour certaines opérations, notamment:
- commander à distance votre aspira-
teur robot;
- accéder aux informations de statut;
- utiliser la fonction vidéo (pour
ScoutRX3HomeVisionHD)
La connexion de votre aspirateur robot
à votre réseau Wi-Fi augmentera la
consommation d’énergie, même
lorsque l’appareil sera éteint.
Assurez-vous d’avoir un signal suffi-
samment puissant pour votre réseau
Wi-Fi dans les pièces où l’aspirateur
robot sera utilisé.
Disponibilité de la connexion Wi-Fi
La connexion Wi-Fi partage sa plage de
fréquence avec d'autres appareils (y
compris les four micro-ondes et les
jouets télécommandés). Des interrup-
tions sporadiques ou totales de
connexion peuvent donc se produire.
Par conséquent, la disponibilité des
fonctions présentées ne peut être ga-
rantie à tout moment.
Disponibilité de Miele@home
La capacité à utiliser l’application
MieleScout dépend de la disponibilité
du service Miele@home dans votre
pays.
Le service Miele@home n’est pas dis-
ponible dans tous les pays.
Pour obtenir des informations sur la dis-
ponibilité, veuillez consulter le site
www.miele.com.
Téléchargement de l’application
MieleScout
L’application MieleScout est disponible
en téléchargement gratuit dans
l’AppleAppStore
®
ou dans le Goo-
glePlayStore™.

fr-CA
108
Téléchargez l’application MieleScout
sur un terminal mobile (tablette ou té-
léphone intelligent).
Pour des raisons de protection des
données, vous devez connecter indivi-
duellement chaque terminal mobile à
l’aspirateur robot.
Activation de la fonction réseau de
l’aspirateur robot
Pour connecter l’aspirateur robot à
votre réseau Wi-Fi, vous devez tout
d’abord activer la fonction réseau. La
fonction réseau est désactivée par dé-
faut.
Il existe deuxfaçons d’activer la fonc-
tion réseau:
Option1 (télécommande)
Appuyez sur la toucheWI-FI.
Le témoin du Wi-Fi s’allume sur le
panneau de commande.
Option2 (panneau de commande)
Appuyez sur la toucheStation pen-
dant au moins 2secondes.
Le témoin du Wi-Fi s’allume sur le
panneau de commande.
Lancez l’application MieleScout et
configurez un compte utilisateur
Miele.
Vous pouvez connecter votre terminal
mobile directement à l’aspirateur robot
ou vous connecter via votre réseau Wi-
Fi.
Remarque pour les revendeurs
Vous pouvez connecter votre aspira-
teur robot directement à un terminal
mobile sans réseau Wi-Fi.
Pour cela, connectez votre terminal
mobile au Wi-Fi de l’aspirateur robot.
Utilisez le numéro de série de l’aspira-
teur robot comme mot de passe Wi-Fi.
Vous trouverez le numéro de série sur
un autocollant situé dans le comparti-
ment de rangement et sur la plaque si-
gnalétique située sur le côté inférieur
de l’aspirateur robot. Suivez les ins-
tructions sur l’application MieleScout.
Suivez les instructions de navigation
de l’utilisateur sur l’application
MieleScout.
Veuillez noter que l’aspirateur robot
suit toujours les plus récentes com-
mandes enregistrées, peu importe si
les réglages ont été configurés à l’aide
de la télécommande, du bande de
commande ou d’un terminal mobile.
Fonction vidéo
(pour le modèle ScoutRX3HomeVi-
sion, utilisez via l’application
MieleScout)

fr-CA
109
La caméra de droite située à l’avant de
l’aspirateur robot envoie des images
chiffrées en temps réel au terminal mo-
bile sélectionné. La qualité de la trans-
mission dépend du débit de votre
connexion Internet domestique et de la
rapidité de votre terminal mobile.
Le témoin de la fonction vidéo sur le
panneau de commande clignote en
rouge lorsque des images sont en-
voyées.
La vidéo en direct est seulement lue
dans l’application MieleScout; elle
n’est pas sauvegardée.
La confidentialité et la sphère privée
de tiers doivent être respectées lors
de l’utilisation de la fonction vidéo. Par
conséquent, il est recommandé d’utili-
ser l’aspirateur robot avec fonction vi-
déo chez vous uniquement. Toute
autre personne présente doit être in-
formée avant de démarrer l’utilisation
de la fonction vidéo.
Nous recommandons de nettoyer régu-
lièrement les 2caméras avec un chiffon
doux et sec.
Retrait du module Wi-Fi
Appuyez sur la touche de déverrouil-
lage au-dessus de l’aspirateur robot.
Le couvercle du compartiment de ran-
gement s’ouvre.
Déverrouillez le bac à poussière en
soulevant la poignée.
Sortez le bac à poussière.
Retirez le cache par l’avant.
Retirez le module Wi-Fi.
Replacez le cache.
Entretien
Risque de blessures dues à la
rotation de la brosse cylindrique.
L’aspirateur robot peut se mettre en
marche sans prévenir pendant que
des opérations d’entretien sont ef-
fectuées.
Mettez l’aspirateur robot hors tension
avant d’effectuer tout travail d’entre-
tien. Pour cela, glissez le bouton I/0
sur le côté de l’aspirateur robot à la
position 0.
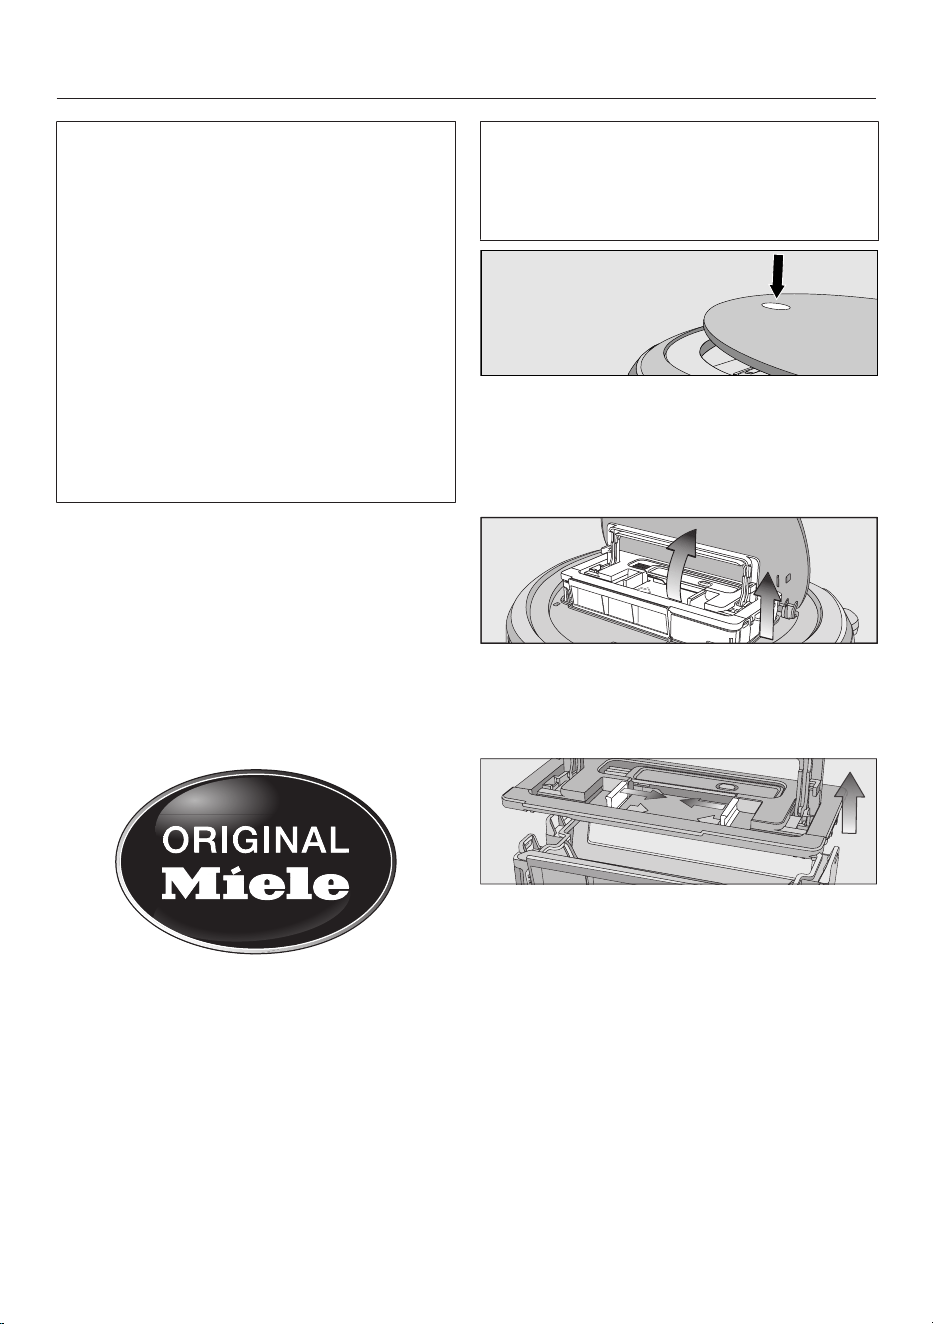
fr-CA
110
Nous recommandons d’utiliser exclu-
sivement des accessoires d’origine
portant le logo «ORIGINAL Miele» sur
l’emballage. Seuls ces accessoires
vous garantissent la puissance d’aspi-
ration optimale de votre aspirateur ro-
bot et les meilleurs résultats de net-
toyage possibles.
Veuillez noter que les erreurs et dom-
mages résultant de l’utilisation d’ac-
cessoires qui ne portent pas le logo
«ORIGINAL Miele» sur leur emballage
ne seront pas couverts par la garantie
de l’aspirateur robot.
Achat d’accessoires
Les accessoires Miele d’origine sont
disponibles sur la boutique en ligne
Miele, auprès du service technique
Miele et chez votre revendeur Miele.
Les accessoires Miele d’origine sont re-
connaissables par le logo «ORIGINAL
Miele» sur l’emballage.
Vidage du bac à poussière
Videz le bac à poussière de l’aspirateur
robot après chaque utilisation pour ob-
tenir les meilleurs résultats de net-
toyage possibles.
Il faut vider le bac à poussière au plus
tard lorsque «l_ _l» s’affiche à l’écran,
se déplaçant du bas vers le haut.
Le contenu du bac à poussière peut
être jeté avec les ordures ménagères,
tant qu’il ne contient pas de substan-
ces interdites.
Appuyez sur la touche de déverrouil-
lage au-dessus de l’aspirateur robot.
Le couvercle du compartiment de ran-
gement s’ouvre.
Déverrouillez le bac à poussière en
soulevant la poignée.
Sortez le bac à poussière.
Appuyez sur l’une ou les 2touches
de déverrouillage dans le sens de la
flèche et retirez le couvercle du bac à
poussière.
Videz le bac à poussière.
Remettez le couvercle du bac à
poussière en place en vous assurant
qu’il s’enclenche.
Replacez le bac à poussière, poignée
relevée, dans l’aspirateur robot et ra-
baissez la poignée jusqu’à ce que le
bac s’enclenche.
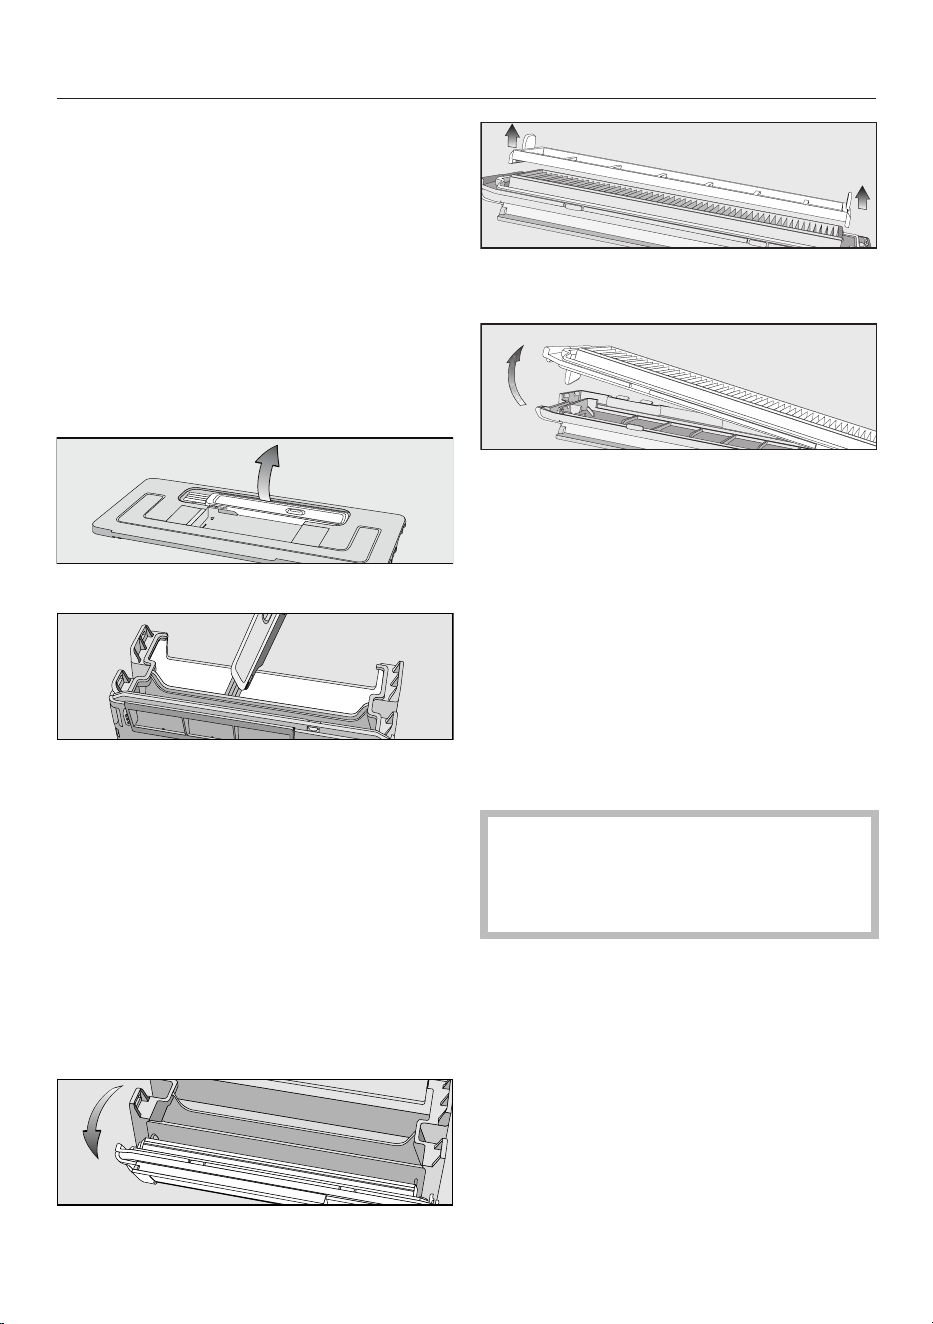
fr-CA
111
Fermez le couvercle du compartiment
de rangement et appuyez sur la
touche de déverrouillage pour le ver-
rouiller.
Nettoyage du bac à poussière
Nettoyez le bac à poussière selon les
besoins.
Un outil de nettoyage se trouve sur le
dessus du couvercle du bac à pous-
sière.
Retirez l'outil de nettoyage.
Nettoyez le bac à poussière et le des-
sous du couvercle à l'aide de l'outil
de nettoyage.
Nettoyage du filtre d’évacuation
Nettoyez le filtre d’évacuation selon les
besoins.
Le compartiment du filtre d’évacuation
est situé dans le bac à poussière.
Retirez le couvercle du bac à pous-
sière.
Retirez le filtre du bac à poussière.
Retirez le pré-filtre et nettoyez-le au
besoin à l’aide de l’outil de nettoyage.
Dégagez le filtre d’évacuation et net-
toyez-le à l’aide de l’outil de net-
toyage.
Réinstallez le filtre d’évacuation dans
le cache.
Placez le pré-filtre sur le filtre d’éva-
cuation.
Le montage du filtre est terminé.
Remettez soigneusement le filtre en
place dans le bac à poussière, puis
verrouillez-le.
Le filtre d’évacuation doit être rem-
placé après environ 6mois afin d’ob-
tenir les meilleurs résultats de net-
toyage possibles.
Nettoyage des brosses latérales
Nettoyez les brosses latérales selon les
besoins. Vous aurez besoin de l'outil de
nettoyage qui se trouve sur le dessus
du couvercle du bac à poussière.
Placez l'aspirateur-robot à l'envers
sur une surface plane et propre.
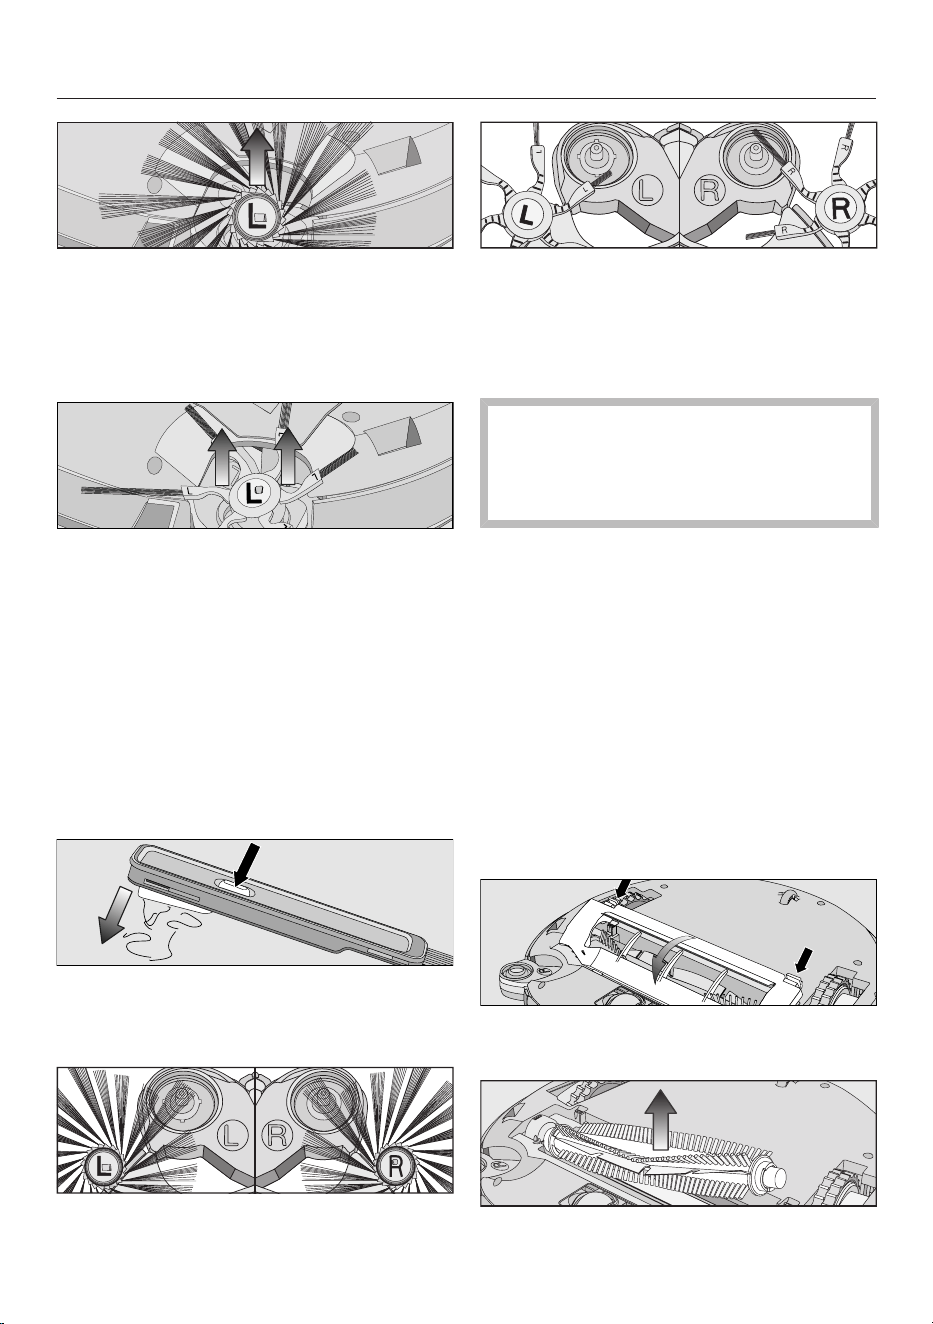
fr-CA
112
Brosses latérales universelles à
20bras: saisissez les brosses laté-
rales opposées (une poignée longue
et une poignée courte par main) et ti-
rez-les vers le haut pour les extraire.
Brosses latérales de tapis à 6bras:
saisissez les supports de brosses la-
térales élastiques (un support par
main) et tirez-les vers le haut pour les
extraire.
Retirez les fils et les cheveux à l’aide
du balai qui est situé au fond de l’ou-
til de nettoyage.
Tenez le balai au-dessus de la pou-
belle.
Appuyez plusieurs fois sur le bouton
sur le dessus du balai jusqu’à ce que
tous les fils et les cheveux tombent.
Poussez doucement les 2brosses la-
térales propres sur les axes jusqu’à
ce qu’elles s’enclenchent avec un
clic. Respectez les lettres indiquant la
gauche L et la droite R.
Pour une qualité de nettoyage opti-
male, nous recommandons de rem-
placer les 2brosses latérales au bout
d’unan environ.
Nettoyage de la brosse cylindrique
Nettoyez la brosse cylindrique selon les
besoins. Pour cela, vous aurez besoin
de l’outil de nettoyage qui se trouve sur
le dessus du couvercle du bac à pous-
sière.
Placez l’aspirateur robot à l’envers
sur une surface plane et propre.
Retirez les 2brosses latérales.
Consultez la section «Nettoyage des
brosses latérales».
Déverrouillez le protège-brosse et re-
tirez le cache.
Retirez la brosse cylindrique.
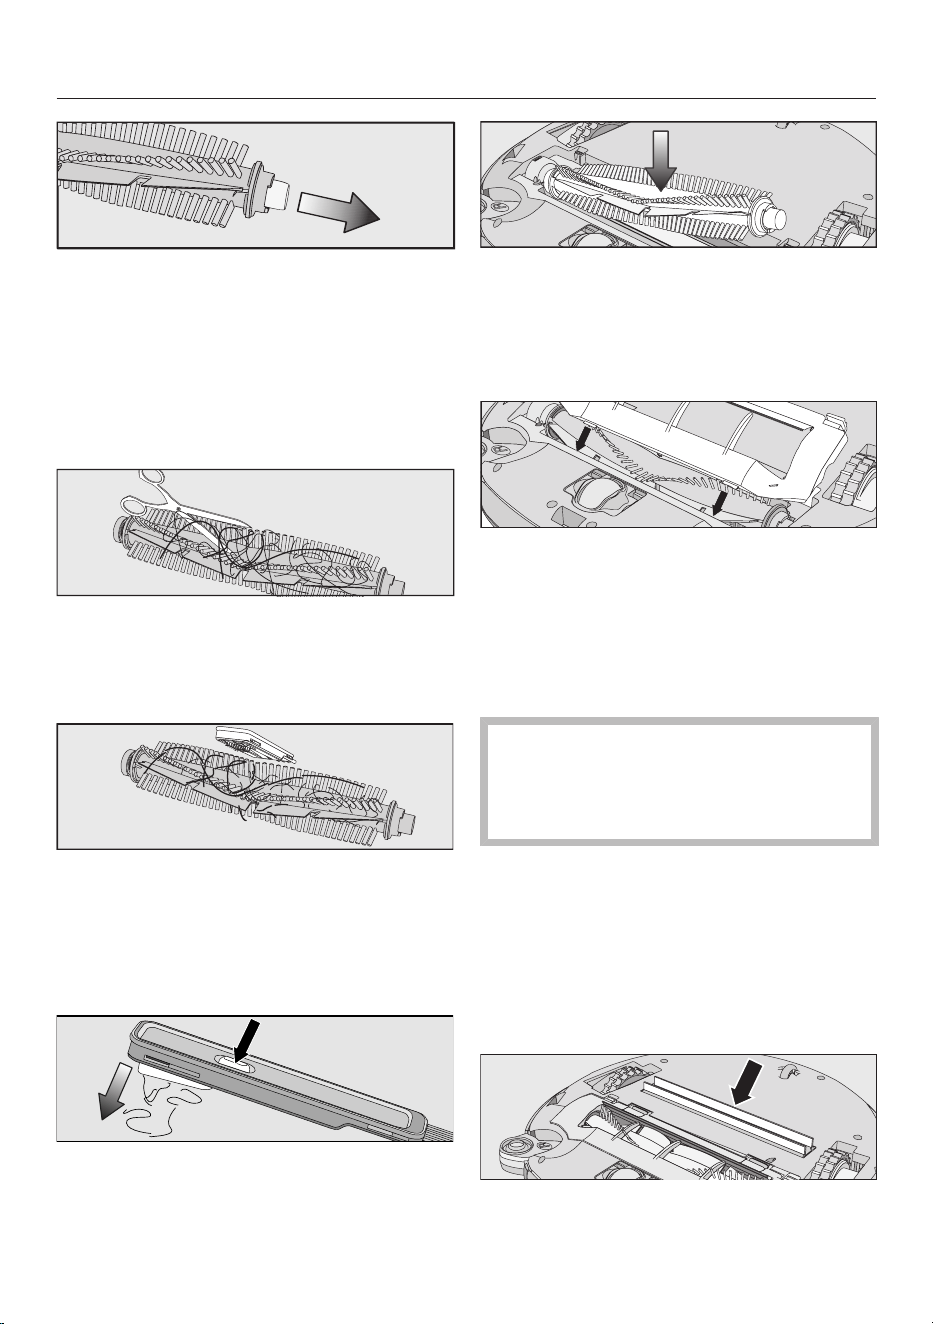
fr-CA
113
Retirez le cache du roulement de la
brosse cylindrique et enlevez les fils
ou les poils qui sont coincés autour
du roulement.
Remettez le cache du roulement en
place en vous assurant qu’il s’en-
clenche.
À l’aide d’une paire de ciseaux, cou-
pez les fils ou les cheveux qui se sont
enroulés autour de la brosse cylin-
drique.
Retirez les fils et les cheveux à l’aide
du balai qui est situé au fond de l’ou-
til de nettoyage.
Tenez le balai au-dessus de la pou-
belle.
Appuyez plusieurs fois sur le bouton
sur le dessus du balai jusqu’à ce que
tous les fils et les cheveux tombent.
Remettez la brosse cylindrique en
place avec le cache du roulement
fixé. Veillez à ce que le côté, dont
l’extrémité est pointue, soit inséré
dans la fente correspondante.
Replacez avec précaution le protège-
brosse des 2côtés en vous assurant
qu’il s’enclenche.
Remettez les brosses latérales en
place. Consultez la section «Net-
toyage des brosses latérales».
Pour une qualité de nettoyage opti-
male, nous recommandons de rem-
placer la brosse cylindrique par une
neuve au bout d’unan environ.
Nettoyage des joints d’étanchéité du
bac à poussière
Nettoyez les joints d’étanchéité sous le
bac à poussière selon les besoins.
Placez l’aspirateur robot à l’envers
sur une surface plane et propre.
Nettoyez les joints d’étanchéité avec
un chiffon légèrement humide.
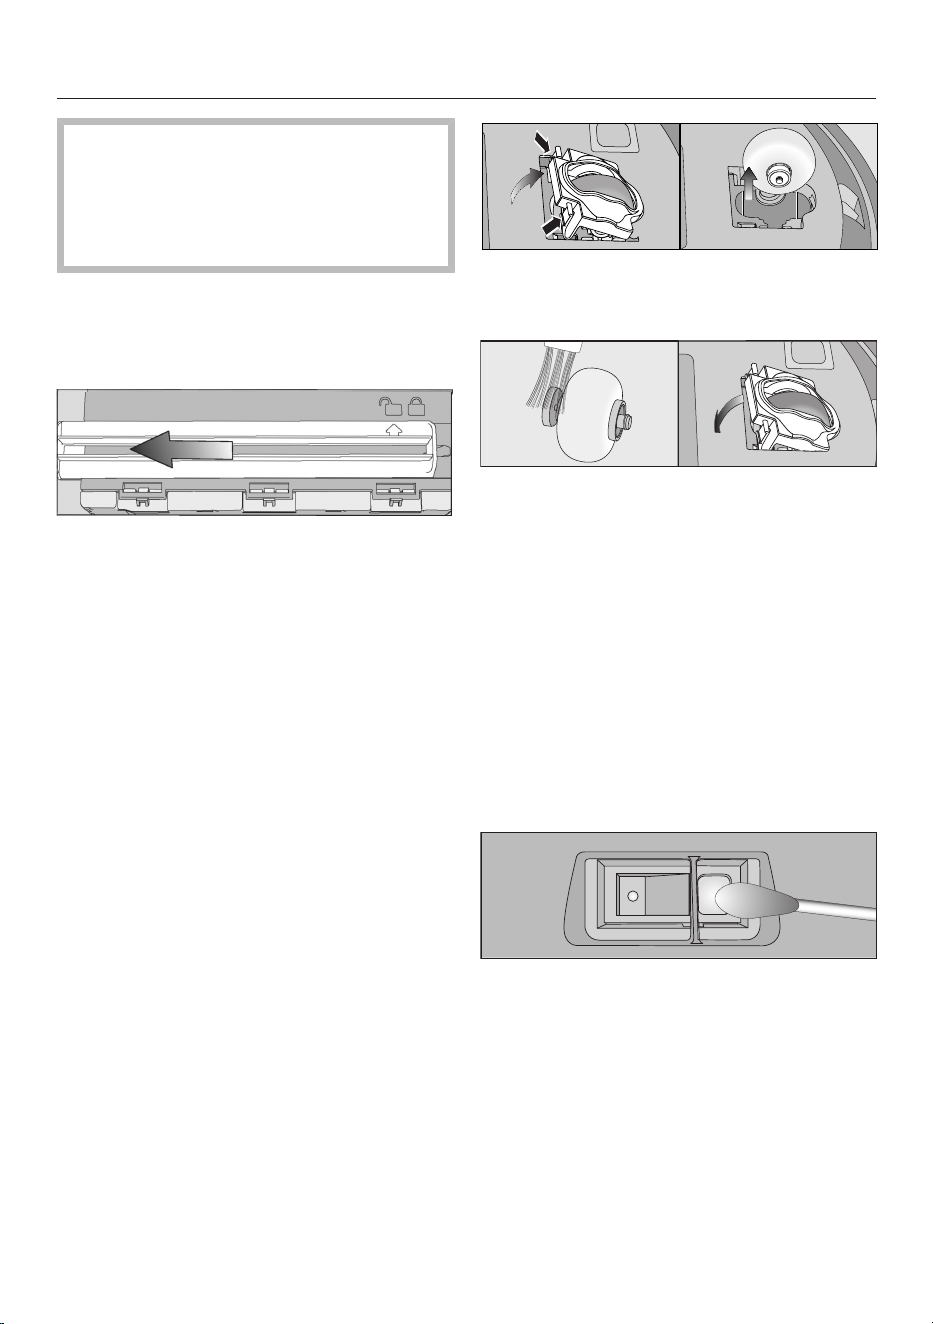
fr-CA
114
Pour une qualité de nettoyage opti-
male, nous recommandons de rem-
placer l’unité de joints d’étanchéité
par une neuve au bout d’unan envi-
ron.
Remplacement de l’unité de joints
d’étanchéité du bac à poussière
Sortez le bac à poussière.
Détachez l’unité de joints d’étanchéi-
té du dessous du bac à poussière de
sorte que la flèche pointe vers le
symbole.
Déposez l’unité de joints d’étanchéi-
té.
Insérez la nouvelle unité de joints
d’étanchéité de sorte que la flèche
pointe vers le symbole.
Verrouillez l’unité de joints d’étanchéi-
té en vous assurant qu’il s’enclenche.
La flèche doit pointer vers le sym-
bole.
Nettoyage de la roue avant
Nettoyez la roue avant selon les be-
soins. Vous aurez besoin de l'outil de
nettoyage qui se trouve sur le dessus
du couvercle du bac à poussière.
Placez l'aspirateur-robot à l'envers
sur une surface plane et propre.
Déverrouillez le couvercle.
Sortez la roue avant.
Retirez les fils et les cheveux et net-
toyez la roue avant, le couvercle et la
fente de la roue à l'aide de l'outil de
nettoyage.
Replacez la roue avant et fermez le
couvercle en vous assurant qu'il s'en-
clenche.
Nettoyage des capteurs
Nettoyez les capteurs selon les besoins.
Placez l'aspirateur-robot à l'envers
sur une surface plane et propre.
Nettoyez les capteurs minutieuse-
ment au moyen d'un coton-tige sec.
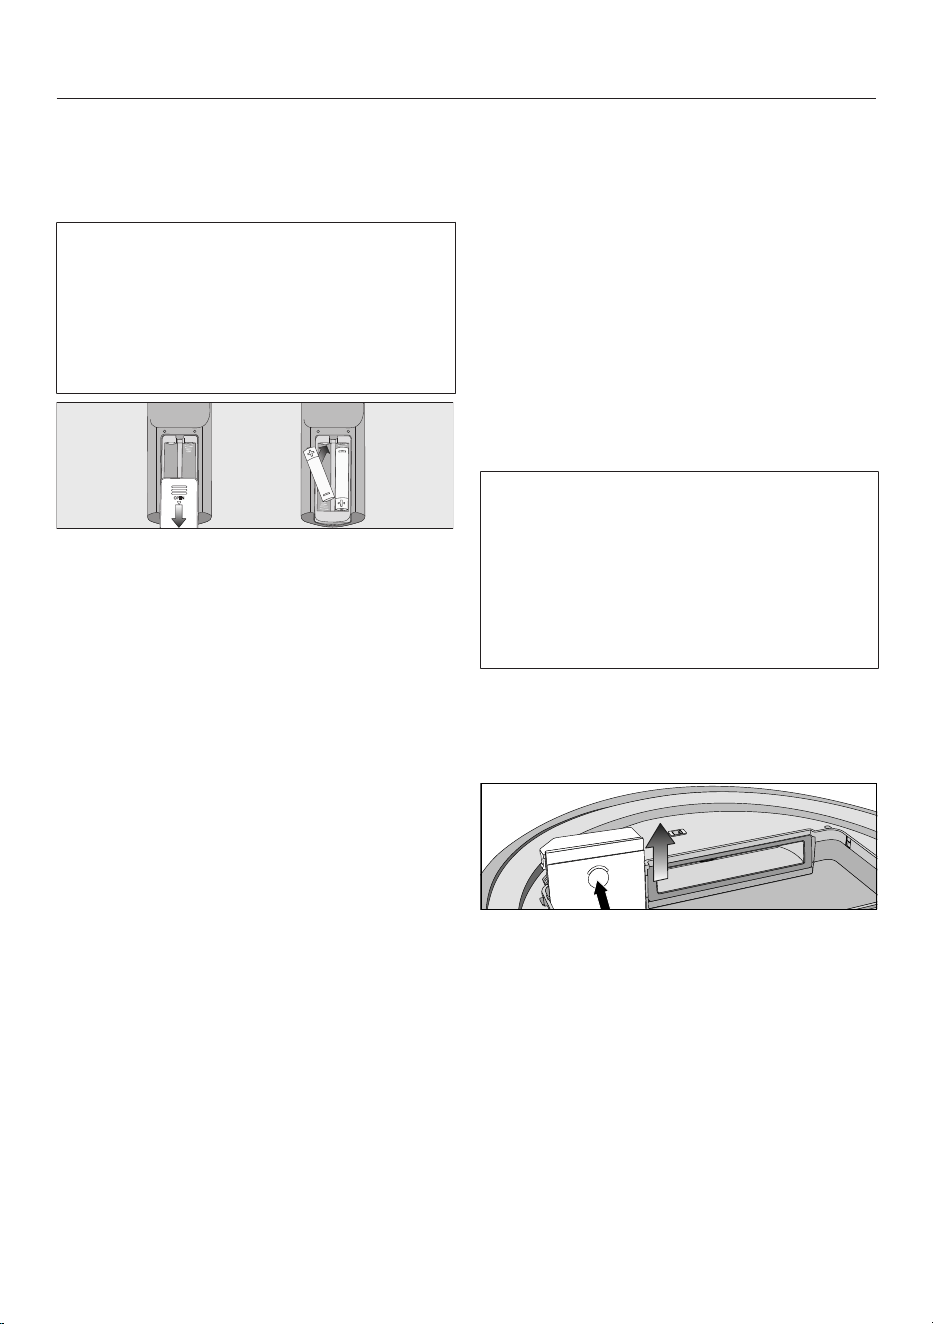
fr-CA
115
Remplacement des piles de la télé-
commande
2piles (AAA, 1,5V) sont requises.
Respectez les instructions concernant
la manipulation et l’élimination des
piles qui se trouvent dans les sections
«Consignes de sécurité et mises en
garde» et «Protection de l’environne-
ment» au début de ce mode d’emploi.
Retirez le couvercle du compartiment
à piles.
Remplacez les piles. Assurez-vous de
respecter la polarité.
Fermez le couvercle du compartiment
à piles.
Remplacement de la batterie rechar-
geable
Il est nécessaire d’utiliser une batterie
rechargeable au lithium-ionMiele d’ori-
gine:
- YCR-M05 pour ScoutRX3
- YCR-MT12 pour ScoutRX3Runner
ET ScoutRX3HomeVisionHD
Le compartiment de la batterie rechar-
geable est situé dans le compartiment
de rangement de l’aspirateur robot.
Respectez les instructions concernant
la manipulation et l’élimination des
batteries rechargeables, qui se
trouvent dans les sections
«Consignes de sécurité et mises en
garde» et «Protection de l’environne-
ment» au début de ce mode d’emploi.
Ouvrez le compartiment de range-
ment.
Sortez le bac à poussière.
Ouvrez le compartiment de la batterie
rechargeable en déverrouillant le cou-
vercle vers le haut.
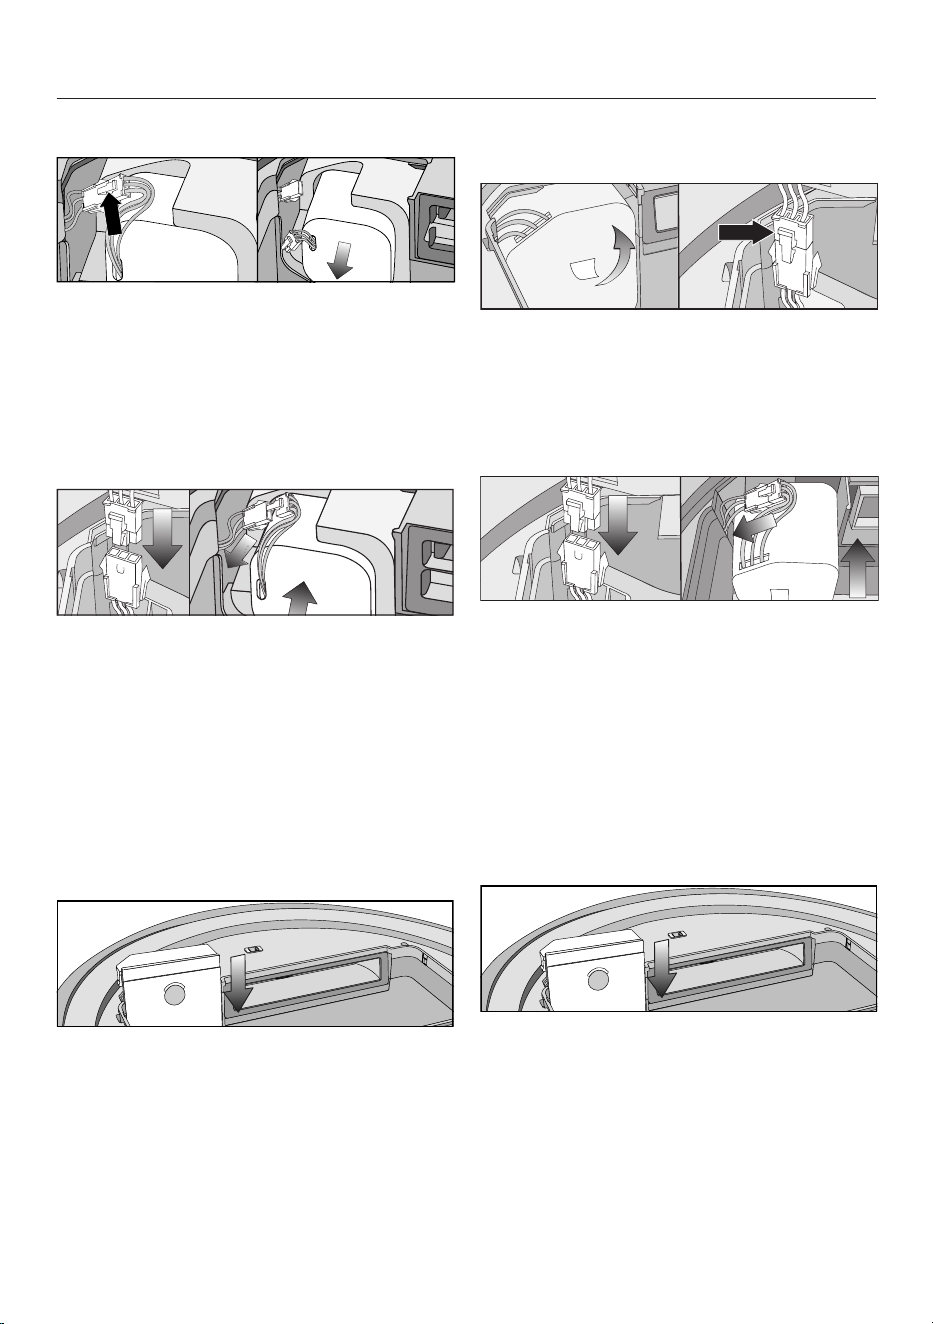
fr-CA
116
ScoutRX3 (YCR-M05)
Retirez les câbles d’alimentation avec
précaution afin que le connecteur
sorte de la fente.
Appuyez sur la languette du connec-
teur pour détacher la fiche.
Sortez la batterie rechargeable.
Insérez la fiche de la nouvelle batterie
rechargeable dans la prise, en vous
assurant qu’elle s’enclenche.
Insérez la batterie rechargeable avec
précaution, en veillant qu’elle soit
correctement positionnée (voir le côté
droit de l’image).
Rangez le connecteur dans la fente
latérale.
Replacez avec précaution le cou-
vercle du compartiment de la batterie
rechargeable et fermez-le en vous as-
surant qu’il s’enclenche.
ScoutRX3Runner et Scout RX3
Home Vision HD (YCR-MT12)
Sortez la batterie rechargeable avec
précaution à l’aide de la languette
pour accéder au connecteur.
Appuyez sur la languette du connec-
teur pour détacher la fiche.
Insérez la fiche de la nouvelle batterie
rechargeable dans la prise, en vous
assurant qu’elle s’enclenche.
Rangez le connecteur dans la fente
latérale.
Insérez la batterie rechargeable avec
précaution, en veillant qu’elle soit
correctement positionnée (voir le côté
droit de l’image).
Replacez avec précaution le cou-
vercle du compartiment de la batterie
rechargeable et fermez-le en vous as-
surant qu’il s’enclenche.
fr-CA
117
Nettoyage et entretien
Risque de blessures dues à la
rotation de la brosse cylindrique.
L’aspirateur robot peut se mettre en
marche sans prévenir pendant que
des opérations d’entretien sont ef-
fectuées.
Mettez l’aspirateur robot hors tension
avant d’effectuer tout travail d’entre-
tien. Pour cela, glissez le bouton I/0
sur le côté de l’aspirateur robot à la
position 0.
Aspirateur robot et accessoires
Risque de décharge électrique
due à la tension du secteur.
La présence d’humidité dans l’aspi-
rateur robot et les accessoires peut
causer des décharges électriques.
Ne plongez jamais l’aspirateur robot
ou les accessoires fournis dans
l’eau.
Respectez les consignes de nettoyage
spéciales présentées dans la section
«Entretien».
Nettoyez l’aspirateur robot et tous les
accessoires en plastique à l’aide d’un
produit nettoyant pour le plastique dis-
ponible dans le commerce.
La charge statique peut entraîner une
accumulation de poussière sur l’aspira-
teur robot. Pour l’enlever, utilisez un
chiffon doux et sec.
Dommages dus à des produits
nettoyants inappropriés.
Les surfaces de l’appareil se rayent
facilement. Le contact avec des pro-
duits nettoyants inappropriés peut
altérer ou décolorer les surfaces ex-
térieures.
N’utilisez pas de nettoyants abrasifs,
de produits pour vitres, de net-
toyants multi-usages ni de produits
d’entretien à base d’huile.
Rangement/Réglages d’usine
Rangement
Mettez l’aspirateur robot hors tension
si vous n’allez pas l’utiliser pendant
longtemps. Pour cela, glissez le bou-
ton I/0 sur le côté de l’aspirateur ro-
bot à la position 0.
Si vous prévoyez de ne pas utiliser
votre aspirateur robot pendant une pé-
riode prolongée, rangez-le dans un en-
droit frais et bien aéré, mais jamais à
une température ambiante inférieure à
0°C.
Pour un entretien optimal, rangez l’as-
pirateur robot à moitié rechargé (le té-
moin du niveau de charge sur le pan-
neau de commande est orange).

fr-CA
118
Réglages d’usine
Tous les réglages par défaut peuvent
être rétablis sur l’aspirateur robot. Mu-
nissez-vous de la télécommande.
Appuyez et maintenez simultanément
pendant au moins 5secondes les
touches sensitives Spot et Turbo du
panneau de commande.
r:St s’affiche à l’écran.
Dans les 2secondes suivantes, ap-
puyez sur la touche OK sur la télé-
commande, jusqu’à ce queF:tr s’af-
fiche à l’écran.
L’aspirateur robot redémarre avec ses
paramètres d’usine restaurés.
Service technique
Contact en cas d'anomalies
Vous n'arrivez pas à résoudre la panne
par vous même? Contactez le service
après-vente Miele ou votre revendeur
Miele.
Les coordonnées du service après-
vente Miele figurent en fin de notice.
Garantie
Pour plus d'informations reportez-vous
aux conditions de garantie fournies au-
près du service après-vente Miele.
fr-CA
119
Foire aux questions
Vous pouvez régler la plupart des défauts ou anomalies courants par vous-même.
Dans bon nombre de cas, vous économiserez ainsi du temps et de l'argent car
vous n'aurez pas besoin de faire appel au service technique.
Les tableaux suivants vous aideront à déceler la cause d'un défaut ou d'une ano-
malie et à y remédier.
Risque de blessures dues à la rotation de la brosse cylindrique.
L’aspirateur robot peut se mettre en marche sans prévenir pendant que les ano-
malies sont traitées.
Mettez l’aspirateur robot hors tension avant de résoudre une anomalie quel-
conque. Pour cela, glissez le bouton I/0 sur le côté de l’aspirateur robot à la po-
sition 0.
Problème Cause et solution possibles
La performance de net-
toyage est médiocre.
Le bac à poussière est plein.
Videz et nettoyez le bac à poussière.
La brosse cylindrique est sale ou usée.
Nettoyez-la.
Remplacez-la.
Les joints d’étanchéité du bac à poussière sont sales
ou usés.
Nettoyez les joints d’étanchéité et la conduite
d’aspiration intermédiaire.
Remplacez l’unité de joints d’étanchéité.
Vérifiez que le protège-brosse est correctement
installé et bloqué des 2côtés (voir la section «En-
tretien»–«Nettoyage de la brosse cylindrique»).
Le filtre d’évacuation est sale.
Nettoyez-le.
Remplacez-le.
Les brosses latérales sont usées.
Remplacez-les.
L’aspirateur robot
s’éteint, bien que vous
ayez appuyé sur la
touche de mise en
marche.
La batterie rechargeable n’est pas suffisamment
chargée.
Branchez correctement l’aspirateur robot aux
contacts de recharge de la station d’accueil déjà
branchée.
fr-CA
120
Problème Cause et solution possibles
L’aspirateur robot ne
rentre pas à la station
d’accueil après avoir
nettoyé la pièce.
Il a commencé à aspirer de n’importe quel point dans
la pièce.
L’aspirateur robot revient à son point de départ.
L’éclairage n’est pas suffisant pour la navigation de
l’aspirateur robot.
Veillez à un éclairage suffisant.
La station d’accueil est mal branchée.
Branchez la station d’accueil comme indiqué dans
ce mode d’emploi; voir la section «Raccorde-
ment»–«Connexion à la station d’accueil».
Il n’y a aucune transmission entre l’émetteur infra-
rouge de la station d’accueil et l’aspirateur robot.
Nettoyez soigneusement l’avant de la station d’ac-
cueil et celui de l’aspirateur robot avec un chiffon
doux et sec et assurez-vous qu’aucun objet ne
perturbe le signal.
Les obstacles qui se trouvent sur le plancher à net-
toyer peuvent gêner la navigation.
Observez le déplacement de l’aspirateur robot
pendant le nettoyage.
Supprimez les obstacles, le cas échéant.
Délimitez la zone problématique à l’aide des
bandes magnétiques.
Réduisez la hauteur maximale pouvant être
franchie par l’aspirateur robot. Consultez la section
«Utilisation»–«Réduction de la hauteur maxi-
male pouvant être franchie».
L’aspirateur robot ne se
recharge pas.
La station d’accueil est mal branchée.
Branchez la station d’accueil comme indiqué dans
ce mode d’emploi; voir la section «Raccorde-
ment»–«Connexion à la station d’accueil».

fr-CA
121
Problème Cause et solution possibles
L'aspirateur-robot ne
réagit pas.
L'aspirateur-robot est éteint.
Allumez-le (glissez le bouton I/0 vers I).
Les piles de la télécommande sont mal insérées.
Assurez-vous que la polarité est correcte.
Les piles de la télécommande sont épuisées.
Remplacez les piles.
Il n'y a aucune transmission entre l'émetteur infra-
rouge de l'aspirateur-robot et la télécommande.
Nettoyez soigneusement l'avant de l'aspirateur-ro-
bot et le dessus de la télécommande avec un chif-
fon doux et sec et assurez-vous qu'aucun objet ne
perturbe le signal.
La télécommande est trop proche ou trop éloignée
de l'aspirateur-robot.
Corrigez la distance et orientez toujours la télé-
commande vers l'aspirateur-robot.
«l_ _l» s’affiche à
l’écran,
se déplaçant du bas
vers le haut.
Le bac à poussière est plein.
Videz et nettoyez le bac à poussière.
rLOC s’affiche à l’écran. Le nettoyage a été interrompu; l’aspirateur robot a
été déplacé pendant la pause.
Procédez comme décrit dans la section «Utilisa-
tion»–«Interruption du nettoyage».
fr-CA
122
Messages d’erreur
Risque de blessures dues à la rotation de la brosse cylindrique.
L’aspirateur robot peut se mettre en marche sans prévenir pendant que les er-
reurs sont traités.
Mettez l’aspirateur robot hors tension avant de résoudre une erreur quelconque.
Pour cela, glissez le bouton I/0 sur le côté de l’aspirateur robot à la position 0.
Les messages d’erreur sont affichés à l’écran.
Votre aspirateur robot est fourni avec un autocollant qui répertorie tous les mes-
sages d’erreur. Vous pouvez coller cet autocollant sur le côté inférieur du cou-
vercle du compartiment de rangement.
Problème Cause et solution possibles
F 1 Erreur «Roue surélevée»
Placez l’aspirateur robot sur une surface plane.
F 2 Erreur «Capteurs sales»
Nettoyez les capteurs. Ce message d’erreur s’af-
fiche aussi lorsqu’au démarrage de l’aspirateur ro-
bot, le capteur anti-collision se trouve sur du vide.
Éloignez l’aspirateur robot du bord.
F 3 Erreur «Filtre non reconnu»
Insérez le bac à poussière avec le filtre d’évacua-
tion dans l’aspirateur robot.
F 4 Erreur «Enrayement des roues motrices»
Vérifiez si les roues motrices ne sont pas sales.
Retirez les fils et les cheveux. Ce message d’erreur
s’affiche aussi lorsque l’aspirateur robot se bloque.
F 5 Erreur «Enrayement des brosses»
Vérifiez si la brosse cylindrique et les brosses laté-
rales sont sales. Nettoyez la brosse cylindrique et
les brosses latérales. Ce message d’erreur s’af-
fiche aussi lorsque des objets sont coincés dans
l’aspirateur robot.
F 6 Erreur «Surcharge du moteur du ventilateur»
Videz et nettoyez le bac à poussière. Nettoyez ou
remplacez le filtre d’évacuation.
fr-CA
123
Problème Cause et solution possibles
F 7 Erreur système interne ou erreur «Aspirateur robot
en dehors de la température ambiante de fonctionne-
ment autorisée»
Éteignez l’aspirateur robot, puis rallumez-le (bou-
ton I/0).
F 8 Erreur «Roue avant sale»
Vérifiez si la roue avant, le cache ou la fente de la
roue ne sont pas sales. Retirez les fils ou les che-
veux et nettoyez la roue avant, le cache et la fente
de la roue.
Réinitialisation du mes-
sage d’erreur après la
correction du problème
Vous pouvez réinitialiser les messages d’erreur
décrits ci-dessus de la manière suivante
- Éteignez l’aspirateur robot, puis rallumez-le (bouton
I/0).
- Appuyez sur la touche Mise en marche de la télé-
commande.
- Appuyez sur la touche sensitive du panneau de
commande de l’aspirateur robot pendant au moins
3secondes.
Données techniques
(pour le module Wi-Fi)
Gamme de fréquences 2,412–2,472GHz
Puissance maximale d’émission <100mW
Déclaration de conformité
Miele déclare par la présente que cet aspirateur robot est conforme à la direc-
tive2014/53/UE.

fr-CA
124
Droit d'auteur et licences
Miele utilise son propre logiciel ou un logiciel tiers non couvert par une licence
open source, pour faire fonctionner et contrôler l’aspirateur robot. Ce logiciel/Ces
composants logiciels sont soumis à des droits d’auteur. Les droits d’auteur déte-
nus par Miele et des tiers doivent être respectés.
De plus, cet aspirateur robot contient des composants logiciels distribués sous li-
cence open source. Vous pouvez consulter localement les composants open
source inclus dans l’appareil avec les avis de droits d’auteurs correspondants, les
copies de conditions de licence applicables audit moment et toutes les autres in-
formations via une adresse IP en utilisant un navigateur Web (http://<Adresse IP>/
Licences). Les dispositions de responsabilité et de garantie des conditions de li-
cence open source qui y figurent ne s’appliquent qu’à l’égard des ayants droit res-
pectifs.
L’aspirateur robot contient notamment des composants logiciels dont la licence
est accordée par les ayants droit au titre de la licence publique générale GNU, ver-
sion2, ou de la licence publique générale amoindrie GNU, version2.1. Pendant
une période d’au moins 3ans à compter de l’achat ou de la livraison de l’aspira-
teur robot respectivement, Miele propose de vous fournir ou de fournir à des tiers
une copie lisible par machine du code source des composants open source conte-
nus dans l’aspirateur robot, sous licence selon les termes de la licence publique
générale GNU, version2, ou de la licence publique générale amoindrie GNU, ver-
sion2.1, sur un support de données (CD-ROM, DVD ou clé USB). Pour obtenir ce
code source, veuillez nous contacter par e-mail ([email protected]) ou à l’adresse
suivante, en précisant le nom du produit, le numéro de série et la date d’achat:
Miele&Cie. KG
Open Source
GTZ/TIM
Carl-Miele-Straße29
33332Gütersloh, Allemagne
Veuillez noter la garantie limitée en faveur des ayants droit au titre de la licence pu-
blique générale GNU, version2, ou de la licence publique générale amoindrie
GNU, version2.1:
This program is distributed in the hope that it will be useful, but WITHOUT ANY
WARRANTY, without even the implied warranty of MERCHANTABILITY of FITNESS
FOR A PARTICULAR PURPOSE. See the GNU General Public License and GNU
Lesser General Public License for more details.
Vous pouvez obtenir des instructions détaillées pour l’utilisation des modes de test
par le service technique Miele.

fr-CA - Garantie restreinte – Aspirateurs Canada
125
Les conditions de la garantie suivante sont valides au Canada seulement.
Miele Limitée, (ci-après nommée "Miele") garantit à l’acheteur original que ce produit, y compris tous ses accessoires
et pièces autorisés par Miele, est libre de tout défaut de matériel et de fabrication.
1. Entrée en vigueur et durée de la garantie
Cette garantie est valide durant la période de temps suivante :
a) Appareils électroménagers aux fins d’utilisation domestique normale et non commerciale :
– Un (1) an, pièce et main-d’œuvre.
– Modules RemoteVision® : Veuillez vous reporter à la "Garantie restreinte - Module RemoteVision® -
Canada" de Miele.
– Garantie supplémentaire de 5 et 10 ans sur les systèmes scellés de réfrigération : la garantie sur le
système scellé de réfrigération couvre tous les compresseurs, les condensateurs, les évaporateurs et les
déshydrateurs-filtres d'origine, ainsi que le fluide frigorigène et les tuyaux de raccordement d'origine.
– Garantie de cinq (5) ans - Si une plainte concernant un matériau défectueux ou un défaut de fabrication lié
au système scellé de réfrigération utilisé dans les réfrigérateurs, les caves à vin et les congélateurs Miele est
adressée à Miele dans les cinq (5) ans suivant la date d'achat de l'appareil, les défauts du système scellé de
réfrigération couverts par la garantie seront réparés gratuitement (pièces et main-d'œuvre comprises).
– Garantie de dix (10) ans - Si une plainte concernant les défauts susmentionnés est adressée à Miele à
partir de la sixième (6e) année et jusqu'au dernier jour de la dixième (10e) année suivant la date d'achat
de l'appareil, la garantie couvrira le remplacement ou la réparation de tous les éléments du système
scellé de réfrigération présentant un défaut matériel ou un défaut de fabrication couvert par la garantie,
excepté les frais de main-d'œuvre. Si le client en fait la demande, Miele se chargera de la réparation ou du
remplacement des pièces, mais aux frais du client.
b) Appareils électroménagers aux fins d’utilisation commerciale :
– Six (6) mois, pour pièces et main-d’œuvre.
c) Aspirateurs destinés à une utilisation domestique, non commerciale dans des conditions normales :
– Un (1) an, pour les aspirateurs verticaules aspirateur-balais sans fil et les aspirateurs-traîneaux pièces et
main-d’œuvre.
– Deux (2) ans, pour le moteur des aspirateurs verticaux S170 - S189 pièces et main-d’œuvre.
– Deux (2) ans, pour la batterie Varta des aspirateurs-balais sans fil pièces et main-d'oeuvre.
– Sept (7) ans, pour le moteur VortexTM des aspirateurs-chariots, aspirateurs verticaux et aspirateurs-balais
sans fil, excepté pour les modèles d’aspirateurs verticaux S170-S189 dont le moteur est garanti deux (2)
ans pièces et main-d’œuvre.
d) Aspirateurs aux fins d’utilisation commerciale :
– Six (6) mois, pour les produits à utilisation commerciale. Pièce et main-d’œuvre.
– Un (1) an, pour le moteur des aspirateurs verticaux et des aspirateurs-traîneaux. Pièces et main-d’œuvre.
e) Appareils commerciaux.
– Un (1) an, pièces et main d’œuvre dans la zone de service direct Miele.
– Un (1) an, pièces uniquement dehors la zone de service direct Miele.
Contactez Miele Professional pour déterminer si vous êtes dans la zone de service direct Miele.
2. Date d’entrée en vigueur
La garantie entre en vigueur à la date de l'achat. En cas de remplacement par Miele d'un produit couvert par une
garantie, la période de garantie initiale n'est pas prolongée; sa date d'entrée en vigueur correspond à la date de
l'achat initial.
3. Conditions préalables liées à la garantie
3.1 Miele assume la responsabilité en vertu de la garantie à la condition que les conditions suivantes aient été
respectées :
a) vous êtes l'acheteur initial et votre produit ne provient pas d'une revente;
b) le produit a été acheté auprès de Miele ou auprès d'un détaillant Miele autorisé au Canada;
c) le cas échéant, le produit a été installé par une personne compétente, autorisée par Miele, conformément
aux instructions d'installation en vigueur;
d) le produit se trouve au Canada.
3.2 Les réclamations en vertu de la garantie seront honorées uniquement si la non-conformité aux dispositions
de la garantie est signalée par écrit et si le produit est retourné à Miele ou à un détaillant Miele autorisé
accompagné d'une preuve de la date d'achat, pendant la période prévue à l'article 1 ci-dessus.

fr-CA - Garantie restreinte – Aspirateurs Canada
126
4. Étendue de la garantie
En cas de matériaux défectueux ou de défaut de fabrication pendant la période prévue à l'article 1 ci-dessus, Miele
réparera ou, à son choix, remplacera dans un délai raisonnable le produit ou toute pièce ou tout accessoire Miele
dont la fabrication ou les matériaux sont défectueux. Les produits ou les pièces défectueux deviennent la propriété de
Miele lorsqu'ils sont remplacés.
5. Exclusions de la garantie
La garantie ne couvre pas les produits, y compris les pièces et les accessoires de ces produits, qui :
a) n'ont pas été installés conformément aux instructions d'installation de Miele;
b) ont été endommagés par négligence, à la suite d'un accident ou d'une utilisation mauvaise, inappropriée ou
anormale, ou encore en raison de l'entretien ou du transport inapproprié ou anormal;
c) contiennent des accessoires ou des pièces de rechange non fabriqués par Miele, y compris les filtres, les
sacs à poussière et tout autre produit non fabriqué par Miele;
d) ont été réparés, entretenus ou modifiés par une personne autre qu'une personne du centre de services ou un
technicien autorisé par Miele.
6. Usure normale
L'usure normale ne constitue pas un défaut de fabrication ni un défaut de matériaux.
7. Limitation de responsabilité
7.1 À moins d'acheter une garantie prolongée auprès de Miele avant l'échéance de la présente garantie, celle-ci
est la seule garantie que vous offre Miele. Miele se désiste de toute autre garantie maximale permise par la
loi, expresse ou implicite, y compris toute garantie de qualité marchande ou d'usage à une fin particulière, à
l'exception de la présente garantie.
7.2 Les recours décrits dans le présent document constituent vos seuls recours en vertu de la présente garantie. À
moins d'une autre mention, la responsabilité de Miele pour les dommages réels, quelle que soit leur nature, est
limitée au montant que vous avez payé pour le produit. Miele se dégage de toute responsabilité, de tout dommage
indirect ou de tout autre dommage, qu'il soit attribuable à la violation du contrat, à la responsabilité délictuelle (y
compris la négligence), à la responsabilité du fait du produit ou à toute autre théorie juridique. En aucun cas les deux
parties ne seront tenues responsables de toute perte de bénéfices ou d'économies, de dommage consécutif ou de
tout autre dommage financier.
8. Lois provinciales particulières
La présente garantie accorde à l'acheteur des droits légaux particuliers. L'acheteur peut également exercer d'autres
droits qui peuvent varier d'une province à l'autre au Canada. Certaines provinces interdisent la restriction ou l'exclusion
des garanties implicites. Par conséquent, il est possible que certaines restrictions et exclusions ne s'appliquent pas.
9. Service à la clientèle
9.1 Pour faire exécuter des travaux d'entretien couverts en vertu de la présente garantie ou pour obtenir de plus
amples renseignements, veuillez communiq
uer avec Miele à l'adresse ou aux numéros suivants :
Miele Limited, No sans frais : 1-800-565-6435
161, Four Valley Drive Adresse électronique : [email protected]
Vaughan (Ontario)
Canada L4K 4V8
9.2 Si des travaux d'entretien sont nécessaires, l'appareil devra peut-être être déplacé par une personne
autorisée par Miele et emporté à un centre de services Miele autorisé. Si vous demandez un entretien et que
vous habitez une région éloignée, tel qu'il a été déterminé par Miele, à sa seule discrétion, à l'occasion, vous
devrez, selon le choix de Miele, assumer certains frais :
a) soit les frais de déplacement qu'engage Miele pour se présenter à votre lieu de résidence;
b) soit les frais de déplacement et d'envoi de l'appareil, de votre lieu de résidence au centre de services
Miele autorisé le plus près.
Miele Limitée
Siège social au Canada et Centre Miele
161 Four Valley Drive
Vaughan, ON L4K 4V8
Canada
www.miele.ca
customercar[email protected]
[email protected] (questions commerciales)
Service à la clientèle
Téléphone : (800) 565-6435
customercar[email protected] (questions générales et Service technique)

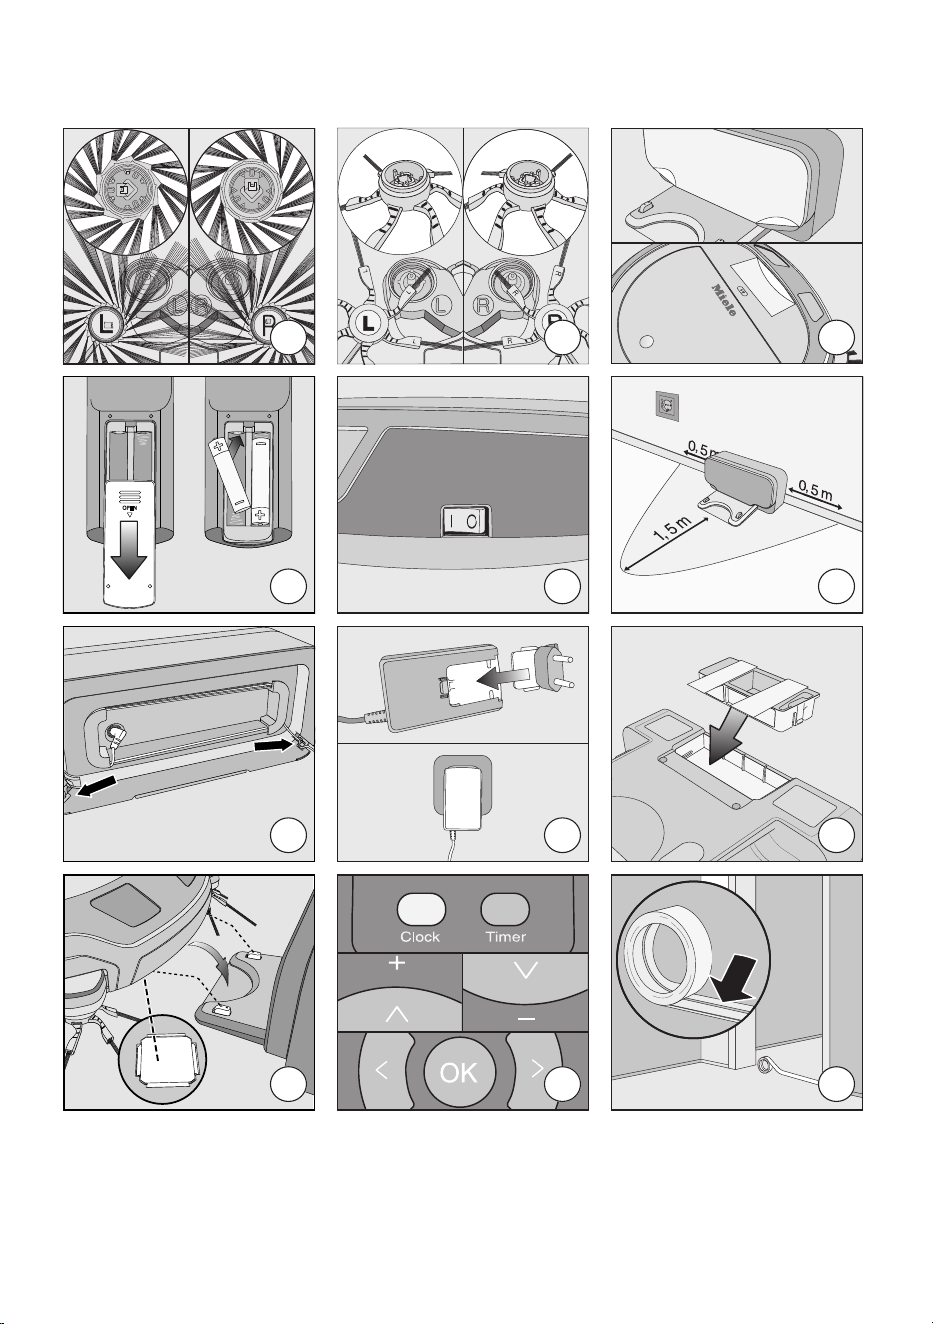
01
02
03
04
05
06
07
08
09
10
11
12

Importateur
Miele Limitée
Siège social au Canada et Centre Miele
161 Four Valley Drive
Vaughan, ON L4K 4V8
www.miele.ca
Service à la clientèle
Téléphone : 800 565-6435
Canada
Veuillez indiquer le modèle et le numéro
de série de votre appareil lorsque vous
contactez le service à la clientèle.
Allemagne
Fabricant
Miele & Cie. KG
Carl-Miele-Straße 29
33332 Gütersloh
9 Independence Way
Princeton, NJ 08540
www.mieleusa.com
U.S.A.
Miele, Inc.
National Headquarters
Please have the model and serial number
of your appliance available when
contacting Customer Service.
Canada
Importer
Miele Limited
Headquarters and Miele Centre
Customer Support
Phone: 888-99-MIELE (64353)
161 Four Valley Drive
Vaughan, ON L4K 4V8
www.miele.ca
Customer Care Centre
Phone:
800-565-6435
905-532-2272
International Headquarters
Miele & Cie. KG
Carl-Miele-Straße 29
33332 Gütersloh
Germany
SPQL0 - 0322 M.-Nr. 11 846 510 / 02