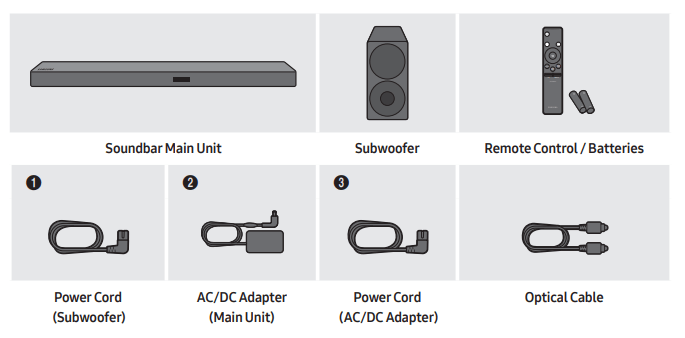
The power connection steps are labelled (1, 2, 3). For more information about power connections
For Soundbar wall mounting components
Micro USB to USB adapter and HDMI cables are sold separately. To purchase, contact a Samsung Service Center or Samsung Customer Care.
The appearance of the accessories may differ slightly from the illustrations above.
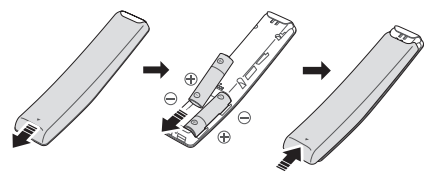
Inserting Batteries before using the Remote Control (AA batteries X 2)
Slide the back cover in the direction of the arrow until it is completely removed. Insert 2 AA batteries (1.5V) oriented so that their polarity is correct. Slide the back cover back into position.
PRODUCT OVERVIEW
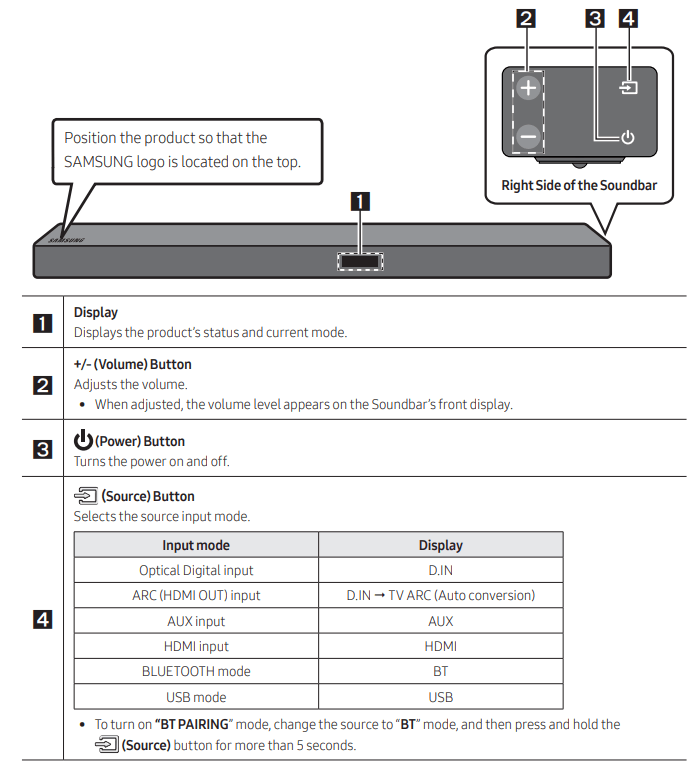
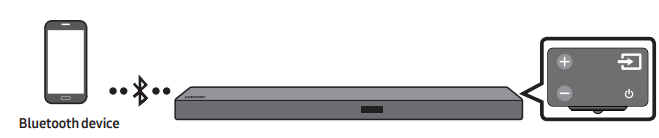
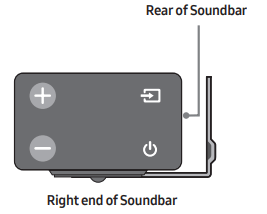
Front Panel/Top Panel of the Soundbar
When you plug in the AC cord, the power button will begin working in 4 to 6 seconds.
When you turn on this unit, there will be a 4 to 5 second delay before it produces sound.
If you hear sounds from both the TV and Soundbar, go to the Settings menu for the TV audio and change the TV speaker to External Speaker.
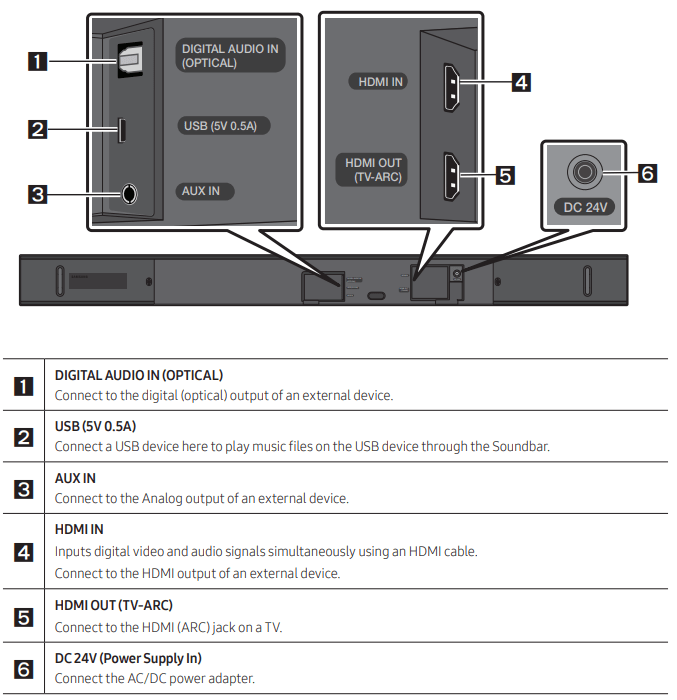
Bottom Panel of the Soundbar
When disconnecting the power cord from a wall outlet, pull the plug. Do not pull the cable.
Do not connect this unit or other components to an AC outlet until all connections between components are complete.
CONNECTING THE SOUNDBAR
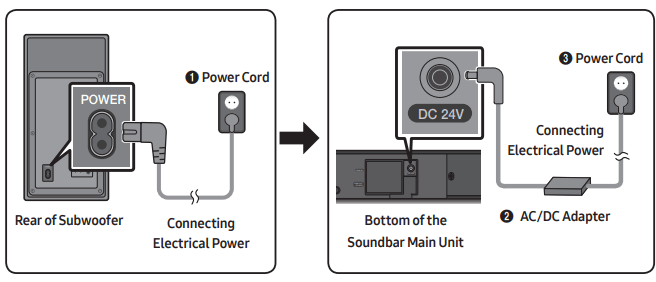
Connecting Electrical Power
Use the power components (1, 2, 3) to connect the units to electrical outlets in the following order: 1.) Subwoofer → 2.) Soundbar Main Unit. See the illustrations below
For more information about the required electrical power and power consumption, refer to the label attached to the product. (Label: Rear of the Soundbar Main Unit)
Make sure to rest the AC/DC Adapter flat on a table or the floor. If you place the AC/DC Adapter so that it is hanging with the AC cord input facing upwards, water or other foreign substances could enter the Adapter and cause the Adapter to malfunction.
Connecting the Soundbar to the Subwoofer
When the subwoofer is connected, you can enjoy rich bass sound.
Automatic connection between the Subwoofer and the Soundbar
When you turn the power on after connecting the power cables to the Soundbar and subwoofer, the subwoofer is automatically connected to the Soundbar.
When auto pairing is complete, the blue indicators at the rear of the subwoofer turn on.
LED Indicator Lights on the Rear of Subwoofer
Manually connecting the Subwoofer or Surround Speakers
Before performing the manual connection procedure below:
Check whether the power cables for the Soundbar and subwoofer or Surround Speakers are connected properly.
Make sure that the Soundbar is turned off.
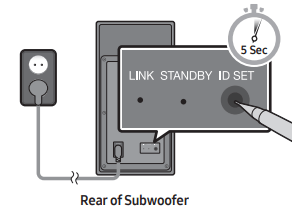
1. Press and hold ID SET on the rear of the subwoofer speakers for at least 5 seconds.
The red indicator at the rear of each speaker turns off and the blue indicator blinks.
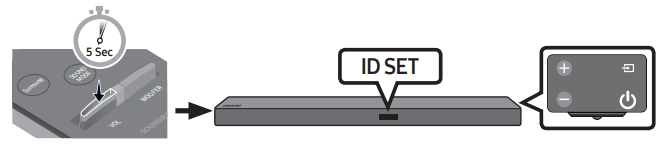
2. Turn off the Soundbar.
3. Press and hold the VOL button on the remote control for at least 5 seconds with the Soundbar turned off (OFF).
4. The ID SET message appears on the display of the Soundbar for 1.3 seconds, and then disappear
5. When the blue indicator on the subwoofer blinks, turn on the Soundbar’s power by pressing (Power) button on the right side of the main unit or on the remote control.
6. When the connection is successfully established, the blue indicator on the rear of the subwoofer stops blinking and glows continuously.
If the connection process fails, the blue indicator will flash continuously. Go to Step 1 and start again.
NOTES
Do not connect the power cord of this product or your TV to a wall outlet until all connections between components are complete.
Before moving or installing this product, be sure to turn off the power and disconnect the power cord.
If the main unit is powered off, the wireless subwoofer will go into stand-by mode and the STANDBY LED on the rear of the sub-woofer will turn red after blinking blue several times.
If you use a device that uses the same frequency (5.8GHz) as the Soundbar near the Soundbar, interference may cause some sound interruption.
The maximum transmission distance of the main unit’s wireless signal is about 32.8 ft (10 m), but may vary depending on your operating environment. If a steel-concrete or metallic wall is between the main unit and the wireless subwoofer, the system may not operate at all because the wireless signal cannot penetrate metal.
PRECAUTIONS
Wireless receiving antennas are built into the wireless subwoofer. Keep the unit away from water and moisture.
For optimal listening performance, make sure that the area around the wireless subwoofer and the Wireless Receiver Module (sold separately) is clear of any obstructions.
CONNECTING TO YOUR TV
Hear TV sound from your Soundbar through wired or wireless connections.
When the Soundbar is connected to selected Samsung TVs, the Soundbar can be controlled using the TV’s remote control.
When using optical cable, this feature can be supported by 2017 Samsung Smart TVs that support Bluetooth.
This function also allows you to use the TV menu to adjust the sound field and various settings as well as the volume and mute.
Method 1. Connecting with a Cable
Connecting using an Optical Cable
1. Connect the DIGITAL AUDIO IN (OPTICAL) port on the Soundbar to the OPTICAL OUT port of the TV with a digital optical cable.
2. Press the (Source) button on the top panel or remote control, and then select the “D.IN” mode
Auto Power Link
Auto Power Link automatically turns on the Soundbar when the TV is turned on.
Connect the Soundbar and a TV with a digital optical cable.
Press the (Source) button on the right side panel or on the remote control, and then select “D.IN”.
Press the Left button on the remote control for 5 seconds to turn Auto Power Link on or off.
Auto Power Link is set to ON by default.
(To turn off this function, turn off Auto Power using the Soundbar.)
Depending on the connected device, Auto Power Link may not function.
This function is only available in the “D.IN” mode.
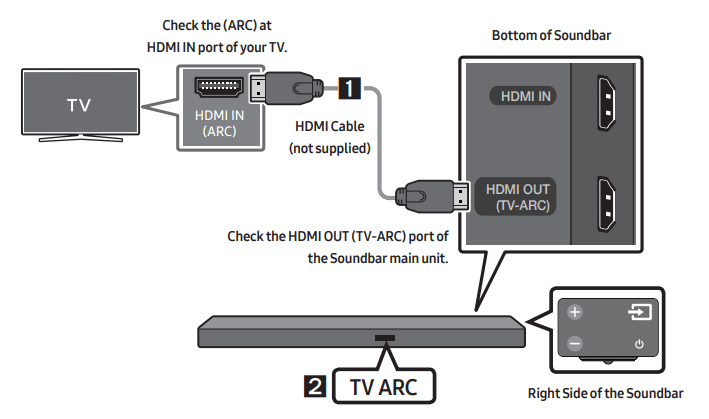
Connecting a TV using an HDMI Cable
1. With the Soundbar and TV turned on, connect the HDMI cable (not supplied) as shown in the figure.
2. “TV ARC” appears in the display window of the Soundbar main unit and the Soundbar plays TV sound.
If TV sound is inaudible, press the (Source) button on the remote control or on the top of the Soundbar to switch to “D.IN” mode. The screen displays “D.IN” and “TV ARC” in sequence, and TV sound is played.
If “TV ARC” does not appear in the display window of the Soundbar main unit, confirm that the HDMI cable (not supplied) is connected to the correct port.
Use the volume buttons on the TV’s remote control to change the volume on the Soundbar.
NOTES
HDMI is an interface that enables the digital transmission of video and audio data with just a single connector.
If the TV provides an ARC port, connect the HDMI cable to the HDMI IN (ARC) port.
We recommend you use a coreless HDMI cable if possible. If you use a cored HDMI cable, use one whose diameter is less than 0.55 inches (14 mm).
This function is not available if the HDMI cable does not support ARC.
When the audio in a broadcast is encoded in Dolby Digital and the “Digital Output Audio Format” on your TV is set to PCM, we recommend that you change the setting to Dolby Digital. When the setting on the TV is changed, you will experience better sound quality. (The TV menu may use different words for Dolby Digital and PCM depending on the TV manufacturer.)
Method 2. Connecting Wirelessly
Connecting a TV via Bluetooth
When a TV is connected using Bluetooth, you can hear stereo sound without the hassle of cabling.
Only one TV can be connected at a time.
The initial connection
1. Press the (Source) button on the top panel and then select “BT”. "BT” changes to “BT PAIRING” in a few seconds automatically or changes to “BT READY” if there is a connect record.
2. Change “BT” to “BT PAIRING”. If “BT READY” appears, press and hold the (Source) button on the right side panel of the Soundbar or on the remote control for more than 5 seconds to display “BT PAIRING”. 3. Select Bluetooth mode on the TV. (For more information, see the TV’s manual.) 4. Select “[AV] Samsung Soundbar Mxxx M-Series” from the list on TV’s screen. An available Soundbar is indicated with “Need Pairing” or “Paired” on the TV Bluetooth device list. To connect to the Soundbar, select the message and establish a connection. When the TV is connected, [TV Name] → “BT” appears on the Soundbar’s front display. 5. You can now hear TV sound from the Soundbar.
If the device fails to connect
If the previously connected Soundbar listing (e.g. “[AV] Samsung Soundbar Mxxx M-Series”) appears in the list, delete it.
In “BT” mode, press and hold the (Source) button for more than 5 seconds on the right side panel of the Soundbar or on the remote control to switch to “BT PAIRING” mode. Then, select “[AV] Samsung Soundbar Mxxx M-Series” from the TV’s search list.
What are the BT READY and BT PAIRING statuses?
BT READY : In this mode, you can search for previously connected TVs or connect to the Soundbar from a previously connected mobile device.
BT PAIRING : In this mode, you can connect to a new device. (While in “BT” mode, press and hold the (Source) button for more than 5 seconds on the right side of the Soundbar or on the remote control.)
Disconnecting the Soundbar from the TV
Press the (Source) button on the top panel or on the remote control and switch to any mode but “BT”.
Disconnecting takes time because the TV must receive a response from the Soundbar. (The time required may differ, depending on the TV model.)
To cancel automatic Bluetooth connection between the Soundbar and TV, press the (Play/Pause) button on the remote control for 5 seconds in “BT READY” status. (Toggle On → Off)
CONNECTING AN EXTERNAL DEVICE
Connect to an external device via a wired connection or Bluetooth connection to play the external device’s sound through the Soundbar.
Connecting using an Optical or Analog Audio (AUX) Cable
1 Optical Cable
Connect DIGITAL AUDIO IN (OPTICAL) on the main unit to the OPTICAL OUT jack of the Source Device using a digital optical cable.
Select “D.IN” mode by pressing the (Source) button on the right side panel or on the remote control.
2 Audio (AUX) Cable
Connect AUX IN (Audio) on the main unit to the AUDIO OUT jack of the Source Device using an audio cable.
Select “AUX” mode by pressing (Source) button on the right side panel or on the remote control.
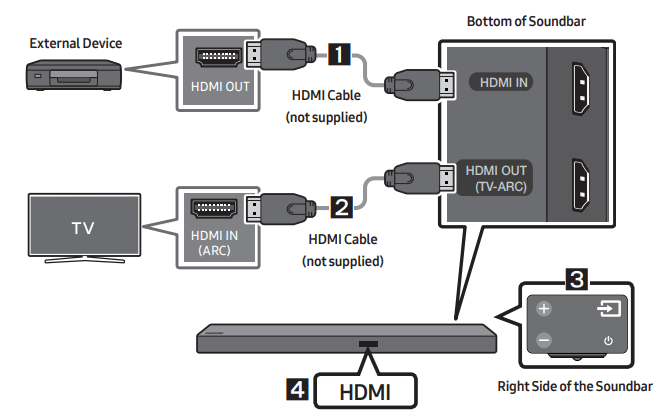
Connecting using an HDMI Cable
1. Connect an HDMI cable (not supplied) from the HDMI port on the back of the product to the HDMI OUT port on your digital device.
2. Connect an HDMI cable (not supplied) from the HDMI TO TV (ARC) port on the back of the product to the HDMI IN port on your TV.
3. Press the (Source) button on the top panel or on the remote control, and then select “HDMI”.
4. “HDMI” mode is displayed on the Soundbar display panel and sound plays.
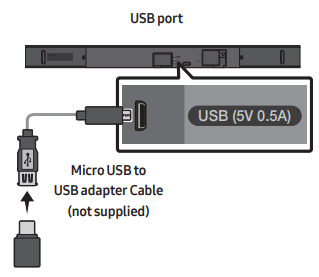
CONNECTING A USB
You can play music files located on USB storage devices through the Soundbar.
1. Connect a Micro USB to USB adapter cable with a male USB 2.0 Micro USB plug (Type B) on one end and a standard female 2.0 USB jack (Type A) on the other end to the micro USB jack on your Soundbar.
Micro USB to USB adapter Cable is sold separately. To purchase, contact a Samsung Service Center or Samsung Customer Care.
2. Connect your USB device to the female end of the adapter cable.
3. Press the (Source) button on the right side panel or on the remote control, and then select “USB”.
4. “USB” appears in the display screen.
5. Play music files from the USB storage device through the Soundbar.
The Soundbar automatically turns off (Auto Power Off) if no USB device has been connected for more than 5 minutes.
File Format Type Compatibility lis
If there are too many folders (about 200) and files (about 2000) stored on the USB device, it may take the Soundbar some time to access and play files.
CONNECTING A MOBILE DEVICE
Connecting via Bluetooth
When a mobile device is connected using Bluetooth, you can hear stereo sound without the hassle of cabling.
You cannot connect more than one Bluetooth device at a time.
The initial connection
1. Press the (Source) button on the right side panel or on the remote control, and then select “BT”.
2. Change “BT” to “BT PAIRING”.
If “BT READY” appears, press and hold the (Source) button on the right side panel of the Soundbar or on the remote control for more than 5 seconds to display “BT PAIRING”.
3. Select “[AV] Samsung Soundbar Mxxx M-Series” from the list.
When a Soundbar is connected to the Bluetooth device, “[Bluetooth Device Name] → “BT” appears in the front display.
4. Play music files from the device, connected via Bluetooth, through the Soundbar.
If the device fails to connect
If a previously connected Soundbar listing (e.g. “[AV] Samsung Soundbar A5-Series”) appears in the list, delete it.
In “BT” mode, press and hold the (Source) button for more than 5 seconds on the right side panel of the Soundbar or on the remote control to switch to “BT PAIRING” mode. Then, select “[AV] Samsung Soundbar Mxxx M-Series” from the Bluetooth device search list.
What are the BT READY and BT PAIRING statuses?
BT READY : In this mode, you can search for previously connected TVs or connect to the Soundbar from a previously connected mobile device.
BT PAIRING : In this mode, you can connect to a new device. (While in “BT” mode, press and hold the (Source) button for more than 5 seconds on the right side of the Soundbar or on the remote control.)
NOTES
If asked for a PIN code when connecting a Bluetooth device, enter <0000>.
In Bluetooth connection mode, the Bluetooth connection will be lost if the distance between the
Soundbar and the Bluetooth device exceeds 32.8 ft.
The Soundbar automatically turns off after 5 minutes in the Ready state.
The Soundbar may not perform Bluetooth search or connection correctly under the following circumstances:
If there is a strong electrical field around the Soundbar.
If several Bluetooth devices are simultaneously paired with the Soundbar.
If the Bluetooth device is turned off, not in place, or malfunctions.
Electronic devices may cause radio interference. Devices that generate electromagnetic waves must be kept away from the Soundbar main unit - e.g., microwaves, wireless LAN devices, etc.
The Soundbar supports SBC data (44.1kHz, 48kHz).
Connect only to a Bluetooth device that supports the A2DP (AV) function.
You cannot connect the Soundbar to a Bluetooth device that supports only the HF (Hands Free) function.
Once you have paired the Soundbar to a Bluetooth device, selecting “[AV] Samsung Soundbar Mxxx M-Series” from the device’s scanned devices list will automatically change the Soundbar to “BT” mode.
Available only if the Soundbar is listed among the Bluetooth device’s paired devices.(The Bluetooth device and the Soundbar must have been previously paired at least once.)
The Soundbar will appear in the Bluetooth device’s searched devices list only when the Soundbar is displaying “BT READY”.
Soundbar cannot be paired to another Bluetooth device, while using the Bluetooth function.
Bluetooth Power On (Bluetooth POWER)
If a previously paired Bluetooth device tries to pair with the Soundbar when the Bluetooth Power On function is on and the Soundbar is turned off, the Soundbar turns on automatically.
1. Press and hold the Bluetooth POWER button for more than 5 seconds on the remote while the Soundbar is turned on.
2. “ON-BLUETOOTH POWER” appears on the Soundbar’s display.
Disconnecting the Bluetooth device from a Soundbar
You can disconnect a Bluetooth device from the Soundbar. For instructions, see the Bluetooth device’s user manual.
The Soundbar will be disconnected.
When the Soundbar is disconnected from the Bluetooth device, the Soundbar will display “BT DISCONNECTED” on the front display.
Disconnecting the Soundbar from the Bluetooth device
Press the (Source) button on the top panel or on the remote control, and then change to any mode except “BT”.
Disconnecting takes time because the Bluetooth device must receive a response from the Soundbar. (Disconnection time may differ, depending on the Bluetooth device)
When the Soundbar is disconnected from the Bluetooth device, the Soundbar will display “BT DISCONNECTED” on the front display.
NOTES
In Bluetooth connection mode, the Bluetooth connection will be lost if the distance between the Soundbar and the Bluetooth device exceeds 32.8 ft (10 m).
The Soundbar automatically turns off after 20 minutes in the Ready state.
More About Bluetooth
Bluetooth is a technology that enables Bluetooth-compliant devices to interconnect easily with each other using a short wireless connection.
A Bluetooth device may cause noise or malfunction, depending on usage, if:
A part of your body is in contact with the receiving/transmitting system of the Bluetooth device or the Soundbar.
It is subject to electrical variation from obstructions caused by a wall, corner, or office partition.
It is exposed to electrical interference from same frequency-band devices including medical equipment, microwave ovens, and wireless LANs.
Pair the Soundbar with the Bluetooth device while they are close together.
The further the distance between the Soundbar and Bluetooth device, the worse the quality is. If the distance exceeds the Bluetooth operational range, the connection is lost.
In poor reception areas, the Bluetooth connection may not work properly.
The Bluetooth connection only works when it is close to the unit. The connection will be automatically cut off if the Bluetooth device is out of range. Even within range, the sound quality may be degraded by obstacles such as walls or doors.
This wireless device may cause electric interference during its operation.
USING THE SOUNDBAR REMOTE CONTROL
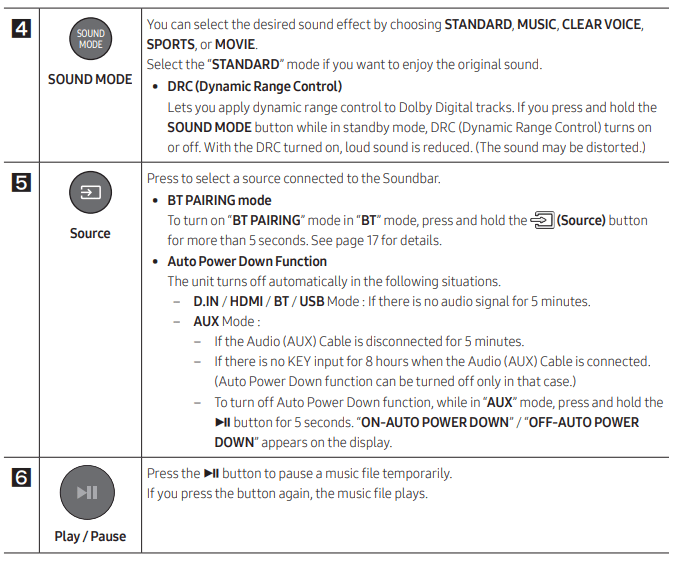
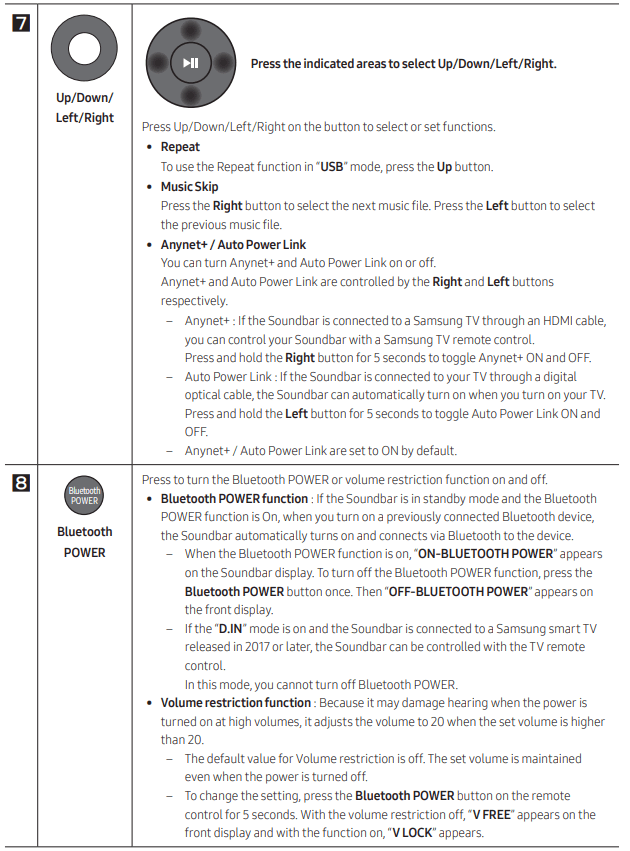
How to Use the Remote Control
Adjusting the Soundbar volume with a TV remote control
Use the TV menu to set the TV speaker on a Samsung TV external speakers. (For more information, see the TV’s user manual.)
After installing the Soundbar, you can adjust the Soundbar’s volume using the IR remote control that came with a Samsung TV. (If you do not want to use this function, when the Soundbar is on, press and hold the Surround button for 5 seconds. “OFF-TV REMOTE” appears in the Soundbar’s display and the function turns off.) To adjust the volume using only the Samsung TV remote control, press and hold the Surround button for more than 5 seconds until “SAMSUNG-TV REMOTE” appears in the Soundbar display.
Each time the Surround button is held for 5 seconds, the mode switches in the following order: “SAMSUNG-TV REMOTE” (Default mode) → “OFF-TV REMOTE” → “ALL-TV REMOTE”.
To adjust the Soundbar volume with the remote control that came with a TV made by a third party manufacturer, turn the Soundbar on, press and hold the Surround button for 5 seconds (“OFF-TV REMOTE” appears on the Soundbar’s display), release the Surround button, and then press and hold the Surround button again for more than 5 seconds. (“ALL-TV REMOTE” appears on the Soundbar’s display.)
This function may not be available, depending on the remote control.
Output specifications forthe different sound effect modes
Samsung Wireless Rear Speaker Kit can be purchased separately. To purchase a Kit, contact the vendor you purchased the Soundbar from.
INSTALLING THE WALL MOUNT
Installation Precautions
Install on a vertical wall only.
Do not install in a place with high temperature or humidity.
Verify whether the wall is strong enough to support the product’s weight. If not, reinforce the wall or choose another installation point.
Purchase and use the fixing screws or anchors appropriate for the kind of wall you have (plaster board, iron board, wood, etc.). If possible, fix the support screws into wall studs.
Purchase wall mounting screws according to the type and thickness of the wall you want to mount the Soundbar on.
Diameter: M5
Length: 1 3/8 inches (35 mm) or longer recommended.
Connect cables from the unit to external devices before you install the Soundbar on the wall.
Make sure the unit is turned off and unplugged before you install it. Otherwise, it may cause an electric shock.
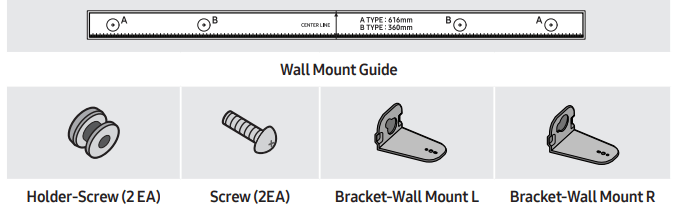
Wallmount Components
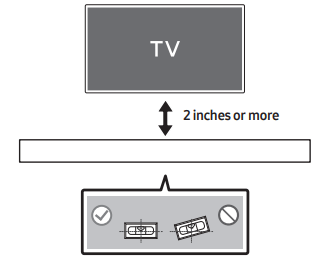
1. Place the Wall Mount Guide against the wall surface.
The Wall Mount Guide must be level.
If your TV is mounted on the wall, install the Soundbar at least 2 inches (5 cm) below the TV
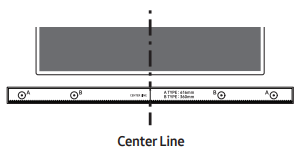
2. Align the Wall Mount Guide’s Center Line with the center of your TV (if you are mounting the Soundbar below your TV), and then fix the Wall Mount Guide to the wall using tape.
If you are not mounting below a TV, place the Center Line in the center of the installation area.
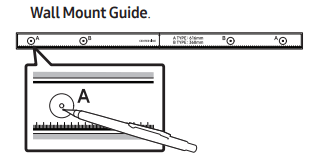
3. Push a pen tip or sharpened pencil tip through the center of the A-TYPE images on each end of the Guide to mark the holes for the supporting screws, and then remove the Wall Mount Guide.
4. Using an appropriately sized drill bit, drill a hole in the wall at each marking.
If the markings do not correspond to the positions of studs, make sure you insert appropriate anchors or mollies into the holes before you insert the support screws. If you use anchors or mollies, make sure the holes you drill are large enough for the anchors or mollies you use.
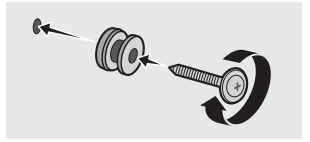
5. Push a screw (not supplied) through each Holder-Screw, and then screw each screw firmly into a support screw hole.
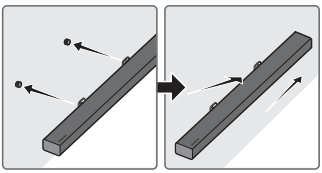
6.Use the two Screws (M4 x L12) to attach both Bracket-Wall Mount L and R to the Soundbar’s bottom. For a proper fit, make sure to align the bumps on the Soundbar to the holes on the brackets
When assembling, make sure the hanger part of the Bracket -Wall Mounts are located behind the rear of the Soundbar
The left and right mounts are different shapes. Make sure to position them correctly
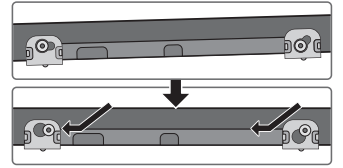
7. Install the Soundbar with the attached Bracket-Wall Mounts by hanging the Bracket-Wall Mounts on the Holder-Screws on the wall.
Slightly tilt the Soundbar to insert both Holder-Screw heads into Bracket-Wall Mount holes. Push the Soundbar in the direction of the arrow to make sure both sides are firmly fixed.
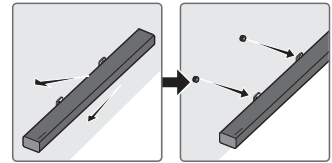
Detaching the Soundbar from the Wall
To separate the Soundbar from the wall mount, push it in the direction of arrow, tilt it up slightly, and then pull it away from the wall as shown.
Do not hang onto the installed unit and avoid striking or dropping the unit.
Secure the unit firmly to the wall so that it does not fall off. If the unit falls off, it may cause an injury or damage the product.
When the unit is installed on a wall, please make sure that children do not pull any of the connecting cables, as this may cause it to fall.
For the optimal performance of a wall mount installation, install the speaker system at least 2 inches (5 cm) below the TV, if the TV is mounted on the wall.
For your safety, if you do not mount the unit on the wall, install it on a secure, flat surface where it is unlikely to fall.
SOFTWARE UPDATE
Samsung may offer updates for the Soundbar’s system firmware in the future
If an update is offered, you can update the firmware by connecting a USB device with the firmware update stored on it to the USB port on your Soundbar. For more information about how to download update files, go to the Samsung Electronics website. Then, enter or select the model of your Soundbar, select Software & Apps, and then Downloads. The option name can vary
Update Procedure
Important: The update function erases all user settings. We recommend you write down your settings so that you can easily reset them after the update. Note that updating the firmware resets the subwoofer connection too.
1. Connect a Micro USB to USB adapter cable with a male USB 2.0 Micro USB plug (Type B) on one end and a standard female 2.0 USB jack (Type A) on the other end to the micro USB jack on your Soundbar.
The Micro USB to USB adapter cable is sold separately. To purchase, contact a Samsung Service Center or Samsung Customer Care.
2. Follow the steps below to download the product software: Go to the Samsung website at (samsung.com) → search for the model name - select the customer support option (the option name is subject to change)
3. Save the downloaded software to a USB stick and select “Extract Here” to unzip the folder.
4. Turn off the Soundbar and connect the USB stick containing the software update to the female port on a Micro USB adapter cable. Connect the cable to the USB port on the Soundbar.
5. Turn on the Soundbar. Within 3 minutes, “UPDATE” is displayed and updating begins.
6. When the update finishes, the Soundbar turns off. Press the button on the remote control for 5 seconds. “INIT” appears on the display and then the Soundbar turns off. The update is complete.
The update is complete.
This product has a DUAL BOOT function.If the firmware fails to update, you can update the firmware again.
If UPDATE is not displayed
1. Turn off the Soundbar, disconnect and then reconnect the USB storage device that contains the update files to the Soundbar’s USB port.
2. Disconnect the Soundbar’s power cord, reconnect it, and then turn on the Soundbar.
Updating firmware may not work properly if audio files supported by the Soundbar are stored in the USB storage device.
Do not disconnect the power or remove the USB device while updates are being applied. The main unit will turn off automatically after completing the firmware update.
After update is completed, the user setup in Soundbar is initialized. We recommend you write down your settings so that you can easily reset them after the update. Note that updating firmware resets the subwoofer connection too. If the connection to the subwoofer is not re-established automatically after the update, refer to page 6. If the software update fails, check if the USB stick is defective.
Mac OS users should use MS-DOS (FAT) as the USB format.
Updating via USB may not be available, depending on the USB storage device manufacturer.
TROUBLESHOOTING
The unit will not turn on.
Is the power cord plugged into the outlet?
Connect the power plug to the outlet.
A function does not work when the button is pressed.
Is there static electricity in the air?
Disconnect the power plug and connect it again.
Sound dropouts occur in BT mode.
See the Bluetooth connection sections on pages 11 and 17.
Sound is not produced.
Is the Mute function on?
Press the VOL button to cancel the function.
Is the volume set to minimum?
Adjust the Volume.
The remote control does not work.
Are the batteries drained?
Replace with new batteries.
Is the distance between the remote control and Soundbar main unit too far?
Move the remote control closer to the Soundbar main unit.
The red LED on the subwoofer blinks and the subwoofer is not producing sound.
This issue can occur if the subwoofer is not connected to the Soundbar main unit.
Try to connect your subwoofer again.
The subwoofer drones and vibrates noticeably.
Try to adjust the vibration of your subwoofer.
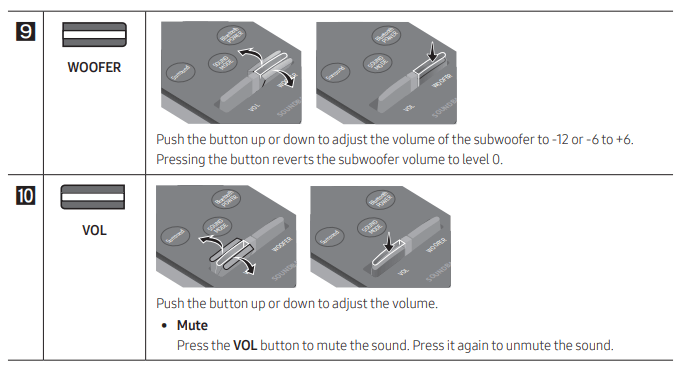
Push the WOOFER button on your remote control up or down to adjust the subwoofer volume. between -12, -6 ~ +6)

 (Power) button on the right side of the main unit or on the remote control.
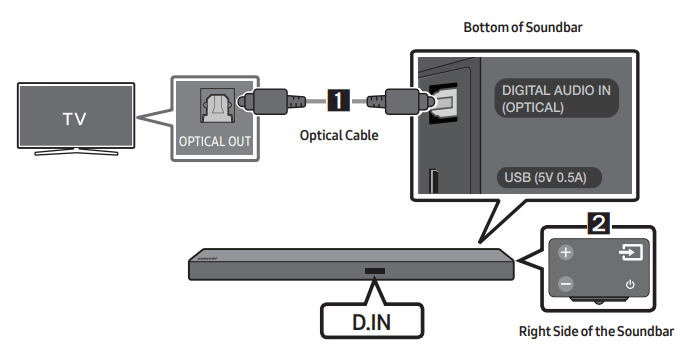
 (Source) button on the top panel or remote control, and then select the “D.IN” mode
 (Source) button on the remote control or on the top of the Soundbar to switch to “D.IN” mode. The screen displays “D.IN” and “TV ARC” in sequence, and TV sound is played.
 (Source) button on the top panel and then select “BT”. "BT” changes to “BT PAIRING” in a few seconds automatically or changes to “BT READY” if there is a connect record.
 (Source) button on the top panel or on the remote control and switch to any mode but “BT”.
 (Play/Pause) button on the remote control for 5 seconds in “BT READY” status. (Toggle On → Off)
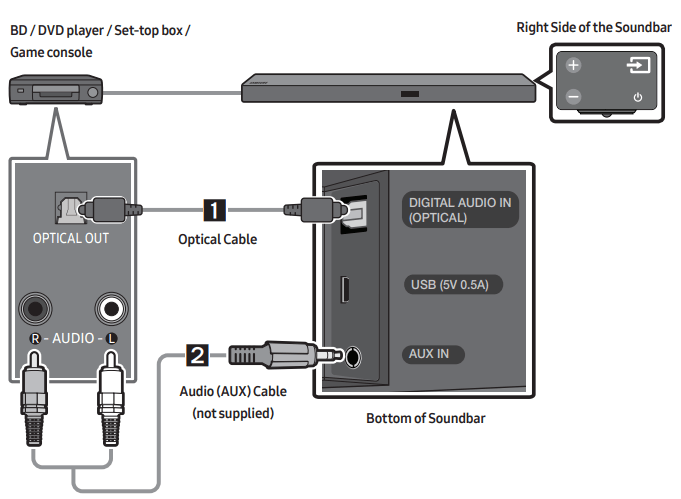
 (Source) button on the top panel or on the remote control, and then select “HDMI”.
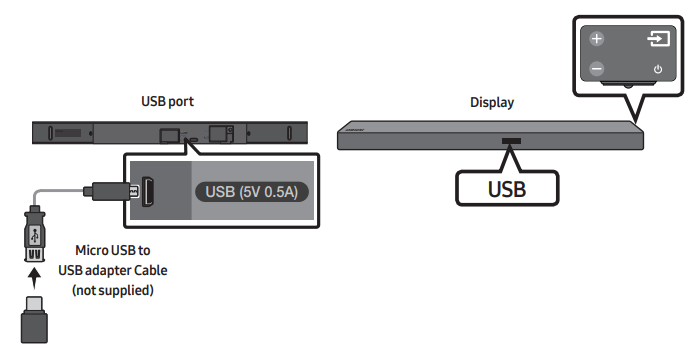
 (Source) button on the right side panel or on the remote control, and then select “USB”.
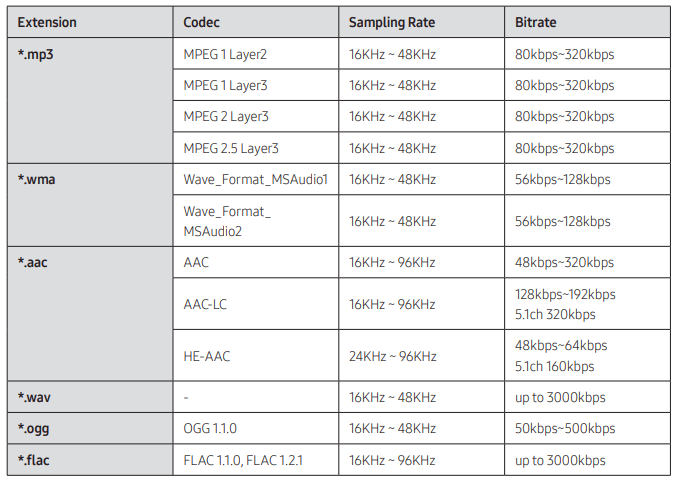
 (Source) button on the right side panel or on the remote control, and then select “BT”.
  (Source) button on the top panel or on the remote control, and then change to any mode except “BT”.
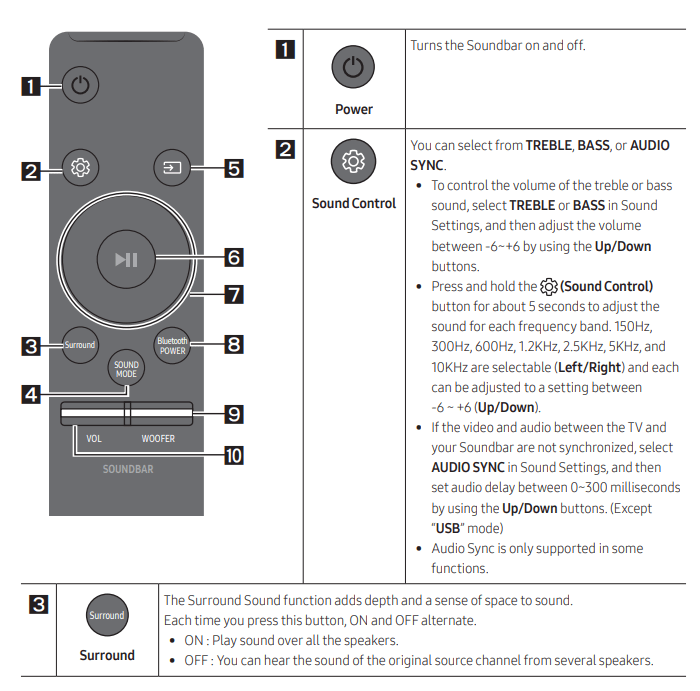
 Output specifications forthe different sound effect modes
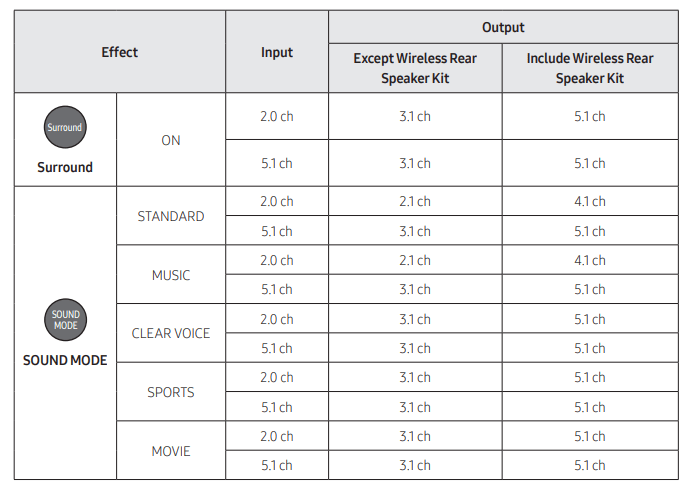


 button on the remote control for 5 seconds. “INIT” appears on the display and then the Soundbar turns off. The update is complete.