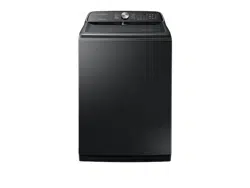
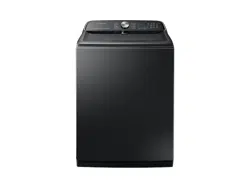
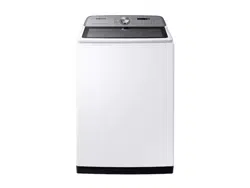
Washer User Manual
Models: WA54R7200A*/ WA50R5200A*
Installation
Follow these instructions carefully to ensure proper installation of your washer and to prevent accidents when using it.
WARNING
Certain internal parts are intentionally not grounded and may present a risk of electric shock only during servicing. Service personnel - Do not contact the following parts while the appliance is energized: Control board. heat sink. motor. inlet valve. heater and pump.
Unpacking your washer
Unpack your washer and inspect it for shipping damage. Make sure you have received all the items shown on the next page. If your washer was damaged during shipping. or you do not have all of the items. call 1-800-726-7864 (1-800-SAMSUNG)
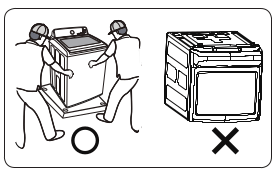
To prevent personal injury or strain. wear protective gloves whenever lifting or carrying the unit.
WARNING
Packing materials can be dangerous to children; Keep all packing material (plastic bags. polystyrene. etc) well out of children’s reach.
CAUTION
You must have at least 2 people unpack the washer. To remove the cushion bottom of the packing materials. do not tip the washer over on its front side
When you lay the washer down to remove the carton base. protect the side of the washer and lay it down carefully. Never lay your washer on its back or front.
What's included
Make sure all the parts are included in the product package. If you have a problem with the washer or the parts. Contact the Samsung customer care center at 1-800-726-7864or your retailer.

01 Drain hose
02 Hose guide
O3 Lid
04 Active Waterjet nozzle
05 Bleach compartment
06 Tub
07 Leveling feet
08 Water hose (Hot)
09 Water hose (Cold)
10 Control panel
11 Active Waterjet button
12 Detergent drawer
13 Power cord
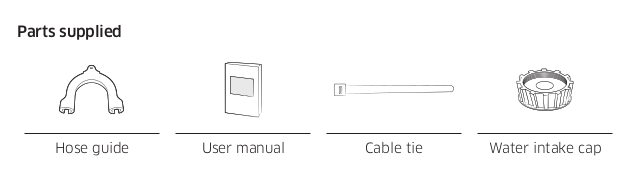
Note
+ If you lose an accessory and want to purchase a replacement. contact the Samsung customer care center at 1-800-SAMSUNG (1-800-726-7864)
+ The design of the parts and accessories may differ from the pictures above. Their design is subject to change without notice for product improvement.
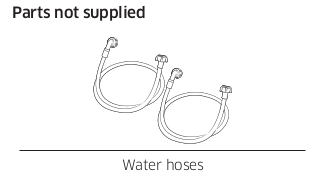
CAUTION
+ Do not reuse old water hoses. which may leak or burst. causing flooding and/or property damage.
+ Make sure rubber washers are inserted in each coupling of both water hoses.
Install requirements:
Electrical supply and grounding
+ AC 120 V/ 60 Hz / 15 AMP fuse or circuit breaker is required.
+ Use an individual branch circuit. Connect only the washer to the circuit.
To ensure proper grounding. the washer comes with a power cord featuring a three-prong grounding plug for use in a properly installed and grounded outlet.
Check with a qualified electrician or service person if you are not sure about the grounding
Do not modify the provided plug. If it does not fit the outlet. call a qualified electrician to install a proper outlet.
WARNING
+ Do NOT use an extension cord
+ Use only the power cord that comes with the washer.
+ Do NOT connect the ground wire to plastic plumbing. gas lines. or hot water pipes
+ Improperly connected grounding conductors may cause electric shock
+ To prevent unnecessary risk of fire. electrical shock. or personal injury. all wiring and grounding must be done in accordance with local codes. or in the absence of local codes. in accordance with the National Electrical Code. ANSI/NFPA No. 70-Latest
Revision (for the US) or the Canadian Electrical Code CSA C22.1 - Latest Revisions and local codes and ordinances. It is your responsibility to provide adequate electrical service for your washer
Water supply
Proper water pressure for this washer is between 20-116 psi (137-800 kPa). Water pressure less than 20 psi (137 kPa) may cause the water valve not to close completely. or it may take longer to fill the drum. causing the washer to turn off. Water taps must be within 4 ft. (122 cm) from the rear of the washer so that the provided inlet hoses reach the washer.
To reduce the risk of leaks:
+ Make sure water taps are easily accessible
+ Tum off the taps when the washer is not in use.
+ Check for any leaks at the water inlet hose fittings on a regular basis.
CAUTION
Before using the washer for the first time. check all connections at the water valve and taps for any leaks.
Drain
Samsung recommends a standpipe 18 in. (460 mm) high. The drain hose must be connected through the hose clip to the standpipe. and the standpipe must fully cover the drain hose.
Flooring
For best performance. the washer must be installed on a solid floor. Wood floors may need to be reinforced to minimize vibration and/or unbalanced loads. Carpeting and soft tile surfaces do not provide good resistance to vibrations and may cause the washer to move slightly during the spin cycle
CAUTION
Do NOT install the washer on a platform or a poorly supported structure.
Water temperature
Do not install the washer in areas where water may freeze as the washer always retains some water in its water valves. pumps. and/or hoses. Frozen water can cause damage to belts. the pump. and other components of the washer.
Dimensions
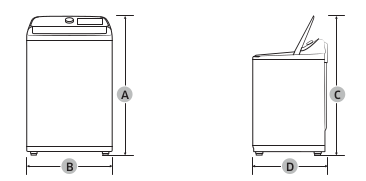

Clearance requirement
This clearance requirement is applicable for washers only.
Note
+ For the dryer's clearance requirement. see the dryer’s user manual
+ If the washer and dryer have different clearance requirements. use the one with the larger value
Alcove or closet installations
Minimum clearance for stable operation:

If both the washer and a dryer are installed in the same location. the front of the alcove or closet must have two unobstructed air openings for a combined minimum total area of 72 in? (465 cm’).
This clearance requirement is applicable for washer and dryer pair installation.
Side by side installation

Step-by-step installation
STEP 1 Select alocation
Location requirements:
- A solid. level surface without carpeting or flooring that may obstruct ventilation
- No direct sunlight
- Adequate room for ventilation and wiring
- Ambient temperature always higher than the freezing point (32 °F /0 °Q.
- Away from heat sources
STEP 2 Connect the water hose
CAUTION
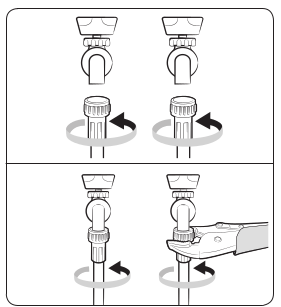
+ Make sure to use new water hoses and that rubber gaskets (8) are inside the couplings (A) at both ends of the hoses Water hoses without the gaskets may leak
+ Allow 6 in. (150 mm) of space between the back of the washer and the wall to prevent water hoses from being kinked. Kinked hoses may cause water leaks.
+ If there isa water leak. stop using the washer and contact a local Samsung service center. A water leak may cause electric shock
+ Do not stretch the water hoses by force.
If a hose is too short. replace the hose with a longer hose

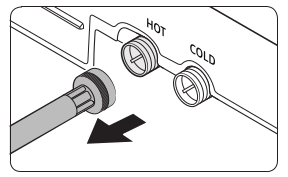
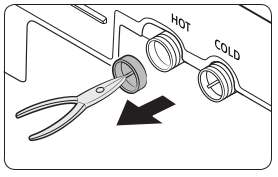
1. Attach the water hoses to the hot and cold water taps. and then hand tighten the water hose fittings until they are tight. Then. use pliers to tighten the fittings by an additional two-thirds of a turn. To avoid damaging the fittings. do not overtighten them.
2. Pull the water hoses to check if they are firmly connected.
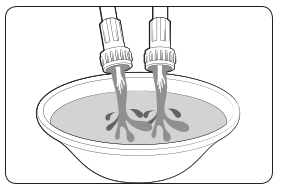
3. Put the other ends of the hoses into a bucket. and then open the water taps for 10 - 15 seconds to remove impurities. When done. close the taps.
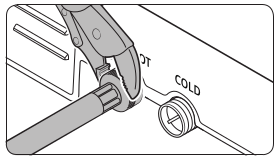
4. Attach the water hoses to the hot and cold water inlets on the back of the washer. and then hand tighten the water hose fittings until they are tight. Then. use pliers to tighten the fittings by an additional two-thirds of a turn.
Note
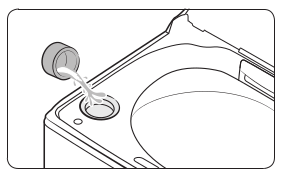
If you do not want to use the hot water supply hose. insert the water intake cap onto the hot water supply intake. When you do a wash. press Temp. to select Cold.
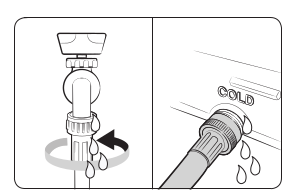
5. Open the water taps. and check for leaks.
STEP 3 Connect the drain hose
To a Laundry Tub or Drain Pipe
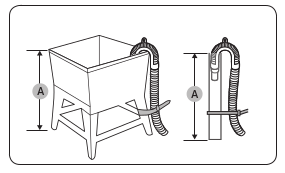
1. Check the height (A) of your drain system and make sure the minimum and maximum heights shown below are met.
Minimum 39 in. (99 cm)
Maximum’ 96 in. (245 cm)
Note
Make sure to measure the height from the floor where the washer is placed
Draining efficiency may be reduced if the drain system is at the maximum height.
To prevent the washer from siphoning water. do not use a drain system below the minimum height.

2. Attach the drain hose to the plastic hose guide (8)
3. Route the drain hose to the drain system.
CAUTION
+ If using a standpipe. make sure the standpipe and drain hose connection is not airtight.
+ If using a standpipe. make sure the drain hose is inserted at least 6 in. (152 mm) but no more than 8 in. (203 mm) into the standpipe.
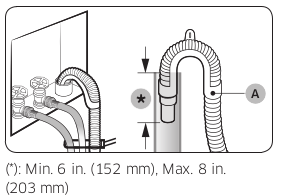
4. Secure the drain hose with cable ties.
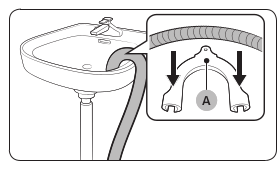
Over the edge of a wash basin The drain hose must be placed no lower than 24 in. (60 cm) and no higher than
35 in. (90 cm) from the floor. To keep the spout of the drain hose bent. use the supplied plastic hose guide (A). Secure the Quide to the wall using a hook to ensure stable drainage.
STEP 4 Level the washer
Leveling models without adjustable nuts
1. Slide the washer into position.
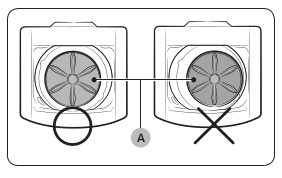
2. Open the lid of the washer. and then pour the water into the tub until the blades of the pulsator on the bottom of the washer are about half covered.
3. If the washer is level. the pulsator (A) will be positioned at the center of the tub as shown in the figure and the water will appear level in the tub. That is. the water will reach the same height on all sides of the tub.

4. If the washer is not level. turn the appropriate leveling feet clockwise (B) to lower the washer. or counterclockwise (0) to raise the washer so that it is level.
5. Once you have the washer leveled. push down on all 4 corners to ensure that all 4 feet are touching the floor. If the washer rocks when you push down on a corner. adjust the leveling foot at that corner so the foot is firmly on the floor.
Note
+ You can also level the washer by lining a level up with the seam that runs between the top of the washer and the body of the washer and checking if the washer is level on all 4 sides.
+ See the diagram above. left. After you have checked all 4 sides and leveled the washer. perform Step 5 above.
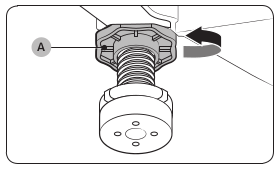
Leveling a model with adjustable nuts (Applicable models only)
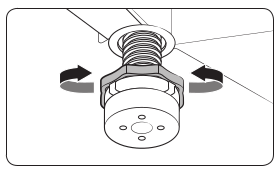
1. Slightly lift the washer. and then turn the leveling feet to level the washer.
2. When the washer is level. turn the locking nut (A) counterclockwise to tighten it.
STEP 5 Power on
Plug the power cord into an AC 120 V / 60 Hz / 15 AMP approved electrical outlet protected by a 15-amp fuse or circuit breaker. Then. press Power to turn on the washer.
STEP 6 Runa test cycle
Run a test cycle as follows to check if your washer is properly installed.
Load about 6 Ib. of laundry into the tub.
Press Power to turn on your washer.
Turn the Cycle Selector to RINSE*SPIN.
Press and hold Start/Pause (Hold to Start) to start the test cycle.
The washer should not rock or vibrate excessively when water is supplied or when washing and spinning. and should drain well during the spin cycle.
Note
+ If water leaks while water is being supplied or drained. check the water connections. See "STEP 2 Connect the water hose” on page 19
+ If the washer rocks and vibrates excessively. level your washer again. See "STEP 4 Level the washer” on page 22 yawn
Before you start
Initial settings
Run calibration (recommended)
Calibration ensures accurate weight detection by the washer. Make sure the tub is empty before running calibration.
1. Press Power to turn on the washer.
2. Press and hold Temp. and Delay End simultaneously for 3 seconds.
3. Press and hold Start/Pause (Hold to Start) to start calibration. The tub rotates clockwise or counterclockwise for approximately 2 minutes.
4. When complete. “0” appears on the display. and the washer turns off automatically.
Laundry guidelines
STEP 1 Sort
Sort the laundry according to these criteria:
+ Care label: sort the laundry into cottons. mixed fibers. synthetics. silks. wools. and rayon.
+ Color: Separate whites from colors.
+ Size: Mixing different sized items together in the tub improves washing performance.
+ Sensitivity: Wash delicate items separately. For pure new woolen items. curtains. and silk items. check the labels on the items.
Note: Make sure to check the care label on all clothing. and sort clothing accordingly before starting the wash.
STEP 2 Empty pockets
Empty all the pockets of your laundry items
+ Metal objects such as coins. pins. and buckles on clothing may damage other laundry items as well as the tub. Turn clothing with buttons and embroideries inside out
+ If pants or jacket zippers are open while washing. the tub may be damaged. Zippers should be closed and fixed with a string
+ Clothing with long strings may become entangled with other clothes. Make sure to tie the strings before starting the wash.
STEP 3 Use a laundry net
+ Brassieres (water washable) must be placed in a laundry net. Metal parts of the brassieres may break through and tear other laundry items.
+ Cashmilon. large volume items. and lightweight clothes (lace-decorated clothes. lingerie. nylon stockings. and synthetic fabrics) may float during washing and not wash properly. Use the laundry net or wash them separately.
+ Donot wash the laundry net by itself without other laundry. This can cause abnormal vibrations that could cause the washer to move and result in injury.
CAUTION
Make sure to soak inflatable items (such as blankets. and cotton-filled or microfiber quilts) in water before you run a cycle
+ Inflatable items may damage the laundry or the washer during the washing or spinning process.
+ Regardless of the size. it is safer to wash blankets or quilts one item at a time. This will also get them cleaner. Two different-sized blankets in the same load can cause the load to become unbalanced. compromising the spinning process.
To puta blanket in your washer
Fold the blanket as shown. and then put it below the plastic ring (A) at the top of the tub.

STEP 4 Prewash (if necessary)
+ To remove stains and dirt on collars. sleeves. hems. and pockets. apply detergent lightly. let sit for a minute. and then brush off carefully.
+ Use powder or liquid detergents. Do not use soap. Soap can remain on the tub after washing
+ To prewash white socks. sleeves. and collars apply a little detergent. and then brush carefully.
CAUTION
Make sure the laundry is inserted completely.
+ Any exposed part of the laundry can cause damage to the washer or the laundry itself or cause a water leak
+ Make sure the laundry does not extend past the plastic ring at the top of the tub.
STEP 5 Determine the load capacity
Make sure the laundry does not extend past the plastic ring at the top of the tub. If it does. it can cause the washing machine to wash improperly or cause damage to the washer or the laundry itself or cause a water leak
Note
When washing bedding or bedding covers. the wash time may be lengthened or the spin efficiency may be reduced.
For bedding or bedding covers. the recommended load capacity is 7.5 Ib (3.5 kg) or less.
CAUTION
If the laundry is unbalanced and the “UB” information code is displayed. redistribute the load. Unbalanced laundry can reduce spinning performance.
STEP 6 Add the correct detergent type
The type of detergent you use - general purpose. specifically for woolens. etc. - depends on the type of fabric (cotton. synthetic. delicate items. woo). color. wash temperature. and degree of soiling. Regardless of the specific type of detergent you use. always use "low suds” HE laundry detergent which is designed for automatic washers
Note
+ Follow the detergent manufacturer's recommendations based on the weight of the laundry. the degree of soiling. and the hardness of the water in your local area. If you are not sure about the water hardness. contact your local water authority.
+ Donot use detergent that tends to harden or solidify. This detergent may remain in the washer after the rinse cycle. blocking the drain outlet.
Use HE detergent only
Your washer is designed to use high efficiency (HE) detergents.
+ For the best cleaning results. use a high efficiency detergent such as Tide HE. Wisk HE. Cheer HE or Gain HE*. High efficiency detergents contain suds suppressors that reduce or eliminate suds. When fewer suds are produced. the load tumbles more efficiently and cleaning is maximized. (Brand names are trademarks of their respective manufacturers)
WARNING
Regular detergent is not recommended. Use HE detergents only.
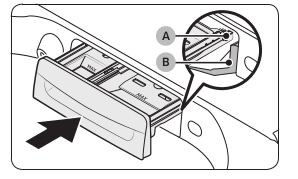
Detergent drawer guidelines
The washer provides a two-compartment dispenser for detergent and fabric softener. The bleach compartment is located on the left side of the tub.

A. Softener compartment: Add a recommended amount of fabric softener into the softener compartment.
B. Detergent compartment: Apply a recommended amount of liquid detergent into the compartment. To use a powdered detergent. remove the liquid detergent container.
The washer does not dispense the powdered detergent from the liquid detergent container.
C. Bleach compartment: Add bleach as instructed by the manufacturer
Note
+ Do not pour color-safe bleach into the bleach compartment.
+ Use the softener compartment only for liquid fabric softeners
CAUTION
+ Donot open the detergent drawer while the washer is operating
+ Do not use the following types of detergent:
- Tablet or capsule types
- Ball or net types
+ To prevent the compartment from clogging. concentrated or highly-enriched agents (fabric softener or detergent) must be diluted with water before being added.
To add washing agents to the detergent drawer
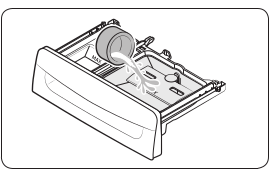
1. Open the lid
2. Slide open the detergent drawer
3. Add liquid laundry detergent to the liquid detergent container in the main wash compartment.
CAUTION
+ Make sure the liquid detergent container is inserted in the main wash compartment.
Note
+ Do not add powdered laundry detergent or other powdered laundry agents to the liquid laundry container.
+ To use powdered detergents. see To use powdered detergent on page 32
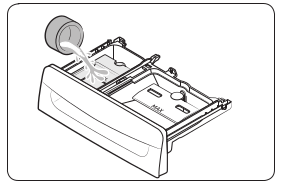
4. Add fabric softener to the softener compartment.
CAUTION
Powdered fabric softener is not recommended. Use liquid fabric softener only.
Concentrated fabric softener must be diluted with water before being added.
Do not add detergent to the softener compartment.
Close the detergent drawer.
Note
Do not exceed the max line when adding cleaning agents.
+ It is normal for a small amount of water to remain in the detergent compartment at the end of a cycle
+ When adding color-safe bleach. we recommend that you use liquid detergent.
To use powdered detergent
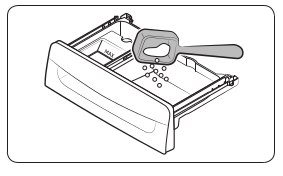
First. remove the provided liquid detergent container from the detergent compartment. Then. add powdered detergent to the detergent compartment according to the detergent manufacturer's instructions.
CAUTION
Do not add powdered detergent to the liquid detergent container.
To use the bleach compartment
Add only liquid chlorine bleach to the bleach compartment. Do not exceed the max line.
CAUTION
Do not add undiluted liquid chlorine bleach directly to the load or to the tub. This may cause fabric damage.
Operations
WARNING: To reduce the risk of fire. electric shock. oF injury to persons. read the Safety information before operating this appliance.
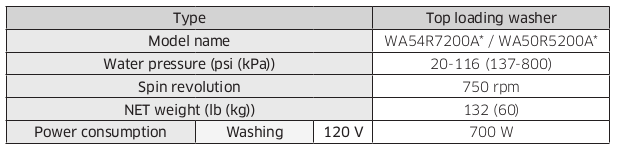
Control panel
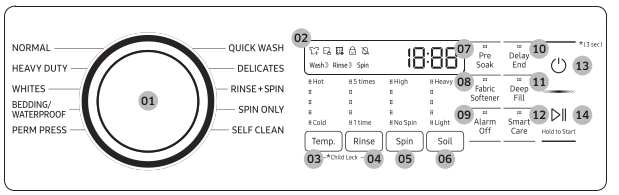
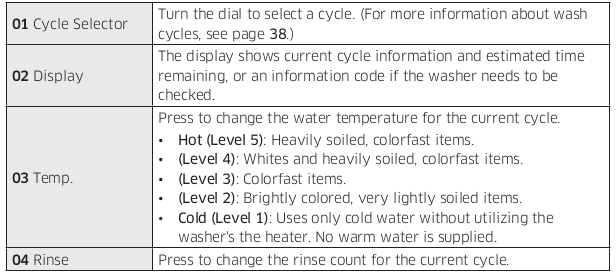
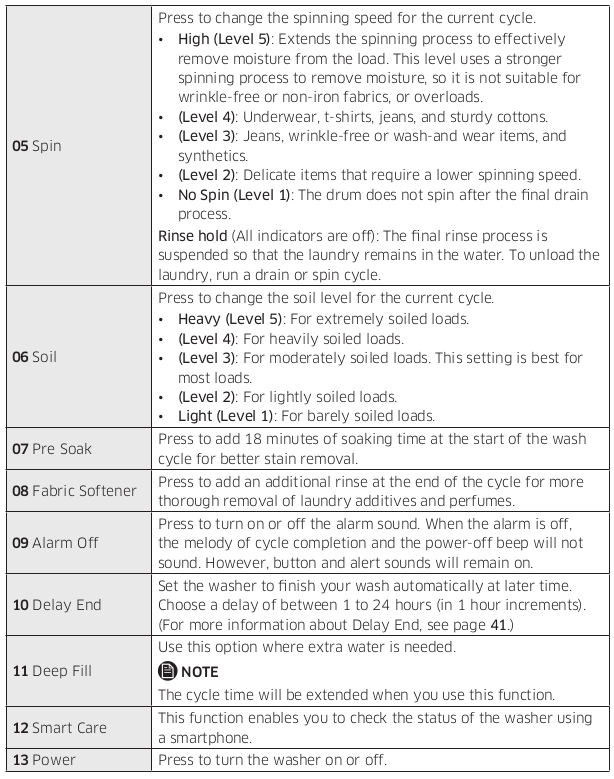

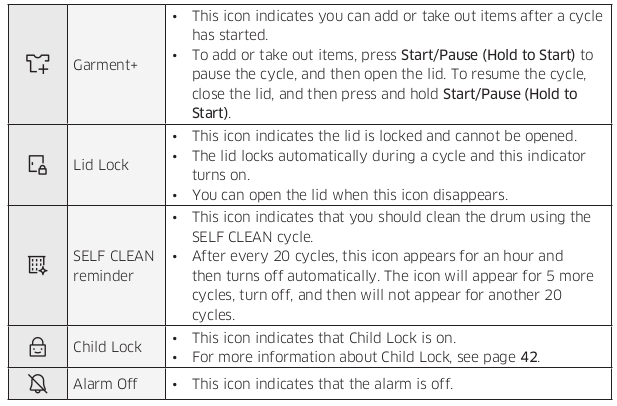
Icon description
Simple steps to start

1. Press Power to turn on the washer.
2. Turn the Cycle Selector to select a cycle
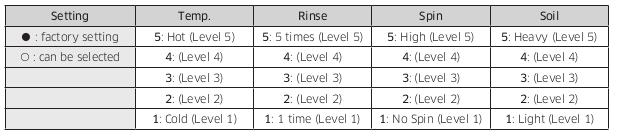
3. Change the cycle settings (Temp. Rinse. Spin. and Soil) as necessary.
4. Select desired options as necessary.
5. Press and hold Start/Pause (Hold to Start)
To change the cycle during operation
1. Press Start/Pause (Hold to Start) to stop operation.
2. Select a different cycle. and repeat steps 2-3 above if necessary.
3. Press and hold Start/Pause (Hold to Start) again to start the new cycle.
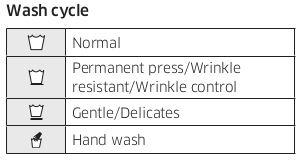
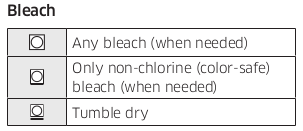
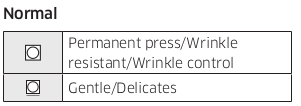
Cycle overview
Note: The washer detects the weight of the items and automatically adjusts the optimal water level. washing time. rinse counts. and spin counts. (This may not be applicable on some cycles)
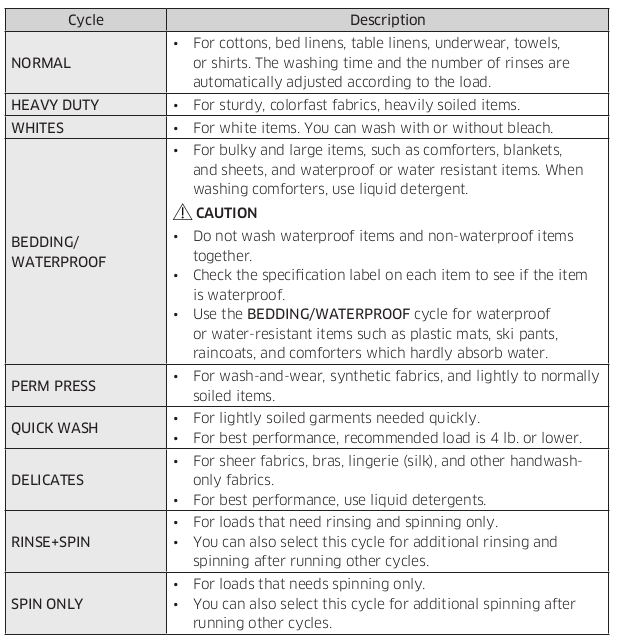

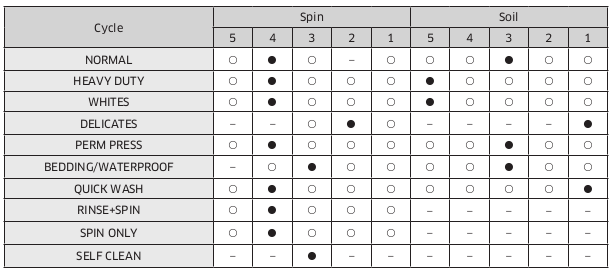
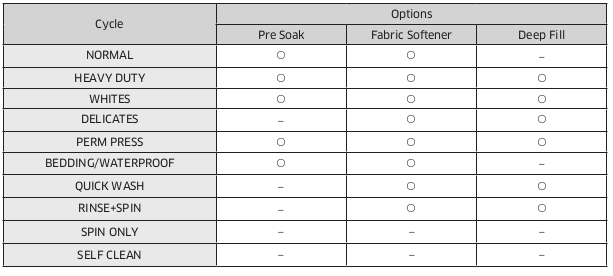
Cycle chart
Use this chart to set the best cycle and options for you laundry.

Active Waterjet (for prewash)

You can use the Active Waterjet function to hand-wash your items before you put them in the washer.
1. Press Power to turn on your washer.
2. Open the lic
3. Press Active Waterjet to supply water
4. Hand-wash the items.
5. When done. press Active Waterjet again to stop the water.
Note: If you want to hand-wash while the washer is operating. press Start/Pause (Hold to Start) to stop operation. and then follow steps 1-4 above
Note
+ The Active Waterjet function stops operating automatically when the washer detects the maximum water level
+ The Active Waterjet function stops operating automatically 5 minutes after it begins. To add more water. press Active Waterjet again to resupply water.
+ If the Active Waterjet function is activated immediately after the washer turns on. the washer will spray water for 1 second before supplying water through the Active
Waterjet outlet.
+ To drain water added by the Active Waterjet function. turn the power off. Water will be drained automatically for few minutes. and then you can turn the power on again when the water is completely drained.
CAUTION
+ Do not block the Active Waterjet outlet with hands. Water may leak outside the tub. causing a system failure
+ Do notuse the Active Waterjet to wash shoes. food. or pets
+ Due to differences in air pressure. water coming from the Active Waterjet may splatter when you first activate it.
+ Make sure the lid is closed tightly before you start a load of laundry.
Delay End
You can set the washer to finish your wash automatically at a later time by choosing a delay of between 1 to 24 hours (in 1 hour increments). The hour displayed indicates the time the wash will finish.
1. Select a cycle. Then. change the cycle settings if necessary.
2. Press Delay End repeatedly until a desired end time is set.
3. Press and hold Start/Pause (Hold to Start)
4. To cancel Delay End. restart the washer by pressing Power.
Real-life case
You want to finish a two-hour cycle 3 hours from now. To do this. you add the Delay End option to the current cycle with a 3-hour setting. and then press and hold Start/Pause (Hold to Start) at 2:00 pm. The washer starts operating at 3:00 pm and ends at 5:00 pm.
Provided below is the time line for this example.

ATC (Auto Temperature Control)
ATC enables the washer to control water temperatures in each washing cycle using the internal thermistor. It is designed to maintain certain washing temperatures for best results.
Note
+ If you select NORMAL or HEAVY DUTY. you may notice the washer supplying cold water. This is normal because the machine is designed to reduce power consumption. In these cycles. the water temperature for Level 5 is similar to bath-water temperatures. and Level 3 is similar to comfortable swimming pool temperatures.
+ To wash clothes at a specific temperature. you must choose a different cycle first.
Child Lock
The Child Lock function locks the washer door to prevent children from climbing into and suffocating inside the tub.
Activating the Child Lock function
Press and hold Temp. and Rinse simultaneously for approximately 3 seconds.
+ When you activate the Child Lock function. the & child Lock indicator blinks.
Using the Child Lock function
If the lid is opened when the Child Lock function is on. “dC” is displayed and an alarm sounds.
+ If the water level in the tub is above the safe water level. “dC” is displayed on the LED display and the washer starts to drain water by force after 30 seconds.
+ If the water level in the tub is above the safe water level and the Child Lock function is turned on while the lid is open. “CL” is displayed on the LED display. even if the washer is turned off. and the washer drains water by force.
+ When Child Lock is on and the washer is off. if the water in the tub is above the safe water level and the lid is opened. “CL” is displayed on the LED display. No alarm sounds. but the washer drains the water. When the draining operation finishes. the power automatically turns off again.
+ If you activate the Child Lock function while the washer is running. the Start/Pause (Hold to Start) button will not work.
+ After the compulsory drain. “CL” blinks at 1 second intervals and the washer enters the “CL” mode. (When the washer is in the “CL” mode. only the Power button works.)
+ To cancel the “CL” mode. turn the power off and then on again.
+ To cancel the “dC” mode. deactivate the Child Lock function. To deactivate the Child
Lock function. press and hold Temp. and Rinse simultaneously for at least 3 seconds.
Deactivating the Child Lock function
Press and hold both Temp. and Rinse simultaneously for approximately 3 seconds.
+ When you deactivate the Child Lock function. the @ Child Lock indicator is turned off.
+ The Child Lock function prevents children or the infirm from accidently operating the washer and injuring themselves.
WARNING
If a child enters the washer. the child may become trapped and suffocate
CAUTION
+ Once you have activated the Child Lock function. it continues working even if the power is turned off.
+ Forcing the lid open can result in injury or damage to the product.
Note
To add laundry after you have activated the Child Lock function. you must first deactivate the Child Lock function.
Smart Care
To enable this function. you must first download the Samsung Laundry app from the Play Store or the App Store and install it on a mobile device that has a camera function. The Smart Care function has been optimized for Galaxy and iPhone mobile devices (applicable models only).
1. When the washer detects an issue to check. an information code appears on the display. To enter Smart Care mode. press Smart Care.
2. The washer starts the self-diagnosis procedure and displays an information code if a problem is detected.
3. Run the Samsung Laundry app on your mobile device. and then tap Smart Care.
4. Put the mobile device close to the washer's display so that the smartphone camera and the washer face each other. The information code will be recognized automatically by the app.
5. When the information code is recognized correctly. the app provides detailed information about the problem with applicable solutions
Note
+ The function name. Smart Care. may differ depending on the language.
+ If the washer’s display reflects light. the app may fail to recognize the information code.
+ If the app fails to recognize the information code. you can enter the code manually on the app.
Maintenance
Keep the washer clean for best performance and to lengthen its life cycle
WARNING
Certain internal parts are intentionally not grounded and may present a risk of electric shock only during servicing. Service personnel - Do not contact the following parts while the appliance is energized: Control board. heat sink. motor. inlet valve. heater. and pump.
Self Clean
Certain usage and environmental conditions may result in some residue build-up or odor in the washer tub. To prevent this build-up of residue or odor causing bacteria and keep your washer tub fresh and clean. perform the SELF CLEAN cycle at least once a month or every 20 cycles. Perform the recommended procedure below when using the SELF CLEAN cycle.
1. Remove all items from the washer tub and ensure the tub is empty. Laundry left in the tub during the SELF CLEAN cycle may be damaged.
2. Press Power to turn on the washer.
3. Turn the Cycle Selector to SELF CLEAN.
4. Press and hold Start/Pause (Hold to Start)
Note
The water temperature for SELF CLEAN is defaulted to Hot. This temperature cannot be changed.
+ Inthe case where residue is present in the washer tub. add 1 cup (8 floz. 240ml) of liquid chlorine bleach to the bleach compartment before you start the SELF CLEAN cycle.
+ Do not use or mix any other detergent or chemicals during the SELF CLEAN cycle. If necessary. run a RINSE+SPIN cycle after the SELF CLEAN cycle has completed to help remove any remaining residue
CAUTION
+ Check the washer tub before using the SELF CLEAN cycle. Remove any remaining water in the tub by running a SPIN ONLY cycle prior to starting the SELF CLEAN cycle
+ If there is chlorine bleach left in the washer tub for an extended period of time. rust can occur.
SELF CLEAN reminder
+ After 20 washing cycles. the SELF CLEAN LED reminder icon and the SELF CLEAN cycle LED will blink on the control panel for an hour and then turn off automatically.
+ The reminder will appear on the control panel for 5 additional consecutive cycles before turning off. The next reminder will not appear until another 20 cycles have been completed.
Cleaning the exterior
1. Turn off the water taps after finishing the day's washing. This will shut off the water supply to your washer and prevent the unlikely possibility of damage from escaping water. Leave the lid open to allow the inside of your washer to dry out.
2. Use a soft cloth to wipe up all detergent. bleach. or other spills as they occur. Clean the following as recommended below:
- Control Panel - Clean with a soft. damp cloth. Do not use abrasive powders or cleaning pads. Do not spray cleaners directly on the panel.
- Cabinet - Clean with soap and water
Cleaning the interior
Clean the interior of your washer periodically to remove any dirt. soil. odor. mold. mildew or bacterial residue that may remain in your washer as a result of washing clothes.
CAUTION
Failure to follow these instructions may result in unpleasant conditions. including odors and/or permanent stains on your washer or laundry.
Note
Hard water deposits may be removed. if needed. Use a cleaner labeled “Washer safe”.
Care for an extended period of non-use
Avoid leaving the washer unused for an extended time. However. if you intend to leave the washer unused for a long period of time. follow the directions below:
1. Press Power. and then turn the Cycle Selector to QUICK WASH
2. Empty the drum. and then press and hold Start/Pause (Hold to Start)
3. When the cycle is complete. close the water taps and disconnect the water hoses.
4. Turn off the washer. and then unplug the power cord.
5. Open the door to let air circulate through the drum.
Cleaning the mesh filter
Clean the mesh filters in the water inlets once or twice a year.
1. Turn off the washer. and then unplug the power cord.
2. Close the water taps.
3. Loosen and disconnect the water hoses from the back of the washer. Cover the each hose with a cloth or towel to prevent water from gushing out.
4. Use pliers to pull out the mesh filter from the inlet valves.
5. Thoroughly clean the mesh filters in water.
6. Completely dry the mesh filters. Do not dry in direct sunlight.
7. Reinsert the mesh filters. and then reconnect the water hoses.
8. Open the water taps.
Note
If a mesh filter is clogged. the "4C” information code appears on the washer's display screen.
Cleaning the detergent drawer
1. Fully pull out the detergent drawer.
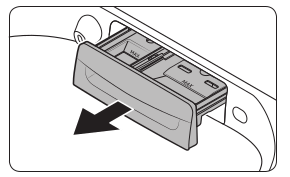
2. To remove. pull the detergent drawer while pushing the ends of each side in.
3. Remove the inserts from the compartments. Rinse the inserts and the drawer in warm water and clean with a soft brush.

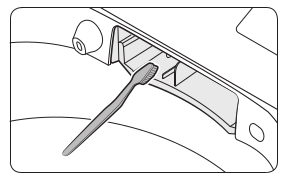
4. Clean the drawer opening thoroughly with a small. non-metallic brush.
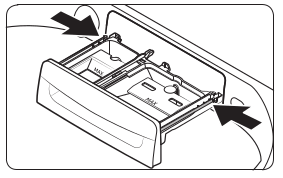
5. Return the inserts to the proper compartments. Replace the drawer by placing the drawer rail (A) on the compartment rail (B) while tilting the drawer downward.
6. Fully push the drawer back to close.
Troubleshooting
Checkpoints
If you encounter a problem with the washer. first check the table below and try the suggestions.
Does not turn on.
- Make sure YOUr NOME Grectrical syStem IS Providing electrical power that matches the requirements of the washer. See page 16
- Make sure the power cord is completely plugged in.
- Check the fuse or reset the circuit breaker: if you have turned the power off to drain the water added by the Active Waterjet function. power does not turn on until the water is completely drained.
Does not start.
- Make sure the door is closed.
- Make sure the water taps are open.
- Make sure to press or tap Start/Pause (Hold to Start) to start the washing machine.
- Make sure Child Lock is not activated.
- Before the washing machine starts to fill. it will make a series of clicking noises to check the door lock. and then does a quick drain.
- Was the door opened during the spinning cycle? Close the door. and then press or tap Start/Pause (Hold to Start) to resume.
- The machine has entered Standby. has paused. or is in a soaking cycle. Please wait.
- Check the fuse or reset the circuit breaker.
Water is not supplied.
- Make sure you press or tap Start/Pause (Hold to Start) after selecting the cycle and options
- Make sure the water taps are open.
- Are the mesh filters in the water inlets clogged? Clean the mesh filters by brushing with a toothbrush. See page 46.
- Is the water supply cut off? If the water supply is cut off. close the tap and power off.
- Straighten the water supply hoses
- Open and close the door. and then press or tap Start/Pause (Hold to Start)
- If the water pressure is low. it takes longer to start washing
- If the water level is not as high as necessary or lower than expected. use the level selector to adjust the water level.
After a cycle. detergent remains in the automatic dispenser.
- Make sure the washing machine is running with sufficient water pressure.
- Make sure the detergent drawer is properly inserted
- Remove and clean the detergent drawer. and then try again.
Vibrates excessively or makes noise.
- Make sure the washing machine 15 On a level MOor. I the floor is not level. use the levelling feet to adjust the washing machine.
- Make sure the washing machine is not contacting any other object.
- Make sure the laundry load is balanced.
- Make sure the laundry is spread evenly in the washing machine. Spread out the laundry evenly and start again.
- Make sure the space around the washing machine is free of objects.
- Humming is produced normally during operation.
- Objects such as coins can cause noise. Remove these objects from the washing machine after washing is complete.
Stops.
- Make sure the washer's power cord is fully plugged in and the circuit is live.
- Check the fuse or reset the circuit breaker.
- Close the door. and then press or tap Start/Pause (Hold to Start) to start the washing machine. For your safety. the washing machine will not spin unless the door is closed.
- Before the washing machine starts to fill. it will make a series of clicking noises to check the door lock. and then does a quick drain.
- There may be a pause or soak period in the cycle. Wait briefly and the washing machine may start.
- Make sure the inlet hose filters at the taps are not clogged.
- Periodically clean the filters. See page 47
- This problem can occur temporarily due to low voltage in your household electrical system. It will be resolved when the voltage returns to normal.
Fills with the wrong temperature water.
- Fully open both water taps.
- Make sure the temperature selection is correct.
- Make sure the hoses are connected to the correct water taps. Flush the water lines.
- Disconnect the hoses and clean the mesh filters. The water inlet mesh filters may be clogged. See page 46.
- While the washing machine fills. the water temperature may change as the automatic temperature control feature checks incoming water temperature. This is normal.
- While the washing machine fills. you may notice just hot and/or just cold water going through the dispenser when cold or warm temperatures are selected. This is a normal function of the automatic temperature control feature as the washing machine determines the water temperature.
Door (Lid) locked or will not open.
- + While the washing machine is operating. press or tap Start/Pause (Hold to Start) to stop the washing machine.
- + It may take a few moments for the door lock mechanism to disengage.
Does not drain and/or spin.
- Check the fuse or reset the circuit breaker.
- Make sure the electrical voltage is normal.
- Make sure the washing machine is plugged in.
- Make sure the drain hose is pointed downward. (Natural drain models only)
- Make sure the drain hose is not clogged.
- Make sure the drain hose is not kinked.
- Straighten the drain hose. If there is a drain restriction. call for service.
- Close the door. and then press or tap Start/Pause (Hold to Start). For your safety. the washing machine will not spin unless the door is closed.
Load is wet at the end of the cycle.
- Use the High or Extra High spin speed cycle. (Applicable model only)
- Use high efficiency (HE) detergent to reduce oversudsing.
- The load is too small. Small loads (one or two items) may become unbalanced and not spin completely.
Leaks water.
- Make sure all hose connections are tight.
- Make sure the water supply hoses’ rubber washers are in the correct position. Screw the hoses on tightly again. See pages 19 through 21.
- Make sure the end of the drain hose is correctly inserted and secured to the drain system.
- Avoid overloading.
- Use high efficiency (HE) detergent to prevent oversudsing
- Make sure the water supply hose is not kinked.
- If the water supply pressure is too strong. water may leak.
- Close the water tap a little
- Make sure water is not leaking from the water tap. If it is. repair the water tap.
Excessive suds.
- Use high efficiency (HE) detergent to prevent oversudsing
- Reduce the detergent amount for soft water. smalll loads. or lightly soiled loads.
- Don't use Non-HE detergent.
The spin basket or drain/supply hose is frozen.
- Use warm water to help loosen the water supply hoses and drain hose. and then disconnect them. Soak them in warm water.
- Fill the spin basket with warm water. and then wait for about 10 minutes.
- Put a hot towel on the drain hose connector.
- Reconnect the water supply hoses and drain hose. and then check if water is supplied properly.
Water drains out immediately.
- Make sure the drain hose is not clogged. and is hung over the drain hose hook. Fill the spin basket halfway with water. and try spinning again.
- Lift the end of the drain hose to prevent water from draining. Fill the spin basket halfway with water. and then run the Spin cycle after releasing the drain hose.
- Make sure the drain hose is installed correctly. See pages 21 and 22. Adjust the position of the drain hose as instructed.
Water drains out immediately.
- Make sure the drain hose !s not clogged. and is hung over the drain hose hook. Fill the spin basket halfway with water. and try spinning again.
- Lift the end of the drain hose to prevent water from draining. Fill the spin basket halfway with water. and then run the Spin cycle after releasing the drain hose.
- Make sure the drain hose is installed correctly. See pages 21 and 22. Adiust the position of the drain hose as instructed.
Stains on clothes.
- + Select an appropriate cycle for the laundry. Use the HEAVY DUTY cycle for stained clothes.
- Apply a recommended amount of detergent as instructed by the detergent manufacturer.
- + Clean the magic filter (if it comes with your washer) on a regular basis.
Has odors.
- Excessive suds collect in recesses and can cause foul odors.
- Runa SELF CLEAN cycle to sanitize periodically.
- Dry the washing machine interior after a cycle has finished.
The washer may display information codes to help you understand what is occurring with your washer better
1C
The Water Level sensor is not working properly. Turn off the washer. unplug it. wait 30 seconds. and then plug the washer in again. If the information code remains. contact a Samsung customer service center.
Note: If the washer displays “1C’. the washer will automatically drain for 3 minutes. During this time. the Power button is inoperative.
3C
Check the motor for operation.
+ Try restarting the cycle.
+ If the problem continues. call for service.
4C
Water is not supplied.
+ Make sure the water taps are open.
+ Make sure the water hoses are not clogged.
+ Make sure the water taps are not frozen.
+ Make sure the washing machine is operating with sufficient water pressure.
+ Make sure that the cold water tap and the hot water tap are properly connected. Clean the mesh filter as it may be clogged
Note: If the washer displays "4C’. the washer will automatically drain for 3 minutes. During this time. the Power button is inoperative.
4C2
+ Make sure the cold water supply hose is firmly connected to the cold water tap. If it is connected to the hot water tap. laundry may be damaged when some cycles are run.
5C
Water is not draining.
Make sure the drain hose is not frozen or clogged.
Make sure the drain hose is positioned correctly. depending on the connection type.
Clean the mesh debris filter as it may be clogged.
Make sure the drain hose is straight all the way to the drain system.
Turn off the washer. unplug it. wait one minute. and then plug the washer in again. If the information code remains. contact a Samsung customer service center.
9C1
The electronic control needs to be checked (Over Voltage Error).
+ Check if power is supplied properly.
+ Turn off the washer. unplug it. wait one minute. and then plug the washer in again. If the information code remains. contact a Samsung customer service center.
9C2
Low voltage detected.
+ Check if the power cord is plugged in.
+ Turn off the washer. unplug it. wait one minute. and then plug the washer in again. If the information code remains. contact a
Samsung customer service center.
AC6
Inverter Communication problem.
+ Turn off the washer. unplug it. wait one minute. and then plug the washer in again. If the information code remains. contact a
Samsung customer service center.
dC
Operating the washer with the door open.
+ Make sure the door is properly closed.
+ Make sure laundry is not caught in the door.
HC
High temperature heating check.
+ Turn off the washer. unplug it. wait one minute. and then plug the washer in again. If the information code remains. contact a
Samsung customer service center.
LC
Check the drain hose.
+ Make sure the end of the drain hose is positioned correctly.
+ Make sure the drain hose is not clogged.
+ Turn off the washer. unplug it. wait one minute. and then plug the washer in again. If the information code remains. contact a Samsung customer service center.
Note
When the washer displays "LC’. the washer drains for 3 minutes.
During this time. the Power button is inoperative.
OC
Water overflowed.
+ Restart after spinning
+ Turn off the washer. unplug it. wait one minute. and then plug the washer in again. If the information code remains. contact a Samsung customer service center.
PC
When position of the clutch can't be detected.
+ Turn off the washer. unplug it. wait one minute. and then plug the washer in again. If the information code remains. contact a
Samsung customer service center.
PC1
After position of the clutch is detected. if the signal from the clutch hall is incorrect.
+ Turn off the washer. unplug it. wait one minute. and then plug the washer in again. If the information code remains. contact a
Samsung customer service center.
Ub
Spinning does not work.
Make sure laundry is spread out evenly.
Make sure the washing machine is on a flat. stable surface.
Redistribute the load. If only one item of clothing needs washing. such as a bathrobe or pair of jeans. the final spin result might be unsatisfactory. and a "Ub" check message will appear in the display.
Ur
Display for additional rinsing
+ Appears when additional rinsing cycle senses that tub is unbalanced
+ Press any button/key to release the display.
8C
Check the MEMS sensor.
+ Power the washer off. Wait 2-3 minutes. power the washer on. and then try again.
+ If the problem continues. call for service.
Specifications
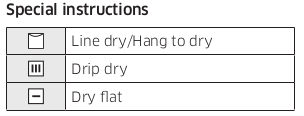
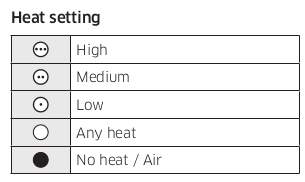
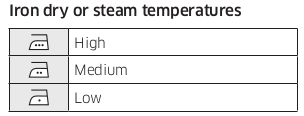
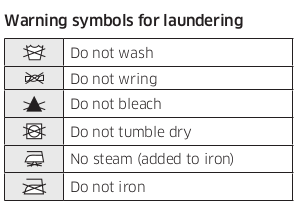
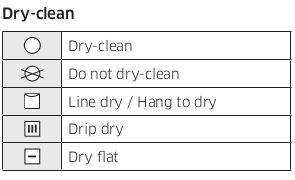
Fabric care chart
The following symbols provide garment care direction. The clothing care labels include symbols for drying. bleaching. drying and ironing. or dry cleaning when necessary. The use of symbols ensures consistency among garment manufacturers of domestic and imported items. Follow care label directions to optimize garment life and reduce laundering problems

Note
This represents appropriate wash water temperatures for various items. The temperature range for Hot is 105" - 125 “F / 41° - 52°C. for Warm 85° - 105 *F / 29° 41°C. and for Cold 60" - 85 “F / 16° 29°°C. (Wash water temperature must be a minimum of 60 °F / 16 °C for detergent activation and effective cleaning)
The clothes washer can not ensure these temperatures because the actual temperature of the water entering your washer depends on water heater settings and regional water supply temperatures. For example. cold water entering the home in the northern states during winter may be 40 F / 4 °C which is too cold for effective cleaning. In this situation. you will need to adjust the water temperature by selecting a warm setting. adding some hot water to the MAX FILL line. or using your washer's heating option. if available.
Helping the environment
- + Your washer is manufactured from recyclable materials. If you decide to dispose of it. please observe local waste disposal regulations. Cut off the power cord so that the appliance cannot be connected to a power source. Remove the lid so that animals and small children cannot get trapped inside the appliance
- + Donot exceed the detergent quantities recommended in the detergent manufacturers’ instructions.
- + Use stain removal products and bleaches before the wash cycle only when necessary.
- + Save water and electricity by only washing full loads (the exact amount depends upon the program used).
Declaration of conformity
This appliance complies with UL2157.
Specification sheet