Documents: Go to download!
- Owner's manual - (English, Spanish)
- Operating your French Door Refrigerator
- Troubleshooting
Table of contents
Owners' Guide Refrigeration
Operating your French Door Refrigerator
CHECKING THE CONTROL PANEL
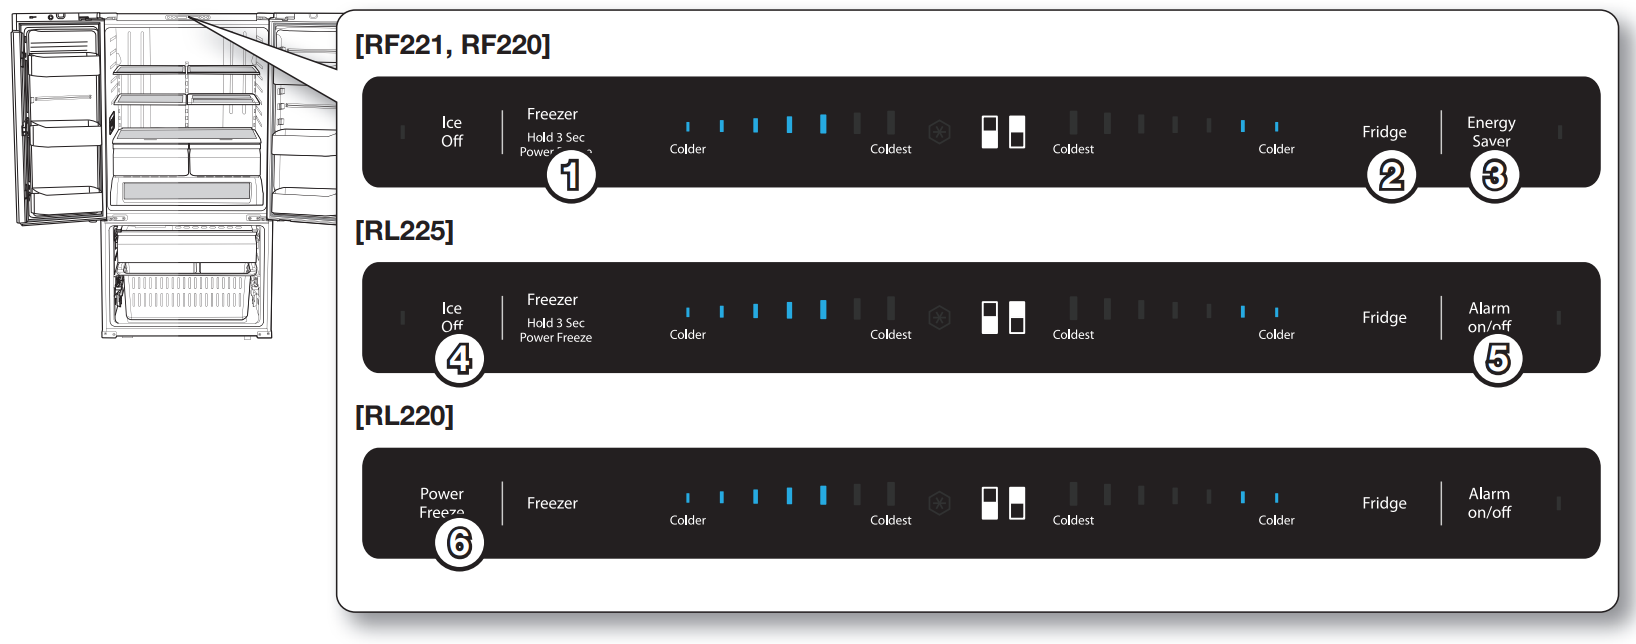
| ( 1 ) Freezer (Hold 3 sec for Power Freeze) | Press the Freezer button to set the freezer temperature between colder and coldest. Press and hold the Freezer button for 3 seconds to activate Power Freezer function which speeds up the freezing process in the freezer. |
| ( 2 ) Fridge | Press the Fridge button to set the Fridge temperature between cold and coldest. |
| ( 3 ) Energy Saver | For better energy effi ciency, press the Energy Saver button. If condensation occurs on the doors, turn the Energy Saver Button function off. |
| ( 4 ) Ice Off | If you don’t want to make more ice, Press the Ice Off button. The LED will light up and the Ice-Maker stops making ice. |
| ( 5 ) Alarm On/Off | Press the Alarm On/Off button to turn the door open alarm on and off. |
| ( 6 ) Power Freeze | Press this button to activate Power Freezer function which speeds up the freezing process in the freezer. |
USING THE CONTROL PANEL
Freezer/Fridge (Temperature adjustment)
Press the Freezer or Fridge button until the desired temperature is set. For lower temperature, press the Freezer or Fridge button until more LED lights (coldest). For higher temperature, press the Freezer or Fridge button until less LED lights (colder). Each time you press the Freezer or Fridge button, temperature indicator will change in below order.
Power Freeze 
RF221 / RF220 / RL225
This icon will light up when you activate the Power Freeze function. Power Freeze function generates cool air for 50 hours continuously and it makes the inside of the refrigerator cool faster. This function is useful when you make ice more quickly. When you have enough, just press and hold the Freeze (Hold 3 sec for Power Freeze) button again for 3 seconds to cancel the Power Freeze function.
RL220
This icon will light up when you activate the Power Freeze function. Power Freeze function generates cool air for 50 hours continuously and it makes the inside of the refrigerator cool faster.
NOTE: When you have enough, just press the Power Freeze button again to cancel the Power Freeze function. When you use this function the energy consumption of the refrigerator may increase. Remember to turn it off when you do not need it and return the freezer to your original temperature setting.
Energy Saver
This LED will light up when you activate the Energy Saver function. The Energy Saver function is automatically set to “ON” when power is supplied to the Refrigerator. If condensation occurs on the doors, turn the Energy Saver function off.
NOTE: In some places, water drop may be generated on the door part. In this case, it is recommended to turn off the Energy saver function.
Ice Off
This LED will light up when you activate the Ice Off function. In this case, the ice will not be produced.
Alarm On/Off
If the door alarm is set to On, an alarm beeps if any refrigerator door is left open for more than three minutes. The beeping stops when you close the door. The door alarm function is pre-set to On in the factory. You can turn it off by touching and then releasing this button. You can turn it back on in the same fashion. The LED lights up when the function is on.
Canceling cooling off mode (Freezer/ Fridge Temperature Indicator moving)
NOTE: Cooling off function is for store display, and it makes the refrigerator not to generate cool air. (Only for product sold in U.S)


CAUTION: In case of Cooling off Mode, refrigerator may seem like working but it does not make cool air. To cancel this mode, press the “Cooling O Key” at the same time for 5 seconds until “Ding-dong” sounds.
COOLING OFF KEY
RF221, RF220, RL225 Model :
Ice Off + Freezer Key
RL220 Model:
Power Freeze + Freezer Key
Reverse Osmosis Water Supply
IMPORTANT:
The pressure of the water supply coming out of a reverse osmosis system going to the water inlet valve of the refrigerator needs to be between 35 and 120 psi (241 and 827 kPa).
If a reverse osmosis water fi ltration system is connected to your cold water supply, the water pressure to the reverse osmosis system needs to be a minimum of 40 to 60 psi (276 to 414 kPa.) If the water pressure to the reverse osmosis system is less than 40 to 60 psi (276 to 414 kPa):
- Check to see whether the sediment fi lter in the reverse osmosis system is blocked. Replace the fi lter if necessary.
- Allow the storage tank on the reverse osmosis system to refi ll after heavy usage.
- If your refrigerator has a water fi lter, it may further reduce the water pressure when used in conjunction with a reverse osmosis system. Remove the water fi lter.
If you have questions about your water pressure, call a licensed, qualifi ed plumber.
USING THE COLD WATER DISPENSER
Using the Water dispenser (RF221**)
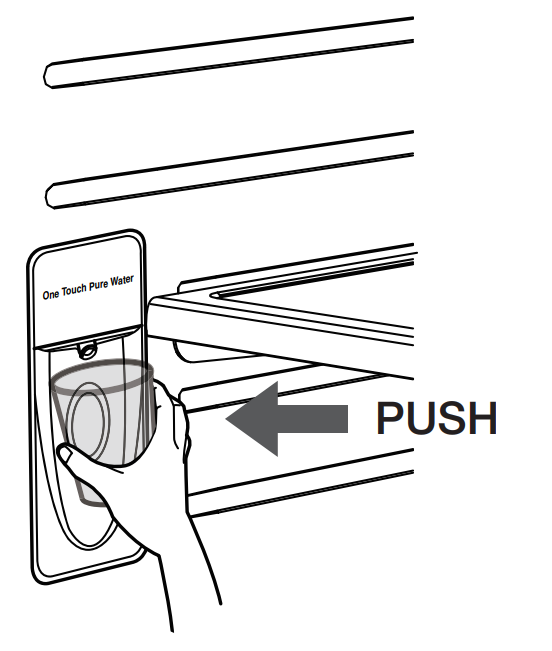
Place a glass underneath the water outlet and push gently against the water dispenser lever with your glass. Make sure the glass is in line with the dispenser to prevent the water from splashing out.
If you have just installed the refrigerator or installed a new water fi lter, Flush 11 L through fi lter before use (fl ush approximately 6 minutes). Make sure water fl ows cleanly before drinking.
CAUTION: If you have a long vacation or business trip, close the water valve and shut off the water supply to the Refrigerator. This will help prevent accidental leakages.
NOTE:
Water clouding phenomenon
All water provided to refrigerators fl ows through the core fi lter which is an alkaline water fi lter. In this process, the pressure in the water that has fl owed out of the fi lter gets increased, and oxygen and nitrogen become saturated. When this water fl ows out in the air, the pressure plummets and the oxygen and nitrogen get supersaturated so that they turn into gas bubbles. The water could look misty due to these oxygen bubbles.The water may look temporarily cloudy due to these oxygen bubbles. After a few seconds, the water will look clear.
NOTE: The water tank’s capacity is approximately 1 L.
Please wait 1 second before removing the cup after dispensing water to prevent spills.
PARTS AND FEATURES
Use this page to become more familiar with the parts and features of the refrigerator
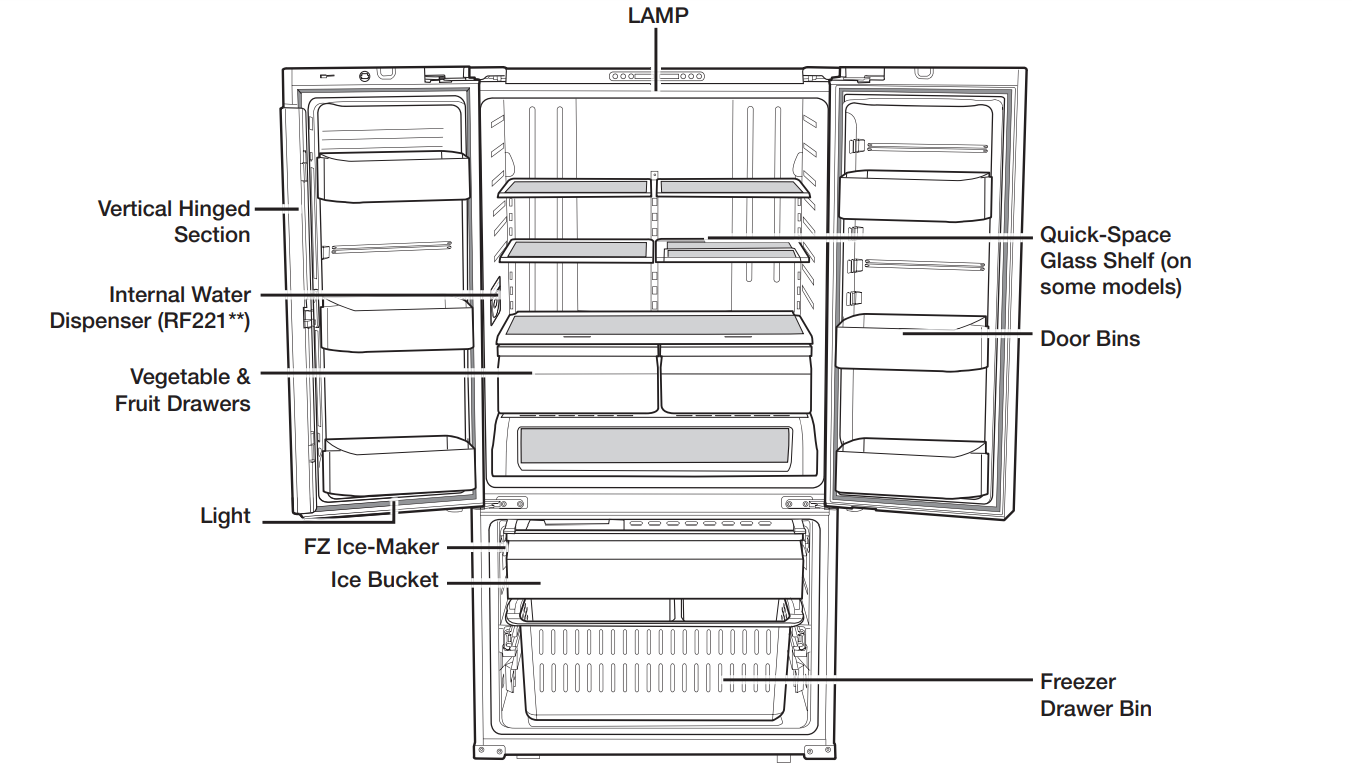
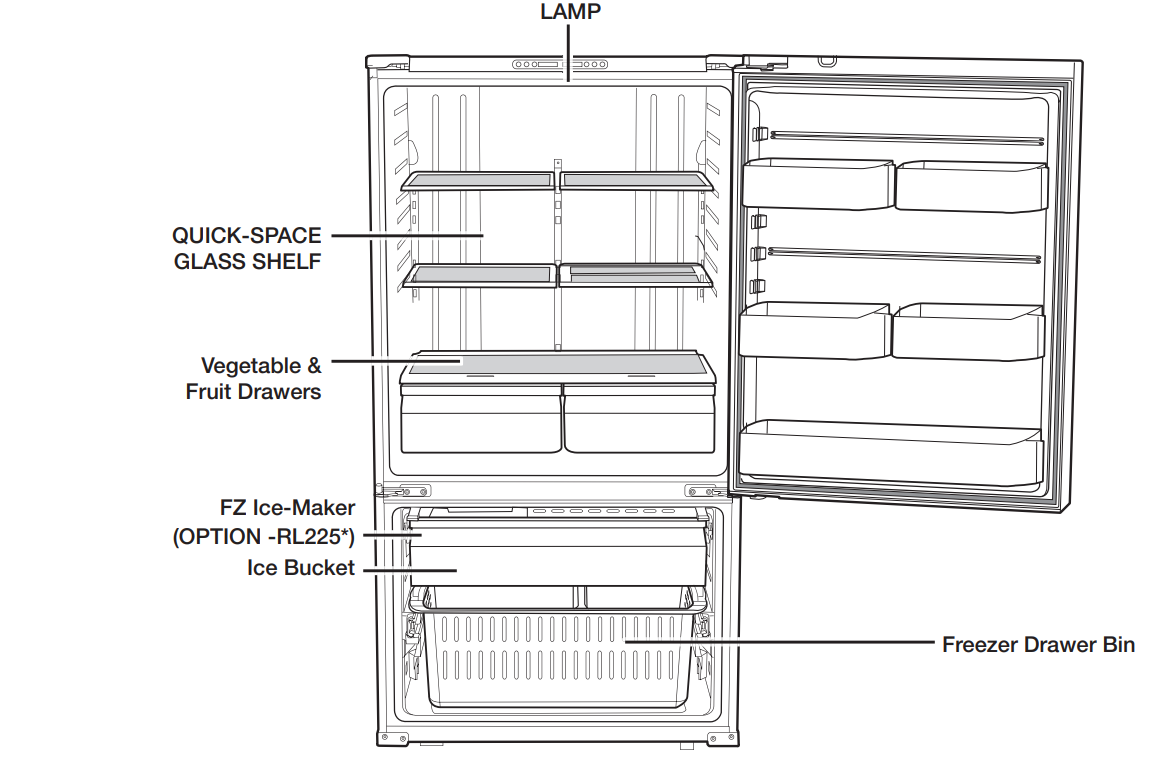
NOTE: When closing the door, make sure the Vertical Hinged Section is in the correct position to avoid scratching the other door.
If the Vertical Hinged Section is reversed, put it back to the right position and close the door.
Moisture may appear at times on the Vertical Hinged Section.
The door handle may become loose over time. If this happens, tighten the bolts found on the inside of the door.
If you close one door with a lot of force, the other door may open.
NOTE: When the interior or exterior LED lamp has gone out, please contact your service agents.
REMOVING THE REFRIGERATOR ACCESSORIES
- Door Bins
• Door Bins
To remove - Simply lift the bin up and pull straight out.
To relocate - Slide it in above the desires location and push down until it stops.
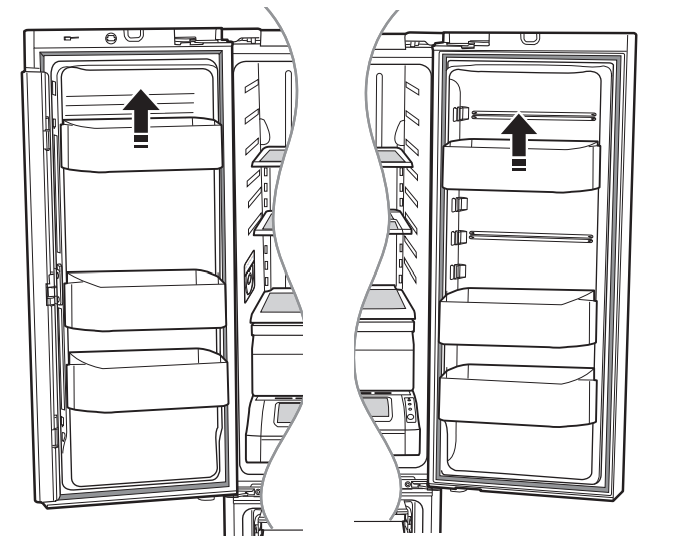
NOTE: Injury may occur if the door bins are not fi rmly assembled. Do not allow children to play with bins. Sharp corners of the bins may cause injury.
See other models: J1053 WA54M8750AW RH22H9010SG DVG45R6300V B1045AV/S/C
CAUTION: Do not adjust a bin full of food. Remove the food fi rst. Dust removal method - Remove the guard and wash in water - Tempered Glass shelves
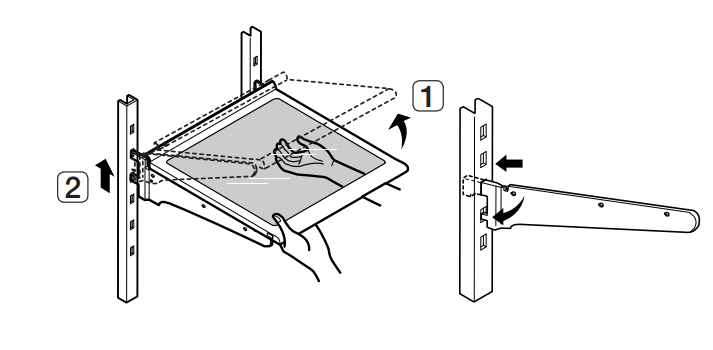
To remove - Tilt up the front of the shelf in the direction shown ( 1 ) and lift it up vertically ( 2 ). Pull the shelf out.
To relocate - Tilt the front of the shelf up and guide the shelf hooks into the slots at a desired height. Then lower the front of the shelf so that the hooks can drop into the slots.
CAUTION: The Tempered Glass shelves are heavy. Use special care when removing them.
- Vegetable & Fruit Drawers
To remove - Pull the drawer out to full extension. Tilt up the front of the drawer and pull straight out.
To relocate - Insert the drawer into the frame rails and push back into place.
CAUTION: The drawers need to be removed before the glass shelf above them can be lifted out.
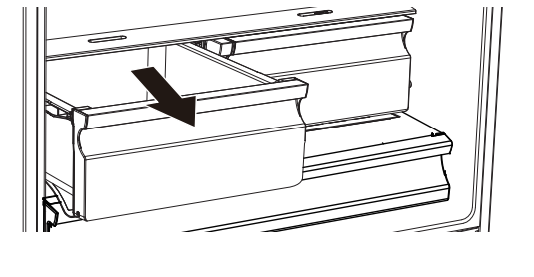
- Pantry
To remove the Pantry – Pull the pantry out to full extension. Tilt up the front side of the pantry and pull straight out.
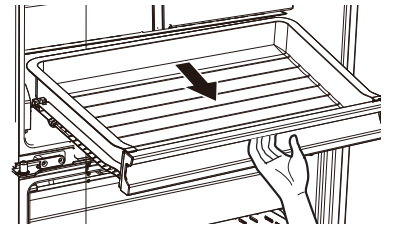
Using the doors
Ensure that the doors close all the way and are securely sealed.
When the refrigerator door is only partially open, it will automatically close. But, the door will stay open when opened more than the auto close range and you must close it manually.
REMOVING THE REFRIGERATOR ACCESSORIES
- ICE BUCKET
To remove - Lift the ice bucket ( 1 ).
To relocate - Place the ice bucket into the Super extended drawer ( 2 ).
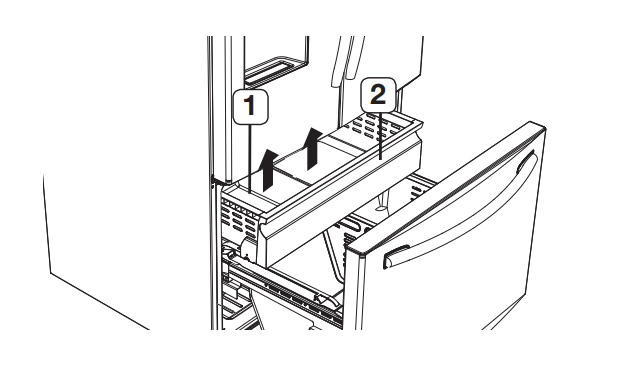
- Super Extended Drawer
To remove - Pull the drawer out to full extension. Tilt up the rear of the drawer and lift straight out.
To relocate - Place the drawer onto the rails ( 4 ) by tilting it up. Lower the drawer into place until it is horizontal and slide the Drawer ( 3 ) in.

- Freezer Drawer
To remove the freezer drawer - Pull the freezer drawer out fully. Tilt up the rear of the bin and lift it out to remove.
To relocate the freezer drawer - Place the bin into the rail assembly.
CAUTION: Do not allow babies or children go inside the freezer drawer. They could damage the refrigerator and seriously injure themselves. Do not sit on the freezer door. The door may break. Do not allow children to climb into the freezer drawer.
CAUTION: Do not remove the divider.
WARNING: If trapped inside, children may be injured or suffocate to death.

CLEANING THE REFRIGERATOR
Caring for your Samsung French Door Refrigerator prolongs the life of your appliance and helps keep the refrigerator free of odor and germs.
Cleaning the Interior
Clean the inside walls and accessories with a mild detergent and then wipe dry with a soft cloth. You can remove the drawers and shelves for a more thorough cleaning. Just make sure to dry drawers and shelves before putting them back into place.
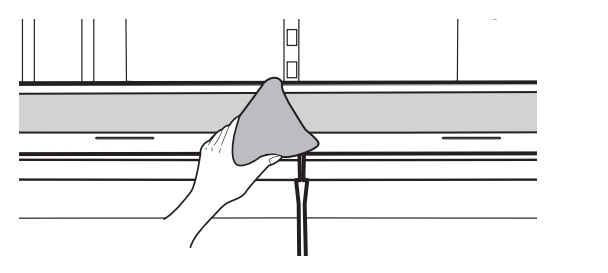
Cleaning the Exterior
Wipe the control panel and digital display with a damp, clean, soft cloth. Do not spray water directly on the surface of the refrigerator.
The doors, handles and cabinet surfaces should be cleaned with a mild detergent and then wiped dry with a soft cloth. To keep your appliance looking its best, polish the exterior once or twice a year.
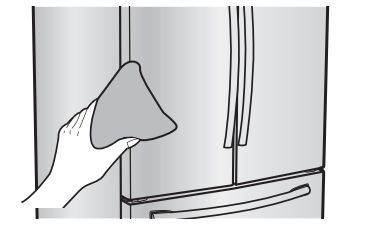
CAUTION: Do not spray water directly on the refrigerator. Use a clean, damp cloth to clean.
CAUTION: Do not use benzene, thinner, or Clorox for cleaning. They may damage the surface of the appliance and may cause a fi re.
CAUTION: You can erase the printed letters on the display if you apply stainless cleaner directly to the area where the letters are printed.
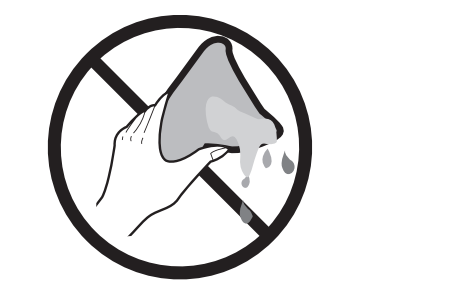
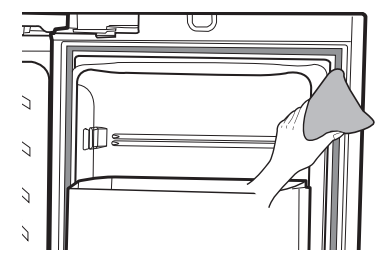
If the rubber door seals are dirty, the doors may not close properly, and the refrigerator will not operate effi ciently. Keep the door seals free of dust or stains by cleaning the doors with a mild detergent and damp cloth. Wipe dry with a clean, soft cloth.
CAUTION: Do not clean the refrigerator with benzene, thinner, or car detergent due to risk of fi re.
Cleaning the rear side of the refrigerator
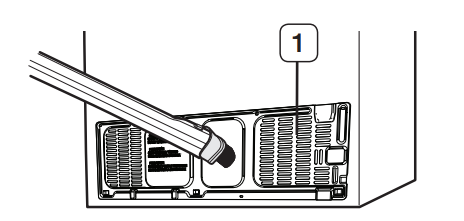
To keep cords and exposed parts free of dust and dirt accumulation.
Vacuum the rear side of the appliance once or twice a year.
CAUTION: Do not remove the back cover ( 1 ). You could suffer an electric shock.
FOOD STORAGE TIPS
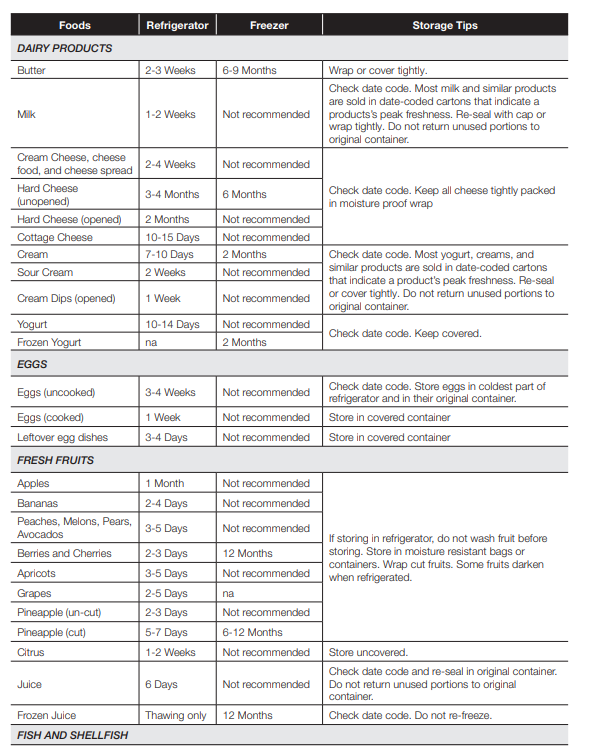
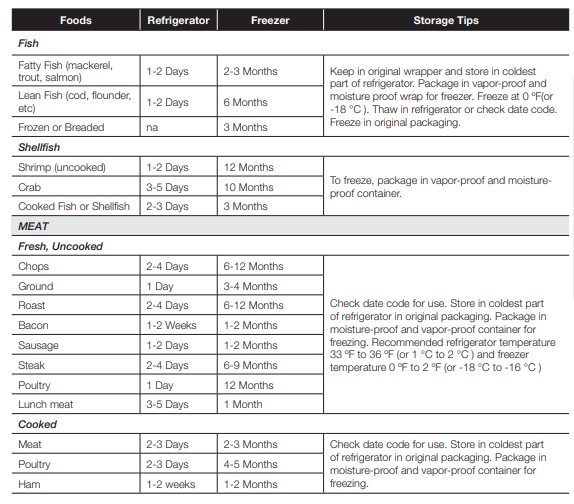
Sources:
American Meat Institute Foundation. 1994. Yellow pages: answers to predictable questions consumers ask about meat and poultry. American Meat Institute Food Marketing Institute. 1999. The food keeper. Food Marketing Institute, Washington, D.C. Freeland-Graves, J.H. and G.C. Peckham. 1996. Foundations of food preparation, 6th ed. Prentice-Hall, Inc. Englewood Cliffs, NJ. Hillers, V.N. 1993. Storing foods at home. Washington State University Cooperative Extension, Pullman, WA. Publ. EB 1205. National Restaurant Association. 2001. Be cool-chill out! Refrigerate promptly. National Restaurant Association Education Foundation¼s International Food Safety Council, Washington, D.C. USDA. 1997. Basics for handling food safely. U.S. Department of Agriculture, Food Safety and Inspection Service, Washington, D.C.
Troubleshooting
| PROBLEM | SOLUTION |
| The refrigerator does not work at all or it does not chill suffi ciently. |
|
| The food in the fridge is frozen. |
|
| You hear unusual noise or sounds. |
|
| The cabinet-door sealing area of the appliance is hot and condensation is occurring. |
|
| Ice Maker is not producing ice. |
|
| You can hear water bubbling in the refrigerator. |
|
| There is a bad smell in the refrigerator. |
|
| Frost forms on the walls of the freezer. |
|
| Water dispenser is not functioning. |
|
| Auto close system does not work with the freezer door. |
|
