User manual Range
Overview
Layout


NOTE: If you need a part marked with an asterisk (*), you can buy it from the Samsung Contact Center (1-800-726-7864).
What’s included

Surface burner grates (3) *

Surface burners and caps (5) *

Smart divider (1) *

Gliding rack (1) *

Flat rack (1) *

Griddle (1) *

Wok grate (1) *

Temp probe (1) *

Air fry tray (1) *
NOTE: If you need an accessory marked with an asterisk (*), you can buy it from the Samsung Contact Center (1-800-726-7864).
Control panel


How to use dial knob

The dial knob can be manipulated as following methods: turning and pushing.
1. Turning
Turning the dial knob clockwise or counterclockwise will show next or previous mode when selecting the cooking mode.
Turning the dial knob clock-wise or counterclockwise will increase or decrease the value when selecting the cooking temperature or time.
2. Pushing
By pushing the dial knob, current value will be entered.
NOTE: Dial knob cannot be disassembled. Do not pull it forcibly.
Before you start
You should know about the following features and components before you use your range for the first time.
Sleep mode
Sleep
After 2 minutes of inactivity (or 1 minute when the oven is in standby mode), the control panel enters Sleep mode. In Sleep mode, the control panel is inactive, displaying only the time, until it is reactivated by the user.
Wake-Up

To activate the control panel, push or turn the dial knob. User preferences are available in this mode including the timer, oven light, and control lock.
Clock
You must set the clock correctly to ensure the automatic features work properly. This product supports two time formats: 12-hour (default) and 24-hour.
To set the clock time

- Tap
 .
.
- Select Set time using the dial knob.
- Enter the current time using the dial knob.
- Push the dial knob to confirm the settings.
To set the Date

- Tap .
- Select Set Date using the dial knob.
- Enter the current Date using the dial knob.
- Push the dial knob to confirm the settings.
To change the time format (12hr/24hr)

- Tap .
- Select Time format using the dial knob.
- Turn the dial knob to select 12hr or 24hr.
- Push the dial knob to save the changes.
NOTE: You can set or change the clock or the kitchen timer before you start a cooking mode or while most cooking modes are operating. However, you cannot set or change the time if a time based function is operating (Time Bake, for example) or the Sabbath option is enabled.
Oven vent/cooling vent

The Oven/Cooling vents are located at the back of the oven range. Proper air circulation prevents combustion problems and ensures good performance.
- Do not block the vent or its surroundings.
- Use caution when placing items near the vent. Hot steam can cause them to overheat or melt.
Cooktop
STEP 1
Put all ingredients into a cooking container (pan, pot, etc.).

STEP 2
Place the container on a surface burner.

STEP 3
Ignite the surface burner.
An LED on the control knob illuminates when you turn the control knob.

Gas burners

Each burner has a corresponding knob that lets you to set the flame level from LO to HI. In addition, each burner knob has a Lite setting. Turning a knob to Lite ignites the corresponding burner. The burner indicators are located above each knob and show which burner the knob controls. Each burner is designed for specific cooking purposes. See the table below.

* Tomato sauce needs to be stirred while it is simmering.
Cooktop
Ignition
CAUTION
The knob LED indicates if a burner knob has been turned on.
It does not indicate if the burner flame is on.
Check for an actual flame, whether the knob LED is on or off.
Make sure all surface burners are properly installed. To light a burner:

- Push in the control knob, and then turn it to the Lite position. The knob LED is on and you will hear a “clicking” sound indicating the electronic ignition system is working properly.
- After the surface burner lights, turn the control knob to shift it out of the Lite position and turn off the electronic ignition system.
- Turn the control knob to adjust the flame level.
Manual ignition
If there is a power failure, you can ignite the burner manually. Use caution when doing this.
- Hold a long gas grill lighter to the surface burner you want to light.
- Push in the control knob for that burner, and then turn it to the Lite position. Turn on the grill lighter to ignite the burner.
- After the burner is lit, turn the control knob to adjust the flame level.
Flame level
The flames on the burners should always stay under the cookware, and should not extend beyond the cookware bottom at any time.
WARNING
- Flames larger than the cookware bottom may result in a fire or physical injury.
- When you set a burner to simmer, do not turn the burner knob quickly. Watch the flame to make sure it stays on.
- After turning on a surface burner, make sure that the burner has ignited even if the knob LED is on. Adjust the level of the flame by turning the burner knob.
- Always turn off the surface burner controls before removing cookware. All surface burner controls should be turned OFF when you are not cooking.
- Always turn the burners off before you go to sleep or go out.
- If you smell gas, turn off the gas to the range and call a qualified service technician. NEVER use an open flame to locate a leak.
- If the LED on the control knob doesn't turn on when the surface burner has ignited, call a qualified service technician.
- If the knob LED illuminates, but the surface burner does not ignite, turn off the control knob immediately.
Cookware
Requirements
- Flat bottom and straight sides.
- Tight-fitting lid.
- Well-balanced with the handle weighing less than the main portion of the pot or pan.
Material characteristics
- Aluminum: An excellent heat conductor. Some types of food may cause the aluminum to darken. However, anodized aluminum cookware resists staining and pitting.
- Copper: An excellent heat conductor but discolors easily.
- Stainless steel: A slow heat conductor with uneven cooking performance but is durable, easy to clean, and resists staining.
- Cast-Iron: A poor conductor but retains heat very well.
- Enamelware: Heating characteristics depend on the base material.
- Glass: A slow heat conductor. Use only glass cookware that is specified for range top cooking or oven use.
Size limitations

CAUTION!
- Do not place a small pan or pot with a bottom diameter of about 6 inches or less on the center grate. This cookware may tip over. Use the rear burners for this small-sized cookware.
* : 6 inches or less
- Always make sure cookware handles are turned to the side or rear of the cooktop and not over other surface burners. This will minimize the chance of burns, spillovers, and the ignition of flammable materials that can be caused if pots or pans are bumped accidently.
- When using glass cookware, make sure it is designed for range top cooking.
- Never leave plastic items on the cooktop. Hot air from the vent can melt or ignite plastic items or cause build up of dangerous pressure in closed plastic containers. You may get severe burns if you touch the surfaces near the vent while the oven is operating.
- Make sure you hold the handle of a wok or a small one-handled pot while cooking.
Wok grate
Woks are often used for stir frying, pan frying, deep frying, and poaching. The provided wok grate supports 12” to 14” woks.
- Turn off all burners, and wait until the grates completely cool down.
- Place the wok grate on either side grate.
- Put a wok on the wok grate. Make sure the wok settles on the wok grate.
- Turn on the burner, and adjust the flame level as appropriate.

CAUTION!

- Do not remove the wok grate until the cooktop grates, surfaces, and wok grate completely cool down.
- When you use the wok with the cooktop or when the oven is on, the wok grate on the cooktop may become very hot. Use oven gloves when placing or removing the wok grate.
- Do not use pans with a flat bottom or woks with a diameter less than the wok ring diameter. The pan or wok may tip over.
- Do not use an oversized pan. The burner flames may spread out, causing damage nearby.
- Do not use the wok grate and the griddle at the same time.
- This cooktop is not designed to flame foods or cook with a wok or wok ring attachment. If foods are flamed, they should only be flamed under a ventilation hood that is on.
Griddle
The removable coated griddle provides an extra cooking surface. This is useful especially when cooking meat, pancakes, or other foods requiring a large cooking area.

The griddle can be used only with the center burner on the center grate. Use caution when putting the griddle on the center grate.
In most cases, you should preheat the griddle before cooking. See the table below.

CAUTION!
- Do not remove the griddle until the cooktop grates, surfaces, and griddle itself cool down.
- If you leave the griddle on the cooktop, it may become very hot when you use the cooktop or oven. Use oven gloves when placing or removing the griddle.
- Do not overheat the griddle. This can damage the coating of the griddle.
- Do not use metal utensils that can damage the griddle surface.
- Do not use the griddle for other purposes, for example, as a cutting board or a storage shelf.
- Do not cook excessively greasy foods. The grease may spill over.
- The griddle is quite heavy because it is made of cast iron. Use both hands when placing or removing the griddle.
NOTE
- You may need to adjust heat settings for the griddle over time.
- The griddle may discolor over time as it becomes seasoned with use.
- Do not let rust remain on the griddle. If rust appears on the griddle, remove it as soon as possible.
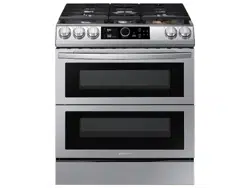
Dual Door™
This oven has a unique Dual Door™ that is hinged in the middle. If you have inserted the Smart Divider and divided the oven in two (so it is in Twin Mode), you only need to open the top half to access the upper cavity. When you’re using the Flex Duo™ capability, you can access the top oven space much more easily and with greater energy efficiency.
How to use the upper door
1. Hold the handle and the lever. Press the lever to release the door latch, and then pull the handle.

2. This will open only the upper door as shown.

How to use the full door
1. Hold the lever-less area of the handle, and then pull.

2. This will open the whole door as shown.

CAUTION
- When opening the whole door, make sure to grasp the handle by the lever-less portion. If you press the lever halfway through opening the whole door, the upper door may open, causing physical injury.

NOTE
- Do not put heavy objects on, or apply excessive force, to the upper door.
- Do not let children play with or on the upper door.
Electric oven
Single mode
STEP 1: Put all ingredients in a heat-safe container.

STEP 2: Select a cooking mode, and then start preheating.

STEP 3: Place the container on a rack.

STEP 4: Close the door and start cooking.

NOTE
- The cooling fan automatically runs for a certain amount of time after cooking is complete.
- There can be a slight popping sound during oven cooking. This sound may occur during the normal oven burner cycling, when the oven burner flame is extinguished.
Twin mode
STEP 1: Put all ingredients in a heat-safe container.

STEP 2: Insert the Smart Divider into the 4th rack position and push in until the range beeps.
CAUTION: When the Smart Divider is properly inserted, the “-” icon appears.

STEP 3: Select a cooking mode, and then start preheating.

STEP 4: Arrange food containers on the racks.

STEP 5: Close the door and start cooking.

NOTE:
- To use Twin mode operation, insert the Smart Divider.
- The cooling fan automatically runs for a certain amount of time after cooking is complete.
- When you are not using the Smart Divider, store it at room temperature.
- Handle the Smart Divider with both hands.
- Use oven gloves when inserting or removing the Smart Divider.
- Please note that the time for the upper and lower ovens to preheat is different.
- Do not put food containers directly on the Smart Divider for cooking purposes.

CAUTION
If the range displays “-dc-”
- Check the Smart Divider to see if it is installed correctly.
- Do not insert/remove the Smart Divider during cooking.
Cooking mode

- Make sure to close the door before you start cooking.
- If you leave the door open for 2030 seconds while the oven is in convection baking, convection roasting, baking, or broiling modes, the oven burner shuts off. To restart the burner, close the door.
NOTE: Oven modes will be reordered by the frequently of use and the most frequently used temperature of each mode will be displayed as a default.
Single mode

1. Select a mode using the dial knob (Mode : Bake, Convection Bake, Convection Roast, Air Fry, Broil, etc.).
2. If necessary, use the dial knob to change the default temperature. You can set the oven to any temperature.
- You can start right away with the setting value by tapping START
3. If necessary, you can set the Cook Time and Delay Start when "Start" displays.
Tap START or push the dial knob to start.
- The oven preheats until it reaches the temperature you set.
- It will beep six times when it reaches the set temperature.
- When preheating is complete, place the food in the oven, and then close the door
4. When cooking is complete, tap OFF, and then take out the food.

NOTE: To change the temperature during cooking, repeat steps 1 through 3 above.
Twin mode

1. Insert the Smart Divider into the cavity.
2. Tap UPPER or LOWER.
3. Select a mode using the dial knob.
4. If necessary, use the dial knob to change the default temperature. You can set the oven to any temperature.
- You can start right away with the setting value by tapping START.
5. Push the dial knob, if necessary, you can set Cook Time and Delay Start when "Start" displays.
Tap START or push the dial knob to start.
- The oven preheats until it reaches the temperature you set.
- It will beep when it reaches the set temperature.
- When preheating is complete, place the food in the upper oven, and then close the door.
6. When cooking is complete, choose the cavity and tap  .
.

Temperature setting guides
Twin Mode Temperature setting ranges
Your oven has different temperature setting ranges when you use the upper oven and lower oven simultaneously. The range for each oven changes, depending on the function and temperature setting of the other oven. See the tables below and on the next page for details.


Temperature Limitations by Mode

For Convection Bake or Convection Roast, use Auto Conversion to set the minimum temperature to 200 °F (95 °C) if necessary. See “Auto Conversion” on page 40 for details.
Using the oven racks
Single Mode - One Oven Cavity
Your oven range comes with 2 racks and 7 rack positions. The rack positions are delineated by rack guides which support the racks. Each rack guide has a stop that prevents the rack from loosening during the oven's operation. Each rack has stoppers that need to be placed correctly on the rack guides. The stoppers prevent the racks from accidently coming out of the oven completely when you pull the racks out.


CAUTION
- Do not cover an oven rack with aluminum foil. This will hamper heat circulation, resulting in poor baking.
- Do not place aluminum foil on the oven bottom. The aluminum can melt and damage the oven.
- Arrange the oven racks only when the oven is cool.
- When placing an oven rack in the top-most rack position (position 7), make sure the rack is situated stably on the embossed stop.
Twin Mode - Two Oven Cavities
In Twin mode, the Smart Divider separates the oven into an upper oven and lower oven. The upper oven and lower oven each have 3 rack positions.


- The upper oven has 3 racks positions (A, B, C).
- The lower oven has 3 racks positions (1, 2, 3).
CAUTION
Precautions for using only the upper oven:
- You must preheat the oven. If you do not, the food may be overcooked or burnt on the surface and undercooked inside.
- To change the temperature during cooking, first remove the food and change the temperature. Then, put the food back inside the oven. Otherwise, the food may be burnt by the broil burner while the upper oven is preheating.
- In Convection baking mode, do not bake food over 2 inches (50 mm) in height.
- The cooking time may be longer than with single-oven cooking.
NOTE
- For simultaneous cooking in twin modes, we recommend using the Gliding Rack for upper oven and broil rack for lower oven.
- For cooking fresh or homemade foods, spread the oil over a larger area more evenly, crisping up the food more effectively.
- We recommend cooking pizza and pies using the 2nd rack position in Single mode or the 2nd rack position of the lower oven in Twin mode for crispy bottoms.
Inserting and removing an oven rack
To insert an oven rack
- Place the rear end of the rack on a rack guide.
- Slide the rack into the rack guide while holding the front end of the rack.

To remove an oven rack
- Pull out the rack until it stops.
- Pull up the front end of the rack and remove it from the rack guide.

Rack and Pan placement
Centering the baking pans in the oven as much as possible will produce better results. If baking with more than 1 pan, place the pans so each has at least 1˝ to 1½˝ of air space around it.
When baking on a single oven rack, place the oven rack in position 3 or 4. See the figure on the left.

When baking cakes and cookies on multiple racks, place the oven racks in positions 3 and 5. See the figure on the left.

Using Multiple Oven Racks

Before using the racks
The oven has two racks.
Each rack has stops that need to be placed correctly on the supports. These stops will keep the rack from coming completely out.
REMOVING THE RACKS
- Pull the rack straight out until it stops.
- Lift up the front of the rack, and then pull it out.
REPLACING THE RACKS
- Place the end of the rack on the support.
- Tilt the front end up and push the rack in.

CAUTION
- Do not cover a rack with aluminum foil or place aluminum foil on the oven bottom. This will hamper heat circulation, resulting in poor baking, and may damage the oven bottom.
- Arrange the oven racks only when the oven is cool.
Using the gliding rack
The fully extendable Gliding Rack makes food preparation easier, especially when you are preparing heavier dishes. The Gliding Rack has 2 glide tracks that allow you to extend the rack well out of the oven without touching the sides of the oven walls.
Installing the Gliding rack
- With the Gliding rack in the "Closed" position and the oven off, carefully insert the Gliding Rack between the guides until the rack reaches the back.

- When using the Gliding Rack in the oven, be sure to pull on the handle of the rack only to slide it in and out. If you grasp the frame while using the rack, the entire Gliding Rack will be removed. Make sure you use oven mitts when handling the Gliding Rack during cooking.

Removing the Gliding rack
- With the Gliding rack in the "Closed" position and the oven off and cool, grasp the rack and frame and pull both forward to remove.

CAUTION: Do not install the Gliding rack directly above the Flat rack and Air fry tray. You will not be able to install it properly and the rack could fall.

NOTE: You can install the Gliding rack in any rack positions except the highest (level 7) and lowest (level 1) rack position in the oven.
Using the divider
- To use twin mode operation, insert the divider.
- You cannot use the Self-Clean or Steam-Clean functions when the divider is installed in the oven cavity.
- Handle the divider with both hands.
- Use oven gloves when inserting or removing the divider.
To Install the Divider into the Oven Cavity
- Insert the divider into the 4th rack position of the cavity.
- Push the divider in until its back end rests against the back of the cavity.
- If the divider is installed correctly, the "-" icon appears on the display.

CAUTION: If the range displays "-dC-"
- Check the divider to see if it is installed correctly.
To Insert the Divider into the Divider Storage Location
1. Open the Storage drawer.

2. Tilt the divider up slightly and rest it on the storage drawer.

3. Tip the divider down in.

Recipe guide
Baking
Bake is used to cook cakes, cookies, and casseroles. Always preheat the oven first. Baking temperatures and times will vary depending on the ingredients and the size and shape of the baking pan used. Dark or nonstick coatings may cook faster with more browning.
NOTE
- Place food in the oven after preheating if the recipe calls for it.
- Preheating is very important for good results when baking cakes, cookies, pastry, and breads. After the oven has reached the desired temperature, the oven will beep 3 times.
- If you are using an oven thrmometer in the oven cavity, the temperature registered by the thermometer may differ from the actual set oven temperature.
- For performance reasons, the convection fan may be turned on or off during the operation.
Convection cooking
The convection fan at the back of the oven circulates hot air evenly throughout the oven cavities so that food is evenly cooked and browned in less time than with regular heat.


NOTE
- When using convection cooking, always preheat the oven for the best results.
- When you have finished cooking, the cooling fan will continue to run until the oven has cooled down.
- For performance reasons, the convection fan may be turned on or off during the operation.
| Convection baking |
- Ideal for foods being cooked using multiple racks.
- Good for large quantities of food.
- Provides the best performance for cookies, biscuits, brownies, cupcakes, cream puffs, sweet rolls, angel food cake, and bread.
- Cookies bake best when cooked on flat cookie sheets.
- When convection baking using a single rack, place the rack in rack position 3 or 4. (In Twin mode, position A or 1.)
- When convection baking using two racks, place the racks in positions 3 and 5 (cakes and cookies).
- The oven automatically adjusts the temperature for convection baking.
|
| Convection roasting |
- Good for larger, tender cuts of meat, uncovered.
- For best performance, place a broiler pan and grid under the meat or poultry. The pan catches grease spills and the grid prevents grease spatters.
- Heated air circulates over, under, and around the food. Meat and poultry are browned on all sides as if they were cooked on a rotisserie.
|
Broiling
Broiling uses the oven broil burner at the top of the oven to cook and brown food. Meat or fish must be put on a broiling grid in a broiling pan. Preheating for 5 minutes before broiling is recommended.
NOTE
- This oven is designed for closed door broiling. While broiling, keep the door closed. Only open the door to put food in, turn food over, or take food out.
- Use the Broil Rack for the best results.
- Use the Broil LO for poultry or thick cuts of meat to prevent overbroiling.
- Use caution when you open the oven door to turn over the food. The air escaping from the oven will be very hot.
- If you leave the oven door open for more than 2 minutes when the oven is on, all heating elements will shut off automatically.
- When you have finished cooking, the cooling fan will continue to run until the oven has cooled down.
Broiling guide
For detailed instructions, see page 32.
NOTE
- This is for reference only.
- Preheating for 5 minutes before broiling is recommended.
- The size, weight, thickness, starting temperature, and your doneness preference will affect broiling times.
- This guide is based on meats at refrigerator temperature.
- Use the broil rack for the best results.

CAUTION: Make sure to close the door after turning over the food.
Air Fry mode
This feature uses hot air for crispier and healthier frozen or fresh foods without or less oil than normal convection modes. For best results, use this mode in single oven mode and place the Air Fry tray in position 3. The temperature can be set between 350 °F and 500 °F. Preheating is not necessary for this mode. Follow recipe or package directions for set temperature, time or quantity.
How to set the oven for Air Fry mode
- Place the tray on rack position 3.
- Select Air Fry mode using the dial knob.
- Use the dial knob to change the default temperature. Enter the suggested temperature for your food as recommended by its instructions. The default temperature is 425 °F.
- Push the dial knob and set the Cook Time or Delay Start, if necessary.
- Tap START or push the dial knob.
- When cooking is complete, tap and take out the food.

NOTE
- Place a baking sheet or tray on the rack below the Air Fry tray to catch any drippings. This will help to reduce splatter and smoke.
- Air Fry is designed for baking on a single oven rack. Place food on rack position 3 for best results.


Dehydrate
Dehydrate dries food or removes moisture from food via heat circulation. After drying the food, keep it in a cool and dry place. For fruit, adding lemon (or pineapple) juice or sprinkling sugar on the fruit helps the fruit retain sweetness.
NOTE
- There is no preheating before dehydrating.
- Place the rack in rack position 3 or 4.
Bread Proof
Proof mode provides an optimal temperature for the bread proofing process, and therefore does not require a temperature adjustment. For the best results, always start the Proof option with a cool oven.
NOTE
- There is no preheating before bread proof.
- Place the rack in rack position 3.
Keep Warm
Keeps cooked food warm at a low temperature up to 3 hours.
NOTE: Place the rack in rack position 3 or 4.
CAUTION: You should not use this feature to reheat cold food.
Temperature probe (Single Mode Only)
The temperature probe lets you cook roasts and poultry to the exact internal temperature you want, taking the guess work out of determining whether a piece of meat is done or not.
You can use the temperature probe with the oven set to Bake, Convection Bake, or Convection Roast. When you use the temperature probe, the internal temperature is shown on the display when it reaches 100 °F.
1. Push the temperature probe into the meat so that the tip of the probe reaches the center of the meat.
- When you insert the temperature probe, make sure it does not contact bone, fat, or gristle.
- For bone-in meats, insert the probe into the center of the lowest and thickest portion of the piece.
- For whole poultry (turkey, large chickens, etc.), insert the probe into the thickest part of the inner thigh, parallel to the leg.
- If you remove the temperature probe while cooking is in process, the oven shuts off in 60 seconds.
- The temperature probe may not function properly if inserted into frozen food. (The temperature probe icon doesn’t appear.)

2. Insert the temperature probe plug into the socket on the top side wall of the oven.
3. Select the cooking operation (Convection Bake, Convection Roast, or Bake) and the temperature.
4. Set the internal temperature between 100 °F to 200 °F using the dial knob.


5. Set Delay Start if necessary.
6. Tap START. When the food reaches the set internal temperature, the oven automatically shuts off, and then beeps.
NOTE: Temperature probe operation will shut off when the temperature reaches the temperature you set.
Temperature table

CAUTION
- To protect the temperature probe, be careful not to insert the probe so that it comes out of the meat. Make sure that the probe is inserted around the center of the meat.
- Do not store the probe in the oven.
- Do not leave the probe inside the oven during the Self-Cleaning or Broiling cycle. This will cause permanent damage to the probe.
- To avoid damage to the probe, defrost food in advance.
- Do not use tongs when inserting or removing the probe. Tongs can damage the probe.
- Use the temperature probe only for the applicable cooking operations.
NOTE: If you have covered the meat with aluminum foil and you let it stand covered for 10 minutes after cooking is complete, the internal temperature increases by 5-10 °F degrees.
Cooking options
CAUTION: Food that can easily spoil, such as milk, eggs, fish, poultry, and meat, should be chilled in a refrigerator before they are placed in the oven. Even when chilled, they should not stand for more than 1 hour before cooking begins and should be removed promptly when cooking is completed.
Cook Time
Timed cooking sets the oven to cook foods at a set temperature for a set length of time. The oven automatically turns off when it finishes.
Mode: Bake / Convection Bake / Convection Roast / Air Fry / Dehydrate

- Select a desired cooking mode, such as Bake.
- If necessary, change the temperature using the dial knob.
- When "Start" displays, select Set Cook Time using the dial knob.
- Set the cooking time between 1 minute and 9 hours and 59 minutes (9:59) using the dial knob.
- Tap START. The oven will automatically turn on and start preheating. The temperature will increase until it reaches the temperature you set. The oven starts cooking for the amount of time you set.
- When preheating is complete, put the container with the food on a rack, and then close the door.
- When the cooking time has elapsed, the oven will automatically shut off and then beep.
NOTE: To change the programmed cooking time, tap the  and enter a different time. Then, push the dial knob to confirm.
Delay Start
Delay Start function lets you delay when the oven will start cooking. You can set Delay Start so that it delays the automatic start of a cooking operation you select by up to 12 hours.
Mode: Bake / Convection Bake / Convection Roast / Air Fry / Dehydrate / Self Clean

- Place the container with the food on a rack, and then close the door.
- Start a desired cooking mode, such as Bake.
- If necessary, change the temperature using the dial knob.
- When "Start" displays, select Set Delay Start using the dial knob.
- Set the starting time using the dial knob.
- Tap START.
- The oven starts cooking at the set time.
NOTE: To change the starting time, push the dial and enter a new starting time.
Special features
With the Sabbath option
- The oven temperature can be set higher or lower after you have set this option.
- The display doesn’t change and the oven will not beep when you change the temperature.
- Once the oven is properly set for baking with the Sabbath option active, the oven will remain continuously on until the Sabbath feature is cancelled. This will override the factory preset 12 hour energy saving feature.
- If the oven light is needed during the Sabbath, tap
 before activating the Sabbath feature. Once the oven light is turned on and the Sabbath option is active, the oven light will remain on until the Sabbath option is turned off.
- If you want the oven light off, be sure to turn it off before activating the Sabbath feature.
- Do not use the surface cooktop when the Sabbath option is on.
To enable the Sabbath option

- Start a Bake Mode (single mode only).
- Tap , and select the Sabbath option.
- Turn the dial knob to select On.
- Push the dial knob to save the changes.
NOTE
- You can change the oven temperature once baking starts, but the display will not change or beep. After changing the temperature, it takes 15 seconds before the oven recognizes the change.
- You can turn off the oven at any time by tapping OFF. However, this doesn’t deactivate the Sabbath option.
- To deactivate the Sabbath option, hold down for 3 seconds.
- You can set the cooking time before activating the Sabbath option.
- After a power failure, the oven will not resume operation automatically. “Sabbath” will appear in the control panel, but the oven will not turn back on. Food can be safely removed from the oven, but you should not turn off the Sabbath option and turn the oven back on until after the Sabbath/Holidays.
- After the Sabbath observance, turn off the Sabbath option by tapping and holding for at least 3 seconds.
CAUTION
- Do not attempt to activate any other functions except for Bake when the Sabbath option is on. Only the following pads will function properly: Number Pad, Bake, Oven Start/Set, and Oven Off.
- Do not open the oven door or change the oven temperature for about 30 minutes after you have started the Sabbath option. Let the oven reach the set temperature. The oven fan operates only when the oven temperature increases.
More Functions
Tap the button on the control panel, and then turn the dial knob to use additional functions or change various settings for your oven. Please refer to the following table for detailed descriptions.


Timer
The timer gives you an extra timer you can use to time cooking tasks, such as boiling eggs. It does not, however, start or stop any cooking operation. You can set the timer from 1 minute to 9 hours and 59 minutes.
- Tap , and select Timer using the dial knob.
- Enter a desired time using the dial knob.
- When done, push the dial knob.
- To cancel the timer settings, push or turn the dial knob. To select cancel using the dial knob.
- When the set time elapses, the oven beeps and displays the “Time is up”. Timer starts counting up the time after finishing Timer, it lasts for only 10 minutes. Push or turn the dial knob.
Favorite
You can add up to 10 frequently used cook settings to the Favorites list to easily apply them in the future.
Adding the new cook settings to the Favorites
- Tap . and select Favorite using the dial knob.
- Set the cook setting (Mode, Temperature, Cook Time, Probe Temp).
- If necessary, select option (Cook Time and Probe Temp).
Editing the favorite cook settings
- Tap . and select Favorite using the dial knob.
- Select Edit.
- Change the cook settings. Items appear on the list may change upon what you select. (Cook mode, temperature, Cook Time, etc.)
Deleting the favorite cook settings
- Tap . and select Favorite using the dial knob.
- Select Delete.
- Select the favorite cook setting you want to delete.
Using the favorite cook settings
- The saved Favorite item will be displayed as one of the oven modes. Select your favorite item among the modes.
- Tap START.
My Mode List
You can add or remove the cooking modes and create a custom list.
- Tap . and select My Mode List using the dial knob.
- Turn and push the dial knob to check or uncheck the modes.
- Select Save to save the changes.
Lock
Lock the control panel and the door to prevent accidental operations or product tipping.
Tap , and select Lock using the dial knob to lock both the control panel and the door. When the Oven Lock is on, the oven panel does not operate and the oven door is locked and cannot be opened. Turn and push the dial knob to check or uncheck the modes.
Auto Conversion
Auto Conversion automatically converts regular baking temperatures to convection baking temperatures. For example, if you enter a regular recipe temperature of 350 °F and tap START, the oven displays the converted temperature of 325 °F.
- Tap , and select Auto Conversion using the dial knob.
- Turn the dial knob to select On/Off.
- Push the dial knob to save the changes.
Screen Timeout
You can set the length of time before the screen saver turns on.
- Tap , and select Screen Timeout using the dial knob.
- Turn the dial knob to select time setting (5min, 10min, 15mim, 20min and always on).
- Push the dial knob to save the changes.
NOTE
Energy consumption may increase depending on your setting.
When the timeout setting is set to "Always on", the brightness of the LCD automatically changes to level 2 if there is no action for 3 minutes.
12hr Energy Saving
This will automatically turn off the oven 12 hours after baking starts or 3 hours after broiling starts.
- Tap , and select 12hr Energy Saving using the dial knob.
- Turn the dial knob to select On/Off.
- Push the dial knob to save the changes.
Sound
Turn sound (beeps) On/Off.
- Tap , and select Sound using the dial knob.
- Turn the dial knob to select On/Off.
- Push the dial knob to save the changes.
System Setting
Tap and hold for 3 sec, on the control panel, and then turn the dial knob to use additional functions or change various settings for your oven.
Please refer to the following table for detailed descriptions.

Language
Select a preferred language from English, French. You can not change the language during cooking.
- Tap and hold for 3 seconds.
- Select Language using the dial knob.
- Turn the dial knob to select Language and push to save the changes.
Temp. Unit (°F or °C)
Change the temperature format of the oven to Fahrenheit or Centigrade. The default is Fahrenheit.
- Tap and hold for 3 seconds.
- Select Temperature unit using the dial knob.
- Turn the dial knob to select unit and push to save the changes.
Calibrate Temperature
The oven temperature has been calibrated at the factory. When first using the oven, follow the recommended recipe times and temperatures. If it appears that the oven is too hot or too cool, you can recalibrate the oven temperature. Before recalibrating, test a recipe by using a temperature setting that is higher or lower than recommended. The baking results should help you decide how much of an adjustment is needed. The oven temperature can be adjusted by ±35 °F (±19 °C).
- Tap and hold for 3 seconds.
- Select Calibrate Temp using the dial knob.
- Turn the dial knob to adjust temperature value.
- Push the dial knob to save the changes.
NOTE
This adjustment does not affect the broiling or the self-cleaning temperature, and is retained in memory after a power failure.
My Pattern
This function remembers and stores the cook settings frequently used by the user.
- Tap and hold for 3 seconds.
- Select My Pattern using the dial knob.
- Turn the dial knob to select On/Off and push to save the changes.
Default Cavity
One cavity will be selected as a default in twin mode when oven turns on.
- Tap and hold for 3 seconds.
- Select Default Cavity using the dial knob.
- Turn the dial knob to select Upper or Lower and push to save the changes.
Welcome Lighting
Lighting pattern will be shown on cooktop knobs when the oven display wakes up.
- Tap and hold for 3 sec.
- Select Welcome Lighting using the dial knob.
- Turn the dial knob to select On/Off and push to save the change.
Demo mode
This is used by retailers for display purposes only. In this mode, the heating element does not operate.
- Tap and hold for 3 seconds.
- Select Demo mode using the dial knob.
- Turn the dial knob to select On/Off and push to save the changes.
Reset
Reset your oven th its factory default settings. This will erase all data and can't be recovered.
- Tap and hold for 3 seconds.
- Select Reset using the dial knob.
- Turn the dial knob to select Cancel/Reset.
Smart control
How to connect the oven
- Download and open the SmartThings app on your smart device.
- Follow the app's on-screen instructions to connect your range.
- Once the process is complete, the connected icon located on your range displays and the app will confirm you are connected.
- If the connection icon does not turn on, follow the instruction on the app to reconnect.

To control the oven remotely
- Tap
 . appears in the display. The oven can now be controlled remotely with a connected device.
- Select the oven icon on the SmartThings app to open the Oven Control app. When the app is connected to the oven, you can perform the following functions through the application:


WI-FI On/Off
If you turn WI-FI mode Off, mobile devices cannot connect to the range.
- Tap and hold for 3 seconds.
- Select Wi-Fi using the dial knob.
- Turn the dial knob to select On/Off and push to save the changes.
NOTE
- Opening the oven door or tapping will delete from the display and prevent most of the remote functions from operating.
- When oven cooking is finished or cancelled, is removed from the display.
- For safety reasons, you cannot turn on the electric oven remotely.
- For safety reasons, you must specify the cooking time to enable remote control.
- The oven continues operating even if the Wi-Fi connection is lost.
- Smart Control will not work properly if the Wi-Fi Connection is unstable.
- See the SmartThings app manual for detailed information.
Voice control
To use the Range’s Voice Control function, you need Bixby / Amazon Alexa App / Google Assistant App on your mobile device.
Refer to the table below for all available functions.
Bixby
Start conversation with Bixby on SAMSUNG mobile by saying “Hi Bixby” or by pressing the side key.

Amazon Alexa & Google Assistant
Samsung smart home appliances are supported by SmartThings skill in Alexa & action in Google Assistant.
Installation Guide
Here’s how to link SmartThings account into Amazon Alexa or Google Assistant. SmartThings App and Alexa App(or Google Assistant App) Should be installed on your phone.
- Setup the supported devices to SmartThings.
- After device setup, tap + button on the screen.
- Tap ‘Voice assistant’ and link your Samsung account to Amazon Alexa. (or Google Assistant)
- Check the devices are visible on Amazon Alexa app. Then account linking is complete. (Check the devices are visible and set the location(home&room) of devices in Google home app. Then account linking is complete.)


NOTE: On/Off spec of smart control is same as guided in SmartThings app.
Maintenance
Cleaning
CAUTION: Wear the glove during cleaning.
Control panel
First, lock the control panel and the door to prevent accidental operations and/or product tipping.
- Tap , and select Lock using the dial knob to lock both the control panel and the door.
- Clean the control panel using a soft cloth dampened with plain water, warm soapy water, or glass cleaner. Do not spray cleansers directly onto the control panel.
- When done, touch , and select Lock using the dial knob to unlock both the control panel and the door.
WARNING
- Make sure the control panel turns off and all surfaces of the range are cool before cleaning. Otherwise, you can get burned.
- If the range has been moved away from the wall, make sure the Anti-Tip device is reinstalled properly when the range has been put into place again. Otherwise, the range may tip over, causing physical injuries.
- Do not use steel-wool or abrasive cleansers of any kind. These can scratch or damage the surface.
Stainless steel surface
- Remove any spills, spots, and grease stains using a soft, wet cloth.
- Apply an approved stainless steel cleanser to a cloth or paper towel.
- Clean one small area at a time, rubbing with the grain of the stainless steel if applicable.
- When done, dry the surface using a soft, dry cloth.
- Repeat steps 2 through 4 as many times as necessary.
CAUTION
- Do not use a steel-wool pad or abrasive cleanser on stainless steel surfaces. It will scratch the surface.
- Do not spray any type of cleanser into the manifold holes. The ignition system is located in those holes and must be kept free of moisture.
Racks
To keep the racks clean, remove them from the cavity, and soak them in lukewarm soapy water. Then, scour soil off of the racks using a plastic scouring pad. If the racks do not slide in and out smoothly after you have cleaned them, rub the side rail guides with wax paper or a cloth containing a few drops of cooking oil. This will help the racks glide more easily on their tracks.
NOTE
- Do not put the racks in a dishwasher.
- If a rack does not slide in and out smoothly, apply a few drops of cooking oil to the oven rack guides.
- If a rack becomes too difficult to slide in or out, lubricate the rack with graphite lubricant.
- To purchase the graphite lubricant, contact us at 1-800-SAMSUNG (726-7864).
CAUTION
- Do not leave the racks in the oven during the self-cleaning cycle. The extreme heat generated in this cycle can permanently peel off the rack coating and make it difficult to slide the racks on the guide rails.
- Do not spray cooking oil or lubricant directly onto the racks.
Air fry tray
To keep the Air fry tray clean, remove them from the cavity, and soak them in Lukewarm soapy water. Then, scour soil off of the Air fry tray using a plastic scouring pad.
NOTE: The air fry tray is dishwasher-safe.
CAUTION: Do not leave the air fry tray in the oven during the self-cleaning cycle. The extreme heat generated in this cycle can permanently peel off the air fry coating, their color will turn slightly blue and finish will be dull.
Gliding Rack
- Gliding racks may be cleaned by hand with an abrasive cleaner or steel wool. During cleaning, be careful not to allow water or cleaner to enter the slides of the rack.
To lubricate the slides
1. Remove the rack from the oven. See removing the gliding rack in the USING THE GLIDING RACK section.
2. Fully extend the rack on a table or countertop. Newspaper may be placed underneath the rack for easy cleanup.

3. If there is debris in the slide tracks, wipe it away using a paper towel. (Any graphite lubricant wiped away must be replaced - See steps 4 through 7.)

4. Shake the graphite lubricant before opening it. Starting with the left (front and back) slide mechanism of the rack, place four (4) small drops of lubricant on the two (2) bottom tracks of the slide close to the bearing carriers.

5. Repeat for the right (front and back) slide mechanism of the rack.
6. Open and close the rack several times to distribute the lubricant.
7. Replace the cap on the lubricant and shake it again. Turn the rack over and repeat steps 3, 4, 5, and 6.
8. Close the rack, turn rack right-side-up and place in the oven. See installing the gliding rack in the USING THE GLIDING RACK section.

NOTE: Do not spray the gliding rack with cooking spray or other lubricant sprays.
Oven
Wear the glove during cleaning.

Door
Do not remove the inner gasket of the oven door for cleaning.

- Use soap and water to thoroughly clean the top, sides, and front of the oven door. Rinse well. You may use a glass cleaner oven door on the outside glass of the oven door. DO NOT immerse the door in water. DO NOT spray or allow water or the glass cleaner to enter the door vents. DO NOT use oven cleaners, cleaning powders, or any harsh abrasive cleaning materials on the outside of the oven door.
- DO NOT clean the oven door gasket. The oven door gasket is made of a woven material which is essential for a good seal. Care should be taken not to rub, damage, or remove this gasket.
Door inner side
- Inner surface: Clean the inner side of the door manually using a soapy plastic scouring pad, and then wipe with a dry cloth. Take care not to get the gasket wet or allow moisture into the door.
- Inner glass: The inner glass is cleaned automatically during the self-cleaning cycle.
Door outer side
- Outer surface: Follow the cleaning instructions for the stainless steel surface in the previous section.
- Outer glass: Clean the outer glass using a glass cleanser or soapy water. Rinse and dry thoroughly. Take care not to get the gasket wet or allow moisture into the door.

CAUTION: Do not let moisture enter the door or contact the door gasket (*). Moisture may reduce the gasket’s performance.
Burner controls
Make sure all surface burner knobs are in the OFF position.
- Pull knobs off the control valve stems.
- Clean the knobs in warm, soapy water. Then, rinse and dry them thoroughly.
- Clean the stainless steel surfaces using stainless steel cleaner.
- Re-attach the knobs to the control valve stems.

CAUTION
- Do not clean the control knobs in a dish washer.
- Do not spray cleansers directly onto the control panel. Moisture entering the electric circuits may cause electric shock or product damage.
Cooktop surface
The porcelain-enameled cooktop surface needs to be kept clean. We recommend that you remove food spills immediately after they take place.
- Turn off all surface burners.
- Wait until all burner grates cool down, and then remove them.
- Clean the cooktop surface using a soft cloth. If food spills run into gaps of the burner components, remove the burner cap and the head, and wipe up the spills.
- When cleaning is finished, reinsert the burner components, and then put the burner grates back into position.

CAUTION
- Do not use a steel-wool pad or abrasive cleaner, which can scratch or damage the enamel surface.
- Do not remove the cooktop surface to clean it. The gas lines leading to the burner manifolds can be damaged, resulting in a fire or system failure.
- Do not pour water into the cooktop well while cleaning the cooktop. This could leak down into the range gas and electrical systems creating a risk of electrical shock or high levels of Carbon Monoxide, due to corrosion of the gas valves or ports.
- Keep oven vent ducts unobstructed. Clean vents frequently to avoid grease buildup.
Burner grates and components
Turn off all surface burners and make sure they have all cooled down.
- Remove the center burner grate(C) following both sides grates.(L/R)
- Remove the burner caps from the burner heads.
- Remove the burner heads from the valve manifolds to reveal the starter electrodes.
- Clean all removable grates and burner components in warm, soapy water. Do not use steel-wool pads or abrasive cleaners.
- Rinse and dry grates and burner components thoroughly.
- Return the burner heads to their positions on top of the manifold valves. Make sure a starter electrode is inserted through the hole in each burner head.
- Return the burner caps to their positions on top of the burner heads. To ensure proper and safe operation, make sure the burner caps lie flat on top of the burner heads.
- Reinstall the burner grates in their respective positions.
- Turn on each burner and check if it operates properly. After verifying that a burner operates normally, turn it off.


NOTE:
- The brass parts of your burner will change color with use. However, this will not affect performance and you can clean the brass parts with a brass cleaner.
- After cleaning, confirm that the burner port openings aren't plugged.
- Shake out any excess water and then let burner heads and caps dry thoroughly. Placing the center burner upside down will allow the water to drain out more easily.
- Do not wash any burner components in a dish washer.

CAUTION
- The starter electrodes are not removable. Do not attempt to remove them by force.
- To avoid chipping, do not bang grates and caps against each other or against hard surfaces, such as cast iron cookware.
- The burner head can be blocked by food or dust. Clean the head if it appears blocked. If you clean the head with water, assemble it only after it is completely dry. If the head is wet, it might prevent the burners from igniting.
- To avoid falling down the grates, make sure to remove both sides grates first.
- Do not attempt to remove center oval burner cap from the head.
Burner reinstall guide
Dual burner head
1. Orient the burner head so that the opening for the electrode lines up with the electrode.

2. Install the burner head so that the electrode passes through the opening for the electrode. Make sure the burner head lies flat on the stove top.

Round burner head
1. Orient the burner head so that the opening for the electrode lines up with the electrode.

2. Install the burner head so that the electrode passes through the opening for the electrode. Make sure the burner head lies flat on the stove top.

Oval burner
1. Orient the burner head so that the opening for the electrode lines up with the electrode.

2. Install the burner head so that the electrode passes through the opening for the electrode. Make sure the burner head lies flat on the stove top.

Burner cap
1. Match the burner caps to the burners by size, and then reinstall the caps on the burner heads.

CAUTION: Make sure each cap is reinstalled on the correct burner head, is centered on the burner head, and lies flat.

CAUTION: Make sure all burner components (heads and caps) are reinstalled properly. They will be stable and rest flat when correctly installed.


NOTE: The precise simmer burner (RR) cap and the inner Dual burner (RF) cap are interchangeable.

Self-cleaning (Single mode only)
This self-cleaning oven uses high temperatures (well above cooking temperatures) to burn off leftover grease and residue completely or reduce them to a finely powdered ash that you can wipe away with a damp cloth.
CAUTION
- Do not leave small children unattended near the range during the self-cleaning cycle. The outside surfaces of the range can get extremely hot.
- Some birds are extremely sensitive to fumes from a self-cleaning oven. Relocate birds to a well-ventilated room away from the range.
- Do not line the oven, oven racks, or oven bottom with aluminum foil. Doing so will result in poor heat distribution, produce poor baking results, and cause permanent damage to the oven interior. The aluminum foil will melt onto and adhere to the interior oven surfaces.
- Do not force the oven door open during the self-cleaning cycle. This will damage the automatic door-locking system. The door automatically locks when the self-cleaning cycle is started and stays locked until the cycle is cancelled and the oven temperature is below 400 °F.
- Use caution when opening the oven door after the self-cleaning cycle. The electric oven will still be VERY HOT and hot air and steam might escape when the door is open.
- Wipe off any excess spillage before using the self-cleaning operation.
- Do not use oven cleaners. Commercial oven cleaners or oven liners should NEVER be used in or around any part of the oven. Residue from oven cleaners will damage the inside of the oven during a self-cleaning operation.
To perform the self-cleaning cycle
Make sure the door lock is released. Remove all racks from the oven cavity.

1. Make sure the oven door is closed completely and unlocked.
2. Tap , and select Cleaning > Self-Clean using the dial knob. Then, select the cleaning time by turning the dial knob one or more times in accordance with the table below.

3. Tap START. The oven door is locked and the oven begins to heat up.
4. When the self-cleaning cycle is complete, the oven beeps 10 times. The door will remain locked until the oven temperature falls below 400 °F (200 °C). You can open the door when it is safe to open.
CAUTION: Do not use the surface burners while the electric oven is performing a self-cleaning cycle.
WARNING: Be sure all controls are OFF and all surfaces are COOL before cleaning any part of the range.
NOTE: Make sure all surface burners are off while the oven is performing a self cleaning cycle. Self-clean will not operate if a surface burner is on.

To delay starting a self-cleaning cycle

- Repeat steps 1 and 2 on the previous page.
- Select Set Delay Start.
- Set the time you want the oven to start self-cleaning using the dial knob.
- Tap START. The oven will start self-cleaning at your specified time.
To cancel the self-cleaning cycle
You may find it necessary to stop or interrupt a self-cleaning cycle due to smoke in the oven. To turn off the self-cleaning cycle, tap OFF. The cycle turns off, but the door remains locked and the Lock icon blinks until the oven temperature falls below 400 °F (200 °C).
After self-cleaning
- The door stays locked until the internal oven temperature falls below 400 °F.
- When the oven has cooled down, wipe the oven surfaces with a cloth to remove ash residue.
- Stubborn stains can be removed using a steel-wool pad. Lime deposits can be removed using a vinegar-soaking cloth.
- If you are not satisfied with the cleaning results, repeat the cycle. Wait until the oven cools down, and then start a new cycle.
- The cooling fan automatically runs for certain amount of time after self-cleaning.
- Self-cleaning does not operate within 2 hours after running the self-cleaning cycle.
CAUTION: Do not attempt to open the oven door immediately after the self-cleaning cycle is complete. The oven is still very hot when the door unlocks. Escaping hot air or steam could burn you.
Steam-cleaning
How to set the oven for steam-cleaning
For light cleaning, the steam-cleaning function saves time and energy. For heavierduty cleaning, use the self-cleaning function.
- Remove all accessories from the oven.
- Pour approximately 10 oz. (300 ml) of water onto the bottom of the empty oven and then close the oven door. Use normal water only, not distilled water.
- Tap , and select Cleaning > Steam Clean using the dial knob.
- Tap START. The oven door is locked automatically and the oven begins to heat up. When the operation is complete, the display will blink and a beep will sound.
- Press OFF.
- Clean the oven’s interior. There will be a significant amount of water remaining on the bottom of the oven after a steam-cleaning cycle. Remove the residual water with a sponge or soft dry cloth.


NOTE: When steam-cleaning, use exactly 10 oz. of water since this produces the best results.
NOTE:
If you start Steam Clean when the oven temperature is above 100˚F, Hot will appear in the display. Because this function produces the best results when started while the oven is cool, we recommend that you wait until the oven has cooled down and Hot disappears from the display.
After a steam-cleaning cycle
- Take care when opening the door before a steam-cleaning procedure has ended. The water on the bottom is hot.
- Open the oven door and remove the remaining water with a sponge. Do not leave the residual water in the oven for any length of time. Wipe the oven clean and dry with a soft cloth. Do not forget to wipe under the oven door seal.
- Use a detergent-soaked sponge, a soft brush, or a nylon scrubber to wipe the oven interior. Remove stubborn residue with a nylon scourer. You can remove lime deposits with a cloth soaked in vinegar.
- If the oven remains dirty, you can repeat the procedure once the oven has cooled.
- For heavy residue, such as grease left over from roasting, we recommend that you rub detergent into the residue before activating the steam-cleaning function.
- After cleaning, leave the oven door ajar at a 15° angle to allow the interior enamel surface to dry thoroughly.
Replacing the oven light
Oven light
The oven light is a standard 40-watt appliance bulb. It comes on when you open the oven door.
- Turn off the oven.
- Make sure the oven and oven light are cool.
- Open the door, and remove the glass cover by turning it counterclockwise.
- Remove the oven light from the socket by turning it counterclockwise.
- Insert a new 40-watt appliance bulb into the socket, and then turn it clockwise to tighten.
- Reinsert the glass cover, and then turn it clockwise to tighten.

CAUTION: To prevent electric shock, make sure the oven is turned off and cool before replacing the oven light.
NOTE
- The oven light does not operate during the self-cleaning cycle.
- Remove the racks if they prevent you from accessing the oven light.
Removing and reinstalling the oven door
How to remove the door
NOTE: You can remove the upper door the same way you remove the full door.
CAUTION
- The door is very heavy. Be careful when removing and lifting the door. Do not lift the door by the handle.
- Turn the power OFF before removing the door.
1. Open the door completely.
2. Pull the hinge locks down toward the door frame to the unlocked position.

3. Firmly grasp both sides of the door at the top.
4. Close the door to the door removal position, which is approximately 5 degrees from vertical (Fig. 1).
5. Lift the door up and out until the hinge arm is clear of the slot (Fig. 2).

How to reinstall the door
You can reinstall the upper door the same way you reinstall the full door.
1. Firmly grasp both sides of the door at the top.
2. With the door at the same angle as the removal position, slide the indentation of the hinge arm into the bottom edge of the hinge slot. The notch in the hinge arm must be fully inserted into the bottom of the slot.

3. Open the door fully. If the door will not open fully, the indentation is not inserted correctly in the bottom edge of the slot.
4. Push the hinge locks up against the front frame of the oven cavity into the locked position.

5. Close the oven door.
How to remove and reinstall the Storage drawer
Storage drawer
1. Slide open the drawer until it stops.
2. Locate the roller guide clips on either side. Using both hands, pull down the left clip while lifting the right clip, and then remove the drawer.
3. Clean the drawer in warm, soapy water using a cloth or soft brush. Then, rinse and dry it thoroughly.

4. Put the drawer in the roller guides on either side, and then snap the clips into place.

Troubleshooting
If you encounter a problem with the range, check the tables starting below, and then try the suggested actions.
Checkpoints
Gas safety
| Problem |
Possible cause |
Action |
|
You smell gas.
|
The surface burner knob is not in the OFF position and the burner is not lit.
|
Turn the burner knob to OFF.
|
|
There is a gas leak.
|
Clear the room, building, or area of all occupants. Immediately call your gas supplier from a neighbor’s phone. Do not call from your phone. It is electrical and could cause a spark that could ignite the gas. Follow the gas supplier’s instructions.
If you cannot reach your gas supplier, call the fire department.
|
Surface burner
| Problem |
Possible cause |
Action |
|
All burners do not light.
|
The power cord is not plugged into the electrical outlet.
|
Make sure the electrical plug is plugged into a live, properly grounded outlet.
|
|
A fuse in your home may be blown or the circuit breaker may have tripped.
|
Replace the fuse or reset the circuit breaker.
|
|
The gas supply is not properly connected or turned on.
|
See the Installation Instructions that came with your range.
|
|
Surface burners do not light.
|
The control knob is not set properly.
|
Push in the control knob and turn it to the Lite position.
|
|
The burner caps are not in place.
The burner base is misaligned.
|
Clean the electrodes.
Put the burner cap on the burner head.
Align the burner base.
|
|
Surface burner clicks during operation.
|
The control knob has been left in the Lite position.
|
After the burner lights, turn the control knob to a desired setting.
If the burner still clicks, contact a service technician.
|
|
The burners do not burn evenly.
|
Surface burner components and caps are not assembled correctly and level.
|
See page 50.
|
|
The surface burners are dirty.
|
Clean the surface burner components.
(See page 49.)
|
|
Very large or yellow surface burner flames.
|
The wrong burner orifice is installed.
|
Check the burner orifice size. Contact your installer if you have the wrong orifice (LP gas instead of natural gas or natural gas instead of LP gas).
|
|
Surface burners light but oven burners do not light.
|
The oven door lock is turned on.
|
The display will show the Lock icon. Hold the oven door open and tap and hold START for 3 seconds. The oven will beep and the Lock icon will turn off.
|
|
The Gas Pressure Regulator shut off switch is in the off position.
|
Call a qualified service technician.
|
Oven
| Problem |
Cause |
Action |
|
The oven control beeps and displays an information code.
|
There may be an issue with your oven. See the “Information codes” chart on page 61.
|
Tap OFF, and then restart the oven.
If the problem persists, disconnect all power to the range for at least 30 seconds and then reconnect the power. If this does not solve the problem, call for service.
|
|
The oven will not turn on.
|
The oven is not completely plugged into the electrical outlet.
|
Make sure the electrical plug is fully inserted into a live, properly grounded outlet.
|
|
A fuse in your home may be blown or thecircuit breaker may have tripped.
|
Replace the fuse or reset the circuit breaker.
|
|
The oven temperature istoo hot or cold.
|
The oven thermostat needs adjustment.
|
See page 42.
|
|
The oven heater will not shut off.
|
The oven door lock is turned on.
|
The display will show the Lock icon. Hold the oven door open and tap and hold START for 3seconds. The oven will beep and the Lock icon will turn off.
|
|
The Sabbath function has been activated.
|
SAb and the time of day will show in the display. All other controls and signals will be deactivated.To turn off the oven only, tap OFF.
To cancel the Sabbath function and reactivate the controls and signals, tap and hold for 3 seconds.
|
|
The oven light (lamp)will not turn on.
|
The oven door lock is turnedon.
|
The display will show the Lock icon. Hold the oven door open, and then tap and hold START for 3 seconds. The oven will beep and the Lock icon will turn off.
|
|
The Sabbath function has beenactivated.
|
SAb and the time of day will show in the display. All other controls and signals will be deactivated. To cancel the Sabbath function and reactivate the light switch and other controls, press and hold for 3 seconds.
|
|
A loose or burned-out bulb.
|
See page 54.
|
|
The switch operating the ovenlight needs to be replaced.
|
Call for a qualified service technician.
|
|
The oven smoke sexcessively during broiling.
|
Meat or food was not properly prepared before broiling.
|
Cut away excess fat and/or fatty edges that may curl.
|
|
Improperly positioned top oven rack.
|
See the broiling guide on page 33.
|
|
The controls are not being set properly.
|
See page 32.
|
|
Greasy build up on oven surfaces.
|
Regular cleaning is necessary when broiling frequently.
|
|
Cooking is finished, but the cooling fan is still running.
|
The fan automatically runs for a certain amount of time to ventilate the inside of the oven.
|
This is not a product malfunction. The fan is designed to run automatically for a period of time to cool down the oven.
|
|
The oven will not self-clean.
|
The oven door lock is turned on.
|
The display will show the Lock icon. Hold the oven door open, and then tap and hold START for 3 seconds. The oven will beep and the Lock icon will turn off.
|
|
The Smart Divider is installed in the oven.
|
Self-clean will not operate with the Smart Divider installed. Remove it from the oven.
|
|
The oven is too hot.
|
Let the oven cool down, and then reset the controls. The self-clean cycle will not lock the ovendoor if the oven temperature is too hot. The door must lock before the self- clean cycle can start.
|
|
The self-cleaning oven controls are notproperly set.
|
Reset the self-cleaning oven controls. (See page 51.)
|
|
A surface burner is on.
|
Turn off the surface burner. Self-clean will not operate if a surface burner is on.
|
|
A crackling or popping sound.
|
This is normal.
|
This is the sound of the metal heating and cooling during any cooking or cleaning function.
|
|
Excessive smoking during a self-cleaning cycle.
|
This is the first time the oven has been cleaned.
|
This is normal. The oven will always smoke more the first time it is cleaned.
Wipe up all excessive soil before starting the self- cleaning cycle.
If smoke persists, tap OFF. Open the windows to clear the smoke from the room. After the oven has cooled andunlocked, wipe up excessive soil, and then reset the oven for self-cleaning.
|
|
The oven door will not open after a self-cleaning cycle.
|
This is normal.
|
The oven door will stay locked until the oven temperature drops below 400 °F.
|
|
The oven is not clean after a self- cleaning cycle.
|
A fine dust or ash is normal.
|
This can be wiped clean with a damp cloth.
Set the self-cleaning cycle for a longer cleaning time.
The cycle was not long enough to burn off the dirt buildup. Extremely dirty ovens require hand-cleaning ofexcessive spillovers and food buildup before you start a self-cleaning cycle. Multiple self-cleaning cycles maybe necessary to completely clean the oven.
|
|
There is steam or smoke coming from under the control panel.
|
This is normal.
|
The oven vent is located there. More steam is visible when you are using the convection functions or when baking or roasting multiple items at the same time.
|
|
A burning or oily odor coming from the vent.
|
This is normal for a new oven and will disappear within1/2 hour of the first bake cycle.
|
To speed the process, set a self-cleaning cycle for a minimum of 3 hours. (See page 52.)
|
|
Strong odor.
|
This is temporary.
|
The insulation around the inside of the oven emits an odor the first few times the oven is used.
|
|
The oven racks are difficult to slide.
|
This is normal.
|
Apply a small amount of vegetable oil to a paper towel, and then wipe the edges of the oven racks with the paper towel. Racks become dull and hard to slide if they are left in the oven during a self-clean cycle.
|
|
Fan noise.
|
This is normal.
|
The convection fan runs until the function is over or the door is opened.
|
|
The convection fan isnot working.
|
This isnormal.
|
The fan starts automatically when the oven reaches the preheat temperature.
|
Others
| Problem |
Cause |
Action |
|
The product is notlevel.
|
The appliance has been installed improperly.
The leveling leg(s) is (are) damaged or uneven.
|
Make sure the floor is level, strong, and stable. If the floor sags or slopes, contact a carpenter.
Check and level the range. (See the Installation Instructions.)
|
|
The kitchen cabinets are not properly aligned and make the range appearto be not level.
|
Ensure that cabinets are square and provide sufficient room for installation.
|
|
The display goes blank.
|
The electrical outlet Ground Fault Interrupter (GFI or GFCI) has been tripped and needs to bereset.
Your digital control has been damaged.
|
Replace fuse or reset circuit breaker.
|
|
Food does not bake or roast properly in the oven.
|
The wrong cooking mode is selected.
|
See page 23.
|
|
The oven racks have not been positioned properly for the foods being cooked.
|
See page 27.
|
|
Incorrect cookware or cookware of improper size is being used.
|
See page 17.
|
|
The oven thermostat needs adjustment.
|
See page 42.
|
|
There is aluminum foil on racks or oven bottom.
|
Remove foil.
|
|
The clock or timers are not set correctly.
|
See page 16.
|
|
Food does not broil properly in the oven.
|
The oven controls are not set properly.
|
See page 32.
|
|
The oven door was not closed during broiling.
|
See page 32.
|
|
The rack has not been properly positioned.
|
See the broiling guide on page33.
|
Information codes
| Code symbol |
Meaning |
Solution |
 |
Oven sensor malfunction.
|
- Tap OFF, and then restart the oven.
- If the problem persists, disconnect all power to the oven range for at least 30 seconds and then reconnect the power.
|
 |
The oven is overheating.
|
 |
Check the Control PBA NTC Sensor.
|
 |
Temp probe malfunction.
|
 |
Check the PBA NTC Sensor.
|
 |
Check the PBA NTC Sensor.
|
 |
Check the cooling system.
|
 |
Control pad malfunction.
|
 |
Door lock malfunction.
|
 |
PCB signal malfunction.
|
 |
Touch IC and PCB signal malfunction.
|
 |
Divider switch malfunction. |
- If the Divider is in the oven, make sure it is pushed in all the way.
- If the Divider is not in the oven, see if something is pressing against the divider switch in the back of the oven.
- If the Divider is all the way in or there is nothing pressing against the Divider switch, tap OFF, and then restart the oven. If the problem persists, disconnect all power to the oven range for at least 30 seconds, and then reconnect the power.
|