English
AVIC-W8500NEX
AVIC-W6500NEX
MULTIMEDIA NAVIGATION RECEIVER
Operation Manual
Notice to all users:
This software requires that the product is properly connected to your vehicle’ s
parking brake and depending on your vehicle, additional installation may be
required. For more information, please contact your Authorized Pioneer
Electronics retailer or call us at (800) 421-1404.
Be sure to read Important Information for the User first!
Important Information for the User includes the important information that you
must understand before using this product.

English
- 2 -
Important
■Precaution ......................... 5
Notes on internal memory........................................ 5
About this manual ....................................................... 5
■Parts and controls............. 6
Main unit ......................................................................... 6
Remote Control............................................................. 7
Protecting your product against theft.................. 8
■Basic operation ............... 10
Notes on using the LCD panel............................... 10
Adjusting the LCD panel angle ............................. 10
Resetting the microprocessor ............................... 10
Preparing the remote control ................................ 11
Starting up the unit ................................................... 12
Starting up the navigation system ...................... 13
Using the touch panel.............................................. 14
Top menu screen ........................................................ 17
■Navigation....................... 19
Menu screen view and operations....................... 19
Map Screen................................................................... 20
Searching for a destination..................................... 26
Starting the navigation............................................ 34
Checking and modifying the current route...... 34
Storing a location in [Saved Location] ............... 40
Storing a route in [Saved Routes] ........................ 42
Receiving real-time traffic information
(TMC) ....................................................................... 43
Checking useful information about your
trip ............................................................................ 46
Navigation Settings .................................................. 51
Updating the map ..................................................... 61
■Bluetooth ......................... 62
Bluetooth connection.............................................. 62
Bluetooth settings ..................................................... 62
Hands-free phoning.................................................. 63
Bluetooth audio ......................................................... 68
■Wi-Fi.................................. 70
Wi-Fi connection ........................................................ 70
Wi-Fi settings ............................................................... 70
Wi-Fi audio ................................................................... 71
■AV source ......................... 72
Supported AV source................................................ 72
Displaying the AV operation screen.................... 72
Selecting a source ..................................................... 73
Changing the display order of source ................ 73
Adjusting the range of favorite source icons
area .......................................................................... 74
■Setup for iPod®/iPhone® or
smartphone ..................... 75
iPod/iPhone ................................................................. 75
Smartphone (Android™ device) ........................... 76
■
HD Radio™ Technology....
77
About HD Radio stations......................................... 77
Starting procedure .................................................... 78
Basic operation ........................................................... 78
Storing the strongest broadcast frequencies
(BSM) ....................................................................... 79
Radio settings ............................................................. 80
■Disc ................................... 81
Inserting and ejecting a disc ................................. 81
Contents
Thank you for buying this Pioneer
product.
Please read through these instructions
so you will know how to operate your
model properly. After you have finished
reading the instructions, keep this
document in a safe place for future
reference.
The screen shown in the examples may
differ from actual screens, which may be
changed without notice for
performance and function
improvements.

English
- 3 -
Basic operation ........................................................... 82
■Compressed files............. 86
Inserting and ejecting media................................. 86
Starting procedure .................................................... 88
Basic operation ........................................................... 89
■iPod .................................. 94
Connecting your iPod............................................... 94
Basic operation ........................................................... 94
■WebLink™ ........................ 98
Using WebLink ............................................................ 98
Starting procedure .................................................... 98
Using the audio mix function ............................. 100
■Apple CarPlay™ ............. 101
Using Apple CarPlay............................................... 101
Setting the driving position ................................ 101
Starting procedure ................................................. 102
Adjusting the volume ............................................ 103
■Android Auto™ .............. 104
Using Android Auto................................................ 104
Setting the driving position ................................ 104
Starting procedure ................................................. 105
Adjusting the volume ............................................ 106
Setting the auto-launch function...................... 106
■Pandora®........................ 108
Listening to Pandora.............................................. 108
Basic operation ........................................................ 109
■SiriusXM® Satellite
Radio.............................. 111
Subscribing to the SiriusXM Satellite Radio
service .................................................................. 111
Listening to SiriusXM ............................................. 112
Basic operation ........................................................ 112
TuneScan™................................................................. 114
SportsFlash™ ............................................................. 115
SmartFavorites ......................................................... 115
Using Featured Favorites Band........................... 116
Parental lock.............................................................. 116
Using the content alerts function ..................... 116
SiriusXM settings ..................................................... 117
■HDMI .............................. 119
Starting procedure .................................................. 119
Basic operation ......................................................... 119
■AUX................................. 120
Starting procedure .................................................. 120
Basic operation ......................................................... 121
■AV input ......................... 122
Starting procedure .................................................. 122
Basic operation ......................................................... 123
■Wireless Mirroring......... 124
Starting procedure .................................................. 124
Basic operation ......................................................... 125
■iDatalink......................... 126
Using iDatalink.......................................................... 126
Activating iDatalink Maestro ............................... 126
Starting procedure .................................................. 127
Displaying obstacle detection
information ......................................................... 129
iDatalink settings ..................................................... 129
■Settings .......................... 131
Displaying the setting screen.............................. 131
System settings ........................................................ 131
Theme settings ......................................................... 141
Audio settings........................................................... 143
Video settings ........................................................... 150
■Favorite menu................ 153
Creating a shortcut ................................................. 153
Selecting a shortcut................................................ 153
Removing a shortcut .............................................. 153
■Other functions ............. 154
Setting the time and date..................................... 154
Changing the wide screen mode....................... 154
Selecting the video for the rear display........... 155
Setting the anti-theft function............................ 156
Restoring this product to the default
settings ................................................................. 157
■Appendix ....................... 158
Troubleshooting....................................................... 158
Error messages.......................................................... 161
Positioning technology ......................................... 167
Handling large errors ............................................. 168

English
- 4 -
Route setting information.................................... 172
Handling and care of discs................................... 173
Playable discs............................................................ 174
Detailed information for playable media ....... 174
Bluetooth ................................................................... 179
SiriusXM® Satellite Radio ...................................... 179
Wi-Fi ............................................................................. 180
HD Radio™ Technology ......................................... 180
SDXC ............................................................................ 180
WMA/WMV ................................................................ 180
FLAC ............................................................................. 180
DivX.............................................................................. 181
AAC............................................................................... 181
WebLink...................................................................... 181
Waze............................................................................. 181
Google™, Google Play, Android ......................... 181
Android Auto ............................................................ 181
Detailed information regarding connected iPod
devices ................................................................. 181
Using app-based connected content.............. 182
Pandora®..................................................................... 183
HDMI ............................................................................ 183
IVONA Text-to-Speech........................................... 183
Notice regarding video viewing ........................ 184
Notice regarding DVD-Video viewing ............. 184
Notice regarding MP3 file usage ....................... 184
Notice regarding open source licenses........... 184
Map coverage ........................................................... 184
Using the LCD screen correctly .......................... 184
Specifications............................................................ 185
English
- 5 -
• If the battery is disconnected or discharged, the memory will be erased and must be
reprogrammed.
• The information will be erased by disconnecting the yellow lead from the battery (or
removing the battery itself ).
• Some of the settings and recorded contents will not be reset.
This manual uses diagrams of actual screens to describe operations. However, the
screens on some units may not match those shown in this manual depending on the
model used.
Precaution
Notes on internal memory
About this manual
Meanings of symbols used in this manual
This indicates model names that are supported by the described operations.
This indicates to touch the appropriate soft key on the touch screen.
This indicates to touch and hold the appropriate soft key on the touch screen.
0000NEX
- 6 -
English
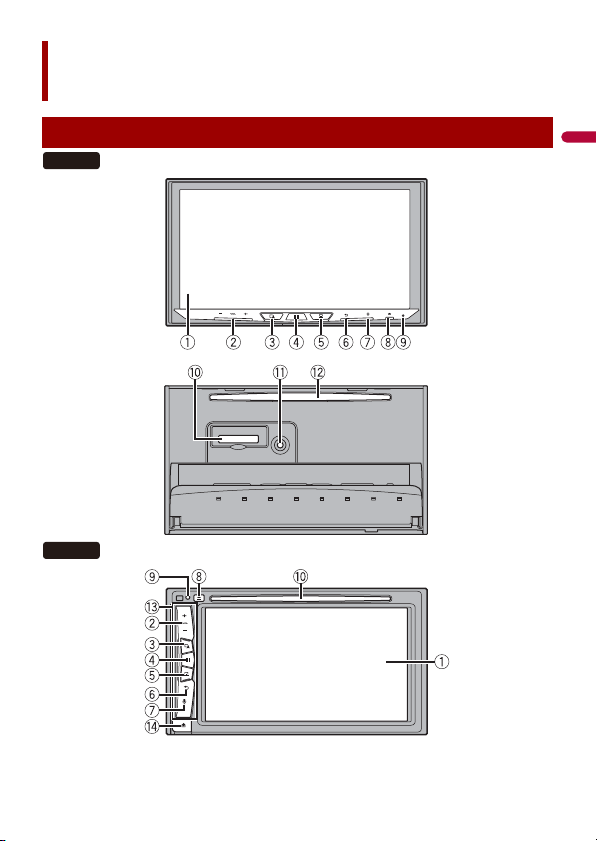
Parts and controls
Main unit
W8500NEX
W6500NEX
English
- 7 -
LCD screen
VOL (+/-)
Press to switch between the Application screen and the AV operation screen.
Press and hold to switch to the camera view mode.
NOTE
To activate the camera view mode with this button, set [Back Camera Input] to
[On] or [AV Input] to [Camera] (page 132).
Press to display the top menu screen.
Press and hold to power off. To power back on, press any button.
Press to display the menu bar (page 15).
Press and hold to mute or unmute.
Press to display the top menu screen or back to previous screen.
Press and hold to turn off the display.
Press to activate the voice recognition mode with a connected iPhone or
smartphone.
Press and hold to display the connectable device list screen or device search
screen.
RESET Press to reset the microprocessor (page 10).
SD card slot Refer to Inserting and ejecting an SD memory card (page 86).
Auto EQ
microphone
input jack
Use to connect a microphone for acoustical measurement (sold separately).
Disc-loading
slot
Refer to Inserting and ejecting a disc (page 81).
Detachable faceplate
Press to remove the detachable faceplate from this product.
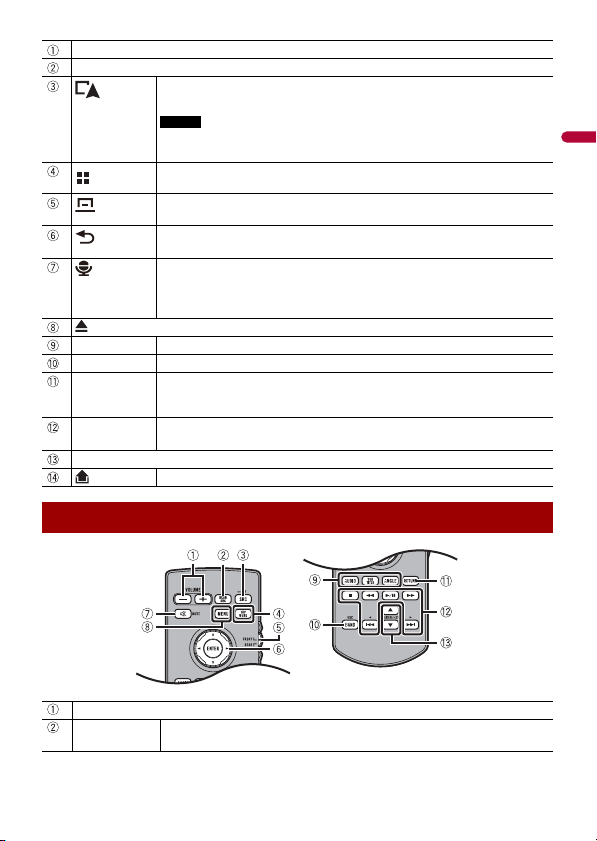
Remote Control
VOLUME (+/-)
REAR SRC Press to cycle through all the available rear sources.
Press and hold to turn the rear source off.
- 8 -
English
CAUTION
• Do not expose the detachable faceplate to excessive shock or disassemble it.
• Never grip the buttons tightly or use force when removing or attaching the detachable faceplate.
• Keep the detachable faceplate out of reach of small children to prevent them from placing it in their
mouths.
• After removing the detachable faceplate, keep it in a safe place so it is not scratched or damaged.
• Do not expose the detachable faceplate to direct sunlight and high temperatures.
• When removing or attaching the detachable faceplate, do so after turning off the ignition switch
(ACC OFF).
SRC Press to cycle through all the available sources.
Press and hold to turn the source off.
TOP MENU Press to return to the top menu during DVD playback.
Source mode
select switch
Use to switch the source mode between the front source and the rear source.
Thumb pad Use to select a menu on the DVD menu.
MUTE
MENU Displays the DVD menu during DVD playback.
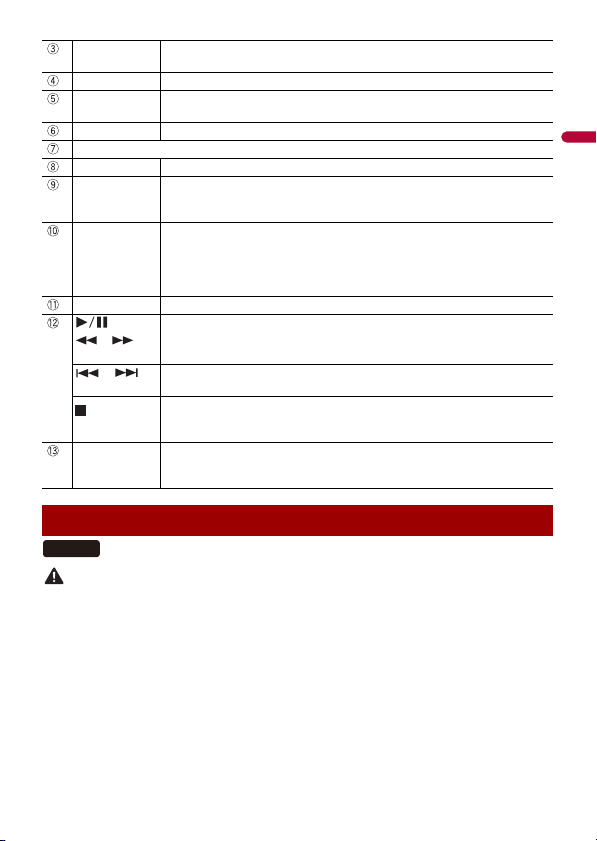
AUDIO
SUBTITLE
ANGLE
Press to change the audio language, subtitle language or viewing angle
during DVD playback.
BAND/ESC Press to select the tuner band when tuner is selected as a source.
Press to switch between media file types when playing the following types of
data:
• Disc
• External storage device (USB, SD)
RETURN Press to return to the specified point and start playback from there.
Press to pause or resume playback.
or For audio: Press and hold to perform fast reverse or fast forward.
For video: Press to perform fast reverse or fast forward.
or Press to return to the previous track (chapter) or go to the next track (chapter).
Press to answer or end a call.
Press to stop playback.
If you resume playback, playback will start from the point where you stopped.
Press the button again to stop playback completely.
FOLDER/P.CH Press to select the next or previous title or folder.
Press to recall radio station frequencies assigned to preset channel keys.
Press to answer or end a call.
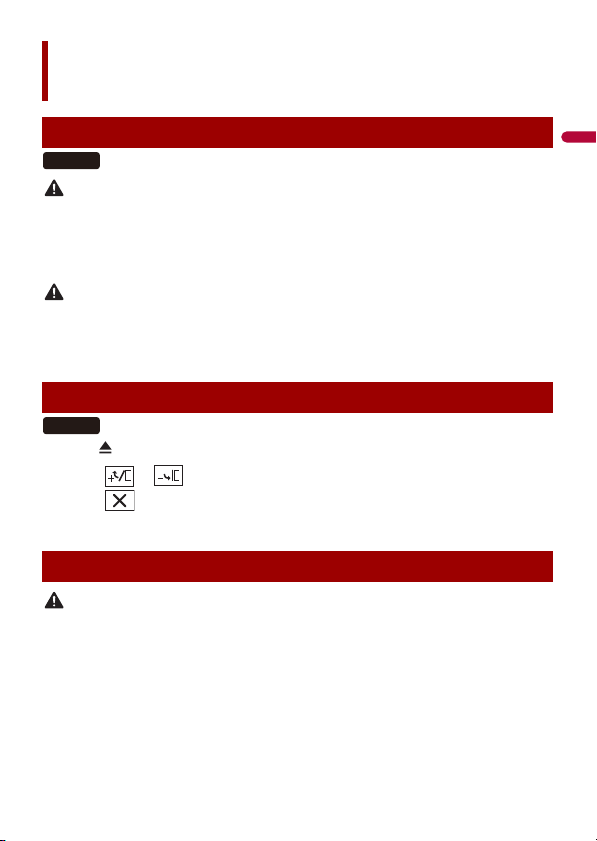
Protecting your product against theft
W6500NEX

English
- 9 -
1 Press the button.
2 Gently grip the bottom of the detachable faceplate and slowly pull it outward.
Detachable faceplate
1 Slide the detachable faceplate all the way into this product.
2 Push the lower part of the detachable faceplate until you hear a click.
Removing the detachable faceplate
Attaching the detachable faceplate
- 10 -
English
WARNING
• Keep hands and fingers clear of this product when opening, closing, or adjusting the LCD panel. Be
especially cautious of children’s hands and fingers.
• Do not use with the LCD panel left open. It may result in injury in the event of an accident.
• Close the LCD panel before putting the vehicle in motion. Driving with the LCD panel open may
damage the unit, and any backup camera image shown through the LCD panel will not be visible.
CAUTION
• Do not open or close the LCD panel forcefully. It may cause a malfunction.
• Do not operate this product until the LCD panel has completely opened or closed. If this product is
operated while the LCD panel is opening or closing, the LCD panel may stop at that angle for safety.
• Do not place glass or can on the open LCD panel.
1 Press .
2 Touch or to adjust the angle of the LCD panel.
3 Touch .
Returns to the previous screen.
CAUTION
• Pressing the RESET button resets settings and recorded contents to the factory settings.
– Do not perform this operation when a device is connected to this product.
– Some of the settings and recorded contents will not be reset.
• The microprocessor must be reset under the following conditions:
– Prior to using this product for the first time after installation.
– If this product fails to operate properly.
– If there appears to be problems with the operation of the system.
– If your vehicle position is shown on the map with a significant positioning error.
1 Turn the ignition switch OFF.
Basic operation
Notes on using the LCD panel
Adjusting the LCD panel angle
Resetting the microprocessor
W8500NEX
W8500NEX
English
- 11 -
2 Press RESET with a pen tip or other pointed tools.
Settings and recorded contents are reset to the factory settings.
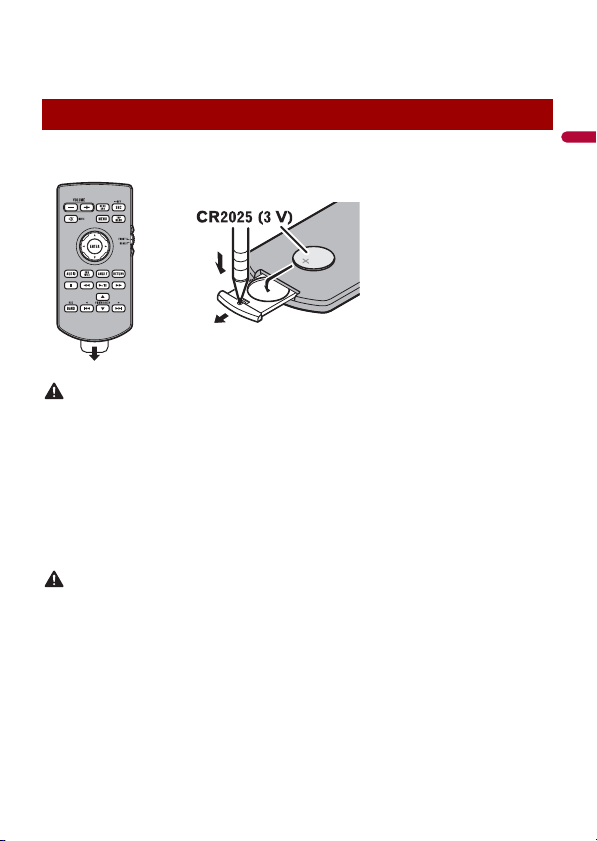
Remove the insulation sheet before use.
WARNING
• Do not ingest the battery, Chemical Burn Hazard.
(The remote control supplied with) This product contains a coin/button cell battery. If the coin/
button cell battery is swallowed, it can cause severe internal burns in just 2 hours and can lead to
death.
Keep new and used batteries away from children.
If the battery compartment does not close securely, stop using the product and keep it away from
children.
If you think batteries might have been swallowed or placed inside any part of the body, seek
immediate medical attention.
• Batteries (battery pack or batteries installed) must not be exposed to excessive heat such as sunshine,
fire or the like.
CAUTION
• Remove the battery if the remote control is not used for a month or longer.
• There is a danger of explosion if the battery is incorrectly replaced. Replace only with the same or
equivalent type.
• Do not handle the battery with metallic tools.
• Do not store the battery with metallic objects.
• If the battery leaks, wipe the remote control completely clean and install a new battery.
• When disposing of used batteries, please comply with governmental regulations or environmental
public institution’s rules that apply in your country/area.
• “Perchlorate Material – special handling may apply. See www.dtsc.ca.gov/hazardouswaste/
perchlorate. (Applicable to California, U.S.A.)”
Preparing the remote control
How to replace the battery
Insert the CR2025 (3 V) battery with the plus (+) and
minus (-) poles orientated properly.
- 12 -
English
Point the remote control in the direction of the front panel to operate.
NOTE
The remote control may not function properly in direct sunlight.
Important
• Do not store the remote control in high temperatures or direct sunlight.
• Do not let the remote control fall onto the floor, where it may become jammed under the brake or gas
pedal.
1 Start the engine to boot up the system.
The [Select Program Language] screen appears.
NOTES
• From the second time on, the screen shown will differ depending on the previous conditions.
• From the second time on, enter the password for the anti-theft function if the password entry
screen appears.
2 Touch the language.
3 Touch .
The [Speaker Mode Settings] screen appears.
4 Touch the speaker modes.
[Standard Mode]
4-speaker system with front and rear speakers, or a 6-speaker system with front and
rear speakers and subwoofers.
[Network Mode]
3-way system with a high range speaker, middle range speaker and subwoofer (low
range speaker) for reproduction of high, middle and low frequencies (bands).
WARNING
Do not use the unit in Standard Mode when a speaker system for 3-way Network Mode is
connected to the unit. This may cause damage to the speakers.
5 Touch .
Initial Legal Disclaimer screen appears.
6 Touch [OK].
The top menu screen appears.
Using the remote control
Starting up the unit

English
- 13 -
NOTE
Once the speaker mode is set, the setting cannot be changed unless this product is restored to the
default settings. Restore the default settings to change the speaker mode setting (page 157).
To change the speaker mode, you need to restore this product to the default settings.
1 Restore the default setting (page 157).
When you use the navigation function for the first time, an initial setup process starts
automatically. Follow the steps below.
TIP
You can change the language later using [Regional] in the [Settings] screen. Other settings can be
restarted later using [Start Configuration Wizard] in the [Settings] screen.
1 Press .
2 Touch .
3 Touch the language that you want to use on the navigation screen, then touch
[Select].
4 Read the terms carefully, check the details, and then touch [Accept] if you agree
to the conditions.
5 Touch [Next].
6 Touch the language that you want to use for voice guidance messages, then
touch [Next].
7 If needed, modify the unit settings, then touch [Next].
8 If needed, modify the default route planning options, then touch [Next].
Switching the speaker mode
Starting up the navigation system
- 14 -
English
9 Touch [Finish].
You can operate this product by touching the keys on the screen directly with your
fingers.
NOTE
To protect the LCD screen from damage, be sure to touch the screen only with your finger gently.
: Returns to the previous screen.
: Close the screen.
Using the touch panel
Common touch panel keys
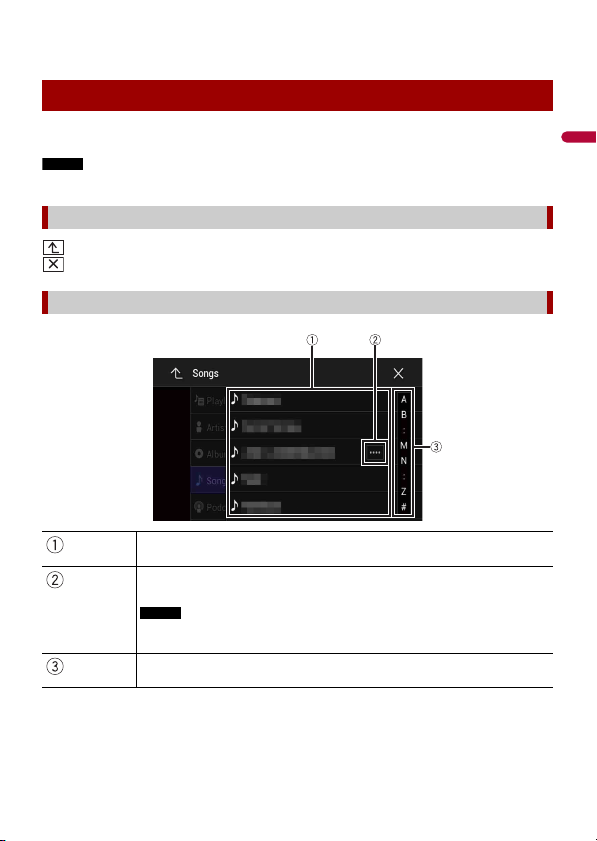
Operating list screens
Touching an item on the list allows you to narrow down the options and
proceed to the next operation.
Appears when all characters are not displayed on the display area.
If you touch the key, the rests are scrolled for display.
NOTE
This function is available only when you stop your vehicle in a safe place and apply
the parking brake.
Appears when items cannot be displayed on a single page.
Drag the side bar, the initial search bar or the list to view any hidden items.

English
- 15 -
1
Press .
The menu bar pops up on the screen.
NOTE
The menu bar availability may vary depending on the activating source.
1 Touch or .
Operating the time bar
You can change the playback point by dragging the key.
The playback time corresponding to the position of the key is displayed while
dragging the key.
Operating the menu bar
Switches the dimmer duration by day or night.
Switches between playback and pause.
Skips files forward or backward.
Performs fast reverse or fast forward.
Displays setting menu screen (page 131).
Closes the menu bar.
Switching the operation panel
- 16 -
English
The hidden function keys appear.
NOTE
This key does not appear for some AV sources.
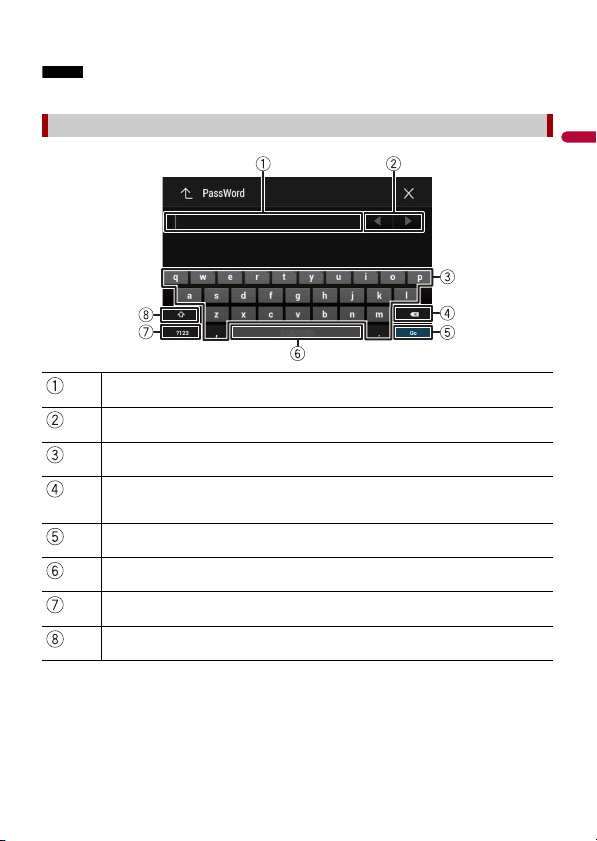
Operating the on-screen keyboard
Displays the characters that are entered.
Moves the cursor to the right or left for a number of characters equivalent to the
number of touches.
Enters the characters in the text box.
Deletes the input text to the left of the cursor one letter at a time.
Touching and holding the key deletes the letters to the left of the cursor in rapid
succession.
Confirms the entry and proceeds to the next step.
Enters a space.
Switches between alphabet and numbers/symbols.
Switches between capital and lower case letters.
English
- 17 -
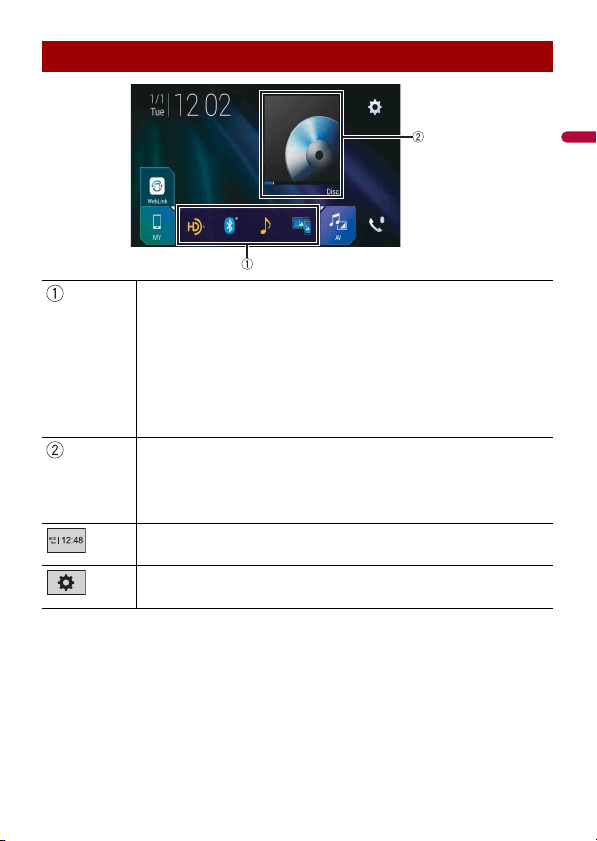
Top menu screen
Favorite source icons
TIPS
• When you connect the external navigation system to this unit, the navigation
mode key is displayed at the middle of the right side of the display.
• If you select [Power OFF], you can turn off almost all functions. The [Power OFF]
mode is released in the following cases.
– An incoming call is received (only for hands-free phoning via Bluetooth).
– A rear view camera image is input when the vehicle is in reverse.
– A button on this unit is pressed.
– The ignition switch is turned off (ACC OFF), then turned on (ACC ON).
AV/Device source operation key.
Displays the current source.
TIP
When the last source is displayed behind the key, you can switch the source by
touching the key.
Setting the time and date (page 154)
Settings (page 131) and Favorite menu (page 153)

- 18 -
English
Connected device key
Displays connected device.
Switches the source or application with connected devices such as WebLink,
external navigation system, Apple CarPlay, Android Auto.
TIPS
• When a device with a compatible application is connected, the favorite
application key appears. Once the key appears, you can adjust the range of the
favorite application key area with the following steps.
1 Touch and ho ld .
appears at the top right of the favorite application key.
2 Drag to the desired position.
To finish the adjusting, touch any place of the display except for the
favorite application key.
• You can also switch the mobile device to be connected with the following steps.
1 Touch .
2 Touch .
3 Select desired device then follow the instruction.
Touch for the first wireless connection with the device.
NOTE
This function is available only when you stop your vehicle in a safe place and apply
the parking brake or the vehicle is completely stopped.
AV source (page 72)
Hands-free phoning (page 63)
Displays the map screen.

English
- 19 -
1 Press .
2 Touch .
The main menu screen appears.
Main screen
Navigation
Menu screen view and operations
Returns to the map screen.
Notifications that contain important information.
Displays the previous or next page of the navigation menu.
The locations that you saved as favorites.
Switches between 2D, 3D, and 2D North up view modes.
The [User Profiles] screen where you can create new profiles or edit the
existing profiles. If multiple drivers are using this product, they can create
their own profiles with their own settings. If you select a new profile, this
product restarts so that the new settings can take effect.

- 20 -
English
Most of the information provided by your navigation system can be seen on the map.
You need to become familiar with how information appears on the map.
Navigation items
Searches for a destination using various methods (page 26).
Builds your route or edits the route currently set (page 34).
Displays the traffic screen (page 43).
Displays useful information to support your driving (page 46).
Configures the navigation-related settings (page 51).
Displays information about your navigation system (e.g. the version
information or license).
Main menu screen icons with a planned route (only appear when a route
is planned)
Adds a waypoint (page 36).
Displays route alternatives, parts of the route to avoid, or specific
roads in your planned route to avoid.
Displays the route in its full length on the map, and displays route
parameters and route alternatives.
Deletes your route or removes a waypoint.
Suspends and resumes the route guidance.
Map Screen
English
- 21 -
NOTE
Depending on the conditions and settings, some items may not be displayed.
* The information appears only when a route is set.
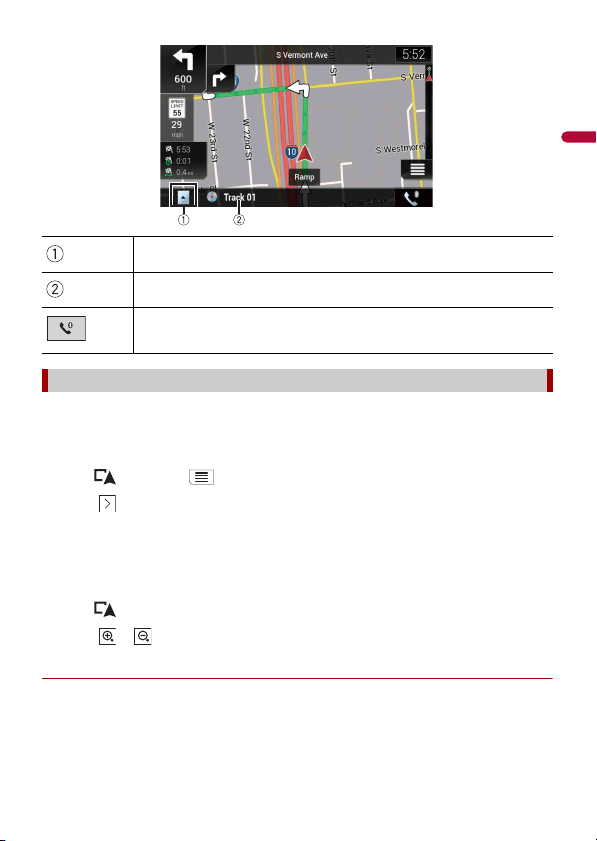
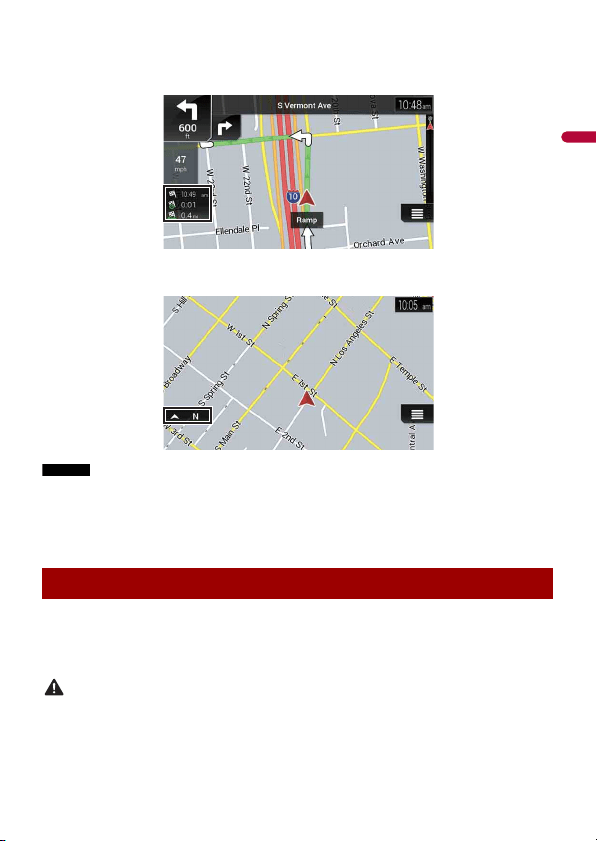
▶AV information bar
AV information is displayed at the bottom of the map screen.
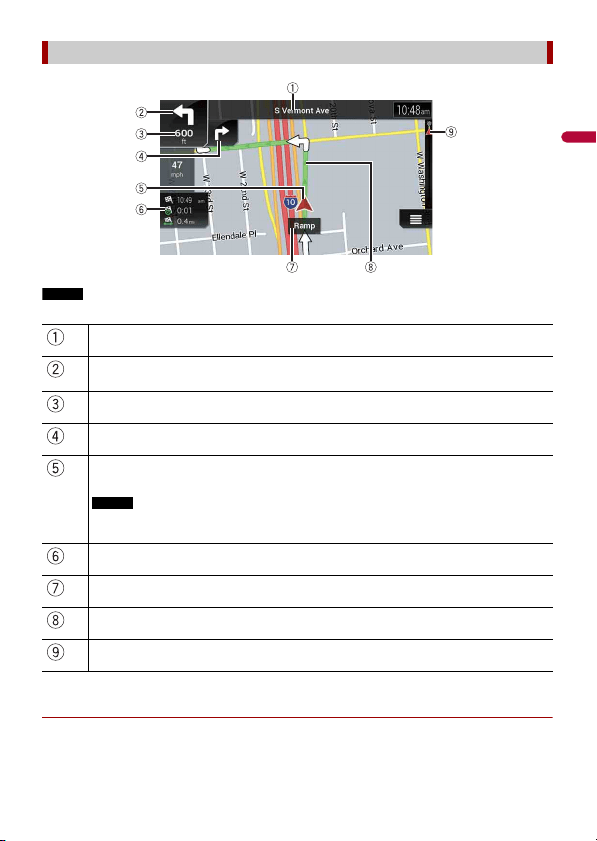
How to read the map screen
*
Shows the number and name of the street to be used (or next guidance point).
*
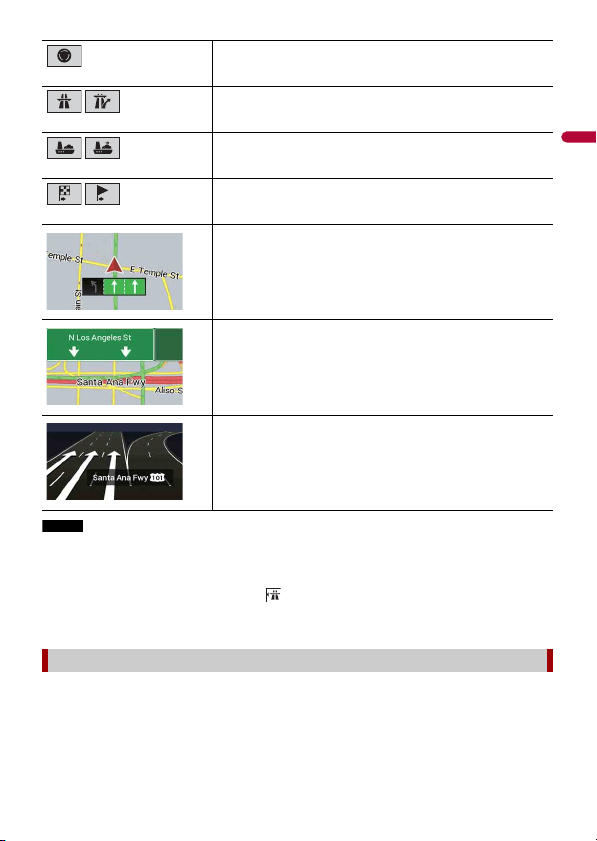
Shows the next guidance point (maneuver). The type of the event (turn, traffic circle,
exiting freeway, etc.) is displayed (page 24).
*
Shows the distance to the next guidance point (maneuver).
*
Shows the maneuver after the next maneuver.
Indicates the current location of your vehicle. The apex of the triangular mark
indicates your orientation and the display moves automatically as you drive.
NOTE
When there is no GPS position, the triangular mark is transparent. It shows your last known
position.
Displays the data field.
Shows the name of the street (or city) that your vehicle is traveling on (or in).
*
Indicates the current route. The route currently set is highlighted in color on the map.
*
Indicates the progress to the final destination.
- 22 -
English
By default, even if the map scale is changed on the scrolled map, it will return to the
preset scale (according to the setting in [Viewpoint] of the [Navigation Map] settings)
when the current position map is displayed. To change the scale of the current position
map, perform the following procedure.
1 Press then touch .
2 Touch then [Settings].
3 Touch [Navigation Map] then [Map Display].
4 Touch [Viewpoint].
5 Drag the pop-up window and touch [Manual].
6 Press .
7 Touch or .
▶Smart Zoom
Your navigation system features "Smart Zoom" that works in two ways.
• When the route is set:
When approaching a turn, "Smart Zoom" will zoom in and raise the view angle to
enable you to easily recognize your maneuver at the next junction. If the next turn is at
Touch to display the AV source list.
Shows the current status of AV source briefly.
Touch to display the phone menu screen (page 63).
Changing the scale or the map manually
English
- 23 -
a distance, it will zoom out and lower the view angle to be flat so you can see the road
in front of you.
• When the route is not set:
"Smart Zoom" will zoom in if you drive slowly and zoom out when you drive at high
speed.
You can switch how the map is displayed. For 2D map view mode, you can select
between “Heading up” and “North up”.
1 Press .
2 Touch .
3 Touch the following key.
Each time you touch the key, the setting changes.
1 Press .
2 Touch anywhere on the map or touch and drag the map in the desired direction to
scroll.
If you place the cursor on the desired location, a brief overview about the location will
appear at the top of the screen, showing the street name and other information for
the location.
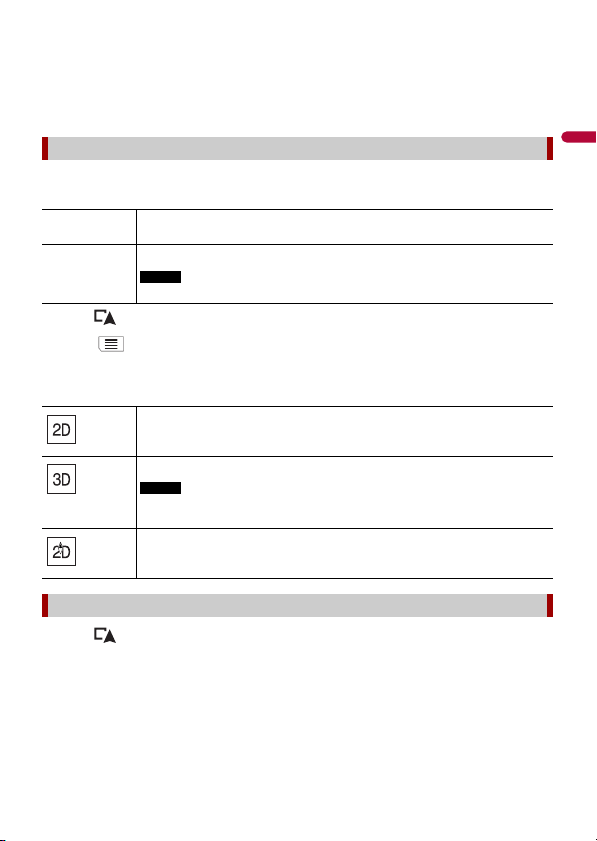
Switching between 2D, 3D, and 2D North up views
Heading up The map display always shows the vehicle’s direction as proceeding toward
the top of the screen.
North up The map display always has north at the top of the screen.
NOTE
The map orientation is fixed at “Heading up” when the 3D map screen is displayed.
Indicates 2D Heading up view mode is currently selected.
Indicates 3D Heading up view mode is currently selected.
NOTE
There is a limit to map scaling in 3D map view mode. If the map scale is zoomed
out further, the map is zoomed out in 2D map.
Indicates 2D North up view mode is currently selected.
Scrolling the map to the position you want to see

- 24 -
English
3 Touch .
The map returns to the current position.
TIP
If you press , the map returns to the current position.
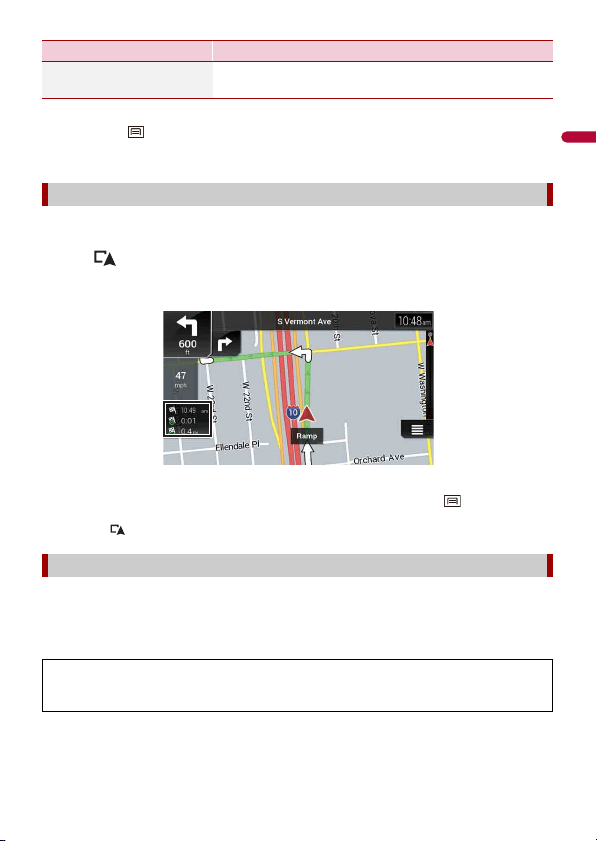
▶Control keys on the scrolled map
Map screen (scrolled map)
Once the route guidance begins, the system provides various guides by voice, text
indications and signs.
▶Frequently shown route events
The following are some examples of the maneuvers that are displayed.
Changes the map view mode.
The current map mode is shown on the control key.
Zooms in or out on the map.
You can also zoom out or in by pinching or expanding the map.
Rotates the map clockwise or counterclockwise.
Cancels map rotation.
Tilts the map angle up or down.
You can change the vertical view angle of the map in 3D mode only.
Route guidance
Turn left, turn right, turn back.
Go left on the traffic circle, 3rd exit (next maneuver).
English
- 25 -
NOTE
If the data for these items is not contained in the map data, the information is not available even if
there are signs on the actual road.
TIP
When you set [Offer Freeway Services] to on, appears while you are driving on freeways. Touch the
icon to open the details of the next few exits or service stations. In addition, touch an item to show its
location on the map. You can set it as a waypoint easily.
The data fields are different when you are navigating a route and when you have no
specified destination. For example, the data field provides the following information.
Enter traffic circle (maneuver after the next maneuver).
Freeway entrance or freeway exit.
Board ferry or leave ferry.
Approaching the destination or a waypoint.
Lane information
When navigating on multilane roads, you will need to make sure to
take the proper lane for the recommended route.
Signposts
Signs are displayed at the top of the map.
Junction view
If you are approaching a complex intersection, the map is replaced
with a 3D view of the junction.
Browsing the data field
- 26 -
English
• When the route is set:
Distance to final destination, time needed to reach the final destination and estimated
arrival time are shown.
• When the route is not set:
Direction or altitude is shown.
NOTES
• Touching and holding the field allows you to display the setting screen for the field. For details, refer
to page 57.
• The estimated time of arrival is an ideal value calculated based on the speed limit value set in [Max.
Speed] of vehicle type setting and the actual driving speed. The estimated time of arrival is only a
reference value, and does not guarantee arrival at that time. For details, refer to page 51.
Search for a destination or waypoint using the address or another method.
You can also set a destination by touching the map on the screen.
Once the destination is set, the system can start the navigation by touching [Start
Navigation] (page 34).
CAUTION
For safety reasons, these route-setting functions are not available while your vehicle is in motion. To
enable these functions, you must stop in a safe place and put on the parking brake.
Searching for a destination
English
- 27 -
NOTE
Some information regarding traffic regulations depends on the time when the route calculation is
performed. Thus, the information may not correspond with a certain traffic regulation when your
vehicle actually passes through the location in question. Also, the information on the traffic regulations
provided applies for a passenger vehicle, and not for a truck or other delivery vehicles. Always follow
the actual traffic regulations when driving.
1 Press .
2 Touch .
3 Touch [New Route].
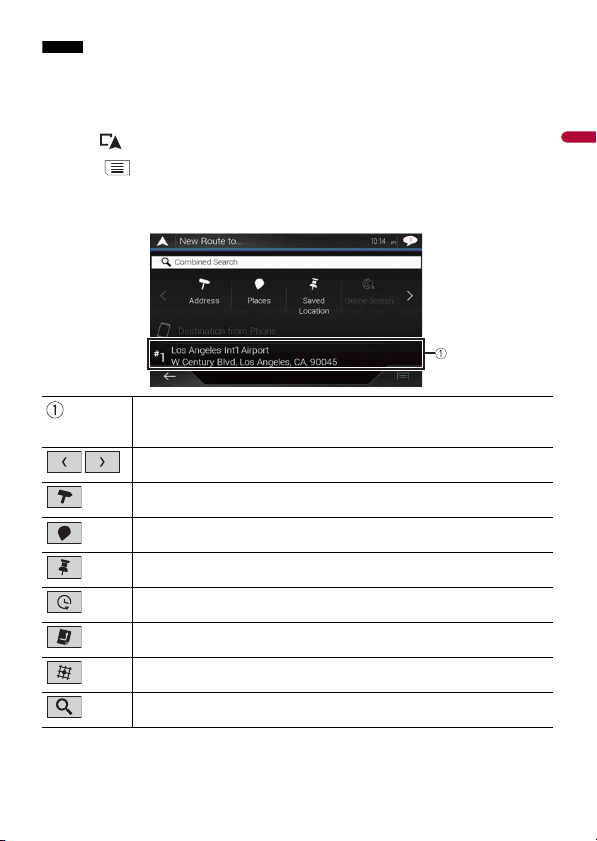
The following screen appears.
Suggests a destination based on your navigation habits, using
parameters such as current time of day, day of week and current
location.
Displays the previous or next page of the searching for a destination
menu.
Searches for a location by entering the specific address (page 28).
Searches for various facilities (Points Of Interest - POI) such as gas
stations accommodations, etc. by selecting the category (page 28).
Selects a destination from the stored locations (page 30).
Searches for a location from the recently visited places (page 31).
Selects a destination from the stored routes (page 30).
Searches for a location by entering a latitude and longitude
(page 31).
Searches for a location using multiple factors (page 31).

- 28 -
English
Search a destination in which the address is specified.
TIP
Depending on the search results, some steps may be skipped.
1 Touch [Address].
2 Select the [Country].
Proposes the country where you are as a default.
If you want to change the search area, set another country.
3 Select the [City or ZIP code].
Proposes the city/town where you are as a default.
You can select the city/town using its postal code instead of its name.
4 Select the [Street].
If the street name is not available, touch [Go to City] and select the city/town. This
way the center of the selected city/town becomes the destination of the route.
5 Select [Select House Number or Intersection].
This item will be displayed after a street is set. If the house number is not available,
touch [Go to Street] and select the street. This way the center of the selected street
becomes the destination of the route.
After you touch the selected address to finish the address search, the searched
location appears on the map screen.
6 Touch [Select as Destination].
You can search for various facilities (Points Of Interest – POI). by selecting the category
such as gas stations, accommodation or restaurant.
▶Searching for POIs using preset categories
The preset search allows you to quickly find the most frequently selected types of POIs.
1 Touch [Places].
2 Touch the category.
The preset search categories are as follows.
• [Gas Station]
• [Accommodation]
• [Restaurant]
• [Parking]
3 Touch t he P OI.
The searched location appears on the map screen.
Searching for a location by address
Searching for Points of Interest (POI)
English
- 29 -
TIP
If you touch , you can sort the results or show the locations of all facilities on the map.
4 Touch [Select as Destination].
NOTES
• When a route is not set, POIs are searched for around the current position.
• When the current position is not available either (no GPS signal), POIs are searched for around the last
known position.
• When a route is set, [Gas Station] and [Restaurant] are searched for along the route, and
[Accommodation] and [Parking] are searched for around the destination.
▶Searching for POIs by category or directly from the name of the facilities
You can search for POIs by their categories and subcategories. You can also search for
POIs by their names in each of their categories.
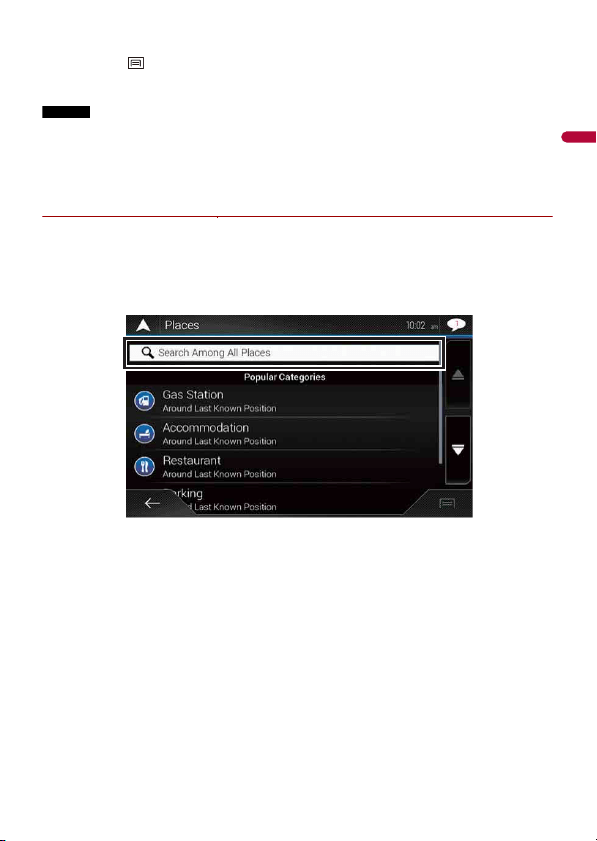
1 Touch [Places].
2 Touch [Search Among All Places].
3 Touch [Around Here] and then select the area in which the POIs should be
searched for.
• [Category View]:
You can select whether or not POI categories are displayed.
• [Around Here]:
Searches around the current position. Or, around the last known position if the
current position is not available. The results will be listed in order of the distance
from this position.
• [In a City]:
Searches for a place within a selected city/town. The results will be listed in order of
the distance from the center of the selected city/town.
• [Around Destination]:
Searches for a place around the destination of the current route. The results will be

- 30 -
English
listed in order of the distance from the destination. (This key is active only when
the route is set.)
• [Along Route]:
Searches along the current route, and not around a point already set. This is useful
when searching for a stopover that results in a minimal detour, such as searching
for gas stations or restaurants. The results will be listed in order of the length of the
necessary detour. (This key is active only when the route is set.)
4 Select one of the categories, subcategories or brands to narrow down the places.
TIP
Use the keyboard to enter the name of the place if you touch [Search by Name].
5 Touch t he P OI.
The searched location appears on the map screen.
TIP
If you touch , you can change the sort method of the results.
6 Touch [Select as Destination].
Storing locations you visit frequently saves time and effort.
Selecting an item from the list provides an easy way to specify the position.
NOTE
This function is available if locations have been registered in [Saved Location] that contains two preset
categories: [Home] and [Work] (page 40).
1 Touch [Saved Location].
2 Touch the entry.
The searched location appears on the map screen.
3 Touch [Select as Destination].
TIP
You can edit the details of saved locations by touching and then [Edit].
Storing routes you use frequently saves time and effort.
NOTE
This function is available if routes have been registered in [Saved Routes] (page 42).
1 Touch [Saved Routes].
2 Touch the entry.
Selecting a destination from stored locations
Selecting a destination from stored routes

English
- 31 -
3
Touch [Show Route].
4 Touch [Start Navigation].
TIP
You can change the final destination or add waypoints in [Route Planner] (page 34).
The places that were previously set as destinations or waypoints have been
automatically stored in [History].
1 Touch [ History].
2 Touch the entry.
The searched location appears on the map screen.
3 Touch [Select as Destination].
The [Combined Search] feature lets you quickly find a place by its name and search area.
TIP
The [Combined Search] function also searches your stored data.
1 Touch [ Combined Search ].
2 Touch the right text box to enter the country and city/town.
3 Enter the name, address, or category of the destination to the left text box, then
touch .
4 Touch the entry.
The searched location appears on the map screen.
5 Touch the right of the list to narrow down the search results.
TIP
If you touch a map data provider logo, you can narrow down the list of results by showing the
results from the provider.
6 Touch [Select as Destination].
Entering a latitude and longitude pinpoints the location.
1 Touch [Coordinates].
Selecting a destination from history
Searching for a location using [Combined Search]
Searching for a location by the coordinates

- 32 -
English
2 Enter the latitude value and touch [OK].
TIP
When entering the coordinates in UTM format, touch , then [UTM Coordinates].
3 Enter the longitude value and touch [GO!].
The searched location appears on the map screen.
4 Touch [Select as Destination].
TIP
You can change the display format of the latitude and longitude to any of the following formats:
decimal degrees; degrees and decimal minutes; or degrees, minutes and decimal seconds.
NOTE
When a value is already entered in the text field, delete the value first.
Specifying a location after scrolling the map enables you to set the position as a
destination or waypoint.
1 Press .
2 Touch and drag the screen to scroll the map.
3 Touch the location that you want to select as your destination.
The cursor appears.
4 Touch [Select as Destination].
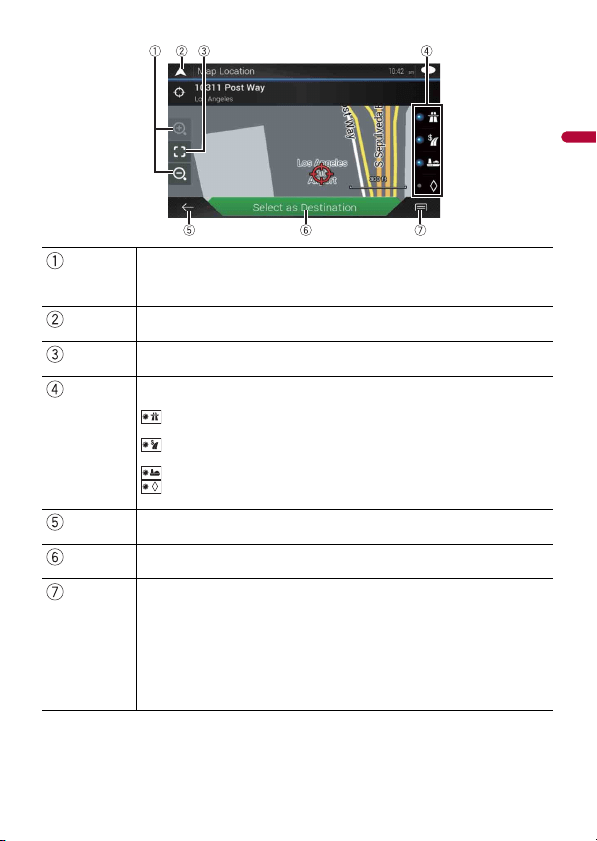
Once a location is searched, the [Map Location] screen appears. You can select some
options for the route or displayed map location before route calculation.
TIP
If you touch the map, the cursor is placed at that position. Also, you can scroll the map by dragging the
map.
Searching for a location by scrolling the map
Selecting the route options
English
- 33 -
Zoom in/zoom out
TIP
You can also pinch or expand the map to zoom in or out.
Cancels the [Map Location] screen and displays the map of the current
position.
Returns the cursor to the initial position and the map scale to the initial scale.
Shows the route setting preferences for route calculation. Touch the keys to
activate or deactivate the preference.
: Calculates the route prioritizing the use of freeways when the key is
activated.
: Calculates the route prioritizing the use of per-use charged toll roads when
the key is activated.
: Calculates the route prioritizing the use of ferries when the key is activated.
: Calculates the route prioritizing the use of carpool and HOV lanes when the
key is activated.
Returns to the previous screen.
Sets the cursor position to your destination (or waypoint).
Displays the shortcuts.
• [Detailed Information]:
Shows the detailed information of the point.
• [Save Location]:
Saves the displayed location as your favorite location. The saved location can be
easily recalled later.
• [Places Around Cursor]:
Searches for POIs around the displayed location. Touch the POI to show the [Map
Location] screen, and also set the POI as the destination (or waypoint).

- 34 -
English
1 Once the destination is selected, touch [Select as Destination].
The route summary screen appears and countdown begins. When the countdown
ends, the guidance automatically starts. If you touch the screen anywhere during the
countdown, the countdown stops and the screen will stay as it is.
2 Touch [Start Navigation].
Your navigation system starts the route guidance.
TIP
See page 24 for details on the route summary screen.
When navigation is already started, there are several ways to modify the current route.
The following sections describe some of those options.
The [Route Planner] (or [My Route]) feature lets you build your route using the list of
destinations.
TIP
Once you set the route, you can edit your route using the menu displayed as [My Route].
1 Press then touch .
2 Touch [Route Planner] or [My Route].
3 Touch one of the options.
Starting the navigation
Checking and modifying the current route
Building a route using [Route Planner]
English
- 35 -
▶Changing the starting position
The starting position for route can be changed from the current position.
1 Press then touch .
2 Touch [Route Planner] or [My Route].
3 Touch [Current GPS Position].
4 Touch [Set Start Point] or [Change Start Point] and then touch [OK].
5 Search for a location.
6 Touch [Set Start Point] or [Change Start Point].
The selected position is set as the starting position for route calculation.
7 Touch [Show Route] or [Continue Without Route].
Starting position (The current vehicle position is set as default and [Current GPS
Position] is displayed.) (page 35)
Calculates the route and shows the [Route Summary] screen.
Displays the options for the location.
[Move Up]/[Move Down]:
Edits the order you want to visit the locations.
[Delete]:
Deletes the destination or waypoint.
[Save Location]:
Stores the location in [Saved Location] (page 40).
[Change]:
Changes the destination or waypoint to another location.
[Show on Map]:
Shows the selected location on the map.
Displays the shortcuts.
[Delete All]:
Deletes all waypoints and the destination. Touch [Continue Without Route] to cancel the
planned route.
[Optimize Waypoints]:
Changes the order of waypoints automatically so that the route can be easily traveled. (If the
resulting order is the same as the current order, this option is invalid.)
[Optimize Route]:
Changes the order of all waypoints and the destination automatically so that the route can
be easily traveled. (If the resulting order is the same as the current order, this option is
invalid.)
Inserts a new waypoint.
Adds a new destination and changes the current destination to the last waypoint.
- 36 -
English
The system starts route recalculation after [Show Route] is touched, and then the
[Route Summary] screen appears. After [Start Navigation] is touched, your navigation
system starts the route guidance.
NOTE
After [Continue Without Route] is touched, the current position map appears.
▶Changing the starting position
1 Press then touch .
2 Touch [Route Planner] or [My Route].
3 Touch [Current GPS Position].
4 Touch [Back to GPS Position] and then touch [Delete Start Point].
The starting position for route calculation returns to the current position.
1 Press then touch .
2 Touch [Add Waypoint].
3 Search for a location.
4 Touch [Select as Waypoint].
The route is recalculated, and the [Route Summary] screen appears. (When the
waypoint is already set, the [My Route] screen appears. Touch [Show Route] and
proceed to the next step.)
5 Touch [Start Navigation].
Your navigation system starts the route guidance.
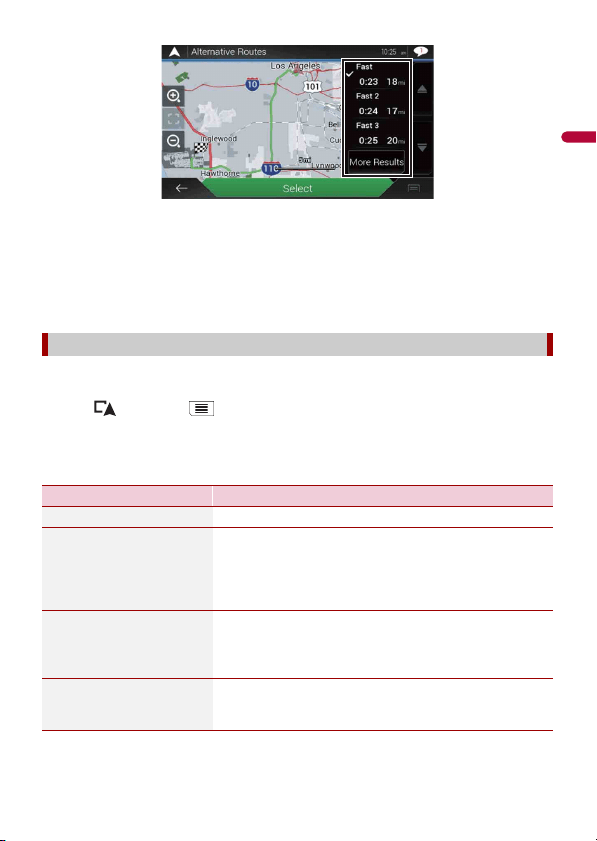
You can select another route and compare different route alternatives.
1 Press then touch .
2 Touch [Detours & Alternatives].
3 Touch [Alternative Routes].
4 Touch any of the route calculate conditions.
You can see the approximate time required and total distance of selected route
alternatives. Touch any of the route alternatives to see it on the map.
Adding waypoints
Checking route alternatives
English
- 37 -
TIP
If more than three route alternatives have been found, [More Results] appears. Touch [More
Results] to show the other routes.
5 Touch [Select].
The selected route is applied as your current route. For more information about route
calculation conditions, refer to [Route Planning Method] (page 53).
You can check for detour routes that avoid the selected sections or streets, or that avoid
the road ahead. You can also check for alternative routes.
1 Press then touch .
2 Touch [Detours & Alternatives].
3 Touch one of the options.
Checking detour routes
Menu Item Description
[Alternative Routes] Shows the alternative routes (page 36).
[Avoid Special Sections] Shows the route avoiding certain sections. Touch the list
item to select the section you want to avoid. The distance
and time difference, suggested route, current route, and
the section avoided are shown. Touch [Accept] to apply the
suggested route.
[Avoid Specific Road] Shows the route avoiding certain roads. Touch the list item
to select the road you want to avoid. Distance and time
difference, suggested route, current route, section avoided
are shown. Touch [Accept] to apply the suggested route.
[Avoid Road Ahead] Shows the route avoiding the road ahead. Touch [+] or [-]
to set the distance you want to avoid. Touch [Avoid] to
apply the suggested route.

- 38 -
English
NOTE
The route set by [Alternative Routes] cannot be canceled.
Once you set the route, you can check a summary of the current route.
1 Press then touch .
2 Touch [Route Summary].
3 Touch one of the options.
The condition of the displayed route is shown in the upper left by an icon. The total
length of the route and approximate required time for the route are in the lower left.
TIP
You can scroll the map by dragging the map.
[Restore Original Route] Cancels the route with avoidances and restores the
previous route.
Checking route information and preferences
Shows the information for a transit point on the route.
Touch to see the location on the map. Touch [Avoid] and [Accept] to set the location as a
location to avoid.
Shows alternative routes (page 36).
Menu Item Description

English
- 39 -
If you no longer need to travel to your destination, follow the steps below to cancel the
route guidance.
1 Press then touch .
2 Touch [Cancel Route] or [Delete Waypoint].
3 Touch one of the options.
If there are no waypoints on the route, touch [Cancel Route] to cancel the route.
If there are waypoints on the route, touch [Cancel Route] to cancel the route. Touch
[Delete Waypoint] to delete only the nearest waypoint. In such a case the route is
recalculated.
You can run a simulation of the navigation for the current route, as a demonstration.
1 Set a route to your destination (page 26).
2 Press then touch .
3 Touch [Route Summary], and then touch .
4 Touch [Simulation].
The simulation starts from the starting point of the route, and using a realistic speed,
it leads you through the whole recommended route.
NOTE
To stop the simulation, touch [Close].
Displays the shortcuts.
[Route Preferences]:
Shows the route setting preferences. If you change the preferences, the route is recalculated.
[Itinerary]:
Shows all transit points in detail. Touch a transit point to show its position on the map. If you
touch [Avoid] and [Accept] on the map screen, the route is recalculated avoiding the transit
point (as much as possible).
[Save Route]:
Saves the displayed route. The saved route can be recalled later.
[Places Along Route]:
Searches for POIs along the displayed route. Touch the POI to show the [Map Location]
screen, and also set the POI as a waypoint.
[Simulation]:
You can run a simulation of the navigation for the current route, as a demonstration
(page 39).
Canceling the current route guidance
Watching the simulation of the route
- 40 -
English
Storing your favorite locations in [Saved Location] allows you to save the time and effort
used on re-entering this information.
[Saved Location] can include your home location, workplace, and places you have
already registered.
You can store one home location and one workplace location.
1 Press then touch .
2 Touch [New Route], and then [Saved Location].
You can also display the [Saved Location] screen by touching on the bottom of
the screen when the navigation menu is displayed.
3 Touch [Home] or [Work] and then touch [OK].
When you have already stored your home or workplace, touch [Home] or [Work] to
show the location on the [Map Location] screen.
4 Search for a location (page 26).
5 Touch [Save Location].
The cursor position has been stored.
You can store a frequently visited location (such as a relative’s home) to allow easy
routing.
1 Press then touch .
2 Touch [New Route], and then [Saved Location].
You can also display the [Saved Location] screen by touching on the bottom of
the screen when the navigation menu is displayed.
3 Touch [Add Location].
4 Search for a location (page 26).
5 Touch [Save Location].
6 Enter the name if needed and then touch .
The cursor position has been stored.
TIP
In the on-screen keyboard, touching or enables you to store the location as your home or
workplace location.
Storing a location in [Saved Location]
Storing your home and your workplace location
Storing your favorite locations
English
- 41 -
1 Press then touch .
2 Touch [New Route], and then [Saved Location].
3 Touch , and then touch [Edit].
The [Select Location to Edit] screen appears.
4 Touch the item you want to rename and touch [Rename].
5 Enter the name and then touch .
6 Touch [Done].
NOTE
[Home] and [Work] cannot be renamed. The location can be set again.
1 Press then touch .
2 Touch [New Route], and then [Saved Location].
3 Touch , and then touch [Edit].
The [Select Location to Edit] screen appears.
4 Touch the item you want to delete and touch [Delete].
A message will appear asking you to confirm the deletion.
NOTES
• [Home] and [Work] cannot be deleted. The location can be set again.
• If you touch and then touch [Delete All], all entries (including the home and workplace
locations) can be deleted.
5 Touch [OK].
6 Touch [Done].
You can save any map location (such as a school zone or railroad crossing) as an alert
point.
Important
The warning for road safety cameras (like speed cameras) is disabled when you are in certain countries
where warnings for road safety cameras are prohibited. However, you are fully responsible for ensuring
that this feature is legal in the country where you intend to use it.
Renaming stored locations
Deleting stored locations
Saving a location as an alert point

- 42 -
English
NOTE
To use this function, activate the warnings beforehand and set the alert types (page 55).
1 Press .
2 Scroll the map and select a location.
The cursor appears at the selected point.
3 Touch .
4 Touch [Add Alert Points].
5 Set the necessary parameters.
6 Touch [Save].
Editing the stored alert points
Stored alert points can be edited.
1 Press .
2 Scroll the map and move the cursor over the stored alert point, and then touch
.
3 Touch [Edit Alert Points].
4 Set the necessary parameters.
If you touch and then touch [Delete], the selected alert point will be deleted.
5 Touch [Edit].
Storing your favorite routes in [Saved Routes] allows you to save the time and effort used
on re-entering this information.
1 Set a route to your destination (page 26).
2 Press then touch .
Menu Item Description
[Alert Type] Set the type of the alert point.
[Speed Limit] Set the speed limit for this alert point (if applicable).
[Direction] Set the direction from which you expect the alert to come
from.
Storing a route in [Saved Routes]
Storing your favorite routes
English
- 43 -
3
Touch [Route Summary], and then touch .
4 Touch [Save Route].
5 Enter the name if needed and then touch .
1 Press then touch .
2 Touch [New Route], and then .
3 Touch [Saved Routes].
4 Touch , and then touch [Edit].
5 Touch the item you want to rename and touch [Rename].
6 Enter the name and then touch .
7 Touch [Done].
1 Press then touch .
2 Touch [New Route], and then .
3 Touch [Saved Routes].
4 Touch , and then touch [Edit].
5 Touch the item you want to delete and touch [Delete].
NOTE
If you touch and then touch [Delete All], all entries can be deleted.
6 Touch [Delete].
The Traffic Message Channel (TMC) provides real-time traffic reports. If the navigation
system is equipped with the TMC feature, you can check the traffic reports and
information received.
Renaming stored routes
Deleting stored routes
Receiving real-time traffic information (TMC)
- 44 -
English
1 Press then touch .
2 Touch [Traffic].
The [Traffic Summary] screen appears.
Traffic information is displayed onscreen in a list. This allows you to check how many
traffic incidents have occurred, the locations, and the distance from your current
position.
1 Press then touch .
2 Touch [Traffic].
The [Traffic Summary] screen appears.
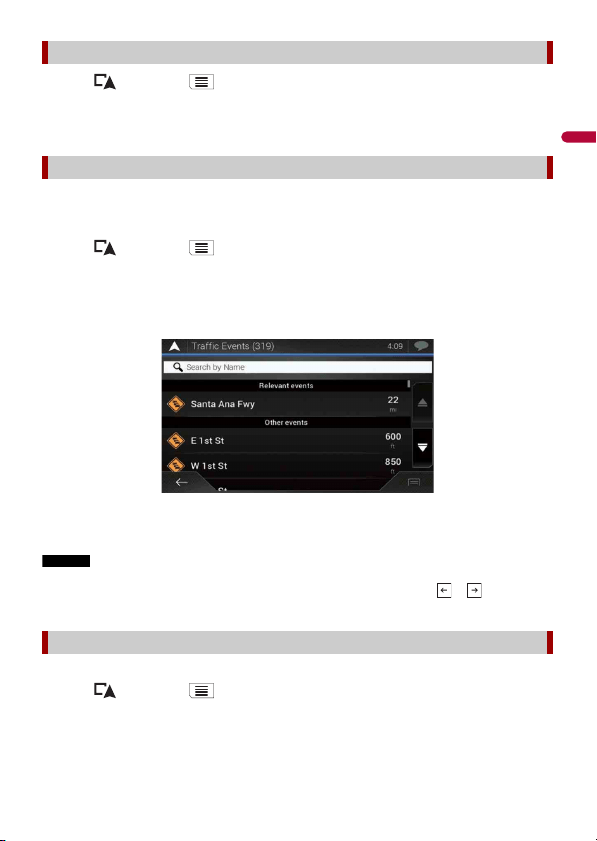
3 Touch [Traffic Events].
A list with traffic information that has been received is shown. The list is sorted by
distance from your current position. Places (street names) where incidents have
occurred are displayed on the list.
NOTES
• If a route is set, relevant events for your current route are shown in the upper section of the list.
• Touching the desired item allows you to check its position on the map. Touch or to show the
previous or next event.
Traffic event information can be displayed on the map.
1 Press then touch .
2 Touch [Traffic].
The [Traffic Summary] screen appears.
Displaying the [Traffic Summary] screen
Viewing the traffic list
Checking the traffic incidents on the map

English
- 45 -
3
Touch [Traffic Map].
Road segments affected by traffic incidents are displayed in an alternate color on the
map, and small symbols above the road show the nature of the incident.
The traffic congestion lines indicate the degree of the congestion by color.
The notification icon shows the status of traffic information reception.
1 Touch the relevant traffic event icon on the map.
Traffic notification icon
Traffic notification icon
Indicates that there are no traffic incidents in your coverage area.
Indicates that information on traffic incidents are being received.
Indicates that there are no significant traffic incidents on your route.
Indicates that there are significant traffic incidents on your route. The icon shows
the type of the next traffic incident.
- 46 -
English
You can check the details of the traffic incidents. Touch the relevant event to display the
location on the map.
The traffic information feature is turned on by default. To enable or disable the TMC
feature, perform the following procedure.
NOTE
If you turn the traffic information feature off, [Traffic] on the navigation menu disappears.
1 Press then touch .
2 Touch , and then touch [Settings].
3 Touch , and then touch [Traffic].
4 Touch [Traffic] to turn the switch on or off.
The [Useful Information] menu contains various information to support your driving.
1 Press then touch .
2 Touch [Useful Information].
The [Useful Information] screen appears.
Information on each option in the [Useful Information] menu
Turning the traffic information on or off
Checking useful information about your trip
About the [Useful Information] menu
Menu Item Description
[Where Am I?] Displays a special screen with information about the
current position and a key to search for nearby emergency
or roadside assistance services.
TIP
To save the current position as a [Saved Location] destination,
touch (page 40).
[Help Nearby] Check for POIs in your surroundings.
The preset search categories are as follows.
• [Car Repair]
• [Health]
• [Police]
• [Gas Station]

English
- 47 -
Activating the trip logger enables you to record your driving history (hereinafter called
“trip log”). You can review your trip log later. The trip logger is set so that it can be started
manually by default. You can change the settings of this function in order to save the log
automatically. For details, refer to [Trip Monitor] (page 61).
▶Activating trip logger temporarily
One-time activation is useful if you want to create a log only for a particular trip.
1 Press then touch .
2 Touch [Useful Information].
3 Touch [Trip Monitor].
A list of trip logs already recorded appears. A blank list appears if you have not
recorded any trip logs yet.
4 Touch [Start New Recording].
The trip logger is activated. The touch key changes to [Stop Recording]. Touching
[Stop Recording] allows you to deactivate the trip logger.
NOTES
• If there is not enough space in the built-in memory, the oldest trip log will be overwritten by the new
one.
• If you want the system to always activate the trip logger whenever the GPS signal is available, turn on
[Enable Auto-Saving]. For details, refer to “Setting the trip logger” (page 48).
▶Browsing the trip log
1 Record the trip log.
2 Press then touch .
3 Touch [Useful Information].
4 Touch [Trip Monitor].
To export all trip logs, touch [Export All].
5 Touch any of the items to see the details.
[Trip Monitor] Check the statistical data of your trips (for example, start
time, end time, average speed, etc.) (page 47).
[GPS Information] Displays the GPS information screen with satellite position
and signal strength information.
[Fuel Consumption] Estimates the fuel cost to your destination by entering the
fuel consumption information in the navigation system.
Recording your travel history
Menu Item Description

- 48 -
English
TIP
To display the trip log on the map, touch [Visible on Map] to tick the check box. Touching allows
you to view the shortcuts and enables you to use the following functions.
▶Setting the trip logger
1 Record the trip log.
2 Press then touch .
3 Touch [Useful Information].
4 Touch [Trip Monitor].
5 Touch and then touch [Trip Monitor Settings].
6 Touch any of the items to change the settings.
TIP
[Trip database size] indicates the current data size of the trip log (track log included).
Editing a trip log
1 Press then touch .
2 Touch [Useful Information].
3 Touch [Trip Monitor].
4 Touch and then touch [Edit].
5 Touch any of the items to edit.
Menu Item Description
[View on Map] Shows the trip log on the map screen.
[Export Track Log] Exports the track log currently selected to an external
storage device.
Menu Item Description
[Enable Auto-Saving] Set whether automatic trip logging is activated or not.
[Save Track Log] Track logs, the sequence of the positions given by the GPS
receiver, can be saved together with trip logs. You can
activate the track logger whenever the trip logger is
activated.
Menu Item Description
[Delete] Deletes the trip log.
[Rename] Renames the trip log.
English
- 49 -
TIP
If you touch and then touch [Delete All], all entries can be deleted.
6 Touch [Done].
In the trip computer screen, the information received from the GPS receiver and your
vehicle is displayed like a meter for a vehicle.
1 Press .
2 Touch the data field key.
TIPS
• If you touch [Trip Summary], the details of the current trip are displayed. Touch and then touch
[Save Trip] to store the current trip log.
• If you press , you can return to the map screen.
The fuel consumption monitor helps you keep track of the fuel consumption of your car
even if you do not use the navigation system for all your journeys. Set the initial
odometer value and then record the distance driven and the amount of fuel whenever
you fill up your car. You can also set reminders for regular car maintenance.
[Change Color] Changes the color by selecting another color from the
color table.
Using the Trip Computer mode
Calculating the fuel consumption
These calculations are based only on the information that you provide and not on any
data from the vehicle. The fuel mileage displayed is only a reference value, and does
not guarantee that the fuel mileage displayed can be obtained.
Menu Item Description

- 50 -
English
▶Setting the initial odometer value
Before you use the fuel consumption feature, enter the initial odometer value from
which you want to start measuring the mileage.
1 Press then touch .
2 Touch [Useful Information].
3 Touch [Fuel Consumption].
4 Touch [Initial Odometer Value].
5 Enter the initial odometer value and then touch .
The initial odometer value has been set.
▶Entering the fuel consumption information
To calculate the fuel consumption for the distance you have traveled, enter the distance
driven and the amount of fuel whenever you fill up your car.
1 Press then touch .
2 Touch [Useful Information].
3 Touch [Fuel Consumption].
4 Touch [Add].
5 Touch [Current Odometer Value] and then enter the current odometer value.
6 Touch [Gas Amount] to enter the amount of fuel pumped this time.
7 Touch [Gas Price / Unit] to enter the fuel unit price this time.
8 Touch [Add].
9 Touch [Done].
TIP
To delete an entry, touch to display the shortcut for deletion.
▶Setting the car maintenance schedule
1 Press then touch .
2 Touch [Useful Information].
3 Touch [Fuel Consumption].
4 Touch .
5 Touch [Maintenance Schedule].
6 Touch [Add] or the one of entries.

English
- 51 -
7
Enter the name, date, and mileage for the reminder.
8 Touch [Done].
TIP
To delete an entry, touch to display the shortcut for deletion.
You can configure the navigation settings, and modify the behavior of this system.
1 Press then touch .
2 Touch , and then touch [Settings].
The [Settings] screen appears.
3 Touch one of the following categories, then select the options.
[Route Preferences] (page 51)
[Sound] (page 54)
[Warnings] (page 55)
[Navigation Map] (page 57)
[Regional] (page 59)
[Display] (page 60)
[Traffic] (page 60)
[Trip Monitor] (page 61)
[Start Configuration Wizard] (page 61)
[SyncTool] (page 61)
Sets the type of vehicle you are driving, the road types used in route planning, and the
route planning method.
Navigation Settings
[Route Preferences]

- 52 -
English
Menu Item Description
[Vehicle] Set the type of vehicle you will be using on the route.
NOTES
• The route is planned based on the selected vehicle type.
• To enhance the route accuracy, correctly select a vehicle type
that is similar to the condition of your vehicle.
TIPS
• To edit the name and estimated maximum speed of the selected
vehicle profile, touch .
• To add a new vehicle profile, touch [Add Profile]. Then select one
of the vehicle types and set the name and estimated maximum
speed.
[Car] • Maneuver restrictions and directional constraints are
taken into account when planning a route.
• Roads are used only if access for cars is allowed.
• Private roads and resident-only roads are used only if they
are inevitable to reach the destination.
[Emergency] • All maneuvers available at intersections are taken into
account.
• Directional constraints are taken into account in the same
way as travel in the opposite direction is allowed at low
speeds.
• Only private roads that need to be used to access the
destination are included.
• Walkways are excluded from routes.
[Bus] • Maneuver restrictions and directional constraints are
taken into account when planning a route.
• Roads are used only if access for buses is allowed.
• Private roads, resident-only roads and walkways are
excluded from routes.
[Taxi] • Maneuver restrictions and directional constraints are
taken into account when planning a route.
• Roads are used only if access for taxis is allowed.
• Private roads, resident-only roads and walkways are
excluded from routes.
[Truck] • Maneuver restrictions and directional constraints are
taken into account when planning a route.
• Only roads that allow truck access are included.
• Private roads, resident-only roads and walkways are
excluded from routes.
• U-turns are not used in routes (turning around on a
divided road is not considered a U-turn for the purpose of
this system).

English
- 53 -
[Route Planning Method] Set to change the route planning method. Route
calculation can be optimized for different situations and
vehicle types by changing the planning method.
[Fast] Calculates a route with the shortest travel time to your
destination as a priority. Usually the best selection for fast
and standard cars.
[Easy] Result in a route with fewer turns and no difficult
maneuvers. With this option, you can make this system to
take, for example, the freeway instead of a series of smaller
roads or streets.
[Short] Calculates a route with the shortest distance to your
destination as a priority. Usually practical for slower
vehicles. Rarely practical to use to search for shorter routes
for normal vehicles regardless of the speed.
[Economical] Calculates a route that is quick and saves fuel.
[Navigation Mode] Enable or disable off-road navigation.
[On-road] The route is planned towards the destination along the
roads on the map.
[Off-road] The route is planned towards the destination in a straight
line, not along the roads on the map.
[Highways] Set to off to avoid prioritizing freeways for calculating the
route.
NOTE
This function is useful when you want to avoid freeways such as
when driving a slow car or towing another vehicle.
[Period Charge] Set to off to avoid prioritizing toll roads for calculating the
route.
This function is useful when you want to avoid toll roads
with restricted time access that require you to purchase a
separate pass or vignette to extend the length of time
allotted for use.
NOTE
This option can be enabled or disabled separately from the pre-
use toll road usage option.
[Per-use Toll] Set to off to avoid prioritizing per-use charged toll roads for
calculating the route.
NOTE
This function is useful when you want to avoid toll roads where
there is a per-use charge.
Menu Item Description

- 54 -
English
* Car shuttle trains are used to transport vehicles for relatively short distances and they usually
connect places that are not easily accessible by road.
Adjusts the different sound volumes and changes the voice guidance profile.
[Ferries] Set to off to avoid prioritizing ferries for calculating the
route.
[Car Shuttle Trains]* Set to off to avoid prioritizing car shuttle trains for
calculating the route.
[Carpool Lanes] Set to off to avoid prioritizing carpool and HOV lanes for
calculating the route.
[Unpaved Roads] Set to off to avoid prioritizing unpaved roads for
calculating the route.
[Sound]
Menu Item Description
[Voice] Adjust the volume of the guidance sounds (verbal
instructions).
[Alert Beeps] Adjust the volume of the non-verbal alert sounds (beeps).
[Ding] Adjust the volume of the sound (ding) that precedes the
verbal instructions.
[Voice Guidance] Enable or disable voice guidance.
[Announce Streets and
Roads in Native Language
Area]*
Select whether to have the navigation system announce
the street names in the native language of the area, only
the road numbers, or only the maneuvers.
[Announce Streets and
Roads in Foreign
Language Area]*
Select whether to have the navigation system read the
street names in a foreign country, only the road numbers,
or only the maneuvers.
[Early Indication of
Maneuvers]
Select whether you want an immediate announcement for
the next maneuver or to receive the information when the
maneuver is near.
[Verbosity Level] Set the verbosity of the voice instructions.
(How much information is given and how often the
prompts occur.)
[Minimal] Given once right before the next maneuver.
[Medium] Given once as the vehicle approaches the next maneuver
and it is repeated right before the maneuver.
Menu Item Description
English
- 55 -
* Enabled only when a TTS-voice is selected for the voice language.
Enables or disables warnings and sets up the warning function.
Important
• This system is able to warn you if you exceed the current speed limit. This information may not be
available for your region (ask your local dealer), or may not be fully correct for all roads on the map.
• You are liable for ensuring that using this feature is legal in the country where you intend to use it.
[Verbose] Given once relatively far from the next maneuver, it is
repeated as the vehicle approaches the next maneuver,
and it is repeated again right before the actual maneuver.
[Announce Route
Summary]*
Select whether to have the navigation system announce by
voice a quick summary of the route whenever a route is
calculated.
[Announce Traffic Info]* Select whether to have the navigation system announce by
voice the traffic information whenever a traffic incident on
your route is received.
[Announce System
Messages]*
Select whether to read out the message when a system
message appears.
[Warnings]
Menu Item Description
[Speed Warning] Set the type of speed and alert warnings.
[Warn When Speeding] Select whether to receive visible and/or audible warnings.
[Disabled] No warnings will go off.
[Visual] Visible warnings will go off when exceeding the speed
limit.
[Audio and Visual] Audible and visible warnings will go off when exceeding
the speed limit.
[Speed Limit Always
Visible]
Select whether to see the speed limit sign on the map all
the time. The color of the speed limit sign changes as
exceeding the speed limit when selected.
[Outside Cities: ***% of
the Speed Limit]
Set the percentage of the speed limit warning message in
rural areas.
[Within Cities: ***% of
the Speed Limit]
Set the percentage of the speed limit warning message in
urban areas.
[Alert Points] This setting allows you to receive a warning when
approaching alert points like school zones or railroad
crossings (page 56).
Menu Item Description
- 56 -
English
▶Setting the alert point warnings
You can set an alert for the different alert point categories, individually.
Important
The warning for road safety cameras (like speed cameras) is disabled when you are in certain countries
where warnings for road safety cameras are prohibited. However, you are fully responsible for ensuring
that this feature is legal in the country where you intend to use it.
1 Press then touch .
2 Touch , and then touch [Settings].
3 Touch [Warnings].
4 Touch [ Alert Points].
5 Touch [Alert Point Warnings] to turn it on.
6 Touch the item you want to set from [Alert Types] or [Speed Camera Types].
7 Touch any of the items to change the setting.
8 Touch [Warning Type] and then touch one of the options.
NOTE
If you select [Audio and Visual] in the warning type setting, you can change the reception timing of
the audio alert. If you select [Only When Speeding], the audio alert is only played when you exceed
the given speed limit. If you select [When Approaching], the audio alert is always played when
approaching one of these alert points. In order to draw your attention, the alert is different when
you exceed the speed limit.
[Alert Point Warnings] Set to on to enable to adjust a variety of alert warnings.
[Alert Types] Set the type of alert point.
[Speed Camera Types] Set the type of speed camera.
[Warning Road Signs] Touch this key to turn on or off warnings and to set the
distance from the hazard to receive the warning at. These
can be set individually for the different warning types.
[Disabled] The system does not warn you of the alert points for this category.
[Visual] You will receive a visible warning while you are approaching the
points in this category.
[Audio and Visual] You will receive audible and visible warnings while you are
approaching the points in this category.
Menu Item Description

English
- 57 -
Fine-tunes the appearance of the map screen and adjusts how the software helps you
navigate with different kinds of route-related information on the map screen.
[Navigation Map]
Menu Item Description
[Map Display] See the effect when you change a setting.
[Viewpoint]
[Far] [Normal] [Close]
[Manual]
Adjust the basic zoom and tilt levels to your needs. Some
preset levels are available. If you select [Manual], you can
store adjusted map scales and view angles.
[Color Mode]
[Auto] [Day] [Night]
Switches between daytime and nighttime color modes or
let the software switch between the two modes
automatically a few minutes before sunrise and a few
minutes after sunset.
[Day Map Color] Select the color scheme used in the daytime map.
[Night Map Color] Select the color scheme used in the nighttime map.
[Landmarks]* Shows or hides 3D landmarks which are 3D artistic or block
representations of prominent or well-known objects.
[Buildings]* Shows or hides 3D city models which are 3D artistic or
block representations of complete city building data
containing actual building sizes and actual positions on the
map.
[3D Terrain] Shows or hides the 3D elevation of the surrounding terrain.
[Track Logs] Turns on or off track log saving which saves the sequence
of the locations you go through on your journeys.
[Place Markers] Select which POI icons to show on the map while
navigating.
[Data Fields] Choose to have different values displayed for when
navigating a route to a select destination and for when just
cruising around without any particular destination
(page 25).
[First], [Second] and [Third] selects items displayed in the
data fields shown when the route exists. [Without Route]
selects the items displayed in the data fields shown when a
route does not exist.
[Route Progress Bar] Turns on or off the route progress bar to display the current
route as a straight line located on the right side of the map.
The arrow represents your current position and moves up
the line as you travel along the route.
[Offer Freeway Services] Select whether to stop by a gas station or a restaurant
during your journey (page 24).

- 58 -
English
[Services Displayed] Select the service types displayed for the freeway exits or
service stations. Choose from the POI categories.
[Automatic Overview] When selected, the map zooms out to show an overview of
the surrounding area if the next route event (maneuver) is
far. When you get close to the event, the map returns to the
normal map view.
[Signposts] Whenever adequate information is available, lane
information similar to the real ones on road signs above
the road is displayed at the top of the map. You can turn
this feature on or off.
[Junction View] If you are approaching a freeway exit or a complex
intersection and the necessary information is available, the
map is replaced with a 3D view of the junction.
[Tunnel View] When entering tunnels, the surface roads and buildings
can be distracting. This feature shows a generic picture of a
tunnel instead of the map. A top-down overview of the
tunnel and remaining distance are also displayed.
[Offer Congestion Detour
on Highways]
When you slow down while driving on a freeway due to a
traffic congestion, this navigation system offers you a
detour using the next exit. The message shows you the
distance to the exit and the difference in the distance and
estimated time compared to the original route. You can
choose from one of the following options:
• Touch [Dismiss] or just ignore the message if you want to
keep the original route.
• Touch [Preview] to see an overview of the original route
and the detour to make the decision. You can accept the
detour as shown in the preview, or increase the freeway
segment bypassed before accepting.
• Turn to the suggested new direction.
[Offer Real Time
Alternative Routes]
Alternative routes can be suggested when driving on
normal roads. This navigation system will select a different
turn in the upcoming intersection and offer you a different
route for the next section of the route. You cannot,
however, modify the offered detour.
[Offer Parking Around
Destination]
Parking at the destination may not be easy to find in city
areas. As you approach the destination, this navigation
system can offer parking category places near your
destination. Touch to open a top-down map with the
destination and the offered parking places. The route is
calculated by selecting one of the parking places.
Menu Item Description

English
- 59 -
* This function becomes effective only when the additional map data is installed (AVIC-W6500NEX).
Changes the voice guidance language, the application language, and measurement
units.
[Offer Hints Upon Detour] If you leave the recommended route and suddenly exit the
freeway, this navigation system offers different alternatives
near the exit like gas stations or restaurants. Also, if there
are avoidable parts of the original route ahead (like a
tunnel, a toll road or a ferry), you will find them in the list in
case you want to bypass them with the help of this
navigation system.
[Regional]
Menu Item Description
[Language] Displays the current language of the user interface. By
touching the key, you can select a new language from the
list of available languages. This system will restart if you
change this setting.
[Voice Language] Displays the current voice guidance profile. By touching
the key, you can select a new voice guidance language
from the list of available languages and speakers. Touch
any of these keys to hear a sample voice prompt.
[Units and Formats] Set the various units to be used by this system.
NOTE
This system may not support all the listed units in some voice
guidance languages.
[Time Zone] By default, the time zone is taken from the map
information and adjusted according to your current
location.
NOTE
If a setting other than [Automatic Time Zone] is selected, [Time
Zone] (the option to set the time difference manually) and
[Daylight Saving Time] (the option to turn on or off daylight saving
time) can also be set.
[Automatic Time Zone] The time zone setting changes automatically.
[Manual Time Zone] The present setting value for the time difference and
daylight saving time that you set are used.
Menu Item Description

- 60 -
English
Sets separate themes for daytime and nighttime use, adjusts the display backlight, and
enables or disables menu animations.
Enables or disables the traffic information feature.
[Manual Time Zone if
Auto Unavailable]
The time zone setting changes automatically if automatic
change is available. Otherwise, the present setting value
that you set is used.
[Manual Time Zone in
Current Zone]
The present setting value that you set is used in the current
time zone. If your vehicle moves to another time zone, the
time zone setting changes automatically.
[Daylight Saving Time] Set daylight saving time as applying or not unless
[Automatic Time Zone] is set.
[Display]
Menu Item Description
[Menu Animations] When animation is turned on, the keys on the menus and
keyboard screens are animated. Screen transitions are also
animated.
[Day Skin Theme] Select the style and colors of the navigation menu used in
the daytime.
[Night Skin Theme] Select the style and colors of the navigation menu used in
the nighttime.
[Traffic]
Menu Item Description
[Traffic] Enable or disable the TMC receiver that can receive real-
time traffic information.
[Data Source]
[Radio] [Online]
Select which data source to receive real-time traffic
information from. [Online] is available only if the device is
enabled.
[Use Traffic Info] Select whether to have traffic incidents be taken into
consideration when the route is calculated.
[Show Traffic Info] Select whether to show icons relevant to traffic incidents
and lines indicating the traffic flow on the map.
[Off] No traffic icons or lines indicating the traffic flow are
shown.
[Color] Only the lines indicating traffic flow are shown on the map.
Menu Item Description

English
- 61 -
Turns automatic trip log saving on or off and checks the current size of the trip database.
Modifies the basic software parameters used during the initial setup process.
Starts the synchronization tool, which makes it possible to update your maps (page 61).
You can update existing content, purchase additional maps and activate extra services
on your product. To update the content, download the update on your USB memory
storage by using the computer to which the Naviextras Toolbox is installed. Then,
transfer the data from connected USB memory storage to your navigation system by
using [SyncTool] on this product. For details, access the following URL and refer to “HOW
TO UPDATE?” GUIDE.
http://pioneer.naviextras.com
[Color And Icon] Icons for the relevant traffic incidents and lines indicating
the traffic flow are shown on the map.
[Show Free Traffic Flow As
Well]
Select whether to receive information on smooth traffic
flow.
[Offer Detour if it Saves at
Least:]
Set the minimum time to be saved when having the system
suggest a detour route. If the estimated time saved by the
planned detour avoiding the traffic incidents is more than
the set time, the system suggests the new detour route.
Otherwise, the new route is not suggested.
[Confirm Detours
Manually]
Enable or disable the manual confirmation of every
recalculation.
[Trip Monitor]
Menu Item Description
[Enable Auto-Saving] Set whether automatic trip logging is activated or not
(page 48).
[Save Track Log] Track logs, the sequence of the positions given by the GPS
receiver, can be saved together with trip logs. You can
activate the track logger whenever the trip logger is
activated (page 48).
[Start Configuration Wizard]
[SyncTool]
Updating the map
Menu Item Description

- 62 -
English
1 Turn on the Bluetooth function on the device.
2 Press .
3 Touch then .
The Bluetooth screen appears.
4 Touch [Connection].
5 Touch .
The unit starts to search for available devices, then displays them in the device list.
6 Touch the Bluetooth device name.
After the device is successfully registered, a Bluetooth connection is established by
the system. Once the connection is established, the device name is displayed on the
list.
NOTES
• If twenty devices are already paired, [Memory Full] is displayed. Delete a paired device first (page 63).
• If your device supports SSP (Secure Simple Pairing), a six-digit number appears on the display of this
product. Touch [Yes] to pair the device.
• If a PIN code input is required, enter a PIN code. (The default PIN code is "0000".)
TIP
The Bluetooth connection can also be made by detecting this product from the Bluetooth device.
Before registration, make sure that [Visibility] in the [Bluetooth] menu is set to [On] (page 63). For
details on Bluetooth device operations, refer to the operating instructions supplied with the Bluetooth
device.
1 Press .
2 Touch then .
CAUTION
Never turn this product off and disconnect the device while the Bluetooth setting operation is being
processed.
Bluetooth
Bluetooth connection
Bluetooth settings
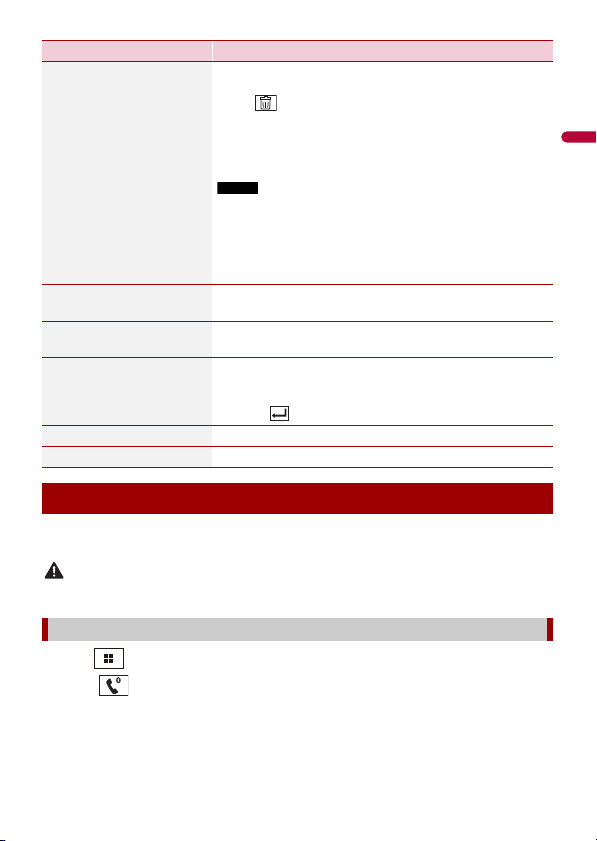
English
- 63 -
To use this function you need to connect your cellular phone to this product via
Bluetooth in advance (page 62).
CAUTION
For your safety, avoid talking on the phone as much as possible while driving.
1 Press .
2 Touch .
The phone menu screen appears.
3 Touch one of the call icons on the phone menu screen.
Menu Item Description
[Connection] Connect, disconnect, or delete registered Bluetooth device
manually.
Touch to delete registered device.
To connect a registered Bluetooth device manually, touch
the name of the device.
To disconnect the device, touch the name of the connected
device in the list.
NOTE
Connect the Bluetooth device manually in the following cases:
• Two or more Bluetooth devices are registered, and you want to
manually select the device to be used.
• You want to reconnect a disconnected Bluetooth device.
• Connection cannot be established automatically for some
reason.
[Auto Connect]
[On] [Off]
Select [On] to connect the last connected Bluetooth device
automatically.
[Visibility]
[On] [Off]
Select [On] to make this product visible to the other device.
[PIN Code Input] Change the PIN code for Bluetooth connection.
The default PIN code is “0000”.
1 Touch [0] to [9] to input the pin code (up to 8 digits).
2 Touch .
[Device Information] Displaying the device name and address of this product.
[Bluetooth Memory Clear] Touch [Clear] then [OK] to clear the Bluetooth memory.
Hands-free phoning
Making a phone call
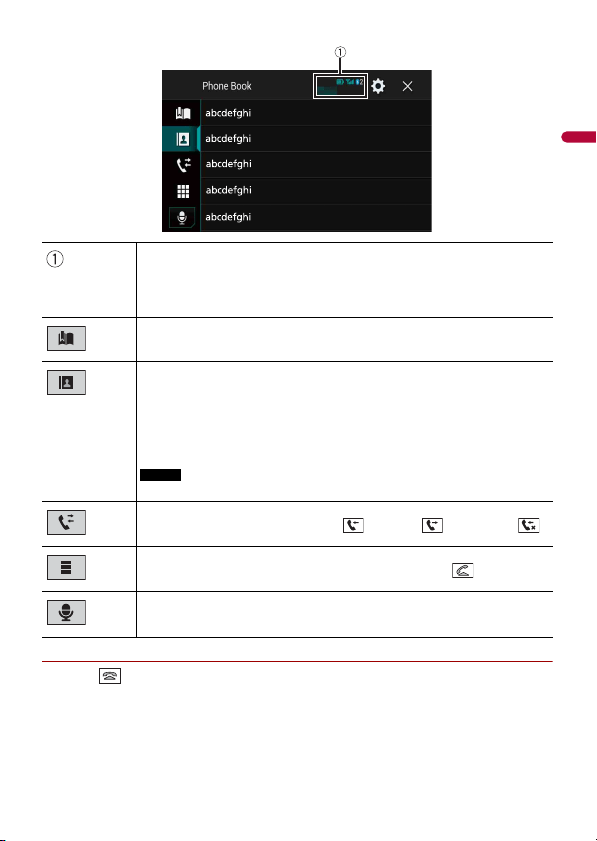
- 64 -
English
▶To end the call
1 Touch .
The following items are displayed.
• Name of the current cellular phone
• List number of the current cellular phone
• Reception status of the current cellular phone
• Battery status of the current cellular phone
Using preset dial list (page 65)
Using phone book
Select a contact from the phone book. Touch the desired name on the list then
select the phone number.
TIPS
• The contacts on your phone will be automatically transferred to this product.
• Update the phone book manually.
NOTE
[Visibility] of the [Bluetooth] screen should be on (page 63).
Using call history
Make a phone call from the received call , dialed call , or missed call .
Direct phone number input
Enter the number keys to enter the phone number then touch to make a call.
Switches to the voice recognition function (page 65).

English
- 65 -
▶Registering a phone number
You can easily store up to six phone numbers per device as presets.
1 Press .
2 Touch .
3 Touch or .
On the [Phone Book] screen, touch the desired name to display the contact’s phone
number.
4 Touch .
▶Dialing from the preset dial list
1 Touch .
2 Touch the desired entry on the list to make a call.
The dial screen appears and dialing starts.
▶Deleting a phone number
1 Press .
2 Touch .
3 Touch .
4 Touch .
5 Touch [Yes].
1 Touch to answer the call.
Touch to end the call.
TIPS
• Touch while getting a call waiting, switch to the talking person.
• Touch while getting a call waiting to reject the call.
You can use the voice recognition function of iPhone or smartphone.
NOTES
• When an iPhone running iOS 6.1 or higher is used, Siri® Eyes Free Mode is available with this product.
Using the preset dial lists
Receiving a phone call
Voice recognition function

- 66 -
English
• For using this function with a smartphone, the device must be compatible with Android Auto. For
using the voice recognition function with a smartphone, launch Android Auto beforehand.
1 Press .
2 Touch .
3 Touch .
The voice recognition function launches and the voice control screen appears.
TIP
You can also launch the voice recognition function by pressing .
1 Touch .
TIP
To display the dial confirmation screen, touch again.
NOTES
• The dial confirmation screen cannot be minimized on the AV operation screen.
• AV sources cannot be selected even if the dial confirmation screen is minimized while talking on the
phone or receiving an incoming call.
1 Press .
2 Touch then .
During a conversation, you can switch to private mode (talk directly on your cellular
phone).
1 Touch or to turn private mode on or off.
Minimizing the dial confirmation screen
Phone settings
Menu Item Description
[Auto Answer]
[On] [Off]
Select [On] to answer an incoming call automatically.
[Ring Tone]
[On] [Off]
Select [On] if the ring tone does not come out from the car
speakers.
[Invert Name] Select [Yes] to change the order of the first and last names
in the phone book.
Setting the private mode

English
- 67 -
This product can be adjusted to the other party’s listening volume.
1 Touch to switch between the three volume levels.
▶General notes
• Connection to all cellular phones featuring Bluetooth wireless technology is not
guaranteed.
• The line-of-sight distance between this product and your cellular phone must be 10
meters or less when sending and receiving voice and data via Bluetooth technology.
• With some cellular phones, the ring sound may not be output from the speakers.
• If private mode is selected on the cellular phone, hands-free phoning may be disabled.
▶Registration and connection
• Cellular phone operations vary depending on the type of cellular phone. Refer to the
instruction manual that came with your cellular phone for detailed instructions.
• When phone book transfer does not work, disconnect your phone and then perform
pairing again from your phone to this product.
▶Making and receiving calls
• You may hear a noise in the following situations:
– When you answer the phone using the button on the phone.
– When the person on the other end of the line hangs up the phone.
• If the person on the other end of the line cannot hear the conversation due to an echo,
decrease the volume level for hands-free phoning.
• With some cellular phones, even after you press the accept button on the cellular
phone when a call comes in, hands-free phoning may not be performed.
• The registered name will appear if the phone number is already registered in the
phone book. When the same phone number is registered under different names, only
the phone number will be displayed.
▶The received call and dialed number histories
• You cannot make a call to the entry of an unknown user (no phone number) in the
received call history.
• If calls are made by operating your cellular phone, no history data will be recorded in
this product.
▶Phone book transfers
• If there are more than 1 000 phone book entries on your cellular phone, not all entries
may download completely.
• Depending on the phone, this product may not display the phone book correctly.
Adjusting the other party’s listening volume
Notes for hands-free phoning

- 68 -
English
• If the phone book in the phone contains image data, the phone book may not be
transferred correctly.
• Depending on the cellular phone, phone book transfer may not be available.
Before using the Bluetooth audio player, register and connect the device to this product
(page 62).
NOTES
• Depending on the Bluetooth audio player connected to this product, the available operations with
this product may be limited to the following two levels:
– A2DP (Advanced Audio Distribution Profile): Only playing back songs on your audio player is
possible.
– A2DP and AVRCP (Audio/Video Remote Control Profile): Playing back, pausing, selecting songs, etc.,
are possible.
• Depending on the Bluetooth device connected to this product, the available operations with this
product may be limited or differ from the descriptions in this manual.
• While you are listening to songs on your Bluetooth device, refrain from operating the phone function
as much as possible. If you try operating, the signal may cause noise for song playback.
• When you are talking on the Bluetooth device connected to this product via Bluetooth, it may pause
playback.
1 Press .
2 Touch then .
The system setting screen appears.
3 Touch [AV Source Settings].
4 Confirm that [Bluetooth Audio] is turned on.
5 Press .
6 Touch .
The AV source screen appears.
7 Touch [Bluetooth Audio].
The Bluetooth audio playback screen appears.
Bluetooth audio playback screen 1
Bluetooth audio
Basic operation
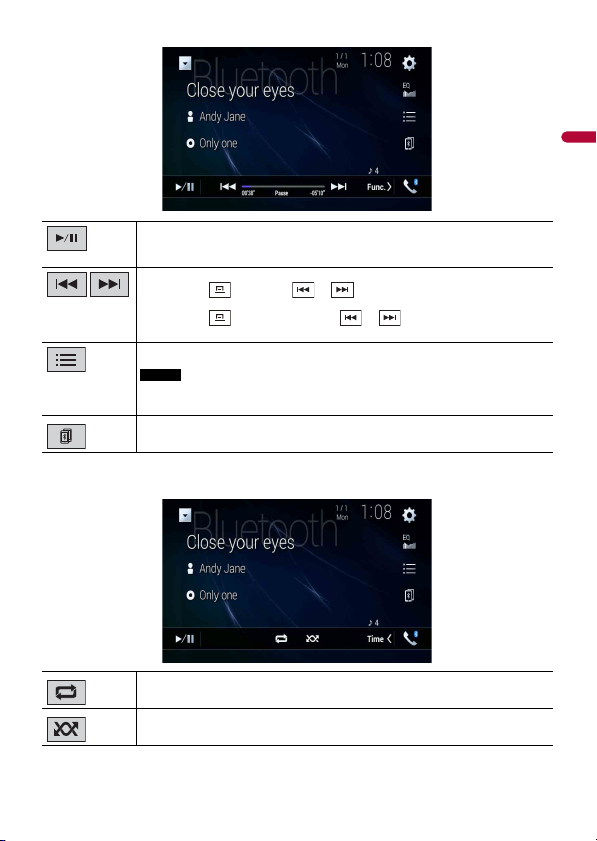
English
- 69 -
Bluetooth audio playback screen 2
Switches between playback and pause.
Skips files forward or backward.
• By pressing then touch or , you can also skip files forward or
backward.
• By pressing then touch and hold or , you can also perform fast
reverse or fast forward.
Selects a file or folder from the list to playback.
NOTE
This function is available only when the AVRCP version of the Bluetooth device is
1.4 or higher.
Switches among the Bluetooth devices when the devices are connected to
this product via Bluetooth.
Sets a repeat play range.
Plays files in random order.
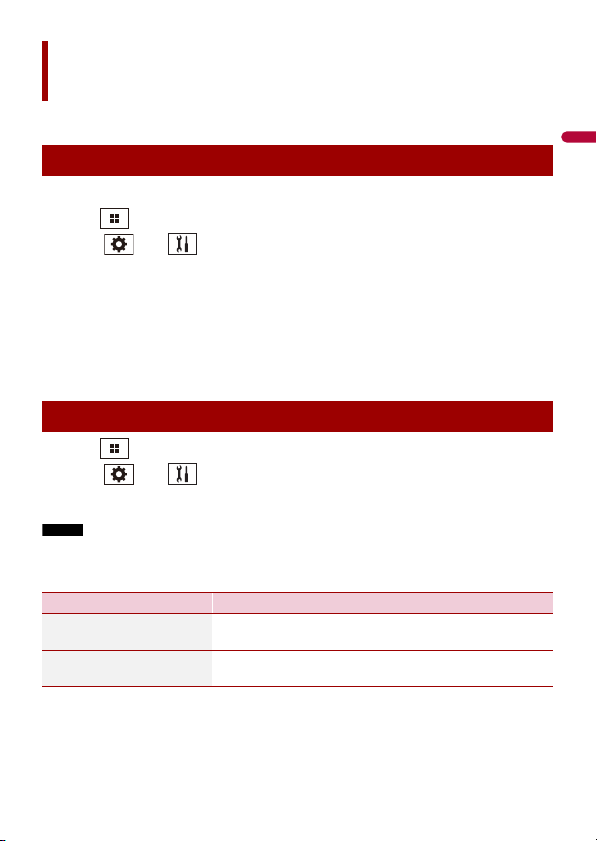
- 70 -
English
You can connect your Wi-Fi certfied mobile device to this product via Wi-Fi connection.
1 Turn on the Wi-Fi function on the device.
2 Press .
3 Touch then .
4 Touch [Wi-Fi Settings].
5 Set [Wi-Fi] to [ON].
6 Touch [Device Information].
7 Connect this product with the dislayed network name in [Device Information]
from the mobile device.
1 Press .
2 Touch then .
3 Touch [Wi-Fi Settings].
NOTE
This setting is available only when you stop your vehicle in a safe place and apply the parking brake.
The menu items vary according to the source.
Wi-Fi
Wi-Fi connection
Wi-Fi settings
Menu Item Description
[Wi-Fi]
[ON] [OFF]
Switches Wi-Fi connection on or off.
[Device Information] Displays the network name and MAC address of this
product.
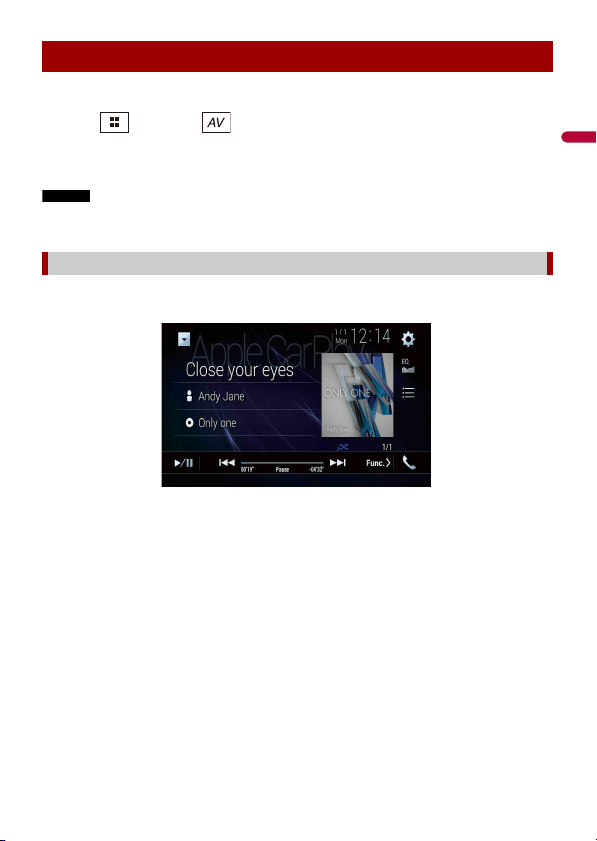
English
- 71 -
Before using the Wi-Fi audio player, connect the device to this product via Apple
CarPlay™ (page 101) or Android Auto wirelessly (page 105).
1 Press then touch .
2 Touch [Wi-Fi Audio].
The Wi-Fi audio playback screen appears.
NOTES
• [Wi-Fi Audio] is displayed as [Android Auto] when the Android Auto is in use.
• [Wi-Fi Audio] is displayed as [Apple CarPlay] when the Apple CarPlay is in use.
Wi-Fi audio screen (Example: Apple CarPlay)
Wi-Fi audio with Apple CarPlay operation is same as the iPod source function. For details
of the operation, refer to the iPod operation (page 94).
Wi-Fi audio
Basic operation

- 72 -
English
You can play or use the following sources with this product.
• HD Radio Broadcasts (HD Radio™ tuner)
• CD
• ROM (compressed audio or video files on discs)
• DVD-Video
• Video-CD
The following sources can be played back or used by connecting an auxiliary device.
• USB
• SD*
• iPod
• Pandora®
• Bluetooth® audio
• Wi-Fi audio (Apple CarPlay, Android Auto)
• SiriusXM® Satellite Radio
• AV input (AV)
• AUX
• HDMI
• Wireless Mirroring
• Car Sources (iDatalink)
* AVIC-W8500NEX
1 Press then touch the AV operation key.
The AV operation screen appears.
AV source
Supported AV source
Displaying the AV operation screen
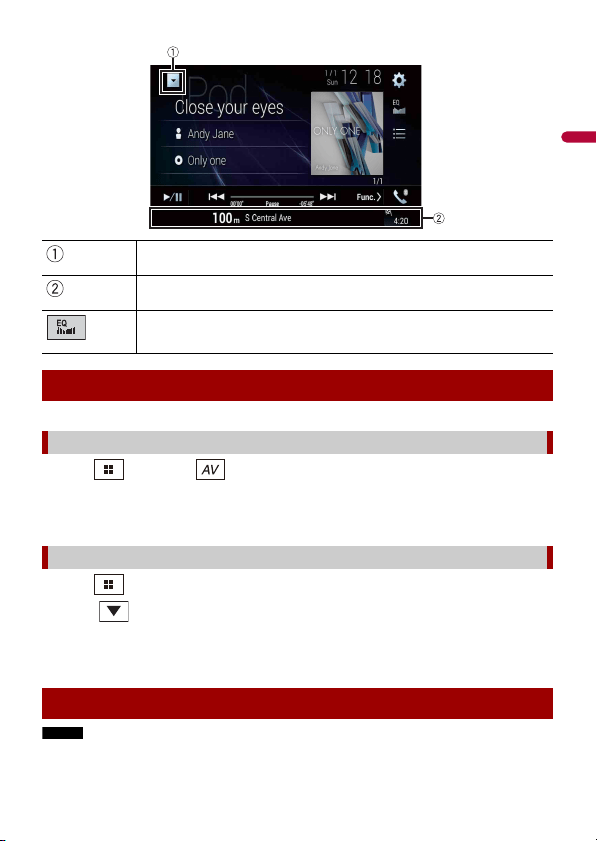
English
- 73 -
1
Press then touch .
2 Touch the source icon.
When you select [Source OFF], the AV source is turned off.
1 Press then touch the AV operation key.
2 Touch .
3 Touch t he s ource key.
When you select [Source OFF], the AV source is turned off.
NOTE
This function is available only when you stop your vehicle in a safe place and apply the parking brake.
Displays the source list.
Shows the navigation information.
This is not displayed for some sources.
Recalls equalizer curves (page 143).
Selecting a source
Source on the AV source selection screen
Source on the source list
Changing the display order of source
- 74 -
English
1 Press then touch .
2 Touch and hold the source icon and drag the icon to the desired position.
1 Press then touch the AV operation key.
2 Touch .
3 Touch .
4 Drag the source key to the desired position.
NOTE
This function is available only when you stop your vehicle in a safe place and apply the parking brake.
1 Press .
2 Touch and hold .
appears at the top left of the favorite source icons.
3 Drag to the desired position.
To finish the adjusting, touch any place of the display except for the favorite source
icons area.
Changing the display order of source icons
Changing the display order of source keys
Adjusting the range of favorite source icons area

English
- 75 -
When using an iPod/iPhone or a smartphone with this product, configure settings of this
product according to the device to be connected. This section describes the settings
required for each device.
NOTES
• Operation methods may vary depending on the iPod/iPhone model or smartphone and its software
version.
• Depending on the software version of iPod/iPhone or the version of smartphone OS, it may not be
compatible with this unit.
• The setting may not be operable right after it is changed.
• This setting is available only when a hands-free telephone is not used.
• The setting will change after the following processes are automatically executed.
– The source is turned off.
– WebLink, Apple CarPlay or Android Auto is exited.
– The smartphone connection (USB and Bluetooth) is disconnected.
Compatible iPod/iPhone models
• iPhone 7
• iPhone 7 Plus
• iPhone SE
• iPhone 6s
• iPhone 6s Plus
• iPhone 6
• iPhone 6 Plus
• iPhone 5s
• iPhone 5c
• iPhone 5
• iPod touch® (6th generation)
• iPod touch (5th generation)
• iPod nano® (7th generation)
Depending on the iPod models, it may not be compatible with some AV sources. For
details about iPod/iPhone compatibility with this product, refer to the information on
our website.
1 Press .
2 Touch then .
Setup for iPod®/iPhone®
or smartphone
iPod/iPhone

- 76 -
English
3 Touch [Smartphone-related Settings].
4 Touch [Smartphone Setup].
5 Touch [iPhone/iPod].
The available function icons are displayed.
6 Touch [OK].
Compatible smartphones
Compatibility with all smartphones is not guaranteed. For details about smartphone
compatibility with this product, refer to the information on our website.
1 Press .
2 Touch then .
3 Touch [Smartphone-related Settings].
4 Touch [Smartphone Setup].
5 Touch [Others].
6 Touch [Android Auto] to use Android Auto.
Touch [WebLink] to use WebLink.
The available function icons are displayed.
7 Touch [OK].
Smartphone (Android™ device)
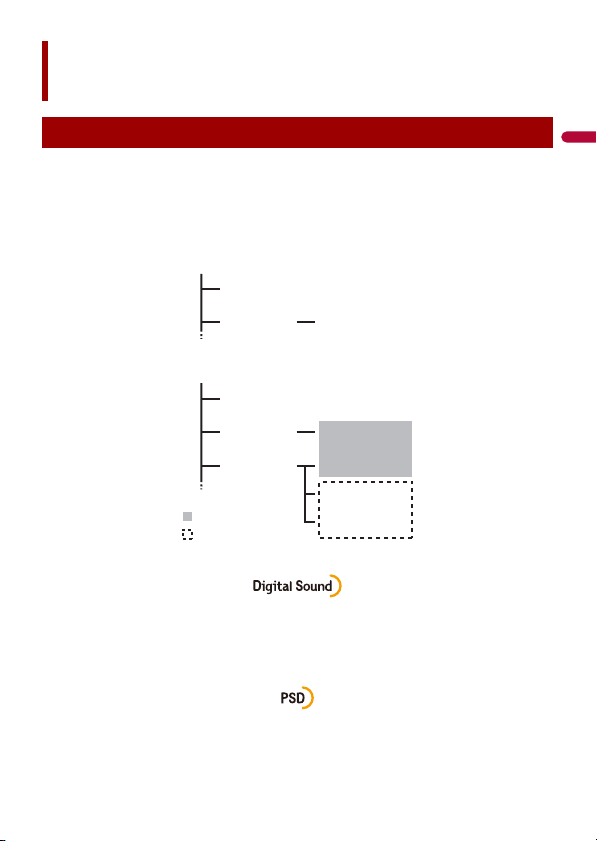
English
- 77 -
HD Radio stations offer high quality audio and data services. HD Radio stations are
brought to you by your local FM or AM stations.
HD Radio stations feature the following:
• High quality audio
• FM multicasting
• Data service
Digital, CD-quality sound. HD Radio Technology enables local radio stations to broadcast
a clean digital signal. AM sounds like today’s FM and FM sounds like a CD.
HD Radio™ Technology
About HD Radio stations
: Sub channel
AM band
Analog AM
Analog AM Digital AM
FM band
Analog FM
Analog FM Digital FM
Analog FM Digital FM-1ch
Digital FM-2ch
Digital FM-3ch
: Main channel
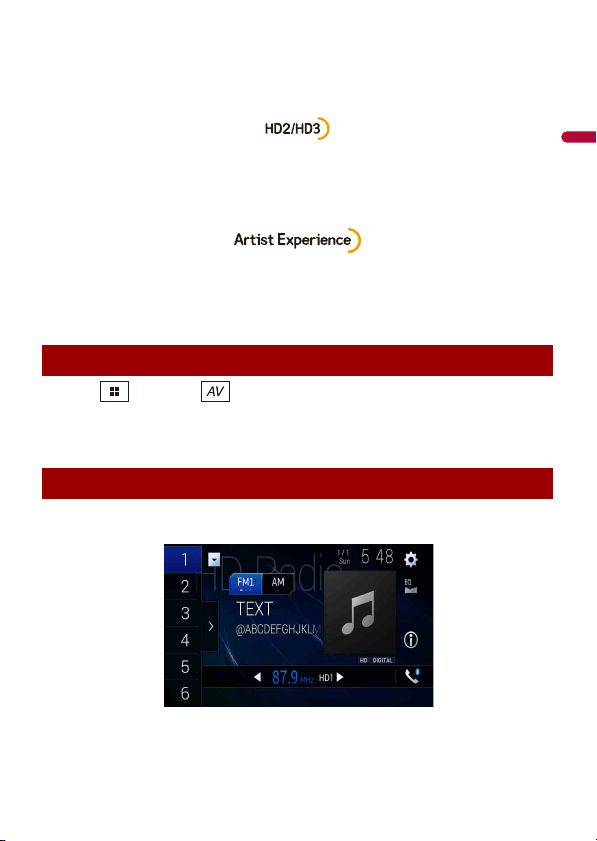
- 78 -
English
Program Service Data: Contributes to the superior user experience of HD Radio
Technology. Presents song name, artist, station IDs, HD2/HD3 Channel Guide, and other
relevant data streams.
Adjacent to traditional main stations are extra local FM channels. These HD2/HD3
Channels provide new, original music as well as deep cuts into traditional genre.
Visual information related to content being played on your HD Radio receiver, such as
Album Art, historical photographs, still art from live broadcasts, among other related
content.
1 Press then touch .
2 Touch [HD Radio].
The HD Radio screen appears.
HD Radio screen
Starting procedure
Basic operation
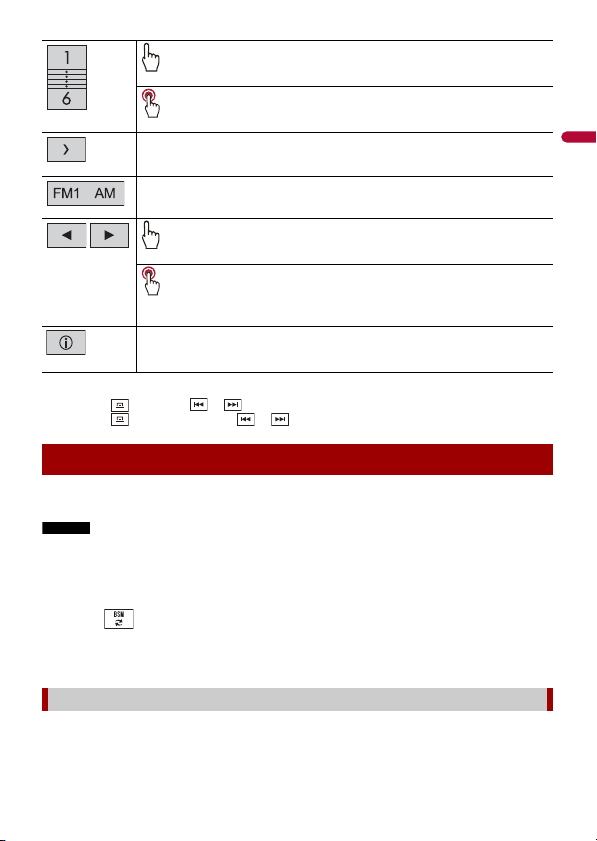
English
- 79 -
TIPS
• By pressing then touch or , you can also switch the preset channels.
• By pressing then touch and hold or and releasing it, you can also perform seek tuning.
The BSM (best stations memory) function automatically stores the six strongest
broadcast frequencies under the preset channel keys [1] to [6].
NOTES
• Storing broadcast frequencies with BSM may replace those you have already saved.
• Previously stored broadcast frequencies may remain stored if the number of frequencies stored has
not reached the limit.
1 Touch the preset channel list display key.
2 Touch to begin search.
While the message is displayed, the six strongest broadcast frequencies will be
stored under the preset channel keys in the order of their signal strength.
1 Touch [Cancel].
Recalls the preset channel stored to a key from memory.
Stores the current broadcast frequency to a key.
Displays the preset channel list.
Select an item on the list ([1] to [6]) to switch to the preset channel.
Selects the FM1, FM2, FM3 or AM band.
Performs manual tuning.
Performs seek tuning or non stop seek tuning.
Releasing the key in a few seconds skips to the nearest station from the
current frequency. Keep holding the key for long seconds to perform,
performs non stop seek tuning.
Switches the text display between the main channel and sub channels.
Storing the strongest broadcast frequencies (BSM)
To cancel the storage process

- 80 -
English
1 Press .
2 Touch then .
The system setting screen appears.
3 Touch [AV Source Settings].
4 Touch [Radio Settings].
The menu items vary according to the source.
Radio settings
Menu Item Description
[Blending]
[On] [Off]
Switches to the analog broadcast of the same
frequency level automatically when reception
of a digital broadcast becomes weak. Select
[Off] to receive only a digital signal.
[Seek] Select the method of seek tuning.
[Seek All] Seeks stations from both analog and digital
broadcasting.
[Seek HD] Only seeks stations from digital broadcasting.
[Local]
[Off]
FM: [Level1] [Level2] [Level3] [Level4]
AM: [Level1] [Level2]
Local seek tuning allows you to only tune into
radio stations with sufficiently strong signals.
NOTE
[Level4] for FM and [Level2] for AM are available only
with the stations with the strongest signals.
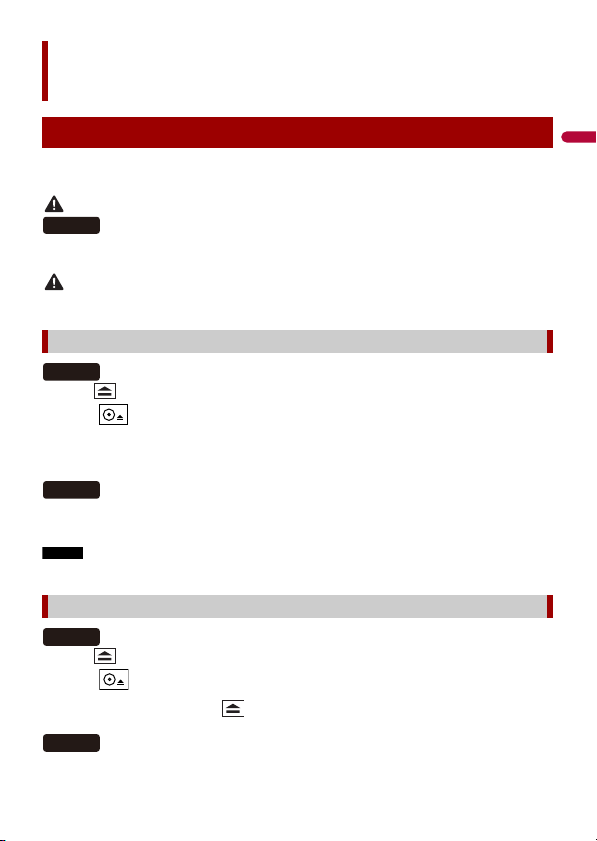
English
- 81 -
You can play a normal music CD, Video-CD, or DVD-Video using the built-in drive of this
product.
WARNING
Keep hands and fingers clear of this product when opening, closing, or adjusting the LCD panel. Be
especially cautious of children’s hands and fingers.
CAUTION
Do not insert anything other than a disc into the disc-loading slot.
1 Press .
2 Touch to open the LCD panel.
3 Insert a disc into the disc-loading slot.
The source changes and then playback will start.
1 Insert a disc into the disc-loading slot.
The source changes and then playback will start.
NOTE
If the disc is already set, select [Disc] as the playing source.
1 Press .
2 Touch to open the LCD panel.
3 Remove the disc and press .
Disc
Inserting and ejecting a disc
Inserting a disc
Ejecting a disc
W8500NEX
W8500NEX
W6500NEX
W8500NEX
W6500NEX
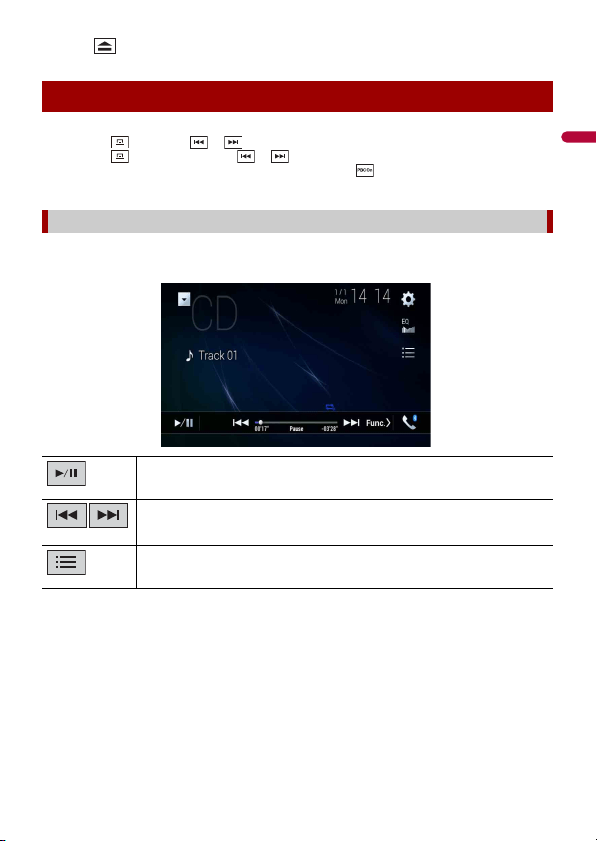
- 82 -
English
1 Press .
TIPS
• By pressing then touch or , you can also skip files/chapters forward or backward.
• By pressing then touch and hold or , you can also perform fast reverse or fast forward.
• If a Video-CD with PBC (playback control) On is being played, appears.
• You can set the screen size for the video image (page 154).
Audio source screen 1
Basic operation
Audio source
Switches between playback and pause.
Skips files forward or backward.
Selects a track from the list.
Touch a track on the list to play back.
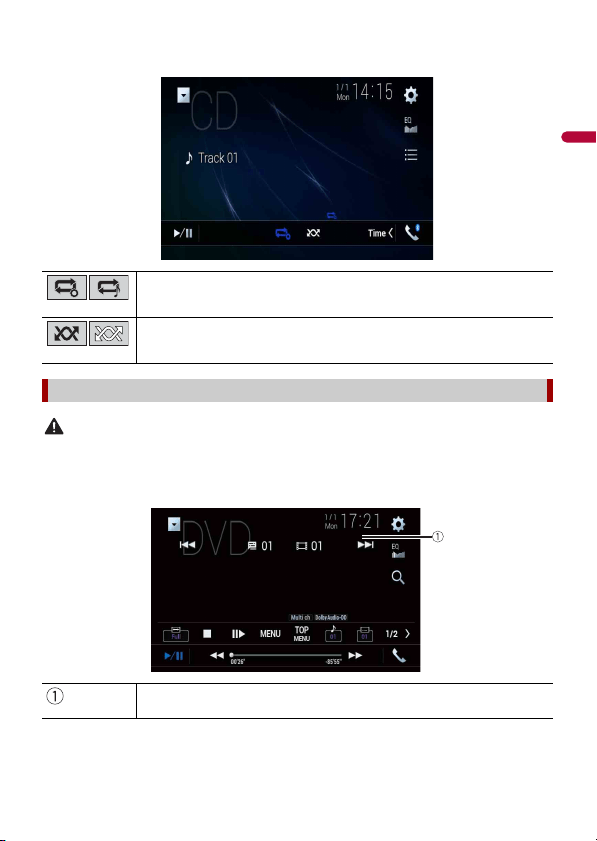
English
- 83 -
Audio source screen 2
CAUTION
For safety reasons, video images cannot be viewed while your vehicle is in motion. To view video
images, stop in a safe place and apply the parking brake.
Video source screen 1
Sets a repeat play for the current disc/the current track.
Plays or does not play tracks in random order.
Video source
Hides the touch panel keys.
To display the keys again, touch anywhere on the screen.
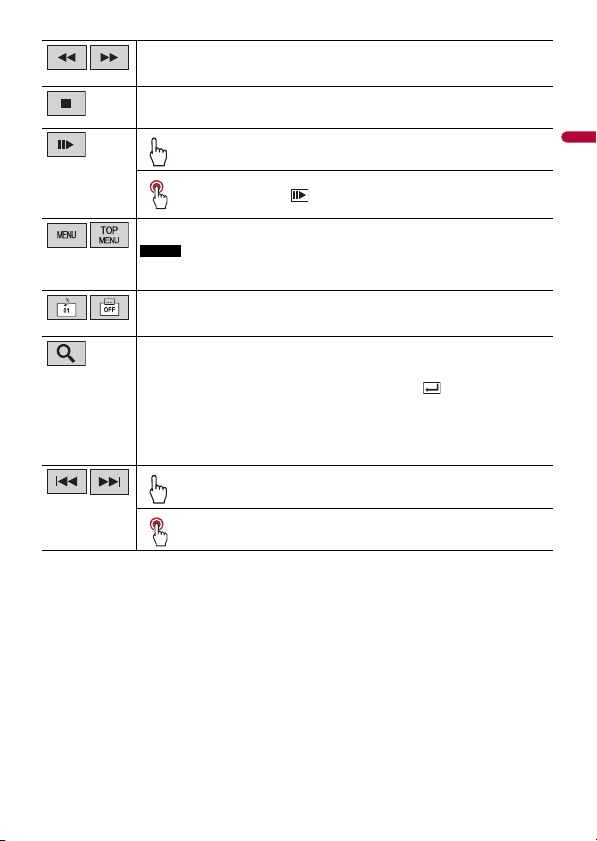
- 84 -
English
* PBC (playback control) only
Performs fast reverse or fast forward.
Touch again to change the playback speed.
Stops playback.
Performs frame-by-frame playback.
Performs slow-motion playback.
Each time you touch , it changes the speed in four steps in the
following order: 1/16 -> 1/8 -> 1/4 -> 1/2
Displays the DVD menu.
NOTE
This function may not work properly with some DVD disc content. In that case, use
touch panel keys to operate the DVD menu.
Switches the audio/subtitle language.
Searches for the part you want to play.
Touch [Title], [Chapter], [10key], or [Track] then input the desired number from [0]
to [9].
To start playback from the number you registered, touch .
TIPS
• To cancel an input number, touch [C].
• For DVD-Videos, you can select [Title], [Chapter] or [10Key].
• For Video-CDs, you can select [Track] or [10key].*
Skips files/chapters forward or backward.
Performs fast reverse or fast forward.
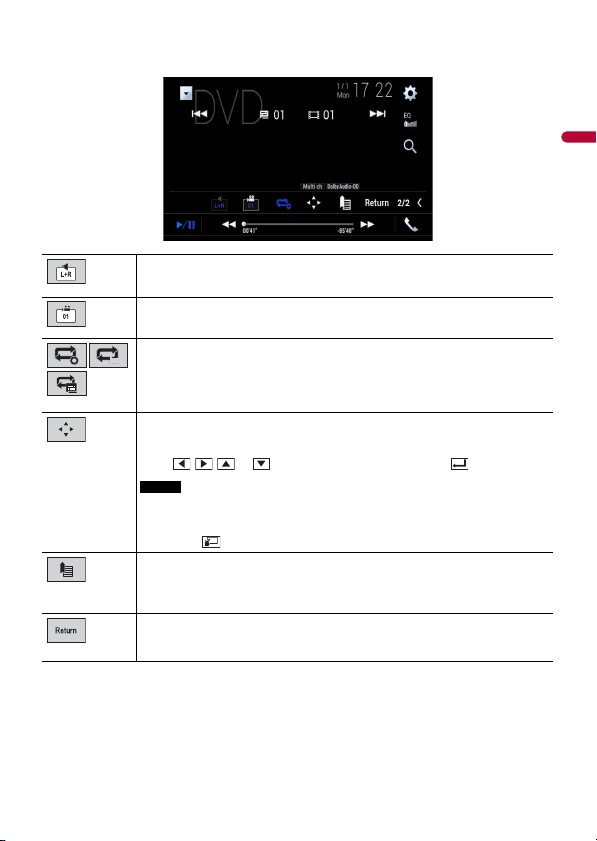
English
- 85 -
Video source screen 2
Selects the audio output from [L+R], [Left], [Right], [Mix].
This function is available for Video-CDs and DVDs recorded with LPCM audio.
Changes the viewing angle (Multi-angle).
This function is available for DVDs featuring multi-angle recordings.
Sets a repeat play for all files/the current chapter/the current title.
Displays the DVD menu keypad.
If items on the DVD menu appear, the touch panel keys may overlay them. If so,
select an item using these touch panel keys.
Touch , , , or to select the menu item then touch .
NOTE
The way to display the menu differs depending on the disc.
TIP
If you touch , you can operate the DVD menu directly.
Resumes playback (Bookmark).
This function is available for DVD-Video. You can memorize one point as a
Bookmark for a disc (up to five discs). To clear the bookmark on the disc, touch and
hold this key.
Returns and begins playback from the specified point.
This function is available for DVD-Video and Video-CDs featuring PBC (playback
control).

- 86 -
English
SD function is only available for AVIC-W8500NEX.
You can play compressed audio, compressed video, or still image files stored in a disc or
an external storage device.
WARNING
Keep hands and fingers clear of this product when opening, closing, or adjusting the LCD panel. Be
especially cautious of children’s hands and fingers.
CAUTION
• Do not insert anything other than a disc into the disc-loading slot.
• Do not insert anything other than SD memory cards into the SD card slot.
• Ejecting an SD memory card during data transfer can damage the SD memory card. Be sure to eject
the SD memory card by the procedure described in this manual.
• Do not press when an SD memory card is not fully inserted. Doing so may damage the card.
• Do not press before an SD memory card has been completely removed. Doing so may damage
the card.
1 Press .
2 Touch to open the LCD panel.
3 Insert a disc into the disc-loading slot.
The source changes and then playback will start.
1 Insert a disc into the disc-loading slot.
The source changes and then playback will start.
NOTE
If the disc is already set, select [Disc] as the playing source.
Compressed files
Inserting and ejecting media
Inserting a disc
Ejecting a disc
W8500NEX
W8500NEX
W6500NEX
W8500NEX
English
- 87 -
1
Press .
2 Touch to open the LCD panel.
3 Remove the disc and press .
1 Press .
1 Press .
2 Touch to open the LCD panel.
3 Insert an SD memory card into the SD card slot.
4 Press .
NOTES
• This system is not compatible with the Multi Media Card (MMC).
• Compatibility with all SD memory cards is not guaranteed.
• This product may not achieve optimum performance with some SD memory cards.
1 Press .
2 Touch to open the LCD panel.
3 Press the middle of the SD memory card gently until it clicks.
4 Pull the SD memory card out straight.
5 Press .
1 Pull out the plug from the USB port of the USB cable.
2 Plug a USB storage device into the USB cable.
NOTES
• This product may not achieve optimum performance with some USB storage devices.
Inserting an SD memory card
Ejecting an SD memory card
Plugging a USB storage device
W6500NEX
W8500NEX
W8500NEX
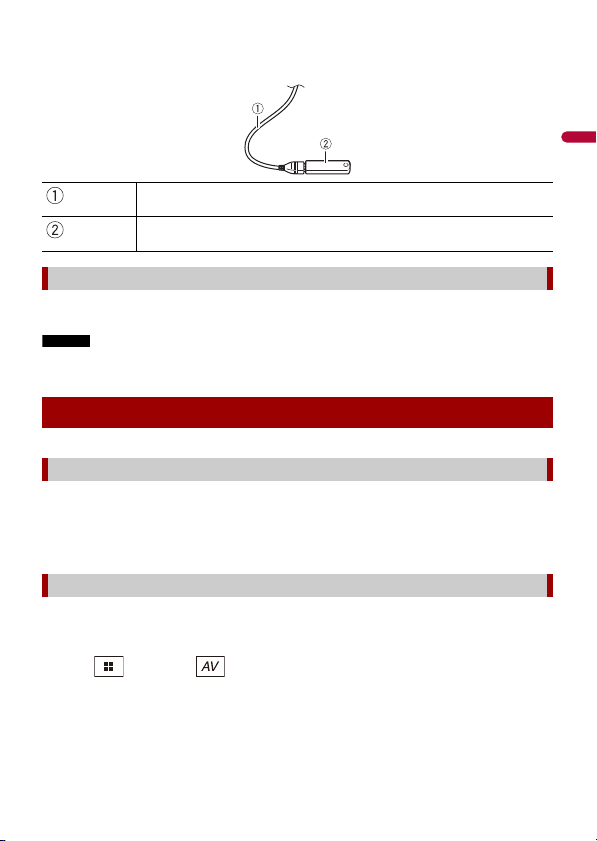
- 88 -
English
• Connection via a USB hub is not possible.
• A USB cable is required for connection.
1 Pull out the USB storage device from the USB cable.
NOTES
• Check that no data is being accessed before pulling out the USB storage device.
• Turn off (ACC OFF) the ignition switch before unplugging the USB storage device.
1 Insert the disc (page 86).
TIP
If the disc is already set, select [Disc] as the playing source.
1 Insert the SD memory card into the SD card slot or plug the USB storage device
into the USB connector.
2 Press then touch .
3 Touch [USB] or [SD].
Playback is performed in order of folder numbers. Folders are skipped if they contain
no playable files.
USB cable
USB storage device
Unplugging a USB storage device
Starting procedure
For Disc
For USB/SD
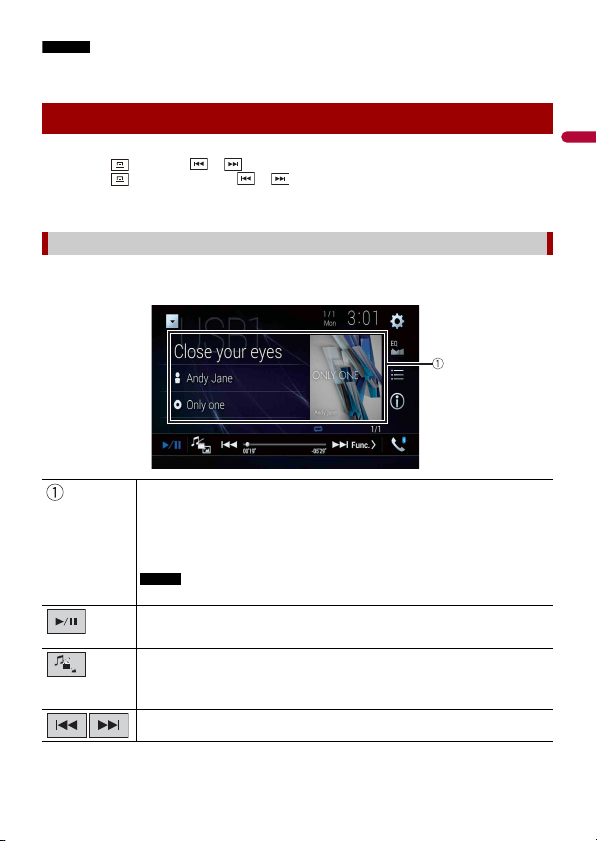
English
- 89 -
NOTES
• For details on inserting SD card see on Inserting an SD memory card (page 87).
• For details on plugging USB storage device, see on Plugging a USB storage device (page 87).
TIPS
• By pressing then touch or , you can also skip files/chapters forward or backward.
• By pressing then touch and hold or on the audio or video file, you can also perform fast
reverse or fast forward.
• You can set the screen size for the video and image files (page 154).
Audio source screen 1 (Example: USB)
Basic operation
Audio source
Displays the link search screen.
Touch the song to play back followed by touching the song information, after
switching to Music Browse mode (page 90).
TIP
If you touch the artwork, the list of songs in the album is displayed.
NOTE
This function is available for the external storage device (USB, SD) only.
Switches between playback and pause.
Switches the following media file types.
[Music]: Compressed audio files
[Video]: Compressed video files
[Photo]: Image files
Skips files forward or backward.
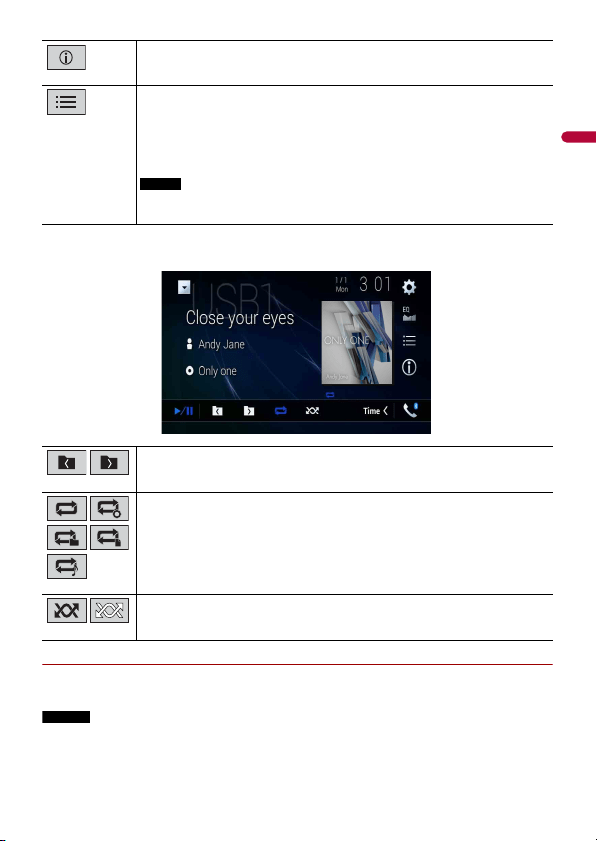
- 90 -
English
Audio source screen 2 (Example: USB)
▶Selecting a file using Music Browse mode
You can select files to play back using the category list if the files contain tag
information.
NOTES
• This function is available for the external storage device (USB, SD) only.
• Music Browse mode cannot be held once the power is turned off.
Switches the current music information display.
Selects a file from the list.
Touch a file on the list to playback.
TIP
Touching a folder on the list shows its contents. You can play a file on the list by
touching it.
NOTE
When you play compressed audio files stored in an external storage device (USB,
SD), you can search for a file using Music Browse (page 90).
Selects the previous folder or the next folder.
Sets a repeat play range for all files/the current folder/the current file.
Plays files or does not play in random order.
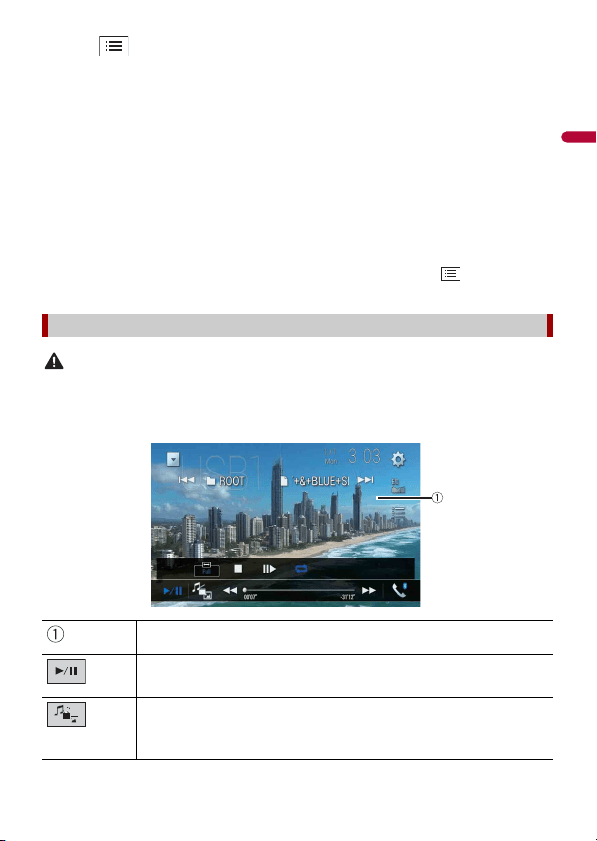
English
- 91 -
1
Touch .
2 Touch the [Tag] tab.
3 Touch the desired category to display the file list.
4 Touch the item.
Refine the item until the desired song title or file name is displayed on the list.
5 Touch the desired song title or file name to play back.
If the selection made with Music Browse has been canceled, you can switch to Music
Browse mode again by touching the [Tag] tab on the file/folder list screen and
touching the desired track.
TIP
Once the database is created in the USB storage, there is no need to create the database again as long
as the same contents are saved. To enter the Music Browse mode directly, touch and then touch
[Tag] before selecting the song.
CAUTION
For safety reasons, video images cannot be viewed while your vehicle is in motion. To view video
images, stop in a safe place and apply the parking brake.
Video source screen (Example: USB)
Video source
Hides the touch panel keys.
To display the keys again, touch anywhere on the screen.
Switches between playback and pause.
Switches the following media file types.
[Music]: Compressed audio files
[Video]: Compressed video files
[Photo]: Image files
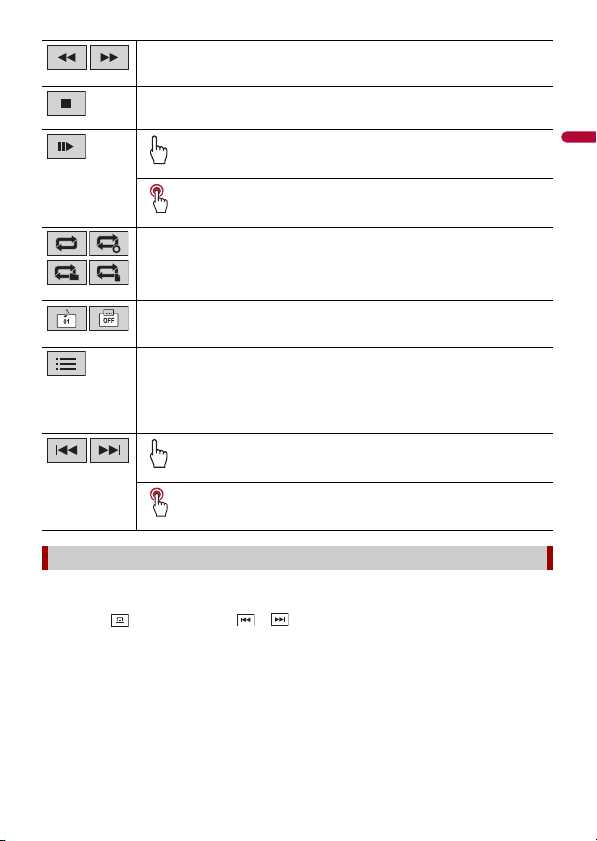
- 92 -
English
TIPS
• Image files are not displayed in the rear display.
• By pressing then touch and hold or on the still image file, you can search through 10
image files at a time. If the file currently being played is the first or last file in the folder, the search is
not performed.
Performs fast reverse or fast forward.
Touch again to change the playback speed.
Stops playback.
Performs frame-by-frame playback.
Performs slow-motion playback.
Sets a repeat play range for all files/the current folder/the current file.
Switches the audio/subtitle language.
Selects a file from the list.
Touch a file on the list to playback.
TIP
Touching a folder on the list shows its contents. You can play a file on the list by
touching it.
Skips files forward or backward.
Performs fast reverse or fast forward.
Still image source
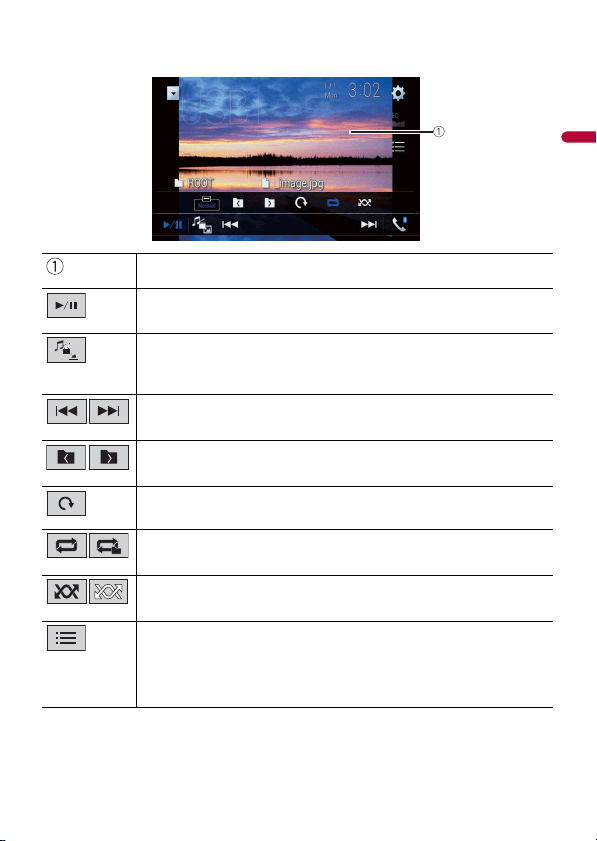
English
- 93 -
Still image screen
Hides the touch panel keys.
To display the keys again, touch anywhere on the screen.
Switches between playback and pause.
Switches the following media file types.
[Music]: Compressed audio files
[Video]: Compressed video files
[Photo]: Image files
Skips files forward or backward.
Selects the previous folder or the next folder.
Rotates the displayed picture 90° clockwise.
Sets a repeat play range for all files/the current folder.
Plays all files in the current repeat play range or does not play them in
random order.
Selects a file from the list.
Touch a file on the list to playback.
TIP
Touching a folder on the list shows its contents. You can play a file on the list by
touching it.

- 94 -
English
When connecting an iPod to this product, the settings are automatically configured
according to the device to be connected.
NOTES
• Depending on the generation or version of the iPod, some functions may not be available.
• Do not delete the Apple Music® app from your iPod since some functions may not be available.
• When connecting an iPhone or iPod touch, quit all applications before connecting the device.
1 Connect your iPod via USB.
2 Press then touch .
3 Touch [iPod].
NOTE
For details on USB connection, refer to the Installation Manual.
TIPS
• By pressing then touch or , you can also skip files forward or backward.
• By pressing then touch and hold or , you can also perform fast reverse or fast forward.
NOTE
Skipping backward, fast reverse and fast forward are not available while playing Apple Music Radio.
iPod
Connecting your iPod
Basic operation
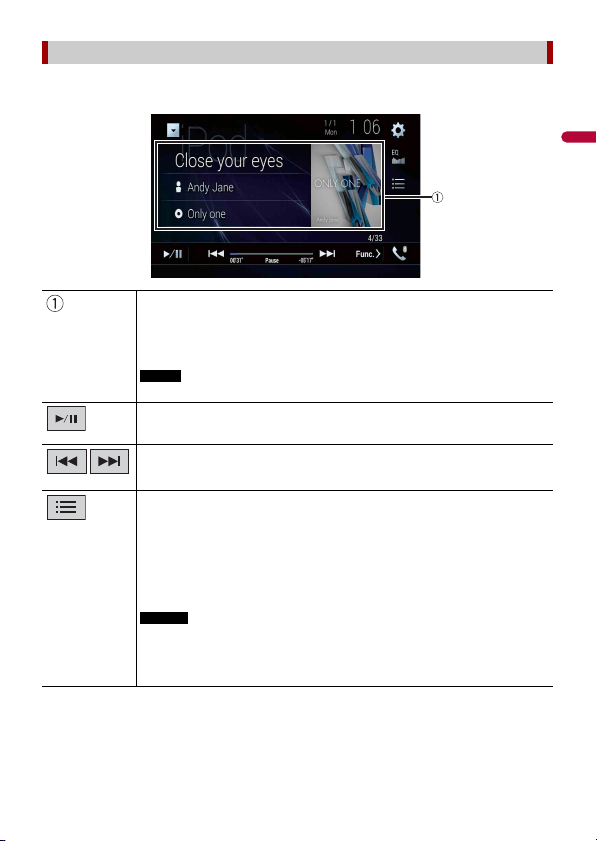
English
- 95 -
Audio source screen 1
Audio source
Displays the link search screen.
Select a song from the list related to the song currently playing.
TIP
If you touch the artwork, the list of songs in the album is displayed.
NOTE
This function is not available while playing Apple Music Radio.
Switches between playback and pause.
Skips files forward or backward.
Selects a song from the list.
Touch the category then the title of the list to playback of the selected list.
TIPS
• If you use English as the system language, the alphabet search function is
available. Touch the initial search bar to use this function.
• When you touch Apple Music Radio station in the list screen, Apple Music Radio
screen appears (page 96).
NOTES
• Depending on the generation or version of the iPod, some functions may not be
available.
• Only 16 000 songs in the iPod are available in the list if the iPod has more than 16
000 songs. Available songs depend on the iPod.
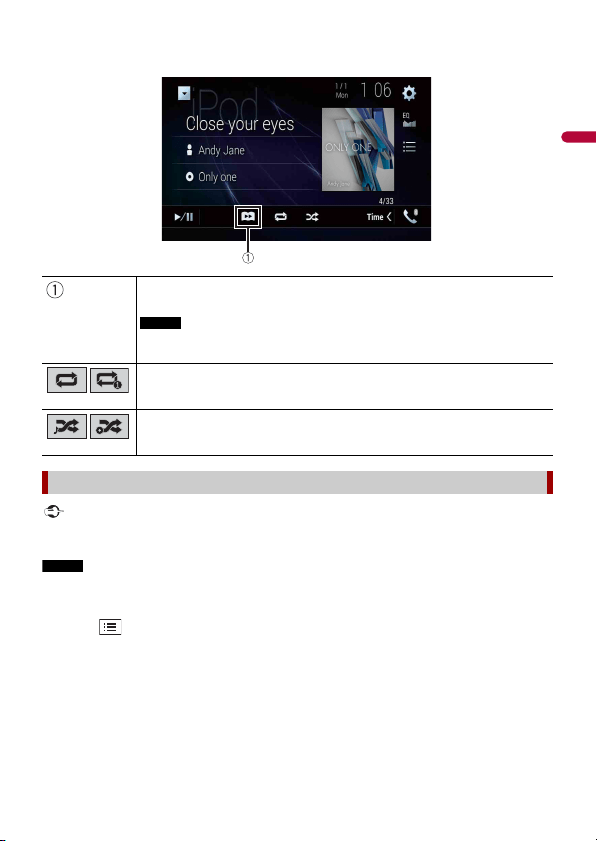
- 96 -
English
Audio source screen 2
Important
Apple Music Radio may not be available in your country or region. For details about Apple Music Radio,
visit the following site: http://www.apple.com/music/
NOTE
This function is only available when using the iPod function with an iPhone 7, iPhone 7 Plus, iPhone SE,
iPhone 6s, iPhone 6s Plus, iPhone 6, iPhone 6 Plus, iPhone 5s, iPhone 5c, iPhone 5 or iPod touch (5th
and 6th generation).
1 Touch .
2 Touch [ Radio].
Changes the audiobook speed.
Normal—Fast—Slow
NOTE
The audiobook speed icon may not change depending on the connected iPod/
iPhone.
Sets a repeat play range for all in the selected list/the current song.
Plays songs within the selected list/album randomly.
Apple Music® Radio source
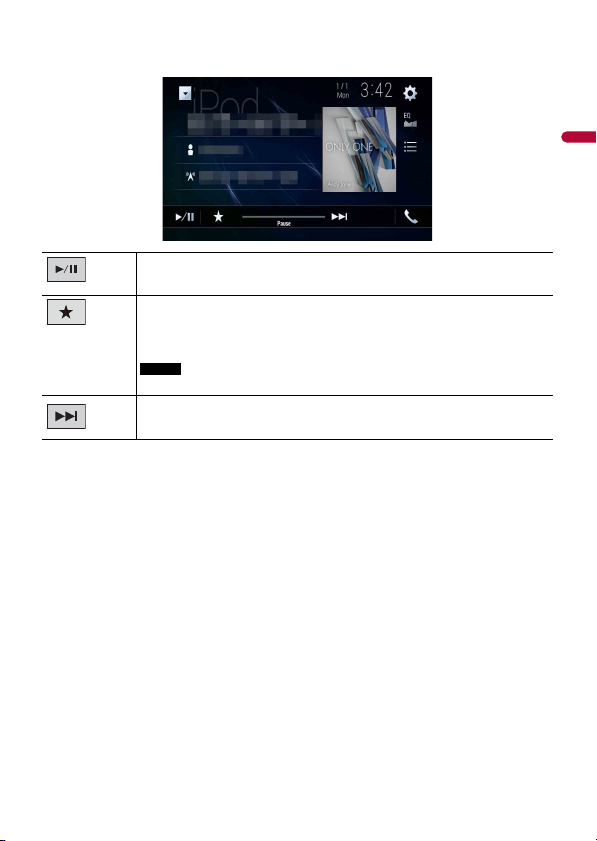
English
- 97 -
Apple Music Radio screen
Switches between playback and pause.
Displays the pop-up menu for Apple Music Radio.
• Touch [Play More Like This] to play back songs similar to the current song.
• Touch [Play Less Like This] to set it not to play back the current song again.
• Touch [Add to iTunes Wish List] to add the current song to the iTunes® wish list.
NOTE
This function may not be used depending on your Apple Music account status.
Skips tracks forward.

- 98 -
English
WebLink lets you enjoy compatible smartphones apps in the car. You can operate
WebLink compatible applications with finger gestures such as tapping, dragging,
scrolling, or flicking on the screen of this product.
NOTES
• The supported finger gestures may vary depending on the WebLink compatible application.
• To use WebLink, you must first install the WebLink Host app on the iPhone or smartphone. For details
about the WebLink Host app, visit the following site: https://www.abaltatech.com/weblink/
• Be sure to read Using app-based connected content (page 182) before you perform this operation.
• Copyright protected files such as DRM cannot be played.
WARNING
Certain uses of the iPhone or smartphone may not be legal while driving in your jurisdiction, so you
must be aware of and obey any such restrictions. If in doubt as to a particular function, only perform it
while the car is parked. No feature should be used unless it is safe to do so under the driving conditions
you are experiencing.
Important
• Pioneer is not liable for any issues that may arise from incorrect or flawed app-based content.
• The content and functionality of the supported applications are the responsibility of the App
providers.
• In WebLink, functionality through the product is limited while driving, with available functions
determined by the App providers.
• Availability of WebLink functionality is determined by the App provider, and not determined by
Pioneer.
• WebLink allows access to applications other than those listed that are subject to limitations while
driving.
When connecting an iPhone or a smartphone to this product, settings are required
according to the connected device. For details, refer to Setup for iPod®/iPhone® or
smartphone (page 75).
TIPS
• Touch the desired application icon after the WebLink Host app is launched.
• The desired application is launched, and the application operation screen appears.
• Press to go back to the top menu screen.
WebLink™
Using WebLink
Starting procedure

English
- 99 -
WebLink
1 Connect your iPhone to this product via USB.
Refer to the Installation Manual.
2 Press .
3 Touch .
4 Touch [WebLink].
5 Touch desired icon in the tab.
The WebLink app is launched.
NOTE
The video playback capability depends on the connected Android device.
1 Unlock your smartphone and connect it to this product via USB.
Refer to the Installation Manual.
2 Press .
3 Touch .
4 Touch [WebLink].
5 Touch desired icon in the tab.
The WebLink app is launched.
Displays the main menu of the WebLink source screen.
For iPhone users
For smartphone (Android) users
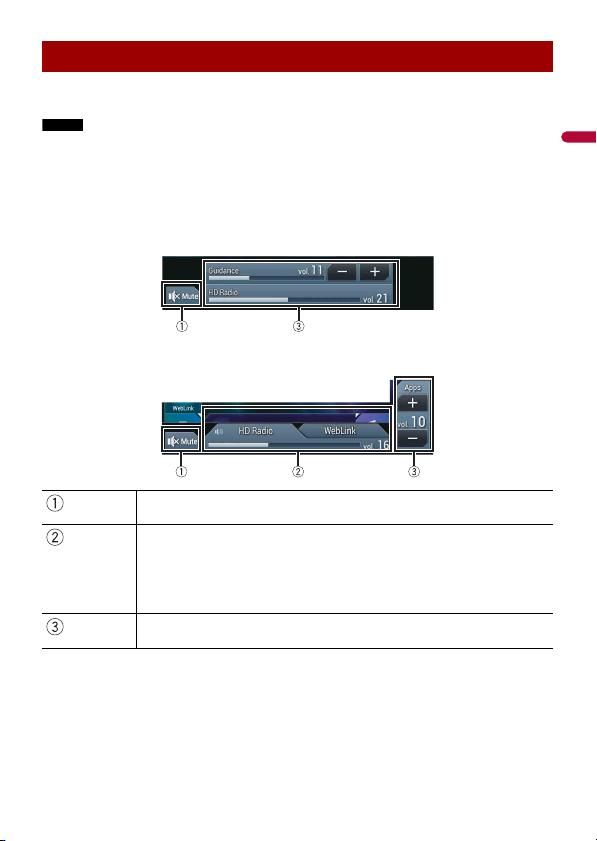
- 100 -
English
You can output the audio mixing AV source and an application for iPhone or
smartphone when WebLink is used.
NOTE
Depending on the application or AV source, this function may not be available.
1 Start up the WebLink.
2 Press VOL (+/-).
The audio mix menu will be displayed on the screen.
Android
iOS
Using the audio mix function
Touch to mute. Touch again to cancel mute.
Sets whether to switch the sound mix function on or off.
• Left tab:
The audio mix function is enabled (mix on) and the App volume is displayed.
• Right tab:
The audio mix function is disabled (mix off). This is not displayed on the AV
operation screen.
Adjusts the application audio volume.

English
- 101 -
You can operate iPhone applications with finger gestures such as tapping, dragging,
scrolling, or flicking on the screen of this product.
Compatible iPhone models
For details about compatibility of iPhone models, refer to the following website.
http://www.apple.com/ios/carplay
NOTE
The compatible finger gestures vary depending on the application for the iPhone.
WARNING
Certain uses of the iPhone may not be legal while driving in your jurisdiction, so you must be aware of
and obey any such restrictions. If in doubt as to a particular function, only perform it while the car is
parked. No feature should be used unless it is safe to do so under the driving conditions you are
experiencing.
Important
Apple CarPlay may not be available in your country or region.
For details about Apple CarPlay, visit the following site:
http://www.apple.com/ios/carplay
• The content and functionality of the supported applications are the responsibility of the App
providers.
• In Apple CarPlay, usage is limited while driving, with availability of functions and content determined
by the App providers.
• Apple CarPlay allows access to applications other than those listed that are subject to limitations
while driving.
• PIONEER IS NOT RESPONSIBLE AND DISCLAIMS LIABILITY FOR THIRD PARTY (NON-PIONEER) APPS
AND CONTENT, INCLUDING WITHOUT LIMITATION ANY INACCURACIES OR INCOMPLETE
INFORMATION.
To achieve optimum usability of Apple CarPlay, set the driving position setting correctly
according to the vehicle. The setting will be applied the next time an Apple CarPlay
compatible device is connected to this product.
1 Press .
2 Touch then .
The system setting screen appears.
Apple CarPlay™
Using Apple CarPlay
Setting the driving position
- 102 -
English
3 Touch [Smartphone-related Settings].
4 Touch [Driving Position].
[Left]
Select for a left-hand drive vehicle.
[Right]
Select for a right-hand drive vehicle.
When connecting an iPhone to this product, settings are required according to the
connected device. For details, refer to Setup for iPod®/iPhone® or smartphone (page 75).
1 Connect an Apple CarPlay compatible device to this product via USB.
2 Press .
3 Touch .
4 Touch [Apple CarPlay].
5 Touch the Apple CarPlay icon in the tab.
The application screen appears.
Before using Apple CarPlay wirelessly, connect the device to this product via Bluetooth
and turn on Apple CarPlay in the Bluetooth setting menu of the device (page 62).
1 Turn on the Wi-Fi function on the device.
2 Press .
3 Touch .
The device search screen appears.
Touch then skip to step 4 since the device list screen appears if Apple CarPlay had
previously been used wirelessly with the device.
NOTE
The unit cannot detect the device unless the Bluetooth or Apple CarPlay setting menu is displayed
on the iPhone screen.
4 Touch .
5 Touch a desired device on the screen.
Starting procedure
Wired connection
Wireless connection
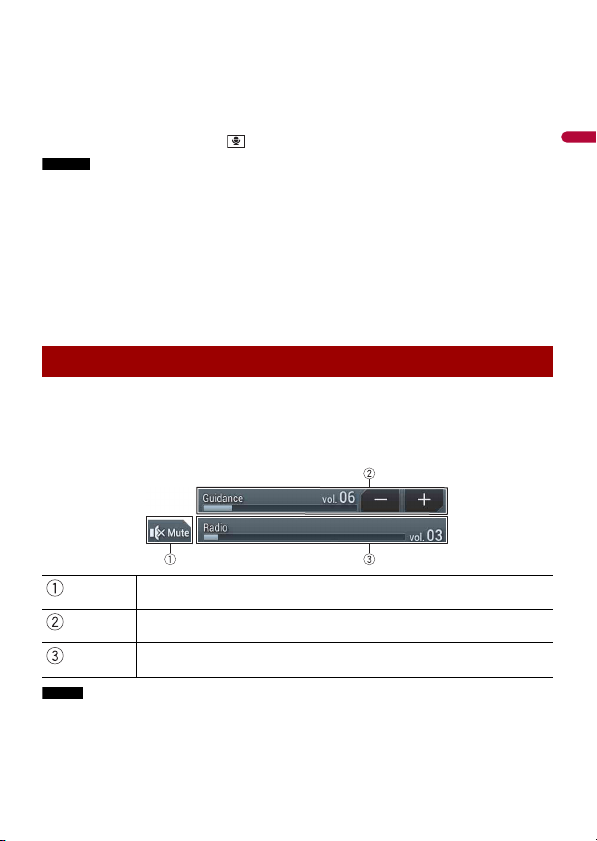
English
- 103 -
The unit configures the connection then start the application.
TIP
You can also start Apple CarPlay with a desired device by opening the Bluetooth or Apple CarPlay
setting menu while displaying the device search or device list screen.
TIP
You can use Siri function by pressing once Apple CarPlay is activated.
NOTES
• For details on USB connection, refer to the Installation Manual.
• If an Apple CarPlay compatible device has been connected and another screen is displayed, touch
[Apple CarPlay] on the top menu screen to display the Application menu screen.
• The Bluetooth connection with the Apple CarPlay compatible device will be terminated automatically
if Apple CarPlay is turned on. While Apple CarPlay is turned on, only a Bluetooth audio connection will
be possible for devices other than the device connected via Apple CarPlay.
• Hands-free phoning via Bluetooth wireless technology is not available while Apple CarPlay is on. If
Apple CarPlay is turned on during a call on a cellular phone other than an Apple CarPlay compatible
device, the Bluetooth connection will be terminated after the call ends.
• The route guidance using the internal navigation system will stop automatically if the route guidance
function in Apple CarPlay is launched.
You can adjust the guidance volume separately from the main sound volume when
Apple CarPlay is used.
1 While Apple CarPlay is activated, press VOL (+/-).
The volume menu will be displayed on the screen.
NOTE
The volume menu is displayed for four seconds. If the menu disappears, press VOL (+/-) again. The
menu reappears.
Adjusting the volume
Touch to mute. Touch again to cancel mute.
Touch [+]/[-] to adjust the guidance volume.
Displays the main sound volume. To adjust the main sound volume, press
VOL (+/-) on the unit.

- 104 -
English
You can operate Android applications with finger gestures such as tapping, dragging,
scrolling, or flicking on the screen of this product.
Compatible Android devices
For details about compatibility of Android models, refer to the following website.
https://support.google.com/androidauto
NOTE
The compatible finger gestures vary depending on the application for the smartphone.
WARNING
Certain uses of the smartphone may not be legal while driving in your jurisdiction, so you must be
aware of and obey any such restrictions. If in doubt as to a particular function, only perform it while the
car is parked. No feature should be used unless it is safe to do so under the driving conditions you are
experiencing.
Important
Android Auto may not be available in your country or region.
For details about Android Auto, please refer to the Google support site:
http://support.google.com/androidauto
• The content and functionality of the supported applications are the responsibility of the App
providers.
• In Android Auto, usage is limited while driving, with availability of functions and content determined
by the App providers.
• Android Auto allows access to applications other than those listed that are subject to limitations
while driving.
• PIONEER IS NOT RESPONSIBLE AND DISCLAIMS LIABILITY FOR THIRD PARTY (NON-PIONEER) APPS
AND CONTENT, INCLUDING WITHOUT LIMITATION ANY INACCURACIES OR INCOMPLETE
INFORMATION.
To achieve optimum usability of Android Auto, set the driving position setting correctly
according to the vehicle. The setting will be applied the next time an Android Auto
compatible device is connected to this product.
1 Press .
2 Touch then .
The system setting screen appears.
Android Auto™
Using Android Auto
Setting the driving position
W8500NEX

English
- 105 -
3 Touch [Smartphone-related Settings].
4 Touch [Driving Position].
[Left]
Select for a left-hand drive vehicle.
[Right]
Select for a right-hand drive vehicle.
When connecting a smartphone to this product, settings are required according to the
connected device. For details, refer to Setup for iPod®/iPhone® or smartphone (page 75).
1 Connect an Android Auto™ compatible device to this product via USB.
2 Press .
3 Touch .
4 Touch [Android Auto].
5 Touch the Android Auto icon in the tab.
A Bluetooth connection with the Android Auto compatible device is automatically
established and a Bluetooth connection with any other devices are terminated.
Before using Android Auto wirelessly, connect the device to this product via Bluetooth
(page 62).
1 Turn on the Wi-Fi function on the device.
2 Press .
3 Touch .
The device search screen appears.
Touch then skip to step 4 since the device list screen appears if Android Auto had
previously been used wirelessly with the device.
NOTE
The unit cannot detect the device unless the Bluetooth setting menu is displayed on the
smartphone screen.
4 Touch .
Starting procedure
Wired connection
Wireless connection

- 106 -
English
5 Touch a desired device on the screen.
The unit configures the connection then start the application.
TIP
You can use voice recognition function by pressing once Android Auto is activated.
NOTES
• For details on USB connection, refer to the Installation Manual.
• If twenty devices are already paired, the message confirming whether to delete the registered device
is displayed. If you want to delete the device, touch [Agree]. If you want to delete other device, touch
[BT Settings] and delete the devices manually (page 63).
• If Android Auto is turned on during a call on a cellular phone other than the Android Auto compatible
device, the Bluetooth connection will switch to the Android Auto compatible device after the call.
You can adjust the guidance volume separately from the main sound volume when
Android Auto is used.
1 While Android Auto is activated, press VOL (+/-).
The volume menu will be displayed on the screen.
NOTE
The volume menu is displayed for four seconds. If the menu disappears, press VOL (+/-) again. The
menu reappears.
If this function is set to on, Android Auto will launch automatically when an Android
Auto compatible device is connected to this product.
Adjusting the volume
Touch to mute. Touch again to cancel mute.
Touch [+]/[-] to adjust the guidance volume.
Displays the main sound volume. To adjust the main sound volume, press
VOL (+/-) on the unit.
Setting the auto-launch function

English
- 107 -
NOTE
Android Auto will launch automatically only when an Android Auto compatible device is correctly
connected to this product.
1 Press .
2 Touch then .
3 Touch [Smartphone-related Settings].
4 Touch [Android Auto Auto-launch] to switch [On] or [Off].

- 108 -
English
Pandora Music is a music service not affiliated with Pioneer. More information is
available at http://www.pandora.com.
The Pandora mobile application is available for iPhone and smartphones. Please visit
www.pandora.com/everywhere/mobile for the latest compatibility information.
WARNING
Certain uses of the iPhone or smartphone may not be legal while driving in your jurisdiction, so you
must be aware of and obey any such restrictions.
If in doubt as to a particular function, only perform it while the car is parked.
No feature should be used unless it is safe to do so under the driving conditions you are experiencing.
Important
Create a free or a paid account online. You can create the account in the Pandora application from your
iPhone or smartphone, or from the website (http://www.pandora.com/account/register).
Limitations:
• The Pandora service is subject to change without notice. The service could be affected
by any of the following: firmware version of the iPhone or smartphone, firmware
version of the Pandora application, changes to the Pandora music service.
• Certain functions of the Pandora service are not available when accessing the service
through Pioneer car audio/video products. They include, but are not limited to the
following: sending information about current stations, buying tracks from iTunes App
Store® or Google Play, viewing additional text information, logging in to Pandora,
adjusting Cell Network Audio Quality.
NOTE
In this chapter, iPhone and iPod touch will be referred to as "iPhone".
Update the firmware of the Pandora application to the latest version before use.
1 Unlock the mobile device and connect it to this product.
• iPhone via USB or Bluetooth
• Smartphone via Bluetooth
2 Press then touch .
3 Touch [Pandora].
4 Launch the Pandora application on the mobile device and start playback.
NOTES
• For details on Bluetooth connection, see page 62.
Pandora®
Listening to Pandora
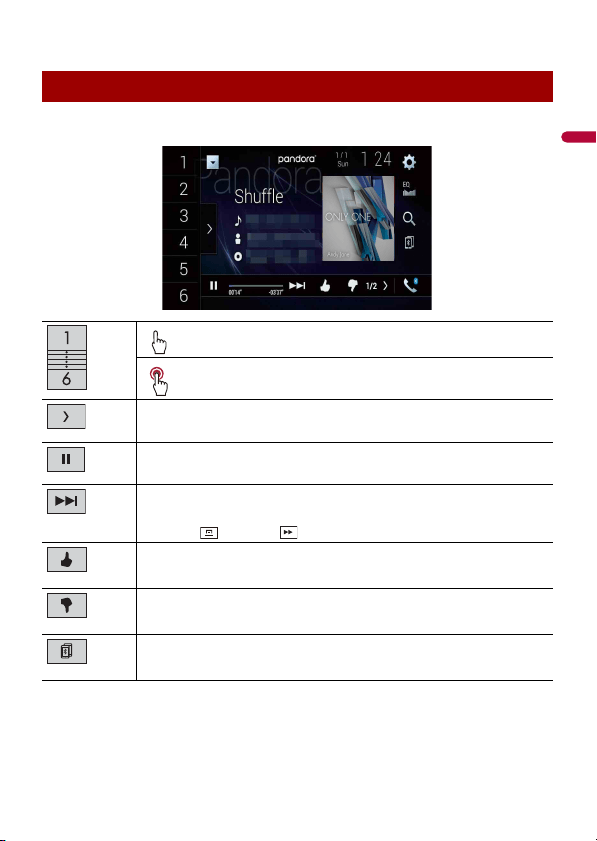
English
- 109 -
• For details on USB connection, refer to the Installation Manual.
Playback screen 1
Basic operation
Recalls the preset station stored to a key from the memory.
Stores the current station to a key.
Displays the preset station list.
Select an item on the list ([1] to [6]) to switch to the preset station.
Switches between playback and pause.
Skips tracks forward.
TIP
By pressing then touch , you can skip songs forward.
*
Gives a Thumbs Up to the playing track.
*
Gives a Thumbs Down to the playing track and skips to the next track.
Switches among connected devices.

- 110 -
English
* and are not available when using a shared station.
Playback screen 2
Selects a Pandora station from the list.
• : Switches to the station list.
• : Switches to the genre list.
• : Plays only one track based on particular musical characteristics from several
shuffled stations.
• : Deletes the station.
•A-Z: Sorts the items in the list alphabetically.
•Date: Sorts the items in the list in the order of the dates.
TIP
Shared stations are indicated by .
Creates a new station.
Touch [Track] or [Artist] to create a new station.
Adds information for the track currently playing to bookmarks.

English
- 111 -
Only SiriusXM® brings you more of what you love to listen to, all in one place. Get over
140 channels, including commercial-free music plus the best sports, news, talk, comedy,
and entertainment. Welcome to the world of satellite radio. A SiriusXM Connect Vehicle
Tuner and Subscription are required. For more information, visit the website
(www.siriusxm.com).
To take full advantage of all the SiriusXM capabilities, such as TuneMix™, SportsFlash™
and Traffic & Weather Now™, please use the SXV300 tuner or later version (sold
separately). Other tuners are compatible but may limit the features.
1 Press then touch .
2 Touch [SiriusXM].
You should be able to tune in to Channel 1. If you cannot get Channel 1, ensure that
your SiriusXM Connect Vehicle Tuner is installed correctly.
3 Switch to Channel 0 and check the Radio ID.
The SiriusXM Radio ID can be found by tuning in to Channel 0.
In addition, the Radio ID is located on the bottom of the SiriusXM Connect Vehicle
Tuner and its packaging.
You will need this number to activate your subscription.
NOTE
The SiriusXM Radio ID does not include the letters I, O, S, or F.
4 Activate the service either online or by phone.
TIP
In the USA, you can activate online or by calling SiriusXM Listener Care:
• Visit the website
www.siriusxm.com/activatenow
• Call SiriusXM Listener Care at
1-866-635-2349
For Canadian subscriptions, please contact:
• Visit the website
www.siriusxm.ca/activatexm
and click on "ACTIVATE RADIO" at the top right corner of the page, or call (1-877-438-9677).
NOTES
• The SiriusXM satellites will send an activation message to your tuner. When the tuner has received the
message, [Subscription Updated] is displayed.
SiriusXM® Satellite Radio
Subscribing to the SiriusXM Satellite Radio service
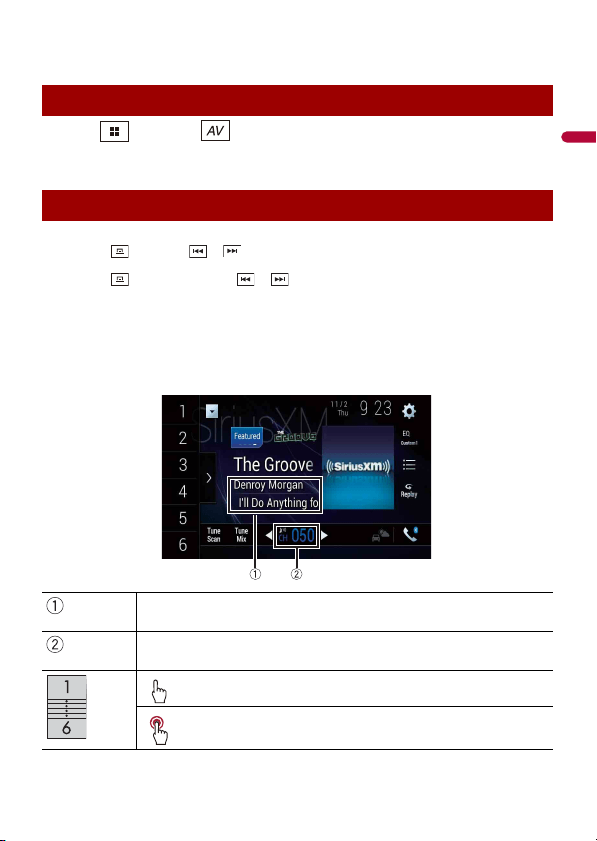
- 112 -
English
• The activation process usually takes 10 to 15 minutes, but it may take up to an hour. Your radio will
need to be powered on and receiving the SiriusXM signal to receive the activation message.
1 Press then touch .
2 Touch [SiriusXM].
TIPS
• By pressing then touch or , you can move the preset channels up or down on the current
channel screen, and skip files forward or backward on the play time indicator screen.
• By pressing then touch and hold or , you can move channels up or down on the current
channel screen, and perform fast reverse or fast forward on the play time indicator screen.
• On the Featured Favorites Band, the current broadcast frequency cannot be stored to a key
(page 116).
• If fewer than two music channels are stored as presets, you cannot use the TuneMix function.
• [RADIO ID] is displayed when Channel 0 is selected.
Current channel display (Live broadcast mode)
Listening to SiriusXM
Basic operation
Memorizes the current channel content information for the alert function
(page 116).
Selects a channel directly.
Recalls the preset channel stored to a key from the memory.
Stores the current channel to a key.
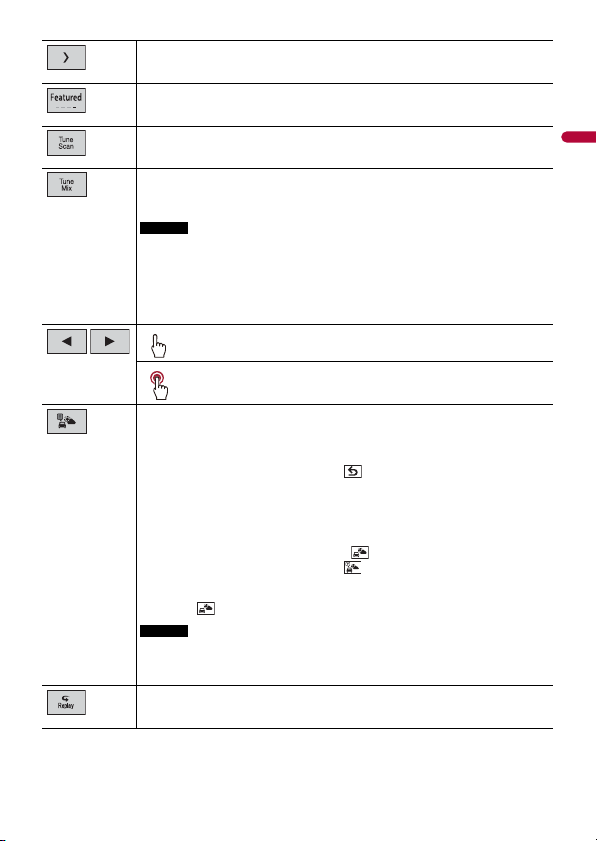
English
- 113 -
Displays the preset channels.
Select an item on the list ([1] to [6]) to switch to the preset channel.
Selects a band.
There are 4 bands. You can store 6 channels per band for a total of 24 presets.
Performs TuneScan™ (page 114).
Switches TuneMix™ to on or off.
You can use TuneMix™ to play a unique blend of songs from each of the music
channels stored as presets on the current band.
NOTES
• When fewer than two music channels are stored as presets, you cannot use
TuneMix™.
• Locked channels will not be used by TuneMix™ until the channels are unlocked
by entering the parental control passcode.
• TuneMix™ is only compatible with SXV300 or later tuner models (sold
separately).
Performs channel number down/up.
Performs fast channel number down/up.
Switches to the channel broadcasting the traffic and weather information for
the selected city (Traffic & Weather Now™).
Touch the Traffic & Weather Now™ button and you will be able to hear the latest
report for the selected city from the beginning.
To cancel Traffic & Weather Now™, touch .
TIPS
• Grayed out: Traffic and weather broadcast for your market is not yet available.
• With green dot: Latest report available, but not listened to yet.
• White: Latest report available to hear again.
• To listen to the information again, touch on the current channel display.
• If you have not selected the city, touch to select the city. You can also select
the city in advance (page 118).
• If you have already selected the city, you can listen to the information only by
touching .
NOTES
• The selected city can be changed in the Sirius XM settings (page 118).
• Traffic & Weather Now™ is only compatible with SXV300 or later tuner models
(sold separately).
Switches between live broadcast mode and Replay Mode.

- 114 -
English
Replay Mode (Time bar display)
When you activate the TuneScan™ feature, you will hear a few seconds of the songs
which have not been listened to from each of the music channels stored as presets on
the current band.
NOTES
• When fewer than two music channels are stored as presets, you cannot use TuneScan™.
Selects a channel from the list.
Select the category name or the list of all channels then touch the desired channel.
To switch the display list, touch .
TIPS
• The displayed list switches in the following order.
Channel Name—Artist Name—Song Title—Content Info
• If you touch , you can scan each channel in the selected category.
NOTES
• The types of categories available depend on the types of channels available.
• It may take time to display the channel list depending on the SiriusXM reception
condition.
Switches between playback and pause.
Performs content forward or backward.
Performs fast forward or rewind.
Switches between live broadcast mode and Replay Mode.
TuneScan™
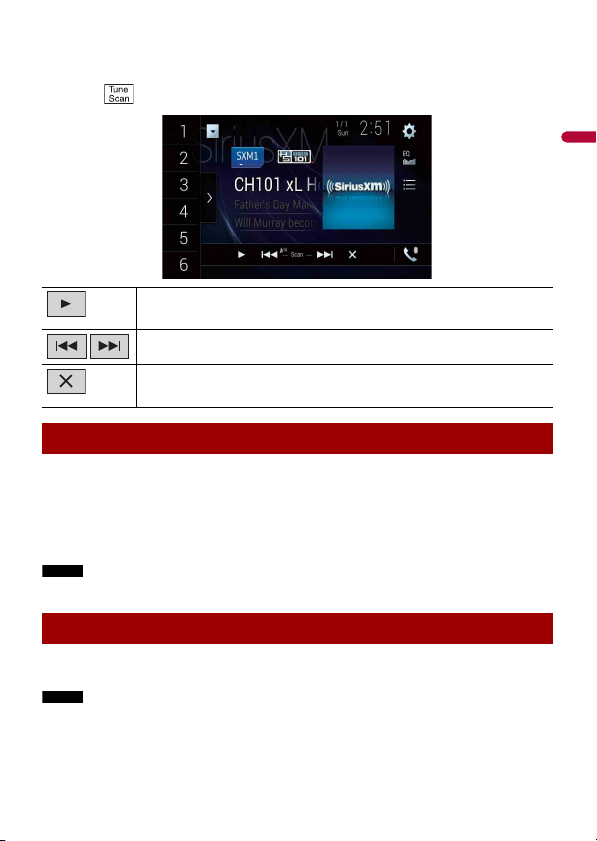
English
- 115 -
• TuneScan™ may take a few minutes to become available after the product is turned on or the preset
band is changed.
• Tune Scan™ is compatible with SXV200 or later tuner models (sold separately).
1 Touch to display the following display.
SportsFlash™ will notify you when a big play happens during a game with one of your
favorite sports teams.
Choose to tune in and hear the play unfold like it was live. Continue listening to the
game, or you can return to your previous channel.
For details, see [SportsFlash] (page 118) and [SportsFlash List] (page 118) in SiriusXM
settings.
NOTE
SportsFlash™ is only compatible with SXV300 or later tuner models (sold separately).
All preset channels will buffer the content to be used for Replay, TuneStart, TuneScan
and TuneMix features.
NOTE
SmartFavorite is compatible with SXV200 or later tuner models (sold separately).
Continues playing the current scanning song or channel.
Skips to the previous/next song during TuneScan™ or to the previous/next
channel during category scan.
Cancels scan play and returns to the previous channel.
SportsFlash™
SmartFavorites

- 116 -
English
Featured Favorites are groups of channels that are created by the SiriusXM Programming
department allowing you to discover new channels. Featured Favorite channels are
dynamic and can change often, allowing you to discover new channels.
For details, see [Featured Favorites] and [Featured Band Update Messages] in SiriusXM
settings (page 117).
When there is a Featured Favorite, access it with the band key.
1 Touch the band key.
SXM1—SXM2—SXM3—FF
When there are multiple Featured Favorites, access them from the category list.
It is displayed at the bottom of the category list (page 114).
The Parental Control feature allows you to limit access to any SiriusXM channels,
including those with mature content. When enabled, the Parental Control feature
requires you to enter a passcode to tune to the locked channels.
For details, see [Parental Control] in SiriusXM settings (page 117).
The song titles, artist names, and your favorite sport teams that you are listening to can
be memorized on an alert list.
When a program that matches a keyword memorized to the alert list is broadcast, a beep
sounds and a message is displayed.
For Details, see [Alert List](page 117) in SiriusXM settings .
NOTES
• You can register up to 50 keywords in the alert list.
• You can enable or disable alerts by setting the alert function.
• The radio will display an alert message when a matching artist, song, or team is found on another
channel. Touch [Jump] to switch to the channel. If you touch [Stay], the channel will not switch.
1 On the current channel content information area, touch the item for which you
want an alert.
2 Touch [OK] for the artist or song, or touch [Team1] or [Team2] for the game.
Using Featured Favorites Band
How to access
Parental lock
Using the content alerts function
Memorizing the current contents
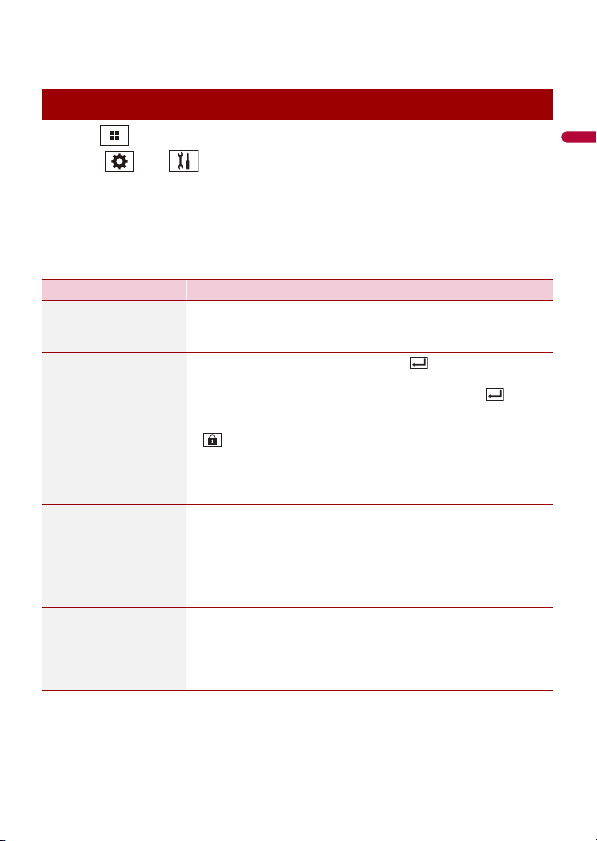
English
- 117 -
TIP
To set the alert function, you can set up at [Alert List] (page 117) in the [SiriusXM Settings].
1 Press .
2 Touch then .
The system setting screen appears.
3 Touch [AV Source Settings].
4 Touch [SiriusXM Settings].
The menu items vary according to the source.
SiriusXM settings
Menu Item Description
[Tune Start]
[On] [Off]
Start songs automatically from the beginning when you tune to
one of your preset channels in the current preset band when
TuneStart™ is turned on.
[Parental Control] Enter the current passcode then touch to set this function
(the default passcode is 0000).
• To edit the passcode, touch [Edit Code] then touch
followed by entering the new passcode.
• To lock the channel, touch the appropriate channel.
appears and the channel is locked.
TIPS
• When you touch the locked channel, the channel is unlocked.
• When you touch [Clear All], all locked channels are unlocked.
[Alert List] Select to activate the alert function of each memorized alert list
by touching by [Alert On] or [Alert Off].
TIPS
• Touch [Delete All] to delete all items memorized to the alert list.
• If you touch and hold the list item, you can delete the item from the
list.
[Team Settings] Set to notify you when games involving your favorite sports
teams are about to start.
1 Select your favorite league in the list screen.
2 Touch your favorite team in your selected league to switch
the alert on or off.

- 118 -
English
[Featured Favorites]
[On] [Off]
Set to [On] to allow you to discover new channels created by
the SiriusXM Programming department.
NOTE
If the Featured Favorite Band needs to update, the Featured Band
Update message will appear.
[Featured Band
Update Messages]
[On] [Off]
Set to [On] to be notified when the featured seasonal theme is
updated.
TIP
To display [Featured Band Update Messages] at all times, [Featured
Favorites] needs to be set to [On].
[SportsFlash]
[On] [Off]
Activates the SportsFlash™ function.
• Touch [Play] to listen to the notified channel.
• Touch [Ignore] to stay tuned to the current channel.
• Touch [Cancel] to cancel notifications regarding the game.
[SportsFlash List] Select favorite teams for SportsFlash™.
• Touch [Edit List] then select a league and team to set the
favorite.
TIPS
• You can touch an item again to deselect it.
• If you want to remove all the teams you have set, touch [Clear All].
Setting of priorities
If you set many Favorite Teams, SportsFlash™ notifications can
be received for up to 5 Favorite Teams at once. Set the priorities
if more than six teams are set as Favorite Teams.
1 Touch [Prioritize] on the team selection screen.
2 Select the five high priority teams from the selected
favorite teams.
[City Setting] Select the city for the latest traffic and weather report in Traffic
& Weather Now™.
[SiriusXM Reset] Set to restore to the default SiriusXM settings by touching
[Restore].
CAUTION
Do not turn off the engine while restoring the settings.
NOTES
• This setting is available only when you stop your vehicle in a safe place
and apply the parking brake.
• The source is turned off before the process starts.
Menu Item Description

English
- 119 -
CAUTION
For safety reasons, video images cannot be viewed while your vehicle is in motion. To view video
images, stop in a safe place and apply the parking brake.
NOTE
A High Speed HDMI® Cable (sold separately) is required for connection. For details, refer to the
Installation Manual.
1 Press then touch .
2 Touch [HDMI].
The HDMI source screen appears.
HDMI source screen
HDMI
Starting procedure
Basic operation
Hides the touch panel keys.
To display the keys again, touch anywhere on the screen.
TIP
You can set the screen size for the video image (page 154).
- 120 -
English
You can display the video image output by the device connected to video input.
CAUTION
For safety reasons, video images cannot be viewed while your vehicle is in motion. To view video
images, stop in a safe place and apply the parking brake.
NOTES
• A Mini-jack AV cable (sold separately) is required for connection. For details, refer to the Installation
Manual.
• You can set the screen size for the video image (page 154).
1 Press .
2 Touch then .
3 Touch [Input/Output Settings].
4 Confirm that [AUX Input] is turned on.
5 Press then touch .
6 Touch [AUX].
The AUX screen appears.
AUX
Starting procedure
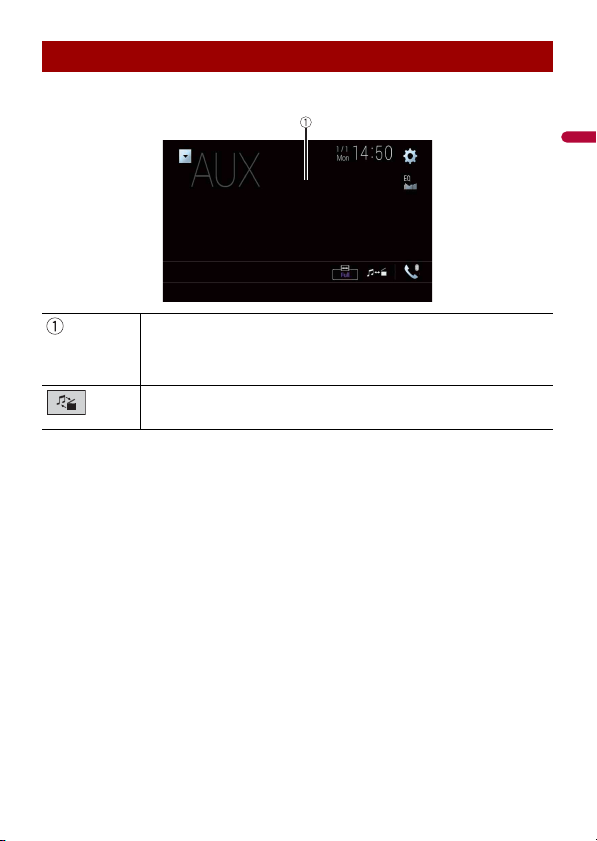
- 122 -
English
You can display the video image output by the device connected or the camera to video
input. For details, refer to the Installation Manual.
CAUTION
For safety reasons, video images cannot be viewed while your vehicle is in motion. To view video
images, stop in a safe place and apply the parking brake.
1 Press .
2 Touch then .
3 Touch [Input/Output Settings].
4 Touch [AV Input].
5 Touch [Source] for AV source or [Camera] for camera.
6 Press then touch .
7 Touch [AV] for AV source or [Camera View] for camera.
The image is displayed on the screen.
NOTE
If [Source] is selected, [2nd Camera Input] is automatically set to [Off] (page 133).
AV input
Starting procedure
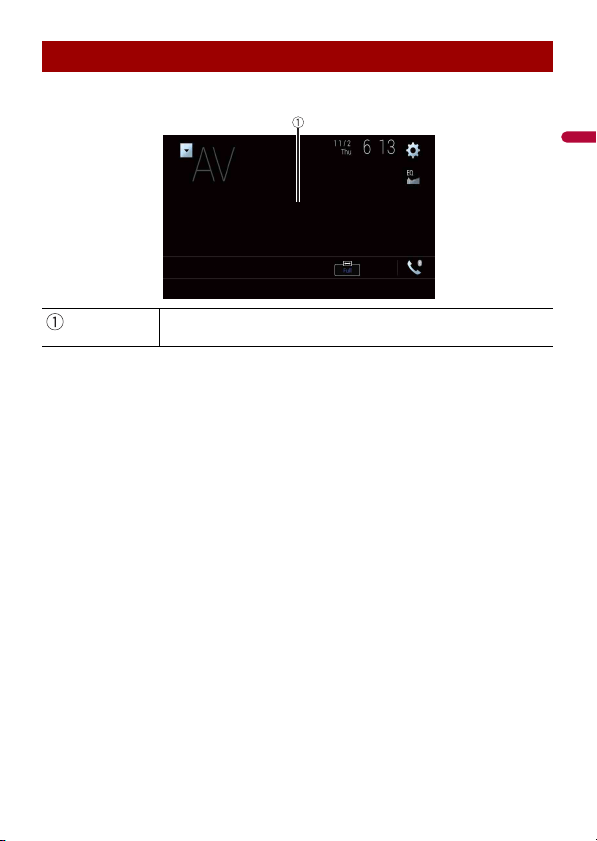
English
- 123 -
AV source screen
Basic operation
Hides the touch panel keys.
To display the keys again, touch anywhere on the screen.
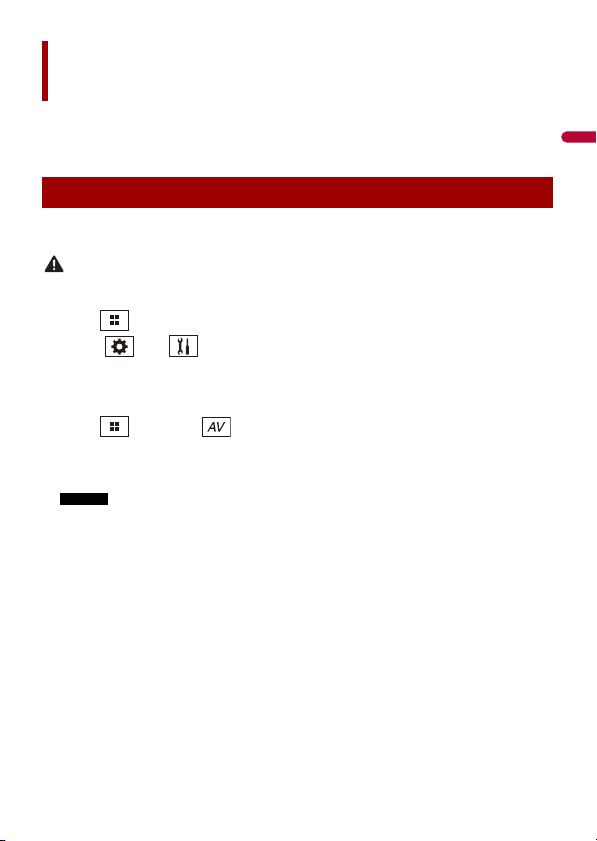
- 124 -
English
(This function is available only for Android device.)
Wireless Mirroring is a wireless display designed to mirror your mobile device on this
product screen via Wi-Fi connection.
Wireless Mirroring operations and procedures vary depending on the connected mobile
device. Refer to the instruction manual that came with your mobile device.
CAUTION
For safety reasons, this function is available only when you stop your vehicle in a safe place and apply
the parking brake.
1 Press .
2 Touch then .
3 Touch [Wi-Fi Settings].
4 Confirm that [Wi-Fi] is turned on.
5 Press then touch .
6 Touch [Mirroring].
A connection is configured then the instruction message appears on the display.
NOTES
• When Apple CarPlay or Android Auto with wireless connection is activated, the connection
swtiching confirmation screen appears (Android Auto function is only available for AVIC-
W8500NEX). Touch [OK] to proceed to Wireless Mirroring.
• When the Wi-Fi connection is set to [OFF], the connection confirmation screen appears. Touch
[Start] to make the connection.
7 Make a Wireless Mirroring connection on the mobile device.
8 Touch [Yes].
The Wireless Mirroring screen appears.
Wireless Mirroring
Starting procedure
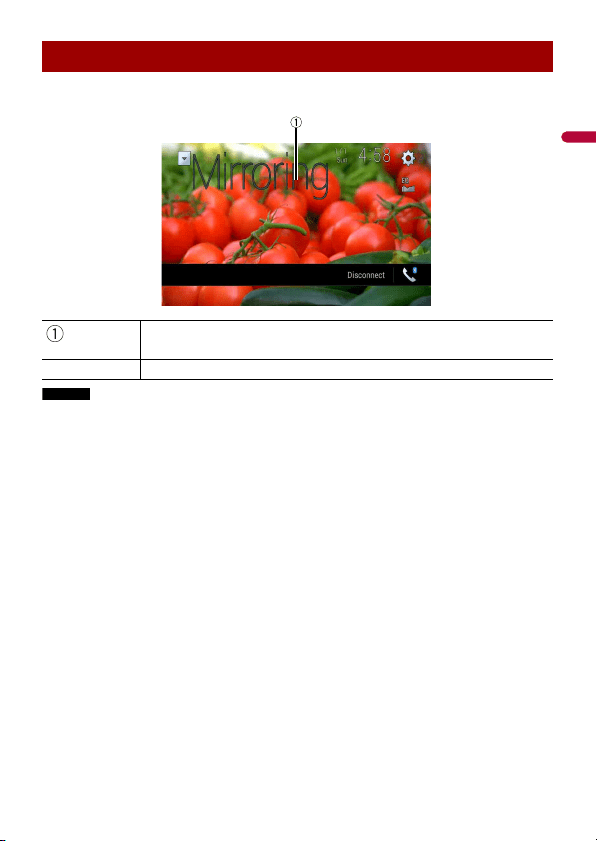
English
- 125 -
Wireless Mirroring screen (Example)
NOTES
• The screen shown in the example may differ from the connected mobile device.
• If the Android device is not ready for Miracast UIBC, you cannot perform touch operation.
Basic operation
Displays Full screen.
[Disconnect]
Disconnects Wireless Mirroring.

- 126 -
English
You can access the satellite radio source provided for the vehicle. The vehicle
information and many OEM systems such as steering wheel controls, warning chimes,
driver safety systems, and etc. can be displayed on this product by connecting the
optional iDatalink adapter. It is also possible to add visual screens such as gauges,
vehicle information, climate control, and parking assist. However, an extra interface
module is required to access these features.
NOTE
Since the type of module varies depending on the vehicle model, search for your vehicle at the
following URL to determine what features are available for each module. Remember to select the
correct radio model for accurate results.
http://maestro.idatalink.com/
Important
• For details about vehicle models that are compatible with the iDatalink adapter, refer to the
information on our website.
• For information on installing the iDatalink adapter, refer to the install guide of the iDatalink adapter.
• After installing the iDatalink adapter, be sure to check the operations.
• Functions and displays vary depending on the vehicle model. For details of the functions available for
each model, refer to the information on our website.
• Please note that the device number of this product and a computer with internet access are required
to program your Maestro RR module. For troubleshooting information about iDatalink functions, visit
the following website.
http://maestro.idatalink.com/support
Limitations
• The data is transmitted to this product from your vehicle system via the connected
iDatalink adapter. Therefore, the actual data contents displayed on your product may
be different from the contents on the screen described in this manual.
• When information on your vehicle or on the devices of your vehicle is sent from the
iDatalink Maestro module, a screen notifying you of such information may pop up.
Before using and/or connecting the iDatalink Maestro adapter, you will need to first flash
the Maestro RR module with the appropriate vehicle and head unit firmware.
1 Find the device number (12 alphanumeric characters) on the label on the
packaging of this product or on the product itself.
iDatalink
Using iDatalink
Activating iDatalink Maestro

English
- 127 -
2 Access the following website and follow the on-screen instructions to configure
the desired firmware.
http://maestro.idatalink.com/
NOTE
When the serial number input is required, input the device number of this product.
3 Install the vehicle/head unit specific firmware on your iDatalink Maestro module.
4 Connect this product to iDatalink Maestro, and then install this product to the
vehicle.
The iDatalink function will be active.
NOTES
• Device number input is required for updating the iDatalink Maestro module. Take a note of the device
number as necessary.
• For details on installing the firmware, refer to iDatalink Maestro website.
• For details on connecting this product to iDatalink Maestro, refer to the Installation Manual.
• You can also check the device number on the [Firmware Information] screen of this product
(page 138).
1 Connect the iDatalink Maestro adapter to this product.
For details, refer to the Installation manual.
2 Press then touch .
3 Touch [Car Sources] or [Car Features].
The touched menu screen appears.
These operations are almost similar to the built in AV sources of this product. For details
of the operations, refer to the related pages.
• USB/iPod operations (page 86) (page 94)
• SiriusXM tuner operations (page 111)
• Bluetooth audio operations (page 68)
• Hands-free phone operations (page 63)
You can check and operate the following screens after selecting [Car Features] in the
starting procedure. Touch one of the icons on the left side of the screen to change the
feature.
Starting procedure
Using functions in Car Sources
Using functions in Car Features
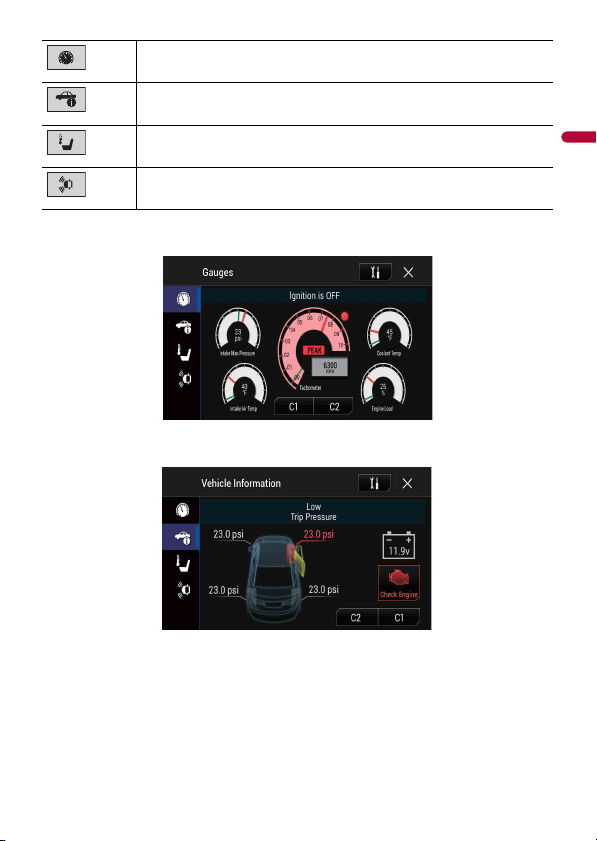
- 128 -
English
Gauges screen
Vehicle Information screen
Displays the Gauge screen.
Displays the Vehicle Information screen.
Displays the Climate screen.
Displays the Parking Assist screen.
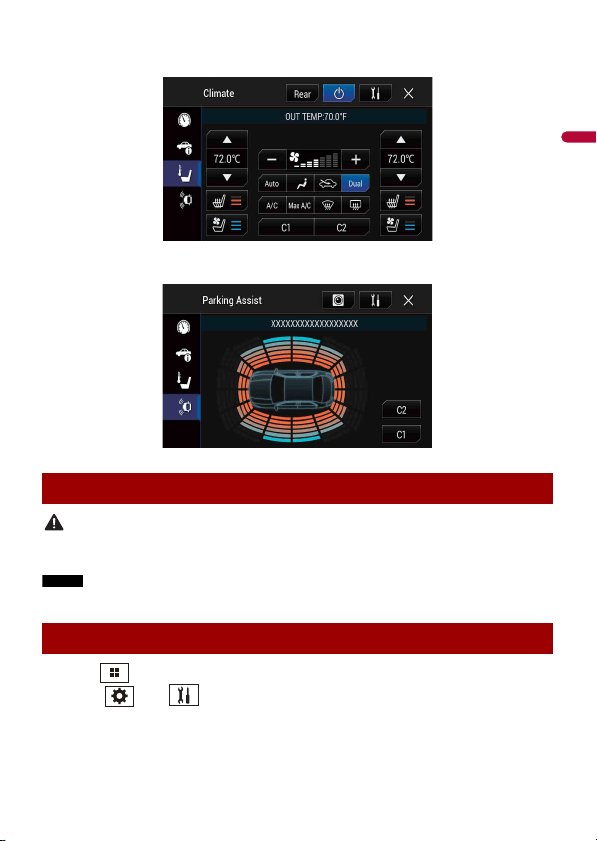
English
- 129 -
Climate screen
Parking Assist screen
CAUTION
This function is intended solely to assist the driver’s vision. It does not detect all dangers and obstacles
and is not a substitute for your attentiveness, judgment, and care while parking your vehicle.
NOTE
This function is only available for vehicles equipped with a parking sensor system.
1 Press .
2 Touch then .
3 Touch [OEM Settings] or [OEM Volume Settings].
The setting screen for iDatalink appears.
Displaying obstacle detection information
iDatalink settings

- 130 -
English
Menu Item Description
[OEM Settings] Setting for iDatalink function when the iDatalink adapter is
connected to the unit.
[OEM Volume Settings] Setting for iDatalink function volume when the iDatalink
adapter is connected to the unit.
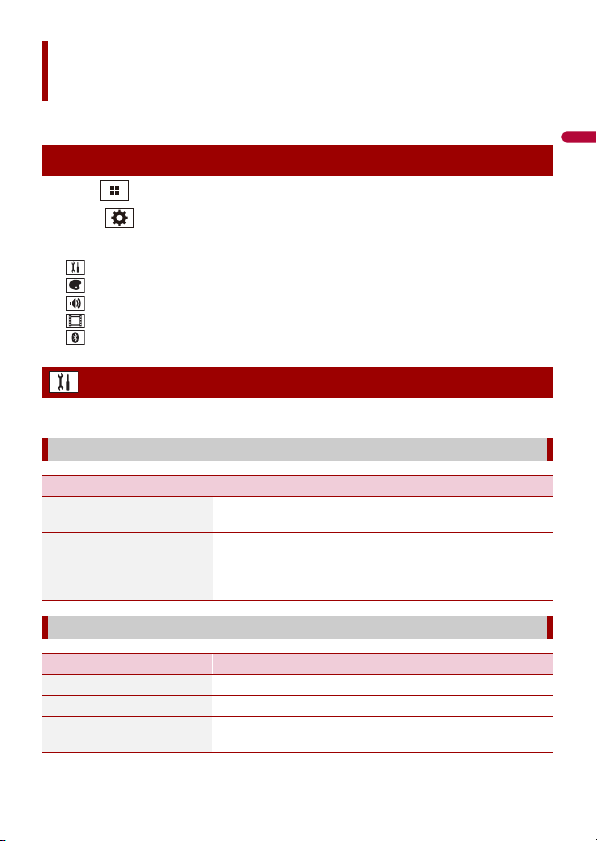
English
- 131 -
You can adjust various settings in the main menu.
1 Press .
2 Touch .
3 Touch one of the following categories, then select the options.
System settings (page 131)
Theme settings (page 141)
Audio settings (page 143)
Video settings (page 150)
Bluetooth settings (page 62)
The menu items vary according to the source.
Settings
Displaying the setting screen
System settings
[Navigation Related Settings]
Menu Item Description
[Navigation info window]
[On] [Off]
You can set whether to display the guidance information of
the navigation on the AV operation screen.
[AV/App Guide Mode]
[On] [Off]
You can set whether to automatically switch to the
navigation screen from the AV screen or the application
screen when your vehicle approaches a guidance point
such as an intersection.
[AV Source Settings]
Menu Item Description
[Radio Settings] (page 80)
[SiriusXM Settings] (page 117)
[Bluetooth Audio]
[On] [Off]
Setting Bluetooth audio source activation.

- 132 -
English
* AVIC-W8500NEX
A separately sold rear view camera (e.g. ND-BC8) is required for utilizing the rear view
camera function. (For details, consult your dealer.)
▶Rear view camera
This product features a function that automatically switches to the full-screen image of
the rear view camera installed on your vehicle when the shift lever is in the REVERSE (R)
position.
Camera View mode also allows you to check what is behind you while driving.
TIP
The parking assist guidelines can be displayed temporarily on the rear view camera screen by touching
the icon at the top left of the screen. The guidelines can be adjusted. For details on how to adjust the
guidelines, see [Parking Assist Guide Adjust] (page 134).
[Smartphone-related Settings]
Menu Item Description
[Smartphone Setup] Setting the connected mobile device (page 75).
[Driving Position]
[Right] [Left]
Setting the driving position.
• Apple CarPlay™ (page 101)
• Android Auto™ (page 104)
[Android Auto Auto-
launch]*
[On] [Off]
Select [On] to automatically launch Android Auto when an
Android device is connected to the unit.
[Auto Mix (iPhone/iPod)]
Menu Item Description
[Auto Mix (iPhone/iPod)]
[On] [Off]
Select whether to perform mixing the sound output from
WebLink and AV source sound automatically.
[Input/Output Settings]
Menu Item Description
[AV Input]
[Source] [Camera] [Off]
Select AV input source (page 122).
[AUX Input]
[On] [Off]
Set to [On] for AUX source (page 120).
[Camera settings]
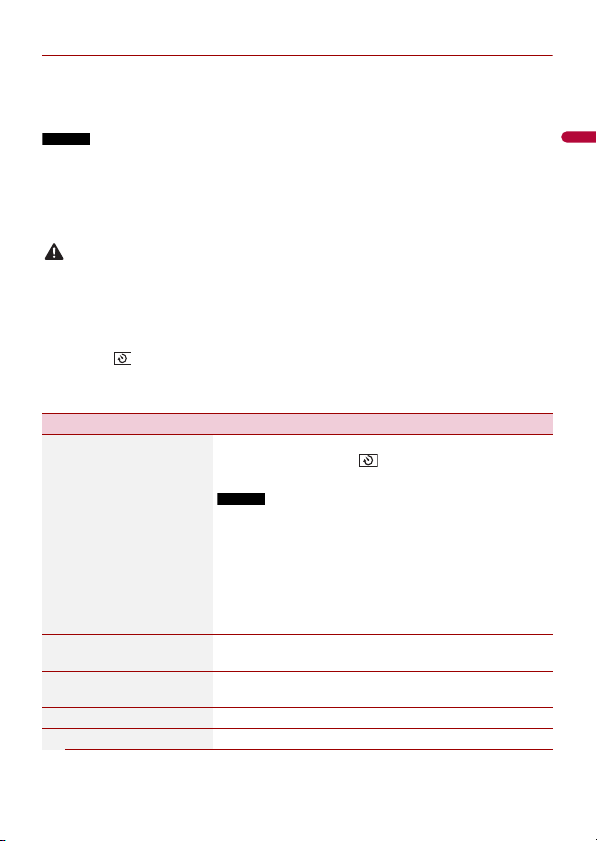
English
- 133 -
▶Camera for Camera View mode
Camera View can be displayed at all times. Note that with this setting, the camera image
is not resized to fit, and that a portion of what is seen by the camera is not viewable.
To display the camera image, touch [Camera View] on the AV source selection screen
(page 73).
NOTES
• To set the rear view camera as the camera for Camera View mode, set [Back Camera Input] to [On]
(page 133).
• When using the 2nd camera, set [AV Input] to [Camera] (page 122).
• When the camera view of both the rear view camera and 2nd camera are available, the key to switch
the display appears. Touch this key to switch the display between the rear view image and 2nd
camera image.
CAUTION
Pioneer recommends the use of a camera which outputs mirror reversed images, otherwise the screen
image may appear reversed.
• Immediately verify whether the display changes to the rear view camera image when the shift lever is
moved to REVERSE (R) from another position.
• When the screen changes to full-screen rear view camera image during normal driving, switch to the
opposite setting in [Reverse Gear Setting].
• If you touch while the camera image is displayed, the displayed image turns off temporarily.
• When the camera view of both the rear view camera and 2nd camera are available, the key to switch
the display appears. Touch this key to switch the display between the rear view image and 2nd
camera image.
Menu Item Description
[Camera View]
[On] [Off]
Set to [On] to display camera view at all times. (The same
mode is turned on when is touched on the camera
view screen. The setting value is synchronized.)
NOTES
• To set the rear view camera as the camera for Camera View
mode, set [Back Camera Input] to [On] (page 133).
• When using the second camera, set [AV Input] to [Camera] or
[2nd Camera Input] to [On] (both settings are synchronized)
(page 133).
TIP
You can also turn this function on by touching [Camera View] on
the AV source selection screen or in the source list.
[Back Camera Input]
[Off] [On]
Setting the second camera activation (front camera, etc.).
Setting rear view camera activation.
[2nd Camera Input]
[Off] [On]
Setting the second camera activation (front camera, etc.).
This function is synchronized with [AV Input] setting.
[Reverse Gear Setting] Setting the polarity of the rear view camera.
[Battery] The polarity of the connected lead is positive.
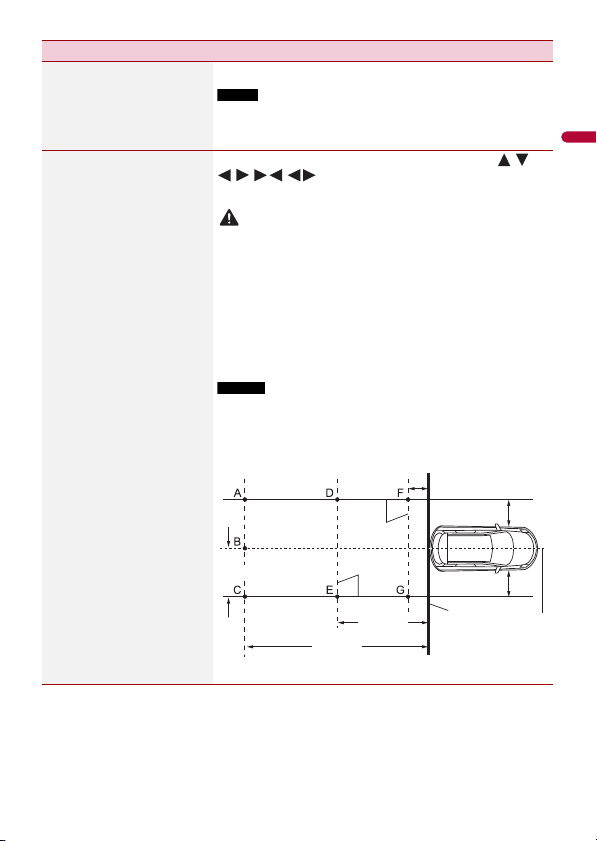
- 134 -
English
[Ground] The polarity of the connected lead is negative.
NOTE
If the camera polarity setting is wrong, or wrong camera setting is
made, press RESET button to release the rear view camera screen
and then change the camera polarity setting to [Battery].
[Parking Assist Guide
Adjust]
Adjusting the guidelines by dragging or touching / /
// / on the screen.
Touch [Default] to reset the settings.
CAUTION
• When adjusting the guidelines, park the vehicle in a safe place
and apply the parking brake; this setting is available only when
the vehicle is parked with the parking brake applied.
• Turn the vehicle off before getting out to place the markings.
• The range projected by the rear view camera is limited. Also, the
vehicle width and distance guidelines displayed on the rear view
camera image may differ from the actual vehicle width and
distance. (The guidelines are straight lines.)
• The image quality may deteriorate depending on the usage
environment, such as at night or in dark surroundings.
NOTES
• Use painter's tape or similar tape to place markings as shown
below before setting up the guidelines.
• Adjust the guidelines so that they overlay the tape markings as
closely as possible.
Menu Item Description
30 cm (1 ft)
Markings
Markings
Rear bumper
Vehicle Longitudinal
Centerline
3.05 m
(10 ft)
6.1 m
(20 ft)
1.52 m (5 ft)
25 cm (9-7/8 in.)
25 cm (9-7/8 in.)
English
- 135 -
Touch [Restore] to restore the settings to the default settings.
CAUTION
Do not turn off the engine while restoring the settings.
NOTE
This setting is available only when you stop your vehicle in a safe place and apply the parking brake.
[Wi-Fi Settings]
Menu Item Description
[Wi-Fi Settings] (page 70)
[Demo Mode]
Menu Item Description
[Demo Mode]
[On] [Off]
Setting the demo mode.
[System Language]
Menu Item Description
[System Language] Select the system language.
NOTES
• If the embedded language and the selected language setting are
not the same, the text information may not display properly.
• Some characters may not be displayed properly.
[Restore Settings]
Menu Item Description
[All Settings] Almost all settings or recorded content returns to the
default.
[Audio Settings] Restore to default Audio settings.
NOTE
This setting is available when the source is turned off.
[Theme Settings] Restore to default Theme settings.
[Bluetooth Settings] Restore to default Bluetooth settings.
- 136 -
English
If you feel that the touch panel keys on the screen deviate from the actual positions that
respond to your touch, adjust the response positions of the touch panel screen.
NOTES
• Do not use sharp pointed tools such as ballpoint or mechanical pens. They may damage the screen.
• Do not turn off the engine while saving the adjusted position data.
• This setting is available only when you stop your vehicle in a safe place and apply the parking brake.
NOTE
This setting is available only when you stop your vehicle in a safe place and apply the parking brake.
[Beep Tone]
Menu Item Description
[Beep Tone]
[On] [Off]
Select [Off] to disable the beep sound when the button is
pressed or the screen is touched.
[Touch Panel Calibration]
Menu Item Description
[Touch Panel Calibration] 1 Touch two corners of the screen along the arrows then
touch the centers of the two [+] marks at the same
time twice.
2 Press .
The adjustment results are saved.
3 Press once again.
Proceed to 16-point adjustment.
4 Gently touch the center of the [+] mark displayed on
the screen.
The target indicates the order.
• When you press , the previous adjustment
position returns.
• When you press and hold , the adjustment is
canceled.
5 Press and hold .
The adjustment results are saved.
[Dimmer Settings]
Menu Item Description
[Dimmer Trigger] Setting the dimmer brightness.
W6500NEX
English
- 137 -
You can adjust the picture for each source and rear view camera.
CAUTION
For safety reasons, you cannot use some of these functions while your vehicle is in motion. To enable
these functions, you must stop in a safe place and apply the parking brake.
To adjust following menu, touch , , , to adjust.
[Auto] Switches the dimmer to on or off automatically according
to your vehicle’s headlight turning on or off.
[Manual] Switches the dimmer to on or off manually.
[Time] Switches the dimmer to on or off at the time you adjusted.
[Day/Night] Setting the dimmer duration by day or night.
You can use this function when [Dimmer Trigger] is set to
[Manual].
[Day] Turns the dimmer function to off.
[Night] Turns the dimmer function to on.
[Dimmer Duration] Adjust the time that the dimmer is turned on or off by
dragging the cursors or touching or .
You can use this function when [Dimmer Trigger] is set to
[Time].
TIPS
• Each touch of or moves the cursor backward or forward
in the 15 minute width.
• When the cursors are placed on the same point, the dimmer
available time is 0 hours.
• When the cursor for off time setting is placed on the left end and
the cursor for on time setting is placed on the right end, the
dimmer available time is 0 hours.
• When the cursor for on time setting is placed on the left end and
the cursor for off time setting is placed on the right end, the
dimmer available time is 24 hours.
NOTE
The time display of the dimmer duration adjusting bar depends on
the clock display setting (page 154).
[Picture Adjustment]
Menu Item Description
[Brightness]
[-24] to [+24]
Adjust the black intensity.
Menu Item Description

- 138 -
English
* With some pictures, you cannot adjust [Hue] and [Color].
NOTES
• The adjustments of [Brightness], [Contrast], and [Dimmer Level] are stored separately when your
vehicle's headlights are off (daytime) and on (nighttime).
• [Brightness] and [Contrast] are switched automatically depending on the setting of [Dimmer
Settings].
• [Dimmer Level] can be changed the setting or the time to switch it to on or off (page 136).
• The picture adjustment may not be available with some rear view cameras.
• The setting contents can be memorized separately.
[Contrast]
[-24] to [+24]
Adjust the contrast.
[Color]*
[-24] to [+24]
Adjust the color saturation.
[Hue]*
[-24] to [+24]
Adjust the tone of color (which color is emphasized, red, or
green).
[Dimmer Level]
[+1] to [+48]
Adjust the brightness of the display.
[Temperature]
[-3] to [+3]
Adjust the color temperature, resulting in a better white
balance.
[System Information]
Menu Item Description
[Firmware Information] Displays the firmware version.
TIP
You can also check the open source license of the functions that
this product is equipped with by touching [License] in this menu.
Menu Item Description

English
- 139 -
[Firmware Update]
CAUTION
• The external storage device for updating must contain only the
correct update file.
• Never turn this product off, eject the SD memory card or
disconnect the USB storage device while the firmware is being
updated.
• You can only update the firmware when the vehicle is stopped
and the parking brake is engaged.
• You cannot update the old firmware version once the latest
firmware is updated.
1 Download the firmware update files into your
computer.
2 Connect a blank (formatted) storage device to your
computer then locate the correct update file and copy
it onto the USB storage device.
3 Set the external storage device to this product
(page 87).
4 Turn the source off (page 73).
5 Display the [System] setting screen (page 131).
6 Touch [System Information].
7 Touch [Firmware Update].
8 Touch [Continue].
Follow the on-screen instructions to finish updating the
firmware.
NOTE
If an error message appears on the screen, touch the display and
perform the above steps again.
[3D Calibration Status] Check the sensor learning status, such as the degree of
learning. You can also check the current sensor values and
the total number of speed pulses.
To delete the learned results stored in the sensor, follow
the below instructions.
1 Touch [Distance] or [Speed Pulse], and then touch
[Yes].
2 Touch [Learning] and then touch [Reset All].
TIP
Touch [Reset All] to reset the sensor after changing the
installation position or angle.
NOTE
If you touch [Reset Distance], all learned results stored in
[Distance] are cleared.
Menu Item Description

- 140 -
English
[Connection Status] Check that the leads are properly connected between this
product and vehicle.
[GPS Antenna] Displays the connection status of the GPS antenna ([OK] or
[NOK]) and the reception sensitivity.
NOTE
If reception is poor, change the installation position of the GPS
antenna.
[Positioning Status] Displays the positioning status (3D positioning, 2D
positioning, or no positioning), the number of satellites
used for positioning (orange), and the number of satellites
that have received signals (yellow). If signals from more
than three satellites are received, the current location can
be measured.
[Installation] Indicates whether the installation position of this product
is correct or not. If installed correctly, [OK] appears. When
this product is installed at an extreme angle exceeding the
limitation of the installing angle, [NOK(Inst. Angle)] is
displayed. If the installation of this product is continually
changed and it is not firmly fixed into place,
[NOK(Vibration)] is displayed.
[Speed Pulse] The speed pulse value detected by this product is shown.
[Illumination] Displays the status of headlights or small lamps of the
vehicle.
[Back Signal] When the shift lever is shifted to “R” (reverse position), the
signal switches to [High] or [Low]. The signal displayed
varies depending on the vehicle.
[iDataLink] Displays the status of the optional iDatalink adapter.
[OEM Settings]
Menu Item Description
[OEM Settings] (page 130).
[OEM Volume Settings]
Menu Item Description
[OEM Volume Settings] (page 130).
Menu Item Description

English
- 141 -
CAUTION
Do not turn off the engine while importing an image from the external storage device.
The menu items vary according to the source.
Theme settings
Menu Item Description
[Background]
[Home] [AV]
Select the wall paper from the preset items in this product
or original pictures via the external device such as USB
storage device and SD memory card.
TIP
The wall paper can be set from selections for the top menu screen
and AV operation screen.
Preset Display Selects the desired preset background display.
(custom)* Displays the background display image imported from the
external storage device.
To set the image from an external device, touch then
select the desired image by touching the desired external
storage device after connecting the device.
NOTE
Background display image must be used within the following
formats.
• JPEG image files (.jpg or .jpeg)
• Allowable data size is 10 MB or smaller
• Allowable image size is 4 000 pixels × 4 000 pixels or smaller
(off) Hides the background display.
[Illumination] Select an illumination color from the color list or create a
defined color.
Colored Keys Select the desired preset color.
(custom) Displays the screen to customize the illumination color.
To customize the defined color, touch then touch
or to adjust the brightness and the level of red, green
and blue to create favorite color.
To store the customized color in the memory, touch and
hold [Memo], and the customized color will be available at
the next illumination setting by touching .
TIP
You can also adjust the color tone by dragging the color bar.
(rainbow) Shifts gradually between the preset colors in sequence.
- 142 -
English
* The external storage device is inserted or plugged in in advance to customize the image (page 86).
You can export settings you have made on the [Theme] screen to an external storage
device. Also, you can import them from an external storage device.
CAUTION
Do not turn off the engine while exporting or importing the settings.
NOTES
• If multiple external storage devices that include available data are connected to this product, the
order of priority for the targets that the Theme settings are exported to or imported from is as follows:
SD memory card
USB storage device (USB port 1)
USB storage device (USB port 2)
USB storage device (USB port 1)
USB storage device (USB port 2)
• This setting is available only when you stop your vehicle in a safe place and apply the parking brake.
▶Exporting Theme settings
1 Set the external storage device (page 86).
[Theme] Select the theme color.
TIP
You can preview the top menu screen or the AV operation screen
by touching [Home] or [AV] respectively.
[Clock] Select the style of the clock from the preset image.
Preset Images Select the desired preset style for the clock.
(off) Hides the clock display.
[Splash Screen] Select the splash screen from the preinstalled image in this
product or external devices such as USB storage devices
and SD memory cards.
Preset Images Selects the desired preset splash screen image.
(custom)* Displays the splash screen image imported from the
external storage device.
To set the image from an external device, touch then
select the desired image by touching the desired external
storage device after connecting the device.
Replicating the settings
Menu Item Description
W8500NEX
W6500NEX
English
- 143 -
2
Press .
3 Touch then .
4 Touch [Export].
5 Touch the item you want export.
[Illumination]
[Theme]
[Splash Screen]
[Select All]
6 Touch [Export].
▶Importing Theme settings
1 Set the external storage device (page 86).
A message confirming whether to import the stored setting data appears.
2 Touch [Import].
The menu items vary according to the source. Some of the menu items become
unavailable when the volume is set to mute or the source is off.
Audio settings
Menu Item Description
[Graphic EQ]
[Super Bass] [Powerful]
[Natural] [Vocal] [Flat]
[Custom1] [Custom2]
Select or customize the equalizer curve.
Select a curve that you want to use as the basis of
customizing then touch the frequency that you want to
adjust.
TIPS
• If you touch [Custom1] or [Custom2], the equalizer curve
currently stored in [Custom1] or [Custom2] is recalled.
• If the equalizer curve stored in [Custom1] or [Custom2] is
modified, each stored curve will be overwritten.
• If you trail your finger across the bars of multiple equalizer
bands, the equalizer curve settings will be set to the value of the
touched point on each bar.
• If the preset equalizer curve other than [Custom1] or [Custom2]
is modified, the curve setting will be overwritten in [Custom1].
- 144 -
English
[Fader/Balance] Touch or to adjust the front/rear speaker balance.
Set [Front] and [Rear] to [0] when using a dual speaker
system.
Touch or to adjust the left/right speaker balance.
TIP
You can also set the value by dragging the point on the displayed
table.
NOTE
Only the balance can be adjusted when [Network Mode] is
selected as the speaker mode.
[Mute Level] Select mute or attenuate the AV source volume and iPhone
or smartphone application volume when the navigation
outputs the guidance voice.
[ATT] The volume becomes 20 dB lower than the current volume.
[Mute] The volume becomes 0.
[Off] The volume does not change.
[Source Level Adjuster]
[-4] to [+4]
Adjust the volume level of each source to prevent radical
changes in volume when switching between sources other
than FM.
Touch or to adjust the source volume after
comparing the FM tuner volume level with the level of the
source.
TIP
If you directly touch the area where the cursor can be moved, the
SLA (source level adjustment) setting will be changed to the value
of the touched point.
NOTES
• Settings are based on the FM tuner volume level, which remains
unchanged.
• This function is not available when the FM tuner is selected as
the AV source.
[Subwoofer]
[On] [Off]
Select enable or disable rear subwoofer output from this
product.
NOTE
If [Off] is selected, the subwoofer adjustment is not available in
[Speaker Level], [Time Alignment] and [Crossover].
Menu Item Description
English
- 145 -
[Speaker Level]
Listening position*1*2
[Off] [Front Left] [Front
Right] [Front] [All]
Standard Mode*3
[Front Left] [Front Right]
[Rear Left] [Rear Right]
[Subwoofer]
Network Mode*3
[High Left] [High Right]
[Mid Left] [Mid Right]
[Subwoofer]
Speaker output level
[-24] to [10]
Adjust the speaker output level of the listening position.
1 Touch or to select the listening position then
select the output speaker.
2 Touch or to adjust the selected speaker output
level.
[Crossover] Select a speaker unit (filter) to adjust the HPF or LPF cutoff
frequency and the slope for each speaker unit (page 149).
[Subwoofer Settings] Select the subwoofer phase (page 149).
[Listening Position]*1
[Off] [Front Left] [Front
Right] [Front] [All]
Select a listening position that you want to make as the
center of sound effects.
[Time Alignment]
[On] [Off]
Listening position*1*2
[Off] [Front Left] [Front
Right] [Front] [All]
Standard Mode*3*4
[Front Left] [Front Right]
[Rear Left] [Rear Right]
[Subwoofer]
Network Mode*3*4
[High Left] [High Right]
[Mid Left] [Mid Right]
[Subwoofer]
Distance
[0] to [140]
Select or customize the time alignment settings to reflect
the distance between the listener’s position and each
speaker. You need to measure the distance between the
head of the listener and each speaker unit.
1 Touch or to select the listening position then
select the alignment speaker.
2 Touch or to input the distance between the
selected speaker and listening position.
TIP
If you touch [TA On], the time alignment is turned off mandatorily.
NOTE
This function is available only when the listening position setting
is set to [Front Left] or [Front Right].
[Auto EQ]
[On] [Off]
Set the auto-adjusted equalizer to suit the vehicle’s
acoustics. To use this function, the Auto EQ measurement
must be done in advance (page 148).
[A-EQ&TA Measurement] Measures and adjusts the vehicles acoustics, equalizer, and
time alignment automatically to suit the vehicle interior
(page 148).
Menu Item Description

- 146 -
English
*1 [All] is not available when [Network Mode] is selected as the speaker mode.
[Save Settings] Save to recall the following current sound settings by
touching [OK]: slope, subwoofer phase, speaker level,
Graphic EQ, HPF/LPF, listening position, crossover, time
alignment.
TIP
When you touch [Cancel], return to the [Audio] setting screen.
[Load Settings] Load the sound settings.
NOTES
• [Sound Setting] is available only when you have already saved
the sound settings (page 146).
• [Auto EQ&TA Setting] is available only when you have already
performed Auto EQ measurement (page 147).
[ASL] Set to one of five levels to increase the volume level of the
audio depending on the driving speed and road
conditions.
[BASS Boost]
[0] to [6]
Adjust the bass boost level.
[Rear Speaker Output]
[Rear] [Subwoofer]
Select the rear speaker output.
NOTES
• This function is available when [Standard Mode] is selected as
the speaker mode.
• If [Subwoofer] is selected, the rear speaker adjustment is not
available in [Speaker Level], [Time Alignment] and [Crossover].
[Loudness]
[Off] [Low] [Mid] [High]
Compensates for deficiencies in the low-frequency and
high-frequency ranges at low volume.
[Automatic Level Control] Corrects automatically the audio level difference between
the music files or the sources.
[Off] Turns the auto level control setting off.
[Mode1] Corrects a little the audio level difference between the
music files or the sources (for the narrow dynamic range
audio signal).
[Mode2] Corrects widely the audio level difference between the
music files or the sources (for the wide dynamic range
audio signal).
[Sound Retriever]
[Off] [Mode1] [Mode2]
Enhances compressed audio and restores rich sound
automatically.
TIP
[Mode2] has a stronger effect than [Mode1].
Menu Item Description

English
- 147 -
*2 If you change the listening position setting, the output levels of all the speakers will change in
conjunction with the setting.
*3 To use this function, the vehicle’s acoustics must be measured in advance.
*4 This function is available only when the [Listening Position] setting is set to [Front Left] or [Front
Right].
By measuring the vehicle’s acoustics, the equalizer curve can be adjusted automatically
to suit the vehicle interior.
WARNING
A loud tone (noise) may be emitted from the speakers when measuring the vehicle’s acoustics. Never
perform Auto EQ measurement while driving.
CAUTION
• Thoroughly check the conditions before performing Auto EQ as the speakers may be damaged if this
is performed under the following conditions:
– When the speakers are incorrectly connected. (For example, when a rear speaker is connected as a
subwoofer output.)
– When a speaker is connected to a power amp delivering output higher than the speaker’s
maximum input power capability.
• If a microphone for acoustical measurement (sold separately) is not placed in the appropriate
location, the measurement tone may become loud and measurement may take a long time, resulting
in battery drainage. Be sure to place the microphone in the specified location.
▶Before operating the Auto EQ function
• Perform Auto EQ in a quiet place with the vehicle engine and air conditioning
switched off. Also, cut the power of car phones or cellular phones in the vehicle, or
remove them in advance. Surrounding sounds may prevent correct measurement of
the vehicle’s acoustics.
• Be sure to use the microphone for acoustical measurement (sold separately). Using
other microphones may prevent measurement, or result in incorrect measurement of
the vehicle’s acoustics.
• To perform Auto EQ, the front speakers must be connected.
• When this product is connected to a power amp with input level control, Auto EQ may
be impossible if the power amp’s input level is set below the standard level.
• When this product is connected to a power amp with an LPF (low pass filter), turn the
LPF off before performing Auto EQ. Also, set the cutoff frequency for the built-in LPF of
an active subwoofer to the highest frequency.
• The distance has been calculated by a computer to provide optimum delay to ensure
accurate results. Do not change this value.
– The reflected sound within the vehicle is strong and delay occurs.
– The LPF on active subwoofers or external amps delay the lower sounds.
• If an error occurs during measurement, check the following before measuring the
vehicle’s acoustics.
– Front speakers (left/right)
Adjusting the equalizer curve automatically (Auto EQ)

- 148 -
English
– Rear speakers (left/right)
–Noise
– Microphone for acoustical measurement (sold separately)
–Low battery
▶Performing Auto EQ
CAUTION
Do not turn off the engine while the measurement is in progress.
NOTES
• Auto EQ changes the audio settings as follows:
– The fader/balance settings return to the center position (page 144).
• Previous settings for Auto EQ will be overwritten.
1
Stop the vehicle in a quiet place, close all doors, windows, and sun roof, and then
turn the engine off.
If the engine is left running, engine noise may prevent correct Auto EQ.
NOTE
If driving restrictions are detected during measurement, the measurement is canceled.
2
Fix the microphone for acoustical measurement (sold separately) in the center of
the headrest of the driver’s seat, facing forward.
The Auto EQ may differ depending on where you place the microphone. If desired,
place the microphone on the front passenger seat and perform Auto EQ.
3
Disconnect the iPhone or smartphone device.
4
Turn on the ignition switch (ACC ON).
If the vehicle’s air conditioner or heater is turned on, turn it off.
5
Switch the AV source to [Source OFF] (page 73).
6
Press .
7
Touch then .
8
Touch [A-EQ&TA Measurement].
9
Connect the microphone for acoustical measurement (sold separately) with this
product.
Plug the microphone into the Auto EQ microphone input jack on this product
(page 6).
Plug the microphone into the AUX input jack on the back panel of this product (refer
to the Installation Manual).
W8500NEX
W6500NEX

English
- 149 -
NOTE
Use an extension cable (sold separately) if the cord of the microphone (sold separately) is not long
enough.
10
Touch [Front Left] or [Front Right] to select the current listening position.
11
Touch [Start].
A 10-second countdown starts.
NOTE
The Bluetooth connection is disconnected before the process starts.
12
Exit the vehicle and keep the doors closed until the countdown finishes.
When the countdown finishes, a measurement tone (noise) is emitted from the
speakers and Auto EQ measurement begins.
13
Wait until the measurement is completed.
When Auto EQ is completed, a message is displayed.
NOTE
The measurement time varies depending on the type of vehicle.
TIP
To stop the measurement, touch [Stop].
14
Store the microphone carefully in the glove compartment or another safe place.
If the microphone is subjected to direct sunlight for an extended period, high
temperatures may cause distortion, color change, or malfunction.
You can adjust the cutoff frequency value of each speaker.
The following speakers can be adjusted:
[Standard Mode]: Front, Rear, Subwoofer.
[Network Mode]: High, Mid, Subwoofer.
NOTES
• Subwoofer settings are available only when [Subwoofer] is [On].
• Rear speaker settings are available only when [Rear Speaker Output] is [Rear].
1 Press .
2 Touch then .
3 Touch [Crossover] or [Subwoofer Settings].
4 Touch or to switch the speaker.
5 Drag the graph line to set the cutoff position.
6 Drag the lowest point of the graph to set the cutoff slope.
The following items can also be set.
Adjusting the cutoff frequency value
- 150 -
English
The menu items vary according to the source.
This setting is available only when [Disc] is selected as the source.
Switches the subwoofer phase between normal and reverse position.
LPF/HPF
Switches the LPF/HPF setting to [On] or [Off]. When it is turned off, the high-pass
filter or low-pass filter of each speaker can also be turned on by touching the
graph lines.
Video settings
[DVD/DivX Setup]
Menu Item Description
[Subtitle Language]*1*2 Set a subtitle language preference. When you select
[Others], a language code input screen is shown. Input the
four-digit code of the desired language then touch .
[Audio Language]*1*2 Set an audio language preference. When you select
[Others], a language code input screen is shown. Input the
four-digit code of the desired language then touch .
[Menu Language]*1*2 Set a menu language preference. When you select [Others],
a language code input screen is shown. Input the four-digit
code of the desired language then touch .
[Multi Angle]
[On] [Off]
Set to display the angle icon on the screen.
[TV Aspect] Set the aspect ratio suitable for your rear display 16:9 (wide
screen display) or 4:3 (regular display). (We recommend
use of this function only when you want to fit the aspect
ratio to the rear display.)
NOTES
• When playing discs that do not have a panscan system, the disc
is played back with [Letter Box] even if you select the [Pan Scan]
setting. Confirm whether the disc package bears the
mark.
• The TV aspect ratio cannot be changed for some discs. For
details, refer to the disc's instructions.
[16:9] Displays the wide screen image (16:9) as it is (initial
setting).
[Letter Box] Makes the image in the shape of a letterbox with black
bands on the top and bottom of the screen.

English
- 151 -
[Pan Scan] Cuts the image short on the right and left sides of the
screen.
[Parental] Set restrictions so that children cannot watch violent or
adult-oriented scenes. You can set the parental lock level in
steps as desired.
1 Touch [0] to [9] to input a four-digit code number.
2 Touch .
Registers the code number, and you can now set the
level.
3 Touch any number between [1] to [8] to select the
desired level.
The lower the level is set, the tighter the restriction is
applied.
4 Touch .
Sets the parental lock level.
NOTES
• We recommend keeping a record of your code number in case
you forget it.
• The parental lock level is recorded on the disc. You can confirm it
by looking at the disc package, the included booklet, or the disc
itself. You cannot use parental lock with discs that do not feature
a recorded parental lock level.
• With some discs, parental lock operates to skip certain scenes
only, after which normal playback resumes. For details, refer to
the disc's instructions.
• When you set a parental lock level and then play a disc featuring
parental lock, code number input indications may be displayed.
In this case, playback will begin when the correct code number is
input.
[DivX® VOD] Displays this product's registration and deregistration code
to register this product with your DivX VOD content
provider to play DivX® VOD (video on demand) content on
this product.
TIP
You can do this by generating a DivX VOD registration code, which
you submit to your provider.
[Registration Code] is 10-digit.
[Deregistration Code] is 8-digit.
NOTE
Make a note of the code as you will need it when you register or
deregister from a DivX VOD provider.
Menu Item Description

- 152 -
English
*1 You can switch the language by touching the switch languages key during playback.
*2 The setting made here will not be affected even if the language is switched during playback using
the appropriate key.
[DVD Auto Play]
[On] [Off]
Set to display the DVD menu automatically and start
playback from the first chapter of the first title when a DVD
disc with a DVD menu is inserted.
NOTE
Some DVDs may not operate properly. If this function is not fully
operable, turn this function off and start playback.
[Time Per Photo Slide]
Menu Item Description
[Time Per Photo Slide]
[5sec] [10sec] [15sec]
[Manual]
Select the interval of image file slideshows on this product.
[Video Signal Setting]
Menu Item Description
[AV]
[Auto] [PAL] [NTSC] [PAL-
M] [PAL-N] [SECAM]
Select the suitable video signal setting when you connect
this product to an AV equipment.
[AUX]
[Auto] [PAL] [NTSC] [PAL-
M] [PAL-N] [SECAM]
Select the suitable video signal setting when you connect
this product to an AUX equipment.
[Camera]
[Auto] [PAL] [NTSC] [PAL-
M] [PAL-N] [SECAM]
Select the suitable video signal setting when you connect
this product to a rear view camera.
Menu Item Description

English
- 153 -
Registering your favorite menu items in shortcuts allows you to quickly jump to the
registered menu screen by a simple touch on the [Favorites] screen.
NOTE
Up to 12 menu items can be registered in the favorite menu.
1 Press then touch .
2 Touch the star icon of the menu item.
The star icon for the selected menu is filled in.
TIP
To cancel the registration, touch the star icon in the menu column again.
1 Press then touch .
2 Touch .
3 Touch the menu item.
1 Press then touch .
2 Touch .
3 Touch and hold the favorite menu column.
The selected menu item is removed from the [Favorites] screen.
TIP
You can also remove a shortcut by touching and holding the registered menu column.
Favorite menu
Creating a shortcut
Selecting a shortcut
Removing a shortcut

- 154 -
English
1 Touch the current time on the screen.
2 Touch one of the items to adjust.
• You can change the time display format to [12hour] or [24hour].
• You can change the order of date display format: Day-month, Month-day.
You can set the screen mode for AV screen and image files.
1 Touch the screen display mode key.
2 Touch the desired mode.
Other functions
Setting the time and date
Changing the wide screen mode
Screen display mode key
[Full] A 4:3 picture is enlarged in the horizontal direction only, enabling you to enjoy an
image without any omissions.
[Zoom] A 4:3 picture is enlarged in the same proportion both vertically and horizontally.
[Normal] A 4:3 picture is displayed normally, without changing its proportion.
[Trimming] An image is displayed across the entire screen with the horizontal-to-vertical ratio
left as is. If the screen ratio differs from the image, the image may be displayed
partly cut off either at the top/bottom or sides.
NOTE
[Trimming] is for image files only.
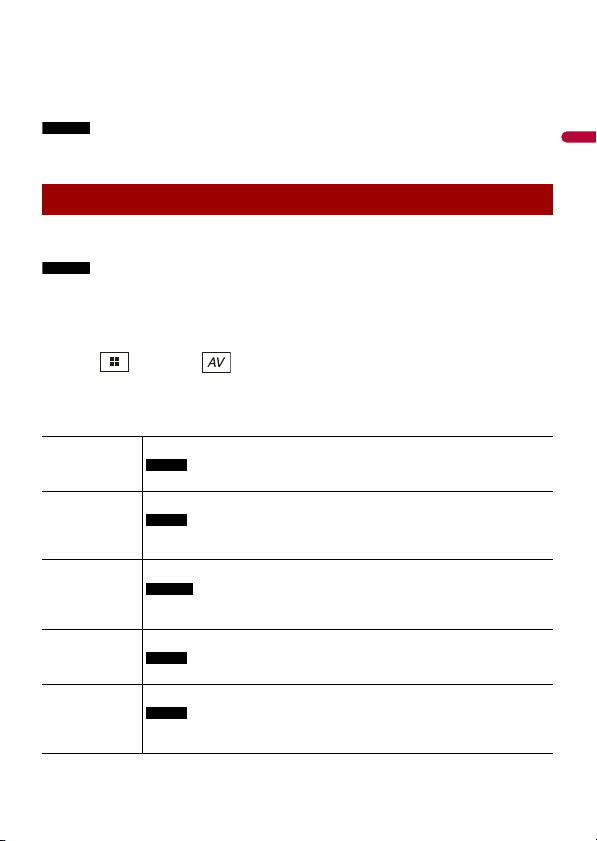
English
- 155 -
TIPS
• Different settings can be stored for each video source.
• When a video is viewed in wide screen mode that does not match its original aspect ratio, it may
appear different.
• The video image will appear coarser when viewed in [Zoom] mode.
NOTES
• Image files can be set to either [Normal] or [Trimming] in wide screen mode.
• This setting is available only when you stop your vehicle in a safe place and apply the parking brake.
You can choose either to show the same image as the front screen or to show the
selected source on the rear display.
NOTES
• Video files on the external storage device are not available as a source for the rear display when
[Apple CarPlay] is activated.
• Video files on the external storage device are not available as a source for the rear display when
[Android Auto] is activated in [Smartphone Setup].*
* AVIC-W8500NEX
1 Press then touch .
2 Touch [Rear].
3 Touch the source you want to show on the rear display.
Selecting the video for the rear display
[Mirror] The video on the front screen of this product is output to the rear display.
NOTE
Not all videos or sounds can be output to the rear display.
[DVD/CD] The video and sound of a disc are output to the rear display.
NOTE
Compatible video types are DVD-V, Video-CD, DivX, MPEG-1, MPEG-2, and MPEG-
4 only.
[USB1] The video and sound of the USB storage device is output to the rear display.
NOTES
• The port that supports the rear display will only be USB port 1.
• Compatible file types are MPEG-4, H.264, WMV, MKV, and FLV only.
[SD]* The video and sound of the SD memory cards are output to the rear display.
NOTE
Compatible file types are MPEG-4, H.264, WMV, MKV, and FLV only.
[AV] The video and/or sound of the AV input source are output to the rear display.
NOTE
The video image and sound are output only when [AV Input] is set to [Source]
(page 122).
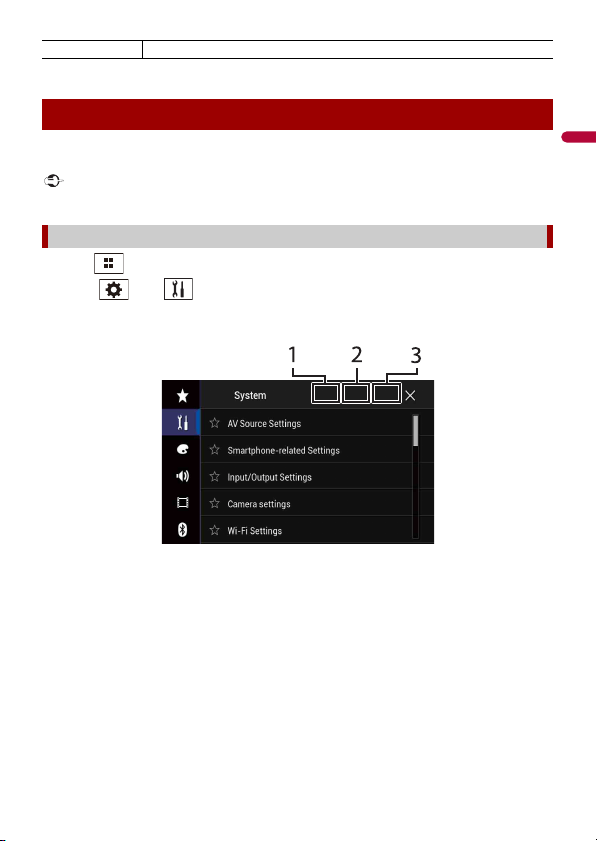
- 156 -
English
* AVIC-W8500NEX
You can set a password for this product. If the back-up lead is cut after the password is
set, this product prompts for the password at the time of next boot up.
Important
If you forgot your password, contact the nearest authorized Pioneer Service Station.
1 Press .
2 Touch then .
3 Touch 1, followed by 2, and then touch 3.
4 Touch [Set Password].
5 Enter the password.
5 to 16 characters can be entered for a password.
6 Touch [Go].
7 Enter a password hint.
Up to 40 characters can be entered for a hint.
8 Touch [Go].
If you want to change the password currently set, enter the current password and
then enter the new one.
9 Check the password, and then touch [OK].
[Source OFF] Nothing is output to the rear display.
Setting the anti-theft function
Setting the password

English
- 157 -
The current password and password hint can be deleted.
1 Press .
2 Touch then .
3 Touch 1, followed by 2, and then touch 3 (page 156).
4 Touch [ Clear Password].
5 Touch [Yes].
6 Touch [OK].
7 Enter the current password.
8 Touch [Go].
A message indicating that the security setting is canceled appears.
You can restore settings or recorded content to the default settings from [Restore
Settings] in the [System] menu (page 135).
Deleting the password
Restoring this product to the default settings

English
- 158 -
If you have problems operating this
product, refer to this section. The most
common problems are listed below, along
with likely causes and solutions. If a
solution to your problem cannot be found
here, contact your dealer or the nearest
authorized Pioneer service facility.
A black screen is displayed, and
operation is not possible using the touch
panel keys.
→ [Power OFF] mode is on.
– Press any button on this product to
release the mode.
– Press and hold the RESET button to
release the rear view camera screen
and then change the camera polarity
setting to [Battery].
CD or DVD playback is not possible.
→ The disc is inserted upside down.
– Insert the disc with the label upward.
→ The disc is dirty.
–Clean the disc.
→ The disc is cracked or otherwise
damaged.
– Insert a normal, round disc.
→ The files on the disc are in an irregular
file format.
– Check the file format.
→ The disc format cannot be played back.
– Replace the disc.
→ The loaded disc is a type this product
cannot play.
– Check what type of disc it is.
The screen is covered by a caution
message and the video cannot be shown.
→ The parking brake lead is not connected
or the parking brake is not applied.
– Connect the parking brake lead
correctly, and apply the parking brake.
→ The parking brake interlock is activated.
– Park your vehicle in a safe place and
apply the parking brake.
No video output from the connected
equipment.
→ The [AV Input] or [AUX Input] setting is
incorrect.
–Correct the settings.
The audio or video skips.
→ This product is not firmly secured.
–Secure this product firmly.
No sounds are produced. The volume
level will not rise.
→ Cables are not connected correctly.
– Connect the cables correctly.
→ The system is performing still, slow
motion, or frame-by-frame playback
with DVD-Video.
– There is no sound during still, slow
motion, or frame-by-frame playback
with DVD-Video.
→ The system is paused or performing fast
reverse or forward during the disc
playback.
– For the media other than music CD
(CD-DA), there is no sound on fast
reverse or forward.
Appendix
Troubleshooting
Common problems
Problems with the AV screen

English
- 159 -
The icon is displayed, and operation is
impossible.
→ The operation is not compatible with
the video configuration.
– The operation is not possible. (For
example, the DVD playing does not
feature that angle, audio system,
subtitle language, etc.)
The picture stops (pauses) and this
product cannot be operated.
→ The reading of data is impossible during
disc playback.
– Stop playback once, then restart.
The picture is stretched, with an incorrect
aspect ratio.
→ The aspect setting is incorrect for the
display.
– Select the appropriate setting for that
image.
A parental lock message is displayed and
DVD playback is not possible.
→ The parental lock is on.
– Turn the parental lock off or change
the level.
The parental lock for DVD playback
cannot be canceled.
→ The code number is incorrect.
– Input the correct code number.
The DVD video is not played back with
the audio/subtitle language specified in
[DVD/DivX Setup].
→ The DVD does not support the
language selected in [DVD/DivX Setup].
– Playback in the selected language is
not possible if the language selected
in [DVD/DivX Setup] is not recorded
on the disc.
The picture is extremely unclear/
distorted and dark during playback.
→ The disc features a signal to prohibit
copying. (Some discs may have this.)
– Since this product is compatible with
the copy guard analog copy protect
system, the picture may suffer from
horizontal stripes or other
imperfections when a disc with that
kind of protection signal is viewed on
some displays. This is not a
malfunction.
iPod cannot be operated.
→ The iPod is frozen.
– Reconnect the iPod with the USB
interface cable for iPod/iPhone.
–Update the iPod software version.
→ An error has occurred.
– Reconnect the iPod with the USB
interface cable for iPod/iPhone.
– Park your vehicle in a safe place, and
then turn off the ignition switch (ACC
OFF). Subsequently, turn the ignition
switch to on (ACC ON) again.
–Update the iPod software version.
→ Cables are not connected correctly.
– Connect the cables correctly.
Sound from the iPod cannot be heard.
→ The audio output direction may switch
automatically when the Bluetooth and
USB connections are used at the same
time.
– Use the iPod to change the audio
output direction.
No back camera image when the vehicle
is in reverse.
→ The back camera input setting on the
receiver is set to Off.
– Change the back camera setting to On
in the settings menu. (Refer to the
System Settings section of this manual
to adjust.)
→ The camera input may be loose or not
connected.
– Check the connection and make sure
the male end of the camera is
connected to the brown input on the

English
- 160 -
back of the receiver. (Refer to the
installation manual.)
→ The reverse lead on the receiver may
not be connected to the proper wire at
the reverse lamp.
– Check the connection and make sure
that the violet/white lead of the
receiver is connected to the lead
whose voltage changes when the shift
lever is put in reverse. (Refer to the
installation manual.)
Black screen displayed when the vehicle
is in reverse, with no camera installed.
→ Back camera input is set to On.
–Turn the setting to Off in the settings
menu. (Refer to the System Settings
section of this manual to adjust.)
Back image displayed when vehicle is not
in reverse.
→ The camera polarity is not set properly
in the Camera settings menu.
– Review System Settings section of this
manual for steps to switch the camera
polarity. Park in a safe place, then
while keeping your foot firmly on the
brake, put the vehicle in reverse,
access the System Settings menu, and
change the camera polarity setting.
Put vehicle back in park. (Refer to the
System Settings section of this manual
to adjust.)
Dialing is impossible because the touch
panel keys for dialing are inactive.
→ Your phone is out of range for service.
– Retry after re-entering the range for
service.
→ The connection between the cellular
phone and this product cannot be
established.
– Perform the connection process.
A black screen is displayed.
→ While operating an application, the
application was ended on the
smartphone side.
–Press to display the top menu
screen.
→ The smartphone OS may be awaiting
screen operation.
– Stop the vehicle in a safe place and
check the screen on the smartphone.
The screen is displayed, but operation
does not work at all.
→ An error has occurred.
– Park your vehicle in a safe place, and
then turn off the ignition switch (ACC
OFF). Subsequently, turn the ignition
switch to on (ACC ON) again.
– When an Android device is connected,
disconnect the Bluetooth connection
from this product and then reconnect
it.
The smartphone was not charged.
→ Charging stopped because the
temperature of the smartphone rose
due to prolonged use of the
smartphone during charging.
– Disconnect the smartphone from the
cable, and wait until the smartphone
cools down.
→ More battery power was consumed
than was gained from charging.
– This problem may be resolved by
stopping any unnecessary services on
the smartphone.
The status of the vehicle for the forward
and backward directions are reversed.
→ Since part of the vehicle status is sent to
the connected device when you use the
Android Auto function, this problem
Problems with the phone screen
Problems with Application
screen

English
- 161 -
occurs when the reverse gear polarity
setting of this product is incorrect.
– Check the polarity and re-select the
correct setting.
When problems occur with this product, an
error message appears on the display.
Refer to the table below to identify the
problem, then take the suggested
corrective action. If the error persists,
record the error message and contact your
dealer or your nearest Pioneer service
center.
AMP Error
→ This product fails to operate or the
speaker connection is incorrect; the
protective circuit is activated.
– Check the speaker connection. If the
message fails to disappear even after
the engine is switched off/on, contact
your dealer or an authorized Pioneer
Service Station for assistance.
TEMP
→ The temperature of this product is
outside the normal operating range.
–Wait until this product returns to a
temperature within the normal
operating limits.
Product overheat. System will be shut
down automatically in 1 minute. Restart
the product by ACC-Off/On may fix this
problem. If this message keeps showing
up, it is possible that some problem
occured in the product.
→ The temperature is too high for this
product to operate.
– Follow the instructions displayed on
the screen. If this does not solve the
problem, contact your dealer or an
authorized Pioneer Station for
assistance.
Positioning is not possible due to the
hardware. Please contact your dealer or
Pioneer service center.
→ The location display is not possible due
to hardware failure.
– Contact your dealer or an authorized
Pioneer Station for assistance.
No GPS antenna. Check connection.
→ GPS reception is lost.
– Check the antenna connection. If the
message fails to disappear even after
the engine is switched off/on, contact
your dealer or an authorized Pioneer
Station for assistance.
GPS antenna problem detected. Contact
dealer or service center.
→ GPS antenna lead is short-circuited.
– Contact your dealer or an authorized
Pioneer Station for assistance.
Calibration will start, but may be
inaccurate without speed pulse.
→ The speed pulse sensor is not
connected correctly.
– Contact your dealer or an authorized
Pioneer Station for assistance.
Sensor error. Please contact your dealer
or Pioneer Service Center.
→ An error has occurred with the sensor.
– Contact your dealer or an authorized
Pioneer Station for assistance.
Detected unusual speed pulses.
→ The speed pulse cannot be detected
correctly.
– Contact your dealer or an authorized
Pioneer Station for assistance.
Error messages
Common

English
- 162 -
Detected changes in the installation
angle or position. The in-dash receiver is
updating the sensor learning data.
→ Changes in the installation angle or
position are detected.
– Wait until the sensor learning finishes.
Speed pulse wire is not connected. The
system will operate in simple hybrid
mode.
→ Speed pulse wire is not connected.
– The speed pulse cannot be detected if
the speed pulse wire is not connected
correctly.
Error-19
(Communication error occurred.)
→ Communication failed.
– Disconnect the cable from the iPod.
Once the iPod’s main menu is
displayed, reconnect the iPod and
reset it.
Our content licenses limit the number of
tracks you may skip.
→ Skip limit reached.
– Do not exceed the skip limit.
– Pandora limits the total number of
skips per hour.
Please sign in to your Pandora account
→ You are not logged in to the Pandora
application.
– Please log in to the Pandora
application.
Check USB
→ The USB connector or USB cable has
short-circuited.
– Check that the USB connector or USB
cable is not caught in something or
damaged.
→ The connected USB storage device
consumes more than maximum
allowable current.
– Disconnect the USB storage device
and do not use it. Turn the ignition
switch to OFF, then to ACC or ON and
then connect a compliant USB storage
device.
Poor network connection. Listening will
resume when it’s restored.
→ The Pandora application is accessed/
relocated from outside the licensing
region.
– Access Pandora from within the
licensing region.
Incompatible USB
→ The connected USB storage device is
not supported by this product.
– Disconnect your device and replace it
with a compatible USB storage device.
Check Antenna
→ The antenna connection is incorrect.
– Check the antenna connection. If the
message fails to disappear even after
the engine is switched off/on, contact
your dealer or the nearest authorized
Pioneer service center for assistance.
Check Tuner
→ The SiriusXM Connect Vehicle Tuner
connection is incorrect.
– Check the tuner connection and
battery voltage. If the message fails to
disappear even after the engine is
switched off/on, contact your dealer
or the nearest authorized Pioneer
service center for assistance.
No Signal
→ The SiriusXM Connect Vehicle Tuner is
having difficulty receiving the SiriusXM
satellite signal.
Pandora
SiriusXM® Satellite Radio

English
- 163 -
– Verify that your vehicle is outdoors
with a clear view of the southern sky.
– Verify that the SiriusXM magnetic
mount antenna is mounted on a metal
surface on the outside of the vehicle.
– Move the SiriusXM antenna away from
any obstructions.
No Content
→ TuneScan™ is not available.
– Perform the operation with another
preset channel.
Channel Not Available
→ The channel that you have requested is
not a valid SiriusXM channel.
– Visit www.siriusxm.com for more
information about the SiriusXM
channel lineup.
Subscription Updated Press Enter to
Continue
→ This product has detected a change in
your SiriusXM subscription status.
– Touch [Enter] to clear the message.
In the U.S.A., visit www.siriusxm.com
or call 1-866-635-2349 if you have
questions about your subscription. In
Canada, visit www.siriusxm.ca or call
1-877-438-9677 if you have questions
about your subscription.
Channel Not Subscribed. Call SiriusXM to
Subscribe.
→ The channel that you have requested is
not included in your SiriusXM
subscription package.
– Check the content of your SiriusXM
subscription package.
In the U.S.A., visit www.siriusxm.com
or call 1-866-635-2349 if you have
questions about your subscription
package or would like to subscribe to
this channel. In Canada, visit
www.siriusxm.ca or call 1-877-438-
9677.
Channel Locked Please Enter the Lock
Code
→ Locked by the radio Parental Control
feature.
– Release the channel lock.
Artist Unavailable
→ The alert memo function is not
available.
– Perform the operation with another
channel.
Song Unavailable
→ The alert memo function is not
available.
– Perform the operation with another
channel.
Team Unavailable
→ The alert memo function is not
available.
– Perform the operation with another
channel.
Alert Memory Full You can manage alert
memory in the alert list
→ The memory is full.
– Clear the alert list.
Memory Full
→ The memory has become full while
playback was paused.
– Resume playback.
Memory Nearly Full
→ The memory has become nearly full
while playback was paused.
– Resume playback.
No qualified TuneMix music channels in
this band.
→ There are no qualified TuneMix
channels in this band.
– Requires two or more qualified music
channels to be stored as presets in the
current band.

English
- 164 -
Error-02-XX/FF-FF
→ The disc is dirty.
–Clean the disc.
→ The disc is scratched.
– Replace the disc.
→ The disc is loaded upside down.
– Check that the disc is loaded correctly.
→ There is an electrical or mechanical
error.
–Press the RESET button.
Different Region Disc
→ The disc does not have the same region
number as this product.
– Replace the DVD with one bearing the
correct region number.
Unplayable Disc
→ This type of disc cannot be played on
this product.
– Replace the disc with one that can be
played on this product.
Unplayable File
→ This type of file cannot be played on this
product.
– Select a file that can be played.
Skipped
→ The inserted disc contains DRM
protected files.
– The protected files are skipped.
Protect
→ All the files on the inserted disc are
embedded with DRM.
– Replace the disc.
This DivX rental has expired.
→ The inserted disc contains expired DivX
VOD content.
– Select a file that can be played.
Video resolution not supported
→ Files that cannot be played on this
product are included in the file.
– Select a file that can be played.
Unable to write to flash memory.
→ The playback history for VOD contents
cannot be saved for some reason.
–Retry.
– If the message appears frequently,
consult your dealer.
Your device is not authorized to play this
DivX protected video.
→ This product’s DivX registration code
has not been authorized by the DivX
VOD contents provider.
–Register this product to the DivX VOD
contents provider.
Video frame rate not supported
→ DivX file’s frame rate is more than 30 fps.
– Select a file that can be played.
Audio Format not supported
→ This type of file is not supported on this
product.
– Select a file that can be played.
SD function is only available for AVIC-
W8500NEX.
Error-02-9X/-DX
→ Communication failed.
– Turn the ignition switch OFF and back
ON.
– Disconnect the USB storage device.
– Change to a different source. Then,
return to the USB storage device.
Unplayable File
→ There is no playable file in the external
storage device (USB, SD).
Disc
External storage device (USB,
SD)

English
- 165 -
– Check that the files in the external
storage device (USB, SD) are
compatible with this product.
→ Security for the connected external
storage device (USB, SD) is enabled.
– Follow the external storage device
(USB, SD) instructions to disable
security.
Skipped
→ The connected external storage device
(USB, SD) contains DRM protected files.
– The protected files are skipped.
Protect
→ All the files on the connected external
storage device (USB, SD) are embedded
with DRM.
– Replace the external storage device
(USB, SD).
Incompatible USB
→ The connected USB storage device is
not supported by this product.
– Disconnect your device and replace it
with a compatible USB storage device.
Incompatible SD
→ The SD memory card is not supported
by this product.
– Remove your device and replace it
with a compatible SD memory card.
– Format the SD memory card. It is
recommended that you use SD
Formatter for formatting SD memory
cards.
Check USB
→ The USB connector or USB cable has
short-circuited.
– Check that the USB connector or USB
cable is not caught in something or
damaged.
→ The connected USB storage device
consumes more than maximum
allowable current.
– Disconnect the USB storage device
and do not use it. Turn the ignition
switch to OFF, then to ACC or ON and
then connect a compliant USB storage
device.
HUB Error
→ The connected USB hub is not
supported by this product.
– Directly connect the USB storage
device to this product.
No Response
→ This product cannot recognize the
connected USB storage device.
– Disconnect the device and replace it
with another USB storage device.
Video resolution not supported
→ Files that cannot be played on this
product are included in the file.
– Select a file that can be played.
USB1 was disconnected for device
protection. Do not re-insert this USB
memory into the unit. Press reset to
restart USB memory. (USB2 was
disconnected for device protection. Do
not re-insert this USB memory into the
unit. Press reset to restart USB memory.)
→ The USB connector or USB cable is
short-circuited.
– Check that the USB connector or USB
cable is not caught in something or
damaged.
→ The connected USB storage device
consumes more than maximum
allowable current.
– Disconnect the USB storage device
and do not use it. Turn the ignition
switch to OFF, then to ACC or ON and
then connect a compliant USB storage
device.
→ The USB interface cable for iPod/iPhone
is short-circuited.
–Confirm that the USB interface cable
for iPod/iPhone or USB cable is not
caught in something or damaged.

English
- 166 -
Audio Format not supported
→ This type of file is not supported on this
product.
– Select a file that can be played.
Error-02-6X/-9X/-DX
→ iPod failure.
– Disconnect the cable from the iPod.
Once the iPod’s main menu is
displayed, reconnect the iPod and
reset it.
Error-02-67
→ The iPod firmware version is old.
–Update the iPod version.
Error-10
→ The power failed for the Bluetooth
module of this product.
– Turn the ignition switch to OFF and
then to ON.
If the error message is still displayed after
performing the above action, please
contact your dealer or an authorized
Pioneer Service Station.
Attempting to connect to Apple CarPlay.
→ Communication failed and the system is
trying to connect.
→ Wait for a while. Then, perform the
actions below if the error message is still
displayed.
–Restart the iPhone.
– Disconnect the cable from the iPhone,
and then connect the iPhone again
after a few seconds.
– Turn the ignition switch to OFF and
then to ON.
If the error message is still displayed after
performing the above action, please
contact your dealer or an authorized
Pioneer Service Station.
Android Auto has stopped.
→ The connected device is not compatible
with Android Auto.
– Check if the device is compatible with
Android Auto.
→ The startup of Android Auto failed for
some reasons.
– Disconnect the cable from the
smartphone, and then connect the
smartphone again after a few seconds.
–Restart the smartphone.
– Turn the ignition switch to OFF and
then to ON.
If the error message is still displayed after
performing the above action, please
contact your dealer or an authorized
Pioneer Service Station.
→ The time set in this product is not
correct.
– Check if GPS signals are received and
the time is correctly set.
Bluetooth pairing failed. Please pair your
Android phone manually.
→ The Bluetooth pairing failed for some
reasons.
– Pair this product with the device
manually.
To use Android Auto, please stop your car
and check your Android phone.
→ The default settings are displayed on
the screen of the Android Auto
compatible device or images are not
output from the Android Auto
compatible device.
– Park your vehicle in a safe place, and
follow the instructions displayed on
iPod
Bluetooth
Apple CarPlay
Android Auto
W8500NEX
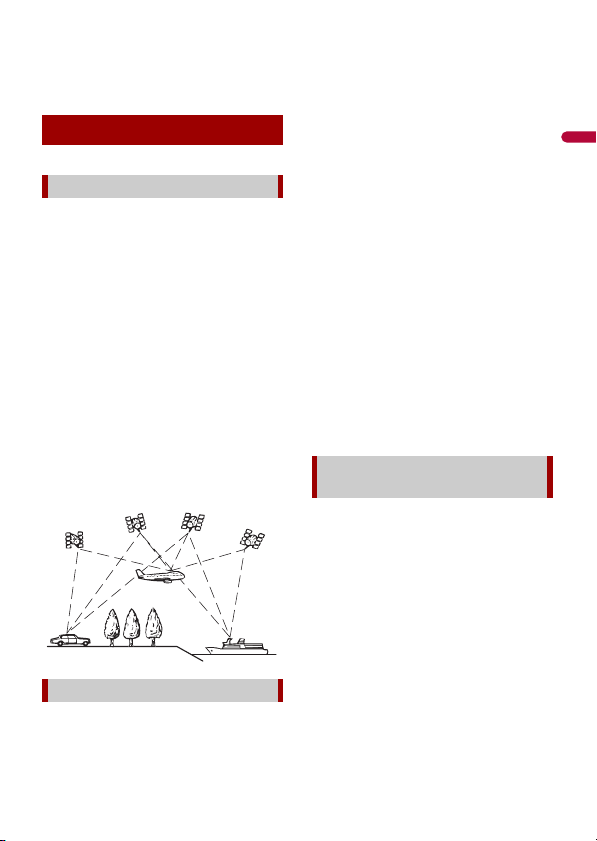
English
- 167 -
the screen. If the error message is still
displayed after performing on-screen
instructions, please reconnect the
device.
The Global Positioning System (GPS) uses a
network of satellites orbiting the Earth.
Each of the satellites, which orbit at a
height of 68 900 000 feet (21 000 km),
continually broadcasts radio signals giving
time and position information. This
ensures that signals from at least three can
be picked up from any open area on the
ground’s surface.
The accuracy of the GPS information
depends on how good the reception is.
When the signals are strong and reception
is good, GPS can determine latitude,
longitude and altitude for accurate
positioning in three dimensions. But if
signal quality is poor, only two dimensions,
latitude and longitude, can be obtained
and positioning errors are somewhat
greater.
The built-in sensor in the navigation
system also calculates your position. The
current location is measured by detecting
driving distance with the speed pulse, the
turning direction with the gyro sensor and
inclination of the road with the G sensor.
The built-in sensor can even calculate
changes of altitude, and correct the
discrepancies in the distance traveled
caused by driving along winding roads or
up slopes.
If you use this navigation system with
connecting the speed pulse, the system
will become more accurate than no
connection of speed pulse. So you connect
the speed pulse without fail to get the
accuracy of positioning.
• The position of the speed detection
circuit vary depending on the vehicle
model. For details, consult your
authorized Pioneer dealer or an
installation professional.
• Some types of vehicles may not output a
speed signal while driving at just a few
kilometers per hour. In such a case, the
current location of your vehicle may not
be displayed correctly while in traffic
congestion or in a parking lot.
For maximum accuracy, your navigation
system continually compares GPS data
with your estimated position as calculated
from the data of built-in sensor. However, if
only the data from the built-in sensor is
available for a long period, positioning
errors are gradually compounded until the
estimated position becomes unreliable. For
this reason, whenever GPS signals are
available, they are matched with the data
of the built-in sensor and used to correct it
for improved accuracy.
• If you use chains on your wheels for
winter driving or put on the spare wheel,
errors may suddenly increase because of
difference in wheel diameter. Initialize
Positioning technology
Positioning by GPS
Positioning by dead reckoning
How do GPS and dead reckoning
work together?
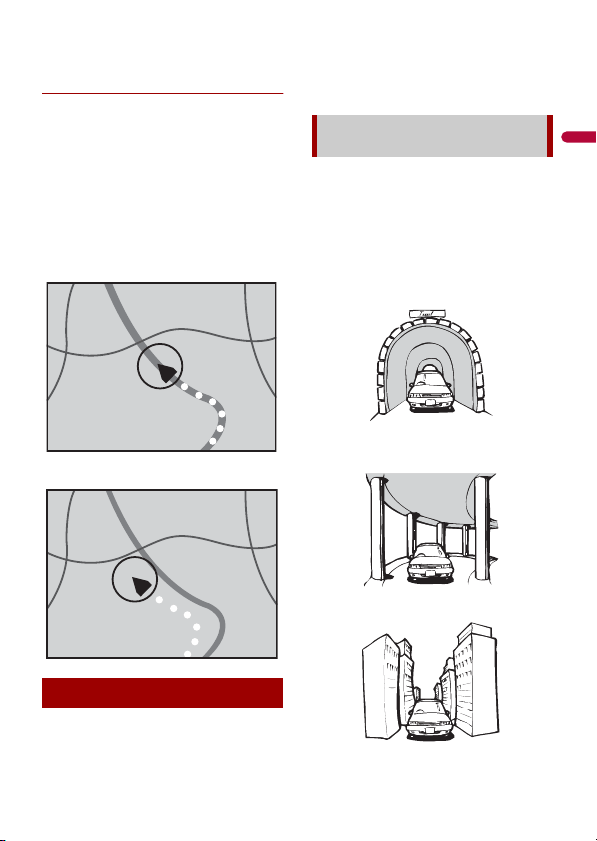
English
- 168 -
the sensor status and it may recover the
accuracy to normal condition (page 139).
Map matching
As mentioned, the positioning systems
used by this navigation system are
susceptible to certain errors. Their
calculations may, on occasion, place you in
a location on the map where no road
exists. In this situation, the processing
system understands that vehicles travel
only on roads, and can correct your
position by adjusting it to a nearby road.
This is called map matching.
With map matching
Without map matching
Positioning errors are kept to a minimum
by combining GPS, dead reckoning and
map matching. However, in some
situations, these functions may not work
properly, and the error may become
bigger.
• GPS positioning is disabled if signals
cannot be received from more than two
GPS satellites.
• In some driving conditions, signals from
GPS satellites may not reach your vehicle.
In this case, it is impossible for the system
to use GPS positioning.
In tunnels or enclosed parking garages
Under elevated roads or similar
structures
When driving among high buildings
Handling large errors
When positioning by GPS is
impossible
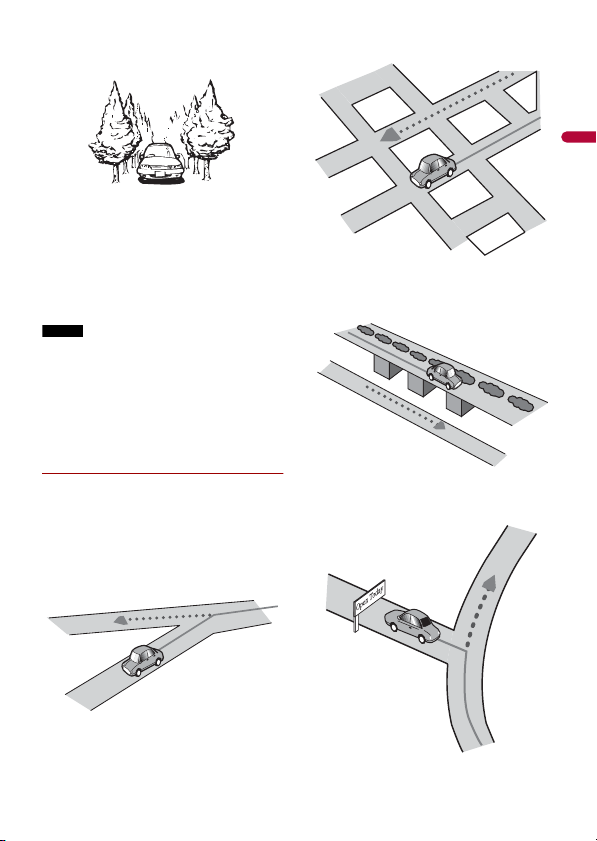
English
- 169 -
When driving through a dense forest
or tall trees
• If a car phone or cellular phone is used
near the GPS antenna, GPS reception may
be lost temporarily.
• Do not cover the GPS antenna with spray
paint or car wax, because this may block
the reception of GPS signals. Snow
buildup can also degrade the signals, so
keep the antenna clear.
NOTE
If a GPS signal has not been received for a
long time, your vehicle’s actual position
and the current position mark on the map
may diverge considerably or may not be
updated. In such case, once GPS reception
is restored, accuracy will be recovered.
Conditions likely to cause noticeable
positioning errors
For various reasons, such as the state of the
road you are traveling on and the
reception status of the GPS signal, the
actual position of your vehicle may differ
from the position displayed on the map
screen.
If you make a slight turn.
If there is a parallel road.
If there is another road very nearby,
such as in the case of an elevated
freeway.
If you take a recently opened road that
is not on the map.
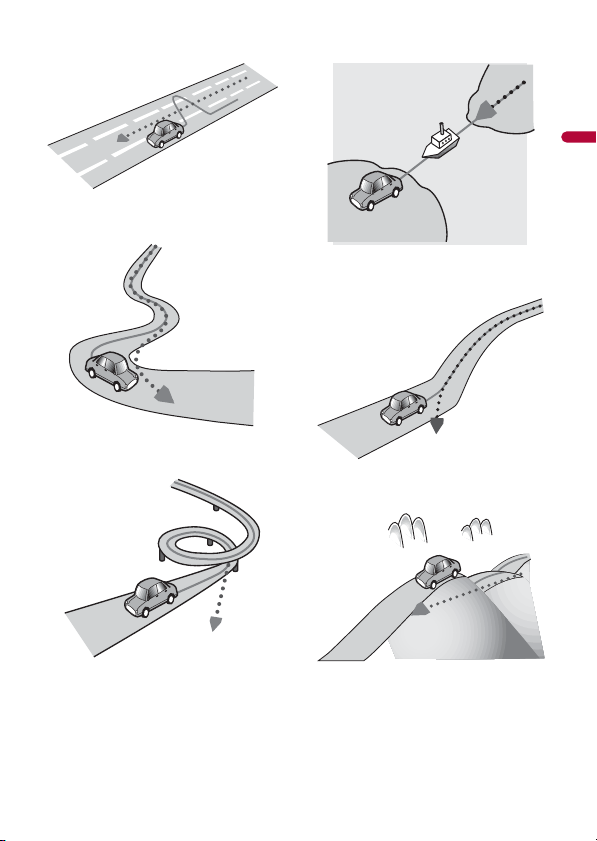
English
- 170 -
If you drive in zigzags.
If the road has a series of hairpin
bends.
If there is a loop or similar road
configuration.
If you take a ferry.
If you are driving on a long, straight
road or a gently curving road.
If you are on a steep mountain road
with many height changes.
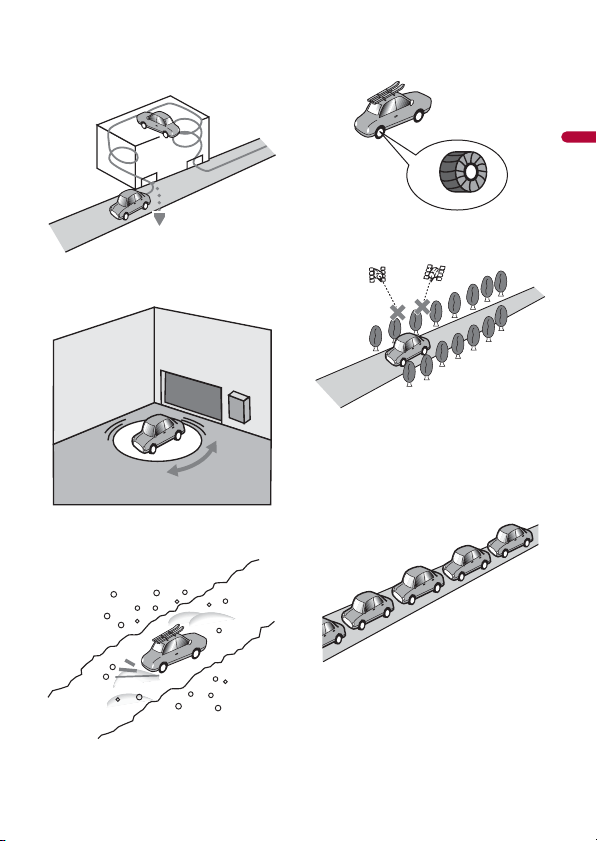
English
- 171 -
If you enter or exit a multi-storey
parking lot or similar structure using a
spiral ramp.
If your vehicle is turned on a turntable
or similar structure.
If your vehicle’s wheels spin, such as on
a gravel road or in snow.
If you put on chains, or change your
tires for ones with a different size.
If trees or other obstacles block the
GPS signals for a considerable period.
If you drive very slowly, or in a start-
and-stop manner, as in a traffic
congestion.
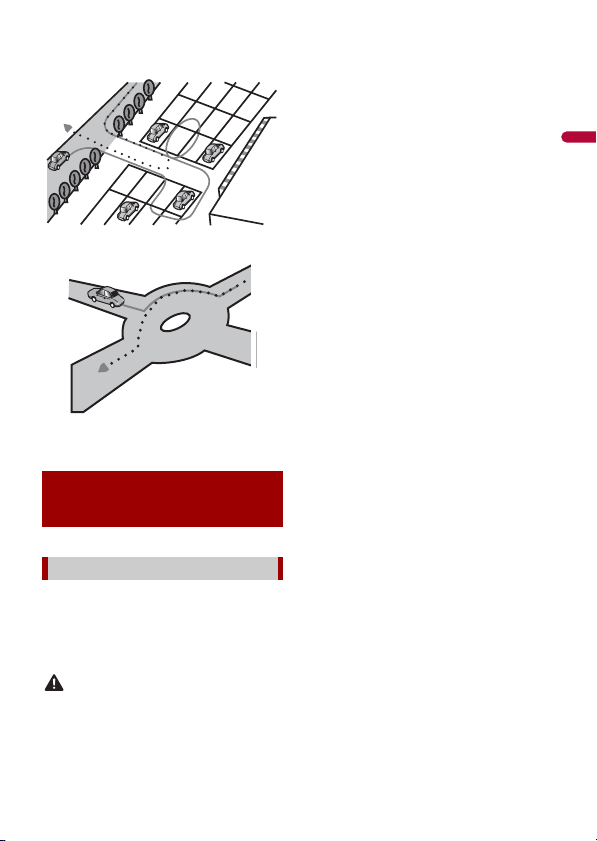
English
- 172 -
If you join the road after driving
around a large parking lot.
When you drive around a traffic circle.
When starting driving immediately
after starting the engine.
Your navigation system sets a route to your
destination by applying certain built-in
rules to the map data. This section provides
some useful information about how a
route is set.
CAUTION
When a route is calculated, the route and
voice guidance for the route are
automatically set. Also, for day or time
traffic regulations, only information about
traffic regulations applicable at the time
when the route was calculated is
considered. One-way streets and street
closures may not be taken into
consideration. For example, if a street is
open during the morning only, but you
arrive later, it would be against the traffic
regulations so you cannot drive along the
set route. When driving, please follow the
actual traffic signs. Also, the system may
not know some traffic regulations.
• The calculated route is one example of
the route to your destination decided by
the navigation system while taking the
type of streets or traffic regulations into
account. It is not necessarily an optimum
route. (In some cases, you may not be
able to set the streets you want to take. If
you need to take a certain street, set a
waypoint on that street.)
• If the destination is too far, there may be
instances where the route cannot be set.
(If you want to set a long-distance route
going across several areas, set waypoints
along the way.)
• During voice guidance, turns and
intersections from the freeway are
announced. However, if you pass
intersections, turns, and other guidance
points in rapid succession, some may
delay or not be announced.
• It is possible that guidance may direct
you off a freeway and then back on again.
• In some cases, the route may require you
to travel in the opposite direction to your
current heading. In such cases, you are
instructed to turn around, so please turn
around safely by following the actual
traffic rules.
• In some cases, a route may begin on the
opposite side of a railway or river from
your actual current location. If this
happens, drive towards your destination
for a while, and try route calculation
again.
Route setting
information
Route search specifications

English
- 173 -
• When there is a traffic congestion ahead,
a detour route may not be suggested if
driving through the traffic congestion
would still be better than taking the
detour.
• There may be instances when the starting
point, the waypoint and the destination
point are not on the highlighted route.
• The number of traffic circle exits
displayed on the screen may differ from
the actual number of roads.
Route highlighting
• Once set, the route is highlighted in
bright color on the map.
• The immediate vicinity of your starting
point and destination may not be
highlighted, and neither will areas with
particularly complex road layouts.
Consequently, the route may appear to
be cut off on the display, but voice
guidance will continue.
Auto reroute function
• If you deviate from the set route, the
system will re-calculate the route from
that point so that you remain on track to
the destination.
• This function may not work under certain
conditions.
Some basic precautions are necessary
when handling your discs.
• Use only conventional, fully circular discs.
Do not use shaped discs.
• Do not use cracked, chipped, warped, or
otherwise damaged discs as they may
damage the built-in drive.
• Use 12-cm discs. Do not use 8-cm discs or
an adapter for 8-cm discs.
• When using discs that can be printed on
label surfaces, check the instructions and
the warnings of the discs. Depending on
the discs, inserting and ejecting may not
be possible. Using such discs may result
in damage to this equipment.
• Do not attach labels, write on or apply
chemicals to the surface of the discs.
• Do not attach commercially available
labels or other materials to the discs.
• To clean a disc, wipe it with a soft cloth,
moving outward from the center.
• Condensation may temporarily impair
the built-in drive’s performance.
• Playback of discs may not be possible
because of disc characteristics, disc
format, recorded application, playback
environment, storage conditions and so
on.
• Road shocks may interrupt disc playback.
• Read the precautions for discs before
using them.
• At extremely high temperatures, a
temperature cutout protects this product
by switching it off automatically.
• Despite our careful design of the product,
small scratches that do not affect actual
operation may appear on the disc surface
as a result of mechanical wear, ambient
conditions for use or handling of the disc.
This is not a sign of the malfunction of
this product. Consider it to be normal
wear and tear.
Handling and care of
discs
Built-in drive and care
Ambient conditions for playing a
disc
English
- 174 -
• is a trademark of DVD Format/Logo
Licensing Corporation.
• It is not possible to play DVD Audio discs.
This DVD drive may not be able to play all
discs bearing the marks shown above.
This unit is not compatible with discs
recorded in AVCHD (Advanced Video
Codec High Definition) format. Do not
insert in AVCHD discs. If inserted, the disc
may not be ejected.
• DualDiscs are two-sided discs that have a
recordable CD for audio on one side and
a recordable DVD for video on the other.
• Playback of the DVD side is possible with
this product. However, since the CD side
of DualDiscs is not physically compatible
with the general CD standard, it may not
be possible to play the CD side with this
product.
• Frequent loading and ejecting of a
DualDisc may result in scratches to the
disc.
• Serious scratches can lead to playback
problems on this product. In some cases,
a DualDisc may become stuck in the disc-
loading slot and will not eject. To prevent
this, we recommend you refrain from
using DualDisc with this product.
• Please refer to the manufacturer for more
detailed information about DualDiscs.
This product will down-mix Dolby Digital signals
internally and the sound will be output in stereo.
• Manufactured under license from Dolby
Laboratories. Dolby, Dolby Audio and the
double-D symbol are trademarks of
Dolby Laboratories.
Common notes about disc
compatibility
• Certain functions of this product may not
be available for some discs.
• Compatibility with all discs is not
guaranteed.
• It is not possible to play DVD-RAM discs.
• Playback of discs may become impossible
with direct exposure to sunlight, high
temperatures, or depending on the
storage conditions in the vehicle.
Playable discs
DVD-Video
CD
AVCHD recorded discs
Playing DualDisc
Dolby Digital
Detailed information
for playable media
Compatibility

English
- 175 -
DVD-Video discs
• DVD-Video discs that have incompatible
region numbers cannot be played on this
DVD drive. The region number of the
player can be found on this product’s
chassis.
DVD-R/DVD-RW/DVD-R SL (Single
Layer)/DVD-R DL (Dual Layer) discs
• Unfinalized discs which have been
recorded with the Video format (video
mode) cannot be played back.
• Discs which have been recorded with the
Video Recording format (VR mode)
cannot be played back.
• DVD-R DL (Dual Layer) discs which have
been recorded with Layer Jump
recording cannot be played back.
• For detailed information about recording
mode, please contact the manufacturer
of media, recorders, or writing software.
CD-R/CD-RW discs
• Unfinalized discs cannot be played back.
• It may not be possible to playback CD-R/
CD-RW discs recorded on a music CD
recorder or a computer because of disc
characteristics, scratches or dirt on the
disc, or dirt, scratches or condensation on
the lens of the built-in drive.
• Playback of discs recorded on a computer
may not be possible, depending on the
recording device, writing software, their
settings, and other environmental
factors.
• Please record with the correct format.
(For details, please contact manufacturer
of media, recorders, or writing software.)
• Titles and other text information
recorded on a CD-R/CD-RW disc may not
be displayed by this product (in the case
of audio data (CD-DA)).
• Read the precautions with CD-R/CD-RW
discs before using them.
Common notes about the external
storage device (USB, SD)
SD function is only available for AVIC-
W8500NEX.
• Do not leave the external storage device
(USB, SD) storage device in any location
with high temperatures.
• Depending on the kind of the external
storage device (USB, SD) storage device
you use, this product may not recognize
the storage device or files may not be
played back properly.
• The text information of some audio and
video files may not be correctly
displayed.
• File extensions must be used properly.
• There may be a slight delay when starting
playback of files on an external storage
device (USB, SD) storage device with
complex folder hierarchies.
• Operations may vary depending on the
kind of an external storage device (USB,
SD) storage device.
• It may not be possible to play some music
files from SD or USB because of file
characteristics, file format, recorded
application, playback environment,
storage conditions, and so on.
• Copyright protected files cannot be
played back.
SD memory cards
• For details about SD memory card
compatibility with this product, refer to
Specifications (page 185).
• Some SD memory cards may not be
recognized by this unit even if the SD
memory cards can be recognized by a
computer. Formatting the SD memory
cards using a dedicated formatter may
resolve the problem. SD memory cards
formatted using the standard formatting
function on a computer do not comply
with the SD standard. Problems such as
that those cards cannot be read or
written could occur. It is recommended

English
- 176 -
that you use a dedicated formatter to
avoid such problems. All of the data
stored on an SD memory card will be
deleted when the card is formatted. Back
up any needed data beforehand as
necessary. A dedicated formatter for SD
memory cards can be obtained from the
following site.
https://www.sdcard.org/
• This product is not compatible with the
Multi Media Card (MMC).
USB storage device
• For details about USB storage device
compatibility with this product, refer to
Specifications (page 185).
• Protocol: bulk
• You cannot connect a USB storage device
to this product via a USB hub.
• Partitioned USB storage device is not
compatible with this product.
• Firmly secure the USB storage device
when driving. Do not let the USB storage
device fall onto the floor, where it may
become jammed under the brake or gas
pedal.
• There may be a slight delay when starting
playback of audio files encoded with
image data.
• Some USB storage devices connected to
this product may generate noise on the
radio.
• Do not connect anything other than the
USB storage device.
Common notes about DivX files
• Only DivX files downloaded from DivX
partner sites are guaranteed for proper
operation. Unauthorized DivX files may
not operate properly.
• DRM rental files cannot be operated until
playing back is started.
• This product corresponds to a DivX file
display of up to 1 590 minutes 43
seconds. Search operations beyond this
time limit are prohibited.
• DivX VOD file playback requires
supplying the ID code of this product to
the DivX VOD provider. Regarding the ID
code, refer to Displaying your DivX VOD
registration code on page 151.
• For details on the DivX video versions
that can be played on this product, refer
to Specifications (page 185).
• For more details about DivX, visit the
following site: http://www.divx.com/
DivX subtitle files
• Srt format subtitle files with the
extension “.srt” can be used.
• Only one subtitle file can be used for each
DivX file. Multiple subtitle files cannot be
associated.
• Subtitle files that are named with the
same character string as the DivX file
before the extension are associated with
the DivX file. The character strings before
the extension must be exactly the same.
However, if there is only one DivX file and
one subtitle file in a single folder, the files
are associated even if the file names are
not the same.
• The subtitle file must be stored in the
same folder as the DivX file.
• Up to 255 subtitle files may be used. Any
more subtitle files will not be recognized.
• Up to 64 characters can be used for the
name of the subtitle file, including the
extension. If more than 64 characters are
used for the file name, the subtitle file
may not be recognized.
• The character code for the subtitle file
should comply with ISO-8859-1. Using
characters other than ISO-8859-1 may
cause the characters to be displayed
incorrectly.
• The subtitles may not be displayed
correctly if the displayed characters in the
subtitle file include control code.
• For materials that use a high transfer rate,
the subtitles and video may not be
completely synchronized.

English
- 177 -
• If multiple subtitles are programmed to
display within a very short time frame,
such as 0.1 seconds, the subtitles may not
be displayed at the correct time.
SD function is only available for AVIC-
W8500NEX.
General
• Files may not be played back properly
depending on the environment in which
the file was created or on the contents of
the file.
• This product may not play back files,
depending on the application used to
encode the files.
• This product may not operate correctly,
depending on the application used to
encode WMA files.
• Depending on the version of Windows
Media™ Player used to encode WMA files,
album names and other text information
may not be correctly displayed.
• There may be a slight delay when starting
playback of audio files encoded with
image data.
• This product is not compatible with
packet write data transfer.
• This product can recognize up to 32
characters, beginning with the first
character, including extension for the file
and folder name. Depending on the
display area, this product may try to
display them with a reduced font size.
However, the maximum number of the
characters that you can display varies
according to the width of each character,
and of the display area.
• Folder selection sequence or other
operations may be altered, depending on
the encoding or writing software.
• Regardless of the length of blank section
between the songs of original recording,
compressed audio discs play with a short
pause between songs.
• Maximum playback time of audio file
stored in the disc: 60 h
• Maximum playback time of audio file
stored on an external storage device
(USB, SD): 7.5 h (450 minutes)
• This product assigns folder numbers. The
user cannot assign folder numbers.
CD-R/-RW
DVD-R/-R SL/-R DL/DVD-RW
USB storage device/SD memory card
Media compatibility chart
CODEC FORMAT MP3, WMA,
AAC, DivX,
MPEG1, MPEG2,
MPEG4
FILE SYSTEM ISO 9660 level
1, level 2,
Romeo Joliet
MAX. DIRECTORY No limit
MAX. FOLDER No. 700
MAX. FILE No. 999
CODEC FORMAT MP3, WMA,
AAC, MPEG2,
MPEG4
FILE SYSTEM ISO 9660 level
1, level 2,
Romeo Joliet
MAX. FOLDER No. 700
MAX. FILE No. 3 500
CODEC FORMAT MP3, WMA,
AAC, WAV,
FLAC, H.264,
MPEG2, MPEG4,
WMV, FLV, MKV,
JPEG
FILE SYSTEM FAT16/32/NTFS
MAX. DIRECTORY 8
MAX. FOLDER No. FAT16, FAT32:
65 536
NTFS:
No limit

English
- 178 -
MP3 compatibility
• Ver. 2.x of ID3 tag is prioritized when both
Ver. 1.x and Ver. 2.x exist.
• This product is not compatible with the
following: MP3i (MP3 interactive), mp3
PRO, m3u playlist
WMA compatibility
• This product is not compatible with the
following: Windows Media™ Audio 9
Professional, Lossless, Voice
WAV compatibility
• The sampling frequency shown in the
display may be rounded.
• WAV files on the CD-R/-RW, DVD-R/-RW/-
R SL/-R DL cannot be played.
AAC compatibility
• This product plays back AAC files
encoded by iTunes.
FLAC compatibility
• FLAC files on the CD-R/-RW, DVD-R/-RW/-
R SL/-R DL cannot be played.
DivX compatibility
• This product is not compatible with the
following: DivX Ultra format, DivX files
without video data, DivX files encoded
with LPCM (Linear PCM) audio codec
• Depending on the file information
composition, such as the number of
audio streams, there may be a slight
delay in the start of playback on discs.
• If a file contains more than 4 GB, playback
stops before the end.
• Some special operations may be
prohibited because of the composition of
DivX files.
• Files with high transfer rates may not be
played back correctly. The standard
transfer rate is 4 Mbps for CDs and 10.08
Mbps for DVDs.
• DivX files on the external storage device
(USB, SD) cannot be played.
CD-R/-RW, DVD-R/-R SL/-R DL/DVD-RW
MAX. FILE No. FAT16, FAT32:
65 536
NTFS:
No limit
SAMPLING FREQUENCY 16 kHz to 48
kHz
TRANSMISSION RATE 8 kbps to 320
kbps, VBR
ID3 TAG USB:
v1,v1.1,v2.2,v2.
3,v2.4
Disc:
v1,v1.1,v2.2,v2.
3
SAMPLING FREQUENCY USB: 32 kHz to
48 kHz
Disc: 8 kHz to
48 kHz
TRANSMISSION RATE USB: 48 kbps to
320 kbps (CBR),
VBR
Disc: 5 kbps to
320 kbps (CBR),
VBR
DECODING FORMAT LPCM
SAMPLING FREQUENCY 16 kHz to 48
kHz
TRANSMISSION RATE Approx. 1.5
Mbps
SAMPLING FREQUENCY 11.025 kHz to
48 kHz
TRANSMISSION RATE USB: 16 kbps to
320 kbps (CBR)
Disc: 8 kbps to
320 kbps (CBR)
SAMPLING FREQUENCY 8 kHz to 192
kHz
EXTENSION .avi/.divx
PROFILE Home Theater
Profile
MAX RESOLUTION 720 x 576
English
- 179 -
Audio and video files compatibility
(USB, SD)
• Files may not be able to be played back
depending on the bit rate.
• Only USB storage devices can play back
VOB files.
.avi
.mp4
.3gp
.mkv
.mov
.flv
.f4v
.asf
.wmv
.vob
The Bluetooth® word mark and logos are
registered trademarks owned by Bluetooth SIG,
Inc. and any use of such marks by PIONEER
CORPORATION is under license. Other
trademarks and trade names are those of their
respective owners.
Compatible video codec MPEG4, H.264,
H.263, Xvid
Maximum resolution 1 920 x 1 080
Maximum frame rate 30 fps
Compatible video codec MPEG4, H.264,
H.263
Maximum resolution 1 920 x 1 080
Maximum frame rate 30 fps
Compatible video codec MPEG4, H.264,
H.263
Maximum resolution 1 920 x 1 080
Maximum frame rate 30 fps
Compatible video codec MPEG4, H.264,
Xvid
Maximum resolution 1 920 x 1 080
Maximum frame rate 30 fps
Compatible video codec MPEG4, H.264,
H.263
Maximum resolution 1 920 x 1 080
Maximum frame rate 30 fps
Compatible video codec H.264
Maximum resolution 1 920 x 1 080
Maximum frame rate 30 fps
Compatible video codec H.264
Maximum resolution 1 920 x 1 080
Maximum frame rate 30 fps
Compatible video codec WMV/VC-1
Maximum resolution 1 920 x 1 080
Maximum frame rate 30 fps
Compatible video codec WMV/VC-1
Maximum resolution 1 920 x 1 080
Maximum frame rate 30 fps
Compatible video codec MPEG2, H.264
Maximum resolution 1 920 x 1 080
Maximum frame rate 30 fps
Bluetooth
SiriusXM® Satellite
Radio

English
- 180 -
Sirius, XM and all related marks and logos are
trademarks of Sirius XM Radio Inc. All rights
reserved.
The Wi-Fi CERTIFIED™ Logo is a certification
mark of Wi-Fi Alliance®.
HD Radio Technology manufactured under
license from iBiquity Digital Corporation.
U.S. and Foreign Patents. For patents see
http://dts.com/patents. HD Radio and the
HD, HD Radio, and "ARC" logos are
registered trademarks or trademarks of
iBiquity Digital Corporation in the United
States and/or other countries.
SDXC Logo is a trademark of SD-3C LLC.
Windows Media is either a registered trademark
or trademark of Microsoft Corporation in the
United States and/or other countries.
• This product includes technology owned
by Microsoft Corporation and cannot be
used or distributed without a license
from Microsoft Licensing, Inc.
Copyright © 2000-2009 Josh Coalson
Copyright © 2011-2013 Xiph.Org
Foundation
Redistribution and use in source and
binary forms, with or without modification,
are permitted provided that the following
conditions are met:
– Redistributions of source code must
retain the above copyright notice, this list
of conditions and the following
disclaimer.
– Redistributions in binary form must
reproduce the above copyright notice,
this list of conditions and the following
disclaimer in the documentation and/or
other materials provided with the
distribution.
– Neither the name of the Xiph.org
Foundation nor the names of its
contributors may be used to endorse or
promote products derived from this
software without specific prior written
permission.
THIS SOFTWARE IS PROVIDED BY THE
COPYRIGHT HOLDERS AND
CONTRIBUTORS “AS IS” AND ANY EXPRESS
OR IMPLIED WARRANTIES, INCLUDING, BUT
NOT LIMITED TO, THE IMPLIED
WARRANTIES OF MERCHANTABILITY AND
FITNESS FOR A PARTICULAR PURPOSE ARE
DISCLAIMED. IN NO EVENT SHALL THE
FOUNDATION OR CONTRIBUTORS BE
LIABLE FOR ANY DIRECT, INDIRECT,
Wi-Fi
HD Radio™ Technology
SDXC
WMA/WMV
FLAC

English
- 181 -
INCIDENTAL, SPECIAL, EXEMPLARY, OR
CONSEQUENTIAL DAMAGES (INCLUDING,
BUT NOT LIMITED TO, PROCUREMENT OF
SUBSTITUTE GOODS OR SERVICES; LOSS OF
USE, DATA, OR PROFITS; OR BUSINESS
INTERRUPTION) HOWEVER CAUSED AND
ON ANY THEORY OF LIABILITY, WHETHER
IN CONTRACT, STRICT LIABILITY, OR TORT
(INCLUDING NEGLIGENCE OR OTHERWISE)
ARISING IN ANY WAY OUT OF THE USE OF
THIS SOFTWARE, EVEN IF ADVISED OF THE
POSSIBILITY OF SUCH DAMAGE.
DivX® Home Theater Certified devices have been
tested for high-quality DivX Home Theater video
playback (including .avi, .divx). When you see
the DivX logo, you know you have the freedom
to play your favorite videos.
DivX®, DivX Certified® and associated logos are
trademarks of DivX, LLC and are used under
license.
This DivX Certified® device can play DivX® Home
Theater video files up to 576p (including .avi,
.divx).
Download free software at www.divx.com to
create, play and cast digital videos.
AAC is short for Advanced Audio Coding
and refers to an audio compression
technology standard used with MPEG-2
and MPEG-4. Several applications can be
used to encode AAC files, but file formats
and extensions differ depending on the
application which is used to encode. This
unit plays back AAC files encoded by
iTunes.
WebLink is a trademark of Abalta
Technologies, Inc.
Waze and Waze logo are registered
trademarks of Google LLC.
Google, Google Play and Android are
trademarks of Google LLC.
Android Auto is a trademark of Google LLC.
• Pioneer accepts no responsibility for data
lost from an iPod, even if that data is lost
while using this product. Please back up
your iPod data regularly.
• Do not leave the iPod in direct sunlight
for extended amounts of time. Extended
exposure to direct sunlight can result in
iPod malfunction due to the resulting
high temperature.
• Do not leave the iPod in any location with
high temperatures.
• Firmly secure the iPod when driving. Do
not let the iPod fall onto the floor, where
DivX
AAC
WebLink
Waze
Google™, Google Play,
Android
Android Auto
Detailed information
regarding connected iPod
devices
English
- 182 -
it may become jammed under the brake
or gas pedal.
• For details, refer to the iPod manuals.
Use of the Made for Apple badge means that
an accessory has been designed to connect
specifically to the Apple product(s) identified
in the badge, and has been certified by the
developer to meet Apple performance
standards. Apple is not responsible for the
operation of this device or its compliance with
safety and regulatory standards.
Please note that the use of this accessory
with an Apple product may affect wireless
performance.
iPhone, iPod, iPod nano, iPod touch, and
Lightning are trademarks of Apple Inc.,
registered in the U.S. and other countries.
App Store is a service mark of Apple Inc.
iOS is a trademark on which Cisco holds
the trademark right in the US and certain
other countries.
iTunes is a trademark of Apple Inc.,
registered in the U.S. and other
countries.
Apple Music is a trademark of Apple
Inc., registered in the U.S. and other
countries.
Apple CarPlay is a trademark of Apple Inc.
Use of the Works with Apple badge means
that an accessory has been designed to work
specifically with the technology identified in
the badge and has been certified by the
developer to meet Apple performance
standards.
Works with Siri through the microphone.
Android Auto function is only available for
AVIC-W8500NEX.
Important
Requirements to access app-based
connected content services using this
product:
• Latest version of the Pioneer compatible
connected content application(s) for the
smartphone, available from the service
provider, downloaded to your
smartphone.
• A current account with the content
service provider.
• Smartphone Data Plan.
Note: if the Data Plan for your
iPhone, iPod and Lightning®
App Store
iOS
iTunes
Apple Music
Apple CarPlay
Siri
Using app-based
connected content

English
- 183 -
smartphone does not provide for
unlimited data usage, additional charges
from your carrier may apply for accessing
app-based connected content via 3G,
EDGE and/or LTE (4G) networks.
• Connection to the Internet via 3G, EDGE,
LTE (4G) or Wi-Fi network.
• Optional Pioneer adapter cable
connecting your iPhone to this product.
Limitations:
• Access to app-based connected content
will depend on the availability of cellular
and/or Wi-Fi network coverage for the
purpose of allowing your smartphone to
connect to the Internet.
• Service availability may be
geographically limited to the region.
Consult the connected content service
provider for additional information.
• Ability of this product to access
connected content is subject to change
without notice and could be affected by
any of the following: compatibility issues
with future firmware versions of
smartphone; compatibility issues with
future versions of the connected content
application(s) for the smartphone;
changes to or discontinuation of the
connected Content application(s) or
service by its provider.
• Pioneer is not liable for any issues that
may arise from incorrect or flawed app-
based content.
• The content and functionality of the
supported applications are the
responsibility of the App providers.
• In WebLink, Apple CarPlay and Android
Auto, functionality through the product
is limited while driving, with available
functions determined by the App
providers.
• Availability of WebLink, Apple CarPlay
and Android Auto functionalities is
determined by the App provider, and not
determined by Pioneer.
• WebLink, Apple CarPlay and Android
Auto allow access to applications other
than those listed (subject to limitations
while driving), but the extent to which
content can be used is determined by the
App providers.
Pandora, the Pandora logo, and the Pandora
trade dress are trademarks or registered
trademarks of Pandora Media, Inc. Used with
permission.
Pandora is only available in certain countries.
Please visit
http://www.pandora.com/legal
for more information.
The terms HDMI and HDMI High-Definition
Multimedia Interface, and the HDMI Logo
are trademarks or registered trademarks of
HDMI Licensing Administrator, Inc.
Pandora®
HDMI
IVONA Text-to-Speech

English
- 184 -
Remember that use of this system for
commercial or public viewing purposes
may constitute an infringement on the
author’s rights as protected by the
Copyright Law.
This item incorporates copy protection
technology that is protected by U.S.
patents and other intellectual property
rights of Rovi Corporation. Reverse
engineering and disassembly are
prohibited.
Supply of this product only conveys a
license for private, non-commercial use
and does not convey a license nor imply
any right to use this product in any
commercial (i.e. revenue-generating) real
time broadcasting (terrestrial, satellite,
cable and/or any other media),
broadcasting/streaming via internet,
intranets and/or other networks or in other
electronic content distribution systems,
such as pay-audio or audio-on-demand
applications. An independent license for
such use is required. For details, please visit
http://www.mp3licensing.com.
For details about the open source licenses
for the functions that this product is
equipped with, please visit
http://www.oss-pioneer.com/car/
multimedia/
For details about the map coverage of this
product, refer to the information on our
website.
• When the LCD screen is subjected to
direct sunlight for a long period of time, it
will become very hot, resulting in
possible damage to the LCD screen.
When not using this product, avoid
exposing it to direct sunlight as much as
possible.
• The LCD screen should be used within
the temperature ranges shown in
Specifications (page 185).
• Do not use the LCD screen at
temperatures higher or lower than the
operating temperature range, because
the LCD screen may not operate normally
and could be damaged.
• The LCD screen is exposed in order to
increase its visibility within the vehicle.
Please do not press strongly on it as this
may damage it.
• Do not push the LCD screen with
excessive force as this may scratch it.
Notice regarding video
viewing
Notice regarding DVD-
Video viewing
Notice regarding MP3
file usage
Notice regarding open
source licenses
Map coverage
Using the LCD screen
correctly
Handling the LCD screen

English
- 185 -
• Never touch the LCD screen with
anything besides your finger when
operating the touch panel functions. The
LCD screen can scratch easily.
• If the LCD screen is near the vent of an air
conditioner, make sure that air from the
air conditioner is not blowing on it. Heat
from the heater may break the LCD
screen, and cool air from the cooler may
cause moisture to form inside this
product, resulting in possible damage.
• Small black dots or white dots (bright
dots) may appear on the LCD screen.
These are due to the characteristics of the
LCD screen and do not indicate a
malfunction.
• The LCD screen will be difficult to see if it
is exposed to direct sunlight.
• When using a cellular phone, keep the
antenna of the cellular phone away from
the LCD screen to prevent disruption of
the video in the form of disturbances
such as spots or colored stripes.
• When removing dust from or cleaning
the LCD screen, first turn this product off
and then wipe the screen with a soft dry
cloth.
• When wiping the LCD screen, take care
not to scratch the surface. Do not use
harsh or abrasive chemical cleaners.
A light emitting diode is used inside the
display to illuminate the LCD screen.
• At low temperatures, using the LED
backlight may increase image lag and
degrade the image quality because of the
characteristics of the LCD screen. Image
quality will improve with an increase in
temperature.
• The product lifetime of the LED backlight
is more than 10 000 hours. However, it
may decrease if used in high
temperatures.
• If the LED backlight reaches the end of its
product lifetime, the screen will become
dimmer and the image will no longer be
visible. In that case, please consult your
dealer or the nearest authorized Pioneer
Service Station.
General
Rated power source:
14.4 V DC (10.8 V to 15.1 V allowable)
Grounding system:
Negative type
Maximum current consumption:
10.0 A
Dimensions (W × H × D):
(AVIC-W8500NEX)
Chassis D:
178 mm × 100 mm × 165 mm (7 in. × 3-
7/8 in. × 6-1/2 in.)
Nose:
171 mm × 97 mm × 18 mm (6-3/4 in. ×
3-7/8 in. × 3/4 in.)
(AVIC-W6500NEX)
Chassis D:
178 mm × 100 mm × 165 mm (7 in. × 3-
7/8 in. × 6-1/2 in.)
Nose:
170 mm × 97 mm × 7 mm (6-3/4 in. ×
3-7/8 in. × 1/4 in.)
Weight:
(AVIC-W8500NEX)
2.0 kg (4.6 lbs)
(AVIC-W6500NEX)
1.7 kg (3.8 lbs)
NAND flash memory:
Liquid crystal display (LCD)
screen
Maintaining the LCD screen
LED (light-emitting diode)
backlight
Specifications

English
- 186 -
16 GB
Navigation
GPS receiver:
System:
GPS L1C/Ac, SBAS L1C/A, GLONASS
L1OF
SPS (Standard Positioning Service)
Reception system:
72-channel multi-channel reception
system
Reception frequency:
1 575.42 MHz/1 602 MHz
Sensitivity:
-140 dBm (typ)
Position update frequency:
Approx. once per second
GPS antenna:
Antenna:
Micro strip flat antenna/right-handed
helical polarization
Antenna cable:
3.55 m (11 ft. 7 in.)
Dimensions (W × H × D):
33 mm × 14.7 mm × 36 mm (1-1/4 in. × 1/
2 in. × 1-3/8 in.)
Weight:
73.7 g (0.2 lbs)
Display
Screen size/aspect ratio:
(AVIC-W8500NEX)
6.94 inch wide/16:9 (effective display
area: 156.24 mm × 81.6 mm) (6-1/8 in. ×
3-1/4 in.)
(AVIC-W6500NEX)
6.2 inch wide/16:9 (effective display area:
137.52 mm × 77.232 mm) (5-3/8 in. × 3
in.)
Pixels:
(AVIC-W8500NEX)
1 209 600 (2 520 × 480)
(AVIC-W6500NEX)
1 152 000 (2 400 × 480)
Display method:
TFT Active matrix driving
Color system:
PAL/NTSC/PAL-M/PAL-N/SECAM
compatible
Temperature range:
-10 ˚C to +60 ˚C (+14 ˚F to +140 ˚F)
Audio
Maximum power output:
• 50 W × 4 ch/4 Ω
• 50 W × 2 ch/4 Ω + 70 W × 1 ch/2 Ω (for
subwoofer)
Continuous power output:
22 W × 4 (50 Hz to 15 kHz, 5 %THD, 4 Ω
LOAD, Both Channels Driven)
Load impedance:
4 Ω (4 Ω to 8 Ω allowable)
Preout output level (max): 4.0 V
Equalizer (13-Band Graphic Equalizer):
Frequency:
50 Hz/80 Hz/125 Hz/200 Hz/315 Hz/
500 Hz/800 Hz/1.25 kHz/2 kHz/3.15
kHz/5 kHz/8 kHz/12.5 kHz
Gain: ±12 dB (2 dB/step)
<Standard Mode>
HPF:
Frequency:
25 Hz/31.5 Hz/40 Hz/50 Hz/63 Hz/80
Hz/100 Hz/125 Hz/160 Hz/200 Hz/250
Hz
Slope:
-6 dB/oct, -12 dB/oct, -18 dB/oct, -24
dB/oct, OFF
Subwoofer/LPF:
Frequency:
25 Hz/31.5 Hz/40 Hz/50 Hz/63 Hz/80
Hz/100 Hz/125 Hz/160 Hz/200 Hz/250
Hz
Slope:
-6 dB/oct, -12 dB/oct, -18 dB/oct, -24
dB/oct, -30 dB/oct, -36 dB/oct, OFF
Gain:
+10 dB to -24 dB (1 dB/step)
Phase: Normal/Reverse
Time alignment:
0 to 140 step (1 inch/step)
Bass boost:

English
- 187 -
Gain: +12 dB to 0 dB (2 dB/step)
Speaker level:
+10 dB to -24 dB (1 dB/step)
<Network Mode>
HPF (High):
Frequency:
1.25 kHz/1.6 kHz/2 kHz/2.5 kHz/3.15
kHz/4 kHz/5 kHz/6.3 kHz/8 kHz/10 kHz/
12.5 kHz
Slope:
-6 dB/oct, -12 dB/oct, -18 dB/oct, -24
dB/oct
HPF (Mid):
Frequency:
25 Hz/31.5 Hz/40 Hz/50 Hz/63 Hz/80
Hz/100 Hz/125 Hz/160 Hz/200 Hz/250
Hz
Slope:
-6 dB/oct, -12 dB/oct, -18 dB/oct, -24
dB/oct, OFF
LPF (Mid):
Frequency:
1.25 kHz/1.6 kHz/2 kHz/2.5 kHz/3.15
kHz/4 kHz/5 kHz/6.3 kHz/8 kHz/10 kHz/
12.5 kHz
Slope:
-6 dB/oct, -12 dB/oct, -18 dB/oct, -24
dB/oct, OFF
Subwoofer:
Frequency:
25 Hz/31.5 Hz/40 Hz/50 Hz/63 Hz/80
Hz/100 Hz/125 Hz/160 Hz/200 Hz/250
Hz
Slope:
-6 dB/oct, -12 dB/oct, -18 dB/oct, -24
dB/oct, -30 dB/oct, -36 dB/oct, OFF
Gain:
+10 dB to -24 dB (1 dB/step)
Phase: Normal/Reverse
Time alignment:
0 to 140 step (1 inch/step)
Bass boost:
Gain: +12 dB to 0 dB (2 dB/step)
Speaker level:
+10 dB to -24 dB (1 dB/step)
DVD drive
System:
DVD-V, VCD, CD, MP3, WMA, AAC, DivX,
MPEG player
Usable discs:
DVD-VIDEO, VIDEO-CD, CD, CD-R, CD-
RW, DVD-R, DVD-RW, DVD-R DL
Region number: 1
Frequency response:
5 Hz to 44 000 Hz (with DVD, at sampling
frequency 96 kHz)
Signal-to-noise ratio:
96 dB (1 kHz) (IHF-A network) (RCA level)
Video output level:
Video:
1.0 V p-p/75 Ω (±0.2 V)
Number of channels: 2 (stereo)
MP3 decoding format:
MPEG-1 & 2 & 2.5 Audio Layer 3
WMA decoding format:
Ver. 7, 8, 9 (2 ch audio) (Windows
Media Player)
AAC decoding format:
MPEG-4 AAC (iTunes encoded only):
.m4a (Ver. 11 and earlier)
DivX decoding format:
Home Theater Ver. 3.11, 4.x, 5.x, 6.x:
.avi, .divx
MPEG video decoding format:
MPEG1:
.mpg, .mpeg, .dat
MPEG-2 PS:
.mpg, .mpeg
MPEG4 part 2 (visual), MS-MPEG4 Ver.
3:
.avi
USB
USB standard spec:
USB 1.1, USB 2.0 high speed
Max current supply: 1.6 A
USB Class:
MSC (Mass Storage Class), iPod (Audio
Class, HID Class)
File system: FAT1 6, FAT32, NTFS

English
- 188 -
<USB audio>
MP3 decoding format:
MPEG-1/Layer-1, MPEG-1/Layer-2, MPEG-
1/Layer-3
MPEG-2/Layer-1, MPEG-2/Layer-2, MPEG-
2/Layer-3
MPEG-2.5/Layer-3
WMA decoding format:
WMA 10 Std, WMA 10 Pro, WMA 9
Lossless
AAC decoding format:
MPEG-2 AAC-LC, MPEG-4 AAC-LC
FLAC signal format:
Ver. 1.3.0
WAV signal format:
Linear PCM
<USB image>
JPEG decoding format:
JPEG
<USB video>
H.264 video decoding format:
Base Line Profile, Main Profile, High
Profile
WMV video decoding format:
VC-1 SP/MP/AP, WMV 7/8
MPEG4 video decoding format:
Simple Profile, Advanced Simple Profile
(except GMC)
SD
(AVIC-W8500NEX)
Compatible physical format:
Version 2.0
File system: FAT1 6, FAT32, NTFS
<SD audio>
MP3 decoding format:
MPEG-1/Layer 1, MPEG-1/Layer 2, MPEG-
1/Layer 3,
MPEG-2/Layer 1, MPEG-2/Layer 2, MPEG-
2/Layer 3,
MPEG-2.5/Layer 3
WMA decoding format:
WMA 10 Std, WMA 10 Pro, WMA 9
Lossless
AAC decoding format:
MPEG-2 AAC-LC, MPEG-4 AAC-LC
WAV signal format:
Linear PCM
FLAC signal format:
Ver. 1.3.0
<SD image>
JPEG decoding format:
JPEG
<SD video>
H.264 video decoding format:
Base Line Profile, Main Profile, High
Profile
WMV video decoding format:
VC-1 SP/MP/AP, WMV 7/8
MPEG4 video decoding format:
Simple Profile, Advanced Simple Profile
(except GMC)
Bluetooth
Version:
Bluetooth 4.1
Output power:
+4 dBm Max. (Power class 2)
Frequency band:
2 400 MHz to 2 483.5 MHz
FM tuner
Frequency range:
87.9 MHz to 107.9 MHz
Usable sensitivity:
12 dBf (1.1 μV/75 Ω, mono, S/N: 30 dB)
Signal-to-noise ratio:
80 dB (digital broadcasting) (IHF-A
network)
72 dB (analog broadcasting) (IHF-A
network)
AM tuner
Frequency range:
530 kHz to 1 710 kHz

English
- 189 -
Usable sensitivity:
28 μV (S/N: 20 dB)
Signal-to-noise ratio:
80 dB (digital broadcasting) (IHF-A
network)
62 dB (analog broadcasting) (IHF-A
network)
Wi-Fi
Frequency channel:
1, 6, 11 ch (2.4 GHz)
149, 151, 155 ch (5 GHz)
Security:
WPA 2 (personal)
Output power:
+16 dBm Max (2.4 GHz)
+13 dBm Max (5 GHz)
CEA2006 Specifications
Power output:
14 W RMS × 4 Channels (4 Ω and 1 %
THD+N)
S/N ratio:
91 dBA (reference: 1 W into 4 Ω)
NOTE
Specifications and design are subject to possible
modifications without notice due to
improvements.
<
=

© 2019 PIONEER CORPORATION. All rights reserved.
<OPM_AVICW8500NEXUC_en_A> UC
To keep up to date with the latest navigational data, you can periodically
update your navigation system. For further details, please visit:
http://pioneer.naviextras.com