English
Français
Español
Important (Serial number)
The serial number is located on the bottom of this unit. For your own security and
convenience, be sure to record this number on the enclosed warranty card.
Important (Numéro de série)
Le numéro de série se trouve au bas de cet appareil. Pour votre sécurité et votre
commodité, veillez à noter ce numéro sur la carte de garantie fournie.
Importante (Número de serie)
El número de serie se encuentra en la parte inferior de esta unidad. Por su
propia seguridad y comodidad, asegúrese de anotar este número en la tarjeta de
garantía que se adjunta.
DVD RDS AV RECEIVER
AUTORADIO AV RDS LECTEUR DE DVD
RADIO AV RDS CON DVD
AVH-4100NEX
Owner’s Manual
Mode d’emploi
Manual de instrucciones

2
Thank you for buying this Pioneer product.
Please read through these instructions so you will know how to operate your model prop-
erly. After you have finished reading the instructions, keep this document in a safe place for
future reference.
Contents
Important
The screens shown in the examples may
differ from actual screens, which may be
changed without notice for performance
and function improvements.
Precaution
Information to User .................................6
The Safety of Your Ears is in
Your Hands ............................................. 6
ESTABLISH A SAFE LEVEL: ....................... 6
BE SURE TO OBSERVE THE
FOLLOWING GUIDELINES: .................. 6
License, Warranty Disclaimer
& Limitation of Liability .....................6
SAFETY PROVISIONS ................................ 6
Important safety information .................7
Parking brake interlock ...........................7
To ensure safe driving ................................. 7
When using a display con-
nected to V OUT .................................7
To avoid battery exhaustion ....................7
Rear view camera.....................................7
Handling the SD card slot ......................7
Handling the USB connector .................8
Failure to operate .....................................8
Visit our website .......................................8
Protecting the LCD panel and
screen ..................................................8
Notes on internal memory ......................8
Before removing the vehicle battery ......... 8
Data subject to erasure ............................... 8
Resetting the microprocessor .................... 8
About this manual ...................................8
Use and care of the remote control .......8
Installing the battery ................................... 8
Using the remote control ............................ 8
Basic operation
Checking part names and
functions .............................................9
Remote control .........................................9
Protecting your product
against theft .......................................9
Removing the front panel ......................... 10
Attaching the front panel .......................... 10
Notes on using the LCD panel..............10
Adjusting the LCD panel angle ............10
Inserting/ejecting/connect-
ing media ..........................................10
Inserting and ejecting a disc .................... 10
Inserting and ejecting an SD
memory card ........................................ 10
Connecting and disconnecting
an iPod .................................................. 11
Plugging and unplugging a
USB storage device............................. 11
Startup and termination........................11
On first-time startup ..............................11
Regular startup ......................................11
Turning off the display ...........................11
When the Application screen is
available ............................................... 11
When the Application screen is
not available ......................................... 11
How to use the screens .........................12
Switching screens using the
touch panel keys ................................. 12
Switching screens using the
hardware buttons ................................ 12
Supported AV source ............................12
Displaying the AV operation screen ....12
Selecting a front source on the
AV source selection screen ................ 13
Selecting a front source on the
source list ............................................. 13
Selecting a rear source ............................. 13
Turning off the AV source .....................13
Changing the display order
of source icons .................................13
Changing the display order
of source keys ..................................13
Using the touch panel ...........................13
Using the common touch panel keys ...... 13
Operating list screens ............................... 13
Operating the time bar .............................. 14
Operating the on-screen keyboard .......... 14
Registering and con-
necting a Bluetooth device
Preparing communication devices ......14
Registering your Bluetooth devices ....14
Searching for nearby Bluetooth
devices .................................................. 14
Pairing from your Bluetooth devices ....... 15
Connecting to a Bluetooth
device automatically ........................... 15
Deleting a registered device..................... 15
Connecting a registered
Bluetooth device manually.............15
Switching visibility ................................15
Entering the PIN code for
Bluetooth wireless connection ......16
Displaying the Bluetooth address .......16
Clearing the Bluetooth memory ..........16
Updating Bluetooth software ...............16
Displaying the Bluetooth
software version ..............................16
Using hands-free phoning
Displaying the phone menu .................16
Touch panel keys ....................................... 16
Reading the screen.................................... 17
Making a phone call ..............................17
Direct dialing.............................................. 17
Calling a number in the phone book ....... 17
Dialing from the history ............................ 17
Using the preset dial lists ......................... 18
Receiving a phone call ..........................18
Answering an incoming call .................... 18
Minimizing the dial confirma-
tion screen ........................................18
Changing the phone settings ...............18
Answering a call automatically ............... 18
Switching the ring tone ............................ 18
Inverting names in the phone book ......... 19
Setting the private mode .......................... 19
Adjusting the other party’s
listening volume .................................. 19
Using the voice recognition
function .............................................19
Notes for hands-free phoning ..............19
iPod / iPhone or
smartphone setup operation
The basic flow of iPod /
iPhone or smartphone setup ..........20
Setting the device connec-
tion method ......................................20
iPod compatibility ..................................20
Android™ device compatibility ............20
AppRadio Mode Compatibility .............20
MirrorLink device compatibility ...........20
Information on the connec-
tions and functions for
each device .......................................21
HD Radio™ reception
HD Radio stations ..................................22
Using the touch panel keys ..................22
Reading the screen ................................22
Starting procedure .................................23
Selecting a band ....................................23
Manual tuning ........................................23
Seek tuning.............................................23
Selecting a preset channel
from the preset channel list ...........23
Storing broadcast frequencies .............23
Storing the strongest broad-
cast frequencies ..............................23
Tuning into strong frequencies ............23
Switching the seek mode .....................24
Switching the reception mode .............24
Storing song information to
an iPod (iTunes Tagging) ................24
Operating with the hardware
buttons ..............................................24
Playing a disc
Using the touch panel keys
(for audio) .........................................24
Using the touch panel keys
(for video) ..........................................24
Reading the screen (for audio) .............25
Reading the screen (for video) .............25
Starting procedure .................................26
Selecting files from the file
name list ...........................................26
Playing tracks in random order ............26
Setting a repeat play range...................26
Switching the media file type ...............26
Searching for the part you
want to play ......................................26
Operating the DVD menu .....................26
Switching the subtitle language ..........26
Switching the audio language .............27
Frame-by-frame playback .....................27
Slow motion playback ...........................27

3
Returning to a specified scene .............27
Resuming playback (Bookmark) .........27
Operating the DVD menu
using touch panel keys ...................27
Switching the multi-angle
DVD display ......................................27
Selecting the audio output ...................27
Operating with the hardware
buttons ..............................................27
Playing compressed
audio files
Using the touch panel keys ..................28
Reading the screen ................................28
Starting procedure (for Disc) ...............29
Starting procedure (for USB/SD).........29
Switching the browse mode .................29
Selecting files from the file
name list ...........................................29
Selecting a file from the list
related to the song cur-
rently playing (link search) .............29
Playing files in random order ...............29
Setting a repeat play range...................29
Switching the media file type ...............30
Operating with the hardware
buttons ..............................................30
Playing compressed
video files
Using the touch panel keys ..................30
Reading the screen ................................30
Starting procedure (for Disc) ...............30
Starting procedure (for USB/SD).........30
Selecting files from the file
name list ...........................................31
Setting a repeat play range...................31
Frame-by-frame playback .....................31
Slow motion playback ...........................31
Switching the media file type ...............31
Operating with the hardware
buttons ..............................................31
Playing compressed
still image files
Using the touch panel keys ..................31
Reading the screen ................................32
Starting procedure .................................32
Selecting files from the file
name list ...........................................32
Playing files in random order ...............32
Setting a repeat play range...................32
Switching the media file type ...............32
Setting the slideshow interval .............32
Operating with the hardware
buttons ..............................................32
Using an iPod
Using the touch panel keys
(for audio) .........................................33
Using the touch panel keys
(for video) ..........................................33
Using the touch panel keys
(for iTunes Radio) ............................33
Reading the screen (for audio) .............33
Reading the screen (for video) .............33
Reading the screen (for
iTunes Radio) ...................................33
Starting procedure .................................34
Setting the shuffle play .........................34
Setting a repeat play range...................34
Selecting song or video
sources from the playlist screen ....34
Using iTunes Radio ................................35
Playing back songs similar to
the current song .................................. 35
Setting the current song not to
be played back again .......................... 35
Adding the current song to the
wish list ................................................ 35
Using this product’s iPod
function from your iPod ..................35
Changing the speed of audio-
book playback ..................................35
Displaying lists related to the
song currently playing
(link search)......................................36
Operating with the hardware
buttons ..............................................36
Playing back music from a
music app other than
iPod music, as the iPod source ......36
Using the touch panel keys ...................... 36
Reading the screen.................................... 36
Playing music output
from the Android
Auto-compatible device
Using the touch panel keys ..................36
Reading the screen ................................36
Starting procedure .................................37
Using your iPhone or
smartphone applications
Using AppRadio Mode ..........................37
Using the touch panel keys (App
control side bar) .................................. 37
Starting procedure .................................... 37
Using the keyboard ................................... 38
Adjusting the image size (For
smartphone users) .............................. 38
Displaying the image of your
application (iPhone with
30-pin connector) ................................ 39
Displaying the image of your
application (iPhone with
Lightning connector) .......................... 39
Displaying the image of your
application (smartphone)................... 39
Using Android Auto ...............................39
Starting procedure .................................... 39
Setting the driving position ...................... 40
Adjusting the volume ................................ 40
Using MirrorLink mode .........................40
Using the touch panel keys (App
control side bar) .................................. 40
Starting procedure .................................... 40
Using the audio mix function ...............40
Streaming Pandora
®
Pandora operations ...............................41
Using the touch panel keys ..................41
Reading the screen ................................41
Starting procedure .................................41
For iPhone with a 30-pin connec-
tor users ................................................ 41
For iPhone with a Lightning
connector users ................................... 41
For smartphone users ............................... 42
Selecting a Pandora station
from the list ......................................42
Creating a station ..................................42
Operating with the hardware
buttons ..............................................42
Using Aha Radio
Using the touch panel keys ..................42
Reading the screen ................................43
Starting procedure .................................43
For iPhone with a 30-pin connec-
tor users ................................................ 43
For iPhone with a Lightning
connector users ................................... 43
For smartphone users ............................... 43
Operating with the hardware
buttons ..............................................43
Using iDatalink
Activating iDatalink Maestro ................44
Updating the iDatalink Maestro
module .................................................. 44
Starting procedure .................................44
Hands-free phone ..................................45
Setting Bluetooth ...................................... 45
Phone Book screen ................................... 45
History list screen...................................... 45
Dial screen.................................................. 45
Dial confirmation screen .......................... 45
Using a Bluetooth
audio player
Using the touch panel keys ..................45
Reading the screen ................................46
Starting procedure .................................46
Selecting files from the file
name list ...........................................46
Playing files in random order ...............46
Setting a repeat play range...................46
Operating with the hardware
buttons ..............................................46
Using the SiriusXM
®
satellite radio
SiriusXM satellite radio operations .....46
Subscribing to the SiriusXM
Satellite Radio service ........................ 46
Using the touch panel keys ..................47
Reading the screen ................................47
Starting procedure .................................48
Manual tuning ........................................48
Selecting a preset channel
from the preset channel list ...........48
Storing broadcast channels .................48
Selecting a SiriusXM channel
directly ..............................................48
Selecting a channel from a
list of all channels ............................48
4
Selecting a channel from the
category list ......................................48
Switching the displayed list .................49
Using the Replay™ function .................49
Setting SiriusXM TuneStart™ ..............49
Using TuneScan™ ..................................49
Using category scan ..............................49
Using TuneMix™ ....................................49
Checking the update Traffic
and Weather information ................50
Registering the city ................................... 50
Setting parental lock .............................50
Setting the passcode ................................ 50
Locking the channel .................................. 50
Using the content alerts func-
tion (such as Song Alerts,
Artist Alerts and Game Alerts) .......50
Memorizing the current contents ............ 50
Setting the program you
want to be alerted for ......................51
Selecting teams for Game Alert ...........51
Setting the Featured
Favorites function............................51
Setting the update notifica-
tion for Featured Favorites ..............51
Using the SportsFlash™ function ........51
Selecting teams for SportsFlash..........52
Restoring the SiriusXM set-
tings to the default ..........................52
Storing song information to
an iPod (iTunes Tagging) ................52
Operating with the hardware
buttons ..............................................52
Using an HDMI source
Using the touch panel keys ..................52
Reading the screen ................................53
Starting procedure .................................53
Using an AUX source
Using the touch panel keys ..................53
Reading the screen ................................53
Starting procedure .................................53
Setting the video signal ........................53
Switching the operation screen ...........53
Using AV input
Using the touch panel keys ..................54
Reading the screen ................................54
Starting procedure .................................54
Setting the video signal ........................54
Using MIXTRAX
Touch panel keys....................................54
Selecting an item to play songs ...........54
Selecting songs not to be played .........55
Specifying the playback portion ..........55
Setting the flash pattern .......................55
System settings
Activating the Bluetooth
audio source .....................................55
Setting the ever scroll ...........................55
Setting AV input .....................................55
Setting the rear view camera................56
Setting rear view camera activation ........ 56
Setting the polarity of the rear
view camera ......................................... 56
Setting the reversed image
display for the rear view image .......... 56
Setting the camera for
Camera View mode .........................56
Displaying the parking assist
guidelines .........................................57
Setting guidelines on the rear
view image ........................................57
Setting the second camera input .........57
Setting the second camera activation .... 57
Setting the reversed image set-
ting for the second camera
input image .......................................... 57
Turning off the demo screen .................58
Selecting the system language ............58
Setting the keyboard lan-
guage with the applica-
tion for iPhone .................................58
Setting the beep sound .........................58
Adjusting the response posi-
tions of the touch panel
(touch panel calibration) ................58
Setting the dimmer function ................58
Setting whether to activate
the dimmer function ........................59
Setting the duration of time
for the dimmer function
to be active .......................................59
Adjusting the picture .............................59
Displaying the firmware version ..........60
Updating firmware .................................60
Checking the connections of leads .....60
Audio adjustments
Using fader/balance adjustment .........60
Using balance adjustment....................60
Switching sound muting/
attenuation .......................................61
Adjusting source levels .........................61
Adjusting the filter .................................62
Adjusting the front and rear
speaker output ..................................... 62
Using the subwoofer output ..................... 62
Selecting the listening position ...........63
Adjusting the speaker output
levels finely .......................................63
Adjusting the time alignment ..............63
Using the equalizer ................................64
Recalling equalizer curves ....................... 64
Customizing the equalizer curves ........... 64
Using the auto-adjusted equalizer .......... 64
Adjusting the equalizer curve
automatically (Auto EQ) .................65
Before operating the Auto EQ function .. 65
Performing Auto EQ .................................. 65
Theme menu
Selecting the background display .......66
Changing to the background
display image stored on the
external storage device (USB, SD).... 66
Setting the illumination color ..............66
Selecting the color from the
preset colors ........................................ 66
Creating a user-defined color ................... 66
Selecting the theme color .....................67
Selecting the clock image ....................67
Changing the preinstalled
splash screen ...................................67
Changing to the splash screen
stored on the external
storage device (USB, SD) ................... 67
Replicating the settings ........................67
Exporting “Theme” settings ..................... 67
Importing “Theme” settings..................... 67
Setting up the video player
Setting the top-priority languages .......68
Setting the subtitle language ................... 68
Setting the audio language ...................... 68
Setting the menu language ...................... 68
Setting the angle icon display ..............68
Setting the aspect ratio .........................68
Setting parental lock .............................69
Setting the code number and level ......... 69
Displaying your DivX VOD
registration code ..............................69
Displaying your DivX VOD
deregistration code .........................69
Automatic playback of DVDs ...............69
Setting the video signal for
the rear view camera .......................69
Favorite menu
Creating a shortcut ................................70
Selecting a shortcut ..............................70
Removing a shortcut .............................70
Common operations
Setting the time and date .....................70
Storing song information to
an iPod (iTunes Tagging) ................70
Setting the “Sound
Retriever” function ..........................71
Changing the wide screen mode .........71
Other functions
Selecting the video for the
rear display .......................................71
Setting the anti-theft function ..............71
Setting the password ................................ 71
Entering the password .............................. 72
Deleting the password .............................. 72
Forgotten password ................................... 72
Restoring this product to the
default settings ................................72
Restoring the default settings.................. 72
Precautions
Your new product and this manual ......72
Important safeguards ............................72
Connection
Precautions before connect-
ing the system ..................................73
Before installing this product ...............73
To prevent damage ................................73
Notice for the blue/white lead .................. 73
Connecting the power cord ..................74
Connecting to separately
sold power amp................................75
Connecting an iPhone, iPod,
Android device or a
MirrorLink™ device..........................75

5
Connecting an iPhone with
Lightning connector ........................76
Connecting via the USB port ................... 76
Connecting via the HDMI port ................. 76
Connecting an iPhone with
30-pin connector ..............................76
Connecting via the AUX input .................. 76
Connecting via the RGB input ................. 76
Connecting the Android™ device ........77
Connecting an Android device
with an HDMI port ............................... 77
Connecting an Android device
with an MHL port ................................. 77
Connecting the Android or
MirrorLink™ device..........................77
Securing the High Speed
HDMI
®
Cable ....................................77
Connecting a rear view camera............77
Connecting the external
video component .............................78
Using AV input ........................................... 78
Using an AUX input ................................... 78
Connecting an HDMI device ................78
Connecting the rear display .................79
When using a rear display
connected to rear video output .......... 79
Installation
Precautions before installation ............79
Before installing .....................................79
Installing this product ...........................79
Installation notes ....................................... 79
Installation using the screw
holes on the side of this product ....... 79
Fastening the front panel.......................... 80
Installing the microphone ....................80
Mounting on the sun visor ........................ 80
Installation on the steering column ........ 80
Adjusting the microphone angle ............. 80
Appendix
Troubleshooting .....................................81
Error messages ......................................82
Handling and care of discs ...................86
Built-in drive and care ............................... 86
Ambient conditions for playing a disc .... 86
Playable discs ........................................86
DVD-Video and CD .................................... 86
AVCHD recorded discs ............................. 86
Playing DualDisc ....................................... 86
Dolby Digital .............................................. 87
Detailed information for
playable media .................................87
Compatibility .............................................. 87
Media compatibility chart ........................ 88
Bluetooth ................................................90
SiriusXM
®
satellite radio .......................90
HD Radio™ Technology ........................90
SDHC.......................................................90
WMA/WMV .............................................90
DivX .........................................................90
AAC ..........................................................90
Google, Google Play,
Android™, and Android Auto .........90
MirrorLink ...............................................91
MIXTRAX ................................................91
Detailed information regard-
ing connected iPod devices ...........91
iPod and iPhone......................................... 91
Lightning .................................................... 91
App Store .................................................... 91
iOS............................................................... 91
iTunes .......................................................... 91
iTunes Radio ............................................... 91
Using app-based connected
content ..............................................91
Pandora
®
..................................................... 91
Aha Radio ................................................... 91
HDMI .......................................................91
MHL .........................................................91
Notice regarding video viewing ...........91
Notice regarding DVD-Video
viewing ..............................................91
Notice regarding MP3 file usage .........91
Notice regarding open source
licenses .............................................92
Using the LCD screen correctly ...........92
Handling the LCD screen ......................... 92
Liquid crystal display (LCD) screen ........ 92
Maintaining the LCD screen .................... 92
LED (light-emitting diode) backlight ....... 92
Specifications ........................................93
01
Chapter
6
En
Precaution
Information to User
Contains FCC ID : RKXFC6000TS
Contains IC ID : 5119A-FC6000TS
This device complies with Part 15 of FCC
Rules and Industry Canada licence-ex-
empt RSS standard(s). Operation is
subject to the following two conditions:
(1) this device may not cause interfer-
ence, and (2) this device must accept
any interference, including interference
that may cause undesired operation of
this device.
This transmitter must not be co-located
or operated in conjunction with any
other antenna or transmitter.
The Bluetooth antenna cannot be
removed (or replaced) by user.
This equipment complies with FCC/
IC radiation exposure limits set forth
for an uncontrolled environment and
meets the FCC radio frequency (RF)
Exposure Guidelines and RSS-102 of the
IC radio frequency (RF) Exposure rules.
This equipment has very low levels of
RF energy that it deemed to comply
without maximum permissive exposure
evaluation (MPE). But it is desirable
that it should be installed and operated
keeping the radiator at least 20 cm or
more away from person’s body (exclud-
ing extremities: hands, wrists, feet and
ankles).
Alteration or modifications carried out
without appropriate authorization may
invalidate the user’s right to operate the
equipment.
NOTE: This equipment has been tested
and found to comply with the limits for a
Class B digital device, pursuant to Part 15
of the FCC Rules. These limits are designed
to provide reasonable protection against
harmful interference in a residential instal-
lation. This equipment generates, uses and
can radiate radio frequency energy and, if
not installed and used in accordance with
the instructions, may cause harmful inter-
ference to radio communications. However,
there is no guarantee that interference will
not occur in a particular installation. If this
equipment does cause harmful interfer-
ence to radio or television reception, which
can be determined by turning the equip-
ment off and on, the user is encouraged
to try to correct the interference by one or
more of the following measures:
— Reorient or relocate the receiving
antenna.
— Increase the separation between the
equipment and receiver.
— Connect the equipment into an outlet
on a circuit different from that to which
the receiver is connected.
— Consult the dealer or an experienced
radio/TV technician for help.
CAUTION:
USE OF CONTROL OR ADJUSTMENT
OR PERFORMANCE OF PROCEDURES
OTHER THAN THOSE SPECIFIED HEREIN
MAY RESULT IN HAZARDOUS RADIATION
EXPOSURE.
CAUTION:
THE USE OF OPTICAL INSTRUMENTS
WITH THIS PRODUCT WILL INCREASE EYE
HAZARD.
CAUTION
This product is a Class 1 laser product clas-
sified under the Safety of laser products,
IEC 60825-1:2007, and contains a class 1M
laser module. To ensure continued safety,
do not remove any covers or attempt to gain
access to the inside of the product. Refer all
servicing to qualified personnel.
CAUTION—CLASS 1M VISIBLE AND INVISIBLE
LASER RADIATION WHEN OPEN, DO NOT VIEW
DIRECTLY WITH OPTICAL INSTRUMENTS.
WARNING
This product contains chemicals known to
the State of California and other governmen-
tal entities to cause cancer and birth defects
or other reproductive harm. Wash hands after
handling.
■ The Safety of Your Ears is in
Your Hands
Get the most out of your equipment by
playing it at a safe level—a level that lets
the sound come through clearly without
annoying blaring or distortion and, most
importantly, without affecting your sensitive
hearing. Sound can be deceiving. Over
time, your hearing “comfort level” adapts to
higher volumes of sound, so what sounds
“normal” can actually be loud and harmful to
your hearing. Guard against this by setting
your equipment at a safe level BEFORE your
hearing adapts.
■ ESTABLISH A SAFE LEVEL:
Set your volume control at a low setting.
Slowly increase the sound until you can
hear it comfortably and clearly, without
distortion.
Once you have established a comfortable
sound level, set the dial and leave it there.
■ BE SURE TO OBSERVE THE
FOLLOWING GUIDELINES:
Do not turn up the volume so high that
you can’t hear what’s around you.
Use caution or temporarily discontinue
use in potentially hazardous situations.
Do not use headphones while operating a
motorized vehicle; the use of headphones
may create a traffic hazard and is illegal
in many areas.
License, Warranty Disclaimer
& Limitation of Liability
■ SAFETY PROVISIONS
■ Disclaimer
THE WARRANTIES SET FORTH IN
PIONEER’S LIMITED WARRANTY ARE THE
ONLY WARRANTIES MADE BY PIONEER OR
ANY OF ITS LICENSORS, AS APPLICABLE.
PIONEER AND ITS LICENSORS EXPRESSLY
DISCLAIM ALL OTHER WARRANTIES,
EXPRESS OR IMPLIED, INCLUDING,
WITHOUT LIMITATION, WARRANTIES OF
MERCHANTABILITY AND FITNESS FOR A
PARTICULAR PURPOSE.
■ Limitation of Liability
TO THE MAXIMUM EXTENT PERMISSIBLE
UNDER APPLICABLE LAW, NEITHER
PIONEER NOR ITS LICENSORS WILL BE
LIABLE TO YOU OR TO ANY OTHER PARTY
FOR ANY INDIRECT, CONSEQUENTIAL,
INCIDENTAL, PUNITIVE, OR SPECIAL
DAMAGES, REGARDLESS OF THE FORM
OF ACTION, WHETHER IN CONTRACT OR
IN TORT, INCLUDING NEGLIGENCE, EVEN
IF SUCH PARTIES HAVE BEEN ADVISED OF
THE POSSIBILITY OF SUCH DAMAGES.
TO THE MAXIMUM EXTENT PERMISSIBLE
UNDER APPLICABLE LAW, PIONEER’S, OR
ITS LICENSORS’, TOTAL LIABILITY OF ANY
KIND ARISING OUT OF OR RELATED TO
YOUR USE OF THE PRODUCTS, INCLUDING,
BUT NOT LIMITED TO, ANY WARRANTY
CLAIMS, OR ANY CLAIMS FOR PROPERTY
DAMAGE, DEATH OR DISABILITY,
REGARDLESS OF THE FORUM AND
REGARDLESS OF WHETHER ANY ACTION
OR CLAIM IS BASED ON CONTRACT,

English
01
Chapter
7
En
TORT, (INCLUDING NEGLIGENCE), STRICT
PRODUCT LIABILITY, OR ANY OTHER
LEGAL THEORY, WILL NOT EXCEED ONE
THOUSAND DOLLARS (USD$1 000).
SOME JURISDICTIONS DO NOT ALLOW
THE EXCLUSION OF DAMAGES OR
LIMITATION OF LIABILITY, SO THE ABOVE
EXCLUSIONS OR LIMITATIONS, TO THE
EXTENT PROHIBITED BY APPLICABLE LAW,
MAY NOT APPLY TO YOU. YOUR SPECIFIC
RIGHTS MAY VARY FROM JURISDICTION TO
JURISDICTION.
Important safety information
WARNING
Do not attempt to install or service this
product by yourself. Installation or ser-
vicing of this product by persons without
training and experience in electronic
equipment and automotive accessories
may be dangerous and could expose
you to the risk of electric shock, injury or
other hazards.
Do not allow this product to come into
contact with liquids. Electrical shock
could result. Also, damage to the prod-
uct, smoke, and overheating could result
from contact with liquids.
If liquid or foreign matter should get
inside this product, park your vehicle in
a safe place, turn the ignition switch off
(ACC OFF) immediately and consult your
dealer or the nearest authorized Pioneer
Service Station. Do not use this product
in this condition because doing so may
result in a fire, electric shock, or other
failure.
If you notice smoke, a strange noise
or odor from this product, or any other
abnormal signs on the LCD screen, turn
off the power immediately and consult
your dealer or the nearest authorized
Pioneer Service Station. Using this
product in this condition may result in
permanent damage to the system.
Do not disassemble or modify this prod-
uct, as there are high-voltage compo-
nents inside which may cause an electric
shock. Be sure to consult your dealer or
the nearest authorized Pioneer Service
Station for internal inspection, adjust-
ments or repairs.
Before using this product, be sure to read
and fully understand the following safety
information:
Do not operate this product, any appli-
cations, or the rear view camera option
(if purchased) if doing so will divert your
attention in any way from the safe opera-
tion of your vehicle. Always observe safe
driving rules and follow all existing traffic
regulations. If you experience difficulty
in operating this product or reading the
display, park your vehicle in a safe loca-
tion and apply the parking brake before
making the necessary adjustments.
Never set the volume of this product so
high that you cannot hear outside traffic
and emergency vehicles.
To promote safety, certain functions are
disabled unless the vehicle is stopped
and/or the parking brake is applied.
Keep this manual handy as a reference
for operating procedures and safety
information.
Do not install this product where it may
(i) obstruct the driver’s vision, (ii) impair
the performance of any of the vehicle’s
operating systems or safety features,
including air bags or hazard lamp buttons
or (iii) impair the driver’s ability to safely
operate the vehicle.
Please remember to fasten your seat belt
at all times while operating your vehicle. If
you are ever in an accident, your injuries
can be considerably more severe if your
seat belt is not properly buckled.
Never use headphones while driving.
Parking brake interlock
Certain functions (such as viewing of
video image and certain touch panel key
operations) offered by this product could
be dangerous (possibly resulting in serious
injury or death) and/or unlawful if used while
driving. To prevent such functions from
being used while the vehicle is in motion,
there is an interlock system that senses
when the parking brake is set and when the
vehicle is moving. If you attempt to use the
functions described above while driving,
they will become disabled until you stop
the vehicle in a safe place, and (1) apply the
parking brake, (2) release the parking brake,
and then (3) apply the parking brake again.
Please keep the brake pedal pushed down
before releasing the parking brake.
■ To ensure safe driving
WARNING
LIGHT GREEN LEAD AT POWER
CONNECTOR IS DESIGNED
TO DETECT PARKED STATUS
AND MUST BE CONNECTED TO
THE POWER SUPPLY SIDE OF
THE PARKING BRAKE SWITCH.
IMPROPER CONNECTION OR
USE OF THIS LEAD MAY VIOLATE
APPLICABLE LAW AND MAY
RESULT IN SERIOUS INJURY OR
DAMAGE.
Do not take any steps to tamper
with or disable the parking brake
interlock system which is in place for
your protection. Tampering with or
disabling the parking brake interlock
system could result in serious injury
or death.
To avoid the risk of damage and injury
and the potential violation of applicable
laws, this product is not for use with a
video image that is visible to the driver.
In some countries the viewing of video
image on a display inside a vehicle even
by persons other than the driver may be
illegal. Where such regulations apply,
they must be obeyed.
If you attempt to watch video image while
driving, the warning “Viewing of front seat
video source while driving is strictly pro-
hibited.” will appear on the screen. To watch
video image on this display, stop the vehicle
in a safe place and apply the parking brake.
Please keep the brake pedal pushed down
before releasing the parking brake.
When using a display con-
nected to V OUT
The video output terminal (V OUT) is for
connection of a display to enable passen-
gers in the rear seats to watch video images.
WARNING
NEVER install the rear display in a location
that enables the driver to watch video
images while driving.
To avoid battery exhaustion
Be sure to run the vehicle engine while using
this product. Using this product without
running the engine can drain the battery.
WARNING
Do not install this product in a vehicle that
does not have an ACC wire or circuitry
available.
Rear view camera
With an optional rear view camera, you are
able to use this product as an aid to keep
an eye on trailers, or backing into a tight
parking spot.
WARNING
SCREEN IMAGE MAY APPEAR
REVERSED.
USE INPUT ONLY FOR REVERSE OR
MIRROR IMAGE REAR VIEW CAMERA.
OTHER USE MAY RESULT IN INJURY OR
DAMAGE.
CAUTION
For safety reasons, the rear view camera
function is not available until this prod-
uct boots up completely.
The rear view mode is to use this product
as an aid to keep an eye on the trailers,
or while backing up. Do not use this
function for entertainment purposes.
Handling the SD card slot
CAUTION
Keep the SD memory card out of the
reach of small children to prevent them
from accidentally swallowing it.
To prevent data loss and damage to the
storage device, never remove it from this
product while data is being transferred.
If data loss or corruption occurs on
the storage device for any reason, it is
usually not possible to recover the data.
Pioneer accepts no liability for damages,
01
Chapter
8
En
costs or expenses arising from data loss
or corruption.
Never insert or eject an SD memory card
while driving.
Handling the USB connector
CAUTION
To prevent data loss and damage to the
storage device, never remove it from this
product while data is being transferred.
Pioneer cannot guarantee compatibility
with all USB mass storage devices and
assumes no responsibility for any loss
of data on media players, iPhone, smart-
phone, or other devices while using this
product.
Failure to operate
After-sales service for Pioneer
products
Please contact the dealer or distributor
from which you purchased the product for
after-sales service (including warranty con-
ditions) or any other information. In case
the necessary information is not available,
please contact the companies listed below.
Please do not ship your product to the
companies at the addresses listed below for
repair without making advance contact.
— U.S.A
Pioneer Electronics (USA) Inc.
CUSTOMER SUPPORT DIVISION
P.O. Box 1760 Long Beach, CA
90801-1760
800-421-1404
— CANADA
Pioneer Electronics of Canada, Inc.
CUSTOMER SATISFACTION
DEPARTMENT
340 Ferrier Street, Unit 2, Markham,
Ontario L3R 2Z5, Canada
1-877-283-5901
905-479-4411
For warranty information, please see the
Limited Warranty sheet included with your
product.
Visit our website
Visit us at the following site:
http://www.pioneerelectronics.com
In Canada
http://www.pioneerelectronics.ca
1 Register your product.
2 Receive updates on the latest products
and technologies.
3 Download owner’s manuals, order prod-
uct catalogs, research new products, and
much more.
4 Receive notices of software upgrades and
software updates.
Protecting the LCD panel and
screen
p Do not expose the LCD screen to direct
sunlight when this product is not
used. This may result in LCD screen
malfunction due to the resulting high
temperatures.
p When using a cellular phone, keep the
antenna of the cellular phone away from
the LCD screen to prevent disruption of
the video in the form of spots, colored
stripes, etc.
p To protect the LCD screen from damage,
be sure to touch the touch panel keys
only with your finger and do so gently.
Notes on internal memory
■ Before removing the vehicle
battery
p Some of the settings and recorded con-
tents will not be reset.
■ Data subject to erasure
The information is erased by disconnecting
the yellow lead from the battery (or removing
the battery itself).
p Some of the settings and recorded con-
tents will not be reset.
■ Resetting the microprocessor
CAUTION
Pressing the RESET button resets set-
tings and recorded contents to the factory
settings.
p Do not perform this operation when a
device is connected to this product.
p Some of the settings and recorded
contents will not be reset.
The microprocessor must be reset under the
following conditions:
Prior to using this product for the first
time after installation.
If this product fails to operate properly.
If there appears to be problems with the
operation of the system.
1 Turn the ignition switch OFF.
2 Press the RESET button with a pen
tip or other pointed implement.
Settings and recorded contents are reset to
the factory settings.
1
1 RESET button
About this manual
This manual uses diagrams of actual
screens to describe operations. However,
the screens on some units may not match
those shown in this manual depending on
the model used.
Use and care of the remote
control
■ Installing the battery
Slide the tray on the back of the remote con-
trol out and insert the battery with the plus
(+) and minus (–) poles aligned properly.
When using for the first time, pull out the
film protruding from the tray.
WARNING
Keep the battery out of the reach of chil-
dren. Should the battery be swallowed,
consult a doctor immediately.
Batteries (battery pack or batteries
installed) must not be exposed to exces-
sive heat such as sunshine, fire or the
like.
CAUTION
Remove the battery if the remote control
is not used for a month or longer.
There is a danger of explosion if the
battery is incorrectly replaced. Replace
only with the same or equivalent type.
Do not handle the battery with metallic
tools.
Do not store the battery with metallic
objects.
If the battery leaks, wipe the remote
control completely clean and install a
new battery.
When disposing of used batteries, com-
ply with governmental regulations or
environmental public institutions’ rules
that apply in your country/area.
“Perchlorate Material – special handling
may apply.
See www.dtsc.ca.gov/hazardouswaste/
perchlorate. (Applicable to California,
U.S.A.)”
■ Using the remote control
Point the remote control in the direction of
the front panel to operate.
The remote control may not function
properly in direct sunlight.
Important
Do not store the remote control in high
temperatures or direct sunlight.
English
02
Chapter
9
En
Do not let the remote control fall onto
the floor, where it may become jammed
under the brake or gas pedal.
Basic operation
Checking part names and
functions
This chapter gives information about the
names of the parts and the main features
using the buttons.
1 32 4
5
6 7 8 9
b
c
a
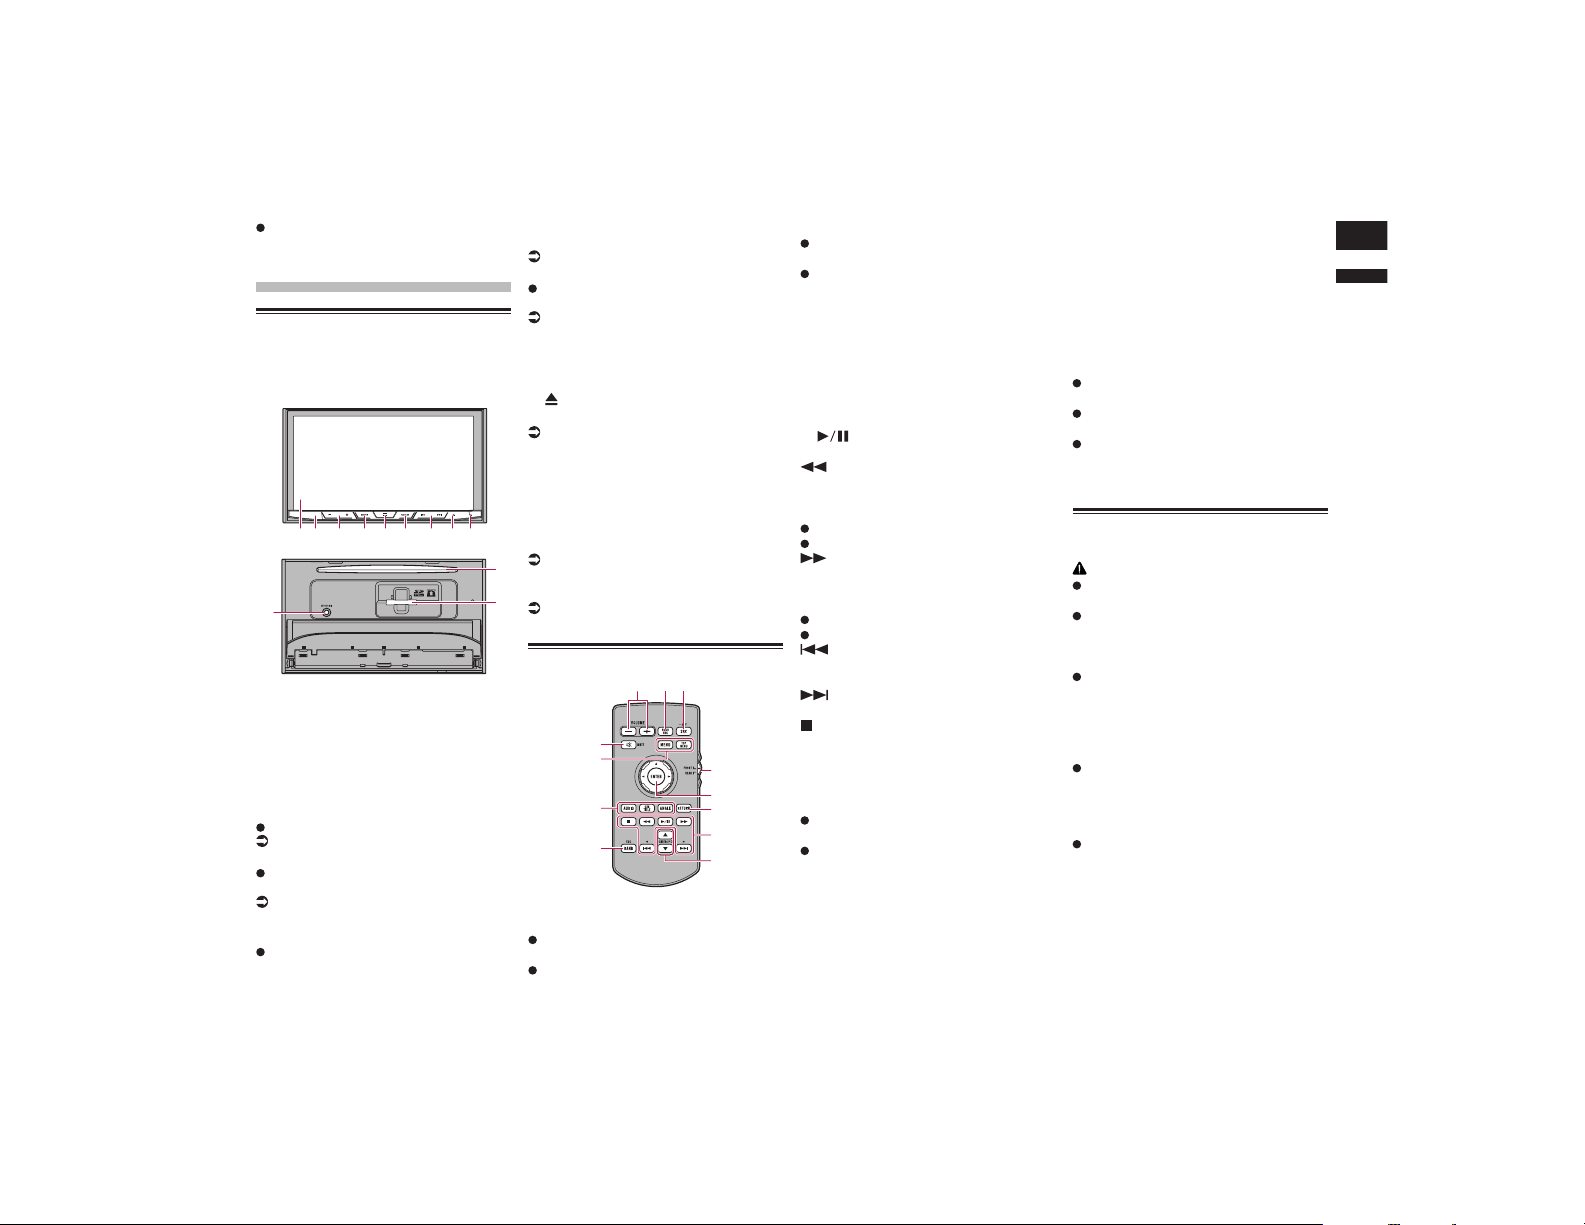
1 LCD screen
2 Remote control sensor
3 VOL (+/–) button
Press to adjust the AV (Audio and Video)
source volume.
4 MUTE button
Press to mute. Press again to unmute.
5 HOME button
Press to display the Top menu screen.
For details of the operations, refer to How
to use the screens on page 12.
Press and hold to activate the voice
recognition function.
For details, refer to Using the voice
recognition function on page 19.
6 MODE button
Press to switch between the Application
screen and the AV operation screen.
p If the display cannot switch from the
AV operation screen to the Application
screen when the MODE button is
pressed, the display will turn off.
For details of the operations, refer to How
to use the screens on page 12.
Press and hold to turn the display off
when the Application screen is available.
For details, refer to Turning off the display
on page 11.
7 TRK button
Press to perform manual seek tuning, fast
forward, reverse and track search controls.
8 button
9 RESET button
For details of the operations, refer
to Resetting the microprocessor on
page 8.
a Auto EQ microphone input jack
Use to connect a microphone for acoustical
measurement (sold separately).
b Disc-loading slot
Insert a disc to play.
For details, refer to Inserting and ejecting
a disc on page 10.
c SD card slot
For details, refer to Inserting and ejecting
an SD memory card on page 10.
Remote control
3
4
2
1
5
6
7
9
8
b
a
c
1 VOLUME (+/–)
2 REAR SRC
Press to cycle through all the available
rear sources.
Press and hold to turn the rear source
off.
3 SRC/OFF
Press to cycle through all the available
front sources.
Press and hold to turn the front source
off.
4 Source mode select switch
Use to switch the source mode between the
front source and the rear source.
5 Thumb pad
Use to select a menu on the DVD menu.
6 RETURN
Returns to the specified point and starts
playback from there.
7
Press to pause or resume playback.
For audio
Press and hold to perform fast reverse.
For video
Press to perform fast reverse.
Press to change the fast reverse speed.
For audio
Press and hold to perform fast forward.
For video
Press to perform fast forward.
Press to change the fast forward speed.
Press to return to the previous track
(chapter).
Press to go to the next track (chapter).
Press to stop playback.
If you resume playback, playback will start
from the point where you stopped. Touch the
key again to stop playback completely.
8 FOLDER/P.CH
Press to select the next or previous disc
or folder.
Press to recall radio station frequencies
assigned to preset channel keys.
9 MUTE
Press to mute. Press again to unmute.
a MENU
Press to display the DVD menu during DVD
playback.
TOP MENU
Press to return to the top menu during DVD
playback.
b AUDIO
Press to change the audio language during
DVD playback.
SUBTITLE
Press to change the subtitle language
during DVD playback.
ANGLE
Press to change the viewing angle during
DVD playback.
c BAND/ESC
Press to select the tuner band when
tuner is selected as a source.
Press to cancel the control mode of
functions.
Press to switch between media file types
when playing the following types of data:
— Disc
— External storage device (USB, SD)
Protecting your product
against theft
CAUTION
Do not attempt to detach the front panel
while DISC/SD is in the eject position.
Do not attempt to detach the front panel
while data is being written to USB/SD.
Doing so may cause the data to become
corrupted.
After the front panel has been detached,
the attaching plate will move back to its
original position automatically.
Be careful not to let hands or other
objects get caught behind the monitor as
it is moving back.
Please make sure that the front panel is
in its original position while the vehicle is
in motion.
It is dangerous to drive with the front
panel sticking out.
Do not place beverages or other objects
on top of the front panel while it is fully
open.
02
Chapter
10
En
Important
Handle the front panel with care when
removing or attaching it.
Avoid subjecting the front panel to exces-
sive shock.
Keep the front panel out of direct sun-
light and high temperatures.
If removed, replace the front panel on the
unit before starting up your vehicle.
■ Removing the front panel
1 Press the button.
2 Touch the following key.
The front panel automati-
cally slides toward you.
3 Slide the dial at the bottom of the
front panel to the right, and lift up
the front panel while pushing down
on the dial.
4 Put the front panel into the pro-
vided protective case for safe
keeping.
■ Attaching the front panel
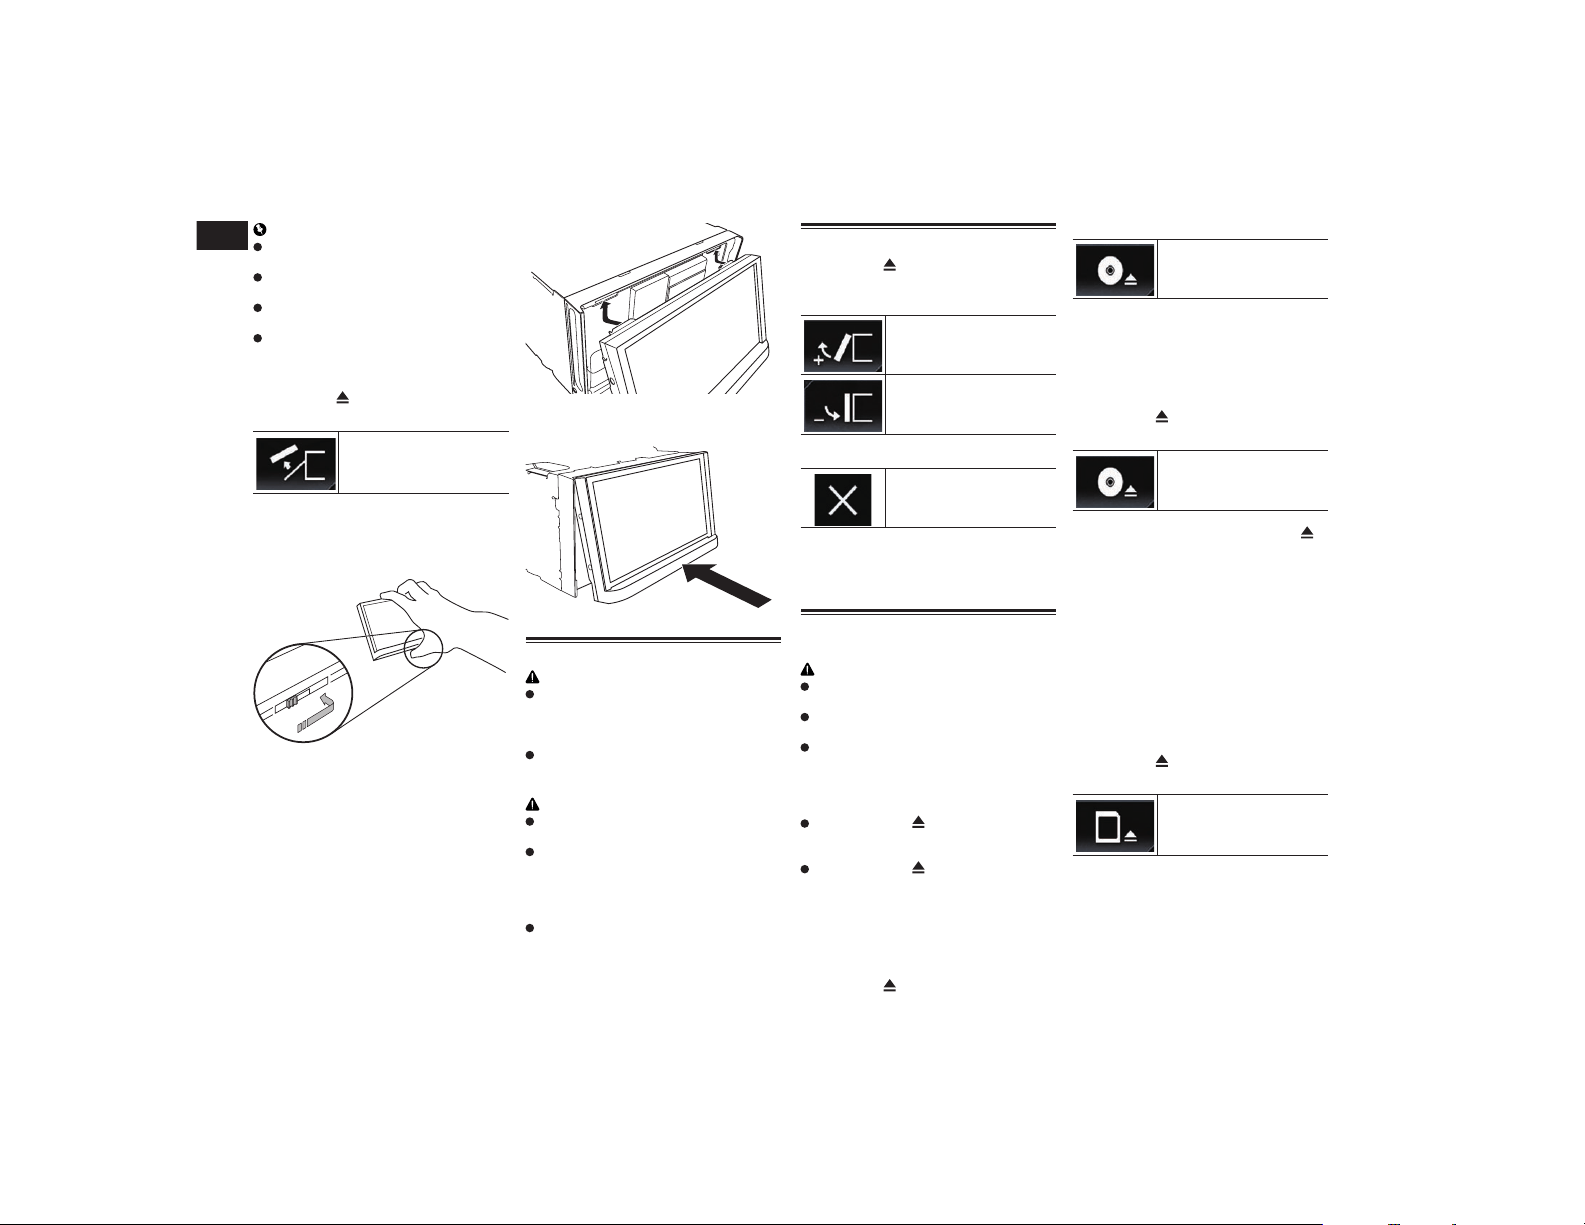
1 Slide the front panel into the top of
the unit and push it into place.
Slide the inserter on the front panel into the
insertion slot on top of the unit and push it
into place.
2 Push on the bottom of the front
panel until it clicks into place.
Notes on using the LCD panel
WARNING
Keep hands and fingers clear of this
product when opening, closing, or
adjusting the LCD panel. Be especially
cautious of children’s hands and fingers.
Do not use with the LCD panel left open.
If the LCD panel is left open, it may result
in injury in the event of an accident.
CAUTION
Do not open or close the LCD panel by
force. This may cause a malfunction.
Do not operate this product until the LCD
panel has completely opened or closed.
If this product is operated while the LCD
panel is opening or closing, the LCD
panel may stop at that angle for safety.
Do not place a glass or can on the open
LCD panel. Doing so may break this
product.
Adjusting the LCD panel angle
1 Press the button.
2 Touch the following keys to adjust
the angle of the LCD panel.
Laying the panel down.
Returning the panel to the
upright position.
3 Touch the following key.
Returns to the previous
screen.
p The adjusted angle of the LCD panel will
be memorized and the LCD panel will
automatically return to that angle the next
time the LCD panel is opened or closed.
Inserting/ejecting/connecting
media
CAUTION
Do not insert anything other than a disc
into the disc-loading slot.
Do not insert anything other than SD
memory cards into the SD card slot.
Ejecting an SD memory card during data
transfer can damage the SD memory
card. Be sure to eject the SD memory
card by the procedure described in this
manual.
Do not press the button when an SD
memory card is not fully inserted. Doing
so may damage the card.
Do not press the button before an
SD memory card has been completely
removed. Doing so may damage the
card.
■ Inserting and ejecting a disc
Inserting a disc
1 Press the button.
2 Touch the following key.
Opens the LCD panel.
3 Insert a disc into the disc-loading
slot.
The disc is loaded, and the LCD panel
closes.
Ejecting a disc
1 Press the button.
2 Touch the following key.
The LCD panel opens, and
the disc is ejected.
3 Remove the disc, and press the
button.
The LCD panel closes.
■ Inserting and ejecting an SD
memory card
p This system is not compatible with the
Multi Media Card (MMC).
p Compatibility with all SD memory cards is
not guaranteed.
p This product may not achieve optimum
performance with some SD memory
cards.
Inserting an SD memory card
1 Press the button.
2 Touch the following key.
Opens the LCD panel.
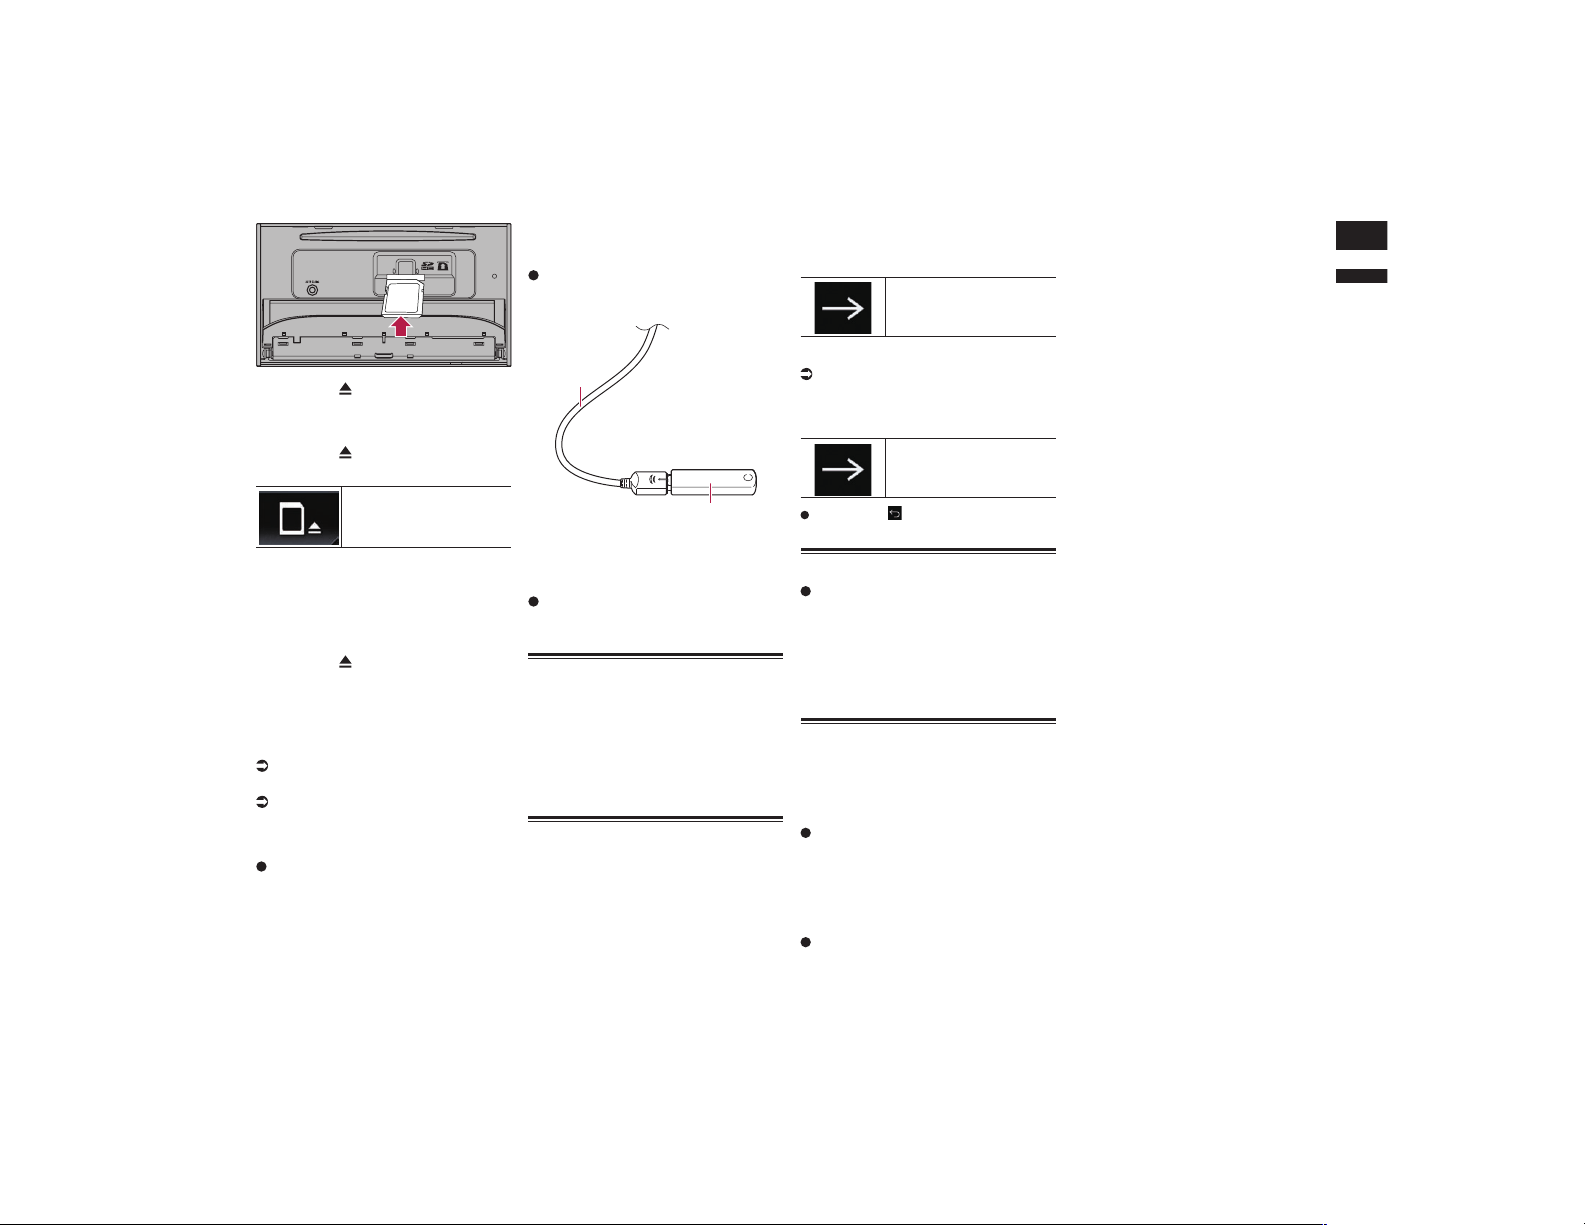
3 Insert an SD memory card into the
SD card slot.
Insert it with the label surface face-up and
press the card until it clicks and completely
locks.
English
02
Chapter
11
En
4 Press the button.
The LCD panel closes.
Ejecting an SD memory card
1 Press the button.
2 Touch the following key.
Opens the LCD panel.
3 Press the middle of the SD mem-
ory card gently until it clicks.
The SD memory card is ejected.
4 Pull the SD memory card out
straight.
5 Press the button.
The LCD panel closes.
■ Connecting and disconnecting
an iPod
Connecting your iPod
For details, refer to Connecting an iPhone
with Lightning connector on page 76.
For details, refer to Connecting an iPhone
with 30-pin connector on page 76.
Disconnecting your iPod
Pull out the cables after confirming
that no data is being accessed.
■ Plugging and unplugging a USB
storage device
p This product may not achieve optimum
performance with some USB storage
devices.
p Connection via a USB hub is not possible.
p A USB cable is required for connection.
Plugging in a USB storage device
Plug a USB storage device into the
USB cable.
2
1
1 USB cable
2 USB storage device
Unplugging a USB storage device
Pull out the USB storage device
after checking that no data is being
accessed.
Startup and termination
1 Start the engine to boot up the
system.
After a short pause, the splash screen
comes on for a few seconds.
2 Turn off the vehicle engine to ter-
minate the system.
This product is also turned off.
On rst-time startup
When you use this product for the first time,
select the language that you want to use.
1 Start the engine to boot up the
system.
After a short pause, the splash screen
comes on for a few seconds.
The “Select Program Language” screen
appears.
2 Touch the language that you want
to use on screen.
3 Touch the following key.
Displays the “Smartphone
Setup” screen.
4 Touch the item you want to set.
For details, refer to Information on the
connections and functions for each
device on page 21.
5 Touch the following key.
Displays the Top menu
screen.
If you touch , the display returns to the
previous screen.
Regular startup
Start the engine to boot up the
system.
After a short pause, the splash screen
comes on for a few seconds.
p The screen shown will differ depending
on the previous conditions.
p Enter the password for the anti-theft func-
tion if the password entry screen appears.
Turning off the display
You can turn off the display at night or when
the screen is too bright.
■ When the Application screen is
available
Press and hold the MODE button.
The display turns off.
p If you touch the screen when the display
is off, it reverts to the original screen.
■ When the Application screen is
not available
Press the MODE button.
The display turns off.
p If you touch the screen when the display
is off, it reverts to the original screen.
02
Chapter
12
En
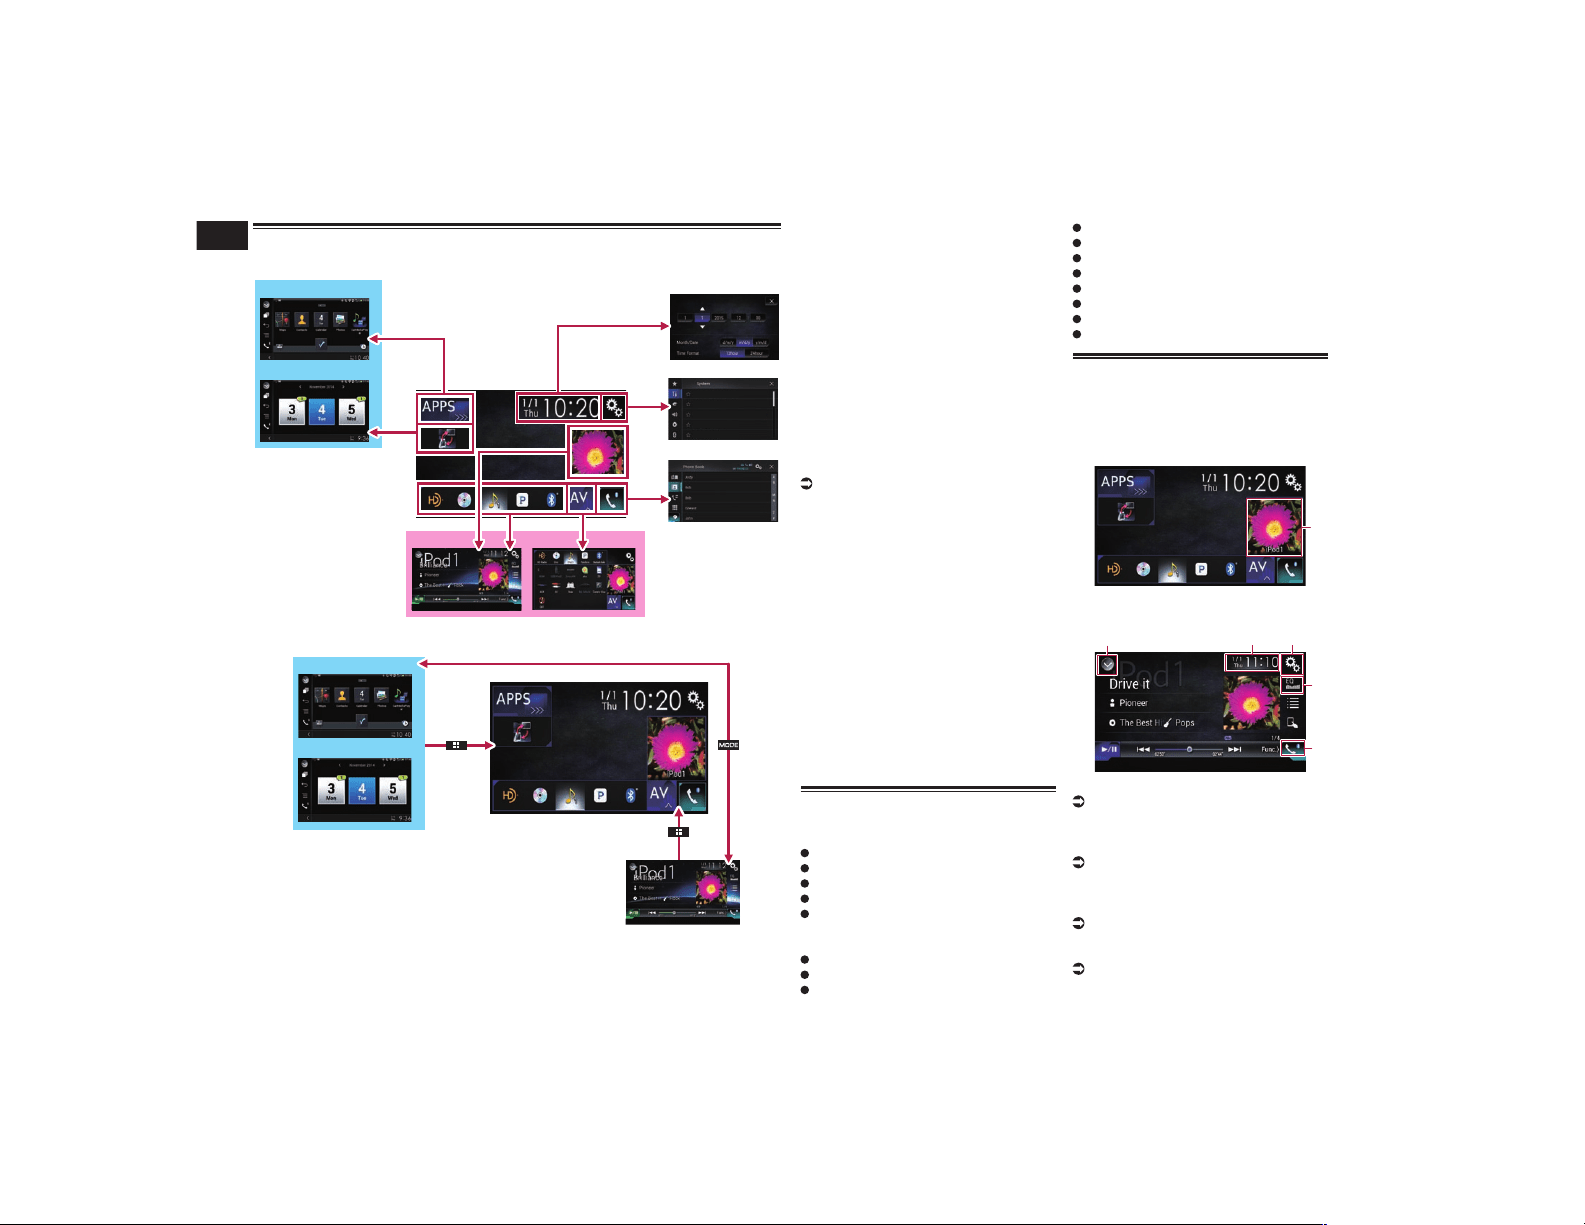
How to use the screens
■ Switching screens using the touch panel keys
1
2
3
4
7
8
9
5
6
■ Switching screens using the hardware buttons
8
9
1
7
1 Top menu screen
This is the starting menu to access the
desired screens and operate the various
functions.
p If you press the HOME button, the Top
menu screen is displayed.
p “APPS” is displayed when AppRadio
Mode or MirrorLink mode is on.
p “Android Auto” is displayed when
Android Auto is on.
2 Time and date setting screen
You can set the time and date settings.
3 Setting menu screen
You can customize the system and audio
settings, etc.
4 Phone menu screen
You can access the screen that is related to
hands-free phoning.
5 AV source selection screen
You can select the AV source.
6 Favorite source icons
You can display the icons of frequently used
sources by dragging the icons to the display
area.
For details of the operation, refer to
Changing the display order of source
icons on page 13.
7 AV operation screen
You can operate each source.
8 Application operation screen
You can control the iPhone or smartphone
applications directly on this product.
p If applications are not available, the
Application operation screen will not be
displayed.
9 Application menu screen
This product can switch to the application
menu, on which you can display and operate
the application for an iPhone or a smart-
phone on the screen.
p If application menus are not available,
the Application menu screen will not be
displayed.
Supported AV source
You can play or use the following sources
with this product.
HD Radio (HD Radio™ tuner)
CD
ROM (compressed audio or video files)
DVD-Video
Video-CD
The following sources can be played back or
used by connecting an auxiliary device.
USB
SD
iPod
My Vehicle
Pandora
®
Aha Radio
Bluetooth audio
SiriusXM
®
Satellite Radio
AV input (AV)
AUX
HDMI
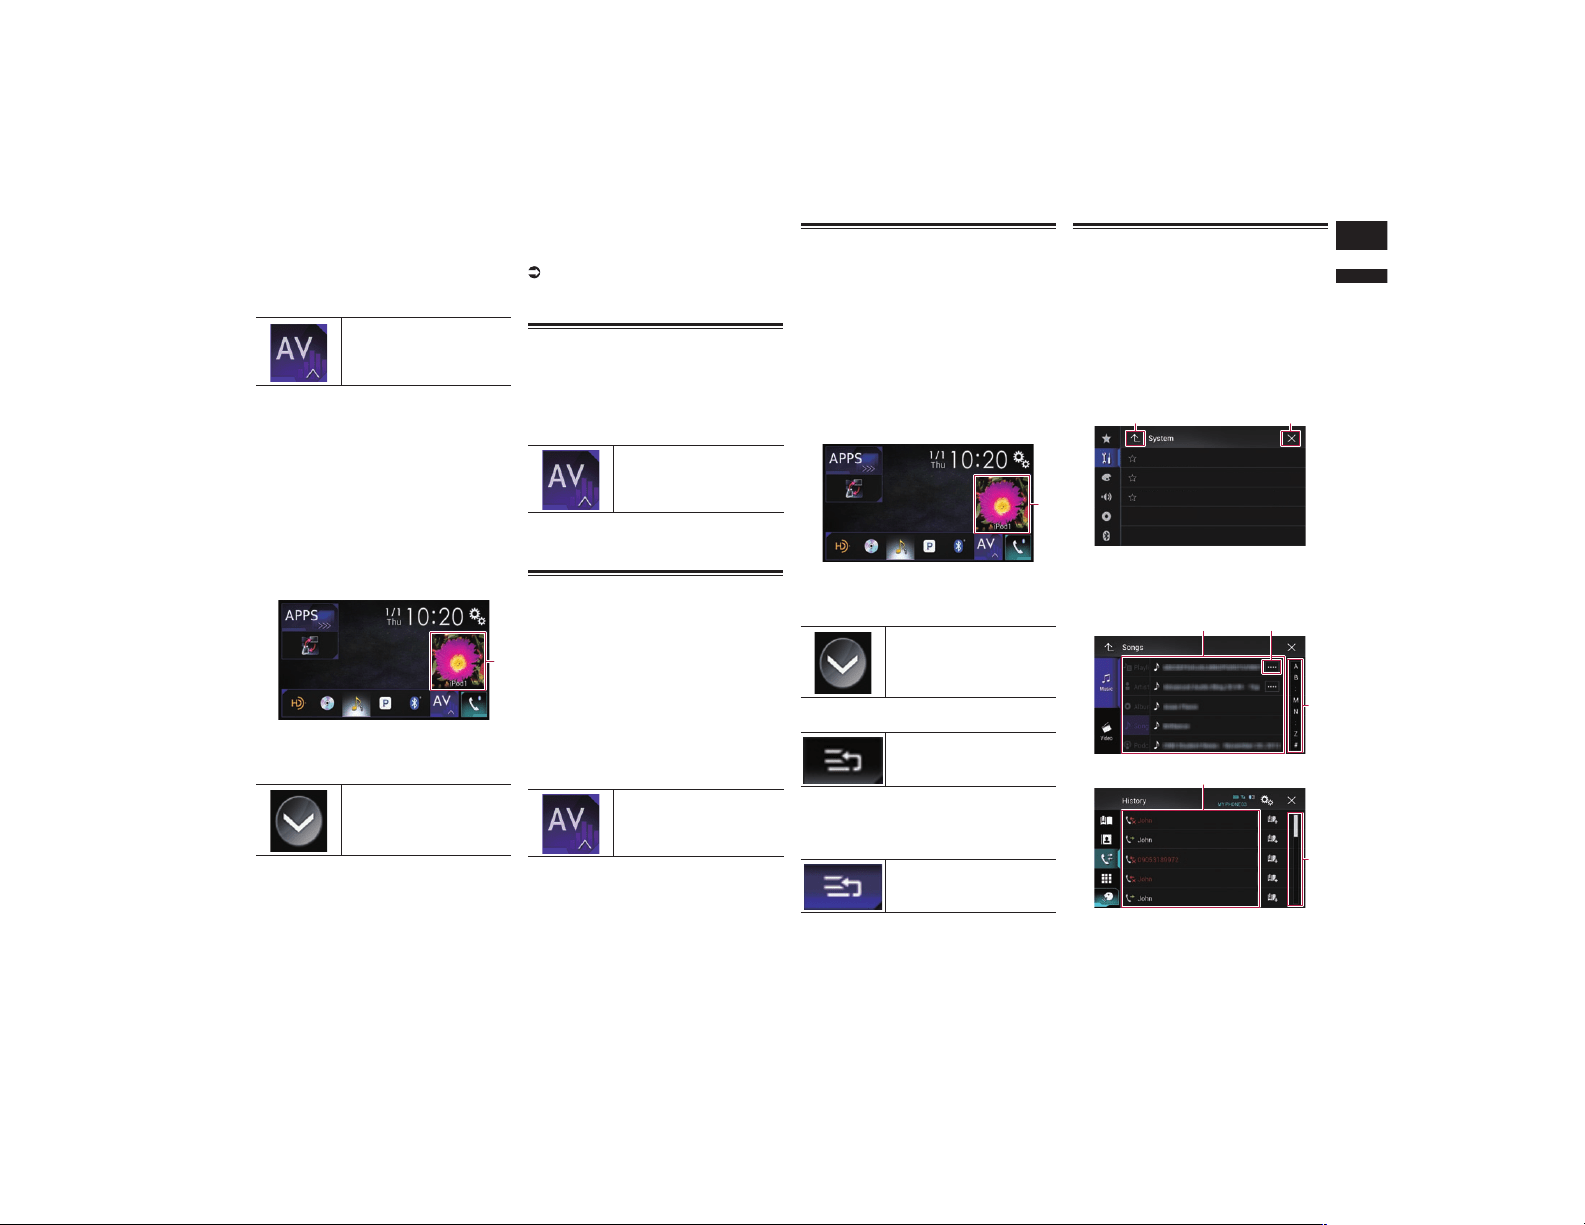
Displaying the AV operation
screen
1 Press the HOME button to display
the Top menu screen.
2 Touch the AV operation key.
1
1 AV operation key
The AV operation screen appears.
1 32
4
5
1 Displays the source list.
For details, refer to Selecting a front
source on the source list on page 13.
2 Displays the Time and date setting
screen.
For details, refer to Setting the time and
date on page 70.
3 Displays the Setting menu screen.
4 Recalls equalizer curves.
For details, refer to Using the equalizer on
page 64.
5 Displays the Phone menu screen.
For details, refer to Displaying the phone
menu on page 16.
English
02
Chapter
13
En
■ Selecting a front source on the
AV source selection screen
1 Press the HOME button to display
the Top menu screen.
2 Touch the following key.
Displays the AV source
selection screen.
3 Touch the source icon you want to
select.
The AV operation screen of the selected
source appears.
■ Selecting a front source on the
source list
p This function is not available during a call
via this product.
1 Press the HOME button to display
the Top menu screen.
2 Touch the AV operation key.
1
1 AV operation key
The AV operation screen appears.
3 Touch the following key.
Displays the source list.
4 Touch the source key you want to
select.
The AV operation screen of the selected
source appears.
p “Camera View” is available only when
“Back Camera Input” or “2nd Camera
Input” is set to “On”.
■ Selecting a rear source
You can select a source output to the rear
display.
For details of the operations, refer to
Selecting the video for the rear display on
page 71.
Turning off the AV source
Turn off the AV source to stop playing or
receiving the AV source.
1 Press the HOME button to display
the Top menu screen.
2 Touch the following key.
Displays the AV source
selection screen.
3 Touch [OFF].
The AV source is turned off.
Changing the display order of
source icons
You can change the display order of source
icons on the AV source selection screen.
p This setting is available only when you
stop your vehicle in a safe place and apply
the parking brake.
p This function is not available during a call
via this product.
1 Press the HOME button to display
the Top menu screen.
2 Touch the following key.
Displays the AV source
selection screen.
3 Touch and hold a source icon,
and drag the icon to the desired
position.
p If the source icon is moved, the order of
the source list is also changed.
Changing the display order of
source keys
You can change the display order of source
keys on the source list.
p This setting is available only when you
stop your vehicle in a safe place and apply
the parking brake.
p This function is not available during a call
via this product.
1 Press the HOME button to display
the Top menu screen.
2 Touch the AV operation key.
1
1 AV operation key
The AV operation screen appears.
3 Touch the following key.
Displays the source list.
4 Touch the following key.
The source keys can be
moved.
5 Drag the source key to the desired
position.
6 Touch the following key.
Returns to the previous
screen.
p If the source key is moved, the source
icons displayed on the Top menu screen
and the AV source screen are also moved.
Using the touch panel
You can operate this product by touching
the marks and items (touch panel keys)
displayed on the screen directly with your
fingers.
p To protect the LCD screen from damage,
be sure to touch the touch panel keys
only with your finger and do so gently.
■ Using the common touch panel
keys
1 2
1 Returns to the previous screen.
2 Closes the screen.
■ Operating list screens
3
1
2
3
1
1 Touching an item on the list selects the
item or narrows down the options.
03
Chapter
14
En
2 Appears when all characters are not
displayed on the display area.
If you touch the key, the rest of the char-
acters are scrolled for display.
3 Appears when items cannot be displayed
on a single page only.
Drag the slider bar to view any hidden
items.
Also, you can drag the list to view any
hidden items.
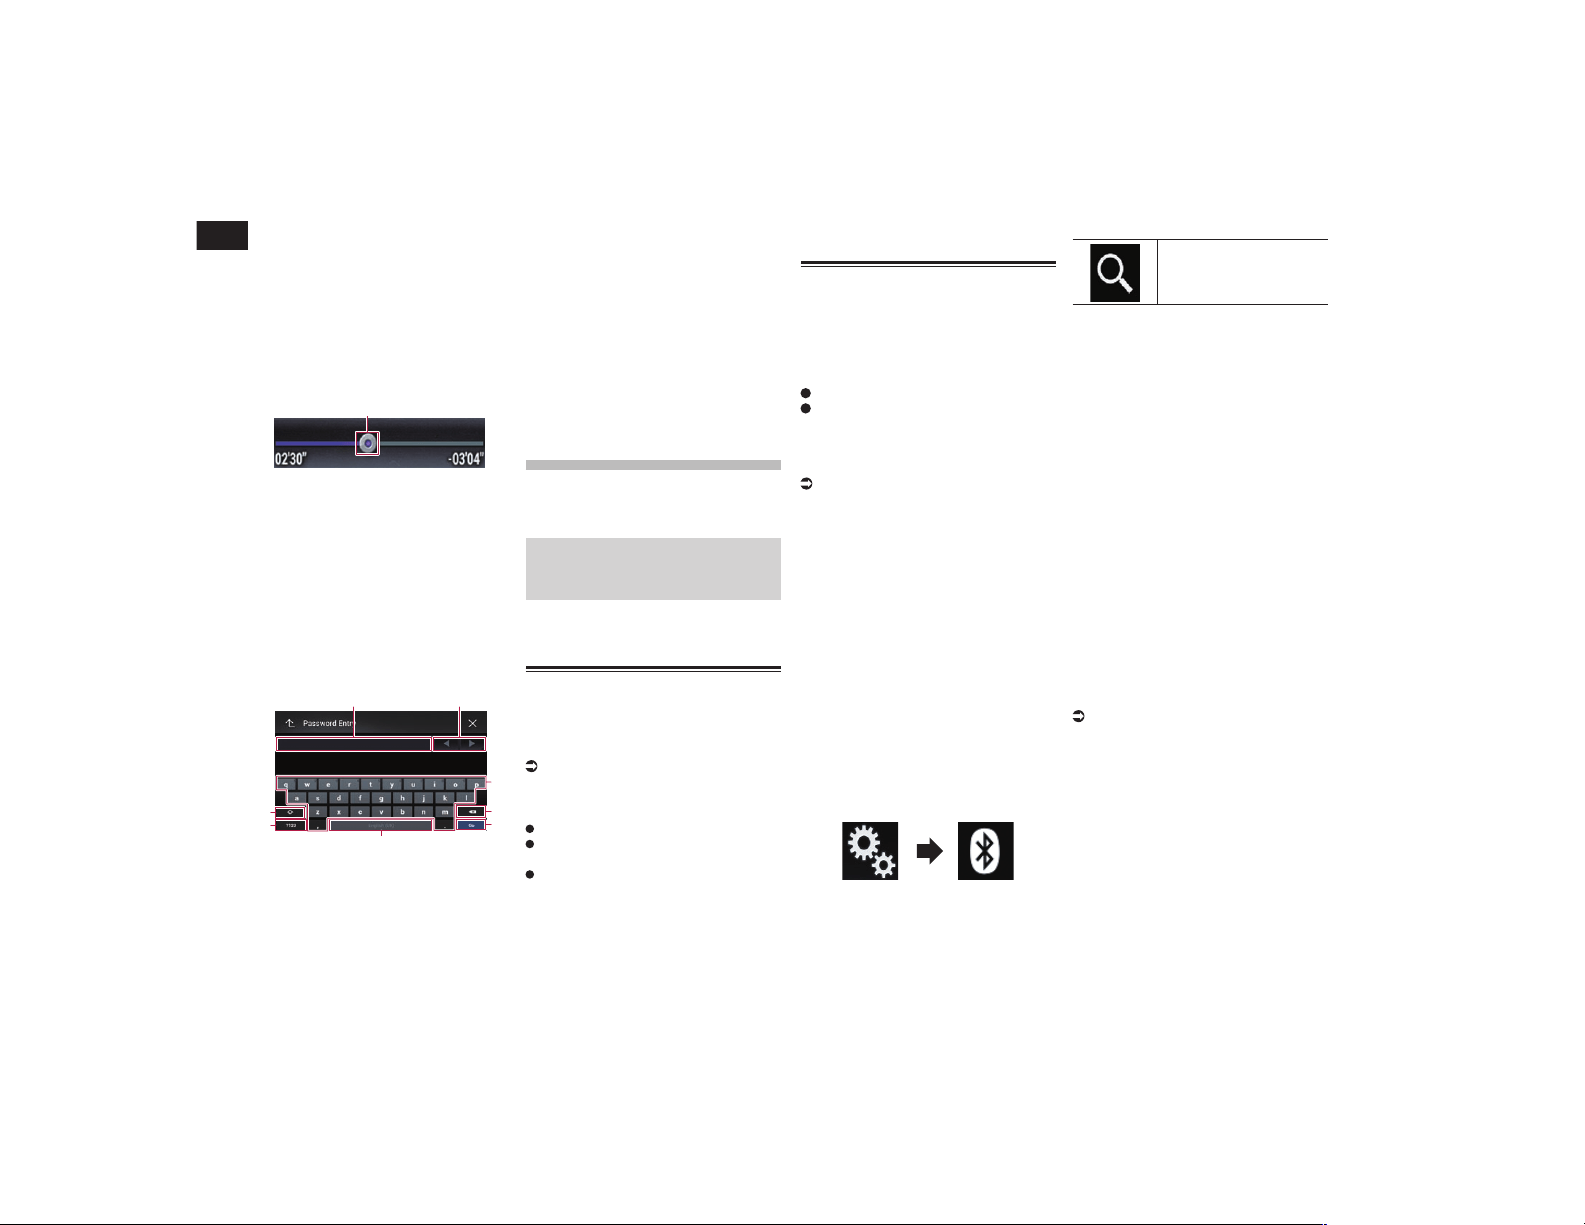
■ Operating the time bar
1
1 You can change the playback point by
dragging the key.
p Playback time corresponding to the posi-
tion of the key is displayed while dragging
the key.
p This function is not available when using
iPod function with an iPhone 6 Plus,
iPhone 6, iPhone 5s, iPhone 5c, iPhone 5,
or iPod touch (5th generation).
p This function is not available for some
media or sources.
■ Operating the on-screen
keyboard
6
5
4
3
8
7
21
1 Displays the characters that are entered.
If there is no text in the box, an informa-
tive guide with text appears.
2 Moves the cursor to the right or left for a
number of characters equivalent to the
number of touches.
3 Enters the characters in the text box.
4 Deletes the input text to the left of the
cursor one letter at a time. Continuing to
touch the key deletes all of the text.
5 Confirms the entry and proceeds to the
next step.
6 Enters a space.
A space equivalent to the number of
touches is inserted.
7 Switches between alphabet and
numbers/symbols.
8 Switches between capital and lower case
letters.
Registering and con-
necting a Bluetooth
device
If your devices feature Bluetooth
®
technol-
ogy, this product can be connected to your
devices wirelessly. This section describes
how to set up a Bluetooth connection.
For details about connectivity with the
devices featuring Bluetooth wireless
technology, refer to the information on our
website.
p The “Bluetooth” menu is available only
when you stop your vehicle in a safe place
and apply the parking brake.
Preparing communication
devices
This product has a built-in function that
enables to use devices featuring Bluetooth
wireless technology.
For details, refer to Notes for hands-free
phoning on page 19.
You can register and use devices that feature
the following profiles with this product.
HFP (Hands-Free Profile)
A2DP (Advanced Audio Distribution
Profile)
SPP (Serial Port Profile)
p When this product is turned off, the
Bluetooth connection is also discon-
nected. When the system restarts, the
system automatically attempts to recon-
nect the previously-connected device.
Even when the connection is severed for
some reason, the system automatically
reconnects the specified device (except
when the connection is severed due to
device operation).
Registering your Bluetooth
devices
You need to register your devices featuring
Bluetooth wireless technology when you
connect it to this product for the first time. A
total of three devices can be registered. Two
registration methods are available:
Searching for nearby Bluetooth devices
Pairing from your Bluetooth devices
p If three devices are already paired,
“Memory Full” is displayed and pairing
cannot be performed. In such cases,
delete a paired device first.
For details, refer to Deleting a registered
device on page 15.
■ Searching for nearby Bluetooth
devices
The system searches for available Bluetooth
devices near this product, displays them in a
list, and registers them for connection.
p When the device is already connected,
this function is inactive.
1 Activate the Bluetooth wireless
technology on your devices.
p For some Bluetooth devices, no specific
action is necessary to activate Bluetooth
wireless technology. For details, refer to
the instruction manual of your devices.
p Set the device visible to other devices.
2 Press the HOME button to display
the Top menu screen.
3 Touch the following keys in the
following order.
The “Bluetooth” screen appears.
4 Touch [Connection].
5 Touch the following key.
Starts searching.
The system searches for Bluetooth devices
waiting for a connection and displays them
in the list if a device is found.
p Up to 20 devices will be listed in the order
that the devices are found.
6 Wait until your Bluetooth device
appears in the list.
p If you cannot find the Bluetooth device
that you want to connect, check that the
device is waiting for a Bluetooth wireless
technology connection.
7 Touch the name of the Bluetooth
device you want to register.
While connecting, “Pairing… Please wait.”
is displayed. If the connection is established,
“Paired.” is displayed.
p If your device supports SSP (Secure
Simple Pairing), a six-digit number
appears on the display of this product.
Touch [Yes] to pairing the device.
p If the connection fails, “Error” is dis-
played. In such cases, try again from the
beginning.
p The PIN code is set to “0000” as the
default, but can be changed.
For details, refer to Entering the PIN code
for Bluetooth wireless connection on
page 16.
p Once the connection is established,
the device name is displayed. Touch the
device name to disconnect.
After the device is successfully registered,
a Bluetooth connection is established from
the system.
The profile icons displayed on the registered
device list screen light up as follows.
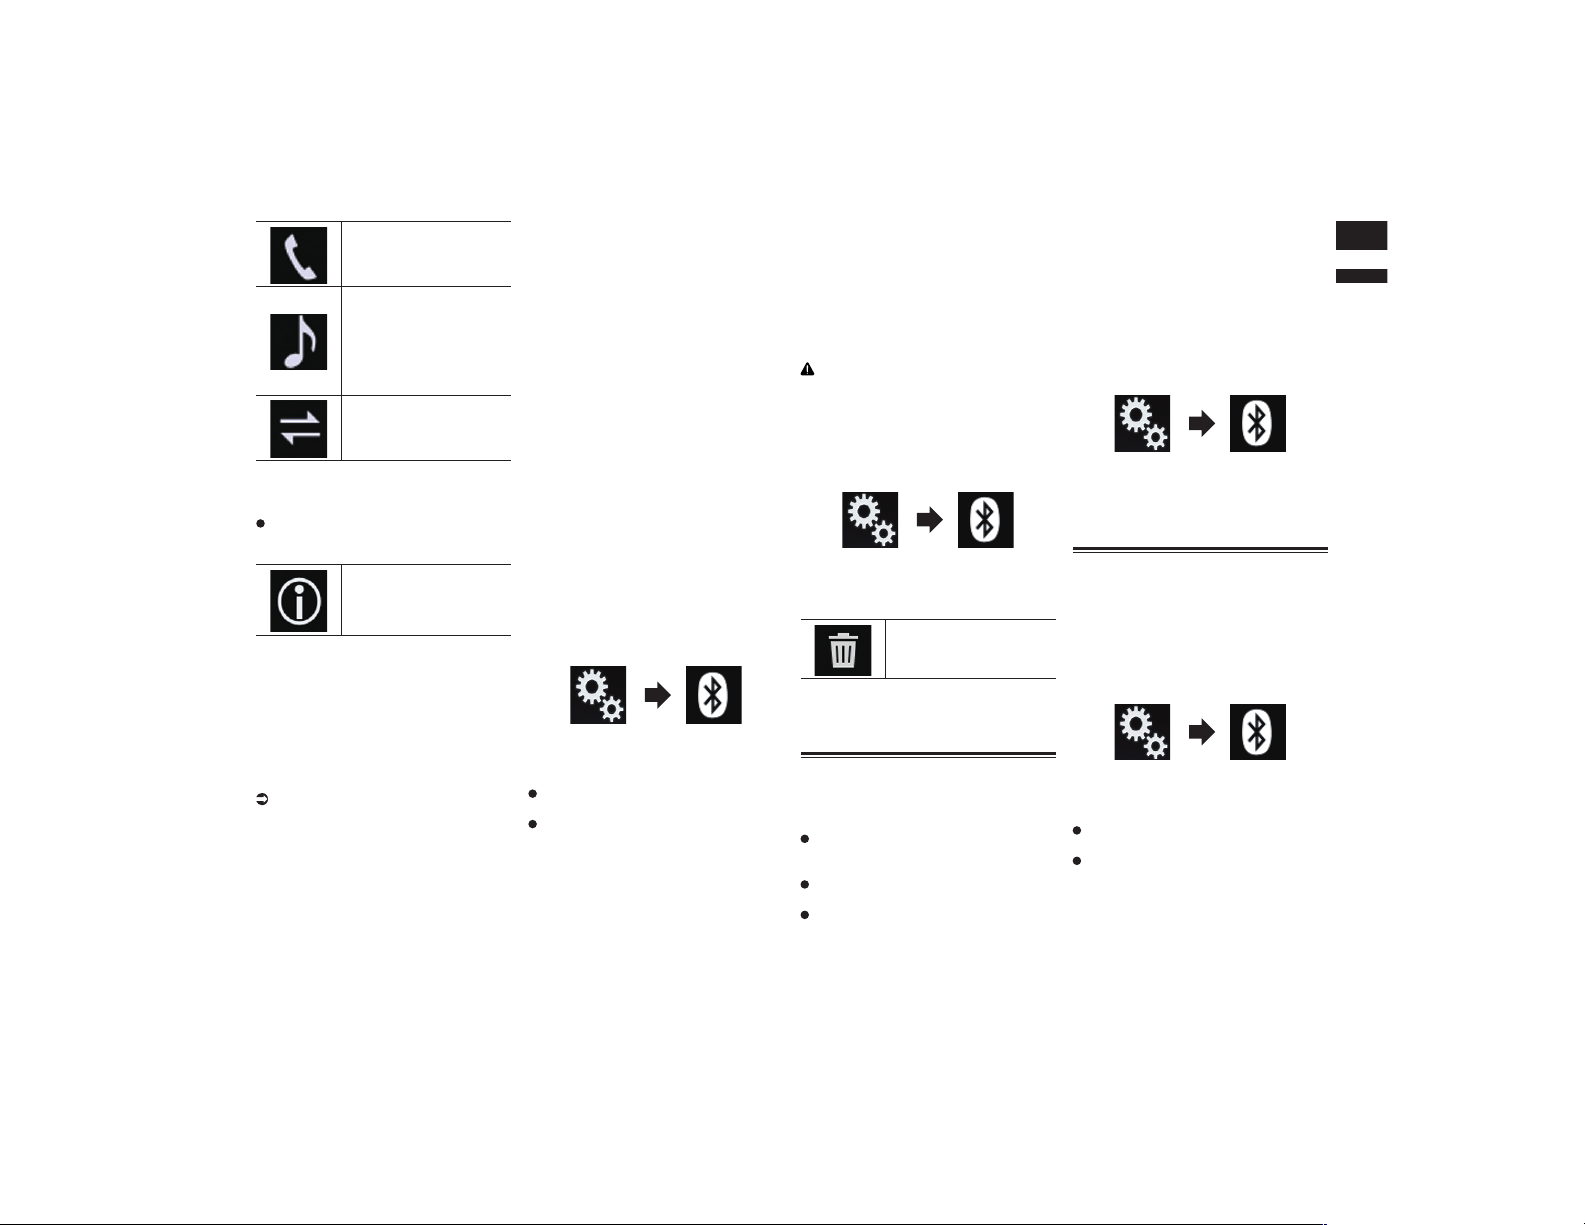
English
03
Chapter
15
En
Lights up when your mobile
device is successfully con-
nected with the HFP (Hands-
Free Profile).
Lights up when your
audio device is success-
fully connected with the
A2DP (Advanced Audio
Distribution Profile)/AVRCP
(Audio/Video Remote
Control Profile).
Lights up when the
Bluetooth connection is
established with the SPP
(Serial Port Profile).
p After pairing, the phone book registered
in the device may be automatically trans-
mitted to this product.
If you touch the following key, you can
switch the display between the device
names and Bluetooth device addresses.
Switches between the device
names and Bluetooth device
addresses.
■ Pairing from your Bluetooth
devices
You can register a Bluetooth device by
setting this product to standby mode and
requesting a connection from the Bluetooth
device.
p Before registration, make sure that
“Visibility” in the “Bluetooth” menu is
set to “On”.
For details, refer to Switching visibility on
page 15.
1 Activate the Bluetooth wireless
technology on your devices.
p For some Bluetooth devices, no specific
action is necessary to activate Bluetooth
wireless technology. For details, refer to
the instruction manual of your devices.
2 Use the Bluetooth setting in the
device to pair this product with the
device.
p If a PIN code input is required, enter
a PIN code. (The default PIN code is
“0000”.)
When the device is successfully regis-
tered, the connection settings are made
from the device.
p If registration fails, repeat the procedure
from the beginning.
■ Connecting to a Bluetooth
device automatically
If this function is set to on, a connection
between your Bluetooth device and this
product will take place automatically as
soon as the two devices are less than a few
meters apart.
Initially, this function is set to on.
p If this function is set to on, a connection
with the last connected Bluetooth device
will be established automatically when
the ignition switch is turned on.
1 Press the HOME button to display
the Top menu screen.
2 Touch the following keys in the
following order.
The “Bluetooth” screen appears.
3 Touch [Auto Connect] repeatedly
until the desired setting appears.
On (default):
Turns the automatic connection on.
Off:
Turns the automatic connection off.
If your Bluetooth device is ready for a
Bluetooth wireless connection, a connec-
tion to this product will automatically be
established.
If connection fails, “Bluetooth auto con-
nection failed. Retry?” appears.
Touch [Yes] to reconnect.
■ Deleting a registered device
When you have already registered three
Bluetooth devices and you want to add
another one, you must first delete one of the
registered devices.
p If a registered phone is deleted, all the
phone book entries and call history lists
that correspond to the phone will be also
cleared.
CAUTION
Never turn this product off while the paired
Bluetooth device is being deleted.
1 Press the HOME button to display
the Top menu screen.
2 Touch the following keys in the
following order.
The “Bluetooth” screen appears.
3 Touch [Connection].
4 Touch the following key.
Deletes a paired device.
A confirmation message appears.
5 Touch [Yes].
The device is deleted.
Connecting a registered
Bluetooth device manually
Connect the Bluetooth device manually in
the following cases:
Two or more Bluetooth devices are reg-
istered, and you want to manually select
the device to be used.
You want to reconnect a disconnected
Bluetooth device.
Connection cannot be established auto-
matically for some reason.
To start the connection manually, carry out
the following procedure.
1 Activate the Bluetooth wireless
technology on your devices.
p For some Bluetooth devices, no specific
action is necessary to activate Bluetooth
wireless technology. For details, refer to
the instruction manual of your devices.
2 Press the HOME button to display
the Top menu screen.
3 Touch the following keys in the
following order.
The “Bluetooth” screen appears.
4 Touch [Connection].
5 Touch the name of the device that
you want to connect.
Switching visibility
This function sets whether or not to make
this product visible to other devices.
Initially, this function is set to on.
1 Press the HOME button to display
the Top menu screen.
2 Touch the following keys in the
following order.
The “Bluetooth” screen appears.
3 Touch [Visibility] repeatedly until
the desired setting appears.
On (default):
Turns the visibility on.
Off:
Turns the visibility off.

04
Chapter
16
En
Entering the PIN code for
Bluetooth wireless connection
To connect your Bluetooth device to this
product via Bluetooth wireless technol-
ogy, you need to enter a PIN code on your
Bluetooth device to verify the connection.
p The default code is “0000”, but you can
change it with this function.
1 Press the HOME button to display
the Top menu screen.
2 Touch the following keys in the
following order.
The “Bluetooth” screen appears.
3 Touch [PIN Code Input].
The “PIN Code” screen appears.
4 Touch [0] to [9] to input pin code
(up to 8 digits).
5 Touch the following key.
Stores the PIN code in this
product.
Displaying the Bluetooth
address
You can check the Bluetooth address of this
product.
1 Press the HOME button to display
the Top menu screen.
2 Touch the following keys in the
following order.
The “Bluetooth” screen appears.
3 Touch [Device Information].
The Bluetooth address is displayed.
Clearing the Bluetooth
memory
CAUTION
Never turn this product off while the
Bluetooth memory is being cleared.
1 Press the HOME button to display
the Top menu screen.
2 Touch the following keys in the
following order.
The “Bluetooth” screen appears.
3 Touch [Bluetooth Memory Clear].
4 Touch [Clear].
The confirmation screen appears.
5 Touch [OK].
The Bluetooth memory is cleared.
If you do not want to clear the memory,
touch [Cancel].
Updating Bluetooth software
This function is used to update this prod-
uct with the latest Bluetooth software. For
details on Bluetooth software and updating,
refer to our website.
p The source is turned off and the
Bluetooth connection is disconnected
before the process starts.
CAUTION
Never turn this product off while the soft-
ware is being updated.
1 Press the HOME button to display
the Top menu screen.
2 Touch the following keys in the
following order.
The “Bluetooth” screen appears.
3 Touch [BT Software Update].
4 Touch [Start].
The data transfer screen is displayed.
p Follow the on-screen instructions to finish
updating the Bluetooth software.
Displaying the Bluetooth soft-
ware version
If this product fails to operate properly, you
may need to consult your dealer for repair.
In such cases, you may be asked to specify
the software version. Perform the following
procedure to check the version on this unit.
1 Press the HOME button to display
the Top menu screen.
2 Touch the following keys in the
following order.
The “Bluetooth” screen appears.
3 Touch [Bluetooth Version
Information].
The version of this product’s Bluetooth
module appears.
Using hands-free
phoning
CAUTION
For your safety, avoid talking on the phone as
much as possible while driving.
If your cellular phone features Bluetooth
technology, this product can be connected
to your cellular phone wirelessly. Using this
hands-free function, you can operate this
product to make or receive phone calls. This
section describes how to set up a Bluetooth
connection and how to operate a cellular
phone featuring Bluetooth technology on
this product.
For details about connectivity with the
devices featuring Bluetooth wireless
technology, refer to the information on our
website.
Displaying the phone menu
p Connect a cellular phone to this product
for using hands-free phoning.
For details, refer to Chapter 3.
p The Phone icon is displayed on the follow-
ing screens.
— Top menu screen
— AV operation screen
— On the App control side bar on the
AppRadio Mode and MirrorLink mode
screens
Touch the following key.
Displays the Phone menu
screen.
p The “Phone Book” screen appears when
using this function for the first time. The
screen of the last-used function appears
from the next time.
■ Touch panel keys
4
2
3
5
1
6 7
8
1 Displays the preset dial screen.
2 Switches to the phone book list.
3 Switches to the missed, received and
dialed call lists.
4 Switches the mode to enter the phone
number directly.
5 Switches to the voice recognition
function.
6 Displays the Setting menu screen.
7 Closes the screen.
8 Displays entries in the list by the initial
character.
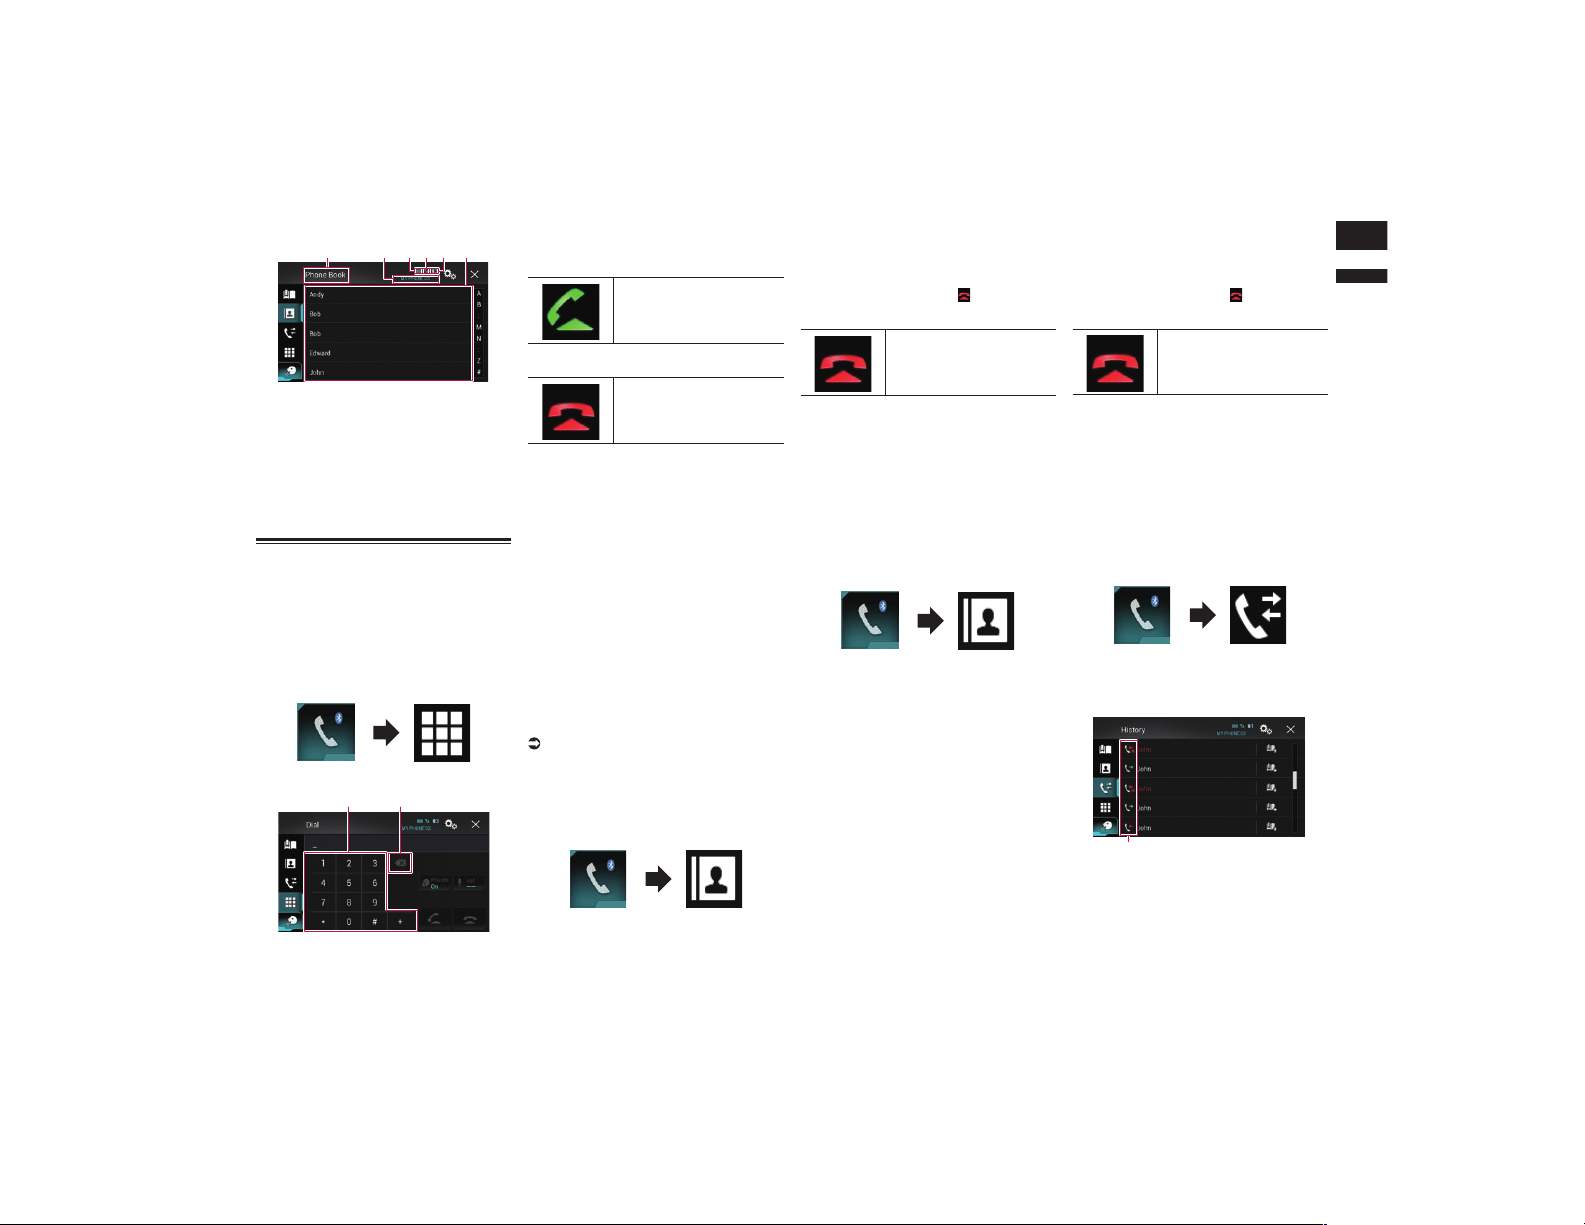
English
04
Chapter
17
En
■ Reading the screen
1 32 4 5 6
1 Menu title
2 Name of the connected cellular phone
3 Battery status of the cellular phone
4 Reception status of the cellular phone
5 Indicates that a Bluetooth telephone is
connected.
The list number of the connected device
is displayed.
6 List display area
Making a phone call
You can make a phone call in many different
ways.
■ Direct dialing
1 Press the HOME button to display
the Top menu screen.
2 Touch the following keys in the
following order.
The “Dial” screen appears.
1 2
1 Dial pad
2 Deletes one digit. Touch and hold to
delete all digits.
3 Touch the number keys to enter the
phone number.
4 Touch the following key.
Makes a call.
5 Touch the following key.
Ends the call.
The call ends.
p You may hear a noise when you hang up
the phone.
■ Calling a number in the phone
book
After finding the number you want to call in
the phone book, you can select the entry and
make the call.
p The contacts on your phone will normally
be transferred to this product automati-
cally when the phone is connected.
If the contacts are not transferred auto-
matically, you can transfer the contacts
using the phone menu of the cellular
phone.
To transfer the contacts using the phone
menu of the cellular phone, set this
product visible to other devices.
For details, refer to Switching visibility on
page 15.
1 Press the HOME button to display
the Top menu screen.
2 Touch the following keys in the
following order.
The “Phone Book” screen appears.
3 Touch the desired name on the list.
The details screen of the phone book
appears.
4 Touch the phone number you want
to dial.
The dial screen appears.
5 Dialing starts.
p To cancel the call, touch .
6 Touch the following key.
Ends the call.
The call ends.
Selecting a number by alphabet
search mode
If many phone numbers are registered in
the phone book, you can search for phone
numbers by alphabet search mode.
1 Press the HOME button to display
the Top menu screen.
2 Touch the following keys in the
following order.
The “Phone Book” screen appears.
3 Drag the Initial Search Bar to find
an entry by the initial character of
the name.
The alphabet corresponding to the cur-
rent position on the Initial Search Bar is
displayed.
4 Release the Initial Search Bar at
the desired alphabet.
The “Phone Book” entries starting with that
letter (e.g. “Ben”, “Brian” and “Burt” when
“B” is selected) will be displayed.
p To refine the search with a different letter,
touch [Cancel].
5 Touch an entry to display the
phone number list of the entry.
The details screen of the phone book
appears.
6 Touch the phone number you want
to dial.
The dial screen appears.
7 Dialing starts.
p To cancel the call, touch .
8 Touch the following key.
Ends the call.
The call ends.
■ Dialing from the history
The most recent calls made (dialed, received
and missed) are stored in the call history list.
You can browse the call history list and call
numbers from it.
1 Press the HOME button to display
the Top menu screen.
2 Touch the following keys in the
following order.
The “History” screen appears.
p Depending on the type of cellular phone,
some calls may not be displayed in the
call history.
1

04
Chapter
18
En
1 Type of call history
Received calls.
Dialed calls.
Missed calls.
3 Touch the desired entry on the list
to make a call.
The dial screen appears.
4 Dialing starts.
p To cancel the call, touch .
5 Touch the following key.
Ends the call.
The call ends.
■ Using the preset dial lists
You can dial a number from the preset dial
list.
Registering a phone number
You can easily store up to six phone numbers
per device as presets.
1 Press the HOME button to display
the Top menu screen.
2 Touch the following keys in the
following order.
The “Phone Book” or “History” screen
appears.
3 Touch the following key.
Registers the phone number
to the “Preset Dial” list.
Dialling from the preset dial list
1 Press the HOME button to display
the Top menu screen.
2 Touch the following keys in the
following order.
The “Preset Dial” screen appears.
3 Touch the desired entry on the list
to make a call.
The dial screen appears.
4 Dialing starts.
p To cancel the call, touch .
5 Touch the following key.
Ends the call.
The call ends.
Deleting a phone number
1 Press the HOME button to display
the Top menu screen.
2 Touch the following keys in the
following order.
The “Preset Dial” screen appears.
3 Touch the following key.
Deletes the phone number.
Receiving a phone call
You can answer an incoming call to your
cellular phone via this product.
■ Answering an incoming call
This product informs you that it is receiving a
call by displaying a message and producing
a ring sound.
p You can set the system to automatically
answer incoming calls. If this product is
not set to automatically answer incoming
calls, answer the calls manually.
For details, refer to Answering a call
automatically on page 18.
p The registered name appears if the phone
number of the received call is already
registered in “Phone Book”.
1 Touch the following key.
Answers an incoming call.
Rejects an incoming call.
The rejected call is recorded in the missed
call history list.
For details, refer to Dialing from the
history on page 17.
2 Touch the following key.
Ends the call.
The call ends.
Minimizing the dial conrma-
tion screen
p The dial confirmation screen cannot be
minimized on the AV operation screen.
p AV sources cannot be selected even if the
dial confirm screen is minimized while
talking on the phone.
1 Touch the following key.
The dial confirmation screen
is minimized.
2 Touch the following key.
Displays the dial confirma-
tion screen again.
Changing the phone settings
■ Answering a call automatically
This product automatically answers incom-
ing calls to the connected cellular phone, so
you can answer calls while driving without
taking your hands off the steering wheel.
When “Auto Answer” is set to “On”, an
incoming call will be automatically answered
in 5 seconds.
1 Press the HOME button to display
the Top menu screen.
2 Touch the following keys in the
following order.
The “Bluetooth” screen appears.
3 Touch [Auto Answer] repeatedly
until the desired setting appears.
Off (default):
Turns the automatic answering off.
On:
Turns the automatic answering on.
■ Switching the ring tone
You can select whether or not to use this
product’s ring tone.
1 Press the HOME button to display
the Top menu screen.
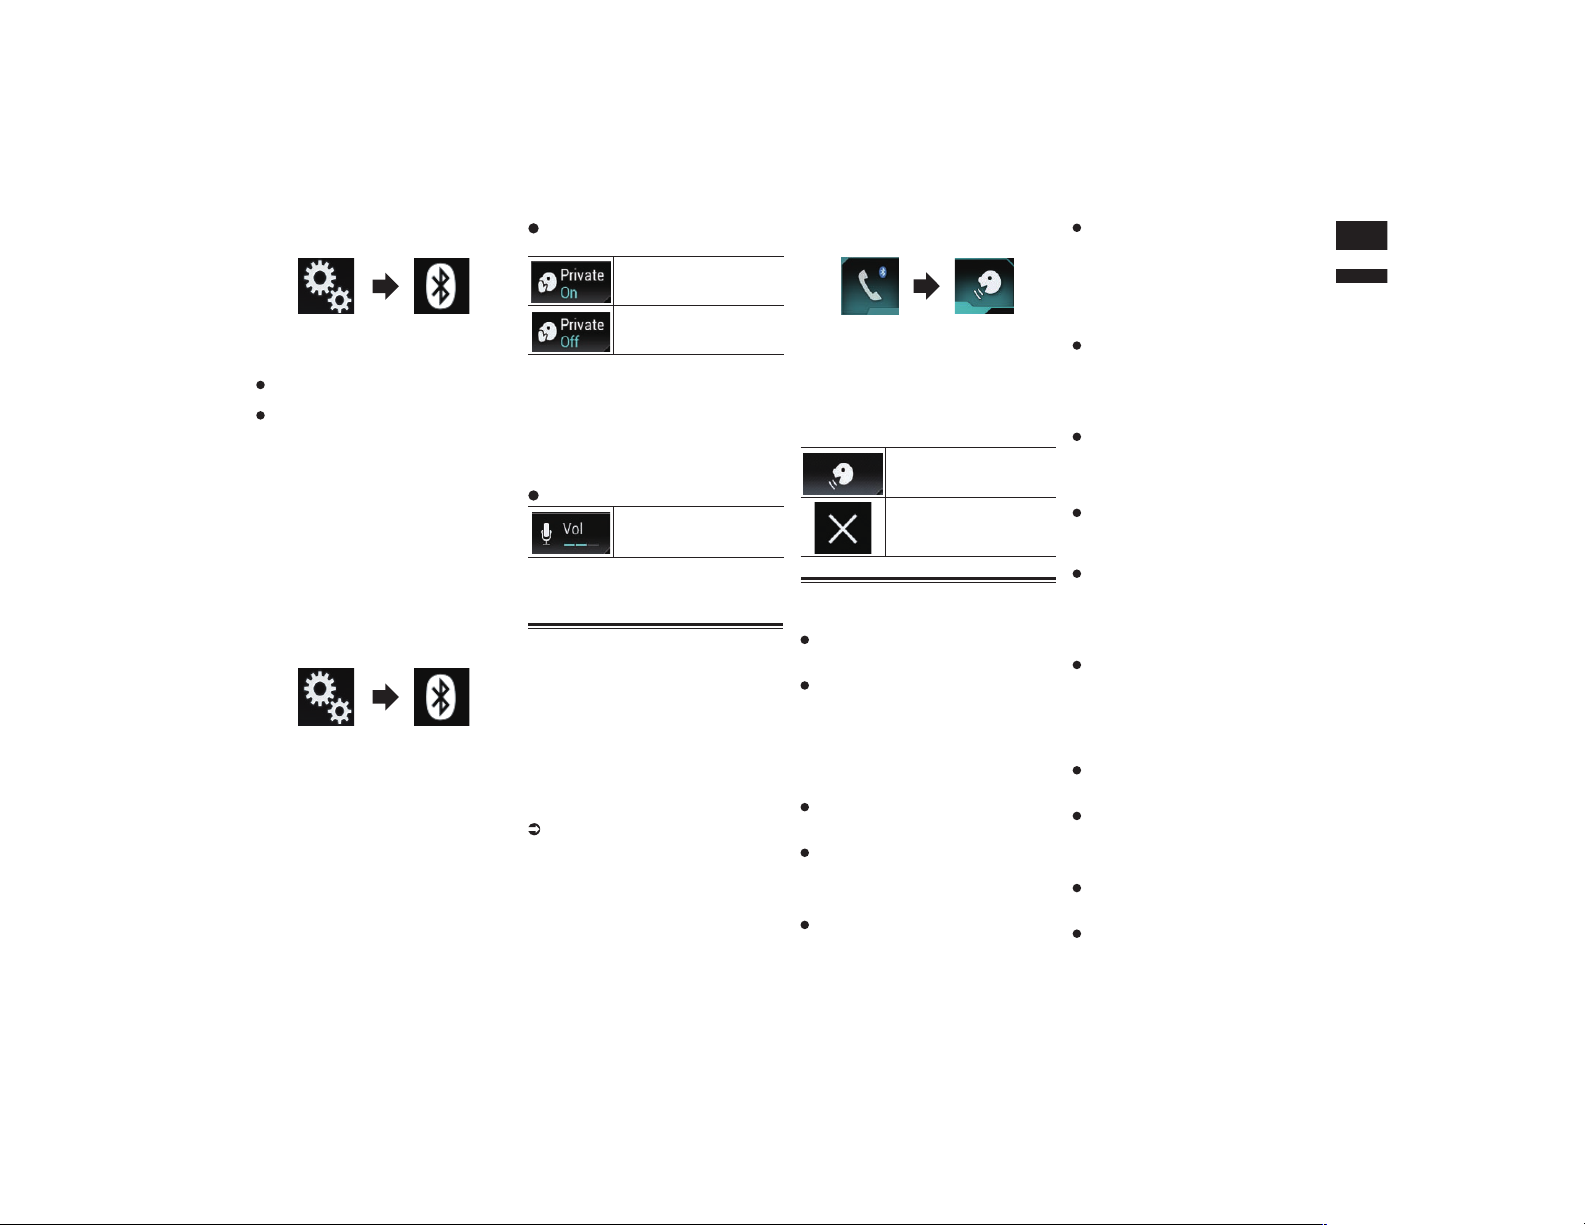
English
04
Chapter
19
En
2 Touch the following keys in the
following order.
The “Bluetooth” screen appears.
3 Touch [Ring Tone] repeatedly until
the desired setting appears.
On (default):
Turns the ring tone on.
Off:
Turns the ring tone off.
■ Inverting names in the phone
book
When your device is connected to this prod-
uct, the first and last names of your contacts
may be registered to the phone book in
reverse order.
You can use this function to change the
order back. (Inverting the names in the
phone book)
1 Press the HOME button to display
the Top menu screen.
2 Touch the following keys in the
following order.
The “Bluetooth” screen appears.
3 Touch [Invert Name].
The confirmation screen appears.
4 Touch [Yes].
p If the inversion fails, “Invert Name Error”
appears. In such cases, try again from the
beginning.
p Inverting the names of your contacts from
this product does not affect the data on
your cellular phone.
■ Setting the private mode
During a conversation, you can switch to
private mode (talk directly on your cellular
phone).
Touch the following keys to turn
private mode on or off.
Talk directly on your mobile
device.
Hands-free phoning
■ Adjusting the other party’s lis-
tening volume
To maintain good sound quality, this prod-
uct can adjust the other party’s listening
volume.
If the volume is too loud or not loud enough,
use this function.
Touch the following key.
Switches between the three
volume levels.
p This function can be performed even
while talking on the phone.
p Settings can be stored for each device.
Using the voice recognition
function
You can use the voice recognition function of
iPhone or smartphone.
p When an iPhone running iOS 6.1 or
higher is used, Siri Eyes Free Mode is
available with this product.
p For using this function with a smart-
phone, the device must be compatible
with Android Auto and “Mode” in
“Smartphone Setup” must be set to
“Android Auto” beforehand.
For details, refer to Information on the
connections and functions for each
device on page 21.
1 Press the HOME button to display
the Top menu screen.
2 Touch the following keys to start
voice control.
The voice recognition function launches and
the voice control screen appears.
You can use the voice recognition function
in the same way as using it on the iPhone or
smartphone.
p You can also launch the voice recognition
function by pressing and holding the
HOME button.
Indicates that this product
is on standby for your voice
commands.
Cancels the voice recogni-
tion function.
Notes for hands-free phoning
General notes
Connection to all cellular phones featur-
ing Bluetooth wireless technology is not
guaranteed.
The line-of-sight distance between this
product and your cellular phone must
be 10 meters or less when sending and
receiving voice and data via Bluetooth
technology. However, the actual trans-
mission distance may be shorter than the
estimated distance, depending on the
usage environment.
With some cellular phones, the ring
sound may not be output from the
speakers.
If private mode is selected on the cellu-
lar phone, hands-free phoning may be
disabled.
Registration and connection
Cellular phone operations vary depending
on the type of cellular phone. Refer to the
instruction manual that came with your
cellular phone for detailed instructions.
With cellular phones, phone book trans-
fer may not work even though your phone
is paired with this product. In that case,
disconnect your phone, and then perform
pairing again from your phone to this
product.
Making and receiving calls
You may hear a noise in the following
situations:
— When you answer the phone using the
button on the phone.
— When the person on the other end of the
line hangs up the phone.
If the person on the other end of the line
cannot hear the conversation due to
an echo, decrease the volume level for
hands-free phoning. This may reduce the
echo.
With some cellular phones, even if you
press the accept button on the cellular
phone when a call comes in, hands-free
phoning may not be performed.
The registered name appears if the phone
number of the received call is already
registered in the phone book. When one
phone number is registered under dif-
ferent names, only the phone number is
displayed.
If the phone number of the received
call is not registered in the phone book,
the phone number of the received call
appears.
The received call and the dialed
number histories
You cannot make a call to the entry of an
unknown user (no phone number) in the
received call history.
If calls are made by operating your
cellular phone, no history data will be
recorded in this product.
Phone book transfers
If there are more than 800 phone book
entries on your cellular phone, all entries
may not be downloaded completely.
With some cellular phones, it may not be
possible to transfer all items in the phone
book at one time. In this case, transfer
items one by one from your cellular
phone.
05
Chapter
20
En
Depending on the cellular phone, this
product may not display the phone book
correctly. (Some characters may be gar-
bled, or the order of first and last names
may be reversed.)
If the phone book in the cellular phone
contains image data, the phone book may
not be transferred correctly. (Image data
cannot be transferred from the cellular
phone.)
Depending on the cellular phone, phone
book transfer may not be available.
iPod / iPhone or smart-
phone setup operation
When using an iPod / iPhone or a smart-
phone with this product, configure the
settings of this product according to the
device to be connected.
This section describes the settings required
for each device.
The basic ow of iPod / iPhone
or smartphone setup
1 Select the method for connecting your
device.
For details, refer to Setting the device
connection method on page 20.
2 Connect your device to this product.
For details of the connections, refer to
Chapter 31.
3 If necessary, connect your device to this
product via Bluetooth connection.
For details of the Bluetooth connection,
refer to Chapter 3.
Setting the device connection
method
If you want to use the application for iPhone
or smartphone on this product, you must
select the method for connecting your
device.
Settings are required according to the
connected device.
1 Press the HOME button to display
the Top menu screen.
2 Touch the following keys in the
following order.
The “System” screen appears.
3 Touch [Input/Output Settings].
4 Touch [Smartphone Setup].
The “Smartphone Setup” screen appears.
5 Configure the following settings.
Device: Select the device to be
connected.
Connection: Select the connection
method.
p Configure the settings correctly accord-
ing to the device to be connected and the
connection method to be used.
For details, refer to Information on the
connections and functions for each
device on page 21.
p If you change the setting, the confirma-
tion screen appears.
Touch [OK].
The setting will change after the following
processes are automatically executed.
— The source is turned off.
— AppRadio Mode or MirrorLink mode is
exited.
— The smartphone connection (USB and
Bluetooth) is disconnected.
To cancel, touch [Cancel].
p The setting cannot be changed for a while
after the setting is changed.
iPod compatibility
This product supports only the following
iPod models and iPod software versions.
Others may not work correctly.
Made for
iPhone 6 Plus: iOS 8
iPhone 6: iOS 8
iPhone 5s: iOS 7.0.3
iPhone 5c: iOS 7.0.3
iPhone 5: iOS 7.0.3
iPhone 4s: iOS 7.0.3
iPhone 4: iOS 7.0.3
iPhone 3GS: iOS 6.0.1
iPod touch (5th generation): iOS 6.0.1
iPod touch (4th generation): iOS 6.0.1
iPod touch (3rd generation): iOS 5.1.1
iPod touch (2nd generation): iOS 4.2.1
iPod classic 160GB (2009): Ver. 2.0.4
iPod classic 160GB (2008): Ver. 2.0.1
iPod classic 80GB: Ver. 1.1.2
iPod nano (7th generation)
iPod nano (6th generation): Ver. 1.2
iPod nano (5th generation): Ver. 1.0.2
iPod nano (4th generation): Ver. 1.0.4
iPod nano (3rd generation): Ver. 1.1.3
p You can connect and control an iPod
compatible with this product by using
separately sold connector cables.
p Operation methods may vary depending
on the iPod model and the software
version of the iPod.
p Depending on the software version of the
iPod, it may not be compatible with this
product.
For details about iPod compatibility with
this product, refer to the information on
our website.
This manual applies to the following iPod
models.
iPod with 30-pin connector
iPhone 4s
iPhone 4
iPhone 3GS
iPod touch 4th generation
iPod touch 3rd generation
iPod touch 2nd generation
iPod classic 160GB
iPod classic 80GB
iPod nano 6th generation
iPod nano 5th generation
iPod nano 4th generation
iPod nano 3rd generation
iPod with Lightning connector
iPhone 6 Plus
iPhone 6
iPhone 5s
iPhone 5c
iPhone 5
iPod touch 5th generation
iPod nano 7th generation
Android™ device
compatibility
p Operation methods may vary depending
on the Android device and the software
version of the Android OS.
p Depending on the version of the Android
OS, it may not be compatible with this
product.
p Compatibility with all Android devices is
not guaranteed.
For details about Android device com-
patibility with this product, refer to the
information on our website.
AppRadio Mode Compatibility
iPod with 30-pin connector
iPhone 4s
iPhone 4
iPod touch 4th generation
iPod with Lightning connector
iPhone 6 Plus
iPhone 6
iPhone 5s
iPhone 5c
iPhone 5
iPod touch 5th generation
For details about Android device com-
patibility with this product, refer to the
information on our website.
MirrorLink device
compatibility
p This product is compatible with
MirrorLink version 1.0.
p Compatibility with all MirrorLink devices
is not guaranteed.
For details about MirrorLink device
compatibility with this product, refer to
the information on our website.
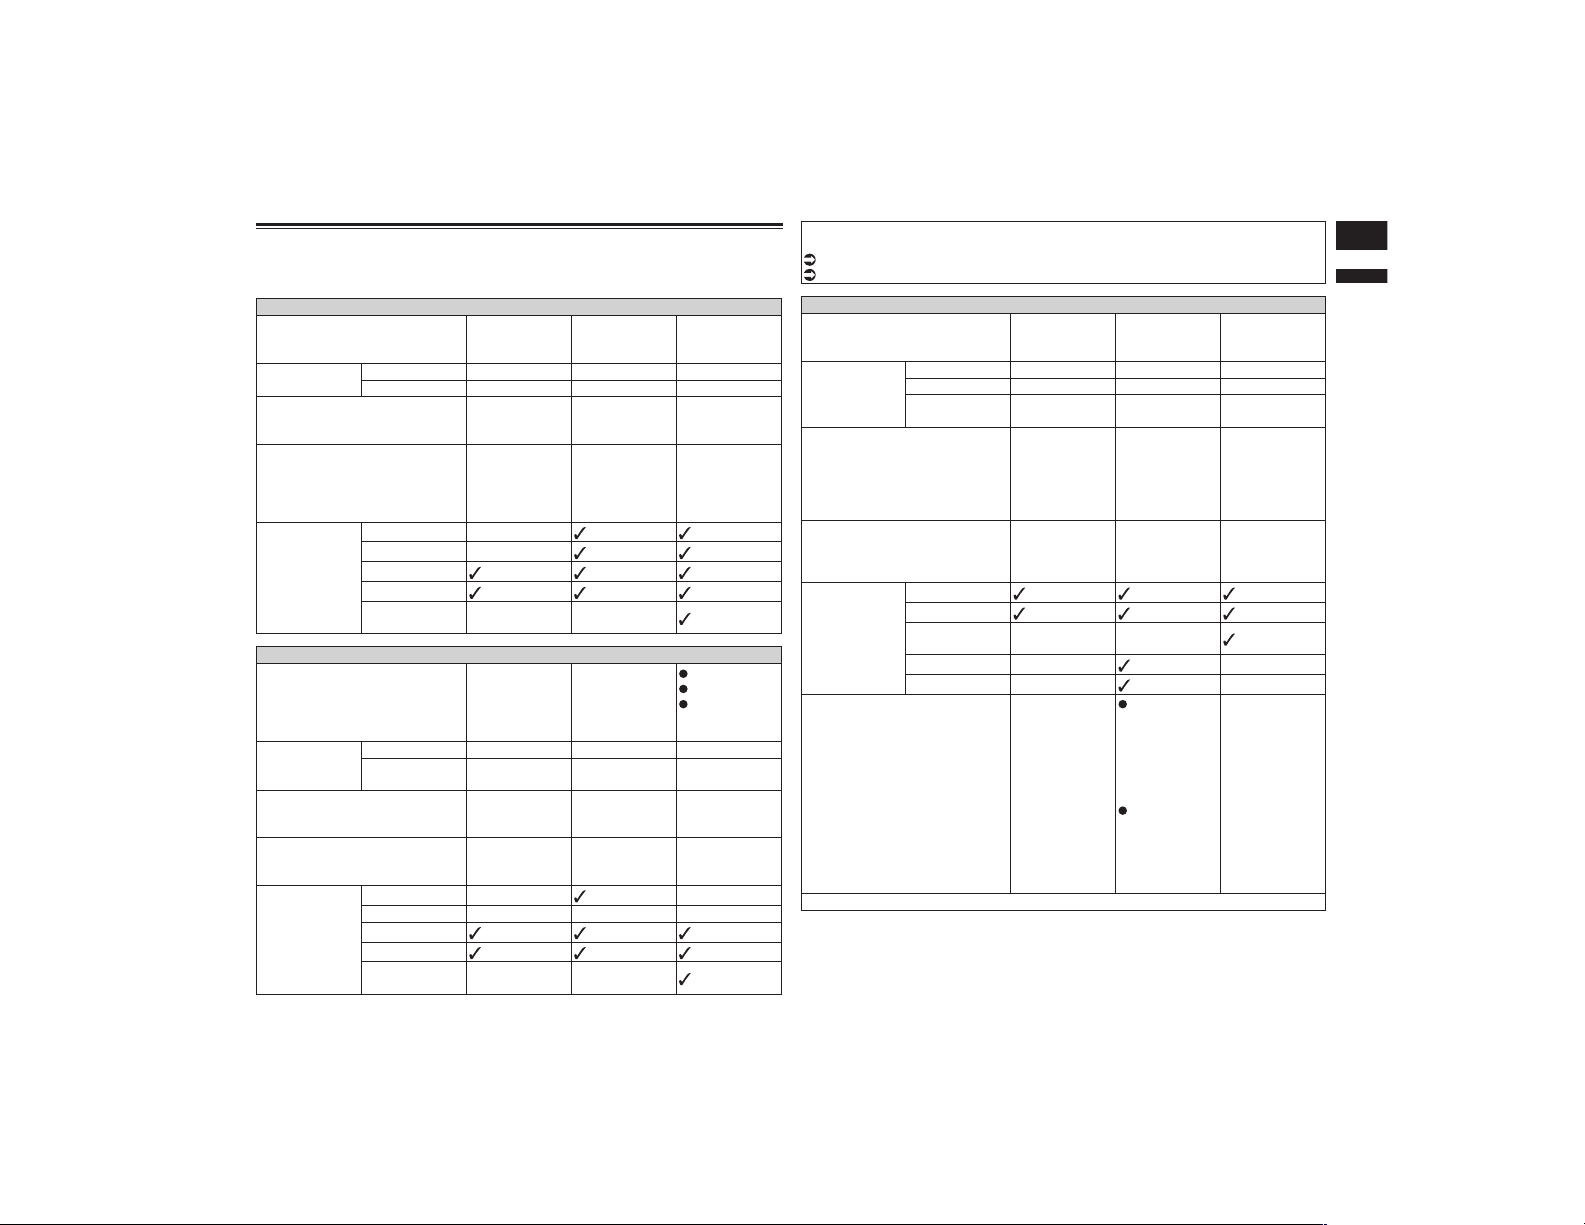
English
05
Chapter
21
En
Information on the connections and functions for each device
The settings and cables required for connecting each device, and the available sources are
as follows.
iPod / iPhone with a 30-pin connector
Required cable (sold separately)
Cable con-
nection is not
required.
CD-IU201V CD-IU201S
Smartphone
Setup
Device iPhone/iPod iPhone/iPod iPhone/iPod
Connection Bluetooth USB USB
Bluetooth connection
Bluetooth
connection is
required.
— —
Connection requirement —
Connect to USB
port 1 for using
aha or Pandora.
Connect to USB
port 1 for using
aha, Pandora,
or AppRadio
Mode.
Available source
iPod (audio) —
iPod (video) —
aha
Pandora
AppRadio
Mode
— —
iPod / iPhone with a Lightning connector
Required cable (sold separately)
Cable con-
nection is not
required.
CD-IU52
CD-IH202
CD-IU52
Lightning
Digital AV
Adapter
Smartphone
Setup
Device iPhone/iPod iPhone/iPod iPhone/iPod
Connection Bluetooth USB
Digital AV
adapter
Bluetooth connection
Bluetooth
connection is
required.
—
Bluetooth
connection is
required.
Connection requirement —
Connect to USB
port 1 for using
aha or Pandora.
—
Available source
iPod (audio) —
— (*1)
iPod (video) — — — (*1)
aha
Pandora
AppRadio
Mode
— —
(*1) Use AppRadio Mode to play music or videos on an iPod. For using AppRadio Mode,
install the CarMediaPlayer app on your iPod.
For details about the CarMediaPlayer, refer to the information on our website.
Refer to the CarMediaPlayer manual for more information.
Android, MirrorLink
Required cable (sold separately)
Cable con-
nection is not
required.
CD-MU200 CD-AH200
Smartphone
Setup
Device Others Others Others
Connection Bluetooth USB HDMI
Mode —
Android Auto/
MirrorLink/Off
—
Bluetooth connection
Bluetooth
connection is
required.
Bluetooth
connection is
required for
using aha,
Pandora, or
Android Auto.
Bluetooth
connection is
required.
Connection requirement —
Connect to USB
port 2 for using
MirrorLink or
Android Auto.
—
Available source
aha
Pandora
AppRadio
Mode
— —
MirrorLink — —
Android Auto —
(*1)
—
Remarks —
Select
“Android
Auto” for
“Mode”
for using
Android
Auto.
Select
“MirrorLink”
for “Mode”
for using
MirrorLink
mode.
—
(*1) Available only when an Android Auto-compatible device is connected.
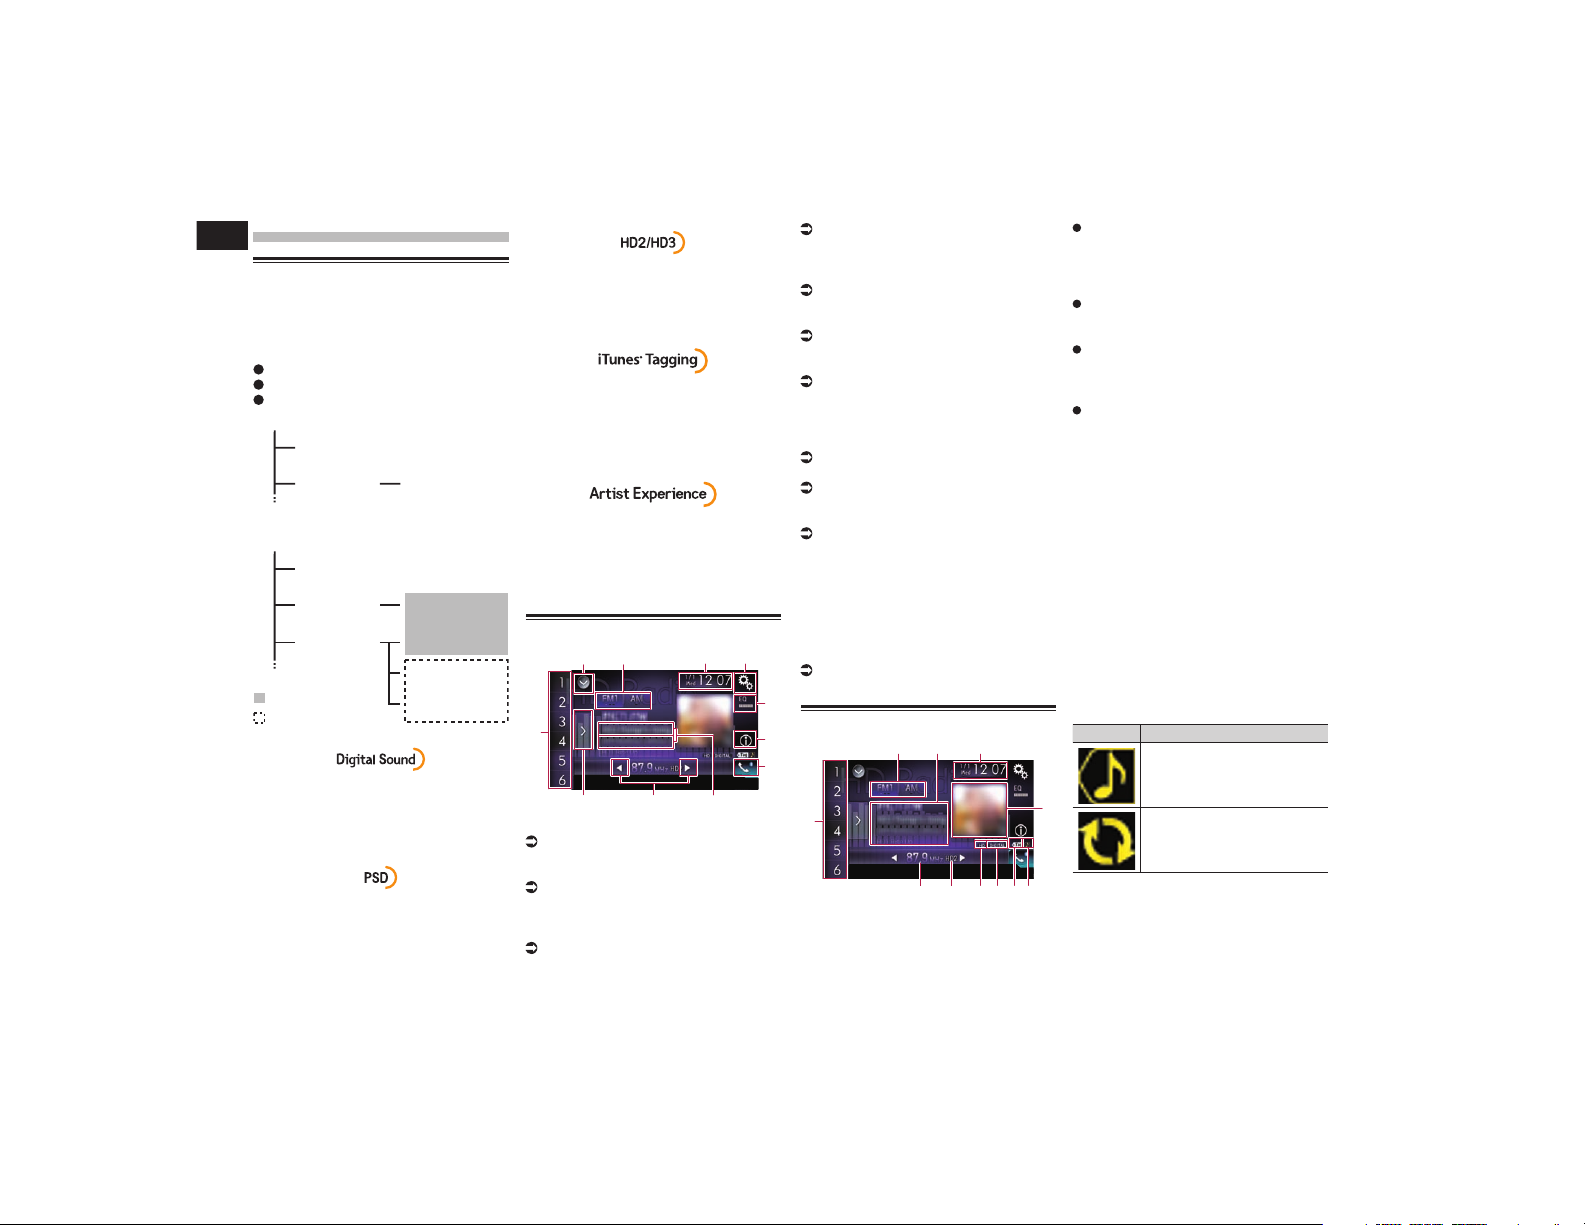
06
Chapter
22
En
HD Radio™ reception
HD Radio stations
HD Radio stations offer high quality audio
and data services. HD Radio stations are
brought to you by your local FM or AM
stations.
HD Radio stations feature the following:
High quality audio
FM multicasting
Data service
: Sub channel
AM band
Analog AM
Analog AM Digital AM
FM band
Analog FM
Analog FM Digital FM
Analog FM Digital FM-1ch
Digital FM-2ch
Digital FM-3ch
: Main channel
Digital, CD-quality sound. HD Radio
Technology enables local radio stations to
broadcast a clean digital signal. AM sounds
like today’s FM and FM sounds like a CD.
Program Service Data: Contributes to the
superior user experience of HD Radio
Technology. Presents song name, artist,
station IDs, HD2/HD3 Channel Guide, and
other relevant data streams.
Adjacent to traditional main stations are
extra local FM channels. These HD2/HD3
Channels provide new, original music as
well as deep cuts into traditional genre.
iTunes
®
Tagging provides you the oppor-
tunity to discover a wide range of content
and the means to “tag” that content for
later review and purchase from the iTunes
®
Store.
Visual information related to content being
played on your HD Radio receiver, such as
Album Art, historical photographs, still art
from live broadcasts, among other related
content.
Using the touch panel keys
1 2 43
5
6
7
a
9 8
b
1 Displays the source list.
For details, refer to Selecting a front
source on the source list on page 13.
2 Selects a band.
For details, refer to Selecting a band on
page 23.
3 Displays the Time and date setting
screen.
For details, refer to Setting the time and
date on page 70.
4 Displays the Setting menu screen.
5 Recalls equalizer curves.
For details, refer to Using the equalizer on
page 64.
6 Switches the text display between the
main channel and multicast channels.
For details, refer to Reading the screen on
page 22.
7 Displays the Phone menu screen.
For details, refer to Displaying the phone
menu on page 16.
8 Stores song information to an iPod.
For details, refer to Storing song infor-
mation to an iPod (iTunes Tagging) on
page 70.
9 Performs manual tuning or seek
tuning.
For details, refer to Manual tuning on
page 23.
For details, refer to Seek tuning on
page 23.
a Displays the preset channels.
For details, refer to Selecting a preset
channel from the preset channel list on
page 23.
b Recalls the preset channel stored to a
key from memory with a single touch
of the key.
Stores the current broadcast fre-
quency to a key for later recall by
continuing to touch the key.
For details, refer to Storing broadcast
frequencies on page 23.
Reading the screen
b
4
3
2
78
1
a 9 56
1 Band indicator
Shows the tuned band: FM1, FM2, FM3 or
AM.
2 Detailed information
Main channel
Call sign, program service or
frequency
Shows the call sign, the program service
or the frequency of the broadcast station
currently being received.
Song title
Shows the title of the current song (when
available).
Artist (performer) name
Shows the artist (performer) name for the
song currently playing (when available).
Multicast channels
Multicast channel number and song
title
Shows the numbers of multicast chan-
nels and the song titles.
p The information is not displayed if there is
no corresponding information.
p The currently tuned multicast channel is
displayed at the top of the list.
3 Current time and date
4 Album artwork
Shows the artwork for the current song
(when available).
p If the album artwork cannot be acquired,
the station logo is displayed. If the station
logo cannot be acquired either, a prein-
stalled image is displayed.
5 iTunes
®
tagging song status indicator
Shows the status of the song information
stored in this product.
p The icon is displayed on all operation
screens of AV sources.
Indicator Meaning
Appears when the song infor-
mation tag is stored in this
product.
Appears when the song infor-
mation tag is being transferred
to an iPod.
6 iTunes
®
tagging indicator
Indicates songs that are capable of iTunes
tagging.
p The icon is displayed on all operation
screens of AV sources.
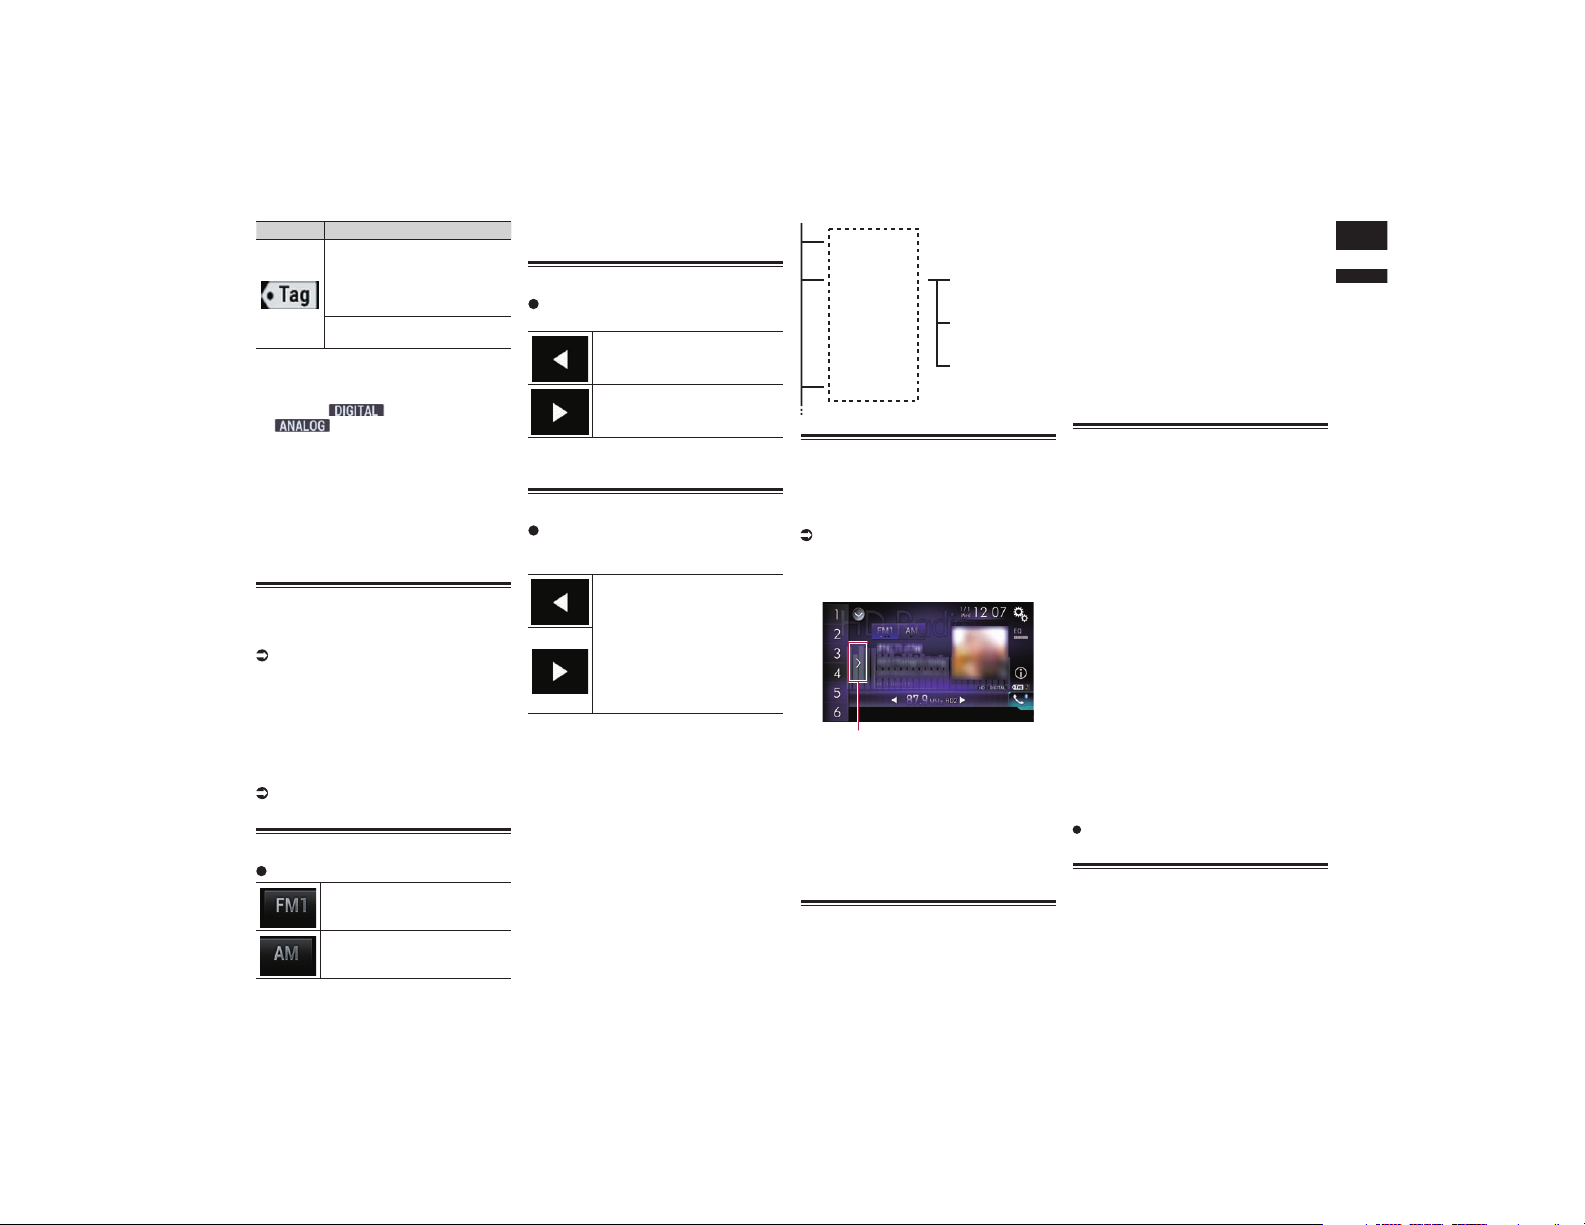
English
06
Chapter
23
En
Indicator Meaning
Appears when this product
receives an iTunes song tag
that can be stored and then
downloaded to an iPod for later
purchase.
Flashes when this product is
storing song tag information.
7 Signal type indicator
Shows the type of signal currently being
received. If a digital broadcast is being
received, appears. Otherwise,
appears.
8 HD Radio indicator
Shows that HD Radio station information
is being received.
9 Multicasting indicator
Shows the number of multicast channels
in the current frequency.
a Frequency indicator
b Preset number indicator
Shows the selected preset item.
Starting procedure
1 Display the AV source selection
screen.
For details of the operations, refer to
Displaying the AV operation screen on
page 12.
2 Touch [HD Radio] on the AV source
selection screen.
The “HD Radio” screen appears.
3 Use the touch panel keys on the
screen to control the radio.
For details, refer to Using the touch panel
keys on page 22.
Selecting a band
Touch the following key.
Switches between the following
FM bands: FM1, FM2 and FM3.
Switches to AM band.
p This function is convenient for preparing
different preset lists for each band.
Manual tuning
Touch the following keys to tune
manually.
Moves down one step at a time.
Moves up one step at a time.
p This function is convenient for preparing
different preset lists for each band.
Seek tuning
Touch and hold one of the follow-
ing keys for about one second and
then release.
Scans frequencies until it finds
a broadcast strong enough for
good reception.
You can cancel seek tuning by
touching either key briefly.
If you keep holding either key,
you can skip broadcasting fre-
quencies. Seek tuning will start
when you release the key.
p When an analog station is being received,
only analog broadcasts can be tuned up
or down.
If a digital broadcast is not being received
yet, tuning up or down seeks the next or
previous analog station.
Analog FM
Analog FM
Analog FM
Digital FM-1ch
Digital FM-2ch
Digital FM-3ch
Selecting a preset channel
from the preset channel list
Once you have stored broadcast channels,
you can easily recall preset channels from
memory with a single touch of a key.
For details, refer to Storing broadcast
frequencies on page 23.
1 Touch the preset channel list dis-
play key.
1
1 Preset channel list display key
2 Touch the item on the list (“1” to
“6”) to switch to a channel regis-
tered as a preset channel.
p If you touch the preset channel list
display key while the preset channel list
is displayed, the list disappears and the
preset tuning keys are displayed.
Storing broadcast frequencies
With a touch of any of the preset tuning keys
(“1” to “6”), you can easily store up to six
broadcast channels for later recall (also with
the touch of a key).
1 Select a frequency that you want to
store in memory.
2 Touch and hold a preset tuning key
[1] to [6].
The selected radio station is stored in
memory.
The next time you touch the same preset
tuning key “1” to “6”, the service component
is recalled from memory.
p Up to 18 FM stations, six for each of the
three FM bands, as well as six AM sta-
tions, can be stored in memory.
Storing the strongest broad-
cast frequencies
The BSM (best stations memory) function
automatically stores the six strongest broad-
cast frequencies under the preset tuning
keys “1” to “6” and, once stored there, you
can tune into them with the touch of a key.
p Storing broadcast frequencies with BSM
may replace broadcast frequencies you
have already saved.
p Previously stored broadcast frequencies
may remain stored if the number of
strong broadcast frequencies stored has
not reached the limit.
1 Touch the preset channel list dis-
play key.
The preset channel list appears.
2 Touch [BSM] to start a search.
A message appears. While the message
is displayed, the six strongest broadcast
frequencies will be stored under the preset
tuning keys “1” to “6” in the order of their
signal strength. When this is complete, the
message will disappear.
If you touch [Cancel], the storage pro-
cess is canceled.
Tuning into strong
frequencies
Local seek tuning allows you to only tune
into those radio stations with sufficiently
strong signals for good reception.
p This setting is available only when “HD
Radio” is selected as the source.

07
Chapter
24
En
1 Press the HOME button to display
the Top menu screen.
2 Touch the following keys in the
following order.
The “System” screen appears.
3 Touch [AV Source Settings].
4 Touch [Radio Settings].
5 Touch [Local].
The pop-up menu appears.
6 Touch the item you want to set.
FM
Off (default):
Turns the seek tuning setting off.
Level1:
Sets the level of sensitivity for FM to level
1.
Level2:
Sets the level of sensitivity for FM to level
2.
Level3:
Sets the level of sensitivity for FM to level
3.
Level4:
Sets the level of sensitivity for FM to level
4.
AM
Off (default):
Turns the seek tuning setting off.
Level1:
Sets the level of sensitivity for AM to level
1.
Level2:
Sets the level of sensitivity for AM to level
2.
p The FM “Level4” (AM “Level2”) setting
allows reception of only stations with the
strongest signals, while lower settings
allow reception of those with weaker
signals.
Switching the seek mode
You can select the method of seek tuning.
p This setting is available only when “HD
Radio” is selected as the source.
1 Press the HOME button to display
the Top menu screen.
2 Touch the following keys in the
following order.
The “System” screen appears.
3 Touch [AV Source Settings].
4 Touch [Radio Settings].
5 Touch [Seek] repeatedly until the
desired setting appears.
Seek All (default):
Seeks stations from both analog and
digital broadcasting.
Seek HD:
Only seeks stations from digital
broadcasting.
Switching the reception mode
If reception of a digital broadcast becomes
weak, the tuner automatically switches to
the analog broadcast of the same frequency
level by default. If you want to avoid frequent
automatic switching, change this setting
to “Off”.
p This setting is available only when “HD
Radio” is selected as the source.
1 Press the HOME button to display
the Top menu screen.
2 Touch the following keys in the
following order.
The “System” screen appears.
3 Touch [AV Source Settings].
4 Touch [Radio Settings].
5 Touch [Blending] repeatedly until
the desired setting appears.
On (default):
Switches to the analog broadcast of the
same frequency automatically.
Off:
Does not switch to the analog broadcast
of the same frequency automatically.
Storing song information to
an iPod (iTunes Tagging)
For details, refer to Storing song infor-
mation to an iPod (iTunes Tagging) on
page 70.
Operating with the hardware
buttons
Press the TRK button.
You can move up or down the preset
channels.
Press and hold the TRK button.
You can perform seek tuning.
Playing a disc
You can play a normal music CD, Video-CD
or DVD-Video using the built-in drive of
this product. This section describes these
operations.
CAUTION
For safety reasons, video images cannot be
viewed while your vehicle is in motion. To
view video images, you must stop in a safe
place and apply the parking brake.
Using the touch panel keys
(for audio)
Example: CD
Playback screen (page 1)
1 32
7
4
5
6
b a 8 9 8
Playback screen (page 2)
7cde
Using the touch panel keys
(for video)
Example: DVD
Playback screen (page 1)
1 32
4
f
6
9
b
l
m
8k j 8 i
g
h
7
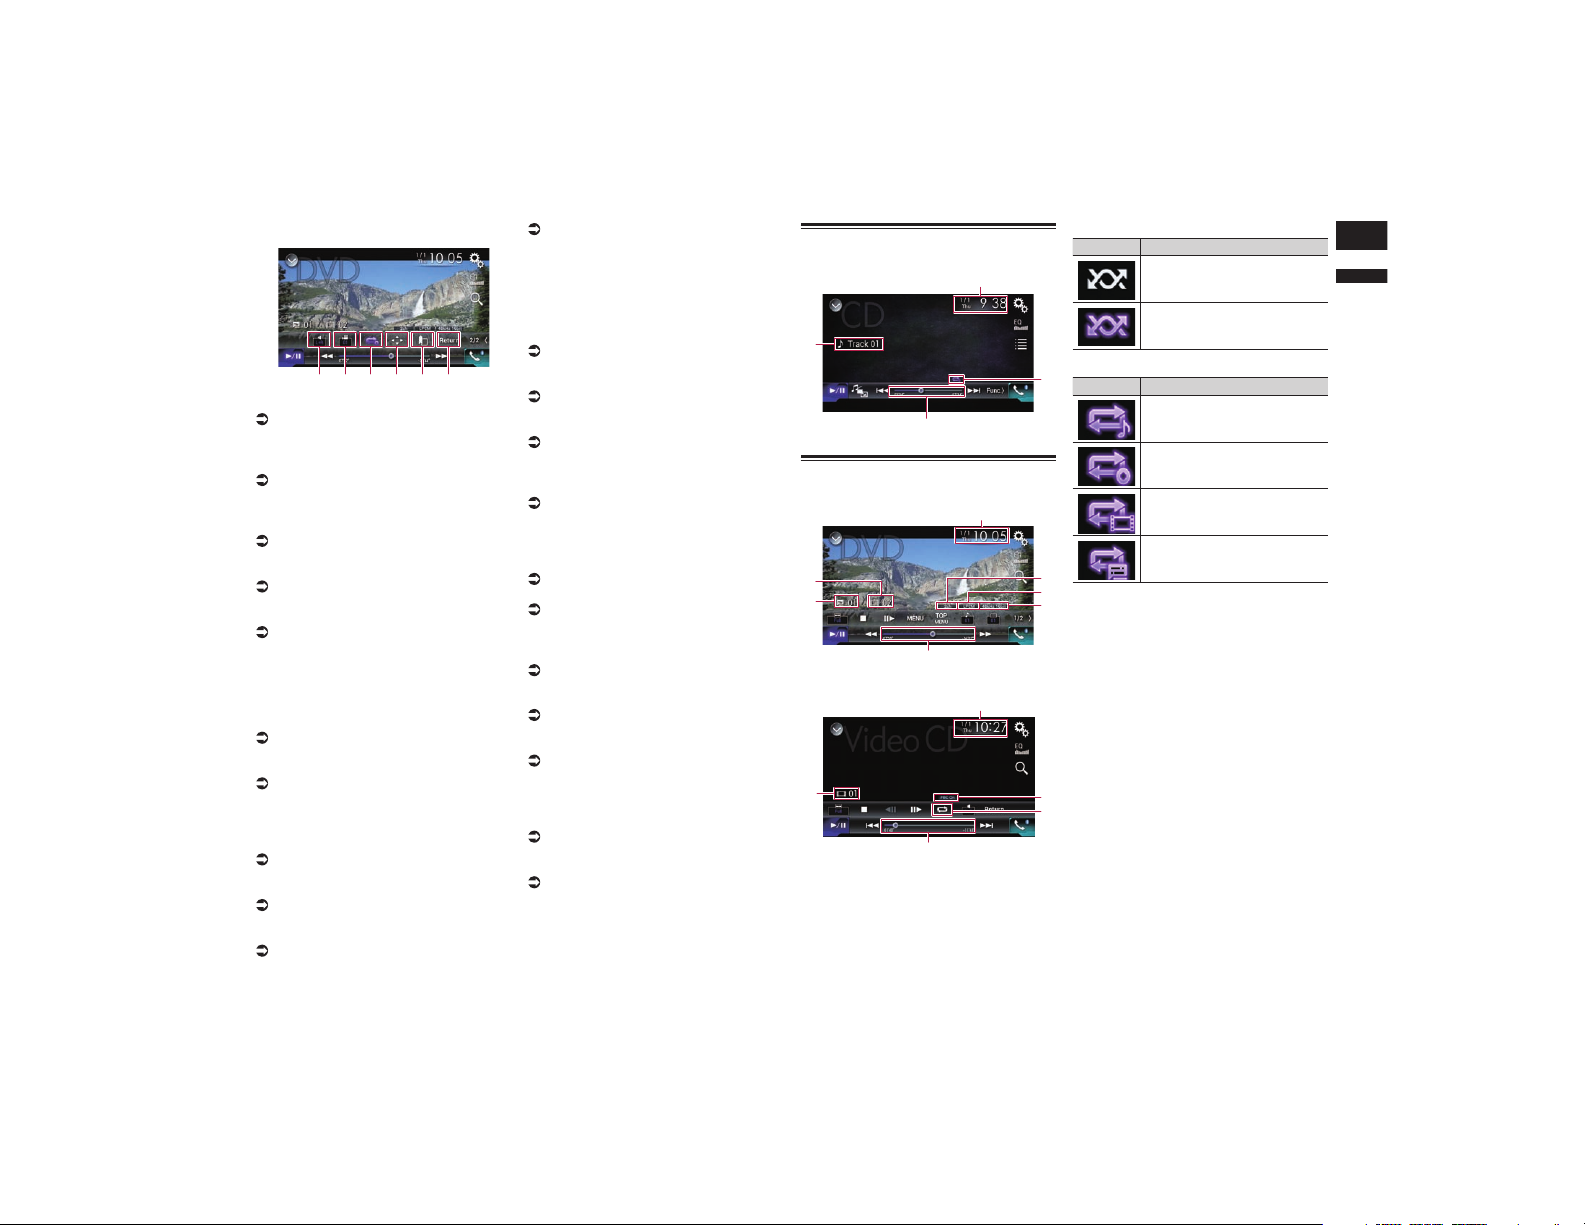
English
07
Chapter
25
En
Playback screen (page 2)
nopeqr
1 Displays the source list.
For details, refer to Selecting a front
source on the source list on page 13.
2 Displays the Time and date setting
screen.
For details, refer to Setting the time and
date on page 70.
3 Displays the Setting menu screen.
4 Recalls equalizer curves.
For details, refer to Using the equalizer on
page 64.
5 Selects a track from the list.
For details, refer to Selecting files from
the file name list on page 26.
6 Displays the Phone menu screen.
For details, refer to Displaying the phone
menu on page 16.
7 Switches to the next or previous
page of touch panel keys.
8 Skips files forward or backward.
9 Changes the playback point by drag-
ging the key.
For details, refer to Operating the time bar
on page 14.
a Switches the media file type.
For details, refer to Switching the media
file type on page 26.
b Switches between playback and
pause.
c Uses “Sound Retriever” function.
For details, refer to Setting the “Sound
Retriever” function on page 71.
d Plays files in random order.
For details, refer to Playing tracks in
random order on page 26.
e Sets a repeat play range.
For details, refer to Setting a repeat play
range on page 26.
f Searches for the part you want to
play.
For details, refer to Searching for the part
you want to play on page 26.
g Hides the touch panel keys.
Touching this area hides the touch panel
keys.
p Touch anywhere on the LCD screen to
display the touch panel keys again.
h Displays the DVD menu.
For details, refer to Operating the DVD
menu on page 26.
i Switches the subtitle language.
For details, refer to Switching the subtitle
language on page 26.
j Switches the audio language.
For details, refer to Switching the audio
language on page 27.
k Stops playback.
l Changes the wide screen mode.
For details, refer to Changing the wide
screen mode on page 71.
m Moves ahead one frame (frame-by-
frame playback) or slows down play-
back speed (slow-motion playback).
For details, refer to Frame-by-frame play-
back on page 27.
For details, refer to Slow motion playback
on page 27.
n Performs an operation (such as
resuming) that is stored on the disc.
For details, refer to Returning to a speci-
fied scene on page 27.
o Resumes playback (Bookmark).
For details, refer to Resuming playback
(Bookmark) on page 27.
p Displays the DVD menu keypad.
For details, refer to Operating the
DVD menu using touch panel keys on
page 27.
q Changes the viewing angle
(Multi-angle).
For details, refer to Switching the
multi-angle DVD display on page 27.
r Selects the audio output.
For details, refer to Selecting the audio
output on page 27.
Reading the screen (for audio)
Example: CD
4
3
1
2
Reading the screen (for video)
Example: DVD
9
8
3
1
7
6
5
Example: Video-CD
3
1
a
4
2
1 Current time and date
2 Playback condition indicator
Indicates the current playback condition.
Playing tracks in random order
Indicator Meaning
Does not play tracks in random
order.
Plays all tracks in the current
disc in random order.
Setting a repeat play range
Indicator Meaning
Repeats just the current track.
Repeats the current disc.
Repeats just the current
chapter.
Repeats just the current title.
3 Play time indicator
Shows the elapsed playing time within
the current file.
4 Track number indicator
Shows the number of the track currently
playing (when available).
5 Audio channel indicator
Shows the current audio channel type,
such as “Mch” (Multi-channel).
6 Digital sound format indicator
Shows which digital sound format (sur-
round sound format) has been selected.
7 Sampling frequency indicator
Shows the sampling frequency currently
playing.
8 Title number indicator
Shows the title number currently playing.
9 Chapter number indicator
Shows the chapter number currently
playing.
a PBC ON indicator
Indicates that a disc with PBC On is
being played.
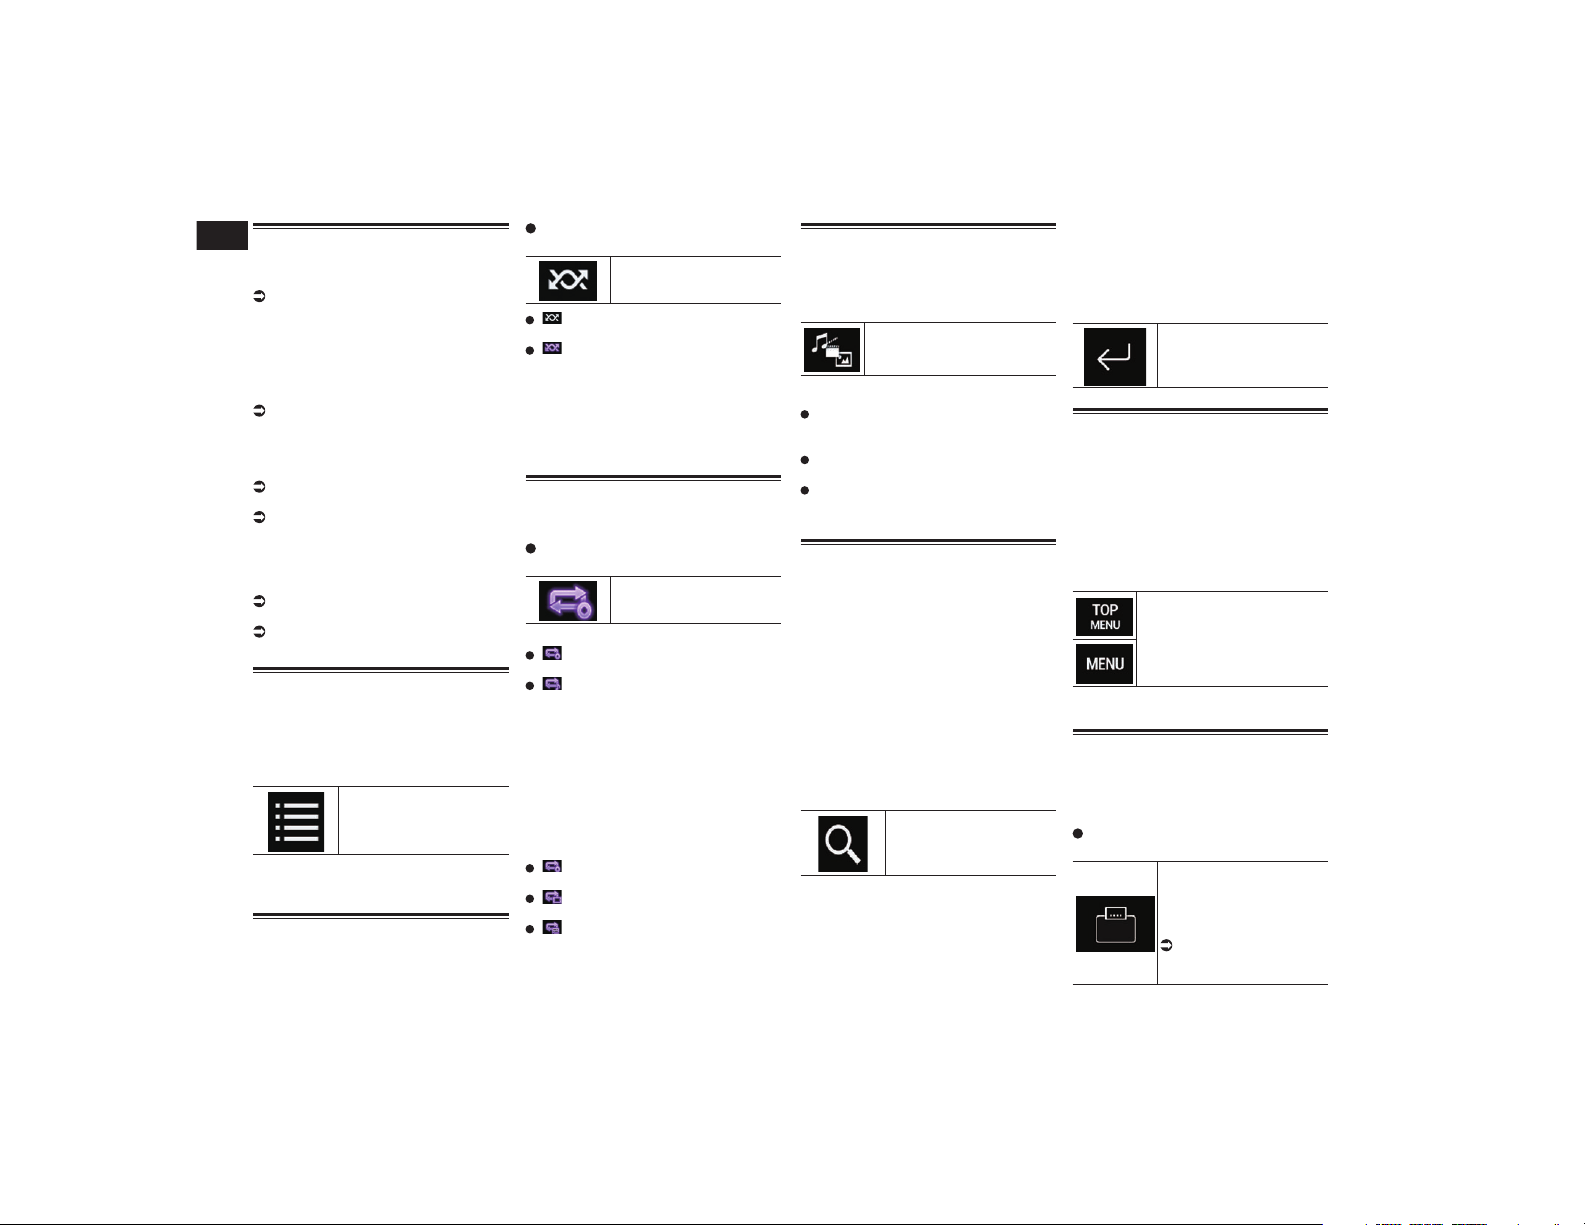
07
Chapter
26
En
Starting procedure
1 Display the AV source selection
screen.
For details of the operations, refer to
Displaying the AV operation screen on
page 12.
2 Insert the disc you want to play
into the disc-loading slot.
The source changes and then playback will
start.
For details, refer to Inserting and ejecting
a disc on page 10.
p If the disc is already set, touch [Disc] on
the source list or on the AV source selec-
tion screen.
For details, refer to Selecting a front
source on the source list on page 13.
For details, refer to Selecting a front
source on the AV source selection screen
on page 13.
3 Use the touch panel keys on the
screen to control the disc.
For details, refer to Using the touch panel
keys (for audio) on page 24.
For details, refer to Using the touch panel
keys (for video) on page 24.
Selecting les from the le
name list
You can select tracks to play back using the
track title list which is a list of the tracks
recorded on a disc.
1 Touch the following key.
Displays a list of the tracks
recorded on the disc.
2 Touch a track on the list to play
back.
Playing tracks in random
order
All tracks on the disc can be played at ran-
dom by only touching a single key.
Touch the following key repeatedly
until the desired setting appears.
Turns random play on or off.
(default):
Does not play tracks in random order.
:
Plays all tracks in the current repeat play
range in random order.
p If you turn random play on when the
repeat play range is set to the current
track, the repeat play range changes
to the whole of the current disc
automatically.
Setting a repeat play range
The repeat play range can be changed by
only touching a single key.
Touch the following key repeatedly
until the desired setting appears.
Changes the repeat play
range.
Audio
(default):
Repeats the current disc.
:
Repeats just the current track.
p If you turn random play on when the
repeat play range is set to the current
track, the repeat play range changes
to the whole of the current disc
automatically.
p If you change the repeat play range from
the whole of the current disc to the cur-
rent track when random play is turned on,
the random play turns off automatically.
Video
(default):
Repeats all files.
:
Repeats just the current chapter.
:
Repeats just the current title.
Switching the media le type
When playing a digital media containing a
mixture of various media file types, you can
switch between media file types to play.
1 Touch the following key.
Displays the pop-up menu for
selecting a media file type to
play on the disc.
2 Touch the item you want to set.
Music:
Switches the media file type to music
(compressed audio).
Video:
Switches the media file type to video.
CD-DA:
Switches the media file type to CD (audio
data (CD-DA)).
Searching for the part you
want to play
You can use the search function to find the
part you want to play.
p For DVD-Videos, you can select Title
(title), Chapter (chapter) or 10Key
(numeric keypad).
p For Video-CDs, you can select Track
(track) or 10Key (numeric keypad).
10Key (numeric keypad) is available
for Video-CDs featuring PBC (playback
control) only.
p Chapter search and time search are not
available when disc playback has been
stopped.
1 Touch the following key.
Displays the screen for
direct number search.
2 Touch [Title] (title), [Chapter]
(chapter), [10Key] (numeric key-
pad), or [Track] (track).
3 Touch [0] to [9] to input the desired
number.
p To cancel an input number, touch [C].
To cancel the input numbers, touch and
hold [C].
4 Touch the following key.
Registers the numbers and
starts playback.
Operating the DVD menu
You can operate the DVD menu by touching
the menu item on the screen directly.
p This function may not work properly with
some DVD disc content. In that case,
use touch panel keys to operate the DVD
menu.
1 Touch the screen to display the
touch panel keys.
2 Touch the following key.
Displays the touch panel keys to
operate the DVD menu.
3 Touch the desired menu item.
Switching the subtitle
language
You can switch the subtitle language while
a disc is playing when the disc has multilin-
gual data (multi-subtitle).
Touch the following key repeatedly
until the desired setting appears.
Changes the subtitle
language.
You can specify the desired
language as the default
subtitle language.
For details, refer to
Setting the top-priority
languages on page 68.
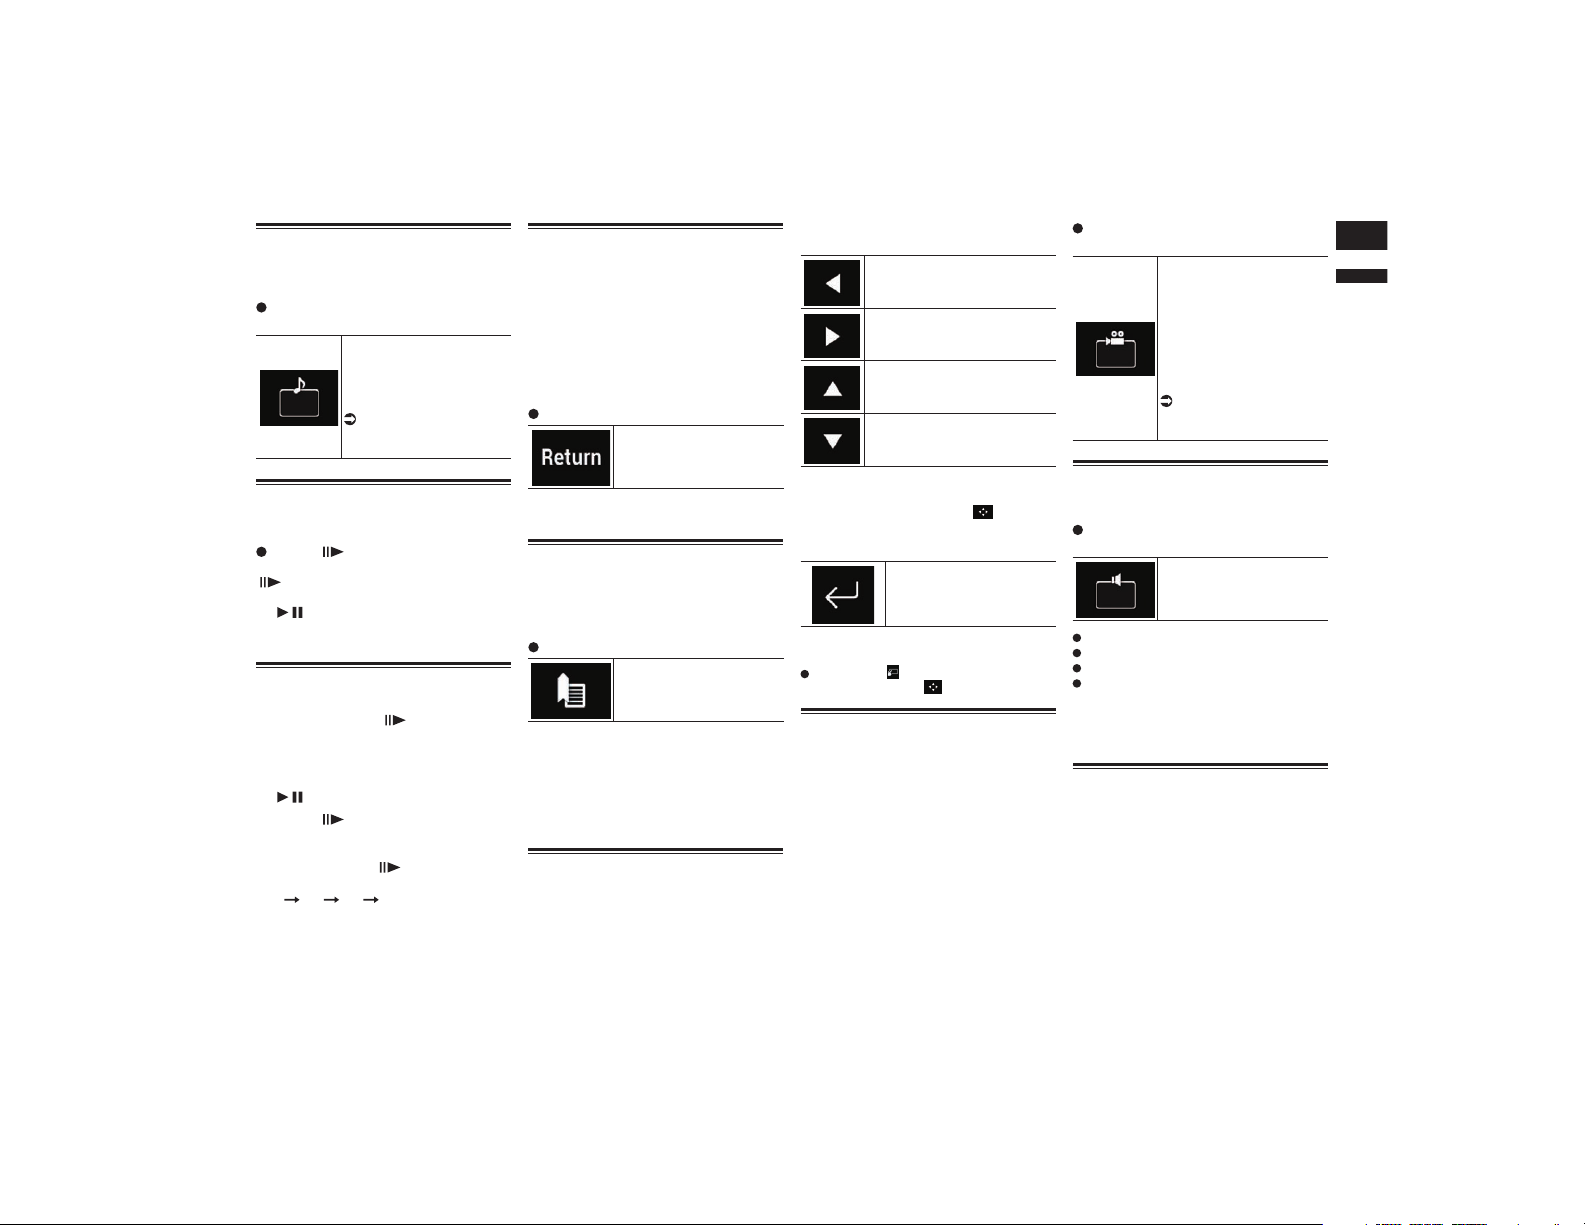
English
07
Chapter
27
En
Switching the audio language
You can switch the audio language while a
disc is playing when the disc has multilin-
gual data (multi-audio).
Touch the following key repeatedly
until the desired setting appears.
Changes the audio
language.
You can specify the desired
language as the default
audio language.
For details, refer to
Setting the top-priority
languages on page 68.
Frame-by-frame playback
This lets you move ahead one frame at a time
during pause.
Touch [ ] during pause.
The video advances one frame each time
[ ] is touched.
p To return to normal playback, touch
[ / ].
p With some discs, images may be unclear
during frame-by-frame playback.
Slow motion playback
This lets you slow down the playback speed.
1 Touch and hold [ ] until an arrow
icon is displayed during playback.
The arrow icon is displayed, and forward
slow motion playback starts.
p To return to normal playback, touch
[ / ].
2 Touch [ ] to adjust playback
speed during slow motion
playback.
Each time you touch [ ], the speed
changes in four steps in the following order:
1/16 1/8 1/4 1/2
p There is no sound during slow motion
playback.
p With some discs, images may be unclear
during slow motion playback.
p Reversed slow motion playback is not
possible.
Returning to a specied scene
When using a disc that has a point recorded
that indicates where to return to, the disc
returns to the specified point and starts
playback from there.
This function cannot be used if a specified
scene has not been preprogrammed on the
disc.
p This function is available for DVD-Video
and Video-CDs featuring PBC (playback
control) only.
Touch the following key.
Returns to the specified
point and starts playback
from there.
p The specified point differs depending on
the disc.
Resuming playback
(Bookmark)
The Bookmark function lets you resume
playback from a selected scene the next time
the disc is loaded.
Touch the following key.
Bookmarks one point for
each of up to five discs.
p If you try to memorize another point for
the same disc, the older bookmark will be
overwritten by the new one.
p To clear the bookmark on a disc, touch
and hold this key.
p The oldest bookmark is replaced by the
new one.
Operating the DVD menu
using touch panel keys
If items on the DVD menu appear, the touch
panel keys may overlay them. If so, select an
item using those touch panel keys.
1 Touch the following keys to select
the desired menu item.
Selects the left menu item.
Selects the right menu item.
Selects the upper menu item.
Selects the lower menu item.
p If the touch panel keys for DVD menu
selection disappear, touch anywhere on
the screen, and then touch . The touch
panel keys are displayed again.
2 Touch the following key.
Confirms the selected item.
p The way to display the menu differs
depending on the disc.
If you touch , the touch panel keys
disappear and the icon is displayed.
Switching the multi-angle
DVD display
With DVDs featuring multi-angle recordings
(scenes shot from multiple angles), you
can switch among viewing angles during
playback.
Touch the following key repeatedly
until the desired setting appears.
Switches between viewing
angles.
During the playback of a
scene shot from multiple
angles, the angle icon is
displayed.
Turn the angle icon display
on or off using the “DVD/
DivX Setup” menu.
For details, refer to
Setting the angle icon
display on page 68.
Selecting the audio output
When playing DVDs recorded with LPCM
audio, you can switch the audio output.
Touch the following key repeatedly
until the desired setting appears.
Changes the audio output
setting.
L+R: Left and right
Left: Left
Right: Right
Mix: Mixing left and right
p This function is not available when disc
playback has been stopped.
p The appearance of this key changes
according to the current setting.
Operating with the hardware
buttons
Press the TRK button.
You can skip tracks or chapters forward or
backward.
Press and hold the TRK button.
You can perform fast reverse or fast forward.

08
Chapter
28
En
Playing compressed
audio les
You can play compressed audio files stored
in a disc or an external storage device (USB,
SD) using the built-in drive of this product.
This section describes how.
For details, refer to Media compatibility
chart on page 88.
Using the touch panel keys
Example: USB
Playback screen (page 1)
1 2 43
9
5
6
7
8
d c a b a
Playback screen (page 2)
9
e
f
g
hij
1 Displays the source list.
For details, refer to Selecting a front
source on the source list on page 13.
2 Displays the MIXTRAX screen.
For details, refer to Chapter 22.
3 Displays the Time and date setting
screen.
For details, refer to Setting the time and
date on page 70.
4 Displays the Setting menu screen.
5 Recalls equalizer curves.
For details, refer to Using the equalizer on
page 64.
6 Selects a file from the list.
For details, refer to Selecting files from
the file name list on page 29.
Displays a list related to the song
currently playing (link search).
For details, refer to Selecting a file from
the list related to the song currently
playing (link search) on page 29.
7 Switches the text display between
tag information and file/folder
information.
For details, refer to Reading the screen on
page 28.
For details, refer to Switching the browse
mode on page 29.
8 Displays the Phone menu screen.
For details, refer to Displaying the phone
menu on page 16.
9 Switches to the next or previous
page of touch panel keys.
a Skips files forward or backward.
b Changes the playback point by drag-
ging the key.
For details, refer to Operating the time bar
on page 14.
c Switches the media file type.
For details, refer to Switching the media
file type on page 30.
d Switches between playback and
pause.
e Displays the album list.
p This function is available only when
playing files in an external storage device
(USB, SD) in the Music Browse mode.
f Uses “Sound Retriever” function.
For details, refer to Setting the “Sound
Retriever” function on page 71.
g Plays files in random order.
For details, refer to Playing files in ran-
dom order on page 29.
h Sets a repeat play range.
For details, refer to Setting a repeat play
range on page 29.
i Selects the previous folder or the next
folder.
j Displays the category list including
the selected item.
p This function is available only when
playing files in an external storage device
(USB, SD) in the Music Browse mode.
Reading the screen
Example: USB
5
2
4
3
1
1 Current file information
Music Browse mode
Song title/File name
Shows the title of the song currently play-
ing (when available). If the title of a song
is not available, the file name appears.
: Artist name
Shows the artist name for the song
currently playing (when available). “No
Name” is displayed if there is no corre-
sponding information.
: Album title/Folder name
Shows the title of the album of the cur-
rent file (when available). If the title of the
album is not available, the folder name
appears.
: Genre
Shows the genre of the current file (when
available). “No Genre” is displayed if
there is no corresponding information.
p Nothing is displayed if the song currently
playing is in a format which does not
support these functions.
Folder Browse mode
: File name
Shows the name of the file currently
playing.
: Folder name
Shows the name of the folder containing
the file currently playing.
2 Current time and date
3 Album artwork
Album art of the current song is displayed
if it is available.
4 Playback condition indicator
Indicates the current playback condition.
Playing files in random order
Indicator Meaning
Does not play files in random
order.
Plays all files within the repeat
range in random order.
Setting a repeat play range (for Disc)
Indicator Meaning
Repeats just the current file.
Repeats just the current folder.
Repeats all compressed audio
files.
Setting a repeat play range (for Music
Browse mode)
Indicator Meaning
Repeats just the current file.
Repeats all compressed audio
files.
Setting a repeat play range (for Folder
Browse mode)
Indicator Meaning
Repeats just the current file.
Repeats just the current folder.
Repeats all compressed audio
files.
5 Play time indicator
Shows the elapsed playing time within
the current file.
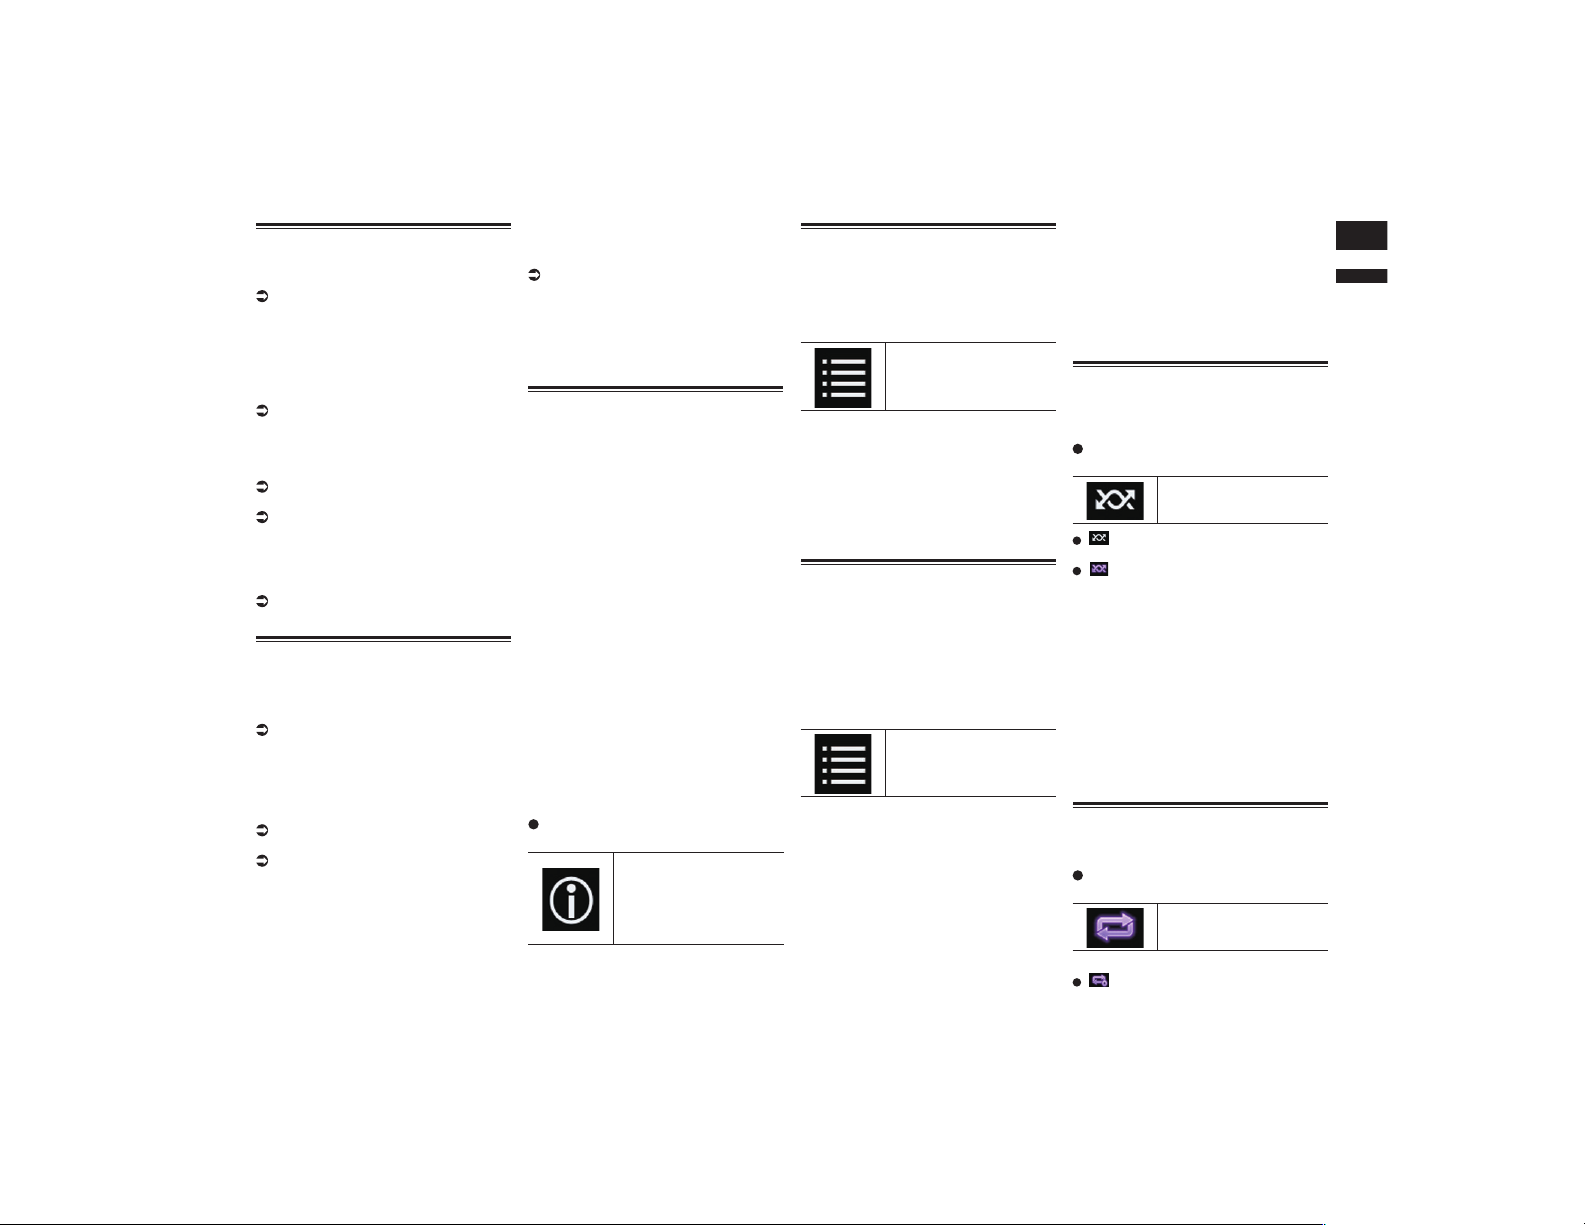
English
08
Chapter
29
En
Starting procedure (for Disc)
1 Display the AV source selection
screen.
For details of the operations, refer to
Displaying the AV operation screen on
page 12.
2 Insert the disc you want to play
into the disc-loading slot.
The source changes and then playback will
start.
For details, refer to Inserting and ejecting
a disc on page 10.
p If the disc is already set, touch [Disc] on
the source list or on the AV source selec-
tion screen.
For details, refer to Selecting a front
source on the source list on page 13.
For details, refer to Selecting a front
source on the AV source selection screen
on page 13.
3 Use the touch panel keys on the
screen to control the disc.
For details, refer to Using the touch panel
keys on page 28.
Starting procedure (for USB/
SD)
1 Display the AV source selection
screen.
For details of the operations, refer to
Displaying the AV operation screen on
page 12.
2 Insert the SD memory card into the
SD card slot or plug the USB stor-
age device into the USB connector.
For details, refer to Plugging in a USB
storage device on page 11.
For details, refer to Inserting and ejecting
an SD memory card on page 10.
3 Touch [USB] or [SD] on the AV
source selection screen.
The source changes and then playback will
start.
4 Use the touch panel keys on the
screen to control the external stor-
age device (USB, SD).
For details, refer to Using the touch panel
keys on page 28.
p Playback is performed in order of folder
numbers. Folders are skipped if they
contain no playable files. If there are no
playable files in folder 01 (root folder),
playback starts from folder 02.
Switching the browse mode
This product supports two types of browse
modes: Folder Browse mode and Music
Browse mode.
p The browse modes are available only for
the external storage device (USB, SD).
Music Browse mode
Displays a song title, artist name, album title
and genre in the current file information dis-
play area on the AV operation screen. Select
when you want to play music files narrowed
down by a category of song title, artist name,
album title or genre.
If connecting an external storage device
(USB, SD), this product accesses the data-
base of music files with tag information
and switches to the Music Browse mode
automatically.
Folder Browse mode
Displays a folder name and file name in the
current file information display area on the
AV operation screen. Select when you want
to search for folders or music files on the
list screen.
p You can switch between the browse
modes for file search by touching the tabs
and selecting a file on the list screen.
Touch the following key repeatedly
until the desired setting appears.
Switches the display infor-
mation between the tag
information (title, artist
name, album title etc.)
and the file/folder name
information.
Selecting les from the le
name list
You can find files to play back using the list
of the files and folders stored on a disc or in
an external storage device (USB, SD).
1 Touch the following key.
Displays the list of the files
or folders stored on a disc
or in the external storage
device (USB, SD).
p Touch the “File” tab to display the file/
folder list for an external storage device
(USB, SD).
2 Touch a file on the list to play back.
p Files are played back in file number order.
p Touching a folder on the list shows its
contents. You can play a file on the list by
touching it.
Selecting a le from the list
related to the song currently
playing (link search)
You can select files to play back using the
category list for the files in an external
storage device (USB, SD).
p This function is available for the external
storage device (USB, SD) only.
1 Touch the following key.
Displays the list of the files
or folders stored in the
external storage device
(USB, SD).
p If the “File” list is displayed, touch the
“Tag” tab to display the category list.
2 Touch the desired category to
display the file list.
The list screen appears.
3 Touch the item that you want to
refine.
Refine the item until the desired song title or
file name is displayed on the list.
p Touching [All] on the list includes all
options in the current list. For example, if
you touch [All] after touching [Artists],
you can proceed to the next screen with
all artists in the list selected.
p After you select “Artists”, “Albums” or
“Genres”, touch one of the lists to start
playing the first song in the selected list
or display the next options.
4 Touch the desired song title or file
name to play back.
Playing les in random order
All files on the disc or in the external storage
device (USB, SD) can be played at random
by only touching a single key.
Touch the following key repeatedly
until the desired setting appears.
Turns random play on or off.
(default):
Does not play files in random order.
:
Plays all audio files in the current repeat
play range in random order.
p If you turn random play on when the
repeat play range is set to the current file
in the Music Browse mode, the repeat
play range changes to the current folder
in the current disc or external storage
device (USB, SD) automatically.
p If you turn random play on when the
repeat play range is set to the current file
in the Folder Browse mode, the repeat
play range changes to the whole of the
current disc or external storage device
(USB, SD) automatically.
Setting a repeat play range
The repeat play range can be changed by
only touching a single key.
Touch the following key repeatedly
until the desired setting appears.
Changes the repeat play
range.
Disc
(default):
Repeats all compressed audio files.

09
Chapter
30
En
:
Repeats just the current folder.
:
Repeats just the current file.
Music Browse mode
(default):
Repeats all files.
:
Repeats just the current file.
Folder Browse mode
(default):
Repeats all files.
:
Repeats the current folder.
:
Repeats just the current file.
Switching the media le type
When playing a digital media containing a
mixture of various media file types, you can
switch between media file types to play.
1 Touch the following key.
Displays the pop-up menu for
selecting a media file type to
play on the disc or in the exter-
nal storage device (USB, SD).
2 Touch the item you want to set.
Music:
Switches the media file type to music
(compressed audio).
Video:
Switches the media file type to video.
CD-DA:
Switches the media file type to CD (audio
data (CD-DA)).
Photo:
Switches the media file type to still image
(JPEG data).
Operating with the hardware
buttons
Press the TRK button.
You can skip files forward or backward.
Press and hold the TRK button.
You can perform fast reverse or fast forward.
Playing compressed
video les
You can play compressed video files stored
on a disc or in an external storage device
(USB, SD) using the built-in drive of this
product. This section describes how.
For details, refer to Media compatibility
chart on page 88.
CAUTION
For safety reasons, video images cannot be
viewed while your vehicle is in motion. To
view video images, you must stop in a safe
place and apply the parking brake.
Using the touch panel keys
Example: Disc
1 32
4
5
9
ce
f
g
h
a bd a
6
7
8
1 Displays the source list.
For details, refer to Selecting a front
source on the source list on page 13.
2 Displays the Time and date setting
screen.
For details, refer to Setting the time and
date on page 70.
3 Displays the Setting menu screen.
4 Recalls equalizer curves.
For details, refer to Using the equalizer on
page 64.
5 Selects a file from the list.
For details, refer to Selecting files from
the file name list on page 31.
6 Hides the touch panel keys.
Touching this area hides the touch panel
keys.
p Touch anywhere on the LCD screen to
display the touch panel keys again.
7 Sets a repeat play range.
For details, refer to Setting a repeat play
range on page 31.
8 Switches the subtitle language.
With DivX featuring multi-subtitle record-
ings, you can switch between subtitle
languages during playback.
9 Displays the Phone menu screen.
For details, refer to Displaying the phone
menu on page 16.
a Skips files forward or backward.
b Switches the audio language.
With DivX files that provide audio play-
back in different languages and different
audio systems (Dolby Digital, DTS, etc.),
you can switch between languages or
audio systems during playback.
c Changes the playback point by drag-
ging the key.
For details, refer to Operating the time bar
on page 14.
d Moves ahead one frame (frame-by-
frame playback) or slows down play-
back speed (slow-motion playback).
For details, refer to Frame-by-frame play-
back on page 31.
For details, refer to Slow motion playback
on page 31.
e Switches the media file type.
For details, refer to Switching the media
file type on page 31.
f Switches between playback and
pause.
g Changes the wide screen mode.
For details, refer to Changing the wide
screen mode on page 71.
h Stops playback.
Reading the screen
Example: Disc
3
2
1
1 Current time and date
2 Play time indicator
Shows the elapsed playing time within
the current file.
3 Current file information
: File name
Shows the name of the file currently
playing.
: Folder name
Shows the name of the folder containing
the file currently playing.
Starting procedure (for Disc)
1 Display the AV source selection
screen.
For details of the operations, refer to
Displaying the AV operation screen on
page 12.
2 Insert the disc you want to play
into the disc-loading slot.
The source changes and then playback will
start.
For details, refer to Inserting and ejecting
a disc on page 10.
p If the disc is already set, touch [Disc] on
the source list or on the AV source selec-
tion screen.
For details, refer to Selecting a front
source on the source list on page 13.
For details, refer to Selecting a front
source on the AV source selection screen
on page 13.
3 Use the touch panel keys on the
screen to control the disc.
For details, refer to Using the touch panel
keys on page 30.
Starting procedure (for USB/
SD)
1 Display the AV source selection
screen.
For details of the operations, refer to
Displaying the AV operation screen on
page 12.
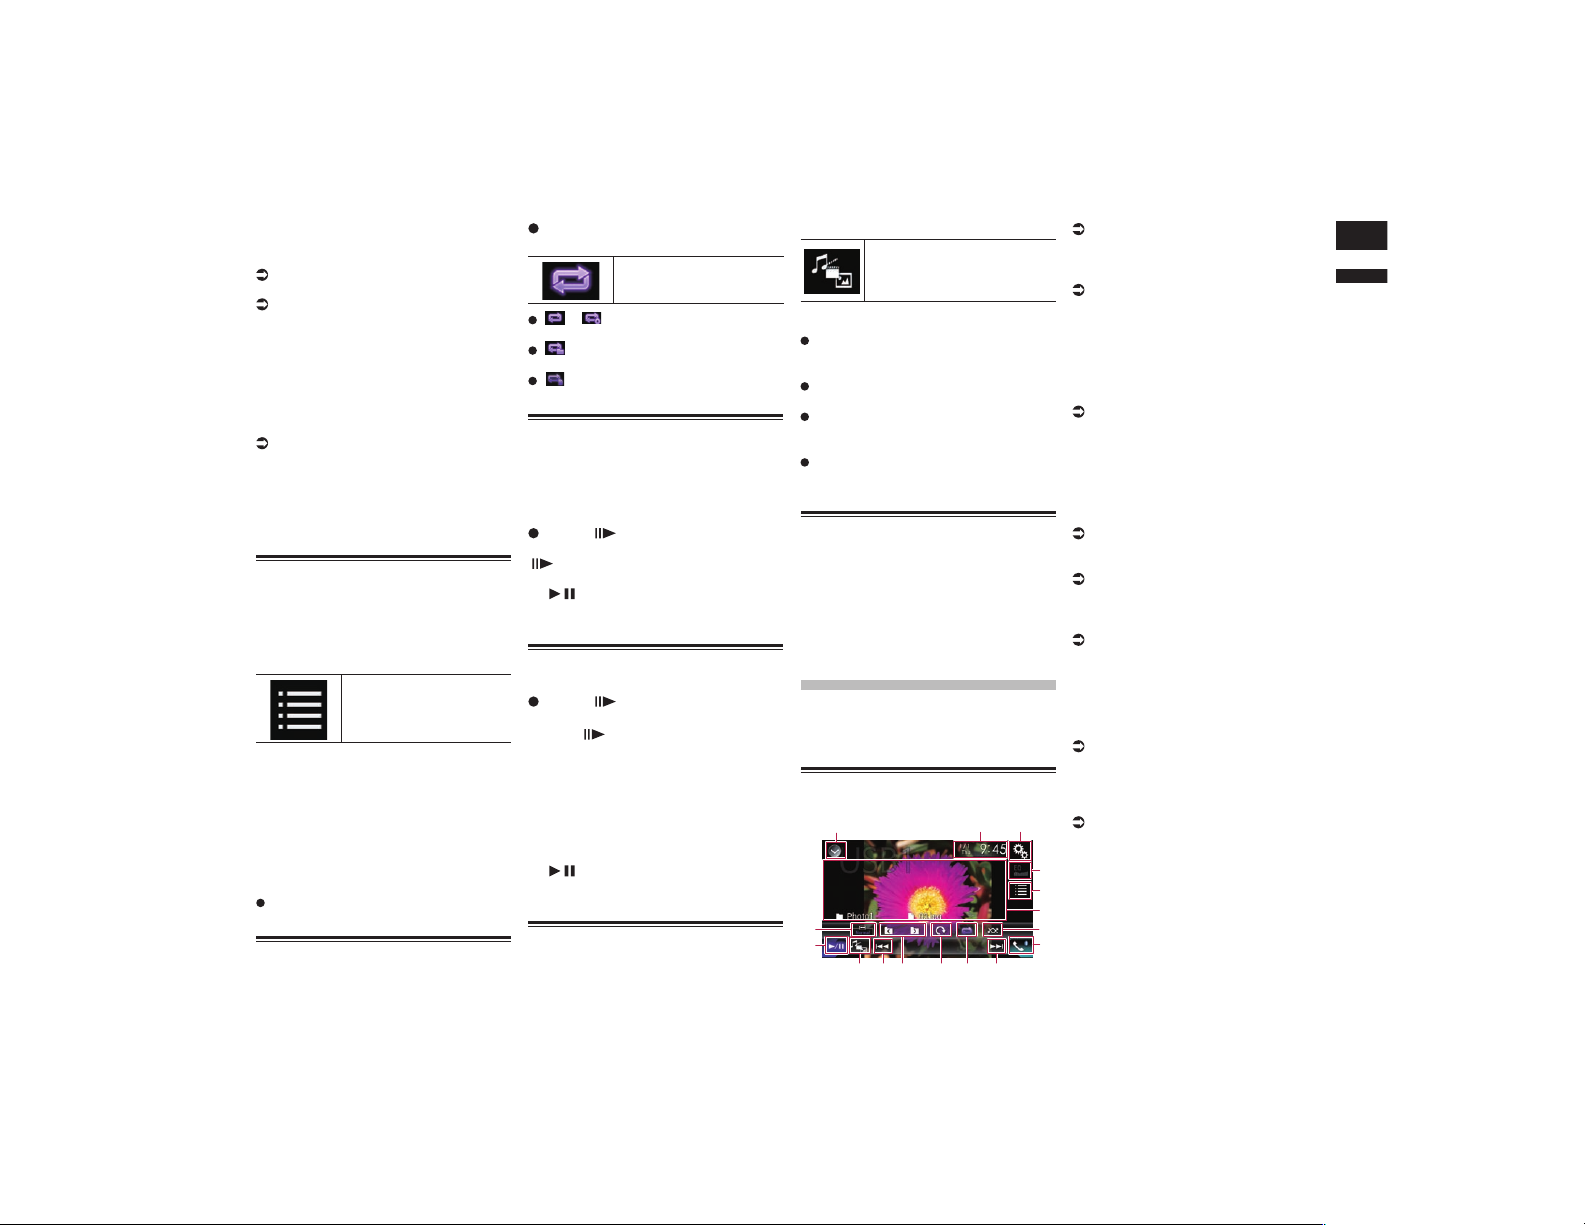
English
10
Chapter
31
En
2 Insert the SD memory card into the
SD card slot or plug the USB stor-
age device into the USB connector.
For details, refer to Plugging in a USB
storage device on page 11.
For details, refer to Inserting and ejecting
an SD memory card on page 10.
3 Touch [USB] or [SD] on the AV
source selection screen.
The image is displayed on the screen.
4 Use the touch panel keys on the
screen to control the external stor-
age device (USB, SD).
For details, refer to Using the touch panel
keys on page 30.
p Playback is performed in order of folder
numbers. Folders are skipped if they
contain no playable files. If there are no
playable files in folder 01 (root folder),
playback starts from folder 02.
Selecting les from the le
name list
You can select files to view using the file
name list of the files stored on a disc or in
the external storage device (USB, SD).
1 Touch the following key.
Displays the list of the files
or folders stored on a disc
or in the external storage
device (USB, SD).
2 Touch a file on the list to play back.
p Files are played back in file number order
and folders are skipped if they contain no
files. (If folder 01 (root folder) contains no
files, playback commences with folder
02.)
p Touching a folder on the list shows its
contents. You can play a file on the list by
touching it.
Touch the playback sign of the thumbnail
to preview the file.
Setting a repeat play range
The repeat play range can be changed by
only touching a single key.
Touch the following key repeatedly
until the desired setting appears.
Changes the repeat play
range.
or (default):
Repeats all files.
:
Repeats just the current folder.
:
Repeats just the current file.
Frame-by-frame playback
This lets you move ahead one frame at a time
during pause.
p This function is available while a com-
pressed video file stored on a disc is
being played.
Touch [ ] during pause.
The video advances one frame each time
[ ] is touched.
p To return to normal playback, touch
[ / ].
p With some discs, images may be unclear
during frame-by-frame playback.
Slow motion playback
This lets you slow down the playback speed.
Touch [ ] (external storage
device (USB, SD)) or touch and
hold [ ] (disc) during playback.
The arrow icon is displayed, and forward
slow motion playback starts.
p There is no sound during slow motion
playback.
p With some discs and external storage
devices (USB, SD), images may be
unclear during slow motion playback.
p To return to normal playback, touch
[ / ].
p Reversed slow motion playback is not
possible.
Switching the media le type
When playing a digital media containing a
mixture of various media file types, you can
switch between media file types to play.
1 Touch the following key.
Displays the pop-up menu for
selecting a media file type to
play on the disc or in the exter-
nal storage device (USB, SD).
2 Touch the item you want to set.
Music:
Switches the media file type to music
(compressed audio).
Video:
Switches the media file type to video.
Photo:
Switches the media file type to still image
(JPEG data).
CD-DA:
Switches the media file type to CD (audio
data (CD-DA)).
Operating with the hardware
buttons
Press the TRK button.
You can skip files forward or backward.
Press and hold the TRK button.
You can perform fast reverse or fast forward.
Playing compressed
still image les
You can view still images (JPEG images)
stored in an external storage device (USB,
SD) using the built-in drive of this product.
This section describes how.
Using the touch panel keys
Example: USB
1 32
4
5
8
abcd
e
f
9 9
6
7
1 Displays the source list.
For details, refer to Selecting a front
source on the source list on page 13.
2 Displays the Time and date setting
screen.
For details, refer to Setting the time and
date on page 70.
3 Displays the Setting menu screen.
4 Recalls equalizer curves.
p This key is not available while you are
viewing still images stored in an external
storage device (USB, SD).
5 Selects a file from the list.
For details, refer to Selecting files from
the file name list on page 32.
6 Hides the touch panel keys.
Touching this area hides the touch panel
keys.
p Touch anywhere on the LCD screen to
display the touch panel keys again.
7 Plays files in random order.
For details, refer to Playing files in ran-
dom order on page 32.
8 Displays the Phone menu screen.
For details, refer to Displaying the phone
menu on page 16.
9 Skips files forward or backward.
a Sets a repeat play range.
For details, refer to Setting a repeat play
range on page 32.
b Rotates the displayed picture 90°
clockwise.
c Selects the previous folder or the next
folder.
d Switches the media file type.
For details, refer to Switching the media
file type on page 32.
e Switches between playback and
pause.
f Changes the wide screen mode.
For details, refer to Changing the wide
screen mode on page 71.

11
Chapter
32
En
Reading the screen
Example: USB
2
1
1 Current time and date
2 Current file information
: File name
Shows the name of the file currently
playing.
: Folder name
Shows the name of the folder containing
the file currently playing.
Starting procedure
1 Display the AV source selection
screen.
For details of the operations, refer to
Displaying the AV operation screen on
page 12.
2 Insert the SD memory card into the
SD card slot or plug the USB stor-
age device into the USB connector.
For details, refer to Plugging in a USB
storage device on page 11.
For details, refer to Inserting and ejecting
an SD memory card on page 10.
3 Touch [USB] or [SD] on the AV
source selection screen.
The image is displayed on the screen.
4 Use the touch panel keys on the
screen to control the external stor-
age device (USB, SD).
For details, refer to Using the touch panel
keys on page 31.
p Playback is performed in order of folder
numbers. Folders are skipped if they
contain no playable files. If there are no
playable files in folder 01 (root folder),
playback starts from folder 02.
Selecting les from the le
name list
You can select files to view using the file
name list of the files stored in the external
storage device (USB, SD).
1 Touch the following key.
Displays the list of the files
stored in the external stor-
age device (USB, SD).
2 Touch a file on the list to play back.
p Files are played back in file number order
and folders are skipped if they contain no
files. (If folder 01 (root folder) contains no
files, playback commences with folder
02.)
p Touching a folder on the list shows its
contents. You can play a file on the list by
touching it.
Playing les in random order
All files in the external storage device (USB,
SD) can be played at random by only touch-
ing a single key.
Touch the following key repeatedly
until the desired setting appears.
Turns random play on or off.
(default):
Does not play files in random order.
:
Plays all files in the current repeat play
range in random order.
Setting a repeat play range
The repeat play range can be changed by
only touching a single key.
Touch the following key repeatedly
until the desired setting appears.
Changes the repeat play
range.
(default):
Repeats all files.
:
Repeats the current folder.
Switching the media le type
When playing a digital media containing a
mixture of various media file types, you can
switch between media file types to play.
1 Touch the following key.
Displays the pop-up menu for
selecting a media file type to
play in the external storage
device (USB, SD).
2 Touch the item you want to set.
Music:
Switches the media file type to music
(compressed audio).
Video:
Switches the media file type to video.
Photo:
Switches the media file type to still image
(JPEG data).
Setting the slideshow interval
JPEG files can be viewed as a slideshow
on this product. In this setting, the interval
between each image can be set.
p This setting is available during playback
of the JPEG files.
1 Press the HOME button to display
the Top menu screen.
2 Touch the following keys in the
following order.
The “Video Setup” screen appears.
3 Touch [Time Per Photo Slide].
The pop-up menu appears.
4 Touch the item you want to set.
10sec (default):
JPEG images switch at intervals of 10
seconds.
5sec:
JPEG images switch at intervals of 5
seconds.
15sec:
JPEG images switch at intervals of 15
seconds.
Manual:
JPEG images can be switched manually.
Operating with the hardware
buttons
Press the TRK button.
You can skip files forward or backward.
Press and hold the TRK button.
You can search 10 JPEG files at a time.
p If the number of files in the folder (from
the file currently being played to the first
or last file) is fewer than 10, the first or
last file in the folder is automatically
played.
p If the file currently being played is the first
or last file in the folder, the search is not
performed.
Using an iPod
For iPod with a 30-pin connector users
p Depending on your iPod, there may not
be any output unless you use a USB inter-
face cable for iPod / iPhone (CD-IU201S/
CD-IU201V) (sold separately). Be sure
to use a USB interface cable for iPod /
iPhone (CD-IU201S/CD-IU201V) (sold
separately) to connect your iPod.
iPod audio and/or video sources
are enabled if either of the cables is
connected.
For details, refer to Connecting an iPhone
with 30-pin connector on page 76.
For iPod / iPhone with a Lightning con-
nector users
p To use iPod audio source, you must
connect your iPod to this product using
a USB interface cable for iPod / iPhone
(CD-IU52) (sold separately).
However, functions related to iPod video
files and AppRadio Mode are not
available.
p iPod audio and/or video sources are not
available when an iPod with a Lightning
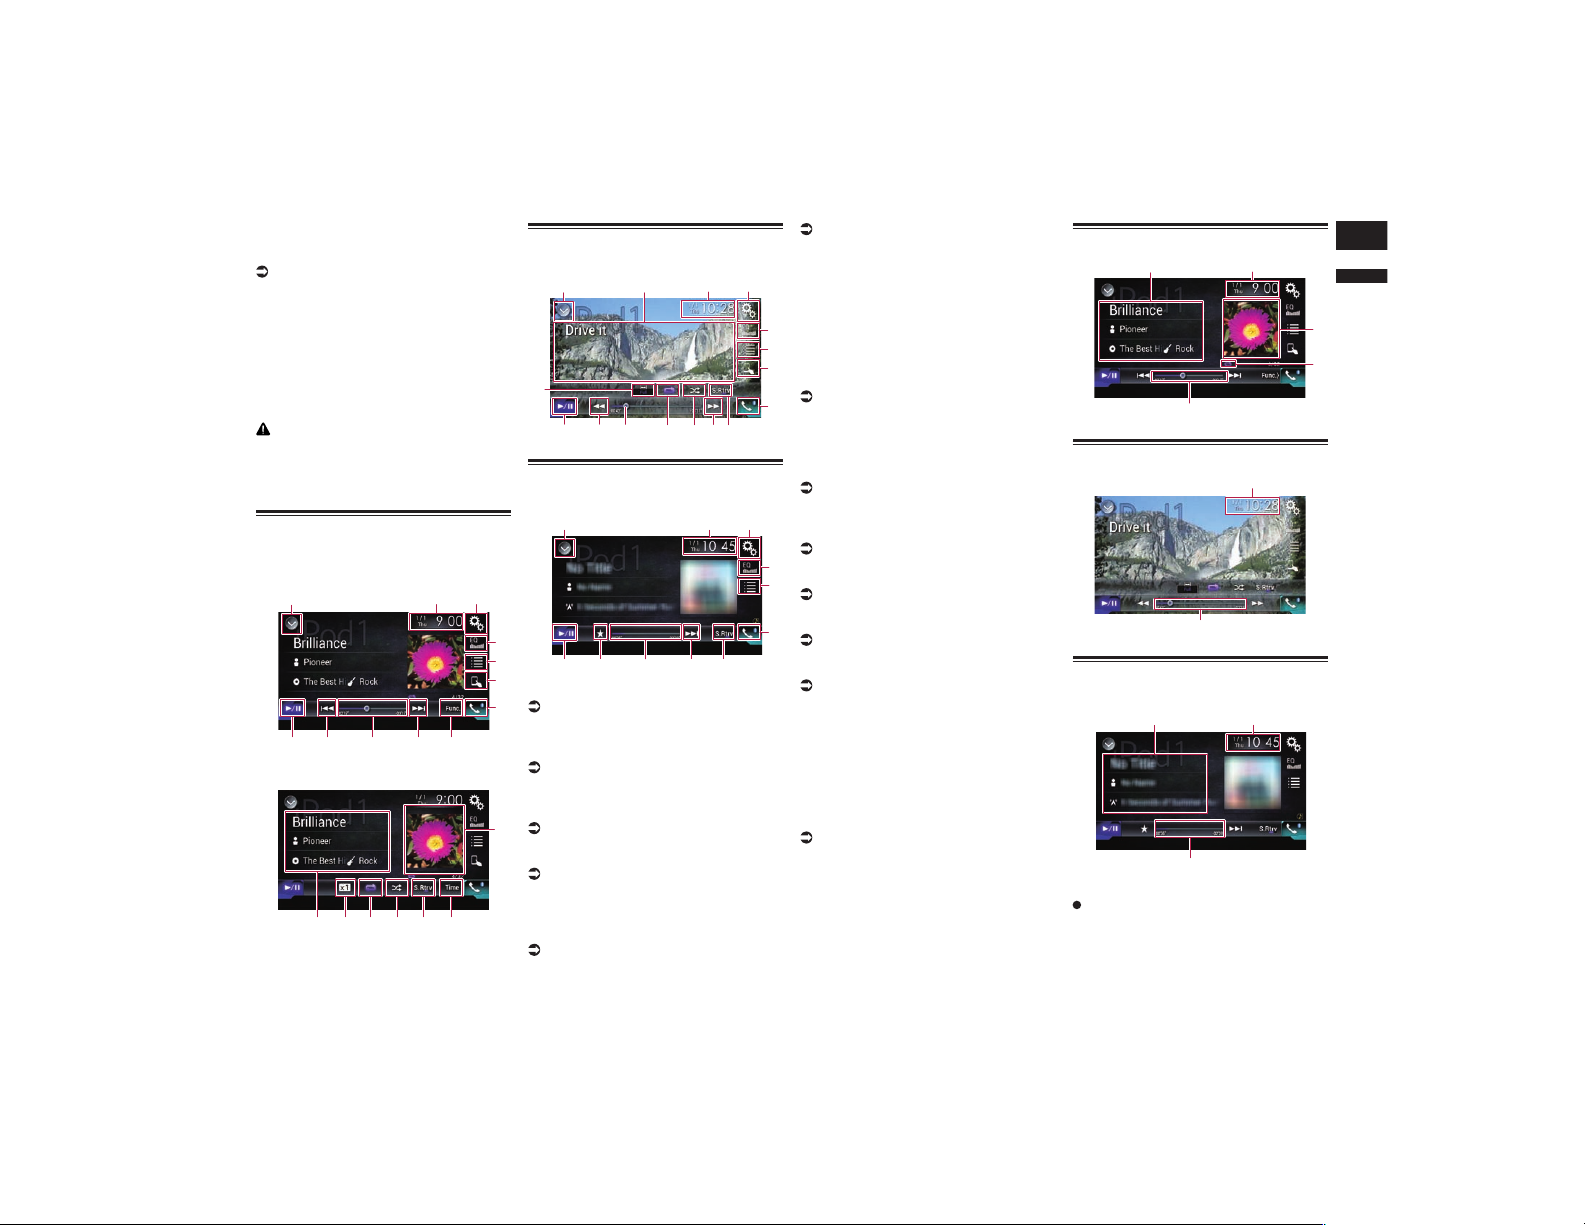
English
11
Chapter
33
En
connector is connected to this product
with a interface cable (CD-IH202) (sold
separately).
For details, refer to Connecting an iPhone
with Lightning connector on page 76.
When you want to play audio and/or video
files on your iPod with a Lightning con-
nector, first install CarMediaPlayer on
your iPod with a Lightning connector and
then launch CarMediaPlayer while in
AppRadio Mode.
For details about the CarMediaPlayer,
refer to the information on our website.
CAUTION
For safety reasons, video images cannot be
viewed while your vehicle is in motion. To
view video images, you must stop in a safe
place and apply the parking brake.
Using the touch panel keys
(for audio)
Playback screen (page 1)
1 32
8
4
5
6
7
b 9 a 9
Playback screen (page 2)
8defg
c
h
Using the touch panel keys
(for video)
1 32
4
5
6
7
b
9 a
9
j
d
ef
i
Using the touch panel keys
(for iTunes Radio)
a 9
1 3
2
4
5
7
dkb
1 Displays the source list.
For details, refer to Selecting a front
source on the source list on page 13.
2 Displays the Time and date setting
screen.
For details, refer to Setting the time and
date on page 70.
3 Displays the Setting menu screen.
4 Recalls equalizer curves.
For details, refer to Using the equalizer on
page 64.
5 Selects a track from the list.
For details, refer to Selecting song or
video sources from the playlist screen on
page 34.
6 Switches the control mode to “App
Mode”.
For details, refer to Using this prod-
uct’s iPod function from your iPod on
page 35.
7 Displays the Phone menu screen.
For details, refer to Displaying the phone
menu on page 16.
8 Switches to the next or previous
page of touch panel keys.
9 Skips files forward or backward.
p Availability of the skip-forward function
while playing iTunes Radio depends on
the iPod.
p The skip-back key is not available while
playing iTunes Radio.
a Changes the playback point.
For details, refer to Operating the time bar
on page 14.
b Switches between playback and
pause.
c Displays the song list of the album
currently playing.
For details, refer to Displaying lists related
to the song currently playing (link search)
on page 36.
d Uses “Sound Retriever” function.
For details, refer to Setting the “Sound
Retriever” function on page 71.
e Plays files in random order.
For details, refer to Setting the shuffle
play on page 34.
f Sets a repeat play range.
For details, refer to Setting a repeat play
range on page 34.
g Changes the audiobook speed.
For details, refer to Changing the speed of
audiobook playback on page 35.
h Displays the category list including
the selected item.
i Hides the touch panel keys.
Touching this area hides the touch panel
keys.
p Touch anywhere on the LCD screen to
display the touch panel keys again.
j Changes the wide screen mode.
For details, refer to Changing the wide
screen mode on page 71.
k Displays the pop-up menu for iTunes
Radio.
Reading the screen (for audio)
5
2
4
3
1
Reading the screen (for video)
5
2
Reading the screen (for iTunes
Radio)
2
5
1
1 Current track information
Song title
Shows the title of the song currently
being played (when available). “No Title”
is displayed if there is no corresponding
information.
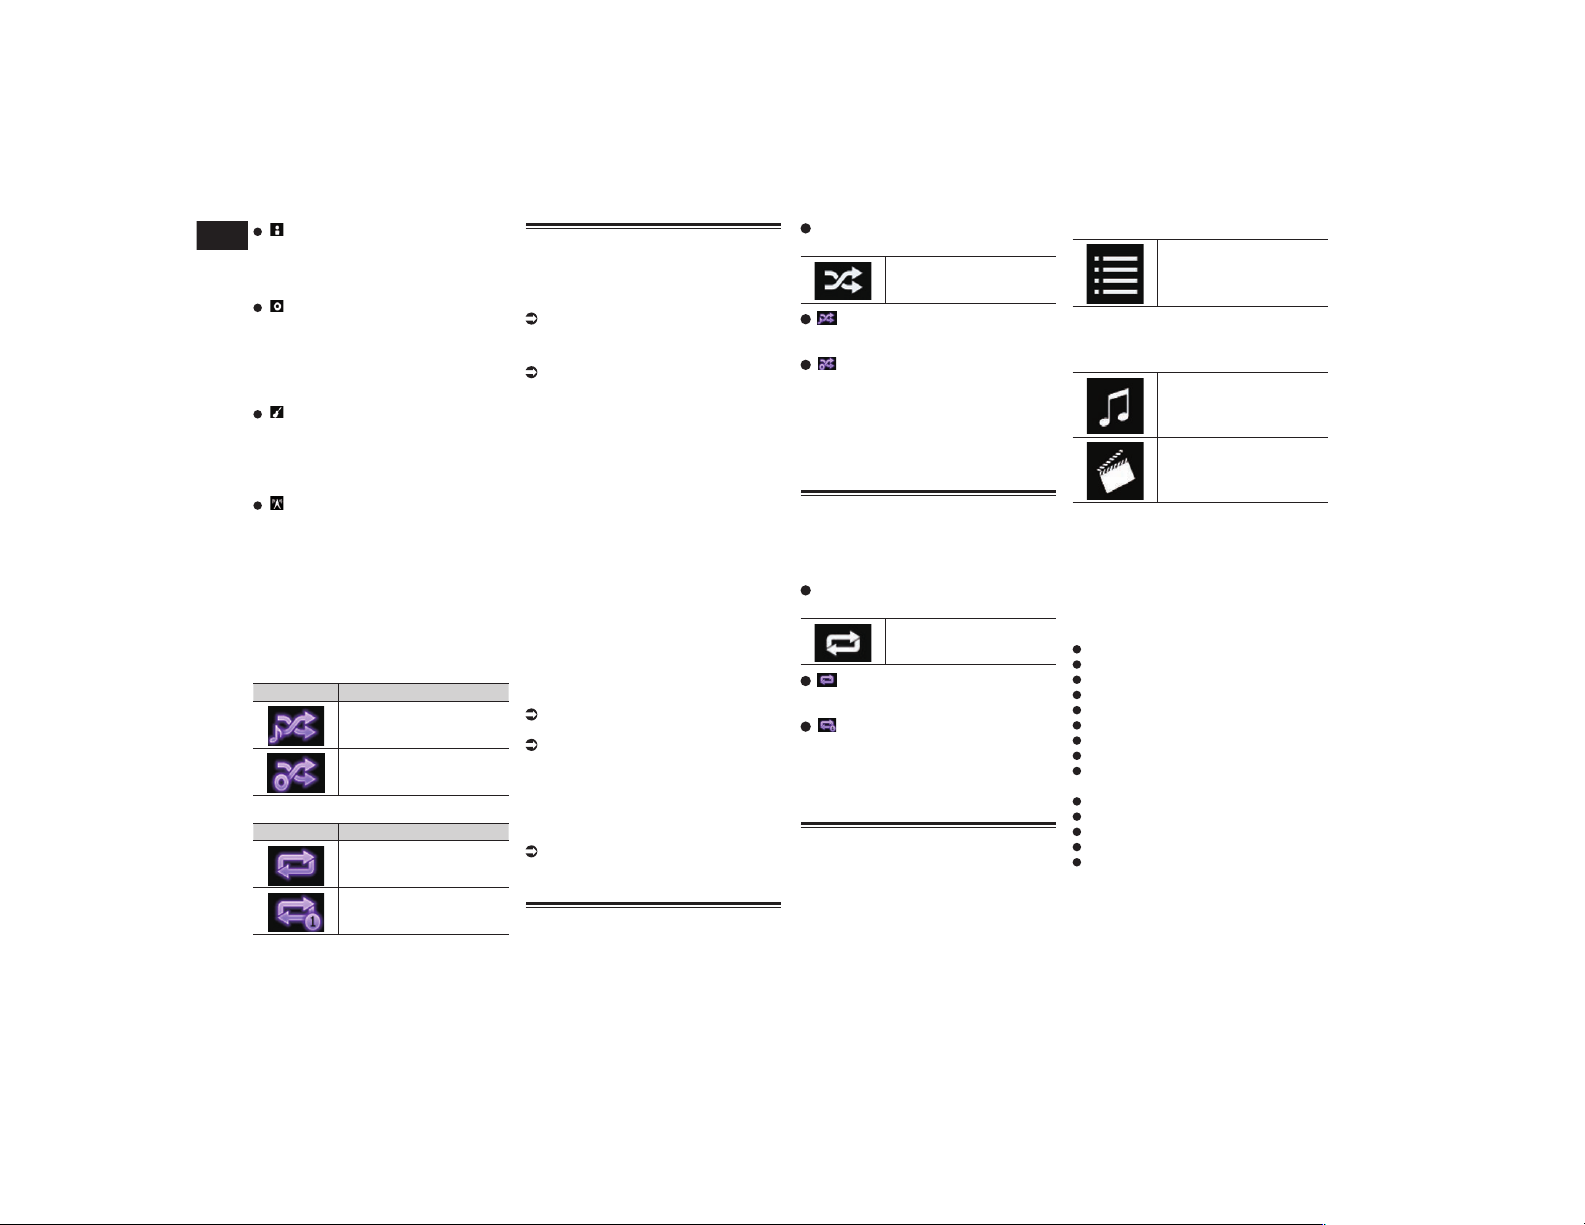
11
Chapter
34
En
: Artist name
Shows the artist name for the song cur-
rently being played (when available). “No
Name” is displayed if there is no corre-
sponding information.
: Album title
Shows the title of the album of the cur-
rent file (when available). “No Title” is
displayed if there is no corresponding
information.
p This information is not available while
playing iTunes Radio.
: Genre
Shows the genre of the current file (when
available). “No Genre” is displayed if
there is no corresponding information.
p This information is not available while
playing iTunes Radio.
: Station
Shows the station name of the song
currently being played.
p This information is available while playing
iTunes Radio.
2 Current time and date
3 Album artwork
Album art of the current song is displayed
if it is available.
4 Playback condition indicator
Indicates the current playback condition.
Setting the shuffle play
Indicator Meaning
Plays back songs or videos
in random order within the
selected list.
Selects an album randomly,
and then plays back all
songs in that album in order.
Setting a repeat play range
Indicator Meaning
Repeats all songs or videos
in the selected list.
Repeats just the current
song or video.
5 Play time indicator
Shows the elapsed playing time within
the current file.
Starting procedure
When connecting an iPod to this product,
you must select the method for connecting
your device. Settings are required according
to the connected device.
For details, refer to Chapter 5.
1 Display the AV source selection
screen.
For details of the operations, refer to
Displaying the AV operation screen on
page 12.
2 Connect your iPod.
p If connecting an iPhone or iPod touch,
quit applications before connecting.
p If an iPhone 6 Plus, iPhone 6, iPhone
5s, iPhone 5c, iPhone 5, or iPod touch
(5th generation) is connected, the
media library (song information) will
be imported from the connected device
and saved to this product. Wait until the
process completes.
The media library will not be imported
if an updated media library of the con-
nected device has been imported or the
memory of this product is full.
3 Touch [iPod] on the AV source
selection screen.
4 Use the touch panel keys on the
screen to control your iPod.
For details, refer to Using the touch panel
keys (for audio) on page 33.
For details, refer to Using the touch panel
keys (for video) on page 33.
p The video image of the iPod may have
noise if the rear display outputs the
video image. When noise is produced in
the video image of the iPod, turn off the
output setting of the rear display.
For details of the operations, refer to
Selecting the video for the rear display on
page 71.
Setting the shufe play
This function shuffles songs, albums or
videos and plays them in random order.
p This function is not available while play-
ing iTunes Radio.
Touch the following key repeatedly
until the desired setting appears.
Turns random play on or off.
:
Plays back songs or videos in random
order within the selected list.
:
Selects an album randomly, and then
plays back all songs in that album in
order.
p This icon may not be displayed when
an iPhone 6 Plus, iPhone 6, iPhone 5s,
iPhone 5c, iPhone 5, or iPod touch (5th
generation) is used.
Setting a repeat play range
The repeat play range can be changed by
only touching a single key.
p This function is not available while play-
ing iTunes Radio.
Touch the following key repeatedly
until the desired setting appears.
Changes the repeat play
range.
:
Repeats all songs or videos in the
selected list.
:
Repeats just the current song or video.
p The repeat setting can be turned off when
an iPhone 6 Plus, iPhone 6, iPhone 5s,
iPhone 5c, iPhone 5, or iPod touch (5th
generation) is used.
Selecting song or video
sources from the playlist
screen
You can search for the song, video, or radio
stations you want to play from the playlist
screen.
1 Touch the following key.
Displays the list of the
category.
The “ROOT” screen appears.
2 Touch the following keys to switch
the music or video category list.
Switches to the music
category list.
Switches to the video cate-
gory list.
p The video category list icon is not avail-
able when using iPod function with an
iPhone 6 Plus, iPhone 6, iPhone 5s,
iPhone 5c, iPhone 5, or iPod touch (5th
generation).
3 Touch the category you want to
search for.
Category lists (for music):
Radio (iTunes Radio)
Playlists
Artists
Albums
Songs
Podcasts
Genres
Composers
Audiobooks
Category lists (for video):
Video Playlists
Movies
Music Videos
TV Shows
Video Podcasts
p Category items that do not correspond to
the connected iPod are not displayed.
p “Radio” is displayed only if iTunes Radio
is available on the iPod.
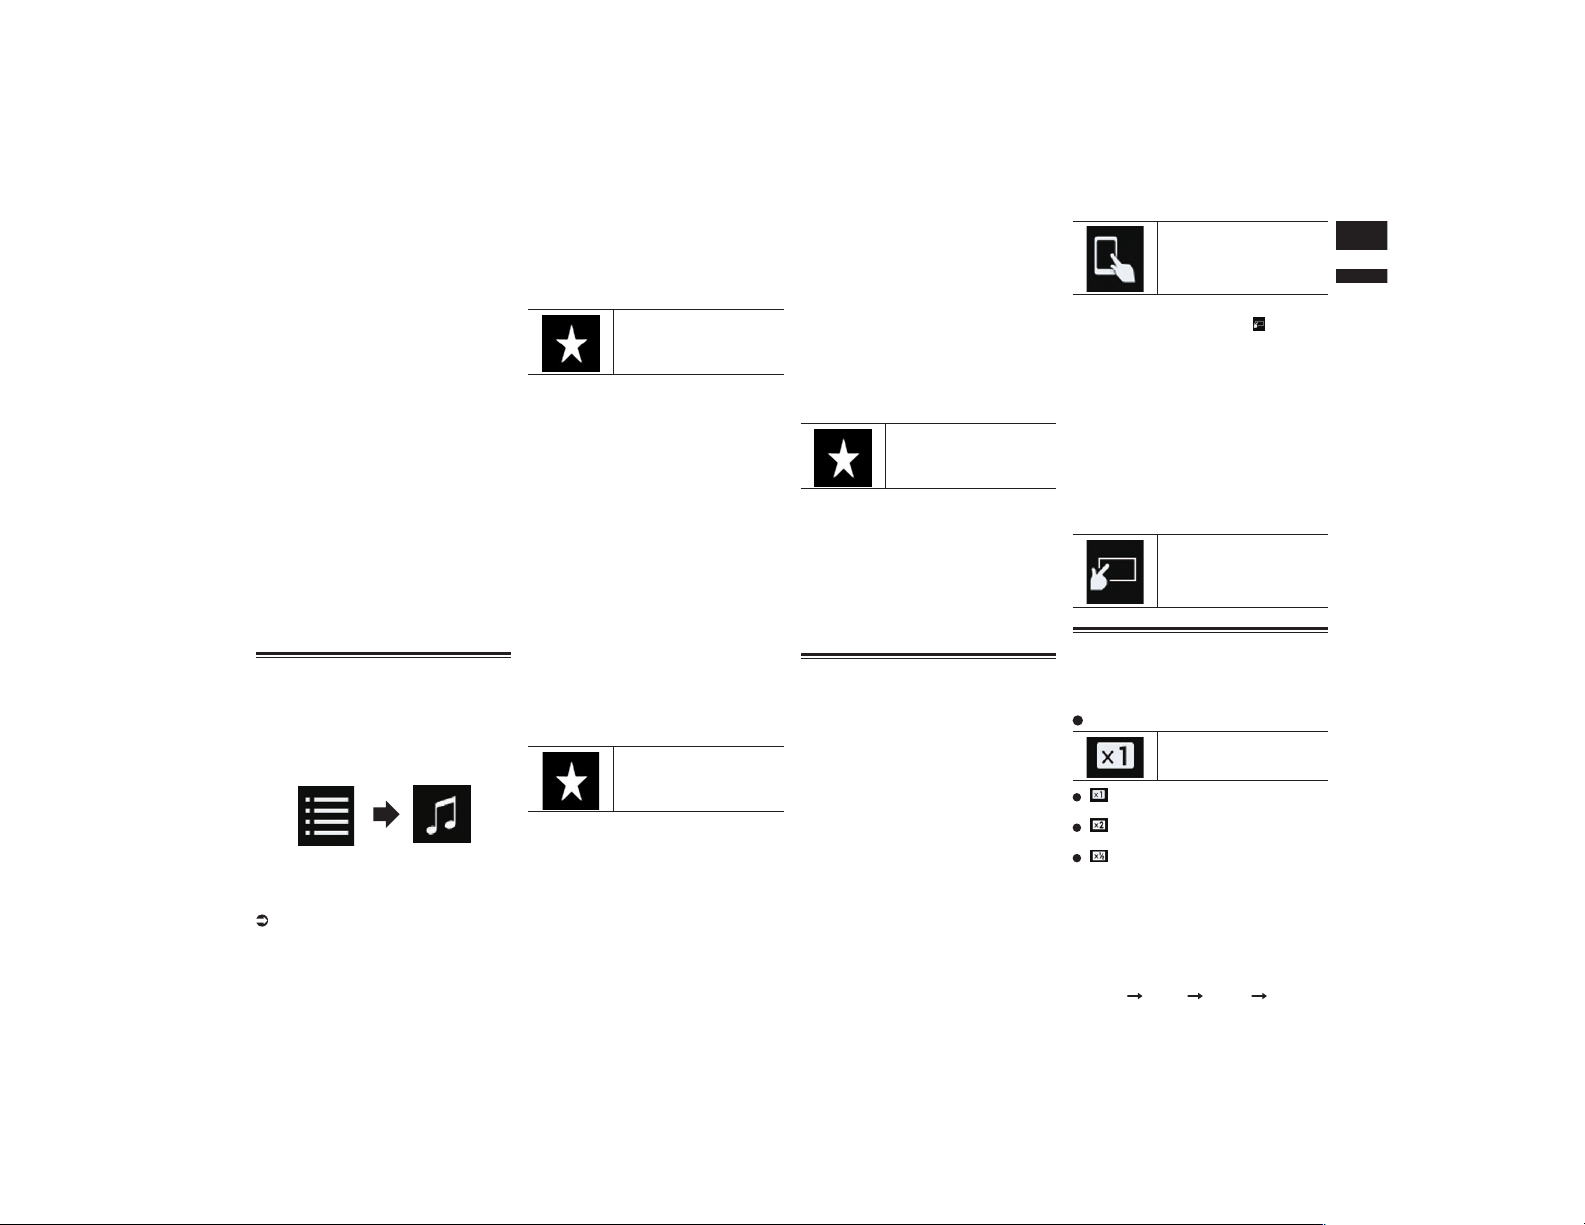
English
11
Chapter
35
En
4 Drag the Initial Search Bar to find
a file by the initial character of the
file name.
The alphabet corresponding to the current
position on the Initial Search Bar is dis-
played and the list scrolls as the bar is slid.
p The Initial Search Bar is not displayed in
the top category list or the song list.
5 Release the Initial Search Bar at
the desired alphabet.
The items whose initial character is the
selected alphabet are displayed.
6 Touch the title of the list that you
want to play.
Repeat this operation until you find the
desired song or video.
7 Start playback of the selected list.
p Depending on the generation or version
of the iPod, some functions may not be
available.
p You can play playlists created with the
MusicSphere application. The applica-
tion is available on our website.
p Playlists that you created with the
MusicSphere application are displayed
in abbreviated form.
Using iTunes Radio
p This function is only available when using
iPod function with an iPhone 6 Plus,
iPhone 6, iPhone 5s, iPhone 5c, iPhone 5,
or iPod touch (5th generation).
1 Touch the following keys in the
following order.
2 Touch [Radio].
3 Use the touch panel keys on the
screen to control your iPod.
For details, refer to Using the touch panel
keys (for iTunes Radio) on page 33.
■ Playing back songs similar to
the current song
You can listen to songs similar to the song
currently being played.
1 Touch the following key.
Displays the pop-up menu.
2 Touch [Play More Like This].
p The display of the menu item indicates as
follows:
— When the menu item is active, the func-
tion can be turned on.
— When the menu item is highlighted, the
function is turned on.
— When the menu item is not active, the
function is not available for the current
song.
p If you touch [Play More Like This] when
the menu item is active, songs similar to
the current song will be played back.
p If you touch [Play More Like This] when
the menu item is highlighted, the func-
tion will turn off.
p The operation result depends on the iPod.
■ Setting the current song not to
be played back again
You can set the current song not to be played
back again.
1 Touch the following key.
Displays the pop-up menu.
2 Touch [Never Play This Song].
p The display of the menu item indicates as
follows:
— When the menu item is active, the func-
tion can be turned on.
— When the menu item is highlighted, the
function is turned on.
— When the menu item is not active, the
function is not available for the current
song.
p If you touch [Never Play This Song]
when the menu item is active, the song
will not be played back again.
p If you touch [Never Play This Song]
when the menu item is highlighted, the
function will turn off.
p The operation result depends on the iPod.
■ Adding the current song to the
wish list
You can add the current song to the wish list
for easy access to the song later.
1 Touch the following key.
Displays the pop-up menu.
2 Touch [Add to iTunes Wish List].
The song will be added to the wish list.
p If the song is already in the wish list,
[Remove from iTunes Wish List ] is dis-
played instead of [Add to iTunes Wish
List]. If you touch [Remove from iTunes
Wish List ], the song will be removed
from the wish list.
p The operation result depends on the iPod.
Using this product’s iPod func-
tion from your iPod
You can control this product’s iPod func-
tion from the connected iPod if the control
mode is set to “App Mode”. The application
screen of the iPod can be displayed on this
product, and the music files and video files
in the iPod can be played back with this
product.
p This function is not available when using
iPod function with an iPhone 6 Plus,
iPhone 6, iPhone 5s, iPhone 5c, iPhone 5,
or iPod touch (5th generation).
p While this function is in use, the iPod
will not turn off even if the ignition key is
turned off. Operate the iPod to turn off the
power.
1 Touch the following key.
Switches the control mode.
p The control mode switches to “App
Mode”. The icon changes to .
2 Operate the connected iPod to
select a video or song and play.
p The following functions are still accessi-
ble from this product even if the control
mode is set to “App Mode”. However,
the operation will depend on your
applications.
— Playing/pausing
— Fast forwarding/reversing
— Tracking up/down
— Moving up/down to a chapter
3 Touch the following key.
Switches the control mode,
to control iPod functions
from this product.
Changing the speed of audio-
book playback
The playback speed can be changed while
playing an audiobook.
Touch the following key.
Changes the playback
speed.
(default):
Plays back in normal speed.
:
Plays back faster than normal speed.
:
Plays back slower than normal speed.
p The icon does not change when using
this function with an iPhone 6 Plus,
iPhone 6, iPhone 5s, iPhone 5c, iPhone
5, or iPod touch (5th generation). The
setting changes as follows when the icon
is touched, even though the icon does not
change.
Faster Slower Normal Faster...
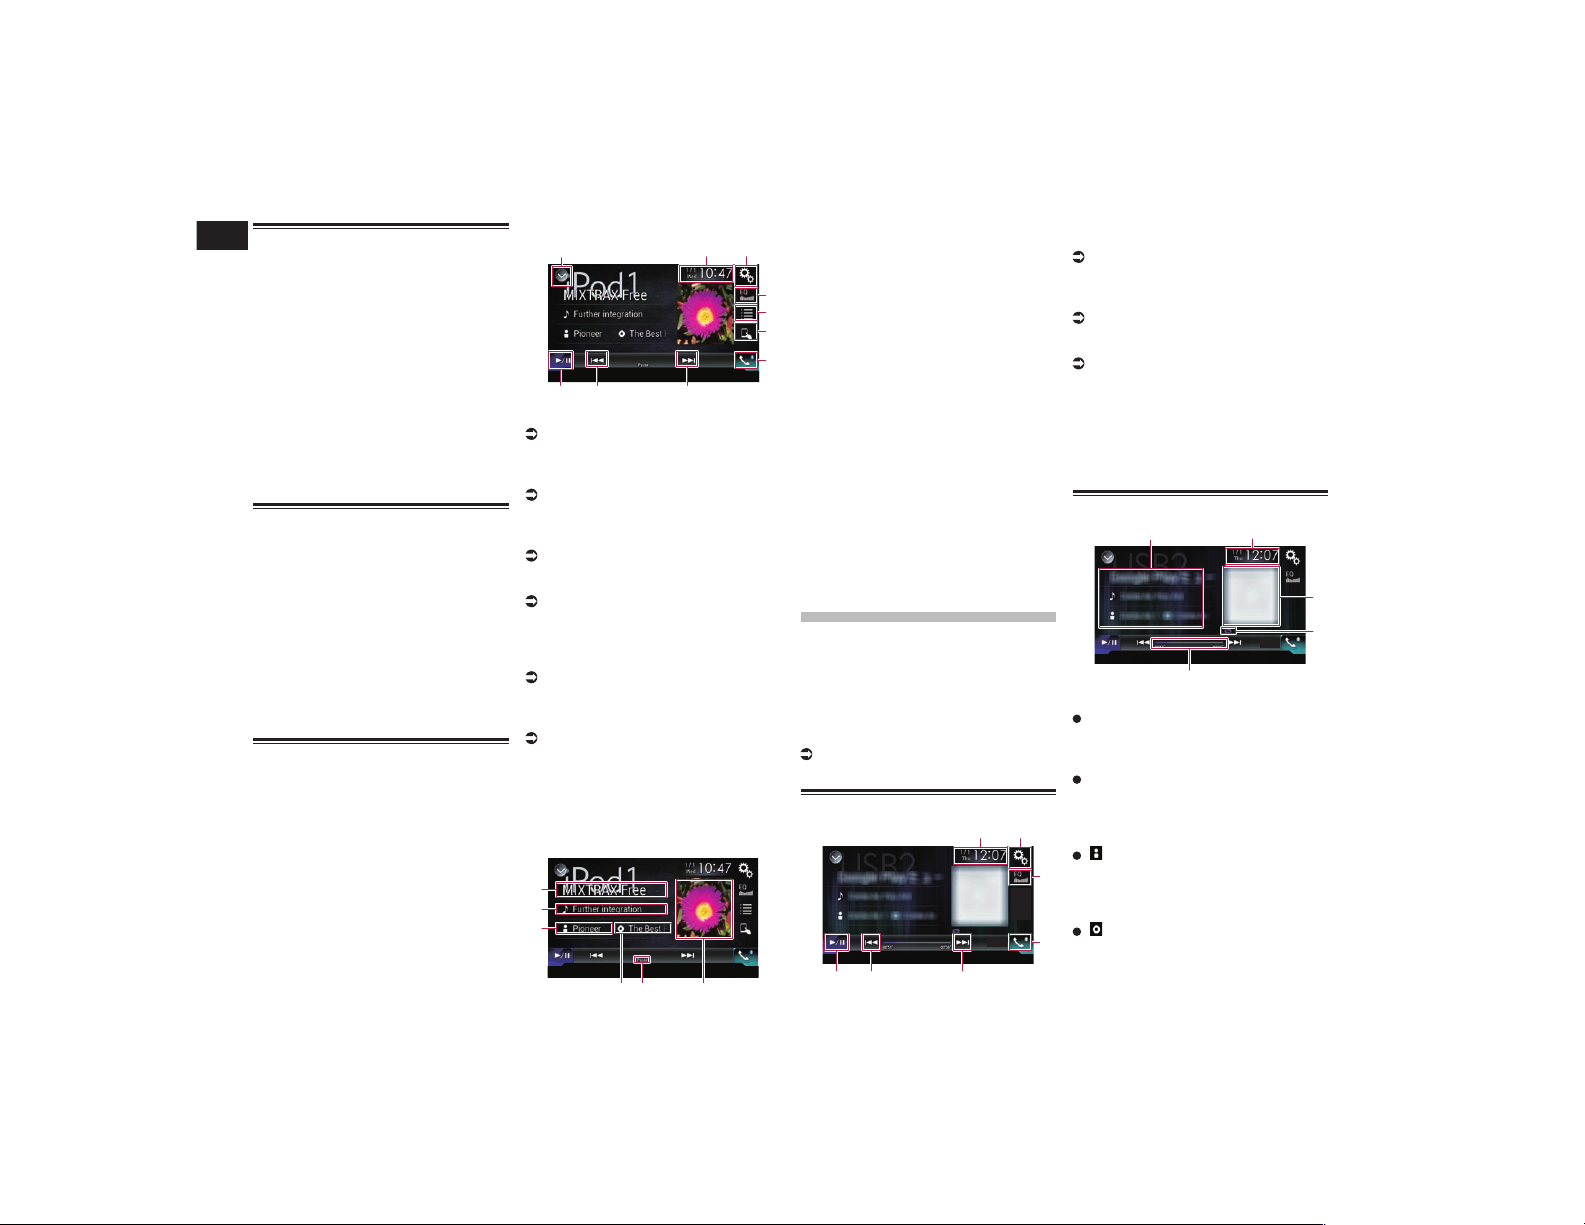
12
Chapter
36
En
Displaying lists related to the
song currently playing (link
search)
p This function is not available while play-
ing iTunes Radio.
1 Touch the artwork to open a list of
the names of songs on the album
currently playing.
2 Touch the name of the song you
want to play to start playing that
song.
p If part of the recorded information is not
displayed, a scroll key appears on the
right side of list. Touch the scroll key to
scroll.
Operating with the hardware
buttons
Press the TRK button.
You can skip songs or videos forward or
backward.
p The skip-back key is not available while
playing iTunes Radio.
When a song or video with chapters is
played, you can skip a chapter forward or
backward.
Press and hold the TRK button.
You can perform fast reverse or fast forward.
Playing back music from a
music app other than iPod
music, as the iPod source
The app name and the song information are
also displayed.
■ Using the touch panel keys
9 8 8
1 32
4
5
6
7
1 Displays the source list.
For details, refer to Selecting a front
source on the source list on page 13.
2 Displays the Time and date setting
screen.
For details, refer to Setting the time and
date on page 70.
3 Displays the Setting menu screen.
4 Recalls equalizer curves.
For details, refer to Using the equalizer on
page 64.
5 Selects a track from the list.
For details, refer to Selecting song or
video sources from the playlist screen on
page 34.
6 Switches the control mode to “App
Mode”.
For details, refer to Using this prod-
uct’s iPod function from your iPod on
page 35.
7 Displays the Phone menu screen.
For details, refer to Displaying the phone
menu on page 16.
8 Skips files forward or backward.
9 Switches between playback and
pause.
■ Reading the screen
1
2
3
4 5 6
1 App name
Shows the App name of the currently
playing.
2 Song title
Shows the title of the song currently
being played (when available). “No Title”
is displayed if there is no corresponding
information.
3 Artist name
Shows the artist name for the song cur-
rently being played (when available). “No
Name” is displayed if there is no corre-
sponding information.
4 Album title
Shows the title of the album of the cur-
rent file (when available). “No Title” is
displayed if there is no corresponding
information.
5 Pause indicator
6 Album artwork
Album art of the current song is displayed
if it is available.
Playing music output
from the Android Auto-
compatible device
If an Android Auto-compatible device is
connected to this product, you can listen to
the music output from the Android device
with this product, and control the playback
directly from this product.
p This function is available only when
Android Auto is turned on. Start the
Android Auto before using this function.
For details, refer to Using Android Auto
on page 39.
Using the touch panel keys
21
3
4
6
5 5
1 Displays the Time and date setting
screen.
For details, refer to Setting the time and
date on page 70.
2 Displays the Setting menu screen.
3 Recalls equalizer curves.
For details, refer to Using the equalizer on
page 64.
4 Displays the Phone menu screen.
For details, refer to Displaying the phone
menu on page 16.
5 Skips files forward or backward.
p Operations may vary depending on the
application used on the Android Auto-
compatible device.
6 Switches between playback and
pause.
Reading the screen
5
2
4
3
1
1 Current track information
Application name
Shows the application name (when avail-
able). “No Name” is displayed if there is
no corresponding information.
Song title
Shows the title of the song currently
playing (when available). “No Title” is
displayed if there is no corresponding
information.
: Artist name
Shows the artist name for the song cur-
rently being played (when available). “No
Name” is displayed if there is no corre-
sponding information.
: Album title
Shows the title of the album of the cur-
rent file (when available). “No Title” is
displayed if there is no corresponding
information.
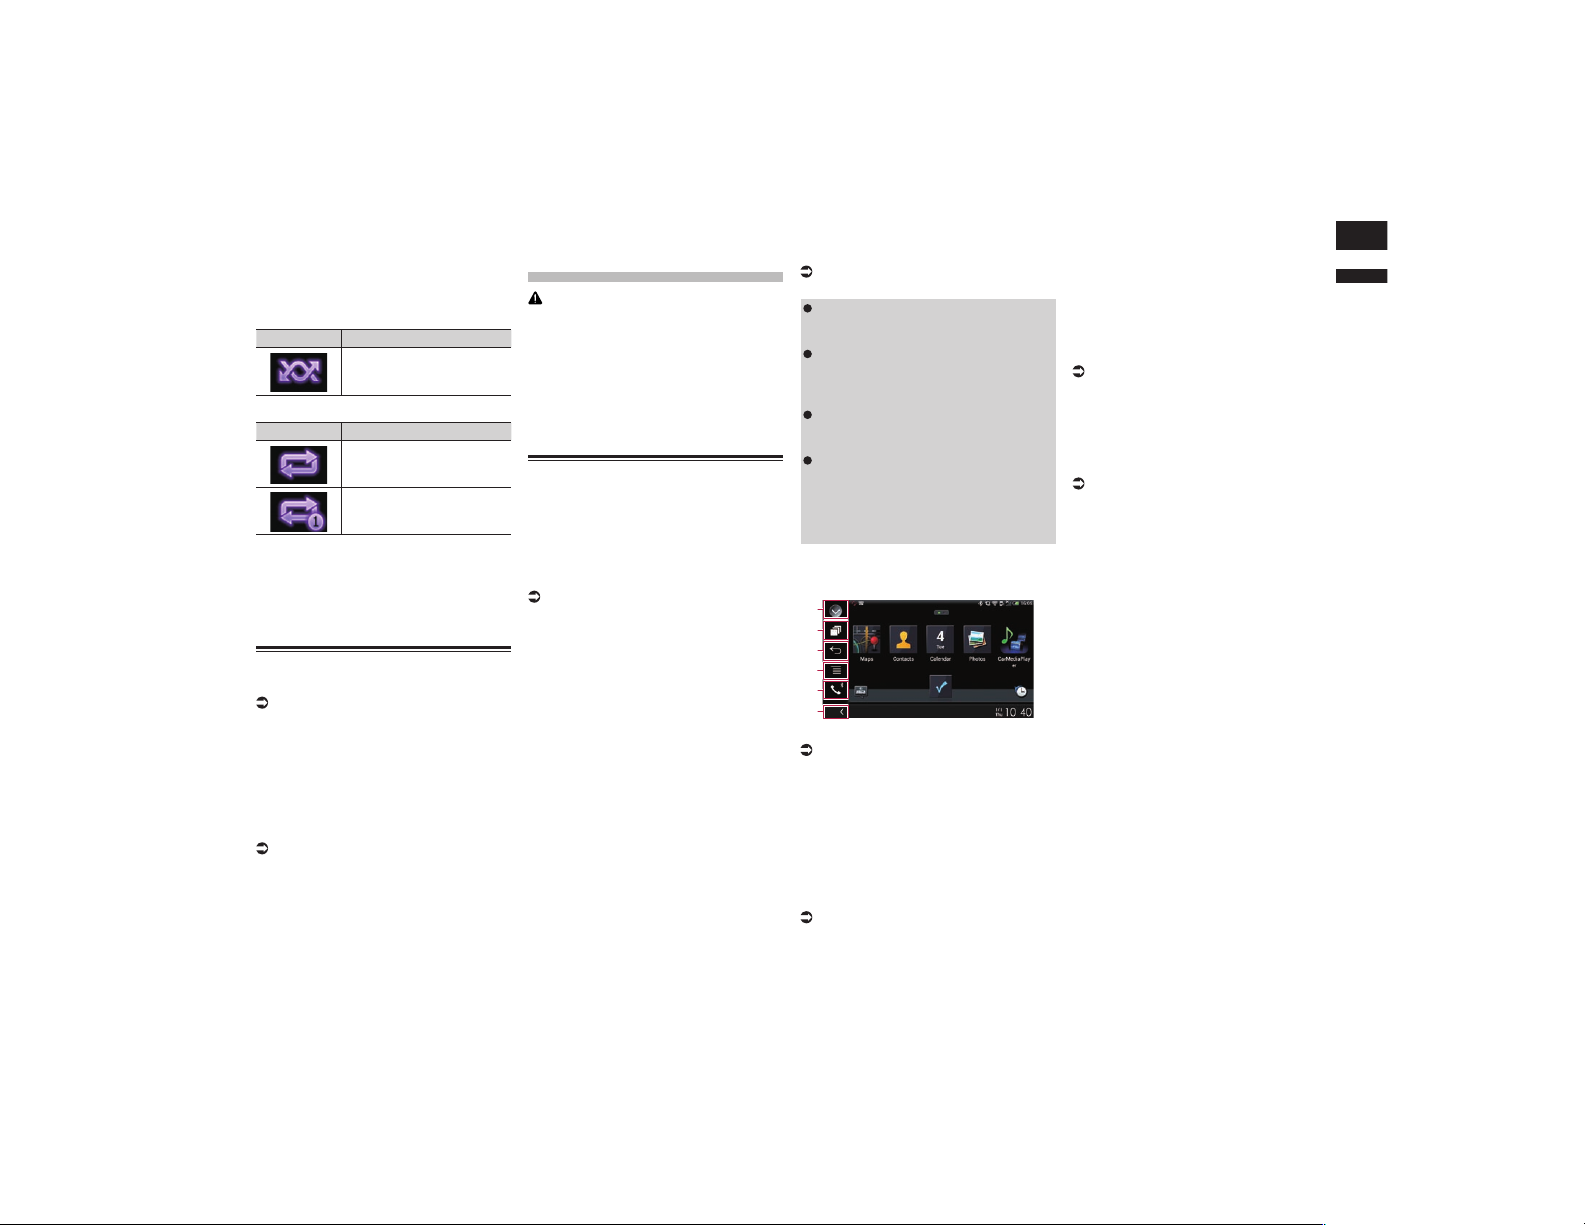
English
13
Chapter
37
En
2 Current time and date
3 Album artwork
Album art of the current song is displayed
if it is available.
4 Playback condition indicator
Indicates the current playback condition.
Setting the shuffle play
Indicator Meaning
Plays all files in the current
repeat play range in random
order.
Setting a repeat play range
Indicator Meaning
Repeats all songs in the
selected list.
Repeats just the current
song.
p Playback condition indicators may not
be displayed depending on the Android
device.
5 Play time indicator
Shows the elapsed playing time within
the current file.
Starting procedure
1 Start up Android Auto.
For details, refer to Using Android Auto
on page 39.
2 Press the HOME button to display
the Top menu screen.
3 Touch [USB2] on the AV source
selection screen.
4 Use the touch panel keys on the
screen to control the playback.
For details, refer to Using the touch panel
keys on page 36.
p The Android Auto function may not
operate properly if the Bluetooth connec-
tion with the Android Auto-compatible
device is terminated.
Using your iPhone
or smartphone
applications
WARNING
Certain uses of an iPhone or a smart-
phone may not be legal while driving in
your jurisdiction, so you must be aware
of and obey any such restrictions.
If in doubt as to a particular function,
only perform it while the car is parked.
No feature should be used unless it is
safe to do so under the driving condi-
tions you are experiencing.
Using AppRadio Mode
You can control applications for an iPhone
or a smartphone directly from the screen
(AppRadio Mode).
In AppRadio Mode, you can operate
applications with finger gestures such as
tapping, dragging, scrolling or flicking on
the screen of this product.
For details of AppRadio Mode com-
patible devices, refer to AppRadio Mode
Compatibility on page 20.
p In this chapter, iPhone and iPod touch
will be referred to as “iPhone”.
p The compatible finger gestures vary
depending on the application for an
iPhone or a smartphone.
p When an application not compatible with
AppRadio Mode is started, depending
on the application, you can see an image
of the application on the screen of this
product. However, you will not be able to
operate the application.
To use AppRadio Mode, install the
AppRadio app on the iPhone or smart-
phone beforehand to enable launching of
the application on this product. For details
about the AppRadio app, visit the following
site:
For U.S.A.
http://www.pioneerelectronics.com/
AppRadioMode
For Canada
http://www.pioneerelectronics.ca/
AppRadioMode
p Be sure to read Using app-based con-
nected content before you perform this
operation.
For details, refer to Using app-based
connected content on page 91.
Content and functionality of compatible
applications are the responsibility of the
App providers.
In AppRadio Mode, usage is limited
while driving, with availability of func-
tions and content determined by the
App providers.
AppRadio Mode allows access to
applications other than those listed,
subject to limitations while driving.
PIONEER IS NOT RESPONSIBLE AND
DISCLAIMS LIABILITY FOR THIRD
PARTY (NON-PIONEER) APPS AND
CONTENT, INCLUDING WITHOUT
LIMITATION ANY INACCURACIES OR
INCOMPLETE INFORMATION.
■ Using the touch panel keys (App
control side bar)
1
2
3
4
5
6
1 Displays the source list.
For details, refer to Selecting a front
source on the source list on page 13.
2 Displays the launcher application
screen.
3 Displays the previous screen.
p When you use an iPhone, this key is not
available.
4 Displays the menu screen.
p When you use an iPhone, this key is not
available.
5 Displays the Phone menu screen.
For details, refer to Displaying the phone
menu on page 16.
6 Displays the current source.
p In AppRadio Mode, App control side bar
will appear.
p If you press the HOME button twice, the
App control side bar will disappear. Press
the HOME button twice again, and the
App control side bar will appear.
■ Starting procedure
When connecting an iPhone or smartphone
to this product, you must select the method
for connecting your device. Settings are
required according to the connected device.
For details, refer to Chapter 5.
The procedure varies depending on the type
of device.
For iPhone with a 30-pin connector
users
1 Connect your iPhone.
For details, refer to Connecting an iPhone
with 30-pin connector on page 76.
2 Press the HOME button to display
the Top menu screen.
3 Touch [APPS].
A message, which notifies you that your
iPhone can launch the application, appears
on the screen.
A message, which asks you whether you
want to launch your application, appears on
your iPhone.
4 Use your iPhone to launch the
application.
The AppRadio app is launched.
5 Touch [OK] on the screen of this
product.
The AppRadio Mode screen (Application
menu screen) appears.
p If you connect your device while an
AppRadio Mode-compatible application
is already running, the application opera-
tion screen will appear on this product.
6 Touch the desired application icon.
The desired application is launched, and the
application operation screen appears.
7 Operate the application.

13
Chapter
38
En
8 Press the HOME button to go back
to the Top menu screen.
For iPhone with a Lightning con-
nector users
1 Register your iPhone and connect
it to this product via Bluetooth
wireless technology.
p The registered device must be selected as
the priority device.
For details, refer to Registering your
Bluetooth devices on page 14.
2 Unlock your iPhone.
3 Connect your iPhone.
p The cable connection method varies
depending on your device.
For details, refer to Connecting an iPhone
with Lightning connector on page 76.
4 Press the HOME button to display
the Top menu screen.
5 Touch [APPS].
The AppRadio app is launched, and the
AppRadio Mode screen (Application menu
screen) appears.
p If you connect your device while an
AppRadio Mode-compatible application
is already running, the application opera-
tion screen will appear on this product.
6 Touch the desired application icon.
The desired application is launched, and the
application operation screen appears.
7 Operate the application.
8 Press the HOME button to go back
to the Top menu screen.
For smartphone users
1 Register your smartphone and con-
nect it to this product via Bluetooth
wireless technology.
p The registered device must be selected as
the priority device.
For details, refer to Registering your
Bluetooth devices on page 14.
2 Unlock your smartphone.
3 Connect your smartphone to this
product via the separately sold App
Connectivity Kit (CD-AH200).
p The cable connection method varies
depending on your device.
For details, refer to Connecting the
Android™ device on page 77.
4 Press the HOME button to display
the Top menu screen.
5 Touch [APPS].
The AppRadio app is launched, and the
AppRadio Mode screen (Application menu
screen) appears.
p If you connect your device while an
AppRadio Mode-compatible application
is already running, the application opera-
tion screen will appear on this product.
6 Touch the desired application icon.
The desired application is launched, and the
application operation screen appears.
7 Operate the application.
8 Press the HOME button to go back
to the Top menu screen.
■ Using the keyboard
CAUTION
For your safety, the keyboard functionality is
only available when the vehicle is stopped
and the parking brake is engaged.
p This function is only available in
AppRadio Mode on the iPhone.
p This function may not be available
depending on your iPhone.
When you tap the text input area of an
application for iPhone, a keyboard will be
displayed on the screen. You can input the
desired text directly from this product.
p The language preference for the keyboard
of this product should be same as the
setting on your iPhone.
If the settings for this product and the
iPhone are different, you may be unable
to enter characters properly.
1 Set the keyboard language.
For details of the operations, refer to
Setting the keyboard language with the
application for iPhone on page 58.
2 Start up the AppRadio Mode.
For details, refer to Starting procedure on
page 37.
3 Touch the text input area on the
application operation screen.
A keyboard for entering text appears.
1
2
3456
7
1 Enters the characters.
2 Deletes the entered text one letter at a
time, beginning at the end of the text.
3 Confirms the entry and allows you to
proceed to the next step.
4 Hides the keyboard and the text can now
be entered using the keyboard of the
iPhone.
5 Changes the iPhone keyboard layout.
p The iPhone keyboard layouts that can be
selected by tapping depends on the
setting for Hardware Keyboard Layout set
on your iPhone.
6 Switches to a keyboard offering numeric
characters and symbols.
7 Converts the case of the keyboard
characters.
■ Adjusting the image size (For
smartphone users)
Black dots may appear on the screen when
using AppRadio Mode with an Android
device connected to this product.
CAUTION
This setting is available only when you stop
your vehicle in a safe place and apply the
parking brake.
p This function can be set under the follow-
ing conditions:
— When an Android device is connected
to this product using CD-AH200 (sold
separately), and when AppRadio Mode
is available after a Bluetooth connection
using SPP (Serial Port Profile) has been
established.
p If this setting has not been set, the set-
ting screen automatically appears in the
following cases:
— When entering AppRadio Mode after a
Bluetooth connection using SPP (Serial
Port Profile) has been established.
— When a Bluetooth connection using SPP
(Serial Port Profile) has been established
in AppRadio Mode.
1 Press the HOME button to display
the Top menu screen.
2 Touch the following keys in the
following order.
The “System” screen appears.
3 Touch [Input/Output Settings].
4 Touch [AppRadio Video
Adjustment].
The confirmation screen appears.
5 Touch [OK].
6 Touch the following keys to adjust
the line to fit smartphone image
size.
Moves the line to the left.
Moves the line to the right.
Moves the line upward.
Moves the line downward.
7 Touch [Preview].
p Confirm that the whole image fills the
screen.

English
13
Chapter
39
En
8 Touch [OK].
p If you want to adjust the setting again
from the beginning, touch [RESET].
■ Displaying the image of your
application (iPhone with 30-pin
connector)
You can set an image of an application
for iPhone, which is not compatible with
AppRadio Mode, to be shown on the
screen.
p Depending on the type of application, you
may not be able to see the image on the
screen.
p You can only control the application on
the connected device.
p When you touch the display in this func-
tion, “Don’t Touch” mark appears on the
upper right corner of the screen.
1 Connect your iPhone.
For details, refer to Connecting an iPhone
with 30-pin connector on page 76.
2 Press the HOME button to display
the Top menu screen.
3 Touch [APPS].
A message, which notifies you that your
iPhone can launch the application, appears
on the screen.
A message, which asks you whether you
want to launch your application, appears on
your iPhone.
4 Use your iPhone to refuse to
launch the application.
5 Touch [OK] on the screen of this
product.
The black screen appears.
6 Launch an application on your
iPhone.
An image of the application appears on the
screen.
7 Press the HOME button to return to
the Top menu screen.
■ Displaying the image of your
application (iPhone with
Lightning connector)
You can set an image of an application
for smartphone, which is not compatible
with AppRadio Mode, to be shown on the
screen.
p Depending on the type of application, you
may not be able to see the image on the
screen.
p When you use this function, do not con-
nect other devices via Bluetooth wireless
technology. Be sure to disconnect your
Bluetooth device before using this
function.
p You can only control the application on
the connected device.
p When you touch the display in this func-
tion, “Don’t Touch” mark appears on the
upper right corner of the screen.
1 Connect your iPhone.
p The cable connection method varies
depending on your device.
For details, refer to Connecting an iPhone
with Lightning connector on page 76.
2 Press the HOME button to display
the Top menu screen.
3 Touch [APPS].
The image in your iPhone appears on the
screen.
4 Launch an application on your
iPhone.
An image of the application appears on the
screen.
5 Press the HOME button to return to
the Top menu screen.
■ Displaying the image of your
application (smartphone)
You can set an image of an application
for smartphone, which is not compatible
with AppRadio Mode, to be shown on the
screen.
p Compatibility with all smartphones is not
guaranteed.
p When you use this function, do not con-
nect other devices via Bluetooth wireless
technology. Be sure to disconnect your
Bluetooth device before using this
function.
p You can only control the application on
the connected device.
p When you touch the display in this func-
tion, “Don’t Touch” mark appears on the
upper right corner of the screen.
1 Connect your smartphone to this
product via the separately sold App
Connectivity Kit (CD-AH200).
p The cable connection method varies
depending on your device.
For details, refer to Connecting the
Android™ device on page 77.
2 Press the HOME button to display
the Top menu screen.
3 Touch [APPS].
The image in your smartphone appears on
the screen.
4 Launch an application on your
smartphone.
An image of the application appears on the
screen.
5 Press the HOME button to return to
the Top menu screen.
Using Android Auto
You can control applications for a smart-
phone directly from the screen (Android
Auto).
In Android Auto, you can operate applica-
tions with finger gestures such as tapping,
dragging, scrolling or flicking on the screen
of this product.
p Android Auto may not be available in
your country or region.
For details about Android Auto, please
refer to the Google support site:
http://support.google.com/androidauto
p This function is available for the Android
Auto-compatible device only.
p The compatible finger gestures vary
depending on the application for a
smartphone.
To use Android Auto, set “Mode” in
“Smartphone Setup” to “Android Auto”
beforehand.
For details, refer to Setting the device
connection method on page 20.
Content and functionality of compatible
applications are the responsibility of the
App providers.
In Android Auto, usage is limited while
driving, with availability of functions
and content determined by the App
providers.
Android Auto allows access to applica-
tions other than those listed, subject to
limitations while driving.
PIONEER IS NOT RESPONSIBLE AND
DISCLAIMS LIABILITY FOR THIRD
PARTY (NON-PIONEER) APPS AND
CONTENT, INCLUDING WITHOUT
LIMITATION ANY INACCURACIES OR
INCOMPLETE INFORMATION.
■ Starting procedure
When connecting an Android Auto-
compatible device to this product, you must
select the method for connecting your
device. Settings are required according to
the connected device.
For details, refer to Chapter 5.
p To achieve optimum usability of Android
Auto, set the driving position setting
correctly according to the vehicle.
For details, refer to Setting the driving
position on page 40.
1 Connect an Android Auto-
compatible device to this product
via the separately sold USB inter-
face cable for use with Android
devices (CD-MU200).
For details, refer to Connecting the
Android or MirrorLink™ device on
page 77.
2 Press the HOME button to display
the Top menu screen.
3 Touch [Android Auto].
The Bluetooth connection with the Android
Auto-compatible device will automatically
be established.
p If Android Auto is turned on during a
call on a cellular phone other than the
Android Auto-compatible device, the
Bluetooth connection will be terminated
after the call ends.
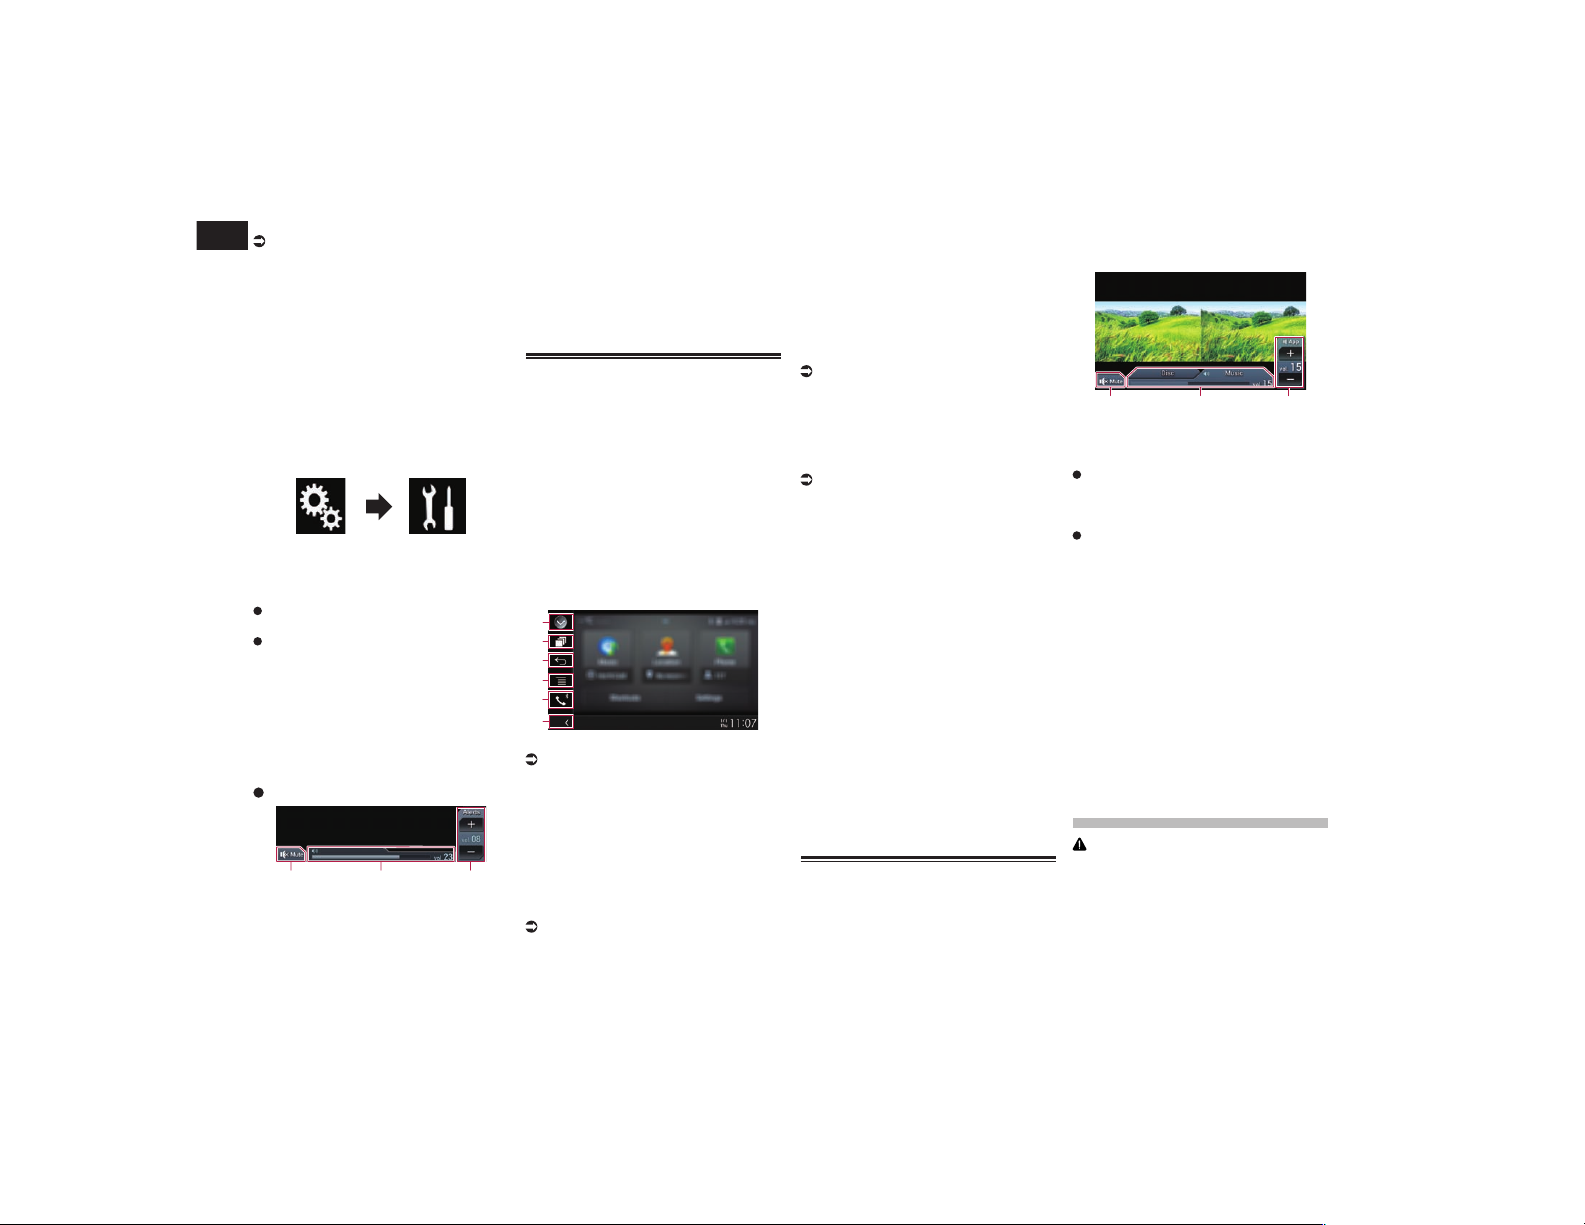
14
Chapter
40
En
4 Operate the application.
For details on adjusting the volume, refer
to Adjusting the volume on page 40.
p The Android Auto function may not
operate properly if the Bluetooth connec-
tion with the Android Auto-compatible
device is terminated.
■ Setting the driving position
To achieve optimum usability of Android
Auto, set the driving position setting cor-
rectly according to the vehicle.
1 Touch the HOME button to display
the Top menu screen.
2 Touch the following keys in the
following order.
The “System” screen appears.
3 Touch [Driving Position].
4 Touch the item you want to set.
Left (default):
Select for a left-hand drive vehicle.
Right:
Select for a right-hand drive vehicle.
The setting will be applied the next time an
Android Auto-compatible device is con-
nected to this product.
■ Adjusting the volume
You can adjust the guidance volume/alert
sound volume separately from the main
sound volume when Android Auto is used.
Touch the VOL (+/–) button.
1
2
3
1 Touch to mute. Touch again to unmute.
2 Displays the main sound volume.
3 Adjusts the guidance volume/alert sound
volume.
Each touch of [+] or [–] increases or
decreases the volume level.
p You cannot adjust the volume of the main
sound on the screen. Touch the VOL
(+/–) button to adjust the volume of the
main sound.
p The volume menu is displayed for four
seconds. If the screen disappears, touch
the VOL (+/–) button again. The screen
reappears.
Using MirrorLink mode
When you connect a MirrorLink device
with compatible applications installed,
you can control the applications for the
mobile device directly from this product
(MirrorLink mode).
You can view and operate the compatible
applications via the display with multi-touch
gestures like tapping, dragging, scrolling,
and flicking.
p Multi-touch gestures may be disabled
depending on the MirrorLink device that
is connected.
■ Using the touch panel keys (App
control side bar)
1
3
2
4
5
6
1 Displays the source list.
For details, refer to Selecting a front
source on the source list on page 13.
2 Displays the launcher application
screen.
3 Displays the previous screen.
p Depending on the type of MirrorLink
device, this key is not available.
4 Displays the menu screen.
p Depending on the type of MirrorLink
device, this key is not available.
5 Displays the Phone menu screen.
For details, refer to Displaying the phone
menu on page 16.
6 Displays the current source.
p In MirrorLink mode, App control side bar
will appear.
p If you press the HOME button twice, the
App control side bar will disappear. Press
the HOME button twice again, and the
App control side bar will appear.
■ Starting procedure
When connecting a MirrorLink device to
this product, you must select the method
for connecting your device. Settings are
required according to the connected device.
For details, refer to Chapter 5.
1 Unlock your MirrorLink device.
2 Connect your MirrorLink device to
this product via the separately sold
USB interface cable for use with
MirrorLink devices (CD-MU200).
For details, refer to Connecting the
Android or MirrorLink™ device on
page 77.
3 Press the HOME button to display
the Top menu screen.
4 Touch [APPS].
If the launcher application is installed in
the MirrorLink device, the application
launches.
If not, the Application menu screen will
appear.
5 Touch the desired application icon.
The desired application is launched, and the
application operation screen appears.
p Some applications may not launch
depending on the state of the connected
device. If it does not launch, launch the
application according to the application
startup message.
6 Operate the application.
7 Press the HOME button to go back
to the Top menu screen.
Using the audio mix function
You can output audio mixing AV source and
an application for iPhone or smartphone
when the AppRadio Mode or MirrorLink
mode is used.
1 Start up the AppRadio Mode or
MirrorLink mode.
2 Press the VOL (+/–) button.
The audio mix menu will be displayed on the
screen.
1 2 3
1 Touch to mute. Touch again to unmute.
2 Sets whether to switch the sound mix
function on or off.
Left tab: The audio mix function is
enabled (mix on). The App volume is
displayed. If you touch the App volume,
the volume keys will be displayed.
Right tab: The audio mix function is
disabled (mix off).
3 Adjusts the application audio volume.
Each touch of [+] or [–] increases or
decreases the volume level.
p The AV operation screen and the
Application screen can be switched by
pressing the MODE button.
p The right tab is not displayed on the AV
operation screen.
p You cannot adjust the volume of the main
sound on the screen. Press the VOL
(+/–) button to adjust the volume of the
main sound.
p The audio mix menu is displayed for four
seconds. If the screen disappears, press
the VOL (+/–) button again. The screen
reappears.
Streaming Pandora
®
WARNING
Certain uses of an iPhone or a smart-
phone may not be legal while driving in
your jurisdiction, so you must be aware
of and obey any such restrictions.
If in doubt as to a particular function,
only perform it while the car is parked.
No feature should be used unless it is
safe to do so under the driving condi-
tions you are experiencing.
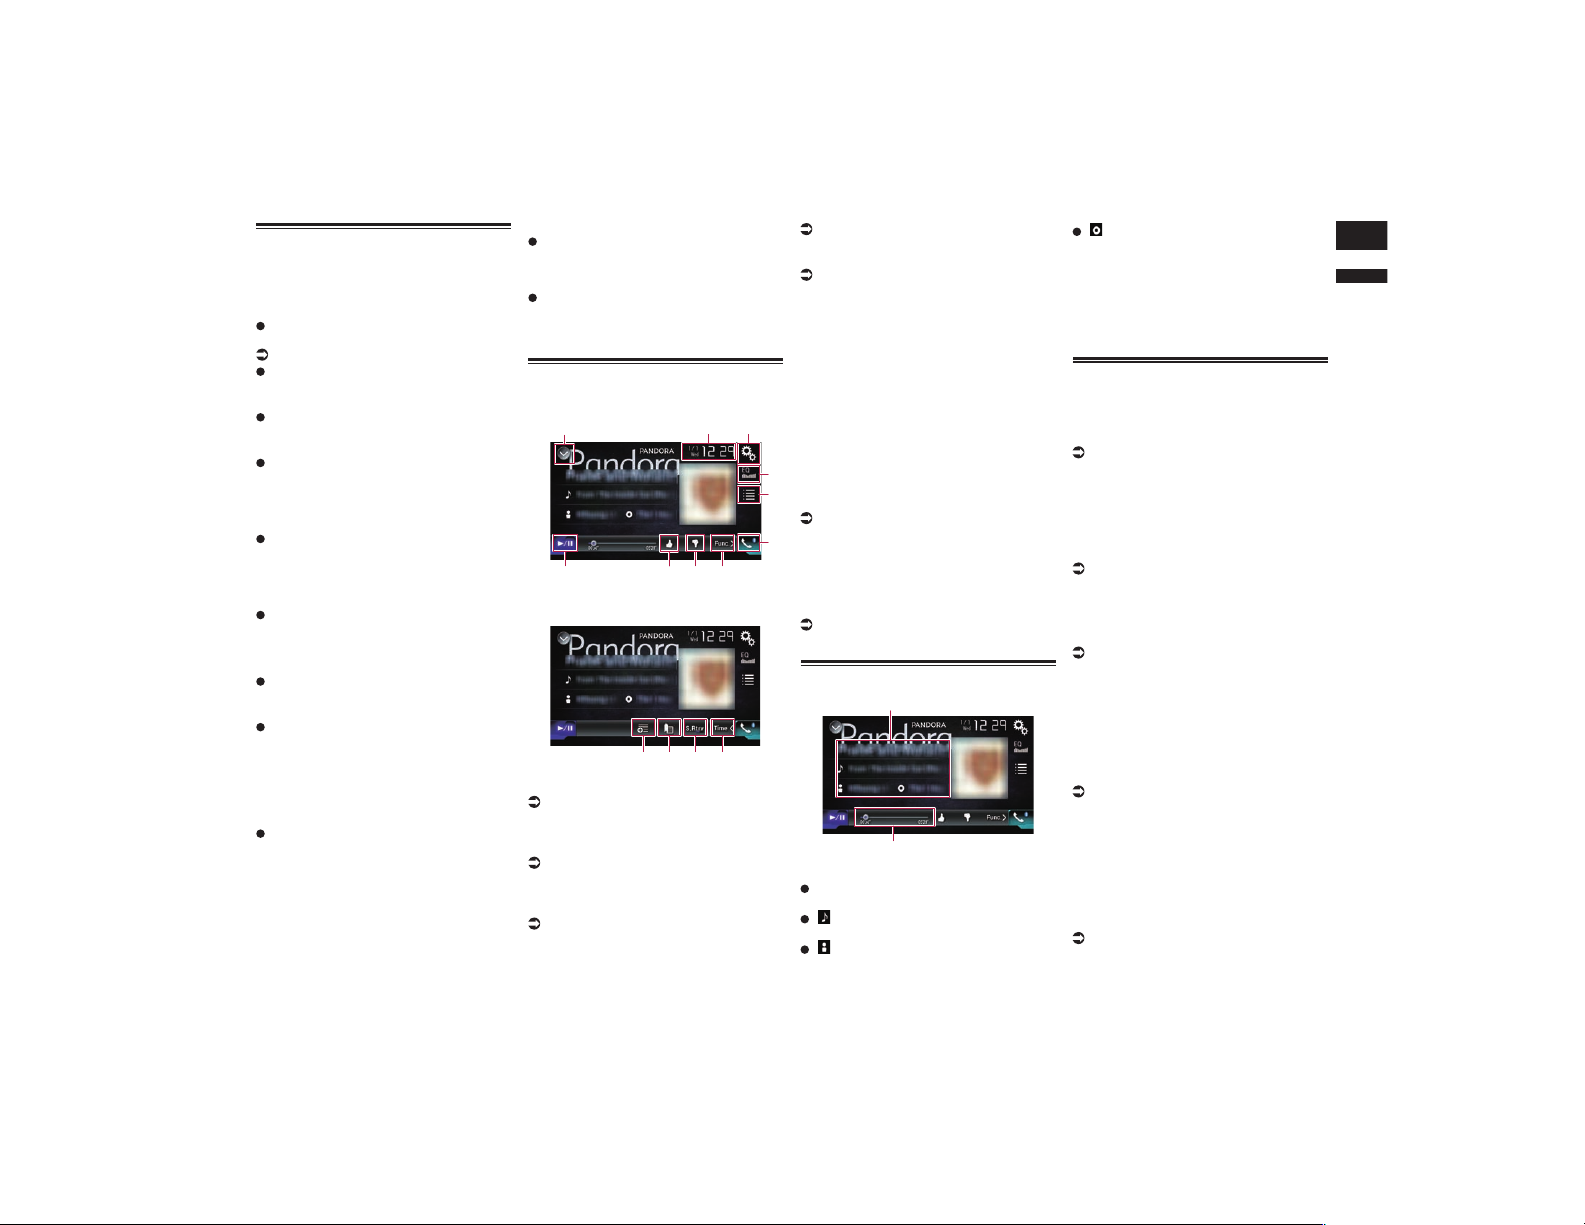
English
14
Chapter
41
En
Pandora operations
You can enjoy Pandora by connecting
an iPhone or a smartphone that has the
Pandora application installed.
Important
Requirements to access Pandora using
Pioneer car audio/video products:
For details, refer to Chapter 5.
Please update the firmware of the
Pandora application to the latest version
before use.
The latest version of the Pandora applica-
tion can be downloaded from the iTunes
App Store or Google Play.
Create a free or a paid account online.
You can create the account in the
Pandora application from your iPhone or
from the website (http://www.pandora.
com/register).
If the Data Plan for your iPhone does
not provide for unlimited data usage,
additional charges from your carrier may
apply for accessing the Pandora service
via 3G, EDGE and/or LTE (4G) networks.
You need to connect to the Internet via
3G, EDGE, LTE (4G) or Wi-Fi network to
use the Pandora service.
Limitations:
Depending on the availability of the
Internet, you may not be able to receive
the Pandora service.
The Pandora service is subject to change
without notice.
The service could be affected by any of
the following: firmware version of the
iPhone, firmware version of the Pandora
application, changes to the Pandora
music service.
Certain functions of the Pandora service
are not available when accessing the
service through Pioneer car audio/video
products.
They include, but are not limited to the
following: sending information about
current stations, buying tracks from
iTunes, viewing additional text informa-
tion, logging in to Pandora, adjusting
Cell Network Audio Quality.
Notes
Pandora internet radio is a music service not
affiliated with Pioneer. More information is
available at
http://www.pandora.com
The Pandora mobile application is available
for iPhone and smartphone, please visit
www.pandora.com/everywhere/mobile for
the latest compatibility information.
Using the touch panel keys
Playback screen (page 1)
1 32
7
4
5
6
a 8
9
Playback screen (page 2)
7bcd
1 Displays the source list.
For details, refer to Selecting a front
source on the source list on page 13.
2 Displays the Time and date setting
screen.
For details, refer to Setting the time and
date on page 70.
3 Displays the Setting menu screen.
4 Recalls equalizer curves.
For details, refer to Using the equalizer on
page 64.
5 Touching the key displays the list of
your Pandora stations.
For details, refer to Selecting a Pandora
station from the list on page 42.
6 Displays the Phone menu screen.
For details, refer to Displaying the phone
menu on page 16.
7 Switches to the next or previous
page of touch panel keys.
8 Touching the key gives a “Thumbs
Down” to the track currently playing
and skips to the next track.
p This function is not available when using
a shared station.
9 Touching the key gives a “Thumbs
Up” to the track currently playing.
p This function is not available when using
a shared station.
a Switches between playback and
pause.
b Uses “Sound Retriever” function.
For details, refer to Setting the “Sound
Retriever” function on page 71.
c Adds information for the track cur-
rently playing to bookmarks.
p Songs added to bookmarks cannot be
viewed from this product.
d Creates a new station.
For details, refer to Creating a station on
page 42.
Reading the screen
2
1
1 Current track information
Shows the Pandora station name the
tuner is currently tuned in to.
: Track title
Shows the title of the current track.
: Artist name
Shows the artist name for the track
currently playing.
: Album title
Shows the title of the album of the cur-
rent track.
p The information is not displayed if there is
no corresponding information.
2 Play time indicator
Shows the elapsed time, remaining time
and time bar of the current track.
Starting procedure
When connecting an iPhone or smartphone
to this product, you must select the method
for connecting your device. Settings are
required according to the connected device.
For details, refer to Chapter 5.
■ For iPhone with a 30-pin connec-
tor users
1 Unlock your iPhone.
2 Connect your iPhone.
p Connect via USB or Bluetooth.
For details of the Bluetooth connection,
refer to Registering your Bluetooth
devices on page 14.
3 Display the AV source selection
screen.
For details of the operations, refer to
Displaying the AV operation screen on
page 12.
4 Touch [Pandora] on the AV source
selection screen.
5 Use the touch panel keys on the
screen to control the Pandora
application.
For details, refer to Using the touch panel
keys on page 41.
■ For iPhone with a Lightning
connector users
1 Unlock your iPhone.
2 Connect your iPhone.
p Connect via USB, Bluetooth, or HDMI and
Bluetooth.
For details of the Bluetooth connection,
refer to Registering your Bluetooth
devices on page 14.

15
Chapter
42
En
p The cable connection method varies
depending on your device.
For details, refer to Connecting an iPhone
with Lightning connector on page 76.
3 Display the AV source selection
screen.
For details of the operations, refer to
Displaying the AV operation screen on
page 12.
4 Touch [Pandora] on the AV source
selection screen.
When you touch [Pandora], this product will
start establishing a Bluetooth connection.
After the connection is successfully
established, the touch panel key on the
“Pandora” screen is activated.
5 Use the touch panel keys on the
screen to control the Pandora
application.
For details, refer to Using the touch panel
keys on page 41.
■ For smartphone users
1 Unlock your smartphone.
2 Connect your smartphone.
p Connect via Bluetooth, or HDMI and
Bluetooth.
For details of the Bluetooth connection,
refer to Registering your Bluetooth
devices on page 14.
p The cable connection method varies
depending on your device.
For details, refer to Connecting the
Android™ device on page 77.
3 Display the AV source selection
screen.
For details of the operations, refer to
Displaying the AV operation screen on
page 12.
4 Touch [Pandora] on the AV source
selection screen.
When you touch [Pandora], this product will
start establishing a Bluetooth connection.
After the connection is successfully
established, the touch panel key on the
“Pandora” screen is activated.
5 Use the touch panel keys on the
screen to control the Pandora
application.
For details, refer to Using the touch panel
keys on page 41.
Selecting a Pandora station
from the list
Touch the following key.
Displays the list of Pandora
stations.
p Touch to switch to the station list.
p Touch to switch to the genre list.
p Touching plays only one track based
on particular musical characteristics, one
at a time, from several shuffled stations.
p Stations indicated by are shared
stations.
p When you touch [A-Z] or [Date], the list
items can be sorted.
A-Z: Sorts the items in the list
alphabetically.
Date: Sorts the items in the list in the
order of the dates the items were created.
p If you touch , the station will be
deleted.
A message prompting you to delete the
station appears.
Touch [Yes]. The station will be deleted.
To cancel, touch [No].
Creating a station
You can create up to 100 stations by a song
or an artist.
p You can also create a station by selecting
a station in the genre list.
p Stations cannot be created in the follow-
ing cases:
— There is no response for 15 seconds.
— The number of created stations reaches
100.
1 Touch the following key.
Displays the pop-up menu.
2 Touch the desired item.
Track:
Create a station by the song currently
being played.
Artist:
Create a station by the artist of the song
currently being played.
To cancel creating a new station, touch
[Cancel].
Operating with the hardware
buttons
Press the TRK button.
You can skip songs forward.
Using Aha Radio
WARNING
Certain uses of an iPhone or a smart-
phone may not be legal while driving in
your jurisdiction, so you must be aware
of and obey any such restrictions.
If in doubt as to a particular function,
only perform it while the car is parked.
No feature should be used unless it is
safe to do so under the driving condi-
tions you are experiencing.
When you connect an iPhone or a smart-
phone with the Aha Radio installed, you can
control, view, and/or listen to Aha Radio
content from this product.
p In this chapter, iPhone and iPod touch
will be referred to as “iPhone”.
p For details concerning operations, refer to
the Help and Tips section within the Aha
Radio application.
p Aha Radio stations may require initial
setup or sign in before the station can be
accessed.
p Be sure to read Using app-based con-
nected content before you perform this
operation.
For details, refer to Using app-based
connected content on page 91.
Notes:
Certain functionality of the Aha Radio
service may not be available when
accessing the service through this
product, including, but not limited to,
creating new Aha stations, deleting Aha
stations, recording ‘shouts’ by voice,
adjusting Aha Radio App settings, log-
ging into Facebook, creating a Facebook
account, logging into Twitter, or creating
a Twitter account.
Aha Radio is a service not affiliated with
Pioneer. More information is available at
http://www.aharadio.com/.
A specific version of the Aha Radio appli-
cation must be installed on your iPhone
or smartphone to enjoy Aha Radio con-
tent on this product.
Because the application for the iPhone
or smartphone is not provided by
Pioneer, the required version of the
application may not yet be available at
the time of purchase of this product.
Availability, version and update informa-
tion can be found at
http://www.pioneerelectronics.com/
aharadio
Using the touch panel keys
1 32
4
5
6
8
7
1 Displays the source list.
For details, refer to Selecting a front
source on the source list on page 13.
2 Displays the Time and date setting
screen.
For details, refer to Setting the time and
date on page 70.
3 Displays the Setting menu screen.
4 Recalls equalizer curves.
For details, refer to Using the equalizer on
page 64.
5 Selects an Aha Radio station from the
list.
Touching this key displays the list of the
available Aha Radio stations. Touch the
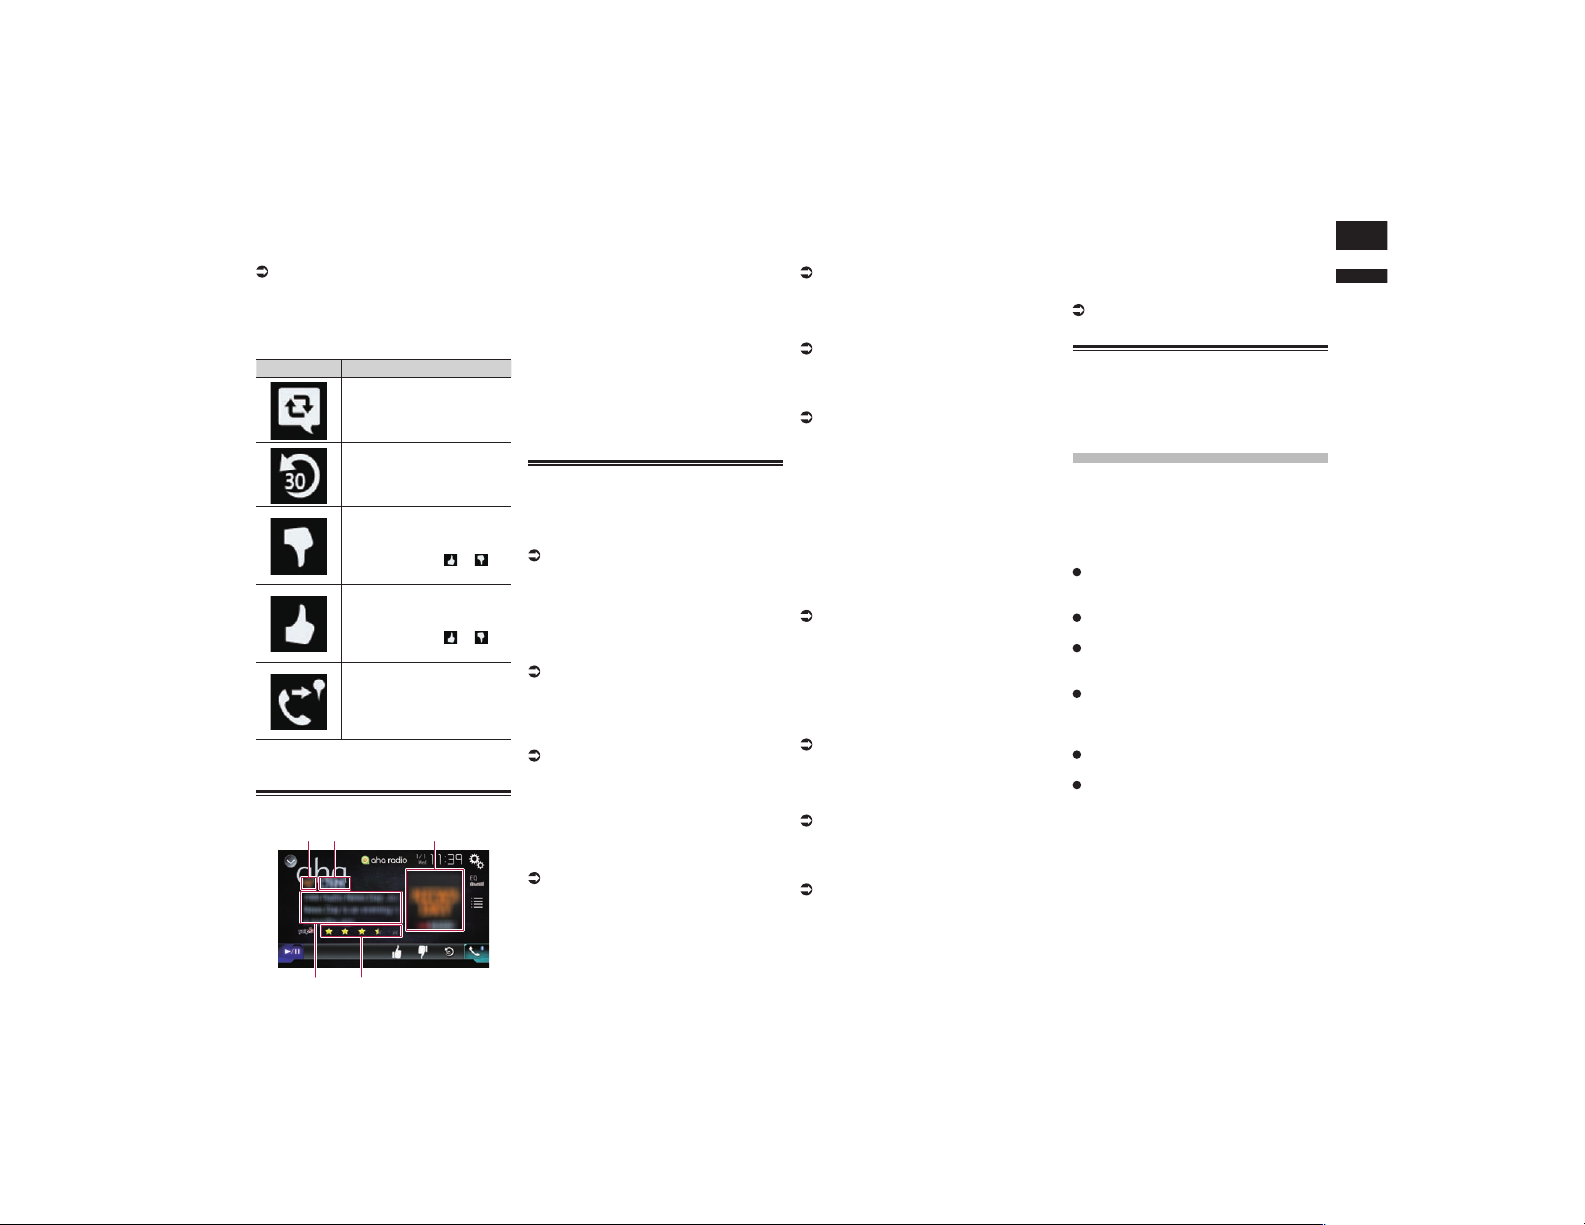
English
16
Chapter
43
En
desired Aha Radio station to change Aha
Radio sources.
6 Displays the Phone menu screen.
For details, refer to Displaying the phone
menu on page 16.
7 Performs additional functions of each
station or content currently playing.
p The icons displayed vary depending on
each station or content.
Indicator Meaning
Touching the key retweets
the selected tweets with your
Twitter account.
Touching the key performs
fast reverse of the current
content for 30 seconds.
Touching the key “dislikes”
the current content.
p Depending on the con-
tent, touching or
cancels “dislikes”.
Touching the key “likes” the
current content.
p Depending on the con-
tent, touching or
cancels “likes”.
Touching the key lets you
make a call to a phone num-
ber registered in the current
content using the hands-free
function.
8 Switches between playback and
pause.
Reading the screen
2
4
1
5
3
1 Station mark
2 Station name
Shows the name of the Aha Radio station
to which this product is currently tuned.
3 Content image
Displays an image of the current content
if available.
4 Rating information
Shows the rated value of the current
content displayed if available.
5 Current station information
Shows information on the content cur-
rently being played.
p The item is blank if there is no corre-
sponding information.
Starting procedure
When connecting an iPhone or smartphone
to this product, you must select the method
for connecting your device. Settings are
required according to the connected device.
For details, refer to Chapter 5.
■ For iPhone with a 30-pin connec-
tor users
1 Unlock your iPhone.
2 Connect your iPhone.
p Connect via USB or Bluetooth.
For details of the Bluetooth connection,
refer to Registering your Bluetooth
devices on page 14.
3 Display the AV source selection
screen.
For details of the operations, refer to
Displaying the AV operation screen on
page 12.
4 Touch [aha] on the AV source
selection screen.
5 Use the touch panel keys on the
screen to control Aha Radio.
For details, refer to Using the touch panel
keys on page 42.
■ For iPhone with a Lightning
connector users
1 Unlock your iPhone.
2 Connect your iPhone.
p Connect via USB, Bluetooth, or HDMI and
Bluetooth.
For details of the Bluetooth connection,
refer to Registering your Bluetooth
devices on page 14.
p The cable connection method varies
depending on your device.
For details, refer to Connecting an iPhone
with Lightning connector on page 76.
3 Display the AV source selection
screen.
For details of the operations, refer to
Displaying the AV operation screen on
page 12.
4 Touch [aha] on the AV source
selection screen.
When you touch [aha], this product will start
establishing a Bluetooth connection.
After the connection is successfully estab-
lished, the touch panel key on the “aha”
screen is activated.
5 Use the touch panel keys on the
screen to control Aha Radio.
For details, refer to Using the touch panel
keys on page 42.
■ For smartphone users
1 Unlock your smartphone.
2 Connect your smartphone.
p Connect via Bluetooth, or HDMI and
Bluetooth.
For details of the Bluetooth connection,
refer to Registering your Bluetooth
devices on page 14.
p The cable connection method varies
depending on your device.
For details, refer to Connecting the
Android™ device on page 77.
3 Display the AV source selection
screen.
For details of the operations, refer to
Displaying the AV operation screen on
page 12.
4 Touch [aha] on the AV source
selection screen.
When you touch [aha], this product will start
establishing a Bluetooth connection.
After the connection is successfully estab-
lished, the touch panel key on the “aha”
screen is activated.
5 Use the touch panel keys on the
screen to control Aha Radio.
For details, refer to Using the touch panel
keys on page 42.
Operating with the hardware
buttons
Press the TRK button.
You can skip contents forward or backward.
Using iDatalink
By connecting the optional iDatalink
adapter, you can access the satellite radio
source provided for the vehicle and the
vehicle information can be displayed on this
product.
Important
For information on installing the iData-
link adapter, refer to the operating man-
ual of the iDatalink adapter.
After installing the iDatalink adapter, be
sure to check the operations.
For details about vehicle models that are
compatible with the iDatalink adapter,
refer to the information on our website.
Functions and displays vary depending
on the vehicle model. For details of the
functions available for each model, refer
to the information on our website.
The iDatalink list screen can be scrolled
up or down by page.
Please note that the device number of
this product and a computer with inter-
net access are required to program your
Maestro RR module. For troubleshooting
information about “iDatalink” functions,
visit www.idatalinkmaestro.com/support
or call iDatalink Maestro Technical
Support toll-free at 877.212.6169 ext
7900.
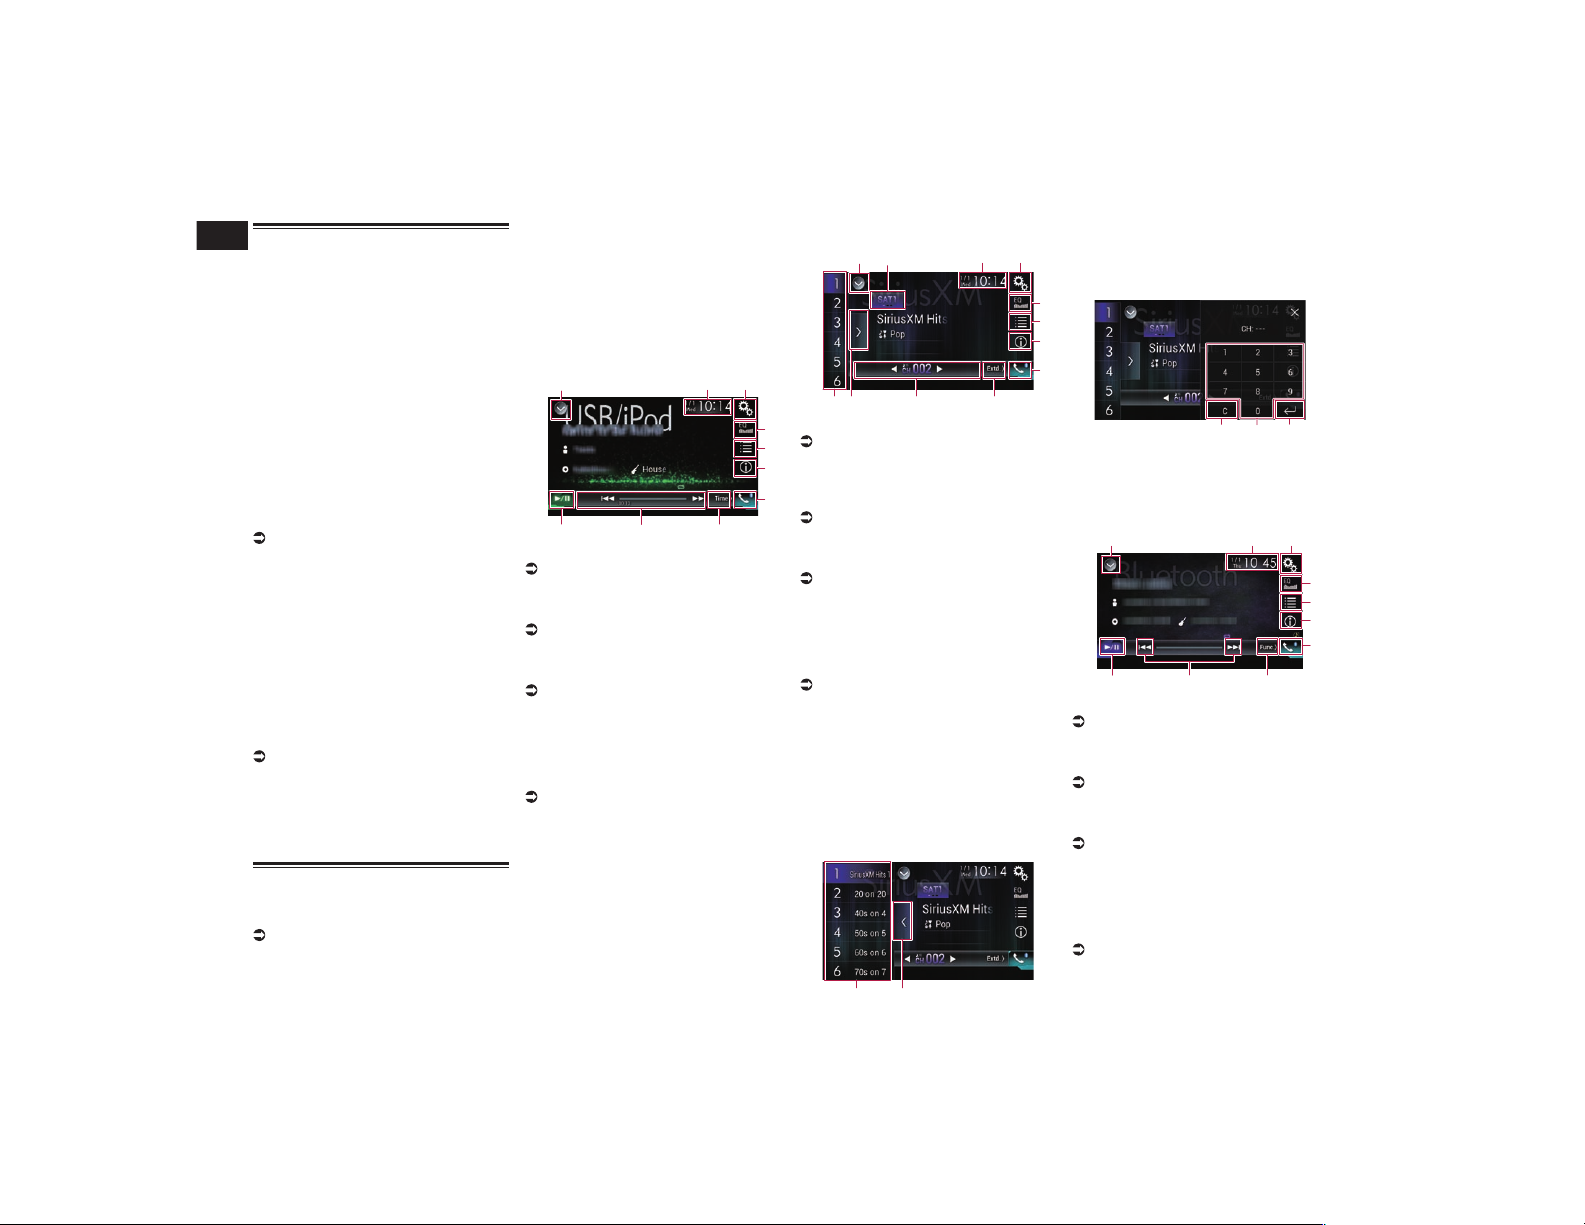
16
Chapter
44
En
Activating iDatalink Maestro
Before using and/or connecting the iData-
link Maestro adapter, you will need to first
flash the Maestro module with the appropri-
ate vehicle and head unit firmware.
■ Updating the iDatalink Maestro
module
1 Find the last six numbers (device
number) on the label on the pack-
aging of this product or on this
product itself.
p Device number input is required for
updating the iDatalink MAESTRO mod-
ule. Take a note of the device number as
necessary.
p You can also check the device number on
the “Firmware Information” screen of
this product.
For details, refer to Displaying the firm-
ware version on page 60.
2 Access the Automotive Data
Solutions Inc. website (www.idata-
linkmaestro.com/) and follow the
on-screen directions to configure
the desired firmware.
p When the serial number input is required,
please input the device number of this
product.
3 Install the vehicle/head unit spe-
cific firmware on your iDatalink
Maestro module.
For details, please refer to Automotive
Data Solutions Inc. website.
4 Connect this product to iDatalink
Maestro, and then install this prod-
uct to the vehicle.
The iDatalink function will be active.
Starting procedure
1 Display the AV source selection
screen.
For details of the operations, refer to
Displaying the AV operation screen on
page 12.
2 Touch [My Vehicle] on the AV
source selection screen.
3 Touch [USB/iPod], [SiriusXM] or
[Bluetooth Audio] when you want
to operate iDatalink.
4 Use the touch panel keys on the
screen to control the OEM feature.
USB/iPod (Media player)
1 32
8
4
5
7
a
9
6
1 Displays the source list.
For details, refer to Selecting a front
source on the source list on page 13.
2 Displays the Time and date setting
screen.
For details, refer to Setting the time and
date on page 70.
3 Displays the Setting menu screen.
4 Recalls equalizer curves.
For details, refer to Using the equalizer on
page 64.
5 Selects a track from the list.
6 Switches the text display between
tag information and file/folder
information.
7 Displays the Phone menu screen.
For details, refer to Displaying the phone
menu on page 16.
8 Switches to the next or previous
page of touch panel keys.
9 Functions and displays vary depend-
ing on the connected type of iDatalink
adapter and the vehicle model.
a Switches between playback and
pause.
Satellite Radio
1 4
9
5
6
8
c a
7
2
b
3
1 Displays the source list.
For details, refer to Selecting a front
source on the source list on page 13.
2 Selects a band.
3 Displays the Time and date setting
screen.
For details, refer to Setting the time and
date on page 70.
4 Displays the Setting menu screen.
5 Recalls equalizer curves.
For details, refer to Using the equalizer on
page 64.
6 Selects a channel from the list.
7 Switches the text display between the
current channel information and the
current content information.
8 Displays the Phone menu screen.
For details, refer to Displaying the phone
menu on page 16.
9 Switches to the next or previous
page of touch panel keys.
a Functions and displays vary depend-
ing on the connected type of iDatalink
adapter and the vehicle model.
b Displays the preset channels.
c Selects a preset channel.
Selecting a preset channel from the
preset channel list
1 2
1 Preset tuning keys
2 Preset channel list display key
Selecting a SiriusXM channel directly
1 2 3
1 Clear key
2 Numeric keys
3 Enter key
Bluetooth Audio
4
5
7
6
8
a 9
1 2
3
1 Displays the source list.
For details, refer to Selecting a front
source on the source list on page 13.
2 Displays the Time and date setting
screen.
For details, refer to Setting the time and
date on page 70.
3 Displays the Setting menu screen.
4 Recalls equalizer curves.
For details, refer to Using the equalizer on
page 64.
5 Selects a track from the list.
6 Switches the text display between
tag information and file/folder
information.
7 Displays the Phone menu screen.
For details, refer to Displaying the phone
menu on page 16.
8 Switches to the next or previous
page of touch panel keys.
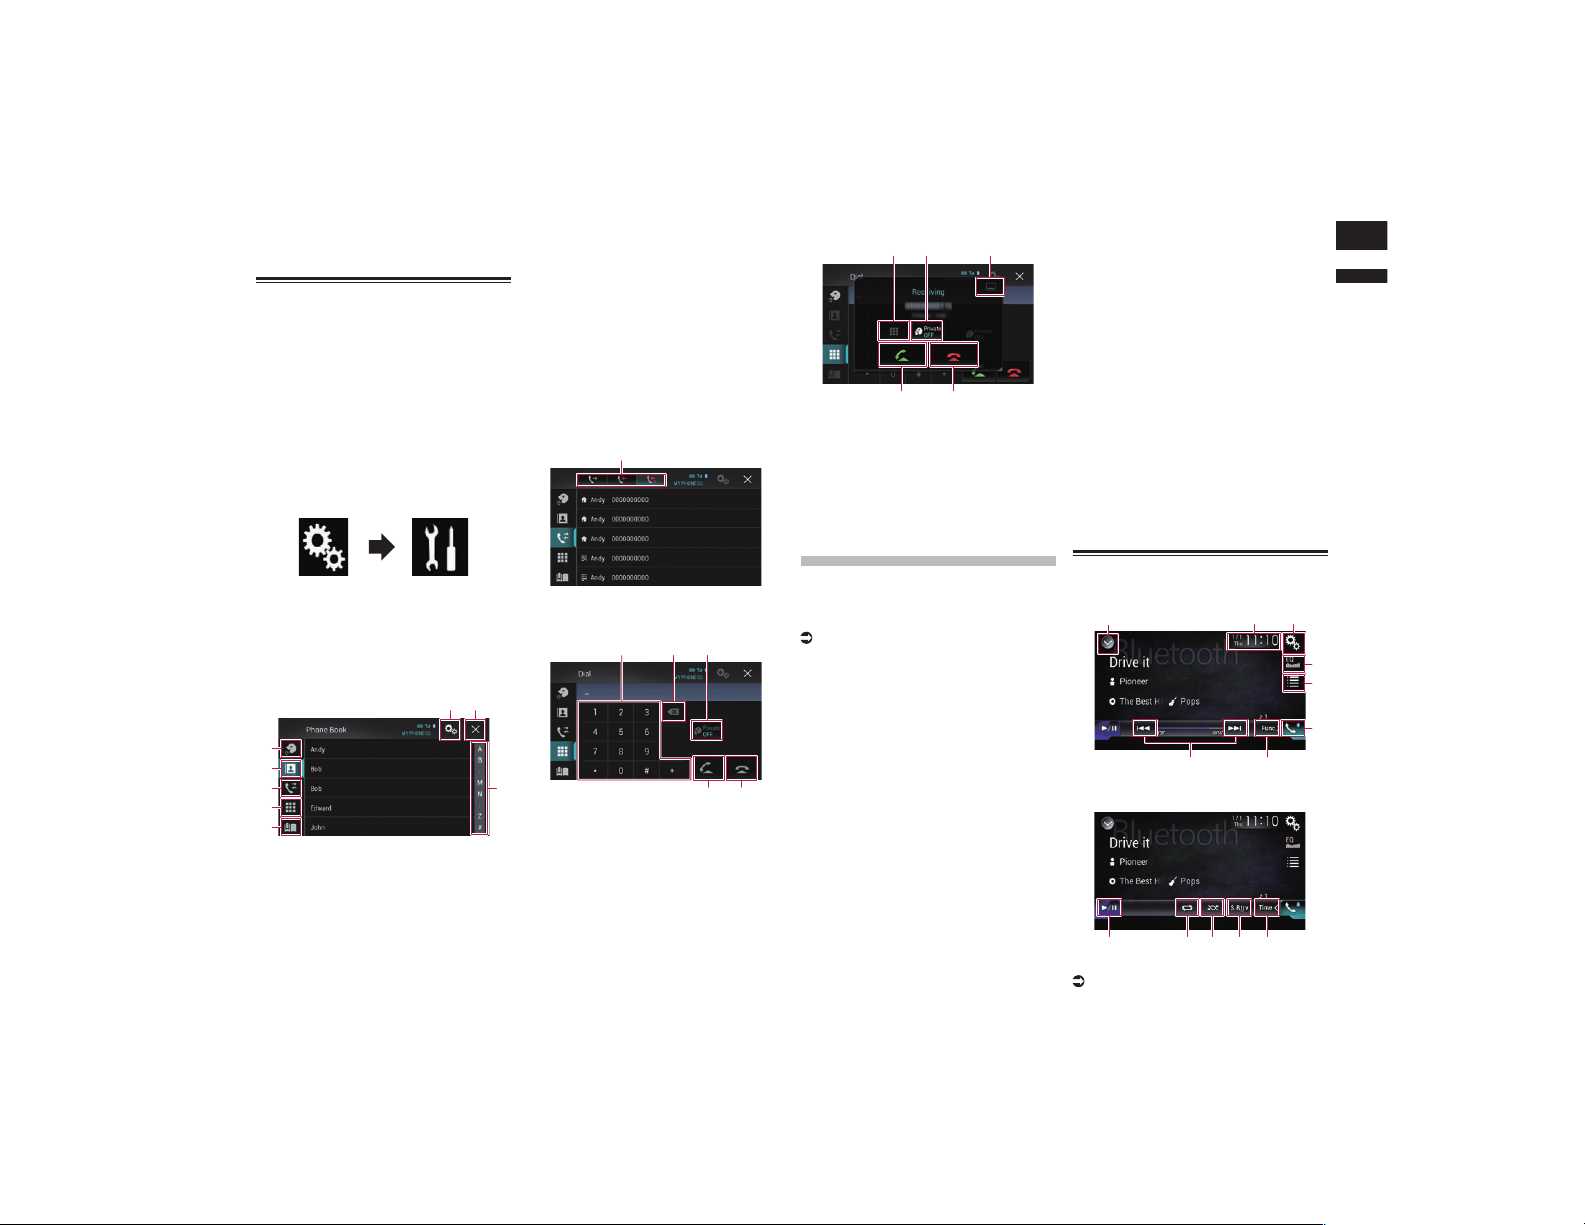
English
17
Chapter
45
En
9 Skips files forward or backward.
a Switches between playback and
pause.
Hands-free phone
By connecting this product to the vehicle
bus system using an iDatalink adapter (sold
separately), this product can access the
hands-free phone for the vehicle.
p This function is not available during a call
via this product or while using the voice
recognition function.
■ Setting Bluetooth
1 Press the HOME button to display
the Top menu screen.
2 Touch the following keys in the
following order.
The “System” screen appears.
3 Touch [OEM Setting].
p Functions and displays vary depending on
the connected type of iDatalink adapter
and the vehicle model.
■ Phone Book screen
1
6
8
2
3
4
7
5
1 Switches to the voice recognition
function.
2 Switches to the phone book list.
3 Switches to the missed, received and
dialed call lists.
4 Switches the mode to enter the phone
number directly.
5 Functions and displays vary depend-
ing on the connected type of iDatalink
adapter and the vehicle model.
6 Displays the Setting menu screen.
p The [Connection] and [Bluetooth
Settings] menus are displayed. The
available functions and displays for the
menus vary depending on the connected
type of iDatalink adapter and the vehicle
model.
7 Closes the screen.
8 Displays entries in the list by the
initial character.
■ History list screen
1
1 Switches to call history.
■ Dial screen
1 2 3
4 5
1 Dial pad
2 Deletes one digit. Touch and hold to
delete all digits.
3 Turns private mode on or off.
4 Makes a phone call, when a phone
number is selected.
Switches between callers on hold.
5 Ends a call.
Rejects an incoming call.
Cancels call waiting.
■ Dial conrmation screen
1 2
3
54
1 Switches the mode to enter the phone
number directly.
2 Turns private mode on or off.
3 Minimizes the dial confirmation
screen.
4 Accepts an incoming call.
5 Ends a call.
Using a Bluetooth
audio player
You can control a Bluetooth audio player.
p Before using the Bluetooth audio player,
you must register and connect the device
to this product.
For details, refer to Registering your
Bluetooth devices on page 14.
p Operations may vary depending on the
Bluetooth audio player.
p Depending on the Bluetooth audio player
connected to this product, the available
operations with this product may be
limited to the following two levels:
— A2DP (Advanced Audio Distribution
Profile): Only playing back songs on your
audio player is possible.
— A2DP and AVRCP (Audio/Video Remote
Control Profile): Playing back, pausing,
selecting songs, etc., are possible.
p Since a number of Bluetooth audio play-
ers are available on the market, opera-
tions with your Bluetooth audio player
using this product vary considerably in
range. Please refer to the instruction
manual that came with your Bluetooth
audio player as well as this manual while
operating your player on this product.
p While you are listening to songs on your
Bluetooth audio player, please refrain
from operating your cellular phone as
much as possible. If you try operating
your cellular phone, the signal may cause
noise for song playback.
p Even if you switch to another source while
listening to a song on your Bluetooth
audio player, song playback may
continues.
p Depending on the Bluetooth audio player
you connected to this product, operations
on this product to control the player
may differ from those explained in this
manual.
p When you are talking on a cellular phone
connected to this product via Bluetooth
wireless technology, song playback from
your Bluetooth audio player connected to
this product may be paused.
p You cannot use Bluetooth audio player
when the connecting cable for using
AppRadio Mode is connected.
Using the touch panel keys
Playback screen (page 1)
8 7
1 3
2
4
5
6
Playback screen (page 2)
79abc
1 Displays the source list.
For details, refer to Selecting a front
source on the source list on page 13.
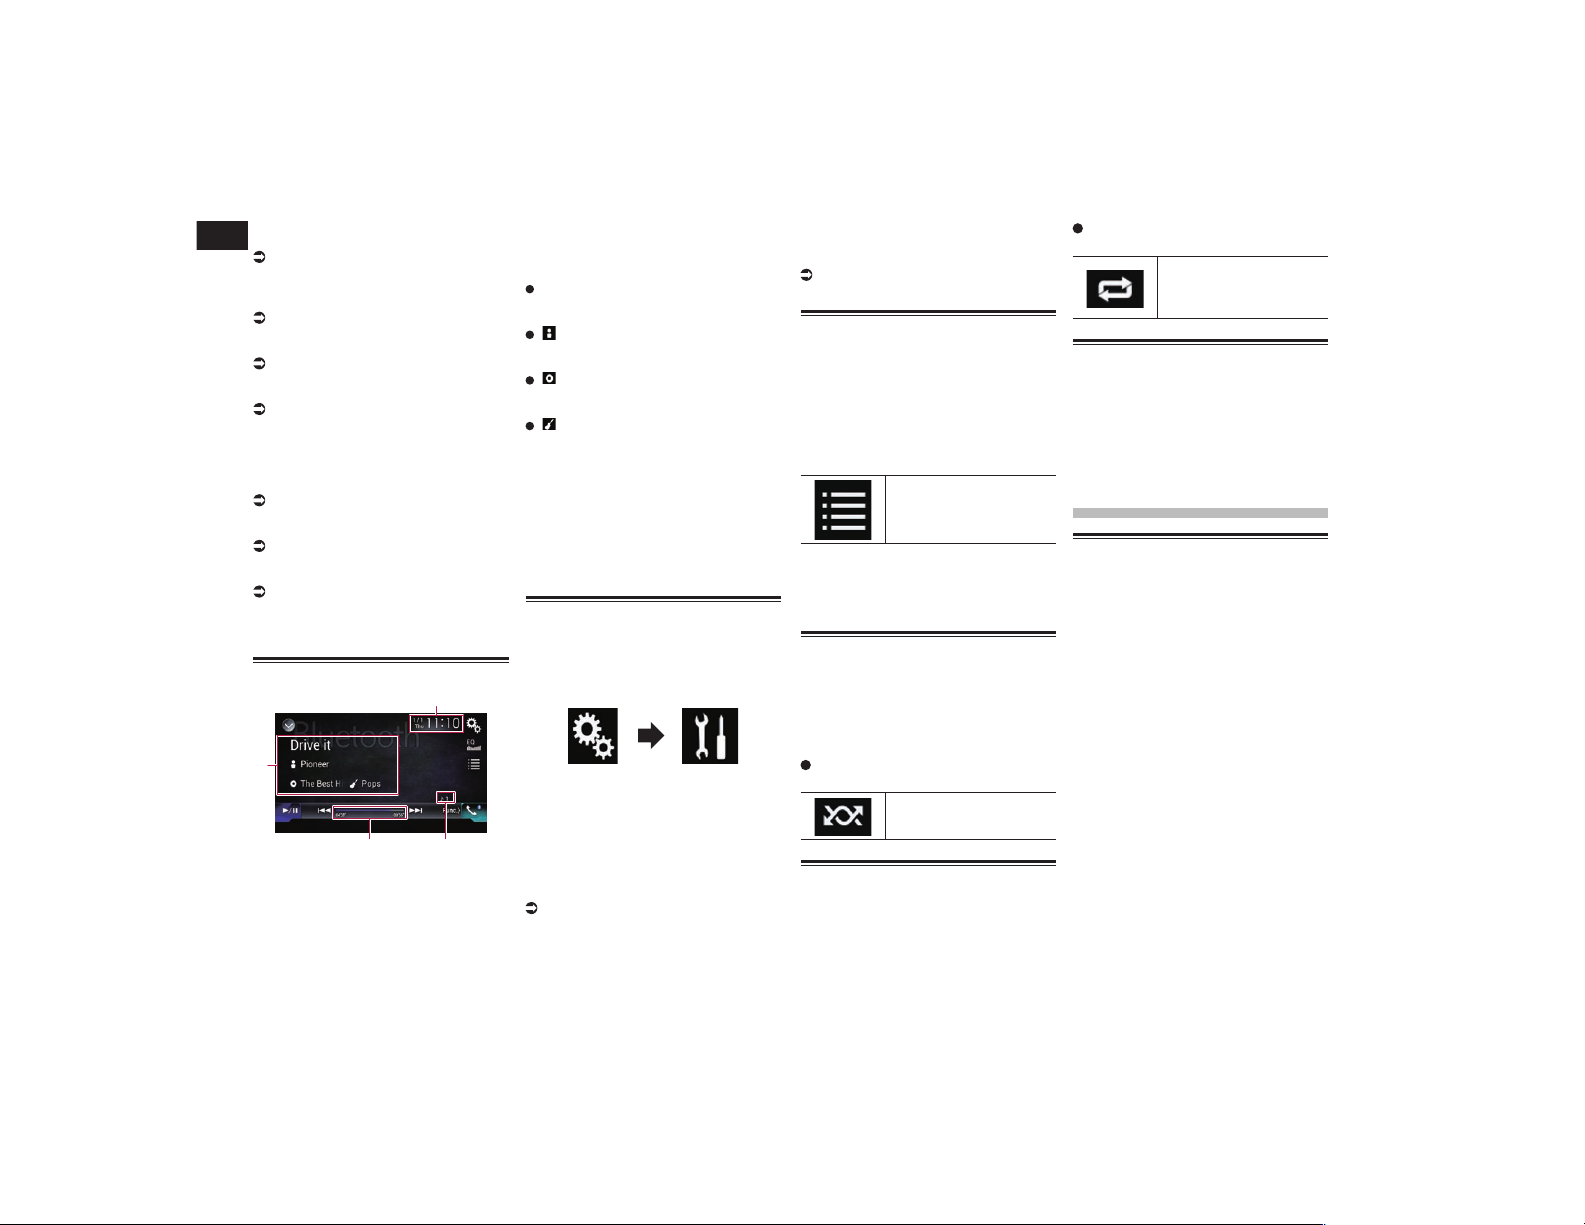
18
Chapter
46
En
2 Displays the Time and date setting
screen.
For details, refer to Setting the time and
date on page 70.
3 Displays the Setting menu screen.
4 Recalls equalizer curves.
For details, refer to Using the equalizer on
page 64.
5 Selects a file from the list.
For details, refer to Selecting files from
the file name list on page 46.
6 Displays the Phone menu screen.
For details, refer to Displaying the phone
menu on page 16.
7 Switches to the next or previous
page of touch panel keys.
8 Skips files forward or backward.
9 Uses “Sound Retriever” function.
For details, refer to Setting the “Sound
Retriever” function on page 71.
a Plays files in random order.
For details, refer to Playing files in ran-
dom order on page 46.
b Sets a repeat play range.
For details, refer to Setting a repeat play
range on page 46.
c Switches between playback and
pause.
Reading the screen
4
1
23
1 Current time and date
2 File number indicator
Shows the file number currently playing
(when available).
3 Play time indicator
Shows the elapsed playing time within
the current file (when available).
4 Current file information
If the connected Bluetooth audio player
features AVRCP 1.3, the following file
information will be displayed.
Track title
Shows the title of the track currently
playing (when available).
: Artist name
Shows the name of the artist for the track
currently playing (when available).
: Album title
Shows the title of the album of the cur-
rent file (when available).
: Genre
Shows the genre of the current file (when
available).
p In the following cases, file information
will only be displayed after a file starts or
resumes playing:
— Bluetooth audio player compatible with
AVRCP1.3 is connected, and the playback
is started by the operation on the device.
— Another file is selected while playback is
paused.
Starting procedure
1 Press the HOME button to display
the Top menu screen.
2 Touch the following keys in the
following order.
The “System” screen appears.
3 Touch [AV Source Settings].
4 Confirm that “Bluetooth Audio” is
turned on.
p The default setting is “On”.
5 Display the AV source selection
screen.
For details of the operations, refer to
Displaying the AV operation screen on
page 12.
6 Touch [Bluetooth Audio] on the AV
source selection screen.
The “Bluetooth” screen appears.
7 Use the touch panel keys on the
screen to control the Bluetooth
audio player.
For details, refer to Using the touch panel
keys on page 45.
Selecting les from the le
name list
The file name list lets you see the list of track
titles for the Bluetooth audio player and lets
you select one of them to play back.
p This function is only available when the
connected Bluetooth audio player sup-
ports AVRCP 1.4.
1 Touch the following key.
Displays the file name list.
2 Touch a file on the list to play back.
p Touching a folder on the list shows its
contents. You can play a file on the list by
touching it.
Playing les in random order
All of the files within the repeat play range
can be played at random by only touching a
single key.
p This function is only available when the
connected Bluetooth audio player sup-
ports AVRCP 1.3.
Touch the following key repeatedly
until the desired setting appears.
Turns random play on or off.
Setting a repeat play range
The repeat play range can be changed by
only touching a single key.
p This function is only available when the
connected Bluetooth audio player sup-
ports AVRCP 1.3.
Touch the following key repeatedly
until the desired setting appears.
Changes the repeat play
range between the current
file and all audio files in the
Bluetooth audio player.
Operating with the hardware
buttons
Press the TRK button.
You can skip files forward or backward.
Press and hold the TRK button.
You can perform fast reverse or fast forward.
Using the SiriusXM
®
sat-
ellite radio
SiriusXM satellite radio
operations
You can use this product to control a
SiriusXM Connect Vehicle Tuner (sold
separately).
For information on how to install the
SiriusXM Connect Vehicle Tuner, consult the
installation guide included with the tuner.
Only SiriusXM
®
brings you more of what you
love to listen to, all in one place. Get over 140
channels, including commercial-free music
plus the best sports, news, talk, comedy
and entertainment. Welcome to the world of
satellite radio. A SiriusXM Vehicle Tuner and
Subscription are required. For more informa-
tion, visit www.siriusxm.com.
■ Subscribing to the SiriusXM
Satellite Radio service
1 Select SiriusXM as the source.
You should be able to tune in to Channel 1. If
you cannot get Channel 1, ensure that your
SiriusXM Connect Vehicle Tuner is installed
correctly as described in the tuner installa-
tion guide.
2 Switch to Channel 0 and check the
Radio ID.
The SiriusXM Radio ID can be found by tun-
ing in to Channel 0. The Radio ID can also be

English
18
Chapter
47
En
found at the bottom of the SiriusXM Connect
Vehicle Tuner screen.
Note that the SiriusXM Radio ID does not
include the letters I, O, S or F.
You will need this number to activate your
subscription.
3 Activate the service either online or
by phone.
In the USA, you can activate online or by
calling SiriusXM Listener care:
Visit www.siriusxm.com/activatenow
Call SiriusXM Listener Care at
1-866-635-2349
For Canadian Subscriptions, please contact:
Visit www.siriusxm.ca/activatexm
Call XM customer Care at 1-877-438-9677
The SiriusXM satellites will send an
activation message to your tuner. When
the tuner has received the message,
“Subscription Updated” is displayed.
Once you have subscribed, SiriusXM
satellites will send an activation message
to your tuner.
The activation process usually takes 10 to
15 minutes but may take up to an hour in
some cases. Do not turn off this product
while the activation message is displayed.
Using the touch panel keys
Live display
1 2 43
5
7
6
8
bc 9ae
df
g
Replay display
hij
7
1 Displays the source list.
For details, refer to Selecting a front
source on the source list on page 13.
2 Selects a band.
3 Displays the Time and date setting
screen.
For details, refer to Setting the time and
date on page 70.
4 Displays the Setting menu screen.
5 Recalls equalizer curves.
For details, refer to Using the equalizer on
page 64.
6 Selects a channel from the list.
For details, refer to Selecting a channel
from a list of all channels on page 48.
For details, refer to Selecting a channel
from the category list on page 48.
7 Switches between the Live screen and
the Replay screen.
For details, refer to Using the Replay™
function on page 49.
8 Displays the Phone menu screen.
For details, refer to Displaying the phone
menu on page 16.
9 Switches to the channel broadcasting
the traffic and weather information for
the selected city.
For details, refer to Checking the update
Traffic and Weather information on
page 50.
a Memorizes the current channel.
For details, refer to Memorizing the cur-
rent contents on page 50.
Stores song information to an iPod.
For details, refer to Storing song infor-
mation to an iPod (iTunes Tagging) on
page 70.
b Selects a channel directly.
For details, refer to Selecting a SiriusXM
channel directly on page 48.
c Performs manual tuning.
For details, refer to Manual tuning on
page 48.
d Plays back the songs from the music
channels stored as presets in the
current band.
For details, refer to Using TuneMix™ on
page 49.
e Displays the preset channels.
For details, refer to Selecting a preset
channel from the preset channel list on
page 48.
f Scans all the songs for the music
channels found in the current preset
band.
For details, refer to Using TuneScan™ on
page 49.
g Recalls the preset channel stored to a
key from memory with a single touch
of the key.
Stores the current broadcast fre-
quency to a key for later recall by
continuing to touch the key.
For details, refer to Storing broadcast
channels on page 48.
h Changes the playback point by drag-
ging the key.
For details, refer to Operating the time bar
on page 14.
i Skips files forward or backward with
a single touch of the key.
Fast forwards or fast reverses by
touching and holding the key.
j Switches between playback and
pause.
Reading the screen
Live display
5
4
1
2 3
9
a
8 67
Replay display
c b
1 Band indicator
Shows the tuned band: SXM1, SXM2,
SXM3 or Featured.
p “Featured” is available only when
“Featured Favorites” is set to “On”.
2 Channel name logo
Shows the name logo of the channel
currently being tuned into.
3 Current time and date
4 Album artwork
Shows the artwork for the current song
(when available).
p If the album artwork is not available, the
SiriusXM Logo image will be displayed.
5 iTunes
®
tagging song status indicator
Shows the status of the song information
stored in this product.
p The icon is displayed on all operation
screens of AV sources.
Indicator Meaning
Appears when the song infor-
mation tag is stored in this
product.
Appears when the song infor-
mation tag is being transferred
to an iPod.
6 iTunes
®
tagging indicator
Indicates songs that are capable of iTunes
tagging.

18
Chapter
48
En
p The icon is displayed on all operation
screens of AV sources.
Indicator Meaning
Appears when this product
receives an iTunes song tag
that can be stored and then
downloaded to an iPod for later
purchase.
Flashes when this product is
storing song tag information.
7 Channel number indicator
Shows the channel number to which the
tuner is currently tuned.
8 Signal level indicator
9 Current channel information
Shows the detailed information of the
broadcast channel currently being
received.
Channel name/Channel number
Shows the channel name or channel
number of the channel currently being
tuned into.
p “RADIO ID” is displayed when Channel 0
is selected.
: Artist (performer) name
Shows the artist (performer) name for the
current song (when available).
: Song title (program name)
Shows the title of the current song
(program).
a Preset number indicator
Highlights the selected preset item.
b Play time indicator
Shows the elapsed playing time within
the stored broadcast.
c Current content information
Shows the detailed information on the
content currently being played.
Channel name/Channel number
Shows the channel name or channel
number of the channel currently being
tuned into.
p “RADIO ID” is displayed when Channel 0
is selected.
: Artist (performer) name
Shows the artist (performer) name for the
current song (when available).
: Song title (program name)
Shows the title of the current song
(program).
Starting procedure
1 Display the AV source selection
screen.
For details of the operations, refer to
Displaying the AV operation screen on
page 12.
2 Touch [SiriusXM] on the AV source
selection screen.
The “SiriusXM” screen appears.
3 Use the touch panel keys on the
screen to control the radio.
For details, refer to Using the touch panel
keys on page 47.
Manual tuning
Touch the following keys to tune
manually.
Moves down one channel at
a time.
Moves up one channel at a time.
p If you keep holding or , you can skip
broadcasting channels.
Selecting a preset channel
from the preset channel list
Once you have stored broadcast channels,
you can easily recall preset channels from
memory with a single touch of a key.
For details, refer to Storing broadcast
frequencies on page 23.
1 Touch the preset channel list dis-
play key.
1
1 Preset channel list display key
2 Touch the item on the list (“1” to
“6”) to switch to a channel regis-
tered as a preset channel.
p If you touch the preset channel list
display key while the preset channel list
is displayed, the list disappears and the
preset tuning keys are displayed.
Storing broadcast channels
With a touch of any of the preset tuning keys
(“1” to “6”), you can easily store up to six
broadcast channels for later recall (also with
the touch of a key).
p The broadcast channel may not be stored
depending on the broadcast channel.
p This function is not available in Featured
band.
1 Select the channel that you want to
store in memory.
2 Touch and hold a preset tuning key
[1] to [6].
The selected channel is memorized.
The next time you touch the same preset
tuning key “1” to “6”, the channel is recalled
from memory.
p Up to 18 channels, six for each of the
three SiriusXM bands, can be memorized.
Selecting a SiriusXM channel
directly
You can select a broadcast channel directly
by entering the desired channel number.
1 Touch the channel number on the
“SiriusXM” screen.
2 Touch [0] to [9] to input the desired
channel number.
p To delete the entered numbers one by
one, touch [C].
3 Touch the following key.
Selects the SiriusXM chan-
nel of the entered number.
4 Touch the following key.
Returns to the previous
screen.
Selecting a channel from a list
of all channels
You can select a channel from any of the
available channels.
p It may take time to display the channel
list depending on the SiriusXM reception
condition.
1 Touch the following key.
Displays the list screen.
2 Select the list of all channels.
3 Touch the desired channel.
4 Touch the following key.
Closes the screen.
Selecting a channel from the
category list
You can select a channel from the available
categories.
The types of categories available depend on
the types of channels available.
p It may take time to display the channel
list depending on the SiriusXM reception
condition.
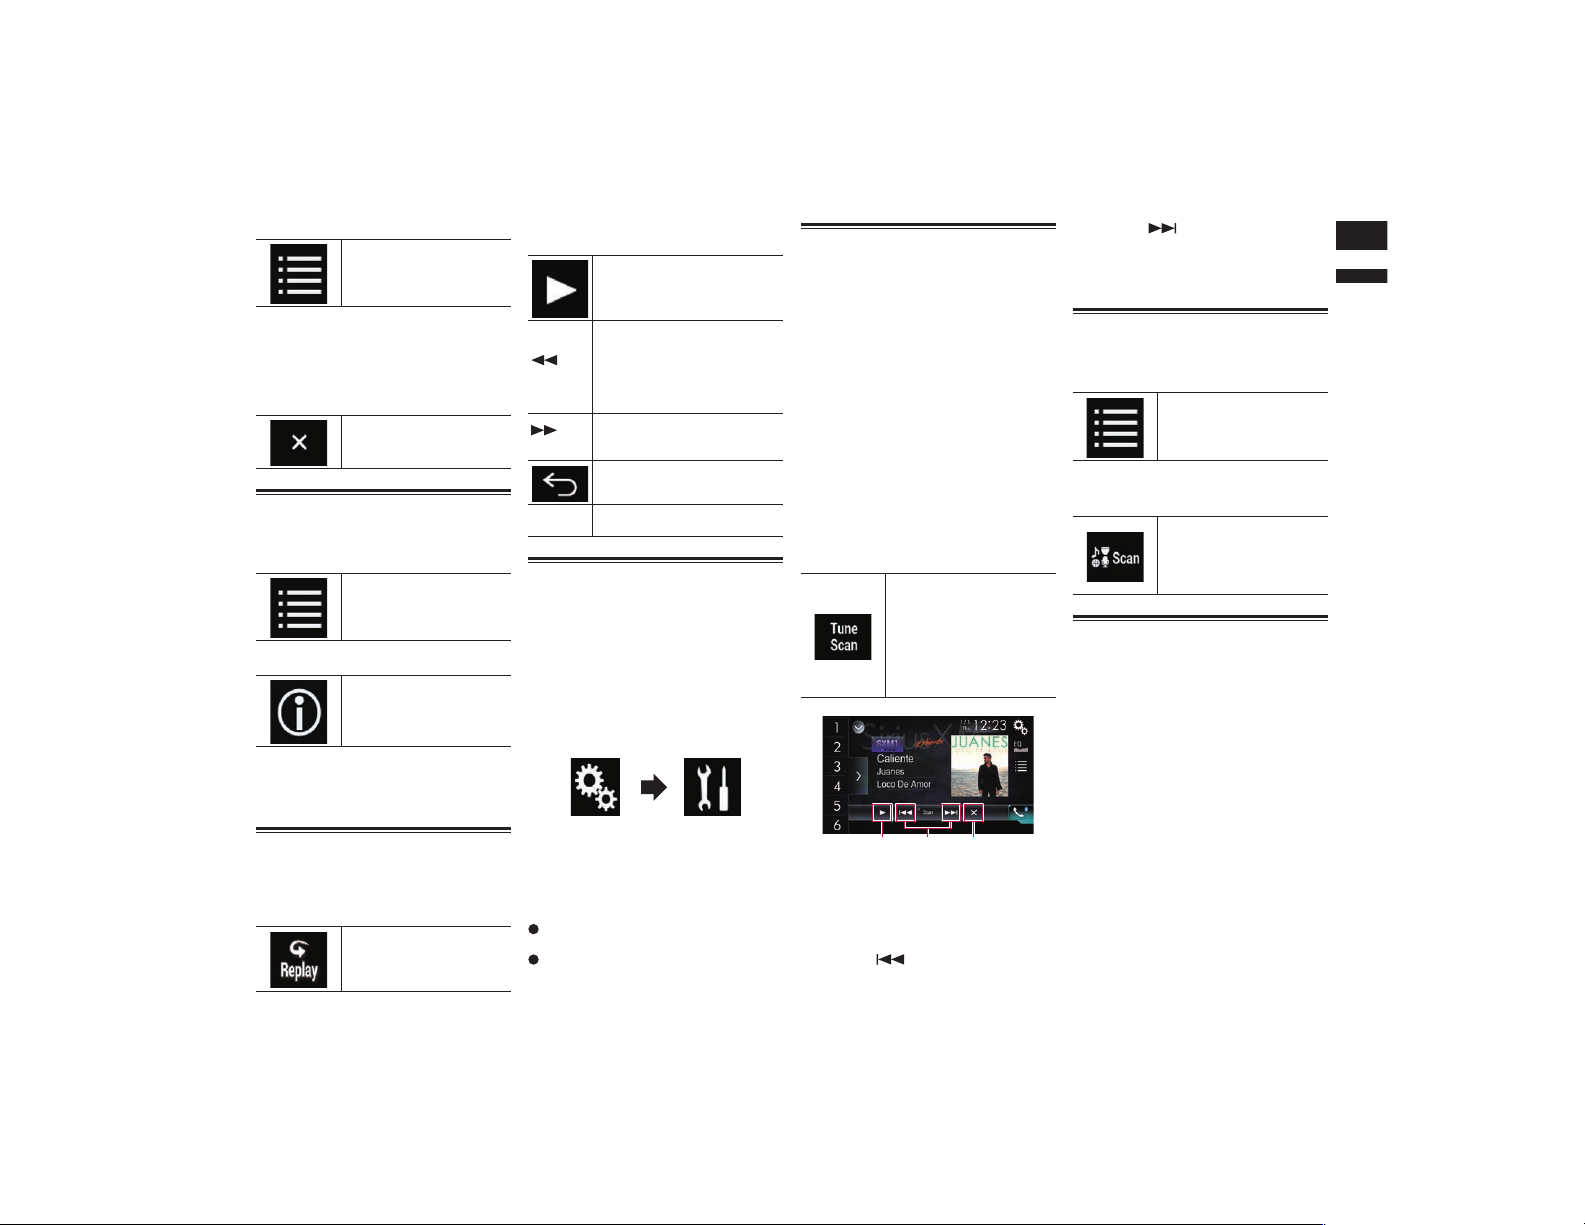
English
18
Chapter
49
En
1 Touch the following key.
Displays the list screen.
2 Touch the category name you want.
The category in the hierarchy under the
selected channel list is displayed.
3 Touch the desired channel.
4 Touch the following key.
Closes the screen.
Switching the displayed list
You can switch between list types when a list
is displayed.
1 Touch the following key.
Displays the list screen.
2 Touch the following key.
Switches between list types.
The displayed list switches in the following
order.
Channel Name—Artist Name—Song Title—
Content Info
Using the Replay™ function
You can pause, skip contents, fast reverse,
fast forward or replay the channel you are
currently listening to.
1 Touch the following key.
Switches to the time bar
display.
2 Touch the following keys or but-
tons to control the radio.
Switches between playback and
pause.
(TRK)
Returns to the beginning of the
current program. Press again
to skip back to the previous
program. Press and hold to
fast reverse scan through the
content.
(TRK)
Jumps to the next program.
Press and hold to fast forward
scan through the content.
Exits Replay mode and tunes
into the current live broadcast.
Time bar
Changes the playback point by
dragging the key.
Setting SiriusXM TuneStart™
Automatically start songs from the begin-
ning when you tune to one of your preset
channels in the current preset band when
TuneStart is turned on.
p This function is available only when
“SiriusXM” is selected as the source.
1 Press the HOME button to display
the Top menu screen.
2 Touch the following keys in the
following order.
The “System” screen appears.
3 Touch [AV Source Settings].
4 Touch [SiriusXM Settings].
5 Touch [Tune Start] repeatedly until
the desired setting appears.
On (default):
Activates the TuneStart function.
Off:
Deactivates the TuneStart function.
Using TuneScan™
When you activate the TuneScan™ feature,
you will hear a few seconds of the songs,
which have not been listened to, from each
of the music channels stored as presets on
the current band.
p This function is available only when the
channel that is tuned in to supports the
TuneScan function.
p If fewer than two music channels are
stored as presets in the current band,
the message, “No Content” is displayed,
and you cannot perform scan tuning. Add
more music channels as presets.
p TuneScan may take a few minutes to
become available after the unit is turned
on or the preset band is changed.
1 Touch the preset channel list dis-
play key.
The preset channel list appears.
2 Touch the following key.
Scans music channels in
the current band for songs,
plays a found song for a few
seconds, and then continues
to scan another song. Each
song on the current channel
plays for a few seconds at
a time.
1 32
1 Continues playing the current scan-
ning song or channel.
p You can stop the TuneScan feature to
listen to the current song and remain
listening to the channel it is on.
2 Skips forward or backward.
Touching [ ] skips to the previous
song during TuneScan or to the previous
channel during category scan.
Touching [ ] skips to the next song
during TuneScan or to the next channel
during category scan.
3 Cancels scan play and returns to the
original channel.
Using category scan
You can scan each channel in the selected
category.
1 Touch the following key.
Displays the list screen.
2 Touch the desired category.
3 Touch the following key.
Performs scan tuning in the
selected category. The live
broadcast for each channel
in the current category plays
for six seconds at a time.
Using TuneMix™
TuneMix™ plays a unique blend of songs
from music channels stored in the current
SiriusXM Preset Band.
p SXV300 or later SiriusXM Connect vehicle
tuner (sold separately) is required to use
this function.
p If fewer than two music channels are
stored as presets in the current band, the
message, “No qualified TuneMix music
channels in this band.” is displayed,
and you cannot use TuneMix™. Add
more music channels to presets.
p TuneMix may take a few minutes to
become available after the unit is turned
on or the preset band is changed.
p If the same channels are stored in the
preset channel list, the channels are
counted as one.
p The channels that parental lock is applied
to cannot be played back by the TuneMix
function.
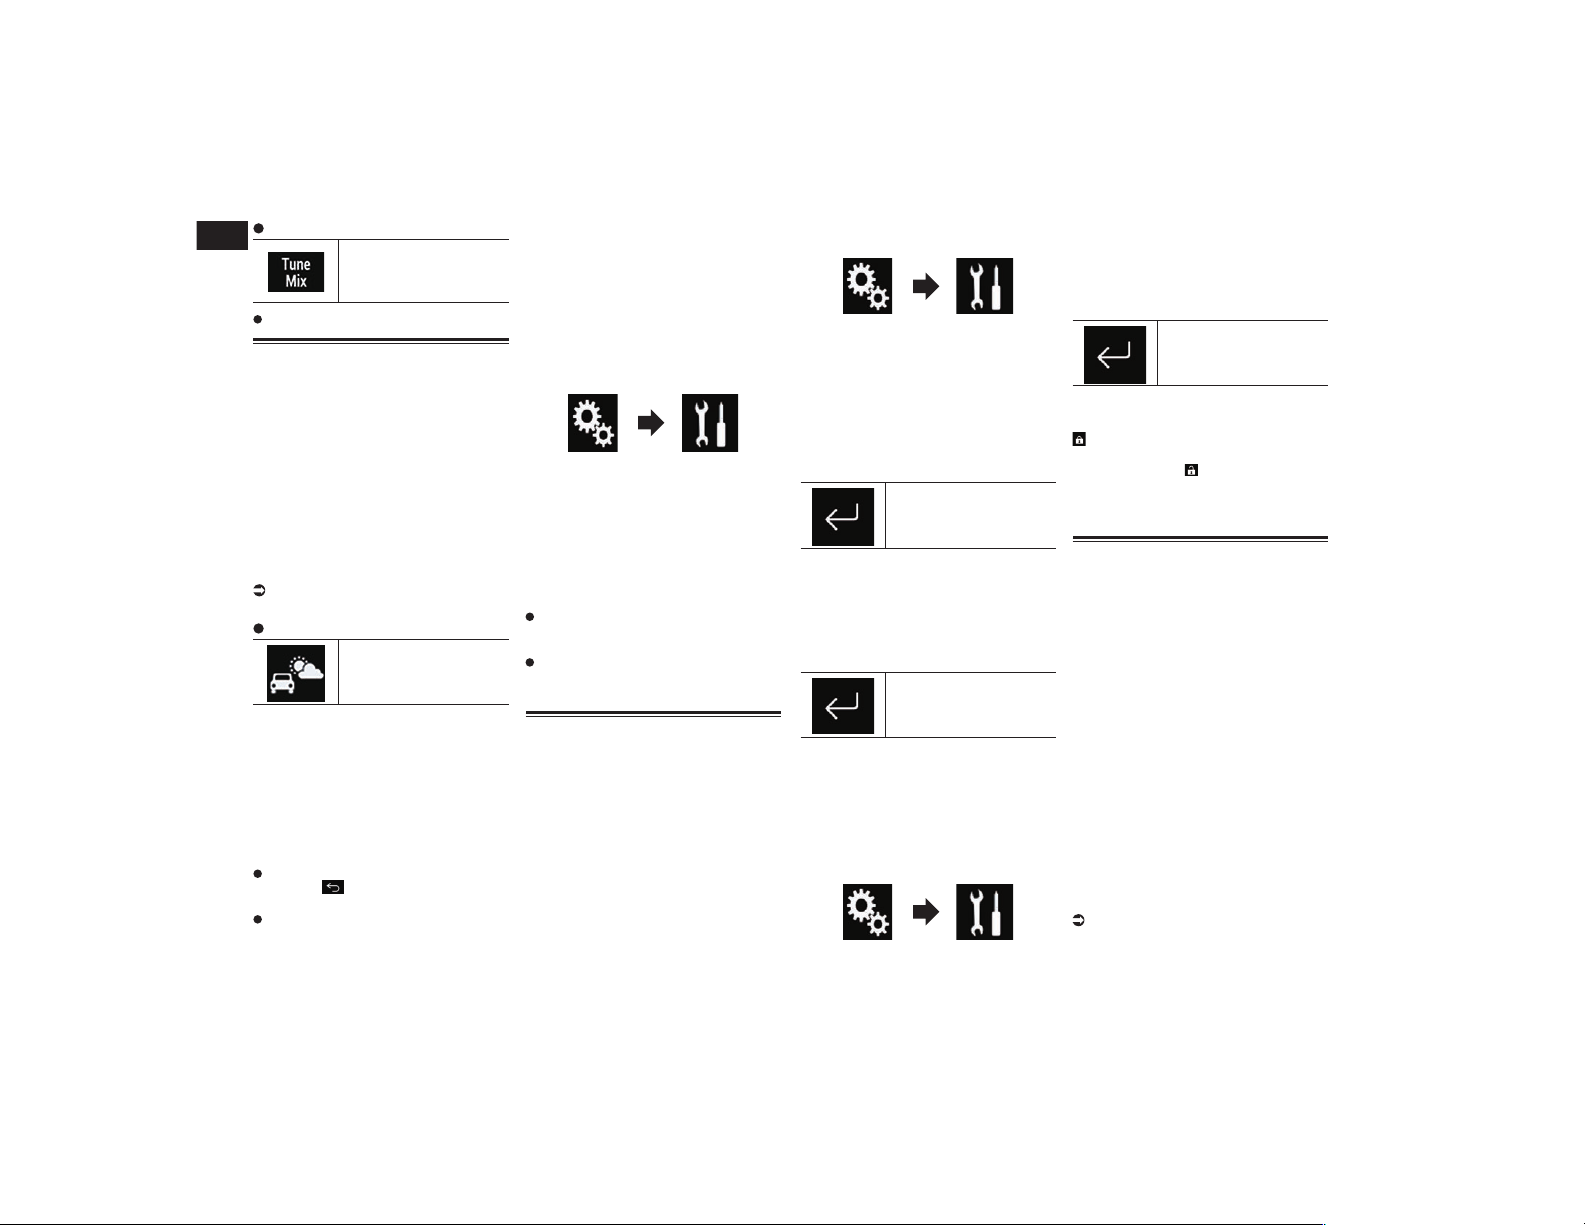
18
Chapter
50
En
Touch the following key.
Plays back the songs from
the music channels stored
as presets in the current
band.
To cancel TuneMix, touch the key again.
Checking the update Trafc
and Weather information
Traffic & Weather Now™ allows you
to access the latest report ready for you
whenever you want to hear it. Set up your
favorite traffic & weather city from the set up
menu and then when you press the Traffic
& Weather Now button you will be able to
hear the latest report and it will start from
the beginning.
p SXV300 or later SiriusXM Connect vehicle
tuner (sold separately) is required to use
this function.
p To use this function, register the desired
city in advance.
For details, refer to Registering the city on
page 50.
Touch the following key.
Switches to the channel
broadcasting the traffic and
weather information for the
selected city.
p The icon display indicates as follows.
— Grayed out: Traffic & Weather broadcast
for your market is not yet available.
— With green dot: latest report available but
not listened to yet.
— White: latest report available to hear
again.
p If the key is touched when a target city
is not registered, the “City” screen is
displayed.
You can return to the original channel by
pressing while listening to the traffic
and weather channel.
The channel automatically returns to
the original channel after the broadcast
reaches the end of the traffic and weather
information.
■ Registering the city
p SXV300 or later SiriusXM Connect vehicle
tuner (sold separately) is required to use
this function.
p This function is available only when
“SiriusXM” is selected as the source.
1 Press the HOME button to display
the Top menu screen.
2 Touch the following keys in the
following order.
The “System” screen appears.
3 Touch [AV Source Settings].
4 Touch [SiriusXM Settings].
5 Touch [City Setting].
The “City” screen appears.
6 Touch the desired city.
p A check mark appears for the selected
item.
If you touch [No City Selected], the
check mark will be removed from the
selected city.
If you remove the check mark from the
selected city, a check mark automatically
appears for “No City Selected”.
Setting parental lock
The SiriusXM Parental Control feature allows
you to control access to channels that you
consider inappropriate for younger listeners.
When enabled, the Parental Control feature
requires you to enter a passcode to tune into
the locked channels.
■ Setting the passcode
p This function is available only when
“SiriusXM” is selected as the source.
1 Press the HOME button to display
the Top menu screen.
2 Touch the following keys in the
following order.
The “System” screen appears.
3 Touch [AV Source Settings].
4 Touch [SiriusXM Settings].
5 Touch [Parental Control].
The “Parental Control” screen appears.
6 Enter the passcode.
p The default passcode is “0000”.
7 Touch the following key.
Displays the “Locked
Channel” screen.
8 Touch [Edit Code].
The “Edit Code” screen appears.
9 Enter the passcode you want to set.
p To delete the entered numbers one by
one, touch [C].
10 Touch the following key.
Displays the “Locked
Channel” screen.
■ Locking the channel
p This function is available only when
“SiriusXM” is selected as the source.
1 Press the HOME button to display
the Top menu screen.
2 Touch the following keys in the
following order.
The “System” screen appears.
3 Touch [AV Source Settings].
4 Touch [SiriusXM Settings].
5 Touch [Parental Control].
The “Parental Control” screen appears.
6 Enter the current passcode.
7 Touch the following key.
Displays the “Locked
Channel” screen.
8 Touch the channel you want to
lock.
appears and the channel is locked.
p If you touch a locked channel, the
icon switches to and the channel is
unlocked.
p If you touch [Clear All], all locked chan-
nels are unlocked.
Using the content alerts func-
tion (such as Song Alerts,
Artist Alerts and Game Alerts)
While listening to SiriusXM Satellite Radio,
you can be alerted when your favorite songs,
artists or games involving your favorite
sports teams are playing on other channels.
The radio will display an alert message when
a matching artist, song or team is found on
another channel. Then you can choose if
you want to tune into that favorite or you can
ignore it and stay on your current channel.
Information on setting up the Artist, Song
and Game Alerts is described below.
■ Memorizing the current
contents
The song titles, artist names, and your favor-
ite sport teams to which you are listening
can be memorized to an alert list.
1 On the current channel content
information area, touch the item for
which you want an alert.
For details, refer to Using the touch panel
keys on page 47.
A confirmation message appears.

English
18
Chapter
51
En
2 Touch [Set Alert] for artist or song,
or touch [Team1] or [Team2] for
game.
The song, artist, or game is memorized to
an alert list.
When a program that matches a keyword
memorized to the alert list is broadcast, a
beep sounds and a message is displayed.
3 Touch [Jump] to switch to the
channel.
You can listen to the track.
p You can enable or disable alerts by setting
the alert function.
p Notification may not be provided depend-
ing on the status of this product.
If you touch [Stay], the channel will not
switch.
Setting the program you want
to be alerted for
1 Press the HOME button to display
the Top menu screen.
2 Touch the following keys in the
following order.
The “System” screen appears.
3 Touch [AV Source Settings].
4 Touch [SiriusXM Settings].
5 Touch [Alert List].
The “Alert List” screen appears.
6 Touch the artist name, song title
or team you want to be alerted for
when available.
The alert indicator is highlighted, and the
alert setting is enabled.
p If you touch the indicator highlighted, the
alert setting is canceled.
p If you touch and hold the list item, you
can delete the item from the list.
p You can register up to 50 keywords in the
alert list.
1 2
1 Delete All
Deletes all items memorized to the alert
list.
2 Alert On/Alert Off
Changes the settings in the following
order each time you touch the key.
Alert On (default):
Activates the alert function.
Alert Off:
Deactivates the alert function.
Selecting teams for Game
Alert
This product can notify you when games
involving your favorite sports teams are
about to start. To use this function, you need
to store the teams you want to follow in
advance.
1 Press the HOME button to display
the Top menu screen.
2 Touch the following keys in the
following order.
The “System” screen appears.
3 Touch [AV Source Settings].
4 Touch [SiriusXM Settings].
5 Touch [Team Settings].
The “League” screen appears.
6 Touch the desired league.
7 Touch the desired team.
The team settings are enabled.
Setting the Featured Favorites
function
Featured Favorites are groups of chan-
nels that are created by the SiriusXM
Programming department allowing you to
discover new channels. Featured Favorite
channels are dynamic and can change
often, allowing you to discover new
channels.
p This function is available only when
“SiriusXM” is selected as the source.
p If this function is turned on, “Featured”
will be available as a band selection.
p The featured seasonal theme will be auto-
matically updated. You can set whether to
be notified of the update.
For details, refer to Setting the update
notification for Featured Favorites on
page 51.
1 Press the HOME button to display
the Top menu screen.
2 Touch the following keys in the
following order.
The “System” screen appears.
3 Touch [AV Source Settings].
4 Touch [SiriusXM Settings].
5 Touch [Featured Favorites] repeat-
edly until the desired setting
appears.
On (default):
Activates the Featured Favorite function.
Off
Deactivates the Featured Favorite
function.
p If the setting is changed to “Off” while
listening to the channel in Featured band,
the channel does not change and the
band display on the screen changes to
“SXM1”.
Setting the update notica-
tion for Featured Favorites
You can set whether to be notified when the
featured seasonal theme is updated.
p This function is available only when
“SiriusXM” is selected as the source and
“Featured Favorites” is set to “On”.
For details, refer to Setting the Featured
Favorites function on page 51.
1 Press the HOME button to display
the Top menu screen.
2 Touch the following keys in the
following order.
The “System” screen appears.
3 Touch [AV Source Settings].
4 Touch [SiriusXM Settings].
5 Touch [Featured Band Update
Messages] repeatedly until the
desired setting appears.
On (default):
Activates the update notification function.
Off
Deactivates the update notification
function.
Using the SportsFlash™
function
The SportsFlash function notifies you with
a pop-up message if a notable event occurs
in the game of your favorite sports teams
even if you are listening to another channel.
By touching [Play] on the pop-up message
displayed on the screen, the radio switches
to the channel broadcasting the game and
starts playback about 30 seconds before the
notable event occurred allowing you to hear
it unfold as if you listened to it live. If you
return to the original channel after listen-
ing to the highlight of the game, the radio
plays back from the time that the channel
was switched. You will not miss either the
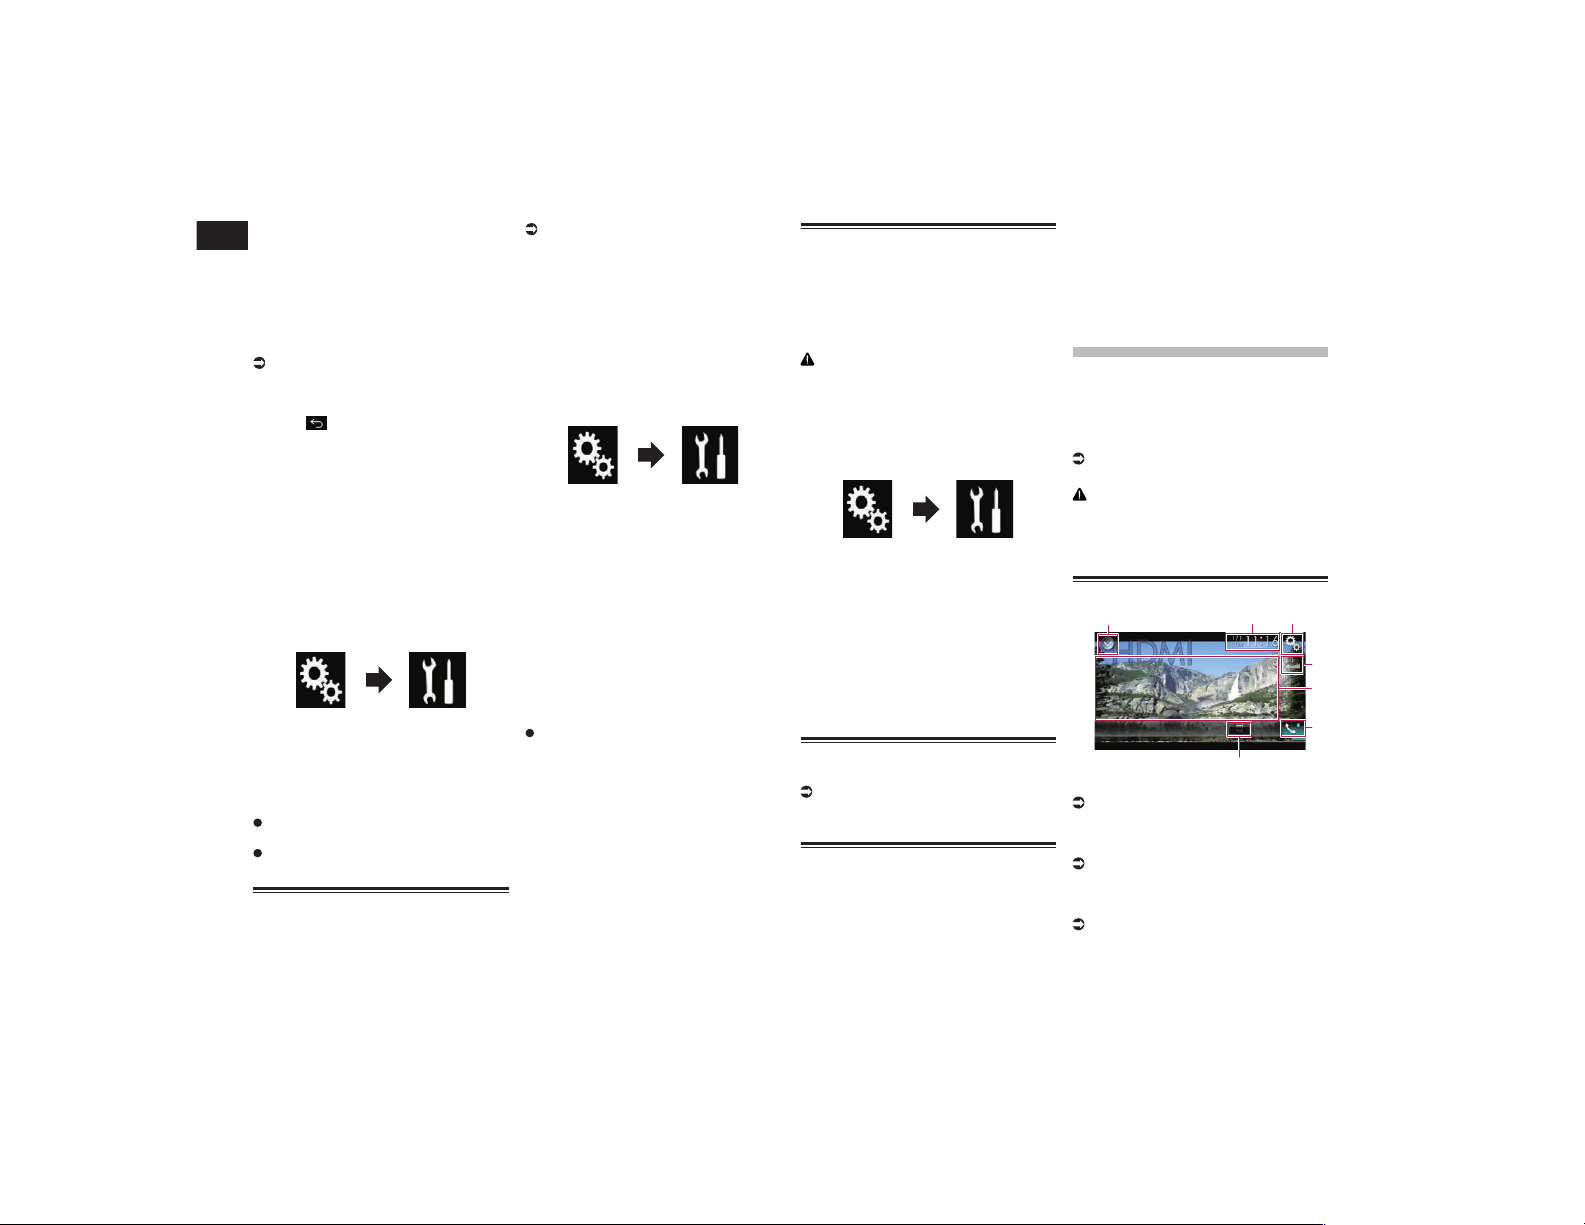
19
Chapter
52
En
highlight of the game or the contents of the
channel you were originally listening to.
p SXV300 or later SiriusXM Connect vehicle
tuner (sold separately) is required to use
this function.
p This function is available only when
“SiriusXM” is selected as the source.
p To use this function, before the game
starts select the teams you want to follow.
For details, refer to Selecting teams for
SportsFlash on page 52.
p Touch [Play] to listen to the notified
channel. To return to the original channel,
touch within five minutes after the
channel is switched.
p Touch [Ignore] to stay tuned to the cur-
rent channel.
p Touch [Cancel] to cancel notifications
regarding the game.
p Notification messages will not be dis-
played while you are listening to the
channel that is the target of SportsFlash
or while the Radio ID is displayed.
1 Press the HOME button to display
the Top menu screen.
2 Touch the following keys in the
following order.
The “System” screen appears.
3 Touch [AV Source Settings].
4 Touch [SiriusXM Settings].
5 Touch [SportsFlash] repeatedly
until the desired setting appears.
On (default):
Activates the SportsFlash function.
Off
Deactivates the SportsFlash function.
Selecting teams for
SportsFlash
p This function is available only when
“SiriusXM” is selected as the source and
“SportsFlash” is set to “On”.
For details, refer to Using the
SportsFlash™ function on page 51.
p Up to 50 teams can be registered as the
target of SportsFlash.
p If five prioritized teams are registered,
notification messages for the teams other
than the prioritized teams may not be
displayed.
1 Press the HOME button to display
the Top menu screen.
2 Touch the following keys in the
following order.
The “System” screen appears.
3 Touch [AV Source Settings].
4 Touch [SiriusXM Settings].
5 Touch [SportsFlash List].
The “SportsFlash List” screen appears.
6 Touch [Edit List].
Available leagues and teams are displayed.
p Touch a league to narrow down the
options as necessary.
7 Touch the teams to register to the
SportsFlash List.
p A check mark appears for the selected
item.
Touch [Clear All] to cancel all the
selections.
8 Touch [Prioritize] to register the
selected teams as the prioritized
teams.
p You can select up to five prioritized teams
for SportsFlash.
p [Prioritize] is not available if not more
than five teams are registered in the
SportsFlash list. The teams are automat-
ically registered as the prioritized teams.
p If five teams are already registered as the
prioritized teams, remove a check mark
from one of the teams in the list on the
“Prioritize List” screen before adding
another team.
Restoring the SiriusXM set-
tings to the default
You can restore the SiriusXM settings to the
default.
p This setting is available only when you
stop your vehicle in a safe place and apply
the parking brake.
CAUTION
Do not turn off the engine while restoring
the settings.
1 Press the HOME button to display
the Top menu screen.
2 Touch the following keys in the
following order.
The “System” screen appears.
3 Touch [AV Source Settings].
4 Touch [SiriusXM Settings].
5 Touch [SiriusXM Reset].
The “SiriusXM Reset” screen appears.
6 Touch [Restore].
The settings are restored to the default.
p The source is turned off and the
Bluetooth connection is disconnected
before the process starts.
Storing song information to
an iPod (iTunes Tagging)
For details, refer to Storing song infor-
mation to an iPod (iTunes Tagging) on
page 70.
Operating with the hardware
buttons
Press the TRK button.
You can move up or down the preset chan-
nels when the current channel is displayed.
You can skip files forward or backward when
the play time indicator is displayed.
Press and hold the TRK button.
You can move up or down channels by
holding down the button when the current
channel is displayed.
You can perform fast reverse or fast forward
by holding down the button when the play
time indicator is displayed.
Using an HDMI source
You can display the video image output by
the device connected to this product. This
section describes operations for an HDMI
source.
p A High Speed HDMI
®
Cable (sold sepa-
rately) is required for connection.
For details, refer to Connecting an HDMI
device on page 78.
CAUTION
For safety reasons, video images cannot be
viewed while your vehicle is in motion. To
view video images, you must stop in a safe
place and apply the parking brake.
Using the touch panel keys
1 32
7
5
4
6
1 Displays the source list.
For details, refer to Selecting a front
source on the source list on page 13.
2 Displays the Time and date setting
screen.
For details, refer to Setting the time and
date on page 70.
3 Displays the Setting menu screen.
4 Recalls equalizer curves.
For details, refer to Using the equalizer on
page 64.
5 Hides the touch panel keys.
Touching this area hides the touch panel
keys.

English
20
Chapter
53
En
p Touch anywhere on the LCD screen to
display the touch panel keys again.
6 Displays the Phone menu screen.
For details, refer to Displaying the phone
menu on page 16.
7 Changes the wide screen mode.
For details, refer to Changing the wide
screen mode on page 71.
Reading the screen
1
1 Current time and date
Starting procedure
1 Display the AV source selection
screen.
For details of the operations, refer to
Displaying the AV operation screen on
page 12.
2 Touch [HDMI] on the AV source
selection screen.
The image is displayed on the screen.
3 Use the touch panel keys on the
screen to control the external unit.
For details, refer to Using the touch panel
keys on page 52.
Using an AUX source
You can display the video image output by
the device connected to this product. This
section describes operations for an AUX
source.
p A Mini-jack AV cable (CD-RM10) (sold
separately) is required for connection.
For details, refer to Connecting the exter-
nal video component on page 78.
CAUTION
For safety reasons, video images cannot be
viewed while your vehicle is in motion. To
view video images, you must stop in a safe
place and apply the parking brake.
Using the touch panel keys
1 32
8
5
4
6
7
1 Displays the source list.
For details, refer to Selecting a front
source on the source list on page 13.
2 Displays the Time and date setting
screen.
For details, refer to Setting the time and
date on page 70.
3 Displays the Setting menu screen.
4 Recalls equalizer curves.
For details, refer to Using the equalizer on
page 64.
5 Hides the touch panel keys.
Touching this area hides the touch panel
keys.
p Touch anywhere on the LCD screen to
display the touch panel keys again.
6 Displays the Phone menu screen.
For details, refer to Displaying the phone
menu on page 16.
7 Switches the operation screen.
For details, refer to Switching the opera-
tion screen on page 53.
8 Changes the wide screen mode.
For details, refer to Changing the wide
screen mode on page 71.
Reading the screen
1
1 Current time and date
Starting procedure
You can display the video image output by
the device connected to video input.
1 Press the HOME button to display
the Top menu screen.
2 Touch the following keys in the
following order.
The “System” screen appears.
3 Touch [Input/Output Settings].
4 Confirm that “AUX Input” is turned
on.
p The default setting is “On”.
5 Display the AV source selection
screen.
For details of the operations, refer to
Displaying the AV operation screen on
page 12.
6 Touch [AUX] on the AV source
selection screen.
The image is displayed on the screen.
7 Use the touch panel keys on the
screen to control the external unit.
For details, refer to Using the touch panel
keys on page 53.
Setting the video signal
When you connect this product to an AUX
equipment, select the suitable video signal
setting.
p You can operate this function only for the
video signal input into the AUX input.
1 Press the HOME button to display
the Top menu screen.
2 Touch the following keys in the
following order.
The “Video Setup” screen appears.
3 Touch [Video Signal Setting].
4 Touch [AUX].
The pop-up menu appears.
5 Touch the item you want to set.
Auto (default):
Adjusts the video signal setting
automatically.
PAL:
Sets the video signal to PAL.
NTSC:
Sets the video signal to NTSC.
PAL-M:
Sets the video signal to PAL-M.
PAL-N:
Sets the video signal to PAL-N.
SECAM:
Sets the video signal to SECAM.
Switching the operation
screen
You can switch between the screen to oper-
ate music files and that to operate video
files.
Touch the following key.
Switches between the
screen to operate video files
and that to operate music
files.
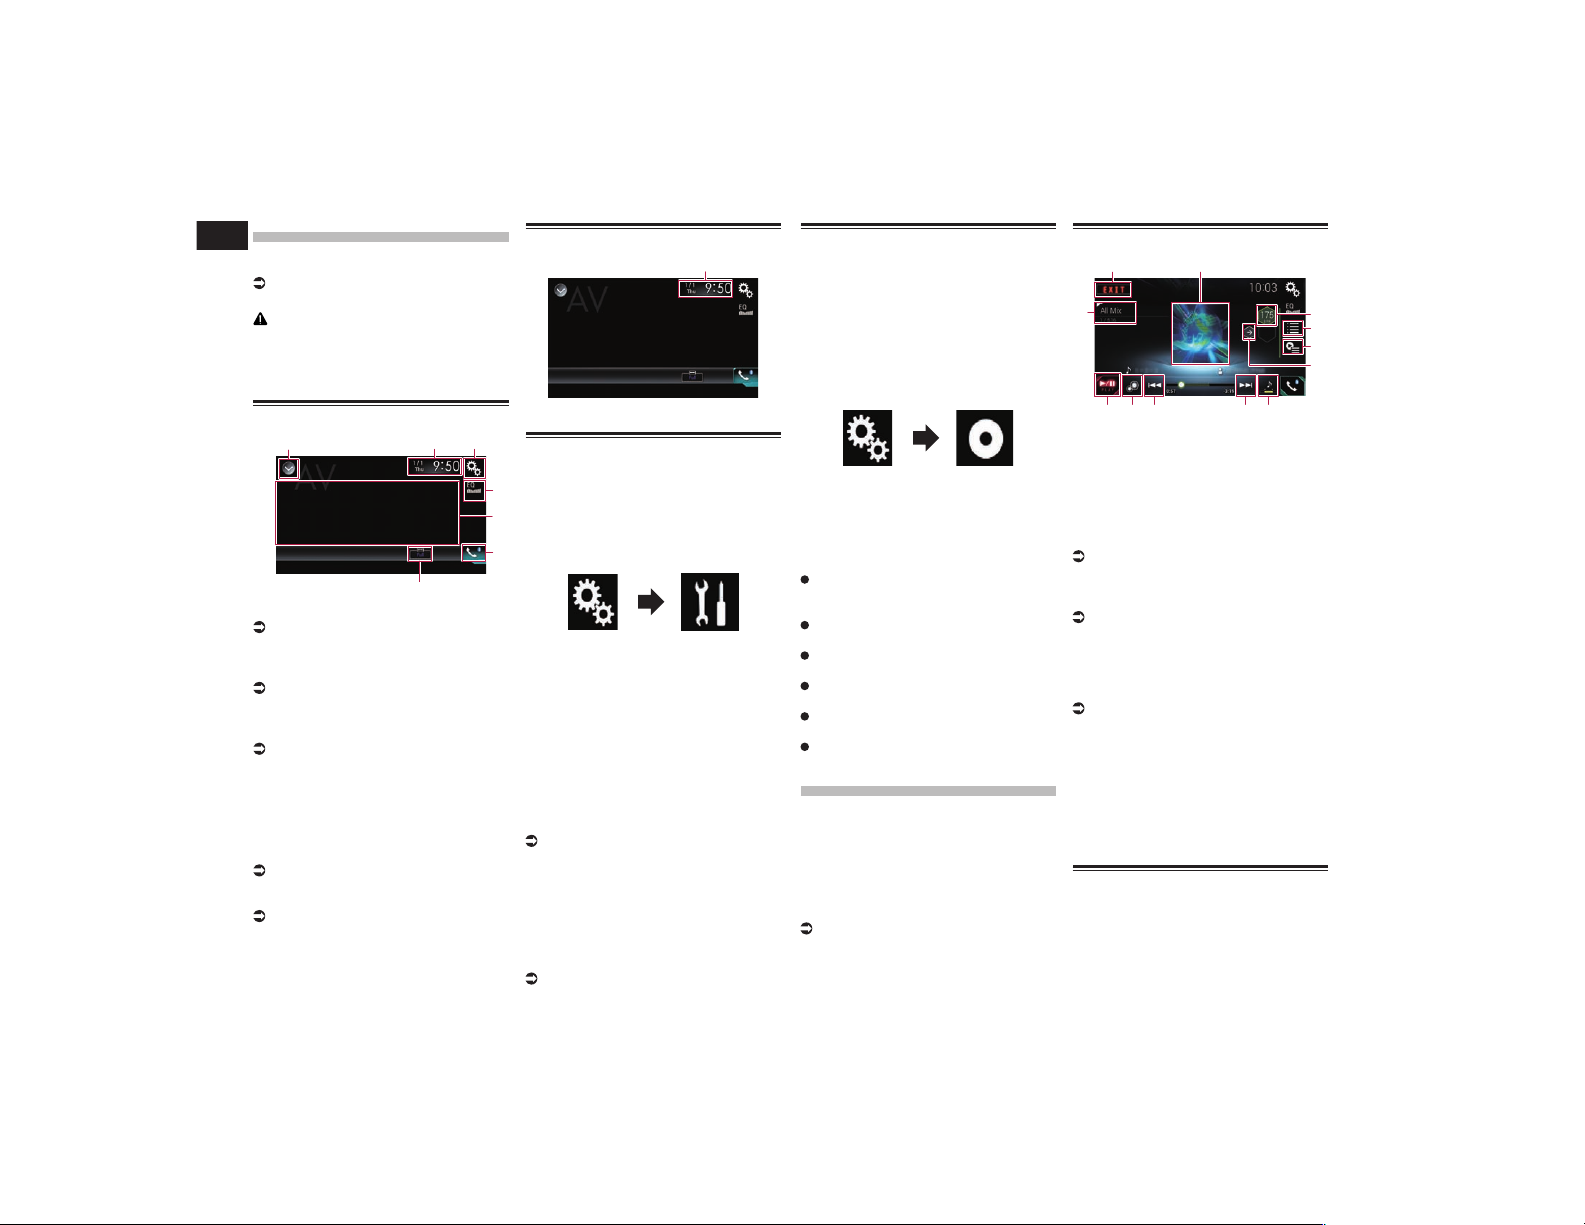
21/22
Chapter
54
En
Using AV input
You can display the video image output by
the device connected to this product.
For details, refer to Connecting the exter-
nal video component on page 78.
CAUTION
For safety reasons, video images cannot be
viewed while your vehicle is in motion. To
view video images, you must stop in a safe
place and apply the parking brake.
Using the touch panel keys
1 32
7
5
4
6
1 Displays the source list.
For details, refer to Selecting a front
source on the source list on page 13.
2 Displays the Time and date setting
screen.
For details, refer to Setting the time and
date on page 70.
3 Displays the Setting menu screen.
4 Recalls equalizer curves.
For details, refer to Using the equalizer on
page 64.
5 Hides the touch panel keys.
Touching this area hides the touch panel
keys.
p Touch anywhere on the LCD screen to
display the touch panel keys again.
6 Displays the Phone menu screen.
For details, refer to Displaying the phone
menu on page 16.
7 Changes the wide screen mode.
For details, refer to Changing the wide
screen mode on page 71.
Reading the screen
1
1 Current time and date
Starting procedure
You can display the video image output by
the device connected to video input.
1 Press the HOME button to display
the Top menu screen.
2 Touch the following keys in the
following order.
The “System” screen appears.
3 Touch [Input/Output Settings].
4 Touch [AV Input].
The pop-up menu appears.
5 Touch [Source].
The video image output by the connected
external device can be displayed.
p If “Source” is selected, “2nd Camera
Input” is automatically set to “Off”.
6 Display the AV source selection
screen.
For details of the operations, refer to
Displaying the AV operation screen on
page 12.
7 Touch [AV] on the AV source selec-
tion screen.
The image is displayed on the screen.
8 Use the touch panel keys on the
screen to control the external unit.
For details, refer to Using the touch panel
keys on page 54.
Setting the video signal
When you connect this product to an AV
equipment, select the suitable video signal
setting.
p You can operate this function only for the
video signal input into the AV input.
1 Press the HOME button to display
the Top menu screen.
2 Touch the following keys in the
following order.
The “Video Setup” screen appears.
3 Touch [Video Signal Setting].
4 Touch [AV].
The pop-up menu appears.
5 Touch the item you want to set.
Auto (default):
Adjusts the video signal setting
automatically.
PAL:
Sets the video signal to PAL.
NTSC:
Sets the video signal to NTSC.
PAL-M:
Sets the video signal to PAL-M.
PAL-N:
Sets the video signal to PAL-N.
SECAM:
Sets the video signal to SECAM.
Using MIXTRAX
MIXTRAX is original technology for creating
non-stop mixes of selections from your audio
library, complete with DJ effects that make
them sound as if a DJ is right there with you
playing the music.
p You can turn MIXTRAX on by touching
[MIXTRAX] on the playback screen of
compressed audio files.
For details, refer to Using the touch panel
keys on page 28.
Touch panel keys
1
4
6
5
7
b
2
9
3
a 8 8
1 Exits the MIXTRAX screen.
2 Displays the LinkGate screen.
Touch the desired item. Songs related to
the selected item are played.
3 Specifies the BPM.
The original BPM is not displayed during
playback.
4 Displays the item selection screen.
For details of the operations, refer to
Selecting an item to play songs on
page 54.
5 Displays the playback list screen.
For details of the operations, refer to
Selecting songs not to be played on
page 55.
6 Sets to the original BPM (Beats Per
Minute).
7 Specifies the playback portion.
For details of the operations, refer to
Specifying the playback portion on
page 55.
8 Touch to select a track.
Touch and hold to fast forward or rewind.
9 Turns on or off the MIXTRAX original
visual display.
a Pauses and starts playback.
b Displays the item selected on the
LinkGate screen or item selection screen.
Selecting an item to play
songs
You can specify an item to play songs related
to it.
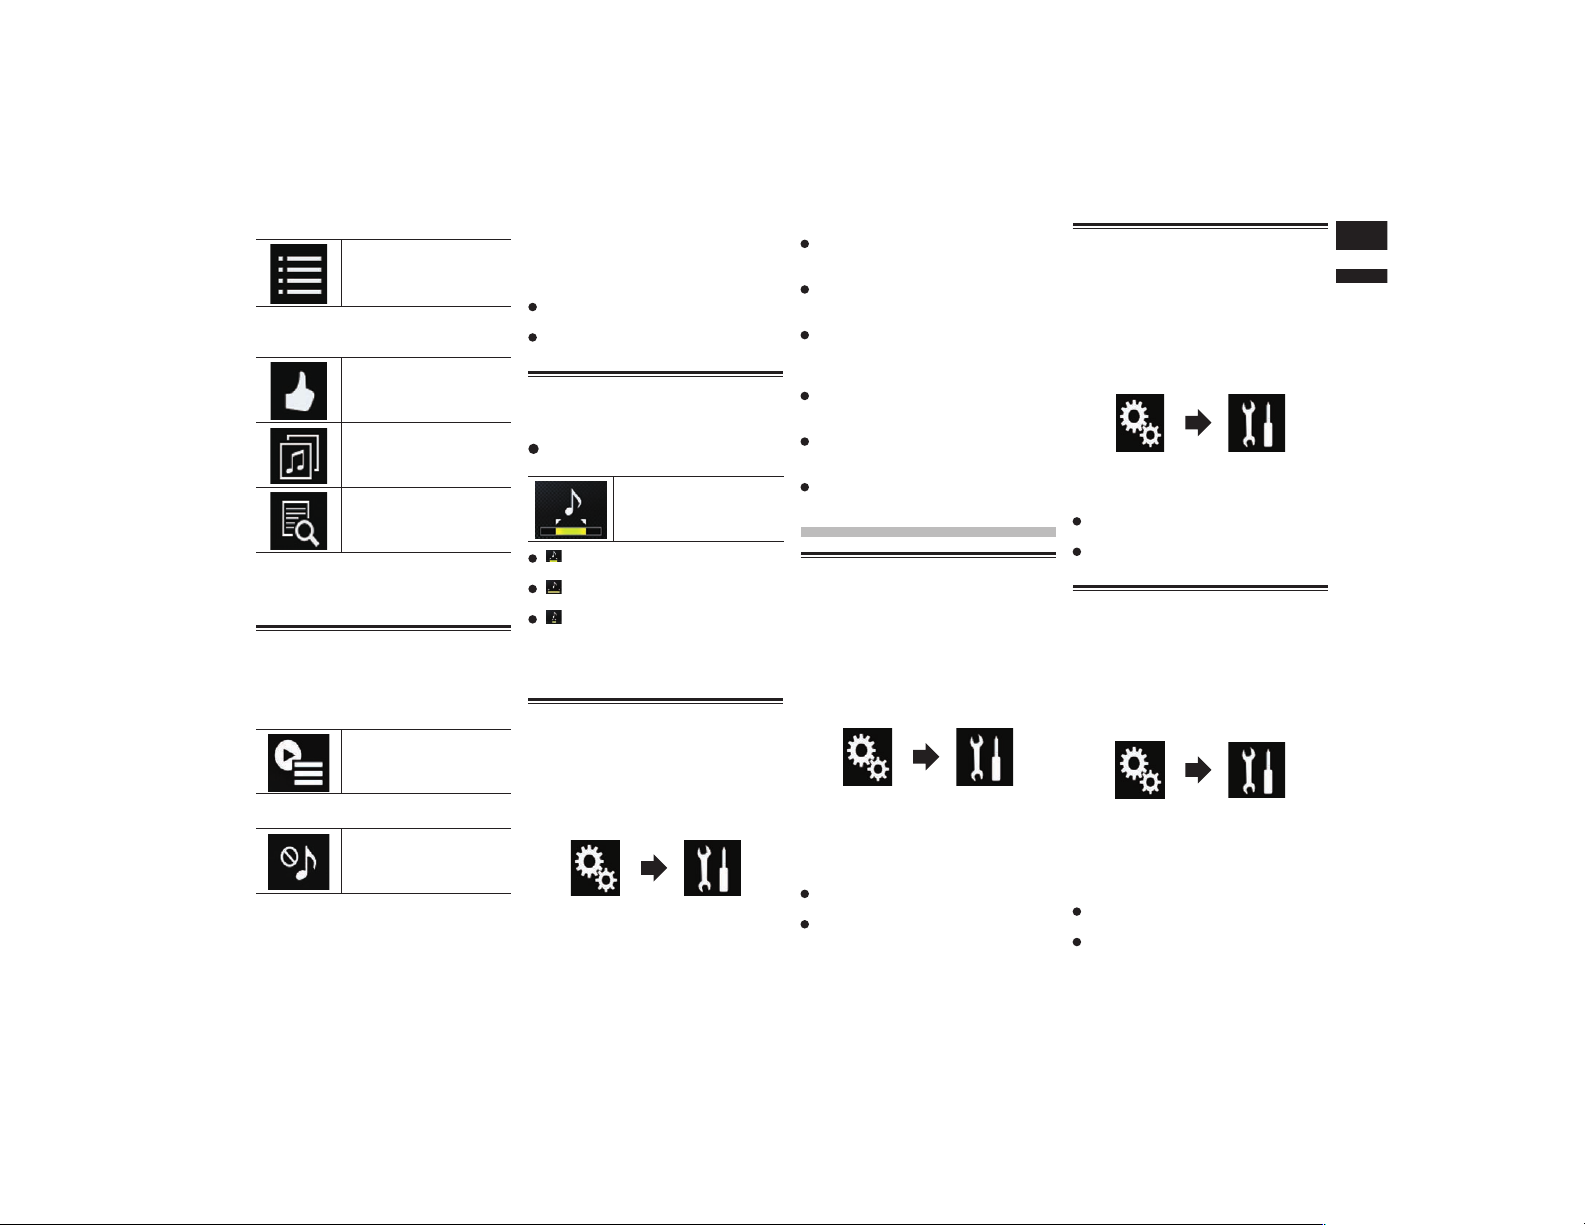
English
23
Chapter
55
En
1 Touch the following key.
Displays the item selection
screen.
2 Touch the following keys to select
the item.
Displays the MIX pattern list.
Displays the tag list.
Displays the file list.
3 Select an item in the list.
Songs related to the selected item are
played.
Selecting songs not to be
played
You can select items or songs not to be
played.
1 Touch the following key.
Displays the playback list
screen.
2 Touch the following key.
Displays the “Playback not
allowed” screen.
3 Touch [Songs], [Artists] or
[Albums].
4 Touch the box on the left of the
item or song that you do not want
to play.
An icon is displayed. Items displayed with
the icon will not be played.
If you touch [Unselect All], all the selec-
tions are canceled.
If you touch [Select All], all the items are
selected.
Specifying the playback
portion
You can specify the playback portion.
Touch the following key repeatedly
until the desired setting appears.
Changes the playback
portion.
(default):
Plays back a middle portion.
:
Plays back a long portion.
:
Plays back a short portion.
p The most suitable sound effect is auto-
matically applied when switching to the
next song.
Setting the ash pattern
The flashing color changes with the changes
in the sound and bass levels.
1 Press the HOME button to display
the Top menu screen.
2 Touch the following keys in the
following order.
The “System” screen appears.
3 Touch [AV Source Settings].
4 Touch [MIXTRAX Settings].
5 Touch [Flash Pattern].
The pop-up menu appears.
6 Touch the item you want to set.
Sound1 (default) to Sound6:
The flash pattern changes according to
the sound level. Select a desired mode.
L-Pass1 to L-Pass6:
The flash pattern changes according to
the bass level. Select a desired mode.
Random1:
The flash pattern changes randomly
according to the sound level mode and
low pass mode.
Random2:
The flash pattern changes randomly
according to the sound level mode.
Random3:
The flash pattern changes randomly
according to the low pass mode.
Off:
The flash pattern does not flash.
System settings
Activating the Bluetooth
audio source
You need to activate the Bluetooth audio
source in order to use a Bluetooth audio
player.
1 Press the HOME button to display
the Top menu screen.
2 Touch the following keys in the
following order.
The “System” screen appears.
3 Touch [AV Source Settings].
4 Touch [Bluetooth Audio] repeat-
edly until the desired setting
appears.
On (default):
Activates the Bluetooth audio source.
Off:
Deactivates the Bluetooth audio source.
Setting the ever scroll
When “Ever Scroll” is set to “On”, recorded
text information scrolls continuously in the
display. Set to “Off” if you prefer the informa-
tion to scroll just once.
1 Press the HOME button to display
the Top menu screen.
2 Touch the following keys in the
following order.
The “System” screen appears.
3 Touch [Ever Scroll] repeatedly until
the desired setting appears.
Off (default):
Turns the ever scroll setting off.
On:
Turns the ever scroll setting on.
Setting AV input
You can use external video equipment such
as portable players connected to this prod-
uct with this setting.
1 Press the HOME button to display
the Top menu screen.
2 Touch the following keys in the
following order.
The “System” screen appears.
3 Touch [Input/Output Settings].
4 Touch [AV Input].
The pop-up menu appears.
5 Touch the item you want to set.
Off (default):
Deactivates the AV source.
Source:
Displays the video image output by the
connected external device.
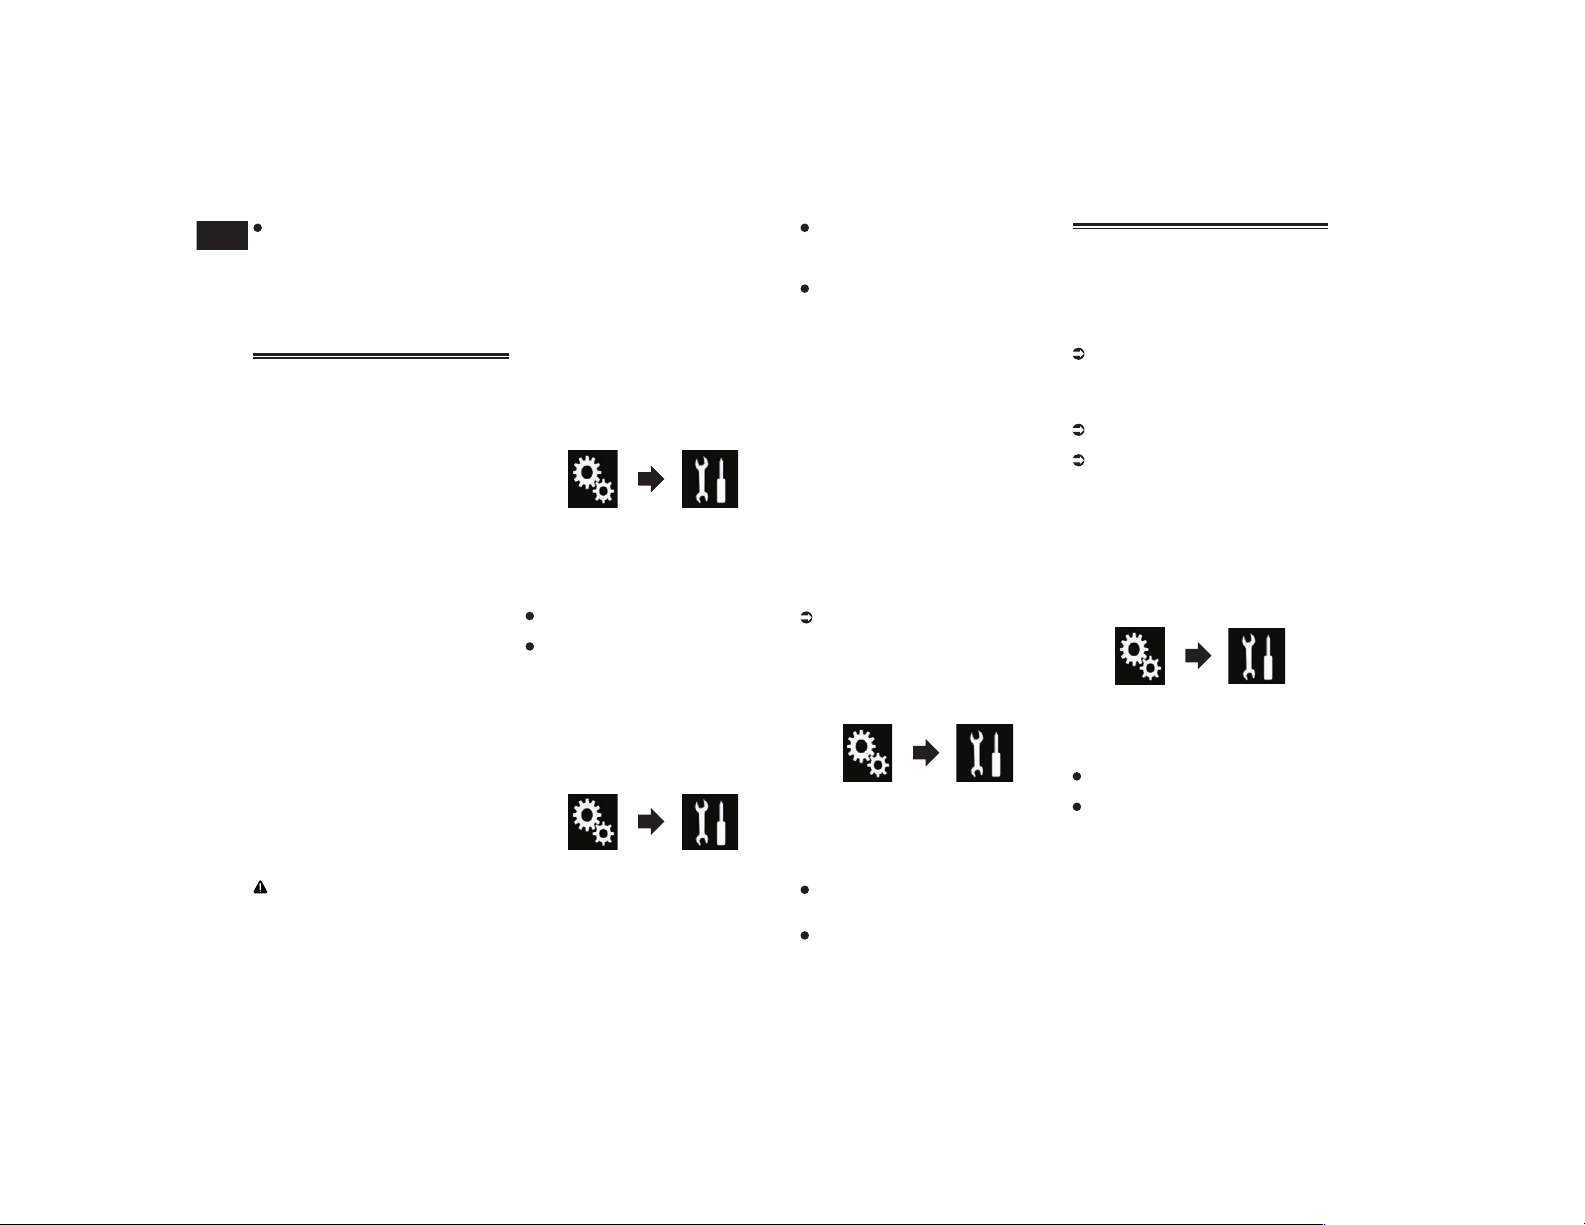
23
Chapter
56
En
Camera:
Displays the image output by the con-
nected external camera.
p If “Camera” is selected, “2nd Camera
Input” is automatically set to “On”.
p If “Off” or “Source” is selected, “2nd
Camera Input” is automatically set to
“Off”.
Setting the rear view camera
The following two functions are available.
A separately sold rear view camera (e.g.
ND-BC6) is required for utilizing the rear
view camera function. (For details, consult
your dealer.)
Rear view camera
This product features a function that
automatically switches to the full-screen
image of the rear view camera installed on
your vehicle. When the shift lever is in the
REVERSE (R) position, the screen auto-
matically switches to full-screen rear view
camera image.
p If the shift lever is aligned to the
REVERSE (R) position immediately after
the system of this product is started up,
only the camera image will be displayed
and the parking assist guidelines will not
be displayed. The parking assist guide-
lines will be displayed on the camera
image after a little while. Be sure to check
the conditions around the vehicle even
before the guidelines and the message
are displayed.
Camera for Camera View mode
Camera View can be displayed at all times
(e.g. when monitoring an attached trailer,
etc.). Please note that with this setting, the
camera image is not resized to fit, and that
a portion of what is seen by the camera is
not viewable.
CAUTION
Check to make sure settings for rear view
camera displays a mirror reversed image.
p Immediately verify whether the dis-
play changes to a rear view camera
image when the shift lever is aligned to
REVERSE (R) from another position.
p When the screen changes to full-screen
rear view camera image during normal
driving, switch to the opposite setting in
“Reverse Gear Setting”.
■ Setting rear view camera
activation
To view images of the rear view camera on
the screen of this product, “Back Camera
Input” needs to be set to “On”.
1 Press the HOME button to display
the Top menu screen.
2 Touch the following keys in the
following order.
The “System” screen appears.
3 Touch [Camera settings].
4 Touch [Back Camera Input]
repeatedly until the desired setting
appears.
Off (default):
Turns the back camera input setting off.
On:
Turns the back camera input setting on.
■ Setting the polarity of the rear
view camera
1 Press the HOME button to display
the Top menu screen.
2 Touch the following keys in the
following order.
The “System” screen appears.
3 Touch [Camera settings].
4 Touch [Reverse Gear Setting]
repeatedly until the desired setting
appears.
Battery (default):
When the polarity of the connected lead
is positive while the shift lever is in the
REVERSE (R) position.
Ground:
When the polarity of the connected lead
is negative while the shift lever is in the
REVERSE (R) position.
When the shift lever is aligned to the
REVERSE (R) position after setting the rear
view camera, the rear view image appears.
■ Setting the reversed image dis-
play for the rear view image
Rear view camera images are displayed
reversed (as mirror images) on the front
screen except when a rear view camera that
can output images in the correct direction is
used. You can set whether to reverse the rear
view camera images to be displayed on the
front screen.
p This setting is available only when you
stop your vehicle in a safe place and apply
the parking brake.
p This function is available only when
“Back Camera Input” is “On”.
For details, refer to Setting rear view
camera activation on page 56.
1 Press the HOME button to display
the Top menu screen.
2 Touch the following keys in the
following order.
The “System” screen appears.
3 Touch [Camera settings].
4 Touch [Back Camera: Reverse
Video] repeatedly until the desired
setting appears.
Off (default):
Does not reverse the rear view camera
images.
On:
Reverses the rear view camera images.
Setting the camera for
Camera View mode
To display Camera View at all times,
“Camera View” needs to be set to “On”.
p To set the rear view camera for Camera
View mode, “Back Camera Input”
needs to be set to “On”.
For details, refer to Setting rear view
camera activation on page 56.
p To set the second camera for Camera
View mode, set “AV Input” to “Camera”
or set “2nd Camera Input” to “On”.
For details, refer to Setting AV input on
page 55.
For details, refer to Setting the second
camera input on page 57.
p You can also turn this function on by
touching [Camera View] on the AV
source selection screen or in the source
list.
1 Press the HOME button to display
the Top menu screen.
2 Touch the following keys in the
following order.
The “System” screen appears.
3 Touch [Camera settings].
4 Touch [Camera View] repeatedly
until the desired setting appears.
Off (default):
Turns the camera view setting off.
On:
Turns the camera view setting on.
If no operations are performed for seven
seconds after the AV operation screen is
displayed, the camera view will appear
automatically.
p If you touch the screen while the camera
view is displayed, the displayed image will
turn off temporarily.
When the camera view of both rear view
camera and second camera are available,
the key to switch the display appears.
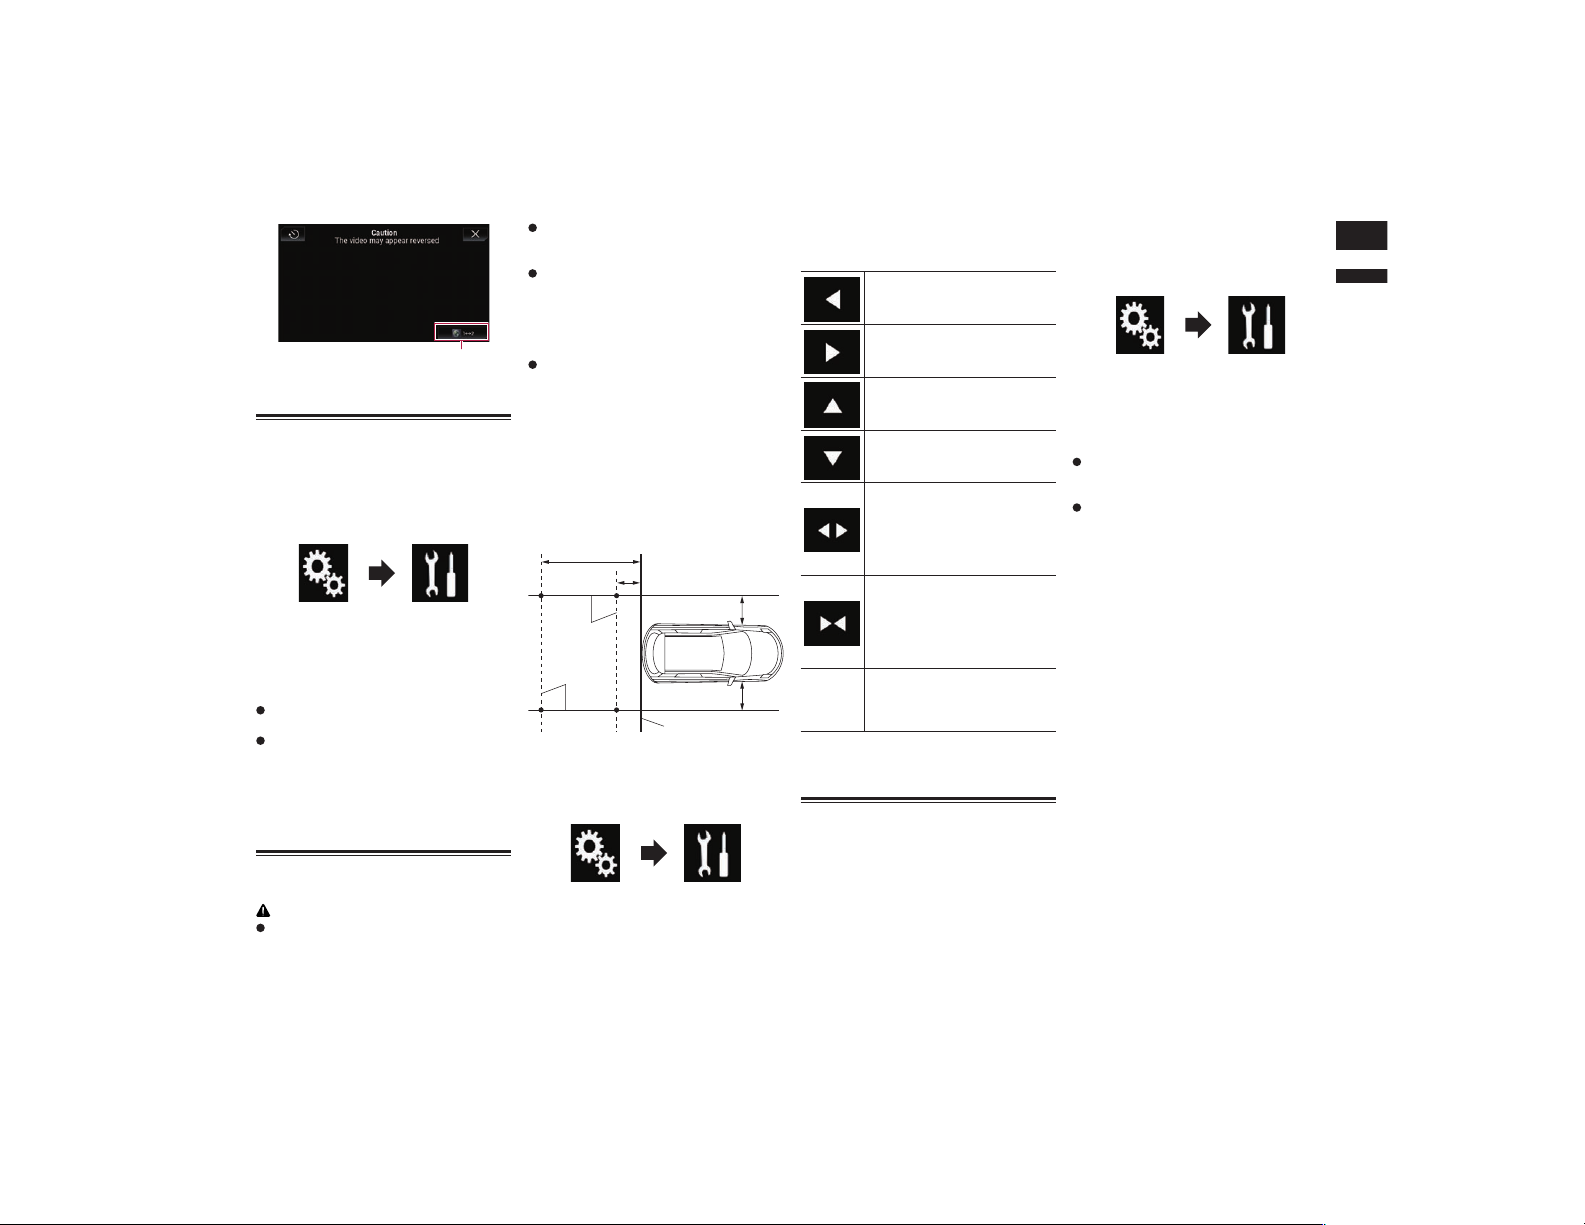
English
23
Chapter
57
En
1
1 Switches the display between rear view
image and second camera image.
Displaying the parking assist
guidelines
1 Press the HOME button to display
the Top menu screen.
2 Touch the following keys in the
following order.
The “System” screen appears.
3 Touch [Camera settings].
4 Touch [Parking Assist Guide]
repeatedly until the desired setting
appears.
Off (default):
Hides the guidelines.
On:
Displays the guidelines.
When the shift lever is aligned to the
REVERSE (R) position after setting the rear
view camera, the rear view image appears.
p If you press and hold the MUTE button,
the rear view image disappears.
Setting guidelines on the rear
view image
CAUTION
When adjusting the guidelines, be sure
to park the vehicle in a safe place and
apply the parking brake.
Before getting out of the car to place the
markings, be sure to turn the ignition
switch off (ACC OFF).
The range projected by the rear view
camera is limited. Also, the vehicle width
and distance guidelines displayed on the
rear view camera image may differ from
the actual vehicle width and distance.
(The guidelines are straight lines.)
The image quality may deteriorate
depending on the usage environment,
such as at night or in dark surroundings.
1 Park your vehicle in a safe place
and apply the parking brake.
2 Using packing tape or similar,
place markings approximately
25 cm (9-7/8 in.) from each side of
the vehicle, and approximately
50 cm (1 ft. 8 in.) and 2 m (6 ft. 7 in.)
from the rear bumper.
Rear bumper
25 cm
(9-7/8 in.)
25 cm
(9-7/8 in.)
50 cm (1 ft. 8 in.)
2 m (6 ft. 7 in.)
Markings
Markings
3 Press the HOME button to display
the Top menu screen.
4 Touch the following keys in the
following order.
The “System” screen appears.
5 Touch [Camera settings].
6 Touch [Parking Assist Guide
Adjust].
7 Set the guidelines by dragging the
four points.
8 Touch the following keys to
adjust the position of the point if
necessary.
Moves the point to the left.
Moves the point to the right.
Moves the point upward.
Moves the point downward.
Extends the line to the left and
right from the current center
point of the distance guideline.
The adjustment points on the
lateral coordinates at both ends
will also move.
Shortens the line from the left
and right to the current center
point of the distance guideline.
The adjustment points on the
lateral coordinates at both ends
will also move.
Default
Resets the settings of the dis-
tance and vehicle width guide-
lines and adjustment points to
the default.
p When a point is moved, the distance from
the initial value is displayed at the bottom
of the screen.
Setting the second camera
input
You can view images of the second camera
(a front camera etc.) on the screen of this
product.
■ Setting the second camera
activation
p To view images of the second camera on
the screen of this product, “2nd Camera
Input” needs to be set to “On”.
1 Press the HOME button to display
the Top menu screen.
2 Touch the following keys in the
following order.
The “System” screen appears.
3 Touch [Camera settings].
4 Touch [2nd Camera Input] repeat-
edly until the desired setting
appears.
Off (default):
Turns the second camera input setting
off.
On:
Turns the second camera input setting
on.
p The confirmation message appears if
setting “2nd Camera Input” to “On”
while the AV source is on. The AV source
will turn off if “Yes” is selected, and “2nd
Camera Input” will be set to “On”. Select
“No” to cancel setting “2nd Camera
Input” to “On”.
p If “On” is selected, “AV Input” is auto-
matically set to “Camera”.
p If “Off” is selected, “AV Input” is auto-
matically set to “Off”.
■ Setting the reversed image
setting for the second camera
input image
Second camera images are displayed
reversed (as mirror images) on the front
screen except when a second view camera
that can output images in the correct direc-
tion is used. You can set whether to reverse
the second camera images to be displayed
on the front screen.
p This setting is available only when you
stop your vehicle in a safe place and apply
the parking brake.
p This function is available when “2nd
Camera Input” is “On” or “AV Input” is
set to “Camera”.
23
Chapter
58
En
1 Press the HOME button to display
the Top menu screen.
2 Touch the following keys in the
following order.
The “System” screen appears.
3 Touch [Camera settings].
4 Touch [2nd Camera: Reverse
video] repeatedly until the desired
setting appears.
Off (default):
Does not reverse the second camera
images.
On:
Reverses the second camera images.
Turning off the demo screen
If the demo screen appears, perform the
following procedure to turn off the demo
screen.
1 Press the HOME button to display
the Top menu screen.
2 Touch the following keys in the
following order.
The “System” screen appears.
3 Touch [Demo Mode] repeatedly
until the desired setting appears.
On (default):
Displays the demo screen.
Off:
Hides the demo screen.
You can also turn off the demo screen by
pressing and holding the MUTE button.
Selecting the system
language
The system language can be selected.
The language can be changed for the
following:
— The “Audio” screen
— The “System” screen
— The “Video Setup” screen
— The “Bluetooth” screen
— Language for messages
Some operations on this product are pro-
hibited from use while driving or require
careful attention when operated. In such
cases, a caution message will appear on
the display. You can change the language
for caution messages with this setting.
If the embedded language and the
selected language setting are not the
same, text information may not display
properly.
Some characters may not be displayed
properly.
1 Press the HOME button to display
the Top menu screen.
2 Touch the following keys in the
following order.
The “System” screen appears.
3 Touch [System Language].
The pop-up menu appears.
4 Touch the desired language.
After the language is selected, the previous
screen returns.
Setting the keyboard lan-
guage with the application
for iPhone
You can use the keyboard in AppRadio
Mode by setting the language of the key-
board for iPhone.
p This function is only available in
AppRadio Mode on the iPhone.
1 Press the HOME button to display
the Top menu screen.
2 Touch the following keys in the
following order.
The “System” screen appears.
3 Touch [Keyboard].
The “Keyboard” screen appears.
4 Touch the desired language.
After the language is selected, the previous
screen returns.
Setting the beep sound
1 Press the HOME button to display
the Top menu screen.
2 Touch the following keys in the
following order.
The “System” screen appears.
3 Touch [Beep Tone] repeatedly until
the desired setting appears.
On (default):
Sounds a beep.
Off:
Does not sound a beep.
Adjusting the response
positions of the touch panel
(touch panel calibration)
If you feel that the touch panel keys on the
screen deviate from the actual positions that
respond to your touch, adjust the response
positions of the touch panel screen.
p This setting is available only when you
stop your vehicle in a safe place and apply
the parking brake.
p Do not use sharp pointed tools such as a
ballpoint or mechanical pen, which could
damage the screen.
p Do not turn off the engine while saving
the adjusted position data.
1 Press the HOME button to display
the Top menu screen.
2 Touch the following keys in the
following order.
The “System” screen appears.
3 Touch [Touch Panel Calibration].
The touch panel adjustment screen appears.
4 Touch two corners of the screen
along the arrows, and then touch
the centers of two + marks at the
same time twice.
5 Press the HOME button.
The adjustment results are saved.
6 Press the HOME button once again.
Proceed to 16-point adjustment.
If you press and hold the HOME button,
the adjustment is canceled.
7 Gently touch the center of the +
mark displayed on the screen.
The target indicates the order.
After you touch all marks, the adjusted
position data is saved.
If you press the HOME button, the previ-
ous adjustment position returns.
If you press and hold the HOME button,
the adjustment is canceled.
8 Press and hold the HOME button.
The adjustment results are saved.
Setting the dimmer function
You can specify the timing that the dimmer
function is to be turned on.
1 Press the HOME button to display
the Top menu screen.
2 Touch the following keys in the
following order.
The “System” screen appears.
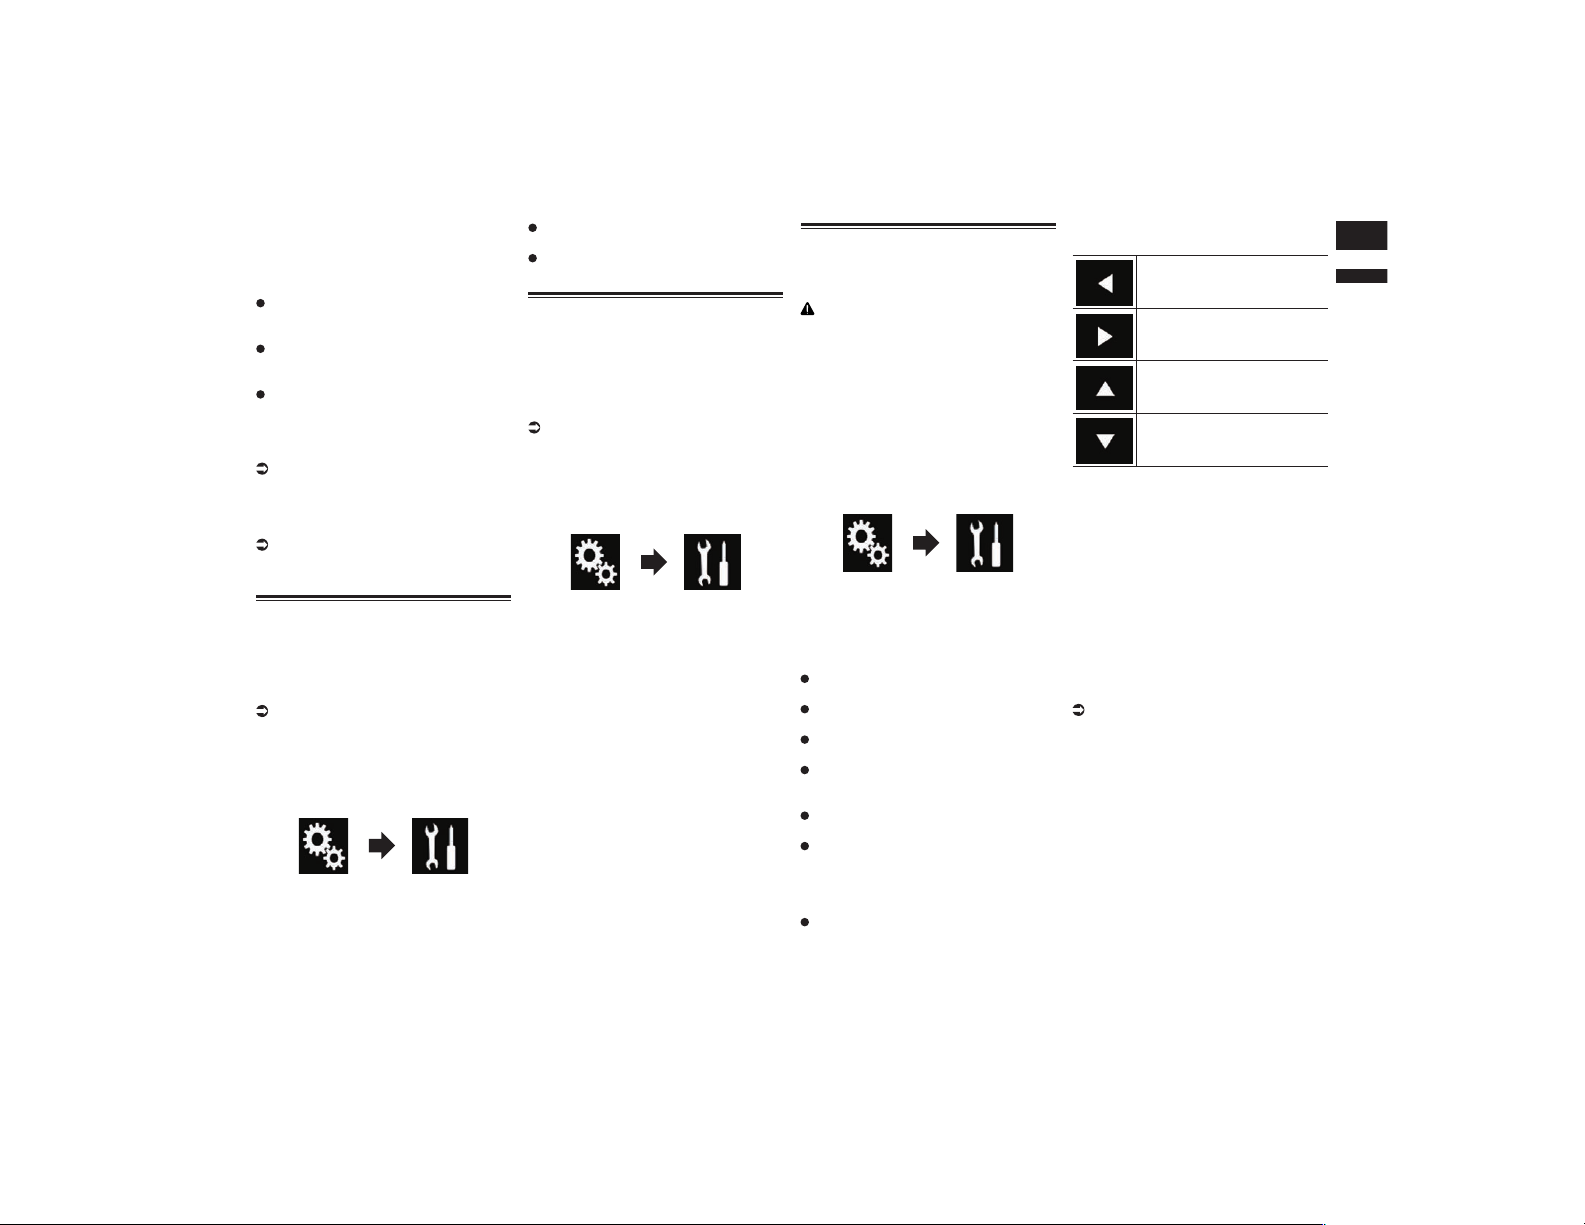
English
23
Chapter
59
En
3 Touch [Dimmer Settings].
4 Touch [Dimmer Trigger].
The pop-up menu appears.
5 Touch the item you want to set.
Auto (default):
Activates the dimmer function when the
vehicle’s headlights are on (nighttime).
Manual:
Enables to set whether to activate the
dimmer function.
Time:
Enables to set the duration of time for the
dimmer function to be active.
p If “Manual” is selected, set whether to
activate the dimmer function.
For details, refer to Setting whether
to activate the dimmer function on
page 59.
p If “Time” is selected, specify the duration
for the dimmer function to be active.
For details, refer to Setting the duration of
time for the dimmer function to be active
on page 59.
Setting whether to activate
the dimmer function
You can set whether to activate the dimmer
function at nighttime.
p This function is available only when
“Dimmer Trigger” is set to “Manual”.
For details, refer to Setting the dimmer
function on page 58.
1 Press the HOME button to display
the Top menu screen.
2 Touch the following keys in the
following order.
The “System” screen appears.
3 Touch [Dimmer Settings].
4 Touch [Day/Night].
The pop-up menu appears.
5 Touch the item you want to set.
Day (default):
Deactivates the dimmer function.
Night:
Activates the dimmer function.
Setting the duration of time
for the dimmer function to be
active
You can set the duration of time for the
dimmer function to be active.
p This function is available only when
“Dimmer Trigger” is set to “Time”.
For details, refer to Setting the dimmer
function on page 58.
1 Press the HOME button to display
the Top menu screen.
2 Touch the following keys in the
following order.
The “System” screen appears.
3 Touch [Dimmer Settings].
4 Touch [Dimmer Duration].
The duration setting bar appears.
5 Touch the desired points on the
duration setting bar, or slide the
cursors to specify the start time
and the end time, respectively.
p The time display format depends on the
“Time Format” setting.
p The value displayed at the center of the
duration setting bar (“12” for 12-hour
format and “00” for 24-hour format)
indicates midnight. The values to the
left of the value at the center are for the
afternoon, and the values to the right of
value at the center are for the morning.
p The default values are “18:00” (start time)
and “6:00” (end time).
p The value can be changed in 15-minute
steps.
Adjusting the picture
You can adjust the picture for each source,
the Application screen, and rear view
camera.
CAUTION
For safety reasons, you cannot use some
of these functions while your vehicle is in
motion. To enable these functions, you must
stop in a safe place and apply the parking
brake.
1 Display the screen you wish to
adjust.
2 Press the HOME button to display
the Top menu screen.
3 Touch the following keys in the
following order.
The “System” screen appears.
4 Touch [Picture Adjustment].
5 Touch any of the following keys to
select the function to be adjusted.
Picture adjustment items are displayed.
Brightness:
Adjusts the black intensity.
Contrast:
Adjusts the contrast.
Color:
Adjusts the color saturation.
Hue:
Adjusts the tone of color (which color is
emphasized, red or green).
Dimmer Level:
Adjusts the brightness of the display.
Temperature:
Adjusts the color temperature, resulting
in a better white balance.
p You can adjust Hue only when the color
system is set to NTSC.
If you touch [Rear View] or [2nd
Camera], the mode changes to the
selected camera mode. By touching
[Source], [Navi] or [Apps], you can
return to the selected mode.
6 Touch the following keys to adjust
the selected item.
Decreases the level of the
selected item.
Increases the level of the
selected item.
Selects the adjustable previous
item.
Selects the adjustable next item.
Each time you touch the key, the level of the
selected item increases or decreases.
p “Brightness”, “Contrast”, “Color” and
“Hue” can be adjusted from “-24” to
“+24”.
p “Dimmer Level” can be adjusted from
“+1” to “+48”.
p “Temperature” can be adjusted from “-3”
to “+3”.
p The adjustments of “Brightness”,
“Contrast”, and “Dimmer Level” are
stored separately for the On/Off status of
the dimmer function. These are switched
automatically depending on whether the
dimmer function is on or off.
For details on setting the dimmer func-
tion, refer to Setting the dimmer function
on page 58.
p The picture adjustment may not be avail-
able with some rear view cameras.
p The setting contents can be memorized
separately for the following screens and
video images.
— DVD, Video-CD and Disc
— AV and external camera
— USB (Video) and USB (JPEG)
— SD (Video) and SD (JPEG)
— iPod (iPod with a 30-pin connector)
— iPod (Video) and AppRadio Mode (iPod
with a 30-pin connector)
— HDMI and AppRadio Mode (HDMI)
— Android Auto
— MirrorLink
— AUX

24
Chapter
60
En
— MIXTRAX, images output from the exter-
nal device
— Rear view camera
Displaying the rmware
version
1 Press the HOME button to display
the Top menu screen.
2 Touch the following keys in the
following order.
The “System” screen appears.
3 Touch [System Information].
4 Touch [Firmware Information].
The “Firmware Information” screen
appears.
p You can check the open source licenses
of the functions that this product is
equipped with under “License” on the
“Firmware Information” screen.
Updating rmware
CAUTION
Never turn this product off, eject the SD
memory card or disconnect the USB
storage device while the firmware is
being updated.
You can only update the firmware when
the vehicle is stopped and the parking
brake is engaged.
p Use the USB port1 to update the firmware
using a USB storage device.
1 Download the firmware update
files.
2 Connect a blank (formatted) SD
memory card or USB storage
device to your computer, and then
locate the correct update file and
copy it onto the SD memory card or
USB storage device.
3 Turn the source off.
For details, refer to Turning off the AV
source on page 13.
4 Press the HOME button to display
the Top menu screen.
5 Touch the following keys in the
following order.
The “System” screen appears.
6 Touch [System Information].
7 Touch [Firmware Update].
The “Firmware Update” screen appears.
8 Touch [Continue] to display the
data transfer mode.
p Follow the on-screen instructions to finish
updating the firmware.
p This product will reset automatically after
the firmware update is completed if the
update is successful.
p When the firmware update starts, the
source is turned off and the Bluetooth
connection is disconnected.
p If an error message appears on the
screen, touch [Continue] to proceed and
start the recovery sequence.
Checking the connections of
leads
Check that the leads are properly connected
between this product and vehicle. Also
check whether they are connected in the
correct positions.
1 Press the HOME button to display
the Top menu screen.
2 Touch the following keys in the
following order.
The “System” screen appears.
3 Touch [System Information].
4 Touch [Connection Status].
The “Connection Status” screen appears.
Illumination
When the headlights or small lamps of
the vehicle are on, “ON” is displayed.
When the small lamps of the vehicle are
off, “OFF” is displayed. (If the orange/
white lead is not connected, “OFF”
appears.)
iDatalink
When the optional iDatalink adapter
is connected and the protocol version
matches, “OK” is displayed. If the version
does not match, “Unsupported Version”
is displayed. If the optional iDatalink
adapter is not connected, “NOK” is
displayed.
Audio adjustments
Using fader/balance
adjustment
You can select a fader/balance setting that
provides an ideal listening environment in all
occupied seats.
p This function is available only when main
audio is available.
p This function is available only when “Rear
Speaker” is set to “On”.
For details, refer to Adjusting the front
and rear speaker output on page 62.
1 Press the HOME button to display
the Top menu screen.
2 Touch the following keys in the
following order.
The “Audio” screen appears.
3 Touch [Fader/Balance].
The “Fader/Balance” screen appears.
4 Touch the following keys to adjust
the front/rear speaker balance.
Moves towards the front.
Moves towards the rear.
Each time you touch the keys, the front/rear
speaker balance moves towards the front
or rear.
p “Front25” to “Rear25” is displayed as the
front/rear speaker balance moves from
the front to rear.
p The default setting is “F/R 0 L/R 0”.
p Set “Front” and “Rear” to “0” when using
a dual speaker system.
5 Touch the following keys to adjust
the left/right speaker balance.
Moves towards the left.
Moves towards the right.
Each time you touch the keys, the left/right
speaker balance moves towards the left or
right.
p “Left25” to “Right25” is displayed as the
left/right speaker balance moves from the
left to right.
p The default setting is “L/R 0”.
p You can also set the fader/balance by
dragging the point on the displayed table.
Using balance adjustment
You can adjust the balance between right/
left sound output.
p This function is available only when main
audio is available.
p This function is available only when “Rear
Speaker” is set to “Off”.
For details, refer to Adjusting the front
and rear speaker output on page 62.
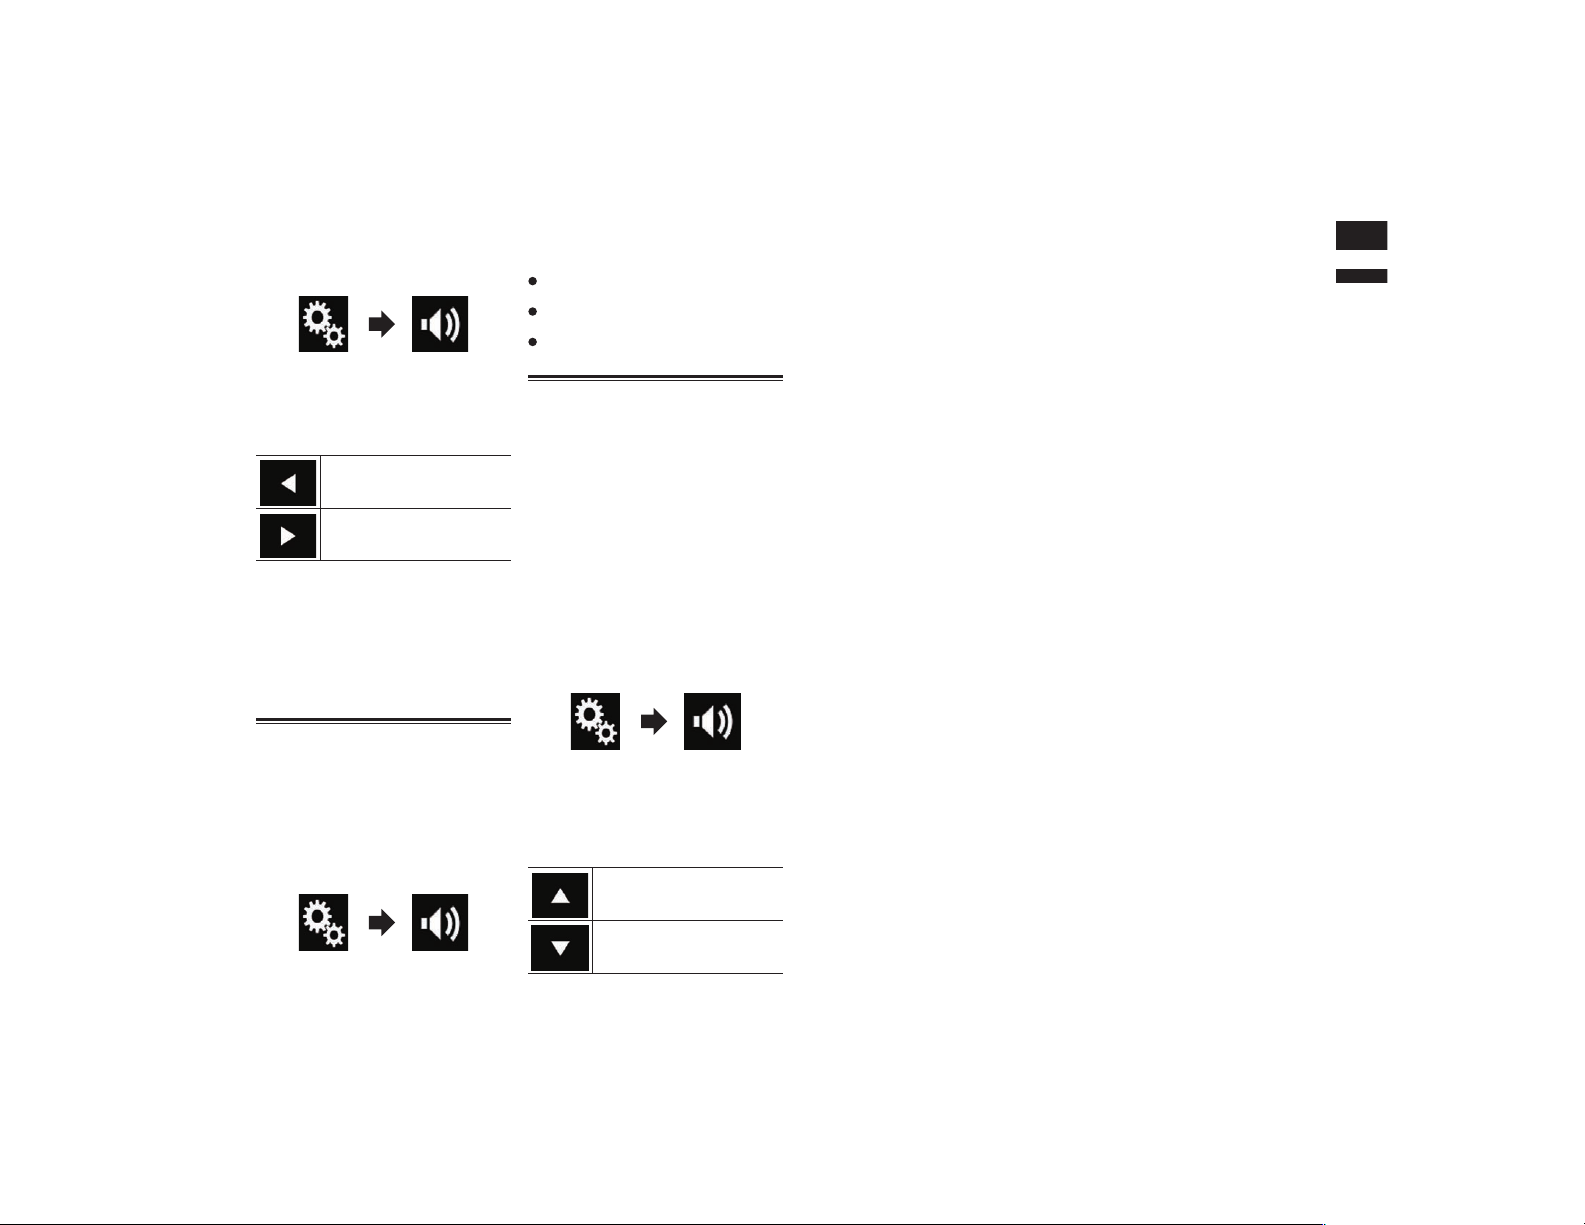
English
24
Chapter
61
En
1 Press the HOME button to display
the Top menu screen.
2 Touch the following keys in the
following order.
The “Audio” screen appears.
3 Touch [Balance].
The “Fader/Balance” screen appears.
4 Touch the following keys to adjust
the left/right speaker balance.
Moves towards the left.
Moves towards the right.
Each time you touch the keys, the left/right
speaker balance moves towards the left or
right.
p “Left25” to “Right25” is displayed as the
left/right speaker balance moves from the
left to right.
p The default setting is “L/R 0”.
p You can also set the fader/balance by
dragging the point on the displayed table.
Switching sound muting/
attenuation
Sound from this system is automatically
muted or attenuated when a signal from
equipment with a mute function is received.
1 Press the HOME button to display
the Top menu screen.
2 Touch the following keys in the
following order.
The “Audio” screen appears.
3 Touch [Mute Level].
The pop-up menu appears.
4 Touch the item you want to set.
ATT (default):
The volume becomes 1/10.
Mute:
The volume becomes 0.
Off:
The volume does not change.
Adjusting source levels
The SLA (source level adjustment) function
adjusts the volume level of each source to
prevent radical changes in volume when
switching between sources.
p This function is available only when main
audio is available.
p Settings are based on the FM tuner
volume level, which remains unchanged.
p This function is not available when the FM
tuner is selected as the AV source.
1 Compare the FM tuner volume
level with the level of the source
you want to adjust.
2 Press the HOME button to display
the Top menu screen.
3 Touch the following keys in the
following order.
The “Audio” screen appears.
4 Touch [Source Level Adjuster].
The “Source Level Adjuster” screen
appears.
5 Touch the following keys to adjust
the source volume.
Increases the source volume.
Decreases the source volume.
p If you directly touch the area where the
cursor can be moved, the SLA setting
will be changed to the value of the
touched point.
p “+4” to “–4” is displayed as the source
volume is increased or decreased.
p The default setting is “0”.

24
Chapter
62
En
The following AV sources are set to the same source level adjustment volume
automatically.
Required
cable (sold
separately)
Smartphone Setup
AV sources
Device Connection
iPod / iPhone
with a 30-pin
connector
CD-IU201V iPhone/iPod USB
USB1
iPod1
aha
Pandora
CD-IU201S iPhone/iPod USB
USB1
aha
Pandora
iPod1
AppRadio
Mode
iPod / iPhone
with a Lightning
connector
CD-IH202
CD-IU52
Lightning
Digital AV
Adapter
iPhone/iPod
Digital AV
adapter
aha
Pandora
AppRadio
Mode
HDMI
CD-IU52 iPhone/iPod USB
iPod1
aha
Pandora
Android device
CD-MU200 Others USB
Android Auto
MirrorLink
CD-AH200 Others HDMI
aha
Pandora
AppRadio
Mode
HDMI
p When a USB storage device is connected
to USB port 1 or USB port 2, the source
level adjustment volume is automatically
set to the same level as the USB port
to which the device is connected. The
source level adjustment volume that is
automatically set varies depending on
whether the device is connected to USB
port 1 or USB port 2.
p When an iPod / iPhone with a Lightning
connector is connected to USB port 1
or USB port 2 using a USB interface
cable for iPod / iPhone (CD-IU52) (sold
separately), the source level adjustment
volume is automatically set to the same
level as the USB port to which the iPod
/ iPhone with a Lightning connector is
connected. The source level adjustment
volume that is automatically set varies
depending on whether the iPod / iPhone
with a Lightning connector is connected
to USB port 1 or USB port 2.
p When an Android Auto-compatible
device or a MirrorLink device is con-
nected to USB port 2, the source level
adjustment volume is automatically set to
the same level as USB port 2.
Adjusting the lter
The following adjustments can be made
during filter adjustments. Make the appro-
priate adjustments for the reproduced
frequency band and characteristics of the
connected speaker unit.
20 1 k
0
10 k
Frequency (Hz)
3
4
2
Level (dB)
100
1
1 Reproduced frequency band
2 Slope adjustment
3 Cut-off frequency of the LPF
4 Cut-off frequency of the HPF
■ Adjusting the front and rear
speaker output
You can set the frequency range for the
sound output from the front and rear
speakers.
p This function is available only when main
audio is available.
1 Press the HOME button to display
the Top menu screen.
2 Touch the following keys in the
following order.
The “Audio” screen appears.
3 Confirm that “Rear Speaker” is set
to “On”.
p The default setting is “On”.
4 Touch [Crossover].
The “Cutoff” screen appears.
5 Touch the following keys to select
“Front” or “Rear”.
Selects the adjustable previous
speaker.
Selects the adjustable next
speaker.
6 Touch [HPF] to turn on.
7 Drag the line graph horizontally
to adjust the range of cut-off fre-
quency from “50” Hz to “200” Hz.
p The default setting is “100” Hz.
8 Drag the tip of the slope to adjust
the range of level between “–6” dB/
oct and “–18” dB/oct.
p The default setting is “–12” dB/oct.
■ Using the subwoofer output
This product is equipped with a subwoofer
output mechanism, which can be turned
on or off.
p This function is available only when main
audio is available.
1 Press the HOME button to display
the Top menu screen.
2 Touch the following keys in the
following order.
The “Audio” screen appears.
3 Touch [Subwoofer] to set the sub-
woofer output “On”.
p The default setting is “Off”.
4 Touch [Subwoofer].
The “Cutoff” screen appears.

English
24
Chapter
63
En
5 Touch the following keys to select
“Subwoofer”.
Selects the adjustable previous
speaker.
Selects the adjustable next
speaker.
6 Touch [LPF] to turn on.
7 Touch the following keys to select
the phase of subwoofer output.
Sets the phase of subwoofer
output to normal.
Sets the phase of subwoofer
output to reverse.
8 Drag the line graph horizontally
to adjust the range of cut-off fre-
quency from “50” Hz to “200” Hz.
p The default setting is “100” Hz.
9 Drag the tip of the slope to adjust
the range of level between “–6” dB/
oct and “–18” dB/oct.
p The default setting is “–18” dB/oct.
Selecting the listening
position
You can select a listening position that you
want to make as the center of sound effects.
p This function is available only when main
audio is available.
1 Press the HOME button to display
the Top menu screen.
2 Touch the following keys in the
following order.
The “Audio” screen appears.
3 Touch [Listening Position].
The “Listening Position” screen appears.
4 Touch the desired position.
Off (default):
Changes the listening position setting to
off.
Front:
Changes the listening position setting to
front.
Front-L:
Changes the listening position setting to
front left.
Front-R:
Changes the listening position setting to
front right.
All:
Changes the listening position setting to
all.
Adjusting the speaker output
levels nely
Fine adjustments of the speaker output level
can be made by listening to audio output.
p This function is available only when main
audio is available.
p This function is available only when “Rear
Speaker” is set to “On”.
For details, refer to Adjusting the front
and rear speaker output on page 62.
p This function is available only when
“Subwoofer” is set to “On”.
For details, refer to Using the subwoofer
output on page 62.
1 Press the HOME button to display
the Top menu screen.
2 Touch the following keys in the
following order.
The “Audio” screen appears.
3 Touch [Speaker Level].
The “Speaker Level” screen appears.
4 Touch the following keys to select
the listening position if necessary.
Selects the listening position.
Off:
Changes the listening position setting to
off.
Front Left:
Changes the listening position setting to
front left.
Front Right:
Changes the listening position setting to
front right.
Front:
Changes the listening position setting to
front.
All:
Changes the listening position setting to
all.
p If you change the listening position
setting, the output levels of all the speak-
ers will change in conjunction with the
setting.
5 Touch the following keys to adjust
the speaker output level.
Decreases the speaker level.
Increases the speaker level.
p “–24” dB to “10” dB is displayed as the
distance to be corrected is increased or
decreased.
Front Left:
Changes the speaker level of the front left
speaker.
Front Right:
Changes the speaker level of the front
right speaker.
Rear Left:
Changes the speaker level of the rear left
speaker.
Rear Right:
Changes the speaker level of the rear
right speaker.
Subwoofer:
Changes the speaker level of the sub-
woofer speaker.
If you touch [Apply Auto EQ], the result
of “A-EQ&TA Measurement” will be
applied to the speaker level setting.
p To use this function, the vehicle’s acous-
tics must be measured in advance.
Adjusting the time alignment
By adjusting the distance from each speaker
to the listening position, time alignment is
able to correct the time required for sound to
reach the listening position.
p This function is available only when main
audio is available.
p This function is available only when “Rear
Speaker” is set to “On”.
For details, refer to Adjusting the front
and rear speaker output on page 62.
p This function is available only when
“Subwoofer” is set to “On”.
For details, refer to Using the subwoofer
output on page 62.
p This function is available only when the
listening position setting is set to “Front
Left” or “Front Right”.
For details, refer to Selecting the listening
position on page 63.
1 Measure the distance between
the head of the listener and each
speaker unit.
2 Press the HOME button to display
the Top menu screen.
3 Touch the following keys in the
following order.
The “Audio” screen appears.
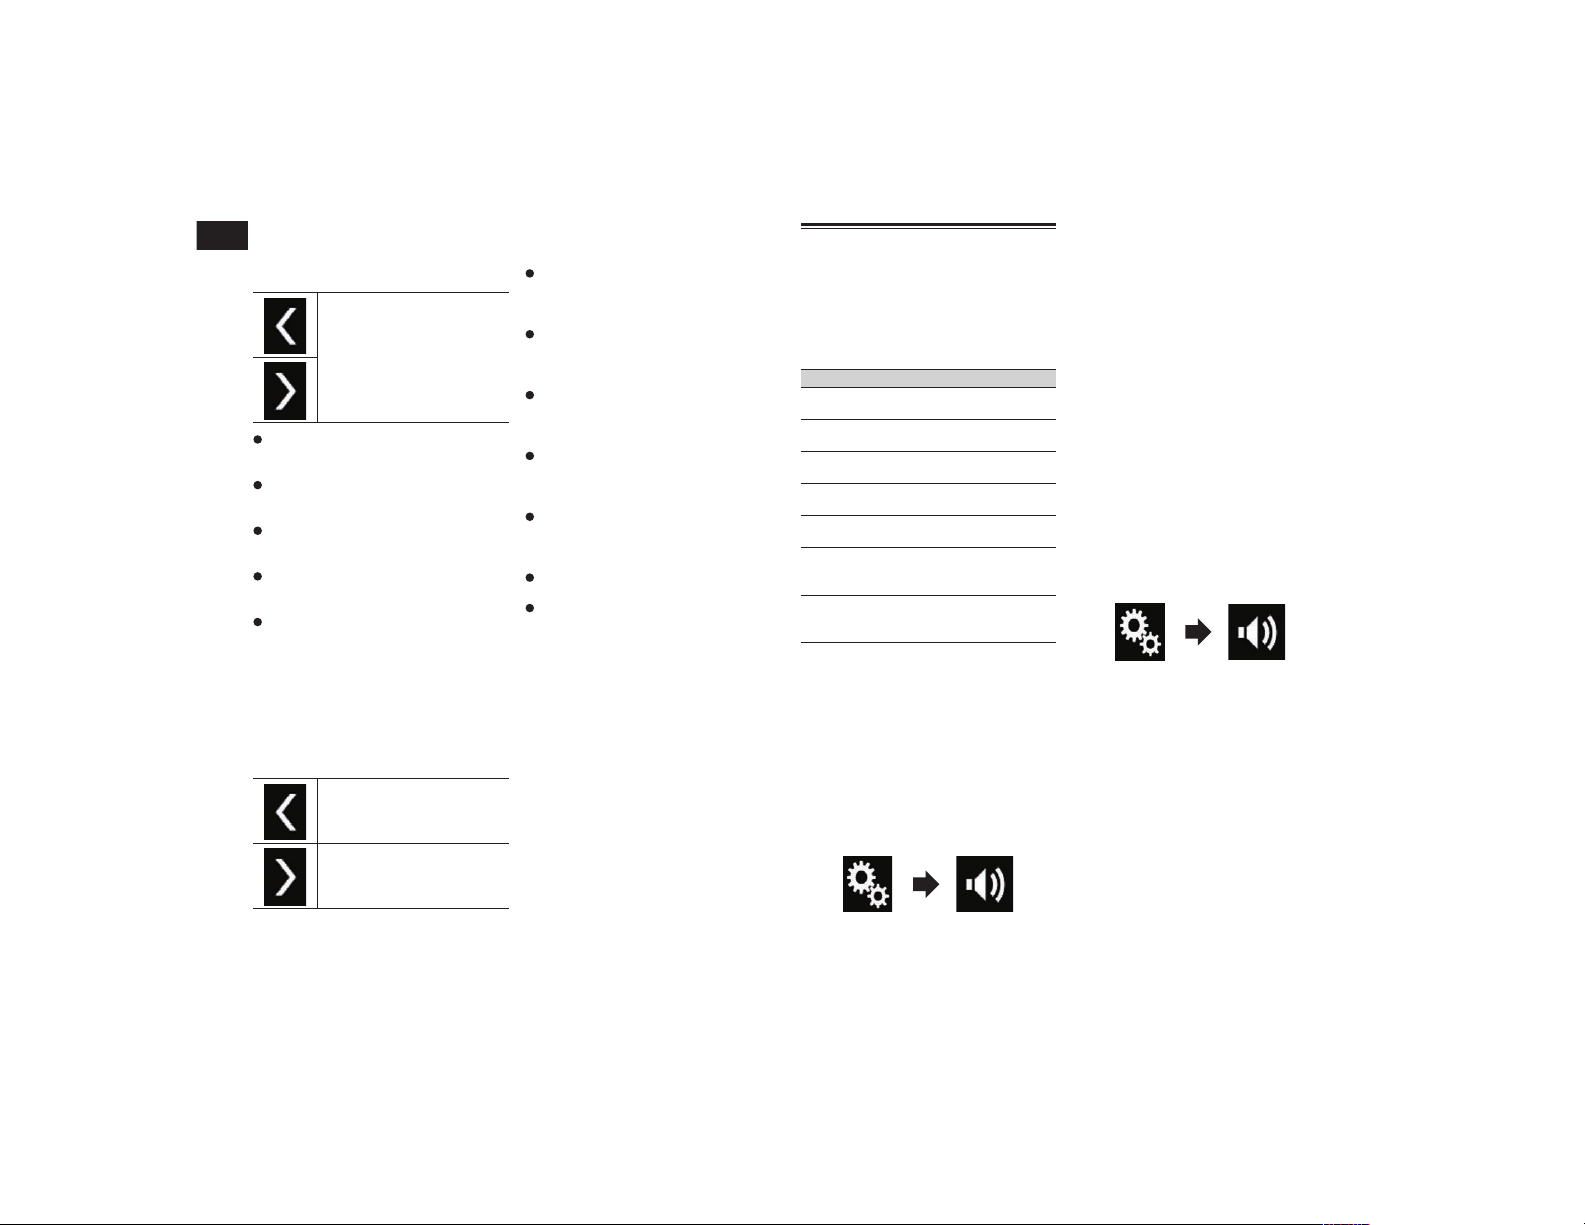
24
Chapter
64
En
4 Touch [Time Alignment].
The “Time Alignment” screen appears.
5 Touch the following keys to select
the listening position if necessary.
Selects the listening position.
Off:
Changes the listening position setting to
off.
Front Left:
Changes the listening position setting to
front left.
Front Right:
Changes the listening position setting to
front right.
Front:
Changes the listening position setting to
front.
All:
Changes the listening position setting to
all.
p If you change the listening position
setting, the output levels of all the speak-
ers will change in conjunction with the
setting.
6 Touch the following keys to input
the distance between the selected
speaker and the listening position.
Decreases the distance between
the selected speaker and the
selected listening position.
Increases the distance between
the selected speaker and the
selected listening position.
p “0.0” inch to “200.0” inch is displayed as
the distance to be corrected is increased
or decreased.
Front Left:
Changes the distance between the front
left speaker and the selected listening
position.
Front Right:
Changes the distance between the front
right speaker and the selected listening
position.
Rear Left:
Changes the distance between the rear
left speaker and the selected listening
position.
Rear Right:
Changes the distance between the rear
right speaker and the selected listening
position.
Subwoofer:
Changes the distance between the sub-
woofer speaker and the selected listening
position.
If you touch [TA On], the time alignment
is turned off.
If you touch [Apply Auto EQ], the result
of “A-EQ&TA Measurement” will be
applied to the time alignment setting.
p To use this function, the vehicle’s acous-
tics must be measured in advance.
Using the equalizer
The equalizer lets you adjust equalization to
match the vehicle interior acoustic charac-
teristics as desired.
■ Recalling equalizer curves
There are seven stored equalizer curves that
you can easily recall at any time. Here is a
list of the equalizer curves:
Equalizer curve
S.Bass is a curve in which only low-pitched
sound is boosted.
Powerful is a curve in which low- and high-
pitched sounds are boosted.
Natural is a curve in which low- and high-
pitched sounds are slightly boosted.
Vocal is a curve in which the midrange,
which is the human vocal range, is boosted.
Flat is a flat curve in which nothing is
boosted.
Custom1 is an adjusted equalizer curve
that you create. If you select this curve, the
effect is applied to all AV sources.
Custom2 is an adjusted equalizer curve
that you create. If you select this curve, the
effect is applied to all AV sources.
p This function is available only when main
audio is available.
p The default setting is “Powerful”.
p When “Flat” is selected, no supplement
or correction is made to the sound. This is
useful to check the effect of the equalizer
curves by switching alternatively between
“Flat” and a set equalizer curve.
1 Press the HOME button to display
the Top menu screen.
2 Touch the following keys in the
following order.
The “Audio” screen appears.
3 Touch [Graphic EQ].
The “Graphic EQ” screen appears.
4 Touch the equalizer you want.
■ Customizing the equalizer
curves
You can adjust the currently selected equal-
izer curve setting as desired. Adjustments
can be made with a 13-band graphic
equalizer.
p This function is available only when main
audio is available.
p If you make adjustments when a curve
“S.Bass”, “Powerful”, “Natural”,
“Vocal”, or “Flat” is selected, the equal-
izer curve settings will be changed to
“Custom1” automatically.
p If you make adjustments when the
“Custom2” curve is selected for example,
the “Custom2” curve will be updated.
p “Custom1” and “Custom2” curves can
be created common to all sources.
1 Press the HOME button to display
the Top menu screen.
2 Touch the following keys in the
following order.
The “Audio” screen appears.
3 Touch [Graphic EQ].
The “Graphic EQ” screen appears.
4 Touch one of the keys to select a
curve that you want to use as the
basis of customizing.
5 Touch the frequency for which you
want to adjust the level.
p If you trail a finger across the bars of
multiple equalizer bands, the equalizer
curve settings will be set to the value of
the touched point on each bar.
■ Using the auto-adjusted
equalizer
You can set the auto-adjusted equalizer
to suit the vehicle’s acoustics. To use this
function, the vehicle’s acoustics must be
measured in advance.
English
24
Chapter
65
En
For details of the operations, refer to
Adjusting the equalizer curve automati-
cally (Auto EQ) on page 65.
p To manually adjust the equalizer curve,
set “Auto EQ&TA” to “Off”.
1 Press the HOME button to display
the Top menu screen.
2 Touch the following keys in the
following order.
The “Audio” screen appears.
3 Touch [Auto EQ&TA] repeatedly
until the desired setting appears.
Off (default):
Turns the Auto EQ&TA setting off.
On:
Turns the Auto EQ&TA setting on.
Adjusting the equalizer curve
automatically (Auto EQ)
By measuring the vehicle’s acoustics, the
equalizer curve can be adjusted automati-
cally to suit the vehicle interior.
WARNING
A loud tone (noise) may be emitted from
the speakers when measuring the vehicle’s
acoustics. Never perform Auto EQ measure-
ment while driving.
CAUTION
Thoroughly check the conditions before
performing Auto EQ, as the speakers
may be damaged if this is performed
under the following conditions:
— When the speakers are incorrectly
connected. (For example, when a rear
speaker is connected as a subwoofer
output.)
— When a speaker is connected to a power
amp delivering output higher than
the speaker’s maximum input power
capability.
If a microphone for acoustical measure-
ment (sold separately) is not placed in an
appropriate location, the measurement
tone may become loud and measure-
ment may take a long time, resulting in
battery drainage. Be sure to place the
microphone in the specified location.
■ Before operating the Auto EQ
function
Perform Auto EQ in as quiet a place as
possible, with the vehicle engine and air
conditioning switched off. Also, cut power
to car phones or cellular phones in the
vehicle, or remove them from the vehicle
before performing Auto EQ. Sounds other
than the measurement tone (surrounding
sounds, engine sound, telephones ring-
ing, etc.) may prevent correct measure-
ment of the vehicle’s acoustics.
Be sure to perform Auto EQ using the
microphone for acoustical measurement
(sold separately). Using another micro-
phone may prevent measurement, or
result in incorrect measurement of the
vehicle’s acoustics.
To perform Auto EQ, the front speakers
must be connected.
When this product is connected to a
power amp with input level control, Auto
EQ may be impossible if the power amp’s
input level is set below the standard level.
When this product is connected to a
power amp with an LPF (low pass filter),
turn the LPF off before performing Auto
EQ. Also, set the cut-off frequency for the
built-in LPF of an active subwoofer to the
highest frequency.
The distance has been calculated by a
computer to provide optimum delay to
ensure accurate results. Do not change
this value.
— The reflected sound within the vehicle is
strong and delays occur.
— The LPF on active subwoofers or external
amps delay the lower sounds.
If an error occurs during measurement,
a message appears and measurement
is canceled. Check the following before
measuring the vehicle’s acoustics.
— Front speakers (left/right)
— Rear speakers (left/right)
— Noise
— Microphone for acoustical measurement
(sold separately)
— Low battery
■ Performing Auto EQ
p Auto EQ changes the audio settings as
follows:
— “Auto EQ&TA” is set to “On”.
For details, refer to Using the auto-ad-
justed equalizer on page 64.
— The fader/balance settings return to the
center position.
For details, refer to Using balance adjust-
ment on page 60.
— The equalizer curve switches to “Flat”.
For details, refer to Using the equalizer on
page 64.
— The front and rear speakers will automat-
ically be adjusted to a high pass filter
setting.
p Previous settings for Auto EQ will be
overwritten.
p Do not press the button to open or
close the panel when you are using the
microphone.
CAUTION
Do not turn off the engine while the mea-
surement is in progress.
1 Stop the vehicle in a quiet place,
close all the doors, windows and
sun roof, and then turn the engine
off.
If the engine is left running, engine noise
may prevent correct Auto EQ.
p If driving restrictions are detected during
measurement, measurement is canceled.
2 Fix the microphone for acoustical
measurement (sold separately) in
the center of the headrest of the
driver’s seat, facing forward.
The Auto EQ may differ depending on where
you place the microphone. If desired, place
the microphone on the front passenger seat
and perform Auto EQ.
3 Disconnect the iPhone or smart-
phone device.
4 Turn on the ignition switch (ACC
ON).
If the vehicle’s air conditioner or heater is
turned on, turn it off. Noise from the fan in
the air conditioner or heater may prevent
correct Auto EQ.
5 Switch the AV source to “OFF”.
For details of the operations, refer to
Displaying the AV operation screen on
page 12.
6 Press the HOME button to display
the Top menu screen.
7 Touch the following keys in the
following order.
The “Audio” screen appears.
8 Touch [A-EQ&TA Measurement].
The “A-EQ&TA Measurement” screen
appears.
9 Connect the microphone for acous-
tical measurement (sold sepa-
rately) with this product.
Plug the microphone into the microphone
input jack on this product.
10 Touch [Front Left] or [Front Right]
to select the current listening
position.
11 Touch [Start].
A 10-second countdown starts.
p The Bluetooth connection is discon-
nected before the process starts.
12 Exit the vehicle and keep the
doors closed until the countdown
finishes.
When the countdown finishes, a measure-
ment tone (noise) is emitted from the speak-
ers and the Auto EQ measurement begins.
13 Wait until the measurement is
completed.
When Auto EQ is completed, a message is
displayed indicating that the measurement
is completed.
25
Chapter
66
En
p If the vehicle’s acoustics cannot be
measured correctly, an error message will
be displayed.
p The measurement time varies depending
on the type of vehicle.
p To stop the measurement, touch [Stop].
14 Store the microphone carefully in
the glove compartment or another
safe place.
If the microphone is subjected to direct sun-
light for an extended period, high tempera-
tures may cause distortion, color change or
malfunction.
Theme menu
Selecting the background
display
The background display can be selected
from 8 different preset displays for the AV
operation screen and 5 different preset dis-
plays for the Top menu screen. Furthermore,
you can change the background display
to other images imported from an external
storage device (USB, SD).
1 Press the HOME button to display
the Top menu screen.
2 Touch the following keys in the
following order.
The “Theme” screen appears.
3 Touch [Background].
p You can also change the screen for
settings by touching [Illumination],
[Theme] or [Clock] on this screen.
4 Touch [Home] or [AV] to switch the
screen displays.
p The setting contents can be memorized
separately for the AV operation screen
and the Top menu screen.
5 Touch the item you want to set.
Preset displays:
Selects the desired preset background
display.
(custom):
Displays the background display image
imported from the external storage device
(USB, SD).
For details, refer to Changing to the
background display image stored on the
external storage device (USB, SD) on
page 66.
(off):
Hides the background display.
■ Changing to the background
display image stored on the
external storage device (USB,
SD)
You can change the background display
image to an image imported from the exter-
nal storage device (USB, SD).
p Background display image must be used
within the following formats.
— JPEG image files (.jpg or .jpeg)
— Allowable data size is 10 MB or smaller
— Allowable image size is 4 000 pixels ×
4 000 pixels or smaller
CAUTION
Do not turn off the engine while importing
an image from the external storage device
(USB, SD).
1 Press the HOME button to display
the Top menu screen.
2 Touch the following keys in the
following order.
The “Theme” screen appears.
3 Touch [Background].
p You can also change the screen for
settings by touching [Illumination],
[Theme] or [Clock] on this screen.
4 Touch the following key.
Displays the list of the back-
ground display images stored
on the external storage device
(USB, SD).
5 Touch the desired external storage
device (USB, SD).
6 Touch the image to use as the
background display from the list.
The image is set as the background display.
p You can delete the imported image and
restore the setting for the background
display to the default by touching and
holding the custom key.
Setting the illumination color
The illumination color can be selected from
5 different colors. Furthermore, the illumina-
tion can be switched between these 5 colors
in order.
■ Selecting the color from the
preset colors
You can select an illumination color from the
color list.
1 Press the HOME button to display
the Top menu screen.
2 Touch the following keys in the
following order.
The “Theme” screen appears.
3 Touch [Illumination].
p You can also change the screen
for settings by touching [Theme],
[Background] or [Clock] on this screen.
4 Touch the color you want.
Colored keys:
Selects the desired preset color.
(custom):
Displays the screen to customize the
illumination color.
For details, refer to Creating a user-de-
fined color on page 66.
(rainbow):
Shifts through the rainbow of colors
gradationally.
p You can preview the Top menu screen
or the AV operation screen by touching
[Home] or [AV] respectively.
■ Creating a user-dened color
You can create a user-defined color. The
created color is stored, and you can select
the color when setting the illumination color
the next time.
1 Press the HOME button to display
the Top menu screen.
2 Touch the following keys in the
following order.
The “Theme” screen appears.
3 Touch [Illumination].
p You can also change the screen
for settings by touching [Theme],
[Background] or [Clock] on this screen.
4 Touch the following key.
Displays the screen to create a
user-defined color and store it
to memory.
5 Touch the following keys.
Adjusts the brightness and the
level of red, green and blue to
create a favorite color.
p You can also adjust the color tone by
dragging the color bar.
6 Touch and hold [Memo] to store the
customized color in the memory.
The customized color is stored in the
memory.
The set color will be recalled from the mem-
ory the next time you touch the same key.

English
25
Chapter
67
En
Selecting the theme color
A theme color can be selected from 5 differ-
ent colors.
1 Press the HOME button to display
the Top menu screen.
2 Touch the following keys in the
following order.
The “Theme” screen appears.
3 Touch [Theme].
p You can also change the screen for
settings by touching [Illumination],
[Background] or [Clock] on this screen.
4 Touch the color you want.
p You can preview the Top menu screen
or the AV operation screen by touching
[Home] or [AV] respectively.
Selecting the clock image
The clock on the AV operation screen and
the Top menu screen can be selected from 3
different images.
1 Press the HOME button to display
the Top menu screen.
2 Touch the following keys in the
following order.
The “Theme” screen appears.
3 Touch [Clock].
p You can also change the screen for
settings by touching [Illumination],
[Theme] or [Background] on this
screen.
4 Touch the item you want to set.
Preset images:
Selects the desired preset clock image.
(off):
Hides the clock display.
p You can preview the Top menu screen
or the AV operation screen by touching
[Home] or [AV] respectively.
Changing the preinstalled
splash screen
You can change the splash screen to other
images preinstalled in this product.
1 Press the HOME button to display
the Top menu screen.
2 Touch the following keys in the
following order.
The “Theme” screen appears.
3 Touch [Splash Screen].
4 Touch the item you want to set.
Preset images:
Selects the desired preset splash screen
image.
(custom):
Displays the splash screen image
imported from the external storage device
(USB, SD).
For details, refer to Changing to the
splash screen stored on the external
storage device (USB, SD) on page 67.
■ Changing to the splash screen
stored on the external storage
device (USB, SD)
You can change the splash screen to other
images imported from the external storage
device (USB, SD).
CAUTION
Do not turn off the engine while importing
an image from the external storage device
(USB, SD).
1 Press the HOME button to display
the Top menu screen.
2 Touch the following keys in the
following order.
The “Theme” screen appears.
3 Touch [Splash Screen].
4 Touch the following key.
Displays the list of the splash
screens stored on the external
storage device (USB, SD).
5 Touch the desired external storage
device (USB, SD).
6 Touch the image to use as the
splash screen from the list.
The image is set as the splash screen.
p You can delete the imported image and
restore the setting on the splash screen
to the default by touching and holding the
custom key.
Replicating the settings
■ Exporting “Theme” settings
You can export settings you have made on
the “Theme” screen to an external storage
device (USB, SD). These settings can be
exported separately.
p This setting is available only when you
stop your vehicle in a safe place and apply
the parking brake.
p If multiple external storage devices are
connected to this product, the order of
priority for the targets that the “Theme”
settings are exported to is as follows:
1 SD memory card
2 USB storage device that is connected to
USB port 1
3 USB storage device that is connected to
USB port 2
CAUTION
Do not turn off the engine while exporting
the settings.
1 Insert the SD memory card into the
SD card slot or plug the USB stor-
age device into the USB connector.
For details, refer to Plugging in a USB
storage device on page 11.
For details, refer to Inserting and ejecting
an SD memory card on page 10.
2 Press the HOME button to display
the Top menu screen.
3 Touch the following keys in the
following order.
The “Theme” screen appears.
4 Touch [Export].
The “Settings Export” screen appears.
5 Touch the desired item.
Illumination:
Selects the illumination color setting.
Splash Screen:
Selects the splash screen setting.
Select All:
Selects all settings.
6 Touch [Export].
Data export starts.
After the data is exported, a completion
message appears.
p The source is turned off and the
Bluetooth connection is disconnected
before the process starts.
■ Importing “Theme” settings
The settings made on the “Theme” screen
that were exported to an external storage
device (USB, SD) can be imported.
p This setting is available only when you
stop your vehicle in a safe place and apply
the parking brake.
p If multiple external storage devices that
include available data are connected to
this product, the order of priority for the
targets that the “Theme” settings are
imported from is as follows:
1 SD memory card
2 USB storage device that is connected to
USB port 1
26
Chapter
68
En
3 USB storage device that is connected to
USB port 2
CAUTION
Do not turn off the engine while import-
ing the settings.
To prevent data loss and damage to the
SD memory card, never edit the data
exported to the SD memory card.
1 Insert the SD memory card into the
SD card slot or plug the USB stor-
age device into the USB connector.
For details, refer to Plugging in a USB
storage device on page 11.
For details, refer to Inserting and ejecting
an SD memory card on page 10.
A message confirming whether to import the
stored setting data appears.
2 Touch [Import].
Data import starts.
When the data is successfully imported, an
import complete message is displayed.
p The source is turned off and the
Bluetooth connection is disconnected
before the process starts.
Setting up the video
player
Setting the top-priority
languages
You can assign the top-priority language to
the top-priority subtitle, audio and menu
in initial playback. If the selected language
is recorded on the disc, subtitles, audio
and menu are displayed or output in that
language.
p This setting is available only when “Disc”
is selected as the source.
■ Setting the subtitle language
You can set a desired subtitle language.
When available, the subtitles will be dis-
played in the selected language.
1 Press the HOME button to display
the Top menu screen.
2 Touch the following keys in the
following order.
The “Video Setup” screen appears.
3 Touch [DVD/DivX Setup].
4 Touch [Subtitle Language].
The pop-up menu appears.
5 Touch the desired language.
When you select “Others”, a language code
input screen is shown. Input the four-digit
code of the desired language then touch .
The subtitle language is set.
p If the selected language is not available,
the language specified on the disc is
displayed.
p You can switch the subtitle language by
touching the subtitle language switching
key during playback.
p The setting made here will not be affected
even if the subtitle language is switched
during playback using the subtitle lan-
guage switching key.
■ Setting the audio language
You can set the preferred audio language.
1 Press the HOME button to display
the Top menu screen.
2 Touch the following keys in the
following order.
The “Video Setup” screen appears.
3 Touch [DVD/DivX Setup].
4 Touch [Audio Language].
The pop-up menu appears.
5 Touch the desired language.
When you select “Others”, a language code
input screen is shown. Input the four-digit
code of the desired language then touch .
The audio language is set.
p If the selected language is not available,
the language specified on the disc is
applied.
p You can switch the audio language by
touching the audio language switching
key during playback.
p The setting made here will not be affected
even if the audio language is switched
during playback using the audio lan-
guage switching key.
■ Setting the menu language
You can set the preferred language in which
the menus recorded on a disc are displayed.
1 Press the HOME button to display
the Top menu screen.
2 Touch the following keys in the
following order.
The “Video Setup” screen appears.
3 Touch [DVD/DivX Setup].
4 Touch [Menu Language].
The pop-up menu appears.
5 Touch the desired language.
When you select “Others”, a language code
input screen is shown. Input the four-digit
code of the desired language then touch .
The menu language is set.
p If the selected language is not available,
the language specified on the disc is
displayed.
Setting the angle icon display
You can set whether to display the angle
icon on the scenes where the angle can be
switched.
p This setting is available only when “Disc”
is selected as the source.
1 Press the HOME button to display
the Top menu screen.
2 Touch the following keys in the
following order.
The “Video Setup” screen appears.
3 Touch [DVD/DivX Setup].
4 Touch [Multi Angle] repeatedly
until the desired setting appears.
On (default):
Turns the multi-angle setting on.
Off:
Turns the multi-angle setting off.
Setting the aspect ratio
There are two kinds of displays. A wide
screen display has a width-to-height ratio (TV
aspect) of 16:9, while a regular display has
a TV aspect of 4:3. If you use a regular rear
display with a TV aspect of 4:3, you can set
the aspect ratio suitable for your rear display.
(We recommend use of this function only
when you want to fit the aspect ratio to the
rear display.)
p When using a regular display, select
either “Letter Box” or “Pan Scan”.
Selecting “16:9” may result in an unnatu-
ral image.
p If you select the TV aspect ratio, this
product’s display will change to the same
setting.
p This setting is available only when “Disc”
is selected as the source.
1 Press the HOME button to display
the Top menu screen.
2 Touch the following keys in the
following order.
The “Video Setup” screen appears.
3 Touch [DVD/DivX Setup].
4 Touch [TV Aspect].
The pop-up menu appears.
English
26
Chapter
69
En
5 Touch the item you want to set.
16:9 (default):
Displays the wide screen image (16:9) as
it is (initial setting).
Letter Box:
Makes the image in the shape of a let-
terbox with black bands on the top and
bottom of the screen.
Pan Scan:
Cuts the image short on the right and left
sides of the screen.
p When playing discs that do not have a
panscan system, the disc is played back
with “Letter Box” even if you select the
“Pan Scan” setting. Confirm whether the
disc package bears the mark.
p The TV aspect ratio cannot be changed
for some discs. For details, refer to the
disc’s instructions.
Setting parental lock
Some DVD-Video discs let you use parental
lock to set restrictions so that children can-
not watch violent or adult-oriented scenes.
You can set the parental lock level in steps
as desired.
p This setting is available only when “Disc”
is selected as the source.
p When you set a parental lock level and
then play a disc featuring parental lock,
code number input indications may be
displayed. In this case, playback will start
when the correct code number is input.
■ Setting the code number and
level
When you first use this function, register
your code number. If you do not register
a code number, the parental lock will not
operate.
1 Press the HOME button to display
the Top menu screen.
2 Touch the following keys in the
following order.
The “Video Setup” screen appears.
3 Touch [DVD/DivX Setup].
4 Touch [Parental].
The “Parental” screen appears.
5 Touch [0] to [9] to input a four-digit
code number.
6 While the input number is dis-
played, touch the following key.
Registers the code number.
7 Touch any number between [1] to
[8] to select the desired level.
8:
Enables playback of the entire disc (initial
setting).
7 to 2:
Enables playback of discs for children
and non-adult oriented discs.
1:
Enables only playback of discs for
children.
8 While the input number is dis-
played, touch the following key.
Sets the parental lock level.
p We recommend that you keep a record of
your code number in case you forget it.
p The parental lock level is recorded on the
disc. You can confirm it by looking at the
disc package, the included literature or
the disc itself. You cannot use parental
lock with discs that do not feature a
recorded parental lock level.
p With some discs, parental lock operates
to skip certain scenes only, after which
normal playback resumes. For details,
refer to the disc’s instructions.
Displaying your DivX VOD
registration code
If you want to play DivX VOD (video on
demand) content on this product, you must
first register this product with your DivX VOD
content provider. You do this by generating
a DivX VOD registration code, which you
submit to your provider.
p Keep a record of the code as you will
need it when you register this product to
the DivX VOD provider.
p This setting is available only when “Disc”
is selected as the source.
1 Press the HOME button to display
the Top menu screen.
2 Touch the following keys in the
following order.
The “Video Setup” screen appears.
3 Touch [DVD/DivX Setup].
4 Touch [DivX
®
VOD].
The “DivX
®
VOD” screen appears.
p If a registration code has already been
activated, it cannot be displayed.
5 Touch [Registration Code].
Your 10-digit registration code is displayed.
p Make a note of the code as you will need
it when you register with a DivX VOD
provider.
Displaying your DivX VOD
deregistration code
A registration code registered with a deregis-
tration code can be deleted.
p This setting is available only when “Disc”
is selected as the source.
1 Press the HOME button to display
the Top menu screen.
2 Touch the following keys in the
following order.
The “Video Setup” screen appears.
3 Touch [DVD/DivX Setup].
4 Touch [DivX
®
VOD].
The “DivX
®
VOD” screen appears.
5 Touch [Deregistration Code].
Your eight-digit deregistration code is
displayed.
p Make a note of the code as you will need
it when you deregister from a DivX VOD
provider.
Automatic playback of DVDs
When a DVD disc with a DVD menu is
inserted, this product will cancel the menu
automatically and start playback from the
first chapter of the first title.
p Some DVDs may not operate properly. If
this function is not fully operable, turn
this function off and start playback.
p This setting is available only when “Disc”
is selected as the source.
1 Press the HOME button to display
the Top menu screen.
2 Touch the following keys in the
following order.
The “Video Setup” screen appears.
3 Touch [DVD/DivX Setup].
4 Touch [DVD Auto Play] repeatedly
until the desired setting appears.
Off (default):
Turns the DVD Auto Play setting off.
On:
Turns the DVD Auto Play setting on.
Setting the video signal for
the rear view camera
When you connect a rear view camera to
this product, select the suitable video signal
setting.
p You can operate this function only for the
video signal input into the AV input.
1 Press the HOME button to display
the Top menu screen.
27/28
Chapter
70
En
2 Touch the following keys in the
following order.
The “Video Setup” screen appears.
3 Touch [Video Signal Setting].
4 Touch [Camera].
The pop-up menu appears.
5 Touch the item you want to set.
Auto (default):
Adjusts the video signal setting
automatically.
PAL:
Sets the video signal to PAL.
NTSC:
Sets the video signal to NTSC.
PAL-M:
Sets the video signal to PAL-M.
PAL-N:
Sets the video signal to PAL-N.
SECAM:
Sets the video signal to SECAM.
Favorite menu
Registering your favorite menu items in
shortcuts allows you to quickly jump to the
registered menu screen by a simple touch
on the “Favorites” screen.
p Up to 12 menu items can be registered in
the favorite menu.
Creating a shortcut
1 Touch the HOME button to display
the Top menu screen.
2 Touch the following key.
Displays the Setting menu
screen.
3 Touch the star icon of the menu
item that you want to add to the
favorite menu.
The star icon for the selected menu is filled
in.
To cancel the registration, touch the star
icon in the menu column again.
Selecting a shortcut
1 Press the HOME button to display
the Top menu screen.
2 Touch the following keys in the
following order.
The “Favorites” screen appears.
3 Touch the desired item.
Removing a shortcut
1 Press the HOME button to display
the Top menu screen.
2 Touch the following keys in the
following order.
The “Favorites” screen appears.
3 Touch and hold the star icon of the
favorite menu you want to remove.
The selected menu is removed from the
“Favorites” screen.
Common operations
Setting the time and date
1 Touch the current time on the
screen to display the Time and
date setting screen.
2 Touch or to set the correct time
and date.
On this screen, you can operate the follow-
ing items.
Month/Date
m/d/y (default):
Changes the date display format to
month/date/year.
d/m/y
Changes the date display format to date/
month/year.
y/m/d:
Changes the date display format to year/
month/date.
Time Format
12hour (default):
Changes the display to 12-hour format
with am/pm.
24hour:
Changes the display to 24-hour format.
Storing song information to
an iPod (iTunes Tagging)
You can store song information to the iPod
when this product receives song informa-
tion. The songs will appear in a playlist called
“Tagged playlist” in iTunes the next time you
synchronize your iPod. You can directly buy
the songs via this product.
Depending on when the song information is
stored, information for the previous song or
the song after the current song may also be
stored. Be sure to confirm the song before
you purchase it.
p The iTunes Tagging function is available
when the song information is available.
p This function is available for the following
iPod models:
iPhone 4s
iPhone 4
iPhone 3GS
iPhone 3G
iPhone
iPod touch 5th generation
iPod touch 4th generation
iPod touch 3rd generation
iPod touch 2nd generation
iPod touch 1st generation
iPod classic
iPod nano 6th generation
iPod nano 5th generation
iPod nano 4th generation
iPod nano 3rd generation
p The version of iTunes must be 7.4 or
higher.
1 Press the HOME button to display
the Top menu screen.
2 Touch the following keys in the
following order.
The “System” screen appears.
3 Touch [AV Source Settings].
4 Touch [Tag Forwarding] repeatedly
until the desired setting appears.
USB1 (default):
Transfers the song information to your
iPod which is connected to USB port 1.
USB2:
Transfers the song information to your
iPod which is connected to USB port 2.
5 Tune into a broadcast station.
When the song information is received,
is displayed while the desired song is being
broadcast, and the touch panel key becomes
active.
HD Radio
For details, refer to iTunes
®
tagging indi-
cator on page 22.
For details, refer to Using the touch panel
keys on page 22.
SiriusXM
For details, refer to iTunes
®
tagging indi-
cator on page 47.
For details, refer to Using the touch panel
keys on page 47.
6 Touch the following key.
HD Radio
The touch panel key on which the song title
or artist name is displayed
SiriusXM
The touch panel key on which the artist
name, song title, category name or content
text is displayed
The information on the song on air is stored
in this product.
While the information is being acquired,
is displayed.
When it is completed, turns off and
is displayed.
p The song information for up to 50 songs
can be stored in this product.
Depending on when the song information
is stored, information for the previous

English
29
Chapter
71
En
song or the song after the current song
may also be stored.
7 Connect your iPod.
The song information is transferred to your
iPod.
p If the iPod is already connected, the
song information will be transferred to
your iPod every time you touch the touch
panel key on which song information is
displayed.
When the song information transfer to
your iPod is completed, disappears.
p When the song information transfer is
completed, the information stored in this
product will be automatically deleted.
p If you turn off this product or disconnect
the iPod while transferring song informa-
tion, the transfer may not successfully
complete.
p While this product is storing song
information, transfer to an iPod is not
possible.
Setting the “Sound Retriever”
function
The “Sound Retriever” function automat-
ically enhances compressed audio and
restores rich sound.
Touch the following key repeatedly
until the desired setting appears on
the AV operation screen.
Sets the “Sound Retriever”
function.
(Mode1) (default):
Activates the “Sound Retriever”
function.
(Mode2):
Activates the “Sound Retriever”
function.
(Off):
Deactivates the “Sound Retriever”
function.
p Mode2 has a stronger effect than Mode1.
Changing the wide screen
mode
You can set the screen size for the video and
JPEG images.
p This setting is available only when you
stop your vehicle in a safe place and apply
the parking brake.
p The default setting is “Full” for video, and
“Normal” for JPEG images.
1 Touch the following key.
Displays the setting screen to
select the appropriate screen
ratio for the playback video.
p The appearance of this key changes
according to the current setting.
2 Touch the desired mode.
Full
A 4:3 picture is enlarged in the horizontal
direction only, enabling you to enjoy a 4:3
TV picture (normal picture) without any
omissions.
p This setting is for video only.
Zoom
A 4:3 picture is enlarged in the same pro-
portion both vertically and horizontally;
ideal for a wide screen picture.
p This setting is for video only.
Normal
A 4:3 picture is displayed normally, giving
you no sense of disparity since its propor-
tions are the same as those of the normal
picture.
Trimming
An image is displayed across the entire
screen with the horizontal-to-vertical
ratio left as is. If the horizontal-to-vertical
ratio differs between the display and the
image, the image may be displayed partly
cut off either at the top/bottom or sides.
p This setting is for JPEG images only.
p Different settings can be stored for each
video source.
p When a video is viewed in a wide screen
mode that does not match its original
aspect ratio, it may appear different.
p The video image will appear coarser when
viewed in “Zoom” mode.
Other functions
Selecting the video for the
rear display
You can choose either to show the same
image as the front screen or to show the
selected source on the rear display.
p This function is not available during a call
via this product or while using the voice
recognition function.
1 Press the HOME button to display
the Top menu screen.
2 Touch the following key.
Displays the AV source
selection screen.
3 Touch [Rear].
The “Rear” screen appears.
4 Touch the source you want to show
on the rear display.
The source you can select is as follows.
Mirror
The video on the front screen of this
product is output to the rear display.
— Not all videos or sounds can be output to
the rear display.
DVD/CD
The video and sound of DVDs are output
to the rear display.
— Compatible file types are DVD-V,
Video-CD, DivX, MPEG-1, MPEG-2, and
MPEG-4 only.
USB/iPod
The video and sound of the USB storage
device or iPod are output to the rear
display.
— The port that supports the rear display will
only be USB port 1.
— Compatible file types are MPEG-4, H.264,
WMV, MKV, and FLV only.
SD
The video and sound of the SD memory
cards are output to the rear display.
— Compatible file types are MPEG-4, H.264,
WMV, MKV, and FLV only.
AV
The video and sound of the AV input are
output to the rear display.
— The video image and sound are output
only when “AV” has both video and
sound.
— The video image and sound are output
only when “AV Input” is set to “Source”.
For details, refer to Setting AV input on
page 55.
OFF
Nothing is output to the rear display.
Touch the following key.
Closes the “Rear” screen.
You can also select “Rear” on the source
list.
For details, refer to Selecting a front
source on the source list on page 13.
p Video files on the external storage device
(USB, SD) are not available as a source
for the rear display when Android Auto
is on.
Setting the anti-theft function
You can set a password for this product. If
the back-up lead is cut after the password is
set, this product prompts for the password
at the time of next boot up.
■ Setting the password
1 Press the HOME button to display
the Top menu screen.
2 Touch the following keys in the
following order.
The “System” screen appears.
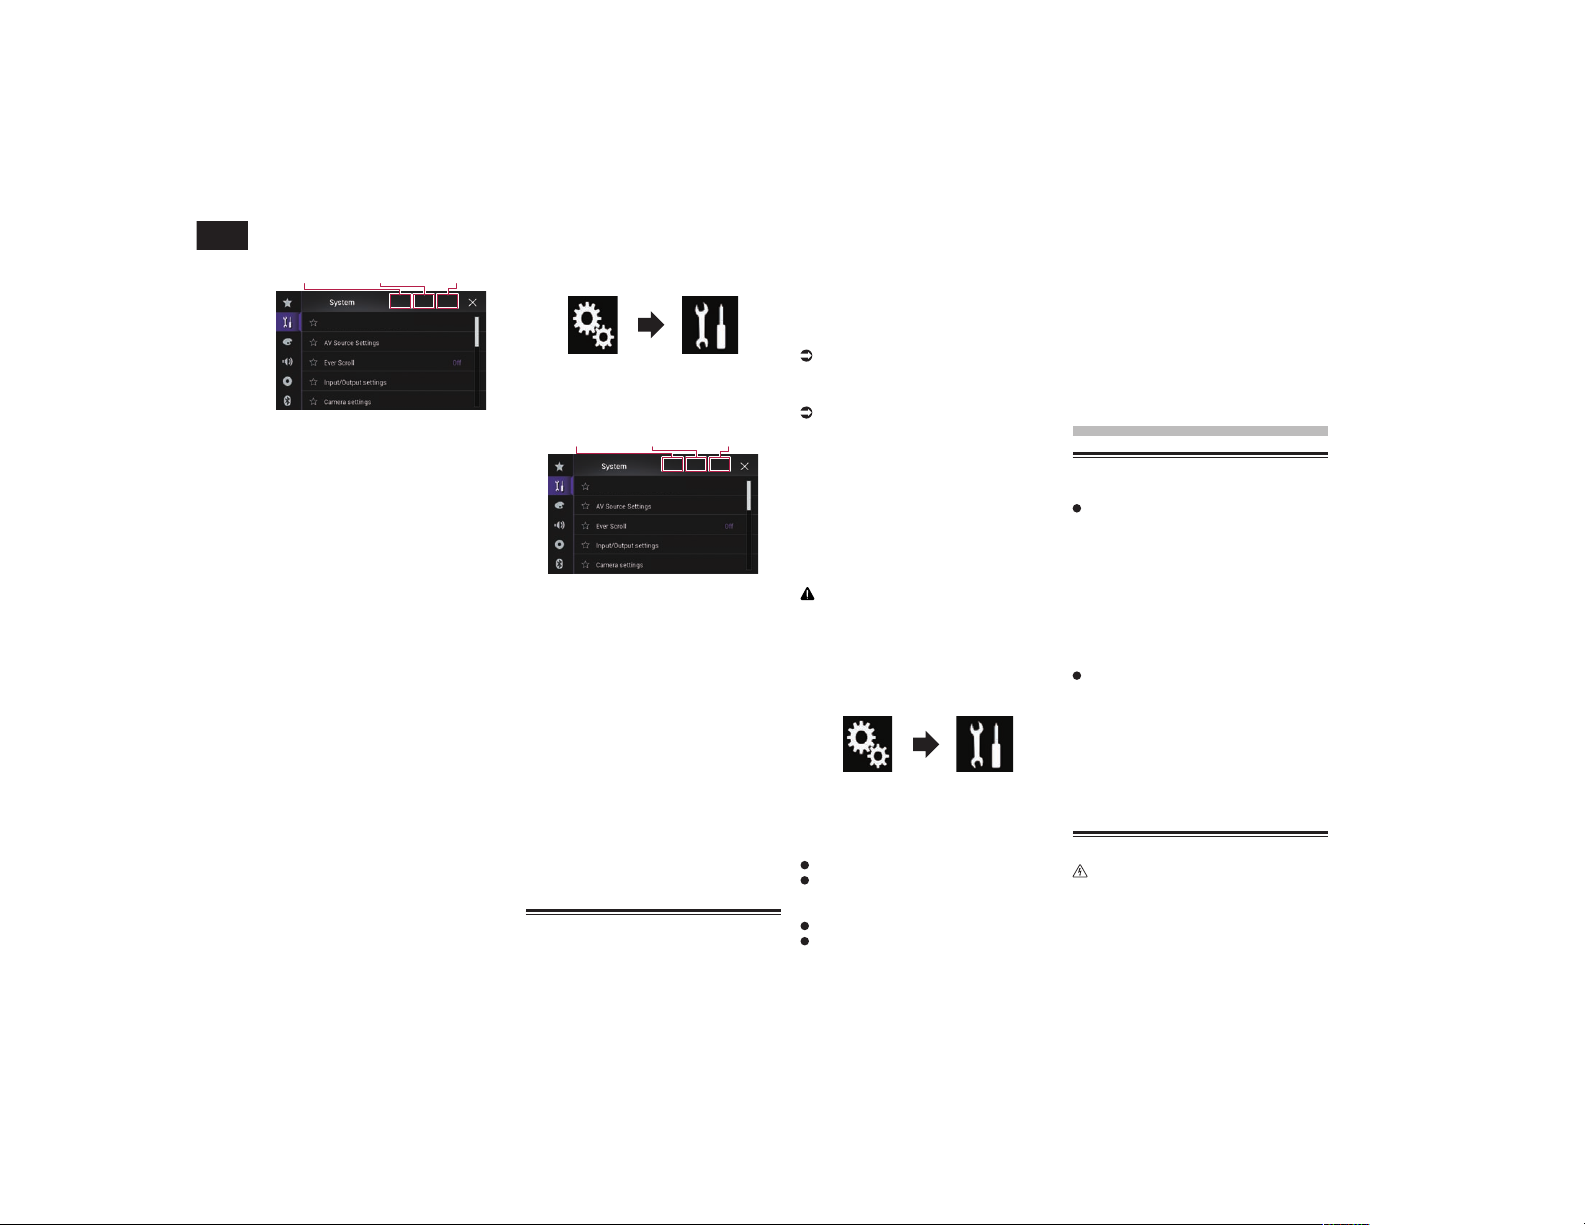
30
Chapter
72
En
3 Touch Area1, followed by Area2,
and then touch and hold Area3.
Area1 Area2 Area3
The “Anti-theft Setting Menu” screen
appears.
4 Touch [Set Password].
The “Password Entry” screen appears.
5 Enter the password you want to set.
p 5 to 16 characters can be entered for a
password.
6 Touch [Go].
The “Hint Entry” screen appears.
7 Enter a password hint.
p Up to 40 characters can be entered for a
hint.
8 Touch [Go].
The “Password Confirmation” screen
appears.
p If you want to change the password
currently set, enter the current password
and then enter the new one.
9 Check the password, and then
touch [OK].
The “Anti-theft Setting Menu” screen
appears.
■ Entering the password
On the password input screen, you must
enter the current password.
1 Enter the password.
2 Touch [Go].
When the correct password is entered, this
product will be unlocked.
■ Deleting the password
The current password and password hint
can be deleted.
1 Press the HOME button to display
the Top menu screen.
2 Touch the following keys in the
following order.
The “System” screen appears.
3 Touch Area1, followed by Area2,
and then touch and hold Area3.
Area1 Area2 Area3
The “Anti-theft Setting Menu” screen
appears.
4 Touch [Clear Password].
A message confirming whether to delete the
password appears.
5 Touch [Yes].
The password setting screen appears.
A message confirming a password hint
appears.
6 Touch [OK].
The “Password Entry” screen appears.
7 Enter the current password.
8 Touch [Go].
A message indicating that the security
setting is canceled appears.
■ Forgotten password
Contact the nearest authorized Pioneer
Service Station.
Restoring this product to the
default settings
You can restore settings or recorded content
to the default settings. Various methods are
used to clear user data.
Method 1: Remove the vehicle
battery
Resets various settings registered to this
product.
Method 2: Touch the item you
want to initialize on the “System”
screen
For details, refer to Restoring the default
settings on page 72.
Method 3: Press the RESET button
For details of the operations, refer
to Resetting the microprocessor on
page 8.
p Some of the settings and recorded con-
tents will not be reset.
■ Restoring the default settings
Resets various settings registered to this
product to the default settings.
p This setting is available only when you
stop your vehicle in a safe place and apply
the parking brake.
CAUTION
Do not turn off the engine while restoring
the settings.
1 Press the HOME button to display
the Top menu screen.
2 Touch the following keys in the
following order.
The “System” screen appears.
3 Touch [Restore Settings].
4 Touch the item you want to
initialize.
All Settings
Audio Settings
p This setting is available when the source
is turned off.
Theme Settings
Bluetooth Settings
A message confirming whether to initialize
the settings appears.
p If you want to return settings or recorded
content to the default, touch [All
Settings].
p Some of the settings configured on the
“Theme” setting will not be reset.
p The settings for My Vehicle are not reset.
5 Touch [Restore].
When the selected item is successfully
initialized, a completion message appears.
p The source is turned off and the
Bluetooth connection is disconnected
before the process starts.
Precautions
Your new product and this
manual
Do not operate this product, any appli-
cations, or the rear view camera option
(if purchased) if doing so will divert your
attention in any way from the safe opera-
tion of your vehicle. Always observe safe
driving rules and follow all existing traffic
regulations. If you experience difficulty
in operating this product or reading the
display, park your vehicle in a safe loca-
tion and apply the parking brake before
making the necessary adjustments.
Do not install this product where it may
(i) obstruct the driver’s vision, (ii) impair
the performance of any of the vehicle’s
operating systems of safety features,
including airbags, hazard lamp buttons,
or (iii) impair the driver’s ability to safely
operate the vehicle. In some cases, it may
not be possible to install this product
because of the vehicle type or the shape
of the vehicle interior.
Important safeguards
WARNING
Pioneer does not recommend that you
install this product yourself. This prod-
uct is designed for professional instal-
lation only. We recommend that only
authorized Pioneer service personnel,
who have special training and experi-
ence in mobile electronics, set up and
install this product. NEVER SERVICE
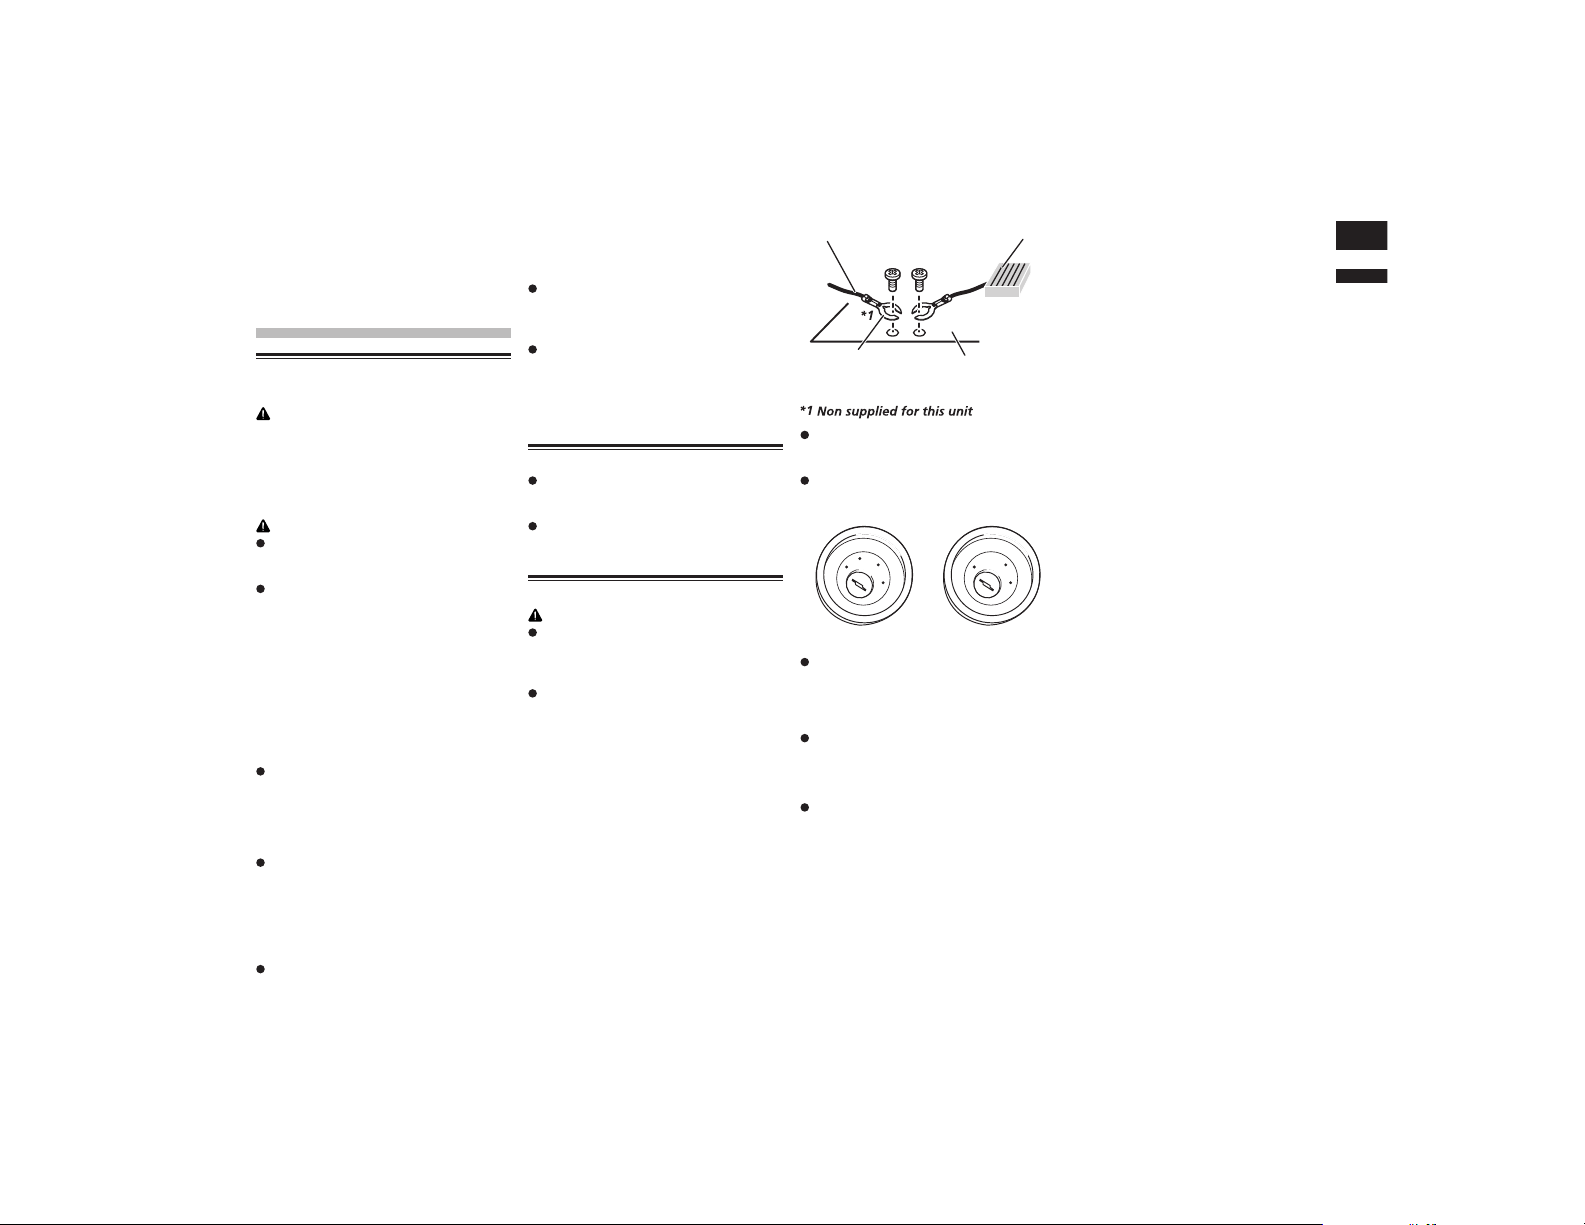
English
31
Chapter
73
En
THIS PRODUCT YOURSELF. Installing
or servicing this product and its connect-
ing cables may expose you to the risk of
electric shock or other hazards, and can
cause damage to this product that is not
covered by warranty.
Connection
Precautions before connecting
the system
WARNING
Do not take any steps to tamper with or
disable the parking brake interlock sys-
tem which is in place for your protection.
Tampering with or disabling the parking
brake interlock system could result in
serious injury or death.
CAUTION
Secure all wiring with cable clamps
or electrical tape. Do not allow any
bare wiring to remain exposed.
Do not directly connect the yellow
lead of this product to the vehicle
battery. If the lead is directly con-
nected to the battery, engine vibra-
tion may eventually cause the insula-
tion to fail at the point where the wire
passes from the passenger compart-
ment into the engine compartment. If
the yellow lead’s insulation tears as
a result of contact with metal parts,
short-circuiting can occur, resulting
in considerable danger.
It is extremely dangerous to allow
cables to become wound around the
steering column or shift lever. Be
sure to install this product, its cables,
and wiring away in such so that they
will not obstruct or hinder driving.
Make sure that the cables and wires
will not interfere with or become
caught in any of the vehicle’s moving
parts, especially the steering wheel,
shift lever, parking brake, sliding seat
tracks, doors, or any of the vehicle’s
controls.
Do not route wires where they will
be exposed to high temperatures. If
the insulation heats up, wires may
become damaged, resulting in a short
circuit or malfunction and permanent
damage to the product.
Do not shorten any leads. If you do,
the protection circuit (fuse holder,
fuse resistor or filter, etc.) may fail to
work properly.
Never feed power to other electronic
products by cutting the insulation of
the power supply lead of this prod-
uct and tapping into the lead. The
current capacity of the lead will be
exceeded, causing overheating.
Before installing this product
Use this unit with a 12-volt battery and
negative grounding only. Failure to do so
may result in a fire or malfunction.
To avoid shorts in the electrical system,
be sure to disconnect the (–) battery
cable before installation.
To prevent damage
WARNING
Use speakers over 50 W (output
value) and between 4 W to 8 W
(impedance value). Do not use 1 W to
3 W speakers for this unit.
The black cable is ground. When
installing this unit or power amp
(sold separately), make sure to con-
nect the ground wire first. Ensure
that the ground wire is properly
connected to metal parts of the car’s
body. The ground wire of the power
amp and the one of this unit or any
other device must be connected to
the car separately with different
screws. If the screw for the ground
wire loosens or falls out, it could
result in fire generation of smoke or
malfunction.
Ground wire
Metal parts of car’
s body
POWER AMP
Other devices
(Another electr
onic
device in the car)
When replacing the fuse, be sure
to only use a fuse of the rating pre-
scribed on this product.
This product cannot be installed in a
vehicle without ACC (accessory) position
on the ignition switch.
A
C
C
O
N
S
T
A
R
T
O
F
F
O
N
S
T
A
R
T
O
F
F
ACC position No ACC position
To avoid short-circuiting, cover the
disconnected lead with insulating tape.
It is especially important to insulate all
unused speaker leads, which if left uncov-
ered may cause a short circuit.
For connecting a power amp or other
devices to this product, refer to the man-
ual for the product to be connected.
■ Notice for the blue/white lead
When the ignition switch is turned on
(ACC ON), a control signal is output
through the blue/white lead. Connect to
an external power amp’s system remote
control terminal, the auto-antenna relay
control terminal, or the antenna booster
power control terminal (max. 300 mA
12 V DC). The control signal is output
through the blue/white lead, even if the
audio source is switched off.

31
Chapter
74
En
Connecting the power cord
Antenna jack
Power supply
Power cord
Yellow/black
If you use an equipment with Mute function, wire this lead to the Audio Mute lead on
that equipment. If not, keep the Audio Mute lead free of any connections.
Light green
Used to detect the ON/OFF status of the parking brake. This lead
must be connected to the power supply side of the parking brake
switch.
Blue/white
Connect to system control terminal of the
power amp (max. 300 mA 12 V DC).
Ground side
Power supply side
Parking brake
switch
This product
Violet/white
Of the two lead wires connected to the back lamp, connect the one in which the
voltage changes when the gear shift is in the REVERSE (R) position. This connection
enables the unit to sense whether the car is moving forwards or backwards.
4 m (13 ft. 1 in.)
Please contact your dealer to
inquire about the connectable
navigation unit.
SiriusXM Connect Vehicle Tuner
Please refer to the instruction manual for SiriusXM Connect Vehicle Tuner (sold separately).
iDatalink adapter input Please refer to the instruction manual for the iDatalink adapter
(sold separately).*
Pioneer
navigation
system
RGB cable (supplied with navigation system)
Fuse (10 A)
Microphone
Left Right
Front speaker Front speaker
Rear speaker
White Gray
Gray/blackWhite/black
Green Violet
Green/black Violet/black
Rear speaker
With a two-speaker system, do not connect
anything to the speaker leads that are not
connected to speakers.
Wired remote input
Hard-wired remote control adapter can be connected (sold separately).
Yellow
To terminal supplied with power regardless of
ignition switch position.
Orange/white
To lighting switch terminal.
Black (ground)
To vehicle (metal) body.
Red
To electric terminal controlled by ignition
switch (12 V DC) ON/OFF.
Notes
* Before using and/or connecting the iDatalink Maestro adapter, you will need to first flash the Maestro module with the appropriate vehicle and head unit firmware. You can find the
device number that is required for the activation on the followings (refer to Updating the iDatalink Maestro module on page 44):
— the label on the packaging of this product
— the label on this product
— the “Firmware Information” screen
Make sure to connect the microphone supplied with this product when using Android Auto.
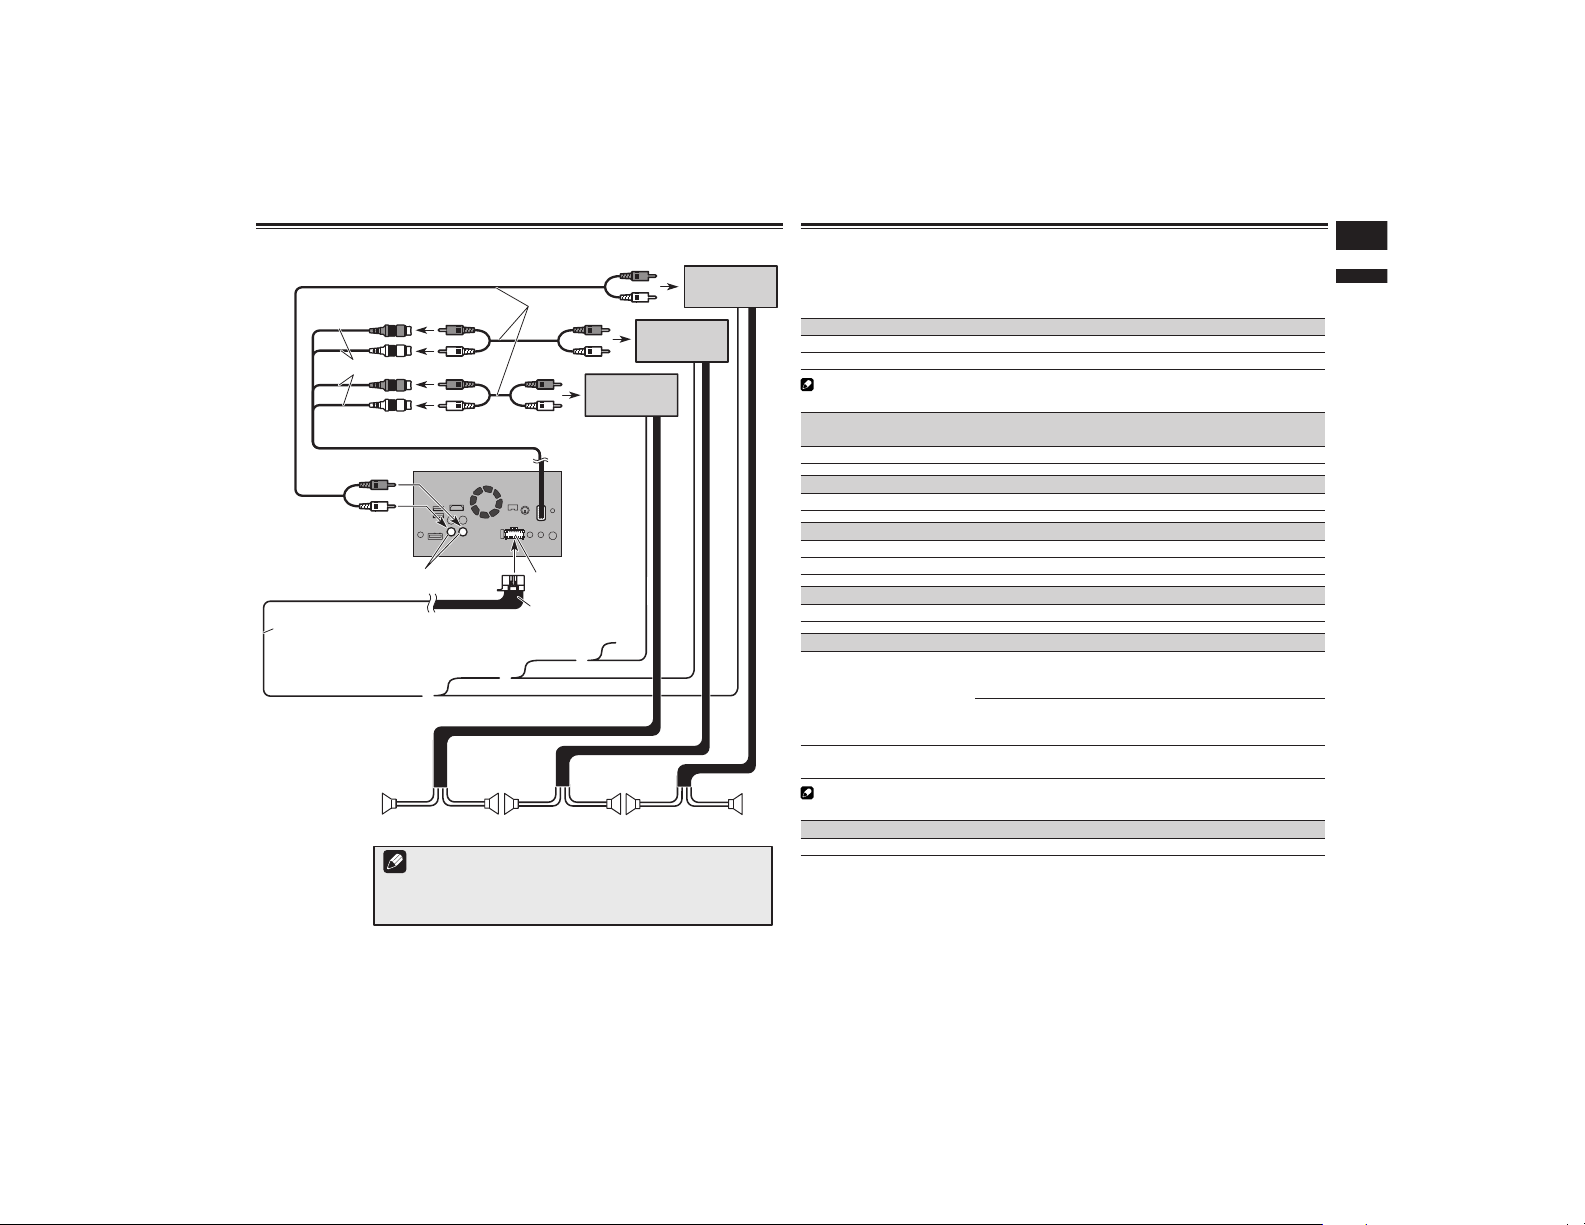
English
31
Chapter
75
En
Connecting to separately sold power amp
System remote control
Power cord
Blue/white
Power amp
(sold separately)
Power amp
(sold separately)
Power amp
(sold separately)
Front speaker
Rear speaker
Subwoofer
RCA
cables
(sold separately)
This product
15 cm (5-7/8 in.)
Rear outputs
(REAR OUTPUT)
Front outputs
(FRONT OUTPUT)
To system control terminal of the power amp
(max. 300 mA 12 V DC).
White, Red (SWL, SWR)
Notes
· You can change the RCA output of the subwoofer depending on your subwoofer
system.
· The subwoofer output of this product is monaural.
Power supply
Connecting an iPhone, iPod, Android device or a MirrorLink™
device
Find your device and the function you want to operate from the list below, and refer to the
page for the connection.
iPhone 6 Plus/iPhone 6/iPhone 5s/iPhone 5c/iPhone 5
iPod (audio) Refer to Connecting via the USB port on page 76.
AppRadio Mode Refer to Connecting via the HDMI port on page 76.
Note
Any connections mentioned above are available to use aha and Pandora.
iPhone 3GS/iPod touch (2nd and 3rd generation)/iPod classic 160GB/
iPod classic 80GB/iPod nano (3rd, 4th, 5th, and 6th generation)
Refer to Connecting via the AUX input on page 76.
iPhone 4s/iPhone 4/iPod touch (4th generation)
Refer to Connecting via the RGB input on page 76.
iPod touch (5th generation)
iPod (audio) Refer to Connecting via the USB port on page 76.
AppRadio Mode Refer to Connecting via the HDMI port on page 76.
iPod nano (7th generation)
Refer to Connecting via the USB port on page 76.
Android device
AppRadio Mode
HDMI port
Refer to Connecting an Android device with an HDMI port
on page 77.
MHL port
Refer to Connecting an Android device with an MHL port on
page 77.
Android Auto
Refer to Connecting the Android or MirrorLink™ device on
page 77.
Note
Any connections mentioned above are available to use aha and Pandora.
MirrorLink device
Refer to Connecting the Android or MirrorLink™ device on page 77.
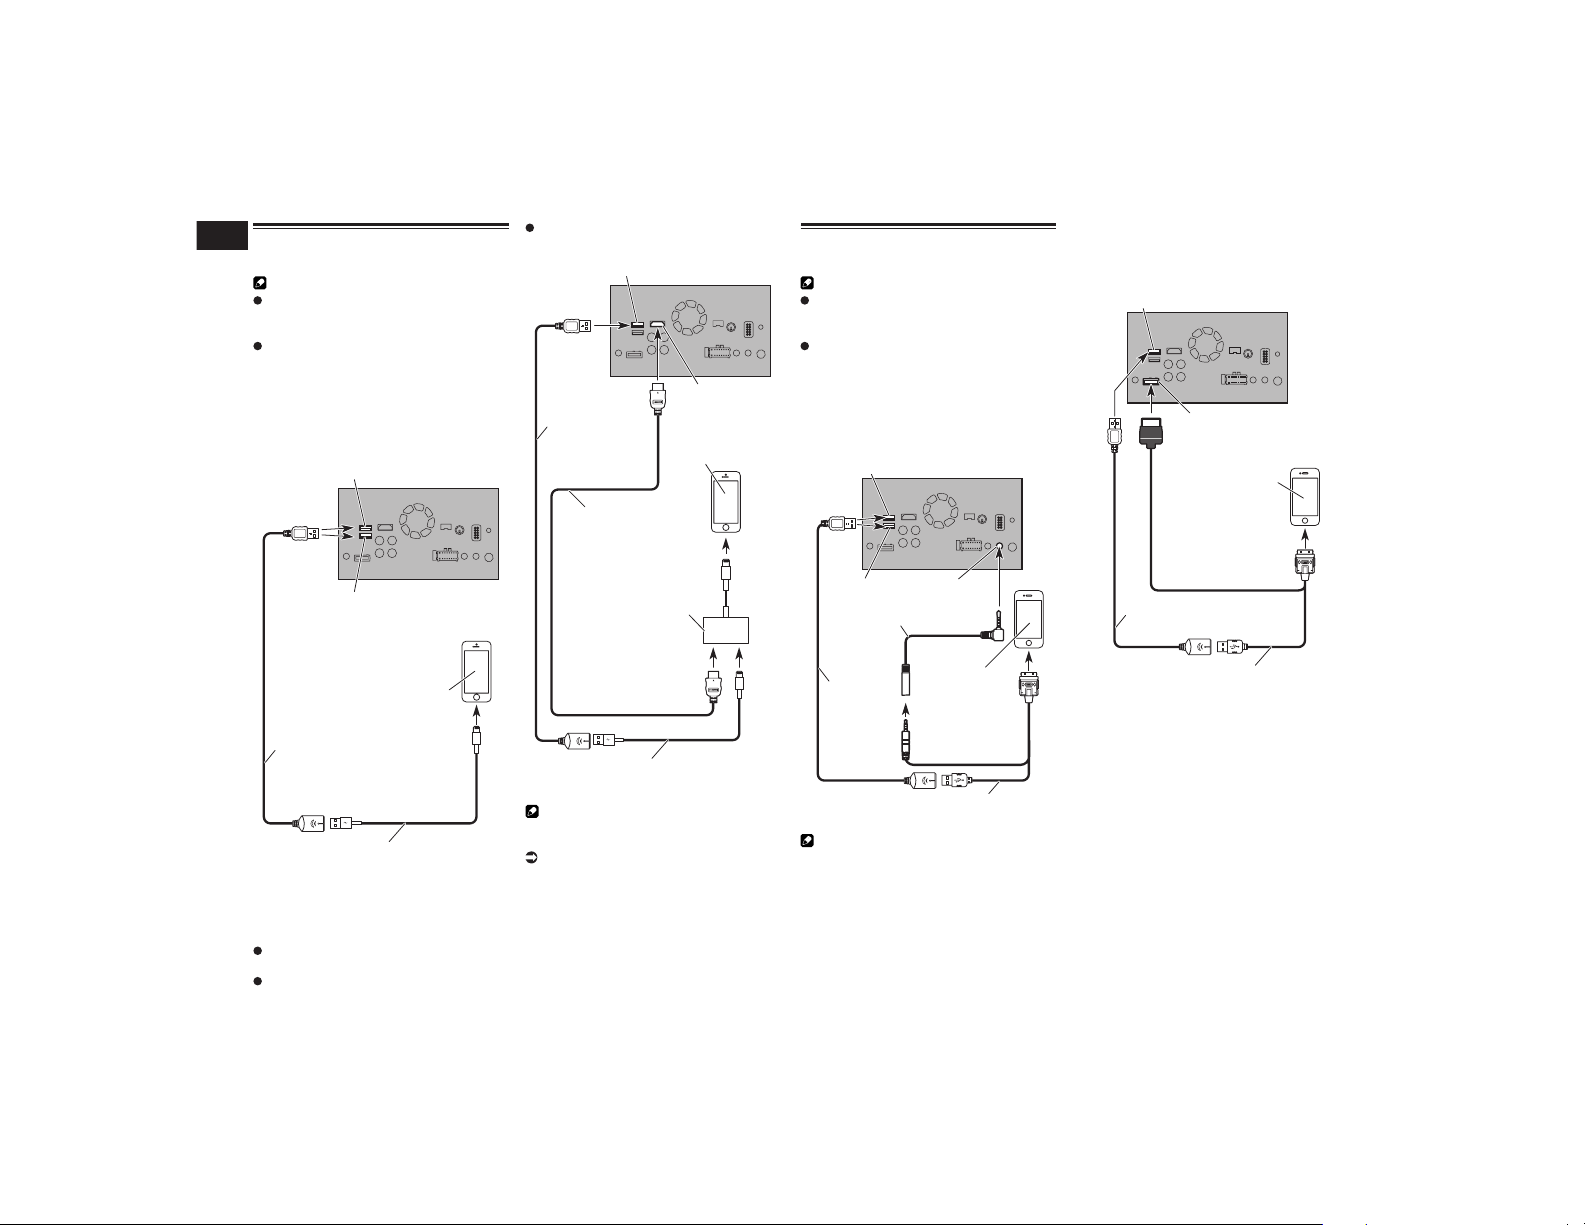
31
Chapter
76
En
Connecting an iPhone with
Lightning connector
Notes
For details on how to connect an external
device using a separately sold cable,
refer to the manual for the cable.
For details concerning the connection,
operations and compatibility of iPhone,
refer to Chapter 5.
■ Connecting via the USB port
The USB interface cable for iPod / iPhone
(CD-IU52) (sold separately) is required for
the connection.
USB cable
1.5 m (4 ft. 11 in.)
USB interface cable for iPod / iPhone
(CD-IU52) (sold separately)
This product
USB port 1
iPhone with
Lightning connector
USB port 2
■ Connecting via the HDMI port
The following cables are required for the
connection.
HDMI interface cable for iPod / iPhone
(CD-IH202) (sold separately)
USB interface cable for iPod / iPhone
(CD-IU52) (sold separately)
Lightning Digital AV Adapter (Apple Inc.
products) (sold separately)
USB cable
1.5 m (4 ft. 11 in.)
This product
USB port 1
USB interface cable for iPod / iPhone
(CD-IU52) (sold separately)
iPhone with
Lightning connector
High Speed HDMI
®
Cable
(Type A - A)
(supplied with CD-IH202)
HDMI port
Lightning Digital AV Adapter
(Apple Inc. products)
(sold separately)
Note
When you connect the High Speed HDMI
®
Cable, use the lock tie to fix it securely.
For details, refer to Securing the High
Speed HDMI
®
Cable on page 77.
Connecting an iPhone with
30-pin connector
Notes
For details on how to connect an external
device using a separately sold cable,
refer to the manual for the cable.
For details concerning the connection,
operations and compatibility of iPhone,
refer to Chapter 5.
■ Connecting via the AUX input
The USB interface cable for iPod / iPhone
(CD-IU201V) (sold separately) is required for
the connection.
This product
USB interface cable for iPod / iPhone
(CD-IU201V) (sold separately)
USB cable
1.5 m
(4 ft. 11 in.)
iPhone with
30-pin connector
AUX input
USB port 1
USB port 2
Mini-jack extension cable
(supplied with CD-IU201V)
Note
Connect the USB cable to USB port 1 when
using “aha” or “Pandora” as the source.
■ Connecting via the RGB input
The USB interface cable for iPod / iPhone
(CD-IU201S) (sold separately) is required for
the connection.
USB cable
1.5 m (4 ft. 11 in.)
USB interface cable for iPod / iPhone
(CD-IU201S) (sold separately)
This product
USB port 1
RGB input
iPhone with
30-pin connector
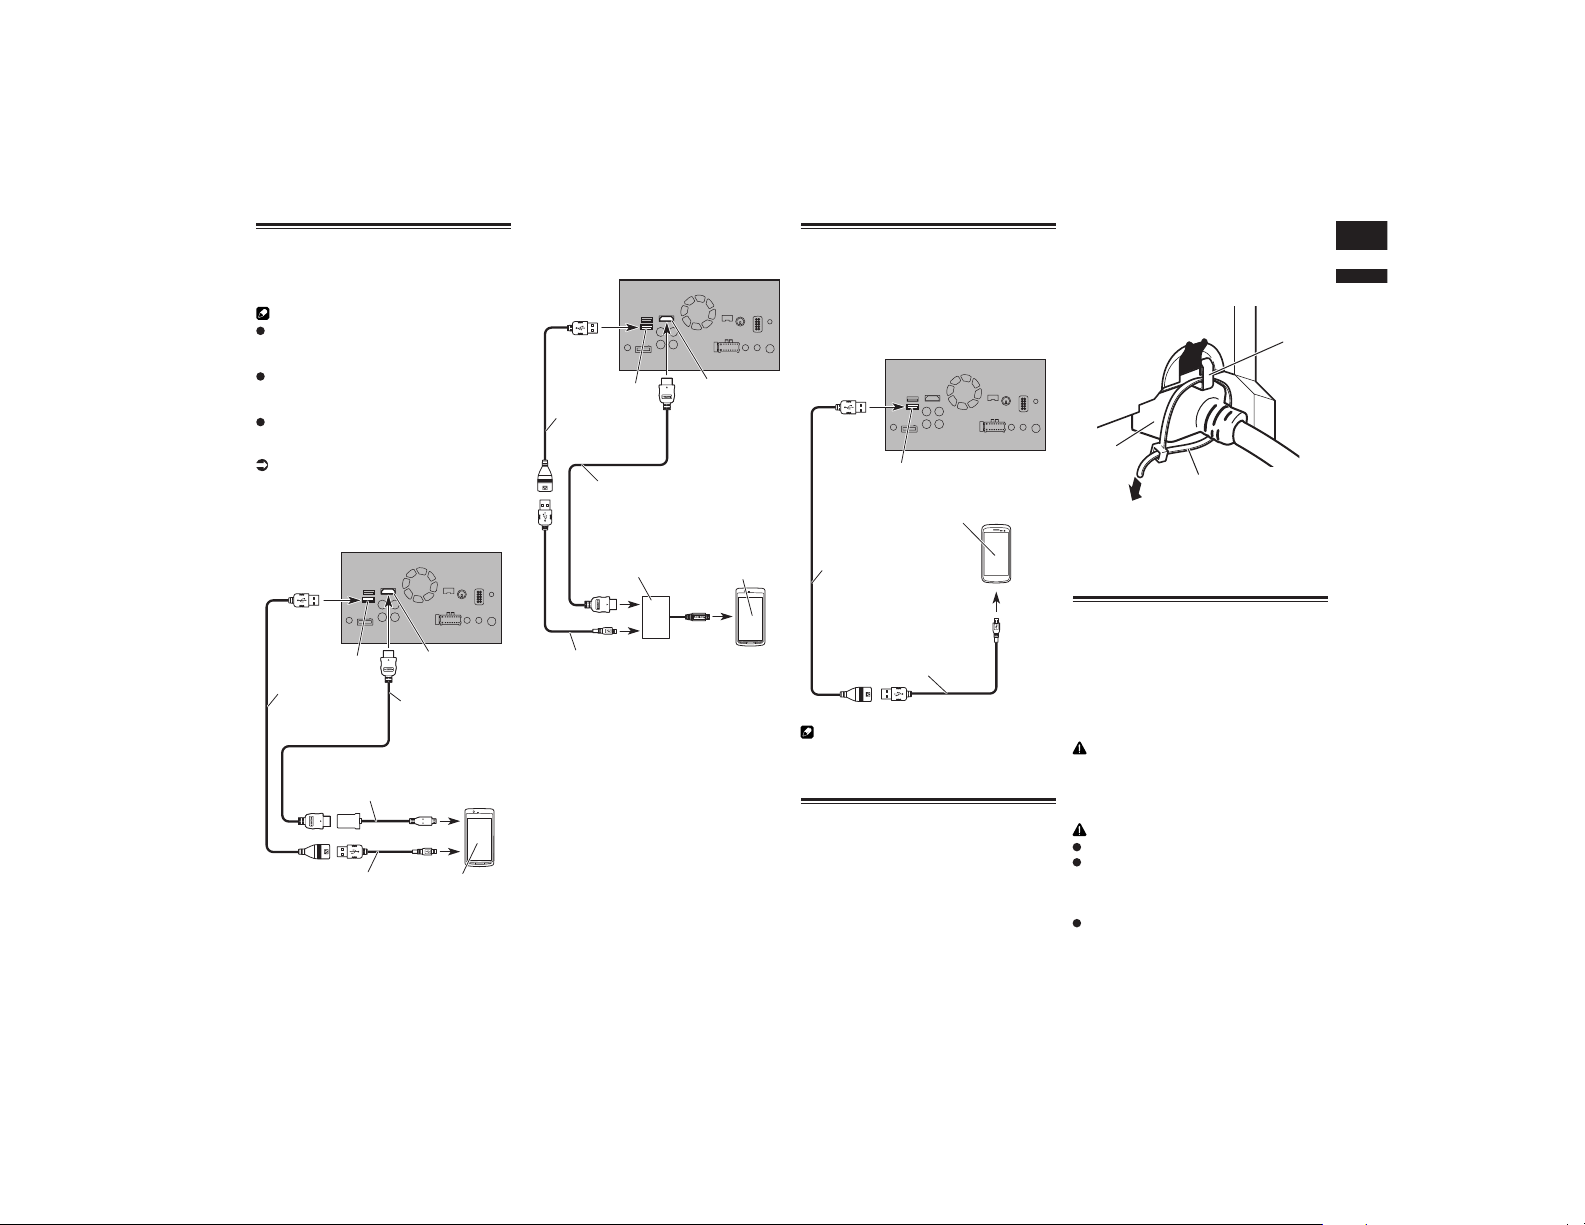
English
31
Chapter
77
En
Connecting the Android™
device
App Connectivity Kit (CD-AH200) (sold sepa-
rately) is required for the connection.
Notes
For details on how to connect an external
device using a separately sold cable,
refer to the manual for the cable.
For details concerning the connection
and operations of Android device. refer
to Chapter 5.
When you connect the High Speed
HDMI
®
Cable, use the lock tie to fix it
securely.
For details, refer to Securing the High
Speed HDMI
®
Cable on page 77.
■ Connecting an Android device
with an HDMI port
USB cable
(supplied with
CD-AH200)
This product
Android device
USB port 2
HDMI port
High Speed HDMI
®
Cable (Type A - A)
(supplied with
CD-AH200)
USB - micro USB cable
(Type USB A - micro USB B)
(supplied with CD-AH200)
Adapter cable
(HDMI Type A - D)
(supplied with CD-AH200)
■ Connecting an Android device
with an MHL port
USB cable
(supplied with
CD-AH200)
This product
Android device
USB port 2
HDMI port
High Speed HDMI
®
Cable
(Type A - A)
(supplied with CD-AH200)
USB - micro USB cable
(Type USB A - micro USB B)
(supplied with CD-AH200)
MHL adapter
(supplied with
CD-AH200)
Connecting the Android or
MirrorLink™ device
The USB interface cable for use with
Android or MirrorLink™ devices (CD-
MU200) (sold separately) is required for the
connection.
USB cable
(supplied with CD-MU200)
USB - micro USB cable
(Type USB A - micro USB B)
(supplied with CD-MU200)
This product
Android or MirrorLink device
USB port 2
Note
For details on how to connect an external
device using a separately sold cable, refer to
the manual for the cable.
Securing the High Speed
HDMI
®
Cable
Be sure to fix the High Speed HDMI
®
Cable
with the lock tie, when you connect the
external device with the High Speed HDMI
®
Cable.
1 Insert the High Speed HDMI
®
Cable into the HDMI port.
2 Wrap the lock tie around the hook
above the HDMI port and the High
Speed HDMI
®
Cable, and then
tighten it to secure the High Speed
HDMI
®
Cable.
1
2
3
1 Hook
2 Lock tie
3 High Speed HDMI
®
Cable
p Do not tighten up the lock tie more than
necessary.
Connecting a rear view
camera
When this product is used with a rear view
camera, it is possible to automatically
switch from the video to rear view image
when the shift lever is moved to REVERSE
(R). Camera View mode also allows you to
check what is behind you while driving.
WARNING
USE INPUT ONLY FOR REVERSE OR
MIRROR IMAGE REAR VIEW CAMERA.
OTHER USE MAY RESULT IN INJURY OR
DAMAGE.
CAUTION
The screen image may appear reversed.
The rear view camera is used as an aid to
keep an eye on trailers, or backing into a
tight parking spot. Do not use this func-
tion for entertainment purposes.
Objects in rear view may appear closer or
more distant than in reality.
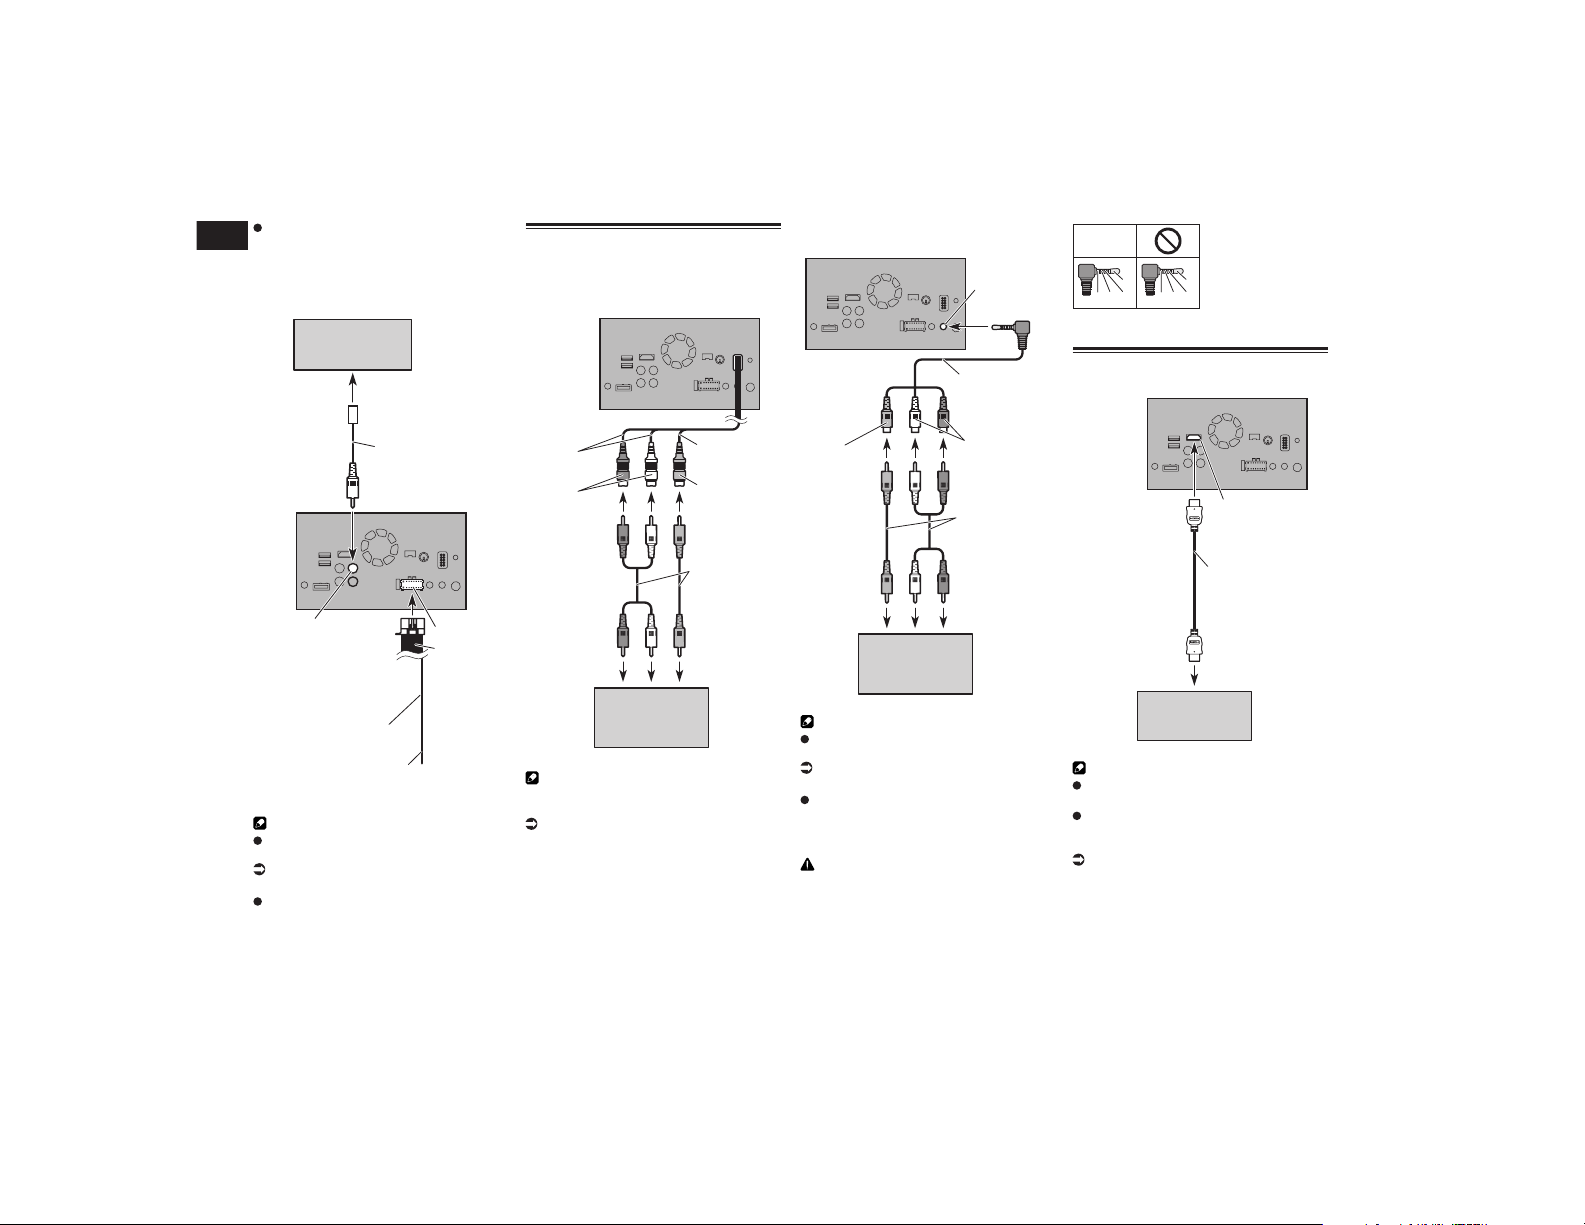
31
Chapter
78
En
Please note that the image area shown
by the rear view camera may differ
slightly when full-screen images are dis-
played when backing and when checking
the rear of the vehicle while moving
forward.
Rear view camera
(ND-BC6)
(sold separately)
This product
Brown (BC IN)
RCA cable
(supplied with ND-BC6)
Vi
olet/white
(REVERSE-GEAR SIGNAL
INPUT)
To video output
Power cord
Power supply
For more details about the wiring, refer to
Connecting the power cord on page 74.
Notes
This mode is available when the rear view
camera setting is set to “On”.
For details, refer to Setting rear view
camera activation on page 56.
Connect this product to the rear view
camera only. Do not connect to any other
equipment.
Connecting the external video
component
■ Using AV input
To video outputTo audio outputs
External video
component
(sold separately)
This product
Red, white
(AUDIO INPUT)
RCA cables
(sold separately)
Yellow
(VIDEO INPUT)
23 cm (9 in.)
15 cm (5-7/8 in.)
Note
This mode is available when the setting of AV
input is set to “On”.
For details, refer to Setting AV input on
page 55.
■ Using an AUX input
To video output To audio outputs
External video
component
(sold separately)
This product
Red, white
RCA cables
(sold separately)
Yellow
AUX input
Mini-jack AV cable
(CD-RM10)
(sold separately)
Notes
This mode is available when the setting
of AUX input is set to “On”.
For details, refer to Starting procedure on
page 53.
When connecting an external video com-
ponent using a mini-jack AV cable, use a
separately sold AUX extension cable as
necessary.
CAUTION
Be sure to use a mini-jack AV cable (CD-
RM10) (sold separately) for wiring. If you use
other cables, the wiring position might differ
resulting in disturbed images and sounds.
OK
G
V
R
L
G
R
V
L
L : Left audio (White)
R : Right audio (Red)
V : Video (Yellow)
G : Ground
Connecting an HDMI device
HDMI device
(sold separately)
This product
HDMI port
High Speed HDMI
®
Cable
(sold separately)
Notes
For details concerning the operations of
HDMI device, refer to Chapter 19.
When you connect the High Speed
HDMI
®
Cable, use the lock tie to fix it
securely.
For details, refer to Securing the High
Speed HDMI
®
Cable on page 77.
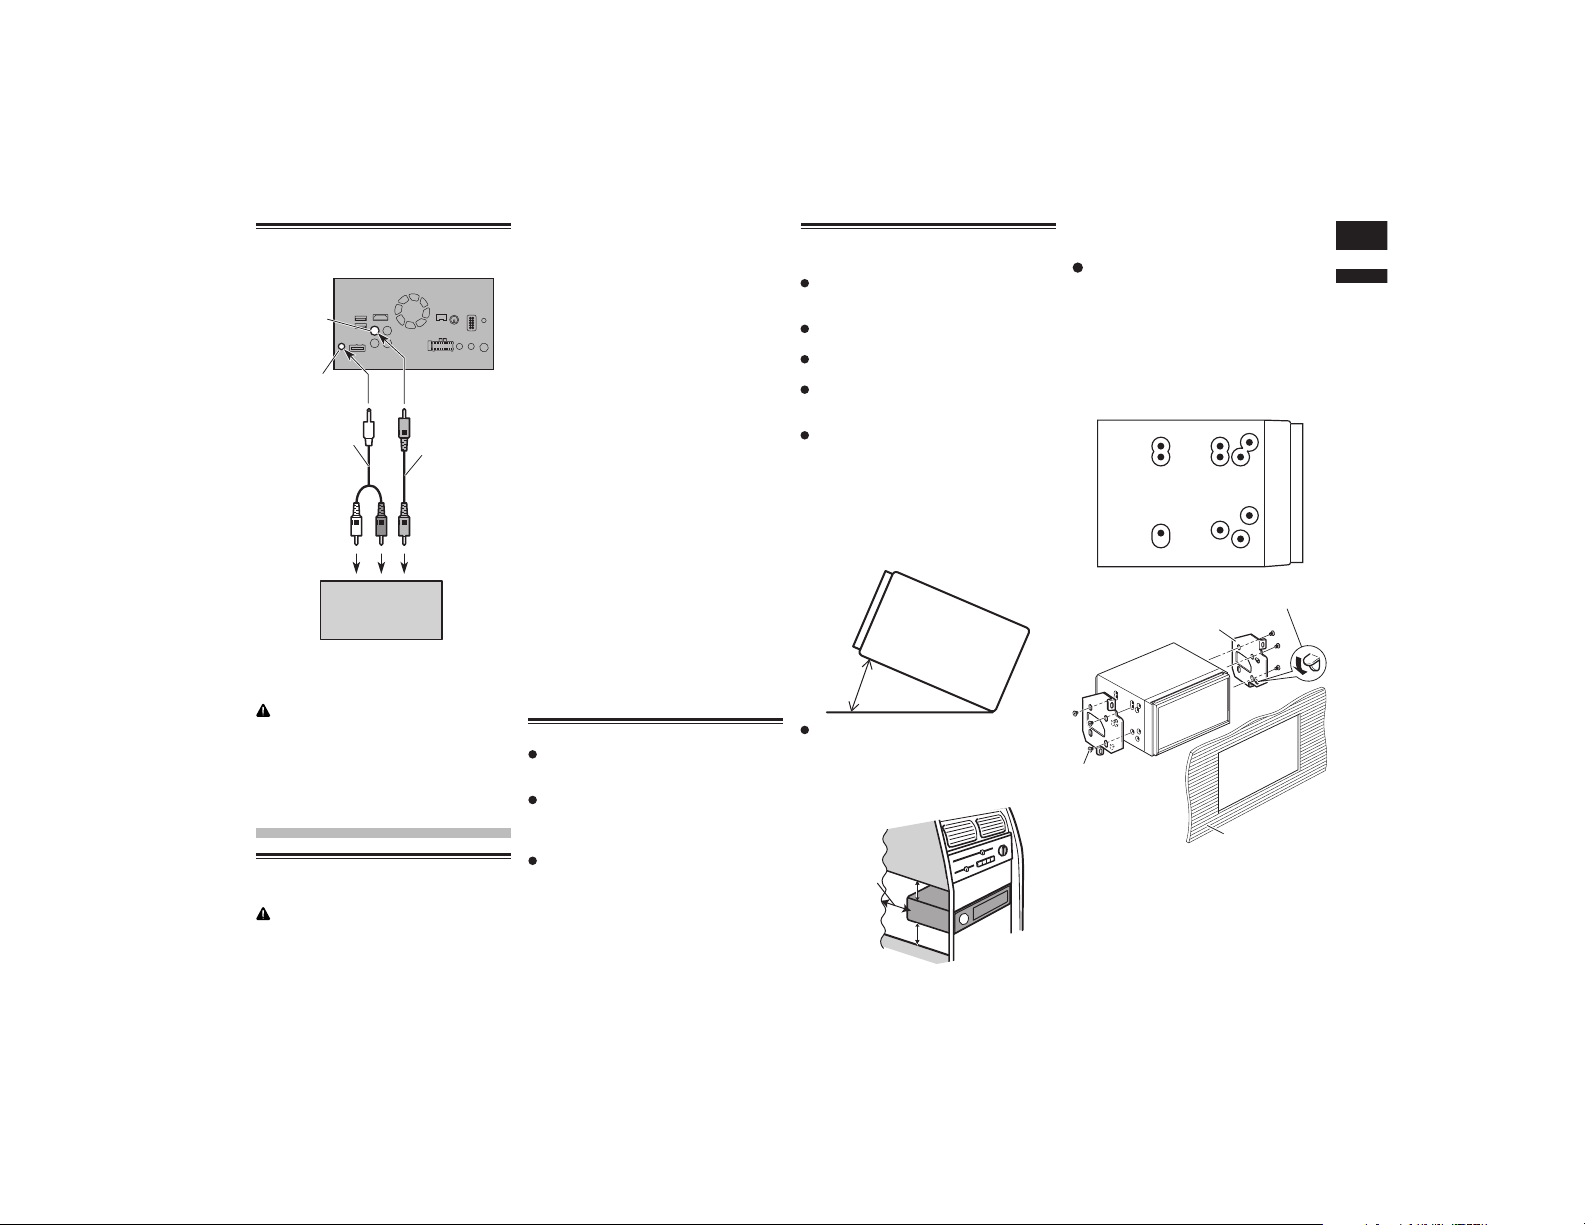
English
32
Chapter
79
En
Connecting the rear display
To video inputTo audio inputs
Rear display with
RCA input jacks
(sold separately)
RCA cables
(sold separately)
Mini pin plug cable
(sold separately)
This product
Rear audio
output
Yellow (V OUT)
■ When using a rear display con-
nected to rear video output
WARNING
NEVER install the rear display in a loca-
tion that enables the driver to watch the
video source while driving.
This product’s rear video output is for con-
nection of a display to enable passengers in
the rear seats to watch the video source.
Installation
Precautions before
installation
CAUTION
Never install this product in places
where, or in a manner that:
— Could injure the driver or passengers
if the vehicle stops suddenly.
— May interfere with the driver’s oper-
ation of the vehicle, such as on the
floor in front of the driver’s seat, or
close to the steering wheel or shift
lever.
— To ensure proper installation, be
sure to use the supplied parts in the
manner specified. If any parts are not
supplied with this product, use com-
patible parts in the manner specified
after you have the parts’ compatibil-
ity checked by your dealer. If parts
other than supplied or compatible
ones are used, they may damage
internal parts of this product or they
may work loose and the product may
become detached.
— Do not install this product where it
may (i) obstruct the driver’s vision,
(ii) impair the performance of any of
the vehicle’s operating systems or
safety features, including airbags,
hazard lamp buttons or (iii) impair
the driver’s ability to safely operate
the vehicle.
— Never install this product in front of
or next to the place in the dashboard,
door, or pillar from which one of
your vehicle’s airbags would deploy.
Please refer to your vehicle’s owner’s
manual for reference to the deploy-
ment area of the frontal airbags.
Before installing
Consult with your nearest dealer if instal-
lation requires drilling holes or other
modifications of the vehicle.
Before making a final installation of this
product, temporarily connect the wiring
to confirm that the connections are
correct and the system works properly.
Do not install this product in a position
where the opening of the LCD panel is
obstructed by any obstacles, such as the
shift lever. Before installing this product,
be sure to leave sufficient space so that
the LCD panel does not obstruct the shift
lever when it is fully opened. This may
cause interference with the shift lever, or
a malfunction of the mechanism of this
product.
Installing this product
■ Installation notes
Do not install this product in places
subject to high temperatures or humidity,
such as:
Places close to a heater, vent or air
conditioner.
Places exposed to direct sunlight, such
as on top of the dashboard.
Places that may be exposed to rain, such
as close to the door or on the vehicle’s
floor.
Install this product horizontally on a
surface within 0 to 30 degrees tolerance
(within 5 degrees to the left or right).
Improper installation of the unit with
the surface tilted more than these toler-
ances increases the potential for errors
in the vehicle’s location display, and
might otherwise cause reduced display
performance.
30°
When installing, to ensure proper heat
dispersal when using this unit, make sure
you leave ample space behind the rear
panel and wrap any loose cables so they
are not blocking the vents.
Leave ample
space
5 cm
5 cm
■ Installation using the screw
holes on the side of this product
Fastening this product to the fac-
tory radio-mounting bracket.
Position this product so that its screw holes
are aligned with the screw holes of the
bracket, and tighten the screws at three
locations on each side.
Use either the truss head screws (5 mm
× 8 mm) or flush surface screws (5 mm
× 9 mm), depending on the shape of the
bracket’s screw holes.
If the pawl interferes with installation,
you may bend it down out of the way.
1
2
3
1 Factory radio-mounting bracket
2 Dashboard or console
3 Truss head screw or flush surface screw
Be sure to use the screws supplied with
this product.
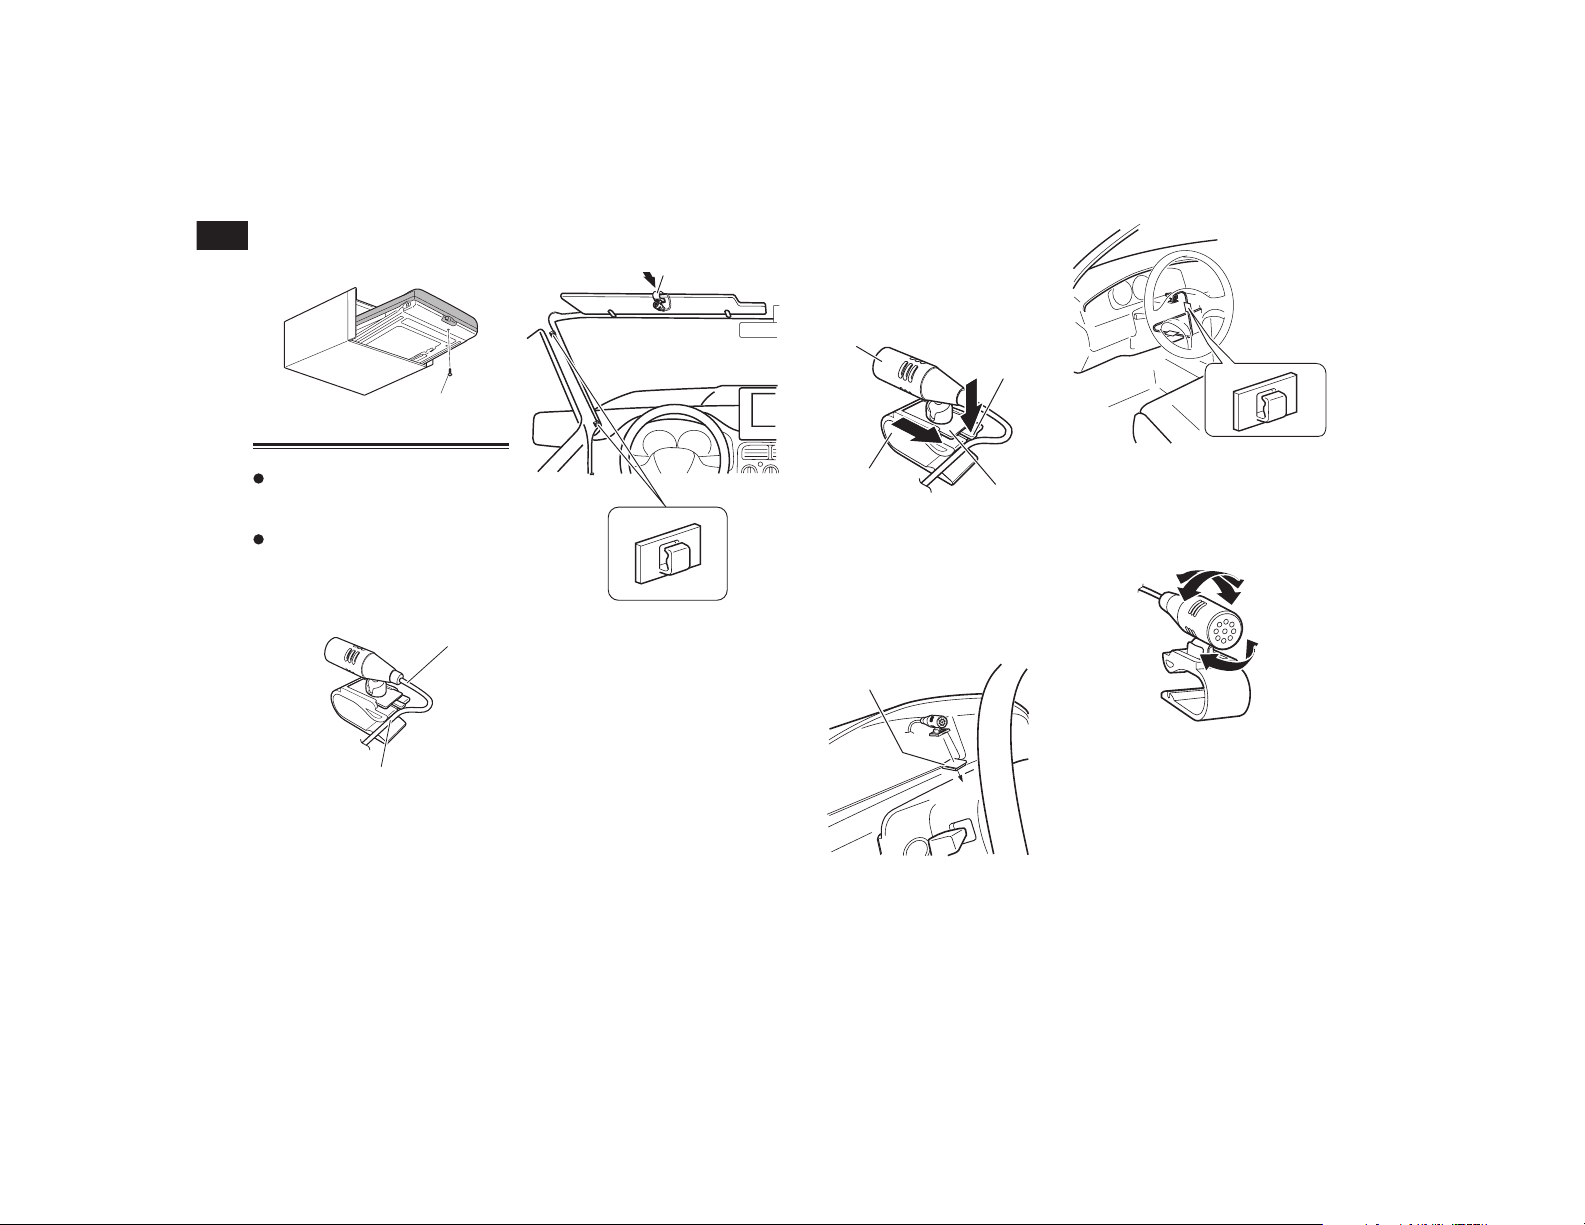
32
Chapter
80
En
■ Fastening the front panel
If you do not plan to detach the front panel,
the front panel can be fastened with sup-
plied screw.
1
1 Screw (2 mm × 6 mm)
Installing the microphone
Install the microphone in a place where
its direction and distance from the driver
make it easiest to pick up the driver’s
voice.
Be sure to turn off (ACC OFF) the product
before connecting the microphone.
■ Mounting on the sun visor
1 Fit the microphone lead into the
groove.
1
2
1 Microphone lead
2 Groove
2 Attach the microphone clip to the
sun visor.
1
2
1 Microphone clip
2 Clamps
Use separately sold clamps to secure the
lead where necessary inside the vehicle.
Install the microphone on the sun visor
when it is in the up position. It cannot rec-
ognize the driver’s voice if the sun visor is in
the down position.
■ Installation on the steering
column
1 Detach the microphone base from
the microphone clip by sliding the
microphone base while pressing
the tab.
4
1
2
3
1 Microphone
2 Tab
3 Microphone base
4 Microphone clip
2 Mount the microphone on the
steering column.
Install the microphone on the steering
column, keeping it away from the steering
wheel.
1
2
1 Double-sided tape
2 Clamps
Use separately sold clamps to secure the
lead where necessary inside the vehicle.
■ Adjusting the microphone angle
The microphone angle can be adjusted.
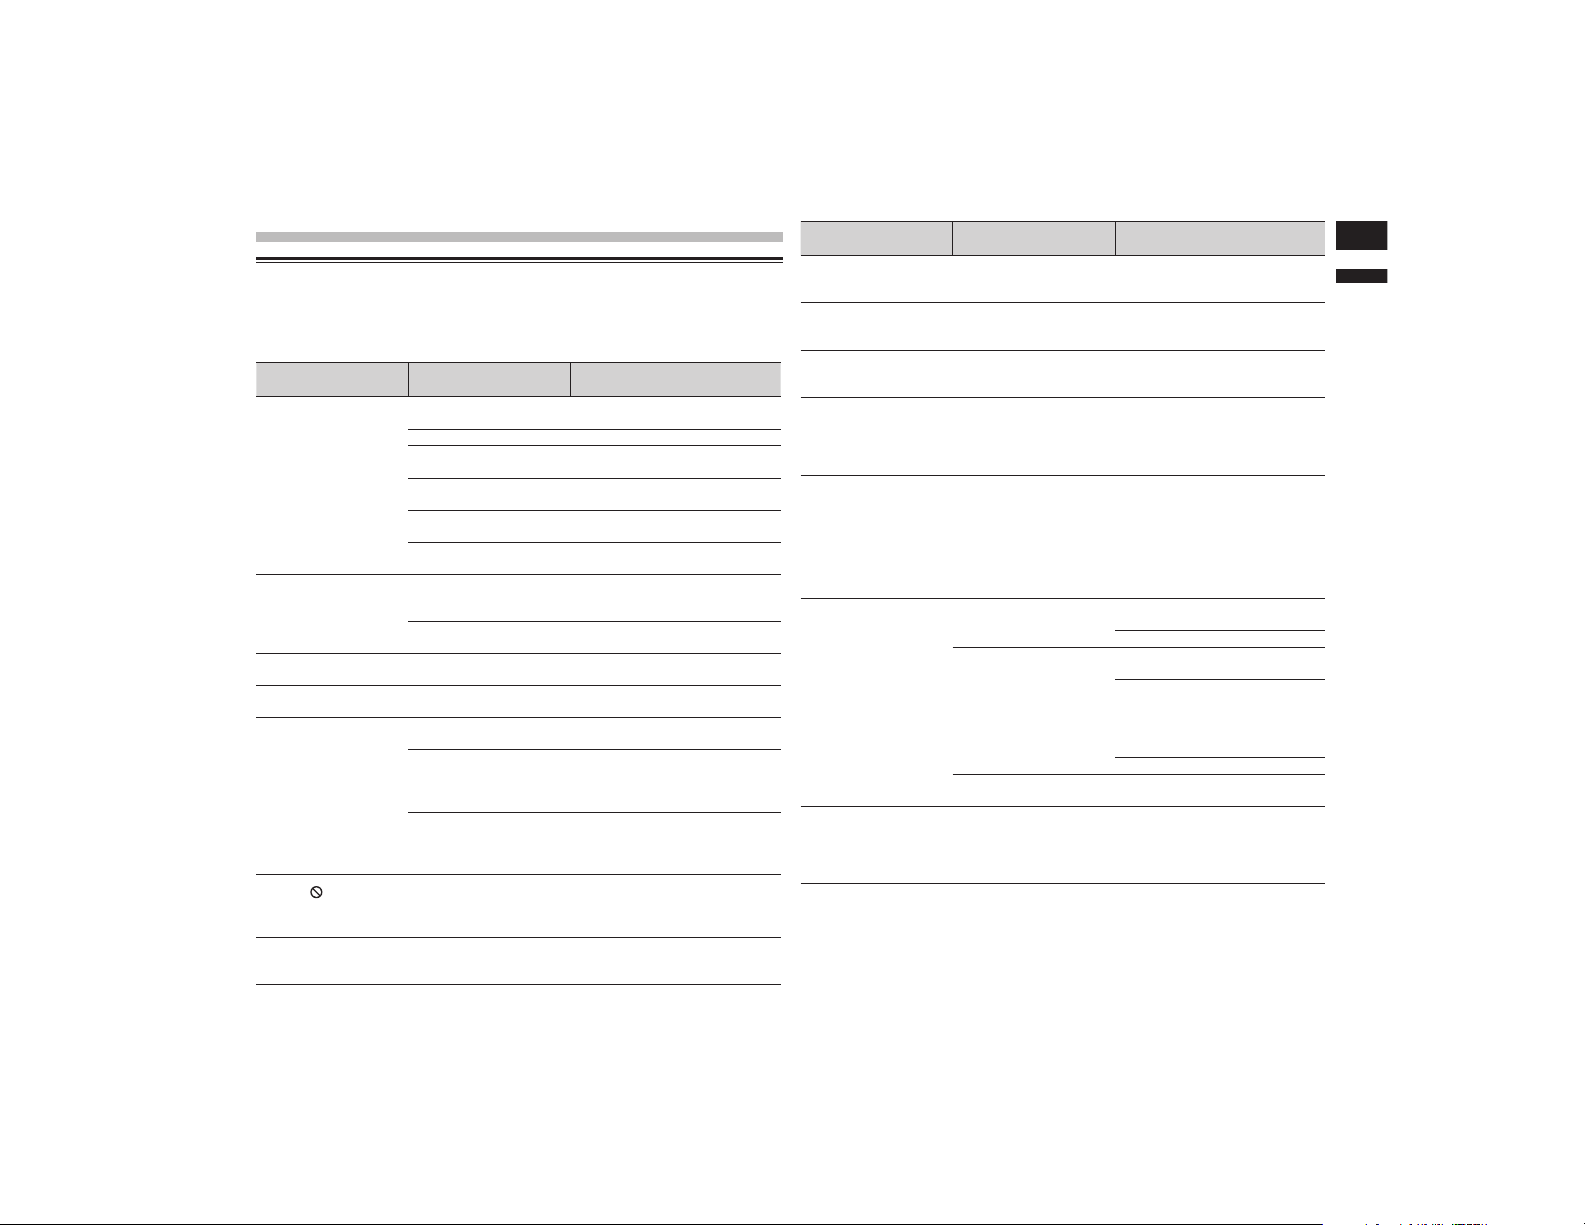
English
Appendix
81
En
Appendix
Troubleshooting
If you have problems operating this product, refer to this section. The most common prob-
lems are listed below, along with likely causes and solutions. If a solution to your problem
cannot be found here, contact your dealer or the nearest authorized Pioneer service facility.
Problems with the AV screen
Symptom Cause Action
Reference
CD or DVD playback is
not possible.
The disc is inserted upside
down.
Insert the disc with the label
upward.
The disc is dirty. Clean the disc.
The disc is cracked or
otherwise damaged.
Insert a normal, round disc.
The files on the disc are in
an irregular file format.
Check the file format.
The disc format cannot be
played back.
Replace the disc.
The loaded disc is a type
this product cannot play.
Check what type of disc it is.
page 87
The screen is covered
by a caution message
and the video cannot be
shown.
The parking brake lead is
not connected or applied.
Connect the parking brake lead
correctly, and apply the parking
brake.
The parking brake interlock
is activated.
Park your vehicle in a safe place
and apply the parking brake.
No video output from the
connected equipment.
The “AV Input” setting is
incorrect.
Correct the settings.
page 55
The audio or video skips.
This product is not firmly
secured.
Secure this product firmly.
No sounds are produced.
The volume level will
not rise.
Cables are not connected
correctly.
Connect the cables correctly.
The system is performing
still, slow motion, or frame-
by-frame playback with
DVD-Video.
There is no sound during still, slow
motion, or frame-by-frame playback
with DVD-Video.
The system is paused or
performing, fast reverse
or forward during the disc
playback.
For the media other than music CD
(CD-DA), there is no sound on fast
reverse or forward.
The icon
is displayed,
and operation is
impossible.
The operation is not
compatible with the video
configuration.
This operation is not possible. (For
example, the DVD playing does not
feature that angle, audio system,
subtitle language, etc.)
The picture stops
(pauses) and this product
cannot be operated.
The reading of data is
impossible during disc
playback.
Stop playback once, then restart.
Symptom Cause Action
Reference
The picture is stretched,
with an incorrect aspect
ratio.
The aspect setting is incor-
rect for the display.
Select the appropriate setting for
that image.
page 68
A parental lock message
is displayed and DVD
playback is not possible.
The parental lock is on.
Turn the parental lock off or change
the level.
page 69
The parental lock for
DVD playback cannot be
canceled.
The code number is
incorrect.
Input the correct code number.
page 69
Playback is not with the
audio language and sub-
title language settings
selected in “DVD/DivX
Setup”.
The DVD playing does not
feature dialog or subtitles
in the language selected in
“DVD/DivX Setup”.
Switching to a selected language
is not possible if the language
selected in “DVD/DivX Setup” is
not recorded on the disc.
page 68
The picture is extremely
unclear/distorted and
dark during playback.
The disc features a signal
to prohibit copying. (Some
discs may have this.)
Since this product is compatible
with the copy guard analog copy
protect system, the picture may
suffer from horizontal stripes or
other imperfections when a disc
with that kind of protection signal
is viewed on some displays. This is
not a malfunction.
iPod cannot be operated.
The iPod is frozen.
Reconnect the iPod with the USB
interface cable for iPod / iPhone.
Update the iPod software version.
An error has occurred.
Reconnect the iPod with the USB
interface cable for iPod / iPhone.
Park your vehicle in a safe place,
and then turn off the ignition switch
(ACC OFF). Subsequently, turn the
ignition switch to on (ACC ON)
again.
Update the iPod software version.
Cables are not connected
correctly.
Connect the cables correctly.
Sound from the iPod
cannot be heard.
The audio output direction
may switch automatically
when the Bluetooth and
USB connections are used
at the same time.
Use the iPod to change the audio
output direction.
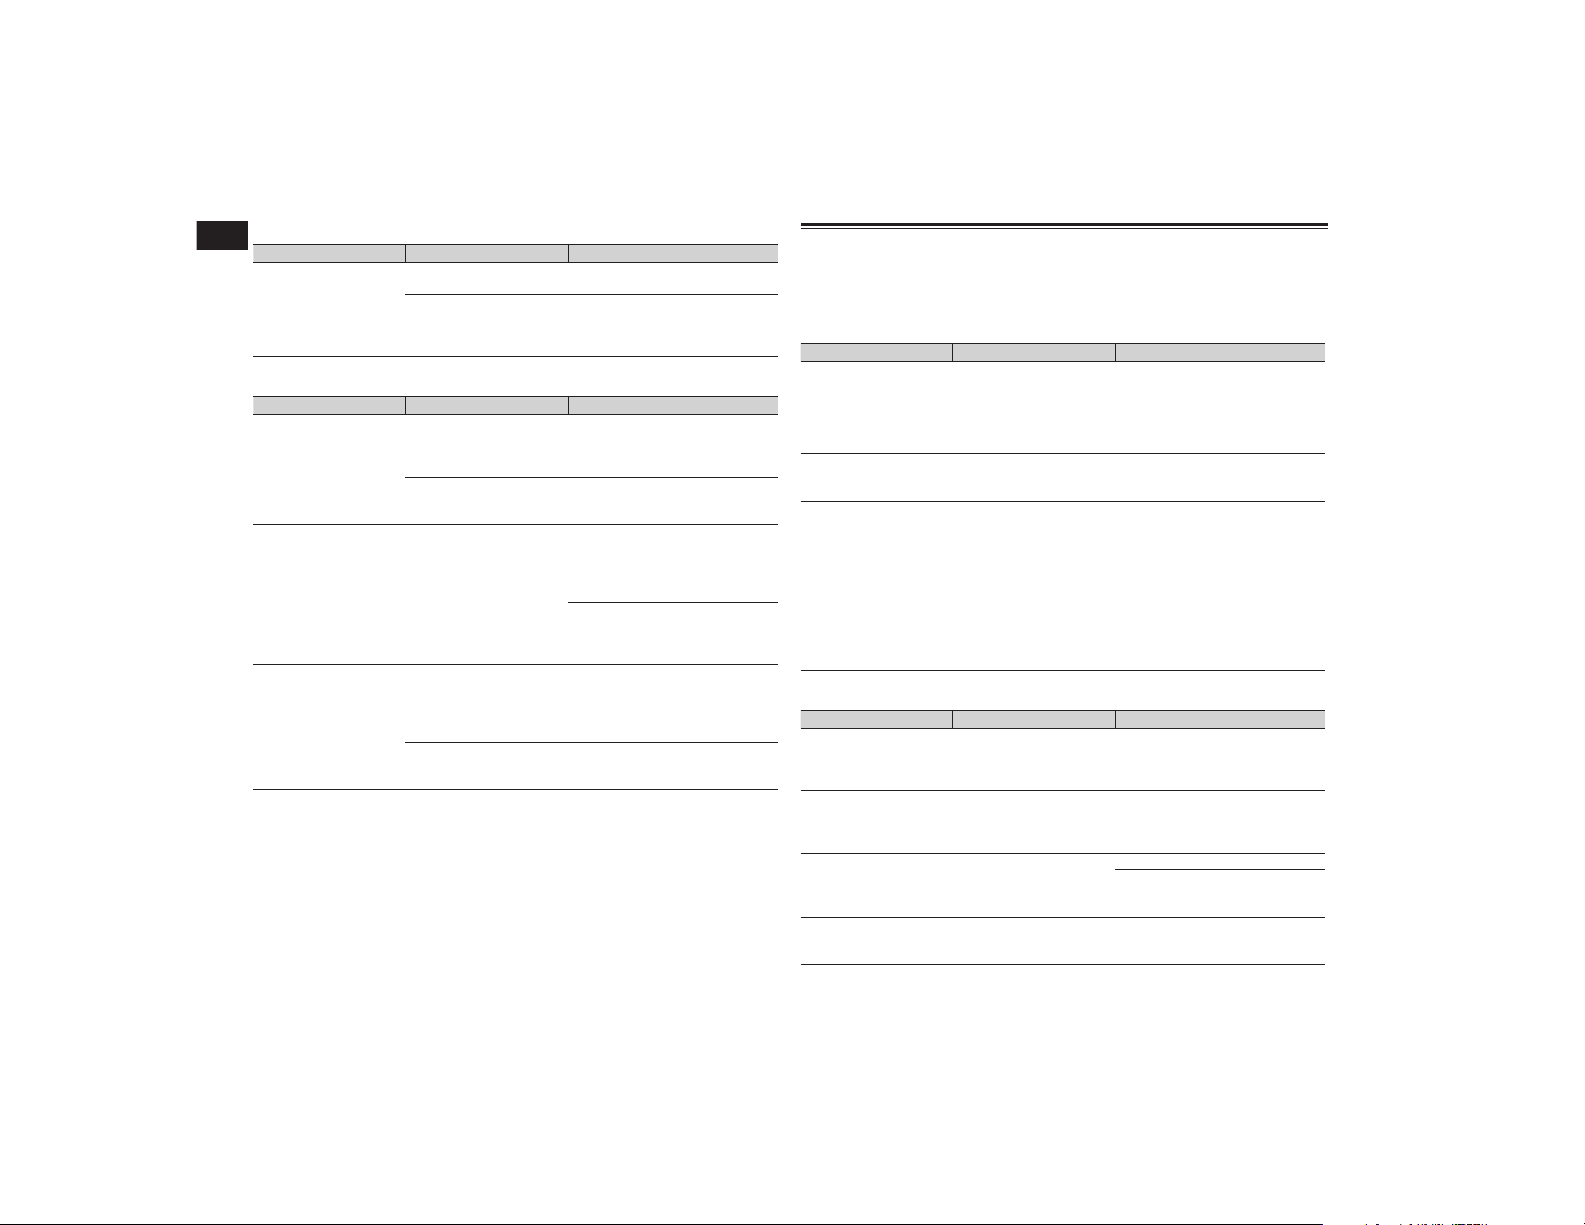
Appendix
82
En
Problems with the phone screen
Symptom Cause Action
Dialing is impossible
because the touch panel
keys for dialing are
inactive.
Your phone is out of range
for service.
Retry after re-entering the range
for service.
The connection between
the cellular phone and this
product cannot be estab-
lished now.
Perform the connection process.
Problems with the Application screen
Symptom Cause Action
A black screen is
displayed.
While operating an appli-
cation, the application was
ended on the smartphone
side.
Press the HOME button to display
the Top menu screen.
The smartphone OS may be
awaiting screen operation.
Stop the vehicle in a safe place
and check the screen on the
smartphone.
The screen is displayed,
but operation does not
work at all.
An error has occurred.
Park your vehicle in a safe place,
and then turn off the ignition switch
(ACC OFF). Subsequently, turn the
ignition switch to on (ACC ON)
again.
When an Android device is con-
nected, disconnect the Bluetooth
connection from this product and
then reconnect it.
The smartphone was not
charged.
Charging stopped because
the temperature of the
smartphone rose due to
prolonged use of the smart-
phone during charging.
Disconnect the smartphone from
the cable, and wait until the smart-
phone cools down.
More battery power was
consumed than was gained
from charging.
This problem may be resolved by
stopping any unnecessary services
on the smartphone.
Error messages
When problems occur with this product, an error message appears on the display. Refer to
the table below to identify the problem, then take the suggested corrective action. If the error
persists, record the error message and contact your dealer or your nearest Pioneer service
center.
Common
Message Cause Action
AMP Error
This product fails to oper-
ate or the speaker connec-
tion is incorrect; the protec-
tive circuit is activated.
Check the speaker connection.
If the message fails to disappear
even after the engine is switched
off/on, contact your dealer or an
authorized Pioneer Service Station
for assistance.
TEMP
The temperature of this
product is outside the
normal operating range.
Wait until this product returns to
a temperature within the normal
operating limits.
Product overheat.
System will be shut
down automatically in
1 minute. Restart the
product by ACC-Off/
On may fix this prob-
lem. If this message
keeps showing up, it
is possible that some
problem occured in the
product.
The temperature is too high
for this product to operate.
Follow the instructions displayed
on the screen. If this does not solve
the problem, contact your dealer or
an authorized Pioneer Station for
assistance.
Pandora
Message Cause Action
Communication error
occurred.
iPod failure.
Disconnect the cable from the
iPod. Once the iPod’s main menu
is displayed, reconnect the iPod
and reset it.
Error-19 Communication failed.
Disconnect the cable from the
iPod. Once the iPod’s main menu
is displayed, reconnect the iPod
and reset it.
Skip limit reached. Skip limit reached.
Do not exceed the skip limit.
Due to music licensing restrictions,
Pandora limits the total number of
skips per hour.
Check Device
Device error message
displayed in Pandora
application.
Please check your connected
device.
English
Appendix
83
En
Message Cause Action
Incompatible USB
The connected USB stor-
age device is not supported
by this product.
Disconnect your device and replace
it with a compatible USB storage
device.
Check USB
The USB connector or USB
cable has short-circuited.
Check that the USB connector or
USB cable is not caught in some-
thing or damaged.
The connected USB stor-
age device consumes more
than maximum allowable
current.
Disconnect the USB storage device
and do not use it. Turn the ignition
switch to OFF, then to ACC or ON
and then connect a compliant USB
storage device.
Aha Radio
Message Cause Action
Communication Error iPod failure.
Disconnect the cable from the
iPod. Once the iPod’s main menu
is displayed, reconnect the iPod
and reset it.
Error-02-6X iPod failure.
Disconnect the cable from the
iPod. Once the iPod’s main menu
is displayed, reconnect the iPod
and reset it.
SiriusXM Satellite Radio
Message Cause Action
Reference
Check Antenna
The antenna connection is
incorrect.
Check the antenna connection. If
the message fails to disappear even
after the engine is switched off/on,
contact your dealer or the nearest
authorized Pioneer service center
for assistance.
Check Tuner
The SiriusXM Connect
Vehicle Tuner connection is
incorrect.
Check the tuner connection and
battery voltage. If the message
fails to disappear even after the
engine is switched off/on, contact
your dealer or the nearest autho-
rized Pioneer service center for
assistance.
Message Cause Action
Reference
No Signal
The SiriusXM Connect
Vehicle Tuner is having
difficulty receiving the
SiriusXM satellite signal.
Verify that your vehicle is outdoors
with a clear view of the southern
sky.
Verify that the SiriusXM magnetic
mount antenna is mounted on a
metal surface on the outside the
vehicle.
Move the SiriusXM antenna away
from any obstructions.
No Content TuneScan is not available.
Perform the operation with another
preset channel.
Channel Not Available
The channel that you have
requested is not a valid
SiriusXM channel.
Check the SiriusXM channel lineup.
Subscription Updated
Press Enter to
Continue
This product has detected
a change in your SiriusXM
subscription status.
Touch [Enter] to clear the message.
Channel Not
Subscribed. Call Sirius
XM to Subscribe.
The channel that you have
requested is not included
in your SiriusXM subscrip-
tion package.
Check the content of your SiriusXM
subscription package.
Channel Locked Please
Enter the Lock Code
Locked by the radio
Parental Control feature.
Release the channel lock.
Artist Unavailable
The alert memo function is
not available.
Perform the operation with another
channel.
Song Unavailable
The alert memo function is
not available.
Perform the operation with another
channel.
Team Unavailable
The alert memo function is
not available.
Perform the operation with another
channel.
Alert Memory Full You
can manage alert mem-
ory in the alert list
The memory is full.
Clear the alert list.
page 52
Memory Full
The memory has become
full while playback was
paused.
Resume playback.
Memory Nearly Full
The memory has become
nearly full while playback
was paused.
Resume playback.
Appendix
84
En
Disc
Message Cause Action
Reference
Error-02-XX/FF-FF
The disc is dirty. Clean the disc.
The disc is scratched. Replace the disc.
The disc is loaded upside
down.
Check that the disc is loaded
correctly.
There is an electrical or
mechanical error.
Press the RESET button.
page 8
Different Region Disc
The disc does not have the
same region number as
this product.
Replace the DVD with one bearing
the correct region number.
Unplayable Disc
This type of disc cannot be
played on this product.
Replace the disc with one that can
be played on this product.
Unplayable File
This type of file cannot be
played on this product.
Select a file that can be played.
page 88, page 93
Skipped
The inserted disc contains
DRM protected files.
The protected files are skipped.
Protect
All the files on the inserted
disc are embedded with
DRM.
Replace the disc.
This DivX rental has
expired.
The inserted disc contains
expired DivX VOD content.
Select a file that can be played.
Video resolution not
supported
Files that cannot be
played on this product are
included in the file.
Select a file that can be played.
page 88, page 93
Unable to write to flash
memory.
The playback history for
VOD contents cannot be
saved for some reason.
Retry.
If the message appears frequently,
consult your dealer.
Your device is not
authorized to play this
DivX protected video.
This product’s DivX regis-
tration code has not been
authorized by the DivX VOD
contents provider.
Register this product to the DivX
VOD contents provider.
Video frame rate not
supported
DivX file’s frame rate is
more than 30 fps.
Select a file that can be played.
Audio Format not
supported
This type of file is not sup-
ported on this product.
Select a file that can be played.
page 88, page 93
External storage device (USB, SD)
Message Cause Action
Reference
Error-02-9X/-DX Communication failed.
Turn the ignition switch OFF and
back ON.
Disconnect the USB storage
device.
Change to a different source. Then,
return to the USB storage device.
Message Cause Action
Reference
Unplayable File
This type of file cannot be
played on this product.
Select a file that can be played.
page 88, page 93
Security for the connected
external storage device
(USB, SD) is enabled.
Follow the external storage device
(USB, SD) instructions to disable
security.
Skipped
The connected external
storage device (USB, SD)
contains DRM protected
files.
The protected files are skipped.
Protect
All the files on the con-
nected external storage
device (USB, SD) are
embedded with DRM.
Replace the external storage device
(USB, SD).
Incompatible USB
The connected USB stor-
age device is not supported
by this product.
Disconnect your device and replace
it with a compatible USB storage
device.
Incompatible SD
The SD memory card is not
supported by this product.
Remove your device and replace it
with a compatible SD memory card.
page 87
Format the SD memory card. It is
recommended that you use SD
Formatter for formatting SD mem-
ory cards.
page 87
Check USB
The USB connector or USB
cable is short-circuited.
Check that the USB connector or
USB cable is not caught in some-
thing or damaged.
The connected USB stor-
age device consumes more
than maximum allowable
current.
Disconnect the USB storage device
and do not use it. Turn the ignition
switch to OFF, then to ACC or ON
and then connect a compliant USB
storage device.
Video resolution not
supported
Files that cannot be
played on this product are
included in the file.
Select a file that can be played.
page 88, page 93
English
Appendix
85
En
Message Cause Action
Reference
USB1 was discon-
nected for device
protection. Do not
re-insert this USB
memory into the unit.
Press reset to restart
USB memory.
USB2 was discon-
nected for device
protection. Do not
re-insert this USB
memory into the unit.
Press reset to restart
USB memory.
The USB connector or USB
cable is short-circuited.
Check that the USB connector or
USB cable is not caught in some-
thing or damaged.
The connected USB stor-
age device consumes more
than maximum allowable
current.
Disconnect the USB storage device
and do not use it. Turn the ignition
switch to OFF, then to ACC or ON
and then connect a compliant USB
storage device.
The USB interface cable
for iPod / iPhone is
short-circuited.
Confirm that the USB interface
cable for iPod / iPhone or USB
cable is not caught in something or
damaged.
Audio Format not
supported
This type of file is not sup-
ported on this product.
Select a file that can be played.
page 88, page 93
iPod
Message Cause Action
Error-02-6X/-9X/-DX iPod failure.
Disconnect the cable from the
iPod. Once the iPod’s main menu
is displayed, reconnect the iPod
and reset it.
Error-02-67
The iPod firmware version
is old.
Update the iPod version.
iTunes tagging
Message Cause Action
Error-8D
Built-in FLASH ROM
encountered an error.
Turn the ignition switch to OFF and
then to ON.
Tag store failed.
Tag information cannot be
stored in this product.
Try again.
Already stored.
This tag information is
already stored in memory.
Tag information can only be saved
once for any given song. Tag infor-
mation cannot be saved for the
same song more than once.
Memory full. Connect
iPod.
The tag information is suc-
cessfully stored. The flash
memory of this product has
become full.
The tag information on this product
is transferred to the iPod automati-
cally when an iPod is connected.
Memory full. Tags not
stored. Connect iPod.
This product’s flash mem-
ory used as the temporary
storage area is full.
The tag information on this product
is transferred to the iPod automati-
cally when an iPod is connected.
iPod full. Tags not
transferred.
Memory used for tag infor-
mation on the iPod is full.
Synchronize the iPod with iTunes
and clean up the tagged playlist.
Message Cause Action
Tag transfer failed.
Reconnect your iPod.
This product’s tag infor-
mation cannot transfer to
the iPod.
Check the iPod and try again.
Bluetooth
Message Cause Action
Error-10
The power failed for the
Bluetooth module of this
product.
Turn the ignition switch to OFF and
then to ON.
If the error message is still dis-
played after performing the above
action, please contact your dealer
or an authorized Pioneer Service
Station.
Android Auto
Message Cause Action
Reference
Android Auto has
stopped.
The connected device
is not compatible with
Android Auto.
Check if the device is compatible
with Android Auto.
The startup of Android
Auto failed for some
reasons.
Disconnect the cable from the
smartphone, and then connect
the smartphone again after a few
seconds.
Restart the smartphone.
Turn the ignition switch to OFF and
then to ON.
If the error message is still dis-
played after performing the above
action, please contact your dealer
or an authorized Pioneer Service
Station.
The time set in this product
is not correct.
Check if the time is correctly set.
Bluetooth pairing
failed. Please pair
your Android phone
manually.
The Bluetooth pairing failed
for some reasons.
Pair this product with the device
manually.
page 14, page 15
Appendix
86
En
MirrorLink
Message Cause Action
The application list
could not be read out.
Failed to load the applica-
tion list.
Disconnect the cable from the
smartphone, and then connect
the smartphone again after a few
seconds.
Turn the ignition switch to OFF and
then to ON.
If the error message is still dis-
played after performing the above
action, reset the smartphone.
If the error message is still dis-
played after performing the above
action, please contact your dealer
or an authorized Pioneer Service
Station.
There is no supported
application on your
MirrorLink device.
No supported applications
can be found.
Install MirrorLink compliant appli-
cations to your MirrorLink device.
Communication error
occurred.
There was a communica-
tion error.
Disconnect the cable from the
smartphone, and then connect
the smartphone again after a few
seconds.
Turn the ignition switch to OFF and
then to ON.
If the error message is still dis-
played after performing the above
action, reset the smartphone.
If the error message is still dis-
played after performing the above
action, please contact your dealer
or an authorized Pioneer Service
Station.
Launching the applica-
tion failed.
Failed to launch the
application.
Try again.
Failed to display the
screen of your device
because of irregular
resolution.
The image size is too large.
The size of the images transferred
from the device exceeds 800 × 480.
If your MirrorLink
device is locked,
please unlock it when
it is safe and lawful for
you to do so.
The MirrorLink device is
locked.
Unlock the MirrorLink device.
Handling and care of discs
Some basic precautions are necessary when
handling your discs.
■ Built-in drive and care
Use only conventional, fully circular
discs. Do not use shaped discs.
Do not use cracked, chipped, warped, or
otherwise damaged discs as they may
damage the built-in drive.
Use 12-cm discs. Do not use 8-cm discs
or an adapter for 8-cm discs.
When using discs that can be printed
on label surfaces, check the instruc-
tions and the warnings of the discs.
Depending on the discs, inserting and
ejecting may not be possible. Using
such discs may result in damage to this
equipment.
Do not attach labels, write on or apply
chemicals to the surface of the discs.
Do not attach commercially available
labels or other materials to the discs.
Condensation may temporarily impair
the built-in drive’s performance.
Playback of discs may not be possible
because of disc characteristics, disc
format, recorded application, playback
environment, storage conditions and so
on.
Road shocks may interrupt disc
playback.
Read the precautions for discs before
using them.
■ Ambient conditions for playing
a disc
At extremely high temperatures, a tem-
perature cutout protects this product by
switching it off automatically.
Despite our careful design of the prod-
uct, small scratches that do not affect
actual operation may appear on the disc
surface as a result of mechanical wear,
ambient conditions for use or handling
of the disc. This is not a sign of the
malfunction of this product. Consider it
to be normal wear and tear.
Playable discs
■ DVD-Video and CD
DVD-Video
CD
p is a trademark of DVD Format/Logo
Licensing Corporation.
p It is not possible to play DVD-Audio
discs. This DVD drive may not be able to
play all discs bearing the marks shown
above.
■ AVCHD recorded discs
This unit is not compatible with discs
recorded in AVCHD (Advanced Video Codec
High Definition) format. Do not insert
AVCHD discs. If inserted, the disc may not
be ejected.
■ Playing DualDisc
DualDiscs are two-sided discs that have
a recordable CD for audio on one side
and a recordable DVD for video on the
other.
Playback of the DVD side is possible with
this product. However, since the CD side
of DualDiscs is not physically compatible
with the general CD standard, it may not
be possible to play the CD side with this
product.
Frequent loading and ejecting of a
DualDisc may result in scratches to the
disc.

English
Appendix
87
En
Serious scratches can lead to playback
problems on this product. In some
cases, a DualDisc may become stuck in
the disc-loading slot and will not eject. To
prevent this, we recommend you refrain
from using DualDisc with this product.
Please refer to the manufacturer
for more detailed information about
DualDiscs.
■ Dolby Digital
This product will down-mix Dolby Digital
signals internally and the sound will be
output in stereo.
p Manufactured under license from
Dolby Laboratories. Dolby and the dou-
ble-D symbol are trademarks of Dolby
Laboratories.
Detailed information for play-
able media
■ Compatibility
Common notes about disc
compatibility
Certain functions of this product may not
be available for some discs.
Compatibility with all discs is not
guaranteed.
It is not possible to playback DVD-ROM/
DVD-RAM discs.
Playback of discs may become impos-
sible with direct exposure to sunlight,
high temperatures, or depending on the
storage conditions in the vehicle.
DVD-Video discs
DVD-Video discs that have incompatible
region numbers cannot be played on
this DVD drive. The region number of the
player can be found on this product’s
chassis.
DVD-R/DVD-RW/DVD-R SL (Single
Layer)/DVD-R DL (Dual Layer) discs
Unfinalized discs which have been
recorded with the Video format (video
mode) cannot be played back.
Discs which have been recorded with
the Video Recording format (VR mode)
cannot be played back.
DVD-R DL (Dual Layer) discs which have
been recorded with Layer Jump record-
ing cannot be played back.
For detailed information about recording
mode, please contact the manufacturer
of media, recorders, or writing software.
CD-R/CD-RW discs
Unfinalized discs cannot be played back.
It may not be possible to playback CD-R/
CD-RW discs recorded on a music CD
recorder or a computer because of disc
characteristics, scratches or dirt on the
disc, or dirt, scratches or condensation
on the lens of the built-in drive.
Playback of discs recorded on a com-
puter may not be possible, depending on
the recording device, writing software,
their settings, and other environmental
factors.
Please record with the correct format.
(For details, please contact manufacturer
of media, recorders, or writing software.)
Titles and other text information
recorded on a CD-R/CD-RW disc may not
be displayed by this product (in the case
of audio data (CD-DA)).
Read the precautions with CD-R/CD-RW
discs before using them.
Common notes about the external
storage device (USB, SD)
Do not leave the external storage device
(USB, SD) in any location with high
temperatures.
Depending on the kind of the external
storage device (USB, SD) you use, this
product may not recognize the storage
device or files may not be played back
properly.
The text information of some audio
and video files may not be correctly
displayed.
File extensions must be used properly.
There may be a slight delay when
starting playback of files on an external
storage device (USB, SD) with complex
folder hierarchies.
Operations may vary depending on the
kind of an external storage device (USB,
SD).
It may not be possible to play some
music files from SD or USB because of
file characteristics, file format, recorded
application, playback environment,
storage conditions, and so on.
Notes on SD memory cards
Some SD memory cards may not be
recognized by this unit even if the SD
memory cards can be recognized by a
computer. Formatting the SD memory
cards using a dedicated formatter may
resolve the problem. SD memory cards
formatted using the standard formatting
function on a computer do not comply
with the SD standard. Problems such as
that those cards cannot be read or writ-
ten could occur. It is recommended that
you use a dedicated formatter to avoid
such problems. All of the data stored
on an SD memory card will be deleted
when the card is formatted. Back up any
needed data beforehand as necessary.
A dedicated formatter for SD memory
cards can be obtained from the following
site.
https://www.sdcard.org/
USB storage device compatibility
For details about USB storage device
compatibility with this product, refer to
Specifications on page 93.
Protocol: bulk
You cannot connect a USB storage
device to this product via a USB hub.
Partitioned USB storage device is not
compatible with this product.
Firmly secure the USB storage device
when driving. Do not let the USB storage
device fall onto the floor, where it may
become jammed under the brake or gas
pedal.
There may be a slight delay when start-
ing playback of audio files encoded with
image data.
Some USB storage devices connected to
this product may generate noise on the
radio.
Do not connect anything other than the
USB storage device.
The sequence of audio files on USB
storage device
For USB storage device, the sequence is
different from that of USB storage device.
SD memory card and SDHC mem-
ory card
For details about SD memory card
compatibility with this product, refer to
Specifications on page 93.
Handling guidelines and supple-
mental information
This product is not compatible with the
Multi Media Card (MMC).
Copyright protected files cannot be
played back.
Notes specic to DivX les
Only DivX files downloaded from DivX
partner sites are guaranteed for proper
operation. Unauthorized DivX files may
not operate properly.
DRM rental files cannot be operated until
playing back is started.
This product corresponds to a DivX
file display of up to 1 590 minutes 43
seconds. Search operations beyond this
time limit are prohibited.
DivX VOD file playback requires supply-
ing the ID code of this product to the
DivX VOD provider. Regarding the ID
code, refer to Displaying your DivX VOD
registration code on page 69.
Plays all versions of DivX video, except
for DivX 7 with standard playback of DivX
media files.
For more details about DivX, visit the
following site:
http://www.divx.com/
DivX subtitle les
Srt format subtitle files with the exten-
sion “.srt” can be used.
Only one subtitle file can be used for
each DivX file. Multiple subtitle files
cannot be associated.
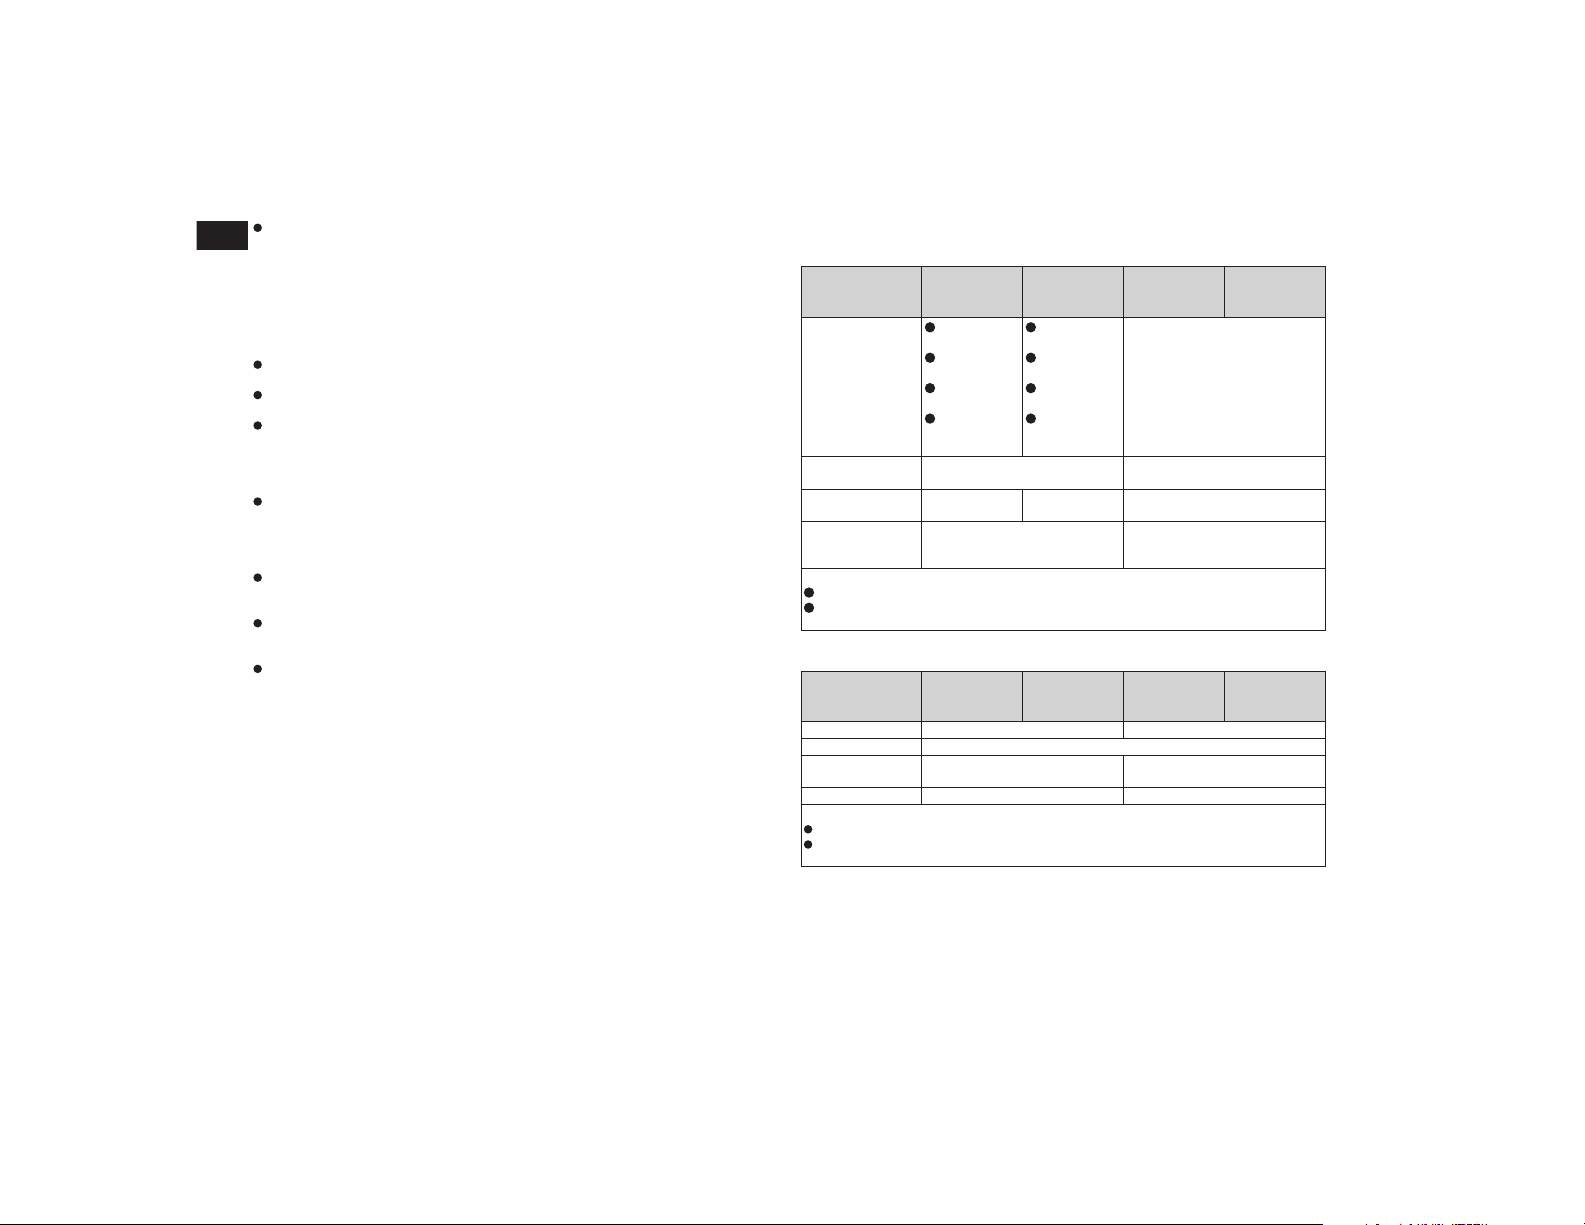
Appendix
88
En
Subtitle files that are named with the
same character string as the DivX file
before the extension are associated with
the DivX file. The character strings before
the extension must be exactly the same.
However, if there is only one DivX file and
one subtitle file in a single folder, the files
are associated even if the file names are
not the same.
The subtitle file must be stored in the
same folder as the DivX file.
Up to 255 subtitle files may be used. Any
more subtitle files will not be recognized.
Up to 64 characters can be used for the
name of the subtitle file, including the
extension. If more than 64 characters are
used for the file name, the subtitle file
may not be recognized.
The character code for the subtitle file
should comply with ISO-8859-1. Using
characters other than ISO-8859-1 may
cause the characters to be displayed
incorrectly.
The subtitles may not be displayed
correctly if the displayed characters in
the subtitle file include control code.
For materials that use a high transfer
rate, the subtitles and video may not be
completely synchronized.
If multiple subtitles are programmed to
display within a very short time frame,
such as 0.1 seconds, the subtitles may
not be displayed at the correct time.
■ Media compatibility chart
General
Media CD-R/-RW
DVD-R/-R
SL/-R DL/
DVD-RW
USB storage
device
SD memory
card
File system
ISO9660
level 1
ISO9660
level 2
Romeo,
Joliet
UDF 1.02 /
1.50 / 2.00 /
2.01 / 2.50
ISO9660
level 1
ISO9660
level 2
Romeo,
Joliet
UDF 1.02 /
1.50 / 2.00 /
2.01 / 2.50
FAT16/FAT32/NTFS
Maximum number
of folders
700 1 500
Maximum number
of files
999 3 500 15 000
Playable file types
MP3, WMA, AAC, DivX, MPEG-1,
MPEG-2, MPEG-4
MP3, WMA, AAC, WAV, FLAC,
H.264, MPEG-2, MPEG-4, WMV,
FLV, MKV, JPEG
Notes:
Maximum playback time of audio file stored in the disc: 60 h
Maximum playback time of audio file stored on an external storage device (USB, SD):
7.5 h (450 minutes)
MP3 compatibility
Media CD-R/-RW
DVD-R/-R
SL/-R DL/
DVD-RW
USB storage
device
SD memory
card
File extension .mp3 .mp2, .mp3, .m2a, .mka
Bit rate 8 kbps to 320 kbps (CBR), VBR
Sampling frequency
16 kHz to 48 kHz (32 kHz, 44.1 kHz,
48 kHz for emphasis)
8 kHz to 48 kHz
ID3 tag ID3 tag Ver. 1.0, 1.1, 2.2, 2.3 ID3 tag Ver. 1.0, 1.1, 2.2, 2.3, 2.4
Notes:
Ver. 2.x of ID3 tag is prioritized when both Ver. 1.x and Ver. 2.x exist.
This product is not compatible with the following:
MP3i (MP3 interactive), mp3 PRO, m3u playlist
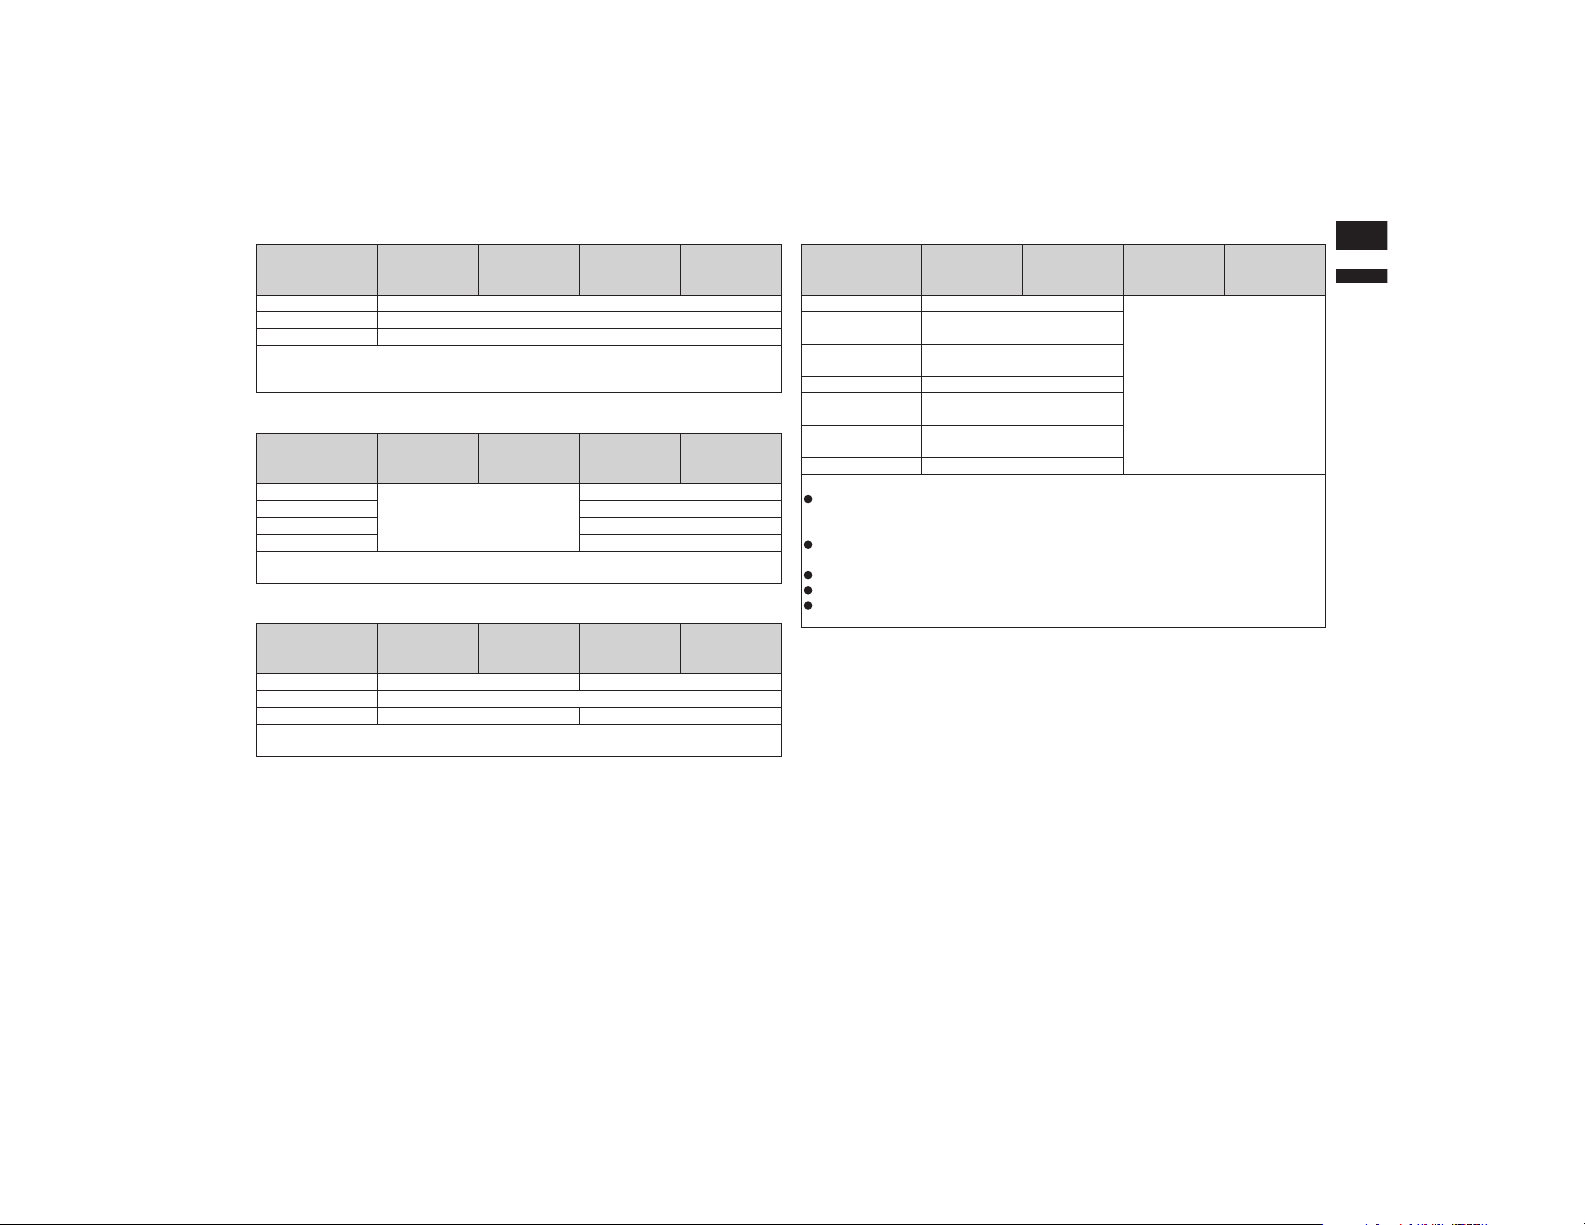
English
Appendix
89
En
WMA compatibility
Media CD-R/-RW
DVD-R/-R
SL/-R DL/
DVD-RW
USB storage
device
SD memory
card
File extension .wma
Bit rate 5 kbps to 320 kbps (CBR), VBR
Sampling frequency 8 kHz to 48 kHz
Note:
This product is not compatible with the following:
Windows Media™ Audio 9 Professional, Lossless, Voice
WAV compatibility
Media CD-R/-RW
DVD-R/-R
SL/-R DL/
DVD-RW
USB storage
device
SD memory
card
File extension
WAV files on the CD-R/-RW,
DVD-R/-RW/-R SL/-R DL cannot
be played.
.wav
Format Linear PCM (LPCM)
Sampling frequency 16 kHz to 48 kHz
Quantization bits 8 bits and 16 bits
Note:
The sampling frequency shown in the display may be rounded.
AAC compatibility
Media CD-R/-RW
DVD-R/-R
SL/-R DL/
DVD-RW
USB storage
device
SD memory
card
File extension .m4a .aac, .adts, .mka, .m4a
Bit rate 8 kbps to 320 kbps (CBR)
Sampling frequency 8 kHz to 44.1 kHz 8 kHz to 48 kHz
Note:
This product plays back AAC files encoded by iTunes.
DivX compatibility
Media CD-R/-RW
DVD-R/-R
SL/-R DL/
DVD-RW
USB storage
device
SD memory
card
File extension .avi/.divx
DivX files on the external storage
device (USB, SD) cannot be
played.
Profile (DivX
version)
Home Theater Ver. 3.11/Ver. 4.x/
Ver. 5.x/Ver. 6.x
Compatible audio
codec
MP3, Dolby Digital
Bit rate (MP3) 8 kbps to 320 kbps (CBR), VBR
Sampling frequency
(MP3)
16 kHz to 48 kHz (32 kHz, 44.1 kHz,
48 kHz for emphasis)
Maximum image
size
720 pixels × 576 pixels
Maximum file size 4 GB
Notes:
This product is not compatible with the following:
DivX Ultra format, DivX files without video data, DivX files encoded with LPCM (Linear
PCM) audio codec
Depending on the file information composition, such as the number of audio streams,
there may be a slight delay in the start of playback on discs.
If a file contains more than 4 GB, playback stops before the end.
Some special operations may be prohibited because of the composition of DivX files.
Files with high transfer rates may not be played back correctly. The standard transfer
rate is 4 Mbps for CDs and 10.08 Mbps for DVDs.
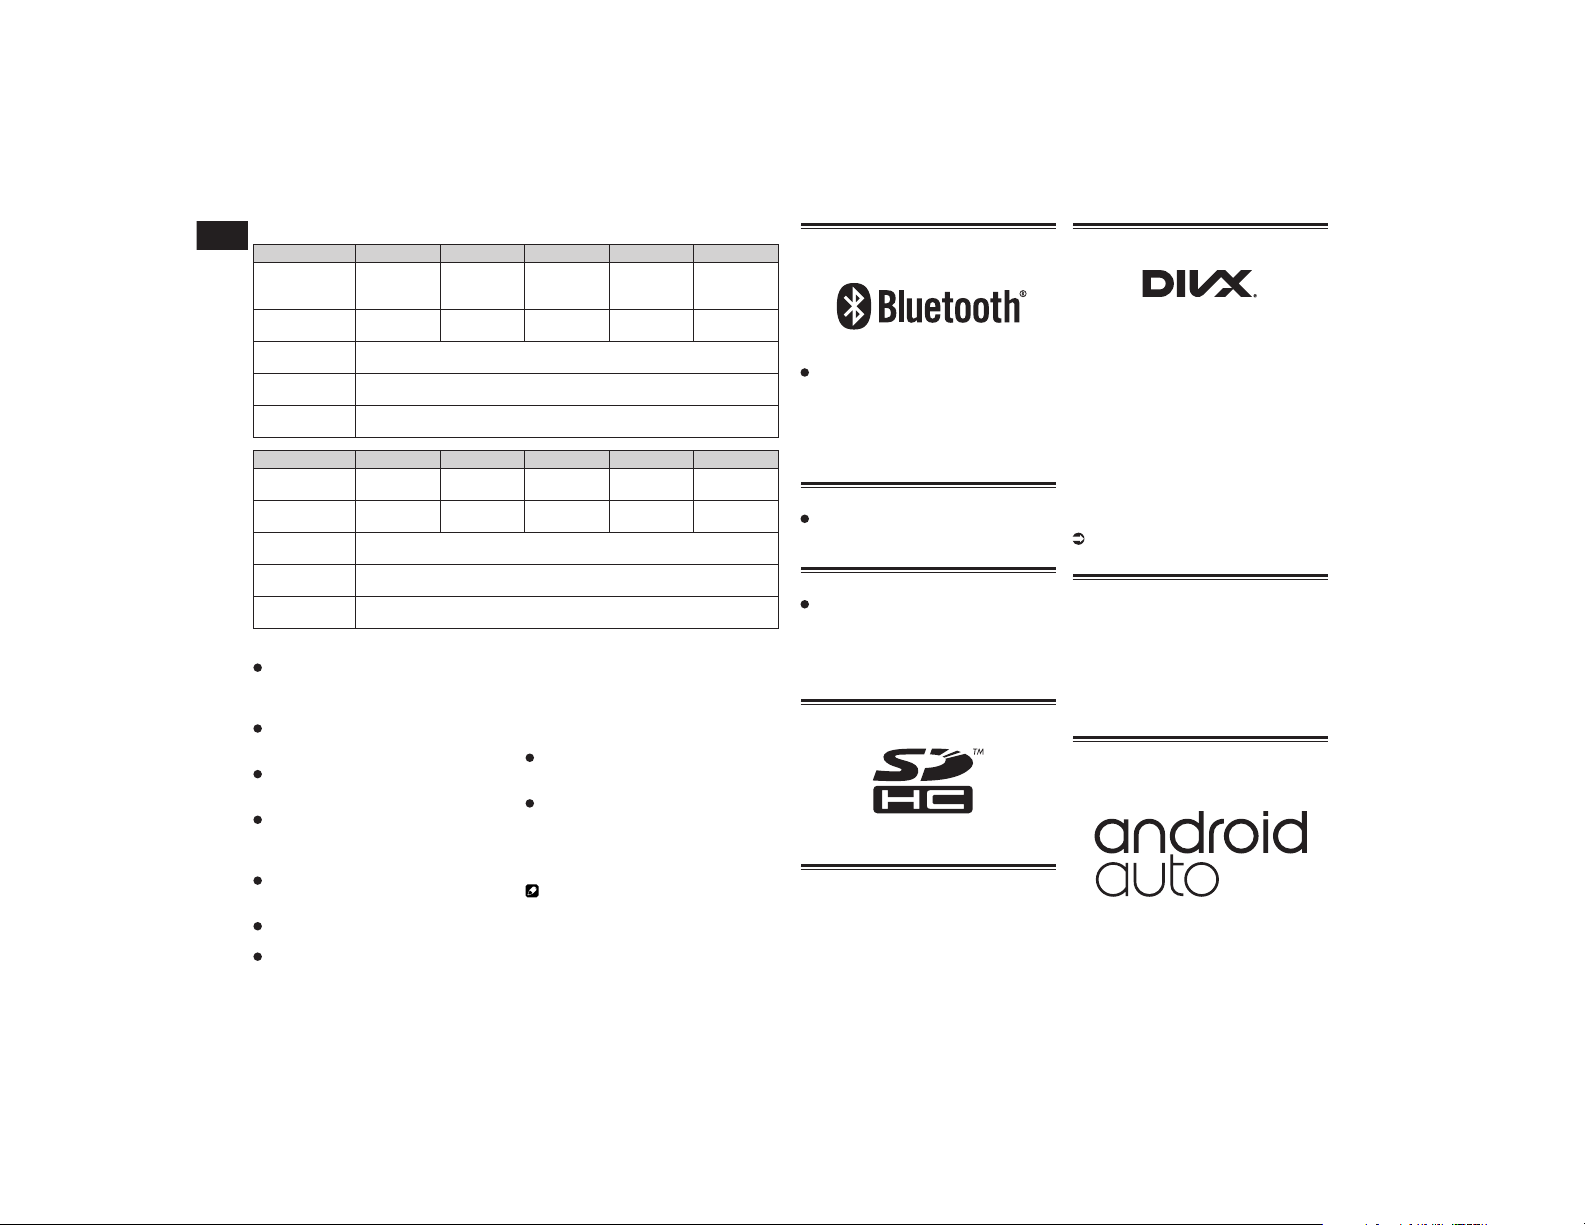
Appendix
90
En
Video les compatibility (USB, SD)
File extension .avi .mkv .mov .f4v .mp4
Compatible
video codec
MPEG-4,
H.264, H.263,
Xvid
MPEG-4,
H.264, VC-1,
Xvid
MPEG-4,
H.264, H.263
H.264, H.263
MPEG-4,
H.264, H.263
Compatible
audio codec
MP3, AAC,
LPCM
MP3, AAC,
Vorbis
MP3, AAC MP3, AAC MP3, AAC
Maximum frame
rate
30 fps
Maximum file
size
4 GB
Maximum
playback time
150 minutes
File extension .3gp .wmv .asf .flv .vob
Compatible
video codec
MPEG-4,
H.264, H.263
WMV, VC-1 WMV, VC-1 H.264
H.264,
MPEG-2
Compatible
audio codec
AAC WMA WMA MP3, AAC
MP3, AAC,
LPCM
Maximum frame
rate
30 fps
Maximum file
size
4 GB
Maximum
playback time
150 minutes
Common notes
Files may not be played back properly
depending on the environment in which
the file was created or on the contents of
the file.
This product may not play back files,
depending on the application used to
encode the files.
This product may not operate correctly,
depending on the application used to
encode WMA files.
Depending on the version of Windows
Media™ Player used to encode WMA
files, album names and other text infor-
mation may not be correctly displayed.
There may be a slight delay when start-
ing playback of audio files encoded with
image data.
This product is not compatible with
packet write data transfer.
This product can recognize up to 32
characters, beginning with the first char-
acter, including extension for the file and
folder name. Depending on the display
area, this product may try to display
them with a reduced font size. However,
the maximum number of the characters
that you can display varies according to
the width of each character, and of the
display area.
Folder selection sequence or other
operations may be altered, depending on
the encoding or writing software.
Regardless of the length of blank section
between the songs of original recording,
compressed audio discs play with a short
pause between songs.
Example of a hierarchy
Note
This product assigns folder numbers. The user
cannot assign folder numbers.
Bluetooth
The Bluetooth
®
word mark and logos
are registered trademarks owned by
Bluetooth SIG, Inc. and any use of such
marks by PIONEER CORPORATION is
under license. Other trademarks and
trade names are those of their respective
owners.
SiriusXM
®
satellite radio
Sirius, XM and all related marks and
logos are trademarks of Sirius XM Radio,
Inc. All rights reserved.
HD Radio™ Technology
HD Radio Technology manufactured
under license from iBiquity Digital
Corporation. U.S. and Foreign Patents.
HD Radio™ and the HD, HD Radio, and
“Arc” logos are proprietary trademarks of
iBiquity Digital Corp.
SDHC
SDHC Logo is a trademark of SD-3C, LLC.
WMA/WMV
Windows Media is either a registered trade-
mark or trademark of Microsoft Corporation
in the United States and/or other countries.
p This product includes technology owned
by Microsoft Corporation and cannot
be used or distributed without a license
from Microsoft Licensing, Inc.
DivX
DivX Certified
®
devices have been tested for
high-quality DivX
®
(.divx, .avi) video playback.
When you see the DivX logo, you know you
have the freedom to play your favorite DivX
movies.
DivX
®
, DivX Certified
®
and associated logos
are trademarks of DivX, LLC and are used
under license.
This DivX Certified
®
device has passed rigor-
ous testing to ensure it plays DivX
®
videos.
To play purchased DivX movies, first register
your device at vod.divx.com. Find your regis-
tration code in the DivX VOD section of your
device setup menu.
For details, refer to Displaying your DivX
VOD registration code on page 69.
AAC
AAC is short for Advanced Audio Coding and
refers to an audio compression technology
standard used with MPEG-2 and MPEG-4.
Several applications can be used to encode
AAC files, but file formats and extensions
differ depending on the application which
is used to encode. This unit plays back AAC
files encoded by iTunes.
Google, Google Play,
Android™, and Android Auto
Google, Google Play, Android, Android Auto
and other marks are trademarks of Google
Inc.
English
Appendix
91
En
MirrorLink
MirrorLink Certified™, the Design Only™
Certification Logo, MirrorLink™ and the
MirrorLink™ Logo are certification marks
and trademarks of the Car Connectivity
Consortium LLC. Unauthorized use is strictly
prohibited.
MIXTRAX
MIXTRAX is a trademark of the PIONEER
CORPORATION.
Detailed information regard-
ing connected iPod devices
CAUTION
Pioneer accepts no responsibility for
data lost from an iPod, even if that data
is lost while using this product. Please
back up your iPod data regularly.
Do not leave the iPod in direct sunlight
for extended amounts of time. Extended
exposure to direct sunlight can result
in iPod malfunction due to the resulting
high temperature.
Do not leave the iPod in any location with
high temperatures.
Firmly secure the iPod when driving. Do
not let the iPod fall onto the floor, where
it may become jammed under the brake
or gas pedal.
For details, refer to the iPod manuals.
■ iPod and iPhone
“Made for iPod” and “Made for iPhone”
mean that an electronic accessory has been
designed to connect specifically to iPod or
iPhone, respectively, and has been certified
by the developer to meet Apple performance
standards.
Apple is not responsible for the operation of
this device or its compliance with safety and
regulatory standards.
Please note that the use of this accessory
with iPod or iPhone may affect wireless
performance.
iPhone, iPod, iPod classic, iPod nano, and
iPod touch are trademarks of Apple Inc.,
registered in the U.S. and other countries.
■ Lightning
Lightning is a trademark of Apple Inc.
■ App Store
App Store is a service mark of Apple Inc.
■ iOS
iOS is a trademark on which Cisco holds the
trademark right in the US and certain other
countries.
■ iTunes
iTunes is a trademark of Apple Inc., regis-
tered in the U.S. and other countries.
■ iTunes Radio
iTunes Radio is a service mark of Apple Inc.
Using app-based connected
content
IMPORTANT
Requirements to access app-based con-
nected content services using this product:
Latest version of the Pioneer compatible
connected content application(s) for
the smartphone, available from the
service provider, downloaded to your
smartphone.
A current account with the content
service provider.
Smartphone Data Plan.
Note: if the Data Plan for your smart-
phone does not provide for unlimited
data usage, additional charges from your
carrier may apply for accessing app-
based connected content via 3G, EDGE
and/or LTE (4G) networks.
Connection to the Internet via 3G, EDGE,
LTE (4G) or Wi-Fi network.
Optional Pioneer adapter cable connect-
ing your iPhone to this product.
Limitations:
Access to app-based connected content
will depend on the availability of cellular
and/or Wi-Fi network coverage for the
purpose of allowing your smartphone to
connect to the Internet.
Service availability may be geographi-
cally limited to the region. Consult the
connected content service provider for
additional information.
Ability of this product to access con-
nected content is subject to change with-
out notice and could be affected by any
of the following: compatibility issues with
future firmware versions of smartphone;
compatibility issues with future versions
of the connected content application(s)
for the smartphone; changes to or dis-
continuation of the connected Content
application(s) or service by its provider.
Pioneer is not liable for any issues that
may arise from incorrect or flawed app-
based content.
The content and functionality of the sup-
ported applications are the responsibility
of the App providers.
In AppRadio Mode and Android Auto,
functionality through the product is
limited while driving, with available func-
tions determined by the App providers.
Availability of AppRadio Mode and
Android Auto functionalities is deter-
mined by the App provider, and not
determined by Pioneer.
AppRadio Mode and Android Auto
allow access to applications other than
those listed (subject to limitations while
driving), but the extent to which content
can be used is determined by the App
providers.
■ Pandora
®
Pandora, the Pandora logo, and the Pandora
trade dress are trademarks or registered
trademarks of Pandora Media, Inc. Used
with permission.
Pandora is currently available in the United
States, Australia, and New Zealand.
■ Aha Radio
Aha, Aha Radio and the Aha and Aha
Radio logos are either the trademarks
or the registered trademarks of Harman
International Industries, Incorporated.
HDMI
The terms HDMI and HDMI High-Definition
Multimedia Interface, and the HDMI Logo
are trademarks or registered trademarks of
HDMI Licensing, LLC in the United States
and other countries.
MHL
MHL, the MHL Logo, and Mobile High-
Definition Link are trademarks or registered
trademarks of MHL, LLC in the United States
and other countries.
Notice regarding video
viewing
Remember that use of this system for com-
mercial or public viewing purposes may
constitute an infringement on the author’s
rights as protected by the Copyright Law.
Notice regarding DVD-Video
viewing
This item incorporates copy protection
technology that is protected by U.S. patents
and other intellectual property rights of Rovi
Corporation. Reverse engineering and disas-
sembly are prohibited.
Notice regarding MP3 le
usage
Supply of this product only conveys a license
for private, non-commercial use and does
not convey a license nor imply any right to
use this product in any commercial (i.e.
revenue-generating) real time broadcasting

Appendix
92
En
(terrestrial, satellite, cable and/or any other
media), broadcasting/streaming via internet,
intranets and/or other networks or in other
electronic content distribution systems,
such as pay-audio or audio-on-demand
applications. An independent license for
such use is required. For details, please visit
http://www.mp3licensing.com.
Notice regarding open source
licenses
For details about the open source licenses
for the functions that this product is
equipped with, please visit
http://www.oss-pioneer.com/car/multimedia/
Using the LCD screen correctly
■ Handling the LCD screen
When the LCD screen is subjected to
direct sunlight for a long period of time,
it will become very hot, resulting in possi-
ble damage to the LCD screen. When not
using this product, avoid exposing it to
direct sunlight as much as possible.
The LCD screen should be used within
the temperature ranges shown in
Specifications.
Do not use the LCD screen at tempera-
tures higher or lower than the operating
temperature range, because the LCD
screen may not operate normally and
could be damaged.
The LCD screen is exposed in order to
increase its visibility within the vehicle.
Please do not press strongly on it as this
may damage it.
Do not push the LCD screen with exces-
sive force as this may scratch it.
Never touch the LCD screen with any-
thing besides your finger when operating
the touch panel functions. The LCD
screen can scratch easily.
■ Liquid crystal display (LCD)
screen
If the LCD screen is near the vent of an
air conditioner, make sure that air from
the air conditioner is not blowing on it.
Heat from the heater may break the LCD
screen, and cool air from the cooler may
cause moisture to form inside this prod-
uct, resulting in possible damage.
Small black dots or white dots (bright
dots) may appear on the LCD screen.
These are due to the characteristics of
the LCD screen and do not indicate a
malfunction.
The LCD screen will be difficult to see if it
is exposed to direct sunlight.
When using a cellular phone, keep the
antenna of the cellular phone away from
the LCD screen to prevent disruption
of the video in the form of disturbances
such as spots or colored stripes.
■ Maintaining the LCD screen
When removing dust from or cleaning
the LCD screen, first turn this product off
and then wipe the screen with a soft dry
cloth.
When wiping the LCD screen, take care
not to scratch the surface. Do not use
harsh or abrasive chemical cleaners.
■ LED (light-emitting diode)
backlight
A light emitting diode is used inside the
display to illuminate the LCD screen.
At low temperatures, using the LED
backlight may increase image lag and
degrade the image quality because of the
characteristics of the LCD screen. Image
quality will improve with an increase in
temperature.
The product lifetime of the LED
backlight is more than 10 000 hours.
However, it may decrease if used in high
temperatures.
If the LED backlight reaches the end
of its product lifetime, the screen will
become dimmer and the image will no
longer be visible. In that case, please
consult your dealer or the nearest autho-
rized Pioneer Service Station.

Appendix
93
En
Specications
● General
Rated power source ..................14.4 V DC
(allowable voltage range:
10.8 V to 15.1 V DC)
Grounding system .............Negative type
Maximum current consumption 10.0 A
Dimensions (W × H × D):
Chassis ....................... 178 mm × 100 mm
× 164 mm
(7 in. × 3-7/8 in. × 6-1/2 in.)
Nose.............................. 171 mm × 97 mm
× 20 mm
(6-3/4 in. × 3-7/8 in. × 3/4 in.)
Weight ................................2.2 kg (4.9 lbs)
● Display
Screen size/aspect ratio .....................6.95
inch wide/16:9
(effective display area: 156.6 mm × 81.6 mm)
(6-1/8 in. × 3-1/4 in.)
Pixels ....................1 152 000 (2 400 × 480)
Display method ........... TFT Active matrix
driving
Color system .......................... PAL/NTSC/
PAL-M/PAL-N/SECAM compatible
Tolerable temperature range:
Power off ..........................–4 °F to +176 °F
● Audio
Maximum power output ............ 50 W × 4
Continuous power output ......... 22 W × 4
(50 Hz to 15 kHz, 5 %THD, 4 W LOAD,
Both Channels Driven)
Load impedance ...................................4 W
(4 W to 8 W allowable)
Preout output level (max) ................ 4.0 V
Equalizer (13-Band Graphic Equalizer):
Frequency ................ 50 Hz/80 Hz/125 Hz/
200 Hz/315 Hz/500 Hz/800 Hz/1.25 kHz/
2 kHz/3.15 kHz/5 kHz/8 kHz/12.5 kHz
Gain ................................................±12 dB
HPF:
Frequency .................. 50 Hz/63 Hz/80 Hz/
100 Hz/125 Hz/160 Hz/200 Hz
Slope .....................–6 dB/oct, –12 dB/oct,
–18 dB/oct
Subwoofer (mono):
Frequency .................. 50 Hz/63 Hz/80 Hz/
100 Hz/125 Hz/160 Hz/200 Hz
Slope .....................–6 dB/oct, –12 dB/oct,
–18 dB/oct
Gain ...............................–24 dB to +10 dB
Phase .............................. Normal/Reverse
Time alignment .................... 0 to 200 step
(1 inch/step)
● DVD drive
System ........ DVD-Video, VCD, CD, MP3,
WMA, AAC, DivX, MPEG player
Region number ........................................1
Usable discs .........................DVD-VIDEO,
VIDEO-CD, CD, CD-R, CD-RW,
DVD-R, DVD-RW, DVD-RDL
Frequency response .... 5 Hz to 44 000 Hz
(with DVD, at sampling frequency 96 kHz)
Signal-to-noise ratio ...........96 dB (1 kHz)
(IHF-A network) (RCA level)
Output level:
Video ......................1.0 Vp-p/75 W (±0.2 V)
Number of channels ................. 2 (stereo)
MP3 decoding format .... MPEG-1, 2 & 2.5
Audio Layer 3
WMA decoding format .............Ver.7, 8, 9
(2 ch audio) (Windows Media Player)
AAC decoding format .........MPEG-4 AAC
(only encoded by iTunes):
.m4a (Ver.11 and earlier)
DivX decoding format.......Home Theater
Ver.3.11, Ver.4.X, Ver.5.X, Ver.6.X :
.avi, .divx
MPEG video decoding format
.................. MPEG-1: mpg, mpeg, dat
MPEG-2 PS: mpg, mpeg
MPEG-4 Part2 (Visual),
MS MPEG-4 Ver.3: avi
● USB
USB standard spec. .......USB1.1, USB2.0
High Speed
Max current supply ........................... 1.6 A
USB Class ................MSC (Mass Storage
Class) device, iPod (AudioClass,
HID Class) device
File system .........................FAT16, FAT32,
NTFS
MP3 decoding format ...MPEG-1/Layer 1,
MPEG-1/Layer 2, MPEG-1/Layer 3
MPEG-2/Layer 1, MPEG-2/Layer 2,
MPEG-2/Layer 3
MPEG-2.5/Layer 3
WMA decoding format ........WMA10 Std,
WMA10 Pro, WMA9 Lossless
AAC decoding format ..MPEG-2 AAC-LC,
MPEG-4 AAC-LC
WAVE signal format .............Linear-PCM
H.264 video decoding format
.........BaseLine Profile, Main Profile,
High Profile
WMV video decoding format ........... VC-1
SP/MP/AP, WMV 7/8
MPEG4 video decoding format
.....................................SimpleProfile,
AdvancedSimpleProfile
(except GMC)
JPEG decoding format .................... JPEG
● SD
Compatible physical format
.......................................... Version 2.0
File system .........................FAT16, FAT32,
NTFS
MP3 decoding format ...MPEG-1/Layer 1,
MPEG-1/Layer 2, MPEG-1/Layer 3
MPEG-2/Layer 1, MPEG-2/Layer 2,
MPEG-2/Layer 3
MPEG-2.5/Layer 3
WMA decoding format ........WMA10 Std,
WMA10 Pro, WMA9 Lossless
AAC decoding format ..MPEG-2 AAC-LC,
MPEG-4 AAC-LC
WAVE signal format .............Linear-PCM
H.264 video decoding format
.........BaseLine Profile, Main Profile,
High Profile
WMV video decoding format ........... VC-1
SP/MP/AP, WMV 7/8
MPEG4 video decoding format
.....................................SimpleProfile,
AdvancedSimpleProfile
(except GMC)
JPEG decoding format .................... JPEG
● Bluetooth
Version ................................ Bluetooth 3.0
+EDR certified
Output power......................+4 dBm Max.
(Power class 2)
● FM tuner
Frequency range ................... 87.9 MHz to
107.9 MHz
Usable sensitivity ............................11 dBf
(0.8 µV/75 W, mono, S/N: 30 dB)
Signal-to-noise ratio
............. 80 dB (digital broadcasting)
(IHF-A network)
72 dB (analog broadcasting)
(IHF-A network)
● AM tuner
Frequency range ......................530 kHz to
1 710 kHz
Usable sensitivity ............................. 25 µV
(S/N: 20 dB)
Signal-to-noise ratio
............. 80 dB (digital broadcasting)
(IHF-A network)
62 dB (analog broadcasting)
(IHF-A network)
● CEA2006 Specications
Power output ... 14 W RMS × 4 Channels
(4 W and ≦ 1 % THD+N)
S/N ratio ......................................... 91 dBA
(reference: 1 W into 4 W)
Note
Specifications and design are subject to
possible modifications without notice due to
improvements.

2
Merci d’avoir acheté ce produit Pioneer.
Veuillez lire attentivement ces instructions de façon à savoir comment utiliser votre modèle
correctement. Après avoir terminé de lire les instructions, conservez ce document dans un
endroit sûr afin de pouvoir le consulter facilement à l’avenir.
Sommaire
Important
Les écrans fournis en exemple peuvent
être différents des écrans réels, lesquels
peuvent être modifiés sans préavis à titre
d’améliorations des performances et des
fonctions.
Précautions
Informations pour l’utilisateur ...............6
La protection de votre ouïe est
entre vos mains ..................................... 6
CHOISISSEZ UN VOLUME
SÉCURITAIRE : ...................................... 6
N’OUBLIEZ PAS DE
RESPECTER LES
DIRECTIVES SUIVANTES : .................. 6
Licence, exonération de
garantie et limite de
responsabilité ....................................6
DISPOSITIONS EN MATIÈRE
DE SÉCURITÉ ........................................ 6
Consignes importantes de sécurité .......6
Verrouillage par le frein à main ..............7
Pour garantir une conduite en
toute sécurité ......................................... 7
Lors de l’utilisation d’un affi-
cheur branché à la borne V OUT ......7
Pour éviter l’épuisement de
la batterie ............................................7
Caméra de rétrovisée ..............................7
Manipulation de la fente de
la carte SD ..........................................8
Manipulation du connecteur USB .........8
Problème de fonctionnement .................8
Notre site web ..........................................8
Protection du panneau et de
l’écran LCD .........................................8
Remarques sur la mémoire interne .......8
Avant de retirer la batterie du véhicule ..... 8
Données faisant l’objet d’un
effacement ............................................. 8
Réinitialisation du microprocesseur ......... 8
Quelques mots sur ce mode
d’emploi ..............................................8
Utilisation et soin de la télé-
commande ..........................................9
Mise en place de la batterie ....................... 9
Utilisation de la télécommande ................. 9
Commandes de base
Vérification des noms des
composants et des fonctions ...........9
Télécommande ........................................9
Protection de votre appareil
contre le vol ......................................10
Retrait du panneau avant ......................... 10
Fixation du panneau avant ....................... 10
Remarques relatives à l’utili-
sation du panneau LCD ..................10
Réglage de l’angle du pan-
neau LCD ..........................................11
Insertion/éjection/connexion
d’un support .....................................11
Insertion et éjection d’un disque ............. 11
Insertion et éjection d’une carte
mémoire SD ......................................... 11
Connexion et déconnexion d’un iPod ..... 11
Branchement et débranche-
ment d’un périphérique de
stockage USB ...................................... 11
Démarrage et terminaison ....................12
Lors du premier démarrage ..................12
Démarrage ordinaire .............................12
Désactivation de l’affichage .................12
Lorsque l’écran de l’application
est disponible ...................................... 12
Lorsque l’écran de l’application
n’est pas disponible ............................ 12
Comment utiliser les écrans.................13
Changement d’écran à l’aide
des touches de l’écran tactile ............ 13
Changement d’écran à l’aide
des touches physiques ....................... 13
Sources AV prises en charge................13
Affichage de l’écran de fonction AV ....13
Sélection d’une source avant
sur l’écran de Sélection de
source AV ............................................. 14
Sélection d’une source avant
dans la liste de sources ...................... 14
Sélection d’une source arrière ................. 14
Mise hors tension de la source AV.......14
Changement de l’ordre d’affi-
chage des icônes sources ..............14
Changement de l’ordre d’affi-
chage des touches sources ............14
Utilisation de l’écran tactile..................14
Utilisation des touches cou-
rantes de l’écran tactile ...................... 14
Utilisation des écrans de liste .................. 15
Utilisation de la barre temporelle ............ 15
Utilisation du clavier sur l’écran .............. 15
Enregistrement et
raccordement d’un
périphérique Bluetooth
Préparation des dispositifs
de communication ..........................15
Enregistrement de vos péri-
phériques Bluetooth........................15
Recherche des périphériques
Bluetooth à proximité ......................... 15
Appariement depuis vos péri-
phériques Bluetooth ........................... 16
Connexion automatique à un
périphérique Bluetooth ...................... 16
Suppression d’un périphérique
enregistré ............................................. 16
Connexion manuelle d’un
périphérique Bluetooth
enregistré..........................................16
Changement de visibilité ......................17
Saisie du code PIN pour la
connexion sans fil Bluetooth .........17
Affichage de l’adresse Bluetooth.........17
Effacement de la mémoire
Bluetooth ..........................................17
Mise à jour du logiciel Bluetooth .........17
Affichage de la version du
logiciel Bluetooth ............................17
Utilisation de la télé-
phonie mains libres
Affichage du menu téléphone ..............18
Touches de l’écran tactile ......................... 18
Lecture de l’écran ...................................... 18
Effectuer un appel ..................................18
Marquage direct ........................................ 18
Appel d’un numéro enregistré
dans l’annuaire .................................... 18
Appel à partir du journal des appels ....... 19
Utilisation des listes de numé-
rotation prédéfinie............................... 19
Recevoir un appel ..................................19
Prendre un appel ....................................... 19
Réduction de l’écran de
confirmation de numérotation .......20
Modification des réglages du téléphone
...20
Prendre automatiquement un appel ....... 20
Mise en service ou hors service
de la sonnerie ...................................... 20
Inversion des noms dans l’annuaire ....... 20
Réglage du mode privé ............................. 20
Réglage du volume d’écoute d’un tiers
.... 20
Utilisation de la fonction de
reconnaissance vocale ...................20
Remarques pour la télépho-
nie mains libres................................21
Configuration d’un
iPod / iPhone ou smartphone
Procédure de configuration
de base d’un iPod /
iPhone ou smartphone ...................21
Réglage de la méthode de
connexion de l’appareil ...................21
Compatibilité avec l’iPod ......................21
Compatibilité d’appareil Android™ .....22
Compatibilité AppRadio Mode .............22
Compatibilité d’appareil MirrorLink ....22
Informations relatives aux
connexions et fonctions
de chaque appareil ..........................22
Réception HD Radio™
Stations HD Radio .................................23
Utilisation des touches de
l’écran tactile ....................................24
Lecture de l’écran ..................................24
Procédure de départ ..............................24
Sélection d’une bande ..........................25
Syntonisation manuelle ........................25
Syntonisation automatique ..................25
Sélection d’un canal préréglé
dans la liste des canaux préréglés
....25
Mise en mémoire des fré-
quences de radiodiffusion ..............25

3
Mise en mémoire des fré-
quences de radiodiffusion
les plus puissantes ..........................25
Syntonisation des fréquences
puissantes ........................................25
Changement du mode de recherche ...26
Changement du mode de réception ....26
Mémorisation des informa-
tions de la chanson sur
un iPod (balisage iTunes) ...............26
Utilisation avec les boutons
physiques .........................................26
Lecture d’un disque
Utilisation des touches de
l’écran tactile (pour l’audio) ...........26
Utilisation des touches de
l’écran tactile (pour la vidéo) ..........26
Lecture de l’écran (pour l’audio) ..........27
Lecture de l’écran (pour la vidéo) ........27
Procédure de départ ..............................28
Sélection de fichiers dans la
liste des noms de fichiers ...............28
Lecture des pistes dans un
ordre aléatoire ..................................28
Réglage d’une plage de
lecture répétée .................................28
Changement du type de
fichier multimédia ...........................28
Recherche de la partie que
vous souhaitez lire ...........................28
Utilisation du menu DVD ......................28
Changement de la langue
des sous-titres ..................................29
Changement de la langue de
l’audio ...............................................29
Lecture image par image ......................29
Lecture en ralenti ...................................29
Retour à une scène spécifiée ...............29
Reprise de la lecture (Signet) ...............29
Utilisation du menu DVD
à l’aide des touches de
l’écran tactile ....................................29
Changement de l’affichage
de DVD multi-angle .........................30
Sélection de la sortie audio ..................30
Utilisation avec les boutons physiques
...30
Lecture de fichiers
audio compressé
Utilisation des touches de
l’écran tactile ....................................30
Lecture de l’écran ..................................31
Procédure de démarrage
(pour Disque) ...................................31
Procédure de démarrage
(pour USB/SD) .................................31
Changement du mode de
navigation .........................................31
Sélection de fichiers dans la
liste des noms de fichiers ...............32
Sélection d’un fichier dans
la liste lié à la chanson
en cours de lecture
(recherche de liaison) .....................32
Lecture des fichiers dans un
ordre aléatoire ..................................32
Réglage d’une plage de
lecture répétée .................................32
Changement du type de
fichier multimédia ...........................32
Utilisation avec les boutons physiques
....33
Lecture de fichiers
vidéo compressée
Utilisation des touches de
l’écran tactile ....................................33
Lecture de l’écran ..................................33
Procédure de démarrage
(pour Disque) ...................................33
Procédure de démarrage
(pour USB/SD) .................................33
Sélection de fichiers dans la
liste des noms de fichiers ...............34
Réglage d’une plage de
lecture répétée .................................34
Lecture image par image ......................34
Lecture en ralenti ...................................34
Changement du type de
fichier multimédia ...........................34
Utilisation avec les boutons physiques
....34
Lecture de fichiers
images fixes compressées
Utilisation des touches de
l’écran tactile ....................................34
Lecture de l’écran ..................................35
Procédure de départ ..............................35
Sélection de fichiers dans la
liste des noms de fichiers ...............35
Lecture des fichiers dans un
ordre aléatoire ..................................35
Réglage d’une plage de
lecture répétée .................................35
Changement du type de
fichier multimédia ...........................35
Réglage de l’intervalle du diaporama
....35
Utilisation avec les boutons physiques
...36
Utilisation d’un iPod
Utilisation des touches de
l’écran tactile (pour l’audio) ...........36
Utilisation des touches de
l’écran tactile (pour la vidéo) ..........36
Utilisation des touches de
l’écran tactile (pour iTunes Radio)
....36
Lecture de l’écran (pour l’audio) ..........37
Lecture de l’écran (pour la vidéo) ........37
Lecture de l’écran (pour
iTunes Radio) ...................................37
Procédure de départ ..............................37
Réglage de la lecture aléatoire ............37
Réglage d’une plage de
lecture répétée .................................38
Sélection de sources de
chansons ou vidéo dans
l’écran de liste de lecture ................38
Utilisation d’iTunes Radio.....................38
Lecture de chansons similaires
à la chanson en cours de lecture ....... 38
Réglage pour que la chanson en
cours de lecture ne soit pas
lue à nouveau ....................................... 38
Ajout de la chanson en cours de
lecture à la liste de souhaits .............. 39
Utilisation de la fonction iPod
de ce produit à partir de votre iPod
....39
Changement de la vitesse de
lecture d’un livre audio ...................39
Affichage des listes liées à
la chanson en cours de
lecture (recherche de liaison) ........39
Utilisation avec les boutons physiques
....39
Lecture de musique autre que
la musique d’un iPod à
partir d’une application de
musique, comme source iPod
........39
Utilisation des touches de
l’écran tactile ....................................... 39
Lecture de l’écran ...................................... 40
Lecture de musique
provenant d’un appareil
compatible avec Android Auto
Utilisation des touches de
l’écran tactile ....................................40
Lecture de l’écran ..................................40
Procédure de départ ..............................40
Utilisation des appli-
cations de votre
iPhone ou smartphone
Utilisation de AppRadio Mode .............41
Utilisation des touches de
l’écran tactile (barre de
commande latérale d’application) .... 41
Procédure de départ .................................. 41
Utilisation du clavier ................................. 42
Réglage de la taille de l’image
(pour les utilisateurs de
smartphone) ........................................ 42
Affichage de l’image de votre
application (iPhone avec
connecteur à 30 broches) ................... 42
Affichage de l’image de votre
application (iPhone avec
connecteur Lightning) ........................ 43
Affichage de l’image de votre
application (smartphone)................... 43
Utilisation d’Android Auto ....................43
Procédure de départ .................................. 43
Réglage de la position de conduite ......... 44
Réglage du volume .................................... 44
Utilisation du mode MirrorLink ............44
Utilisation des touches de
l’écran tactile (barre de
commande latérale d’application) .... 44
Procédure de départ .................................. 44
Utilisation de la fonction de
mixage audio ....................................44
Transmission de Pandora
®
Utilisation de Pandora ...........................45
Utilisation des touches de
l’écran tactile ....................................45
Lecture de l’écran ..................................46
Procédure de départ ..............................46

4
À l’attention des utilisateurs
d’un iPhone avec connec-
teur à 30 broches ................................. 46
À l’attention des utilisateurs
d’un iPhone avec connec-
teur Lightning ...................................... 46
Pour les utilisateurs de smartphone ....... 46
Sélection d’une station
Pandora dans la liste .......................46
Création d’une station ...........................46
Utilisation avec les boutons physiques
...47
Utilisation de Aha Radio
Utilisation des touches de
l’écran tactile ....................................47
Lecture de l’écran ..................................47
Procédure de départ ..............................47
À l’attention des utilisateurs
d’un iPhone avec connec-
teur à 30 broches ................................. 48
À l’attention des utilisateurs
d’un iPhone avec connec-
teur Lightning ...................................... 48
Pour les utilisateurs de smartphone ....... 48
Utilisation avec les boutons
physiques .........................................48
Utilisation de iDatalink
Activation de iDatalink Maestro ..........48
Mise à jour du module iDatalink
Maestro ................................................. 48
Procédure de départ ..............................48
Téléphone mains libres .........................49
Réglage Bluetooth ..................................... 49
Écran de l’annuaire ................................... 50
Écran de liste du journal ........................... 50
Écran de numérotation ............................. 50
Écran de confirmation de numérotation
... 50
Utilisation d’un lec-
teur audio Bluetooth
Utilisation des touches de
l’écran tactile ....................................50
Lecture de l’écran ..................................51
Procédure de départ ..............................51
Sélection de fichiers dans la
liste des noms de fichiers ...............51
Lecture des fichiers dans un
ordre aléatoire ..................................51
Réglage d’une plage de
lecture répétée .................................51
Utilisation avec les boutons physiques
...51
Using the SiriusXM
®
satellite radio
SiriusXM satellite radio operations .....51
Abonnement au service Radio
Satellite SiriusXM ............................... 52
Utilisation des touches de
l’écran tactile ....................................52
Lecture de l’écran ..................................52
Procédure de départ ..............................53
Syntonisation manuelle ........................53
Sélection d’un canal préréglé
dans la liste des canaux préréglés
...53
Mémorisation des canaux de
radiodiffusion ...................................53
Sélection directe d’un canal SiriusXM
...53
Sélection d’un canal dans
une liste de tous les canaux ...........54
Sélection d’un canal dans la
liste de catégorie .............................54
Changement de la liste affichée ..........54
Utilisation de la fonction Replay™ .......54
Réglage de SiriusXM TuneStart™ ........54
Utilisation de TuneScan™ .....................54
Utilisation du balayage de la
catégorie ...........................................55
Utilisation de TuneMix™ .......................55
Vérification des informations
mises à jour sur le trafic
et sur les prévisions
météorologiques ..............................55
Enregistrement de la ville ......................... 55
Réglage du verrouillage parental ........55
Réglage du mot de passe ......................... 55
Verrouillage du canal ................................ 56
Utilisation de la fonction d’alertes
de contenu (comme les
alertes de chanson, les alertes
d’artiste et les alertes de matchs)
..........56
Mémorisation des contenus en cours ..... 56
Réglage du programme pour
lequel vous voulez être alerté .........56
Sélection d’équipes pour une
alerte de match ................................56
Réglage de la fonction des
favoris proposés ...............................56
Réglage de la notification de
mise à jour pour les favo-
ris proposés ......................................57
Utilisation de la fonction
SportsFlash™ ...................................57
Sélection d’équipes pour SportsFlash
....57
Restauration des réglages
SiriusXM par défaut ........................58
Mémorisation des informa-
tions de la chanson sur
un iPod (balisage iTunes) ...............58
Utilisation avec les boutons physiques
...58
Utilisation d’une source HDMI
Utilisation des touches de l’écran tactile
....58
Lecture de l’écran ..................................58
Procédure de départ ..............................58
Utilisation d’une source AUX
Utilisation des touches de
l’écran tactile ....................................59
Lecture de l’écran ..................................59
Procédure de départ ..............................59
Réglage du signal vidéo ........................59
Changement de l’écran de fonction ....59
Utilisation de l’entrée AV
Utilisation des touches de
l’écran tactile ....................................59
Lecture de l’écran ..................................60
Procédure de départ ..............................60
Réglage du signal vidéo ........................60
Utilisation de MIXTRAX
Touches de l’écran tactile .....................60
Sélection d’un élément pour
la lecture de chansons ....................60
Sélection de chansons à ne pas lire ....60
Définition de la plage de lecture. .........61
Réglage du modèle de clignotement
....61
Paramètres du système
Activation de la source audio
Bluetooth ..........................................61
Réglage du défilement continu ............61
Réglage de l’entrée AV ..........................61
Réglage de la caméra de rétrovisée ....62
Réglage d’activation de la
caméra de rétrovisée .......................... 62
Réglage de la polarité de la
caméra de rétrovisée .......................... 62
Réglage de l’affichage de
l’image inversée pour
l’image de rétrovisée ........................... 62
Réglage de la caméra pour le
mode Point de vue de la caméra ....62
Affichage des instructions
d’aide au stationnement .................63
Réglage des directives sur
l’image de rétrovisée .......................63
Réglage de l’entrée de la
deuxième caméra ............................63
Réglage d’activation de la
deuxième caméra ................................ 63
Réglage de l’image inversée
pour l’image d’entrée de la
deuxième caméra ................................ 64
Désactivation de l’écran de
démonstration ..................................64
Sélection de la langue du système ......64
Réglage de la langue du
clavier avec l’application
pour iPhone ......................................64
Réglage du bip sonore ..........................64
Réglage des positions de
réponse de l’écran tactile
(Étalonnage de l’écran tactile) .......64
Réglage de la fonction d’atté-
nuation de la luminosité .................65
Réglage d’activation ou non
de la fonction d’atténua-
tion de la luminosité ........................65
Réglage de la durée d’activa-
tion de la fonction d’atté-
nuation de la luminosité .................65
Réglage de l’image ................................65
Affichage de la version du
micrologiciel ....................................66
Mise à jour du micrologiciel .................66
Vérification des raccorde-
ments des câbles .............................66
Réglages sonores
Réglage de l’équilibre
avant-arrière et droite-gauche ........67
Réglage de l’équilibre sonore ..............67
Basculement entre mise en
sourdine et atténuation du son ......67
Ajustement des niveaux des sources
....67
Réglage du filtre .....................................68
Réglage de la sortie du haut-
parleur avant et arrière ....................... 68

5
Utilisation de la sortie pour
haut-parleur d’extrêmes graves......... 69
Sélection de la position d’écoute .........69
Réglage précis des niveaux
de sortie du haut-parleur ................69
Réglage de l’alignement temporel ......70
Utilisation de l’égaliseur .......................70
Rappel des courbes d’égalisation ........... 70
Personnalisation des courbes
d’égalisation ........................................ 71
Utilisation de l’égaliseur autoajusté ....... 71
Réglage automatique de la
courbe d’égalisation (Auto EQ) ......71
Avant d’utiliser la fonction Auto EQ ........ 71
Réalisation de la fonction Auto EQ ......... 71
Menu du Thème
Sélection d’un affichage
d’arrière-plan ....................................72
Remplacement par l’image d’ar-
rière-plan enregistrée sur le
périphérique de stockage
externe (USB, SD) ............................... 72
Réglage de la couleur d’éclairage .......73
Sélection de la couleur parmi
les couleurs prédéfinies ..................... 73
Création d’une couleur définie
par l’utilisateur .................................... 73
Sélection de la couleur de thème ........73
Sélection de l’image d’horloge ............73
Modification de l’écran de
démarrage préinstallé .....................73
Remplacement par l’écran de
démarrage enregistré sur le
périphérique de stockage
externe (USB, SD) ............................... 74
Duplication des réglages ......................74
Exportation des réglages “Thème” .......... 74
Importation des réglages “Thème” ......... 74
Configuration du lecteur vidéo
Réglage des langues prioritaires .........74
Réglage de la langue des sous-titres ...... 74
Réglage de la langue de l’audio............... 75
Réglage de la langue du menu ................ 75
Réglage de l’affichage de
l’icône d’angle ..................................75
Réglage du rapport de format ..............75
Réglage du verrouillage parental ........75
Réglage du numéro de code et
du niveau .............................................. 75
Affichage du code d’enregis-
trement de VOD DivX ......................76
Affichage du code de désen-
registrement de VOD DivX .............76
Lecture automatique de DVD ...............76
Réglage du signal vidéo de la
caméra de rétrovisée .......................76
Menu de favoris
Création d’un raccourci ........................77
Sélection d’un raccourci .......................77
Suppression d’un raccourci .................77
Opérations communes
Réglage de l’heure et de la date ...........77
Mémorisation des informa-
tions de la chanson sur
un iPod (balisage iTunes) ...............77
Réglage de la fonction
“Sound Retriever”............................78
Changement du mode écran large ......78
Autres fonctions
Sélection de la vidéo pour
l’écran arrière ...................................78
Paramétrage de la fonction antivol......79
Réglage du mot de passe ......................... 79
Saisie du mot de passe ............................. 79
Suppression du mot de passe .................. 79
Mot de passe oublié .................................. 79
Restauration des réglages
par défaut du produit ......................79
Restauration des réglages par défaut ..... 79
Précautions
Votre nouveau produit et ce manuel....80
Importantes mesures de sécurité ........80
Connexion
Précautions à prendre avant
de brancher le système ...................80
Avant d’installer ce produit ..................80
Pour éviter toute détérioration .............80
Remarque concernant le fil bleu/blanc .. 81
Branchement du cordon
d’alimentation ..................................82
Connexion à un amplificateur
de puissance vendu séparément ...83
Connexion d’un iPhone, iPod,
appareil Android ou appa-
reil MirrorLink™ ...............................83
Connexion d’un iPhone avec
connecteur Lightning ......................84
Connexion via le port USB ....................... 84
Connexion via le port HDMI ..................... 84
Connexion d’un iPhone avec
connecteur à 30 broches .................84
Connexion via l’entrée AUX ...................... 84
Connexion via l’entrée RGB ..................... 84
Connexion d’un périphérique
Android™ ..........................................84
Connexion d’un périphérique
Android via un port HDMI .................. 85
Connexion d’un périphérique
Android via un port MHL .................... 85
Connexion d’un appareil
Android ou MirrorLink™ .................85
Fixation du câble HDMI
®
haute vitesse ....................................85
Connexion d’une caméra de
rétrovisée ..........................................85
Connexion d’un élément
vidéo externe ....................................86
Utilisation de l’entrée AV .......................... 86
Utilisation d’une entrée AUX.................... 86
Connexion d’un périphérique HDMI ...86
Connexion de l’afficheur arrière ..........87
Utilisation d’un écran arrière
raccordé à la sortie vidéo arrière ....... 87
Installation
Précautions à prendre avant
l’installation......................................87
Avant de procéder à l’installation ........87
Installation de ce produit ......................87
Remarques sur l’installation .................... 87
Installation en utilisant les trous
de vis sur les côtés de ce produit ...... 87
Fixation de la façade ................................. 88
Installation du microphone ..................88
Installation sur le pare-soleil .................... 88
Installation sur la colonne de direction .. 88
Réglage de l’angle du microphone ......... 88
Annexe
Dépannage .............................................89
Messages d’erreur .................................90
Manipulation et entretien des
disques ..............................................94
Lecteur intégré et précautions ................. 94
Conditions ambiantes pour le disque ..... 94
Disques lisibles ......................................94
DVD-Vidéo et CD........................................ 94
Disques enregistrés en AVCHD ............... 94
Lecture de DualDisc .................................. 94
Dolby Digital .............................................. 95
Informations détaillées sur
les supports lisibles .........................95
Compatibilité.............................................. 95
Tableau de compatibilité des supports ... 96
Bluetooth ................................................98
Radio Satellite SiriusXM
®
.....................98
Technologie HD Radio™ .......................98
SDHC.......................................................98
WMA/WMV .............................................98
DivX .........................................................98
AAC ..........................................................98
Google, Google Play,
Android™ et Android Auto .............99
MirrorLink ...............................................99
MIXTRAX ................................................99
Informations détaillées
concernant les dispositifs
iPod connectés ................................99
iPod et iPhone ............................................ 99
Lightning .................................................... 99
App Store .................................................... 99
iOS ............................................................... 99
iTunes .......................................................... 99
iTunes Radio ............................................... 99
Utilisation de contenus
connectés via une application .......99
Pandora
®
..................................................... 99
Aha Radio ................................................... 99
HDMI .....................................................100
MHL .......................................................100
Avis concernant la visualisa-
tion de données vidéo ...................100
Avis concernant la visualisa-
tion de DVD-Vidéo .........................100
Avis concernant l’utilisation
de fichiers MP3 ..............................100
Avis concernant les licences
open source ....................................100
Utilisation correcte de l’écran LCD....100
Manipulation de l’écran LCD ................. 100
Écran à cristaux liquides (LCD) ............. 100
Entretien de l’écran LCD ......................... 100
Rétroéclairage par DEL (diode
électroluminescente) ........................ 100
Spécifications ......................................101
01
Chapitre
6
Fr
Précautions
Informations pour
l’utilisateur
Contient ID FCC : RKXFC6000TS
Contient ID IC : 5119A-FC6000TS
Le présent appareil est conforme aux la
partie 15 des règles de la FCC et CNR
d’Industrie Canada applicables aux
appareils radio exempts de licence.
L’exploitation est autorisée aux deux
conditions suivantes: (1) l’appareil ne
doit pas produire de brouillage, et (2)
l’utilisateur de l’appareil doit accepter
tout brouillage radioélectrique subi,
même si le brouillage est susceptible
d’en compromettre le fonctionnement.
L’antenne Bluetooth ne peut pas être
supprimé (ou remplacé) par l’utilisateur.
Cet équipement est conforme aux
limites d’exposition aux rayonnements
énoncées pour un environnement
non contrôlé et respecte les règles les
radioélectriques (RF) de la FCC lignes
directrices d’exposition et d’exposition
aux fréquences radioélectriques (RF)
CNR-102 de l’IC. Cet équipement émet
une énergie RF très faible qui est
considérée conforme sans évaluation
de l’exposition maximale autorisée.
Cependant, cet équipement doit être
installé et utilisé en gardant une dis-
tance de 20 cm ou plus entre le dispo-
sitif rayonnant et le corps (à l’exception
des extrémités : mains, poignets, pieds
et chevilles).
ATTENTION
Ce produit est classifié comme produit
laser de classe 1 selon la norme IEC 60825-
1:2007 “Sécurité des appareils à laser” et
contient un module laser de classe 1M.
Pour assurer une sécurité permanente,
n’enlevez aucun couvercle et n’essayez pas
d’accéder à l’intérieur du produit. Faites
effectuer l’entretien par du personnel
qualifié.
APPAREIL À LASER DE CLASSE 1
ATTENTION—ÉMISSIONS DE RADIATIONS LASER VISIBLES ET
INVISIBLES DE CLASSE 1M SI OUVERT. NE PAS OBSERVER
DIRECTEMENT AVEC DES INSTRUMENTS OPTIQUES.
■ La protection de votre ouïe est
entre vos mains
Pour assurer le rendement optimal de votre
matériel et – plus important encore – la
protection de votre ouïe, réglez le volume à
un niveau raisonnable. Pour ne pas altérer
votre sens de la perception, le son doit être
clair mais ne produire aucun vacarme et
être exempt de toute distorsion. Votre ouïe
peut vous jouer des tours. Avec le temps,
votre système auditif peut en effet s’adapter
à des volumes supérieurs, et ce qui vous
semble un « niveau de confort normal »
pourrait au contraire être excessif et contri-
buer à endommager votre ouïe de façon
permanente. Le réglage de votre matériel
à un volume sécuritaire AVANT que votre
ouïe s’adapte vous permettra de mieux vous
protéger.
■ CHOISISSEZ UN VOLUME
SÉCURITAIRE :
Réglez d’abord le volume à un niveau
inférieur.
Montez progressivement le volume
jusqu’à un niveau d’écoute confor-
table ; le son doit être clair et exempt de
distorsions.
Une fois que le son est à un niveau
confortable, ne touchez plus au bouton
du volume.
■ N’OUBLIEZ PAS DE RESPECTER
LES DIRECTIVES SUIVANTES :
Lorsque vous montez le volume,
assurez-vous de pouvoir quand même
entendre ce qui se passe autour de vous.
Faites très attention ou cessez temporai-
rement l’utilisation dans les situations
pouvant s’avérer dangereuses.
N’utilisez pas des écouteurs ou un
casque d’écoute lorsque vous opérez un
véhicule motorisé ; une telle utilisation
peut créer des dangers sur la route et est
illégale à de nombreux endroits.
Licence, exonération
de garantie et limite de
responsabilité
■ DISPOSITIONS EN MATIÈRE DE
SÉCURITÉ
■ Limitation de responsabilité
LES GARANTIES EXPRIMÉES DANS LA
GARANTIE LIMITÉE DE PIONEER SONT
LES SEULES GARANTIES FAITES PAR
PIONEER OU UN QUELCONQUE DE CES
CONCÉDANTS DE LICENCE, SELON LE
CAS. PIONEER ET SES CONCÉDANTS DE
LICENCE DÉCLINENT EXPRESSÉMENT
TOUTE AUTRE GARANTIE, EXPRESSE
OU IMPLICITE, Y COMPRIS ET SANS
LIMITATION, LES GARANTIES DE QUALITÉ
MARCHANDE ET D’ADÉQUATION À UN
USAGE PARTICULIER.
■ Limite de responsabilité
DANS TOUTE LA MESURE PERMISE
PAR LA LOI EN VIGUEUR, NI PIONEER
NI SES CONCÉDANTS DE LICENCE NE
SAURONT ÊTRE RESPONSABLES VIS-
À-VIS DE VOUS DE TOUS DOMMAGES
INDIRECTS, CONSÉCUTIFS, ACCESSOIRES,
PUNITIFS OU SPÉCIAUX, QUELQUE
SOIT LE FONDEMENT JURIDIQUE, QUE
CE SOIT SUR LE FONDEMENT DE SA
RESPONSABILITÉ CONTRACTUELLE OU
EXTRACONTRACTUELLE, Y COMPRIS LA
NÉGLIGENCE, MÊME SI CES PARTIES ONT
ÉTÉ AVERTIES DE LA POSSIBILITÉ DE TELS
DOMMAGES.
DANS TOUTE LA MESURE PERMISE
PAR LA LOI EN VIGUEUR, LA PLEINE
RESPONSABILITÉ DE PIONEER OU DE SES
CONCÉDANTS DE LICENCE DÉCOULANT
DE OU LIÉE À VOTRE UTILISATION
DES PRODUITS, Y COMPRIS, SANS
LIMITATION, LES RÉCLAMATIONS AU
TITRE DE LA GARANTIE OU QUELCONQUE
RÉCLAMATION POUR DES DOMMAGES
MATÉRIELS, LE DÉCÈS OU L’INVALIDITÉ,
INDÉPENDAMMENT DE L’INSTANCE
ET DU MOTIF JURIDIQUE INVOQUÉ,
CONTRACTUEL, RESPONSABILITÉ CIVILE
OU PÉNALE (Y COMPRIS NÉGLIGENCE),
DE LA RESPONSABILITÉ DU FAIT DES
PRODUITS OU DE TOUT AUTRE PRINCIPE
DE DROIT, NE SAURAIT DÉPASSER MILLE
DOLLARS (1 000 USD).
CERTAINES JURIDICTIONS N’AUTORISENT
PAS L’EXCLUSION DES DOMMAGES
OU LIMITE DE RESPONSABILITÉ, LES
LIMITATIONS ET EXCLUSIONS CI-DESSUS,
DANS LA MESURE OÙ ELLES SONT
INTERDITES PAR LA LOI EN VIGUEUR,
PEUVENT DONC NE PAS S’APPLIQUER
À VOUS. VOS DROITS SPÉCIFIQUES
PEUVENT VARIER D’UNE JURIDICTION À
L’AUTRE.
Consignes importantes de
sécurité
AVERTISSEMENT
N’essayez pas d’installer ou de faire
l’entretien de ce produit vous-même.
L’installation ou l’entretien de ce produit
par des personnes n’ayant aucune for-
mation ou expérience en matière d’équi-
pements électroniques et accessoires
automobiles peut être dangereux et peut
entraîner des risques d’électrocution, de
blessure ou autres.
Ce produit ne doit pas être en contact
avec des liquides pour éviter tout risque
d’électrocution. En outre, le contact avec
des liquides peut entraîner des dom-
mages, provoquer de la fumée et une
surchauffe de ce produit.

Français
01
Chapitre
7
Fr
Si un liquide ou une matière étrangère
pénétrait dans ce produit, garez votre
véhicule dans un endroit sûr, coupez le
contact (ACC OFF) immédiatement, puis
consultez votre revendeur ou le centre
de service Pioneer agréé le plus proche.
N’utilisez pas ce produit dans ces
conditions car cela pourrait entraîner
un incendie, un choc électrique ou une
autre défaillance.
Si vous remarquez de la fumée, un bruit
étrange ou une odeur venant de ce pro-
duit ou tout autre signe anormal venant
de l’écran LCD, coupez immédiatement
l’alimentation électrique et consultez
votre revendeur ou le centre de service
Pioneer agréé le plus proche. L’utilisation
de ce produit dans ces conditions
risque d’endommager définitivement le
système.
Ne désassemblez pas ou ne modifiez pas
ce produit au risque de subir une électro-
cution avec les composants haute ten-
sion qui le composent. Veuillez consulter
votre revendeur ou le service après-vente
Pioneer agréé le plus proche pour les
vérifications internes, les réglages ou les
réparations.
Avant d’utiliser ce produit, veuillez lire les
consignes de sécurité suivantes de manière
à bien les comprendre :
N’utilisez pas ce produit, n’importe quelle
application ou la caméra de rétrovisée en
option (le cas échéant) si celui-ci risque
d’une façon ou d’une autre de détourner
votre attention. Observez toujours les
règles de sécurité et respectez toujours
les réglementations de la circulation
routière en vigueur. Si vous éprouvez des
difficultés à utiliser ce produit ou à lire
l’écran, garez votre véhicule en lieu sûr et
serrez le frein à main avant d’effectuer les
réglages nécessaires.
N’élevez jamais le volume de ce produit
à un niveau tel que vous ne puissiez
pas entendre les bruits de la circulation
environnante et les véhicules d’urgence.
Pour plus de sécurité, certaines fonctions
sont désactivées tant que le véhicule
n’est pas à l’arrêt et/ou que le frein à
main n’est pas serré.
Conservez ce mode d’emploi à portée
de main afin de vous y référer pour
les modes de fonctionnement et les
consignes de sécurité.
N’installez pas ce produit à un endroit
où il risque (i) d’entraver la visibilité du
conducteur, (ii) d’altérer le fonctionne-
ment de certains systèmes de commande
ou dispositifs de sécurité du véhicule, y
compris les airbags ou les touches de
feux de détresse ou (iii) d’empêcher le
conducteur de conduire le véhicule en
toute sécurité.
Veillez à toujours attacher votre cein-
ture de sécurité sur la route. En cas
d’accident, le port de la ceinture peut
réduire considérablement la gravité des
blessures.
N’utilisez jamais de casques d’écoute
pendant la conduite.
Verrouillage par le frein à
main
Certaines fonctions (telles que la visualisa-
tion d’images vidéo et certaines opérations
des touches de l’écran tactile) offertes par
ce produit peuvent être dangereuses (sus-
ceptibles d’entraîner des blessures graves
voire mortelles) et/ou illégales si elles sont
utilisées pendant que vous conduisez. Pour
éviter que de telles fonctions soient utilisées
pendant que le véhicule est en déplacement,
un système de verrouillage détecte quand le
frein à main est serré et quand le véhicule
est en déplacement. Si vous essayez d’utili-
ser les fonctions décrites ci-dessus pendant
que vous conduisez, elles deviendront
indisponibles jusqu’à ce que vous arrêtiez le
véhicule dans un endroit sûr et que vous (1)
serriez le frein à main, (2) desserriez le frein
à main, puis (3) serriez de nouveau le frein
à main. Pensez à appuyer sur la pédale de
frein lorsque vous desserrez le frein à main.
■ Pour garantir une conduite en
toute sécurité
AVERTISSEMENT
LE FIL VERT CLAIR DU
CONNECTEUR D’ALIMENTATION
EST CONÇU POUR DÉTECTER
L’ÉTAT DE STATIONNEMENT
ET DOIT ÊTRE BRANCHÉ CÔTÉ
ALIMENTATION ÉLECTRIQUE
DU CONTACTEUR DE FREIN À
MAIN. UN RACCORDEMENT
INCORRECT OU UNE UTILISATION
INAPPROPRIÉE DE CE FIL PEUT
ENFREINDRE LA LOI EN VIGUEUR
ET RISQUE D’ENTRAÎNER DES
DOMMAGES CORPORELS OU
MATÉRIELS GRAVES.
N’essayez pas de modifier ou désac-
tiver le système de verrouillage du
frein à main, lequel est installé pour
votre protection. La modification
ou la désactivation du système de
verrouillage du frein à main peut
entraîner des blessures graves, voire
mortelles.
Pour éviter les risques de dommages ou
blessures et la violation éventuelle des
lois applicables, ce produit ne doit pas
être utilisé lorsqu’une image vidéo est
visible par le conducteur.
Dans certains pays, le fait de regarder
une Image vidéo sur un afficheur dans
une voiture est illégal, même s’il s’agit
d’autres personnes que le conducteur.
Lorsqu’il existe de telles règles, vous
devez vous y conformer.
Si vous essayez de regarder une image vidéo
tout en conduisant, l’avertissement “Il est
strictement interdit d’utiliser la source
vidéo du siège avant en roulant.” apparaî-
tra à l’écran. Pour regarder une image vidéo
sur l’afficheur, stationnez votre véhicule en
lieu sûr et serrez le frein à main. Veuillez
maintenir la pédale de frein enfoncée avant
de desserrer le frein à main.
Lors de l’utilisation d’un af-
cheur branché à la borne V
OUT
La borne de sortie vidéo (V OUT) est desti-
née au branchement d’un afficheur permet-
tant aux passagers arrière de regarder les
Images vidéo.
AVERTISSEMENT
N’installez JAMAIS l’écran arrière à un
endroit où le conducteur pourrait voir des
images vidéo pendant la conduite.
Pour éviter l’épuisement de la
batterie
Assurez-vous de faire tourner le moteur lors
de l’utilisation de cet appareil. Utiliser cet
appareil sans faire tourner le moniteur peut
décharger la batterie.
AVERTISSEMENT
N’installez pas ce produit dans des véhicules
qui ne possèdent pas de câble ACC ni de
circuit disponible.
Caméra de rétrovisée
Avec une caméra de rétrovisée en option,
vous pouvez utiliser ce produit pour sur-
veiller une caravane ou pour vous garer en
marche arrière dans un emplacement de
stationnement un peu étroit.
AVERTISSEMENT
L’IMAGE DE L’ÉCRAN PEUT PARAÎTRE
INVERSÉE.
UTILISEZ L’ENTRÉE UNIQUEMENT
POUR LA CAMÉRA DE RÉTROVISÉE
D’IMAGES RETOURNÉES OU
INVERSÉES. TOUTE AUTRE UTILISATION
POURRAIT ENTRAÎNER DES
BLESSURES OU DOMMAGES.
ATTENTION
Par mesures de sécurité, la fonction de
caméra de rétrovisée n’est pas dispo-
nible tant que ce produit n’est pas com-
plètement démarré.
Le mode de rétrovisée doit être utilisé
pour vous aider à surveiller une cara-
vane ou pour faire une marche arrière.
N’utilisez pas cette fonction dans un but
de divertissement.

01
Chapitre
8
Fr
Manipulation de la fente de la
carte SD
ATTENTION
Conservez la carte mémoire SD hors de
la portée des jeunes enfants pour éviter
qu’elle soit avalée accidentellement.
Pour éviter toute perte de données et tout
dommage du périphérique de stockage,
ne le retirez jamais de ce produit pen-
dant que des données sont en cours de
transfert.
Si une perte ou une altération des don-
nées se produit sur le périphérique de
stockage pour une raison ou une autre,
il n’est normalement pas possible de
récupérer les données. Pioneer ne peut
être tenu responsable de tout dommage,
coût ou dépenses découlant de la perte
ou de l’altération des données.
Ne jamais insérer ni éjecter de carte
mémoire SD tout en conduisant.
Manipulation du connecteur
USB
ATTENTION
Pour éviter toute perte de données et tout
dommage du périphérique de stockage,
ne le retirez jamais de ce produit pen-
dant que des données sont en cours de
transfert.
Pioneer ne saurait garantir la compa-
tibilité avec tous les périphériques de
stockage de masse USB et n’assume
aucune responsabilité en cas de pertes
des données contenues sur les lecteurs
multimédias, iPhone, smartphones ou
tout autre appareil lors de l’utilisation de
ce produit.
Problème de fonctionnement
Service après vente pour les produits
Pioneer
Veuillez contacter le revendeur ou le distri-
buteur auprès duquel vous avez acheté le
produit pour obtenir le service après vente
(y compris les conditions de la garantie) ou
d’autres informations. Dans le cas où les
informations souhaitées ne sont pas dispo-
nibles, veuillez contacter les compagnies
de la liste ci-dessous.
Veuillez ne pas envoyer votre produit direc-
tement aux compagnies dont l’adresse est
ci-dessous pour réparation avant d’avoir
pris contact avec elles.
— États-Unis
Pioneer Electronics (USA) Inc.
DIVISION DE SERVICE APRÈS VENTE
P.O. Box 1760 Long Beach, CA
90801-1760
800-421-1404
— CANADA
Pioneer Électroniques du Canada, Inc.
DÉPARTEMENT DE SATISFACTION DE
LA CLIENTÈLE
340 Ferrier Street, Unit 2, Markham,
Ontario L3R 2Z5, Canada
1-877-283-5901
905-479-4411
Pour les informations sur la garantie, veuil-
lez vous reporter à la carte de la garantie
limitée fournie avec votre produit.
Notre site web
Visitez notre site :
http://www.pioneerelectronics.com
Au Canada
http://www.pioneerelectronics.ca
1 Enregistrez votre produit.
2 Recevez des informations sur les produits
et les technologies les plus récentes.
3 Téléchargez des modes d’emploi, com-
mandez des catalogues de produits,
recherchez de nouveaux produits, etc.
4 Recevez une notification des mises à
niveau de logiciel et des mises à jour de
logiciel.
Protection du panneau et de
l’écran LCD
p N’exposez pas l’écran LCD aux rayons du
soleil lorsque ce produit n’est pas utilisé,
sous peine de provoquer un dysfonction-
nement de l’écran LCD en raison de la
hausse de la température.
p Lorsque vous utilisez un téléphone por-
table, maintenez l’antenne du portable
éloignée de l’écran LCD pour éviter la
perturbation de la vidéo sous la forme de
taches, de bandes colorées, etc.
p Pour empêcher l’écran LCD d’être
endommagé, touchez les touches de
l’écran tactile uniquement avec le doigt et
procédez délicatement.
Remarques sur la mémoire
interne
■ Avant de retirer la batterie du
véhicule
p Certains réglages et contenus enregistrés
ne sont pas réinitialisés.
■ Données faisant l’objet d’un
effacement
Les informations sont effacées si vous
débranchez le fil jaune de la batterie (ou
retirez la batterie).
p Certains réglages et contenus enregistrés
ne sont pas réinitialisés.
■ Réinitialisation du
microprocesseur
ATTENTION
Appuyez sur le bouton RESET pour rétablir
les réglages et contenus enregistrés d’usine.
p N’effectuez pas cette opération lorsqu’un
périphérique est connecté à ce produit.
p Certains réglages et contenus enregis-
trés ne sont pas réinitialisés.
Le microprocesseur doit être réinitialisé
dans les conditions suivantes :
Avant la première utilisation de ce produit
après son installation.
En cas d’anomalie de fonctionnement de
ce produit.
Si des problèmes de fonctionnement du
système surviennent.
1 Coupez le contact.
2 Appuyez sur le bouton RESET avec
la pointe d’un crayon ou autre objet
pointu.
Les réglages et contenus enregistrés d’usine
sont rétablis.
1
1 Bouton RESET
Quelques mots sur ce mode
d’emploi
Ce manuel présente des écrans réels
pour décrire les opérations. En fonction
du modèle utilisé, les écrans de certaines
unités peuvent toutefois être différentes de
celles présentées dans ce manuel.
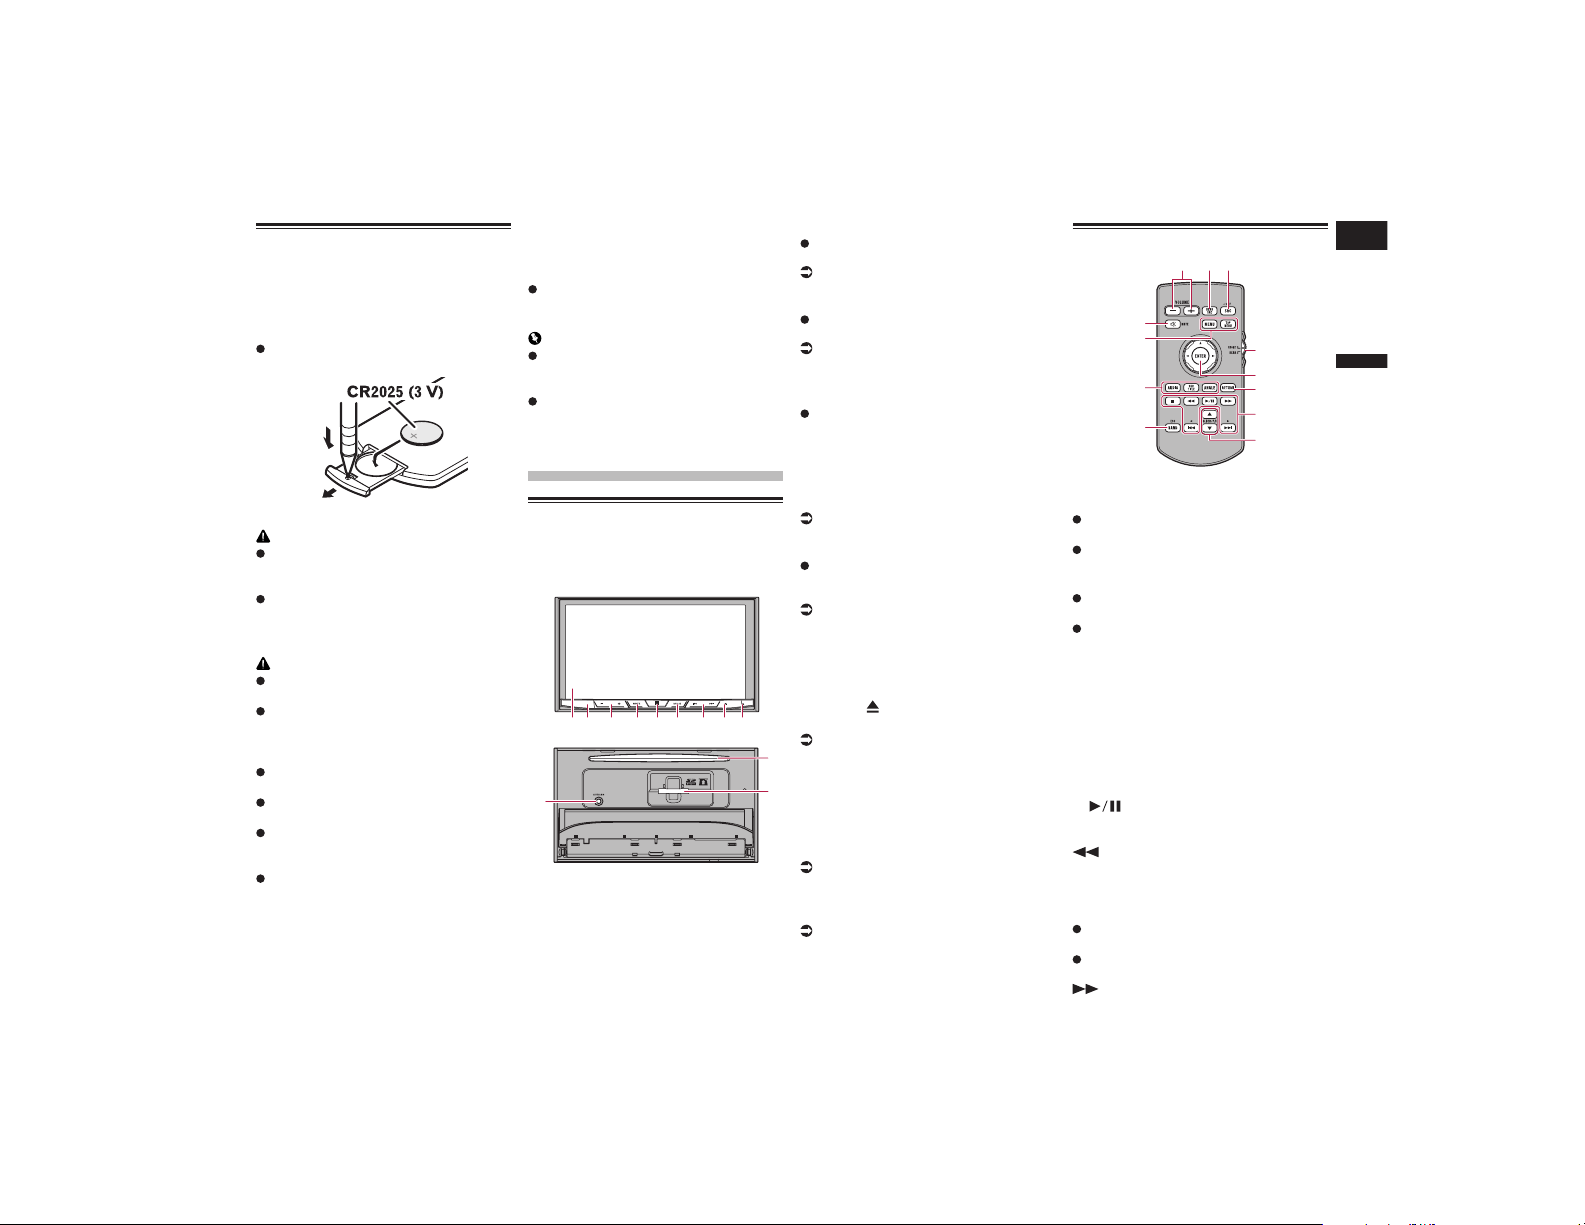
Français
02
Chapitre
9
Fr
Utilisation et soin de la
télécommande
■ Mise en place de la batterie
Retirez le panneau à l’arrière de la télécom-
mande et insérez la batterie en alignant
correctement les pôles plus (+) et moins (–).
Lors de la première utilisation, retirez le
film qui dépasse du porte-pile.
AVERTISSEMENT
Tenez la batterie hors de portée des
enfants. En cas d’ingestion de la batterie,
consultez immédiatement un médecin.
Les batteries (bloc batterie ou batteries
installés) ne doivent pas être exposées à
une chaleur excessive comme la lumière
directe du soleil, du feu ou similaire.
ATTENTION
Retirez la pile si la télécommande n’est
pas utilisée pendant un mois ou plus.
Il existe un risque d’explosion si la bat-
terie n’est pas correctement remplacée.
Remplacez-la uniquement par une batte-
rie du même type ou de type équivalent.
Ne manipulez pas la pile avec un outil
métallique.
Ne rangez pas la batterie avec des objets
métalliques.
En cas de fuite de la batterie, nettoyez
rigoureusement la télécommande et
installez une nouvelle batterie.
Lors de la mise au rebut de batteries
usagées, respectez les réglementations
gouvernementales ou règles des orga-
nismes environnementaux publics en
vigueur dans votre pays/région.
■ Utilisation de la télécommande
Pointez la télécommande dans la direc-
tion de la face avant de l’appareil à
télécommander.
La télécommande peut ne pas fonction-
ner correctement à la lumière directe du
soleil.
Important
Ne laissez pas la télécommande expo-
sée à des températures élevées ou à la
lumière directe du soleil.
Ne laissez pas la télécommande tomber
sur le plancher, où elle pourrait gêner le
bon fonctionnement de la pédale de frein
ou d’accélérateur.
Commandes de base
Vérication des noms des
composants et des fonctions
Ce chapitre fournit des informations sur
les noms des composants et les fonctions
principales en utilisant les boutons.
1 32 4
5
6 7 8 9
b
c
a
1 Écran LCD
2 Capteur de télécommande
3 Bouton VOL (+/–)
Appuyez sur ce bouton pour régler le volume
de la source AV (Audio et Vidéo).
4 Bouton MUTE
Appuyez pour couper le son. Appuyez de
nouveau pour rétablir le son.
5 Bouton HOME
Appuyez sur ce bouton pour afficher
l’écran du Menu principal.
Pour en savoir plus sur les opérations,
reportez-vous à la page 13, Comment
utiliser les écrans.
Maintenez enfoncé pour activer la fonc-
tion de reconnaissance vocale.
Pour en savoir plus, reportez-vous à la
page 20, Utilisation de la fonction de
reconnaissance vocale.
6 Bouton MODE
Appuyez sur ce bouton pour basculer
entre l’écran de l’application et l’écran
de Fonction AV.
p Si l’affichage ne bascule pas entre
l’écran de Fonction AV et l’écran de
l’application lorsque vous appuyez sur le
bouton MODE, l’affichage s’éteindra.
Pour en savoir plus sur les opérations,
reportez-vous à la page 13, Comment
utiliser les écrans.
Maintenez enfoncé pour désactiver l’affi-
chage lorsque l’écran de l’application est
disponible.
Pour en savoir plus, reportez-vous à la
page 12, Désactivation de l’affichage.
7 Bouton TRK
Appuyez sur ce bouton pour procéder à la
syntonisation manuelle, l’avance/retour
rapide et la recherche de pistes.
8 Bouton
9 Bouton RESET
Pour en savoir plus sur les opéra-
tions, reportez-vous à la page 8,
Réinitialisation du microprocesseur.
a Prise d’entrée de microphone Auto EQ
Utilisez-la pour connecter un microphone de
mesure acoustique (vendu séparément).
b Logement de chargement de disque
Insérez le disque à reproduire.
Pour en savoir plus, reportez-vous à la
page 11, Insertion et éjection d’un
disque.
c Fente de carte SD
Pour en savoir plus, reportez-vous à la
page 11, Insertion et éjection d’une
carte mémoire SD.
Télécommande
3
4
2
1
5
6
7
9
8
b
a
c
1 VOLUME (+/–)
2 REAR SRC
Appuyez pour parcourir toutes les
sources arrière disponibles.
Maintenez enfoncé pour désactiver la
source arrière.
3 SRC/OFF
Appuyez pour parcourir toutes les
sources avant disponibles.
Maintenez enfoncé pour désactiver la
source avant.
4 Sélecteur de mode source
Utilisez-le pour basculer le mode source
entre la source avant et la source arrière.
5 Pavé de rejet/acceptation
Utilisez-le pour sélectionner un menu dans
le menu du DVD.
6 RETURN
Retourne au point spécifié et lance la lecture
à partir de celui-ci.
7
Appuyez pour mettre en pause ou reprendre
la lecture.
Pour l’audio
Maintenez enfoncé pour effectuer un retour
rapide.
Pour la vidéo
Appuyez sur cette touche pour effectuer
un retour rapide.
Appuyez pour changer la vitesse du
retour rapide.
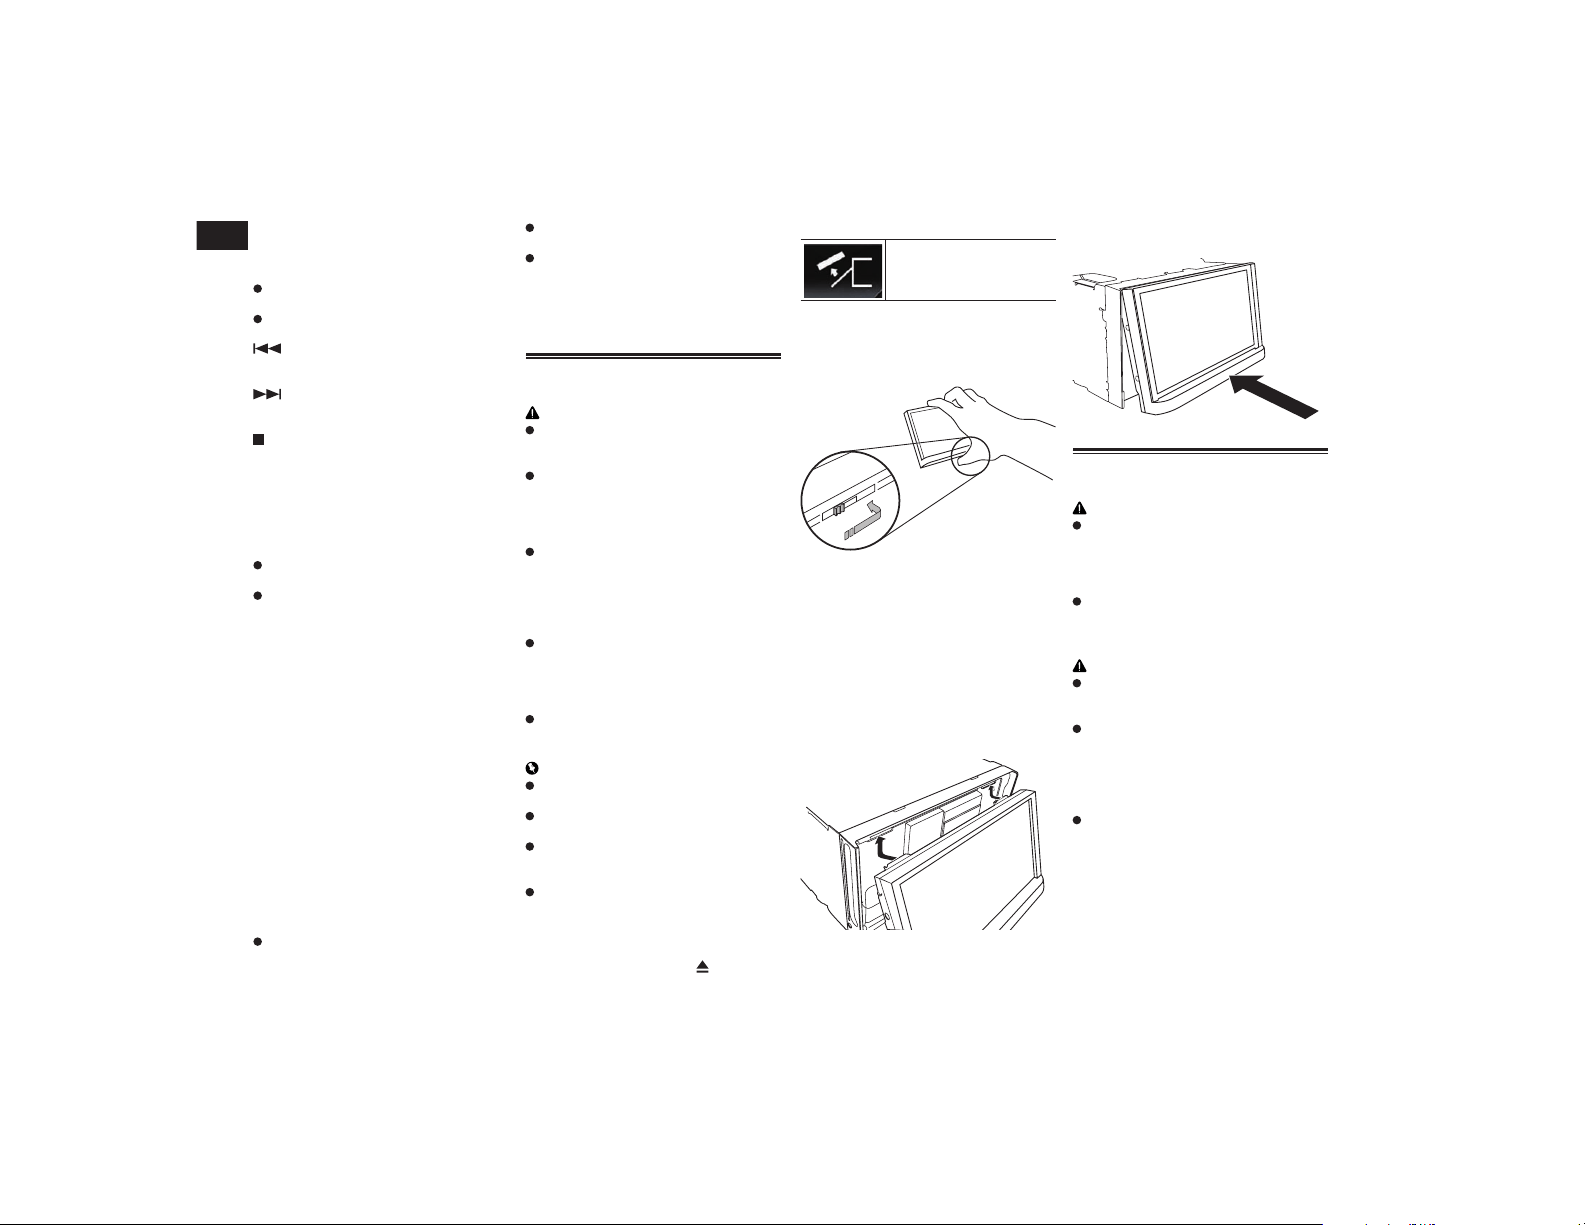
02
Chapitre
10
Fr
Pour l’audio
Maintenez enfoncé pour effectuer une
avance rapide.
Pour la vidéo
Appuyez sur cette touche pour effectuer
une avance rapide.
Appuyez pour changer la vitesse de
l’avance rapide.
Appuyez pour revenir à la piste (chapitre)
précédente.
Appuyez pour accéder à la piste (chapitre)
suivante.
Appuyez sur cette touche pour arrêter la
lecture.
Si vous reprenez la lecture, celle-ci démarre
à partir du point auquel vous vous étiez
arrêté. Touchez à nouveau la touche pour
arrêter complètement la lecture.
8 FOLDER/P.CH
Appuyez pour sélectionner le disque ou
dossier suivant ou précédent.
Appuyez pour rappeler des fréquences
de station de radio affectées à des
touches de canal préréglé.
9 MUTE
Appuyez pour couper le son. Appuyez de
nouveau pour rétablir le son.
a MENU
Appuyez sur cette touche pour afficher le
menu DVD pendant la lecture d’un DVD.
TOP MENU
Appuyez sur cette touche pour revenir au
menu principal pendant la lecture d’un DVD.
b AUDIO
Appuyez sur cette touche pour changer
la langue audio pendant la lecture d’un DVD.
SUBTITLE
Appuyez pour changer la langue des sous-
titres pendant la lecture d’un DVD.
ANGLE
Appuyez sur cette touche pour changer
l’angle de vue pendant la lecture d’un DVD.
c BAND/ESC
Appuyez pour sélectionner la bande de
syntonisation lorsque le syntoniseur est
sélectionné comme source.
Appuyez pour annuler le mode de com-
mande des fonctions.
Appuyez pour basculer entre les types
de fichiers multimédias lors de la lecture
des types de données suivants :
— Disque
— Périphérique de stockage externe (USB,
SD)
Protection de votre appareil
contre le vol
ATTENTION
N’essayez pas de détacher le panneau
avant alors que le disque/la carte SD est
en position d’éjection.
N’essayez pas de détacher le panneau
avant pendant l’écriture de données sur
le périphérique USB/la carte SD.
Ceci pour entraîner une corruption des
données.
Une fois le panneau avant détaché, la
plaque de fixation revient automatique-
ment à sa position d’origine.
Veillez à ne pas coincer vos mains ou
d’autres objets derrière le moniteur
pendant son déplacement.
Vérifiez que le panneau avant est bien
dans sa position d’origine lorsque le
véhicule se déplace.
Il est dangereux de conduire alors que le
panneau avant bouge.
Ne placez pas de boissons ou d’autres
objets au-dessus du panneau avant
lorsqu’il est totalement ouvert.
Important
Manipulez délicatement le panneau
avant lors de son retrait ou de sa fixation.
Évitez d’exposer le panneau avant à un
choc excessif.
Tenez le panneau avant à l’écart de la
lumière directe du soleil et des hautes
températures.
Si la face avant a été enlevée, remettez-la
sur l’appareil avant de démarrer votre
véhicule.
■ Retrait du panneau avant
1 Appuyez sur le bouton .
2 Touchez la touche suivante.
Le panneau avant glisse
automatiquement vers vous.
3 Faites glisser le pavé situé au bas
du panneau avant vers la droite,
puis relevez le panneau avant tout
en appuyant sur le pavé.
4 Placez le panneau avant dans
l’étui de protection fourni pour le
préserver.
■ Fixation du panneau avant
1 Faites glisser le panneau avant en
haut de l’unité et appuyez dessus
pour le mettre en place.
Faites glisser la pièce d’insertion située sur
le panneau avant dans la fente d’insertion
située en haut de l’unité et appuyez dessus
pour le mettre en place.
2 Appuyez sur le bas du panneau
avant jusqu’au déclic.
Remarques relatives à l’utili-
sation du panneau LCD
AVERTISSEMENT
Tenez les mains et les doigts à l’écart de
ce produit lorsque vous ouvrez, fermez
ou réglez le panneau LCD. Faites parti-
culièrement attention aux mains et aux
doigts des enfants.
N’utilisez pas l’appareil avec le panneau
LCD ouvert. Si le panneau LCD est
ouvert, ceci présente un risque de bles-
sure en cas d’accident.
ATTENTION
N’ouvrez ni ne fermez le panneau LCD
de force, sous peine de provoquer un
dysfonctionnement.
N’utilisez pas ce produit tant que le
panneau LCD n’est pas complètement
ouvert ou fermé. Si ce produit est utilisé
pendant l’ouverture ou la fermeture du
panneau LCD, il peut s’arrêter sur cet
angle par mesure de sécurité.
Ne posez ni verre ni canette sur le pan-
neau LCD ouvert sous peine de rompre
ce produit.
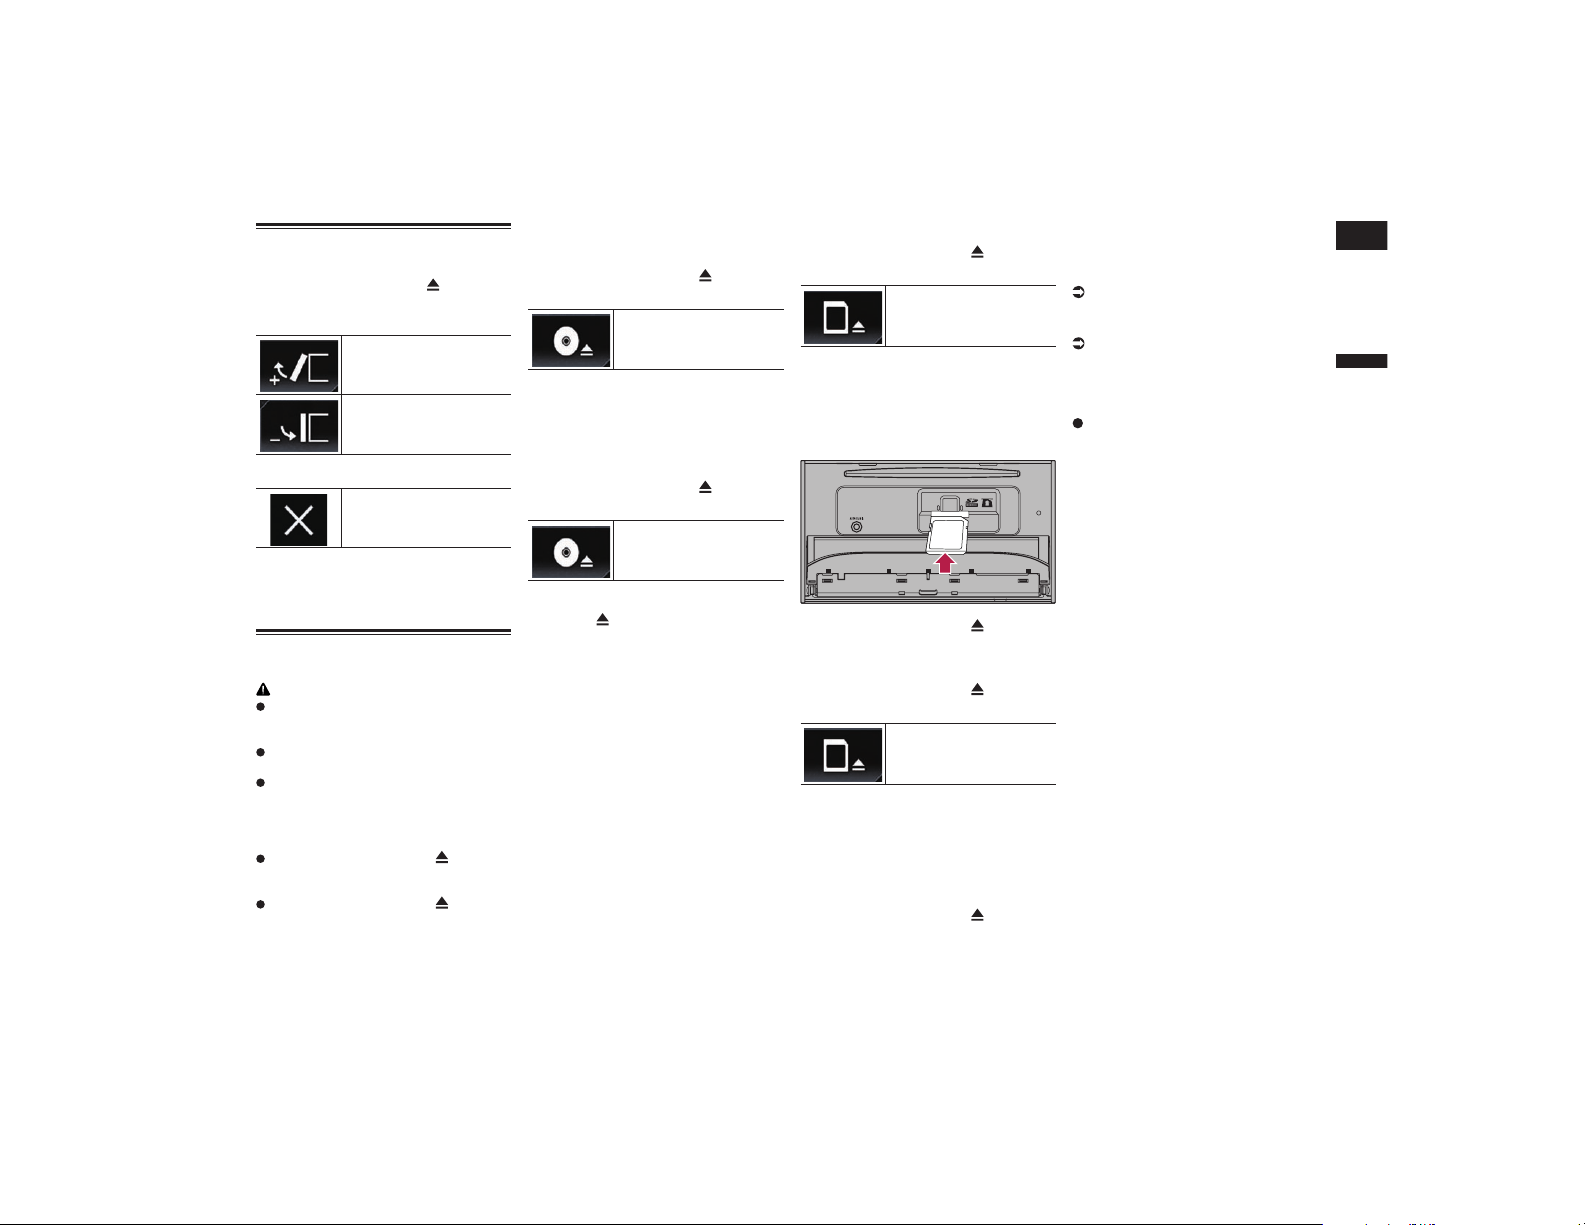
Français
02
Chapitre
11
Fr
Réglage de l’angle du pan-
neau LCD
1 Appuyez sur le bouton .
2 Touchez les touches suivantes pour
régler l’angle du panneau LCD.
En posant le panneau à
l’horizontale.
En remettant le panneau à la
verticale.
3 Touchez la touche suivante.
Retourne à l’écran
précédent.
p Le réglage de l’angle du panneau LCD est
mémorisé et celui-ci reviendra automa-
tiquement à cet angle la prochaine fois
que le panneau LCD est ouvert ou fermé.
Insertion/éjection/connexion
d’un support
ATTENTION
N’insérez aucun objet dans le logement
de chargement de disque autre qu’un
disque.
N’insérez aucun objet autre qu’une carte
mémoire SD dans la fente de carte SD.
Éjecter une carte mémoire SD pendant
le transfert de données peut endomma-
ger la carte mémoire SD. Assurez-vous
d’éjecter la carte mémoire SD à l’aide de
la procédure décrite dans ce manuel.
N’appuyez pas sur le bouton si la
carte mémoire SD n’est pas complète-
ment insérée sous peine de l’abîmer.
N’appuyez pas sur le bouton avant
que la carte mémoire SD soit complète-
ment retirée sous peine de l’abîmer.
■ Insertion et éjection d’un disque
Insérer un disque
1 Appuyez sur le bouton .
2 Touchez la touche suivante.
Ouvre le panneau LCD.
3 Insérez un disque dans le logement
de chargement de disque.
Le disque est chargé et le panneau LCD se
ferme.
Éjecter un disque
1 Appuyez sur le bouton .
2 Touchez la touche suivante.
Le panneau LCD s’ouvre et
le disque est éjecté.
3 Retirez le disque et appuyez sur le
bouton .
Le panneau LCD se ferme.
■ Insertion et éjection d’une carte
mémoire SD
p Le présent système n’est pas compatible
avec les cartes Multi Media Card (MMC).
p La compatibilité n’est pas garantie avec
toutes les cartes mémoire SD.
p Avec certaines cartes mémoire SD, il se
peut que ce produit n’atteigne pas sa
performance optimale.
Insertion d’une carte mémoire SD
1 Appuyez sur le bouton .
2 Touchez la touche suivante.
Ouvre le panneau LCD.
3 Insérez une carte mémoire SD dans
la fente de carte SD.
Insérez-la avec le côté comportant l’étiquette
vers le haut et poussez sur la carte jusqu’à
ce que vous entendiez un déclic et qu’elle
soit complètement verrouillée.
4 Appuyez sur le bouton .
Le panneau LCD se ferme.
Éjection d’une carte mémoire SD
1 Appuyez sur le bouton .
2 Touchez la touche suivante.
Ouvre le panneau LCD.
3 Appuyez délicatement au centre
de la carte mémoire SD jusqu’au
déclic.
La carte mémoire SD est éjectée.
4 Tirez tout droit sur la carte
mémoire SD pour la sortir.
5 Appuyez sur le bouton .
Le panneau LCD se ferme.
■ Connexion et déconnexion d’un
iPod
Connexion de votre iPod
Pour en savoir plus, reportez-vous à la
page 84, Connexion d’un iPhone avec
connecteur Lightning.
Pour en savoir plus, reportez-vous à la
page 84, Connexion d’un iPhone avec
connecteur à 30 broches.
Déconnexion de votre iPod
Débranchez les câbles après avoir
vérifié qu’aucune donnée n’est en
cours d’accès.
■ Branchement et débranchement
d’un périphérique de stockage
USB
p Avec certains périphériques de stockage
USB, il se peut que ce produit n’atteigne
pas sa performance optimale.
p Le raccordement via un concentrateur
USB n’est pas possible.
p Un câble USB est nécessaire pour la
connexion.
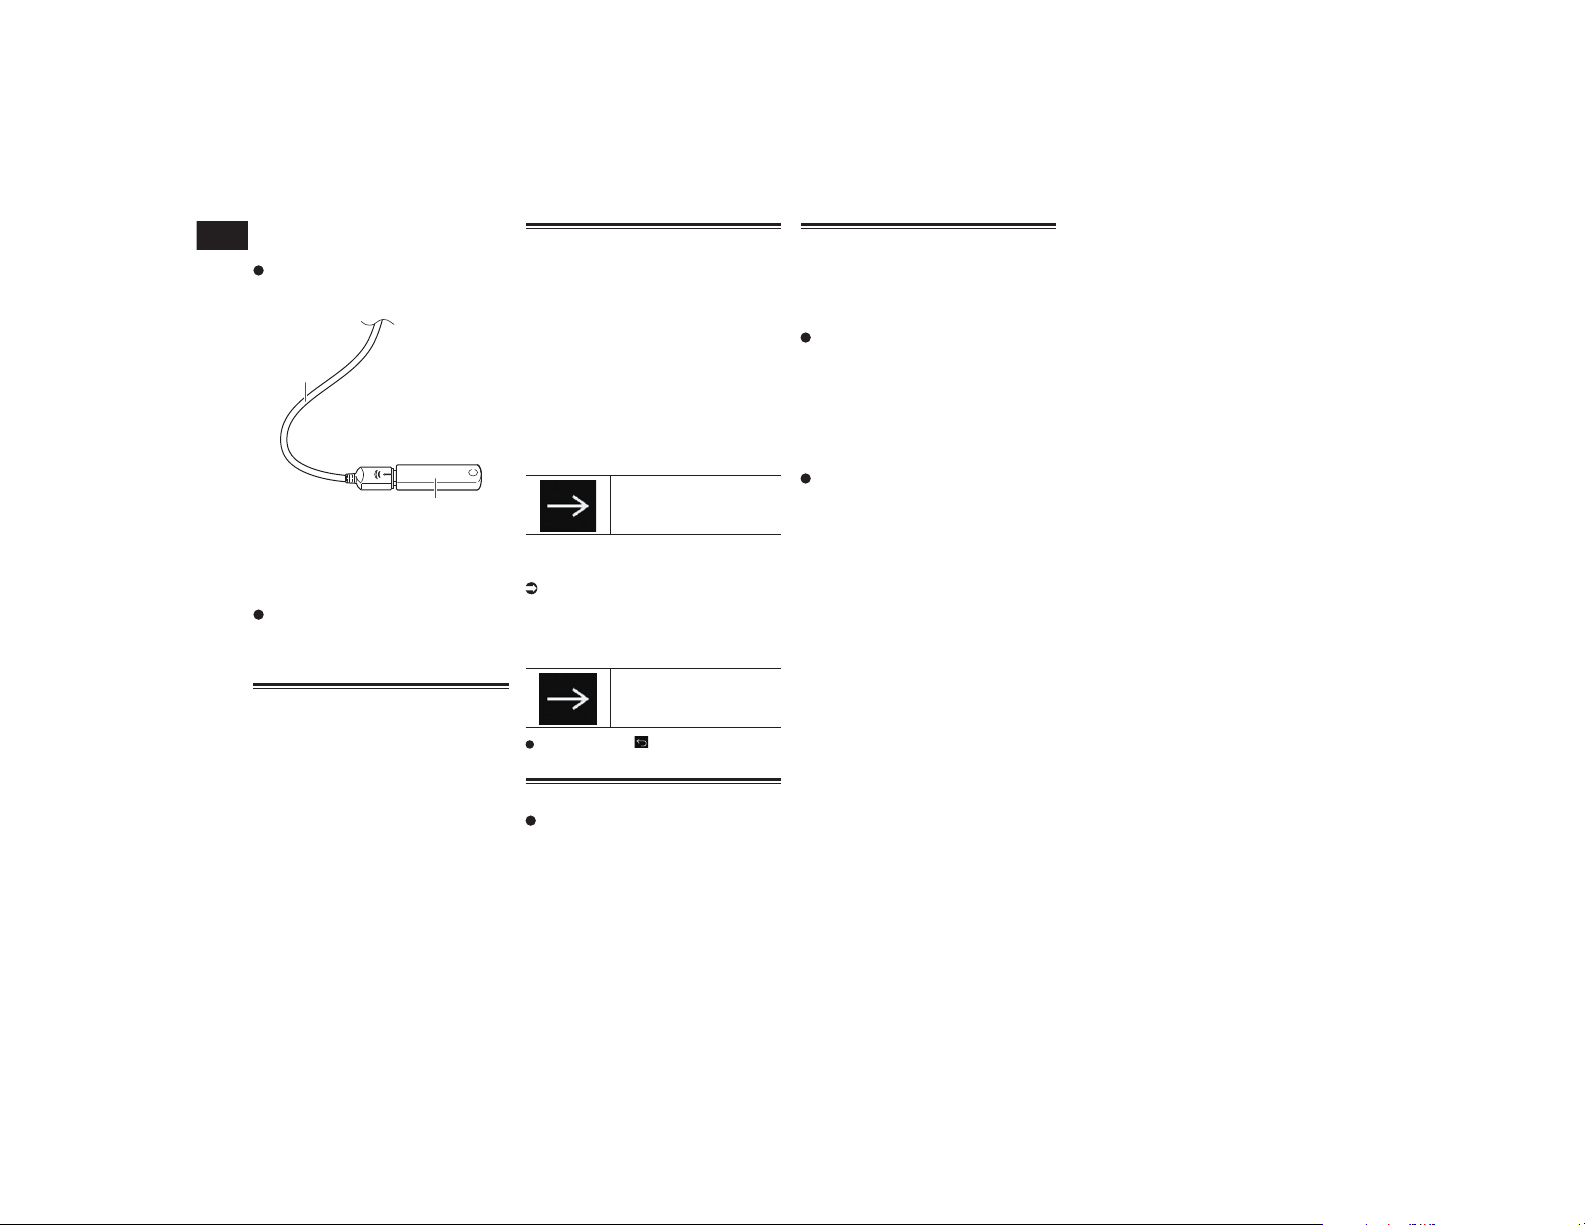
02
Chapitre
12
Fr
Branchement d’un périphérique
de stockage USB
Branchez un périphérique de stoc-
kage USB sur le câble USB.
2
1
1 Câble USB
2 Périphérique de stockage USB
Débranchement du périphérique
de stockage USB
Débranchez le périphérique de
stockage USB après avoir vérifié
qu’aucune donnée n’est en cours
d’accès.
Démarrage et terminaison
1 Allumez le moteur pour démarrer le
système.
Après une courte pause, l’écran de
démarrage apparaît l’espace de quelques
secondes.
2 Coupez le moteur du véhicule pour
éteindre le système.
Ce produit est également mis hors tension.
Lors du premier démarrage
Lorsque vous utilisez ce produit pour la
première fois, sélectionnez la langue que
vous souhaitez utiliser.
1 Allumez le moteur pour démarrer le
système.
Après une courte pause, l’écran de
démarrage apparaît l’espace de quelques
secondes.
L’écran “Select Program Language”
apparaît.
2 Touchez la langue que vous souhai-
tez utiliser sur l’écran.
3 Touchez la touche suivante.
Affiche l’écran “Config. tél.
intelligent”.
4 Touchez l’élément que vous sou-
haitez régler.
Pour en savoir plus, reportez-vous à la
page 22, Informations relatives aux
connexions et fonctions de chaque
appareil.
5 Touchez la touche suivante.
Affiche l’écran de Menu
principal.
Si vous touchez , l’affichage retourne à
l’écran précédent.
Démarrage ordinaire
Allumez le moteur pour démarrer le
système.
Après une courte pause, l’écran de
démarrage apparaît l’espace de quelques
secondes.
p L’écran affiché diffère en fonction des
conditions précédentes.
p Saisissez le mot de passe pour la fonction
antivol si l’écran de saisie du mot de
passe apparaît.
Désactivation de l’afchage
Vous pouvez désactiver l’affichage la nuit ou
si l’écran est trop lumineux.
■ Lorsque l’écran de l’application
est disponible
Maintenez enfoncé le bouton
MODE.
L’affichage est désactivé.
p Si vous touchez l’écran lorsque l’affi-
chage est désactivé, il revient à l’écran
initial.
■ Lorsque l’écran de l’application
n’est pas disponible
Appuyez sur le bouton MODE.
L’affichage est désactivé.
p Si vous touchez l’écran lorsque l’affi-
chage est désactivé, il revient à l’écran
initial.
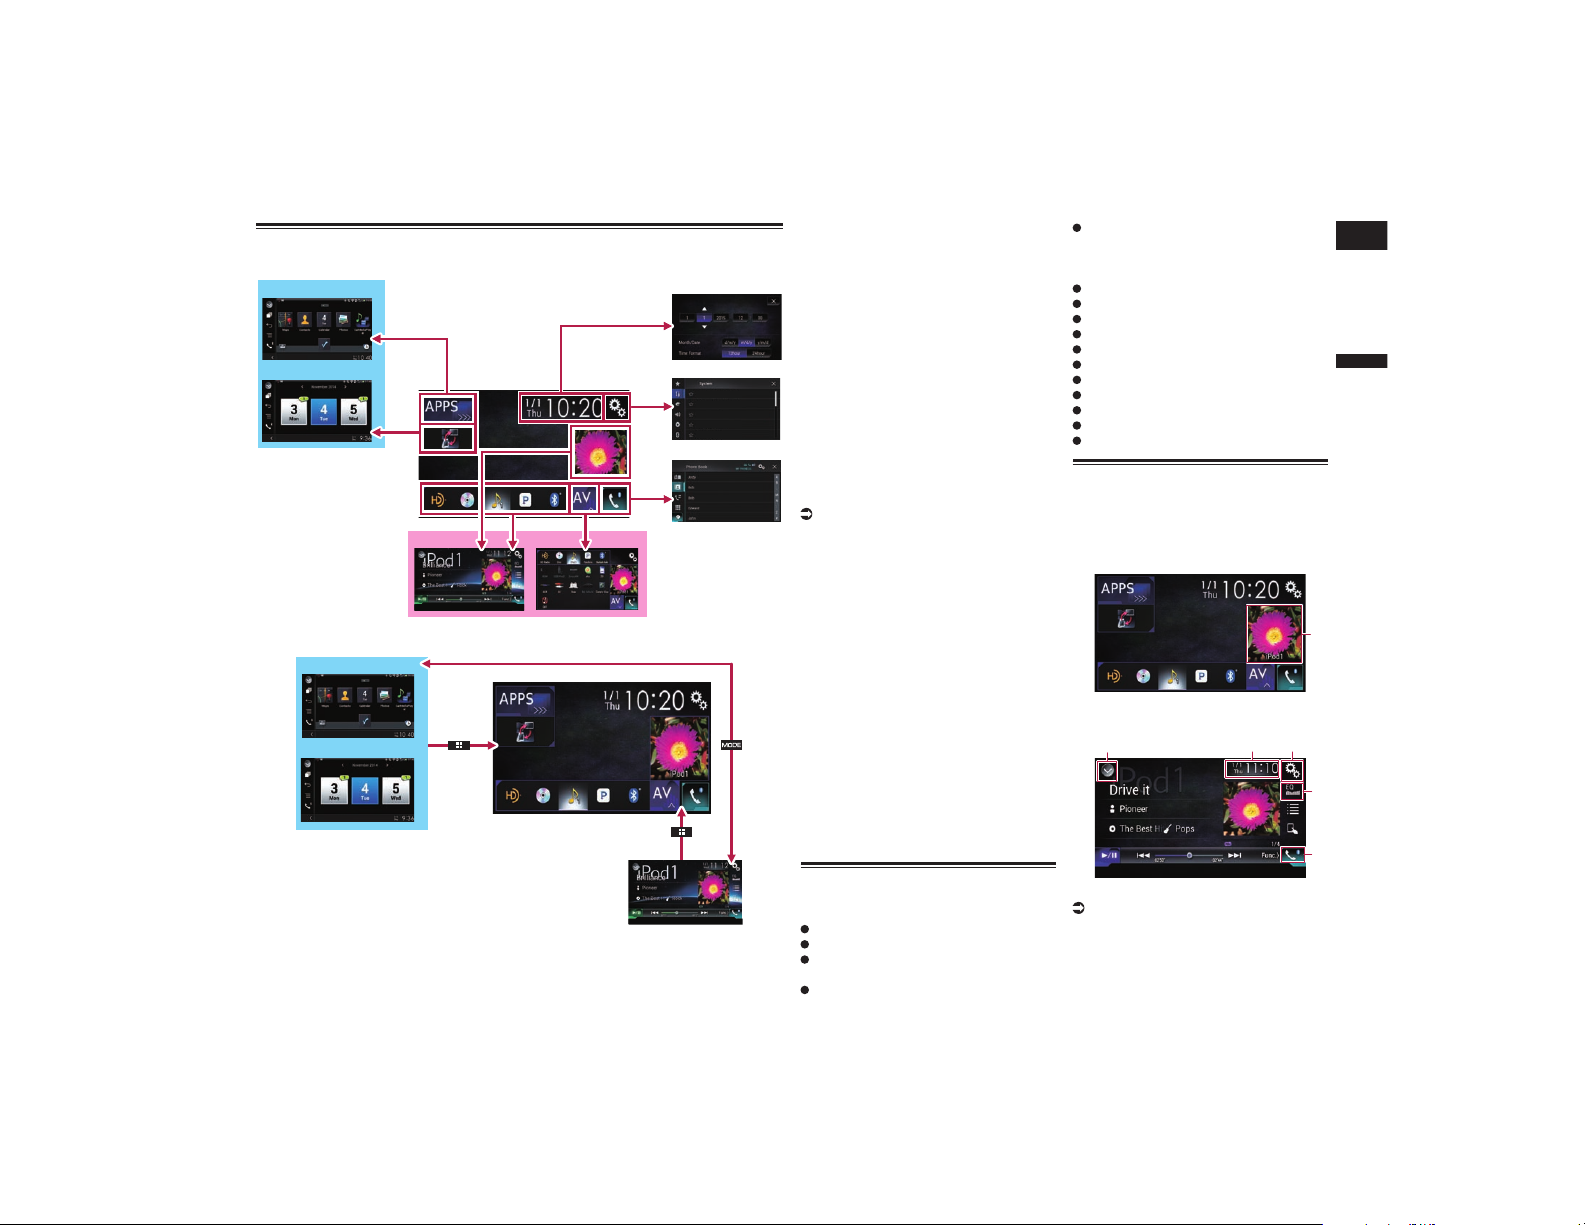
Français
02
Chapitre
13
Fr
Comment utiliser les écrans
■ Changement d’écran à l’aide des touches de l’écran tactile
1
2
3
4
7
8
9
5
6
■ Changement d’écran à l’aide des touches physiques
8
9
1
7
1 Écran de Menu principal
C’est le menu de démarrage permettant
d’accéder aux écrans souhaités et de com-
mander diverses fonctions.
p Si vous appuyez sur le bouton HOME,
l’écran de Menu principal s’affiche.
p “APPS” s’affiche lorsque AppRadio
Mode ou le mode MirrorLink est activé.
p “Android Auto” s’affiche lorsque
Android Auto est activé.
2 Écran de Réglage de l’heure et de la
date
Vous pouvez définir les réglages de l’heure
et de la date.
3 Écran de Paramètre
Vous pouvez personnaliser les réglages
système et audio, etc.
4 Écran de Menu téléphone
Vous pouvez accéder à l’écran relatif à la
téléphonie mains libres.
5 Écran de Sélection de source AV
Vous pouvez sélectionner la source AV.
6 Icônes sources favorites
Vous pouvez afficher les icônes des sources
fréquemment utilisées en faisant glisser les
icônes sur la zone d’affichage.
Pour en savoir plus sur les opéra-
tions, reportez-vous à la page 14,
Changement de l’ordre d’affichage des
icônes sources.
7 Écran de fonction AV
Vous pouvez faire fonctionner chaque
source.
8 Écran de commande de l’application
Vous pouvez commander les applications de
l’iPhone ou du smartphone directement sur
ce produit.
p Si aucune application n’est disponible,
l’écran de commande de l’application ne
s’affiche pas.
9 Écran de menu de l’application
Ce produit peut basculer sur le menu de
l’application, qui vous permet d’afficher et
d’utiliser l’application pour iPhone ou smart-
phone sur l’écran.
p Si aucun menu de l’application n’est
disponible, l’écran de menu de l’applica-
tion ne s’affiche pas.
Sources AV prises en charge
Vous pouvez lire ou utiliser les sources
suivantes avec ce produit.
HD Radio (tuner HD Radio™)
CD
ROM (fichiers audio ou vidéo
compressés)
DVD-Vidéo
CD vidéo
Les sources suivantes peuvent être lues
ou utilisées en raccordant un dispositif
auxiliaire.
USB
SD
iPod
Mon véhicule
Pandora
®
Aha Radio
Audio Bluetooth
Radio Satellite SiriusXM
®
Entrée AV (AV)
AUX
HDMI
Afchage de l’écran de fonc-
tion AV
1 Appuyez sur le bouton HOME pour
afficher l’écran de Menu principal.
2 Touchez la touche de fonction AV.
1
1 Touche de fonction AV
L’écran de fonction AV apparaît.
1 32
4
5
1 Affiche la liste de sources.
Pour en savoir plus, reportez-vous à la
page 14, Sélection d’une source avant
dans la liste de sources.
2 Affiche l’écran de Réglage de l’heure
et de la date.
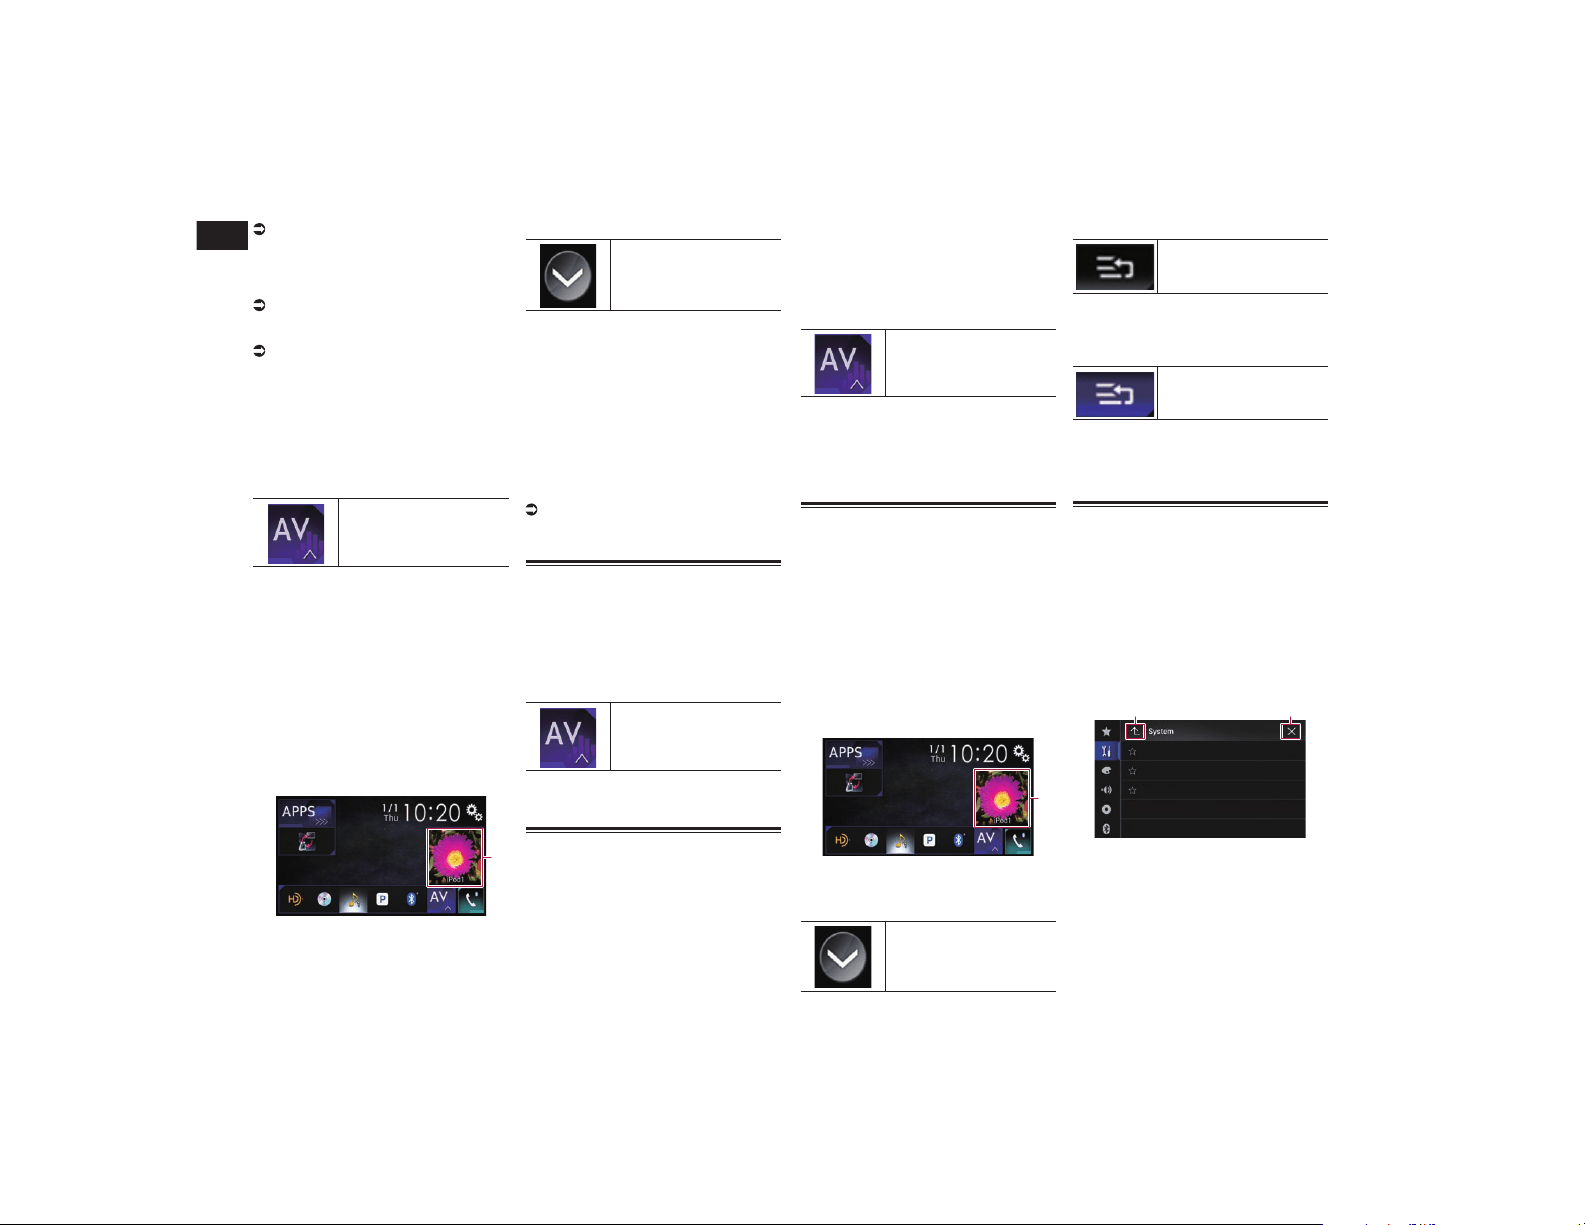
02
Chapitre
14
Fr
Pour en savoir plus, reportez-vous à la
page 77, Réglage de l’heure et de la
date.
3 Affiche l’écran de Paramètre.
4 Rappelle des courbes d’égalisation.
Pour en savoir plus, reportez-vous à la
page 70, Utilisation de l’égaliseur.
5 Affiche l’écran de Menu téléphone.
Pour en savoir plus, reportez-vous à la
page 18, Affichage du menu téléphone.
■ Sélection d’une source avant sur
l’écran de Sélection de source
AV
1 Appuyez sur le bouton HOME pour
afficher l’écran de Menu principal.
2 Touchez la touche suivante.
Affiche l’écran de Sélection
de source AV.
3 Touchez l’icône source que vous
souhaitez sélectionner.
L’écran de Fonction AV de la source sélec-
tionnée apparaît.
■ Sélection d’une source avant
dans la liste de sources
p Cette fonction n’est pas disponible pen-
dant un appel téléphonique à l’aide de ce
produit.
1 Appuyez sur le bouton HOME pour
afficher l’écran de Menu principal.
2 Touchez la touche de fonction AV.
1
1 Touche de fonction AV
L’écran de fonction AV apparaît.
3 Touchez la touche suivante.
Affiche la liste de sources.
4 Touchez la touche source que vous
souhaitez sélectionner.
L’écran de Fonction AV de la source sélec-
tionnée apparaît.
p “Camera View” est disponible unique-
ment lorsque “Entrée de la caméra ar.”
ou “2e entrée de caméra” est réglé sur
“Marche”.
■ Sélection d’une source arrière
Vous pouvez sélectionner une sortie de
source vers l’écran arrière.
Pour en savoir plus sur les opérations,
reportez-vous à la page 78, Sélection de
la vidéo pour l’écran arrière.
Mise hors tension de la source
AV
Mettez la source AV hors tension pour arrê-
ter la lecture ou capter la source AV.
1 Appuyez sur le bouton HOME pour
afficher l’écran de Menu principal.
2 Touchez la touche suivante.
Affiche l’écran de Sélection
de source AV.
3 Touchez [OFF].
La source AV est mise hors tension.
Changement de l’ordre d’af-
chage des icônes sources
Vous pouvez changer l’ordre d’affichage des
icônes sources dans l’écran de Sélection de
source AV.
p Ce réglage est disponible uniquement
lorsque vous arrêtez votre véhicule dans
un endroit sûr et serrez le frein à main.
p Cette fonction n’est pas disponible pen-
dant un appel téléphonique à l’aide de ce
produit.
1 Appuyez sur le bouton HOME pour
afficher l’écran de Menu principal.
2 Touchez la touche suivante.
Affiche l’écran de Sélection
de source AV.
3 Maintenez enfoncée une icône
source, puis faites glisser l’icône
vers la position souhaitée.
p Si l’icône source est déplacée, l’ordre de
la liste de sources est également changé.
Changement de l’ordre d’af-
chage des touches sources
Vous pouvez changer l’ordre d’affichage des
touches sources dans la liste de sources.
p Ce réglage est disponible uniquement
lorsque vous arrêtez votre véhicule dans
un endroit sûr et serrez le frein à main.
p Cette fonction n’est pas disponible pen-
dant un appel téléphonique à l’aide de ce
produit.
1 Appuyez sur le bouton HOME pour
afficher l’écran de Menu principal.
2 Touchez la touche de fonction AV.
1
1 Touche de fonction AV
L’écran de fonction AV apparaît.
3 Touchez la touche suivante.
Affiche la liste de sources.
4 Touchez la touche suivante.
Les touches sources
peuvent être déplacées.
5 Faites glisser la touche source vers
la position souhaitée.
6 Touchez la touche suivante.
Retourne à l’écran
précédent.
p Si la touche source est déplacée, les
icônes sources affichées dans l’écran de
Menu principal et l’écran de Sélection de
source AV sont également déplacées.
Utilisation de l’écran tactile
Vous pouvez commander ce produit en tou-
chant les symboles et éléments (touches de
l’écran tactile) affichés à l’écran directement
avec les doigts.
p Pour empêcher l’écran LCD d’être
endommagé, touchez les touches de
l’écran tactile uniquement avec le doigt et
procédez délicatement.
■ Utilisation des touches cou-
rantes de l’écran tactile
1 2
1 Retourne à l’écran précédent.
2 Ferme l’écran.
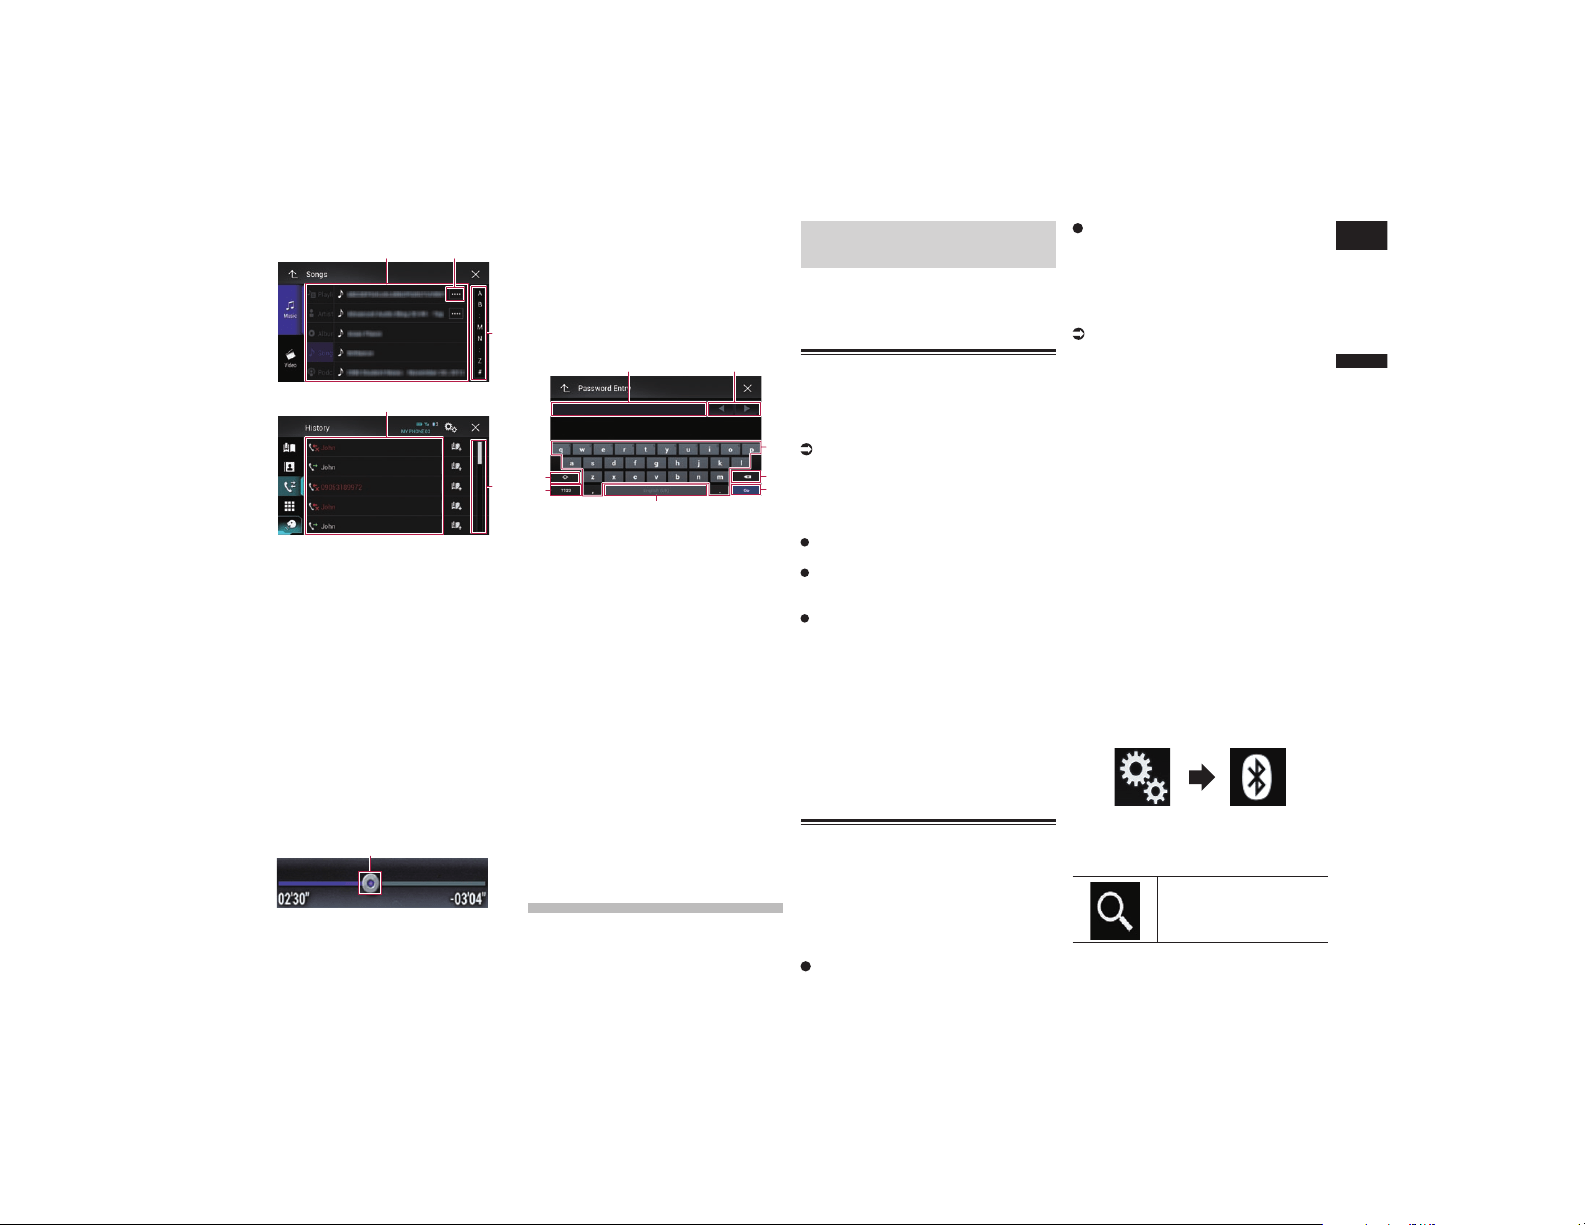
Français
03
Chapitre
15
Fr
■ Utilisation des écrans de liste
3
1
2
3
1
1 Toucher un élément sur la liste permet de
sélectionner l’élément ou de réduire le
nombre d’options.
2 Apparaît lorsque tous les caractères
ne sont pas affichés dans la zone
d’affichage.
Si vous touchez la touche, les caractères
restants sont défilés pour affichage.
3 Apparaît lorsque des éléments ne
peuvent pas être affichés sur une seule
page.
Faites glisser la barre d’effacement pour
afficher des éléments masqués.
Vous pouvez également faire glisser la
liste pour afficher des éléments masqués.
■ Utilisation de la barre
temporelle
1
1 Vous pouvez changer le point de lecture
en faisant glisser la touche.
p L’heure de lecture correspondant à la
position de la touche s’affiche pendant le
glissement de la touche.
p Cette fonction n’est pas disponible
lorsque vous utilisez une fonction d’iPod
avec un iPhone 6 Plus, iPhone 6, iPhone
5s, iPhone 5c, iPhone 5 ou iPod touch (5e
génération).
p Cette fonction n’est pas disponible pour
certains supports ou sources.
■ Utilisation du clavier sur l’écran
6
5
4
3
8
7
21
1 Affiche les caractères que vous avez
entrés. S’il n’y a pas de texte dans la zone,
un texte d’information apparaît à la place.
2 Déplace le curseur vers la droite ou la
gauche du même nombre de caractères
que le nombre de tapotements.
3 Saisit les caractères dans la zone de
texte.
4 Supprime le texte saisi à gauche du
curseur lettre par lettre. Si vous continuez
de toucher la touche, le reste du texte est
également supprimé.
5 Confirme l’entrée et passe à l’étape
suivante.
6 Saisit un espace.
Un espace équivalent au nombre de
touchers est inséré.
7 Bascule entre l’alphabet et les nombres/
symboles.
8 Bascule entre les lettres majuscules et
les lettres minuscules.
Enregistrement et rac-
cordement d’un péri-
phérique Bluetooth
Si vos périphériques intègrent la technologie
Bluetooth
®
, ce produit peut être connecté
sans fil à vos périphériques. Cette section
explique comment configurer la connexion
Bluetooth.
Pour en savoir plus sur la connectivité avec
les périphériques intégrant la technologie
sans fil Bluetooth, visitez notre site Web.
p Le menu “Bluetooth” est disponible
uniquement lorsque vous arrêtez votre
véhicule dans un endroit sûr et serrez le
frein à main.
Préparation des dispositifs de
communication
Ce produit est équipé d’une fonction qui
permet d’utiliser des périphériques intégrant
la technologie sans fil Bluetooth.
Pour en savoir plus, reportez-vous à la
page 21, Remarques pour la téléphonie
mains libres.
Vous pouvez enregistrer et utiliser les péri-
phériques présentant les profils suivants
avec ce produit.
HFP (Hands-Free Profile, Profil mains
libres)
A2DP (Advanced Audio Distribution
Profile, Profil de distribution audio
avancée)
SPP (Serial Port Profile, Profil de port
série)
p Lorsque le produit est éteint, la connexion
Bluetooth est également désactivée.
Lorsque le système redémarre, il essaie
automatiquement de reconnecter le
périphérique préalablement connecté.
Même lorsque la connexion est interrom-
pue pour une raison ou pour une autre,
le système reconnecte automatique-
ment le périphérique spécifié (sauf si la
connexion a été interrompue suite à une
opération sur le périphérique).
Enregistrement de vos péri-
phériques Bluetooth
Vous devez enregistrer vos périphériques
intégrant la technologie sans fil Bluetooth
lors de la première connexion à ce produit.
Un total de trois périphériques peut être
enregistré. Deux méthodes d’enregistrement
sont disponibles :
Recherche des périphériques Bluetooth à
proximité
Appariement depuis vos périphériques
Bluetooth
p Si trois périphériques sont déjà appariés,
“Mémoire pleine” s’affiche et l’apparie-
ment ne peut pas être réalisé. Dans ces
cas, supprimez tout d’abord un périphé-
rique apparié.
Pour en savoir plus, reportez-vous à la
page 16, Suppression d’un périphé-
rique enregistré.
■ Recherche des périphériques
Bluetooth à proximité
Le système recherche les périphériques
Bluetooth disponibles à proximité du pro-
duit, les affiche dans une liste et les enre-
gistre pour la connexion.
p Si le périphérique est déjà connecté, cette
fonction est inactive.
1 Activez la technologie sans fil
Bluetooth sur vos périphériques.
p Sur certains périphériques Bluetooth,
aucune action spécifique n’est néces-
saire pour activer la technologie sans
fil Bluetooth. Pour en savoir plus, repor-
tez-vous au manuel d’utilisation de vos
périphériques.
p Réglez l’appareil pour qu’il soit visible par
les autres périphériques.
2 Appuyez sur le bouton HOME pour
afficher l’écran de Menu principal.
3 Touchez les touches suivantes
dans l’ordre indiqué.
L’écran “Bluetooth” apparaît.
4 Touchez [Connexion].
5 Touchez la touche suivante.
La recherche démarre.
Le système recherche des périphériques
Bluetooth en attente de connexion et affiche
dans une liste les périphériques trouvés.
03
Chapitre
16
Fr
p Un maximum de 20 périphériques sont
énumérés dans la liste dans l’ordre où ils
ont été trouvés.
6 Attendez que votre périphérique
Bluetooth apparaisse dans la liste.
p Si vous ne parvenez pas à trouver le
périphérique Bluetooth que vous souhai-
tez connecter, vérifiez qu’il est en attente
de connexion de la technologie sans fil
Bluetooth.
7 Touchez le nom du périphérique
Bluetooth que vous souhaitez
enregistrer.
“Couplage en cours... veuillez patien-
ter.” s’affiche pendant la connexion. Si la
connexion est établie, “Couplage réussi.”
s’affiche.
p Si votre périphérique prend en charge
SSP (Secure Simple Pairing, appariement
simple et sécurisé), un nombre de six
chiffres apparaît sur l’affichage de ce
produit. Touchez [Oui] pour apparier le
périphérique.
p En cas d’échec de la connexion, “Erreur”
s’affiche. Dans ce cas, réessayez depuis
le début.
p Le code PIN est réglé par défaut sur
“0000” mais peut être modifié.
Pour en savoir plus, reportez-vous à la
page 17, Saisie du code PIN pour la
connexion sans fil Bluetooth.
p Une fois la connexion établie, le nom du
périphérique s’affiche. Touchez le nom du
périphérique pour le déconnecter.
Une fois le périphérique correctement enre-
gistré, une connexion Bluetooth est établie à
partir du système.
Les icônes de profil affichées sur l’écran de
liste de périphériques enregistrés s’éclairent
comme suit.
S’éclaire lorsque votre
périphérique mobile est
correctement connecté avec
HFP (Hands-Free Profile,
Profil mains libres).
S’éclaire lorsque votre
périphérique audio est
correctement connecté avec
A2DP (Advanced Audio
Distribution Profile, Profil de
distribution audio avancée)/
AVRCP (Audio/Video Remote
Control Profile, Profil de
commande audio/vidéo à
distance).
S’éclaire lorsque la
connexion Bluetooth est
établie avec SPP (Serial Port
Profile, Profil de port série).
p Après l’appariement, l’annuaire enregis-
tré dans le périphérique peut automati-
quement être transmis à ce produit.
Si vous touchez la touche suivante, vous
pouvez changer l’écran entre les noms
des périphériques et les adresses des
périphériques Bluetooth.
Bascule entre les noms
des périphériques et les
adresses des périphériques
Bluetooth.
■ Appariement depuis vos péri-
phériques Bluetooth
Vous pouvez enregistrer un périphérique
Bluetooth en mettant ce produit en mode
de veille et en demandant une connexion au
périphérique Bluetooth.
p Avant l’enregistrement, vérifiez que
“Visibilité” dans le menu “Bluetooth”
est réglé sur “Marche”.
Pour en savoir plus, reportez-vous à la
page 17, Changement de visibilité.
1 Activez la technologie sans fil
Bluetooth sur vos périphériques.
p Sur certains périphériques Bluetooth,
aucune action spécifique n’est néces-
saire pour activer la technologie sans
fil Bluetooth. Pour en savoir plus, repor-
tez-vous au manuel d’utilisation de vos
périphériques.
2 Utilisez le réglage Bluetooth du
périphérique pour apparier ce
produit au périphérique.
p Si la saisie d’un code PIN est requise,
entrez un code PIN. (Le code PIN par
défaut est “0000”.)
Une fois le périphérique enregistré avec
succès, les réglages de connexion sont
effectués depuis le périphérique.
p En cas d’échec de l’enregistrement,
recommencez depuis le début.
■ Connexion automatique à un
périphérique Bluetooth
Si cette fonction est activée, une connexion
entre votre périphérique Bluetooth et ce
produit est automatiquement établie dès
que les deux périphériques ne sont éloignés
que de quelques mètres.
Au démarrage, cette fonction est activée.
p Si cette fonction est activée, une
connexion avec le dernier périphérique
Bluetooth connecté sera établie automa-
tiquement lorsque le contact est allumé.
1 Appuyez sur le bouton HOME pour
afficher l’écran de Menu principal.
2 Touchez les touches suivantes
dans l’ordre indiqué.
L’écran “Bluetooth” apparaît.
3 Touchez à plusieurs reprises
[Connexion automatique] jusqu’à
ce que le réglage souhaité
apparaisse.
Marche (par défaut) :
Active la connexion automatique.
Arrêt :
Désactive la connexion automatique.
Si votre périphérique Bluetooth est prêt
pour une connexion sans fil Bluetooth,
une connexion à ce produit est établie
automatiquement.
En cas d’échec de la connexion, “Échec de
la connexion automatique Souhaitez-
vous réessayer?” apparaît.
Touchez [Oui] pour reconnecter.
■ Suppression d’un périphérique
enregistré
Lorsque vous avez déjà enregistré trois
périphériques Bluetooth et que vous souhai-
tez en ajouter un autre, il est nécessaire de
commencer par supprimer l’un des périphé-
riques enregistrés.
p Lorsqu’un téléphone enregistré est sup-
primé, toutes les entrées de l’annuaire et
le journal des appels correspondants sont
également effacés.
ATTENTION
Ne mettez jamais ce produit hors tension
pendant la suppression du périphérique
Bluetooth apparié.
1 Appuyez sur le bouton HOME pour
afficher l’écran de Menu principal.
2 Touchez les touches suivantes
dans l’ordre indiqué.
L’écran “Bluetooth” apparaît.
3 Touchez [Connexion].
4 Touchez la touche suivante.
Supprime un périphérique
apparié.
Un message de confirmation apparaît.
5 Touchez [Oui].
Le périphérique est supprimé.
Connexion manuelle d’un
périphérique Bluetooth
enregistré
Connectez le périphérique Bluetooth
manuellement dans les cas suivants :
Deux périphériques Bluetooth ou plus
sont enregistrés et vous souhaitez sélec-
tionner manuellement le périphérique à
utiliser.
Vous souhaitez reconnecter un périphé-
rique Bluetooth déconnecté.
Français
04
Chapitre
17
Fr
La connexion ne peut être établie automa-
tiquement pour une raison ou pour une
autre.
Pour lancer la connexion manuellement,
suivez la procédure suivante.
1 Activez la technologie sans fil
Bluetooth sur vos périphériques.
p Sur certains périphériques Bluetooth,
aucune action spécifique n’est néces-
saire pour activer la technologie sans
fil Bluetooth. Pour en savoir plus, repor-
tez-vous au manuel d’utilisation de vos
périphériques.
2 Appuyez sur le bouton HOME pour
afficher l’écran de Menu principal.
3 Touchez les touches suivantes
dans l’ordre indiqué.
L’écran “Bluetooth” apparaît.
4 Touchez [Connexion].
5 Touchez le nom du périphérique
que vous souhaitez connecter.
Changement de visibilité
Cette fonction définit si ce produit est visible
ou non par les autres périphériques.
Au démarrage, cette fonction est activée.
1 Appuyez sur le bouton HOME pour
afficher l’écran de Menu principal.
2 Touchez les touches suivantes
dans l’ordre indiqué.
L’écran “Bluetooth” apparaît.
3 Touchez à plusieurs reprises
[Visibilité] jusqu’à ce que le
réglage souhaité apparaisse.
Marche (par défaut) :
Active la visibilité.
Arrêt :
Désactive la visibilité.
Saisie du code PIN pour la
connexion sans l Bluetooth
Pour connecter votre périphérique Bluetooth
à ce produit via la technologie sans fil
Bluetooth, vous devez saisir un code PIN sur
votre périphérique Bluetooth afin de vérifier
la connexion.
p Le code par défaut est “0000” mais
vous pouvez le modifier à l’aide de cette
fonction.
1 Appuyez sur le bouton HOME pour
afficher l’écran de Menu principal.
2 Touchez les touches suivantes
dans l’ordre indiqué.
L’écran “Bluetooth” apparaît.
3 Touchez [Saisie du code NIP].
L’écran “Code NIP” apparaît.
4 Touchez [0] à [9] pour saisir le code
PIN (jusqu’à 8 chiffres).
5 Touchez la touche suivante.
Enregistre le code PIN dans
ce produit.
Afchage de l’adresse
Bluetooth
Vous pouvez vérifier l’adresse Bluetooth de
ce produit.
1 Appuyez sur le bouton HOME pour
afficher l’écran de Menu principal.
2 Touchez les touches suivantes
dans l’ordre indiqué.
L’écran “Bluetooth” apparaît.
3 Touchez [Info sur l’appareil].
L’adresse Bluetooth s’affiche.
Effacement de la mémoire
Bluetooth
ATTENTION
Ne mettez jamais ce produit hors tension
pendant l’effacement de la mémoire
Bluetooth.
1 Appuyez sur le bouton HOME pour
afficher l’écran de Menu principal.
2 Touchez les touches suivantes
dans l’ordre indiqué.
L’écran “Bluetooth” apparaît.
3 Touchez [Effacer la mémoire BT].
4 Touchez [Effacer].
L’écran de confirmation apparaît.
5 Touchez [OK].
La mémoire Bluetooth est effacée.
Si vous ne voulez pas effacer la mémoire
sélectionnée, touchez [Annuler].
Mise à jour du logiciel
Bluetooth
Cette fonction permet de mettre à jour ce
produit avec la dernière version du logiciel
Bluetooth. Pour en savoir plus sur le logiciel
Bluetooth et la mise à jour, visitez notre site
Web.
p La source est désactivée et la connexion
Bluetooth est déconnectée avant de
démarrer le processus.
ATTENTION
Ne mettez jamais ce produit hors tension
pendant la mise à jour du logiciel.
1 Appuyez sur le bouton HOME pour
afficher l’écran de Menu principal.
2 Touchez les touches suivantes
dans l’ordre indiqué.
L’écran “Bluetooth” apparaît.
3 Touchez [Mise à jour du logiciel
BT].
4 Touchez [Marche].
L’écran de transfert de données s’affiche.
p Suivez les instructions à l’écran pour ter-
miner la mise à jour du logiciel Bluetooth.
Afchage de la version du
logiciel Bluetooth
En cas de dysfonctionnement de ce produit,
vous devrez peut-être contacter votre reven-
deur pour réparation.
Dans ce cas, la version du logiciel vous sera
peut-être demandée. Suivez la procédure
suivante pour vérifier la version sur cette
unité.
1 Appuyez sur le bouton HOME pour
afficher l’écran de Menu principal.
2 Touchez les touches suivantes
dans l’ordre indiqué.
L’écran “Bluetooth” apparaît.
3 Touchez [Info sur la version BT].
La version du module Bluetooth de ce pro-
duit apparaît.
Utilisation de la télé-
phonie mains libres
ATTENTION
Pour votre sécurité, évitez de téléphoner
dans la mesure du possible en conduisant.
Si votre téléphone portable intègre la tech-
nologie Bluetooth, ce produit peut être relié
sans fil à votre téléphone portable. À l’aide
de la fonction mains libres, vous pouvez utili-
ser le produit pour effectuer ou recevoir des
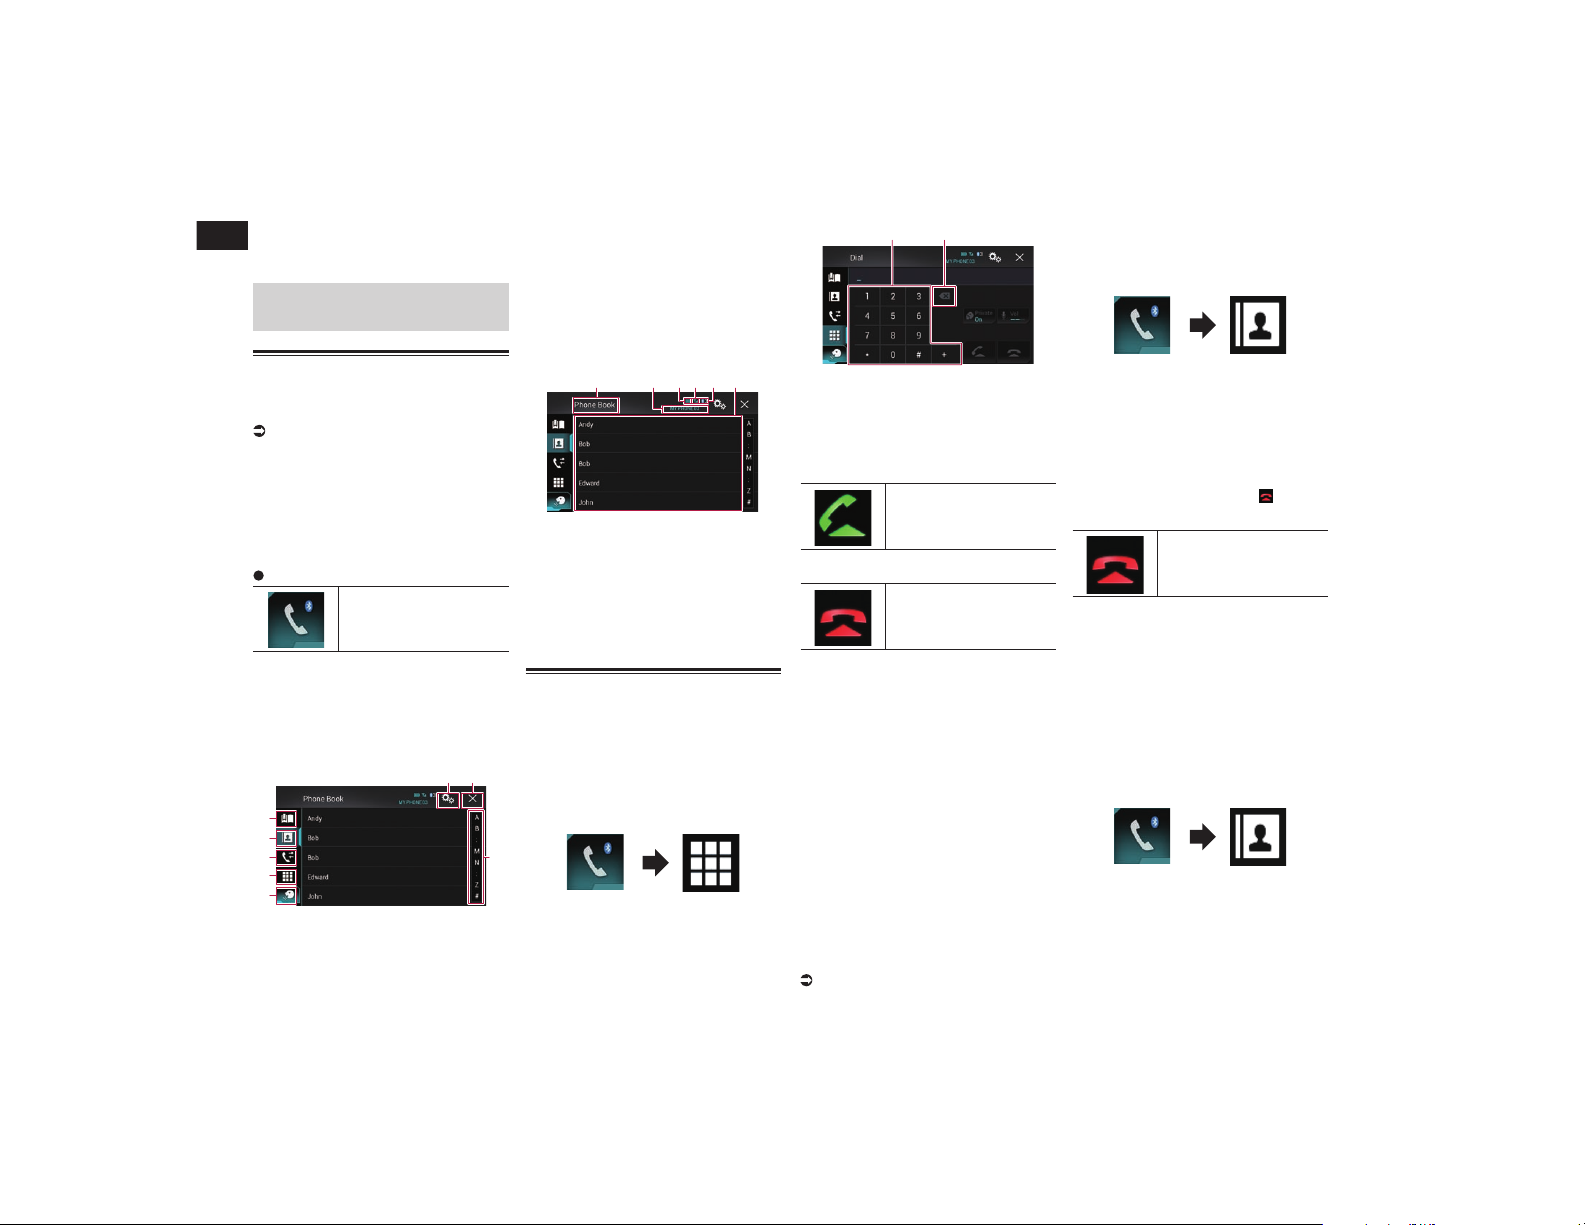
04
Chapitre
18
Fr
appels. Cette section décrit la configuration
d’une connexion Bluetooth et l’utilisation
d’un téléphone portable intégrant la techno-
logie Bluetooth avec le produit.
Pour en savoir plus sur la connectivité avec
les périphériques intégrant la technologie
sans fil Bluetooth, visitez notre site Web.
Afchage du menu téléphone
p Connectez un téléphone portable à ce
produit pour l’utilisation de la téléphonie
mains libres.
Pour en savoir plus, reportez-vous à
Chapitre 3.
p L’icône Téléphone s’affiche sur les écrans
suivants.
— Écran de Menu principal
— Écran de Fonction AV
— Sur la barre de commande latérale d’ap-
plication des écrans de AppRadio Mode
et du mode MirrorLink
Touchez la touche suivante.
Affiche l’écran de Menu
téléphone.
p L’écran “Annuaire téléphonique”
apparaît lorsque vous utilisez cette fonc-
tion pour la première fois. L’écran de la
dernière fonction utilisée apparaît la fois
suivante.
■ Touches de l’écran tactile
4
2
3
5
1
6 7
8
1 Affiche l’écran de numérotation
prédéfinie.
2 Bascule vers la liste de l’annuaire.
3 Bascule vers les listes des appels en
absence, reçus et effectués.
4 Change de mode pour entrer directement
le numéro de téléphone.
5 Bascule vers la fonction de reconnais-
sance vocale.
6 Affiche l’écran de Paramètre.
7 Ferme l’écran.
8 Affiche les entrées dans la liste par le
premier caractère.
■ Lecture de l’écran
1 32 4 5 6
1 Titre de menu
2 Nom du téléphone portable connecté
3 État de la batterie du téléphone portable
4 État de la réception du téléphone portable
5 Indique qu’un téléphone Bluetooth est
connecté.
Le numéro de la liste du périphérique
connecté s’affiche.
6 Zone d’affichage de liste
Effectuer un appel
Vous disposez de nombreuses méthodes
pour effectuer un appel.
■ Marquage direct
1 Appuyez sur le bouton HOME pour
afficher l’écran de Menu principal.
2 Touchez les touches suivantes
dans l’ordre indiqué.
L’écran “Composer” apparaît.
1 2
1 Pavé numérique
2 Supprime un chiffre. Maintenez-le
enfoncé pour supprimer tous les chiffres.
3 Touchez les touches numériques
pour saisir le numéro de téléphone.
4 Touchez la touche suivante.
Effectue un appel.
5 Touchez la touche suivante.
Met fin à l’appel.
L’appel est terminé.
p Il se peut que vous entendiez un bruit
lorsque vous raccrochez.
■ Appel d’un numéro enregistré
dans l’annuaire
Une fois le numéro que vous souhaitez
appeler trouvé dans l’annuaire, vous pouvez
sélectionner l’entrée et effectuer l’appel.
p Les contacts sur votre téléphone sont
généralement transférés automatique-
ment vers ce produit lorsque le téléphone
est connecté.
Si les contacts ne sont pas transférés
automatiquement, vous pouvez les
transférer à l’aide du menu téléphone du
téléphone portable.
Pour transférer les contacts à l’aide du
menu téléphone du téléphone portable,
réglez ce produit pour qu’il soit visible par
les autres périphériques.
Pour en savoir plus, reportez-vous à la
page 17, Changement de visibilité.
1 Appuyez sur le bouton HOME pour
afficher l’écran de Menu principal.
2 Touchez les touches suivantes
dans l’ordre indiqué.
L’écran “Annuaire téléphonique” apparaît.
3 Touchez le nom désiré dans la liste.
L’écran de détails de l’annuaire apparaît.
4 Touchez le numéro de téléphone
que vous souhaitez composer.
L’écran de numérotation apparaît.
5 Le numéro est composé.
p Pour annuler l’appel, touchez .
6 Touchez la touche suivante.
Met fin à l’appel.
L’appel est terminé.
Sélection d’un numéro en mode de
recherche alphabétique
Si beaucoup de numéros de téléphone sont
enregistrés dans l’annuaire, vous pouvez
rechercher des numéros de téléphone en
mode de recherche alphabétique.
1 Appuyez sur le bouton HOME pour
afficher l’écran de Menu principal.
2 Touchez les touches suivantes
dans l’ordre indiqué.
L’écran “Annuaire téléphonique” apparaît.
3 Faites glisser la barre de recherche
initiale pour trouver une entrée par
le premier caractère du nom.
La lettre de l’alphabet correspondant à la
position actuelle sur la barre de recherche
initiale est affichée.
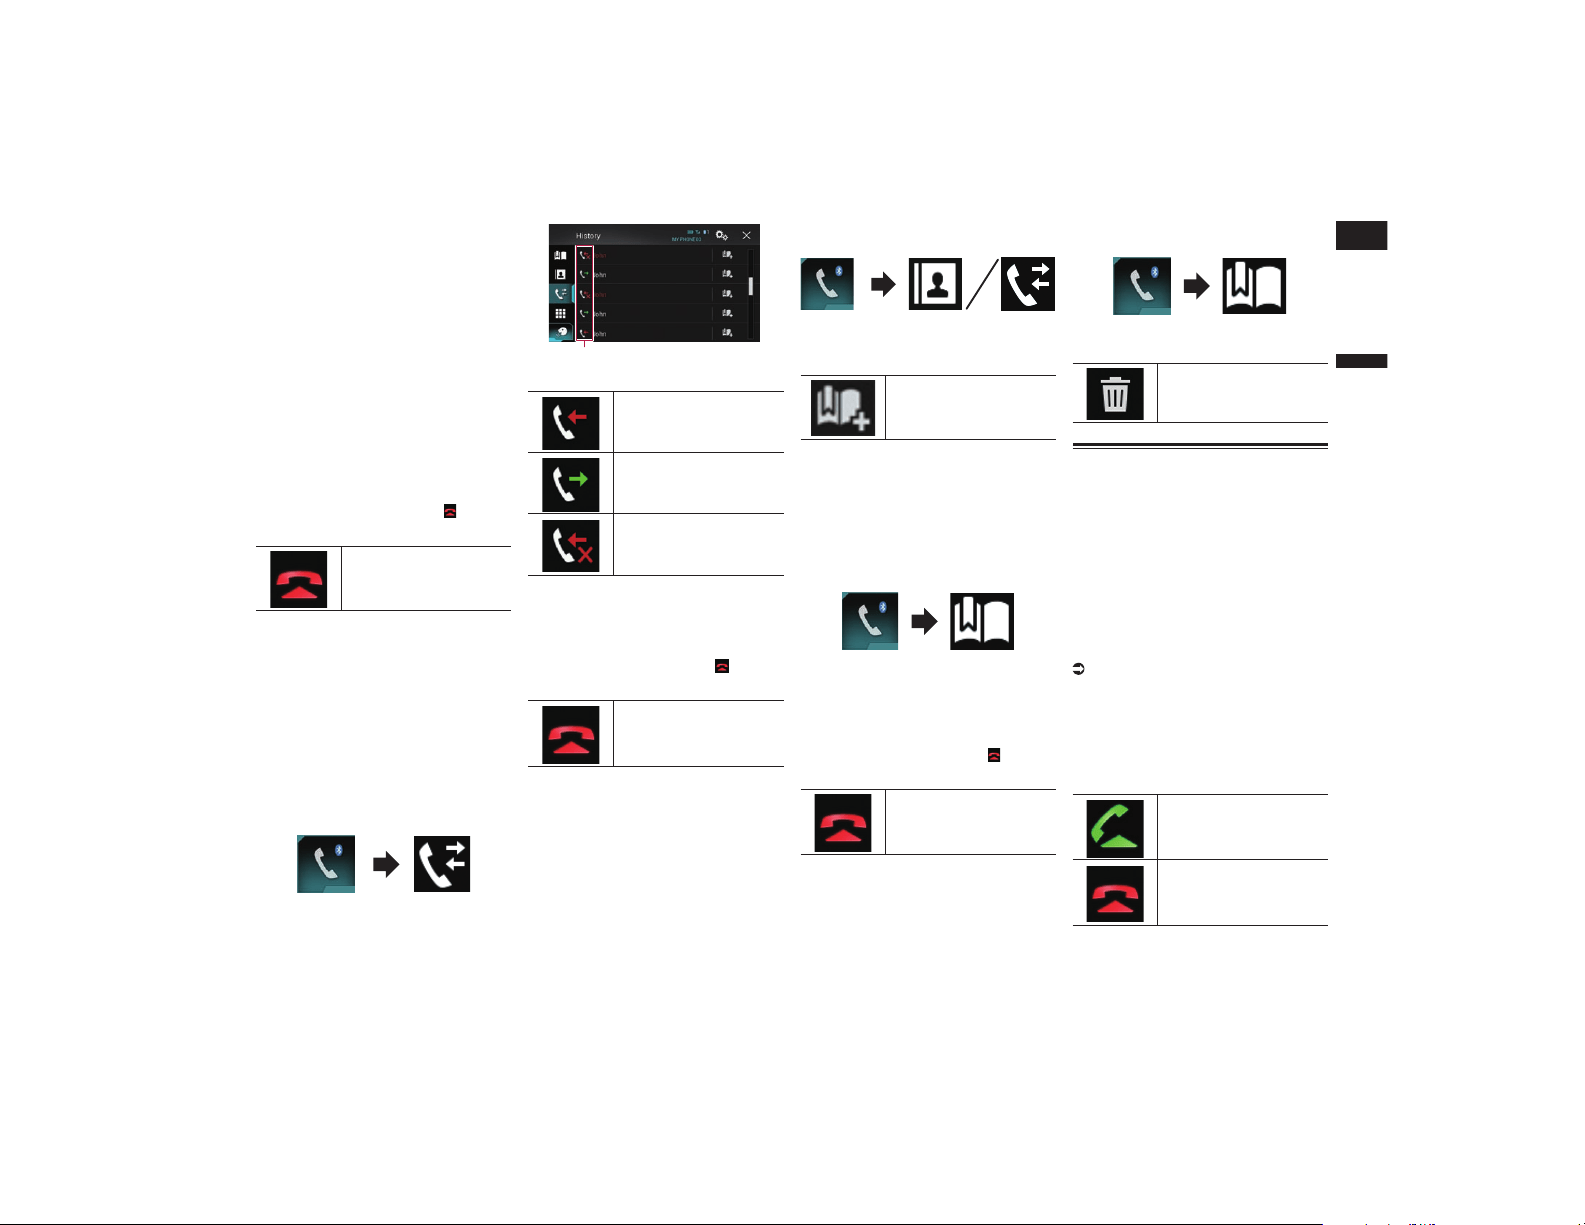
Français
04
Chapitre
19
Fr
4 Relâchez la barre de recherche
initiale à la lettre de l’alphabet
souhaitée.
Les entrées “Annuaire téléphonique” com-
mençant par cette lettre (par ex., Ben, Brian
et Burt lorsque la lettre B est sélectionnée)
s’affichent.
p Pour affiner la recherche avec une autre
lettre, touchez [Annuler].
5 Touchez une entrée pour afficher la
liste des numéros de téléphone de
l’entrée.
L’écran de détails de l’annuaire apparaît.
6 Touchez le numéro de téléphone
que vous souhaitez composer.
L’écran de numérotation apparaît.
7 Le numéro est composé.
p Pour annuler l’appel, touchez .
8 Touchez la touche suivante.
Met fin à l’appel.
L’appel est terminé.
■ Appel à partir du journal des
appels
Les appels effectués (numéros marqués), les
appels reçus ou les appels en absence les
plus récents sont mémorisés dans le journal
des appels. Vous pouvez parcourir le journal
et appeler des numéros qui s’y trouvent.
1 Appuyez sur le bouton HOME pour
afficher l’écran de Menu principal.
2 Touchez les touches suivantes
dans l’ordre indiqué.
L’écran “Historique” apparaît.
p Selon le type de téléphone portable, cer-
tains appels peuvent ne pas être affichés
dans le journal des appels.
1
1 Type de journal des appels
Appels reçus.
Appels effectués.
Appels en absence.
3 Touchez une entrée de la liste pour
effectuer un appel.
L’écran de numérotation apparaît.
4 Le numéro est composé.
p Pour annuler l’appel, touchez .
5 Touchez la touche suivante.
Met fin à l’appel.
L’appel est terminé.
■ Utilisation des listes de numéro-
tation prédénie
Vous pouvez composer un numéro à partir
de la liste de numérotation prédéfinie.
Enregistrement d’un numéro de
téléphone
Vous pouvez enregistrer jusqu’à six numéros
de téléphone prédéfinis par périphérique.
1 Appuyez sur le bouton HOME pour
afficher l’écran de Menu principal.
2 Touchez les touches suivantes
dans l’ordre indiqué.
L’écran “Annuaire téléphonique” ou
“Historique” apparaît.
3 Touchez la touche suivante.
Enregistre le numéro de
téléphone dans la liste
“Numéro en mémoire”.
Composition d’un numéro à par-
tir de la liste de numérotation
prédénie
1 Appuyez sur le bouton HOME pour
afficher l’écran de Menu principal.
2 Touchez les touches suivantes
dans l’ordre indiqué.
L’écran “Numéro en mémoire” apparaît.
3 Touchez une entrée de la liste pour
effectuer un appel.
L’écran de numérotation apparaît.
4 Le numéro est composé.
p Pour annuler l’appel, touchez .
5 Touchez la touche suivante.
Met fin à l’appel.
L’appel est terminé.
Suppression d’un numéro de
téléphone
1 Appuyez sur le bouton HOME pour
afficher l’écran de Menu principal.
2 Touchez les touches suivantes
dans l’ordre indiqué.
L’écran “Numéro en mémoire” apparaît.
3 Touchez la touche suivante.
Supprime le numéro de
téléphone.
Recevoir un appel
Vous pouvez répondre aux appels entrants
sur votre téléphone portable via ce produit.
■ Prendre un appel
Lorsque le produit reçoit un appel, un mes-
sage apparaît pour vous en informer et un
bip sonore se fait entendre.
p Vous pouvez régler le système pour qu’il
réponde automatiquement aux appels
entrants. Si ce produit n’est pas réglé
pour répondre automatiquement aux
appels entrants, répondez manuellement
aux appels.
Pour en savoir plus, reportez-vous à la
page 20, Prendre automatiquement un
appel.
p Le nom enregistré apparaît si le
numéro de téléphone de l’appel reçu
est déjà enregistré dans “Annuaire
téléphonique”.
1 Touchez la touche suivante.
Répond à un appel entrant.
Rejette un appel entrant.
L’appel rejeté est enregistré dans le journal
des appels en absence.
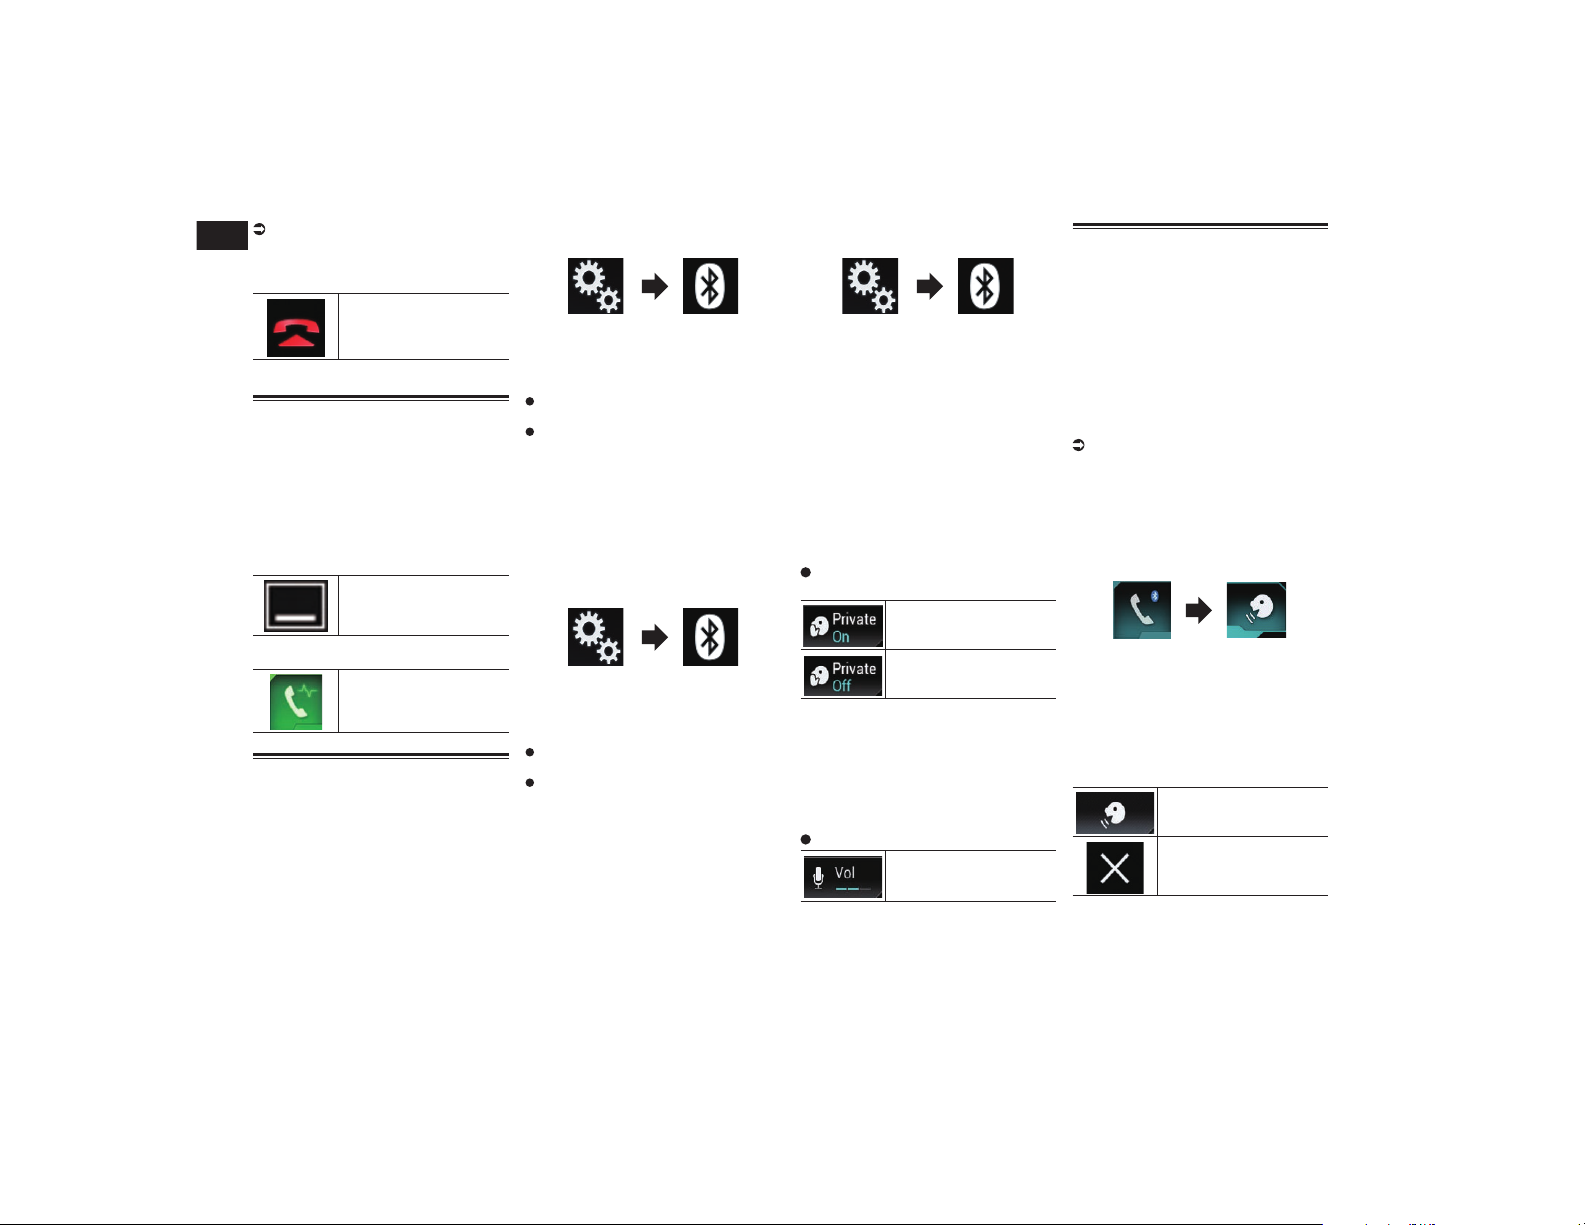
04
Chapitre
20
Fr
Pour en savoir plus, reportez-vous à la
page 19, Appel à partir du journal des
appels.
2 Touchez la touche suivante.
Met fin à l’appel.
L’appel est terminé.
Réduction de l’écran de conr-
mation de numérotation
p L’écran de confirmation de numérotation
ne peut pas être réduit sur l’écran de
Fonction AV.
p Les sources AV ne peuvent pas être sélec-
tionnées même si l’écran de confirmation
de numérotation est réduit lorsque vous
parlez au téléphone.
1 Touchez la touche suivante.
L’écran de confirmation de
numérotation est réduit.
2 Touchez la touche suivante.
Affiche de nouveau
l’écran de confirmation de
numérotation.
Modication des réglages du
téléphone
■ Prendre automatiquement un
appel
Ce produit répond automatiquement aux
appels entrants sur le téléphone portable
connecté, vous permettant de répondre à un
appel tout en conduisant sans avoir à quitter
les mains du volant.
Lorsque “Réponse automatique” est réglé
sur “Marche”, un appel entrant est automa-
tiquement répondu après 5 secondes.
1 Appuyez sur le bouton HOME pour
afficher l’écran de Menu principal.
2 Touchez les touches suivantes
dans l’ordre indiqué.
L’écran “Bluetooth” apparaît.
3 Touchez à plusieurs reprises
[Réponse automatique] jusqu’à ce
que le réglage souhaité apparaisse.
Arrêt (par défaut) :
Désactive la réponse automatique.
Marche :
Active la réponse automatique.
■ Mise en service ou hors service
de la sonnerie
Vous pouvez choisir d’utiliser ou non la
sonnerie de ce produit.
1 Appuyez sur le bouton HOME pour
afficher l’écran de Menu principal.
2 Touchez les touches suivantes
dans l’ordre indiqué.
L’écran “Bluetooth” apparaît.
3 Touchez à plusieurs reprises
[Tonalité] jusqu’à ce que le réglage
souhaité apparaisse.
Marche (par défaut) :
Active la sonnerie.
Arrêt :
Désactive la sonnerie.
■ Inversion des noms dans
l’annuaire
Lorsque votre périphérique est connecté à
ce produit, les premier et dernier noms de
vos contacts peuvent être enregistrés dans
l’ordre inverse dans l’annuaire.
Vous pouvez utiliser cette fonction pour
rétablir l’ordre. (Inversion des noms dans
l’annuaire)
1 Appuyez sur le bouton HOME pour
afficher l’écran de Menu principal.
2 Touchez les touches suivantes
dans l’ordre indiqué.
L’écran “Bluetooth” apparaît.
3 Touchez [Inversion des noms].
L’écran de confirmation apparaît.
4 Touchez [Oui].
p En cas d’échec de l’inversion, “Erreur
d’inversion des noms” apparaît. Dans
ce cas, réessayez depuis le début.
p L’inversion des noms de vos contacts
à partir de ce produit n’affecte pas les
données sur votre téléphone portable.
■ Réglage du mode privé
Au cours d’une conversation, vous pouvez
passer en mode privé (parlez directement
dans votre téléphone portable).
Touchez les touches suivantes pour
activer ou désactiver le mode privé.
Parlez directement dans
votre périphérique mobile.
Téléphonie mains libres
■ Réglage du volume d’écoute
d’un tiers
Pour maintenir une qualité sonore correcte,
ce produit peut régler le volume d’écoute de
l’autre tiers.
Si le volume est trop fort ou s’il n’est pas
suffisant, utilisez cette fonction.
Touchez la touche suivante.
Bascule entre les trois
niveaux de volume.
p Cette fonction peut être effectuée même
lorsque vous parlez dans le téléphone.
p Des réglages peuvent être enregistrés
pour chaque périphérique.
Utilisation de la fonction de
reconnaissance vocale
Vous pouvez utiliser la fonction de recon-
naissance vocale d’un iPhone ou d’un
smartphone.
p Lorsqu’un iPhone exécutant iOS 6.1 ou
supérieure est utilisé, le mode Siri Eyes
Free est disponible avec ce produit.
p Pour l’utilisation de cette fonction avec
un smartphone, l’appareil doit être com-
patible avec Android Auto et “Mode”
dans “Config. tél. intelligent” doit être
réglé sur “Android Auto” au préalable.
Pour en savoir plus, reportez-vous à la
page 22, Informations relatives aux
connexions et fonctions de chaque
appareil.
1 Appuyez sur le bouton HOME pour
afficher l’écran de Menu principal.
2 Touchez les touches suivantes pour
démarrer la commande vocale.
La fonction de reconnaissance vocale est
lancée et l’écran de commande vocale
apparaît.
Vous pouvez utiliser la fonction de recon-
naissance vocale comme vous le feriez sur
l’iPhone ou le smartphone.
p Vous pouvez également lancer la fonction
de reconnaissance vocale en maintenant
enfoncé le bouton HOME.
Indique que le produit est
en attente de commandes
vocales.
Annule la fonction de recon-
naissance vocale.

Français
05
Chapitre
21
Fr
Remarques pour la téléphonie
mains libres
Remarques générales
La connexion à tous les téléphones
portables dotés de la technologie sans fil
Bluetooth n’est pas garantie.
La distance en ligne droite entre ce
produit et votre téléphone portable doit
être au maximum de 10 mètres lors de
l’envoi et de la réception de la voix et des
données via la technologie Bluetooth.
Néanmoins, la distance de transmission
réelle peut être plus courte que la dis-
tance estimée, selon l’environnement
d’utilisation.
Avec certains téléphones portables, il se
peut que le bip sonore ne soit pas émis
des haut-parleurs.
Si le mode privé est sélectionné sur le
téléphone portable, la téléphonie mains
libres peut être désactivée.
Enregistrement et connexion
Le fonctionnement varie en fonction du
téléphone portable utilisé. Pour en savoir
plus, reportez-vous au manuel d’utilisa-
tion fourni avec votre téléphone portable.
Avec les téléphones portables, le transfert
de l’annuaire peut ne pas fonctionner
même si votre téléphone est apparié avec
ce produit. Dans ce cas, débranchez votre
téléphone, puis procédez à nouveau à
l’appariement depuis votre téléphone vers
ce produit.
Effectuer et recevoir des appels
Vous entendrez probablement un bruit
dans les situations suivantes :
— Lorsque vous répondez au téléphone avec
le bouton du téléphone.
— Lorsque votre interlocuteur raccroche.
Si votre interlocuteur n’entend pas la
conversation du fait d’un écho, diminuez
le volume du téléphone mains libres, ce
qui devrait permettre de réduire l’écho.
Avec certains téléphones portables,
même si vous appuyez sur le bouton de
votre téléphone portable pour accepter
un appel, la téléphonie mains libres peut
ne pas être disponible.
Le nom enregistré apparaît si le numéro
de téléphone de l’appel reçu est déjà
enregistré dans l’annuaire. Lorsqu’un
numéro de téléphone est enregistré sous
différents noms, seul le numéro de télé-
phone s’affiche.
Si le numéro de téléphone de l’appelant
n’est pas enregistré dans l’annuaire, c’est
le numéro qui s’affiche.
Les journaux des appels reçus et le
journal des numéros composés
Vous ne pouvez pas appeler à partir de
l’entrée d’un utilisateur inconnu (pas de
numéro de téléphone) dans le journal des
appels reçus.
Si les appels sont effectués en utilisant
le téléphone portable, aucune donnée de
journal n’est enregistrée dans ce produit.
Transferts de l’annuaire
Si votre téléphone portable comporte
plus de 800 entrées dans l’annuaire, il se
peut que toutes les entrées ne soient pas
téléchargées complètement.
Avec certains téléphones portables, il
n’est parfois pas possible de transférer
tous les éléments en une fois vers l’an-
nuaire. Dans ce cas, transférez les élé-
ments de votre téléphone portable un par
un.
Selon le téléphone portable, ce produit
peut ne pas afficher correctement l’an-
nuaire. (Certains caractères peuvent être
illisibles ou le prénom et le nom peuvent
être inversés.)
Si l’annuaire du téléphone portable
contient des images, il se peut que
l’annuaire ne soit pas correctement
transféré. (Les images ne peuvent pas
être transférées à partir du téléphone
portable.)
Sur certains téléphones portables, le
transfert de l’annuaire n’est pas possible.
Conguration d’un
iPod / iPhone ou
smartphone
Lors de l’utilisation d’un iPod / iPhone ou
d’un smartphone avec ce produit, configurez
les réglages du produit en fonction de l’ap-
pareil à connecter.
Cette section décrit les réglages nécessaires
pour chaque appareil.
Procédure de conguration
de base d’un iPod / iPhone ou
smartphone
1 Sélectionnez la méthode de connexion
de votre appareil.
Pour en savoir plus, reportez-vous à la
page 21, Réglage de la méthode de
connexion de l’appareil.
2 Connectez votre appareil à ce produit.
Pour en savoir plus sur les connexions,
reportez-vous à Chapitre 31.
3 Si nécessaire, connectez votre appa-
reil à ce produit via une connexion
Bluetooth.
Pour en savoir plus sur la connexion
Bluetooth, reportez-vous à Chapitre 3.
Réglage de la méthode de
connexion de l’appareil
Pour utiliser l’application pour iPhone ou
smartphone sur ce produit, vous devez
sélectionner une méthode pour connecter
votre appareil.
Les réglages varient selon l’appareil
connecté.
1 Appuyez sur le bouton HOME pour
afficher l’écran de Menu principal.
2 Touchez les touches suivantes
dans l’ordre indiqué.
L’écran “Système” apparaît.
3 Touchez [Paramètres
entrée-sortie].
4 Touchez [Config. tél. intelligent].
L’écran “Config. tél. intelligent” apparaît.
5 Configurez les réglages suivants.
Appareil : Sélectionnez l’appareil à
connecter.
Connexion : Sélectionnez la méthode de
connexion.
p Configurez correctement les réglages en
fonction de l’appareil à connecter et de la
méthode de connexion utilisée.
Pour en savoir plus, reportez-vous à la
page 22, Informations relatives aux
connexions et fonctions de chaque
appareil.
p Si vous modifiez le réglage, l’écran de
confirmation s’affiche.
Touchez [OK].
Le réglage change après l’exécution
automatique des processus suivants.
— La source est désactivée.
— Le mode AppRadio Mode ou
MirrorLink est arrêté.
— La connexion du smartphone (USB et
Bluetooth) est déconnectée.
Pour annuler, touchez [Annuler].
p Le réglage ne peut pas être changé
pendant un certain temps après avoir été
changé.
Compatibilité avec l’iPod
Ce produit prend uniquement en charge les
modèles d’iPod et les versions logicielles
d’iPod qui suivent. Les autres modèles ou
versions risquent de ne pas fonctionner
correctement.
Conçu pour
iPhone 6 Plus : iOS 8
iPhone 6 : iOS 8
iPhone 5s : iOS 7.0.3
iPhone 5c : iOS 7.0.3
iPhone 5 : iOS 7.0.3
iPhone 4s : iOS 7.0.3
iPhone 4 : iOS 7.0.3
iPhone 3GS : iOS 6.0.1
iPod touch (5e génération) : iOS 6.0.1
iPod touch (4e génération) : iOS 6.0.1
iPod touch (3e génération) : iOS 5.1.1
iPod touch (2e génération) : iOS 4.2.1
iPod classic 160 Go (2009) : Ver. 2.0.4
iPod classic 160 Go (2008) : Ver. 2.0.1
iPod classic 80 Go : Ver. 1.1.2
iPod nano (7e génération)
iPod nano (6ème génération) : Ver. 1.2
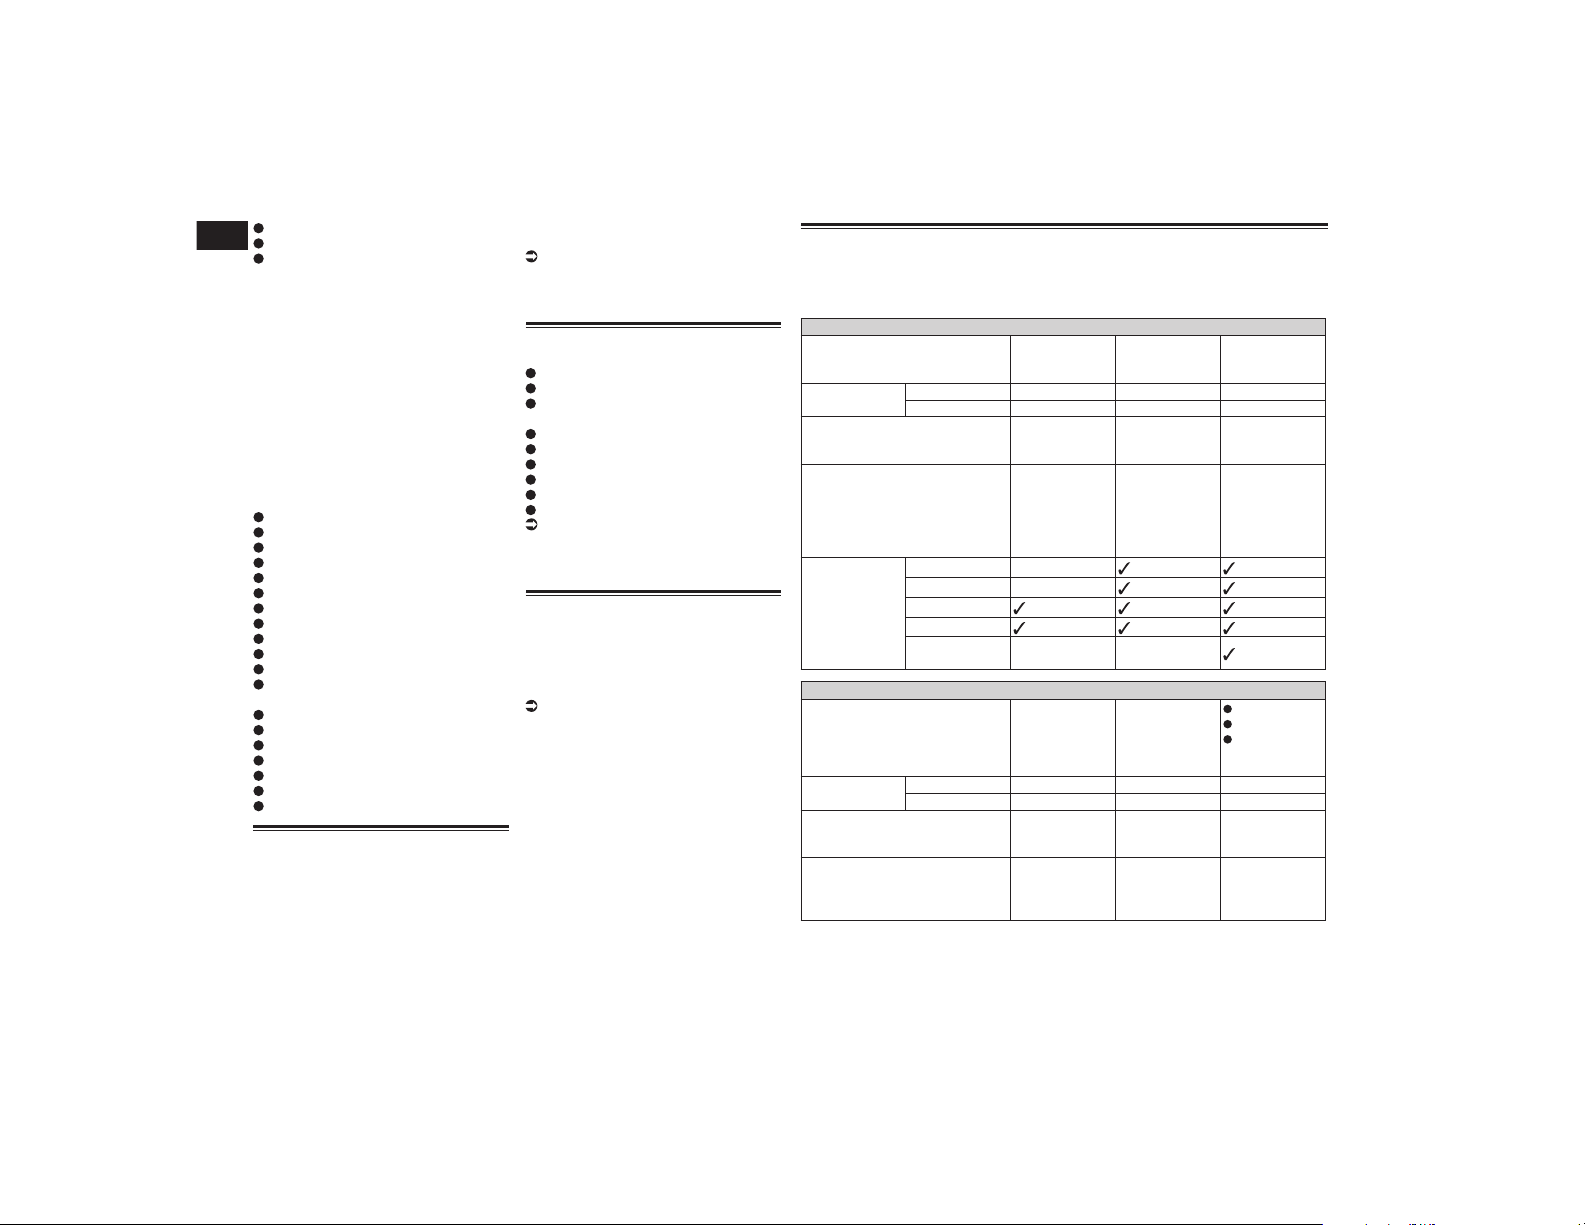
05
Chapitre
22
Fr
iPod nano (5e génération) : Ver. 1.0.2
iPod nano (4e génération) : Ver. 1.0.4
iPod nano (3e génération) : Ver. 1.1.3
p Vous pouvez connecter et commander
un iPod compatible avec ce produit en
utilisant des câbles de connexion vendus
séparément.
p Les méthodes d’opération peuvent varier
selon le modèle de l’iPod et la version
logicielle de l’iPod.
p En fonction de la version logicielle de
l’iPod, ce dernier peut ne pas être compa-
tible avec ce produit.
Pour en savoir plus sur la compatibilité
d’un iPod avec ce produit, consultez les
informations sur notre site Web.
Ce manuel concerne les modèles d’iPod
suivants.
iPod avec connecteur à 30 broches
iPhone 4s
iPhone 4
iPhone 3GS
iPod touch 4e génération
iPod touch 3e génération
iPod touch 2e génération
iPod classic 160 Go
iPod classic 80 Go
iPod nano 6ème génération
iPod nano 5e génération
iPod nano 4e génération
iPod nano 3e génération
iPod avec connecteur Lightning
iPhone 6 Plus
iPhone 6
iPhone 5s
iPhone 5c
iPhone 5
iPod touch 5e génération
iPod nano 7e génération
Compatibilité d’appareil
Android™
p Les méthodes d’opération peuvent varier
selon le modèle de l’appareil Android et
la version logicielle du système d’exploita-
tion Android.
p En fonction de la version du système
d’exploitation Android, ce dernier peut ne
pas être compatible avec ce produit.
p La compatibilité n’est pas garantie avec
tous les appareils Android.
Pour en savoir plus sur la compatibilité
d’un appareil Android avec ce produit,
consultez les informations sur notre site
Web.
Compatibilité AppRadio Mode
iPod avec connecteur à 30 broches
iPhone 4s
iPhone 4
iPod touch 4e génération
iPod avec connecteur Lightning
iPhone 6 Plus
iPhone 6
iPhone 5s
iPhone 5c
iPhone 5
iPod touch 5e génération
Pour en savoir plus sur la compatibilité
d’un appareil Android avec ce produit,
consultez les informations sur notre site
Web.
Compatibilité d’appareil
MirrorLink
p Ce produit est compatible avec
MirrorLink version 1.0.
p La compatibilité n’est pas garantie avec
tous les appareils MirrorLink.
Pour en savoir plus sur la compatibilité
d’un appareil MirrorLink avec ce produit,
consultez les informations sur notre site
Web.
Informations relatives aux connexions et fonctions de chaque
appareil
Les réglages et câbles nécessaires pour connecter chaque appareil, ainsi que les sources
disponibles sont les suivants.
iPod / iPhone avec connecteur à 30 broches
Câble nécessaire (vendu
séparément)
Une connexion
par câble n’est
pas nécessaire.
CD-IU201V CD-IU201S
Config. tél.
intelligent
Appareil iPhone/iPod iPhone/iPod iPhone/iPod
Connexion Bluetooth USB USB
Connexion Bluetooth
Une connexion
Bluetooth est
nécessaire.
— —
Connexion requise —
Connectez au
port USB 1 pour
utiliser aha ou
Pandora.
Connectez au
port USB 1
pour utiliser
aha, Pandora
ou AppRadio
Mode.
Source
disponible
iPod (audio) —
iPod (vidéo) —
aha
Pandora
AppRadio
Mode
— —
iPod / iPhone avec connecteur Lightning
Câble nécessaire (vendu
séparément)
Une connexion
par câble n’est
pas nécessaire.
CD-IU52
CD-IH202
CD-IU52
Adaptateur
Lightning AV
numérique
Config. tél.
intelligent
Appareil iPhone/iPod iPhone/iPod iPhone/iPod
Connexion Bluetooth USB Adapt. AV num.
Connexion Bluetooth
Une connexion
Bluetooth est
nécessaire.
—
Une connexion
Bluetooth est
nécessaire.
Connexion requise —
Connectez au
port USB 1 pour
utiliser aha ou
Pandora.
—
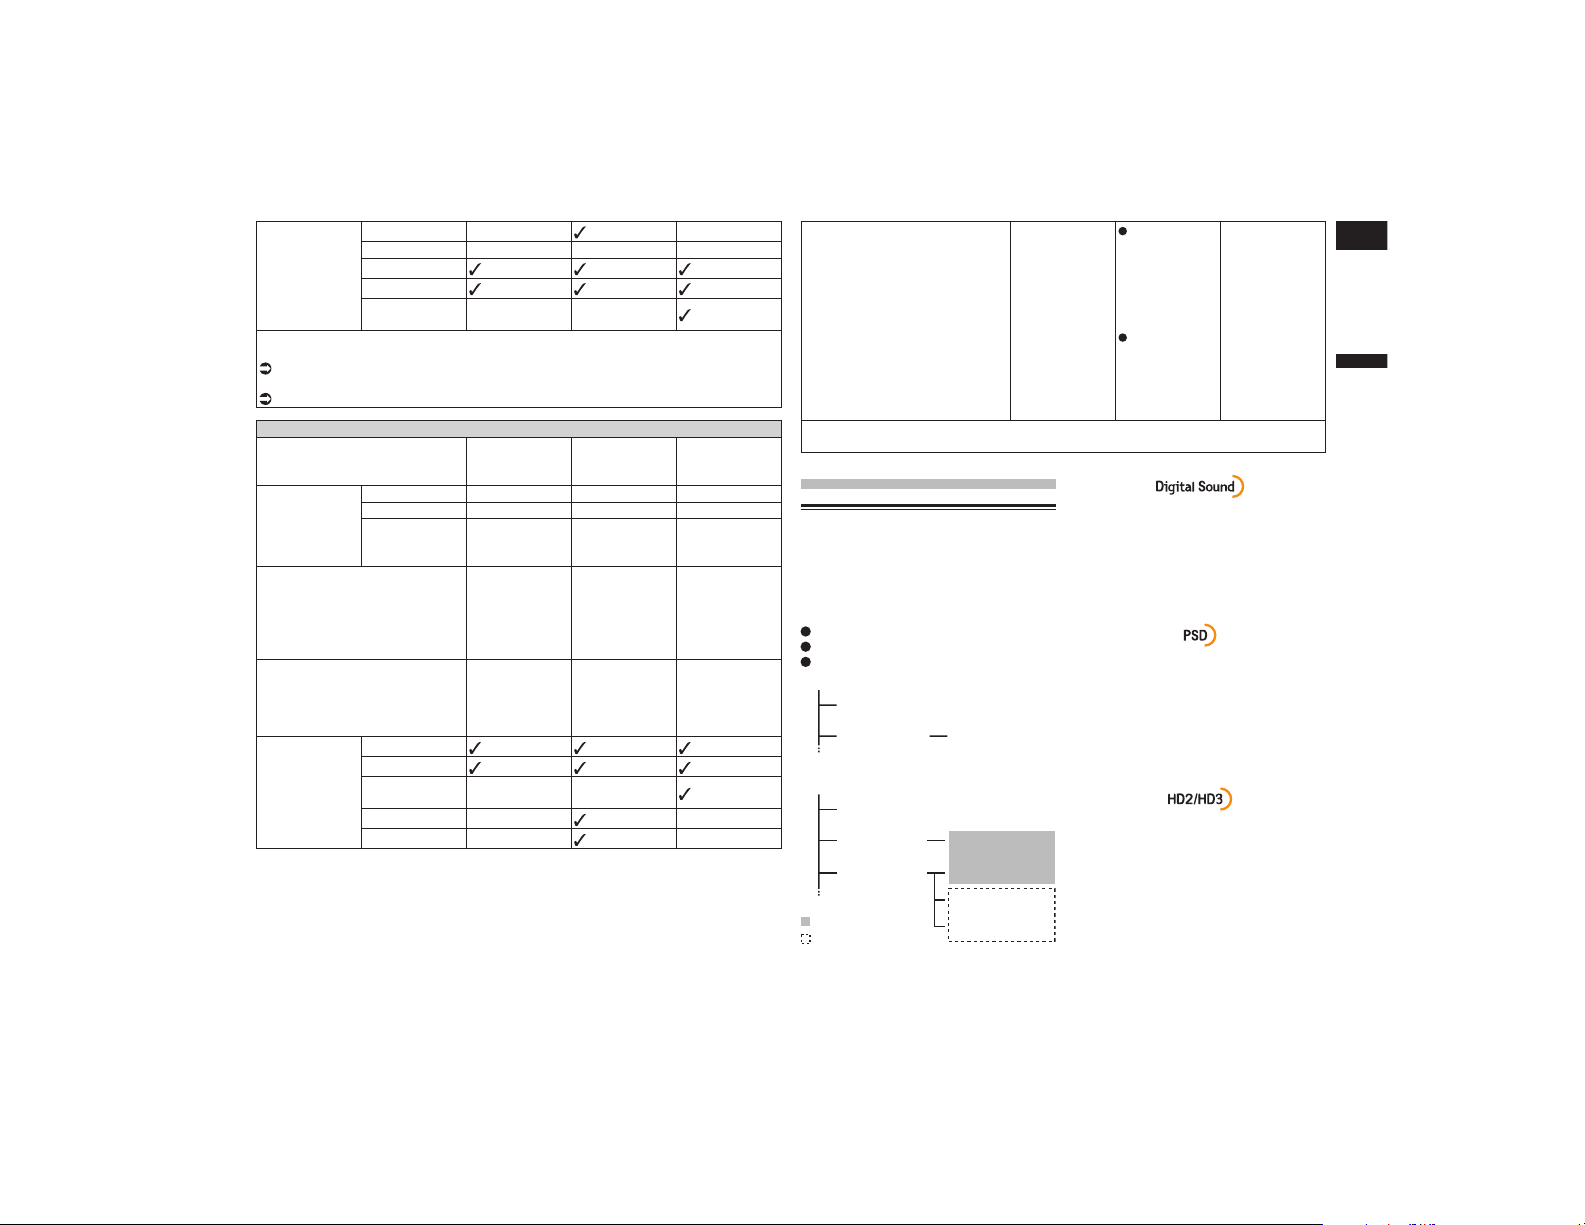
Français
06
Chapitre
23
Fr
Source
disponible
iPod (audio) — — (*1)
iPod (vidéo) — — — (*1)
aha
Pandora
AppRadio
Mode
— —
(*1) Utilisez AppRadio Mode pour lire de la musique ou des vidéos sur un iPod. Pour
utiliser AppRadio Mode, installez l’application CarMediaPlayer sur votre iPod.
Pour en savoir plus sur le CarMediaPlayer, reportez-vous aux informations disponibles
sur notre site Web.
Consultez le manuel CarMediaPlayer pour de plus amples informations.
Android, MirrorLink
Câble nécessaire (vendu
séparément)
Une connexion
par câble n’est
pas nécessaire.
CD-MU200 CD-AH200
Config. tél.
intelligent
Appareil Autres Autres Autres
Connexion Bluetooth USB HDMI
Mode —
Android Auto/
MirrorLink/
Arrêt
—
Connexion Bluetooth
Une connexion
Bluetooth est
nécessaire.
Une connexion
Bluetooth est
nécessaire pour
utiliser aha,
Pandora ou
Android Auto.
Une connexion
Bluetooth est
nécessaire.
Connexion requise —
Connectez au
port USB 2
pour utiliser
MirrorLink ou
Android Auto.
—
Source
disponible
aha
Pandora
AppRadio
Mode
— —
MirrorLink — —
Android Auto —
(*1)
—
Remarques —
Sélectionnez
“Android
Auto” pour
“Mode”
pour utiliser
Android
Auto.
Sélectionnez
“MirrorLink”
pour “Mode”
pour utiliser
le mode
MirrorLink.
—
(*1) Disponible uniquement lorsqu’un appareil compatible avec Android Auto est
connecté.
Réception HD Radio™
Stations HD Radio
Les stations HD Radio offrent une qualité
audio et des services de données supérieurs.
Les stations HD Radio vous sont offertes par
vos stations locales FM ou AM.
Les stations HD Radio offrent les fonctionna-
lités suivantes :
Audio de grande qualité
FM multidiffusion
Service de données
: Canal secondaire
Bande AM
AM analogique
AM analogique AM numérique
Bande FM
FM analogique
FM analogique FM numérique
FM analogique FM numérique-1ca
FM numérique-2ca
FM numérique-3ca
: Canal principal
Son numérique de qualité CD. La technolo-
gie HD Radio permet aux stations de radio
locales d’émettre un signal numérique
clair. Le son de la bande AM s’apparente au
son de la bande FM et le son de la bande
FM s’apparente à celui d’un CD.
Données du service de programme :
Permettent à l’utilisateur de bénéficier
de la technologie avancée de HD Radio.
Indiquent le titre des chansons, le nom de
l’interprète, les codes d’identification des
stations, le guide des canaux HD2/HD3,
ainsi que d’autres flux de données utiles.
Les canaux HD2/HD3, canaux FM locaux
adjacents au canal principal, offrent une
musique nouvelle et originale, ainsi qu’une
grande variété de genres musicaux.

06
Chapitre
24
Fr
La fonction iTunes
®
Tagging vous permet de
découvrir une large gamme de contenus et
également d’ “étiqueter” ce contenu pour
consultation ultérieure, ainsi que d’acheter
des titres depuis le magasin iTunes
®
Store.
Informations visuelles relatives au contenu
lu sur votre récepteur HD Radio, comme
les pochettes d’album, les photographies
anciennes, les captures d’émissions en
direct, entre autres contenus connexes.
Utilisation des touches de
l’écran tactile
1 2 43
5
6
7
a
9 8
b
1 Affiche la liste de sources.
Pour en savoir plus, reportez-vous à la
page 14, Sélection d’une source avant
dans la liste de sources.
2 Sélectionne une bande.
Pour en savoir plus, reportez-vous à la
page 25, Sélection d’une bande.
3 Affiche l’écran de Réglage de l’heure
et de la date.
Pour en savoir plus, reportez-vous à la
page 77, Réglage de l’heure et de la
date.
4 Affiche l’écran de Paramètre.
5 Rappelle des courbes d’égalisation.
Pour en savoir plus, reportez-vous à la
page 70, Utilisation de l’égaliseur.
6 Bascule l’affichage du texte entre
le canal principal et les canaux de
multidiffusion.
Pour en savoir plus, reportez-vous à la
page 24, Lecture de l’écran.
7 Affiche l’écran de Menu téléphone.
Pour en savoir plus, reportez-vous à la
page 18, Affichage du menu téléphone.
8 Mémorise les informations de la
chanson sur un iPod.
Pour en savoir plus, reportez-vous à la
page 77, Mémorisation des informa-
tions de la chanson sur un iPod (balisage
iTunes).
9 Effectue la syntonisation manuelle ou
la syntonisation automatique.
Pour en savoir plus, reportez-vous à la
page 25, Syntonisation manuelle.
Pour en savoir plus, reportez-vous à la
page 25, Syntonisation automatique.
a Affiche les canaux préréglés.
Pour en savoir plus, reportez-vous à la
page 25, Sélection d’un canal préréglé
dans la liste des canaux préréglés.
b Rappelle de la mémoire le canal
préréglé associé à une touche si vous
touchez une fois la touche.
Enregistre la fréquence de radiodiffu-
sion en cours sur une touche pour un
rappel ultérieur si vous continuez de
toucher la touche.
Pour en savoir plus, reportez-vous à la
page 25, Mise en mémoire des fré-
quences de radiodiffusion.
Lecture de l’écran
b
4
32
78
1
a 9 56
1 Indicateur de bande
Indique la bande syntonisée : FM1, FM2,
FM3 ou AM.
2 Informations détaillées
Canal principal
Signe d’appel, service du programme
ou fréquence
Indique le signe d’appel, le service du
programme ou la fréquence de la station
émettrice actuellement reçue.
Titre de la chanson
Indique le titre de la chanson en cours de
lecture (si disponible).
Nom de l’artiste (interprète)
Indique le nom de l’artiste (interprète)
de la chanson en cours de lecture (si
disponible).
Canaux de multidiffusion
Numéro du canal de multidiffusion et
titre de la chanson
Affiche les numéros des canaux de multi-
diffusion et les titres de chansons.
p Aucune information n’est affichée en l’ab-
sence d’informations correspondantes.
p Le canal de multidiffusion actuellement
syntonisé est affiché en haut de la liste.
3 Heure et date actuelles
4 Pochette de l’album
Affiche la pochette de la chanson en
cours de lecture (si disponible).
p Si la pochette de l’album ne peut pas être
obtenue, le logo de la station s’affiche.
Si le logo de la station ne peut pas être
obtenu non plus, une image préinstallée
s’affiche.
5 Indicateur d’état du balisage de chan-
sons iTunes
®
Affiche l’état des informations de la
chanson mémorisées dans le produit.
p L’icône est affichée sur tous les écrans de
fonction des sources AV.
Indicateur
Signification
Apparaît lorsque les informa-
tions de balise de la chanson
sont enregistrées dans ce
produit.
Apparaît quand les informa-
tions de balise de la chanson
sont en cours de transfert sur
un iPod.
6 Indicateur de balisage iTunes
®
Indique les chansons pour lesquelles le
balisage iTunes est possible.
p L’icône est affichée sur tous les écrans de
fonction des sources AV.
Indicateur
Signification
Apparaît lorsque ce produit
reçoit une balise de chanson
iTunes qui peut être mémorisée
et téléchargée sur un iPod pour
un achat ultérieur.
Clignote lorsque ce produit
enregistre des informations de
balise de la chanson.
7 Indicateur de type de signal
Affiche le type de signal actuellement
reçu. Si une émission numérique est
reçue, apparaît. Autrement,
apparaît.
8 Indicateur HD Radio
Indique que des informations sur la
station HD Radio sont reçues.
9 Indicateur de multidiffusion
Affiche le nombre de canaux de multidif-
fusion de la fréquence actuelle.
a Indicateur de fréquence
b Indicateur de numéro de présélection
Indique l’élément préréglé choisi.
Procédure de départ
1 Affichez l’écran de Sélection de
source AV.
Pour en savoir plus sur les opérations,
reportez-vous à la page 13, Affichage
de l’écran de fonction AV.
2 Touchez [HD Radio] sur l’écran de
Sélection de source AV.
L’écran “HD Radio” apparaît.
3 Utilisez les touches de l’écran
tactile pour commander la radio.
Pour en savoir plus, reportez-vous à la
page 24, Utilisation des touches de
l’écran tactile.
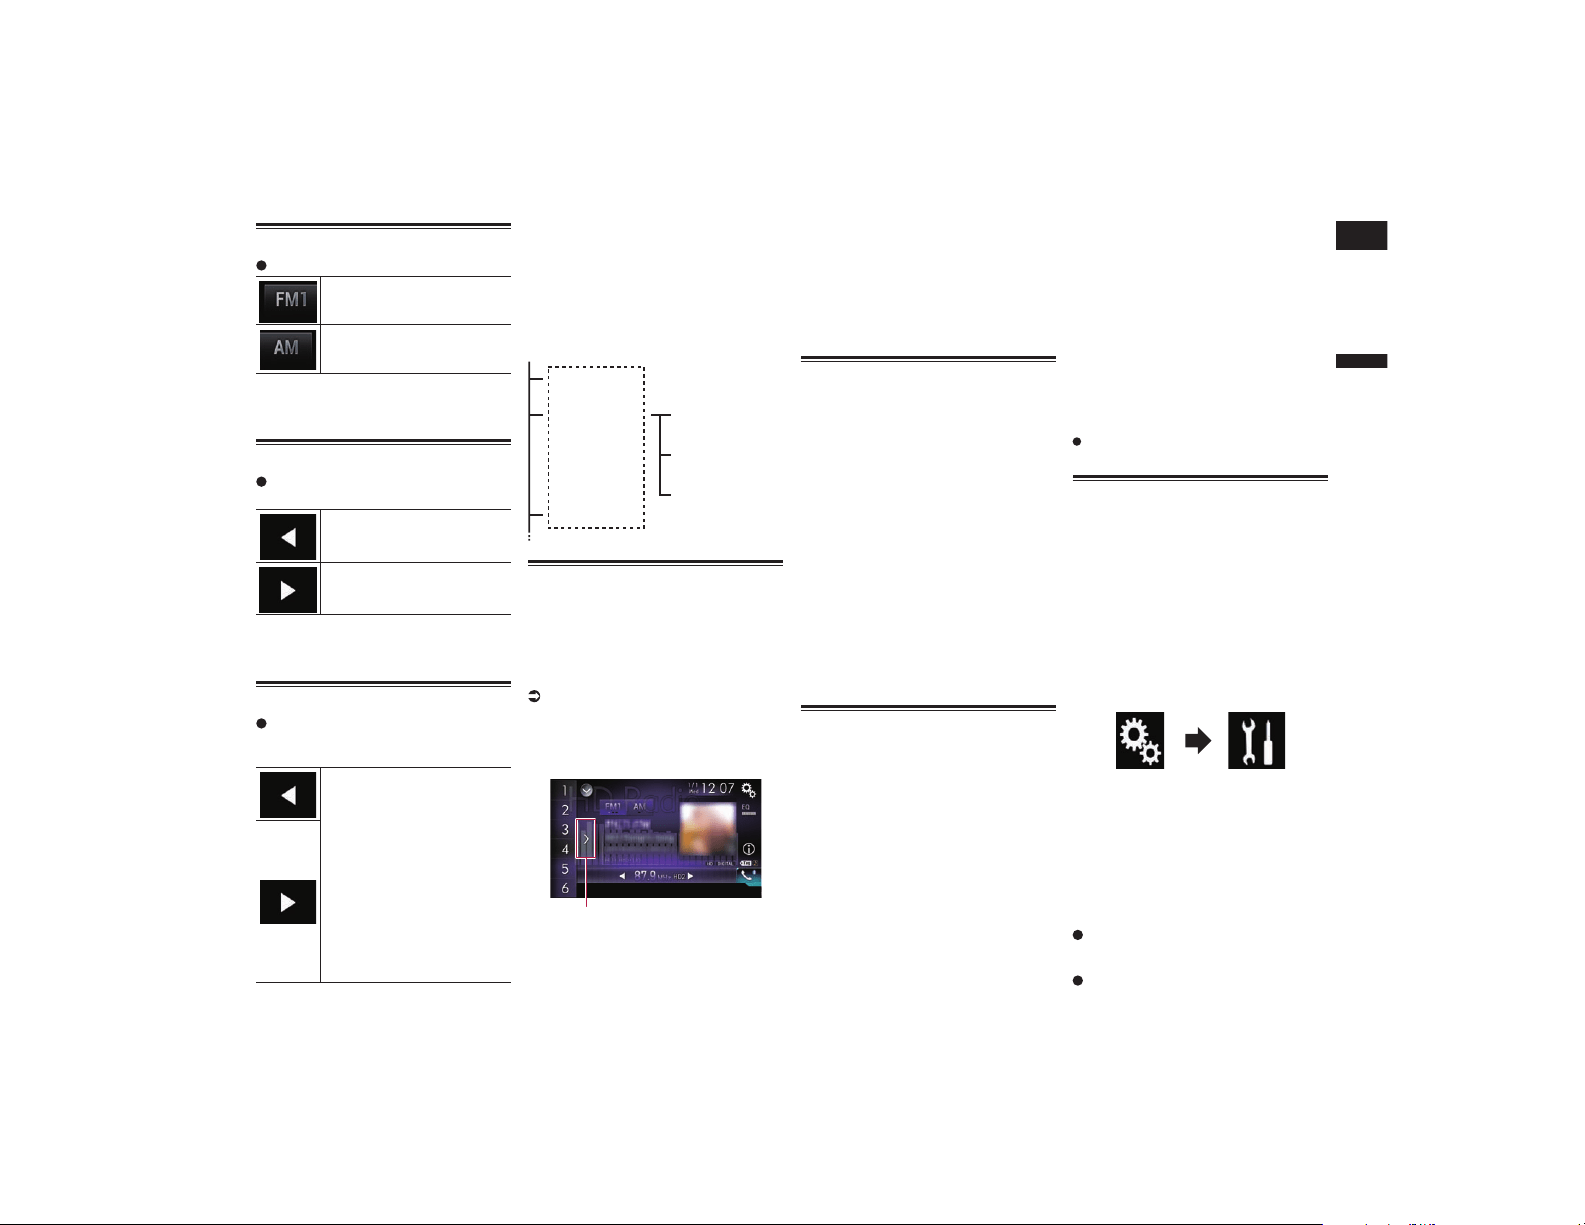
Français
06
Chapitre
25
Fr
Sélection d’une bande
Touchez la touche suivante.
Bascule entre les bandes FM
suivantes : FM1, FM2 et FM3.
Bascule sur la bande AM.
p Cette fonction est pratique pour préparer
différentes listes prédéfinies pour chaque
bande.
Syntonisation manuelle
Touchez les touches suivantes pour
syntoniser manuellement.
Déplace d’une étape à la fois
vers le bas.
Déplace d’une étape à la fois
vers le haut.
p Cette fonction est pratique pour préparer
différentes listes prédéfinies pour chaque
bande.
Syntonisation automatique
Maintenez enfoncée une des
touches suivantes pendant une
seconde environ, puis relâchez-la.
Balaie les fréquences jusqu’à ce
qu’une station assez puissante
pour offrir une bonne réception
soit trouvée.
Vous pouvez annuler la syntoni-
sation automatique en touchant
brièvement l’une ou l’autre
touche.
Si vous maintenez enfoncée
l’une ou l’autre touche, vous
pouvez ignorer les fréquences
de radiodiffusion. La syntonisa-
tion automatique démarre alors
lorsque vous relâchez la touche.
p Lorsqu’une station analogique est
reçue, seules les émissions analogiques
peuvent être syntonisées vers l’avant ou
l’arrière.
Si aucune émission numérique n’est
encore reçue, la syntonisation d’une
autre station vers l’avant ou l’arrière est
réalisée parmi les stations analogiques
suivantes ou précédentes.
FM analogique
FM analogique
FM analogique
FM numérique-1ca
FM numérique-2ca
FM numérique-3ca
Sélection d’un canal préré-
glé dans la liste des canaux
préréglés
Une fois les canaux de radiodiffusion mémo-
risés, vous pouvez facilement rappeler les
canaux préréglés depuis la mémoire, en
touchant une seule touche.
Pour en savoir plus, reportez-vous à la
page 25, Mise en mémoire des fré-
quences de radiodiffusion.
1 Touchez la touche d’affichage de la
liste des canaux préréglés.
1
1 Touche d’affichage de la liste des canaux
préréglés
2 Touchez l’élément de la liste (“1”
à “6”) pour basculer sur un canal
enregistré comme canal préréglé.
p Si vous touchez la touche d’affichage de
la liste des canaux préréglés alors que la
liste des canaux préréglés est affichée,
celle-ci disparaît et les touches de présé-
lection s’affichent.
Mise en mémoire des fré-
quences de radiodiffusion
Si vous touchez l’une des touches de pré-
sélection (“1” à “6”), vous pouvez aisément
enregistrer jusqu’à six canaux de radiodif-
fusion qui pourront être rappelés plus tard
(également en touchant une touche).
1 Sélectionnez la fréquence que vous
désirez mettre en mémoire.
2 Maintenez enfoncée une touche de
présélection [1] à [6].
La station de radio sélectionnée est mise en
mémoire.
La prochaine fois que vous touchez la même
touche de présélection “1” à “6”, le compo-
sant de service est rappelé de la mémoire.
p Jusqu’à 18 stations FM, six pour cha-
cune des trois bandes FM, ainsi que
six stations AM, peuvent être mises en
mémoire.
Mise en mémoire des fré-
quences de radiodiffusion les
plus puissantes
La fonction BSM (Best Stations Memory,
mise en mémoire des meilleures stations)
mémorise automatiquement les six fré-
quences de radiodiffusion les plus puis-
santes pour les touches de présélection “1” à
“6” et, une fois mémorisées, il vous suffit de
toucher une touche pour les syntoniser.
p En mémorisant des fréquences de radio-
diffusion avec BSM, il se peut que les
fréquences de radiodiffusion déjà enre-
gistrées soient remplacées.
p Les fréquences de radiodiffusion précé-
demment mémorisées peuvent rester en
mémoire si le nombre de fréquences de
radiodiffusion puissantes n’a pas atteint
la limite.
1 Touchez la touche d’affichage de la
liste des canaux préréglés.
La liste des canaux préréglés apparaît.
2 Touchez [BSM] pour lancer une
recherche.
Un message apparaît. Pendant que le mes-
sage est affiché, les six fréquences de radio-
diffusion les plus puissantes sont mémori-
sées pour les touches de présélection “1” à
“6” dans l’ordre de leur puissance de signal.
Ceci fait, le message disparaît.
Si vous touchez [Annuler], le processus
de mémorisation est annulé.
Syntonisation des fréquences
puissantes
La syntonisation automatique locale vous
permet de rechercher uniquement les sta-
tions de radio ayant un signal suffisant pour
une bonne réception.
p Ce réglage est disponible uniquement
lorsque “HD Radio” est sélectionné
comme source.
1 Appuyez sur le bouton HOME pour
afficher l’écran de Menu principal.
2 Touchez les touches suivantes
dans l’ordre indiqué.
L’écran “Système” apparaît.
3 Touchez [Réglages de source A/V].
4 Touchez [Paramètres radio].
5 Touchez [Local].
Le menu contextuel apparaît.
6 Touchez l’élément que vous sou-
haitez régler.
FM
Arrêt (par défaut) :
Désactive le réglage de syntonisation
automatique.
Niveau 1 :
Règle le niveau de sensibilité de FM sur 1.
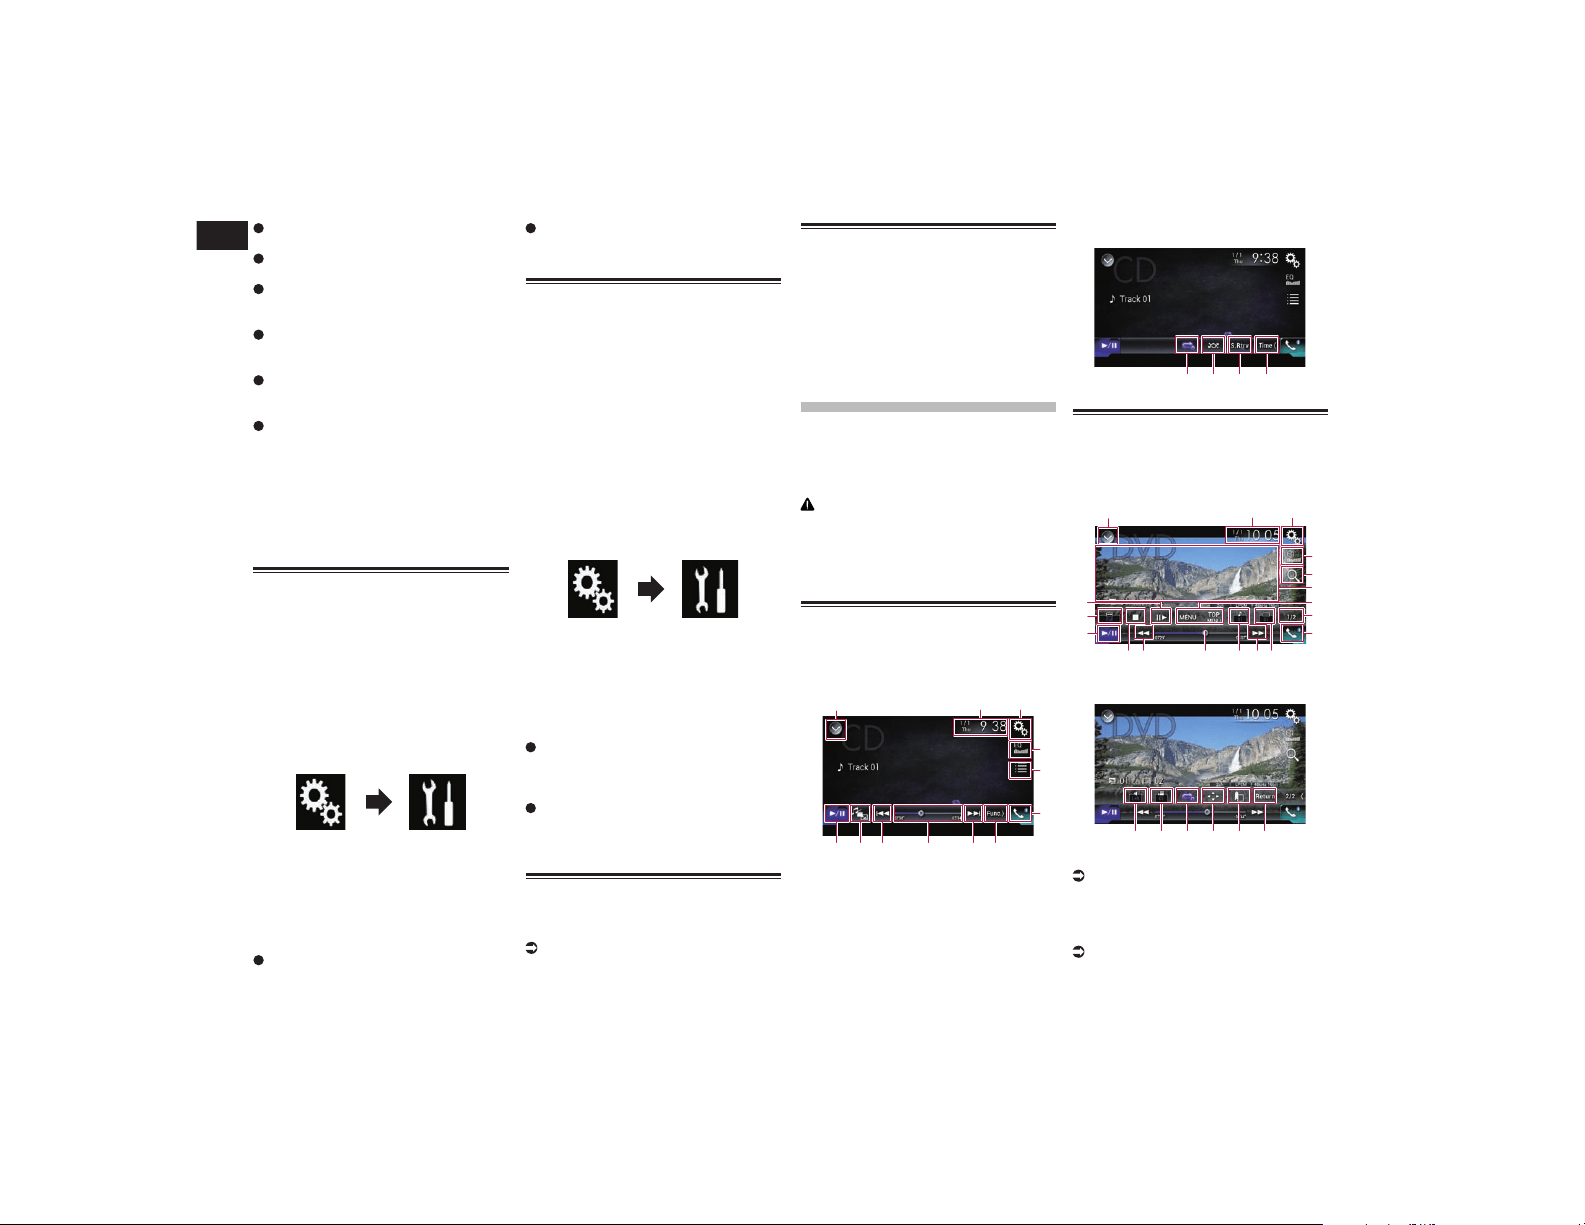
07
Chapitre
26
Fr
Niveau 2 :
Règle le niveau de sensibilité de FM sur 2.
Niveau 3 :
Règle le niveau de sensibilité de FM sur 3.
Niveau 4 :
Règle le niveau de sensibilité de FM sur 4.
AM
Arrêt (par défaut) :
Désactive le réglage de syntonisation
automatique.
Niveau 1 :
Règle le niveau de sensibilité de AM sur
1.
Niveau 2 :
Règle le niveau de sensibilité de AM sur
2.
p La valeur FM “Niveau 4” (AM “Niveau 2”)
permet la réception des stations ayant les
signaux les plus puissants uniquement,
tandis que les autres valeurs autorisent la
réception de stations ayant des signaux
moins puissants.
Changement du mode de
recherche
Vous pouvez sélectionner la méthode de
syntonisation automatique.
p Ce réglage est disponible uniquement
lorsque “HD Radio” est sélectionné
comme source.
1 Appuyez sur le bouton HOME pour
afficher l’écran de Menu principal.
2 Touchez les touches suivantes
dans l’ordre indiqué.
L’écran “Système” apparaît.
3 Touchez [Réglages de source A/V].
4 Touchez [Paramètres radio].
5 Touchez à plusieurs reprises
[Recherche] jusqu’à ce que le
réglage souhaité apparaisse.
Rech. glob. (par défaut) :
Recherche les stations pour les émis-
sions analogiques et numériques.
Rech. HD :
Recherche uniquement les stations des
émissions numériques.
Changement du mode de
réception
Si la réception d’une émission numérique
se détériore, le syntoniseur passe automa-
tiquement sur l’émission analogique du
même niveau de fréquence par défaut. Si
vous souhaitez éviter que cette commutation
automatique se produise fréquemment,
changez ce réglage sur “Arrêt”.
p Ce réglage est disponible uniquement
lorsque “HD Radio” est sélectionné
comme source.
1 Appuyez sur le bouton HOME pour
afficher l’écran de Menu principal.
2 Touchez les touches suivantes
dans l’ordre indiqué.
L’écran “Système” apparaît.
3 Touchez [Réglages de source A/V].
4 Touchez [Paramètres radio].
5 Touchez à plusieurs reprises
[Fusion] jusqu’à ce que le réglage
souhaité apparaisse.
Marche (par défaut) :
Commute sur l’émission analogique
du même niveau de fréquence
automatiquement.
Arrêt :
Ne commute pas sur l’émission ana-
logique du même niveau de fréquence
automatiquement.
Mémorisation des informa-
tions de la chanson sur un
iPod (balisage iTunes)
Pour en savoir plus, reportez-vous à la
page 77, Mémorisation des informa-
tions de la chanson sur un iPod (balisage
iTunes).
Utilisation avec les boutons
physiques
Appuyez sur le bouton TRK.
Vous pouvez déplacer les canaux préréglés
vers le haut ou vers le bas.
Maintenez enfoncé le bouton TRK.
Vous pouvez procéder à la syntonisation
automatique.
Lecture d’un disque
Vous pouvez lire un CD musical, CD-Vidéo ou
DVD-Vidéo normal qui contient des fichiers
audio compressés à l’aide du lecteur intégré
de ce produit. Cette section en décrit le
fonctionnement.
ATTENTION
Pour des raisons de sécurité, les images
vidéo ne sont pas visibles quand le véhicule
est en mouvement. Pour voir des images
vidéo, arrêtez-vous dans un endroit sûr et
serrez le frein à main.
Utilisation des touches de
l’écran tactile (pour l’audio)
Exemple : CD
Écran de lecture (page 1)
1 32
7
4
5
6
b a 8 9 8
Écran de lecture (page 2)
7cde
Utilisation des touches de
l’écran tactile (pour la vidéo)
Exemple : DVD
Écran de lecture (page 1)
1 32
4
f
6
9
b
l
m
8k j 8 i
g
h
7
Écran de lecture (page 2)
nopeqr
1 Affiche la liste de sources.
Pour en savoir plus, reportez-vous à la
page 14, Sélection d’une source avant
dans la liste de sources.
2 Affiche l’écran de Réglage de l’heure
et de la date.
Pour en savoir plus, reportez-vous à la
page 77, Réglage de l’heure et de la
date.
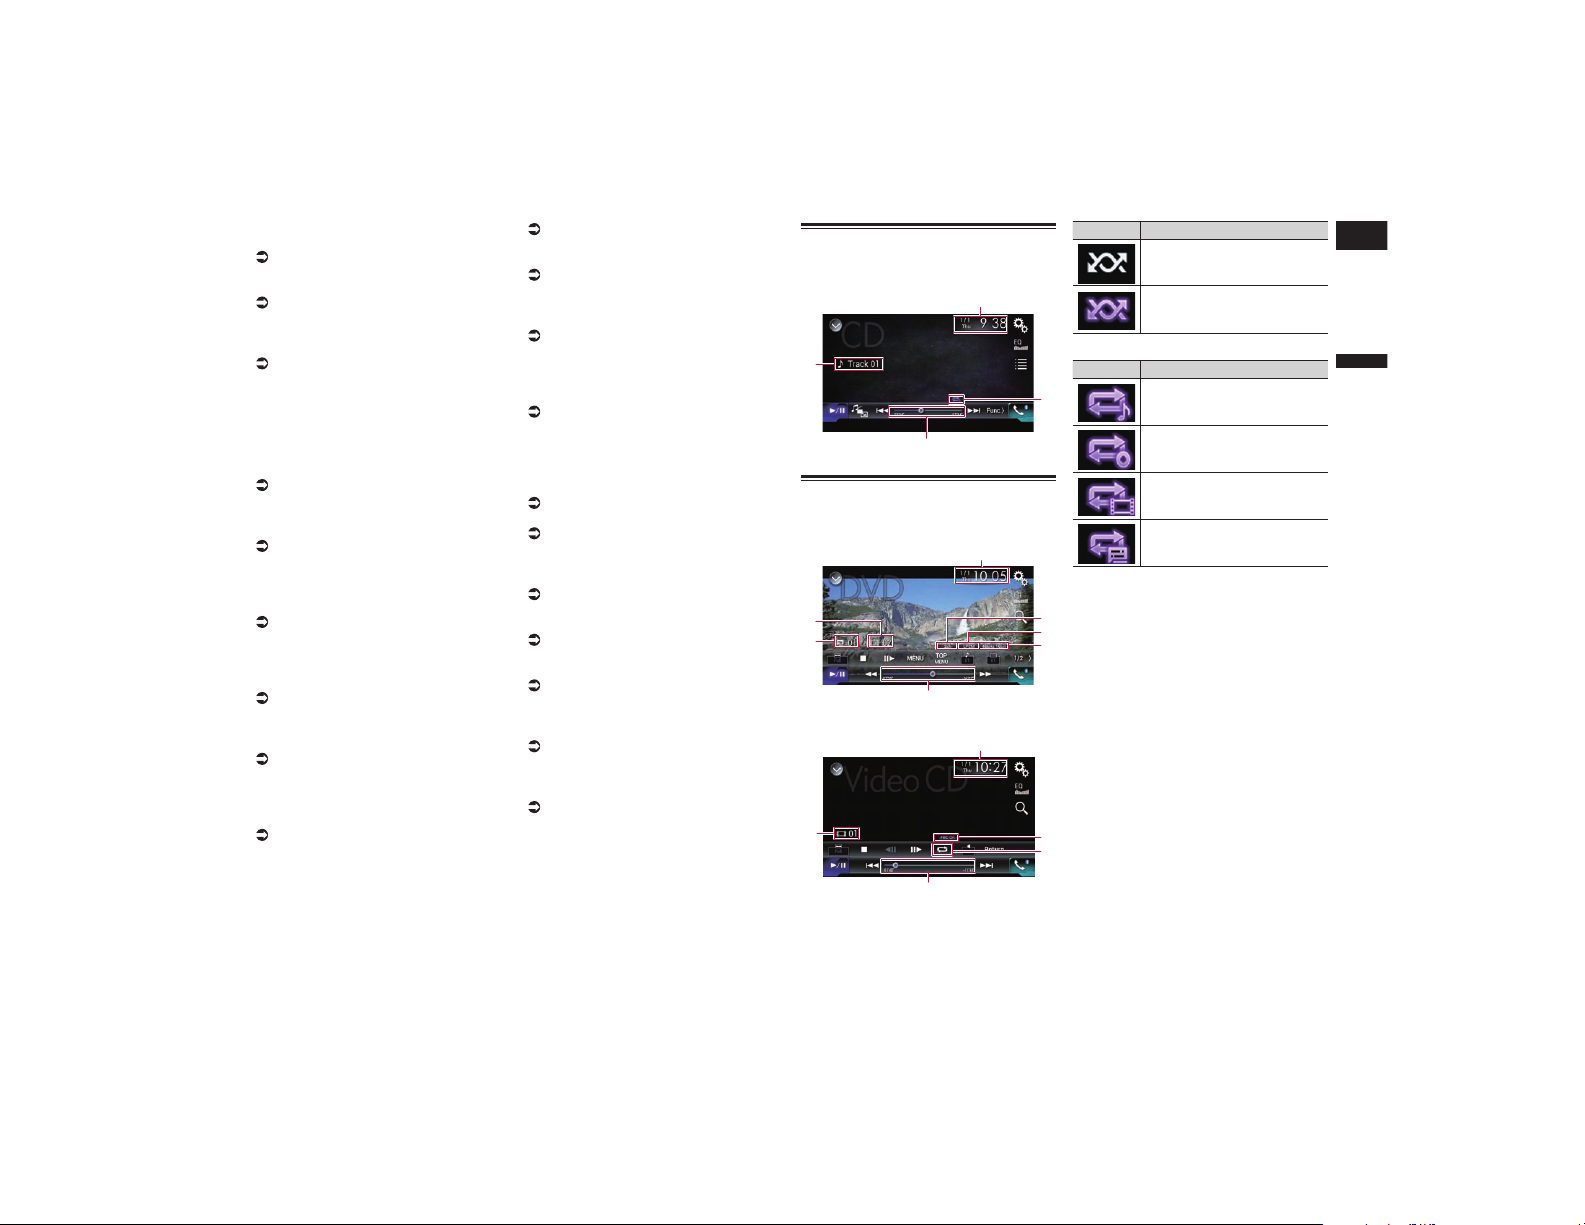
Français
07
Chapitre
27
Fr
3 Affiche l’écran de Paramètre.
4 Rappelle des courbes d’égalisation.
Pour en savoir plus, reportez-vous à la
page 70, Utilisation de l’égaliseur.
5 Sélectionne une piste dans la liste.
Pour en savoir plus, reportez-vous à la
page 28, Sélection de fichiers dans la
liste des noms de fichiers.
6 Affiche l’écran de Menu téléphone.
Pour en savoir plus, reportez-vous à la
page 18, Affichage du menu téléphone.
7 Passe à la page suivante ou précé-
dente des touches de l’écran tactile.
8 Saute des fichiers en avant ou en
arrière.
9 Change le point de lecture en faisant
glisser la touche.
Pour en savoir plus, reportez-vous à
la page 15, Utilisation de la barre
temporelle.
a Change le type de fichier multimédia.
Pour en savoir plus, reportez-vous à
la page 28, Changement du type de
fichier multimédia.
b Bascule entre lecture et pause.
c Utilise la fonction “Sound Retriever”.
Pour en savoir plus, reportez-vous à la
page 78, Réglage de la fonction “Sound
Retriever”.
d Lit des fichiers dans un ordre
aléatoire.
Pour en savoir plus, reportez-vous à la
page 28, Lecture des pistes dans un
ordre aléatoire.
e Règle une plage de lecture répétée.
Pour en savoir plus, reportez-vous à la
page 28, Réglage d’une plage de lec-
ture répétée.
f Recherche la partie que vous souhai-
tez lire.
Pour en savoir plus, reportez-vous à la
page 28, Recherche de la partie que
vous souhaitez lire.
g Masque les touches de l’écran tactile.
Touchez cette zone pour masquer les
touches de l’écran tactile.
p Touchez un quelconque endroit de l’écran
LCD pour afficher de nouveau les touches
de l’écran tactile.
h Affiche le menu DVD.
Pour en savoir plus, reportez-vous à la
page 28, Utilisation du menu DVD.
i Change la langue des sous-titres.
Pour en savoir plus, reportez-vous à la
page 29, Changement de la langue des
sous-titres.
j Change la langue de l’audio.
Pour en savoir plus, reportez-vous à la
page 29, Changement de la langue de
l’audio.
k Arrête la lecture.
l Change le mode écran large.
Pour en savoir plus, reportez-vous à la
page 78, Changement du mode écran
large.
m Avance d’une image (lecture image
par image) ou recule en ralenti (lec-
ture en ralenti).
Pour en savoir plus, reportez-vous à la
page 29, Lecture image par image.
Pour en savoir plus, reportez-vous à la
page 29, Lecture en ralenti.
n Procède à une opération (comme la
reprise) mémorisée sur le disque.
Pour en savoir plus, reportez-vous à la
page 29, Retour à une scène spécifiée.
o Reprend la lecture (Signet).
Pour en savoir plus, reportez-vous à la
page 29, Reprise de la lecture (Signet).
p Affiche le clavier du menu DVD.
Pour en savoir plus, reportez-vous à la
page 29, Utilisation du menu DVD à
l’aide des touches de l’écran tactile.
q Change d’angle de vue (multi-angle).
Pour en savoir plus, reportez-vous à la
page 30, Changement de l’affichage de
DVD multi-angle.
r Sélectionne la sortie audio.
Pour en savoir plus, reportez-vous à la
page 30, Sélection de la sortie audio.
Lecture de l’écran (pour
l’audio)
Exemple : CD
4
3
1
2
Lecture de l’écran (pour la
vidéo)
Exemple : DVD
9
8
3
1
7
6
5
Exemple : CD vidéo
3
1
a
4
2
1 Heure et date actuelles
2 Indicateur de l’état de la lecture
Indique l’état actuel de la lecture.
Lecture des pistes dans un ordre
aléatoire
Indicateur
Signification
Les pistes ne sont pas lues
dans un ordre aléatoire.
Toutes les pistes sur le disque
en cours de lecture sont lues
dans un ordre aléatoire.
Réglage d’une plage de lecture répétée
Indicateur
Signification
La piste en cours de lecture
seulement est répétée.
Le disque en cours de lecture
est répété.
Le chapitre en cours de lecture
seulement est répété.
Le titre en cours de lecture
seulement est répété.
3 Indicateur de temps de lecture
Indique le temps de lecture écoulé dans
le fichier sélectionné.
4 Indicateur du numéro de piste
Indique le numéro de la piste en cours de
lecture (si disponible).
5 Indicateur du canal audio
Indique le type de canal audio utilisé,
comme “Mch” (multicanaux).
6 Indicateur du format audionumérique
Indique le format audionumérique (for-
mat surround) sélectionné.
7 Indicateur de fréquence
d’échantillonnage
Indique la fréquence d’échantillonnage
en cours de lecture.
8 Indicateur de numéro du titre
Indique le numéro du titre en cours de
lecture.
9 Indicateur de numéro de chapitre
Indique le numéro du chapitre en cours
de lecture.
a Indicateur PBC ON
Indique qu’un disque avec PBC activé est
en cours de lecture.
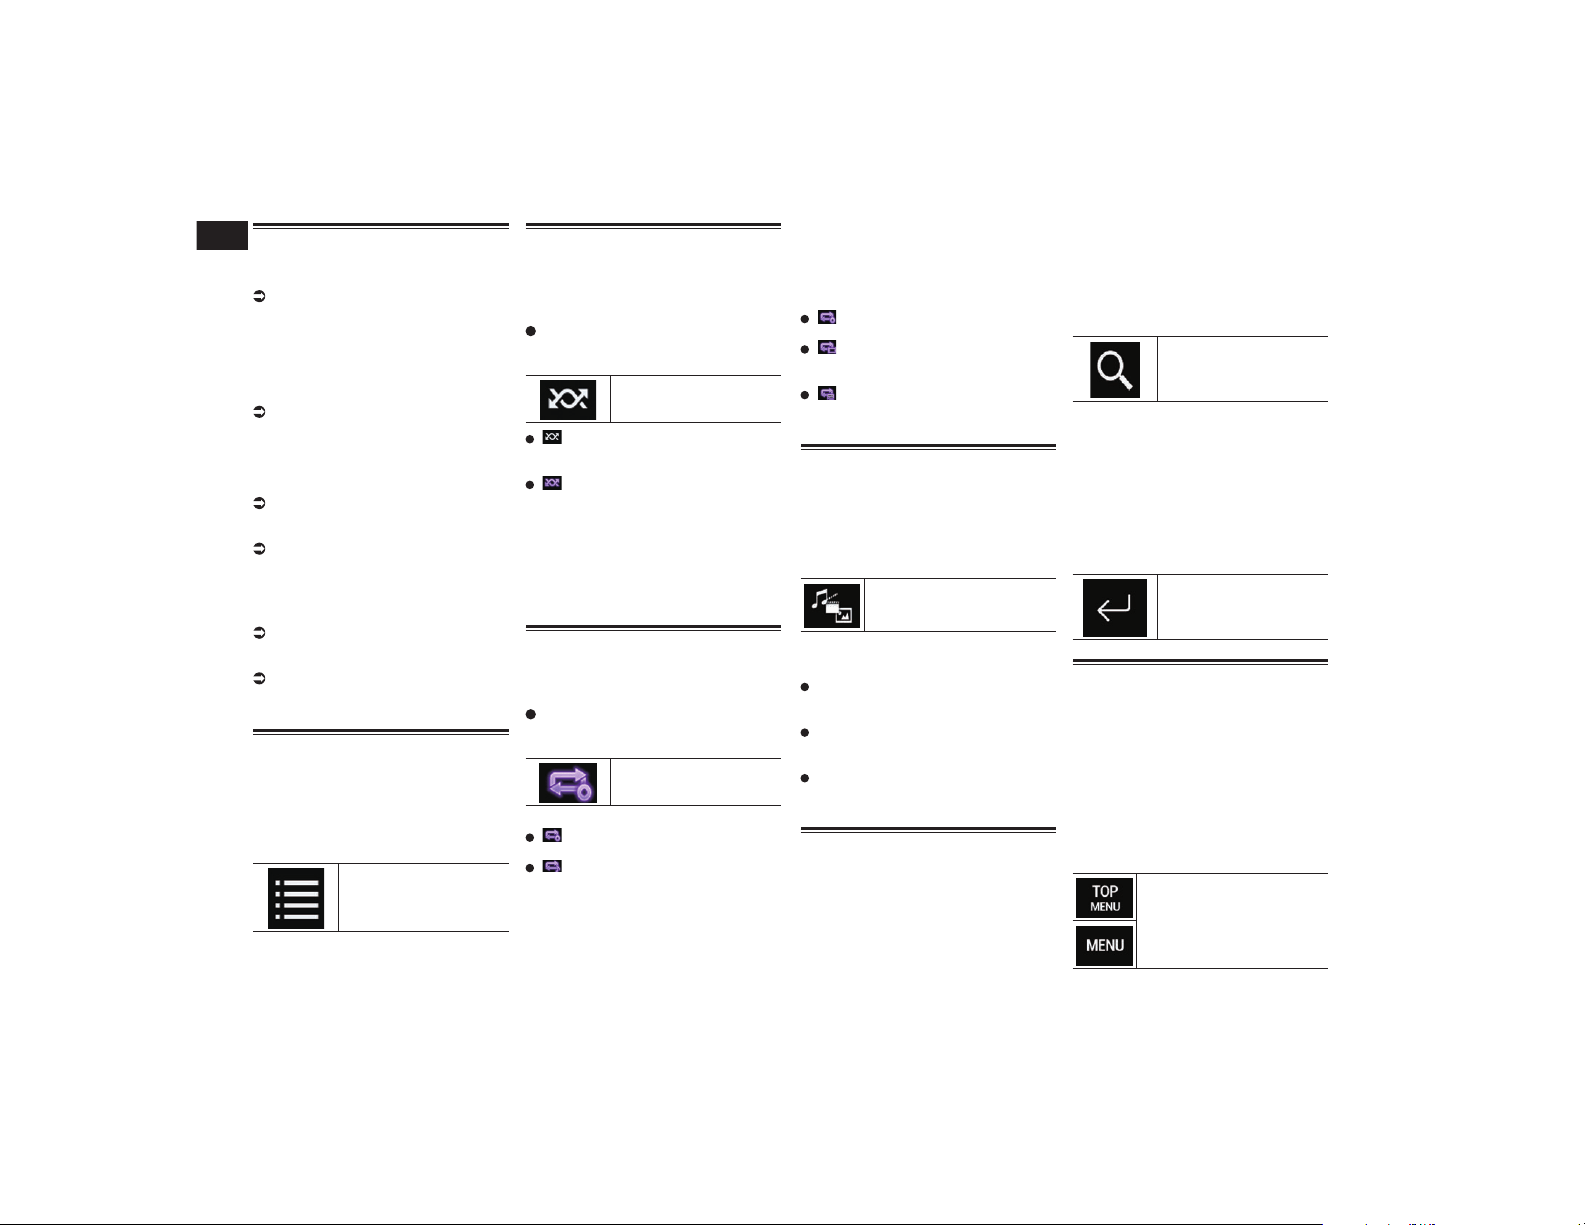
07
Chapitre
28
Fr
Procédure de départ
1 Affichez l’écran de Sélection de
source AV.
Pour en savoir plus sur les opérations,
reportez-vous à la page 13, Affichage
de l’écran de fonction AV.
2 Insérez le disque que vous voulez
lire dans le logement de charge-
ment de disque.
La source change et la lecture démarre.
Pour en savoir plus, reportez-vous à la
page 11, Insertion et éjection d’un
disque.
p Si le disque est déjà inséré, touchez
[Disc] sur la liste source ou sur l’écran de
Sélection de source AV.
Pour en savoir plus, reportez-vous à la
page 14, Sélection d’une source avant
dans la liste de sources.
Pour en savoir plus, reportez-vous à la
page 14, Sélection d’une source avant
sur l’écran de Sélection de source AV.
3 Utilisez les touches de l’écran
tactile pour commander le disque.
Pour en savoir plus, reportez-vous à la
page 26, Utilisation des touches de
l’écran tactile (pour l’audio).
Pour en savoir plus, reportez-vous à la
page 26, Utilisation des touches de
l’écran tactile (pour la vidéo).
Sélection de chiers dans la
liste des noms de chiers
Vous pouvez sélectionner des pistes à lire
dans la liste des titres de pistes qui corres-
pond à la liste des pistes enregistrées sur
un disque.
1 Touchez la touche suivante.
Affiche une liste des pistes
enregistrées sur le disque.
2 Touchez une piste de la liste pour
la lire.
Lecture des pistes dans un
ordre aléatoire
À l’aide d’une seule touche, vous pouvez lire
toutes les pistes du disque dans un ordre
aléatoire.
Touchez à plusieurs reprises la
touche suivante jusqu’à ce que le
réglage souhaité apparaisse.
Active ou désactive la lec-
ture aléatoire.
(par défaut) :
Les pistes ne sont pas lues dans un ordre
aléatoire.
:
Lit toutes les pistes dans la plage de
lecture répétée en cours dans un ordre
aléatoire.
p Si vous activez la lecture aléatoire alors
que la plage de lecture répétée est réglée
sur la piste en cours, la plage de lecture
répétée s’applique automatiquement à
l’ensemble du disque en cours de lecture.
Réglage d’une plage de lec-
ture répétée
Vous pouvez modifier la plage de lecture
répétée à l’aide d’une seule touche.
Touchez à plusieurs reprises la
touche suivante jusqu’à ce que le
réglage souhaité apparaisse.
Change la plage de lecture
répétée.
Audio
(par défaut) :
Le disque en cours de lecture est répété.
:
La piste en cours de lecture seulement
est répétée.
p Si vous activez la lecture aléatoire alors
que la plage de lecture répétée est réglée
sur la piste en cours, la plage de lecture
répétée s’applique automatiquement à
l’ensemble du disque en cours de lecture.
p Si vous changez la plage de lecture
répétée de l’ensemble du disque en cours
de lecture sur la piste en cours lorsque
la lecture aléatoire est activée, la lecture
aléatoire se désactive automatiquement.
Vidéo
(par défaut) :
Répète tous les fichiers.
:
Le chapitre en cours de lecture seule-
ment est répété.
:
Le titre en cours de lecture seulement est
répété.
Changement du type de
chier multimédia
Lors de la lecture d’un support numérique
contenant divers types de fichiers multimé-
dias, vous pouvez basculer entre les types de
fichiers multimédias à lire.
1 Touchez la touche suivante.
Affiche le menu contextuel de
sélection d’un type de fichier
multimédia à lire sur le disque.
2 Touchez l’élément que vous sou-
haitez régler.
Music :
Passe au type de fichier multimédia
musical (audio compressé).
Video :
Passe au type de fichier multimédia
vidéo.
CD-DA :
Passe au type de fichier multimédia CD
(données audio (CD-DA)).
Recherche de la partie que
vous souhaitez lire
Vous pouvez utiliser la fonction de recherche
pour trouver la partie que vous souhaitez lire.
p Pour les DVD-Vidéo, vous pouvez sélec-
tionner Title (titre), Chapter (chapitre)
ou 10Key (clavier numérique).
p Pour les CD vidéo, vous pouvez sélec-
tionner Track (piste) ou 10Key (clavier
numérique).
10Key (clavier numérique) est disponible
uniquement pour les CD vidéo dotés de la
fonction PBC (contrôle de la lecture).
p La recherche de chapitre et la recherche
temporelle ne sont pas disponibles quand
la lecture du disque est arrêtée.
1 Touchez la touche suivante.
Affiche l’écran de recherche
directe d’un numéro.
2 Touchez [Title] (titre), [Chapter]
(chapitre), [10Key] (clavier numé-
rique) ou [Track] (piste).
3 Touchez [0] à [9] pour saisir le
numéro souhaité.
p Pour annuler un numéro saisi, touchez
[C]. Pour annuler les numéros saisis,
maintenez enfoncée la touche [C].
4 Touchez la touche suivante.
Enregistre les numéros et
lance la lecture.
Utilisation du menu DVD
Vous pouvez commander le menu DVD en
touchant directement un élément du menu
sur l’écran.
p Il se peut que cette fonction ne fonc-
tionne pas correctement avec le contenu
de certains disques DVD. Le cas échéant,
utilisez les touches de l’écran tactile afin
de commander le menu DVD.
1 Touchez l’écran pour afficher les
touches de l’écran tactile.
2 Touchez la touche suivante.
Affiche les touches de l’écran
tactile pour pouvoir utiliser le
menu DVD.
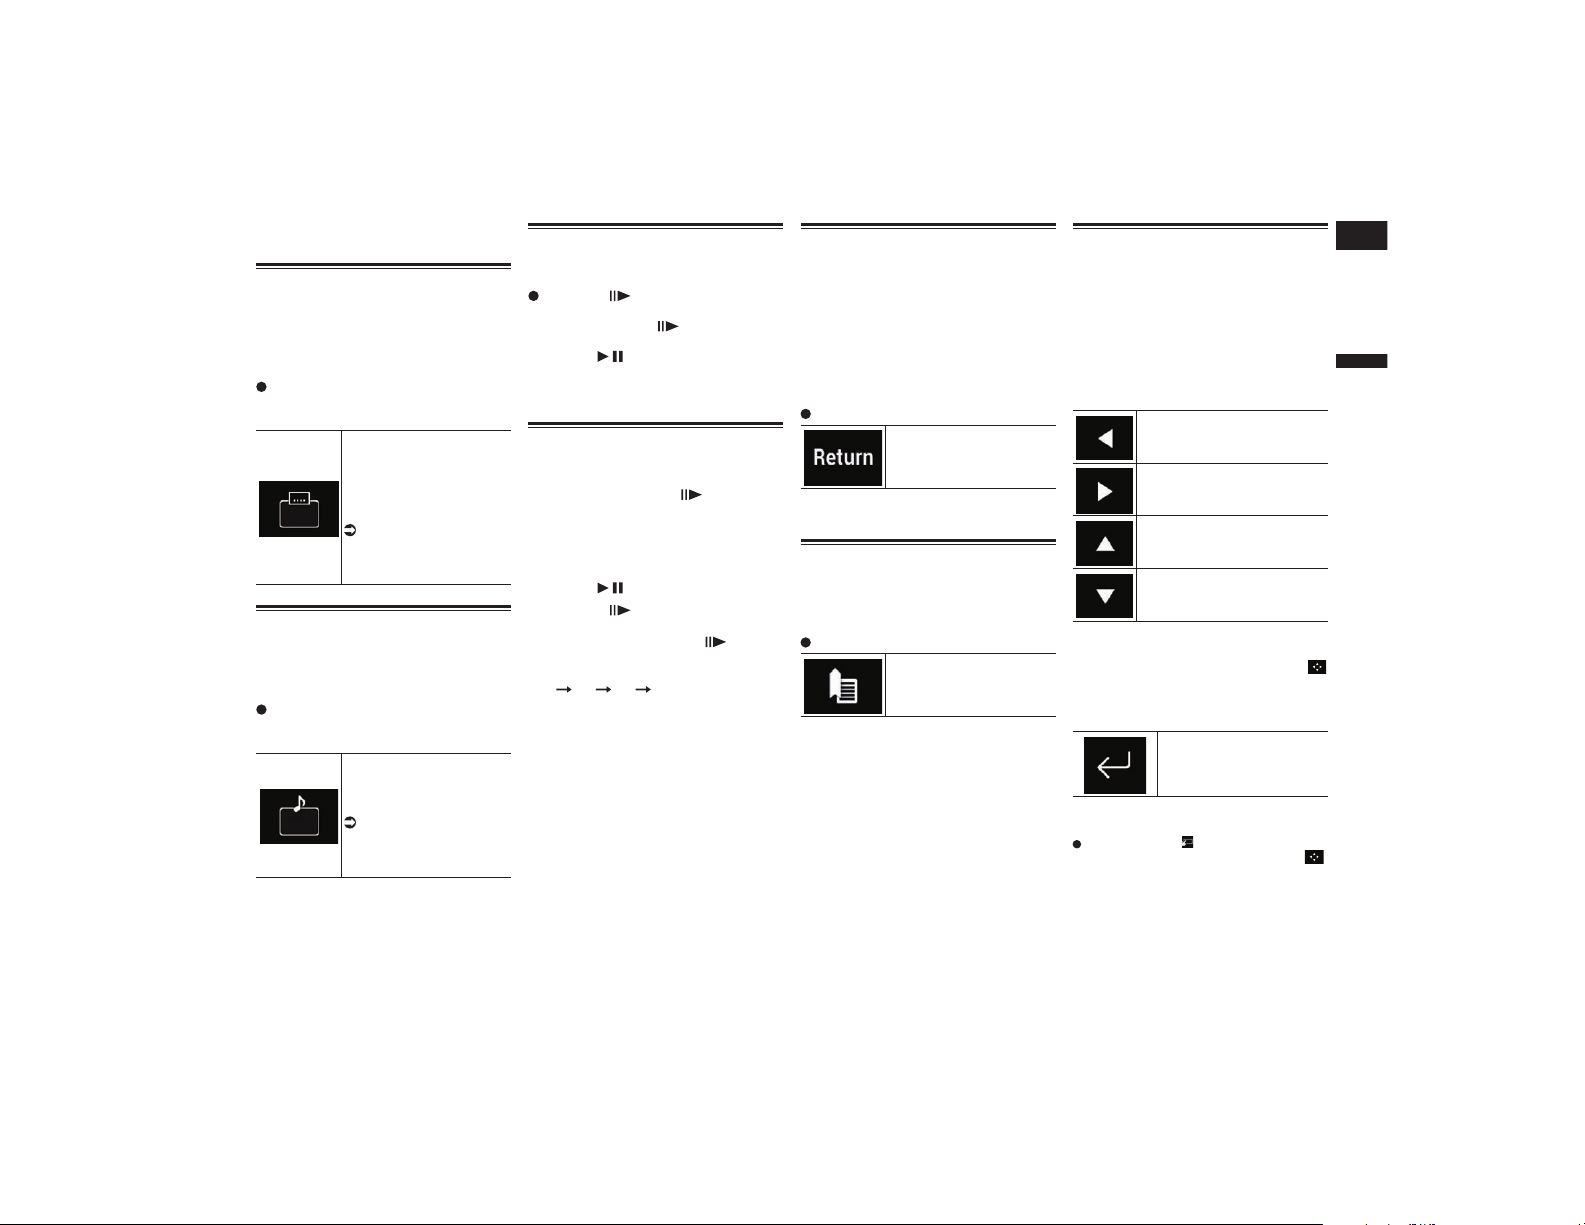
Français
07
Chapitre
29
Fr
3 Touchez l’élément de menu
souhaité.
Changement de la langue des
sous-titres
Vous pouvez changer de langue de sous-
titres pendant la lecture d’un disque
s’il comporte des données multilingues
(multi-sous-titre).
Touchez à plusieurs reprises la
touche suivante jusqu’à ce que le
réglage souhaité apparaisse.
Change la langue des
sous-titres.
Vous pouvez spécifier la
langue souhaitée comme
langue des sous-titres par
défaut.
Pour en savoir plus,
reportez-vous à la
page 74, Réglage des
langues prioritaires.
Changement de la langue de
l’audio
Vous pouvez changer de langue audio pen-
dant la lecture d’un disque s’il comporte des
données multilingues (multi-audio).
Touchez à plusieurs reprises la
touche suivante jusqu’à ce que le
réglage souhaité apparaisse.
Change la langue de l’audio.
Vous pouvez spécifier la
langue souhaitée comme
langue de l’audio par défaut.
Pour en savoir plus,
reportez-vous à la
page 74, Réglage des
langues prioritaires.
Lecture image par image
Cette fonction vous permet d’avancer image
par image pendant la pause.
Touchez [ ] pendant la pause.
La vidéo avance image par image chaque
fois que vous touchez [ ].
p Pour retourner à la lecture normale,
touchez [ / ].
p Avec certains disques, il est possible que
les images ne soient pas nettes en lecture
image par image.
Lecture en ralenti
Cette fonction vous permet de ralentir la
vitesse de lecture.
1 Maintenez enfoncé [ ] jusqu’à
ce qu’une icône en forme de flèche
s’affiche pendant la lecture.
La flèche s’affiche et la lecture en ralenti
commence.
p Pour retourner à la lecture normale,
touchez [ / ].
2 Touchez [ ] pour régler la vitesse
de lecture en mode ralenti.
Chaque fois que vous touchez [ ], la
vitesse change parmi quatre plages, dans
l’ordre suivant :
1/16 1/8 1/4 1/2
p Il n’y a pas de son pendant la lecture en
ralenti.
p Avec certains disques, il est possible que
les images ne soient pas nettes en lecture
en ralenti.
p La lecture en ralenti arrière n’est pas
possible.
Retour à une scène spéciée
Lorsque vous utilisez un disque comportant
un point enregistré indiquant où revenir, le
disque retourne au point spécifié et lance la
lecture à partir de celui-ci.
Cette fonction ne peut pas être utilisée si
aucune scène spécifiée n’a été préprogram-
mée sur le disque.
p Cette fonction est disponible uniquement
pour les DVD-Vidéo et CD vidéo dotés de
la fonction PBC (contrôle de la lecture).
Touchez la touche suivante.
Retourne au point spécifié
et lance la lecture à partir de
celui-ci.
p Le point spécifié varie en fonction du
disque.
Reprise de la lecture (Signet)
La fonction de Signet vous permet de
reprendre la lecture à partir d’une scène
sélectionnée, la prochaine fois que le disque
est chargé.
Touchez la touche suivante.
Crée un signet sur un point
sur chaque disque, jusqu’à
cinq disques maximum.
p Si vous tentez de mémoriser un autre
point sur le même disque, l’ancien signet
est remplacé par le nouveau.
p Pour effacer le signet sur un disque,
maintenez enfoncée cette touche.
p Le plus ancien signet est remplacé par le
nouveau.
Utilisation du menu DVD à
l’aide des touches de l’écran
tactile
Si des éléments du menu DVD apparaissent,
les touches de l’écran tactile peuvent les
recouvrir. Le cas échéant, sélectionnez un
élément au moyen de ces touches.
1 Touchez les touches suivantes pour
sélectionner l’élément de menu
souhaité.
Sélectionne l’élément de menu
à gauche.
Sélectionne l’élément de menu
à droite.
Sélectionne l’élément de menu
supérieur.
Sélectionne l’élément de menu
inférieur.
p Si les touches de l’écran tactile de sélec-
tion du menu DVD disparaissent, touchez
n’importe où sur l’écran, puis touchez
. Les touches de l’écran tactile s’affichent
à nouveau.
2 Touchez la touche suivante.
Confirme l’élément
sélectionné.
p L’affichage du menu varie en fonction du
disque.
Si vous touchez , les touches de
l’écran tactile disparaissent et l’icône
s’affiche.
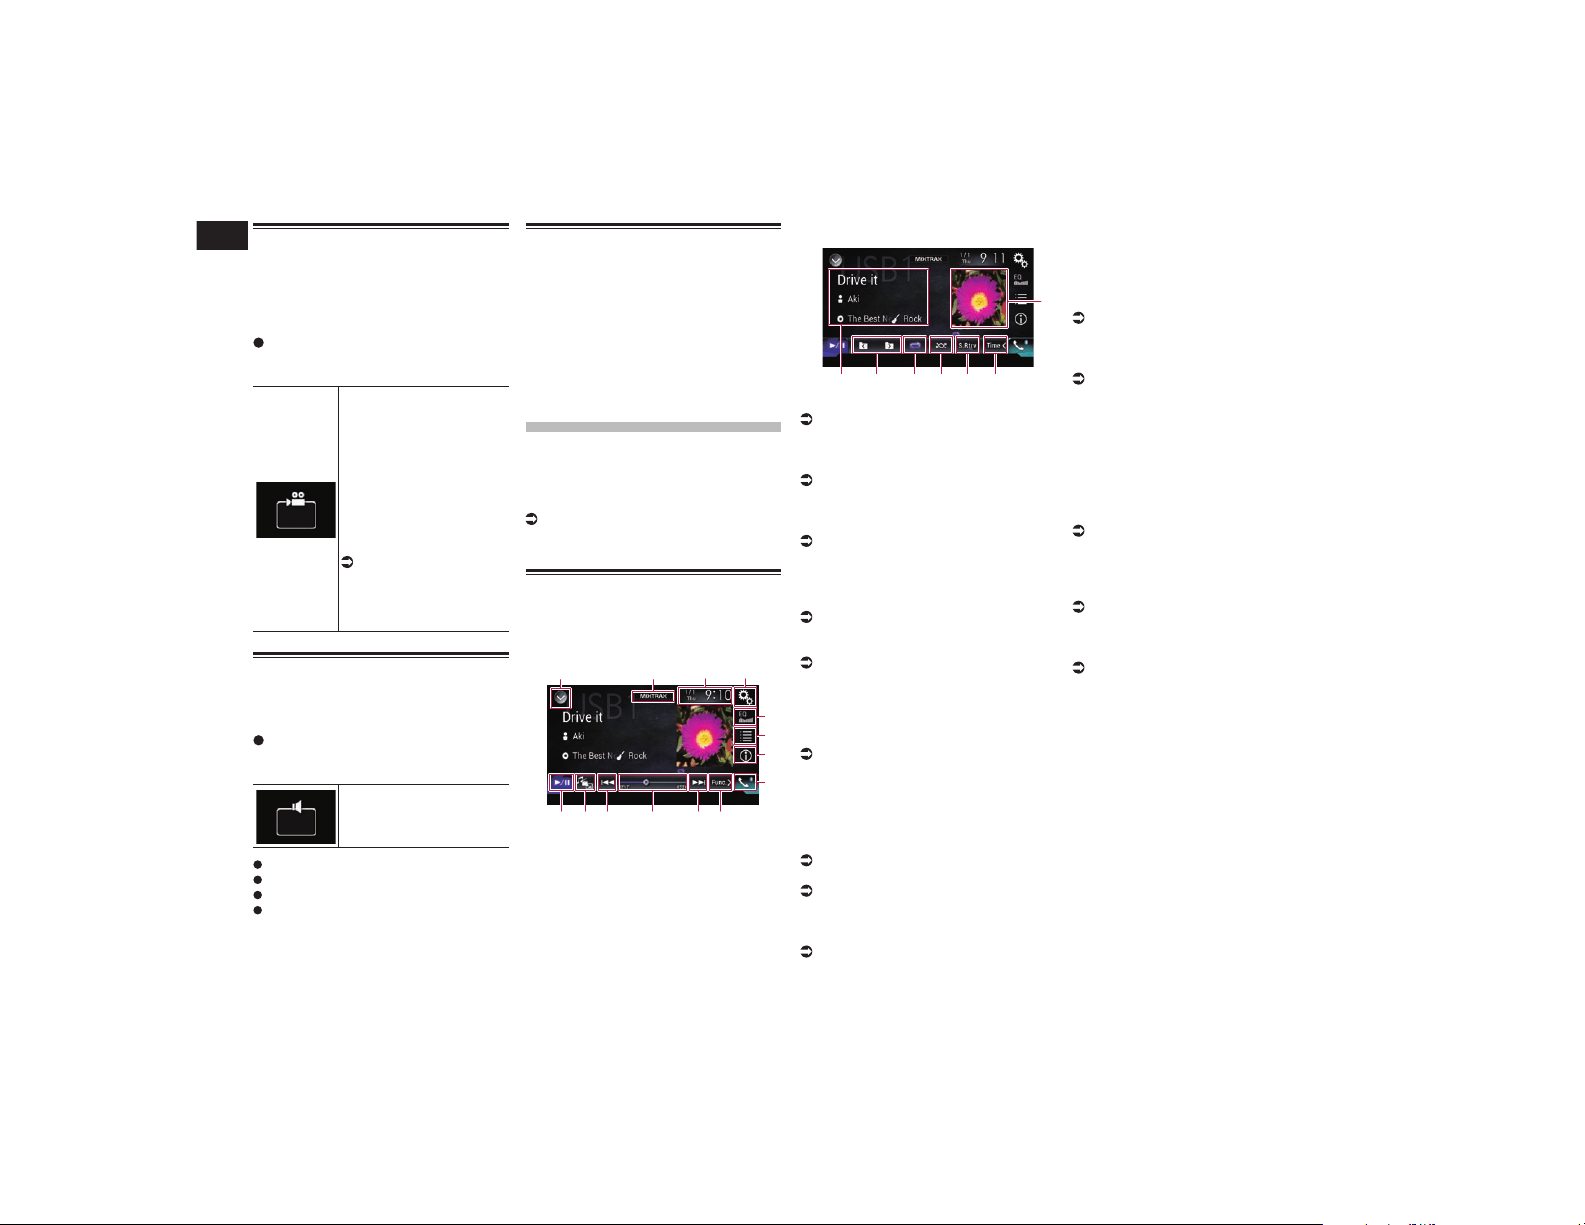
08
Chapitre
30
Fr
Changement de l’afchage de
DVD multi-angle
Dans le cas de DVD contenant des enregis-
trements multi-angles (scènes prises sous
plusieurs angles), vous pouvez basculer
entre les angles de vue pendant la lecture.
Touchez à plusieurs reprises la
touche suivante jusqu’à ce que le
réglage souhaité apparaisse.
Bascule entre les angles
de vue.
Pendant la lecture d’une
scène filmée sous plusieurs
angles, l’icône d’angle est
affichée.
Activez ou désactivez
l’affichage de l’icône
d’angle à l’aide du menu
“Configuration DVD/
DivX”.
Pour en savoir plus,
reportez-vous à la
page 75, Réglage de
l’affichage de l’icône
d’angle.
Sélection de la sortie audio
Lors de la lecture de DVD enregistré avec
de l’audio LPCM, vous pouvez changer la
sortie audio.
Touchez à plusieurs reprises la
touche suivante jusqu’à ce que le
réglage souhaité apparaisse.
Change le réglage de sortie
audio.
L+R : gauche et droite
Left : gauche
Right : droite
Mix : mixage gauche et droite
p Cette fonction n’est pas disponible quand
la lecture du disque est arrêtée.
p L’apparence de cette touche est différente
selon le réglage sélectionné.
Utilisation avec les boutons
physiques
Appuyez sur le bouton TRK.
Vous pouvez sauter les pistes ou les cha-
pitres en avant ou en arrière.
Maintenez enfoncé le bouton TRK.
Vous pouvez effectuer un retour ou une
avance rapide.
Lecture de chiers
audio compressé
Vous pouvez lire des fichiers audio com-
pressé sur un disque ou un périphérique
de stockage externe (USB, SD) à l’aide du
lecteur intégré de ce produit. Cette section
vous explique comment.
Pour en savoir plus, reportez-vous à la
page 96, Tableau de compatibilité des
supports.
Utilisation des touches de
l’écran tactile
Exemple : USB
Écran de lecture (page 1)
1 2 43
9
5
6
7
8
d c a b a
Écran de lecture (page 2)
9
e
f
g
hij
1 Affiche la liste de sources.
Pour en savoir plus, reportez-vous à la
page 14, Sélection d’une source avant
dans la liste de sources.
2 Affiche l’écran MIXTRAX.
Pour en savoir plus, reportez-vous à
Chapitre 22.
3 Affiche l’écran de Réglage de l’heure
et de la date.
Pour en savoir plus, reportez-vous à la
page 77, Réglage de l’heure et de la
date.
4 Affiche l’écran de Paramètre.
5 Rappelle des courbes d’égalisation.
Pour en savoir plus, reportez-vous à la
page 70, Utilisation de l’égaliseur.
6 Sélectionne un fichier dans la liste.
Pour en savoir plus, reportez-vous à la
page 32, Sélection de fichiers dans la
liste des noms de fichiers.
Affiche une liste liée à la chanson
en cours de lecture (recherche de
liaison).
Pour en savoir plus, reportez-vous à la
page 32, Sélection d’un fichier dans la
liste lié à la chanson en cours de lecture
(recherche de liaison).
7 Bascule l’affichage du texte entre les
informations sur la balise et les infor-
mations sur le fichier/dossier.
Pour en savoir plus, reportez-vous à la
page 31, Lecture de l’écran.
Pour en savoir plus, reportez-vous à la
page 31, Changement du mode de
navigation.
8 Affiche l’écran de Menu téléphone.
Pour en savoir plus, reportez-vous à la
page 18, Affichage du menu téléphone.
9 Passe à la page suivante ou précé-
dente des touches de l’écran tactile.
a Saute des fichiers en avant ou en
arrière.
b Change le point de lecture en faisant
glisser la touche.
Pour en savoir plus, reportez-vous à
la page 15, Utilisation de la barre
temporelle.
c Change le type de fichier multimédia.
Pour en savoir plus, reportez-vous à
la page 32, Changement du type de
fichier multimédia.
d Bascule entre lecture et pause.
e La liste des albums est affichée.
p Cette fonction est disponible uniquement
lors de la lecture de fichiers d’un périphé-
rique de stockage externe (USB, SD) en
mode Music Browse.
f Utilise la fonction “Sound Retriever”.
Pour en savoir plus, reportez-vous à la
page 78, Réglage de la fonction “Sound
Retriever”.
g Lit des fichiers dans un ordre
aléatoire.
Pour en savoir plus, reportez-vous à la
page 32, Lecture des fichiers dans un
ordre aléatoire.
h Règle une plage de lecture répétée.
Pour en savoir plus, reportez-vous à la
page 32, Réglage d’une plage de lec-
ture répétée.
i Sélectionne le dossier précédent ou
suivant.
j Affiche la liste des catégories compre-
nant l’élément sélectionné.
p Cette fonction est disponible uniquement
lors de la lecture de fichiers d’un périphé-
rique de stockage externe (USB, SD) en
mode Music Browse.

Français
08
Chapitre
31
Fr
Lecture de l’écran
Exemple : USB
5
2
4
3
1
1 Informations sur le fichier sélectionné
Mode Music Browse
Titre de la chanson/Nom du fichier
Indique le titre de la chanson en cours
de lecture (si disponible). Si le titre d’une
chanson n’est pas disponible, le nom du
fichier apparaît.
: Nom de l’artiste
Indique le nom de l’artiste de la chanson
en cours de lecture (si disponible). “Sans
non” s’affiche si aucune information
correspondante n’est disponible.
: Titre de l’album/Nom du dossier
Indique le titre de l’album du fichier en
cours de lecture (si disponible). Si le titre
de l’album n’est pas disponible, le nom
du dossier apparaît.
: Genre
Indique le genre du fichier en cours de
lecture (si disponible). “Sans genre”
s’affiche si aucune information corres-
pondante n’est disponible.
p Aucune information n’est affichée si la
chanson en cours de lecture est dans un
format ne prenant pas ces fonctions en
charge.
Mode Folder Browse
: Nom du fichier
Indique le nom du fichier en cours de
lecture.
: Nom du dossier
Indique le nom du dossier contenant le
fichier en cours de lecture.
2 Heure et date actuelles
3 Pochette de l’album
Pochette de l’album de la chanson en
cours de lecture, si disponible.
4 Indicateur de l’état de la lecture
Indique l’état actuel de la lecture.
Lecture des fichiers dans un ordre
aléatoire
Indicateur
Signification
Les fichiers ne sont pas lus
dans un ordre aléatoire.
Lit tous les fichiers dans la
plage de lecture répétée en
cours dans un ordre aléatoire.
Réglage d’une plage de lecture répétée
(pour Disque)
Indicateur
Signification
Le fichier en cours de lecture
seulement est répété.
Le dossier en cours de lecture
seulement est répété.
Tous les fichiers audio com-
pressés sont répétés.
Réglage d’une plage de lecture répétée
(pour le mode Music Browse)
Indicateur
Signification
Le fichier en cours de lecture
seulement est répété.
Tous les fichiers audio com-
pressés sont répétés.
Réglage d’une plage de lecture répétée
(pour le mode Folder Browse)
Indicateur
Signification
Le fichier en cours de lecture
seulement est répété.
Le dossier en cours de lecture
seulement est répété.
Tous les fichiers audio com-
pressés sont répétés.
5 Indicateur de temps de lecture
Indique le temps de lecture écoulé dans
le fichier sélectionné.
Procédure de démarrage (pour
Disque)
1 Affichez l’écran de Sélection de
source AV.
Pour en savoir plus sur les opérations,
reportez-vous à la page 13, Affichage
de l’écran de fonction AV.
2 Insérez le disque que vous voulez
lire dans le logement de charge-
ment de disque.
La source change et la lecture démarre.
Pour en savoir plus, reportez-vous à la
page 11, Insertion et éjection d’un
disque.
p Si le disque est déjà inséré, touchez
[Disc] sur la liste source ou sur l’écran de
Sélection de source AV.
Pour en savoir plus, reportez-vous à la
page 14, Sélection d’une source avant
dans la liste de sources.
Pour en savoir plus, reportez-vous à la
page 14, Sélection d’une source avant
sur l’écran de Sélection de source AV.
3 Utilisez les touches de l’écran
tactile pour commander le disque.
Pour en savoir plus, reportez-vous à la
page 30, Utilisation des touches de
l’écran tactile.
Procédure de démarrage (pour
USB/SD)
1 Affichez l’écran de Sélection de
source AV.
Pour en savoir plus sur les opérations,
reportez-vous à la page 13, Affichage
de l’écran de fonction AV.
2 Insérez la carte mémoire SD dans
la fente de carte SD ou branchez le
périphérique de stockage USB sur
le connecteur USB.
Pour en savoir plus, reportez-vous à la
page 12, Branchement d’un périphé-
rique de stockage USB.
Pour en savoir plus, reportez-vous à la
page 11, Insertion et éjection d’une
carte mémoire SD.
3 Touchez [USB] ou [SD] sur l’écran
de Sélection de source AV.
La source change et la lecture démarre.
4 Utilisez les touches de l’écran
tactile pour commander le périphé-
rique de stockage externe (USB,
SD).
Pour en savoir plus, reportez-vous à la
page 30, Utilisation des touches de
l’écran tactile.
p La lecture suit l’ordre des numéros de
dossier. Les dossiers sont ignorés s’ils
ne contiennent pas de fichiers lisibles.
En l’absence de fichiers lisibles dans
le dossier 01 (dossier racine), la lecture
commence depuis le dossier 02.
Changement du mode de
navigation
Ce produit prend en charge deux types de
mode de navigation : mode Folder Browse et
mode Music Browse.
p Ces modes de navigation s’appliquent
uniquement aux périphériques de stoc-
kage externe (USB, SD).
Mode Music Browse
Affiche un titre de chanson, nom d’ar-
tiste, titre d’album et genre dans la zone
d’affichage des informations du fichier en
cours de lecture sur l’écran de Fonction
AV. Sélectionnez si vous souhaitez lire des
fichiers musicaux par catégorie de titre de
chanson, nom d’artiste, titre d’album ou
genre.
Lorsque vous connectez un périphérique
de stockage externe (USB, SD), ce produit
accède à la base de données de fichiers
musicaux contenant des informations de

08
Chapitre
32
Fr
balise et passe automatiquement en mode
Music Browse.
Mode Folder Browse
Affiche un nom de dossier et un nom de
fichier dans la zone d’affichage des infor-
mations du fichier en cours de lecture sur
l’écran de Fonction AV. Sélectionnez si vous
souhaitez rechercher des dossiers ou des
fichiers musicaux sur l’écran de liste.
p Vous pouvez basculer entre les modes de
navigation pour une recherche de fichier
en touchant les onglets et en sélection-
nant un fichier sur l’écran de liste.
Touchez à plusieurs reprises la
touche suivante jusqu’à ce que le
réglage souhaité apparaisse.
Bascule les informations
d’affichage entre les infor-
mations de balise (titre, nom
de l’artiste, titre de l’album,
etc.) et les informations de
nom de fichier/dossier.
Sélection de chiers dans la
liste des noms de chiers
Vous pouvez trouver des fichiers à lire à
l’aide de la liste des fichiers et dossiers enre-
gistrés sur un disque ou un périphérique de
stockage externe (USB, SD).
1 Touchez la touche suivante.
Affiche la liste des fichiers
ou dossiers enregistrés sur
un disque ou le périphérique
de stockage externe (USB,
SD).
p Touchez l’onglet “File” pour afficher la
liste des fichiers/dossiers d’un périphé-
rique de stockage externe (USB, SD).
2 Touchez un fichier de la liste pour
le lire.
p Les fichiers sont lus dans l’ordre des
numéros de fichiers.
p Touchez un dossier dans la liste pour voir
son contenu. Vous pouvez lire un fichier
dans la liste en le touchant.
Sélection d’un chier dans
la liste lié à la chanson en
cours de lecture (recherche de
liaison)
Vous pouvez sélectionner les fichiers à lire
à l’aide de la liste de catégorie pour les
fichiers sur un périphérique de stockage
externe (USB, SD).
p Cette fonction est disponible uniquement
pour le périphérique de stockage externe
(USB, SD).
1 Touchez la touche suivante.
Affiche la liste des fichiers
ou dossiers enregistrés dans
le périphérique de stockage
externe (USB, SD).
p Si la liste “File” est affichée, touchez
l’onglet “Tag” pour afficher la liste de
catégorie.
2 Touchez la catégorie souhaitée
pour afficher la liste des fichiers.
L’écran de liste apparaît.
3 Touchez l’élément que vous voulez
affiner.
Affinez l’élément jusqu’à ce que le titre de
la chanson ou le nom du fichier souhaité
s’affiche dans la liste.
p Touchez [Tous] sur la liste pour inclure
toutes les options de la liste en cours. Par
exemple, si vous touchez [Tous] après
avoir touché [Artistes], vous pouvez pas-
ser à l’écran suivant avec tous les artistes
de la liste sélectionnés.
p Après avoir sélectionné “Artistes”,
“Albums” ou “Genres”, touchez une des
listes pour lancer la lecture de la pre-
mière chanson de la liste sélectionnée ou
afficher les options suivantes.
4 Touchez le titre de la chanson ou le
nom du fichier à lire.
Lecture des chiers dans un
ordre aléatoire
Tous les fichiers sur le disque ou le péri-
phérique de stockage externe (USB, SD)
peuvent être lus dans un ordre aléatoire en
touchant une seule touche.
Touchez à plusieurs reprises la
touche suivante jusqu’à ce que le
réglage souhaité apparaisse.
Active ou désactive la lec-
ture aléatoire.
(par défaut) :
Les fichiers ne sont pas lus dans un ordre
aléatoire.
:
Tous les fichiers audio dans la plage de
lecture répétée en cours sont lus dans un
ordre aléatoire.
p Si vous activez la lecture aléatoire alors
que la plage de lecture répétée est réglée
sur le fichier en cours en mode Music
Browse, la plage de lecture répétée
s’applique automatiquement au dossier
en cours du disque ou du périphérique de
stockage externe (USB, SD) en cours de
lecture.
p Si vous activez la lecture aléatoire alors
que la plage de lecture répétée est réglée
sur le fichier en cours en mode Folder
Browse, la plage de lecture répétée s’ap-
plique automatiquement à l’ensemble du
disque ou du périphérique de stockage
externe (USB, SD) en cours de lecture.
Réglage d’une plage de lec-
ture répétée
Vous pouvez modifier la plage de lecture
répétée à l’aide d’une seule touche.
Touchez à plusieurs reprises la
touche suivante jusqu’à ce que le
réglage souhaité apparaisse.
Change la plage de lecture
répétée.
Disque
(par défaut) :
Tous les fichiers audio compressés sont
répétés.
:
Le dossier en cours de lecture seulement
est répété.
:
Le fichier en cours de lecture seulement
est répété.
Mode Music Browse
(par défaut) :
Répète tous les fichiers.
:
Le fichier en cours de lecture seulement
est répété.
Mode Folder Browse
(par défaut) :
Répète tous les fichiers.
:
Le dossier en cours de lecture est répété.
:
Le fichier en cours de lecture seulement
est répété.
Changement du type de
chier multimédia
Lors de la lecture d’un support numérique
contenant divers types de fichiers multimé-
dias, vous pouvez basculer entre les types de
fichiers multimédias à lire.
1 Touchez la touche suivante.
Affiche le menu contextuel pour
sélectionner un type de fichier
multimédia à lire sur le disque
ou le périphérique de stockage
externe (USB, SD).
2 Touchez l’élément que vous sou-
haitez régler.
Music :
Passe au type de fichier multimédia
musical (audio compressé).
Video :
Passe au type de fichier multimédia
vidéo.
CD-DA :
Passe au type de fichier multimédia CD
(données audio (CD-DA)).
Photo :
Bascule le type de fichier multimédia sur
image fixe (données JPEG).
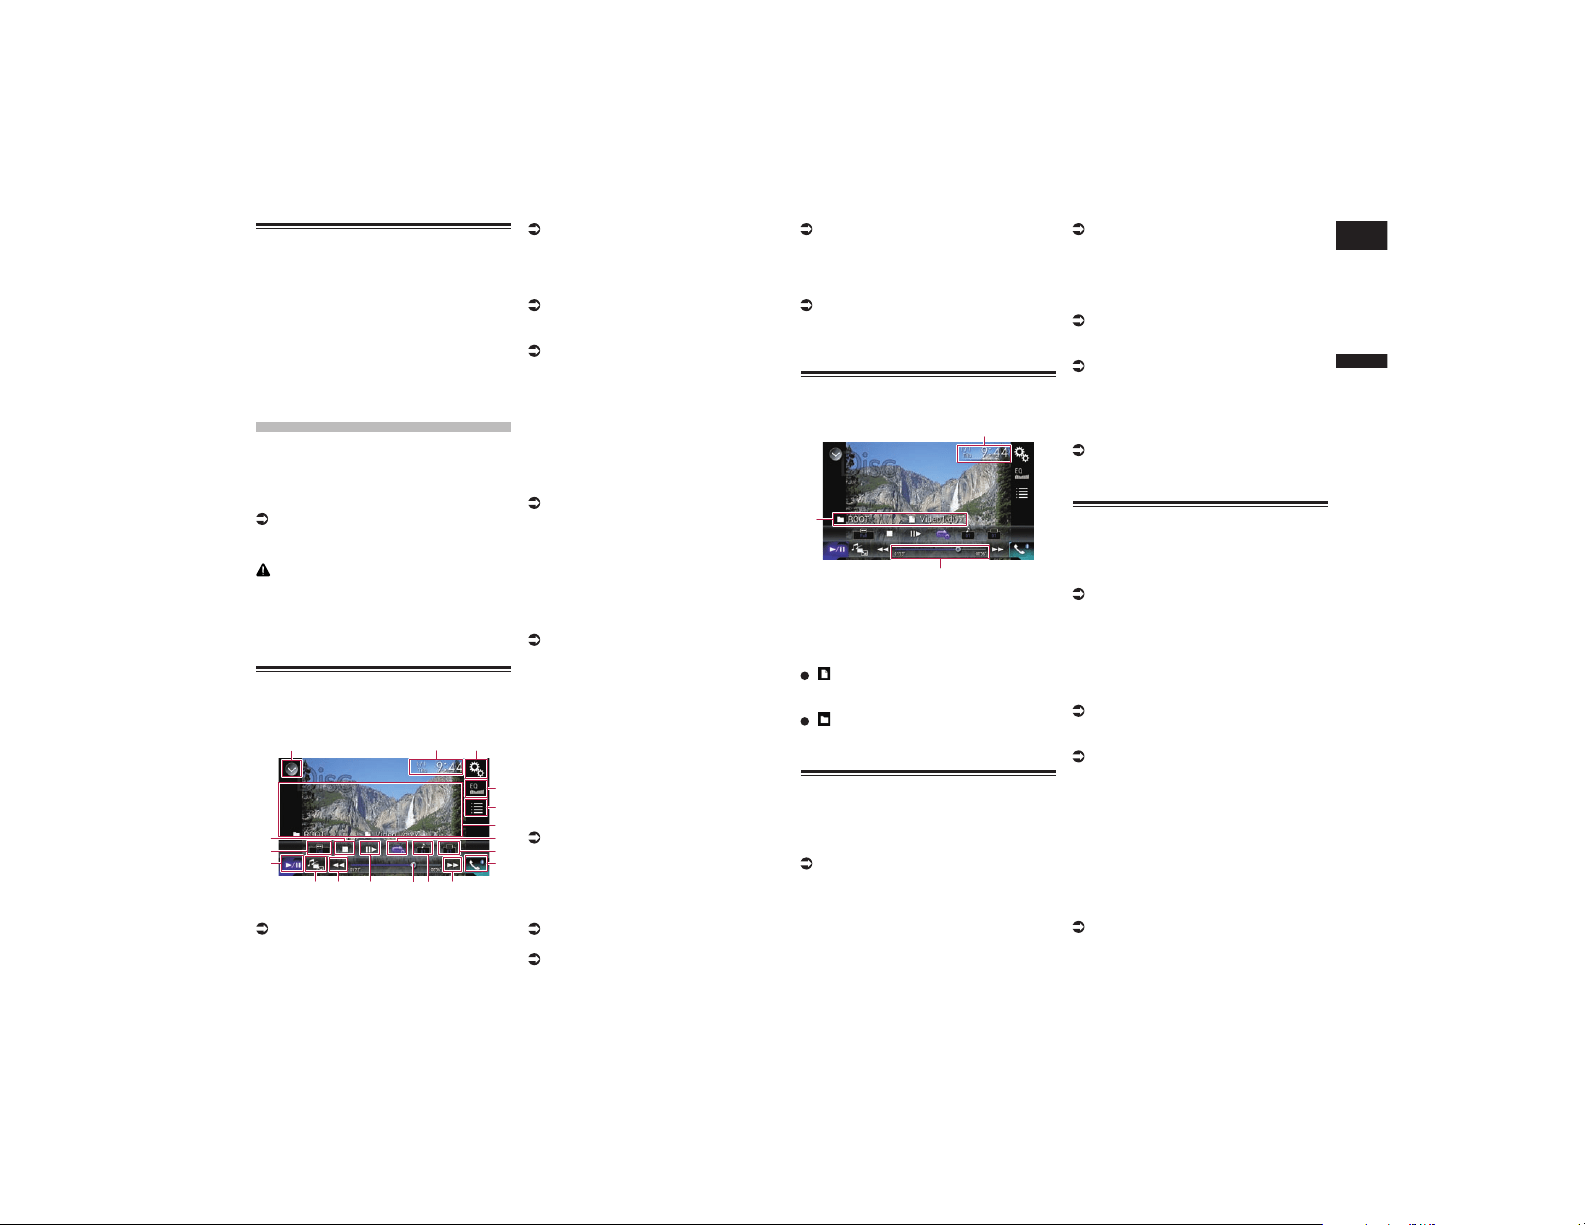
Français
09
Chapitre
33
Fr
Utilisation avec les boutons
physiques
Appuyez sur le bouton TRK.
Vous pouvez sauter les fichiers en avant ou
en arrière.
Maintenez enfoncé le bouton TRK.
Vous pouvez effectuer un retour ou une
avance rapide.
Lecture de chiers
vidéo compressée
Vous pouvez lire des fichiers vidéo com-
pressée sur un disque ou un périphérique
de stockage externe (USB, SD) à l’aide du
lecteur intégré de ce produit. Cette section
vous explique comment.
Pour en savoir plus, reportez-vous à la
page 96, Tableau de compatibilité des
supports.
ATTENTION
Pour des raisons de sécurité, les images
vidéo ne sont pas visibles quand le véhicule
est en mouvement. Pour voir des images
vidéo, arrêtez-vous dans un endroit sûr et
serrez le frein à main.
Utilisation des touches de
l’écran tactile
Exemple : disque
1 32
4
5
9
ce
f
g
h
a bd a
6
7
8
1 Affiche la liste de sources.
Pour en savoir plus, reportez-vous à la
page 14, Sélection d’une source avant
dans la liste de sources.
2 Affiche l’écran de Réglage de l’heure
et de la date.
Pour en savoir plus, reportez-vous à la
page 77, Réglage de l’heure et de la
date.
3 Affiche l’écran de Paramètre.
4 Rappelle des courbes d’égalisation.
Pour en savoir plus, reportez-vous à la
page 70, Utilisation de l’égaliseur.
5 Sélectionne un fichier dans la liste.
Pour en savoir plus, reportez-vous à la
page 34, Sélection de fichiers dans la
liste des noms de fichiers.
6 Masque les touches de l’écran tactile.
Touchez cette zone pour masquer les
touches de l’écran tactile.
p Touchez un quelconque endroit de l’écran
LCD pour afficher de nouveau les touches
de l’écran tactile.
7 Règle une plage de lecture répétée.
Pour en savoir plus, reportez-vous à la
page 34, Réglage d’une plage de lec-
ture répétée.
8 Change la langue des sous-titres.
Avec DivX comprenant des enregistre-
ments multi-sous-titres, vous pouvez
basculer entre les langues des sous-titres
pendant la lecture.
9 Affiche l’écran de Menu téléphone.
Pour en savoir plus, reportez-vous à la
page 18, Affichage du menu téléphone.
a Saute des fichiers en avant ou en
arrière.
b Change la langue de l’audio.
Avec des fichiers DivX permettant une
lecture audio dans différentes langues et
différents systèmes audio (Dolby Digital,
DTS, etc.), vous pouvez basculer entre les
langues ou les systèmes audio pendant la
lecture.
c Change le point de lecture en faisant
glisser la touche.
Pour en savoir plus, reportez-vous à
la page 15, Utilisation de la barre
temporelle.
d Avance d’une image (lecture image
par image) ou recule en ralenti (lec-
ture en ralenti).
Pour en savoir plus, reportez-vous à la
page 34, Lecture image par image.
Pour en savoir plus, reportez-vous à la
page 34, Lecture en ralenti.
e Change le type de fichier multimédia.
Pour en savoir plus, reportez-vous à
la page 34, Changement du type de
fichier multimédia.
f Bascule entre lecture et pause.
g Change le mode écran large.
Pour en savoir plus, reportez-vous à la
page 78, Changement du mode écran
large.
h Arrête la lecture.
Lecture de l’écran
Exemple : disque
3
2
1
1 Heure et date actuelles
2 Indicateur de temps de lecture
Indique le temps de lecture écoulé dans
le fichier sélectionné.
3 Informations sur le fichier sélectionné
: Nom du fichier
Indique le nom du fichier en cours de
lecture.
: Nom du dossier
Indique le nom du dossier contenant le
fichier en cours de lecture.
Procédure de démarrage (pour
Disque)
1 Affichez l’écran de Sélection de
source AV.
Pour en savoir plus sur les opérations,
reportez-vous à la page 13, Affichage
de l’écran de fonction AV.
2 Insérez le disque que vous voulez
lire dans le logement de charge-
ment de disque.
La source change et la lecture démarre.
Pour en savoir plus, reportez-vous à la
page 11, Insertion et éjection d’un
disque.
p Si le disque est déjà inséré, touchez
[Disc] sur la liste source ou sur l’écran de
Sélection de source AV.
Pour en savoir plus, reportez-vous à la
page 14, Sélection d’une source avant
dans la liste de sources.
Pour en savoir plus, reportez-vous à la
page 14, Sélection d’une source avant
sur l’écran de Sélection de source AV.
3 Utilisez les touches de l’écran
tactile pour commander le disque.
Pour en savoir plus, reportez-vous à la
page 33, Utilisation des touches de
l’écran tactile.
Procédure de démarrage (pour
USB/SD)
1 Affichez l’écran de Sélection de
source AV.
Pour en savoir plus sur les opérations,
reportez-vous à la page 13, Affichage
de l’écran de fonction AV.
2 Insérez la carte mémoire SD dans
la fente de carte SD ou branchez le
périphérique de stockage USB sur
le connecteur USB.
Pour en savoir plus, reportez-vous à la
page 12, Branchement d’un périphé-
rique de stockage USB.
Pour en savoir plus, reportez-vous à la
page 11, Insertion et éjection d’une
carte mémoire SD.
3 Touchez [USB] ou [SD] sur l’écran
de Sélection de source AV.
L’image s’affiche à l’écran.
4 Utilisez les touches de l’écran
tactile pour commander le périphé-
rique de stockage externe (USB,
SD).
Pour en savoir plus, reportez-vous à la
page 33, Utilisation des touches de
l’écran tactile.
p La lecture suit l’ordre des numéros de
dossier. Les dossiers sont ignorés s’ils

10
Chapitre
34
Fr
ne contiennent pas de fichiers lisibles.
En l’absence de fichiers lisibles dans
le dossier 01 (dossier racine), la lecture
commence depuis le dossier 02.
Sélection de chiers dans la
liste des noms de chiers
Vous pouvez sélectionner les fichiers à affi-
cher à l’aide de la liste de noms de fichiers
des fichiers enregistrés sur un disque ou le
périphérique de stockage externe (USB, SD).
1 Touchez la touche suivante.
Affiche la liste des fichiers
ou dossiers enregistrés sur
un disque ou le périphérique
de stockage externe (USB,
SD).
2 Touchez un fichier de la liste pour
le lire.
p Les fichiers sont lus dans l’ordre du
numéro de fichier et les dossiers sont
ignorés s’ils ne contiennent aucun fichier.
(Si le dossier 01 (dossier racine) ne
contient aucun fichier, la lecture com-
mence au dossier 02.)
p Touchez un dossier dans la liste pour voir
son contenu. Vous pouvez lire un fichier
dans la liste en le touchant.
Touchez le symbole de lecture de la
miniature pour prévisualiser le fichier.
Réglage d’une plage de lec-
ture répétée
Vous pouvez modifier la plage de lecture
répétée à l’aide d’une seule touche.
Touchez à plusieurs reprises la
touche suivante jusqu’à ce que le
réglage souhaité apparaisse.
Change la plage de lecture
répétée.
ou (par défaut) :
Répète tous les fichiers.
:
Le dossier en cours de lecture seulement
est répété.
:
Le fichier en cours de lecture seulement
est répété.
Lecture image par image
Cette fonction vous permet d’avancer image
par image pendant la pause.
p Cette fonction est disponible pendant la
lecture d’un fichier vidéo compressée
enregistré sur un disque.
Touchez [ ] pendant la pause.
La vidéo avance image par image chaque
fois que vous touchez [ ].
p Pour retourner à la lecture normale,
touchez [ / ].
p Avec certains disques, il est possible que
les images ne soient pas nettes en lecture
image par image.
Lecture en ralenti
Cette fonction vous permet de ralentir la
vitesse de lecture.
Touchez [ ] (périphérique de
stockage externe (USB, SD)) ou
touchez de manière prolongée [ ]
(disque) pendant la lecture.
La flèche s’affiche et la lecture en ralenti
commence.
p Il n’y a pas de son pendant la lecture en
ralenti.
p Avec certains disques et périphériques de
stockage externe (USB, SD), il est pos-
sible que les images ne soient pas nettes
en lecture en ralenti.
p Pour retourner à la lecture normale,
touchez [ / ].
p La lecture en ralenti arrière n’est pas
possible.
Changement du type de
chier multimédia
Lors de la lecture d’un support numérique
contenant divers types de fichiers multimé-
dias, vous pouvez basculer entre les types de
fichiers multimédias à lire.
1 Touchez la touche suivante.
Affiche le menu contextuel pour
sélectionner un type de fichier
multimédia à lire sur le disque
ou le périphérique de stockage
externe (USB, SD).
2 Touchez l’élément que vous sou-
haitez régler.
Music :
Passe au type de fichier multimédia
musical (audio compressé).
Video :
Passe au type de fichier multimédia
vidéo.
Photo :
Bascule le type de fichier multimédia sur
image fixe (données JPEG).
CD-DA :
Passe au type de fichier multimédia CD
(données audio (CD-DA)).
Utilisation avec les boutons
physiques
Appuyez sur le bouton TRK.
Vous pouvez sauter les fichiers en avant ou
en arrière.
Maintenez enfoncé le bouton TRK.
Vous pouvez effectuer un retour ou une
avance rapide.
Lecture de chiers
images xes
compressées
Vous pouvez visualiser des images fixes
(images JPEG) enregistrées sur un péri-
phérique de stockage externe (USB, SD) à
l’aide du lecteur intégré de ce produit. Cette
section vous explique comment.
Utilisation des touches de
l’écran tactile
Exemple : USB
1 32
4
5
8
abcd
e
f
9 9
6
7
1 Affiche la liste de sources.
Pour en savoir plus, reportez-vous à la
page 14, Sélection d’une source avant
dans la liste de sources.
2 Affiche l’écran de Réglage de l’heure
et de la date.
Pour en savoir plus, reportez-vous à la
page 77, Réglage de l’heure et de la
date.
3 Affiche l’écran de Paramètre.
4 Rappelle des courbes d’égalisation.
p Cette touche n’est pas disponible lors de
la visualisation d’images fixes enregis-
trées sur un périphérique de stockage
externe (USB, SD).
5 Sélectionne un fichier dans la liste.
Pour en savoir plus, reportez-vous à la
page 35, Sélection de fichiers dans la
liste des noms de fichiers.
6 Masque les touches de l’écran tactile.
Touchez cette zone pour masquer les
touches de l’écran tactile.
p Touchez un quelconque endroit de l’écran
LCD pour afficher de nouveau les touches
de l’écran tactile.
7 Lit des fichiers dans un ordre
aléatoire.
Pour en savoir plus, reportez-vous à la
page 35, Lecture des fichiers dans un
ordre aléatoire.
8 Affiche l’écran de Menu téléphone.
Pour en savoir plus, reportez-vous à la
page 18, Affichage du menu téléphone.
9 Saute des fichiers en avant ou en
arrière.
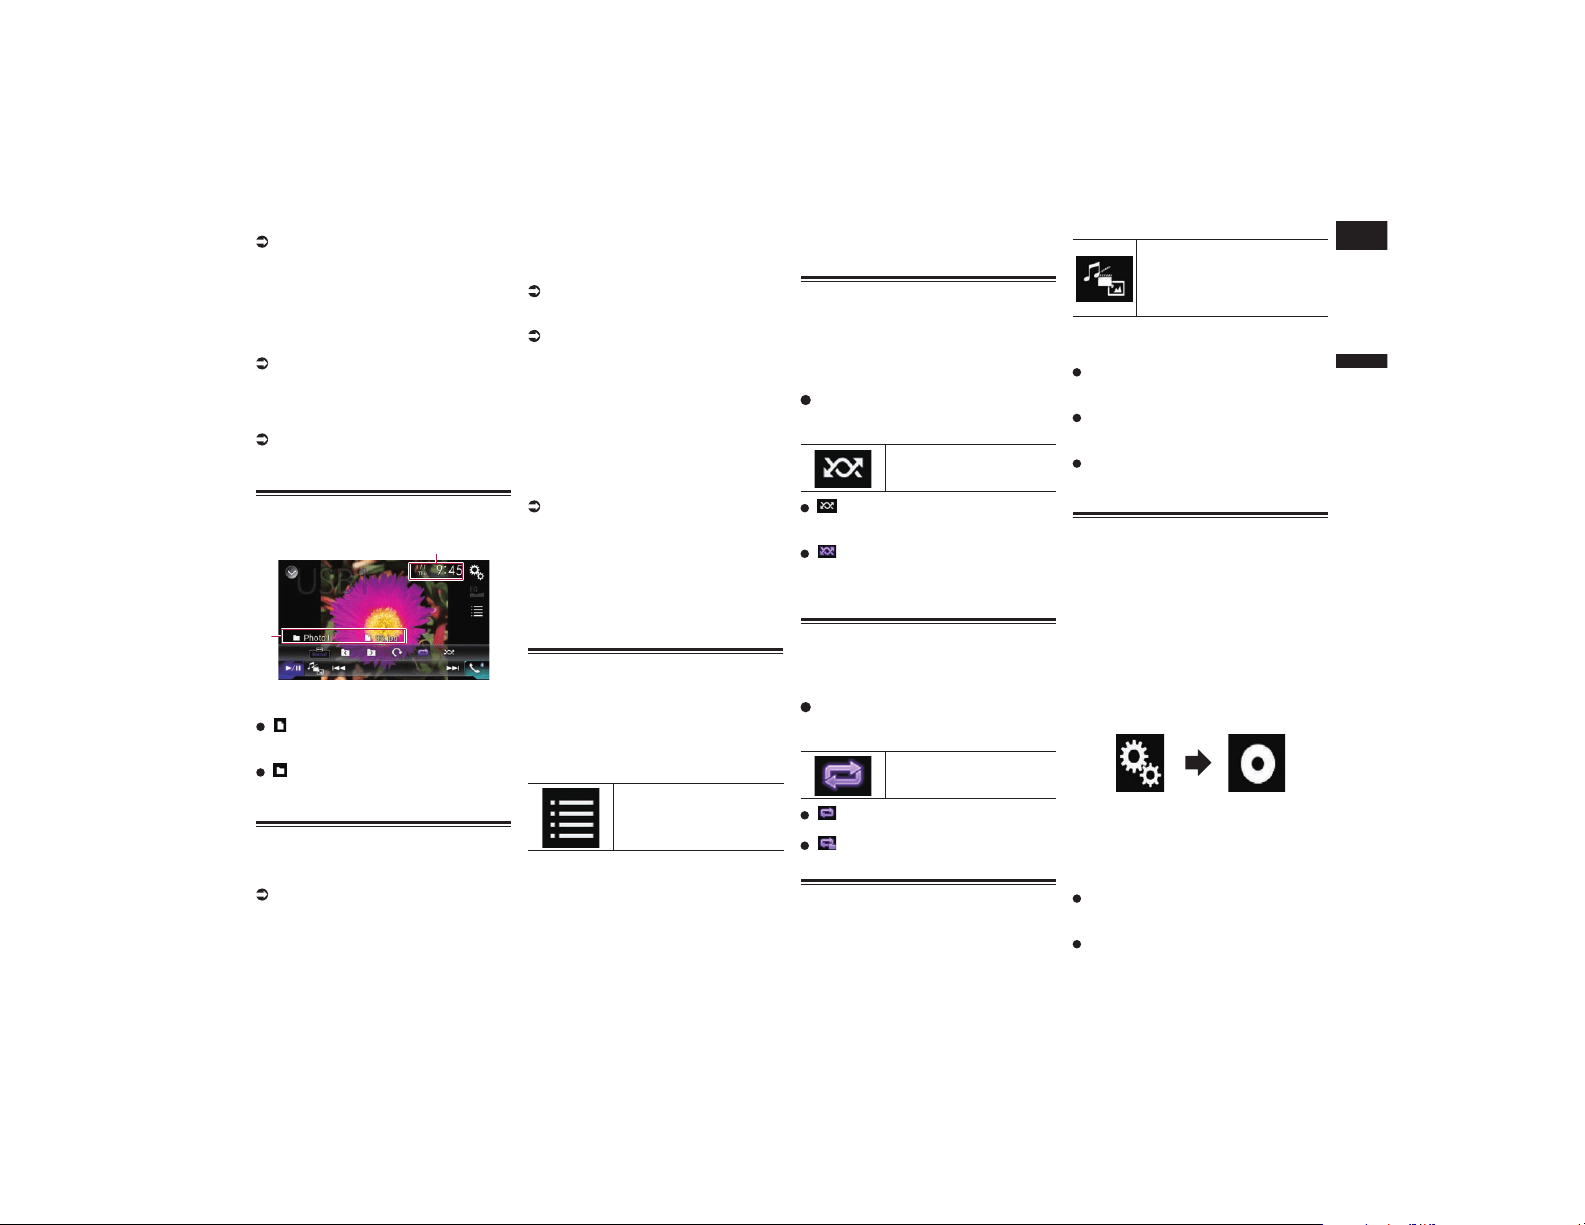
Français
10
Chapitre
35
Fr
a Règle une plage de lecture répétée.
Pour en savoir plus, reportez-vous à la
page 35, Réglage d’une plage de lec-
ture répétée.
b Tourne l’image affichée de 90° dans le
sens horaire.
c Sélectionne le dossier précédent ou
suivant.
d Change le type de fichier multimédia.
Pour en savoir plus, reportez-vous à
la page 35, Changement du type de
fichier multimédia.
e Bascule entre lecture et pause.
f Change le mode écran large.
Pour en savoir plus, reportez-vous à la
page 78, Changement du mode écran
large.
Lecture de l’écran
Exemple : USB
2
1
1 Heure et date actuelles
2 Informations sur le fichier sélectionné
: Nom du fichier
Indique le nom du fichier en cours de
lecture.
: Nom du dossier
Indique le nom du dossier contenant le
fichier en cours de lecture.
Procédure de départ
1 Affichez l’écran de Sélection de
source AV.
Pour en savoir plus sur les opérations,
reportez-vous à la page 13, Affichage
de l’écran de fonction AV.
2 Insérez la carte mémoire SD dans
la fente de carte SD ou branchez le
périphérique de stockage USB sur
le connecteur USB.
Pour en savoir plus, reportez-vous à la
page 12, Branchement d’un périphé-
rique de stockage USB.
Pour en savoir plus, reportez-vous à la
page 11, Insertion et éjection d’une
carte mémoire SD.
3 Touchez [USB] ou [SD] sur l’écran
de Sélection de source AV.
L’image s’affiche à l’écran.
4 Utilisez les touches de l’écran
tactile pour commander le périphé-
rique de stockage externe (USB,
SD).
Pour en savoir plus, reportez-vous à la
page 34, Utilisation des touches de
l’écran tactile.
p La lecture suit l’ordre des numéros de
dossier. Les dossiers sont ignorés s’ils
ne contiennent pas de fichiers lisibles.
En l’absence de fichiers lisibles dans
le dossier 01 (dossier racine), la lecture
commence depuis le dossier 02.
Sélection de chiers dans la
liste des noms de chiers
Vous pouvez sélectionner les fichiers à affi-
cher à l’aide de la liste de noms de fichiers
des fichiers enregistrés sur le périphérique
de stockage externe (USB, SD).
1 Touchez la touche suivante.
Affiche la liste des fichiers
enregistrés dans le périphé-
rique de stockage externe
(USB, SD).
2 Touchez un fichier de la liste pour
le lire.
p Les fichiers sont lus dans l’ordre du
numéro de fichier et les dossiers sont
ignorés s’ils ne contiennent aucun fichier.
(Si le dossier 01 (dossier racine) ne
contient aucun fichier, la lecture com-
mence au dossier 02.)
p Touchez un dossier dans la liste pour voir
son contenu. Vous pouvez lire un fichier
dans la liste en le touchant.
Lecture des chiers dans un
ordre aléatoire
Tous les fichiers sur le périphérique de
stockage externe (USB, SD) peuvent être
lus dans un ordre aléatoire en touchant une
seule touche.
Touchez à plusieurs reprises la
touche suivante jusqu’à ce que le
réglage souhaité apparaisse.
Active ou désactive la lec-
ture aléatoire.
(par défaut) :
Les fichiers ne sont pas lus dans un ordre
aléatoire.
:
Lit tous les fichiers dans la plage de
lecture répétée en cours dans un ordre
aléatoire.
Réglage d’une plage de lec-
ture répétée
Vous pouvez modifier la plage de lecture
répétée à l’aide d’une seule touche.
Touchez à plusieurs reprises la
touche suivante jusqu’à ce que le
réglage souhaité apparaisse.
Change la plage de lecture
répétée.
(par défaut) :
Répète tous les fichiers.
:
Le dossier en cours de lecture est répété.
Changement du type de
chier multimédia
Lors de la lecture d’un support numérique
contenant divers types de fichiers multimé-
dias, vous pouvez basculer entre les types de
fichiers multimédias à lire.
1 Touchez la touche suivante.
Affiche le menu contextuel pour
sélectionner un type de fichier
multimédia à lire sur le péri-
phérique de stockage externe
(USB, SD).
2 Touchez l’élément que vous sou-
haitez régler.
Music :
Passe au type de fichier multimédia
musical (audio compressé).
Video :
Passe au type de fichier multimédia
vidéo.
Photo :
Bascule le type de fichier multimédia sur
image fixe (données JPEG).
Réglage de l’intervalle du
diaporama
Les fichiers JPEG peuvent être affichés
sous forme de diaporama sur ce produit. Ce
réglage permet de régler l’intervalle entre
chaque image.
p Ce réglage est disponible pendant la
lecture de fichiers JPEG.
1 Appuyez sur le bouton HOME pour
afficher l’écran de Menu principal.
2 Touchez les touches suivantes
dans l’ordre indiqué.
L’écran “Configuration vidéo” apparaît.
3 Touchez [Secondes (s) par diapo].
Le menu contextuel apparaît.
4 Touchez l’élément que vous sou-
haitez régler.
10s (par défaut) :
Les images JPEG changent toutes les 10
secondes.
5s :
Les images JPEG changent toutes les 5
secondes.

11
Chapitre
36
Fr
15s :
Les images JPEG changent toutes les 15
secondes.
Manuel :
Les images JPEG peuvent être changées
manuellement.
Utilisation avec les boutons
physiques
Appuyez sur le bouton TRK.
Vous pouvez sauter les fichiers en avant ou
en arrière.
Maintenez enfoncé le bouton TRK.
Vous pouvez rechercher 10 fichiers JPEG à
la fois.
p Si le nombre de fichiers du dossier (du
fichier en cours de lecture jusqu’au pre-
mier ou dernier fichier) est inférieur à 10,
le premier ou dernier fichier du dossier
est automatiquement lu.
p Si le fichier en cours de lecture est le
premier ou le dernier du dossier, la
recherche n’est pas effectuée.
Utilisation d’un iPod
À l’attention des utilisateurs d’un iPod
avec connecteur à 30 broches
p Selon votre iPod, il se peut que rien ne
soit émis à moins que vous n’utilisiez un
câble d’interface USB pour iPod / iPhone
(CD-IU201S/CD-IU201V) (vendu séparé-
ment). Veillez à utiliser un câble d’inter-
face USB pour iPod / iPhone (CD-IU201S/
CD-IU201V) (vendu séparément) pour
connecter votre iPod.
Les sources audio et/ou vidéo de l’iPod
sont activées si un des câbles est
connecté.
Pour en savoir plus, reportez-vous à la
page 84, Connexion d’un iPhone avec
connecteur à 30 broches.
À l’attention des utilisateurs d’un iPod /
iPhone avec connecteur Lightning
p Pour utiliser la source audio de l’iPod,
vous devez connecter votre iPod à ce
produit à l’aide d’un câble d’interface
USB pour iPod / iPhone (CD-IU52) (vendu
séparément).
Les fonctions liées aux fichiers vidéo
d’iPod et le AppRadio Mode ne sont
toutefois pas disponibles.
p Les sources audio et/ou vidéo de l’iPod ne
sont pas disponibles lorsqu’un iPod avec
un connecteur Lightning est connecté à
ce produit à l’aide d’un câble d’interface
(CD-IH202) (vendu séparément).
Pour en savoir plus, reportez-vous à la
page 84, Connexion d’un iPhone avec
connecteur Lightning.
Lorsque vous souhaitez lire des fichiers
audio et/ou vidéo sur votre iPod avec
connecteur Lightning, installez tout
d’abord CarMediaPlayer sur votre iPod
avec connecteur Lightning, puis lancez
CarMediaPlayer en AppRadio Mode.
Pour en savoir plus sur le
CarMediaPlayer, reportez-vous aux
informations disponibles sur notre site
Web.
ATTENTION
Pour des raisons de sécurité, les images
vidéo ne sont pas visibles quand le véhicule
est en mouvement. Pour voir des images
vidéo, arrêtez-vous dans un endroit sûr et
serrez le frein à main.
Utilisation des touches de
l’écran tactile (pour l’audio)
Écran de lecture (page 1)
1 32
8
4
5
6
7
b 9 a 9
Écran de lecture (page 2)
8defg
c
h
Utilisation des touches de
l’écran tactile (pour la vidéo)
1 32
4
5
6
7
b
9 a
9
j
def
i
Utilisation des touches de
l’écran tactile (pour iTunes
Radio)
a 9
1 3
2
4
5
7
dkb
1 Affiche la liste de sources.
Pour en savoir plus, reportez-vous à la
page 14, Sélection d’une source avant
dans la liste de sources.
2 Affiche l’écran de Réglage de l’heure
et de la date.
Pour en savoir plus, reportez-vous à la
page 77, Réglage de l’heure et de la
date.
3 Affiche l’écran de Paramètre.
4 Rappelle des courbes d’égalisation.
Pour en savoir plus, reportez-vous à la
page 70, Utilisation de l’égaliseur.
5 Sélectionne une piste dans la liste.
Pour en savoir plus, reportez-vous à
la page 38, Sélection de sources de
chansons ou vidéo dans l’écran de liste
de lecture.
6 Change le mode de commande sur
“Mode Application”.
Pour en savoir plus, reportez-vous à la
page 39, Utilisation de la fonction iPod
de ce produit à partir de votre iPod.
7 Affiche l’écran de Menu téléphone.
Pour en savoir plus, reportez-vous à la
page 18, Affichage du menu téléphone.
8 Passe à la page suivante ou précé-
dente des touches de l’écran tactile.
9 Saute des fichiers en avant ou en
arrière.
p La disponibilité de la fonction de saut en
avant lors de l’écoute d’iTunes Radio
dépend de l’iPod.
p La touche de saut en arrière n’est pas dis-
ponible lors de l’écoute d’iTunes Radio.
a Change le point de lecture.
Pour en savoir plus, reportez-vous à
la page 15, Utilisation de la barre
temporelle.
b Bascule entre lecture et pause.
c Affiche la liste des chansons de l’al-
bum en cours de lecture.
Pour en savoir plus, reportez-vous à la
page 39, Affichage des listes liées à la
chanson en cours de lecture (recherche
de liaison).
d Utilise la fonction “Sound Retriever”.
Pour en savoir plus, reportez-vous à la
page 78, Réglage de la fonction “Sound
Retriever”.
e Lit des fichiers dans un ordre
aléatoire.
Pour en savoir plus, reportez-vous à
la page 37, Réglage de la lecture
aléatoire.
f Règle une plage de lecture répétée.
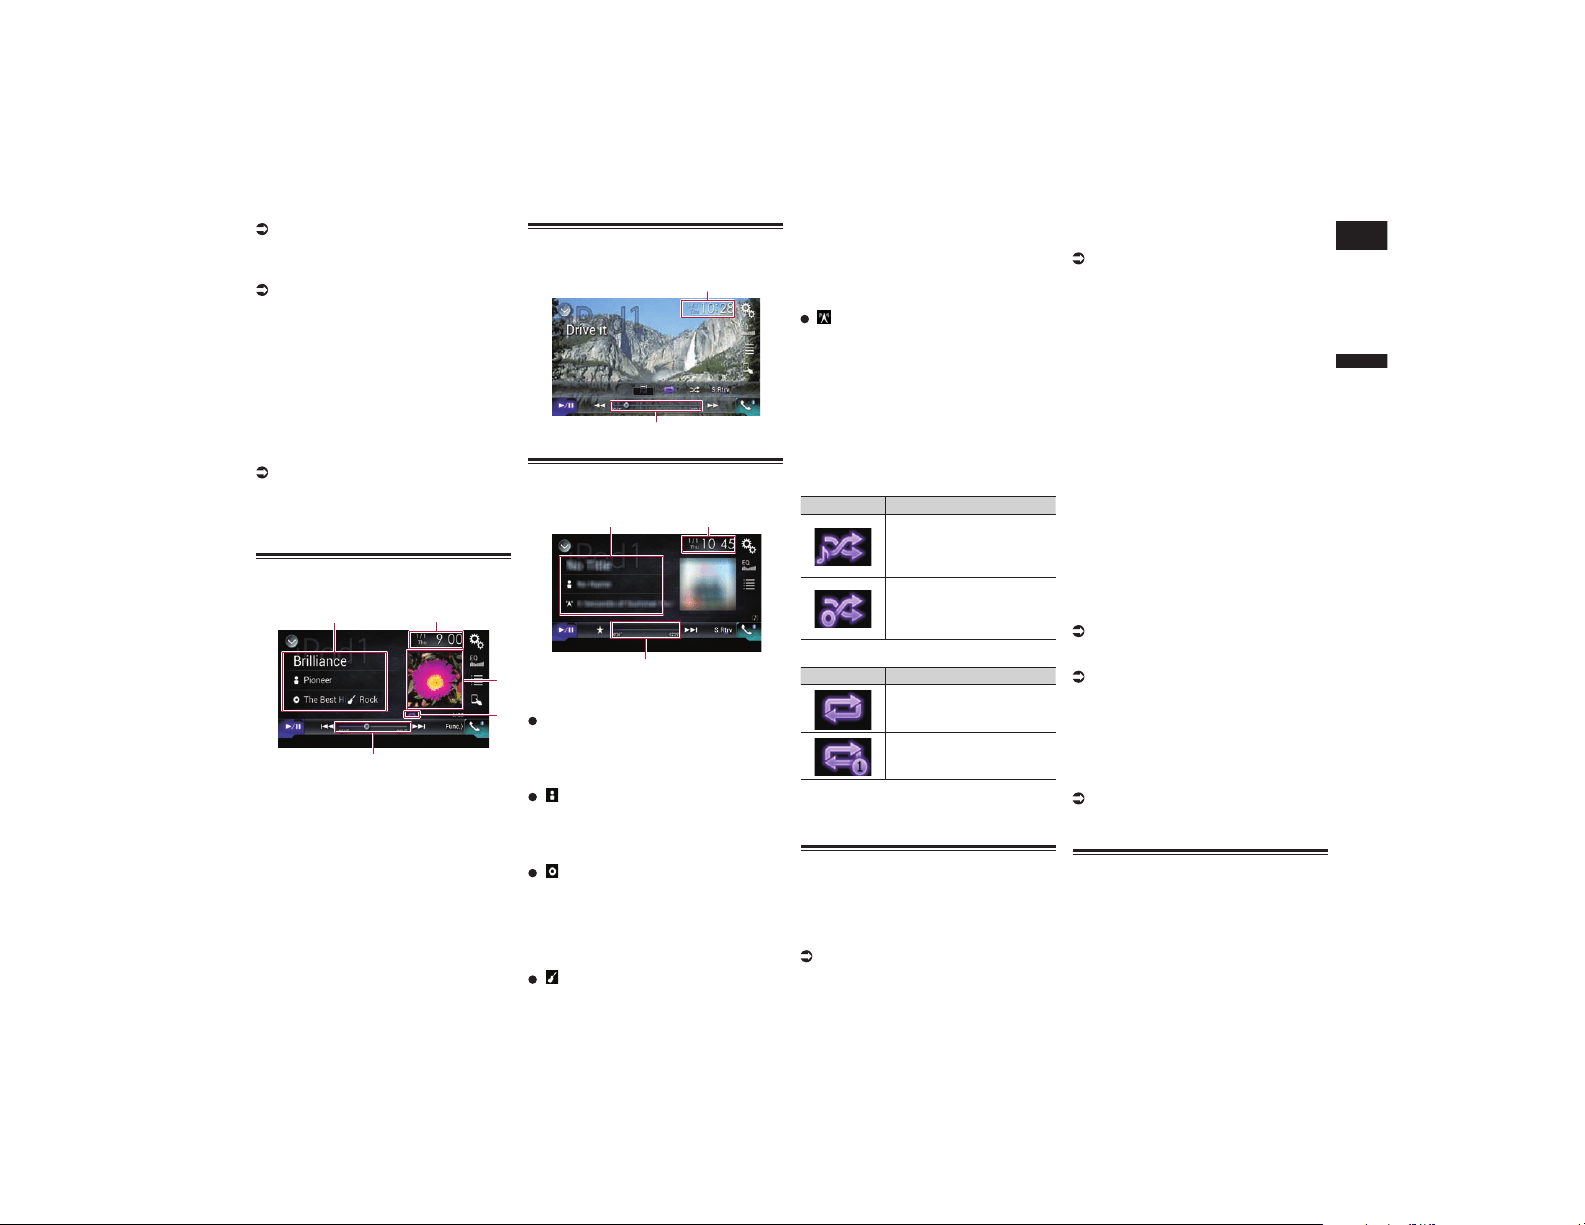
Français
11
Chapitre
37
Fr
Pour en savoir plus, reportez-vous à la
page 38, Réglage d’une plage de lec-
ture répétée.
g Change la vitesse du livre audio.
Pour en savoir plus, reportez-vous à la
page 39, Changement de la vitesse de
lecture d’un livre audio.
h Affiche la liste des catégories compre-
nant l’élément sélectionné.
i Masque les touches de l’écran tactile.
Touchez cette zone pour masquer les
touches de l’écran tactile.
p Touchez un quelconque endroit de l’écran
LCD pour afficher de nouveau les touches
de l’écran tactile.
j Change le mode écran large.
Pour en savoir plus, reportez-vous à la
page 78, Changement du mode écran
large.
k Affiche le menu contextuel pour
iTunes Radio.
Lecture de l’écran (pour
l’audio)
5
2
4
3
1
Lecture de l’écran (pour la
vidéo)
5
2
Lecture de l’écran (pour iTunes
Radio)
2
5
1
1 Informations sur la piste en cours de
lecture
Titre de la chanson
Indique le titre de la chanson en cours
de lecture (si disponible). “Sans titre”
s’affiche si aucune information corres-
pondante n’est disponible.
: Nom de l’artiste
Indique le nom de l’artiste de la chanson
en cours de lecture (si disponible). “Sans
non” s’affiche si aucune information
correspondante n’est disponible.
: Titre de l’album
Indique le titre de l’album du fichier en
cours de lecture (si disponible). “Sans
titre” s’affiche si aucune information
correspondante n’est disponible.
p Ces informations ne sont pas disponibles
lors de l’écoute d’iTunes Radio.
: Genre
Indique le genre du fichier en cours de
lecture (si disponible). “Sans genre”
s’affiche si aucune information corres-
pondante n’est disponible.
p Ces informations ne sont pas disponibles
lors de l’écoute d’iTunes Radio.
: Station
Indique le nom de la station de la chan-
son en cours de lecture.
p Ces informations sont disponibles lors de
l’écoute d’iTunes Radio.
2 Heure et date actuelles
3 Pochette de l’album
Pochette de l’album de la chanson en
cours de lecture, si disponible.
4 Indicateur de l’état de la lecture
Indique l’état actuel de la lecture.
Réglage de la lecture aléatoire
Indicateur Signification
Les chansons ou les vidéos
sont lues dans un ordre
aléatoire dans la liste
sélectionnée.
Sélectionne un album au
hasard, puis lit toutes les
chansons de cet album dans
l’ordre.
Réglage d’une plage de lecture répétée
Indicateur Signification
Toutes les chansons ou les
vidéos sont répétées dans la
liste sélectionnée.
La chanson ou la vidéo en
cours de lecture seulement
est répétée.
5 Indicateur de temps de lecture
Indique le temps de lecture écoulé dans
le fichier sélectionné.
Procédure de départ
Lors de la connexion d’un iPod à ce pro-
duit, vous devez sélectionner la méthode
de connexion de votre périphérique. Des
réglages sont nécessaires en fonction du
périphérique connecté.
Pour en savoir plus, reportez-vous à
Chapitre 5.
1 Affichez l’écran de Sélection de
source AV.
Pour en savoir plus sur les opérations,
reportez-vous à la page 13, Affichage
de l’écran de fonction AV.
2 Connectez votre iPod.
p Si vous connectez un iPhone ou iPod
touch, fermez les applications avant la
connexion.
p Si un iPhone 6 Plus, iPhone 6, iPhone 5s,
iPhone 5c, iPhone 5 ou iPod touch (5e
génération) est connecté, la bibliothèque
multimédia (informations sur les chan-
sons) est importée de l’appareil connecté
et enregistrée sur ce produit. Attendez la
fin du processus.
La bibliothèque multimédia n’est pas
importée si la bibliothèque multimédia
mise à jour du périphérique connecté
a été importée ou si la mémoire de ce
produit est saturée.
3 Touchez [iPod] sur l’écran de
Sélection de source AV.
4 Utilisez les touches de l’écran
tactile pour commander votre iPod.
Pour en savoir plus, reportez-vous à la
page 36, Utilisation des touches de
l’écran tactile (pour l’audio).
Pour en savoir plus, reportez-vous à la
page 36, Utilisation des touches de
l’écran tactile (pour la vidéo).
p L’image vidéo de l’iPod peut présenter
des parasites si elle est émise sur l’écran
arrière. En cas de parasites sur l’image
vidéo de l’iPod, désactivez la sortie sur
l’écran arrière.
Pour en savoir plus sur les opérations,
reportez-vous à la page 78, Sélection de
la vidéo pour l’écran arrière.
Réglage de la lecture aléatoire
Cette fonction permet une lecture aléatoire
des chansons, albums ou vidéos et les lit
dans un ordre aléatoire.
p Cette fonction n’est pas disponible lors de
l’écoute d’iTunes Radio.

11
Chapitre
38
Fr
Touchez à plusieurs reprises la
touche suivante jusqu’à ce que le
réglage souhaité apparaisse.
Active ou désactive la lec-
ture aléatoire.
:
Les chansons ou les vidéos sont lues
dans un ordre aléatoire dans la liste
sélectionnée.
:
Sélectionne un album au hasard, puis lit
toutes les chansons de cet album dans
l’ordre.
p Cette icône peut ne pas être affichée lors
de l’utilisation d’un iPhone 6 Plus, iPhone
6, iPhone 5s, iPhone 5c, iPhone 5 ou iPod
touch (5e génération).
Réglage d’une plage de lec-
ture répétée
Vous pouvez modifier la plage de lecture
répétée à l’aide d’une seule touche.
p Cette fonction n’est pas disponible lors de
l’écoute d’iTunes Radio.
Touchez à plusieurs reprises la
touche suivante jusqu’à ce que le
réglage souhaité apparaisse.
Change la plage de lecture
répétée.
:
Toutes les chansons ou les vidéos sont
répétées dans la liste sélectionnée.
:
La chanson ou la vidéo en cours de
lecture seulement est répétée.
p Le réglage de répétition peut être désac-
tivé lors de l’utilisation d’un iPhone 6
Plus, iPhone 6, iPhone 5s, iPhone 5c,
iPhone 5 ou iPod touch (5e génération).
Sélection de sources de chan-
sons ou vidéo dans l’écran de
liste de lecture
Vous pouvez rechercher la chanson, la vidéo
ou les stations de radio que vous souhaitez
lire dans l’écran de liste de lecture.
1 Touchez la touche suivante.
Affiche la liste de la
catégorie.
L’écran “RACINE” apparaît.
2 Touchez les touches suivantes pour
changer de liste de catégorie de
musique ou vidéo.
Bascule vers la liste de
catégorie de musique.
Bascule vers la liste de
catégorie vidéo.
p L’icône de la liste de catégorie vidéo n’est
pas disponible lorsque vous utilisez une
fonction d’iPod avec un iPhone 6 Plus,
iPhone 6, iPhone 5s, iPhone 5c, iPhone 5
ou iPod touch (5e génération).
3 Touchez la catégorie dans laquelle
vous souhaitez rechercher.
Listes de catégories (musique) :
Radio (iTunes Radio)
Listes de lectures
Artistes
Albums
Chansons
Podcasts
Genres
Compositeurs
Livres audio
Listes de catégories (vidéo) :
Listes de lectures vidéo
Films
Vidéo musicales
Émissions de télévision
Podcasts vidéo
p Les catégories ne correspondant pas à
l’iPod connecté ne sont pas affichées.
p “Radio” s’affiche uniquement si iTunes
Radio est disponible sur l’iPod.
4 Faites glisser la barre de recherche
initiale pour trouver un fichier par
le premier caractère du nom du
fichier.
La lettre de l’alphabet correspondant à la
position actuelle sur la barre de recherche
initiale est affichée et la liste défile en même
temps que vous faites glisser la barre.
p La barre de recherche initiale n’est pas
affichée dans la première liste de catégo-
rie ou liste de chansons.
5 Relâchez la barre de recherche
initiale à la lettre de l’alphabet
souhaitée.
Les éléments dont le premier caractère cor-
respond à la lettre de l’alphabet sélectionnée
sont affichés.
6 Touchez le titre de la liste que vous
voulez reproduire.
Répétez cette opération jusqu’à ce que vous
trouviez la chanson ou vidéo souhaitée.
7 Lancez la lecture de la liste
sélectionnée.
p Selon la génération ou la version de
l’iPod, certaines fonctions peuvent ne pas
être disponibles.
p Vous pouvez lire des listes de lectures
créées avec l’application MusicSphere.
L’application est disponible sur notre site
Web.
p Les listes de lectures que vous avez
créées avec l’application MusicSphere
sont affichées sous forme abrégée.
Utilisation d’iTunes Radio
p Cette fonction est disponible uniquement
lorsque vous utilisez une fonction d’iPod
avec un iPhone 6 Plus, iPhone 6, iPhone
5s, iPhone 5c, iPhone 5 ou iPod touch (5e
génération).
1 Touchez les touches suivantes
dans l’ordre indiqué.
2 Touchez [Radio].
3 Utilisez les touches de l’écran
tactile pour commander votre iPod.
Pour en savoir plus, reportez-vous à la
page 36, Utilisation des touches de
l’écran tactile (pour iTunes Radio).
■ Lecture de chansons similaires à
la chanson en cours de lecture
Vous pouvez écouter des chansons simi-
laires à la chanson en cours de lecture.
1 Touchez la touche suivante.
Affiche le menu contextuel.
2 Touchez [Play More Like This].
p La signification de l’affichage de l’élé-
ment de menu est la suivante :
— Lorsque l’élément de menu est actif, la
fonction peut être activée.
— Lorsque l’élément de menu est en surbril-
lance, la fonction est activée.
— Lorsque l’élément de menu n’est pas
actif, la fonction n’est pas disponible pour
la chanson en cours de lecture.
p Si vous touchez [Play More Like This]
lorsque l’élément de menu est actif, des
chansons similaires à la chanson en
cours de lecture seront lues.
p Si vous touchez [Play More Like This]
lorsque l’élément de menu est en surbril-
lance, la fonction est désactivée.
p Le résultat du fonctionnement dépend de
l’iPod.
■ Réglage pour que la chanson en
cours de lecture ne soit pas lue
à nouveau
Vous pouvez effectuer un réglage pour que
la chanson en cours de lecture ne soit pas
lue à nouveau.
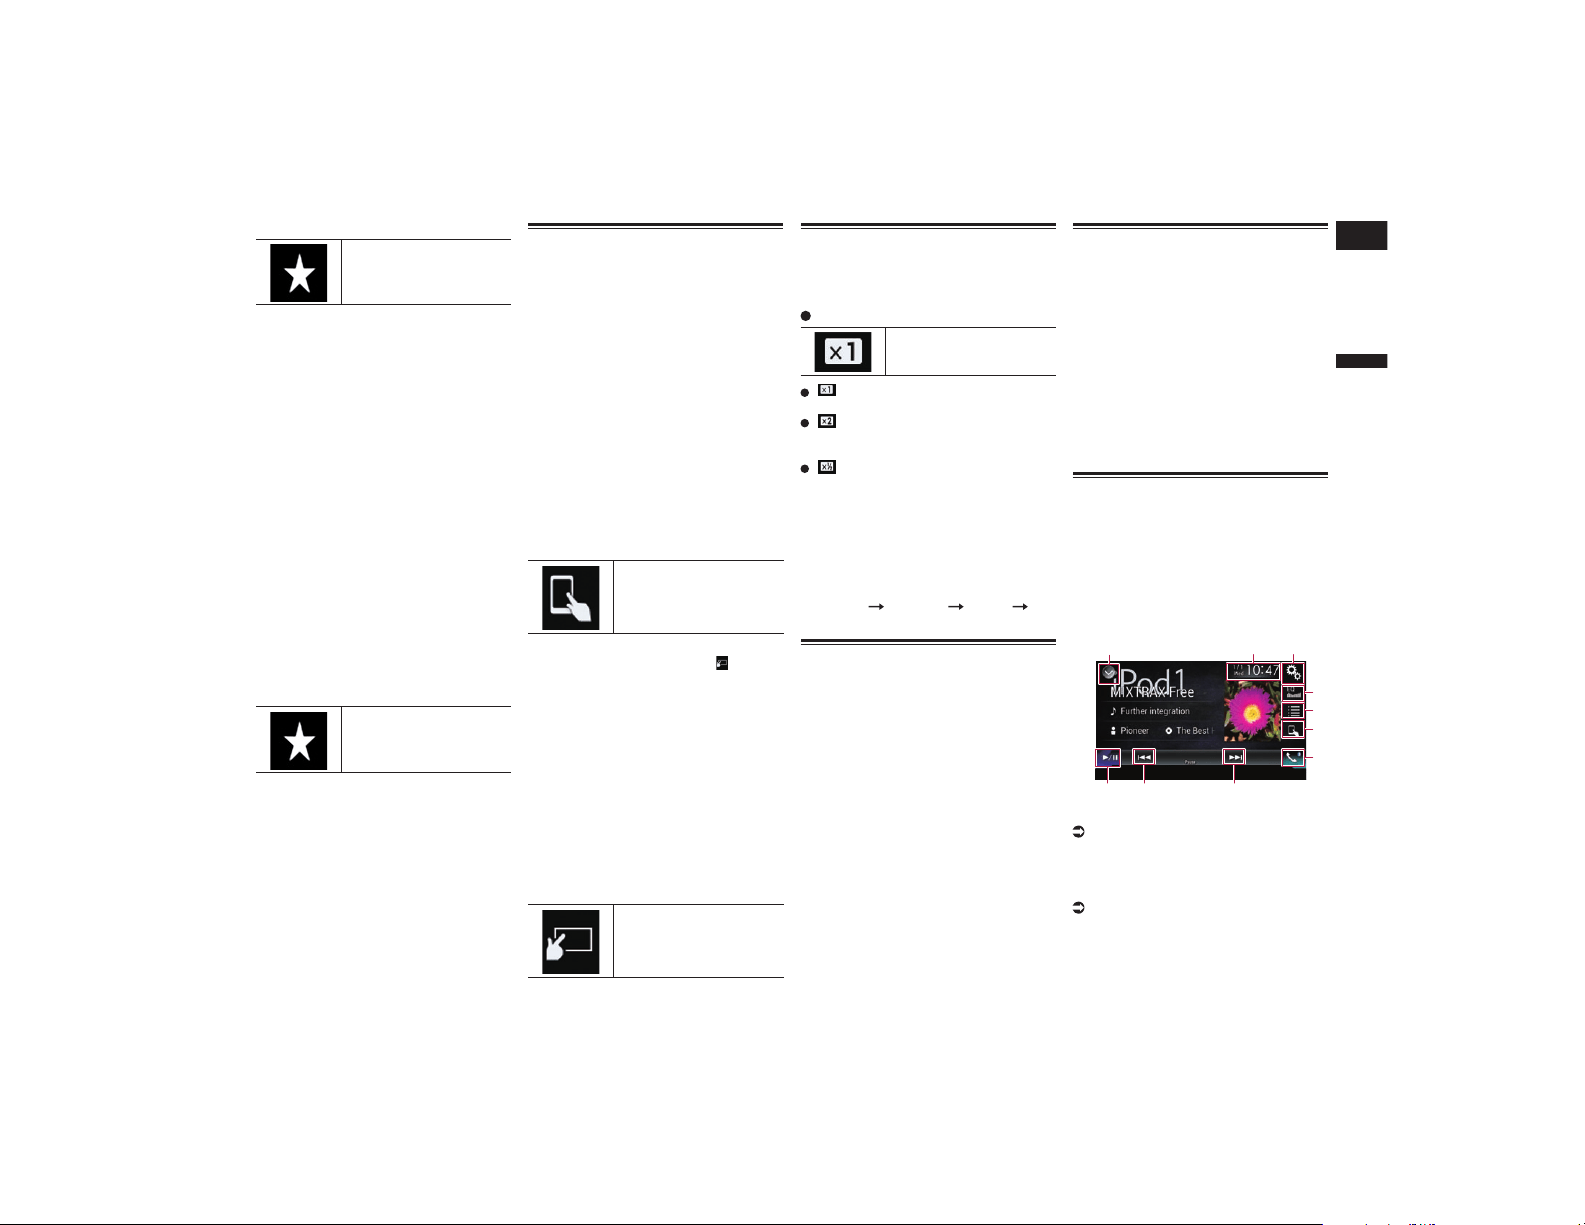
Français
11
Chapitre
39
Fr
1 Touchez la touche suivante.
Affiche le menu contextuel.
2 Touchez [Never Play This Song].
p La signification de l’affichage de l’élé-
ment de menu est la suivante :
— Lorsque l’élément de menu est actif, la
fonction peut être activée.
— Lorsque l’élément de menu est en surbril-
lance, la fonction est activée.
— Lorsque l’élément de menu n’est pas
actif, la fonction n’est pas disponible pour
la chanson en cours de lecture.
p Si vous touchez [Never Play This Song]
lorsque l’élément de menu est actif, la
chanson ne sera pas lue à nouveau.
p Si vous touchez [Never Play This Song]
lorsque l’élément de menu est en surbril-
lance, la fonction est désactivée.
p Le résultat du fonctionnement dépend de
l’iPod.
■ Ajout de la chanson en cours de
lecture à la liste de souhaits
Vous pouvez ajouter la chanson en cours de
lecture à la liste de souhaits pour accéder
facilement à la chanson ultérieurement.
1 Touchez la touche suivante.
Affiche le menu contextuel.
2 Touchez [Add to iTunes Wish List].
La chanson est ajoutée à la liste de souhaits.
p Si la chanson est déjà dans la liste de
souhaits, [Remove from iTunes Wish
List] s’affiche au lieu de [Add to iTunes
Wish List]. Si vous touchez [Remove
from iTunes Wish List], la chanson est
supprimée de la liste de souhaits.
p Le résultat du fonctionnement dépend de
l’iPod.
Utilisation de la fonction iPod
de ce produit à partir de votre
iPod
Vous pouvez commander la fonction iPod
de ce produit à partir de l’iPod connecté si
le mode de commande est réglé sur “Mode
Application”. L’écran d’application de l’iPod
peut être affiché sur ce produit et les fichiers
audio et vidéo de l’iPod peuvent être lus avec
ce produit.
p Cette fonction n’est pas disponible
lorsque vous utilisez une fonction d’iPod
avec un iPhone 6 Plus, iPhone 6, iPhone
5s, iPhone 5c, iPhone 5 ou iPod touch (5e
génération).
p Lorsque cette fonction est utilisée, l’iPod
ne s’éteint pas même si vous coupez le
contact. Utilisez l’iPod pour le mettre hors
tension.
1 Touchez la touche suivante.
Change le mode de
commande.
p Le mode de commande passe en “Mode
Application”. L’icône devient .
2 Utilisez l’iPod connecté pour sélec-
tionner une vidéo ou une chanson à
lire.
p Les fonctions suivantes sont toujours
accessibles à partir du produit même si le
mode de commande est réglé sur “Mode
Application”. L’utilisation dépendra
toutefois de vos applications.
— Lecture/pause
— Avance/retour rapide
— Suivi vers le haut/bas
— Déplacement vers le haut/bas dans un
chapitre
3 Touchez la touche suivante.
Change le mode de com-
mande pour commander les
fonctions de l’iPod à partir
de ce produit.
Changement de la vitesse de
lecture d’un livre audio
La vitesse de lecture peut être changée
pendant la lecture d’un livre audio.
Touchez la touche suivante.
Change la vitesse de lecture.
(par défaut) :
Revient à la vitesse normale.
:
Lit à une vitesse supérieure à la vitesse
normale.
:
Lit à une vitesse inférieure à la vitesse
normale.
p L’icône ne change pas lorsque vous utili-
sez cette fonction avec un iPhone 6 Plus,
iPhone 6, iPhone 5s, iPhone 5c, iPhone 5
ou iPod touch (5e génération). Le réglage
change comme suit lorsque vous touchez
l’icône, même si l’icône ne change pas.
Plus vite Moins vite Normal
Plus vite...
Afchage des listes liées à la
chanson en cours de lecture
(recherche de liaison)
p Cette fonction n’est pas disponible lors de
l’écoute d’iTunes Radio.
1 Touchez la pochette pour ouvrir
la liste des noms de chansons de
l’album en cours de lecture.
2 Touchez le nom de la chanson que
vous souhaitez lire pour lancer la
lecture de cette chanson.
p Si une partie des informations enregis-
trées ne s’affiche pas, une touche de
défilement apparaît à droite de la liste.
Touchez la touche de défilement pour
faire défiler.
Utilisation avec les boutons
physiques
Appuyez sur le bouton TRK.
Vous pouvez sauter les chansons ou les
vidéos en avant ou en arrière.
p La touche de saut en arrière n’est pas dis-
ponible lors de l’écoute d’iTunes Radio.
Pendant la lecture d’une chanson ou d’une
vidéo avec chapitres, vous pouvez sauter un
chapitre en avant ou en arrière.
Maintenez enfoncé le bouton TRK.
Vous pouvez effectuer un retour ou une
avance rapide.
Lecture de musique autre que
la musique d’un iPod à partir
d’une application de musique,
comme source iPod
Le nom de l’application et les informations
de la chanson sont également affichés.
■ Utilisation des touches de
l’écran tactile
9 8 8
1 32
4
5
6
7
1 Affiche la liste de sources.
Pour en savoir plus, reportez-vous à la
page 14, Sélection d’une source avant
dans la liste de sources.
2 Affiche l’écran de Réglage de l’heure
et de la date.
Pour en savoir plus, reportez-vous à la
page 77, Réglage de l’heure et de la
date.
3 Affiche l’écran de Paramètre.
4 Rappelle des courbes d’égalisation.
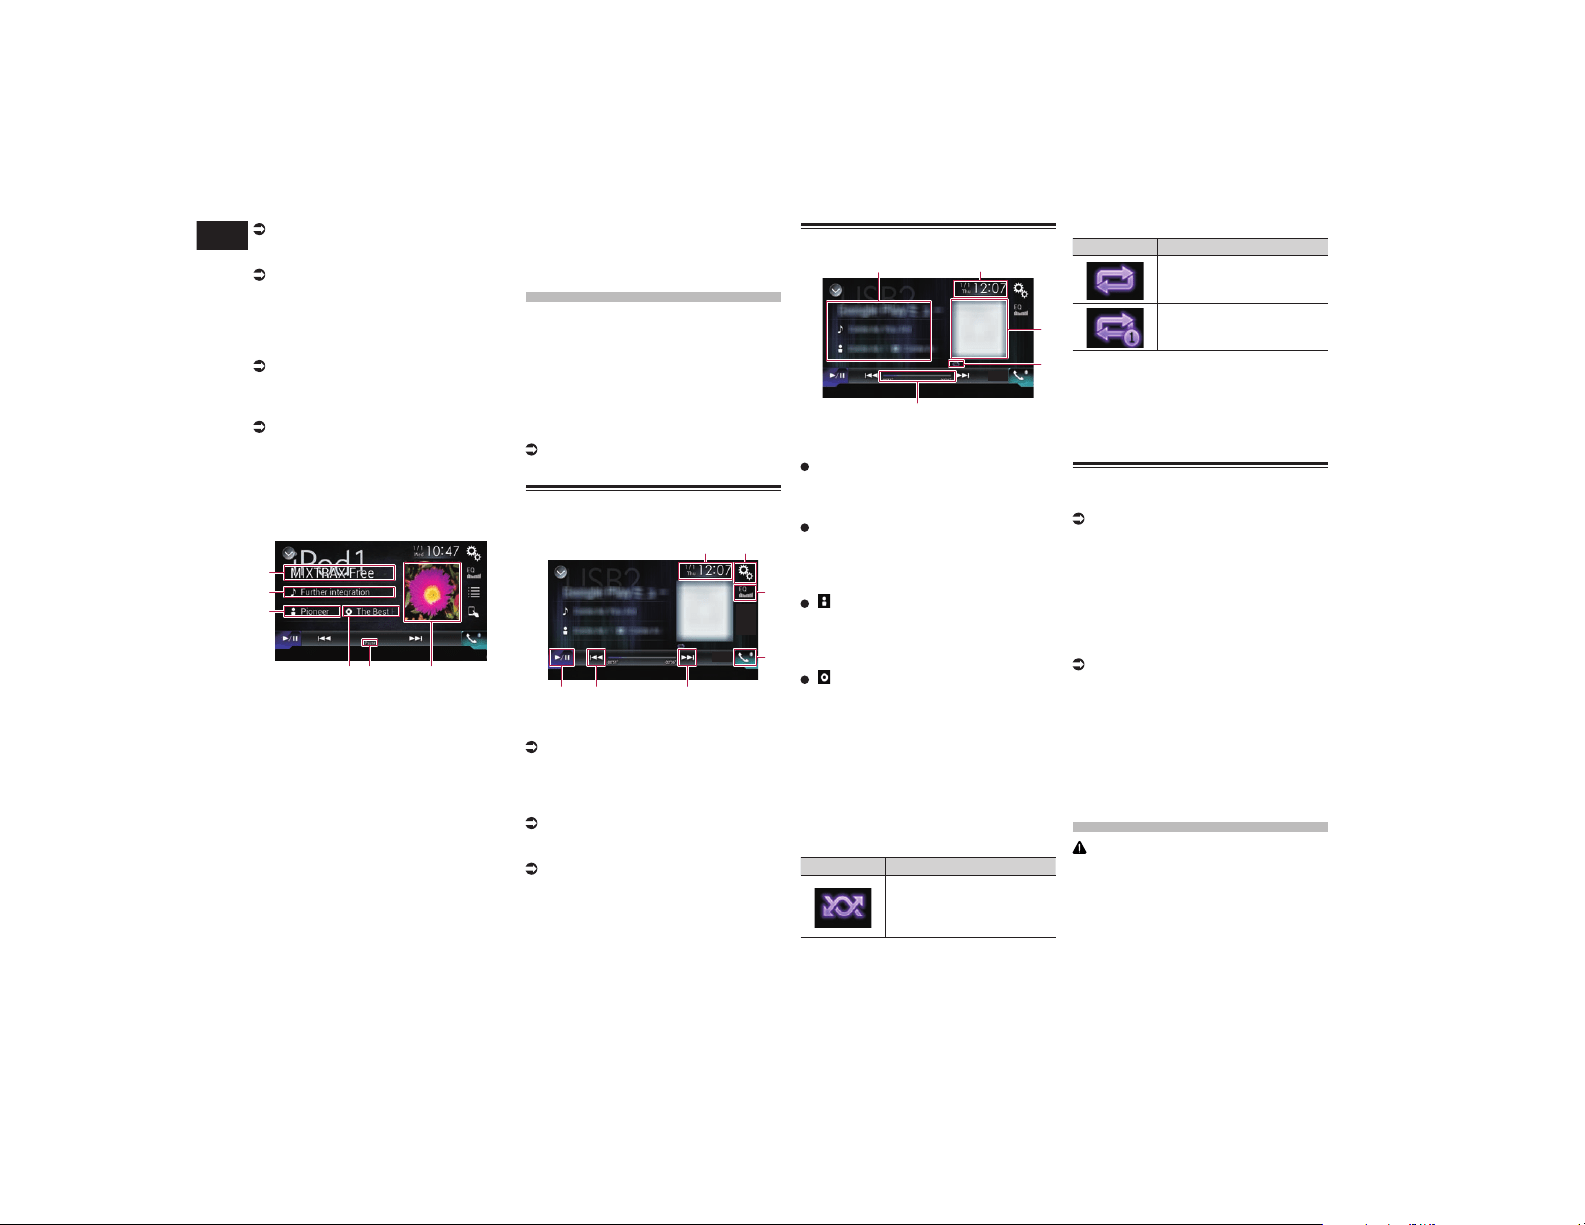
12/13
Chapitre
40
Fr
Pour en savoir plus, reportez-vous à la
page 70, Utilisation de l’égaliseur.
5 Sélectionne une piste dans la liste.
Pour en savoir plus, reportez-vous à
la page 38, Sélection de sources de
chansons ou vidéo dans l’écran de liste
de lecture.
6 Change le mode de commande sur
“Mode Application”.
Pour en savoir plus, reportez-vous à la
page 39, Utilisation de la fonction iPod
de ce produit à partir de votre iPod.
7 Affiche l’écran de Menu téléphone.
Pour en savoir plus, reportez-vous à la
page 18, Affichage du menu téléphone.
8 Saute des fichiers en avant ou en
arrière.
9 Bascule entre lecture et pause.
■ Lecture de l’écran
1
2
3
4 5 6
1 Nom de l’application
Indique le nom de l’application en cours.
2 Titre de la chanson
Indique le titre de la chanson en cours
de lecture (si disponible). “Sans titre”
s’affiche si aucune information corres-
pondante n’est disponible.
3 Nom de l’artiste
Indique le nom de l’artiste de la chanson
en cours de lecture (si disponible). “Sans
non” s’affiche si aucune information
correspondante n’est disponible.
4 Titre de l’album
Indique le titre de l’album du fichier en
cours de lecture (si disponible). “Sans
titre” s’affiche si aucune information
correspondante n’est disponible.
5 Indicateur de pause
6 Pochette de l’album
Pochette de l’album de la chanson en
cours de lecture, si disponible.
Lecture de musique
provenant d’un appa-
reil compatible avec
Android Auto
Si un appareil compatible avec Android
Auto est connecté à ce produit, vous pouvez
écouter la musique de l’appareil Android
avec ce produit et commander la lecture
directement à partir de ce produit.
p Cette fonction est disponible unique-
ment lorsque Android Auto est activé.
Démarrez Android Auto avant d’utiliser
cette fonction.
Pour en savoir plus, reportez-vous à la
page 43, Utilisation d’Android Auto.
Utilisation des touches de
l’écran tactile
21
3
4
6
5 5
1 Affiche l’écran de Réglage de l’heure
et de la date.
Pour en savoir plus, reportez-vous à la
page 77, Réglage de l’heure et de la
date.
2 Affiche l’écran de Paramètre.
3 Rappelle des courbes d’égalisation.
Pour en savoir plus, reportez-vous à la
page 70, Utilisation de l’égaliseur.
4 Affiche l’écran de Menu téléphone.
Pour en savoir plus, reportez-vous à la
page 18, Affichage du menu téléphone.
5 Saute des fichiers en avant ou en
arrière.
p Les opérations peuvent varier selon
l’application utilisée sur l’appareil compa-
tible avec Android Auto.
6 Bascule entre lecture et pause.
Lecture de l’écran
5
2
4
3
1
1 Informations sur la piste en cours de
lecture
Nom de l’application
Indique le nom de l’application (si dispo-
nible). “Sans non” est affiché en l’ab-
sence d’informations correspondantes.
Titre de la chanson
Indique le titre de la chanson en cours
de lecture (si disponible). “Sans titre”
est affiché en l’absence d’informations
correspondantes.
: Nom de l’artiste
Indique le nom de l’artiste de la chanson
en cours de lecture (si disponible). “Sans
non” s’affiche si aucune information
correspondante n’est disponible.
: Titre de l’album
Indique le titre de l’album du fichier en
cours de lecture (si disponible). “Sans
titre” s’affiche si aucune information
correspondante n’est disponible.
2 Heure et date actuelles
3 Pochette de l’album
Pochette de l’album de la chanson en
cours de lecture, si disponible.
4 Indicateur de l’état de la lecture
Indique l’état actuel de la lecture.
Réglage de la lecture aléatoire
Indicateur Signification
Lit tous les fichiers dans
la plage de lecture répétée
en cours dans un ordre
aléatoire.
Réglage d’une plage de lecture répétée
Indicateur Signification
Toutes les chansons sont
répétées dans la liste
sélectionnée.
La chanson en cours de lec-
ture seulement est répétée.
p Les indicateurs de l’état de la lecture
peuvent ne pas être affichés selon l’appa-
reil Android.
5 Indicateur de temps de lecture
Indique le temps de lecture écoulé dans
le fichier sélectionné.
Procédure de départ
1 Lancez Android Auto.
Pour en savoir plus, reportez-vous à la
page 43, Utilisation d’Android Auto.
2 Appuyez sur le bouton HOME pour
afficher l’écran de Menu principal.
3 Touchez [USB2] sur l’écran de
Sélection de source AV.
4 Utilisez les touches de l’écran
tactile pour commander la lecture.
Pour en savoir plus, reportez-vous à la
page 40, Utilisation des touches de
l’écran tactile.
p La fonction Android Auto peut ne pas
fonctionner correctement si la connexion
Bluetooth avec l’appareil compatible avec
Android Auto est interrompue.
Utilisation des applica-
tions de votre iPhone
ou smartphone
AVERTISSEMENT
Certaines utilisations d’un iPhone ou
d’un smartphone pouvant ne pas être
légales en conduisant dans votre juri-
diction, vous devez connaître de telles
restrictions et les respecter.
En cas de doute sur une fonction donnée,
ne l’utilisez que lorsque le véhicule est
garé.
Aucune fonctionnalité ne doit être
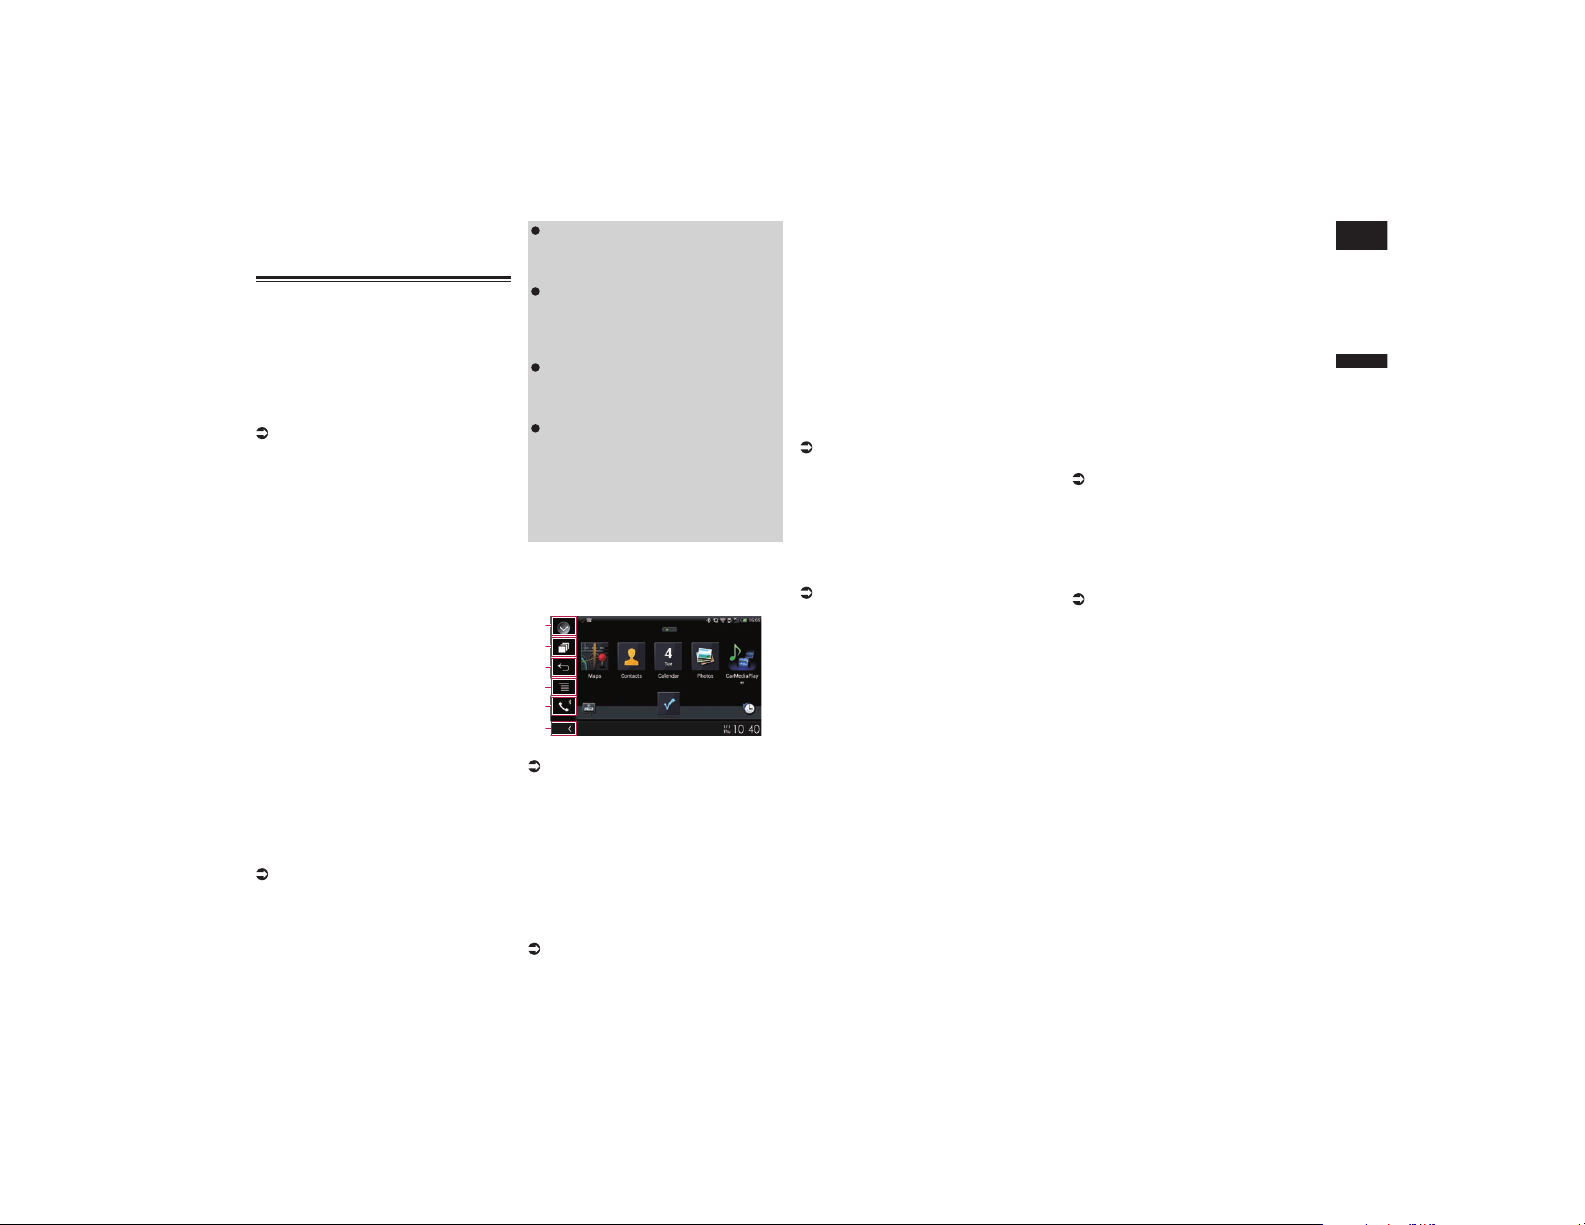
Français
13
Chapitre
41
Fr
utilisée tant qu’il n’est pas sûr de le
faire dans les conditions de conduite
rencontrées.
Utilisation de AppRadio Mode
Vous pouvez commander les applica-
tions pour un iPhone ou un smartphone
directement depuis l’écran de ce produit
(AppRadio Mode).
En AppRadio Mode, vous pouvez utiliser
les applications avec le doigt, à savoir par
tapotement, glissement, défilement ou
balayage sur l’écran de ce produit.
Pour en savoir plus sur les appareils com-
patibles avec AppRadio Mode, repor-
tez-vous à la page 22, Compatibilité
AppRadio Mode.
p Dans ce chapitre, iPhone et iPod touch
sont appelés “iPhone”.
p Les mouvements de doigts compatibles
dépendent de l’application pour un
iPhone ou un smartphone.
p Si une application non compatible avec
AppRadio Mode est lancée, selon
l’application, vous pouvez voir une image
de l’application sur l’écran de ce produit.
Cependant, vous ne pouvez pas comman-
der l’application.
Pour utiliser AppRadio Mode, installez
AppRadio app sur l’iPhone ou le smart-
phone au préalable pour pouvoir lancer
l’application sur ce produit. Pour en savoir
plus sur AppRadio app, visitez le site Web :
Pour les États-Unis
http://www.pioneerelectronics.com/
AppRadioMode
Pour le Canada
http://www.pioneerelectronics.ca/
AppRadioMode
p Veillez à lire Utilisation de contenus
connectés via une application avant de
procéder à cette opération.
Pour en savoir plus, reportez-vous à
la page 99, Utilisation de contenus
connectés via une application.
Le contenu et les fonctionnalités des
applications compatibles sont de la
responsabilité des fournisseurs des
applications.
En AppRadio Mode, l’utilisation est
limitée pendant la conduite, les fonc-
tions et le contenu disponibles étant
déterminés par les fournisseurs des
applications.
AppRadio Mode permet d’accéder à
des applications autres que celles de la
liste, soumises à des limitations pen-
dant la conduite.
PIONEER N’EST PAS RESPONSABLE
ET DÉCLINE TOUTE RESPONSABILITÉ
CONCERNANT LES APPLICATIONS
TIERCES ET CONTENU TIERS (NE
PROVENANT PAS DE PIONEER),
Y COMPRIS ET SANS LIMITATION,
TOUTES ERREURS OU INFORMATIONS
INCOMPLÈTES.
■ Utilisation des touches de
l’écran tactile (barre de com-
mande latérale d’application)
1
2
3
4
5
6
1 Affiche la liste de sources.
Pour en savoir plus, reportez-vous à la
page 14, Sélection d’une source avant
dans la liste de sources.
2 Affiche l’écran de l’application de
lancement.
3 Affiche l’écran précédent.
p Cette touche n’apparaît pas lorsque vous
utilisez l’iPhone.
4 Affiche l’écran de menu.
p Cette touche n’apparaît pas lorsque vous
utilisez l’iPhone.
5 Affiche l’écran de Menu téléphone.
Pour en savoir plus, reportez-vous à la
page 18, Affichage du menu téléphone.
6 Affiche la source en cours.
p En AppRadio Mode, la barre de com-
mande latérale d’application apparaît.
p Si vous appuyez deux fois sur le bouton
HOME, la barre de commande latérale
d’application disparaît. Appuyez de nou-
veau deux fois sur le bouton HOME pour
faire apparaître la barre de commande
latérale d’application.
■ Procédure de départ
Lors de la connexion d’un iPhone ou d’un
smartphone à ce produit, vous devez sélec-
tionner la méthode de connexion de votre
périphérique. Des réglages sont nécessaires
en fonction du périphérique connecté.
Pour en savoir plus, reportez-vous à
Chapitre 5.
La procédure dépend du type de votre
appareil.
À l’attention des utilisateurs
d’un iPhone avec connecteur à
30 broches
1 Connectez votre iPhone.
Pour en savoir plus, reportez-vous à la
page 84, Connexion d’un iPhone avec
connecteur à 30 broches.
2 Appuyez sur le bouton HOME pour
afficher l’écran de Menu principal.
3 Touchez [APPS].
Un message vous informant que votre
iPhone peut lancer l’application apparaît à
l’écran.
Un message vous demandant si vous sou-
haitez lancer votre application apparaît sur
votre iPhone.
4 Utilisez votre iPhone pour lancer
l’application.
AppRadio app est lancée.
5 Touchez [OK] sur l’écran de ce
produit.
L’écran AppRadio Mode (écran de menu de
l’application) apparaît.
p Si vous connectez votre appareil
alors qu’une application compatible
AppRadio Mode est déjà exécutée,
l’écran de commande de l’application
apparaît sur ce produit.
6 Touchez l’icône d’application
désirée.
L’application désirée est lancée et l’écran de
commande de l’application apparaît.
7 Commandez l’application.
8 Appuyez sur le bouton HOME pour
revenir à l’écran de Menu principal.
À l’attention des utilisateurs d’un
iPhone avec connecteur Lightning
1 Enregistrez votre iPhone et connec-
tez-le à ce produit via la technolo-
gie sans fil Bluetooth.
p L’appareil enregistré doit être sélectionné
comme appareil prioritaire.
Pour en savoir plus, reportez-vous à la
page 15, Enregistrement de vos péri-
phériques Bluetooth.
2 Déverrouillez votre iPhone.
3 Connectez votre iPhone.
p La méthode de connexion du câble
dépend de votre appareil.
Pour en savoir plus, reportez-vous à la
page 84, Connexion d’un iPhone avec
connecteur Lightning.
4 Appuyez sur le bouton HOME pour
afficher l’écran de Menu principal.
5 Touchez [APPS].
AppRadio app est lancée et l’écran
AppRadio Mode (écran de menu de l’appli-
cation) apparaît.
p Si vous connectez votre appareil
alors qu’une application compatible
AppRadio Mode est déjà exécutée,
l’écran de commande de l’application
apparaît sur ce produit.
6 Touchez l’icône d’application
désirée.
L’application désirée est lancée et l’écran de
commande de l’application apparaît.
7 Commandez l’application.
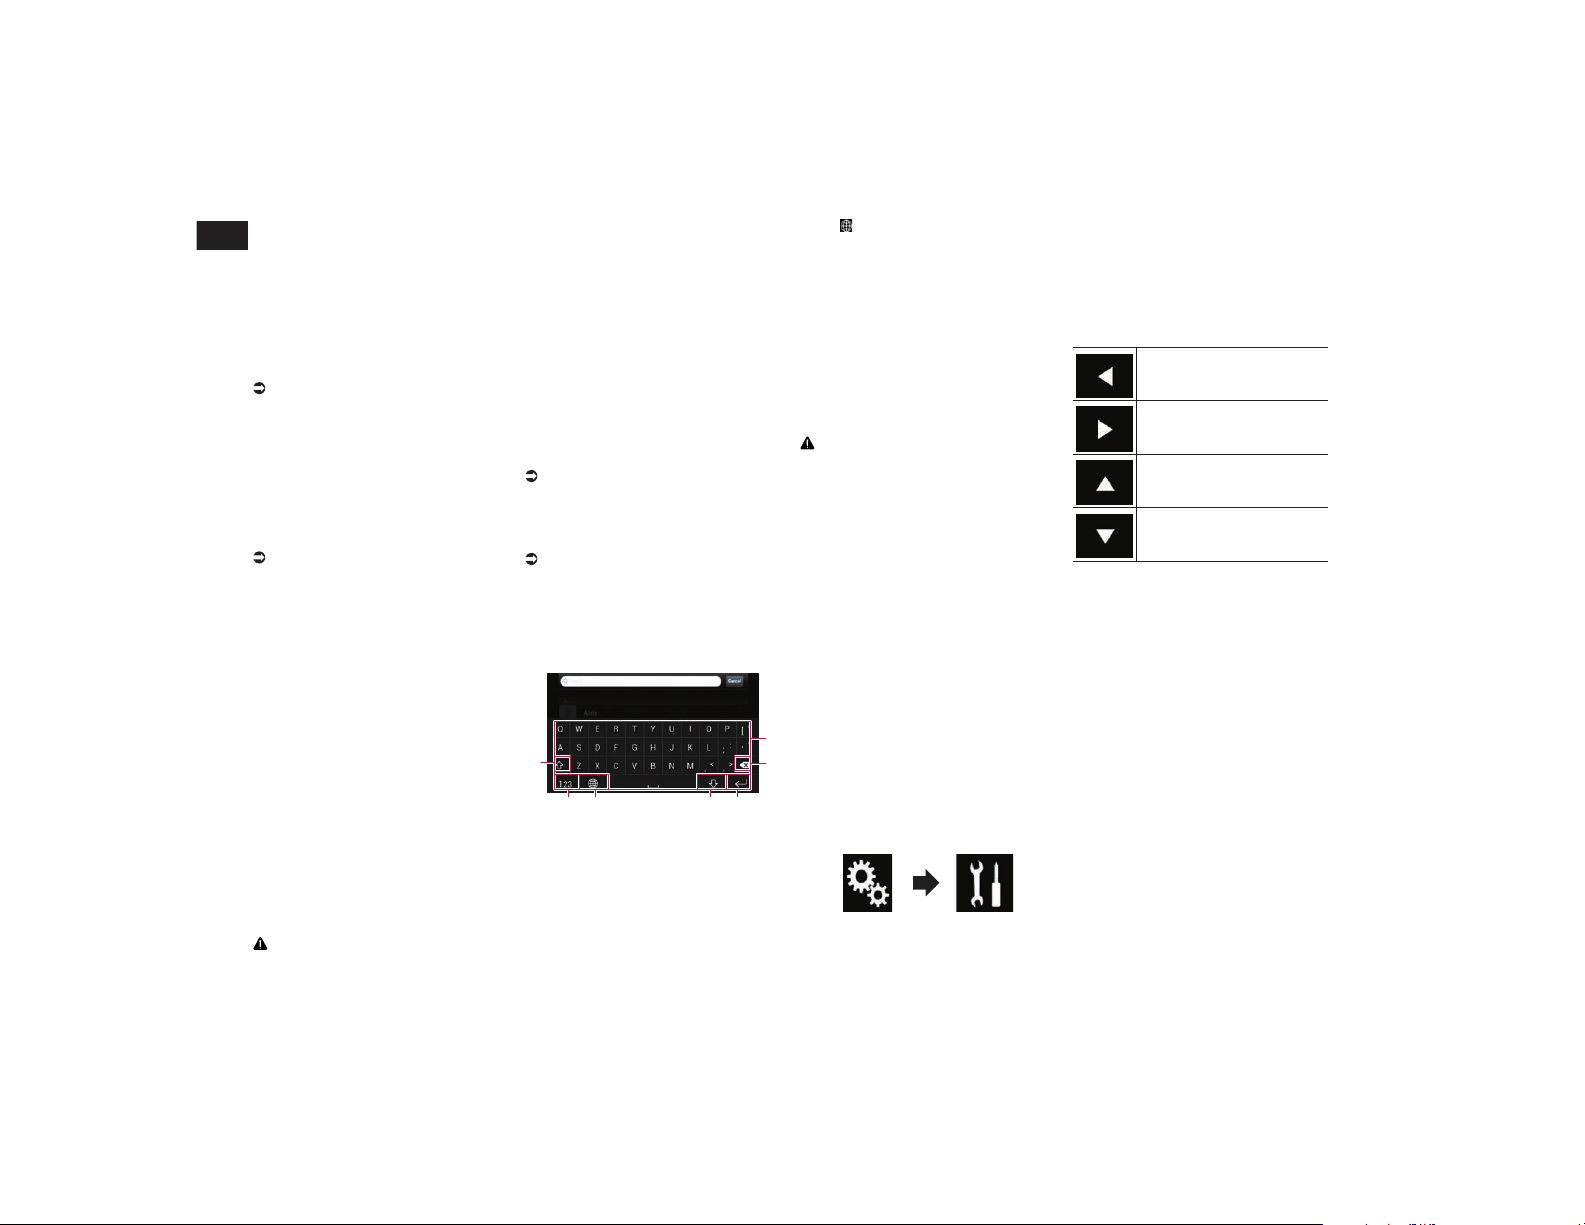
13
Chapitre
42
Fr
8 Appuyez sur le bouton HOME pour
revenir à l’écran de Menu principal.
Pour les utilisateurs de
smartphone
1 Enregistrez votre smartphone et
connectez-le à ce produit via la
technologie sans fil Bluetooth.
p L’appareil enregistré doit être sélectionné
comme appareil prioritaire.
Pour en savoir plus, reportez-vous à la
page 15, Enregistrement de vos péri-
phériques Bluetooth.
2 Déverrouillez votre smartphone.
3 Connectez votre smartphone à ce
produit via le Kit de connexion aux
applications vendu séparément
(CD-AH200).
p La méthode de connexion du câble
dépend de votre appareil.
Pour en savoir plus, reportez-vous à la
page 84, Connexion d’un périphérique
Android™.
4 Appuyez sur le bouton HOME pour
afficher l’écran de Menu principal.
5 Touchez [APPS].
AppRadio app est lancée et l’écran
AppRadio Mode (écran de menu de l’appli-
cation) apparaît.
p Si vous connectez votre appareil
alors qu’une application compatible
AppRadio Mode est déjà exécutée,
l’écran de commande de l’application
apparaît sur ce produit.
6 Touchez l’icône d’application
désirée.
L’application désirée est lancée et l’écran de
commande de l’application apparaît.
7 Commandez l’application.
8 Appuyez sur le bouton HOME pour
revenir à l’écran de Menu principal.
■ Utilisation du clavier
ATTENTION
Pour votre sécurité, la fonction de clavier
n’est disponible que lorsque le véhicule est
arrêté et que le frein à main est serré.
p Cette fonction est disponible uniquement
en AppRadio Mode sur l’iPhone.
p Cette fonction peut ne pas être disponible
selon votre iPhone.
Lorsque vous tapotez sur la zone de saisie
de texte d’une application pour iPhone, un
clavier s’affiche à l’écran. Vous pouvez saisir
le texte souhaité directement à partir de ce
produit.
p La préférence de langue pour le clavier de
ce produit doit être identique au réglage
sur votre iPhone.
Si les réglages pour ce produit et l’iPhone
sont différents, vous ne pourrez pas saisir
correctement les caractères.
1 Réglez la langue du clavier.
Pour en savoir plus sur les opérations,
reportez-vous à la page 64, Réglage
de la langue du clavier avec l’application
pour iPhone.
2 Lancez AppRadio Mode.
Pour en savoir plus, reportez-vous à la
page 41, Procédure de départ.
3 Touchez la zone de saisie de
texte sur l’écran de commande de
l’application.
Un clavier apparaît pour que vous puissiez
saisir le texte.
1
2
3456
7
1 Saisit les caractères.
2 Supprime le texte saisi lettre par lettre à
partir de la fin du texte.
3 Confirme l’entrée et vous permet de
passer à l’étape suivante.
4 Masque le clavier et le texte peut désor-
mais être saisi au moyen du clavier de
l’iPhone.
5 Modifie la disposition du clavier de
l’iPhone.
p Les dispositions du clavier de l’iPhone
pouvant être sélectionnées en tapotant
sur dépendent du réglage Hardware
Keyboard Layout défini sur votre iPhone.
6 Bascule vers un clavier proposant des
caractères numériques et des symboles.
7 Change la casse des caractères du
clavier.
■ Réglage de la taille de l’image
(pour les utilisateurs de
smartphone)
Des points noirs peuvent apparaître sur
l’écran lors de l’utilisation de AppRadio
Mode avec un appareil Android connecté à
ce produit.
ATTENTION
Ce réglage est disponible uniquement
lorsque vous arrêtez votre véhicule dans un
endroit sûr et serrez le frein à main.
p Cette fonction peut être réglée dans les
conditions suivantes :
— Lorsqu’un appareil Android est connecté
à ce produit à l’aide de CD-AH200 (vendu
séparément) et lorsque AppRadio Mode
est disponible après qu’une connexion
Bluetooth soit établie avec SPP (Serial
Port Profile, Profil de port série).
p Si ce réglage n’a pas été effectué, l’écran
de réglage apparaît automatiquement
dans les cas suivants :
— Lors du passage en AppRadio Mode
après qu’une connexion Bluetooth soit
établie avec SPP (Serial Port Profile, Profil
de port série).
— Lorsqu’une connexion Bluetooth est
établie avec SPP (Serial Port Profile, Profil
de port série) en AppRadio Mode.
1 Appuyez sur le bouton HOME pour
afficher l’écran de Menu principal.
2 Touchez les touches suivantes
dans l’ordre indiqué.
L’écran “Système” apparaît.
3 Touchez [Paramètres
entrée-sortie].
4 Touchez [Réglage de la vidéo
AppRadio].
L’écran de confirmation apparaît.
5 Touchez [OK].
6 Touchez les touches suivantes pour
ajuster la ligne afin de l’adapter à
la taille de l’image du smartphone.
Déplace la ligne vers la gauche.
Déplace la ligne vers la droite.
Déplace la ligne vers le haut.
Déplace la ligne vers le bas.
7 Touchez [Aperçu].
p Vérifiez que l’ensemble de l’image remplit
l’écran.
8 Touchez [OK].
p Si vous souhaitez ajuster à nouveau
le réglage depuis le début, touchez
[RÉINITIAL.].
■ Afchage de l’image de votre
application (iPhone avec
connecteur à 30 broches)
Vous pouvez régler une image d’une applica-
tion pour iPhone, qui n’est pas compatible
avec AppRadio Mode, pour qu’elle s’af-
fiche à l’écran.
p Selon le type d’application, il se peut
que vous ne puissiez pas voir l’image à
l’écran.
p Vous pouvez uniquement commander
l’application sur l’appareil raccordé.
p Lorsque vous touchez l’écran pendant
cette fonction, la marque “Ne pas tou-
cher” apparaît dans le coin supérieur
droit de l’écran.

Français
13
Chapitre
43
Fr
1 Connectez votre iPhone.
Pour en savoir plus, reportez-vous à la
page 84, Connexion d’un iPhone avec
connecteur à 30 broches.
2 Appuyez sur le bouton HOME pour
afficher l’écran de Menu principal.
3 Touchez [APPS].
Un message vous informant que votre
iPhone peut lancer l’application apparaît à
l’écran.
Un message vous demandant si vous sou-
haitez lancer votre application apparaît sur
votre iPhone.
4 Utilisez votre iPhone pour refuser
de lancer l’application.
5 Touchez [OK] sur l’écran de ce
produit.
L’écran noir apparaît.
6 Lancez une application sur votre
iPhone.
Une image de l’application apparaît à
l’écran.
7 Appuyez sur le bouton HOME pour
revenir à l’écran de Menu principal.
■ Afchage de l’image de votre
application (iPhone avec
connecteur Lightning)
Vous pouvez régler une image d’une applica-
tion pour smartphone, qui n’est pas com-
patible avec AppRadio Mode, pour qu’elle
s’affiche à l’écran.
p Selon le type d’application, il se peut
que vous ne puissiez pas voir l’image à
l’écran.
p Lorsque vous utilisez cette fonction, ne
connectez pas d’autres appareils via la
technologie sans fil Bluetooth. Veillez à
débrancher votre périphérique Bluetooth
avant d’utiliser cette fonction.
p Vous pouvez uniquement commander
l’application sur l’appareil raccordé.
p Lorsque vous touchez l’écran pendant
cette fonction, la marque “Ne pas tou-
cher” apparaît dans le coin supérieur
droit de l’écran.
1 Connectez votre iPhone.
p La méthode de connexion du câble
dépend de votre appareil.
Pour en savoir plus, reportez-vous à la
page 84, Connexion d’un iPhone avec
connecteur Lightning.
2 Appuyez sur le bouton HOME pour
afficher l’écran de Menu principal.
3 Touchez [APPS].
L’image sur votre iPhone apparaît à l’écran.
4 Lancez une application sur votre
iPhone.
Une image de l’application apparaît à
l’écran.
5 Appuyez sur le bouton HOME pour
revenir à l’écran de Menu principal.
■ Afchage de l’image de votre
application (smartphone)
Vous pouvez régler une image d’une applica-
tion pour smartphone, qui n’est pas com-
patible avec AppRadio Mode, pour qu’elle
s’affiche à l’écran.
p La compatibilité n’est pas garantie avec
tous les smartphones.
p Lorsque vous utilisez cette fonction, ne
connectez pas d’autres appareils via la
technologie sans fil Bluetooth. Veillez à
débrancher votre périphérique Bluetooth
avant d’utiliser cette fonction.
p Vous pouvez uniquement commander
l’application sur l’appareil raccordé.
p Lorsque vous touchez l’écran pendant
cette fonction, la marque “Ne pas tou-
cher” apparaît dans le coin supérieur
droit de l’écran.
1 Connectez votre smartphone à ce
produit via le Kit de connexion aux
applications vendu séparément
(CD-AH200).
p La méthode de connexion du câble
dépend de votre appareil.
Pour en savoir plus, reportez-vous à la
page 84, Connexion d’un périphérique
Android™.
2 Appuyez sur le bouton HOME pour
afficher l’écran de Menu principal.
3 Touchez [APPS].
L’image sur votre smartphone apparaît à
l’écran.
4 Lancez une application sur votre
smartphone.
Une image de l’application apparaît à
l’écran.
5 Appuyez sur le bouton HOME pour
revenir à l’écran de Menu principal.
Utilisation d’Android Auto
Vous pouvez commander les applications
pour un smartphone directement depuis
l’écran (Android Auto).
Avec Android Auto, vous pouvez utiliser les
applications avec le doigt, à savoir par tapo-
tement, glissement, défilement ou balayage
sur l’écran de ce produit.
p Android Auto peut ne pas être dispo-
nible dans votre pays ou région.
Pour en savoir plus sur Android Auto,
reportez-vous au site de support de
Google :
http://support.google.com/androidauto
p Cette fonction est disponible uniquement
pour l’appareil compatible avec Android
Auto.
p Les mouvements de doigts compa-
tibles dépendent de l’application pour
smartphone.
Pour utiliser Android Auto, réglez “Mode”
dans “Config. tél. intelligent” sur
“Android Auto” au préalable.
Pour en savoir plus, reportez-vous à la
page 21, Réglage de la méthode de
connexion de l’appareil.
Le contenu et les fonctionnalités des
applications compatibles sont de la
responsabilité des fournisseurs des
applications.
Avec Android Auto, l’utilisation est
limitée pendant la conduite, les fonc-
tions et le contenu disponibles étant
déterminés par les fournisseurs des
applications.
Android Auto permet d’accéder à des
applications autres que celles de la
liste, soumises à des limitations pen-
dant la conduite.
PIONEER N’EST PAS RESPONSABLE
ET DÉCLINE TOUTE RESPONSABILITÉ
CONCERNANT LES APPLICATIONS
TIERCES ET CONTENU TIERS (NE
PROVENANT PAS DE PIONEER),
Y COMPRIS ET SANS LIMITATION,
TOUTES ERREURS OU INFORMATIONS
INCOMPLÈTES.
■ Procédure de départ
Lors de la connexion d’un appareil compa-
tible avec Android Auto à ce produit, vous
devez sélectionner la méthode de connexion
de votre appareil. Les réglages sont requis
en fonction de l’appareil connecté.
Pour en savoir plus, reportez-vous à
Chapitre 5.
p Pour une utilisation optimale d’Android
Auto, réglez correctement la position de
conduite en fonction du véhicule.
Pour en savoir plus, reportez-vous à la
page 44, Réglage de la position de
conduite.
1 Connectez un appareil compatible
avec Android Auto à ce produit via
le câble d’interface USB vendu
séparément à utiliser avec des
appareils Android (CD-MU200).
Pour en savoir plus, reportez-vous à la
page 85, Connexion d’un appareil
Android ou MirrorLink™.
2 Appuyez sur le bouton HOME pour
afficher l’écran de Menu principal.
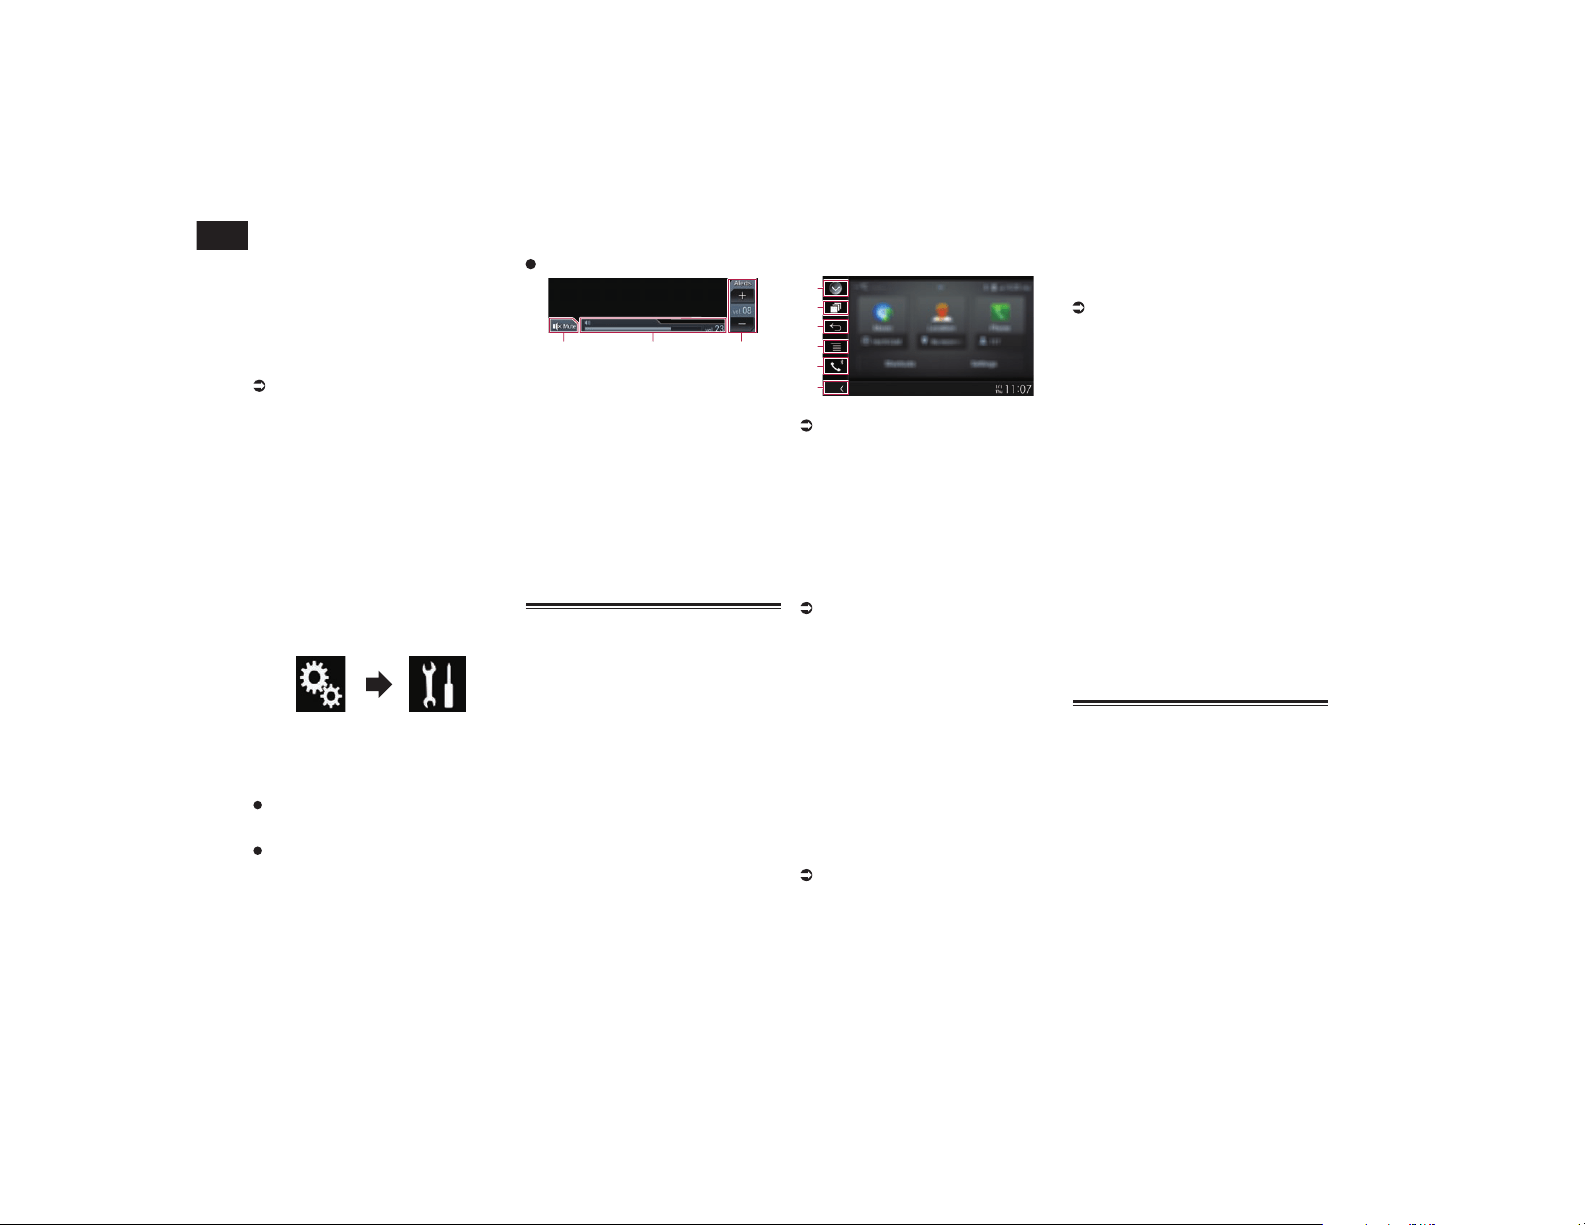
13
Chapitre
44
Fr
3 Touchez [Android Auto].
La connexion Bluetooth avec l’appareil
compatible avec Android Auto est établie
automatiquement.
p Si Android Auto est activé pendant un
appel sur un téléphone portable autre
que l’appareil compatible avec Android
Auto, la connexion Bluetooth sera inter-
rompue lorsque l’appel est terminé.
4 Commandez l’application.
Pour en savoir plus sur le réglage du
volume, reportez-vous à la page 44,
Réglage du volume.
p La fonction Android Auto peut ne pas
fonctionner correctement si la connexion
Bluetooth avec l’appareil compatible avec
Android Auto est interrompue.
■ Réglage de la position de
conduite
Pour une utilisation optimale d’Android
Auto, réglez correctement la position de
conduite en fonction du véhicule.
1 Touchez le bouton HOME pour
afficher l’écran de Menu principal.
2 Touchez les touches suivantes
dans l’ordre indiqué.
L’écran “Système” apparaît.
3 Touchez [Position, conduite].
4 Touchez l’élément que vous sou-
haitez régler.
G (par défaut) :
Sélectionnez pour un véhicule de
conduite à gauche.
D :
Sélectionnez pour un véhicule de
conduite à droite.
Le réglage sera appliqué la prochaine fois
qu’un appareil compatible avec Android
Auto est connecté à ce produit.
■ Réglage du volume
Vous pouvez régler le volume du guidage et
des sons d’alertes séparément du volume
du son principal lorsque Android Auto est
utilisé.
Touchez le bouton VOL (+/–).
1
2
3
1 Touchez pour couper le son. Touchez de
nouveau pour rétablir le son.
2 Affiche le volume du son principal.
3 Règle le volume du guidage vocal et des
sons d’alertes.
Chaque fois que vous touchez [+] ou [–],
le volume sonore augmente ou diminue.
p Vous ne pouvez pas régler le volume du
son principal à l’écran. Touchez le bouton
VOL (+/–) pour régler le volume du son
principal.
p Le menu du volume s’affiche pendant
quatre secondes. Si l’écran disparaît,
touchez de nouveau le bouton VOL (+/–).
L’écran réapparaît.
Utilisation du mode
MirrorLink
Lorsque vous connectez un périphérique
MirrorLink sur lequel des applications
compatibles sont installées, vous pouvez
commander les applications de l’appareil
mobile directement à partir de ce produit
(mode MirrorLink).
Vous pouvez afficher et commander les
applications compatibles via l’écran à l’aide
de gestes à pressions multiples comme le
tapotement, le glissement, le défilement ou
le balayage.
p Les gestes à pressions multiples
peuvent être désactivés selon l’appareil
MirrorLink qui est connecté.
■ Utilisation des touches de
l’écran tactile (barre de com-
mande latérale d’application)
1
3
2
4
5
6
1 Affiche la liste de sources.
Pour en savoir plus, reportez-vous à la
page 14, Sélection d’une source avant
dans la liste de sources.
2 Affiche l’écran de l’application de
lancement.
3 Affiche l’écran précédent.
p En fonction des types du périphérique
MirrorLink, cette touche n’apparaît pas.
4 Affiche l’écran de menu.
p En fonction des types du périphérique
MirrorLink, cette touche n’apparaît pas.
5 Affiche l’écran de Menu téléphone.
Pour en savoir plus, reportez-vous à la
page 18, Affichage du menu téléphone.
6 Affiche la source en cours.
p En mode MirrorLink, la barre de com-
mande latérale d’application apparaît.
p Si vous appuyez deux fois sur le bouton
HOME, la barre de commande latérale
d’application disparaît. Appuyez de nou-
veau deux fois sur le bouton HOME pour
faire apparaître la barre de commande
latérale d’application.
■ Procédure de départ
Lors de la connexion d’un appareil
MirrorLink à ce produit, vous devez sélec-
tionner la méthode de connexion de votre
appareil. Les réglages varient selon l’appa-
reil connecté.
Pour en savoir plus, reportez-vous à
Chapitre 5.
1 Déverrouillez votre appareil
MirrorLink.
2 Connectez votre appareil
MirrorLink à ce produit via le câble
d’interface USB vendu séparé-
ment à utiliser avec des appareils
MirrorLink (CD-MU200).
Pour en savoir plus, reportez-vous à la
page 85, Connexion d’un appareil
Android ou MirrorLink™.
3 Appuyez sur le bouton HOME pour
afficher l’écran de Menu principal.
4 Touchez [APPS].
Si l’application de lancement est installée
sur l’appareil MirrorLink, l’application
démarre.
Si ce n’est pas le cas, l’écran de menu de
l’application apparaît.
5 Touchez l’icône d’application
désirée.
L’application désirée est lancée et l’écran de
commande de l’application apparaît.
p Certaines applications peuvent ne pas se
lancer selon l’état de l’appareil connecté.
Si elle ne se lance pas, lancez l’applica-
tion en fonction du message de démar-
rage de l’application.
6 Commandez l’application.
7 Appuyez sur le bouton HOME pour
revenir à l’écran de Menu principal.
Utilisation de la fonction de
mixage audio
Vous pouvez émettre un mixage audio de la
source AV et de l’application pour iPhone ou
smartphone si AppRadio Mode ou le mode
MirrorLink est utilisé.
1 Lancez AppRadio Mode ou le mode
MirrorLink.
2 Appuyez sur le bouton VOL (+/–).
Le menu de mixage audio s’affiche à l’écran.

Français
14
Chapitre
45
Fr
1 2 3
1 Touchez pour couper le son. Touchez de
nouveau pour rétablir le son.
2 Règle pour activer ou non la fonction de
mixage du son.
Onglet de gauche : La fonction de mixage
audio est activée (mixage activé). Le
volume de l’application s’affiche. Si vous
touchez le volume de l’application, les
touches de volume s’affichent.
Onglet de droite : La fonction de mixage
audio est désactivée (mixage désactivé).
3 Règle le volume audio de l’application.
Chaque fois que vous touchez [+] ou [–],
le volume sonore augmente ou diminue.
p L’écran de Fonction AV et l’écran d’ap-
plication peuvent être permutés en
appuyant sur le bouton MODE.
p L’onglet de droite ne s’affiche pas sur
l’écran de Fonction AV.
p Vous ne pouvez pas régler le volume du
son principal à l’écran. Appuyez sur le
bouton VOL (+/–) pour régler le volume
du son principal.
p Le menu de mixage audio s’affiche pen-
dant quatre secondes. Si l’écran dispa-
raît, appuyez de nouveau sur le bouton
VOL (+/–). L’écran réapparaît.
Transmission de
Pandora
®
AVERTISSEMENT
Certaines utilisations d’un iPhone ou
d’un smartphone pouvant ne pas être
légales en conduisant dans votre juri-
diction, vous devez connaître de telles
restrictions et les respecter.
En cas de doute sur une fonction donnée,
ne l’utilisez que lorsque le véhicule est
garé.
Aucune fonctionnalité ne doit être
utilisée tant qu’il n’est pas sûr de le
faire dans les conditions de conduite
rencontrées.
Utilisation de Pandora
Vous pouvez profiter de Pandora en connec-
tant un iPhone ou un smartphone sur lequel
l’application Pandora est installée.
Important
Conditions requises pour l’accès à
Pandora à l’aide d’appareils audio/vidéo
pour véhicule Pioneer :
Pour en savoir plus, reportez-vous à
Chapitre 5.
Veuillez mettre à jour le micrologiciel de
l’application Pandora vers la dernière
version avant utilisation.
La dernière version de l’application
Pandora peut être téléchargée depuis
iTunes App Store ou Google Play.
Créez un compte gratuit ou payant en
ligne. Vous pouvez créer le compte
dans l’application Pandora depuis votre
iPhone ou depuis le site Web (http://
www.pandora.com/register).
Si le forfait de données pour votre iPhone
n’offre pas une utilisation illimitée des
données, des frais supplémentaires
pourraient vous être facturés par votre
fournisseur pour l’accès au service
Pandora via les réseaux 3G, EDGE et/ou
LTE (4G).
Vous devez vous connecter à Internet via
un réseau 3G, EDGE, LTE (4G) ou Wi-Fi
pour utiliser le service Pandora.
Restrictions :
En fonction de la disponibilité d’Inter-
net, il se peut que vous ne puissiez pas
recevoir le service Pandora.
Le service Pandora peut être modifié
sans préavis.
Le service peut être affecté par n’importe
quel élément suivant : version du micro-
logiciel de l’iPhone, version du microlo-
giciel de l’application Pandora, modifica-
tion du service de musique Pandora.
Certaines fonctions du service Pandora
ne sont pas disponibles lors de l’accès
au service via les appareils audio/vidéo
pour véhicule Pioneer.
Sont comprises, mais sans s’y limiter,
les fonctions suivantes : envoi d’infor-
mations sur les stations actuelles, achat
de pistes sur iTunes, visualisation d’in-
formations textuelles supplémentaires,
connexion à Pandora, réglage de la
qualité audio du réseau cellulaire (Cell
Network Audio Quality).
Remarques
Pandora internet radio est un service de
musique non affilié à Pioneer. De plus
amples informations sont disponibles à
l’adresse
http://www.pandora.com
L’application mobile Pandora est disponible
pour les iPhone et smartphones. Veuillez
visitez le site www.pandora.com/everywhere/
mobile pour en savoir plus sur les dernières
informations en matière de compatibilité.
Utilisation des touches de
l’écran tactile
Écran de lecture (page 1)
1 32
7
4
5
6
a 8
9
Écran de lecture (page 2)
7bcd
1 Affiche la liste de sources.
Pour en savoir plus, reportez-vous à la
page 14, Sélection d’une source avant
dans la liste de sources.
2 Affiche l’écran de Réglage de l’heure
et de la date.
Pour en savoir plus, reportez-vous à la
page 77, Réglage de l’heure et de la
date.
3 Affiche l’écran de Paramètre.
4 Rappelle des courbes d’égalisation.
Pour en savoir plus, reportez-vous à la
page 70, Utilisation de l’égaliseur.
5 Toucher cette touche affiche la liste
de vos stations Pandora.
Pour en savoir plus, reportez-vous à
la page 46, Sélection d’une station
Pandora dans la liste.
6 Affiche l’écran de Menu téléphone.
Pour en savoir plus, reportez-vous à la
page 18, Affichage du menu téléphone.
7 Passe à la page suivante ou précé-
dente des touches de l’écran tactile.
8 Si vous touchez la touche, vous
rejetez la piste en cours de lecture et
passez à la piste suivante.
p Cette fonction n’est pas disponible
lorsque vous utilisez une station
partagée.
9 Si vous touchez la touche, vous
acceptez la piste en cours de lecture.
p Cette fonction n’est pas disponible
lorsque vous utilisez une station
partagée.
a Bascule entre lecture et pause.
b Utilise la fonction “Sound Retriever”.
Pour en savoir plus, reportez-vous à la
page 78, Réglage de la fonction “Sound
Retriever”.
c Ajoute des informations sur la piste
en cours de lecture aux signets.
p Les chansons ajoutées aux signets ne
peuvent pas être visualisées à partir de ce
produit.
d Crée une nouvelle station.
Pour en savoir plus, reportez-vous à la
page 46, Création d’une station.
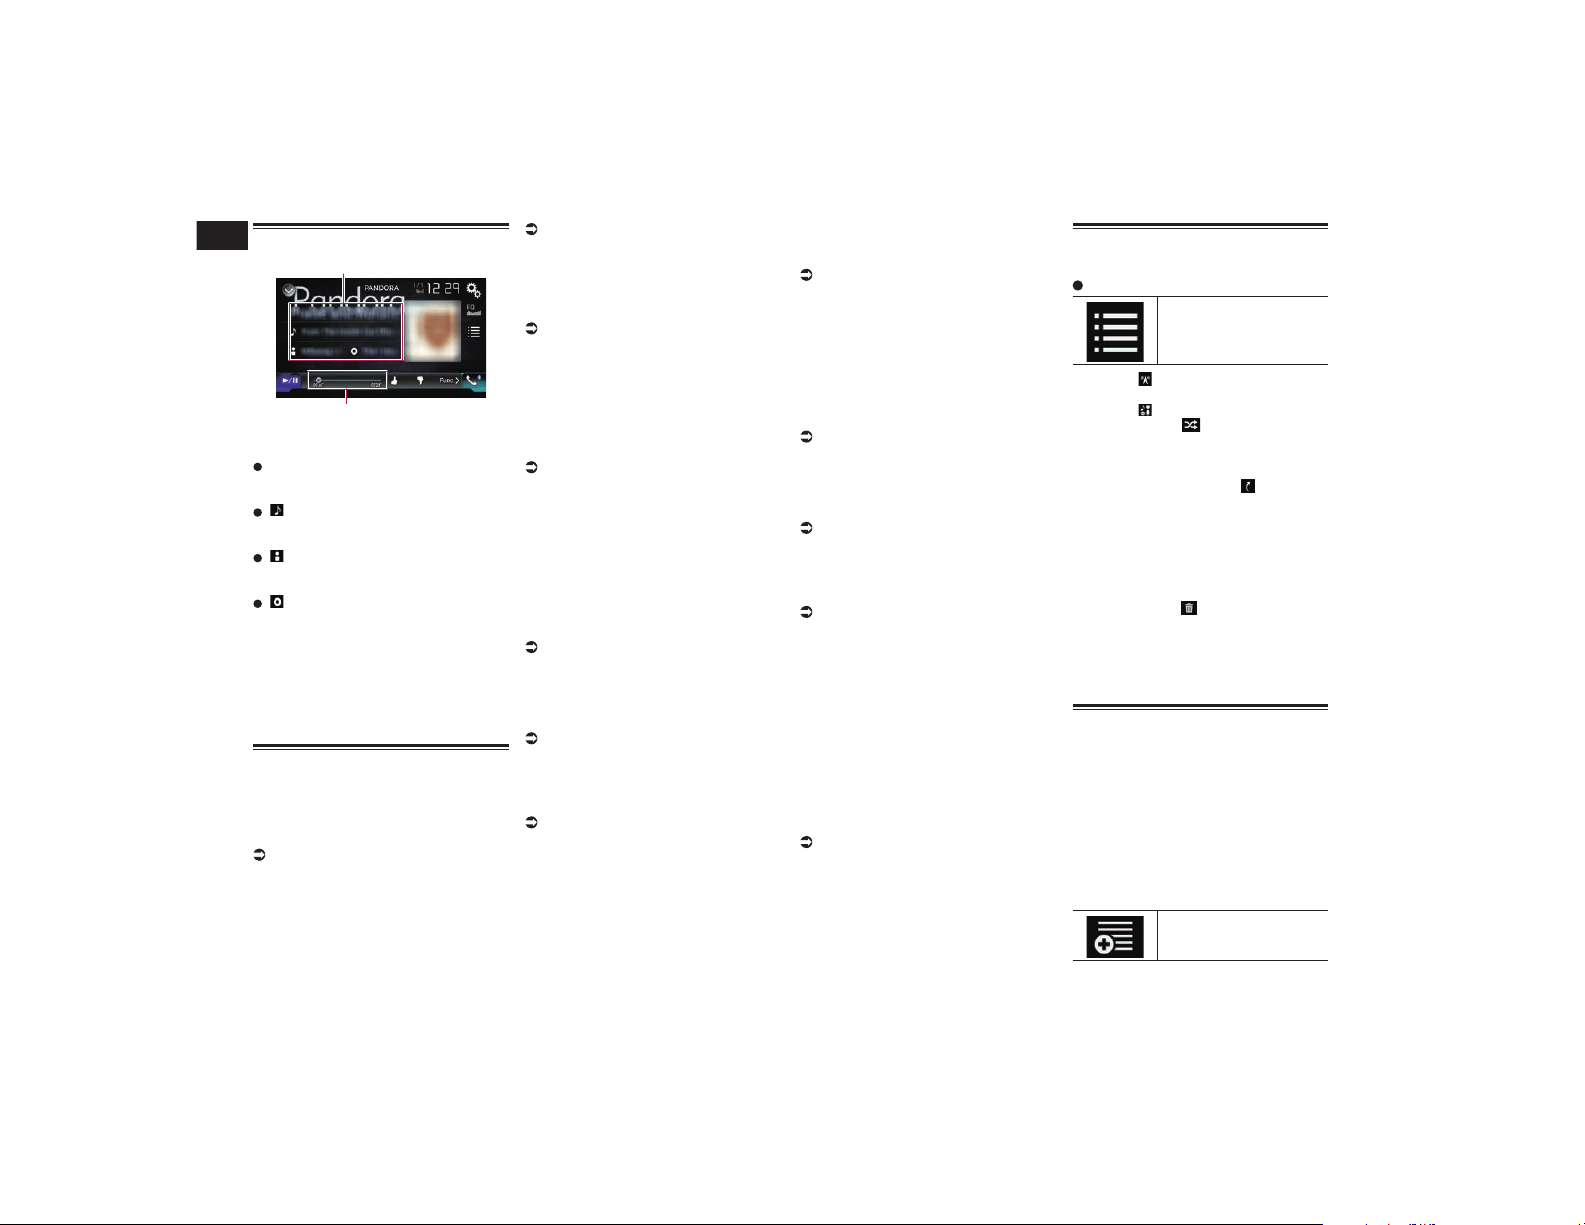
14
Chapitre
46
Fr
Lecture de l’écran
2
1
1 Informations sur la piste en cours de
lecture
Indique le nom de la station Pandora
diffusée sur laquelle le syntoniseur est
actuellement syntonisé.
: Titre de la piste
Indique le titre de la piste en cours de
lecture.
: Nom de l’artiste
Indique le nom de l’artiste de la piste en
cours de lecture.
: Titre de l’album
Indique le titre de l’album de la piste en
cours de lecture.
p Aucune information n’est affichée en l’ab-
sence d’informations correspondantes.
2 Indicateur de temps de lecture
Indique le temps écoulé, le temps restant
et la barre temporelle de la piste en cours
de lecture.
Procédure de départ
Lors de la connexion d’un iPhone ou d’un
smartphone à ce produit, vous devez sélec-
tionner la méthode de connexion de votre
périphérique. Des réglages sont nécessaires
en fonction du périphérique connecté.
Pour en savoir plus, reportez-vous à
Chapitre 5.
■ À l’attention des utilisateurs
d’un iPhone avec connecteur à
30 broches
1 Déverrouillez votre iPhone.
2 Connectez votre iPhone.
p Connectez-vous via USB ou Bluetooth.
Pour en savoir plus sur la connexion
Bluetooth, reportez-vous à la page 15,
Enregistrement de vos périphériques
Bluetooth.
3 Affichez l’écran de Sélection de
source AV.
Pour en savoir plus sur les opérations,
reportez-vous à la page 13, Affichage
de l’écran de fonction AV.
4 Touchez [Pandora] sur l’écran de
Sélection de source AV.
5 Utilisez les touches de l’écran tac-
tile pour commander l’application
Pandora.
Pour en savoir plus, reportez-vous à la
page 45, Utilisation des touches de
l’écran tactile.
■ À l’attention des utilisateurs
d’un iPhone avec connecteur
Lightning
1 Déverrouillez votre iPhone.
2 Connectez votre iPhone.
p Connectez-vous via USB, Bluetooth, ou
HDMI et Bluetooth.
Pour en savoir plus sur la connexion
Bluetooth, reportez-vous à la page 15,
Enregistrement de vos périphériques
Bluetooth.
p La méthode de connexion du câble
dépend de votre appareil.
Pour en savoir plus, reportez-vous à la
page 84, Connexion d’un iPhone avec
connecteur Lightning.
3 Affichez l’écran de Sélection de
source AV.
Pour en savoir plus sur les opérations,
reportez-vous à la page 13, Affichage
de l’écran de fonction AV.
4 Touchez [Pandora] sur l’écran de
Sélection de source AV.
Lorsque vous touchez [Pandora], ce pro-
duit commence à établir une connexion
Bluetooth.
Une fois la connexion établie, la touche de
l’écran tactile sur l’écran “Pandora” est
activée.
5 Utilisez les touches de l’écran tac-
tile pour commander l’application
Pandora.
Pour en savoir plus, reportez-vous à la
page 45, Utilisation des touches de
l’écran tactile.
■ Pour les utilisateurs de
smartphone
1 Déverrouillez votre smartphone.
2 Connectez votre smartphone.
p Connectez-vous via Bluetooth, ou HDMI
et Bluetooth.
Pour en savoir plus sur la connexion
Bluetooth, reportez-vous à la page 15,
Enregistrement de vos périphériques
Bluetooth.
p La méthode de connexion du câble
dépend de votre appareil.
Pour en savoir plus, reportez-vous à la
page 84, Connexion d’un périphérique
Android™.
3 Affichez l’écran de Sélection de
source AV.
Pour en savoir plus sur les opérations,
reportez-vous à la page 13, Affichage
de l’écran de fonction AV.
4 Touchez [Pandora] sur l’écran de
Sélection de source AV.
Lorsque vous touchez [Pandora], ce pro-
duit commence à établir une connexion
Bluetooth.
Une fois la connexion établie, la touche de
l’écran tactile sur l’écran “Pandora” est
activée.
5 Utilisez les touches de l’écran tac-
tile pour commander l’application
Pandora.
Pour en savoir plus, reportez-vous à la
page 45, Utilisation des touches de
l’écran tactile.
Sélection d’une station
Pandora dans la liste
Touchez la touche suivante.
Affiche la liste des stations
Pandora.
p Touchez pour passer à liste des
stations.
p Touchez pour passer à liste des genres.
p Si vous touchez , une seule piste
d’après des caractéristiques musicales
particulières est lue à la fois à partir de
plusieurs stations aléatoires.
p Les stations indiquées par sont des
stations partagées.
p Si vous touchez [A-Z] ou [Date], les
éléments de la liste peuvent être triés.
A-Z : Trie les éléments de la liste par
ordre alphabétique.
Date : Trie les éléments de la liste par
ordre de dates de création des éléments.
p Si vous touchez , la station sera
supprimée.
Un message vous invitant à supprimer la
station s’affiche.
Touchez [Oui]. La station sera supprimée.
Pour annuler, touchez [Non].
Création d’une station
Vous pouvez créer jusqu’à 100 stations avec
une chanson ou un artiste.
p Vous pouvez également créer une station
en sélectionnant une station dans la liste
des genres.
p Les stations ne peuvent pas être créées
dans les cas suivants :
— Il n’y a aucune réponse pendant 15
secondes.
— Le nombre de stations créées atteint 100.
1 Touchez la touche suivante.
Affiche le menu contextuel.

Français
15
Chapitre
47
Fr
2 Touchez l’élément souhaité.
Plage :
Créez une station à l’aide de la chanson
en cours de lecture.
Artiste :
Créez une station à l’aide de l’artiste de la
chanson en cours de lecture.
Pour annuler la création d’une nouvelle
station, touchez [Annuler].
Utilisation avec les boutons
physiques
Appuyez sur le bouton TRK.
Vous pouvez sauter les chansons en avant.
Utilisation de Aha
Radio
AVERTISSEMENT
Certaines utilisations d’un iPhone ou
d’un smartphone pouvant ne pas être
légales en conduisant dans votre juri-
diction, vous devez connaître de telles
restrictions et les respecter.
En cas de doute sur une fonction donnée,
ne l’utilisez que lorsque le véhicule est
garé.
Aucune fonctionnalité ne doit être
utilisée tant qu’il n’est pas sûr de le
faire dans les conditions de conduite
rencontrées.
Lorsque vous connectez un iPhone ou un
smartphone sur lequel Aha Radio est ins-
tallé, vous pouvez commander, afficher et/
ou écouter du contenu Aha Radio à partir de
ce produit.
p Dans ce chapitre, iPhone et iPod touch
sont appelés “iPhone”.
p Pour en savoir plus sur le fonctionne-
ment, reportez-vous à la section Aide et
astuces de l’application Aha Radio.
p Les stations Aha Radio peuvent néces-
siter une configuration initiale ou une
inscription avant de pouvoir y accéder.
p Veillez à lire Utilisation de contenus
connectés via une application avant de
procéder à cette opération.
Pour en savoir plus, reportez-vous à
la page 99, Utilisation de contenus
connectés via une application.
Remarques :
Certaines fonctionnalités du service de
Aha Radio peuvent ne pas être dispo-
nibles lorsque vous accédez à ce service
par le biais de ce produit Pioneer, y com-
pris, mais sans s’y limiter, la création de
nouvelles stations Aha, la suppression
de stations Aha, l’enregistrement de
‘cris’ vocaux, l’ajustement des réglages
de l’application Aha Radio, la connexion
à Facebook, la création d’un compte
Facebook, la connexion à Twitter ou la
création d’un compte Twitter.
Aha Radio est un service non affilié à
Pioneer. De plus amples informations
sont disponibles à l’adresse http://www.
aharadio.com/.
Une version spécifique de l’application
Aha Radio doit être installée sur votre
iPhone ou smartphone pour pouvoir
profiter des contenus Aha Radio sur ce
produit.
Étant donné que l’application pour
l’iPhone ou le smartphone n’est pas four-
nie par Pioneer, il se peut que la version
de l’application nécessaire ne soit pas
encore disponible au moment de l’achat
de ce produit.
Vous trouverez des renseignements sur
la disponibilité, la version et la mise à
jour à l’adresse
http://www.pioneerelectronics.com/
aharadio
Utilisation des touches de
l’écran tactile
1 32
4
5
6
8
7
1 Affiche la liste de sources.
Pour en savoir plus, reportez-vous à la
page 14, Sélection d’une source avant
dans la liste de sources.
2 Affiche l’écran de Réglage de l’heure
et de la date.
Pour en savoir plus, reportez-vous à la
page 77, Réglage de l’heure et de la
date.
3 Affiche l’écran de Paramètre.
4 Rappelle des courbes d’égalisation.
Pour en savoir plus, reportez-vous à la
page 70, Utilisation de l’égaliseur.
5 Sélectionne une station Aha Radio
dans la liste.
Touchez cette touche pour afficher la
liste des stations Aha Radio disponibles.
Touchez la station Aha Radio souhaitée
pour changer les sources Aha Radio.
6 Affiche l’écran de Menu téléphone.
Pour en savoir plus, reportez-vous à la
page 18, Affichage du menu téléphone.
7 Exécute des fonctions supplémen-
taires de chaque station ou contenu
en cours de lecture.
p Les icônes affichées dépendent de
chaque station ou contenu.
Indicateur Signification
Si vous touchez la touche,
les tweets sélectionnés sont
retweetés avec votre compte
Twitter.
Si vous touchez la touche, le
retour rapide du contenu en
cours de lecture est exécuté
pendant 30 secondes.
Si vous touchez la touche, le
contenu actuel reçoit un “Je
n’aime pas”.
p Selon le contenu, si vous
touchez ou , les “Je
n’aime pas” sont annulés.
Si vous touchez la touche,
le contenu actuel reçoit un
“J’aime”.
p Selon le contenu, si vous
touchez ou , les
“J’aime” sont annulés.
Si vous touchez la touche,
vous pouvez appeler un
numéro de téléphone
enregistré dans le contenu
actuel au moyen de la fonc-
tion mains libres.
8 Bascule entre lecture et pause.
Lecture de l’écran
2
4
1
5
3
1 Repère de station
2 Nom de la station
Affiche le nom de la station Aha Radio
sur laquelle le produit est actuellement
syntonisé.
3 Image du contenu
Affiche une image du contenu actuel si
disponible.
4 Information de classement
Indique le classement du contenu actuel-
lement affiché si disponible.
5 Informations sur la station actuelle
Indique les informations sur le contenu
en cours de lecture.
p L’élément reste vide en l’absence d’infor-
mations correspondantes.
Procédure de départ
Lors de la connexion d’un iPhone ou d’un
smartphone à ce produit, vous devez sélec-
tionner la méthode de connexion de votre
périphérique. Des réglages sont nécessaires
en fonction du périphérique connecté.
Pour en savoir plus, reportez-vous à
Chapitre 5.

16
Chapitre
48
Fr
■ À l’attention des utilisateurs
d’un iPhone avec connecteur à
30 broches
1 Déverrouillez votre iPhone.
2 Connectez votre iPhone.
p Connectez-vous via USB ou Bluetooth.
Pour en savoir plus sur la connexion
Bluetooth, reportez-vous à la page 15,
Enregistrement de vos périphériques
Bluetooth.
3 Affichez l’écran de Sélection de
source AV.
Pour en savoir plus sur les opérations,
reportez-vous à la page 13, Affichage
de l’écran de fonction AV.
4 Touchez [aha] sur l’écran de
Sélection de source AV.
5 Utilisez les touches de l’écran
tactile pour commander Aha Radio.
Pour en savoir plus, reportez-vous à la
page 47, Utilisation des touches de
l’écran tactile.
■ À l’attention des utilisateurs
d’un iPhone avec connecteur
Lightning
1 Déverrouillez votre iPhone.
2 Connectez votre iPhone.
p Connectez-vous via USB, Bluetooth, ou
HDMI et Bluetooth.
Pour en savoir plus sur la connexion
Bluetooth, reportez-vous à la page 15,
Enregistrement de vos périphériques
Bluetooth.
p La méthode de connexion du câble
dépend de votre appareil.
Pour en savoir plus, reportez-vous à la
page 84, Connexion d’un iPhone avec
connecteur Lightning.
3 Affichez l’écran de Sélection de
source AV.
Pour en savoir plus sur les opérations,
reportez-vous à la page 13, Affichage
de l’écran de fonction AV.
4 Touchez [aha] sur l’écran de
Sélection de source AV.
Lorsque vous touchez [aha], ce produit com-
mence à établir une connexion Bluetooth.
Une fois la connexion établie, la touche de
l’écran tactile sur l’écran “aha” est activée.
5 Utilisez les touches de l’écran
tactile pour commander Aha Radio.
Pour en savoir plus, reportez-vous à la
page 47, Utilisation des touches de
l’écran tactile.
■ Pour les utilisateurs de
smartphone
1 Déverrouillez votre smartphone.
2 Connectez votre smartphone.
p Connectez-vous via Bluetooth, ou HDMI
et Bluetooth.
Pour en savoir plus sur la connexion
Bluetooth, reportez-vous à la page 15,
Enregistrement de vos périphériques
Bluetooth.
p La méthode de connexion du câble
dépend de votre appareil.
Pour en savoir plus, reportez-vous à la
page 84, Connexion d’un périphérique
Android™.
3 Affichez l’écran de Sélection de
source AV.
Pour en savoir plus sur les opérations,
reportez-vous à la page 13, Affichage
de l’écran de fonction AV.
4 Touchez [aha] sur l’écran de
Sélection de source AV.
Lorsque vous touchez [aha], ce produit com-
mence à établir une connexion Bluetooth.
Une fois la connexion établie, la touche de
l’écran tactile sur l’écran “aha” est activée.
5 Utilisez les touches de l’écran
tactile pour commander Aha Radio.
Pour en savoir plus, reportez-vous à la
page 47, Utilisation des touches de
l’écran tactile.
Utilisation avec les boutons
physiques
Appuyez sur le bouton TRK.
Vous pouvez sauter du contenu en avant ou
en arrière.
Utilisation de iDatalink
En raccordant l’adaptateur iDatalink en
option, vous pouvez accéder à la source
radio satellite prévue pour le véhicule et les
informations sur le véhicule peuvent être
affichées sur ce produit.
Important
Pour en savoir plus sur l’installation de
l’adaptateur iDatalink, reportez-vous au
manuel de fonctionnement de l’adapta-
teur iDatalink.
Après avoir installé l’adaptateur
iDatalink, assurez-vous de vérifier le
fonctionnement.
Pour en savoir plus sur les modèles de
véhicule compatibles avec l’adaptateur
iDatalink, reportez-vous aux informations
de notre site Web.
Les fonctions et les affichages varient en
fonction du modèle du véhicule. Pour en
savoir plus sur les fonctions disponibles
pour chaque modèle, reportez-vous aux
informations de notre site Web.
Vous pouvez faire défiler l’écran de liste
iDatalink par page vers le haut ou vers le
bas.
Veuillez noter que le numéro d’appareil
de ce produit et un ordinateur ayant
accès à Internet sont nécessaires pour
programmer votre module Maestro RR.
Pour des informations de dépannage sur
les fonctions “iDatalink”, visitez le site
www.idatalinkmaestro.com/support ou
appelez le soutien technique de iDatalink
Maestro au numéro gratuit 877.212.6169,
poste 7900.
Activation de iDatalink
Maestro
Avant d’utiliser et/ou de raccorder l’adapta-
teur iDatalink Maestro, vous devez d’abord
mettre à jour le module Maestro avec le
micrologiciel de l’unité principale et du
véhicule approprié.
■ Mise à jour du module iDatalink
Maestro
1 Les six derniers chiffres (le numéro
d’appareil) se trouvent sur l’éti-
quette sur l’emballage de ce pro-
duit ou sur le produit lui-même.
p La saisie du numéro d’appareil est
nécessaire pour la mise à jour du module
iDatalink MAESTRO. Notez le numéro
d’appareil si nécessaire.
p Vous pouvez également vérifier le numéro
d’appareil sur l’écran “Info sur le micro-
logiciel” de ce produit.
Pour en savoir plus, reportez-vous à la
page 66, Affichage de la version du
micrologiciel.
2 Accédez au site Web de
Automotive Data Solutions Inc.
(www.idatalinkmaestro.com/) et
suivez les instructions à l’écran
pour configurer le micrologiciel
souhaité.
p Lorsque la saisie du numéro de série
est nécessaire, veuillez saisir le numéro
d’appareil de ce produit.
3 Installez le micrologiciel spéci-
fique de l’unité principale/du véhi-
cule sur votre module iDatalink
Maestro.
Pour en savoir plus, reportez-vous au site
Web de Automotive Data Solutions Inc.
4 Raccordez ce produit à iDatalink
Maestro, puis installez ce produit
sur le véhicule.
La fonction iDatalink devient active.
Procédure de départ
1 Affichez l’écran de Sélection de
source AV.
Pour en savoir plus sur les opérations,
reportez-vous à la page 13, Affichage
de l’écran de fonction AV.
2 Touchez [My Vehicle] sur l’écran de
Sélection de source AV.
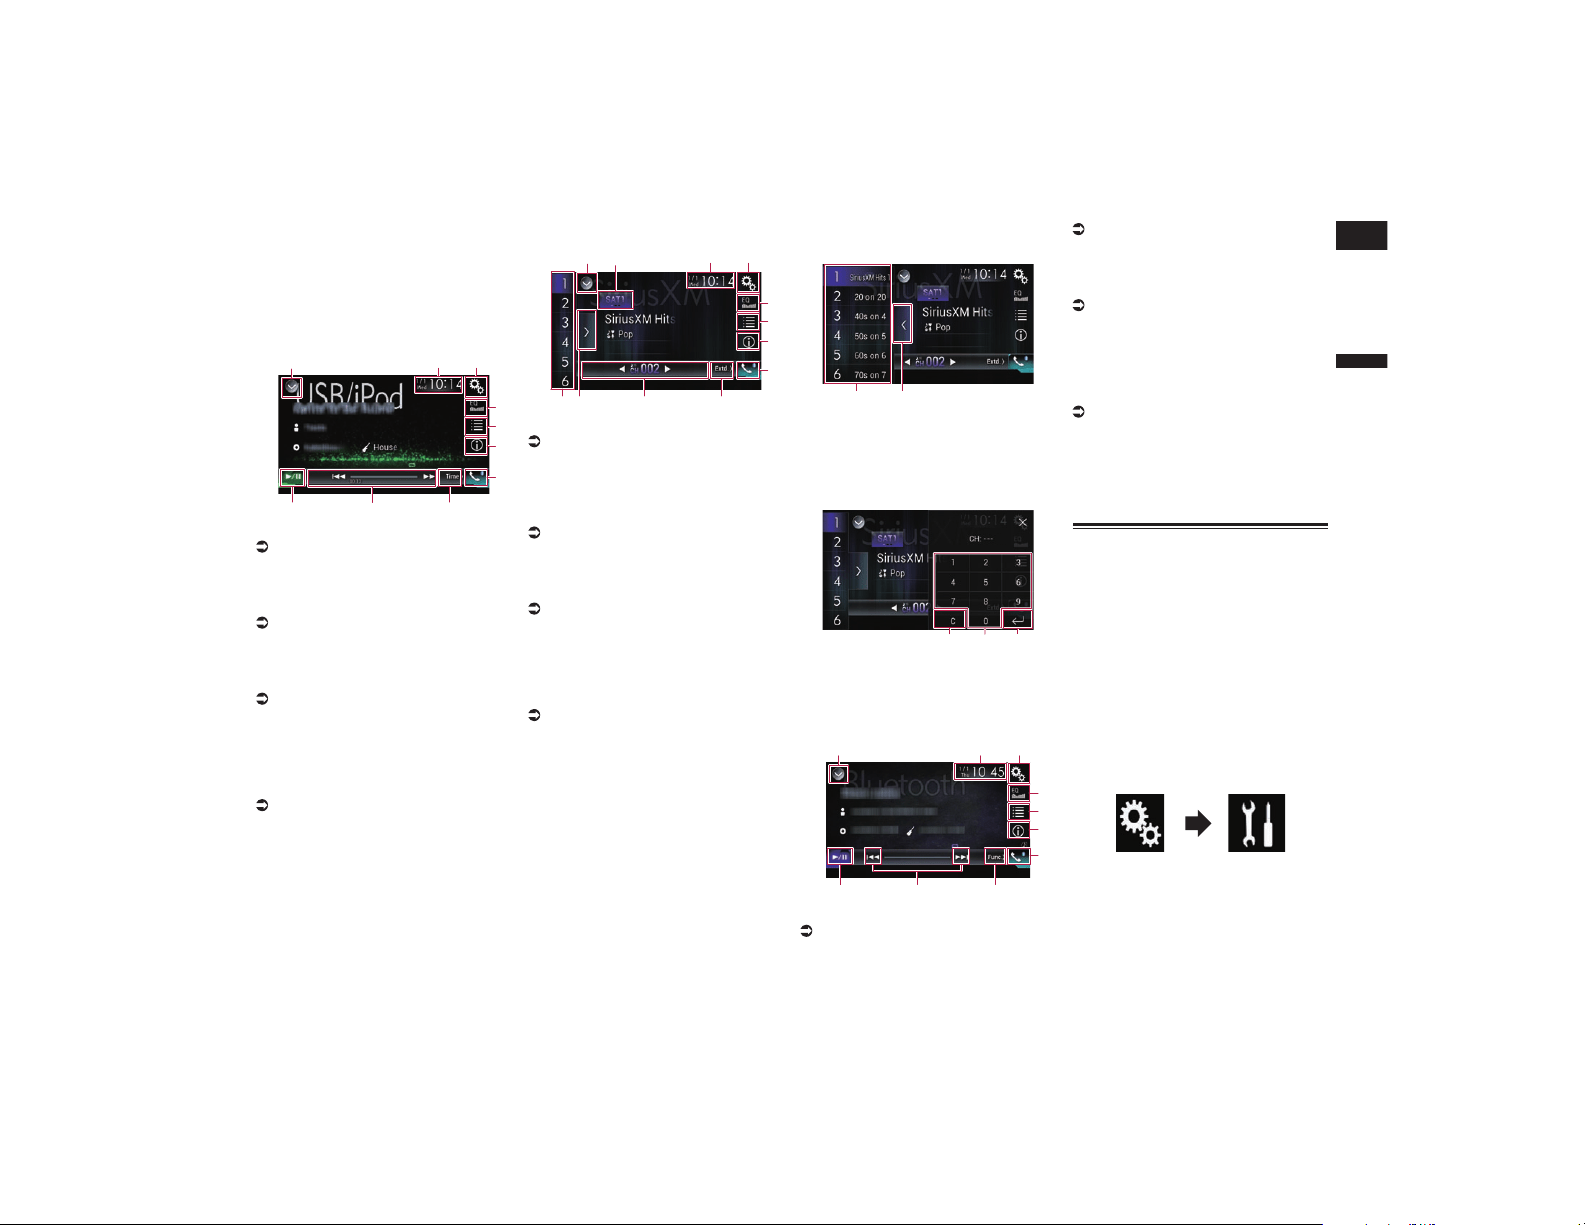
Français
16
Chapitre
49
Fr
3 Touchez [USB/iPod], [SiriusXM]
ou [Bluetooth Audio] si vous sou-
haitez utiliser iDatalink.
4 Utilisez les touches de l’écran
tactile pour commander la fonc-
tionnalité OEM.
USB/iPod (Lecteur multimédia)
1 32
8
4
5
7
a
9
6
1 Affiche la liste de sources.
Pour en savoir plus, reportez-vous à la
page 14, Sélection d’une source avant
dans la liste de sources.
2 Affiche l’écran de Réglage de l’heure
et de la date.
Pour en savoir plus, reportez-vous à la
page 77, Réglage de l’heure et de la
date.
3 Affiche l’écran de Paramètre.
4 Rappelle des courbes d’égalisation.
Pour en savoir plus, reportez-vous à la
page 70, Utilisation de l’égaliseur.
5 Sélectionne une piste dans la liste.
6 Bascule l’affichage du texte entre les
informations sur la balise et les infor-
mations sur le fichier/dossier.
7 Affiche l’écran de Menu téléphone.
Pour en savoir plus, reportez-vous à la
page 18, Affichage du menu téléphone.
8 Passe à la page suivante ou précé-
dente des touches de l’écran tactile.
9 Les fonctions et les affichages varient
en fonction du type d’adaptateur
iDatalink connecté et du modèle de
véhicule.
a Bascule entre lecture et pause.
Radio satellite
1 4
9
5
6
8
c a
7
2
b
3
1 Affiche la liste de sources.
Pour en savoir plus, reportez-vous à la
page 14, Sélection d’une source avant
dans la liste de sources.
2 Sélectionne une bande.
3 Affiche l’écran de Réglage de l’heure
et de la date.
Pour en savoir plus, reportez-vous à la
page 77, Réglage de l’heure et de la
date.
4 Affiche l’écran de Paramètre.
5 Rappelle des courbes d’égalisation.
Pour en savoir plus, reportez-vous à la
page 70, Utilisation de l’égaliseur.
6 Sélectionne un canal sur la liste.
7 Bascule l’affichage du texte entre les
informations sur le canal actuel et les
informations sur le contenu actuel.
8 Affiche l’écran de Menu téléphone.
Pour en savoir plus, reportez-vous à la
page 18, Affichage du menu téléphone.
9 Passe à la page suivante ou précé-
dente des touches de l’écran tactile.
a Les fonctions et les affichages varient
en fonction du type d’adaptateur
iDatalink connecté et du modèle de
véhicule.
b Affiche les canaux préréglés.
c Sélectionne un canal préréglé.
Sélection d’un canal préréglé dans la
liste des canaux préréglés
1 2
1 Touches de présélection
2 Touche d’affichage de la liste des
canaux préréglés
Sélection directe d’un canal SiriusXM
1 2 3
1 Touche Effacer
2 Touches numériques
3 Touche Entrée
Audio Bluetooth
4
5
7
6
8
a 9
1 2 3
1 Affiche la liste de sources.
Pour en savoir plus, reportez-vous à la
page 14, Sélection d’une source avant
dans la liste de sources.
2 Affiche l’écran de Réglage de l’heure
et de la date.
Pour en savoir plus, reportez-vous à la
page 77, Réglage de l’heure et de la
date.
3 Affiche l’écran de Paramètre.
4 Rappelle des courbes d’égalisation.
Pour en savoir plus, reportez-vous à la
page 70, Utilisation de l’égaliseur.
5 Sélectionne une piste dans la liste.
6 Bascule l’affichage du texte entre les
informations sur la balise et les infor-
mations sur le fichier/dossier.
7 Affiche l’écran de Menu téléphone.
Pour en savoir plus, reportez-vous à la
page 18, Affichage du menu téléphone.
8 Passe à la page suivante ou précé-
dente des touches de l’écran tactile.
9 Saute des fichiers en avant ou en
arrière.
a Bascule entre lecture et pause.
Téléphone mains libres
En raccordant ce produit au système de bus
du véhicule à l’aide de l’adaptateur iData-
link (vendu séparément), ce produit peut
accéder au téléphone mains libres pour le
véhicule.
p Cette fonction n’est pas disponible pen-
dant un appel téléphonique à l’aide de
ce produit ou lors de l’utilisation de la
fonction de reconnaissance vocale.
■ Réglage Bluetooth
1 Appuyez sur le bouton HOME pour
afficher l’écran de Menu principal.
2 Touchez les touches suivantes
dans l’ordre indiqué.
L’écran “Système” apparaît.
3 Touchez [Par. FEO].
p Les fonctions et les affichages varient en
fonction du type d’adaptateur iDatalink
connecté et du modèle de véhicule.
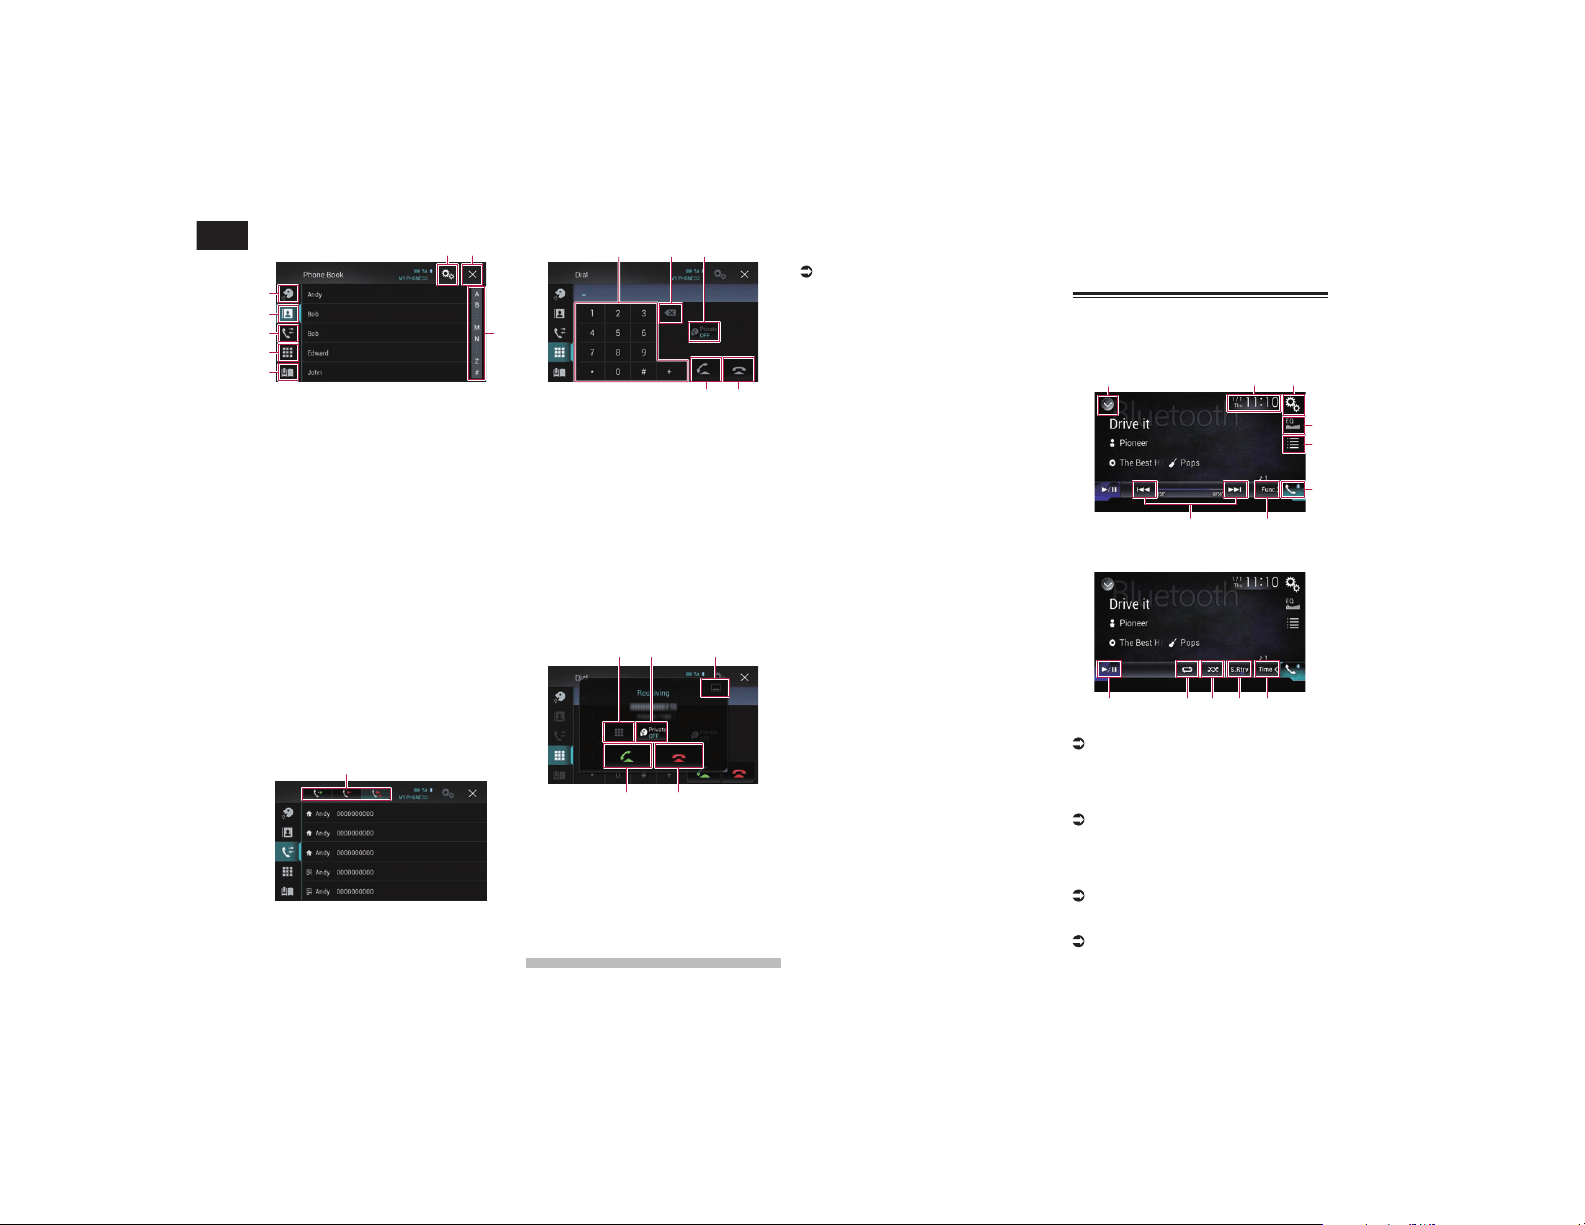
17
Chapitre
50
Fr
■ Écran de l’annuaire
1
6
8
2
3
4
7
5
1 Bascule vers la fonction de reconnais-
sance vocale.
2 Bascule vers la liste de l’annuaire.
3 Bascule vers les listes des appels en
absence, reçus et composés.
4 Bascule vers le mode de saisie directe
du numéro de téléphone.
5 Les fonctions et les affichages varient
en fonction du type d’adaptateur
iDatalink connecté et du modèle de
véhicule.
6 Affiche l’écran de Paramètre.
p Les menus [Connexion] et [Paramètres
Bluetooth] sont affichés. Les fonctions
et les affichages des menus disponibles
varient en fonction du type d’adaptateur
iDatalink connecté et du modèle de
véhicule.
7 Ferme l’écran.
8 Affiche les entrées dans la liste par le
premier caractère.
■ Écran de liste du journal
1
1 Bascule sur le journal des appels.
■ Écran de numérotation
1 2 3
4 5
1 Pavé numérique
2 Supprime un chiffre. Maintenez-le
enfoncé pour supprimer tous les
chiffres.
3 Active ou désactive le mode privé.
4 Effectue un appel lorsqu’un numéro
de téléphone est sélectionné.
Bascule entre les appelants en
attente.
5 Met fin à un appel.
Rejette un appel entrant.
Annule l’appel en attente.
■ Écran de conrmation de
numérotation
1 2 3
5
4
1 Bascule vers le mode de saisie directe
du numéro de téléphone.
2 Active ou désactive le mode privé.
3 Réduit l’écran de confirmation de
numérotation.
4 Accepte un appel entrant.
5 Met fin à un appel.
Utilisation d’un lecteur
audio Bluetooth
Vous pouvez commander un lecteur audio
Bluetooth.
p Avant d’utiliser le lecteur audio
Bluetooth, vous devez enregistrer et
connecter le périphérique sur ce produit.
Pour en savoir plus, reportez-vous à la
page 15, Enregistrement de vos péri-
phériques Bluetooth.
p Les opérations peuvent différer selon le
lecteur audio Bluetooth.
p Selon le lecteur audio Bluetooth connecté
à ce produit, les opérations disponibles
avec ce produit peuvent être limitées aux
deux niveaux suivants :
— A2DP (Advanced Audio Distribution
Profile) : Seule la lecture des chansons
sur votre lecteur audio est possible.
— A2DP et AVRCP (Audio/Video Remote
Control Profile) : La lecture, la pause,
la sélection de chansons, etc. sont
possibles.
p Étant donné que de nombreux lecteurs
audio Bluetooth sont disponibles sur le
marché, les opérations possibles avec
votre lecteur audio Bluetooth en utilisant
ce produit varient considérablement.
Veuillez consulter le manuel d’utilisa-
tion accompagnant votre lecteur audio
Bluetooth ainsi que ce manuel pendant
que vous utilisez le lecteur avec ce
produit.
p Lorsque vous écoutez des chansons
sur votre lecteur audio Bluetooth, évitez
autant que possible d’utiliser un télé-
phone portable. Si vous essayez de faire
fonctionner votre téléphone portable, le
signal peut provoquer un bruit affectant
la lecture des chansons.
p Même si vous permutez sur une autre
source pendant que vous écoutez une
chanson sur le lecteur audio Bluetooth, la
lecture de la chanson continue.
p Selon le lecteur audio Bluetooth
connecté à ce produit, les opérations
pour commander le lecteur sur ce produit
peuvent différer de celles expliquées dans
ce manuel.
p Lorsque vous parlez sur un téléphone
portable connecté à ce produit via la
technologie sans fil Bluetooth, la lecture
des chansons depuis le lecteur audio
Bluetooth connecté à ce produit peut être
suspendue.
p Vous ne pouvez pas utiliser le lecteur
audio Bluetooth si le câble de connexion
utilisé pour AppRadio Mode est
branché.
Utilisation des touches de
l’écran tactile
Écran de lecture (page 1)
8 7
1 3
2
4
5
6
Écran de lecture (page 2)
79abc
1 Affiche la liste de sources.
Pour en savoir plus, reportez-vous à la
page 14, Sélection d’une source avant
dans la liste de sources.
2 Affiche l’écran de Réglage de l’heure
et de la date.
Pour en savoir plus, reportez-vous à la
page 77, Réglage de l’heure et de la
date.
3 Affiche l’écran de Paramètre.
4 Rappelle des courbes d’égalisation.
Pour en savoir plus, reportez-vous à la
page 70, Utilisation de l’égaliseur.
5 Sélectionne un fichier dans la liste.
Pour en savoir plus, reportez-vous à la
page 51, Sélection de fichiers dans la
liste des noms de fichiers.
6 Affiche l’écran de Menu téléphone.
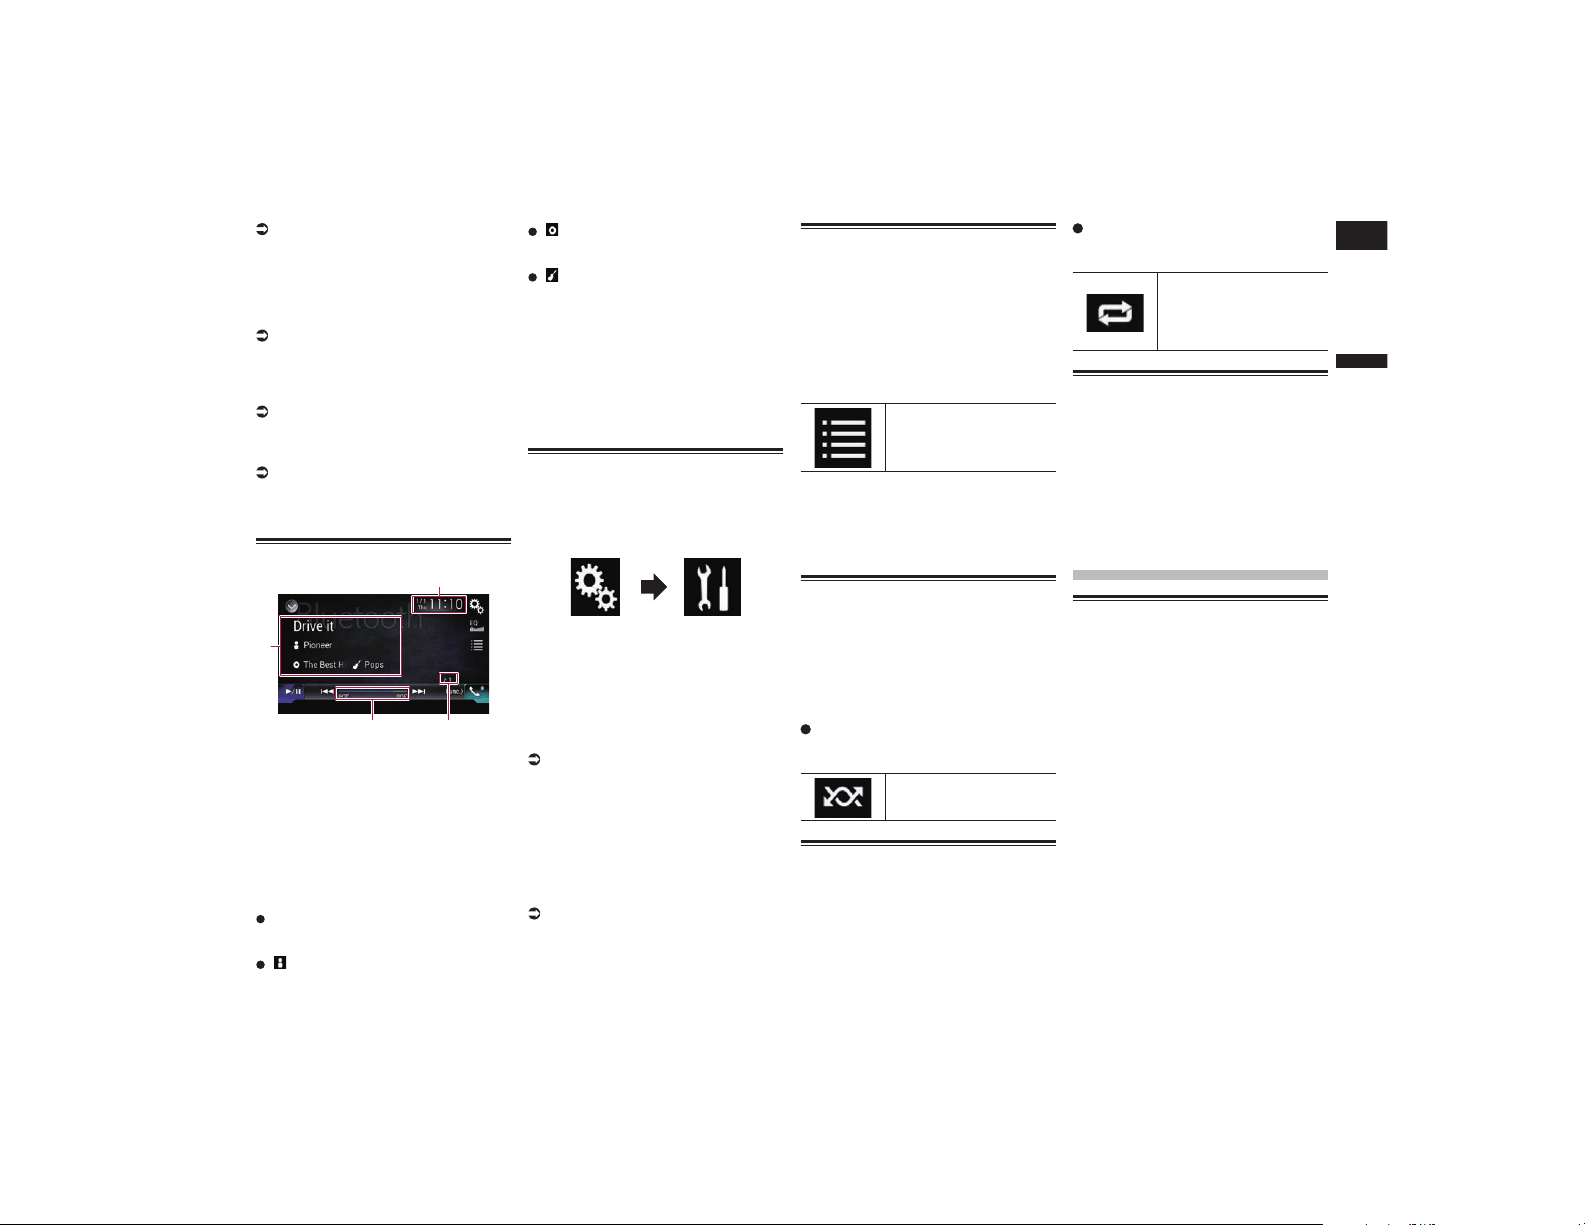
Français
18
Chapitre
51
Fr
Pour en savoir plus, reportez-vous à la
page 18, Affichage du menu téléphone.
7 Passe à la page suivante ou précé-
dente des touches de l’écran tactile.
8 Saute des fichiers en avant ou en
arrière.
9 Utilise la fonction “Sound Retriever”.
Pour en savoir plus, reportez-vous à la
page 78, Réglage de la fonction “Sound
Retriever”.
a Lit des fichiers dans un ordre
aléatoire.
Pour en savoir plus, reportez-vous à la
page 51, Lecture des fichiers dans un
ordre aléatoire.
b Règle une plage de lecture répétée.
Pour en savoir plus, reportez-vous à la
page 51, Réglage d’une plage de lec-
ture répétée.
c Bascule entre lecture et pause.
Lecture de l’écran
4
1
23
1 Heure et date actuelles
2 Indicateur de numéro de fichier
Indique le numéro du fichier en cours de
lecture (s’il est disponible).
3 Indicateur de temps de lecture
Indique le temps de lecture écoulé dans
le fichier sélectionné (si disponible).
4 Informations sur le fichier sélectionné
Si le lecteur audio Bluetooth raccordé
intègre AVRCP 1.3, les informations de
fichier suivantes s’affichent.
Titre de la piste
Indique le titre de la piste en cours de
lecture (s’il est disponible).
: Nom de l’artiste
Indique le nom de l’artiste de la piste en
cours de lecture (si disponible).
: Titre de l’album
Indique le titre de l’album du fichier en
cours de lecture (s’il est disponible).
: Genre
Indique le genre du fichier en cours de
lecture (si disponible).
p Dans les cas suivants, les informations
de fichier ne s’affichent qu’après avoir
démarré un fichier ou repris la lecture :
— Un lecteur audio Bluetooth compatible
avec AVRCP1.3 est raccordé et la lecture
est lancée en utilisant l’appareil.
— Un autre fichier est sélectionné lorsque la
lecture est en pause.
Procédure de départ
1 Appuyez sur le bouton HOME pour
afficher l’écran de Menu principal.
2 Touchez les touches suivantes
dans l’ordre indiqué.
L’écran “Système” apparaît.
3 Touchez [Réglages de source A/V].
4 Confirmez que “Audio Bluetooth”
est activé.
p Le réglage par défaut est “Marche”.
5 Affichez l’écran de Sélection de
source AV.
Pour en savoir plus sur les opérations,
reportez-vous à la page 13, Affichage
de l’écran de fonction AV.
6 Touchez [Bluetooth Audio] sur
l’écran de Sélection de source AV.
L’écran “Bluetooth” apparaît.
7 Utilisez les touches de l’écran
tactile pour commander le lecteur
audio Bluetooth.
Pour en savoir plus, reportez-vous à la
page 50, Utilisation des touches de
l’écran tactile.
Sélection de chiers dans la
liste des noms de chiers
La liste des noms de fichiers vous permet
de consulter la liste des titres de pistes du
lecteur audio Bluetooth et de sélectionner
l’un d’entre eux pour le lire.
p Cette fonction est disponible unique-
ment lorsque le lecteur audio Bluetooth
connecté prend en charge AVRCP 1.4.
1 Touchez la touche suivante.
Affichez la liste des noms de
fichiers.
2 Touchez un fichier de la liste pour
le lire.
p Touchez un dossier dans la liste pour voir
son contenu. Vous pouvez lire un fichier
dans la liste en le touchant.
Lecture des chiers dans un
ordre aléatoire
À l’aide d’une seule touche, vous pouvez
lire tous les fichiers dans la plage de lecture
répétée en cours dans un ordre aléatoire.
p Cette fonction est disponible unique-
ment lorsque le lecteur audio Bluetooth
connecté prend en charge AVRCP 1.3.
Touchez à plusieurs reprises la
touche suivante jusqu’à ce que le
réglage souhaité apparaisse.
Active ou désactive la lec-
ture aléatoire.
Réglage d’une plage de lec-
ture répétée
Vous pouvez modifier la plage de lecture
répétée à l’aide d’une seule touche.
p Cette fonction est disponible unique-
ment lorsque le lecteur audio Bluetooth
connecté prend en charge AVRCP 1.3.
Touchez à plusieurs reprises la
touche suivante jusqu’à ce que le
réglage souhaité apparaisse.
Change la plage de lecture
répétée entre le fichier en
cours de lecture et tous les
fichiers audio sur le lecteur
audio Bluetooth.
Utilisation avec les boutons
physiques
Appuyez sur le bouton TRK.
Vous pouvez sauter les fichiers en avant ou
en arrière.
Maintenez enfoncé le bouton TRK.
Vous pouvez effectuer un retour ou une
avance rapide.
Using the SiriusXM
®
satellite radio
SiriusXM satellite radio
operations
Vous pouvez utiliser ce produit pour com-
mander un syntoniseur pour véhicule
SiriusXM Connect (vendu séparément).
Pour en savoir plus sur l’installation du syn-
toniseur pour véhicule SiriusXM Connect,
consultez le guide d’installation fourni avec
le syntoniseur.
SiriusXM
®
vous apporte le meilleur de ce
que vous aimez écouter, le tout en un seul
système. Obtenez plus de 140 stations,
notamment le plus large choix de musique
sans publicités, de sports, d’informations,
de discussion, d’émissions humoristiques
et de divertissements. Bienvenue dans le
monde de la radio satellite. Un syntoniseur
de véhicule SiriusXM et un abonnement
sont nécessaires. Pour plus d’informations,
visitez le site www.siriusxm.com.
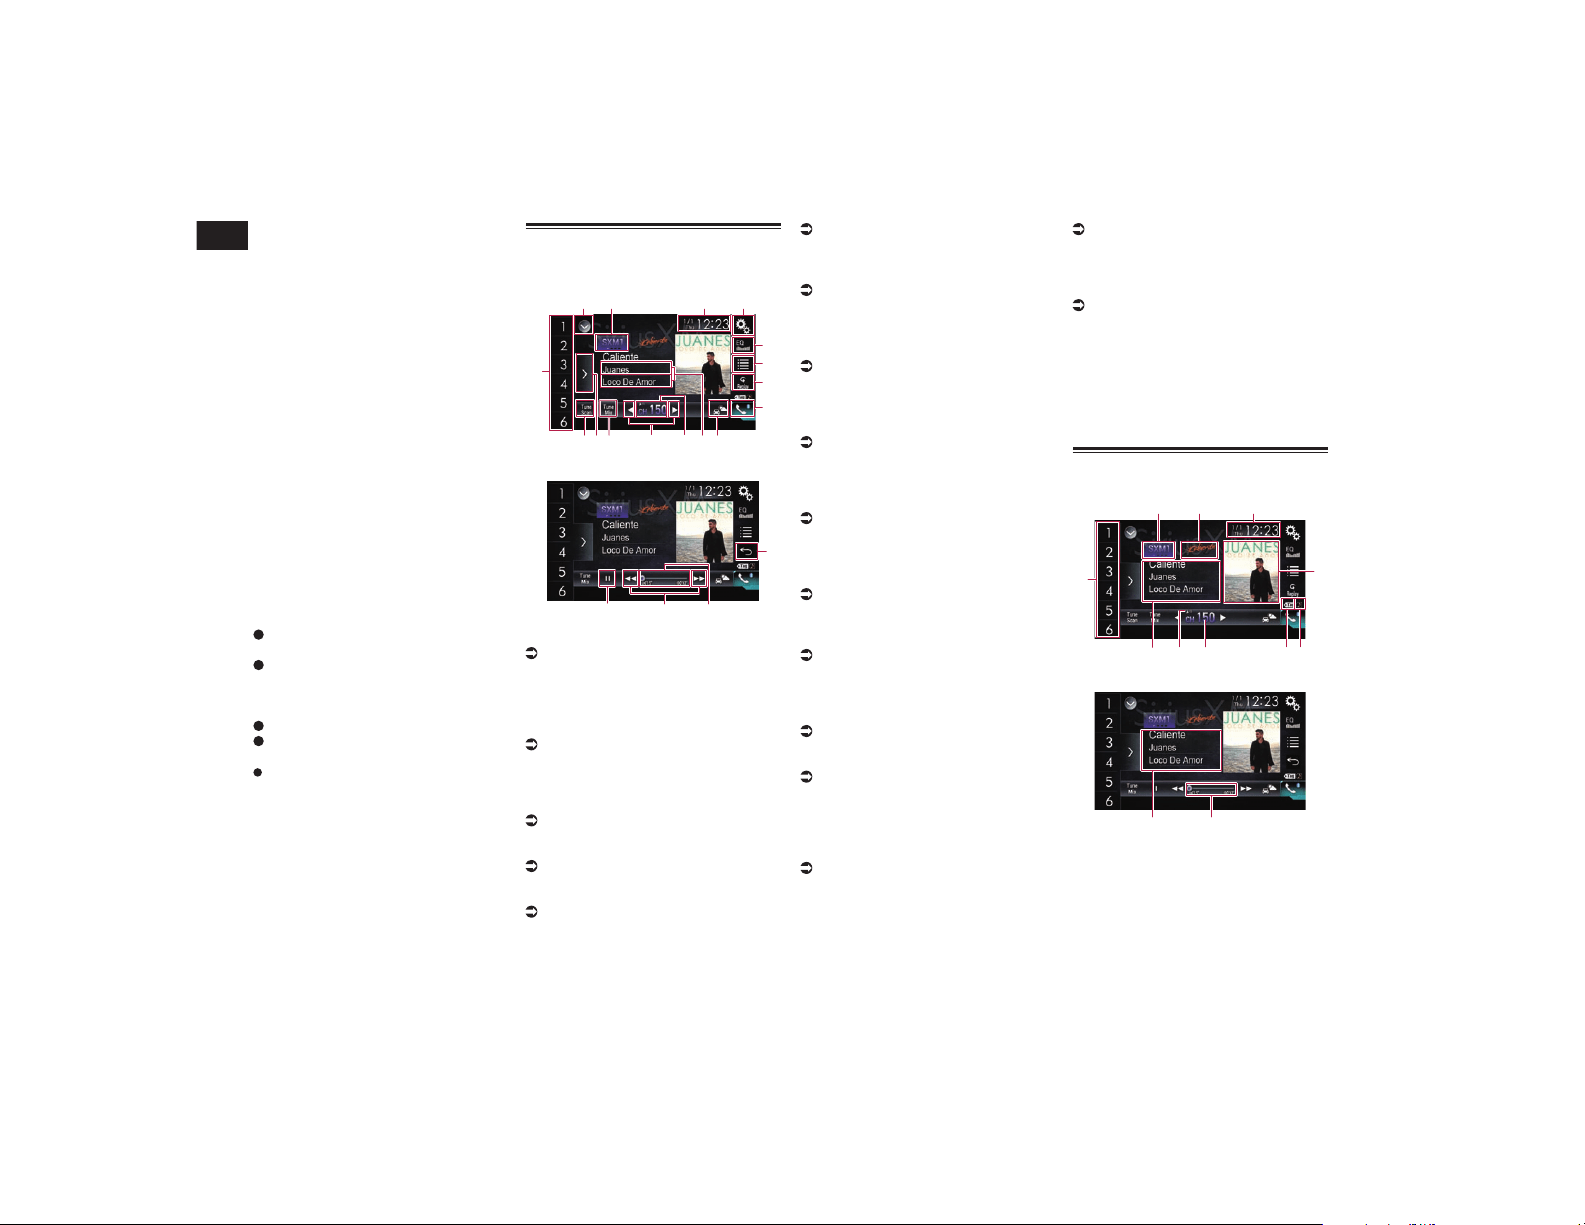
18
Chapitre
52
Fr
■ Abonnement au service Radio
Satellite SiriusXM
1 Sélectionnez SiriusXM comme
source.
Vous devriez être en mesure de syntoniser
le Canal 1. Si vous ne pouvez pas obtenir le
Canal 1, assurez-vous que le syntoniseur
pour véhicule SiriusXM Connect est installé
correctement tel que décrit dans le guide
d’installation du syntoniseur.
2 Basculez sur le Canal 0 et vérifiez
l’identificateur de la radio.
L’ID de la radio SiriusXM peut être trouvé en
accédant au Canal 0. Il peut également être
trouvé au bas de l’écran du syntoniseur pour
véhicule SiriusXM Connect.
Notez que cet ID de radio SiriusXM n’inclut
pas les lettres I, O, S et F.
Ce numéro est obligatoire pour activer votre
abonnement.
3 Activez le service en ligne ou par
téléphone.
Aux États-Unis, vous pouvez effectuer l’acti-
vation en ligne ou en appelant le service à la
clientèle de SiriusXM :
Visitez le site www.siriusxm.com/
activatenow
Appelez le service à la clientèle de
SiriusXM au 1-866-635-2349
Pour les abonnements canadiens, veuillez
contacter :
Visitez le site www.siriusxm.ca/activatexm
Appelez le service à la clientèle de XM au
1-877-438-9677
Les satellites SiriusXM envoient un
message d’activation à votre syntoniseur.
Lorsque le syntoniseur reçoit le message,
“Abonnement mis à jour” s’affiche.
Une fois que vous êtes abonné, les
satellites SiriusXM envoient un message
d’activation à votre syntoniseur.
Le processus d’activation prend généra-
lement 10 à 15 minutes mais peut, dans
certains cas, prendre jusqu’à une heure.
Ne mettez pas ce produit hors tension
lorsque le message d’activation est
affiché.
Utilisation des touches de
l’écran tactile
Affichage en direct
1 2 43
5
7
6
8
bc 9ae
df
g
Affichage de rediffusion
hij
7
1 Affiche la liste de sources.
Pour en savoir plus, reportez-vous à la
page 14, Sélection d’une source avant
dans la liste de sources.
2 Sélectionne une bande.
3 Affiche l’écran de Réglage de l’heure
et de la date.
Pour en savoir plus, reportez-vous à la
page 77, Réglage de l’heure et de la
date.
4 Affiche l’écran de Paramètre.
5 Rappelle des courbes d’égalisation.
Pour en savoir plus, reportez-vous à la
page 70, Utilisation de l’égaliseur.
6 Sélectionne un canal dans la liste.
Pour en savoir plus, reportez-vous à la
page 54, Sélection d’un canal dans une
liste de tous les canaux.
Pour en savoir plus, reportez-vous à la
page 54, Sélection d’un canal dans la
liste de catégorie.
7 Bascule entre les écrans En direct et
Rediffusion.
Pour en savoir plus, reportez-vous à la
page 54, Utilisation de la fonction
Replay™.
8 Affiche l’écran de Menu téléphone.
Pour en savoir plus, reportez-vous à la
page 18, Affichage du menu téléphone.
9 Bascule sur le canal qui diffuse les
informations sur le trafic et la météo
pour la ville sélectionnée.
Pour en savoir plus, reportez-vous à la
page 55, Vérification des informations
mises à jour sur le trafic et sur les prévi-
sions météorologiques.
a Mémorise le canal actuel.
Pour en savoir plus, reportez-vous à la
page 56, Mémorisation des contenus
en cours.
Mémorise les informations de la
chanson sur un iPod.
Pour en savoir plus, reportez-vous à la
page 77, Mémorisation des informa-
tions de la chanson sur un iPod (balisage
iTunes).
b Sélectionne directement un canal.
Pour en savoir plus, reportez-vous à la
page 53, Sélection directe d’un canal
SiriusXM.
c Effectue la syntonisation manuelle.
Pour en savoir plus, reportez-vous à la
page 53, Syntonisation manuelle.
d Lit les chansons des canaux de
musique enregistrés comme canaux
préréglés sur la bande actuelle.
Pour en savoir plus, reportez-vous à la
page 55, Utilisation de TuneMix™.
e Affiche les canaux préréglés.
Pour en savoir plus, reportez-vous à la
page 53, Sélection d’un canal préréglé
dans la liste des canaux préréglés.
f Parcourt toutes les chansons des
canaux de musique trouvés sur la
bande préréglée actuelle.
Pour en savoir plus, reportez-vous à la
page 54, Utilisation de TuneScan™.
g Rappelle de la mémoire le canal
préréglé associé à une touche si vous
touchez une fois la touche.
Enregistre la fréquence de radiodiffu-
sion en cours sur une touche pour un
rappel ultérieur si vous continuez de
toucher la touche.
Pour en savoir plus, reportez-vous à la
page 53, Mémorisation des canaux de
radiodiffusion.
h Change le point de lecture en faisant
glisser la touche.
Pour en savoir plus, reportez-vous à
la page 15, Utilisation de la barre
temporelle.
i Saute des fichiers en avant ou en
arrière à l’aide d’une seule touche.
Effectue une avance rapide ou un
retour rapide en touchant de manière
prolongée la touche.
j Bascule entre lecture et pause.
Lecture de l’écran
Affichage en direct
5
4
1
2 3
9
a
8 67
Affichage de rediffusion
c b
1 Indicateur de bande
Indique la bande syntonisée : SXM1,
SXM2, SXM3 ou Featured.
p “Featured” est disponible uniquement
lorsque “Favoris préférés” est réglé sur
“Marche”.
2 Logo du nom de canal
Indique le logo du nom du canal
syntonisé.
3 Heure et date actuelles
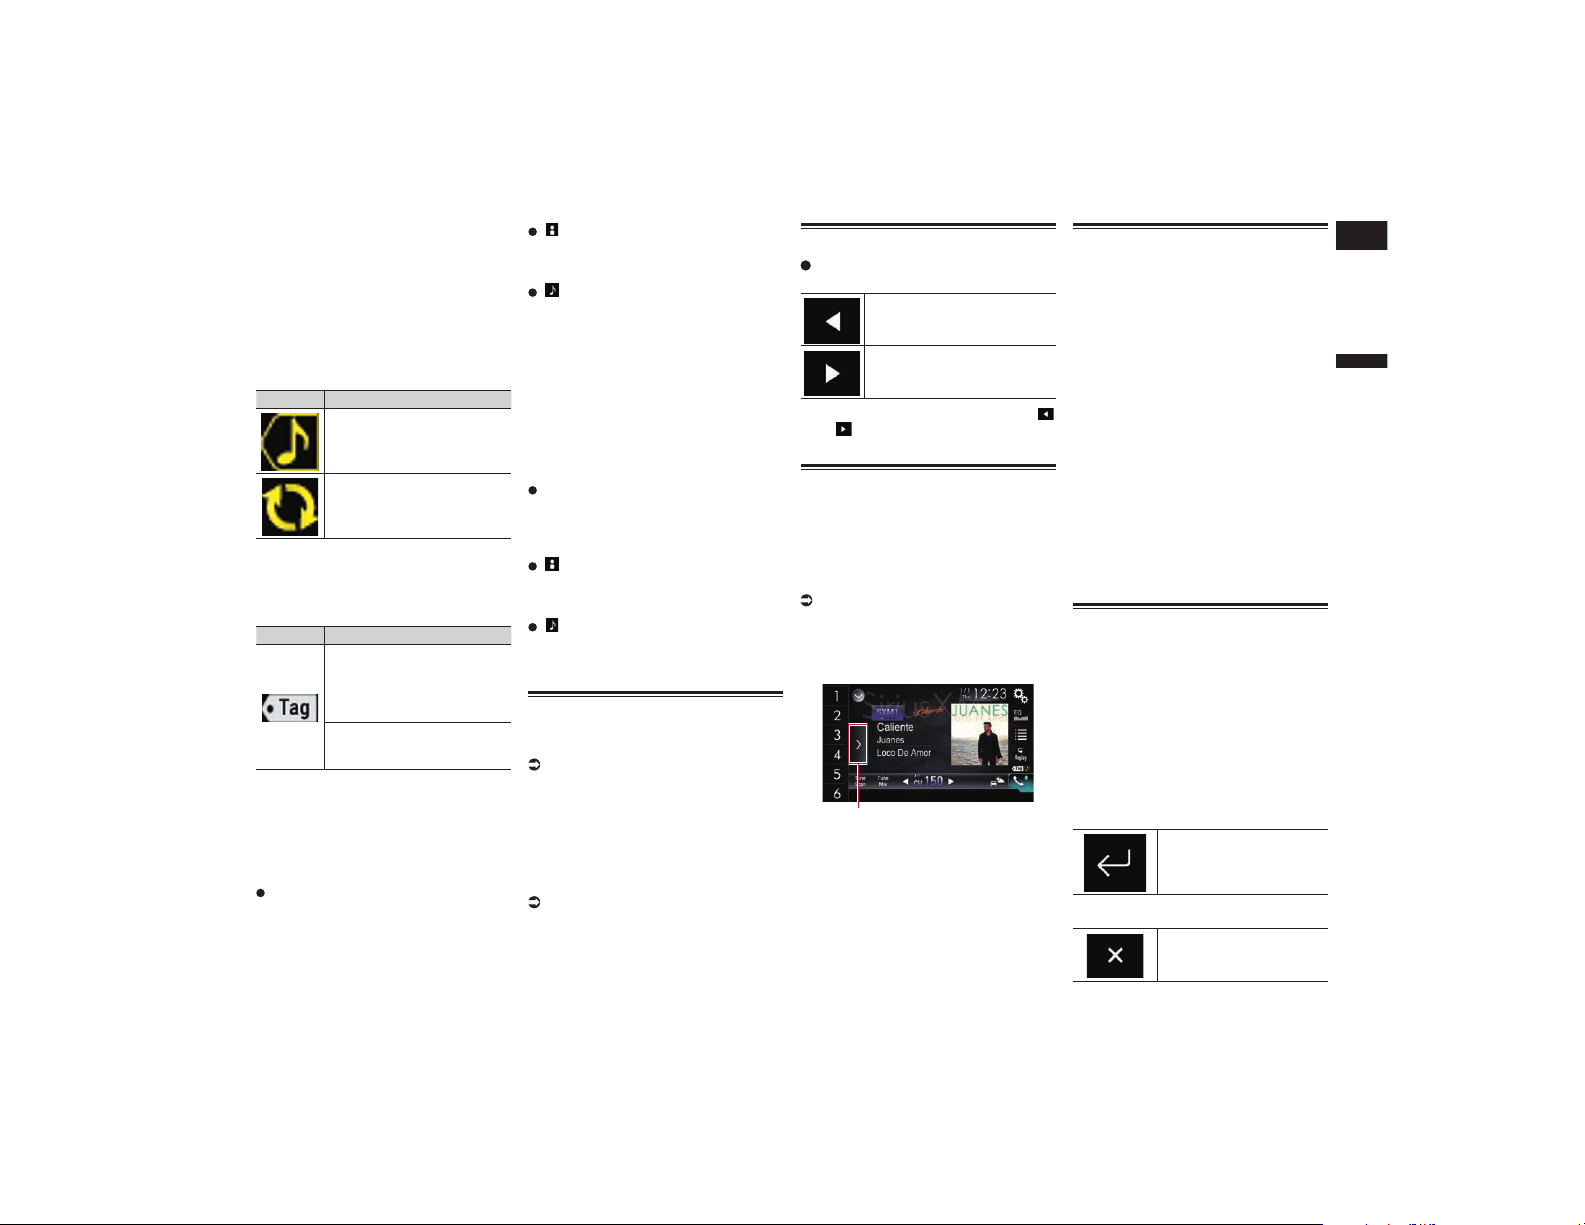
Français
18
Chapitre
53
Fr
4 Pochette de l’album
Affiche la pochette de la chanson en
cours de lecture (si disponible).
p Si la pochette de l’album n’est pas dispo-
nible, l’image du logo SiriusXM s’affiche.
5 Indicateur d’état du balisage de chan-
sons iTunes
®
Affiche l’état des informations de la
chanson mémorisées dans le produit.
p L’icône est affichée sur tous les écrans de
fonction des sources AV.
Indicateur
Signification
Apparaît lorsque les informa-
tions de balise de la chanson
sont enregistrées dans ce
produit.
Apparaît quand les informa-
tions de balise de la chanson
sont en cours de transfert sur
un iPod.
6 Indicateur de balisage iTunes
®
Indique les chansons pour lesquelles le
balisage iTunes est possible.
p L’icône est affichée sur tous les écrans de
fonction des sources AV.
Indicateur
Signification
Apparaît lorsque ce produit
reçoit une balise de chanson
iTunes qui peut être mémorisée
et téléchargée sur un iPod pour
un achat ultérieur.
Clignote lorsque ce produit
enregistre des informations de
balise de la chanson.
7 Indicateur du numéro de canal
Affiche le numéro du canal sur lequel le
syntoniseur est actuellement syntonisé.
8 Indicateur du niveau du signal
9 Informations sur le canal sélectionné
Affiche les informations détaillées du
canal actuellement reçu.
Nom du canal/Numéro du canal
Indique le nom du canal ou le numéro du
canal syntonisé.
p “ID radio” est affiché lorsque le Canal 0
est sélectionné.
: Nom de l’artiste (interprète)
Indique le nom de l’artiste (interprète)
de la chanson en cours de lecture (si
disponible).
: Titre de la chanson (nom du
programme)
Indique le titre de la chanson (pro-
gramme) en cours de lecture.
a Indicateur de numéro de présélection
Met en surbrillance l’élément préréglé
choisi.
b Indicateur de temps de lecture
Indique le temps de lecture écoulé de
l’émission enregistrée.
c Informations sur le contenu actuel
Indique les informations détaillées sur le
contenu en cours de lecture.
Nom du canal/Numéro du canal
Indique le nom du canal ou le numéro du
canal syntonisé.
p “ID radio” est affiché lorsque le Canal 0
est sélectionné.
: Nom de l’artiste (interprète)
Indique le nom de l’artiste (interprète)
de la chanson en cours de lecture (si
disponible).
: Titre de la chanson (nom du
programme)
Indique le titre de la chanson (pro-
gramme) en cours de lecture.
Procédure de départ
1 Affichez l’écran de Sélection de
source AV.
Pour en savoir plus sur les opérations,
reportez-vous à la page 13, Affichage
de l’écran de fonction AV.
2 Touchez [SiriusXM] sur l’écran de
Sélection de source AV.
L’écran “SiriusXM” apparaît.
3 Utilisez les touches de l’écran
tactile pour commander la radio.
Pour en savoir plus, reportez-vous à la
page 52, Utilisation des touches de
l’écran tactile.
Syntonisation manuelle
Touchez les touches suivantes pour
syntoniser manuellement.
Déplace d’un canal à la fois vers
le bas.
Déplace d’un canal à la fois vers
le haut.
p Si vous touchez de manière prolongée
ou , vous pouvez sauter des canaux de
radiodiffusion.
Sélection d’un canal préré-
glé dans la liste des canaux
préréglés
Une fois les canaux de radiodiffusion mémo-
risés, vous pouvez facilement rappeler les
canaux préréglés depuis la mémoire, en
touchant une seule touche.
Pour en savoir plus, reportez-vous à la
page 25, Mise en mémoire des fré-
quences de radiodiffusion.
1 Touchez la touche d’affichage de la
liste des canaux préréglés.
1
1 Touche d’affichage de la liste des canaux
préréglés
2 Touchez l’élément de la liste (“1”
à “6”) pour basculer sur un canal
enregistré comme canal préréglé.
p Si vous touchez la touche d’affichage de
la liste des canaux préréglés alors que la
liste des canaux préréglés est affichée,
celle-ci disparaît et les touches de présé-
lection s’affichent.
Mémorisation des canaux de
radiodiffusion
Si vous touchez l’une des touches de pré-
sélection (“1” à “6”), vous pouvez aisément
enregistrer jusqu’à six canaux de radiodif-
fusion qui pourront être rappelés plus tard
(également en touchant une touche).
p Certains canaux de radiodiffusion ne
peuvent pas être mémorisés.
p Cette fonction n’est pas disponible sur la
bande “Featured”.
1 Sélectionnez le canal que vous
désirez mettre en mémoire.
2 Maintenez enfoncée une touche de
présélection [1] à [6].
Le canal sélectionné est mémorisé.
La prochaine fois que vous touchez la même
touche de présélection “1” à “6”, le canal est
rappelé de la mémoire.
p Jusqu’à 18 canaux, six pour chacune
des trois bandes SiriusXM, peuvent être
mémorisés.
Sélection directe d’un canal
SiriusXM
Vous pouvez sélectionner un canal de radio-
diffusion directement en entrant le numéro
de canal souhaité.
1 Touchez le numéro du canal sur
l’écran “SiriusXM”.
2 Touchez les touches [0] à [9] pour
saisir le numéro souhaité.
p Pour supprimer les numéros saisis un par
un, touchez [C].
3 Touchez la touche suivante.
Sélectionne le canal
SiriusXM correspondant au
numéro saisi.
4 Touchez la touche suivante.
Retourne à l’écran
précédent.
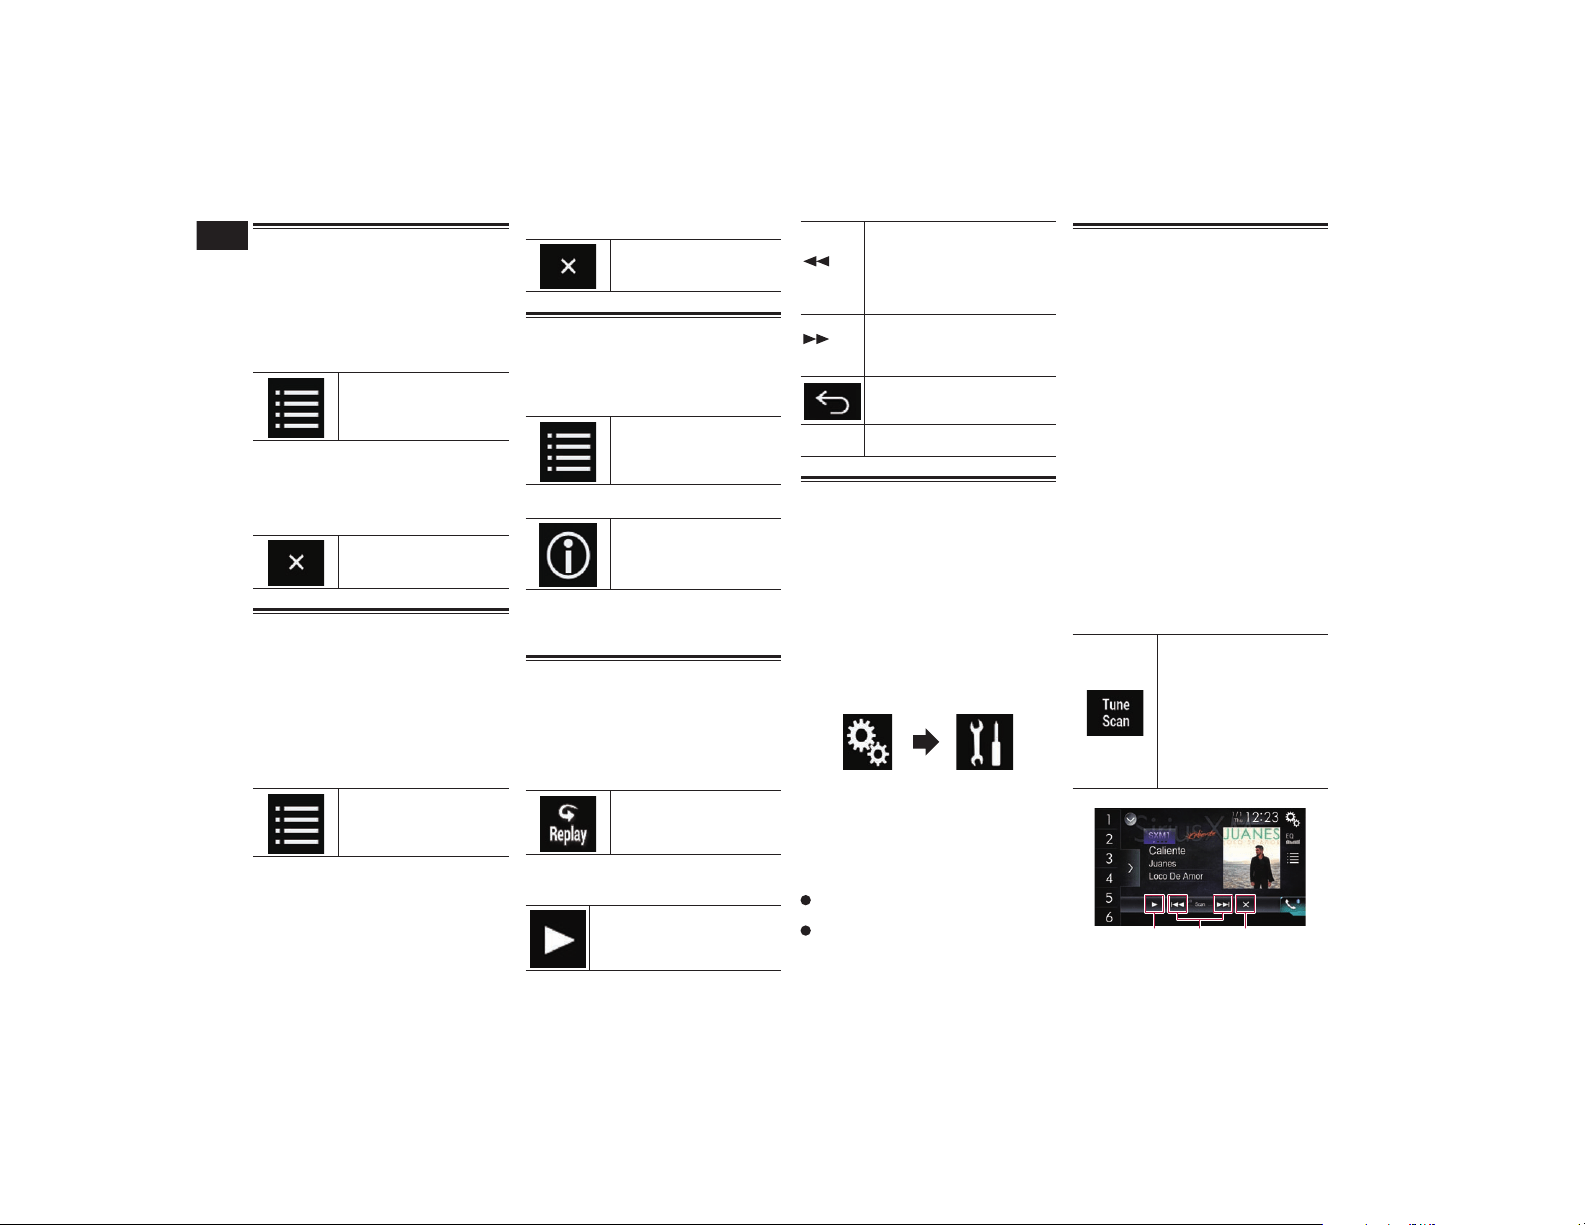
18
Chapitre
54
Fr
Sélection d’un canal dans une
liste de tous les canaux
Vous pouvez sélectionner un canal parmi
tous les canaux disponibles.
p L’affichage de la liste des canaux peut
prendre du temps en fonction des condi-
tions de réception SiriusXM.
1 Touchez la touche suivante.
Affiche l’écran de liste.
2 Sélectionne la liste de tous les
canaux.
3 Touchez le canal désiré.
4 Touchez la touche suivante.
Ferme l’écran.
Sélection d’un canal dans la
liste de catégorie
Vous pouvez sélectionner un canal parmi les
catégories disponibles.
Les types de catégories disponibles
dépendent des types de canaux disponibles.
p L’affichage de la liste des canaux peut
prendre du temps en fonction des condi-
tions de réception SiriusXM.
1 Touchez la touche suivante.
Affiche l’écran de liste.
2 Touchez le nom de la catégorie
souhaité.
La catégorie dans la hiérarchie dans la liste
de canaux sélectionnée est affichée.
3 Touchez le canal désiré.
4 Touchez la touche suivante.
Ferme l’écran.
Changement de la liste
afchée
Vous pouvez basculer entre les types de
listes lorsqu’une liste est affichée.
1 Touchez la touche suivante.
Affiche l’écran de liste.
2 Touchez la touche suivante.
Bascule entre les types de
listes.
La liste affichée change dans l’ordre suivant.
Nom du canal—Nom de l’artiste—Titre de la
chanson—Informations sur le contenu
Utilisation de la fonction
Replay™
Vous pouvez mettre en pause, sauter du
contenu, effectuer un retour rapide ou une
avance rapide ou relire le canal que vous
êtes en train d’écouter.
1 Touchez la touche suivante.
Bascule sur l’affichage de la
barre temporelle.
2 Touchez les touches ou boutons
suivants pour commander la radio.
Vous permutez entre la lecture
et la pause.
(TRK)
Retourne au début du pro-
gramme en cours. Appuyez à
nouveau pour passer au pro-
gramme précédent. Maintenez
enfoncé pour un balayage en
retour rapide du contenu.
(TRK)
Saute au programme suivant.
Maintenez enfoncé pour un
balayage en avance rapide du
contenu.
Quitte le mode Replay et synto-
nise sur l’émission diffusée en
direct en cours.
Barre
temporelle
Change le point de lecture en
faisant glisser la touche.
Réglage de SiriusXM
TuneStart™
Les chansons commencent automatique-
ment du début lorsque vous réglez l’un de
vos canaux préréglés sur la bande préréglée
actuelle et que TuneStart est activé.
p Cette fonction est disponible uniquement
lorsque “SiriusXM” est sélectionné
comme source.
1 Appuyez sur le bouton HOME pour
afficher l’écran de Menu principal.
2 Touchez les touches suivantes
dans l’ordre indiqué.
L’écran “Système” apparaît.
3 Touchez [Réglages de source A/V].
4 Touchez [Paramètres SiriusXM].
5 Touchez à plusieurs reprises [Tune
Start] jusqu’à ce que le réglage
souhaité apparaisse.
Marche (par défaut) :
Active la fonction TuneStart.
Arrêt :
Désactive la fonction TuneStart.
Utilisation de TuneScan™
Lorsque vous activez la fonction
TuneScan™, vous entendrez quelques
secondes des chansons qui n’ont pas
été écoutées, de chacun des canaux de
musique enregistrés comme canaux préré-
glés sur la bande actuelle.
p Cette fonction est disponible uniquement
lorsque le canal qui est syntonisé prend
en charge la fonction TuneScan.
p Si moins de deux canaux de musique
sont enregistrés comme canaux préré-
glés sur la bande actuelle, le message
“Aucun contenu” s’affiche et vous ne
pouvez pas effectuer le balayage. Ajoutez
plus de canaux de musique comme
canaux préréglés.
p TuneScan peut prendre quelques
minutes pour devenir disponible après
la mise sous tension de l’appareil ou la
modification de la bande préréglée.
1 Touchez la touche d’affichage de la
liste des canaux préréglés.
La liste des canaux préréglés apparaît.
2 Touchez la touche suivante.
Parcourt les chansons des
canaux de musique sur
la bande actuelle, lit une
chanson trouvée pendant
plusieurs secondes, puis
continue à parcourir une
autre chanson. Les chan-
sons du canal actuel sont
lues une à la fois pendant
plusieurs secondes.
1 32
1 Continue la lecture du canal ou de la
chanson en cours de balayage.
Français
18
Chapitre
55
Fr
p Vous pouvez arrêter la fonction
TuneScan pour écouter la chanson en
cours de lecture et continuer l’écoute du
canal actuel.
2 Saute en avant ou en arrière.
Toucher [ ] permet de sauter à la
chanson précédente pendant TuneScan
ou au canal précédent pendant le
balayage de la catégorie.
Toucher [ ] permet de sauter à la
chanson suivante pendant TuneScan ou
au canal suivant pendant le balayage de
la catégorie.
3 Annule le balayage et retourne au
canal initial.
Utilisation du balayage de la
catégorie
Vous pouvez parcourir chaque canal de la
catégorie sélectionnée.
1 Touchez la touche suivante.
Affiche l’écran de liste.
2 Touchez la catégorie désirée.
3 Touchez la touche suivante.
Effectue le balayage dans
la catégorie sélectionnée.
Les émissions diffusées en
direct de chaque canal de la
catégorie sélectionnée sont
lues une à la fois pendant six
secondes.
Utilisation de TuneMix™
TuneMix™ lit un mélange unique de chan-
sons des canaux de musique enregistrés sur
la bande préréglée SiriusXM actuelle.
p Le SXV300 ou un syntoniseur pour véhi-
cule SiriusXM Connect ultérieur (vendu
séparément) est nécessaire pour l’utilisa-
tion de cette fonction.
p Si moins de deux canaux de musique
sont enregistrés comme canaux préré-
glés sur la bande actuelle, le message
“Aucun canal musical TuneMix quali-
fié sur cette plage.” s’affiche et vous ne
pouvez pas utiliser TuneMix™. Ajoutez
plus de canaux de musique comme
canaux préréglés.
p TuneMix peut prendre quelques minutes
pour devenir disponible après la mise
sous tension de l’appareil ou la modifica-
tion de la bande préréglée.
p Si les mêmes canaux sont enregistrés
dans la liste des canaux préréglés, les
canaux sont comptés comme un seul.
p Les canaux pour lesquels le verrouillage
parental est appliqué ne peuvent pas être
lus par la fonction TuneMix.
Touchez la touche suivante.
Lit les chansons des canaux
de musique enregistrés
comme canaux préréglés
sur la bande actuelle.
Pour annuler TuneMix, touchez à nou-
veau la touche.
Vérication des informa-
tions mises à jour sur le
trac et sur les prévisions
météorologiques
Traffic & Weather Now™ vous permet
d’accéder et d’écouter le dernier bulletin à
tout moment. Si vous définissez votre ville
favorite pour le trafic et la météo dans le
menu de configuration, vous pourrez écou-
ter le dernier bulletin à partir du début en
appuyant sur le bouton Traffic & Weather
Now.
p Le SXV300 ou un syntoniseur pour véhi-
cule SiriusXM Connect ultérieur (vendu
séparément) est nécessaire pour l’utilisa-
tion de cette fonction.
p Pour utiliser cette fonction, enregistrez la
ville souhaitée au préalable.
Pour en savoir plus, reportez-vous à la
page 55, Enregistrement de la ville.
Touchez la touche suivante.
Bascule sur le canal qui
diffuse les informations sur
le trafic et la météo pour la
ville sélectionnée.
p La signification de l’affichage de l’icône
est comme suit.
— Grisé : La diffusion d’informations sur le
trafic et la météo n’est pas encore dispo-
nible pour votre marché.
— Avec un point vert : le bulletin le plus
récent est disponible et n’a pas encore
été écouté.
— Blanc : le bulletin le plus récent est dispo-
nible pour une nouvelle écoute.
p Si vous touchez la touche alors qu’une
ville cible n’est pas enregistrée, l’écran
“Ville” s’affiche.
Vous pouvez revenir au canal initial en
appuyant sur tout en écoutant le
canal sur le trafic et la météo.
Le canal revient automatiquement au
canal initial lorsque la diffusion des
informations sur le trafic et la météo se
termine.
■ Enregistrement de la ville
p Le SXV300 ou un syntoniseur pour véhi-
cule SiriusXM Connect ultérieur (vendu
séparément) est nécessaire pour l’utilisa-
tion de cette fonction.
p Cette fonction est disponible uniquement
lorsque “SiriusXM” est sélectionné
comme source.
1 Appuyez sur le bouton HOME pour
afficher l’écran de Menu principal.
2 Touchez les touches suivantes
dans l’ordre indiqué.
L’écran “Système” apparaît.
3 Touchez [Réglages de source A/V].
4 Touchez [Paramètres SiriusXM].
5 Touchez [Paramétrage de la ville].
L’écran “Ville” s’affiche.
6 Touchez la ville souhaitée.
p L’élément sélectionné est coché.
Si vous touchez [Ville non sélection-
née], la coche de la ville sélectionnée est
supprimée.
Si vous décochez la ville sélectionnée,
une coche apparaît automatiquement
pour “Ville non sélectionnée”.
Réglage du verrouillage
parental
La fonction de verrouillage parental de
SiriusXM vous permet de contrôler l’accès
aux canaux que vous considérez comme
étant inappropriés pour de jeunes auditeurs.
Une fois activée, la fonction de verrouillage
parental exige que vous saisissiez un mot
de passe pour syntoniser sur les canaux
verrouillés.
■ Réglage du mot de passe
p Cette fonction est disponible uniquement
lorsque “SiriusXM” est sélectionné
comme source.
1 Appuyez sur le bouton HOME pour
afficher l’écran de Menu principal.
2 Touchez les touches suivantes
dans l’ordre indiqué.
L’écran “Système” apparaît.
3 Touchez [Réglages de source A/V].
4 Touchez [Paramètres SiriusXM].
5 Touchez [Contrôle parental].
L’écran “Contrôle parental” apparaît.
6 Saisissez le mot de passe.
p Le mot de passe par défaut est “0000”.
7 Touchez la touche suivante.
Affiche l’écran “Chaîne
verrouillée”.
8 Touchez [Modi. code].
L’écran “Modi. code” apparaît.
9 Saisissez le mot de passe que vous
souhaitez régler.
p Pour supprimer les numéros saisis un par
un, touchez [C].
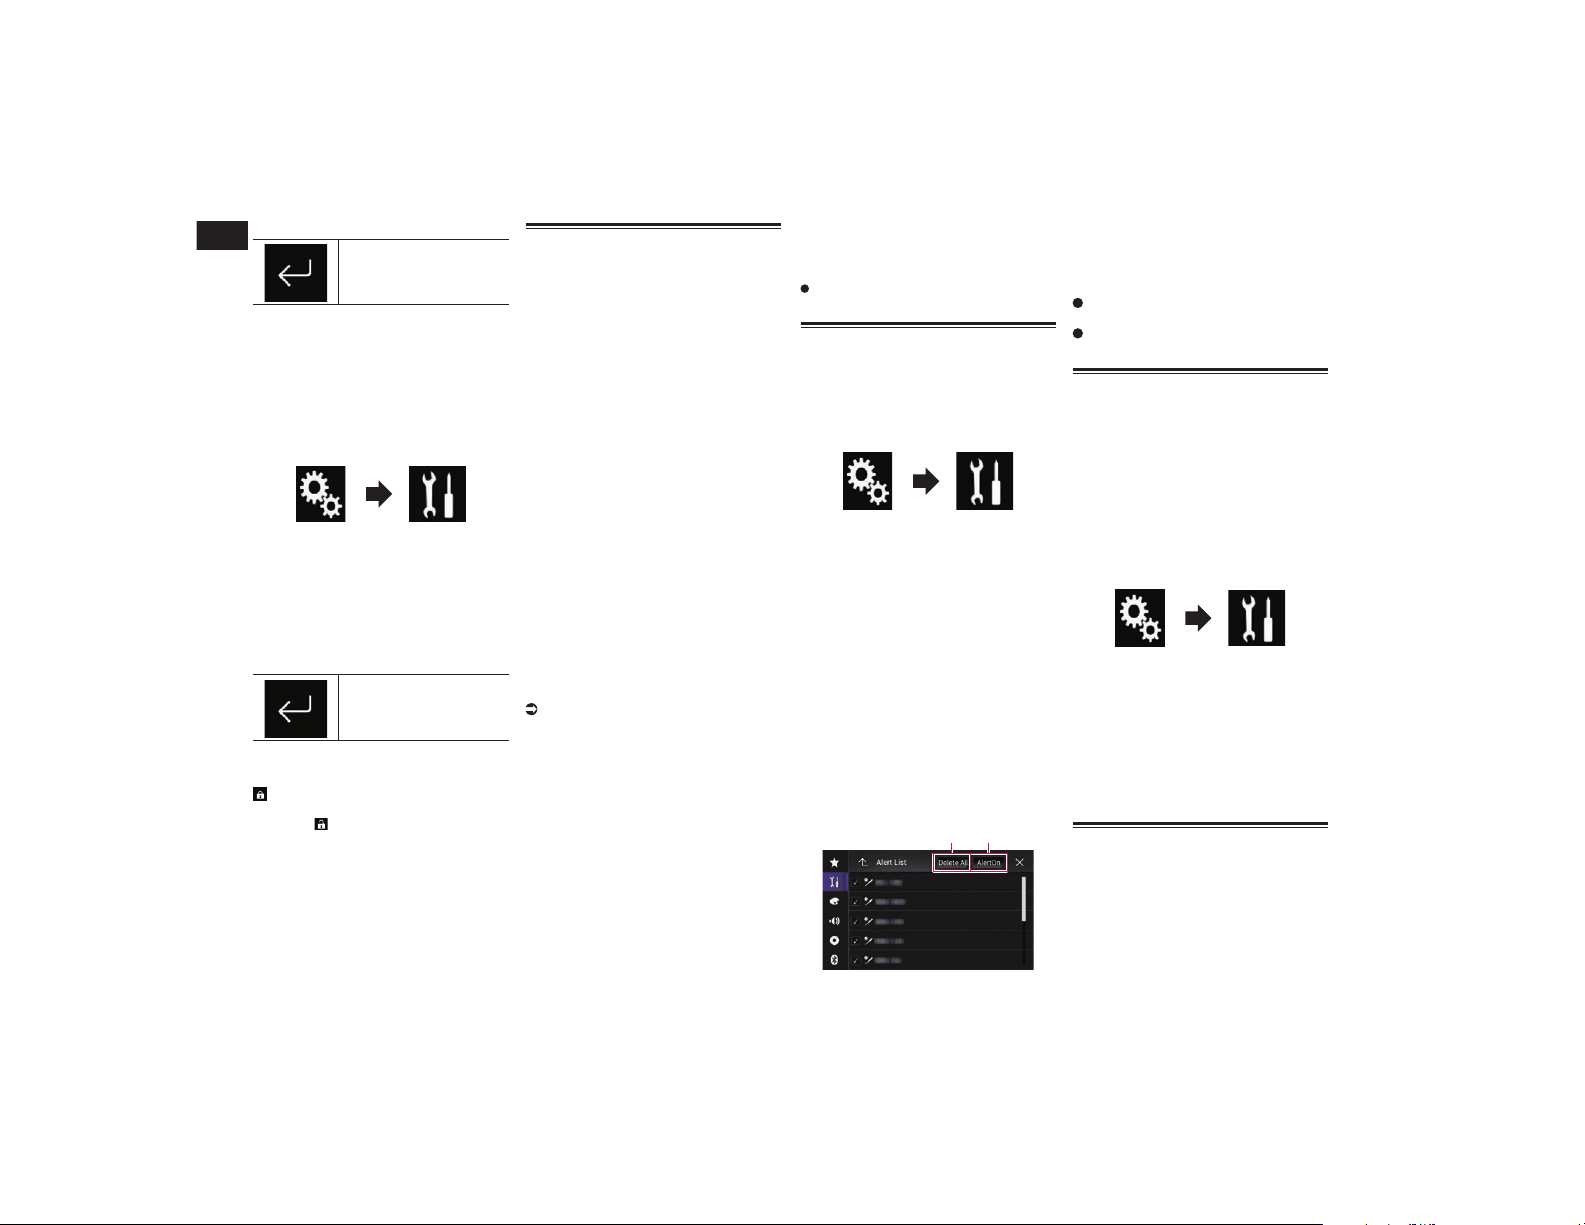
18
Chapitre
56
Fr
10 Touchez la touche suivante.
Affiche l’écran “Chaîne
verrouillée”.
■ Verrouillage du canal
p Cette fonction est disponible uniquement
lorsque “SiriusXM” est sélectionné
comme source.
1 Appuyez sur le bouton HOME pour
afficher l’écran de Menu principal.
2 Touchez les touches suivantes
dans l’ordre indiqué.
L’écran “Système” apparaît.
3 Touchez [Réglages de source A/V].
4 Touchez [Paramètres SiriusXM].
5 Touchez [Contrôle parental].
L’écran “Contrôle parental” apparaît.
6 Saisissez le mot de passe actuel.
7 Touchez la touche suivante.
Affiche l’écran “Chaîne
verrouillée”.
8 Touchez le canal que vous voulez
verrouiller.
apparaît et le canal est verrouillé.
p Si vous touchez le canal verrouillé, l’icône
devient et le canal est déverrouillé.
p Si vous touchez [Effac.tt], tous les
canaux verrouillés sont déverrouillés.
Utilisation de la fonction
d’alertes de contenu (comme
les alertes de chanson, les
alertes d’artiste et les alertes
de matchs)
Lorsque vous écoutez Radio Satellite
SiriusXM, vous pouvez être alerté lorsque
vos chansons, artistes ou matches (dans les-
quels joue votre équipe favorite) favoris sont
diffusés sur d’autres canaux. La radio affiche
un message d’alerte lorsqu’un artiste, une
chanson ou une équipe est trouvé sur un
autre canal. Vous pouvez ensuite choisir si
vous voulez syntoniser sur ce favori ou vous
pouvez l’ignorer et rester sur le canal actuel.
Les informations sur le réglage des alertes
d’artiste, de chanson et de match sont
décrites ci-dessous.
■ Mémorisation des contenus en
cours
Les titres des chansons, les noms des
artistes et vos équipes sportives favorites
que vous écoutez peuvent être mémorisés
sur une liste d’alertes.
1 Dans la zone d’informations sur le
contenu du canal en cours, touchez
l’élément pour lequel vous souhai-
tez une alerte.
Pour en savoir plus, reportez-vous à la
page 52, Utilisation des touches de
l’écran tactile.
Un message de confirmation apparaît.
2 Touchez [Régler Alerte] pour l’ar-
tiste ou la chanson, ou touchez
[Équipe 1] ou [Équipe 2] pour le
match.
La chanson, l’artiste ou le match est mémo-
risé dans une liste d’alertes.
Lorsqu’un programme correspondant à un
mot-clé mémorisé dans une liste d’alertes
est diffusé, un bip retentit et un message
s’affiche.
3 Touchez [Sauter] pour basculer sur
le canal.
Vous pouvez écouter la piste.
p Vous pouvez activer ou désactiver les
alertes en réglant la fonction d’alerte.
p Il se peut qu’aucune notification n’appa-
raisse en fonction de l’état de ce produit.
Si vous touchez [Rester], le canal ne
changera pas.
Réglage du programme pour
lequel vous voulez être alerté
1 Appuyez sur le bouton HOME pour
afficher l’écran de Menu principal.
2 Touchez les touches suivantes
dans l’ordre indiqué.
L’écran “Système” apparaît.
3 Touchez [Réglages de source A/V].
4 Touchez [Paramètres SiriusXM].
5 Touchez [Liste d’alertes].
L’écran “Liste d’alertes” apparaît.
6 Touchez le nom de l’artiste, le
titre de la chanson ou le nom de
l’équipe pour lequel vous voulez
être alerté lorsque disponible.
L’indicateur d’alerte est mis en surbrillance
et le réglage d’alerte est activé.
p Si vous touchez l’indicateur en surbril-
lance, le réglage d’alerte est annulé.
p Si vous touchez de manière prolongée
l’élément de la liste, vous pouvez suppri-
mer l’élément dans la liste.
p Vous pouvez enregistrer jusqu’à 50 mots-
clés dans la liste d’alertes.
1 2
1 Suppr.tt
Supprime tous les éléments mémorisés
dans la liste d’alertes.
2 Alerte act./Alerte dés.
Change les réglages dans l’ordre suivant
chaque fois que vous touchez la touche.
Alerte act. (par défaut) :
Active la fonction d’alerte.
Alerte dés. :
Désactive la fonction d’alerte.
Sélection d’équipes pour une
alerte de match
Ce produit peut vous informer quand des
matchs concernant vos équipes sportives
favorites sont sur le point de commencer.
Pour utiliser cette fonction, vous devez
d’abord régler les équipes que vous souhai-
tez suivre.
1 Appuyez sur le bouton HOME pour
afficher l’écran de Menu principal.
2 Touchez les touches suivantes
dans l’ordre indiqué.
L’écran “Système” apparaît.
3 Touchez [Réglages de source A/V].
4 Touchez [Paramètres SiriusXM].
5 Touchez [Paramètres de l’équipe].
L’écran “Ligue” apparaît.
6 Touchez la ligue désirée.
7 Touchez l’équipe désirée.
Les réglages de l’équipe sont activés.
Réglage de la fonction des
favoris proposés
Les favoris proposés sont des groupes de
canaux créés par le service de programma-
tion de SiriusXM vous permettant de décou-
vrir de nouveaux canaux. Les favoris propo-
sés sont dynamiques et peuvent changer
souvent, afin de vous permettre de découvrir
de nouveaux canaux.
Français
18
Chapitre
57
Fr
p Cette fonction est disponible uniquement
lorsque “SiriusXM” est sélectionné
comme source.
p Si cette fonction est activée, “Featured”
est disponible comme sélection de
bande.
p Le thème de saison proposé est automa-
tiquement mis à jour. Vous pouvez choisir
d’être informé de la mise à jour.
Pour en savoir plus, reportez-vous à la
page 57, Réglage de la notification de
mise à jour pour les favoris proposés.
1 Appuyez sur le bouton HOME pour
afficher l’écran de Menu principal.
2 Touchez les touches suivantes
dans l’ordre indiqué.
L’écran “Système” apparaît.
3 Touchez [Réglages de source A/V].
4 Touchez [Paramètres SiriusXM].
5 Touchez à plusieurs reprises
[Favoris préférés] jusqu’à ce que le
réglage souhaité apparaisse.
Marche (par défaut) :
Active la fonction des favoris proposés.
Arrêt
Désactive la fonction des favoris
proposés.
p Si vous modifiez le réglage sur “Arrêt”
lorsque vous écoutez le canal sur la
bande “Featured”, le canal ne change
pas et l’affichage de la bande sur l’écran
devient “SXM1”.
Réglage de la notication de
mise à jour pour les favoris
proposés
Vous pouvez choisir d’être informé de la
mise à jour du thème de saison proposé.
p Cette fonction est disponible uniquement
lorsque “SiriusXM” est sélectionné
comme source et “Favoris préférés” est
réglé sur “Marche”.
Pour en savoir plus, reportez-vous à la
page 56, Réglage de la fonction des
favoris proposés.
1 Appuyez sur le bouton HOME pour
afficher l’écran de Menu principal.
2 Touchez les touches suivantes
dans l’ordre indiqué.
L’écran “Système” apparaît.
3 Touchez [Réglages de source A/V].
4 Touchez [Paramètres SiriusXM].
5 Touchez à plusieurs reprises [Mess.
de mise à jour plage préférée]
jusqu’à ce que le réglage souhaité
apparaisse.
Marche (par défaut) :
Active la fonction de notification de mise
à jour.
Arrêt
Désactive la fonction de notification de
mise à jour.
Utilisation de la fonction
SportsFlash™
La fonction SportsFlash vous informe avec
un message contextuel si un événement
important se produit lors d’un match de
vos équipes sportives favorites même si
vous écoutez un autre canal. En touchant
[Lecture] sur le message contextuel affiché
à l’écran, la radio passe sur le canal qui
diffuse le match et lance la lecture à partir
de 30 secondes environ avant que l’évé-
nement important se produise pour vous
permettre d’écouter le déroulement comme
si vous l’écoutiez en direct. Si vous revenez
au canal initial après avoir écouté le temps
fort du match, la radio reprend à partir du
moment où le canal avait été changé. Vous
ne manquerez ni le temps fort du match
ni le contenu du canal que vous écoutiez
initialement.
p Le SXV300 ou un syntoniseur pour véhi-
cule SiriusXM Connect ultérieur (vendu
séparément) est nécessaire pour l’utilisa-
tion de cette fonction.
p Cette fonction est disponible uniquement
lorsque “SiriusXM” est sélectionné
comme source.
p Pour utiliser cette fonction, sélectionnez
les équipes que vous souhaitez suivre
avant le début du match.
Pour en savoir plus, reportez-vous à la
page 57, Sélection d’équipes pour
SportsFlash.
p Touchez [Lecture] pour écouter le canal
dont vous avez été informé. Pour revenir
au canal initial, touchez dans les cinq
minutes suivant le changement de canal.
p Touchez [Ignorer] pour rester sur le canal
actuel.
p Touchez [Annuler] pour annuler les
notifications concernant les matchs.
p Les messages de notification ne sont pas
affichés lorsque vous écoutez le canal qui
est la cible de SportsFlash ou lorsque
l’identificateur de la radio est affiché.
1 Appuyez sur le bouton HOME pour
afficher l’écran de Menu principal.
2 Touchez les touches suivantes
dans l’ordre indiqué.
L’écran “Système” apparaît.
3 Touchez [Réglages de source A/V].
4 Touchez [Paramètres SiriusXM].
5 Touchez à plusieurs reprises
[SportsFlash] jusqu’à ce que le
réglage souhaité apparaisse.
Marche (par défaut) :
Active la fonction SportsFlash.
Arrêt
Désactive la fonction SportsFlash.
Sélection d’équipes pour
SportsFlash
p Cette fonction est disponible uniquement
lorsque “SiriusXM” est sélectionné
comme source et “SportsFlash” est
réglé sur “Marche”.
Pour en savoir plus, reportez-vous à la
page 57, Utilisation de la fonction
SportsFlash™.
p Il est possible d’enregistrer jusqu’à 50
équipes comme cible de SportsFlash.
p Si cinq équipes prioritaires sont enre-
gistrées, les messages de notification
pour les autres équipes non prioritaires
peuvent ne pas être affichés.
1 Appuyez sur le bouton HOME pour
afficher l’écran de Menu principal.
2 Touchez les touches suivantes
dans l’ordre indiqué.
L’écran “Système” apparaît.
3 Touchez [Réglages de source A/V].
4 Touchez [Paramètres SiriusXM].
5 Touchez [Liste SportsFlash].
L’écran “Liste SportsFlash” s’affiche.
6 Touchez [Modif. liste].
Les ligues et les équipes disponibles sont
affichées.
p Touchez une ligue pour réduire le nombre
d’options si nécessaire.
7 Touchez les équipes à enregistrer
dans la liste SportsFlash.
p L’élément sélectionné est coché.
Touchez [Effac.tt] pour annuler toutes les
sélections.
8 Touchez [Hiérarchiser] pour enre-
gistrer les équipes sélectionnées
comme équipes prioritaires.
p Vous pouvez sélectionner jusqu’à cinq
équipes prioritaires pour SportsFlash.
p [Hiérarchiser] n’est pas disponible s’il
n’y a pas plus de cinq équipes enregis-
trées dans la liste SportsFlash. Les
équipes sont automatiquement enregis-
trées comme équipes prioritaires.
p Si cinq équipes sont déjà enregistrées
comme équipes prioritaires, décochez
une des équipes dans la liste à l’écran
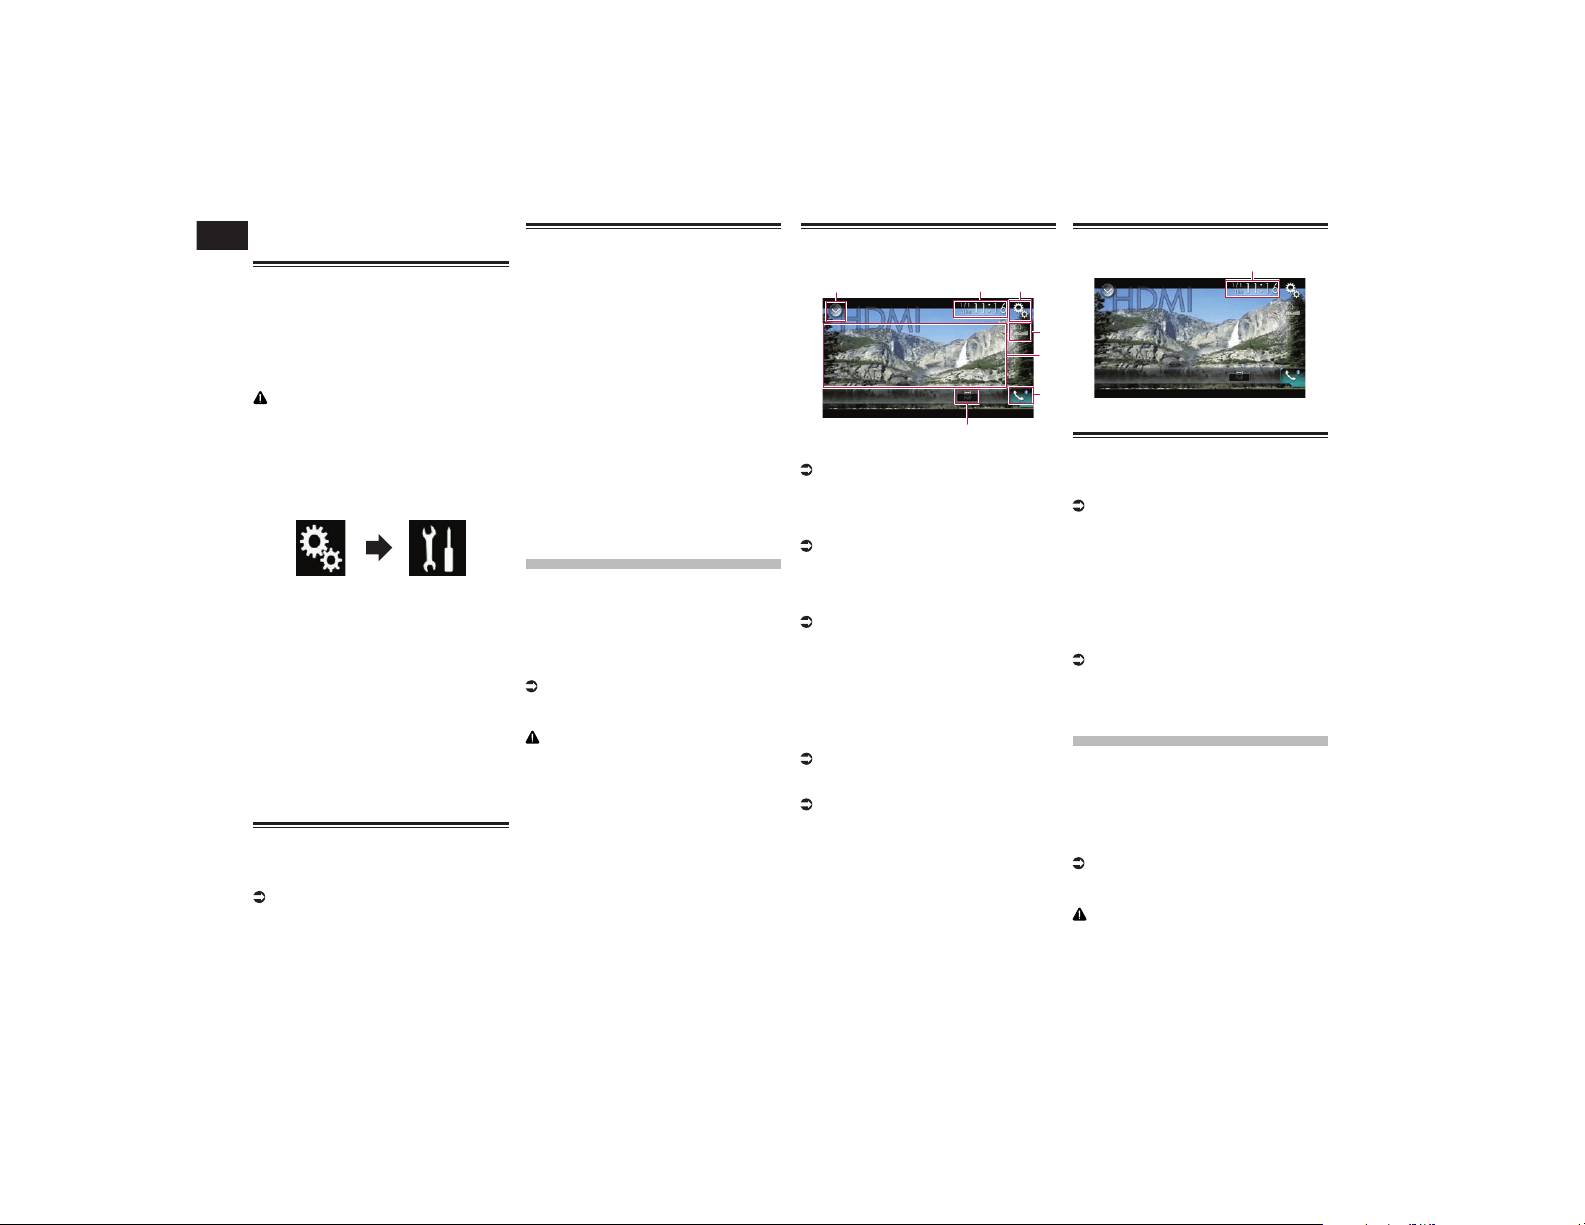
19/20
Chapitre
58
Fr
“Hiérarchiser la liste” avant d’ajouter
une autre équipe.
Restauration des réglages
SiriusXM par défaut
Vous pouvez restaurer les réglages SiriusXM
par défaut.
p Ce réglage est disponible uniquement
lorsque vous arrêtez votre véhicule dans
un endroit sûr et serrez le frein à main.
ATTENTION
Ne coupez pas le moteur lors de la restaura-
tion des réglages.
1 Appuyez sur le bouton HOME pour
afficher l’écran de Menu principal.
2 Touchez les touches suivantes
dans l’ordre indiqué.
L’écran “Système” apparaît.
3 Touchez [Réglages de source A/V].
4 Touchez [Paramètres SiriusXM].
5 Touchez [Réinitialisation
SiriusXM].
L’écran “Réinitialisation SiriusXM”
apparaît.
6 Touchez [Restaurer].
Les réglages sont restaurés à leurs valeurs
par défaut.
p La source est désactivée et la connexion
Bluetooth est déconnectée avant de
démarrer le processus.
Mémorisation des informa-
tions de la chanson sur un
iPod (balisage iTunes)
Pour en savoir plus, reportez-vous à la
page 77, Mémorisation des informa-
tions de la chanson sur un iPod (balisage
iTunes).
Utilisation avec les boutons
physiques
Appuyez sur le bouton TRK.
Vous pouvez déplacer les canaux préréglés
vers le haut ou vers le bas lorsque le canal
actuel est affiché.
Vous pouvez sauter les fichiers en avant ou
en arrière lorsque l’indicateur de temps de
lecture est affiché.
Maintenez enfoncé le bouton TRK.
Vous pouvez déplacer les canaux vers le
haut ou vers le bas en maintenant enfoncé le
bouton lorsque le canal actuel est affiché.
Vous pouvez effectuer un retour rapide ou
une avance rapide en maintenant enfoncé
le bouton lorsque l’indicateur de temps de
lecture est affiché.
Utilisation d’une source
HDMI
Vous pouvez afficher la sortie d’image vidéo
sur le périphérique connecté à ce produit.
Cette section décrit les opérations pour une
source HDMI.
p Un câble HDMI
®
haute vitesse (vendu
séparément) est nécessaire pour la
connexion.
Pour en savoir plus, reportez-vous à la
page 86, Connexion d’un périphérique
HDMI.
ATTENTION
Pour des raisons de sécurité, les images
vidéo ne sont pas visibles quand le véhicule
est en mouvement. Pour voir des images
vidéo, arrêtez-vous dans un endroit sûr et
serrez le frein à main.
Utilisation des touches de
l’écran tactile
1 32
7
5
4
6
1 Affiche la liste de sources.
Pour en savoir plus, reportez-vous à la
page 14, Sélection d’une source avant
dans la liste de sources.
2 Affiche l’écran de Réglage de l’heure
et de la date.
Pour en savoir plus, reportez-vous à la
page 77, Réglage de l’heure et de la
date.
3 Affiche l’écran de Paramètre.
4 Rappelle des courbes d’égalisation.
Pour en savoir plus, reportez-vous à la
page 70, Utilisation de l’égaliseur.
5 Masque les touches de l’écran tactile.
Touchez cette zone pour masquer les
touches de l’écran tactile.
p Touchez un quelconque endroit de l’écran
LCD pour afficher de nouveau les touches
de l’écran tactile.
6 Affiche l’écran de Menu téléphone.
Pour en savoir plus, reportez-vous à la
page 18, Affichage du menu téléphone.
7 Change le mode écran large.
Pour en savoir plus, reportez-vous à la
page 78, Changement du mode écran
large.
Lecture de l’écran
1
1 Heure et date actuelles
Procédure de départ
1 Affichez l’écran de Sélection de
source AV.
Pour en savoir plus sur les opérations,
reportez-vous à la page 13, Affichage
de l’écran de fonction AV.
2 Touchez [HDMI] sur l’écran de
Sélection de source AV.
L’image s’affiche à l’écran.
3 Utilisez les touches de l’écran
tactile pour commander l’appareil
externe.
Pour en savoir plus, reportez-vous à la
page 58, Utilisation des touches de
l’écran tactile.
Utilisation d’une source
AUX
Vous pouvez afficher la sortie d’image vidéo
sur le périphérique connecté à ce produit.
Cette section décrit les opérations pour une
source AUX.
p Un câble AV mini-jack (CD-RM10) (vendu
séparément) est nécessaire pour la
connexion.
Pour en savoir plus, reportez-vous à la
page 86, Connexion d’un élément vidéo
externe.
ATTENTION
Pour des raisons de sécurité, les images
vidéo ne sont pas visibles quand le véhicule
est en mouvement. Pour voir des images
vidéo, arrêtez-vous dans un endroit sûr et
serrez le frein à main.
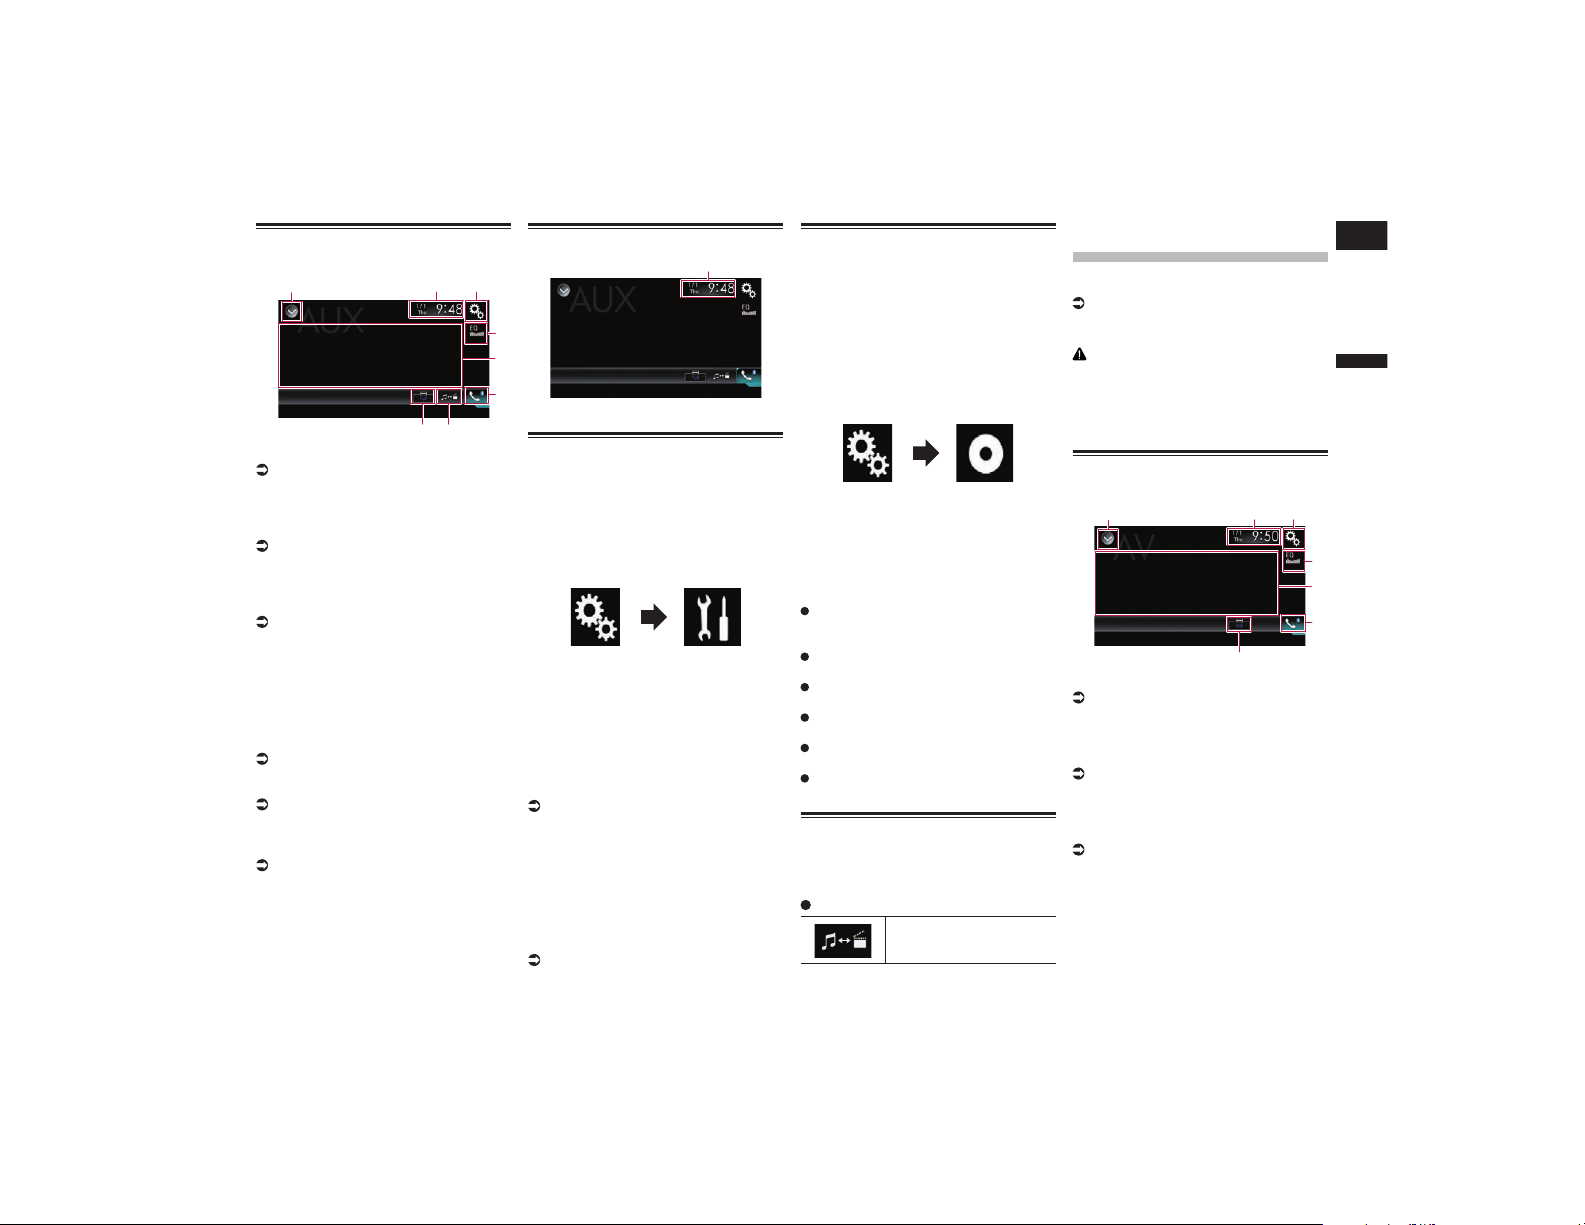
Français
21
Chapitre
59
Fr
Utilisation des touches de
l’écran tactile
1 32
8
5
4
6
7
1 Affiche la liste de sources.
Pour en savoir plus, reportez-vous à la
page 14, Sélection d’une source avant
dans la liste de sources.
2 Affiche l’écran de Réglage de l’heure
et de la date.
Pour en savoir plus, reportez-vous à la
page 77, Réglage de l’heure et de la
date.
3 Affiche l’écran de Paramètre.
4 Rappelle des courbes d’égalisation.
Pour en savoir plus, reportez-vous à la
page 70, Utilisation de l’égaliseur.
5 Masque les touches de l’écran tactile.
Touchez cette zone pour masquer les
touches de l’écran tactile.
p Touchez un quelconque endroit de l’écran
LCD pour afficher de nouveau les touches
de l’écran tactile.
6 Affiche l’écran de Menu téléphone.
Pour en savoir plus, reportez-vous à la
page 18, Affichage du menu téléphone.
7 Bascule vers l’écran de fonction.
Pour en savoir plus, reportez-vous à la
page 59, Changement de l’écran de
fonction.
8 Change le mode écran large.
Pour en savoir plus, reportez-vous à la
page 78, Changement du mode écran
large.
Lecture de l’écran
1
1 Heure et date actuelles
Procédure de départ
Vous pouvez afficher la sortie d’image vidéo
sur le périphérique connecté à l’entrée
vidéo.
1 Appuyez sur le bouton HOME pour
afficher l’écran de Menu principal.
2 Touchez les touches suivantes
dans l’ordre indiqué.
L’écran “Système” apparaît.
3 Touchez [Paramètres
entrée-sortie].
4 Vérifiez que “Entrée AUX” est
activé.
p Le réglage par défaut est “Marche”.
5 Affichez l’écran de Sélection de
source AV.
Pour en savoir plus sur les opérations,
reportez-vous à la page 13, Affichage
de l’écran de fonction AV.
6 Touchez [AUX] sur l’écran de
Sélection de source AV.
L’image s’affiche à l’écran.
7 Utilisez les touches de l’écran
tactile pour commander l’appareil
externe.
Pour en savoir plus, reportez-vous à la
page 59, Utilisation des touches de
l’écran tactile.
Réglage du signal vidéo
Lorsque vous connectez ce produit à un
équipement auxiliaire, sélectionnez le
réglage du signal vidéo approprié.
p Vous ne pouvez utiliser cette fonction que
pour l’entrée de signal vidéo dans l’entrée
AUX.
1 Appuyez sur le bouton HOME pour
afficher l’écran de Menu principal.
2 Touchez les touches suivantes
dans l’ordre indiqué.
L’écran “Configuration vidéo” apparaît.
3 Touchez [Config. du signal vidéo].
4 Touchez [AUX].
Le menu contextuel apparaît.
5 Touchez l’élément que vous sou-
haitez régler.
Auto (par défaut) :
Ajuste automatiquement le réglage du
signal vidéo.
PAL :
Règle le signal vidéo sur PAL.
NTSC :
Règle le signal vidéo sur NTSC.
PAL-M :
Règle le signal vidéo sur PAL-M.
PAL-N :
Règle le signal vidéo sur PAL-N.
SECAM :
Règle le signal vidéo sur SECAM.
Changement de l’écran de
fonction
Vous pouvez changer d’écran entre des
fichiers musicaux et des fichiers vidéo.
Touchez la touche suivante.
Bascule entre l’écran des
fichiers vidéo et des fichiers
musicaux.
Utilisation de l’entrée
AV
Vous pouvez afficher la sortie d’image vidéo
sur le périphérique connecté à ce produit.
Pour en savoir plus, reportez-vous à la
page 86, Connexion d’un élément vidéo
externe.
ATTENTION
Pour des raisons de sécurité, les images
vidéo ne sont pas visibles quand le véhicule
est en mouvement. Pour voir des images
vidéo, arrêtez-vous dans un endroit sûr et
serrez le frein à main.
Utilisation des touches de
l’écran tactile
1 32
7
5
4
6
1 Affiche la liste de sources.
Pour en savoir plus, reportez-vous à la
page 14, Sélection d’une source avant
dans la liste de sources.
2 Affiche l’écran de Réglage de l’heure
et de la date.
Pour en savoir plus, reportez-vous à la
page 77, Réglage de l’heure et de la
date.
3 Affiche l’écran de Paramètre.
4 Rappelle des courbes d’égalisation.
Pour en savoir plus, reportez-vous à la
page 70, Utilisation de l’égaliseur.
5 Masque les touches de l’écran tactile.
Touchez cette zone pour masquer les
touches de l’écran tactile.
p Touchez un quelconque endroit de l’écran
LCD pour afficher de nouveau les touches
de l’écran tactile.
6 Affiche l’écran de Menu téléphone.
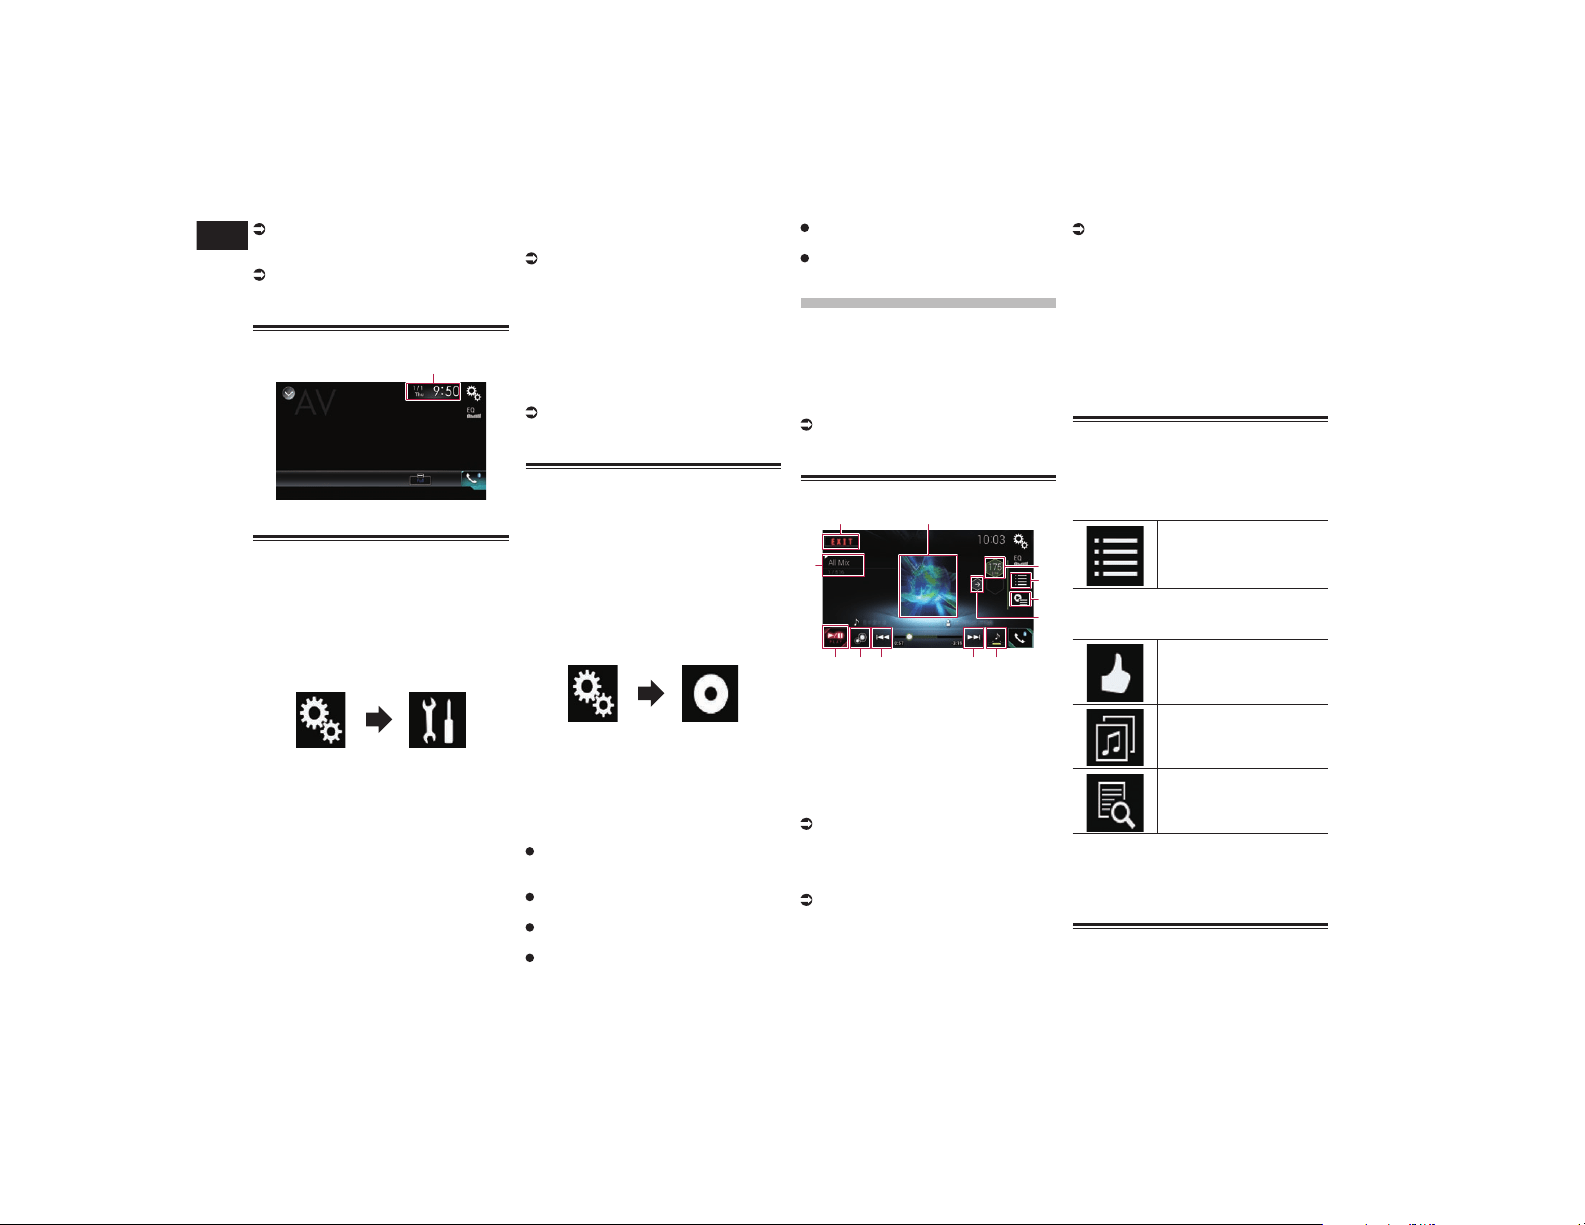
22
Chapitre
60
Fr
Pour en savoir plus, reportez-vous à la
page 18, Affichage du menu téléphone.
7 Change le mode écran large.
Pour en savoir plus, reportez-vous à la
page 78, Changement du mode écran
large.
Lecture de l’écran
1
1 Heure et date actuelles
Procédure de départ
Vous pouvez afficher la sortie d’image vidéo
sur le périphérique connecté à l’entrée
vidéo.
1 Appuyez sur le bouton HOME pour
afficher l’écran de Menu principal.
2 Touchez les touches suivantes
dans l’ordre indiqué.
L’écran “Système” apparaît.
3 Touchez [Paramètres
entrée-sortie].
4 Touchez [Entrée AV].
Le menu contextuel apparaît.
5 Touchez [Source].
La sortie d’image vidéo sur le périphérique
externe connecté peut être affichée.
p Si “Source” est sélectionné, “2e entrée
de caméra” est automatiquement réglé
sur “Arrêt”.
6 Affichez l’écran de Sélection de
source AV.
Pour en savoir plus sur les opérations,
reportez-vous à la page 13, Affichage
de l’écran de fonction AV.
7 Touchez [AV] sur l’écran de
Sélection de source AV.
L’image s’affiche à l’écran.
8 Utilisez les touches de l’écran
tactile pour commander l’appareil
externe.
Pour en savoir plus, reportez-vous à la
page 59, Utilisation des touches de
l’écran tactile.
Réglage du signal vidéo
Lorsque vous connectez ce produit à un
équipement audiovisuel, sélectionnez le
réglage du signal vidéo approprié.
p Vous ne pouvez utiliser cette fonction
que quand l’entrée de signal AV reçoit le
signal vidéo.
1 Appuyez sur le bouton HOME pour
afficher l’écran de Menu principal.
2 Touchez les touches suivantes
dans l’ordre indiqué.
L’écran “Configuration vidéo” apparaît.
3 Touchez [Config. du signal vidéo].
4 Touchez [AV].
Le menu contextuel apparaît.
5 Touchez l’élément que vous sou-
haitez régler.
Auto (par défaut) :
Ajuste automatiquement le réglage du
signal vidéo.
PAL :
Règle le signal vidéo sur PAL.
NTSC :
Règle le signal vidéo sur NTSC.
PAL-M :
Règle le signal vidéo sur PAL-M.
PAL-N :
Règle le signal vidéo sur PAL-N.
SECAM :
Règle le signal vidéo sur SECAM.
Utilisation de MIXTRAX
MIXTRAX est la technologie d’origine de
création de mixages en continu de sélec-
tions dans votre bibliothèque audio, accom-
pagnés d’effets DJ comme le ferait un DJ.
p Vous pouvez activer MIXTRAX en tou-
chant [MIXTRAX] sur l’écran de lecture
de fichiers audio compressés.
Pour en savoir plus, reportez-vous à la
page 30, Utilisation des touches de
l’écran tactile.
Touches de l’écran tactile
1
4
6
5
7
b
2
9
3
a 8 8
1 Quitte l’écran MIXTRAX.
2 Affiche l’écran LinkGate.
Touchez l’élément souhaité. Les chan-
sons liées à l’élément sélectionné sont
lues.
3 Spécifie la valeur BPM.
La valeur BPM d’origine ne s’affiche pas
pendant la lecture.
4 Affiche l’écran de sélection d’élément.
Pour en savoir plus sur les opérations,
reportez-vous à la page 60, Sélection
d’un élément pour la lecture de
chansons.
5 Affiche l’écran de liste de lecture.
Pour en savoir plus sur les opérations,
reportez-vous à la page 60, Sélection de
chansons à ne pas lire.
6 Règle la valeur BPM (Beats Per Minute)
d’origine.
7 Spécifie la plage de lecture.
Pour en savoir plus sur les opérations,
reportez-vous à la page 61, Définition
de la plage de lecture..
8 Touchez pour sélectionner une piste.
Maintenez enfoncé pour une avance ou
un retour rapide.
9 Active ou désactive l’affichage original de
MIXTRAX.
a Met en pause et lance la lecture.
b Affiche l’élément sélectionné sur
l’écran LinkGate ou l’écran de sélection
d’élément.
Sélection d’un élément pour
la lecture de chansons
Vous pouvez spécifier un élément afin de lire
les chansons qui lui sont liées.
1 Touchez la touche suivante.
Affiche l’écran de sélection
d’élément.
2 Touchez les touches suivantes pour
sélectionner l’élément.
Affiche la liste des modèles
MIX.
Affiche la liste des balises.
Affiche la liste des fichiers.
3 Sélectionnez un élément dans la
liste.
Les chansons liées à l’élément sélectionné
sont lues.
Sélection de chansons à ne
pas lire
Vous pouvez sélectionner des éléments ou
des chansons à ne pas lire.
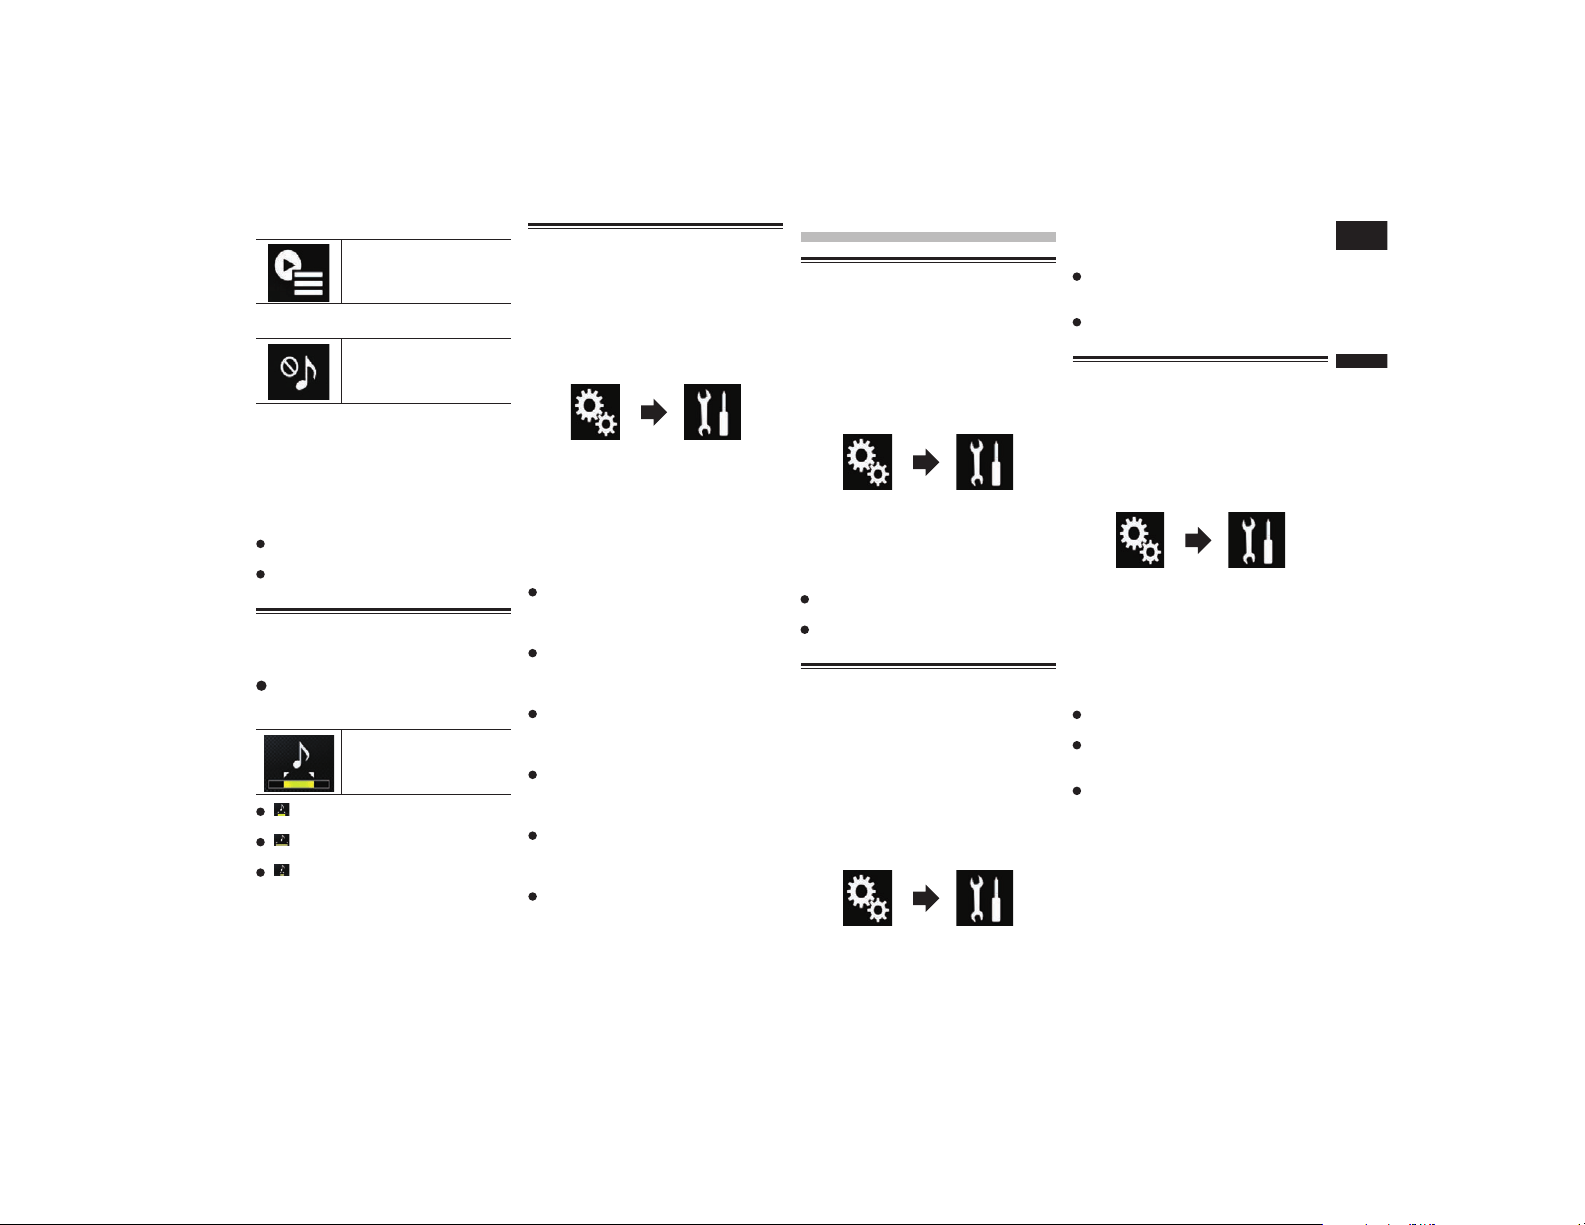
Français
23
Chapitre
61
Fr
1 Touchez la touche suivante.
Affiche l’écran de liste de
lecture.
2 Touchez la touche suivante.
Affiche l’écran “Playback
not allowed”.
3 Touchez [Songs], [Artists] ou
[Albums].
4 Touchez la case à gauche de l’élé-
ment ou de la chanson que vous ne
souhaitez pas lire.
Une icône s’affiche. Les éléments accompa-
gnés de l’icône ne seront pas lus.
Si vous touchez [Unselect All], toutes les
sélections sont annulées.
Si vous touchez [Select All], tous les
éléments sont sélectionnés.
Dénition de la plage de
lecture.
Vous pouvez spécifier la plage de lecture.
Touchez à plusieurs reprises la
touche suivante jusqu’à ce que le
réglage souhaité apparaisse.
Change la plage de lecture.
(par défaut) :
Lecture d’une plage moyenne.
:
Lecture d’une plage longue.
:
Lecture d’une plage courte.
p L’effet sonore le plus approprié est auto-
matiquement appliqué lors du passage à
la chanson suivante.
Réglage du modèle de
clignotement
Les couleurs clignotantes changent suivant
l’évolution du niveau sonore et des graves.
1 Appuyez sur le bouton HOME pour
afficher l’écran de Menu principal.
2 Touchez les touches suivantes
dans l’ordre indiqué.
L’écran “Système” apparaît.
3 Touchez [Réglages de source A/V].
4 Touchez [Paramétrage MIXTRAX].
5 Touchez [Clignotement].
Le menu contextuel apparaît.
6 Touchez l’élément que vous sou-
haitez régler.
Son1 (par défaut) à Son6 :
Le modèle de clignotement change en
fonction du niveau sonore. Sélectionnez
le mode souhaité.
Bass1 à Bass6 :
Le modèle de clignotement change
en fonction du niveau des graves.
Sélectionnez le mode souhaité.
Aléatoire1 :
Le modèle de clignotement change de
manière aléatoire en fonction du mode du
niveau sonore et du mode passe-bas.
Aléatoire2 :
Le modèle de clignotement change de
manière aléatoire en fonction du mode du
niveau sonore.
Aléatoire3 :
Le modèle de clignotement change de
manière aléatoire en fonction du mode
passe-bas.
Arrêt :
Le modèle de clignotement ne change
pas.
Paramètres du système
Activation de la source audio
Bluetooth
Vous devez activer la source audio Bluetooth
pour pouvoir utiliser le lecteur audio
Bluetooth.
1 Appuyez sur le bouton HOME pour
afficher l’écran de Menu principal.
2 Touchez les touches suivantes
dans l’ordre indiqué.
L’écran “Système” apparaît.
3 Touchez [Réglages de source A/V].
4 Touchez à plusieurs reprises
[Audio Bluetooth] jusqu’à ce que le
réglage souhaité apparaisse.
Marche (par défaut) :
Active la source audio Bluetooth.
Arrêt :
Désactive la source audio Bluetooth.
Réglage du délement
continu
Lorsque “Défilement perpétuel” est réglé
sur “Marche”, les informations de texte
enregistrées défilent en continu sur l’écran.
Réglez sur “Arrêt” si vous souhaitez que les
informations ne défilent qu’une seule fois.
1 Appuyez sur le bouton HOME pour
afficher l’écran de Menu principal.
2 Touchez les touches suivantes
dans l’ordre indiqué.
L’écran “Système” apparaît.
3 Touchez à plusieurs reprises
[Défilement perpétuel] jusqu’à ce
que le réglage souhaité apparaisse.
Arrêt (par défaut) :
Désactive le réglage de défilement
continu.
Marche :
Active le réglage de défilement continu.
Réglage de l’entrée AV
Vous pouvez utiliser un appareil vidéo
externe, comme un lecteur portable, et le
raccorder à ce produit avec ce réglage.
1 Appuyez sur le bouton HOME pour
afficher l’écran de Menu principal.
2 Touchez les touches suivantes
dans l’ordre indiqué.
L’écran “Système” apparaît.
3 Touchez [Paramètres
entrée-sortie].
4 Touchez [Entrée AV].
Le menu contextuel apparaît.
5 Touchez l’élément que vous sou-
haitez régler.
Arrêt (par défaut) :
Désactive la source AV.
Source :
Affiche la sortie d’image vidéo sur le
périphérique externe connecté.
Caméra :
Affiche la sortie d’image vidéo sur la
caméra externe connectée.
p Si “Caméra” est sélectionné, “2e entrée
de caméra” est automatiquement réglé
sur “Marche”.
p Si “Arrêt” ou “Source” est sélectionné,
“2e entrée de caméra” est automatique-
ment réglé sur “Arrêt”.
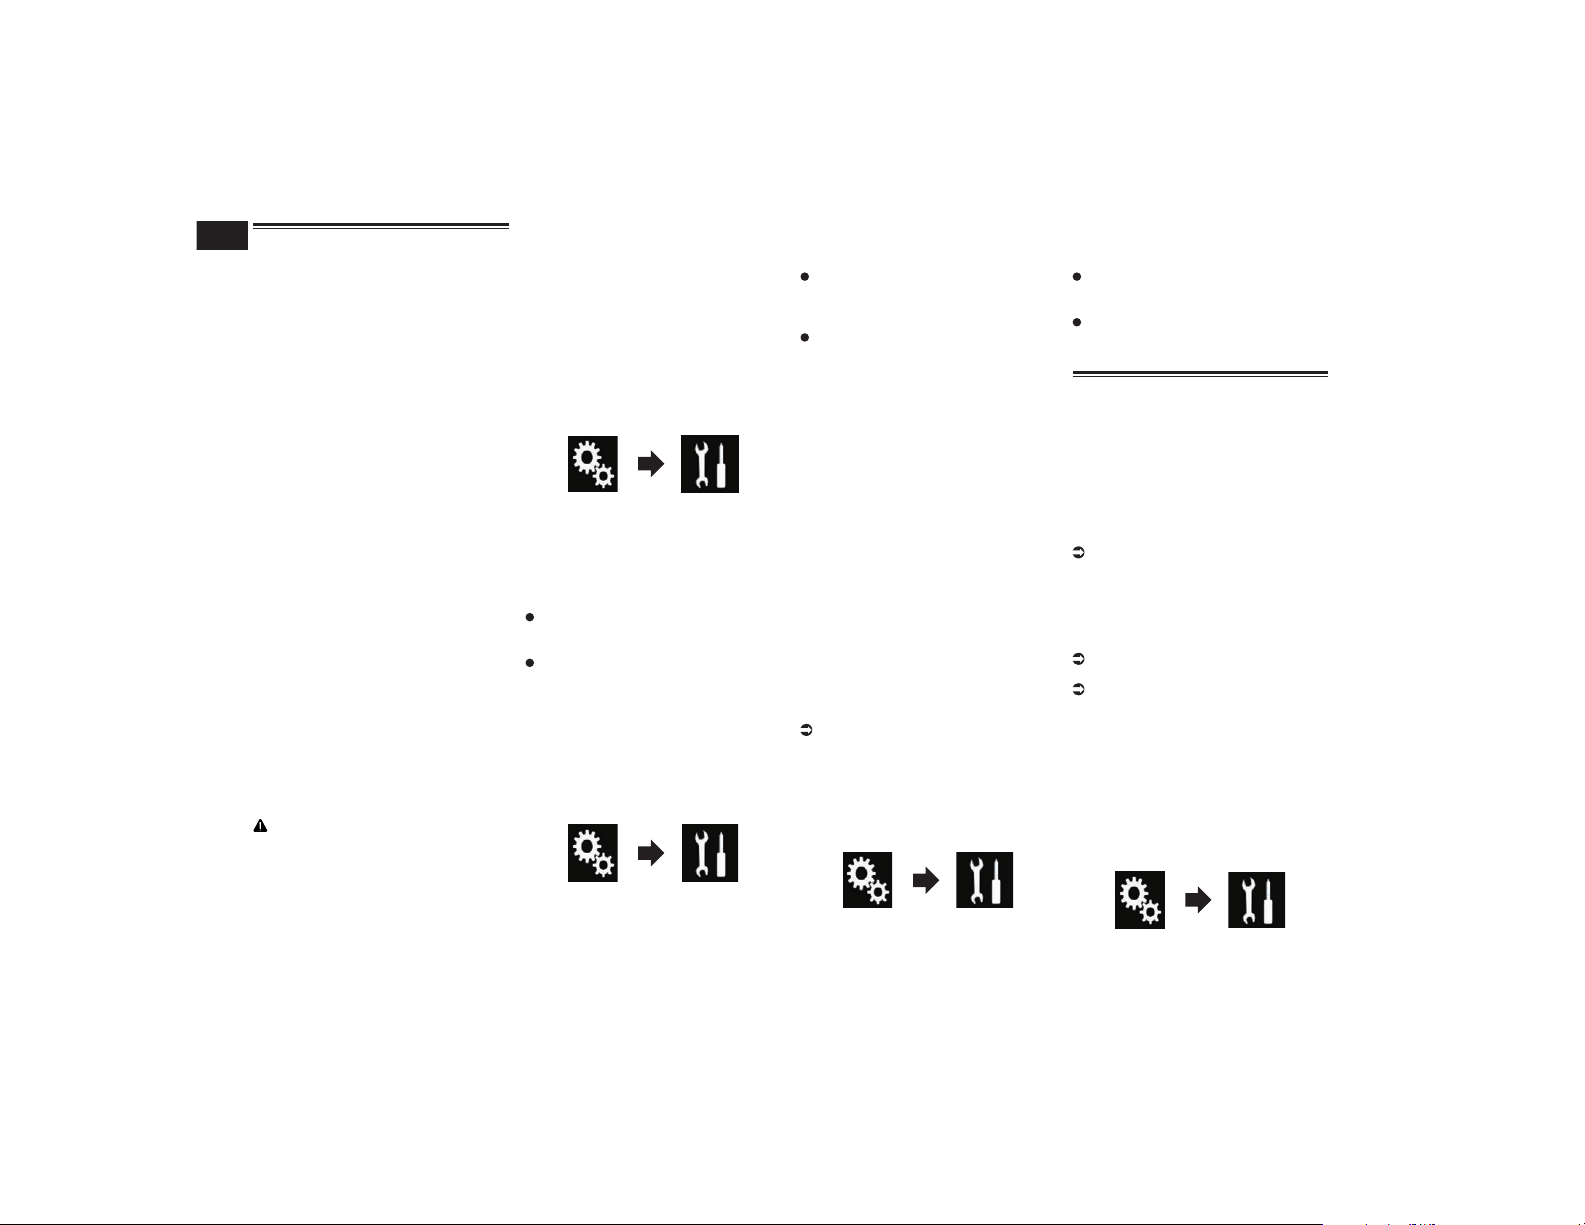
23
Chapitre
62
Fr
Réglage de la caméra de
rétrovisée
Les deux fonctions suivantes sont dispo-
nibles. Une caméra de rétrovisée vendue
séparément (par ex., ND-BC6) est nécessaire
pour utiliser la fonction de caméra de rétro-
visée. (Pour en savoir plus, veuillez consulter
votre revendeur.)
Caméra de rétrovisée
Ce produit comporte une fonction permet-
tant de basculer automatiquement sur
l’image en plein écran de la caméra de rétro-
visée installée sur votre véhicule. Lorsque le
levier de vitesse est sur la position REVERSE
(R), l’écran bascule automatiquement sur
l’image en plein écran de la caméra de
rétrovisée.
p Si le levier de vitesse est mis en position
REVERSE (R) immédiatement après le
démarrage du système de ce produit,
seule l’image de la caméra s’affiche et
l’aide au stationnement n’est pas affi-
chée. L’aide au stationnement s’affiche
sur l’image de la caméra après un certain
temps. Assurez-vous de vérifier les condi-
tions autour du véhicule avant même
l’affichage de l’aide et du message.
Caméra pour le mode Point de vue
de la caméra
Point de vue de la caméra peut être affi-
ché n’importe quand (par exemple, pour
vérifier une caravane remorquée, etc.).
Veuillez noter qu’avec ce réglage, l’image de
la caméra n’est pas modifiée pour s’adapter
à l’écran et qu’une portion de l’image habi-
tuelle de la caméra est tronquée.
ATTENTION
Assurez-vous que les réglages pour la
caméra de rétrovisée affiche une image
miroir inversée.
p Vérifiez immédiatement que l’écran
affiche une image de caméra de rétrovi-
sée lorsque le levier de vitesse est mis en
position REVERSE (R) depuis une autre
position.
p Lorsque l’écran bascule sur l’image en
plein écran de la caméra de rétrovisée
pendant la conduite normale, passez
au réglage inverse dans “Polarité de la
caméra”.
■ Réglage d’activation de la
caméra de rétrovisée
Pour afficher les images de la caméra
de rétrovisée sur l’écran de ce produit,
“Entrée de la caméra ar.” doit être réglé sur
“Marche”.
1 Appuyez sur le bouton HOME pour
afficher l’écran de Menu principal.
2 Touchez les touches suivantes
dans l’ordre indiqué.
L’écran “Système” apparaît.
3 Touchez [Paramètres de la
caméra].
4 Touchez à plusieurs reprises
[Entrée de la caméra ar.] jusqu’à ce
que le réglage souhaité apparaisse.
Arrêt (par défaut) :
Désactive le réglage d’entrée de caméra
arrière.
Marche :
Active le réglage d’entrée de caméra
arrière.
■ Réglage de la polarité de la
caméra de rétrovisée
1 Appuyez sur le bouton HOME pour
afficher l’écran de Menu principal.
2 Touchez les touches suivantes
dans l’ordre indiqué.
L’écran “Système” apparaît.
3 Touchez [Paramètres de la
caméra].
4 Touchez à plusieurs reprises
[Polarité de la caméra] jusqu’à ce
que le réglage souhaité apparaisse.
Pile (par défaut) :
Lorsque la polarité du fil connecté est
positive avec le levier de vitesse sur la
position REVERSE (R).
Masse :
Lorsque la polarité du fil connecté est
négative avec le levier de vitesse sur la
position REVERSE (R).
Lorsque le levier de vitesse est mis en
position REVERSE (R) après avoir réglé la
caméra de rétrovisée, l’image de rétrovisée
apparaît.
■ Réglage de l’afchage de
l’image inversée pour l’image
de rétrovisée
Les images de la caméra de rétrovisée
apparaissent inversées (comme des images
miroir) sur l’écran avant sauf lorsqu’une
caméra de rétrovisée pouvant générer des
images dans le bon sens est utilisée. Vous
pouvez choisir d’inverser les images de la
caméra de rétrovisée à afficher sur l’écran
avant.
p Ce réglage est disponible uniquement
lorsque vous arrêtez votre véhicule dans
un endroit sûr et serrez le frein à main.
p Cette fonction est disponible uniquement
lorsque “Entrée de la caméra ar.” est
réglé sur “Marche”.
Pour en savoir plus, reportez-vous à la
page 62, Réglage d’activation de la
caméra de rétrovisée.
1 Appuyez sur le bouton HOME pour
afficher l’écran de Menu principal.
2 Touchez les touches suivantes
dans l’ordre indiqué.
L’écran “Système” apparaît.
3 Touchez [Paramètres de la
caméra].
4 Touchez à plusieurs reprises [Cam.
arr.: vidéo de recul] jusqu’à ce que
le réglage souhaité apparaisse.
Arrêt (par défaut) :
N’inverse pas les images de la caméra de
rétrovisée.
Marche :
Inverse les images de la caméra de
rétrovisée.
Réglage de la caméra pour
le mode Point de vue de la
caméra
Pour que Point de vue de la caméra puisse
être affiché n’importe quand, “Point de vue
de la caméra” doit être réglé sur “Marche”.
p Pour régler la caméra de rétrovisée pour
le mode Point de vue de la caméra,
“Entrée de la caméra ar.” doit être réglé
sur “Marche”.
Pour en savoir plus, reportez-vous à la
page 62, Réglage d’activation de la
caméra de rétrovisée.
p Pour régler la deuxième caméra pour le
mode Point de vue de la caméra, réglez
“Entrée AV” sur “Caméra” ou réglez “2e
entrée de caméra” sur “Marche”.
Pour en savoir plus, reportez-vous à la
page 61, Réglage de l’entrée AV.
Pour en savoir plus, reportez-vous à la
page 63, Réglage de l’entrée de la
deuxième caméra.
p Vous pouvez également activer cette
fonction en touchant [Camera View]
sur l’écran de Sélection de source AV ou
dans la liste de sources.
1 Appuyez sur le bouton HOME pour
afficher l’écran de Menu principal.
2 Touchez les touches suivantes
dans l’ordre indiqué.
L’écran “Système” apparaît.
3 Touchez [Paramètres de la
caméra].
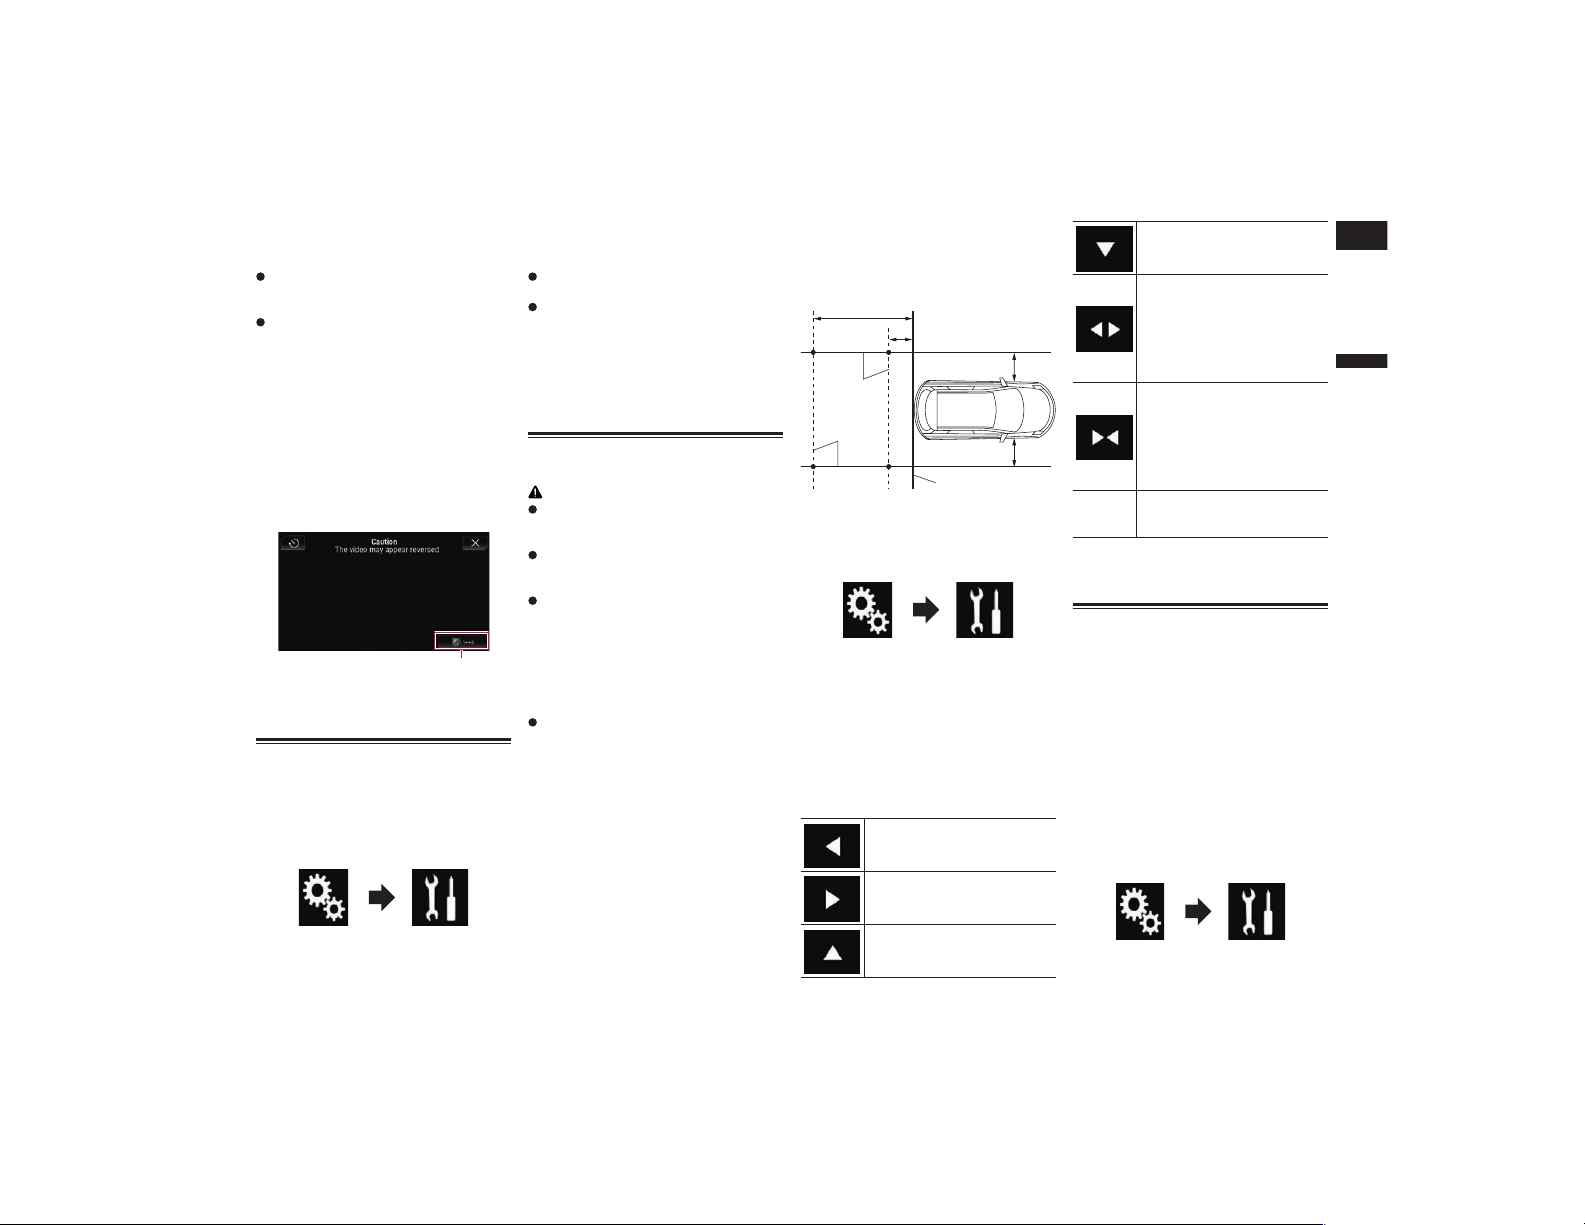
Français
23
Chapitre
63
Fr
4 Touchez à plusieurs reprises [Point
de vue de la caméra] jusqu’à ce que
le réglage souhaité apparaisse.
Arrêt (par défaut) :
Désactive le réglage d’affichage de la
caméra.
Marche :
Active le réglage d’affichage de la
caméra.
Si aucune opération n’est effectuée pendant
sept secondes après l’affichage de l’écran
de Fonction AV, l’affichage de la caméra
apparaît automatiquement.
p Si vous touchez l’écran pendant l’affi-
chage de la caméra, l’image affichée
s’éteint temporairement.
Lorsque les vues de la caméra de rétrovisée
et de la deuxième caméra sont toutes deux
disponibles, la touche permettant de chan-
ger l’affichage apparaît.
1
1 Bascule l’affichage entre l’image de la
caméra de rétrovisée et l’image de la
deuxième caméra.
Afchage des instructions
d’aide au stationnement
1 Appuyez sur le bouton HOME pour
afficher l’écran de Menu principal.
2 Touchez les touches suivantes
dans l’ordre indiqué.
L’écran “Système” apparaît.
3 Touchez [Paramètres de la
caméra].
4 Touchez à plusieurs reprises
[Guide aide stationn.] jusqu’à ce
que le réglage souhaité apparaisse.
Arrêt (par défaut) :
Masque les directives.
Marche :
Affiche les directives.
Lorsque le levier de vitesse est mis en
position REVERSE (R) après avoir réglé la
caméra de rétrovisée, l’image de rétrovisée
apparaît.
p Si vous maintenez enfoncé le bouton
MUTE, l’image de rétrovisée disparaît.
Réglage des directives sur
l’image de rétrovisée
ATTENTION
Lors du réglage des directives, veillez à
stationner le véhicule dans un endroit
sûr et à serrer le frein à main.
Avant de descendre de la voiture pour
placer les repères, veillez à couper le
contact (ACC OFF).
La portée de projection de la caméra de
rétrovisée est limitée. Par ailleurs, les
directives sur la largeur du véhicule et
la distance affichées sur l’image de la
caméra de rétrovisée peuvent être diffé-
rentes de la largeur du véhicule et de la
distance réelles. (Les directives sont des
lignes droites.)
La qualité de l’image peut se détériorer
selon l’environnement d’utilisation, la
nuit ou dans un endroit sombre, par
exemple.
1 Stationnez votre véhicule en lieu
sûr et serrez le frein à main.
2 En utilisant du ruban d’emballage
ou autre, placez les repères à
environ 25 cm de chaque côté du
véhicule et à environ 50 cm et 2 m
du pare-chocs arrière.
Pare-chocs arrière
25�cm
50�cm
25�cm
2�m
Repères
Repères
3 Appuyez sur le bouton HOME pour
afficher l’écran de Menu principal.
4 Touchez les touches suivantes
dans l’ordre indiqué.
L’écran “Système” apparaît.
5 Touchez [Paramètres de la
caméra].
6 Touchez [Régl. : guide stationn.].
7 Réglez les directives en faisant
glisser les quatre points.
8 Touchez les touches suivantes
pour ajuster la position du point si
nécessaire.
Déplace le point vers la gauche.
Déplace le point vers la droite.
Déplace le point vers le haut.
Déplace le point vers le bas.
Prolonge la ligne vers la gauche
et la droite à partir du point
central en cours de la directive
de distance. Les points d’ajus-
tement sur les coordonnées
latérales à chaque extrémité
sont également déplacés.
Réduit la ligne à gauche et à
droite vers le point central en
cours de la directive de dis-
tance. Les points d’ajustement
sur les coordonnées latérales
à chaque extrémité sont égale-
ment déplacés.
Défaut
Rétablit les réglages par défaut
des directives de largeur de dis-
tance et les points d’ajustement.
p Lorsqu’un point est déplacé, la distance
par rapport à sa valeur initiale s’affiche en
bas de l’écran.
Réglage de l’entrée de la deu-
xième caméra
Vous pouvez visualiser les images de la
deuxième caméra (une caméra avant, etc.)
sur l’écran de ce produit.
■ Réglage d’activation de la deu-
xième caméra
p Pour afficher les images de la deuxième
caméra sur l’écran de ce produit, “2e
entrée de caméra” doit être réglé sur
“Marche”.
1 Appuyez sur le bouton HOME pour
afficher l’écran de Menu principal.
2 Touchez les touches suivantes
dans l’ordre indiqué.
L’écran “Système” apparaît.
3 Touchez [Paramètres de la
caméra].
23
Chapitre
64
Fr
4 Touchez à plusieurs reprises [2e
entrée de caméra] jusqu’à ce que le
réglage souhaité apparaisse.
Arrêt (par défaut) :
Désactive le réglage d’entrée de la deu-
xième caméra.
Marche :
Active le réglage d’entrée de la deuxième
caméra.
p Le message de confirmation apparaît
si vous réglez “2e entrée de caméra”
sur “Marche” alors que la source AV
est en service. La source AV est mise
hors tension si “Oui” est sélectionné,
et “2e entrée de caméra” est réglé sur
“Marche”. Sélectionnez “Non” pour
annuler le réglage de “2e entrée de
caméra” sur “Marche”.
p Si “Marche” est sélectionné, “Entrée
AV” est automatiquement réglé sur
“Caméra”.
p Si “Arrêt” est sélectionné, “Entrée AV”
est automatiquement réglé sur “Arrêt”.
■ Réglage de l’image inversée
pour l’image d’entrée de la
deuxième caméra
Les images de la deuxième caméra appa-
raissent inversées (comme des images
miroir) sur l’écran avant sauf lorsqu’une
deuxième caméra pouvant générer des
images dans le bon sens est utilisée. Vous
pouvez choisir d’inverser les images de la
deuxième caméra à afficher sur l’écran
avant.
p Ce réglage est disponible uniquement
lorsque vous arrêtez votre véhicule dans
un endroit sûr et serrez le frein à main.
p Cette fonction est disponible lorsque “2e
entrée de caméra” est sur “Marche” ou
“Entrée AV” est réglé sur “Caméra”.
1 Appuyez sur le bouton HOME pour
afficher l’écran de Menu principal.
2 Touchez les touches suivantes
dans l’ordre indiqué.
L’écran “Système” apparaît.
3 Touchez [Paramètres de la
caméra].
4 Touchez à plusieurs reprises [2e
cam.: vidéo de recul] jusqu’à ce
que le réglage souhaité apparaisse.
Arrêt (par défaut) :
N’inverse pas les images de la deuxième
caméra.
Marche :
Inverse les images de la deuxième
caméra.
Désactivation de l’écran de
démonstration
Si l’écran de démonstration apparaît, suivez
la procédure suivante pour le désactiver.
1 Appuyez sur le bouton HOME pour
afficher l’écran de Menu principal.
2 Touchez les touches suivantes
dans l’ordre indiqué.
L’écran “Système” apparaît.
3 Touchez à plusieurs reprises [Mode
de démonstration] jusqu’à ce que
le réglage souhaité apparaisse.
Marche (par défaut) :
Affiche l’écran de démonstration.
Arrêt :
Masque l’écran de démonstration.
Vous pouvez également désactiver l’écran
de démonstration en maintenant enfoncé
le bouton MUTE.
Sélection de la langue du
système
La langue du système peut être
sélectionnée.
La langue peut être changée pour les
éléments suivants :
— L’écran “Audio”
— L’écran “Système”
— L’écran “Configuration vidéo”
— L’écran “Bluetooth”
— Langue des messages
Certaines fonctions de ce produit ne
peuvent pas être utilisées pendant la
conduite ou requièrent une attention
particulière. Dans ce cas de figure, un
message d’avertissement apparaît à
l’écran. Vous pouvez changer la langue
des messages d’avertissement avec ce
réglage.
Si les réglages de la langue intégrée et
de la langue sélectionnée sont différents,
les informations de texte peuvent ne pas
s’afficher correctement.
Certains caractères peuvent ne pas
s’afficher correctement.
1 Appuyez sur le bouton HOME pour
afficher l’écran de Menu principal.
2 Touchez les touches suivantes
dans l’ordre indiqué.
L’écran “Système” apparaît.
3 Touchez [Langage du système].
Le menu contextuel apparaît.
4 Touchez la langue désirée.
Une fois la langue sélectionnée, l’écran
précédent est rétabli.
Réglage de la langue du cla-
vier avec l’application pour
iPhone
Vous pouvez utiliser le clavier en AppRadio
Mode en réglant la langue du clavier pour
iPhone.
p Cette fonction est disponible uniquement
en AppRadio Mode sur l’iPhone.
1 Appuyez sur le bouton HOME pour
afficher l’écran de Menu principal.
2 Touchez les touches suivantes
dans l’ordre indiqué.
L’écran “Système” apparaît.
3 Touchez [Clavier].
L’écran “Clavier” apparaît.
4 Touchez la langue désirée.
Une fois la langue sélectionnée, l’écran
précédent est rétabli.
Réglage du bip sonore
1 Appuyez sur le bouton HOME pour
afficher l’écran de Menu principal.
2 Touchez les touches suivantes
dans l’ordre indiqué.
L’écran “Système” apparaît.
3 Touchez à plusieurs reprises
[Tonalité] jusqu’à ce que le réglage
souhaité apparaisse.
Marche (par défaut) :
Émet un bip.
Arrêt :
N’émet pas de bip.
Réglage des positions de
réponse de l’écran tactile
(Étalonnage de l’écran tactile)
Si la position des touches de l’écran tactile
est décalée par rapport à la position où
celles-ci réagissent quand vous touchez
l’écran, ajustez leur position sur l’écran
tactile.
p Ce réglage est disponible uniquement
lorsque vous arrêtez votre véhicule dans
un endroit sûr et serrez le frein à main.
p N’utilisez pas un objet pointu, tel qu’un
stylo-bille ou un portemine, qui risquerait
d’endommager l’écran.

Français
23
Chapitre
65
Fr
p Ne coupez pas le moteur lors de la
sauvegarde des données sur la position
ajustée.
1 Appuyez sur le bouton HOME pour
afficher l’écran de Menu principal.
2 Touchez les touches suivantes
dans l’ordre indiqué.
L’écran “Système” apparaît.
3 Touchez [Calibration écran tactile].
L’écran de réglage du panneau tactile
apparaît.
4 Touchez les deux coins de l’écran
le long des flèches, puis touchez
les centres des deux symboles +
simultanément deux fois.
5 Appuyez sur le bouton HOME.
Les résultats du réglage sont sauvegardés.
6 Appuyez encore une fois sur le bou-
ton HOME.
Effectuez le réglage sur 16 points.
Si vous maintenez enfoncé le bouton
HOME, le réglage est annulé.
7 Touchez délicatement le centre du
symbole + affiché à l’écran.
La cible indique l’ordre.
Une fois tous les symboles touchés,
les données de position modifiées sont
enregistrées.
Si vous appuyez sur le bouton HOME,
la position précédemment réglée est
rétablie.
Si vous maintenez enfoncé le bouton
HOME, le réglage est annulé.
8 Maintenez enfoncé le bouton
HOME.
Les résultats du réglage sont sauvegardés.
Réglage de la fonction d’atté-
nuation de la luminosité
Vous pouvez spécifier le moment de l’ac-
tivation de la fonction d’atténuation de la
luminosité.
1 Appuyez sur le bouton HOME pour
afficher l’écran de Menu principal.
2 Touchez les touches suivantes
dans l’ordre indiqué.
L’écran “Système” apparaît.
3 Touchez [Paramètres de
gradation].
4 Touchez [Déclencheur de
gradation].
Le menu contextuel apparaît.
5 Touchez l’élément que vous sou-
haitez régler.
Auto (par défaut) :
Active la fonction d’atténuation de la
luminosité lorsque les phares du véhicule
sont allumés (la nuit).
Manuel :
Permet de choisir d’activer la fonction
d’atténuation de la luminosité.
Temps :
Permet de régler la durée d’activation de
la fonction d’atténuation de la luminosité.
p Si “Manuel” est sélectionné, choisissez
d’activer la fonction d’atténuation de la
luminosité.
Pour en savoir plus, reportez-vous à
la page 65, Réglage d’activation ou
non de la fonction d’atténuation de la
luminosité.
p Si “Temps” est sélectionné, spécifiez la
durée d’activation de la fonction d’atté-
nuation de la luminosité.
Pour en savoir plus, reportez-vous à la
page 65, Réglage de la durée d’acti-
vation de la fonction d’atténuation de la
luminosité.
Réglage d’activation ou non
de la fonction d’atténuation
de la luminosité
Vous pouvez choisir d’activer la fonction
d’atténuation de la luminosité la nuit.
p Cette fonction est disponible uniquement
lorsque “Déclencheur de gradation” est
réglé sur “Manuel”.
Pour en savoir plus, reportez-vous à la
page 65, Réglage de la fonction d’atté-
nuation de la luminosité.
1 Appuyez sur le bouton HOME pour
afficher l’écran de Menu principal.
2 Touchez les touches suivantes
dans l’ordre indiqué.
L’écran “Système” apparaît.
3 Touchez [Paramètres de
gradation].
4 Touchez [Jour/Nuit].
Le menu contextuel apparaît.
5 Touchez l’élément que vous sou-
haitez régler.
Jour (par défaut) :
Désactive la fonction d’atténuation de la
luminosité.
Nuit :
Active la fonction d’atténuation de la
luminosité.
Réglage de la durée d’activa-
tion de la fonction d’atténua-
tion de la luminosité
Vous pouvez régler la durée d’activation de la
fonction d’atténuation de la luminosité.
p Cette fonction est disponible uniquement
lorsque “Déclencheur de gradation” est
réglé sur “Temps”.
Pour en savoir plus, reportez-vous à la
page 65, Réglage de la fonction d’atté-
nuation de la luminosité.
1 Appuyez sur le bouton HOME pour
afficher l’écran de Menu principal.
2 Touchez les touches suivantes
dans l’ordre indiqué.
L’écran “Système” apparaît.
3 Touchez [Paramètres de
gradation].
4 Touchez [Durée de gradation].
La barre de réglage de la durée apparaît.
5 Touchez les points souhaités sur
la barre de réglage de la durée ou
faites glisser les curseurs pour
spécifier l’heure de début et l’heure
de fin, respectivement.
p Le format d’affichage de l’heure dépend
du réglage “Base horaire”.
p La valeur affichée au centre de la barre
de réglage de la durée (“12” pour le
format 12 heures et “00” pour le format
24 heures) indique minuit. Les valeurs à
gauche de la valeur au centre sont pour
l’après-midi et les valeurs à droite de la
valeur au centre sont pour le matin.
p Les valeurs par défaut sont “18:00” (heure
de début) et “6:00” (heure de fin).
p La valeur peut être modifiée par incré-
ments de 15 minutes.
Réglage de l’image
Vous pouvez ajuster l’image pour chaque
source, pour l’écran de l’application et pour
la caméra de rétrovisée.
ATTENTION
Pour des raisons de sécurité, vous ne pou-
vez pas utiliser certaines de ces fonctions
lorsque votre véhicule est en mouvement.
Pour activer ces fonctions, vous devez vous
arrêter en lieu sûr et serrer le frein à main.
1 Affichez l’écran que vous souhaitez
ajuster.
2 Appuyez sur le bouton HOME pour
afficher l’écran de Menu principal.
23
Chapitre
66
Fr
3 Touchez les touches suivantes
dans l’ordre indiqué.
L’écran “Système” apparaît.
4 Touchez [Ajustement de l’image].
5 Touchez l’une des touches sui-
vantes pour sélectionner la fonc-
tion à ajuster.
Les éléments d’ajustement d’image
s’affichent.
Luminosité :
Ajuste l’intensité du noir.
Contraste :
Ajuste le contraste.
Couleur :
Ajuste la saturation des couleurs.
Teinte :
Ajuste la tonalité de couleur (quelle
couleur est accentuée, rouge ou vert).
Niv. de gradation :
Ajuste la luminosité de l’affichage.
Température :
Ajuste la température de couleur, d’où
une meilleure balance des blancs.
p Vous ne pouvez ajuster Teinte que
lorsque le système de couleur est réglé
sur NTSC.
Si vous touchez [Vue arrière] ou [2e
caméra], le mode passe au mode
de caméra sélectionné. En touchant
[Source], [Navig.] ou [Appli], vous
pouvez revenir au mode sélectionné.
6 Touchez les touches suivantes pour
ajuster l’élément sélectionné.
Réduit le niveau de l’élément
sélectionné.
Augmente le niveau de l’élé-
ment sélectionné.
Sélectionne l’élément précédent
réglable.
Sélectionne l’élément suivant
réglable.
Chaque fois que vous touchez la touche, le
niveau de l’élément sélectionné augmente
ou diminue.
p “Luminosité”, “Contraste”, “Couleur” et
“Teinte” peuvent être ajustés entre “-24”
et “+24”.
p “Niv. de gradation” peut être ajusté
entre “+1” et “+48”.
p “Température” peut être ajusté entre “-3”
et “+3”.
p Les réglages de “Luminosité”,
“Contraste” et “Niv. de gradation” sont
enregistrés séparément pour l’état activé/
désactivé de la fonction d’atténuation
de la luminosité. Ces réglages changent
automatiquement selon que la fonction
d’atténuation de la luminosité est activée
ou désactivée.
Pour en savoir plus sur le réglage de la
fonction d’atténuation de la luminosité,
reportez-vous à la page 65, Réglage de
la fonction d’atténuation de la luminosité.
p L’ajustement d’image peut ne pas être
disponible avec certaines caméras de
rétrovisée.
p Le contenu du réglage peut être mémo-
risé séparément pour les écrans suivants
et les images vidéo.
— DVD, Video-CD et Disc
— AV et caméra externe
— USB (vidéo) et USB (JPEG)
— SD (Vidéo) et SD (JPEG)
— iPod (iPod avec connecteur à 30
broches)
— iPod (vidéo) et AppRadio Mode (iPod
avec connecteur à 30 broches)
— HDMI et AppRadio Mode (HDMI)
— Android Auto
— MirrorLink
— AUX
— MIXTRAX, sortie d’images du périphé-
rique externe
— Caméra de rétrovisée
Afchage de la version du
micrologiciel
1 Appuyez sur le bouton HOME pour
afficher l’écran de Menu principal.
2 Touchez les touches suivantes
dans l’ordre indiqué.
L’écran “Système” apparaît.
3 Touchez [Info sur le système].
4 Touchez [Info sur le micrologiciel].
L’écran “Info sur le micrologiciel” apparaît.
p Vous pouvez vérifier les licences open
source des fonctions dont ce produit est
équipé dans “Licence” sur l’écran “Info
sur le micrologiciel”.
Mise à jour du micrologiciel
ATTENTION
Ne mettez jamais ce produit hors ten-
sion, n’éjectez pas la carte mémoire SD
ou ne déconnectez jamais le périphé-
rique de stockage USB pendant la mise
à jour du micrologiciel.
Vous ne pouvez mettre à jour le microlo-
giciel que lorsque le véhicule est arrêté
et que le frein à main est serré.
p Utilisez un port USB 1 pour mettre à jour
le micrologiciel à l’aide d’un périphérique
de stockage USB.
1 Téléchargez les fichiers de mise à
jour du micrologiciel.
2 Connectez une carte mémoire SD
vierge (formatée) SD ou un péri-
phérique de stockage USB à votre
ordinateur, puis localisez le fichier
de mise à jour correct et copiez-le
sur la carte mémoire SD ou le péri-
phérique de stockage USB.
3 Désactivez la source.
Pour en savoir plus, reportez-vous à la
page 14, Mise hors tension de la source
AV.
4 Appuyez sur le bouton HOME pour
afficher l’écran de Menu principal.
5 Touchez les touches suivantes
dans l’ordre indiqué.
L’écran “Système” apparaît.
6 Touchez [Info sur le système].
7 Touchez [Mise à jour microlog.].
L’écran “Mise à jour microlog.” apparaît.
8 Touchez [Continuer] pour afficher
le mode de transfert de données.
p Suivez les instructions à l’écran pour
terminer la mise à jour du micrologiciel.
p Ce produit est automatiquement réinitia-
lisé une fois la mise à jour du micrologi-
ciel terminée avec succès.
p Au démarrage de la mise à jour du micro-
logiciel, la source est désactivée et la
connexion Bluetooth est arrêtée.
p Si un message d’erreur apparaît à l’écran,
touchez [Continuer] pour continuer et
lancer la séquence de récupération.
Vérication des raccorde-
ments des câbles
Vérifiez que les câbles sont correctement
raccordés entre ce produit et le véhicule.
Vérifiez également s’ils sont raccordés dans
la bonne position.
1 Appuyez sur le bouton HOME pour
afficher l’écran de Menu principal.
2 Touchez les touches suivantes
dans l’ordre indiqué.
L’écran “Système” apparaît.
Français
24
Chapitre
67
Fr
3 Touchez [Info sur le système].
4 Touchez [État de la connexion].
L’écran “Installation” apparaît.
Illumination
Lorsque les phares ou les codes du
véhicule sont allumés, “Marche” s’af-
fiche. Lorsque les codes du véhicule
sont éteints, “Arrêt” s’affiche. (Si le fil
orange/blanc n’est pas branché, “Arrêt”
apparaît.)
iDataLink
Quand l’adaptateur iDataLink en option
est connecté et que la version du pro-
tocole correspond, “OK” s’affiche. Si la
version ne correspond pas, “Non prise
en charge” s’affiche. Si l’adaptateur
iDataLink en option n’est pas connecté,
“Incorrect” s’affiche.
Réglages sonores
Réglage de l’équilibre
avant-arrière et droite-gauche
Vous pouvez régler l’équilibre avant-arrière
et droite-gauche de manière à optimiser
l’écoute, quel que soit le siège occupé.
p Cette fonction est disponible uniquement
lorsque l’audio principal est disponible.
p Cette fonction est disponible uniquement
lorsque “Haut-parleur arrière” est réglé
sur “Marche”.
Pour en savoir plus, reportez-vous à la
page 68, Réglage de la sortie du haut-
parleur avant et arrière.
1 Appuyez sur le bouton HOME pour
afficher l’écran de Menu principal.
2 Touchez les touches suivantes
dans l’ordre indiqué.
L’écran “Audio” apparaît.
3 Touchez [Équilibreur/balance].
L’écran “Équilibreur/balance” apparaît.
4 Touchez les touches suivantes pour
régler l’équilibre des haut-parleurs
avant/arrière.
Se déplace vers l’avant.
Se déplace vers l’arrière.
Chaque fois que vous touchez les touches,
l’équilibre des haut-parleurs avant/arrière se
déplace vers l’avant ou l’arrière.
p “Avant25” à “Ar.25” s’affiche lorsque
l’équilibre des haut-parleurs avant/arrière
se déplace de l’avant vers l’arrière.
p Le réglage par défaut est “Av/Ar 0 G/D
0”.
p Réglez “Avant” et “Ar.” sur “0” lors
de l’utilisation d’un système à double
haut-parleur.
5 Touchez les touches suivantes pour
régler l’équilibre des haut-parleurs
gauche/droite.
Se déplace vers la gauche.
Se déplace vers la droite.
Chaque fois que vous touchez les touches,
l’équilibre des haut-parleurs gauche/droite
se déplace vers la gauche ou la droite.
p “G25” à “D25” s’affiche lorsque l’équi-
libre des haut-parleurs gauche/droite se
déplace de la gauche vers la droite.
p Le réglage par défaut est “G/D 0”.
p Vous pouvez également régler l’équilibre
avant-arrière et gauche-droite en faisant
glisser le point sur le tableau affiché.
Réglage de l’équilibre sonore
Vous pouvez régler l’équilibre entre la sortie
sonore droite/gauche.
p Cette fonction est disponible uniquement
lorsque l’audio principal est disponible.
p Cette fonction est disponible uniquement
lorsque “Haut-parleur arrière” est réglé
sur “Arrêt”.
Pour en savoir plus, reportez-vous à la
page 68, Réglage de la sortie du haut-
parleur avant et arrière.
1 Appuyez sur le bouton HOME pour
afficher l’écran de Menu principal.
2 Touchez les touches suivantes
dans l’ordre indiqué.
L’écran “Audio” apparaît.
3 Touchez [Balance].
L’écran “Équilibreur/balance” apparaît.
4 Touchez les touches suivantes pour
régler l’équilibre des haut-parleurs
gauche/droite.
Se déplace vers la gauche.
Se déplace vers la droite.
Chaque fois que vous touchez les touches,
l’équilibre des haut-parleurs gauche/droite
se déplace vers la gauche ou la droite.
p “G25” à “D25” s’affiche lorsque l’équi-
libre des haut-parleurs gauche/droite se
déplace de la gauche vers la droite.
p Le réglage par défaut est “G/D 0”.
p Vous pouvez également régler l’équilibre
avant-arrière et gauche-droite en faisant
glisser le point sur le tableau affiché.
Basculement entre mise en
sourdine et atténuation du
son
Le son émis par ce système est automati-
quement coupé ou atténué lorsqu’un signal
en provenance d’un équipement possédant
la fonction silencieux est reçu.
1 Appuyez sur le bouton HOME pour
afficher l’écran de Menu principal.
2 Touchez les touches suivantes
dans l’ordre indiqué.
L’écran “Audio” apparaît.
3 Touchez [Niveau d’atténuation].
Le menu contextuel apparaît.
4 Touchez l’élément que vous sou-
haitez régler.
ATT (par défaut) :
Le volume est ramené à 1/10e.
Sourdine :
Le volume est ramené à 0.
Arrêt :
Le volume ne change pas.
Ajustement des niveaux des
sources
La fonction SLA (réglage du niveau de la
source) règle le niveau du volume sonore de
chaque source pour éviter les fortes varia-
tions d’amplitude sonore en passant d’une
source à l’autre.
p Cette fonction est disponible uniquement
lorsque l’audio principal est disponible.
p Les réglages sont basés sur le niveau
du volume du syntoniseur FM qui, lui,
demeure inchangé.
p Cette fonction n’est pas disponible
lorsque le syntoniseur FM est sélectionné
comme source AV.
1 Comparez le niveau du volume du
syntoniseur FM au niveau de la
source que vous souhaitez ajuster.
2 Appuyez sur le bouton HOME pour
afficher l’écran de Menu principal.
3 Touchez les touches suivantes
dans l’ordre indiqué.

24
Chapitre
68
Fr
L’écran “Audio” apparaît.
4 Touchez [Régl. niv. source].
L’écran “Régl. niv. source” apparaît.
5 Touchez les touches suivantes pour
ajuster le volume de la source.
Augmente le volume de la
source.
Diminue le volume de la source.
p Si vous touchez directement la zone dans
laquelle le curseur peut être déplacé, le
réglage SLA prend la valeur du point
touché.
p “+4” à “–4” s’affiche à mesure que le
volume sonore augmente ou diminue.
p Le réglage par défaut est “0”.
Les sources AV suivantes sont réglées automatiquement au même volume sonore.
Câble néces-
saire (vendu
séparément)
Config. tél. intelligent
Sources AV
Appareil Connexion
iPod / iPhone
avec connecteur
à 30 broches
CD-IU201V iPhone/iPod USB
USB1
iPod1
aha
Pandora
CD-IU201S iPhone/iPod USB
USB1
aha
Pandora
iPod1
AppRadio
Mode
iPod / iPhone
avec connecteur
Lightning
CD-IH202
CD-IU52
Adaptateur
Lightning AV
numérique
iPhone/iPod Adapt. AV num.
aha
Pandora
AppRadio
Mode
HDMI
CD-IU52 iPhone/iPod USB
iPod1
aha
Pandora
Appareil Android
CD-MU200 Autres USB
Android Auto
MirrorLink
CD-AH200 Autres HDMI
aha
Pandora
AppRadio
Mode
HDMI
p Lorsqu’un périphérique de stockage USB
est connecté au port USB 1 ou au port
USB 2, le volume de réglage du niveau de
la source est automatiquement défini sur
le même niveau que celui du port USB
auquel le périphérique est connecté. Le
volume de réglage du niveau de la source
qui est automatiquement défini varie
selon que le périphérique est connecté au
port USB 1 ou au port USB 2.
p Lorsqu’un iPod / iPhone avec connecteur
Lightning est connecté au port USB 1
ou au port USB 2 à l’aide d’un câble
d’interface USB pour iPod / iPhone
(CD-IU52) (vendu séparément), le volume
de réglage du niveau de la source est
automatiquement défini sur le même
niveau que celui du port USB auquel
l’iPod / iPhone avec connecteur Lightning
est connecté. Le volume de réglage du
niveau de la source qui est automati-
quement défini varie selon que l’iPod /
iPhone avec connecteur Lightning est
connecté au port USB 1 ou au port USB
2.
p Lorsqu’un appareil compatible avec
Android Auto ou un appareil MirrorLink
est connecté au port USB 2, le volume de
réglage du niveau de la source est auto-
matiquement défini sur le même niveau
que celui du port USB 2.
Réglage du ltre
Les réglages suivants peuvent être effectués
pendant le réglage du filtre. Apportez les
réglages appropriés pour la bande de fré-
quence reproduite et les caractéristiques du
haut-parleur connecté.
20 1 k
0
10 k
Fréquence (Hz)
3
4
2
Niveau (dB)
100
1
1 Bande de fréquence reproduite
2 Réglage de la pente
3 Fréquence de coupure du LPF
4 Fréquence de coupure du HPF
■ Réglage de la sortie du haut-
parleur avant et arrière
Vous pouvez régler la plage de fréquence
de la sortie sonore des haut-parleurs avant
et arrière.
p Cette fonction est disponible uniquement
lorsque l’audio principal est disponible.
1 Appuyez sur le bouton HOME pour
afficher l’écran de Menu principal.
2 Touchez les touches suivantes
dans l’ordre indiqué.
L’écran “Audio” apparaît.
3 Vérifiez que “Haut-parleur arrière”
est réglé sur “Marche”.
p Le réglage par défaut est “Marche”.
4 Touchez [Répartition].
L’écran “Seuil” apparaît.
Français
24
Chapitre
69
Fr
5 Touchez les touches suivantes pour
sélectionner “Avant” ou “Ar.”.
Sélectionne le haut-parleur
précédent réglable.
Sélectionne le haut-parleur
suivant réglable.
6 Touchez [HPF] pour activer.
7 Faites glisser le graphique horizon-
talement pour régler la plage de
fréquence de coupure entre “50” Hz
et “200” Hz.
p Le réglage par défaut est “100” Hz.
8 Faites glisser l’extrémité de
la pente pour régler la plage
du niveau entre “–6” dB/oct et
“–18” dB/oct.
p Le réglage par défaut est “–12” dB/oct.
■ Utilisation de la sortie pour
haut-parleur d’extrêmes graves
Ce produit est équipé d’une sortie du haut-
parleur d’extrêmes qui peut être mise en ou
hors service.
p Cette fonction est disponible uniquement
lorsque l’audio principal est disponible.
1 Appuyez sur le bouton HOME pour
afficher l’écran de Menu principal.
2 Touchez les touches suivantes
dans l’ordre indiqué.
L’écran “Audio” apparaît.
3 Touchez [Caisson de basse] pour
régler la sortie du haut-parleur
d’extrêmes sur “Marche”.
p Le réglage par défaut est “Arrêt”.
4 Touchez [Paramètres du caisson de
basse].
L’écran “Seuil” apparaît.
5 Touchez les touches suivantes pour
sélectionner “Caisson basse”.
Sélectionne le haut-parleur
précédent réglable.
Sélectionne le haut-parleur
suivant réglable.
6 Touchez [LPF] pour activer.
7 Touchez les touches suivantes pour
sélectionner la phase de la sortie
du haut-parleur d’extrêmes.
Règle la sortie du haut-parleur
d’extrêmes sur normal.
Inverse la sortie du haut-parleur
d’extrêmes.
8 Faites glisser le graphique horizon-
talement pour régler la plage de
fréquence de coupure entre “50” Hz
et “200” Hz.
p Le réglage par défaut est “100” Hz.
9 Faites glisser l’extrémité de
la pente pour régler la plage
du niveau entre “–6” dB/oct et
“–18” dB/oct.
p Le réglage par défaut est “–18” dB/oct.
Sélection de la position
d’écoute
Vous pouvez sélectionner la position
d’écoute souhaitée comme centre des effets
sonores.
p Cette fonction est disponible uniquement
lorsque l’audio principal est disponible.
1 Appuyez sur le bouton HOME pour
afficher l’écran de Menu principal.
2 Touchez les touches suivantes
dans l’ordre indiqué.
L’écran “Audio” apparaît.
3 Touchez [Position d’écoute].
L’écran “Position d’écoute” apparaît.
4 Touchez la position souhaitée.
Arrêt (par défaut) :
Désactive le réglage de la position
d’écoute.
Avant :
Bascule le réglage de la position d’écoute
sur l’avant.
Avant-G :
Bascule le réglage de la position d’écoute
sur l’avant gauche.
Avant-D :
Bascule le réglage de la position d’écoute
sur l’avant droite.
Tous :
Bascule le réglage de la position d’écoute
sur tous.
Réglage précis des niveaux de
sortie du haut-parleur
Des réglages précis du niveau de sortie du
haut-parleur sont possibles en écoutant la
sortie audio.
p Cette fonction est disponible uniquement
lorsque l’audio principal est disponible.
p Cette fonction est disponible uniquement
lorsque “Haut-parleur arrière” est réglé
sur “Marche”.
Pour en savoir plus, reportez-vous à la
page 68, Réglage de la sortie du haut-
parleur avant et arrière.
p Cette fonction est disponible uniquement
lorsque “Caisson de basse” est réglé sur
“Marche”.
Pour en savoir plus, reportez-vous à la
page 69, Utilisation de la sortie pour
haut-parleur d’extrêmes graves.
1 Appuyez sur le bouton HOME pour
afficher l’écran de Menu principal.
2 Touchez les touches suivantes
dans l’ordre indiqué.
L’écran “Audio” apparaît.
3 Touchez [Niveau du haut-parleur].
L’écran “Niveau du haut-parleur” apparaît.
4 Touchez les touches suivantes pour
sélectionner la position d’écoute si
nécessaire.
Sélectionne la position d’écoute.
Arrêt :
Désactive le réglage de la position
d’écoute.
Av. à G :
Bascule le réglage de la position d’écoute
sur l’avant gauche.
Av. à D :
Bascule le réglage de la position d’écoute
sur l’avant droite.
Avant :
Bascule le réglage de la position d’écoute
sur l’avant.
Tous :
Bascule le réglage de la position d’écoute
sur tous.
p Si vous modifiez le réglage de la position
d’écoute, les niveaux de sortie de tous
les haut-parleurs change en fonction du
réglage sélectionné.

24
Chapitre
70
Fr
5 Touchez les touches suivantes
pour ajuster le niveau de sortie du
haut-parleur.
Diminue le niveau du
haut-parleur.
Augmente le niveau du
haut-parleur.
p “–24” dB à “10” dB s’affiche à mesure
que la distance à corriger augmente ou
diminue.
Av. à G :
Bascule le niveau du haut-parleur sur le
haut-parleur avant gauche.
Av. à D :
Bascule le niveau du haut-parleur sur le
haut-parleur avant droite.
Ar. à G :
Bascule le niveau du haut-parleur sur le
haut-parleur arrière gauche.
Ar. à D :
Bascule le niveau du haut-parleur sur le
haut-parleur arrière droite.
Caisson basse :
Bascule le niveau du haut-parleur sur le
haut-parleur d’extrêmes graves.
Si vous touchez [Appl. autoEQ], le
résultat de “Mesure EQ et IR auto”
sera appliqué au réglage de niveau du
haut-parleur.
p Pour utiliser cette fonction, l’acous-
tique du véhicule doit être mesurée au
préalable.
Réglage de l’alignement
temporel
En réglant la distance entre chaque haut-
parleur et la position d’écoute, l’alignement
temporel permet de corriger la durée
nécessaire au son pour parvenir à la position
d’écoute.
p Cette fonction est disponible uniquement
lorsque l’audio principal est disponible.
p Cette fonction est disponible uniquement
lorsque “Haut-parleur arrière” est réglé
sur “Marche”.
Pour en savoir plus, reportez-vous à la
page 68, Réglage de la sortie du haut-
parleur avant et arrière.
p Cette fonction est disponible uniquement
lorsque “Caisson de basse” est réglé sur
“Marche”.
Pour en savoir plus, reportez-vous à la
page 69, Utilisation de la sortie pour
haut-parleur d’extrêmes graves.
p Cette fonction n’est disponible que
lorsque la position d’écoute est réglée sur
“Av. à G” ou “Av. à D”.
Pour en savoir plus, reportez-vous à
la page 69, Sélection de la position
d’écoute.
1 Mesurez la distance entre la tête de
la personne qui écoute et chaque
haut-parleur.
2 Appuyez sur le bouton HOME pour
afficher l’écran de Menu principal.
3 Touchez les touches suivantes
dans l’ordre indiqué.
L’écran “Audio” apparaît.
4 Touchez [Alignement temps].
L’écran “Alignement temps” apparaît.
5 Touchez les touches suivantes pour
sélectionner la position d’écoute si
nécessaire.
Sélectionne la position d’écoute.
Arrêt :
Désactive le réglage de la position
d’écoute.
Av. à G :
Bascule le réglage de la position d’écoute
sur l’avant gauche.
Av. à D :
Bascule le réglage de la position d’écoute
sur l’avant droite.
Avant :
Bascule le réglage de la position d’écoute
sur l’avant.
Tous :
Bascule le réglage de la position d’écoute
sur tous.
p Si vous modifiez le réglage de la position
d’écoute, les niveaux de sortie de tous
les haut-parleurs change en fonction du
réglage sélectionné.
6 Touchez les touches suivantes pour
entrer la distance entre le haut-
parleur sélectionné et la position
d’écoute.
Diminue la distance entre le
haut-parleur sélectionné et la
position d’écoute sélectionnée.
Augmente la distance entre le
haut-parleur sélectionné et la
position d’écoute sélectionnée.
p “0.0” pouces à “200.0” pouces s’affiche à
mesure que la distance à corriger aug-
mente ou diminue.
Av. à G :
Change la distance entre le haut-parleur
avant gauche et la position d’écoute
sélectionnée.
Av. à D :
Change la distance entre le haut-parleur
avant droite et la position d’écoute
sélectionnée.
Ar. à G :
Change la distance entre le haut-parleur
arrière gauche et la position d’écoute
sélectionnée.
Ar. à D :
Change la distance entre le haut-parleur
arrière droite et la position d’écoute
sélectionnée.
Caisson basse :
Change la distance entre le haut-parleur
d’extrêmes graves et la position d’écoute
sélectionnée.
Si vous touchez [IR arrêt], l’alignement
temporel est désactivé.
Si vous touchez [Appl. autoEQ], le
résultat de “Mesure EQ et IR auto”
s’applique au réglage de l’alignement
temporel.
p Pour utiliser cette fonction, l’acous-
tique du véhicule doit être mesurée au
préalable.
Utilisation de l’égaliseur
L’égaliseur vous permet de régler l’égalisa-
tion de façon à correspondre aux caractéris-
tiques acoustiques intérieures du véhicule
si souhaité.
■ Rappel des courbes
d’égalisation
Sept courbes d’égalisation sont enregis-
trées, que vous pouvez aisément rappeler à
tout moment. Ci-après, la liste des courbes
d’égalisation :
Courbe d’égalisation
Basse est une courbe qui amplifie les sons
graves uniquement.
Puiss. est une courbe qui amplifie à la fois
les sons graves et aigus.
Naturel est une courbe qui amplifie légère-
ment à la fois les sons graves et aigus.
Vocal est une courbe qui amplifie les sons
médiums, c’est-à-dire de production vocale.
Plat est une courbe plate sans
amplification.
Perso1 est une courbe d’égalisation
personnalisée. Si vous sélectionnez cette
courbe, elle se répercutera sur toutes les
sources AV.
Perso2 est une courbe d’égalisation
personnalisée. Si vous sélectionnez cette
courbe, elle se répercutera sur toutes les
sources AV.
p Cette fonction est disponible uniquement
lorsque l’audio principal est disponible.
p Le réglage par défaut est “Puiss.”.
p Avec “Plat” sélectionné, aucun ajout
ou correction n’est apporté au son. Ceci
se révèle pratique pour vérifier l’effet
des courbes d’égalisation en alternant
Français
24
Chapitre
71
Fr
entre “Plat” et une courbe d’égalisation
prédéfinie.
1 Appuyez sur le bouton HOME pour
afficher l’écran de Menu principal.
2 Touchez les touches suivantes
dans l’ordre indiqué.
L’écran “Audio” apparaît.
3 Touchez [EQ graphique].
L’écran “EQ graphique” apparaît.
4 Touchez l’égaliseur souhaité.
■ Personnalisation des courbes
d’égalisation
Vous pouvez régler la courbe d’égalisation
sélectionnée comme vous le souhaitez. Les
réglages peuvent être effectués avec un
égaliseur graphique à 13 bandes.
p Cette fonction est disponible uniquement
lorsque l’audio principal est disponible.
p Si vous procédez à des réglages lors-
qu’une courbe “Basse”, “Puiss.”,
“Naturel”, “Vocal” ou “Plat” est sélec-
tionnée, les réglages de la courbe d’éga-
lisation deviennent automatiquement
“Perso1”.
p Si vous procédez à des réglages lors-
qu’une courbe “Perso2” est sélectionnée
par exemple, la courbe “Perso2” est mise
à jour.
p Des courbes “Perso1” et “Perso2”
peuvent être créées pour être communes
à toutes les sources.
1 Appuyez sur le bouton HOME pour
afficher l’écran de Menu principal.
2 Touchez les touches suivantes
dans l’ordre indiqué.
L’écran “Audio” apparaît.
3 Touchez [EQ graphique].
L’écran “EQ graphique” apparaît.
4 Touchez l’une des touches pour
sélectionner la courbe que vous
souhaitez utiliser comme base de
votre personnalisation.
5 Touchez la fréquence dont vous
souhaitez régler le niveau.
p Si vous glissez un doigt sur les barres
de plusieurs bandes d’égalisation, les
réglages de la courbe d’égalisation
prennent la valeur du point touché sur
chaque barre.
■ Utilisation de l’égaliseur
autoajusté
Vous pouvez régler l’égaliseur autoajusté en
fonction de l’acoustique de votre véhicule.
Pour utiliser cette fonction, l’acoustique du
véhicule doit avoir été mesurée au préalable.
Pour en savoir plus sur les opérations,
reportez-vous à la page 71, Réglage
automatique de la courbe d’égalisation
(Auto EQ).
p Pour régler manuellement la courbe
d’égalisation, réglez “EQ et IR auto” sur
“Arrêt”.
1 Appuyez sur le bouton HOME pour
afficher l’écran de Menu principal.
2 Touchez les touches suivantes
dans l’ordre indiqué.
L’écran “Audio” apparaît.
3 Touchez à plusieurs reprises [EQ et
IR auto] jusqu’à ce que le réglage
souhaité apparaisse.
Arrêt (par défaut) :
Désactive le réglage Auto EQ&TA.
Marche :
Active le réglage Auto EQ&TA.
Réglage automatique de la
courbe d’égalisation (Auto
EQ)
En mesurant l’acoustique du véhicule,
la courbe d’égalisation peut être réglée
automatiquement en fonction de l’intérieur
du véhicule.
AVERTISSEMENT
Un son grave (bruit) peut être émis des haut-
parleurs lors de la mesure de l’acoustique
du véhicule. Ne réalisez jamais la mesure
Auto EQ en conduisant.
ATTENTION
Vérifiez bien les conditions avant de
réaliser le réglage Auto EQ, car les haut-
parleurs peuvent être endommagés s’il
est réalisé dans les conditions suivantes
:
— Quand les haut-parleurs ne sont pas
connectés correctement. (Par exemple,
quand un haut-parleur arrière est
connecté à la sortie du haut-parleur
d’extrêmes graves.)
— Quand un haut-parleur est connecté à
un amplificateur de puissance délivrant
une puissance de sortie supérieure à
la capacité de puissance d’entrée du
haut-parleur.
Si un microphone pour la mesure acous-
tique (vendu séparément) n’est pas placé
dans un endroit approprié, la tonalité de
mesure peut devenir forte et la mesure
peut prendre du temps, entraîner une
décharge de la batterie. Assurez-vous de
placer le microphone à l’endroit spécifié.
■ Avant d’utiliser la fonction Auto
EQ
Réalisez la fonction Auto EQ dans un
endroit aussi calme que possible, avec
le moteur du véhicule et la climatisation
arrêtés. Coupez aussi l’alimentation des
téléphones automobiles ou des télé-
phones portables, ou retirez-les du véhi-
cule avant de réaliser la fonction Auto EQ.
D’autres sons que la tonalité de mesure
(bruits environnants, bruits du moteur,
sonnerie de téléphone, etc.) peuvent
empêcher de mesurer correctement
l’acoustique du véhicule.
Assurez-vous de réaliser la fonction Auto
EQ en utilisant le microphone pour la
mesure acoustique (vendu séparément).
Utiliser un autre microphone peut empê-
cher la mesure, ou entraîner une mesure
incorrecte de l’acoustique du véhicule.
Pour réaliser la fonction Auto EQ,
les haut-parleurs avant doivent être
connectés.
Lorsque ce produit est connecté à un
amplificateur de puissance avec com-
mande du niveau d’entrée, la fonction
Auto EQ peut être incapable de fonction-
ner si le niveau d’entrée de l’amplificateur
est réglé en dessous du niveau standard.
Lorsque ce produit est connecté à un
amplificateur de puissance avec filtre
passe-bas (LPF), désactivez le filtre avant
de réaliser la fonction Auto EQ. De plus,
réglez la fréquence de coupure du filtre
passe-bas intégré d’un haut-parleur
d’extrêmes graves actif sur la plus haute
fréquence possible.
La distance a été calculée par un ordi-
nateur afin d’offrir le délai optimum et
assurer des résultats précis. Ne changez
pas cette valeur.
— Le son réfléchi dans le véhicule est impor-
tant et des retards se produisent.
— Le filtre passe-bas sur des haut-parleurs
d’extrêmes graves actifs ou des amplifica-
teurs extérieurs retarde les sons graves.
Si une erreur se produit pendant la
mesure, un message apparaît et la
mesure est annulée. Vérifiez ce qui
suit avant de mesurer l’acoustique du
véhicule.
— Haut-parleurs avant (gauche/droite)
— Haut-parleurs arrière (gauche/droite)
— Bruit
— Microphone pour la mesure acoustique
(vendu séparément)
— Batterie faible
■ Réalisation de la fonction Auto
EQ
p Auto EQ change les réglages audio
comme suit :
— “EQ et IR auto” est réglé sur “Marche”.
Pour en savoir plus, reportez-vous à la
page 71, Utilisation de l’égaliseur
autoajusté.
— Les réglages de l’équilibre avant-arrière/
droite-gauche retournent à la position
centrale.
Pour en savoir plus, reportez-vous à la
page 67, Réglage de l’équilibre sonore.

25
Chapitre
72
Fr
— La courbe d’égalisation passe à “Plat”.
Pour en savoir plus, reportez-vous à la
page 70, Utilisation de l’égaliseur.
— Les haut-parleurs avant et arrière sont
réglés automatiquement sur un réglage
de filtre passe-haut.
p Les réglages précédents pour Auto EQ
sont remplacés.
p N’appuyez pas sur le bouton pour
ouvrir ou fermer le panneau lorsque vous
utilisez le microphone.
ATTENTION
Ne coupez pas le moteur pendant que la
mesure est en cours.
1 Arrêtez le véhicule dans un endroit
calme, fermez toutes les portes, les
vitres et le toit ouvrant, puis coupez
le moteur.
Si le moteur est laissé en marche, le bruit du
moteur peut empêcher la mesure directe de
la fonction Auto EQ.
p Si des restrictions de conduite sont
détectées pendant la mesure, la mesure
est annulée.
2 Fixez le microphone pour la mesure
acoustique (vendu séparément) au
centre de l’appuie-tête du conduc-
teur, en le dirigeant vers l’avant.
La mesure Auto EQ peut différer en fonction
de l’emplacement du microphone. Si vous
préférez, vous pouvez placer le microphone
au niveau du siège passager et réaliser la
fonction Auto EQ.
3 Débranchez l’iPhone ou le
smartphone.
4 Allumez le contact (ACC ON).
Si la climatisation ou le chauffage est activé,
désactivez-le. Le bruit provenant du ventila-
teur de la climatisation ou du chauffage peut
empêcher une mesure correcte Auto EQ.
5 Basculez la source AV sur “OFF”.
Pour en savoir plus sur les opérations,
reportez-vous à la page 13, Affichage
de l’écran de fonction AV.
6 Appuyez sur le bouton HOME pour
afficher l’écran de Menu principal.
7 Touchez les touches suivantes
dans l’ordre indiqué.
L’écran “Audio” apparaît.
8 Touchez [Mesure EQ et IR auto].
L’écran “Mesure EQ et IR auto” apparaît.
9 Connectez le microphone de
mesure acoustique (vendu séparé-
ment) à ce produit.
Branchez le microphone dans la prise d’en-
trée du microphone de ce produit.
10 Touchez [Av. à G] ou [Av. à D] pour
sélectionner la position d’écoute
actuelle.
11 Touchez [Marche].
Un compte à rebours de 10 secondes
démarre.
p La connexion Bluetooth est déconnectée
avant de démarrer le processus.
12 Sortez du véhicule et laissez les
portières fermées jusqu’à ce que le
compte à rebours soit terminé.
Lorsque le compte à rebours est terminé,
une tonalité (bruit) de mesure est émise
par les haut-parleurs et la mesure Auto EQ
démarre.
13 Attendez que la mesure soit
terminée.
Quand la mesure Auto EQ est terminée,
un message est affiché, indiquant que la
mesure est terminée.
p Si l’acoustique du véhicule ne peut pas
être mesurée correctement, un message
d’erreur est affiché.
p La durée de la mesure varie en fonction
du type de véhicule.
p Pour arrêter la mesure, touchez [Arrêt].
14 Rangez le microphone avec précau-
tion dans la boîte à gants ou dans
un autre endroit sûr.
Si le microphone est exposé à la lumière
directe du soleil pendant une période prolon-
gée, la température élevée peut causer une
déformation, un changement de couleur ou
un mauvais fonctionnement.
Menu du Thème
Sélection d’un afchage
d’arrière-plan
L’affichage d’arrière-plan peut être sélec-
tionné parmi 8 affichages prédéfinis pour
l’écran de Fonction AV et parmi 5 affichages
prédéfinis pour l’écran de Menu principal.
Vous pouvez également remplacer l’affi-
chage d’arrière-plan par d’autres images
importées d’un périphérique de stockage
externe (USB, SD).
1 Appuyez sur le bouton HOME pour
afficher l’écran de Menu principal.
2 Touchez les touches suivantes
dans l’ordre indiqué.
L’écran “Thème” apparaît.
3 Touchez [Arrière-plan].
p Vous pouvez également changer l’écran
des réglages en touchant [Éclairement],
[Thème] ou [Horloge] sur cet écran.
4 Touchez [Départ] ou [AV] pour
changer d’écran.
p Le contenu du réglage peut être mémo-
risé séparément pour l’écran de Fonction
AV et l’écran de Menu principal.
5 Touchez l’élément que vous sou-
haitez régler.
Affichages prédéfinis :
Sélectionne l’affichage d’arrière-plan
prédéfini de votre choix.
(personnalisé) :
Affiche l’image d’arrière-plan importée du
périphérique de stockage externe (USB,
SD).
Pour en savoir plus, reportez-vous à la
page 72, Remplacement par l’image
d’arrière-plan enregistrée sur le périphé-
rique de stockage externe (USB, SD).
(désactivé) :
Masque l’affichage d’arrière-plan.
■ Remplacement par l’image
d’arrière-plan enregistrée sur
le périphérique de stockage
externe (USB, SD)
Vous pouvez remplacer l’image d’ar-
rière-plan par une image importée du péri-
phérique de stockage externe (USB, SD).
p L’image d’arrière-plan doivent être utilisée
dans les formats suivants.
— Fichiers d’images JPEG (.jpg ou .jpeg)
— La taille autorisée des données est de
10 Mo ou moins
— La taille d’image autorisée est de 4 000
pixels × 4 000 pixels ou moins
ATTENTION
Ne coupez pas le moteur lors de l’importa-
tion d’une image du périphérique de stoc-
kage externe (USB, SD).
1 Appuyez sur le bouton HOME pour
afficher l’écran de Menu principal.
2 Touchez les touches suivantes
dans l’ordre indiqué.
L’écran “Thème” apparaît.
3 Touchez [Arrière-plan].
p Vous pouvez également changer l’écran
des réglages en touchant [Éclairement],
[Thème] ou [Horloge] sur cet écran.
4 Touchez la touche suivante.
Affiche la liste des images
d’arrière-plan enregistrées sur
le périphérique de stockage
externe (USB, SD).
5 Touchez le périphérique de stoc-
kage externe (USB, SD) souhaité.
6 Touchez l’image à utiliser comme
affichage d’arrière-plan dans la
liste.
L’image est définie en tant qu’affichage
d’arrière-plan.
Français
25
Chapitre
73
Fr
p Vous pouvez supprimer l’image impor-
tée et rétablir le réglage par défaut de
l’affichage d’arrière-plan en maintenant
enfoncée la touche personnalisée.
Réglage de la couleur
d’éclairage
La couleur d’éclairage peut être sélection-
née parmi 5 couleurs différentes. De plus,
l’éclairage peut être permuté entre ces 5
couleurs en séquence.
■ Sélection de la couleur parmi les
couleurs prédénies
Vous pouvez sélectionner une couleur
d’éclairage dans la liste des couleurs.
1 Appuyez sur le bouton HOME pour
afficher l’écran de Menu principal.
2 Touchez les touches suivantes
dans l’ordre indiqué.
L’écran “Thème” apparaît.
3 Touchez [Éclairement].
p Vous pouvez également changer l’écran
des réglages en touchant [Thème],
[Arrière-plan] ou [Horloge] sur cet
écran.
4 Touchez la couleur souhaitée.
Touches de couleur :
Pour sélectionner la couleur prédéfinie de
votre choix.
(personnalisé) :
Affiche l’écran de personnalisation de la
couleur d’éclairage.
Pour en savoir plus, reportez-vous à la
page 73, Création d’une couleur définie
par l’utilisateur.
(arc-en-ciel) :
Change de couleur selon les gradations
de l’arc-en-ciel.
p Vous pouvez prévisualiser l’écran de
Menu principal ou l’écran de Fonction
AV en touchant [Départ] ou [AV],
respectivement.
■ Création d’une couleur dénie
par l’utilisateur
Vous pouvez créer une couleur définie par
l’utilisateur. La couleur créée est enregistrée,
et vous pouvez la sélectionner lors du pro-
chain réglage de la couleur d’éclairage.
1 Appuyez sur le bouton HOME pour
afficher l’écran de Menu principal.
2 Touchez les touches suivantes
dans l’ordre indiqué.
L’écran “Thème” apparaît.
3 Touchez [Éclairement].
p Vous pouvez également changer l’écran
des réglages en touchant [Thème],
[Arrière-plan] ou [Horloge] sur cet
écran.
4 Touchez la touche suivante.
Affiche l’écran de création d’une
couleur définie par l’utilisateur
et de son enregistrement dans
la mémoire.
5 Touchez les touches suivantes.
Réglez la luminosité et le niveau
de rouge, vert et bleu afin de
créer une couleur préférée.
p Vous pouvez également ajuster la tonalité
de couleur en faisant glisser la barre des
couleurs.
6 Maintenez enfoncé [Mémo] pour
enregistrer la couleur personnali-
sée dans la mémoire.
La couleur personnalisée est enregistrée
dans la mémoire.
La couleur définie est rappelée de la
mémoire lorsque vous touchez ultérieure-
ment sur la même touche.
Sélection de la couleur de
thème
Une couleur de thème peut être sélection-
née parmi 5 couleurs.
1 Appuyez sur le bouton HOME pour
afficher l’écran de Menu principal.
2 Touchez les touches suivantes
dans l’ordre indiqué.
L’écran “Thème” apparaît.
3 Touchez [Thème].
p Vous pouvez également changer l’écran
des réglages en touchant [Éclairement],
[Arrière-plan] ou [Horloge] sur cet
écran.
4 Touchez la couleur souhaitée.
p Vous pouvez prévisualiser l’écran de
Menu principal ou l’écran de Fonction
AV en touchant [Départ] ou [AV],
respectivement.
Sélection de l’image
d’horloge
L’horloge de l’écran de Fonction AV et de
l’écran de Menu principal peut être sélec-
tionnée parmi 3 images.
1 Appuyez sur le bouton HOME pour
afficher l’écran de Menu principal.
2 Touchez les touches suivantes
dans l’ordre indiqué.
L’écran “Thème” apparaît.
3 Touchez [Horloge].
p Vous pouvez également changer l’écran
des réglages en touchant [Éclairement],
[Thème] ou [Arrière-plan] sur cet écran.
4 Touchez l’élément que vous sou-
haitez régler.
Images prédéfinies :
Sélectionne l’image d’horloge prédéfinie
de votre choix.
(désactivé) :
Masque l’affichage d’horloge.
p Vous pouvez prévisualiser l’écran de
Menu principal ou l’écran de Fonction
AV en touchant [Départ] ou [AV],
respectivement.
Modication de l’écran de
démarrage préinstallé
Vous pouvez utiliser d’autres images pré-
installées dans le produit pour l’écran de
démarrage.
1 Appuyez sur le bouton HOME pour
afficher l’écran de Menu principal.
2 Touchez les touches suivantes
dans l’ordre indiqué.
L’écran “Thème” apparaît.
3 Touchez [Écran de la page de
garde].
4 Touchez l’élément que vous sou-
haitez régler.
Images prédéfinies :
Sélectionne l’image d’écran de démar-
rage prédéfinie de votre choix.
(personnalisé) :
Affiche l’image d’écran de démarrage
importée du périphérique de stockage
externe (USB, SD).
Pour en savoir plus, reportez-vous à la
page 74, Remplacement par l’écran de
démarrage enregistré sur le périphérique
de stockage externe (USB, SD).
26
Chapitre
74
Fr
■ Remplacement par l’écran
de démarrage enregistré sur
le périphérique de stockage
externe (USB, SD)
Vous pouvez remplacer l’écran de démar-
rage par d’autres images importées du
périphérique de stockage externe (USB, SD).
ATTENTION
Ne coupez pas le moteur lors de l’importa-
tion d’une image du périphérique de stoc-
kage externe (USB, SD).
1 Appuyez sur le bouton HOME pour
afficher l’écran de Menu principal.
2 Touchez les touches suivantes
dans l’ordre indiqué.
L’écran “Thème” apparaît.
3 Touchez [Écran de la page de
garde].
4 Touchez la touche suivante.
Affiche la liste des écrans de
démarrage enregistrés sur
le périphérique de stockage
externe (USB, SD).
5 Touchez le périphérique de stoc-
kage externe (USB, SD) souhaité.
6 Touchez l’image à utiliser comme
écran de démarrage dans la liste.
L’image est définie en tant qu’écran de
démarrage.
p Vous pouvez supprimer l’image impor-
tée et rétablir le réglage par défaut sur
l’écran de démarrage en maintenant
enfoncée la touche personnalisée.
Duplication des réglages
■ Exportation des réglages
“Thème”
Vous pouvez exporter les réglages que vous
avez effectués sur l’écran “Thème” sur un
périphérique de stockage externe (USB,
SD). Ces réglages peuvent être exportés
séparément.
p Ce réglage est disponible uniquement
lorsque vous arrêtez votre véhicule dans
un endroit sûr et serrez le frein à main.
p Si plusieurs périphériques de stockage
externe sont connectés à ce produit,
l’ordre de priorité des cibles vers les-
quelles les réglages “Thème” sont expor-
tés est comme suit :
1 Carte mémoire SD
2 Périphérique de stockage USB connecté
au port USB 1
3 Périphérique de stockage USB connecté
au port USB 2
ATTENTION
Ne coupez pas le moteur lors de l’exporta-
tion des réglages.
1 Insérez la carte mémoire SD dans
la fente de carte SD ou branchez le
périphérique de stockage USB sur
le connecteur USB.
Pour en savoir plus, reportez-vous à la
page 12, Branchement d’un périphé-
rique de stockage USB.
Pour en savoir plus, reportez-vous à la
page 11, Insertion et éjection d’une
carte mémoire SD.
2 Appuyez sur le bouton HOME pour
afficher l’écran de Menu principal.
3 Touchez les touches suivantes
dans l’ordre indiqué.
L’écran “Thème” apparaît.
4 Touchez [Exporter].
L’écran “Export. paramètres” apparaît.
5 Touchez l’élément souhaité.
Éclairement :
Sélectionne le réglage de couleur
d’éclairage.
Écran de la page de garde :
Sélectionne le réglage d’écran de
démarrage.
Tt sélect. :
Sélectionne tous les réglages.
6 Touchez [Exporter].
L’exportation des données commence.
Une fois les données exportées, un message
de fin apparaît.
p La source est désactivée et la connexion
Bluetooth est déconnectée avant de
démarrer le processus.
■ Importation des réglages
“Thème”
Les réglages effectués sur l’écran “Thème”
et exportés sur un périphérique de stockage
externe (USB, SD) peuvent être importés.
p Ce réglage est disponible uniquement
lorsque vous arrêtez votre véhicule dans
un endroit sûr et serrez le frein à main.
p Si plusieurs périphériques de stockage
externe qui contiennent des données
disponibles sont connectés à ce produit,
l’ordre de priorité des cibles à partir
desquelles les réglages “Thème” sont
importés est comme suit :
1 Carte mémoire SD
2 Périphérique de stockage USB connecté
au port USB 1
3 Périphérique de stockage USB connecté
au port USB 2
ATTENTION
Ne coupez pas le moteur lors de l’impor-
tation des réglages.
Pour éviter toute perte de données et tout
dommage de la carte mémoire SD, ne
modifiez pas les données exportées sur
la carte mémoire SD.
1 Insérez la carte mémoire SD dans
la fente de carte SD ou branchez le
périphérique de stockage USB sur
le connecteur USB.
Pour en savoir plus, reportez-vous à la
page 12, Branchement d’un périphé-
rique de stockage USB.
Pour en savoir plus, reportez-vous à la
page 11, Insertion et éjection d’une
carte mémoire SD.
Un message confirmant l’importation des
données de réglage enregistrées s’affiche.
2 Touchez [Importer].
L’importation des données commence.
Une fois les données correctement impor-
tées, un message de fin d’importation
s’affiche.
p La source est désactivée et la connexion
Bluetooth est déconnectée avant de
démarrer le processus.
Conguration du lec-
teur vidéo
Réglage des langues
prioritaires
Vous pouvez régler la langue prioritaire pour
les sous-titres, la bande-son et le menu de la
lecture initiale. Si la langue sélectionnée est
enregistrée sur le disque, les sous-titres, la
bande son et le menu sont affichés ou émis
dans cette langue.
p Ce réglage est disponible uniquement
lorsque “Disc” est sélectionné comme
source.
■ Réglage de la langue des
sous-titres
Vous pouvez régler la langue des sous-
titres souhaitée. S’ils sont disponibles,
les sous-titres s’affichent dans la langue
sélectionnée.
1 Appuyez sur le bouton HOME pour
afficher l’écran de Menu principal.
2 Touchez les touches suivantes
dans l’ordre indiqué.
L’écran “Configuration vidéo” apparaît.
3 Touchez [Configuration DVD/
DivX].
4 Touchez [Langue de sous-titrage].
Le menu contextuel apparaît.
5 Touchez la langue désirée.
Lorsque vous sélectionnez “Autres”, un
écran de saisie du code de langue apparaît.
Saisissez le code à quatre chiffres de la
langue souhaitée, puis touchez .
La langue des sous-titres est réglée.
Français
26
Chapitre
75
Fr
p Si la langue sélectionnée n’est pas dispo-
nible, la langue spécifiée par défaut sur le
disque est émise et affichée.
p Vous pouvez changer la langue des sous-
titres en touchant la touche de change-
ment de langue des sous-titres pendant
la lecture.
p Le réglage effectué ici n’est pas affecté
même si vous changez la langue des
sous-titres pendant la lecture à l’aide de
la touche de changement de langue des
sous-titres.
■ Réglage de la langue de l’audio
Vous pouvez régler votre langue audio
préférée.
1 Appuyez sur le bouton HOME pour
afficher l’écran de Menu principal.
2 Touchez les touches suivantes
dans l’ordre indiqué.
L’écran “Configuration vidéo” apparaît.
3 Touchez [Configuration DVD/
DivX].
4 Touchez [Langue audio].
Le menu contextuel apparaît.
5 Touchez la langue désirée.
Lorsque vous sélectionnez “Autres”, un
écran de saisie du code de langue apparaît.
Saisissez le code à quatre chiffres de la
langue souhaitée, puis touchez .
La langue de l’audio est réglée.
p Si la langue sélectionnée n’est pas dispo-
nible, la langue spécifiée sur le disque est
appliquée.
p Vous pouvez changer la langue de l’audio
en touchant la touche de changement de
langue de l’audio pendant la lecture.
p Le réglage effectué ici n’est pas affecté
même si vous changez la langue de
l’audio pendant la lecture à l’aide de la
touche de changement de langue de
l’audio.
■ Réglage de la langue du menu
Vous pouvez définir la langue préférée dans
laquelle les menus enregistrés sur un disque
sont affichés.
1 Appuyez sur le bouton HOME pour
afficher l’écran de Menu principal.
2 Touchez les touches suivantes
dans l’ordre indiqué.
L’écran “Configuration vidéo” apparaît.
3 Touchez [Configuration DVD/
DivX].
4 Touchez [Menu de langues].
Le menu contextuel apparaît.
5 Touchez la langue désirée.
Lorsque vous sélectionnez “Autres”, un
écran de saisie du code de langue apparaît.
Saisissez le code à quatre chiffres de la
langue souhaitée, puis touchez .
La langue du menu est réglée.
p Si la langue sélectionnée n’est pas dispo-
nible, la langue spécifiée par défaut sur le
disque est émise et affichée.
Réglage de l’afchage de
l’icône d’angle
Vous pouvez choisir d’afficher l’icône
d’angle sur les scènes où l’angle peut être
changé.
p Ce réglage est disponible uniquement
lorsque “Disc” est sélectionné comme
source.
1 Appuyez sur le bouton HOME pour
afficher l’écran de Menu principal.
2 Touchez les touches suivantes
dans l’ordre indiqué.
L’écran “Configuration vidéo” apparaît.
3 Touchez [Configuration DVD/
DivX].
4 Touchez à plusieurs reprises
[Multi-angle] jusqu’à ce que le
réglage souhaité apparaisse.
Marche (par défaut) :
Active le réglage multi-angle.
Arrêt :
Désactive le réglage multi-angle.
Réglage du rapport de format
Il y a deux types d’affichage. Un affichage en
écran large a un rapport largeur sur hauteur
(rapport télévision) de 16:9, tandis qu’un
affichage ordinaire a un rapport télévision de
4:3. Si vous utilisez un écran arrière ordi-
naire avec un rapport télévision de 4:3, vous
pouvez régler le rapport de format correct
pour votre écran arrière. (Nous vous recom-
mandons d’utiliser cette fonction unique-
ment lorsque vous souhaitez que le rapport
de format tienne sur l’écran arrière.)
p Lors de l’utilisation d’un affichage ordi-
naire, sélectionnez “Panora.” ou “Plein
écran”. Sélectionner “16:9” peut entraî-
ner une image non naturelle.
p Si vous sélectionnez le rapport de format
télévision, l’affichage de ce produit prend
le même réglage.
p Ce réglage est disponible uniquement
lorsque “Disc” est sélectionné comme
source.
1 Appuyez sur le bouton HOME pour
afficher l’écran de Menu principal.
2 Touchez les touches suivantes
dans l’ordre indiqué.
L’écran “Configuration vidéo” apparaît.
3 Touchez [Configuration DVD/
DivX].
4 Touchez [Aspect TV].
Le menu contextuel apparaît.
5 Touchez l’élément que vous sou-
haitez régler.
16:9 (par défaut) :
Affiche l’image au format d’écran large
(16:9) telle quelle (réglage initial).
Panora. :
Applique à l’image la forme d’une boîte
aux lettres avec des bandes noires en
haut et en bas de l’écran.
Plein écran :
Coupe l’image sur la droite et la gauche
de l’écran.
p Lors de la lecture de disques ne disposant
pas du système Panscan (recadrage auto-
matique), le disque est lu avec “Panora.”
même si vous sélectionnez le réglage
“Plein écran”. Vérifiez que l’emballage
du disque porte le symbole .
p Le rapport de format télévision peut être
modifié pour certains disques. Pour en
savoir plus, reportez-vous aux instruc-
tions du disque.
Réglage du verrouillage
parental
Certains disques DVD-Vidéo permettent
l’utilisation du verrouillage parental pour
définir des restrictions afin que les enfants
ne puissent pas regarder de scènes vio-
lentes ou destinées aux adultes. Vous pouvez
régler le niveau de verrouillage parental à
votre guise.
p Ce réglage est disponible uniquement
lorsque “Disc” est sélectionné comme
source.
p Lorsque vous réglez un verrouillage
parental, puis lancez la lecture d’un
disque avec verrouillage parental, les
indications de saisie du numéro de code
peuvent être affichées. Dans ce cas, la
lecture commence lorsque le numéro de
code est saisi.
■ Réglage du numéro de code et
du niveau
Lorsque vous utilisez cette fonction pour la
première fois, enregistrez votre numéro de
code. Si vous n’enregistrez pas de numéro
de code, le verrouillage parental ne sera
pas actif.

26
Chapitre
76
Fr
1 Appuyez sur le bouton HOME pour
afficher l’écran de Menu principal.
2 Touchez les touches suivantes
dans l’ordre indiqué.
L’écran “Configuration vidéo” apparaît.
3 Touchez [Configuration DVD/
DivX].
4 Touchez [Parental].
L’écran “Parental” apparaît.
5 Touchez les touches [0] à [9] pour
saisir un numéro de code à quatre
chiffres.
6 Quand le numéro saisi est affiché,
touchez la touche suivante.
Enregistre le numéro de
code.
7 Touchez un nombre entre [1] et
[8] pour sélectionner le niveau
souhaité.
8 :
Active la lecture de l’intégralité du disque
(réglage initial).
7 à 2 :
Active la lecture des disques pour enfants
et des disques non destinés aux adultes.
1 :
Active la lecture de disques pour enfants
uniquement.
8 Quand le numéro saisi est affiché,
touchez la touche suivante.
Définit le niveau de verrouil-
lage parental.
p Nous vous recommandons de garder
trace de votre numéro de code au cas où
vous l’oublieriez.
p Le niveau de verrouillage parental est
enregistré sur le disque. Vous pouvez le
confirmer en regardant l’emballage du
disque, la documentation fournie ou le
disque lui-même. Vous ne pouvez pas
utiliser le verrouillage parental avec des
disques ne comportant pas de niveau de
verrouillage parental enregistré.
p Pour certains disques, le verrouillage
parental peut uniquement ignorer cer-
taines scènes, après lesquelles la lecture
normale reprend. Pour en savoir plus,
reportez-vous aux instructions du disque.
Afchage du code d’enregis-
trement de VOD DivX
Pour reproduire un contenu VOD (vidéo à la
demande) DivX sur ce produit, vous devez
d’abord enregistrer le produit auprès de
votre fournisseur de contenu VOD DivX.
Pour ce faire, générez un code d’enregis-
trement VOD DivX et soumettez-le à votre
fournisseur.
p Notez votre code, car vous en aurez
besoin pour enregistrer ce produit auprès
de votre fournisseur VOD DivX.
p Ce réglage est disponible uniquement
lorsque “Disc” est sélectionné comme
source.
1 Appuyez sur le bouton HOME pour
afficher l’écran de Menu principal.
2 Touchez les touches suivantes
dans l’ordre indiqué.
L’écran “Configuration vidéo” apparaît.
3 Touchez [Configuration DVD/
DivX].
4 Touchez [DivX
®
à la demande].
L’écran “DivX
®
à la demande” apparaît.
p Si un code d’enregistrement a déjà été
activé, il ne peut pas être affiché.
5 Touchez [Code d’inscription].
Votre code d’enregistrement de 10 chiffres
apparaît.
p Notez votre code par écrit, car vous
en aurez besoin pour vous enregistrer
auprès de votre fournisseur VOD DivX.
Afchage du code de désenre-
gistrement de VOD DivX
Un code d’enregistrement enregistré avec
un code de désenregistrement peut être
effacé.
p Ce réglage est disponible uniquement
lorsque “Disc” est sélectionné comme
source.
1 Appuyez sur le bouton HOME pour
afficher l’écran de Menu principal.
2 Touchez les touches suivantes
dans l’ordre indiqué.
L’écran “Configuration vidéo” apparaît.
3 Touchez [Configuration DVD/
DivX].
4 Touchez [DivX
®
à la demande].
L’écran “DivX
®
à la demande” apparaît.
5 Touchez [Code de désinscription].
Votre code de désenregistrement de huit
chiffres apparaît.
p Notez votre code par écrit, car vous en
aurez besoin pour vous désenregistrer
auprès de votre fournisseur VOD DivX.
Lecture automatique de DVD
Lorsqu’un disque DVD avec un menu DVD
est inséré, ce produit annule automatique-
ment le menu DVD et démarre la lecture à
partir du premier chapitre du premier titre.
p Certains DVD peuvent ne pas fonctionner
normalement. Si cette fonction ne fonc-
tionne pas correctement, désactivez-la et
démarrez la lecture.
p Ce réglage est disponible uniquement
lorsque “Disc” est sélectionné comme
source.
1 Appuyez sur le bouton HOME pour
afficher l’écran de Menu principal.
2 Touchez les touches suivantes
dans l’ordre indiqué.
L’écran “Configuration vidéo” apparaît.
3 Touchez [Configuration DVD/
DivX].
4 Touchez à plusieurs reprises
[Lecture automatique DVD]
jusqu’à ce que le réglage souhaité
apparaisse.
Arrêt (par défaut) :
Désactive le réglage de lecture automa-
tique du DVD.
Marche :
Active le réglage de lecture automatique
du DVD.
Réglage du signal vidéo de la
caméra de rétrovisée
Lorsque vous connectez une caméra de
rétrovisée à ce produit, sélectionnez le
réglage du signal vidéo approprié.
p Vous ne pouvez utiliser cette fonction
que quand l’entrée de signal AV reçoit le
signal vidéo.
1 Appuyez sur le bouton HOME pour
afficher l’écran de Menu principal.
2 Touchez les touches suivantes
dans l’ordre indiqué.
L’écran “Configuration vidéo” apparaît.
3 Touchez [Config. du signal vidéo].
4 Touchez [Caméra].
Le menu contextuel apparaît.
5 Touchez l’élément que vous sou-
haitez régler.
Auto (par défaut) :
Ajuste automatiquement le réglage du
signal vidéo.
Français
27/28
Chapitre
77
Fr
PAL :
Règle le signal vidéo sur PAL.
NTSC :
Règle le signal vidéo sur NTSC.
PAL-M :
Règle le signal vidéo sur PAL-M.
PAL-N :
Règle le signal vidéo sur PAL-N.
SECAM :
Règle le signal vidéo sur SECAM.
Menu de favoris
L’enregistrement de vos éléments de menu
favoris dans des raccourcis vous permet
d’accéder rapidement à l’écran de menu
enregistré en touchant simplement l’écran
“Favoris”.
p Il est possible d’enregistrer un maximum
de 12 éléments dans le menu des favoris.
Création d’un raccourci
1 Touchez le bouton HOME pour
afficher l’écran de Menu principal.
2 Touchez la touche suivante.
Affiche l’écran de Paramètre.
3 Touchez l’icône en forme d’étoile
de l’élément de menu que vous
souhaitez ajouter au menu des
favoris.
L’icône en forme d’étoile du menu sélec-
tionné est remplie.
Pour annuler l’enregistrement, touchez
de nouveau l’icône en forme d’étoile dans
la colonne des menus.
Sélection d’un raccourci
1 Appuyez sur le bouton HOME pour
afficher l’écran de Menu principal.
2 Touchez les touches suivantes
dans l’ordre indiqué.
L’écran “Favoris” apparaît.
3 Touchez l’élément souhaité.
Suppression d’un raccourci
1 Appuyez sur le bouton HOME pour
afficher l’écran de Menu principal.
2 Touchez les touches suivantes
dans l’ordre indiqué.
L’écran “Favoris” apparaît.
3 Maintenez enfoncée l’icône en
forme d’étoile du menu des favoris
que vous souhaitez supprimer.
Le menu sélectionné est supprimé de l’écran
“Favoris”.
Opérations communes
Réglage de l’heure et de la
date
1 Touchez l’heure actuelle sur l’écran
pour afficher l’écran de Réglage de
l’heure et de la date.
2 Touchez ou pour régler l’heure
et la date correctes.
Cet écran vous permet d’opérer les éléments
suivants.
Mois/date
m/j/a (par défaut) :
Change le format d’affichage de la date
sur mois/jour/année.
j/m/a
Change le format d’affichage de la date
sur jour/mois/année.
a/m/j :
Change le format d’affichage de la date
sur année/mois/jour.
Base horaire
12 heures (par défaut) :
Passe à l’affichage au format 12 heures
avec AM/PM.
24 heures :
Passe à l’affichage au format 24 heures.
Mémorisation des informa-
tions de la chanson sur un
iPod (balisage iTunes)
Vous pouvez mémoriser les informations
de la chanson sur votre iPod si le produit a
reçu ces informations. Les chansons appa-
raissent dans une liste de lecture appelée
Liste de lecture balisée dans iTunes la pro-
chaine fois que vous synchroniserez votre
iPod. Vous pouvez acheter directement les
chansons à l’aide du produit.
En fonction du moment où les informations
de la chanson ont été mémorisées, les infor-
mations de la chanson précédente ou de la
chanson après la chanson en cours peuvent
aussi être mémorisées. Assurez-vous de
vérifier la chanson avant de l’acheter.
p La fonction de balisage iTunes est dis-
ponible lorsque les informations de la
chanson sont disponibles.
p Cette fonction est disponible sur les
modèles iPod suivants :
iPhone 4s
iPhone 4
iPhone 3GS
iPhone 3G
iPhone
iPod touch 5e génération
iPod touch 4e génération
iPod touch 3e génération
iPod touch 2e génération
iPod touch 1re génération
iPod classic
iPod nano 6ème génération
iPod nano 5e génération
iPod nano 4e génération
iPod nano 3e génération
p La version d’iTunes doit être 7.4 ou
supérieure.
1 Appuyez sur le bouton HOME pour
afficher l’écran de Menu principal.
2 Touchez les touches suivantes
dans l’ordre indiqué.
L’écran “Système” apparaît.
3 Touchez [Réglages de source A/V].
4 Touchez à plusieurs reprises
[Transfert de mots-clés] jusqu’à ce
que le réglage souhaité apparaisse.
USB1 (par défaut) :
Transfère les informations de la chanson
sur votre iPod qui est connecté au port
USB 1.
USB2 :
Transfère les informations de la chanson
sur votre iPod qui est connecté au port
USB 2.
5 Syntonisez une station de
radiodiffusion.
Lorsque les informations de la chanson sont
reçues, s’affiche lorsque la chanson
souhaitée est diffusée et la touche de l’écran
tactile devient active.
HD Radio
Pour en savoir plus, reportez-vous à
la page 24, Indicateur de balisage
iTunes
®
.
Pour en savoir plus, reportez-vous à la
page 24, Utilisation des touches de
l’écran tactile.
SiriusXM
Pour en savoir plus, reportez-vous à
la page 53, Indicateur de balisage
iTunes
®
.
Pour en savoir plus, reportez-vous à la
page 52, Utilisation des touches de
l’écran tactile.
6 Touchez la touche suivante.
HD Radio
La touche de l’écran tactile sur laquelle le
titre de la chanson ou le nom de l’artiste
s’affiche
SiriusXM
29
Chapitre
78
Fr
La touche de l’écran tactile sur laquelle le
nom de l’artiste, le titre de la chanson, le
nom de la catégorie ou le texte du contenu
s’affiche
Les informations de la chanson en cours de
diffusion sont mémorisées sur le produit.
Lorsque les informations sont en cours
d’acquisition, s’affiche.
Une fois l’acquisition terminée, s’éteint
et s’affiche.
p Les informations d’un maximum de 50
chansons peuvent être mémorisées sur
ce produit.
En fonction du moment où les informa-
tions de la chanson ont été mémorisées,
les informations de la chanson précé-
dente ou de la chanson suivante peuvent
aussi avoir été mémorisées.
7 Connectez votre iPod.
Les informations de la chanson sont transfé-
rées sur votre iPod.
p Si l’iPod est déjà connecté, les informa-
tions de la chanson sont transférées
sur votre iPod chaque fois que vous
touchez la touche de l’écran tactile sur
laquelle les informations de la chanson
s’affichent.
Une fois le transfert des informations
de la chanson sur votre iPod terminé,
disparaît.
p Lorsque le transfert des informations de
la chanson est terminé, les informations
mémorisées dans le produit sont effacées
automatiquement.
p Si vous éteignez le produit ou débran-
chez l’iPod pendant le transfert des
informations de la chanson, il se peut
que le transfert ne soit pas correctement
terminé.
p Pendant que le produit mémorise les
informations de la chanson, le transfert
sur un iPod n’est pas possible.
Réglage de la fonction “Sound
Retriever”
La fonction “Sound Retriever” améliore
automatiquement l’audio compressé et
restaure un son riche.
Touchez à plusieurs reprises la
touche suivante jusqu’à ce que
l’écran de Fonction AV apparaisse.
Règle la fonction “Sound
Retriever”.
(Mode1) (par défaut) :
Active la fonction “Sound Retriever”.
(Mode2) :
Active la fonction “Sound Retriever”.
(Désactivé) :
Désactive la fonction “Sound Retriever”.
p L’effet du Mode2 est supérieur à celui du
Mode1.
Changement du mode écran
large
Vous pouvez régler la taille d’écran pour la
vidéo et les images JPEG.
p Ce réglage est disponible uniquement
lorsque vous arrêtez votre véhicule dans
un endroit sûr et serrez le frein à main.
p Le réglage par défaut est “Full” pour la
vidéo et “Normal” pour les images JPEG.
1 Touchez la touche suivante.
Affiche l’écran de réglage pour
sélectionner le format d’écran
approprié à la lecture de vidéo.
p L’apparence de cette touche est différente
selon le réglage sélectionné.
2 Touchez le mode souhaité.
Full
Une image 4:3 est agrandie horizontale-
ment uniquement, ce qui vous permet
de bénéficier d’une image TV 4:3 (image
normale) sans aucune omission.
p Ce réglage s’applique à la vidéo
uniquement.
Zoom
Une image 4:3 est agrandie dans les
mêmes proportions verticale et horizon-
tale ; ce qui convient parfaitement aux
images d’écran large.
p Ce réglage s’applique à la vidéo
uniquement.
Normal
Une image 4:3 est affichée normalement,
ce qui ne vous donne aucune sensation
de disparité puisque ses proportions
sont les mêmes que celles de l’image
normale.
Trimming
Une image s’affiche sur l’ensemble
de l’écran selon le rapport horizontal/
vertical. Si le rapport horizontal/vertical
est différent entre l’affichage et l’image,
l’image peut être partiellement coupée en
haut/bas ou sur les côtés.
p Ce réglage s’applique aux images JPEG
uniquement.
p Des réglages différents peuvent être
mémorisés pour chaque source vidéo.
p Lorsqu’une vidéo est affichée dans un
mode écran large différent de son rapport
de format d’origine, elle peut apparaître
différente.
p L’image vidéo est plus grossière lors-
qu’elle est affichée en mode “Zoom”.
Autres fonctions
Sélection de la vidéo pour
l’écran arrière
Vous pouvez choisir de montrer la même
image que l’écran avant ou de montrer la
source sélectionnée sur l’écran arrière.
p Cette fonction n’est pas disponible pen-
dant un appel téléphonique à l’aide de
ce produit ou lors de l’utilisation de la
fonction de reconnaissance vocale.
1 Appuyez sur le bouton HOME pour
afficher l’écran de Menu principal.
2 Touchez la touche suivante.
Affiche l’écran de Sélection
de source AV.
3 Touchez [Rear].
L’écran “Rear” apparaît.
4 Touchez la source que vous souhai-
tez afficher sur l’écran arrière.
Vous trouverez ci-dessous une liste des
sources sélectionnables.
Mirror
La vidéo sur l’écran avant de ce produit
est émise sur l’écran arrière.
— Toutes les vidéos ou tous les sons ne
peuvent pas être émis sur l’écran arrière.
DVD/CD
La vidéo et l’audio des DVD sont émises
sur l’écran arrière.
— Les types de fichiers compatibles sont
DVD-V, Video-CD, DivX, MPEG-1, MPEG-2
et MPEG-4 uniquement.
USB/iPod
La vidéo et l’audio du périphérique de
stockage USB ou de l’iPod sont émises
sur l’écran arrière.
— Le seul port prenant en charge l’écran
arrière est le port USB 1.
— Les types de fichiers compatibles sont
MPEG-4, H.264, WMV, MKV et FLV
uniquement.
SD
La vidéo et l’audio des cartes mémoire SD
sont émises sur l’écran arrière.
— Les types de fichiers compatibles sont
MPEG-4, H.264, WMV, MKV et FLV
uniquement.
AV
La vidéo et le son de l’entrée AV sont émis
sur l’écran arrière.
— L’image vidéo et le son sont émis unique-
ment lorsque “AV” comprend à la fois
vidéo et audio.
— L’image vidéo et le son sont émis unique-
ment lorsque “Entrée AV” est réglé sur
“Source”.
Pour en savoir plus, reportez-vous à la
page 61, Réglage de l’entrée AV.
OFF
Rien ne s’affiche sur l’écran arrière.
Touchez la touche suivante.
Ferme l’écran “Rear”.
Vous pouvez également sélectionner
“Rear” dans la liste de sources.
Pour en savoir plus, reportez-vous à la
page 14, Sélection d’une source avant
dans la liste de sources.
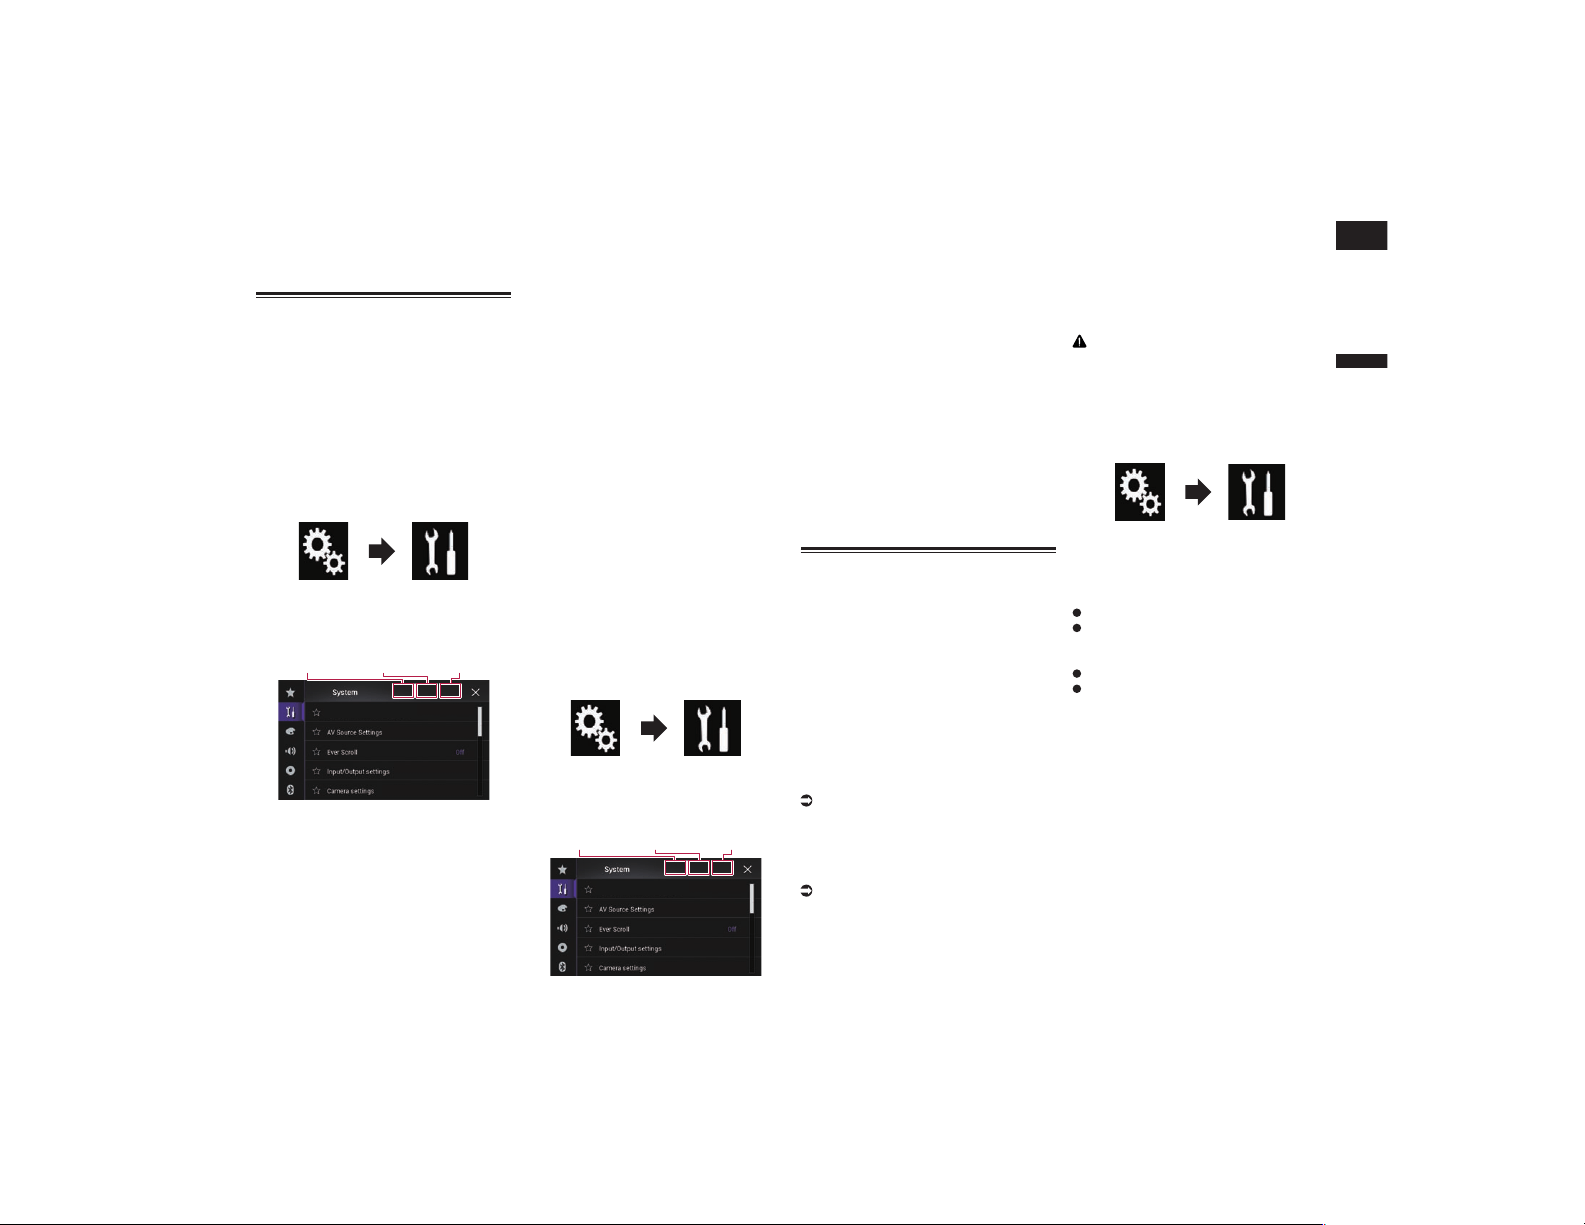
Français
29
Chapitre
79
Fr
p Les fichiers vidéo du périphérique de
stockage externe (USB, SD) ne sont pas
disponibles comme source pour l’écran
arrière lorsque Android Auto est activé.
Paramétrage de la fonction
antivol
Vous pouvez définir un mot de passe pour le
produit. Si le fil conducteur de secours est
coupé après avoir défini le mot de passe, le
produit vous invitera à saisir le mot de passe
lors du prochain redémarrage.
■ Réglage du mot de passe
1 Appuyez sur le bouton HOME pour
afficher l’écran de Menu principal.
2 Touchez les touches suivantes
dans l’ordre indiqué.
L’écran “Système” apparaît.
3 Touchez Zone 1 suivi par Zone 2,
puis maintenez enfoncé Zone 3.
Zone 1 Zone 2 Zone 3
L’écran “Menu de configuration antivol”
apparaît.
4 Touchez [Définir mot de passe].
L’écran “Saisie du mot de passe” apparaît.
5 Saisissez le mot de passe souhaité.
p Vous pouvez saisir entre 5 et 16 carac-
tères pour un mot de passe.
6 Touchez [OK].
L’écran “Saisie d’un indice” apparaît.
7 Saisissez un rappel de mot de
passe.
p Vous pouvez saisir jusqu’à 40 caractères
pour un rappel de mot de passe.
8 Touchez [OK].
L’écran “Confirm. mot de passe” apparaît.
p Si vous souhaitez changer le mot de
passe, saisissez le mot de passe actuel,
puis saisissez le nouveau mot de passe.
9 Vérifiez le mot de passe, puis tou-
chez [OK].
L’écran “Menu de configuration antivol”
apparaît.
■ Saisie du mot de passe
Sur l’écran de saisie du mot de passe, vous
devez saisir le mot de passe actuel.
1 Saisissez le mot de passe.
2 Touchez [OK].
Lorsque le mot de passe correct est saisi, ce
produit sera déverrouillé.
■ Suppression du mot de passe
Le mot de passe actuel et la question asso-
ciée peuvent être supprimés.
1 Appuyez sur le bouton HOME pour
afficher l’écran de Menu principal.
2 Touchez les touches suivantes
dans l’ordre indiqué.
L’écran “Système” apparaît.
3 Touchez Zone 1 suivi par Zone 2,
puis maintenez enfoncé Zone 3.
Zone 1 Zone 2 Zone 3
L’écran “Menu de configuration antivol”
apparaît.
4 Touchez [Eff. mot de passe].
Un message confirmant la suppression du
mot de passe s’affiche.
5 Touchez [Oui].
L’écran de réglage du mot de passe apparaît.
Un message confirmant le rappel de mot de
passe apparaît.
6 Touchez [OK].
L’écran “Saisie du mot de passe” apparaît.
7 Saisissez le mot de passe actuel.
8 Touchez [OK].
Un message indiquant que le réglage de
sécurité est annulé apparaît.
■ Mot de passe oublié
Veuillez vous adresser au centre de service
Pioneer agréé le plus proche.
Restauration des réglages par
défaut du produit
Vous pouvez restaurer les réglages et le
contenu enregistré par défaut. Diverses
méthodes peuvent être utilisées pour effacer
les données utilisateur.
Méthode 1 : Retirez la batterie du
véhicule
Réinitialise divers réglages enregistrés sur
le produit.
Méthode 2 : Touchez l’élément que
vous souhaitez réinitialiser sur
l’écran “Système”
Pour en savoir plus, reportez-vous à la
page 79, Restauration des réglages par
défaut.
Méthode 3 : Appuyez sur le bou-
ton RESET
Pour en savoir plus sur les opéra-
tions, reportez-vous à la page 8,
Réinitialisation du microprocesseur.
p Certains réglages et contenus enregistrés
ne sont pas réinitialisés.
■ Restauration des réglages par
défaut
Réinitialise les réglages par défaut de divers
réglages enregistrés sur le produit.
p Ce réglage est disponible uniquement
lorsque vous arrêtez votre véhicule dans
un endroit sûr et serrez le frein à main.
ATTENTION
Ne coupez pas le moteur lors de la restaura-
tion des réglages.
1 Appuyez sur le bouton HOME pour
afficher l’écran de Menu principal.
2 Touchez les touches suivantes
dans l’ordre indiqué.
L’écran “Système” apparaît.
3 Touchez [Restauration param.].
4 Touchez l’élément que vous sou-
haitez réinitialiser.
Tous les paramètres
Paramètres audio
p Ce réglage est disponible lorsque la
source est désactivée.
Paramètres de thème
Paramètres Bluetooth
Un message confirmant l’initialisation des
réglages s’affiche.
p Si vous souhaitez rétablir les réglages ou
le contenu enregistré par défaut, touchez
[Tous les paramètres].
p Certains réglages configurés sur l’écran
“Thème” ne sont pas réinitialisés.
p Les réglages de My Vehicle ne sont pas
réinitialisés.
5 Touchez [Restaurer].
Lorsque l’élément sélectionné est cor-
rectement réinitialisé, un message de fin
apparaît.
p La source est désactivée et la connexion
Bluetooth est déconnectée avant de
démarrer le processus.
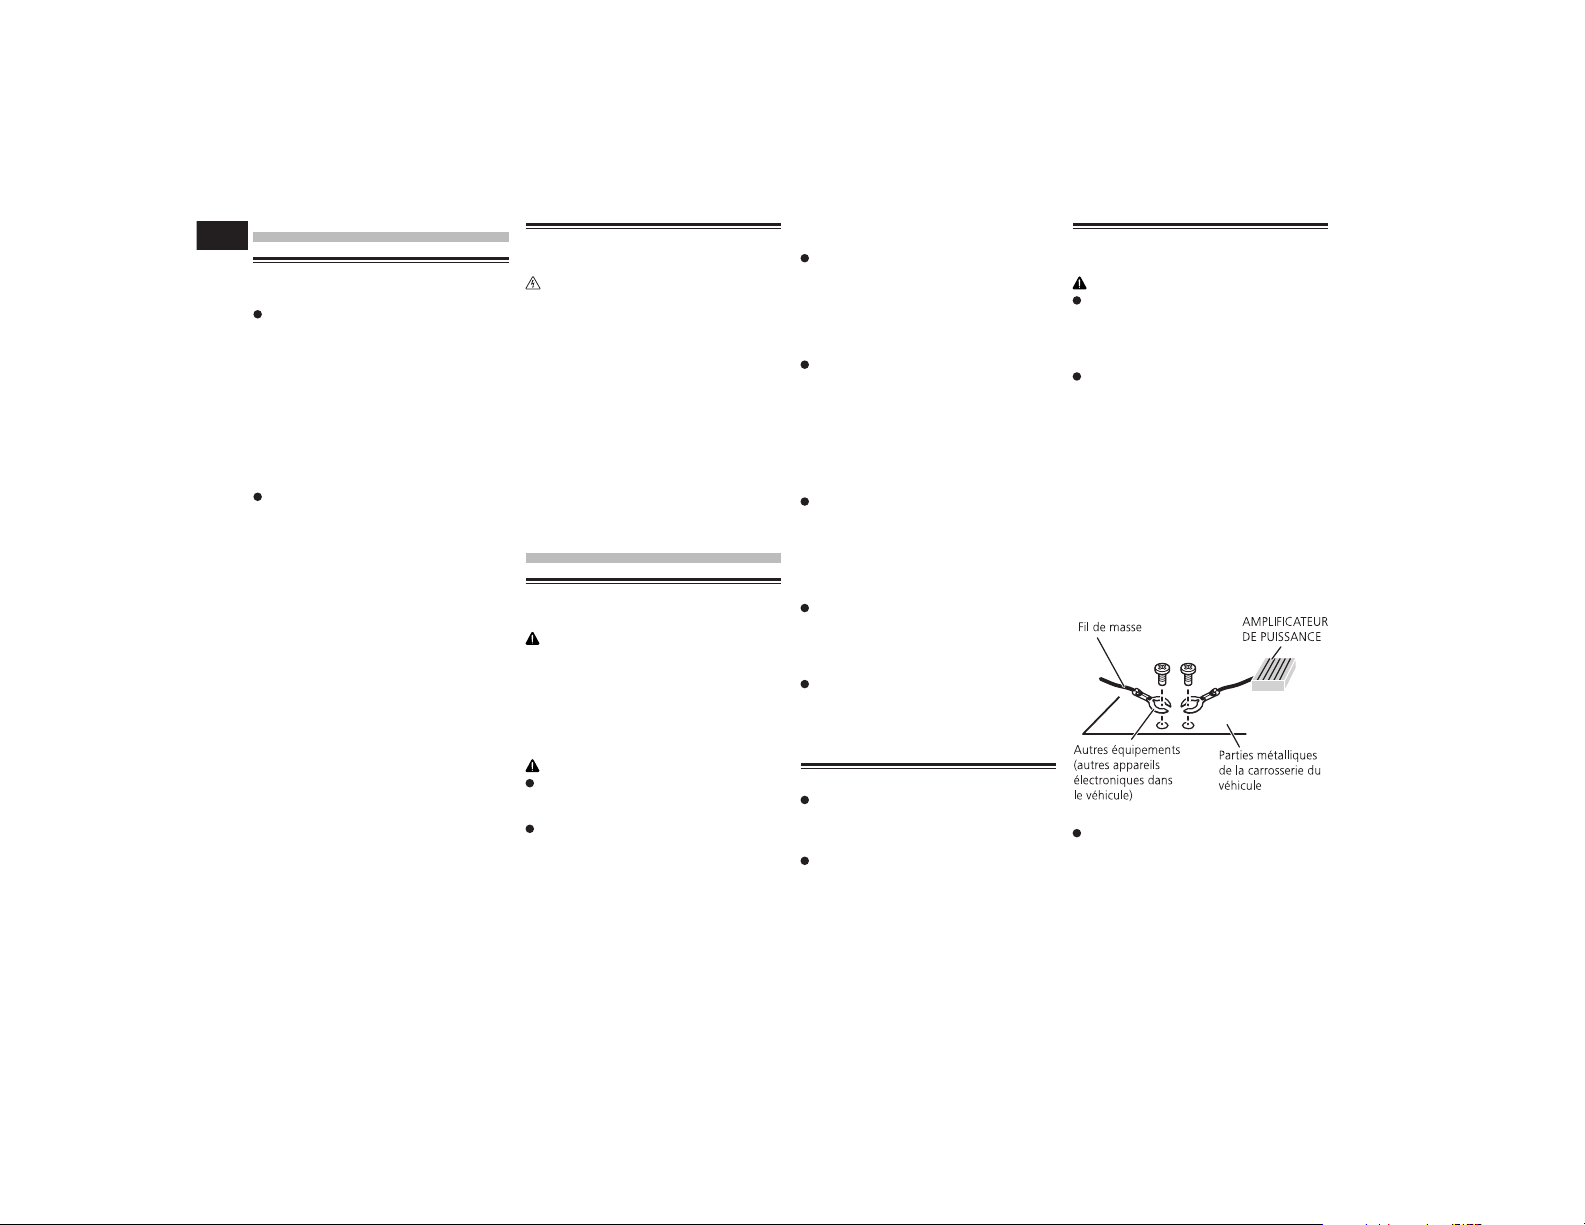
30/31
Chapitre
80
Fr
Précautions
Votre nouveau produit et ce
manuel
N’utilisez pas ce produit, n’importe quelle
application ou la caméra de rétrovisée en
option (le cas échéant) si celui-ci risque
d’une façon ou d’une autre de détourner
votre attention. Observez toujours les
règles de sécurité et respectez toujours
les réglementations de la circulation
routière en vigueur. Si vous éprouvez des
difficultés à utiliser ce produit ou à lire
l’écran, garez votre véhicule en lieu sûr et
serrez le frein à main avant d’effectuer les
réglages nécessaires.
N’installez pas ce produit dans un endroit
où il risque (i) d’entraver la visibilité du
conducteur, (ii) d’altérer le fonctionne-
ment de certains systèmes de commande
des dispositifs de sécurité du véhicule,
y compris les airbags ou les touches de
feux de détresse, ou (iii) d’empêcher le
conducteur de conduire le véhicule en
toute sécurité. Dans certains cas, il peut
ne pas être possible d’installer ce produit
en raison du type de véhicule ou de la
forme de l’intérieur du véhicule.
Importantes mesures de
sécurité
AVERTISSEMENT
Pioneer vous recommande de ne pas ins-
taller ce produit vous-même. Ce produit
doit être exclusivement installé par un
professionnel. Nous recommandons que
seul le personnel d’entretien Pioneer
agréé, qui dispose d’une formation et
d’une expérience spéciales dans l’élec-
tronique mobile, configure et installe
ce produit. N’INTERVENEZ JAMAIS
SUR CE PRODUIT VOUS-MÊME.
L’installation ou l’entretien de ce produit
et de ses câbles de connexion peut vous
exposer à un risque de choc électrique
ou à d’autres dangers, et peut entraîner
des dommages du produit non couverts
par la garantie.
Connexion
Précautions à prendre avant
de brancher le système
AVERTISSEMENT
N’essayez pas de modifier ou désacti-
ver le système de verrouillage du frein
à main, lequel est installé pour votre
protection. La modification ou la désac-
tivation du système de verrouillage du
frein à main peut entraîner des blessures
graves, voire mortelles.
ATTENTION
Attachez tous les fils avec des col-
liers ou des serre-câbles. Ne laissez
aucun fil à nu.
Ne raccordez pas directement le fil
jaune conducteur de ce produit à la
batterie du véhicule. Si ce fil conduc-
teur est directement raccordé à la
batterie, les vibrations du moteur
peuvent finir par user les câbles au
niveau de la jonction avec l’habitacle
et provoquer un défaut d’isolation. Si
l’isolation du fil conducteur jaune se
déchire sous l’effet du contact avec
des pièces métalliques, il peut en
résulter un court-circuit extrêmement
dangereux.
Il est extrêmement dangereux de
laisser les câbles s’enrouler autour de
la colonne de direction ou du levier
de vitesse. Assurez-vous d’installer
ce produit, ses câbles et les fils de
telle façon qu’ils n’obstruent ni ne
gênent la conduite.
Veillez à ce que la trajectoire des
câbles et des fils n’interfère pas avec
les pièces en mouvement du véhi-
cule. Fixez les câbles de manière à les
empêcher d’être happés par, notam-
ment, le volant, le levier de vitesse, le
frein à main, les glissières de siège,
les portes, ou tout autre élément de
commande du véhicule.
La trajectoire des fils ne doit pas être
exposée à des températures élevées.
Si l’isolation chauffe, les fils risquent
d’être endommagés, ce qui peut
entraîner un court-circuit ou un dys-
fonctionnement, et endommager de
manière irrémédiable le produit.
Ne raccourcissez aucun fil conduc-
teur. Vous risqueriez autrement de
provoquer un dysfonctionnement du
circuit de protection (porte-fusibles,
résistance de fusible ou filtre, etc.).
N’utilisez jamais le cordon d’alimen-
tation de ce produit pour raccorder
d’autres appareils électriques. La
capacité du cordon serait dépassée,
ce qui provoquerait une surchauffe.
Avant d’installer ce produit
Utilisez cet appareil uniquement avec
une batterie de 12 V, avec pôle négatif à la
masse. Sinon, cela pourrait entraîner un
incendie ou un mauvais fonctionnement.
Afin d’éviter tout risque de court-circuit,
débranchez le câble de la borne négative
(–) de la batterie avant de commencer la
pose.
Pour éviter toute
détérioration
AVERTISSEMENT
Utilisez des haut-parleurs de plus de
50 W (valeur de sortie) et avec une
impédance comprise entre 4 W et 8 W.
N’utilisez pas de haut-parleurs 1 W à
3 W avec cet appareil.
Le câble noir est celui de la mise à la
terre. Lors de l’installation de cette
unité ou de l’amplificateur (vendu
séparément), connectez toujours
le fil de mise à la terre en premier.
Assurez-vous que le fil de mise à la
terre est correctement connecté aux
pièces métalliques du châssis de la
voiture. Le fil de mise à la terre de
l’amplificateur et celui de cette unité
ou de tout autre appareil doivent être
connectés séparément à la voiture
avec des vis différentes. Si les vis du
fil de mise à la terre sont desserrées
ou tombent, il pourrait en résulter un
incendie ou un dysfonctionnement.
Non fourni avec cet appareil
*1
*1
Lors du remplacement du fusible,
veillez à utiliser seulement un fusible
du calibre indiqué sur ce produit.

Français
31
Chapitre
81
Fr
Ce produit ne peut pas être installé
dans un véhicule qui ne possède pas de
position ACC (accessoire) sur le commu-
tateur d’allumage.
A
C
C
O
N
S
T
A
R
T
O
F
F
O
N
S
T
A
R
T
O
F
F
Position ACC Pas de position ACC
Pour éviter les courts-circuits, recouvrez
les fils déconnectés de ruban isolant. Il
est particulièrement important d’isoler
tous les fils conducteurs de haut-parleurs
non utilisés pour éviter tout risque de
court-circuit.
Pour connecter un amplificateur de puis-
sance ou d’autres appareils à ce produit,
reportez-vous au manuel du produit à
connecter.
■ Remarque concernant le l bleu/
blanc
Lorsque le commutateur d’allumage
est sur Marche (ACC ON), un signal de
commande est émis par le biais du fil
bleu/blanc. Raccordez-le à une borne
de commande à distance du système
d’amplificateur de puissance externe, à la
prise de commande de relais de l’antenne
automatique du véhicule ou au terminal
de commande d’alimentation de l’ampli-
ficateur d’antenne (max. 300 mA 12 VCC).
Le signal de commande est émis par le
biais du fil bleu/blanc, même si la source
audio est désactivée.
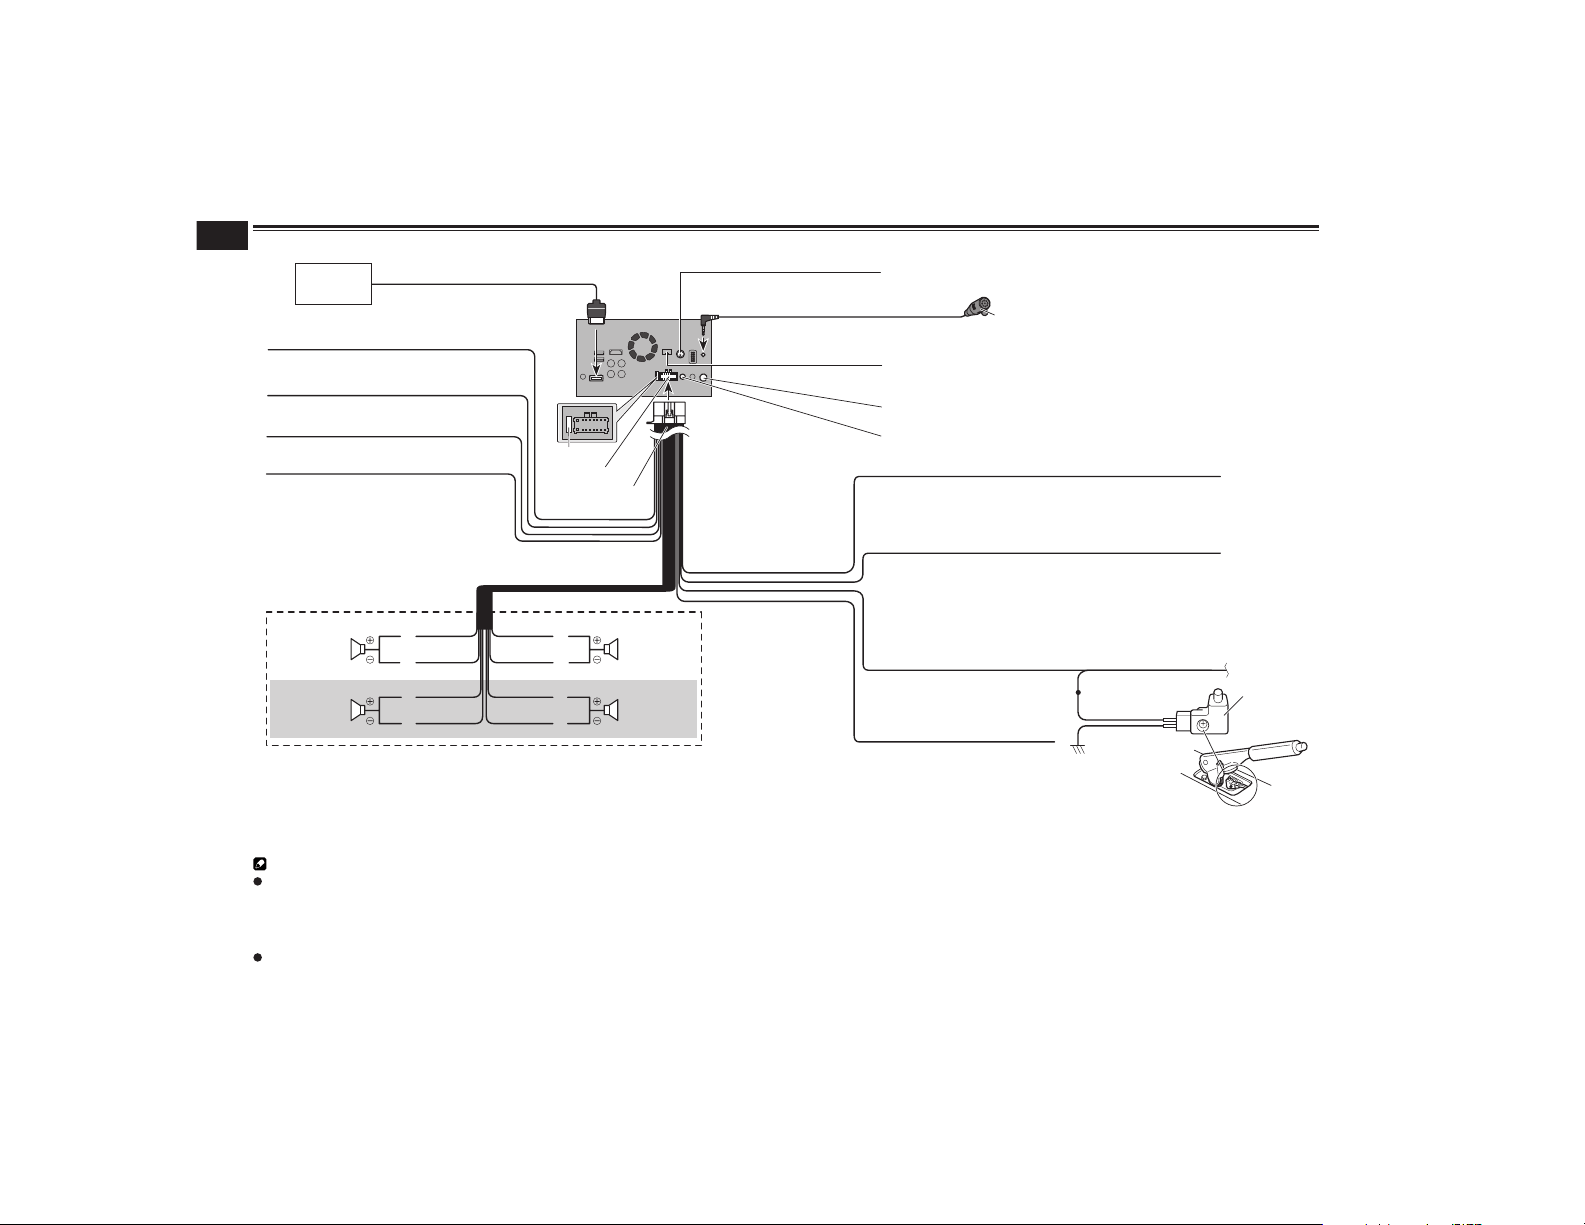
31
Chapitre
82
Fr
Branchement du cordon d’alimentation
Prise d’antenne
Alimentation
Cordon d’alimentation
Jaune/noir
Si vous utilisez un équipement avec une fonction silence, raccordez ce fil au fil Audio
Mute de cet équipement. Dans le cas contraire, ne connectez rien sur le fil Audio Mute.
Vert clair
Utilisé pour détecter l’état ON/OFF du frein à main. Ce fil doit être
connecté au côté alimentation électrique du contacteur de frein à
main.
Bleu/blanc
Connectez à la borne de commande du
système d’amplificateur de puissance
(300 mA 12 Vcc max.).
Côté terre
Côté alimentation
électrique
Contacteur de
frein à main
Ce produit
Violet/blanc
Des deux fils raccordés au feu arrière, raccordez celui pour lequel la tension change
lorsque le levier de vitesse est en position REVERSE (R). Ce raccordement permet à
l’appareil de détecter si le véhicule avance ou recule.
4 m
Veuillez contacter votre revendeur pour
plus d’informations sur les unités de
navigation pouvant être raccordées.
Syntonisateur pour véhicule SiriusXM Connect
Reportez-vous au manuel d’instructions du syntonisateur pour véhicule SiriusXM Connect
(vendu séparément).
Entrée d’adaptateur iDatalink Reportez-vous au manuel d’instructions de l’adaptateur iDatalink
(vendu séparément).*
Système
de navigation
Pioneer
Câble RVB (fourni avec le système de navigation)
Fusible (10 A)
Microphone
Gauche Droite
Haut-parleur avant Haut-parleur avant
Haut-parleur arrière
Blanc Gris
Gris/noirBlanc/noir
Vert Violet
Vert/noir Violet/noir
Haut-parleur arrière
Dans un système à deux haut-parleurs, ne
connectez rien sur les fils de haut-parleur
non raccordés aux haut-parleurs.
Entrée de commande à distance câblée
Un adaptateur de commande à distance câblée (vendu séparément) peut être raccordé.
Jaune
Vers la borne fournie avec l’alimentation quelle que soit
la position du contacteur d’allumage.
Orange/blanc
Vers la borne du contacteur d’éclairage.
Noir (masse)
Vers la carrosserie (métallique) du véhicule.
Rouge
Vers la borne électrique commandée par le contacteur
d’allumage (12 Vcc) ON/OFF.
Remarques
* Avant d’utiliser et/ou de raccorder l’adaptateur iDatalink Maestro, vous devez d’abord mettre à jour le module Maestro avec le micrologiciel de l’unité principale et du véhicule appro-
prié. Le numéro d’appareil nécessaire pour l’activation se trouve aux endroits suivants (reportez-vous à la page 48, Mise à jour du module iDatalink Maestro) :
— l’étiquette sur l’emballage de ce produit
— l’étiquette sur ce produit
— l’écran “Info sur le micrologiciel”
Assurez-vous de connecter le microphone fourni avec ce produit lors de l’utilisation de Android Auto.
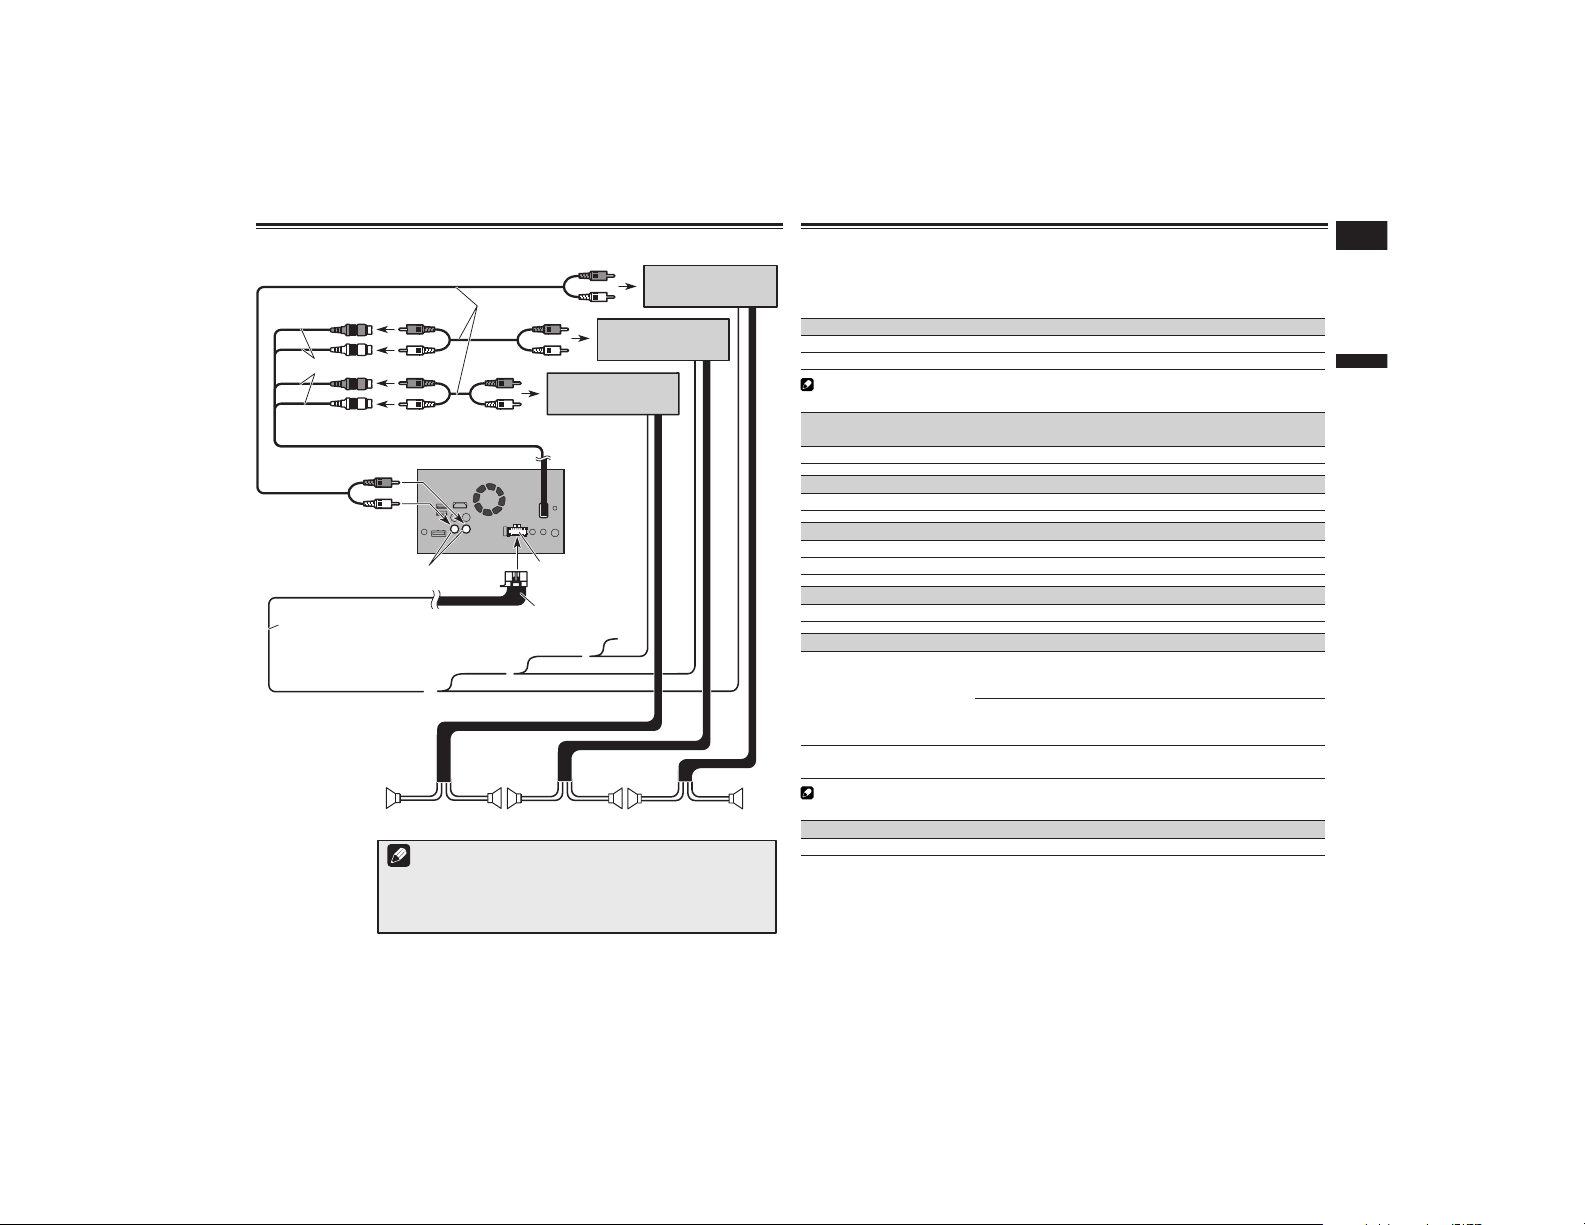
Français
31
Chapitre
83
Fr
Connexion à un amplicateur de puissance vendu séparément
Commande à distance du système
Bleu/blanc
Amplificateur de puissance
(vendu séparément)
Amplificateur de puissance
(vendu séparément)
Amplificateur de puissance
(vendu séparément)
Haut-parleur avant
Haut-parleur arrière
Haut-parleur d’extrêmes graves
Câbles RCA
(vendus séparément)
Ce produit
15 cm
Sorties arrière
(REAR OUTPUT)
Sorties avant
(FRONT OUTPUT)
Vers la borne de commande du système
d’amplificateur de puissance
(300 mA 12 VCC max.).
Blanc, rouge (SWL, SWR)
Remarques
· Vous pouvez modifier la sortie RCA du haut-parleur d’extrêmes graves en
fonction de votre système de haut-parleur d’extrêmes graves.
· La sortie du haut-parleur d’extrêmes graves de ce produit est monaurale.
Cordon d’alimentation
Alimentation
Connexion d’un iPhone, iPod, appareil Android ou appareil
MirrorLink™
Trouvez votre appareil et la fonction que vous voulez utiliser dans la liste ci-dessous, puis
reportez-vous à la page concernant la connexion.
iPhone 6 Plus/iPhone 6/iPhone 5s/iPhone 5c/iPhone 5
iPod (audio) Reportez-vous à la page 84, Connexion via le port USB.
AppRadio Mode Reportez-vous à la page 84, Connexion via le port HDMI.
Remarque
Toutes les connexions mentionnées ci-dessus sont disponibles pour utiliser aha et Pandora.
iPhone 3GS/iPod touch (2e et 3e génération)/iPod classic 160 Go/
iPod classic 80 Go/iPod nano (3e, 4e, 5e et 6e génération)
Reportez-vous à la page 84, Connexion via l’entrée AUX.
iPhone 4s/iPhone 4/iPod touch (4e génération)
Reportez-vous à la page 84, Connexion via l’entrée RGB.
iPod touch (5e génération)
iPod (audio) Reportez-vous à la page 84, Connexion via le port USB.
AppRadio Mode Reportez-vous à la page 84, Connexion via le port HDMI.
iPod nano (7e génération)
Reportez-vous à la page 84, Connexion via le port USB.
Appareil Android
AppRadio Mode
Port HDMI
Reportez-vous à la page 85, Connexion d’un périphérique
Android via un port HDMI.
Port MHL
Reportez-vous à la page 85, Connexion d’un périphérique
Android via un port MHL.
Android Auto
Reportez-vous à la page 85, Connexion d’un appareil
Android ou MirrorLink™.
Remarque
Toutes les connexions mentionnées ci-dessus sont disponibles pour utiliser aha et Pandora.
Appareil MirrorLink
Reportez-vous à la page 85, Connexion d’un appareil Android ou MirrorLink™.
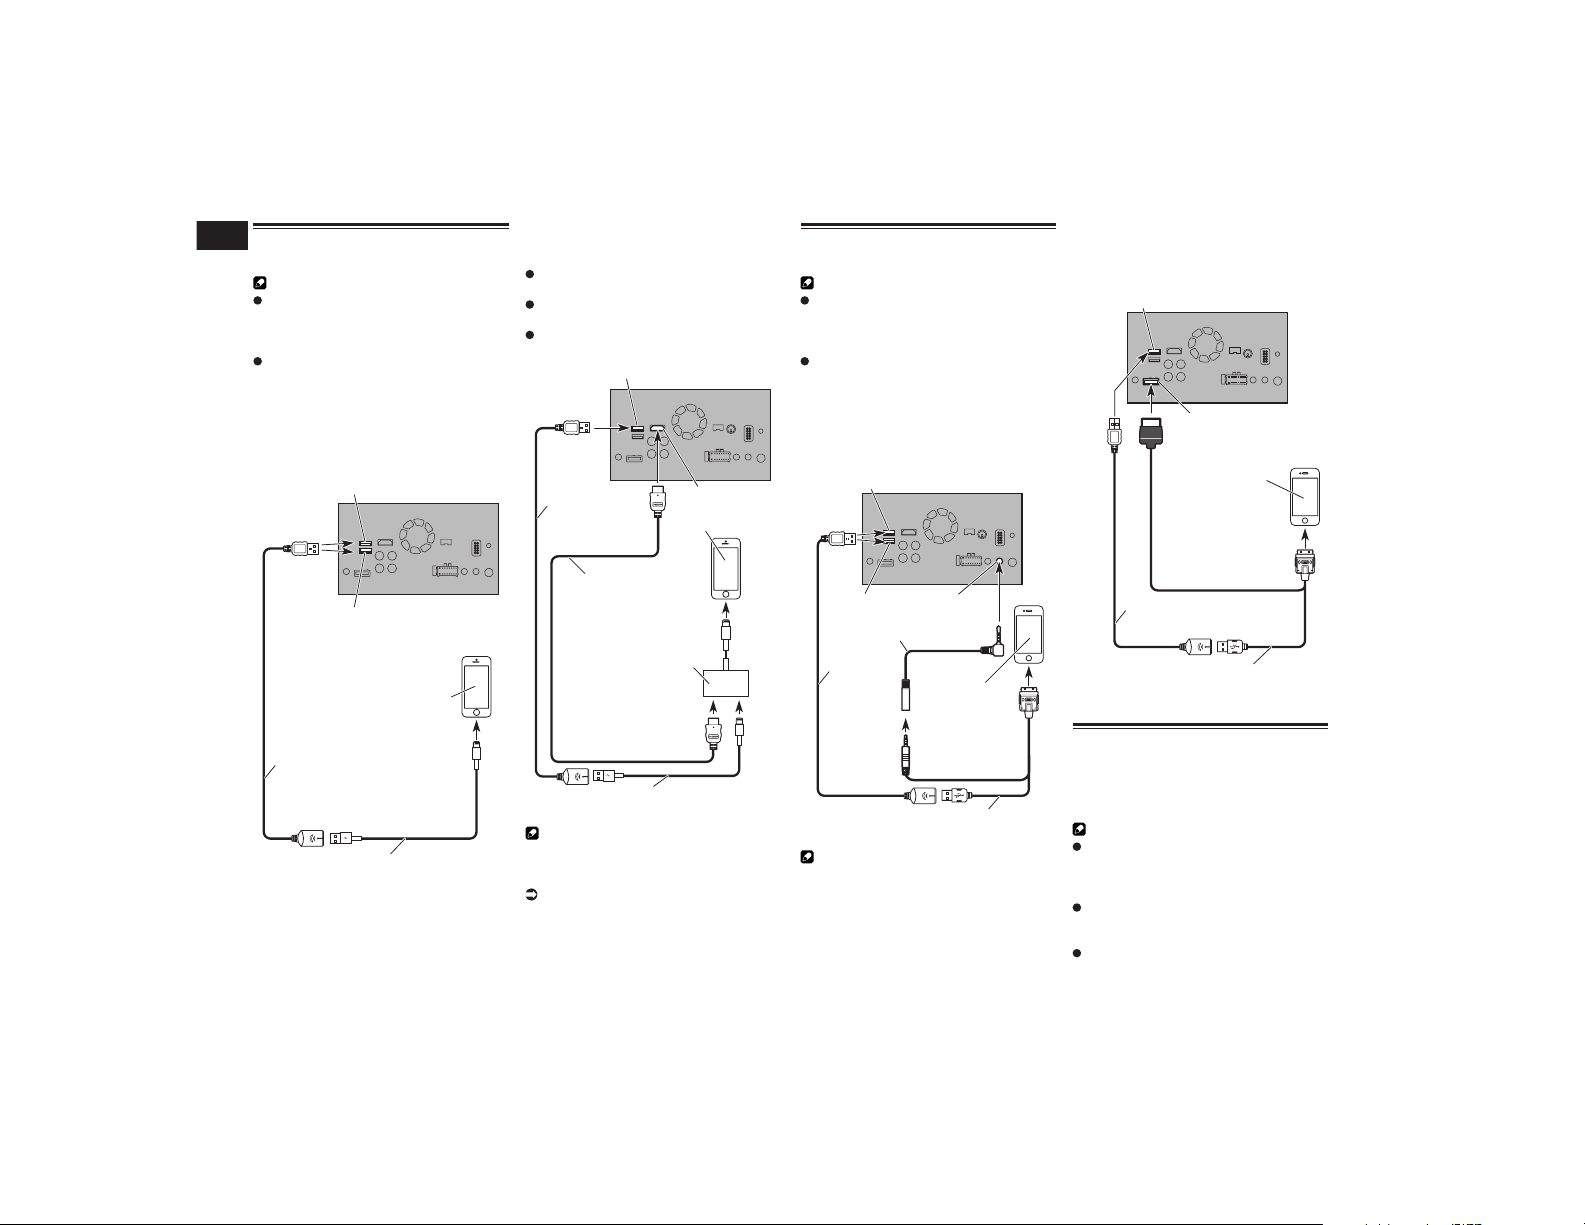
31
Chapitre
84
Fr
Connexion d’un iPhone avec
connecteur Lightning
Remarques
Pour en savoir plus sur la connexion d’un
périphérique externe à l’aide d’un câble
vendu séparément, reportez-vous au
manuel du câble.
Pour en savoir plus sur la connexion, le
fonctionnement et la compatibilité d’un
iPhone, reportez-vous au Chapitre 5.
■ Connexion via le port USB
Le câble d’interface USB pour iPod / iPhone
(CD-IU52) (vendu séparément) est néces-
saire pour la connexion.
Câble USB
1,5 m
Câble d’interface USB pour iPod / iPhone
(CD-IU52) (vendu séparément)
Ce produit
Port USB 1
iPhone avec connecteur
Lightning
Port USB 2
■ Connexion via le port HDMI
Les câbles suivants sont nécessaires pour
la connexion.
Câble d’interface HDMI pour iPod /
iPhone (CD-IH202) (vendu séparément)
Câble d’interface USB pour iPod / iPhone
(CD-IU52) (vendu séparément)
Adaptateur Lightning AV numérique
(produits Apple Inc.) (vendu séparément)
Câble USB
1,5 m
Ce produit
Port USB 1
iPhone avec
connecteur Lightning
Câble HDMI
®
haute vitesse
(Type A - A)
(fourni avec CD-IH202)
Port HDMI
Adaptateur Lightning
AV numérique
(produits Apple Inc.)
(vendu séparément)
Câble d’interface USB pour iPod / iPhone
(CD-
IU52) (vendu séparément)
Remarque
Lorsque vous connectez le câble HDMI
®
haute vitesse, utilisez l’attache de blocage
pour le fixer fermement.
Pour en savoir plus, reportez-vous à la
page 85, Fixation du câble HDMI
®
haute vitesse.
Connexion d’un iPhone avec
connecteur à 30 broches
Remarques
Pour en savoir plus sur la connexion d’un
périphérique externe à l’aide d’un câble
vendu séparément, reportez-vous au
manuel du câble.
Pour en savoir plus sur la connexion, le
fonctionnement et la compatibilité d’un
iPhone, reportez-vous au Chapitre 5.
■ Connexion via l’entrée AUX
Le câble d’interface USB pour iPod / iPhone
(CD-IU201V) (vendu séparément) est néces-
saire pour la connexion.
Rallonge pour câble mini-jack
(fourni avec CD-IU201V)
Port USB 1
Ce produit
Port USB 2 Entrée AUX
iPhone avec
connecteur à
30 broches
Câble USB
1,5 m
Câble d’interface USB pour iPod / iPhone
(CD-IU201V) (vendu séparément)
Remarque
Connectez le câble USB au port USB 1
lors de l’utilisation de “aha” ou “Pandora”
comme source.
■ Connexion via l’entrée RGB
Le câble d’interface USB pour iPod / iPhone
(CD-IU201S) (vendu séparément) est néces-
saire pour la connexion.
Ce produit
Port USB 1
Entrée RGB
iPhone avec
connecteur à
30 broches
Câble USB
1,5 m
Câble d’interface USB pour iPod / iPhone
(CD-IU201S) (vendu séparément)
Connexion d’un périphérique
Android™
Le kit de connexion aux applications (CD-
AH200) (vendu séparément) est nécessaire
pour la connexion.
Remarques
Pour en savoir plus sur la connexion d’un
périphérique externe à l’aide d’un câble
vendu séparément, reportez-vous au
manuel du câble.
Pour en savoir plus sur la connexion et le
fonctionnement d’un appareil Android,
reportez-vous au Chapitre 5.
Lorsque vous connectez le câble HDMI
®
haute vitesse, utilisez l’attache de blo-
cage pour le fixer fermement.

Français
31
Chapitre
85
Fr
Pour en savoir plus, reportez-vous à la
page 85, Fixation du câble HDMI
®
haute vitesse.
■ Connexion d’un périphérique
Android via un port HDMI
Ce produit
Câble HDMI
®
haute
vitesse (Type A - A)
(fourni avec CD-AH200)
Appareil Android
Port USB 2
Port HDMI
Câble USB
(fourni avec
CD-AH200)
Câble d’adaptateur (HDMI Type A - D)
(fourni avec CD-AH200)
Câble USB - micro USB
(Type USB A - micro USB B)
(fourni avec CD-AH200)
■ Connexion d’un périphérique
Android via un port MHL
Ce produit
Port USB 2
Port HDMI
Câble HDMI
®
haute
vitesse (Type A - A)
(fourni avec CD-AH200)
Adaptateur MHL
(fourni avec CD-AH200)
Appareil Android
Câble USB - micro USB
(Type USB A - micro USB B)
(fourni avec CD-AH200)
Câble USB
(fourni avec CD-AH200)
Connexion d’un appareil
Android ou MirrorLink™
Le câble d’interface USB utilisé avec les
appareils Android ou MirrorLink™ (CD-
MU200) (vendu séparément) est nécessaire
pour la connexion.
Ce produit
Appareil Android ou MirrorLink
Câble USB
(fourni avec CD-MU200)
Câble USB - micro USB
(Type USB A - micro USB B)
(fourni avec CD-MU200)
Port USB 2
Remarque
Pour en savoir plus sur la connexion d’un
périphérique externe à l’aide d’un câble
vendu séparément, reportez-vous au manuel
du câble.
Fixation du câble HDMI
®
haute
vitesse
Veillez à fixer le câble HDMI
®
haute vitesse à
l’aide de l’attache de blocage lorsque vous
connectez un périphérique externe à l’aide
du câble HDMI
®
haute vitesse.
1 Insérez le câble HDMI
®
haute
vitesse dans le port HDMI.
2 Enroulez l’attache de blocage
autour du crochet situé au-dessus
du port HDMI et du câble HDMI
®
haute vitesse, puis serrez-la afin de
fixer le câble HDMI
®
haute vitesse.
1
2
3
1 Crochet
2 Attache de blocage
3 Câble HDMI
®
haute vitesse
p Ne serrez pas l’attache de blocage plus
que nécessaire.
Connexion d’une caméra de
rétrovisée
Quand ce produit est utilisé avec une
caméra de rétrovisée, il est possible de
commuter automatiquement entre le signal
vidéo et l’image de rétrovisée quand le
levier de vitesse est placé sur la position
REVERSE (R). Le mode Point de vue de la
caméra vous permet également de vérifier
ce qu’il y a derrière le véhicule quand vous
conduisez.
AVERTISSEMENT
UTILISEZ L’ENTRÉE UNIQUEMENT POUR LA
MARCHE ARRIÈRE OU L’IMAGE INVERSÉE
DE LA CAMÉRA DE RÉTROVISÉE. TOUTE
AUTRE UTILISATION PEUT ENTRAÎNER
DES BLESSURES CORPORELLES OU UNE
DÉTÉRIORATION DE L’APPAREIL.
ATTENTION
L’image de l’écran peut apparaître
inversée.
La caméra de rétrovisée est à utiliser en
tant qu’aide pour surveiller une cara-
vane, ou pour se garer en marche arrière

31
Chapitre
86
Fr
dans un emplacement de parking un peu
étroit. N’utilisez pas cette fonction dans
un but de divertissement.
Les objets dans la caméra de rétrovisée
peuvent paraître plus proches ou plus
éloignés qu’en réalité.
Veuillez noter que la zone de l’image
affichée par la caméra de rétrovisée peut
légèrement différer selon que les images
plein écran sont affichées en marche
arrière, ou que vous vérifiez ce qui se
passe à l’arrière du véhicule en marche
avant.
Marron (BC IN)
Caméra de rétrovisée
(ND-BC6)
(vendu séparément)
Ce produit
Câble RCA
(fourni avec ND-BC6)
Vers la sortie vidéo
Violet/blanc
(REVERSE-GEAR
SIGNAL INPUT)
Cordon d’alimentation
Alimentation
Pour en savoir plus à propos des raccor-
dements, reportez-vous à la page 82,
Branchement du cordon d’alimentation.
Remarques
Ce mode est disponible lorsque le
réglage de la caméra de rétrovisée est
sur “Marche”.
Pour en savoir plus, reportez-vous à la
page 62, Réglage d’activation de la
caméra de rétrovisée.
Ne branchez que ce produit sur la
caméra de rétrovisée. N’y raccordez
aucun autre appareil.
Connexion d’un élément
vidéo externe
■ Utilisation de l’entrée AV
23 cm
15 cm
Vers la sortie
vidéo
Vers les sorties
audio
Élément vidéo
externe (vendu
séparément)
Ce produit
Rouge, blanc
(AUDIO INPUT)
Câbles RCA
(vendu
séparément)
Jaune
(VIDEO INPUT)
Remarque
Ce mode est disponible lorsque le réglage de
l’entrée AV est sur “Marche”.
Pour en savoir plus, reportez-vous à la
page 61, Réglage de l’entrée AV.
■ Utilisation d’une entrée AUX
Vers la sortie
vidéo
Vers les sorties
audio
Élément vidéo externe
(vendu séparément)
Ce produit
Rouge, blanc
Câbles RCA
(vendu
séparément)
Jaune
Entrée AUX
Câble AV mini-jack
(CD-RM10) (vendu
séparément)
Remarques
Ce mode est disponible lorsque
le réglage de l’entrée AUX est sur
“Marche”.
Pour en savoir plus, reportez-vous à la
page 58, Procédure de départ.
Lors de la connexion d’un élément vidéo
externe à l’aide d’un câble AV mini-jack,
utilisez un câble d’extension AUX vendu
séparément si nécessaire.
ATTENTION
Veillez à utiliser un câble AV mini-jack (CD-
RM10) (vendu séparément) pour le raccor-
dement. Si vous utilisez un autre type de
câble, la position du raccordement pourrait
différer, entraînant une déformation du son
et des images.
OK
G
V
R
L
G
R
V
L
L : Audio gauche (Blanc)
R : Audio droite (Rouge)
V : Vidéo (Jaune)
G : Masse
Connexion d’un périphérique
HDMI
Appareil HDMI
(vendu séparément)
Ce produit
Port HDMI
Câble HDMI
®
haute
vitesse (vendu
séparément)
Remarques
Pour en savoir plus sur le fonctionne-
ment d’un appareil HDMI, reportez-vous
au Chapitre 19.
Lorsque vous connectez le câble HDMI
®
haute vitesse, utilisez l’attache de blo-
cage pour le fixer fermement.
Pour en savoir plus, reportez-vous à la
page 85, Fixation du câble HDMI
®
haute vitesse.
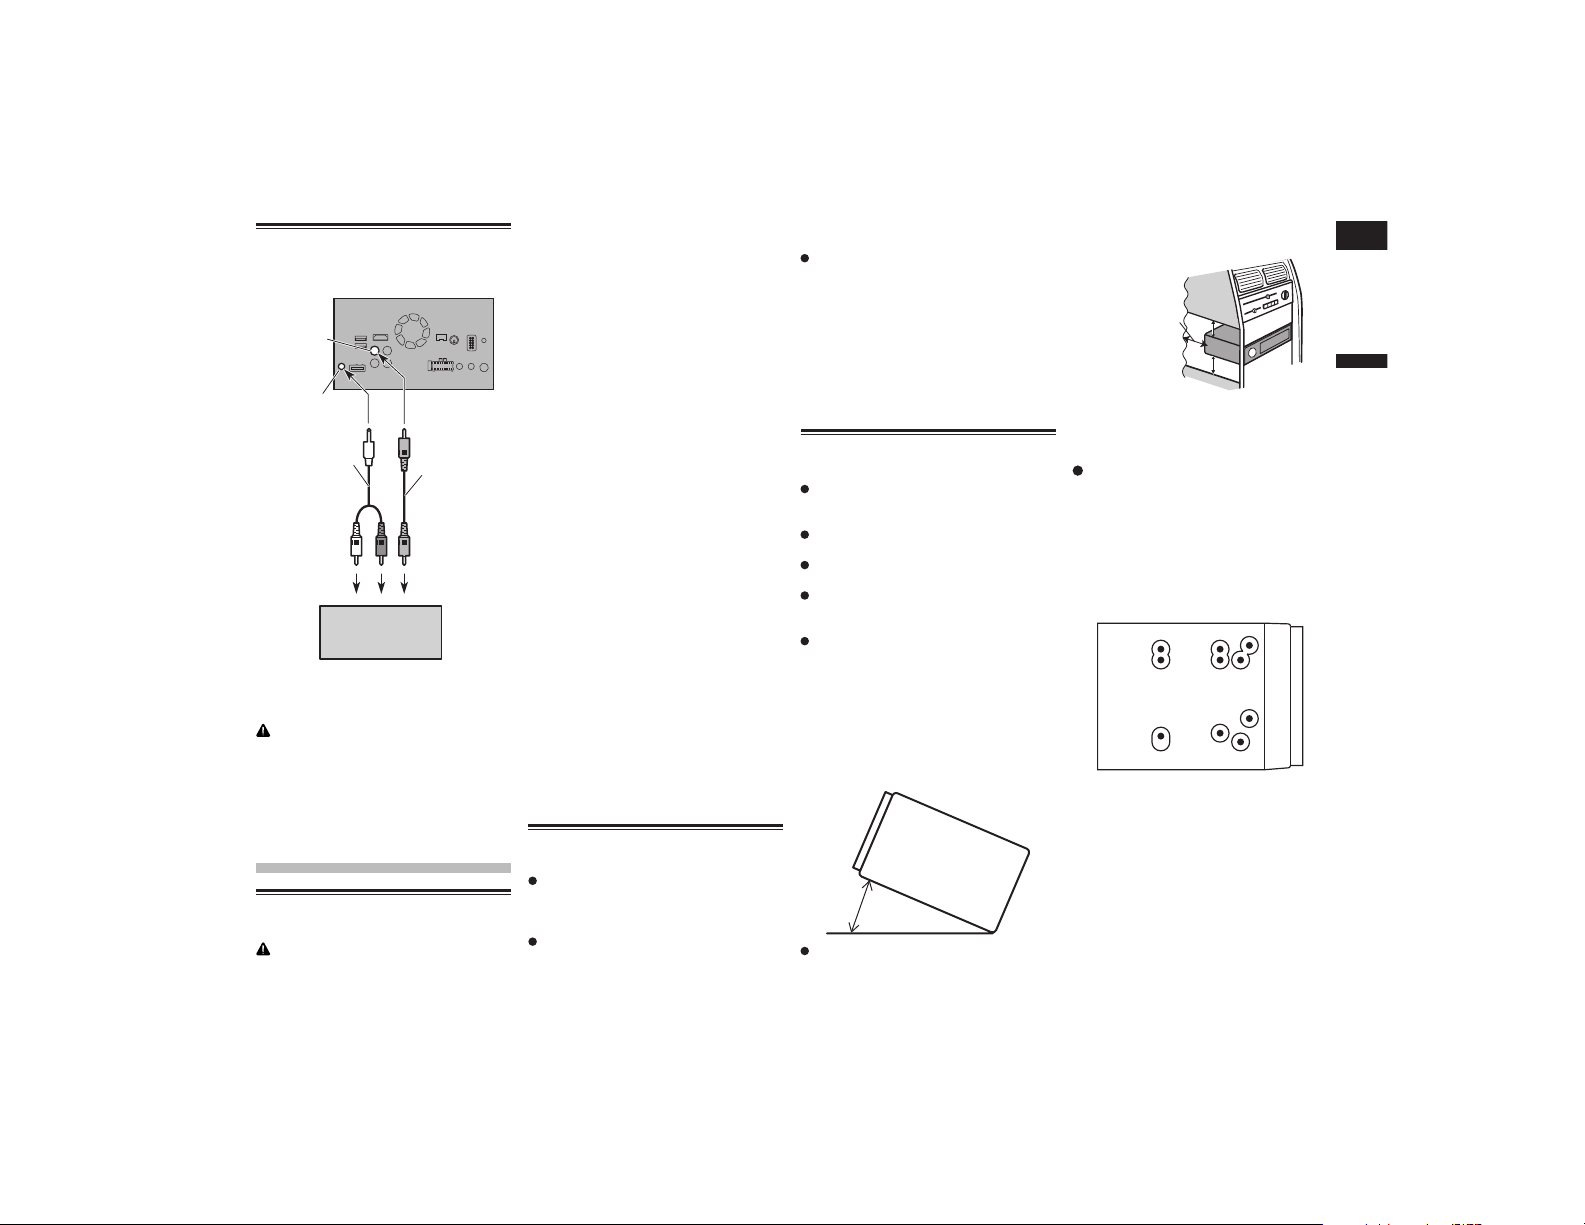
Français
32
Chapitre
87
Fr
Connexion de l’afcheur
arrière
Écran arrière avec
prises d’entrée RCA
(vendu séparément)
Câble RCA
(vendu
séparément)
Câble connecteur
mini-prise (vendu
séparément)
Ce produit
Sortie audio arrière
Jaune (V OUT)
Vers la entrée
vidéo
Vers les entrées
audio
■ Utilisation d’un écran arrière
raccordé à la sortie vidéo arrière
AVERTISSEMENT
NE JAMAIS installer l’écran arrière dans
un endroit permettant au conducteur de
regarder la source vidéo en conduisant.
La sortie vidéo arrière de ce produit permet
de connecter un afficheur permettant aux
passagers occupant les sièges arrière de
visionner la source vidéo.
Installation
Précautions à prendre avant
l’installation
ATTENTION
Ne jamais installer ce produit dans un
endroit ou de telle sorte qu’il :
— risque de blesser le conducteur ou
les passagers en cas d’arrêt brusque.
— puisse interférer avec les com-
mandes de manœuvre du conducteur
tel que sur le plancher, en face du
siège conducteur, ou à proximité du
volant ou du levier de vitesse.
— Pour garantir une installation cor-
recte, assurez-vous d’utiliser les
pièces fournies de la façon spécifiée.
Si certaines pièces ne sont pas
fournies avec cet appareil, utilisez
des pièces compatibles de la façon
spécifiée après avoir fait vérifier la
compatibilité par votre revendeur.
Si d’autres pièces que les pièces
fournies ou compatibles sont utili-
sées, elles peuvent endommager les
pièces internes de ce produit ou être
mal assujetties, et le produit peut se
détacher.
— N’installez pas ce produit dans un
endroit où il risque (i) d’entraver la
visibilité du conducteur, (ii) d’altérer
le fonctionnement de certains sys-
tèmes de commande ou dispositifs
de sécurité, y compris les airbags ou
les touches de commande des feux
de détresse, ou (iii) d’empêcher le
conducteur de conduire le véhicule
en toute sécurité.
— N’installez jamais ce produit devant
ou à côté d’un endroit sur le tableau
de bord, une portière ou un pilier, à
partir duquel un des airbags du véhi-
cule doit se déployer. Veuillez vous
reporter au mode d’emploi du véhi-
cule pour en savoir plus sur les zones
de déploiement des airbags frontaux.
Avant de procéder à
l’installation
Consultez le concessionnaire le plus
proche si l’installation nécessite de per-
cer des trous ou toute autre modification
du véhicule.
Avant d’installer ce produit définiti-
vement, connectez le câblage provi-
soirement pour vous assurer que les
connexions sont correctes et que le
système fonctionne normalement.
N’installez pas ce produit dans une
position où l’ouverture du panneau LCD
serait gênée par des obstacles, le levier
de vitesse par exemple. Avant d’installer
ce produit, veillez à laisser un espace
suffisant afin que le panneau LCD ne
gêne pas l’utilisation du levier de vitesse
lorsqu’il est complètement ouvert. Ceci
pourrait entraîner une interférence avec
le levier de vitesse ou un dysfonctionne-
ment du mécanisme de ce produit.
Installation de ce produit
■ Remarques sur l’installation
N’installez pas ce produit dans un endroit
soumis à des températures élevées ou à
l’humidité. Par exemple :
À proximité du chauffage, de la ventila-
tion ou de la climatisation.
En plein soleil, comme sur le dessus du
tableau de bord.
Endroits susceptibles d’être exposés à la
pluie, près de la portière ou sur le plan-
cher du véhicule par exemple.
Installez ce produit horizontalement sur
une surface avec une tolérance de 0 à 30
degrés (dans une plage de 5 degrés vers
la gauche ou la droite). Une mauvaise ins-
tallation de l’unité avec une inclinaison
de la surface supérieure à cette marge de
tolérance risque d’accroître le potentiel
d’erreurs dans l’affichage de l’empla-
cement, et de réduire les performances
d’affichage.
30°
Lors de l’installation de l’appareil, laissez
suffisamment d’espace derrière le pan-
neau arrière pour permettre une dissi-
pation correcte de la chaleur et enroulez
tout câble gênant de façon qu’il n’obstrue
pas les orifices de ventilation.
Laissez suffisamment
d’espace
5 cm
5 cm
■ Installation en utilisant les trous
de vis sur les côtés de ce produit
Fixez ce produit au support de
montage radio d’usine.
Positionnez ce produit de sorte que les trous
des vis soient alignés avec ceux du support,
puis serrez les vis aux trois emplacements
de chaque côté.
Utilisez les vis à tête bombée (5 mm ×
8 mm) ou les vis à tête plate (5 mm × 9 mm),
en fonction de la forme des trous de vis du
support.
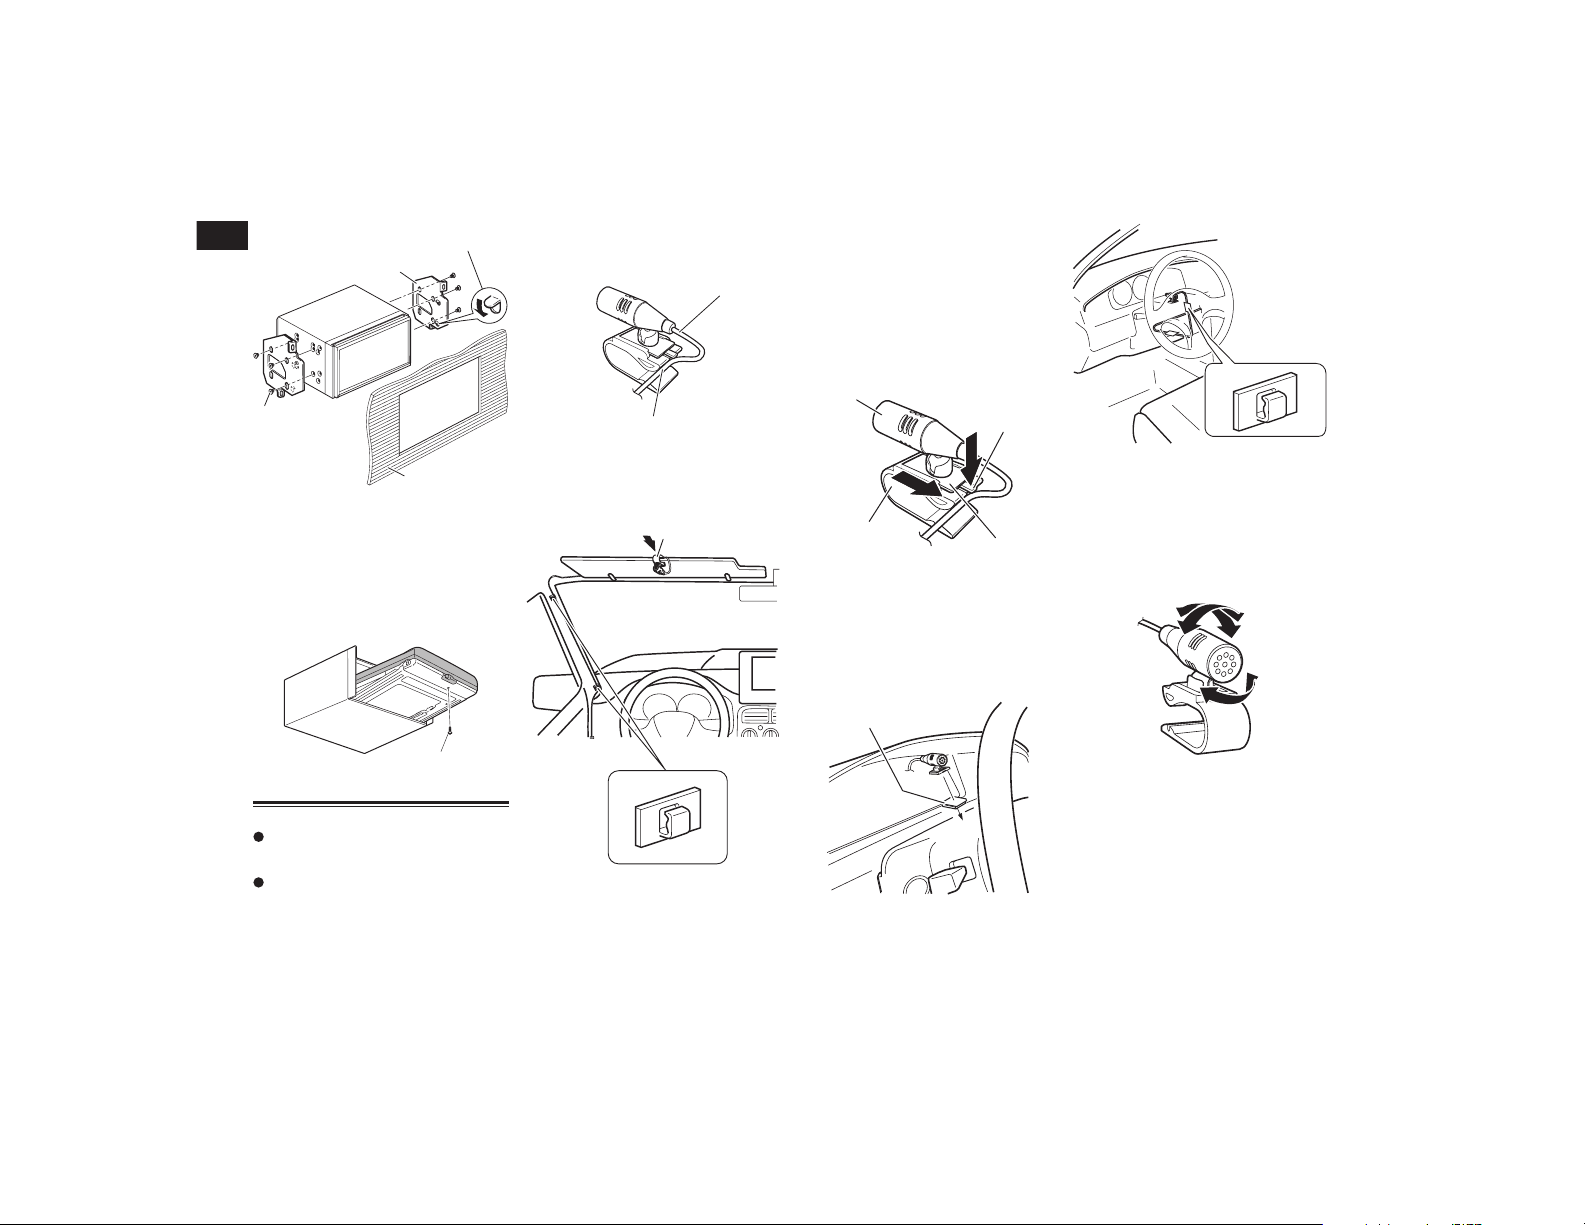
32
Chapitre
88
Fr
Si le cliquet interfère avec l’installation,
vous pouvez le replier complètement vers
le bas.
1
2
3
1 Support de montage radio d’usine
2 Tableau de bord ou console
3 Vis à tête bombée ou vis à tête plate
Veillez à utiliser les vis fournies avec ce
produit.
■ Fixation de la façade
Si vous ne souhaitez pas détacher la face
avant, elle peut être fixée avec les vis
fournies.
1
1 Vis (2 mm × 6 mm)
Installation du microphone
Installez le microphone dans un endroit
permettant une bonne réception de la
voix du conducteur.
Éteignez ce produit (ACC OFF) avant de
connecter le microphone.
■ Installation sur le pare-soleil
1 Insérez le fil du microphone dans la
fente.
1
2
1 Fil du microphone
2 Fente
2 Fixez l’agrafe pour micro au
pare-soleil.
1
2
1 Agrafe pour micro
2 Serre-fils
Utilisez des serre-fils vendus séparément
pour fixer le fil conducteur aux endroits
nécessaires dans le véhicule.
Installez le microphone sur le pare-so-
leil lorsqu’il est en position relevée. La
reconnaissance vocale est impossible
lorsque le pare-soleil est en position
abaissée.
■ Installation sur la colonne de
direction
1 Retirez la base du microphone de
l’agrafe pour micro en faisant glis-
ser la base du microphone tout en
enfonçant la languette.
4
1
2
3
1 Microphone
2 Languette
3 Base du microphone
4 Agrafe pour micro
2 Montez le microphone sur la
colonne de direction.
Installez le microphone sur la colonne de
direction, à distance du volant.
1
2
1 Bande adhésive à double face
2 Serre-fils
Utilisez des serre-fils vendus séparément
pour fixer le fil conducteur aux endroits
nécessaires dans le véhicule.
■ Réglage de l’angle du
microphone
L’angle du microphone peut être ajusté.
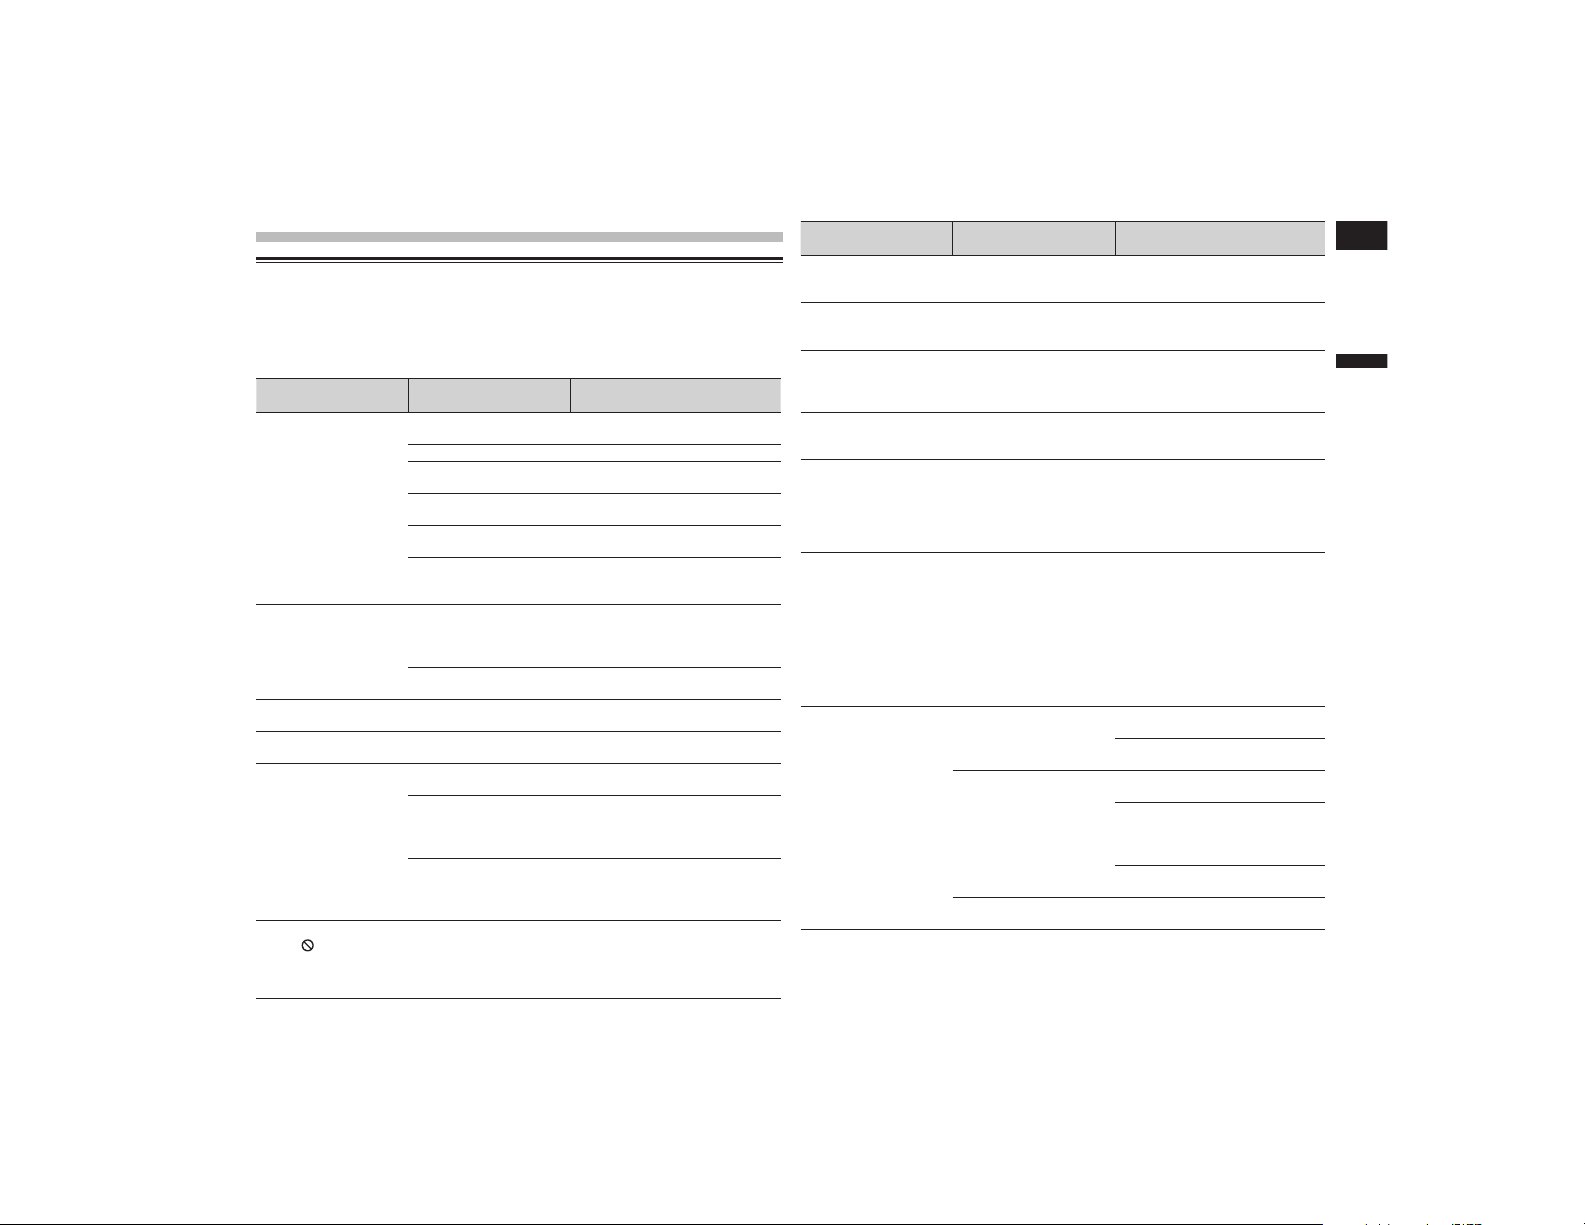
Français
Annexe
89
Fr
Annexe
Dépannage
Consultez cette section si vous rencontrez des difficultés pour utiliser ce produit. Les
principaux problèmes sont indiqués ci-dessous, accompagnés des causes probables et de
solutions suggérées. Si vous ne trouvez pas ici de solution à votre problème, adressez-vous à
votre revendeur ou à un centre de service Pioneer agréé.
Problèmes avec l’écran de commandes AV
Symptôme Causes possibles Action
Référence
Lecture du CD ou DVD
impossible.
Le disque a été inséré à
l’envers.
Insérez le disque avec l’étiquette
vers le haut.
Le disque est sale. Nettoyez le disque.
Le disque est fissuré ou
endommagé.
Insérez un disque rond normal.
Les fichiers du disque sont
dans un format incorrect.
Vérifiez le format des fichiers.
Le format du disque ne
peut pas être lu.
Changez de disque.
Le type de disque chargé
n’est pas compatible avec
ce produit.
Vérifiez le type du disque.
la page 95
L’écran est recouvert d’un
message d’avertissement
et la vidéo n’est pas
visible.
Le fil de détection de la
position du frein à main
n’est pas branché ou le
frein n’est pas serré.
Branchez correctement le fil du
frein à main et serrez le frein à
main.
Le verrouillage par frein à
main est activé.
Stationnez votre véhicule en lieu
sûr et serrez le frein à main.
Pas de sortie vidéo de
l’équipement raccordé.
Le réglage “Entrée AV” est
incorrect.
Rectifiez les réglages.
la page 61
L’audio ou la vidéo saute.
Le produit n’est pas ferme-
ment fixé.
Fixez-le fermement.
Aucun son n’est émis.
Le niveau du volume
n’augmente pas.
Les câbles ne sont pas
branchés correctement.
Connectez les câbles correctement.
Le système est en mode de
lecture d’image fixe, ralenti
ou image par image d’un
DVD-Vidéo.
Il n’y a aucun son en mode de lec-
ture d’image fixe, ralenti ou image
par image d’un DVD-Vidéo.
Le système est en pause ou
exécute un retour ou une
avance rapide pendant la
lecture du disque.
Pour tout autre support qu’un CD
musical (CD-DA), il n’y a pas de son
en retour ou avance rapide.
L’icône
est affichée,
et l’opération est
impossible.
L’opération n’est pas com-
patible avec la configura-
tion vidéo.
Cette opération n’est pas possible.
(Par exemple, le DVD en cours de
lecture ne possède pas cet angle,
ce système audio, cette langue de
sous-titre, etc.)
Symptôme Causes possibles Action
Référence
L’image s’arrête (pause)
et le produit ne fonc-
tionne pas.
La lecture des données
est impossible pendant la
lecture du disque.
Arrêtez une fois la lecture, puis
reprenez-la.
L’image est étirée, avec
un rapport de format
incorrect.
Le réglage du rapport
n’est pas correct pour
l’affichage.
Sélectionnez le réglage approprié
pour cette image.
la page 75
Un message de verrouil-
lage parental est affiché
et la lecture du DVD n’est
pas possible.
Le verrouillage parental
est actif.
Désactivez le verrouillage parental
ou changez le niveau.
la page 75
Le verrouillage parental
pour la lecture du DVD
ne peut pas être annulé.
Le numéro de code est
incorrect.
Saisissez le numéro de code
correct.
la page 75
La lecture ne se fait pas
avec les réglages de
langue audio et langue
des sous-titres sélection-
nés dans “Configuration
DVD/DivX”.
Le DVD lu ne comporte pas
de dialogues ou sous-titres
dans la langue sélection-
née dans “Configuration
DVD/DivX”.
Il est impossible de changer de
langue si la langue sélectionnée
dans “Configuration DVD/DivX”
n’est pas enregistrée sur le disque.
la page 74
L’image est très floue/
distordue et sombre
pendant la lecture.
Le disque émet un signal
interdisant de copier.
(Certains disques en sont
pourvus.)
Étant donné que le produit est
compatible avec le système de pro-
tection contre la copie analogique
CopyGuard, des bandes horizon-
tales ou autres imperfections
peuvent affecter l’image lorsqu’un
disque pourvu de ce type de signal
de protection est visionné sur cer-
tains écrans. Ceci n’est pas le signe
d’un dysfonctionnement.
Impossible d’utiliser
l’iPod.
L’iPod est bloqué.
Reconnectez l’iPod avec le câble
d’interface USB Pour iPod / iPhone.
Mettez à jour la version logicielle
de l’iPod.
Une erreur s’est produite.
Reconnectez l’iPod avec le câble
d’interface USB Pour iPod / iPhone.
Stationnez votre véhicule en lieu
sûr et coupez le contact (ACC OFF).
Ensuite, rallumez le contact (ACC
ON).
Mettez à jour la version logicielle
de l’iPod.
Les câbles ne sont pas
branchés correctement.
Connectez les câbles correctement.
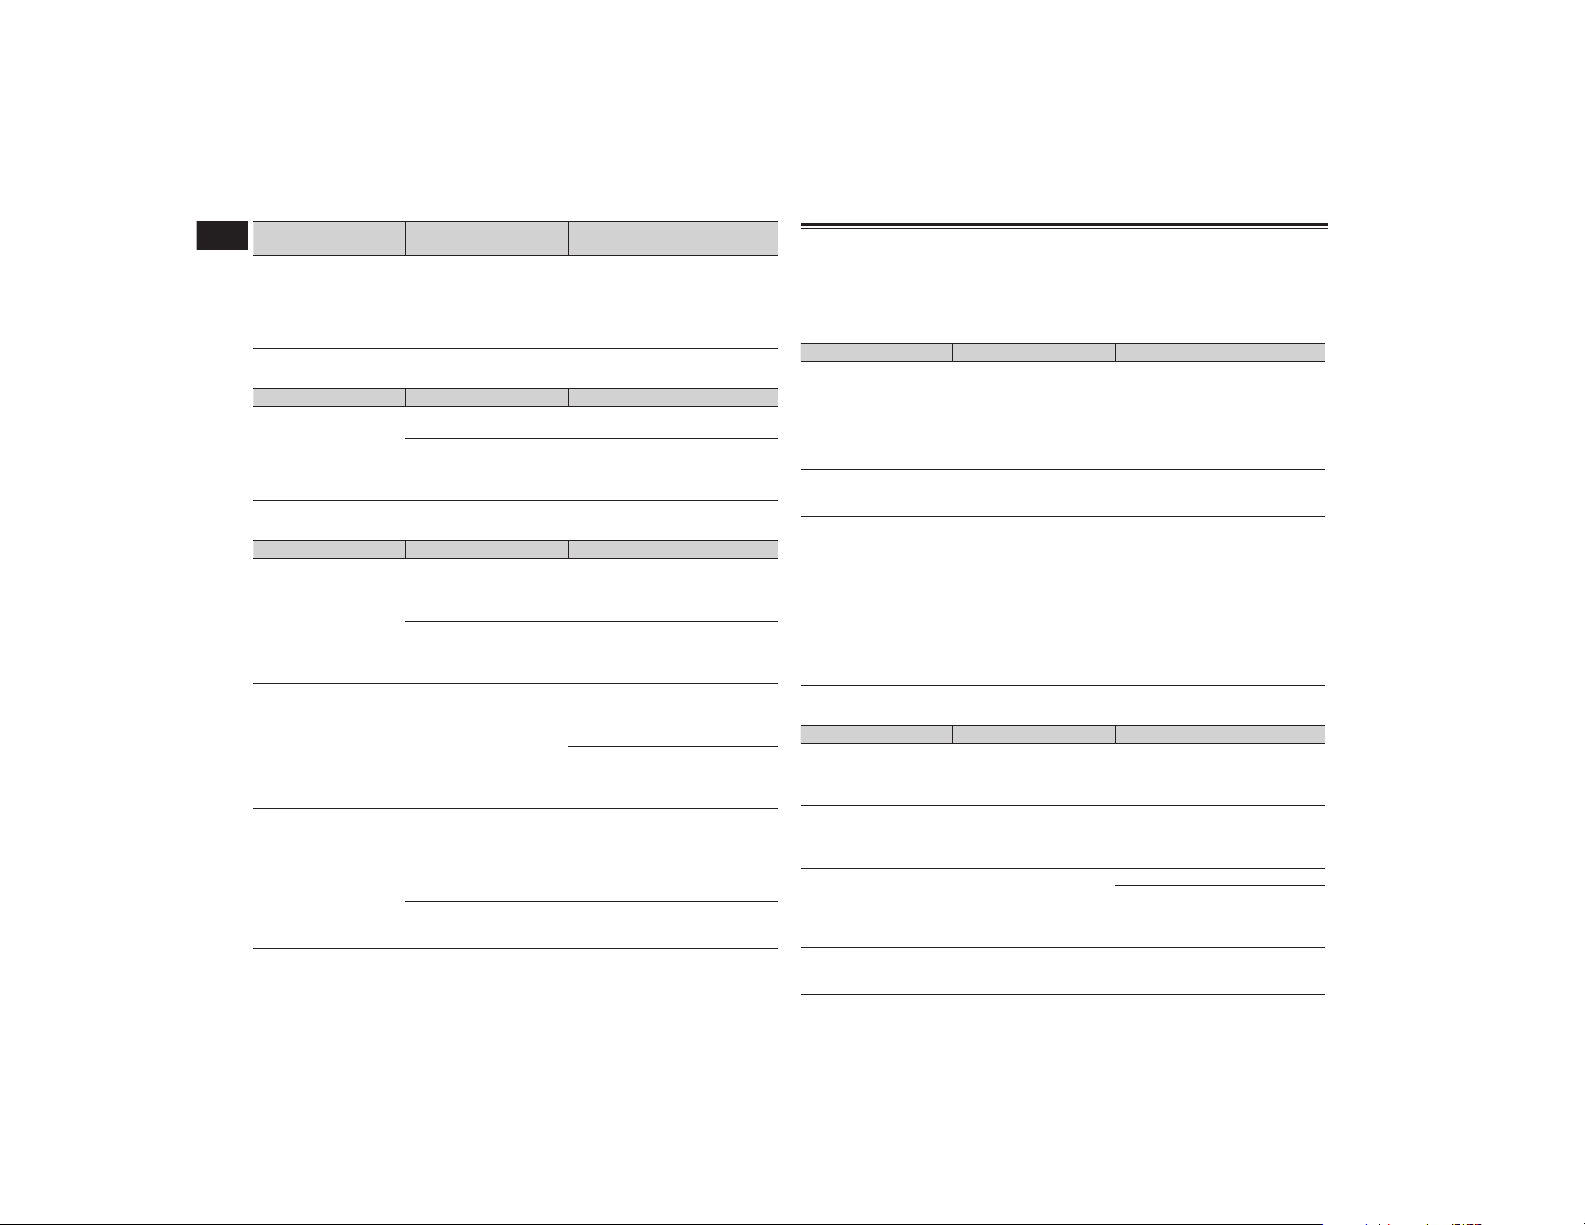
Annexe
90
Fr
Symptôme Causes possibles Action
Référence
Le son depuis l’iPod n’est
pas entendu.
Le sens de sortie du son
peut automatiquement
changer lorsque des
connexions Bluetooth
et USB sont utilisées
simultanément.
Utilisez l’iPod pour modifier le sens
de sortie du son.
Problèmes avec l’écran du téléphone
Symptôme Causes possibles Action
Impossible de compo-
ser un numéro, car les
touches de l’écran tactile
ne sont pas actives.
Votre téléphone est hors
réseau.
Réessayez après être revenu dans
une zone couverte.
La connexion entre le
téléphone portable et le
produit est impossible pour
le moment.
Suivez la procédure de connexion.
Problèmes avec l’écran de l’application
Symptôme Causes possibles Action
Un écran noir est affiché.
Pendant que vous utilisiez
une application, celle-ci
a été interrompue côté
smartphone.
Appuyez sur le bouton HOME pour
afficher l’écran de Menu principal.
Le système d’exploitation
du smartphone peut être
en attente d’opérations sur
l’écran.
Arrêtez le véhicule dans un lieu sûr
et vérifiez l’écran du smartphone.
L’écran est affiché, mais
aucune opération n’est
possible.
Une erreur s’est produite.
Stationnez votre véhicule en lieu
sûr et coupez le contact (ACC OFF).
Ensuite, rallumez le contact (ACC
ON).
Si un appareil Android est
connecté, coupez la connexion
Bluetooth depuis ce produit, puis
rétablissez-la.
Le smartphone n’était
pas chargé.
La recharge s’est arrêtée,
car la température du
smartphone a augmenté
en raison de son utilisation
prolongée pendant la
recharge.
Débranchez le smartphone du
câble et patientez jusqu’à ce qu’il
refroidisse.
La batterie a consommé
plus d’énergie qu’elle n’a
été rechargée.
Ce problème peut être résolu en
interrompant les services inutiles
sur le smartphone.
Messages d’erreur
Lorsqu’un problème surgit avec les fonctions Bluetooth, un message d’erreur apparaît sur
l’écran. Reportez-vous au tableau ci-dessous pour identifier le problème, puis effectuez
l’action corrective suggérée. Si l’erreur persiste, enregistrez le message d’erreur et contactez
votre revendeur ou le centre de service Pioneer le plus proche.
Commun
Message Causes possibles Action
Erreur AMP
Ce produit ne fonctionne
pas ou le branchement des
haut-parleurs est incor-
rect ; le circuit de protec-
tion est activé.
Vérifiez le branchement des haut-
parleurs. Si le message ne disparaît
toujours pas, même après avoir
coupé/allumé le moteur, contactez
votre revendeur ou un centre de
service Pioneer agréé pour obtenir
de l’aide.
TEMP
La température du produit
est en dehors de la plage
de fonctionnement normal.
Patientez jusqu’à ce que la tempé-
rature du produit revienne dans la
plage de fonctionnement normal.
Surchauffe du produit.
Le système s’éteindra
automatiquement dans
1 min. Redémarrer le
produit au moyen de
ACC-Off/On pourrait
régler ce problème. Si
ce message s’affiche
de nouveau, il est
possible que le produit
soit défectueux.
La température est trop
élevée pour que ce produit
puisse fonctionner.
Suivez les instructions affichées à
l’écran. Si cela ne résout pas le pro-
blème, contactez votre revendeur
ou un centre Pioneer agréé pour
obtenir de l’aide.
Pandora
Message Causes possibles Action
Erreur de
communication.
Défaillance de l’iPod.
Débranchez le câble de l’iPod. Dès
que le menu principal de l’iPod
s’affiche, rebranchez l’iPod et
réinitialisez-le.
Error-19 Échec de communication.
Débranchez le câble de l’iPod. Dès
que le menu principal de l’iPod
s’affiche, rebranchez l’iPod et
réinitialisez-le.
La limite de saut est
atteinte.
Limite de saut atteinte.
Ne dépassez pas la limite de saut.
En raison des restrictions de
licences de musique, Pandora
limite le nombre total de sauts par
heure.
Vérifiez l’appareil
Message d’erreur de
périphérique affiché dans
l’application Pandora.
Veuillez vérifier votre périphérique
connecté.

Français
Annexe
91
Fr
Message Causes possibles Action
USB incompatible
Le périphérique de stoc-
kage USB connecté n’est
pas pris en charge par ce
produit.
Déconnectez votre périphérique et
remplacez-le par un périphérique
de stockage USB compatible.
Vérifiez l’USB
Le connecteur USB
ou le câble USB est en
court-circuit.
Vérifiez que le connecteur USB ou
le câble USB n’est pas coincé ou
endommagé.
Le périphérique de
stockage USB connecté
consomme plus que le cou-
rant maximum autorisé.
Déconnectez le périphérique de
stockage USB et ne l’utilisez pas.
Coupez le contact, rallumez-le,
puis connectez un périphérique de
stockage USB compatible.
Aha Radio
Message Causes possibles Action
Erreur de comm. Défaillance de l’iPod.
Débranchez le câble de l’iPod. Dès
que le menu principal de l’iPod
s’affiche, rebranchez l’iPod et
réinitialisez-le.
Error-02-6X Défaillance de l’iPod.
Débranchez le câble de l’iPod. Dès
que le menu principal de l’iPod
s’affiche, rebranchez l’iPod et
réinitialisez-le.
Radio Satellite SiriusXM
Message Causes possibles Action
Référence
Vérif. anten.
La connexion de l’antenne
est incorrecte.
Vérifiez la connexion de l’antenne.
Si le message ne disparaît pas
même après avoir éteint puis
démarré le moteur, consultez votre
distributeur ou le centre de service
Pioneer agréé le plus proche.
Vérif. Synton.
La connexion du syn-
toniseur pour véhicule
SiriusXM Connect est
incorrecte.
Vérifiez la connexion du syntoni-
seur et la tension de la batterie. Si
le message ne disparaît pas même
après avoir éteint puis démarré le
moteur, consultez votre distributeur
ou le centre de service Pioneer le
plus proche.
Message Causes possibles Action
Référence
Sign. abs.
Le syntoniseur pour véhi-
cule SiriusXM Connect
rencontre des difficultés
pour recevoir le signal
satellite SiriusXM.
Vérifiez que votre véhicule se trouve
à l’extérieur et que l’horizon au sud
est dégagé.
Vérifiez que l’antenne à montage
magnétique SiriusXM est installée
sur une surface métallique à l’exté-
rieur du véhicule.
Éloignez l’antenne SiriusXM de tout
obstacle.
Aucun contenu
TuneScan n’est pas
disponible.
Effectuez l’opération avec un autre
canal préréglé.
Chaîne non disponible.
Le canal que vous avez
demandé n’est pas un
canal SiriusXM valide.
Vérifiez le réglage du canal
SiriusXM.
Abonnement mis à jour
Appuyez sur la touche
Retour pour continuer
Ce produit a détecté un
changement dans votre
statut d’abonnement
SiriusXM.
Touchez [« Retour »] pour effacer
le message.
Chaîne non comprise
dans l’abonnement.
Contactez SiriusXM
pour vous abonner.
Le canal que vous avez
demandé n’est pas inclus
dans votre abonnement à
SiriusXM.
Vérifiez le contenu de votre abonne-
ment à SiriusXM.
Chaîne verrouillée
Veuillez saisir le code
de verrouillage
Verrouillé par la fonction
de verrouillage parental de
la radio.
Déverrouillez le canal.
Artiste non disponible
La fonction mémo d’alerte
n’est pas disponible.
Effectuez l’opération avec un autre
canal.
Chanson non
disponible
La fonction mémo d’alerte
n’est pas disponible.
Effectuez l’opération avec un autre
canal.
Équipe non disponible
La fonction mémo d’alerte
n’est pas disponible.
Effectuez l’opération avec un autre
canal.
La mémoire des alertes
est pleine. Vous pouvez
gérer la mémoire des
alertes dans la liste des
alertes.
La mémoire est saturée.
Effacez la liste d’alertes.
la page 58
Mémoire pleine
La mémoire est devenue
saturée pendant la pause
de la lecture.
Reprenez la lecture.
Mémoire presque
pleine
La mémoire est devenue
presque saturée pendant la
pause de la lecture.
Reprenez la lecture.
Annexe
92
Fr
Disque
Message Causes possibles Action
Référence
Error-02-XX/FF-FF
Le disque est sale. Nettoyez le disque.
Le disque est rayé. Changez de disque.
Le disque est inséré à
l’envers.
Vérifiez que le disque est placé
correctement.
Il y a une erreur électrique
ou mécanique.
Appuyez sur le bouton RESET.
la page 8
Disque de région diff.
Le disque n’a pas le même
numéro de région que ce
produit.
Remplacez le DVD par un autre
ayant un numéro de région correct.
Disque injouable
Ce type de disque ne peut
pas être lu sur ce produit.
Remplacez le disque par un disque
pouvant être lu sur ce produit.
Fichier non joué
Ce type de fichier ne peut
pas être lu sur ce produit.
Sélectionnez un fichier pouvant
être lu.
la page 96, la page 101
Sauté
Le disque inséré contient
des fichiers protégés par
DRM.
Les fichiers protégés sont ignorés.
Protection
Tous les fichiers du disque
inséré sont protégés par
DRM (gestion des droits
numériques).
Changez de disque.
Cet abonnement à
DivX a expiré.
Le disque inséré contient
du contenu VOD DivX
expiré.
Sélectionnez un fichier pouvant
être lu.
Résolution vidéo non
prise en charge.
Des fichiers ne pouvant
pas être lus sur le produit
sont inclus dans le fichier.
Sélectionnez un fichier pouvant
être lu.
la page 96, la page 101
Ecriture impossible sur
mémoire Flash.
L’historique de lecture des
contenus VOD ne peut pas
être enregistré pour une
raison inconnue.
Réessayez.
Si le message apparaît souvent,
contactez votre revendeur.
Votre appareil n’est
pas autorisé à lire des
vidéos DivX protégés.
Le code d’enregistrement
DivX du produit n’a pas été
autorisé par le fournisseur
de contenu VOD DivX.
Enregistrez le produit auprès du
fournisseur de contenu VOD DivX.
Fréquence d’image
vidéo non prise en
charge.
La cadence du fichier DivX
est supérieure à 30 ips.
Sélectionnez un fichier pouvant
être lu.
Format audio non pris
en charge
Ce type de fichier n’est
pas pris en charge sur ce
produit.
Sélectionnez un fichier pouvant
être lu.
la page 96, la page 101
Périphérique de stockage externe (USB, SD)
Message Causes possibles Action
Référence
Error-02-9X/-DX Échec de communication.
Coupez le contact puis rallumez-le.
Déconnectez le périphérique de
stockage USB.
Changez la source, puis revenez au
périphérique de stockage USB.
Fichier non joué
Ce type de fichier ne peut
pas être lu sur ce produit.
Sélectionnez un fichier pouvant
être lu.
la page 96, la page 101
La sécurité du périphérique
de stockage externe (USB,
SD) connecté est activée.
Suivez les instructions du périphé-
rique de stockage externe (USB,
SD) pour désactiver la sécurité.
Sauté
Le périphérique de stoc-
kage externe (USB, SD)
connecté contient des
fichiers protégés par DRM.
Les fichiers protégés sont ignorés.
Protection
Tous les fichiers sur le
périphérique de stoc-
kage externe (USB, SD)
connecté contiennent du
contenu DRM.
Remplacez le périphérique de
stockage externe (USB, SD).
USB incompatible
Le périphérique de stoc-
kage USB connecté n’est
pas pris en charge par ce
produit.
Déconnectez votre périphérique et
remplacez-le par un périphérique
de stockage USB compatible.
Flash incompatible
La carte mémoire SD n’est
pas prise en charge par ce
produit.
Retirez votre périphérique et rem-
placez-le par une carte mémoire SD
compatible.
la page 95
Formatez la carte mémoire
SD. L’utilisation du logiciel SD
Formatter est recommandée pour
formater des cartes mémoire SD.
la page 95
Vérifiez l’USB
Le connecteur USB
ou le câble USB est en
court-circuit.
Vérifiez que le connecteur USB ou
le câble USB n’est pas coincé ou
endommagé.
Le périphérique de
stockage USB connecté
consomme plus que le cou-
rant maximum autorisé.
Déconnectez le périphérique de
stockage USB et ne l’utilisez pas.
Coupez le contact, rallumez-le,
puis connectez un périphérique de
stockage USB compatible.
Résolution vidéo non
prise en charge.
Des fichiers ne pouvant
pas être lus sur le produit
sont inclus dans le fichier.
Sélectionnez un fichier pouvant
être lu.
la page 96, la page 101
Français
Annexe
93
Fr
Message Causes possibles Action
Référence
USB1 déconnecté pour
protéger l’appareil.
Ne réinsérez pas la
mémoire USB dans
l’appareil. Appuyez
sur réinitialiser pour
redémarrer la mémoire
USB.
USB2 déconnecté pour
protéger l’appareil.
Ne réinsérez pas la
mémoire USB dans
l’appareil. Appuyez
sur réinitialiser pour
redémarrer la mémoire
USB.
Le connecteur USB
ou le câble USB est en
court-circuit.
Vérifiez que le connecteur USB ou
le câble USB n’est pas coincé ou
endommagé.
Le périphérique de
stockage USB connecté
consomme plus que le cou-
rant maximum autorisé.
Déconnectez le périphérique de
stockage USB et ne l’utilisez pas.
Coupez le contact, rallumez-le,
puis connectez un périphérique de
stockage USB compatible.
Le câble d’interface USB
Pour iPod / iPhone est en
court-circuit.
Vérifiez que le câble d’interface
USB Pour iPod / iPhone ou le
câble USB n’est pas coincé ou
endommagé.
Format audio non pris
en charge
Ce type de fichier n’est
pas pris en charge sur ce
produit.
Sélectionnez un fichier pouvant
être lu.
la page 96, la page 101
iPod
Message Causes possibles Action
Error-02-6X/-9X/-DX Défaillance de l’iPod.
Débranchez le câble de l’iPod. Dès
que le menu principal de l’iPod
s’affiche, rebranchez l’iPod et
réinitialisez-le.
Error-02-67
La version du micrologiciel
de l’iPod est ancienne.
Mettez à jour la version d’iPod.
Balisage iTunes
Message Causes possibles Action
Error-8D
La ROM FLASH intégrée a
rencontré une erreur.
Coupez le contact puis rallumez-le.
Échec de stockage des
mots-clés.
Les informations de balise
ne peuvent pas être enre-
gistrées sur ce produit.
Réessayez.
Déjà stockés.
Ces informations de balise
sont déjà enregistrées dans
la mémoire.
Les informations de balise ne
peuvent être enregistrées qu’une
seule fois pour une chanson don-
née. Les informations de balise
ne peuvent pas être enregistrées
plusieurs fois pour une même
chanson.
Message Causes possibles Action
Mémoire pleine.
Connectez l’iPod.
Les informations de balise
sont correctement enregis-
trées. La mémoire flash de
ce produit est saturée.
Les informations de balise sur ce
produit sont automatiquement
transférées sur l’iPod lorsqu’un
iPod est connecté.
Mémoire pleine. Mots-
clés non enregistrés.
Connectez l’iPod.
La mémoire flash du
produit utilisée comme
stockage temporaire est
saturée.
Les informations de balise sur ce
produit sont automatiquement
transférées sur l’iPod lorsqu’un
iPod est connecté.
iPod plein. Mots-clés
non transférés.
La mémoire utilisée pour
les informations de balise
sur l’iPod est saturée.
Synchronisez l’iPod avec iTunes et
effacez la liste de lecture balisée.
Échec de transfert
des mots-clés.
Reconnectez votre
iPod.
Les informations de balise
de ce produit ne peuvent
pas être transférées sur
l’iPod.
Vérifiez l’iPod et réessayez.
Bluetooth
Message Causes possibles Action
Error-10
Problème d’alimentation
du module Bluetooth de ce
produit.
Coupez le contact puis rallumez-le.
Si le message d’erreur s’affiche
toujours après cette action, contac-
tez votre revendeur ou un centre de
service Pioneer agréé.
Android Auto
Message Causes possibles Action
Référence
Android Auto s’est
arrêté.
L’appareil connecté n’est
pas compatible avec
Android Auto.
Vérifiez si l’appareil est compatible
avec Android Auto.
Le démarrage d’Android
Auto a échoué pour une
raison ou pour une autre.
Débranchez le câble du smart-
phone, puis reconnectez le smart-
phone après quelques secondes.
Redémarrez le smartphone.
Coupez le contact puis rallumez-le.
Si le message d’erreur s’affiche
toujours après cette action, contac-
tez votre revendeur ou un centre de
service Pioneer agréé.
L’heure réglée dans ce pro-
duit n’est pas correcte.
Vérifiez si l’heure est réglée
correctement.
Le jumelage
Bluetooth a échoué.
Jumelez votre
téléphone Android
manuellement.
L’appariement Bluetooth a
échoué pour une raison ou
pour une autre.
Appariez manuellement ce produit
avec l’appareil.
la page 15, la page 16

Annexe
94
Fr
MirrorLink
Message Causes possibles Action
La liste d’applications
n’a pu être lue.
Échec de chargement de la
liste d’applications.
Débranchez le câble du smart-
phone, puis reconnectez le smart-
phone après quelques secondes.
Coupez le contact puis rallumez-le.
Si le message d’erreur s’affiche
toujours après cette action, réinitia-
lisez le smartphone.
Si le message d’erreur s’affiche
toujours après cette action, contac-
tez votre revendeur ou un centre de
service Pioneer agréé.
Il n’y a aucune appli-
cation prise en charge
sur votre appareil
MirrorLink.
Aucune application prise
en charge n’a été trouvée.
Installez des applications compa-
tibles avec MirrorLink sur votre
périphérique MirrorLink.
Erreur de
communication.
Une erreur de communica-
tion s’est produite.
Débranchez le câble du smart-
phone, puis reconnectez le smart-
phone après quelques secondes.
Coupez le contact puis rallumez-le.
Si le message d’erreur s’affiche
toujours après cette action, réinitia-
lisez le smartphone.
Si le message d’erreur s’affiche
toujours après cette action, contac-
tez votre revendeur ou un centre de
service Pioneer agréé.
Échec de lancement de
l’application.
Échec de lancement de
l’application.
Réessayez.
Échec d’affichage
de l’écran de votre
appareil en raison
de l’irrégularité de la
résolution.
La taille de l’image est trop
grande.
La taille des images transférées du
périphérique est supérieure à 800
× 480.
Si votre appareil
MirrorLink est ver-
rouillé, déverrouillez-le
lorsqu’il n’y a aucun
danger et que cela
ne constitue pas une
infraction au code de
la route.
L’appareil MirrorLink est
verrouillé.
Déverrouillez l’appareil MirrorLink.
Manipulation et entretien des
disques
Certaines précautions fondamentales sont
nécessaires lors du maniement de vos
disques.
■ Lecteur intégré et précautions
Utilisez exclusivement des disques
traditionnels, parfaitement circulaires.
N’utilisez pas d’autres formes de disque.
N’utilisez pas de disque fissuré, ébréché,
gondolé, etc., car cela risque d’endom-
mager le lecteur intégré.
Utilisez des disques de 12 cm. N’utilisez
pas de disques de 8 cm ou un adaptateur
pour disques de 8 cm.
Quand vous utilisez des disques qui
peuvent être imprimés, vérifiez les ins-
tructions et les avertissements sur les
disques. En fonction des disques, l’in-
sertion et l’éjection peuvent ne pas être
possibles. Utiliser de tels disques peut
entraîner des dommages à l’équipement.
Ne collez pas d’étiquettes, n’écrivez
pas ou n’appliquez pas de produits
chimiques sur la surface du disque.
Ne collez pas d’étiquettes en vente dans
le commerce ou d’autres matériaux sur
les disques.
La condensation peut perturber tempo-
rairement le fonctionnement du lecteur
intégré.
La lecture des disques peut ne pas être
possible à cause de leurs caractéris-
tiques, de leur format, de l’application
utilisée pour l’enregistrement, de l’envi-
ronnement de lecture, des conditions de
stockage, etc.
Les secousses dues à la route peuvent
interrompre la lecture du disque.
Lisez les précautions d’emploi des
disques avant de les utiliser.
■ Conditions ambiantes pour le
disque
Par temps très chaud, un dispositif
protège ce produit en le mettant auto-
matiquement hors service en cas de
surchauffe.
En dépit du soin apporté lors de la
conception de ce produit, de petites
rayures, qui n’affectent pas le fonc-
tionnement normal du système, sont
susceptibles d’apparaître à la surface du
disque suite à une usure mécanique, en
raison des conditions ambiantes d’utili-
sation ou de nombreuses manipulations
du disque. Il ne s’agit aucunement d’un
dysfonctionnement de ce produit, mais
d’une usure normale.
Disques lisibles
■ DVD-Vidéo et CD
DVD-Vidéo
CD
p est une marque de commerce de
DVD Format/Logo Licensing Corporation.
p Les disques DVD audio ne peuvent pas
être lus. Il se peut que ce lecteur de DVD
ne puisse pas lire tous les disques por-
tant les marques ci-dessus.
■ Disques enregistrés en AVCHD
Cet appareil n’est pas compatible avec
les disques enregistrés au format AVCHD
(Advanced Video Codec High Definition).
N’insérez pas de disques AVCHD. Sinon,
il se peut que le disque ne puisse pas être
éjecté.
■ Lecture de DualDisc
Les DualDiscs possèdent une face CD
pour enregistrer des fichiers audio et une
face DVD pour enregistrer des fichiers
vidéo.

Français
Annexe
95
Fr
La face DVD peut être lue avec ce pro-
duit. Toutefois, la face CD des DualDiscs
étant physiquement incompatible avec
les normes générales CD, il se peut que
la face CD ne puisse pas être lue par ce
produit.
Si vous chargez et éjectez souvent
un DualDisc, vous risquez de rayer le
disque.
Certaines rayures peuvent entraîner des
problèmes de lecture sur ce produit.
Parfois, le DualDisc reste bloqué dans
le logement de chargement de disque et
ne peut pas être éjecté. Pour éviter ceci,
nous vous conseillons d’éviter l’utilisa-
tion de DualDisc avec ce produit.
Veuillez contacter le fabricant pour plus
d’informations sur les DualDiscs.
■ Dolby Digital
Ce produit mélange-abaisse en interne les
signaux Dolby Digital et le son est émis en
stéréo.
p Fabriqué sous licence de Dolby
Laboratories. Dolby et le symbole
double-D sont des marques déposées de
Dolby Laboratories.
Informations détaillées sur les
supports lisibles
■ Compatibilité
Remarques générales sur la com-
patibilité des disques
Certaines fonctions de ce produit
risquent de ne pas être disponibles pour
certains disques.
La compatibilité n’est pas garantie avec
tous les disques.
Il n’est pas possible de lire des disques
DVD-ROM/DVD-RAM.
La lecture des disques peut devenir
impossible suite à une exposition directe
au soleil, à de hautes températures ou
du fait des conditions de rangement
dans le véhicule.
Disques DVD-Vidéo
Les disques DVD-Vidéo qui ont des
numéros de région incompatibles ne
peuvent pas être lus sur ce lecteur de
DVD. Le numéro de région du lecteur se
trouve sur le châssis de ce produit.
Disques DVD-R/DVD-RW/DVD-R SL
(simple couche)/DVD-R DL (double
couche)
Les disques non finalisés ayant été
enregistrés au format Vidéo (mode vidéo)
ne peuvent pas être lus.
Les disques ayant été enregistrés au
format d’enregistrement vidéo (mode
VR) ne peuvent pas être lus.
Les disques DVD-R DL (double couche)
ayant été enregistrés en mode Layer
Jump ne peuvent pas être lus.
Pour des informations détaillées sur le
mode d’enregistrement, veuillez vous
adresser au fabricant du support, de
l’enregistreur ou du logiciel d’écriture.
Disques CD-R/CD-RW
Les disques non finalisés ne peuvent pas
être lus.
Il est possible que les disques CD-R/
CD-RW enregistrés sur un graveur CD
musical ou un ordinateur ne soient pas
lisibles du fait des caractéristiques du
disque, de la présence de rayures ou
poussière sur le disque ou en raison de
rayures, saleté ou condensation sur la
lentille du lecteur intégré.
Selon l’appareil d’enregistrement, le
logiciel d’écriture, leurs réglages et
d’autres facteurs environnementaux, il
se peut que les disques enregistrés sur
un ordinateur ne soient pas lisibles.
Veuillez enregistrer dans le format
correct. (Pour en savoir plus, veuillez
contacter le fabricant du support, de
l’enregistreur ou du logiciel d’écriture.)
Il est possible que ce produit n’affiche
pas les titres et autres informations tex-
tuelles enregistrées sur un CD-R/CD-RW
(dans le cas de données audio (CD-DA)).
Avant d’utiliser des CD-R/CD-RW, veuil-
lez lire les précautions à prendre.
Remarques générales sur le péri-
phérique de stockage externe
(USB, SD)
Ne laissez pas le périphérique de stoc-
kage externe (USB, SD) dans un empla-
cement aux températures élevées.
Selon le type du périphérique de stoc-
kage externe (USB, SD) que vous utilisez,
ce produit peut ne pas reconnaître le
périphérique de stockage ou les fichiers
peuvent ne pas être lus correctement.
Les informations textuelles de certains
fichiers audio et vidéo risquent de ne pas
s’afficher correctement.
Les extensions de fichiers doivent être
utilisées correctement.
Au démarrage de la lecture de fichiers
à partir d’un périphérique de stockage
externe (USB, SD) comportant une struc-
ture hiérarchique de dossiers complexe,
il peut y avoir un court temps d’attente.
Les opérations peuvent varier selon le
type de périphérique de stockage externe
(USB, SD).
Il peut ne pas être possible de reproduire
certains fichiers musicaux d’une source
SD ou USB à cause des caractéristiques
des fichiers, du format des fichiers, de
l’application utilisée pour l’enregistre-
ment, de l’environnement de lecture, des
conditions de stockage, etc.
Remarques sur les cartes mémoire
SD
Certaines cartes mémoire SD peuvent
ne pas être reconnues par cet appareil
même si elles le sont par un ordinateur.
Ce problème peut être résolu en for-
matant les cartes mémoire SD à l’aide
d’un logiciel de formatage dédié. Les
cartes mémoire SD formatées à l’aide
de la fonction de formatage standard
d’un ordinateur ne sont pas conformes
à la norme SD. Des problèmes tels
que l’impossibilité de lire une carte ou
d’écrire sur une carte peuvent survenir.
L’utilisation d’un logiciel de formatage
dédié est recommandée pour éviter
de tels problèmes. Toutes les données
enregistrées sur une carte mémoire
SD seront supprimées lorsque la carte
est formatée. Sauvegardez toutes les
données nécessaires au préalable. Un
logiciel de formatage dédié pour cartes
mémoire SD peut être obtenu sur le site
suivant.
https://www.sdcard.org/
Compatibilité du périphérique de
stockage USB
Pour en savoir plus sur la compatibilité
du périphérique de stockage USB avec
ce produit, reportez-vous à la page 101,
Spécifications.
Protocole : en bloc
Vous ne pouvez pas connecter un péri-
phérique de stockage USB à ce produit
via un concentrateur USB.
Les périphériques de stockage USB avec
partition ne sont pas compatibles avec
ce produit.
Fixez soigneusement le périphérique de
stockage USB pendant la conduite. Ne le
laissez pas tomber sur le sol, où il risque
de se retrouver coincé sous la pédale de
frein ou l’accélérateur.
Au démarrage de la lecture des fichiers
audio codés avec des données d’images,
il peut y avoir un court temps d’attente.
Certains périphériques de stockage USB
connectés à ce produit peuvent produire
un bruit parasite affectant la radio.
Ne connectez rien d’autre qu’un périphé-
rique de stockage USB.
La séquence des fichiers audio sur un
périphérique de stockage USB
Pour les périphériques de stockage USB,
la séquence de lecture est différente de la
séquence sur le périphérique de stockage
USB.
Carte mémoire SD et carte
mémoire SDHC
Pour en savoir plus sur la compatibi-
lité de la carte mémoire SD avec ce
produit, reportez-vous à la page 101,
Spécifications.
Directives de manipulation et
informations supplémentaires
Ce produit n’est pas compatible avec les
cartes Multi Media Card (MMC).
Il n’est pas possible de lire des fichiers
au copyright protégé.
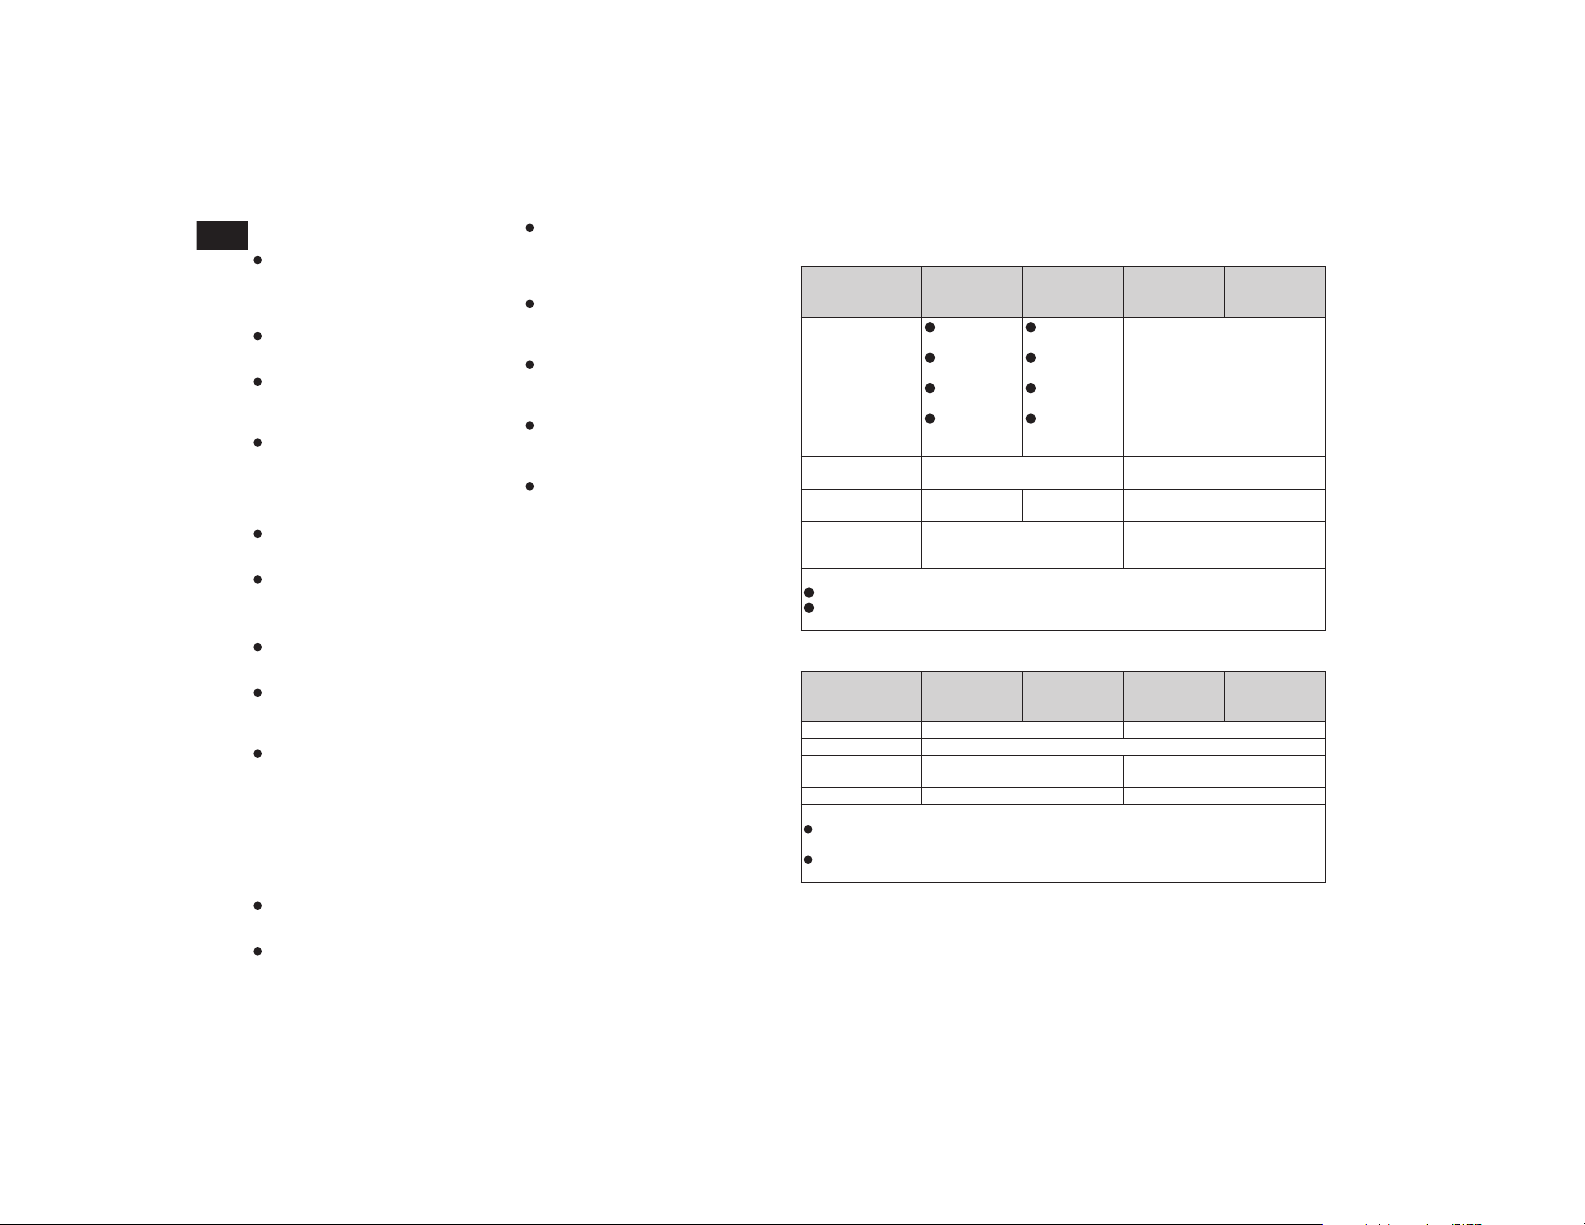
Annexe
96
Fr
Remarques spéciques aux
chiers DivX
Seul le bon fonctionnement des fichiers
DivX téléchargés depuis des sites parte-
naires DivX est garanti. Les fichiers DivX
non autorisés peuvent ne pas fonction-
ner correctement.
Les fichiers de location DRM ne peuvent
pas être commandés tant que la lecture
n’a pas commencé.
Ce produit correspond à un fichier
DivX allant jusqu’à 1 590 minutes 43
secondes. Les fonctions de recherche
au-delà de cette limite sont interdites.
Pour lire un fichier VOD DivX, vous
devez fournir le code ID de ce produit au
fournisseur VOD DivX. Pour plus d’infor-
mations sur le code ID, reportez-vous à la
page 76, Affichage du code d’enregis-
trement de VOD DivX.
Prend en charge la lecture de toutes les
versions de vidéo DivX, sauf DivX 7 et les
fichiers multimédias DivX standards.
Pour en savoir plus sur DivX, visitez le
site Web :
http://www.divx.com/
Fichiers de sous-titres DivX
Les fichiers de sous-titres au format srt
(avec l’extension “.srt”) peuvent être
utilisés.
Seul un fichier de sous-titres peut être
utilisé pour chaque fichier DivX. Vous ne
pouvez pas associer plusieurs fichiers de
sous-titres.
Les fichiers de sous-titres nommés avec
la même chaîne de caractères (avant
l’extension) que le fichier DivX sont
associés au fichier DivX. Les chaînes
de caractères avant l’extension doivent
être identiques. Toutefois, s’il n’y a qu’un
fichier DivX et un fichier de sous-titres
dans un seul dossier, les fichiers sont
associés même si les noms de fichiers
diffèrent.
Le fichier de sous-titres doit être enregis-
tré dans le même dossier que le fichier
DivX.
Jusqu’à 255 fichiers de sous-titres
peuvent être utilisés. Les fichiers de
sous-titres au-delà de cette limite ne
seront pas reconnus.
Le nom de chaque fichier de sous-titres
peut contenir jusqu’à 64 caractères,
extension incluse. Au-delà de cette limite
de 64 caractères, le fichier de sous-titre
risque de ne pas être reconnu.
Le code de caractère du fichier de sous-
titres doit être conforme aux normes ISO-
8859-1. Dans le cas contraire, les carac-
tères ne s’afficheront pas correctement.
Les sous-titres risquent de ne pas s’affi-
cher correctement si les caractères du
fichier de sous-titres comprennent un
code de commande.
Pour les équipements avec un haut
débit de transfert, les sous-titres et
la vidéo risquent de ne pas être bien
synchronisés.
Si l’affichage de plusieurs sous-titres
dans un court laps de temps, 0,1
seconde par exemple, a été programmé,
les sous-titres risquent de ne pas s’affi-
cher au bon moment.
■ Tableau de compatibilité des supports
Généralités
Support CD-R/-RW
DVD-R/-R
SL/-R DL/
DVD-RW
Périphérique
de stockage
USB
Carte
mémoire SD
Système de fichiers
ISO9660
niveau 1
ISO9660
niveau 2
Romeo,
Joliet
UDF 1.02 /
1.50 / 2.00 /
2.01 / 2.50
ISO9660
niveau 1
ISO9660
niveau 2
Romeo,
Joliet
UDF 1.02 /
1.50 / 2.00 /
2.01 / 2.50
FAT16/FAT32/NTFS
Nombre maximum
de dossiers
700 1 500
Nombre maximum
de fichiers
999 3 500 15 000
Types de fichiers
pouvant être lus
MP3, WMA, AAC, DivX, MPEG-1,
MPEG-2, MPEG-4
MP3, WMA, AAC, WAV, FLAC,
H.264, MPEG-2, MPEG-4, WMV,
FLV, MKV, JPEG
Remarques :
Durée de lecture maximum d’un fichier audio stocké sur le disque : 60 h
Durée de lecture maximum d’un fichier audio stocké sur un périphérique de stockage
externe (USB, SD) : 7,5 h (450 minutes)
Compatibilité MP3
Support CD-R/-RW
DVD-R/-R
SL/-R DL/
DVD-RW
Périphérique
de stockage
USB
Carte
mémoire SD
Extension de fichier .mp3 .mp2, .mp3, .m2a, .mka
Débit binaire 8 kbps à 320 kbps (CBR), VBR
Fréquence
d’échantillonnage
16 kHz à 48 kHz (32 kHz, 44,1 kHz,
48 kHz pour plus de relief)
8 kHz à 48 kHz
Balise ID3 Balise ID3 Ver. 1.0, 1.1, 2.2, 2.3 Balise ID3 Ver. 1.0, 1.1, 2.2, 2.3, 2.4
Remarques :
La version 2.x de la balise ID3 a la priorité lorsque les versions 1.x et 2.x existent toutes
les deux.
Ce produit n’est pas compatible avec les programmes suivants :
MP3i (MP3 interactif), mp3 PRO, liste de diffusion m3u
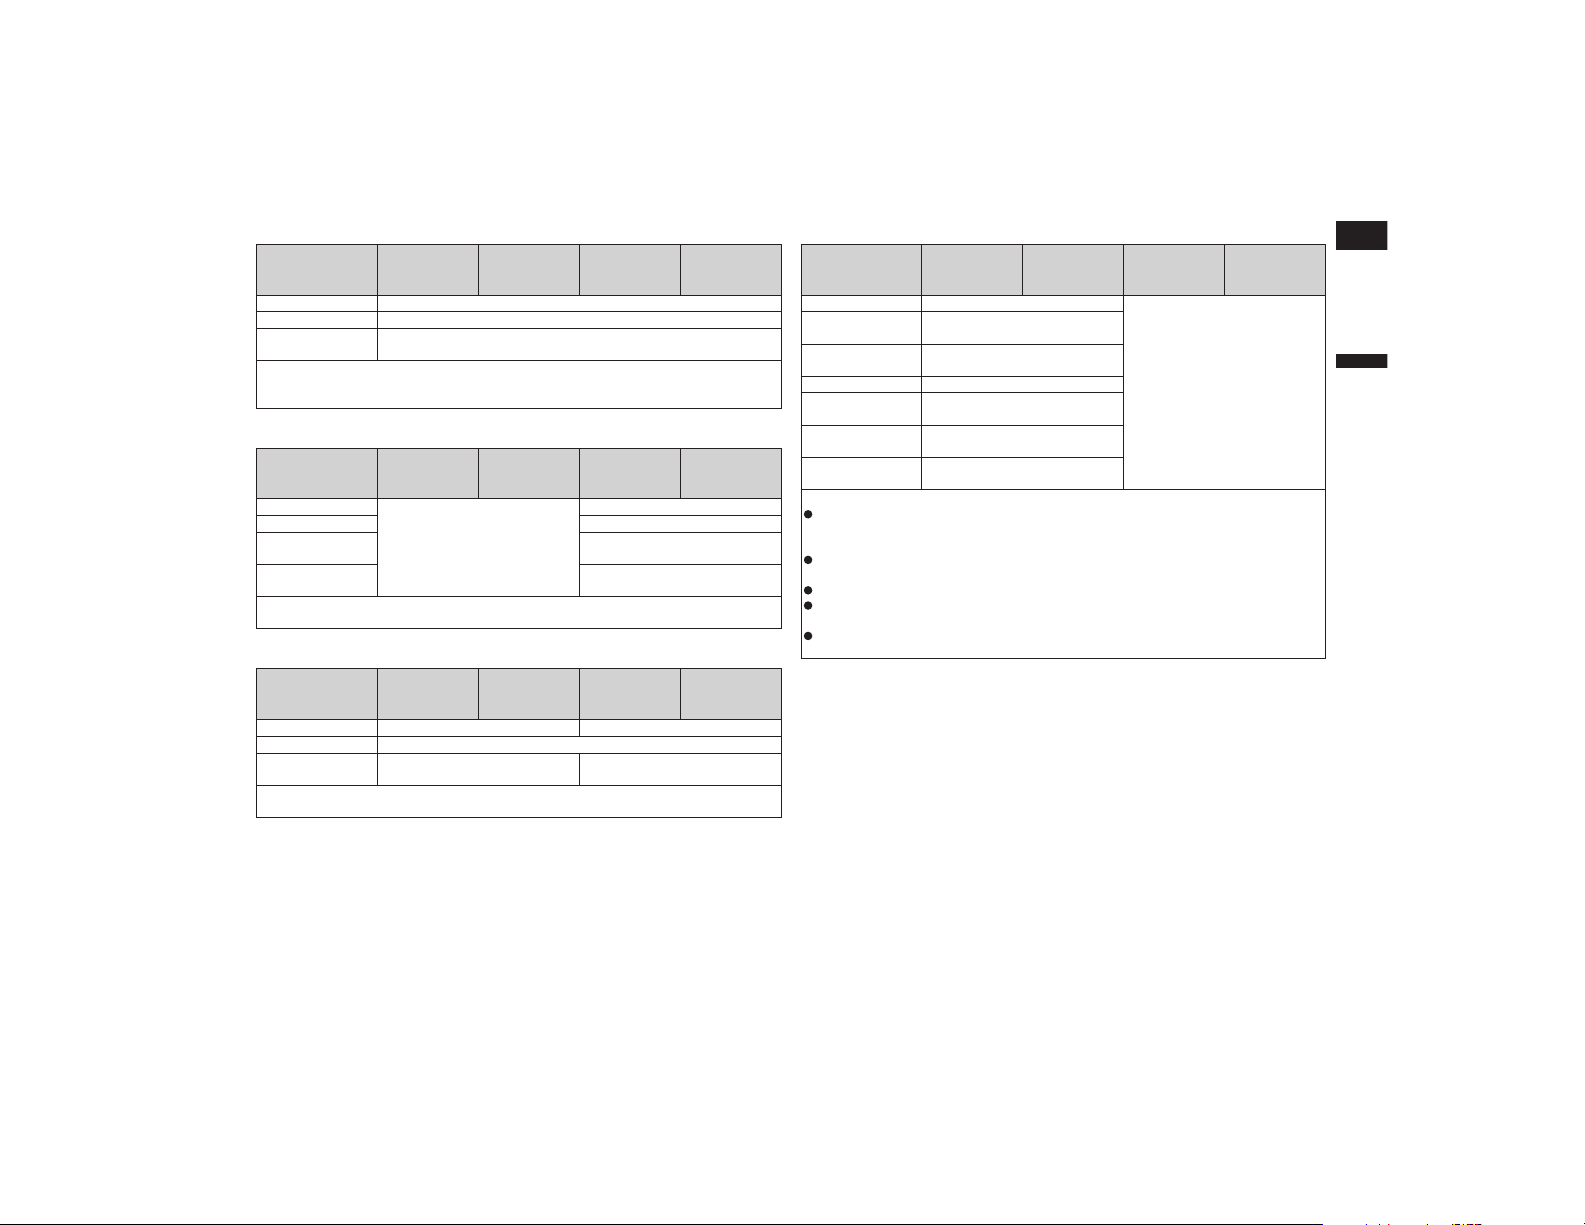
Français
Annexe
97
Fr
Compatibilité WMA
Support CD-R/-RW
DVD-R/-R
SL/-R DL/
DVD-RW
Périphérique
de stockage
USB
Carte
mémoire SD
Extension de fichier .wma
Débit binaire 5 kbps à 320 kbps (CBR), VBR
Fréquence
d’échantillonnage
8 kHz à 48 kHz
Remarque :
Ce produit n’est pas compatible avec les programmes suivants :
Windows Media™ Audio 9 Professional, Lossless, Voice
Compatibilité WAV
Support CD-R/-RW
DVD-R/-R
SL/-R DL/
DVD-RW
Périphérique
de stockage
USB
Carte
mémoire SD
Extension de fichier
Les fichiers WAV sur le CD-R/-RW,
DVD-R/-RW/-R SL/-R DL ne
peuvent pas être lus.
.wav
Format PCM linéaire (LPCM)
Fréquence
d’échantillonnage
16 kHz à 48 kHz
Bits de
quantification
8 bits et 16 bits
Remarque :
La fréquence d’échantillonnage indiquée à l’écran peut être arrondie.
Compatibilité AAC
Support CD-R/-RW
DVD-R/-R
SL/-R DL/
DVD-RW
Périphérique
de stockage
USB
Carte
mémoire SD
Extension de fichier .m4a .aac, .adts, .mka, .m4a
Débit binaire 8 kbps à 320 kbps (CBR)
Fréquence
d’échantillonnage
8 kHz à 44,1 kHz 8 kHz à 48 kHz
Remarque :
Ce produit lit les fichiers AAC codés par iTunes.
Compatibilité DivX
Support CD-R/-RW
DVD-R/-R
SL/-R DL/
DVD-RW
Périphérique
de stockage
USB
Carte
mémoire SD
Extension de fichier .avi/.divx
Les fichiers DivX du périphérique
de stockage externe (USB, SD) ne
peuvent pas être lus.
Profil (version DivX)
Home Theater Ver. 3.11/Ver. 4.x/
Ver. 5.x/Ver. 6.x
Codec audio
compatible
MP3, Dolby Digital
Débit binaire (MP3) 8 kbps à 320 kbps (CBR), VBR
Fréquence d’échan-
tillonnage (MP3)
16 kHz à 48 kHz (32 kHz, 44,1 kHz,
48 kHz pour plus de relief)
Taille d’image
maximale
720 pixels × 576 pixels
Taille de fichier
maximale
4 Go
Remarques :
Ce produit n’est pas compatible avec les programmes suivants :
Format DivX Ultra, fichiers DivX sans données vidéo, fichiers DivX codés avec le codec
audio LPCM (PCM linéaire)
Selon la composition des informations du fichier, comme le nombre de flux audio, au
démarrage de la lecture des disques, il peut y avoir un court temps d’attente.
Si la taille d’un fichier est supérieure à 4 Go, la lecture s’arrêtera avant la fin.
Certaines opérations spéciales sont parfois interdites du fait de la composition des
fichiers DivX.
Les fichiers à hauts débits risquent de ne pas être lus correctement. Le débit de trans-
fert standard est de 4 Mbps pour les CD et 10,08 Mbps pour les DVD.

Annexe
98
Fr
Compatibilité des chiers vidéo (USB, SD)
Extension de
fichier
.avi .mkv .mov .f4v .mp4
Codec vidéo
compatible
MPEG-4,
H.264, H.263,
Xvid
MPEG-4,
H.264, VC-1,
Xvid
MPEG-4,
H.264, H.263
H.264, H.263
MPEG-4,
H.264, H.263
Codec audio
compatible
MP3, AAC,
LPCM
MP3, AAC,
Vorbis
MP3, AAC MP3, AAC MP3, AAC
Fréquence
d’images
maximale
30 ips
Taille de fichier
maximale
4 Go
Durée de lecture
maximum
150 minutes
Extension de
fichier
.3gp .wmv .asf .flv .vob
Codec vidéo
compatible
MPEG-4,
H.264, H.263
WMV, VC-1 WMV, VC-1 H.264
H.264,
MPEG-2
Codec audio
compatible
AAC WMA WMA MP3, AAC
MP3, AAC,
LPCM
Fréquence
d’images
maximale
30 ips
Taille de fichier
maximale
4 Go
Durée de lecture
maximum
150 minutes
Remarques générales
Les fichiers peuvent ne pas être lus cor-
rectement selon l’environnement dans
lequel le fichier a été créé ou le contenu
du fichier.
Ce produit peut ne pas lire certains
fichiers selon l’application utilisée pour
coder les fichiers.
Ce produit peut ne pas fonctionner
correctement, selon l’application utilisée
pour coder les fichiers WMA.
Selon la version du Lecteur Windows
Media™ utilisé pour coder les fichiers
WMA, les noms d’albums ou autres
informations textuelles risquent de ne
pas s’afficher correctement.
Au démarrage de la lecture des fichiers
audio codés avec des données d’images,
il peut y avoir un court temps d’attente.
Ce produit n’est pas compatible avec
le transfert de données en écriture de
paquets.
Ce produit peut reconnaître jusqu’à 32
caractères, depuis le premier caractère
jusqu’à l’extension de fichier et le nom
de dossier. Selon la zone d’affichage, le
produit peut essayer de les afficher dans
une taille de police réduite. Cependant, le
nombre maximum de caractères pouvant
être affichés dépend de la largeur de
chaque caractère et de la zone d’affichage.
La séquence de sélection de dossiers ou
d’autres opérations peut être modifiée
selon le logiciel de codage ou d’écriture.
Quelle que soit la longueur de la section
vide entre les chansons d’un enregistre-
ment original, les disques audio com-
pressés sont lus avec une courte pause
entre les chansons.
Exemple de hiérarchie
Remarque
Ce produit assigne les numéros de dossier.
L’utilisateur ne peut pas assigner les numéros
de dossier.
Bluetooth
La marque de mot et les logos Bluetooth
®
sont des marques déposées appar-
tenant à Bluetooth SIG, Inc. et toute
utilisation de ces marques par PIONEER
CORPORATION est faite sous licence.
Les autres marques de commerce ou
noms commerciaux sont la propriété de
leur propriétaire respectif.
Radio Satellite SiriusXM
®
Sirius, XM et tous les autres logos et
marques connexes sont des marques de
commerce de Sirius XM Radio, Inc. Tous
droits réservés.
Technologie HD Radio™
Technologie HD Radio fabriquée sous
licence possédée par iBiquity Digital
Corporation. U.S. et des brevets étran-
gers. HD Radio™ et les logos HD, HD
Radio et « Arc » sont des marques com-
merciales de iBiquity Digital Corp.
SDHC
Le logo SDHC est une marque commerciale
de SD-3C, LLC.
WMA/WMV
Windows Media est une marque déposée
ou une marque commerciale de Microsoft
Corporation aux États-Unis et/ou dans
d’autres pays.
p Ce produit intègre une technologie
détenue par Microsoft Corporation, qui
ne peut être utilisée et distribuée que
sous licence de Microsoft Licensing, Inc.
DivX
Les appareils DivX Certified
®
ont été testés
pour leur lecture vidéo DivX
®
(.divx, .avi)
de haute qualité. Quand vous voyez le logo
DivX, vous savez que vous bénéficiez de la
liberté de lire vos films DivX préférés.
DivX
®
, DivX Certified
®
et les logos associés
sont des marques commerciales de DivX,
LLC et sont utilisés sous licence.
Cet appareil DivX Certified
®
a subi avec suc-
cès des tests rigoureux pour garantir qu’il lit
les vidéos DivX
®
.
Pour lire les films DivX que vous avez ache-
tés, enregistrez d’abord votre appareil sur
vod.divx.com. Trouvez votre code d’enregis-
trement dans la section DivX VOD du menu
de configuration de votre appareil.
Pour en savoir plus, reportez-vous à la
page 76, Affichage du code d’enregis-
trement de VOD DivX.
AAC
AAC est l’acronyme de Advanced Audio
Coding et se réfère à la technologie de
compression audio standard utilisée avec
MPEG-2 et MPEG-4. Plusieurs applications
peuvent être utilisées pour coder les fichiers
AAC, mais les formats et extensions de
fichiers diffèrent d’une application à une
autre. Cet appareil lit les fichiers AAC codés
par iTunes.
Français
Annexe
99
Fr
Google, Google Play,
Android™ et Android Auto
Google, Google Play, Android, Android Auto
et les autres marques sont des marques de
Google Inc.
MirrorLink
MirrorLink Certified™, le logo de certifica-
tion Design Only™, MirrorLink™ et le logo
MirrorLink™ sont des marques de certifica-
tion et des marques commerciales du Car
Connectivity Consortium LLC. Toute utilisa-
tion non autorisée est strictement interdite.
MIXTRAX
MIXTRAX est une marque commerciale de
PIONEER CORPORATION.
Informations détaillées
concernant les dispositifs iPod
connectés
ATTENTION
Pioneer n’accepte aucune responsabilité
pour les données perdues depuis un
iPod, même si ces données sont per-
dues pendant l’utilisation de ce produit.
Veuillez effectuer régulièrement une
copie de sauvegarde des données de
votre iPod.
Ne laissez pas l’iPod exposé à la lumière
directe du soleil pendant de longues
périodes. Cela risque de provoquer un
dysfonctionnement de l’iPod en raison
de la température élevée.
Ne laissez pas l’iPod dans un lieu exposé
à de fortes températures.
Fixez soigneusement l’iPod pendant la
conduite. Ne le laissez pas tomber sur
le sol, où il risque de se retrouver coincé
sous la pédale de frein ou l’accélérateur.
Pour en savoir plus, reportez-vous à la docu-
mentation iPod.
■ iPod et iPhone
Les accessoires électroniques portant la
mention « Made for iPod » et « Made for
iPhone » ont été conçus pour fonctionner
respectivement avec un iPod ou un iPhone
et sont certifiés conformes aux exigences
d’Apple par le fabricant.
Apple n’est pas responsable du fonctionne-
ment de cet appareil ou de sa compatibilité
avec les normes réglementaires et de
sécurité.
Veuillez noter que l’emploi de cet accessoire
avec un iPod ou un iPhone peut affecter les
performances sans fil.
iPhone, iPod, iPod classic, iPod nano et
iPod touch sont des marques commerciales
d’Apple Inc., déposées aux États-Unis et
dans d’autres pays.
■ Lightning
Lightning est une marque commerciale
d’Apple Inc.
■ App Store
App Store est une marque de service
d’Apple Inc.
■ iOS
iOS est une marque commerciale dont les
droits afférents sont détenus par Cisco aux
États-Unis et dans d’autres pays.
■ iTunes
iTunes est une marque commerciale d’Apple
Inc., enregistrées aux États-Unis et dans
d’autres pays.
■ iTunes Radio
iTunes Radio est une marque de service
d’Apple Inc.
Utilisation de contenus
connectés via une application
IMPORTANT
Configuration requise pour accéder à des
services de contenu en utilisant ce produit :
La version la plus récente de la (des)
application(s) de contenu connectée(s)
compatible(s) avec Pioneer pour smart-
phone, disponible auprès du fournis-
seur de service, téléchargée sur votre
smartphone.
Un compte actif auprès du fournisseur
de service de contenus.
Forfait données smartphone.
Remarque : si le forfait de données
pour votre smartphone n’offre pas une
utilisation illimitée des données, des
frais supplémentaires pourraient vous
être facturés par votre fournisseur pour
l’accès aux contenus connectés via une
application via les réseaux 3G, EDGE et/
ou LTE (4G).
Connexion à Internet via le réseau 3G,
EDGE, LTE (4G) ou Wi-Fi.
Câble pour adaptateur Pioneer en option
connectant votre iPhone à ce produit.
Restrictions :
L’accès aux contenus connectés via une
application dépendra de la disponibilité
d’un réseau cellulaire et/ou Wi-Fi permet-
tant à votre smartphone de se connecter
à Internet.
La disponibilité du service peut être
géographiquement limitée à la région.
Consultez le fournisseur de service
de contenus connectés pour de plus
amples informations.
La capacité de ce produit d’accéder à
des contenus connectés est susceptible
d’être modifiée sans préavis et pourrait
être affectée par l’une des situations sui-
vantes : problèmes de compatibilité avec
les versions futures de microprogramme
du smartphone, problèmes de compati-
bilité avec les versions futures de la (des)
application(s) de contenus connectée(s)
pour smartphone, les changements ou
l’interruption du service ou de la (des)
application(s) de contenus connectée(s)
par le fournisseur.
Pioneer ne peut pas être tenu respon-
sable pour tout problème survenant à la
suite d’un contenu d’application incor-
rect ou défectueux.
Le contenu et les fonctionnalités des
applications prises en charge sont sous
la responsabilité des fournisseurs de
l’application.
En AppRadio Mode et Android
Auto, les fonctionnalités accessibles
via le produit sont limitées pendant la
conduite, les fonctions disponibles étant
déterminées par les fournisseurs des
applications.
La disponibilité des fonctionnalités
d’AppRadio Mode et Android Auto
est déterminée par les fournisseurs des
applications et non pas par Pioneer.
AppRadio Mode et Android Auto
permettent d’accéder à des applications
autres que celles de la liste (soumises
à des limitations pendant la conduite),
mais le contenu qui peut être utilisé
est déterminé par les fournisseurs des
applications.
■ Pandora
®
Pandora, le logo Pandora et la robe de la
marque Pandora sont des marques de
commerce ou des marques déposées de
Pandora Media, Inc. Utilisation soumise à
autorisation.
Pandora est actuellement disponible
aux États-Unis, en Australie et en
Nouvelle-Zélande.
■ Aha Radio
Aha, Aha Radio et les logos Aha et Aha
Radio sont des marques déposées ou
non d’Harman International Industries,
Incorporated.
Annexe
100
Fr
HDMI
Les termes HDMI et HDMI High-Definition
Multimedia Interface ainsi que le logo HDMI
sont des marques commerciales ou des
marques déposées de HDMI Licensing, LLC
aux États-Unis et dans d’autres pays.
MHL
MHL, le logo MHL, et Mobile High-Definition
Link sont des marques commerciales ou des
marques déposées de MHL, LLC aux États-
Unis et dans d’autres pays.
Avis concernant la visualisa-
tion de données vidéo
Rappelez-vous que l’utilisation de ce sys-
tème dans un but commercial ou de présen-
tation publique peut constituer une violation
de droits d’auteur protégés par les lois sur
le copyright.
Avis concernant la visualisa-
tion de DVD-Vidéo
Ce produit fait appel à des principes techno-
logiques destinés à interdire la piraterie des
œuvres protégées par des droits d’auteur,
principes qui sont eux-mêmes couverts aux
États-Unis par des brevets et d’autres formes
de propriété intellectuelle appartenant à Rovi
Corporation. La rétro-technique et le désas-
semblage sont proscrits.
Avis concernant l’utilisation
de chiers MP3
L’acquisition de ce produit octroie uni-
quement une licence pour une utilisation
privée et non-commerciale de ce produit.
Elle n’octroie en aucun cas une licence ou
un droit d’utilisation pour toute diffusion en
temps réel (terrestre, par satellite, câble et/
ou n’importe quel autre média) commerciale
(c’est-à-dire générant des revenus), diffu-
sion/transmission via Internet, intranets et/
ou autres réseaux ou via d’autres systèmes
de distribution de contenu électronique, tels
que des applications de lecture audio ou
audio sur demande. Une licence indépen-
dante est requise pour de telles utilisations.
Pour en savoir plus, visitez notre site
http://www.mp3licensing.com.
Avis concernant les licences
open source
Pour en savoir plus sur les licences open
source pour les fonctions dont ce produit est
équipé, visitez le site
http://www.oss-pioneer.com/car/multimedia/
Utilisation correcte de l’écran
LCD
■ Manipulation de l’écran LCD
Lorsque l’écran LCD est exposé à la
lumière directe du soleil pendant un
long moment, il devient très chaud, ce
qui risque d’endommager l’écran LCD.
Lorsque vous n’utilisez pas ce produit,
évitez au maximum de l’exposer à la
lumière directe du soleil.
L’écran LCD doit être utilisé dans la
plage de températures indiquée dans
Spécifications.
N’utilisez pas l’écran LCD à des tempé-
ratures élevées ou inférieures à la plage
de température de fonctionnement,
sous peine de provoquer le dysfonc-
tionnement de l’écran LCD ou de
l’endommager.
L’écran LCD est exposé afin d’augmenter
sa visibilité dans le véhicule. Veuillez ne
pas appuyer fortement dessus au risque
de l’endommager.
Ne forcez pas en poussant l’écran LCD
au risque de le rayer.
Ne touchez l’écran LCD qu’avec vos
doigts lorsque vous utilisez les fonctions
de l’écran tactile. L’écran LCD peut se
rayer facilement.
■ Écran à cristaux liquides (LCD)
Si l’écran LCD se trouve à proximité
d’une aération du climatiseur, assu-
rez-vous que l’air provenant du climati-
seur ne souffle pas dessus. L’air chaud
émis par le chauffage peut endommager
l’écran LCD et l’air froid du climatiseur
peut entraîner la formation d’humi-
dité dans ce produit, ce qui risque de
l’endommager.
De petits points noirs ou blancs (points
lumineux) peuvent apparaître sur l’écran
LCD. Ils sont inhérents aux caractéris-
tiques de l’écran LCD et n’indiquent pas
un dysfonctionnement.
L’écran LCD sera difficile à voir s’il est
exposé à la lumière directe du soleil.
Lorsque vous utilisez un téléphone por-
table, maintenez son antenne éloignée
de l’écran LCD pour éviter la perturbation
de la vidéo par l’apparition de taches, de
bandes colorées, etc.
■ Entretien de l’écran LCD
Pour dépoussiérer ou nettoyer l’écran
LCD, éteignez d’abord le produit, puis
essuyez l’écran avec un chiffon sec et
doux.
Lorsque vous essuyez l’écran LCD, faites
attention de ne pas rayer la surface.
N’utilisez pas de nettoyants chimiques
corrosifs ou abrasifs.
■ Rétroéclairage par DEL (diode
électroluminescente)
Une diode électroluminescente est utilisée
à l’intérieur de l’affichage pour éclairer
l’écran LCD.
À basse température, l’utilisation du
rétroéclairage par DEL peut augmenter
la rémanence de l’image et détériorer la
qualité de l’image à cause des caracté-
ristiques de l’écran LCD. La qualité de
l’image augmentera en même temps
que la température.
La durée de vie du rétroéclairage par DEL
est de plus de 10 000 heures. Cependant,
elle peut diminuer s’il est utilisé à haute
température.
Si le rétroéclairage DEL atteint la fin
de sa durée de vie, l’écran devient plus
sombre et l’image n’est plus visible.
Le cas échéant, veuillez consulter
votre revendeur ou le centre de service
Pioneer agréé le plus proche.

Français
Annexe
101
Fr
Spécications
● Généralités
Source électrique nominale ..... 14.4 VCC
(plage de tension autorisée : 10.8 V
à 15.1 VCC)
Installation de mise à la terre
........................................ Type négatif
Consommation électrique maximum
................................................... 10.0 A
Dimensions (L x H x P) :
Châssis ..........................178 mm × 100 mm
× 164 mm
Partie avant.................. 171 mm × 97 mm
× 20 mm
Poids ..................................................2.2 kg
● Afchage
Taille de l’écran/rapport hauteur/largeur
..................6.95 pouces de large/16:9
(zone d’affichage réelle : 156.6 mm
× 81.6 mm)
Pixels ....................1 152 000 (2 400 × 480)
Mode d’affichage
...Commande par matrice active TFT
Système de couleurs ...Compatible PAL/
NTSC/PAL-M/PAL-N/SECAM
Plage de température tolérable :
Hors tension ..................... –4 °F à +176 °F
● Audio
Puissance de sortie maximale
.............................................. 50 W × 4
Puissance de sortie en continue
... 22 W x 4 (50 Hz à 15 kHz, 5 %THD,
4 W impédance, Deux canaux)
Impédance de charge..........................4 W
(de 4 W à 8 W admissible)
Niveau de sortie précédent (max) ... 4.0 V
Égaliseur (Égaliseur graphique à 13
bandes) :
Fréquence .....................50 Hz/80 Hz/125 Hz/
200 Hz/315 Hz/500 Hz/800 Hz/1,25 kHz
/2 kHz/3,15 kHz/5 kHz/8 kHz/12,5 kHz
Gain ................................................±12 dB
HPF :
Fréquence ......................50 Hz/63 Hz/80 Hz
/100 Hz/125 Hz/160 Hz/200 Hz
Pente ......................................... –6 dB/oct,
–12 dB/oct, –18 dB/oct
Haut-parleur d’extrêmes graves (mono) :
Fréquence .......................50 Hz/63 Hz/80 Hz/
100 Hz/125 Hz/160 Hz/200 Hz
Pente ......................................... –6 dB/oct,
–12 dB/oct, –18 dB/oct
Gain ................................–24 dB à +10 dB
Phase ........................... Normale/Inversée
Alignement temporel
............0 à 200 pouces (1 pouce/pas)
● Unité de DVD
Système ....Lecteur DVD-Vidéo, VCD, CD,
MP3, WMA, AAC, DivX, MPEG
Numéro de région ....................................1
Disques utilisables ..............DVD-VIDEO,
VIDEO-CD, CD, CD-R, CD-RW,
DVD-R, DVD-RW, DVD-RDL
Réponse en fréquence ................... 5 Hz à
44 000 Hz (avec DVD, à la fréquence
d’échantillonnage 96 kHz)
Rapport signal sur bruit .....96 dB (1 kHz)
(réseau IHF-A) (niveau RCA)
Niveau de sortie :
Vidéo ......................1,0 Vp-p/75 W (±0,2 V)
Nombre de canaux.................... 2 (stéréo)
Format de décodage MP3
...... MPEG-1, 2 & 2.5 Couche audio 3
Format de décodage WMA
.............. Ver. 7, 8, 9 (2 canaux audio)
(Windows Media Player)
Format de décodage AAC
............ MPEG-4 AAC (fichiers codés
seulement par iTunes) :
.m4a (Ver. 11 et antérieures)
Format de décodage DivX
........Home Theater Ver.3.11, Ver.4X,
Ver.5.X, Ver.6.X : .avi, .divx
Format de décodage vidéo MPEG
................. MPEG-1 : mpg, mpeg, dat
MPEG-2 PS : mpg, mpeg
MPEG-4 Part2 (Visual),
MS MPEG-4 Ver. 3 : avi
● USB
Spécification standard USB
..........USB1.1, USB2.0 haute vitesse
Alimentation max en courant .......... 1,6 A
Classe USB ..........................Périphérique
de stockage de masse (MSC, Mass
Storage Class), iPod (AudioClass,
Classe HID)
Système de fichiers ..........FAT16, FAT32,
NTFS
Format de décodage MP3 ......... MPEG-1/
Couche 1, MPEG-1/Couche 2,
MPEG-1/Couche 3
MPEG-2/Couche 1, MPEG-2/
Couche 2, MPEG-2/Couche 3
MPEG-2.5/Couche 3
Format de décodage WMA
................. WMA10 Std, WMA10 Pro,
WMA9 Lossless
Format de décodage AAC
...MPEG-2 AAC-LC, MPEG-4 AAC-LC
Format du signal WAVE .......Linear-PCM
Format de décodage vidéo H.264
.........BaseLine Profile, Main Profile,
High Profile
Format de décodage vidéo WMV
................VC-1 SP/MP/AP, WMV 7/8
Format de décodage du vidéo MPEG4
.....................................SimpleProfile,
AdvancedSimpleProfile (sauf GMC)
Format de décodage JPEG ............. JPEG
● SD
Format physique compatible
.......................................... Version 2.0
Système de fichiers ..........FAT16, FAT32,
NTFS
Format de décodage MP3 ......... MPEG-1/
Couche 1, MPEG-1/Couche 2,
MPEG-1/Couche 3
MPEG-2/Couche 1, MPEG-2/
Couche 2, MPEG-2/Couche 3
MPEG-2.5/Couche 3
Format de décodage WMA ...WMA10 Std,
WMA10 Pro, WMA9 Lossless
Format de décodage AAC ...........MPEG-2
AAC-LC, MPEG-4 AAC-LC
Format du signal WAVE .......Linear-PCM
Format de décodage vidéo H.264
.........BaseLine Profile, Main Profile,
High Profile
Format de décodage vidéo WMV .... VC-1
SP/MP/AP, WMV 7/8
Format de décodage du vidéo MPEG4
.....................................SimpleProfile,
AdvancedSimpleProfile (sauf GMC)
Format de décodage JPEG ............. JPEG
● Bluetooth
Version ........Certifié Bluetooth 3.0+EDR
Puissance de sortie ...........+4 dBm max.
(Classe électrique 2)
● Syntoniseur FM
Bande de fréquence
........................87,9 MHz à 107,9 MHz
Sensibilité utile ...............................11 dBf
(0,8 µV/75 W mono, S/N : 30 dB)
Rapport signal sur bruit .......................80 dB
(diffusion numérique) (réseau IHF-A)
72 dB (diffusion analogique)
(réseau IHF-A)
● Tuner AM
Bande de fréquence
............................530 kHz à 1 710 kHz
Sensibilité utilisable
............................. 25 µV (S/N : 20 dB)
Rapport signal sur bruit .......................80 dB
(diffusion numérique) (réseau IHF-A)
62 dB (diffusion analogique)
(réseau IHF-A)
● Caractéristiques CEA2006
Puissance de sortie ..........14 W RMS × 4
canaux (4 W et ≦1 % DHT+N)
Rapport S/B ................................... 91 dBA
(référence : 1 W sur 4 W)
Remarque
Les caractéristiques et la présentation peuvent
être modifiées à des fins d’amélioration sans
avis préalable.
2
Gracias por adquirir este producto de Pioneer.
Lea detenidamente estas instrucciones para utilizar de forma correcta el modelo que ha
adquirido. Una vez leídas las instrucciones, guarde este manual en un lugar seguro para
utilizarlo como referencia en el futuro.
Índice
Importante
Las pantallas mostradas en estos ejem-
plos podrían ser diferentes a las pantallas
reales, que podrían cambiarse sin previo
aviso con el objetivo de realizar mejoras de
rendimiento y funcionamiento.
Precaución
La seguridad de sus oídos está
en sus manos ......................................... 6
ESTABLEZCA UN NIVEL SEGURO: ........... 6
ASEGÚRESE DE CUMPLIR LAS
SIGUIENTES NORMAS: ....................... 6
Licencia, exención de garantía
y limitación de responsabilidad
........6
DISPOSICIONES EN MATERIA
DE SEGURIDAD .................................... 6
Información importante de
seguridad ............................................6
Interbloqueo con el freno de mano ........7
Para garantizar una conducción segura
..... 7
Cuando utilice una pantalla
conectada a V OUT ............................7
Para evitar la descarga de la batería .....7
Cámara de retrovisor ...............................7
Uso de la ranura para tarjetas SD ..........7
Uso del conector USB .............................7
Funcionamiento incorrecto ....................7
Visite nuestro sitio web ...........................8
Protección de la pantalla y el
panel LCD ...........................................8
Notas acerca de la memoria interna
......8
Antes de extraer la batería del vehículo
...... 8
Datos sujetos a eliminación ....................... 8
Restablecimiento del microprocesador
...... 8
Acerca de este manual ............................8
Uso y cuidado del mando a distancia
......8
Instalación de la batería ............................. 8
Uso del mando a distancia ......................... 8
Operaciones básicas
Comprobación de las funcio-
nes y los nombres de piezas .............8
Mando a distancia ...................................9
Protección del producto
contra robos .......................................9
Extracción del panel delantero .................. 9
Colocación del panel delantero ............... 10
Notas sobre el uso del panel LCD ........10
Ajuste del ángulo del panel LCD..........10
Inserción/expulsión/cone-
xión de soportes ...............................10
Colocación y expulsión de un disco ........ 10
Colocación y expulsión de una
tarjeta de memoria SD........................ 10
Conexión y desconexión de un iPod ....... 11
Conexión y desconexión de un
dispositivo de almacena-
miento USB .......................................... 11
Inicio y finalización ................................11
En el primer arranque ............................11
Arranque normal ....................................11
Apagado de la pantalla .........................11
Si la pantalla de la aplicación
está disponible .................................... 11
Si la pantalla de la aplicación
no está disponible ............................... 11
Cómo utilizar las pantallas ...................12
Cambio entre pantallas
mediante las teclas del
panel táctil ........................................... 12
Cambio entre pantallas
mediante botones de hardware ......... 12
Fuente de AV compatible ......................12
Visualización de la pantalla
de función AV ...................................12
Selección de una fuente frontal
en la pantalla de Selección
de fuente AV ......................................... 13
Selección de una fuente frontal
en la lista de fuentes ........................... 13
Selección de una fuente trasera .............. 13
Desactivación de la fuente de AV ........13
Cambio del orden de visuali-
zación de los iconos de fuente .......13
Cambio del orden de visuali-
zación de las teclas de fuente ........13
Utilización del panel táctil ....................13
Utilización de las teclas del
panel táctil comunes .......................... 13
Utilización de las pantallas de lista ......... 14
Uso de la barra de tiempo ......................... 14
Funcionamiento del teclado en pantalla
... 14
Registro y conexión
de un dispositivo Bluetooth
Preparación de los dispositi-
vos de comunicación ......................14
Registro de sus dispositivos Bluetooth
....14
Búsqueda de dispositivos
Bluetooth cercanos ............................. 14
Sincronización desde sus
dispositivos Bluetooth ........................ 15
Conexión automática con un
dispositivo Bluetooth .......................... 15
Eliminación de un dispositivo
registrado ............................................. 15
Conexión manual de un dis-
positivo Bluetooth registrado.........15
Cambio de visibilidad ............................16
Introducción del código PIN
para la conexión inalám-
brica Bluetooth ................................16
Visualización de la dirección Bluetooth
.....16
Borrado de la memoria Bluetooth .......16
Actualización del software Bluetooth
....16
Visualización de la versión
del software Bluetooth....................16
Utilización de la tele-
fonía manos libres
Visualización del menú del teléfono ....17
Teclas del panel táctil ................................ 17
Lectura de la pantalla ................................ 17
Realizar una llamada telefónica ...........17
Marcación directa ...................................... 17
Llamada a un número de la
agenda telefónica ................................ 17
Marcación desde el registro ..................... 18
Uso de las listas de marcación
preestablecidas ................................... 18
Recepción de una llamada
telefónica ..........................................18
Respuesta de una llamada entrante ....... 18
Minimización de la pantalla
de confirmación de marcación ......19
Cambio de la configuración
del teléfono .......................................19
Cómo responder a una llamada
automáticamente ................................ 19
Cambio del tono de llamada .................... 19
Inversión de nombres en la
agenda telefónica ................................ 19
Ajuste del modo privado ........................... 19
Ajuste del volumen de escucha
de la otra parte ..................................... 19
Uso de la función de recono-
cimiento de voz ................................19
Notas sobre la telefonía
manos libres .....................................19
Operación de confi-
guración del iPod /
iPhone o smartphone
Flujo básico de la configura-
ción del iPod / iPhone .....................20
Ajuste del método de cone-
xión del dispositivo ..........................20
Compatibilidad con iPod ......................20
Compatibilidad con dispositi-
vos Android™ ...................................21
Compatibilidad con
AppRadio Mode ...............................21
Compatibilidad con dispositi-
vos MirrorLink ..................................21
Información de las conexio-
nes y las funciones de
cada dispositivo...............................21
Recepción de HD Radio™
Emisoras de HD Radio ..........................22
Utilización de las teclas del
panel táctil ........................................23
Lectura de la pantalla ............................23
Procedimiento de inicio ........................23
Selección de una banda ........................24
Sintonización manual ...........................24
Sintonización de búsqueda ..................24
Selección de un canal de
presintonía de la lista de
canales de presintonía ....................24
Almacenamiento de frecuen-
cias de radio .....................................24
Almacenamiento de las
frecuencias de radio con
mayor potencia ................................24
Sintonización de frecuencias potentes
....24
Cambio del modo de búsqueda ...........25
Cambio del modo de recepción ...........25

3
Almacenamiento de la infor-
mación de canción en un
iPod (etiquetado de iTunes)............25
Operaciones con los botones
de hardware ......................................25
Reproducción de un disco
Utilización de las teclas del
panel táctil (para audio) ..................25
Utilización de las teclas del
panel táctil (para vídeo) ..................25
Lectura de la pantalla (para audio) ......26
Lectura de la pantalla (para vídeo) ......26
Procedimiento de inicio ........................27
Selección de archivos de la
lista de nombres de archivo ...........27
Reproducción de las pistas
en orden aleatorio ............................27
Ajuste del rango de reproduc-
ción de repetición ............................27
Cambio del tipo de archivo multimedia
.....27
Búsqueda de la parte que
desea reproducir ..............................27
Funcionamiento del menú DVD ...........27
Cambio del idioma de los
subtítulos ..........................................28
Cambio del idioma de audio .................28
Reproducción fotograma a
fotograma .........................................28
Reproducción a cámara lenta ..............28
Retorno a una escena específica .........28
Reanudación de la reproduc-
ción (Marcador) ...............................28
Utilización del menú DVD
mediante las teclas del panel táctil
...28
Cambio de la visualización
multiángulo del DVD .......................28
Selección de la salida de audio ............29
Operaciones con los botones
de hardware ......................................29
Reproducción de
archivos de audio comprimidos
Utilización de las teclas del
panel táctil ........................................29
Lectura de la pantalla ............................29
Procedimiento de inicio (para el disco)
...30
Procedimiento de inicio (para USB/SD)
....30
Cambio del modo de exploración ........30
Selección de archivos de la
lista de nombres de archivo ...........31
Selección de un archivo de
la lista relacionada con la
canción que se está repro-
duciendo (búsqueda de vínculos)
...31
Reproducción de archivos en
orden aleatorio .................................31
Ajuste del rango de reproduc-
ción de repetición ............................31
Cambio del tipo de archivo
multimedia .......................................31
Operaciones con los botones
de hardware ......................................31
Reproducción de
archivos de vídeo comprimidos
Utilización de las teclas del
panel táctil ........................................32
Lectura de la pantalla ............................32
Procedimiento de inicio (para
el disco).............................................32
Procedimiento de inicio (para
USB/SD) ...........................................32
Selección de archivos de la
lista de nombres de archivo ...........33
Ajuste del rango de reproduc-
ción de repetición ............................33
Reproducción fotograma a
fotograma .........................................33
Reproducción a cámara lenta ..............33
Cambio del tipo de archivo
multimedia .......................................33
Operaciones con los botones
de hardware ......................................33
Reproducción de
archivos de imágenes
estáticas comprimidas
Utilización de las teclas del
panel táctil ........................................33
Lectura de la pantalla ............................34
Procedimiento de inicio ........................34
Selección de archivos de la
lista de nombres de archivo ...........34
Reproducción de archivos en
orden aleatorio .................................34
Ajuste del rango de reproduc-
ción de repetición ............................34
Cambio del tipo de archivo
multimedia .......................................34
Ajuste del intervalo de pre-
sentación de diapositivas ...............34
Operaciones con los botones
de hardware ......................................35
Uso de un iPod
Utilización de las teclas del
panel táctil (para audio) ..................35
Utilización de las teclas del
panel táctil (para vídeo) ..................35
Utilización de las teclas del
panel táctil (para iTunes Radio) .....35
Lectura de la pantalla (para audio) ......36
Lectura de la pantalla (para vídeo) ......36
Lectura de la pantalla (para
iTunes Radio) ...................................36
Procedimiento de inicio ........................36
Ajuste de la reproducción aleatoria ....37
Ajuste del rango de reproduc-
ción de repetición ............................37
Selección de fuentes de can-
ciones o vídeos de la pan-
talla de la lista de reproducción
.......37
Uso de iTunes Radio ..............................37
Reproducción de canciones
similares a la actual ............................ 37
Configurar la canción actual
para que no se vuelva a reproducir ... 38
Añadir la canción actual a la
lista de deseos ..................................... 38
Uso de la función iPod de
este producto desde el iPod ...........38
Cambio de la velocidad de
reproducción del audiolibro ...........38
Visualización de listas rela-
cionadas con la canción
que se está reprodu-
ciendo (búsqueda de vínculos) ......38
Operaciones con los botones
de hardware ......................................38
Reproducción de música
desde una aplicación del
iPod que no sea iPod Music ...........38
Utilización de las teclas del
panel táctil ........................................... 38
Lectura de la pantalla ................................ 39
Reproducir música
desde el dispositivo
compatible con Android Auto
Utilización de las teclas del
panel táctil ........................................39
Lectura de la pantalla ............................39
Procedimiento de inicio ........................39
Uso de las aplicaciones
del iPhone o del smartphone
Uso de AppRadio Mode ........................40
Uso de las teclas del panel táctil
(barra lateral de control de la
aplicación) ........................................... 40
Procedimiento de inicio ............................ 40
Utilización del teclado .............................. 41
Ajuste del tamaño de la imagen
(para usuarios de smartphone) ......... 41
Mostrar la imagen de su aplica-
ción (iPhone con conector
de 30 clavijas) ...................................... 41
Mostrar la imagen de su aplicación
(iPhone con conector Lightning)
........... 42
Visualización de la imagen de
su aplicación (smartphone) ............... 42
Uso de Android Auto .............................42
Procedimiento de inicio ............................ 42
Ajustar la posición de conducción .......... 42
Ajuste de volumen ..................................... 43
Uso del modo MirrorLink ......................43
Uso de las teclas del panel táctil
(barra lateral de control de la
aplicación) ........................................... 43
Procedimiento de inicio ............................ 43
Utilización de la función de
mezcla de audio...............................43
Transmisión de Pandora
®
Funcionamiento de Pandora ................44
Utilización de las teclas del
panel táctil ........................................44
Lectura de la pantalla ............................44
Procedimiento de inicio ........................44
Para usuarios con un iPhone
con conector de 30 clavijas ................ 44
Para usuarios de iPhone con
conector Lightning .............................. 45
Para usuarios de smartphone .................. 45
Selección de una emisora de
Pandora de la lista ...........................45

4
Creación de una emisora ......................45
Operaciones con los botones
de hardware ......................................45
Utilización de Aha Radio
Utilización de las teclas del panel táctil
....46
Lectura de la pantalla ............................46
Procedimiento de inicio ........................46
Para usuarios con un iPhone
con conector de 30 clavijas ................ 46
Para usuarios de iPhone con
conector Lightning .............................. 46
Para usuarios de smartphone .................. 47
Operaciones con los botones
de hardware ......................................47
Uso de iDatalink
Activación de iDatalink Maestro ..........47
Actualización del módulo iData-
link Maestro ......................................... 47
Procedimiento de inicio ........................47
Teléfono manos libres ...........................48
Ajuste de Bluetooth ................................... 48
Pantalla de la agenda telefónica ............. 48
Pantalla de lista de historial ..................... 48
Pantalla de marcación .............................. 49
Pantalla de confirmación de marcación
... 49
Utilización de un
reproductor de audio Bluetooth
Utilización de las teclas del
panel táctil ........................................49
Lectura de la pantalla ............................49
Procedimiento de inicio ........................50
Selección de archivos de la
lista de nombres de archivo ...........50
Reproducción de archivos en
orden aleatorio .................................50
Ajuste del rango de reproduc-
ción de repetición ............................50
Operaciones con los botones
de hardware ......................................50
Utilización de la radio
por satélite SiriusXM
®
Funciones de la radio por
satélite SiriusXM .............................50
Suscripción al servicio de radio
por satélite SiriusXM .......................... 50
Utilización de las teclas del
panel táctil ........................................51
Lectura de la pantalla ............................51
Procedimiento de inicio ........................52
Sintonización manual ...........................52
Selección de un canal de
presintonía de la lista de
canales de presintonía ....................52
Almacenamiento de canales de emisión
....52
Selección de un canal de
SiriusXM directamente ...................52
Selección de un canal en una
lista de todos los canales ...............52
Selección de un canal de la
lista de categorías ...........................52
Cambio de la lista que se muestra ......53
Uso de la función Replay™ ...................53
Ajuste de SiriusXM TuneStart™ ...........53
Uso de TuneScan™ ................................53
Uso de la exploración de categorías ...53
Uso de TuneMix™ ..................................54
Comprobación de la información
del tráfico y del tiempo actualizada
.....54
Registrar la ciudad .................................... 54
Ajuste del bloqueo paterno ..................54
Ajuste de la clave de acceso .................... 54
Bloqueo del canal ...................................... 54
Uso de la función de alertas de
contenido (como alertas
de canciones, alertas de
intérpretes y alertas de juegos)
........55
Memorización del contenido actual ........ 55
Ajuste del programa para el
que desea recibir una alerta ...........55
Selección de equipos para la
alerta de competiciones .................55
Configuración de la función
Favoritos destacados ......................55
Configuración de la notifica-
ción de actualizaciones
para Favoritos destacados ..............55
Uso de la función SportsFlash™ ..........56
Selección de equipos para
SportsFlash ......................................56
Restauración de la configura-
ción de SiriusXM al valor
predeterminado ...............................56
Almacenamiento de la infor-
mación de canción en un
iPod (etiquetado de iTunes)............56
Operaciones con los botones
de hardware ......................................57
Utilización de una
fuente HDMI
Utilización de las teclas del
panel táctil ........................................57
Lectura de la pantalla ............................57
Procedimiento de inicio ........................57
Utilización de una fuente AUX
Utilización de las teclas del
panel táctil ........................................57
Lectura de la pantalla ............................58
Procedimiento de inicio ........................58
Ajuste de la señal de vídeo ...................58
Cambio de la pantalla de función ........58
Utilización de la entrada AV
Utilización de las teclas del
panel táctil ........................................58
Lectura de la pantalla ............................58
Procedimiento de inicio ........................58
Ajuste de la señal de vídeo ...................59
Utilización de MIXTRAX
Teclas del panel táctil ............................59
Selección de un elemento
para reproducir canciones .............59
Selección de canciones que
no se deben reproducir ...................59
Especificación de la parte de
la reproducción ................................60
Ajuste del patrón de parpadeo .............60
Configuración del sistema
Activación de la fuente de
audio Bluetooth ...............................60
Ajuste del desplazamiento
continuo ............................................60
Ajuste de la entrada AV .........................60
Ajuste de la cámara de retrovisor ........60
Ajuste de la activación de la
cámara de retrovisor ........................... 61
Ajuste de la polaridad de la
cámara de retrovisor ........................... 61
Ajuste de la visualización de
imágenes invertidas de la
cámara de retrovisor ........................... 61
Ajuste de la cámara para el
modo Vista de cámara ....................61
Visualización de las indica-
ciones de ayuda al esta-
cionamiento .....................................62
Configuración de las indica-
ciones en la imagen de
retrovisor ...........................................62
Ajuste de la entrada de la
segunda cámara ..............................62
Ajuste de la activación de la
segunda cámara .................................. 62
Ajuste de imágenes invertidas
de la segunda cámara ........................ 62
Desactivación de la pantalla
de demostración ..............................63
Selección del idioma del sistema ........63
Ajuste del idioma del teclado
con la aplicación para iPhone ........63
Ajuste del aviso acústico ......................63
Ajuste de las posiciones de
respuesta del panel táctil
(calibración del panel táctil) ..........63
Ajuste de la función de atenuación .....64
Decidir si activar la función
de atenuación ..................................64
Ajuste del tiempo de activa-
ción de la función de atenuación
....64
Ajuste de la imagen ...............................64
Visualización de la versión
del firmware .....................................65
Actualización del firmware ...................65
Comprobación de las cone-
xiones de los cables ........................65
Ajustes de audio
Utilización del ajuste de
desvanecimiento/balance ..............65
Utilización del ajuste del balance ........66
Cambio del silenciamiento o
la atenuación del sonido .................66
Ajuste de los niveles de la fuente ........66
Ajuste del filtro .......................................67
Ajuste de la salida del altavoz
delantero y trasero .............................. 67
Utilización de la salida del subwoofer .... 67
Selección de la posición de escucha
....68
Ajuste preciso de los niveles
de salida de los altavoces ...............68
Ajuste del alineamiento de tiempo......68
Utilización del ecualizador ...................69

5
Recuperación de las curvas del
ecualizador ........................................... 69
Personalización de las curvas
del ecualizador .................................... 69
Utilización del ecualizador
ajustado automáticamente ................ 70
Ajuste automático de la
curva del ecualiza-
dor (medición con el
Ecualizador automático) .................70
Antes de poner en funciona-
miento la medición con el
Ecualizador automático ...................... 70
Realización de la medición con
el Ecualizador automático .................. 70
Menú de temas
Selección de la visualización
de fondo ............................................71
Cambio de la imagen de fondo
almacenada en el dispositivo de
almacenamiento externo (USB, SD)
....... 71
Ajuste del color de iluminación ...........71
Selección del color a partir de
los colores preestablecidos ............... 71
Creación de un color definido
por el usuario ....................................... 72
Selección del color del tema ................72
Selección de la imagen del reloj ..........72
Cambio de la pantalla de
bienvenida preinstalada .................72
Cambio de la pantalla de
bienvenida almacenada en
el dispositivo de almacena-
miento externo (USB, SD) .................. 72
Duplicación de la configuración ..........73
Exportación de la configuración
de “Tema” ............................................. 73
Importación de la configuración
de “Tema” ............................................. 73
Configuración del
reproductor de vídeo
Ajuste de los idiomas de
mayor prioridad ...............................73
Ajuste del idioma de los subtítulos ......... 73
Ajuste del idioma del audio ...................... 73
Ajuste del idioma de los menús ............... 74
Ajuste de la visualización del
icono de ángulo ...............................74
Ajuste de la relación de aspecto ..........74
Ajuste del bloqueo paterno ..................74
Ajuste del número de código y nivel ....... 74
Visualización del código de
registro DivX VOD ...........................75
Visualización del código de
cancelación de registro DivX VOD
....75
Reproducción automática de DVD ......75
Ajuste de la señal de vídeo
para la cámara de retrovisor ..........75
Menú Favorito
Creación de un acceso directo .............75
Selección de un acceso directo ...........76
Eliminación de un acceso directo ........76
Operaciones comunes
Ajuste de la hora y la fecha ...................76
Almacenamiento de la infor-
mación de canción en un
iPod (etiquetado de iTunes)............76
Ajuste de la función “Sound Retriever”
...76
Cambio del modo de pantalla panorámica
....77
Otras funciones
Selección del vídeo para la
pantalla trasera ................................77
Ajuste de la función antirrobo ..............77
Establecimiento de la contraseña ........... 77
Introducción de la contraseña ................. 78
Eliminación de la contraseña ................... 78
Contraseña olvidada ................................. 78
Restauración de este pro-
ducto a la configuración
predeterminada ...............................78
Restablecimiento del ajuste
predeterminado ................................... 78
Precauciones
Su nuevo producto y este manual .......78
Precauciones importantes ....................78
Conexión
Precauciones antes de
conectar el sistema .........................79
Antes de instalar este producto ...........79
Para impedir daños................................79
Aviso para el cable conductor azul/blanco
... 79
Conexión del cable de alimentación ...80
Conexión al amplificador de
potencia que se vende por separado
...81
Conectar un iPhone, iPod,
dispositivo Android o
dispositivo MirrorLink™ ..................81
Conexión de un iPhone con
conector Lightning ..........................82
Conexión mediante el puerto USB .......... 82
Conexión mediante el puerto HDMI........ 82
Conexión de un iPhone con
conector de 30 clavijas ....................82
Conexión mediante la entrada AUX ........ 82
Conexión mediante la entrada RGB ........ 82
Conexión de dispositivos Android™ ....82
Conexión de un dispositivo
Android con un puerto HDMI ............ 83
Conexión de un dispositivo
Android con un puerto MHL .............. 83
Conectar el dispositivo
Android o MirrorLink™ ....................83
Fijación del cable HDMI
®
de
alta velocidad ...................................83
Conexión de una cámara de retrovisor
.....83
Conexión del componente de
vídeo externo ....................................84
Utilización de la entrada AV ..................... 84
Utilización de una entrada AUX ............... 84
Conexión de un dispositivo HDMI .......84
Conexión de la pantalla trasera ...........85
Uso de una pantalla trasera conec-
tada a la salida de vídeo trasera
............ 85
Instalación
Precauciones antes de la
instalación ........................................85
Antes de la instalación ..........................85
Instalación de este producto ................85
Notas acerca de la instalación ................. 85
Instalación utilizando los orificios
de tornillo del lateral de este producto
... 85
Fijación del panel delantero ..................... 86
Instalación del micrófono .....................86
Montaje en el parasol ................................ 86
Instalación en la columna de dirección
... 86
Ajuste del ángulo del micrófono .............. 86
Apéndice
Solución de problemas .........................87
Mensajes de error ..................................88
Manipulación y cuidado de los discos
....93
Lector integrado y su cuidado .................. 93
Condiciones ambientales para
la reproducción de un disco............... 93
Discos que pueden reproducirse .........93
DVD-Vídeo y CD ......................................... 93
Discos grabados en formato AVCHD ...... 93
Reproducción de DualDisc ...................... 93
Dolby Digital .............................................. 93
Información detallada de los
soportes que se pueden reproducir
...94
Compatibilidad .......................................... 94
Cuadro de compatibilidad con soportes
... 95
Bluetooth ................................................97
Radio por satélite SiriusXM
®
................97
Tecnología HD Radio™ .........................97
SDHC.......................................................97
WMA/WMV .............................................97
DivX .........................................................97
AAC ..........................................................97
Google, Google Play,
Android™ y Android Auto ...............98
MirrorLink ...............................................98
MIXTRAX ................................................98
Información detallada rela-
cionada con los dispositi-
vos iPod conectados .......................98
iPod e iPhone ............................................. 98
Lightning .................................................... 98
App Store .................................................... 98
iOS ............................................................... 98
iTunes .......................................................... 98
iTunes Radio ............................................... 98
Uso del contenido con cone-
xión basado en apps ........................98
Pandora
®
..................................................... 98
Aha Radio ................................................... 98
HDMI .......................................................99
MHL .........................................................99
Aviso acerca de la visualiza-
ción de vídeo ....................................99
Aviso acerca de la visualiza-
ción de DVD-Vídeo ..........................99
Aviso acerca del uso de
archivos MP3 ....................................99
Información sobre las licen-
cias de código abierto .....................99
Utilización correcta de la
pantalla LCD .....................................99
Manipulación de la pantalla LCD ............ 99
Pantalla de visualización de
cristal líquido (LCD) ............................ 99
Mantenimiento de la pantalla LCD.......... 99
Luz de fondo LED (diodo emisor
de luz) ................................................... 99
Especificaciones ..................................100
01
Capítulo
6
Es
Precaución
PRECAUCIÓN
Este producto contiene un diodo de láser
de clase 1, clasificado en la directiva IEC
60825-1:2007 concerniente a la Seguridad
de los productos láser. Para garantizar la
seguridad continua, no extraiga ninguna
tapa ni intente acceder a la parte interna
del producto. Solicite a personal cuali-
ficado que realice todos los trabajos de
mantenimiento.
PRODUCTO LASER CLASE 1
PRECAUCIÓN—LOS PRODUCTOS LÁSER CLASE 1M EMITEN
RADIACIÓN VISIBLE E INVISIBLE UNA VEZ ABIERTOS. NO
LOS MIRE DIRECTAMENTE CON INSTRUMENTOS ÓPTICOS.
ADVERTENCIA
■ La seguridad de sus oídos está
en sus manos
Saque el mayor provecho de su equipo
utilizándolo a un nivel seguro — un nivel
que permita que el sonido salga claramente
sin estruendos o distorsiones molestos, y
que, aún más importante, no afecte a su
audición. El sonido puede engañar. Con el
tiempo, el “nivel de confort” de sus oídos se
adapta a volúmenes de sonido más altos,
por lo que el sonido “normal” puede ser
realmente alto y dañino para sus oídos.
Protéjase contra esto ajustando su equipo a
un nivel seguro ANTES de que sus oídos se
adapten a volúmenes altos.
■ ESTABLEZCA UN NIVEL SEGURO:
Ponga su control de volumen en un
ajuste bajo.
Aumente lentamente el sonido hasta que
pueda oírlo de manera cómoda y clara,,
sin distorsión.
Una vez establecido un nivel de sonido
adecuado, ajuste el dial y déjelo en esa
posición.
■ ASEGÚRESE DE CUMPLIR LAS
SIGUIENTES NORMAS:
No suba el volumen tan alto que no
pueda oír lo que pasa a su alrededor.
Tenga cuidado o deje de usar temporal-
mente el aparato en situaciones poten-
cialmente peligrosas.
No use auriculares mientras utiliza un
vehículo motorizado; el uso de auricula-
res puede crear peligros de tráfico y es
ilegal en muchos lugares.
Licencia, exención de
garantía y limitación de
responsabilidad
■ DISPOSICIONES EN MATERIA DE
SEGURIDAD
■ Exención de responsabilidad
LAS GARANTÍAS ESTABLECIDAS EN LA
GARANTÍA LIMITADA DE PIONEER SON
LAS ÚNICAS GARANTÍAS OFRECIDAS
POR PIONEER O CUALQUIERA DE SUS
LICENCIANTES, SEGÚN PROCEDA.
PIONEER Y SUS LICENCIANTES RECHAZAN
EXPRESAMENTE CUALESQUIERA OTRAS
GARANTÍAS, EXPLÍCITAS O IMPLÍCITAS,
INCLUYENDO, A TÍTULO ENUNCIATIVO
Y NO LIMITATIVO, GARANTÍAS DE
COMERCIALIZACIÓN O DE APTITUD PARA
PROPÓSITOS ESPECÍFICOS.
■ Limitación de responsabilidad
EN LA MAYOR MEDIDA POSIBLE
PERMITIDA POR LA LEY VIGENTE, NI
PIONEER NI SUS LICENCIANTES SERÁN
RESPONSABLES ANTE USTED O ANTE
CUALQUIER TERCERO POR CUALQUIER
DAÑO INDIRECTO, CONSECUENCIAL,
INCIDENTAL, PUNIBLE O ESPECIAL, SIN
IMPORTAR LA FORMA DE ACCIÓN, TANTO
SI DICHA ACCIÓN ES CONTRACTUAL
O EXTRACONTRACTUAL, INCLUYENDO
NEGLIGENCIA, AUNQUE SE AVISARA A
LAS PARTES DE LA POSIBILIDAD DE TALES
DAÑOS.
EN LA MAYOR MEDIDA PERMITIDA POR
LA LEY VIGENTE, LA RESPONSABILIDAD
TOTAL DE PIONEER O SUS LICENCIANTES,
DE CUALQUIER TIPO QUE SE DERIVE
O ESTÉ RELACIONADA CON EL USO
DE LOS PRODUCTOS, INCLUYENDO, A
TÍTULO ENUNCIATIVO Y NO LIMITATIVO,
CUALQUIER RECLAMACIÓN DE GARANTÍA
O CUALQUIER RECLAMACIÓN POR
DAÑOS A PROPIEDADES, MUERTE O
INCAPACIDAD, INDEPENDIENTEMENTE
DEL FORO E INDEPENDIENTEMENTE DE SI
CUALQUIER ACCIÓN O RECLAMACIÓN ES
CONTRACTUAL O EXTRACONTRACTUAL,
(INCLUYENDO NEGLIGENCIA), ESTRICTA
RESPONSABILIDAD DEL PRODUCTO
O CUALQUIER OTRA TEORÍA LEGAL,
NO SERÁ SUPERIOR A MIL DÓLARES
ESTADOUNIDENSES (1 000 USD).
ALGUNAS JURISDICCIONES NO
PERMITEN LA EXCLUSIÓN DE DAÑOS O
LA LIMITACIÓN DE RESPONSABILIDAD,
POR LO QUE ES POSIBLE QUE LAS
EXCLUSIONES O LIMITACIONES
MENCIONADAS, EN LA MEDIDA EN QUE
LO PROHÍBAN LAS LEYES VIGENTES, NO
SE LE PUEDAN APLICAR A USTED. SUS
DERECHOS ESPECÍFICOS PUEDEN VARIAR
DE UNA JURISDICCIÓN A OTRA.
Información importante de
seguridad
ADVERTENCIA
No intente instalar o reparar este pro-
ducto usted mismo. La instalación o la
reparación de este producto por parte de
personas sin la formación y la experien-
cia adecuadas en equipos electrónicos
y accesorios de automoción pueden
resultar peligrosas y podrían exponerle
al riesgo de sufrir descargas eléctricas,
lesiones u otros peligros.
Evite que este producto entre en con-
tacto con cualquier tipo de líquido.
Podrían producirse descargas eléctricas.
En caso de que esto suceda, podría
resultar dañado, salir humo de su inte-
rior y sobrecalentarse.
Si algún líquido o cuerpo extraño entrara
en este producto, aparque su vehículo en
un lugar seguro, desactive el interruptor
de encendido (ACC OFF) inmediata-
mente y póngase en contacto con su
distribuidor o con el servicio técnico
autorizado Pioneer más cercano. No
utilice este producto en ese estado, ya
que hacerlo podría derivar en un incen-
dio, una descarga eléctrica u otro fallo.
Si detecta humo, ruidos u olores extra-
ños en este producto, o cualquier otro
indicio anómalo en la pantalla LCD,
apague el producto inmediatamente y
póngase en contacto con su distribuidor
o con el servicio técnico autorizado
Pioneer más cercano. Si utiliza el pro-
ducto en ese estado podría dañar de
forma permanente el sistema.
No desmonte ni modifique este pro-
ducto, ya que hay componentes de
alta tensión en su interior que podrían
provocar descargas eléctricas. Póngase
en contacto con su distribuidor o con el
servicio técnico autorizado Pioneer más
cercano para efectuar cualquier repara-
ción, ajuste o inspección interna.
Antes de utilizar este producto, asegúrese
de haber leído y comprendido la siguiente
información de seguridad:
No utilice el producto, las aplicaciones ni
la opción de cámara de retrovisor (si dis-
pone de ella) si hacerlo puede distraerle
e impedirle que conduzca de manera
segura. Cumpla siempre las normas de
seguridad relativas a la conducción y
respete todas las regulaciones de tráfico
existentes. Si tiene problemas a la hora
de utilizar este producto o leer la pantalla,
aparque el vehículo en un lugar seguro y
ponga el freno de mano antes de realizar
los ajustes necesarios.
Nunca suba tanto el volumen de este
producto que le impida oír el tráfico del
exterior y los vehículos de emergencia.
Por cuestiones de seguridad, ciertas
funciones estarán deshabilitadas hasta
que se detenga el vehículo y/o se utilice el
freno de mano.
Conserve este manual a mano para con-
sultar los procedimientos de operación y
las consignas de seguridad cuando sea
necesario.
No instale el producto en un lugar que
pueda (i) impedir la visión del conductor,
(ii) interferir en el rendimiento de cual-
quier otro sistema del vehículo o función

Español
01
Capítulo
7
Es
de seguridad, como airbags o botones de
las luces de advertencia, o (iii) impedir
que se pueda conducir de forma segura.
Recuerde abrocharse siempre el cinturón
de seguridad cuando maneje su vehículo.
En el caso de sufrir un accidente, sus
lesiones pueden ser mucho más graves
si no tiene bien puesto su cinturón de
seguridad.
No utilice nunca auriculares mientras
conduce.
Interbloqueo con el freno de
mano
Algunas funciones (como la visualización
de imágenes de vídeo y ciertas operaciones
de las teclas del panel táctil) ofrecidas
en este producto podrían ser peligrosas
(podrían producir lesiones graves o incluso
muertes) y/o ilegales si se utilizan mientras
se conduce. Para impedir que se utilicen
estas funciones mientras el vehículo está en
movimiento, existe un sistema de bloqueo
que detecta cuándo está accionado el freno
de mano y cuándo se está desplazando el
vehículo. Si intenta utilizar estas funciones
a la vez que conduce, verá que estarán
desactivadas hasta que detenga el vehículo
en un lugar seguro y (1) accione el freno de
mano, (2) suelte el freno de mano y vuelva a
(3) accionar el freno de mano. Mantenga el
pedal de freno presionado antes de soltar el
freno de mano.
■ Para garantizar una conducción
segura
ADVERTENCIA
EL CABLE VERDE CLARO DEL
CONECTOR DE ALIMENTACIÓN
ESTÁ DISEÑADO PARA DETECTAR
EL ESTADO DE ESTACIONAMIENTO
Y DEBE CONECTARSE AL LADO
DE LA FUENTE DE ALIMENTACIÓN
DEL INTERRUPTOR DEL FRENO
DE MANO. UN USO O CONEXIÓN
INADECUADOS DE ESTE CABLE
PUEDEN VULNERAR LA LEY
CORRESPONDIENTE Y CAUSAR
DAÑOS O LESIONES GRAVES.
No trate de forzar ni desactivar el
sistema de interbloqueo del freno de
mano que está activado para su pro-
tección. Si trata de forzarlo o desac-
tivarlo, podrían producirse lesiones
graves o incluso la muerte.
Para evitar el riesgo de daños y lesiones
y la posible violación de las leyes apli-
cables, no debe utilizarse este producto
con una imagen de vídeo visible para el
conductor.
En algunos países ver imágenes de vídeo
en una pantalla dentro de un coche,
incluso si se trata de otras personas que
no sean el conductor, puede ser ilegal.
Por tanto, deben acatarse las leyes
aplicables a cada país.
Si intenta visualizar imágenes de vídeo mien-
tras conduce, aparecerá el aviso “Está ter-
minantemente prohibido visualizar una
fuente de video en el asiento delantero
durante la conducción.” en la pantalla.
Para ver imágenes de vídeo en esta pantalla,
debe detener el vehículo en un lugar seguro
y poner el freno de mano. Mantenga el pedal
de freno presionado antes de soltar el freno
de mano.
Cuando utilice una pantalla
conectada a V OUT
El terminal de salida de vídeo (V OUT) sirve
para conectar una pantalla y permitir así a
los pasajeros de los asientos traseros ver las
imágenes de vídeo.
ADVERTENCIA
NO instale NUNCA la pantalla trasera en un
lugar que permita al conductor ver imáge-
nes de vídeo mientras conduce.
Para evitar la descarga de la
batería
Asegúrese de arrancar el motor del vehículo
cuando utilice este producto. Si utiliza este
producto sin arrancar el motor podría ago-
tarse la batería.
ADVERTENCIA
No instale este producto en un vehículo que
no disponga de circuitos o cables ACC.
Cámara de retrovisor
Si dispone de una cámara para visión tra-
sera opcional, puede utilizar el producto
para vigilar un remolque o dar marcha atrás
para aparcar en un lugar difícil.
ADVERTENCIA
LA IMAGEN DE LA PANTALLA PUEDE
APARECER AL REVÉS.
UTILICE LA ENTRADA SÓLO PARA
INVERTIR O CREAR UNA IMAGEN
SIMÉTRICA DE LA CÁMARA PARA
VISIÓN TRASERA. CUALQUIER
OTRO USO PODRÍA OCASIONAR
DESPERFECTOS O DAÑOS
PERSONALES.
PRECAUCIÓN
Por razones de seguridad, la función de
cámara de retrovisor no estará dispo-
nible hasta que este producto se inicie
totalmente.
El modo de retrovisor sirve para utilizar
este producto en la vigilancia de un
remolque o para dar marcha atrás.
No utilice esta función con fines de
entretenimiento.
Uso de la ranura para tarjetas
SD
PRECAUCIÓN
Conserve la tarjeta de memoria SD fuera
del alcance de niños pequeños para
evitar que la ingieran accidentalmente.
Para evitar la pérdida de datos y los
daños en el dispositivo de almace-
namiento, no lo retire nunca de este
producto mientras se estén transfiriendo
datos.
Si se produce una pérdida de datos o se
dañan los datos que contiene el dispo-
sitivo de almacenamiento por alguna
razón, normalmente resultará imposible
recuperar los datos. Pioneer no se
hace responsable de los daños, costes
o gastos ocasionados por la pérdida o
corrupción de los datos.
No inserte ni expulse una tarjeta de
memoria SD mientras conduce.
Uso del conector USB
PRECAUCIÓN
Para evitar la pérdida de datos y los
daños en el dispositivo de almace-
namiento, no lo retire nunca de este
producto mientras se estén transfiriendo
datos.
Pioneer no garantiza la compatibilidad
con todos los dispositivos de almace-
namiento masivo USB, y no se respon-
sabiliza de posibles pérdidas de datos
en reproductores multimedia, iPhone,
smartphones u otros dispositivos
durante la utilización de este producto.
Funcionamiento incorrecto
Servicio posventa para productos
Pioneer
Póngase en contacto con el distribuidor
al que compró el producto para el servicio
posventa (incluyendo las condiciones de la
garantía) o cualquier otra información. Si la
información necesaria no está disponible,
póngase en contacto con las empresas que
se enumeran a continuación.
No envíe su producto a las empresas cuyas
direcciones se indican a continuación para
su reparación sin ponerse antes en con-
tacto con ellas.
— EE. UU.
Pioneer Electronics (USA) Inc.
CUSTOMER SUPPORT DIVISION
P.O. Box 1760 Long Beach, CA
90801-1760
800-421-1404
— CANADÁ
Pioneer Electronics of Canada, Inc.
CUSTOMER SATISFACTION
DEPARTMENT
340 Ferrier Street, Unit 2, Markham,
Ontario L3R 2Z5, Canada
1-877-283-5901
905-479-4411
Para obtener información de garantía,
consulte la hoja de garantía limitada que se
incluye con el producto.

02
Capítulo
8
Es
Visite nuestro sitio web
Visítenos en:
http://www.pioneerelectronics.com
En Canadá
http://www.pioneerelectronics.ca
1 Registre su producto.
2 Reciba noticias de los productos y las
tecnologías más recientes.
3 Descargue manuales de usuario, solicite
catálogos de productos, investigue nue-
vos productos y mucho más.
4 Reciba noticias de nuevas versiones de
software y actualizaciones de software.
Protección de la pantalla y el
panel LCD
p No someta la pantalla LCD a la luz solar
directa cuando no utilice este producto.
Hacerlo podría provocar fallos de funcio-
namiento de la pantalla LCD, provocados
por las elevadas temperaturas.
p Cuando utilice un teléfono móvil, man-
tenga la antena del teléfono alejada de la
pantalla LCD para evitar interrupciones
de vídeo en forma de manchas, líneas de
color, etc.
p Para proteger la pantalla LCD de daños,
asegúrese de pulsar las teclas del panel
táctil únicamente con el dedo, y hágalo
suavemente.
Notas acerca de la memoria
interna
■ Antes de extraer la batería del
vehículo
p Algunas configuraciones y algunos con-
tenidos grabados no se restablecerán.
■ Datos sujetos a eliminación
La información se elimina al desconectar
el cable amarillo de la batería (o quitar la
batería en sí).
p Algunas configuraciones y algunos con-
tenidos grabados no se restablecerán.
■ Restablecimiento del
microprocesador
PRECAUCIÓN
Al pulsar el botón RESET se restablece la
configuración y el contenido grabado a los
valores predeterminados de fábrica.
p No realice esta operación cuando
no haya un dispositivo conectado al
producto.
p Algunas configuraciones y algunos con-
tenidos grabados no se restablecerán.
Se debe reinicializar el microprocesador si
se presentan las siguientes condiciones:
Antes de utilizar el producto por primera
vez después de su instalación.
Si este producto no funciona
correctamente.
Si aparecen problemas de funciona-
miento del sistema.
1 Coloque la llave de encendido del
automóvil en la posición de desac-
tivación (OFF).
2 Pulse el botón RESET con la
punta de un bolígrafo u otro objeto
puntiagudo.
La configuración y el contenido grabado se
restablecen a los valores predeterminados
de fábrica.
1
1 Botón RESET
Acerca de este manual
En este manual se utilizan diagramas de
pantallas reales para describir operaciones.
No obstante, es posible que las pantallas de
algunas unidades no coincidan con las que
se muestran en este manual, en función del
modelo que se utilice.
Uso y cuidado del mando a
distancia
■ Instalación de la batería
Deslice hacia fuera la bandeja de la parte
posterior del mando a distancia e inserte la
batería con los polos positivo (+) y negativo
(–) alineados correctamente.
Al utilizar el mando a distancia por pri-
mera vez, extraiga la película que sobre-
sale de la bandeja.
ADVERTENCIA
Mantenga la batería fuera del alcance de
los niños. Si la batería se ingiriera, con-
sulte con un médico inmediatamente.
Las baterías (paquetes de baterías o
baterías instaladas) no se deben exponer
a un calor excesivo, como la luz del sol,
fuego o similar.
PRECAUCIÓN
Extraiga la batería si no piensa utilizar
el mando a distancia durante un mes o
más tiempo.
Existe un peligro de explosión si la
batería se sustituye incorrectamente.
Sustitúyala solo por una batería del
mismo tipo o equivalente.
No manipule la batería con herramientas
metálicas.
No almacene la batería con objetos
metálicos.
Si la batería presenta fugas, limpie
completamente el mando a distancia e
instale una nueva batería.
Cuando deseche baterías usadas, cum-
pla con la legislación o las normas de
instituciones públicas medioambienta-
les que estén en vigor en su país/área.
■ Uso del mando a distancia
Apunte el mando a distancia hacia la cará-
tula para hacer funcionar la unidad.
Es posible que el mando a distancia no
funcione correctamente si lo expone a la
luz solar directa.
Importante
No guarde el mando a distancia en
lugares expuestos a altas temperaturas o
a la luz solar directa.
No deje caer el mando a distancia al
suelo, ya que puede quedar atascado
debajo del freno o del acelerador.
Operaciones básicas
Comprobación de las funcio-
nes y los nombres de piezas
Este capítulo incluye información acerca de
los nombres de las piezas y las funciones
principales a la hora de utilizar los botones.
1 32 4
5
6 7 8 9
b
c
a
1 Pantalla LCD
2 Sensor del mando a distancia
3 Botón VOL (+/–)
Pulse este botón para ajustar el volumen de
la fuente de AV (audio y vídeo).
4 Botón MUTE
Púlselo para silenciar. Vuelva a pulsarlo para
cancelar el silencio.
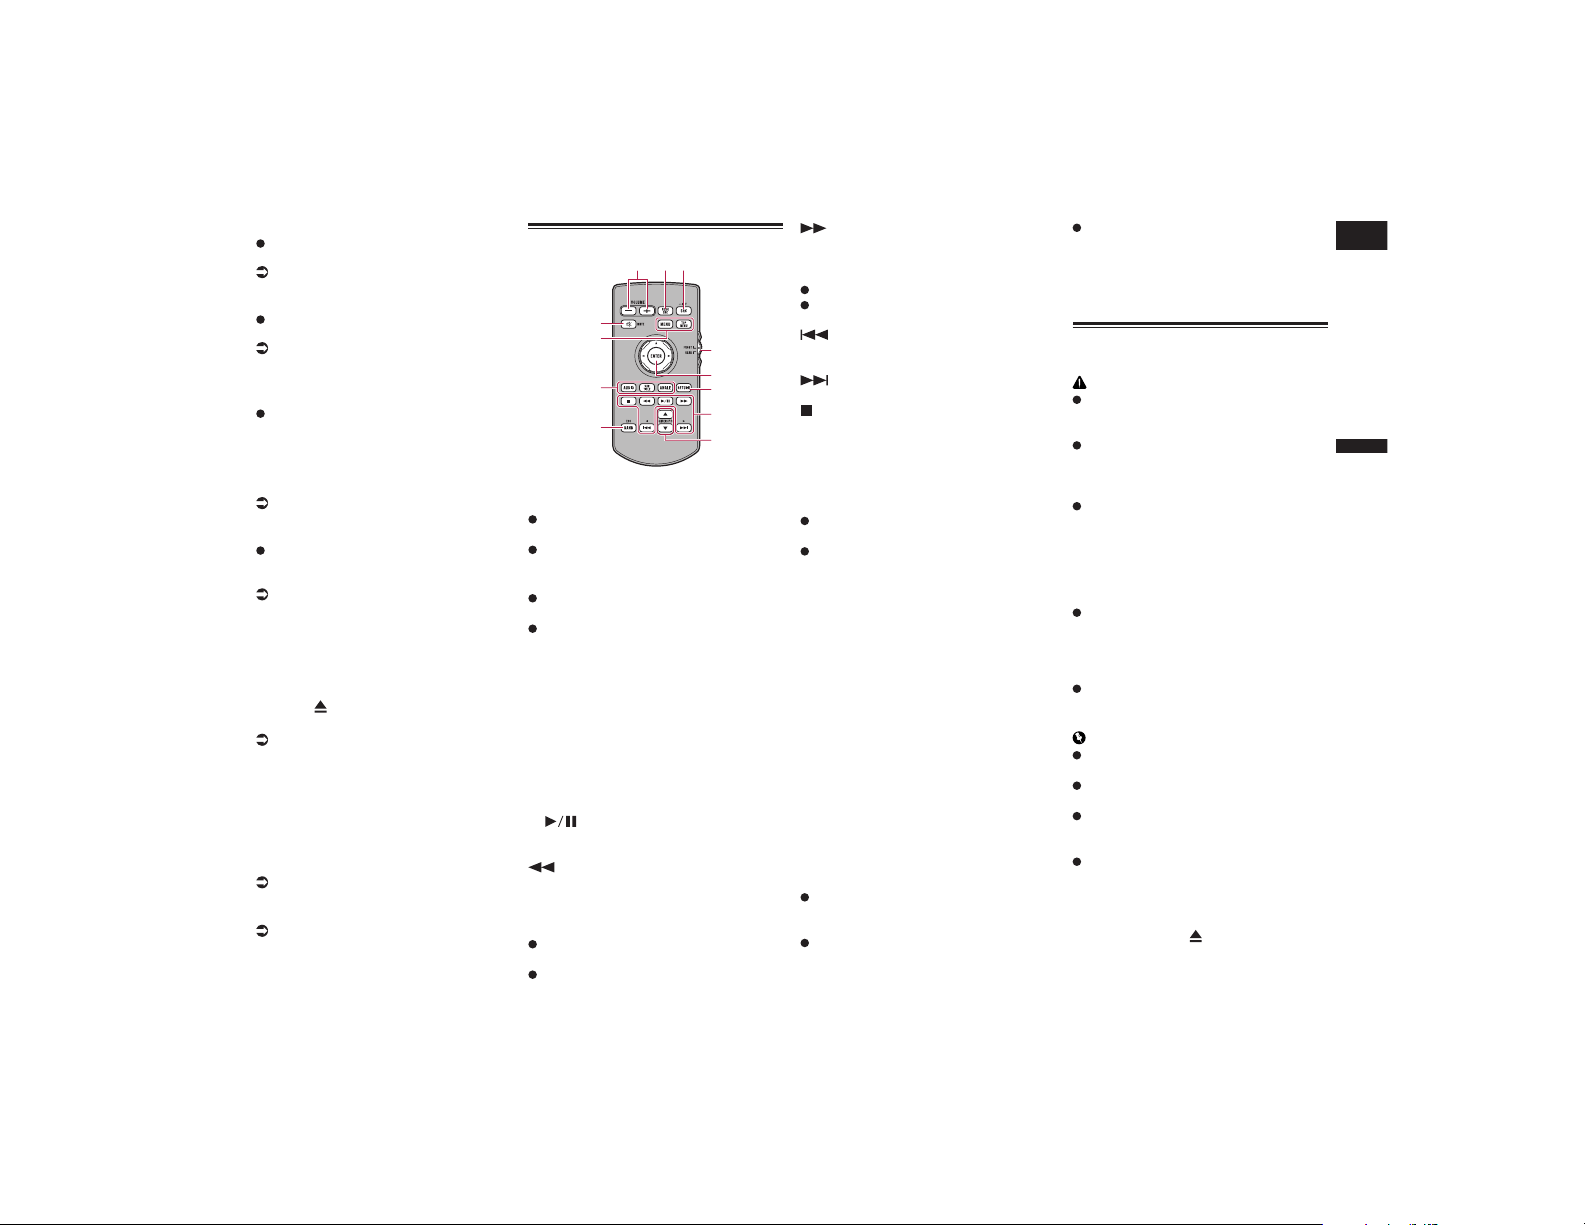
Español
02
Capítulo
9
Es
5 Botón HOME
Púlselo para mostrar la Pantalla de
Menú superior.
Para los detalles sobre las operaciones,
consulte Cómo utilizar las pantallas en la
página 12.
Manténgalo pulsado para activar la
función de reconocimiento de voz.
Para los detalles, consulte Uso de la
función de reconocimiento de voz en la
página 19.
6 Botón MODE
Púlselo para cambiar entre la pantalla
Aplicación y la pantalla de Función AV.
p Si la pantalla no puede cambiar de la
pantalla de Función AV a la pantalla
Aplicación cuando se pulse el botón
MODE, la pantalla se apagará.
Para los detalles sobre las operaciones,
consulte Cómo utilizar las pantallas en la
página 12.
Mantenga pulsado para apagar la pan-
talla cuando la pantalla de la aplicación
está disponible.
Para los detalles, consulte Apagado de la
pantalla en la página 11.
7 Botón TRK
Pulse este botón para utilizar la búsqueda
de sintonía manual, el avance rápido, el
retroceso rápido y los controles de búsqueda
de pista.
8 Botón
9 Botón RESET
Para los detalles sobre las operaciones,
consulte Restablecimiento del micropro-
cesador en la página 8.
a Conector de entrada de micrófono con
ecualizador automático
Utilícelo para conectar un micrófono para la
medición acústica (se vende por separado).
b Ranura para cargar discos
Introduzca el disco que desea reproducir.
Para los detalles, consulte Colocación y
expulsión de un disco en la página 10.
c Ranura para tarjetas SD
Para los detalles, consulte Colocación y
expulsión de una tarjeta de memoria SD
en la página 10.
Mando a distancia
3
4
2
1
5
6
7
9
8
b
a
c
1 VOLUME (+/–)
2 REAR SRC
Pulse esta tecla para desplazarse por
todas las fuentes traseras disponibles.
Manténgala pulsada para apagar la
fuente trasera.
3 SRC/OFF
Pulse esta tecla para desplazarse por
todas las fuentes delanteras disponibles.
Manténgala pulsada para apagar la
fuente delantera.
4 Interruptor de selección de modo de
fuente
Utilícelo para cambiar el modo de fuente
entre la fuente delantera y la fuente trasera.
5 Pulsador
Utilícelo para seleccionar un menú en el
menú de DVD.
6 RETURN
Vuelva al punto especificado e inicia la
reproducción desde allí.
7
Púlselo para realizar una pausa o reanudar
la reproducción.
Para audio
Manténgalo pulsado para un retroceso
rápido.
Para vídeo
Presiónelo para utilizar el retroceso
rápido.
Púlselo para cambiar la velocidad de
retroceso rápido.
Para audio
Manténgalo pulsado para un avance rápido.
Para vídeo
Presiónelo para utilizar el avance rápido.
Púlselo para cambiar la velocidad de
avance rápido.
Púlselo para volver a la pista (capítulo)
anterior.
Púlselo para ir a la pista (capítulo) siguiente.
Presiónelo para detener la reproducción.
Si reanuda la reproducción, ésta empezará
desde el punto en que se detuvo. Vuelva a
pulsar la tecla para detener la reproducción
completamente.
8 FOLDER/P.CH
Púlselo para seleccionar la carpeta o el
disco siguiente o anterior.
Púlselo para recuperar las frecuencias
de emisoras de radio asignadas a las
teclas de canal de presintonía.
9 MUTE
Púlselo para silenciar. Vuelva a pulsarlo para
cancelar el silencio.
a MENU
Presiónelo para visualizar el menú de DVD
durante la reproducción de un DVD.
TOP MENU
Presiónelo para volver al menú superior
durante la reproducción de un DVD.
b AUDIO
Presiónelo para cambiar el idioma del audio
durante la reproducción de un DVD.
SUBTITLE
Púlselo para cambiar el idioma del subtítulo
durante la reproducción del DVD.
ANGLE
Presiónelo para cambiar el ángulo de visión
durante la reproducción de un DVD.
c BAND/ESC
Púlselo para seleccionar la banda del
sintonizador cuando se selecciona el
sintonizador como fuente.
Púlselo para cancelar el modo de control
de las funciones.
Púlselo para cambiar entre tipos de
archivo multimedia cuando reproduzca
los siguientes tipos de datos:
— Disco
— Dispositivo de almacenamiento externo
(USB, SD)
Protección del producto con-
tra robos
PRECAUCIÓN
No intente extraer el panel delantero
mientras el disco o la tarjeta SD está en
la posición de expulsión.
No intente extraer el panel delantero
mientras se están escribiendo datos en
el puerto USB o la tarjeta SD.
Si lo hace, los datos se pueden dañar.
Cuando se haya extraído el panel delan-
tero, la placa de colocación volverá a su
posición original automáticamente.
Tenga cuidado de no dejar que las
manos u otros objetos queden atrapados
detrás del monitor cuando vuelva a su
posición.
Asegúrese de que el panel delantero
esté en su posición original mientras el
vehículo esté en movimiento.
Es peligroso conducir con el panel
delantero sobresaliendo.
No coloque bebidas u otros objetos
encima del panel delantero mientras
esté totalmente abierto.
Importante
Maneje el panel delantero con cuidado
cuando lo extraiga o lo coloque.
No someta el panel delantero a excesivas
sacudidas.
Mantenga el panel delantero fuera del
alcance de la luz del sol directa y de
elevadas temperaturas.
Si extrajo la carátula, vuelva a colocarla
en la unidad antes de poner en marcha
el vehículo.
■ Extracción del panel delantero
1 Pulse el botón .
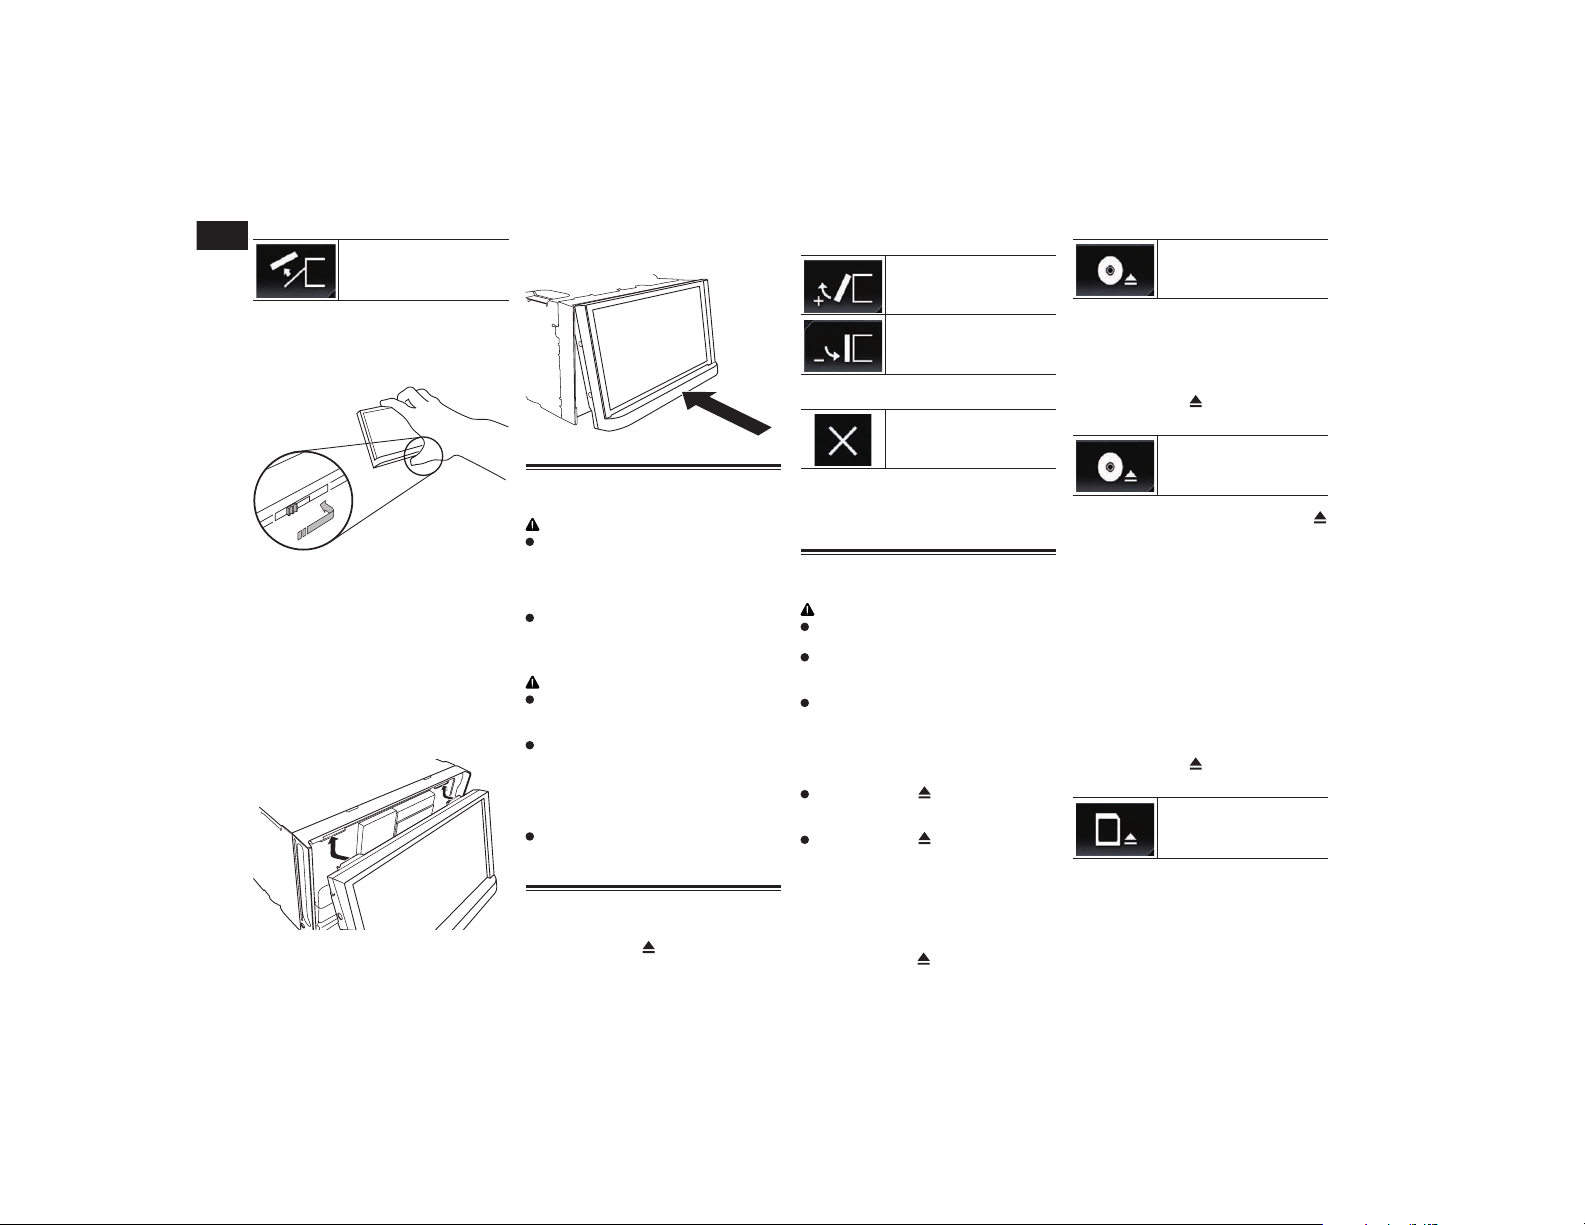
02
Capítulo
10
Es
2 Pulse la siguiente tecla.
El panel delantero se desliza
automáticamente hacia
usted.
3 Deslice el dial de la parte inferior
del panel delantero hacia la dere-
cha y levante el panel delantero
mientras mantiene pulsado el dial.
4 Coloque el panel delantero en el
estuche de protección para guar-
darlo de forma segura.
■ Colocación del panel delantero
1 Deslice el panel delantero sobre la
parte superior de la unidad y empú-
jelo para que encaje en su lugar.
Deslice el mecanismo de inserción del panel
delantero sobre la ranura de inserción de la
parte superior de la unidad y empújelo para
que encaje en su lugar.
2 Presione la parte inferior del panel
delantero hasta que quede enca-
jada en su lugar.
Notas sobre el uso del panel
LCD
ADVERTENCIA
Mantenga las manos y los dedos aleja-
dos de este producto durante la aper-
tura, el cierre o el ajuste del panel LCD.
Tenga especial cuidado con las manos y
los dedos de los niños.
No utilizar con el panel LCD abierto. Si
el panel LCD se queda abierto, podría
provocar daños en caso de producirse
un accidente de tráfico.
PRECAUCIÓN
No abra ni cierre el panel LCD por la
fuerza. Si lo hace, podría provocar un
funcionamiento incorrecto.
No accione este producto hasta que el
panel LCD se haya abierto o cerrado por
completo. Si este producto se acciona
durante la apertura o cierre del panel
LCD, el panel LCD podría detenerse en
dicho ángulo por razones de seguridad.
No coloque un vaso ni una lata sobre
el panel LCD abierto. Si lo hace, podría
romper este producto.
Ajuste del ángulo del panel
LCD
1 Pulse el botón .
2 Pulse las siguientes teclas para
ajustar el ángulo del panel LCD.
Colocar el panel en posición
horizontal.
Devolver el panel a la posi-
ción vertical.
3 Pulse la siguiente tecla.
Vuelve a la pantalla anterior.
p Se memorizará el ángulo ajustado del
panel LCD, y el panel LCD volverá auto-
máticamente a dicho ángulo la próxima
vez que se abra o cierre el panel LCD.
Inserción/expulsión/conexión
de soportes
PRECAUCIÓN
En la ranura para cargar discos solo se
pueden introducir discos.
En la ranura para tarjetas SD solo se
pueden introducir tarjeta de memoria
SD.
Si expulsa una tarjeta de memoria SD
durante el proceso de transferencia de
datos, podría dañar la tarjeta de memo-
ria SD. Asegúrese de expulsar la tarjeta
de memoria SD utilizando el procedi-
miento que se describe en este manual.
No pulse el botón si la tarjeta de
memoria SD no está totalmente introdu-
cida. Si lo hace, podría dañar la tarjeta.
No pulse el botón antes de extraer
totalmente la tarjeta de memoria SD. Si
lo hace, podría dañar la tarjeta.
■ Colocación y expulsión de un
disco
Colocación de un disco
1 Pulse el botón
.
2 Pulse la siguiente tecla.
Abre el panel LCD.
3 Introduzca un disco en la ranura
para cargar discos.
El disco se carga y el panel LCD se cierra.
Expulsión de un disco
1 Pulse el botón .
2 Pulse la siguiente tecla.
El panel LCD se abre, y se
expulsa el disco.
3 Extraiga el disco y pulse el botón
.
El panel LCD se cierra.
■ Colocación y expulsión de una
tarjeta de memoria SD
p Este sistema no es compatible con tarje-
tas Multi Media Card (MMC).
p No se garantiza la compatibilidad con
todas las tarjetas de memoria SD.
p Este producto podría no alcanzar un
rendimiento óptimo con determinadas
tarjetas de memoria SD.
Colocación de una tarjeta de
memoria SD
1 Pulse el botón .
2 Pulse la siguiente tecla.
Abre el panel LCD.
3 Introduzca una tarjeta de memoria
SD en la ranura para tarjetas SD.
Introdúzcala con la superficie de etiqueta
hacia arriba y presione la tarjeta hasta que
encaje con un “clic” y quede totalmente
bloqueada.
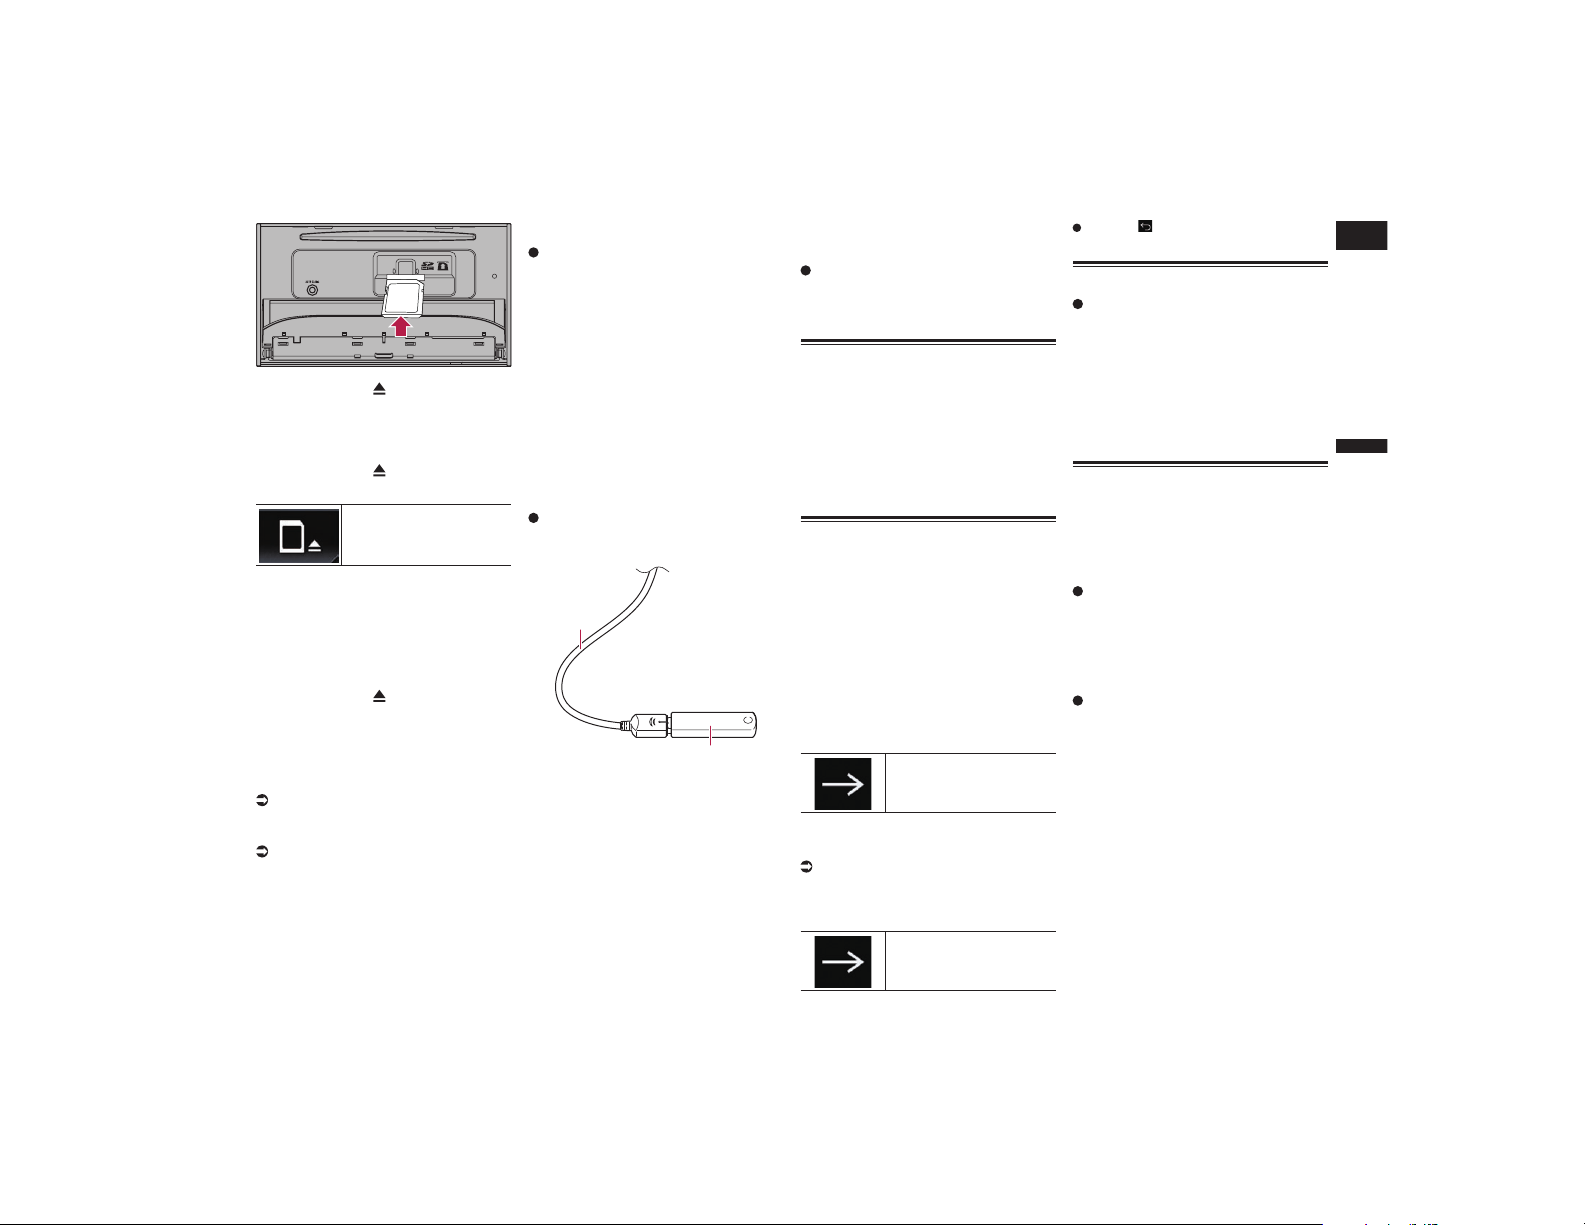
Español
02
Capítulo
11
Es
4 Pulse el botón .
El panel LCD se cierra.
Expulsión de una tarjeta de memo-
ria SD
1 Pulse el botón .
2 Pulse la siguiente tecla.
Abre el panel LCD.
3 Pulse suavemente en el centro de
la tarjeta de memoria SD hasta que
escuche un “clic”.
Se expulsa la tarjeta de memoria SD.
4 Extraiga la tarjeta de memoria SD
de forma recta.
5 Pulse el botón .
El panel LCD se cierra.
■ Conexión y desconexión de un
iPod
Conexión de un iPod
Para más información, consulte Conexión
de un iPhone con conector Lightning en
la página 82.
Para más información, consulte Conexión
de un iPhone con conector de 30 clavijas
en la página 82.
Desconexión de su iPod
Desconecte los cables tras asegu-
rarse de que no se esté accediendo
a los datos.
■ Conexión y desconexión de un
dispositivo de almacenamiento
USB
p Este producto podría no alcanzar un
rendimiento óptimo con determinados
dispositivos de almacenamiento USB.
p No es posible realizar la conexión utili-
zando un concentrador USB.
p Se necesita un cable USB para la
conexión.
Conexión de un dispositivo de
almacenamiento USB
Conecte un dispositivo de almace-
namiento USB al cable USB.
2
1
1 Cable USB
2 Dispositivo de almacenamiento USB
Desconexión de un dispositivo de
almacenamiento USB
Extraiga el dispositivo de almace-
namiento USB tras comprobar que
no se esté accediendo a los datos
que contiene.
Inicio y nalización
1 Encienda el motor para iniciar el
sistema.
Después de una breve pausa, aparece
la pantalla de bienvenida durante varios
segundos.
2 Apague el motor del vehículo para
apagar el sistema.
Este producto también se apaga.
En el primer arranque
Cuando utilice este producto por primera
vez, seleccione el idioma que desea utilizar.
1 Encienda el motor para iniciar el
sistema.
Después de una breve pausa, aparece
la pantalla de bienvenida durante varios
segundos.
Aparecerá la pantalla “Select Program
Language”.
2 Pulse el idioma que desea utilizar
en la pantalla.
3 Pulse la siguiente tecla.
Muestra la pantalla “Config.
smartphone”.
4 Pulse el elemento que desee
ajustar.
Para los detalles, consulte Información
de las conexiones y las funciones de cada
dispositivo en la página 21.
5 Pulse la siguiente tecla.
Muestra la pantalla de Menú
superior.
Si pulsa , la pantalla vuelve a la panta-
lla anterior.
Arranque normal
Encienda el motor para iniciar el
sistema.
Después de una breve pausa, aparece
la pantalla de bienvenida durante varios
segundos.
p La pantalla mostrada diferirá en función
de las condiciones anteriores.
p Si aparece la pantalla de introducción
de contraseña, introduzca la contraseña
para la función antirrobo.
Apagado de la pantalla
Es posible apagar la pantalla por las noches
o cuando la luminosidad de la pantalla es
demasiado alta.
■ Si la pantalla de la aplicación
está disponible
Mantenga pulsado el botón MODE.
Se apaga la pantalla.
p Si pulsa la pantalla mientras está apa-
gada, volverá a la pantalla inicial.
■ Si la pantalla de la aplicación no
está disponible
Pulse el botón MODE.
Se apaga la pantalla.
p Si pulsa la pantalla mientras está apa-
gada, volverá a la pantalla inicial.

02
Capítulo
12
Es
Cómo utilizar las pantallas
■ Cambio entre pantallas mediante las teclas del panel táctil
1
2
3
4
7
8
9
5
6
■ Cambio entre pantallas mediante botones de hardware
8
9
1
7
1 Pantalla de Menú superior
Este es el menú de inicio para acceder a
las pantallas que desee y llevar a cabo las
diversas funciones.
p Si pulsa el botón HOME, se muestra la
Pantalla de Menú superior.
p “APPS” se visualiza si AppRadio Mode
o MirrorLink están activados.
p “Android Auto” se visualiza si Android
Auto está activado.
2 Pantalla de Ajuste de hora y fecha
Puede configurar los ajustes de hora y fecha.
3 Pantalla de Menú de ajustes
Puede personalizar el sistema y la configura-
ción de audio, etc.
4 Pantalla de Menú del teléfono
Puede acceder a la pantalla que hace refe-
rencia a la telefonía manos libres.
5 Pantalla de Selección de fuente AV
Puede seleccionar la fuente AV.
6 Iconos de fuente favorita
Puede visualizar los iconos de las fuentes
más utilizadas arrastrando los iconos en el
área de visualización.
Para los detalles sobre la operación,
consulte Cambio del orden de visua-
lización de los iconos de fuente en la
página 13.
7 Pantalla de función AV
Puede operar cada fuente.
8 Pantalla de función de la aplicación
Podrá controlar las aplicaciones del iPhone
o del smartphone directamente desde este
producto.
p Si las aplicaciones no están disponibles,
no se mostrará la pantalla de función de
la aplicación.
9 Pantalla de menú Aplicación
Este producto puede cambiar al menú de
aplicación, que le permite ver y utilizar la
aplicación para iPhone o smartphone en la
pantalla.
p Si los menús de aplicaciones no están
disponibles, no se mostrará la pantalla
de menú Aplicación.
Fuente de AV compatible
Con este producto puede reproducir o
utilizar las siguientes fuentes.
HD Radio (Sintonizador HD Radio™)
CD
ROM (archivos de audio o vídeo
comprimidos)
DVD-Vídeo
Vídeo-CD
Las siguientes fuentes pueden reproducirse
o utilizarse mediante la conexión de un
dispositivo auxiliar.
USB
SD
iPod
Mi vehículo
Pandora
®
Aha Radio
Audio Bluetooth
Radio por satélite SiriusXM
®
Entrada AV (AV)
AUX
HDMI
Visualización de la pantalla de
función AV
1 Pulse el botón HOME para mostrar
la pantalla de Menú superior.
2 Pulse la tecla de función AV.
1
1 Tecla de función AV
Aparecerá la pantalla de función AV.
1 32
4
5
1 Muestra la lista de fuentes.
Para los detalles, consulte Selección de
una fuente frontal en la lista de fuentes
en la página 13.
2 Muestra la pantalla de Ajuste de hora
y fecha.
Para los detalles, consulte Ajuste de la
hora y la fecha en la página 76.
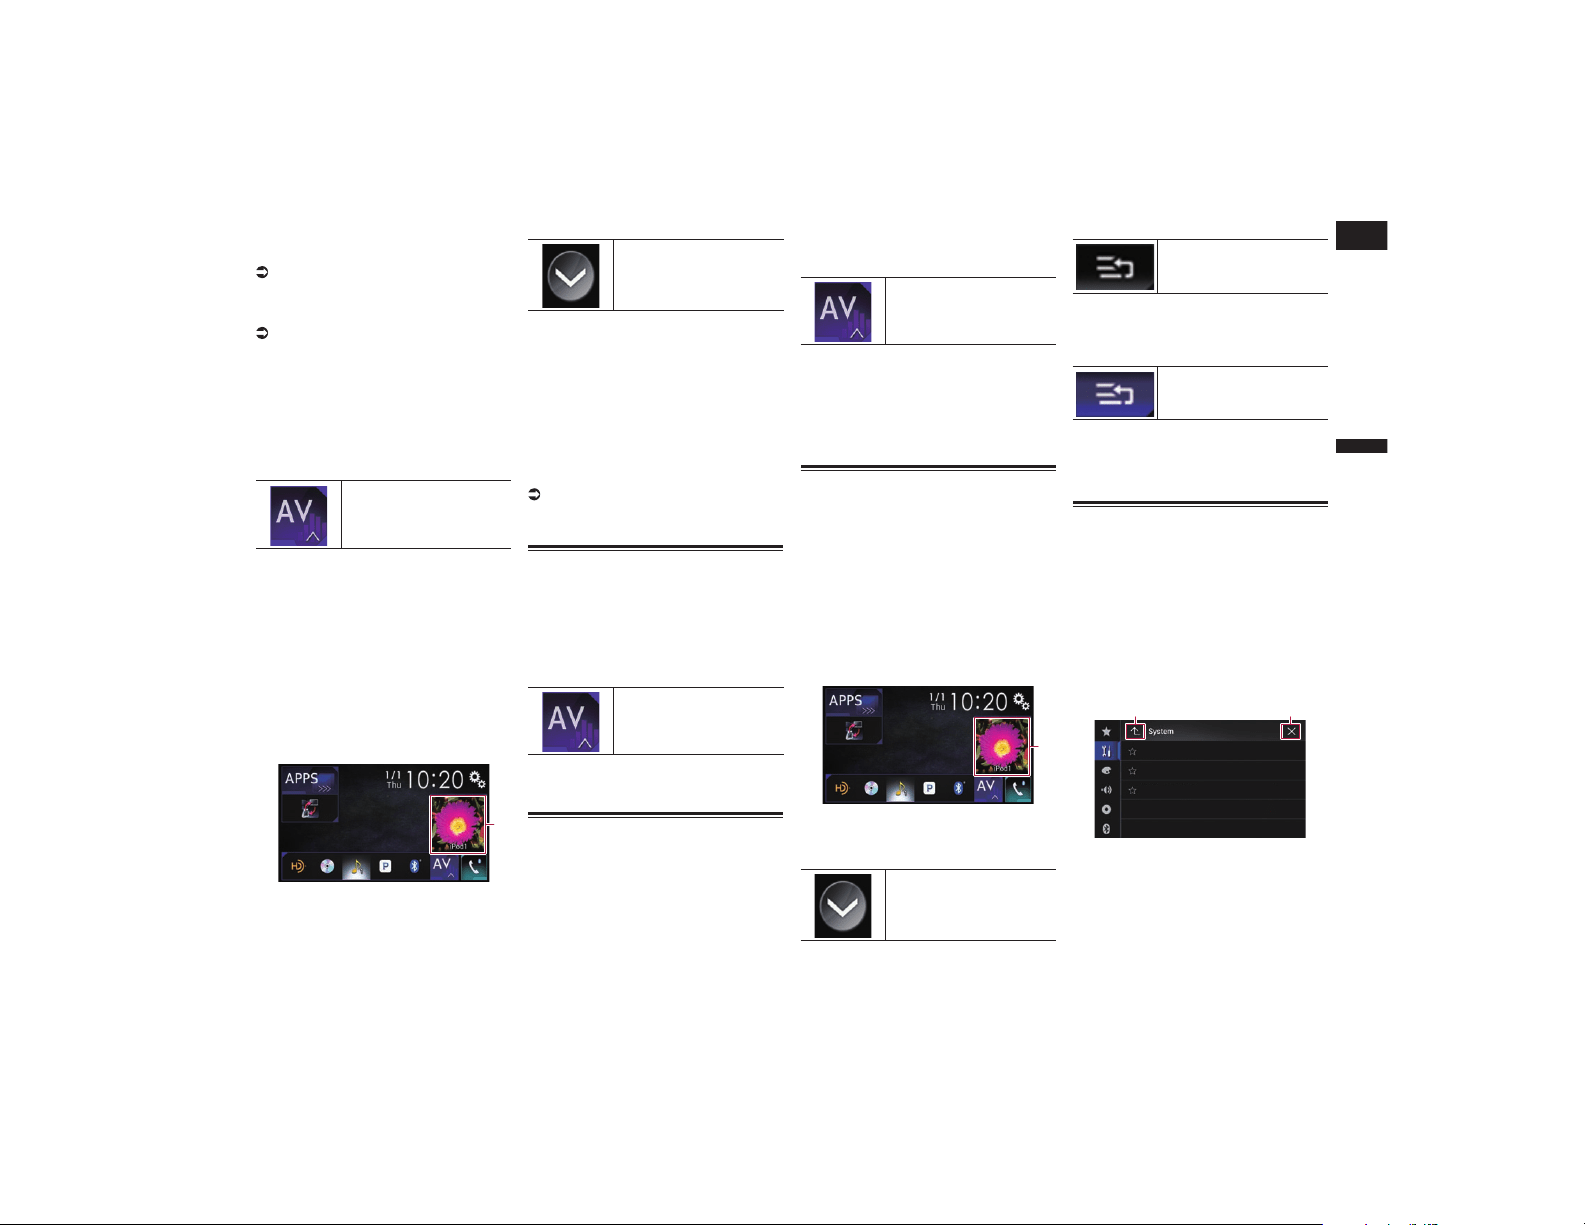
Español
02
Capítulo
13
Es
3 Muestra la pantalla de Menú de
ajustes.
4 Recupera las curvas del ecualizador.
Para los detalles, consulte Utilización del
ecualizador en la página 69.
5 Muestra la pantalla de Menú del
teléfono.
Para los detalles, consulte Visualización
del menú del teléfono en la página 17.
■ Selección de una fuente frontal
en la pantalla de Selección de
fuente AV
1 Pulse el botón HOME para mostrar
la pantalla de Menú superior.
2 Pulse la siguiente tecla.
Muestra la pantalla de
Selección de fuente AV.
3 Pulse el icono de fuente que desee
seleccionar.
Aparecerá la pantalla de Función AV de la
fuente seleccionada.
■ Selección de una fuente frontal
en la lista de fuentes
p Esta función no está disponible durante
una llamada con este producto.
1 Pulse el botón HOME para mostrar
la pantalla de Menú superior.
2 Pulse la tecla de función AV.
1
1 Tecla de función AV
Aparecerá la pantalla de función AV.
3 Pulse la siguiente tecla.
Muestra la lista de fuentes.
4 Pulse la tecla de fuente que desee
seleccionar.
Aparecerá la pantalla de Función AV de la
fuente seleccionada.
p “Camera View” está disponible si
“Entrada cámara trasera” o “2ª Ent. de
cámara” se ajustan en “Act.”.
■ Selección de una fuente trasera
Puede seleccionar una emisión de la fuente
a la pantalla trasera.
Para los detalles sobre las operaciones,
consulte Selección del vídeo para la
pantalla trasera en la página 77.
Desactivación de la fuente de
AV
Desactive la fuente de AV para dejar de
reproducir o recibir la fuente de AV.
1 Pulse el botón HOME para mostrar
la pantalla de Menú superior.
2 Pulse la siguiente tecla.
Muestra la pantalla de
Selección de fuente AV.
3 Pulse [OFF].
La fuente de AV está desactivada.
Cambio del orden de visuali-
zación de los iconos de fuente
Puede cambiar el orden de visualización
de los iconos de fuente de la pantalla de
Selección de fuente AV.
p Este ajuste solo está disponible cuando
detiene su vehículo en un lugar seguro y
acciona el freno de mano.
p Esta función no está disponible durante
una llamada con este producto.
1 Pulse el botón HOME para mostrar
la pantalla de Menú superior.
2 Pulse la siguiente tecla.
Muestra la pantalla de
Selección de fuente AV.
3 Mantenga pulsado un icono de
fuente y arrástrelo a la posición
deseada.
p Si se mueve el icono de fuente, el orden
de la lista de fuentes también se puede
cambiar.
Cambio del orden de visuali-
zación de las teclas de fuente
Puede cambiar el orden de visualización de
las teclas de fuente de la lista de fuentes.
p Este ajuste solo está disponible cuando
detiene su vehículo en un lugar seguro y
acciona el freno de mano.
p Esta función no está disponible durante
una llamada con este producto.
1 Pulse el botón HOME para mostrar
la pantalla de Menú superior.
2 Pulse la tecla de función AV.
1
1 Tecla de función AV
Aparecerá la pantalla de función AV.
3 Pulse la siguiente tecla.
Muestra la lista de fuentes.
4 Pulse la siguiente tecla.
Se pueden mover las teclas
de fuente.
5 Arrastre la tecla de fuente a la
posición deseada.
6 Pulse la siguiente tecla.
Vuelve a la pantalla anterior.
p Si se mueve la tecla de fuente, los iconos
de fuente que se muestran en la pantalla
de Menú superior y en la pantalla de
fuente de AV también se mueven.
Utilización del panel táctil
Puede controlar este producto pulsando las
marcas y elementos (teclas del panel táctil)
mostrados en la pantalla directamente con
los dedos.
p Para proteger la pantalla LCD de daños,
asegúrese de pulsar las teclas del panel
táctil únicamente con el dedo, y hágalo
suavemente.
■ Utilización de las teclas del
panel táctil comunes
1 2
1 Vuelve a la pantalla anterior.
2 Cierra la pantalla.
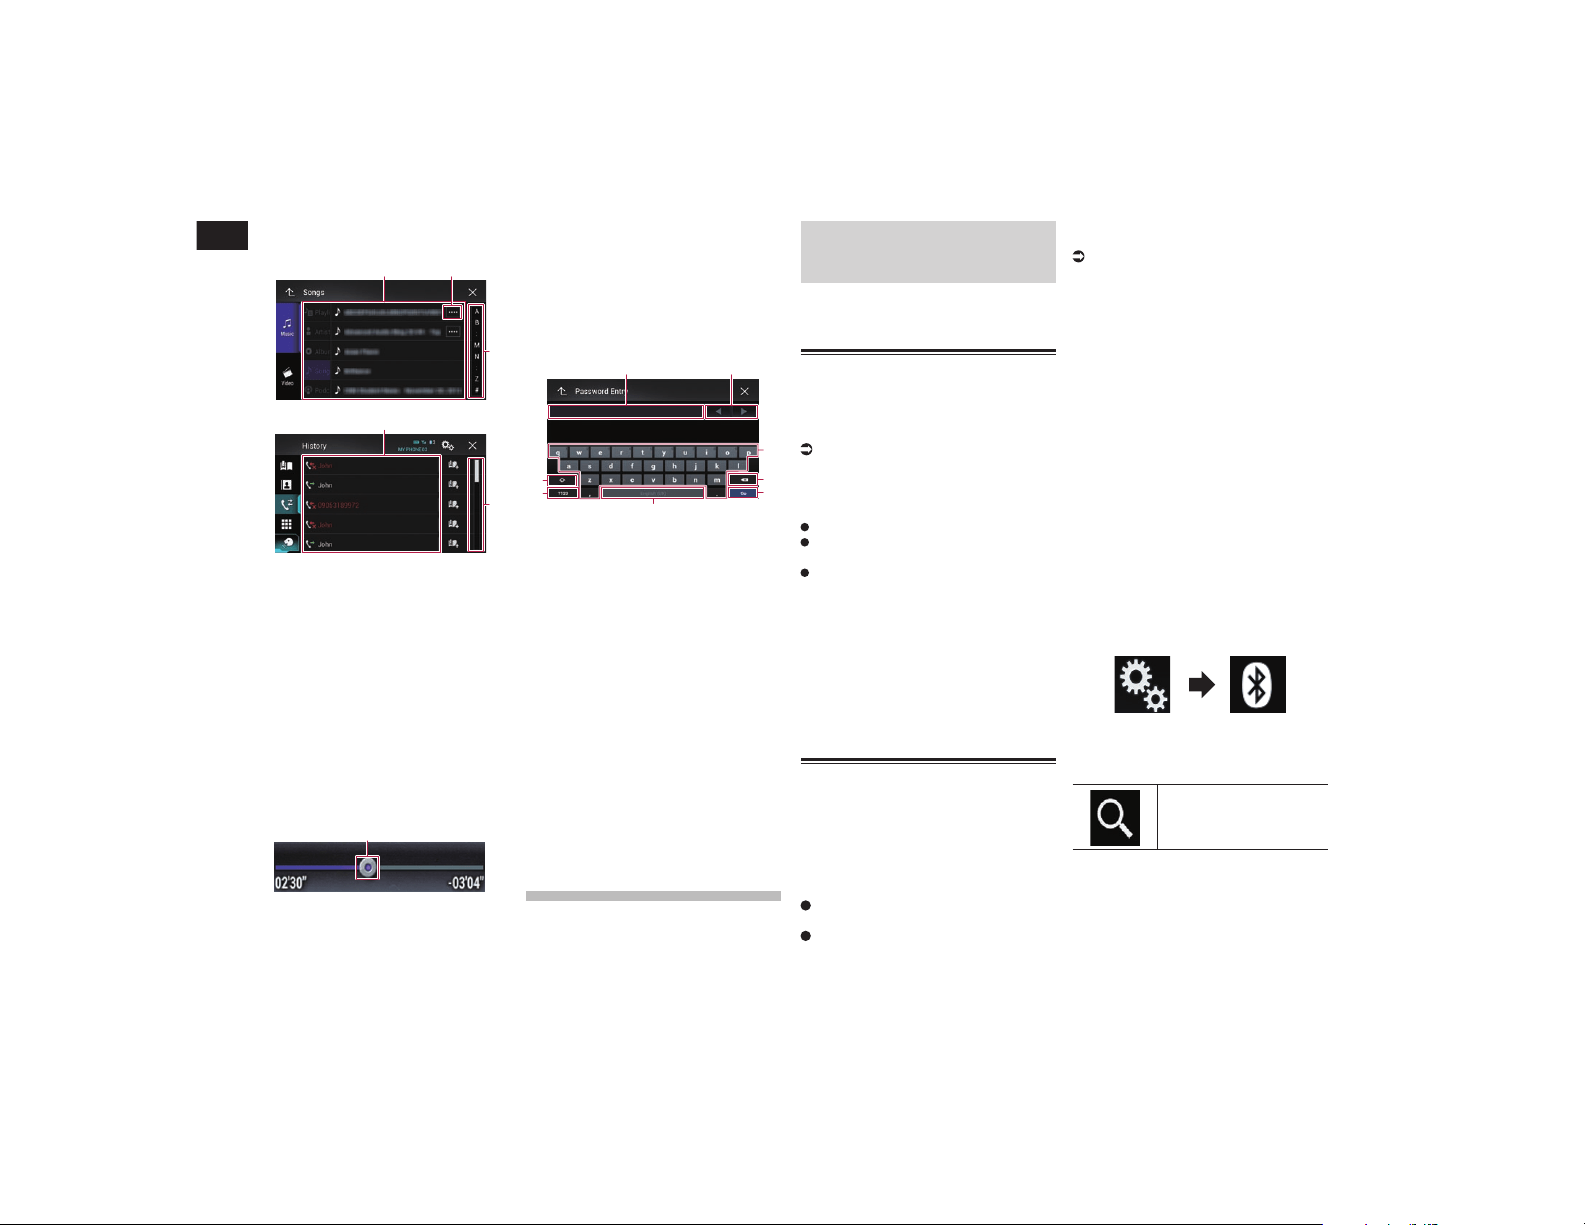
03
Capítulo
14
Es
■ Utilización de las pantallas de
lista
3
1
2
3
1
1 Al pulsar un elemento de la lista se
selecciona el elemento o se limitan las
opciones.
2 Aparece cuando no se muestran todos
los caracteres en el área de visualización.
Si toca la tecla, se desplazan el resto de
caracteres para su visualización.
3 Aparece cuando los elementos no se
pueden mostrar solamente en una sola
página.
Arrastre la barra de desplazamiento para
ver los elementos ocultos.
También puede arrastrar la lista para ver
elementos ocultos.
■ Uso de la barra de tiempo
1
1 Puede cambiar el punto de reproducción
arrastrando la tecla.
p El tiempo de reproducción que se corres-
ponde con la posición de la tecla se
muestra al arrastrarla.
p Esta función no está disponible al utilizar
la función iPod con un iPhone 6 Plus,
iPhone 6, iPhone 5s, iPhone 5c, iPhone 5
o iPod touch (5.ª generación).
p Esta función no está disponible para
algunos medios o fuentes.
■ Funcionamiento del teclado en
pantalla
6
5
4
3
8
7
21
1 Muestra los caracteres que se introdu-
cen. Si no existe texto en el cuadro, apare-
cerá una guía informativa con texto.
2 Mueve el cursor o hacia la derecha o
hacia la izquierda para un número de
caracteres equivalente al número de
toques.
3 Introduce caracteres en el cuadro de
texto.
4 Elimina el texto a la izquierda del cursor
letra a letra. Si sigue pulsando la tecla, se
eliminará todo el texto.
5 Confirma la entrada y avanza hasta el
paso siguiente.
6 Introduce un espacio.
Se introduce un espacio equivalente al
número de veces que se pulse.
7 Cambia entre letras y números/símbolos.
8 Cambia entre letras en mayúscula y en
minúscula.
Registro y conexión
de un dispositivo
Bluetooth
Si sus dispositivos cuentan con tecnología
Bluetooth
®
, este producto podrá conectarse
a sus dispositivos de forma inalámbrica. En
esta sección se describe cómo configurar
una conexión Bluetooth.
Para los detalles acerca de la conectividad
con dispositivos con tecnología inalám-
brica Bluetooth, consulte la información en
nuestro sitio web.
p El menú “Bluetooth” solo está disponible
si detiene su vehículo en un lugar seguro
y acciona el freno de mano.
Preparación de los dispositi-
vos de comunicación
Este producto cuenta con una función inte-
grada que permite utilizar dispositivos con
tecnología inalámbrica Bluetooth.
Para los detalles, consulte Notas sobre la
telefonía manos libres en la página 19.
Con este producto puede registrar y utilizar
dispositivos que cuenten con los siguientes
perfiles.
HFP (Hands-Free Profile)
A2DP (Advanced Audio Distribution
Profile)
SPP (Serial Port Profile)
p Si se desactiva este producto, la conexión
Bluetooth también se desconectará.
Cuando el sistema se reinicia, el sis-
tema trata de volver a conectar auto-
máticamente el dispositivo conectado
anteriormente. Incluso si la conexión se
interrumpe por algún motivo, el sistema
vuelve a conectar automáticamente el
dispositivo especificado (excepto cuando
la conexión se interrumpe por el funcio-
namiento del dispositivo).
Registro de sus dispositivos
Bluetooth
Tendrá que registrar sus dispositivos con
tecnología inalámbrica Bluetooth cuando
los conecte a este producto por primera
vez. Es posible registrar un total de tres
dispositivos. Están disponibles dos métodos
de registro:
Búsqueda de dispositivos Bluetooth
cercanos
Sincronización desde sus dispositivos
Bluetooth
p Si ya hay tres dispositivos sincronizados,
se muestra “Memoria llena” y no se
puede realizar la sincronización. En ese
caso, elimine primero un dispositivo
sincronizado.
Para los detalles, consulte Eliminación
de un dispositivo registrado en la
página 15.
■ Búsqueda de dispositivos
Bluetooth cercanos
El sistema busca dispositivos Bluetooth dis-
ponibles cerca de este producto, los muestra
en una lista y los registra para establecer la
conexión.
p Cuando el dispositivo ya está conectado,
esta función está inactiva.
1 Active la tecnología inalámbrica
Bluetooth en sus dispositivos.
p En algunos dispositivos Bluetooth, no
son necesarias acciones específicas
para activar la tecnología inalámbrica
Bluetooth. Para los detalles, consulte
el manual de instrucciones de sus
dispositivos.
p Configure el dispositivo visible para otros.
2 Pulse el botón HOME para mostrar
la pantalla de Menú superior.
3 Pulse las siguientes teclas en el
orden que se indica.
Aparecerá la pantalla “Bluetooth”.
4 Pulse [Conexión].
5 Pulse la siguiente tecla.
Inicia la búsqueda.
El sistema buscará los dispositivos
Bluetooth que estén a la espera de estable-
cer una conexión y, en caso de encontrar
dispositivos, los mostrará en la lista.
p La lista puede incluir un máximo de 20
dispositivos. Los dispositivos aparece-
rán en la lista en el orden en el que se
encuentren.
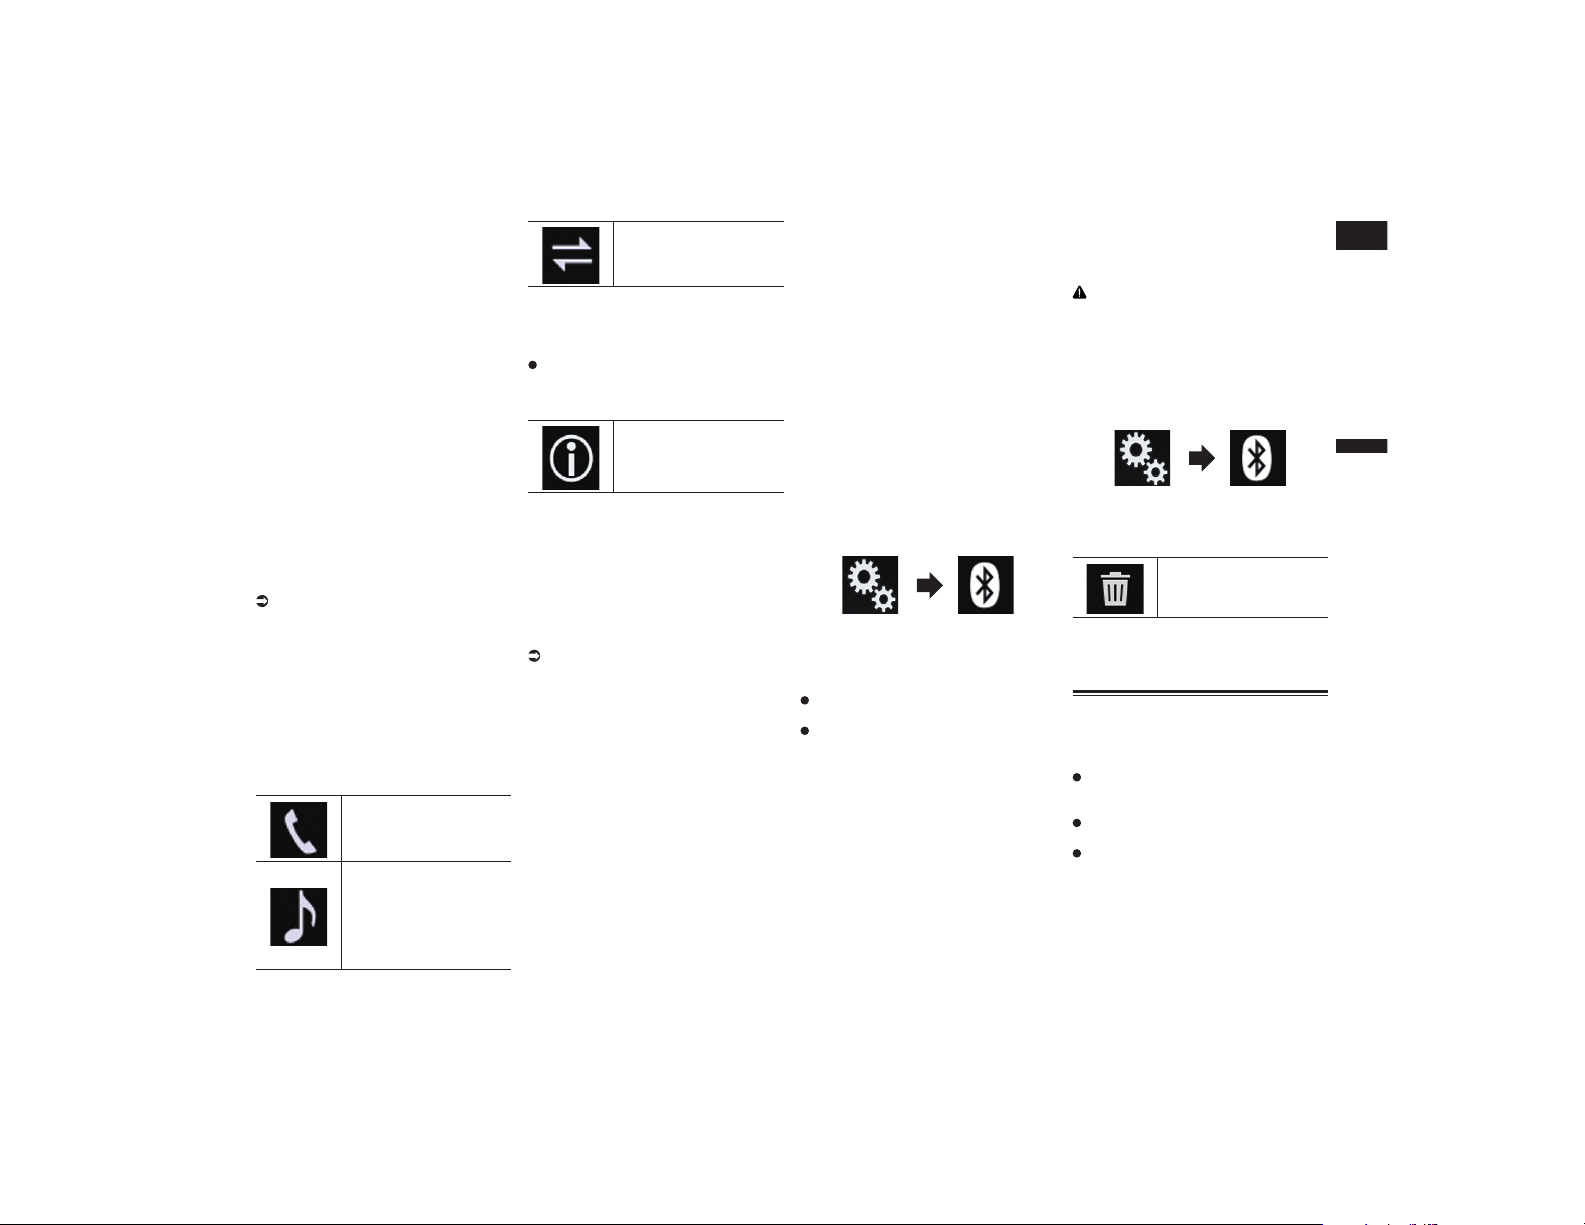
Español
03
Capítulo
15
Es
6 Espere hasta que el dispositivo
Bluetooth aparezca en la lista.
p Si no puede encontrar el dispositivo
Bluetooth que desea conectar, com-
pruebe que el dispositivo esté a la espera
de una conexión de tecnología inalám-
brica Bluetooth.
7 Pulse el nombre del dispositivo
Bluetooth que desea registrar.
Mientras se establece la conexión, se mues-
tra “Emparejando... Favor de esperar.”.
Si se establece la conexión, se muestra
“Emparejado.”.
p Si su dispositivo es compatible con SSP
(Secure Simple Pairing), aparece un
número de seis dígitos en la pantalla de
este producto. Pulse [Sí] para sincronizar
el dispositivo.
p Si se produce un error de conexión, se
muestra “Error”. En ese caso, vuelva a
intentarlo desde el principio.
p El código PIN está establecido en “0000”
de forma predeterminada, pero se puede
cambiar.
Para los detalles, consulte Introducción
del código PIN para la conexión inalám-
brica Bluetooth en la página 16.
p Cuando se haya establecido la conexión,
se mostrará el nombre del dispositivo.
Pulse el nombre del dispositivo para
desconectarse.
Cuando el dispositivo se haya registrado
correctamente, se establecerá una conexión
Bluetooth desde el sistema.
Los iconos de perfil que se muestran en la
pantalla de lista de dispositivos registrados
se iluminan de la siguiente manera.
Se ilumina cuando el dis-
positivo móvil se conecta
correctamente con el HFP
(Hands-Free Profile).
Se ilumina cuando el
dispositivo de audio se
conecta correctamente con
A2DP (Advanced Audio
Distribution Profile)/AVRCP
(Audio/Video Remote
Control Profile).
Se ilumina cuando se esta-
blece la conexión Bluetooth
con SPP (Serial Port Profile).
p Tras la sincronización, la agenda tele-
fónica registrada en el dispositivo se
puede transmitir automáticamente a este
producto.
Si pulsa la siguiente tecla, podrá cambiar
la visualización entre los nombres de
dispositivo y las direcciones de dispositi-
vos Bluetooth.
Cambia entre los nom-
bres de dispositivo y las
direcciones de dispositivos
Bluetooth.
■ Sincronización desde sus dispo-
sitivos Bluetooth
Puede registrar un dispositivo Bluetooth
estableciendo este producto en el modo de
espera y solicitando una conexión desde el
dispositivo Bluetooth.
p Antes del registro, asegúrese de que
“Visibilidad” en el menú “Bluetooth”
esté establecido en “Act.”.
Para los detalles, consulte Cambio de
visibilidad en la página 16.
1 Active la tecnología inalámbrica
Bluetooth en sus dispositivos.
p En algunos dispositivos Bluetooth, no
son necesarias acciones específicas
para activar la tecnología inalámbrica
Bluetooth. Para los detalles, consulte
el manual de instrucciones de sus
dispositivos.
2 Utilice el ajuste Bluetooth del
dispositivo para sincronizar este
producto con el dispositivo.
p Si se necesita introducir un código PIN,
introduzca uno. (El código PIN predeter-
minado es “0000”.)
Cuando el dispositivo se encuentre
correctamente registrado, la configura-
ción de conexión se realizará desde el
dispositivo.
p Si se produce un error durante el proceso
de registro, repita el procedimiento desde
el principio.
■ Conexión automática con un
dispositivo Bluetooth
Si se activa esta función, se establecerá
automáticamente una conexión entre el
dispositivo Bluetooth y este producto en
cuanto los dos dispositivos están separados
por menos de unos metros.
Inicialmente, esta función está activada.
p Si esta función está activada, se estable-
cerá automáticamente la conexión con el
último dispositivo Bluetooth conectado
cuando se conecte el interruptor de
encendido.
1 Pulse el botón HOME para mostrar
la pantalla de Menú superior.
2 Pulse las siguientes teclas en el
orden que se indica.
Aparecerá la pantalla “Bluetooth”.
3 Pulse [Conexión autom.] repetida-
mente hasta que aparezca la confi-
guración deseada.
Act. (valor predeterminado):
Activa la conexión automática.
Des.:
Desactiva la conexión automática.
Si el dispositivo Bluetooth está preparado
para una conexión inalámbrica Bluetooth, se
establecerá automáticamente una conexión
con este producto.
Si se produce un error de conexión, se
muestra “Fallo conexión automática.
¿Reintentar?”.
Pulse [Sí] para volver a conectar.
■ Eliminación de un dispositivo
registrado
Cuando haya registrado tres dispositivos
Bluetooth y desee agregar otro más, primero
deberá eliminar uno de los dispositivos
registrados.
p Si se elimina un teléfono registrado, tam-
bién se borrarán todas las entradas de la
agenda telefónica y las listas del registro
de llamadas relativas a dicho teléfono.
PRECAUCIÓN
Nunca apague este producto mientras el
dispositivo Bluetooth sincronizado se esté
eliminando.
1 Pulse el botón HOME para mostrar
la pantalla de Menú superior.
2 Pulse las siguientes teclas en el
orden que se indica.
Aparecerá la pantalla “Bluetooth”.
3 Pulse [Conexión].
4 Pulse la siguiente tecla.
Elimina un dispositivo
sincronizado.
Aparecerá un mensaje de confirmación.
5 Pulse [Sí].
Se elimina el dispositivo.
Conexión manual de un dispo-
sitivo Bluetooth registrado
Conecte el dispositivo Bluetooth manual-
mente en los siguientes casos:
Hay dos o más dispositivos Bluetooth
registrados y desea seleccionar manual-
mente el dispositivo que se va a utilizar.
Desea volver a conectar un dispositivo
Bluetooth desconectado.
No se puede establecer automáticamente
la conexión por algún motivo.
Para iniciar la conexión manualmente, siga
este procedimiento.
1 Active la tecnología inalámbrica
Bluetooth en sus dispositivos.
p En algunos dispositivos Bluetooth, no
son necesarias acciones específicas
para activar la tecnología inalámbrica
Bluetooth. Para los detalles, consulte
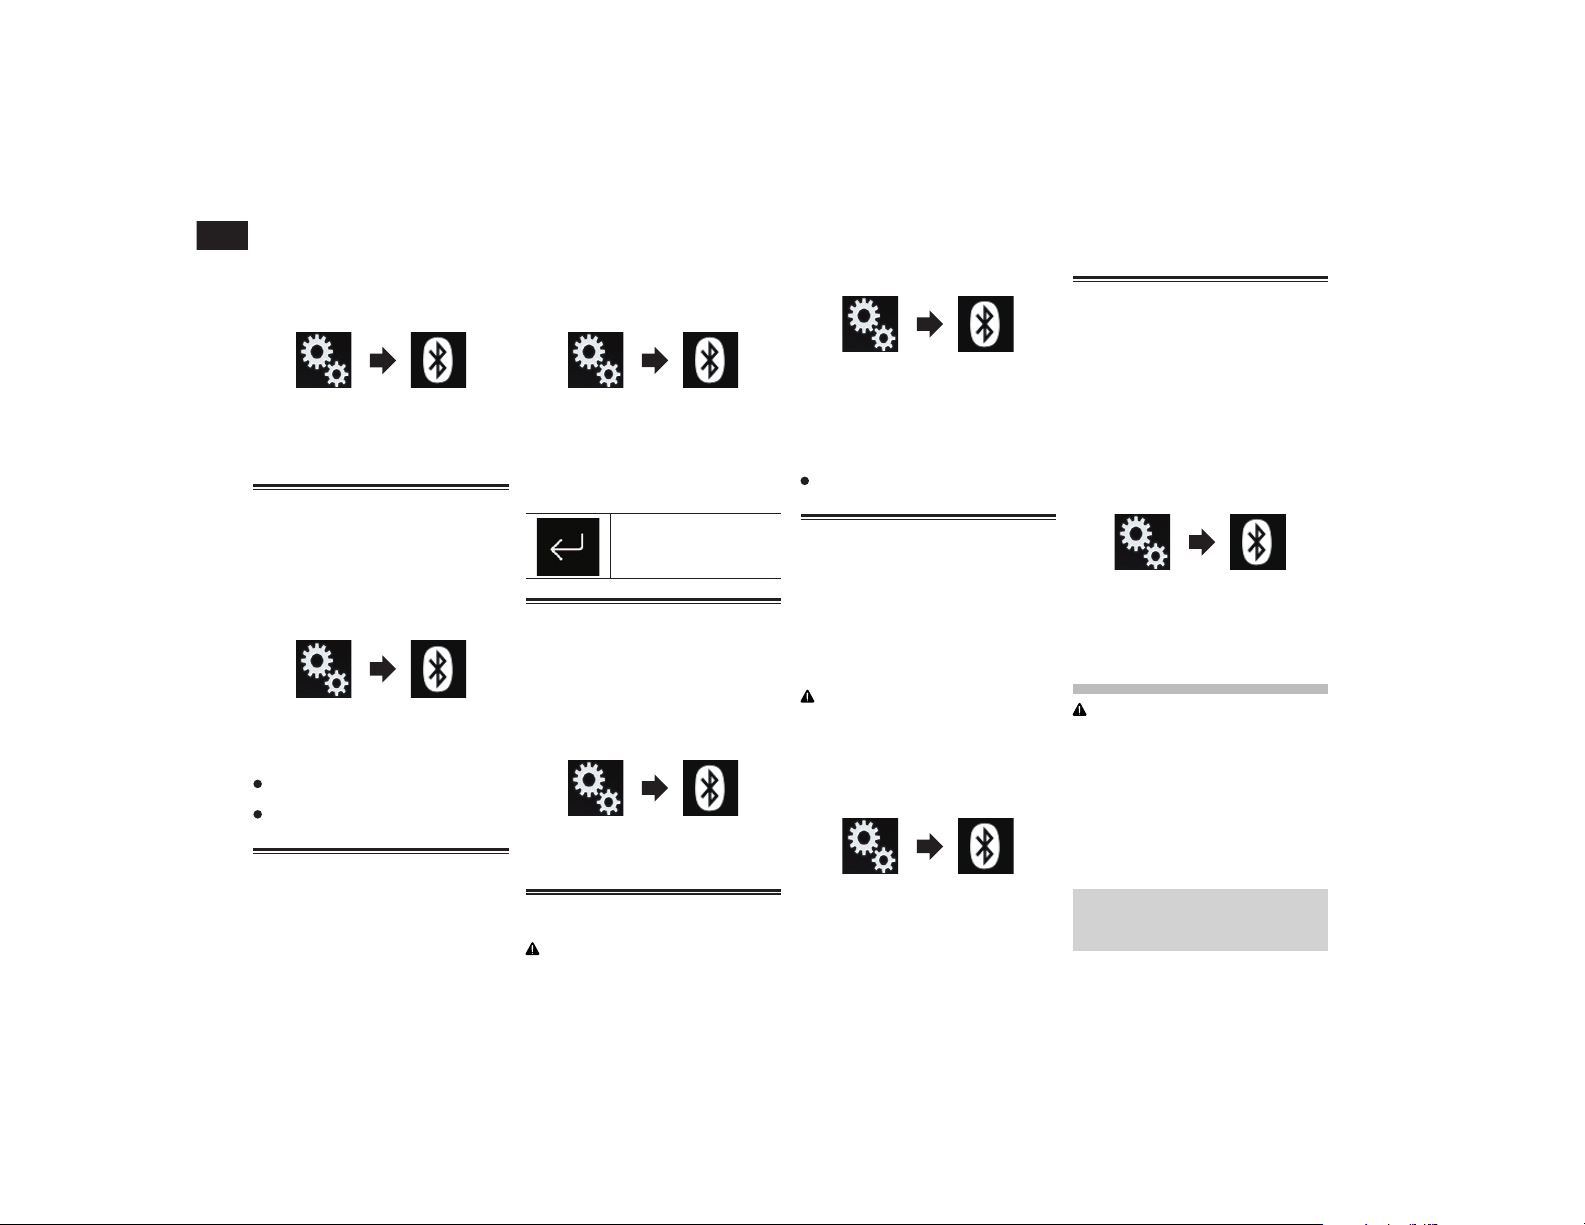
04
Capítulo
16
Es
el manual de instrucciones de sus
dispositivos.
2 Pulse el botón HOME para mostrar
la pantalla de Menú superior.
3 Pulse las siguientes teclas en el
orden que se indica.
Aparecerá la pantalla “Bluetooth”.
4 Pulse [Conexión].
5 Pulse el nombre del dispositivo
que desea conectar.
Cambio de visibilidad
Esta función configura si este producto es
visible para otros dispositivos.
Inicialmente, esta función está activada.
1 Pulse el botón HOME para mostrar
la pantalla de Menú superior.
2 Pulse las siguientes teclas en el
orden que se indica.
Aparecerá la pantalla “Bluetooth”.
3 Pulse [Visibilidad] repetidamente
hasta que aparezca la configura-
ción deseada.
Act. (valor predeterminado):
Activa la visibilidad.
Des.:
Desactiva la visibilidad.
Introducción del código PIN
para la conexión inalámbrica
Bluetooth
Para conectar el dispositivo Bluetooth en
este producto mediante tecnología inalám-
brica Bluetooth, debe introducir un código
PIN en el dispositivo Bluetooth para compro-
bar la conexión.
p El código predeterminado es “0000”, pero
puede cambiarlo con esta función.
1 Pulse el botón HOME para mostrar
la pantalla de Menú superior.
2 Pulse las siguientes teclas en el
orden que se indica.
Aparecerá la pantalla “Bluetooth”.
3 Pulse [Entrada de código PIN].
Aparecerá la pantalla “Código PIN”.
4 Pulse de [0] a [9] para introducir el
código PIN (hasta 8 dígitos).
5 Pulse la siguiente tecla.
Guarda el código PIN en
este producto.
Visualización de la dirección
Bluetooth
Puede comprobar la dirección Bluetooth de
este producto.
1 Pulse el botón HOME para mostrar
la pantalla de Menú superior.
2 Pulse las siguientes teclas en el
orden que se indica.
Aparecerá la pantalla “Bluetooth”.
3 Pulse [Inform. dispositivo].
Se muestra la dirección Bluetooth.
Borrado de la memoria
Bluetooth
PRECAUCIÓN
Nunca apague este producto mientras se
esté borrando la memoria Bluetooth.
1 Pulse el botón HOME para mostrar
la pantalla de Menú superior.
2 Pulse las siguientes teclas en el
orden que se indica.
Aparecerá la pantalla “Bluetooth”.
3 Pulse [Borr. memo. Bluetooth].
4 Pulse [Borrar].
Aparece la pantalla de confirmación.
5 Pulse [OK].
Se borra la memoria Bluetooth.
Si no desea borrar la memoria, pulse
[Cancelar].
Actualización del software
Bluetooth
Esta función se utiliza para actualizar este
producto con el software Bluetooth más
reciente. Para obtener más información
acerca del software Bluetooth y su actualiza-
ción, consulte nuestro sitio web.
p La fuente se apaga y la conexión
Bluetooth se desconecta antes de que se
inicie el proceso.
PRECAUCIÓN
Nunca apague este producto mientras se
esté actualizando el software.
1 Pulse el botón HOME para mostrar
la pantalla de Menú superior.
2 Pulse las siguientes teclas en el
orden que se indica.
Aparecerá la pantalla “Bluetooth”.
3 Pulse [Actualiz. software BT].
4 Pulse [Iniciar].
Se muestra la pantalla de transferencia de
datos.
p Siga las instrucciones en pantalla para
finalizar la actualización del software
Bluetooth.
Visualización de la versión del
software Bluetooth
Si este producto no funciona correctamente,
quizás deba ponerse en contacto con su
distribuidor para su reparación.
En ese caso, se le puede pedir que espe-
cifique la versión del software. Siga este
procedimiento para comprobar la versión de
esta unidad.
1 Pulse el botón HOME para mostrar
la pantalla de Menú superior.
2 Pulse las siguientes teclas en el
orden que se indica.
Aparecerá la pantalla “Bluetooth”.
3 Pulse [Inform. versión Bluetooth].
Se muestra la versión del módulo Bluetooth
de este producto.
Utilización de la telefo-
nía manos libres
PRECAUCIÓN
Por su seguridad, intente no hablar por
teléfono mientras conduce.
Si su teléfono móvil cuenta con tecnología
Bluetooth, podrá conectar este producto al
teléfono móvil sin cables. Si usa la función
manos libres, podrá utilizar este producto
para realizar o recibir llamadas. En esta
sección se describe cómo se configura una
conexión Bluetooth y cómo se debe utilizar
un teléfono móvil compatible con tecnología
Bluetooth en este producto.
Para los detalles acerca de la conectividad
con dispositivos con tecnología inalám-
brica Bluetooth, consulte la información en
nuestro sitio web.
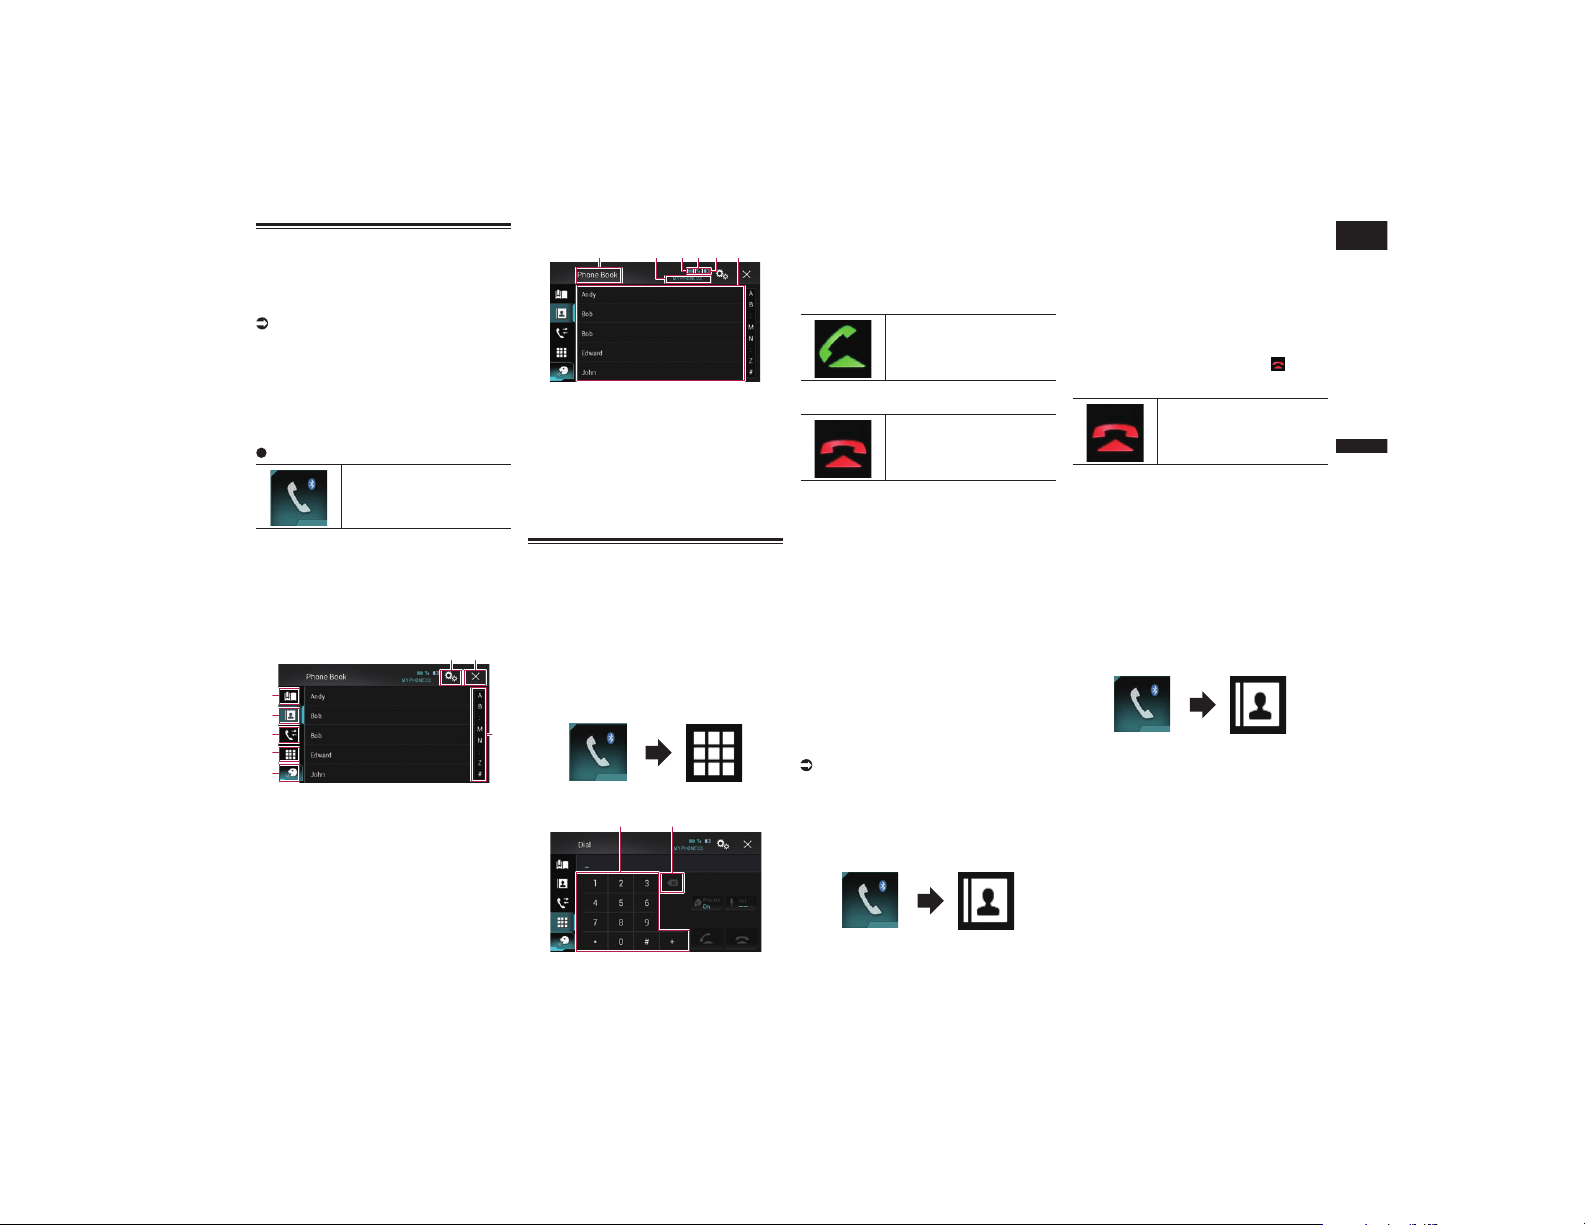
Español
04
Capítulo
17
Es
Visualización del menú del
teléfono
p Conecte un teléfono móvil a este pro-
ducto para utilizar la telefonía manos
libres.
Para los detalles, consulte Capítulo 3.
p El icono de teléfono se muestra en las
siguientes pantallas:
— Pantalla de Menú superior
— Pantalla de Función AV
— En la barra lateral de control de la aplica-
ción de las pantallas de modo AppRadio
Mode y MirrorLink
Pulse la siguiente tecla.
Muestra la pantalla de Menú
del teléfono.
p Se muestra la pantalla “Directorio de
teléfonos” cuando se utiliza esta función
por primera vez. La pantalla de la última
función utilizada se mostrará la siguiente
vez.
■ Teclas del panel táctil
4
2
3
5
1
6 7
8
1 Muestra la pantalla de marcación
preestablecida.
2 Cambia a la lista de la agenda telefónica.
3 Cambia a los registros de llamadas
perdidas, recibidas y marcadas.
4 Cambia el modo para introducir el
número de teléfono directamente.
5 Cambia a la función de reconocimiento
de voz.
6 Muestra la pantalla de Menú de ajustes.
7 Cierra la pantalla.
8 Muestra las entradas en la lista por el
carácter inicial.
■ Lectura de la pantalla
1 32 4 5 6
1 Título del menú
2 Nombre del teléfono móvil conectado
3 Estado de la batería del teléfono móvil
4 Estado de recepción del teléfono móvil
5 Indica que está conectado un teléfono
Bluetooth.
Se muestra el número de lista del disposi-
tivo conectado.
6 Área de visualización de la lista
Realizar una llamada
telefónica
Existen distintas formas de realizar una
llamada telefónica.
■ Marcación directa
1 Pulse el botón HOME para mostrar
la pantalla de Menú superior.
2 Pulse las siguientes teclas en el
orden que se indica.
Aparecerá la pantalla “Marcación”.
1 2
1 Panel de marcado
2 Elimina un dígito. Manténgalo pulsado
para eliminar todos los dígitos.
3 Introduzca el número de teléfono
pulsando las teclas numéricas.
4 Pulse la siguiente tecla.
Realiza una llamada.
5 Pulse la siguiente tecla.
Finaliza la llamada.
La llamada finaliza.
p Puede que oiga ruidos cuando cuelgue el
teléfono.
■ Llamada a un número de la
agenda telefónica
Tras encontrar el número al que desea
llamar en la agenda telefónica, puede selec-
cionar la entrada y realizar la llamada.
p Los contactos del teléfono normalmente
se transferirán a este producto automáti-
camente cuando se conecte el teléfono.
Si los contactos no se transfieren auto-
máticamente, puede hacerlo utilizando el
menú de su teléfono móvil.
Para transferir los contactos utilizando el
menú de su teléfono móvil, configure este
producto visible para otros dispositivos.
Para los detalles, consulte Cambio de
visibilidad en la página 16.
1 Pulse el botón HOME para mostrar
la pantalla de Menú superior.
2 Pulse las siguientes teclas en el
orden que se indica.
Aparecerá la pantalla “Directorio de
teléfonos”.
3 Pulse en la lista el nombre que
desee.
Se mostrará la pantalla de detalles de la
agenda telefónica.
4 Pulse el número de teléfono que
desee marcar.
Se mostrará la pantalla de marcación.
5 Comenzará la marcación.
p Para cancelar la llamada, pulse .
6 Pulse la siguiente tecla.
Finaliza la llamada.
La llamada finaliza.
Selección de un número mediante
el modo de búsqueda alfabética
Si se han registrado muchos números telefó-
nicos en la agenda telefónica, puede buscar
números de teléfono mediante el modo de
búsqueda alfabética.
1 Pulse el botón HOME para mostrar
la pantalla de Menú superior.
2 Pulse las siguientes teclas en el
orden que se indica.
Aparecerá la pantalla “Directorio de
teléfonos”.
3 Arrastre la barra de búsqueda ini-
cial para encontrar una entrada por
el carácter inicial del nombre.
Se visualiza el alfabeto correspondiente con
la posición actual de la barra de búsqueda
inicial.
4 Suelte la barra de búsqueda inicial
en el alfabeto deseado.
Se mostrarán las entradas de la “Directorio
de teléfonos” que empiezan con esa letra
(p. ej. “Bárbara”, “Benito” y “Bernardo”
cuando se selecciona “B”).
p Para refinar la búsqueda con una letra
diferente, pulse [Cancelar].
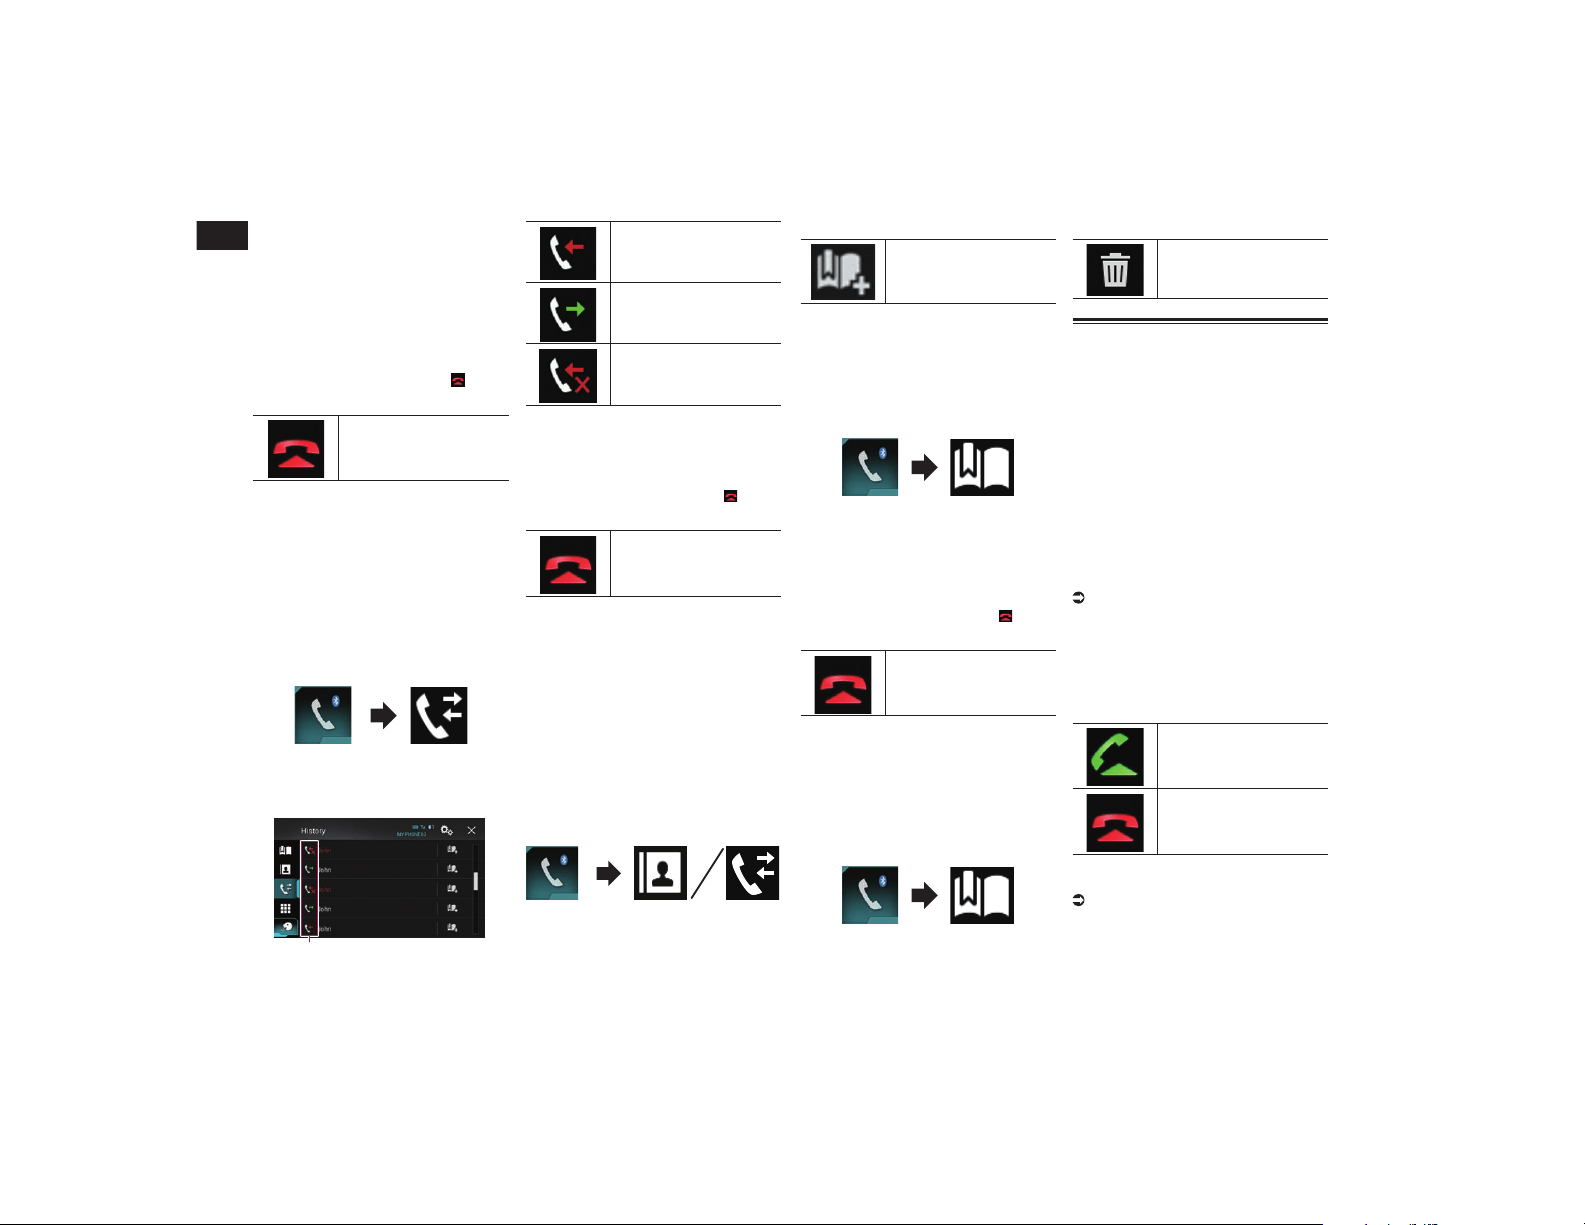
04
Capítulo
18
Es
5 Pulse una entrada para mostrar la
lista de números de teléfono de la
entrada.
Se mostrará la pantalla de detalles de la
agenda telefónica.
6 Pulse el número de teléfono que
desee marcar.
Se mostrará la pantalla de marcación.
7 Comenzará la marcación.
p Para cancelar la llamada, pulse .
8 Pulse la siguiente tecla.
Finaliza la llamada.
La llamada finaliza.
■ Marcación desde el registro
En la lista del registro de llamadas se alma-
cenan las llamadas realizadas (marcadas,
recibidas y perdidas) más recientes. Puede
explorar la lista del registro de llamadas y
realizar llamadas desde allí.
1 Pulse el botón HOME para mostrar
la pantalla de Menú superior.
2 Pulse las siguientes teclas en el
orden que se indica.
Aparecerá la pantalla “Historia”.
p Es posible que no se pueda mostrar todo
el historial de llamadas, en función del
tipo de teléfono móvil.
1
1 Tipo de historial de llamadas
Llamadas recibidas.
Llamadas marcadas.
Llamadas perdidas.
3 Pulse la entrada que desee de la
lista para realizar una llamada.
Se mostrará la pantalla de marcación.
4 Comenzará la marcación.
p Para cancelar la llamada, pulse .
5 Pulse la siguiente tecla.
Finaliza la llamada.
La llamada finaliza.
■ Uso de las listas de marcación
preestablecidas
Puede marcar un número desde la lista de
marcación preestablecida.
Registro de un número de teléfono
Puede almacenar fácilmente hasta seis
números de teléfono por dispositivo como
valores preestablecidos.
1 Pulse el botón HOME para mostrar
la pantalla de Menú superior.
2 Pulse las siguientes teclas en el
orden que se indica.
Aparecerá la pantalla “Directorio de teléfo-
nos” o “Historia”.
3 Pulse la siguiente tecla.
Registra el número de telé-
fono en la lista “Marcación
preajustada”.
Marcación desde la lista de marca-
ción preestablecida
1 Pulse el botón HOME para mostrar
la pantalla de Menú superior.
2 Pulse las siguientes teclas en el
orden que se indica.
Aparecerá la pantalla “Marcación
preajustada”.
3 Pulse la entrada que desee de la
lista para realizar una llamada.
Se mostrará la pantalla de marcación.
4 Comenzará la marcación.
p Para cancelar la llamada, pulse .
5 Pulse la siguiente tecla.
Finaliza la llamada.
La llamada finaliza.
Eliminación de un número de
teléfono
1 Pulse el botón HOME para mostrar
la pantalla de Menú superior.
2 Pulse las siguientes teclas en el
orden que se indica.
Aparecerá la pantalla “Marcación
preajustada”.
3 Pulse la siguiente tecla.
Elimina el número de
teléfono.
Recepción de una llamada
telefónica
Puede responder a una llamada entrante en
su teléfono móvil a través de este producto.
■ Respuesta de una llamada
entrante
Este producto le informa de que está reci-
biendo una llamada mediante la visualiza-
ción de un mensaje y la reproducción de
un timbre.
p Puede configurar el sistema para que
responda automáticamente a las llama-
das entrantes. Si no se ajusta la función
de respuesta automática a las llamadas
entrantes en este producto deberá res-
ponder a las llamadas manualmente.
Para los detalles, consulte Cómo respon-
der a una llamada automáticamente en la
página 19.
p Si el número de teléfono correspondiente
a la llamada recibida ya se encuentra
registrado en “Directorio de teléfonos”,
aparecerá el nombre registrado.
1 Pulse la siguiente tecla.
Responde a una llamada
entrante.
Rechaza una llamada
entrante.
La llamada rechazada se guarda en la lista
del registro de llamadas perdidas.
Para los detalles, consulte Marcación
desde el registro en la página 18.
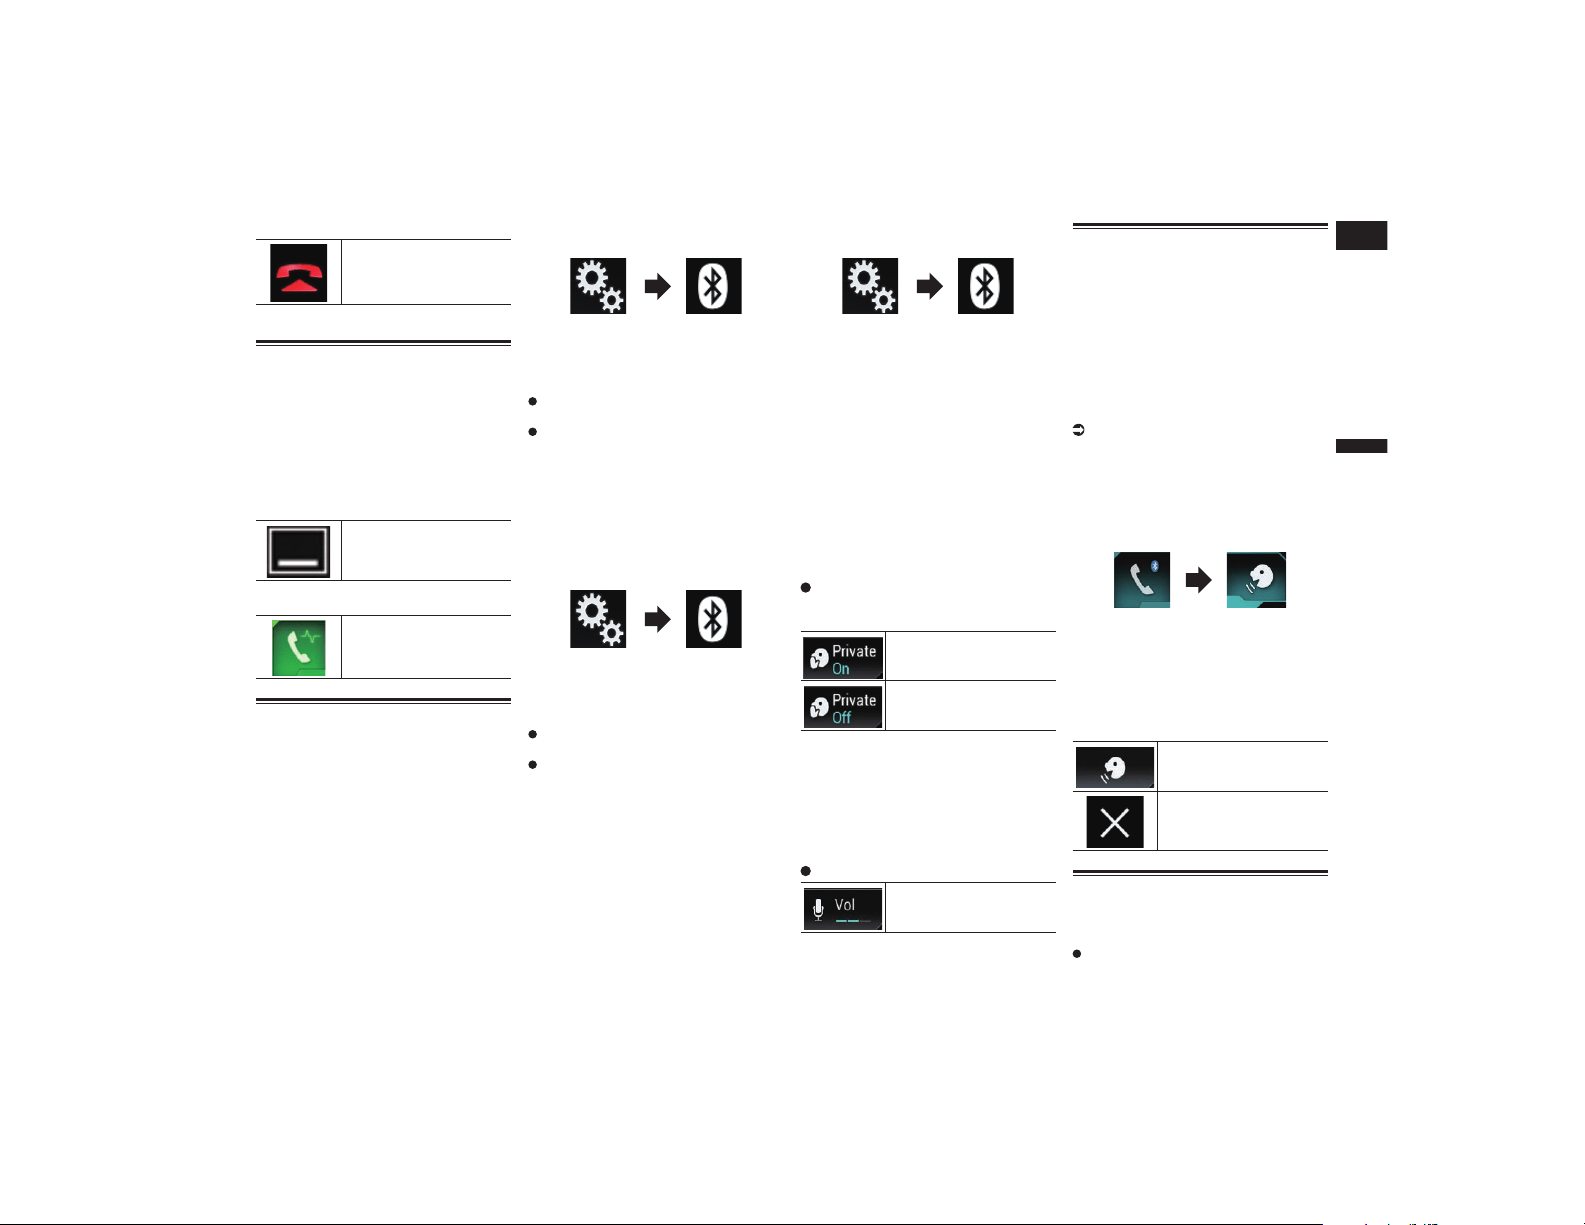
Español
04
Capítulo
19
Es
2 Pulse la siguiente tecla.
Finaliza la llamada.
La llamada finaliza.
Minimización de la pantalla
de conrmación de marcación
p La pantalla de confirmación de marca-
ción no se puede minimizar en la pantalla
de Función AV.
p Las fuentes AV no se pueden seleccionar
aunque se minimice la pantalla de confir-
mación de marcación mientras se habla
por teléfono.
1 Pulse la siguiente tecla.
Se minimiza la pantalla de
confirmación de marcación.
2 Pulse la siguiente tecla.
Vuelve a mostrar la pan-
talla de confirmación de
marcación.
Cambio de la conguración
del teléfono
■ Cómo responder a una llamada
automáticamente
Este producto responde automáticamente
a las llamadas entrantes del teléfono móvil
conectado para que pueda responder a una
llamada mientras conduce sin tener que
quitar las manos del volante.
Cuando “Respuesta automática” se
establezca en “Act.”, se responderá a una
llamada entrante en 5 segundos.
1 Pulse el botón HOME para mostrar
la pantalla de Menú superior.
2 Pulse las siguientes teclas en el
orden que se indica.
Aparecerá la pantalla “Bluetooth”.
3 Pulse [Respuesta automática]
repetidamente hasta que aparezca
la configuración deseada.
Des. (valor predeterminado):
Desactiva la respuesta automática.
Act.:
Activa la respuesta automática.
■ Cambio del tono de llamada
Puede seleccionar si desea usar el tono de
llamada de este producto.
1 Pulse el botón HOME para mostrar
la pantalla de Menú superior.
2 Pulse las siguientes teclas en el
orden que se indica.
Aparecerá la pantalla “Bluetooth”.
3 Pulse [Timbre] repetidamente
hasta que aparezca la configura-
ción deseada.
Act. (valor predeterminado):
Activa el tono de llamada.
Des.:
Desactiva el tono de llamada.
■ Inversión de nombres en la
agenda telefónica
Cuando su dispositivo esté conectado a este
producto, el nombre y los apellidos de sus
contactos se registrarán en la agenda telefó-
nica en orden inverso.
Puede utilizar esta función para cambiar
el orden, invertir los nombres de la agenda
telefónica.
1 Pulse el botón HOME para mostrar
la pantalla de Menú superior.
2 Pulse las siguientes teclas en el
orden que se indica.
Aparecerá la pantalla “Bluetooth”.
3 Pulse [Invertir nombre].
Aparece la pantalla de confirmación.
4 Pulse [Sí].
p Si se produce un error de inversión, se
muestra “Error al invertir nombre”. En
ese caso, vuelva a intentarlo desde el
principio.
p La inversión de los nombres de sus
contactos desde este producto no afecta
a los datos de su teléfono móvil.
■ Ajuste del modo privado
Durante una conversación, puede cambiar a
modo privado (hablar directamente a través
de su teléfono móvil).
Pulse las siguientes teclas para
activar o desactivar el modo
privado.
Hable directamente en su
dispositivo móvil.
Telefonía manos libres
■ Ajuste del volumen de escucha
de la otra parte
Para mantener una buena calidad de sonido,
este producto puede ajustar el volumen de
escucha de la otra parte.
Si el volumen es demasiado alto o bajo,
utilice esta función.
Pulse la siguiente tecla.
Cambia entre los tres niveles
de volumen.
p Esta función se puede ejecutar mientras
se habla por teléfono.
p Se puede almacenar la configuración
para cada dispositivo.
Uso de la función de reconoci-
miento de voz
Puede usar la función de reconocimiento de
voz de iPhone o smartphone.
p Cuando se utilice un iPhone que ejecute
iOS 6.1 o superior, el modo Siri Eyes Free
estará disponible con este producto.
p Para utilizar esta función con un smar-
tphone, el dispositivo ha de ser compa-
tible con Android Auto y primero debe
establecer “Modo” en “Config. smar-
tphone” en “Android Auto”.
Para los detalles, consulte Información
de las conexiones y las funciones de cada
dispositivo en la página 21.
1 Pulse el botón HOME para mostrar
la pantalla de Menú superior.
2 Pulse las siguientes teclas para
iniciar el control de voz.
Se inicia la función de reconocimiento de
voz y aparece la pantalla de control de voz.
Puede usar la función de reconocimiento de
voz de la misma forma que en el iPhone o el
smartphone.
p También puede iniciar la función de reco-
nocimiento de voz manteniendo pulsado
el botón HOME.
Indica que este producto
está esperando sus coman-
dos de voz.
Cancela la función de reco-
nocimiento de voz.
Notas sobre la telefonía
manos libres
Notas generales
No se garantiza la conexión con todos
los teléfonos móviles compatibles con la
tecnología inalámbrica Bluetooth.
05
Capítulo
20
Es
La distancia de línea visual entre este
producto y su teléfono móvil debe ser de
10 metros como máximo cuando envíe
o reciba llamadas o datos a través de la
tecnología Bluetooth. Sin embargo, la
distancia de transmisión real puede ser
inferior a la distancia estimada, en fun-
ción del entorno de uso.
En algunos teléfonos móviles, es posible
que el sonido del timbre no se emita a
través de los altavoces.
Si se selecciona el modo privado en el
teléfono móvil, es posible que se desac-
tive la telefonía manos libres.
Registro y conexión
En función del tipo de teléfono móvil, el
funcionamiento será distinto. Consulte el
manual de instrucciones de su teléfono
móvil si desea más información.
Con los teléfonos móviles, es posible que
no funcione la transferencia de la agenda
telefónica aunque el teléfono móvil esté
sincronizado con este producto. En ese
caso, desconecte el teléfono y vuelva a
realizar la sincronización desde el telé-
fono con este producto.
Cómo realizar y recibir llamadas
Puede que escuche ruidos en las siguien-
tes situaciones:
— Si contesta al teléfono mediante el botón
del teléfono.
— Cuando el interlocutor cuelga el teléfono.
Si el interlocutor no puede escuchar la
conservación telefónica debido al eco,
disminuya el nivel de volumen de la tele-
fonía manos libres. Esto puede reducir el
eco.
En algunos teléfonos móviles, aunque
pulse el botón “aceptar” del teléfono
móvil al recibir una llamada, es posible
que la telefonía manos libres no funcione.
El nombre registrado aparecerá si el
número de teléfono correspondiente a la
llamada recibida ya se encuentra regis-
trado en la agenda telefónica. Si uno de
los números de teléfono está registrado
bajo nombres diferentes, solo se mos-
trará el número de teléfono.
Si el número de teléfono de la llamada
recibida no está registrado en la agenda
telefónica, se mostrará el número de
teléfono.
Los registros de llamadas recibidas
y de llamadas realizadas
No puede llamar a la entrada de un usua-
rio desconocido (sin número de teléfono)
que conste en el registro de llamadas
recibidas.
Si las llamadas se realizan utilizando su
teléfono móvil, no se registrarán datos del
registro en este producto.
Transferencias de agendas
telefónicas
Si su teléfono móvil tiene más de
800 entradas en la agenda telefónica, es
posible que no se descarguen todas las
entradas completamente.
En algunos teléfonos móviles, no será
posible transferir todos los elementos de
la agenda telefónica al mismo tiempo. En
tal caso, transfiera los elementos uno a
uno desde el teléfono móvil.
En función del teléfono móvil, este pro-
ducto podría no mostrar la agenda telefó-
nica correctamente. (Algunos caracteres
podrían aparecer distorsionados, o podría
invertirse el orden del nombre y los
apellidos.)
Si la agenda telefónica del teléfono móvil
incluye datos de imágenes, puede que
la agenda telefónica no se transfiera
correctamente. (No se pueden transferir
los datos de imágenes desde el teléfono
móvil.)
En función del teléfono móvil, es posible
que no pueda realizarse la transferencia
de la agenda telefónica.
Operación de congu-
ración del iPod / iPhone
o smartphone
Al utilizar con este producto un iPod/iPhone
o un smartphone, configure las opciones de
este producto de acuerdo con el dispositivo
que se desea conectar.
En esta sección se describe la configuración
necesaria para cada dispositivo.
Flujo básico de la congura-
ción del iPod / iPhone
1 Seleccione el método de conexión de su
dispositivo.
Para los detalles, consulte Ajuste del
método de conexión del dispositivo en
la página 20.
2 Conecte su dispositivo con este
producto.
Para más información sobre las cone-
xiones, consulte Capítulo 31.
3 Si es necesario, conecte su dispositivo
con este producto mediante una cone-
xión Bluetooth.
Para los detalles sobre la conexión
Bluetooth, consulte Capítulo 3.
Ajuste del método de cone-
xión del dispositivo
Si desea utilizar la aplicación del iPhone
o smartphone en este producto, deberá
seleccionar el método de conexión de su
dispositivo.
Según el dispositivo conectado, los ajustes
necesarios serán unos u otros.
1 Pulse el botón HOME para mostrar
la pantalla de Menú superior.
2 Pulse las siguientes teclas en el
orden que se indica.
Aparecerá la pantalla “Sistema”.
3 Pulse [Config. entrada/salida].
4 Pulse [Config. smartphone].
Aparecerá la pantalla “Config.
smartphone”.
5 Configure los siguientes ajustes.
Dispositivo: seleccione un dispositivo
para su conexión.
Conexión: seleccione el método de
conexión.
p Configure las opciones apropiadas para
el dispositivo que desea conectar y el
método de conexión que se utilizará.
Para los detalles, consulte Información
de las conexiones y las funciones de cada
dispositivo en la página 21.
p Si cambia la configuración, aparecerá la
pantalla de confirmación.
Pulse [OK].
La configuración cambiará cuando se
ejecuten automáticamente los siguientes
procesos.
— La fuente está apagada.
— Se sale del modo AppRadio Mode o
MirrorLink.
— La conexión con el smartphone (USB y
Bluetooth) está desconectada.
Para cancelar, pulse [Cancelar].
p Tras cambiar el ajuste, no podrá volver a
cambiarlo durante un tiempo.
Compatibilidad con iPod
Este producto es compatible únicamente
con los siguientes modelos de iPod y las
versiones de software para iPod que se
indican a continuación. El resto de modelos
y versiones de software podrían no funcionar
correctamente.
Hecho para
iPhone 6 Plus: iOS 8
iPhone 6: iOS 8
iPhone 5s: iOS 7.0.3
iPhone 5c: iOS 7.0.3
iPhone 5: iOS 7.0.3
iPhone 4s: iOS 7.0.3
iPhone 4: iOS 7.0.3
iPhone 3GS: iOS 6.0.1
iPod touch (5.ª generación): iOS 6.0.1
iPod touch (4.ª generación): iOS 6.0.1
iPod touch (3.ª generación): iOS 5.1.1
iPod touch (2.ª generación): iOS 4.2.1
iPod classic 160 GB (2009): Ver. 2.0.4
iPod classic 160 GB (2008): Ver. 2.0.1
iPod classic 80 GB: Ver. 1.1.2
iPod nano (7.ª generación)
iPod nano (6.ª generación): Ver. 1.2
iPod nano (5.ª generación): Ver. 1.0.2
iPod nano (4.ª generación): Ver. 1.0.4
iPod nano (3.ª generación): Ver. 1.1.3
p Podrá conectar y controlar un iPod com-
patible con este producto utilizando los
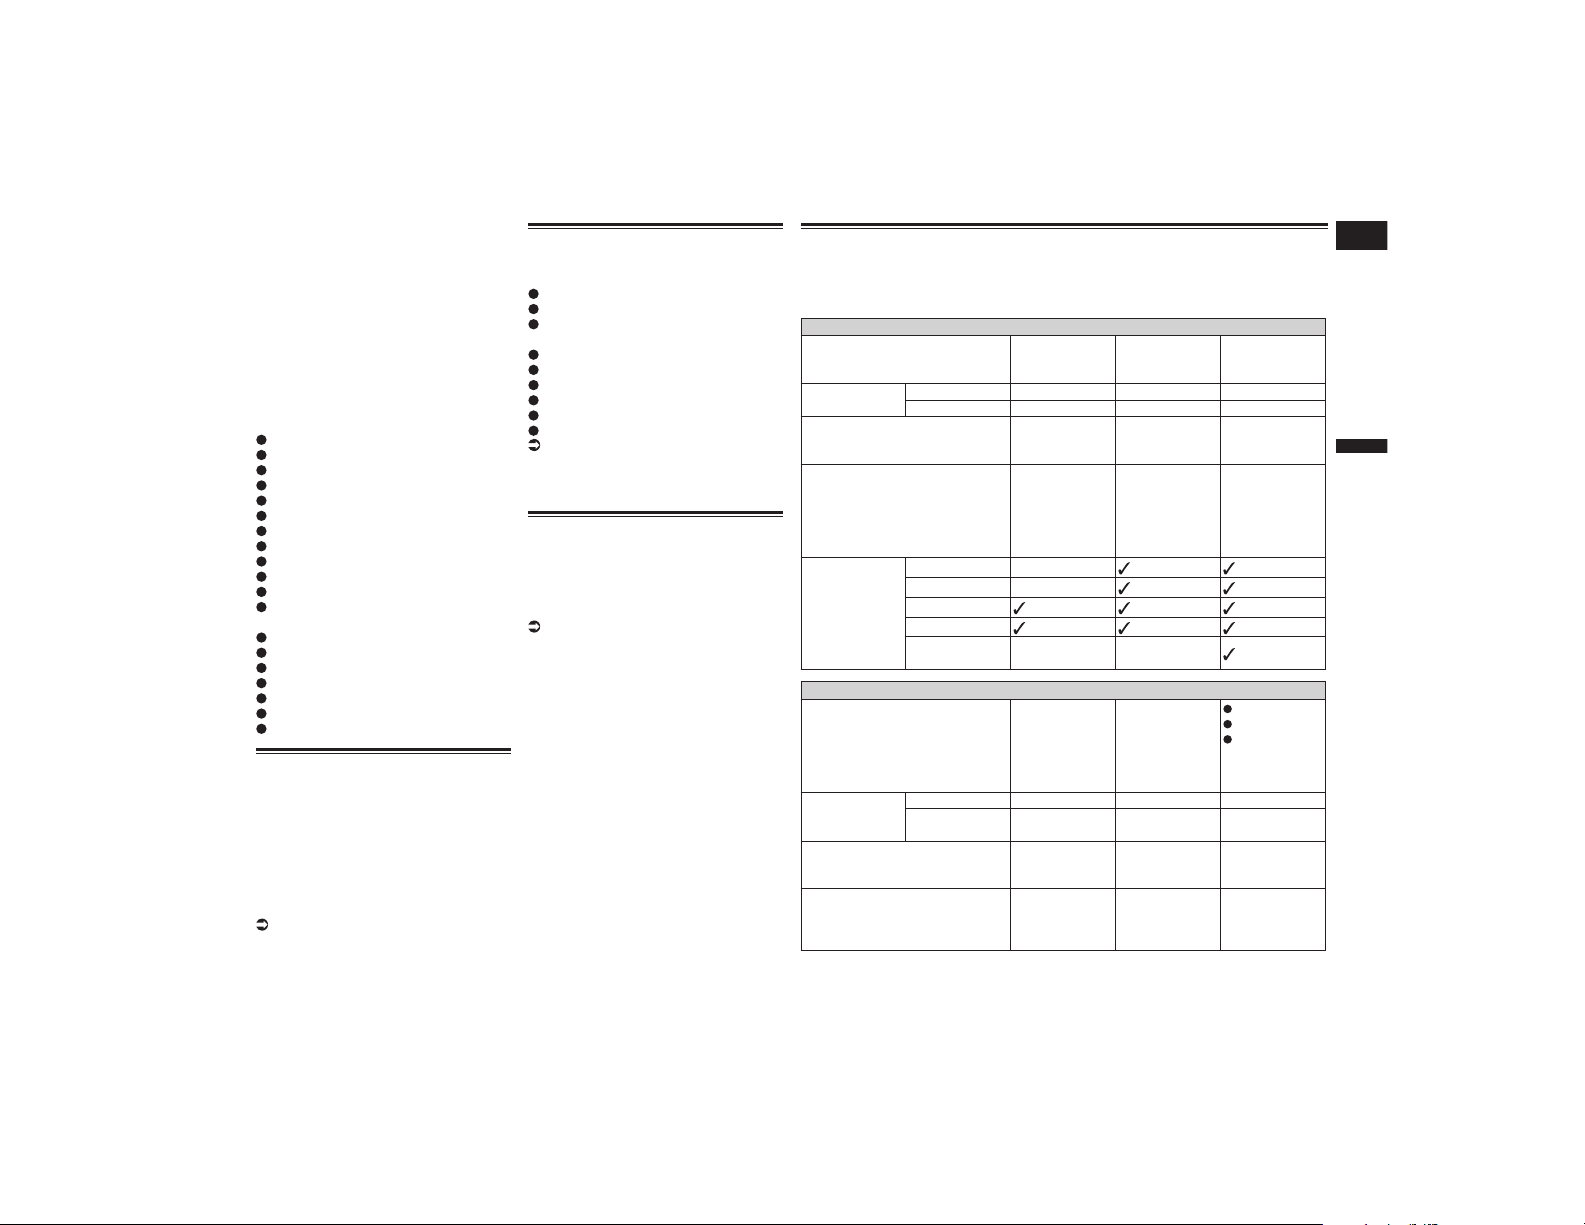
Español
05
Capítulo
21
Es
cables de conexión que se venden por
separado.
p Los métodos operativos podrían variar en
función del modelo de iPod y de la versión
de software del mismo.
p En función de la versión de software del
iPod, es posible que no sea compatible
con este producto.
Para los detalles acerca de la compatibili-
dad del iPod con este producto, consulte
la información de nuestro sitio web.
Este manual se aplica a los siguientes mode-
los de iPod.
iPod con conector de 30 clavijas
iPhone 4s
iPhone 4
iPhone 3GS
iPod touch 4.ª generación
iPod touch 3.ª generación
iPod touch 2.ª generación
iPod classic 160 GB
iPod classic 80 GB
iPod nano 6.ª generación
iPod nano 5.ª generación
iPod nano 4.ª generación
iPod nano 3.ª generación
iPod con conector Lightning
iPhone 6 Plus
iPhone 6
iPhone 5s
iPhone 5c
iPhone 5
iPod touch 5.ª generación
iPod nano 7.ª generación
Compatibilidad con dispositi-
vos Android™
p Los métodos operativos podrían variar
en función del dispositivo Android y de la
versión del sistema operativo Android.
p En función de la versión del sistema
operativo Android, es posible que no sea
compatible con este producto.
p No se garantiza la compatibilidad con
todos los dispositivos Android.
Para los detalles acerca de la compati-
bilidad de dispositivos Android con este
producto, consulte la información de
nuestro sitio web.
Compatibilidad con AppRadio
Mode
iPod con conector de 30 clavijas
iPhone 4s
iPhone 4
iPod touch 4.ª generación
iPod con conector Lightning
iPhone 6 Plus
iPhone 6
iPhone 5s
iPhone 5c
iPhone 5
iPod touch 5.ª generación
Para los detalles acerca de la compati-
bilidad de dispositivos Android con este
producto, consulte la información de
nuestro sitio web.
Compatibilidad con dispositi-
vos MirrorLink
p Este producto es compatible con
MirrorLink, versión 1.0.
p No se garantiza la compatibilidad con
todos los dispositivos MirrorLink.
Para más información acerca de la com-
patibilidad de dispositivos MirrorLink
con este producto, consulte la informa-
ción de nuestro sitio web.
Información de las conexiones y las funciones de cada
dispositivo
A continuación se muestran las configuraciones y los cables que se necesitan para conec-
tar cada dispositivo y las fuentes disponibles.
iPod / iPhone con conector de 30 clavijas
Cable necesario (se vende por
separado)
No se necesita
un cable de
conexión.
CD-IU201V CD-IU201S
Config.
smartphone
Dispositivo iPhone/iPod iPhone/iPod iPhone/iPod
Conexión Bluetooth USB USB
Conexión Bluetooth
Se necesita
una conexión
Bluetooth.
— —
Requisito de conexión —
Conecte con el
puerto USB 1
para utilizar aha
o Pandora.
Conecte con el
puerto USB 1
para utilizar
aha, Pandora
o AppRadio
Mode.
Fuente
disponible
iPod (audio) —
iPod (vídeo) —
aha
Pandora
AppRadio
Mode
— —
iPod / iPhone con conector Lightning
Cable necesario (se vende por
separado)
No se necesita
un cable de
conexión.
CD-IU52
CD-IH202
CD-IU52
Adaptador
de conector
Lightning a
AV digital
Config.
smartphone
Dispositivo iPhone/iPod iPhone/iPod iPhone/iPod
Conexión Bluetooth USB
Adapt. AV
digital
Conexión Bluetooth
Se necesita
una conexión
Bluetooth.
—
Se necesita
una conexión
Bluetooth.
Requisito de conexión —
Conecte con el
puerto USB 1
para utilizar aha
o Pandora.
—
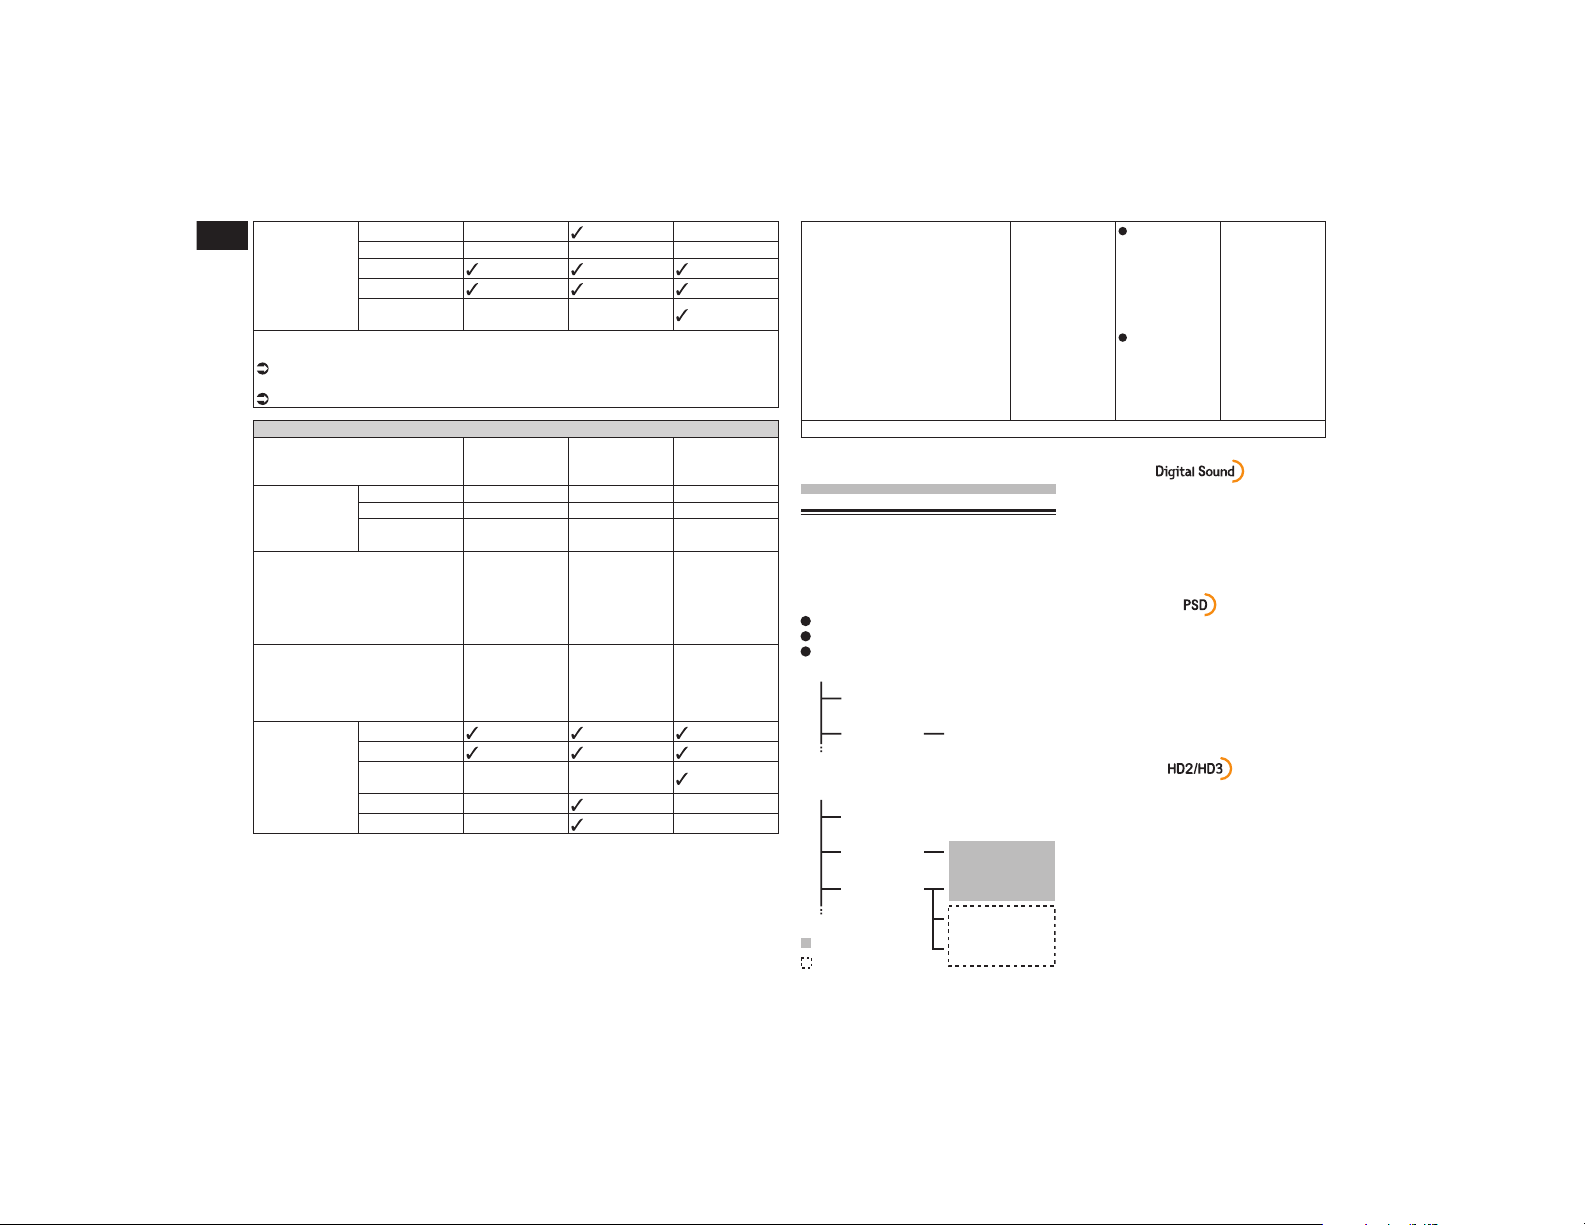
06
Capítulo
22
Es
Fuente
disponible
iPod (audio) — — (*1)
iPod (vídeo) — — — (*1)
aha
Pandora
AppRadio
Mode
— —
(*1) Utilice AppRadio Mode para reproducir música o vídeos en un iPod. Para utilizar
AppRadio Mode, instale la aplicación CarMediaPlayer en su iPod.
Para los detalles acerca de CarMediaPlayer, consulte la información de nuestro sitio
web.
Para obtener más información, consulte el manual de CarMediaPlayer.
Android, MirrorLink
Cable necesario (se vende por
separado)
No se necesita
un cable de
conexión.
CD-MU200 CD-AH200
Config.
smartphone
Dispositivo Otros Otros Otros
Conexión Bluetooth USB HDMI
Modo —
Android Auto/
MirrorLink/Des.
—
Conexión Bluetooth
Se necesita
una conexión
Bluetooth.
Se necesita
una conexión
Bluetooth para
utilizar aha,
Pandora o
Android Auto.
Se necesita
una conexión
Bluetooth.
Requisito de conexión —
Conecte con el
puerto USB 2
para utilizar
MirrorLink o
Android Auto.
—
Fuente
disponible
aha
Pandora
AppRadio
Mode
— —
MirrorLink — —
Android Auto —
(*1)
—
Observaciones —
Seleccione
“Android
Auto” para
“Modo”
para utilizar
Android
Auto.
Seleccione
“MirrorLink”
para “Modo”
para utilizar
el modo
MirrorLink.
—
(*1) Disponible solo cuando hay conectado un dispositivo compatible con Android Auto.
Recepción de HD
Radio™
Emisoras de HD Radio
Las emisoras de HD Radio ofrecen una alta
calidad de audio y servicios de datos. Las
emisoras de HD Radio las ofrecen las emiso-
ras locales de FM o AM.
Las emisoras de HD Radio incluyen:
Audio de alta calidad
Multidifusión FM
Servicio de datos
: Canal secundario
Banda AM
AM analógico
AM analógico AM digital
Banda FM
FM analógico
FM analógico FM digital
FM analógico Canal FM-1 digital
Canal FM-2 digital
Canal FM-3 digital
: Canal principal
Sonido digital de calidad de CD. La tecno-
logía HD Radio permite a las emisoras de
radio locales emitir una señal digital limpia.
Las emisoras AM suenan como FM y las
FM, como un CD.
Datos de servicio de programas: contribu-
yen a una experiencia de usuario superior
de la tecnología HD Radio. Ofrecen el
nombre de la canción, el intérprete, los
identificadores de emisora, la guía de
canales HD2/HD3 y otros flujos de datos
relevantes.
Además de las principales emisoras tra-
dicionales se encuentran canales de FM
locales adicionales. Esos canales HD2/
HD3 proporcionan nueva música original
así como profundas incursiones en géneros
tradicionales.

Español
06
Capítulo
23
Es
El etiquetado de iTunes
®
le proporciona la
oportunidad de descubrir una amplia gama
de contenido y la manera de “etiquetar”
ese contenido para su posterior revisión y
compra en iTunes
®
Store.
Información visual relacionada con el
contenido que se está reproduciendo en
el receptor de HD Radio, como la portada
del álbum, fotografías históricas, imágenes
estáticas de emisiones en directo, entre
otro contenido relacionado.
Utilización de las teclas del
panel táctil
1 2 43
5
6
7
a
9 8
b
1 Muestra la lista de fuentes.
Para los detalles, consulte Selección de
una fuente frontal en la lista de fuentes
en la página 13.
2 Selecciona una banda.
Para los detalles, consulte Selección de
una banda en la página 24.
3 Muestra la pantalla de Ajuste de hora
y fecha.
Para los detalles, consulte Ajuste de la
hora y la fecha en la página 76.
4 Muestra la pantalla de Menú de
ajustes.
5 Recupera las curvas del ecualizador.
Para los detalles, consulte Utilización del
ecualizador en la página 69.
6 Cambia la visualización del texto
entre el canal principal y los canales
de multidifusión.
Para los detalles, consulte Lectura de la
pantalla en la página 23.
7 Muestra la pantalla de Menú del
teléfono.
Para los detalles, consulte Visualización
del menú del teléfono en la página 17.
8 Almacena la información de la can-
ción en un iPod.
Para los detalles, consulte
Almacenamiento de la información de
canción en un iPod (etiquetado de iTunes)
en la página 76.
9 Realiza la sintonización manual o la
sintonización de búsqueda.
Para los detalles, consulte Sintonización
manual en la página 24.
Para los detalles, consulte Sintonización
de búsqueda en la página 24.
a Muestra los canales de presintonía.
Para los detalles, consulte Selección de
un canal de presintonía de la lista de
canales de presintonía en la página 24.
b Recupera el canal de presintonía
almacenado en una tecla desde la
memoria con solo pulsar la tecla.
Almacena la frecuencia de radio
actual en una tecla para recuperarla
posteriormente al pulsar la tecla.
Para los detalles, consulte
Almacenamiento de frecuencias de radio
en la página 24.
Lectura de la pantalla
b
4
3
2
78
1
a 9 56
1 Indicador de banda
Muestra la banda de sintonizada: FM1,
FM2, FM3 o AM.
2 Información detallada
Canal principal
Indicativo de llamada, servicio de
programa o frecuencia
Muestra el indicativo de llamada, el
servicio de programa o la frecuencia
de la emisora de difusión que se está
recibiendo.
Título de la canción
Muestra el título de la canción actual (en
caso de estar disponible).
Nombre del intérprete (artista)
Muestra el nombre del intérprete (artista)
de la canción que se está reprodu-
ciendo actualmente (en caso de estar
disponible).
Canales de multidifusión
Número de canal de multidifusión y
título de la canción
Muestra los números de canales de mul-
tidifusión y los títulos de las canciones.
p Si no existe la correspondiente informa-
ción, la información no se visualiza.
p El canal de multidifusión sintonizado
actualmente se muestra en la parte
superior de la lista.
3 Fecha y hora actuales
4 Portada de álbum
Muestra la imagen de la canción actual
(en caso de estar disponible).
p Si la portada del álbum no se puede
adquirir, se muestra el logotipo de la
emisora. Si tampoco se puede adquirir el
logotipo de la emisora, se muestra una
imagen preinstalada.
5 Indicador de estado de etiquetado de
canciones de iTunes
®
Muestra el estado de la información de la
canción almacenada en este producto.
p El icono se muestra en todas las panta-
llas de función de las fuentes AV.
Indicador Significado
Aparece cuando la etiqueta de
información de la canción se
almacena en este producto.
Aparece cuando se transfiere
la etiqueta de información de la
canción a un iPod.
6 Indicador de etiquetado de iTunes
®
Indica canciones en las que se puede
realizar el etiquetado de iTunes.
p El icono se muestra en todas las panta-
llas de función de las fuentes AV.
Indicador Significado
Aparece cuando este producto
recibe una etiqueta de canción
de iTunes que se puede almace-
nar y después descargar en un
iPod para su posterior compra.
Parpadea cuando este producto
está almacenando la informa-
ción de etiqueta de la canción.
7 Indicador del tipo de señal
Muestra el tipo de señal que se está
recibiendo. Si se está recibiendo una
emisión digital, se muestra . De
lo contrario, se muestra .
8 Indicador de HD Radio
Muestra que se está recibiendo la infor-
mación de la emisora de HD Radio.
9 Indicador de multidifusión
Muestra el número de canales de multidi-
fusión de la frecuencia actual.
a Indicador de frecuencia
b Indicador de número de presintonía
Muestra el elemento de presintonía
seleccionado
Procedimiento de inicio
1 Muestre la pantalla de Selección
de fuente AV.
Para los detalles sobre las operaciones,
consulte Visualización de la pantalla de
función AV en la página 12.
2 Pulse [HD Radio] en la pantalla de
Selección de fuente AV.
Aparecerá la pantalla “HD Radio”.
3 Utilice las teclas del panel táctil de
la pantalla para controlar la radio.
Para los detalles, consulte Utilización
de las teclas del panel táctil en la
página 23.
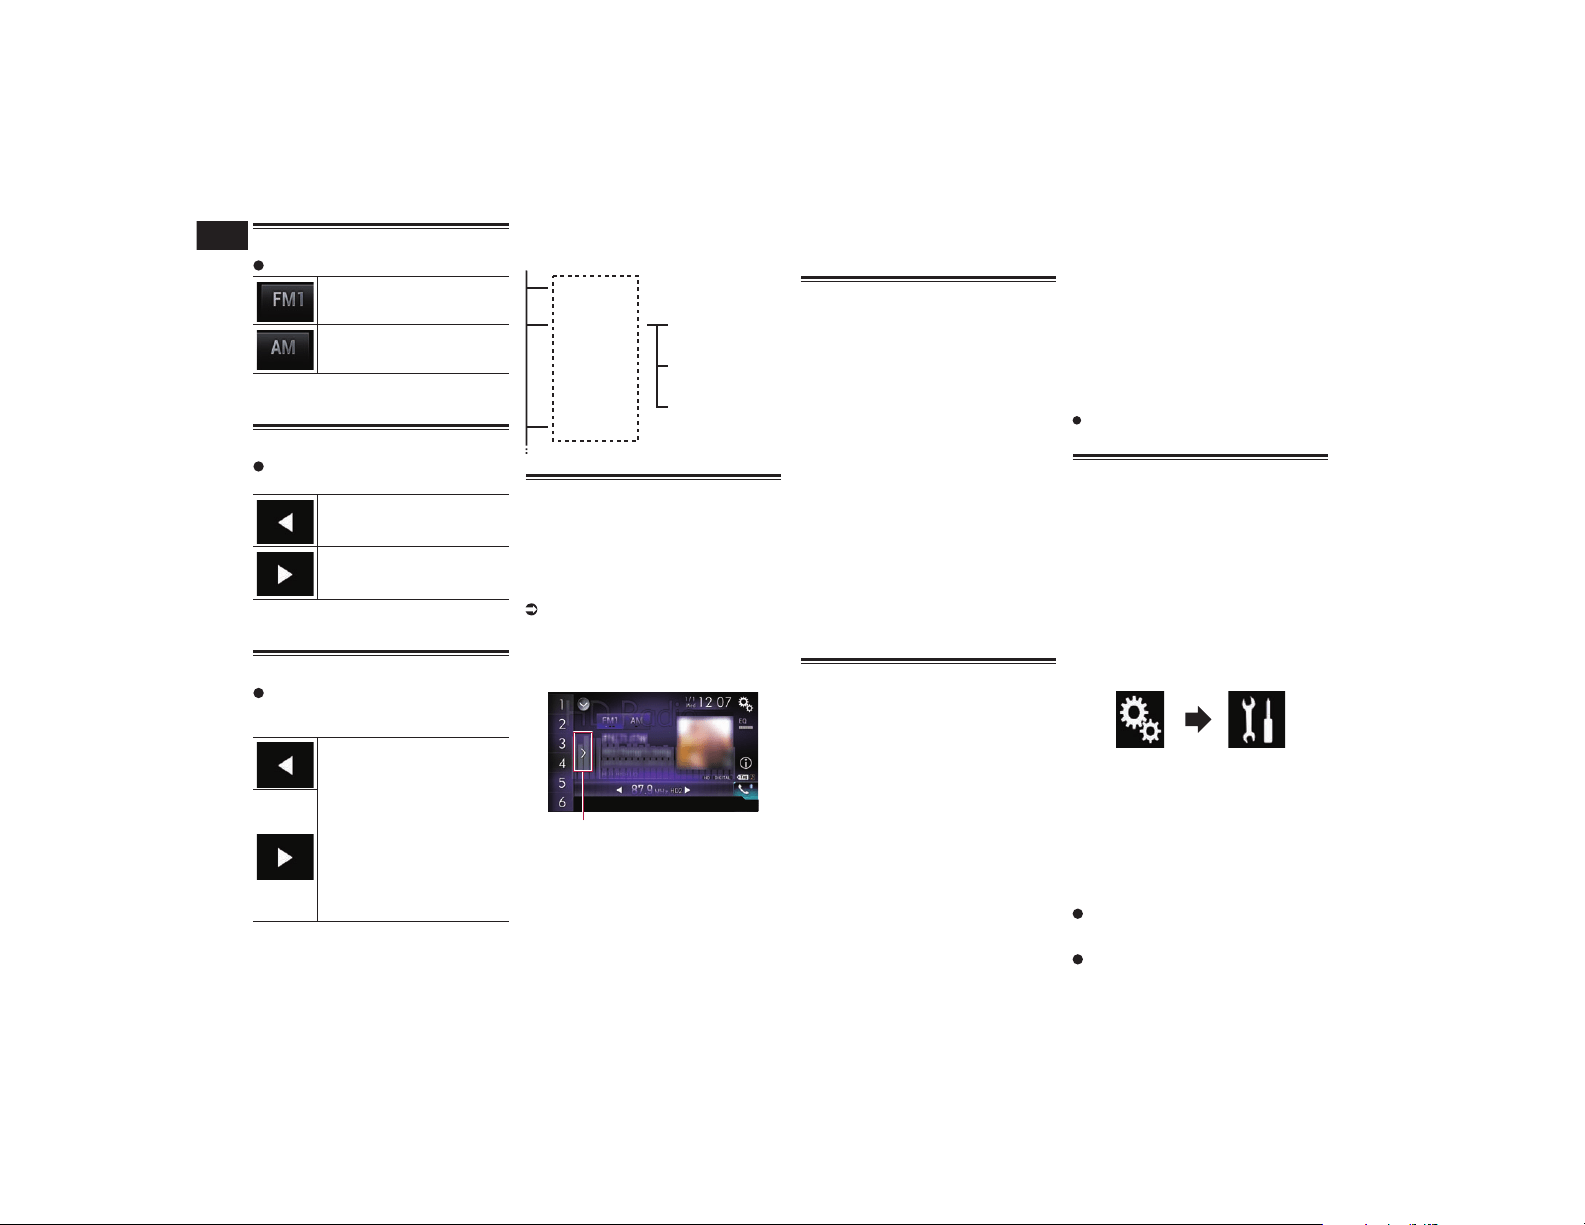
06
Capítulo
24
Es
Selección de una banda
Pulse la siguiente tecla.
Cambia entre las siguientes
bandas de FM: FM1, FM2 y FM3.
Cambia a la banda AM.
p Esta función ayuda a preparar distintas
listas de presintonías para cada banda.
Sintonización manual
Pulse las siguientes teclas para
sintonizar manualmente.
Desplaza la frecuencia un paso
hacia abajo.
Desplaza la frecuencia un paso
hacia arriba.
p Esta función ayuda a preparar distintas
listas de presintonías para cada banda.
Sintonización de búsqueda
Mantenga pulsada una de las
siguientes teclas durante un
segundo y después suéltela.
Explora frecuencias hasta que
encuentra una emisión con
suficiente potencia para una
buena recepción.
Puede cancelar la sintonización
manual tocando cualquier tecla
brevemente.
Si sigue pulsando cualquier
tecla, puede saltar frecuencias
de emisión. La sintonización de
búsqueda empezará cuando
suelte la tecla.
p Cuando se está recibiendo una emisora
analógica solo se pueden sintonizar
emisiones analógicas.
Si aún no se está recibiendo una emisión
digital, al sintonizar se busca la siguiente
emisora analógica o la anterior.
FM analógico
FM analógico
FM analógico Canal FM-1 digital
Canal FM-2 digital
Canal FM-3 digital
Selección de un canal de pre-
sintonía de la lista de canales
de presintonía
Una vez haya almacenado los canales de
emisión, podrá recuperar los canales de
presintonía de la memoria con una sola
pulsación de tecla.
Para los detalles, consulte
Almacenamiento de frecuencias de radio
en la página 24.
1 Pulse la tecla de visualización de la
lista de canales de presintonía.
1
1 Tecla de visualización de lista de canales
de presintonía
2 Pulse el elemento de la lista (“1” a
“6”) para cambiar a un canal regis-
trado como canal de presintonía.
p Si pulsa la tecla de visualización de la
lista de canales de presintonía mien-
tras se muestra la lista de canales de
presintonía, la lista desaparecerá y se
mostrarán las teclas de sintonización de
presintonía.
Almacenamiento de frecuen-
cias de radio
Si pulsa cualquiera de las teclas de sinto-
nización de presintonía (“1” a “6”), puede
guardar fácilmente hasta seis canales de
radio para utilizarlos posteriormente (tam-
bién pulsando una tecla).
1 Seleccione la frecuencia que desea
almacenar en la memoria.
2 Mantenga pulsada una tecla de
sintonización de presintonía [1] a
[6].
Se almacenará en memoria la emisora de
radio seleccionada.
La próxima vez que pulse la misma tecla de
sintonización de presintonía “1” a “6”, se
recuperará el componente de servicio de la
memoria.
p Es posible almacenar en memoria hasta
18 emisoras FM, seis por cada una de las
tres bandas de FM, así como seis emiso-
ras de AM.
Almacenamiento de las fre-
cuencias de radio con mayor
potencia
BSM (memoria de mejores emisoras, por
sus siglas en inglés) almacena de forma
automática las seis frecuencias de radio con
mayor potencia de señal en las teclas de
sintonización de presintonía “1” a “6” y, una
vez almacenadas, podrá sintonizarlas con
tan solo pulsar una tecla.
p Almacenar frecuencias de radio con BSM
podría sustituir frecuencias de radio ya
guardadas.
p Las frecuencias de radio almacenadas
previamente pueden permanecer alma-
cenadas si el número de frecuencias
de radio potentes almacenadas no ha
llegado a su límite.
1 Pulse la tecla de visualización de la
lista de canales de presintonía.
Aparece la lista de canales de presintonía.
2 Pulse [BSM] para iniciar una
búsqueda.
Aparecerá un mensaje. Mientras se muestra
el mensaje, las seis frecuencias de radio
con mayor potencia se almacenarán en las
teclas de sintonización de presintonía “1” a
“6” siguiendo el orden de potencia de señal.
Cuando este proceso finaliza, el mensaje
desaparece.
Si pulsa [Cancelar], se cancelará el
proceso de almacenamiento.
Sintonización de frecuencias
potentes
La sintonización de búsqueda local le per-
mite sintonizar solo las emisoras de radio
con señales lo suficientemente potentes
como para garantizar una buena recepción.
p Esta configuración solo está disponible
cuando se selecciona “HD Radio” como
la fuente.
1 Pulse el botón HOME para mostrar
la pantalla de Menú superior.
2 Pulse las siguientes teclas en el
orden que se indica.
Aparecerá la pantalla “Sistema”.
3 Pulse [Config. fuentes AV].
4 Pulse [Configuración de la radio].
5 Pulse [Local].
Aparecerá el menú emergente.
6 Pulse el elemento que desee
ajustar.
FM
Des. (valor predeterminado):
Desactiva el ajuste de sintonización de
búsqueda.
Nivel1:
Ajusta el nivel de sensibilidad de FM en el
nivel 1.
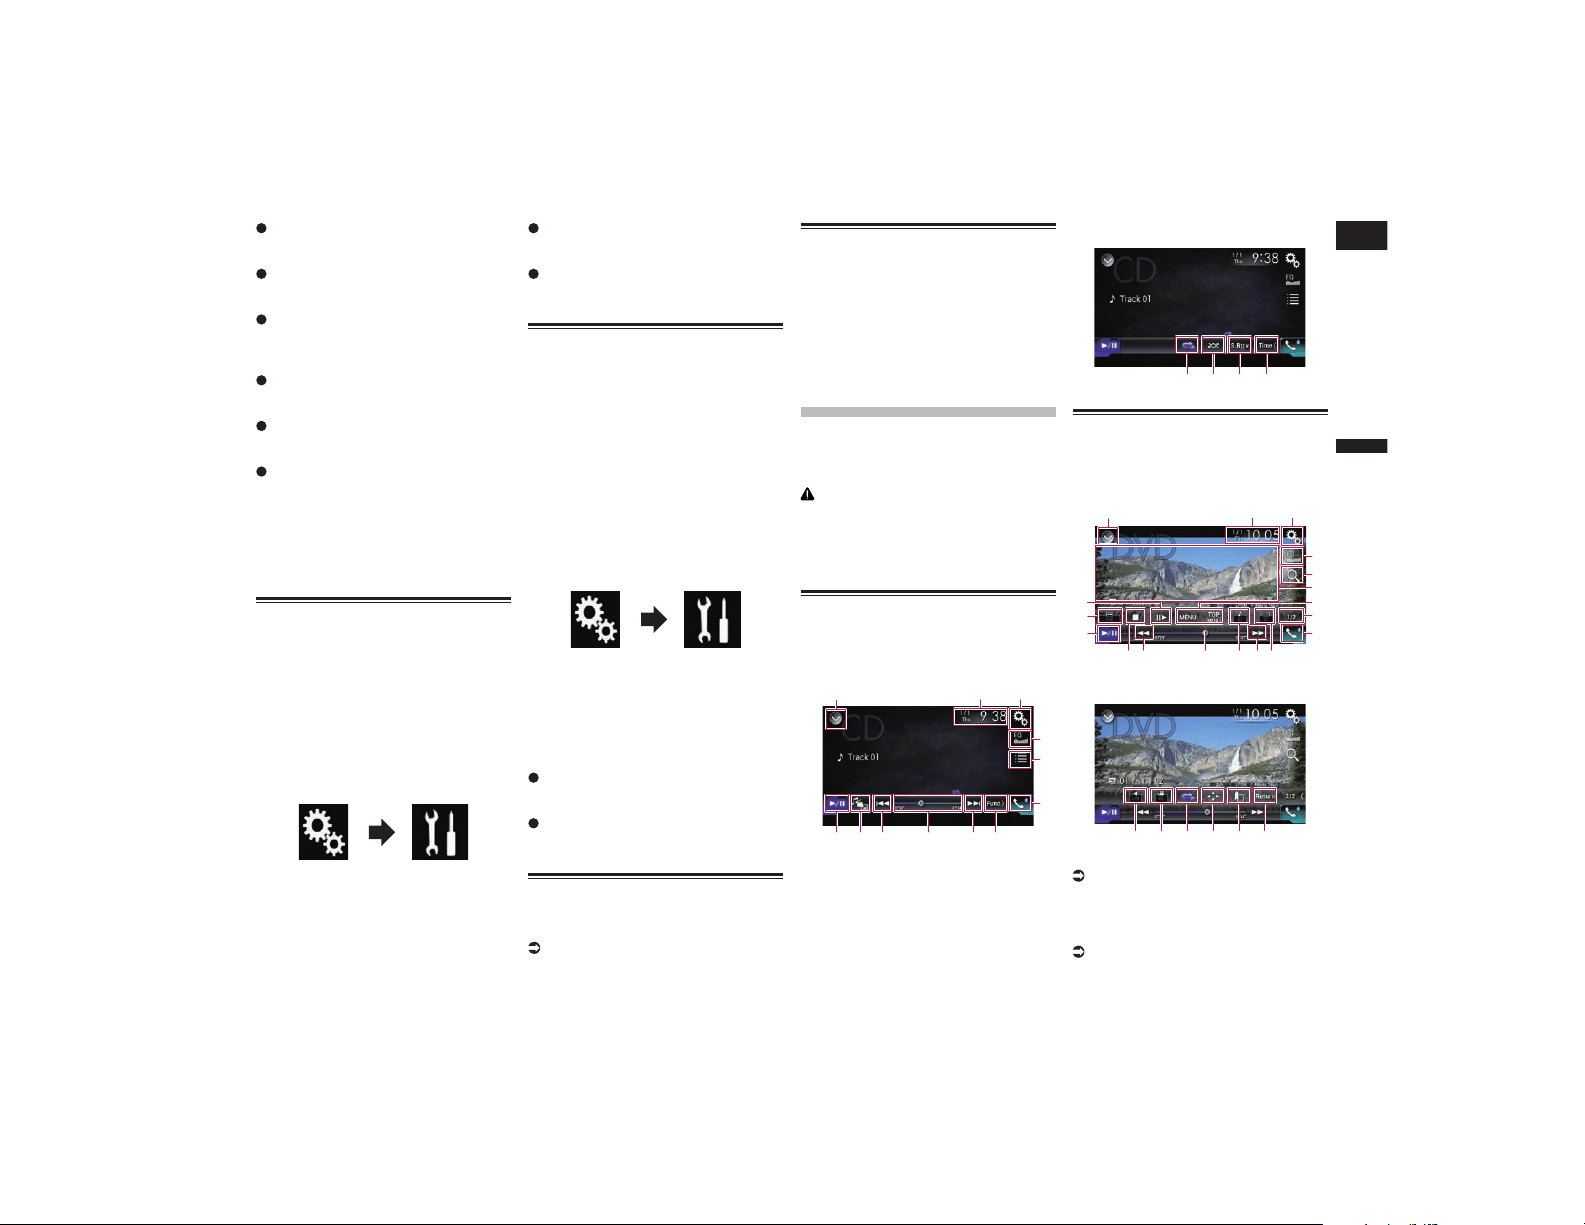
Español
07
Capítulo
25
Es
Nivel2:
Ajusta el nivel de sensibilidad de FM en el
nivel 2.
Nivel3:
Ajusta el nivel de sensibilidad de FM en el
nivel 3.
Nivel4:
Ajusta el nivel de sensibilidad de FM en el
nivel 4.
AM
Des. (valor predeterminado):
Desactiva el ajuste de sintonización de
búsqueda.
Nivel1:
Ajusta el nivel de sensibilidad de AM en
el nivel 1.
Nivel2:
Ajusta el nivel de sensibilidad de AM en
el nivel 2.
p El ajuste de FM “Nivel4” (AM “Nivel2”)
solo permite recibir las emisoras con las
señales más potentes, mientras que la
configuración más baja permite recibir
las emisoras con las señales más débiles.
Cambio del modo de
búsqueda
Puede seleccionar el método de sintoniza-
ción de búsqueda.
p Esta configuración solo está disponible
cuando se selecciona “HD Radio” como
la fuente.
1 Pulse el botón HOME para mostrar
la pantalla de Menú superior.
2 Pulse las siguientes teclas en el
orden que se indica.
Aparecerá la pantalla “Sistema”.
3 Pulse [Config. fuentes AV].
4 Pulse [Configuración de la radio].
5 Pulse [Buscar] repetidamente
hasta que aparezca la configura-
ción deseada.
Bus. todo (valor predeterminado):
Busca emisoras de emisiones analógicas
y digitales.
Buscar HD:
Solo busca emisoras de emisiones
digitales.
Cambio del modo de
recepción
Si la recepción de una emisión digital se
debilita, el sintonizador cambia automáti-
camente a la emisión analógica del mismo
nivel de frecuencia de forma predetermi-
nada. Si desea evitar un cambio automático
frecuente, cambie la configuración a “Des.”.
p Esta configuración solo está disponible
cuando se selecciona “HD Radio” como
la fuente.
1 Pulse el botón HOME para mostrar
la pantalla de Menú superior.
2 Pulse las siguientes teclas en el
orden que se indica.
Aparecerá la pantalla “Sistema”.
3 Pulse [Config. fuentes AV].
4 Pulse [Configuración de la radio].
5 Pulse [Fusión] repetidamente
hasta que aparezca la configura-
ción deseada.
Act. (valor predeterminado):
Cambia automáticamente a la emisión
analógica de la misma frecuencia.
Des.:
No cambia automáticamente a la emisión
analógica de la misma frecuencia.
Almacenamiento de la infor-
mación de canción en un iPod
(etiquetado de iTunes)
Para los detalles, consulte
Almacenamiento de la información de
canción en un iPod (etiquetado de iTunes)
en la página 76.
Operaciones con los botones
de hardware
Pulse el botón TRK.
Puede subir o bajar por los canales de
presintonía.
Mantenga pulsado el botón TRK.
Puede realizar la sintonización de búsqueda.
Reproducción de un
disco
Puede reproducir un CD de música normal,
Video-CD o DVD-Vídeo con el lector inte-
grado de este producto. En esta sección se
describe cómo llevar a cabo este proceso.
PRECAUCIÓN
Por cuestiones de seguridad, no se pueden
ver imágenes de vídeo mientras el vehículo
esté en movimiento. Para ver imágenes de
vídeo, deberá detenerse en un lugar seguro y
accionar el freno de mano.
Utilización de las teclas del
panel táctil (para audio)
Ejemplo: CD
Pantalla de reproducción (página 1)
1 32
7
4
5
6
b a 8 9 8
Pantalla de reproducción (página 2)
7cde
Utilización de las teclas del
panel táctil (para vídeo)
Ejemplo: DVD
Pantalla de reproducción (página 1)
1 32
4
f
6
9
b
l
m
8k j 8 i
g
h
7
Pantalla de reproducción (página 2)
nopeqr
1 Muestra la lista de fuentes.
Para los detalles, consulte Selección de
una fuente frontal en la lista de fuentes
en la página 13.
2 Muestra la pantalla de Ajuste de hora
y fecha.
Para los detalles, consulte Ajuste de la
hora y la fecha en la página 76.
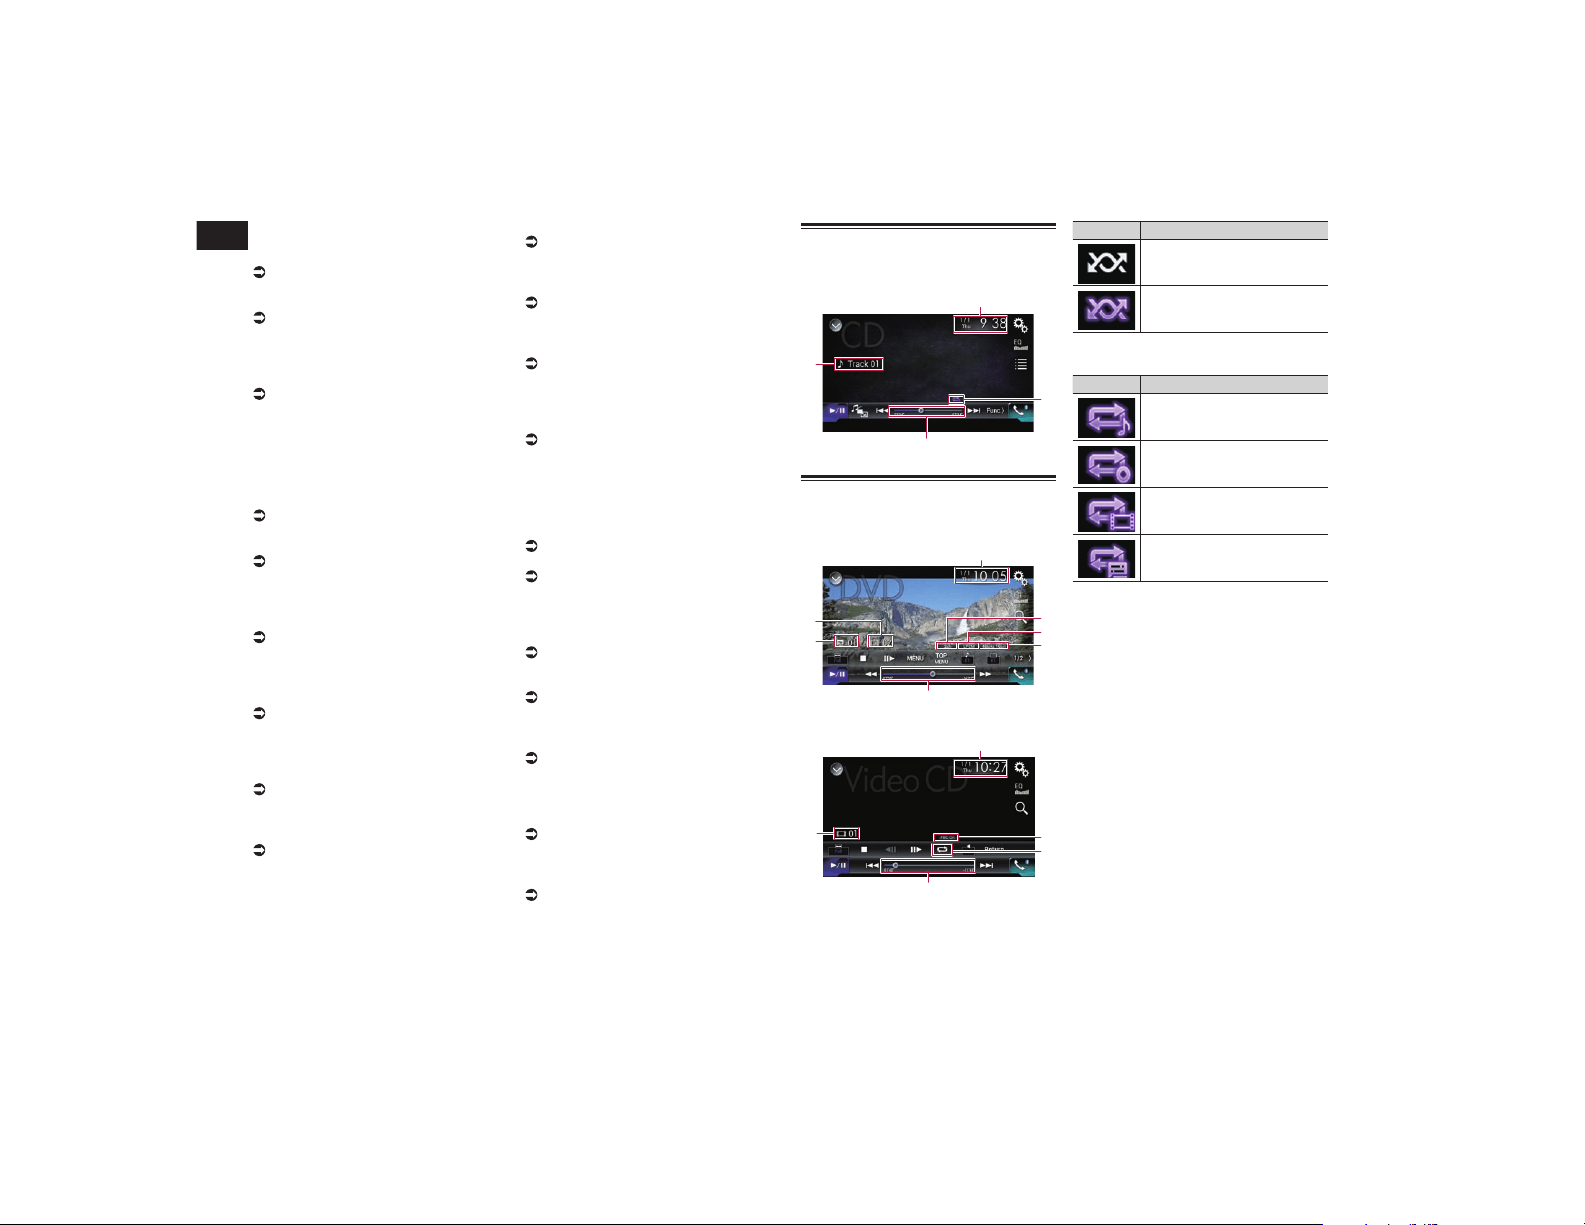
07
Capítulo
26
Es
3 Muestra la pantalla de Menú de
ajustes.
4 Recupera las curvas del ecualizador.
Para los detalles, consulte Utilización del
ecualizador en la página 69.
5 Selecciona una pista de la lista.
Para los detalles, consulte Selección de
archivos de la lista de nombres de archivo
en la página 27.
6 Muestra la pantalla de Menú del
teléfono.
Para los detalles, consulte Visualización
del menú del teléfono en la página 17.
7 Cambia a la página siguiente o ante-
rior de teclas del panel táctil.
8 Hace saltar archivos hacia delante o
hacia atrás.
9 Cambia el punto de reproducción
arrastrando la tecla.
Para los detalles, consulte Uso de la barra
de tiempo en la página 14.
a Cambia el tipo de archivo multimedia.
Para los detalles, consulte Cambio
del tipo de archivo multimedia en la
página 27.
b Cambia entre reproducción y pausa.
c Utiliza la función “Sound Retriever”.
Para los detalles, consulte Ajuste de
la función “Sound Retriever” en la
página 76.
d Reproduce archivos en orden
aleatorio.
Para los detalles, consulte Reproducción
de las pistas en orden aleatorio en la
página 27.
e Ajusta el rango de reproducción de
repetición.
Para los detalles, consulte Ajuste del
rango de reproducción de repetición en la
página 27.
f Busca la parte que desea reproducir.
Para los detalles, consulte Búsqueda
de la parte que desea reproducir en la
página 27.
g Oculta las teclas del panel táctil.
Al pulsar esta área se ocultan las teclas
del panel táctil.
p Pulse en cualquier lugar de la pantalla
LCD para volver a mostrar las teclas del
panel táctil.
h Muestra el menú DVD.
Para los detalles, consulte
Funcionamiento del menú DVD en la
página 27.
i Cambia el idioma de los subtítulos.
Para los detalles, consulte Cambio
del idioma de los subtítulos en la
página 28.
j Cambia el idioma de audio.
Para los detalles, consulte Cambio del
idioma de audio en la página 28.
k Detiene la reproducción.
l Cambia el modo de pantalla
panorámica.
Para los detalles, consulte Cambio del
modo de pantalla panorámica en la
página 77.
m Avanza un fotograma (reproducción
fotograma a fotograma) o reduce la
velocidad de reproducción (reproduc-
ción a cámara lenta).
Para los detalles, consulte Reproducción
fotograma a fotograma en la página 28.
Para los detalles, consulte Reproducción
a cámara lenta en la página 28.
n Realiza una operación (como, por
ejemplo, reanudación) almacenada en
el disco.
Para los detalles, consulte Retorno a una
escena específica en la página 28.
o Reanuda la reproducción (Marcador).
Para los detalles, consulte Reanudación
de la reproducción (Marcador) en la
página 28.
p Muestra el teclado del menú DVD.
Para los detalles, consulte Utilización del
menú DVD mediante las teclas del panel
táctil en la página 28.
q Cambia el ángulo de visualización
(multiángulo).
Para los detalles, consulte Cambio de la
visualización multiángulo del DVD en la
página 28.
r Selecciona la salida de audio.
Para los detalles, consulte Selección de la
salida de audio en la página 29.
Lectura de la pantalla (para
audio)
Ejemplo: CD
4
3
1
2
Lectura de la pantalla (para
vídeo)
Ejemplo: DVD
9
8
3
1
7
6
5
Ejemplo: Vídeo-CD
3
1
a
4
2
1 Fecha y hora actuales
2 Indicador de estado de reproducción
Indica el estado de reproducción actual.
Reproducción de las pistas en orden
aleatorio
Indicador Significado
No reproduce las pistas en
orden aleatorio.
Reproduce todas las pistas del
disco actual en orden aleatorio.
Ajuste del rango de reproducción de
repetición
Indicador Significado
Repite únicamente la pista
actual.
Repite el disco actual.
Repite únicamente el capítulo
actual.
Repite únicamente el título
actual.
3 Indicador de tiempo de reproducción
Muestra el tiempo transcurrido de repro-
ducción del archivo actual.
4 Indicador de número de pista
Muestra el número de la pista que se está
reproduciendo actualmente (en caso de
estar disponible).
5 Indicador de canal de audio
Muestra el tipo de canal de audio actual,
como por ejemplo “Mch” (multicanal).
6 Indicador de formato de sonido
digital
Muestra el formato de sonido digital (for-
mato de sonido envolvente) seleccionado.
7 Indicador de la frecuencia de
muestreo
Muestra la frecuencia de muestreo que
se está reproduciendo.
8 Indicador de número de título
Muestra el número del título que se está
reproduciendo actualmente.
9 Indicador de número de capítulo
Muestra el número de capítulo que se
está reproduciendo actualmente.
a Indicador PBC ON
Indica que se está reproduciendo un
disco con PBC ON.
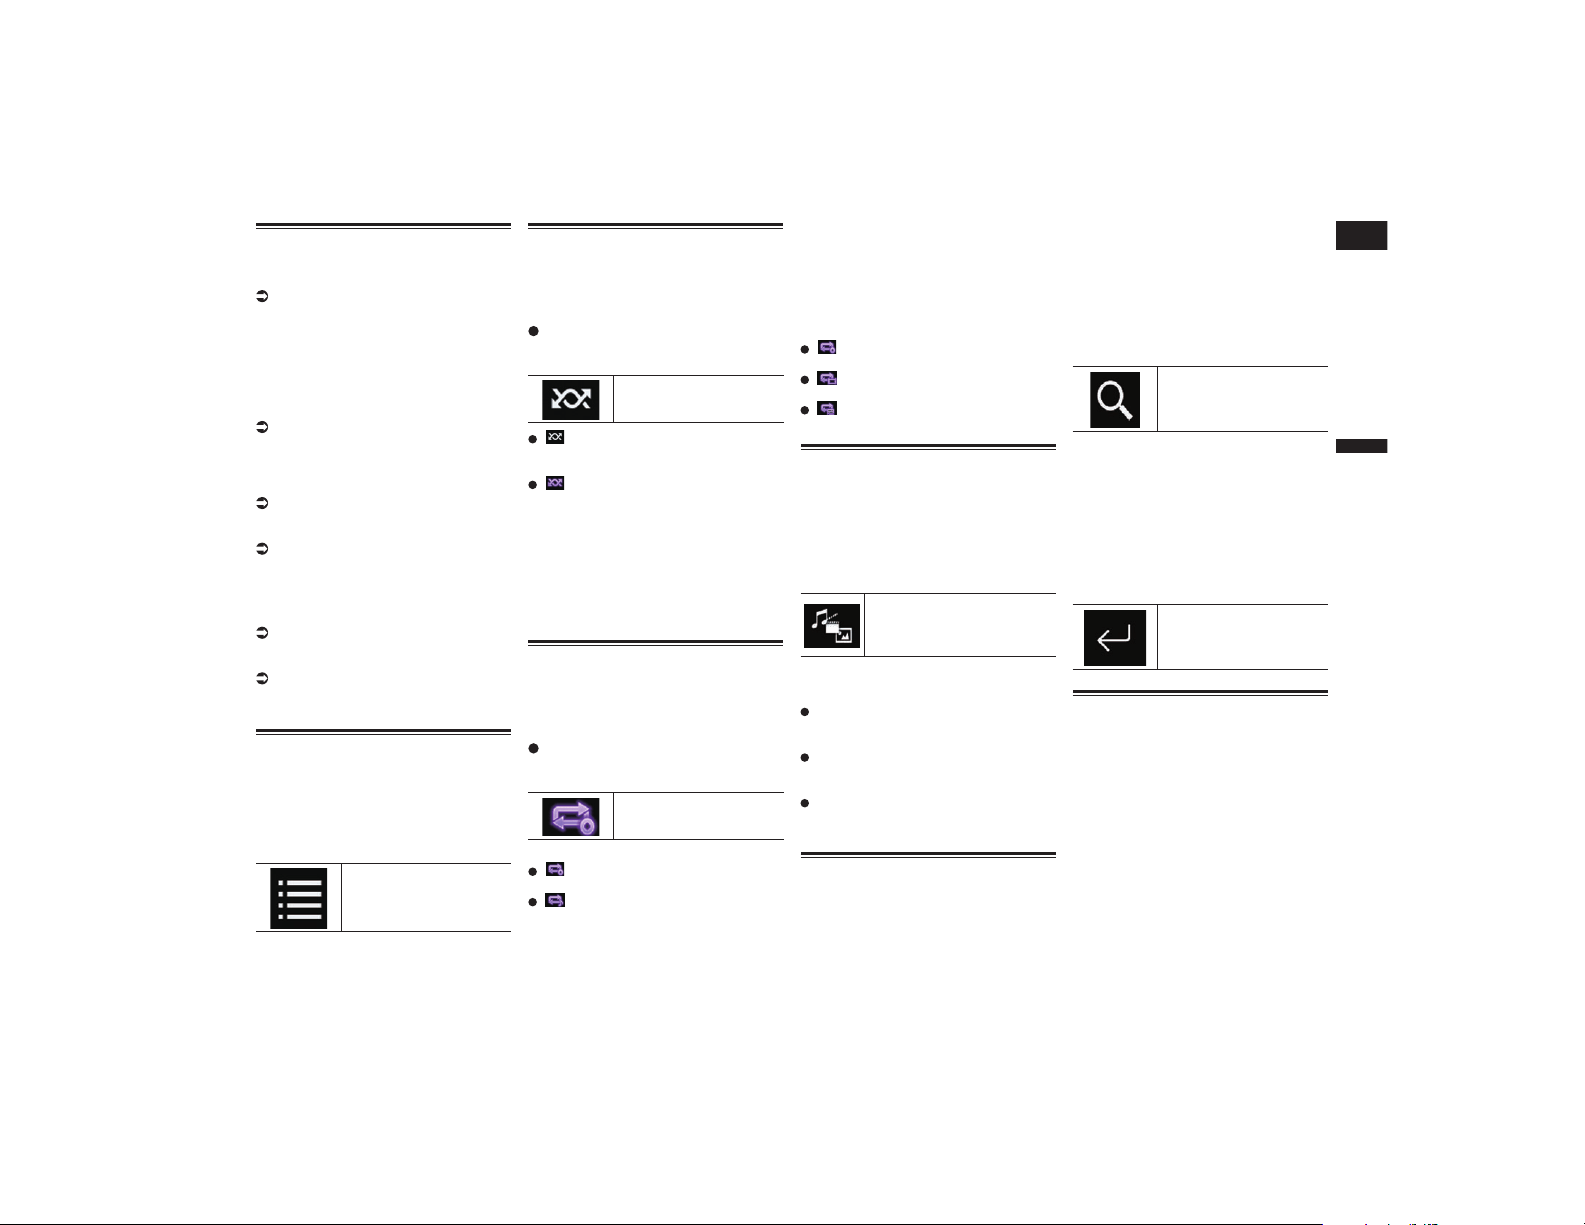
Español
07
Capítulo
27
Es
Procedimiento de inicio
1 Muestre la pantalla de Selección
de fuente AV.
Para los detalles sobre las operaciones,
consulte Visualización de la pantalla de
función AV en la página 12.
2 Introduzca el disco que desee
reproducir en la ranura para cargar
discos.
La fuente cambia y, a continuación, se inicia
la reproducción.
Para los detalles, consulte Colocación y
expulsión de un disco en la página 10.
p Si el disco ya está colocado, pulse [Disc]
en la lista de fuente de la pantalla de
Selección de fuente AV.
Para los detalles, consulte Selección de
una fuente frontal en la lista de fuentes
en la página 13.
Para los detalles, consulte Selección
de una fuente frontal en la pantalla de
Selección de fuente AV en la página 13.
3 Utilice las teclas del panel táctil de
la pantalla para controlar el disco.
Para los detalles, consulte Utilización de
las teclas del panel táctil (para audio) en
la página 25.
Para los detalles, consulte Utilización de
las teclas del panel táctil (para vídeo) en
la página 25.
Selección de archivos de la
lista de nombres de archivo
Puede seleccionar pistas para su reproduc-
ción mediante la lista de títulos de pistas,
que es una lista de las pistas grabadas en
un disco.
1 Pulse la siguiente tecla.
Muestra una lista de pistas
grabadas en el disco.
2 Pulse una pista de la lista para
reproducirla.
Reproducción de las pistas en
orden aleatorio
Se pueden reproducir de forma aleatoria
todas las pistas del disco con tan solo pulsar
una tecla.
Pulse la siguiente tecla repetida-
mente hasta que aparezca la confi-
guración deseada.
Activa o desactiva la repro-
ducción aleatoria.
(valor predeterminado):
No reproduce las pistas en orden
aleatorio.
:
Reproduce todas las pistas del rango
de reproducción de repetición actual en
orden aleatorio.
p Si activa la reproducción aleatoria
cuando el rango de reproducción
está configurado en la pista actual, el
rango de reproducción de repetición
cambia a la totalidad del disco actual
automáticamente.
Ajuste del rango de reproduc-
ción de repetición
El rango de reproducción de repetición
puede cambiarse con tan solo pulsar una
tecla.
Pulse la siguiente tecla repetida-
mente hasta que aparezca la confi-
guración deseada.
Cambia el rango de repro-
ducción de repetición.
Audio
(valor predeterminado):
Repite el disco actual.
:
Repite únicamente la pista actual.
p Si activa la reproducción aleatoria
cuando el rango de reproducción
está configurado en la pista actual, el
rango de reproducción de repetición
cambia a la totalidad del disco actual
automáticamente.
p Si cambia el rango de reproducción de
repetición de la totalidad del disco a la
pista actual cuando la reproducción
aleatoria está activada, esta se desactiva
automáticamente.
Vídeo
(valor predeterminado):
Repite todos los archivos.
:
Repite únicamente el capítulo actual.
:
Repite únicamente el título actual.
Cambio del tipo de archivo
multimedia
Cuando se reproduce contenido multimedia
digital que contiene una mezcla de varios
tipos de archivos multimedia puede cambiar
entre tipos de archivo multimedia para su
reproducción.
1 Pulse la siguiente tecla.
Muestra el menú emergente
para seleccionar un tipo de
archivo multimedia para su
reproducción en el disco.
2 Pulse el elemento que desee
ajustar.
Music:
Cambia el tipo de archivo multimedia a
música (audio comprimido).
Video:
Cambia el tipo de archivo multimedia a
vídeo.
CD-DA:
Cambia el tipo de archivo multimedia a
CD (datos de audio (CD-DA)).
Búsqueda de la parte que
desea reproducir
Puede utilizar la función de búsqueda para
buscar la parte que desea reproducir.
p Para DVD-Vídeo, puede seleccionar Title
(título), Chapter (capítulo) o 10Key
(teclado numérico).
p Para Vídeo-CD, puede seleccionar Track
(pista) o 10Key (teclado numérico).
10Key (teclado numérico) sólo está dis-
ponible para Vídeo-CD con PBC (control
de reproducción).
p La búsqueda de capítulo y la búsqueda
de tiempo no están disponibles si se ha
detenido la reproducción del disco.
1 Pulse la siguiente tecla.
Muestra la pantalla para la
búsqueda numérica directa.
2 Pulse [Title] (título), [Chapter]
(capítulo), [10Key] (teclado numé-
rico) o [Track] (pista).
3 Pulse [0] a [9] para introducir el
número que desee.
p Para cancelar un número introducido,
pulse [C]. Para cancelar los números
introducidos, mantenga pulsado [C].
4 Pulse la siguiente tecla.
Registra los números e
inicia la reproducción.
Funcionamiento del menú
DVD
Puede controlar el menú DVD pulsando
directamente el elemento del menú en la
pantalla.
p Es posible que esta función no funcione
correctamente con determinado conte-
nido de disco DVD. En tal caso, utilice las
teclas del panel táctil para controlar el
menú DVD.
1 Pulse la pantalla para mostrar las
teclas del panel táctil.
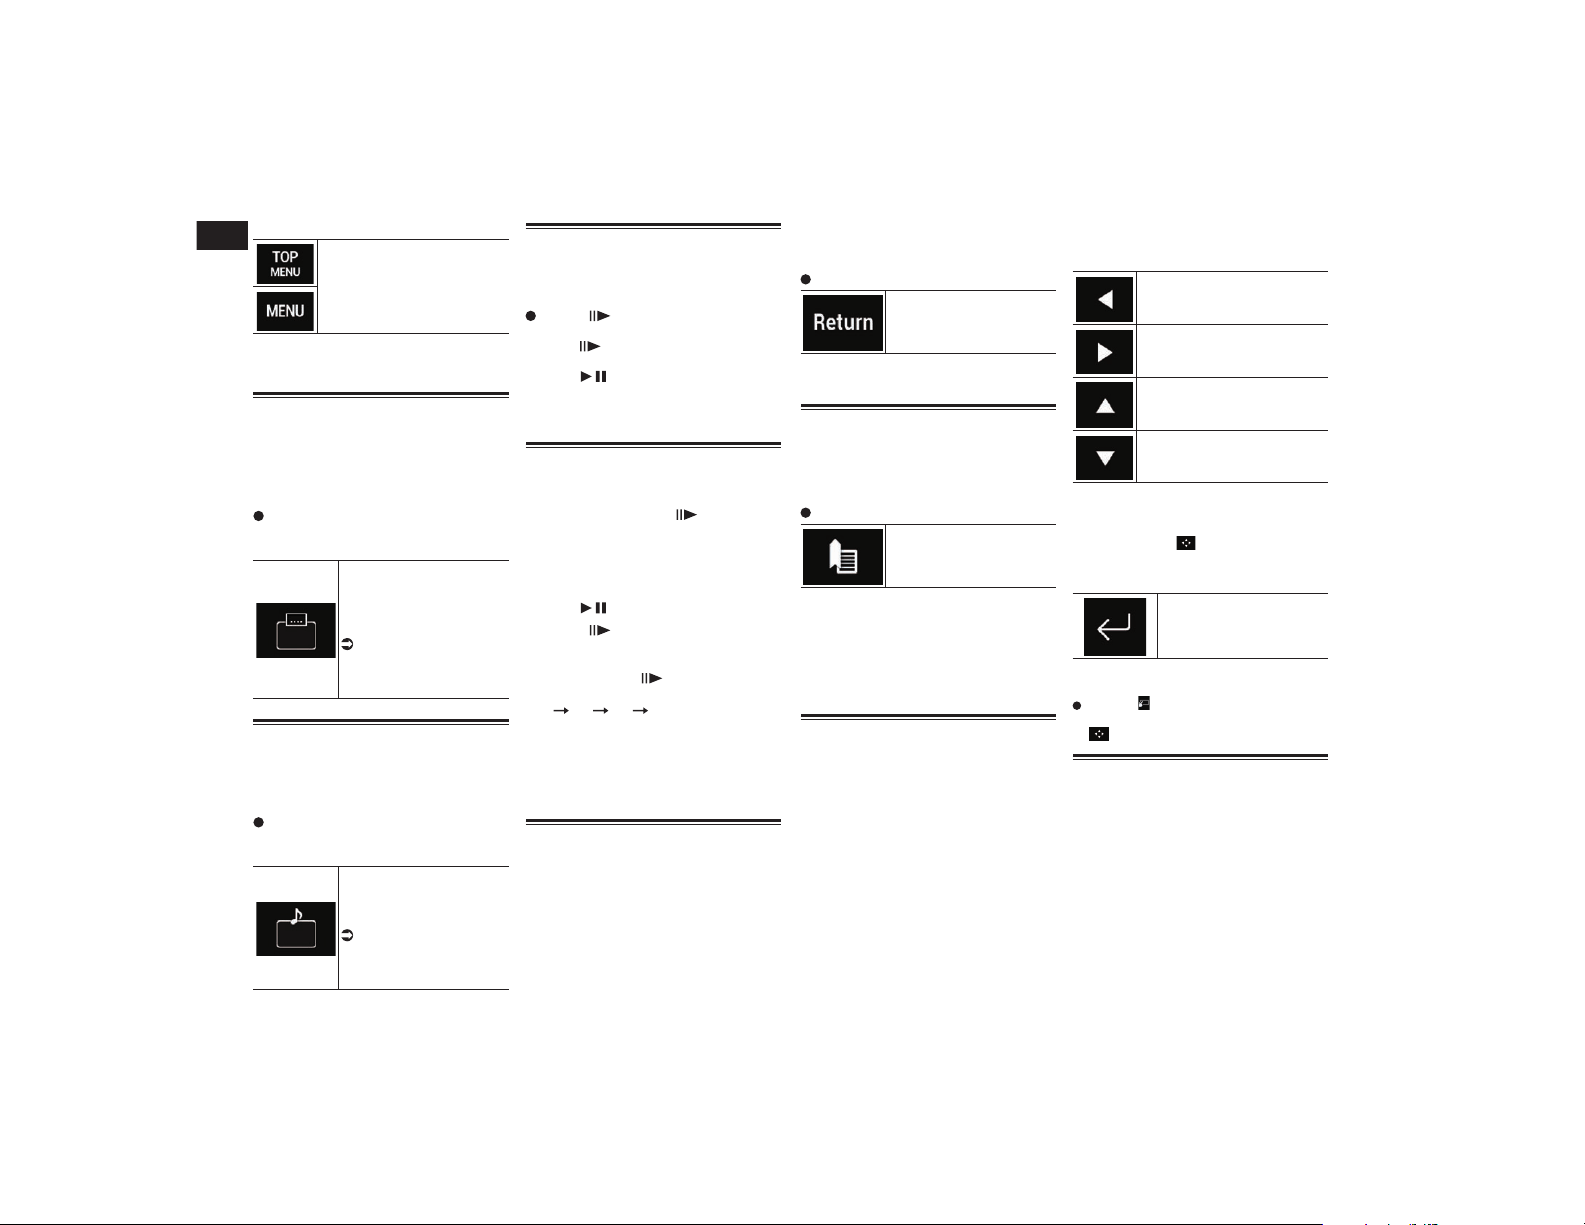
07
Capítulo
28
Es
2 Pulse la siguiente tecla.
Muestra las teclas del panel
táctil que permiten controlar el
menú DVD.
3 Pulse el elemento del menú que
desee.
Cambio del idioma de los
subtítulos
Podrá cambiar el idioma de los subtítulos
durante la reproducción de un disco siem-
pre que el disco contenga datos en varios
idiomas (varios subtítulos).
Pulse la siguiente tecla repetida-
mente hasta que aparezca la confi-
guración deseada.
Cambia el idioma de los
subtítulos.
Puede especificar el idioma
deseado como idioma prede-
terminado de subtítulos.
Para los detalles, con-
sulte Ajuste de los idio-
mas de mayor prioridad
en la página 73.
Cambio del idioma de audio
Podrá cambiar el idioma de audio durante
la reproducción de un disco siempre que
el disco contenga datos en varios idiomas
(varias pistas de audio).
Pulse la siguiente tecla repetida-
mente hasta que aparezca la confi-
guración deseada.
Cambia el idioma de audio.
Puede especificar el idioma
deseado como idioma prede-
terminado de audio.
Para los detalles, con-
sulte Ajuste de los idio-
mas de mayor prioridad
en la página 73.
Reproducción fotograma a
fotograma
Esta función le permite avanzar fotograma a
fotograma durante la pausa.
Pulse [ ] durante la pausa.
El vídeo avanza un fotograma cada vez que
se pulsa [ ].
p Para volver a la reproducción normal,
pulse [ / ].
p En algunos discos, las imágenes pueden
aparecer borrosas durante la reproduc-
ción fotograma a fotograma.
Reproducción a cámara lenta
Esta función le permite reducir la velocidad
de la reproducción.
1 Mantenga pulsado [ ] hasta
que se muestre un icono de flecha
durante la reproducción.
Se mostrará el icono de flecha y empezará la
reproducción hacia delante a cámara lenta.
p Para volver a la reproducción normal,
pulse [ / ].
2 Pulse [ ] para ajustar la velo-
cidad de reproducción durante la
reproducción a cámara lenta.
Cada vez que pulse [ ], la velocidad cam-
bia en cuatro fases en el orden siguiente:
1/16 1/8 1/4 1/2
p No se emite sonido durante la reproduc-
ción a cámara lenta.
p En algunos discos, puede que las imá-
genes aparezcan borrosas durante la
reproducción a cámara lenta.
p No es posible el retroceso a cámara lenta.
Retorno a una escena
especíca
Al utilizar un disco con un punto grabado
que indica adónde regresar, el disco vuelve
al punto especificado y comienza la repro-
ducción desde dicho punto.
Esta función no se puede utilizar si no se ha
programado previamente una escena espe-
cífica en el disco.
p Esta función sólo está disponible para
DVD-Vídeo y Vídeo-CD con PBC (control
de reproducción).
Pulse la siguiente tecla.
Vuelva al punto especificado
e inicia la reproducción
desde allí.
p El punto especificado es diferente en
función del disco.
Reanudación de la reproduc-
ción (Marcador)
La función Marcador le permite reanudar la
reproducción desde una escena seleccio-
nada la próxima vez que cargue el disco.
Pulse la siguiente tecla.
Marca un punto para cada
disco en un máximo de
cinco discos.
p Si intenta memorizar otro punto en el
mismo disco, el marcador más reciente
sobrescribirá el más antiguo.
p Para borrar el marcador de un disco,
mantenga pulsada esta tecla.
p El marcador más antiguo se sustituye
con el nuevo.
Utilización del menú DVD
mediante las teclas del panel
táctil
Si aparecen los elementos del menú DVD,
las teclas del panel táctil pueden aparecer
encima de ellos. Si esto ocurre, seleccione
un elemento con estas teclas del panel
táctil.
1 Pulse las siguientes teclas para
seleccionar el elemento de menú
que desee.
Selecciona el elemento de menú
de la izquierda.
Selecciona el elemento de menú
de la derecha.
Selecciona el elemento de menú
superior.
Selecciona el elemento de menú
inferior.
p Si desaparecen las teclas del panel táctil
para seleccionar el menú DVD, pulse
cualquier punto de la pantalla y, a conti-
nuación, pulse . Las teclas del panel
táctil aparecerán de nuevo.
2 Pulse la siguiente tecla.
Confirma el elemento
seleccionado.
p La forma en que se muestra el menú es
diferente en función del disco.
Si pulsa , las teclas del panel táctil
desaparecerán y aparecerá el icono de
.
Cambio de la visualización
multiángulo del DVD
Con los DVD que contienen grabaciones
multiángulo (escenas rodadas desde varios
ángulos), puede cambiar entre ángulos de
visualización durante la reproducción.
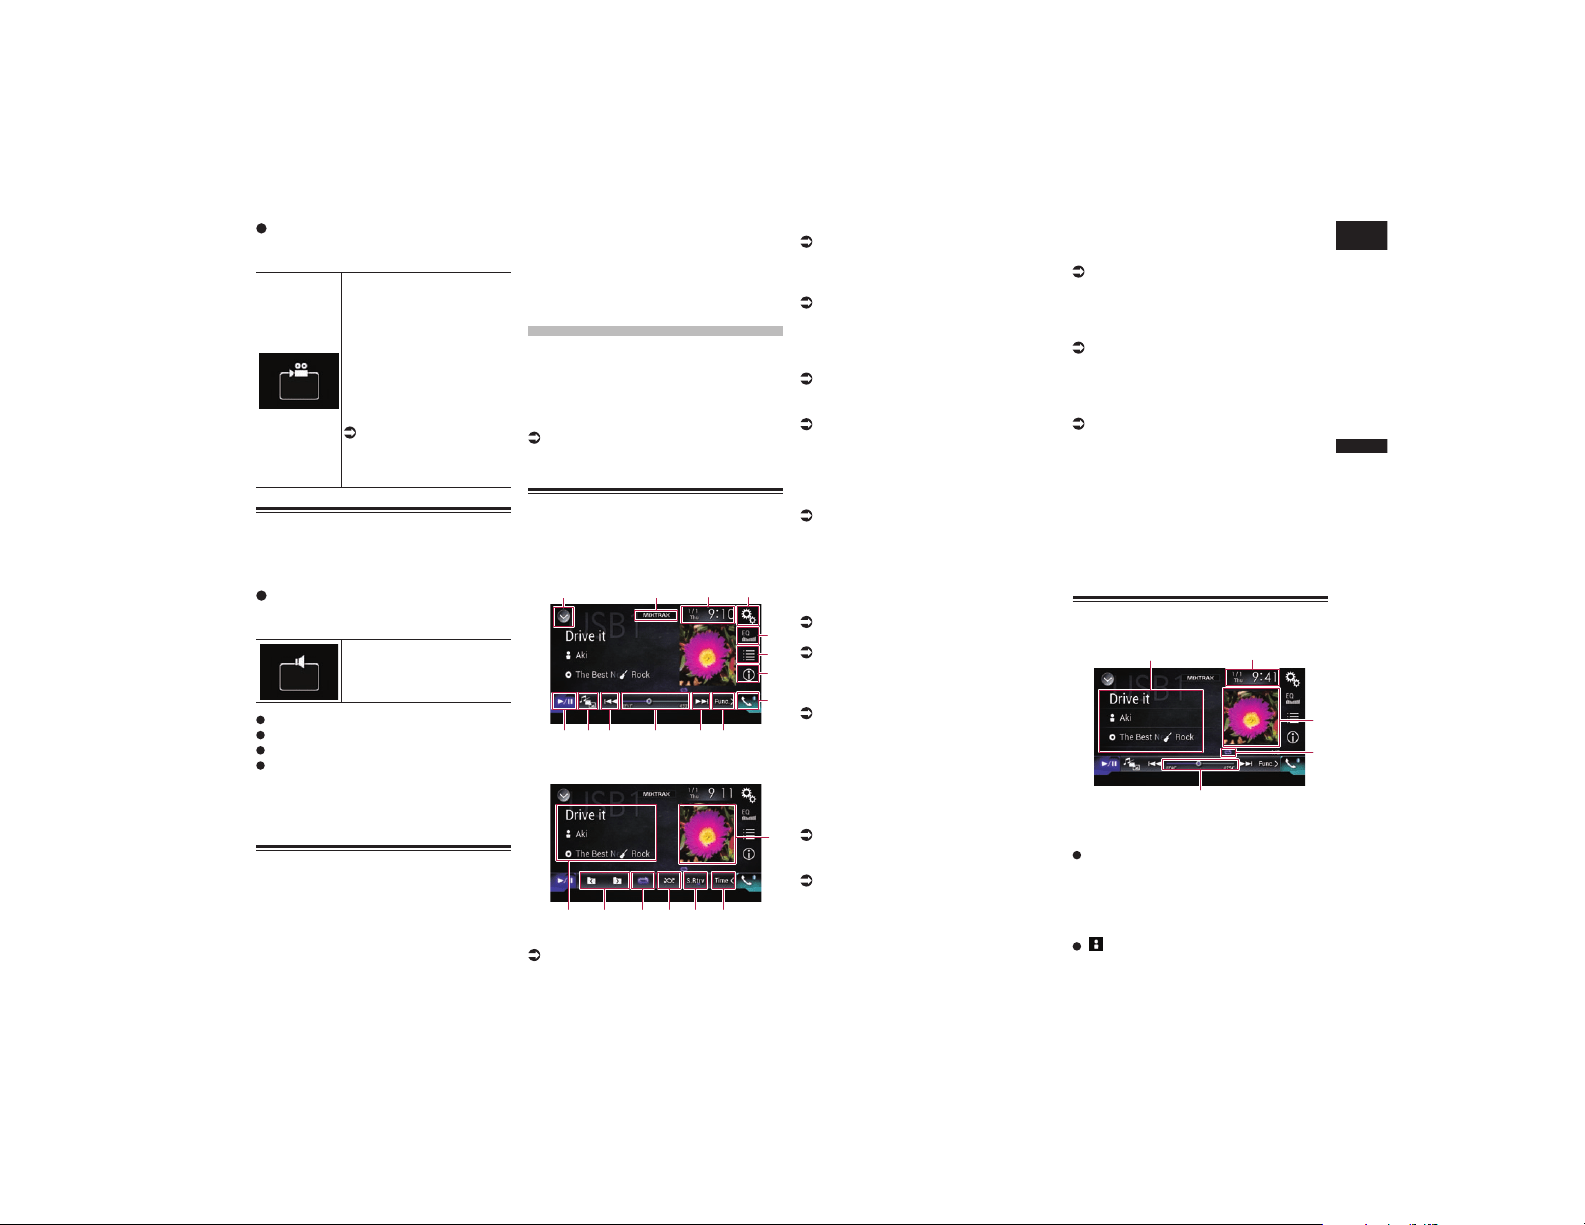
Español
08
Capítulo
29
Es
Pulse la siguiente tecla repetida-
mente hasta que aparezca la confi-
guración deseada.
Cambia entre ángulos de
visualización.
Durante la reproducción de
una escena rodada desde
varios ángulos, se muestra
el icono de ángulo.
Active o desactive la visuali-
zación del icono de ángulo
mediante el menú “Config.
DVD/DivX”.
Para los detalles,
consulte Ajuste de la
visualización del icono de
ángulo en la página 74.
Selección de la salida de audio
Durante la reproducción de DVD grabados
con audio LPCM, se puede cambiar la salida
de audio.
Pulse la siguiente tecla repetida-
mente hasta que aparezca la confi-
guración deseada.
Cambia el ajuste de salida
de audio.
L+R: Izquierda y derecha
Left: Izquierda
Right: Derecha
Mix: Mezclando izquierda y derecha
p Esta función no está disponible cuando
se ha detenido la reproducción del disco.
p El aspecto de esta tecla cambia según el
ajuste actual.
Operaciones con los botones
de hardware
Pulse el botón TRK.
Puede hacer saltar pistas o capítulos hacia
delante o hacia atrás.
Mantenga pulsado el botón TRK.
Puede realizar el retroceso rápido o avance
rápido.
Reproducción de
archivos de audio
comprimidos
Puede reproducir archivos de audio com-
primidos almacenados en un disco o en
un dispositivo de almacenamiento externo
(USB, SD) usando la unidad integrada de
este producto. En esta sección se describe
cómo.
Para los detalles, consulte Cuadro
de compatibilidad con soportes en la
página 95.
Utilización de las teclas del
panel táctil
Ejemplo: USB
Pantalla de reproducción (página 1)
1 2 43
9
5
6
7
8
d c a b a
Pantalla de reproducción (página 2)
9
e
f
g
hij
1 Muestra la lista de fuentes.
Para los detalles, consulte Selección de
una fuente frontal en la lista de fuentes
en la página 13.
2 Muestra la pantalla MIXTRAX.
Para más información, consulte Capítulo
22.
3 Muestra la pantalla de Ajuste de hora
y fecha.
Para los detalles, consulte Ajuste de la
hora y la fecha en la página 76.
4 Muestra la pantalla de Menú de
ajustes.
5 Recupera las curvas del ecualizador.
Para los detalles, consulte Utilización del
ecualizador en la página 69.
6 Selecciona un archivo de la lista.
Para los detalles, consulte Selección de
archivos de la lista de nombres de archivo
en la página 31.
Muestra una lista relacionada con la
canción que se está reproduciendo
(búsqueda de vínculos).
Para los detalles, consulte Selección de
un archivo de la lista relacionada con la
canción que se está reproduciendo (bús-
queda de vínculos) en la página 31.
7 Cambia la visualización del texto
entre información de etiqueta e infor-
mación de archivo/carpeta.
Para los detalles, consulte Lectura de la
pantalla en la página 29.
Para los detalles, consulte Cambio del
modo de exploración en la página 30.
8 Muestra la pantalla de Menú del
teléfono.
Para los detalles, consulte Visualización
del menú del teléfono en la página 17.
9 Cambia a la página siguiente o ante-
rior de teclas del panel táctil.
a Hace saltar archivos hacia delante o
hacia atrás.
b Cambia el punto de reproducción
arrastrando la tecla.
Para los detalles, consulte Uso de la barra
de tiempo en la página 14.
c Cambia el tipo de archivo multimedia.
Para los detalles, consulte Cambio
del tipo de archivo multimedia en la
página 31.
d Cambia entre reproducción y pausa.
e Muestra la lista de álbumes.
p Esta función solo está disponible al
reproducir archivos de dispositivos de
almacenamiento externo (USB, SD) en el
modo de exploración de música.
f Utiliza la función “Sound Retriever”.
Para los detalles, consulte Ajuste de
la función “Sound Retriever” en la
página 76.
g Reproduce archivos en orden
aleatorio.
Para los detalles, consulte Reproducción
de archivos en orden aleatorio en la
página 31.
h Ajusta el rango de reproducción de
repetición.
Para los detalles, consulte Ajuste del
rango de reproducción de repetición en la
página 31.
i Selecciona la carpeta anterior o la
carpeta siguiente.
j Muestra la lista de categorías que
incluye el elemento seleccionado.
p Esta función solo está disponible al
reproducir archivos de dispositivos de
almacenamiento externo (USB, SD) en el
modo de exploración de música.
Lectura de la pantalla
Ejemplo: USB
5
2
4
3
1
1 Información del archivo actual
Modo de exploración de música
Título de la canción/Nombre de
archivo
Muestra el título de la canción que se
está reproduciendo (cuando está dispo-
nible). Si el título de una canción no está
disponible, aparece el nombre de archivo.
: Nombre del intérprete
Muestra el nombre del intérprete de
la canción que se está reproduciendo
(cuando esté disponible). “Sin nombre”
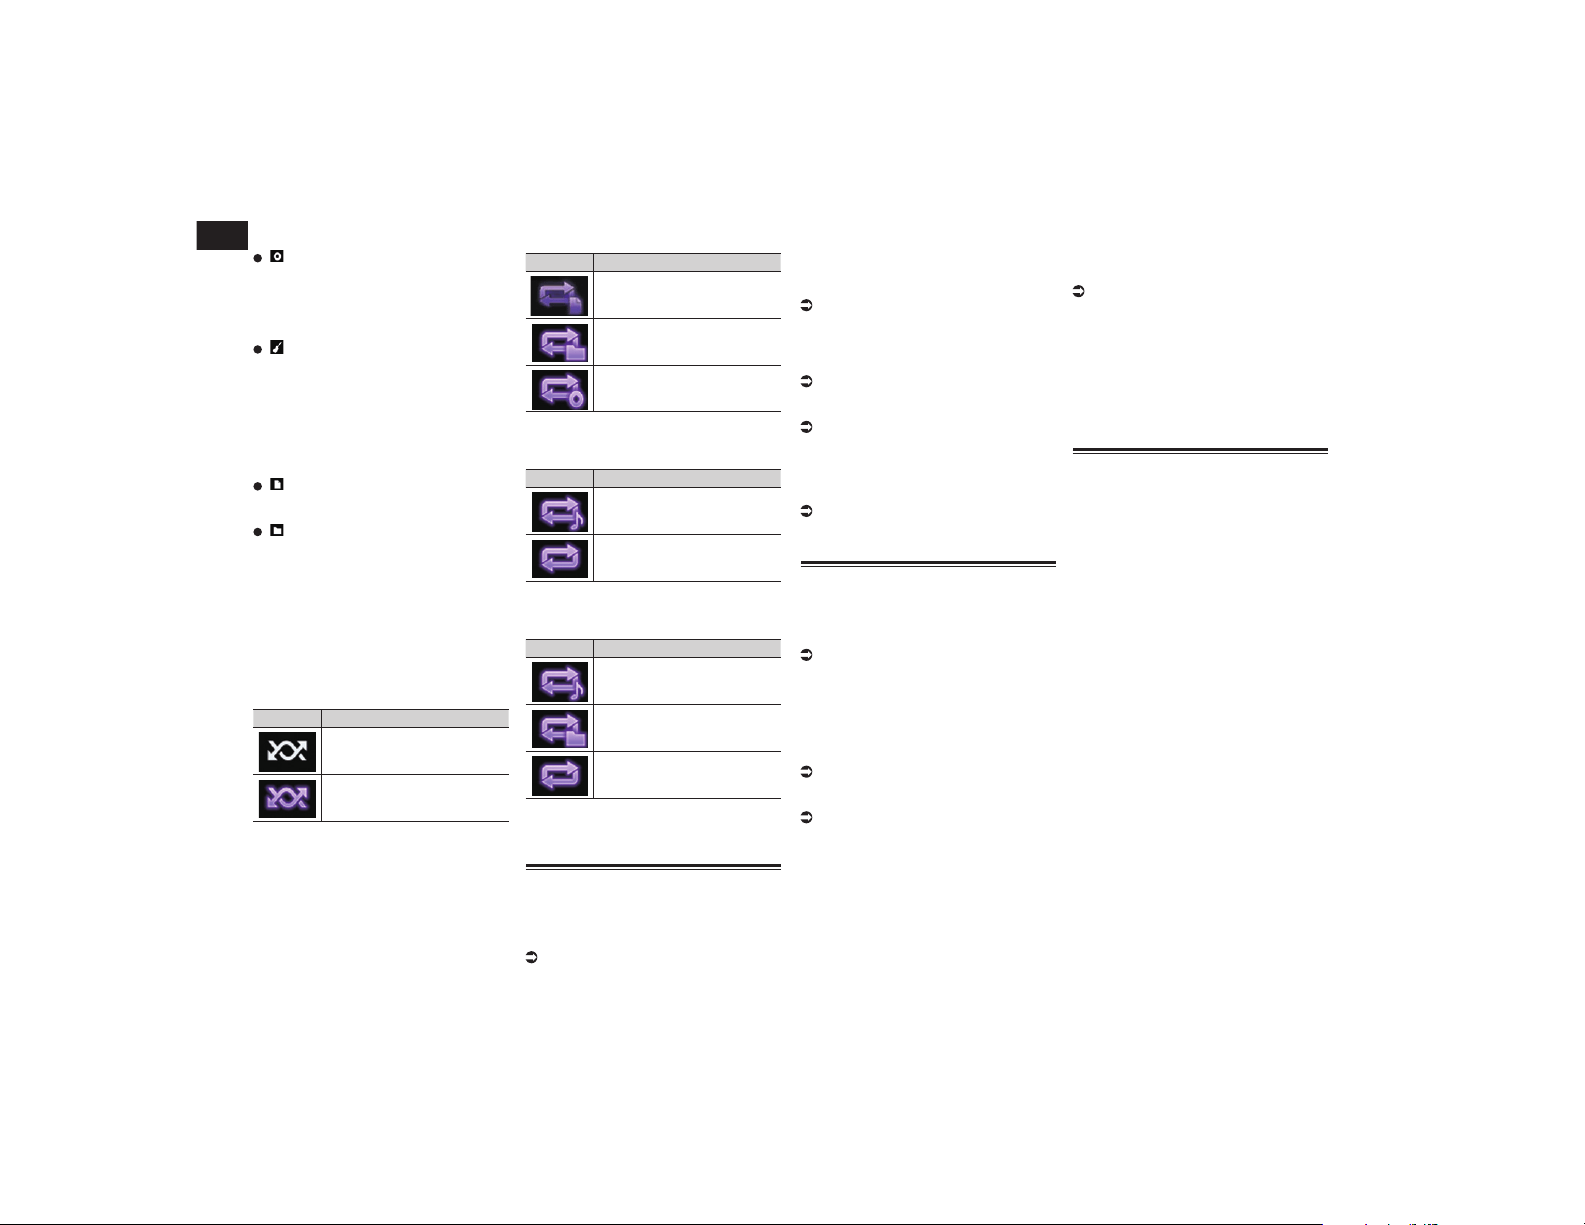
08
Capítulo
30
Es
se muestra si no hay información
correspondiente.
: Título del álbum/Nombre de la
carpeta
Muestra el título del álbum del archivo
actual (cuando está disponible). Si el
título del álbum no está disponible, se
muestra el nombre de la carpeta.
: Género
Muestra el género del archivo actual
(cuando esté disponible). “Sin gén.”
se muestra si no hay información
correspondiente.
p No se muestra nada si la canción que se
está reproduciendo está en un formato
que no admite esas funciones.
Modo de exploración de carpetas
: Nombre de archivo
Muestra el nombre del archivo que se
está reproduciendo actualmente.
: Nombre de la carpeta
Muestra el nombre de la carpeta que
contiene el archivo que se está reprodu-
ciendo actualmente.
2 Fecha y hora actuales
3 Portada de álbum
Si está disponible, aparecerá la portada
del álbum de la canción actual.
4 Indicador de estado de reproducción
Indica el estado de reproducción actual.
Reproducción de archivos en orden
aleatorio
Indicador Significado
No reproduce los archivos en
orden aleatorio.
Reproduce todos los archivos
del rango de repetición en
orden aleatorio.
Ajuste del rango de reproducción de
repetición (para discos)
Indicador Significado
Repite únicamente el archivo
actual.
Repite únicamente la carpeta
actual.
Repite todos los archivos de
audio comprimido.
Ajuste del rango de reproducción de
repetición (para modo de exploración
de música)
Indicador Significado
Repite únicamente el archivo
actual.
Repite todos los archivos de
audio comprimido.
Ajuste del rango de reproducción de
repetición (para modo de exploración de
carpetas)
Indicador Significado
Repite únicamente el archivo
actual.
Repite únicamente la carpeta
actual.
Repite todos los archivos de
audio comprimido.
5 Indicador de tiempo de reproducción
Muestra el tiempo transcurrido de repro-
ducción del archivo actual.
Procedimiento de inicio (para
el disco)
1 Muestre la pantalla de Selección
de fuente AV.
Para los detalles sobre las operaciones,
consulte Visualización de la pantalla de
función AV en la página 12.
2 Introduzca el disco que desee
reproducir en la ranura para cargar
discos.
La fuente cambia y, a continuación, se inicia
la reproducción.
Para los detalles, consulte Colocación y
expulsión de un disco en la página 10.
p Si el disco ya está colocado, pulse [Disc]
en la lista de fuente de la pantalla de
Selección de fuente AV.
Para los detalles, consulte Selección de
una fuente frontal en la lista de fuentes
en la página 13.
Para los detalles, consulte Selección
de una fuente frontal en la pantalla de
Selección de fuente AV en la página 13.
3 Utilice las teclas del panel táctil de
la pantalla para controlar el disco.
Para los detalles, consulte Utilización
de las teclas del panel táctil en la
página 29.
Procedimiento de inicio (para
USB/SD)
1 Muestre la pantalla de Selección
de fuente AV.
Para los detalles sobre las operaciones,
consulte Visualización de la pantalla de
función AV en la página 12.
2 Introduzca la tarjeta de memoria
SD en la ranura para tarjetas SD, o
conecte el dispositivo de almace-
namiento USB en el conector USB.
Para los detalles, consulte Conexión de
un dispositivo de almacenamiento USB
en la página 11.
Para los detalles, consulte Colocación y
expulsión de una tarjeta de memoria SD
en la página 10.
3 Pulse [USB] o [SD] en la pantalla
de Selección de fuente AV.
La fuente cambia y, a continuación, se inicia
la reproducción.
4 Utilice las teclas del panel táctil de
la pantalla para controlar el dispo-
sitivo de almacenamiento externo
(USB, SD).
Para los detalles, consulte Utilización
de las teclas del panel táctil en la
página 29.
p La reproducción se realiza siguiendo el
orden de número de carpetas. Si las car-
petas no contienen archivos que puedan
reproducirse, se omiten. Si en la carpeta
01 (carpeta raíz) no hay archivos que
puedan reproducirse, la reproducción
comienza en la carpeta 02.
Cambio del modo de
exploración
Este producto admite dos tipos de modos de
exploración: modo de exploración de carpe-
tas y modo de exploración de música.
p Los modos de exploración solo están
disponibles para el dispositivo de almace-
namiento externo (USB, SD).
Modo de exploración de música
Muestra el título de una canción, el nombre
del intérprete, el nombre del álbum y el
género en el área de visualización de infor-
mación actual en la pantalla de Función AV.
Selecciónelo cuando desee reproducir archi-
vos de música filtrados por una categoría
de título de canción, nombre de intérprete,
nombre de álbum o género.
Si conecta un dispositivo de almacena-
miento externo (USB, SD), este producto
accede a la base de datos de archivos de
música con información de etiquetas y
cambia al modo de exploración de música
automáticamente.
Modo de exploración de carpetas
Muestra un nombre de carpeta y un nombre
de archivo en el área de visualización de
información de la pantalla de Función AV.
Selecciónelo cuando desee buscar archivos
de música en la pantalla de lista o en las
carpetas de la pantalla de lista.
p Puede cambiar entre los modos de explo-
ración para buscar archivos pulsando las
pestañas y seleccionando un archivo de
la pantalla de lista.
Español
08
Capítulo
31
Es
Pulse la siguiente tecla repetida-
mente hasta que aparezca la confi-
guración deseada.
Cambia la información
visualizada entre la infor-
mación de etiqueta (título,
nombre del artista, título del
álbum, etc.) y la información
del nombre del archivo/
carpeta.
Selección de archivos de la
lista de nombres de archivo
Puede buscar archivos para reproducirlos
usando la lista de archivos y carpetas que
se han almacenado en un disco o en un
dispositivo de almacenamiento externo
(USB, SD).
1 Pulse la siguiente tecla.
Muestra la lista de archivos
o carpetas almacenadas en
un disco o en el dispositivo
de almacenamiento externo
(USB, SD).
p Pulse la pestaña “File” para visualizar la
lista de archivos/carpetas de un dispo-
sitivo de almacenamiento externo (USB,
SD).
2 Pulse un archivo de la lista para
reproducirlo.
p Los archivos se reproducen en el orden
del número de archivo.
p Al pulsar una de las carpetas de la lista se
mostrará su contenido. Puede reproducir
uno de los archivos de la lista pulsando
en él.
Selección de un archivo de
la lista relacionada con la
canción que se está reprodu-
ciendo (búsqueda de vínculos)
Puede seleccionar archivos para reproducir-
los mediante la lista de categorías de archi-
vos en un dispositivo de almacenamiento
externo (USB, SD).
p Esta función sólo está disponible para el
dispositivo de almacenamiento externo
(USB, SD).
1 Pulse la siguiente tecla.
Muestra la lista de archivos
o carpetas almacenados en
el dispositivo de almacena-
miento externo (USB, SD).
p Si se visualiza la lista “File”, pulse la
pestaña “Tag” para visualizar la lista de
categorías.
2 Pulse la categoría que desee para
mostrar la lista de archivos.
Aparece la pantalla de lista.
3 Pulse el elemento que desea
depurar.
Depure el elemento hasta que se muestre el
título de la canción o el nombre de archivo
que desee en la lista.
p Al pulsar [Todas] en la lista se incluyen
todas las opciones de la lista actual. Por
ejemplo, si pulsa [Todas] tras pulsar
[Artistas], puede pasar a la siguiente
pantalla con todos los intérpretes de la
lista seleccionada.
p Tras seleccionar “Artistas”, “Álbumes”
o “Géneros”, pulse una de las listas para
iniciar la reproducción de la primera can-
ción en la lista seleccionada y mostrar las
siguientes opciones.
4 Pulse el título de la canción o el
nombre de archivo que desee para
reproducirlo.
Reproducción de archivos en
orden aleatorio
Se pueden reproducir todos los archivos del
disco o del dispositivo de almacenamiento
externo (USB, SD) aleatoriamente con solo
pulsar una tecla.
Pulse la siguiente tecla repetida-
mente hasta que aparezca la confi-
guración deseada.
Activa o desactiva la repro-
ducción aleatoria.
(valor predeterminado):
No reproduce los archivos en orden
aleatorio.
:
Reproduce todos los archivos de audio
del rango de reproducción de repetición
actual en orden aleatorio.
p Si activa la reproducción aleatoria
cuando el rango de reproducción está
configurado en el archivo actual en el
modo de exploración de música, el rango
de reproducción de repetición cambia
automáticamente a la carpeta actual en
el disco o al dispositivo de almacena-
miento externo (USB, SD) actuales.
p Si activa la reproducción aleatoria
cuando el rango de reproducción está
configurado en el archivo actual en el
modo de exploración de carpetas, el
rango de reproducción de repetición
cambia automáticamente a la totalidad
del disco o al dispositivo de almacena-
miento externo (USB, SD) actuales.
Ajuste del rango de reproduc-
ción de repetición
El rango de reproducción de repetición
puede cambiarse con tan solo pulsar una
tecla.
Pulse la siguiente tecla repetida-
mente hasta que aparezca la confi-
guración deseada.
Cambia el rango de repro-
ducción de repetición.
Disco
(valor predeterminado):
Repite todos los archivos de audio
comprimido.
:
Repite únicamente la carpeta actual.
:
Repite únicamente el archivo actual.
Modo de exploración de música
(valor predeterminado):
Repite todos los archivos.
:
Repite únicamente el archivo actual.
Modo de exploración de carpetas
(valor predeterminado):
Repite todos los archivos.
:
Repite la carpeta actual.
:
Repite únicamente el archivo actual.
Cambio del tipo de archivo
multimedia
Cuando se reproduce contenido multimedia
digital que contiene una mezcla de varios
tipos de archivos multimedia puede cambiar
entre tipos de archivo multimedia para su
reproducción.
1 Pulse la siguiente tecla.
Muestra el menú emergente
para seleccionar un tipo de
archivo multimedia que se
reproducirá en el disco o en un
dispositivo de almacenamiento
externo (USB, SD).
2 Pulse el elemento que desee
ajustar.
Music:
Cambia el tipo de archivo multimedia a
música (audio comprimido).
Video:
Cambia el tipo de archivo multimedia a
vídeo.
CD-DA:
Cambia el tipo de archivo multimedia a
CD (datos de audio (CD-DA)).
Photo:
Cambia el tipo de archivo multimedia a
imagen estática (datos JPEG).
Operaciones con los botones
de hardware
Pulse el botón TRK.
Puede omitir archivos hacia delante o hacia
atrás.
Mantenga pulsado el botón TRK.
Puede realizar el retroceso rápido o avance
rápido.
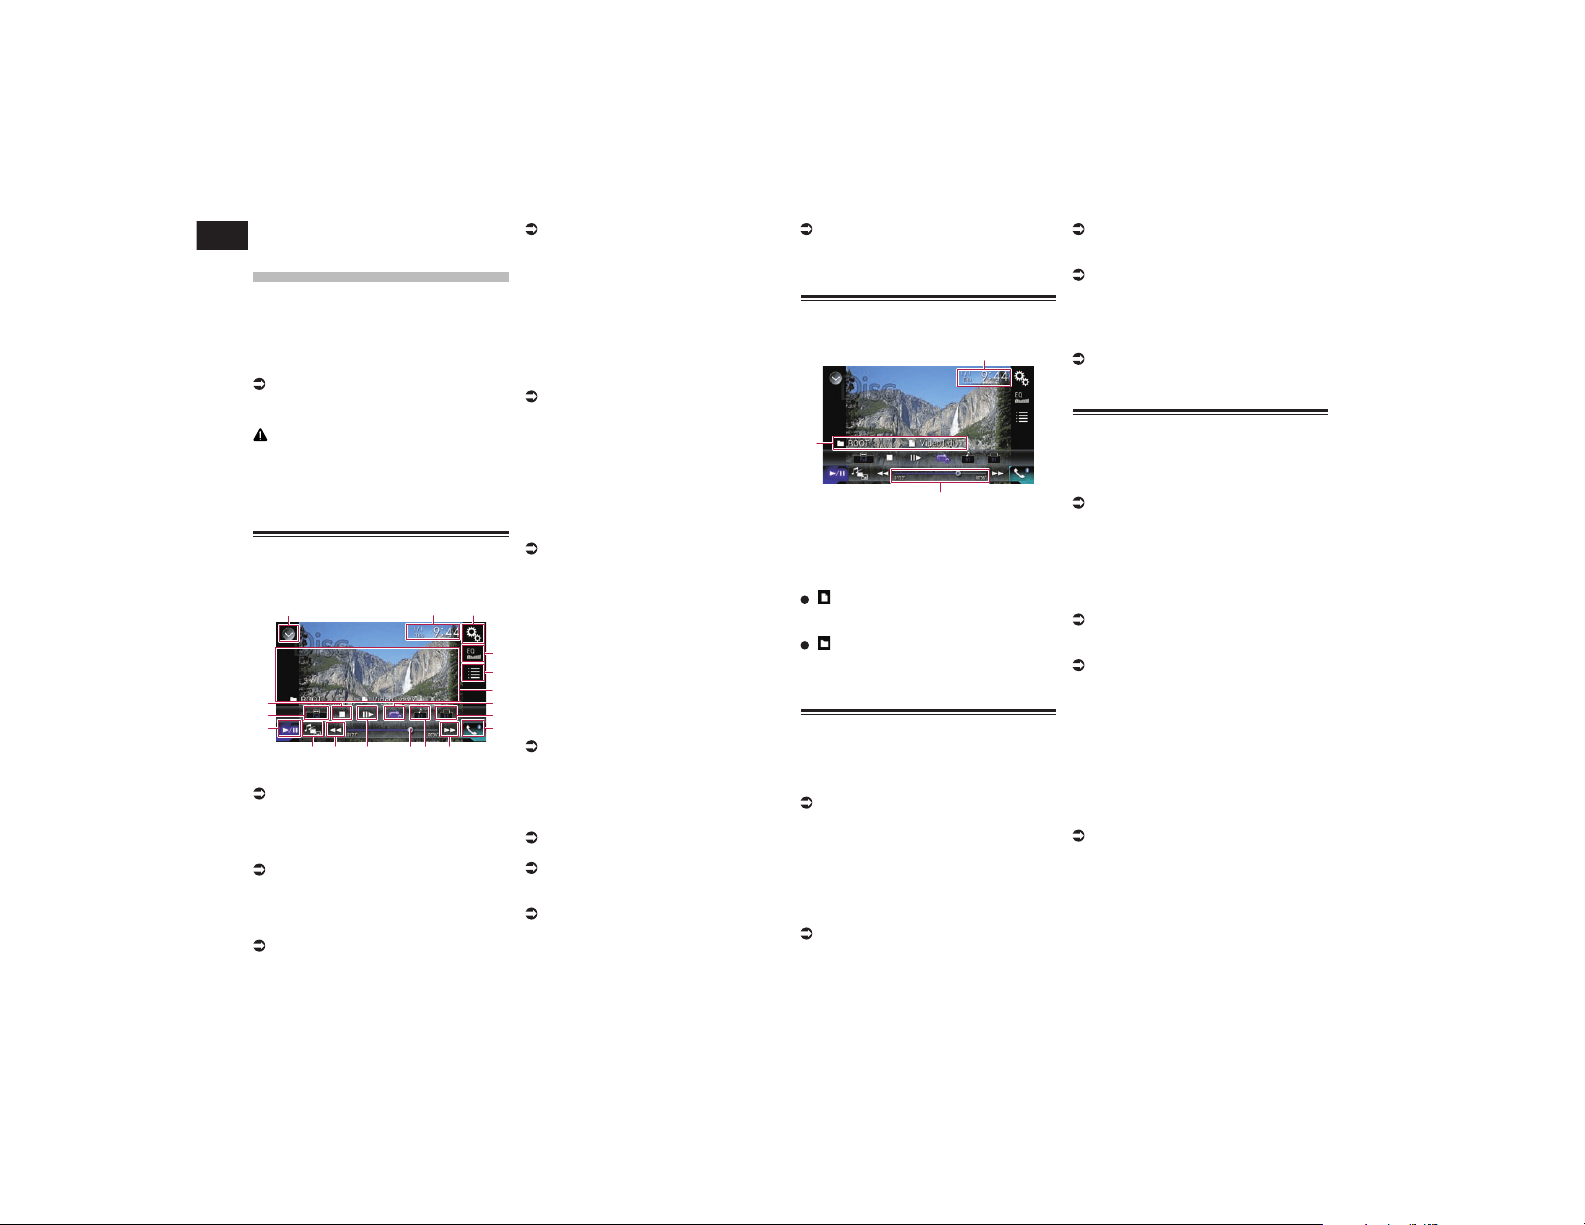
09
Capítulo
32
Es
Reproducción de
archivos de vídeo
comprimidos
Puede reproducir archivos de vídeo com-
primidos almacenados en un disco o en
un dispositivo de almacenamiento externo
(USB, SD) usando la unidad integrada de
este producto. En esta sección se describe
cómo.
Para los detalles, consulte Cuadro
de compatibilidad con soportes en la
página 95.
PRECAUCIÓN
Por cuestiones de seguridad, no se pueden
ver imágenes de vídeo mientras el vehículo
esté en movimiento. Para ver imágenes de
vídeo, deberá detenerse en un lugar seguro y
accionar el freno de mano.
Utilización de las teclas del
panel táctil
Ejemplo: disco
1 32
4
5
9
ce
f
g
h
a bd a
6
7
8
1 Muestra la lista de fuentes.
Para los detalles, consulte Selección de
una fuente frontal en la lista de fuentes
en la página 13.
2 Muestra la pantalla de Ajuste de hora
y fecha.
Para los detalles, consulte Ajuste de la
hora y la fecha en la página 76.
3 Muestra la pantalla de Menú de
ajustes.
4 Recupera las curvas del ecualizador.
Para los detalles, consulte Utilización del
ecualizador en la página 69.
5 Selecciona un archivo de la lista.
Para los detalles, consulte Selección de
archivos de la lista de nombres de archivo
en la página 33.
6 Oculta las teclas del panel táctil.
Al pulsar esta área se ocultan las teclas
del panel táctil.
p Pulse en cualquier lugar de la pantalla
LCD para volver a mostrar las teclas del
panel táctil.
7 Ajusta el rango de reproducción de
repetición.
Para los detalles, consulte Ajuste del
rango de reproducción de repetición en la
página 33.
8 Cambia el idioma de los subtítulos.
Con archivos DivX que cuentan con
varios subtítulos, puede cambiar el
idioma de los subtítulos durante la
reproducción.
9 Muestra la pantalla de Menú del
teléfono.
Para los detalles, consulte Visualización
del menú del teléfono en la página 17.
a Hace saltar archivos hacia delante o
hacia atrás.
b Cambia el idioma de audio.
Con archivos DivX que proporcionan
reproducción de audio en diferentes
idiomas y diferentes sistemas de audio
(Dolby Digital, DTS, etc.), puede cam-
biar entre idiomas o sistemas de audio
durante la reproducción.
c Cambia el punto de reproducción
arrastrando la tecla.
Para los detalles, consulte Uso de la barra
de tiempo en la página 14.
d Avanza un fotograma (reproducción
fotograma a fotograma) o reduce la
velocidad de reproducción (reproduc-
ción a cámara lenta).
Para los detalles, consulte Reproducción
fotograma a fotograma en la página 33.
Para los detalles, consulte Reproducción
a cámara lenta en la página 33.
e Cambia el tipo de archivo multimedia.
Para los detalles, consulte Cambio
del tipo de archivo multimedia en la
página 33.
f Cambia entre reproducción y pausa.
g Cambia el modo de pantalla
panorámica.
Para los detalles, consulte Cambio del
modo de pantalla panorámica en la
página 77.
h Detiene la reproducción.
Lectura de la pantalla
Ejemplo: disco
3
2
1
1 Fecha y hora actuales
2 Indicador de tiempo de reproducción
Muestra el tiempo transcurrido de repro-
ducción del archivo actual.
3 Información del archivo actual
: Nombre de archivo
Muestra el nombre del archivo que se
está reproduciendo actualmente.
: Nombre de la carpeta
Muestra el nombre de la carpeta que
contiene el archivo que se está reprodu-
ciendo actualmente.
Procedimiento de inicio (para
el disco)
1 Muestre la pantalla de Selección
de fuente AV.
Para los detalles sobre las operaciones,
consulte Visualización de la pantalla de
función AV en la página 12.
2 Introduzca el disco que desee
reproducir en la ranura para cargar
discos.
La fuente cambia y, a continuación, se inicia
la reproducción.
Para los detalles, consulte Colocación y
expulsión de un disco en la página 10.
p Si el disco ya está colocado, pulse [Disc]
en la lista de fuente de la pantalla de
Selección de fuente AV.
Para los detalles, consulte Selección de
una fuente frontal en la lista de fuentes
en la página 13.
Para los detalles, consulte Selección
de una fuente frontal en la pantalla de
Selección de fuente AV en la página 13.
3 Utilice las teclas del panel táctil de
la pantalla para controlar el disco.
Para los detalles, consulte Utilización
de las teclas del panel táctil en la
página 32.
Procedimiento de inicio (para
USB/SD)
1 Muestre la pantalla de Selección
de fuente AV.
Para los detalles sobre las operaciones,
consulte Visualización de la pantalla de
función AV en la página 12.
2 Introduzca la tarjeta de memoria
SD en la ranura para tarjetas SD, o
conecte el dispositivo de almace-
namiento USB en el conector USB.
Para los detalles, consulte Conexión de
un dispositivo de almacenamiento USB
en la página 11.
Para los detalles, consulte Colocación y
expulsión de una tarjeta de memoria SD
en la página 10.
3 Pulse [USB] o [SD] en la pantalla
de Selección de fuente AV.
La imagen se mostrará en la pantalla.
4 Utilice las teclas del panel táctil de
la pantalla para controlar el dispo-
sitivo de almacenamiento externo
(USB, SD).
Para los detalles, consulte Utilización
de las teclas del panel táctil en la
página 32.
p La reproducción se realiza siguiendo el
orden de número de carpetas. Si las car-
petas no contienen archivos que puedan
reproducirse, se omiten. Si en la carpeta
01 (carpeta raíz) no hay archivos que
puedan reproducirse, la reproducción
comienza en la carpeta 02.
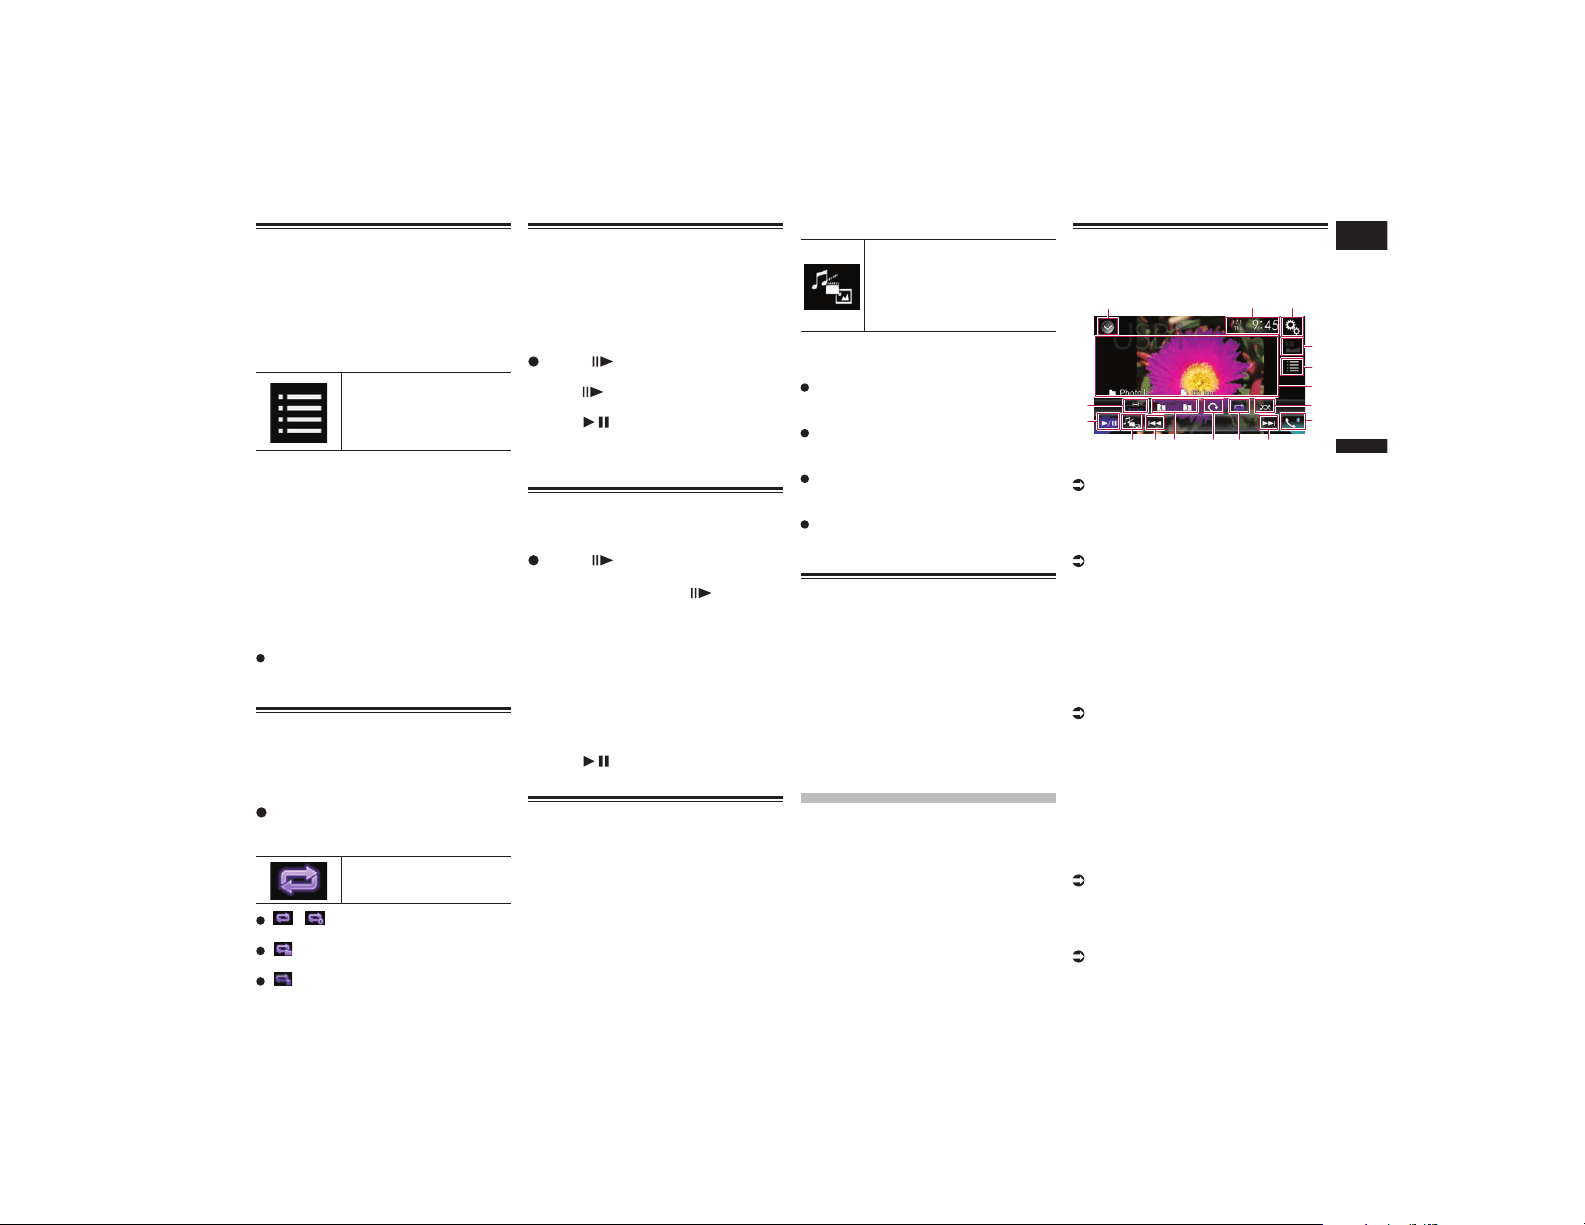
Español
10
Capítulo
33
Es
Selección de archivos de la
lista de nombres de archivo
Puede seleccionar archivos para verlos
mediante la lista de nombres de archivos de
los archivos almacenados en un disco o en
el dispositivo de almacenamiento externo
(USB, SD).
1 Pulse la siguiente tecla.
Muestra la lista de archivos
o carpetas almacenadas en
un disco o en el dispositivo
de almacenamiento externo
(USB, SD).
2 Pulse un archivo de la lista para
reproducirlo.
p Los archivos se reproducen en el orden
del número de archivo y las carpetas
se omiten si no contienen archivos. (Si
la carpeta 01 (carpeta raíz) no contiene
archivos, la reproducción comienza con
la carpeta 02.)
p Al pulsar una de las carpetas de la lista se
mostrará su contenido. Puede reproducir
uno de los archivos de la lista pulsando
en él.
Pulse el símbolo de reproducción de la
miniatura para obtener una vista previa
del archivo.
Ajuste del rango de reproduc-
ción de repetición
El rango de reproducción de repetición
puede cambiarse con tan solo pulsar una
tecla.
Pulse la siguiente tecla repetida-
mente hasta que aparezca la confi-
guración deseada.
Cambia el rango de repro-
ducción de repetición.
o (valor predeterminado):
Repite todos los archivos.
:
Repite únicamente la carpeta actual.
:
Repite únicamente el archivo actual.
Reproducción fotograma a
fotograma
Esta función le permite avanzar fotograma a
fotograma durante la pausa.
p Esta función está disponible mientras se
reproduce un archivo de vídeo compri-
mido almacenado en un disco.
Pulse [ ] durante la pausa.
El vídeo avanza un fotograma cada vez que
se pulsa [ ].
p Para volver a la reproducción normal,
pulse [ / ].
p En algunos discos, las imágenes pueden
aparecer borrosas durante la reproduc-
ción fotograma a fotograma.
Reproducción a cámara lenta
Esta función le permite reducir la velocidad
de la reproducción.
Pulse [ ] (dispositivo de alma-
cenamiento externo (USB, SD))
o mantenga pulsado [ ] (disco)
durante la reproducción.
Se mostrará el icono de flecha y empezará la
reproducción hacia delante a cámara lenta.
p No se emite sonido durante la reproduc-
ción a cámara lenta.
p Con algunos discos y dispositivo de alma-
cenamiento externo (USB, SD), es posible
que las imágenes no sean claras durante
la reproducción a cámara lenta.
p Para volver a la reproducción normal,
pulse [ / ].
p No es posible el retroceso a cámara lenta.
Cambio del tipo de archivo
multimedia
Cuando se reproduce contenido multimedia
digital que contiene una mezcla de varios
tipos de archivos multimedia puede cambiar
entre tipos de archivo multimedia para su
reproducción.
1 Pulse la siguiente tecla.
Muestra el menú emergente
para seleccionar un tipo de
archivo multimedia que se
reproducirá en el disco o en un
dispositivo de almacenamiento
externo (USB, SD).
2 Pulse el elemento que desee
ajustar.
Music:
Cambia el tipo de archivo multimedia a
música (audio comprimido).
Video:
Cambia el tipo de archivo multimedia a
vídeo.
Photo:
Cambia el tipo de archivo multimedia a
imagen estática (datos JPEG).
CD-DA:
Cambia el tipo de archivo multimedia a
CD (datos de audio (CD-DA)).
Operaciones con los botones
de hardware
Pulse el botón TRK.
Puede omitir archivos hacia delante o hacia
atrás.
Mantenga pulsado el botón TRK.
Puede realizar el retroceso rápido o avance
rápido.
Reproducción de archi-
vos de imágenes estáti-
cas comprimidas
Puede visualizar imágenes estáticas (imáge-
nes JPEG) almacenadas en un dispositivo de
almacenamiento externo (USB, SD) usando
la unidad integrada de este producto. En
esta sección se describe cómo.
Utilización de las teclas del
panel táctil
Ejemplo: USB
1 32
4
5
8
abcd
e
f
9 9
6
7
1 Muestra la lista de fuentes.
Para los detalles, consulte Selección de
una fuente frontal en la lista de fuentes
en la página 13.
2 Muestra la pantalla de Ajuste de hora
y fecha.
Para los detalles, consulte Ajuste de la
hora y la fecha en la página 76.
3 Muestra la pantalla de Menú de
ajustes.
4 Recupera las curvas del ecualizador.
p Esta tecla no está disponible mientras
visualiza imágenes estáticas almacena-
das en un dispositivo de almacenamiento
externo (USB, SD).
5 Selecciona un archivo de la lista.
Para los detalles, consulte Selección de
archivos de la lista de nombres de archivo
en la página 34.
6 Oculta las teclas del panel táctil.
Al pulsar esta área se ocultan las teclas
del panel táctil.
p Pulse en cualquier lugar de la pantalla
LCD para volver a mostrar las teclas del
panel táctil.
7 Reproduce archivos en orden
aleatorio.
Para los detalles, consulte Reproducción
de archivos en orden aleatorio en la
página 34.
8 Muestra la pantalla de Menú del
teléfono.
Para los detalles, consulte Visualización
del menú del teléfono en la página 17.
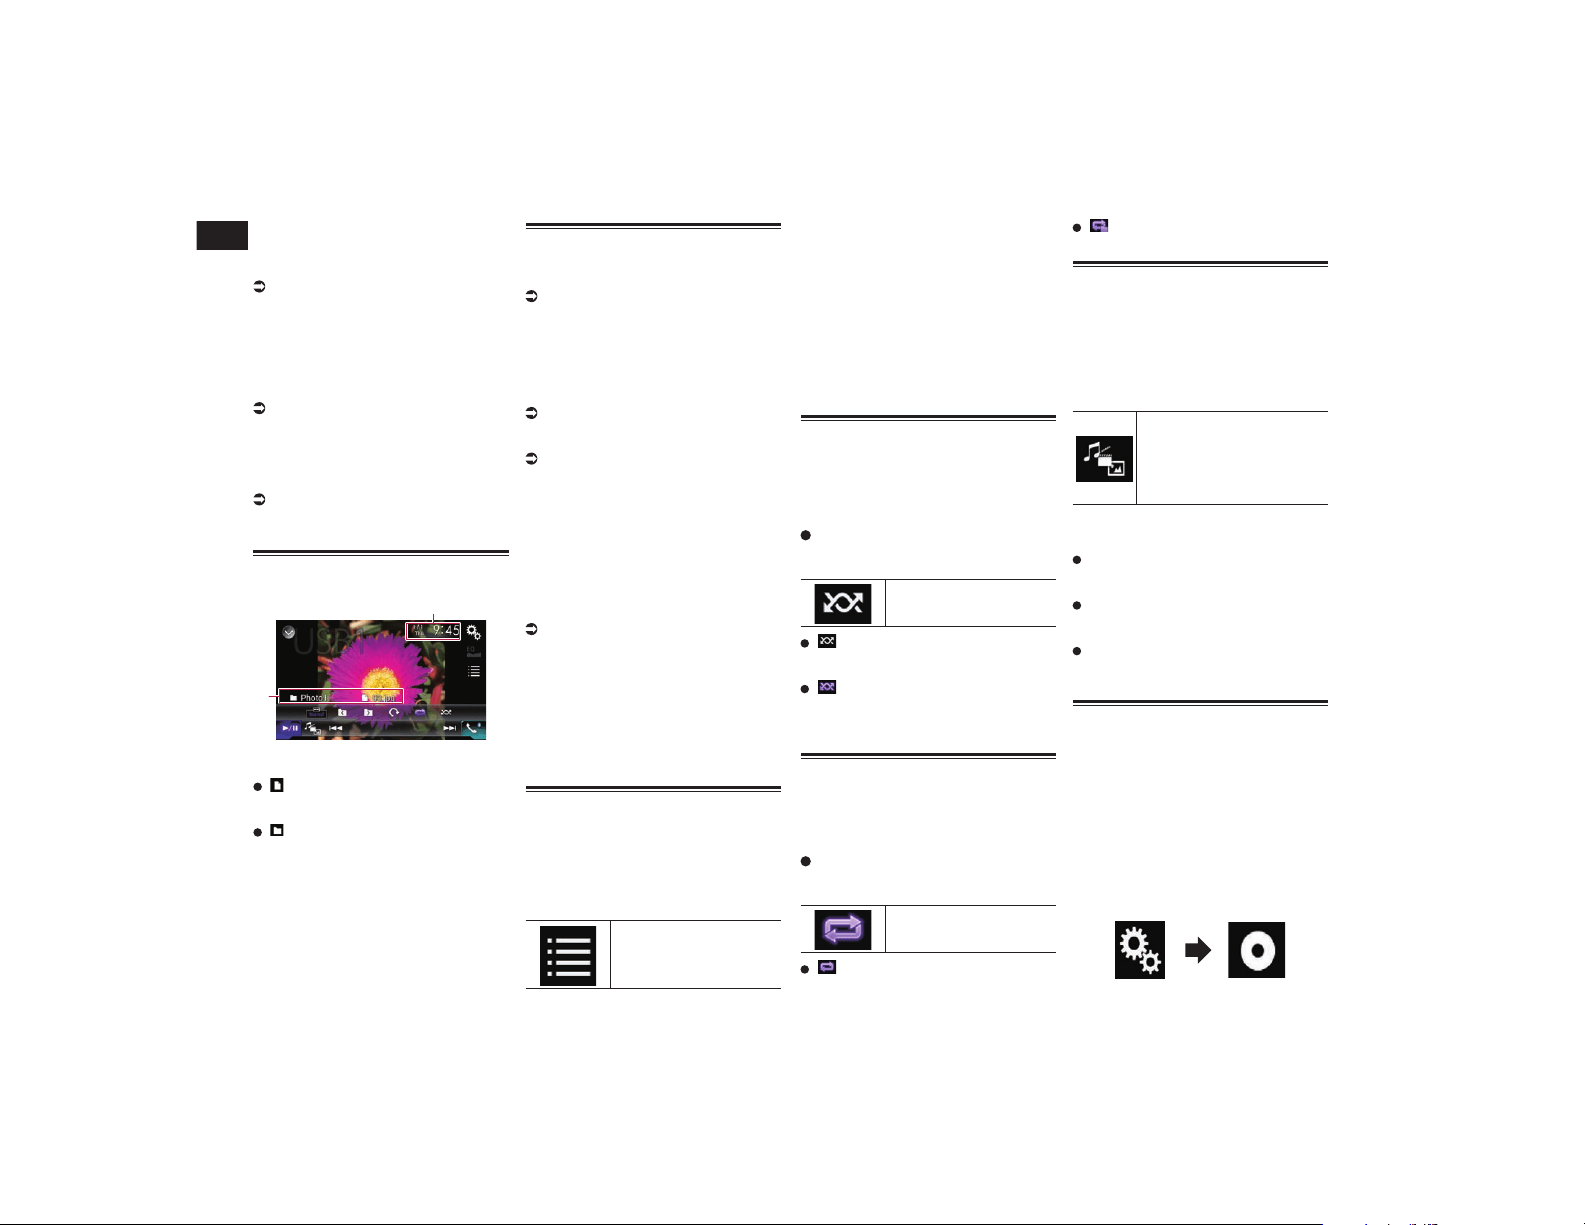
10
Capítulo
34
Es
9 Hace saltar archivos hacia delante o
hacia atrás.
a Ajusta el rango de reproducción de
repetición.
Para los detalles, consulte Ajuste del
rango de reproducción de repetición en la
página 34.
b Gira la imagen que se muestra 90° en
el sentido de las agujas del reloj.
c Selecciona la carpeta anterior o la
carpeta siguiente.
d Cambia el tipo de archivo multimedia.
Para los detalles, consulte Cambio
del tipo de archivo multimedia en la
página 34.
e Cambia entre reproducción y pausa.
f Cambia el modo de pantalla
panorámica.
Para los detalles, consulte Cambio del
modo de pantalla panorámica en la
página 77.
Lectura de la pantalla
Ejemplo: USB
2
1
1 Fecha y hora actuales
2 Información del archivo actual
: Nombre de archivo
Muestra el nombre del archivo que se
está reproduciendo actualmente.
: Nombre de la carpeta
Muestra el nombre de la carpeta que
contiene el archivo que se está reprodu-
ciendo actualmente.
Procedimiento de inicio
1 Muestre la pantalla de Selección
de fuente AV.
Para los detalles sobre las operaciones,
consulte Visualización de la pantalla de
función AV en la página 12.
2 Introduzca la tarjeta de memoria
SD en la ranura para tarjetas SD, o
conecte el dispositivo de almace-
namiento USB en el conector USB.
Para los detalles, consulte Conexión de
un dispositivo de almacenamiento USB
en la página 11.
Para los detalles, consulte Colocación y
expulsión de una tarjeta de memoria SD
en la página 10.
3 Pulse [USB] o [SD] en la pantalla
de Selección de fuente AV.
La imagen se mostrará en la pantalla.
4 Utilice las teclas del panel táctil de
la pantalla para controlar el dispo-
sitivo de almacenamiento externo
(USB, SD).
Para los detalles, consulte Utilización
de las teclas del panel táctil en la
página 33.
p La reproducción se realiza siguiendo el
orden de número de carpetas. Si las car-
petas no contienen archivos que puedan
reproducirse, se omiten. Si en la carpeta
01 (carpeta raíz) no hay archivos que
puedan reproducirse, la reproducción
comienza en la carpeta 02.
Selección de archivos de la
lista de nombres de archivo
Puede seleccionar archivos para verlos
mediante la lista de nombres de archivos de
los archivos almacenados en el dispositivo
de almacenamiento externo (USB, SD).
1 Pulse la siguiente tecla.
Muestra la lista de archivos
almacenados en el dispo-
sitivo de almacenamiento
externo (USB, SD).
2 Pulse un archivo de la lista para
reproducirlo.
p Los archivos se reproducen en el orden
del número de archivo y las carpetas
se omiten si no contienen archivos. (Si
la carpeta 01 (carpeta raíz) no contiene
archivos, la reproducción comienza con
la carpeta 02.)
p Al pulsar una de las carpetas de la lista se
mostrará su contenido. Puede reproducir
uno de los archivos de la lista pulsando
en él.
Reproducción de archivos en
orden aleatorio
Se pueden reproducir todos los archivos
del dispositivo de almacenamiento externo
(USB, SD) aleatoriamente con solo pulsar
una tecla.
Pulse la siguiente tecla repetida-
mente hasta que aparezca la confi-
guración deseada.
Activa o desactiva la repro-
ducción aleatoria.
(valor predeterminado):
No reproduce los archivos en orden
aleatorio.
:
Reproduce todos los archivos del rango
de reproducción de repetición actual en
orden aleatorio.
Ajuste del rango de reproduc-
ción de repetición
El rango de reproducción de repetición
puede cambiarse con tan solo pulsar una
tecla.
Pulse la siguiente tecla repetida-
mente hasta que aparezca la confi-
guración deseada.
Cambia el rango de repro-
ducción de repetición.
(valor predeterminado):
Repite todos los archivos.
:
Repite la carpeta actual.
Cambio del tipo de archivo
multimedia
Cuando se reproduce contenido multimedia
digital que contiene una mezcla de varios
tipos de archivos multimedia puede cambiar
entre tipos de archivo multimedia para su
reproducción.
1 Pulse la siguiente tecla.
Muestra el menú emergente
para seleccionar un tipo de
archivo multimedia que se
reproducirá en un dispositivo
de almacenamiento externo
(USB, SD).
2 Pulse el elemento que desee
ajustar.
Music:
Cambia el tipo de archivo multimedia a
música (audio comprimido).
Video:
Cambia el tipo de archivo multimedia a
vídeo.
Photo:
Cambia el tipo de archivo multimedia a
imagen estática (datos JPEG).
Ajuste del intervalo de pre-
sentación de diapositivas
Los archivos JPEG se pueden ver como
una presentación en este producto. En este
ajuste, se puede establecer el intervalo entre
cada imagen.
p Este ajuste está disponible durante la
reproducción de archivos JPEG.
1 Pulse el botón HOME para mostrar
la pantalla de Menú superior.
2 Pulse las siguientes teclas en el
orden que se indica.
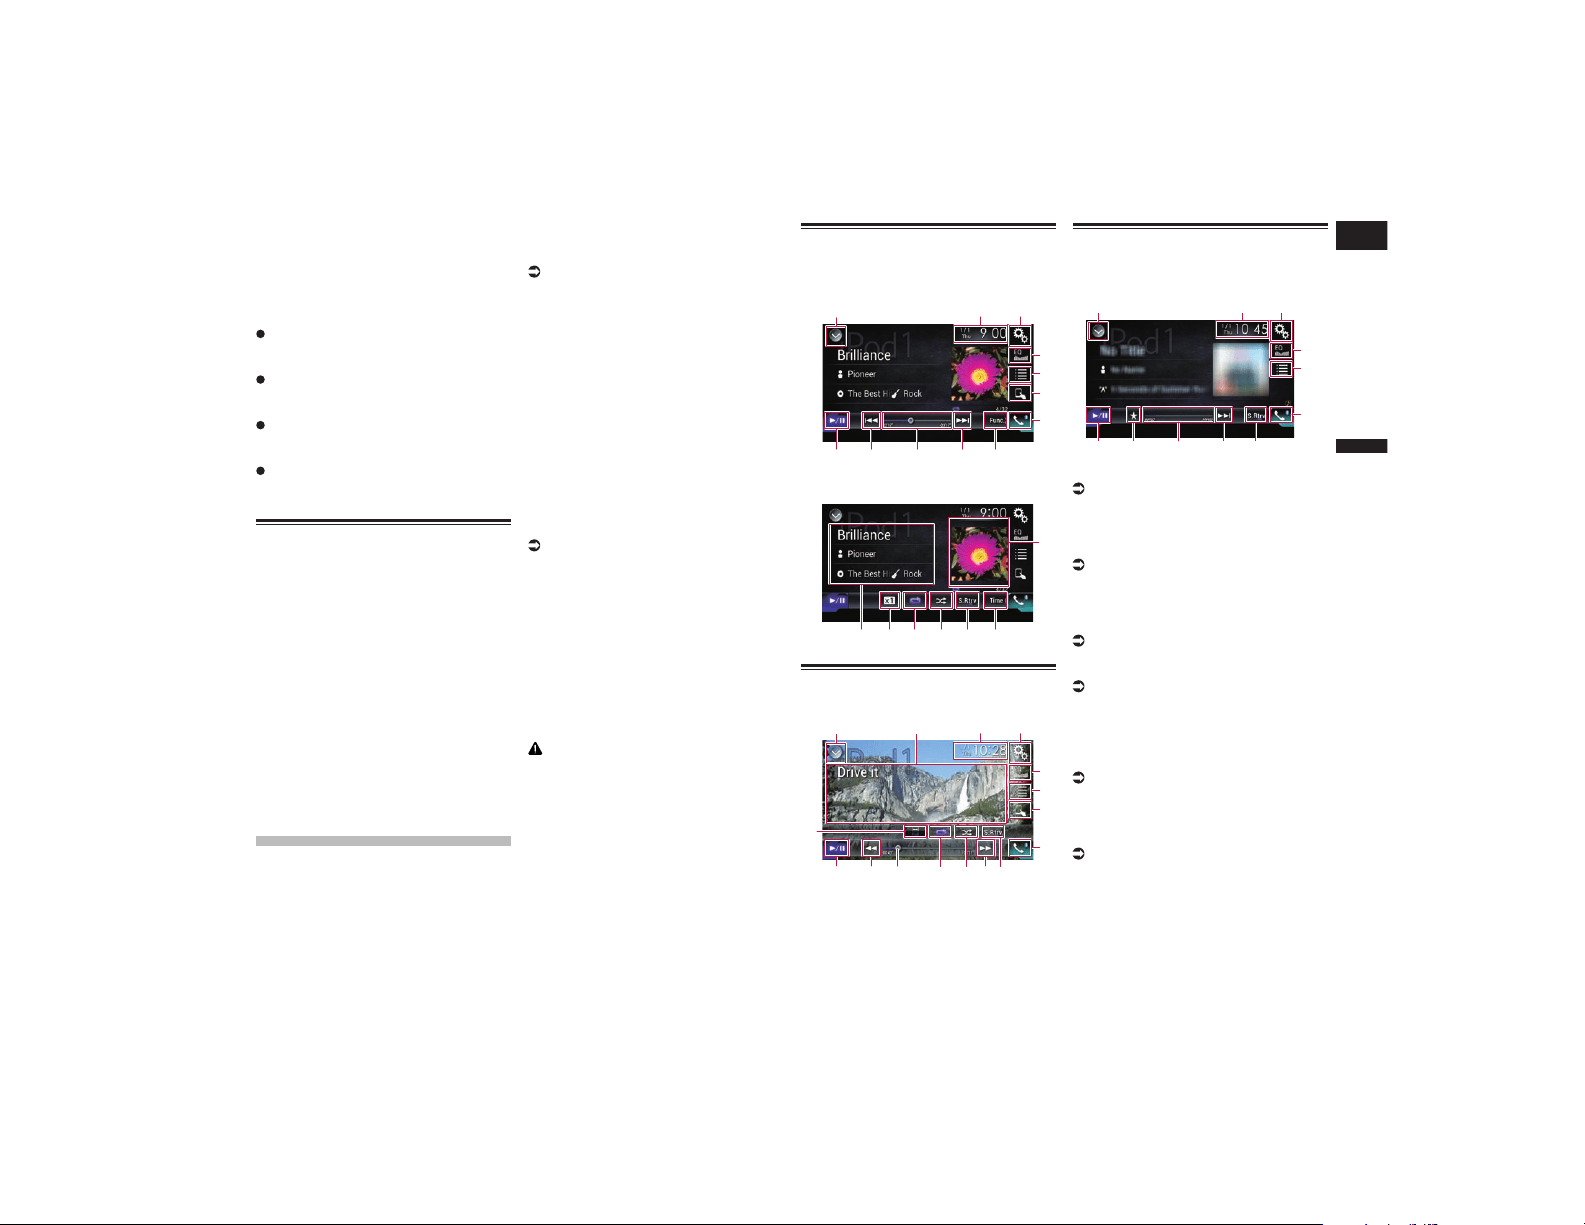
Español
11
Capítulo
35
Es
Aparecerá la pantalla “Configuración de
video”.
3 Pulse [Tiempo por diapositiva].
Aparecerá el menú emergente.
4 Pulse el elemento que desee
ajustar.
10s (valor predeterminado):
Las imágenes JPEG cambian en interva-
los de 10 segundos.
5s:
Las imágenes JPEG cambian en interva-
los de 5 segundos.
15s:
Las imágenes JPEG cambian en interva-
los de 15 segundos.
Manual:
Las imágenes JPEG se pueden cambiar
manualmente.
Operaciones con los botones
de hardware
Pulse el botón TRK.
Puede omitir archivos hacia delante o hacia
atrás.
Mantenga pulsado el botón TRK.
Puede buscar 10 archivos JPEG
simultáneamente.
p Si el número de archivos de la carpeta
(desde el archivo que se está reprodu-
ciendo hasta el primer o último archivo)
es inferior a 10, el primer o el último
archivo de la carpeta se reproduce
automáticamente.
p Si el archivo que se está reproduciendo
es el primero o el último de la carpeta, no
se realiza la búsqueda.
Uso de un iPod
Para usuarios de iPod con conector de
30 clavijas
p En función del modelo de iPod es posible
que no se emita contenido, a menos que
utilice un cable de interfaz USB para iPod
/ iPhone (CD-IU201S/CD-IU201V) (ven-
dido por separado). Asegúrese de utilizar
un cable de interfaz USB para iPod /
iPhone (CD-IU201S/CD-IU201V) (vendido
por separado) para conectar el iPod.
Las fuentes de vídeo y/o audio del iPod
solo están activadas si los cables están
conectados.
Para más información, consulte Conexión
de un iPhone con conector de 30 clavijas
en la página 82.
Para usuarios de iPod con un conector
Lightning
p Para utilizar la fuente de audio iPod,
debe conectar el iPod con este producto
mediante un cable de interfaz USB para
iPod/iPhone (CD-IU52) (se vende por
separado).
No obstante, las funciones relacionadas
con los archivos de vídeo del iPod y el
AppRadio Mode no están disponibles.
p Las fuentes de vídeo y/o audio del iPod
no están disponibles si hay un iPod con
un conector Lightning conectado a este
producto con un cable de interfaz (CD-
IH202) (se vende por separado).
Para más información, consulte Conexión
de un iPhone con conector Lightning en
la página 82.
Si desea reproducir archivos de audio
y/o vídeo en un iPod con un conec-
tor Lightning, primero debe instalar
CarMediaPlayer en el iPod con un
conector Lightning y después iniciar
CarMediaPlayer durante el AppRadio
Mode.
Para los detalles acerca de
CarMediaPlayer, consulte la informa-
ción de nuestro sitio web.
PRECAUCIÓN
Por cuestiones de seguridad, no se pueden
ver imágenes de vídeo mientras el vehículo
esté en movimiento. Para ver imágenes de
vídeo, deberá detenerse en un lugar seguro y
accionar el freno de mano.
Utilización de las teclas del
panel táctil (para audio)
Pantalla de reproducción (página 1)
1 32
8
4
5
6
7
b 9 a 9
Pantalla de reproducción (página 2)
8defg
c
h
Utilización de las teclas del
panel táctil (para vídeo)
1 32
4
5
6
7
b 9 a
9
j
d
ef
i
Utilización de las teclas del
panel táctil (para iTunes
Radio)
a 9
1 3
2
4
5
7
dkb
1 Muestra la lista de fuentes.
Para los detalles, consulte Selección de
una fuente frontal en la lista de fuentes
en la página 13.
2 Muestra la pantalla de Ajuste de hora
y fecha.
Para los detalles, consulte Ajuste de la
hora y la fecha en la página 76.
3 Muestra la pantalla de Menú de
ajustes.
4 Recupera las curvas del ecualizador.
Para los detalles, consulte Utilización del
ecualizador en la página 69.
5 Selecciona una pista de la lista.
Para los detalles, consulte Selección
de fuentes de canciones o vídeos de la
pantalla de la lista de reproducción en la
página 37.
6 Cambia el modo de control a “Modo
de aplicación”.
Para los detalles, consulte Uso de la
función iPod de este producto desde el
iPod en la página 38.
7 Muestra la pantalla de Menú del
teléfono.
Para los detalles, consulte Visualización
del menú del teléfono en la página 17.
8 Cambia a la página siguiente o ante-
rior de teclas del panel táctil.
9 Hace saltar archivos hacia delante o
hacia atrás.
p La disponibilidad de la función de salto
hacia delante durante la reproducción de
iTunes Radio depende del iPod.
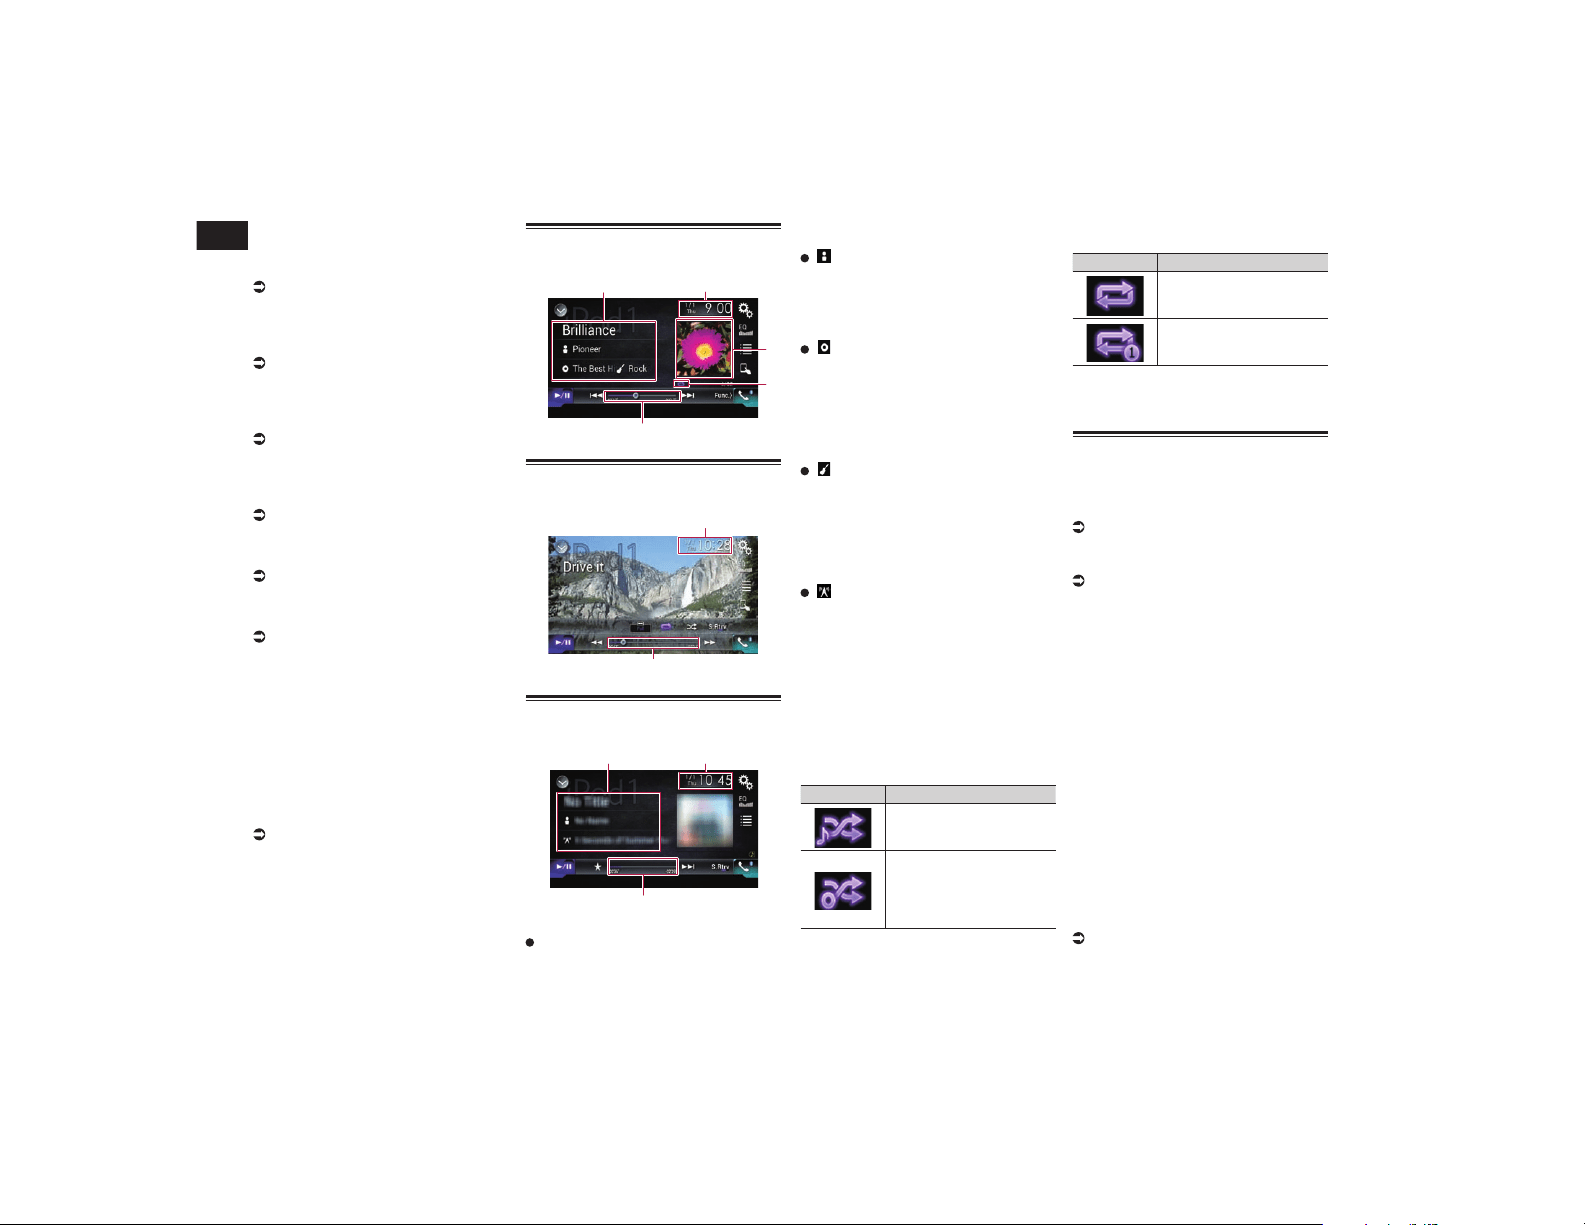
11
Capítulo
36
Es
p La tecla de salto hacia delante no está
disponible durante la reproducción de
iTunes Radio.
a Cambia el punto de reproducción.
Para los detalles, consulte Uso de la barra
de tiempo en la página 14.
b Cambia entre reproducción y pausa.
c Muestra la lista de canciones del
álbum que se está reproduciendo.
Para más información, consulte
Visualización de listas relacionadas con
la canción que se está reproduciendo
(búsqueda de vínculos) en la página 38.
d Utiliza la función “Sound Retriever”.
Para los detalles, consulte Ajuste de
la función “Sound Retriever” en la
página 76.
e Reproduce archivos en orden
aleatorio.
Para los detalles, consulte Ajuste de la
reproducción aleatoria en la página 37.
f Ajusta el rango de reproducción de
repetición.
Para los detalles, consulte Ajuste del
rango de reproducción de repetición en la
página 37.
g Cambia la velocidad del audiolibro.
Para los detalles, consulte Cambio de la
velocidad de reproducción del audiolibro
en la página 38.
h Muestra la lista de categorías que
incluye el elemento seleccionado.
i Oculta las teclas del panel táctil.
Al pulsar esta área se ocultan las teclas
del panel táctil.
p Pulse en cualquier lugar de la pantalla
LCD para volver a mostrar las teclas del
panel táctil.
j Cambia el modo de pantalla
panorámica.
Para los detalles, consulte Cambio del
modo de pantalla panorámica en la
página 77.
k Muestra el menú emergente para
iTunes Radio.
Lectura de la pantalla (para
audio)
5
2
4
3
1
Lectura de la pantalla (para
vídeo)
5
2
Lectura de la pantalla (para
iTunes Radio)
2
5
1
1 Información de la pista actual
Título de la canción
Muestra el título de la canción que
se está reproduciendo (cuando esté
disponible). “Sin título” se muestra si no
hay información correspondiente.
: Nombre del intérprete
Muestra el nombre del intérprete de
la canción que se está reproduciendo
(cuando esté disponible). “Sin nom-
bre” se muestra si no hay información
correspondiente.
: Título del álbum
Muestra el título del álbum del archivo
actual (cuando esté disponible). “Sin
título” se muestra si no hay información
correspondiente.
p Esta información no está disponible
durante la reproducción de iTunes
Radio.
: Género
Muestra el género del archivo actual
(cuando esté disponible). “Sin gén.”
se muestra si no hay información
correspondiente.
p Esta información no está disponible
durante la reproducción de iTunes
Radio.
: Emisora
Muestra el nombre de la emisora de
la canción que se está reproduciendo
actualmente.
p Esta información está disponible durante
la reproducción de iTunes Radio.
2 Fecha y hora actuales
3 Portada de álbum
Si está disponible, aparecerá la portada
del álbum de la canción actual.
4 Indicador de estado de reproducción
Indica el estado de reproducción actual.
Ajuste de la reproducción aleatoria
Indicador Significado
Reproduce las canciones o
los vídeos de la lista selec-
cionada en orden aleatorio.
Selecciona un álbum de
forma aleatoria y, a conti-
nuación, reproduce todas
las canciones de dicho
álbum en orden.
Ajuste del rango de reproducción de
repetición
Indicador Significado
Repite todas las cancio-
nes o vídeos de la lista
seleccionada.
Repite únicamente la can-
ción o el vídeo actual.
5 Indicador de tiempo de reproducción
Muestra el tiempo transcurrido de repro-
ducción del archivo actual.
Procedimiento de inicio
Cuando se conecta un iPod a este producto,
se debe seleccionar el método para conectar
el dispositivo. La configuración se debe ajus-
tar de acuerdo con el dispositivo conectado.
Para los detalles, consulte Capítulo 5.
1 Muestre la pantalla de Selección
de fuente AV.
Para los detalles sobre las operaciones,
consulte Visualización de la pantalla de
función AV en la página 12.
2 Conecte su iPod.
p Si se conecta un iPhone o iPod touch,
salga de las aplicaciones antes de reali-
zar la conexión.
p Si hay conectado un iPhone 6 Plus,
iPhone 6, iPhone 5s, iPhone 5c, iPhone
5 o iPod touch (5.ª generación), la biblio-
teca de medios (información de cancio-
nes), se importará del dispositivo conec-
tado y se guardará en este producto.
Espere hasta que finalice el proceso.
No se importará la biblioteca de medios si
se ha importado la biblioteca de medios
actualizada del dispositivo conectado o si
la memoria del producto está llena.
3 Pulse [iPod] en la pantalla de
Selección de la fuente AV.
4 Utilice las teclas del panel táctil de
la pantalla para controlar el iPod.
Para los detalles, consulte Utilización de
las teclas del panel táctil (para audio) en
la página 35.
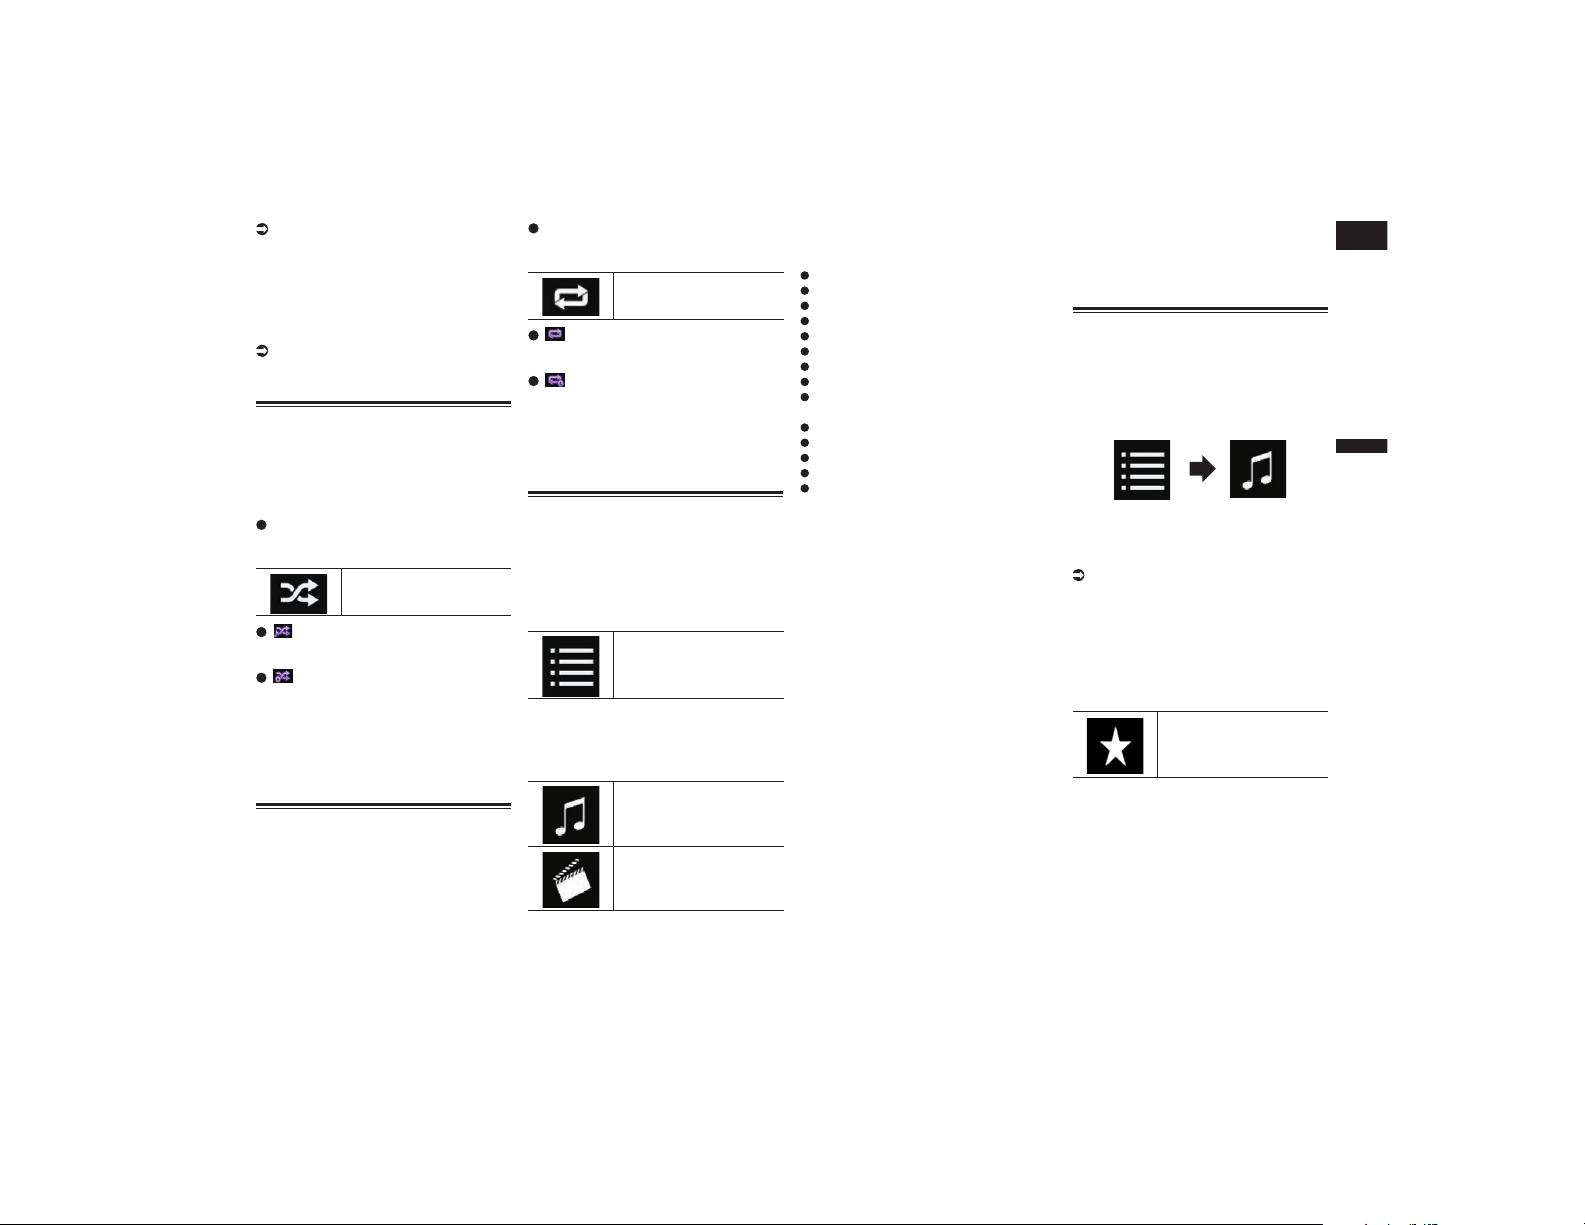
Español
11
Capítulo
37
Es
Para los detalles, consulte Utilización de
las teclas del panel táctil (para vídeo) en
la página 35.
p La imagen de vídeo del iPod podría pre-
sentar ruido si la pantalla trasera emite
la imagen de vídeo. Si se genera ruido en
la imagen de vídeo del iPod, desactive el
ajuste de salida de la pantalla trasera.
Para los detalles sobre las operaciones,
consulte Selección del vídeo para la
pantalla trasera en la página 77.
Ajuste de la reproducción
aleatoria
Esta función ordena y reproduce canciones,
álbumes o vídeos aleatoriamente.
p Esta función no está disponible durante
la reproducción de iTunes Radio.
Pulse la siguiente tecla repetida-
mente hasta que aparezca la confi-
guración deseada.
Activa o desactiva la repro-
ducción aleatoria.
:
Reproduce las canciones o los vídeos de
la lista seleccionada en orden aleatorio.
:
Selecciona un álbum de forma aleatoria
y, a continuación, reproduce todas las
canciones de dicho álbum en orden.
p Este icono podría no mostrarse si se
utiliza un iPhone 6 Plus, iPhone 6, iPhone
5s, iPhone 5c, iPhone 5 o iPod touch
(5.ª generación).
Ajuste del rango de reproduc-
ción de repetición
El rango de reproducción de repetición
puede cambiarse con tan solo pulsar una
tecla.
p Esta función no está disponible durante
la reproducción de iTunes Radio.
Pulse la siguiente tecla repetida-
mente hasta que aparezca la confi-
guración deseada.
Cambia el rango de repro-
ducción de repetición.
:
Repite todas las canciones o vídeos de la
lista seleccionada.
:
Repite únicamente la canción o el vídeo
actual.
p El ajuste de repetición se puede desacti-
var si se utiliza un iPhone 6 Plus, iPhone
6, iPhone 5s, iPhone 5c, iPhone 5 o iPod
touch (5.ª generación).
Selección de fuentes de can-
ciones o vídeos de la pantalla
de la lista de reproducción
Puede buscar la canción, el vídeo o las
emisoras de radio que desea reproducir en
la pantalla de la lista de reproducción.
1 Pulse la siguiente tecla.
Muestra la lista de la
categoría.
Aparecerá la pantalla “RAÍZ”.
2 Pulse las siguientes teclas para
cambiar la lista de la categoría de
vídeo o música.
Cambia a la lista de la cate-
goría de música.
Cambia a la lista de la cate-
goría de vídeo.
p El icono de lista de categoría de vídeo no
está disponible al utilizar la función iPod
con un iPhone 6 Plus, iPhone 6, iPhone
5s, iPhone 5c, iPhone 5 o iPod touch
(5.ª generación).
3 Pulse la categoría en la que desee
realizar la búsqueda.
Listas de categorías (para música):
Radio (iTunes Radio)
Listas de reproducción
Intérpretes
Álbumes
Canciones
Podcasts
Géneros
Compositores
Audiolibros
Listas de categorías (para vídeo):
Listas de reproducción de vídeo
Películas
Vídeos musicales
Programas de televisión
Podcasts de vídeo
p No se muestran los elementos de la
categoría que no se corresponde con el
iPod conectado.
p “Radio” se visualiza solo si iTunes Radio
está disponible en el iPod.
4 Arrastre la barra de búsqueda ini-
cial para encontrar un archivo por
el carácter inicial del nombre.
Se visualiza el alfabeto correspondiente con
la posición actual de la barra de búsqueda
inicial y la lista se desplaza al arrastrar la
barra.
p La barra de búsqueda inicial no se mues-
tra en la lista superior de categorías o la
lista de canciones.
5 Suelte la barra de búsqueda inicial
en el alfabeto deseado.
Se visualizan los elementos cuyo carácter
inicial sea el alfabeto seleccionado.
6 Pulse el título de la lista que desea
reproducir.
Repita esta operación hasta que encuentre
la canción o el vídeo que desee.
7 Inicie la reproducción de la lista
seleccionada.
p En función de la generación o la versión
del iPod, es posible que algunas funcio-
nes no estén disponibles.
p Puede reproducir listas de reproducción
creadas con la aplicación MusicSphere.
La aplicación está disponible en nuestro
sitio web.
p Las listas de reproducción que ha creado
con la aplicación MusicSphere se mues-
tran en la forma abreviada.
Uso de iTunes Radio
p Esta función solo está disponible al utili-
zar la función iPod con un iPhone 6 Plus,
iPhone 6, iPhone 5s, iPhone 5c, iPhone 5
o iPod touch (5.ª generación).
1 Pulse las siguientes teclas en el
orden que se indica.
2 Pulse [Radio].
3 Utilice las teclas del panel táctil de
la pantalla para controlar el iPod.
Para más información, consulte
Utilización de las teclas del panel táctil
(para iTunes Radio) en la página 35.
■ Reproducción de canciones simi-
lares a la actual
Puede escuchar canciones similares a la
que se está reproduciendo actualmente.
1 Pulse la siguiente tecla.
Muestra el menú emergente.
2 Pulse [Play More Like This].
p La visualización del elemento del menú
indica lo siguiente:
— Si el elemento del menú está activo, la
función se puede activar.
— Si el elemento del menú está resaltado, la
función está activada.
— Si el elemento del menú no está activo, la
función no está disponible para la can-
ción actual.
p Si pulsa [Play More Like This] cuando
el elemento del menú está activo, se
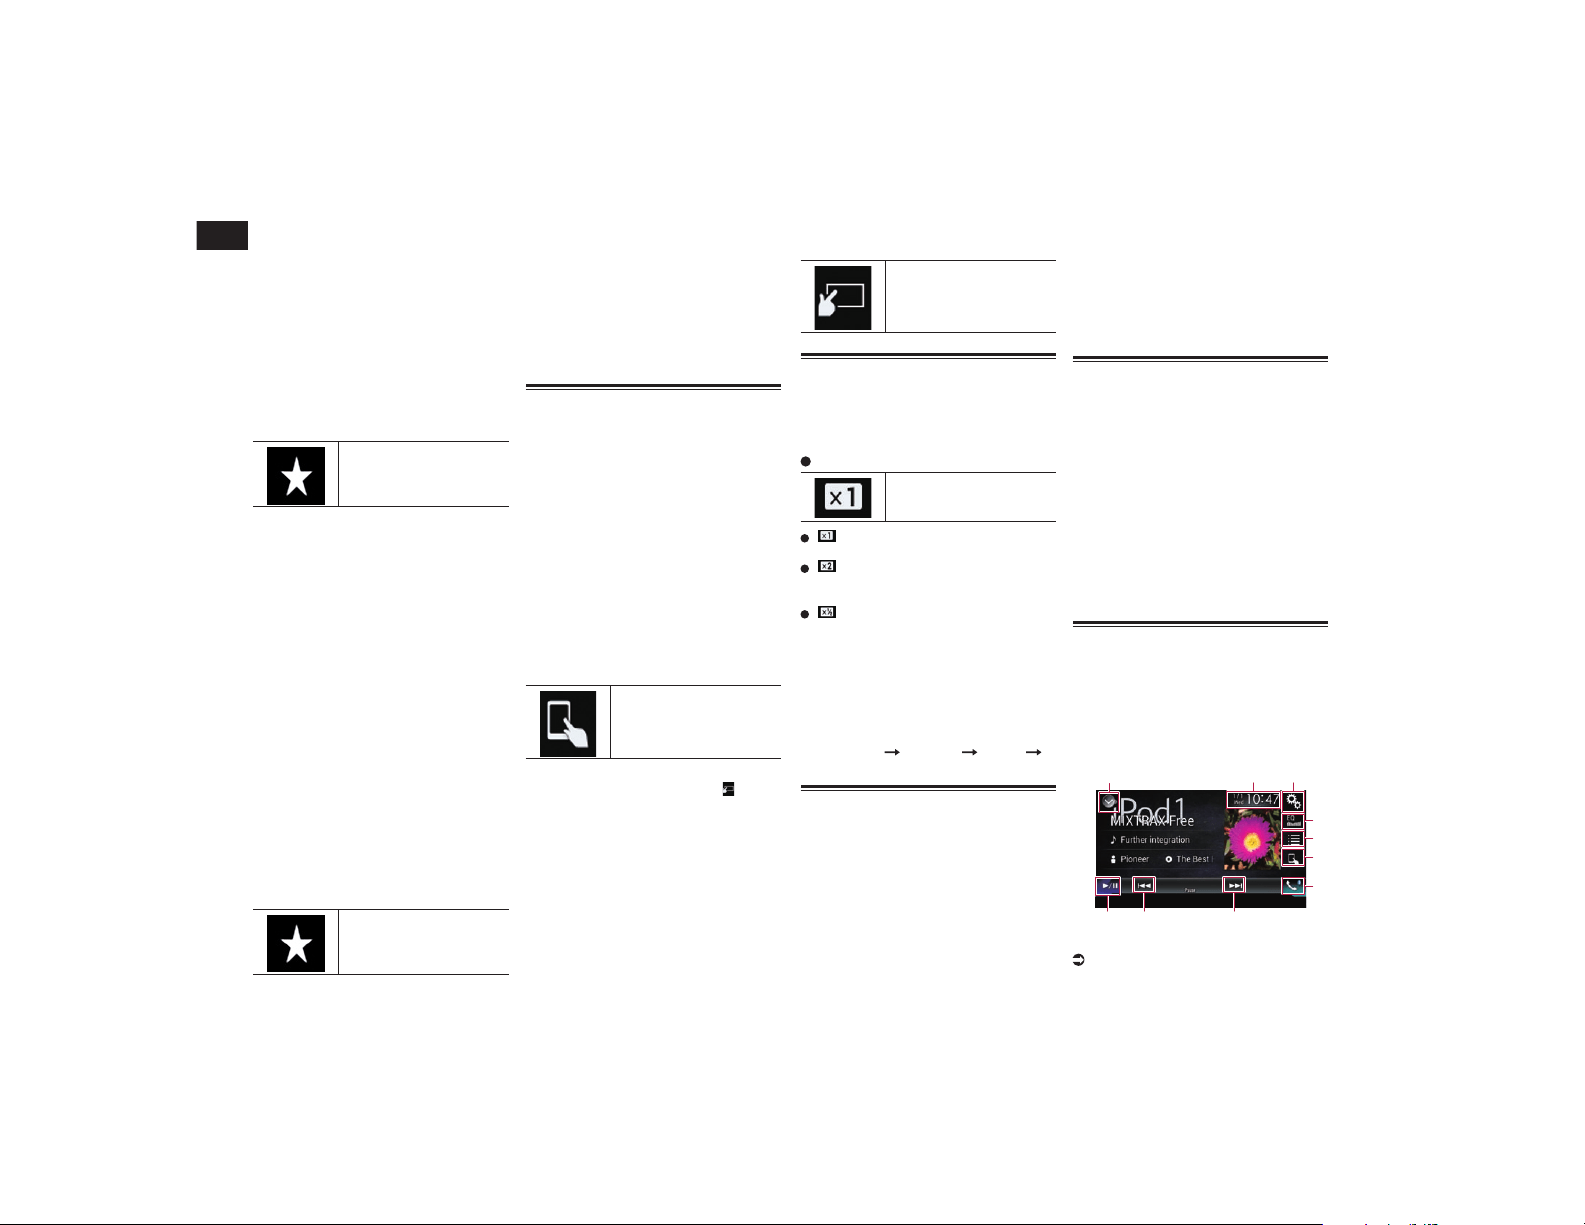
11
Capítulo
38
Es
reproducirán canciones similares a la
canción actual.
p Si pulsa [Play More Like This] cuando
el elemento del menú está resaltado, la
función se desactivará.
p El resultado de la operación depende del
iPod.
■ Congurar la canción actual
para que no se vuelva a
reproducir
Puede configurar la canción actual para que
no se vuelva a reproducir.
1 Pulse la siguiente tecla.
Muestra el menú emergente.
2 Pulse [Never Play This Song].
p La visualización del elemento del menú
indica lo siguiente:
— Si el elemento del menú está activo, la
función se puede activar.
— Si el elemento del menú está resaltado, la
función está activada.
— Si el elemento del menú no está activo, la
función no está disponible para la can-
ción actual.
p Si pulsa [Never Play This Song]
cuando el elemento del menú está activo,
no se volverá a reproducir la canción.
p Si pulsa [Never Play This Song]
cuando el elemento del menú está resal-
tado, la función se desactivará.
p El resultado de la operación depende del
iPod.
■ Añadir la canción actual a la
lista de deseos
Puede añadir la canción actual a la lista de
deseos para acceder más fácilmente a ella
más tarde.
1 Pulse la siguiente tecla.
Muestra el menú emergente.
2 Pulse [Add to iTunes Wish List].
La canción se añadirá a la lista de deseos.
p Si la canción ya está en la lista de deseos,
se visualiza [Remove from iTunes Wish
List] en lugar de [Add to iTunes Wish
List]. Si pulsa [Remove from iTunes
Wish List], la canción se eliminará de la
lista de deseos.
p El resultado de la operación depende del
iPod.
Uso de la función iPod de este
producto desde el iPod
Puede controlar la función iPod de este pro-
ducto desde el iPod conectado si el modo de
control está en “Modo de aplicación”. La
pantalla de la aplicación del iPod se puede
visualizar en este producto y los archivos de
música y vídeo del iPod se pueden reprodu-
cir con este producto.
p Esta función no está disponible al utilizar
la función iPod con un iPhone 6 Plus,
iPhone 6, iPhone 5s, iPhone 5c, iPhone 5
o iPod touch (5.ª generación).
p Mientras se utilice esta función, el iPod
no se apagará aunque se desconecte la
llave de encendido. Utilice los controles
del iPod para apagarlo.
1 Pulse la siguiente tecla.
Cambia el modo de control.
p El modo de control cambia a “Modo de
aplicación”. El icono cambia a .
2 Utilice los controles del iPod
conectado para seleccio-
nar un vídeo o una canción y
reproducirlos.
p Las siguientes funcione siguen siendo
accesibles desde este producto aunque
el modo de control se ajuste en “Modo
de aplicación”. No obstante, las opera-
ciones dependerán de sus aplicaciones.
— Reproducción/pausa
— Avance rápido/retroceso
— Pista arriba/abajo
— Subir/bajar a un capítulo
3 Pulse la siguiente tecla.
Cambia el modo de control
para controlar las funciones
iPod desde este producto.
Cambio de la velocidad de
reproducción del audiolibro
La velocidad de reproducción se puede
cambiar durante la reproducción de un
audiolibro.
Pulse la siguiente tecla.
Cambia la velocidad de
reproducción.
(valor predeterminado):
Reproduce en velocidad normal.
:
Reproduce a una velocidad superior a la
normal.
:
Reproduce a una velocidad inferior a la
normal.
p El icono no cambia al utilizar la función
iPod con un iPhone 6 Plus, iPhone 6,
iPhone 5s, iPhone 5c, iPhone 5 o iPod
touch (5.ª generación). El ajuste cambia
de la siguiente manera cuando se pulsa
el icono a pesar de que este no cambie.
Más rápido Más lento Normal
Más rápido...
Visualización de listas relacio-
nadas con la canción que se
está reproduciendo (búsqueda
de vínculos)
p Esta función no está disponible durante
la reproducción de iTunes Radio.
1 Pulse la portada para abrir una
lista de los nombres de can-
ciones del álbum que se está
reproduciendo.
2 Pulse el nombre de la canción que
desee reproducir para empezar a
reproducirla.
p Si no se muestra parte de la información
grabada, aparece una tecla de despla-
zamiento en el lado derecho de la lista.
Pulse la tecla de desplazamiento para
desplazarse.
Operaciones con los botones
de hardware
Pulse el botón TRK.
Podrá hacer saltar hacia delante o hacia
atrás canciones o vídeos.
p La tecla de salto hacia delante no está
disponible durante la reproducción de
iTunes Radio.
Cuando se reproduzca una canción o vídeo
con capítulos, podrá hacer saltar capítulos
hacia delante o hacia atrás.
Mantenga pulsado el botón TRK.
Puede realizar el retroceso rápido o avance
rápido.
Reproducción de música
desde una aplicación del iPod
que no sea iPod Music
También se muestran el nombre de la aplica-
ción y la información de la canción.
■ Utilización de las teclas del
panel táctil
9 8 8
1 32
4
5
6
7
1 Muestra la lista de fuentes.
Para los detalles, consulte Selección de
una fuente frontal en la lista de fuentes
en la página 13.
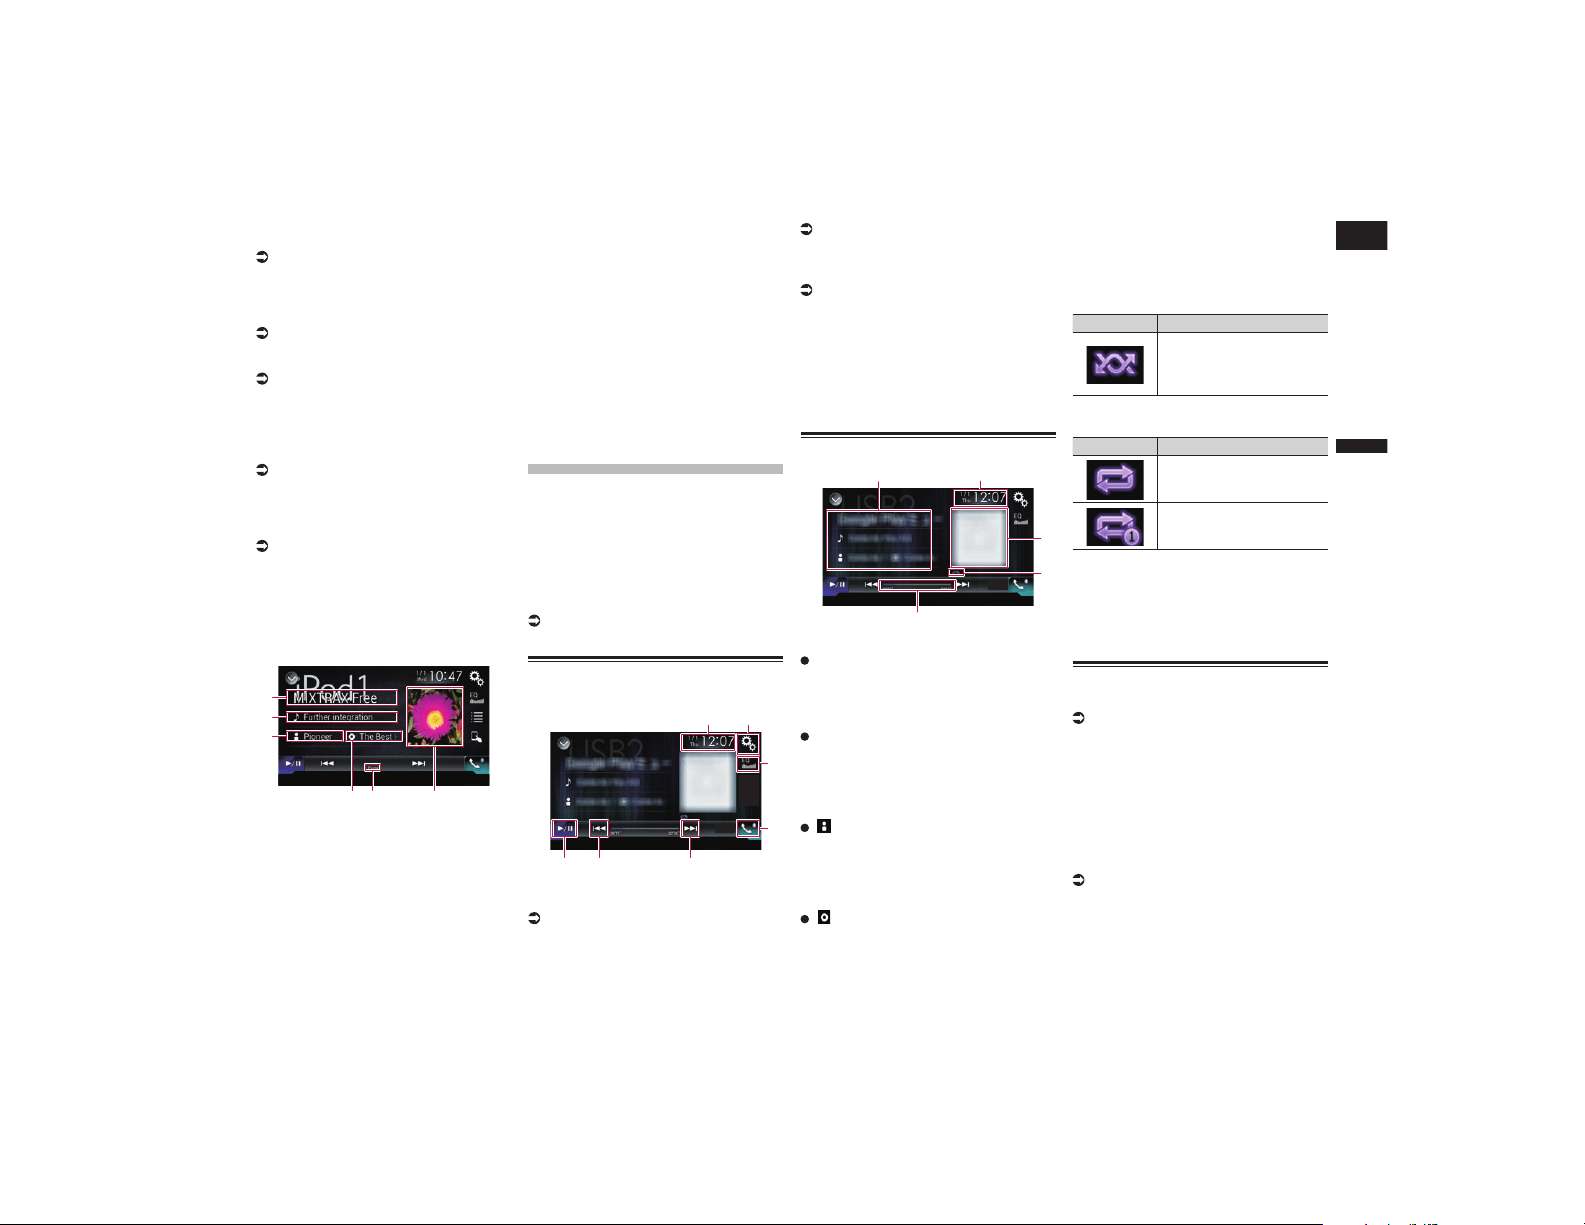
Español
12
Capítulo
39
Es
2 Muestra la pantalla de Ajuste de hora
y fecha.
Para los detalles, consulte Ajuste de la
hora y la fecha en la página 76.
3 Muestra la pantalla de Menú de
ajustes.
4 Recupera las curvas del ecualizador.
Para los detalles, consulte Utilización del
ecualizador en la página 69.
5 Selecciona una pista de la lista.
Para los detalles, consulte Selección
de fuentes de canciones o vídeos de la
pantalla de la lista de reproducción en la
página 37.
6 Cambia el modo de control a “Modo
de aplicación”.
Para los detalles, consulte Uso de la
función iPod de este producto desde el
iPod en la página 38.
7 Muestra la pantalla de Menú del
teléfono.
Para los detalles, consulte Visualización
del menú del teléfono en la página 17.
8 Hace saltar archivos hacia delante o
hacia atrás.
9 Cambia entre reproducción y pausa.
■ Lectura de la pantalla
1
2
3
4 5 6
1 Nombre de la aplicación
Muestra el nombre de la aplicación que
está reproduciendo.
2 Título de la canción
Muestra el título de la canción que se
está reproduciendo (cuando esté dispo-
nible). “Sin título” se muestra si no hay
información correspondiente.
3 Nombre del intérprete
Muestra el nombre del intérprete de
la canción que se está reproduciendo
(cuando esté disponible). “Sin nombre”
se muestra si no hay información
correspondiente.
4 Título del álbum
Muestra el título del álbum del archivo
actual (cuando esté disponible). “Sin
título” se muestra si no hay información
correspondiente.
5 Indicador de pausa
6 Portada de álbum
Si está disponible, aparecerá la portada
del álbum de la canción actual.
Reproducir música
desde el dispositivo
compatible con Android
Auto
Si hay un dispositivo compatible con
Android Auto conectado a este producto,
puede escuchar la música del dispositivo
Android con este producto y controlar la
reproducción directamente desde aquí.
p Esta función solo está disponible cuando
Android Auto está activado. Antes de
utilizar esta función, inicie Android
Auto.
Para más información, consulte Uso de
Android Auto en la página 42.
Utilización de las teclas del
panel táctil
21
3
4
6
5 5
1 Muestra la pantalla de Ajuste de hora
y fecha.
Para los detalles, consulte Ajuste de la
hora y la fecha en la página 76.
2 Muestra la pantalla de Menú de
ajustes.
3 Recupera las curvas del ecualizador.
Para los detalles, consulte Utilización del
ecualizador en la página 69.
4 Muestra la pantalla de Menú del
teléfono.
Para los detalles, consulte Visualización
del menú del teléfono en la página 17.
5 Hace saltar archivos hacia delante o
hacia atrás.
p Las operaciones pueden variar depen-
diendo de la aplicación utilizada en el
dispositivo compatible con Android
Auto.
6 Cambia entre reproducción y pausa.
Lectura de la pantalla
5
2
4
3
1
1 Información de la pista actual
Nombre de la aplicación
Muestra el nombre de la aplicación (si
está disponible). Si no existe la informa-
ción correspondiente, aparecerá “Sin
nombre”.
Título de la canción
Muestra el título de la canción que se
está reproduciendo actualmente (en caso
de estar disponible). Si no existe la infor-
mación correspondiente, aparecerá “Sin
título”.
: Nombre del intérprete
Muestra el nombre del intérprete de
la canción que se está reproduciendo
(cuando esté disponible). “Sin nom-
bre” se muestra si no hay información
correspondiente.
: Título del álbum
Muestra el título del álbum del archivo
actual (cuando esté disponible). “Sin
título” se muestra si no hay información
correspondiente.
2 Fecha y hora actuales
3 Portada de álbum
Si está disponible, aparecerá la portada
del álbum de la canción actual.
4 Indicador de estado de reproducción
Indica el estado de reproducción actual.
Ajuste de la reproducción aleatoria
Indicador Significado
Reproduce todos los archi-
vos del rango de reproduc-
ción de repetición actual en
orden aleatorio.
Ajuste del rango de reproducción de
repetición
Indicador Significado
Repite todas las canciones
de la lista seleccionada.
Repite únicamente la can-
ción actual.
p Los indicadores de estado de reproduc-
ción podrían no visualizarse dependiendo
del dispositivo Android.
5 Indicador de tiempo de reproducción
Muestra el tiempo transcurrido de repro-
ducción del archivo actual.
Procedimiento de inicio
1 Inicie Android Auto.
Para más información, consulte Uso de
Android Auto en la página 42.
2 Pulse el botón HOME para mostrar
la pantalla de Menú superior.
3 Pulse [USB2] en la pantalla de
Selección de la fuente AV.
4 Utilice las teclas del panel táctil
de la pantalla para controlar la
reproducción.
Para más información, consulte
Utilización de las teclas del panel táctil en
la página 39.
p La función Android Auto podría no
funcionar correctamente si la conexión
Bluetooth con el dispositivo compatible
con Android Auto finaliza.
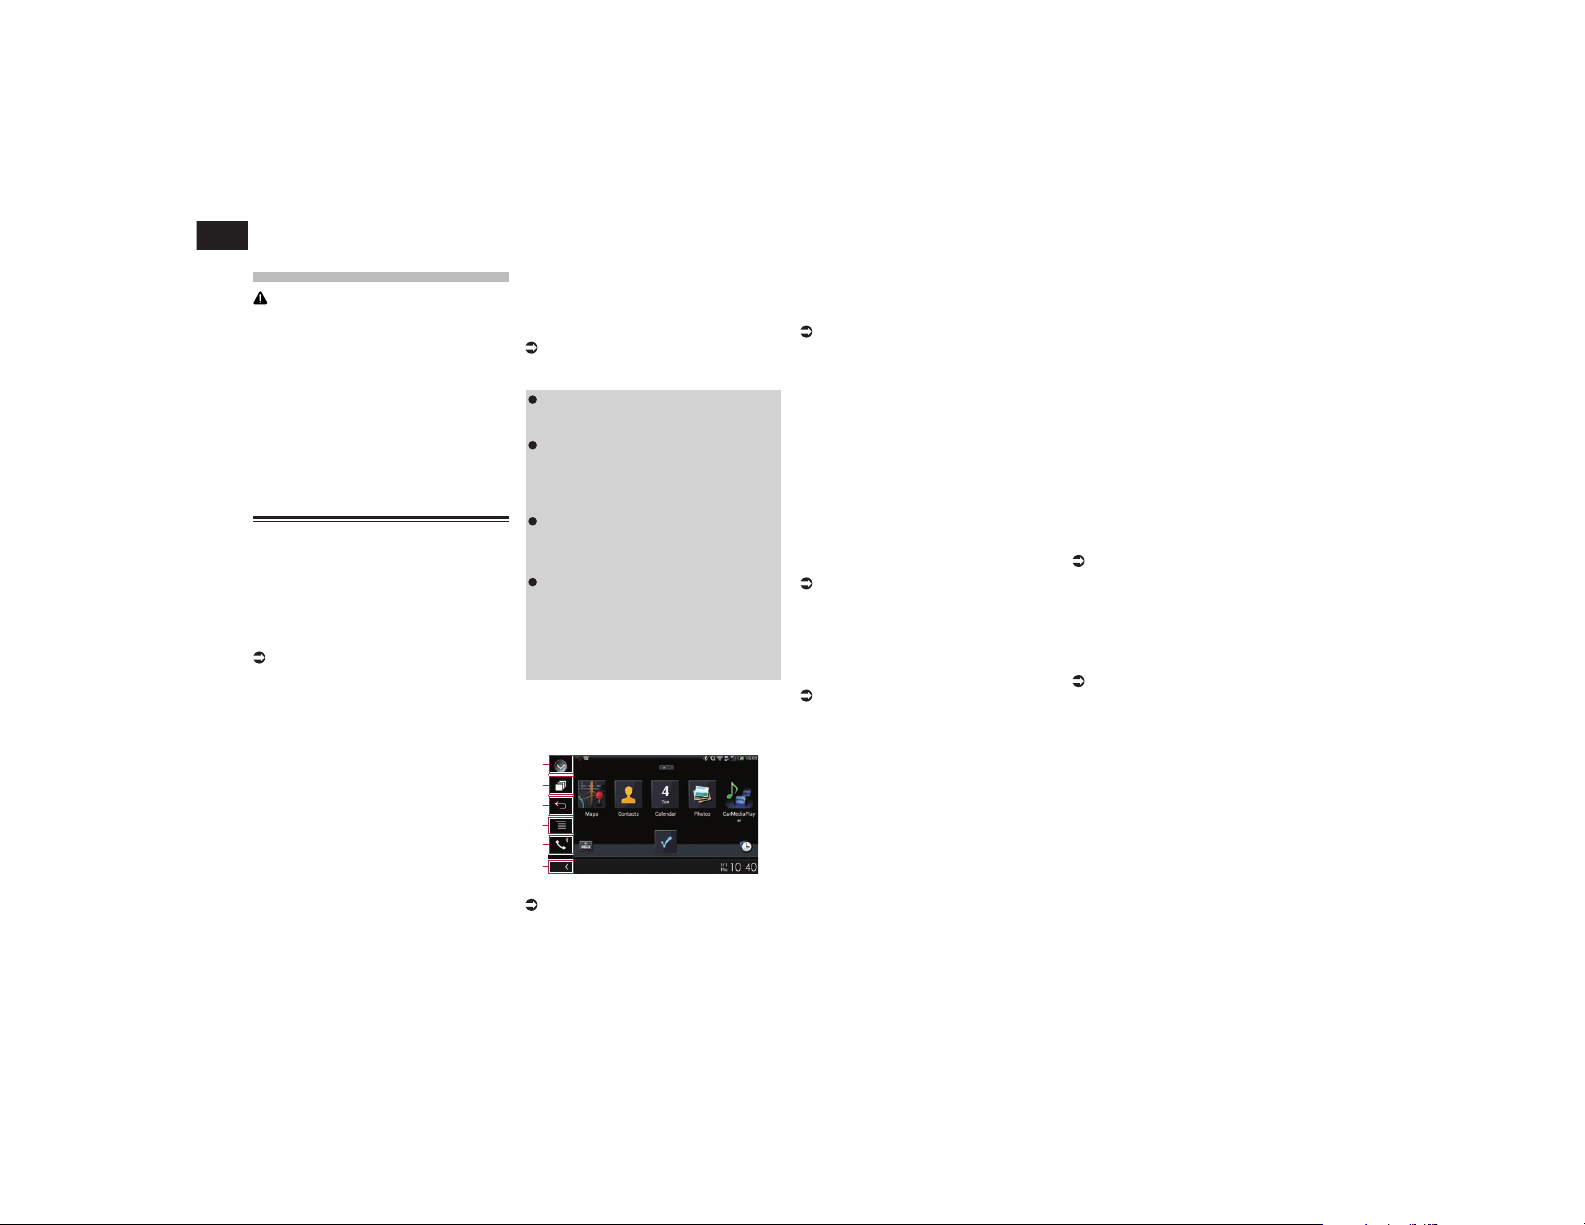
13
Capítulo
40
Es
Uso de las aplicacio-
nes del iPhone o del
smartphone
ADVERTENCIA
Determinados usos de un iPhone o smar-
tphone podrían ser ilegales mientras
conduce en su zona geográfica, por lo
que debe estar al tanto de la normativa y
obedecer dichas restricciones.
Si tiene algún tipo de duda en lo que
respecta a una función determinada,
utilícela únicamente con el vehículo
estacionado.
No deberá utilizar ninguna función
cuyo uso no resulte seguro bajo las
condiciones de conducción que esté
experimentando.
Uso de AppRadio Mode
Puede controlar las aplicaciones de un
iPhone o de un smartphone directamente
desde la pantalla (AppRadio Mode).
En AppRadio Mode, puede utilizar aplica-
ciones pulsando, arrastrando, desplazando
o deslizando el dedo por la pantalla de este
producto.
Para más información sobre dispositivos
compatibles con AppRadio Mode,
consulte Compatibilidad con AppRadio
Mode en la página 21.
p En este capítulo, cuando se habla de
iPhone y iPod touch se hace referencia al
“iPhone”.
p Los gestos que pueden realizarse con el
dedo variarán en función de la aplicación
para un iPhone o un smartphone.
p Cuando se inicia una aplicación que no
es compatible con el AppRadio Mode,
en función de la aplicación, podrá ver una
imagen de la aplicación en la pantalla
de este producto. Sin embargo, no podrá
controlar la aplicación.
Para utilizar AppRadio Mode, instale el
AppRadio app en el iPhone o el smar-
tphone con antelación para permitir el inicio
de la aplicación en este producto. Para
obtener información sobre el AppRadio
app, visite el siguiente sitio:
Para EE. UU.
http://www.pioneerelectronics.com/
AppRadioMode
Para Canadá
http://www.pioneerelectronics.ca/
AppRadioMode
p Asegúrese de leer Uso del contenido con
conexión basado en apps antes de reali-
zar esta operación.
Para los detalles, consulte Uso del conte-
nido con conexión basado en apps en la
página 98.
El contenido y funcionalidad de las apli-
caciones compatibles son responsabili-
dad de los proveedores de la aplicación.
En AppRadio Mode, el uso está limi-
tado durante la conducción, con las
funciones y el contenido disponibles
determinadas por los proveedores de la
aplicación en cuestión.
AppRadio Mode permite acceder
a otras aplicaciones además de las
indicadas, sujeto a limitaciones durante
la conducción.
PIONEER NO SE HACE RESPONSABLE
Y RECHAZA LA RESPONSABILIDAD
DE APLICACIONES Y CONTENIDO
DE TERCEROS (NO PIONNER),
INCLUYENDO SIN LIMITACIÓN
CUALQUIER INEXACTITUD O
INFORMACIÓN INCOMPLETA.
■ Uso de las teclas del panel táctil
(barra lateral de control de la
aplicación)
1
2
3
4
5
6
1 Muestra la lista de fuentes.
Para los detalles, consulte Selección de
una fuente frontal en la lista de fuentes
en la página 13.
2 Muestra la pantalla de la aplicación
de inicio.
3 Muestra la pantalla anterior.
p Cuando utilice el iPhone, esta tecla no
aparece.
4 Muestra la pantalla del menú.
p Cuando utilice el iPhone, esta tecla no
aparece.
5 Muestra la pantalla de Menú del
teléfono.
Para los detalles, consulte Visualización
del menú del teléfono en la página 17.
6 Muestra la fuente actual.
p En AppRadio Mode, aparecerá la barra
lateral de control de la aplicación.
p Si pulsa el botón HOME dos veces,
aparecerá la barra lateral de control
de la aplicación. Pulse el botón HOME
dos veces de nuevo y aparecerá la barra
lateral de control de la aplicación.
■ Procedimiento de inicio
Cuando se conecta un iPhone o smartphone
a este producto, se debe seleccionar el
método para conectar el dispositivo. La
configuración se debe ajustar de acuerdo
con el dispositivo conectado.
Para los detalles, consulte Capítulo 5.
El procedimiento varía en función del tipo de
dispositivo.
Para usuarios con un iPhone con
conector de 30 clavijas
1 Conecte su iPhone.
Para más información, consulte Conexión
de un iPhone con conector de 30 clavijas
en la página 82.
2 Pulse el botón HOME para mostrar
la pantalla de Menú superior.
3 Pulse [APPS].
En la pantalla aparece un mensaje que le
indica que su iPhone puede iniciar la apli-
cación.
Un mensaje que le pregunta si desea iniciar
la aplicación en su iPhone.
4 Utilice su iPhone para iniciar la
aplicación.
Se inicia AppRadio app.
5 Pulse [OK] en la pantalla de este
producto.
Aparece la pantalla AppRadio Mode (pan-
talla de menú Aplicación).
p Si conecta su dispositivo mientras se está
ejecutando una aplicación compatible
con AppRadio Mode, la pantalla de
función de la aplicación se mostrará en el
producto.
6 Pulse el icono de la aplicación que
desee.
Se ejecutará la aplicación que desee y apare-
cerá la pantalla de función de la aplicación.
7 Utilice la aplicación.
8 Pulse el botón HOME para volver a
la pantalla de menú superior.
Para usuarios de iPhone con conec-
tor Lightning
1 Registre su iPhone y conéctelo a
este producto mediante la tecnolo-
gía inalámbrica Bluetooth.
p El dispositivo registrado debe seleccio-
narse como dispositivo prioritario.
Para los detalles, consulte Registro
de sus dispositivos Bluetooth en la
página 14.
2 Desbloquee su iPhone.
3 Conecte su iPhone.
p El método de conexión del cable varía en
función del dispositivo.
Para más información, consulte Conexión
de un iPhone con conector Lightning en
la página 82.
4 Pulse el botón HOME para mostrar
la pantalla de Menú superior.
5 Pulse [APPS].
Se ejecutará AppRadio app y aparecerá
la pantalla AppRadio Mode (pantalla de
menú Aplicación).
p Si conecta su dispositivo mientras se está
ejecutando una aplicación compatible
con AppRadio Mode, la pantalla de
función de la aplicación se mostrará en el
producto.
6 Pulse el icono de la aplicación que
desee.
Se ejecutará la aplicación que desee y apare-
cerá la pantalla de función de la aplicación.
7 Utilice la aplicación.
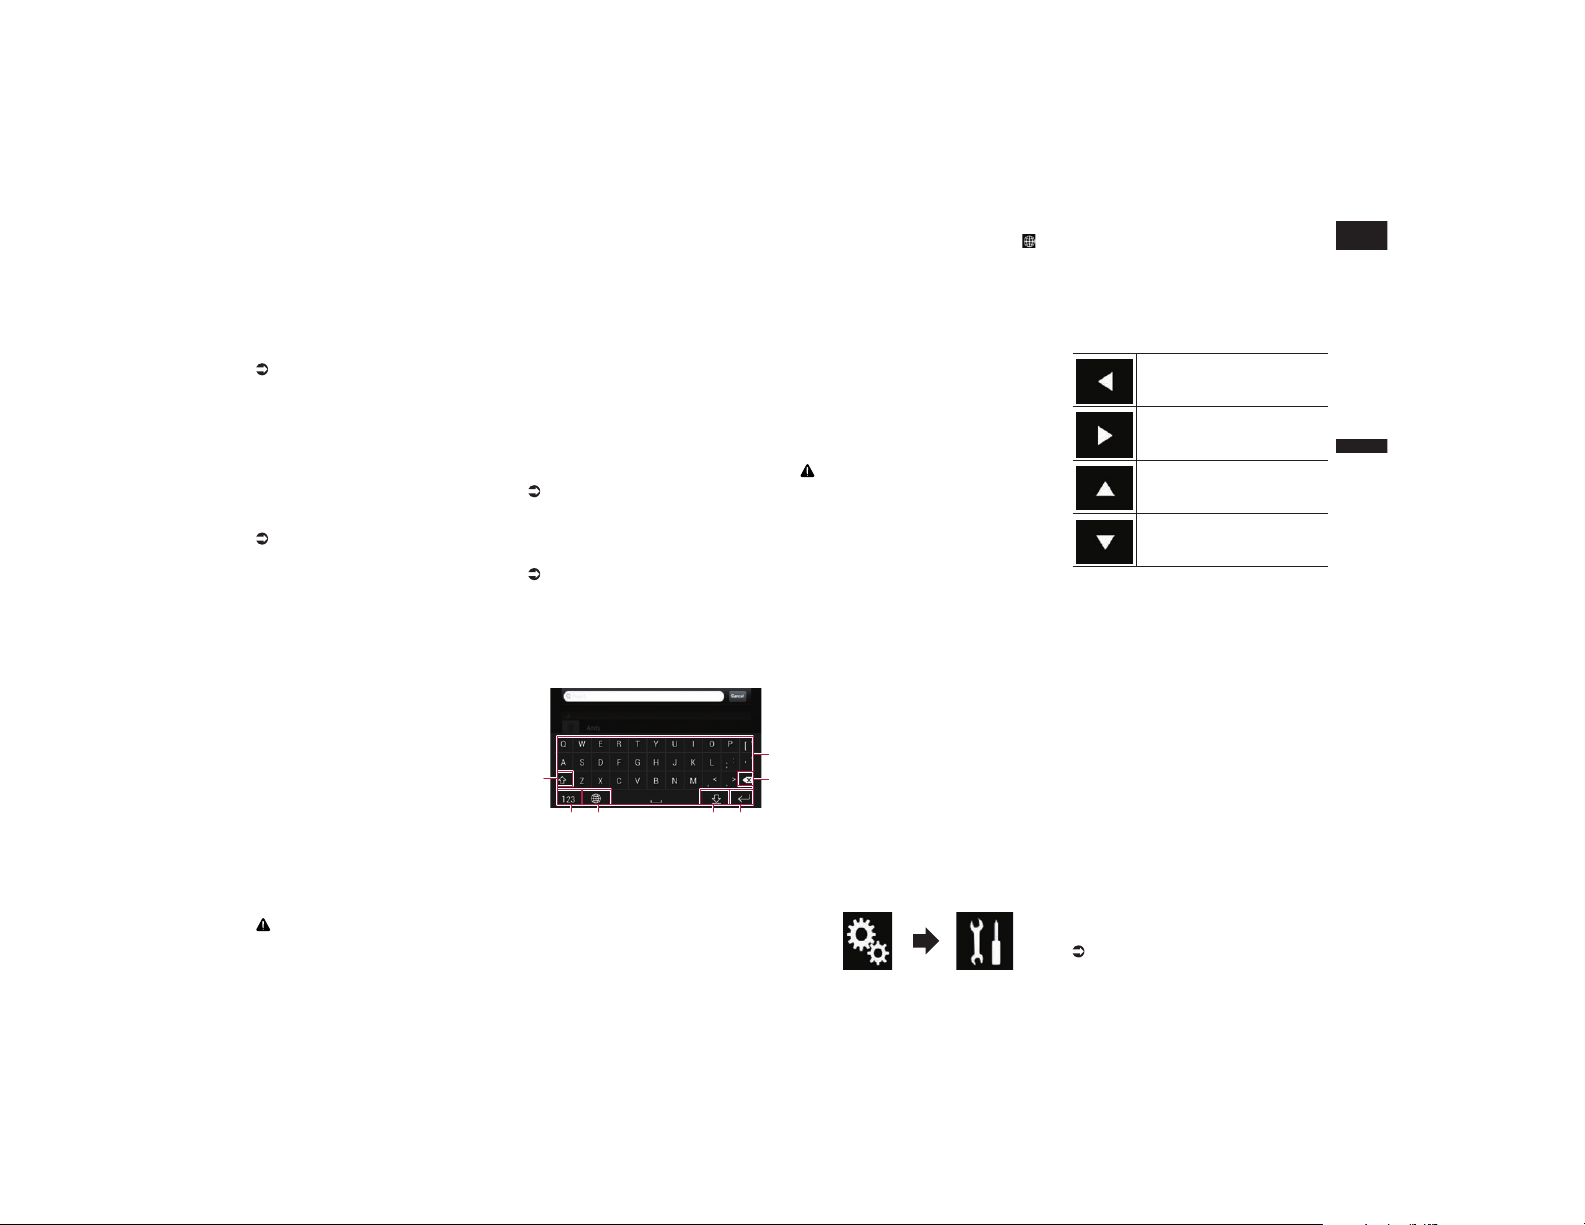
Español
13
Capítulo
41
Es
8 Pulse el botón HOME para volver a
la pantalla de menú superior.
Para usuarios de smartphone
1 Registre su smartphone y conéc-
telo a este producto mediante la
tecnología inalámbrica Bluetooth.
p El dispositivo registrado debe seleccio-
narse como dispositivo prioritario.
Para los detalles, consulte Registro
de sus dispositivos Bluetooth en la
página 14.
2 Desbloquee su smartphone.
3 Conecte su smartphone a este
producto mediante el kit de conec-
tividad de aplicación (CD-AH200),
que se vende por separado.
p El método de conexión del cable varía en
función del dispositivo.
Para más información, consulte
Conexión de dispositivos Android™ en la
página 82.
4 Pulse el botón HOME para mostrar
la pantalla de Menú superior.
5 Pulse [APPS].
Se ejecutará AppRadio app y aparecerá
la pantalla AppRadio Mode (pantalla de
menú Aplicación).
p Si conecta su dispositivo mientras se está
ejecutando una aplicación compatible
con AppRadio Mode, la pantalla de
función de la aplicación se mostrará en el
producto.
6 Pulse el icono de la aplicación que
desee.
Se ejecutará la aplicación que desee y apare-
cerá la pantalla de función de la aplicación.
7 Utilice la aplicación.
8 Pulse el botón HOME para volver a
la pantalla de menú superior.
■ Utilización del teclado
PRECAUCIÓN
Por su seguridad, la funcionalidad del
teclado solo está disponible cuando el
vehículo está detenido y el freno de mano
está activado.
p Esta función está disponible únicamente
en AppRadio Mode en el iPhone.
p Esta función podría no estar disponible
dependiendo del iPhone.
Cuando pulse la siguiente área de entrada
de texto de una aplicación para iPhone, se
mostrará un teclado en la pantalla. Puede
introducir el texto que desee directamente
desde este producto.
p La preferencia de idioma del teclado de
este producto debe ser la misma que la
del iPhone.
Si la configuración de este producto y la
configuración del iPhone son diferentes,
es posible que no pueda introducir los
caracteres correctamente.
1 Establezca el idioma del teclado.
Para los detalles sobre las operaciones,
consulte Ajuste del idioma del teclado
con la aplicación para iPhone en la
página 63.
2 Inicie el AppRadio Mode.
Para los detalles, consulte Procedimiento
de inicio en la página 40.
3 Pulse el área de entrada de texto
de la pantalla de función de la
aplicación.
Aparecerá un teclado para que introduzca
texto.
1
2
3456
7
1 Introduce los caracteres.
2 Elimina el texto introducido letra por
letra, empezando por el final del texto.
3 Confirma la entrada y le permite avanzar
hasta el paso siguiente.
4 Oculta el teclado y el texto ahora puede
introducirse utilizando el teclado o el
iPhone.
5 Cambia la disposición de teclado del
iPhone.
p Las disposiciones de teclado del iPhone
que pueden seleccionarse al pulsar
varían en función de la configuración
de Disposición del teclado físico de su
iPhone.
6 Cambia a un teclado que ofrece símbolos
y caracteres numéricos.
7 Cambia las mayúsculas a minúsculas y
viceversa en los caracteres del teclado.
■ Ajuste del tamaño de la imagen
(para usuarios de smartphone)
Al utilizar AppRadio Mode con un dispo-
sitivo Android conectado a este producto,
podrían aparecer puntos negros en la
pantalla.
PRECAUCIÓN
Este ajuste solo está disponible cuando
detiene su vehículo en un lugar seguro y
acciona el freno de mano.
p Esta función se puede configurar si se
presentan las siguientes condiciones:
— Cuando haya un dispositivo Android
conectado a este producto utilizando
CD-AH200 (se vende por separado) y
cuando la función AppRadio Mode esté
disponible tras haberse establecido una
conexión Bluetooth utilizando SPP (Serial
Port Profile).
p Si no se ha ajustado la configuración, la
pantalla de ajustes aparece automática-
mente en los siguientes casos:
— Al acceder al AppRadio Mode tras
haber establecido una conexión
Bluetooth utilizando SPP (Serial Port
Profile).
— Al acceder al AppRadio Mode tras
haber establecido una conexión
Bluetooth utilizando SPP (Serial Port
Profile).
1 Pulse el botón HOME para mostrar
la pantalla de Menú superior.
2 Pulse las siguientes teclas en el
orden que se indica.
Aparecerá la pantalla “Sistema”.
3 Pulse [Config. entrada/salida].
4 Pulse [Ajuste de AppRadio Video].
Aparece la pantalla de confirmación.
5 Pulse [OK].
6 Pulse las siguientes teclas para
ajustar la línea al tamaño de ima-
gen del smartphone.
Mueve la línea a la izquierda.
Mueve la línea a la derecha.
Mueve la línea hacia arriba.
Mueve la línea hacia abajo.
7 Pulse [Vista previa].
p Confirme que toda la imagen encaja en la
pantalla.
8 Pulse [OK].
p Si quiere volver a realizar el ajuste desde
el principio, pulse [RESTAB.].
■ Mostrar la imagen de su aplica-
ción (iPhone con conector de 30
clavijas)
Puede configurar que se muestre en la
pantalla una imagen de la aplicación
para iPhone, que no es compatible con
AppRadio Mode.
p Según el tipo de aplicación, es posi-
ble que no pueda ver la imagen en la
pantalla.
p Solo puede controlar la aplicación en el
dispositivo conectado.
p Cuando toque la pantalla en esta función,
aparecerá la marca “No tocar” en la
esquina superior derecha de la pantalla.
1 Conecte su iPhone.
Para más información, consulte Conexión
de un iPhone con conector de 30 clavijas
en la página 82.

13
Capítulo
42
Es
2 Pulse el botón HOME para mostrar
la pantalla de Menú superior.
3 Pulse [APPS].
En la pantalla aparece un mensaje que le
indica que su iPhone puede iniciar la apli-
cación.
Un mensaje que le pregunta si desea iniciar
la aplicación en su iPhone.
4 Utilice su iPhone para rehusar que
se inicie la aplicación.
5 Pulse [OK] en la pantalla de este
producto.
Aparece una pantalla negra.
6 Inicie una aplicación en su iPhone.
En la pantalla aparece una imagen de la
aplicación.
7 Pulse el botón HOME para volver a
la pantalla de menú superior.
■ Mostrar la imagen de su apli-
cación (iPhone con conector
Lightning)
Puede configurar que se muestre en la
pantalla una imagen de la aplicación para
smartphone, que no es compatible con
AppRadio Mode.
p Según el tipo de aplicación, es posi-
ble que no pueda ver la imagen en la
pantalla.
p Cuando utilice esta función, no conecte
otros dispositivos a través de la tecno-
logía inalámbrica Bluetooth. Asegúrese
de desconectar su dispositivo Bluetooth
antes de utilizar esta función.
p Solo puede controlar la aplicación en el
dispositivo conectado.
p Cuando toque la pantalla en esta función,
aparecerá la marca “No tocar” en la
esquina superior derecha de la pantalla.
1 Conecte su iPhone.
p El método de conexión del cable varía en
función del dispositivo.
Para más información, consulte Conexión
de un iPhone con conector Lightning en
la página 82.
2 Pulse el botón HOME para mostrar
la pantalla de Menú superior.
3 Pulse [APPS].
La imagen de su iPhone aparece en la
pantalla.
4 Inicie una aplicación en su iPhone.
En la pantalla aparece una imagen de la
aplicación.
5 Pulse el botón HOME para volver a
la pantalla de menú superior.
■ Visualización de la imagen de su
aplicación (smartphone)
Puede configurar que se muestre en la
pantalla una imagen de la aplicación para
smartphone, que no es compatible con
AppRadio Mode.
p No se garantiza la compatibilidad con
todos los smartphones.
p Cuando utilice esta función, no conecte
otros dispositivos a través de la tecno-
logía inalámbrica Bluetooth. Asegúrese
de desconectar su dispositivo Bluetooth
antes de utilizar esta función.
p Solo puede controlar la aplicación en el
dispositivo conectado.
p Cuando toque la pantalla en esta función,
aparecerá la marca “No tocar” en la
esquina superior derecha de la pantalla.
1 Conecte su smartphone a este
producto mediante el kit de conec-
tividad de aplicación (CD-AH200),
que se vende por separado.
p El método de conexión del cable varía en
función del dispositivo.
Para más información, consulte
Conexión de dispositivos Android™ en la
página 82.
2 Pulse el botón HOME para mostrar
la pantalla de Menú superior.
3 Pulse [APPS].
La imagen de su smartphone aparece en la
pantalla.
4 Inicie una aplicación en su
smartphone.
En la pantalla aparece una imagen de la
aplicación.
5 Pulse el botón HOME para volver a
la pantalla de menú superior.
Uso de Android Auto
Puede controlar las aplicaciones de un
smartphone directamente desde la pantalla
(Android Auto).
En Android Auto, puede utilizar aplicacio-
nes pulsando, arrastrando, desplazando o
deslizando el dedo por la pantalla de este
producto.
p Android Auto podría no estar disponible
en su país o zona geográfica.
Para más información sobre Android
Auto, visite el sitio de soporte de Google:
http://support.google.com/androidauto
p Esta función solo está disponible para los
modelos compatibles con Android Auto.
p Los gestos que pueden realizarse con el
dedo variarán en función de la aplicación
para un smartphone.
Para utilizar Android Auto, primero ajuste
“Modo” en “Config. smartphone” en
“Android Auto”.
Para los detalles, consulte Ajuste del
método de conexión del dispositivo en la
página 20.
El contenido y funcionalidad de las apli-
caciones compatibles son responsabili-
dad de los proveedores de la aplicación.
En Android Auto, el uso está limi-
tado durante la conducción, con las
funciones y el contenido disponibles
determinadas por los proveedores de la
aplicación en cuestión.
Android Auto permite acceder a otras
aplicaciones además de las indica-
das, sujeto a limitaciones durante la
conducción.
PIONEER NO SE HACE RESPONSABLE
Y RECHAZA LA RESPONSABILIDAD
DE APLICACIONES Y CONTENIDO
DE TERCEROS (NO PIONNER),
INCLUYENDO SIN LIMITACIÓN
CUALQUIER INEXACTITUD O
INFORMACIÓN INCOMPLETA.
■ Procedimiento de inicio
Al conectar un dispositivo compatible con
Android Auto a este producto, primero
debe seleccionar el método de conexión de
su dispositivo. Según el dispositivo conec-
tado, los ajustes necesarios serán unos u
otros.
Para los detalles, consulte Capítulo 5.
p Para un uso óptimo de Android Auto,
establezca correctamente el ajuste
de posición de conducción según el
vehículo.
Para más información, consulte
Ajustar la posición de conducción en la
página 42.
1 Conecte el dispositivo compatible
con Android Auto a este producto
mediante el cable de interfaz
USB para su uso con dispositivos
Android (CD-MU200).
Para más información, consulte Conectar
el dispositivo Android o MirrorLink™ en la
página 83.
2 Pulse el botón HOME para mostrar
la pantalla de Menú superior.
3 Pulse [Android Auto].
Se establecerá automáticamente la cone-
xión Bluetooth con el dispositivo compatible
con Android Auto.
p Si Android Auto se activa durante una
llamada a un móvil que no sea el dispo-
sitivo compatible con Android Auto, la
conexión Bluetooth terminará al finalizar
la llamada.
4 Utilice la aplicación.
Para más información sobre cómo
ajustar el volumen, consulte Ajuste de
volumen en la página 43.
p La función Android Auto podría no
funcionar correctamente si la conexión
Bluetooth con el dispositivo compatible
con Android Auto finaliza.
■ Ajustar la posición de
conducción
Para un uso óptimo de Android Auto, esta-
blezca correctamente el ajuste de posición
de conducción según el vehículo.
1 Pulse el botón HOME para mostrar
la pantalla de Menú superior.
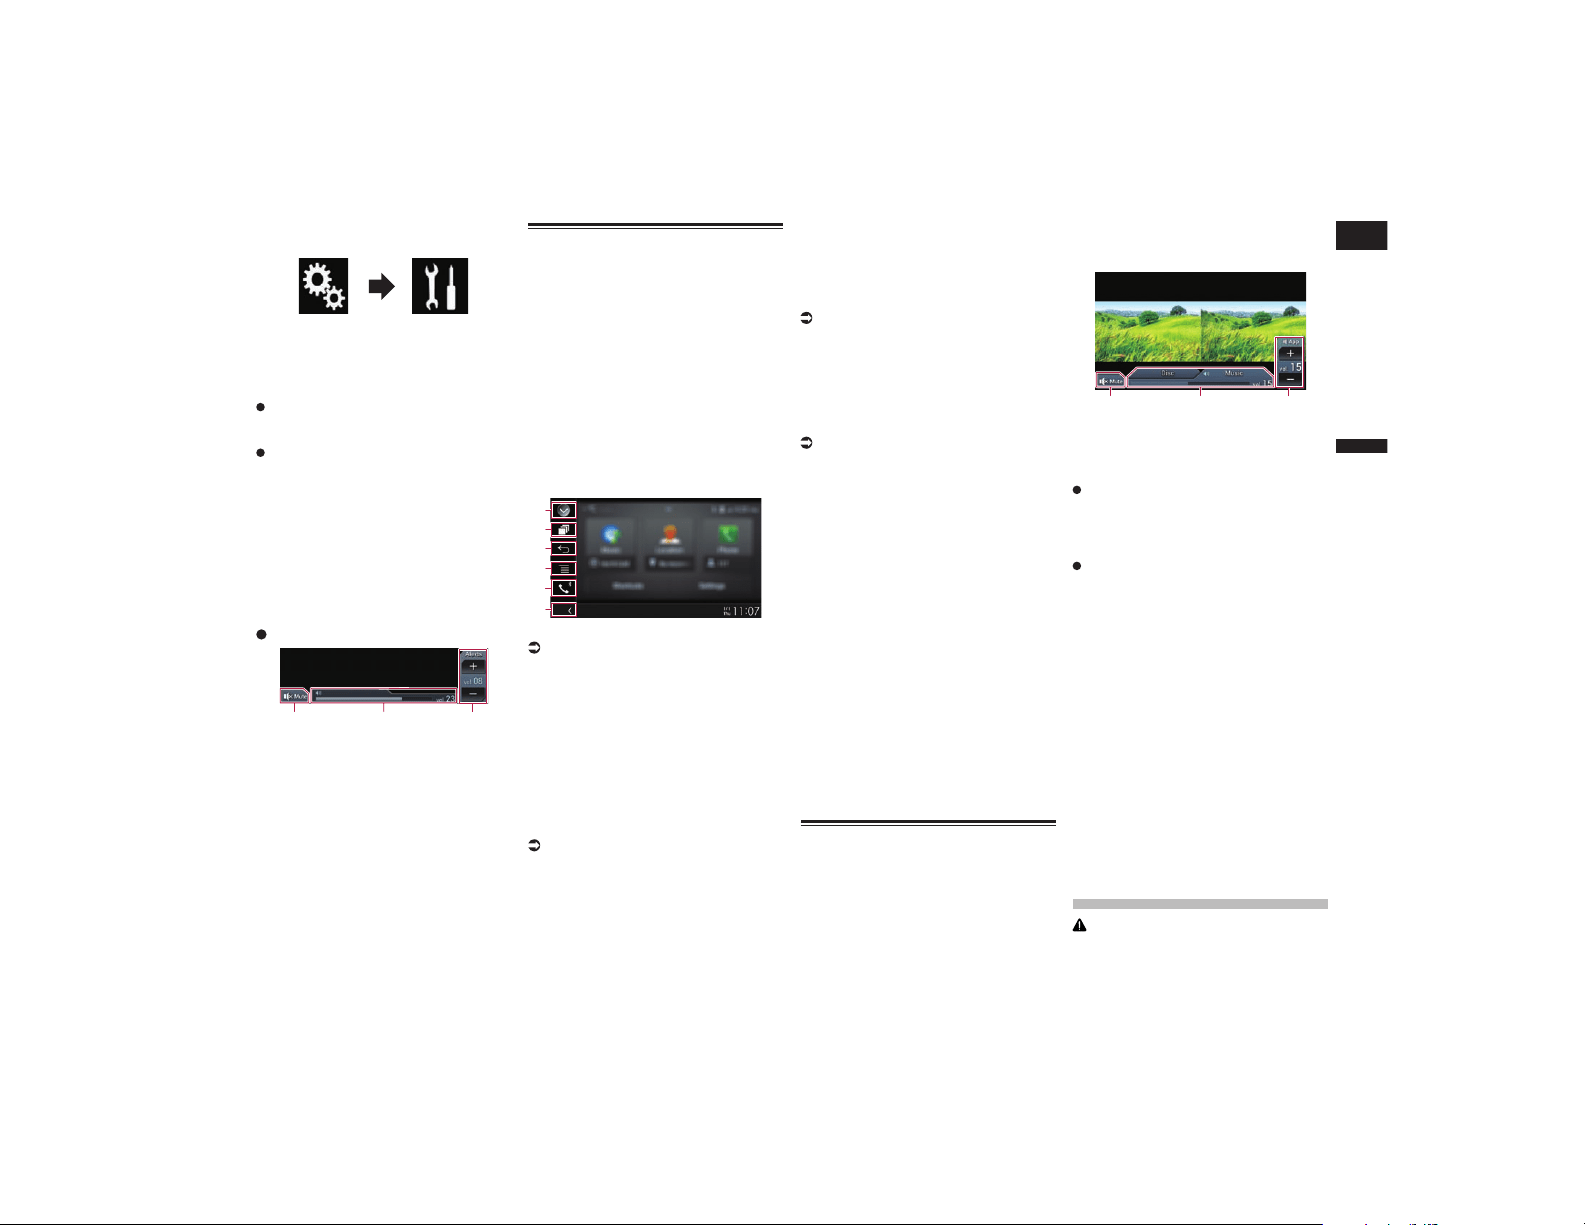
Español
14
Capítulo
43
Es
2 Pulse las siguientes teclas en el
orden que se indica.
Aparecerá la pantalla “Sistema”.
3 Pulse [Posición de conductor].
4 Pulse el elemento que desee
ajustar.
Izq. (valor predeterminado):
Selecciónelo para un vehículo con el
volante a la izquierda.
Der.:
Selecciónelo para un vehículo con el
volante a la derecha.
El ajuste se aplicará la siguiente vez que
se conecte a este producto un dispositivo
compatible con Android Auto.
■ Ajuste de volumen
Si utiliza Android Auto, puede ajustar el
volumen de guía/del sonido de alerta de
manera independiente del volumen del
sonido principal.
Pulse el botón VOL (+/–).
1
2
3
1 Púlselo para silenciar. Vuelva a pulsarlo
para cancelar el silencio.
2 Muestra el volumen principal de sonidos.
3 Ajusta el volumen de guía/volumen de
sonidos de alerta.
Cada vez que pulse [+] o [–] aumentará o
disminuirá el nivel de volumen.
p No puede ajustar en la pantalla el volu-
men del sonido principal. Pulse el botón
VOL (+/–) para ajustar el volumen del
sonido principal.
p El menú de volumen aparecerá en la
pantalla durante cuatro segundos. Si la
pantalla desaparece, pulse nuevamente
el botón VOL (+/–). La pantalla vuelve a
aparecer.
Uso del modo MirrorLink
Cuando se conecte con un dispositivo
MirrorLink con las aplicaciones compati-
bles instaladas, podrá controlar las aplica-
ciones del dispositivo móvil directamente
desde este producto (modo MirrorLink).
Puede ver y utilizar las aplicaciones com-
patibles mediante la pantalla con diversos
gestos táctiles como pulsar, arrastrar, des-
plazar y deslizar.
p Los gestos multitoque se pueden des-
activar dependiendo del dispositivo
MirrorLink que esté conectado.
■ Uso de las teclas del panel táctil
(barra lateral de control de la
aplicación)
1
3
2
4
5
6
1 Muestra la lista de fuentes.
Para los detalles, consulte Selección de
una fuente frontal en la lista de fuentes
en la página 13.
2 Muestra la pantalla de la aplicación
de inicio.
3 Muestra la pantalla anterior.
p En función del tipo de dispositivo
MirrorLink, esta tecla no se muestra.
4 Muestra la pantalla del menú.
p En función del tipo de dispositivo
MirrorLink, esta tecla no se muestra.
5 Muestra la pantalla de Menú del
teléfono.
Para los detalles, consulte Visualización
del menú del teléfono en la página 17.
6 Muestra la fuente actual.
p En el modo MirrorLink, aparecerá la
barra lateral de control de la aplicación.
p Si pulsa el botón HOME dos veces,
aparecerá la barra lateral de control
de la aplicación. Pulse el botón HOME
dos veces de nuevo y aparecerá la barra
lateral de control de la aplicación.
■ Procedimiento de inicio
Cuando conecte un dispositivo MirrorLink a
este producto, deberá seleccionar el método
de conexión con el dispositivo. Según el dis-
positivo conectado, los ajustes necesarios
serán unos u otros.
Para los detalles, consulte Capítulo 5.
1 Desbloquee el dispositivo
MirrorLink.
2 Conecte el dispositivo MirrorLink a
este producto mediante el cable de
interfaz USB para su uso con dis-
positivos MirrorLink (CD-MU200).
Para más información, consulte Conectar
el dispositivo Android o MirrorLink™ en la
página 83.
3 Pulse el botón HOME para mostrar
la pantalla de Menú superior.
4 Pulse [APPS].
Si se instala la aplicación de inicio en el dis-
positivo MirrorLink, se inicia la aplicación.
En caso contrario, aparecerá la pantalla de
menú Aplicación.
5 Pulse el icono de la aplicación que
desee.
Se ejecutará la aplicación que desee y apare-
cerá la pantalla de función de la aplicación.
p Es posible que algunas aplicaciones no
se inicien, dependiendo del estado del
dispositivo conectado. Si no se inicia,
inicie la aplicación de acuerdo con el
mensaje de inicio de la aplicación.
6 Utilice la aplicación.
7 Pulse el botón HOME para volver a
la pantalla de menú superior.
Utilización de la función de
mezcla de audio
Puede emitir audio combinando la fuente de
AV y una aplicación de iPhone o smartphone
mientras se use el modo AppRadio Mode
o MirrorLink.
1 Inicie el modo AppRadio Mode o
MirrorLink.
2 Pulse el botón VOL (+/–).
El menú de mezcla de audio aparecerá en
la pantalla.
1 2 3
1 Púlselo para silenciar. Vuelva a pulsarlo
para cancelar el silencio.
2 Activa o desactiva la función de mezcla
de sonido.
Pestaña izquierda: la función de mezcla
de audio está activada (mix on). Se mues-
tra el volumen de la aplicación. Si pulsa
el volumen de la aplicación, se muestran
las teclas de volumen.
Pestaña derecha: la función de mezcla de
audio está desactivada (mix off).
3 Ajusta el volumen de audio de la
aplicación.
Cada vez que pulse [+] o [–] aumentará o
disminuirá el nivel de volumen.
p La pantalla de Función AV y la pantalla
de la aplicación se pueden intercambiar
pulsando el botón MODE.
p En la pantalla de Función AV no se mues-
tra la pestaña derecha.
p No puede ajustar en la pantalla el volu-
men del sonido principal. Pulse el botón
VOL (+/–) para ajustar el volumen del
sonido principal.
p El menú de mezcla de audio aparecerá en
la pantalla durante cuatro segundos. Si la
pantalla desaparece, pulse nuevamente
el botón VOL (+/–). La pantalla vuelve a
aparecer.
Transmisión de
Pandora
®
ADVERTENCIA
Determinados usos de un iPhone o smar-
tphone podrían ser ilegales mientras
conduce en su zona geográfica, por lo
que debe estar al tanto de la normativa y
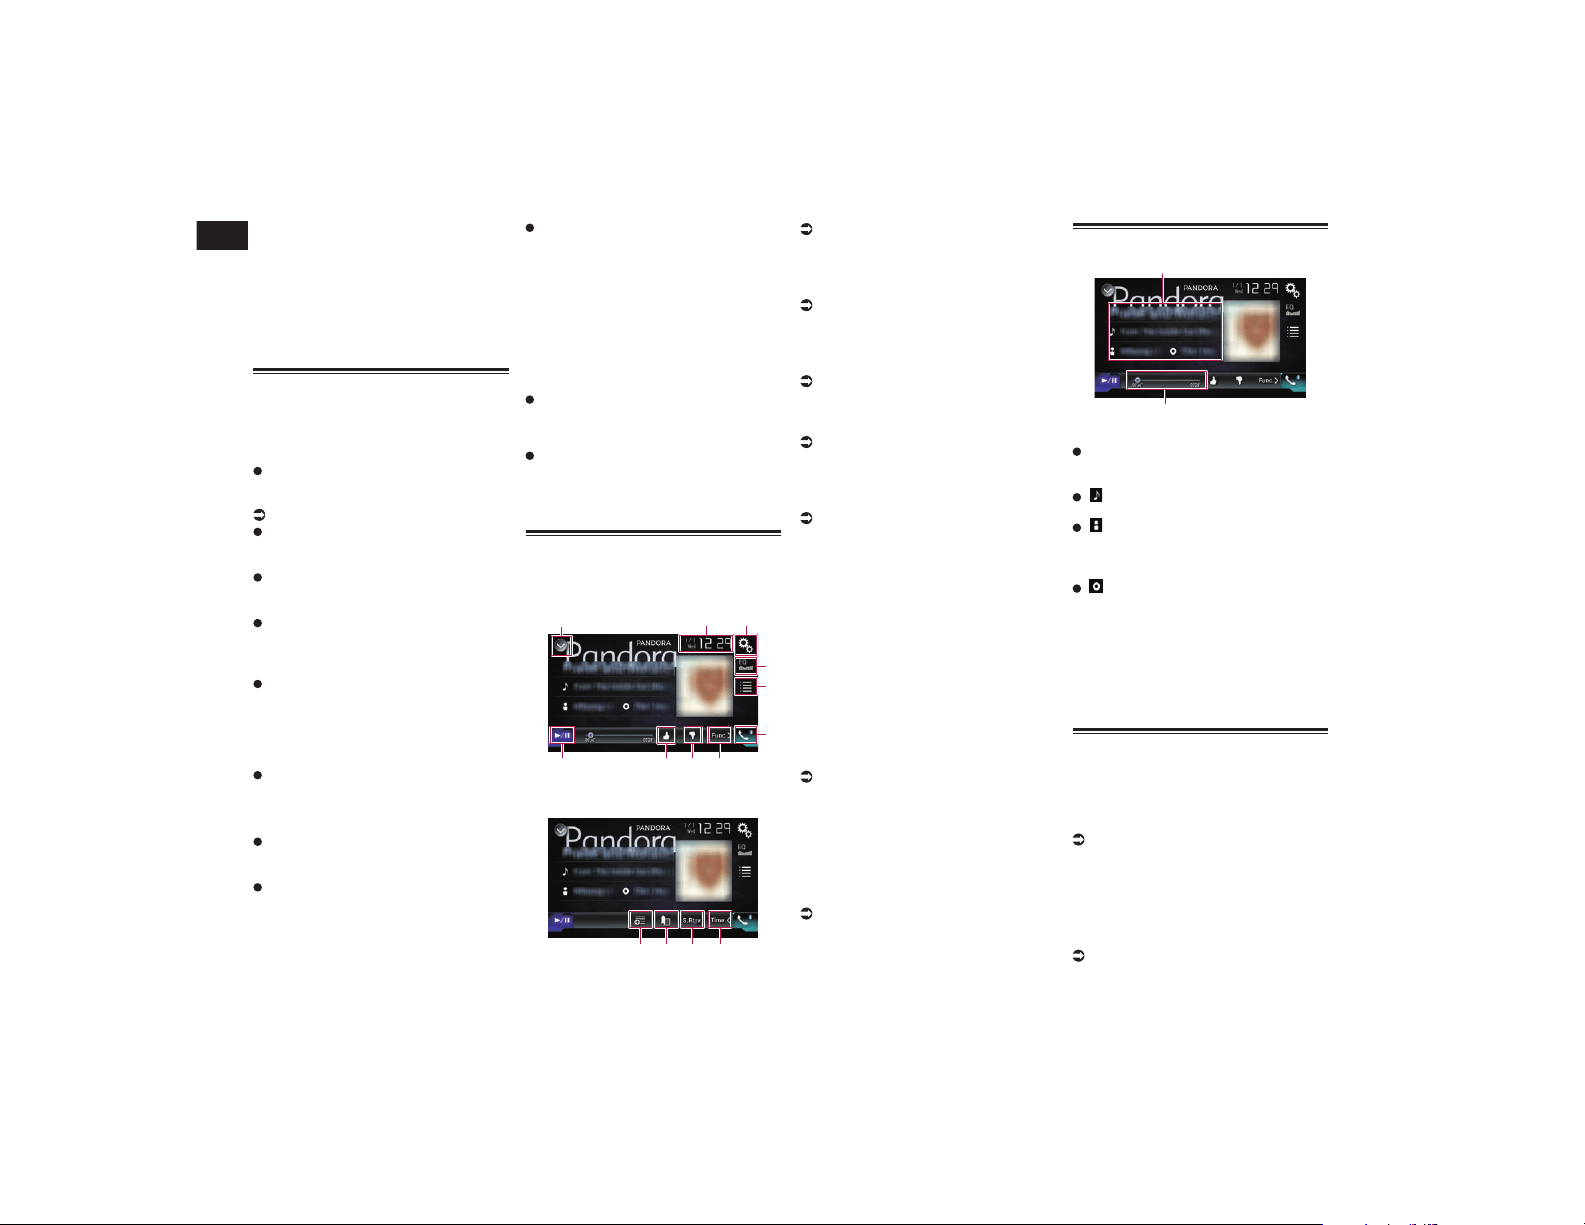
14
Capítulo
44
Es
obedecer dichas restricciones.
Si tiene algún tipo de duda en lo que
respecta a una función determinada,
utilícela únicamente con el vehículo
estacionado.
No deberá utilizar ninguna función
cuyo uso no resulte seguro bajo las
condiciones de conducción que esté
experimentando.
Funcionamiento de Pandora
Puede disfrutar de Pandora conectando un
iPhone o un smartphone que tenga la aplica-
ción Pandora instalada.
Importante
Requisitos para acceder a Pandora
mediante los productos de audio/vídeo
para automóviles de Pioneer:
Para los detalles, consulte Capítulo 5.
Actualice el firmware de la aplicación
Pandora a la versión más reciente antes
de su uso.
La versión más reciente de la aplicación
Pandora se puede descargar de iTunes
App Store o Google Play.
Cree una cuenta gratuita o de pago en
línea. Puede crear la cuenta en la aplica-
ción Pandora desde el iPhone o el sitio
web (http://www.pandora.com/register).
Si la tarifa de datos de su iPhone no le
permite hacer uso de los datos de forma
ilimitada, es posible que su compañía
telefónica le cobre por acceder al servi-
cio Pandora a través de redes 3G, EDGE
y/o LTE (4G).
Debe conectarse a Internet mediante
3G, EDGE, LTE (4G) o una red Wi-Fi para
utilizar el servicio Pandora.
Limitaciones:
En función de la disponibilidad de
Internet, es posible que no pueda recibir
el servicio Pandora.
El servicio Pandora está sujeto a cam-
bios sin previo aviso.
El servicio se podría ver afectado por
cualquiera de los siguientes aspectos:
versión de firmware del iPhone, versión
de firmware de la aplicación Pandora,
cambios al servicio de música Pandora.
Ciertas funciones del servicio Pandora
no están disponibles cuando se accede
al servicio mediante los productos de
audio/vídeo para automóviles de Pioneer.
Incluyen, entre otras: envío de informa-
ción acerca de las emisoras actuales,
creación de pistas desde iTunes, visuali-
zación de información de texto adicional,
inicio de sesión en Pandora y ajuste de la
calidad de audio de la red celular.
Notas
La radio por Internet de Pandora es un
servicio de música no afiliado a Pioneer. Hay
más información disponible en
http://www.pandora.com
La aplicación para móviles Pandora está dis-
ponible para iPhones y smartphones; visite
www.pandora.com/everywhere/mobile para
obtener la información de compatibilidad
más reciente.
Utilización de las teclas del
panel táctil
Pantalla de reproducción (página 1)
1 32
7
4
5
6
a 8
9
Pantalla de reproducción (página 2)
7bcd
1 Muestra la lista de fuentes.
Para los detalles, consulte Selección de
una fuente frontal en la lista de fuentes
en la página 13.
2 Muestra la pantalla de Ajuste de hora
y fecha.
Para los detalles, consulte Ajuste de la
hora y la fecha en la página 76.
3 Muestra la pantalla de Menú de
ajustes.
4 Recupera las curvas del ecualizador.
Para los detalles, consulte Utilización del
ecualizador en la página 69.
5 Al pulsar una tecla se muestra la lista
de emisoras de Pandora.
Para más información, consulte
Selección de una emisora de Pandora de
la lista en la página 45.
6 Muestra la pantalla de Menú del
teléfono.
Para los detalles, consulte Visualización
del menú del teléfono en la página 17.
7 Cambia a la página siguiente o ante-
rior de teclas del panel táctil.
8 Al pulsar la tecla se da una valora-
ción negativa a la pista que se está
reproduciendo y se pasa a la siguiente
pista.
p Esta función no está disponible cuando
se utiliza una emisora compartida.
9 Al pulsar la tecla se da una valora-
ción positiva a la pista que se está
reproduciendo.
p Esta función no está disponible cuando
se utiliza una emisora compartida.
a Cambia entre reproducción y pausa.
b Utiliza la función “Sound Retriever”.
Para los detalles, consulte Ajuste de
la función “Sound Retriever” en la
página 76.
c Añade información de la pista que se
está reproduciendo a los marcadores.
p Las canciones añadidas a los marcado-
res no se pueden visualizar desde este
producto.
d Crea una nueva emisora.
Para más información, consulte Creación
de una emisora en la página 45.
Lectura de la pantalla
2
1
1 Información de la pista actual
Muestra el nombre de la emisora de
Pandora en la que el sintonizador está
sintonizado.
: Título de la pista
Muestra el título de la pista actual.
: Nombre del intérprete
Muestra el nombre del intérprete de
la pista que se está reproduciendo
actualmente.
: Título del álbum
Muestra el título del álbum de la pista
actual.
p Si no existe la correspondiente informa-
ción, la información no se visualiza.
2 Indicador de tiempo de reproducción
Muestra el tiempo transcurrido, el tiempo
restante y la barra de tiempo de la pista
actual.
Procedimiento de inicio
Cuando se conecta un iPhone o smartphone
a este producto, se debe seleccionar el
método para conectar el dispositivo. La
configuración se debe ajustar de acuerdo
con el dispositivo conectado.
Para los detalles, consulte Capítulo 5.
■ Para usuarios con un iPhone con
conector de 30 clavijas
1 Desbloquee su iPhone.
2 Conecte su iPhone.
p Conecte mediante USB o Bluetooth.
Para los detalles sobre la conexión
Bluetooth, consulte Registro de sus
dispositivos Bluetooth en la página 14.
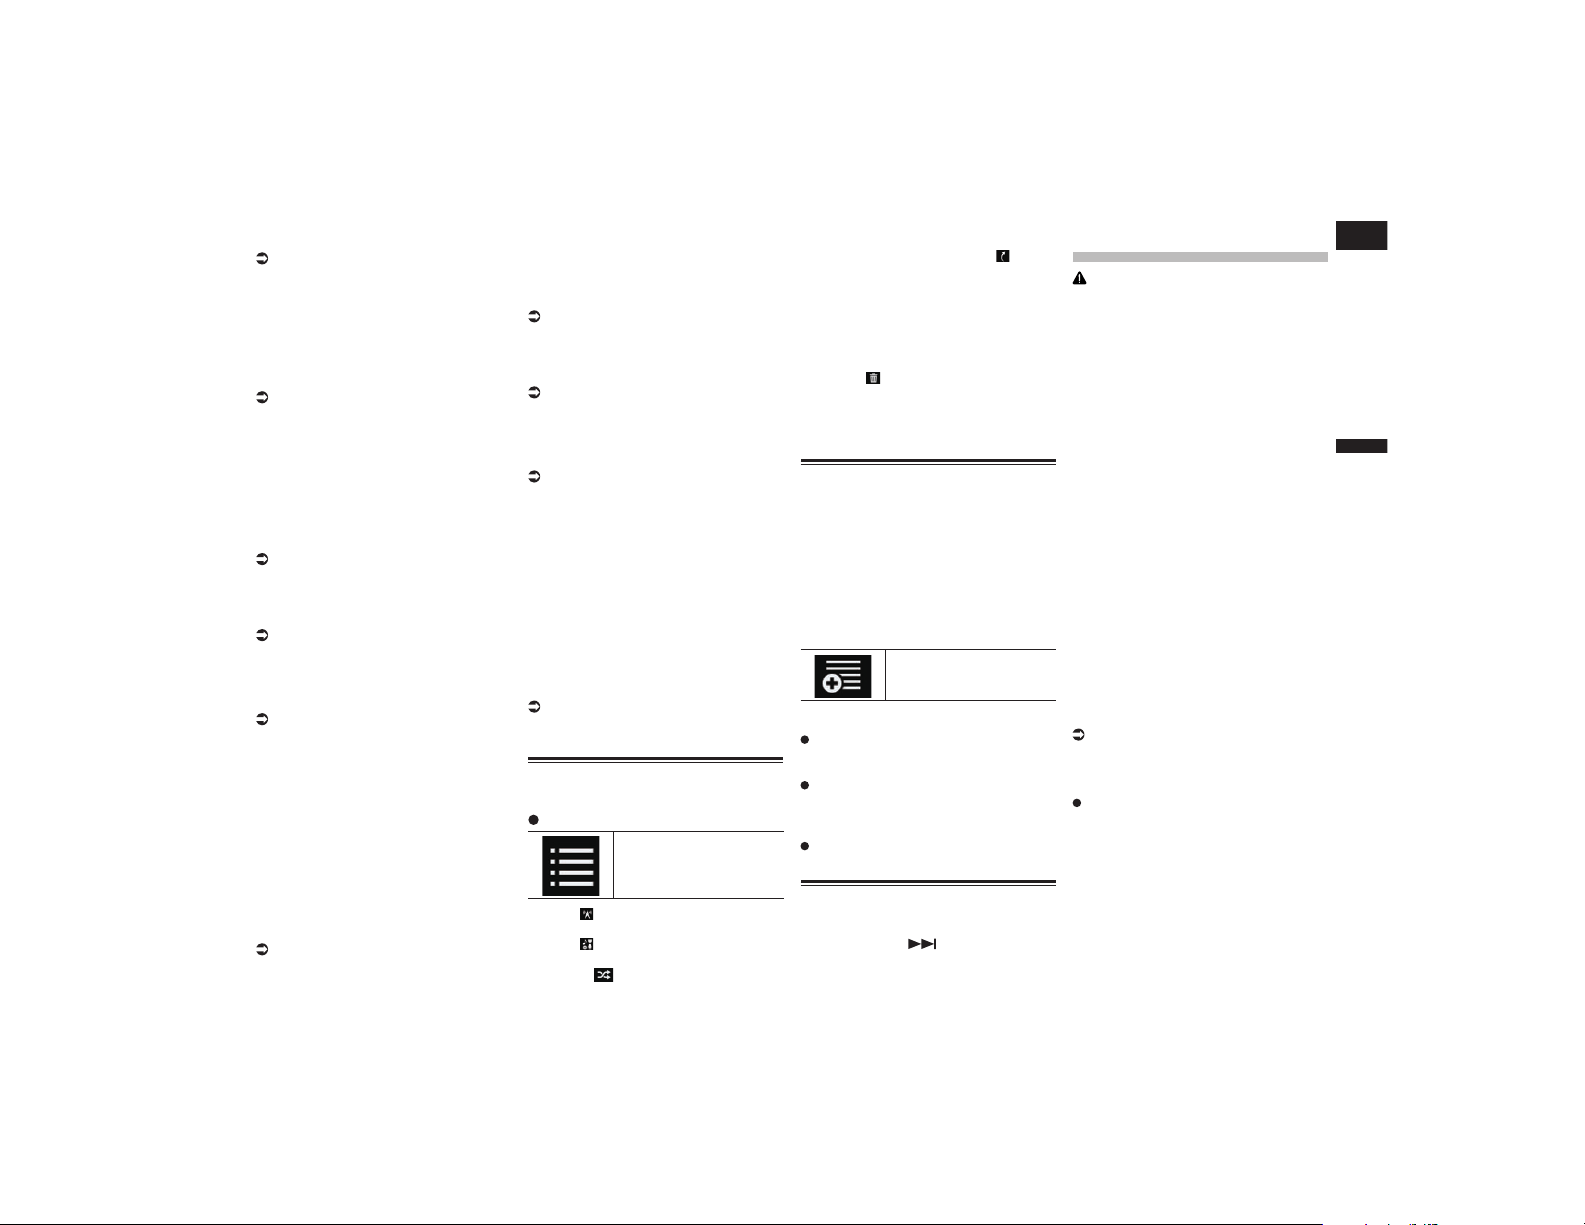
Español
15
Capítulo
45
Es
3 Muestre la pantalla de Selección
de fuente AV.
Para los detalles sobre las operaciones,
consulte Visualización de la pantalla de
función AV en la página 12.
4 Pulse [Pandora] en la pantalla de
Selección de fuente AV.
5 Utilice las teclas del panel táctil de
la pantalla para controlar la aplica-
ción Pandora.
Para los detalles, consulte Utilización
de las teclas del panel táctil en la
página 44.
■ Para usuarios de iPhone con
conector Lightning
1 Desbloquee su iPhone.
2 Conecte su iPhone.
p Conecte mediante USB, Bluetooth o
HDMI y Bluetooth.
Para los detalles sobre la conexión
Bluetooth, consulte Registro de sus
dispositivos Bluetooth en la página 14.
p El método de conexión del cable varía en
función del dispositivo.
Para más información, consulte Conexión
de un iPhone con conector Lightning en
la página 82.
3 Muestre la pantalla de Selección
de fuente AV.
Para los detalles sobre las operaciones,
consulte Visualización de la pantalla de
función AV en la página 12.
4 Pulse [Pandora] en la pantalla de
Selección de fuente AV.
Cuando pulse [Pandora], este producto
empezará a establecer una conexión
Bluetooth.
Una vez establecida la conexión correcta-
mente, se activarán las teclas del panel táctil
de la pantalla “Pandora”.
5 Utilice las teclas del panel táctil de
la pantalla para controlar la aplica-
ción Pandora.
Para los detalles, consulte Utilización
de las teclas del panel táctil en la
página 44.
■ Para usuarios de smartphone
1 Desbloquee su smartphone.
2 Conecte el smartphone.
p Conecte mediante Bluetooth, o HDMI y
Bluetooth.
Para los detalles sobre la conexión
Bluetooth, consulte Registro de sus
dispositivos Bluetooth en la página 14.
p El método de conexión del cable varía en
función del dispositivo.
Para más información, consulte
Conexión de dispositivos Android™ en la
página 82.
3 Muestre la pantalla de Selección
de fuente AV.
Para los detalles sobre las operaciones,
consulte Visualización de la pantalla de
función AV en la página 12.
4 Pulse [Pandora] en la pantalla de
Selección de fuente AV.
Cuando pulse [Pandora], este producto
empezará a establecer una conexión
Bluetooth.
Una vez establecida la conexión correcta-
mente, se activarán las teclas del panel táctil
de la pantalla “Pandora”.
5 Utilice las teclas del panel táctil de
la pantalla para controlar la aplica-
ción Pandora.
Para los detalles, consulte Utilización
de las teclas del panel táctil en la
página 44.
Selección de una emisora de
Pandora de la lista
Pulse la siguiente tecla.
Muestra la lista de emisoras
de Pandora.
p Pulse para cambiar a la lista de
emisoras.
p Pulse para cambiar a la lista de
géneros.
p Si pulsa se reproduce solamente
una pista basada en características
musicales específicas, una cada vez, de
varias emisoras aleatorias.
p Las emisoras con la indicación son
emisoras compartidas.
p Cuando pulse [A-Z] o [Date], los elemen-
tos de la lista se podrán ordenar.
A-Z: Ordena alfabéticamente los elemen-
tos de la lista.
Date: Ordena los elementos de la lista en
el orden de las fechas en que se crearon.
p Si pulsa , la emisora se eliminará.
Aparecerá un mensaje que le pedirá que
elimine la emisora.
Pulse [Sí]. Se eliminará la emisora.
Para cancelar, pulse [No].
Creación de una emisora
Puede crear hasta 100 emisoras por canción
o intérprete.
p También puede crear una emisora selec-
cionando una de la lista de géneros.
p Las emisoras no se pueden crear en los
siguientes casos:
— No hay respuesta durante 15 segundos.
— El número de emisoras creadas alcanza
los 100.
1 Pulse la siguiente tecla.
Muestra el menú emergente.
2 Pulse el elemento que desee.
Pista:
Cree una emisora de la canción que se
está reproduciendo actualmente.
Artista:
Cree una emisora del intérprete de la
canción que se está reproduciendo
actualmente.
Para cancelar la creación de una nueva
emisora, pulse [Cancelar].
Operaciones con los botones
de hardware
Pulse el botón TRK.
Puede saltar canciones hacia delante.
Utilización de Aha
Radio
ADVERTENCIA
Determinados usos de un iPhone o smar-
tphone podrían ser ilegales mientras
conduce en su zona geográfica, por lo
que debe estar al tanto de la normativa y
obedecer dichas restricciones.
Si tiene algún tipo de duda en lo que
respecta a una función determinada,
utilícela únicamente con el vehículo
estacionado.
No deberá utilizar ninguna función
cuyo uso no resulte seguro bajo las
condiciones de conducción que esté
experimentando.
Cuando conecte un iPhone o smartphone
con Aha Radio instalada, podrá controlar,
ver y/o escuchar el contenido de Aha Radio
desde este producto.
p En este capítulo, cuando se habla de
iPhone y iPod touch se hace referencia al
“iPhone”.
p Para los detalles sobre las operaciones,
consulte la sección Ayuda y consejos de
la aplicación Aha Radio.
p Es posible que para acceder a las emiso-
ras de Aha Radio sea necesario realizar
una configuración previa o registrarse.
p Asegúrese de leer Uso del contenido con
conexión basado en apps antes de reali-
zar esta operación.
Para los detalles, consulte Uso del conte-
nido con conexión basado en apps en la
página 98.
Notas:
Es posible que determinadas funciones
del servicio Aha Radio no estén dispo-
nibles al acceder al servicio a través de
este producto, como, por ejemplo, la
creación de nuevas emisoras de Aha,
la eliminación de emisoras de Aha, las
grabaciones de voz, el ajuste de la confi-
guración de la aplicación Aha Radio, el
inicio de sesión en Facebook, la creación
de una cuenta en Facebook, el inicio de
sesión en Twitter o la creación de una
cuenta en Twitter.
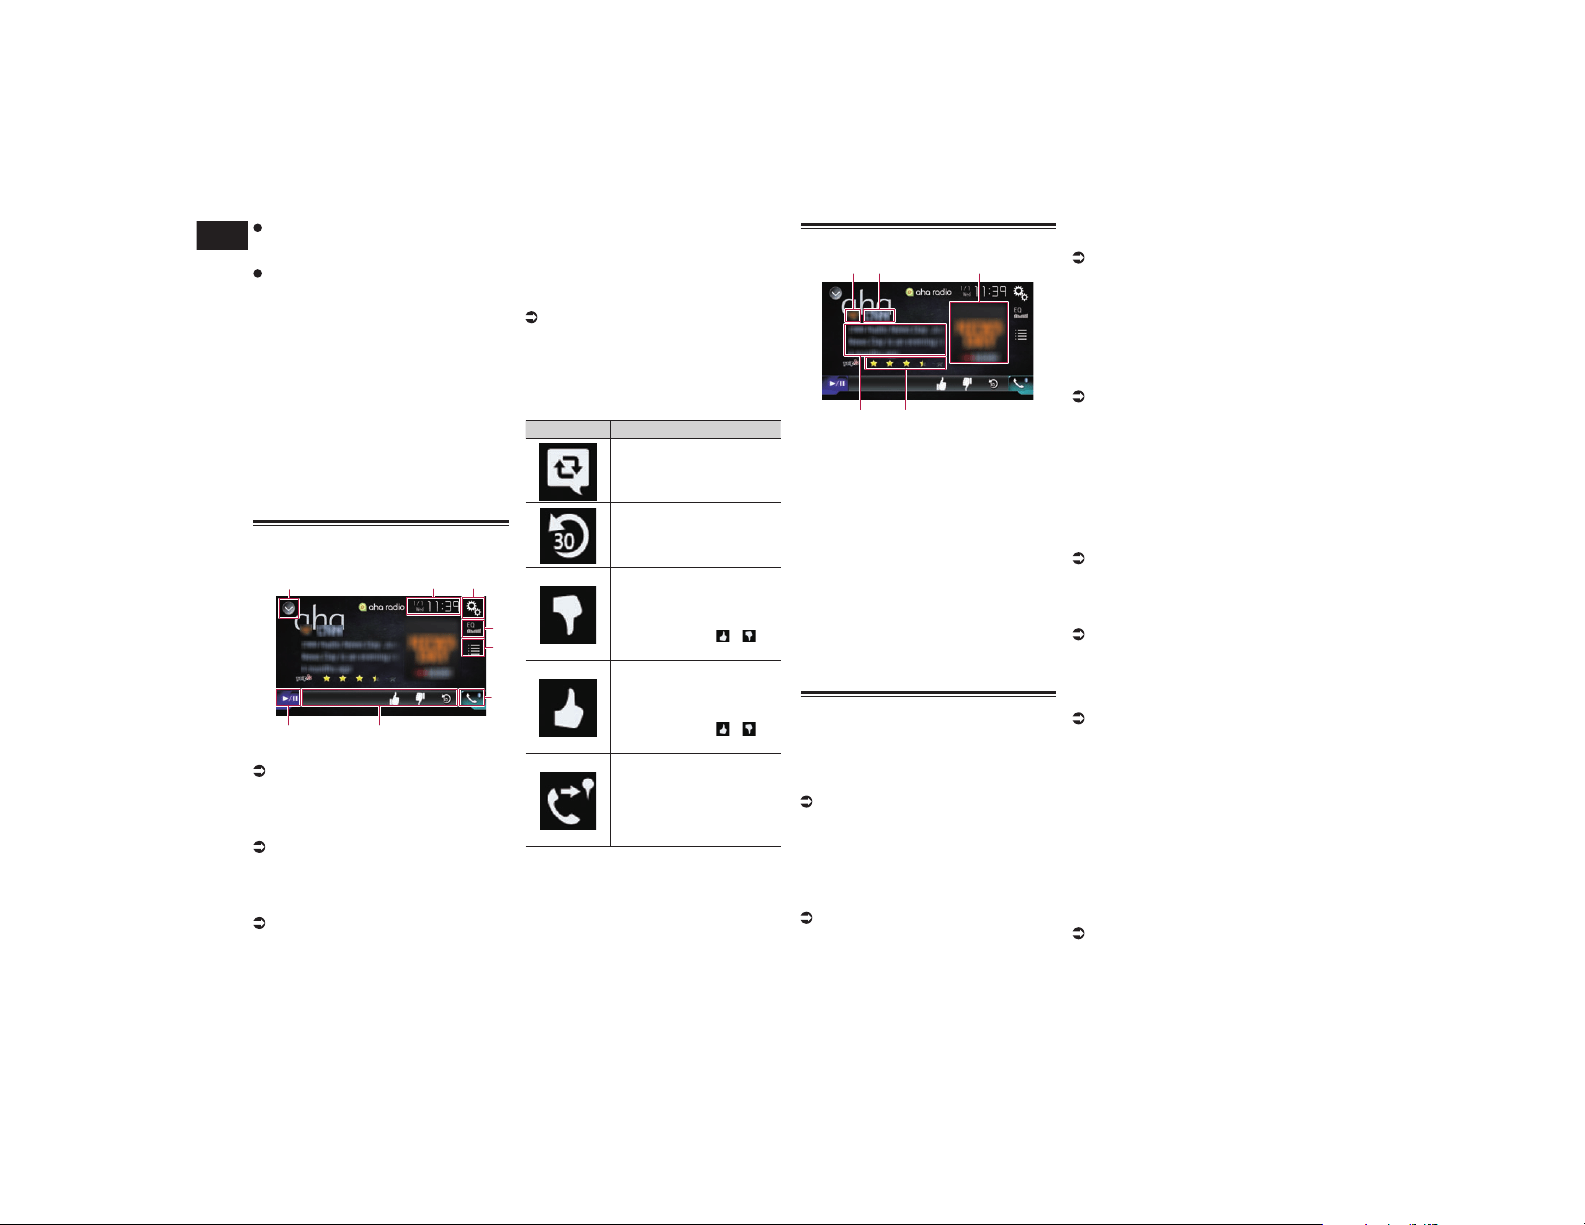
15
Capítulo
46
Es
Aha Radio es un servicio no afiliado a
Pioneer. Más información en http://www.
aharadio.com/.
Para disfrutar del contenido de la aplica-
ción Aha Radio en este producto debe
instalar en su iPhone o smartphone una
versión específica de la aplicación Aha
Radio.
Dado que la aplicación para el iPhone
o smartphone no la suministra Pioneer,
es posible que la versión requerida de
la aplicación no esté disponible en el
momento de la adquisición de este
producto.
Puede encontrar más información sobre
la disponibilidad, la versión y las actuali-
zaciones en
http://www.pioneerelectronics.com/
aharadio
Utilización de las teclas del
panel táctil
1 32
4
5
6
8
7
1 Muestra la lista de fuentes.
Para los detalles, consulte Selección de
una fuente frontal en la lista de fuentes
en la página 13.
2 Muestra la pantalla de Ajuste de hora
y fecha.
Para los detalles, consulte Ajuste de la
hora y la fecha en la página 76.
3 Muestra la pantalla de Menú de
ajustes.
4 Recupera las curvas del ecualizador.
Para los detalles, consulte Utilización del
ecualizador en la página 69.
5 Selecciona una emisora de Aha Radio
de la lista.
Al pulsar esta tecla se muestra la lista de
emisoras de Aha Radio disponibles. Pulse
la emisora de Aha Radio que desee para
cambiar las fuentes de Aha Radio.
6 Muestra la pantalla de Menú del
teléfono.
Para los detalles, consulte Visualización
del menú del teléfono en la página 17.
7 Realiza funciones adicionales de cada
emisora o del contenido que se está
reproduciendo actualmente.
p Los iconos mostrados variarán en función
de la emisora o el contenido.
Indicador Significado
Si pulsa la tecla, volverá a
enviar los tweets selecciona-
dos con su cuenta de Twitter.
Si pulsa la tecla, se produ-
cirá un retroceso rápido del
contenido actual durante 30
segundos.
Si pulsa la tecla, indica que
“No me gusta” el contenido
actual.
p Dependiendo del con-
texto, al pulsar o se
cancela “no me gusta”.
Si pulsa la tecla, indica que
“Me gusta” el contenido
actual.
p Dependiendo del con-
texto, al pulsar o se
cancela “me gusta”.
Si pulsa la tecla, podrá
llamar a un número de
teléfono que esté registrado
en el contenido actual
utilizando la función manos
libres.
8 Cambia entre reproducción y pausa.
Lectura de la pantalla
2
4
1
5
3
1 Marca de emisora
2 Nombre de la emisora
Muestra el nombre de la emisora de Aha
Radio que está sintonizada actualmente
en este producto.
3 Imagen del contenido
Muestra una imagen del contenido actual
si está disponible.
4 Información de clasificación
Muestra la clasificación del contenido
actual mostrado.
5 Información de la emisora actual
Muestra información sobre el contenido
que se está reproduciendo actualmente.
p Si no existe la correspondiente informa-
ción, el elemento estará en blanco.
Procedimiento de inicio
Cuando se conecta un iPhone o smartphone
a este producto, se debe seleccionar el
método para conectar el dispositivo. La
configuración se debe ajustar de acuerdo
con el dispositivo conectado.
Para los detalles, consulte Capítulo 5.
■ Para usuarios con un iPhone con
conector de 30 clavijas
1 Desbloquee su iPhone.
2 Conecte su iPhone.
p Conecte mediante USB o Bluetooth.
Para los detalles sobre la conexión
Bluetooth, consulte Registro de sus
dispositivos Bluetooth en la página 14.
3 Muestre la pantalla de Selección
de fuente AV.
Para los detalles sobre las operaciones,
consulte Visualización de la pantalla de
función AV en la página 12.
4 Pulse [aha] en la pantalla de selec-
ción de la fuente AV.
5 Utilice las teclas del panel táctil
de la pantalla para controlar Aha
Radio.
Para los detalles, consulte Utilización
de las teclas del panel táctil en la
página 46.
■ Para usuarios de iPhone con
conector Lightning
1 Desbloquee su iPhone.
2 Conecte su iPhone.
p Conecte mediante USB, Bluetooth o
HDMI y Bluetooth.
Para los detalles sobre la conexión
Bluetooth, consulte Registro de sus
dispositivos Bluetooth en la página 14.
p El método de conexión del cable varía en
función del dispositivo.
Para más información, consulte Conexión
de un iPhone con conector Lightning en
la página 82.
3 Muestre la pantalla de Selección
de fuente AV.
Para los detalles sobre las operaciones,
consulte Visualización de la pantalla de
función AV en la página 12.
4 Pulse [aha] en la pantalla de selec-
ción de la fuente AV.
Cuando pulse [aha], este producto empe-
zará a establecer una conexión Bluetooth.
Una vez establecida la conexión correcta-
mente, se activarán las teclas del panel táctil
de la pantalla “aha”.
5 Utilice las teclas del panel táctil
de la pantalla para controlar Aha
Radio.
Para los detalles, consulte Utilización
de las teclas del panel táctil en la
página 46.

Español
16
Capítulo
47
Es
■ Para usuarios de smartphone
1 Desbloquee su smartphone.
2 Conecte el smartphone.
p Conecte mediante Bluetooth, o HDMI y
Bluetooth.
Para los detalles sobre la conexión
Bluetooth, consulte Registro de sus
dispositivos Bluetooth en la página 14.
p El método de conexión del cable varía en
función del dispositivo.
Para más información, consulte
Conexión de dispositivos Android™ en la
página 82.
3 Muestre la pantalla de Selección
de fuente AV.
Para los detalles sobre las operaciones,
consulte Visualización de la pantalla de
función AV en la página 12.
4 Pulse [aha] en la pantalla de selec-
ción de la fuente AV.
Cuando pulse [aha], este producto empe-
zará a establecer una conexión Bluetooth.
Una vez establecida la conexión correcta-
mente, se activarán las teclas del panel táctil
de la pantalla “aha”.
5 Utilice las teclas del panel táctil
de la pantalla para controlar Aha
Radio.
Para los detalles, consulte Utilización
de las teclas del panel táctil en la
página 46.
Operaciones con los botones
de hardware
Pulse el botón TRK.
Puede omitir contenido hacia delante o
hacia atrás.
Uso de iDatalink
Si conecta el adaptador iDatalink opcional,
puede acceder a la fuente de radio por saté-
lite que se proporciona para el vehículo y la
información del vehículo se puede mostrar
en este producto.
Importante
Para obtener información sobre la insta-
lación del adaptador iDatalink, consulte
el manual de instrucciones del adapta-
dor iDatalink.
Tras instalar el adaptador iDatalink, ase-
gúrese de comprobar el funcionamiento.
Para obtener más información sobre los
modelos de vehículos compatibles con el
adaptador iDatalink, consulte la informa-
ción de nuestro sitio web.
Las funciones y las pantallas varían en
función del modelo de vehículo. Para
obtener más información sobre las fun-
ciones que están disponibles para cada
modelo, consulte nuestro sitio web.
La pantalla de lista de iDatalink se puede
desplazar hacia arriba o hacia abajo por
páginas.
Recuerde que necesita el número de dis-
positivo de este producto y un ordenador
con acceso a Internet para programar el
módulo Maestro RR. Para más informa-
ción de resolución de problemas sobre
las funciones “iDatalink”, visite www.
idatalinkmaestro.com/support o llame al
número gratuito de soporte técnico de
iDatalink Maestro 877.212.6169 ext 7900.
Activación de iDatalink
Maestro
Antes de utilizar y/o conectar el adapta-
dor iDatalink Maestro, deberá grabar en
la memoria flash del módulo Maestro el
firmware adecuado para el vehículo y la
unidad principal.
■ Actualización del módulo iData-
link Maestro
1 Encontrará los últimos seis dígitos
(número de dispositivo) en la eti-
queta del paquete de este producto
o en el propio producto.
p Para actualizar el módulo iDatalink
Maestro necesita introducir el número de
dispositivo. Anote el número de disposi-
tivo si fuera necesario.
p También puede comprobar el número de
dispositivo en la pantalla “Información
de firmware” de este producto.
Para más información, consulte
Visualización de la versión del firmware
en la página 65.
2 Acceda al sitio web de Automotive
Data Solutions Inc. (www.ida-
talinkmaestro.com/) y siga las
instrucciones en pantalla para
configurar el firmware que desee.
p Cuando se le solicite el número de serie,
introduzca el número de dispositivo de
este producto.
3 Instale el firmware específico del
vehículo o de la unidad principal en
el módulo iDatalink Maestro.
Para los detalles, visite el sitio web de
Automotive Data Solutions Inc.
4 Conecte este producto a iDatalink
Maestro y, a continuación, instale
este producto en el vehículo.
La función iDatalink estará activa.
Procedimiento de inicio
1 Muestre la pantalla de Selección
de fuente AV.
Para los detalles sobre las operaciones,
consulte Visualización de la pantalla de
función AV en la página 12.
2 Pulse [My Vehicle] en la pantalla
de Selección de fuente AV.
3 Pulse [USB/iPod], [SiriusXM] o
[Bluetooth Audio] si desea utilizar
iDatalink.
4 Utilice las teclas del panel táctil de
la pantalla para controlar la fun-
ción OEM.
USB/iPod (Reproductor multimedia)
1 32
8
4
5
7
a
9
6
1 Muestra la lista de fuentes.
Para los detalles, consulte Selección de
una fuente frontal en la lista de fuentes
en la página 13.
2 Muestra la pantalla de Ajuste de hora
y fecha.
Para los detalles, consulte Ajuste de la
hora y la fecha en la página 76.
3 Muestra la pantalla de Menú de
ajustes.
4 Recupera las curvas del ecualizador.
Para los detalles, consulte Utilización del
ecualizador en la página 69.
5 Selecciona una pista de la lista.
6 Cambia la visualización del texto
entre información de etiqueta e infor-
mación de archivo/carpeta.
7 Muestra la pantalla de Menú del
teléfono.
Para los detalles, consulte Visualización
del menú del teléfono en la página 17.
8 Cambia a la página siguiente o ante-
rior de teclas del panel táctil.
9 Las funciones y las visualizaciones
varían dependiendo del tipo de
adaptador iDatalink conectado y del
modelo del vehículo.
a Cambia entre reproducción y pausa.
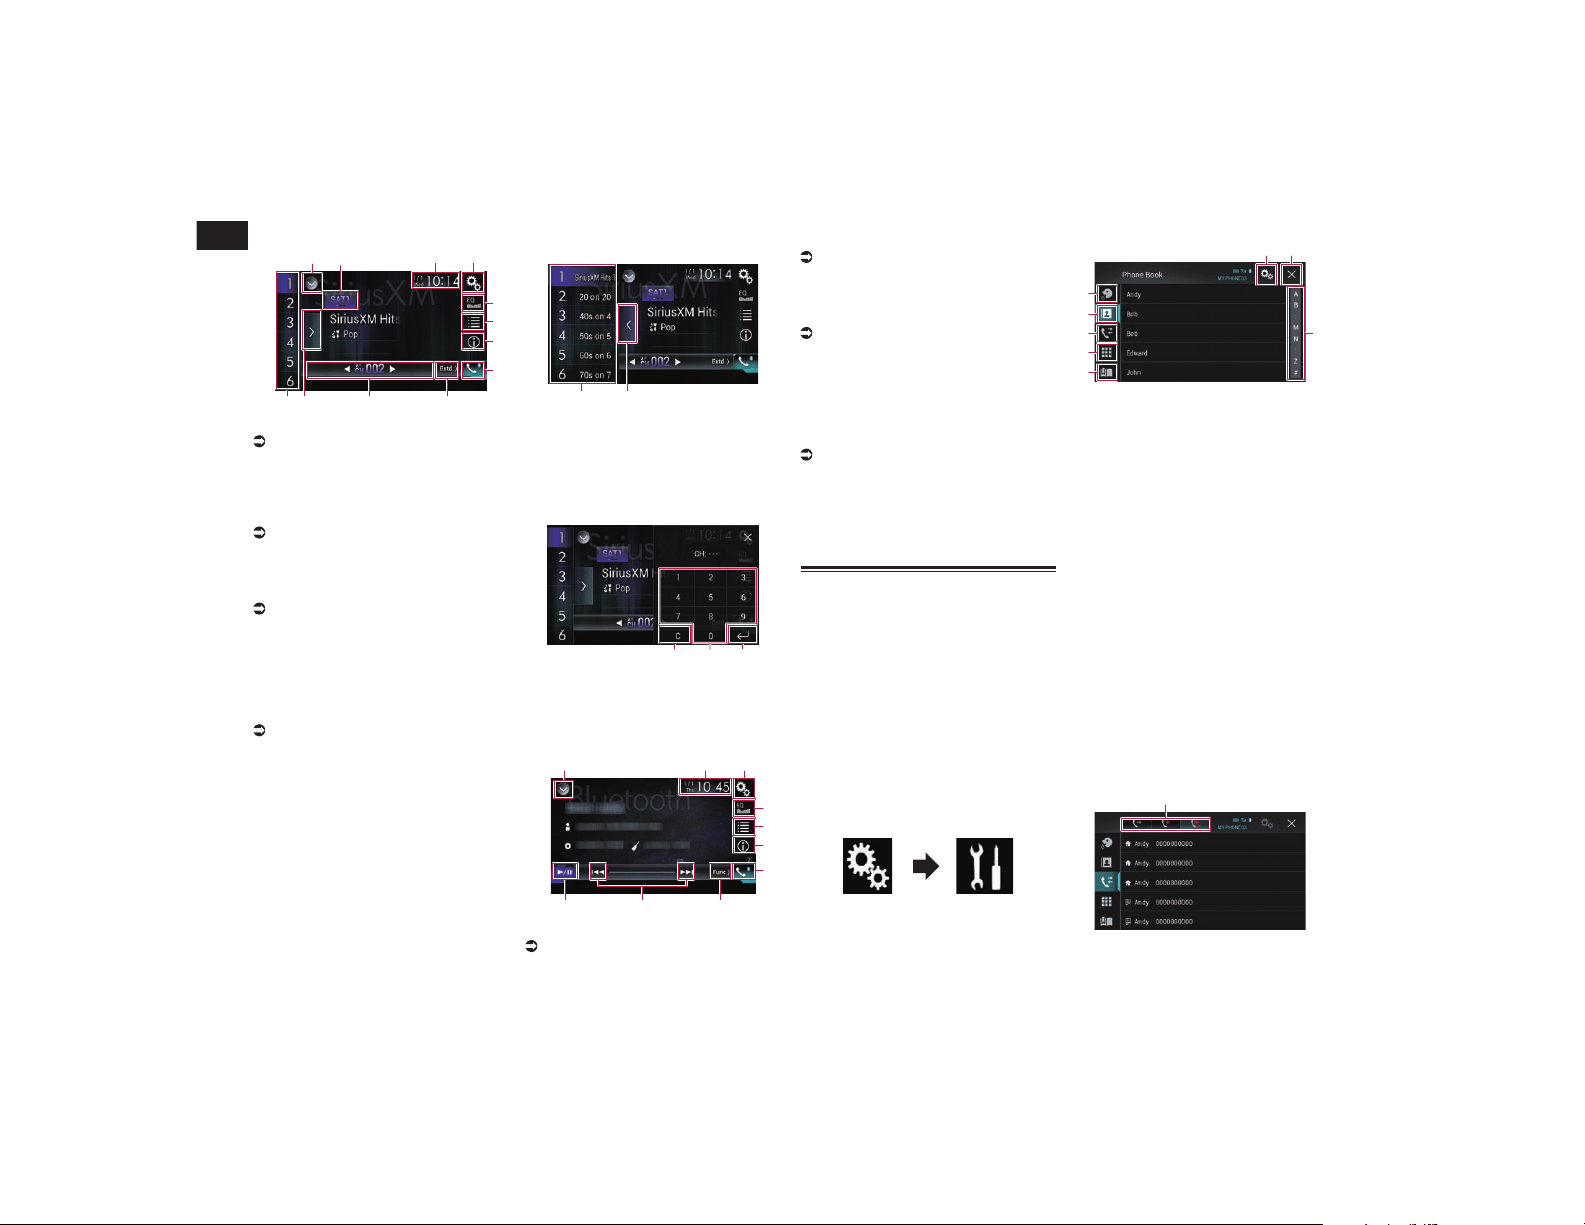
16
Capítulo
48
Es
Radio por satélite
1 4
9
5
6
8
c a
7
2
b
3
1 Muestra la lista de fuentes.
Para los detalles, consulte Selección de
una fuente frontal en la lista de fuentes
en la página 13.
2 Selecciona una banda.
3 Muestra la pantalla de Ajuste de hora
y fecha.
Para los detalles, consulte Ajuste de la
hora y la fecha en la página 76.
4 Muestra la pantalla de Menú de
ajustes.
5 Recupera las curvas del ecualizador.
Para los detalles, consulte Utilización del
ecualizador en la página 69.
6 Selecciona un canal de la lista.
7 Cambia la visualización del texto
entre la información del canal actual y
la información del contenido actual.
8 Muestra la pantalla de Menú del
teléfono.
Para los detalles, consulte Visualización
del menú del teléfono en la página 17.
9 Cambia a la página siguiente o ante-
rior de teclas del panel táctil.
a Las funciones y las visualizaciones
varían dependiendo del tipo de
adaptador iDatalink conectado y del
modelo del vehículo.
b Muestra los canales de presintonía.
c Selecciona un canal de presintonía.
Selección de un canal de presintonía de
la lista de canales de presintonía
1 2
1 Teclas de sintonización de presintonía
2 Tecla de visualización de lista de
canales de presintonía
Selección de un canal de SiriusXM
directamente
1 2 3
1 Tecla de borrado
2 Teclas numéricas
3 Tecla Entrar
Audio Bluetooth
4
5
7
6
8
a 9
1 2 3
1 Muestra la lista de fuentes.
Para los detalles, consulte Selección de
una fuente frontal en la lista de fuentes
en la página 13.
2 Muestra la pantalla de Ajuste de hora
y fecha.
Para los detalles, consulte Ajuste de la
hora y la fecha en la página 76.
3 Muestra la pantalla de Menú de
ajustes.
4 Recupera las curvas del ecualizador.
Para los detalles, consulte Utilización del
ecualizador en la página 69.
5 Selecciona una pista de la lista.
6 Cambia la visualización del texto
entre información de etiqueta e infor-
mación de archivo/carpeta.
7 Muestra la pantalla de Menú del
teléfono.
Para los detalles, consulte Visualización
del menú del teléfono en la página 17.
8 Cambia a la página siguiente o ante-
rior de teclas del panel táctil.
9 Hace saltar archivos hacia delante o
hacia atrás.
a Cambia entre reproducción y pausa.
Teléfono manos libres
Si conecta este producto al sistema del bus
del vehículo mediante un adaptador iData-
link (se vende por separado), este producto
puede acceder al teléfono manos libres para
el vehículo.
p Esta función no está disponible durante
una llamada mediante este producto o
mientras se usa la función de reconoci-
miento de voz.
■ Ajuste de Bluetooth
1 Pulse el botón HOME para mostrar
la pantalla de Menú superior.
2 Pulse las siguientes teclas en el
orden que se indica.
Aparecerá la pantalla “Sistema”.
3 Pulse [Config. OEM].
p Las funciones y las visualizaciones varían
dependiendo del tipo de adaptador iData-
link conectado y del modelo del vehículo.
■ Pantalla de la agenda telefónica
1
6
8
2
3
4
7
5
1 Cambia a la función de reconoci-
miento de voz.
2 Cambia a la lista de la agenda
telefónica.
3 Cambia a los registros de llamadas
perdidas, recibidas y marcadas.
4 Cambia el modo para introducir el
número de teléfono directamente.
5 Las funciones y las visualizaciones
varían dependiendo del tipo de
adaptador iDatalink conectado y del
modelo del vehículo.
6 Muestra la pantalla de Menú de
ajustes.
p Se muestran los menús [Conexión] y
[Configuración Bluetooth]. Las fun-
ciones y las visualizaciones disponibles
en los menús varían en función del tipo
de dispositivo conectado del adaptador
iDatalink y el modelo del vehículo.
7 Cierra la pantalla.
8 Muestra las entradas en la lista por el
carácter inicial.
■ Pantalla de lista de historial
1
1 Cambia al historial de llamadas.
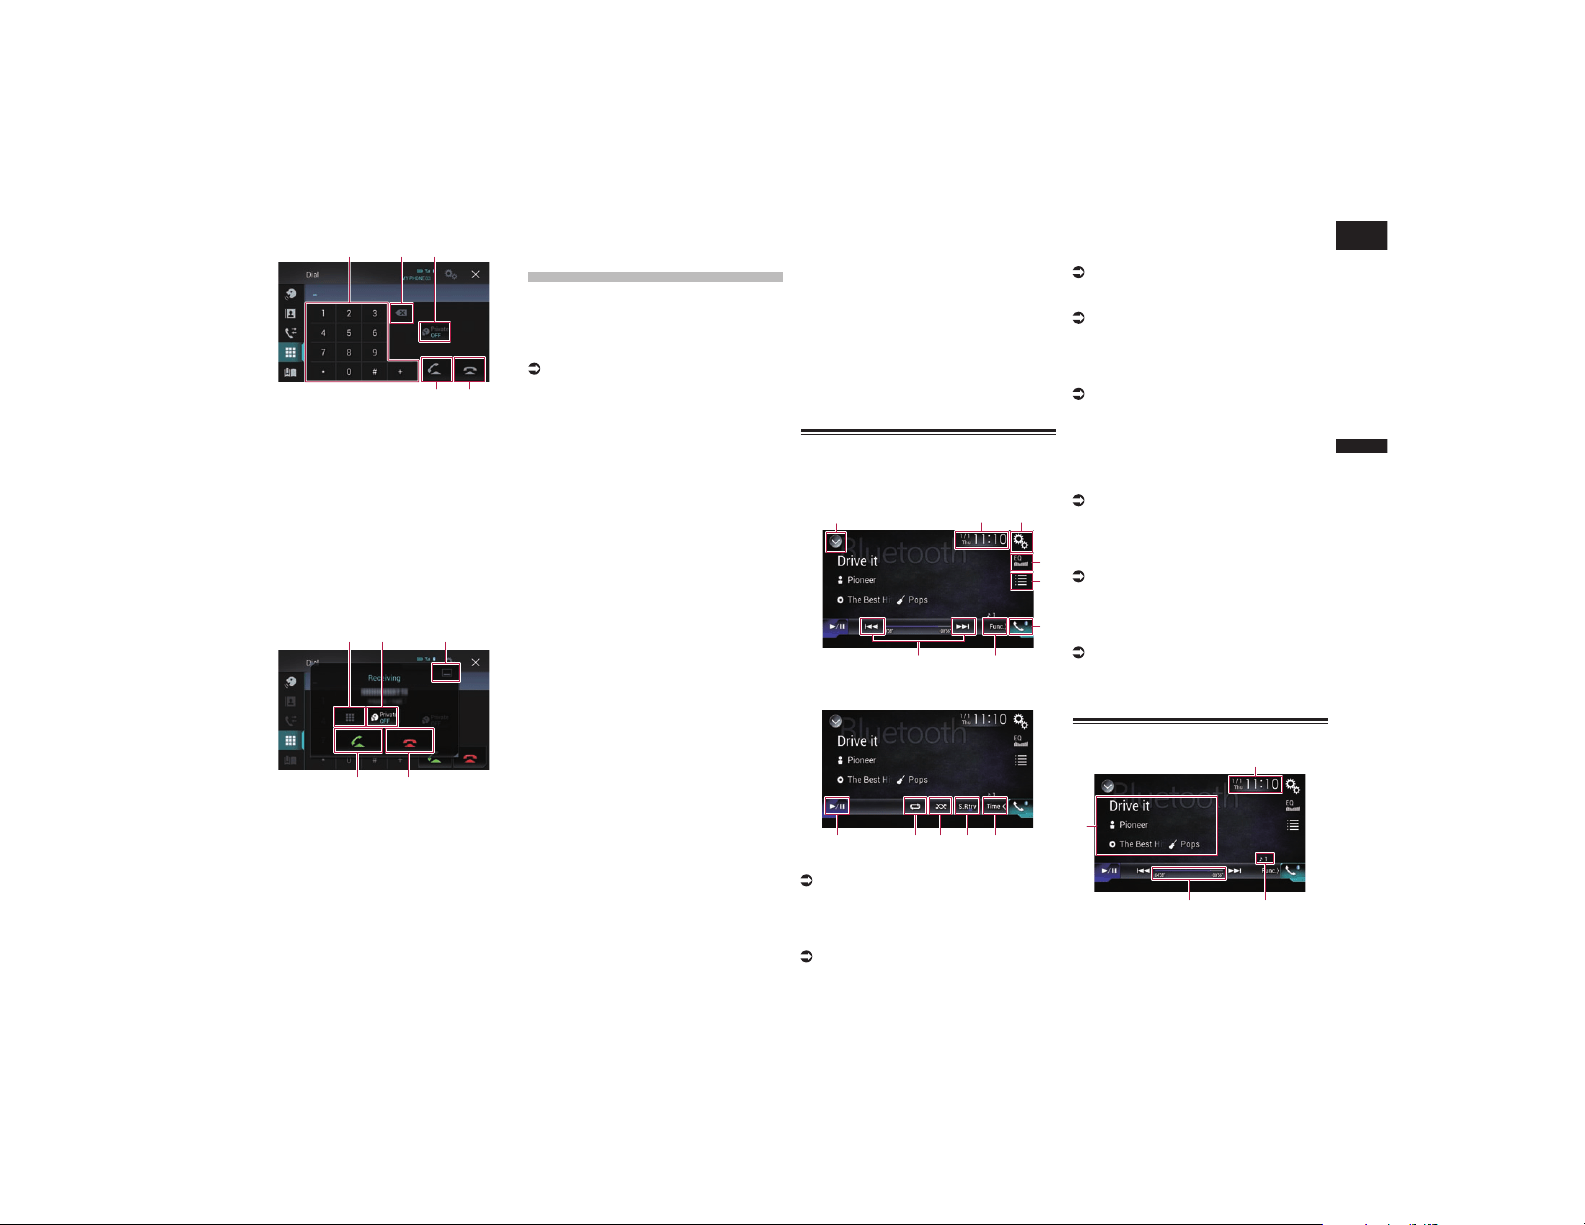
Español
17
Capítulo
49
Es
■ Pantalla de marcación
1 2 3
4 5
1 Panel de marcado
2 Elimina un dígito. Manténgalo pul-
sado para eliminar todos los dígitos.
3 Activa o desactiva el modo privado.
4 Realiza una llamada telefónica
cuando se selecciona un número de
teléfono.
Cambia entre llamadas en espera.
5 Finaliza una llamada.
Rechaza una llamada entrante.
Cancela la llamada en espera.
■ Pantalla de conrmación de
marcación
1 2
3
54
1 Cambia el modo para introducir el
número de teléfono directamente.
2 Activa o desactiva el modo privado.
3 Minimiza la pantalla de confirmación
de marcación.
4 Acepta una llamada entrante.
5 Finaliza una llamada.
Utilización de un
reproductor de audio
Bluetooth
Puede controlar un reproductor de audio
Bluetooth.
p Antes de utilizar el reproductor de audio
Bluetooth, deberá registrar y conectar el
dispositivo a este producto.
Para los detalles, consulte Registro
de sus dispositivos Bluetooth en la
página 14.
p Las operaciones podrían variar en fun-
ción del reproductor de audio Bluetooth.
p En función del reproductor de audio
Bluetooth conectado a este producto,
las operaciones disponibles con este
producto podrían estar limitadas a los
siguientes dos niveles:
— A2DP (Advanced Audio Distribution
Profile): solo es posible reproducir las
canciones de su reproductor de audio.
— A2DP y AVRCP (Perfil de control remoto
de audio/vídeo): es posible reproducir,
pausar, seleccionar canciones, etc.
p Dado que en el mercado existen numero-
sos reproductores de audio Bluetooth, las
operaciones que podrá realizar con este
reproductor de audio Bluetooth utilizando
este producto varían considerablemente.
Consulte el manual de instrucciones
que incluye su reproductor de audio
Bluetooth, así como este manual, mien-
tras controla su reproductor a través de
este producto.
p Mientras esté escuchando canciones
que se encuentren en su reproductor de
audio Bluetooth, evite utilizar su teléfono
móvil siempre que sea posible. Si intenta
utilizar su teléfono móvil, la señal podría
provocar ruidos durante la reproducción
de canciones.
p Incluso si cambia a otra fuente mientras
escucha una canción que se encuentre
en su reproductor de audio Bluetooth,
la reproducción de la canción seguirá
produciéndose.
p En función del reproductor de audio
Bluetooth conectado a este producto, las
operaciones de control del reproductor
a través de este producto podrían variar
con respecto a las que se explican en
este manual.
p Cuando esté hablando a través de un
teléfono móvil conectado a este producto
por medio de la tecnología inalámbrica
Bluetooth, podría pausarse la reproduc-
ción de canciones desde su reproductor
de audio Bluetooth conectado a este
producto.
p No podrá usar el reproductor de audio
Bluetooth cuando está conectado el
cable de conexión para usar AppRadio
Mode.
Utilización de las teclas del
panel táctil
Pantalla de reproducción (página 1)
8 7
1 3
2
4
5
6
Pantalla de reproducción (página 2)
79abc
1 Muestra la lista de fuentes.
Para los detalles, consulte Selección de
una fuente frontal en la lista de fuentes
en la página 13.
2 Muestra la pantalla de Ajuste de hora
y fecha.
Para los detalles, consulte Ajuste de la
hora y la fecha en la página 76.
3 Muestra la pantalla de Menú de
ajustes.
4 Recupera las curvas del ecualizador.
Para los detalles, consulte Utilización del
ecualizador en la página 69.
5 Selecciona un archivo de la lista.
Para los detalles, consulte Selección de
archivos de la lista de nombres de archivo
en la página 50.
6 Muestra la pantalla de Menú del
teléfono.
Para los detalles, consulte Visualización
del menú del teléfono en la página 17.
7 Cambia a la página siguiente o ante-
rior de teclas del panel táctil.
8 Hace saltar archivos hacia delante o
hacia atrás.
9 Utiliza la función “Sound Retriever”.
Para los detalles, consulte Ajuste de
la función “Sound Retriever” en la
página 76.
a Reproduce archivos en orden
aleatorio.
Para los detalles, consulte Reproducción
de archivos en orden aleatorio en la
página 50.
b Ajusta el rango de reproducción de
repetición.
Para los detalles, consulte Ajuste del
rango de reproducción de repetición en la
página 50.
c Cambia entre reproducción y pausa.
Lectura de la pantalla
4
1
23
1 Fecha y hora actuales
2 Indicador de número de archivo
Muestra el número de archivo que está
actualmente en reproducción (en caso de
estar disponible).
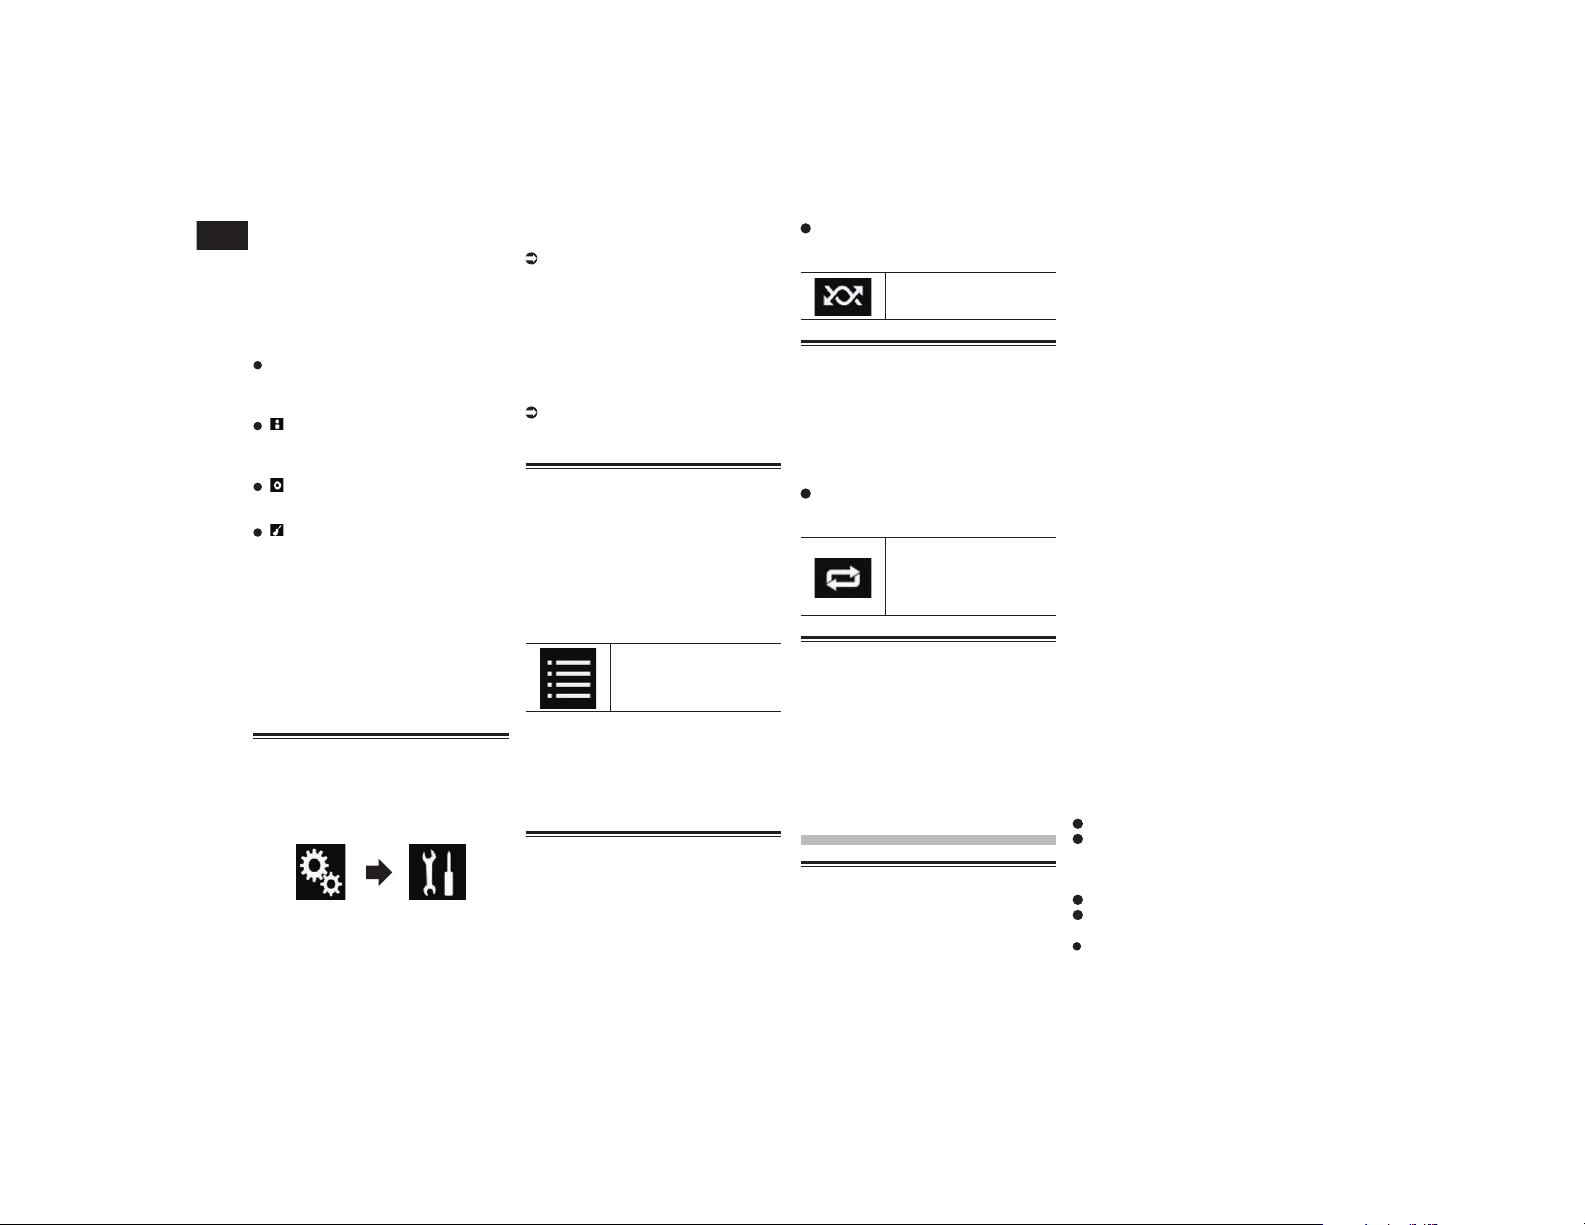
18
Capítulo
50
Es
3 Indicador de tiempo de reproducción
Muestra el tiempo transcurrido de repro-
ducción del archivo actual (en caso de
estar disponible).
4 Información del archivo actual
Si el reproductor de audio Bluetooth
conectado cuenta con AVRCP 1.3, se
mostrará la siguiente información de
archivo.
Título de la pista
Muestra el título de la pista que se está
reproduciendo actualmente (en caso de
estar disponible).
: Nombre del intérprete
Muestra el nombre del intérprete de la
pista que se está reproduciendo actual-
mente (en caso de estar disponible).
: Título del álbum
Muestra el título del álbum del archivo
actual (en caso de estar disponible).
: Género
Muestra el género del archivo actual (en
caso de estar disponible).
p En los casos siguientes, la información
del archivo se mostrará únicamente
cuando comience o se reanude la repro-
ducción de uno de los archivos:
— Hay un reproductor de audio Bluetooth
compatible con AVRCP1.3 conectado y
la reproducción se inicia manejando el
dispositivo.
— Se selecciona otro archivo mientras la
reproducción está en pausa.
Procedimiento de inicio
1 Pulse el botón HOME para mostrar
la pantalla de Menú superior.
2 Pulse las siguientes teclas en el
orden que se indica.
Aparecerá la pantalla “Sistema”.
3 Pulse [Config. fuentes AV].
4 Compruebe que “Bluetooth Audio”
se haya encendido.
p El ajuste predeterminado es “Act.”.
5 Muestre la pantalla de Selección
de fuente AV.
Para los detalles sobre las operaciones,
consulte Visualización de la pantalla de
función AV en la página 12.
6 Pulse [Bluetooth Audio] en la pan-
talla de Selección de la fuente AV.
Aparecerá la pantalla “Bluetooth”.
7 Utilice las teclas del panel táctil de
la pantalla para controlar el repro-
ductor de audio Bluetooth.
Para los detalles, consulte Utilización
de las teclas del panel táctil en la
página 49.
Selección de archivos de la
lista de nombres de archivo
La lista de nombres de archivo le permite ver
la lista de títulos de pistas del reproductor de
audio Bluetooth y le permite seleccionar uno
para su reproducción.
p Esta función está disponible únicamente
cuando el reproductor de audio Bluetooth
conectado admite AVRCP 1.4.
1 Pulse la siguiente tecla.
Muestra la lista de nombres
de archivos.
2 Pulse un archivo de la lista para
reproducirlo.
p Al pulsar una de las carpetas de la lista se
mostrará su contenido. Puede reproducir
uno de los archivos de la lista pulsando
en él.
Reproducción de archivos en
orden aleatorio
Todos los archivos que se encuentran dentro
del rango de reproducción de repetición
pueden reproducirse en orden aleatorio con
tan solo pulsar una tecla.
p Esta función está disponible únicamente
cuando el reproductor de audio Bluetooth
conectado admite AVRCP 1.3.
Pulse la siguiente tecla repetida-
mente hasta que aparezca la confi-
guración deseada.
Activa o desactiva la repro-
ducción aleatoria.
Ajuste del rango de reproduc-
ción de repetición
El rango de reproducción de repetición
puede cambiarse con tan solo pulsar una
tecla.
p Esta función está disponible únicamente
cuando el reproductor de audio Bluetooth
conectado admite AVRCP 1.3.
Pulse la siguiente tecla repetida-
mente hasta que aparezca la confi-
guración deseada.
Cambia el intervalo de repe-
tición de reproducción entre
el archivo actual y todos los
archivos de audio del repro-
ductor de audio Bluetooth.
Operaciones con los botones
de hardware
Pulse el botón TRK.
Puede omitir archivos hacia delante o hacia
atrás.
Mantenga pulsado el botón TRK.
Puede realizar el retroceso rápido o avance
rápido.
Utilización de la radio
por satélite SiriusXM
®
Funciones de la radio por saté-
lite SiriusXM
Se puede usar este producto para controlar
SiriusXM Connect Vehicle Tuner, que se
vende por separado.
Para obtener información sobre cómo insta-
lar SiriusXM Connect Vehicle Tuner, consulte
la guía de instalación que se entrega con
el mismo.
Solo SiriusXM
®
le ofrece más de lo que le
gusta escuchar, en un solo lugar. Consiga
más de 140 canales, incluida música sin
anuncios, la mejor información depor-
tiva, noticias, tertulias y entretenimiento.
Bienvenido al mundo de la radio por satélite.
Es necesario disponer de un sintonizador
SiriusXM Vehicle y estar suscrito. Para más
información, visite www.siriusxm.com.
■ Suscripción al servicio de radio
por satélite SiriusXM
1 Seleccione SiriusXM como fuente.
Debería poder sintonizar el Canal 1. Si no
puede, asegúrese de que SiriusXM Connect
Vehicle Tuner esté instalado correctamente
tal y como se describe en la guía de instala-
ción del sintonizador.
2 Cambie al Canal 0 y compruebe el
identificador de radio.
El identificador de radiofrecuencia de
SiriusXM Radio se puede encontrar sintoni-
zando el Canal 0. El identificador de radio-
frecuencia también se puede encontrar en
la parte inferior de la pantalla de SiriusXM
Connect Vehicle Tuner.
Tenga en cuenta que el identificador de
radiofrecuencia de SiriusXM no incluye las
letras I, O, S o F.
Necesitará este número para activar su
suscripción.
3 Active el servicio online o por
teléfono.
En EE. UU., puede realizar la activación en
línea o llamando al centro de atención al
oyente de SiriusXM:
Visite www.siriusxm.com/activatenow
Llame al centro de atención al oyente de
SiriusXM en el 1-866-635-2349
Para suscripciones canadienses, póngase
en contacto con:
Visite www.siriusxm.ca/activatexm
Llame al centro de atención al cliente de
XM en el 1-877-438-9677
Los satélites SiriusXM enviarán un men-
saje de activación a su sintonizador. Una
vez que el sintonizador haya recibido
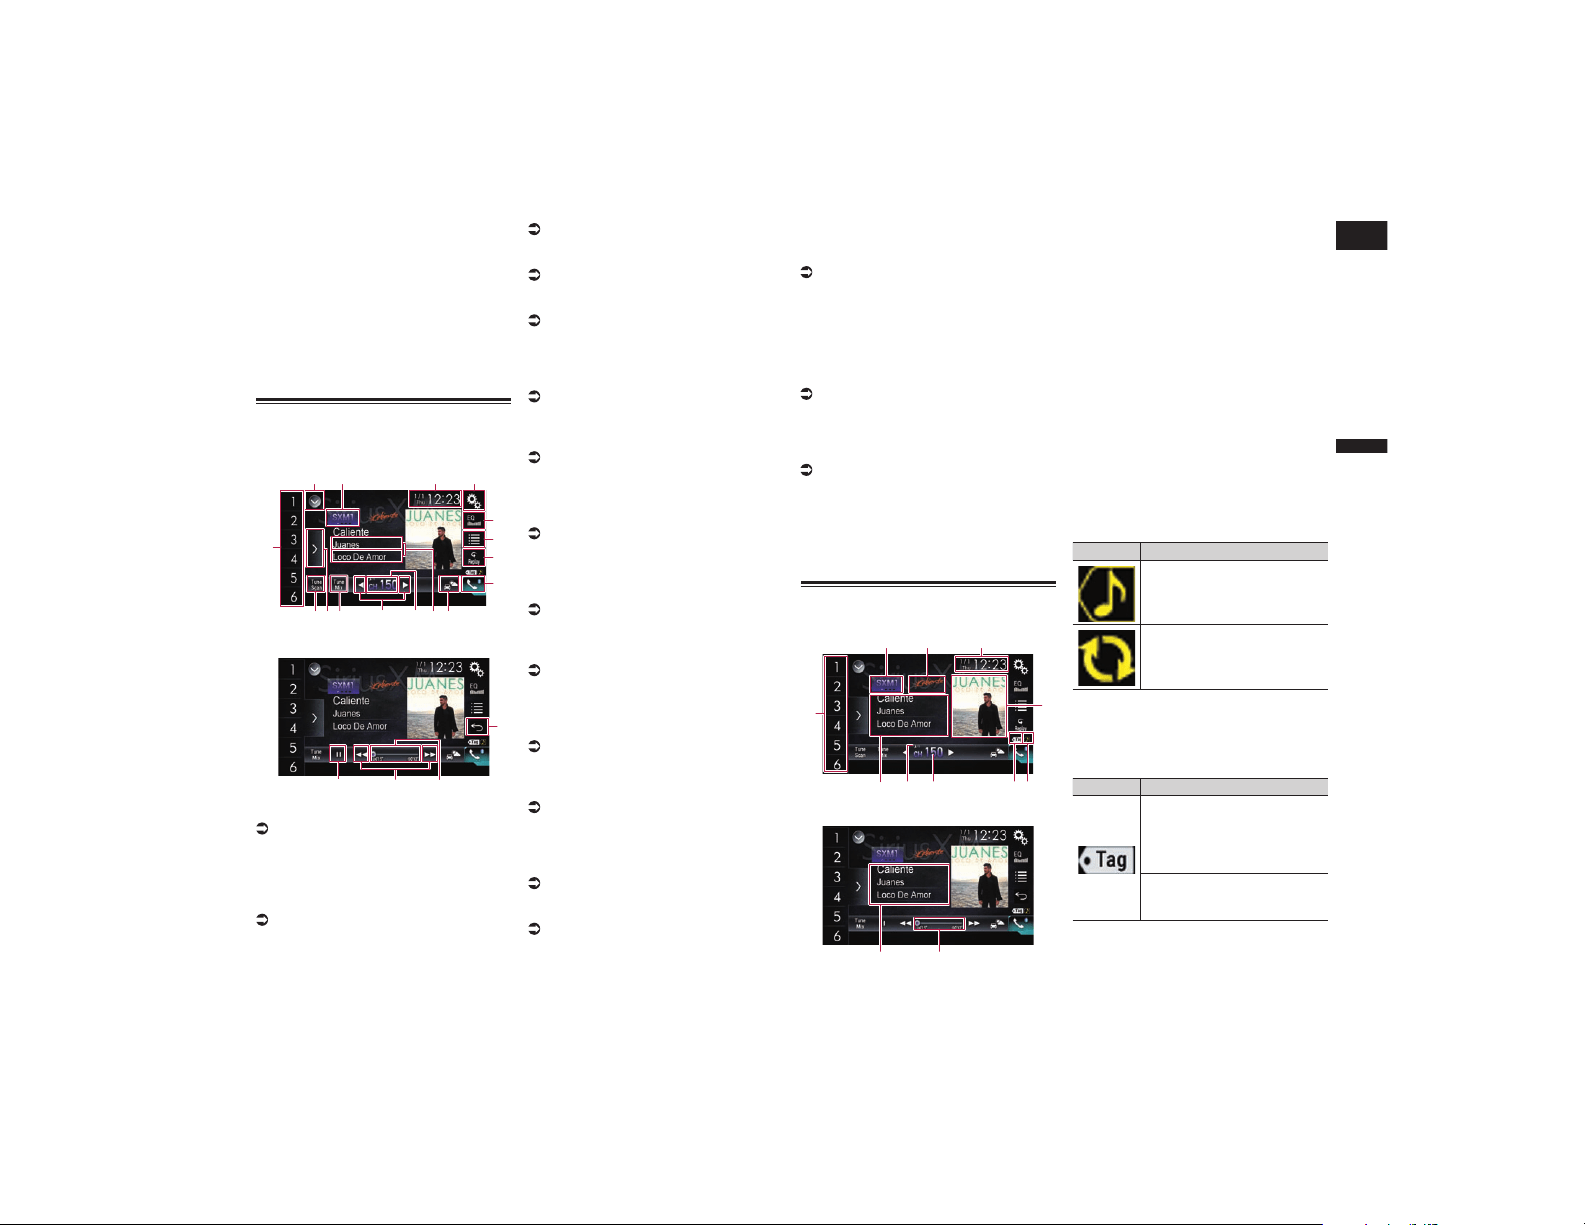
Español
18
Capítulo
51
Es
el mensaje, se muestra “Suscripción
actualizada”.
Una vez que se haya suscrito, los satélites
SiriusXM enviarán un mensaje de activa-
ción a su sintonizador.
El proceso de sintonización suele llevar
entre 10 y 15 minutos, pero en algunos
casos puede demorarse hasta una
hora. No apague este producto mien-
tras se esté visualizando el mensaje de
activación.
Utilización de las teclas del
panel táctil
Pantalla de directo
1 2 43
5
7
6
8
bc 9ae
df
g
Pantalla de reproducción
hij
7
1 Muestra la lista de fuentes.
Para los detalles, consulte Selección de
una fuente frontal en la lista de fuentes
en la página 13.
2 Selecciona una banda.
3 Muestra la pantalla de Ajuste de hora
y fecha.
Para los detalles, consulte Ajuste de la
hora y la fecha en la página 76.
4 Muestra la pantalla de Menú de
ajustes.
5 Recupera las curvas del ecualizador.
Para los detalles, consulte Utilización del
ecualizador en la página 69.
6 Selecciona un canal de la lista.
Para más información, consulte
Selección de un canal en una lista de
todos los canales en la página 52.
Para más información, consulte
Selección de un canal de la lista de
categorías en la página 52.
7 Cambia entre la pantalla de directo y
la pantalla de reproducción.
Para los detalles, consulte Uso de la
función Replay™ en la página 53.
8 Muestra la pantalla de Menú del
teléfono.
Para los detalles, consulte Visualización
del menú del teléfono en la página 17.
9 Cambia al canal que emite informa-
ción del tráfico y del tiempo de la
ciudad seleccionada.
Para más información, consulte
Comprobación de la información del
tráfico y del tiempo actualizada en la
página 54.
a Memoriza el canal actual.
Para los detalles, consulte Memorización
del contenido actual en la página 55.
Almacena la información de la can-
ción en un iPod.
Para los detalles, consulte
Almacenamiento de la información de
canción en un iPod (etiquetado de iTunes)
en la página 76.
b Selecciona un canal directamente.
Para los detalles, consulte Selección de
un canal de SiriusXM directamente en la
página 52.
c Realiza la sintonización manual.
Para los detalles, consulte Sintonización
manual en la página 52.
d Reproduce canciones de los canales
de música almacenados como prees-
tablecidos en la banda actual.
Para más información, consulte Uso de
TuneMix™ en la página 54.
e Muestra los canales de presintonía.
Para los detalles, consulte Selección de
un canal de presintonía de la lista de
canales de presintonía en la página 52.
f Explora todas las canciones de los
canales de música que se encuentran
en la banda preestablecida actual.
Para más información, consulte Uso de
TuneScan™ en la página 53.
g Recupera el canal de presintonía
almacenado en una tecla desde la
memoria con solo pulsar la tecla.
Almacena la frecuencia de radio
actual en una tecla para recuperarla
posteriormente al pulsar la tecla.
Para los detalles, consulte
Almacenamiento de canales de emisión
en la página 52.
h Cambia el punto de reproducción
arrastrando la tecla.
Para los detalles, consulte Uso de la barra
de tiempo en la página 14.
i Salta archivos hacia delante o atrás
con solo pulsar una tecla.
Avanza o retrocede rápidamente al
mantener pulsada la tecla.
j Cambia entre reproducción y pausa.
Lectura de la pantalla
Pantalla de directo
5
4
1
2 3
9
a
8 67
Pantalla de reproducción
c b
1 Indicador de banda
Muestra la banda sintonizada: SXM1,
SXM2, SXM3 o destacada.
p “Destacada” solo está disponible cuando
“Favoritos ofrecidos” se ajusta en
“Act.”.
2 Logotipo del nombre del canal
Muestra el logotipo del nombre del canal
que se está sintonizando.
3 Fecha y hora actuales
4 Portada de álbum
Muestra la imagen de la canción actual
(en caso de estar disponible).
p Si la portada del álbum no está disponi-
ble, se mostrará la imagen del logotipo de
SiriusXM.
5 Indicador de estado de etiquetado de
canciones de iTunes
®
Muestra el estado de la información de la
canción almacenada en este producto.
p El icono se muestra en todas las panta-
llas de función de las fuentes AV.
Indicador Significado
Aparece cuando la etiqueta de
información de la canción se
almacena en este producto.
Aparece cuando se transfiere
la etiqueta de información de la
canción a un iPod.
6 Indicador de etiquetado de iTunes
®
Indica canciones en las que se puede
realizar el etiquetado de iTunes.
p El icono se muestra en todas las panta-
llas de función de las fuentes AV.
Indicador Significado
Aparece cuando este producto
recibe una etiqueta de canción
de iTunes que se puede almace-
nar y después descargar en un
iPod para su posterior compra.
Parpadea cuando este producto
está almacenando la informa-
ción de etiqueta de la canción.
7 Indicador de número de canal
Muestra el número de canal en el
que el sintonizador está sintonizado
actualmente.
8 Indicador de nivel de señal
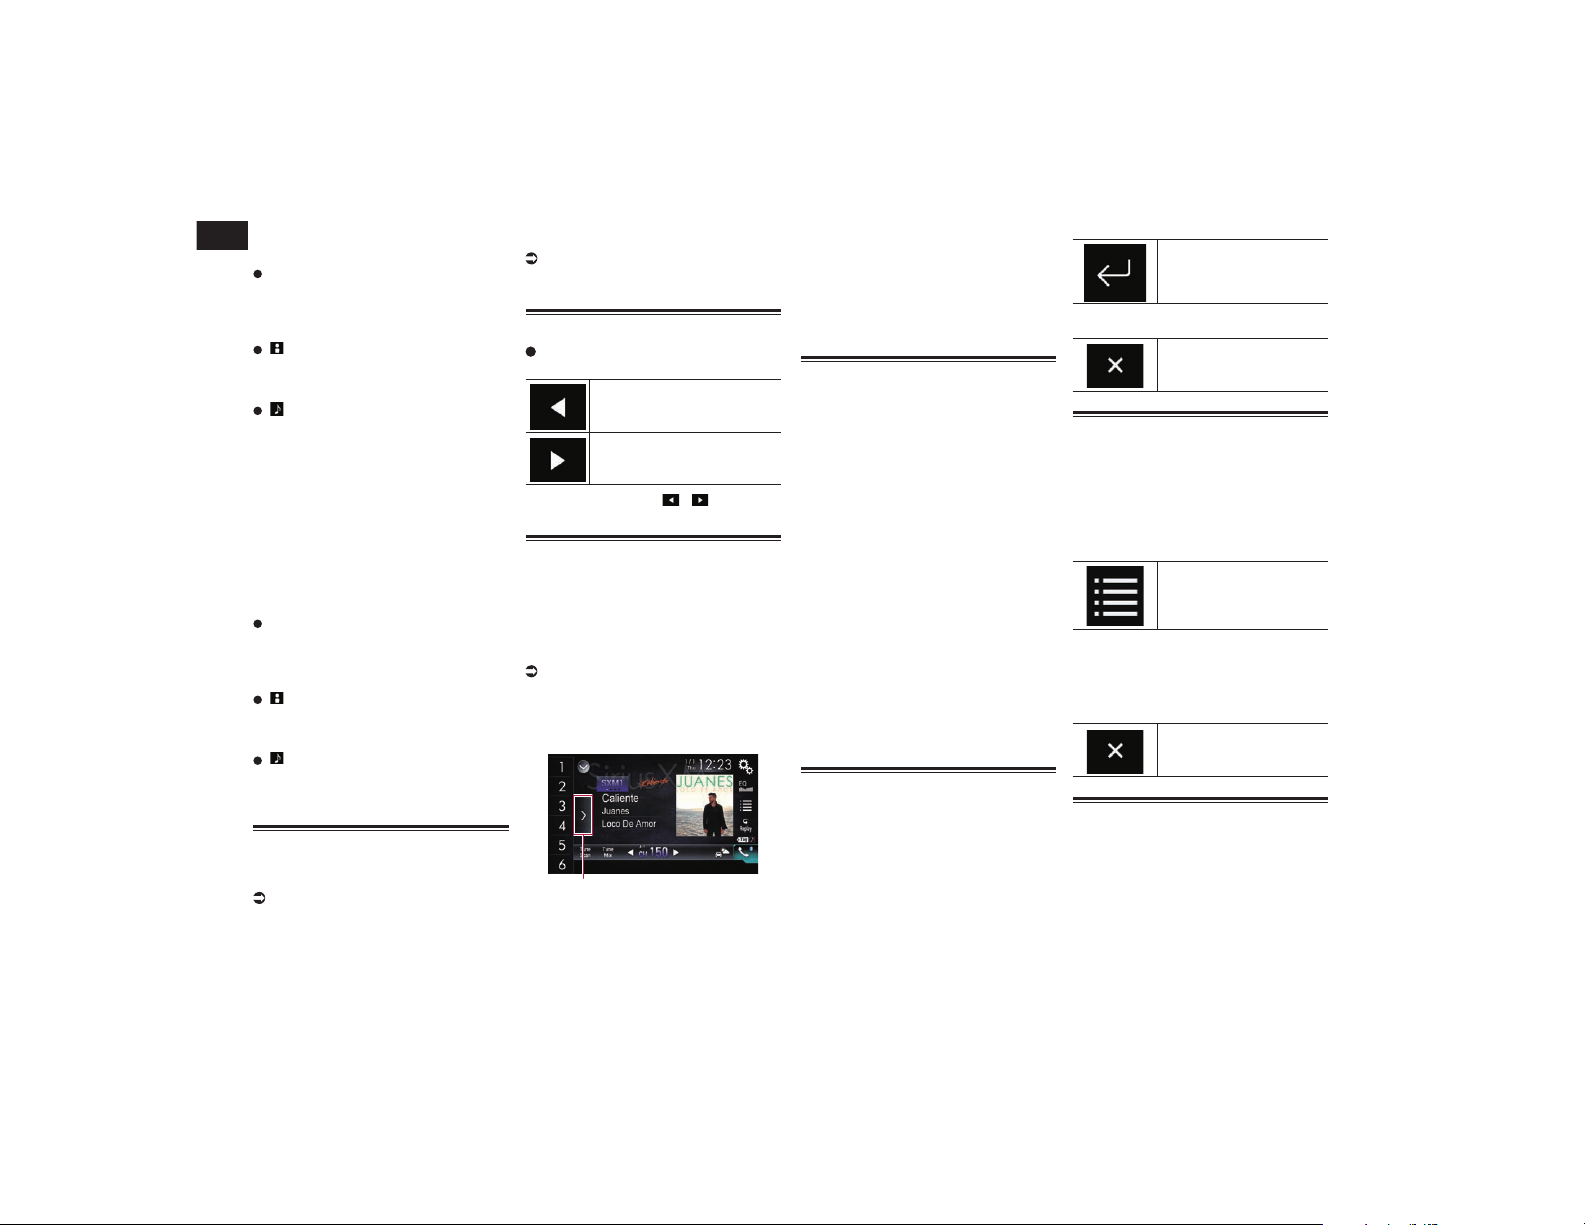
18
Capítulo
52
Es
9 Información del canal actual
Muestra la información detallada del
canal de emisión que se está recibiendo.
Nombre del canal/número del canal
Muestra el nombre del canal o el número
del canal que se está sintonizando.
p Se muestra “ID RADIO” cuando se
selecciona el Canal 0.
: Nombre del intérprete (artista)
Muestra el nombre del intérprete (artista)
de la canción actual (en caso de estar
disponible).
: Título de la canción (nombre del
programa)
Muestra el título de la canción actual
(programa).
a Indicador de número de presintonía
Resalta el elemento de presintonía
seleccionado.
b Indicador de tiempo de reproducción
Muestra el tiempo transcurrido de repro-
ducción de la emisión almacenada.
c Información del contenido actual
Muestra la información detallada sobre
el contenido que se está reproduciendo
actualmente.
Nombre del canal/número del canal
Muestra el nombre del canal o el número
del canal que se está sintonizando.
p Se muestra “ID RADIO” cuando se
selecciona el Canal 0.
: Nombre del intérprete (artista)
Muestra el nombre del intérprete (artista)
de la canción actual (en caso de estar
disponible).
: Título de la canción (nombre del
programa)
Muestra el título de la canción actual
(programa).
Procedimiento de inicio
1 Muestre la pantalla de Selección
de fuente AV.
Para los detalles sobre las operaciones,
consulte Visualización de la pantalla de
función AV en la página 12.
2 Pulse [SiriusXM] en la pantalla de
Selección de fuente AV.
Aparecerá la pantalla “SiriusXM”.
3 Utilice las teclas del panel táctil de
la pantalla para controlar la radio.
Para los detalles, consulte Utilización
de las teclas del panel táctil en la
página 51.
Sintonización manual
Pulse las siguientes teclas para
sintonizar manualmente.
Baja un canal.
Sube un canal.
p Si mantiene pulsado o , puede
saltar canales que emiten.
Selección de un canal de pre-
sintonía de la lista de canales
de presintonía
Una vez haya almacenado los canales de
emisión, podrá recuperar los canales de
presintonía de la memoria con una sola
pulsación de tecla.
Para los detalles, consulte
Almacenamiento de frecuencias de radio
en la página 24.
1 Pulse la tecla de visualización de la
lista de canales de presintonía.
1
1 Tecla de visualización de lista de canales
de presintonía
2 Pulse el elemento de la lista (“1” a
“6”) para cambiar a un canal regis-
trado como canal de presintonía.
p Si pulsa la tecla de visualización de la
lista de canales de presintonía mientras
se muestra la lista de canales de presinto-
nía, la lista desaparecerá y se mostrarán
las teclas de sintonización de presintonía.
Almacenamiento de canales
de emisión
Si pulsa cualquiera de las teclas de sinto-
nización de presintonía (“1” a “6”), puede
guardar fácilmente hasta seis canales de
radio para utilizarlos posteriormente (tam-
bién pulsando una tecla).
p Es posible que el canal de emisión no
se pueda almacenar, dependiendo del
mismo.
p Está función no está disponible en la
banda Destacada.
1 Seleccione el canal que desea
almacenar en la memoria.
2 Mantenga pulsada una tecla de
sintonización de presintonía [1] a
[6].
Se memorizará el canal seleccionado.
La próxima vez que pulse la misma tecla de
sintonización de presintonía “1” a “6”, se
recuperará el canal de la memoria.
p Se pueden memorizar un máximo de 18
canales, seis para cada una de las tres
bandas SiriusXM.
Selección de un canal de
SiriusXM directamente
Puede seleccionar un canal de emisión
introduciendo directamente el número de
canal deseado.
1 Pulse el número de canal en la
pantalla “SiriusXM”.
2 Pulse [0] a [9] para introducir el
número de canal deseado.
p Para eliminar los números introducidos
uno a uno, pulse [C].
3 Pulse la siguiente tecla.
Selecciona el canal de
SiriusXM del número
introducido.
4 Pulse la siguiente tecla.
Vuelve a la pantalla anterior.
Selección de un canal en una
lista de todos los canales
Puede seleccionar un canal entre cualquiera
de los canales disponibles.
p La lista de canales puede tardar en
mostrarse, dependiendo del estado de la
recepción de SiriusXM.
1 Pulse la siguiente tecla.
Muestra la pantalla de lista.
2 Seleccione la lista de todos los
canales.
3 Pulse el canal que desee.
4 Pulse la siguiente tecla.
Cierra la pantalla.
Selección de un canal de la
lista de categorías
Puede seleccionar un canal de las catego-
rías disponibles.
Los tipos de categorías disponibles depen-
den de los tipos de canales disponibles.
p La lista de canales puede tardar en
mostrarse, dependiendo del estado de la
recepción de SiriusXM.
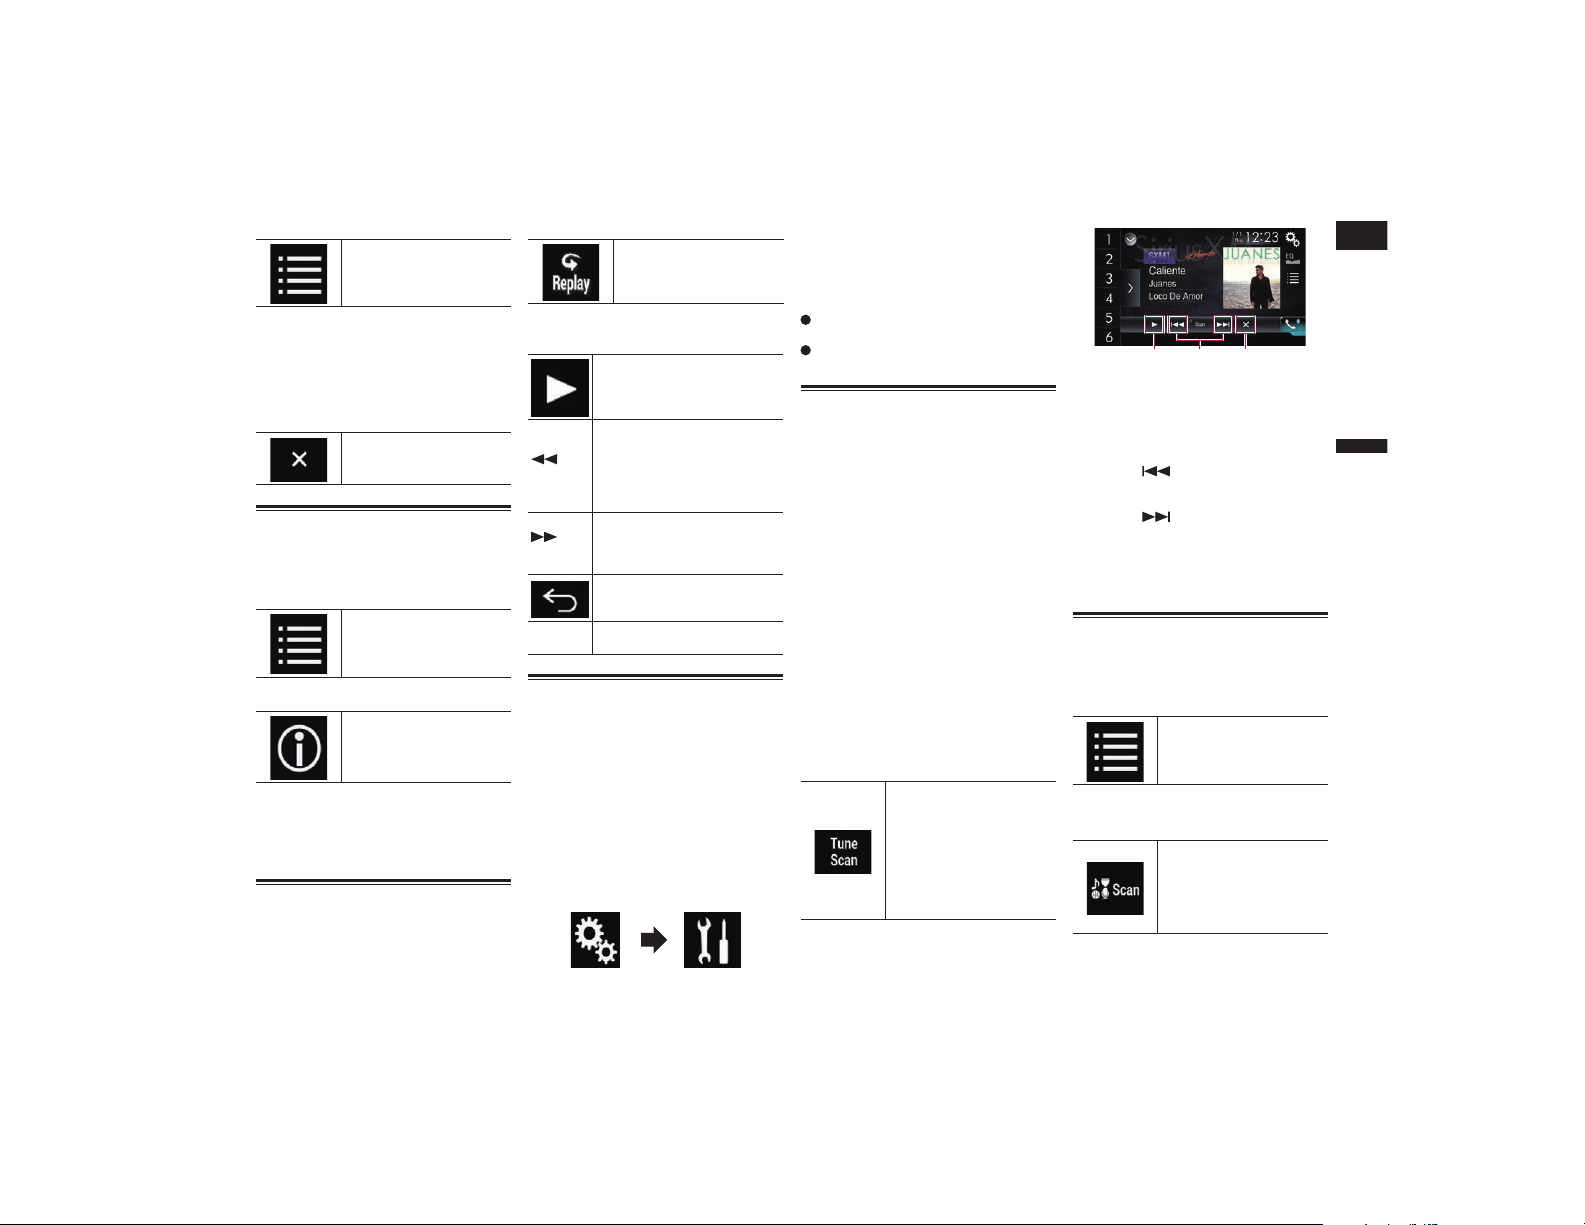
Español
18
Capítulo
53
Es
1 Pulse la siguiente tecla.
Muestra la pantalla de lista.
2 Pulse el nombre de categoría que
desee.
Se muestra la categoría de la jerarquía de la
lista de canales seleccionada.
3 Pulse el canal que desee.
4 Pulse la siguiente tecla.
Cierra la pantalla.
Cambio de la lista que se
muestra
Puede cambiar los tipos de lista cuando se
muestra una lista.
1 Pulse la siguiente tecla.
Muestra la pantalla de lista.
2 Pulse la siguiente tecla.
Cambia entre tipos de listas.
La lista que se muestra cambia en el
siguiente orden.
Nombre de canal—Nombre del intér-
prete—Título de la canción—Información
de contenido
Uso de la función Replay™
Puede realizar pausas, omitir contenido, rea-
lizar un retroceso rápido, realizar un avance
rápido o volver a reproducir el canal que está
escuchando en estos momentos.
1 Pulse la siguiente tecla.
Cambia a la visualización de
la barra de tiempo.
2 Pulse las siguientes teclas o boto-
nes para controlar la radio.
Cambia entre reproducción y
pausa.
(TRK)
Vuelve al principio del programa
actual. Púlselo de nuevo para
volver al programa anterior.
Manténgalo pulsado para
explorar en retroceso rápido el
contenido.
(TRK)
Salta al siguiente programa.
Manténgalo pulsado para
explorar en avance rápido el
contenido.
Sale del modo Replay y sin-
toniza la emisión en directo
actual.
Barra de
tiempo
Cambia el punto de reproduc-
ción arrastrando la tecla.
Ajuste de SiriusXM
TuneStart™
Inicia automáticamente canciones desde el
inicio cuando sintoniza uno de los canales
preestablecidos de la banda de presintonía
actual si TuneStart está activado.
p Esta función solo está disponible cuando
se selecciona “SiriusXM” como la
fuente.
1 Pulse el botón HOME para mostrar
la pantalla de Menú superior.
2 Pulse las siguientes teclas en el
orden que se indica.
Aparecerá la pantalla “Sistema”.
3 Pulse [Config. fuentes AV].
4 Pulse [Config. SiriusXM].
5 Pulse [Tune Start] repetidamente
hasta que aparezca la configura-
ción deseada.
Act. (valor predeterminado):
Activa la función TuneStart.
Des.:
Desactiva la función TuneStart.
Uso de TuneScan™
Cuando active la función TuneScan™,
oirá unos segundos de las canciones que
aún no se han escuchado de cada uno de
los canales de música almacenados como
preestablecidos en la banda actual.
p Esta función solo está disponible cuando
el canal sintonizado es compatible con la
función TuneScan.
p Si hay menos de dos canales de música
almacenados como preestablecidos
en la banda actual, se muestra el
mensaje “Sin contenido” y no puede
realizar la sintonización de exploración.
Añada más canales de música como
preestablecidos.
p TuneScan puede tardar unos minu-
tos en estar disponible después de
encender la unidad o cambiar la banda
preestablecida.
1 Pulse la tecla de visualización de la
lista de canales de presintonía.
Aparece la lista de canales de presintonía.
2 Pulse la siguiente tecla.
Explora canciones de los
canales de música de la
banda actual, reproduce la
canción encontrada durante
unos segundos y continúa
explorando. Cada canción
del canal actual se repro-
duce durante unos segun-
dos cada vez.
1 32
1 Continúa reproduciendo la canción o
el canal que se está explorando.
p Puede detener la función TuneScan para
escuchar la canción actual y seguir escu-
chando el canal en el que se encuentra.
2 Salta hacia delante o hacia atrás.
Si pulsa [ ] pasará a la canción ante-
rior durante TuneScan o al canal ante-
rior durante la exploración de categorías.
Si pulsa [ ] pasará a la siguiente
canción durante TuneScan o al
siguiente canal durante la exploración de
categorías.
3 Cancela la reproducción de explora-
ción y vuelve al canal original.
Uso de la exploración de
categorías
Puede explorar cada canal de la categoría
seleccionada.
1 Pulse la siguiente tecla.
Muestra la pantalla de lista.
2 Pulse la categoría que desee.
3 Pulse la siguiente tecla.
Realiza la sintonización de
exploración en la categoría
seleccionada. La emisión
en directo de cada canal
se reproduce durante seis
segundos cada vez.
18
Capítulo
54
Es
Uso de TuneMix™
TuneMix™ reproduce una mezcla única de
canciones de los canales de música guar-
dados en la actual banda preestablecida
SiriusXM.
p Para utilizar esta función es necesario
disponer de un sintonizador SiriusXM
Connect SXV300 o posterior (vendido por
separado).
p Si hay menos de dos canales de música
almacenados como preestablecidos en
la banda actual, se muestra el mensaje
“No hay canales de música TuneMix
válidos en esta banda.” y no puede
utilizar TuneMix™. Añada más canales
de música como preestablecidos.
p TuneMix puede tardar unos minu-
tos en estar disponible después de
encender la unidad o cambiar la banda
preestablecida.
p Si los mismos canales están almacena-
dos en la lista de canales de presintonía,
los canales cuentan como uno.
p Los canales a los que se aplica el bloqueo
paterno no se pueden reproducir con la
función TuneMix.
Pulse la siguiente tecla.
Reproduce canciones de los
canales de música almace-
nados como preestablecidos
en la banda actual.
Para cancelar TuneMix, pulse de nuevo
la tecla.
Comprobación de la informa-
ción del tráco y del tiempo
actualizada
Traffic & Weather Now™ le permite acce-
der al último parte listo siempre que quiera
escucharlo. Establezca su ciudad favorita de
tráfico y tiempo en el menú de configuración
y cuando pulse el botón Traffic & Weather
Now podrá escuchar el último parte desde
el principio.
p Para utilizar esta función es necesario
disponer de un sintonizador SiriusXM
Connect SXV300 o posterior (vendido por
separado).
p Para utilizar esta función, registre de
antemano la ciudad deseada.
Para más información, consulte Registrar
la ciudad en la página 54.
Pulse la siguiente tecla.
Cambia al canal que emite
información del tráfico y
del tiempo de la ciudad
seleccionada.
p La visualización de iconos indica lo
siguiente:
— Atenuado: No hay partes de tráfico y
tiempo disponibles para su mercado.
— Con punto verde: hay un parte disponible
que aún no ha escuchado.
— Blanco: puede volver a escuchar el último
parte.
p Si pulsa la tecla sin que haya una ciu-
dad registrada, se visualiza la pantalla
“Ciudad”.
Puede volver al canal original pulsando
mientras escucha el canal de tráfico
y tiempo.
El canal vuelve automáticamente al canal
original después de que la transmisión
llegue al final de la información del
tráfico y del tiempo.
■ Registrar la ciudad
p Para utilizar esta función es necesario
disponer de un sintonizador SiriusXM
Connect SXV300 o posterior (vendido por
separado).
p Esta función solo está disponible cuando
se selecciona “SiriusXM” como la
fuente.
1 Pulse el botón HOME para mostrar
la pantalla de Menú superior.
2 Pulse las siguientes teclas en el
orden que se indica.
Aparecerá la pantalla “Sistema”.
3 Pulse [Config. fuentes AV].
4 Pulse [Config. SiriusXM].
5 Pulse [Ajuste de ciudad].
Aparece la pantalla “Ciudad”.
6 Pulse la ciudad que desee.
p Aparece una marca de comprobación
para el elemento seleccionado.
Si pulsa [No hay ciudad seleccionada],
la marca de comprobación se eliminará
de la ciudad seleccionada.
Si elimina la marca de comprobación
de la ciudad seleccionada, aparecerá
automáticamente una marca de
comprobación para “No hay ciudad
seleccionada”.
Ajuste del bloqueo paterno
La función de control parental de SiriusXM
permite controlar el acceso a los canales
que considera inadecuados para los oyentes
más jóvenes.
Cuando está activada la función de control
parental es necesario introducir una clave
de acceso en los canales bloqueados.
■ Ajuste de la clave de acceso
p Esta función solo está disponible cuando
se selecciona “SiriusXM” como la
fuente.
1 Pulse el botón HOME para mostrar
la pantalla de Menú superior.
2 Pulse las siguientes teclas en el
orden que se indica.
Aparecerá la pantalla “Sistema”.
3 Pulse [Config. fuentes AV].
4 Pulse [Config. SiriusXM].
5 Pulse [Control paterno].
Aparecerá la pantalla “Control paterno”.
6 Introduzca la clave de acceso.
p La contraseña predeterminada es “0000”.
7 Pulse la siguiente tecla.
Muestra la pantalla “Canal
bloqueado”.
8 Pulse [Ed. cód.].
Aparecerá la pantalla “Ed. cód.”.
9 Introduzca la clave de acceso que
desee establecer.
p Para eliminar los números introducidos
uno a uno, pulse [C].
10 Pulse la siguiente tecla.
Muestra la pantalla “Canal
bloqueado”.
■ Bloqueo del canal
p Esta función solo está disponible cuando
se selecciona “SiriusXM” como la
fuente.
1 Pulse el botón HOME para mostrar
la pantalla de Menú superior.
2 Pulse las siguientes teclas en el
orden que se indica.
Aparecerá la pantalla “Sistema”.
3 Pulse [Config. fuentes AV].
4 Pulse [Config. SiriusXM].
5 Pulse [Control paterno].
Aparecerá la pantalla “Control paterno”.
6 Introduzca la clave de acceso
actual.
7 Pulse la siguiente tecla.
Muestra la pantalla “Canal
bloqueado”.
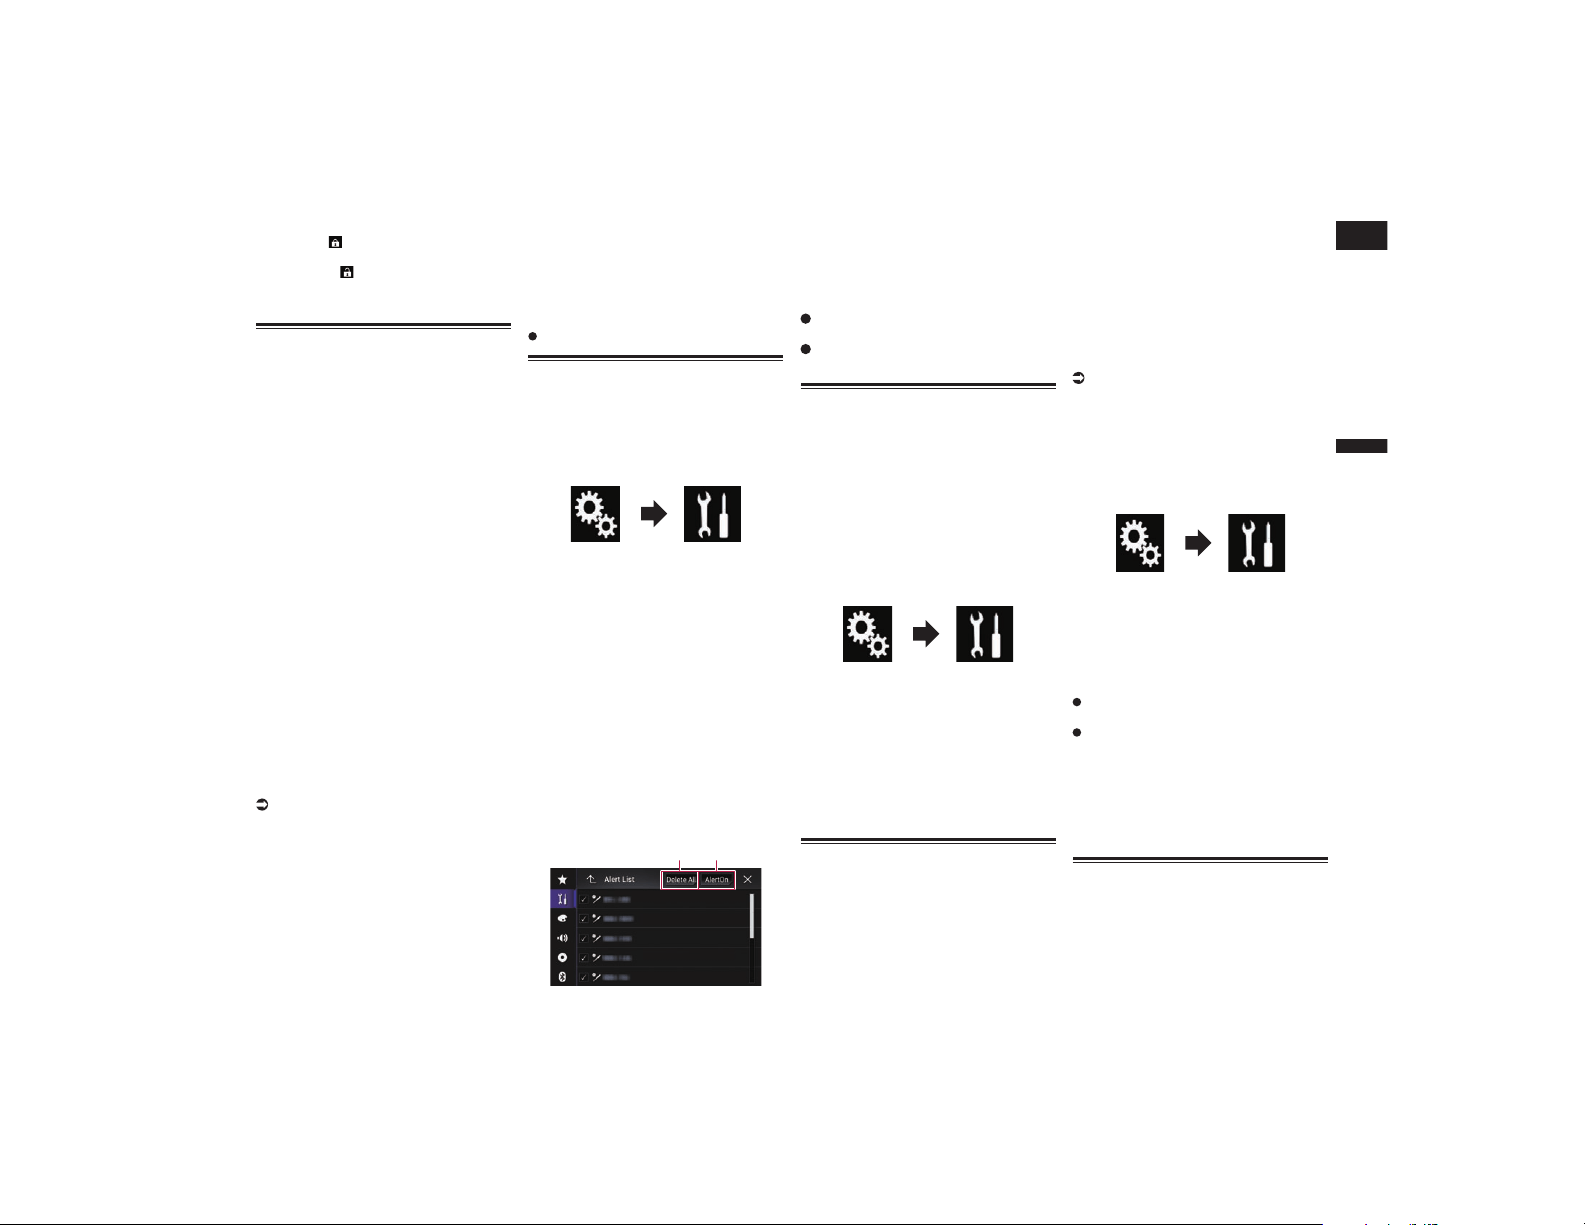
Español
18
Capítulo
55
Es
8 Pulse el canal que desee bloquear.
Se mostrará y se bloqueará el canal.
p Si pulsa un canal bloqueado, el icono
cambiará a y el canal se desbloqueará.
p Si pulsa [Bor. todo], se desbloquearán
todos los canales bloqueados.
Uso de la función de alertas
de contenido (como alertas de
canciones, alertas de intérpre-
tes y alertas de juegos)
Mientras escuche la radio por satélite
SiriusXM, podrá recibir alertas cuando
suenen en otros canales sus canciones e
intérpretes favoritos o cuando se emitan
competiciones en las que participen sus
equipos favoritos. La radio mostrará un
mensaje de alerta cuando se encuentre un
intérprete, una canción o un equipo favorito
coincidente en otro canal. Podrá elegir si
desea sintonizar ese contenido favorito o
bien podrá ignorarlo y permanecer en el
canal actual. La información sobre el ajuste
de las alertas de intérprete, canción y com-
peticiones se proporciona a continuación.
■ Memorización del contenido
actual
Los títulos de las canciones, los nombres
de los intérpretes y los equipos deportivos
favoritos que sigue se pueden memorizar en
una lista de alertas.
1 En el área de información del con-
tenido del canal actual, pulse el
elemento del que desea que se le
avise.
Para los detalles, consulte Utilización
de las teclas del panel táctil en la
página 51.
Aparecerá un mensaje de confirmación.
2 Pulse [Aj. alerta] para intérprete o
canción, o [Equipo1] o [Equipo2]
para juego.
La canción, el intérprete o el juego se memo-
rizarán en una lista de alertas.
Cuando se emita un programa que coincida
con una palabra clave memorizada en la
lista de alertas, sonará un aviso acústico y se
mostrará un mensaje.
3 Pulse [Saltar] para cambiar al
canal.
Puede escuchar la pista.
p Puede activar o desactivar alertas ajus-
tando la función de alerta.
p No se puede proporcionar la notificación
en función del estado de este producto.
Si pulsa [Perman.], el canal no cambiará.
Ajuste del programa para el
que desea recibir una alerta
1 Pulse el botón HOME para mostrar
la pantalla de Menú superior.
2 Pulse las siguientes teclas en el
orden que se indica.
Aparecerá la pantalla “Sistema”.
3 Pulse [Config. fuentes AV].
4 Pulse [Config. SiriusXM].
5 Pulse [Lista de alertas].
Aparecerá la pantalla “Lista de alertas”.
6 Pulse el nombre del intérprete,
el título de la canción o el equipo
para el que desea recibir una alerta
cuando esté disponible.
Se resalta el indicador de alerta y se activa el
ajuste de la alerta.
p Si pulsa el indicador resaltado, se can-
cela el ajuste de la alerta.
p Si mantiene pulsado el elemento de la
lista, puede eliminarlo.
p Puede registrar hasta 50 palabras clave
en la lista de alertas.
1 2
1 Bor. todo
Elimina todos los elementos memoriza-
dos en la lista de alertas.
2 Alr. act./Alr. des.
Cambia los ajustes en el siguiente orden
cada vez que pulse la tecla.
Alr. act. (valor predeterminado):
Activa la función de alerta.
Alr. des.:
Desactiva la función de alerta.
Selección de equipos para la
alerta de competiciones
Este producto puede mostrarle una notifi-
cación cuando vayan a comenzar competi-
ciones deportivas en las que participen sus
equipos favoritos. Para usar esta función,
debe almacenar por anticipado los equipos
que desee seguir.
1 Pulse el botón HOME para mostrar
la pantalla de Menú superior.
2 Pulse las siguientes teclas en el
orden que se indica.
Aparecerá la pantalla “Sistema”.
3 Pulse [Config. fuentes AV].
4 Pulse [Config. SiriusXM].
5 Pulse [Configuración equipo].
Aparecerá la pantalla “Liga”.
6 Pulse la liga que desee.
7 Pulse el equipo que desee.
Se activan los ajustes del equipo.
Conguración de la función
Favoritos destacados
Los favoritos destacados son los grupos de
canales creados por el departamento de
programación de SiriusXM para ayudarle a
descubrir nuevos canales. Los canales favo-
ritos destacados suelen ser dinámicos y a
menudo suelen cambiar, lo que le permitirá
descubrir nuevos canales.
p Esta función solo está disponible cuando
se selecciona “SiriusXM” como la
fuente.
p Si esta función está activada,
“Destacados” estará disponible como
selección de banda.
p Se actualizará automáticamente el tema
destacado de la temporada. Puede con-
figurar si desea que se le notifiquen las
actualizaciones.
Para más información, consulte
Configuración de la notificación de actua-
lizaciones para Favoritos destacados en
la página 55.
1 Pulse el botón HOME para mostrar
la pantalla de Menú superior.
2 Pulse las siguientes teclas en el
orden que se indica.
Aparecerá la pantalla “Sistema”.
3 Pulse [Config. fuentes AV].
4 Pulse [Config. SiriusXM].
5 Pulse [Favoritos ofrecidos] repe-
tidamente hasta que aparezca la
configuración deseada.
Act. (predeterminado):
Activa la función Favoritos destacados.
Des.
Desactiva la función Favoritos
destacados.
p Si se cambia el ajuste a “Des.” mien-
tras se escucha al canal en la banda
Destacados, el canal no cambia y la
visualización de banda en la pantalla
cambia a “SXM1”.
Conguración de la notica-
ción de actualizaciones para
Favoritos destacados
Puede configurar si desea que se le notifi-
quen las actualizaciones del tema destacado
de la temporada.
18
Capítulo
56
Es
p Esta función solo está disponible cuando
se selecciona “SiriusXM” como la fuente
y “Favoritos ofrecidos” está en “Act.”.
Para más información, consulte
Configuración de la función Favoritos
destacados en la página 55.
1 Pulse el botón HOME para mostrar
la pantalla de Menú superior.
2 Pulse las siguientes teclas en el
orden que se indica.
Aparecerá la pantalla “Sistema”.
3 Pulse [Config. fuentes AV].
4 Pulse [Config. SiriusXM].
5 Pulse [Mensaje de act. bandas
ofrecidas] repetidamente hasta que
aparezca la configuración deseada.
Act. (predeterminado):
Activa la función de notificación de
actualizaciones.
Des.
Desactiva la función de notificación de
actualizaciones.
Uso de la función
SportsFlash™
La función SportsFlash le informa con
un mensaje emergente si se produce un
evento importante en el partido de su equipo
deportivo favorito si está escuchando otro
canal. Al pulsar [Reproducir] en el mensaje
emergente que aparece en pantalla, la
radio cambia a la emisora que retransmite
el partido y comienza la reproducción unos
30 segundos antes de que se produjera el
evento, permitiéndole escucharlo como si
fuera en directo. Si tras escuchar la noti-
cia del partido vuelve al canal original, la
radio se reproduce desde el momento en
que se produjo el cambio de canal. No se
perderá nada ni del partido ni de los con-
tenidos del canal que estaba escuchando
originariamente.
p Para utilizar esta función es necesario
disponer de un sintonizador SiriusXM
Connect SXV300 o posterior (vendido por
separado).
p Esta función solo está disponible cuando
se selecciona “SiriusXM” como la
fuente.
p Para usar esta función, seleccione antes
de que empiece el partido los equipos
que desea seguir.
Para más información, consulte
Selección de equipos para SportsFlash
en la página 56.
p Pulse [Reproducir] para escuchar el
canal de la notificación. Para volver al
canal original, pulse en el plazo de
cinco minutos tras realizar el cambio de
canal.
p Pulse [Omitir] para continuar en el canal
actual.
p Pulse [Cancelar] para cancelar las
notificaciones del partido.
p Los mensajes de notificación no se mos-
trarán mientras escucha al canal objetivo
de SportsFlash o mientras se visualiza el
identificador de radio.
1 Pulse el botón HOME para mostrar
la pantalla de Menú superior.
2 Pulse las siguientes teclas en el
orden que se indica.
Aparecerá la pantalla “Sistema”.
3 Pulse [Config. fuentes AV].
4 Pulse [Config. SiriusXM].
5 Pulse [SportsFlash] repetidamente
hasta que aparezca la configura-
ción deseada.
Act. (predeterminado):
Activa la función SportsFlash.
Des.
Desactiva la función SportsFlash.
Selección de equipos para
SportsFlash
p Esta función solo está disponible cuando
se selecciona “SiriusXM” como la fuente
y “SportsFlash” está en “Act.”.
Para más información, consulte Uso de la
función SportsFlash™ en la página 56.
p Puede seleccionar hasta 50 equipos
como objetivo de SportsFlash.
p Si se registran cinco equipos priorita-
rios, no se visualizarán los mensajes de
notificación de equipos que no sean los
prioritarios.
1 Pulse el botón HOME para mostrar
la pantalla de Menú superior.
2 Pulse las siguientes teclas en el
orden que se indica.
Aparecerá la pantalla “Sistema”.
3 Pulse [Config. fuentes AV].
4 Pulse [Config. SiriusXM].
5 Pulse [Lista SportsFlash].
Aparece la pantalla “Lista SportsFlash”.
6 Pulse [Editar lista].
Se visualizan las ligas y equipos disponibles.
p Pulse una liga para delimitar el número
de opciones según sea necesario.
7 Pulse los equipos para registrarlos
en la lista SportsFlash.
p Aparece una marca de comprobación
para el elemento seleccionado.
Pulse [Bor. todo] para cancelar todas las
selecciones.
8 Pulse [Priorizar] para registrar los
equipos seleccionados como equi-
pos prioritarios.
p Puede seleccionar hasta cinco equipos
prioritarios para SportsFlash.
p [Priorizar] no está disponible si no se
registran más de cinco equipos en la lista
SportsFlash. Los equipos se registran
automáticamente como prioritarios.
p Si ya hay cinco equipos registrados como
equipos prioritarios, elimine una marca
de comprobación de uno de los equipos
en la lista de la pantalla “Priorizar lista”
antes de añadir otro equipo.
Restauración de la congu-
ración de SiriusXM al valor
predeterminado
Puede restaurar la configuración de
SiriusXM al valor predeterminado.
p Este ajuste solo está disponible cuando
detiene su vehículo en un lugar seguro y
acciona el freno de mano.
PRECAUCIÓN
No apague el motor mientras se estén
restaurando los ajustes.
1 Pulse el botón HOME para mostrar
la pantalla de Menú superior.
2 Pulse las siguientes teclas en el
orden que se indica.
Aparecerá la pantalla “Sistema”.
3 Pulse [Config. fuentes AV].
4 Pulse [Config. SiriusXM].
5 Pulse [Restablec. SiriusXM].
Aparecerá la pantalla “Restablec.
SiriusXM”.
6 Pulse [Restaurar].
Los ajustes se restaurarán al valor
predeterminado.
p La fuente se apaga y la conexión
Bluetooth se desconecta antes de que se
inicie el proceso.
Almacenamiento de la infor-
mación de canción en un iPod
(etiquetado de iTunes)
Para los detalles, consulte
Almacenamiento de la información de
canción en un iPod (etiquetado de iTunes)
en la página 76.
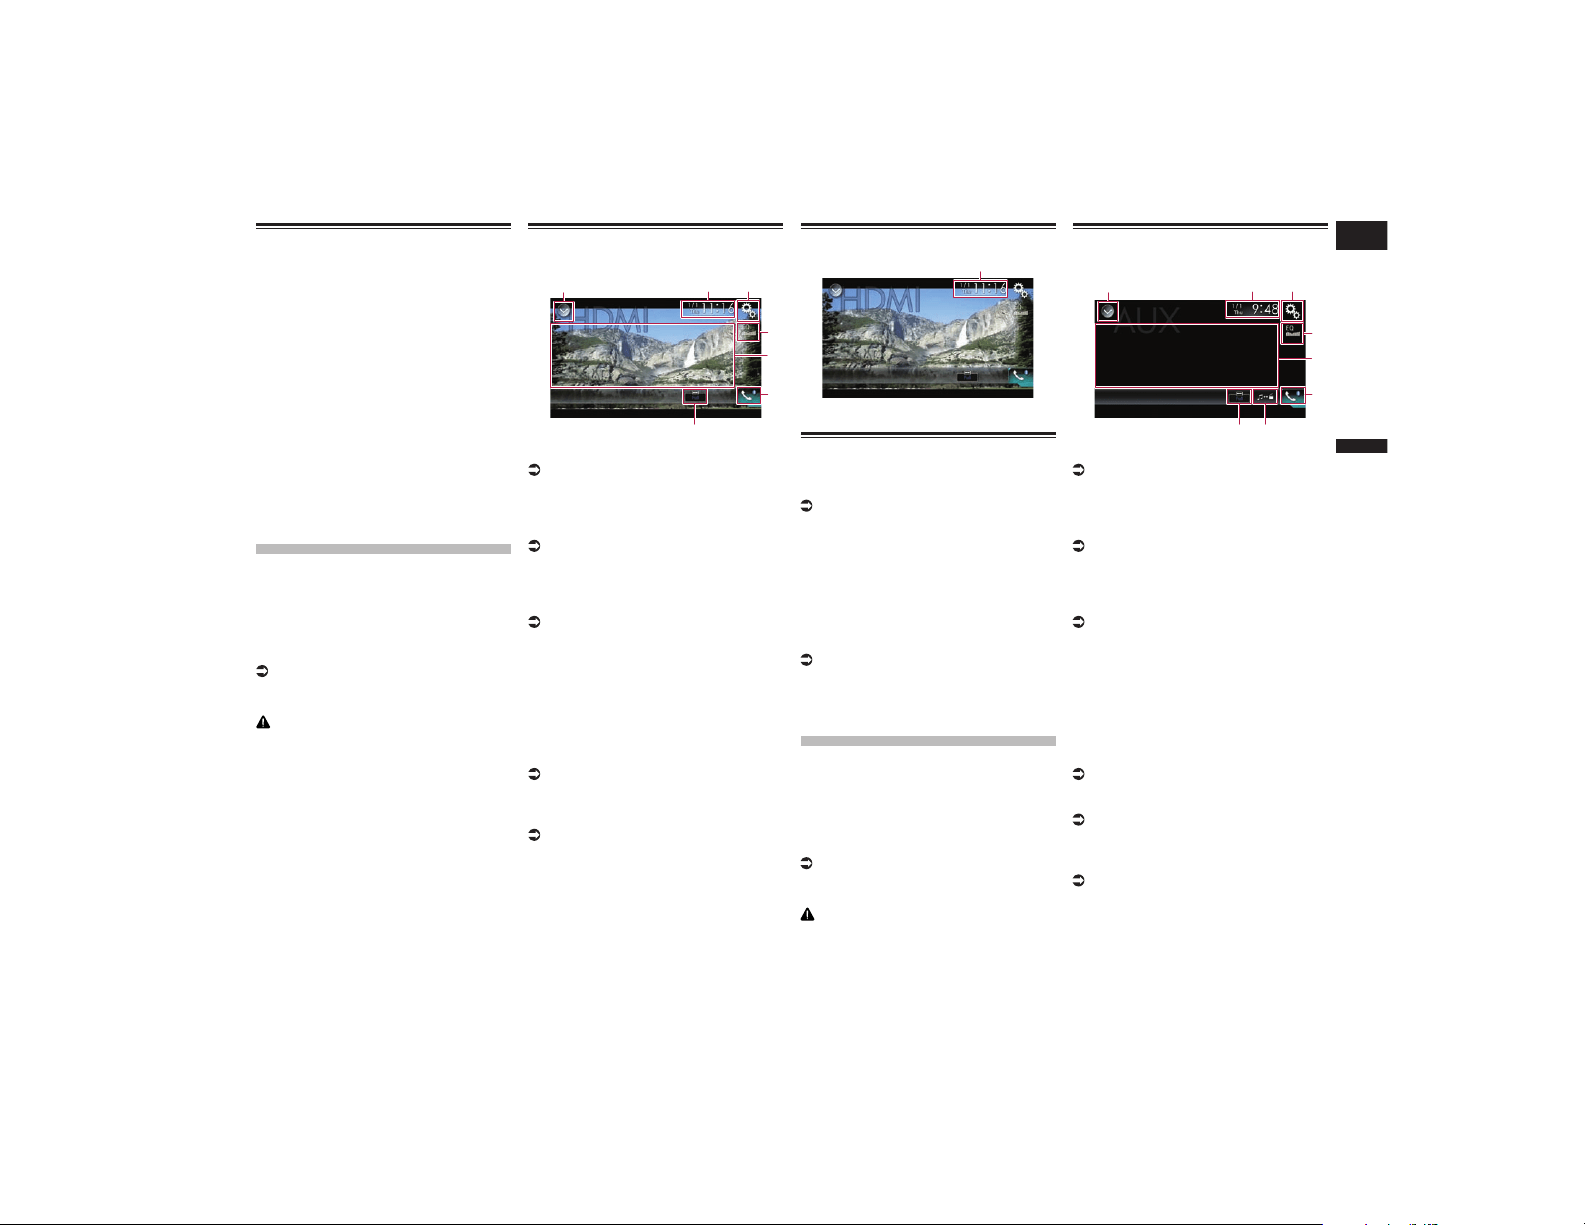
Español
19/20
Capítulo
57
Es
Operaciones con los botones
de hardware
Pulse el botón TRK.
Puede subir o bajar de canal de presintonía
cuando se muestre el canal actual.
Puede desplazarse hacia delante o hacia
atrás entre los archivos cuando se muestre
el indicador de tiempo de reproducción.
Mantenga pulsado el botón TRK.
Puede subir o bajar de canal manteniendo
pulsado el botón cuando se muestre el canal
actual.
Puede realizar un retroceso rápido o un
avance rápido manteniendo pulsado el
botón cuando se muestre el indicador de
tiempo de reproducción.
Utilización de una
fuente HDMI
Puede mostrar la salida de imagen de vídeo
mediante el dispositivo conectado a este
producto. En esta sección se describen las
operaciones para una fuente HDMI.
p Se necesita un cable de alta velocidad
HDMI
®
(se vende por separado) para la
conexión.
Para más información, consulte
Conexión de un dispositivo HDMI en la
página 84.
PRECAUCIÓN
Por cuestiones de seguridad, no se pueden
ver imágenes de vídeo mientras el vehículo
esté en movimiento. Para ver imágenes de
vídeo, deberá detenerse en un lugar seguro y
accionar el freno de mano.
Utilización de las teclas del
panel táctil
1 32
7
5
4
6
1 Muestra la lista de fuentes.
Para los detalles, consulte Selección de
una fuente frontal en la lista de fuentes
en la página 13.
2 Muestra la pantalla de Ajuste de hora
y fecha.
Para los detalles, consulte Ajuste de la
hora y la fecha en la página 76.
3 Muestra la pantalla de Menú de
ajustes.
4 Recupera las curvas del ecualizador.
Para los detalles, consulte Utilización del
ecualizador en la página 69.
5 Oculta las teclas del panel táctil.
Al pulsar esta área se ocultan las teclas
del panel táctil.
p Pulse en cualquier lugar de la pantalla
LCD para volver a mostrar las teclas del
panel táctil.
6 Muestra la pantalla de Menú del
teléfono.
Para los detalles, consulte Visualización
del menú del teléfono en la página 17.
7 Cambia el modo de pantalla
panorámica.
Para los detalles, consulte Cambio del
modo de pantalla panorámica en la
página 77.
Lectura de la pantalla
1
1 Fecha y hora actuales
Procedimiento de inicio
1 Muestre la pantalla de Selección
de fuente AV.
Para los detalles sobre las operaciones,
consulte Visualización de la pantalla de
función AV en la página 12.
2 Pulse [HDMI] en la pantalla de
Selección de la fuente AV.
La imagen se mostrará en la pantalla.
3 Utilice las teclas del panel táctil de
la pantalla para controlar la unidad
externa.
Para los detalles, consulte Utilización
de las teclas del panel táctil en la
página 57.
Utilización de una
fuente AUX
Puede mostrar la salida de imagen de vídeo
mediante el dispositivo conectado a este
producto. En esta sección se describen las
operaciones para una fuente AUX.
p Se necesita un cable AV minijack (CD-
RM10) (se vende por separado) para la
conexión.
Para más información, consulte Conexión
del componente de vídeo externo en la
página 84.
PRECAUCIÓN
Por cuestiones de seguridad, no se pueden
ver imágenes de vídeo mientras el vehículo
esté en movimiento. Para ver imágenes de
vídeo, deberá detenerse en un lugar seguro y
accionar el freno de mano.
Utilización de las teclas del
panel táctil
1 32
8
5
4
6
7
1 Muestra la lista de fuentes.
Para los detalles, consulte Selección de
una fuente frontal en la lista de fuentes
en la página 13.
2 Muestra la pantalla de Ajuste de hora
y fecha.
Para los detalles, consulte Ajuste de la
hora y la fecha en la página 76.
3 Muestra la pantalla de Menú de
ajustes.
4 Recupera las curvas del ecualizador.
Para los detalles, consulte Utilización del
ecualizador en la página 69.
5 Oculta las teclas del panel táctil.
Al pulsar esta área se ocultan las teclas
del panel táctil.
p Pulse en cualquier lugar de la pantalla
LCD para volver a mostrar las teclas del
panel táctil.
6 Muestra la pantalla de Menú del
teléfono.
Para los detalles, consulte Visualización
del menú del teléfono en la página 17.
7 Cambia la pantalla de función.
Para los detalles, consulte Cambio de la
pantalla de función en la página 58.
8 Cambia el modo de pantalla
panorámica.
Para los detalles, consulte Cambio del
modo de pantalla panorámica en la
página 77.
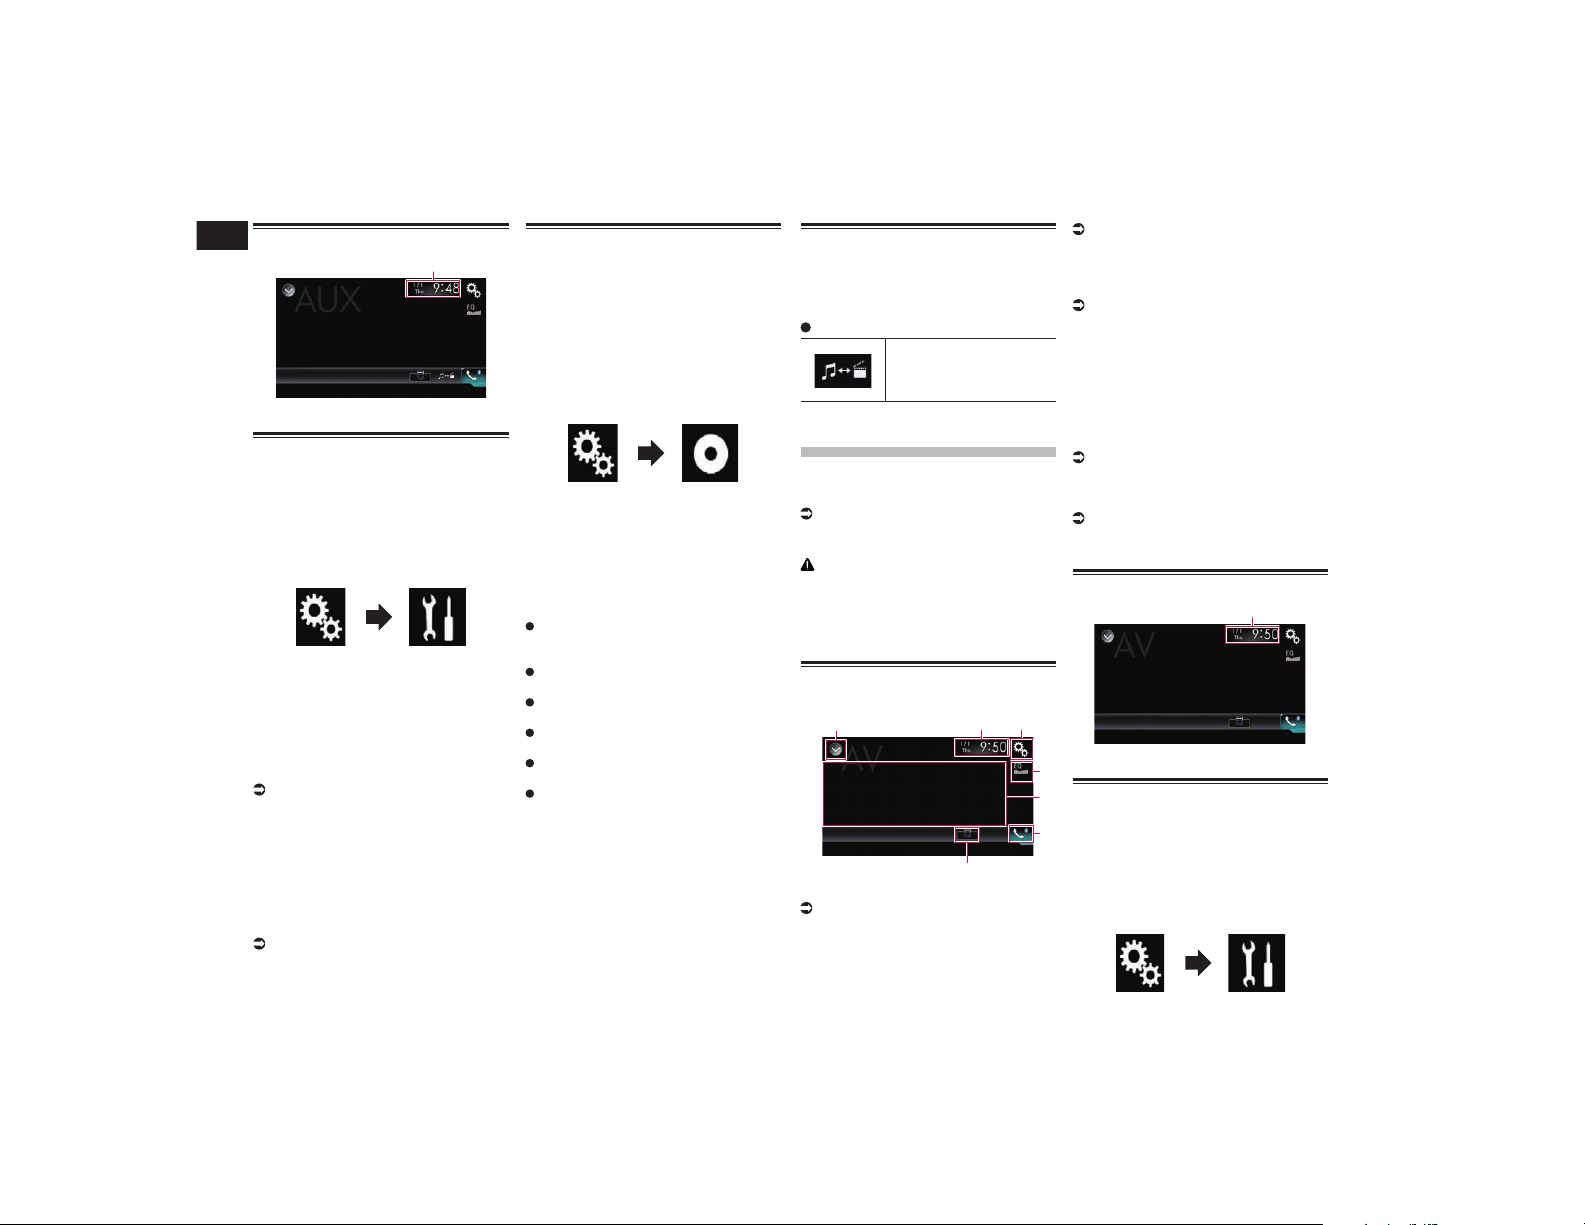
21
Capítulo
58
Es
Lectura de la pantalla
1
1 Fecha y hora actuales
Procedimiento de inicio
Puede visualizar la salida de la imagen de
vídeo a través del dispositivo conectado a la
entrada de vídeo.
1 Pulse el botón HOME para mostrar
la pantalla de Menú superior.
2 Pulse las siguientes teclas en el
orden que se indica.
Aparecerá la pantalla “Sistema”.
3 Pulse [Config. entrada/salida].
4 Compruebe que “Entrada AUX” se
haya encendido.
p El ajuste predeterminado es “Act.”.
5 Muestre la pantalla de Selección
de fuente AV.
Para los detalles sobre las operaciones,
consulte Visualización de la pantalla de
función AV en la página 12.
6 Pulse [AUX] en la pantalla de
Selección de la fuente AV.
La imagen se mostrará en la pantalla.
7 Utilice las teclas del panel táctil de
la pantalla para controlar la unidad
externa.
Para los detalles, consulte Utilización
de las teclas del panel táctil en la
página 57.
Ajuste de la señal de vídeo
Cuando conecte este producto a un equipo
AUX, seleccione el ajuste de señal de vídeo
adecuado.
p Puede utilizar esta función solo para la
entrada de la señal de vídeo en la entrada
AUX.
1 Pulse el botón HOME para mostrar
la pantalla de Menú superior.
2 Pulse las siguientes teclas en el
orden que se indica.
Aparecerá la pantalla “Configuración de
video”.
3 Pulse [Ajuste de señal de video].
4 Pulse [AUX].
Aparecerá el menú emergente.
5 Pulse el elemento que desee
ajustar.
Auto (valor predeterminado):
Ajusta la configuración de la señal de
vídeo automáticamente.
PAL:
Ajusta la señal de vídeo en PAL.
NTSC:
Ajusta la señal de vídeo en NTSC.
PAL-M:
Ajusta la señal de vídeo en PAL-M.
PAL-N:
Ajusta la señal de vídeo en PAL-N.
SECAM:
Ajusta la señal de vídeo en SECAM.
Cambio de la pantalla de
función
Puede cambiar entre la pantalla para contro-
lar los archivos de música y la pantalla para
los archivos de vídeo.
Pulse la siguiente tecla.
Cambia entre la pantalla
para controlar los archivos
de vídeo y la pantalla para
los archivos de música.
Utilización de la
entrada AV
Puede visualizar la salida de la imagen de
vídeo a través del dispositivo conectado a
este producto.
Para más información, consulte Conexión
del componente de vídeo externo en la
página 84.
PRECAUCIÓN
Por cuestiones de seguridad, no se pueden
ver imágenes de vídeo mientras el vehículo
esté en movimiento. Para ver imágenes de
vídeo, deberá detenerse en un lugar seguro y
accionar el freno de mano.
Utilización de las teclas del
panel táctil
1 32
7
5
4
6
1 Muestra la lista de fuentes.
Para los detalles, consulte Selección de
una fuente frontal en la lista de fuentes
en la página 13.
2 Muestra la pantalla de Ajuste de hora
y fecha.
Para los detalles, consulte Ajuste de la
hora y la fecha en la página 76.
3 Muestra la pantalla de Menú de
ajustes.
4 Recupera las curvas del ecualizador.
Para los detalles, consulte Utilización del
ecualizador en la página 69.
5 Oculta las teclas del panel táctil.
Al pulsar esta área se ocultan las teclas
del panel táctil.
p Pulse en cualquier lugar de la pantalla
LCD para volver a mostrar las teclas del
panel táctil.
6 Muestra la pantalla de Menú del
teléfono.
Para los detalles, consulte Visualización
del menú del teléfono en la página 17.
7 Cambia el modo de pantalla
panorámica.
Para los detalles, consulte Cambio del
modo de pantalla panorámica en la
página 77.
Lectura de la pantalla
1
1 Fecha y hora actuales
Procedimiento de inicio
Puede visualizar la salida de la imagen de
vídeo a través del dispositivo conectado a la
entrada de vídeo.
1 Pulse el botón HOME para mostrar
la pantalla de Menú superior.
2 Pulse las siguientes teclas en el
orden que se indica.
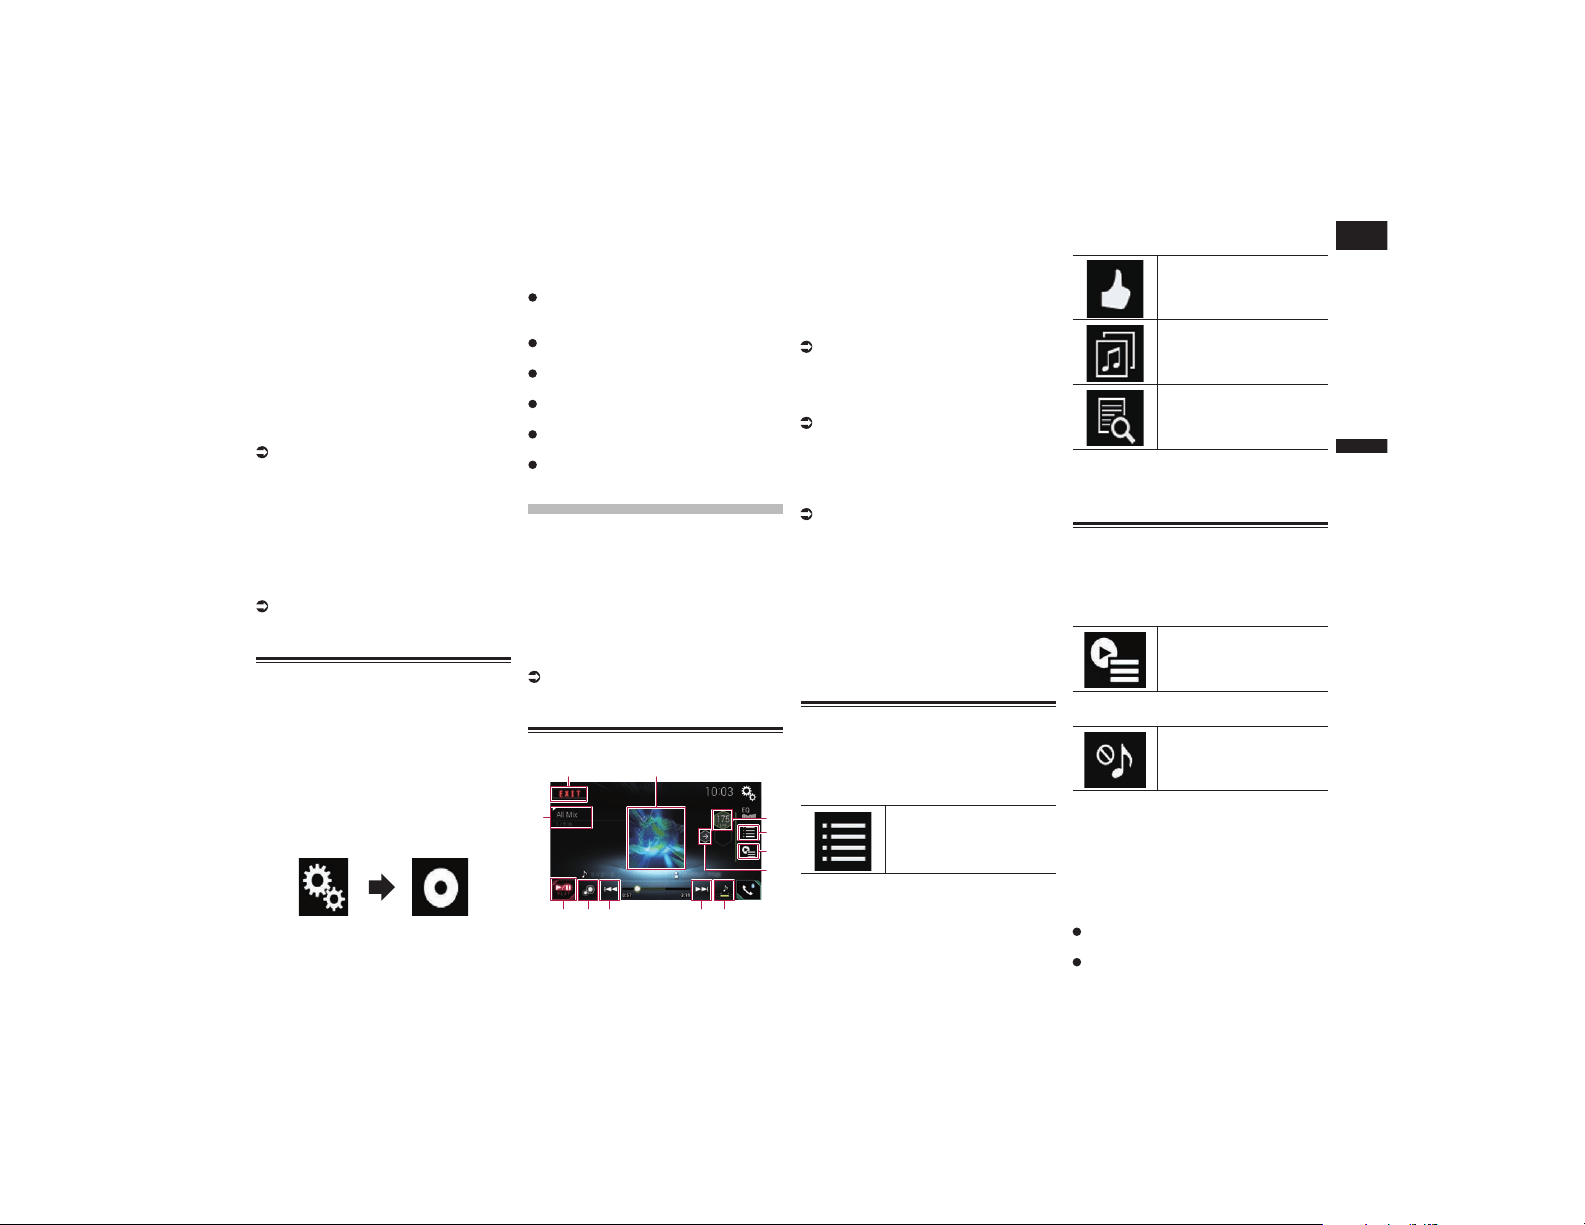
Español
22
Capítulo
59
Es
Aparecerá la pantalla “Sistema”.
3 Pulse [Config. entrada/salida].
4 Pulse [Entrada AV].
Aparecerá el menú emergente.
5 Pulse [Fuente].
Se puede mostrar la salida de imagen de
vídeo emitida por el dispositivo externo
conectado.
p Si está seleccionado “Fuente”, “2ª Ent.
de cámara” se ajusta automáticamente
en “Des.”.
6 Muestre la pantalla de Selección
de fuente AV.
Para los detalles sobre las operaciones,
consulte Visualización de la pantalla de
función AV en la página 12.
7 Pulse [AV] en la pantalla de
Selección de la fuente AV.
La imagen se mostrará en la pantalla.
8 Utilice las teclas del panel táctil de
la pantalla para controlar la unidad
externa.
Para los detalles, consulte Utilización
de las teclas del panel táctil en la
página 58.
Ajuste de la señal de vídeo
Cuando conecte este producto a un equipo
AV, seleccione el ajuste de señal de vídeo
adecuado.
p Puede utilizar esta función solo para la
entrada de la señal de vídeo en la entrada
AV.
1 Pulse el botón HOME para mostrar
la pantalla de Menú superior.
2 Pulse las siguientes teclas en el
orden que se indica.
Aparecerá la pantalla “Configuración de
video”.
3 Pulse [Ajuste de señal de video].
4 Pulse [AV].
Aparecerá el menú emergente.
5 Pulse el elemento que desee
ajustar.
Auto (valor predeterminado):
Ajusta la configuración de la señal de
vídeo automáticamente.
PAL:
Ajusta la señal de vídeo en PAL.
NTSC:
Ajusta la señal de vídeo en NTSC.
PAL-M:
Ajusta la señal de vídeo en PAL-M.
PAL-N:
Ajusta la señal de vídeo en PAL-N.
SECAM:
Ajusta la señal de vídeo en SECAM.
Utilización de MIXTRAX
MIXTRAX es una tecnología original para
crear mezclas de música continuas de selec-
ciones de su biblioteca de audio, completa
con efectos de DJ que hacen que suenen
como si un DJ estuviera con usted reprodu-
ciendo la música.
p Puede activar MIXTRAX pulsando
[MIXTRAX] en la pantalla de repro-
ducción de los archivos de audio
comprimidos.
Para los detalles, consulte Utilización
de las teclas del panel táctil en la
página 29.
Teclas del panel táctil
1
4
6
5
7
b
2
9
3
a 8 8
1 Sale de la pantalla MIXTRAX.
2 Muestra la pantalla LinkGate.
Toque el elemento deseado. Se reprodu-
cirán las canciones relacionadas con el
elemento seleccionado.
3 Especifica los BPM.
Los BPM originales no se muestran
durante la reproducción.
4 Muestra la pantalla de selección de
elementos.
Para los detalles sobre las operaciones,
consulte Selección de un elemento para
reproducir canciones en la página 59.
5 Muestra la pantalla de lista de
reproducción.
Para los detalles sobre las operaciones,
consulte Selección de canciones que no
se deben reproducir en la página 59.
6 Ajusta los BPM (Pulsos por minuto)
originales.
7 Especifica la parte de la reproducción.
Para los detalles sobre las operaciones,
consulte Especificación de la parte de la
reproducción en la página 60.
8 Púlsela para seleccionar una pista.
Manténgala pulsada para el avance
rápido o el retroceso.
9 Activa o desactiva la pantalla original
visual MIXTRAX.
a Pausa e inicia la reproducción.
b Muestra el elemento seleccionado en la
pantalla LinkGate o la pantalla de selec-
ción de elementos.
Selección de un elemento
para reproducir canciones
Puede especificar un elemento para repro-
ducir canciones relacionadas con él.
1 Pulse la siguiente tecla.
Muestra la pantalla de selec-
ción de elementos.
2 Pulse las siguientes teclas para
seleccionar el elemento.
Muestra la lista de patrones
MIX.
Muestra la lista de etiquetas.
Muestra la lista de archivos.
3 Seleccione un elemento de la lista.
Se reproducirán las canciones relacionadas
con el elemento seleccionado.
Selección de canciones que no
se deben reproducir
Puede seleccionar elementos o canciones
que no se deben reproducir.
1 Pulse la siguiente tecla.
Muestra la pantalla de lista
de reproducción.
2 Pulse la siguiente tecla.
Muestra la pantalla
“Playback not allowed”.
3 Pulse [Songs], [Artists] o
[Albums].
4 Pulse el cuadro a la izquierda del
elemento o la canción que no desea
reproducir.
Se mostrará un icono. Los elementos que se
muestran con el icono no se reproducirán.
Si pulsa [Unselect All], se cancelarán
todas las selecciones.
Si pulsa [Select All], se seleccionarán
todos los elementos.
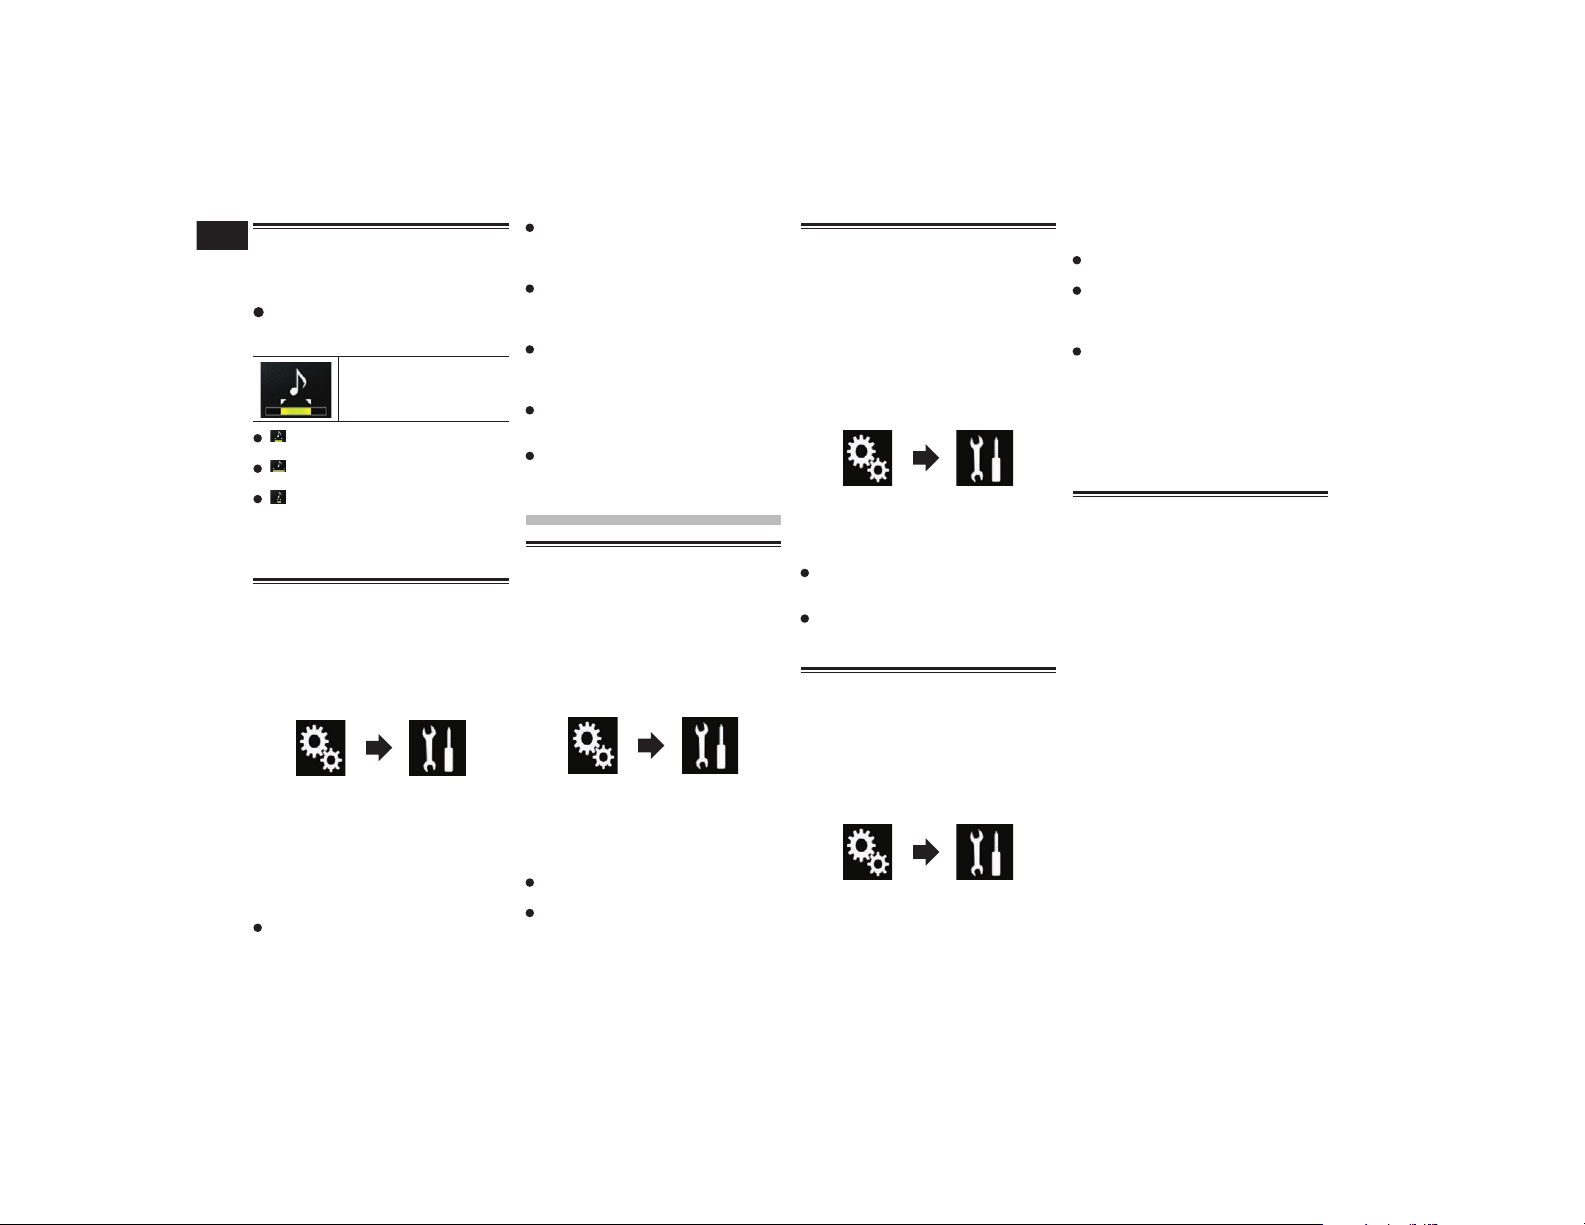
23
Capítulo
60
Es
Especicación de la parte de
la reproducción
Puede especificar la parte de la
reproducción.
Pulse la siguiente tecla repetida-
mente hasta que aparezca la confi-
guración deseada.
Cambia la sección de
reproducción.
(valor predeterminado):
Reproduce una sección media.
:
Reproduce una sección larga.
:
Reproduce una sección corta.
p Se aplica automáticamente el efecto
sonoro más apropiado al cambiar a la
siguiente canción.
Ajuste del patrón de parpadeo
El color parpadeante cambia con los cam-
bios en los niveles de sonidos y bajos.
1 Pulse el botón HOME para mostrar
la pantalla de Menú superior.
2 Pulse las siguientes teclas en el
orden que se indica.
Aparecerá la pantalla “Sistema”.
3 Pulse [Config. fuentes AV].
4 Pulse [Config. MIXTRAX].
5 Pulse [Patrón de flash].
Aparecerá el menú emergente.
6 Pulse el elemento que desee
ajustar.
Sonido1 (predeterminado) a Sonido6:
El patrón de parpadeo cambia según
el nivel de sonido. Seleccione el modo
deseado.
Paso I1 a Paso I6:
El patrón de parpadeo cambia según
el nivel de bajos. Seleccione el modo
deseado.
Aleatorio1:
El patrón de parpadeo cambia de forma
aleatoria según el modo de nivel de
sonido y el modo de paso bajo.
Aleatorio2:
El patrón de parpadeo cambia de forma
aleatoria según el modo de nivel de
sonido.
Aleatorio3:
El patrón de parpadeo cambia de forma
aleatoria según el modo de paso bajo.
Des.:
El patrón de parpadeo no parpadea.
Conguración del
sistema
Activación de la fuente de
audio Bluetooth
Debe activar la fuente de audio Bluetooth
para usar un reproductor de audio
Bluetooth.
1 Pulse el botón HOME para mostrar
la pantalla de Menú superior.
2 Pulse las siguientes teclas en el
orden que se indica.
Aparecerá la pantalla “Sistema”.
3 Pulse [Config. fuentes AV].
4 Pulse [Bluetooth Audio] repetida-
mente hasta que aparezca la confi-
guración deseada.
Act. (valor predeterminado):
Activa la fuente de audio Bluetooth.
Des.:
Desactiva la fuente de audio Bluetooth.
Ajuste del desplazamiento
continuo
Cuando “Desplazar siempre” se ajusta
en “Act.”, la información de texto grabada
se desplaza continuamente en la pantalla.
Ajuste en “Des.” si prefiere que la informa-
ción solo se desplace una vez.
1 Pulse el botón HOME para mostrar
la pantalla de Menú superior.
2 Pulse las siguientes teclas en el
orden que se indica.
Aparecerá la pantalla “Sistema”.
3 Pulse [Desplazar siempre] repe-
tidamente hasta que aparezca la
configuración deseada.
Des. (valor predeterminado):
Desactiva el ajuste de desplazamiento
continuo.
Act.:
Activa el ajuste de desplazamiento
continuo.
Ajuste de la entrada AV
Con este ajuste puede utilizar dispositivos de
vídeo externos como, por ejemplo, reproduc-
tores portátiles conectados a este producto.
1 Pulse el botón HOME para mostrar
la pantalla de Menú superior.
2 Pulse las siguientes teclas en el
orden que se indica.
Aparecerá la pantalla “Sistema”.
3 Pulse [Config. entrada/salida].
4 Pulse [Entrada AV].
Aparecerá el menú emergente.
5 Pulse el elemento que desee
ajustar.
Des. (valor predeterminado):
Desactiva la fuente AV.
Fuente:
Muestra la salida de imagen de vídeo
emitida por el dispositivo externo
conectado.
Cámara:
Muestra la salida de imagen emitida por
la cámara externa conectada.
p Si está seleccionado “Cámara”, “2ª Ent.
de cámara” se ajusta automáticamente
en “Act.”.
p Si está seleccionado “Des.” o “Fuente”,
“2ª Ent. de cámara” se ajusta automáti-
camente en “Des.”.
Ajuste de la cámara de
retrovisor
Están disponibles estas dos funciones. Se
necesita una cámara de retrovisor que se
vende por separado (p. ej. ND-BC6) para
utilizar la función de la cámara de retro-
visor. (Para los detalles, consulte con su
distribuidor.)
Cámara de retrovisor
Este producto incorpora una función que
cambia automáticamente a la imagen a
pantalla completa de la cámara de retrovi-
sor instalada en su vehículo. Al colocar la
palanca de cambios en posición marcha
atrás (R), la pantalla cambia automática-
mente a la imagen de cámara de retrovisor a
pantalla completa.
p Si la palanca de cambios se pone en mar-
cha atrás (R) inmediatamente después
de iniciar el sistema del producto, solo se
mostrará la imagen de la cámara; no se
visualizará la ayuda al estacionamiento.
Transcurrido un tiempo, en la imagen
de la cámara se visualizará la ayuda al
estacionamiento. Asegúrese de compro-
bar las condiciones entorno al vehículo
incluso después de que se visualicen la
ayuda y el mensaje.
Español
23
Capítulo
61
Es
Cámara para el modo Vista de
cámara
Vista de cámara puede visualizarse en
todo momento (por ejemplo, para observar
un remolque enganchado, etc.). Tenga en
cuenta que, con este ajuste, la imagen
de la cámara no se redimensiona, y que
una parte de lo que ve la cámara no puede
visualizarse.
PRECAUCIÓN
Asegúrese de realizar la configuración de
forma que la cámara de retrovisor muestre
una imagen reflejada en un espejo.
p Compruebe inmediatamente si la panta-
lla cambia a una imagen de cámara de
retrovisor cuando la palanca de cambios
se pone en marcha atrás (R) desde otra
posición.
p Si la pantalla cambia a la imagen de
cámara de retrovisor a pantalla completa
durante la conducción normal, cambie al
ajuste opuesto la opción “Polaridad de
la cámara”.
■ Ajuste de la activación de la
cámara de retrovisor
Para visualizar imágenes de la cámara de
retrovisor en la pantalla de este producto,
“Entrada cámara trasera” ha de estar en
“Act.”.
1 Pulse el botón HOME para mostrar
la pantalla de Menú superior.
2 Pulse las siguientes teclas en el
orden que se indica.
Aparecerá la pantalla “Sistema”.
3 Pulse [Config. cámaras].
4 Pulse [Entrada cámara trasera]
repetidamente hasta que aparezca
la configuración deseada.
Des. (valor predeterminado):
Desactiva el ajuste de entrada de la
cámara posterior.
Act.:
Activa el ajuste de entrada de la cámara
posterior.
■ Ajuste de la polaridad de la
cámara de retrovisor
1 Pulse el botón HOME para mostrar
la pantalla de Menú superior.
2 Pulse las siguientes teclas en el
orden que se indica.
Aparecerá la pantalla “Sistema”.
3 Pulse [Config. cámaras].
4 Pulse [Polaridad de la cámara]
repetidamente hasta que aparezca
la configuración deseada.
Batería (valor predeterminado):
Cuando la polaridad del cable conectado
es positiva mientras la palanca de cam-
bios se encuentra en posición de marcha
atrás (R).
Con. tierra:
Cuando la polaridad del cable conectado
es negativa mientras la palanca de cam-
bios se encuentra en posición de marcha
atrás (R).
Cuando la palanca de cambios esté en la
posición de marcha atrás (R) tras configurar
la cámara de retrovisor, aparecerá la imagen
de retrovisor.
■ Ajuste de la visualización de
imágenes invertidas de la
cámara de retrovisor
Las imágenes de la cámara de retrovisor se
mostrarán invertidas (como en un espejo)
en la pantalla delantera a menos que la
cámara de retrovisor pueda emitir imágenes
invertidas. Puede seleccionar si invertir las
imágenes de la cámara de retrovisor que se
visualizan en la pantalla delantera.
p Este ajuste solo está disponible cuando
detiene su vehículo en un lugar seguro y
acciona el freno de mano.
p Esta función solo está disponible cuando
“Entrada cámara trasera” está en
“Act.”.
Para más información, consulte Ajuste de
la activación de la cámara de retrovisor
en la página 61.
1 Pulse el botón HOME para mostrar
la pantalla de Menú superior.
2 Pulse las siguientes teclas en el
orden que se indica.
Aparecerá la pantalla “Sistema”.
3 Pulse [Config. cámaras].
4 Pulse [Cámara trasera: Vídeo
inverso] repetidamente hasta que
aparezca la configuración deseada.
Des. (predeterminado):
No invierte las imágenes de la cámara de
retrovisor.
Act.:
Invierte las imágenes de la cámara de
retrovisor.
Ajuste de la cámara para el
modo Vista de cámara
Para mostrar Vista de cámara en todo
momento, “Vista de cámara” debe ajus-
tarse en “Act.”.
p Para ajustar la cámara de retrovisor en
el modo Vista de cámara, “Entrada
cámara trasera” debe ajustarse en
“Act.”.
Para los detalles, consulte Ajuste de la
activación de la cámara de retrovisor en
la página 61.
p Para ajustar la segunda cámara para el
modo Vista de cámara, ajuste “Entrada
AV” en “Cámara” o “2ª Ent. de cámara”
en “Act.”.
Para los detalles, consulte Ajuste de la
entrada AV en la página 60.
Para más información, consulte Ajuste
de la entrada de la segunda cámara en la
página 62.
p También puede activar esta función
pulsando [Camera View] en la pantalla
de Selección de fuente AV o en la lista de
fuentes.
1 Pulse el botón HOME para mostrar
la pantalla de Menú superior.
2 Pulse las siguientes teclas en el
orden que se indica.
Aparecerá la pantalla “Sistema”.
3 Pulse [Config. cámaras].
4 Pulse [Vista de cámara] repetida-
mente hasta que aparezca la confi-
guración deseada.
Des. (valor predeterminado):
Desactiva el ajuste de vista de la cámara.
Act.:
Activa el ajuste de vista de la cámara.
Si no se realiza ninguna operación durante
los siete segundos posteriores a la aparición
de la pantalla de Función AV, se mostrará
automáticamente la vista de la cámara.
p Si pulsa la pantalla mientras se muestra
la vista de la cámara, se apagará automá-
ticamente la imagen visualizada.
Cuando la vista de cámara de la cámara
de retrovisor y de la segunda cámara esté
disponible, aparecerá la tecla para cambiar
la visualización.
1
1 Cambia la visualización entre la imagen
de retrovisor y la imagen de la segunda
cámara.

23
Capítulo
62
Es
Visualización de las indi-
caciones de ayuda al
estacionamiento
1 Pulse el botón HOME para mostrar
la pantalla de Menú superior.
2 Pulse las siguientes teclas en el
orden que se indica.
Aparecerá la pantalla “Sistema”.
3 Pulse [Config. cámaras].
4 Pulse [Guía ayuda estacionam.]
repetidamente hasta que aparezca
la configuración deseada.
Des. (valor predeterminado):
Oculta las líneas de guía.
Act.:
Muestra las líneas de guía.
Cuando la palanca de cambios esté en la
posición de marcha atrás (R) tras configurar
la cámara de retrovisor, aparecerá la imagen
de retrovisor.
p Si mantiene pulsado el botón MUTE,
desaparece la imagen de vista trasera.
Conguración de las indi-
caciones en la imagen de
retrovisor
PRECAUCIÓN
Cuando realice los ajustes de las indica-
ciones, asegúrese de aparcar el vehículo
en un lugar seguro y de accionar el freno
de mano.
Antes de salir del vehículo para colocar
las marcas, asegúrese de apagar el
interruptor de encendido (ACC OFF).
El alcance proyectado por la cámara de
retrovisor es limitado. Además, las indi-
caciones de la distancia y el ancho del
vehículo mostradas en la imagen de la
cámara de retrovisor pueden diferir de la
distancia y el ancho reales del vehículo
(las directrices son líneas rectas).
La calidad de la imagen puede deterio-
rarse en función del entorno de uso,
como por ejemplo, por la noche o en
lugares oscuros.
1 Estacione el vehículo en un lugar
seguro y accione el freno de mano.
2 Coloque marcas a aproximada-
mente 25 cm de cada lado del vehí-
culo, y aproximadamente a 50 cm
y 2 m del parachoques trasero
utilizando cinta de embalaje o algo
similar.
P arachoques trasero
25 cm
50 cm
25 cm
2 m
Marcas
Marcas
3 Pulse el botón HOME para mostrar
la pantalla de Menú superior.
4 Pulse las siguientes teclas en el
orden que se indica.
Aparecerá la pantalla “Sistema”.
5 Pulse [Config. cámaras].
6 Pulse [Aj. guía ayuda estac.].
7 Ajuste las líneas de guía arras-
trando los cuatro puntos.
8 Pulse las siguientes teclas para
ajustar la posición del punto si es
necesario.
Mueve el punto a la izquierda.
Mueve el punto a la derecha.
Mueve al punto hacia arriba.
Mueve al punto hacia abajo.
Extiende la línea a la izquierda y
la derecha desde el punto cen-
tral actual de la línea de guía de
distancia. Los puntos de ajuste
de las coordenadas laterales
de ambos extremos también se
moverán.
Acorta la línea desde la
izquierda y la derecha hasta el
punto central actual de la línea
de guía de distancia. Los puntos
de ajuste de las coordenadas
laterales de ambos extremos
también se moverán.
Pred.
Restablece la configuración
de las líneas de guía de dis-
tancia y ancho del vehículo y
los puntos de ajuste al valor
predeterminado.
p Si un punto se desplaza, la distancia con
respecto al valor inicial aparece en la
parte inferior de la pantalla.
Ajuste de la entrada de la
segunda cámara
Puede visualizar las imágenes de la segunda
cámara (una cámara frontal, etc.) en la
pantalla de este producto.
■ Ajuste de la activación de la
segunda cámara
p Para visualizar imágenes de la segunda
cámara en la pantalla de este producto,
“2ª Ent. de cámara” ha de estar en
“Act.”.
1 Pulse el botón HOME para mostrar
la pantalla de Menú superior.
2 Pulse las siguientes teclas en el
orden que se indica.
Aparecerá la pantalla “Sistema”.
3 Pulse [Config. cámaras].
4 Pulse [2ª Ent. de cámara] repetida-
mente hasta que aparezca la confi-
guración deseada.
Des. (predeterminado):
Desactiva el ajuste de entrada de la
segunda cámara.
Act.:
Activa el ajuste de entrada de la segunda
cámara.
p Aparece un mensaje de confirmación si
se ajusta “2ª Ent. de cámara” en “Act.”
mientras está activada la fuente AV. La
fuente AV se desactivará si se selecciona
“Sí” y “2ª Ent. de cámara” se ajustará en
“Act.”. Seleccione “No” para cancelar el
ajuste de “2ª Ent. de cámara” en “Act.”.
p Si está seleccionado “Act.”, “Entrada
AV” se ajusta automáticamente en
“Cámara”.
p Si está seleccionado “Des.”, “Entrada
AV” se ajusta automáticamente en
“Des.”.
■ Ajuste de imágenes invertidas
de la segunda cámara
Las imágenes de la segunda cámara se mos-
trarán invertidas (como en un espejo) en la
pantalla delantera a menos que la segunda
cámara pueda emitir imágenes invertidas.
Puede seleccionar si invertir las imágenes
de la segunda cámara que se visualizan en
la pantalla delantera.
Español
23
Capítulo
63
Es
p Este ajuste solo está disponible cuando
detiene su vehículo en un lugar seguro y
acciona el freno de mano.
p Esta función está disponible cuando “2ª
Ent. de cámara” se ajusta en “Act.” o
“Entrada AV” en “Cámara”.
1 Pulse el botón HOME para mostrar
la pantalla de Menú superior.
2 Pulse las siguientes teclas en el
orden que se indica.
Aparecerá la pantalla “Sistema”.
3 Pulse [Config. cámaras].
4 Pulse [2ª cámara: vídeo inverso]
repetidamente hasta que aparezca
la configuración deseada.
Des. (predeterminado):
No invierte las imágenes de la segunda
cámara.
Act.:
Invierte las imágenes de la segunda
cámara.
Desactivación de la pantalla
de demostración
Si aparece la pantalla de demostración, siga
este procedimiento para desactivar la panta-
lla de demostración.
1 Pulse el botón HOME para mostrar
la pantalla de Menú superior.
2 Pulse las siguientes teclas en el
orden que se indica.
Aparecerá la pantalla “Sistema”.
3 Pulse [Modo demo] repetidamente
hasta que aparezca la configura-
ción deseada.
Act. (valor predeterminado):
Muestra la pantalla de demostración.
Des.:
Oculta la pantalla de demostración.
También puede desactivar la pantalla de
demostración manteniendo pulsado el
botón MUTE.
Selección del idioma del
sistema
Se puede seleccionar el idioma del sistema.
Se puede cambiar el idioma para los
siguientes elementos:
— La pantalla “Audio”
— La pantalla “Sistema”
— La pantalla “Configuración de video”
— La pantalla “Bluetooth”
— Idioma para mensajes
El uso de algunas funciones de este
producto está prohibido durante la con-
ducción o requiere una especial atención.
En esos casos, aparecerá un mensaje de
precaución en la pantalla. Puede cambiar
el idioma de los mensajes de precaución
con este ajuste.
Si el ajuste de idioma incorporado y el
idioma seleccionado no son el mismo, es
posible que la información de texto no se
muestre correctamente.
Es posible que algunos caracteres no se
muestren correctamente.
1 Pulse el botón HOME para mostrar
la pantalla de Menú superior.
2 Pulse las siguientes teclas en el
orden que se indica.
Aparecerá la pantalla “Sistema”.
3 Pulse [Idioma del sistema].
Aparecerá el menú emergente.
4 Pulse el idioma que desee.
Tras seleccionar el idioma, volverá a apare-
cer la pantalla anterior.
Ajuste del idioma del teclado
con la aplicación para iPhone
Puede utilizar el teclado en AppRadio
Mode ajustando el idioma del teclado del
iPhone.
p Esta función está disponible únicamente
en AppRadio Mode en el iPhone.
1 Pulse el botón HOME para mostrar
la pantalla de Menú superior.
2 Pulse las siguientes teclas en el
orden que se indica.
Aparecerá la pantalla “Sistema”.
3 Pulse [Teclado].
Aparecerá la pantalla “Teclado”.
4 Pulse el idioma que desee.
Tras seleccionar el idioma, volverá a apare-
cer la pantalla anterior.
Ajuste del aviso acústico
1 Pulse el botón HOME para mostrar
la pantalla de Menú superior.
2 Pulse las siguientes teclas en el
orden que se indica.
Aparecerá la pantalla “Sistema”.
3 Pulse [Tono de pitido] repetida-
mente hasta que aparezca la confi-
guración deseada.
Act. (valor predeterminado):
Se emite un aviso acústico.
Des.:
No se emite un aviso acústico.
Ajuste de las posiciones de
respuesta del panel táctil
(calibración del panel táctil)
Si considera que las teclas del panel táctil
de la pantalla se desvían de las posiciones
reales que responden a su toque, ajuste las
posiciones de respuesta de la pantalla del
panel táctil.
p Este ajuste solo está disponible cuando
detiene su vehículo en un lugar seguro y
acciona el freno de mano.
p No utilice herramientas puntiagudas,
como por ejemplo bolígrafos o portami-
nas, ya que podría dañar la pantalla.
p No apague el motor mientras se estén
guardando los datos de la posición
ajustada.
1 Pulse el botón HOME para mostrar
la pantalla de Menú superior.
2 Pulse las siguientes teclas en el
orden que se indica.
Aparecerá la pantalla “Sistema”.
3 Pulse [Calibración de panel táctil].
Aparecerá la pantalla de ajuste del panel
táctil.
4 Pulse las dos esquinas de la pan-
talla que recorren las flechas, y a
continuación pulse los centros de
las dos marcas + de forma simultá-
nea dos veces.
5 Pulse el botón HOME.
Se guardarán los resultados del ajuste.
6 Pulse el botón HOME una vez más.
Avance al ajuste de 16 puntos.
Si mantiene pulsado el botón HOME, se
cancelará el ajuste.
7 Pulse suavemente el centro de la
marca + mostrada en la pantalla.
El objetivo indica el orden.
Tras pulsar todas las marcas, los datos de la
posición ajustada quedarán guardados.
23
Capítulo
64
Es
Si pulsa el botón HOME, volverá a apare-
cer la posición de ajuste anterior.
Si mantiene pulsado el botón HOME, se
cancelará el ajuste.
8 Mantenga pulsado el botón HOME.
Se guardarán los resultados del ajuste.
Ajuste de la función de
atenuación
Puede especificar cuándo se activará la
función de atenuación.
1 Pulse el botón HOME para mostrar
la pantalla de Menú superior.
2 Pulse las siguientes teclas en el
orden que se indica.
Aparecerá la pantalla “Sistema”.
3 Pulse [Ajuste de atenuador].
4 Pulse [Activador de atenuador].
Aparecerá el menú emergente.
5 Pulse el elemento que desee
ajustar.
Auto (predeterminado):
Activa la función de atenuación cuando
se encienden los faros del vehículo
(durante la noche).
Manual:
Permite decidir si activar la función de
atenuación.
Tiempo:
Permite ajustar el tiempo de activación
de la función de atenuación.
p Si se selecciona “Manual”, decida si
activar la función de atenuación.
Para más información, consulte Decidir
si activar la función de atenuación en la
página 64.
p Si se selecciona “Tiempo”, especifique
el tiempo de activación de la función de
atenuación.
Para más información, consulte Ajuste
del tiempo de activación de la función de
atenuación en la página 64.
Decidir si activar la función de
atenuación
Puede decidir si activar la función de ate-
nuación durante la noche.
p Este ajuste solo está disponible cuando
“Activador de atenuador” se ajusta en
“Manual”.
Para más información, consulte Ajuste
de la función de atenuación en la
página 64.
1 Pulse el botón HOME para mostrar
la pantalla de Menú superior.
2 Pulse las siguientes teclas en el
orden que se indica.
Aparecerá la pantalla “Sistema”.
3 Pulse [Ajuste de atenuador].
4 Pulse [Día/Noche].
Aparecerá el menú emergente.
5 Pulse el elemento que desee
ajustar.
Día (predeterminado):
Desactiva la función de atenuación.
Noche:
Activa la función de atenuación.
Ajuste del tiempo de acti-
vación de la función de
atenuación
Puede ajustar el tiempo de activación de la
función de atenuación.
p Este ajuste solo está disponible cuando
“Activador de atenuador” se ajusta en
“Tiempo”.
Para más información, consulte Ajuste
de la función de atenuación en la
página 64.
1 Pulse el botón HOME para mostrar
la pantalla de Menú superior.
2 Pulse las siguientes teclas en el
orden que se indica.
Aparecerá la pantalla “Sistema”.
3 Pulse [Ajuste de atenuador].
4 Pulse [Duración de atenuador].
Aparece la pantalla de ajuste de tiempo.
5 Pulse los puntos deseados en la
barra de ajuste de tiempo o des-
lice los cursores para especificar
la hora de inicio y de finalización
respectivamente.
p El formato de visualización de hora
depende del ajuste “Formato de Hora”.
p El valor que se visualiza en el centro de
la barra de ajuste de tiempo (“12” en el
formato de 12 horas y “00” en el formato
de 24 horas) indica la medianoche. Los
valores situados a la izquierda del valor
central son para la tarde y los valores
situados a la derecha del valor central
son para la mañana.
p Los valores predeterminados son
“18:00” (hora de inicio) y “6:00” (hora de
finalización).
p El valor se puede cambiar en pasos de
15 minutos.
Ajuste de la imagen
Puede ajustar la imagen para cada fuente,
la pantalla de la aplicación y para la cámara
de retrovisor.
PRECAUCIÓN
Por razones de seguridad, no puede utilizar
algunas de estas funciones mientras el
vehículo está en movimiento. Para activar
estas funciones, debe detenerse en un lugar
seguro y poner el freno de mano.
1 Muestre la pantalla que desea
ajustar.
2 Pulse el botón HOME para mostrar
la pantalla de Menú superior.
3 Pulse las siguientes teclas en el
orden que se indica.
Aparecerá la pantalla “Sistema”.
4 Pulse [Ajuste de imagen].
5 Pulse cualquiera de las siguientes
teclas para seleccionar la función
que se debe ajustar.
Se muestran los elementos de ajuste de la
imagen.
Brillo:
Ajusta la intensidad del color negro.
Contraste:
Ajusta el contraste.
Color:
Ajusta la saturación del color.
Tonalidad:
Ajusta el tono de color (qué color se
destaca, el rojo o el verde).
Niv. de atenuador:
Ajusta el brillo de la pantalla.
Temperatura:
Ajusta la temperatura del color, lo que
tiene como resultado un mejor balance
de blancos.
p Puede ajustar Tonalidad solo cuando el
sistema de color se ajusta en NTSC.
Si pulsa [Vista tras.] o [2ª cámara],
el modo cambia al modo de cámara
seleccionado. Al pulsar [Fuente],
[Navegación] o [Aplicac.] puede volver
al modo seleccionado.
Español
24
Capítulo
65
Es
6 Pulse las siguientes teclas para
ajustar el elemento seleccionado.
Reduce el nivel del elemento
seleccionado.
Aumenta el nivel del elemento
seleccionado.
Selecciona el elemento ajusta-
ble anterior.
Selecciona el siguiente ele-
mento ajustable.
Cada vez que pulsa la tecla, el nivel del ele-
mento seleccionado aumenta o disminuye.
p “Brillo”, “Contraste”, “Color” y
“Tonalidad” se pueden ajustar de “-24” a
“+24”.
p “Niv. de atenuador” se puede ajustar de
“+1” a “+48”.
p “Temperatura” se puede ajustar de “-3” a
“+3”.
p Los ajustes de “Brillo” , “Contraste”
y “Niv. de atenuador” se guardan
independientemente para el estado
encendido/apagado de la función de
atenuación. Cambian automáticamente
dependiendo de si la función de atenua-
ción está activada o no.
Para más información sobre cómo ajus-
tar la función de atenuación, consulte
Ajuste de la función de atenuación en la
página 64.
p El ajuste de imagen podría no estar dispo-
nible con algunas cámaras de retrovisor.
p El contenido del ajuste puede memori-
zarse de forma independiente para las
siguientes pantallas e imágenes de vídeo.
— DVD, Video-CD y Disc
— AV y cámara externa
— USB (Vídeo) y USB (JPEG)
— SD (Video) y SD (JPEG)
— iPod (iPod con conector de 30 clavijas)
— iPod (Vídeo) y AppRadio Mode (iPod
con conector de 30 clavijas)
— HDMI y AppRadio Mode (HDMI)
— Android Auto
— MirrorLink
— AUX
— MIXTRAX, salida de imágenes desde el
dispositivo externo
— Cámara de retrovisor
Visualización de la versión del
rmware
1 Pulse el botón HOME para mostrar
la pantalla de Menú superior.
2 Pulse las siguientes teclas en el
orden que se indica.
Aparecerá la pantalla “Sistema”.
3 Pulse [Información del sistema].
4 Pulse [Información de firmware].
Aparecerá la pantalla “Información de
firmware”.
p Puede comprobar las licencias de código
abierto de las funciones con las que está
equipado este producto en “Licencia” en
la pantalla “Información de firmware”.
Actualización del rmware
PRECAUCIÓN
Nunca apague este producto, nunca
expulse la tarjeta de memoria SD y
nunca desconecte el dispositivo de alma-
cenamiento USB mientras el firmware se
está actualizando.
Solo puede actualizar la versión de fir-
mware cuando el vehículo esté detenido
y se haya aplicado el freno de mano.
p Utilice el puerto USB 1 para actualizar
el firmware utilizando un dispositivo de
almacenamiento USB.
1 Descargue los archivos de actuali-
zación del firmware.
2 Conecte una tarjeta de memoria
SD vacía (formateada) o un dispo-
sitivo de almacenamiento USB al
ordenador, a continuación localice
el archivo de actualización correcto
y cópielo a la tarjeta de memoria
SD o el dispositivo de almacena-
miento USB.
3 Desactive la fuente.
Para los detalles, consulte Desactivación
de la fuente de AV en la página 13.
4 Pulse el botón HOME para mostrar
la pantalla de Menú superior.
5 Pulse las siguientes teclas en el
orden que se indica.
Aparecerá la pantalla “Sistema”.
6 Pulse [Información del sistema].
7 Pulse [Actualización de firmware].
Aparecerá la pantalla “Actualización de
firmware”.
8 Pulse [Continuar] para mostrar el
modo de transferencia de datos.
p Siga las instrucciones en pantalla para
finalizar la actualización del firmware.
p Este producto se restablecerá automáti-
camente cuando se haya completado la
actualización de firmware si la actualiza-
ción se realiza correctamente.
p Cuando empiece la actualización de
firmware, se apagará la fuente y se desco-
nectará la conexión Bluetooth.
p Si aparece un mensaje de error en la pan-
talla, toque [Continuar] para continuar e
iniciar la secuencia de recuperación.
Comprobación de las conexio-
nes de los cables
Compruebe que los cables estén correcta-
mente conectados entre este producto y el
vehículo. Compruebe también que estén
conectados en las posiciones correctas.
1 Pulse el botón HOME para mostrar
la pantalla de Menú superior.
2 Pulse las siguientes teclas en el
orden que se indica.
Aparecerá la pantalla “Sistema”.
3 Pulse [Información del sistema].
4 Pulse [Estado de conexión].
Aparecerá la pantalla “Instalación”.
Iluminación
Cuando los faros principales o los faros
pequeños del vehículo están encendidos,
se muestra “Act.”. Cuando los faros
pequeños del vehículo están apagados,
se muestra “Des.”. (Si no está conec-
tado el cable naranja/blanco, aparecerá
“Des.”.)
iDataLink
Cuando se conecta el adaptador iData-
Link opcional y la versión del protocolo
concuerda, se muestra “OK”. Si la ver-
sión no concuerda, se muestra “Versión
incomp.”. Si el adaptador iDataLink
opcional no está conectado, “Incorrecto”
se muestra.
Ajustes de audio
Utilización del ajuste de
desvanecimiento/balance
Se puede seleccionar el ajuste de desva-
necimiento/balance que proporcione un
entorno de audio ideal en todos los asientos
ocupados.
p La función está disponible solo cuando el
audio principal está disponible.
p Este ajuste solo está disponible cuando
“Bocina trasera” se ajusta en “Act.”.
Para los detalles, consulte Ajuste de la
salida del altavoz delantero y trasero en la
página 67.
1 Pulse el botón HOME para mostrar
la pantalla de Menú superior.
24
Capítulo
66
Es
2 Pulse las siguientes teclas en el
orden que se indica.
Aparecerá la pantalla “Audio”.
3 Pulse [Atenuador/Balance].
Aparecerá la pantalla “Atenuador/
Balance”.
4 Pulse las siguientes teclas para
ajustar el balance del altavoz
delantero/trasero.
Se desplaza hacia delante.
Se desplaza hacia atrás.
Cada vez que pulsa las teclas, el balance del
altavoz delantero/trasero se desplaza hacia
delante o hacia atrás.
p Se muestra “Fron.25” a “Tras.25” a
medida que el balance entre los altavoces
delanteros y los altavoces traseros se des-
plaza de la parte delantera a la trasera.
p El ajuste predeterminado es “F/T 0 I/D
0”.
p Establezca “Fron.” y “Tras.” en “0”
cuando utilice un sistema de dos
altavoces.
5 Pulse las siguientes teclas para
ajustar el balance del altavoz
izquierdo/derecho.
Se desplaza hacia la izquierda.
Se desplaza hacia la derecha.
Cada vez que pulsa las teclas, el balance del
altavoz izquierdo/derecho se desplaza hacia
la izquierda o la derecha.
p Se muestra “Izq.25” a “Der.25” a medida
que el balance entre los altavoces
izquierdos y los altavoces derechos
se desplaza de la parte izquierda a la
derecha.
p El ajuste predeterminado es “I/D 0”.
p También puede ajustar el desvaneci-
miento/balance arrastrando el punto de
la tabla que se muestra.
Utilización del ajuste del
balance
Puede ajustar el balance entre la salida de
sonido derecha/izquierda.
p La función está disponible solo cuando el
audio principal está disponible.
p Este ajuste solo está disponible cuando
“Bocina trasera” se ajusta en “Des.”.
Para los detalles, consulte Ajuste de la
salida del altavoz delantero y trasero en la
página 67.
1 Pulse el botón HOME para mostrar
la pantalla de Menú superior.
2 Pulse las siguientes teclas en el
orden que se indica.
Aparecerá la pantalla “Audio”.
3 Pulse [Balance].
Aparecerá la pantalla “Atenuador/
Balance”.
4 Pulse las siguientes teclas para
ajustar el balance del altavoz
izquierdo/derecho.
Se desplaza hacia la izquierda.
Se desplaza hacia la derecha.
Cada vez que pulsa las teclas, el balance del
altavoz izquierdo/derecho se desplaza hacia
la izquierda o la derecha.
p Se muestra “Izq.25” a “Der.25” a medida
que el balance entre los altavoces
izquierdos y los altavoces derechos
se desplaza de la parte izquierda a la
derecha.
p El ajuste predeterminado es “I/D 0”.
p También puede ajustar el desvaneci-
miento/balance arrastrando el punto de
la tabla que se muestra.
Cambio del silenciamiento o
la atenuación del sonido
El sonido de este sistema se silencia o
atenúa automáticamente cuando se recibe
una señal de un equipo con la función de
silenciamiento.
1 Pulse el botón HOME para mostrar
la pantalla de Menú superior.
2 Pulse las siguientes teclas en el
orden que se indica.
Aparecerá la pantalla “Audio”.
3 Pulse [Nivel de silenciar].
Aparecerá el menú emergente.
4 Pulse el elemento que desee
ajustar.
ATE (valor predeterminado):
El volumen pasa a ser de 1/10.
Silenciar:
El volumen pasa a ser 0.
Des.:
El volumen no cambia.
Ajuste de los niveles de la
fuente
La función SLA (ajuste del nivel de fuente)
ajusta el nivel de volumen de cada fuente
para evitar cambios bruscos de volumen
cuando se alterna entre las fuentes.
p La función está disponible solo cuando el
audio principal está disponible.
p La configuración está basada en el nivel
de volumen del sintonizador de FM, que
se mantiene inalterado.
p Esta función no está disponible cuando
está seleccionado el sintonizador de FM
como fuente de AV.
1 Compare el nivel de volumen del
sintonizador de FM con el de la
fuente que desea ajustar.
2 Pulse el botón HOME para mostrar
la pantalla de Menú superior.
3 Pulse las siguientes teclas en el
orden que se indica.
Aparecerá la pantalla “Audio”.
4 Pulse [Regulador nivel fuente].
Aparecerá la pantalla “Regulador nivel
fuente”.
5 Pulse las siguientes teclas para
ajustar el volumen de la fuente.
Aumenta el volumen de la
fuente.
Reduce el volumen de la fuente.
p Si pulsa directamente el área en la que se
puede mover el cursor, el ajuste de SLA
cambiará al valor del punto que se haya
pulsado.
p Aparecerá “+4” a “–4” a medida que
aumente o disminuya el volumen de la
fuente.
p El ajuste predeterminado es “0”.
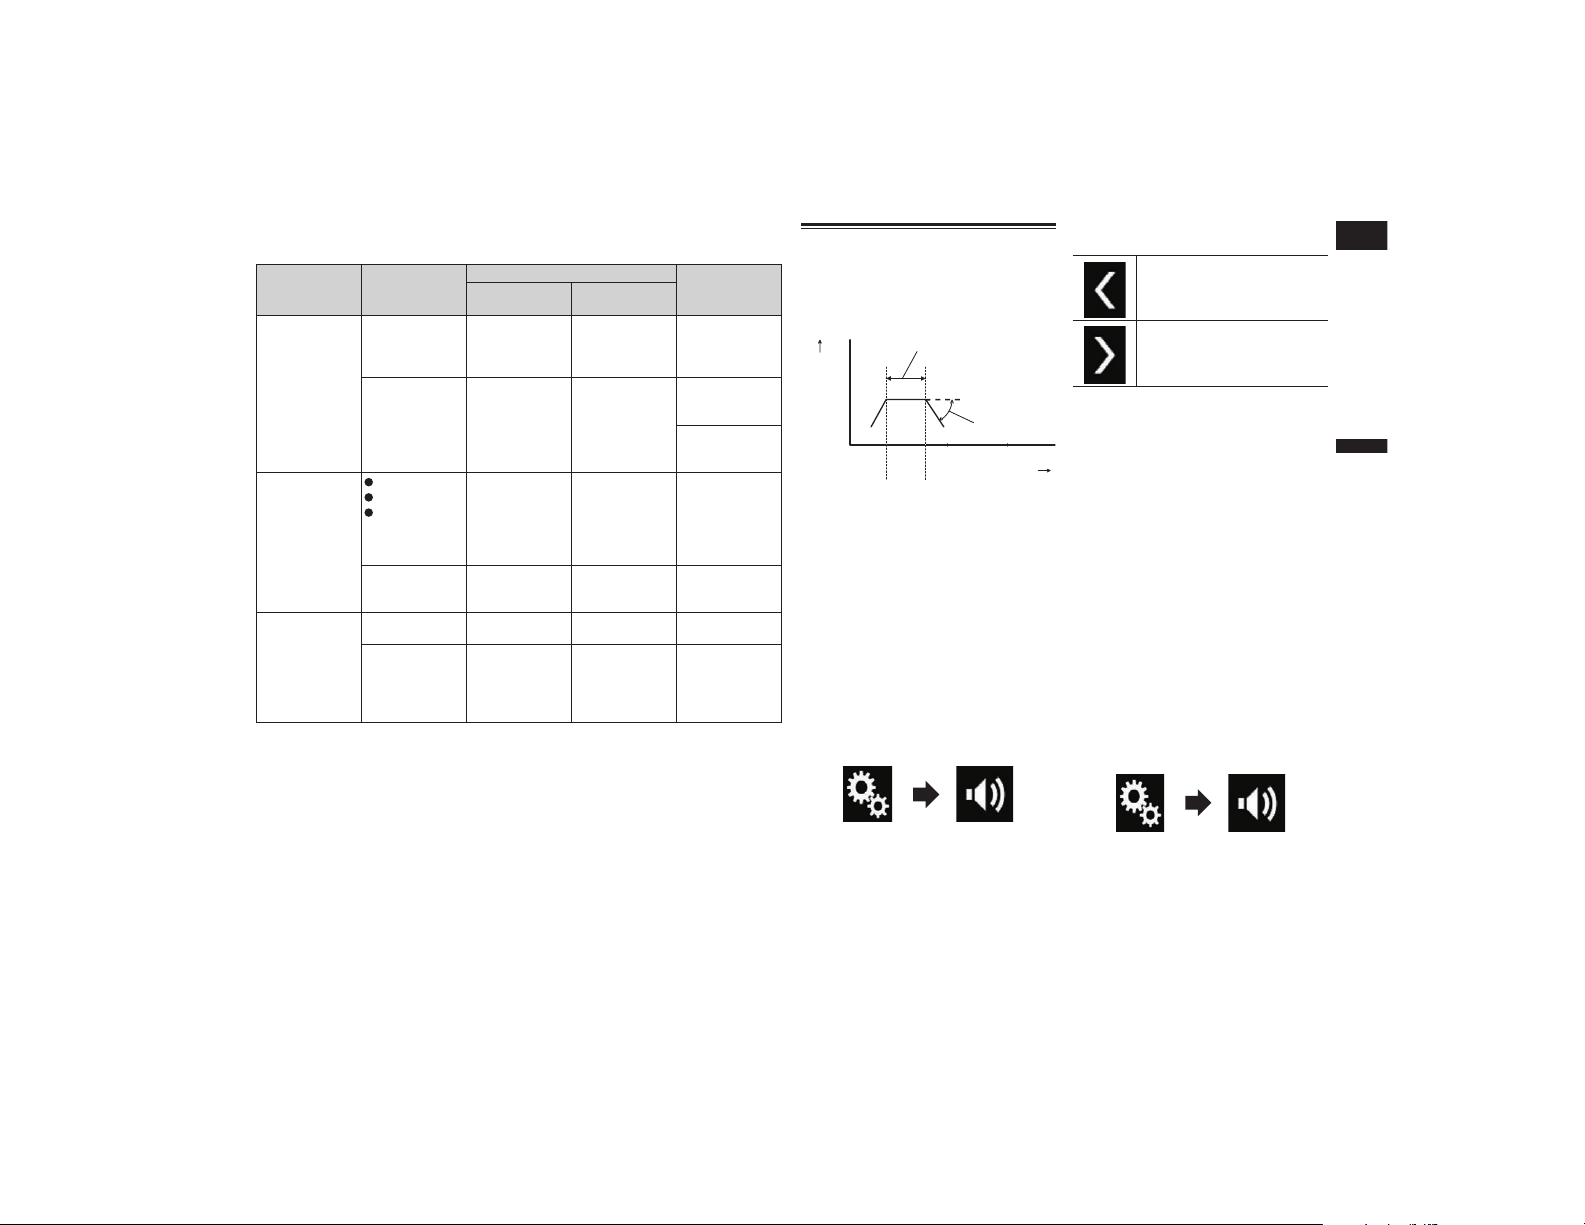
Español
24
Capítulo
67
Es
Las siguientes fuentes de AV se establecen automáticamente en el mismo volumen de
ajuste de nivel de fuente.
Cable necesa-
rio (se vende
por separado)
Config. smartphone
Fuentes AV
Dispositivo Conexión
iPod / iPhone
con conector de
30 clavijas
CD-IU201V iPhone/iPod USB
USB1
iPod1
aha
Pandora
CD-IU201S iPhone/iPod USB
USB1
aha
Pandora
iPod1
AppRadio
Mode
iPod / iPhone
con conector
Lightning
CD-IH202
CD-IU52
Adaptador
de conector
Lightning a
AV digital
iPhone/iPod
Adapt. AV
digital
aha
Pandora
AppRadio
Mode
HDMI
CD-IU52 iPhone/iPod USB
iPod1
aha
Pandora
Dispositivo
Android
CD-MU200 Otros USB
Android Auto
MirrorLink
CD-AH200 Otros HDMI
aha
Pandora
AppRadio
Mode
HDMI
p Cuando el dispositivo de almacenamiento
USB está conectado al puerto USB 1 o 2,
el volumen de ajuste de nivel de fuente se
ajusta automáticamente al mismo nivel
que el puerto USB al que esté conectado
el dispositivo. El volumen de ajuste de
nivel de fuente que se ajusta automática-
mente varía dependiendo de si el disposi-
tivo está conectado al puerto USB 1 o 2.
p Cuando el un iPod/iPhone con conector
Lightning está conectado al puerto USB
1 o 2 utilizando un cable de interfaz USB
para iPod/iPhone (CD-IU52) (se vende por
separado), el volumen de ajuste de nivel
de fuente se ajusta automáticamente
al mismo nivel que el puerto USB al
que esté conectado el iPod/iPhone con
conector Lightning. El volumen de ajuste
de nivel de fuente que se ajusta auto-
máticamente varía dependiendo de si el
iPod/iPhone con conector Lightning está
conectado al puerto USB 1 o 2.
p Cuando un dispositivo compatible con
Android Auto o un dispositivo MirrorLink
está conectado al puerto USB 2, el volu-
men de ajuste de nivel de fuente se ajusta
automáticamente al mismo nivel que el
puerto USB 2.
Ajuste del ltro
Se pueden realizar los siguientes ajustes
durante los ajustes de filtros. Realice los
ajustes adecuados para la banda de frecuen-
cias reproducida y las características de la
unidad de altavoz conectada.
20 1 k
0
10 k
Frecuencia (Hz)
3
4
2
Nivel (dB)
100
1
1 Banda de frecuencia reproducida
2 Ajuste de pendiente
3 Frecuencia de corte de LPF
4 Frecuencia de corte de HPF
■ Ajuste de la salida del altavoz
delantero y trasero
Puede ajustar el margen de frecuencia para
la salida de sonido de los altavoces delan-
tero y trasero.
p La función está disponible solo cuando el
audio principal está disponible.
1 Pulse el botón HOME para mostrar
la pantalla de Menú superior.
2 Pulse las siguientes teclas en el
orden que se indica.
Aparecerá la pantalla “Audio”.
3 Compruebe que “Bocina trasera”
se haya ajustado en “Act.”.
p El ajuste predeterminado es “Act.”.
4 Pulse [Filtro de cruce].
Aparecerá la pantalla “Corte”.
5 Pulse las siguientes teclas para
seleccionar “Fron.” o “Tras.”.
Selecciona el altavoz ajustable
anterior.
Selecciona el altavoz ajustable
siguiente.
6 Pulse [HPF] para activarlo.
7 Arrastre el gráfico de líneas hori-
zontalmente para ajustar el inter-
valo de frecuencia de corte de “50”
Hz a “200” Hz.
p El ajuste predeterminado es “100” Hz.
8 Arrastre la punta de la pendiente
para ajustar el intervalo del nivel
entre “–6” dB/oct y “–18” dB/oct.
p El ajuste predeterminado es “–12” dB/oct.
■ Utilización de la salida del
subwoofer
Este producto cuenta con un mecanismo de
salida del subwoofer que puede activarse o
desactivarse.
p La función está disponible solo cuando el
audio principal está disponible.
1 Pulse el botón HOME para mostrar
la pantalla de Menú superior.
2 Pulse las siguientes teclas en el
orden que se indica.
Aparecerá la pantalla “Audio”.
3 Pulse [Subwoofer] para ajustar la
salida del subwoofer en “Act.”.
p El ajuste predeterminado es “Des.”.
4 Pulse [Config. subwoofer].
Aparecerá la pantalla “Corte”.
24
Capítulo
68
Es
5 Pulse las siguientes teclas para
seleccionar “Subwoof.”.
Selecciona el altavoz ajustable
anterior.
Selecciona el altavoz ajustable
siguiente.
6 Pulse [LPF] para activarlo.
7 Pulse las siguientes teclas para
seleccionar la fase de salida del
subwoofer.
Ajusta la fase de salida del
subwoofer en normal.
Ajusta la fase de salida del
subwoofer en inverso.
8 Arrastre el gráfico de líneas hori-
zontalmente para ajustar el inter-
valo de frecuencia de corte de “50”
Hz a “200” Hz.
p El ajuste predeterminado es “100” Hz.
9 Arrastre la punta de la pendiente
para ajustar el intervalo del nivel
entre “–6” dB/oct y “–18” dB/oct.
p El ajuste predeterminado es “–18” dB/oct.
Selección de la posición de
escucha
Puede seleccionar una posición de escucha
que desee convertir en el centro de los
efectos de sonido.
p La función está disponible solo cuando el
audio principal está disponible.
1 Pulse el botón HOME para mostrar
la pantalla de Menú superior.
2 Pulse las siguientes teclas en el
orden que se indica.
Aparecerá la pantalla “Audio”.
3 Pulse [Posición de escucha].
Aparecerá la pantalla “Posición de
escucha”.
4 Pulse la posición que desea.
Des. (valor predeterminado):
Desactiva el ajuste de posición de
escucha.
Fron.:
Cambia el ajuste de la posición de escu-
cha hacia delante.
Frontal-I:
Cambia el ajuste de la posición de escu-
cha hacia delante a la izquierda.
Frontal-D:
Cambia el ajuste de la posición de escu-
cha hacia delante a la derecha.
Todas:
Cambia el ajuste de la posición de escu-
cha a todo.
Ajuste preciso de los niveles
de salida de los altavoces
Se pueden realizar ajustes precisos del nivel
de salida de los altavoces escuchando la
salida de audio.
p La función está disponible solo cuando el
audio principal está disponible.
p Este ajuste solo está disponible cuando
“Bocina trasera” se ajusta en “Act.”.
Para los detalles, consulte Ajuste de la
salida del altavoz delantero y trasero en la
página 67.
p Este ajuste solo está disponible cuando
“Subwoofer” se ajusta en “Act.”.
Para los detalles, consulte Utilización de
la salida del subwoofer en la página 67.
1 Pulse el botón HOME para mostrar
la pantalla de Menú superior.
2 Pulse las siguientes teclas en el
orden que se indica.
Aparecerá la pantalla “Audio”.
3 Pulse [Nivel de la bocina].
Aparecerá la pantalla “Nivel de la bocina”.
4 Pulse las siguientes teclas para
seleccionar la posición de escucha
si es necesario.
Selecciona la posición de
escucha.
Des.:
Desactiva el ajuste de posición de
escucha.
Front. izq.:
Cambia el ajuste de la posición de escu-
cha hacia delante a la izquierda.
Front. der.:
Cambia el ajuste de la posición de escu-
cha hacia delante a la derecha.
Fron.:
Cambia el ajuste de la posición de escu-
cha hacia delante.
Todas:
Cambia el ajuste de la posición de escu-
cha a todo.
p Si cambia el ajuste de posición de escu-
cha, los niveles de salida de todos los
altavoces cambiarán de forma conjunta
con él ajuste.
5 Pulse las siguientes teclas para
ajustar el nivel de salida del
altavoz.
Reduce el nivel del altavoz.
Aumenta el nivel del altavoz.
p Se mostrará “–24” dB a “10” dB a medida
que aumente o se reduzca la distancia
que se debe corregir.
Front. izq.:
Cambia el nivel del altavoz del altavoz
delantero izquierdo.
Front. der.:
Cambia el nivel del altavoz del altavoz
delantero derecho.
Tras. izq.:
Cambia el nivel del altavoz del altavoz
trasero izquierdo.
Tras. der.:
Cambia el nivel del altavoz del altavoz
trasero derecho.
Subwoof.:
Cambia el nivel del altavoz del altavoz
subwoofer.
Si pulsa [Apl. EQ aut.], el resultado de
“Medición de A-EQ y AT A.” se aplicará
al ajuste de nivel del altavoz.
p Para utilizar esta función, se debe medir
la acústica del vehículo previamente.
Ajuste del alineamiento de
tiempo
Al ajustar la distancia desde cada altavoz
hasta la posición de escucha, el alinea-
miento de tiempo puede corregir el tiempo
necesario para que el sonido llegue a la
posición de escucha.
p La función está disponible solo cuando el
audio principal está disponible.
p Este ajuste solo está disponible cuando
“Bocina trasera” se ajusta en “Act.”.
Para los detalles, consulte Ajuste de la
salida del altavoz delantero y trasero en la
página 67.
Español
24
Capítulo
69
Es
p Este ajuste solo está disponible cuando
“Subwoofer” se ajusta en “Act.”.
Para los detalles, consulte Utilización de
la salida del subwoofer en la página 67.
p Esta función solo está disponible cuando
el ajuste de la posición de escucha se
establece en “Front. izq.” o “Front. der.”.
Para los detalles, consulte Selección de la
posición de escucha en la página 68.
1 Mida la distancia entre la cabeza
de la persona que escucha y cada
unidad de altavoz.
2 Pulse el botón HOME para mostrar
la pantalla de Menú superior.
3 Pulse las siguientes teclas en el
orden que se indica.
Aparecerá la pantalla “Audio”.
4 Pulse [Alineamiento temporal].
Aparecerá la pantalla “Alineamiento
temporal”.
5 Pulse las siguientes teclas para
seleccionar la posición de escucha
si es necesario.
Selecciona la posición de
escucha.
Des.:
Desactiva el ajuste de posición de
escucha.
Front. izq.:
Cambia el ajuste de la posición de escu-
cha hacia delante a la izquierda.
Front. der.:
Cambia el ajuste de la posición de escu-
cha hacia delante a la derecha.
Fron.:
Cambia el ajuste de la posición de escu-
cha hacia delante.
Todas:
Cambia el ajuste de la posición de escu-
cha a todo.
p Si cambia el ajuste de posición de escu-
cha, los niveles de salida de todos los
altavoces cambiarán de forma conjunta
con él ajuste.
6 Pulse las siguientes teclas para
introducir la distancia entre el
altavoz seleccionado y la posición
de escucha.
Reduce la distancia entre el alta-
voz seleccionado y la posición
de escucha seleccionada.
Aumenta la distancia entre el
altavoz seleccionado y la posi-
ción de escucha seleccionada.
p Se mostrará “0.0” pulgadas a “200.0” pul-
gadas a medida que se la distancia que
se debe corregir aumente o disminuya.
Front. izq.:
Cambia la distancia entre el altavoz
delantero izquierdo y la posición de
escucha seleccionada.
Front. der.:
Cambia la distancia entre el altavoz
delantero derecho y la posición de escu-
cha seleccionada.
Tras. izq.:
Cambia la distancia entre el altavoz
trasero izquierdo y la posición de escucha
seleccionada.
Tras. der.:
Cambia la distancia entre el altavoz
trasero derecho y la posición de escucha
seleccionada.
Subwoof.:
Cambia la distancia entre el altavoz
subwoofer y la posición de escucha
seleccionada.
Si pulsa [AT act.], el alineamiento de
tiempo se desactiva.
Si pulsa [Apl. EQ aut.], el resultado de
“Medición de A-EQ y AT A.” se aplicará
al ajuste de alineamiento de tiempo.
p Para utilizar esta función, se debe medir
la acústica del vehículo previamente.
Utilización del ecualizador
El ecualizador le permite ajustar la ecuali-
zación de acuerdo con las características
acústicas del interior del vehículo, según
desee.
■ Recuperación de las curvas del
ecualizador
Existen siete curvas del ecualizador alma-
cenadas que pueden activarse fácilmente
en cualquier momento. A continuación se
muestra la lista de curvas del ecualizador:
Curva del ecualizador
S.Bajo es una curva en la que se intensifi-
can únicamente los sonidos graves.
Potente es una curva en la que se intensifi-
can los sonidos graves y agudos.
Natural es una curva en la que se inten-
sifican ligeramente los sonidos graves y
agudos.
Vocal es una curva en la que se intensifi-
can los tonos medios, los de la voz humana.
Plano es una curva plana en la que no se
intensifica nada.
Pers.1 es una curva del ecualizador ajus-
tada que crea usted mismo. Si selecciona
esta curva, el efecto se aplicará a todas las
fuentes de AV.
Pers.2 es una curva del ecualizador ajus-
tada que crea usted mismo. Si selecciona
esta curva, el efecto se aplicará a todas las
fuentes de AV.
p La función está disponible solo cuando el
audio principal está disponible.
p El ajuste predeterminado es “Potente”.
p Cuando se selecciona “Plano”, no se
realiza al sonido ningún tipo de adición ni
corrección. Esto resulta útil para compro-
bar el efecto de las curvas del ecualiza-
dor, alternando entre “Plano” y una curva
del ecualizador establecida.
1 Pulse el botón HOME para mostrar
la pantalla de Menú superior.
2 Pulse las siguientes teclas en el
orden que se indica.
Aparecerá la pantalla “Audio”.
3 Pulse [EQ gráfico].
Aparecerá la pantalla “EQ gráfico”.
4 Pulse el ecualizador al que desea
acceder.
■ Personalización de las curvas
del ecualizador
Puede ajustar la configuración de la curva
del ecualizador seleccionada actualmente,
según desee. Los ajustes se pueden realizar
con un ecualizador gráfico de 13 bandas.
p La función está disponible solo cuando el
audio principal está disponible.
p Si realiza ajustes cuando está seleccio-
nada una curva “S.Bajo”, “Potente”,
“Natural”, “Vocal” o “Plano”, el ajuste
de la curva del ecualizador cambiará a
“Pers.1” obligatoriamente.
p Si realiza ajustes cuando la curva
“Pers.2” está seleccionada, por ejemplo,
se actualizará la curva “Pers.2”.
p Las curvas “Pers.1” y “Pers.2” se pueden
crear comunes a todas las fuentes.
1 Pulse el botón HOME para mostrar
la pantalla de Menú superior.
2 Pulse las siguientes teclas en el
orden que se indica.
Aparecerá la pantalla “Audio”.
3 Pulse [EQ gráfico].
Aparecerá la pantalla “EQ gráfico”.
4 Pulse una de las teclas para selec-
cionar una curva que desee utilizar
como base para la personalización.

24
Capítulo
70
Es
5 Pulse la frecuencia de la que desea
ajustar el nivel.
p Si pasa un dedo por las barras de varias
bandas del ecualizador, los ajustes de
curva del ecualizador se establecerán en
el valor el punto tocado en cada barra.
■ Utilización del ecualizador ajus-
tado automáticamente
Puede ajustar el ecualizador ajustado auto-
máticamente para adaptarlo a la acústica
del vehículo. Para utilizar esta función,
la acústica del vehículo debe medirse de
antemano.
Para los detalles sobre las operacio-
nes, consulte Ajuste automático de
la curva del ecualizador (medición
con el Ecualizador automático) en la
página 70.
p Para ajustar manualmente la curva del
ecualizador, establezca “EQ y AT auto-
máticos.” en “Des.”.
1 Pulse el botón HOME para mostrar
la pantalla de Menú superior.
2 Pulse las siguientes teclas en el
orden que se indica.
Aparecerá la pantalla “Audio”.
3 Pulse [EQ y AT automáticos.] repe-
tidamente hasta que aparezca la
configuración deseada.
Des. (valor predeterminado):
Desactiva el ajuste de ecualizador y TA
automáticos.
Act.:
Activa el ajuste de ecualizador y TA
automáticos.
Ajuste automático de la curva
del ecualizador (medición con
el Ecualizador automático)
Al medir la acústica del vehículo, la curva
del ecualizador puede ajustarse automá-
ticamente para adaptarse al interior del
vehículo.
ADVERTENCIA
Los altavoces pueden emitir un tono
alto (ruido) al medir la acústica del vehí-
culo. Nunca realice la medición con el
Ecualizador automático mientras conduce.
PRECAUCIÓN
Compruebe a fondo las condiciones
antes de realizar la medición con el
Ecualizador automático, ya que los
altavoces pueden dañarse si se realiza
bajo las siguientes condiciones:
— Cuando los altavoces no están correcta-
mente conectados. (Por ejemplo, cuando
un altavoz trasero está conectado como
una salida del subwoofer.)
— Cuando un altavoz está conectado a
un amplificador de potencia con una
salida que supera la potencia de entrada
máxima del altavoz.
Si no hay un micrófono de medición
acústica (se vende por separado) colo-
cado en la ubicación correcta, el tono de
medición puede elevarse y la medición
puede tardar mucho tiempo en reali-
zarse, por lo que se vaciará la batería.
Asegúrese de colocar el micrófono en la
ubicación especificada.
■ Antes de poner en funciona-
miento la medición con el
Ecualizador automático
Realice la medición con el Ecualizador
automático en el lugar más tranquilo
posible, con el motor del vehículo y el aire
acondicionado apagados. De igual forma,
desactive los teléfonos del coche o los
móviles que estén en el vehículo, o bien
sáquelos del vehículo antes de realizar la
medición con el Ecualizador automático.
Los sonidos ajenos al tono de medición
(sonidos de los alrededores, sonido del
motor, sonido de teléfonos, etc.) pueden
impedir que la acústica del vehículo se
mida correctamente.
Asegúrese de realizar la medición con
el Ecualizador automático utilizando
el micrófono de medición acústica (se
vende por separado). Si utiliza otro micró-
fono, es posible que la medición de la
acústica del vehículo no pueda realizarse
o que se realice incorrectamente.
Para realizar la medición con el
Ecualizador automático, debe conectar
los altavoces delanteros.
Cuando este producto está conectado a
un amplificador de potencia con control
de nivel de entrada, la medición con el
Ecualizador automático podría no llevarse
a cabo si el nivel de entrada del amplifi-
cador de potencia está establecido por
debajo del nivel estándar.
Si este producto está conectado a un
amplificador de potencia con un LPF (fil-
tro de paso bajo), desactive el LPF antes
de realizar la medición con el Ecualizador
automático. De igual forma, establezca la
frecuencia de corte para el LPF integrado
de un subwoofer activo en la máxima
frecuencia.
El ordenador ha calculado la distancia
para proporcionar el retraso óptimo y
garantizar resultados precisos. No cam-
bie este valor.
— El sonido reflejado dentro del vehículo es
fuerte y se producen retrasos.
— El LPF de los subwoofers o amplificado-
res externos activos retrasa los sonidos
más bajos.
Si se produce un error durante la medi-
ción, aparecerá un mensaje y se cance-
lará la medición. Compruebe lo siguiente
antes de medir la acústica del vehículo.
— Altavoces delanteros (izquierdo/derecho)
— Altavoces traseros (izquierdo/derecho)
— Ruido
— Micrófono de medición acústica (se
vende por separado)
— Bajo nivel de batería
■ Realización de la medición con
el Ecualizador automático
p El Ecualizador automático cambia la
configuración de audio de la siguiente
manera:
— “EQ y AT automáticos.” se ajusta en
“Act.”.
Para los detalles, consulte Utilización del
ecualizador ajustado automáticamente
en la página 70.
— La configuración del desvanecimiento/
balance vuelve a la posición central.
Para los detalles, consulte Utilización del
ajuste del balance en la página 66.
— La curva del ecualizador cambia a
“Plano”.
Para los detalles, consulte Utilización del
ecualizador en la página 69.
— Los altavoces delanteros y traseros se
ajustarán automáticamente en un ajuste
de filtro de paso alto.
p Se sobrescribirá la configuración ante-
rior de la medición con el Ecualizador
automático.
p No pulse el botón para abrir o cerrar
el panel cuando esté utilizando el
micrófono.
PRECAUCIÓN
No apague el motor mientras se está reali-
zando la medición.
1 Detenga el vehículo en un lugar
tranquilo, cierre todas las puertas,
las ventanas y el techo solar y, a
continuación, apague el motor.
Si deja el motor encendido, el ruido del
mismo puede impedir que la medición
con el Ecualizador automático se realice
correctamente.
p Si se detectan restricciones de conduc-
ción durante el proceso de medición, se
cancelará la medición.
2 Coloque el micrófono de medición
acústica (se vende por separado)
en el centro del reposacabezas del
asiento del conductor, orientado
hacia delante.
La medición con el Ecualizador automático
puede diferir en función del lugar en el que
coloque el micrófono. Si lo desea, coloque el
micrófono en el asiento del pasajero delan-
tero y realice la medición con el Ecualizador
automático.
3 Desconecte el iPhone o
smartphone.
4 Conexión del interruptor de encen-
dido (ACC ON).
Si el aire acondicionado o la calefacción del
vehículo están encendidos, apáguelos. El
ruido del ventilador del aire acondicionado
o de la calefacción podría impedir que se
realice correctamente la medición con el
Ecualizador automático.
Español
25
Capítulo
71
Es
5 Cambie la fuente de AV a “OFF”.
Para los detalles sobre las operaciones,
consulte Visualización de la pantalla de
función AV en la página 12.
6 Pulse el botón HOME para mostrar
la pantalla de Menú superior.
7 Pulse las siguientes teclas en el
orden que se indica.
Aparecerá la pantalla “Audio”.
8 Pulse [Medición de A-EQ y AT A.].
Aparecerá la pantalla “Medición de A-EQ
y AT A.”.
9 Conecte el micrófono para la medi-
ción acústica (se vende por sepa-
rado) con este producto.
Enchufe el micrófono en el conector del
micrófono de este producto.
10 Pulse [Front. izq.] o [Front. der.]
para seleccionar la posición de
escucha actual.
11 Pulse [Iniciar].
Se iniciará una cuenta atrás de 10 segundos.
p La conexión Bluetooth se desconecta
antes de que se inicie el proceso.
12 Salga del vehículo y mantenga las
puertas cerradas hasta que finalice
la cuenta atrás.
Cuando finalice la cuenta atrás, se emitirá
un tono de medición (ruido) a través de los
altavoces y se iniciará la medición con el
Ecualizador automático.
13 Espere hasta que finalice la
medición.
Cuando finalice la medición con el
Ecualizador automático, aparecerá un
mensaje indicando que ha finalizado la
medición.
p Si la acústica del vehículo no puede
medirse correctamente, aparecerá un
mensaje de error.
p El tiempo de medición variará en función
del tipo de vehículo.
p Para detener la medición, pulse
[Detener].
14 Guarde el micrófono con mucho
cuidado en la guantera o en otro
lugar seguro.
Si el micrófono se expone a la luz solar
directa durante un periodo de tiempo prolon-
gado, las altas temperaturas podrían provo-
car deformaciones, cambios en el color o
errores de funcionamiento.
Menú de temas
Selección de la visualización
de fondo
La visualización de fondo se puede seleccio-
nar entre 8 visualizaciones preestablecidas
diferentes para la pantalla de Función AV y
5 visualizaciones preestablecidas diferentes
para la pantalla de Menú superior. Además,
puede cambiar la imagen de fondo a otras
imágenes importadas desde el dispositivo de
almacenamiento externo (USB, SD).
1 Pulse el botón HOME para mostrar
la pantalla de Menú superior.
2 Pulse las siguientes teclas en el
orden que se indica.
Aparecerá la pantalla “Tema”.
3 Pulse [Fondo].
p También puede cambiar los ajustes de la
pantalla pulsando [Iluminación], [Tema]
o [Reloj] en esta pantalla.
4 Pulse [Home] o [AV] para cambiar
las visualizaciones de pantalla.
p El contenido del ajuste se puede memo-
rizar por separado para la pantalla
de Función AV y la pantalla del Menú
superior.
5 Pulse el elemento que desee
ajustar.
Visualizaciones preestablecidas:
Selecciona la visualización de fondo
preestablecida que desea.
(personalizado):
Muestra la imagen de fondo importada
desde el dispositivo de almacenamiento
externo (USB, SD).
Para los detalles, consulte Cambio de
la imagen de fondo almacenada en el
dispositivo de almacenamiento externo
(USB, SD) en la página 71.
(apagada):
Oculta la visualización de fondo.
■ Cambio de la imagen de fondo
almacenada en el dispositivo de
almacenamiento externo (USB,
SD)
Puede cambiar la imagen de fondo que se
visualiza a una imagen importada desde
el dispositivo de almacenamiento externo
(USB, SD).
p La imagen de fondo se debe usar con los
siguientes formatos.
— Archivos de imagen JPEG (.jpg o .jpeg)
— El tamaño de datos permitido es de
10 MB o inferior
— El tamaño de imagen permitido es de
4 000 × 4 000 píxeles o inferior
PRECAUCIÓN
No apague el motor mientras importa una
imagen del dispositivo de almacenamiento
externo (USB, SD).
1 Pulse el botón HOME para mostrar
la pantalla de Menú superior.
2 Pulse las siguientes teclas en el
orden que se indica.
Aparecerá la pantalla “Tema”.
3 Pulse [Fondo].
p También puede cambiar los ajustes de la
pantalla pulsando [Iluminación], [Tema]
o [Reloj] en esta pantalla.
4 Pulse la siguiente tecla.
Muestra la lista de imágenes de
fondo almacenada en el disposi-
tivo de almacenamiento externo
(USB, SD).
5 Pulse el dispositivo de alma-
cenamiento externo (USB, SD)
deseado.
6 Toque la imagen que utilizará
como visualización de fondo de la
lista.
La imagen se ajusta como imagen de fondo.
p Puede eliminar la imagen importada y
restaurar el ajuste para la visualización
de fondo al valor predeterminado mante-
niendo pulsada la tecla personalizada.
Ajuste del color de
iluminación
Es posible seleccionar el color de ilumina-
ción entre 5 colores diferentes. Además, la
iluminación puede alternarse entre estos 5
colores siguiendo el orden.
■ Selección del color a partir de
los colores preestablecidos
Puede seleccionar un color de iluminación
de la lista de colores.
1 Pulse el botón HOME para mostrar
la pantalla de Menú superior.
2 Pulse las siguientes teclas en el
orden que se indica.
Aparecerá la pantalla “Tema”.
3 Pulse [Iluminación].
p También puede cambiar los ajustes de
la pantalla pulsando [Tema], [Fondo] o
[Reloj] en esta pantalla.
4 Pulse el color que desee.
Teclas de color:
Permiten seleccionar el color preajustado
que desee.

25
Capítulo
72
Es
(personalizado):
Muestra la pantalla para personalizar el
color de iluminación.
Para los detalles, consulte Creación de
un color definido por el usuario en la
página 72.
(arco iris):
Cambia por las opciones de colores de
forma gradual.
p Puede obtener una vista previa de la
pantalla de Menú superior o la pantalla
de Función AV pulsando [Home] o [AV]
respectivamente.
■ Creación de un color denido
por el usuario
Puede crear un color definido por el usua-
rio. El color creado se almacenará y podrá
seleccionarlo la próxima vez que ajuste el
color de iluminación.
1 Pulse el botón HOME para mostrar
la pantalla de Menú superior.
2 Pulse las siguientes teclas en el
orden que se indica.
Aparecerá la pantalla “Tema”.
3 Pulse [Iluminación].
p También puede cambiar los ajustes de
la pantalla pulsando [Tema], [Fondo] o
[Reloj] en esta pantalla.
4 Pulse la siguiente tecla.
Muestra la pantalla para crear
un color definido por el usuario
y almacenarlo en la memoria.
5 Pulse las siguientes teclas.
Ajusta el brillo y el nivel de rojo,
verde y azul para crear un color
favorito.
p También puede ajustar el tono de color
arrastrando la barra de color.
6 Mantenga pulsado [Memor.] para
almacenar el color personalizado
en la memoria.
El color personalizado se almacenará en la
memoria.
El color ajustado se recuperará de la memo-
ria la próxima vez que pulsa la misma tecla.
Selección del color del tema
Se puede seleccionar un color de tema entre
5 colores diferentes.
1 Pulse el botón HOME para mostrar
la pantalla de Menú superior.
2 Pulse las siguientes teclas en el
orden que se indica.
Aparecerá la pantalla “Tema”.
3 Pulse [Tema].
p También puede cambiar los ajustes de
la pantalla pulsando [Iluminación],
[Fondo] o [Reloj] en esta pantalla.
4 Pulse el color que desee.
p Puede obtener una vista previa de la
pantalla de Menú superior o la pantalla
de Función AV pulsando [Home] o [AV]
respectivamente.
Selección de la imagen del
reloj
El reloj de la pantalla de Función AV y de la
pantalla de Menú superior se puede selec-
cionar entre 3 imágenes diferentes.
1 Pulse el botón HOME para mostrar
la pantalla de Menú superior.
2 Pulse las siguientes teclas en el
orden que se indica.
Aparecerá la pantalla “Tema”.
3 Pulse [Reloj].
p También puede cambiar los ajustes de la
pantalla pulsando [Iluminación], [Tema]
o [Fondo] en esta pantalla.
4 Pulse el elemento que desee
ajustar.
Imágenes preestablecidas:
Selecciona la imagen de reloj preestable-
cida que se desea.
(apagada):
Oculta la visualización del reloj.
p Puede obtener una vista previa de la
pantalla de Menú superior o la pantalla
de Función AV pulsando [Home] o [AV]
respectivamente.
Cambio de la pantalla de bien-
venida preinstalada
Es posible cambiar la pantalla de bienvenida
por otras imágenes preinstaladas en este
producto.
1 Pulse el botón HOME para mostrar
la pantalla de Menú superior.
2 Pulse las siguientes teclas en el
orden que se indica.
Aparecerá la pantalla “Tema”.
3 Pulse [Pantalla de bienvenida].
4 Pulse el elemento que desee
ajustar.
Imágenes preestablecidas:
Selecciona la imagen de la pantalla de
bienvenida preestablecida.
(personalizado):
Muestra la imagen de pantalla de bien-
venida importada desde el dispositivo de
almacenamiento externo (USB, SD).
Para los detalles, consulte Cambio de la
pantalla de bienvenida almacenada en el
dispositivo de almacenamiento externo
(USB, SD) en la página 72.
■ Cambio de la pantalla de bien-
venida almacenada en el dis-
positivo de almacenamiento
externo (USB, SD)
Puede cambiar la pantalla de bienvenida a
otras imágenes importadas desde el disposi-
tivo de almacenamiento externo (USB, SD).
PRECAUCIÓN
No apague el motor mientras importa una
imagen del dispositivo de almacenamiento
externo (USB, SD).
1 Pulse el botón HOME para mostrar
la pantalla de Menú superior.
2 Pulse las siguientes teclas en el
orden que se indica.
Aparecerá la pantalla “Tema”.
3 Pulse [Pantalla de bienvenida].
4 Pulse la siguiente tecla.
Muestra la lista de pantallas de
bienvenida almacenada en el
dispositivo de almacenamiento
externo (USB, SD).
5 Pulse el dispositivo de alma-
cenamiento externo (USB, SD)
deseado.
6 Pulse en la lista la imagen que
desea utilizar como pantalla de
bienvenida.
La imagen se ajusta como pantalla de
bienvenida.
p Puede eliminar la imagen importada
y restaurar el ajuste de la pantalla de
bienvenida al valor predeterminado man-
teniendo pulsada la tecla personalizada.
Español
26
Capítulo
73
Es
Duplicación de la
conguración
■ Exportación de la conguración
de “Tema”
Puede exportar los ajustes realizados en la
pantalla “Tema” a un dispositivo de almace-
namiento externo (USB, SD). Estos ajustes
se pueden exportar de forma independiente.
p Este ajuste solo está disponible cuando
detiene su vehículo en un lugar seguro y
acciona el freno de mano.
p Si hay varios dispositivos de almacena-
miento externo conectados este pro-
ducto, el orden de prioridad de destino al
que se exportan los ajustes “Tema” es el
siguiente:
1 Tarjeta de memoria SD
2 Dispositivo de almacenamiento USB
conectado al puerto USB 1
3 Dispositivo de almacenamiento USB
conectado al puerto USB 2
PRECAUCIÓN
No apague el motor mientras se estén
exportando los ajustes.
1 Introduzca la tarjeta de memoria
SD en la ranura para tarjetas SD, o
conecte el dispositivo de almace-
namiento USB en el conector USB.
Para los detalles, consulte Conexión de
un dispositivo de almacenamiento USB
en la página 11.
Para los detalles, consulte Colocación y
expulsión de una tarjeta de memoria SD
en la página 10.
2 Pulse el botón HOME para mostrar
la pantalla de Menú superior.
3 Pulse las siguientes teclas en el
orden que se indica.
Aparecerá la pantalla “Tema”.
4 Pulse [Exportar].
Aparecerá la pantalla “Exportación
config.”.
5 Pulse el elemento que desee.
Iluminación:
Selecciona la configuración del color de
la iluminación.
Pantalla de bienvenida:
Selecciona la configuración de la pantalla
de bienvenida.
Selec. todo:
Selecciona toda la configuración.
6 Pulse [Exportar].
Comenzará la exportación de datos.
Tras exportar los datos, aparece un mensaje
de finalización.
p La fuente se apaga y la conexión
Bluetooth se desconecta antes de que se
inicie el proceso.
■ Importación de la conguración
de “Tema”
Se puede importar la configuración reali-
zada en la pantalla “Tema” que se exportó a
un dispositivo de almacenamiento externo
(USB, SD).
p Este ajuste solo está disponible cuando
detiene su vehículo en un lugar seguro y
acciona el freno de mano.
p Si hay varios dispositivos de almacena-
miento externo con datos disponibles
conectados este producto, el orden de
prioridad de donde es importan los ajus-
tes “Tema” es el siguiente:
1 Tarjeta de memoria SD
2 Dispositivo de almacenamiento USB
conectado al puerto USB 1
3 Dispositivo de almacenamiento USB
conectado al puerto USB 2
PRECAUCIÓN
No apague el motor mientras se estén
importando los ajustes.
Para evitar la pérdida de datos y daños
en la tarjeta de memoria SD, nunca
edite los datos exportados a la tarjeta de
memoria SD.
1 Introduzca la tarjeta de memoria
SD en la ranura para tarjetas SD, o
conecte el dispositivo de almace-
namiento USB en el conector USB.
Para los detalles, consulte Conexión de
un dispositivo de almacenamiento USB
en la página 11.
Para los detalles, consulte Colocación y
expulsión de una tarjeta de memoria SD
en la página 10.
Aparecerá un mensaje que confirma si apa-
recen los datos de ajuste almacenados.
2 Pulse [Importar].
Comenzará la importación de datos.
Cuando se importan correctamente los
datos, se muestra un mensaje de finaliza-
ción de la importación.
p La fuente se apaga y la conexión
Bluetooth se desconecta antes de que se
inicie el proceso.
Conguración del
reproductor de vídeo
Ajuste de los idiomas de
mayor prioridad
Puede asignar el idioma de mayor prioridad
al menú, audio y subtítulo de mayor priori-
dad en la reproducción inicial. Si el idioma
seleccionado está grabado en el disco, los
subtítulos, el audio y el menú se mostrarán o
reproducirán en dicho idioma.
p Esta configuración solo está disponible
cuando se selecciona “Disc” como la
fuente.
■ Ajuste del idioma de los
subtítulos
Puede ajustar el idioma de los subtítulos
que desee. Cuando estén disponibles,
los subtítulos se mostrarán en el idioma
seleccionado.
1 Pulse el botón HOME para mostrar
la pantalla de Menú superior.
2 Pulse las siguientes teclas en el
orden que se indica.
Aparecerá la pantalla “Configuración de
video”.
3 Pulse [Config. DVD/DivX].
4 Pulse [Idioma de subtítulos].
Aparecerá el menú emergente.
5 Pulse el idioma que desee.
Al seleccionar “Otros” aparecerá una pan-
talla de introducción de código de idioma.
Introduzca el código de cuatro dígitos del
idioma que desee y, a continuación, pulse
.
Se ajusta el idioma de los subtítulos.
p Si el idioma seleccionado no está dispo-
nible, se mostrará el idioma predetermi-
nado especificado en el disco.
p Puede cambiar el idioma de los subtítulos
pulsando la tecla de cambio del idioma
de los subtítulos durante la reproducción.
p El ajuste que se establezca aquí no se
verá afectado si se cambia el idioma de
los subtítulos durante la reproducción
mediante la tecla de cambio de idioma de
los subtítulos.
■ Ajuste del idioma del audio
Puede ajustar el idioma de audio preferido.
1 Pulse el botón HOME para mostrar
la pantalla de Menú superior.
2 Pulse las siguientes teclas en el
orden que se indica.
Aparecerá la pantalla “Configuración de
video”.
3 Pulse [Config. DVD/DivX].
4 Pulse [Idioma de audio].
Aparecerá el menú emergente.
5 Pulse el idioma que desee.
Al seleccionar “Otros” aparecerá una pan-
talla de introducción de código de idioma.
Introduzca el código de cuatro dígitos del
idioma que desee y, a continuación, pulse
.
Se ajusta el idioma de audio.
p Si el idioma seleccionado no está disponi-
ble, se aplicará el idioma predeterminado
especificado en el disco.
26
Capítulo
74
Es
p Puede cambiar el idioma del audio pul-
sando la tecla de cambio del idioma del
audio durante la reproducción.
p El ajuste que se establezca aquí no se
verá afectado si se cambia el idioma del
audio durante la reproducción mediante
la tecla de cambio de idioma del audio.
■ Ajuste del idioma de los menús
Puede ajustar el idioma preferido de los
menús en el que los menús guardados en
un disco se muestran.
1 Pulse el botón HOME para mostrar
la pantalla de Menú superior.
2 Pulse las siguientes teclas en el
orden que se indica.
Aparecerá la pantalla “Configuración de
video”.
3 Pulse [Config. DVD/DivX].
4 Pulse [Idioma de menús].
Aparecerá el menú emergente.
5 Pulse el idioma que desee.
Al seleccionar “Otros” aparecerá una pan-
talla de introducción de código de idioma.
Introduzca el código de cuatro dígitos del
idioma que desee y, a continuación, pulse
.
Se ajusta el idioma de los menús.
p Si el idioma seleccionado no está dispo-
nible, se mostrará el idioma predetermi-
nado especificado en el disco.
Ajuste de la visualización del
icono de ángulo
Puede establecer si visualizar el icono de
ángulo en escenas en las que se puede
cambiar el ángulo.
p Esta configuración solo está disponible
cuando se selecciona “Disc” como la
fuente.
1 Pulse el botón HOME para mostrar
la pantalla de Menú superior.
2 Pulse las siguientes teclas en el
orden que se indica.
Aparecerá la pantalla “Configuración de
video”.
3 Pulse [Config. DVD/DivX].
4 Pulse [Multiángulo] repetidamente
hasta que aparezca la configura-
ción deseada.
Act. (valor predeterminado):
Activa el ajuste multiángulo.
Des.:
Desactiva el ajuste multiángulo.
Ajuste de la relación de
aspecto
Existen dos tipos de pantallas. Una pantalla
panorámica tiene una relación anchura/
altura (aspecto de televisión) de 16:9,
mientras que una pantalla normal tiene un
aspecto de televisión de 4:3. Si utiliza una
pantalla trasera normal con un aspecto de
televisión de 4:3, podrá establecer la relación
de aspecto más apropiada para la pantalla
trasera. (Le recomendamos que utilice esta
función únicamente para adaptar la relación
de aspecto a la pantalla trasera.)
p Si utiliza una pantalla normal, seleccione
“Buzón” o “Pan Scan”. Si selecciona
“16:9” podría aparecer una imagen poco
natural.
p Si selecciona la relación de aspecto de
TV, la visualización de este producto
cambiará a la misma configuración.
p Esta configuración solo está disponible
cuando se selecciona “Disc” como la
fuente.
1 Pulse el botón HOME para mostrar
la pantalla de Menú superior.
2 Pulse las siguientes teclas en el
orden que se indica.
Aparecerá la pantalla “Configuración de
video”.
3 Pulse [Config. DVD/DivX].
4 Pulse [Aspecto TV].
Aparecerá el menú emergente.
5 Pulse el elemento que desee
ajustar.
16:9 (valor predeterminado):
Muestra la imagen de pantalla panorá-
mica (16:9) tal y como es (configuración
inicial).
Buzón:
Asigna a la imagen una forma de buzón
con bandas en la parte superior e inferior
de la pantalla.
Pan Scan:
Recorta la imagen en los lados derecho e
izquierdo de la pantalla.
p Durante la reproducción de discos sin
sistema panscan, el disco se reproduce
con “Buzón” incluso si selecciona
el ajuste “Pan Scan”. Confirme si el
paquete del disco incluye la marca
.
p La relación de aspecto de TV no se puede
cambiar para algunos discos. Para los
detalles, consulte las instrucciones del
disco.
Ajuste del bloqueo paterno
Algunos discos de DVD-Vídeo le permiten
utilizar un bloqueo paterno para establecer
restricciones de modo que los niños no pue-
dan ver escenas de violencia o para adultos.
Puede establecer el nivel de bloqueo paterno
en distintos niveles, según sea necesario.
p Esta configuración solo está disponible
cuando se selecciona “Disc” como la
fuente.
p Cuando establezca un nivel de bloqueo
paterno y, a continuación, reproduzca
un disco que contiene bloqueo paterno,
puede que se muestren instrucciones
para introducir el número de código.
En tal caso, la reproducción se iniciará
cuando se introduzca el número de
código correcto.
■ Ajuste del número de código y
nivel
Cuando utilice esta función por primera vez,
registre su número de código. Si no registra
un número de código, el bloqueo paterno no
funcionará.
1 Pulse el botón HOME para mostrar
la pantalla de Menú superior.
2 Pulse las siguientes teclas en el
orden que se indica.
Aparecerá la pantalla “Configuración de
video”.
3 Pulse [Config. DVD/DivX].
4 Pulse [Paterno].
Aparecerá la pantalla “Paterno”.
5 Pulse [0] a [9] para introducir
el número de código de cuatro
dígitos.
6 Mientras se muestra el número
introducido, pulse la siguiente
tecla.
Registra el número de
código.
7 Pulse cualquier tecla de [1] a [8]
para seleccionar el nivel que desee.
8:
Permite la reproducción de todo el disco
(configuración inicial).
7 a 2:
Permite la reproducción de discos desti-
nados a niños y con contenido no adulto.
1:
Permite solo la reproducción de discos
para niños.
Español
27
Capítulo
75
Es
8 Mientras se muestra el número
introducido, pulse la siguiente
tecla.
Establece el nivel de bloqueo
paterno.
p Le recomendamos que anote el número
de código por si acaso lo olvida.
p El nivel de bloqueo paterno se graba en
el disco. Puede confirmarlo consultando
la caja del disco, el folleto incluido o el
propio disco. No puede utilizar el bloqueo
paterno con discos que no cuenten con
un nivel de bloqueo paterno grabado.
p En algunos discos, el bloqueo paterno
funciona para omitir únicamente deter-
minadas escenas, tras las cuales se
reanuda la reproducción normal. Para los
detalles, consulte las instrucciones del
disco.
Visualización del código de
registro DivX VOD
Si desea reproducir contenido DivX VOD
(vídeo a la carta) en este producto, primero
debe registrar este producto en el proveedor
de contenido DivX VOD. Para ello, debe
generar un código de registro DivX VOD, que
remitirá al proveedor.
p Anote el registro del código ya que lo
necesitará al registrar este producto en el
proveedor de DivX VOD.
p Esta configuración solo está disponible
cuando se selecciona “Disc” como la
fuente.
1 Pulse el botón HOME para mostrar
la pantalla de Menú superior.
2 Pulse las siguientes teclas en el
orden que se indica.
Aparecerá la pantalla “Configuración de
video”.
3 Pulse [Config. DVD/DivX].
4 Pulse [DivX
®
VOD].
Aparecerá la pantalla “DivX
®
VOD”.
p Si ya se ha activado un código de registro,
no podrá mostrarse.
5 Pulse [Código de registro].
Se muestra el código de registro de 10
dígitos.
p Anote el código, lo necesitará al regis-
trarse en un proveedor de DivX VOD.
Visualización del código de
cancelación de registro DivX
VOD
Es posible eliminar un código de registro
registrado con un código de cancelación de
registro.
p Esta configuración solo está disponible
cuando se selecciona “Disc” como la
fuente.
1 Pulse el botón HOME para mostrar
la pantalla de Menú superior.
2 Pulse las siguientes teclas en el
orden que se indica.
Aparecerá la pantalla “Configuración de
video”.
3 Pulse [Config. DVD/DivX].
4 Pulse [DivX
®
VOD].
Aparecerá la pantalla “DivX
®
VOD”.
5 Pulse [Contras. canc. registro].
Se muestra el código de cancelación de
registro de ocho dígitos.
p Anote el código, lo necesitará al cancelar
su registro en un proveedor de DivX VOD.
Reproducción automática de
DVD
Al introducir un disco DVD con menú DVD,
este producto cancelará el menú automáti-
camente y comenzará la reproducción desde
el primer capítulo del primer título.
p Puede que algunos DVD no funcionen
correctamente. Si esta opción no fun-
ciona completamente, desactívela e inicie
la reproducción.
p Esta configuración solo está disponible
cuando se selecciona “Disc” como la
fuente.
1 Pulse el botón HOME para mostrar
la pantalla de Menú superior.
2 Pulse las siguientes teclas en el
orden que se indica.
Aparecerá la pantalla “Configuración de
video”.
3 Pulse [Config. DVD/DivX].
4 Pulse [Reprod. aut. DVD] repetida-
mente hasta que aparezca la confi-
guración deseada.
Des. (valor predeterminado):
Desactiva el ajuste de reproducción
automática de DVD.
Act.:
Activa el ajuste de reproducción automá-
tica de DVD.
Ajuste de la señal de vídeo
para la cámara de retrovisor
Cuando conecte una cámara de retrovisor a
este producto, seleccione el ajuste de señal
de vídeo adecuado.
p Puede utilizar esta función solo para la
entrada de la señal de vídeo en la entrada
AV.
1 Pulse el botón HOME para mostrar
la pantalla de Menú superior.
2 Pulse las siguientes teclas en el
orden que se indica.
Aparecerá la pantalla “Configuración de
video”.
3 Pulse [Ajuste de señal de video].
4 Pulse [Cámara].
Aparecerá el menú emergente.
5 Pulse el elemento que desee
ajustar.
Auto (valor predeterminado):
Ajusta la configuración de la señal de
vídeo automáticamente.
PAL:
Ajusta la señal de vídeo en PAL.
NTSC:
Ajusta la señal de vídeo en NTSC.
PAL-M:
Ajusta la señal de vídeo en PAL-M.
PAL-N:
Ajusta la señal de vídeo en PAL-N.
SECAM:
Ajusta la señal de vídeo en SECAM.
Menú Favorito
El registro de sus elementos de menú
favoritos en accesos directos le permite
acceder rápidamente a la pantalla de menú
registrada con tan solo pulsar la pantalla
“Favoritos”.
p Se pueden registrar hasta 12 elementos
de menú en el menú favorito.
Creación de un acceso directo
1 Pulse el botón HOME para mostrar
la pantalla de Menú superior.
2 Pulse la siguiente tecla.
Muestra la pantalla de Menú de
ajustes.
3 Pulse el icono de estrella del ele-
mento del menú que desea añadir
al menú favorito.
Se mostrará el icono de estrella para el
menú seleccionado.
Para cancelar el registro, pulse de nuevo
el icono de estrella en la columna de
menús.

28
Capítulo
76
Es
Selección de un acceso directo
1 Pulse el botón HOME para mostrar
la pantalla de Menú superior.
2 Pulse las siguientes teclas en el
orden que se indica.
Aparecerá la pantalla “Favoritos”.
3 Pulse el elemento que desee.
Eliminación de un acceso
directo
1 Pulse el botón HOME para mostrar
la pantalla de Menú superior.
2 Pulse las siguientes teclas en el
orden que se indica.
Aparecerá la pantalla “Favoritos”.
3 Mantenga pulsado el icono de
estrella del menú favorito que
desee quitar.
El menú seleccionado se quitará de la
pantalla “Favoritos”.
Operaciones comunes
Ajuste de la hora y la fecha
1 Pulse la hora actual de la pantalla
para mostrar la pantalla de Ajuste
de la hora y la fecha.
2 Pulse o para ajustar la hora y
fecha correctas.
En esta pantalla puede controlar los siguien-
tes elementos.
Mes/Fecha
m/d/a (valor predeterminado):
Cambia el formato de visualización de
fecha a mes/día/año.
d/m/a
Cambia el formato de visualización de
fecha a día/mes/año.
a/m/d:
Cambia el formato de visualización de
fecha a año/mes/día.
Formato de Hora
12 horas (valor predeterminado):
Cambia la visualización a formato de 12
horas con am/pm.
24 horas:
Cambia la visualización a formato de 24
horas.
Almacenamiento de la infor-
mación de canción en un iPod
(etiquetado de iTunes)
Puede almacenar la información de la can-
ción en el iPod cuando este producto recibe
la información de la canción. Las canciones
aparecerán en una lista de reproducción
denominada “Lista de reproducción etique-
tada” en iTunes la próxima vez que sincro-
nice el iPod. Puede comprar directamente
las canciones mediante este producto.
En función de cuándo se almacena la infor-
mación de la canción, también se puede
almacenar la información de la canción
anterior o la canción después de la canción
actual. Asegúrese de comprobar la canción
antes de adquirirla.
p La función de etiquetado de iTunes está
disponible cuando también lo está la
información de la canción.
p Esta función está disponible para los
siguientes modelos de iPod:
iPhone 4s
iPhone 4
iPhone 3GS
iPhone 3G
iPhone
iPod touch 5.ª generación
iPod touch 4.ª generación
iPod touch 3.ª generación
iPod touch 2.ª generación
iPod touch 1.ª generación
iPod classic
iPod nano 6.ª generación
iPod nano 5.ª generación
iPod nano 4.ª generación
iPod nano 3.ª generación
p La versión de iTunes debe ser 7.4 o
superior.
1 Pulse el botón HOME para mostrar
la pantalla de Menú superior.
2 Pulse las siguientes teclas en el
orden que se indica.
Aparecerá la pantalla “Sistema”.
3 Pulse [Config. fuentes AV].
4 Pulse [Reenvío de etiquetas] repe-
tidamente hasta que aparezca la
configuración deseada.
USB1 (valor predeterminado):
Transfiere la información de la canción al
iPod que está conectado al puerto USB 1.
USB2:
Transfiere la información de la canción al
iPod que está conectado al puerto USB 2.
5 Sintonice una emisora de emisión.
Cuando se reciba la información de la can-
ción, se mostrará mientras se emite la
canción deseada y la tecla del panel táctil
se activa.
HD Radio
Para los detalles, consulte Indicador de
etiquetado de iTunes
®
en la página 23.
Para los detalles, consulte Utilización
de las teclas del panel táctil en la
página 23.
SiriusXM
Para los detalles, consulte Indicador de
etiquetado de iTunes
®
en la página 51.
Para los detalles, consulte Utilización
de las teclas del panel táctil en la
página 51.
6 Pulse la siguiente tecla.
HD Radio
La tecla del panel táctil en la que se mues-
tra el título de la canción o el nombre del
intérprete
SiriusXM
La tecla del panel táctil en la que se mues-
tra el nombre del intérprete, el título de la
canción, el nombre de la categoría o el texto
del contenido
La información de la canción que se emite
se almacena en este producto.
Mientras se adquiere la información, se
muestra .
Cuando se completa, se desactiva y se
muestra .
p En función de la información de la
canción se pueden almacenar hasta 50
canciones en este producto.
En función de cuándo se almacena la
información de la canción, también se
puede almacenar la información de la
canción anterior o la canción después de
la canción actual.
7 Conecte su iPod.
La información de la canción se transfiere
al iPod.
p Si el iPod ya está conectado, la informa-
ción de la canción se transferirá al iPod
cada vez que toque la tecla del panel
táctil en la que se muestra la información
de la canción.
Cuando se haya completado la infor-
mación de la canción al iPod,
desaparecerá.
p Cuando se completa la transferencia de
la información de la canción, la informa-
ción almacenada en este producto se
elimina automáticamente.
p Si apaga este producto o desconecta el
iPod mientras transfiere información de
canciones, es posible que la transferen-
cia no se complete correctamente.
p Mientras este producto almacena infor-
mación de la canción, no se puede reali-
zar la transferencia a un iPod.
Ajuste de la función “Sound
Retriever”
La función “Sound Retriever” mejora
automáticamente el audio comprimido y
restaura un sonido rico.

Español
29
Capítulo
77
Es
Pulse la siguiente tecla repetida-
mente hasta que aparezca la confi-
guración deseada en la pantalla de
Función AV.
Ajusta la función “Sound
Retriever”.
(Modo1) (valor predeterminado):
Activa la función “Sound Retriever”.
(Modo2):
Activa la función “Sound Retriever”.
(apagada):
Desactiva la función “Sound Retriever”.
p El Modo2 tiene un efecto más intenso
que el Modo1.
Cambio del modo de pantalla
panorámica
Puede establecer el tamaño de pantalla del
vídeo e imágenes JPEG.
p Este ajuste solo está disponible cuando
detiene su vehículo en un lugar seguro y
acciona el freno de mano.
p El ajuste predeterminado es “Full” para
vídeo y “Normal” para imágenes JPEG.
1 Pulse la siguiente tecla.
Muestra la pantalla de ajuste
para seleccionar la relación de
pantalla adecuada para el vídeo
que se reproduce.
p El aspecto de esta tecla cambia según el
ajuste actual.
2 Pulse el modo que desee.
Full
Se aumenta una imagen de 4:3 solo en
dirección horizontal, lo que permite ver
una imagen de televisión de 4:3 (imagen
normal) sin omisiones.
p Este ajuste es para vídeo solamente.
Zoom
La imagen 4:3 se amplía en la misma
proporción horizontal y verticalmente.
Este ajuste resulta ideal para una imagen
de pantalla panorámica.
p Este ajuste es para vídeo solamente.
Normal
La imagen de 4:3 se muestra normal-
mente, por lo que no se perciben dis-
torsiones, ya que sus proporciones son
iguales que las de la imagen normal.
Trimming
Se muestra una imagen en toda la pan-
talla con la relación horizontal a vertical
izquierda tal como es. Si la relación
horizontal a vertical es diferente entre la
pantalla y la imagen, la imagen se puede
cortar parcialmente en cualquiera de las
partes superior e inferior o los lados.
p Este ajuste es para imágenes JPEG
solamente.
p Es posible guardar diferentes ajustes
para cada fuente de vídeo.
p Cuando se visualiza un vídeo en un modo
de pantalla panorámica que no con-
cuerda con su relación de aspecto origi-
nal, puede tener un aspecto diferente.
p La imagen de vídeo aparecerá más granu-
lada cuando se vea en el modo “Zoom”.
Otras funciones
Selección del vídeo para la
pantalla trasera
Puede optar por mostrar la misma imagen
como pantalla delantera o mostrar la fuente
seleccionada en la pantalla trasera.
p Esta función no está disponible durante
una llamada mediante este producto o
mientras se usa la función de reconoci-
miento de voz.
1 Pulse el botón HOME para mostrar
la pantalla de Menú superior.
2 Pulse la siguiente tecla.
Muestra la pantalla de
Selección de fuente AV.
3 Pulse [Rear].
Aparecerá la pantalla “Rear”.
4 Pulse la fuente que desee mostrar
en la pantalla trasera.
Las fuentes que puede seleccionar son las
siguientes.
Mirror
El vídeo de la pantalla delantera de este
producto se emite en la pantalla trasera.
— No se pueden emitir todos los vídeos o
sonidos a la pantalla trasera.
DVD/CD
El vídeo y el sonido de los DVD se emiten
en la pantalla trasera.
— Los tipos de archivo compatibles son
DVD-V, Video-CD, DivX, MPEG-1, MPEG-2
y MPEG-4 solamente.
USB/iPod
El vídeo y el sonido del dispositivo de
almacenamiento USB o del iPod se
emiten en la pantalla trasera.
— El puerto compatible con la pantalla
trasera solo será el puerto USB 1.
— Los tipos de archivo compatibles son
MPEG-4, H.264, WMV, MKV y FLV
solamente.
SD
El vídeo y el sonido de las tarjetas de
memoria SD se emiten en la pantalla
trasera.
— Los tipos de archivo compatibles son
MPEG-4, H.264, WMV, MKV y FLV
solamente.
AV
El vídeo y el sonido de la entrada AV se
emiten en la pantalla trasera.
— La imagen de vídeo y el sonido se emiten
únicamente cuando “AV” cuenta con
vídeo y sonido.
— La imagen de vídeo y el sonido se emiten
únicamente cuando “Entrada AV” está
establecida en “Fuente”.
Para los detalles, consulte Ajuste de la
entrada AV en la página 60.
OFF
No se emite nada en la pantalla trasera.
Pulse la siguiente tecla.
Cierra la pantalla “Rear”.
También puede seleccionar “Rear” en la
lista de fuentes.
Para los detalles, consulte Selección de
una fuente frontal en la lista de fuentes
en la página 13.
p Los archivos de vídeo en un dispositivo
de almacenamiento externo (USB, SD)
no están disponibles como fuente para la
pantalla trasera si está activado Android
Auto.
Ajuste de la función antirrobo
Tiene la posibilidad de establecer una
contraseña para este producto. Si se corta
el cable de reserva tras establecer la contra-
seña, este producto solicitará la contraseña
la próxima vez que arranque.
■ Establecimiento de la
contraseña
1 Pulse el botón HOME para mostrar
la pantalla de Menú superior.
2 Pulse las siguientes teclas en el
orden que se indica.
Aparecerá la pantalla “Sistema”.
3 Pulse Área1, a continuación Área2,
y mantenga pulsado Área3.
Área1 Área2 Área3
Aparecerá la pantalla “Menú config.
antirrobo”.
4 Pulse [Establecer contraseña].
Aparecerá la pantalla “Ingresar
contraseña”.
5 Introduzca la contraseña que desea
establecer.
p La contraseña puede tener entre 5 y 16
caracteres.
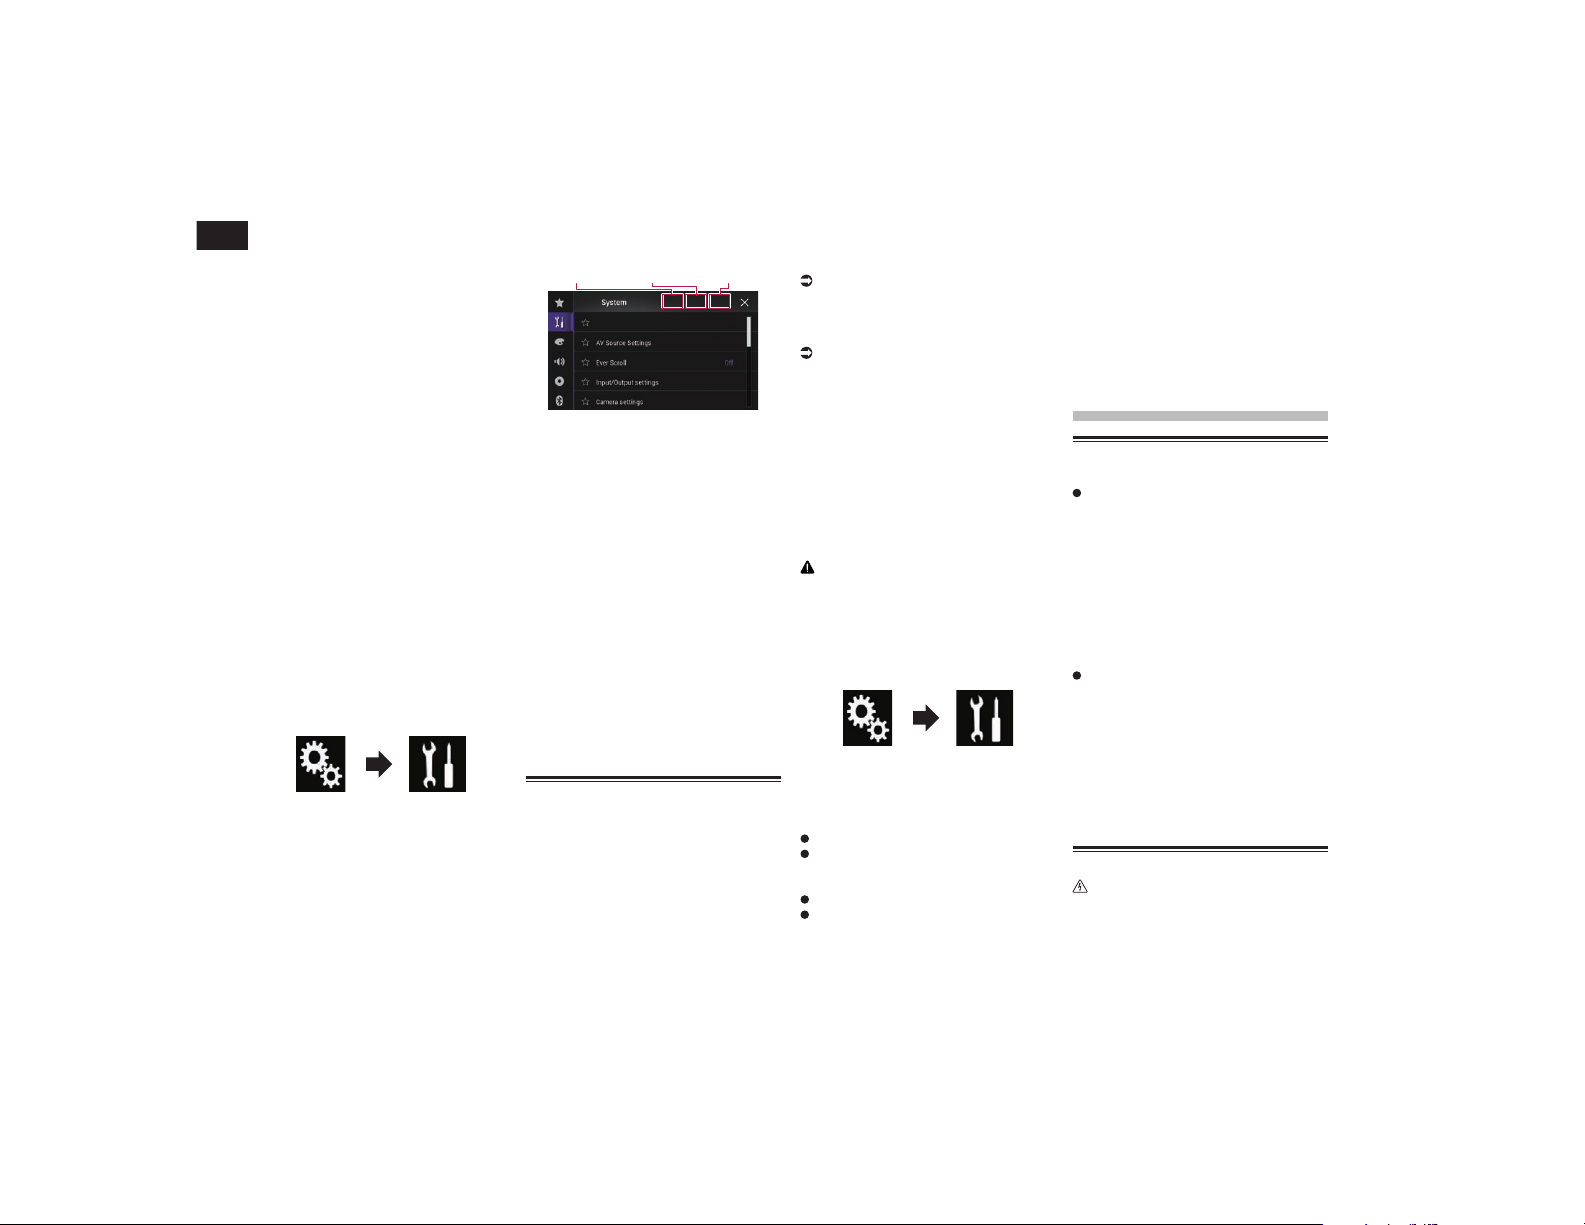
30
Capítulo
78
Es
6 Pulse [Ir].
Aparecerá la pantalla “Ingresar pista”.
7 Introduzca una pista de contraseña.
p La pista puede estar compuesta por un
máximo de 40 caracteres.
8 Pulse [Ir].
Aparecerá la pantalla “Confirm.
contraseña”.
p Si desea cambiar la contraseña actual,
introduzca la contraseña actual y, a
continuación, introduzca la nueva.
9 Compruebe la contraseña y des-
pués pulse [OK].
Aparecerá la pantalla “Menú config.
antirrobo”.
■ Introducción de la contraseña
En la pantalla de introducción de contraseña
deberá introducir la contraseña actual.
1 Introduzca la contraseña.
2 Pulse [Ir].
Cuando se introduzca la contraseña
correcta, este producto se desbloqueará.
■ Eliminación de la contraseña
La contraseña actual y la pista de la contra-
seña se pueden eliminar.
1 Pulse el botón HOME para mostrar
la pantalla de Menú superior.
2 Pulse las siguientes teclas en el
orden que se indica.
Aparecerá la pantalla “Sistema”.
3 Pulse Área1, a continuación Área2,
y mantenga pulsado Área3.
Área1 Área2 Área3
Aparecerá la pantalla “Menú config.
antirrobo”.
4 Pulse [Borrar contraseña].
Aparecerá un mensaje de confirmación de
eliminación de la contraseña.
5 Pulse [Sí].
Aparece la pantalla de establecimiento de la
contraseña.
Aparece un mensaje confirmando una pista
de contraseña.
6 Pulse [OK].
Aparecerá la pantalla “Ingresar
contraseña”.
7 Introduzca la contraseña actual.
8 Pulse [Ir].
Se muestra un mensaje que indica que se
ha cancelado el ajuste de seguridad.
■ Contraseña olvidada
Póngase en contacto con el servicio técnico
autorizado Pioneer más cercano.
Restauración de este pro-
ducto a la conguración
predeterminada
Puede restaurar la configuración o el conte-
nido grabado a la configuración predetermi-
nada. Se utilizan varios métodos para borrar
los datos de usuario.
Método 1: extraiga la batería del
vehículo
Restablece varias configuraciones registra-
das en este producto.
Método 2: pulse el elemento que
desee inicializar en la pantalla
“Sistema”
Para los detalles, consulte
Restablecimiento del ajuste predetermi-
nado en la página 78.
Método 3: Pulse el botón RESET
Para los detalles sobre las operaciones,
consulte Restablecimiento del micropro-
cesador en la página 8.
p Algunas configuraciones y algunos con-
tenidos grabados no se restablecerán.
■ Restablecimiento del ajuste
predeterminado
Restablece varias configuraciones regis-
tradas en este producto a la configuración
predeterminada.
p Este ajuste solo está disponible cuando
detiene su vehículo en un lugar seguro y
acciona el freno de mano.
PRECAUCIÓN
No apague el motor mientras se estén
restaurando los ajustes.
1 Pulse el botón HOME para mostrar
la pantalla de Menú superior.
2 Pulse las siguientes teclas en el
orden que se indica.
Aparecerá la pantalla “Sistema”.
3 Pulse [Restaurar configuración].
4 Pulse el elemento que desee
inicializar.
Todos los parámetros
Configuración de audio
p Este ajuste está disponible cuando la
fuente está desactivada.
Configuración de temas
Configuración Bluetooth
Aparecerá un mensaje de confirmación de
inicialización de la configuración.
p Si desea devolver la configuración o el
contenido grabado a los valores predeter-
minados, pulse [Todos los parámetros].
p Algunos de los ajustes configurados en el
ajuste “Tema” no se restablecerán.
p Los ajustes de My Vehicle no se
restablecerán.
5 Pulse [Restaurar].
Cuando se inicializa correctamente el ele-
mento seleccionado, aparece un mensaje de
finalización.
p La fuente se apaga y la conexión
Bluetooth se desconecta antes de que se
inicie el proceso.
Precauciones
Su nuevo producto y este
manual
No utilice el producto, las aplicaciones ni
la opción de cámara de retrovisor (si dis-
pone de ella) si hacerlo puede distraerle
e impedirle que conduzca de manera
segura. Cumpla siempre las normas de
seguridad relativas a la conducción y
respete todas las regulaciones de tráfico
existentes. Si tiene problemas a la hora
de utilizar este producto o leer la pantalla,
aparque el vehículo en un lugar seguro y
ponga el freno de mano antes de realizar
los ajustes necesarios.
No instale este producto en un lugar que
pueda (i) impedir la visión del conductor,
(ii) afectar al rendimiento de cualquier
otro sistema del vehículo o función de
seguridad, como los airbags, los botones
de las luces de advertencia, o (iii) impedir
que se pueda conducir de forma segura.
En algunos casos, es posible que no
pueda instalarse este producto debido al
tipo de vehículo o a la forma del interior
del vehículo.
Precauciones importantes
ADVERTENCIA
Pioneer aconseja que no realice usted
mismo la instalación del producto. Este
producto se ha diseñado para que su
instalación la realice únicamente un ins-
talador profesional. Recomendamos que
sólo el personal de servicio autorizado
de Pioneer, que cuenta con formación
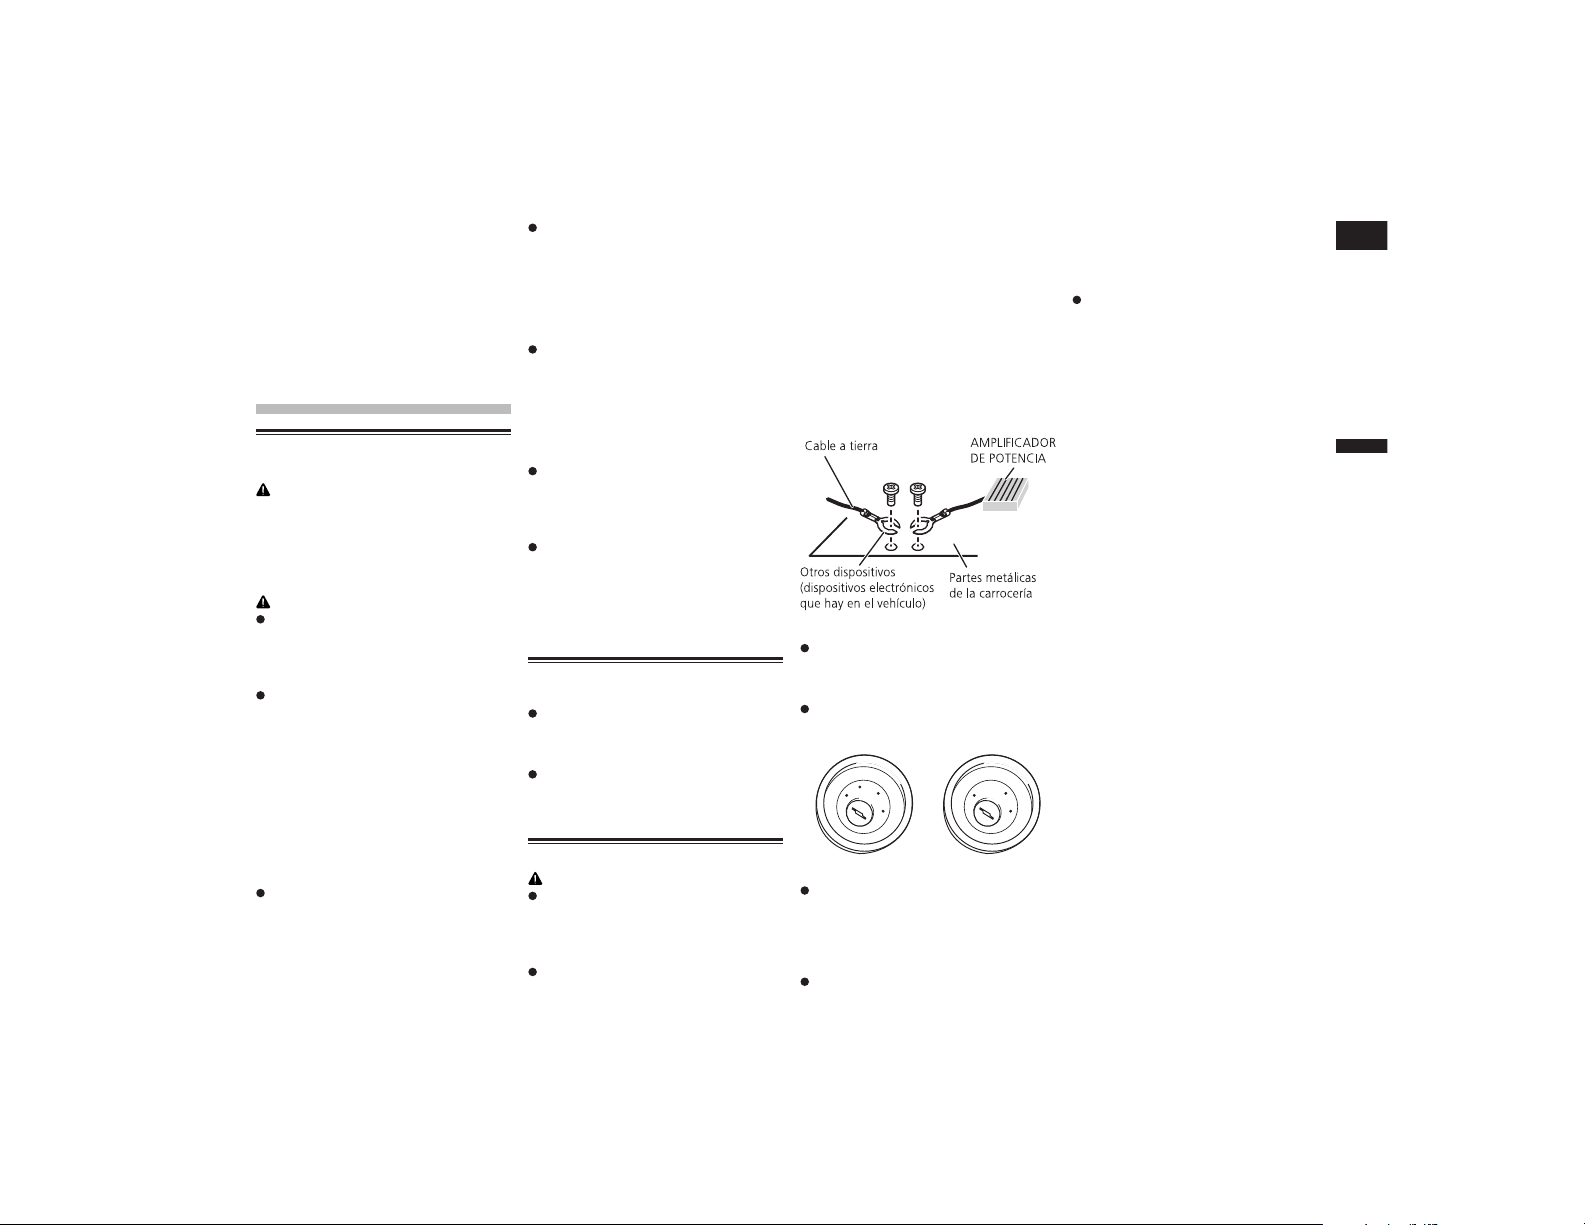
Español
31
Capítulo
79
Es
especializada y experiencia en el campo
de la electrónica móvil, instale y confi-
gure este producto. NUNCA EFECTÚE
EL MANTENIMIENTO DE ESTE
PRODUCTO USTED MISMO. La insta-
lación o el mantenimiento del producto
y de los cables de conexión asociados
puede exponerle al riesgo de una des-
carga eléctrica u otros peligros y puede
ocasionar daños en el producto que no
cubre la garantía.
Conexión
Precauciones antes de conec-
tar el sistema
ADVERTENCIA
No trate de forzar ni desactivar el sis-
tema de interbloqueo del freno de mano
que está activado para su protección. Si
trata de forzarlo o desactivarlo, podrían
producirse lesiones graves o incluso la
muerte.
PRECAUCIÓN
Asegure todo el cableado con
abrazaderas de cables o cinta para
usos eléctricos. No permita que
el cableado pelado permanezca
descubierto.
No enchufe directamente el cable
amarillo de este producto a la batería
del vehículo. Si lo hace, puede que
la vibración del motor acabe provo-
cando un problema relacionado con
el aislamiento en el punto por donde
el cable cruza del compartimiento
del pasajero al compartimiento del
motor. Si se rompe el aislamiento del
cable amarillo como resultado del
contacto con partes metálicas, puede
producirse un cortocircuito y generar
por tanto un peligro considerable.
Es extremadamente peligroso que los
cables se enrollen en la columna de
dirección o en la palanca de cambios.
Asegúrese de instalar este producto,
los cables y los hilos de tal manera
que no dificulten ni entorpezcan la
conducción.
Asegúrese de que los cables y los
hilos no afecten a las piezas móviles
del vehículo ni queden atrapados
en las mismas, especialmente el
volante, la palanca de cambios, el
freno de mano, los asientos deslizan-
tes, las puertas o cualquier control
del vehículo.
No enrute cables que vayan a estar
sometidos a altas temperaturas. Si
se calienta el aislamiento, los cables
pueden resultar dañados y, como
consecuencia, puede producirse
un cortocircuito o una avería y el
producto puede sufrir un deterioro
permanente.
No acorte ningún cable. En el caso de
que lo haga, el circuito de protección
(el portafusibles, la resistencia de
fusible o el filtro, etc.) puede que no
funcione correctamente.
Nunca suministre alimentación a
otros productos electrónicos cor-
tando el aislamiento del cable de
alimentación del producto y tomando
corriente de él. La capacidad nomi-
nal del cable se excederá y causará
recalentamiento.
Antes de instalar este
producto
Utilice esta unidad solamente con una
batería de 12 voltios y puesta a tierra
negativa. De lo contrario, podrá ocasionar
un incendio o un fallo de funcionamiento.
Para evitar cortocircuitos en el sistema
eléctrico, asegúrese de desconectar
el cable de la batería (–) antes de la
instalación.
Para impedir daños
ADVERTENCIA
Utilice altavoces con capacidad
superior a 50 W (valor de salida) y
entre 4 W a 8 W (valor de impedancia).
No utilice altavoces de 1 W a 3 W para
esta unidad.
El cable negro es la conexión a tie-
rra. Cuando instale esta unidad o el
amplificador de potencia (se venden
por separado), asegúrese de conectar
el cable de tierra primero. Asegúrese
de que el cable de masa esté conec-
tado correctamente a piezas de metal
de la carrocería del automóvil. El
cable de tierra del amplificador de
potencia y el de esa unidad o de cual-
quier otro dispositivo deben estar
conectados al automóvil de forma
independiente, con tornillos diferen-
tes. Si el tornillo del cable de tierra se
afloja o cae, se puede provocar humo
por un incendio o una avería.
No se suministra para esta unidad
*1
*1
Al sustituir el fusible, asegúrese de
utilizar exclusivamente un fusible
del régimen nominal descrito en este
producto.
No se puede instalar este producto en un
vehículo sin la posición ACC (accesorio)
en el interruptor de encendido.
A
C
C
O
N
S
T
A
R
T
O
F
F
O
N
S
T
A
R
T
O
F
F
Posición ACC Sin posición ACC
Para evitar cortocircuitos, cubra el con-
ductor desconectado con cinta aislante.
Es especialmente importante aislar todos
los cables de altavoz que no se usen, ya
que si no se recubren pueden llegar a
provocar un cortocircuito.
Para conectar un amplificador de poten-
cia u otros dispositivos a este producto,
consulte el manual del producto que
desea conectar.
■ Aviso para el cable conductor
azul/blanco
Al conectar el interruptor de encendido
(ACC ON), se envía una señal de control
por el cable azul/blanco. Conéctelo al
terminal de control remoto del sistema
externo de amplificadores de potencia,
al terminal de control de relé de la
antena automática, o al terminal de
control de potencia del amplificador de
antena (máx. 300 mA 12 V cc). La señal
de control se envía por el cable azul/
blanco, aunque la fuente de audio esté
desconectada.

31
Capítulo
80
Es
Conexión del cable de alimentación
Clavija de conexión de la antena
Fuente de alimentación
Cable de alimentación
Amarillo/negro
Si utiliza un equipo con función de silenciamiento, conecte el equipo al cable de
silenciamiento de audio de dicho equipo. En caso contrario, deje este cable sin
conectar.
Verde claro
Se utiliza para detectar si el freno de mano está encendido o
apagado. Este cable se debe conectar al lado de la fuente de
alimentación del interruptor del freno de mano.
Azul/blanco
Conectar al terminal de control del sistema
del amplificador de potencia (máx. 300�mA
12�V�cc).
Lado de conexión
a tierra
Lado de la fuente
de alimentación
Interruptor del
freno de mano
Este producto
Violeta/blanco
De los dos cables conectados a la luz posterior, conecte aquel en el que el voltaje
cambia cuando la palanca de cambios está en posición de marcha atrás (R). Esta
conexión le permite a la unidad saber si el vehículo se está moviendo hacia delante o
hacia atrás.
4�m
Para más preguntas sobre su unidad
de navegación conectable, póngase
en contacto con su proveedor.
SiriusXM Connect Vehicle Tuner
Consulte el manual de instrucciones de SiriusXM Connect Vehicle Tuner (se vende por separado).
Entrada del adaptador iDatalink. Consulte el manual de instrucciones del adaptador
iDatalink (se vende por separado).*
Sistema de
navegación de
Pioneer
Cable RGB (se entrega con el sistema de navegación)
Fusible (10�A)
Micrófono
Izquierdo Derecho
Altavoz delantero Altavoz delantero
Altavoz trasero
Blanco Gris
Gris/negroBlanco/negro
Verde Violeta
Verde/negro Violeta/negro
Altavoz trasero
Con un sistema de dos altavoces, no
conecte nada a los cables de altavoces que
no estén conectados a estos últimos.
Entrada de control remoto con cable
Se puede conectar el adaptador de control remoto con cable (se vende por separado).
Amarillo
Al terminal que recibe alimentación independientemente
de la posición del interruptor de encendido.
Naranja/blanco
Al terminal del interruptor de iluminación.
Negro (conexión a tierra)
Al chasis del vehículo (metal).
Rojo
Al terminal eléctrico controlado por el interruptor
de encendido (12�V�cc) ON/OFF.
Notas
* Antes de utilizar y/o conectar el adaptador iDatalink Maestro, deberá grabar en la memoria flash del módulo Maestro el firmware adecuado para el vehículo y la unidad principal.
Encontrará el número de dispositivo necesario para la activación en los siguientes lugares (consulte Actualización del módulo iDatalink Maestro en la página 47):
— la etiqueta en el paquete de este producto
— la etiqueta en este producto
— la pantalla “Información de firmware”
Asegúrese de conectar el micrófono suministrado con este producto cuando utilice Android Auto.
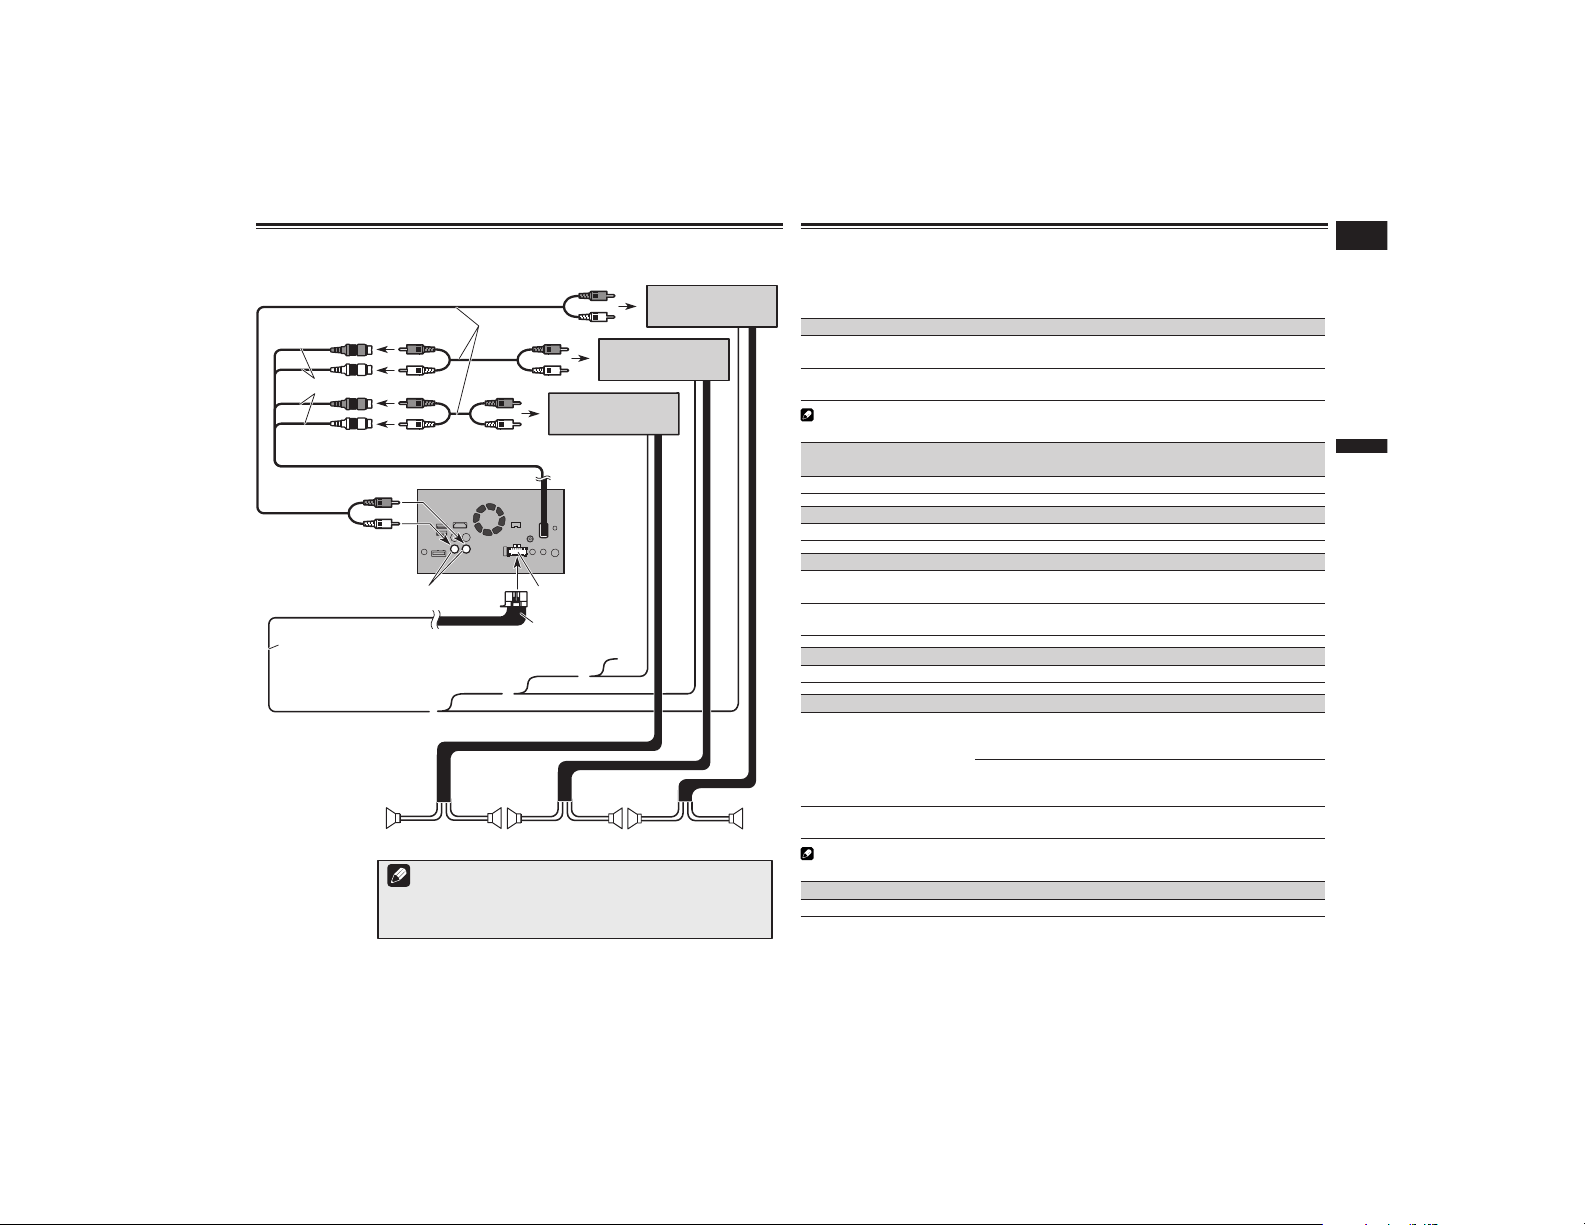
Español
31
Capítulo
81
Es
Conexión al amplicador de potencia que se vende por
separado
Control remoto del sistema
Cable de alimentación
Azul/blanco
Amplificador de potencia
(vendido por separado)
Amplificador de potencia
(vendido por separado)
Amplificador de potencia
(vendido por separado)
Altavoz delantero
Altavoz trasero
Subwoofer
Cables RCA
(vendidos por separado)
Este producto
15 cm
Salidas traseras
(REAR OUTPUT)
Salidas frontales
(FRONT OUTPUT)
Al terminal de control del sistema del amplificador
de potencia (máx. 300 mA 12 V cc).
Blanco, Rojo (SWL, SWR)
Notas
· Puede cambiar la salida RCA del subwoofer en función del sistema del
subwoofer.
· La salida del subwoofer de este producto es monoaural.
Fuente de alimentación
Conectar un iPhone, iPod, dispositivo Android o dispositivo
MirrorLink™
Encuentre su dispositivo y la función que desea manejar en la siguiente lista y, para más
información acerca de la conexión, consulte la página.
iPhone 6 Plus/iPhone 6/iPhone 5s/iPhone 5c/iPhone 5
iPod (audio)
Consulte Conexión mediante el puerto USB en la
página 82.
AppRadio Mode
Consulte Conexión mediante el puerto HDMI en la
página 82.
Aviso
Cualquier conexión anteriormente mencionada puede utilizar aha y Pandora.
iPhone 3GS/iPod touch (2.ª y 3.ª generaciones)/iPod classic 160 GB/
iPod classic 80 GB/iPod nano (3.ª, 4.ª, 5.ª y 6.ª generaciones)
Consulte Conexión mediante la entrada AUX en la página 82.
iPhone 4s/iPhone 4/iPod touch (4.ª generación)
Consulte Conexión mediante la entrada RGB en la página 82.
iPod touch (5.ª generación)
iPod (audio)
Consulte Conexión mediante el puerto USB en la
página 82.
AppRadio Mode
Consulte Conexión mediante el puerto HDMI en la
página 82.
iPod nano (7.ª generación)
Consulte Conexión mediante el puerto USB en la página 82.
Dispositivo Android
AppRadio Mode
Puerto HDMI
Consulte Conexión de un dispositivo Android con un puerto
HDMI en la página 83.
Puerto MHL
Consulte Conexión de un dispositivo Android con un puerto
MHL en la página 83.
Android Auto
Consulte Conectar el dispositivo Android o MirrorLink™ en
la página 83.
Aviso
Cualquier conexión anteriormente mencionada puede utilizar aha y Pandora.
Dispositivo MirrorLink
Consulte Conectar el dispositivo Android o MirrorLink™ en la página 83.
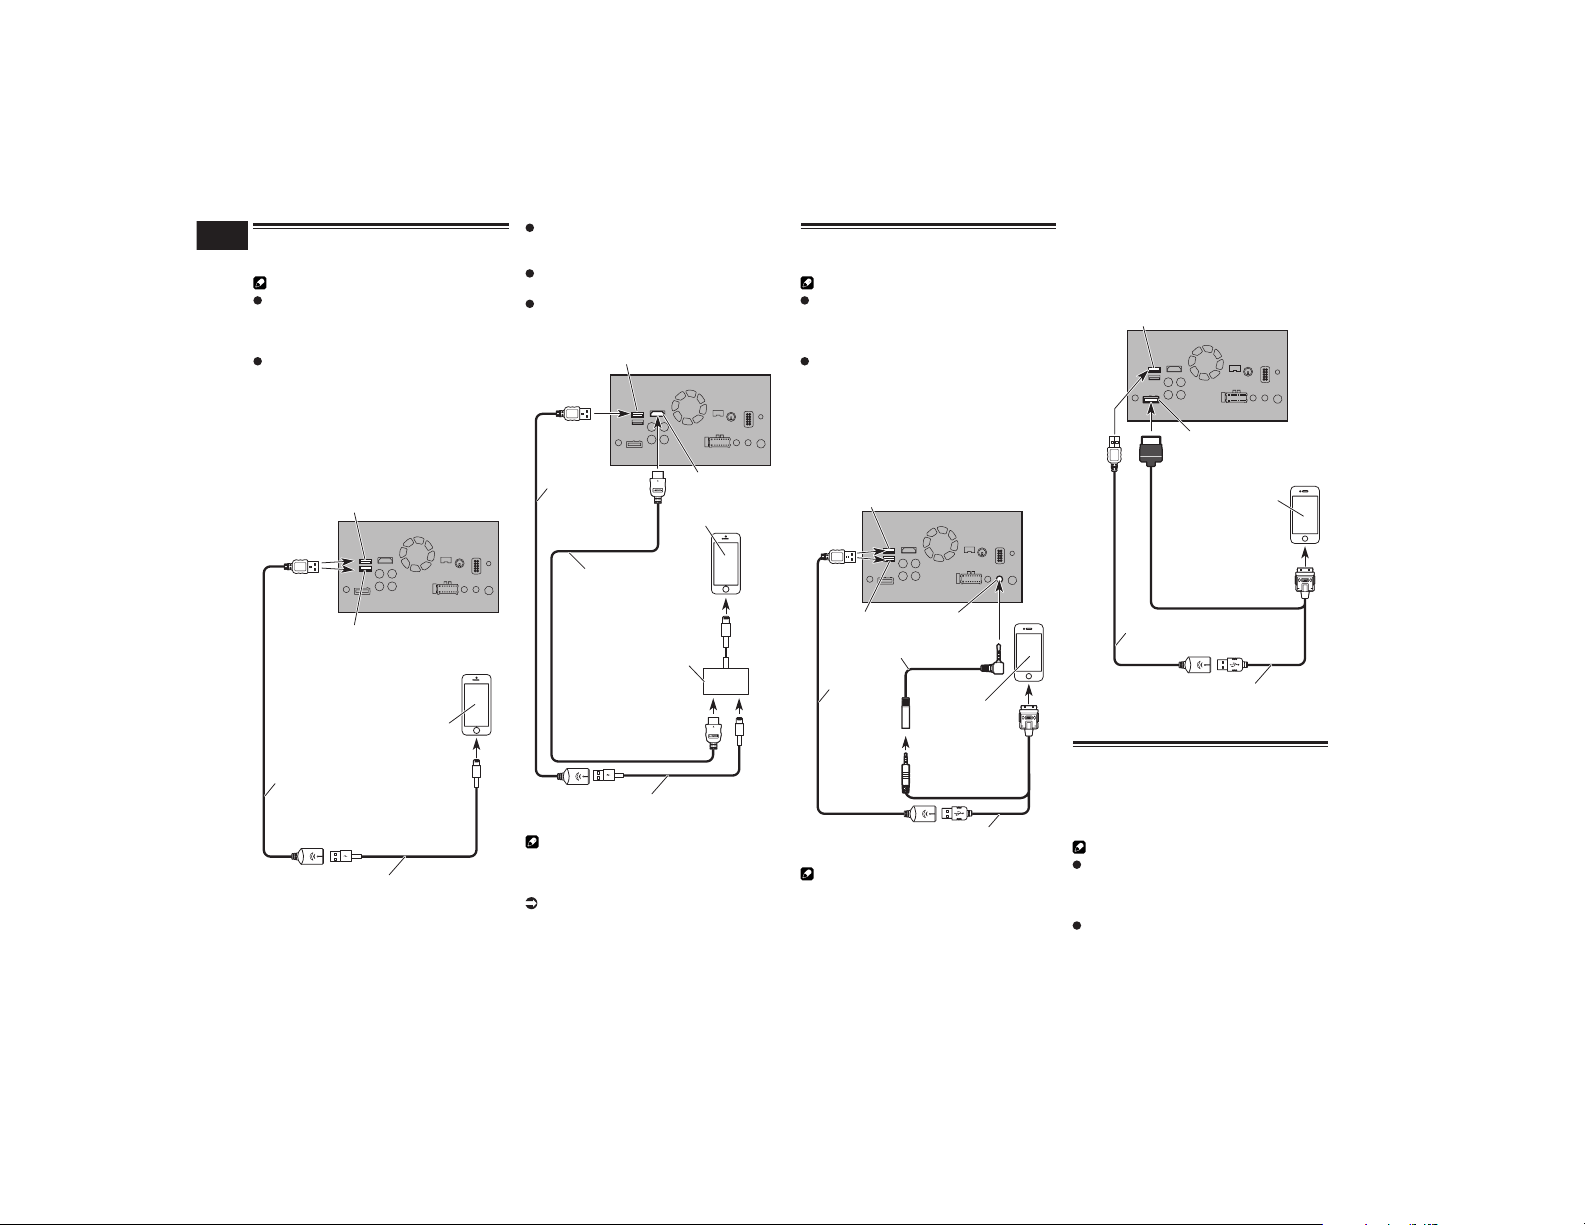
31
Capítulo
82
Es
Conexión de un iPhone con
conector Lightning
Notas
Para obtener más información sobre
cómo conectar un dispositivo externo
mediante un cable que se vende por
separado, consulte el manual del cable.
Para obtener más información sobre la
conexión, las operaciones y la compatibi-
lidad del iPhone, consulte Capítulo 5.
■ Conexión mediante el puerto
USB
Para realizar la conexión es necesario un
cable de interfaz USB para iPod / iPhone
(CD-IU52) (vendido por separado).
Este producto
Puerto USB 1
iPhone con conector
Lightning
Cable USB
1,5 m
Cable de interfaz USB para iPod / iPhone
(CD-IU52) (vendido por separado)
Puerto USB 2
■ Conexión mediante el puerto
HDMI
Se necesitan los siguientes cables para la
conexión.
Cable de interfaz HDMI para iPod
/ iPhone (CD-IH202) (vendido por
separado)
Cable de interfaz USB para iPod / iPhone
(CD-IU52) (vendido por separado)
Adaptador de conector Lightning a AV
digital (producto de Apple Inc.) (se vende
por separado)
Cable USB
1,5 m
Este producto
Puerto USB 1
Cable de interfaz USB para iPod / iPhone
(CD-
IU52) (vendido por separado)
iPhone con conector
Lightning
Cable HDMI
®
de alta velocidad
(Tipo A - A)
(incluido con CD-IH202)
Puerto HDMI
Adaptador de conector
Lightning a AV digital
(producto de Apple Inc.)
(se vende por separado)
Nota
Cuando conecte el cable HDMI
®
de alta
velocidad, utilice la presilla de sujeción para
fijarlo bien.
Para los detalles, consulte Fijación del
cable HDMI
®
de alta velocidad en la
página 83.
Conexión de un iPhone con
conector de 30 clavijas
Notas
Para obtener más información sobre
cómo conectar un dispositivo externo
mediante un cable que se vende por
separado, consulte el manual del cable.
Para obtener más información sobre la
conexión, las operaciones y la compatibi-
lidad del iPhone, consulte Capítulo 5.
■ Conexión mediante la entrada
AUX
Para realizar la conexión es necesario un
cable de interfaz USB para iPod / iPhone
(CD-IU201V) (vendido por separado).
Cable de extensión minijack
(incluido con CD-IU201V)
Puerto USB 1
Este producto
Puerto USB 2
Entrada AUX
iPhone con
conector de 30
clavijas
Cable USB
1,5 m
Cable de interfaz USB para iPod / iPhone
(CD-IU201V) (vendido por separado)
Nota
Conecte el cable USB al puerto USB 1
cuando utilice “aha” o “Pandora” como
fuente.
■ Conexión mediante la entrada
RGB
Para realizar la conexión es necesario un
cable de interfaz USB para iPod / iPhone
(CD-IU201S) (vendido por separado).
Cable USB
1,5 m
Cable de interfaz USB para iPod / iPhone
(CD-IU201S) (vendido por separado)
Este producto
Puerto USB 1
Entrada RGB
iPhone con conector de
30 clavijas
Conexión de dispositivos
Android™
Para realizar la conexión es necesario el kit
de conectividad de aplicación (CD-AH200)
(vendido por separado).
Notas
Para obtener más información sobre
cómo conectar un dispositivo externo
mediante un cable que se vende por
separado, consulte el manual del cable.
Para obtener más información sobre la
conexión y las operaciones de dispositi-
vos Android, consulte Capítulo 5.
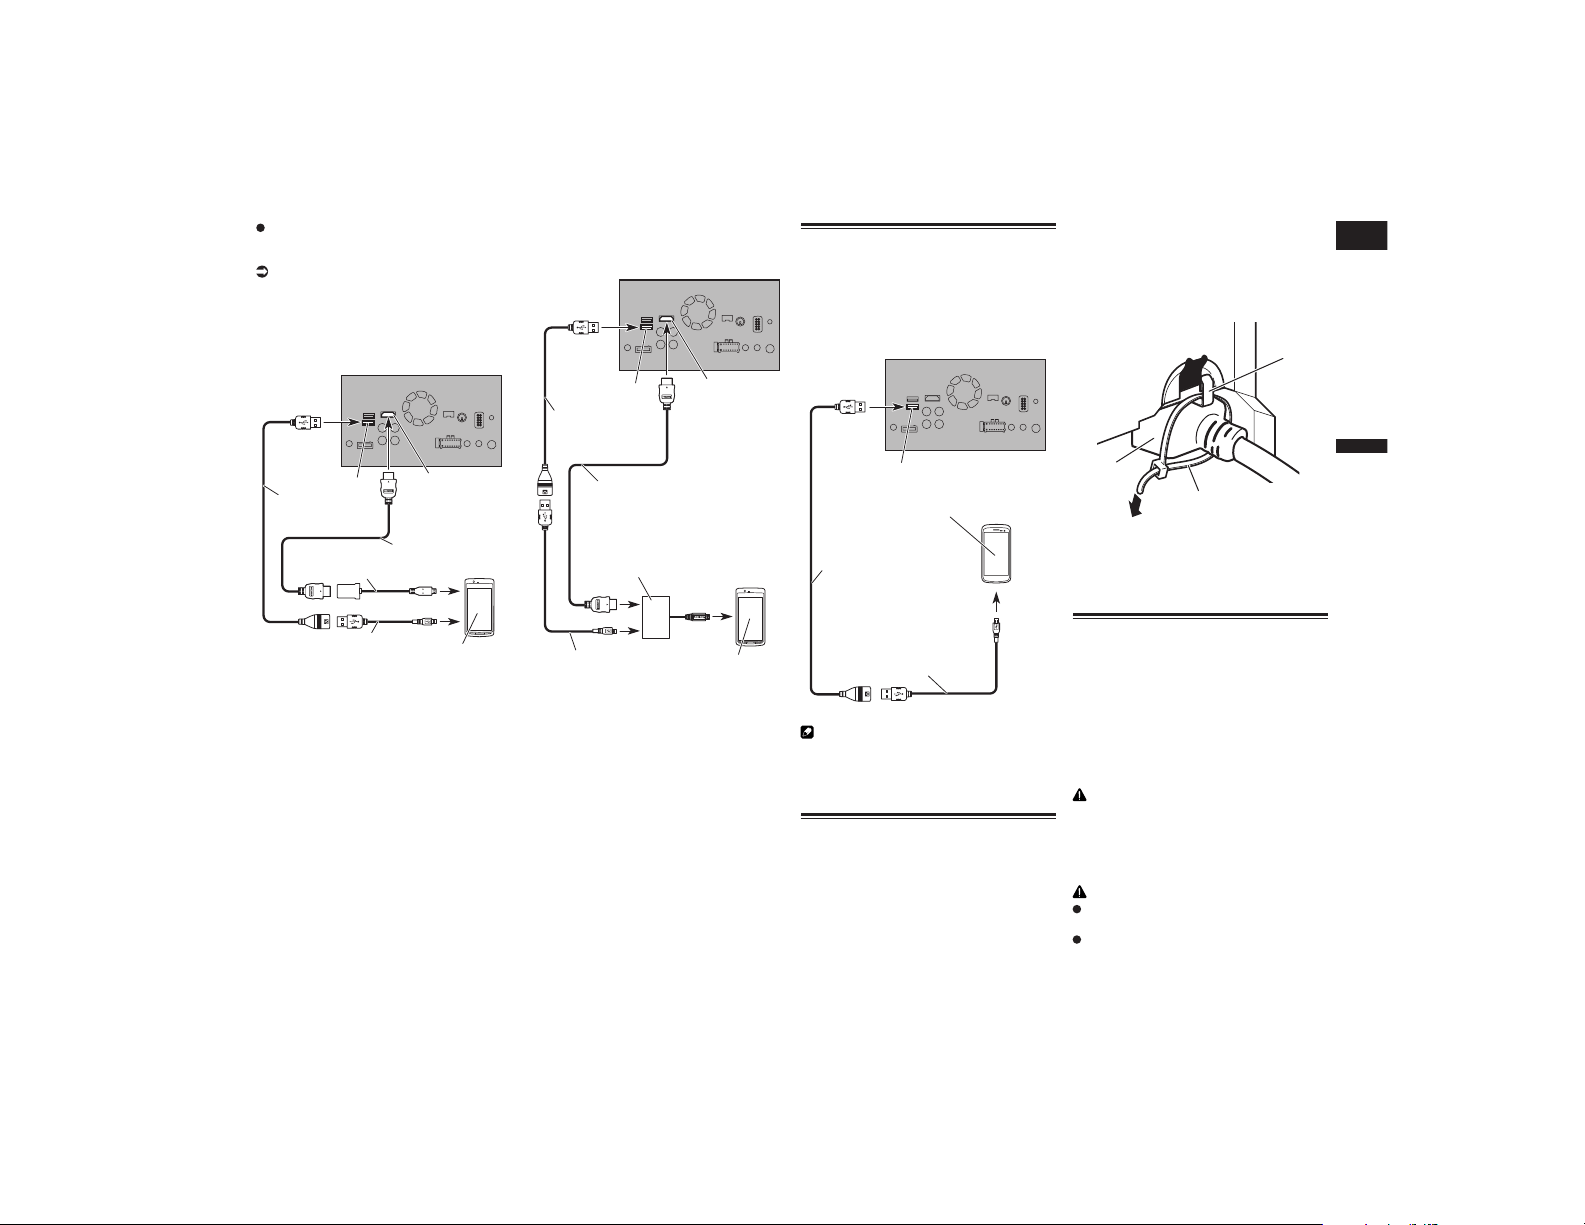
Español
31
Capítulo
83
Es
Cuando conecte el cable HDMI
®
de alta
velocidad, utilice la presilla de sujeción
para fijarlo bien.
Para los detalles, consulte Fijación del
cable HDMI
®
de alta velocidad en la
página 83.
■ Conexión de un dispositivo
Android con un puerto HDMI
Cable USB
(incluido con CD-AH200)
Este producto
Dispositivo Android
Puerto USB 2
Puerto HDMI
Cable USB - micro USB
(Tipo USB A - micro USB B)
(incluido con CD-AH200)
Cable adaptador
(HDMI Tipo A - D)
(incluido con CD-AH200)
Cable HDMI
®
de alta
velocidad
(Tipo A - A)
(incluido con CD-AH200)
■ Conexión de un dispositivo
Android con un puerto MHL
Cable USB
(incluido con
CD-AH200)
Este producto
Dispositivo Android
Puerto USB 2
Puerto HDMI
Cable USB - micro USB
(Tipo USB A - micro USB B)
(incluido con CD-AH200)
Adaptador MHL
(incluido con CD-AH200)
Cable HDMI
®
de alta velocidad
(Tipo A - A)
(incluido con CD-AH200)
Conectar el dispositivo
Android o MirrorLink™
Para realizar la conexión es necesario un
cable de interfaz USB para el uso con dispo-
sitivos Android y MirrorLink™ (CD-MU200)
(vendido por separado).
Cable USB
(incluido con CD-MU200)
Cable USB - micro USB
(Tipo USB A - micro USB B)
(incluido con CD-MU200)
Este producto
Dispositivo MirrorLink o Android
Puerto USB 2
Nota
Para obtener más información sobre cómo
conectar un dispositivo externo mediante un
cable que se vende por separado, consulte el
manual del cable.
Fijación del cable HDMI
®
de
alta velocidad
Asegúrese de fijar el cable HDMI
®
de alta
velocidad con la presilla de sujeción cuando
conecte el dispositivo externo con el cable
HDMI
®
de alta velocidad.
1 Inserte el cable HDMI
®
de alta velo-
cidad en el puerto HDMI.
2 Enrolle la presilla de sujeción alre-
dedor del gancho que se encuentra
encima del puerto HDMI y el cable
HDMI
®
de alta velocidad y, a con-
tinuación, apriételo para fijarlo al
cable HDMI
®
de alta velocidad.
1
2
3
1 Gancho
2 Presilla de sujeción
3 Cable HDMI
®
de alta velocidad
p No apriete la presilla de sujeción más de
lo necesario.
Conexión de una cámara de
retrovisor
Cuando se utiliza este producto con una
cámara de retrovisor, se puede cambiar
automáticamente de la imagen de vídeo
a la imagen de vista trasera cuando se
desplaza la palanca de cambios al modo de
REVERSE (R). El modo Vista de cámara
también le permite comprobar lo que tiene
detrás mientras conduce.
ADVERTENCIA
USE LA ENTRADA SÓLO PARA LA MARCHA
ATRÁS O LA CÁMARA DE RETROVISOR DE
IMAGEN ESPECULAR. CUALQUIER OTRO
USO PUEDE DERIVAR EN LESIONES O
DAÑOS.
PRECAUCIÓN
La imagen en pantalla puede aparecer
invertida.
La cámara de retrovisor se utiliza
como ayuda para vigilar un remolque
o dar marcha atrás en un lugar de
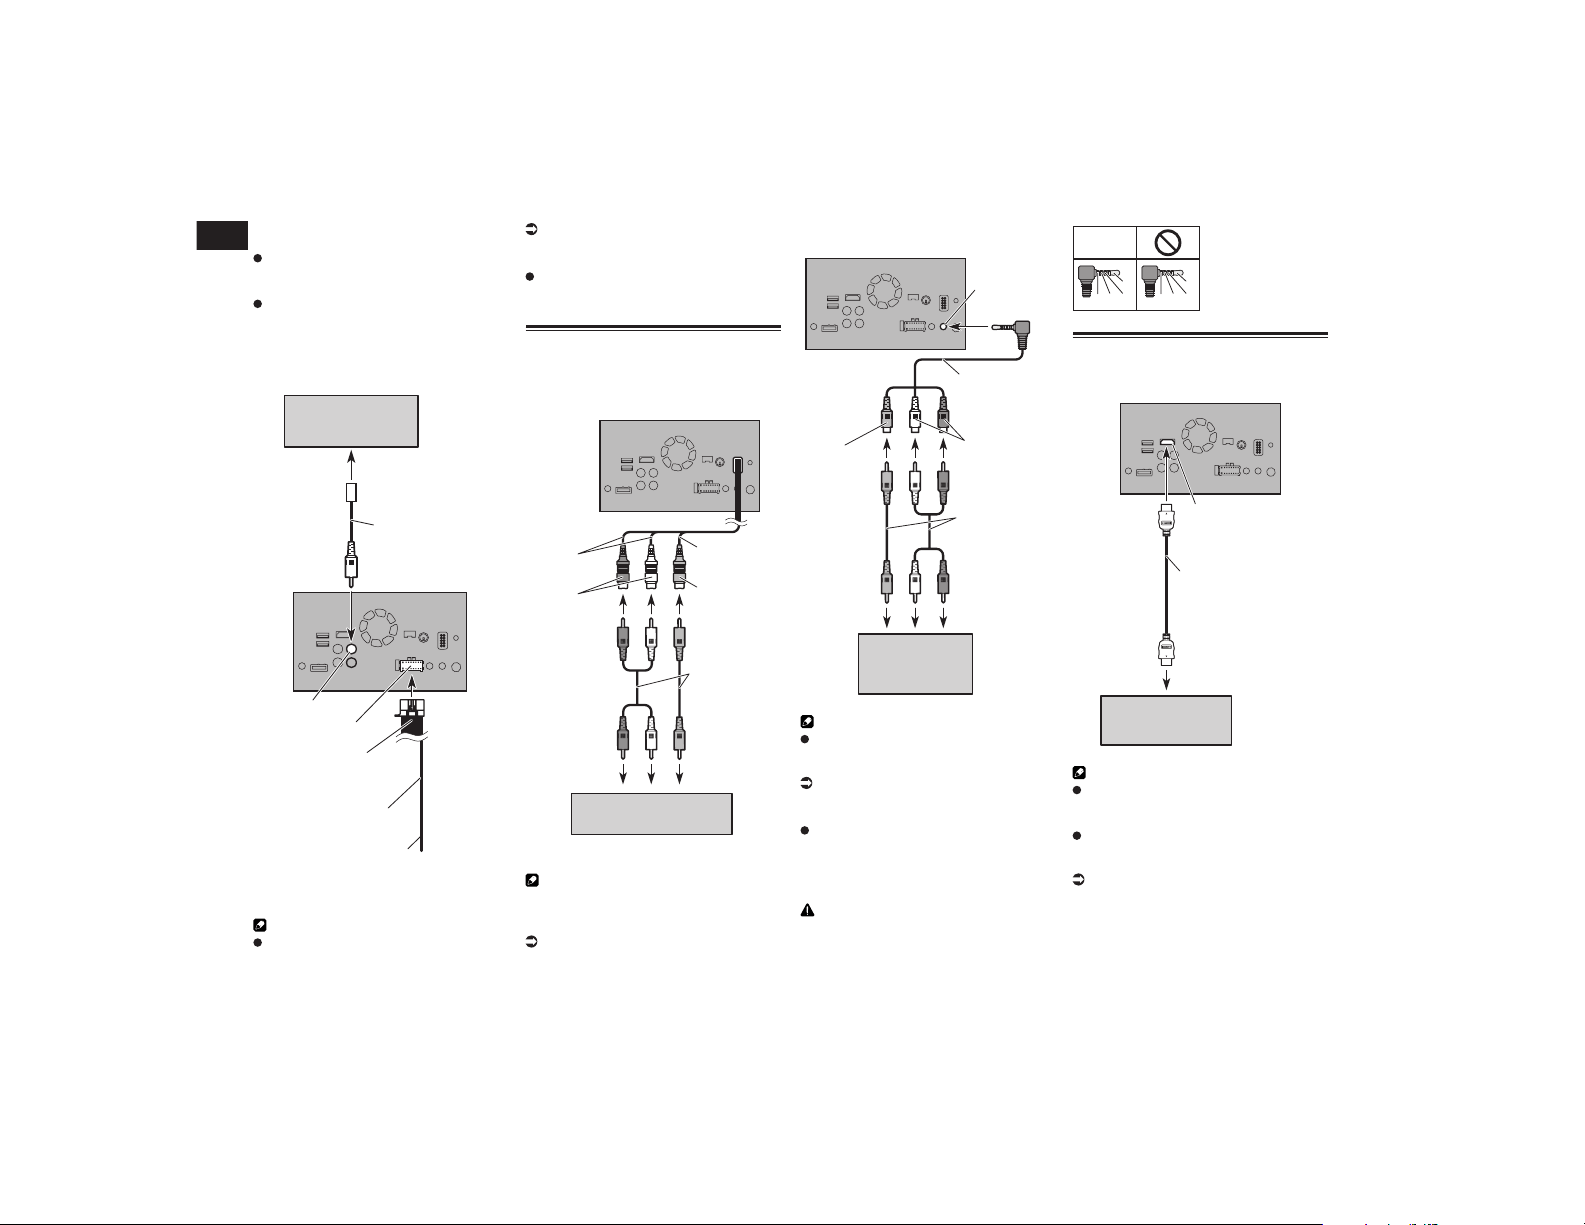
31
Capítulo
84
Es
aparcamiento ajustado. No utilice esta
función con fines de entretenimiento.
Si utiliza la vista trasera es posible que
parezca que los objetos están más cerca
o más lejos de lo que están en realidad.
Tenga en cuenta que el área de la ima-
gen que muestra la cámara de retrovisor
puede diferir ligeramente cuando apa-
rezcan imágenes a pantalla completa al
dar marcha atrás y al comprobar la parte
trasera del vehículo mientras avanza.
Cámara de retrovisor
(ND-BC6)
(se vende por separado)
Este producto
Marrón (BC IN)
Cable RCA
(incluido con ND-BC6)
Vi
oleta/blanco
(REVERSE-GEAR SIGNAL
INPUT)
A la salida de vídeo
Cable de alimentación
Fuente de alimentación
Para obtener más información sobre el
cableado, consulte Conexión del cable de
alimentación en la página 80.
Notas
Este modo está disponible cuando el
ajuste de cámara de retrovisor está
establecido en “Act.”.
Para más información, consulte Ajuste
de la activación de la cámara de retrovi-
sor en la página 61.
Conecte este producto únicamente a la
cámara de retrovisor. No lo conecte a
ningún otro equipo.
Conexión del componente de
vídeo externo
■ Utilización de la entrada AV
A las salidas
de audio
Componente de vídeo externo
(vendido por separado)
A la salida
de vídeo
Este producto
Rojo, blanco
(AUDIO INPUT)
23 cm
15 cm
Amarillo
(VIDEO INPUT)
Cables RCA
(se vende por
separado)
Nota
Este modo está disponible cuando la con-
figuración de la entrada AV se ajusta en
“Act.”.
Para más información, consulte Ajuste
de la entrada AV en la página 60.
■ Utilización de una entrada AUX
A la salida de
vídeo
A las salidas de
audio
Componente de vídeo
externo (vendido por
separado)
Este producto
Rojo, blanco
Cables RCA
(vendidos por
separado)
Amarillo
Entrada AUX
Cable AV minijack
(CD-RM10)
(vendido por separado)
Notas
Este modo está disponible cuando la
configuración de la entrada AUX se
ajusta en “Act.”.
Para los detalles, consulte
Procedimiento de inicio en la
página 57.
Cuando conecte un componente de
vídeo externo utilizando un cable AV
minijack, utilice un cable de extensión
AUX, vendido por separado, si es
necesario.
PRECAUCIÓN
Asegúrese de utilizar un cable AV minijack
(CD-RM10) (se vende por separado) para el
cableado. Si utiliza otros cables, la posición
del cableado puede diferir, provocando
imágenes y sonidos interrumpidos.
OK
G
V
R
L
G
R
V
L
L : Audio izquierda
(Blanco)
R : Audio derecha (Rojo)
V : Video (Amarillo)
G : Tierra
Conexión de un dispositivo
HDMI
Dispositivo HDMI
(vendido por separado)
Este producto
Puerto HDMI
Cable HDMI
®
de alta
velocidad
(vendido por separado)
Notas
Para más información sobre las opera-
ciones del dispositivo HDMI, consulte
Capítulo 19.
Cuando conecte el cable HDMI
®
de alta
velocidad, utilice la presilla de sujeción
para fijarlo bien.
Para los detalles, consulte Fijación del
cable HDMI
®
de alta velocidad en la
página 83.
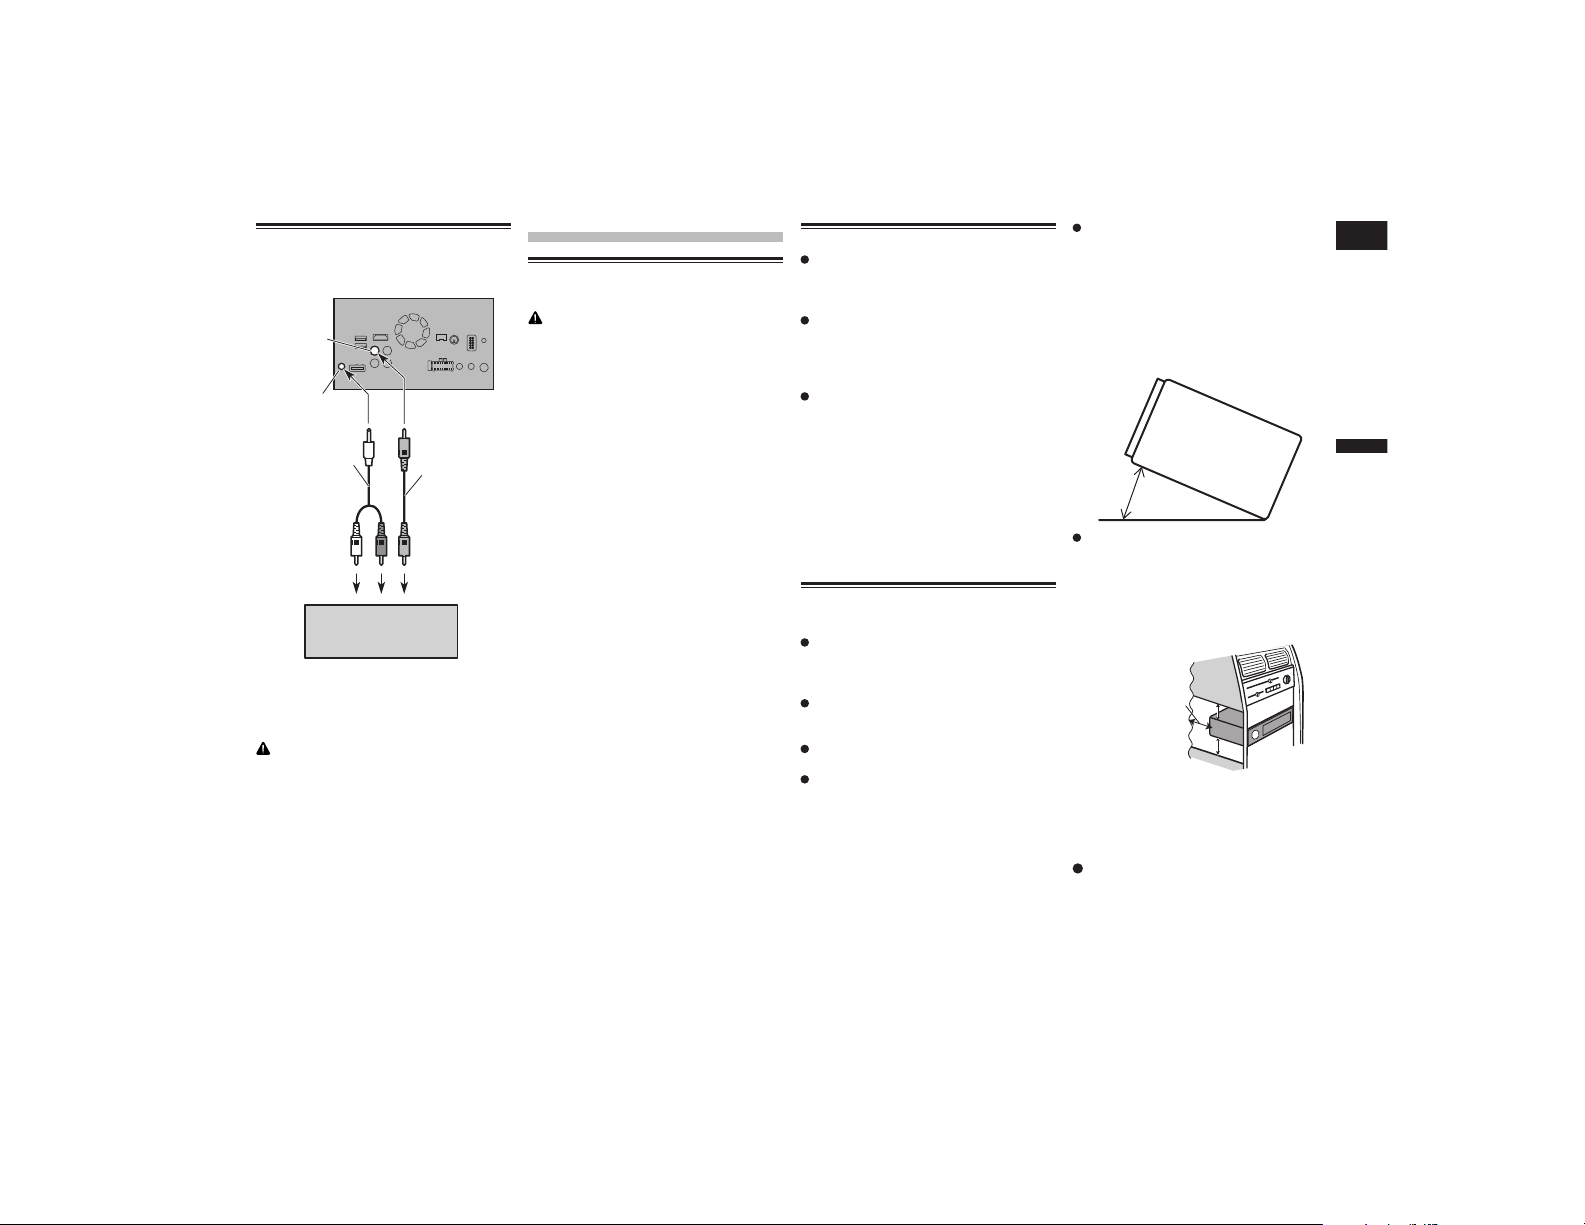
Español
32
Capítulo
85
Es
Conexión de la pantalla
trasera
Pantalla trasera con
conectores de entrada RCA
(vendido por separado)
Cable miniconector
(vendido por
separado)
Cable RCA
(se vende por
separado)
A las entradas
de audio
A la entrada
de vídeo
Este producto
Salida de
audio trasera
Amarillo
(V OUT)
■ Uso de una pantalla trasera
conectada a la salida de vídeo
trasera
ADVERTENCIA
NUNCA instale la pantalla trasera en un
punto que permita al conductor ver la
fuente de vídeo mientras conduce.
La salida de vídeo posterior de este producto
es para conectar una pantalla que permita a
los pasajeros de los asientos posteriores ver
la fuente de vídeo.
Instalación
Precauciones antes de la
instalación
PRECAUCIÓN
Nunca instale este producto en lugares
en los que, o de manera que:
— Pudiese dañar al conductor o a los
pasajeros si el vehículo se detuviese
de repente.
— Pudiese afectar a la conducción del
vehículo, como por ejemplo en el
suelo delante del asiento del conduc-
tor o cerca del volante o la palanca de
cambios.
— Para garantizar una instalación
adecuada, utilice las piezas sumi-
nistradas de la forma especificada.
Si no se suministran piezas con este
producto, utilice piezas compatibles
de la forma especificada después
de haber comprobado a través de
su distribuidor la compatibilidad de
dichas piezas. Si utiliza otras piezas
que no hayan sido suministradas
o que no sean compatibles, éstas
podrán estropear las piezas internas
del producto, o podrán aflojarse y
hacer que se desprenda el producto.
— No instale este producto en un lugar
que pueda (i) impedir la visión del
conductor, (ii) afectar al rendimiento
de cualquier otro sistema del vehí-
culo o función de seguridad, como
airbags, botones de las luces de
advertencia, o (iii) impedir que se
pueda conducir de forma segura.
— No instale este producto delante o
cerca del tablero de instrumentos,
la puerta o el pilar desde los que se
abriría uno de los airbags del vehí-
culo. Consulte el manual del pro-
pietario de su vehículo para obtener
información sobre el área de uso de
los airbags delanteros.
Antes de la instalación
Póngase en contacto con su distribuidor
más cercano si la instalación requiere la
perforación de orificios u otras modifica-
ciones del vehículo.
Antes de realizar la instalación final
de este producto, conecte el cableado
temporalmente y asegúrese de que todo
está conectado correctamente y que el
sistema funciona debidamente.
No instale este producto en un lugar
en el que la apertura del panel LCD se
vea obstruida por cualquier obstáculo,
como la palanca de cambios. Antes
de instalar este producto, asegúrese
de dejar suficiente espacio para que el
panel LCD no choque con la palanca de
cambios cuando esté totalmente abierto.
Puede afectar al funcionamiento de la
palanca de cambios o impedir el correcto
funcionamiento del mecanismo de este
producto.
Instalación de este producto
■ Notas acerca de la instalación
No instale este producto en lugares en
los que pueda estar expuesto a altas
temperaturas o a humedad, como por
ejemplo:
Lugares cercanos a un calefac-
tor, conducto de ventilación o aire
acondicionado.
Lugares expuestos a la luz solar directa
tales como el tablero de instrumentos.
Lugares que pudieran verse expuestos
a lluvia, como por ejemplo cerca de una
puerta o en el suelo del vehículo.
Instale este producto de forma horizontal
en una superficie con una tolerancia
de entre 0 y 30 grados (5 grados a la
izquierda o a la derecha). Si la unidad se
instala de forma incorrecta con una incli-
nación de la superficie que supera estas
tolerancias aumentará la posibilidad de
que aparezcan errores en la pantalla de
ubicación del vehículo, y podría disminuir
el rendimiento de dicha pantalla.
30°
Cuando instale el sistema, para garan-
tizar una correcta dispersión del calor
durante el uso de esta unidad, asegúrese
de dejar un amplio espacio por detrás del
panel trasero y enrollar los cables sueltos
de modo que no bloqueen las aberturas
de ventilación.
Deje un amplio espacio
5 cm
5 cm
■ Instalación utilizando los ori-
cios de tornillo del lateral de
este producto
Fije este producto al soporte de
montaje de radio de fábrica.
Coloque este producto de manera que sus
orificios de tornillo estén alineados con los
orificios de tornillo del soporte, y apriete los
tornillos en tres puntos de cada lado.
Utilice los tornillos de cabeza segmentada
(5 mm × 8 mm) o los tornillos de superficie
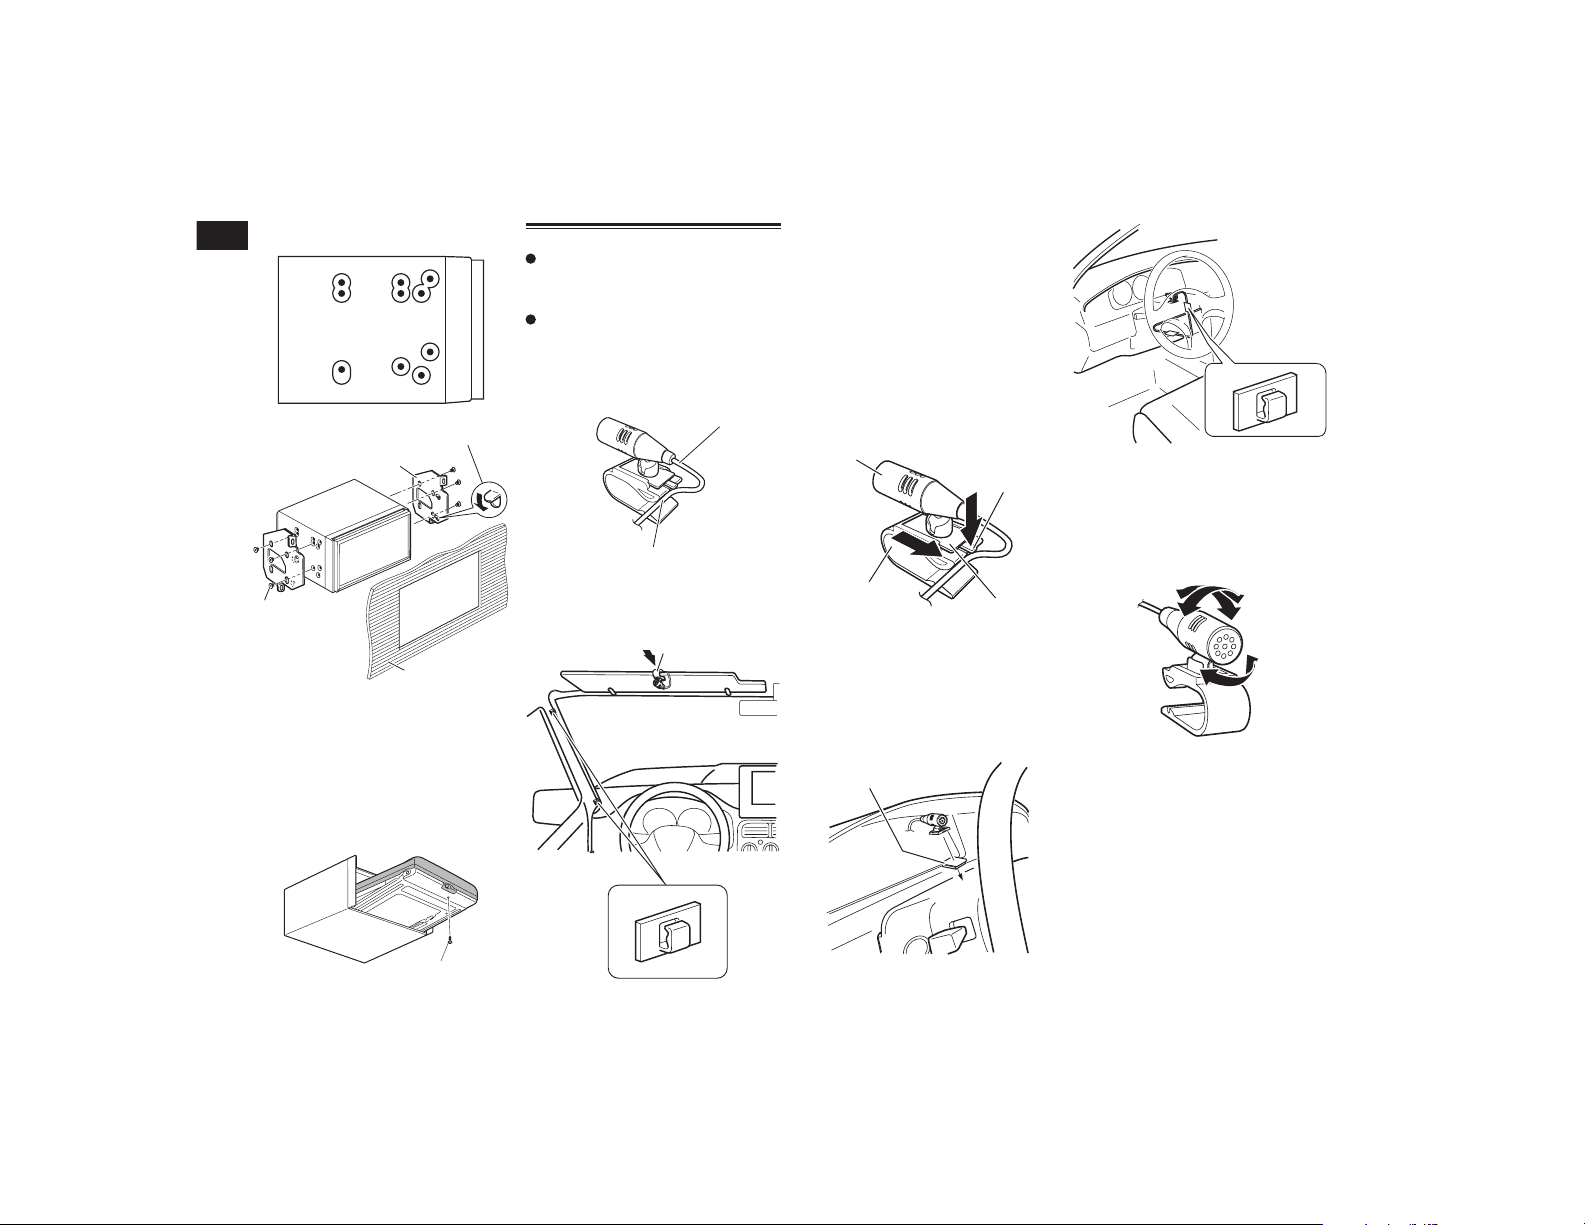
32
Capítulo
86
Es
plana (5 mm × 9 mm), dependiendo de la
forma de los orificios del tornillo del soporte.
Si la pestaña interfiere con la
instalación, puede doblarla para
apartarla.
1
2
3
1 Soporte de montaje de radio de fábrica
2 Tablero de instrumentos o consola
3 Tornillo de cabeza segmentada o tornillo
de superficie plana
Asegúrese de utilizar los tornillos que se
proporcionan con este producto.
■ Fijación del panel delantero
Si no tiene previsto sacar el panel delan-
tero, éste se puede fijar con el tornillo
suministrado.
1
1 Tornillo (2 mm × 6 mm)
Instalación del micrófono
Instale el micrófono de tal forma que esté
correctamente orientado y a la distancia
correcta del conductor para que resulte
fácil recoger la voz del conductor.
Asegúrese de apagar (ACC OFF) el pro-
ducto antes de conectar el micrófono.
■ Montaje en el parasol
1 Coloque el cable del micrófono en
la ranura.
1
2
1 Cable del micrófono
2 Ranura
2 Fije el clip del micrófono al parasol.
1
2
1 Clip del micrófono
2 Abrazaderas
Utilice abrazaderas (se venden por sepa-
rado) para fijar el cable en el interior del
vehículo donde sea necesario.
Instale el micrófono en el parasol cuando
éste esté plegado hacia arriba. No puede
reconocer la voz del conductor si el parasol
está bajado.
■ Instalación en la columna de
dirección
1 Desconecte la base del micrófono
del clip del mismo deslizándola a
la vez que pulsa la lengüeta.
4
1
2
3
1 Micrófono
2 Lengüeta
3 Base del micrófono
4 Clip del micrófono
2 Monte el micrófono en la columna
de dirección.
Instale el micrófono en la columna de direc-
ción, manteniéndolo alejado del volante.
1
2
1 Cinta de doble cara
2 Abrazaderas
Utilice abrazaderas (se venden por sepa-
rado) para fijar el cable en el interior del
vehículo donde sea necesario.
■ Ajuste del ángulo del micrófono
Se puede ajustar el ángulo del micrófono.
Español
Apéndice
87
Es
Apéndice
Solución de problemas
Consulte esta sección si tiene algún problema al utilizar este producto. Los problemas más
comunes se enumeran a continuación, junto con sus causas probables y soluciones. Si no
puede encontrar una solución a su problema, póngase en contacto con su distribuidor o con
el centro de servicio autorizado Pioneer más cercano.
Problemas con la pantalla de AV
Síntoma Causa Acción
Referencia
No se puede reproducir
el CD o el DVD.
El disco está colocado al
revés.
Introduzca el disco con la etiqueta
hacia arriba.
El disco está sucio. Limpie el disco.
El disco está agrietado o
dañado.
Introduzca un disco normal, con
forma redonda.
Los archivos del disco tie-
nen un formato de archivos
irregular.
Compruebe el formato de los
archivos.
No se puede reproducir el
formato del disco.
Cambie el disco.
El disco cargado es de un
tipo que este producto no
puede reproducir.
Compruebe el tipo de disco.
la página 94
En la pantalla aparece un
mensaje de precaución
y no puede mostrarse
el vídeo.
El cable del freno de
mano no está conectado o
accionado.
Conecte el cable del freno de mano
de forma correcta y accione el freno
de mano.
El interbloqueo del freno de
mano está activado.
Estacione el vehículo en un lugar
seguro y accione el freno de mano.
No hay salida de vídeo
procedente de un dispo-
sitivo conectado.
El ajuste “Entrada AV” no
es correcto.
Corrija la configuración.
la página 60
Se omite el audio o el
vídeo.
Este producto no se ha
fijado firmemente.
Fije este producto firmemente.
No se reproduce ningún
sonido.
El nivel del volumen no
sube.
Los cables no están conec-
tados correctamente.
Conecte los cables correctamente.
El sistema reproduce imá-
genes fijas, a cámara lenta
o fotograma a fotograma,
con un DVD-Vídeo.
No se emite sonido durante la
reproducción de imágenes fijas, a
cámara lenta o fotograma a foto-
grama, con un DVD-Vídeo.
El sistema está en modo
pausa o reproduce con
avance/retroceso rápido
durante la reproducción de
un disco.
Para los soportes que no sean CD
de música (CD-DA), no se emite
ningún sonido en el avance rápido
ni el retroceso rápido.
Síntoma Causa Acción
Referencia
Aparece el icono y
no es posible utilizar el
sistema.
La operación no es compa-
tible con la configuración
de vídeo.
Esta operación no es posible. (Por
ejemplo, la reproducción del DVD
no encaja con el ángulo, el sistema
de audio, el idioma de los subtítu-
los, etc.)
La imagen se detiene
(hace una pausa) y
este producto no puede
utilizarse.
No es posible realizar la
lectura de datos durante la
reproducción de un disco.
Detenga la reproducción una vez y,
a continuación, reiníciela.
La imagen aparece esti-
rada, con una relación de
aspecto incorrecta.
El ajuste de aspecto no es
el correcto para la pantalla.
Seleccione el ajuste correcto para
dicha imagen.
la página 74
Se muestra un mensaje
de bloqueo paterno y
no se puede reproducir
el DVD.
El bloqueo paterno está
activado.
Desactive el bloqueo paterno o
cambie el nivel.
la página 74
No se puede cancelar el
bloqueo paterno para la
reproducción de DVD.
El número de código es
incorrecto.
Introduzca el número de código
correcto.
la página 74
La reproducción no
se corresponde con la
configuración de idioma
de audio y de subtítulos
seleccionada en “Config.
DVD/DivX”.
La reproducción del DVD
no incluye diálogos o
subtítulos en el idioma
seleccionado en “Config.
DVD/DivX”.
No es posible cambiar al idioma
seleccionado si el idioma seleccio-
nado en “Config. DVD/DivX” no
está grabado en el disco.
la página 73
La imagen aparece muy
borrosa/distorsionada
y oscura durante la
reproducción.
El disco incluye una señal
que prohíbe realizar copias.
(Algunos discos incorpo-
ran esta protección.)
Dado que este producto es compa-
tible con el sistema de protección
analógico frente a copias, en la
imagen podrían aparecer bandas
horizontales u otras imperfecciones
cuando se visualiza un disco con
dicho tipo de protección en algunas
pantallas. No se trata de un funcio-
namiento incorrecto.
Apéndice
88
Es
Síntoma Causa Acción
Referencia
No es posible controlar
el iPod.
El iPod está bloqueado.
Vuelva a conectar el iPod con el
cable de interfaz USB para iPod /
iPhone.
Actualice la versión de software
del iPod.
Se ha producido un error.
Vuelva a conectar el iPod con el
cable de interfaz USB para iPod /
iPhone.
Estacione su vehículo en un lugar
seguro y, a continuación, desactive
el interruptor de encendido (ACC
OFF). Posteriormente, active el
interruptor de encendido (ACC ON)
de nuevo.
Actualice la versión de software
del iPod.
Los cables no están conec-
tados correctamente.
Conecte los cables correctamente.
No se puede escuchar el
sonido del iPod.
La dirección de salida de
audio puede cambiarse
automáticamente cuando
las conexiones USB y
Bluetooth se utilizan de
forma simultánea.
Utilice el iPod para cambiar la
dirección de salida de audio.
Problemas con la pantalla del teléfono
Síntoma Causa Acción
No se puede marcar por-
que las teclas del panel
táctil de marcado no se
encuentran activas.
El teléfono está fuera de
cobertura.
Vuelva a intentarlo cuando tenga
cobertura.
No se puede establecer la
conexión entre el teléfono
móvil y este producto.
Realice el proceso de conexión.
Problemas con la pantalla de Aplicación
Síntoma Causa Acción
Se muestra una pantalla
en negro.
Mientras se utilizaba la
aplicación se cerró la apli-
cación en el smartphone.
Pulse el botón HOME para mostrar
la pantalla de Menú superior.
Es posible que el SO del
smartphone esté espe-
rando a la operación de la
pantalla.
Detenga el vehículo en un lugar
seguro y consulte la pantalla del
smartphone.
Síntoma Causa Acción
La pantalla se muestra,
pero no puede realizarse
ninguna operación.
Se ha producido un error.
Estacione su vehículo en un lugar
seguro y, a continuación, desactive
el interruptor de encendido (ACC
OFF). Posteriormente, active el
interruptor de encendido (ACC ON)
de nuevo.
Cuando se conecte un dispositivo
Android, desconecte la conexión
Bluetooth de este producto y, a
continuación, vuelva a conectarlo.
El smartphone no se
carga.
La carga se ha detenido
porque la temperatura del
smartphone ha aumen-
tado, debido al uso pro-
longado del smartphone
durante la carga.
Desconecte el smartphone del
cable y espere hasta que el smar-
tphone se enfríe.
Se ha consumido más
carga de batería que la que
se ha obtenido durante el
proceso de carga.
Este problema puede resolverse
deteniendo servicios innecesarios
del smartphone.
Mensajes de error
Cuando se produzcan problemas con este producto aparecerá un mensaje de error en la
pantalla. Consulte la tabla que aparece a continuación para identificar el problema y, a
continuación, realice la acción correctiva que se sugiere. Si el error persiste, anote el men-
saje de error y póngase en contacto con su distribuidor o con el centro de servicio Pioneer
más cercano.
Comunes
Mensaje Causa Acción
Error AMP
Este producto no funciona
o la conexión del altavoz
no es correcta, el circuito
protector está activado.
Compruebe la conexión del alta-
voz. Si el mensaje no desaparece
incluso tras apagar/encender el
motor, póngase en contacto con
su distribuidor o con el servicio
técnico autorizado Pioneer para
obtener ayuda.
TEMP
La temperatura de este
producto se encuentra
fuera del intervalo opera-
tivo normal.
Espere hasta que el producto
vuelva a una temperatura dentro de
los límites operativos normales.
Español
Apéndice
89
Es
Mensaje Causa Acción
Producto recalentado.
El sistema se apagará
automáticamente en
1 minuto. Reiniciar el
producto apagando y
encendiendo el con-
tacto puede corregir
este problema. Si este
mensaje sigue apa-
reciendo, es posible
que el producto tenga
algún problema.
La temperatura es dema-
siado alta para que este
producto funcione.
Siga las instrucciones que se
muestran en pantalla. Si el pro-
blema no se soluciona, contacte
con su proveedor o un servicio
técnico autorizado Pioneer.
Pandora
Mensaje Causa Acción
Se produjo un error de
comunicación.
Error del iPod.
Desconecte el cable del iPod.
Cuando aparezca el menú principal
del iPod, vuelva a conectar el iPod y
restablézcalo.
Error-19 Error de comunicación.
Desconecte el cable del iPod.
Cuando aparezca el menú principal
del iPod, vuelva a conectar el iPod y
restablézcalo.
Omitir límite
alcanzado.
Se ha alcanzado el límite
de saltos.
No sobrepase el límite de saltos.
A causa de las restricciones de
licencias de música, Pandora limita
el número de saltos por hora.
Comp. dispositivo
Mensaje de error que se
muestra en la aplicación
Pandora.
Compruebe el dispositivo
conectado.
USB incompatible
Este producto no es com-
patible con el dispositivo
de almacenamiento USB
conectado.
Desconecte el dispositivo y sustitú-
yalo con un dispositivo de almace-
namiento USB compatible.
Comprobar USB
El conector USB o el cable
USB se ha cortocircuitado.
Compruebe que el conector o cable
USB no se encuentre atrapado o
haya sufrido daños.
El dispositivo de alma-
cenamiento USB conec-
tado consume más de
la corriente máxima
permitida.
Desconecte el dispositivo de alma-
cenamiento USB y no lo utilice.
Coloque la llave de encendido en
OFF, después colóquela en ACC u
ON y, a continuación, conecte un
dispositivo de almacenamiento
USB compatible.
Aha Radio
Mensaje Causa Acción
Error comunicación Error del iPod.
Desconecte el cable del iPod.
Cuando aparezca el menú principal
del iPod, vuelva a conectar el iPod y
restablézcalo.
Error-02-6X Error del iPod.
Desconecte el cable del iPod.
Cuando aparezca el menú principal
del iPod, vuelva a conectar el iPod y
restablézcalo.
Radio por satélite SiriusXM
Mensaje Causa Acción
Referencia
Comp. ant.
La conexión de la antena es
incorrecta.
Compruebe la conexión de la
antena. Si el mensaje no desapa-
rece incluso tras apagar/encender
el motor, póngase en contacto con
su distribuidor o con el servicio
técnico más cercano de Pioneer
para obtener ayuda.
Comp. sint.
La conexión de SiriusXM
Connect Vehicle Tuner es
incorrecta.
Compruebe la conexión del sinto-
nizador y la tensión de la batería. Si
el mensaje no desaparece incluso
tras apagar/encender el motor,
póngase en contacto con su dis-
tribuidor o con el servicio técnico
más cercano de Pioneer para
obtener ayuda.
Sin señal
SiriusXM Connect Vehicle
Tuner tiene dificultades
para recibir la señal del
satélite.
Compruebe que el vehículo esté
al aire libre con una vista clara del
hemisferio sur.
Compruebe que la antena con
montaje magnético esté montada
sobre una superficie metálica en el
exterior del vehículo.
Aleje la antena de SiriusXM de
cualquier obstrucción.
Sin contenido
TuneScan no está
disponible.
Realice la operación con otro canal
de presintonía.
Canal no disponible
El canal que ha solicitado
no es un canal SiriusXM
válido.
Compruebe la lista de canales de
SiriusXM.
Suscripción actuali-
zada Pulse Entrar para
continuar
Este producto ha detectado
un cambio en el estado de
la suscripción de SiriusXM.
Pulse [Entrar] para borrar el
mensaje.
Apéndice
90
Es
Mensaje Causa Acción
Referencia
Canal no suscrito.
Llamar a SiriusXM
para suscribir.
El canal que ha solicitado
no está incluido en el
paquete de suscripción de
SiriusXM.
Compruebe el contenido del
paquete de suscripción de
SiriusXM.
Canal bloqueado Favor
de introducir el código
de bloqueo
Bloqueado por la función
de control parental de la
radio.
Desbloquee el canal.
Artista no disponible
La función de memoria de
alertas no está disponible.
Realice la operación con otro canal.
Canción no disponible
La función de memoria de
alertas no está disponible.
Realice la operación con otro canal.
Equipo no disponible
La función de memoria de
alertas no está disponible.
Realice la operación con otro canal.
Memoria de alertas
llena Puede gestionar
la memoria de alertas
en la lista de alertas
La memoria está llena.
Borre la lista de alertas.
la página 56
Memoria llena
La memoria se ha llenado
mientras la reproducción
estaba en pausa.
Reanude la reproducción.
Memoria casi llena
La memoria casi se ha
llenado mientras la repro-
ducción estaba en pausa.
Reanude la reproducción.
Disco
Mensaje Causa Acción
Referencia
Error-02-XX/FF-FF
El disco está sucio. Limpie el disco.
El disco está arañado. Cambie el disco.
El disco está colocado al
revés.
Compruebe que el disco esté
colocado correctamente.
Se ha producido un error
eléctrico o mecánico.
Pulse el botón RESET.
la página 8
Disco región difer.
El disco no tiene el mismo
código de zona que este
producto.
Cambie el DVD por uno que tenga
el código de zona correcto.
Disco no reproducible
Este producto no puede
reproducir este tipo de
disco.
Sustituya el disco con uno que se
pueda reproducir en este producto.
Archivo no reprod.
Este producto no puede
reproducir este tipo de
archivo.
Seleccione un archivo que se
pueda reproducir.
la página 95, la página 100
Omitido
El disco insertado con-
tiene archivos protegidos
mediante DRM.
Se omiten los archivos protegidos.
Mensaje Causa Acción
Referencia
Proteger
Todos los archivos del
disco insertados incorpo-
ran DRM.
Cambie el disco.
Este DivX alquilado ha
caducado.
El disco insertado tiene
contenido DivX VOD que
ha caducado.
Seleccione un archivo que se
pueda reproducir.
Resolución de video no
admitida
Se incluyen archivos que
no se pueden reproducir
con este producto.
Seleccione un archivo que se
pueda reproducir.
la página 95, la página 100
No se puede escribir
en flash
Por algún motivo, no se
puede guardar el historial
de reproducción del conte-
nido VOD.
Vuelva a intentarlo.
Si el mensaje aparece con frecuen-
cia, consulte a su distribuidor.
Su dispositivo no está
autorizado a repro-
ducir este video DivX
protegido.
El proveedor de contenido
DivX VOS no ha autorizado
el código de registro DivX
de este producto.
Registre este producto en el provee-
dor de contenido DivX VOD.
N. º fotogramas por
segundo no admitido
La velocidad de fotogramas
de este archivo DivX es
suprior a 30 fps.
Seleccione un archivo que se
pueda reproducir.
Formato de audio no
admitido
Este producto no admite
este tipo de archivo.
Seleccione un archivo que se
pueda reproducir.
la página 95, la página 100
Dispositivo de almacenamiento externo (USB, SD)
Mensaje Causa Acción
Referencia
Error-02-9X/-DX Error de comunicación.
Coloque la llave de encendido del
automóvil en la posición de desac-
tivación (OFF) y vuelva a activarla
(ON).
Desconecte el dispositivo de alma-
cenamiento USB.
Cambie a una fuente diferente. A
continuación, vuelva al dispositivo
de almacenamiento USB.
Archivo no reprod.
Este producto no puede
reproducir este tipo de
archivo.
Seleccione un archivo que se
pueda reproducir.
la página 95, la página 100
Se ha activado la seguri-
dad para el dispositivo de
almacenamiento externo
(USB, SD) conectado.
Siga las instrucciones del dispo-
sitivo de almacenamiento externo
(USB, SD) para desactivar la
seguridad.
Español
Apéndice
91
Es
Mensaje Causa Acción
Referencia
Omitido
El dispositivo de almacena-
miento externo (USB, SD)
conectado contiene archi-
vos protegidos con DRM.
Se omiten los archivos protegidos.
Proteger
Todos los archivos del
dispositivo de almacena-
miento externo (USB, SD)
conectado incorporan
DRM.
Sustituya el dispositivo de almace-
namiento externo (USB, SD).
USB incompatible
Este producto no es com-
patible con el dispositivo
de almacenamiento USB
conectado.
Desconecte el dispositivo y sustitú-
yalo con un dispositivo de almace-
namiento USB compatible.
SD incompatible
Este producto no es com-
patible con la tarjeta de
memoria SD.
Retire el dispositivo y sustitúyalo
por una tarjeta de memoria SD
compatible.
la página 94
Formatee la tarjeta de memoria SD.
Le recomendamos que utilice SD
Formatter para formatear las tarje-
tas de memoria SD.
la página 94
Comprobar USB
Se ha producido un corto-
circuito en el conector o
cable USB.
Compruebe que el conector o cable
USB no se encuentre atrapado o
haya sufrido daños.
El dispositivo de alma-
cenamiento USB conec-
tado consume más de
la corriente máxima
permitida.
Desconecte el dispositivo de alma-
cenamiento USB y no lo utilice.
Coloque la llave de encendido en
OFF, después colóquela en ACC u
ON y, a continuación, conecte un
dispositivo de almacenamiento
USB compatible.
Resolución de video no
admitida
Se incluyen archivos que
no se pueden reproducir
con este producto.
Seleccione un archivo que se
pueda reproducir.
la página 95, la página 100
Mensaje Causa Acción
Referencia
USB1 se desconectó
para proteger el dis-
positivo. No reinserte
esta memoria USB en
la unidad. Pulse resta-
blecer para reiniciar la
memoria USB.
USB2 se desconectó
para proteger el dis-
positivo. No reinserte
esta memoria USB en
la unidad. Pulse resta-
blecer para reiniciar la
memoria USB.
Se ha producido un corto-
circuito en el conector o
cable USB.
Compruebe que el conector o cable
USB no se encuentre atrapado o
haya sufrido daños.
El dispositivo de alma-
cenamiento USB conec-
tado consume más de
la corriente máxima
permitida.
Desconecte el dispositivo de alma-
cenamiento USB y no lo utilice.
Coloque la llave de encendido en
OFF, después colóquela en ACC u
ON y, a continuación, conecte un
dispositivo de almacenamiento
USB compatible.
Se ha producido un cor-
tocircuito en el cable de
interfaz USB para iPod /
iPhone.
Compruebe que el cable de interfaz
USB para iPod / iPhone o el cable
USB no se encuentre atrapado o
haya sufrido daños.
Formato de audio no
admitido
Este producto no admite
este tipo de archivo.
Seleccione un archivo que se
pueda reproducir.
la página 95, la página 100
iPod
Mensaje Causa Acción
Error-02-6X/-9X/-DX Error del iPod.
Desconecte el cable del iPod.
Cuando aparezca el menú principal
del iPod, vuelva a conectar el iPod y
restablézcalo.
Error-02-67
El firmware del iPod es
antiguo.
Actualice la versión del iPod.
Apéndice
92
Es
Etiquetado de iTunes
Mensaje Causa Acción
Error-8D
La FLASH ROM integrada
encontró un error.
Coloque la llave de encendido del
automóvil en la posición de desac-
tivación (OFF) y vuelva a activarla
(ON).
Falló almacenamiento
etq.
La información de etiqueta
no se puede almacenar en
este producto.
Vuelva a intentarlo.
Ya almacenado.
Esta información de eti-
queta ya está almacenada
en memoria.
La información de etiqueta solo se
puede guardar una vez para una
canción específica. La información
de etiqueta no se puede guardar
para la misma canción más de
una vez.
Memoria llena.
Conectar iPod.
La información de etiqueta
se ha almacenado correc-
tamente. La memoria flash
de este producto se ha
llenado.
La información de etiqueta de este
producto se transfiera al iPod auto-
máticamente cuando se conecta
un iPod.
Memoria llena. Etq. sin
guardar. Conectar iPod.
La memoria flash de este
producto utilizada como
área de almacenamiento
temporal está llena.
La información de etiqueta de este
producto se transfiera al iPod auto-
máticamente cuando se conecta
un iPod.
iPod lleno. Etq. no
transferidas.
La memoria utilizada para
la información de etiqueta
en el iPod está llena.
Sincronice el iPod con iTunes y
limpie la lista de reproducción
etiquetada.
Falló transferencia etq.
Reconecte su iPod.
La información de etiqueta
de este producto no se
puede transferir al iPod.
Compruebe el iPod y vuelva a
intentarlo.
Bluetooth
Mensaje Causa Acción
Error-10
Error de alimentación del
módulo Bluetooth de este
producto.
Coloque la llave de encendido del
automóvil en la posición de desac-
tivación (OFF) y vuelva a activarla
(ON).
Si el mensaje de error sigue mos-
trándose tras realizar la acción
anterior, póngase en contacto
con su distribuidor o un centro de
servicio autorizado de Pioneer.
Android Auto
Mensaje Causa Acción
Referencia
Android Auto se ha
detenido.
El dispositivo conectado
no es compatible con
Android Auto.
Compruebe si el dispositivo es com-
patible con Android Auto.
Por alguna razón, se ha
producido un error en el
inicio de Android Auto.
Desconecte el cable del smar-
tphone y después vuelva a conectar
el smartphone tras unos segundos.
Reinicie el smartphone.
Coloque la llave de encendido del
automóvil en la posición de desac-
tivación (OFF) y vuelva a activarla
(ON).
Si el mensaje de error sigue mos-
trándose tras realizar la acción
anterior, póngase en contacto
con su distribuidor o un centro de
servicio autorizado de Pioneer.
La hora establecida en este
producto no es correcta.
Compruebe si la hora está bien.
Falló emparejamiento
Bluetooth. Favor de
emparejar su teléfono
Android manualmente.
Por alguna razón, se ha
producido un error en la
conexión por Bluetooth.
Conecte manualmente este pro-
ducto con el dispositivo.
la página 14, la página 15
MirrorLink
Mensaje Causa Acción
La lista de aplicaciones
no se puede leer.
No se pudo cargar la lista
de aplicaciones.
Desconecte el cable del smar-
tphone y después vuelva a conectar
el smartphone tras unos segundos.
Coloque la llave de encendido del
automóvil en la posición de desacti-
vación vuelva a activarla (ON).
Si se sigue mostrando el mensaje
de error tras realizar la acción ante-
rior, restablezca el smartphone.
Si el mensaje de error se sigue
mostrando tras realizar la acción
anterior, póngase en contacto
con su distribuidor o un centro de
servicio autorizado de Pioneer.
No hay ninguna aplica-
ción compatible en su
dispositivo MirrorLink.
No se encuentran aplica-
ciones compatibles.
Instale aplicaciones compatibles
con MirrorLink en el dispositivo
MirrorLink.
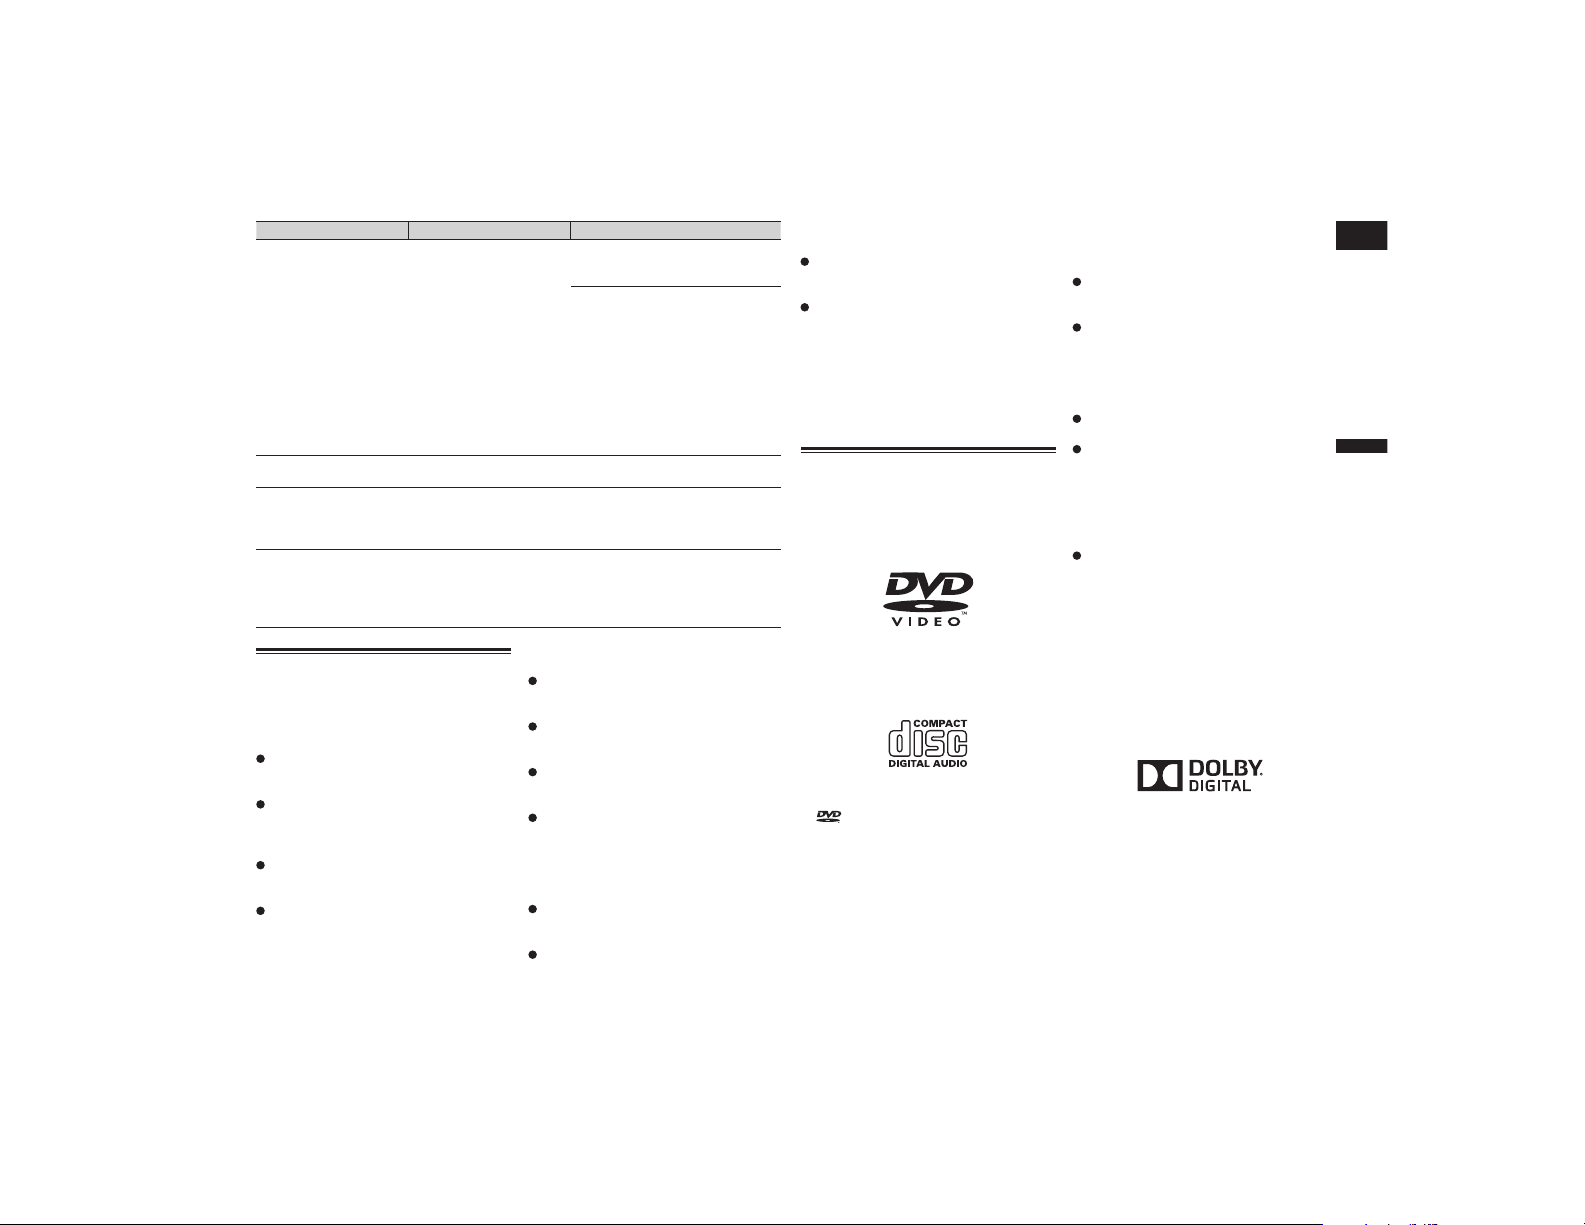
Español
Apéndice
93
Es
Mensaje Causa Acción
Se produjo un error de
comunicación.
Se ha producido un error
de comunicación.
Desconecte el cable del smar-
tphone y después vuelva a conectar
el smartphone tras unos segundos.
Coloque la llave de encendido del
automóvil en la posición de desacti-
vación vuelva a activarla (ON).
Si se sigue mostrando el mensaje
de error tras realizar la acción ante-
rior, restablezca el smartphone.
Si el mensaje de error se sigue
mostrando tras realizar la acción
anterior, póngase en contacto
con su distribuidor o un centro de
servicio autorizado de Pioneer.
Fallo al iniciar la
aplicación.
No se pudo iniciar la
aplicación.
Vuelva a intentarlo.
Fallo al visualizar la
pantalla de su dispo-
sitivo por resolución
irregular.
El tamaño de la imagen es
demasiado grande.
El tamaño de las imágenes trans-
feridas desde el dispositivo excede
800 × 480.
Si el dispositivo
MirrorLink está blo-
queado, desbloquéelo
cuando le resulte
seguro y lícito hacerlo.
El dispositivo MirrorLink
está bloqueado.
Desbloquee el dispositivo
MirrorLink.
Manipulación y cuidado de los
discos
Son necesarias algunas precauciones bási-
cas cuando se manipulan discos.
■ Lector integrado y su cuidado
Utilice únicamente discos redondos
convencionales. No utilice discos con
otras formas.
No utilice discos agrietados, cortados,
arañados o dañados de alguna otra
forma, ya que podrían provocar daños en
el lector integrado.
Utilice discos de 12 cm. No utilice un
adaptador para discos de 8 cm ni discos
de 8 cm.
Si utiliza discos en cuyas superficies
pueden realizarse impresiones en eti-
quetas, consulte las instrucciones y las
advertencias de los discos. En función
de los discos, es posible que no puedan
introducirse ni expulsarse. Si utiliza
dichos discos, el equipo podría sufrir
daños.
No coloque etiquetas, ni escriba ni
aplique productos químicos sobre la
superficie de los discos.
No coloque etiquetas disponibles comer-
cialmente ni otros materiales en los
discos.
La condensación puede afectar de
forma temporal al rendimiento del lector
integrado.
Es posible que los discos no se reproduz-
can por las características y el formato
del disco, las aplicaciones grabadas,
el entorno de reproducción, las condi-
ciones de almacenamiento, entre otras
opciones.
Los golpes o irregularidades del terreno
pueden provocar interrupciones en la
reproducción del disco.
Lea las instrucciones para discos antes
de utilizarlos.
■ Condiciones ambientales para la
reproducción de un disco
A temperaturas muy altas, el termos-
tato protege el producto apagándolo
automáticamente.
A pesar del esmerado diseño del pro-
ducto, podrían aparecer pequeñas rayas
en la superficie del disco como conse-
cuencia del desgaste mecánico, de las
condiciones ambientales de uso, o de la
manipulación del disco. Esto no indica
un mal funcionamiento del producto.
Se debe considerar como un desgaste
normal ocasionado por el uso.
Discos que pueden
reproducirse
■ DVD-Vídeo y CD
DVD-Vídeo
CD
p es una marca registrada de DVD
Format/Logo Licensing Corporation.
p No se pueden reproducir discos de
DVD-Audio. Es posible que el lector de
DVD no sea capaz de reproducir todos
los discos que presentan las marcas
anteriores.
■ Discos grabados en formato
AVCHD
Esta unidad no es compatible con los discos
grabados en el formato AVCHD (Advanced
Video Codec High Definition). No introduzca
discos AVCHD. Si lo hace, es posible que la
unidad no pueda expulsar el disco.
■ Reproducción de DualDisc
Los DualDisc son discos de doble cara
con un CD grabable de audio por un lado
y un DVD grabable de vídeo por el otro.
En este producto es posible reproducir la
cara del DVD. No obstante, dado que la
cara de CD de los DualDisc no es física-
mente compatible con el estándar de CD
convencional, puede que no sea posible
reproducir el CD en este producto.
Los DualDisc se rayan, si se cargan/
expulsan repetidamente.
Si el disco se raya, podrían surgir pro-
blemas a la hora de reproducir el disco
en este producto. En algunos casos, un
DualDisc puede quedarse atascado en la
ranura para cargar discos. Para evitarlo,
le recomendamos no utilizar DualDisc
en este producto.
Póngase en contacto con el fabricante
para obtener información más detallada
acerca de los DualDisc.
■ Dolby Digital
Este producto remezclará a dos pistas las
señales Dolby Digital de forma interna, y el
sonido se emitirá en estéreo.
p Fabricado con la licencia de Dolby
Laboratories. Dolby y el símbolo de la
doble D son marcas comerciales de
Dolby Laboratories.

Apéndice
94
Es
Información detallada de
los soportes que se pueden
reproducir
■ Compatibilidad
Notas comunes acerca de la com-
patibilidad con discos
Es posible que con determinados discos
no puedan utilizarse algunas funciones
de este producto.
No se garantiza la compatibilidad con
todos los discos.
No se pueden reproducir discos
DVD-ROM/DVD-RAM.
La reproducción de discos puede resul-
tar imposible en caso de una exposición
directa a la luz solar, a altas temperatu-
ras o dependiendo de las condiciones de
almacenamiento en el vehículo.
Discos DVD-Vídeo
En este lector de DVD no se pueden
reproducir discos DVD-Vídeo que inclu-
yan códigos de zona no compatibles. El
código de zona del reproductor puede
encontrarse en la carcasa de este
producto.
Discos DVD-R/DVD-RW/DVD-R SL
(una capa)/DVD-R DL (doble capa)
No se pueden reproducir discos no
finalizados que se hayan grabado con el
formato de Vídeo (modo vídeo).
No se pueden reproducir discos que
se hayan grabado con el formato Video
Recording (modo VR).
No se pueden reproducir discos DVD-R
DL (doble capa) que se hayan grabado
con el modo de grabación Layer Jump.
Para los detalles sobre el modo de
grabación, póngase en contacto con el
fabricante del soporte, de la grabadora o
del software de grabación.
Discos CD-R/CD-RW
No es posible reproducir discos no
finalizados.
Puede que no sea posible reproducir
discos CD-R/CD-RW grabados en una
grabadora de CD de música o en un
ordenador debido a las características
del disco, desperfectos o suciedad en el
disco y arañazos, condensación o sucie-
dad en la lente del lector integrado.
Es posible que no se puedan reproducir
discos grabados en un ordenador, en
función del dispositivo utilizado para
la grabación, del software de graba-
ción, su configuración y otros factores
ambientales.
Grabe en el formato correcto. (Para los
detalles, póngase en contacto con el
fabricante del soporte, la grabadora o el
software de grabación.)
Los títulos y otra información de texto
grabados en un disco CD-R/CD-RW
podrían no mostrarse en este producto
(en el caso de datos de audio (CD-DA)).
Lea las instrucciones de los discos
CD-R/CD-RW antes de utilizarlos.
Notas comunes acerca del disposi-
tivo de almacenamiento externo
(USB, SD)
No coloque el dispositivo de alma-
cenamiento externo (USB, SD) en
ninguna ubicación expuesta a elevadas
temperaturas.
En función del tipo de dispositivo de
almacenamiento externo (USB, SD) que
utilice, es posible que este producto no
reconozca el dispositivo de almacena-
miento o que los archivos no se repro-
duzcan de forma correcta.
Es posible que la información de texto de
algunos archivos de vídeo y audio no se
visualice correctamente.
Las extensiones de archivo se deben
utilizar de forma correcta.
Es posible que se produzcan ligeros
retardos al iniciar la reproducción de
archivos en un dispositivo de almacena-
miento externo (USB, SD) que presente
jerarquías de carpetas complejas.
Las operaciones pueden variar según el
tipo de dispositivo de almacenamiento
externo (USB, SD).
Puede que, en función de determinadas
características de archivo, formato de
archivo, aplicación grabada, entorno de
reproducción, condiciones de almacena-
miento y otros factores, no sea posible
reproducir determinados archivos de
música desde una tarjeta SD o un dispo-
sitivo de almacenamiento USB.
Notas sobre las tarjetas de memo-
ria SD
Esta unidad podría no reconocer algunas
tarjetas de memoria SD incluso si éstas
pueden ser reconocidas por un ordena-
dor. Puede resolver el problema forma-
teando la tarjeta de memoria SD con un
formateador específico. Las tarjetas de
memoria SD formateadas utilizando la
función estándar de formateado de un
ordenador no cumplen con el estándar
SD, por lo que podrían no leerse. Le
recomendamos que utilice un formatea-
dor específico para evitar problemas. Al
formatear la tarjeta de memoria SD se
eliminarán todos los datos almacenados,
por lo que es conveniente realizar una
copia de seguridad previamente. En la
siguiente página web encontrará un
formateador específico para tarjetas de
memoria SD:
https://www.sdcard.org/
Compatibilidad con un dispositivo
de almacenamiento USB
Para obtener más información sobre la
compatibilidad del dispositivo de alma-
cenamiento USB con este producto, con-
sulte Especificaciones en la página 100.
Protocolo: bulk
No es posible conectar un dispositivo de
almacenamiento USB a este producto a
través de un concentrador USB.
El dispositivo de almacenamiento USB
particionado no es compatible con este
producto.
Fije bien el dispositivo de almacena-
miento USB cuando conduzca. No deje
caer el dispositivo de almacenamiento
USB al suelo, ya que puede quedar atas-
cado debajo del freno o del acelerador.
Es posible que se produzca un ligero
retraso al iniciar la reproducción de
archivos de audio codificados con datos
de imagen.
Determinados dispositivos de almacena-
miento USB conectados a este producto
podrían generar ruido en la radio.
No conecte ningún dispositivo distinto al
dispositivo de almacenamiento USB.
Orden de los archivos de audio del dis-
positivo de almacenamiento USB
En el dispositivo de almacenamiento USB, el
orden es diferente.
Tarjeta de memoria SD y tarjeta de
memoria SDHC
Para obtener más información sobre la
compatibilidad de la tarjeta de memo-
ria SD con este producto, consulte
Especificaciones en la página 100.
Directrices de manipulación e
información adicional
Este producto no es compatible con
tarjetas Multi Media Card (MMC).
No se pueden reproducir archivos prote-
gidos por derechos de autor.
Notas especícas acerca de los
archivos DivX
Solo está garantizado el funcionamiento
correcto de los archivos DivX descarga-
dos desde sitios asociados a DivX. Los
archivos DivX no autorizados podrían no
funcionar correctamente.
Los archivos DRM de alquiler no se
pueden utilizar hasta que se inicia la
reproducción.
Este producto permite la visualización de
un archivo DivX de hasta 1 590 minutos y
43 segundos. Las operaciones de bús-
queda que superen este límite de tiempo
quedarán prohibidas.
Para reproducir archivos DivX VOD nece-
sitará suministrarle el código de identifi-
cación de este producto al proveedor de
DivX VOD. Para más información sobre
el código de identificación, consulte
Visualización del código de registro DivX
VOD en la página 75.
Reproduce todas las versiones de vídeo
DivX, excepto DivX 7, y ofrece reproduc-
ción estándar de archivos multimedia
DivX.
Para los detalles acerca de DivX, visite el
siguiente sitio:
http://www.divx.com/
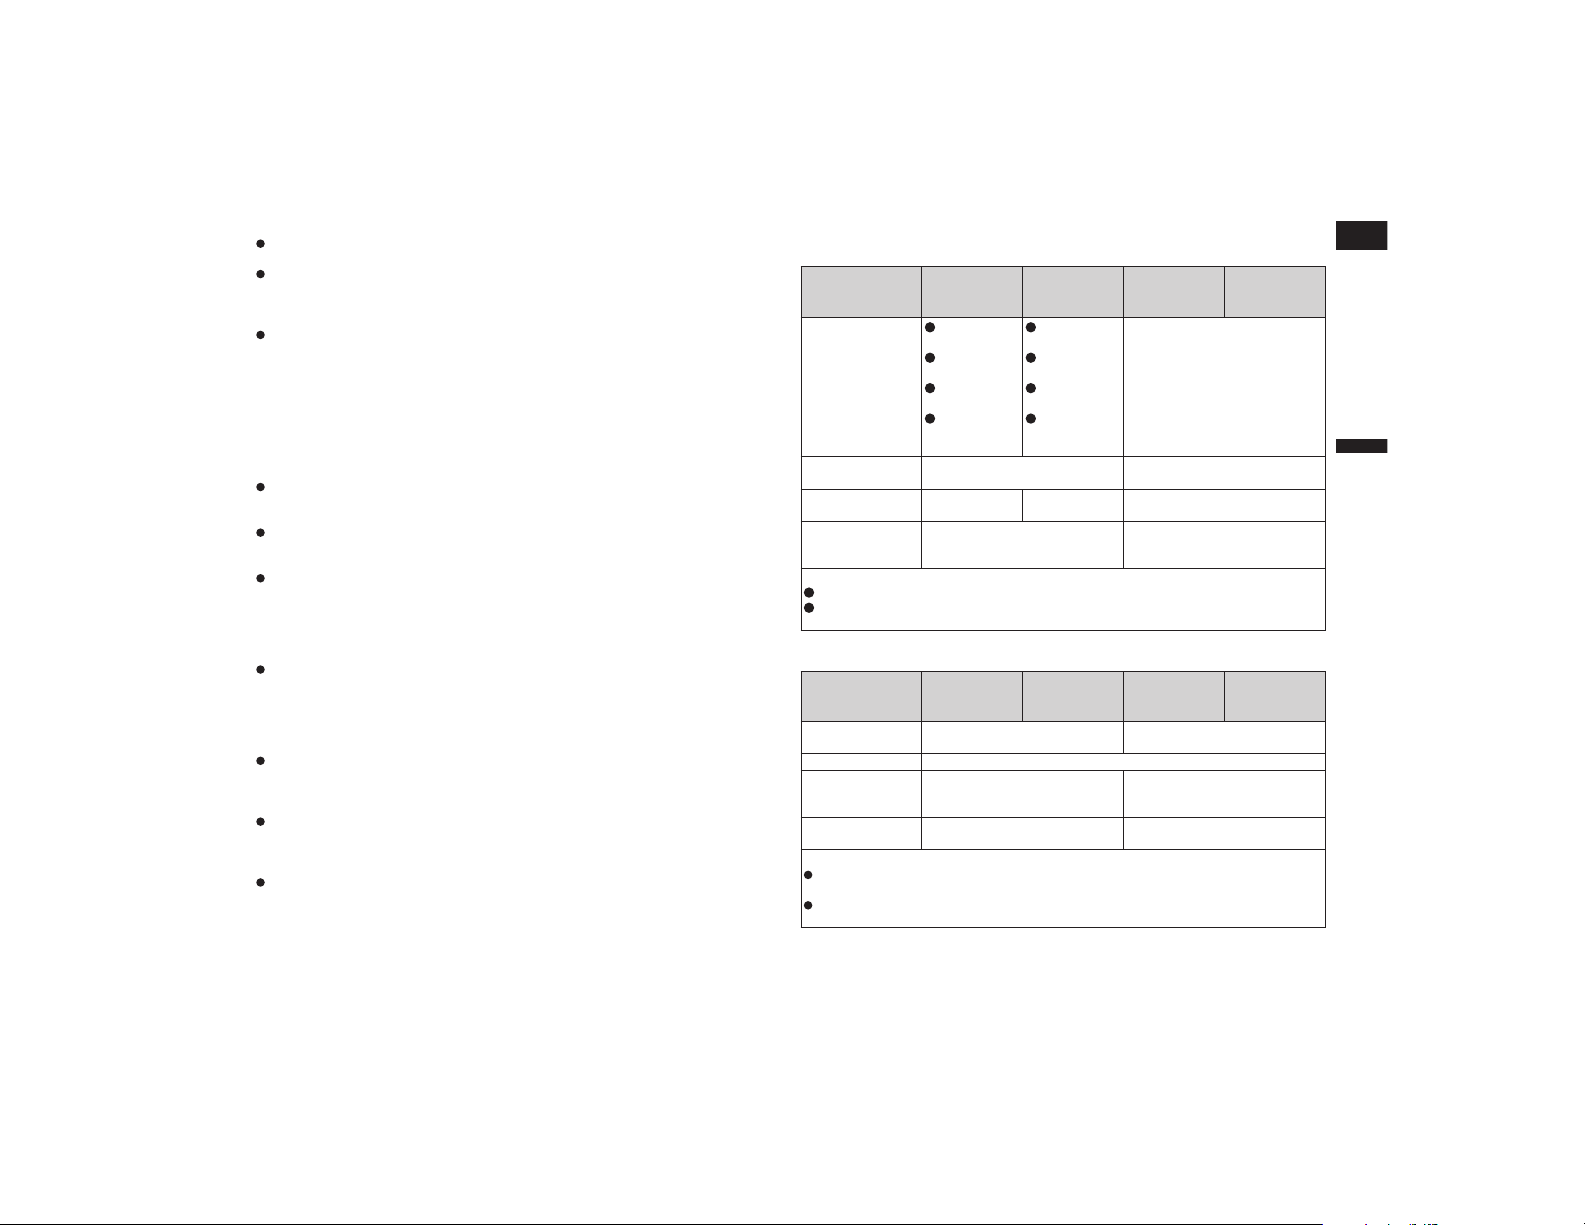
Español
Apéndice
95
Es
Archivos de subtítulos DivX
Se pueden utilizar archivos de subtítulos
en formato SRT con la extensión “.srt”.
Solo se puede utilizar un archivo de
subtítulos para cada archivo DivX. No
se pueden asociar varios archivos de
subtítulos.
Los archivos de subtítulos con la misma
cadena de caracteres en el nombre que
el archivo DivX delante de la extensión
se asocian al archivo DivX. La cadena de
caracteres delante de la extensión debe
ser exactamente igual. No obstante, si
solo hay un archivo DivX y un archivo
de subtítulos en una única carpeta, los
archivos se asocian aunque los nombres
de los archivos no coincidan.
El archivo de subtítulos se debe almace-
nar en la misma carpeta que el archivo
DivX.
Se pueden utilizar hasta 255 archivos
de subtítulos. No se reconocerán más
archivos de subtítulos.
Se pueden utilizar hasta 64 caracteres
para el nombre del archivo del subtítulo,
incluyendo la extensión. Si se utilizan
más de 64 caracteres para el nombre del
archivo, puede que no se reconozca el
archivo de subtítulos.
El código de caracteres del archivo
de subtítulos debe cumplir la norma
ISO-8859-1. Si se utilizan caracteres no
incluidos en la norma ISO-8859-1, es
posible que los caracteres no se mues-
tren correctamente.
Si los caracteres mostrados en el archivo
de subtítulos incluyen un código de
control, es posible que los subtítulos no
se muestren correctamente.
En el caso de materiales que utilicen una
tasa de transferencia alta, es posible que
el vídeo y los subtítulos no estén total-
mente sincronizados.
Si se programan varios subtítulos para
mostrarse en un periodo muy breve,
por ejemplo 0,1 segundos, es posible
que los subtítulos no se muestren en el
momento correcto.
■ Cuadro de compatibilidad con soportes
General
Soportes CD-R/-RW
DVD-R/-R
SL/-R DL/
DVD-RW
Dispositivo
de almacena-
miento USB
Tarjeta de
memoria SD
Sistema de archivos
ISO9660
nivel 1
ISO9660
nivel 2
Romeo,
Joliet
UDF 1.02 /
1.50 / 2.00 /
2.01 / 2.50
ISO9660
nivel 1
ISO9660
nivel 2
Romeo,
Joliet
UDF 1.02 /
1.50 / 2.00 /
2.01 / 2.50
FAT16/FAT32/NTFS
Número máximo de
carpetas
700 1 500
Número máximo de
archivos
999 3 500 15 000
Tipos de archi-
vos que pueden
reproducirse
MP3, WMA, AAC, DivX, MPEG-1,
MPEG-2, MPEG-4
MP3, WMA, AAC, WAV, FLAC,
H.264, MPEG-2, MPEG-4, WMV,
FLV, MKV, JPEG
Notas:
Tiempo máximo de reproducción del archivo de audio almacenado en el disco: 60 h
Tiempo de reproducción máximo de archivo de audio almacenado en un dispositivo de
almacenamiento externo (USB, SD): 7,5 h (450 minutos)
Compatibilidad con MP3
Soportes CD-R/-RW
DVD-R/-R
SL/-R DL/
DVD-RW
Dispositivo
de almacena-
miento USB
Tarjeta de
memoria SD
Extensión de
archivo
.mp3 .mp2, .mp3, .m2a, .mka
Tasa de bits De 8 kbps a 320 kbps (CBR), VBR
Frecuencia de
muestreo
De 16 kHz a 48 kHz (32 kHz,
44,1 kHz, 48 kHz para el
enfatizador)
De 8 kHz a 48 kHz
Etiqueta ID3
Versiones de etiqueta ID3 1.0, 1.1,
2.2, 2.3
Versiones de etiqueta ID3 1.0, 1.1,
2.2, 2.3, 2.4
Notas:
Se le da prioridad a la versión 2.x de etiqueta ID3 cuando existen la versión 1.x y la
versión 2.x.
Este producto no es compatible con:
MP3i (MP3 interactivo), mp3 PRO, lista de reproducción m3u
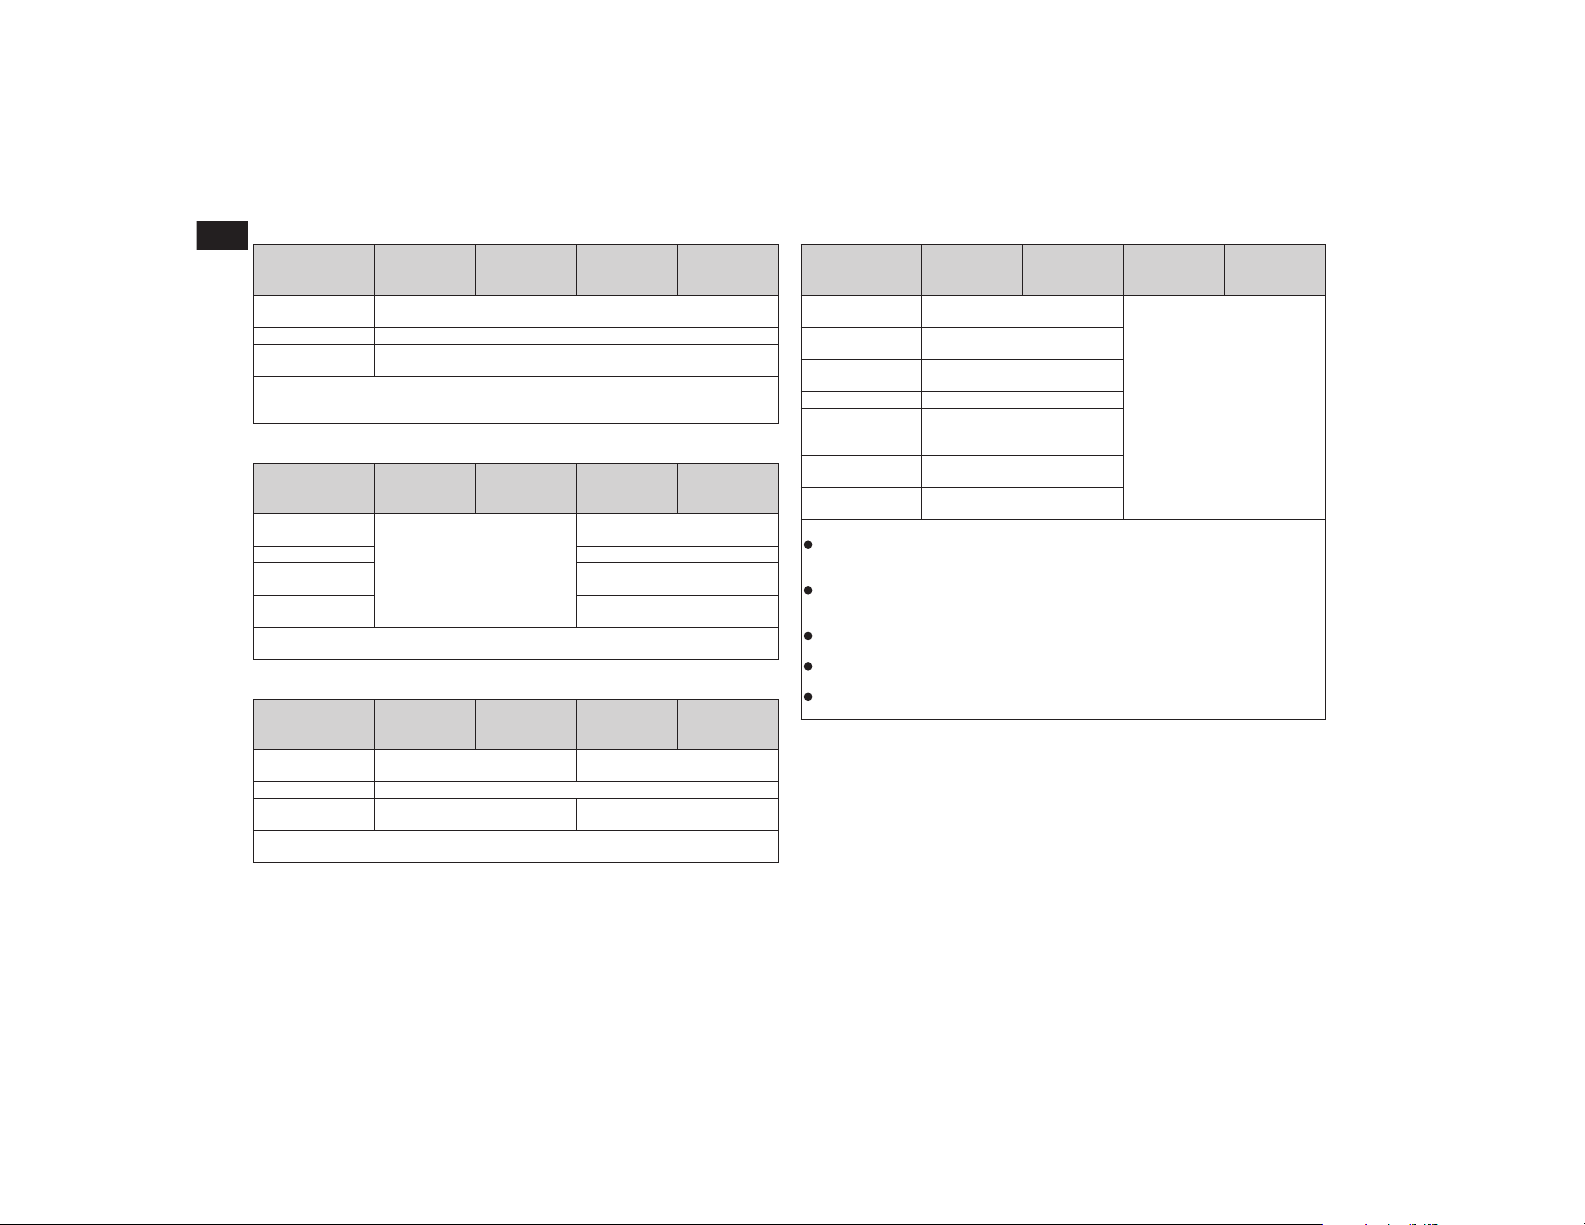
Apéndice
96
Es
Compatibilidad con WMA
Soportes CD-R/-RW
DVD-R/-R
SL/-R DL/
DVD-RW
Dispositivo
de almacena-
miento USB
Tarjeta de
memoria SD
Extensión de
archivo
.wma
Tasa de bits De 5 kbps a 320 kbps (CBR), VBR
Frecuencia de
muestreo
De 8 kHz a 48 kHz
Nota:
Este producto no es compatible con:
Windows Media™ Audio 9 Professional, Lossless, Voice
Compatibilidad con WAV
Soportes CD-R/-RW
DVD-R/-R
SL/-R DL/
DVD-RW
Dispositivo
de almacena-
miento USB
Tarjeta de
memoria SD
Extensión de
archivo
No es posible reproducir archi-
vos WAV que se encuentren en
CD-R/-RW, DVD-R/-RW/-R SL/-R
DL.
.wav
Formato PCM lineal (LPCM)
Frecuencia de
muestreo
De 16 kHz a 48 kHz
Bits de
cuantificación
8 bits y 16 bits
Nota:
Puede redondearse la frecuencia de muestreo que se muestra en la pantalla.
Compatibilidad con AAC
Soportes CD-R/-RW
DVD-R/-R
SL/-R DL/
DVD-RW
Dispositivo
de almacena-
miento USB
Tarjeta de
memoria SD
Extensión de
archivo
.m4a .aac, .adts, .mka, .m4a
Tasa de bits De 8 kbps a 320 kbps (CBR)
Frecuencia de
muestreo
De 8 kHz a 44,1 kHz De 8 kHz a 48 kHz
Nota:
Este producto reproduce archivos AAC codificados con iTunes.
Compatibilidad con DivX
Soportes CD-R/-RW
DVD-R/-R
SL/-R DL/
DVD-RW
Dispositivo
de almacena-
miento USB
Tarjeta de
memoria SD
Extensión de
archivo
.avi/.divx
No se pueden reproducir los
archivos DivX del dispositivo de
almacenamiento externo (USB,
SD).
Perfil (versión DivX)
Home Theater versión 3.11/
versión 4.x/versión 5.x/versión 6.x
Códec de audio
compatible
MP3, Dolby Digital
Tasa de bits (MP3) De 8 kbps a 320 kbps (CBR), VBR
Frecuencia de
muestreo (MP3)
De 16 kHz a 48 kHz (32 kHz,
44,1 kHz, 48 kHz para el
enfatizador)
Tamaño máximo de
imagen
720 píxeles × 576 píxeles
Tamaño máximo de
archivo
4 GB
Notas:
Este producto no es compatible con:
Formato DivX Ultra, archivos DivX sin datos de vídeo, archivos DivX codificados con
códec de audio LPCM (PCM lineal)
En función de la composición de la información de archivo, como por ejemplo el
número de secuencias de audio, puede que haya un ligero retardo al comenzar la
reproducción de los discos.
Si un archivo contiene más de 4 GB, la reproducción se detendrá antes del final del
archivo.
Ciertas operaciones especiales pueden estar prohibidas debido a la composición de los
archivos DivX.
Los archivos con alta tasa de transferencia podrían no reproducirse correctamente. La
tasa de transferencia estándar es 4 Mbps para los CD y 10,08 Mbps para los DVD.
Español
Apéndice
97
Es
Compatibilidad con archivos de vídeo (USB, SD)
Extensión de
archivo
.avi .mkv .mov .f4v .mp4
Códec de vídeo
compatible
MPEG-4,
H.264, H.263,
Xvid
MPEG-4,
H.264, VC-1,
Xvid
MPEG-4,
H.264, H.263
H.264, H.263
MPEG-4,
H.264, H.263
Códec de audio
compatible
MP3, AAC,
LPCM
MP3, AAC,
Vorbis
MP3, AAC MP3, AAC MP3, AAC
Tasa de fotogra-
mas máxima
30 fps
Tamaño máximo
de archivo
4 GB
Tiempo máximo
de reproducción
150 minutos
Extensión de
archivo
.3gp .wmv .asf .flv .vob
Códec de vídeo
compatible
MPEG-4,
H.264, H.263
WMV, VC-1 WMV, VC-1 H.264
H.264,
MPEG-2
Códec de audio
compatible
AAC WMA WMA MP3, AAC
MP3, AAC,
LPCM
Tasa de fotogra-
mas máxima
30 fps
Tamaño máximo
de archivo
4 GB
Tiempo máximo
de reproducción
150 minutos
Notas comunes
Los archivos podrían no reproducirse
correctamente dependiendo del
entorno en que se hayan creado o de los
contenidos.
Este producto podría no reproducir
archivos en función de la aplicación
utilizada para codificar los mismos.
Este producto podría no funcionar
correctamente, en función de la aplica-
ción utilizada para codificar los archivos
WMA.
En función de la versión de Windows
Media™ Player utilizada para codificar
los archivos WMA, el nombre de los
álbumes y otra información textual
podría no mostrarse correctamente.
Es posible que se produzca un ligero
retraso al iniciar la reproducción de
archivos de audio codificados con datos
de imagen.
Este producto no es compatible con la
transferencia de datos en formato de
escritura por paquetes.
Este producto puede reconocer hasta 32
caracteres, empezando por el primer carác-
ter, incluyendo la extensión del archivo y
el nombre de la carpeta. En función del
área de visualización, este producto podría
intentar mostrarlos con un tamaño de
fuente reducido. Sin embargo, el número
máximo de caracteres que puede visualizar
varía en función del ancho de cada carác-
ter y del área de visualización.
La secuencia de selección de carpeta u
otras operaciones podrían modificarse,
en función del software de codificación o
de escritura.
Independientemente de la longitud del
intervalo en blanco entre las canciones
de la grabación original, los discos de
audio comprimido se reproducen con
una breve pausa entre las canciones.
Ejemplo de una jerarquía
Nota
Este producto asigna números de carpeta. El
usuario no puede asignar números de carpeta.
Bluetooth
La marca literal y los logotipos
Bluetooth
®
son marcas registradas
propiedad de Bluetooth SIG, Inc., y
cualquier uso de dichas marcas por
PIONEER CORPORATION se hace bajo
licencia. Otras marcas y nombres comer-
ciales son propiedad de sus respectivos
propietarios.
Radio por satélite SiriusXM
®
Sirius, XM y todos los logotipos y las
marcas relacionadas son marcas
comerciales de Sirius XM Radio, Inc.
Reservados todos los derechos.
Tecnología HD Radio™
Tecnología HD Radio fabricada bajo
licencia de iBiquity Digital Corporation.
Patentes de EE.UU. y de otros países.
HD Radio™ y los logotipos de HD, HD
Radio y del arco son marcas comerciales
propiedad de iBiquity Digital Corp.
SDHC
El logotipo de SDHC es una marca comer-
cial de SD-3C, LLC.
WMA/WMV
Windows Media es una marca registrada
o una marca de fábrica de Microsoft
Corporation en los Estados Unidos y/u otros
países.
p Este producto incluye tecnología propie-
dad de Microsoft Corporation, y no se
puede utilizar ni distribuir sin una licen-
cia de Microsoft Licensing, Inc.
DivX
Los dispositivos DivX Certified
®
se han
sometido a pruebas para comprobar la
reproducción de vídeo DivX
®
(.divx, .avi) de
alta calidad. Si utiliza el logotipo de DivX,
sabe que tiene la libertad de reproducir sus
vídeos DivX favoritos.
DivX
®
, DivX Certified
®
y los logotipos asocia-
dos son marcas comerciales de DivX, LLC y
se utilizan bajo licencia.
Este dispositivo DivX Certified
®
se ha some-
tido a rigurosas pruebas para garantizar que
reproduce vídeo DivX
®
.
Para reproducir vídeos DivX adquiridos, en
primer lugar registre el dispositivo en vod.
divx.com. Obtendrá su código de registro en
la sección DivX VOD del menú de configura-
ción de su dispositivo.
Para los detalles, consulte Visualización
del código de registro DivX VOD en la
página 75.
AAC
AAC es la abreviatura de Advanced Audio
Coding y corresponde a una norma de
tecnología de compresión de audio utilizada
con MPEG-2 y MPEG-4. Se pueden utilizar
varias aplicaciones para codificar los archi-
vos AAC, pero las extensiones y los formatos
de archivo varían en función de la aplicación
que se utilice para la codificación. Esta
unidad reproduce archivos AAC codificados
con iTunes.
Apéndice
98
Es
Google, Google Play,
Android™ y Android Auto
Google, Google Play, Android, Android Auto
y otras marcas son marcas comerciales de
Google Inc.
MirrorLink
MirrorLink Certified™, el logotipo de
Design Only™, MirrorLink™ y el logotipo de
MirrorLink™ son marcas de certificación
y marcas comerciales de Car Connectivity
Consortium LLC. El uso no autorizado de los
mismos está estrictamente prohibido.
MIXTRAX
MIXTRAX es una marca comercial de
PIONEER CORPORATION.
Información detallada relacio-
nada con los dispositivos iPod
conectados
PRECAUCIÓN
Pioneer se exime de toda responsabili-
dad derivada de la pérdida de datos de
un iPod, incluso si dichos datos se pier-
den mientras se utiliza este producto.
Realice una copia de seguridad de los
datos del iPod de forma regular.
No deje el iPod expuesto a la luz solar
directa durante un largo periodo de
tiempo. La exposición prolongada a la luz
solar puede provocar el funcionamiento
incorrecto del iPod como consecuencia
de las altas temperaturas generadas.
No deje el iPod en ningún lugar expuesto
a temperaturas elevadas.
Fije bien el iPod cuando conduzca. No
deje caer el iPod al suelo, ya que puede
quedar atascado debajo del freno o del
acelerador.
Para los detalles, consulte los manuales
del iPod.
■ iPod e iPhone
“Made for iPod” y “Made for iPhone” signi-
fican que un accesorio electrónico ha sido
diseñado para ser conectado específica-
mente a un iPod o a un iPhone, respectiva-
mente, y ha sido homologado por quien lo
desarrolló para cumplir con las normas de
funcionamiento de Apple.
Apple no es responsable del funcionamiento
de este aparato ni de que cumpla con las
normas de seguridad y reguladoras.
Tenga presente que el empleo de este acce-
sorio con un iPod o iPhone puede afectar el
funcionamiento inalámbrico.
iPhone, iPod, iPod classic, iPod nano y iPod
touch son marcas comerciales de Apple
Inc., registradas en los EE. UU. y en otros
países.
■ Lightning
Lightning es una marca comercial de Apple
Inc.
■ App Store
App Store es una marca de servicio de
Apple Inc.
■ iOS
iOS es una marca de fábrica de la que Cisco
tiene el derecho de marca en los EE.UU. y en
otros países.
■ iTunes
iTunes es una marca comercial de Apple Inc.
registrada en EE.UU. y otros países.
■ iTunes Radio
iTunes Radio es una marca de servicio de
Apple Inc.
Uso del contenido con cone-
xión basado en apps
IMPORTANTE
Requisitos para acceder a los servicios de
contenido con conexión basado en apps a
través de este producto:
Deberá descargar en su smartphone la
última versión de las aplicaciones de
contenido con conexión compatibles de
Pioneer para smartphones (póngase en
contacto con su proveedor de servicios).
Una cuenta actual con el proveedor de
servicios de contenido.
Una tarifa de datos para smartphones.
Nota: Si la tarifa de datos de su smar-
tphone no le permite hacer uso de los
datos de forma ilimitada, es posible
que su compañía telefónica le cobre
por acceder a contenido con conexión
basado en aplicaciones a través de redes
3G, EDGE y/o LTE (4G).
Una conexión a Internet a través de
redes 3G, EDGE, LTE (4G).
Cable adaptador Pioneer opcional para
conectar el iPhone a este producto.
Limitaciones:
El acceso a contenido con conexión
basado en apps dependerá de la dispo-
nibilidad de la cobertura de red Wi-Fi
y/o del móvil a fin de conectar su smar-
tphone a Internet.
Es posible que la disponibilidad del
servicio esté geográficamente limitada
a la región. Póngase en contacto con el
proveedor de servicios de contenido con
conexión para obtener más información.
La capacidad de este producto de acce-
der a contenido con conexión está sujeta
a cambios sin previo aviso y podría verse
afectada por lo siguiente: problemas de
compatibilidad con futuras versiones de
firmware del smartphone; problemas de
compatibilidad con futuras versiones de
las aplicaciones de contenido con cone-
xión del smartphone; cambios en las
aplicaciones de contenido con conexión
o en el servicio, o suspensión de dichas
aplicaciones o dicho servicio por parte
de sus proveedores.
Pioneer no se responsabilizará de los
problemas que puedan surgir debido
al contenido incorrecto o imperfecto
basado en apps.
El contenido y funcionalidad de las
aplicaciones compatibles son responsa-
bilidad de los proveedores de la app.
En AppRadio Mode y Android Auto,
las funciones del producto estarán
limitadas durante la conducción, con
las funciones disponibles determinadas
por los proveedores de la aplicación en
cuestión.
La disponibilidad de la función
AppRadio Mode y Android Auto está
determinada por el proveedor de la
aplicación, y no por Pioneer.
AppRadio Mode y Android Auto
permiten acceder a otras aplicaciones
además de las indicadas (sujeto a limi-
taciones durante la conducción), pero
el alcance del uso del contenido estará
determinado por los proveedores de la
aplicación.
■ Pandora
®
Pandora, el logotipo de Pandora y la imagen
comercial Pandora son marcas comerciales
o registradas de Pandora Media, Inc. y se
usan con su permiso.
Pandora está disponible actualmente en los
Estados Unidos, Australia y Nueva Zelanda.
■ Aha Radio
Aha, Aha Radio y los logotipos de Aha y
Aha Radio son marcas comerciales o mar-
cas comerciales registradas de Harman
International Industries, Incorporated.
Español
Apéndice
99
Es
HDMI
Los términos HDMI y HDMI High-Definition
Multimedia Interface y el logotipo HDMI son
marcas de fábrica y marcas registradas de
HDMI Licensing, LLC en los Estados Unidos
y en otros países.
MHL
MHL, el logotipo de MHL y Mobile High-
Definition Link son marcas comerciales
o marcas registradas de MHL, LLC en los
Estados Unidos de América y en otros
países.
Aviso acerca de la visualiza-
ción de vídeo
No olvide que utilizar este sistema con fines
comerciales o en visualizaciones públicas
puede infringir los derechos de autor prote-
gidos por la legislación sobre derechos de
propiedad intelectual.
Aviso acerca de la visualiza-
ción de DVD-Vídeo
Este producto incorpora tecnología de
protección contra la copia que está pro-
tegida por patentes de los EE. UU. y otros
derechos de propiedad intelectual de Rovi
Corporation. La ingeniería inversa y el des-
montaje están prohibidos.
Aviso acerca del uso de archi-
vos MP3
El suministro de este producto implica
exclusivamente la concesión de una licencia
de uso privado no comercial y no concede
derecho alguno a utilizar este producto
para emisiones comerciales (es decir, que
generen ingresos), ya sean en tiempo real
(por medios terrestres, bajo satélite, cable u
otro sistema), por Internet, intranets u otras
redes o en sistemas de distribución electró-
nica de contenido, tales como servicios de
sonido de pago o audio por demanda. Para
estos usos se requiere una licencia indepen-
diente. Para los detalles, visite
http://www.mp3licensing.com.
Información sobre las licen-
cias de código abierto
Para más información sobre las licencias de
código abierto de las funciones con las que
está equipado este producto, visite
http://www.oss-pioneer.com/car/multimedia/
Utilización correcta de la pan-
talla LCD
■ Manipulación de la pantalla LCD
Si se expone la pantalla LCD a la luz
del sol directa de forma prolongada, se
calentará y puede dañarse. Si no está
utilizando este producto, no lo exponga a
la acción directa del sol.
La pantalla LCD debe utilizarse dentro de
los márgenes de temperatura mostrados
en Especificaciones.
No utilice la pantalla LCD a una tem-
peratura superior o inferior al margen
de temperatura operativo, dado que la
pantalla LCD podría no funcionar con
normalidad y sufrir daños.
La pantalla LCD está colocada para faci-
litar su visualización dentro del vehículo.
No la presione con fuerza, ya que podría
dañarla.
No presione la pantalla LCD con mucha
fuerza ya que la puede rayar.
No toque nunca la pantalla LCD con
nada que no sea el dedo para accionar
las funciones del panel táctil, ya que
puede rayarse fácilmente.
■ Pantalla de visualización de
cristal líquido (LCD)
Si la pantalla LCD se encuentra cerca
de un orificio de ventilación del aire
acondicionado, asegúrese de que no le
da el aire. El aire caliente podría dañar la
pantalla LCD, y el aire frío podría generar
humedad en el interior de este producto
y estropearla.
Podrían aparecer en la pantalla LCD pun-
tos negros o blancos pequeños (puntos
brillantes). Esto se debe a las caracterís-
ticas de la pantalla LCD, y no se trata de
un error de funcionamiento.
Será difícil ver la pantalla LCD si está
expuesta a la luz solar directa.
Al utilizar un teléfono móvil, mantenga la
antena del teléfono alejada de la pantalla
LCD para evitar interrupciones de las
imágenes en forma de manchas, líneas
de color, etc.
■ Mantenimiento de la pantalla
LCD
Para limpiar o quitar el polvo de la pan-
talla LCD, primero apague este producto
y después utilice un paño suave y seco
para limpiar la pantalla.
Cuando limpie la pantalla LCD, tenga
cuidado de no rayar la superficie. No
utilice nunca productos de limpieza
abrasivos ni agresivos.
■ Luz de fondo LED (diodo emisor
de luz)
Se utiliza un diodo emisor de luz para ilumi-
nar la pantalla LCD desde dentro.
A bajas temperaturas, si utiliza la luz de
fondo LED, puede aumentar el retardo
de la imagen y disminuir la calidad de la
imagen debido a las características de
la pantalla LCD. La calidad de la ima-
gen mejorará con un incremento de la
temperatura.
La vida útil de la luz de fondo LED es de
más de 10 000 horas. Sin embargo, esta
vida útil puede disminuir si el producto
se utiliza a altas temperaturas.
Si la luz de fondo LED alcanza el final de
su vida útil, la pantalla se volverá cada
vez más tenue, y dejará de poder ver
la imagen. En caso de producirse esta
situación, póngase en contacto con su
distribuidor o con el centro de servicio
Pioneer autorizado más cercano.

Apéndice
100
Es
Especicaciones
● General
Fuente de alimentación nominal
.............................................. 14.4 V cc
(intervalo de tensión permitida:
10.8 V a 15.1 V cc)
Toma de tierra de tipo ...............Negativo
Consumo máximo de corriente ..... 10.0 A
Dimensiones (An × Al × P):
Chasis ......................... 178 mm × 100 mm
× 164 mm
Parte frontal ................. 171 mm × 97 mm
× 20 mm
Peso ...................................................2.2 kg
● Pantalla
Tamaño de la pantalla/relación de aspecto
............ 6.95 pulgadas de ancho/16:9
(área de visualización efectiva:
156.6 mm × 81.6 mm)
Píxeles ..................1 152 000 (2 400 × 480)
Método de visualización
................................Matriz activa TFT
Compatible con el sistema de color
...PAL/NTSC/PAL-M/PAL-N/SECAM
Margen de temperatura tolerable:
Apagado ............................ –4 °F a +176 °F
● Audio
Potencia de salida máxima
.............................................. 50 W × 4
Potencia de salida continua
........... 22 W × 4 (50 Hz a 15 kHz, 5 %
THD, 4 W CARGA, ambos canales
activos)
Impedancia de carga
............4 W (de 4 W a 8 W permitidos)
Nivel de salida del preamplificador
(máxima)
..................................................... 4.0 V
Ecualizador (ecualizador gráfico de 13
bandas):
Frecuencia .....50 Hz/80 Hz/125 Hz/200 Hz/
315 Hz/500 Hz/800 Hz/1.25 kHz/2 kHz/
3.15 kHz/5 kHz/8 kHz/12.5 kHz
Ganancia ........................................±12 dB
HPF:
Frecuencia .... 50 Hz/63 Hz/80 Hz/100 Hz/
125 Hz/160 Hz/200 Hz
Pendiente ..............–6 dB/oct, –12 dB/oct,
–18 dB/oct
Altavoz de subgraves (mono):
Frecuencia .... 50 Hz/63 Hz/80 Hz/100 Hz/
125 Hz/160 Hz/200 Hz
Pendiente ..............–6 dB/oct, –12 dB/oct,
–18 dB/oct
Ganancia ...................de –24 dB a +10 dB
Fase .............................. normal/retroceso
Alineamiento de tiempo
........ 0 a 200 pasos (1 pulgada/paso)
● Lector de DVD
Sistema ....... DVD-Vídeo, VCD, CD, MP3,
WMA, AAC, DivX,
reproductor MPEG
Código de zona .........................................1
Discos compatibles .............. DVD-Vídeo,
Vídeo-CD, CD, CD-R, CD-RW,
DVD-R, DVD-RW, DVD-RDL
Respuesta de frecuencia ..........de 5 Hz a
44 000 Hz (con DVD, a una frecuen-
cia de muestreo de 96 kHz)
Relación de señal a ruido ...96 dB (1 kHz)
(red IHF-A) (nivel RCA)
Nivel de salida:
Vídeo ......................1,0 Vp-p/75 W (±0,2 V)
Número de canales ................. 2 (estéreo)
Formato de descodificación de MP3
.......... MPEG-1, 2 y 2.5 Audio Layer 3
Formato de descodificación WMA
............. Ver. 7, 8, 9 (2 canales audio)
(Windows Media Player)
Formato de descodificación de AAC
...MPEG-4 AAC (solo codificado con
iTunes):
.m4a (ver. 11 y anteriores)
Formato de descodificación de DivX
....Home Theater versión 3.11, versión
4.X, versión 5.X, versión 6.X:
.avi, .divx
Formato de descodificación vídeo MPEG
......................MPEG-1: mpg, mpeg, dat
MPEG-2 PS: mpg, mpeg
MPEG-4 parte 2 (visual),
MS MPEG-4 ver. 3: avi
● USB
Espec. estándar USB ...USB 1.1, USB 2.0
de alta velocidad
Máxima corriente suministrada ...... 1,6 A
Clase USB ......................Dispositivo MSC
(Mass Storage Class),
iPod (AudioClass, HID Class)
Sistema de archivos .........FAT16, FAT32,
NTFS
Formato de descodificación MP3
.................................MPEG-1/Layer 1,
MPEG-1/Layer 2, MPEG-1/Layer 3
MPEG-2/Layer 1, MPEG-2/Layer 2,
MPEG-2/Layer 3
MPEG-2.5/Layer 3
Formato de descodificación WMA
................. WMA10 Std, WMA10 Pro,
WMA9 Lossless
Formato de descodificación AAC
...MPEG-2 AAC-LC, MPEG-4 AAC-LC
Formato de señal WAVE ....... PCM lineal
Formato de descodificación vídeo H.264
.........BaseLine Profile, Main Profile,
High Profile
Formato de descodificación vídeo WMV
................VC-1 SP/MP/AP, WMV 7/8
Formato de decodificación de vídeo
MPEG4 ................................PerfilSencillo,
PerfilSencilloAvanzado (excepto GMC)
Formato de descodificación JPEG ...JPEG
● SD
Formato físico compatible .... Versión 2.0
Sistema de archivos .........FAT16, FAT32,
NTFS
Formato de descodificación MP3
... MPEG-1/Layer 1, MPEG-1/Layer 2,
MPEG-1/Layer 3
MPEG-2/Layer 1, MPEG-2/Layer 2,
MPEG-2/Layer 3
MPEG-2.5/Layer 3
Formato de descodificación WMA
................. WMA10 Std, WMA10 Pro,
WMA9 Lossless
Formato de descodificación AAC
...MPEG-2 AAC-LC, MPEG-4 AAC-LC
Formato de señal WAVE ....... PCM lineal
Formato de descodificación vídeo H.264
.........BaseLine Profile, Main Profile,
High Profile
Formato de descodificación vídeo WMV
................VC-1 SP/MP/AP, WMV 7/8
Formato de decodificación de vídeo
MPEG4 ................................PerfilSencillo,
PerfilSencilloAvanzado (excepto GMC)
Formato de descodificación JPEG ...JPEG
● Bluetooth
Versión ...................................... Bluetooth
3.0+EDR certificado
Potencia de salida ...... +4 dBm máximo.
(clase de potencia 2)
● Sintonizador de FM
Margen de frecuencia .......de 87,9 MHz a
107,9 MHz
Sensibilidad utilizable ....................11 dBf
(0,8 µV/75 W, mono, S/N: 30 dB)
Relación de señal a ruido
.....80 dB (emisión digital) (red IHF-A)
72 dB (emisión analógica) (red IHF-A)
● Sintonizador de AM
Margen de frecuencia .........de 530 kHz a
1 710 kHz
Sensibilidad utilizable ..................... 25 µV
(S/N: 20 dB)
Relación de señal a ruido ...............80 dB
(emisión digital) (red IHF-A)
62 dB (emisión analógica)
(red IHF-A)
● Especicaciones CEA2006
Potencia de salida ............14 W RMS × 4
canales (4 W y ≦ 1 % THD+N)
Relación S/N
....... 91 dBA (referencia: 1 W en 4 W)
Nota
Las especificaciones y el diseño están sujetos a
posibles modificaciones, con vistas a mejoras,
sin previo aviso.


PIONEER CORPORATION
1-1, Shin-ogura, Saiwai-ku, Kawasaki-shi,
Kanagawa 212-0031, JAPAN
PIONEER ELECTRONICS (USA) INC.
P.O. Box 1540, Long Beach, California 90801-1540, U.S.A.
TEL: (800) 421-1404
PIONEER ELECTRONICS OF CANADA, INC.
340 Ferrier Street, Unit 2, Markham, Ontario L3R 2Z5, Canada
TEL: 1-877-283-5901
TEL: 905-479-4411
PIONEER EUROPE NV
Haven 1087, Keetberglaan 1, B-9120 Melsele, Belgium/Belgique
TEL: (0) 3/570.05.11
PIONEER ELECTRONICS ASIACENTRE PTE. LTD.
253 Alexandra Road, #04-01, Singapore 159936
TEL: 65-6472-7555
PIONEER ELECTRONICS AUSTRALIA PTY. LTD.
5 Arco Lane, Heatherton, Victoria, 3202, Australia
TEL: (03) 9586-6300
PIONEER ELECTRONICS DE MEXICO, S.A. de C.V.
Blvd.Manuel Avila Camacho 138 10 piso
Col.Lomas de Chapultepec, Mexico, D.F. 11000
TEL: 55-9178-4270
先鋒股份有限公司
台北市內湖區瑞光路 407號8樓
電話 : 886-(0)2-2657-3588
先鋒電子(香港)有限公司
香港九龍長沙灣道 909號5樓
電話 : 852-2848-6488
© 2015 PIONEER CORPORATION.All rights reserved.
< KYTZ15A >
<CRD4847-A> UC
