User Manual for DVD Receiver
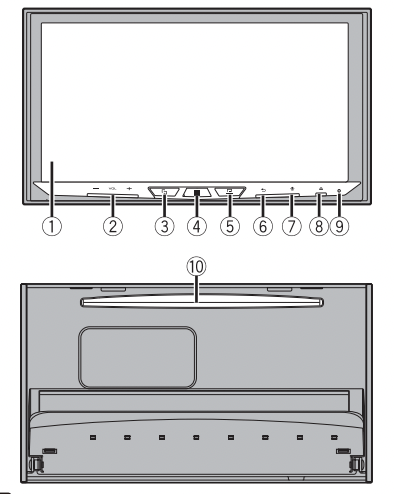
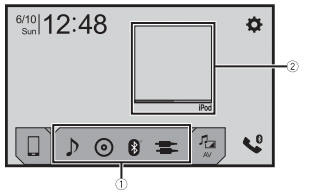
Parts and controls
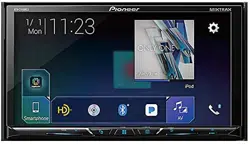
Main unit
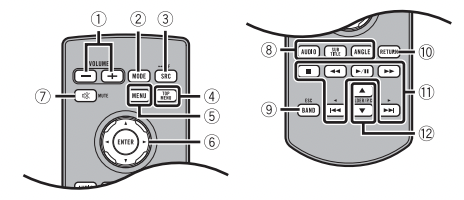
Remote Control
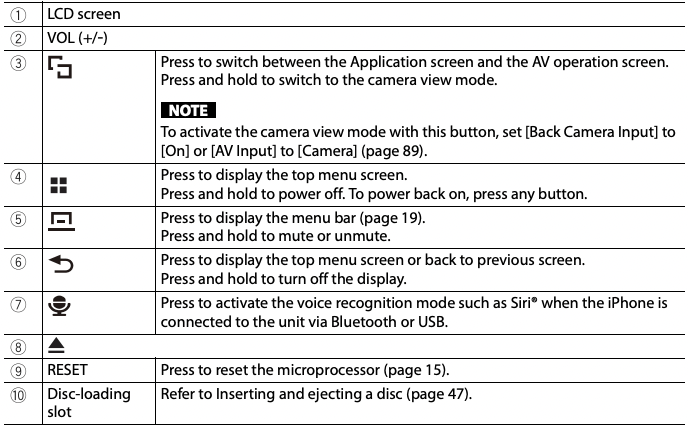
| 1 |
Volume (+/-) |
| 2 |
MODE |
Press to switch between the Application screen and the AV operation screen.
Press and hold to switch to the camera view mode.
NOTE
To activate the camera view mode with this button, set [Back Camera Input] to [On] or [AV Input] to [Camera] (page 89).
|
| 3 |
SRC |
Press to cycle through all the available sources.
Press and hold to turn the source off
|
| 4 |
TOP MENU |
Press to return to the top menu during DVD playback. |
| 5 |
MENU |
Displays the DVD menu during DVD playback |
| 6 |
Thumb pad |
Use to select a menu on the DVD menu. |
| 7 |
MUTE |
| 8 |
AUDIO SUBTITLE ANGLE |
Press to change the audio language, subtitle language or viewing angle during DVD playback. |
| 9 |
BAND/ESC |
Press to select the tuner band when tuner is selected as a source.
Press to switch between media file types when playing the following types of data:
• Disc
• USB
|
| 10 |
RETURN |
Press to return to the specified point and start playback from there. |
| 11 |
 |
Press to pause or resume playback. |
| |
 |
For audio: Press and hold to perform fast reverse or fast forward.
For video: Press to perform fast reverse or fast forward.
|
| |
 |
Press to return to the previous track (chapter) or go to the next track (chapter).
Press to answer or end a call.
|
| |
 |
Press to stop playback.
If you resume playback, playback will start from the point where you stopped.
Press the button again to stop playback completely.
|
| 12. |
FOLDER/P.CH |
Press to select the next or previous title or folder.
Press to recall radio station frequencies assigned to preset channel keys.
Press to answer or end a call.
|
Basic operation
Notes on using the LCD panel
WARNING
- Keep hands and fingers clear of this product when opening, closing, or adjusting the LCD panel. Be especially cautious of children’s hands and fingers.
- Do not use with the LCD panel left open. It may result in injury in the event of an accident.
- Close the LCD panel before putting the vehicle in motion. Driving with the LCD panel open may damage the unit, and any backup camera image shown through the LCD panel will not be visible.
CAUTION
- Do not open or close the LCD panel forcefully. It may cause a malfunction.
- Do not operate this product until the LCD panel has completely opened or closed. If this product is operated while the LCD panel is opening or closing, the LCD panel may stop at that angle for safety.
- Do not place glass or can on the open LCD panel.
Adjusting the LCD panel angle
1 Press .
.
2 Touch or
or to adjust the angle of the LCD panel.
3 Touch . Returns to the previous screen.
Resetting the microprocessor
CAUTION
• Pressing the RESET button resets settings and recorded contents to the factory settings.
– Do not perform this operation when a device is connected to this product.
– Some of the settings and recorded contents will not be reset.
• The microprocessor must be reset under the following conditions:
– Prior to using this product for the first time after installation.
– If this product fails to operate properly.
– If there appears to be problems with the operation of the system.
- 1 Turn the ignition switch OFF.
- 2 Press RESET with a pen tip or other pointed tools. Settings and recorded contents are reset to the factory settings.
Preparing the remote control
Remove the insulation sheet before use.
 |
|
How to replace the battery

Insert the CR2025 (3 V) battery with the plus (+) and minus (-) poles orientated properly.
|
WARNING
- Do not ingest the battery, Chemical Burn Hazard.
( The remote control supplied with) This product contains a coin/button cell battery. If the coin/ button cell battery is swallowed, it can cause severe internal burns in just 2 hours and can lead to death.
Keep new and used batteries away from children.
If the battery compartment does not close securely, stop using the product and keep it away from children.
If you think batteries might have been swallowed or placed inside any part of the body, seek immediate medical attention.
- Batteries (battery pack or batteries installed) must not be exposed to excessive heat such as sunshine, fire or the like.
CAUTION
- Remove the battery if the remote control is not used for a month or longer.
- There is a danger of explosion if the battery is incorrectly replaced. Replace only with the same or equivalent type.
- Do not handle the battery with metallic tools.
- Do not store the battery with metallic objects.
- If the battery leaks, wipe the remote control completely clean and install a new battery.
- When disposing of used batteries, please comply with governmental regulations or environmental public institutions’ rules that apply in your country/area.
- " Perchlorate Material" – special handling may apply.
Using the remote control
Point the remote control in the direction of the front panel to operate.
NOTE
The remote control may not function properly in direct sunlight.
Important
- Do not store the remote control in high temperatures or direct sunlight.
- Do not let the remote control fall onto the floor, where it may become jammed under the brake or gas pedal.
Starting up the unit
1 Start the engine to boot up the system. The [Select Program Language] screen appears.
NOTE From the second time on, the screen shown will differ depending on the previous conditions.
2 Touch the language.
3 Touch  . The [Speaker Mode Settings] screen appears.
4 Touch the speaker modes.
[Standard Mode] 4-speaker system with front and rear speakers, or a 6-speaker system with front and rear speakers and subwoofers.
[Network Mode] 3-way system with a high range speaker, middle range speaker and subwoofer (low range speaker) for reproduction of high, middle and low frequencies (bands).
WARNING Do not use the unit in standard mode when a speaker system for 3-way network mode is connected to the unit. This may cause damage to the speakers.
5 Touch [OK]. Initial Legal Disclaimer screen appears.
6 Touch [OK]. The top menu screen appears.
NOTE Once the speaker mode is set, the setting cannot be changed unless this product is restored to the default settings. Restore the default settings to change the speaker mode setting (page 108).
Switching the speaker mode
To change the speaker mode, you need to restore this product to the default settings.
1 Restore the default setting (page 108).
Using the touch panel
You can operate this product by touching the keys on the screen directly with your fingers.
NOTE To protect the LCD screen from damage, be sure to touch the screen only with your finger gently
Common touch panel keys
 : Returns to the previous screen.
: Close the screen.
Operating list screens
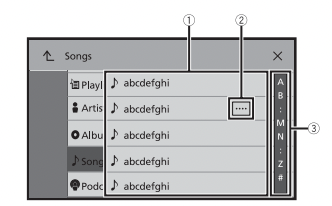
| 1. |
Touching an item on the list allows you to narrow down the options and proceed to the next operation. |
| 2 |
Appears when all characters are not displayed on the display area. If you touch the key, the rests are scrolled for display.
NOTE This function is available only when you stop your vehicle in a safe place and apply the parking brake.
|
| 3 |
Appears when items cannot be displayed on a single page. Drag the side bar, the initial search bar or the list to view any hidden items. |
Operating the time bar

1
|
|
You can change the playback point by dragging the key.
The playback time corresponding to the position of the key is displayed while dragging the key
|
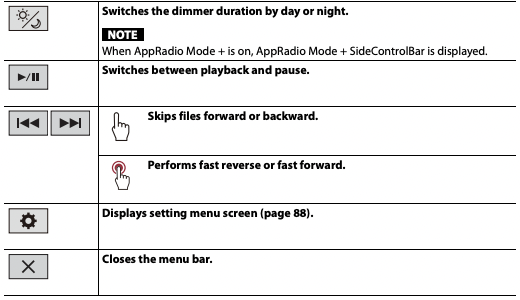
Operating the menu bar
1 Press .
.
The menu bar pops up on the screen.
NOTE The menu bar availability may vary depending on the activating source.

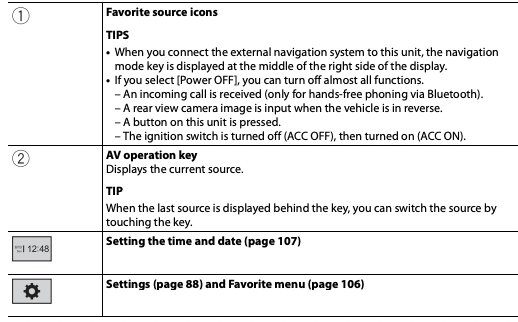
Top menu screen
Bluetooth
Bluetooth connection
1 Turn on the Bluetooth function on the device.
2 Press .
.
3 Touch  then
then . The Bluetooth screen appears.
4 Touch [Connection].
5 Touch . The unit starts to search for available devices, then displays them in the device list.
6 Touch the Bluetooth device name. After the device is successfully registered, a Bluetooth connection is established by the system. Once the connection is established, the device name is displayed on the list.
NOTES
- If five devices are already paired, [Memory Full] is displayed. Delete a paired device first (page 23).
- If your device supports SSP (Secure Simple Pairing), a six-digit number appears on the display of this product. Touch [Yes] to pair the device.
- If you try to connect an unconnected cellular phone while two cellular phones are already connected, the first one of the two connected cellular phones will be disconnected and the unconnected cellular phone will be connected instead.
TIPS
- The Bluetooth connection can also be made by detecting this product from the Bluetooth device.
- Before registration, make sure that [Visibility] in the [Bluetooth] menu is set to [On] (page 23). For details on Bluetooth device operations, refer to the operating instructions supplied with the Bluetooth device.
- Two cellular phones can be connected to this product at the same time (page 23)
Bluetooth settings
1 Press .
2 Touch then .
CAUTION Never turn this product off and disconnect the device while the Bluetooth setting operation is being processed.
| Menu Item |
Description |
| [Connection] |
Connect, disconnect, or delete registered Bluetooth device manually.
Touch to delete registered device. to delete registered device.
To connect a registered Bluetooth device manually, touch the name of the device.
To disconnect the device, touch the name of the connected device in the list.
NOTE Connect the Bluetooth device manually in the following cases:
• Two or more Bluetooth devices are registered, and you want to manually select the device to be used.
• You want to reconnect a disconnected Bluetooth device.
• Connection cannot be established automatically for some reason.
|
|
[Auto Connect]
[On] [Off]
|
Select [On] to connect the last connected Bluetooth device automatically.
NOTE If two Bluetooth devices were connected the last time, the two devices are connected to this product automatically in the order that they are registered in the device list.
|
|
[Visibility]
[On] [Off]
|
Select [On] to make this product visible to the other device. |
| [PIN Code Input] |
Change the PIN code for Bluetooth connection. The default PIN code is “0000”.
1 Touch [0] to [9] to input the pin code (up to 8 digits).
2 Touch  . .
|
| [Device Information] |
Displaying the device name and address of this product. |
| [Bluetooth Memory Clear] |
Touch [Clear] then [OK] to clear the Bluetooth memory. |
Switching the connected Bluetooth device
After registering and connecting the Bluetooth devices to this product, you can switch among the devices using the switch devices key in the phone function and some audio sources.
- You can register up to five Bluetooth devices on this product (page 22).
- You can connect one of the registered devices to this product. In cases where the registered device is equipped with a phone function, a total of two devices can be connected at the same time when using the phone function. If two of the five registered devices are already connected, you can connect the remaining third device to use the audio function only from the switch devices key on the audio source screen.
- The icon for the cellular phone currently being used is displayed on the Phone menu screen. If you connect two cellular phones to this product at the same time, you can switch between the cellular phones using the switch devices key. The contents of the phone menu are memorized for each connected cellular phone (page 24).
- The switch devices key will appear for some audio sources. The audio source may automatically switch to another source depending on the selected device.
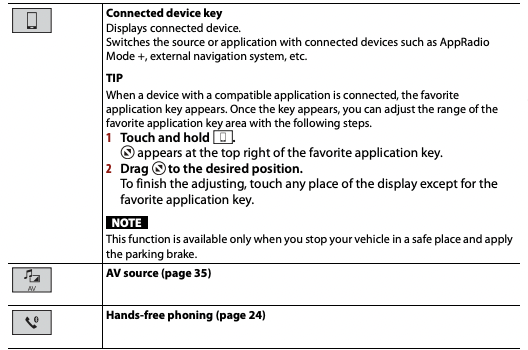
Hands-free phoning
To use this function you need to connect your cellular phone to this product via Bluetooth in advance (page 22).
CAUTION
For your safety, avoid talking on the phone as much as possible while driving.
Making a phone call
1 Press .
2 Touch  . The phone menu screen appears.
3 Touch one of the call icons on the phone menu screen

▶ To end the call
- Touch
 .
.
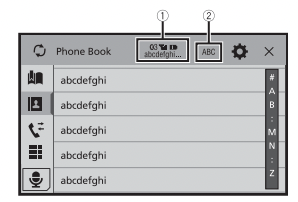
Using the preset dial lists
▶Registering a phone number
You can easily store up to six phone numbers per device as presets.
1 Press .
2 Touch .
3 Touch  or
or  . On the [Phone Book] screen, touch the desired name to display the contact’s phone number.
4 Touch  .
.
▶Dialing from the preset dial list
1 Touch  .
.
2 Touch the desired entry on the list to make a call. The dial screen appears and dialing starts.
▶Deleting a phone number
1 Press .
2 Touch .
3 Touch .
4 Touch  .
.
5 Touch [Yes].
Receiving a phone call
1 Touch  to answer the call.
Touch to end the call.
TIPS
- Touch while getting a call waiting, switch to the talking person.
- Touch while getting a call waiting to reject the call.
NOTE
When two phones are connected at the same time, if an incoming call is received on the second phone while you are talking on the first phone, the dial confirmation screen for the second phone will be displayed.
Voice recognition function (for iPhone)
By connecting your iPhone to this product, you can use the voice recognition function (Siri Eyes Free Mode) on this product.
NOTES
• When an iPhone is used, Siri Eyes Free Mode is available with this product.
• In this chapter, iPhone and iPod touch will be referred to as “iPhone”.
1 Press .
2 Touch .
3 Touch .
The voice recognition function launches and the voice control screen appears.
TIPS
• You can also launch the voice recognition function by pressing .
.
• If two cellular phones are automatically connected to this product with the Bluetooth device auto connect function, the voice recognition function (Siri Eyes Free Mode) will be set on the second phone.
• If you want to use the voice recognition function (Siri Eyes Free Mode) on another connected iPhone, touch  with numbered to the other iPhone. The iPhone that you switch to will be set as the current device.
Minimizing the dial confirmation screen
- Touch
 .
.
TIP
To display the dial confirmation screen, touch  again.
NOTES
- The dial confirmation screen cannot be minimized on the AV operation screen.
- AV sources cannot be selected even if the dial confirmation screen is minimized while talking on the phone or receiving an incoming call.
Phone settings
1 Press .
2 Touch then .
| Menu Item |
Description |
| [Auto Answer] [On] [Off] |
Select [On] to answer an incoming call automatically |
| [Ring Tone] [On] [Off] |
Select [On] if the ring tone does not come out from the car speakers. |
| [Invert Name] |
Select [Yes] to change the order of the first and last names in the phone book. |
Setting the private mode
During a conversation, you can switch to private mode (talk directly on your cellular phone).
1 Touch  or
or  to turn private mode on or off.
NOTES
- If two cellular phones are connected to this product and the first phone is set to private mode, you can receive incoming calls on the second phone while maintaining the call in progress on the first phone.
- When two cellular phones are connected to this product and private mode of the first phone is turned off, if an incoming call on the second phone is answered while a call is in progress on the first phone or while dialing or receiving a call on the first phone, the call, dialing, or receiving on the first phone is ended.
Adjusting the other party’s listening volume
This product can be adjusted to the other party’s listening volume.
1 Touch to switch between the three volume levels.
Notes for hands-free phoning
▶General notes
• Connection to all cellular phones featuring Bluetooth wireless technology is not guaranteed.
• The line-of-sight distance between this product and your cellular phone must be 10 meters or less when sending and receiving voice and data via Bluetooth technology.
• With some cellular phones, the ring sound may not be output from the speakers.
• If private mode is selected on the cellular phone, hands-free phoning may be disabled.
▶Registration and connection
• Cellular phone operations vary depending on the type of cellular phone. Refer to the instruction manual that came with your cellular phone for detailed instructions.
• When phone book transfer does not work, disconnect your phone and then perform pairing again from your phone to this product.
▶Making and receiving calls
• You may hear a noise in the following situations:
– When you answer the phone using the button on the phone.
– When the person on the other end of the line hangs up the phone.
• If the person on the other end of the line cannot hear the conversation due to an echo, decrease the volume level for hands-free phoning.
• With some cellular phones, even after you press the accept button on the cellular phone when a call comes in, hands-free phoning may not be performed.
• The registered name will appear if the phone number is already registered in the phone book. When the same phone number is registered under different names, only the phone number will be displayed.
▶The received call and dialed number histories
• You cannot make a call to the entry of an unknown user (no phone number) in the received call history.
• If calls are made by operating your cellular phone, no history data will be recorded in this product.
▶Phone book transfers
• If there are more than 1 000 phone book entries on your cellular phone, not all entries may download completely.
• Depending on the phone, this product may not display the phone book correctly.
• If the phone book in the phone contains image data, the phone book may not be transferred correctly.
• Depending on the cellular phone, phone book transfer may not be available.
Troubleshooting
If you have problems operating this product, refer to this section. The most common problems are listed below, along with likely causes and solutions. If a solution to your problem cannot be found here, contact your dealer or the nearest authorized Pioneer service facility.
Common problems
A black screen is displayed, and operation is not possible using the touch panel keys.
 [Power OFF] mode is on.
– Press any button on this product to release the mode.
Problems with the AV screen
CD or DVD playback is not possible.
The disc is inserted upside down.
– Insert the disc with the label upward.
The disc is dirty.
– Clean the disc.
The disc is cracked or otherwise damaged.
– Insert a normal, round disc.
The files on the disc are in an irregular file format.
– Check the file format.
The disc format cannot be played back.
– Replace the disc.
The loaded disc is a type this product cannot play.
– Check what type of disc it is.
The screen is covered by a caution message and the video cannot be shown.
The parking brake lead is not connected or the parking brake is not applied.
– Connect the parking brake lead correctly, and apply the parking brake.
The parking brake interlock is activated.
– Park your vehicle in a safe place and apply the parking brake.
No video output from the connected equipment.
The [AV Input] or [AUX Input] setting is incorrect.
– Correct the settings.
The audio or video skips.
This product is not firmly secured.
– Secure this product firmly.
No sounds are produced. The volume level will not rise.
Cables are not connected correctly.
– Connect the cables correctly.
The system is performing still, slow motion, or frame-by-frame playback with DVD-Video.
– There is no sound during still, slow motion, or frame-by-frame playback with DVD-Video.
The system is paused or performing fast reverse or forward during the disc playback.
– For the media other than music CD (CD-DA), there is no sound on fast reverse or forward.
The icon is displayed, and operation is impossible.
The operation is not compatible with the video configuration.
– The operation is not possible. (For example, the DVD playing does not feature that angle, audio system, subtitle language, etc.)
Random playback in Music Browse mode is released in the USB storage device.
Random playback in Music Browse mode is canceled after the ignition switch is turned off (ACC OFF).
– Switch to Music Browse mode again and turn on random playback.
The picture stops (pauses) and this product cannot be operated.
The reading of data is impossible during disc playback.
– Stop playback once, then restart. The picture is stretched, with an incorrect aspect ratio.
The aspect setting is incorrect for the display.
– Select the appropriate setting for that image
A parental lock message is displayed and DVD playback is not possible.
The parental lock is on.
– Turn the parental lock off or change the level.
The parental lock for DVD playback cannot be canceled.
The code number is incorrect.
– Input the correct code number.
Playback is not with the audio language and subtitle language settings selected in [DVD Setup].
The DVD playing does not feature dialog or subtitles in the language selected in [DVD Setup].
– Switching to a selected language is not possible if the language selected in [DVD Setup] is not recorded on the disc.
The picture is extremely unclear/ distorted and dark during playback.
The disc features a signal to prohibit copying. (Some discs may have this.)
- Since this product is compatible with the copy guard analog copy protect system, the picture may suffer from horizontal stripes or other imperfections when a disc with that kind of protection signal is viewed on some displays. This is not a malfunction.
iPod cannot be operated.
The iPod is frozen.
- Reconnect the iPod with the USB interface cable for iPod/iPhone.
- Update the iPod software version.
An error has occurred.
- Reconnect the iPod with the USB interface cable for iPod/iPhone.
- Park your vehicle in a safe place, and then turn off the ignition switch (ACC OFF). Subsequently, turn the ignition switch to on (ACC ON) again.
- Update the iPod software version.
Cables are not connected correctly.
- Connect the cables correctly.
Sound from the iPod cannot be heard.
The audio output direction may switch automatically when the Bluetooth and USB connections are used at the same time.
- Use the iPod to change the audio output direction.
No back camera image when the vehicle is in reverse.
The back camera input setting on the receiver is set to Off.
- Change the back camera setting to On in the settings menu. (Refer to the System Settings section of this manual to adjust.)
The camera input may be loose or not connected.
- Check the connection and make sure the male end of the camera is connected to the brown input on the back of the receiver. (Refer to the installation manual.)
The reverse lead on the receiver may not be connected to the proper wire at the reverse lamp.
- Check the connection and make sure that the violet/white lead of the receiver is connected to the lead whose voltage changes when the shift lever is put in reverese. (Refer to the installation manual.)
Black screen displayed when the vehicle is in reverse, with no camera installed.
Back camera input is set to On.
- Turn the setting to Off in the settings menu. (Refer to the System Settings section of this manual to adjust.)
Back image displayed when vehicle is not in reverse.
The camera polarity is not set properly in the Camera settings menu.
- Review System Settings section of this manual for steps to switch the camera polarity. Park in a safe place, then while keeping your foot firmly on the brake, put the vehicle in reverse, access the System Settings menu, and change the camera polarity setting. Put vehicle back in park. (Refer to the System Settings section of this manual to adjust.)
Problems with the phone screen
Dialing is impossible because the touch panel keys for dialing are inactive.
Your phone is out of range for service.
- Retry after re-entering the range for service.
The connection between the cellular phone and this product cannot be established.
- Perform the connection process.
Of the two cellular phones connected to this product at the same time, if the first phone is dialing, ringing or a call is in progress, dialing cannot be performed on the second phone.
- When the operation on the first of the two cellular phones is completed, use the switch devices key to switch to the second phone and then dial.
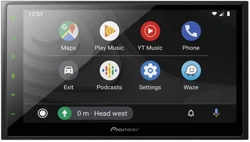
Problems with Application screen
A black screen is displayed.
While operating an application, the application was ended on the smartphone side.
- Press to display the top menu screen.
The smartphone OS may be awaiting screen operation.
- Stop the vehicle in a safe place and check the screen on the smartphone.
The screen is displayed, but operation does not work at all.
An error has occurred.
- Park your vehicle in a safe place, and then turn off the ignition switch (ACC OFF). Subsequently, turn the ignition switch to on (ACC ON) again.
- When an Android device is connected, disconnect the Bluetooth connection from this product and then reconnect it.
The smartphone was not charged.
Charging stopped because the temperature of the smartphone rose due to prolonged use of the smartphone during charging.
- Disconnect the smartphone from the cable, and wait until the smartphone cools down.
More battery power was consumed than was gained from charging.
- This problem may be resolved by stopping any unnecessary services on the smartphone.
Sound from AppRadio Mode + of the Android device cannot be heard from the speakers of this unit.
Depending on the Android device, the sound from AppRadio Mode + may not be output from the speakers of this unit.
- Switch to [Smartphone] in the AppRadio Mode Sound] settings page 89).
Error messages
When problems occur with this product, an error message appears on the display. Refer to the table below to identify the problem, then take the suggested corrective action. If the error persists, record the error message and contact your dealer or your nearest Pioneer service center.
Common
AMP Error
This product fails to operate or the speaker connection is incorrect; the protective circuit is activated.
- Check the speaker connection. If the message fails to disappear even after the engine is switched off/on, contact your dealer or an authorized Pioneer Service Station for assistance.
Pandora
Error-19
( Communication error occurred.)
Communication failed.
- Disconnect the cable from the iPod. Once the iPod’s main menu is displayed, reconnect the iPod and reset it.
Our content licenses limit the number of tracks you may skip.
Skip limit reached.
- Do not exceed the skip limit.
- Pandora limits the total number of skips per hour.
Log in error
You are not logged in to the Pandora application.
- Please log in to the Pandora application.
Check USB
The USB connector or USB cable has short-circuited.
- Check that the USB connector or USB cable is not caught in something or damaged.
The connected USB storage device consumes more than maximum allowable current.
- Disconnect the USB storage device and do not use it. Turn the ignition switch to OFF, then to ACC or ON and then connect a compliant USB storage device.
Poor network connection. Listening will resume when it’s restored.
The Pandora application is accessed/ relocated from outside the licensing region.
- Access Pandora from within the licensing region.
Spotify
Skip limit reached.
Skip limit reached.
- Do not exceed the skip limit.
- Spotify limits the total number of skips per hour.
Check USB
The USB connector or USB cable has short-circuited.
- Check that the USB connector or USB cable is not caught in something or damaged.
The connected USB storage device consumes more than maximum allowable current.
- Disconnect the USB storage device and do not use it. Turn the ignition switch to OFF, then to ACC or ON and then connect a compliant USB storage device.
No Spotify
The Spotify application is not installed in the connected device.
- Install the Spotify application in your mobile device.
Update App
The Spotify application is out of date.
- Update to the latest Spotify application.
Login Please
You are not logged in to the Spotify application.
- Please log in to the Spotify application.
No Signal
The connected device is out of area.
- Connect the device to a network.
SiriusXM® Satellite Radio
Check Antenna
The antenna connection is incorrect.
- Check the antenna connection. If the message fails to disappear even after the engine is switched off/on, contact your dealer or the nearest authorized Pioneer service center for assistance.
Check Tuner
The SiriusXM Connect Vehicle Tuner connection is incorrect.
- Check the tuner connection and battery voltage. If the message fails to disappear even after the engine is switched off/on, contact your dealer or the nearest authorized Pioneer service center for assistance.
No Signal
The SiriusXM Connect Vehicle Tuner is having difficulty receiving the SiriusXM satellite signal.
- Verify that your vehicle is outdoors with a clear view of the southern sky.
- Verify that the SiriusXM magnetic mount antenna is mounted on a metal surface on the outside of the vehicle.
- Move the SiriusXM antenna away from any obstructions.
No Content
TuneScan™ is not available.
- Perform the operation with another preset channel.
Channel Not Available
The channel that you have requested is not a valid SiriusXM channel.
- Visit siriusxm for more information about the SiriusXM channel lineup.
Subscription Updated Press Enter to Continue
This product has detected a change in your SiriusXM subscription status.
- Touch [Enter] to clear the message. In the U.S.A., visit siriusxm or call 1-866-635-2349 if you have questions about your subscription. In Canada, visit siriusxm or call 1-877-438-9677 if you have questions about your subscription.
Channel Not Subscribed. Call SiriusXM to Subscribe.
The channel that you have requested is not included in your SiriusXM subscription package.
- Check the content of your SiriusXM subscription package. In the U.S.A., visit siriusxm or call 1-866-635-2349 if you have questions about your subscription package or would like to subscribe to this channel. In Canada, visit siriusxm or call 1-877-438- 9677.
Channel Locked Please Enter the Lock Code
Locked by the radio Parental Control feature.
- Release the channel lock.
Memory Full
The memory has become full while playback was paused.
Memory Nearly Full
The memory has become nearly full while playback was paused.
There are no qualified TuneMix music
There are no qualified TuneMix channels in this band.
- Requires two or more qualified music channels to be stored as presets in the current band.
Disc
Error-02-XX/FF-FF
The disc is dirty.
The disc is scratched.
The disc is loaded upside down.
- Check that the disc is loaded correctly.
There is an electrical or mechanical error.
Different Region Disc
The disc does not have the same region number as this product.
- Replace the DVD with one bearing the correct region number.
Unplayable Disc
This type of disc cannot be played on this product.
- Replace the disc with one that can be played on this product.
Unplayable File
This type of file cannot be played on this product.
- Select a file that can be played.
Skipped
The inserted disc contains DRM protected files.
- The protected files are skipped.
Protect
All the files on the inserted disc are embedded with DRM.
TEMP
The temperature of this product is outside the normal operating range.
- Wait until this product returns to a temperature within the normal operating limits.
Your device is not authorized to play this DivX protected video.
This product’s DivX registration code has not been authorized by the DivX VOD contents provider.
Video frame rate not supported
DivX file’s frame rate is more than 30 fps.
- Select a file that can be played.
Audio Format not supported
This type of file is not supported on this product.
- Select a file that can be played.
USB storage device
Error-02-9X/-DX
Communication failed.
- Turn the ignition switch OFF and back ON.
- Disconnect the USB storage device.
- Change to a different source. Then, return to the USB storage device.
Unplayable File
There is no playable file in the USB storage device.
- Check that the files in the USB storage device are compatible with this product.
Security for the connected USB storage device is enabled.
- Follow the USB storage device instructions to disable security.
Skipped
The connected USB storage device contains DRM protected files.
- The protected files are skipped.
Protect
All the files on the connected USB storage device are embedded with DRM.
- Replace the USB storage device.
Incompatible USB
The connected USB storage device is not supported by this product.
- Disconnect your device and replace it with a compatible USB storage device.
Check USB
The USB connector or USB cable has short-circuited.
- Check that the USB connector or USB cable is not caught in something or damaged.
The connected USB storage device consumes more than maximum allowable current.
- Disconnect the USB storage device and do not use it. Turn the ignition switch to OFF, then to ACC or ON and then connect a compliant USB storage device.
HUB Error
The connected USB hub is not supported by this product.
- Directly connect the USB storage device to this product.
No Response
This product cannot recognize the connected USB storage device.
- Disconnect the device and replace it with another USB storage device.
USB was disconnected for device protection. Do not re-insert this USB memory into the unit. Please restart the unit.
The USB connector or USB cable has short-circuited.
- Check that the USB connector or USB cable is not caught in something or damaged.
The connected USB storage device consumes more than maximum allowable current.
- Disconnect the USB storage device and do not use it. Turn the ignition switch to OFF, then to ACC or ON and then connect a compliant USB storage device.
The USB interface cable for iPod/iPhone has short-circuited.
- Confirm that the USB interface cable for iPod/iPhone or USB cable is not caught in something or damaged.
Your device is not authorized to play this DivX protected video.
This product’s DivX registration code has not been authorized by the DivX VOD contents provider.
Audio Format not supported
This type of file is not supported on this product.
- Select a file that can be played.
iPod
Error-02-6X/-9X/-DX iPod failure.
Disconnect the cable from the iPod.
- Once the iPod’s main menu is displayed, reconnect the iPod and reset it.
Error-02-67
The iPod firmware version is old.
Bluetooth
Error-10
The power failed for the Bluetooth module of this product.
- Turn the ignition switch to OFF and then to ON.
If the error message is still displayed after performing the above action, please contact your dealer or an authorized Pioneer Service Station.
Handling and care of discs
Some basic precautions are necessary when handling your discs.
Built-in drive and care
- Use only conventional, fully circular discs.
- Do not use shaped discs.
- Do not use cracked, chipped, warped, or otherwise damaged discs as they may damage the built-in drive.
- Use 12-cm discs. Do not use 8-cm discs or an adapter for 8-cm discs.
- When using discs that can be printed on label surfaces, check the instructions and the warnings of the discs. Depending on the discs, inserting and ejecting may not be possible. Using such discs may result in damage to this equipment.
- Do not attach labels, write on or apply chemicals to the surface of the discs.
- Do not attach commercially available labels or other materials to the discs.
- To clean a disc, wipe it with a soft cloth, moving outward from the center.
- Condensation may temporarily impair the built-in drive’s performance.
- Playback of discs may not be possible because of disc characteristics, disc format, recorded application, playback environment, storage conditions and so on.
- Road shocks may interrupt disc playback.
- Read the precautions for discs before using them.
Ambient conditions for playing a disc
- At extremely high temperatures, a temperature cutout protects this product by switching it off automatically.
- Despite our careful design of the product, small scratches that do not affect actual operation may appear on the disc surface as a result of mechanical wear, ambient conditions for use or handling of the disc. This is not a sign of the malfunction of this product. Consider it to be normal wear and tear.