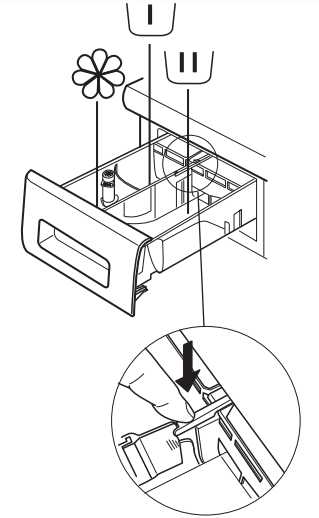
Pour softener or starch solution into the compartment without exceeding the “max” level .
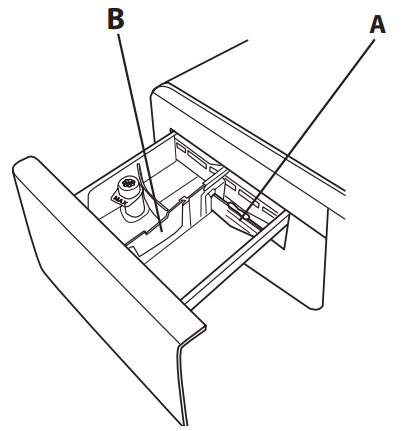
Release button
(press to remove tray for cleaning) .
Preferably use the partition A when washing with a liquid detergent for washing, to ensure that the correct quantity of detergent is used (the partition is included in the bag containing the instructions) .
Move the partition into slot B when using detergent powder .
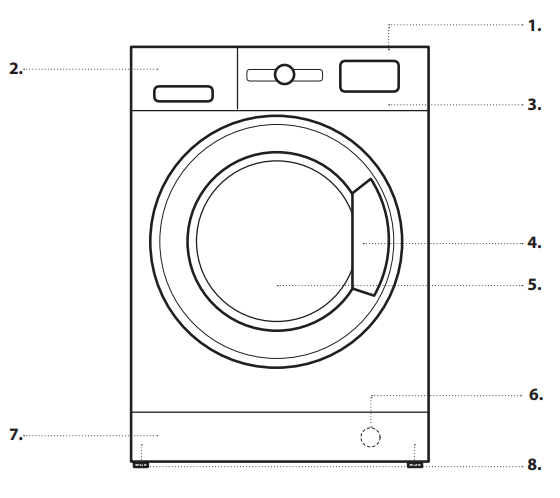
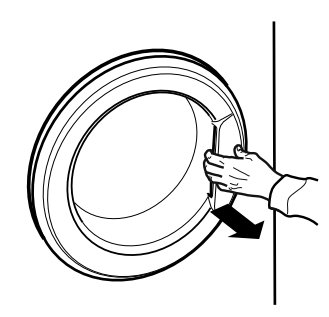
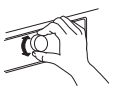
DOOR
To open the door, pull the handle.
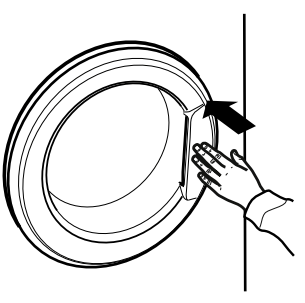
To close the door, push on the handle until it clicks.
HOW TO USE THE APPLIANCE
FIRST TIME USE
Remove any manufacturing debris:
•Select the “Cotton” programme with a temperature setting of 90 °C .
•Pour a small quantity of detergent powder into the main wash compartment of the
detergent dispenser (maximum 1/3 of the quantity the detergent manufacturer recommends for lightly soiled laundry) .
•Start the programme without loading the washer dryer machine (with empty drum) .
DAILY USE
PREPARING THE LAUNDRY
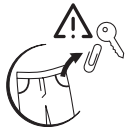
1 . EMPTY POCKETS
•Coins, paper clips, etc . could damage the load and the washer dryer's components .
•Tissues will break down during the wash cycle, and the fragments will have to be subsequently removed by hand .
2 . CLOSE ALL ZIPPERS, BUTTONS, AND HOOKS . TIE ALL RIBBONS OR BELTS .
•Insert the smaller garments (e .g . nylon hosiery, belts, etc .) and garments with hooks (e .g . braziers) into a fabric bag or a pillowcase with a zipper . Remove any rings from curtains, or else place the curtains inside a fabric bag together with the rings .
3 . FABRIC TYPE / SYMBOL ON THE WASH LABEL
Cotton, mixed fabrics, synthetics, wool, garments to be washed by hand .
•Colour
separate the white garments from the coloured garments . Wash any new coloured garments separately .
•Size
Wash items of different sizes in the same load to improve washing efficacy and weight distribution inside the drum .
•Delicates
Wash delicate garments separately; these garments require special handling .
HOW TO USE THE WASHER DRYER
1 . LOADING LAUNDRY .
•Prepare the laundry, following the recommendations given in the section “HINTS AND TIPS” - Open the Door and load the laundry without exceeding the maximum load capacities indicated in the section titled "Programmes and Options" .
•Close the door, pressing until the latch audibly locks, and check that there is no laundry trapped between the door glass and the rubber seal .
2 . OPEN THE WATER TAP .
Check that the washing machine is properly connected to the water mains . Open the water tap .
3 . SWITCHING ON THE WASHER DRYER .
Press button ; the indicator light will flash slowly .
4 . SELECT THE PROGRAMME AND CUSTOMISE THE CYCLE .
This appliance allows for the following functions to be performed:
•Wash only
•Wash and dry
•Dry only
Wash only
Select the desired programme using the PROGRAMME selector . The duration of the wash cycle is shown on the display . The washer dryer machine automatically displays the maximum temperature and spin speed settings possible for the selected programme . Adjust the temperature and/or spin speed settings if needed with the relative buttons .
•Press the “Temp°” button to progressively lower the temperature setting until cold wash has been set (“- -“ will be shown on the display) .
•Press the “Spin speed” button to progressively decrease the spin speed until the spin cycle is turned off (“0” will be shown on the display) . Pressing the button again sets the highest possible setting .
Select the required options (if necessary) .
•Press the button to select the option; the respective button lamp illuminates .
•Press the button again to cancel the option; the
If the selected option is not compatible with the set programme, an error alarm will sound and the indicator light will flash three times .The option is not selected .
Wash and dry
If you want to wash and dry a load without any interruption between the wash and dry cycles, it is necessary to make sure that the load to be washed is within the maximum load drying limit for the selected programme (see “Max. drying load” in the chapter titled “Programmes and Options”).
1 . Follow the instructions given in the paragraph “Wash Only” to select and, if necessary, customise the required programme .
2 . Select the desired drying mode by pressing the “Drying settings” button . Two drying modes are available: automatic or timer .
- Automatic drying with selectable levels:
In automatic drying mode, the washer dryer machine dries the laundry until the set level of dryness is reached . As soon as the "Drying settings" button has been pressed, the washer dryer automatically selects the maximum drying level compatible with the selected programme .Press the button again to reduce the drying level .
The following levels are available:
Wardrobe : laundry is completely dry and ready to be put away in the wardrobe without ironing .
Hanger : laundry is left slightly damp to minimise creasing . Garments must be hung to air dry completely .
Iron : garments are left reasonably damp to make ironing easier .- Timer drying mode:
If you want to set a timed drying cycle, press the “Drying settings” button repeatedly . After all the automatic drying levels have been displayed, continue pressing the “Drying settings” button until the desired time is displayed . Values from 210 to 30 minutes are settable .
If instead you want to wash and dry a load of laundry that exceeds the maximum drying load (see “Max. drying load” in the chapter titled “Programmes and Options”), a number of garments will have to be removed at the end of the wash cycle before proceeding with the drying cycle . Proceed as follows:
1 . Follow the instructions given in the paragraph “Wash Only” to select and, if necessary, customise the required programme .
2 . Do not include a drying cycle.
3 . Once the washing cycle is finished, open the door and remove a few garments to reduce the load . Now follow the instructions for “Dry only”. N.B .: always allow a cooling down period after drying before opening the door.
When using the two preset cycles “Wash & Dry 45’” and “Wash & Dry 90’”, it is not necessary to select and start a drying cycle .
Dry only
This function is used to simply dry a wet load washed previously in the washer dryer or by hand .
1 . Select a programme that's compatible with the type of garments to be dried (e .g . select cotton if you want to dry a load of wet cotton garments) .
2 . Press the “Dry only” button to perform the drying cycle alone, without performing the wash cycle .
3 . Select the desired drying mode by pressing the “Drying settings” button .Two drying modes are available: automatic or timer .
- Automatic drying with selectable levels:
In automatic drying mode, the washer dryer machine dries the laundry until the set level of dryness is reached . As soon as the "Drying
settings" button has been pressed, the washer dryer automatically selects the maximum drying level compatible with the selected programme . Press the button again to reduce the drying level .
The following levels are available:
Wardrobe : laundry is completely dry and ready to be put away in the wardrobe without ironing .
Hanger : laundry is left slightly damp tominimise creasing . Garments must be hung to air dry completely .
Iron : garments are left reasonably damp to make ironing easier .- Timer drying mode:
If you want to set a timed drying cycle, press the “Drying settings” button repeatedly . After all the automatic drying levels have been displayed, continue pressing the “Drying settings” button until the desired time is displayed . Values from 210 to 30 minutes are settable . N .B .: always allow a cooling down period after drying before opening the door .
5 . USING THE CORRECT AMOUNT OF DETERGENT .
Extract the dispenser and pour the detergent into the appropriate trays as explained in the section titled “Detergent Dispenser” . Only if you want to perform a wash or wash + dry programme .
6 . DELAYING THE START OF A PROGRAMME .
If you want to delay the programme's activation, see the section titled“Programmes and Options” .
7 . STARTING A PROGRAMME .
Press the START/PAUSE button . The relative indicator lamp illuminates, the door locks and the door open symbol extinguishes . To change a programme while a cycle is in progress, set the washer dryer to pause mode by pressing the START/PAUSE button (the START/PAUSE indicator light will slowly flash with an amber colour); next, select the desired cycle and press the START/PAUSE button again . To open the door while a cycle is in progress, press the START/PAUSE button; if the symbol turns on, the door can be opened . Press the START/PAUSE button again to resume the programme from the point at which it was interrupted .
8 . CANCELLING A PROGRAMME IN PROGRESS (IF NECESSARY)
Press and hold the button until the washer dryer stops .
If the water level and temperature are low enough, the door unlocks and may be opened . The door remains locked if there is water in the drum . To unlock the door, switch the washer dryer on, select the SPIN & DRAIN programme and turn the spin function off by setting the spin speed to 0 . The water is emptied and the door unlocks at the end of the programme .
9 . SHUT OFF THE WASHER DRYER AT THE END OF THE PROGRAMME .
At the end of the cycle, the message “END” is shown on the display . The door can only be opened once the symbol turns on . Check that the door unlocked symbol is lit, then open the door and take out the laundry .
Press to switch the washer dryer off . To save energy, if the washer dryer is not switched
off manually with the button, it turns off automatically approximately 30 minutes after the end of the programme .
Leave the door slightly ajar in order to allow the inside of the washer dryer to dry .
FUNCTIONS
ON/OFF
To turn on the washer dryer: press this button until the Start/Pause button turns on .
To cancel a programme in progress: Press and hold the button until the washer dryer stops .
To shut off the washer dryer at the end of the programme: press the button until the lights turn off .
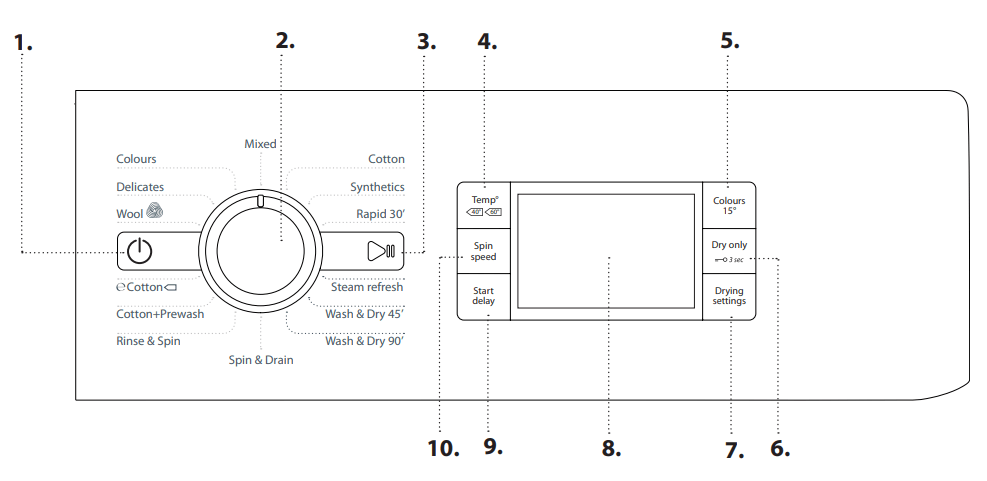
SELECTOR DIAL
•Allows for the programmes to be selected .
•Turn the dial to make a selection.
START/PAUSE
•For starting the programme after having selected the settings
•For pausing a programme in progress
•For resuming a programme that was previously paused
LOCK BUTTON
•To lock the control panel, hold down the “Dry only” button for about 3 seconds . The symbol will light up on the display to indicate that the control panel has been locked (with the exception of the button) . This prevents unintentional changes to programmes, especially with children near the machine .
If any attempt is made to use the control panel, the symbol on the display will begin flashing .
To unlock the control panel, hold down the “Dry only” button for about 3 seconds .
HINTS AND TIPS
RULES FOR SEPARATING LAUNDRY
•Fabric type / indications on label (cotton, mixed fibres, synthetic, wool, handwash items)
•Colour (separate coloured garments from whites, wash new coloured items separately)
•Size (wash items of different sizes in the same load to improve washing efficacy and weight distribution in the drum)
•Delicates (place small items – such as nylon stockings – and garments with clasps – such as braziers – in a laundry bag or in a pillow case with a zip) .
EMPTY POCKETS
•Objects like coins or safety pins can damage the laundry as well as the washer dryer's drum .
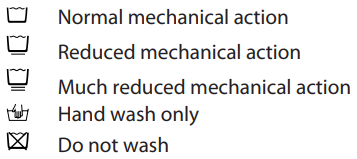
WASH SYMBOLS ON GARMENT LABELS
The value given in the tub symbol is the maximum temperature possible for washing the garment .
CLEAN THE WATER FILTER REGULARLY
•This is needed to prevent the filter from blocking and preventing the water from draining correctly .
SAVING ENERGY AND PROTECTING THE ENVIRONMENT
•Keeping within the load limits indicated in the programme chart will optimise energy, water and detergent consumption and reduce washing times .
•Do not exceed the detergent quantities recommended by the detergent manufacturer .
•Save energy by using a 60 °C instead of a 90 °C wash programme, or by using a 40 °C instead of a 60 °C wash programme . We recommend using
the “ Cotton ” 60 °C programme for cotton garments, which is longer, but uses less energy .
•To save energy and time when washing and drying, select highest spin speed available for the programme to reduce the residual water remaining in the garments at the end of the wash cycle .
ENERGY SAVING TIPS
•Keeping within the load limits indicated in the programme chart will optimise energy, water, and detergent consumption, and will reduce washing times .
•Only use the “Prewash” programme for heavily soiled laundry .
•Pretreat any stains with an appropriate stain remover, or else dampen any dried-on stains with water prior to washing, as this will reduce the need to use a high temperature watch programme .
•In order to save energy, use a 60 °C wash programme rather than a 95 °C programme, or else use a 40 °C programme instead of a 60 °C programme . The 60 °C “ Cotton ” programme is recommended for cotton laundry .
•In order to save time and energy, be sure to select a high spin speed in order to reduce the amount of water remaining in the garments before using a dryer .
•Use the “Colours 15°” option for lightly soiled coloured garments; this will reduce the amount of energy used to heat the water .
CLEANING AND MAINTENANCE
CLEANING THE WASHER DRYER EXTERNALLY
Clean the washer dryer's external parts using a soft damp cloth .
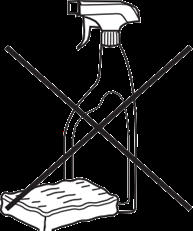
Do not use generic detergents, glass detergents, abrasive powders, or other similar products to clean the control panel, as these could damage the printed elements .
CHECKING THE WATER INTAKE HOSE
Periodically check the integrity of the water intake hose . If it is found to be damaged, contact Customer Support or an authorised dealer in order to obtain a replacement hose .
Based on the type of hose:
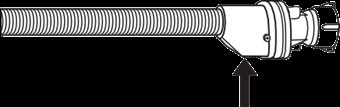
If the water intake hose has a transparent cover, periodically check to make sure that there are no areas where the colour is more pronounced .In such cases, the hose may have a leak and may need to be replaced .
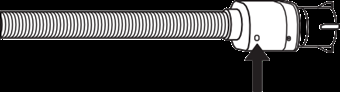
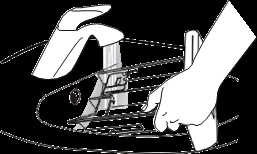
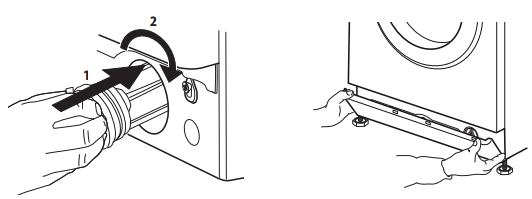
For flood protection hoses: check the safety valve's inspection window (see the arrow) . If it's red, this means that the flood protection function has
been engaged; in this case, the hose will have to be replaced with a new one . In order to detach the hose, press the release button (if present) and unscrew the hose .
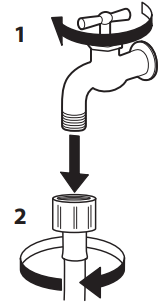
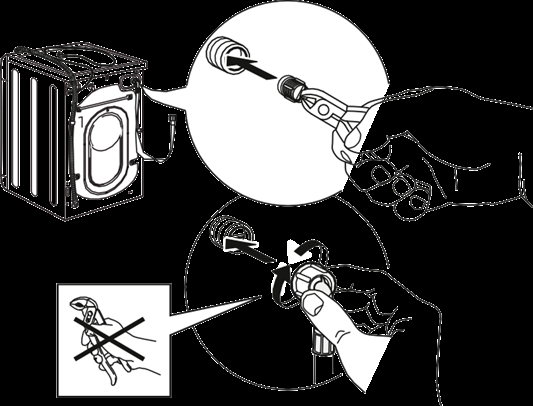
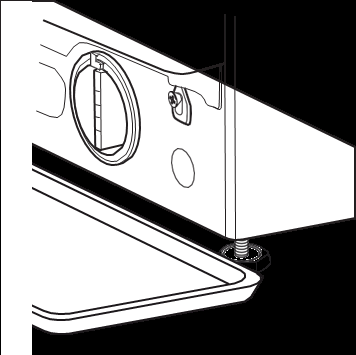
CLEANING THE FILTERS IN THE WATER INTAKE HOSE
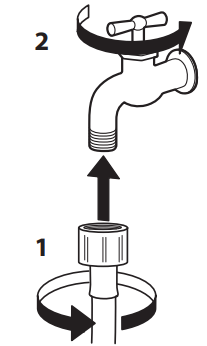
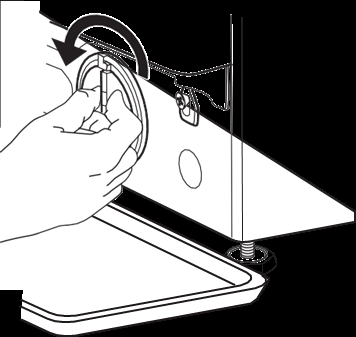
1. Close the water tap and unscrew the intake hose.
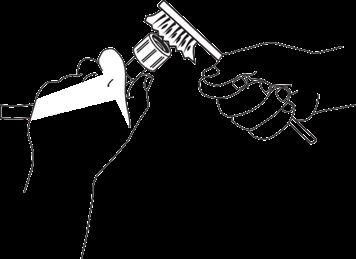
2 . Thoroughly clean the mesh filter at the end of the hose using a brush .
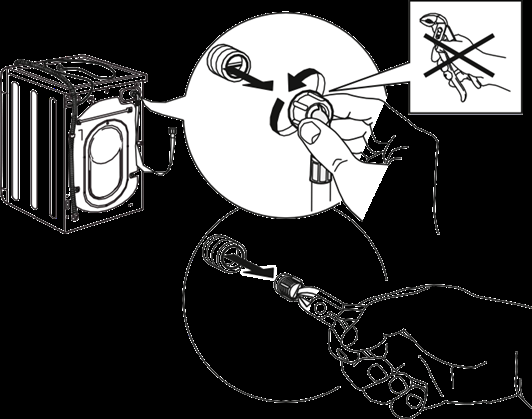
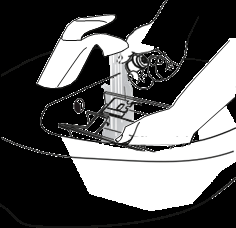
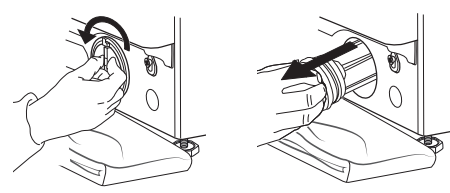
3 . At this point, manually unscrew the intake hose from the back of the washer dryer . Using pliers, extract the mesh filter from the valve on the back of the washer dryer and clean it .
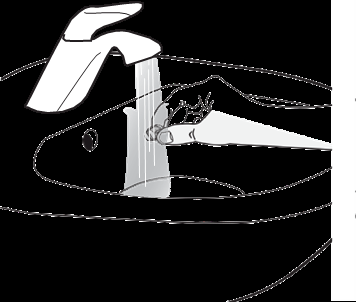
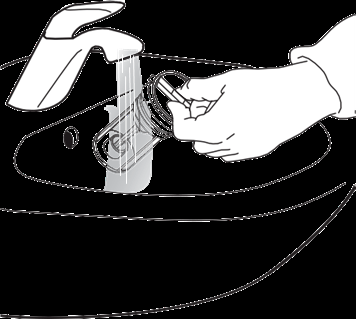
4 . Re-insert the mesh filter . Reconnect the intake hose to the water tap and the washer dryer . Do not use tools to connect the intake hose . Open the water tap and check to make sure that all the connections have been tightened properly .
CLEANING THE DETERGENT DISPENSER
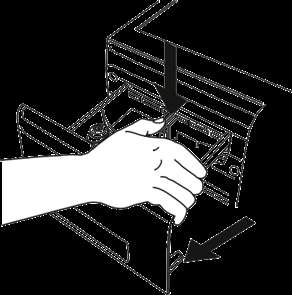
1 . Remove the detergent dispenser by pressing the release button and pulling on the dispenser at the same time .
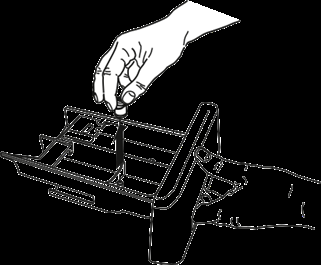
2 . Remove the insert from the fabric softener compartment .
3 . Wash the components under running water, taking care to remove all the detergent and fabric softener residues .
4 . Dry with a soft cloth .
5 . Re-install the detergent dispenser and close it .
CLEANING THE WATER FILTER / DRAINING THE RESIDUAL WATER
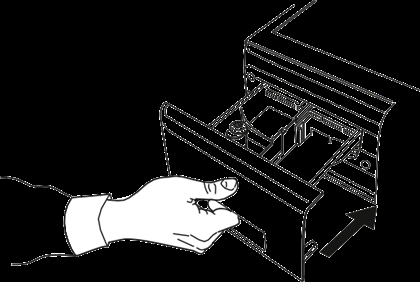
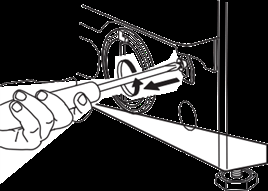
1 . Remove the kick panel: Using a screwdriver, do that which is shown in the following figure .
2 . Container for the drained water: Place a low and wide container under the water filter in order to collect the residual water .
3 . Drain the water: Slowly turn the filter counter-clockwise until all the water has come out . Allow the water to flow out without removing the filter . Once the container is full, close the water filter by turning it clockwise . Empty the container . Repeat the procedure until all the water has been drained .
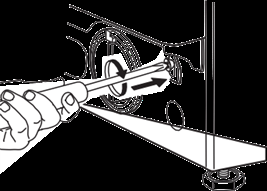
4. Remove the filter: Place a cotton cloth under the water filter in order to absorb any small amounts of residual water. Next, remove the water filter by turning it counter-clockwise.
5 . Clean the water filter: remove any residues from the filter and wash it under running water .
6 . Insert the water filter and reinstall the kick panel: Re-insert the water filter by turning it clockwise . Turn it as far as it will go; the filter's grip should be in its vertical position . In order to check the filter's seal, pour about 1 litre of water into the detergent dispenser .
Re-install the kick panel .
TRANSPORT AND HANDLING
1 . Disconnect the electrical plug and close the water tap .
2 . Check to make sure that the door and the detergent dispenser are securely closed .
3 . Disconnect the intake hose from the water tap, then disconnect the drain hose . Eliminate all the residual water from the hoses, and secure them in such a way that they will not be damaged during the transport operations .
4 . Reapply the transport bolts . Follow the procedure for removing the transport bolts described in the Installation Instructions, in the opposite order .
Important: never transport the washer dryer without having applied the transport bolts .
TROUBLESHOOTING
The washer dryer may sometimes not work properly for certain reasons . Before calling the Support Centre, it is recommended to check to see if the problem can be easily resolved using the following list .
Anomalies
Possible causes / Solution
The washer dryer does not turn on .
•The plug is not inserted into the electrical outlet, or not
enough to make contact .
•There has been a power failure.
•The door is not fully closed.
The wash cycle does not start .
•The ON/OFF button has not been pressed.
•The START/PAUSE button has not been pressed.
•The water tap is not open.
•A start delay has been set.
The washer dryer does not fill with water (the message “H2O” is shown on the display) .
•The water intake hose is not connected to the tap.
•The hose is bent.
•The water tap is not open.
•The mains water supply has been shut off.
•There is not enough pressure.
The washer dryer loads and drains water continuously .
•The START/PAUSE button has not been pressed.
•The drain hose has not been installed at 65 to 100 cm from
the ground .
•The end of the drain hose is immersed in water.
•The drain connector on the wall does not have an air vent. If the problem persists after having performed these checks, close the water tap, shut off the washer dryer, and call the Support Centre .If the dwelling is located on one
of the uppermost floors of a building, a siphon effect can sometimes occur, thus causing the washer dryer to load and drain water continuously .Special anti-siphon valves are available on the market to prevent these types of problems .
The washer dryer does not drain or does not spin .
•The programme does not include the draining function: with
certain programmes it must be activated manually .
•The drain hose is bent.
•The drain line is obstructed.
The washer dryer vibrates excessively during the spin cycle .
•At the time of installation, the drum was not properly
unlocked .
•The washer dryer is not level.
•The washer dryer is squeezed between furniture and the wall.
The washer dryer leaks water .
•The water intake hose has not been tightened properly.
•The detergent dispenser is clogged.
•The drain hose has not been properly fastened.
The indicator lights for the “Colours 15°” option and the START/PAUSE button flash quickly and the display shows an error code (e .g .: F-01, F- . .) .
•Shut off the machine, disconnect the plug from the outlet, and weight about 1 minute before turning it back on . If the problem persists, call the Support Centre .
Too much foam is formed .
•The detergent is not compatible with the washer dryer (it must bear the wording “for washing machines”, “ for hand washing and washing machines”, or something similar) .
•The dosage was excessive.
The washer dryer does not dry .
•The plug is not inserted into the electrical outlet.
•There has been a power failure.
•The door is not fully closed
•A start delay has been set.
•The DRY function is set to its 0 position.
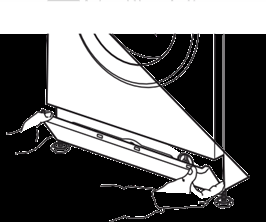
DOOR – HOW TO OPEN IT TO REMOVE THE LAUNDRY IN THE EVENT OF A MALFUNCTION
1 . Drain the residual water as described in the section titled “Draining the residual water” .
2 . Use a screwdriver to remove the screw .
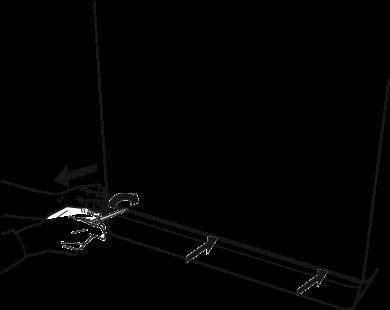
3 . Pull the cord downwards as indicated in the following figure . At this point, the door will unlock and the laundry can be removed .
4 . Afterwards, reattach the cord by inserting the screw with the help of a screwdriver .
5 . Re-install the kick panel
CUSTOMER SUPPORT SERVICE
BEFORE CONTACTING CUSTOMER SUPPORT
1 . Try to resolve any problems you may encounter on your own by consulting the section titled .
TROUBLESHOOTING
2 . Shut off the washer dryer and turn it back on to see if the problem persists .
IF THE PROBLEM PERSISTS, CONTACT CUSTOMER SUPPORT
Always provide:
A brief description of the problem .
The washer dryer model (see the data plate inside the door) .
Your address and telephone number .
For any repairs that may be required, please contact an authorised Customer Support Centre in order to ensure that the repairs are performed correctly using original spare parts .


 ; the indicator light
  will flash slowly .
 : laundry is completely dry and ready to be put away in the wardrobe without ironing .
 : garments are left reasonably damp to make ironing easier .- Timer drying mode:


 symbol will light up on the display to indicate that the control panel has been locked (with the exception of the