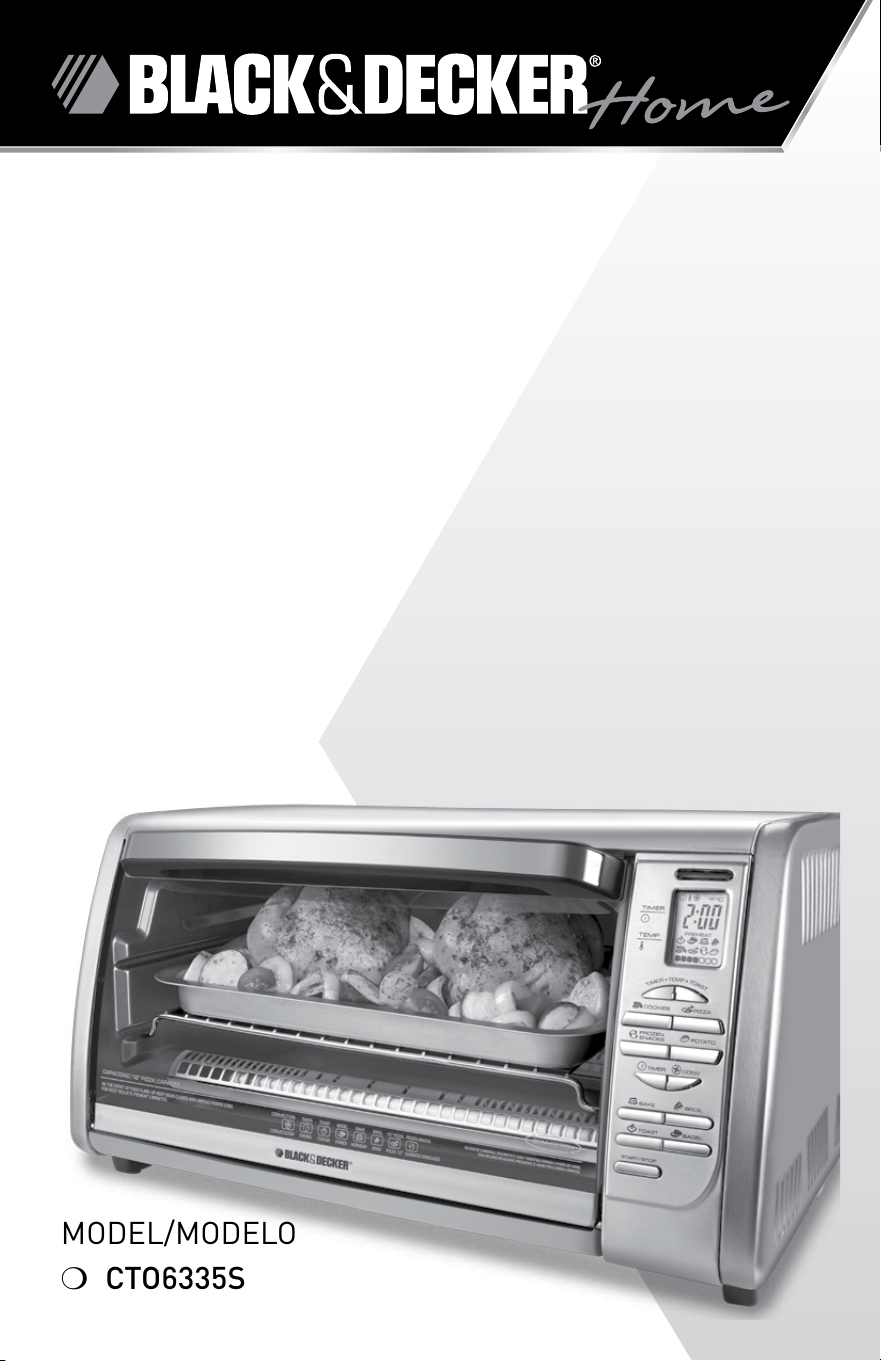
Model/Modelo
❍ CTO6335S
Foronline customer service
andtoregisteryourproduct,goto
www.prodprotect.com/applica
CustomerCare Line:
USA
1-800-231-9786
Accessories/Parts (USA)
1-800-738-0245
Servicio para el cliente:
México
01-800714-2503
Accesorios/Partes (ee.UU)
1-800-738-0245
DigitAL
ConveCtion oven
Horno de ConveCCión
DigitAL

Please Read and Save this Use and Care Book.
iMPORtANt SAFEgUARDS
Whenusingelectricalappliances,basicsafetyprecautionsshouldalways
befollowed,includingthefollowing:
❍Readallinstructions.
❍donottouchhotsurfaces.Usehandlesorknobs.
❍Toprotectagainstelectricalshockdonotimmersecord,plugsor
applianceinwaterorotherliquid.
❍Closesupervisionisnecessarywhenanyapplianceisusedbyornear
children.
❍Unplugfromoutletwhennotinuseandbeforecleaning.Allowtocool
beforeputtingonortakingoffparts.
❍donotoperateanyappliancewithadamagedcordorplug,orafterthe
appliancemalfunctionsorhasbeendamagedinanymanner.Return
appliancetothenearestauthorizedservicefacilityforexamination,
repairoradjustment.or,calltheappropriatetoll-freenumberonthe
coverofthismanual.
❍Theuseofaccessoryattachmentsnotrecommendedbytheappliance
manufacturermaycauseinjuries.
❍donotuseoutdoors.
❍donotletcordhangoveredgeoftableorcounter,ortouchhot
surfaces.
❍donotplaceonornearahotgasorelectricburner,orinaheated
oven.
❍extremecautionmustbeusedwhenmovinganappliancecontaining
hotoilorotherhotliquids.
❍Alwaysattachplugtoappliancefirst,thenplugcordintothewall
outlet.Todisconnect,pressSTART/STopbutton,thenremoveplug
fromwalloutlet.
❍donotuseapplianceforotherthanintendeduse.
❍Useextremecautionwhenremovingtrayordisposingofhotgrease.
❍oversizedfoodsormetalutensilsmustnotbeinsertedinatoaster
oven,astheymaycreateafireorriskofelectricshock.
❍Afiremayoccurifthetoasteroveniscoveredortouchingflammable
materialincludingcurtains,draperies,wallsandthelike,whenin
operation.
❍donotcleanwithmetalscouringpads.piecescanbreakoffthepad
andtouchelectricalpartsresultinginariskofelectricshock.
❍extremecautionshouldbeexercisedwhenusingcontainers
constructedofotherthanmetalorglass.
❍donotstoreanymaterial,otherthanmanufacturer'srecommended
accessories,inthisovenwhennotinuse.
❍donotplaceanyofthefollowingmaterialsintheoven:paper,
cardboard,plasticandthelike.
❍donotcovercrumbtrayoranypartofthisovenwithmetalfoil.
Thiswillcauseoverheatingoftheoven.
SAVE tHESE iNStRUCtiONS.
this product is for household use only.
gROUNDED PLUg
Asasafetyfeature,thisproductisequippedwithagroundedplug,which
willonlyfitintoathree-prongoutlet.donotattempttodefeatthissafety
feature.Improperconnectionofthegroundingconductormayresultinthe
riskofelectricshock.Consultaqualifiedelectricianifyouareindoubtasto
whethertheoutletisproperlygrounded.
tAMPER-RESiStANt SCREW
Warning: this appliance is equipped with a tamper-resistant screw to
prevent removal of the outer cover. to reduce the risk of re or electric
shock, do not attempt to remove the outer cover. there are no user-
serviceable parts inside. Repair should be done only by authorized service
personnel.
ELECtRiCAL CORD
a)Ashortpower-supplycord(ordetachablepower-supplycord)istobe
providedtoreducetheriskresultingfrombecomingentangledinor
trippingoveralongercord.
b)longerdetachablepower-supplycordsorextensioncordsareavailable
andmaybeusedifcareisexercisedintheiruse.
c) Ifalongdetachablepower-supplycordorextensioncordisused,
1) Themarkedelectricalratingofthecordsetorextensioncordshould
beatleastasgreatastheelectricalratingoftheappliance,and
2) Thecordshouldbearrangedsothatitwillnotdrapeoverthe
countertoportabletopwhereitcanbepulledonbychildrenortripped
overunintentionally.
Iftheapplianceisofthegroundedtype,theextensioncordshouldbea
grounding-type3-wirecord.
Note: Ifthepowersupplycordisdamaged,itshouldbereplacedbyqualified
personnel;inlatinAmerica,byanauthorizedservicecenter.
ENgLiSH

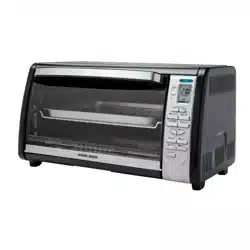
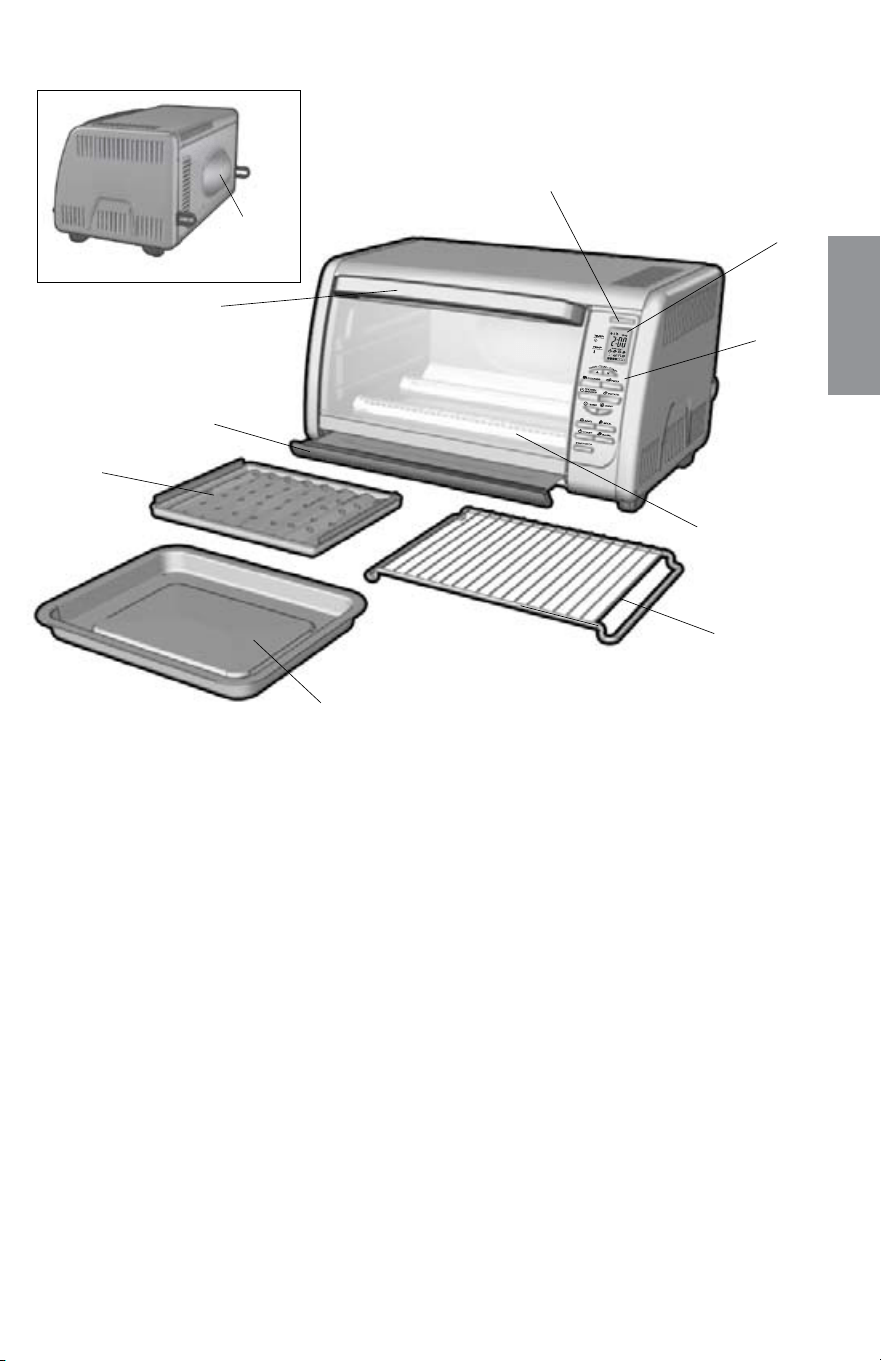
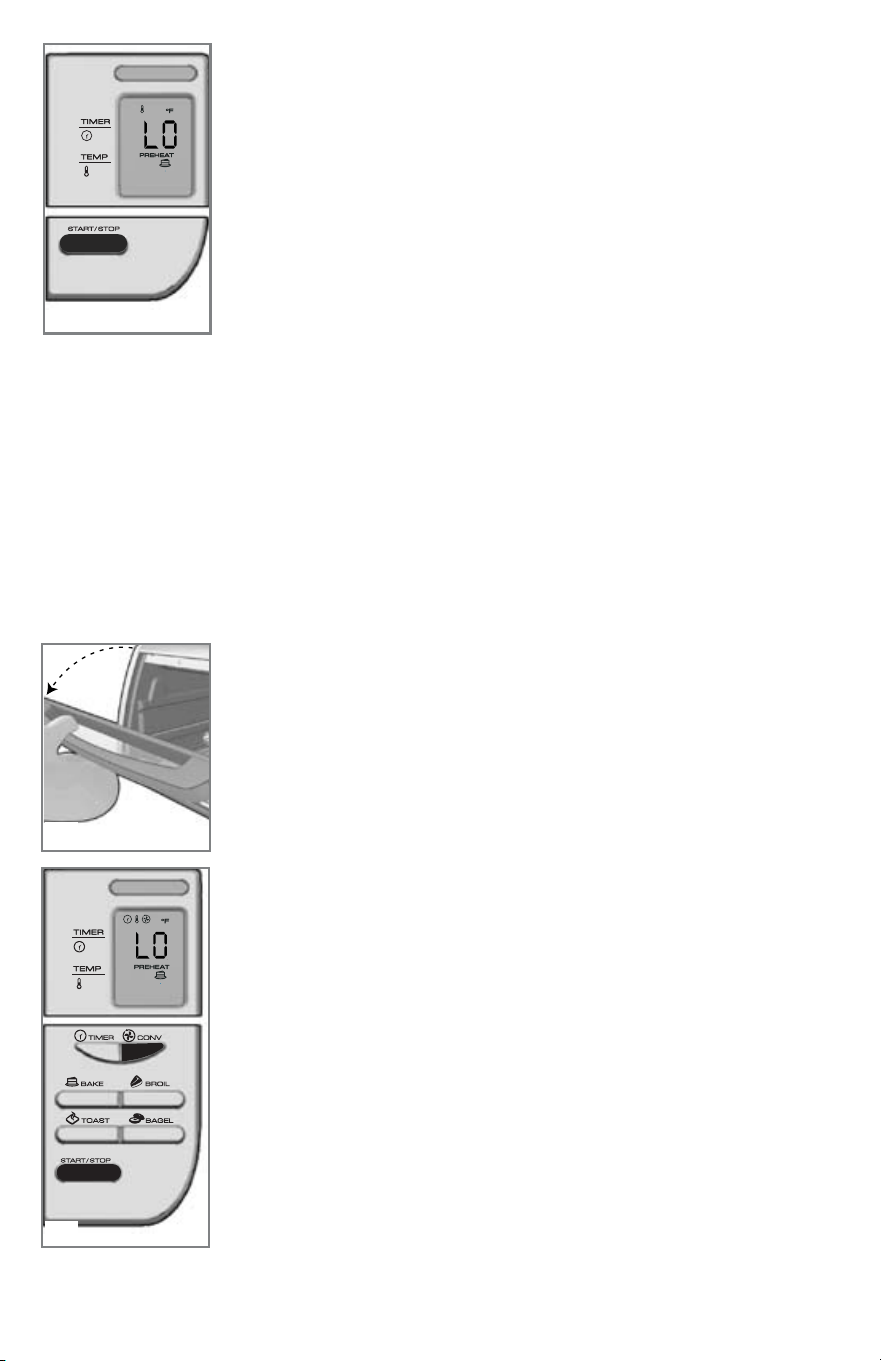
1. On indicator light
. Digital display
. Digital control panel (See B)
. Curved glass door
† . Dual-position rack (Part # 1710)
† 6. Bake pan (drip tray) (Part # 088)
† 7. Broil rack (Part # 17601)
† 8. Slide-out crumb tray (Part # 0887)
9. Door handle
† 10. Extra-deep curved interior
Note: † indicatesconsumerreplaceable/removableparts
Product may vary slightly from what is illustrated.
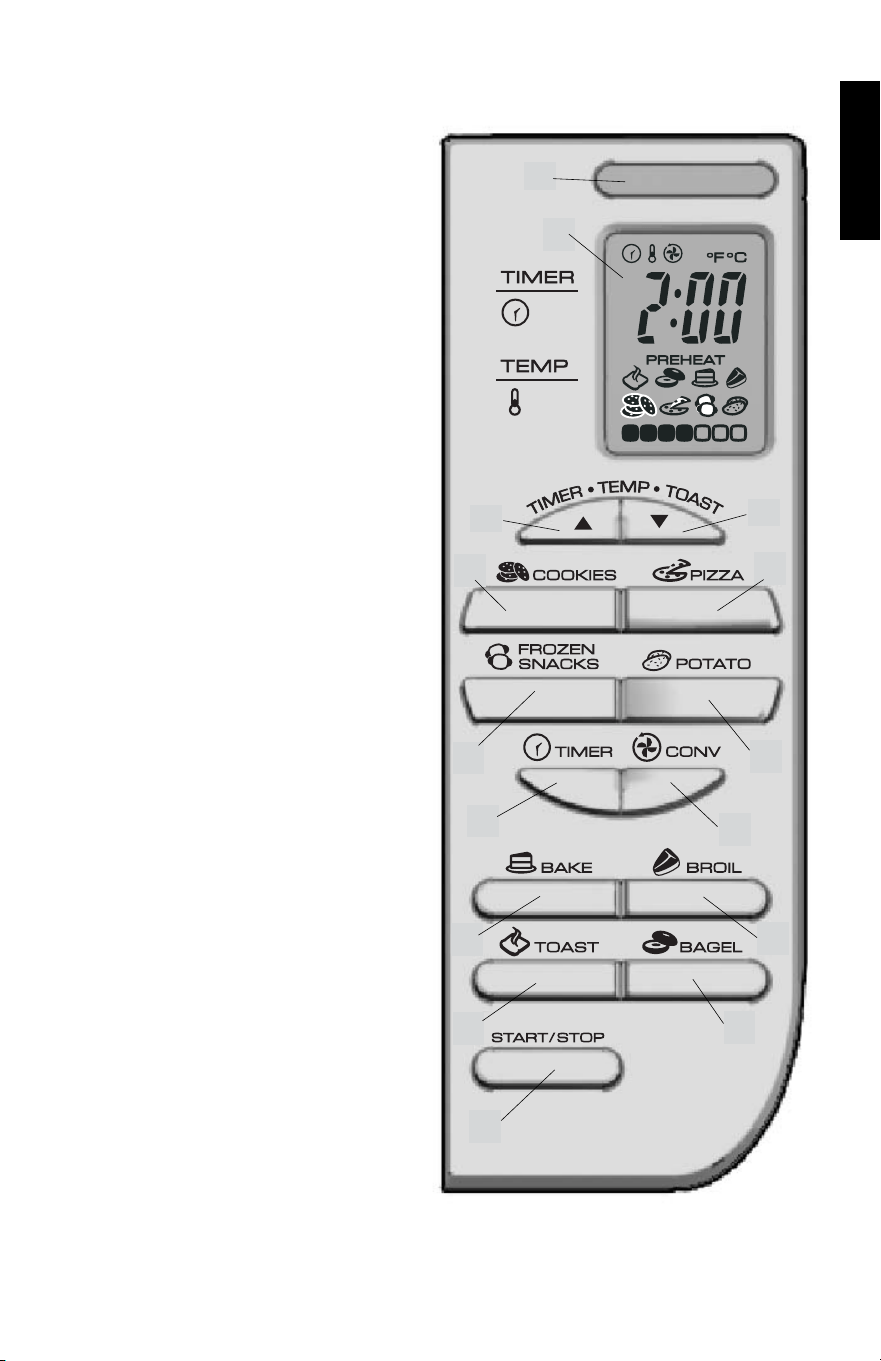
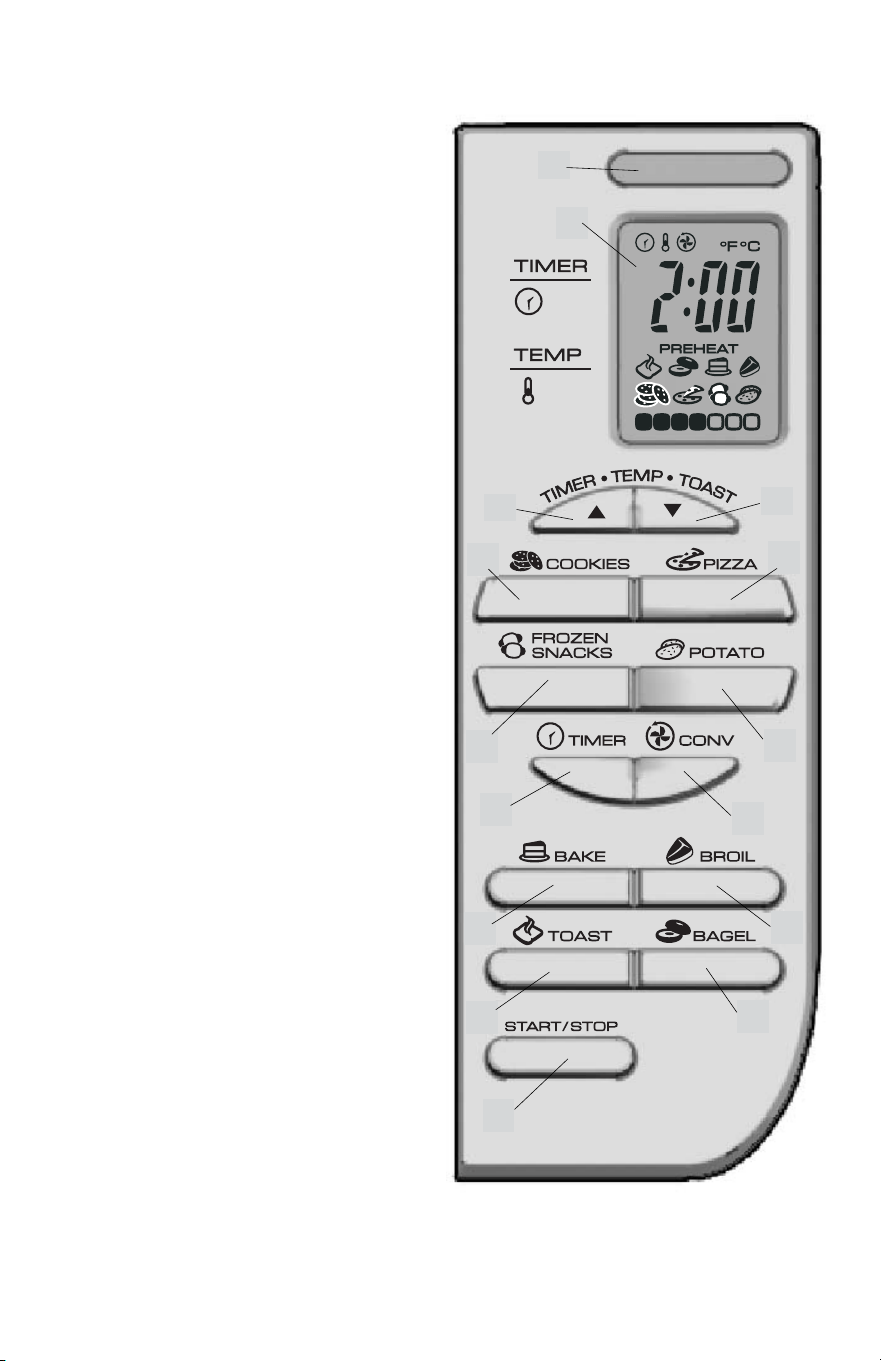
DigitAL CONtROL PANEL FUNCtiONS (B)
ENgLiSH
A
1. indicates when a function is selected
and activated.
. Lets you monitor cooking time,
temperature and toast/bagel shade
levels.
. increases time, temperature and
toast/bagel shade level.
. Decreases time, temperature and
toast/bagel shade level.
. Allows you to use preset cooking time
(1 minutes) and temperature (0˚F)
or adjust as desired.
6. Allows you to use preset cooking time
(0 minutes) and temperature (00˚F)
or adjust as desired.
7. Allows you to use preset cooking time
(6 minutes) and temperature (00˚F)
or adjust as desired.
8. Allows you to use preset cooking time
( minutes) and temperature (00˚F)
or adjust as desired.
9. Sets desired cooking time up to
hours.
10. turns on the internal fan to distribute
heat evenly as it cooks. Works with
the BAKE function. When using this
function, lower the temperature
degrees.
11. Preheats and cooks to set
temperature (0˚F) and time (0
minutes) or you can adjust as desired.
1. Broils at preset temperature (0˚F)
and time (0 minutes) or you can
adjust as desired. You do not need to
preheat unit.
1. Sets bagel shade level (1- 7).
1. Sets toast shade level (1- 7).
1. Press StARt to activate all functions.
Press StOP to end all functions; the
On indicator light shuts off.
1. On indicator light
. Digital display
. Digital control panel (See B)
. Curved glass door
† . Dual-position rack (Part # 1710)
† 6. Bake pan (drip tray) (Part # 088)
† 7. Broil rack (Part # 17601)
† 8. Slide-out crumb tray (Part # 0887)
9. Door handle
† 10. Extra-deep curved interior
Note: † indicatesconsumerreplaceable/removableparts
Product may vary slightly from what is illustrated.
DigitAL CONtROL PANEL FUNCtiONS (B)
ENgLiSH
A
1. indicates when a function is selected
and activated.
. Lets you monitor cooking time,
temperature and toast/bagel shade
levels.
. increases time, temperature and
toast/bagel shade level.
. Decreases time, temperature and
toast/bagel shade level.
. Allows you to use preset cooking time
(1 minutes) and temperature (0˚F)
or adjust as desired.
6. Allows you to use preset cooking time
(0 minutes) and temperature (00˚F)
or adjust as desired.
7. Allows you to use preset cooking time
(6 minutes) and temperature (00˚F)
or adjust as desired.
8. Allows you to use preset cooking time
( minutes) and temperature (00˚F)
or adjust as desired.
9. Sets desired cooking time up to
hours.
10. turns on the internal fan to distribute
heat evenly as it cooks. Works with
the BAKE function. When using this
function, lower the temperature
degrees.
11. Preheats and cooks to set
temperature (0˚F) and time (0
minutes) or you can adjust as desired.
1. Broils at preset temperature (0˚F)
and time (0 minutes) or you can
adjust as desired. You do not need to
preheat unit.
1. Sets bagel shade level (1- 7).
1. Sets toast shade level (1- 7).
1. Press StARt to activate all functions.
Press StOP to end all functions; the
On indicator light shuts off.
6
7
How to Use
Thisproductisforhouseholduseonly.
gEttiNg StARtED
• Removepackingmaterialsandanystickers.peeloffclearprotectivefilmfrom
controlpanel.
• Removeandsaveliterature.
• pleasegotowww.prodprotect.com/applicatoregisteryourwarranty.
• WashallpartsasinstructedinCAReAndCleAnIng.
• Selectalocationfortheunit.leavesomespacebetweenthebackoftheunitand
yourwalltoallowheattoflowwithoutdamagingcabinetandwalls.
• Insertcrumbtrayunderneaththebottomheatingelements.
• Untiethecordandunwindit.
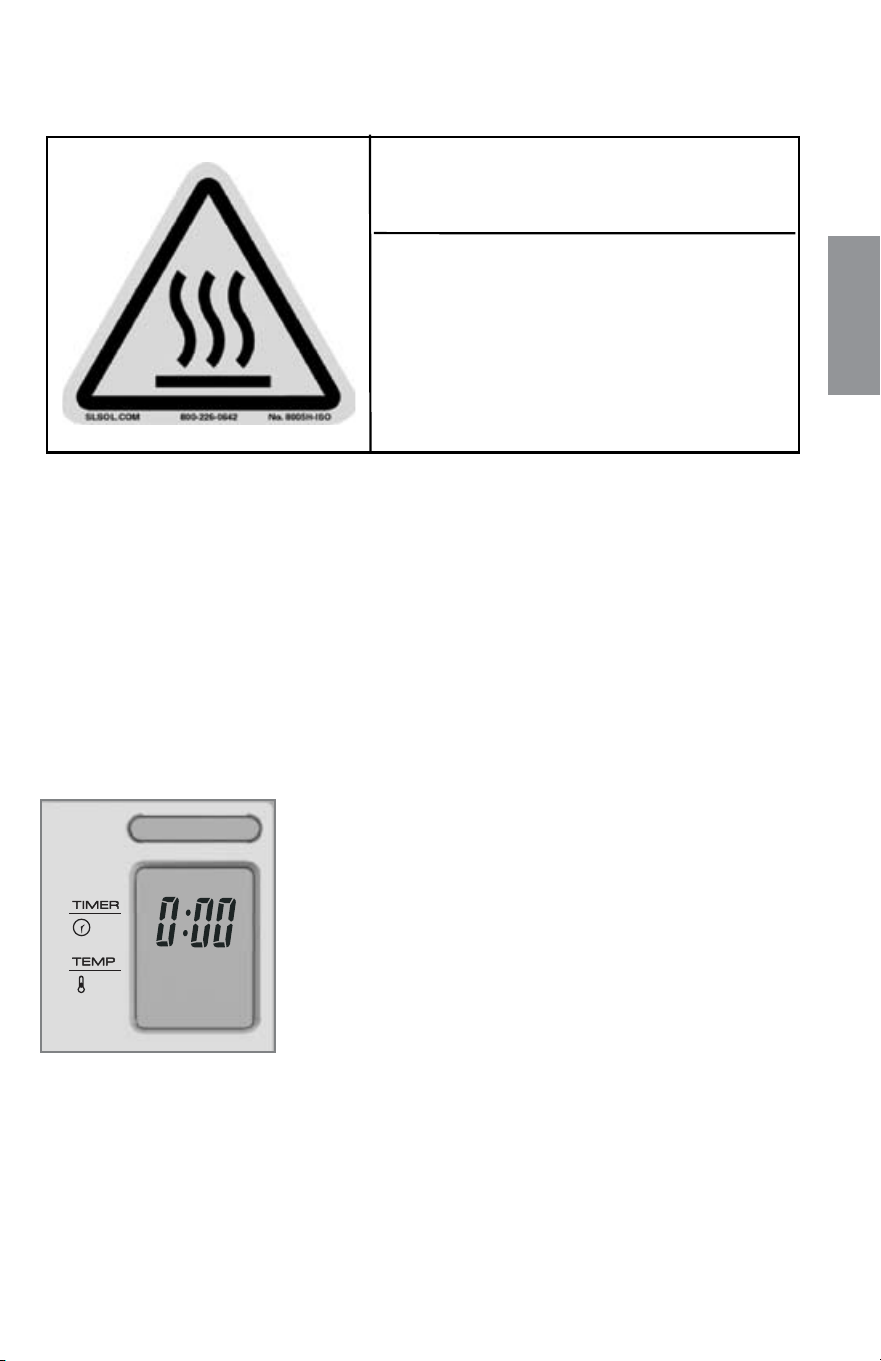
• plugunitintoelectricaloutlet.000showsonthedigital
display(C).
important: During the first few minutes of use, you may
notice smoke and a slight odor. this is normal and is not a
cause for concern.
C
HELPFUL iNFORMAtiON ABOUt YOUR OVEN
• Youcanchangethetemperaturefrom˚Fto˚Cbypressingthe
▲and▼buttons
simultaneously.
• Foryourconvenience,theunitalwaysremembersthelastselectedsettingunless
unplugged.Youcanchangethissettingbeforetheovenbeginspreheatingoronce
ithasreachedthepresettemperatureandtime.
• Youcannotchangethetemperatureortimeduringthepreheatcycle.oncethe
settemperatureisreached,youcanthenchangethetemperatureortimeatany
time.
• Ifusingconvectionbake,remembertolowerthesuggestedtemperatureofa
recipeorpackageby25˚F.
Caution: Unit gets hot. NEVER touch outer surfaces, including the glass door.
Always use oven mitt or pot holder.
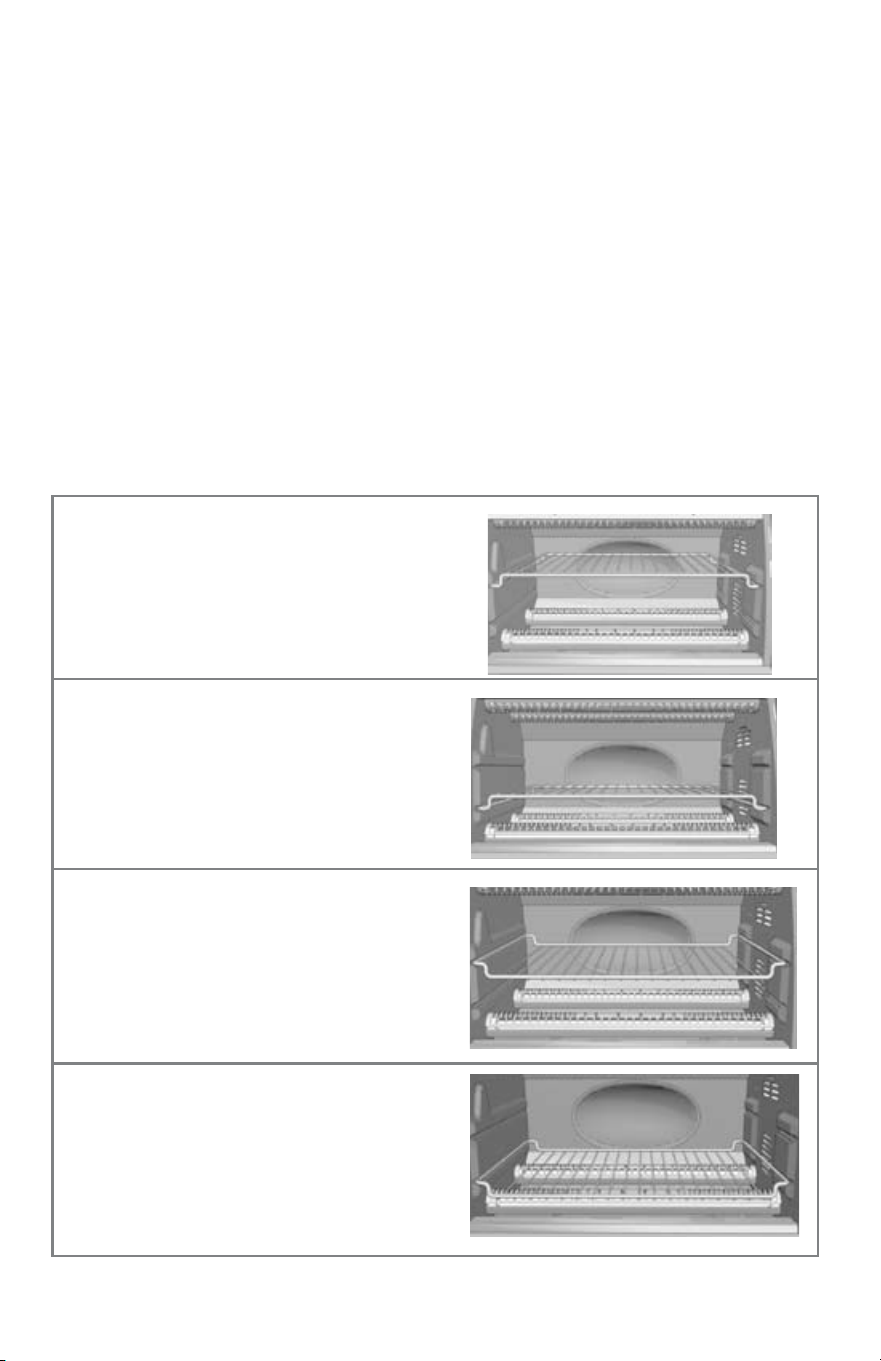
SLiDE RACK POSitiONS
Therearefourpositionsforthesliderack(D).Itcanbeinsertedineithertheupper
orlowerslot.Itcanalsobeinvertedfortwoadditionalpositions.
ENgLiSH
CAUtiON
tHiS OVEN gEtS HOt.
WHEN iN USE, ALWAYS USE OVEN
MittS OR POt HOLDERS WHEN
tOUCHiNg ANY OUtER OR iNNER
SURFACE OF tHE OVEN.
Position 1
Use upper slots along oven walls.
insert rack using a rack-up position.
Position
Use lower slots along oven walls.
insert rack using a rack-up position.
Position
Use upper slots along oven walls.
insert rack using a rack-down
position.
Position
Use lower slots along oven walls.
insert rack using a rack-down
position.
D

6
7
How to Use
Thisproductisforhouseholduseonly.
gEttiNg StARtED
• Removepackingmaterialsandanystickers.peeloffclearprotectivefilmfrom
controlpanel.
• Removeandsaveliterature.
• pleasegotowww.prodprotect.com/applicatoregisteryourwarranty.
• WashallpartsasinstructedinCAReAndCleAnIng.
• Selectalocationfortheunit.leavesomespacebetweenthebackoftheunitand
yourwalltoallowheattoflowwithoutdamagingcabinetandwalls.
• Insertcrumbtrayunderneaththebottomheatingelements.
• Untiethecordandunwindit.
• plugunitintoelectricaloutlet.000showsonthedigital
display(C).
important: During the first few minutes of use, you may
notice smoke and a slight odor. this is normal and is not a
cause for concern.
C
HELPFUL iNFORMAtiON ABOUt YOUR OVEN
• Youcanchangethetemperaturefrom˚Fto˚Cbypressingthe
▲and▼buttons
simultaneously.
• Foryourconvenience,theunitalwaysremembersthelastselectedsettingunless
unplugged.Youcanchangethissettingbeforetheovenbeginspreheatingoronce
ithasreachedthepresettemperatureandtime.
• Youcannotchangethetemperatureortimeduringthepreheatcycle.oncethe
settemperatureisreached,youcanthenchangethetemperatureortimeatany
time.
• Ifusingconvectionbake,remembertolowerthesuggestedtemperatureofa
recipeorpackageby25˚F.
Caution: Unit gets hot. NEVER touch outer surfaces, including the glass door.
Always use oven mitt or pot holder.
SLiDE RACK POSitiONS
Therearefourpositionsforthesliderack(D).Itcanbeinsertedineithertheupper
orlowerslot.Itcanalsobeinvertedfortwoadditionalpositions.
ENgLiSH
CAUtiON
tHiS OVEN gEtS HOt.
WHEN iN USE, ALWAYS USE OVEN
MittS OR POt HOLDERS WHEN
tOUCHiNg ANY OUtER OR iNNER
SURFACE OF tHE OVEN.
Position 1
Use upper slots along oven walls.
insert rack using a rack-up position.
Position
Use lower slots along oven walls.
insert rack using a rack-up position.
Position
Use upper slots along oven walls.
insert rack using a rack-down
position.
Position
Use lower slots along oven walls.
insert rack using a rack-down
position.
D
8
9
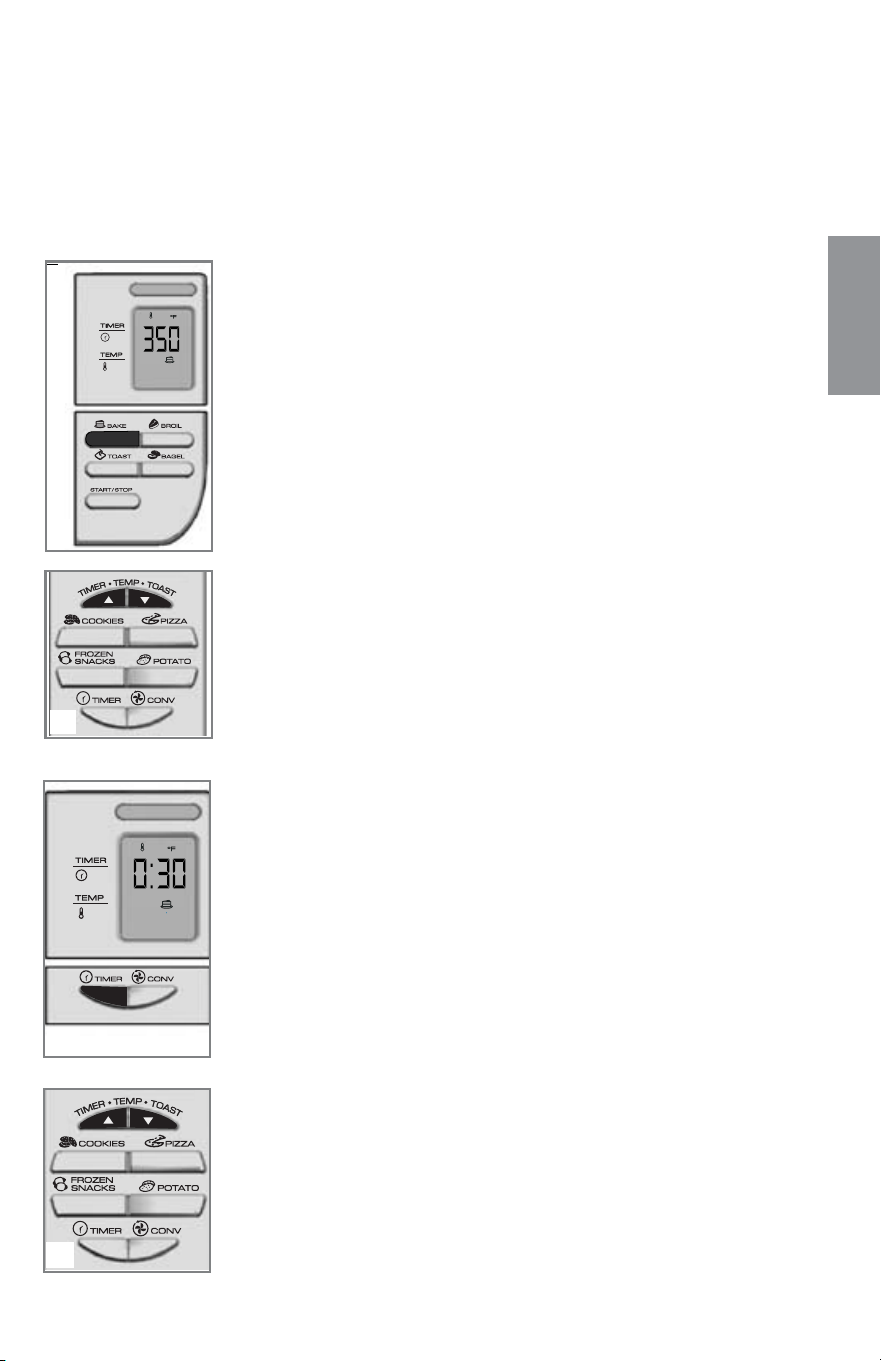
BAKE FUNCtiON
Selecting Cooking temperature and time
Caution: Unit gets hot. NEVER touch outer surfaces, including the glass door. Always
use oven mitt or pot holder.
Note:Youhave10secondsforselectingthetemperatureandtime.Ifyouexceedthis
time,thedisplaywillchangebacktothedefault(000)temperatureandtime;simply
repeatsteps1-5belowtobeginagain.
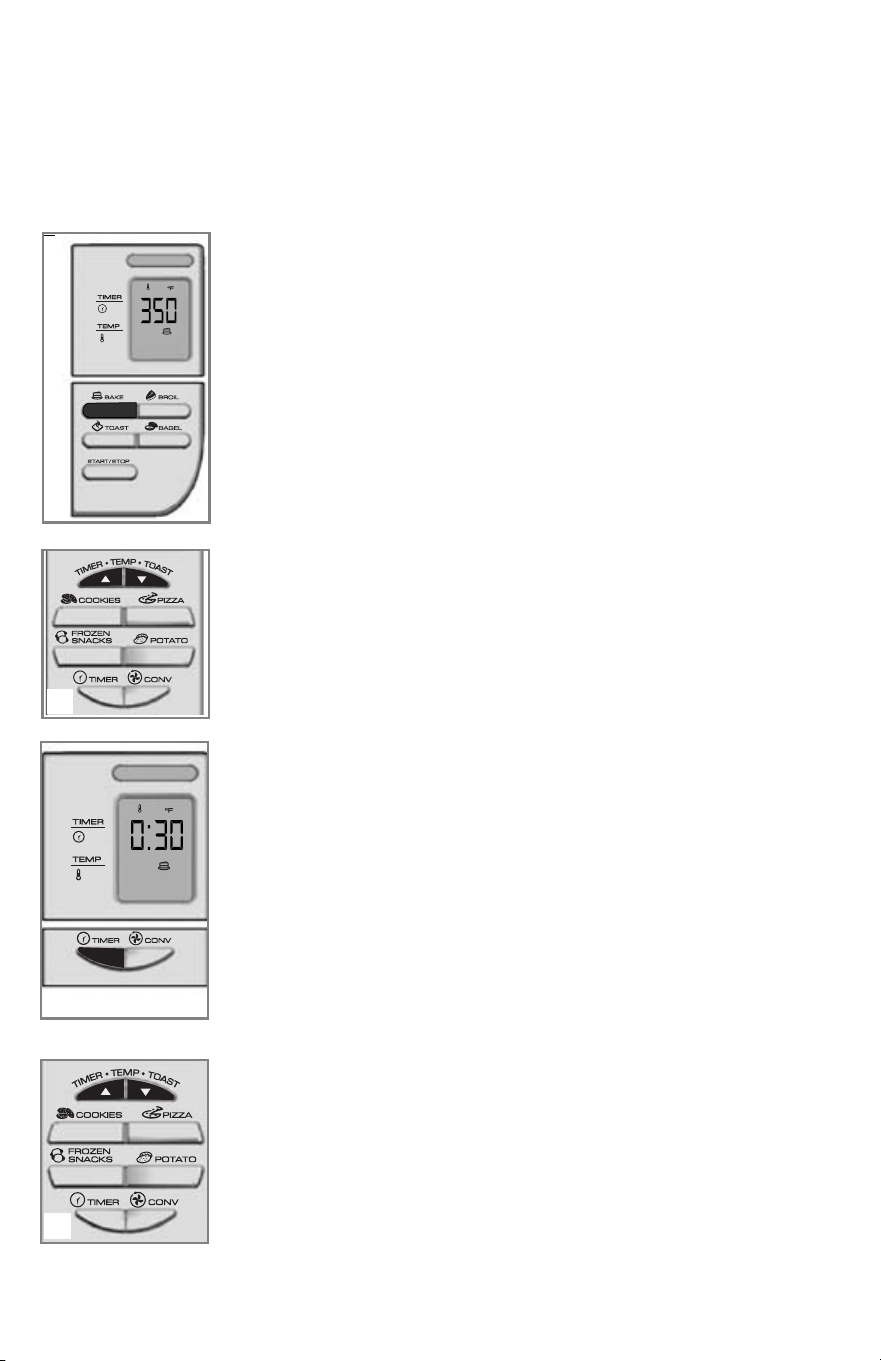
1.pressBAKEbutton.Theunitbeeps,onindicatorlightblinks
and350°F(180°C)defaulttemperatureflashesonthedigital
display(E).
2.to adjust the temperature,immediatelypress(▲)or(▼)button
untilyoureachdesiredtemperature(F).
Note:Cookingtemperaturecanbeadjustedfrom200˚Fto450˚F
(93˚C-232˚C).
• Tapbuttonandreleasetochangeinincrementsof5degrees.
• pressandholdbuttontochangerapidlyinincrementsof
25degrees.
3. to set the cooking time,pressthetiMERbutton.Ifyoujust
pluggedintheunit,thedefaultcookingtimeof:30(30minutes)
flashesonthedisplay(g);otherwiseitwilldisplaythelast
selectedtime.
4. Immediatelypress(▲)or(▼)buttonstoselectdesiredtimeupto
amaximumof2hours(H).
• Tapbuttonandreleasetochangeinone-minuteincrements.
• pressandholdbutton,tochangerapidlyin10-minute
increments.
E
F
g
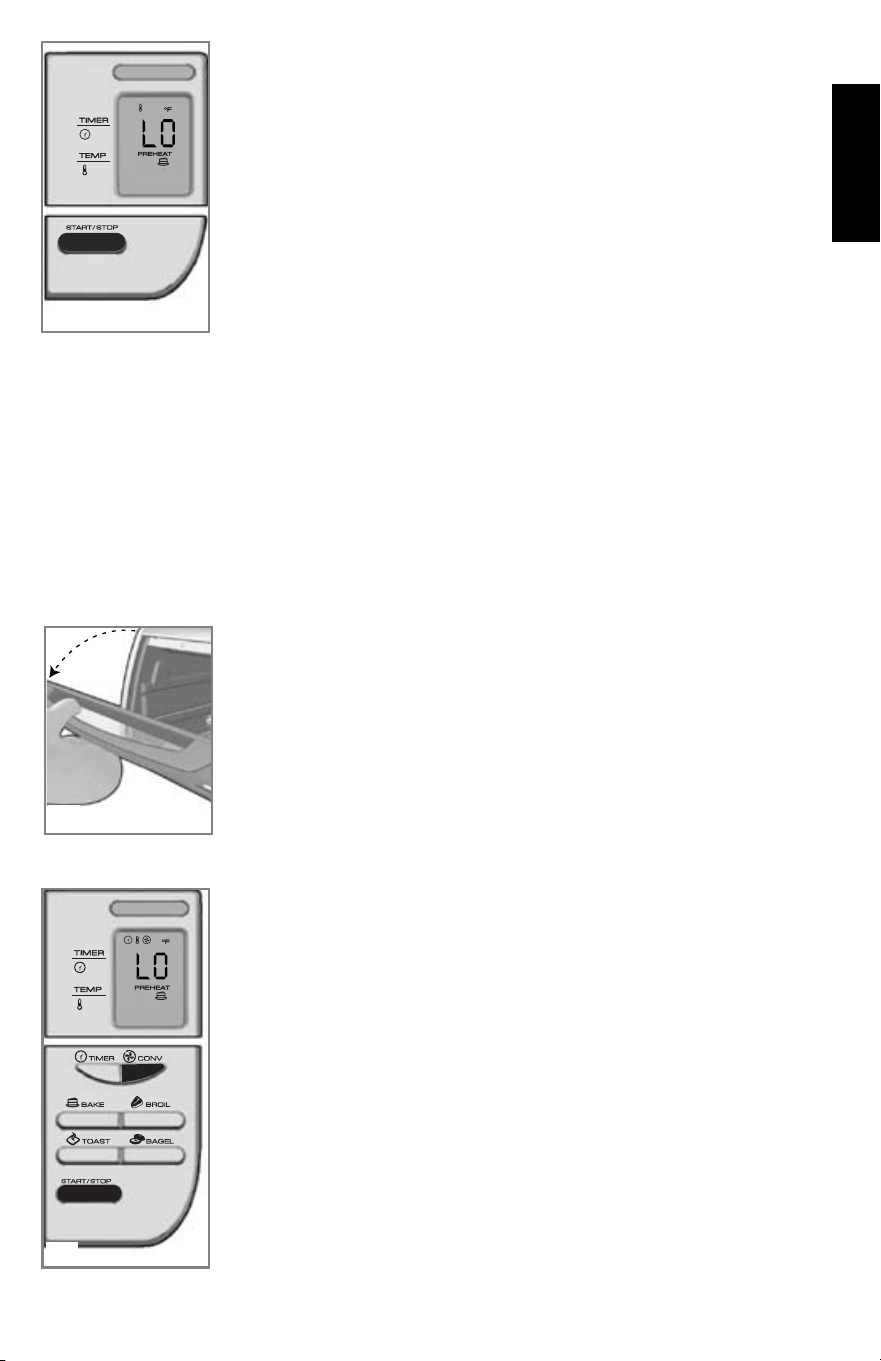
5. onceyouhavesetdesiredtemperatureandtime,press
StARt/StOPbutton.
• digitaldisplayflashesloandpReHeATuntiltheunitreaches
150˚Fthenitflashestemperatureuntilthesettemperatureis
reached(J).
6. openovendoor.Insertfoodtobecookedorheatedinbake
panorpizzapanintotheoven.SeeCookIngCHARTon
pages16and17forrecommendedtemperaturesandtimes.
7. Closeovendoor.
important: You cannot change the temperature or time during the preheat cycle.
Once unit reaches selected temperature, then you can change them at any time.
For your convenience, the unit always remembers the last selected setting,
unless unplugged.
• Whenunitreachessettemperature,itbeepsanddisplayalternatesbetween
temperatureandtimeduringtheentirecookingcycle.
• Thetimewillcountdowninone-minuteincrementsuntilitreaches59seconds,
thenitcountsdowninone-secondincrements.
• Attheendofthecookingcycle,theunitbeeps3timesandcookingstops.
Note:YoucanstopthecookingatanytimebypressingtheStARt/StOPbutton.
8.Toopentheovendoor,useanovenmitttogriphandleand
gentlypullforwardtobringdoordownuntilitrestsonthe
counter(K).
CONVECtiON COOKiNg FUNCtiON
TheConveCTIonfunctionusesaninternalfantodistributeheat
evenly.UsethisfeaturewiththeBAkefunction.
1. Toturnonthefanforconvectioncooking:
• Afteryouhaveselectedthedesiredtemperatureandtime,
pressStARt/StOPbuttonthenpresstheCONVbutton.You
willhearthefanrunningandthedigitaldisplayshowsthefan
symbolthroughoutthecookingcycle(L).
• Whenbakingusingconvection,thetemperatureselected
shouldbe25degreeslowerthanrecommendedtemperature
forconventionalcooking.
• Watchcookingtimeassomefoodswillbakefaster.
H
J
K
ENgLiSH
L
8
9
BAKE FUNCtiON
Selecting Cooking temperature and time
Caution: Unit gets hot. NEVER touch outer surfaces, including the glass door. Always
use oven mitt or pot holder.
Note:Youhave10secondsforselectingthetemperatureandtime.Ifyouexceedthis
time,thedisplaywillchangebacktothedefault(000)temperatureandtime;simply
repeatsteps1-5belowtobeginagain.
1.pressBAKEbutton.Theunitbeeps,onindicatorlightblinks
and350°F(180°C)defaulttemperatureflashesonthedigital
display(E).
2.to adjust the temperature,immediatelypress(▲)or(▼)button
untilyoureachdesiredtemperature(F).
Note:Cookingtemperaturecanbeadjustedfrom200˚Fto450˚F
(93˚C-232˚C).
• Tapbuttonandreleasetochangeinincrementsof5degrees.
• pressandholdbuttontochangerapidlyinincrementsof
25degrees.
3. to set the cooking time,pressthetiMERbutton.Ifyoujust
pluggedintheunit,thedefaultcookingtimeof:30(30minutes)
flashesonthedisplay(g);otherwiseitwilldisplaythelast
selectedtime.
4. Immediatelypress(▲)or(▼)buttonstoselectdesiredtimeupto
amaximumof2hours(H).
• Tapbuttonandreleasetochangeinone-minuteincrements.
• pressandholdbutton,tochangerapidlyin10-minute
increments.
E
F
g
5. onceyouhavesetdesiredtemperatureandtime,press
StARt/StOPbutton.
• digitaldisplayflashesloandpReHeATuntiltheunitreaches
150˚Fthenitflashestemperatureuntilthesettemperatureis
reached(J).
6. openovendoor.Insertfoodtobecookedorheatedinbake
panorpizzapanintotheoven.SeeCookIngCHARTon
pages16and17forrecommendedtemperaturesandtimes.
7. Closeovendoor.
important: You cannot change the temperature or time during the preheat cycle.
Once unit reaches selected temperature, then you can change them at any time.
For your convenience, the unit always remembers the last selected setting,
unless unplugged.
• Whenunitreachessettemperature,itbeepsanddisplayalternatesbetween
temperatureandtimeduringtheentirecookingcycle.
• Thetimewillcountdowninone-minuteincrementsuntilitreaches59seconds,
thenitcountsdowninone-secondincrements.
• Attheendofthecookingcycle,theunitbeeps3timesandcookingstops.
Note:YoucanstopthecookingatanytimebypressingtheStARt/StOPbutton.
8.Toopentheovendoor,useanovenmitttogriphandleand
gentlypullforwardtobringdoordownuntilitrestsonthe
counter(K).
CONVECtiON COOKiNg FUNCtiON
TheConveCTIonfunctionusesaninternalfantodistributeheat
evenly.UsethisfeaturewiththeBAkefunction.
1. Toturnonthefanforconvectioncooking:
• Afteryouhaveselectedthedesiredtemperatureandtime,
pressStARt/StOPbuttonthenpresstheCONVbutton.You
willhearthefanrunningandthedigitaldisplayshowsthefan
symbolthroughoutthecookingcycle(L).
• Whenbakingusingconvection,thetemperatureselected
shouldbe25degreeslowerthanrecommendedtemperature
forconventionalcooking.
• Watchcookingtimeassomefoodswillbakefaster.
H
J
K
ENgLiSH
L
10
11
QUiCK BAKE FUNCtiONS
Thesefunctionsallowyoutocookatpresetcookingtemperaturesandtimes,orcanbe
adjustedasdesired.
Note:YoucanstopthecookingatanytimebypressingtheStARt/StOPbutton.
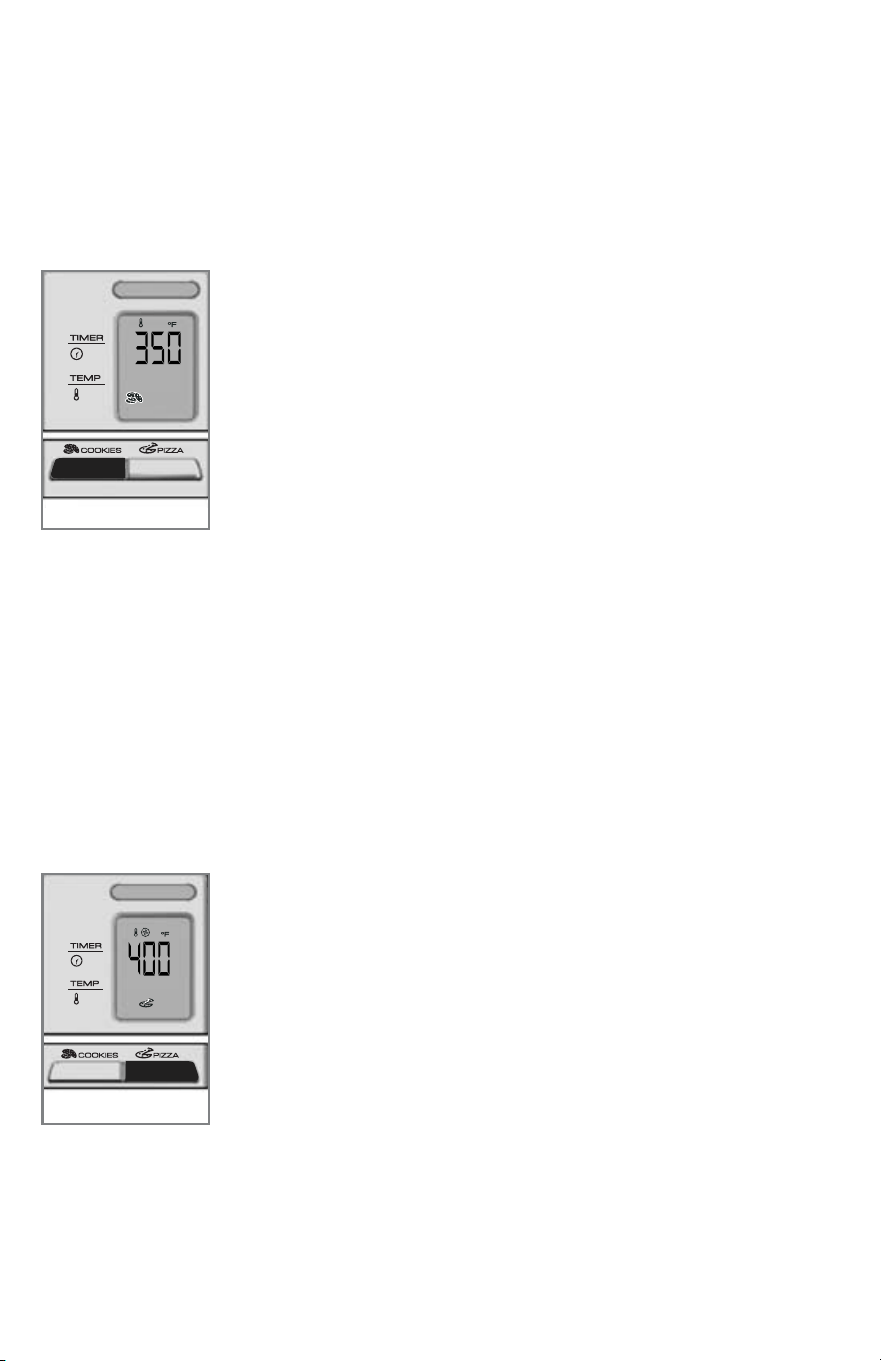
COOKiES FUNCtiON (M)
Preset temperature: 350˚F.
Preset time:12minutes
Rack Position:2or3(refertoFigure D).placeinthecenteroftheoven.
1. pressCOOKiESbutton.
2. Tochangethetemperature,immediatelypress▲or▼buttons.
Tapbuttonandreleasetochangeinincrementsof5degrees.
pressandholdbuttontochangeinincrementsof25degrees.
3. Tochangethetime,pressthetiMERbutton.Tapbuttonand
releasetochangeinone-minuteincrements.pressandhold
buttontochangein10-minuteincrements.
4. pressStARt/StOPbutton.
• digitaldisplayflashespReHeATuntil150˚Ftemperature
isreached;temperaturecontinuestoincreaseuntilset
temperatureisreached.
• onceunitreachessettemperature,itbeepsanddisplayalternatesbetween
temperatureandtimeduringtheentirecookingcycle.
• Thetimewillcountdowninone-minuteincrementsuntilitreaches59seconds,
thenitcountsdowninone-secondincrements.
• Attheendofthecookingcycle,theunitbeeps3timesandcookingstops.
5. openovendoorusingovenmittorpotholderandcarefullyremovefood.
PizzA FUNCtiON (N)
Preset temperature:400˚F.
Preset time:20minutes
Rack Position:2or3(refertoFigure D)
1. pressPizzAbutton.
2. Tochangethetemperature,immediatelypress▲or▼buttons.
Tapbuttonandreleasetochangeinincrementsof5degrees.
pressandholdbuttontochangeinincrementsof25degrees.
3. Tochangethetime,pressthetiMERbutton.Tapbuttonand
releasetochangeinone-minuteincrements.pressandhold
buttontochangein10-minuteincrements.
4. pressStARt/StOPbutton.
• digitaldisplayflashespReHeATuntil150˚Ftemperature
isreached;temperaturecontinuestoincreaseuntilset
temperatureisreached.
• onceunitreachessettemperature,itbeepsanddisplayalternatesbetween
temperatureandtimeduringtheentirecookingcycle.
• Thetimewillcountdowninone-minuteincrementsuntilitreaches59seconds,
thenitcountsdowninone-secondincrements.
M
• Attheendofthecookingcycle,theunitbeeps3timesandcookingstops.
5. openovendoorusingovenmittorpotholderandcarefullyremovefood.
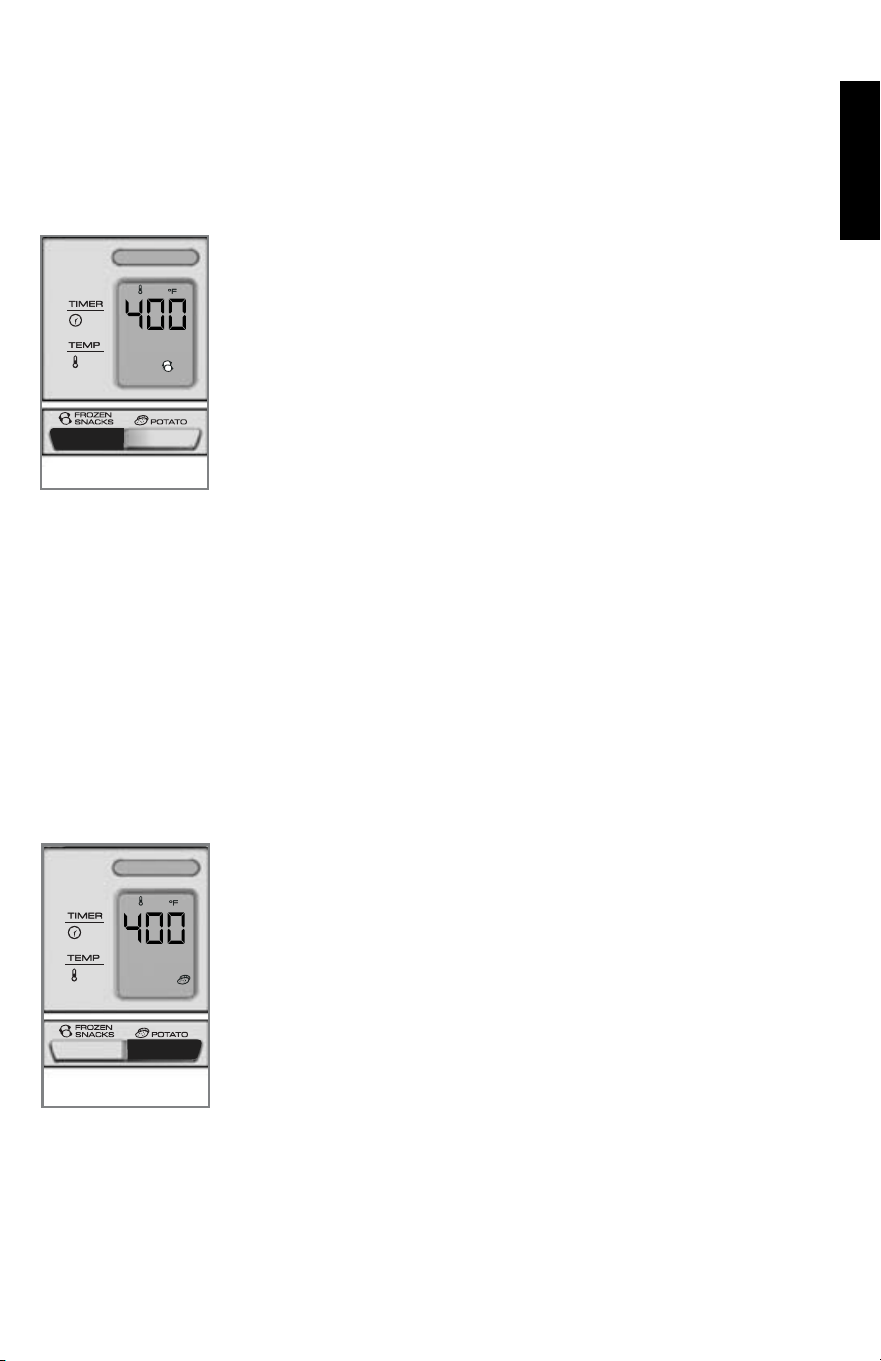
FROzEN SNACKS FUNCtiON (P)
Preset temperature:400˚F.
Preset time:6minutes
Rack Position:2or3(refertoFigure D)
1. pressFROzEN SNACKSbutton.
2. Tochangethetemperature,immediatelypress▲or▼
buttons.Tapbuttonandreleasetochangeinincrementsof
5degrees.pressandholdbuttontochangeinincrementsof
25degrees.
3. Tochangethetime,pressthetiMERbutton.Tapbuttonand
releasetochangeinone-minuteincrements.pressandhold
buttontochangein10-minuteincrements.
4. pressStARt/StOPbutton.
• digitaldisplayflashespReHeATuntil150˚Ftemperature
isreached;temperaturecontinuestoincreaseuntilset
temperatureisreached.
• onceunitreachessettemperature,itbeepsanddisplayalternatesbetween
temperatureandtimeduringtheentirecookingcycle.
• Thetimewillcountdowninone-minuteincrementsuntilitreaches59seconds,
thenitcountsdowninone-secondincrements.
• Attheendofthecookingcycle,theunitbeeps3timesandcookingstops.
5. openovendoorusingovenmittorpotholderandcarefullyremovefood.
POtAtO FUNCtiON (Q)
Preset temperature:400˚F.
Preset time: 45minutes
Rack Position:2or3(refertoFigure D)
1.pressPOtAtObutton.
2.The400°Fpresettemperatureforthepotatofunctioncannot
bechanged.
3.Tochangethetime,pressthetiMERbutton.Tapbuttonand
releasetochangeinone-minuteincrements.pressandhold
buttontochangein10-minuteincrements.
4.pressStARt/StOPbutton.
• digitaldisplayflashespReHeATuntil150˚Ftemperature
isreached;temperaturecontinuestoincreaseuntilset
temperatureisreached.
• onceunitreachessettemperature,itbeepsanddisplay
alternatesbetweentemperatureandtimeduringtheentire
cookingcycle.
• Thetimewillcountdowninone-minuteincrementsuntilitreaches59seconds,
thenitcountsdowninone-secondincrements.
• Attheendofthecookingcycle,theunitbeeps3timesandcookingstops.
5. openovendoorusingovenmittorpotholderandcarefullyremovefood.
N
P
ENgLiSH
Q
10
11
QUiCK BAKE FUNCtiONS
Thesefunctionsallowyoutocookatpresetcookingtemperaturesandtimes,orcanbe
adjustedasdesired.
Note:YoucanstopthecookingatanytimebypressingtheStARt/StOPbutton.
COOKiES FUNCtiON (M)
Preset temperature: 350˚F.
Preset time:12minutes
Rack Position:2or3(refertoFigure D).placeinthecenteroftheoven.
1. pressCOOKiESbutton.
2. Tochangethetemperature,immediatelypress▲or▼buttons.
Tapbuttonandreleasetochangeinincrementsof5degrees.
pressandholdbuttontochangeinincrementsof25degrees.
3. Tochangethetime,pressthetiMERbutton.Tapbuttonand
releasetochangeinone-minuteincrements.pressandhold
buttontochangein10-minuteincrements.
4. pressStARt/StOPbutton.
• digitaldisplayflashespReHeATuntil150˚Ftemperature
isreached;temperaturecontinuestoincreaseuntilset
temperatureisreached.
• onceunitreachessettemperature,itbeepsanddisplayalternatesbetween
temperatureandtimeduringtheentirecookingcycle.
• Thetimewillcountdowninone-minuteincrementsuntilitreaches59seconds,
thenitcountsdowninone-secondincrements.
• Attheendofthecookingcycle,theunitbeeps3timesandcookingstops.
5. openovendoorusingovenmittorpotholderandcarefullyremovefood.
PizzA FUNCtiON (N)
Preset temperature:400˚F.
Preset time:20minutes
Rack Position:2or3(refertoFigure D)
1. pressPizzAbutton.
2. Tochangethetemperature,immediatelypress▲or▼buttons.
Tapbuttonandreleasetochangeinincrementsof5degrees.
pressandholdbuttontochangeinincrementsof25degrees.
3. Tochangethetime,pressthetiMERbutton.Tapbuttonand
releasetochangeinone-minuteincrements.pressandhold
buttontochangein10-minuteincrements.
4. pressStARt/StOPbutton.
• digitaldisplayflashespReHeATuntil150˚Ftemperature
isreached;temperaturecontinuestoincreaseuntilset
temperatureisreached.
• onceunitreachessettemperature,itbeepsanddisplayalternatesbetween
temperatureandtimeduringtheentirecookingcycle.
• Thetimewillcountdowninone-minuteincrementsuntilitreaches59seconds,
thenitcountsdowninone-secondincrements.
M
• Attheendofthecookingcycle,theunitbeeps3timesandcookingstops.
5. openovendoorusingovenmittorpotholderandcarefullyremovefood.
FROzEN SNACKS FUNCtiON (P)
Preset temperature:400˚F.
Preset time:6minutes
Rack Position:2or3(refertoFigure D)
1. pressFROzEN SNACKSbutton.
2. Tochangethetemperature,immediatelypress▲or▼
buttons.Tapbuttonandreleasetochangeinincrementsof
5degrees.pressandholdbuttontochangeinincrementsof
25degrees.
3. Tochangethetime,pressthetiMERbutton.Tapbuttonand
releasetochangeinone-minuteincrements.pressandhold
buttontochangein10-minuteincrements.
4. pressStARt/StOPbutton.
• digitaldisplayflashespReHeATuntil150˚Ftemperature
isreached;temperaturecontinuestoincreaseuntilset
temperatureisreached.
• onceunitreachessettemperature,itbeepsanddisplayalternatesbetween
temperatureandtimeduringtheentirecookingcycle.
• Thetimewillcountdowninone-minuteincrementsuntilitreaches59seconds,
thenitcountsdowninone-secondincrements.
• Attheendofthecookingcycle,theunitbeeps3timesandcookingstops.
5. openovendoorusingovenmittorpotholderandcarefullyremovefood.
POtAtO FUNCtiON (Q)
Preset temperature:400˚F.
Preset time: 45minutes
Rack Position:2or3(refertoFigure D)
1.pressPOtAtObutton.
2.The400°Fpresettemperatureforthepotatofunctioncannot
bechanged.
3.Tochangethetime,pressthetiMERbutton.Tapbuttonand
releasetochangeinone-minuteincrements.pressandhold
buttontochangein10-minuteincrements.
4.pressStARt/StOPbutton.
• digitaldisplayflashespReHeATuntil150˚Ftemperature
isreached;temperaturecontinuestoincreaseuntilset
temperatureisreached.
• onceunitreachessettemperature,itbeepsanddisplay
alternatesbetweentemperatureandtimeduringtheentire
cookingcycle.
• Thetimewillcountdowninone-minuteincrementsuntilitreaches59seconds,
thenitcountsdowninone-secondincrements.
• Attheendofthecookingcycle,theunitbeeps3timesandcookingstops.
5. openovendoorusingovenmittorpotholderandcarefullyremovefood.
N
P
ENgLiSH
Q
1
1
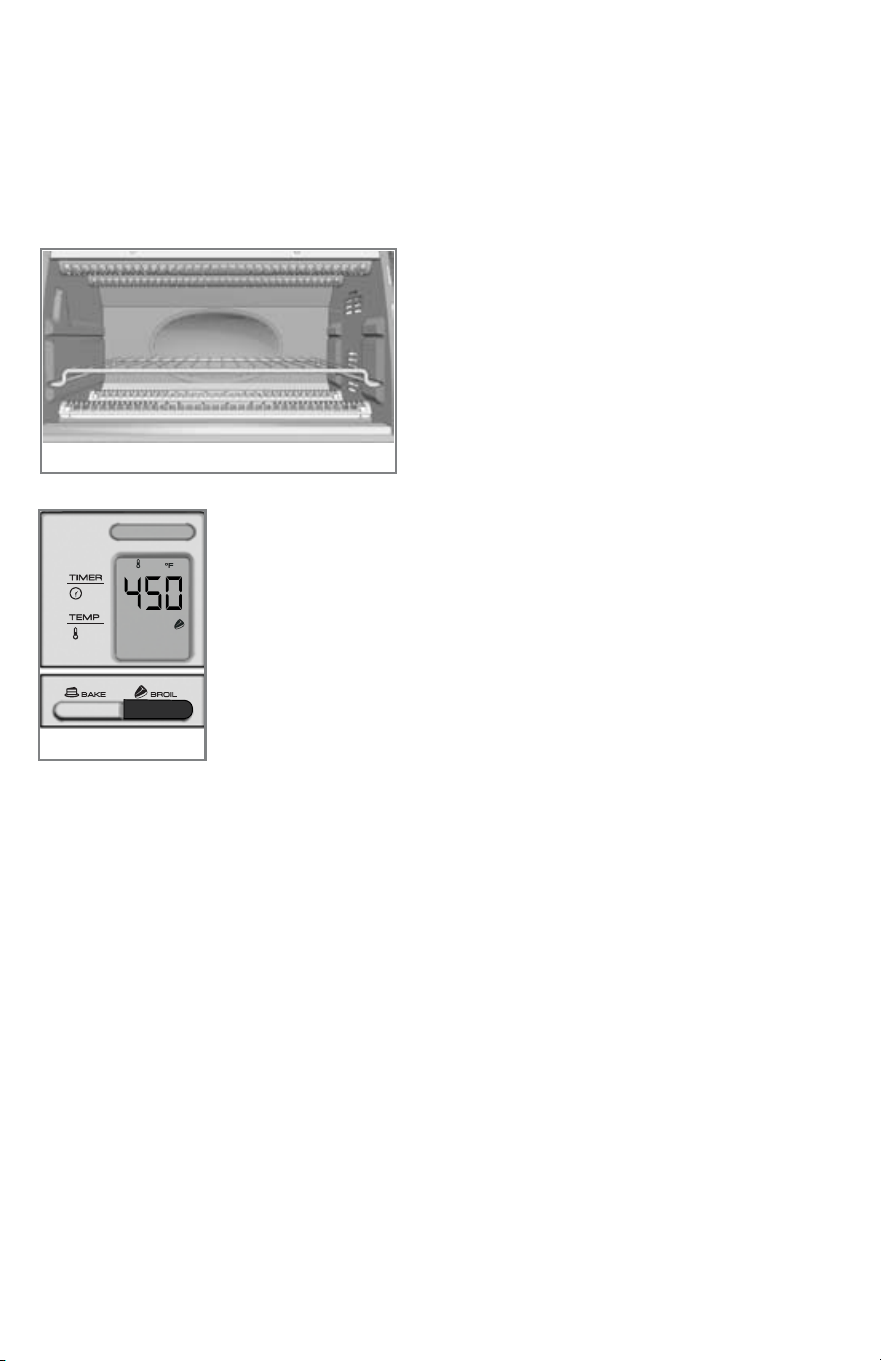
BROiL FUNCtiON
Caution: Unit gets hot. NEVER touch outer surfaces, including the glass door. Always
use oven mitt or pot holder.
Note:Broilingtemperatureispresetat450°F.Youdonotneedtopreheattheoven.
1. placethebroilrackinthebakepan.
2. placefoodtobecookedonbroilrack.
3. openovendoor.
4. Insertrackintooven.Userackposition
2(R).SeeCookIngCHARTonpages
16and17forrecommendedtemperatures
andtimes.
important: Allow at least inches between the
food and the top heating elements.
5. Closeovendoor.
6. pressBROiLbutton.onindicatorlightblinksand450˚Fdefault
temperatureflashesonthedigitaldisplay(S).
7. Tosetcookingtime,pressthetiMERbuttonthenimmediately
press▲or▼button.Tapbuttonandreleasetochangein
one-minuteincrements.pressandholdbuttontochangein
10-minuteincrements.
• digitaldisplayalternatesbetweencookingtemperatureandset
timeduringtheentirecookingcycle.
• Thetimewillcountdowninone-minuteintervalsuntilitreaches
59seconds,thenitcountsdowninone-secondincrements.
• Attheendofthecookingcycle,theunitbeeps3timesandcookingstops.
Note: YoucanstopthecookingatanytimebypressingtheStARt/StOPbutton.
8. openovendoor.
Caution: the unit gets hot! Always use an oven mitt to open or close the door.
R
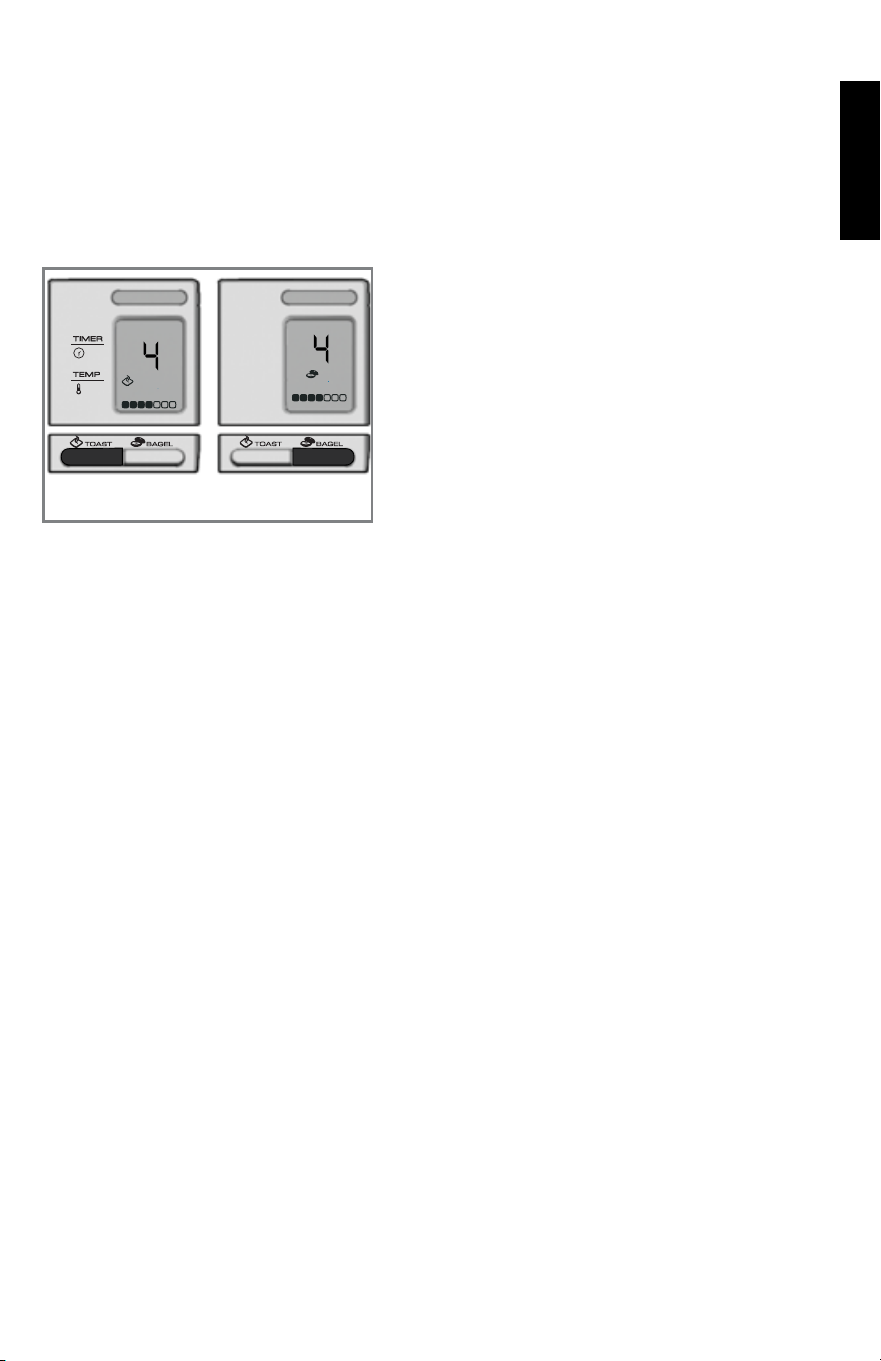
tOAStiNg BREAD OR BAgELS
Caution: Unit gets hot. NEVER touch outer surfaces, including the door. Always use
oven mitt or pot holder.
1. openovendoor.
2. placeslicesofbreadorbagelhalves(cutsideup)onthesliderack.Temperature
andtimearepreset.Itisnotnecessarytopreheattheovenfortoasting.
3. Forbestperformance,userackposition2.
4. Closeovendoor.
5.Fortoastingbread,presstOAStbutton.
Forbagels,pressBAgELbutton.Forboth
functionstheonindicatorblinksandthe
digitaldisplayshows4flashing(medium
setting)(t).Thisisthepresetshadelevel.
Note:Thebagelfunctiontoaststhetopside
andgentlywarmsthebottom.
6.Tochangeshadelevel(1-7),immediately
press▲or▼button.Forbestresults,select
themediumsetting(4)foryourfirstcycle
thanadjustlighterordarkertosuityour
taste.
7. presstheStARt/StOPbutton.
8. oncetoastingcycleisfinished,theunitbeeps3timesandcycleends.
Note:Foryourconvenience,theunitwillrememberthelastselectedshadelevel,
unlessunplugged.
9. openovendoorusingovenmittorpotholder,slideouttheracktoremovebread
orbagels.
t
ENgLiSHENgLiSH
S
1
1
BROiL FUNCtiON
Caution: Unit gets hot. NEVER touch outer surfaces, including the glass door. Always
use oven mitt or pot holder.
Note:Broilingtemperatureispresetat450°F.Youdonotneedtopreheattheoven.
1. placethebroilrackinthebakepan.
2. placefoodtobecookedonbroilrack.
3. openovendoor.
4. Insertrackintooven.Userackposition
2(R).SeeCookIngCHARTonpages
16and17forrecommendedtemperatures
andtimes.
important: Allow at least inches between the
food and the top heating elements.
5. Closeovendoor.
6. pressBROiLbutton.onindicatorlightblinksand450˚Fdefault
temperatureflashesonthedigitaldisplay(S).
7. Tosetcookingtime,pressthetiMERbuttonthenimmediately
press▲or▼button.Tapbuttonandreleasetochangein
one-minuteincrements.pressandholdbuttontochangein
10-minuteincrements.
• digitaldisplayalternatesbetweencookingtemperatureandset
timeduringtheentirecookingcycle.
• Thetimewillcountdowninone-minuteintervalsuntilitreaches
59seconds,thenitcountsdowninone-secondincrements.
• Attheendofthecookingcycle,theunitbeeps3timesandcookingstops.
Note: YoucanstopthecookingatanytimebypressingtheStARt/StOPbutton.
8. openovendoor.
Caution: the unit gets hot! Always use an oven mitt to open or close the door.
R
tOAStiNg BREAD OR BAgELS
Caution: Unit gets hot. NEVER touch outer surfaces, including the door. Always use
oven mitt or pot holder.
1. openovendoor.
2. placeslicesofbreadorbagelhalves(cutsideup)onthesliderack.Temperature
andtimearepreset.Itisnotnecessarytopreheattheovenfortoasting.
3. Forbestperformance,userackposition2.
4. Closeovendoor.
5.Fortoastingbread,presstOAStbutton.
Forbagels,pressBAgELbutton.Forboth
functionstheonindicatorblinksandthe
digitaldisplayshows4flashing(medium
setting)(t).Thisisthepresetshadelevel.
Note:Thebagelfunctiontoaststhetopside
andgentlywarmsthebottom.
6.Tochangeshadelevel(1-7),immediately
press▲or▼button.Forbestresults,select
themediumsetting(4)foryourfirstcycle
thanadjustlighterordarkertosuityour
taste.
7. presstheStARt/StOPbutton.
8. oncetoastingcycleisfinished,theunitbeeps3timesandcycleends.
Note:Foryourconvenience,theunitwillrememberthelastselectedshadelevel,
unlessunplugged.
9. openovendoorusingovenmittorpotholder,slideouttheracktoremovebread
orbagels.
t
ENgLiSHENgLiSH
S

1
1
tROUBLESHOOtiNg
PROBLEM POSSiBLE CAUSE SOLUtiON
Unitisnotheatingorstops
heating.
electricaloutletisnot
workingorovenis
unplugged.
Checktomakesure
outletisworking.
Boththetemperature
controlandthe
timermustbesetin
orderfortheovento
function.
Secondtoastingistoodark. Settingontoastistoo
dark.
Ifdoingrepeated
toastingintheoven,
selectashadeslightly
lighterthanthe
previoussetting.
Moistureformsontheinsideof
theglassdoorduringtoasting.
Theamountofmoisture
differsindifferent
products,whetherbread,
bagelsorfrozenpastries.
Themoisturethat
formsontheoven
doorisquitecommon
andwillusually
disappearduringthe
toastingcycle.Since
theovenisclosed
themoisturecannot
evaporateasitwould
inatoaster.
Foodisovercookedor
undercooked.
Temperatureandcook
timemayneedtobe
adjusted.
Asyouratoaster
ovenismuchsmaller
thanaregular
oven,itmayheat
upfasterandcook
faster.Trylowering
thetemperature
25degreesfrom
thesuggested
temperatureina
recipeoronalabel.
Thereisburntfoododoror
smokingwhenovenisbeing
used.
Thereareremnantsoffood
incrumbtrayoronthe
wallsoftheoven.
Refertothedirections
intheCAReAnd
CleAnIngsection
ofthisUse&Care
booklet.Makesure
allpartsoftheoven,
bakingpanandrack
areclean.
Heatingelementsdonotseem
tobeon.
Theheatingelementscycle
onandoffduringbaking.
Checktheovento
makecertainthe
functiondesiredis
beingused.onbroil,
onlythetopelement
ison.
ENgLiSH
Care and Cleaning
Thisproductcontainsnouserserviceableparts.Referservicetoqualifiedservice
personnel.
CLEANiNg
1. Turnoffunit,unplugfromwalloutletandletitcoolbeforecleaning.
2. Cleantheglassdoorwithanylonpadandsudsywater.donotuseaspray
glasscleaner.
3. Toremovesliderack,openthedoor,pulltherackforwardandout.Washinwarm,
sudsywaterorinadishwasher.Toremovestubbornspots,useapolyester
ornylonpad.Toreplacethesliderack,openthedoorcompletelyandslideintothe
railandclosethedoor.
4. Washthebakepan,broilrackandpizzapaninwarm,sudsywaterorinthe
dishwasher.Tominimizescratching,useapolyesterornylonpad.
5. Toremovethecrumbtray,graspthehandleatthefrontoftheovenandpullitout.
disposeofcrumbsandwashthetrayinwarm,sudsywater.Removestubbornspots
withanylonmeshpad.Besuretodrythoroughlybeforeinsertingthetraybackinto
theoven.
ExtERiOR SURFACES
lettheovencoolcompletelybeforecleaninganyoutersurface.Wipewithadampcloth
orspongeanddrywithpapertowelorsoftcloth.
COOKiNg CONtAiNERS
• Metal,ovenproofglassorceramicbakewarewithoutglasslidscanbeusedinyour
oven.Followmanufacturer'sinstructions.
• Besurethetopedgeofthecontainerisatleast2"awayfromtheupperheating
elements.

1
1
tROUBLESHOOtiNg
PROBLEM POSSiBLE CAUSE SOLUtiON
Unitisnotheatingorstops
heating.
electricaloutletisnot
workingorovenis
unplugged.
Checktomakesure
outletisworking.
Boththetemperature
controlandthe
timermustbesetin
orderfortheovento
function.
Secondtoastingistoodark. Settingontoastistoo
dark.
Ifdoingrepeated
toastingintheoven,
selectashadeslightly
lighterthanthe
previoussetting.
Moistureformsontheinsideof
theglassdoorduringtoasting.
Theamountofmoisture
differsindifferent
products,whetherbread,
bagelsorfrozenpastries.
Themoisturethat
formsontheoven
doorisquitecommon
andwillusually
disappearduringthe
toastingcycle.Since
theovenisclosed
themoisturecannot
evaporateasitwould
inatoaster.
Foodisovercookedor
undercooked.
Temperatureandcook
timemayneedtobe
adjusted.
Asyouratoaster
ovenismuchsmaller
thanaregular
oven,itmayheat
upfasterandcook
faster.Trylowering
thetemperature
25degreesfrom
thesuggested
temperatureina
recipeoronalabel.
Thereisburntfoododoror
smokingwhenovenisbeing
used.
Thereareremnantsoffood
incrumbtrayoronthe
wallsoftheoven.
Refertothedirections
intheCAReAnd
CleAnIngsection
ofthisUse&Care
booklet.Makesure
allpartsoftheoven,
bakingpanandrack
areclean.
Heatingelementsdonotseem
tobeon.
Theheatingelementscycle
onandoffduringbaking.
Checktheovento
makecertainthe
functiondesiredis
beingused.onbroil,
onlythetopelement
ison.
ENgLiSH
Care and Cleaning
Thisproductcontainsnouserserviceableparts.Referservicetoqualifiedservice
personnel.
CLEANiNg
1. Turnoffunit,unplugfromwalloutletandletitcoolbeforecleaning.
2. Cleantheglassdoorwithanylonpadandsudsywater.donotuseaspray
glasscleaner.
3. Toremovesliderack,openthedoor,pulltherackforwardandout.Washinwarm,
sudsywaterorinadishwasher.Toremovestubbornspots,useapolyester
ornylonpad.Toreplacethesliderack,openthedoorcompletelyandslideintothe
railandclosethedoor.
4. Washthebakepan,broilrackandpizzapaninwarm,sudsywaterorinthe
dishwasher.Tominimizescratching,useapolyesterornylonpad.
5. Toremovethecrumbtray,graspthehandleatthefrontoftheovenandpullitout.
disposeofcrumbsandwashthetrayinwarm,sudsywater.Removestubbornspots
withanylonmeshpad.Besuretodrythoroughlybeforeinsertingthetraybackinto
theoven.
ExtERiOR SURFACES
lettheovencoolcompletelybeforecleaninganyoutersurface.Wipewithadampcloth
orspongeanddrywithpapertowelorsoftcloth.
COOKiNg CONtAiNERS
• Metal,ovenproofglassorceramicbakewarewithoutglasslidscanbeusedinyour
oven.Followmanufacturer'sinstructions.
• Besurethetopedgeofthecontainerisatleast2"awayfromtheupperheating
elements.

16
17
ENgLiSH
COOKiNg CHARt
POPULAR FOODS AMOUNt/WEigHt tESt FOR DONENESS/ COOKiNg tEMPERAtURE/tiME COMMENtS
iNtERNAL tEMPERAtURE
Hamburger patties 6-1/4lb(110g)each M-160°F Broilat Turnhalfwaythroughcookingtime
about3/4-inch (71.1°C) 450°F(232°C)
(19mm)thick W-170°F 20-25minutes
(76.7°C)
Fish fillets 2to4 Todesired Bakeat400°F(204°C)or Brushwithmeltedbutter/sprinklewith
4to6ounces(110-171g)each doneness Broilat450°F(232°C) parsleyanddill/servewithlemon
145°F(62.8°C) 8to10minutes wedge
Fish steaks 2to4 145°F(62.8°C) Bakeat
6to8ounces(171g-227g) 400°F(204°C)orBroilat450°F(232°C)
12to15minutes
Boneless, skinless 4,about7ounces 170°F(76.7°C) Bakeat350°F(180°C)about40minutes Brushwithmeltedbutterormargarine
chicken breasts (199g)each/total foraddedflavorandbrowning,
weight1-3/4lb sprinklewithherbsorwith
Roasting chicken 3-1/2(1.59kg) Thigh180°F Bakeat350°F(180°C)about1-1/4hours marinadeorbastingsauce
to4lb(1.81kg) (82.2°C) last15minutes
Breast170°F
(76.7°C)
Baked potatoes 4to6about 220°F(104.4°C) Bakeat400°F Washskinswellandprickpotatoes
1-3/4lb(0.8kg) (204.5°C) withforkinseveralplaces
Popular snack foods:
Frozen french fries, 1packageabout Bakeaccordingtopackage Bakeonpizzapanorbakepan
pizza rolls, cheese 10to14ounces(284-397g) directionsorat400°F(204°C) incenterofoven
sticks, quesadillas, Bakeonpizzapanoronbakepan
mini pizzas, hot wings incenterofoven
cocktail franks in 9cookiesonpizza Bakeaccordingtopackage
pastry, refrigerated pan directionsorat450°F(232°C)
cookie dough
Pizzas Crustisbrowned
andcrisp.
French bread pizza 2 Cheeseismelted Bakeat325°F Forcrispcrust,placepizza
andbeginning (162.8°C) directlyonrack.
tobrown. about30minutes Forsoftercrust,bakeinpizzapan
providedwithoven.
Forevenbrowning,spin
Frozen thin crust 12-inchabout Bakeat400°F pizza1/4-turnabouthalfway
20ounces(567g) (204°C)about throughbaking
12minutes
Self-rising 12-inchabout Bakeat400°F
crust pizza 24ounces(681g) (204°C)about15minutes
Shelf stable pizza 12-inch Bakeat400°F(204°C)about15minutes

18
19
Recipes
SPiNACH PEStO QUiCHE
1singlecrustpieorrefrigeratedpiecrust
5largeeggs
1½cupsmilk
3tbsp.basilpesto
¼tsp.garlicpepper
1pkg.(10oz.)frozenspinach,defrostedandsqueezeddry
¹/³cupmincedpurpleonion
¼cupdicedpimentos
1½cupsshreddedmozzarellaandprovolonecheeseblend
preheatBlack&decker®ovenonBAketo425˚F.Rolloutpastryonlightlyoured
boardtot9-inchglasspieplate.placeinplateandmakeastandingrimofpastry
aroundedges.Followpackagedirectionsforbakingunlledpiecrustorbakeuntil
edgesarelightgoldenbrown.
Meanwhile,inlargebowl,blendeggs,milk,pestoandgarlicpepper.Stirinremaining
ingredients.Spoonintopre-bakedcrust.
Bake7minuteslonger;reducetemperatureto325˚Fandbake35minuteslongeror
untilpiellingissetandknifeinsertedincentercomesoutclean.letrest5minutes
beforeserving.
Makes8servings.
BASiL LEMON HALiBUt
1½cupshalvedcherrytomatoes
3tbsp.choppedItalianparsley
1tbsp.sliveredfreshbasil
1tbsp.snippedfreshchives
1tbsp.sliveredlemonpeel
½tsp.koshersalt
2tbsp.freshlemonjuice
1tbsp.oliveoil
2halibutllets(about6oz.,ea.)
¼tsp.garlicpepper
preheatBlack&decker®ovenonBAketo400˚F.Meanwhile,inmediumbowl,
combinetomatoes,parsley,basil,chives,lemonpeel,¼tsp.salt,lemonjuiceandolive
oil;blendwell.
Spooninto1-quartshallowbakingdish.placeshontopandseasonwithremaining¼
tsp.saltandgarlicpepper.
Bakefor20minutesoruntilshakeseasilywhentestedwithafork(Fishwillhavean
internaltemperatureof145˚F).
Makes2servings.
APPLE BREAD PUDDiNg
4cupslightlytoastedcubedFrenchbread,crustsremoved
1largeapple,nelychopped
½cupgoldenraisins
4largeeggs
1½cupsmilk
1tsp.vanillaextract
1tsp.groundcinnamon
½tsp.groundnutmeg
¼tsp.salt
preheatBlack&decker®ovenonBAketo350°F.Spreadbreadevenlyinbuttered
2-quartbakingdish.Topwithapplesandraisins.
Inmediumbowl,blendeggs,milk,vanilla,cinnamon,nutmegandsalt.pourmixture
overbreadandletstandabout15minutestoallowbreadtoabsorbtheliquid.
Bakeforabout1houruntilpuffedandrminthecenter,andknifeinsertedincenter
comesoutclean.
Makesabout6servings.
ENgLiSH

0
1
isatrademarkofTheBlack&deckerCorporation,
Towson,Maryland,USA
Madeinpeople’sRepublicofChina
printedinpeople’sRepublicofChina
ENgLiSH
NEED HELP?
Forservice,repairoranyquestionsregardingyourappliance,callthe
appropriate800numberoncoverofthisbook.pleaseDO NOtreturnthe
producttotheplaceofpurchase.Also,pleaseDO NOtmailproductbackto
manufacturer,norbringittoaservicecenter.Youmayalsowanttoconsultthe
websitelistedonthecoverofthismanual.
two-Year Limited Warranty
(Applies only in the United States and Canada)
What does it cover?
• Anydefectinmaterialorworkmanshipprovided;however,Applica’sliability
willnotexceedthepurchasepriceofproduct.
For how long?
•Twoyearsfromthedateoforiginalpurchasewithproofofsuchpurchase.
What will we do to help you?
• provideyouwithareasonablysimilarreplacementproductthatiseithernew
orfactoryrefurbished.
How do you get service?
• Saveyourreceiptasproofofdateofsale.
• visittheonlineservicewebsiteatwww.prodprotect.com/applica,orcalltoll-
free1-800-231-9786,forgeneralwarrantyservice.
• Ifyouneedpartsoraccessories,pleasecall1-800-738-0245.
What does your warranty not cover?
• damagefromcommercialuse
• damagefrommisuse,abuseorneglect
• productsthathavebeenmodiedinanyway
• productsusedorservicedoutsidethecountryofpurchase
• glasspartsandotheraccessoryitemsthatarepackedwiththeunit
• Shippingandhandlingcostsassociatedwiththereplacementoftheunit
• Consequentialorincidentaldamages(pleasenote,however,thatsome
statesdonotallowtheexclusionorlimitationofconsequentialorincidental
damages,sothislimitationmaynotapplytoyou.)
How does state law relate to this warranty?
• Thiswarrantygivesyouspeciclegalrights.Youmayalsohaveotherrights
thatvaryfromstatetostateorprovincetoprovince.

Por favor lea este instructivo antes de usar el producto.
iNStRUCCiONES iMPORtANtES
DE SEgURiDAD
Cuandoseutilizanaparatoseléctricos,siempresedeberespetarciertas
medidasdeseguridad,incluyendolassiguientes:
❍porfavorleatodaslasinstrucciones.
❍notoquelassuperficiescalientes.Uselasasasolasperillas.
❍Afindeprotegersecontraunchoqueeléctricoylesionesalaspersonas,no
sumerjaelcable,losenchufesnielaparatoenaguanienningunotroliquido.
❍Todoaparatoeléctricousadoenlapresenciadelosninosoporellosmismos
requierelasupervisiondeunadulto.
❍desconecteelaparatodeltomacorrientecuandonoesteenusoyantes
delimpiarlo.esperequeelaparatoseenfrieantesdeinstalarleoretirarle
piezasyantesdelimpiarlo.
❍nouseningunaparatoeléctricoquetengaelcableoelenchufeaveriado,
quepresenteunproblemadefuncionamientooqueestedanado.Acudaaun
centrodeservicioautorizadoparaqueloexaminen,reparenoajustenollame
gratisalnumerocorrespondienteenlacubiertadeestemanual.
❍elusodeaccesoriosnorecomendadosporelfabricantedelaparatopuede
ocasionarincendio,choqueeléctricoolesionesalaspersonas.
❍nouseesteaparatoalaintemperie.
❍nopermitaqueelcablecuelguedelbordedelamesaodelmostradornique
entreencontactoconsuperficiescalientes.
❍nocoloqueelaparatosobrenicercadelashornillasdegasoeléctricasni
adentrodeunhornocaliente.
❍Tomemuchaprecaucionalmoverdeunlugaraotrounaparatoquecontenga
aceiteuotrosliquidoscalientes.
❍Siempreconecteprimeroelcablealaparatoydespues,enchufeloalatoma
decorriente.paradesconectar,presioneelbotónSTART/STopydespués,
retireelenchufedeltomacorriente.
❍esteaparatosedebeusarunicamenteconelfinprevisto.
❍Tengamuchisimocuidadoalretirarlabandejaoaldesecharlagrasa
caliente.
❍Afindeevitarelriesgodeincendioochoqueeléctrico,jamásintroduzca
alimentosdemasiadograndesniutensiliosdemetaladentrodelaparato.
❍existeelriesgodeincendiosielaparatopermanececubiertomientrasse
encuentraenfuncionamientoosiestellegaseaentrarencontactocon
cualquiermaterialinflamable,incluyendolascortinasylasparedes.
❍noutilicealmohadillasdefibrasmetálicasparalimpiarelaparato.las
fibrasmetálicaspodrianentrarencontactoconlaspiezaseléctricasdel
aparato,resultandoenelriesgodeunchoqueeléctrico.
❍Asegúresedenocolocarnadasobreelaparatomientrasseencuentreen
uso.Tengamuchocuidadoalutilizarrecipientesquenoseandemetalni
devidrio.
❍Cuandoesteaparatonoseencuentreenfuncionamientonosedebe
almacenarnadaapartedelosaccesoriosrecomendadosporelfabricante.
❍nointroduzcalossiguientesmaterialesenelaparato:papel,cartón,
envolturasplasticasnimaterialessemejantes.
❍Afindeevitarqueelaparatosesobrecaliente,nocubralabandejapara
losresiduoscomoningunaotrasuperficiedelaparatoconpapelde
aluminio.
CONSERVE EStAS iNStRUCCiONES.
Este aparato eléctrico es para uso doméstico únicamente.
ESPAÑOL

El producto puede variar ligeramente del que aparece ilustrado.
1. Pantalla digital
. luz indicadora de encendido
. Panel electrónico (Vea B)
. Puerta de cristal redondeada
. Parrilla corrediza
6. Bandeja de horneado (bandeja para goteo)
7. Parrilla de asado
8. Bandeja de residuos removible
9. Manigueta de la puerta
10. Espacio interior profundo redondeado
ESPAÑOL
ENCHUFE DE tiERRA
Comomedidadeseguridad,esteproductocuentaconunenchufedetierraque
tienetrescontactos.notratedealterarestamedidadeseguridad.laconexión
inapropiadadelconductordetierrapuederesultarenunriesgodechoque
eléctrico.Sitienealgunaduda,consulteconunelectricistacalificadopara
asegurarsedequeeltomacorrienteseaunodetierra.
tORNiLLO DE SEgURiDAD
Advertencia: Este aparato cuenta con un tornillo de seguridad para evitar
la remoción de la cubierta exterior del mismo. A fin de reducir el riesgo de
incendio o de choque eléctrico, por favor no trate de remover la cubierta
exterior. Este producto no contiene piezas reparables por el consumidor.
toda reparación se debe llevar a cabo únicamente por personal de servicio
autorizado.
CABLE ELÉCtRiCO
a)elproductodebeproporcionarseconuncablecortoparareducirelriesgode
enredarseodetropezarconuncablelargo.
b)Seencuentrandisponiblescablesdeextensiónmáslargos,queesposible
utilizarsiseempleaelcuidadodebido.
c) Siseutilizauncabledeextensión,
1) elvoltajeeléctricodelcableodelcabledeextensióndebeser,como
mínimo,igualaldelvoltajedelaparato,y
2) elcabledebeacomodarsedemodoquenocuelguedelmostradorode
lamesa,paraevitarqueunniñotiredelmismooquealguiensetropiece
accidentalmente.
Sielaparatoesdeltipoqueesconectadoatierra,elcabledeextensióndeberá
seruncabledetresalambresconectadoatierra.
Nota: Sielcordóndealimentaciónestadañado,enAméricalatinadebe
sustituirseporpersonalcalificadooporelcentrodeservicioautorizado.
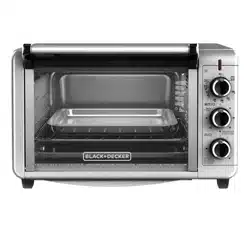
6
7
ESPAÑOL
Como usar
esteproductoestádiseñadoparausodomésticoúnicamente.
PASOS PRELiMiNARES
• Remuevatodoelempaquetadoycualquieretiquetaengomada.desprendael
plásticoprotectordelcontroldepaneles.
• Retireelmaterialdelecturayguárdelo.
• porfavorvisitewww.prodprotect.com/applicapararegistrarsugarantía.
• lavetodaslaspiezasdeacuerdoalasinstruccionesenlaseccióndeCuidadoy
limpieza.
• Seleccioneunlugarparacolocarlaunidad.dejeunespacioentrelaunidadyla
paredparaquesalgaelcalorsindañarloscabinetesnilapared.
• Introduzcalabandejaderesiduosdebajodeloselementosdecalefacción.
• desenrolleelcableyestírelo.
•Conectelaunidadalenchufeeléctrico.losnúmeros
000apareceránenlapantalladigital(C).
importante: Notará un poco de humo y de olor a
quemado durante los primeros momentos. No se
alarme, esto es común.
PRECAUCiÓN
EStE HORNO SE CALiENtA
CUANDO EStÁ EN USO. SiEMPRE
USE AgARRADERAS O gUANtES
DE COCiNA CUANDO tOQUE tODA
SUPERFiCiE iNtERNA O ExtERNA
DEL HORNO.
FUNCiONES DEL PANEL ELECtRÓNiCO DE CONtROLES (B)
1. indica cuando se ha seleccionado y
activado una función.
. Le permite revisar el tiempo de cocción,
la temperatura, y el tostado del pan y
del bagel.
. Aumenta el tiempo, la temperatura y el
nivel de tostado del pan y el bagel.
. Reduce el tiempo, la temperatura y el
nivel de tostado del pan y el bagel.
. Puede prepararlas a la temperatura
(0˚F) y tiempo (1 minutos) prefijado
o lo puede adaptar a su gusto.
6. Puede prepararla a la temperatura
(00˚F) y tiempo (0 minutos) prefijado
o lo puede adaptar a su gusto.
7. Puede prepararlas a la temperatura
(00˚F) y tiempo (6 minutos) prefijado
o lo puede adaptar a su gusto.
8. Puede prepararlas a la temperatura
(00˚F) y tiempo ( minutos) prefijado
o lo puede adaptar a su gusto.
9. Le permite fijar el tiempo de cocción
hasta horas.
10. Enciende el ventilador interno para
distribuir calor uniformemente a
medida que cocina. Sólo funciona con
la función de hornear (BAKE). Baje la
temperatura grados cuando use esta
función.
11. El horno se calienta y cocina
automaticamente (0˚F por 0
minutos), o lo puede adaptar a su gusto.
1. La temperatura y el tiempo de cocción
están prefijados (0˚F y 0 minutos)
o se pueden adaptar a su gusto. No hace
falta calentar la unidad.
1. Regula el tostado para bagels (1- 7).
1. Regula el nivel de tostado (1- 7).
1. Presione la perilla de inicio (StARt)
para activar todas las funciones.
Presione la perilla de finalizar (StOP)
para cesar todas las funciones; la
luz indicadora de encendido (On) se
apagara.
C
8
9
FUNCiÓN PARA HORNEAR
Cómo seleccionar la temperatura y el tiempo de cocción
Precaucion: La unidad se calienta. NUNCA toque la carcasa exterior ni la puerta
de cristal. Use siempre un guante o agarrador de ollas.
Nota:Ustedcuentacon10segundosparaseleccionarlatemperaturayel
tiempo.Sisepasanloscincosegundos,lapantallavolveráautomaticamentea
latemperaturaytiempo000;simplementerepitalospasosabajodel1-5para
comenzardenuevo.
1.presionelaperilladehornear(BAKE).lacampanasonará,
laluzdeencendidopestañea,ylatemperaturaoriginalde
350°Fchiespeaenlapantalla(E).
2.Para cambiar la temperatura,inmediatamentepresionelas
perillas(▲)ó(▼)hastallegaralatemperaturadeseada(F).
Nota:latemperaturadecocciónsepuederegulardesde200˚F
hasta450˚F(93˚C-232˚C).
• Toqueligeramentelaperillaparacambiarenincrementos
de5grados.
• Mantengapresionadalaperillaparacambiarrápidamenteen
incrementosde25grados.
3.Para fijar el tiempo de cocción,presionelaperilladetiempo
(tiME).Siustedacabadeconectarlaunidad,eltiempo
originalde30minutoschispeaenlapantalla.(g);delo
contrario,apareceeltiemposeleccionadoanteriormente.
4.presioneimmediatamentelasperillas(▲)ó(▼)para
seleccionareltiempodeseadohasta2horasmáximo(H).
• Toqueligeramentelaperillaparacambiarenincremento
deunminuto.
• Mantengapresionadalaperillaparacambiarenincremento
de10minutos.
ESPAÑOL
iNFORMACiÓN UtiL ACERCA DE SU HORNO
• puedecambiarlatemperaturade˚Fa˚Cconpresionarlasperillas▲y▼
simultaneamente.
• parasuconveniencia,launidadsiempreguardaenmemorialaúltimaselección
antesdeserdesconectada.Ustedpuedecambiarloantesquelaunidadempiezea
calentarseounavezquealcanzelatemperaturayeltiempoprefijado.
• nopuedecambiarlatemperaturayeltiempoduranteelciclodecalentación.
Cuandolleguealatemperaturafijada,puedecambiarlatemperaturaóeltiempo
encualquiermomento.
• parahornearconelmodoconvencional,recuerdebajarlatemperaturaunos25˚F
(10˚C).
Precaución: Esta unidad se calienta. NUNCA toque las superficies exteriores ni la
puerta de cristal. Use siempre un guante o agarradera de olla.
POSiCiONES DE LA PARRiLLA CORREDizA
laparrillacorredizatienecuatroposiciones(D).Sepuedecolocarenlaaberturade
arribaoladeabajo.Tambiénsepuedeinvertirendosposicionesadicionales.
Posición 1
Use la abertura de arriba a lo largo
de las paredes del horno. Deslize la
parrilla hacia arriba.
Posición
Use la abertura de abajo a lo largo
de las paredes del horno. Deslize la
parrilla hacia arriba.
Posición
Use la abertura de arriba a lo largo
de las paredes del horno. Deslize la
parrilla hacia abajo.
Posición
Use la abertura de abajo a lo largo
de las paredes del horno. Deslize la
parrilla hacia abajo.
D
E
F
g
H
0
1
FUNCiONES PARA HORNEAR RAPiDO
estasfuncioneslepermitencocinarcontemperaturasytiempodecocción
prefijadoperolospuedecambiarasugusto.
Nota:Ustedpuededetenereltiempodecocciónencualquiermomentoconsólo
presionarlaperilladeiniciar/finalizar(StARt/StOP).
FUNCiÓN PARA gALLEtiCAS (M)
Ponga la temperatura a: 180°C(350˚F)
Ponga el tiempo a:12minutes
Posición de la bandeja:2ó3(refiérasealdibujo D).Colóquelaenelcentrodel
horno.
1.presionelaperilladegalleticas(COOKiES).
2.paraalterarlatemperatura,presioneinmediatamentelas
perillas▲ó▼.Toqueligeramentelaperillaparacambiar
enincrementosde5grados.Mantengapresionadalaperilla
paracambiarrápidamenteenincrementosde25grados.
3.paraalterareltiempo,presionelaperilladeltiempo(tiMER).
Toqueligeramentelaperillaparacambiarenincrementos
de1minuto.Mantengapresionadalaperillaparacambiar
rápidamenteenincrementosde10minutos.
4.presionelaperillaparainiciar/finalizar(StARt/StOP).
• lapantalladigitalchispealasletraspReHeAT(precalentar)hastaquelleguea
150˚F;continuaráaumentandohastalleguealatemperaturadeseada.
• Cuandoalcanzelatemperaturafijada,sonarálacampanaylapantallaexhibirá
latemperaturayeltiempoalternamentedurantetodoelciclodecocción.
• eltiempoirábajandoenintervalosdeunminutohastallegara59segundos,
luegobajaenintervalosdesegundos.
• Alfinaldelciclodecocción,launidadsuenalacampana3vecesysedetiene.
5. Useunguanteoagarradordeollaparaabrirelhornoysacarlacomidacon
cuidado.
FUNCiÓN PARA PizzA (N)
Ponga la temperatura a: 204°C(400˚F)
Ponga el tiempo: 20minutes
Posición de la bandeja: 2o3(refiérasealdibujo D)
1.presionelaperilladegalleticas(PizzA).
2.paraalterarlatemperatura,presioneinmediatamentelas
perillas▲ó▼.Toqueligeramentelaperillaparacambiar
enincrementosde5grados.Mantengapresionadalaperilla
paracambiarrápidamenteenincrementosde25grados.
3.paraalterareltiempo,presionelaperilladeltiempo
(tiMER).Toqueligeramentelaperillaparacambiaren
incrementosde1minuto.Mantengapresionadalaperilla
paracambiarrápidamenteenincrementosde10minutos.
4.presionelaperillaparainiciar/finalizar(StARt/StOP).
ESPAÑOL
5.Unavezyafijadalatemperaturayeltiempo,presionelaperilla
deiniciar/finalizar(StARt/StOP).
• lapantallaexhibirálasletrasloypReHeAT(precalentado)
hastaquelatemperaturalleguea150˚F,luegoexhibirála
temperaturaintermitentementehastallegaralatemperatura
fijada(J).
6.Abralapuertadelhorno.Coloquelosalimentosenlabandeja
calientedentrodelhorno.vealaseccióngUíAdeCoCCIónen
laspáginas36y37aquétemperaturayporcuántaduración.
7.Cierrelapuertadelhorno.
importante: No puede cambiar la temperatura ni el tiempo durante el ciclo de
calentamiento. Una vez la unidad llega a la temperatura seleccionada, puede
entonces cambiarlos en cualquier momento. Para su conveniencia, la unidad guarda
en la memoria la última selección antes de desconectarse.
• Cuandolaunidadlleguealatemperaturaajustada,sonarálacampanaylapantalla
exhibiráalternamentelatemperaturayeltiempodecocción.
• eltiempobajaporintervalosdeunminutohastallegara59segundos,luegobaja
enintervalosdesegundos.
• Alterminarelciclo,launidadsonarálacampana3vecesysedetendrá.
Nota:Ustedpuededetenerlacocciónencualquiermomentoconsólopresionarla
perilladeiniciar/finalizar(StARt/StOP).
8.paraabrirlapuertadelhorno,póngaseunguanteoagarradera
dehornoyabrasuavementelapuertahaciaadelantehastaque
descanseencimadelmostrador(K).
FUNCiÓN DE MODO CONVENCiONAL
lafuncióndemodoconvencionalutilizaunventiladorinternopara
distribuirelcaloruniformemente.estesepuedeusarúnicamente
conlafuncióndehornear(BAke).
1.Cómoprenderelventilador:
• despuésdeseleccionarlatemperaturayeltiempo,presione
laperilladeiniciar/finalizarprimeroydespuéslaperillaConv.
podráescucharelsonidodelventiladoryenlapantalladigital
apareceráelsímbolodelventilador(L)duranteelciclode
cocción.
• Cuanohorneeamodoconvencional,seleccionelatemperaturaa
25gradosmenosquelarecomendadaparacocinar.
• Tengacuidadoconeltiempoyaquealgunosalimentosse
cocinanenelhornomásrápidoqueotros.
J
K
L
M
N
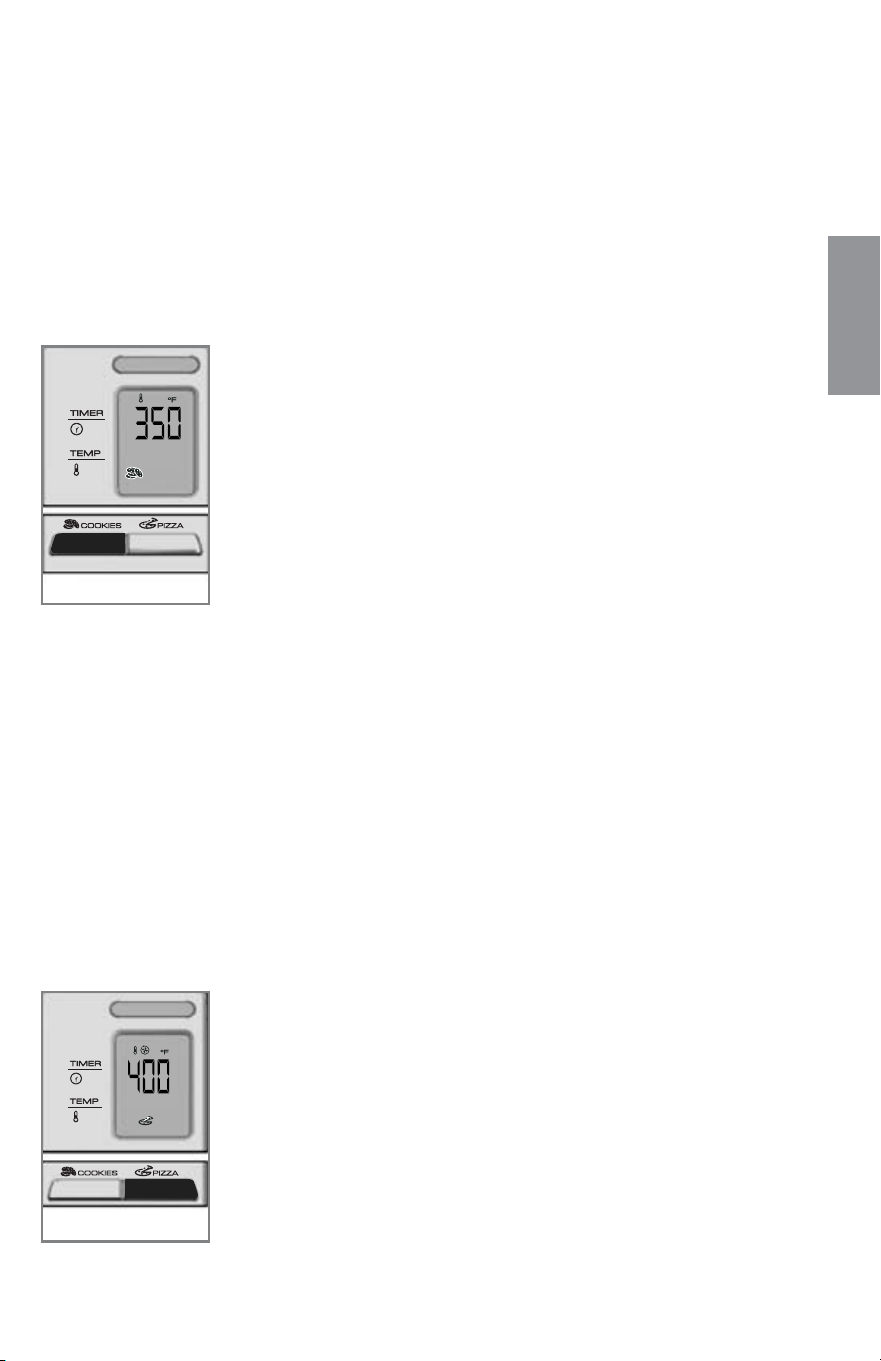
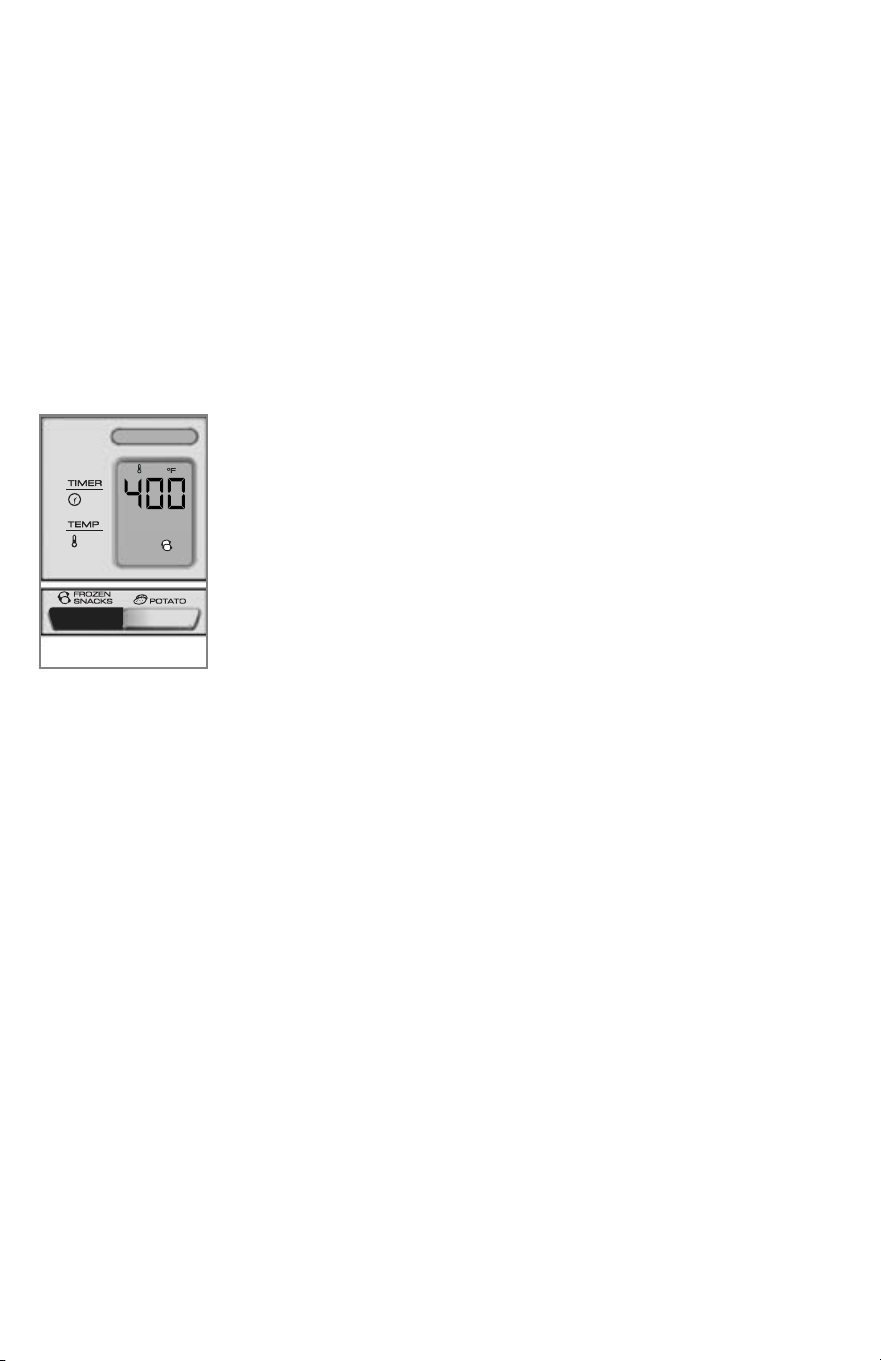
FUNCiÓN PARA PAPAS (Q)
Ponga la temperatura a: 204°C(400˚F)
Ponga el tiempo a: 45minutos
Posición de la bandeja: 2ó3(refiérasealdibujo D)
1.presionelaperillaparapapas(POtAtO).
2.latemperaturapreprogramadade204°Cparalafunción
parapapasnosepuedecambiar.
3.paracambiareltiempo,presionelaperilladeltiempo
(tiMER).Toqueligeramentelaperillaparacambiarloen
incrementosdeunminuto.Mantengapresionadalaperilla
paracambiarloenincrementosde10minutos.
4.presionelaperilladeiniciar/finalizar(StARt/StOP).
• lapantalladigitalexhibirálasletraspReHeAT(precalentado)
hastaquelleguea150˚F,ycontinuaráaumentadohasta
llegaralatemperaturadeseada.
• Cuandoalcanzelatemperaturaajustada,sonarálacampanaylapantalla
exhibirálatemperaturayeltiempoalternamentedurantetodoelciclode
cocción.
• eltiempoirádisminuyendoenintervalosdeunminutohastallegara
59segundos,entoncesdescenderáenintervalosdesegundos.
• Alfinaldelciclodecocción,launidadsonarálacampana3vecesysedetendrá.
5. Useunguanteoagarradordeollaparaabrirelhornoysacarlacomidacon
cuidado.
FUNCiÓN PARA ASAR
Precaucion: La unidad se calienta. NUNCA toque la carcasa exterior ni la puerta
de cristal. Use siempre un guante o agarrador de ollas.
Nota:latemperaturayaestáprogramadaa450°F.nohacefaltaprecalentar
elhorno.
1. Coloquelaparrilladeasadoenlabandejadehornear.
2. Coloquelosalimentosenlaparrilladeasado.
3. Abralapuertadelhorno.
4. Introduzcalaparrillaenelhorno.Usela
posición2
(R).veaenlaseccióndegUíA
deCoCCIónenlaspaginas
36y37aquétemperaturayporcuánta
duración.
importante: Deje al menos pulgadas
entre los alimentos y los elementos
calefactores.
5. Cierrelapuertadelhorno.
ESPAÑOL
• lapantalladigitalchispealasletraspReHeAT(precalentar)hastaquelleguea150
˚F;continuaráaumentandohastalleguealatemperaturadeseada.
• Cuandoalcanzelatemperaturafijada,sonarálacampanaylapantallaexhibirála
temperaturayeltiempoalternamentedurantetodoelciclodecocción.
• eltiempoirábajandoenintervalosdeunminutohastallegara59segundos,luego
bajaenintervalosdesegundos.
• Alfinaldelciclodecocción,launidadsuenalacampana3vecesysedetiene.
5. Useunguanteoagarradordeollaparaabrirelhornoysacarlacomidacon
cuidado.
FUNCiÓN PARA MERiENDAS CONgELADAS (P)
Ponga la temperatura a: 204°C(400˚F)
Ponga el tiempo a: 6minutos
Posición de la bandeja: 2ó3(refiérasealdibujo D)
1.presionelaperilladeFROzEN SNACKS.
2.paraalterarlatemperatura,presioneinmediatamentelas
perillas▲ó▼.Toqueligeramentelaperillaparacambiaren
incrementosde5grados.Mantengapresionadalaperillapara
cambiarrápidamenteenincrementosde25grados.
3.paraalterareltiempo,presionelaperilladeltiempo(tiMER).
Toqueligeramentelaperillaparacambiarenincrementos
de1minuto.Mantengapresionadalaperillaparacambiar
rápidamenteenincrementosde10minutos.
4.presionelaperillaparainiciar/finalizar(StARt/StOP).
• lapantalladigitalchispealasletraspReHeAT(precalentar)hastaquellegue
a150˚F;continuaráaumentandohastalleguealatemperaturadeseada.
• Cuandoalcanzelatemperaturafijada,sonarálacampanaylapantallaexhibirála
temperaturayeltiempoalternamentedurantetodoelciclodecocción.
• eltiempoirábajandoenintervalosdeunminutohastallegara59segundos,luego
bajaenintervalosdesegundos.
• Alfinaldelciclodecocción,launidadsonarálacampana3vecesysedetendrá.
5. Useunguanteoagarradordeollaparaabrirelhornoysacarlacomidacon
cuidado.
P
Q
R
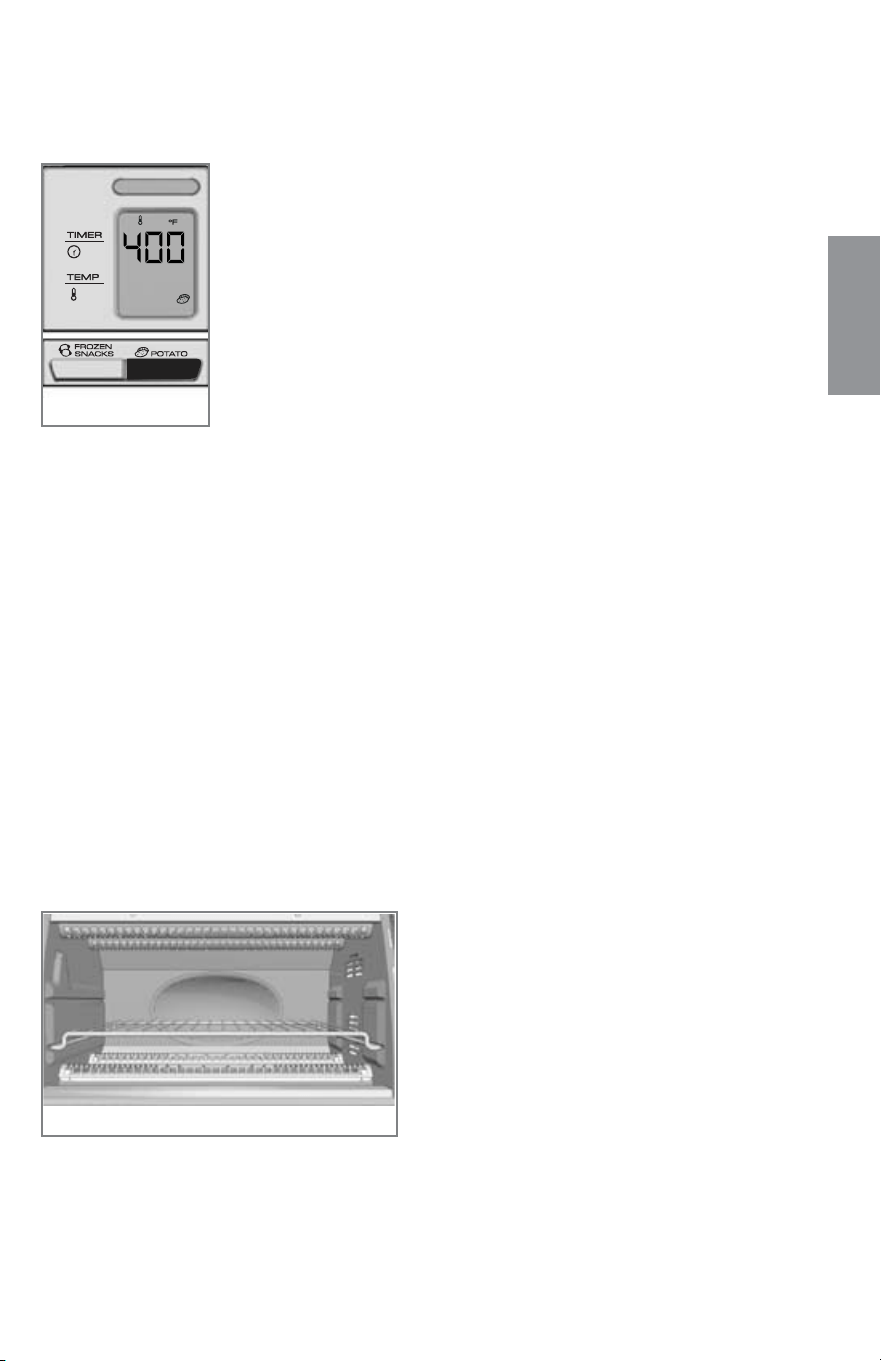
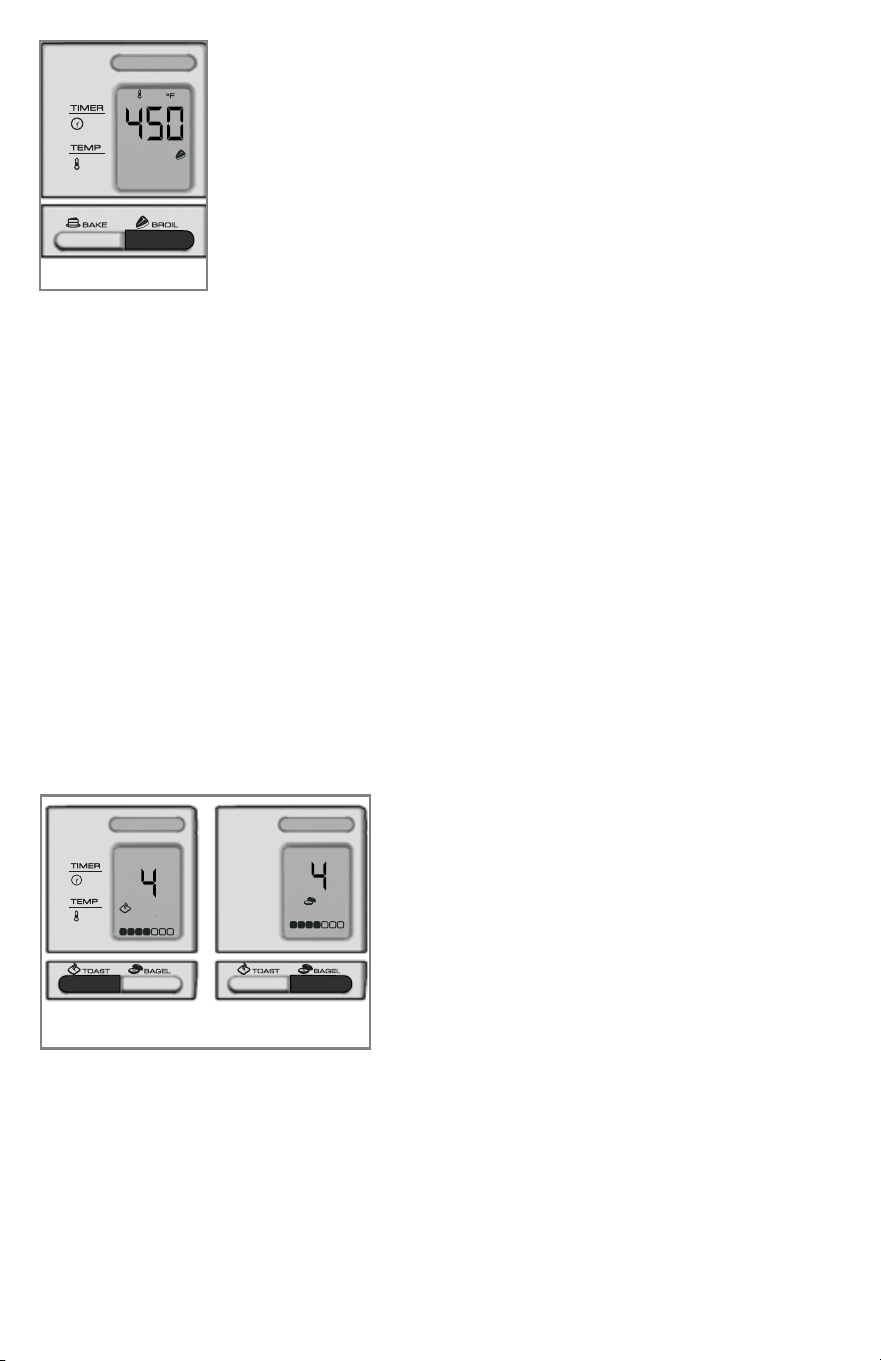
Cuidado y limpieza
esteproductonocontienepiezasqueelusuariopuedareparar.parareparaciones,
refiéraseaunpersonalcalificado.
LiMPiEzA
1. Apagelaunidad,desconécteladelenchufeydejequeseenfríeantesde
limpiarla.
2. limpielapuertadecristalconunaalmohadilladenailonyaguaenjabonada.no
utilizerociadoresdelimpiarcristales.
3. pararetirarlaparrillacorrediza,abralapuerta,tiredelaparrillahacia
adelanteysáquela.lávelaenaguatibiaenjabonadaoenlalavadoradeplatos.
pararemoverlasmanchaspersistentes,utiliceunaalmohadilladepoliestero
nailon.parainstalarlaparrillanuevamente,abralapuertacompletamentey
deslicelaparrillaenlasranuras.
4. lavelabandejadehornear,laparrilladeasarylabandejaparapizzacon
aguatibiaenjabonadaoenlalavadoradeplatos.paranorallarla,useuna
almohadilladepoliesterodenailon.
5. pararemoverlabandejaderesiduos,sujeteelasadelapartedelanteraytire
delabandejahaciafuera.Retirelasmigajasylavelabandejaconjabónyagua
caliente.lasmanchassepuedeneliminarconunaalmohadilladenailon.
Asegúresedesecarbienlabandejaantesdecolocarladenuevoenelhorno.
SUPERFiCiES ExtERiORES
dejequeelhornoseenfríebienantesdelimpiarlasuperficieexterior.limpiecon
unatoallahúmedaoesponjaysequeconpapeltoallaopañohúmedo.
RECiPiENtES PARA COCiNAR
• puedeutilizarrecipientesdemetal,decristalesresistentealcalor,ode
cerámicasintapas.Sigalasinstruccionesdelfabricante.
• Asegúresequehayunespaciomínimode2pulgadasentreelbordesuperiordel
recipienteyloselementoscalefactores.
ESPAÑOL
6.presionelaperilladeasar(BROiL).laluzindicadorade
encendidopestañeayapareceráenlapatallalatemperatura
a450˚F(S).
7.parafijareltiempodecocción,presionelaperilladeltiempo
eimmediatamentepresionelasperillasde▲ó▼.Toque
ligeramentelaperillaparacambiareltiempoenincrementosde
unminuto.Mantengapresionadalaperillaparacambiarloen
incrementosde10minutos.
• lapantallamostraráalternamentelatemperaturayeltiempo
fijadodurantetodoelciclodecocción.
• eltiempoirábajandoenintervalosdeunminutohastallegara59segundos,luego
irábajandoenintervalosdesegundos.
• Alterminarelciclodecocción,launidadsonarálacampana
3vecesysedetendrá.
Nota:puededetenerlaunidadencualquiermomentoconsolopresionarlaperillade
iniciar/finalizar(StARt/StOP).
8. Abralapuertadelhorno.
Precaución: La unidad se calienta. Use siempre un guante o agarrador de ollas.
PARA tOStAR PAN Y BAgELS
Precaución: La unidad se calienta. NUNCA toque la carcasa exterior ni la puerta de
cristal. Use siempre un guante o agarrador de ollas.
1. Abralapueradelhorno.
2. Coloquelatostadadepanolamitaddelbagelenlaparrillacorrediza.la
temperaturayeltiempoestánprefijados.nohacefaltacalentarelhornopara
tostar.
3. paramejorfuncionamento,uselaposicióndeparrilla2
4. Cierrelapuertadelhorno.
5.paratostarpan,presionelaperilladetostado
(tOASt).parabagelspresionelaperilla
deBAgEL.paraambasfunciones,laluz
deencendidopestañeaylapantalladigital
exhibiráel#4intermitente(mediano)(t).este
eselniveldetostadoyaprogramado.
Nota:lafunciónparabagelstuestalapartede
arribaycalientaladeabajo.
6. paracambiarelniveldetostado(1-7),presioneinmediatamentelasperillas▲ó
▼.paramejoresresultados,seleccioneeltostadomediano(4)paraelprimerciclo,
luegoescogamenosomástostado,segúnsugusto.
7. presionelaperilladeiniciar/finalizar(StARt/StOP).
8. Cuandotermineelciclodetostar,sonarálacampana3vecesyterminaráelciclo.
Nota:parasuconveniencia,launidadrecuerdalasúltimasinstruccionesdetostado.
9. Abralapuertadelhornoyconunguanteoagarraderadeolla,saquelaparrillapara
removerelpanolosbagels.
t
S

6
7
ESPAÑOL
gUÍA DE COCCiÓN
ALiMENtOS PORCiÓN/PESO SUPERViSE EL tÉRMiNO/ tEMPERAtURA / OBSERVACiONES
CORRiENtES tEMP. iNtERNA tiEMPO DE COCCiÓN
Hamburguesas 6de1/4lb(0,113kg) Medio- Asara232°C(450°F) voltearamediococinar.
cadaunade3/4"(19mm) 71.1°C(160°F) 20a25minutos
degrosor Biencocido–
76.7°C(170°F)
Filetes de pescado de2a4 Algusto Horneara204°C(400°F) Frotarconmantequilladerretida,
de4a6oz, 62.8°C(145°F) oasara232°C(450°F) rociarconperejilpicadoy
(110a171g)cadauno de8a10minutos eneladoyadornarcon
Bistec de pescado de2a4 62.8°C(145°F) Horneara204°C(400°F) unarebanadadelimón.
de6a8oz, oasara232°C(450°F)
(171a227g)cadauno de12a15minutos
Pechugas de pollo de4a7oz(199g)approx., 76.7°C(170°F) Horneara180°C(350°F) Frotarconmantequilladerretida
sin piel ni hueso cadauna/pesomax. aprox.40minutos oconmargarinapara
de1-3/4lb(0.8kg) acentuarelsaborydorar.
Pollo para asar de3-1/2(1.59kg)a4lb Muslo Horneara180°C(350°F) Rociarconhierbasomarinarcon
(1.8kg) 82.2°C(180°F) Aprox.1-1/4horas salsadurantelosúltimos15
pechuga minutosdesprendafacilmente.
76.7°C(170°F)
Papas al horno de4a6aprox. 104.4°C(220°F) Hornear204°C(400°F) lavarbienlapielypincharlas
1-3/4lb(0.8kg) papasvariasvecesconuntenedor.
Bocadillos comunes:
Papas fritas, 1paquetedeaprox. Seguirlasdireccionesdel Cocinarenlabandejapara
enrollados de pizza, 10(284g)a paqueteuhornear pizzaoenladehorneary
dedos de queso, 14oz.(397g) a204°C(400°F) colocarenelcentrodelhorno
quesadillas, mini Cocinarenlabandejaparapizza
pizzas, alas de pollo 9galletasenlabandeja Seguirlasdireccionesdel oenlabandejadehorneary
picantes, enrollados parapizza paqueteuhornear colocarenelcentrodelhorno.
de salchicha, masa a232°C(450°F)
de galleta refrigerada
Pizzas Costradoradaycrujiente.
Pizza en pan frances 2 Quesoderretido Horneara paraunacostratostadacolocar
yapordorar 162,8°C(325°F) lapizzadirectamenteenlaparrilla
aprox.30minutos paraunacostramásblanda,
colocarlapizzaenlabandeja
Pizza congelada de 1de12"(30.5cm) Horneara204°C(400°F) parapizzaprovista.paraundorado
costra fina aprox.20oz.(567g) aprox.12minutos uniforme,girarlapizza1/4de
vueltaamediohornear.
Pizza de levadura 1de12"(30.5cm) Horneara204°C(400°F)
incluida deaprox.24oz.(681g) aprox.15minutos
Pizza corriente 1de12"(30.5cm) Horneara204°C(400°F)
aprox.15minutos

8
9
SOLUCiÓN DE PROBLEMAS O FALLAS
PROBLEMA POSiBLE CAUSA SOLUCiÓN
elaparatonocalientaodeja
decalentar.
eltomacorrienteno
funcionaoelhornoestá
desconectado.
veriquequeel
tomacorrienteesté
funcionando.Tantoel
controldetemperatura
comoelcronómetrodeben
serajustadosparaqueel
hornofuncione.
lasegundatandade
tostadoresultamuyoscura.
elcontroldelgradode
tostadoestáaunnivel
demasiadoalto.
Sirepitevariastandas,
escojaungradodetostado
másbajoqueelanterior.
Seformahumedadpor
dentroenlapuertadevidrio
duranteelciclodetostado.
lacantidaddehumedad
varíaentreunproductoy
otrosegúnlosproductos;
pan,bagels,pastelesetc.
lahumedadqueseforma
pordentroenlapuertadel
hornoesbastantecomúny
generalmentedesaparece
duranteelciclodetostado.
Comolapuertapermanece
cerrada,lahumedadnose
puedeevaporarcomoen
untostadornormal.
losalimentossesobre
cocinanonosecocinan
bien.
latemperaturayeltiempo
decocciónpuedenrequerir
reajuste.
Comounhornotostadores
muchomáspequeñoque
unhornoregular,puede
quesecalienteycocine
másrápido.ensaye,
reduciendo25gradosdela
temperaturaindicadaenla
recetaoenelpaquete.
elaparatodespideolor
acomidaquemadao
humeacuandoestáen
funcionamiento.
Hayresiduosdecomidaen
labandejaderecoleccióno
enlasparedesdelhorno.
Consultelasinstrucciones
enlaseccióndeCUIdAdo
YlIMpIeZAdeeste
manual.Asegúresede
quetodaslaspartesdel
horno,bandejadehornear
yparrillaesténlimpias.
loselementoscalefactores
parecennoestar
encendidos.
loselementos
calefactoresfuncionan
intermitentementedurante
elciclodecocción.
Asegúresequeelaparato
estéajustadoalafunción
correcta.paraelcaso,
cuandounoasalos
alimentos,solamente
seenciendeelelemento
calefactorsuperior.
ESPAÑOL
RECEtAS
QUiCHE CON PEStO DE ESPiNACAS
1masadepastelounaconchadepastelrefrigerada
5huevos,grandes
240ml(1taza)leche
40ml(3cdas)pestodealbahaca
1ml(¼cdta)pimientaconajo
1paquete(280go10oz)espinacasdescongeladas,escurridas
80ml(¹/³taza)cebollamorada,namentepicada
60ml(¼taza)chilespimiento,cortadosencubitos
350ml(1½tazas)mezcladequesosmozzarellayprovolone,rallados
precalienteelhornoBlack&decker®a220°C(425ºF)conlafunciónBAke
(hornear).estirelamasasobreunasupercieligeramenteenharinadahastacubrir
unmoldedevidrioparapastelde25cm(9pulgadas).Coloquelamasaenelmolde
yformeunaorillaalta.Sigalasinstruccionesdelpaqueteparahornearlaconcha
vacíauhorneehastaqueestéligeramentedorada.
Mientrastanto,enuntazóngrande,mezcleloshuevos,elpestoylapimientacon
ajo.Añadaymezclelosingredientesrestantes.viertaenlaconchapreviamente
horneada.
Cocinepor7minutosadicionales;reduzcalatemperaturaa160°C(325ºF)ycocine
durante35minutosohastaqueelrellenodelpastelestérmeyalinsertarun
cuchilloenelcentroestesalgalimpio.dejereposar5minutosantesdeservir.
Rinde8porciones.

0
1
ESPAÑOL
¿NECESitA AYUDA?
paraservicio,reparacionesopreguntasrelacionadasalproducto,porfavor
llamealnúmerodelcentrodeservicioqueseindicaparaelpaísdondeusted
comprósuproducto.
nodevuélvaelproductoalfabricante.llameolleveelproductoauncentro
deservicioautorizado.
DOS AÑOS DE gARANtÍA LiMitADA
(No aplica en México o Estados Unidos)
¿Qué cubre la garantía?
• lagarantíacubrecualquierdefectodematerialesodemanodeobraque
nohayasidogeneradoporelusoincorrectodelproducto.
¿Por cuánto tiempo es válida la garantía?
• pordosañosapartirdelafechaoriginaldecompramientrasquetenga
unapruebadelacompra.
¿Cómo se obtiene el servicio necesario?
• Conserveelrecibooriginalcomocomprobantedelafechadecompra,
comuníqueseconelcentrodeserviciodesupaísyhagaefectivasu
garantíasicumpleloindicadoenelmanualdeinstrucciones.
¿Cómo se puede obtener servicio?
• Conserveelrecibooriginaldecompra.
• porfavorllamealnúmerodelcentrodeservicioautorizado.
¿Qué aspectos no cubre esta garantía?
• losproductosquehansidoutilizadosencondicionesdistintasalas
normales.
• losdañosocasionadosporelmaluso,elabusoonegligencia.
• losproductosquehansidoalteradosdealgunamanera.
• losdañosocasionadosporelusocomercialdelproducto.
• losproductosutilizadosoreparadosfueradelpaísoriginaldecompra.
• laspiezasdevidrioydemásaccesoriosempacadosconelaparato.
• losgastosdetramitaciónyembarqueasociadosalreemplazodel
producto.
• losdañosyperjuiciosindirectosoincidentales.
¿Qué relación tiene la ley estatal con esta garantía?
•estagarantíaleotorgaderechoslegalesespecícosyelconsumidorpodría
tenerotrosderechosquevaríandeunaregiónaotra.
FabricadoenlaRepúblicapopulardeChina
ImpresoenlaRepúblicapopulardeChina
esunamarcaregistradadeTheBlack&deckerCorporation,
Towson,Maryland,e.U.
HALiBUt (LENgUADO) CON LiMÓN Y ALBAHACA
350ml(1½tazas)tomatescerezos,partidopormitad
40ml(3cdas)perejilitaliano,picado
15ml(1cda)albahacafresca,cortadaentiras
5ml(1cdta)cebollinosfrescos,picados
15ml(1cda)cáscaradelimón,cortadaentiras
2ml(½cdta)salkosher
30ml(2cdas)jugofrescodelimón
15ml(1cda)aceitedeoliva
2leteslenguado(deunas170g(6oz),cadauno)
1ml(¼cdta)pimientaconajo
precalienteelhornoBlack&decker®a215°C(400ºF)conlafunciónBAke(hornear).
Mientrastanto,enuntazónmediano,combinelostomates,elperejil,laalbahaca,los
cebollinos,lacáscaradelimón,1ml(¼cdta)desal,eljugodelimónyelaceitedeoliva;
mezclebien.
viertaenunmoldedehornearsupercialconcapacidadde950ml(1cuartodegalón).
Coloqueelpescadoencimaysazoneconel1ml(¼cdta)desalylapimientaconajo
restantes.
Cocinedurante20minutosohastaqueelpescadoseseparefácilmentealprobarlocon
untenedor.(elpescadodebetenerunatemperaturainternade60°C(145ºF)).
Rinde2porciones.
PUDlN DE PAN CON MANzANA
950ml(4tazas)panfrancés,encubos,ligeramentetostadoysincorteza
1manzanagrande,namentepicada
120ml(½taza)pasasdoradas
4huevosgrandes
350ml(1½tazas)leche
5ml(1cdta)extractodevainilla
5ml(1cdta)canelamolida
2ml(½cdta)nuezmoscadamolida
1ml(¼cdta)sal
precalienteelhornoBlack&decker®a175°C(350ºF)lafunciónBAke(hornear).
esparzaelpanuniformementeenunmoldedehornearconcapacidadde2litros(2
cuartosdegalón),untadoconmantequilla.Cubraconlamanzanaylaspasas.
enuntazónmediano,combineloshuevos,laleche,lavainilla,lacanela,lanuez
moscadaylasal.viertalamezclasobreelpanydejereposardurante15minutospara
permitirqueelpanabsorbaellíquido.
Cocinedurante1horahastaqueestécrecidoyrmeyalinsertaruncuchilloenel
centroestesalgalimpio.
Rindealrededorde6porciones.

Póliza de garantía
(Válida sólo para México)
Duración
ApplicaManufacturing,S.deR.l.deC.v.garantizaesteproductopor2añosa
partirdelafechaoriginaldecompra.
¿Qué cubre esta garantía?
estagarantíacubrecualquierdefectoquepresentenlaspiezas,componentesy
lamanodeobracontenidasenesteproducto.
Requisitos para hacer válida la garantía
parareclamarsugarantíadeberápresentaralCentrodeServicioAutorizado
lapólizaselladaporelestablecimientoendondeadquirióelproducto.Sinola
tiene,podrápresentarelcomprobantedecompraoriginal.
¿Donde hago válida la garantía?
llamesincostoalteléfono018007142503,paraubicarelCentrodeServicio
Autorizadomáscercanoasudomicilioendondeustedpodráencontrarpartes,
componentes,consumiblesyaccesorios.
Procedimiento para hacer válida la garantía
AcudaalCentrodeServicioAutorizadoconelproductoconlapólizadegarantía
selladaoelcomprobantedecompraoriginal,ahísereemplazarácualquierpieza
ocomponentedefectuososincargoalgunoparaelusuarional.estagarantía
incluyelosgastosdetransportaciónquesederivendesucumplimiento.
Excepciones
estagarantíanoseráválidacuandoelproducto:
A)Sehubieseutilizadoencondicionesdistintasalasnormales.
B)nohubiesesidooperadodeacuerdoconelinstructivodeusoquele
acompaña.
C)Cuandoelproductohubiesesidoalteradooreparadoporpersonasno
autorizadasporApplicaManufacturing,S.deR.l.deC.v.
Nota:Ustedpodraencontrarpartes,componentes,consumiblesyaccesorios
enloscentrosdeserviciosautorizados.estagarantíaincluyenlosgastosde
transportaciónquesederivendesuscumplimientodentrodesusreddeservicio.
ESPAÑOL
Argentina
SeRvICIoTeCnICoCenTRAl
ATTendAnCe
Avda.Monroen°3351
BuenosAires–Argentina
Fonos:0810–999-8999
011-4545-4700
011–4545–5574
supervision@attendance.com.ar
Chile
MASTeRSeRvICeSeRvICenTeR
nuevalosleonesn°0252
providencia
Santiago–Chile
FonoServicio:(562)–2327722
servicente@servicenter.cl
Colombia
plInAReS
AvenidaQuito#88A-09
Bogotá,Colombia
Tel.sincosto01800
7001870
Costa Rica
Aplicacioneselectromecanicas,S.A.
Calle26BisyAve.3
SanJose,CostaRica
Tel.:(506)257-5716/223-0136
Ecuador
ServicioMasterdeecuador
Av.6dediciembre9276ylosAlamos
Tel.(593)2281-3882
El Salvador
CalleSanAntonioAbad2936
SanSalvador,elSalvador
Tel.(503)2284-8374
guatemala
MacpartesSA
3ªCalle414Zona9
FrenteaTecun
Tel.(502)2331-5020/2332-2101
Honduras
ServiTotal
ContiguaaTelecentro
Tegucigalpa,Honduras,
Tel.(504)235-6271
México
Articulo123#95local109y112
Col.Centro,Cuauhtemoc,
México,d.F.
Tel.018007142503
Nicaragua
ServiTotal
desemáforodeportezuelo
500metrosalsur.
Managua,nicaragua,
Tel.(505)248-7001
Panamá
ServiciosTécnicosCApRI
TumbamuertoBoulevard
eldoradopanamá
500metrosalsur.
Tel.3020-480-800sincosto
(507)2360-236/159
Perú
ServicioCentralFastService
Av.Angamoseste2431
SanBorja,limaperú
Tel.(511)2251388
Puerto Rico
BuckeyeService
Jesúsp.piñero#1013
puertonuevo,SJpR00920
Tel.:(787)782-6175
Republica Dominicana
plazalama,S.A.
Av,duarte#94
Santodomingo,
Repúblicadominicana
Tel.:(809)687-9171
Venezuela
InversionesBdRCA
Av.CasanovaC.C.
CityMarketnivelplazalocal153
diagonalHotelMelia,
Caracas.
Tel.(582)324-0969
www.applicaservice.com
servicio@applicamail.com
porfavorllamealnúmerocorrespondientequeapareceenlalistaacontinuación
parasolicitarquesehagaefectivalagarantíaydondeUd.puedesolicitarservicio,
reparacionesopartesenelpaísdondeelproductofuécomprado.Tambiénpuede
consultarnosenele-mailservicio@applicamailcom.mx

Póliza de garantía
(Válida sólo para México)
Duración
ApplicaManufacturing,S.deR.l.deC.v.garantizaesteproductopor2añosa
partirdelafechaoriginaldecompra.
¿Qué cubre esta garantía?
estagarantíacubrecualquierdefectoquepresentenlaspiezas,componentesy
lamanodeobracontenidasenesteproducto.
Requisitos para hacer válida la garantía
parareclamarsugarantíadeberápresentaralCentrodeServicioAutorizado
lapólizaselladaporelestablecimientoendondeadquirióelproducto.Sinola
tiene,podrápresentarelcomprobantedecompraoriginal.
¿Donde hago válida la garantía?
llamesincostoalteléfono018007142503,paraubicarelCentrodeServicio
Autorizadomáscercanoasudomicilioendondeustedpodráencontrarpartes,
componentes,consumiblesyaccesorios.
Procedimiento para hacer válida la garantía
AcudaalCentrodeServicioAutorizadoconelproductoconlapólizadegarantía
selladaoelcomprobantedecompraoriginal,ahísereemplazarácualquierpieza
ocomponentedefectuososincargoalgunoparaelusuarional.estagarantía
incluyelosgastosdetransportaciónquesederivendesucumplimiento.
Excepciones
estagarantíanoseráválidacuandoelproducto:
A)Sehubieseutilizadoencondicionesdistintasalasnormales.
B)nohubiesesidooperadodeacuerdoconelinstructivodeusoquele
acompaña.
C)Cuandoelproductohubiesesidoalteradooreparadoporpersonasno
autorizadasporApplicaManufacturing,S.deR.l.deC.v.
Nota:Ustedpodraencontrarpartes,componentes,consumiblesyaccesorios
enloscentrosdeserviciosautorizados.estagarantíaincluyenlosgastosde
transportaciónquesederivendesuscumplimientodentrodesusreddeservicio.
ESPAÑOL
Argentina
SeRvICIoTeCnICoCenTRAl
ATTendAnCe
Avda.Monroen°3351
BuenosAires–Argentina
Fonos:0810–999-8999
011-4545-4700
011–4545–5574
[email protected]om.ar
Chile
MASTeRSeRvICeSeRvICenTeR
nuevalosleonesn°0252
providencia
Santiago–Chile
FonoServicio:(562)–2327722
servicente@servicenter.cl
Colombia
plInAReS
AvenidaQuito#88A-09
Bogotá,Colombia
Tel.sincosto01800
7001870
Costa Rica
Aplicacioneselectromecanicas,S.A.
Calle26BisyAve.3
SanJose,CostaRica
Tel.:(506)257-5716/223-0136
Ecuador
ServicioMasterdeecuador
Av.6dediciembre9276ylosAlamos
Tel.(593)2281-3882
El Salvador
CalleSanAntonioAbad2936
SanSalvador,elSalvador
Tel.(503)2284-8374
guatemala
MacpartesSA
3ªCalle414Zona9
FrenteaTecun
Tel.(502)2331-5020/2332-2101
Honduras
ServiTotal
ContiguaaTelecentro
Tegucigalpa,Honduras,
Tel.(504)235-6271
México
Articulo123#95local109y112
Col.Centro,Cuauhtemoc,
México,d.F.
Tel.018007142503
Nicaragua
ServiTotal
desemáforodeportezuelo
500metrosalsur.
Managua,nicaragua,
Tel.(505)248-7001
Panamá
ServiciosTécnicosCApRI
TumbamuertoBoulevard
eldoradopanamá
500metrosalsur.
Tel.3020-480-800sincosto
(507)2360-236/159
Perú
ServicioCentralFastService
Av.Angamoseste2431
SanBorja,limaperú
Tel.(511)2251388
Puerto Rico
BuckeyeService
Jesúsp.piñero#1013
puertonuevo,SJpR00920
Tel.:(787)782-6175
Republica Dominicana
plazalama,S.A.
Av,duarte#94
Santodomingo,
Repúblicadominicana
Tel.:(809)687-9171
Venezuela
InversionesBdRCA
Av.CasanovaC.C.
CityMarketnivelplazalocal153
diagonalHotelMelia,
Caracas.
Tel.(582)324-0969
www.applicaservice.com
porfavorllamealnúmerocorrespondientequeapareceenlalistaacontinuación
parasolicitarquesehagaefectivalagarantíaydondeUd.puedesolicitarservicio,
reparacionesopartesenelpaísdondeelproductofuécomprado.Tambiénpuede
consultarnosenele-mailservicio@applicamailcom.mx
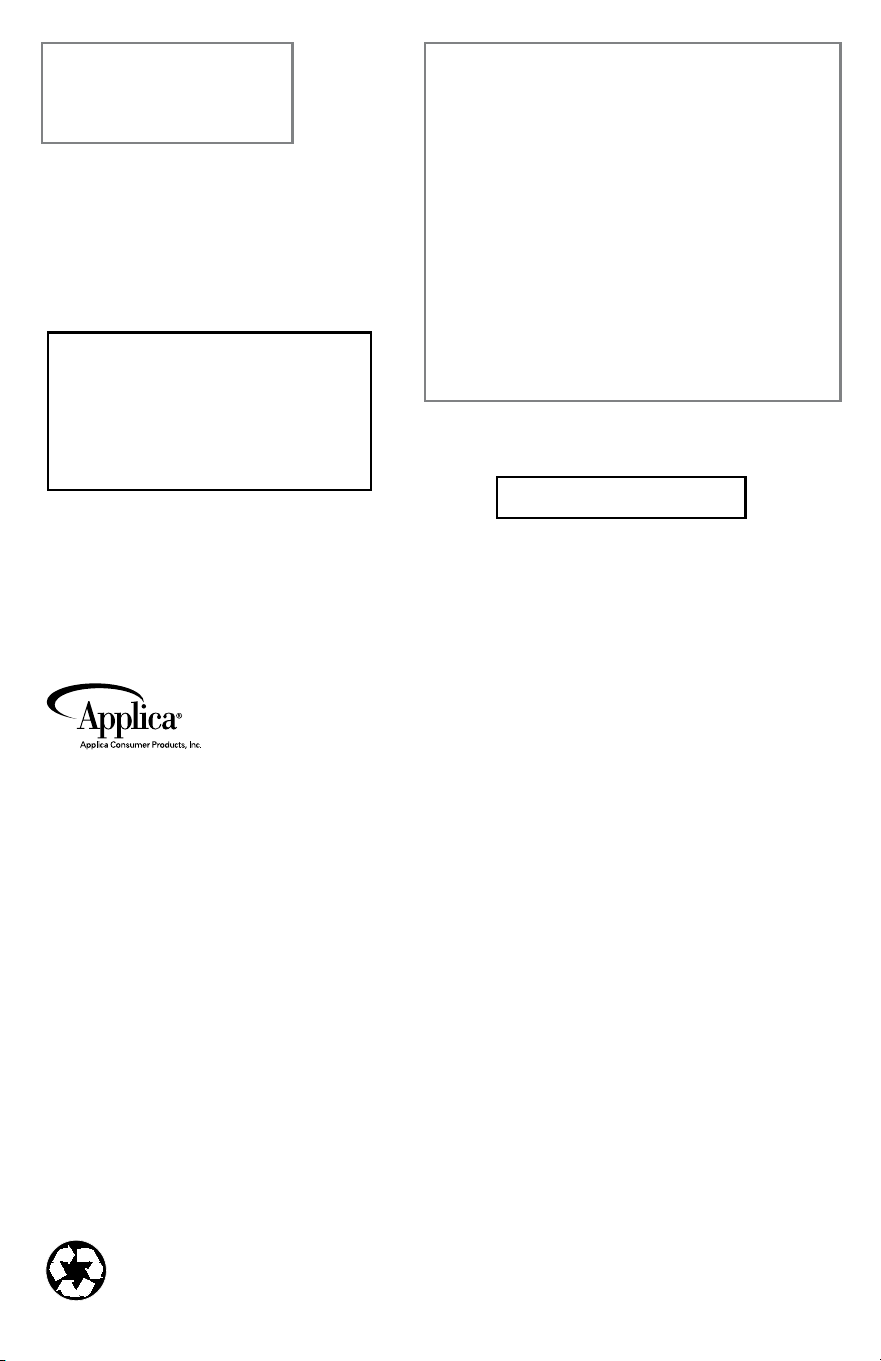
R22010/7-21-68e/S
printedonrecycledpaper.
Impresoenpapelreciclado.
Código de fecha / Date Code
Sellodeldistribuidor:
Fechadecompra:
Modelo:
Comercializado por:
ApplicaManufacturing,S.deR.l.deC.v.
presidenteMazarikno.111,1erpiso
Col.ChapultepecMorales,Mexicod.F
deleg.MiguelHidalgo
Cp11570
MeXICo
Servicio y Reparación
Art.123no.95
Col.Centro,C.p.06050
deleg.Cuauhtemoc
Servicio al Consumidor,
ventadeRefaccionesyAccesorios
018007142503
©2010ApplicaConsumerproducts,Inc.
importado por / imported by:
APPLiCA AMERiCAS, iNC.
Av.JuanBJusto637piso10
(C1425FSA)CiudadAutonomadeBuenosAires
Argentina
C.U.i.t No.
30-69729892-0
importado por / imported by:
APPLiCA MANUFACtURiNg, S. DE R. L. DE C. V.
presidenteMazarikno.111,1erpiso
Col.ChapultepecMorales,Mexicod.F
deleg.MiguelHidalgo
Cp11570
MeXICo
Teléfono:(55)5263-9900
Del interior marque sin costo
01(800)7142503
1 00 W 10 V~ 60 Hz