Each time the heating mode is selected, it conducts a short calibration cycle. Airflow will be automatically controlled during this cycle. Once the calibration cycle is complete, it will revert to the selected airflow speed.
On first use, the machine will default to a temperature 5°F higher than the detected room temperature. Thereafter, the machine will remember the last target temperature set.
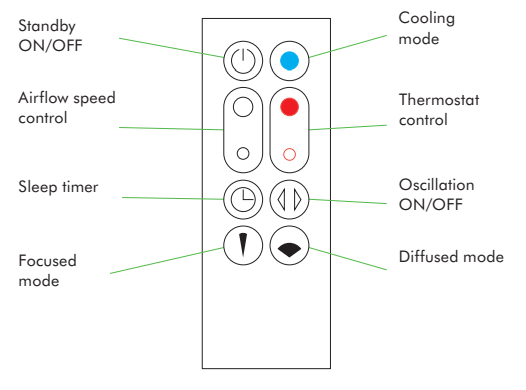
Select the desired room temperature. Pressing the large red button on the remote control increases the target temperature by 2°F; the smaller red button on the remote control decreases it by 2°F. The machine will not operate in heater mode unless the target temperature is above the room temperature.
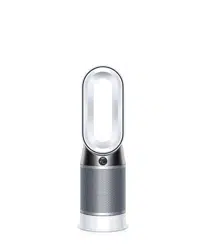
Remote control
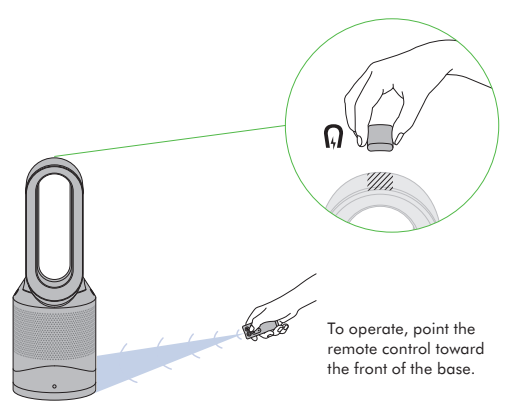
Remote control docks magnetically. Attach the remote control to the top of the machine with the buttons facing down.
To operate, point the remote control toward the front of the base.
Heating and cooling modes
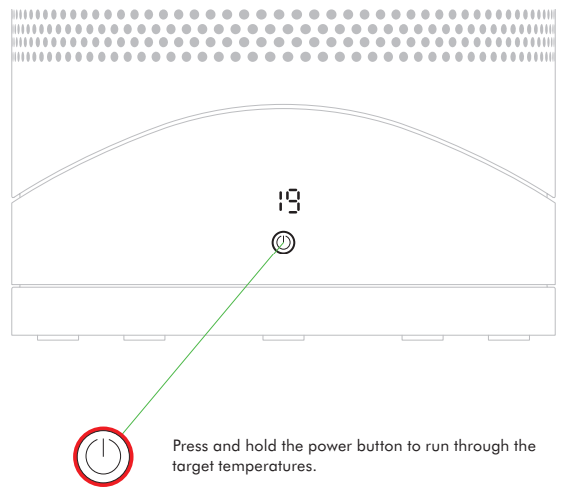
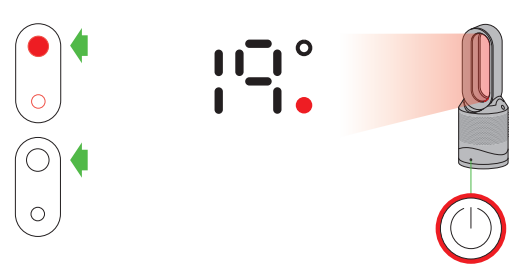
Press the red thermostat control button until the digital display shows the target room temperature. The power button light will change from blue to red to indicate that you have entered heating mode. The heating symbol will be red while heating and will change to white when the target room temperature has been reached. Once the target room temperature has been reached, the machine will stop heating the air. If the room temperature falls below the target temperature, the machine will start to heat again. The red circle surrounding the power button remains on when the machine is in heater mode. To adjust the airflow speed use the airflow control button.
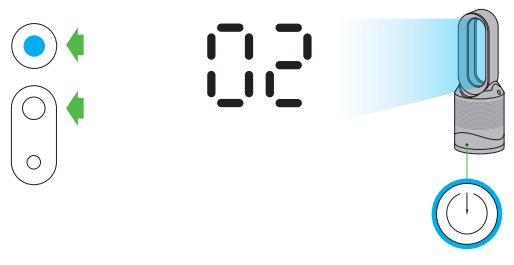
Press the blue cooling mode button to enter cooling mode. The power button light will change from red to blue to indicate that you have entered cooling mode. To adjust the airflow speed use the airflow control button.
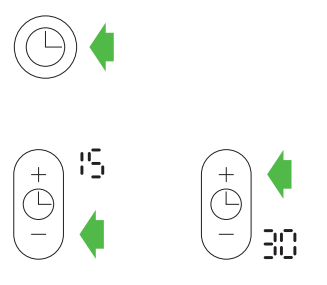
Sleep timer
To set the sleep timer, select the desired time. When time reaches zero, the machine will go into standby mode. To cancel, increase the time until two dashes appear.
When using the sleep timer, the LED display will turn off after 10 seconds of inactivity
Tilt function
Carefully hold the base and the main body. Tilt the amplifier forward or backward for the required airflow angle.
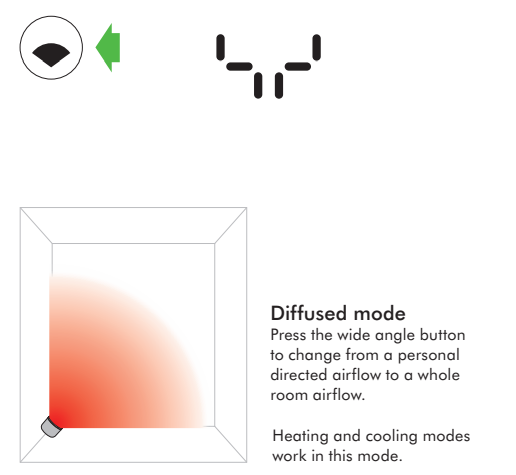
Diffused and focused modes
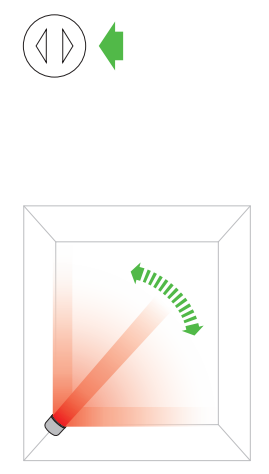
Diffused mode Press the wide angle button to change from a personal directed airflow to a whole room airflow. Carefully hold the base and the main body. Tilt the amplifier forward or backward for the required airflow angle.
Heating and cooling modes work in this mode.
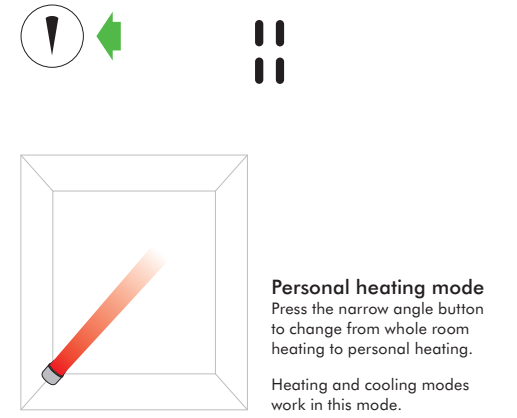
Personal heating mode Press the narrow angle button to change from whole room heating to personal heating.
Heating and cooling modes work in this mode.
Oscillation and airflow speed control
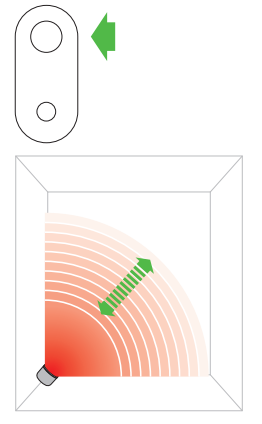
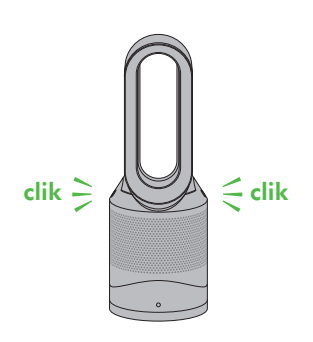
Oscillation control To start the machine oscillating, press the oscillation control button. To stop the machine oscillating, press it again. The machine will not oscillate when the control buttons are pressed.
Airflow speed control To change the airflow speed press the airflow control button. The digital display will show the new fan speed. If in heater mode after 2.5 seconds it will change back to displaying the target temperature.
Clearing blockages
Unplug from the main power source. If the machine has been in use, leave for 1 to 2 hours in order to allow the machine to cool down completely. Look for blockages in the air inlet holes and in the small aperture inside the air loop amplifier. Use a soft brush to remove debris.
Cleaning
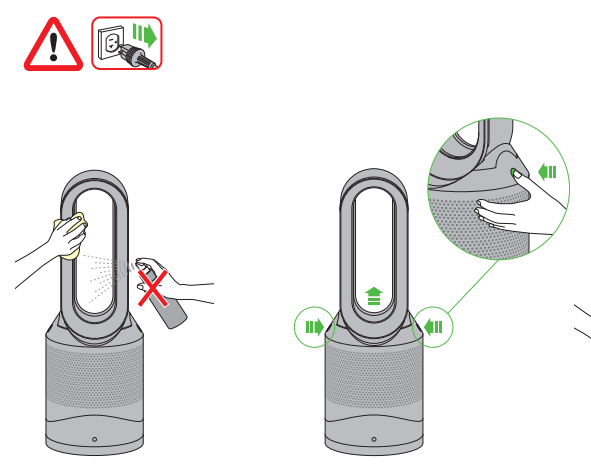
Unplug from the main power source. If the machine has been in use, leave for 1 to 2 hours before cleaning to allow the machine to cool completely. Dust may accumulate on the surface of the machine. Wipe dust from the loop, filter unit and other parts with a dry or damp cloth when dust accumulates. Do not use detergents or polishes.
Caution: hot when in use
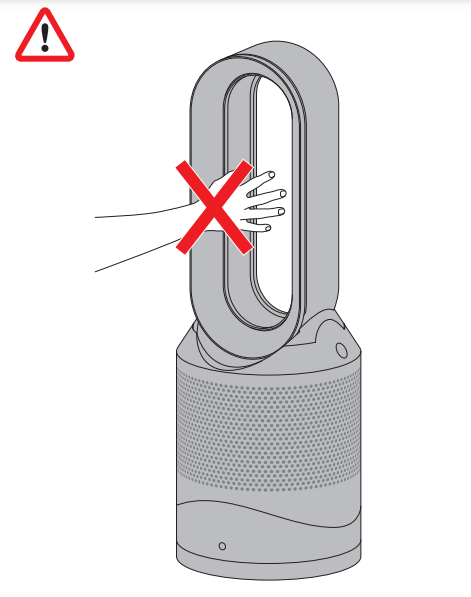
This machine is hot when in use and for a short period after use. Do not let bare skin touch hot surfaces. If children are present, consider positioning the machine out of their reach.
Battery replacement
Battery type CR 2032.
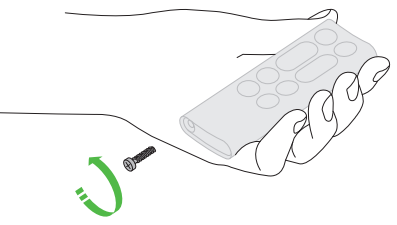
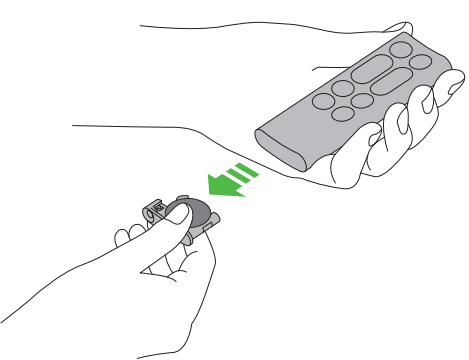
Unscrew the battery compartment on the remote control. Loosen the base and pull to remove the battery.
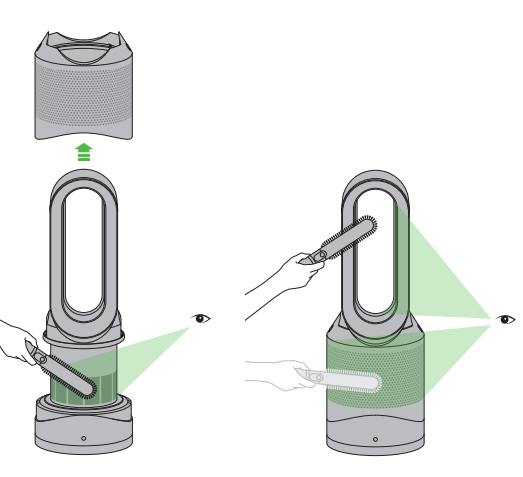
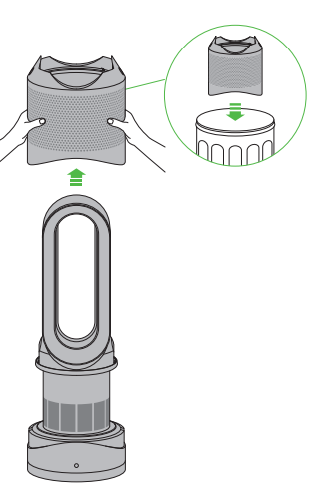
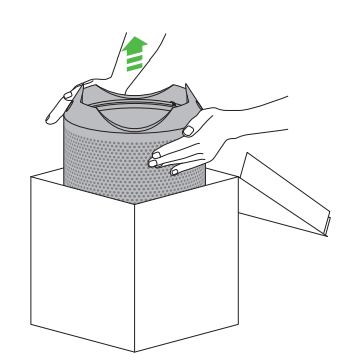
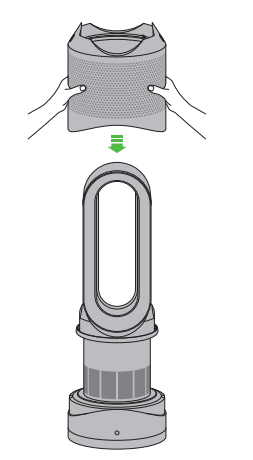
Replacing the filter unit
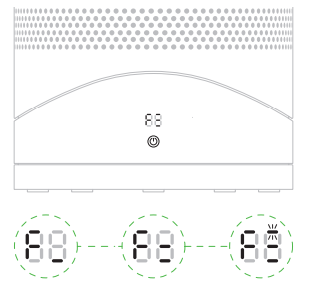
When your non-washable filter unit needs replacing the machine will display the pattern shown. To replace the non-washable filter unit, follow these steps. If the machine has been in use, leave for 1 to 2 hours before replacing the filter unit to allow the machine to cool down completely. Your Dyson machine is programmed to remind you to replace the filter unit after 12 months based on 12 hours usage a day. Please note your indicator will activate sooner with more use. The indicator is only a guide and you may need to replace the filter unit more regularly
1.
2.
3.
4.
5.
6.
7.
A clockwise-rotating loading pattern will be shown on the LED display.
Once the loading pattern is complete, the machine will return to its normal usage.
When you have re-assembled your machine, press and hold the ‘Standby ON/OFF’ button for 6 seconds on the remote control to reset the filter indicator.
USING YOUR DYSON MACHINE
LOOKING AFTER YOUR DYSON MACHINE
Do not carry out any maintenance or repair work other than that shown and described in this Dyson Operating Manual, or advised by the Dyson Helpline.
Always disconnect the plug from the main outlet before inspecting for problems.
If the machine will not operate, first check the main outlet has electricity supply and that the plug is properly inserted into the outlet.
If the fuse needs replacing, please check ‘User servicing instructions’.
OPERATION
Ensure machine is fully assembled in line with the instructions before use. Do not dismantle the machine or use without the loop amplifier fitted.
The machine will not operate in heating mode unless the target temperature is above the room temperature.
Each time the heating mode is selected, it conducts a short calibration cycle.
Airflow will be automatically controlled during this cycle. Once the calibration cycle is complete, it will revert to the selected airflow speed.
The machine will not oscillate when the control buttons are pressed.
Do not lubricate any part of this machine.
CONTROL WITHOUT REMOTE
Press the standby button on the machine to turn ON/OFF.
Press and hold the standby button on the machine to adjust the target temperature. The target temperature will increase to a maximum before decreasing. If the target temperature is set at 32°F it will switch from heating to cool mode.
The airflow, diffused and personal heating modes, oscillation function and sleep timer controls cannot be operated without the remote control.
LED DISPLAY
The LED Display will dim after 10 seconds of use (The power button does not dim).
Press any button, other than the standby ON/OFF, to reactivate.
Do not press standby ON/Off as this will turn the appliance off.
SLEEP TIMER
To set the sleep timer, select the desired time. When time reaches zero, the machine will go into standby mode. To cancel, increase the time until two dashes appear.
The LED display will turn off after 10 seconds of inactivity - this is a power saving feature and avoids light interference at night time.
Press any button, other than the standby ON/OFF, to reactivate.
When sleep timer is ON, do not press the standby ON/OFF as this will turn the appliance off and turn sleep timer off too.
TILT FUNCTION
Carefully hold the base and the main body. Tilt the amplifier forward or backward for the required airflow angle.
AUTOMATIC CUT-OUT
For your safety this machine is fitted with automatic cut-out switches that operate if the machine tips over or overheats. If the switches operate, unplug the machine and allow it to cool. Before restarting the machine check and clear any blockages and ensure the machine is on a solid level surface.
In heating mode the machine will automatically switch ‘OFF’ after 9 hours of continuous use and will return to standby mode. To restart the machine, press the power button on either the remote control or the base.
TROUBLESHOOTING
Fault codes F4, F5, F6: If one of these appears on the display, unplug the machine, wait for 30 to 60 seconds and/or plug the machine into a different socket. If you continue to receive the fault code, please contact the
Dyson Helpline.
Fault codes F2, F3, F7: If one of these appears on the display, please contact the Dyson Helpline.
REPLACEABLE PARTS
BATTERY REPLACEMENT
CAUTION!
Switch 'OFF' and unplug the machine before replacing the batteries.
Unscrew the battery compartment on the remote control. Loosen the base and pull to remove the battery.
Do not install backwards or short circuit the batteries.
Do not attempt to dismantle or charge the batteries. Keep away from fire.
Always replace the screw in the remote control.
Follow battery manufacturers' instructions when installing new batteries (battery type CR 2032).
Limited functionality is available without the remote control (see 'Control without remote').
NON-WASHABLE FILTER UNIT
Your filter unit is non-washable and non-recyclable.
To replace your filter unit follow the steps as shown.
To dispose of your old filter unit: remove it from the machine and place it in your household waste bin.
A new filter unit can be purchased at www.dyson.com/filter.
DISPOSAL INFORMATION
Dispose of or recycle the battery in accordance with local ordinances or regulations.
Keep the used batteries away from children as these can still harm children if swallowed.
Dyson products are made from high grade recyclable materials. Recycle where possible.
Your filter unit is non-washable and non-recyclable.
The battery should be removed from the product before disposal.
#1 Can you control the heat temperature and if so, does it shut off once it hits that temp?
The Dyson Hot + Cool does have the ability to set a target temperature while in heat mode - up to 99 degrees. Once your room temperature hits that target temp, the machine won't shut off, but it will stop blowing out heated air, until the machine dips below that target temperature again.
The filter in the Dyson HP01 Pure Hot + Cool has 4382 hours of life. If you were to run your machine 12 hours every day, your filter would last a year. Your machine will flash an "F" icon, when the filter needs to be replaced.
#3 Can the air purifier function alone, without the cooling fan or heater operating?
The Dyson HP01 Pure Hot + Cool will only purify the air when the machine is turned on, either in hot or cool mode. The air gets purified when it passes through the HEPA filter, and is then expelled in to the air via the amplifier loop. To have the air purified, you will need to have the unit on, even in the lowest speed setting of 1.