USER MANUAL
Preparations
Parts
Control Panel
- The color and shape of parts may differ from what is shown. Specifications are subject to change without notice to improve quality

| Parts |
Description |
| JOG Button |
Multi directional button that helps navigate.
- The JOG button is located at the bottom right side of the screen and has 5 directions of UP, DOWN, LEFT, RIGHT, and PRESS (ENTER)
|
| Power LED |
This LED is power status indicator and works as
- Power On (Power button): Off
- Power saving mode: Blinking
- Power Off (Power button): On
- The power Indicator operation can be swapped by changing in the menu.(System → Power LED On) Actual models because of functional variation maybe haven’t this function.
|
| Function Key Guide |
Press the JOG button when the screen is turned on. The Function KeyGuide will appear. To access the onscreen menu when the guide is displayed, press the corresponding direction button again.
- Function Key Guide may vary depending on the function or product model. Please refer to the actual product.
|
| Game Setting Key |
Use shortcut keys to access previously saved custom game modes.
- Game Setting 1 / Game Setting 2 / Game Setting 3
- The Game Setting Keys are located at the bottom right on the front of the monitor. To edit and save a custom game mode, go to Game → Save Settings.
|
Function Key Guide
- To enter the main menu or to use other items, press the JOG button to display the Function Key Guide. You can exit by pressing the JOG button again.

UP/DOWN/LEFT/RIGHT: Move to the item you want. The description for each item will appear when the focus changes.
PRESS(ENTER): The selected item will be applied.
| Icons |
Description |
 Menu Menu |
Selects  by moving the JOG button in the function key guide screen. by moving the JOG button in the function key guide screen.
The OSD (On Screen Display) of your Monitor’s feature appears.
|
 Source Source |
Selects  to change the input signal by moving the JOG button in the to change the input signal by moving the JOG button in the
Function Key Guide screen. A message will appear on the top left corner of the screen if the input signal has been changed.
|
 PBP PBP |
Selects  by moving the JOG button in the function key guide screen. by moving the JOG button in the function key guide screen.
Press the button when configuring settings for the PBP function is required.
|
 Power Off Power Off |
Selects  to turn the Monitor off by moving the JOG button in the function key guide screen. to turn the Monitor off by moving the JOG button in the function key guide screen. |
When the monitor displays nothing (i.e. Power saving mode or Non-signal mode), 2 direct keys for control source and power could be used as below.

When the monitor displays the Main menu the JOG Button could be used as below

Game Setting Key
You can quickly view the setting with a shortcut key at the bottom without using an OSD menu. You can directly see the settings for three different modes.
- Game Setting 1 / Game Setting 2 / Game Setting 3

The displayed image may differ depending on the model.
The displayed images reflect the status of the functions as the settings in OSD of the corresponding functions other than the real-time values.
This menu is not available when PBP is enabled
Changing Brightness, Contrast and Sharpness settings
You can adjust Brightness, Contrast or Sharpness by moving the JOG button up, if no OSD menu is displayed.

- The displayed image may differ depending on the model.
- The default brightness can vary depending on the region.
Brightness
This menu is not available when Eye Saver Mode is enabled.
This menu is not available when Picture Mode is set to Dynamic Contrast mode.
Contrast
This menu is not available when Picture Mode is set to Cinema or Dynamic Contrast mode.
Sharpness
This menu is not available when Picture Mode is set to Cinema or Dynamic Contrast mode.
This menu is not available when PBP is enabled.
Changing the Volume setting
You can adjust Volume by moving the JOG button left or right, if no OSD menu is displayed.

- The displayed image may differ depending on the model.
- If the audio quality of a connected input device is poor, the Auto Mute function on the product may mute the sound or cause choppy audio when applying the headphones or speakers. Set the input volume for the input device to at least 20% and control the volume using the volume control (JOG button LEFT/RIGHT) on the product.
- What is Auto Mute?
- The function mutes the audio to improve sound effect when there is sound noise or when the input signal is weak, usually due to a problem with the volume of an input device.
- To activate the Mute function, access the Volume control screen, then use the JOG button to move the focus down.
To deactivate the Mute function, access the Volume control screen, then increase or decrease the Volume.
Reverse Side
The color and shape of parts may differ from what is shown. Specifications are subject to change without notice to improve quality.

Upgrading the Software via USB
1. Be sure to insert the USB disk into the 1 port. You can upgrade the software via USB only if either the monitor screen operates normally or the check signal is displayed on the monitor screen.
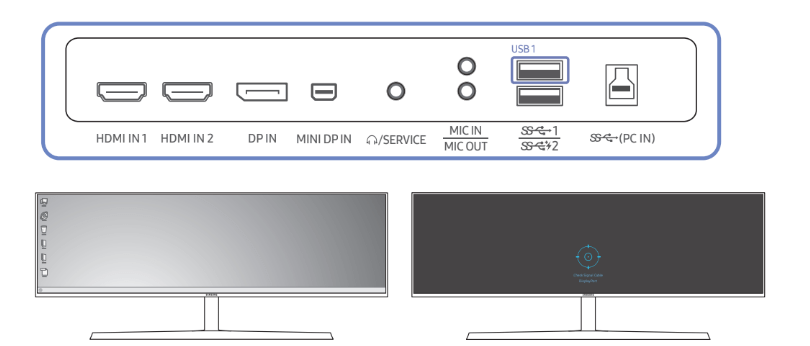
When the screen as shown in the following figure is displayed, press and hold the Down arrow key for 5 seconds.

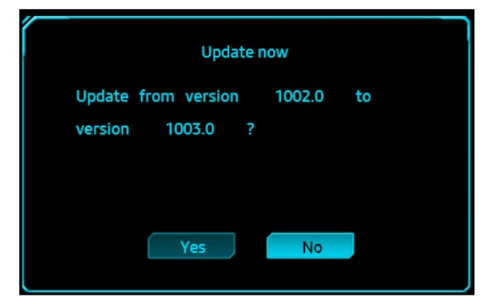
2. When the message as shown in the following figure is displayed on the monitor, select Yes to upgrade the software.

3. When the screen as shown in the following figure is displayed, select Yes.
4. The software upgrading proceeds.

Note
- The supported USB disk formats are FAT, FAT32, and NTFS.
- For the CHG90 model, make sure that each upgrade file is a BIN format file, follows the CHG90 model naming rule (m-HG949CCAA-****.*[4 digits].bin, where ****.* is a version number, and 4 digits are a checksum. For example, “m-HG949CCAA-1000.0[6E80].bin” complies with the naming rule for the CHG90 model.), and must be copied to the root directory.
- Make sure that the USB disk only contains one upgrade file for each model, and then follow the instructions in this guide.
- If you want to revert or downgrade to a lower version, change the file name as m-HG949CCAA-0000.0[4 digits], and then take the same steps.
- If the No valid update files found. Please check your USB device and try again. message is displayed, this is probably due to the following reasons.

- No USB disk is inserted into the USB 1 port.
- The USB disk format is not supported.
- The USB disk contains no valid upgrade files. (No upgrade files exist, or the file names are incorrect.)
6. Do not turn off the monitor. And prevent the upgrading from any interruption as far as possible. If an interruption happens, the monitor will return to the production version.
- Note that the production version may not be the same as the version before this upgrading if some other upgrading has been done earlier.
Adjusting the Product Tilt and Height
- The color and shape of parts may differ from what is shown. Specifications are subject to change without notice to improve quality

- The monitor tilt and height can be adjusted.
- When adjusting the tilt and height, hold both sides of the product and avoid using excessive force to prevent damage.
- When adjusting the stand height, you may hear a noise. This noise is generated because the ball inside the stand slides when the stand height is adjusted. It is a normal noise and not a product malfunction
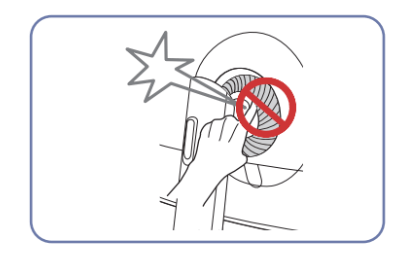
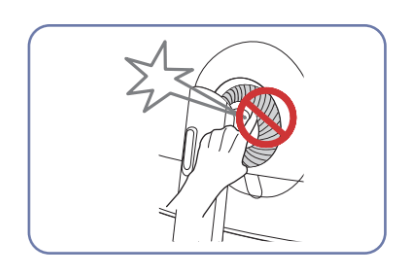
Caution

- Grasp the left and right sides of the monitor and adjust the tilt
After adjusting the product tilt and height, if the screen is not level, take the following actions.

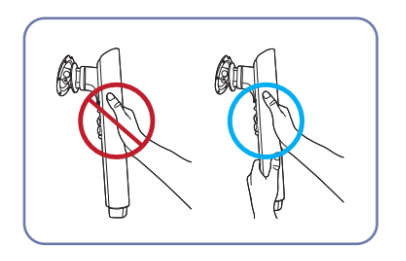
- Hold the bezel at both side edges and adjust the monitor angle until the screen becomes level. (Be careful not to directly hold the LCD display.)
- The monitor angle can be adjusted from -4° to +4°.
Anti-theft Lock
An anti-theft lock allows you to use the product securely even in public places.
The locking device shape and locking method depend on the manufacturer. Refer to the user guide provided with your anti-theft locking device for details.
To lock an anti-theft locking device:

- Fix the cable of your anti-theft locking device to a heavy object such as a desk.
- Put one end of the cable through the loop on the other end.
- Insert the locking device into the anti-theft lock slot at the back of the product.
- Lock the locking device.
- An anti-theft locking device can be purchased separately.
- Refer to the user guide provided with your anti-theft locking device for details.
- Anti-theft locking devices can be purchased at electronics retailers or online.
Installation
Attaching the Stand (Type one)
Before assembling the product, place the product down on a flat and stable surface so that the screen is facing downwards
 |
|
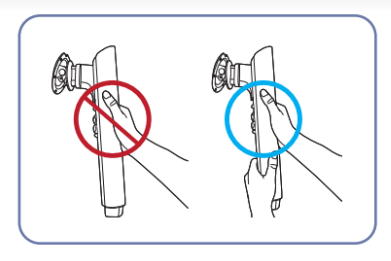
Caution
Hold the stand neck with both hands, not one hand, to prevent it from falling off and causing injury. |
 |
|
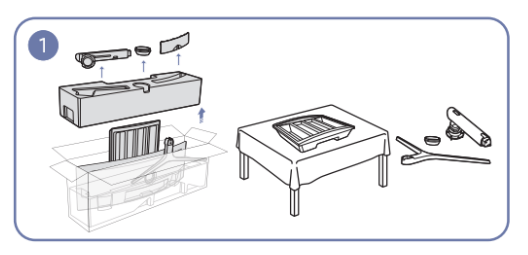
Remove the Cushion Top and Cushion Front, and then place the Cushion Front on the desk. |
 |
|
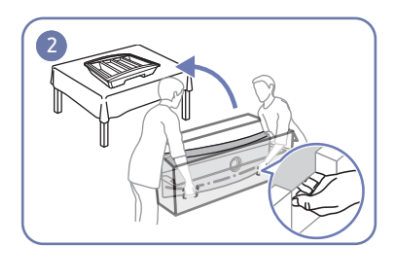
Pull the monitor out of the package (two people are required for this work), and then place the monitor on the Cushion Front. |
 |
|
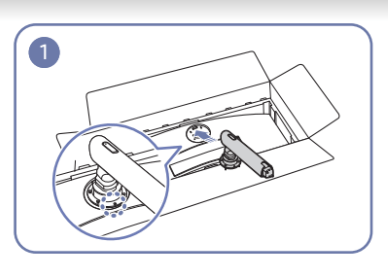
Place the stand neck on the monitor as shown in the figure. |
 |
|
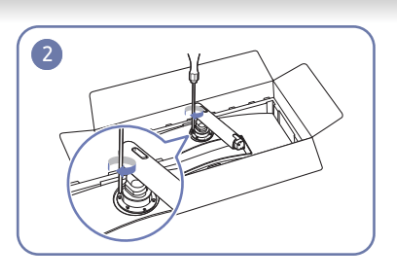
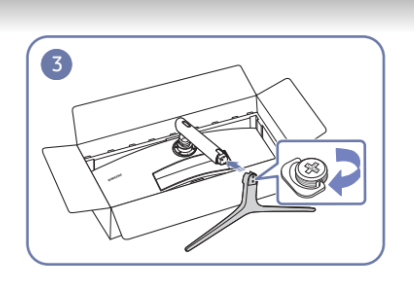
Fasten the screws at the top of the stand neck. |
 |
|
Insert the stand base into the stand neck in the direction as shown in the figure.
|
 |
|
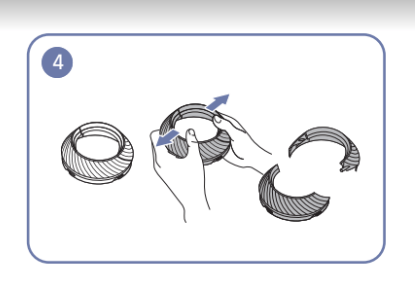
Disassemble the COVER-REAR TOP. |
 |
|
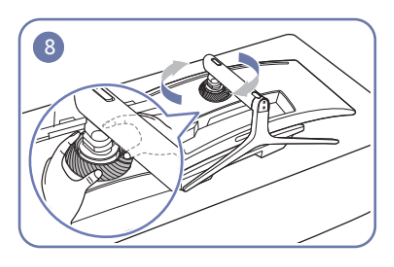
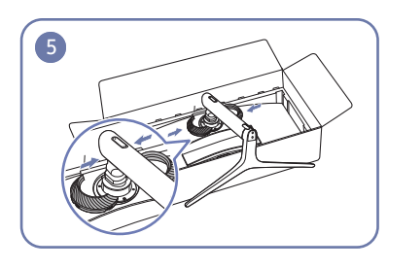
Assemble the COVER-REAR TOP to the stand neck as shown in the figure.
|
 |
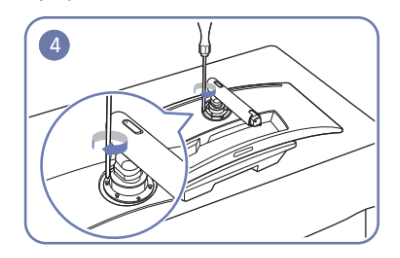
|
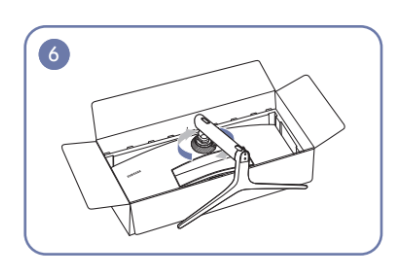
Rotate the COVER-REAR TOP clockwise. |
Attaching the Stand (Type two)
Before assembling the product, place the product down on a flat and stable surface so that the screen is facing downwards.
 |
|
Caution
Hold the stand neck with both hands, not one hand, to prevent it from falling off and causing injury. |
 |
|
Place the stand neck on the monitor as shown in the figure. |
 |
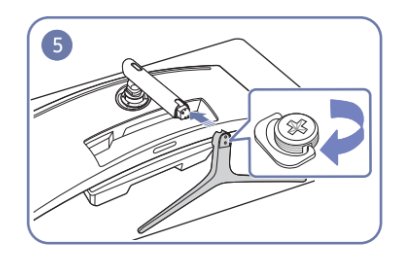
|
Fasten the screws at the top of the stand neck. |
 |
|
Insert the stand base into the stand neck in the direction as shown in the figure. |
 |
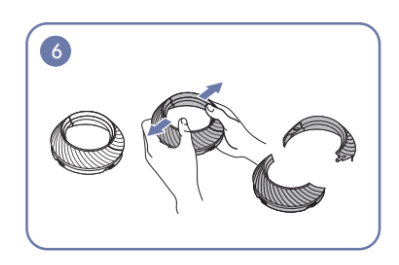
|
Disassemble the COVER-REAR TOP. |
 |
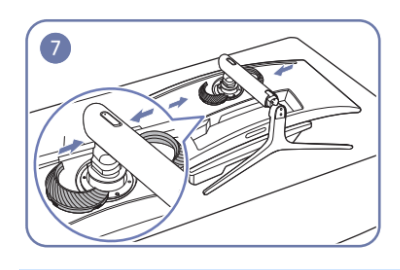
|
Assemble the COVER-REAR TOP to the stand neck as shown in the figure. |
 |
|
Rotate the COVER-REAR TOP clockwise. |
 |
|
Stand up the monitor as shown in the figure.
|
 |
|
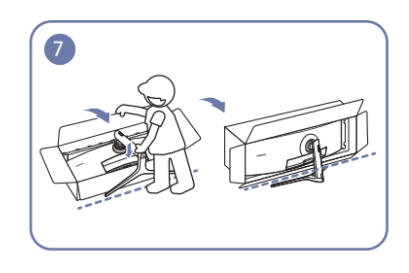
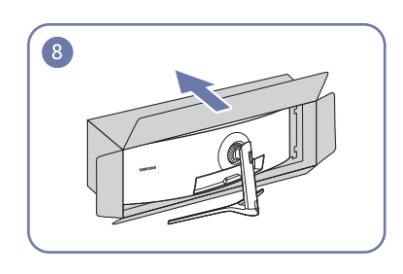
Remove the package. |
Removing the Stand (For Attaching the BRACKET WALL)
Before removing the stand from the monitor, place the monitor on a flat and stable surface with the screen facing down
 |
|
Rotate the COVER-REAR TOP counterclockwise. |
 |
|
Lift the COVER-REAR TOP |
 |
|
Disassemble the COVER-REAR TOP. |
 |
|
Remove the stand base from the stand neck. |
 |
|
Unfasten the 4 screws at the top of the stand neck. |
 |
|
Lift and remove the stand. |
 |
|
Caution
Do not press down on the monitor. There is a risk of damaging the monitor.
|
Attaching the BRACKET WALL
- Power the product off and remove the power cable from the power socket

A Attach the BRACKET WALL here
B BRACKET WALL
Align B with A on the monitor, then tightly fasten with the screws removed from the stand (P.19).
Notes
- Using a screw longer than the standard length can damage the internal components of the product.
- The length of screws required for a wall mount that does not comply with the VESA standards may vary depending on the specifications.
- Do not use screws that do not comply with the VESA standards. Do not attach the wall-mount kit or desktop stand using excessive force. The product may get damaged or fall and cause personal injury. Samsung shall not be held liable for any damage or injury caused by using improper screws or attaching the wall-mount kit or desktop stand using excessive force.
- Samsung shall not be held liable for any product damage or personal injury caused by using a wallmount kit other than the one specified or from an attempt to install the wall-mount kit on your own.
- To mount the product on a wall, ensure you purchase a wall-mount kit that can be installed 10 cm or farther away from the wall.
- Be sure to use a wall-mount kit that complies with the standards.
- To install the monitor using a wall mount, disconnect the stand base from the monitor

Do not attach the BRACKET WALL when the monitor is turned on. This may cause electric shock and might result in injury.
Connecting and Using a Source Device
Pre-connection Checkpoints
- Before connecting a source device, read the user manual provided with it.
- The number and locations of ports on source devices may differ from device to device.
- Do not connect the power cable before connecting all other cables. Ensure you connect a source device first before connecting the power cable. Connecting the power cable during connection may damage the product.
- Check the types of ports at the back of the product you want to connect.
Connecting and Using a PC
Select a connection method suitable for your PC.
- Connecting parts may differ in different products.
- Provided ports may vary depending on the product.
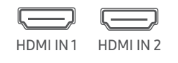
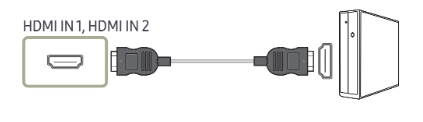
Connection Using the HDMI Cable
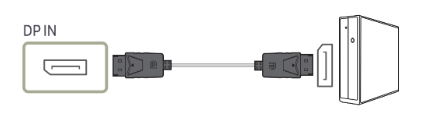
Connection Using the DP Cable
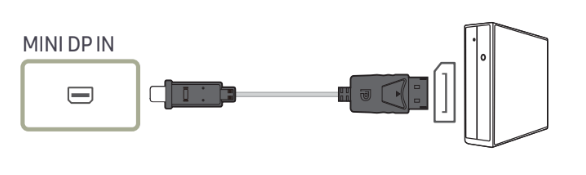
Connection Using the MINI DP Cable
Connecting to Headphones

- Use headphones when activating sound with an HDMI-HDMI, DP or MINI DP cable.
Connecting to Microphone

Connection Using the Audio Cable

Connecting the Product to a PC as a USB HUB
Connecting a PC to the Product
The product can function as a HUB by connecting to a PC via a USB cable. You can connect a source device directly to the product and control the device from the product, without having to connect the device to the PC.
To use the product as a USB hub, connect the product to a PC using a USB cable.

Connect the USB cable to  on the back of the product and USB
  on the PC.
A USB 2.0 cable can be used to connect the product to a PC. However, to take full advantage of the USB 3.0 function, connect a USB 3.0 cable between the PC and the product. Ensure the PC supports USB 3.0.
Utilizing the Product as a USB HUB
Using the product as a hub, connect and use various source devices with the product at the same time.
A PC cannot connect to multiple source devices at the same time as it has a limited number of input/ output ports available. The HUB feature on the product will improve your work efficiency by allowing you to connect multiple source devices to the USB ports on the product at the same time without connecting them to a PC.

If multiple source devices are connected to the PC, the many cables around the PC may look messy.
Connecting the devices directly to the product will resolve such inconvenience.
Connect a mobile device such as an MP3 player or smartphone to the product when connected to a PC.
This allows you to control the device from the PC or charge the device battery.
- To detect and start a USB device faster, connect the device to the USB 3.0 port on the product. The read/write rate will be affected by the USB device and your PC.
- The product does not support media play. If you need to play a file in your USB device, please connect the product as a Hub to your PC and play the file on your PC.
- For USB-related problems caused by OS, drive programs or software, please contact relevant suppliers.
- With the launch of various USB devices on the market, we cannot guarantee that our products are matched with all USB devices.
- For an external mass-storage HDD requiring external power supply, be sure to connect it to a power source.
- The super charging can only be provided through port
 2. According to the USB 3.0 battery charging specification, 2 can support a maximum current of 1.5A. The actual current value depends on the device to be charged.
- If the current is too high or an exception occurs, the over-current protection will be triggered. This is a normal setting of the product.
- USB devices requiring high current may not be supported.
 1 can support a maximum current of 1.0A, and 2 can support a maximum current of 1.5A.
- The battery can be charged in the power-saving mode, but it cannot be charged when the product is powered off.
- Charging your USB device is not possible if the power cable is disconnected from the power socket.
- The USB device needs to be purchased separately
Connecting the Power

To use the product, connect the power cable to a power outlet and the POWER IN port on the product.
- The input voltage is switched automatically.
Tidying Up the Connected Cables
 Headphones hanger
 Downward
 Upward
 |
|
Connect the corresponding cables. |
 |
|
Arrange the cables against the bend tendency of the cables and pull the cables out of the COVER-REAR SUB grooves. |
 |
|
Hang the HOLDER-CABLE in the direction as shown in the figure. |
 |
|
Arrange the cables against their bend tendency, and then pull them through the HOLDER-CABLE hangers. When the set height is changed, you need to arrange the cables and pull them through the HOLDER-CABLE hangers again. |
 |
|
Push the COVER STAND BODY REAR in the direction as shown in the figure. |
 |
|
Remove the COVER STAND BODY REAR by pulling it in the direction as shown in the figure. |
 |
|
Place the corresponding cables into the stand-neck holder. Do not stretch the cable. Three cables in one holder is recommended. |
 |
|
Attach the COVER STAND BODY REAR in the direction as shown in the figure with the buckles not being exposed. |
 |
|
Move down the COVER STAND BODY REAR until it covers the stand neck completely. |
 |
|
Adjust the set height, if required. |
 |
|
Open the Headset Hanger by pushing it down. |
 |
|
Hang the headset. |
 |
|
Rotate and then push up the Headset Hanger in the directions as shown in the figure. |
 |
|
Caution
Open the COVER-REAR SUB in the direction as shown in the figure.
|
Troubleshooting Guide
Requirements Before Contacting Samsung Customer Service Center
Before calling Samsung Customer Service Center, test your product as follows. If the problem persists, contact Samsung Customer Service Center.
Testing the Product
Check if your product is operating normally by using the product test function.
If the screen is turned off and the power indicator blinks even though the product is properly connected to a PC, perform a self-diagnosis test.
- Power off both the PC and product.
- Disconnect the cables from the product.
- Power on the product.
- If the message Check the cable connection and the settings of the source device. appears, the product is working normally.
- If the screen remains blank, check the PC system, video controller and cable.
Checking the Resolution and Frequency
For a mode that exceeds the supported resolution(refer to Standard Signal Mode Table), the message Not Optimum Mode will appear for a short time.
The displayed resolution may vary, depending on the computer system settings and cables.
Check the following.
Installation issue (PC mode)
- The screen keeps switching on and off.
- Check the cable connection between the product and PC, and ensure the connectors are locked.
- Blank spaces are found on all four sides of the screen when an HDMI or HDMI-DVI cable is connected to the product and PC.
- The blank spaces found on the screen have nothing to do with the product.
- Blank spaces on the screen are caused by the PC or graphics card. To resolve the problem, adjust the screen size in the HDMI or DVI settings for the graphics card.
- If the graphics card settings menu does not have an option to adjust the screen size, update the graphics card driver to the latest version.
- Please contact the graphics card or computer manufacturer for further details about how to adjust the screen settings.)
Screen issue
- The power LED is off. The screen will not switch on.
- Check that the power cable is connected properly.
- The message Check the cable connection and the settings of the source device. appears.
- Check that the cable is properly connected to the product.
- Check that the device connected to the product is powered on.
- Not Optimum Mode is displayed.
- This message appears when the signal from the graphics card exceeds the maximum resolution or frequency for the product.
- Change the maximum resolution and frequency to suit the product performance, referring to Standard Signal Mode Table (P.52).
- The images on the screen look distorted.
- Check the cable connection to the product.
- The screen is not clear. The screen is blurry.
- Remove any accessories (video extension cable, etc.) and try again.
- Set the resolution and frequency to the recommended level.
- The screen appears unstable and shaky. There are shadows or ghost images left on the screen.
- Check that the resolution and frequency for the PC are within the range of resolution and frequency compatible with the product. Next, if required, change the settings, referring to Standard Signal Mode Table (P.52) in this manual and the Information menu on the product.
- The screen is too bright. The screen is too dark.
- Adjust Brightness and Contrast.
- Screen color is inconsistent.
- Change the Color settings.
- The colors on the screen have a shadow and are distorted.
- Change the Color settings.
- White does not really look white.
- Change the Color settings.
- There is no image on the screen and the power LED blinks every 0.5 to 1 second.
- The product is operating in power-saving mode.
- Press any key on the keyboard or move the mouse to return to normal operating mode.
- Text is blurry.
- If using a Windows OS (e.g. Windows 7, Windows 8, Windows 8.1 or Windows 10): Go to Control Panel → Fonts → Adjust ClearType text and change Turn on ClearType.
- Video playback is choppy.
- Playback of high-definition large video files can be choppy. This may be because the video player is not optimized for the computer resource.
- Try playing the file on another video player.
Sound issue
- There is no sound.
- Check the connection of the audio cable or adjust the volume.
- Check the volume.
- The volume is too low.
- Adjust the volume.
- If the volume is still low after turning it up to the maximum level, adjust the volume on your PC sound card or software program.
- Video is available but there is no sound.
- Sound cannot be heard if an HDMI-DVI cable is used to connect the input device.
- Connect the device using an HDMI cable or DP cable.
Source device issue
- A beeping sound is heard when my PC is booting.
- If a beeping sound is heard when your PC is booting, have your PC serviced
Q & A
Refer to the user manual for your PC or graphics card for further instructions on adjustment.
How can I change the frequency?
Set the frequency on your graphics card.
- Windows 7: Go to Control Panel → Appearance and Personalization → Display → Screen Resolution → Advanced settings → Monitor, and adjust Refresh rate under Monitor settings.
- Windows 8(Windows 8.1): Go to Settings → Control Panel → Appearance and Personalization → Display → Screen Resolution → Advanced settings → Monitor, and adjust Refresh rate under Monitor settings.
- Windows 10(Early version): Go to Settings → System → Display → Advanced display settings → Display adapter properties → Monitor, and adjust Screen refresh rate under Monitor settings.
- Windows 10(Version 1703 and later): Go to Settings → System → Display → Display adapter properties → Monitor, and adjust Screen refresh rate under Monitor settings.
How can I change the resolution?
- Windows 7: Go to Control Panel → Appearance and Personalization → Display → Adjust Resolution, and adjust the resolution.
- Windows 8(Windows 8.1): Go to Settings → Control Panel → Appearance and Personalization → Display → Adjust Resolution, and adjust the resolution.
- Windows 10(Early version): Go to Settings → System → Display → Advanced display settings, and adjust the resolution.
- Windows 10(Version 1703 and later): Go to Settings → System → Display, and adjust the resolution.
How do I set power-saving mode?
- Windows 7: Set power-saving mode in Control Panel → Appearance and Personalization → Personalize → Screen Saver Settings → Power options or BIOS SETUP on the PC.
- Windows 8(Windows 8.1): Set power-saving mode in Settings → Control Panel → Appearance and Personalization → Personalize → Screen Saver Settings → Power options or BIOS SETUP on the PC.
- Windows 10(Early version): Set power-saving mode in Settings → Personalization → Lock screen → Screen timeout settings → Power & sleep or BIOS SETUP on the PC.
- Windows 10(Version 1703 and later): Go to Settings → Power & sleep, and make the setup.
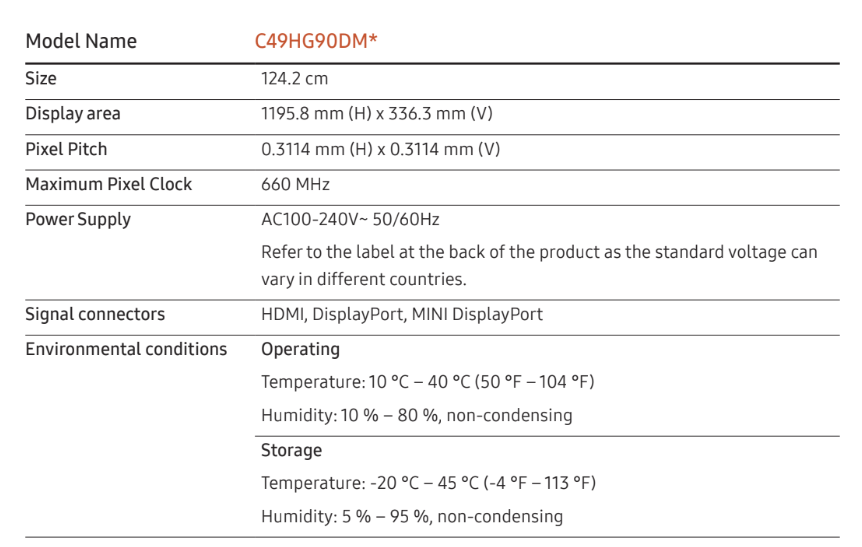
Specifications
General
Plug-and-Play
This monitor can be installed and used with any Plug-and-Play compatible systems. Two-way data exchange between the monitor and PC system optimizes the monitor settings. Monitor installation takes place automatically. However, you can customize the installation settings if desired.
Panel Dots (Pixels)
Due to the nature of the manufacturing of this product, approximately 1 pixel per million (1ppm) may be brighter or darker on the LCD panel. This does not affect product performance.
The above specifications are subject to change without notice to improve quality.
This device is a Class B digital apparatus.
For detailed device specifications, visit the Samsung Electronics website.
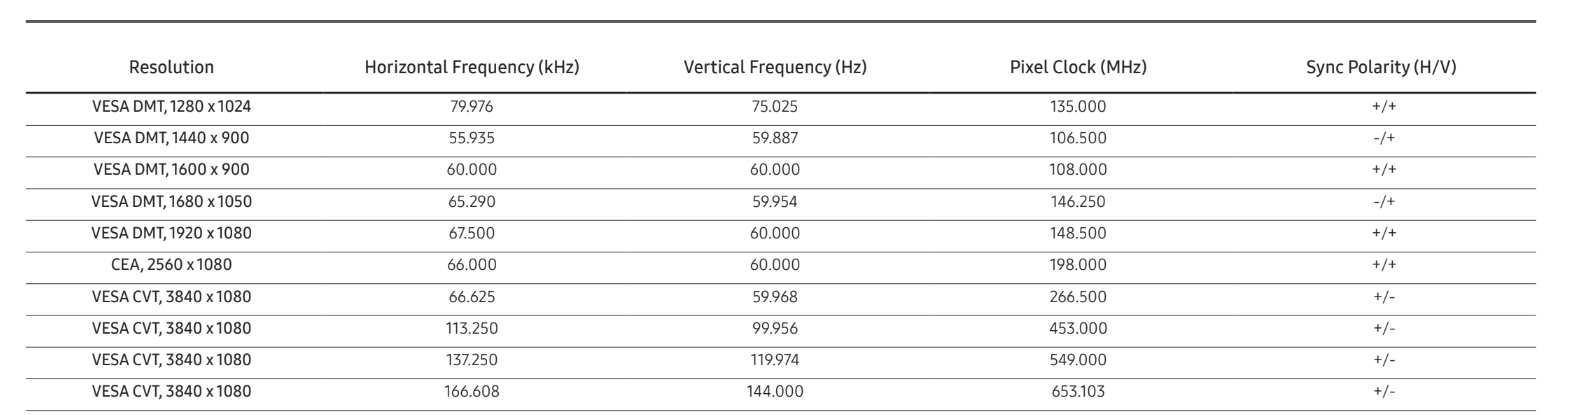
Standard Signal Mode Table

If a signal that belongs to the following standard signal modes is transmitted from your PC, the screen will automatically be adjusted. If the signal transmitted from the PC does not belong to the standard signal modes, the screen may be blank even though the power LED turns on. In such a case, change the settings according to the following table by referring to the graphics card user manual.
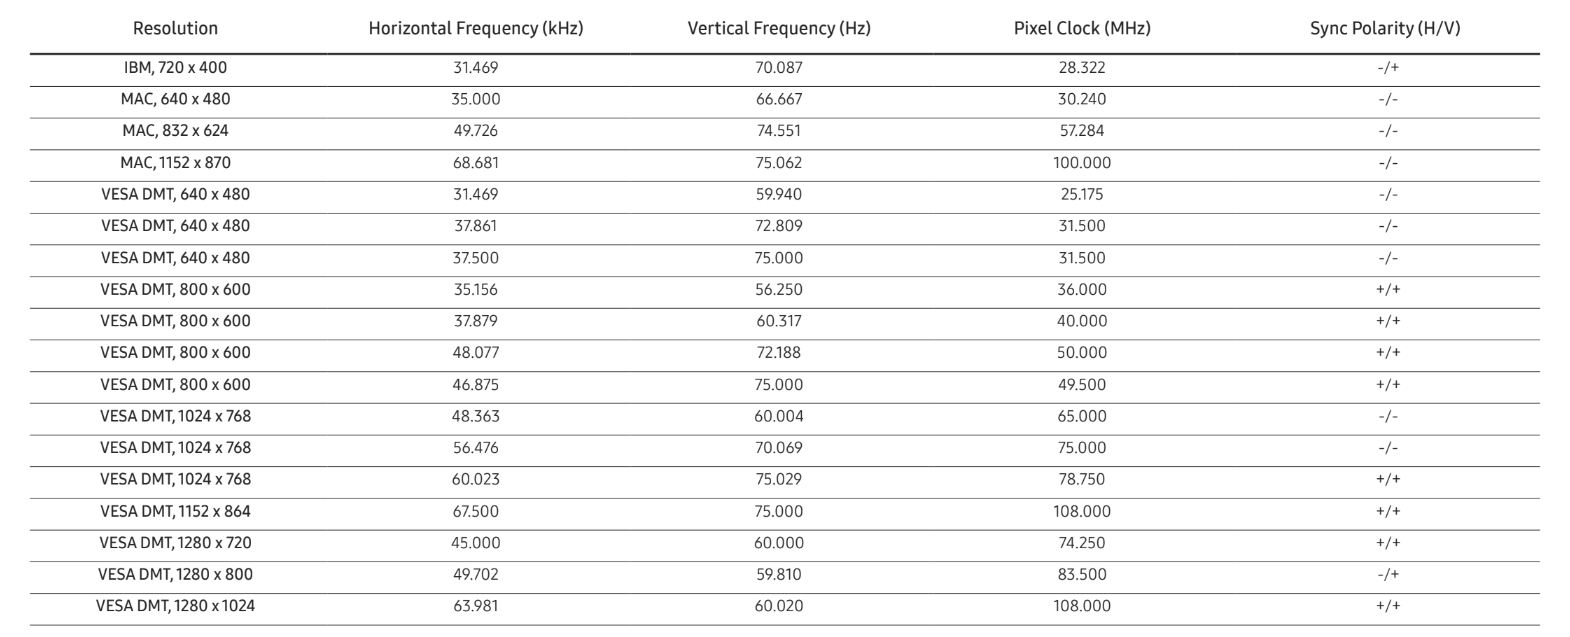
Horizontal Frequency
The time required to scan a single line from the left to the right side of the screen is called a horizontal cycle. The reciprocal number of a horizontal cycle is called horizontal frequency. Horizontal frequency is measured in kHz.
Vertical Frequency
Repeating the same picture dozens of times per second allows you to view natural pictures. The repeat frequency is called "vertical frequency" or "refresh rate" and is indicated in Hz.
This product can be set to only one resolution for each screen size to obtain the optimum picture quality due to the nature of the panel. Using a resolution other than the specified resolution may degrade the picture quality. To avoid this, it is recommended that you select the optimum resolution specified for your product.