User Manual Computer Monitor
Preparations
Parts
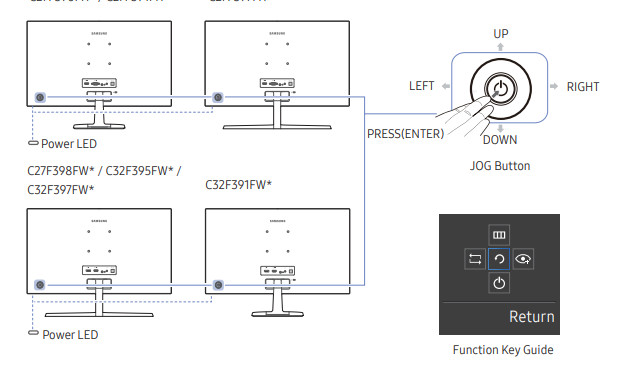
Control Panel
The color and shape of parts may differ from what is shown. Specifications are subject to change without notice to improve quality.
Icons & Description
- JOG Button
- Multi directional button that helps navigate.
- The JOG button is located on the rear left side of the product. The button can be used to move up, down, left or right, or as Enter.
- Power LED
- This LED is power status indicator and works as
- Power On (Power button): Off
- Power saving mode: Blinking
- Power Off (Power button): On
- The power Indicator operation can be swapped by changing in the menu. (System Power LED On) Actual models because of functional variation maybe haven’t this function.
- Function Key Guide
- Press the JOG button when the screen is turned on. The Function Key Guide will appear. To access the onscreen menu when the guide is displayed, press the corresponding direction button again.
- Function Key Guide may vary depending on the function or product model. Please refer to the actual product.
Direct Key guide
- The shortcut button screen (OSD menu) shown below is displayed only when the monitor screen is turned on, the computer resolution changes, or the input source changes.
- The function buttons page shows if Eye Saver Mode is enabled.

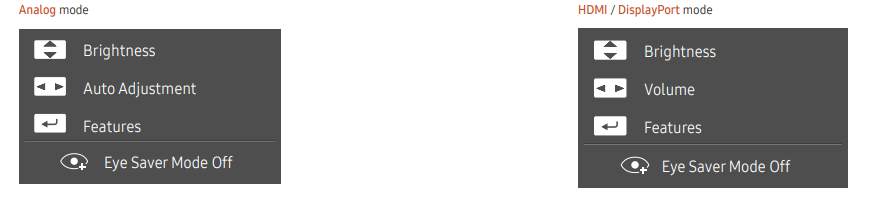
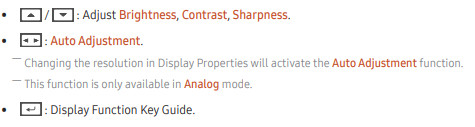
― Analog mode option
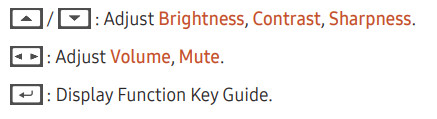
― HDMI / DisplayPort mode option
Function Key Guide
― To enter the main menu or to use other items, press the JOG button to display the Function Key Guide. You can exit by pressing the JOG button again.
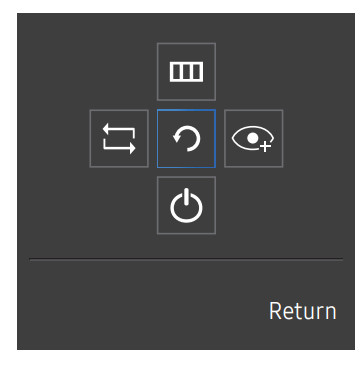
UP/DOWN/LEFT/RIGHT: Move to the item you want. The description for each item will appear when the focus changes. PRESS(ENTER): The selected item will be applied.
Icons & Description

- Selects to change the input signal by moving the JOG button in the Function Key Guide screen. A message will appear on the top left corner of the screen if the input signal has been changed.

- Selects by moving the JOG button in the function key guide screen. The OSD (On Screen Display) of your Monitor’s feature appears. OSD control lock: Maintain the current settings, or lock the OSD control to prevent unintended changes to settings. Enable/Disable: To lock/unlock the OSD control, press the LEFT button for 10 seconds when the main menu displayed.
- If the OSD control is locked, Brightness and Contrast can be adjusted. Eye Saver Mode is available. System => FreeSync, Power LED On is available. Information can be viewed.

- Selects by moving the JOG button in the function key guide screen. Press to enable or disable Eye Saver Mode. The items below are not available if the Eye Saver Mode function is enable.
- Picture => Bright, Brightness, Color, Game Mode
- System =>
 Eco Saving Plus

- Selects to turn the Monitor off by moving the JOG button in the function key guide screen.
― Actual models because of functional variation, Function key guide options will be different.
When the monitor displays nothing (i.e. Power saving mode or Non-signal mode), 2 direct keys for control source and power could be used as below.
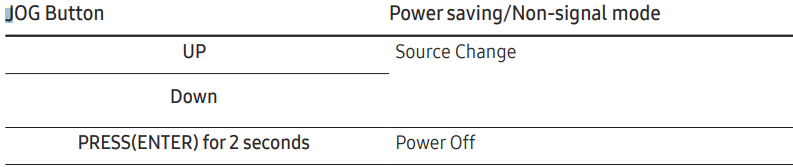
When the monitor displays the Main menu the JOG Button could be used as below.
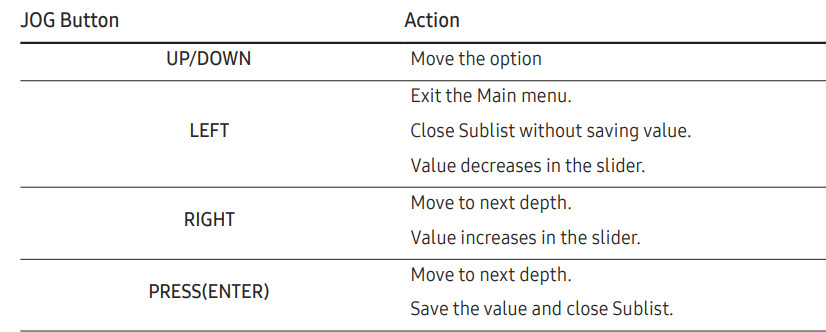
Changing Brightness, Contrast and Sharpness settings
You can adjust Brightness, Contrast or Sharpness by moving the JOG button up or down, if no OSD menu is displayed.
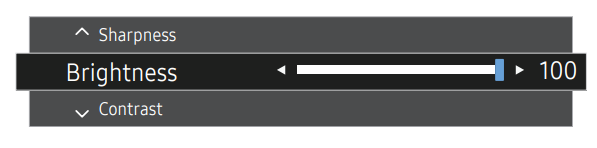
― The displayed image may differ depending on the model.
― The default brightness can vary depending on the region.
Brightness
- This menu is not available when Bright is set to Dynamic Contrast mode.
- This menu is not available when Eco Saving Plus is enabled.
- This menu is not available when Eye Saver Mode is enabled.
Contrast
- This menu is not available when Bright is in Cinema or Dynamic Contrast mode.
- This menu is not available when Game Mode is enabled.
Sharpness
- This menu is not available when Bright is in Cinema or Dynamic Contrast mode.
- This menu is not available when Upscale is in Mode1 or Mode2 mode.
- This menu is not available when Game Mode is enabled.
Changing the Volume setting
You can adjust Volume by moving the JOG button left or right, if no OSD menu is displayed. This function is only available in HDMI / DisplayPort mode.

- The displayed image may differ depending on the model.
- If the audio quality of a connected input device is poor, the Auto Mute function on the product may mute the sound or cause choppy audio when applying the headphones or speakers. Set the input volume for the input device to at least 20% and control the volume using the volume control (JOG button LEFT/RIGHT) on the product.
- What is Auto Mute? The function mutes the audio to improve sound effect when there is sound noise or when the input signal is weak, usually due to a problem with the volume of an input device.
- To activate the Mute function, access the Volume control screen, then use the JOG button to move the focus down. To deactivate the Mute function, access the Volume control screen, then increase or decrease the Volume
Reverse Side
― The color and shape of parts may differ from what is shown. Specifications are subject to change without notice to improve quality.
Adjusting the Product Tilt
― The color and shape of parts may differ from what is shown. Specifications are subject to change without notice to improve quality.
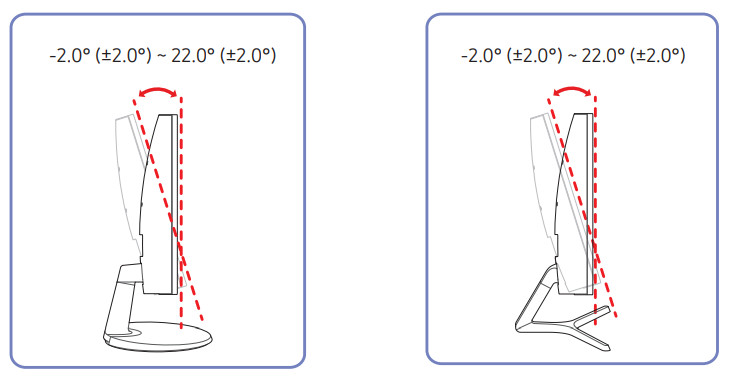
- You can adjust the product tilt.
- Hold the lower part of the product and adjust the tilt carefully
Anti-theft Lock
― An anti-theft lock allows you to use the product securely even in public places.
― The locking device shape and locking method depend on the manufacturer. Refer to the user guide provided with your anti-theft locking device for details.
To lock an anti-theft locking device:
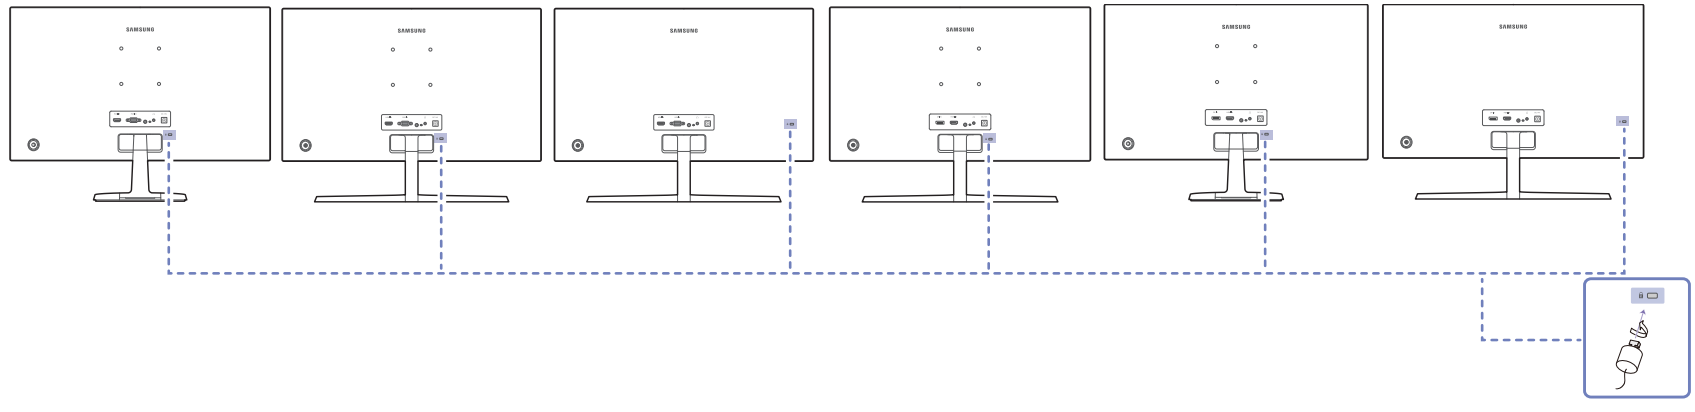
- Fix the cable of your anti-theft locking device to a heavy object such as a desk.
- Put one end of the cable through the loop on the other end.
- Insert the locking device into the anti-theft lock slot at the back of the product.
- Lock the locking device.
- An anti-theft locking device can be purchased separately.
- Refer to the user guide provided with your anti-theft locking device for details.
- Anti-theft locking devices can be purchased at electronics retailers or online.
Precautions for moving the monitor
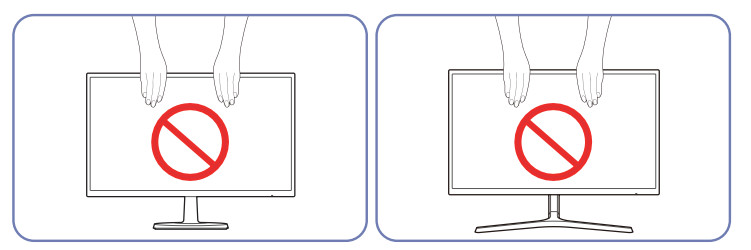
Do not directly apply pressure on the screen.
Do not hold the screen when moving the monitor.
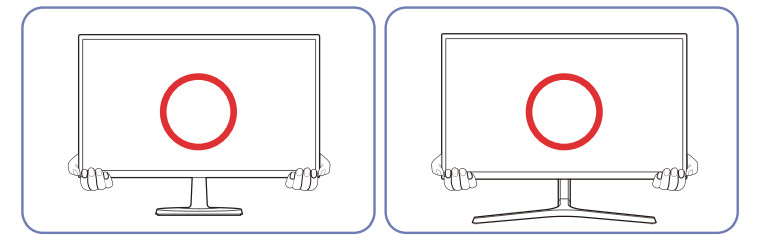
Hold the lower part of the monitor when moving it.
Installing the Wall Mount (Not for C27F397FH* / C32F397FW* models)
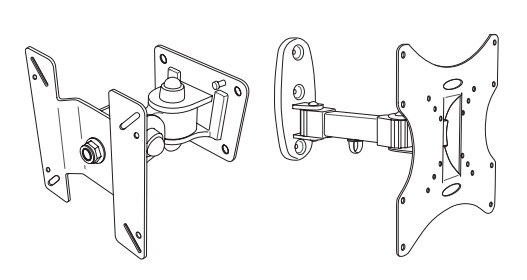
Installing the Wall Mount Kit
The wall mount kit allows you to mount the product on the wall. Purchase a compatible wall-mount kit to use with the product. For detailed information on installing the wall mount, see the instructions provided with the wall mount. We recommend you contact a technician for assistance when installing the wall mount bracket. Samsung Electronics is not responsible for any damage to the product or injury to yourself or others if you elect to install the wall mount on your own.
Wall Mount Kit Specifications (VESA) (Not for C27F397FH* / C32F397FW* models)
― Install your wall mount on a solid wall perpendicular to the floor. Before attaching the wall mount to surfaces other than plaster board, please contact your nearest dealer for additional information. If you install the product on a slanted wall, it may fall and result in severe personal injury. Samsung wall mount kits contain a detailed installation manual and all parts necessary for assembly are provided.
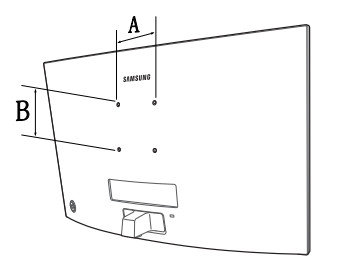
- Do not use screws that are longer than the standard length or do not comply with the VESA standard screw specifications. Screws that are too long may cause damage to the inside of the product.
- For wall mounts that do not comply with the VESA standard screw specifications, the length of the screws may differ depending on the wall mount specifications.
- Do not fasten the screws too firmly. This may damage the product or cause the product to fall, leading to personal injury. Samsung is not liable for these kinds of accidents.
- Samsung is not liable for product damage or personal injury when a non-VESA or non-specified wall mount is used or the consumer fails to follow the product installation instructions.
- Do not mount the product at more than a 15 degree tilt.
- Standard dimensions for wall mount kits are shown in the table below.
Connecting and Using a Source Device
Pre-connection Checkpoints
― Before connecting a source device, read the user manual provided with it. The number and locations of ports on source devices may differ from device to device.
― Do not connect the power cable before connecting all other cables. Ensure you connect a source device first before connecting the power cable. Connecting the power cable during connection may damage the product.
― Check the types of ports at the back of the product you want to connect.
Connecting and Using a PC
Select a connection method suitable for your PC.
- Connecting parts may differ in different products.
- Provided ports may vary depending on the product.
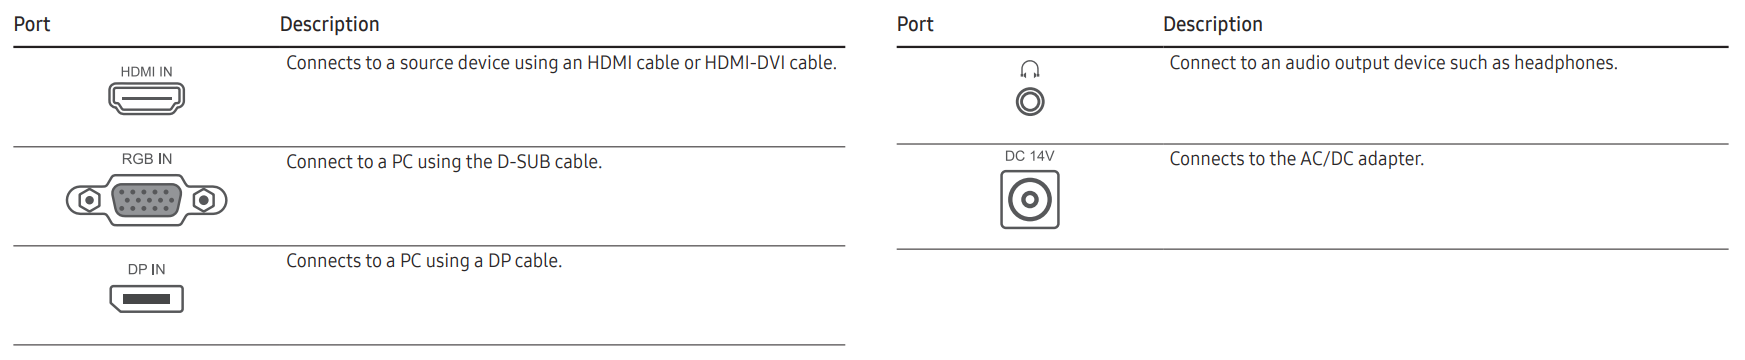
Connection Using the D-SUB Cable (Analog Type)

Connection Using the HDMI or HDMI-DVI Cable
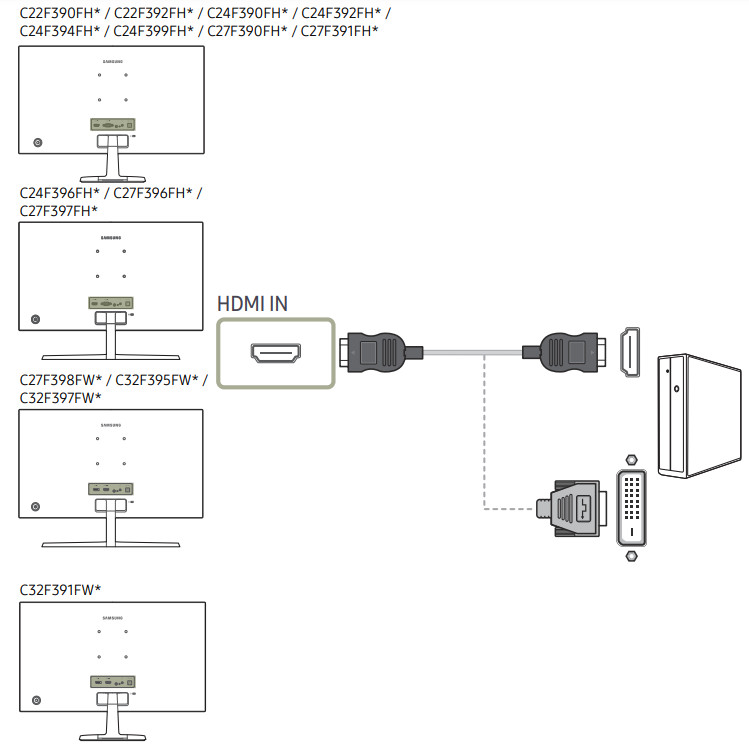
The audio function is not supported if the source device is connected using the HDMI-DVI cable
Connection Using an DP Cable
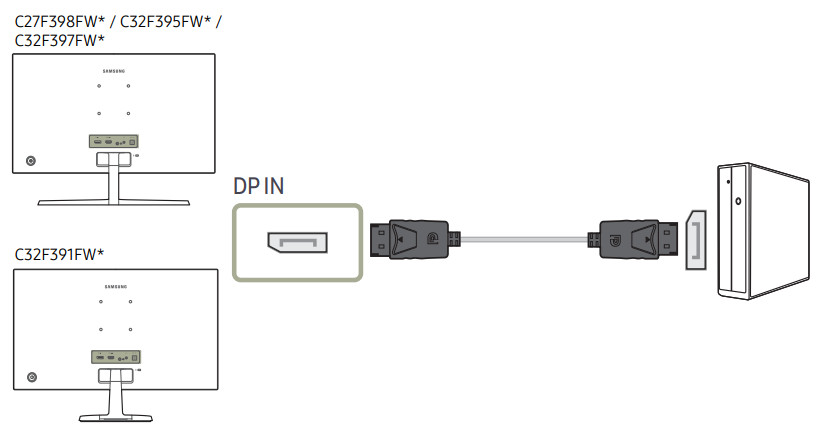
A DP cable shorter under 1.5m in length is recommended. Using a cable longer than 1.5m can affect the picture quality
Connecting to Headphones
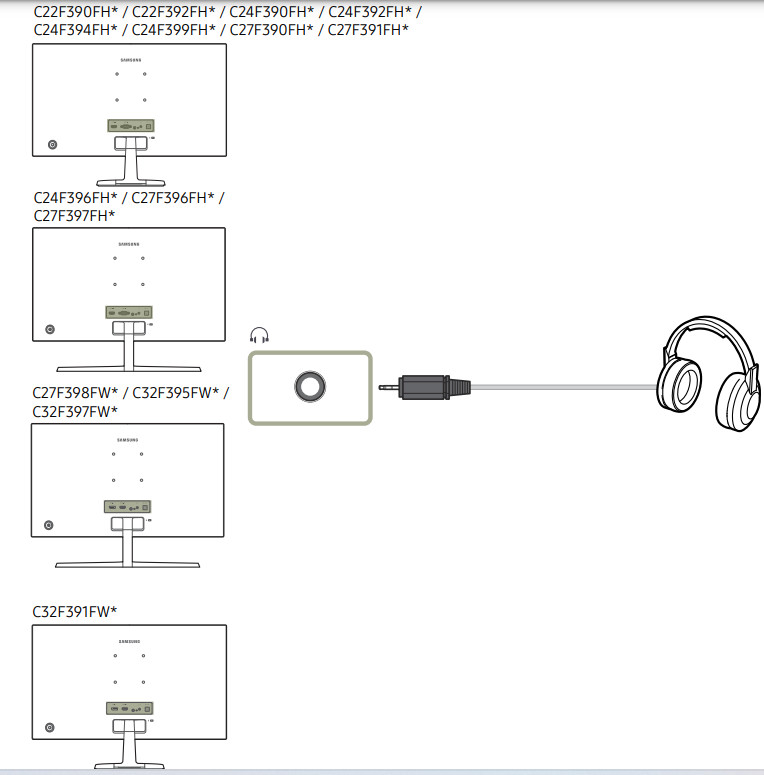
― The sound could only be heard when using the HDMI to HDMI or DP cable.
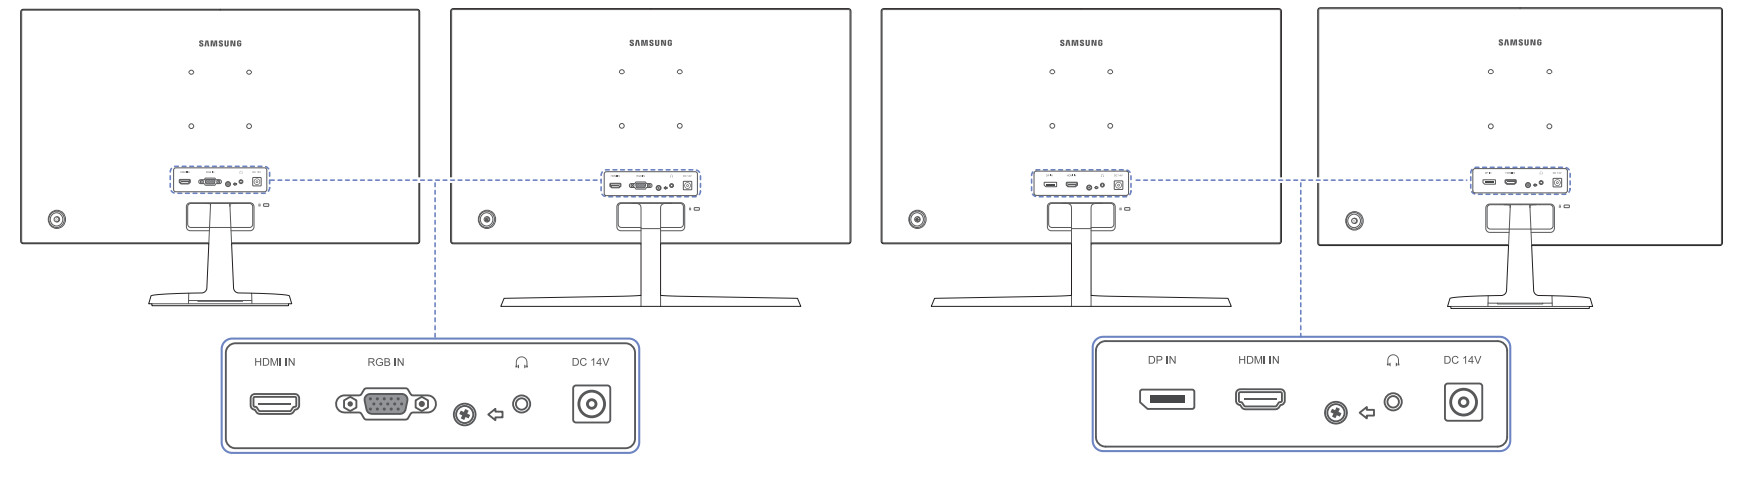
Connecting the Power
Optional
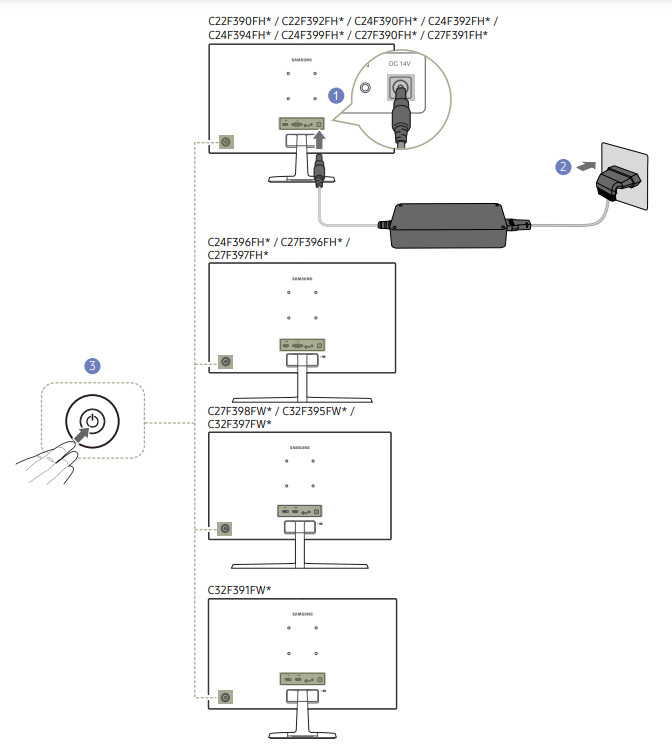
- Connect the power cable to the AC/DC adapter. Then, connect the AC/DC adapter to the DC 14V port on the back of the product.
- Next, connect the power cable to the power outlet.
- Press the JOG button on the back of the monitor to turn it on.
- The input voltage is switched automatically
Optional
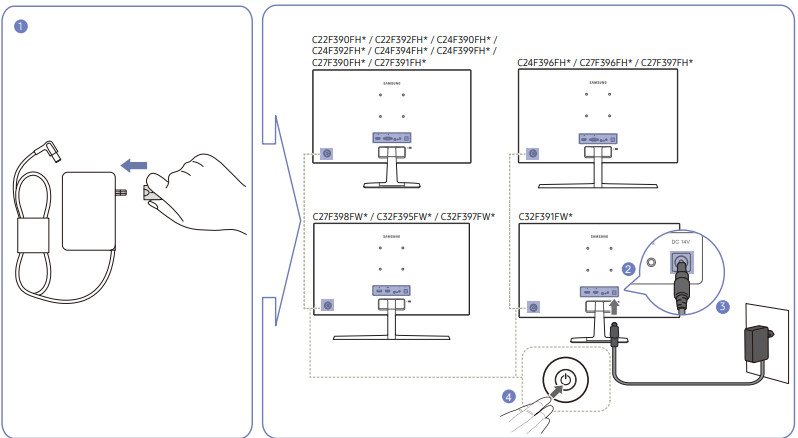
- Connect the power plug to the AC/DC adapter. (Optional)
- Connect the AC/DC adapter cable to the DC 14V port on the back of the monitor.
- Plug the AC/DC adapter into the power outlet.
- Press the JOG button on the back of the monitor to turn it on.
- The input voltage is switched automatically
Correct posture to use the product
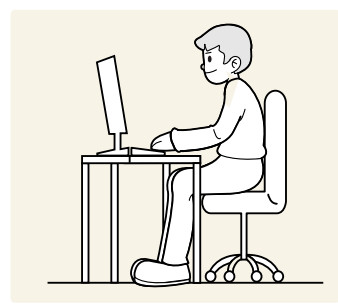
Use the product in the correct posture as follows:
- Straighten your back.
- Adjust the angle so light does not reflect on the screen.
- Keep your forearms perpendicular to your upper arms and level with the back of your hands.
- Keep your elbows at about a right angle.
- Adjust the height of the product so you can keep your knees bent at 90 degrees or more, your heels attached to the floor, and your arms lower than your heart.
Driver Installation
― You can set the optimum resolution and frequency for this product by installing the corresponding drivers.
― To install the latest version of the product driver, download it from the Samsung Electronics website at http://www.samsung.com.
Setting Optimum Resolution
An information message about setting optimum resolution will appear if you power on the product for the first time after purchase. Select a language on the product and change the resolution on your PC to the optimum setting.
- If the optimum resolution is not selected, the message will appear up to three times for a specified time even when the product is turned off and on again.
- The optimum resolution can also be selected in Control Panel on your PC.
Screen Setup
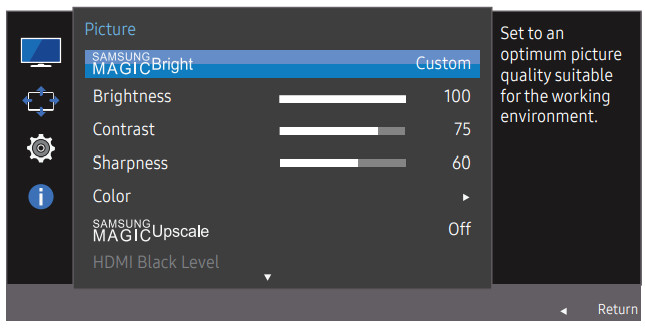
SAMSUNG MAGIC Bright
This menu provides an optimum picture quality suitable for the environment where the product will be used.
- This menu is not available when Eco Saving Plus is enabled.
- This menu is not available when Game Mode is enabled.
- This menu is not available when Eye Saver Mode is enabled.
You can customize the brightness to suit your preferences.
― The displayed image may differ depending on the model.
In PC mode
- Custom: Customize the contrast and brightness as required.
- Standard: Obtain a picture quality suitable for editing documents or using Internet.
- Cinema: Obtain the brightness and sharpness of TVs suitable for enjoying video and DVD content.
- Dynamic Contrast: Obtain balanced brightness through automatic contrast adjustment.
In AV mode
When the external input is connected through HDMI/DP and PC/AV Mode is set to AV, Bright has four automatic picture settings (Dynamic, Standard, Movie and Custom) that are preset at the factory. You can activate either Dynamic, Standard, Movie or Custom. You can select Custom which automatically recalls your personalized picture settings.
- Dynamic: Select this mode to view a sharper image than in Standard mode.
- Standard: Select this mode when the surroundings are bright. This also provides a sharp image.
- Movie: Select this mode when the surroundings are dark. This will save power and reduce eye fatigue.
- Custom: Select this mode when you want to adjust the image according to your preferences.
Brightness
You can adjust the general brightness of the picture. (Range: 0~100) A higher value will make the picture appear brighter.
- This menu is not available when Bright is set to Dynamic Contrast mode.
- This menu is not available when Eco Saving Plus is enabled.
- This menu is not available when Eye Saver Mode is enabled.
Contrast
Adjust the contrast between the objects and background. (Range: 0~100) A higher value will increase the contrast to make the object appear clearer.
- This option is not available when Bright is in Cinema or Dynamic Contrast mode.
- This menu is not available when Game Mode is enabled.
Sharpness
Make the outline of objects more clear or blurry. (Range: 0~100) A higher value will make the outline of objects clearer.
- This option is not available when Bright is in Cinema or Dynamic Contrast mode.
- This menu is not available when Upscale is in Mode1 or Mode2 mode.
- This menu is not available when Game Mode is enabled.
Color
Adjust the tint of the screen.
― This menu is not available when Bright is set to Cinema or Dynamic Contrast mode.
― This menu is not available when Game Mode is enabled.
― This menu is not available when Eye Saver Mode is enabled.
- Red: Adjust the red saturation level. Values closer to 100 mean greater intensity for the color.
- Green: Adjust the green saturation level. Values closer to 100 mean greater intensity for the color.
- Blue: Adjust the blue saturation level. Values closer to 100 mean greater intensity for the color.
- Color Tone: Select a color tone that best suits your viewing needs.
- Cool 2: Set the color temperature to be cooler than Cool 1.
- Cool 1: Set the color temperature to be cooler than Normal mode.
- Normal: Display the standard color tone.
- Warm 1: Set the color temperature to be warmer than Normal mode.
- Warm 2: Set the color temperature to be warmer than Warm 1.
- Custom: Customize the color tone.
- When the external input is connected through HDMI/DP and PC/AV Mode is set to AV, Color Tone has four color temperature settings (Cool, Normal, Warm and Custom).
- Gamma: Adjust the middle level of luminance.
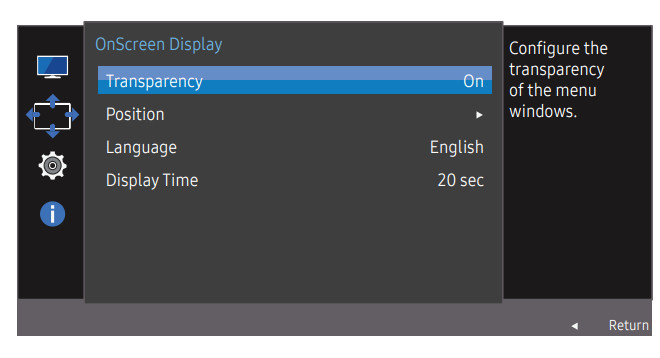
Adjusting OSD (On Screen Display) settings
Transparency
Set the transparency for the menu windows.
― The displayed image may differ depending on the model.
Position
Adjust the menu position.
Language
Set the menu language.
- A change to the language setting will only be applied to the onscreen menu display.
- It will not be applied to other functions on your PC.
Display Time
Set the on-screen display (OSD) menu to automatically disappear if the menu is not used for a specified period of time. Display Time can be used to specify the time after which you want the OSD menu to disappear.
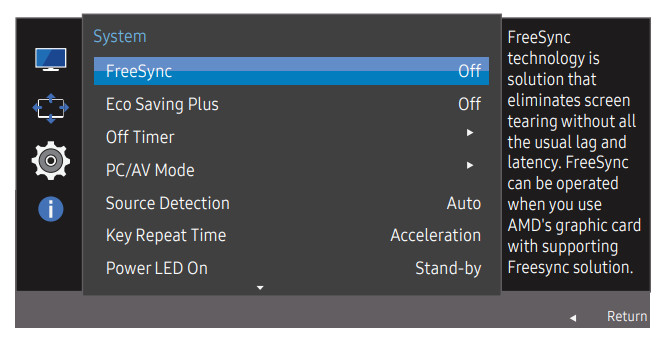
Setup and Reset
FreeSync
C32F391FW* / C32F395FW* / C32F397FW* models are not supported.
FreeSync technology is solution that eliminates screen tearing without all the usual lag and latency. This feature will eliminate screen tearing and lag during game play. Improve your gaming experience. FreeSync is only available in HDMI or DisplayPort mode.
- Off: Disable FreeSync.
- Standard Engine: Enable the basic FreeSync functions of the AMD graphics card.
- Ultimate Engine: Enable the FreeSync feature with a higher screen frame rate. Screen tearing (abnormal sync between the screen and content) is reduced in this mode. Note that screen flickering may occur during game play.
When enable FreeSync function, please use maximum screen refresh rate for optimal freesync effect. The refresh rate setting method please refer to Q & A How can I change the frequency?
― When using the FreeSync function, use the HDMI/DP cable provided by the monitor manufacturer.
― The displayed image may differ depending on the model.
If the FreeSync function is enabled, the following may occur:
- The screen may flicker when you play games depending on the game option settings. Decreasing the game setting values might help to remove the flicker. Installing the latest drivers from the AMD website may also fix this issue.
- The response rate during the game may fluctuate depending on the resolution. A higher resolution generally decreases the response rate.
- The sound quality of the monitor may be degraded.
― If you encounter any issues when using the function, contact the Samsung Service Center.
The models in the Graphic Cards list supports FreeSync
FreeSync can only be used with specific AMD graphics card models. Refer to the following list for supported graphics cards: Make sure to install the latest official graphics drivers from AMD that support FreeSync.
― For additional AMD graphics card models that support the FreeSync feature, visit the official AMD website.
― Select FreeSync Off if you are using a graphics card from a different manufacturer.
- AMD Radeon R9 300 Series
- AMD Radeon R9 Fury X
- AMD Radeon R7 360
- AMD Radeon R9 295X2
- AMD Radeon R9 290X
- AMD Radeon R9 290
- AMD Radeon R9 285
- AMD Radeon R7 260X
- AMD Radeon R7 260
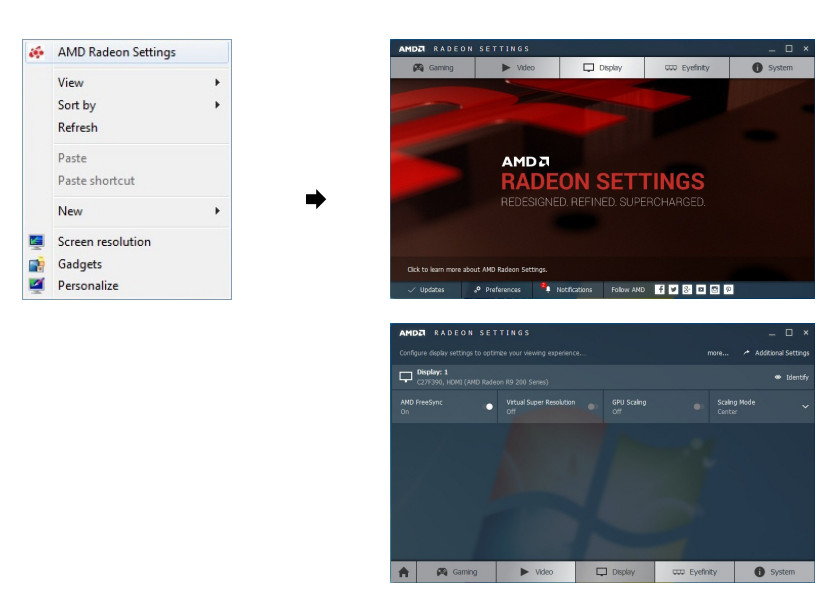
How do you enable FreeSync?
- Set FreeSync to Standard Engine or Ultimate Engine in the OSD menu.
- Enable FreeSync in AMD Radeon Settings: Right-click the mouse AMD Radeon Settings Display The "AMD FreeSync" feature should be set to "On". Select to "On" if not already enabled.
Eco Saving Plus
Reduce energy consumption compared to consumption at the maximum brightness level.
― This option is not available when Bright is in Dynamic Contrast mode.
― This menu is not available when Game Mode is enabled.
― This menu is not available when Eye Saver Mode is enabled.
- Off: Deactivate the Eco Saving Plus function.
- Auto: The power consumption will automatically be reduced by about 10% over the current setting. (The reduction of power consumption depends on the customer screen brightness condition.)
- Low: Saves up to 25 % energy compared to the maximum brightness.
- High: Saves up to 50 % energy compared to the maximum brightness
Off Timer
Off Timer: Turn on Off Timer mode.
Turn Off After: The off timer can be set within a range of 1 to 23 hours. The product will automatically power off after the specified number of hours.
― This option is only available when Off Timer is set to On.
― For products for the market in some regions, the Off Timer is set to automatically activate 4 hours after the product powers on. This is done in accordance with power supply regulations. If you do not want the timer to activate, go to MENU System and set Off Timer to Off.
PC/AV Mode
Set PC/AV Mode to AV. The picture size will be enlarged. This option is useful when you view a movie.
- Set to PC when connected to a PC.
- Set to AV when connected to an AV device.
― This function does not support Analog mode.
― Supplied for the wide models only such as 16:9 or 16:10.
― If the monitor is in HDMI/DisplayPort mode and the screen says Check Signal Cable or power saving mode activates, press the JOG button to display the function-button screen and then select the  icon. You can select PC or AV.
Source Detection
Select either Auto or Manual as the method to recognize input signal.
Key Repeat Time
Control the response rate of a button when the button is pressed. Acceleration, 1 sec, or 2 sec can be selected. If No Repeat is selected, a command responds only once when a button is pressed.
Power LED On
Configure the settings to enable or disable the power LED located at the lower part of the product.
- Working: The power LED is on when the product is turned on.
- Stand-by: The power LED is on when the product is turned off.
Reset All
Return all the settings for the product to the default factory settings.
Information
View the current input source, frequency and resolution.
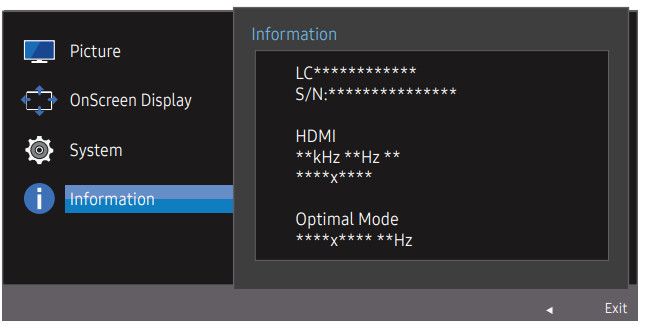
― The displayed image may differ depending on the model.
Installing the Software
Easy Setting Box

Easy Setting Box enables users to use the monitor by partitioning multiple sections. To install the latest version of Easy Setting Box, download it from the Samsung Electronics website at http://www.samsung.com.
― The software may not work properly if you do not restart the computer after the installation.
― The Easy Setting Box icon may not appear depending on the computer system and the product specifications.
― If the shortcut icon does not appear, press the F5 key
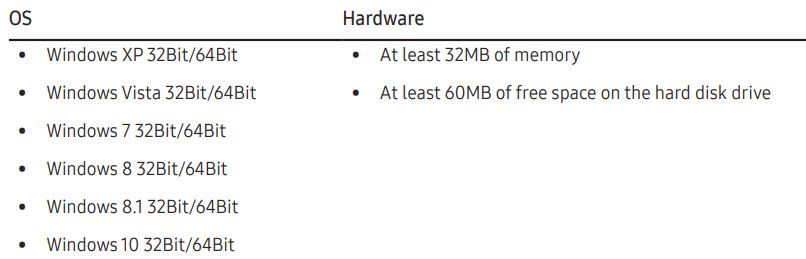
System Requirements
Troubleshooting
Testing the Product
Check if your product is operating normally by using the product test function. If the screen is turned off and the power indicator blinks even though the product is properly connected to a PC, perform a self-diagnosis test.
- Power off both the PC and product.
- Disconnect the cables from the product.
- Power on the product.
- If the message Check Signal Cable appears, the product is working normally.
― If the screen remains blank, check the PC system, video controller and cable.
Checking the Resolution and Frequency
For a mode that exceeds the supported resolution(refer to Standard Signal Mode Table), the message Not Optimum Mode will appear for a short time.
― The displayed resolution may vary, depending on the computer system settings and cables.
Check the following.
Installation issue (PC mode)
- The screen keeps switching on and off.
- Check the cable connection between the product and PC, and ensure the connectors are locked.
- Blank spaces are found on all four sides of the screen when an HDMI or HDMI-DVI cable is connected to the product and PC.
- The blank spaces found on the screen have nothing to do with the product.
- Blank spaces on the screen are caused by the PC or graphics card. To resolve the problem, adjust the screen size in the HDMI or DVI settings for the graphics card.
- If the graphics card settings menu does not have an option to adjust the screen size, update the graphics card driver to the latest version.
- (Please contact the graphics card or computer manufacturer for further details about how to adjust the screen settings.)
Screen issue
- The power LED is off. The screen will not switch on.
- Check that the power cable is connected properly
- The message Check Signal Cable appears.
- Check that the cable is properly connected to the product.
- Check that the device connected to the product is powered on.
- Not Optimum Mode is displayed.
- This message appears when the signal from the graphics card exceeds the maximum resolution or frequency for the product.
- Change the maximum resolution and frequency to suit the product performance, referring to Standard Signal Mode Table (P.43).
- The images on the screen look distorted.
- Check the cable connection to the product.
- The screen is not clear. The screen is blurry.
- Adjust Coarse and Fine.
- Remove any accessories (video extension cable, etc.) and try again.
- Set the resolution and frequency to the recommended level.
- The screen appears unstable and shaky. There are shadows or ghost images left on the screen.
- Check that the resolution and frequency for the PC are within the range of resolution and frequency compatible with the product. Next, if required, change the settings, referring to Standard Signal Mode Table (P.43) in this manual and the Information menu on the product.
- The screen is too bright. The screen is too dark.
- Adjust Brightness and Contrast.
- Screen color is inconsistent.
- Change the Color settings.
- The colors on the screen have a shadow and are distorted.
- Change the Color settings.
- White does not really look white.
- Change the Color settings.
- There is no image on the screen and the power LED blinks every 0.5 to 1 second.
- The product is operating in power-saving mode.
- Press any key on the keyboard or move the mouse to return to normal operating mode.
- Text is blurry.
- If using a Windows OS (e.g. Windows 7, Windows 8, Windows 8.1 or Windows 10): Go to Control Panel => Fonts => Adjust ClearType text and change Turn on ClearType.
- Video playback is choppy.
- Playback of high-definition large video files can be choppy. This may be because the video player is not optimized for the computer resource.
- Try playing the file on another video player.
Sound issue
- There is no sound.
- Check the connection of the audio cable or adjust the volume.
- Check the volume.
- The volume is too low.
- Adjust the volume.
- If the volume is still low after turning it up to the maximum level, adjust the volume on your PC sound card or software Program.
- Video is available but there is no sound.
- Sound cannot be heard if a HDMI-DVI cable is used to connect the input device.
- Connect the device using an HDMI cable or a DP cable.
Source device issue
- A beeping sound is heard when my PC is booting.
- If a beeping sound is heard when your PC is booting, have your PC serviced.
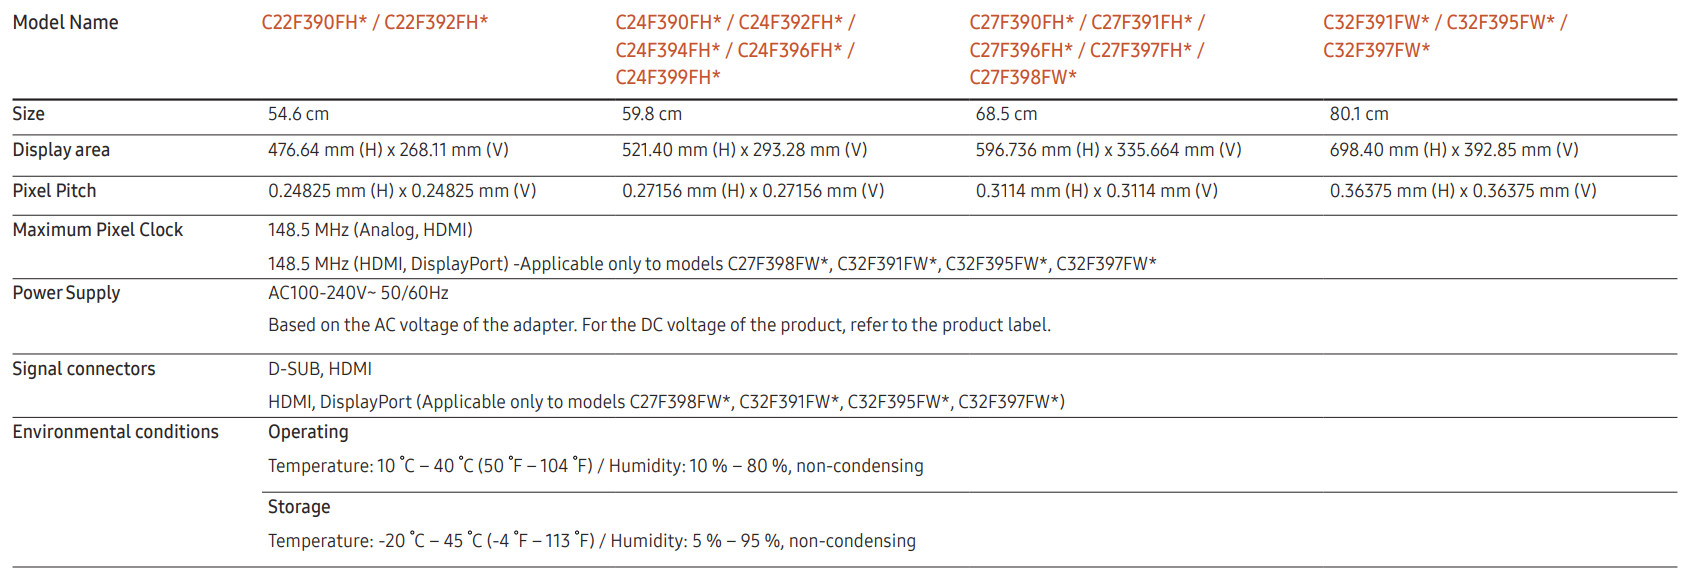
Specifications
General
- Plug-and-Play This monitor can be installed and used with any Plug-and-Play compatible systems. Two-way data exchange between the monitor and PC system optimizes the monitor settings. Monitor installation takes place automatically. However, you can customize the installation settings if desired.
- Panel Dots (Pixels) Due to the nature of the manufacturing of this product, approximately 1 pixel per million (1ppm) may be brighter or darker on the LCD panel. This does not affect product performance.
- The above specifications are subject to change without notice to improve quality.
- This device is a Class B digital apparatus.
- For detailed device specifications, visit the Samsung Electronics website.
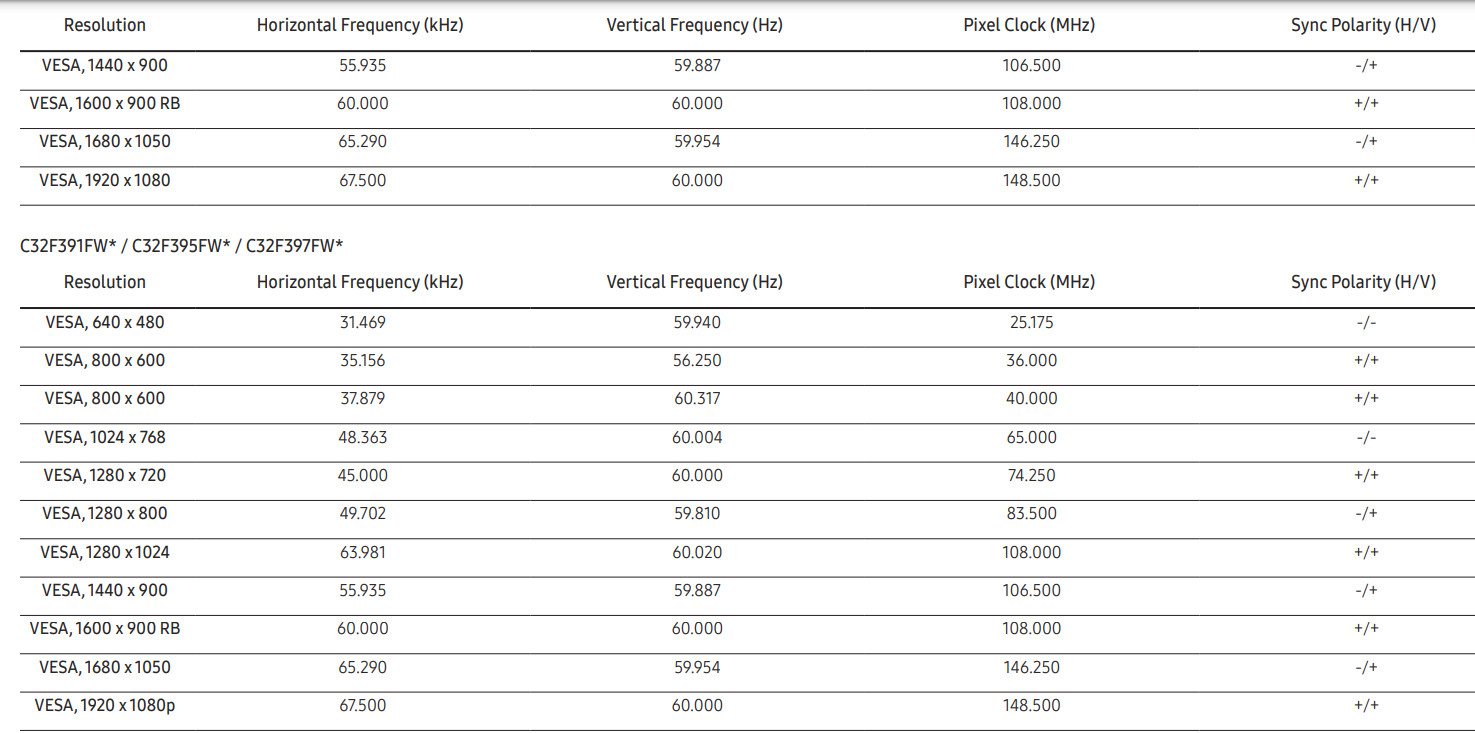
Standard Signal Mode Table
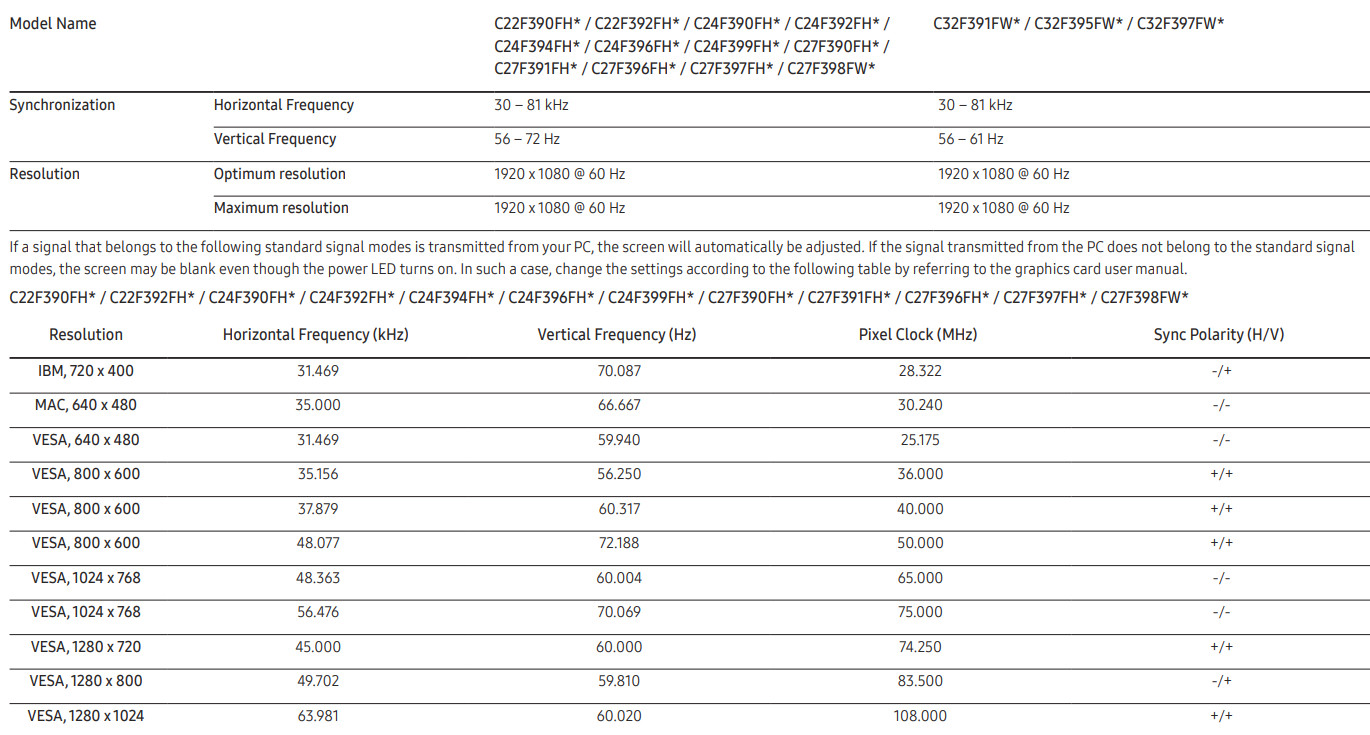
- Horizontal Frequency The time required to scan a single line from the left to the right side of the screen is called a horizontal cycle. The reciprocal number of a horizontal cycle is called horizontal frequency. Horizontal frequency is measured in kHz.
- Vertical Frequency Repeating the same picture dozens of times per second allows you to view natural pictures. The repeat frequency is called "vertical frequency" or "refresh rate" and is indicated in Hz.
- This product can be set to only one resolution for each screen size to obtain the optimum picture quality due to the nature of the panel. Using a resolution other than the specified resolution may degrade the picture quality. To avoid this, it is recommended that you select the optimum resolution specified for your product.
- Check the frequency when you exchange a CDT monitor (connected to a PC) for an LCD monitor. If the LCD monitor does not support 85 Hz, change the vertical frequency to 60 Hz using the CDT monitor before you exchange it with the LCD monitor.
Appendix
Responsibility for the Pay Service (Cost to Customers)
When the service is requested, in spite of in warranty, we may charge you for a visit from a service technician in the following cases.
Not a product defect
Cleaning of the product, Adjustment, Explanation, Re-installation and etc.
- If a service technician gives instructions on how to use product or simply adjusts options without disassembling product.
- If a defect is caused by external environmental factors (Internet, Antenna, Wired Signal, etc.)
- If a product is reinstalled or devices are connected additionally after installing the purchased product for the first time.
- If a product is reinstalled to move to a different spot or to move to a different house.
- If customer requests instructions on how to use because of another company's product.
- If customer requests instructions on how to use the network or another company's Program.
- If customer requests software installation and setup for the product.
- If a service technician removes/cleans dusts or foreign materials inside of the product.
- If customer requests an installation additionally after purchasing a product through homeshopping or online.
A Product damage caused by customer's fault
Product damage caused by customer's mishandling or wrong repair If a product damage is caused by;
- External impact or drop. • Use of supplies or separately sold product unspecified by Samsung.
- Repair from a person besides an engineer of outsourcing service company or partner of Samsung Electronics Co., Ltd.
- Remodeling or repairing the product by customer.
- Using it with incorrect voltage or non-authorised electrical connections.
- Not following the "cautions" in User Manual.
Others
- If product fails by natural disaster. (lightning, fire, earthquake, flood damage, etc)
- If consumable components are all used up. (Battery, Toner, Fluorescent lights, Head, Vibrator, Lamp, Filter, Ribbon, etc.)
― If customer requests a service in case the product has no defect, service fee may be charged. So please read User Manual first.