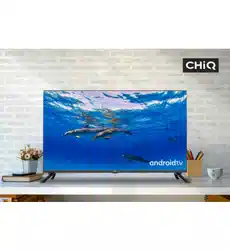
User Manual Smart TV
Getting started
Fitting the stand
Before you can install your TV set, you need to fit the stand. Alternatively, you can mount it on the wall. A Phillips screwdriver is needed to perform the installation. Please check stand installation guide in accessory bag.
Setting up the TV set
Place your TV set on a flat, stable surface (e.g. a table or a specially designed TV stand). Make sure that all cables are laid simply and safely and do not represent a trip hazard. The device must be connected to a mains socket using the mains cable. This mains socket must be easily accessible so that the mains plug can be removed immediately in the event of an emergency.
Fitting the batteries into the remote control
- Turn the remote control over with the back facing upwards, put thumb on the top of the battery cover where it has a triangle sign. Push down gently and pull down the cover out of the position.
- Insert the batteries supplied into the remote control. Make sure that you insert the batteries correctly with the polarity as shown inside the battery compartment.
- Replace the battery compartment cover and push in the opposite direction to the arrow until it clicks into place.
Notes on Using Batteries: The use of the wrong type of batteries may cause chemical leakage and/or explosion.
Please note the following:
- Always ensure that the batteries Eire inserted with the + and - terminals in the correct direction as shown in the battery compartment.
- Different types of batteries have different characteristics. Do not mix different types.
- Do not mix old and new batteries. Mixing old And new batteries will shorten battery life and/or cause chemical leakage. Replace batteries as soon as they do not work.
- Chemicals which leak from batteries may cause skin irritation. If any chemical matter seeps out of the batteries, wipe it up immediately with a dry cloth.
- The batteries may have a shorter life expectancy due to storage conditions. Remove the batteries whenever you anticipate that the remote control will not be used for Em extended period.
- The batteries (battery pack or batteries installed) should not be exposed to excessive heat such as sunshine, fire or the like.
CAUTION:
- It may result in an explosion if batteries are replaced incorrectly.
- Only replace batteries with the same or equivalent type.
Controls and connections
Caution: Before connecting or disconnecting any cables, switch off all related devices (also the TV). Otherwise you could damage the devices.
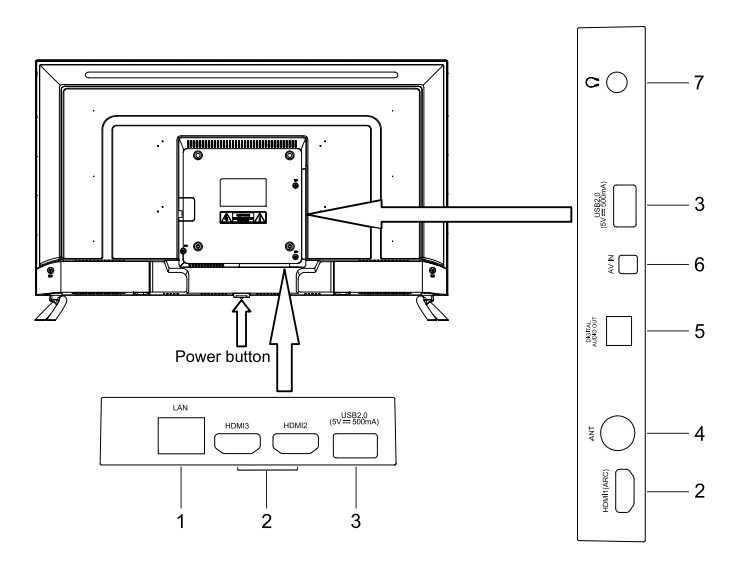
- LAN: Network port
- HDMI ports
- USB 2.0 port
- Antenna socket
- Digital audio out
- AV IN( require a mini AV cable which is in accessory bag)
- Headphone out
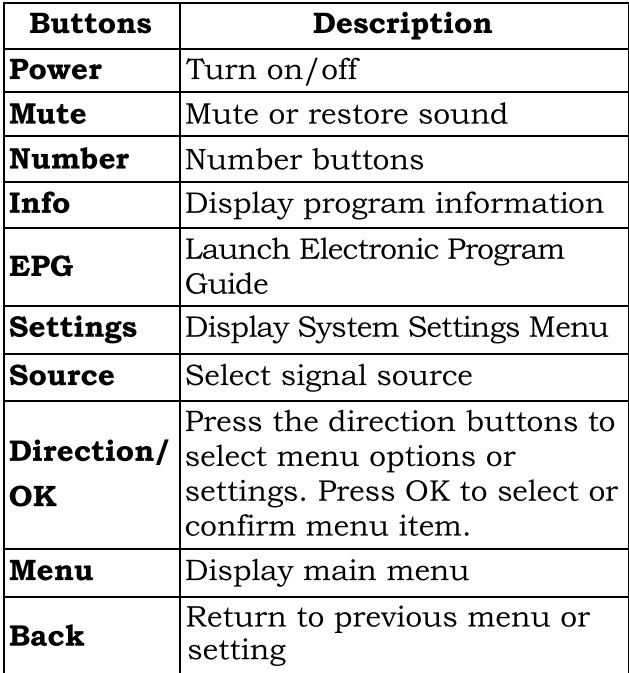
Remote control
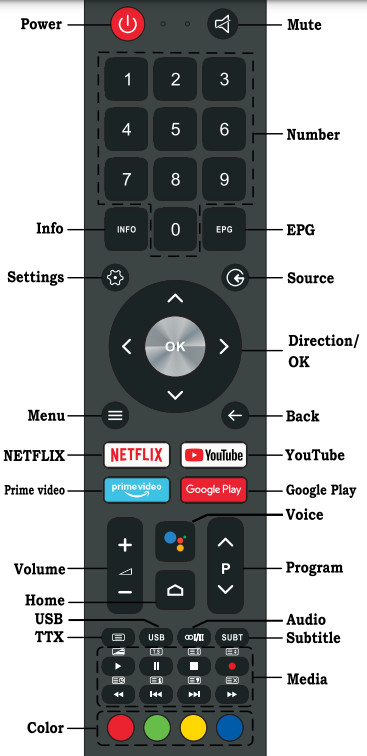
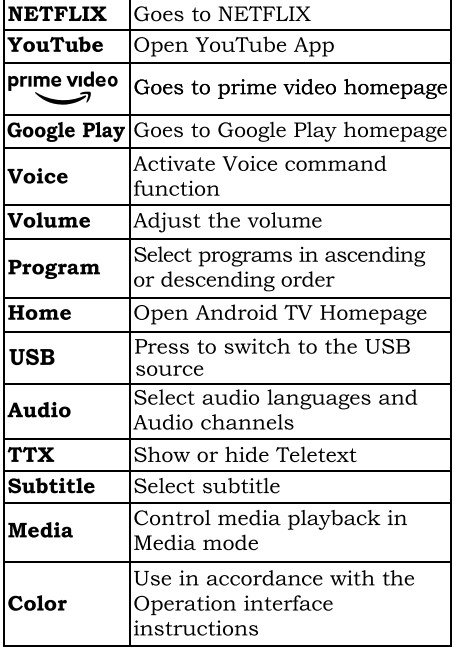
Definition of the buttons on remote control:
Connecting antennae, Internet and external devices
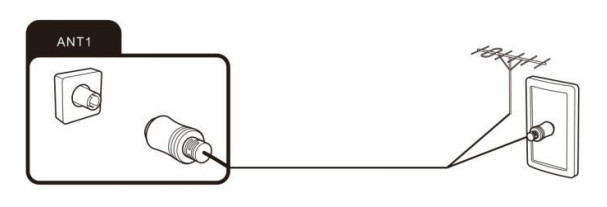
Connecting the TV antenna or cable TV. You can connect the cable from your indoor or outdoor antenna or cable TV to the antenna socket.
Connecting the network cable (LAN connection)
You can also establish an internet connection via WiFi.

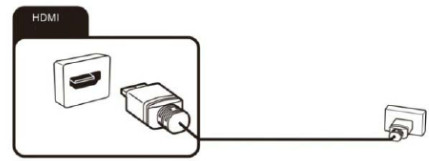
Connecting external equipment with HDMI interface
HDMI is the abbreviation for "High Definition Multimedia" and allows the digital transmission of both audio video signals over the same cable. Press source button  and select the signal source “HDMI 1/2/3” accordingly.
Connecting headphones
You can connect headphones or an analogue playback device to the socket marked with a headphones symbol.
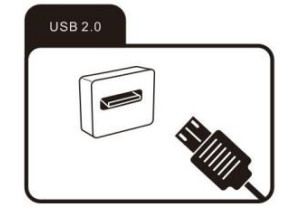
Connecting USB device
The TV has USB 2.0 ports for connection with appropriate mass storage devices.
Connecting an external device with AV output
Conect external devices via the AV IN jack directly to TV by using a Mini AV IN cable. In order to play the audioand video signal fed in from the external device on the TV, Press source button and select the signal source “AV”.

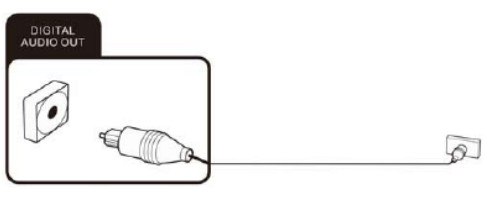
Connecting a digital audio system
You can connect your TV set to a digital audio system. Sending the TV's digital audio signal to external audio equipment via the digital audio output port.
Powering the TV set on and off
Powering on
Check that the TV is in standby mode. This means the power cable must be connected to a working power point. Then press the power button on the device or the  button on the remote control to turn on the TV.
Powering off
To power the TV off, either press the Power button on the device or press the button on the remote control.
Note: If press and hold the power button or (!) standby button on the remote control for short period of time, TV will go into fully standby mode. When it is powering on again, TV will start from the original power on procedure. After about 30 times of powering on & off, TV will go into fully standby mode which allow TV to clear some temporary files for better performance.
Initial Setup
The first time you switch on the TV, the Welcome screen appears, which guides you through the initial setup process. Follow the on-screen instructions to finish the initial setup process such as selecting the language, connecting to the network, scanning channels, and more. During each step, either make a choice or skip the step. If you skip a step, you can perform the setup later from the settings menu.
Note:
The country setting need to be Australia, otherwise TV can’t receive digital channels. If you miss the step, please go to menu => setting => device preferences => reset the TV.
When scan the channels, please set up scan mode to “Antenna”.
If the channel search retrieved no channel or only some channels it could be caused by poor broadcasting or antenna reception isn’t strong enough. Manufacturers cannot be held responsible for poor broadcasting in some areas or antenna reception issue. Please contact your local antenna technician if it is a reception issue.
Network Connection
Your TV will require an internet connection to operate all functions. Data usage charges may apply. Please refer to your Internet Service Provider (ISP) for additional information. To access the internet, you must subscribe to high speed broadband internet service from your internet service provider.
Your TV can be connected to your home network in two ways:
- Wired, using the RJ45 (LAN) connector on the back panel.
- Wireless, using the internal wireless or external wireless USB adapter and your home wireless network. Please get WIFI password ready if it has one. Please contact ISP or technician who set up the router.
Watching Connected Devices
Press on the remote control to display the source list. Press  to select TV or other input sources and press OK to confirm.
You can also press  home page button on the remote control to display the homepage, press to move to the Sources symbol
  on the top right hand side, then press and OK to select the input source.
Accessing Channels
Using the numeric buttons: press the corresponding numeric buttons on the remote control to access the channels. Using the  buttons: press the buttons on the remote control to change channels.
Press OK button in TV mode to bring up channel LIST, use and OK to select channels.
Adjusting Volume
Volume control: press  buttons on the remote control to increase or decrease the volume.
Sound mute: press the  button to temporarily mute the sound. Press this button again or the
  button to restore the sound.
Basic TV instructions
Installing Channels
This section describes how to search and store channels automatically. This may be done in any of the cases below:
- you have skipped the channel installation step in the initial setup;
- you are prompted that there are no channels in TV mode;
- you want to update channels list.
- In TV mode, press
 Menu button on the remote control and select Settings > Channel.
- Make sure Channel Installation Mode is set to Antenna.
- Go into Channels and select Channel Scan, press OK button to start.
- The channel scan may take a few minutes. After the automatic search, channels are arranged in a preset order. You can also skip, move or edit channels in the Channels menu.
Using BPG (Electronic Program Guide)
EPG is an on-screen guide that displays scheduled digital TV program. You can navigate, select and view programs.
Note: The DTV EPG does not require an internet connection.
- To use the DTV EPG, Press EPG button on the remote control, the Program Guide menu will appear, which allows you to get information about the current or future program playing on each channel. Navigate through the different programs using the arrow button on the remote control.
- Use the related color buttons shown at the bottom of the screen to view EPG.
- It might have no information to be displayed. Please change channel first and TV can get proper EPG information from TV signal when the channel is on.
Using Subtitles
You can enable subtitles for each TV channel. Subtitles are broadcast via DVB-T digital broadcasts. With digital broadcast, you have the additional option of selecting a preferred subtitle language.
Turning on/off subtitles
In TV mode, press = Menu button then select Advance options, select Subtitle and press OK to enter. You can set up subtitle language,2nd subtitle language and subtitle type via the menu.
Access subtitle via remote
In TV mode, press SUBT button on the bottom of remote control, then the English will display on the screen to indicate subtitle function is on. Press the button again to close subtitle function and English will disappear on the screen.
Please note the remote subtitle button can turn on and off subtitle function temporary, change channels will active original setting in menu.
Please go to main menu to turn it on and off completely.
Accessing Smart TV Homepage
- Press home button on the remote control to display the homepage.
- To quit homepage, press input source button to access TV and other input mode.
The homepage allows you to enjoy Internet Applications (Apps) and specially adapted Internet websites, and perform system settings for your TV. You can make controlling with the TV remote control.
- Press
 and OK to enter the desired Apps, functions or settings.
- To change the Favorites apps order, select an app, press OK button and hold, a menu will appear and you can press to change.
- Press
 return button to return to the homepage.
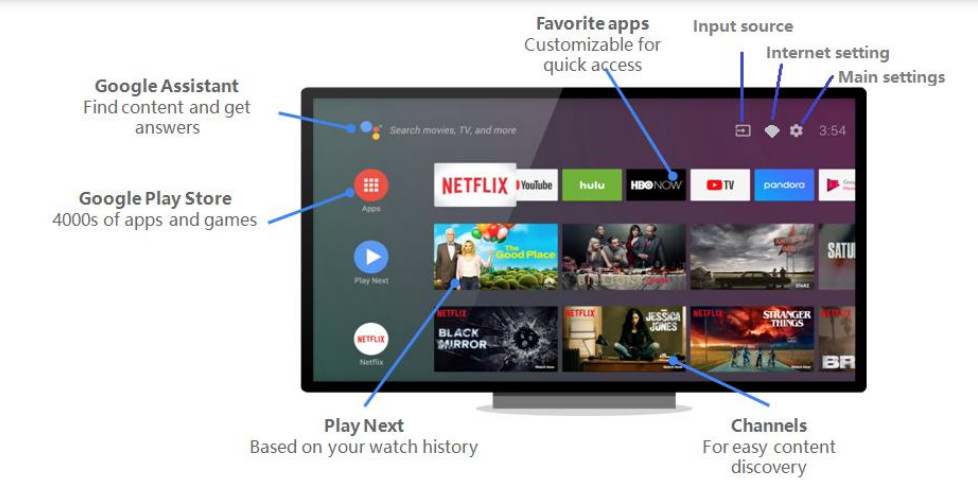
Apps can be downloaded via google play store, google service account is required. Please sign in or create a new account before starting the service.
Delete an app or game
From the TV Home screen, scroll down and select Settings 
- Under "Device," select Apps.
- Under "Downloaded apps," choose the app you want to remove.
- Select Uninstall OK.
According to circumstances of the content provider, an application’s updates or the application itself may be discontinued.
Changes in application content may be made without prior notice by service provider. Notes:
- Configure the network settings before using Smart TV applications.
- Slow responses and/or interruptions may occur, depending on your network conditions.
- If you experience a problem using an application, please contact the content provider. Since the connection with Internet takes time,it’s recommended that you wait a few minutes to use the Smart TV feature after activation of TV from standby.
Help function
The Help function offers a lot of information about your TV operation.
To use the Help function, Press home button and then use the arrow and OK buttons to select “+” symbol to add help app to favourites bar.

This Help function explains how to use this TV. Additionally, you can also refer to the Setup Guide for descriptions about TV installation, and the Reference Guide for parts descriptions and specifications of this TV.
To use the USB function, Press home button and then use the arrow and OK buttons to select “+” symbol to add Media Player to favourites bar.

You can enjoy photos/music/movies stored on a USB device on the TV screen.
Select Device on the media player main menu.
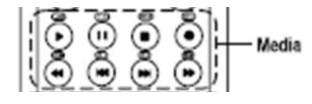
Select folder from the menu that is displayed, browse the files and select the desired files to playback. When play the file, press OK button to check the file information and other functions. You can press menu button to set up play mode and other settings. The media control buttons can be found on the top of remote.
The formats supported
music
.mp3, .m4a, ,ac3, .aac, .ogg, .flac, .mp2. video
.dat, .vob, .mpg, .mpeg, .mp4, .mkv, .m4v, .mov, .m2t, .ts, .tp, .trp, .flv, ,f4v, .avi, .wmv, .3gp, .webm.
image
.jpg,.jpeg,.bmp, .png, .gif ,.webp.
PVR(Personal Video Recorder)
PVR allows you to record your favorite TV program. Before you use the function, connect a USB drive to the TV USB socket.
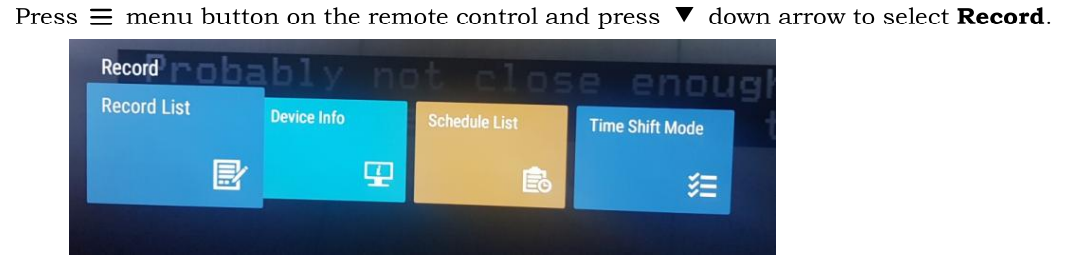
- Record List (To watch or delete recorded content)
- All recorded programs will show on the list, to playback, select the file and press OK to play. Press yellow color button to delete a file and press blue color button to show file information.
- All recorded programs can only be played via Record list, they are not compatible with media player .computer system or other devices.
- Device Info
- Select a USB drive, press ok to format USB device or check USB speed.
- Schedule List
- All preset schedule list will show on the list, select a recording program and press OK, you can edit or delete the schedule recording program.
Instant record
In TV mode, press  red dot button on remote control and TV will start recording and a message will appear on screen. After the message disappear, a recording time sign will appear on the left bottom comer.
To stop recording, press ■ stop button to stop recording.
Schedule record
Press EPG button, then select a program to be recorded, press red dot recording button to active a recording menu, you can set up start date, start time, stop time schedule type and repeat time from the menu. Then select Add to save the schedule list or cancel to quit.
Bluetooth Function
Bluetooth is a wireless technology standard for exchanging data over short distance between Bluetooth devices. You can connect Bluetooth audio device, mouse or keyboard via the TV.
- Press main menu button on the remote control, select Settings > remote & accessories.
- Add accessory and press OK to enter. The TV will search nearby Bluetooth devices automatically.
- Select an available device, press OK and follow the guides on the screen to connect it
Note: Bluetooth technology (if available in your TV) uses 2.4GHz frequency thus close proximity to WiFi access points, routers or microwave ovens might interfere with Bluetooth audio streaming. If you face interruptions in audio reception, you should restart your Bluetooth device to find frequency with less interferences and if you continue to face issues you should move closer to TV or increase space between TV and source of interferences.
Google Assistant 
- Quickly find and play your favorite shows, get answers and control your home. Your Assistant is now ready to help on eligible Android TV devices.
- Press google assistant button on your remote to get started.
- An introduction will appear on your TV screen, follow the steps to get started.
- When Give a command or ask a question, please close the top remote to your mouth to get better reception.
Note:
- The remote has Bluetooth function, please code remote to TV if you skip it on Initial Setup. Google sign in is required for the service.
Chromecast Built-in 
Chromecast built-in delivers multi-screen TV and audio experiences with speakers. Casting is as simple as pressing a button from your favorite app. Watch your favorites on the TV while switching to another app.
Listen to your top tunes while taking a phone call or sending a text, all without interrupting what’s playing on the speakers. With Chromecast built-in, your phone is your personalized remote control that you can use to browse, play, pause, and even make playlists.
How to cast
To set up your Chromecast built-in, visit chromecast.com/built-in/setuD

Trouble-shooting
You can solve most common problems yourself using the solutions below. If the problem persists after checking the suggested solutions, please contact CHIQ customer care 1300796688.
General problems
The TV set will not switch on or stop responding.
- Plug the power cable of the TV set into a working mains socket.
- Replace the batteries in the remote control.
- Unplug the plug of the power cable from the mains socket, wait approx. 30 seconds and plug the power cable back in. The device should then work normally.
The remote control does not work
- Is there an obstruction between the remote control and the sensor on the TV?
- Replace the batteries.
- Make sure that the remote control sensor is not exposed to direct sunlight.
TV reception problems
No picture
- Is the antenna plugged in properly? Is the antenna cable damaged?
- Is the antenna cable plug firmly connected?
- Have you selected the correct signal source on the TV set?
- Have you already executed a channel search at your present location?
- Are all the connection cables to external signal sources properly connected?
- Is the connection cable to the external signal source damaged?
- Have you selected the correct signal source on the TV set?
Poor picture
- Is the antenna plugged in? Adjust the antenna.
- Check that the channel is tuned properly.
- Adjust the picture settings, such as brightness, colour, sharpness.
No sound
- Is the sound muted? Press the
 button .
- Is the volume turned down? Press the button .
No colour
- Adjust the colour setting.
- Check the programme is broadcast in colour.
- Check that the channel is tuned properly.
Multimedia playback problems
File is not played back
- Check that the USB mass storage device contains compatible files.
Problems with playback from external devices
No sound
- Check that the audio cable is properly connected or damaged.
- Make sure that you have selected the correct signal source on your TV set.
Sound is distorted or humming
- Clean the connector plugs.
- Replace the connection cable to the external device.
Problems with online services (Smart TV)
If you are using a cable network connection (LAN)
- Check that the network cable is properly connected.
- Check whether the network cable is damaged.
- Check whether you can access the internet from another device on the network .
- It is possible that the server for the selected service is temporarily down.
- Check the network settings on the TV set.
If you are using a wireless network
- Check whether you can access the internet from another device on the wireless network.
- It is possible that the server for the selected service is temporarily down.
- Check the network settings on the TV set.
Wall-mounting
Please ensure your kit is compatible with one of the following VESA Standards: 200 x 200 mm. The kit is not included in the package. To do this, dismount the stand as follows:
- Power the device off and unplug all cables and connectors. For the following steps you will need a conventional Phillips screwdriver.
- Lie a soft cloth on an empty, level table and carefully place the TV screen side down on it.
- Undo the fastening screws on the stand. See also the Installation Guide of Base Stand (supplied). The stand is now removable.
- Install the VESA wall mount on the back of the monitor. Follow the installation instructions that came with your wall mount kit.
Warning: Make sure that the rawlplugs and screws you use to fit the device to the wall are strong enough to support the weight of the device. Also make sure that the material of the wall itself is strong enough.
Keep the base, the stand and the screws in a safe place in case you need to reassemble the base again. If necessary, you can also disassemble the base so it takes up less space.
Note: All the pictures in this user manual are for illustrative purposes only and may be used for reference. Depending on the model, the actual product shall prevail.