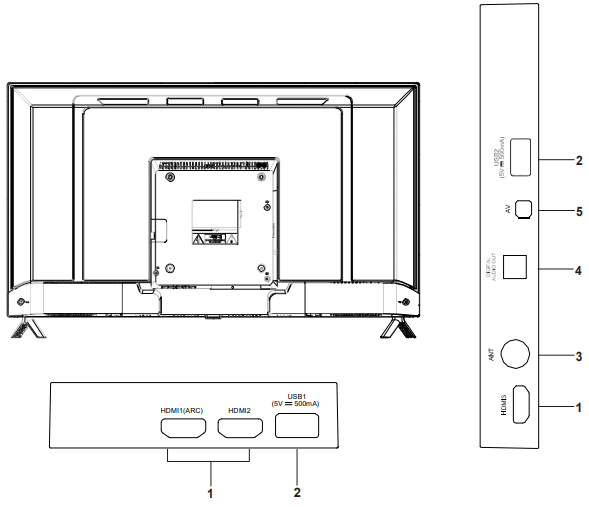
NOTE: Input / Output connectivity options may change from model to model.
Connection and setup
Connection Installation
Before the installation and use, please read carefully the relevant content in “Warning and Safety instructions”.
HDMI: Support AV devices with an HDMI connector (such as set top box, DVD player, digital TV set, etc.).HDMI is also called as high definition multimedia interface, and it can transmit digital audio and video signal with one cable.
NOTE: HDMI 1 (supports ARC function)
ARC: (Audio Return Channel) Adopted in TV output of digital audio, can be connected to the device supporting ARC, transmit the TV sound to the device.
ANT: Used to connect the antenna and receive signals of the external antenna.
DIGITAL AUDIO OUT: Sending the TV's digital audio signal to external audio equipment via the Digital Audio Output port.
AV IN: The output AV terminal of DVD can be connected with the AV input port of the TV through AV cable.
NOTE: If AV works as mini terminal, please choose to use a one-to-three audio & video cable.
USB: Connect a USB Storage device and multimedia file playback.
NOTE:
The range of power input for the TV is 100-240V~ 50/60Hz; Do not connect the TV power input port with the power cable out of the above range.
Before connecting to an external device, please firstly make sure that the TV set and the external device have been turned off. When connecting, please make reference to the interface name and the interface color to connect the signal cable.
Please hold the insulated part of the plug when you are unplugging the power cable, do not touch directly the metallic part of the cable.
Getting Started
Using the Remote Control
When using the remote control, aim it at remote sensor on the television. If there is an object between the remote control and the remote sensor on the unit, the unit may not operate.
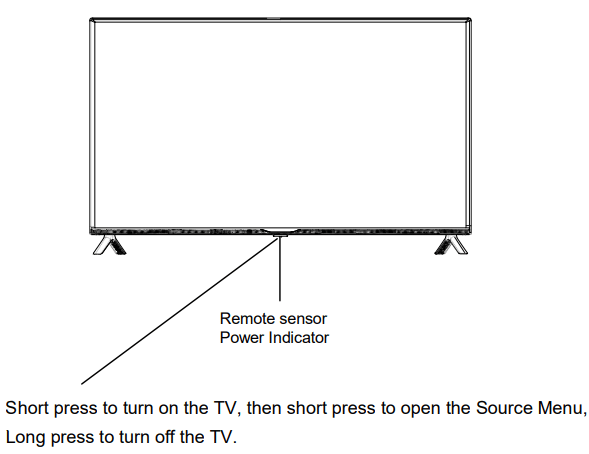
Point the remote control at the REMOTE SENSOR located on the television.
When using this television in a very brightly lit area, the infrared REMOTE CONTROL SENSOR may not work properly.
The recommended effective distance for using the remote control is about 7 meters.
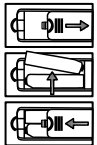
Installing Batteries in the Remote Control
Open the cover at the back of the remote control.
Install two AAA size batteries. Make sure to match the “+” and “-” ends of the batteries with the diagram inside the compartment.
Replace the cover.
Battery Replacement
You will need to install the batteries into the remote control to make it operate following the instruction below. When the batteries become weak, the operating distance of the remote control will be greatly reduced and you will need to replace the batteries.
Notes on Using Batteries: The use of the wrong type of batteries may cause chemical leakage and/or explosion. Please note the following:
Always ensure that the batteries are inserted with the + and - terminals in the correct direction as shown in the battery compartment.
Different types of batteries have different characteristics. Do not mix different types.
Do not mix old and new batteries. Mixing old and new batteries will shorten battery life and/or cause chemical leakage.
Replace batteries as soon as they do not work.
Chemicals which leak from batteries may cause skin irritation. If any chemical matter seeps out of the batteries, wipe it up immediately with a dry cloth.
The batteries may have a shorter life expectancy due to storage conditions. Remove the batteries whenever you anticipate that the remote control will not be used for an extended period.
The batteries (battery pack or batteries installed) shall not be exposed to excessive heat such as sunshine, fire or the like.
CAUTION:
It may result in an explosion if batteries are replaced incorrectly.
Only replace batteries with the same or equivalent type.
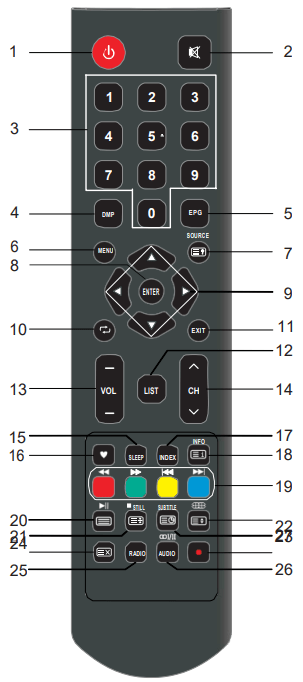
Remote Control
The buttons of the original remote control are as following:
Definition of the buttons on remote control:
Power: Press to enter or exit the standby mode.
: Mute or restore sound.
NUMBER BUTTONS: Choose channels or password importation.
DMP: Press to switch to the Media source.
EPG: Electronic Program Guide, use in the DTV mode.
MENU: Press to display/disappear the on screen menus or to quit some operations.
SOURCE: Press to select signal source : Reveal the hidden information of some teletext pages.
ENTER: Select or confirm menu item.
▲/▼/◄/►: Press the direction buttons to 11 select menu options or settings.
: Return to last viewed program.
EXIT: Quit the current interface.
LIST: Press to call up the channel list. Press again to exit it.
VOL+/VOL-: Press to adjust the volu level up or down.
CH∧ /CH∨ : Press to select channels in ascending or descending order
SLEEP: Press to set the sleep timer me. When the preset length of time has passed, the TV set enters standby mode.
: Switch on/off the favorite programs list.
INDEX: Change the list by TIMER or CHANNEL. (In PROGRAMME GUIDE menu) Press to enter the Recorded list. (In DTV mode)
INFO: display the current program information on the screen. : Go to the index page.
COLOR BUTTONS: Red/green/yellow/ blue key navigation link.
: Fast reverse (in Media mode)
: Fast forward (in Media mode)
: Previous (in Media mode)
: Next (in Media mode)
: Enter the Teletext, press again for MIX mode, press this button again to exit.
: Play / Pause (in Media mode)
STILL: Press to hold the picture.
: Stop (in Media/PVR mode).
: Hold the teletext page on display, press again to release.
: Press to select different images sizes.
: Change size of teletext screen in display mode
SUBTITLE: Enter the subtitle menu.
: Enter subtitle mode or subpage.
: Cancel the teletext but not to exit teletext, press again show teletext.
RADIO: Press to interchange Radio and program (In DTV mode). DTV programs when there is Radio.
AUDIO(∞I/II): Press to select the NICAM modes in Analog TV mode.Press to select desired audio language in Digital TV Mode.
: Press button to start recording. (In DTV mode)
NOTE: The buttons not mentioned here are not used. All pictures in this manual are examples, only for reference, actual product may differ from the pictures.
Basic Operation
Turning on and off the TV
Turn on the TV Connect the TV to your mains socket. If TV has a power switch, turn it on firstly. In standby mode, press Power button on the remote to turn on the TV.
Turn off the TV Press the button on the remote control to enter standby mode. Do not leave your TV in standby mode for long periods of time. It is best to unplug the power cord.
NOTE: If there is an accident power off, the TV will be in standby mode automatically after re-supply the power. To ensure the normal use of the TV, the frequent turning on and off is forbidden, when there is an accident power off, it is recommended to unplug the power cable from the power socket.
First Time Setup
If this is the first time you run the TV, the Initial Setup Menu will appear in the picture, and the items of this menu also exist in other menus, so you are able to change the values after you set them up.
Tips: Make sure that the antenna connection is made.
Set you desired language Press ▲/▼buttons to select the language to be used for menus and message.
Select your country Press the ▲/▼ buttons to select the country you are living in, and then press the ► button.
Select your time zone. Press the ▲/▼ buttons to select a time zone, and then press the ► button.
Select your TV environment. Press the ▲/▼ buttons to select the Home Mode or Store Mode and then press the ►button. • Home is the recommended setting to produce the best energy efficiency. If you want to set Store Mode, a message appears asking you to confirm your choice.
Auto Tuning Press the ► button to start the auto searching. First tuning DTV, press Menu and left arrow button to skip DTV tuning.
NOTE:
If the TV doesn't receive any channels, please check your aerial connection or the country you selected, and then try an auto search again.
If the TV just receives some of the channels, it m.eans the aerial's reception isn't good enough and an antenna service is recommended
Choosing a TV channel
Using the ∧ /∨ on the panel of TV or CH / on the remote control.
Press CH∧ to increase channel number.
Press CH∨ to decrease channel number.
Using 0-9 digital buttons.
You can select the channel number by pressing 0 to 9.
Additionally, when TV is in some mode, the TV will work in TV mode and play the corresponding channel if any number button is pressed.
Example
To select - channel (e.g. Channel 5): Press 5.
To select -- channel (e.g. Channel 20): Press 2 and 0 in a short time.
Volume Adjustment
Press the +/- on the panel of TV or VOL+/- on the remote control to adjust the volume.
If you want to switch the sound OFF, press the .
You can release mute by pressing the or increase the volume.
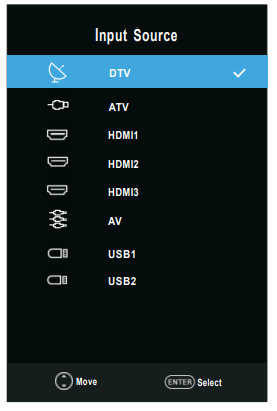
Changing the Input Source
You can select the input source by pressing the SOURCE button on the remote control. Press the▲/▼buttons to cycle through the input source, and press the ENTER button to confirm your choice.
Menu Operation
How to Navigate Menus
Before using the TV follow the steps below to learn how to navigate the menu in order to select and adjust different functions. The access step may differ depending on the selected menu.
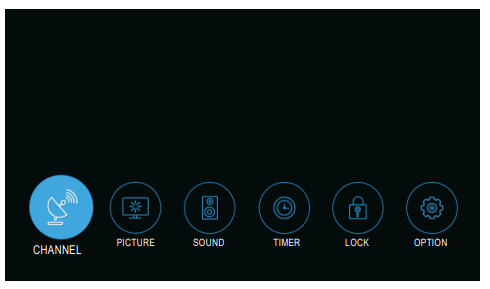
1. Press the MENU button to display the main menu.
2. Press the ◄/►buttons to cycle through the main menu. You can choose between Channel, Picture, Sound, Timer, Lock and Option.
3. Press the ENTER button to access the submenu page.
4. Press the ▲/▼ buttons to select the preferred option.
5. Press the ◄/► buttons to adjust the value.
6. Press the MENU button to return to the previous menu.
7. Press the EXIT button to exit the entire menu.
NOTE:
When an item in MENU is displayed gray, it means that the item is not available or cannot be adjusted.
Some items in the menus may be hidden depending on modes or signal sources used.
Buttons on the TV have the same function as corresponding buttons on the remote control. If your remote control is lost or couldn’t work, you may use the buttons on the TV to select menus. This manual focuses on operation of the remote control.
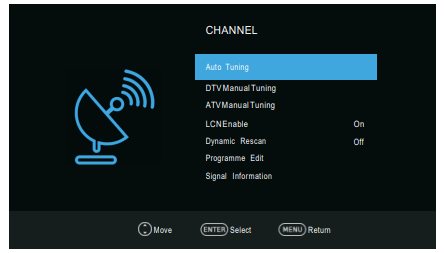
Channel Menu
Auto tuning: Select the ENTER button to start Auto Tuning.
Select the country and. tune type for channels.
The TV will begin memorizing all of the available channels.
Once the progress bar is full, the found channels will be stored and the unit will proceed to the search for TV, DTV and Radio. If you press the MENU button in TV searching, the Channel Tuning will skip to DTV searching as the suggestive picture shows.
DTV Manual Tuning: Press the ENTER button.
Press the ◄/►button to select channel, then press the ENTER button to search. When a channel is found, the searching process will stop, the channel will be saved with current channel number.
If the program is not your expected one, please press the ◄/►button to continue the searching. Press the EXIT button to exit.
ATV Manual Tuning: Manual store for ATV channels.
Storage To 1: Store the searched channel to 1 (you can adjust the channel number by◄/►).
Sound_Standard: Select the sound Standard.
Video_Standard: Select the Video Standard.
Current CH 1: Select the current channel.
Search: Press the ◄ button to search down from the current frequency, and press the ► button to search up.
Fine-Tune: Adjust the frequency of the channel finely. Press the red button to save it. Press the EXIT to exit.
LCN Enable
Press the ENTER button to select On or Off.
Dynamic Rescan (In DTV mode)
Switch the Dynamic Rescan function On or Off.
Programme Edit
Press the▲/▼ buttons select the Programme Edit, then press the ENTER button to enter sub-menu. First press the▲/▼buttons to highlight the channel you want to delete, skip, or Move, then:
Delete: Press the RED button to delete the channel.
Move: Press the YELLOW button to set the channel to moving state, and then press the ▲/▼buttons to move it to the position you want to put.
Skip: Press the BLUE button to skip the channel.(Your TV set will skip the channel automatically when using CH+/- to view the channels.)
Favorite: Press the button to set the favorite channel. (One or more groups can be select.)
Signal Information(Only available when there is signal under DTV)
Press the▲/▼buttons to select the Signal Information, then press the ENTER button to see the detail information.
Picture Menu
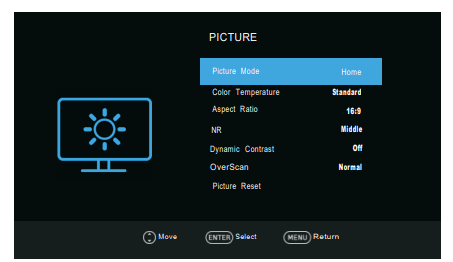
Picture Mode: You can select the type of picture which best corresponds to your viewing requirements. Contrast, Brightness, Color, Sharpness, and Tint (NTSC) can be adjusted when the picture mode is set to User. NOTE:The manufacture’s recommendation mode is Home.
Contrast: Adjust the white level of the picture.
Brightness: Adjust darkness of black sections in the picture.
Color: Adjust the color intensity of the picture.
Sharpness: Object edges are enhanced for picture detail.
Tint: Adjust the hue of the picture. (valid only for NTSC signals).
Color Temperature: Select the color temperature that you feel comfortable.
Aspect Ratio: You can select the picture size which best corresponds to your viewing requirements.
NR: Reduces screen noise without compromising video quality.
Dynamic Contrast: Adjusts the contrast to the optimal level according to the image's brightness.
OverScan (In DTV mode): The picture reproduction rate is adjusted.
PC Mode (In HDMI mode): Switch PC Mode function On or Off.
Game Mode (In HDMI mode): Switch Game Mode function On or Off.
Picture Reset: Reset all picture settings to the factory defaults.
Sound Menu
Sound Mode: You can select a sound mode to suit your personal preferences. Treble and Bass can be adjusted when the sound mode is set to User.
Treble: Adjust the high frequency sounds.
Bass: Adjust the low frequency sounds.
Balance: Adjust the level of sound coming from the left and right speakers.
AVL(Auto Volume Level): Auto Volume automatically remains on the same level of volume if you change programmes. Because each broadcasting station has its own signal conditions, volume adjustment may be needed every time when the channel is changed. This feature allows users to enjoy stable volume levels by making automatic adjustments for each program.
Surround: The surround sound can be enabled or disabled according to the needs to experience unique audio effects.
SPDIF Mode: You can select a desired SPDIF Output mode.
AD Switch (In DTV mode): * this is only available in some countries, mainly in North America and Europe. This is an auxiliary audio function that provides an additional audio track for visually challenged persons. This function handles the Audio Stream for the AD (Audio Description), when it is sent along with the Main audio from the broadcaster.
Audio Delay: Correct audio-video sync problems, when watching TV and when listening to audio output using an external device such as an audio receiver (0ms~250ms).
Sound Reset: Reset all sound settings to the factory defaults.
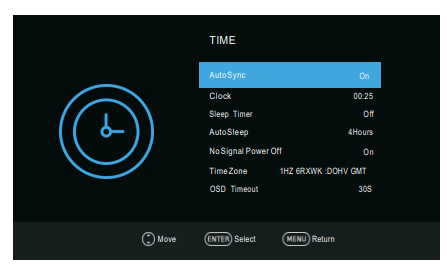
Timer Menu
Auto Sync: If set it to ON, the TV will sync the local clock according to the DTV broadcasting time automatically.
Clock: Display either the DTV signal stream time or set the time manually.
Sleep Timer: Sleep Timer switches the TV to standby after a defined period of time. To cancel the Sleep Timer, set to "Off ".
Auto Sleep: Select the Auto Sleep time you want. The TV will enter into standby mode automatically when there is no any operation in set time.
No Signal Power Off: Switch No Signal Power Off function On or Off.
Time Zone: Select your time zone (When the Auto Sync is set On, the Time Zone can be adjusted).
OSD Timeout: Select the time in seconds (15s, 30s, 60s, off) that you want the On-Screen Menu remains display after your last operation.
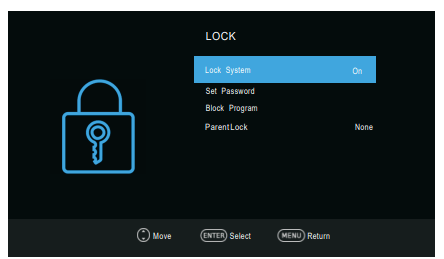
Lock Menu
Lock System: The feature can prevent unauthorized operating the TV set, unless entering 4-digit password.The default password is 0000. NOTE: If you forget your password, the super password of 1225 still is valid.
Set Password: Press the ENTER button to access the submenu. You can set your private password. Press the number buttons on the remote control to set the new password. When the new password has been input twice, the setting is finished successfully.
Block Program (In ATV/DTV mode): Press the YELLOW button to lock the available channel you want. Press the YELLOW button again to unlock it. To watch a locked channel, enter your 4 digit password number when input screen displays.
Parent Lock (In DTV mode): This feature can prevent children watching adult’s TV programmes, according to the rating limit set. This function appears according to information from broadcasting station. Therefore if the signal has incorrect information, this function does not operate.
Option Menu
Language: Select your preferred On Screen Display language.
Audio Languages: Select you’re preferred audio language. (Available for digital channels if multiple audio languages are broadcasted.)
Subtitle: Switch the Subtitle function On or Off.
Subtitle Languages: Select your preferred subtitle Language. (Available for digital channels if multiple subtitle languages are broadcasted.)
Hearing Impaired: When hearing Impaired is ON, the TV screen will give some information to the people whose hearing are impaired when Hearing Impaired is Off, the information will be hidden.
Country: Display the current country.
Environment Select: Select the Environment Select Home or Store. Store mode is the optimal setting for store environment.
Energy Saving: When the Environment Select is set Home, the Energy Saving can be adjusted. Switch the Energy Saving function On or Off.
Health Remind: Switch the Health Remind function On or Off. While Health Remind
HDMI_CEC: Press▲/▼buttons to select HDMI CEC, press ENTER to enter sub-menu.
HDMI_CEC: Press ENTER buttons to switch the HDMI CEC on or off.
ARC: To enable the audio through an AV receiver using HDMI (ARC). Press ENTER buttons to switch the HDMI ARC function on or off.
Auto Standby: When the user turns off the TV, all active CEC enabled devices on the HDMI input will go to standby. Press ENTER buttons to switch the auto standby function on or off.
Auto Power On: Pushing the "Play" button on the CEC enabled device will command the device to play, turn the TV on, and the HDMI input, that the device is connected to, will become the active input device for the TV.
Device List: Display devices that are connected to TV.
Power On Logo: Switch the Power On Logo function On or Off.
Default: Restore the system settings to the factory default. When the restore is complete, the TV will enter standby mode.
DivX(R) VOD: When entering this option, you can view the registration code relevant information about the DivX ®.
Installation Guide: This is an installation guide to help you to setup the TV.
Software Version: Display current software version information.
Software Update (USB): Update the software using the USB memory device. Please be careful not to disconnect the power or remove the USB drive until updates are complete.
Important Unique Buttons
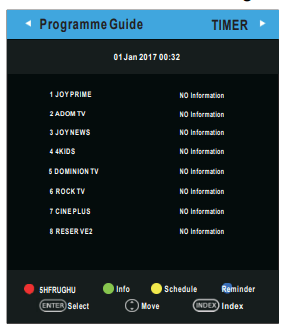
PROGRAMME GUIDE (In DTV mode
Press EPG button to display the Programme Guide menu. This function let you know the detailed information of the channel, indicating the time of the program playing. From the Programme Guide it is possible to check the program information for the next eight days (If the information is available from the broadcaster).
Press the▲/▼buttons to select a different channel in the list and press ENTER to active the channel.
Recorder: Press the red/ button to set the parameters for recording. You can choose the time of the appointment to record you want, different schedules should not overlap. The unit is able to do schedule recording when TV is turning on or in standby mode. When recording starts in standby mode, there will be no picture or sound from the unit.
Info: Press green button to see the detailed information of the current channel.
Schedule: Press the yellow button to display the Schedule list.
Reminder: If you find the desired program which will be shown in the future. Press the blue button to book program.
Time/Channel: Press Index button to select the top of items, and press the ◄/► button to change the list by Time or Channel.
Press the EPG or EXIT button to exit
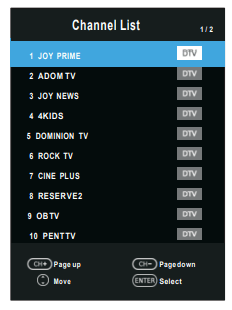
Channel List
Press LIST button to display the Channel List.
Press the ▲/▼ buttons to select the channel and press ENTER to watch it.
Press CH∧/∨ button to page up or down the Channel list.
Press EXIT button to exit the channel list.
Favorite List
Press button to display the Favorite List.
Press red, green, yellow, blue button to select the desired favorite group.
Press the ▲/▼ buttons to select the channel and press ENTER to watch it. Press CH / button to page up or down the Favorite list.
Press EXIT button to exit the Favorite List.
Troubleshooting Guide
When you meet the following common problems, you might diagnose and get the solutions without contacting with the technicians.
Symptoms
Possible Reason
Solutions
No picture, no sound, and no indicator light on
1.The power cord is not plugged in
2.The power is off
1.Plug the power cord in
2.Turn the power on
Picture and sound with abnormity
1.Contrast, sharpness, and color are set improperly
2.Color system is set improperly
3.Sound system is set improperly
1.Adjust the value of Contrast, sharpness, and colour
2.Set the Color system to the country broadcasting standard
3.Set the Sound system to the country broadcasting standard
Picture is spotted or with snow
Signal source is low-grade or the signal cord is in a lower quality
Use the qualified signal cord
No picture, no sound and indicator light is green/blue
Volume is in the minimum value or TV is in mute mode.
Adjust the value of volume
The signal cable is not correctly connected.
Connect the signal cable correctly
Blue screen, AV is displayed
There is no signal input or the video cable is not connected or incorrectly connected
Connect the signal cable correctly
No sound
There is no audio signal input or audio cable is not connected correctly
Connect the signal cable correctly
HDMI source, with snow pixel of full screen
The source generate is not standard
Plug the HDMI cable again
The remote control does not work
Batteries are improperly installed or exhausted
1. Make sure the positive and the negative polarities are correct.
2.Check if there is a loose contact between the batteries and the springs
3.Replace the batteries
Maintenance
Early malfunctions can be prevented. Careful and regular cleaning can extend the life of your new TV. Be sure to turn the power off and unplug the power cord before you begin any cleaning.
Cleaning the screen
Here’s a great way to keep the dust off your screen for a while. Wet a soft cloth in a mixture of lukewarm water and a little fabric softener or dish washing detergent. Wring the cloth until it’s almost dry, and then used it to wipe the screen.
Make sure the excess water is off the screen, and then let it air-dry before you turn on your TV.
Cleaning the cabinet
To remove dirt or dust, wipe the cabinet with a soft, dry, lint-free cloth. Please be sure not to use a wet cloth.
Extended Absence
If you expect to leave your TV dormant for a long time (such as a vacation), it’s a good idea to unplug the power cord to protect against possible damage from lightning or power surges.

 : Mute or restore sound.
  : Reveal the hidden information of some teletext pages.
 : Return to last viewed program.
  : Switch on/off the favorite programs list.
 : Go to the index page.
 : Fast reverse (in Media mode)
 : Fast forward (in Media mode)
  : Previous (in Media mode)
  : Next (in Media mode)
 : Enter the Teletext, press again for MIX mode, press this button again to exit.
  : Play / Pause (in Media mode)
 : Stop (in Media/PVR mode).
  : Hold the teletext page on display, press again to release.
 : Press to select different images sizes.
  : Change size of teletext screen in display mode
 : Enter subtitle mode or subpage.
 : Cancel the teletext but not to exit teletext, press again show teletext.
 : Press
  Power button on the remote to turn on the TV.