If the screen is dark, a press of the Power button will “wake up” the display.
Select a wash cycle. (Defaults are set for each cycle. These default settings can be changed. See Control setting for more information).
Press the Pause/Add a Garment button .
CONTROL SETTING
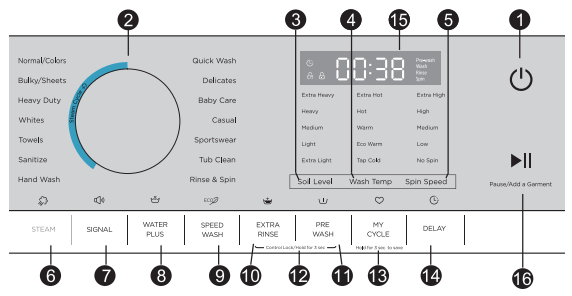
Power
Press to “wake up” the display. If the display is active, press to put the washer into standby mode.
NOTE: Pressing Power does not disconnect the appliance from the power supply.
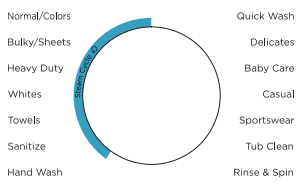
Wash Cycles
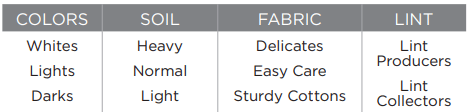
The wash cycles are optimized for specific types of wash loads. The chart below will help you match the setting with the loads.
Normal/ Colors*
For heavily to lightly soiled colorfast cottons, household linens, work and play clothes.
NOTE: This is the most common cycle.
Bulky/ Sheets*
For large items such as comforters, blankets, small rugs and similar bulky items.
Heavy Duty*
Washing the large and heavy clothing, such as overcoats or towels.
Whites*
For heavily to lightly soiled white laundry, work and play clothes
Towels*
For items such as towels, sheets, pillowcases and dish rags.
Sanitize*
For increased water temperature which will sanitize and kill more than 99.9% of many common bacteria found in home laundry. For best results, select the extra heavy soil setting when using the Sanitize cycle.
Hand wash*
Especially gentle wash program for wool or hand-wash fabrics.
Quick Wash
For lightly soiled items needed in a hurry. Cycle time is approximately 40 minutes, depending on selected options.
Delicates
For delicate, washable textiles, e.g. made of silk, satin, synthetic fibers or blended fabrics.
Baby Care
Washing the baby’s clothes, it can make the baby’s wear cleaner and make the rinse performance better to protect the baby skin.
Casual
Mixed load consisting of textiles made of cotton and synthetics.
Sportswear
Washing the activewear.
Tub Clean
Use for cleaning the basket of residue and odor.
Recommended use of at least once per month.
NOTE: Never load laundry white using Tub Clean. The laundry may become damaged See the Care and Cleaning section.
Rinse & Spin
To quickly rinse and spin out any items at any time.
SOIL LEVEL
Change the Soil level to increase or decrease the wash time to remove different amounts of soil.
To change the Soil level, press the Soil level button until you have reached the desired setting. You can choose between Extra Light, Light, Medium, Heavy or Extra Heavy soil levels.
WASH TEMP
Adjust to select the proper main water temperature for the wash cycle. The PreWash rinse water is always cold to help reduce energy usage and reduce setting of stains and wrinkles.
Follow the fabric manufacturer’s care label when selecting the wash temperature.
To change the wash temperature, press the wash Temp button until you have reached the desired setting. You can choose between Tap Cold, Eco Warm, Warm, Hot or Extra Hot.
By design, to protect fabrics, not all wash temperatures are available for certain wash cycles.
SPIN SPEED
Changing the Spin speed changes the final spin speed of the cycles.
Always follow the garment manufacturer’s care label when changing the Spin speed.
To change the Spin speed, press the Spin speed button until you have reached the desired setting. You can choose between No Spin, Low, Medium, High or Extra High. Higher spin speeds are not available on certain cycles, such as Delicates. Higher spin speeds remove more water from the clothes and will help reduce dry time, but may also increase the possibility of setting wrinkles on some fabrics.
STEAM
Steam adds steam into the washer to assist with loosening stains on the Normal/Colors, Bulky/ Sheets, Heavy Duty, Whites, Towels, Sanitize or Hand Wash cycle.
To use:
1. Turn power ON and select a wash cycle.
2. Select the Add Steam button to activate steam.
3. Press the Pause/Add a Garment button.
SIGNAL
Use the Signal pad to change the volume of the end-of-cycle signal.
Press the pad until you reach the desired volume.
WATER PLUS
Increases the water level of the main wash.
To use:
1. Turn power ON and select a wash cycle.
2. Select the Add Water Plus button to activate water plus.
3. Press the Pause/Add a Garment button.
SPEED WASH
This option reduces the overall washer cycle time by optimizing the wash, rinse and spin actions and/ or gently raising the wash temperature to get clothes cleaned faster. Option is available on Normal/ Colors, Bulky/Sheets, Heavy Duty, Whites, Towels, Hand Wash, Delicates, Baby Care, Casual or Sportswear cycles. Total wash time will vary based on cycle chosen and options selected.
To use:
1. Turn power on and select a wash cycle which has Time Saver as an option.
2. Make any adjustments to Soil, Temp and Spin as desired.
3. Press the Speed Wash button to reduce the overall wash time.
4. Press the Pause/Add a Garment button.
EXTRA RINSE
This option allows for an extra rinse during a cycle to remove excess dirt and detergent from soiled loads.
A drain and spin cycle can be achieved by pressing the Extra Rinse button until the light is no longer illuminated.
PRE WASH
Prewash is an extra wash before the main wash. Use it for heavily soiled clothes or for clothes with a care label that recommends prewashing before washing. Be sure to add liquid or powder high efficiency detergent, or the proper wash additive to the prewash dispenser.
PreWash must be selected prior to pressing Pause/ Add a Garment. The PreWash feature will fill the washer with cold water (adding the prewash detergent), tumble the clothes, drain and spin. Then the washer will run the selected wash cycle.
EXTRA RINSE and PRE WASH
Control Lock / Hold for 3 sec
You can lock the controls to prevent any selections from being made. Or you can lock or unlock the controls after you have started a cycle.
Children cannot accidentally start the washer by touching buttons with this option selected.
To lock the washer, press and hold the Extra Rinse and Pre Wash buttons for 3 seconds.
To unlock the washer controls, press and hold Extra Rinse and Pre Wash buttons for 3 seconds.
NOTE: The Power button can still be used when the machine is locked.
MY CYCLE
Hold for 3 sec to save
To save a favorite cycle, set the desired setting for wash cycle, soil level, spin speed and wash temp settings and hold down the My Cycle button for 3 seconds, A beep will sound to indicate the cycle has been saved.
To use your custom cycle, press the My Cycle button before washing a load.
To change the saved cycle, set the desired setting and hold down the My Cycle button for 3 seconds.
NOTE: When using My Cycle, wash options cannot be modified after the cycle has been started.
NOTE: If you change wash options with My Cycle before starting the cycle, the My Cycle light will turn off and you will be returned to the base cycle.
DELAY
You can delay the start of a wash cycle for up to 24 hours. Press the Delay Wash button to choose the amount of time you want to delay the start of the wash cycle. Once the desired time is reached, press the Pause/Add a Garment button. The machine will count down and start automatically at the correct time.
NOTE: If you forget to fully close the door, a remainder signal will beep reminding you to do so.
NOTE: If you open the door when the delay is counting down, the machine will enter the pause state. You must close the door and press Pause/Add a Garment again in order to restart the countdown.
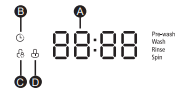
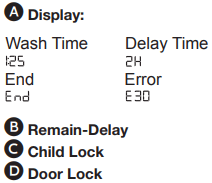
Display
Displays the approximate time remaining until the end of the cycle.
NOTE: The cycle time is affected by the water pressure in your home and the balance of the load in the washer. You may see the time remaining on the display increase to accommodate a slower spin speed to handle unbalanced loads.
Cycle status is also displayed and certain features such as Delay Wash or Steam are shown indicating they have been selected.
Pause / Add a Garment
Press to start a wash cycle. If the washer is running, pressing it once will pause the washer. Press again to restart the wash cycle.
If you want add a garment,please press the Pause/Add a Garment. The washer will unlock the door. Press again to restart the cycle.
NOTE: In some cycles the washer will drain first, then unlock the door when it is paused.
NOTE: The washer performs automatic system checks after pressing the Pause/Add a Garment button. Water will flow in 45 seconds or less. You may hear the door lock and unlock before water flows; this is normal.
FEATURES
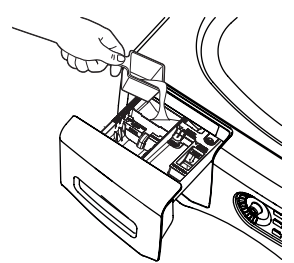
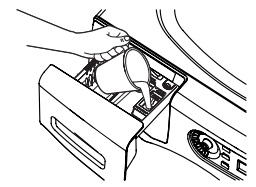
THE DISPENSER DRAWER
Slowly open the dispenser drawer by pulling it out until it stops. After adding laundry products, slowly close the dispenser drawer. Closing the drawer too quickly could result in early dispensing of the bleach, fabric softener or detergent.
You may see water in the dispenser drawer at the end of the cycle. This is a result of the flushing/siphoning action and is part of the normal operation of the washer.
The Prewash Compartment
• Only use the Prewash Compartment if you are selecting the Prewash cycle for heavily soiled clothes. Add measured detergent or prewash additive to the back left prewash compartment of the dispenser drawer.
• Detergent or prewash additive is flushed from the dispenser in the prewash cycle (if selected).
NOTE: Liquid detergent will drain into the washer drum as it is added.
• Detergent usage may need to be adjusted for water temperature, water hardness, size and soil level of the load. Avoid using too much detergent in your washer as it can lead to over sudsing and detergent residue being left on the clothes.
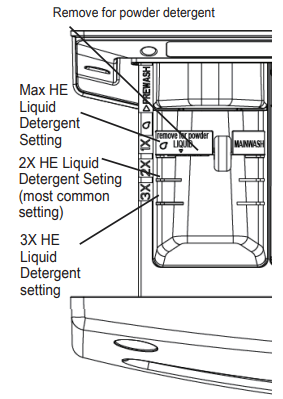
The Detergent Compartment
• High-efficient detergent is required for this washer. Use the detergent manufacturer’s recommended amount.
• Add measured detergent to the front left detergent compartment of the dispenser drawer.
• Detergent is flushed from the dispenser at the beginning of the wash cycle. Either powdered or liquid detergent can be used.
• Powder Detergent-Remove the Detergent selection insert and place it in a safe location outside of the washer. Follow the detergent manufacturer’s instructions when measuring the amount of powder to use.
• Detergent usage may need to be adjusted for water temperature, water hardness, size and soil level of the load. Avoid using too much detergent in your washer as it can lead to oversudsing and detergent residue being left on the clothes.
• Using more detergent than the recommended quantity can cause residue buildup on your washer.
• Liquid Detergent - Locate the concentration of your detergent on the bottle. Place the Detergent selection insert in the corresponding location depending on the concentration.
The Liquid Bleach Compartment
IMPORTANT: Be sure to identify the correct compartment for bleach before using.
If desired, measure out the recommended amount of liquid bleach, not to exceed 1/3 cup (80 ml), and pour into the right compartment labeled “LIQUID BLEACH”.
Do not exceed the maximum fill line. Overfilling can cause early dispensing of the bleach which could result in damaged clothes.
NOTE: Do not use powdered bleach in the dispenser.
The Fabric Softener Compartment
IMPORTANT: Be sure to identify the correct compartment for fabric softener before using.
If desired, pour the recommended amount of liquid fabric softener into the compartment labeled “FABRIC SOFTENER”.
Use only liquid fabric softener in the dispenser.
Dilute with water to the maximum fill line.
Do not exceed the maximum fill line. Overfilling can cause early dispensing of the fabric softener which could stain clothes.
NOTE: Do not pour fabric softener directly on the wash load.
LOADING AND USING THE WASHER
Always follow fabric manufacturer’s care label when laundering.
SORTING WASH LOADS
Sort laundry into loads that can be washed together.
• Combine large and small items in a load. Load large items first. Large items should not be more than half the total wash load.
• Washing single items is not recommended. This may cause an out-ofbalance load. Add one or two similar items.
• Pillows and comforters should not be mixed with other items. This may cause an out-of-balance load.
LOADING THE WASHER
Wash drum may be fully loaded with loosely added items. Do not wash fabrics containing flammable materials (waxes, cleaning fluids, etc.).
To add items after washer has started, press Pause/Add a Garment and wait until the door is unlatched. The washer may take up to 30 seconds to unlock the door after pressing Pause/Add a Garment depending on the machine conditions. Do not try to force open the door when it is locked. After the door unlocks, open gently. Add items, close the door and press Pause/Add a Garment to restart.
WASHER CARE
CLEANING
EXTERIOR
Immediately wipe off any spills. Wipe with damp cloth. Do not hit surface with sharp objects.
INTERIOR
To clean the interior of the washer, select the Tub Clean feature on the control panel. This Tub Clean cycle should be performed, at a minimum, once per month. This cycle will use more water, in addition to bleach, to control the rate at which soils and detergents may accumulate in your washer.
NOTE: Read the instructions below completely before starting the Tub Clean cycle.
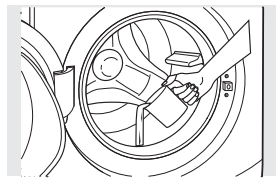
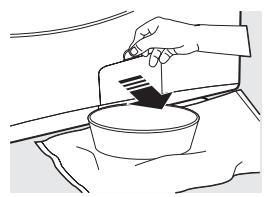
1. Remove any garments or objects from the washer and ensure the washer basket is empty.
2. Open the washer door and pour one cup or 250 ml of liquid bleach or other washing machine cleaner into the basket.
3. Close the door and select the Tub Clean cycle. Push the Pause/Add a Garment button.
4. When the Tub Clean cycle is working, the display will show the estimated cycle time remaining. The cycle will complete in about 90 minutes. Do not interrupt the cycle.
5. After the cycle is complete, leave the door open slightly for better ventilation.
If for any reason the cycle needs to be interrupted, the door will not open immediately. Forcing open the door at this stage may cause water to flood. The door will open after the water is drained to a level where it would not flood the floor.
Tub Clean may be interrupted by pressing the Pause/Add a Garment button in between cycles. A power outage in the house might also interrupt the cycle. When the power supply is back, the Tub Clean cycle resumes where it had stopped. When interrupted, be sure to run a complete Tub Clean cycle before using the washer. If the Power pad is pressed during Tub Clean, the cycle will be lost.
IMPORTANT:
• Run Tub Clean with 1 Cup (250 ml) of bleach once a month.
• After the completion of a Tub Clean cycle, the interior of your washer may have a bleach smell.
• It is recommended to run a light color load after the Tub Clean cycle.
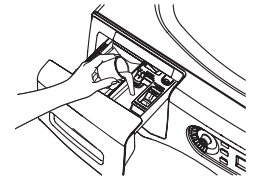
DISPENSER DRAWER AREA
Detergent and fabric softener may build up in the dispenser drawer. Residue should be removed once or twice a month.
Lock tab is visible only after drawer has been pulled open.
Remove the drawer by first pulling it out until it stops. Then reach back into right rear corner of the drawer cavity and press down firmly on the lock tab, pulling out the drawer.
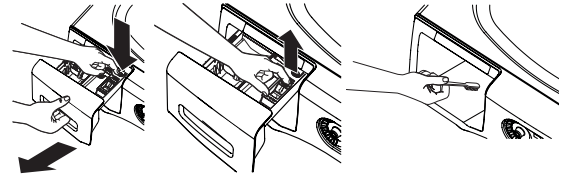
CLEANING THE PUMP FILTER
Due to the nature of the front-load washer, it is sometimes possible for small articles to pass to the pump. The washer has a filter to capture lost items so they are not dumped to the drain. To retrieve lost items, clean out the pump filter.
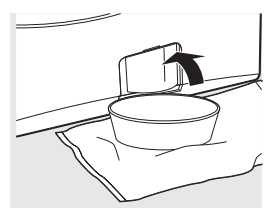
1. Using a coin or flat screwdriver in the notch on the door, open the access door.
2. Place a shallow pan or dish under the pump access door and towels on the floor in front of the washer to protect the floor. It is normal to catch about a cup of water when the filter is removed.
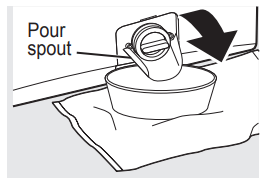
3. Pull down the pour spout.
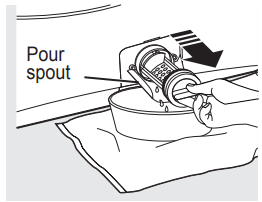
4. Turn the pump filter counterclockwise and remove the filter. Open slowly to allow the water to drain.
5. Clean the debris from the filter.
6. Replace the filter and turn clockwise. Tighten securely.
7. Flip up the pour spout.
8. Close the access door.
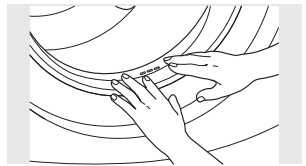
CLEANING THE DOOR GASKET
1. Open the washer door. Using both hands, press down the door gasket. Remove any foreign objects if found trapped inside the gasket. Make sure there is nothing blocking the holes behind the gasket.
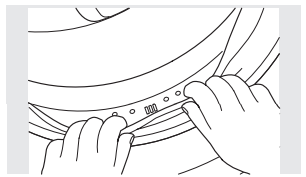
2. While holding down the door gasket, inspect the interior gasket by pulling it down with your fingers. Remove any foreign objects if found trapped inside this gasket. Make sure there is nothing blocking the holes behind the gasket.
3. When you are finished cleaning the door gasket, remove your hands and the gasket will return to the operating position.
MOVING, STORAGE AND LONG VACATIONS
Ask the service technician to remove water from drain pump and hoses. Do not store the washer where it will be exposed to the weather. When moving the washer, the tub should be kept stationary by using the shipping bolts removed during installation. See Installation Instructions in this book.
Be sure the water supply is shut off at the faucets. Drain all water from the hoses if the weather will be below freezing.
BEFORE YOU CALL FOR SERVICE...
Troubleshooting Tips
Save time and money! Review the charts on the following pages first and you may not need to call for service.
Problem
Possible Cause
What To Do
Not draining
Not spinning
Not agitating
Load is out of balance
• Redistribute clothes and run drain & spin or rinse & spin.
• Increase load size if washing small load containing heavy and light items.
Pump clogged
• See page 25 on how to clean the Pump Filter.
Drain hose is kinked or improperly connected
• Straighten drain hose and make sure washer is not sitting on it.
Household drain may be clogged
• Check household plumbing. You may need to call a plumber.
Drain hose siphoning; drain hose pushed too far down the drain
• Ensure there is an air gap between hose and drain.
Leaking water
Door gasket is damaged
• Check to see if gasket is seated and not torn. Objects left in pockets may cause damage to the washer (nails, screws, pens, pencils).
Door gasket not damaged
• Water may drip from the door when the door is opened. This is a normal operation.
• Carefully wipe off rubber door seal. Sometimes dirt or clothing is left in this seal and can cause a small leak.
Check back left of washer for water
• If this area is wet, you have oversudsing condition. Use less detergent.
Fill hoses or drain hose is improperly connected
• Make sure hose connections are tight at washer and faucets and make sure end of drain hose is correctly inserted in and secured to drain facility.
Household drain may be clogged
• Check household plumbing. You may need to call a plumber.
Dispenser clogged
• Powder soap may cause clogs inside the dispenser and cause water to leak out the front of the dispenser. Remove drawer and clean both drawer and inside of dispenser box. Please refer to Cleaning the Washer section.
Incorrect use of detergent
• Use HE and correct amount of detergent.
Dispenser box crack
• If new installation, check for crack on inside of dispenser box.
Clothes too wet
Load is out of balance
• Redistributes clothes and run drain & spin or rinse & spin.
• Increase load size if washing small load containing heavy and light items.
• The machine will slow the spin speed down to 400 rpm if it has a hard time balancing the load. This speed is normal.
Pump clogged
• See page 25 on how to clean the Pump Filter.
Overloading
• The dry weight of the load should be less than 22 lbs.
Drain hose is kinked or improperly connected
• Straighten drain hose and make sure washer is not sitting on it.
Household drain may be clogged
• Check household plumbing. You may need to call a plumber.
Drain hose siphoning; drain hose pushed too far down the drain
• Ensure there is an air gap between hose and drain.
Incomplete cycle or timer not advancing
Automatic load redistribution
• Timer adds 3 minutes to cycle for each rebalance. 11 or 15 rebalances may be done. This is normal operation. Do nothing; the machine will finish the wash cycle.
Pump clogged
• See page 25 on how to clean the Pump Filter.
Drain hose is kinked or improperly connected
• Straight drain hose and make sure washer is not sitting on it.
Household drain may be clogged
• Check household plumbing. You may need to call a plumber.
Drain hose siphoning; drain hose pushed too far down the drain
• Ensure there is an air gap between hose and drain.
Loud or unusual noise; vibration or shaking
Cabinet moving
• Washer is designed to move 1/4" to reduce forces transmitted to the floor. This movement is normal.
All rubber leveling legs are not firmly touching the floor
• Push and pull on the back right and then back left of your washer to check if it is level. If the washer is uneven, adjust the rubber leveling legs so they are all firmly touching the floor and locked in place. Your installed should correct this problem.
Unbalanced load
• Open door and manually redistribute load. To check machine, run rinse and spin with no load. If normal, unbalance was caused by load.
Pump clogged
• See page 25 on how to clean the Pump Filter.
No power/ washer not working or dead
Washer is unplugged
• Make sure cord is plugged securely into a working outlet.
Washer is unplugged
• Turn cold faucet fully on.
Circuit breaker/fuse is tripped/blown
• Check house circuit breaker/fuses. Replace fuses or reset breaker. Washer should have separate outlet.
Automatic self system checks
• First time the washer is plugged in, automatic checks occur. It may take up to 20 seconds before you can use your washer. This is normal operation.
Snags, holes, tears, rips or excessive wear
Overloaded
• The dry weight of the load should be less than 22 lbs.
Pens, pencils, nails, screws or other objects left in pockets
• Remove loose items from pockets.
Pins, snaps, hooks, sharp buttons, belt buckles, zippers and sharp objects left in pockets
• Fasten snaps, hooks, buttons and zippers.
Control time wrong or changes
This is normal
• During spin the washer may need to rebalance the load sometimes to reduce vibrations. When this happens, the estimated time is increased causing time left to increase or jump.
Not enough water
This is normal
• Horizontal washers do not require the tub to fill with water like top-load washers.
Washer pauses or has to be restarted, or washer door is locked and will not open
Pump clogged
• See page 25 on how to clean the Pump Filter.
Door unlocks or press Pause/Add a Garment and machine doesn’t operate
This is normal
• Front-load washers start up differently than topload washers, and it takes 30 seconds to check the system. The door will lock and unlock.
Incorrect operation
• Simply open and close the door firmly; then press Pause/Add a Garment.
Water does not enter washer or enters slowly
Automatic self system checks
• After Pause/Add a Garment is pressed, the washer does several system checks. Water will flow 60 seconds after Pause/Add a Garment is pressed.
Water supply is turned off
• Turn on water supply.
Water valve screens are stopped up
• Turn off the water source and remove the water connection hoses from the upper back of the washer. Use a brush or toothpick to clean the screens in the machine. Reconnect the hose and turn the water back on.
Wrinkling
Improper sorting
• Avoid mixing heavy items (like work clothes) with light items (like blouses).
Overloading
• Load your washer so clothes have enough room to move freely.
Incorrect wash cycle
• Match cycle selection to the type of fabric you are washing (especially for easy care loads).
Repeated washing in water that is too hot
Wash in warm or cold water.
Grayed or yellowed clothes
Not enough detergent
• Use correct amount of detergent.
Not using HE (high efficiency) detergent
• Use HE detergent.
Hard water
• Use hottest water safe for fabric.
• Use a water conditioner like Calgon brand or install a water softener.
Detergent is not dissolving
• Try a liquid detergent.
Dye transfer
• Sort clothes by color. If fabric label states wash separately unstable dyes may be indicated.
Colored spots
Incorrect use of fabric softener
• Check fabric softener package for instructions and follow directions for using dispenser.
Dye transfer
• Sort whites or lightly colored items from dark colors.
• Promptly remove wash load from washer.
Slight variation in metallic color
This is normal appearance
• Due to the metallic properties of paint used for this unique product, slight variations of color may occur due to viewing angles and lighting conditions.
Smell inside your washer
Washer unused for a long time, not using recommended quality of HE detergent or used too much detergent
• Run a Tub Clean cycle once a month.
• In the case of strong smell, you may need to run the Tub Clean cycle more than once a month.
• Use only the amount of detergent recommended on the detergent container.
• Use only HE (highefficiency) detergent.
• Always remove wet items from the washer promptly after machine stops running.
• Leave the door slightly open for the water to air dry. Close supervision is necessary if this appliance is used by or near children. Do not allow children to play on, with or inside this or any other appliance.
Detergent leak
Incorrect placement of detergent insert
Make sure detergent insert is properly located and fully seated. Never put detergent above max line.
Improper dispensing of softener or bleach
Dispenser clogged
Softener or bleach is filled above the max line
Softener or bleach is filled above the max line
Make sure to have the correct amount of softener or bleach.
Softener or bleach cap issue
Make sure softener and bleach cap for dispenser are seated or they will not work.
ERROR CODES
Description
Reason
Solution
Door is not closed properly
Restart after the door is closed.
Check if the clothes is stuck.
Water injecting problem while washing
Check if the water pressure is too low.
Straighten the water hoses.
Check if the inlet valve filter is blocked.
Overtime water draining
Check if the drain hose is blocked, clean drain filter.
Water overflow
Restart the washer.
Others
Please try again first, call up service line if there are still troubles.

 Press the Power button
 button will “wake up” the display.
 Select a wash cycle. (Defaults are set for each cycle. These default settings can be changed. See Control setting for more information).
 Press the Pause/Add a Garment button
  .
. Power
Power Wash Cycles
 SOIL LEVEL
 WASH TEMP
 SPIN SPEED
 STEAM
STEAM SIGNAL
 WATER PLUS
 SPEED WASH
 EXTRA RINSE
 PRE WASH
 EXTRA RINSE and PRE WASH
 MY CYCLE
 DELAY
DELAY Display