
CAUTION: HOT SURFACE !
CAUTION: RISK OF FIRE !
USER’S MANUAL
Read this Manual
Washer - Spinner - Dryer
Use all instructions and explanations
on installation before use. Follow the
instructions carefully. Keep the operation
instructions handy for later use. If the
product is sold or passed on then ensure
that the new owner always receives this
manual.
Model: FP-92LFC100GMTH-W2
FP-92LFC120GMTH-W1

SAFETY INSTRUCTIONS
CONTENTS
1
Safety Instructions
INSTALLATION
Product Description
Installation
OPERATION
Quick Start
Before Each Wash
Detergent Dispenser
Control Panel
Options
Other Functions
Programs
Washing Program Table
MAINTENANCE
Cleaning and Care
Troubleshooting
Technical Specifications
2
8
9
12
13
14
16
17
19
23
24
25
28
29
Safety Instructions
For your safety,the information in this manual must be followed to minimize
the risk of fire or explosion, electric shock, or to prevent property damage,
personal injury or loss of life. Explanation of the symbols:
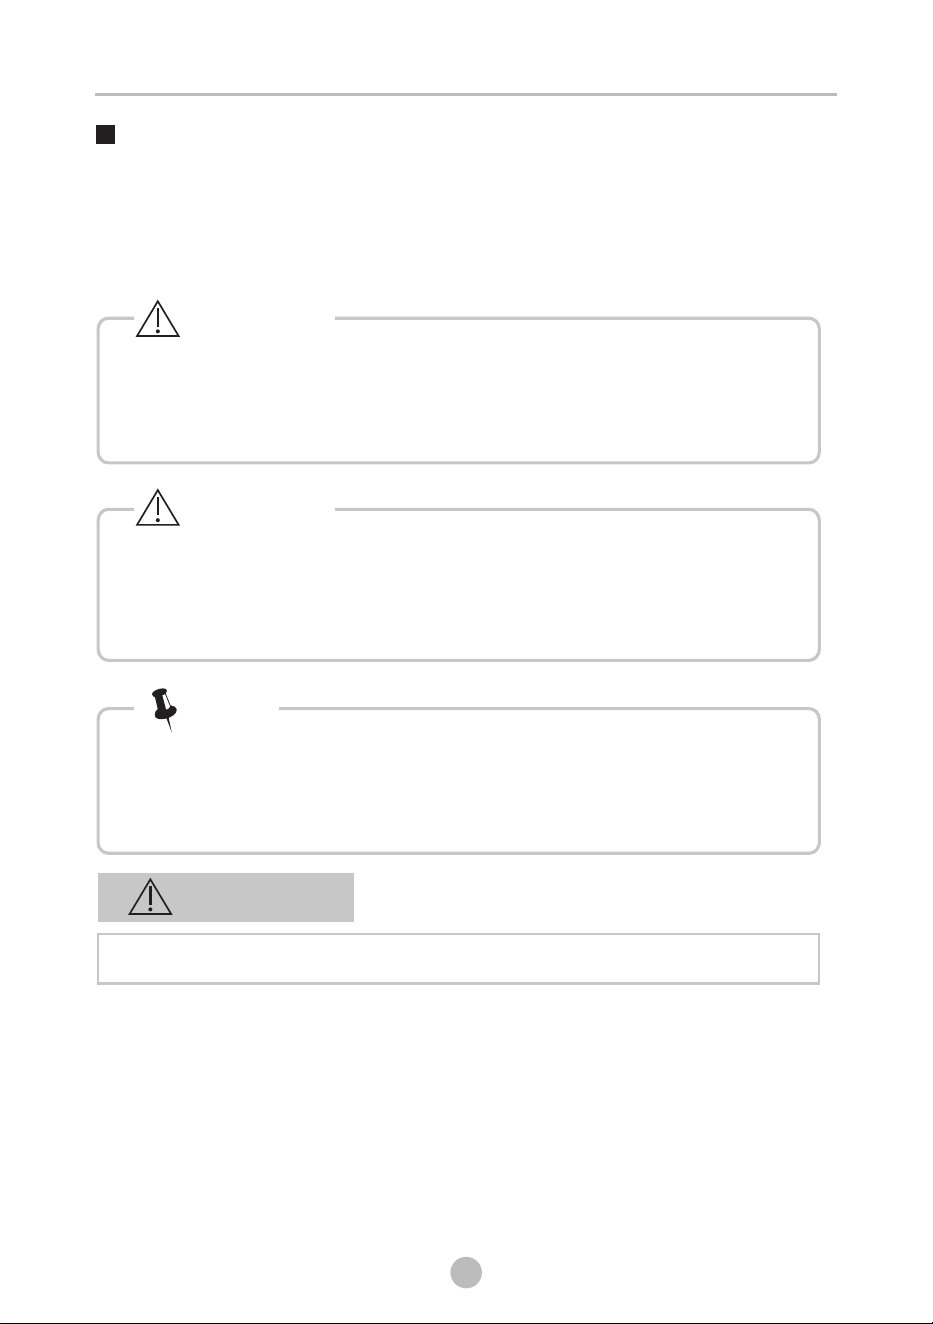
This combination of symbol and descriptive words indicates a
potentially dangerous situation which may result in death or serious
injuries unless it’s avoided.
Warning!
2
SAFETY INSTRUCTIONS
This combination of symbol and descriptive words indicates a
potentially dangerous situation which may result in slight and minor
injuries or damage to property and the environment.
Caution
This combination of symbol and descriptive words indicates a
potentially dangerous situation which may result in slight or
minor injuries.
• If the supply cord is damaged, it must be replaced by the
manufacturer, its service agent or similarly qualified person,
in order to avoid hazards.
• The new hose sets supplied with the appliance must be used
and the old hose sets must not be used.
• Before maintenance, unplug the appliance.
Note
Warning!
Electric Shock!

• Always unplug the machine and turn off the water supply after
use. The standard inlet water pressure: 0.05MPa~1MPa.
• This appliance must be grounded. In the event of malfunction
or breakdown, grounding will reduce the risk of electric shock
by providing a path of at least resistance for electric current.
• This appliance is equipped with a cord having an
equipment-grounding conductor and grounding plug. The plug
must be inserted into an appropriate outlet that is properly
installed and grounded in accordance will all local codes and
ordinances.
• Pull out its plug from the power socket before cleaning or
maintenance.
• Do not use any socket with rated current less than that of
appliance. Never pull out power plug with wet hands.
• Please remember to disconnect water and power supply
immediately after the clothes are washed.
• The appliance can be used by children aged 8 years and
above and persons with reduced physical, sensory or mental
capabilities or lack of experience and knowledge if they have
been given supervision or instruction concerning use of the
appliance in a safe way and understand the hazards involved.
Children shall not play with appliance. Cleaning and user
maintenance shall not be done by children without supervision.
• Children of less than 3 years should be supervised to ensure
that they do not play with appliance.
• Animals and children can climb on the machine. Check the
machine before every operation.
• Children should be supervised that they do not play with the
appliance.
3
SAFETY INSTRUCTIONS
Risk to Children!

• The glass door may be very hot during the operation. Keep
children and pets far away from the machine during operation.
• Remove all the packaging materials and transport bolts before
using the appliance. Otherwise, serious damage may result
• Do not wash or dry articles that have been cleaned in,
washed in, soaked in, or spotted with combustible or explosive
substances (such as wax, oil, paint, gasoline, degreasers,
dry-cleaning solvents, kerosene, etc.) This may result in fire
or explosion.
• The washer/dryer is not to be used if industrial chemicals
have been used for cleaning.
• The exhaust air must not be discharged into a duct that is for exhausting
fumes from appliances that burn gas or other fuels.
• Rinse the above mentioned articles thoroughly by hand before
putting them in the appliance.
• This washing machine is for indoor use only.
• Its not intended for built-in use.
• The openings must not be obstructed by a carpet.
• The washing machine shall not be installed in the bathroom or
very wet rooms with explosive or explosive and corrosive gases.
• The washing machine with a single inlet valve only can be
connected to cold water supply.
4
SAFETY INSTRUCTIONS
Risk of Explosion!
Caution
Installing the product

• Plug must be accessible after installation.
• The appliance must not be installed behind a lockable door, a
sliding door or a door with a hinge on the opposite side to that
of the washer dryer.
• The appliance shall not be installed in humid places.
• This household appliance isn’t intended for built-in installation.
• Remove all the packages and transport bolts before using the
appliance. Otherwise, serious damage may result.
• The product is only for home use and is only designed for the
textiles suitable for machine washing and drying.
• Do not climb up the sit on top cover of the machine.
• Do not lean against machine door.
• Cautions during handling machine:
1. Transport bolts shall be reinstalled to the machine by a
qualified person.
2. The accumulated water shall be drained out of the machine.
3. Handle the machine carefully. Never hold protruding parts
of the machine while lifting. Machined door cannot be used
as the handle during the transport.
4. This appliance is heavy. Transport with care.
5. Hands shall not be inserted into the rotating drum.
• Please do not close the door with excessive forces. If it is found
difficult to close the door, please check if the clothes are put in
or distributed well.
• It is forbidden to wash carpets.
5
SAFETY INSTRUCTIONS
Risk of damaging the appliance!
Operating the appliance!

• Before washing the clothes for the firs time, the product should be
operated without clothes, using AUTO CLEAN as the suggested
program.
• Flammable and explosive or toxic solvents are forbidden. Gasoline
and alcohol etc. shall not be use as detergents. Please only select
the detergents suitable for machine washing, especially for front
load washing machines.
• Make sure that all pockets are emptied. Sharp and rigid items such
as coins, brooches, nails, screws, or stones, etc., may cause
serious damages to this machine.
• Please check whether the water inside the drum has been drained
before opening its door. Please do not open the door of there is
any water visible.
• Be careful of being scalded when the product drains hot
washing water.
• Never refill the water by hand during washing.
• After the program is completed, please wait for two minutes
before opening the door.
• If its unavoidable to tumble dry fabrics stained with vegetable/
cooking oil contaminated by hair care products, the affected fabrics
should first washed in hot water with an extra amount of detergent.
This will reduce the risk of combustion but not totally eliminate it.
• Adequate ventilation has to be provided to avoid the back flow of
gases into the room from other gas-fed appliance, and open fires.
• Do not dry unwashed items in this appliance. Items that have been
soiled with substances such as cooking oil, acetone, alcohol,
petrol, kerosene, spot removers, turpentine, waxes, wax removers
should be washed in hot water with an extra amount of detergent before
being dried in the appliance.
6
SAFETY INSTRUCTIONS

7
• Items such as foam rubber (latex foam), shower caps, waterproof
textiles, rubber backed articles and clothes or pillows fitted with
foam rubber pads should not be dried in the machine.
• Fabric softener or similar products should be used as specified in
the fabric softener instruction guide.
• The final part of a washer dryer cycle occurs without heat
(cool down cycle) to ensure that the items are left at a temperature
not harmful to clothing and textiles.
• Remove all objects from pockets (such as lighters and matches)
before using the appliance.
• Warning: Never stop the machine before the end of the drying cycle,
unless all items can be quickly removed and spread out so that the
heat is dissipated.
SAFETY INSTRUCTIONS

Note
Accessories
8
Water supply hose
Detergent dispenser
Door
Transport
hole plug
Supply hose
cold water
Drain hose support
(optional)
User’s Manual
• The product line chart is for reference only, please refer
to the actual product as standard.
Service filter
Drain hose
Drum
Power supply cord
Control panel
Top cover
INSTALLATION
Product Description

9
Unpacking the washing machine
Remove transport bolts
w
w
>
Installation
Installation Area
INSTALLATION
Warning!
• Stability is important to prevent the product
from moving.
• Make sure that the product does not stand
on power cord.
Warning!
• Packaging material (e.g. films, Styrofoam) can
be dangerous to children.
• There is a risk of suffocation. Keep all
packaging materials well away from children.
Warning!
• You must remove the transport bolts from the back before
using the product.
• You’ll need the transport bolts again if you will transport the
product, so make sure you keep them in safe place.
Please do the following steps to remove the bolts:
1. Loosen 4 bolts with spanner and then remove them.
2. Cover the holes with transport hole plugs
3. Keep the transport bolts properly, for future use.
Before installing the machine, the location
characterized as follows shall be selected:
1. Rigid, dry and level surface
2. Avoid direct sunlight
3. Sufficient ventilation
4. Room tempreature is above 0°C
5. Keep away from the heat resources such as coal or gas.
9
10
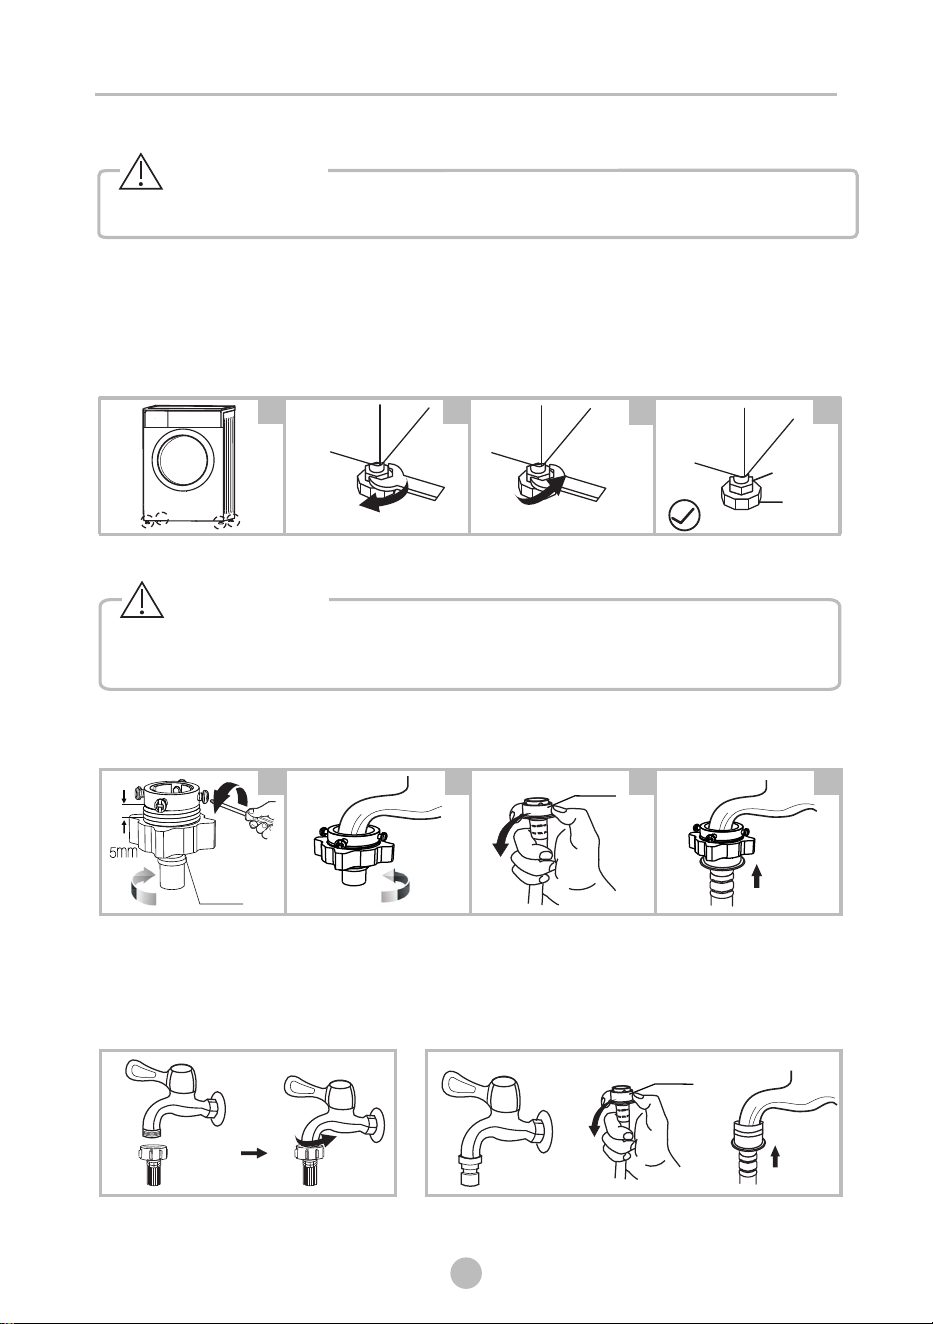
Levelling the washing machine
Connect Water Supply Hose
Connect the inlet pipe as indicated, There are two ways to connect the inlet pipe.
1.Connection between ordinary tap and inlet hose.
2
3
4
1
Raise
Lower
Lock
nut
foot
Warning!
Loosen clamp nut
and four bolts
Press the tap end
against the rubber ring
inside the clamp then
tighten the 4 screws.
Press slide bushing,
insert inlet hose into
connecting base
slide bushing
2
3
41
Connection finished
clamp nut
Tap with threads and inlet hose
Special tap for washing machine
2.Connection between screw tap and inlet hose.
slide bushing
INSTALLATION
• The lock nuts on all four feet must be screwed tightly against the housing.
1.Check if the legs are closely attached to the cabinet. If not, please
turn them to their original position then tighten the nuts.
2.Loosen the lock nut then turn the feet until it closely contacts with the floor.
3.Adjust the legs and lock them with a wrench, make sure the
machine is steady
Warning!
• To prevent leakage or water damage, follow the instructions below.
Do not kink, crush, modify or cut the water inlet hose.

10
11
Warning!
Drain Hose
There are two ways to place the end of drain hose:
1.Put it into the floor drain . 2.Connect it to the pipe of the
floor drain.
• If drain hose is too long, do not force it into washing machine as it will
cause abnormal noises.
• When installing drain hose, fix it properly with a rope.
•
•
Position drain hose properly ,otherwise damage might result due
to water leakage.
Do not kink or protract the drain hose.
Water
trough
niM . mc06
mc001
xaM .
Trough
Hose Retainer
Bind
Max.100cm
Min.60cm
Min.60cm
Max.100cm
• If the machine has drain hose support, please install it as shown below.
Warning!
Warning!
Note!
water supply hose
water Inlet valve
Connect the other end of inlet
pipe to the inlet valve at the
back of
the product
and
fasten the pipe tightly
clockwise.
INSTALLATION

10
12
• Before washing, please make sure that the unit is installed properly.
Before washing at first time, the washing machine shall be operated
without clothes using RAPID (at SPEED WASH setting) as the suggested
program.
•
1. Before Washing
The buzzer will sound or “END” will be displayed.
Open tap
Load
Close door
Plug in
Add detergent
Quick Start
3 . After Washing
• Detergent only needs to be added in "case I “after selecting pre-washing
(for models with this function).
1 2 3 4 5
2 . Washing
Power On
Select Program Select function
deor fault
S ta r t u p
1 2 3 4
1. If default is selected, step 3 can be skipped.
2. The function button’s table is for reference only, please refer to
the actual product as standard.
Note!
Note!
Caution!
Main
was h
Prewash
S oftener
OPERATION

10
13
Tie tassels into knots; fasten
zippers and buttons
Please check the labels and the explanation of using detergent before wash.
Use non-foaming or less-foaming detergent suitable for machine washing
properly.
Washing a single piece of clothing may cause severe unbalance and
consequently sound alarm. In this case, it is suggested to add one or
two more pieces of clothing to the wash load that will also make
draining smoother. Do not wash clothes stained with kerosene,
gasoline, alcohol, and other flammable materials.
Take items out of the
pockets
Put small clothes into a
laundry net
Check the label
Before Each Wash
Turn the following clothes
inside out: those that easily
form fiber balls on its surface
and those with long strands
of fiber
Segregate clothes with
varying textures or materials
Warning!
OPERATION

10
14
Detergent Dispenser
Pre wash detergent
Main wash detergent
Softener
II
I
Pull out the dispenser
Liquid detergent
Powder detergent
Caution!
Barrier Barrier
OPERATION
Detergent only needs to be added in “case I” after selecting pre-washing
(for models with this function).
10
15
P rogram
E C O W as h
Delicate
S ilent
Antiallergic
Towel
S hoes
Auto C lean
S pin O nly
P rogram
Dry O nly
C otton
Duvet
Normal
J eans
S tain W ash
R apid
Means required Means optional
○
Note!
• As for powder detergents that have formed into cluster or masses,
it is suggested to dilute the detergent in some water, before pouring
into the detergent box. This will prevent the inlet of the detergent box
from clogging and water from overflowing during the filling process.
• Choose the suitable type of detergent for the various washing
temperatures, to get the best washing effect with less water and
energy consumption.
• Pay attention to whether the detergent has dried up in the dispenser,
and clean the dispenser regularly especially when the washing
machine is not used for long periods of time
OPERATION
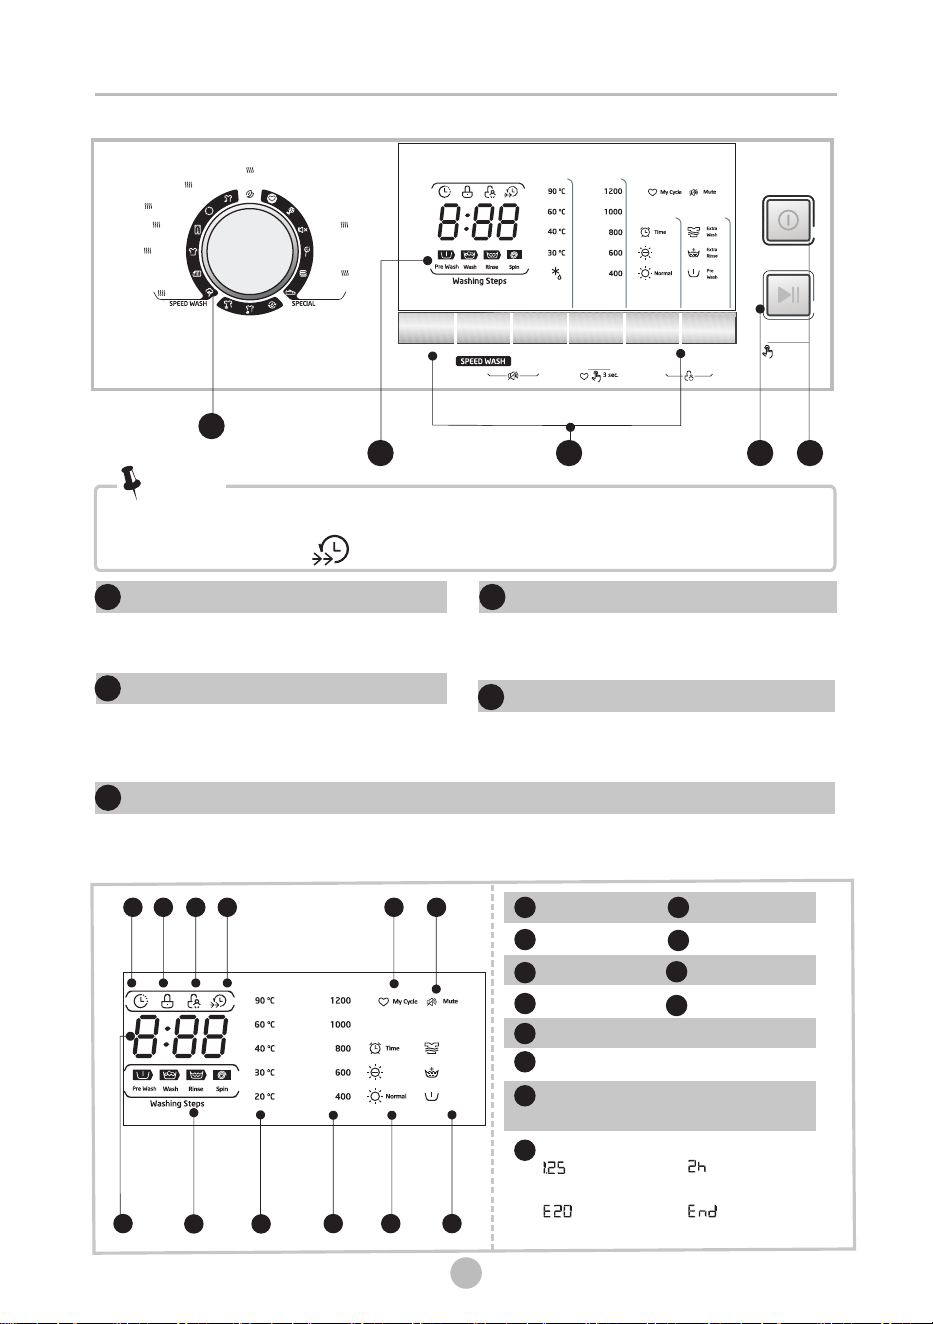
Control panel
D
CB
A
E
J
K
I
G
F
H
L
1
1
1
2
4
3
1
5
4
Delay
A
C hild Lock
C
Door Lock
B
E xtra W ash/ E xtra Rinse / Pre W ash
G
Was h T ime Delay Time
E rror End
L
My C ycle
E
Mute
F
D
S peed Wash
Time/ S oft/ Normal
H
Water Temp.
J
Was hing Progress
( P re W as h- W ash- R inse- S pin)
K
S pin S peed
I
10
1 6
ECO Wash
My Cyc le
Deli cate
Sile nt
Anti allergic
Towel
Shoe s
Auto
Clea n
Spin
Only
Dry
Only
Cott on
Duve t
Norm al
Jean s
Stai n Wash
Rapi d
15 Mi n Wash |5 9Mi n Wash An d Dry
Soft
Delay
Temperature
Spin
Dry
Options
Extra
Options
On |Off
Start | Pause
Add Clothes
3 sec. Unlock Do or
Soft
Pre
Wash
Extra
Wash
Extra
Rinse
Note!
On/Off
Switches the product on or off.
• The illustration for reference only, Please refer to the actual product as standard.
• The program with the icon has the Speed Wash option.
Press this button to commence or
temporarily stop the washing cycle.
Option
This allows you to select an
additional function that will light
up when selected
Start / Pause
Available according to the
laundry type.
Program
1
1
3
1
2
Display
Shows the settings, estimated remaining time, options and staus
messages for your washer. The display will remail on through out the cycle.
5
OPERATION

Extra Rinse
Speed Wash
The function decreases the washing time.
To set the Delay function:
1. Select program
2. Press the DELAY END button to choose the start time delay
(the delay time is 0-24 hours).
3. Press [ START/PAUSE] to commence the delay operation
To cancel the Delay function:
Press the DELAY button until the display becomes 0H. It should be
pressed before starting the program. If the program has already started,
the [ ON/OFF] button should be pressed, to reset the program.
If there is an interruption in the power supply while the machine is
operating, a special memory stores the selected program and when
the power is restarted, the machine will run the previous program
automatically.
This option is for very dirty clothes. The washing time and intensity
increase, to also increase the washing performance.
This can be used to reduce the wrinkles of clothes.
The clothes are soaked for 20 minutes after the drum is automatically
filled with water up to the proper level.
DELAY
Options
1 7
Extra Wash
Anti-crease
Soak
/
PREWASH
The PREWASH function provides an extra wash before the main
wash is executed. It’s suitable for cleaning soiled clothes and
needs detergent in case 1.
This setting provides an extra rinse, when selected.
Choose the Program
Start
ON/OFF
Set the time
DELAY
OPERATION
Caution!

10
2 2
10
1 8
Delay Pre Wash Extra Wash
Speed Wash
Extra Rinse
P rogram Option
E C O W as h
Delicate
S ilent
Antiallergic
Towel
S hoes
Auto C lean
S pin O nly
Dry O nly
C otton
Duvet
Normal
J eans
S tain W ash
R apid
OPERATION
Means required Means optional
○

10
2 2
10
1 9
Dry
Users can choose Soft drying, Normal drying and Timer drying
when using the drying function.
Among them, Soft drying and Normal drying are conventional drying,
and Timer drying offers customized drying time.
1. The drying function is only available for programs with drying
symbol “ ” , as shown in instructions of the operation panel
program.
2. Press the Dry button continously to switch between between Normal
drying, Soft drying and Timer drying. The default is Soft Drying.
3. Timer drying setting time: 30, 60, 120 , 180 (min)
Dry
Other Functions
RELOAD
With this operation, the user can add pieces of laundry into the machine,
even after washing has begun. At this point, however, the drum is rotating
and there is a large amount of hot water in it. This is an unsafe condition
and the door cannot be opened forcibly. To reload, press
[START/PAUSE] for 3 seconds and follow the steps below.
1.Wait until the drum stops rotating.
2.The door will be automatically unlocked.
3.Open the door , add clothes to the drum, and close the door. Press the
[START/PAUSE] button.
• Don't use the Reload function when the water level is over the edge
of the inner tub or when the temperature is high.Please add clothes
when the drum stops rotating.
DRY
OPERATION
Clothes
Press [Start/Pause] 3 sec.
ON/OFF Choose the Program Set Start
Reload the clothes Start
Caution

10
2 0
My Cycle
Child Lock
Frequently – used programs can be stored here. After choosing the
setting for your customized program, press [ ] for 3 seconds
to store it in the memory. The default program stored is Cotton.
To avoid mis operation by children
ON/OFF Start/
Pause
Press [Function] and [Select] or [Dry]
and [Extra Options] 3 seconds until the buzzer beeps
Function
Select
/
/
/
/
or
Dry
Options
/
Extra
Options
Temperature
S peed
OPERATION
• Press the two buttons also for 3 seconds, to deactivate CHILD LOCK.
• The CHILD LOCK will lock all buttons except [ON/OFF]
• When the power supply is cut, the CHILD LOCK function is deactivated
• For some models, the CHILD LOCK will not be deactivated when
the power supply is cut.
Caution
Press the button to regulate the water temperature
( Cold, 20°C, 30°C,40°C,60°C,90°C).
Speed
Press this button to change the spin speed.
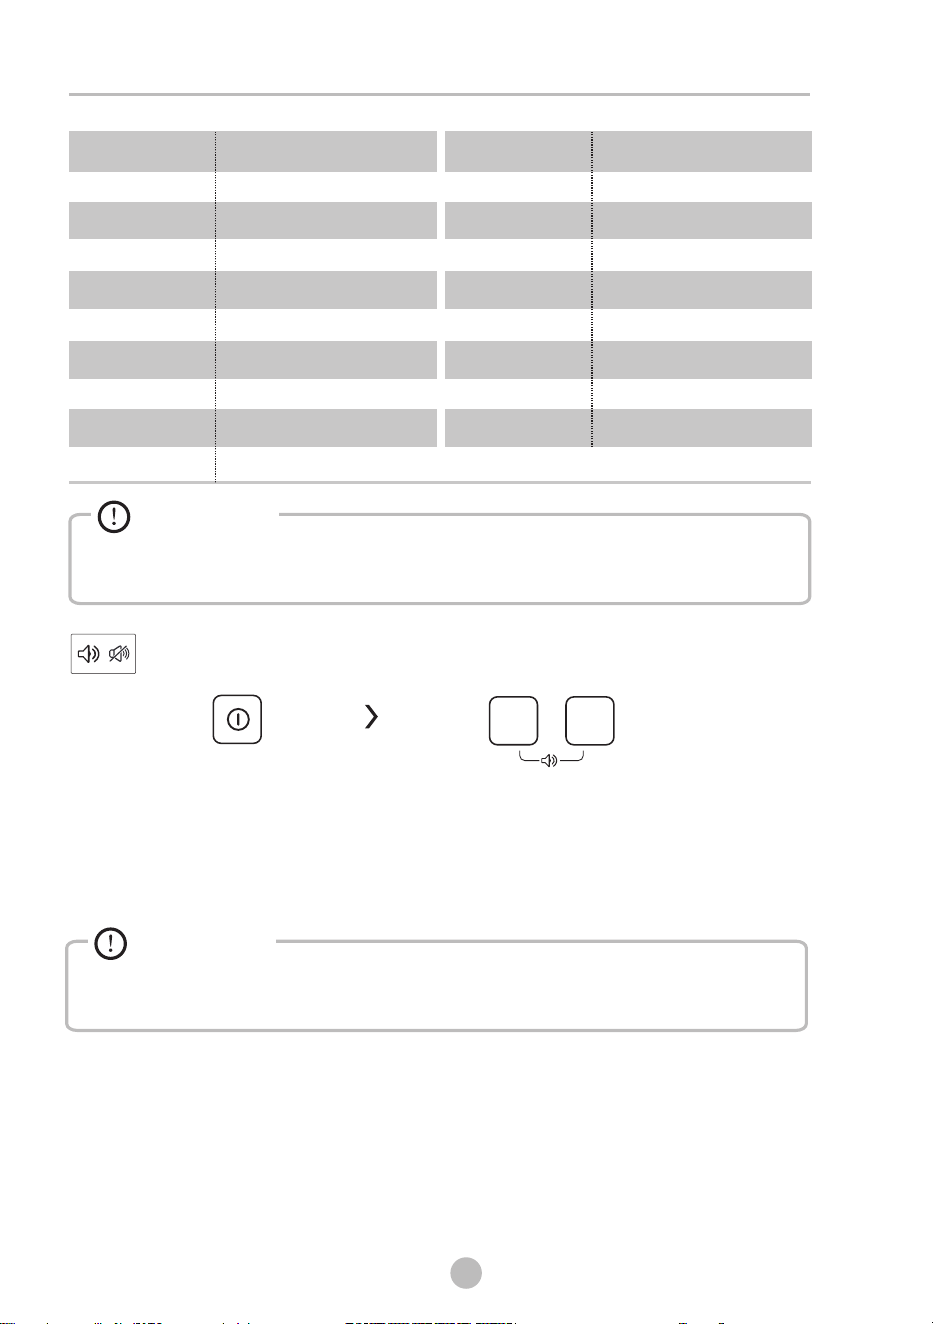
ON/OFF Press [Speed Wash] and [Temp.] button
for 3 seconds and the buzzer will be muted.
10
2 1
/
• When the lights of SPEED are off, it means that the spin process
will not be executed.
To Mute the buzzer
To activate the buzzer function, press the two buttons again for
3 seconds. This setting will be kept, unless deactivation is done again.
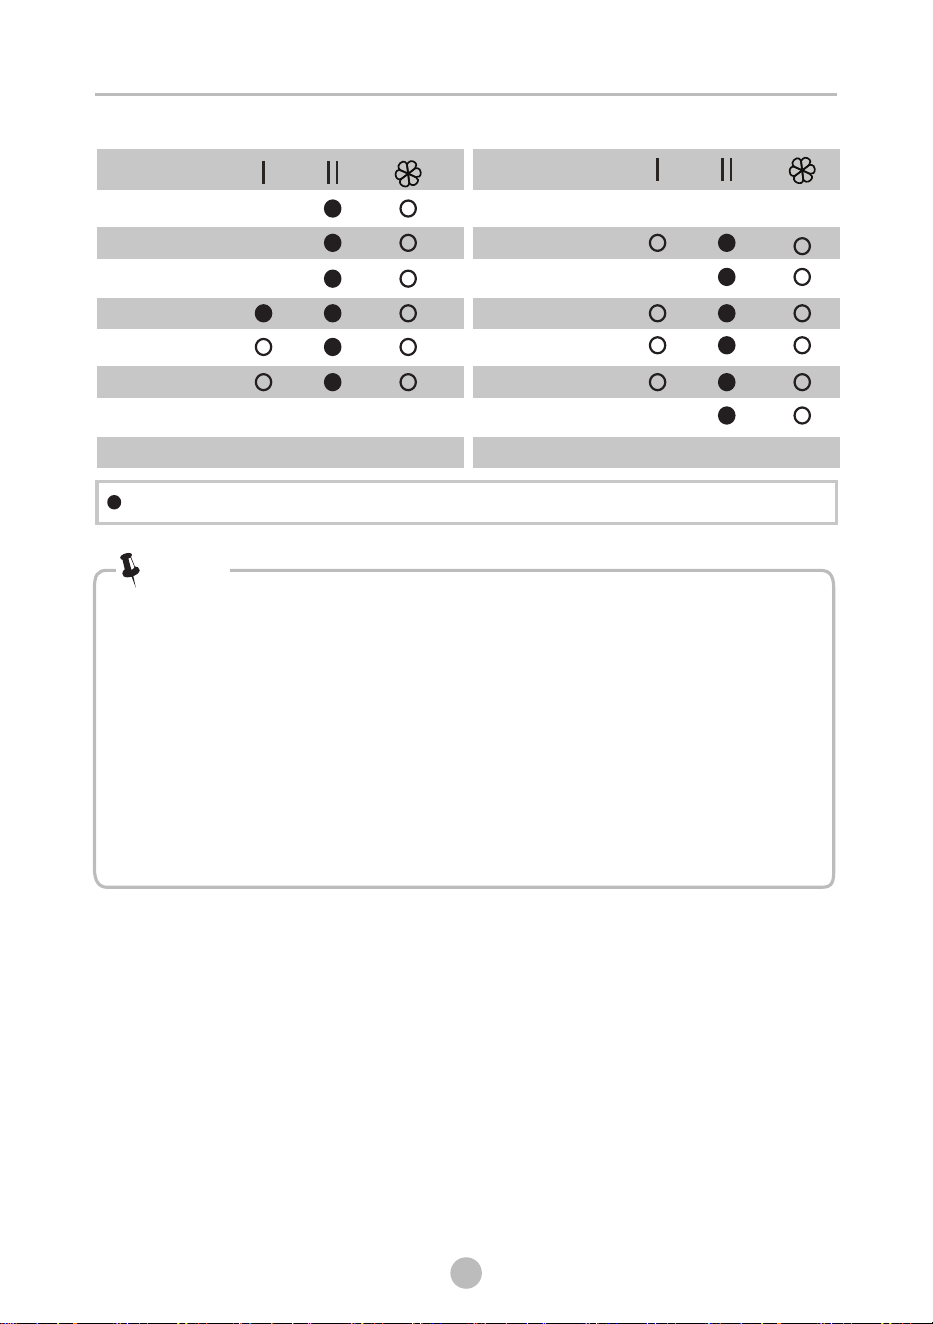
P rogram
E C O W as h
Delicate
S ilent
Antiallergic
Towel
S hoes
Auto c lean
S pin O nly
Default S peed( rpm) P rogram
Dry O nly
C otton
Duvet
Normal
J eans
S tain W ash
R apid
Default S peed( rpm)
800
800
800
600
800
----
1200
800
800
800
1200
800
1200
800
1200
800
1200
Temp.
Speed
Wash
OPERATION
Caution
• After Muting the buzzer function, the other control panel sounds will
be deactivated.
Caution

10
2 2
Dry
Press the Dry button continually to choose the dry level:
Extra Dry / Normal Dry (Normal) / Gentle Dry (Soft) / Time / Air Dry
Can be used when there are fewer clothes to be dried. The drying time
settings to choose from are as follows (in minutes):
30, 60, 120, 180 and actual time that will be displayed will show an
additional 10 minutes (for the default spinning time).
The corresponding drying capacity recommended per setting is as follows:
0.5kg , 1kg, 2kg, 3kg.
• Drying hints
- Clothes should be dried after spinning.
- To ensure proper drying, classify clothes according to fabric type
and the drying temperature.
- Be sure to set the proper drying time for synthetic fabrics/ textiles.
- if you want to iron clothes, set shorter drying time, to retain a
little moisture in your clothes
• Clothed not suitable for drying
- Particularly delicate items such as synthetic curtains, wool, silk, garments with
metal inserts, nylon stockings, bulky garments such as anoraks, bed covers, quilts,
sleeping bags and duvets must not be machine dried.
- Garments padded with foam-rubber or materials similar to foam-rubber must also not
be machine dried.
- Fabrics containing residues of setting lotions, hair sprays, nail solvents or similar
solutions must not be machine dried, in order to avoid the formation of harmful
vapors.
Time
Confirms selection of the Pre Wash, Extra Rinse, Extra Wash.
Option Confirm
Extra Dry: When you need to wear the clothes immediately after
drying is finished
Normal Dry: When clothes will be ironed and stored
Gentle Dry: For light clothes
Air Dry: Clothes are spun without heat, to remove peculiar smell
OPERATION
Note!

10
2 3
Programs
OPERATION
Programs are availanle according to the laundry type.
Program Descrip�on
ECO Wash
Uses room-temperature water, preserving original colors, saving
energy, and s�ll delivering great cleaning performance
Delicate
For light, washable tex�les such as silk, sa�n, synthe�c fiber, or
blended fabrics
Silent
In this program, the bu�on sound is deac�vated, thereby, allowing a
rela�vely more quiet opera�on, especially late at night.
An�-allergic
Uses 60
O
C water for steriliza�on and effec�vely kills some allergens
Towel Designed to effec�vely wash the thick fabric of towels
Shoes Can wash a pair of sneakers or other washable types of shoes
Auto-Clean
Cleans the inside and outside surfaces of the drum, with 90
O
C high-
temperature water and without clothes loaded. When the proper
amount of bleach is added, the cleaning effect will be be
�er. This
program may be done regularly or as needed.
Spin Only
May be used when an extra spin is needed or when spinning hand-
washed clothes or those from other washing machines. There are
several spin speeds to choose from.
Dry Only
For drying clothes that have just been spun. The drying �me is
automa�cally adjusted, based on the cloth load.
Co�on
For long-las�ng tex�les and heat-resistant tex�les made of co�on or
linen
Duvet Especially designed to wash duvet coats
Normal
For daily-washable clothes, this program has a long washing period
and a strong wash ac�on. Recommended for washing daily co�on
ar�cles such as bed sheets, quilt covers, pillow cases, underwear, etc.
Jeans Designed to effec�vely wash the thick and tough fabric of jeans
Stain Wash Removes most stains from various types of clothing
Rapid
You can choose between a 15-minute wash only program or a 59-
minute Wash and Dry (with heat) program.

2 4
Washing Program Table
• The parameter in this table are for user’s reference only. The actual
parameters maybe different with those in above mentioned table.
• The programs with the icon have the dry function option.
Note!
Default
Program
Washing/Drying
(kg)
Load
Default Time (H)
Temp.
( °C)
12.0
2.0/2.0
E C O W as h
Delicate
S ilent
Antiallergic
Towel
S hoes
Auto C lean
S pin O nly
Dry O nly
C otton
Duvet
Normal
J eans
S tain W ash
R apid
60
60
40
60
30
Cold
60
90
Cold
–
30
–
40
Cold
3.0
12.0/8.0
12.0
12.0/6.0
2.0
–
12.0
-/8.0
12.0/8.0
2.5
12.0/8.0
12.0/8.0
12.0/8.0
1.0/1.0
10.0
2.0/2.0
3.0
10.0/7.0
10.0
10.0/5.0
2.0
–
10.0
-/7.0
10.0/7.0
2.5
10.0/7.0
10.0/7.0
10.0/7.0
1.0/1.0
10.0
1200
2:44
2:10
2:50
1:48
1:45
0:50
1:18
0:12
–
1:04
1:30
2:45
1:27
0:58
0:59
60
1200
2:44
2:10
2:50
1:48
1:45
0:50
1:18
0:12
–
1:04
1:30
2:45
1:27
0:58
0:59
12.0
OPERATION
Cleaning and Care
10
2 5
MAINTENANCE
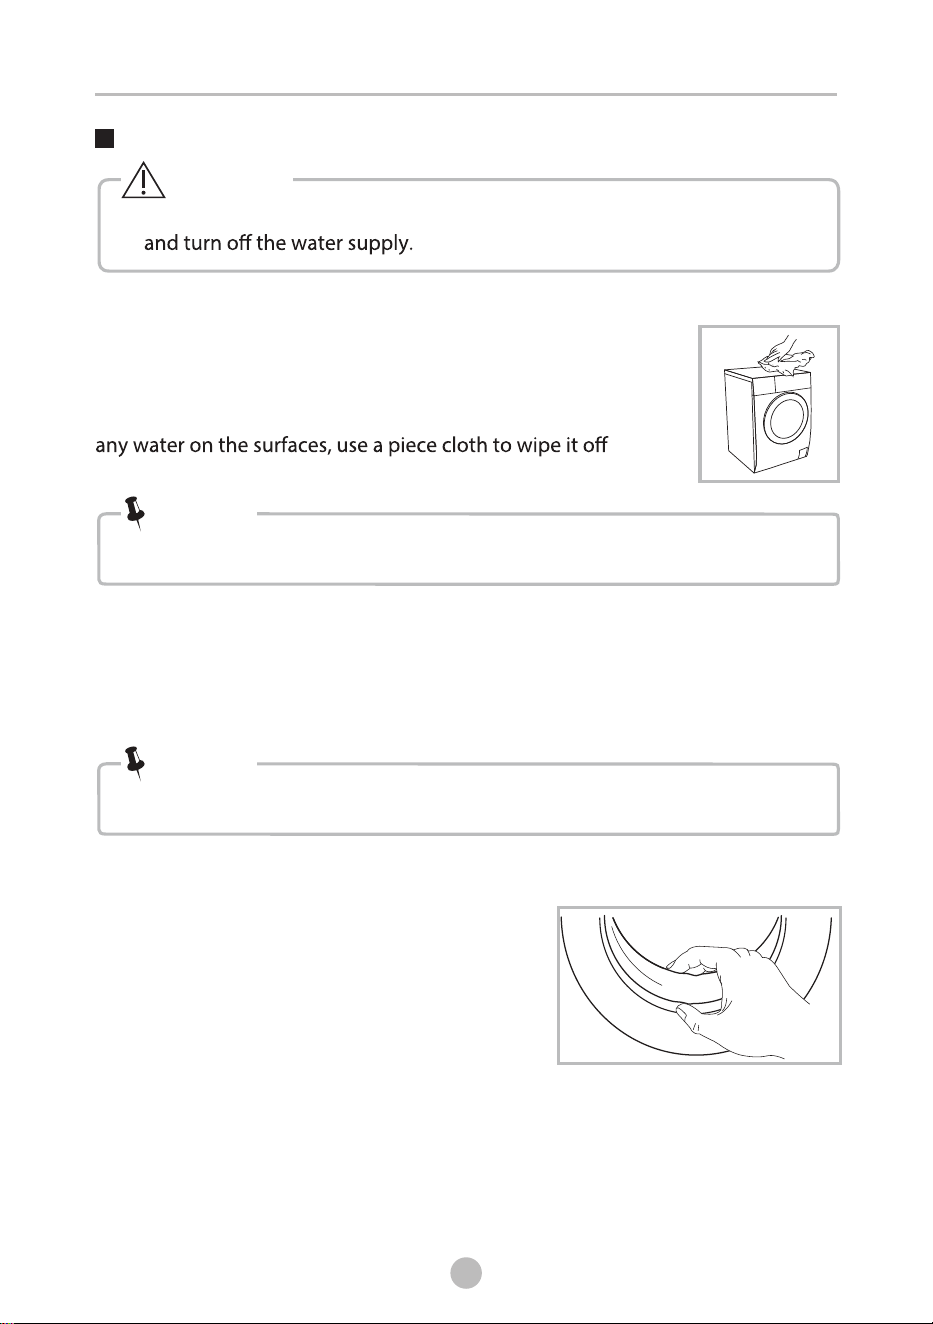
• Before proceeding with maintenance of the unit, disconnect the power plug
Proper maintenance on the washing machine can extend
its lifespan. The surface can be cleaned with diluted
non-abrasive neutral detergents when necessary. If there is
immediately. No sharp items are allowed to hit the cabinet.
Wipe the glass and door seal after each wash,
to remove lint and stains. If lint builds up, water
leak may occur. Remove any coins, buttons,
and other objects from the door seal after
each wash.
Rust (from metal articles) left inside the drum shall be removed immediately
with chlorine-free detergents.
Never use steel wool.
C leaning the Cabinet
Cleaning the Drum
• Don’t put laundry in the washing machine during the drum cleaning.
Cleaning the Door Seal And Glass
Note!
•
Formic acid and its diluted solvents or equivalent are forbidden.
Note!
Warning!

10
2 6
MAINTENANCE
Washing the filter at the faucet side
•
unit decreases.
Cleaning the Detergent Dispenser
Do not use alcohol,solvents or chemical products to clean the machine.•
A
Clean the dispenser
drawer with running
Clean the inside
recesses with an old
toothbrush
Pull out the dispenser
drawer and press at “A”.
water
Insert the dispenser
drawer.
1
2
3
4
Note!
Note!
1. Close the faucet.
2. Remove the water supply hose from
the faucet
4. Reconnect the water supply hose
1. Remove the inlet pipe from the back of
the machine
and reinstall it after washing.
4. Reconnect the inlet pipe.
1. Press down the arrow located on softener
cover inside the drawer.
2. Lift the clip, take out the detergent box
and wash all compartments with water.
3. Put back the softener cover and push the
drawer into position.
Cleaning the inlet filter

10
2 7
MAINTENANCE
Open the lower c over c ap
R otate 90°C and pull out
the emergency drain hos e,
and take o ff the hose c ap
Open the filter by turning
to the c ounter c lockwise
R emove e xtraneous m atter
1
2
3
C lose the l ower c over c ap
6
5
4
E mergency
drain hose
After water runs out,reset
the drain hose
•
•
•
•
•
Beware of hot water!
Allow detergent solution to cool down
Unplug the machine to avoid electrical shock before washing.
matter from the wash load.
Clean the lter periodically to ensure the normal operation of the
washing machine.
•
•
•
Make sure that the lower cover cap and the emergency drain hose are
reinstalled properly. The cap plates should be aligned with the hole
plates, to avoid water leak.
Some models do not have an emergency hose. Rotate the lower cover
cap directly, to make water run into a basin or similar container.
When the appliance is in use and depending on the program selected,
there can be hot water in the pump. Never remove the pump cover
cycle and is empty. When putting back the cover, ensure that it is
securely re-tightened, in order to prevent leaks and children from
opening it.
Cleaning the Drain Pump Filter
Caution
Warning!
10
2 8
MAINTENANCE
•
Note!
Description
Reason
Solution
R
Check if clothes are stuck.
Clean the outlet hose.
estart after the door is closed
Door is not closed properly.
Door cannot be Washer's safety protection
design is activated.
Disconnect the power.
PC board or wire harness
has connection problem.
Check if the power is shut
down and if the power plug
is connected correctly.
Check if the transport bolts
have been removed
Check if it is installed on a
solid and level
oor.
opened
Disconnect the power, restart
the product.
Water leakage
The connection between inlet
pipe or outlet hose is not tight.
Check and fasten water pipes.
Clean and wipe the deterg
ent
box.
Abnormal noise
Indicator or display
does not light up
Washing machine
cannot start
Detergent residues
in the dispenser
Detergent is damp or lumpy.
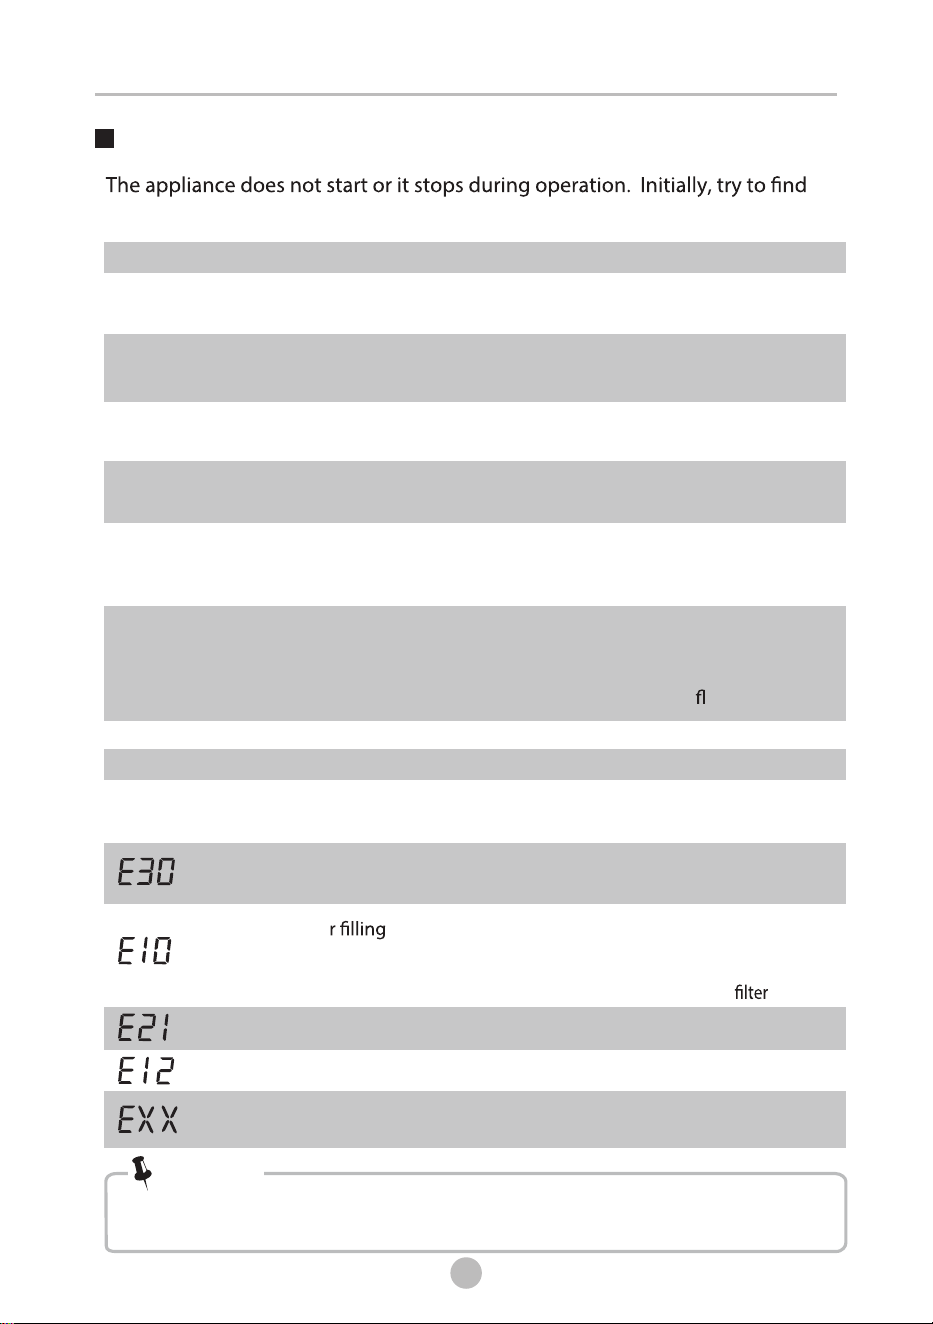
Alarm indication
Wate
problem during
washing
Reason
Solution
Check if the water pressure is
too low.
S
Check if the inlet valve is blocked.
traighten the water pipe.
Check if the drain hose is blocked.
Others
Water overflow
Restart the washer.
Restart after the door is closed
Check if the clothes is stuck
Door is not closed properly
a solution to the problem. If there is none, contact the service center.
Draining exceeds time limit.
Try to look for a solution again
then call for service if none is found
After checking, turn on the appliance. If the problem occurs again,
contact a service center.
Troubleshooting

10
2 9
S tandard Water Pressure
0 . 0 5 MP a~ 1MP a
H
W
D
MAINTENANCE
Technical Specifications
Maximum Current 10A
Model FP-92LFC120GMTH-W1 FP-92LFC100GMTH-W2
Power supply 220V~, 60Hz 220V~, 60Hz
Washing Capacity 12.0kg 10.0kg
Drying Capacity 8.0kg 7.0kg
Dimension ( W*D*H) mm 595*595*850 595*565*850
Weight 73kg 71kg
Rated Power 1800W 1800W
Drying Power 1200W 1200W
