OWNER'S MANUAL
FRIDGE & FREEZER
Before beginning installation, read these instructions
carefully. This will simplify installation and ensure that the
product is installed correctly and safely. Leave these
instructions near the product after installation for future
reference.
ENGLISH
MFL71728004
Rev.05_050925
www.lg.com
Copyright © 2022-2025 LG Electronics. All Rights Reserved

TABLE OF CONTENTS
This manual may contain images or
content that may be different from the
model you purchased.
This manual is subject to revision by the
manufacturer.
SAFETY INSTRUCTIONS
READ ALL INSTRUCTIONS BEFORE USE...........................................................4
WARNING............................................................................................................4
CAUTION ...........................................................................................................10
CARING FOR THE ENVIRONMENT..................................................................11
INSTALLATION
Before Installation ...........................................................................................14
Levelling the Appliance ...................................................................................14
Turning on the Power......................................................................................15
Moving the Appliance for Relocation ............................................................15
OPERATION
Before Use ........................................................................................................17
Product Features..............................................................................................20
Control Panel ....................................................................................................22
Water Dispenser...............................................................................................24
Icemaker ...........................................................................................................26
Door in Door .....................................................................................................27
Fridge Drawer...................................................................................................28
Door Basket ......................................................................................................28
Shelf ...................................................................................................................28
SMART FUNCTIONS
LG ThinQ Application.......................................................................................29
Smart Diagnosis ...............................................................................................30
MAINTENANCE
Cleaning ............................................................................................................32
Deodorizer ........................................................................................................33
TROUBLESHOOTING
Before Calling for Service................................................................................34

4
SAFETY INSTRUCTIONS
SAFETY INSTRUCTIONS
READ ALL INSTRUCTIONS BEFORE USE
The following safety guidelines are intended to prevent unforeseen
risks or damage from unsafe or incorrect operation of the appliance.
The guidelines are separated into ‘WARNING’ and ‘CAUTION’ as
described below.
Safety Messages
WARNING
WARNING
• To reduce the risk of explosion, fire, death, electric shock, injury or
scalding to persons when using this product, follow basic
precautions, including the following:
Technical Safety
• This appliance is not intended for use by persons (including children)
with reduced physical, sensory or mental capabilities, or lack of
experience and knowledge, unless they have been given supervision
or instruction concerning use of the appliance by a person
This symbol is displayed to indicate matters and operations
that can cause risk. Read the part with this symbol carefully
and follow the instructions in order to avoid risk.
WARNING
This indicates that the failure to follow the instructions can
cause serious injury or death.
CAUTION
This indicates that the failure to follow the instructions can
cause the minor injury or damage to the product.
5
SAFETY INSTRUCTIONS
ENGLISH
responsible for their safety. Children should be supervised to ensure
that they do not play with the appliance.
• This appliance is intended to be used in household and similar
applications such as:
- staff kitchen areas in shops, offices and other working
environments;
- farm houses and by clients in hotels, motels and other residential
type environments;
- bed and breakfast type environments;
- catering and similar non-retail applications.
• This appliance is not for use in portable or mobile installations, such
as marine or RV uses, where it will be in motion while operating.
•
• This appliance contains a small amount of isobutane refrigerant
(R600a), but it is also combustible. When transporting and installing
the appliance, care should be taken to ensure that no parts of the
refrigerating circuit are damaged.
• The refrigerant and insulation blowing gas used in the appliance
require special disposal procedures. Consult with service agent or a
similarly qualified person before disposing of them.
• Do not damage the refrigerant circuit.
• If the power cord is damaged or the hole of the outlet socket is loose,
it must be replaced. Do not use the power cord and contact an
authorized service centre in order to avoid a hazard.
• Do not locate multiple portable socket-outlets or portable power
supplies at the rear of the appliance.
• Securely plug the power plug in the outlet socket after completely
removing any moisture and dust.
• Never unplug the appliance from the power supply by pulling on the
power cable. Always grip the power plug firmly and pull straight out
from the outlet socket.
This symbol alerts you to flammable materials that can
ignite and cause a fire if you do not take care.

6
SAFETY INSTRUCTIONS
• Keep ventilation openings, in the appliance enclosure or in the built-
in structure, clear of obstruction.
• Do not store explosive substances such as aerosol cans with a
flammable propellant in this appliance.
• Do not tilt the appliance to pull or push it when transporting.
• When positioning the appliance, ensure the supply cord is not
trapped or damaged.
• Do not use mechanical devices or other means to accelerate the
defrosting process.
• Do not use a hair drier to dry the inside of the appliance or place a
candle inside to remove the odours.
• Do not use electrical appliances inside the food storage
compartments of the appliance, unless they are of the type
recommended by the manufacturer.
• Make sure not to get a body part such as a hand or foot stuck while
moving the appliance.
• Disconnect the power cord before cleaning the appliance interior or
exterior.
• Do not spray water or inflammable substances (toothpaste, alcohol,
thinner, benzene, flammable liquid, abrasive, etc.) over the interior or
exterior of the appliance to clean it.
• Do not clean the appliance with brushes, cloths or sponges with
rough surfaces or which are made of metallic material.
• Only qualified service personnel from LG Electronics service centre
should disassemble or repair the appliance.
Risk of Fire and Flammable Materials
• If a leak is detected, avoid any naked flames or potential sources of
ignition and air the room in which the appliance is standing for
several minutes. In order to avoid the creation of a flammable gas air
mixture if a leak in the refrigerating circuit occurs, the size of the
room in which the appliance is used should correspond to the
amount of refrigerant used. The room must be 1 m² in size for every
8 g of R600a refrigerant inside the appliance.

7
SAFETY INSTRUCTIONS
ENGLISH
• Refrigerant leaking out of the pipes could ignite or cause an
explosion.
• The amount of refrigerant in your particular appliance is shown on
the identification plate inside the appliance.
Installation
• This appliance should only be transported by two or more people
holding the appliance securely.
• Install the appliance on a firm and level floor.
• Do not install the appliance in a damp and dusty place. Do not install
or store the appliance in any outdoor area, or any area that is subject
to weathering conditions such as direct sunlight, wind, rain, or
temperatures below freezing.
• Do not place the appliance in direct sunlight or expose it to the heat
from heating appliances such as stoves or heaters.
• Be careful not to expose the rear of the appliance when installing.
• Install the appliance in a place where it is easy to unplug the power
plug of the appliance.
• Be careful not to let the appliance door fall during assembly or
disassembly.
• Be careful not to pinch, crush, or damage the power cable during
assembly or disassembly of the appliance door.
• Be careful not to point the power plug up or let the appliance lean
against the power plug.
• Do not modify or extend the power cable.
• Ensure that the outlet socket is properly grounded, and that the earth
pin on the power cord is not damaged or removed from the power
plug. For more details on grounding, inquire at an LG Electronics
customer information centre.
• This appliance is equipped with a power cord having an equipment-
grounding conductor and a grounding power plug. The power plug
must be plugged into an appropriate outlet socket that is installed
and grounded in accordance with all local codes and ordinances.

8
SAFETY INSTRUCTIONS
• Never start up an appliance showing any signs of damage. If in doubt,
consult your dealer.
• Dispose of all packaging materials (such as plastic bags and
styrofoam) away from children. The packaging materials can cause
suffocation.
• Do not plug the appliance into a multi socket adapter which does not
have a power cable (mounted).
• The appliance should be connected to a dedicated power line which
is separately fused.
• Do not use a multi-socket outlet which is not properly grounded
(portable). It must comply with the technical specifications of the
appliance and may only be used for the appliance.
Operation
• Do not use the appliance for any purpose (storage of medical or
experimental materials or shipping) other than any domestic
household food storage use.
• If water penetrates electrical parts of the appliance, disconnect
power plug and contact an LG Electronics customer information
centre.
• Unplug the power plug during a severe thunderstorm or lightening
or when not in use for a long period of time.
• Do not touch the power plug or the appliance controls with wet
hands.
• Do not bend the power cable excessively or place a heavy object on it.
• Immediately unplug the power plug and contact an LG Electronics
customer information centre if you detect a strange sound, odour, or
smoke coming from the appliance.
• Do not place hands or metallic objects inside the area emitting the
cold air, cover or heat releasing grille on the back.
• Do not apply excessive force or impact to the back cover of the
appliance.
• Be careful of nearby children when you open or close the appliance
door. The door may bump the child and cause injury.

9
SAFETY INSTRUCTIONS
ENGLISH
• Avoid the danger of children getting trapped inside the appliance. A
child trapped inside the appliance can cause suffocation.
• Do not put animals, such as pets into the appliance.
• Do not place heavy or fragile objects, containers filled with liquid,
combustible substances, flammable objects (such as candles, lamps,
etc.), or heating devices (such as stoves, heaters, etc.) on the
appliance.
• Do not place any electronic appliance (such as heater and mobile
phone) inside the appliance.
• If there is a gas leakage (isobutane, propane, natural gas, etc.), do not
touch the appliance or power plug and ventilate the area
immediately. This appliance uses a refrigerant gas (isobutane,
R600a). Although it uses a small amount of the gas, it is still
combustible gas. Gas leakage during appliance transport, installation
or operation can cause fire, explosion or injury if sparks are caused.
• Do not use or store flammable or combustible substances (ether,
benzene, alcohol, chemical, LPG, combustible spray, insecticide, air
freshener, cosmetics, etc.) near the appliance.
• This appliance incorporates an earth connection for functional
purposes.
• Connect to potable water supply only.
- If connected to a water supply, connect to a potable water supply
only.
• Fill with potable water only.
- If using an icemaker or dispenser water tank, make sure to fill it with
potable water only.
Disposal
• When discarding the appliance, remove the door gasket while leaving
the shelves and baskets in place and keep children away from the
appliance.
10
SAFETY INSTRUCTIONS
CAUTION
CAUTION
• To reduce the risk of minor injury to persons, malfunction, or damage
to the product or property when using this product, follow basic
precautions, including the following:
Installation
• After unpacking, check the appliance for any damage that may have
occurred during transit.
• Wait for at least 3 to 4 hours in order to ensure the refrigerant circuit
is fully efficient.
• Move the appliance carefully on sensitive floors to avoid damage to
the floor.
Operation
• Do not touch frozen food or the metal parts in the freezer
compartment with wet or damp hands. It may cause frostbite.
• Do not place glass containers, bottles or cans (especially those
containing carbonated drinks) in the freezer compartment, shelves or
ice bucket that will be exposed to temperatures below freezing.
Contents may expand when frozen, break the container and cause
injury.
• The tempered glass on the front side of the appliance door or the
shelves can be damaged by an impact. If it is broken, do not touch it
with hands.
• Do not hang from the appliance doors, storage room, shelf or climb
up into it.
• Do not store an excessive amount of water bottles or containers for
side dishes on the door baskets.
• Do not open or close the appliance door with excessive force.
• If the hinge of the appliance door is damaged or operates
improperly, stop using the appliance and contact an authorized
service centre.

11
SAFETY INSTRUCTIONS
ENGLISH
• Prevent animals from nibbling on the power cable or water hose.
• Never eat frozen foods immediately after they have been taken out in
the freezer compartment. There is a risk of freezing or the formation
of frost blisters. FIRST AID: Immediately hold it under cold running
water. Do not pull it away.
• Make sure not to get a hand or foot stuck upon opening or closing the
appliance door or door in door.
Maintenance
• This appliance is equipped with maintenance-free LED interior light.
Do not remove cover or LED lamp in any attempt to repair or change
it. Contact an LG Electronics customer information centre.
• Do not clean glass shelves or covers with warm water when they are
cold. They may shatter if exposed to sudden temperature changes.
• Do not insert the shelves upside down. The shelves may fall.
• If ice forms in the freezer compartment, please contact LG Electronics
customer service. Do not use sharp-edged objects to remove any
frost or ice build-up. Do not use sprays, electric heating devices such
as fan heaters, hair dryers, steam cleaners or other heat sources for
defrosting. Plastic parts could deform.
• Dispose of the ice inside the ice bucket in the freezer compartment
during an extended power outage.
CARING FOR THE ENVIRONMENT
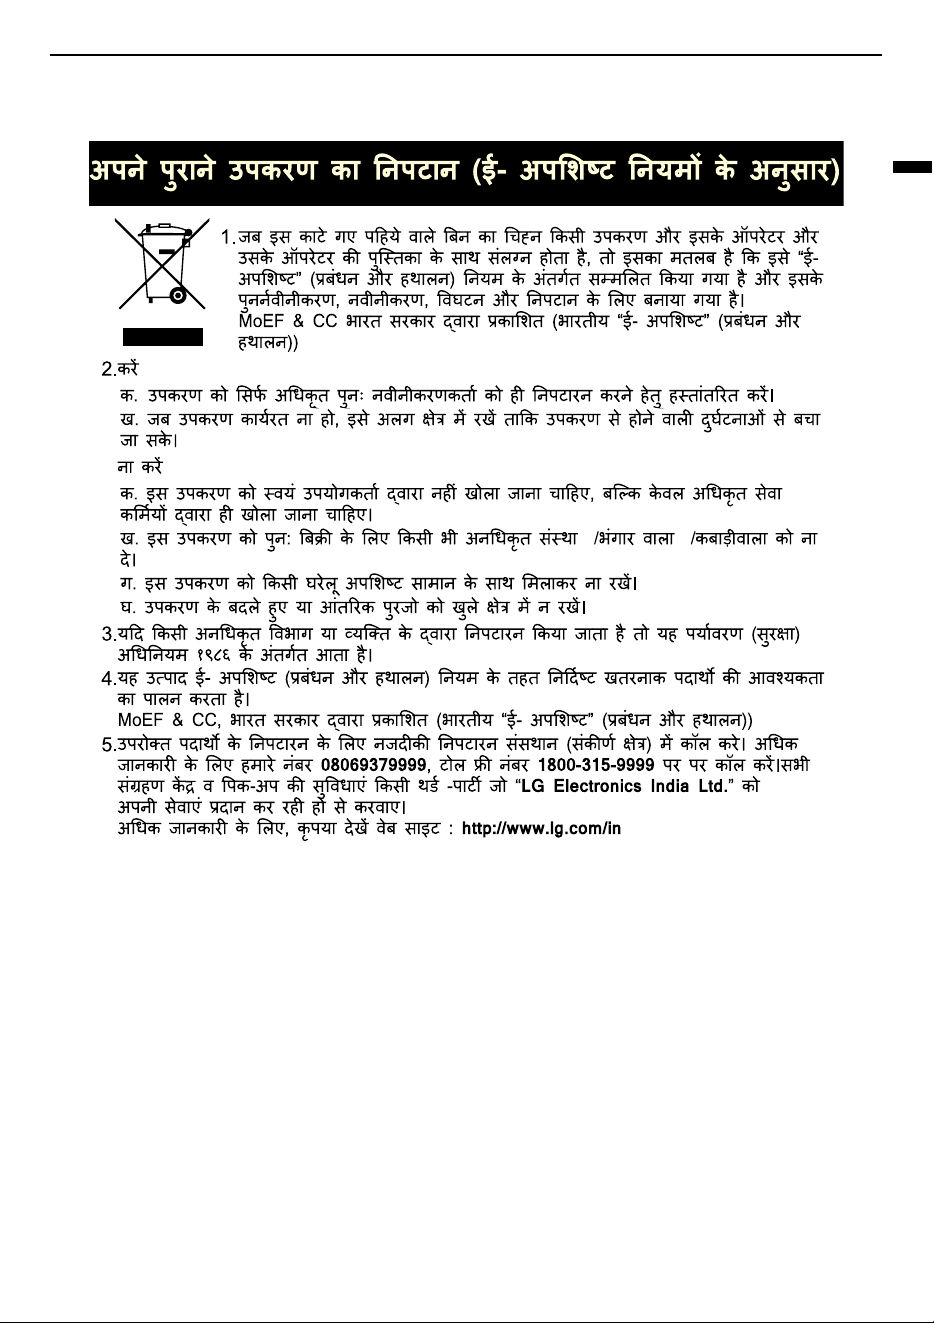
Disposal of Your Old Appliance (as per e-waste Rules)
2. Do's
1. When this crossed out wheeled bin symbol is depicted on
the product and its operator’s manual, it means the product
is covered by E-Waste Management Rules India published
by MoEF & CC , Govt. of India and are meant to be recycled,
dismantled, refurbished or disposed off.

12
SAFETY INSTRUCTIONS
• a. The product is required to be handed over only to the authorized
recycler for disposal.
• b. Keep the product in isolated area, after it becomes non-functional/
unrepairable so as to prevent its accidental breakage.
Don'ts
• a. The product should not be opened by the user himself/herself, but
only by authorized service personnel.
• b. The product is not meant for re-sale to any unauthorized agencies/
scrap dealer/kabariwalah.
• c. The product is not meant for mixing into household waste stream.
• d. Do not keep any replaced spare part(s) from the product in
exposed area.
3. Any disposal through unauthorized agencies/person will attract
action under Environment (Protection) Act 1986.
4. Hazards of improper handling or accidental breakage :
• a. The refrigerant (R134a) used, if overexposed, might cause dizziness
and loss of concentration. Liquid contact can cause irritation and
frostbite. The refrigerant (R600a), squirting out of the pipes could
ignite or cause eye injury.
• b. The blowing agent cyclopentane is highly flammable liquid and
vapor. Harmful to aquatic life. Contact with liquid may cause cold
burns/frost bites. Repeated exposure causes skin dryness.
5. This product is complied with the requirement of Hazardous
Substances as specified under E-Waste Management Rules India
published by MoEF & CC , Govt. of India.
6. To locate a nearest collection centre or call for pick-up (limited area
only) for disposal of this appliance, please contact No. 08069379999
,
Toll Free No. 1800-315-9999 for details. All collection centre and pick up
facilities are done by third parties with LG Electronics India Ltd. Merely
as a facilitator. For more detailed information, please visit : http://
www.lg.com/in.
13
SAFETY INSTRUCTIONS
ENGLISH
14
INSTALLATION
INSTALLATION
Before Installation
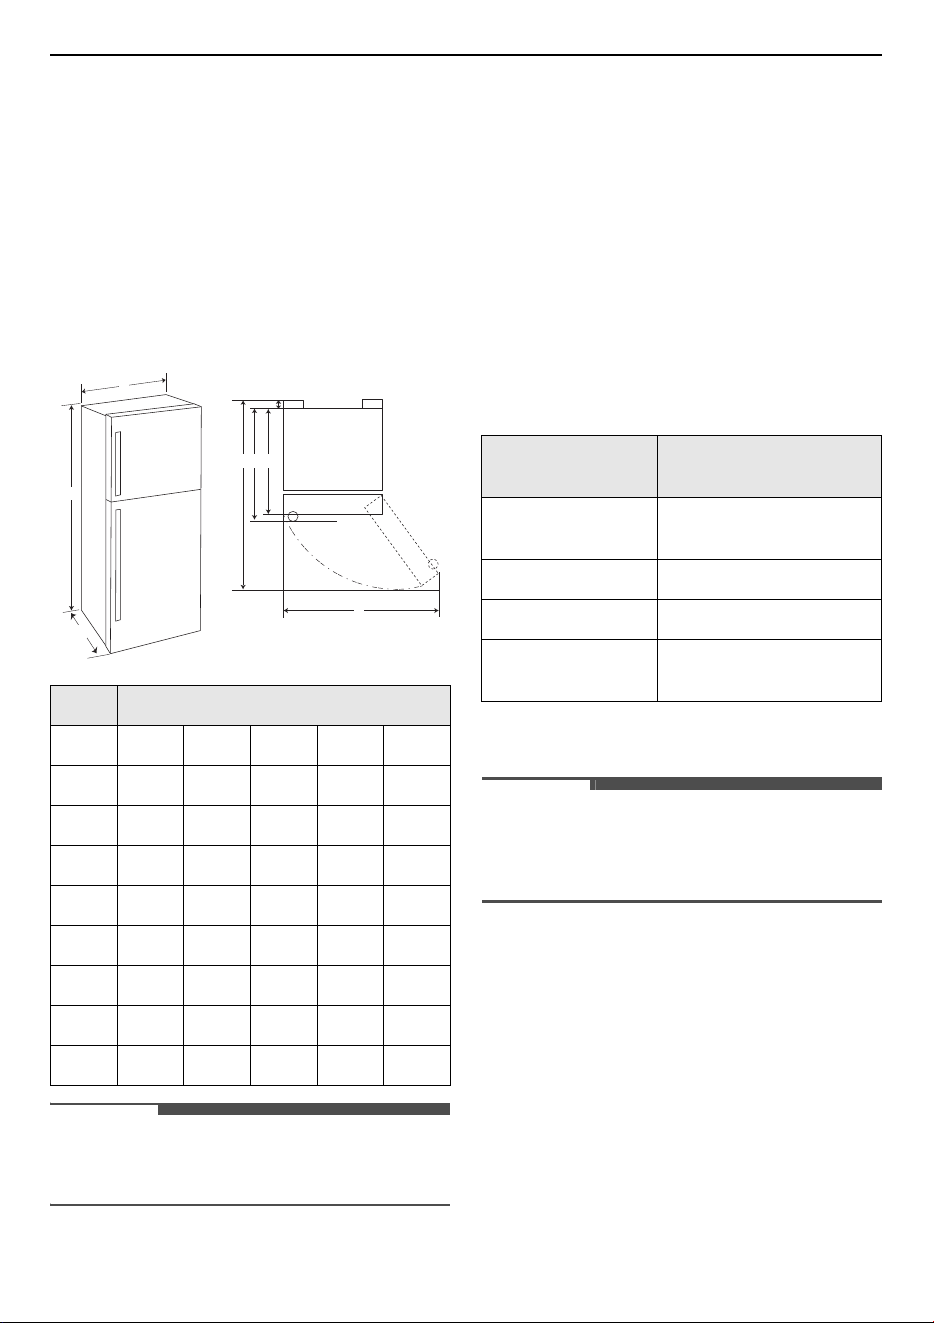
Dimensions and Clearances
Too small of a distance from adjacent items may
result in the degradation of freezing capability and
increased electricity costs. Allow over 50 mm of
clearance between the back of the appliance and
the wall when installing the appliance.
NOTE
• You can determine what type of appliance it is by
looking at the label inside the appliance.
Ambient Temperature
• The appliance is designed to operate within a
limited range of ambient temperatures,
depending on the climate zone.
• The internal temperatures could be affected by
the location of the appliance, the ambient
temperature, the frequency of door opening and
so on.
• The climate class can be found on the rating
label.
* Australia, India, Kenya
** Argentina
NOTE
• The appliances rated from SN to T are intended
to be used at an ambient temperature between
10 ºC and 43 ºC.
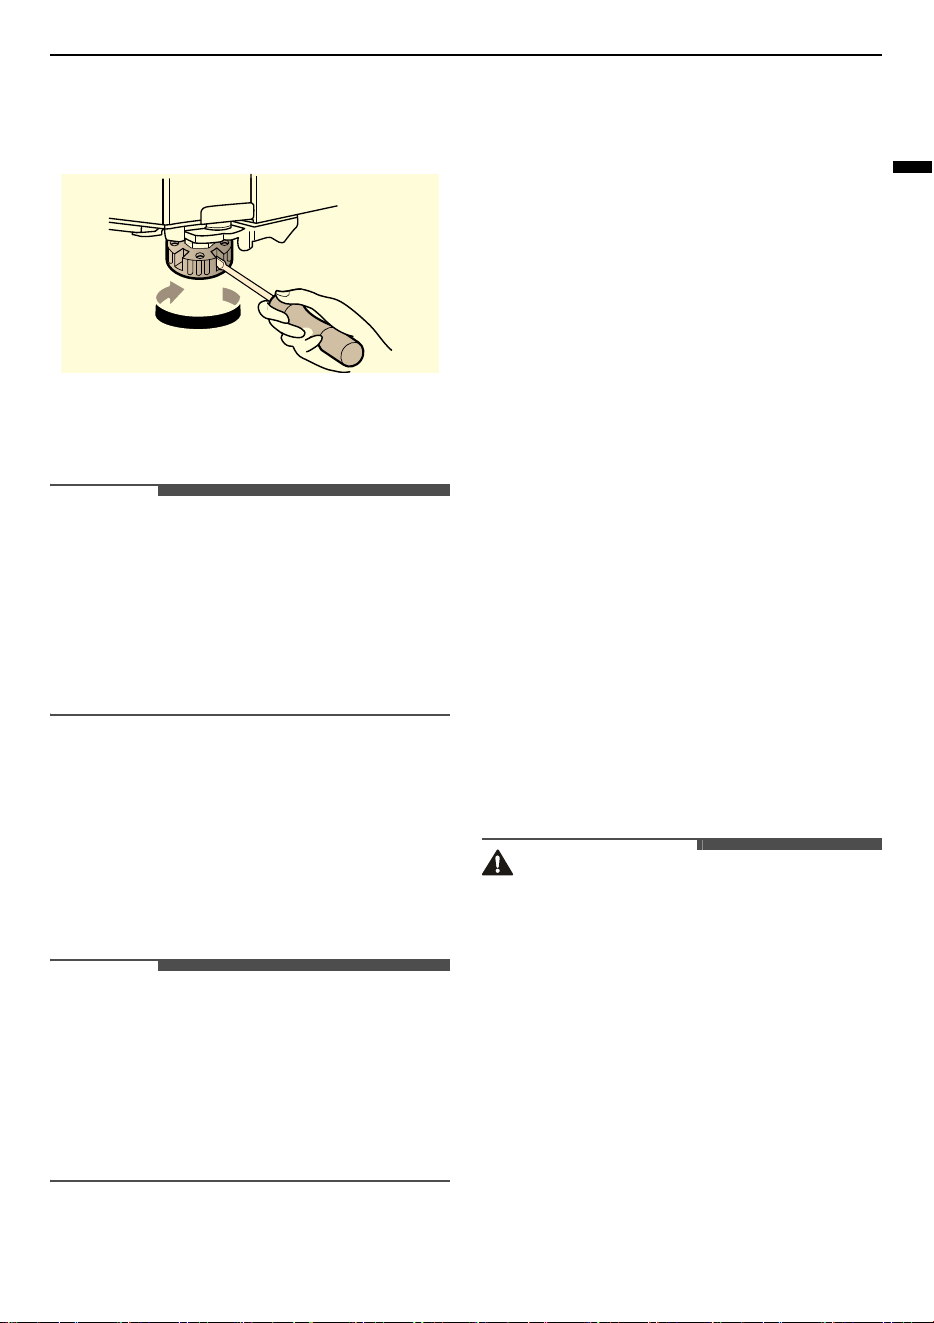
Levelling the Appliance
Adjusting the Levelling Leg
If the appliance seems unsteady, or the doors do
not close easily, adjust the appliance’s tilt using the
instructions below.
- Type (mm)
-abcde
A 780 780 780 700 700
B 1800 1800 1720 1680 1680
C 730 700 730 730 700
D 2727272727
E 673 673 673 673 673
F 703 - 703 703 -
G 1420 1420 1420 1340 1340
H 1390 1340 1390 1250 1210
A
C
EFG
B
D
H
Climate Class
Ambient Temperature
Range ºC
SN (Extended
Temperate)
+10 - +32
N (Temperate) +16 - +32
ST (Subtropical) +16 - +38 / +18 - +38**
T (Tropical) +10 - +43* / +16 - +43 /
+18 - +43**
15
INSTALLATION
ENGLISH
1
Turn the levelling leg clockwise to raise that
side of the appliance or counterclockwise to
lower it.
2
Open the doors and check to make sure that
they close easily.
NOTE
• Leveling the doors may not be possible when the
floor is not leveled, or is of weak or poor
construction.
• The refrigerator is heavy and should be installed
on a rigid and solid surface.
• Some timber flooring may cause levelling
difficulties if it flexes excessively.
Turning on the Power
Connecting the Appliance
To turn on the appliance, connect the power plug
into the outlet socket. Do not double up with other
appliances on the same outlet.
NOTE
• After connecting the power supply cord (or plug)
to the outlet, wait enough time before you put
food into the appliance. If you add food before
the appliance has cooled completely, your food
may spoil.
• To turn off the appliance, disconnect the power
plug from the outlet socket.
Moving the Appliance for
Relocation
Moving the Appliance
1
Remove all food from inside the appliance.
2
Fix the power plug.
• Models with a power plug hook:
Pull the power plug out, insert and fix it into
the power plug hook at the rear or on top of
the appliance.
• Models without a power plug hook:
Pull the power plug out and fix the power
supply cable with a tape to the side of the
appliance where the power socket is located
at the installation site.
3
Tape parts such as shelves and the door handle
to prevent from falling off while moving the
appliance.
4
Move the appliance with more than two people
carefully. When transporting the appliance
over a long distance, keep the appliance
upright.
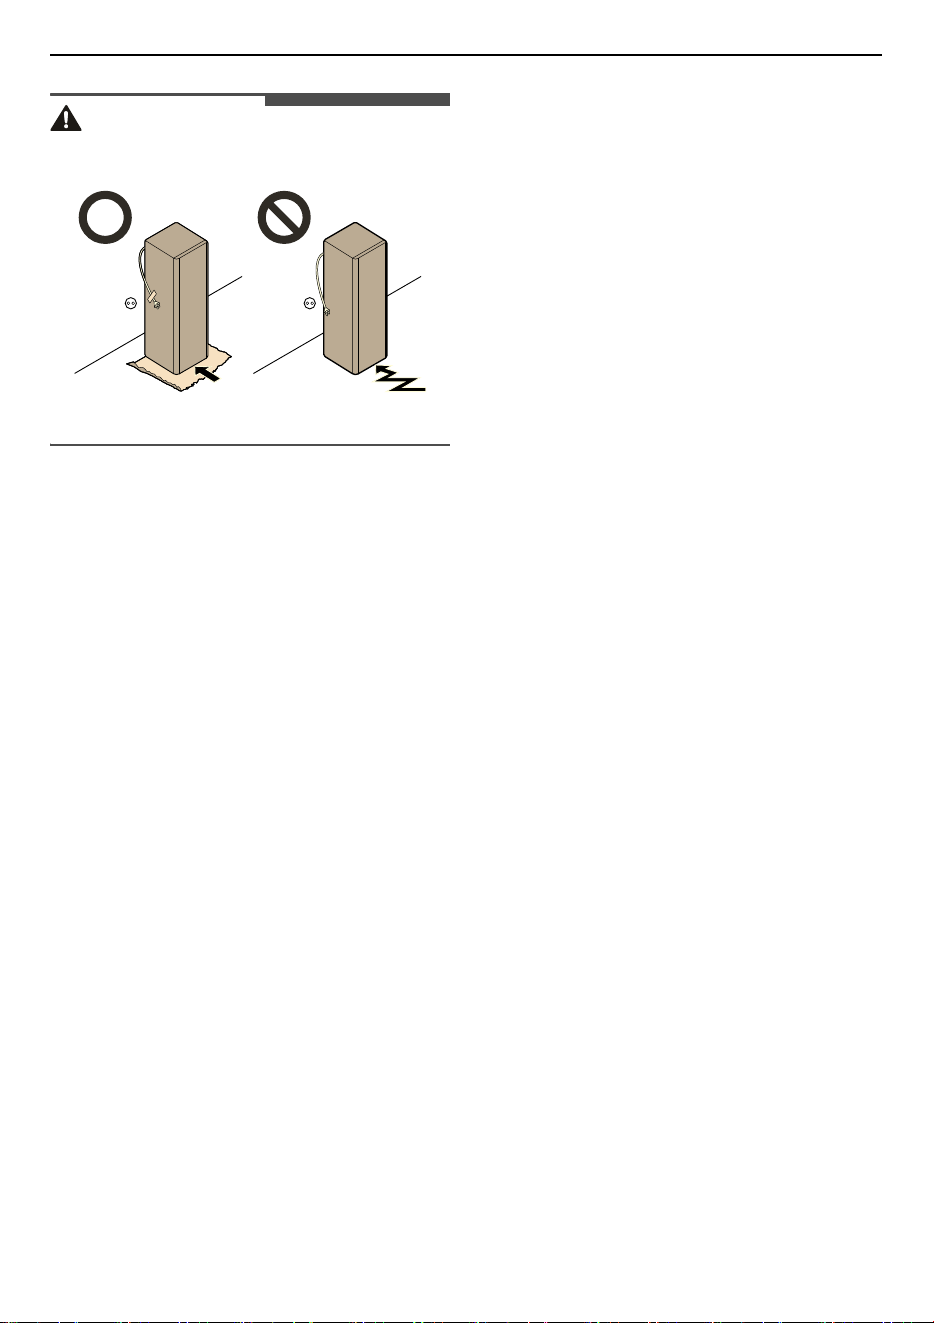
CAUTION
• Move the appliance carefully on sensitive floors
to avoid damage to the floor.
- Use cardboard, floor mat or carpet to prevent
scratches on the floor when installing or
moving the appliance.
16
INSTALLATION
CAUTION
- Do not move the appliance in zigzags.
5
After installing the appliance, connect the
power plug into a mains outlet socket and
switch it on.

17
OPERATION
ENGLISH
OPERATION
Before Use
Notes for Operation
• Before placing food in the appliance, clean the
inside and outside of the appliance with warm
water and a mild washing-up liquid to remove
manufacturing residues.
• Users should keep in mind that frost can form if
the door is not closed completely or if the
humidity is high during the summer.
• Ensure there is sufficient space between food
stored on the shelf or door basket to allow the
door to close completely.
• Opening the door for long periods can cause a
significant increase of the temperature in the
compartments of the appliance.
• If the refrigerating appliance is left empty for
long periods, switch off, defrost, clean, dry, and
leave the door open to prevent mould
developing within the appliance.
• Note that a temperature rise after defrosting has
a permissible range in the appliance
specifications. If you wish to minimise the impact
on the food storage due to a temperature rise,
seal or wrap the stored food in several layers.
Door Open Alarm
This feature is only available on some models.
The alarm sounds if the door is left open or not
completely closed.
NOTE
• Contact the LG Electronics customer information
centre if the alarm sound continues even after
closing all doors.
Failure Detection
The appliance can automatically detect problems
during the operation.
NOTE
• If a problem is detected, the appliance may not
operate and an error code is displayed even
when any button is pressed.
• If an error code is indicated on the display, do
not turn off the power. Immediately contact the
LG Electronics customer information centre and
report the error code. If you turn off the power,
the repair technician from the our information
centre may have difficulty finding the problem.
Suggestion for Energy Saving
• For the most efficient use of energy, keep all
inner parts (e.g. door bins, drawers and shelves)
on their original location. Altering their positions
may result in less efficient energy consumption
or performance.
• Ensure there is sufficient space between stored
foods. This allows cold air to be circulated evenly
and lowers electricity bills.
• Store hot food only after it has cooled in order to
prevent dew or frost.
• When storing food in the freezer compartment,
set the freezer temperature lower than the
temperature indicated on the food.
• Do not set the temperature of the appliance
lower than needed.
• Do not put food near the temperature sensor of
the fridge compartment. Keep a distance of at
least 3 cm from the sensor.
Storing Foods Effectively
• Food may freeze or spoil if stored at the wrong
temperature. Set the refrigerator to the correct
temperature for the food being stored.
• Store frozen food or refrigerated food inside
sealed containers.
• Check the expiration date and label (storage
instructions) before storing food in the
appliance.

18
OPERATION
• Do not store food for a long period of time if it
spoils easily at a low temperature.
• Do not place unfrozen food in direct contact with
food that is already frozen. Do not store
excessive amounts of fresh food.
• Freeze food in portion-sized quantities for faster
freezing, easier thawing and processing.
• Place the refrigerated food or frozen food in
each fridge or freezer compartment
immediately after purchasing.
• Store raw meat and fish in suitable containers in
the refrigerator, so that it is not in contact with or
drip onto other food.
• Refrigerated foods and other food items can be
stored on top of the vegetable drawer.
• Avoid refreezing any food which has been
completely thawed. Freezing any food which has
been completely thawed again will lower its taste
and nutrition.
- Only take out the amount of food that you
need. Consume thawed food quickly. It can
only be refrozen after being cooked.
• Cool hot food before storing. If too much hot
food is placed inside, the internal temperature of
the appliance can increase and negatively affect
other foods stored in the appliance.
• Do not overfill the appliance. Cold air can not
circulate properly if the appliance is overfilled.
• If you set an excessively low temperature for
food, it may become frozen. Do not set a
temperature lower than the required
temperature for the food to be stored correctly.
• If there are chill compartments in the appliance,
do not store vegetables and fruits with higher
moisture content in the chill compartments as
they may freeze due to the lower temperature.
• Always follow the food manufacturer's
instructions on the permissible storage duration
of frozen food. Do not exceed the recommended
storage time of food.
- Mark the storage date, permissible storage
duration, and the food name on the packaging
to prevent it from exceeding the storage time
limit.
• In the event of a blackout, call the electricity
company and ask how long it is going to last.
- You should avoid door openings while the
power is off.
- When the power supply gets back to normal,
check the condition of the food.
- If the power outage lasts longer, especially
during the summer months, please follow
these guidelines:
- Do not place additional food into the
appliance during the power outage.
- If the power outage is announced and is
expected to last for more than 10 hours,
prepare some ice and put it in a container on
the top shelf of the fridge.
- Due to the temperature increase in the
appliance during a power outage or other
malfunction, the shelf life of the food will be
reduced and its quality will decrease. If
necessary, process thawed food and freeze it
again in the cooked state.
Maximum Freezing Capacity
• For maximum freezing capacity, set the freezer
temperature to the coldest temperature setting.
•
Express Freeze
function will allow the freezer to
reach its maximum freezing capacity. This
generally takes up to 24 hours and automatically
switches off.
•
Express Freeze
must be switched on for 2 hours
before fresh products are placed in the freezer
compartment.
• To freeze food items quickly, store the food in
the center of lower compartment. Food items
will freeze most quickly in the zone.
• To get better air circulation, insert all inner parts
like baskets, drawers, and shelves.
Freezing the Maximum Amount
of Food
If large quantities of food are to be stored, the
icemaker should be taken out of the appliance and
the food should be stacked directly on the freezer
shelves in the freezer compartment.

19
OPERATION
ENGLISH
NOTE
• Insert the icemaker in the right position.
Two Star Compartment
This feature is only available on some models.
• Two star (
a
) basket or drawer can be used to
store ice and food from -12 °C to -18 °C for short
periods.
• Two star frozen food compartments are suitable
for storing pre-frozen food, storing or making
icecream and making ice cubes.
• Two star compartments are not suitable for the
freezing of fresh food.
• The number of freezer door baskets and freezer
drawers with two star sections may vary
depending on the model purchased.
20
OPERATION
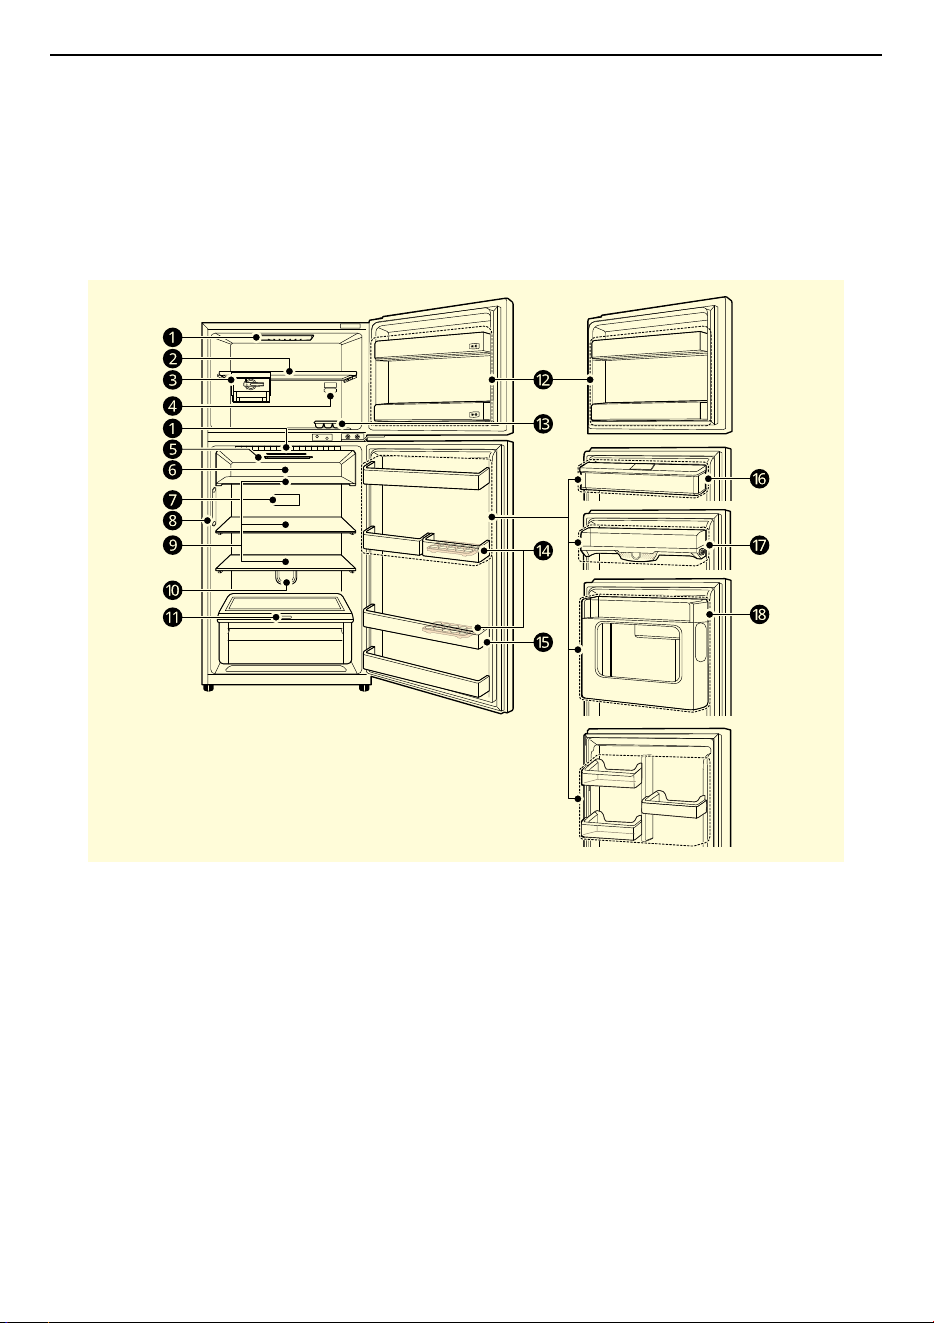
Product Features
The appearance or components of the appliance may differ from model to model.
Interior (Two Star
a
)
*1 This feature is only available on some models.
a
LED Lamp
*1
The LED lamps inside the appliance light up when you open the door.
b
Freezer Shelf
This is where frozen foods such as meat, fish, and icecream can be stored.
c
Moving Icemaker
*1
This is where ice is manually produced and stored.
• You can slide the icemaker along the shelf from side to side to any desired position.
d
Freezer Temperature Controller
This controller regulates the air flow to the freezer compartment by setting it to a suitable balance.
e
Deodorizer
*1
Deodorizes the fresh food compartment without harming the food.
f
Fresh Room Drawer / Pull Out Tray
*1

21
OPERATION
ENGLISH
This is where food items are stored at a colder temperature than the regular fridge area.
g
Fridge Temperature Control Panel
*1
This is where you can set the fridge temperature.
h
Door Cooling
*1
This is where cold air comes out to keep the fridge door basket cool.
i
Fridge Shelf
This is where refrigerated foods and other items are stored.
• Store the foods with higher moisture content at the front of the shelf.
• The shelf height can be adjusted by inserting the shelf in another groove of different height.
• The actual number of shelves may differ from model to model.
j
Air Filter
*1
Reduces odours inside the fridge compartment.
k
Fresh Vegetable Drawer
This is where fruits and vegetables are stored to help maintain freshness by adjusting the humidity
controller.
l
Freezer Door Basket
This is where small packaged frozen food or frequently used foods can be stored.
NOTE
• The number of freezer door baskets with two star section may vary depending on model purchased.
m
Ice Tray
*1
This is where ice is manually produced.
n
Movable Egg Tray
This is where eggs are stored.
• You can move it to and use it at a desired position as needed. However, do not use it as the ice bin or
place it on the shelf on top of the fridge or the vegetables drawer.
o
Fridge Door Basket
This is where small packages of refrigerated foods, drinks and sauce containers are stored.
NOTE
• The number of fridge door baskets may vary depending on model purchased.
p
Water Tank
*1
This is where water is stored to supply the dispenser.
q
Fridge Door Air Duct
*1
The cold air which comes from door cooling compartment is directly delivered to the fridge door basket.
r
Door in Door Compartment
*1
This is where foods which are taken out frequently such as beverages and snacks are stored.
22
OPERATION
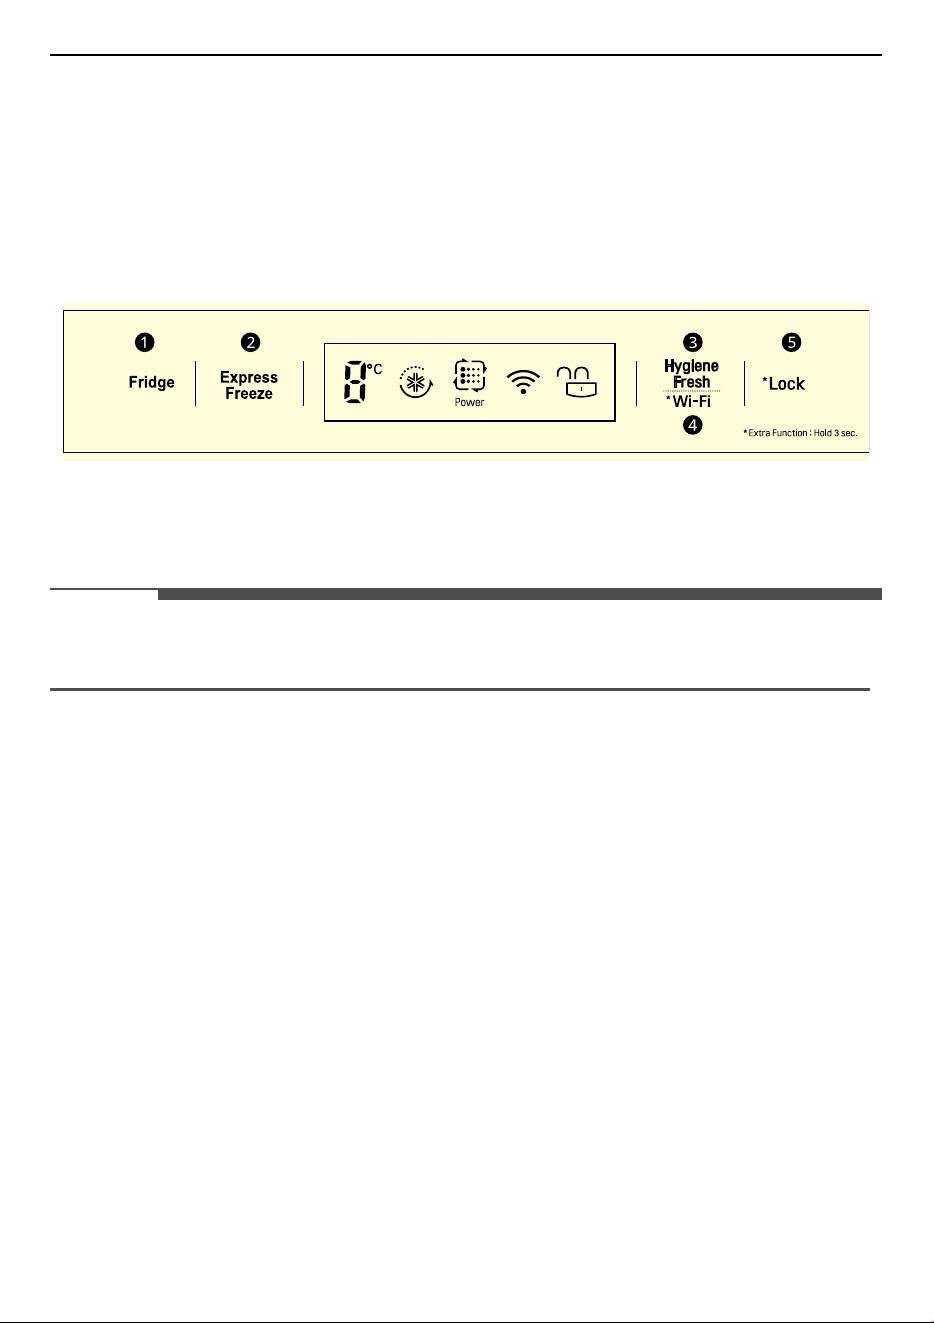
Control Panel
The actual control panel may differ from model to model.
Control Panel and Functions
*1 This control panel is only available on some models.
Control Panel 1: On the Freezer Door
*1
a
Fridge
Press this button repeatedly to select a desired temperature between 0
7
and 6
7
.
• The initial fridge temperature is 3
7
.
NOTE
• The actual inner temperature varies depending on the food status, as the indicated setting temperature
is a target temperature, not actual temperature within the appliance.
b
Express Freeze
This function can quickly freeze a large amount of ice or frozen foods.
• This function is enabled and disabled in turn each time you press the button.
• This function automatically terminates after a specific period has passed.
c
Hygiene Fresh
This function reduces odours inside the fridge.
• Each time you press the
Hygiene Fresh
button, the Hygiene Fresh function mode will change to
Auto
~
Power
~
Off
~
Auto
alternatively.
d
Wi-Fi
This button allows the appliance to connect to a home Wi-Fi network. Refer to Smart Functions for
information on the initial setup of the
LG ThinQ
application.
e
Lock
This locks the buttons on the control panel.
• To lock the control panel buttons, press and hold the Lock button for 3 seconds until the
k
icon
appears and the function is activated.
• To disable the function, press and hold the Lock button for 3 seconds until the
l
icon appears and
the function is deactivated.
23
OPERATION
ENGLISH
NOTE
• For optimal food preservation, increasing or decreasing 1
7
from the default temperature is
recommended.
• The control panel will turn off automatically for energy saving.
• If any finger or skin comes into contact with the control panel while cleaning it, the button function may
operate.
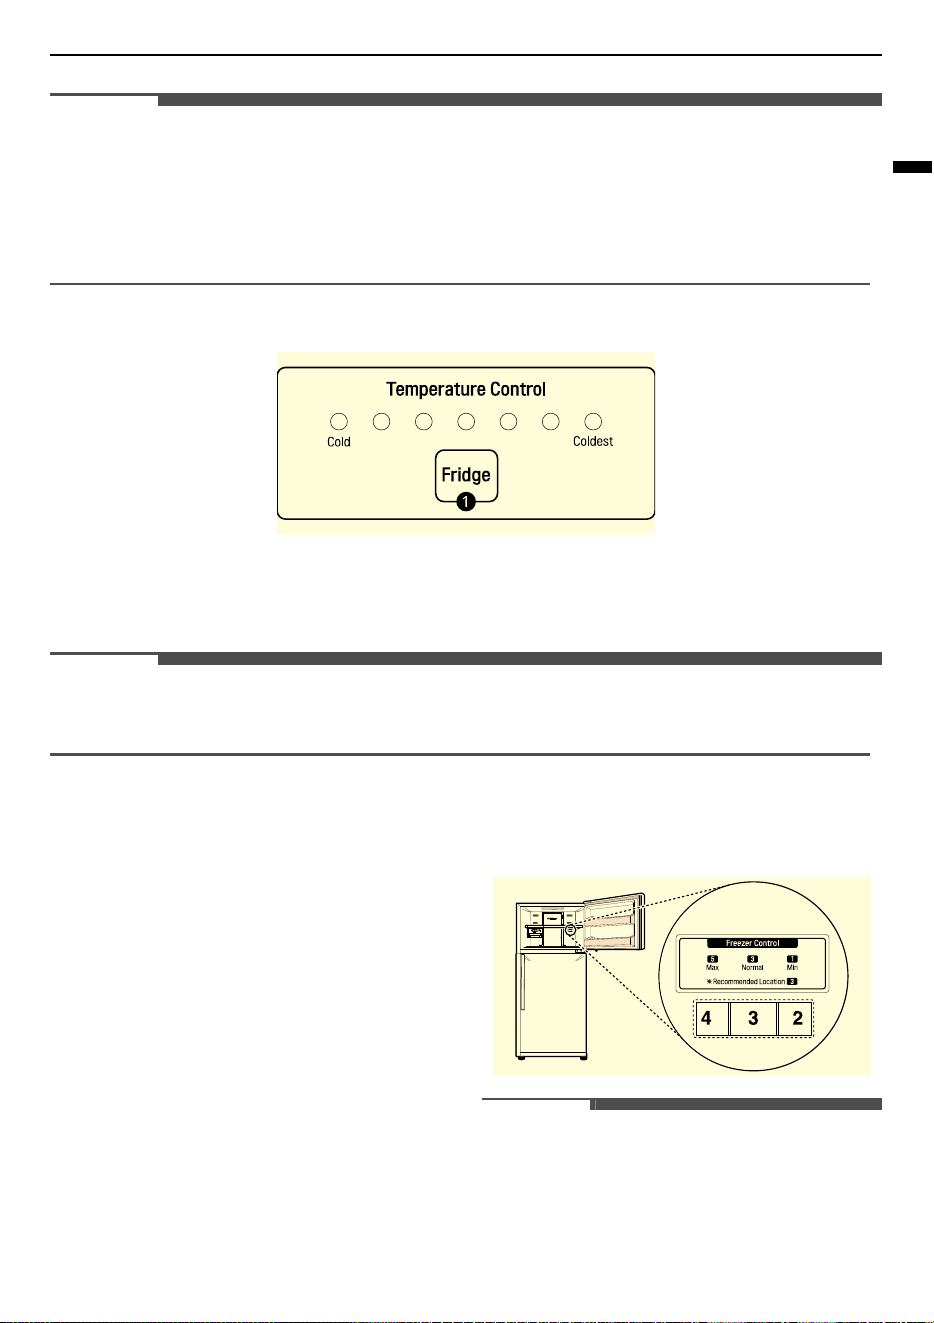
Control Panel 2: Inside the Fridge
*1
a
Fridge
Press this button repeatedly to select a desired temperature between Cold and Coldest.
• The initial fridge temperature is Normal.
NOTE
• For optimal food preservation, increasing or decreasing one level from the default temperature is
recommended.
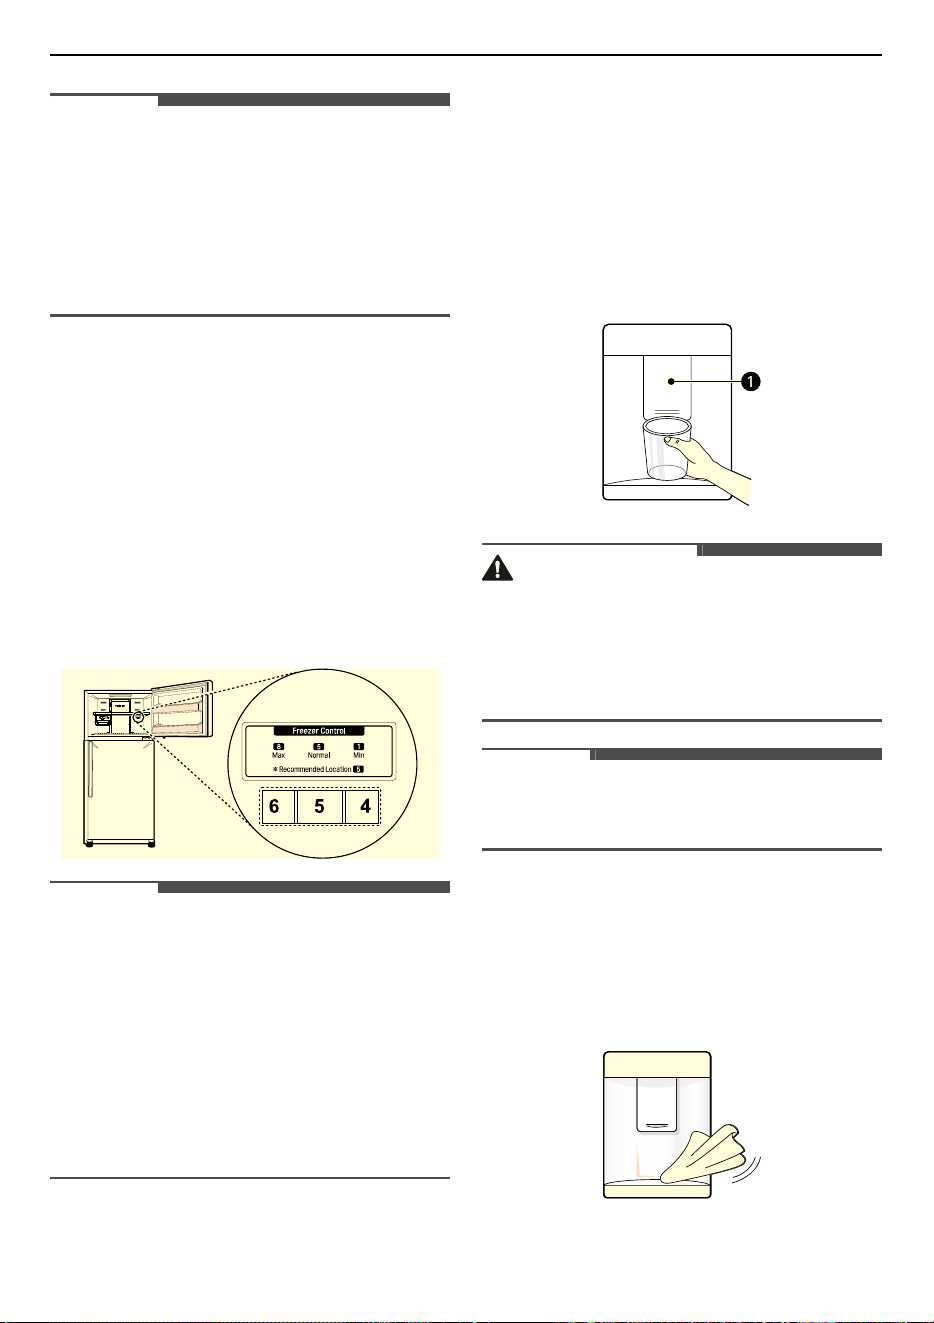
Setting the Freezer
Temperature Level (1-7)
The temperature can be adjusted from level 1 to
level 7. Level 3 is recommended.
• You can lower the temperature by turning the
controller to the right and raise the temperature
by turning the controller to the left.
• Setting the controller at level 6-7 will maintain a
low temperature in the freezer. When the quick
freezing is finished (level 7), set the controller to
the recommended level.
NOTE
• For optimal food preservation, increasing or
decreasing one level from the default
temperature is recommended.
24
OPERATION
NOTE
• Wait until 2 or 3 hours have passed after
connecting the appliance to the outlet before
storing food in the appliance.
• The internal temperatures could be affected by
the location of the appliance, the ambient
temperature, the frequency of door opening and
so on.
Setting the Freezer
Temperature Level (1-8)
This feature is only available on some models.
The temperature can be adjusted from level 1 to
level 8. Level 5 is recommended.
• You can lower the temperature by turning the
controller to the right and raise the temperature
by turning the controller to the left.
• Setting the controller at 6-8 level will maintain a
low temperature in the freezer.
NOTE
• For optimal food preservation, increasing or
decreasing one level from the default
temperature is recommended.
• Wait until 2 or 3 hours have passed after
connecting the appliance to the outlet before
storing food in the appliance.
• The internal temperatures could be affected by
the location of the appliance, the ambient
temperature, the frequency of door opening and
so on.
Water Dispenser
This feature is only available on some models.
Using the Dispenser
You can dispense water by pressing the lever.
• Press the paddle
a
of the water dispenser to get
cold water.
CAUTION
• Keep children away from the dispenser to
prevent children playing with or damaging the
controls.
• Do not use a thin crystal cup or chinaware when
dispensing water or ice.
NOTE
• If the cup rim is small, water may splash out of
the glass or miss it completely.
Cleaning the Dispenser Tray
Wipe the entire area with a damp cloth. The
dispenser tray may become wet easily due to
spilled water.
25
OPERATION
ENGLISH
Cleaning the Dispenser Outlet
Wipe the dispenser outlet frequently with a clean
cloth as it may get dirty easily.
NOTE
• Lint from a cloth may adhere to the outlet.
Filling the Water Tank
The water tank holds the water which is to be
dispensed.
1
Open the cap on the top of the water tank.
2
Fill the water tank with potable water and close
the cap.
WARNING
• Fill with potable water only. Do not fill the water
tank with beverages or hot water.
• Children should not be allowed near the water
tank.
CAUTION
• Do not apply excessive force or impact when
removing or assembling the water dispenser
tank.
NOTE
• The water tank should be washed before filling it
with potable water.
• If water does not come out, fill the water tank
with potable water.
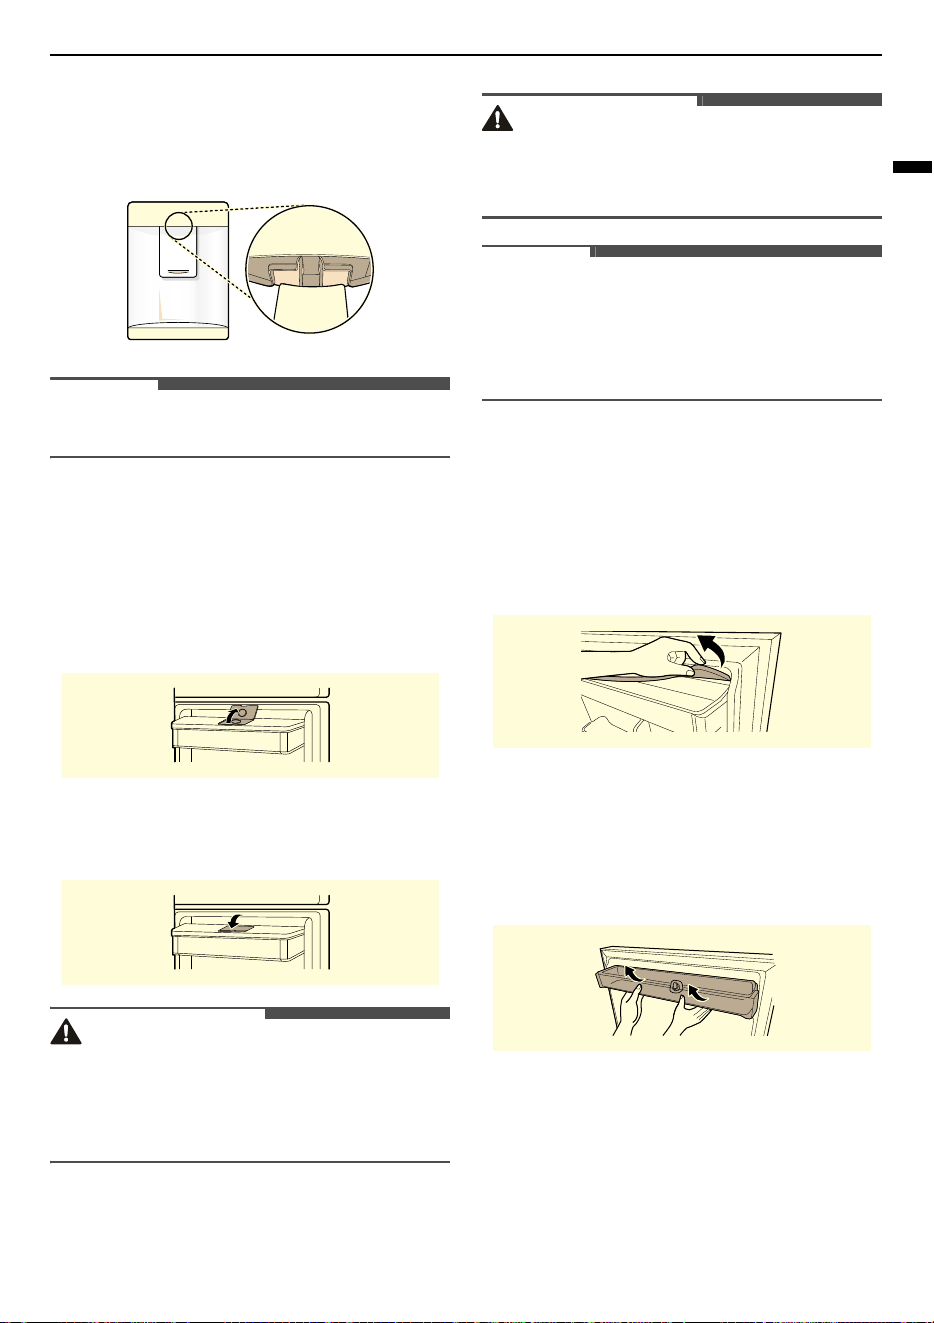
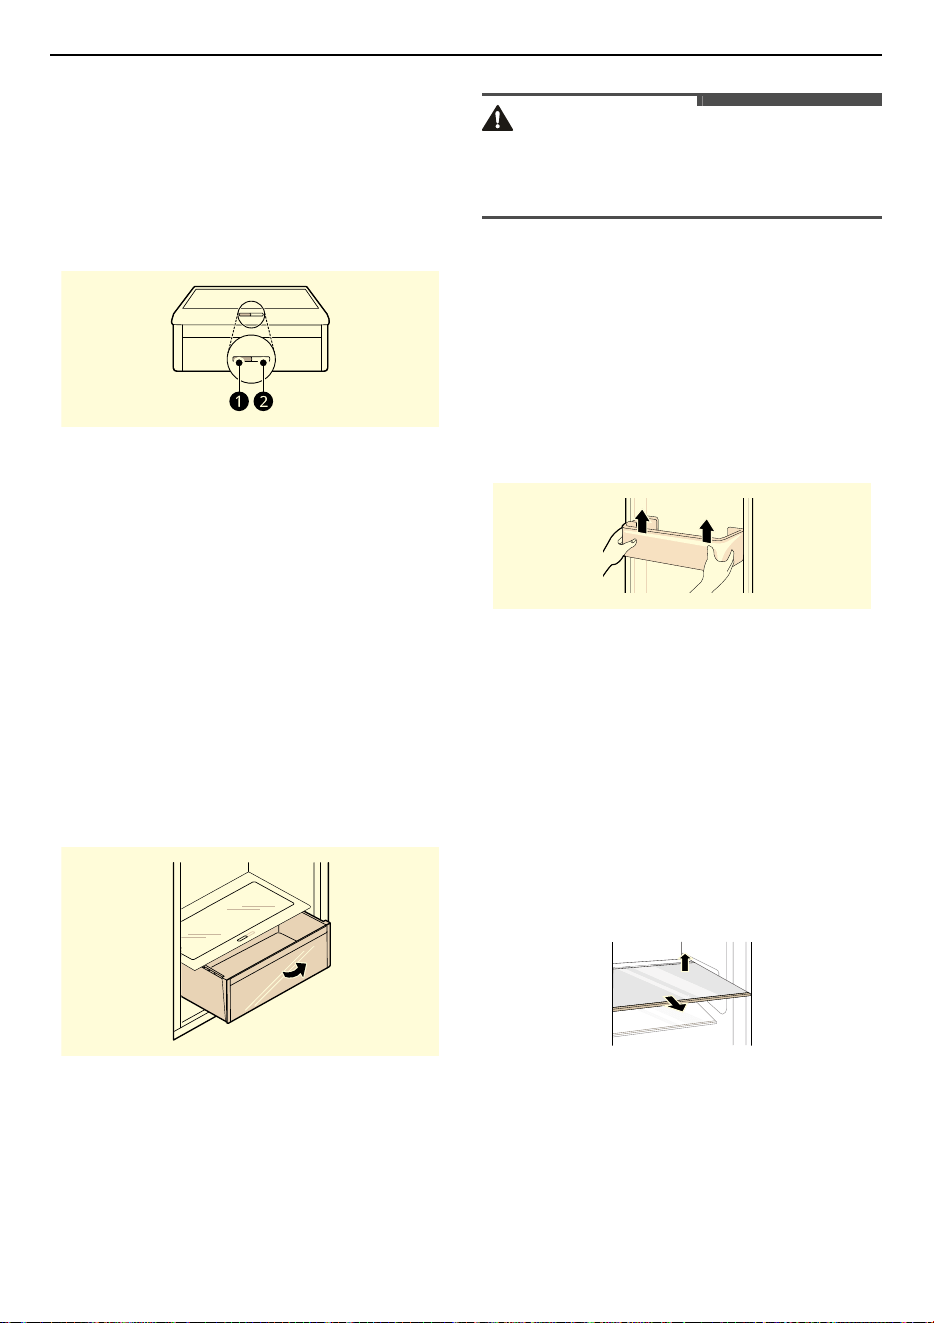
Cleaning the Water Tank
Clean water tanks if they have not been used for 48
hours.
1
Remove the water tank cover.
2
Empty the water tank.
3
Hold the water tank with both hands and pull it
up.
26
OPERATION
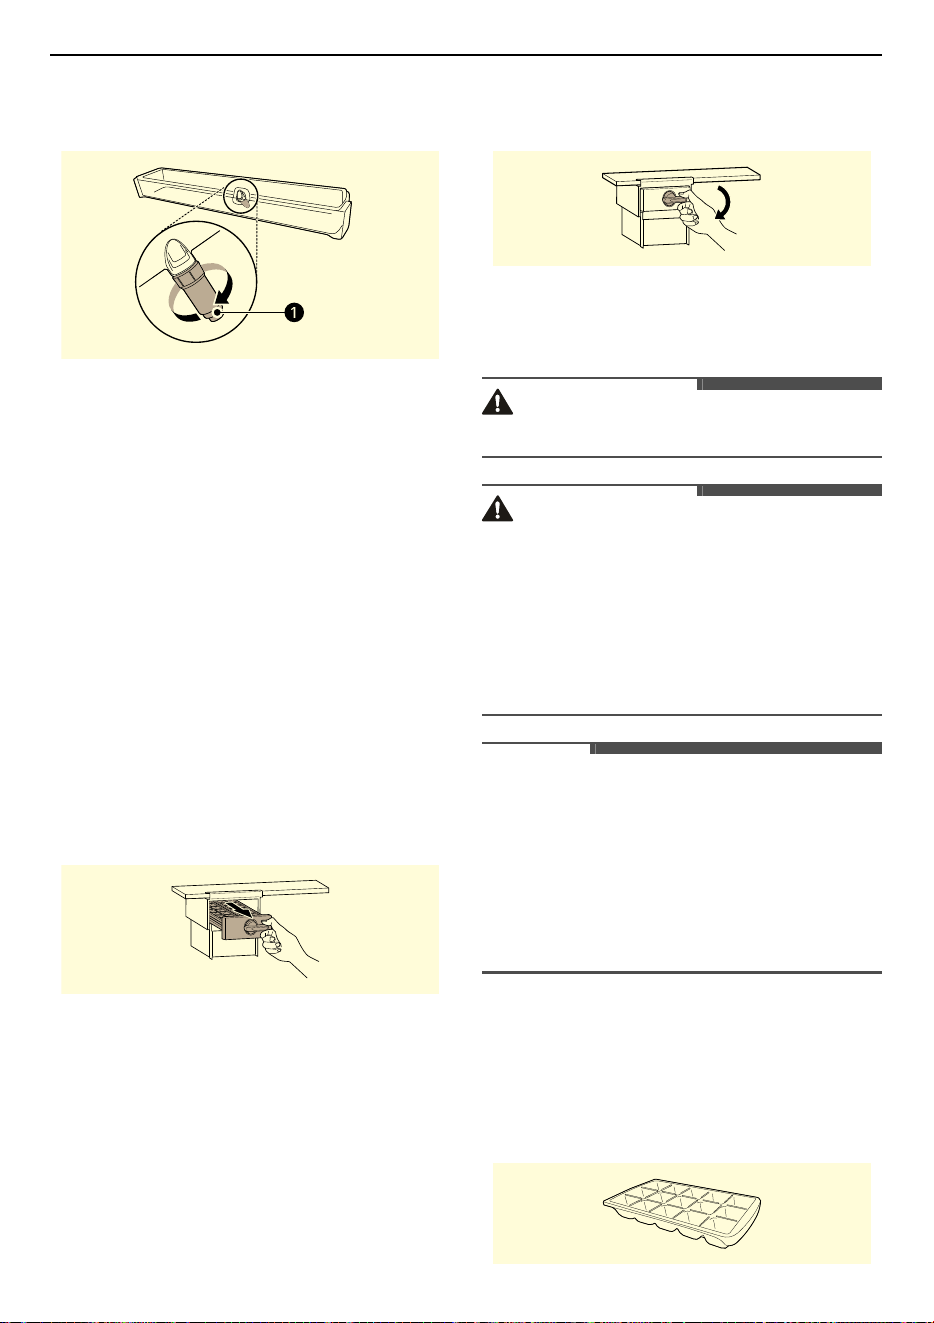
4
Remove the water valve
a
in the water tank by
turning it clockwise.
5
Clean the water tank and the water valve in
running water. Wipe the inside and outside of
the water tank and the fridge door with a clean
cloth.
6
Mount the water tank in the reverse order of
the removal process.
Icemaker
This feature is only available on some models.
Using the Moving Icemaker
This is where ice is manually produced and stored.
1
Pull out the ice tray from the Icemaker.
2
Fill the ice tray with water up to the marked
water line.
3
Hold and push the ice tray back to its original
position.
4
Hold the lever of the ice tray and turn it
clockwise to release the ice cubes.
5
Hold the handle of the ice basket and pull out
it.
WARNING
• Fill with potable water only.
CAUTION
• Be careful not to spill water when pushing the ice
tray.
• Be careful not to twist the ice tray with force as it
can be broken.
• If you open and close the freezer door
frequently, it may take longer for water to be
frozen.
NOTE
• You can remove the ice maker to create more
space inside the freezer compartment if you do
not use it.
• If the ice tray is overfilled, the ice cubes may stick
together and be difficult to remove.
• Ice can be removed more easily by pouring
water on the ice tray.
Using the Ice Tray
This is where ice is manually produced.
Fill the ice tray with water up to the marked water
line.
27
OPERATION
ENGLISH
WARNING
• Fill with potable water only.
CAUTION
• Be careful not to twist the ice tray with force as it
can be broken.
• If you open and close the freezer door
frequently, it may take longer for water to be
frozen.
NOTE
• If the ice tray is overfilled, the ice cubes may stick
together and be difficult to remove.
• Ice can be removed more easily by pouring
water on the ice tray.
Door in Door
This feature is only available on some models.
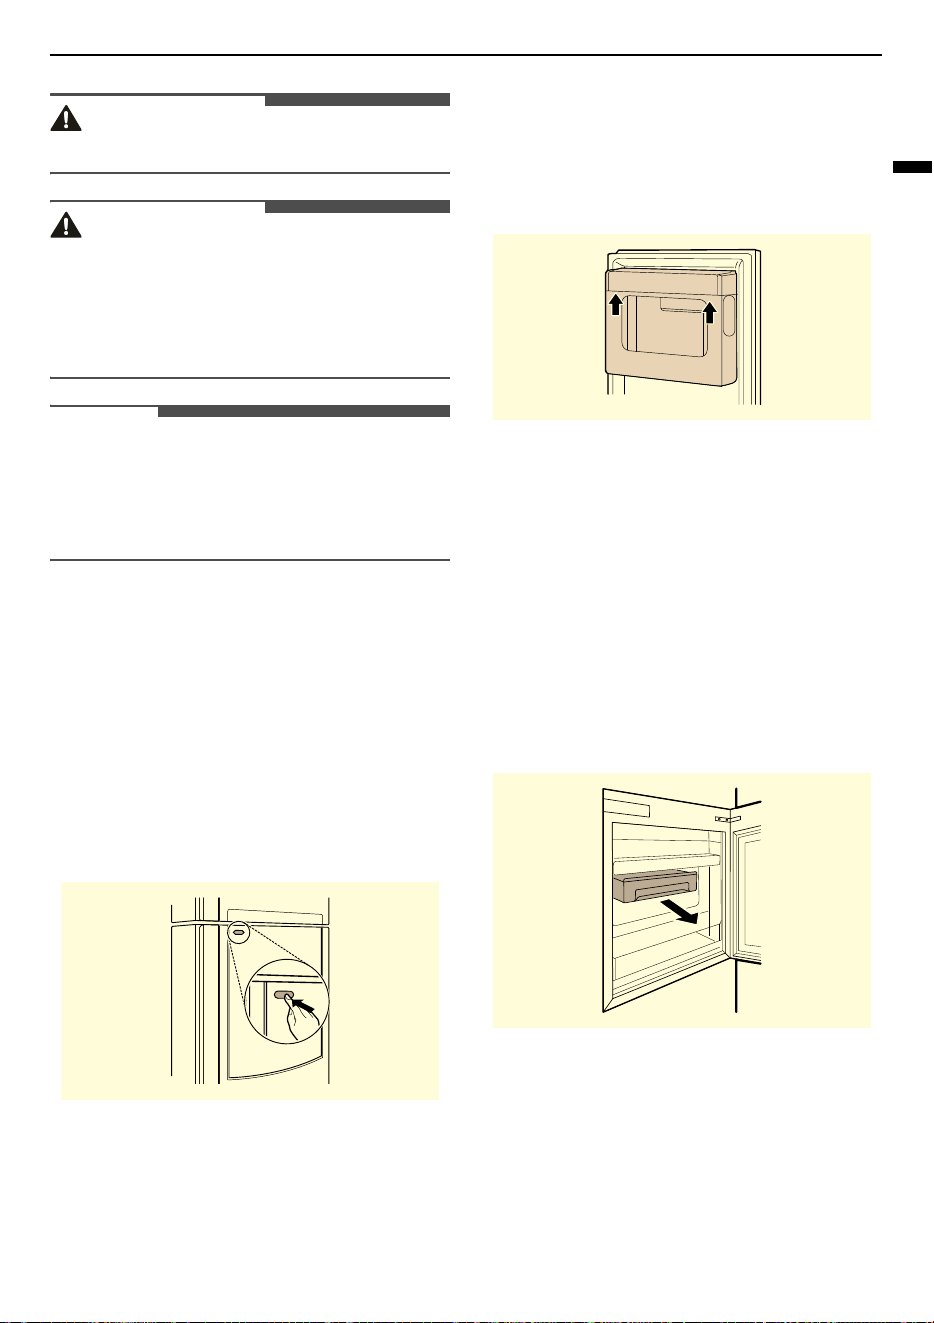
Using the Door in Door
Press the button at the top of the fridge door until
the Door in Door opens.
There is plenty of storage space inside the Door in
Door and its surrounding baskets, allowing you to
store food in an organized manner.
Removing and Refitting the
Door in Door Case
1
Hold the case inside the Door in Door with both
hands and remove it by lifting it upward.
2
Mount the Door in Door in the reverse order of
the removal process.
Using the Door in Door Basket
Store food that is frequently taken out and used.
1
Open the Door in Door.
2
Pull out the Door in Door basket.
3
Mount the Door in Door basket in the reverse
order of the removal process.
28
OPERATION
Fridge Drawer
Using the Fresh Vegetable
Drawer
Vegetable compartment can adjust the humidity by
moving the knob.
a
For storing fruit.
b
For storing vegetables.
Removing and Refitting the
Fresh Vegetable Drawer
1
Remove the contents of the drawer. Hold the
handle of the vegetable drawer and gently pull
it out outward until the drawer stops
completely.
2
Lift the vegetable drawer up and remove it by
pulling it out.
3
Mount the vegetable drawer in the reverse
order of the removal process.
CAUTION
• Remove all food from inside the appliance,
otherwise injuries can be caused by the weight
of stored foods.
Door Basket
Removing/Refitting the Door
Basket
1
Hold both edges of the basket and remove it by
lifting it upward.
2
Refit the door basket in the reverse order of the
removal process.
Shelf
Removing/Refitting the Shelf
1
Hold the both side of the shelf. Lift the shelf up
and remove it by pulling it out.
2
Refit the shelf by sliding it inward until the shelf
snaps into the frame.
29
SMART FUNCTIONS
ENGLISH
SMART FUNCTIONS
LG ThinQ Application
This feature is only available on models with Wi-Fi.
The
LG ThinQ
application allows you to
communicate with the appliance using a
smartphone.
LG ThinQ Application Features
Communicate with the appliance from a
smartphone using the convenient smart features.
Smart Diagnosis
• If you experience a problem while using the
appliance, this smart diagnosis feature will help
you diagnose the problem.
Settings
• Allows you to set various options on the
appliance and in the application.
NOTE
• In the following cases, you must update the
network information for each appliance in the
LG ThinQ
application under
Device Cards
>
Settings
>
Change Network
.
- wireless router is changed
- wireless router password is changed
- Internet service provider is changed
• The application is subject to change for
appliance improvement purposes without notice
to users.
• Functions may vary by model.
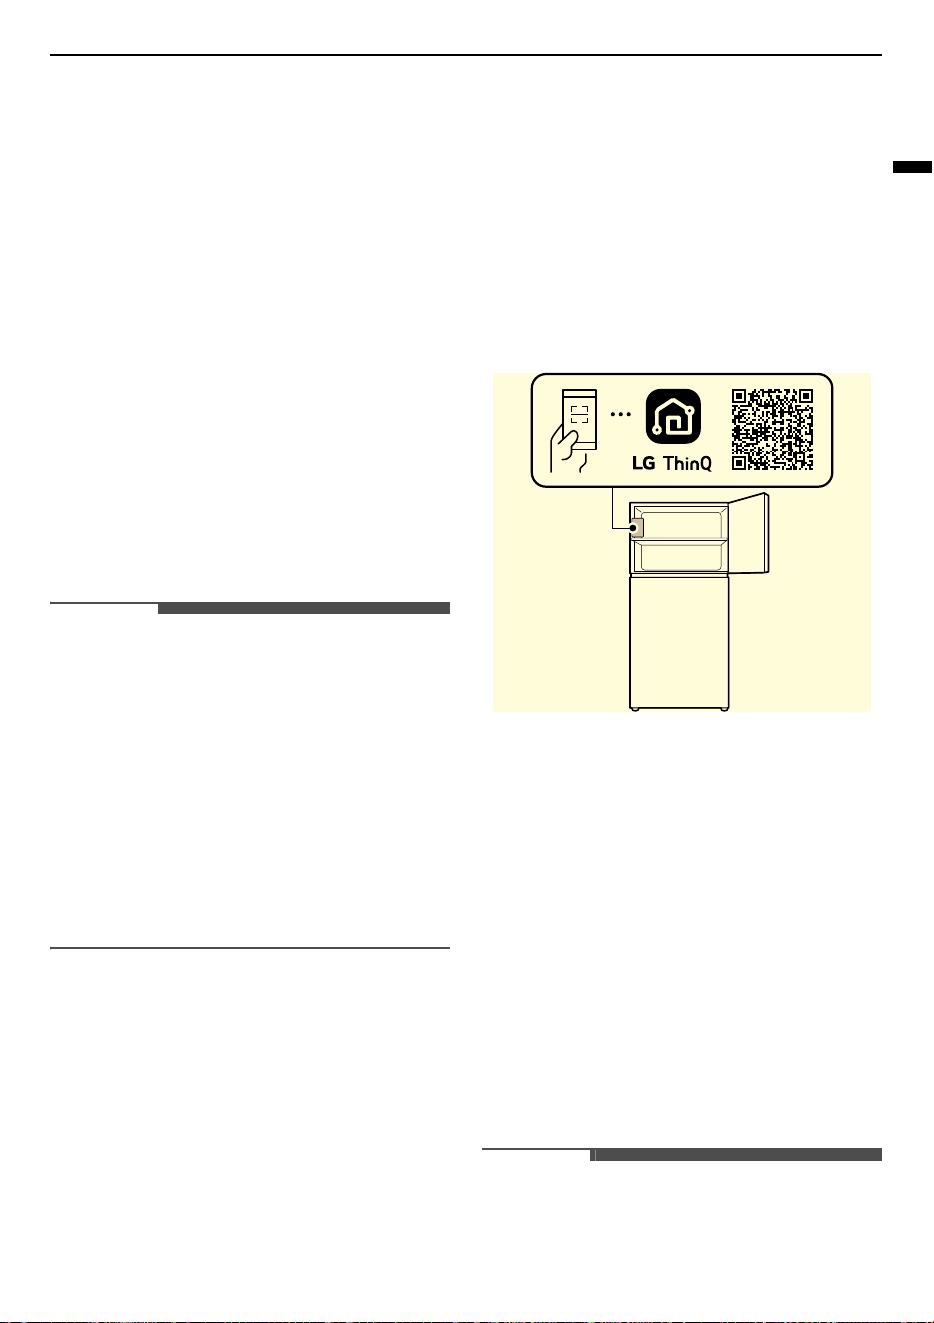
Installing LG ThinQ Application
and Connecting an LG
Appliance
Models with QR Code
Scan the QR code attached to the product using the
camera or a QR code reader application on your
smartphone.
Models without QR Code
1
Search for and install the
LG ThinQ
application
from the Google Play Store or Apple App Store
on a smartphone.
2
Run the
LG ThinQ
application and sign in with
your existing account or create an LG account
to sign in.
3
Touch the add (
~
) button on the
LG ThinQ
application to connect your LG appliance.
Follow the instructions in the application to
complete the process.
NOTE
• To verify the Wi-Fi connection, check that the Wi-
Fi indicator on the control panel is lit.

30
SMART FUNCTIONS
NOTE
• The appliance supports 2.4 GHz Wi-Fi networks
only. To check your network frequency, contact
your Internet service provider or refer to your
wireless router manual.
•
LG ThinQ
is not responsible for any network
connection problems or any faults,
malfunctions, or errors caused by network
connection.
• The surrounding wireless environment can
make the wireless network service run slowly.
• If the distance between the appliance and the
wireless router is too far, the signal strength
becomes weak. It may take a long time to
connect or installation may fail.
• If the appliance is having trouble connecting to
the Wi-Fi network, it may be too far from the
router. Purchase a Wi-Fi repeater (range
extender) to improve the Wi-Fi signal strength.
• The network connection may not work properly
depending on the Internet service provider.
• The Wi-Fi connection may not connect or may be
interrupted because of the home network
environment.
• The appliance cannot be connected due to
problems with the wireless signal transmission.
Unplug the appliance and wait about a minute
before trying again.
• If the firewall on your wireless router is enabled,
disable the firewall or add an exception to it.
• The wireless network name (SSID) should be a
combination of English letters and numbers. (Do
not use special characters.)
• Smartphone user interface (UI) may vary
depending on the mobile operating system (OS)
and the manufacturer.
• If the security protocol of the router is set to
WEP
, you may fail to set up the network. Please
change it to other security protocols (
WPA2
is
recommended) and connect the product again.
• To disable the Wi-Fi function, press and hold the
Wi-Fi
button for 3 seconds. The Wi-Fi indicator
will be turned off.
• To reconnect the appliance or add another user,
press and hold the
Wi-Fi
button for 3 seconds to
temporarily turn it off. Run the
LG ThinQ
application and follow the instructions in the
application to connect the appliance.
Open Source Software Notice
Information
To obtain the source code that is contained in this
product, under GPL, LGPL, MPL, and other open
source licenses that have the obligation to disclose
source code, and to access all referred license
terms, copyright notices and other relevant
documents, please visit https://
opensource.lge.com.
LG Electronics will also provide open source code to
you on CD-ROM for a charge covering the cost of
performing such distribution (such as the cost of
media, shipping, and handling) upon email request
to opensou[email protected]m.
This offer is valid to anyone in receipt of this
information for a period of three years after our
last shipment of this product.
Smart Diagnosis
This feature is only available on some models.
Use this feature to help you diagnose and solve
problems with your appliance.
NOTE
• For reasons not attributable to LGE’s negligence,
the service may not operate due to external
factors such as, but not limited to, Wi-Fi
unavailability, Wi-Fi disconnection, local app
store policy, or app unavailability.
• The feature may be subject to change without
prior notice and may have a different form
depending on where you are located.
Using LG ThinQ to Diagnose
Issues
If you experience a problem with your Wi-Fi
equipped appliance, it can transmit
troubleshooting data to a smartphone using the
LG ThinQ
application.
31
SMART FUNCTIONS
ENGLISH
• Launch the
LG ThinQ
application and select the
Smart Diagnosis
feature in the menu. Follow
the instructions provided in the
LG ThinQ
application.
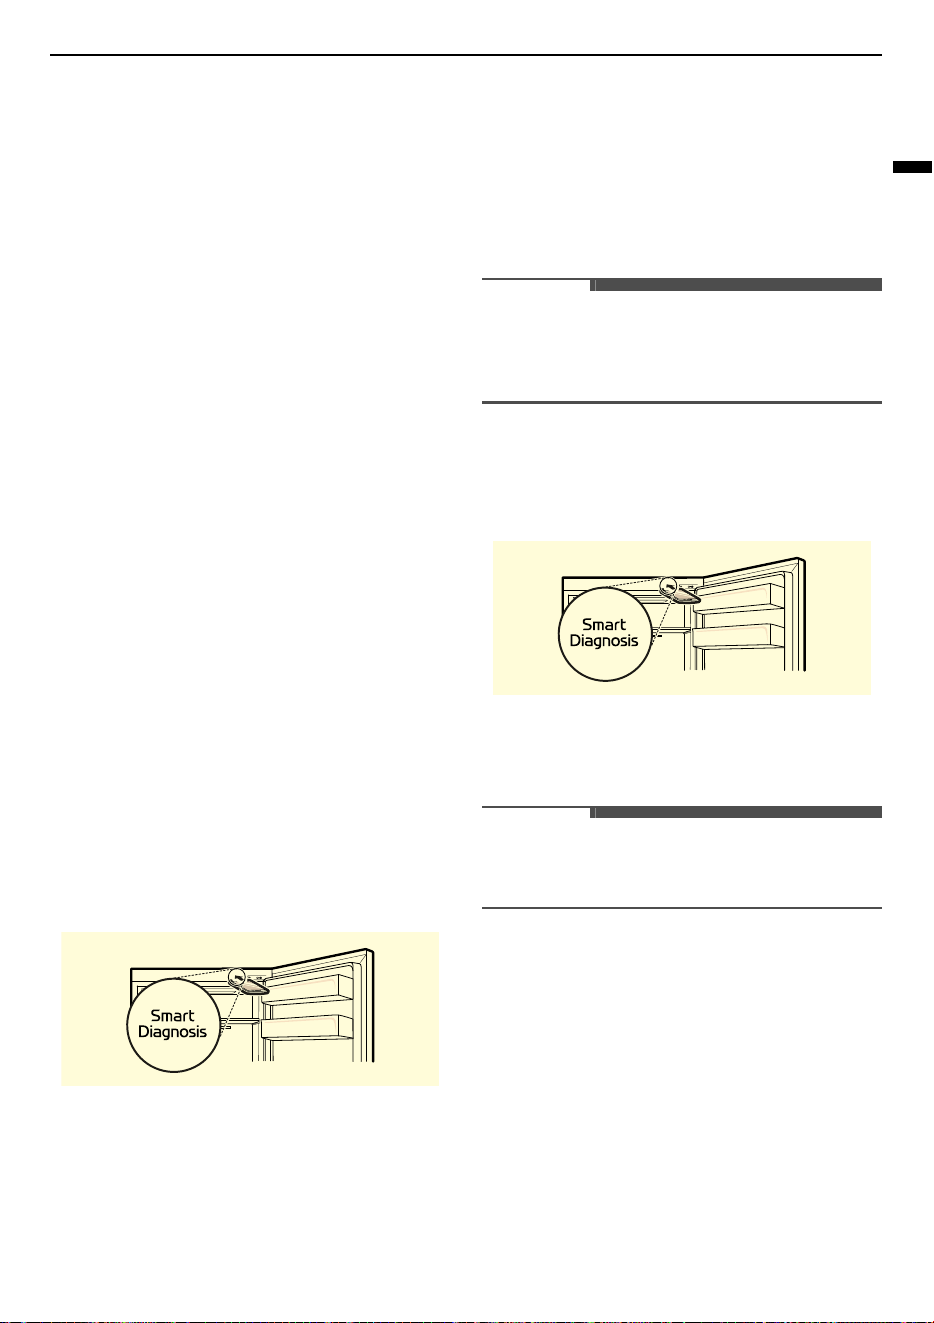
Using Audible Diagnosis to
Diagnose Issues
*1 This control panel is only available on some
models.
Follow the instructions below to use the audible
diagnosis method.
• Launch the
LG ThinQ
application and select the
Smart Diagnosis
feature in the menu. Follow
the instructions for audible diagnosis provided
in the
LG ThinQ
application.
Control Panel 1: On the Freezer Door
*1
1
Press the
Lock
button to activate the lock
function.
• If the display has been locked for over 5
minutes, you must deactivate the lock and
then reactivate it.
2
Press and hold the
Fridge
button for 3 seconds
or longer.
3
Open both fridge and freezer door, and then
hold the phone on the upper right speaker
hole.
4
After the data transfer is complete, the
diagnosis will be displayed in the application.
Control Panel 2: Inside the Fridge
*1
1
Open the fridge door.
2
Close and open the fridge door 5 times within
8 seconds.
NOTE
• If you do not close and open the door 5 times
within 8 seconds, the time will be reset. Then you
have to close and open the door 5 times again.
3
If the buzzer sounds 4 times, open the freezer
door and hold the phone near the speaker
hole.
4
After the data transfer is complete, the
diagnosis will be displayed in the application.
NOTE
• For best results, do not move the phone while
the tones are being transmitted.
32
MAINTENANCE
MAINTENANCE
Cleaning
General Cleaning Tips
• Performing manual defrosting, maintenance or
cleaning of the appliance while food is stored in
the freezer can raise the temperature of the food
and reduce its storage life.
• Regularly clean any surfaces that can come in
contact with food.
• When cleaning the inside or outside of the
appliance, do not wipe it with a rough brush,
toothpaste, or flammable materials. Do not use
cleaning agents containing flammable
substances. This may cause discolouration or
damage to the appliance.
- Flammable substances: alcohol (ethanol,
methanol, isopropyl alcohol, isobutyl alcohol,
etc.), thinner, bleach, benzene, flammable
liquid, abrasive, etc.
• After cleaning, check if the power cable is
damaged.
Cleaning the Exterior
• When cleaning the outside air vents of the
appliance by means of vacuuming, then the
power cord should be unplugged from the outlet
to avoid any static discharge that can damage
the electronics or cause an electric shock.
Regular cleaning of the rear and side ventilation
covers is recommended to maintain reliable and
economical operation of the unit.
• Keep the air vents on the exterior of the
appliance clean. Blocked air vents can cause fire
or appliance damage.
• For the appliance exterior, use a clean sponge or
soft cloth and a mild detergent in warm water.
Do not use abrasive or harsh cleaners. Dry
thoroughly with a soft cloth. Do not use
contaminated cloths when cleaning the stainless
steel doors. Always use a dedicated cloth and
wipe in the same direction as the grain. This
helps reduce surface staining and tarnishing.
Cleaning the Interior
• Before removing a shelf or drawer from inside
the appliance, remove all stored foods from the
shelf or drawer to prevent injury or damage to
the appliance. Otherwise, injury may occur due
to the weight of stored foods.
• Detach the shelves and drawers and clean them
with water and a mild detergent, and then dry
them sufficiently, before replacing them.
• Regularly wipe the door gaskets and door seals
with water and a mild detergent.
• Door basket spills and stains should be cleaned
as they can compromise storage ability of the
basket and could even be damaged.
• Never clean the shelves, door baskets, or
containers in the dishwasher or in hot water. The
parts may become deformed, and glass may
shatter due to the heat.
• The automatic defrosting system in the
appliance ensures that the compartment
remains free of ice buildup under normal
operating conditions. Users do not need to
defrost it manually.
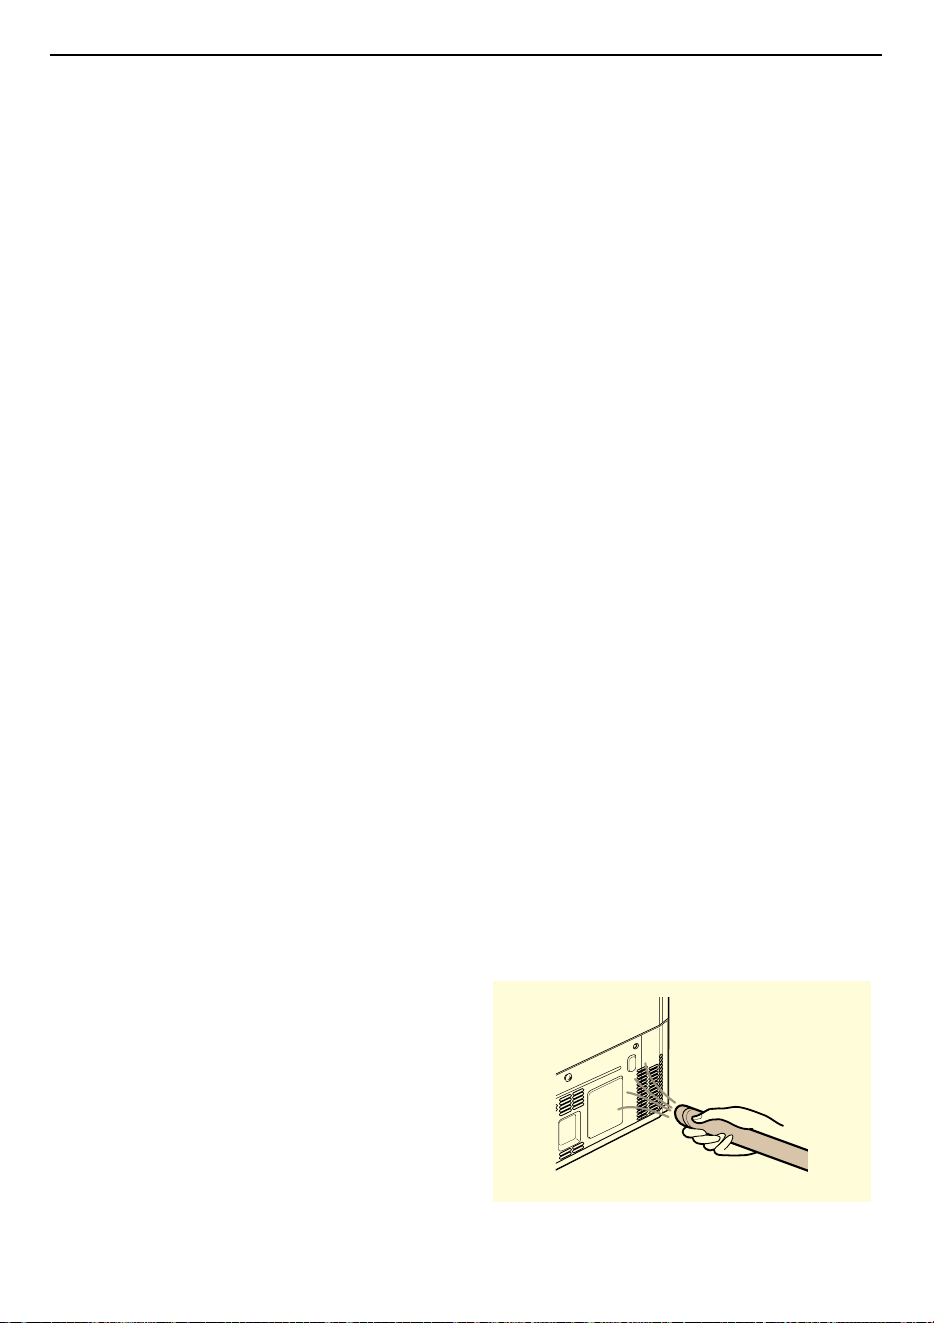
Cleaning the Condenser Cover
This feature is only available on some models.
Use a vacuum cleaner with a brush to clean the
condenser cover and vents. Do not remove the
panel covering the condenser coil area.
We recommend that this be done every 12 months
to maintain operating efficiency.
33
MAINTENANCE
ENGLISH
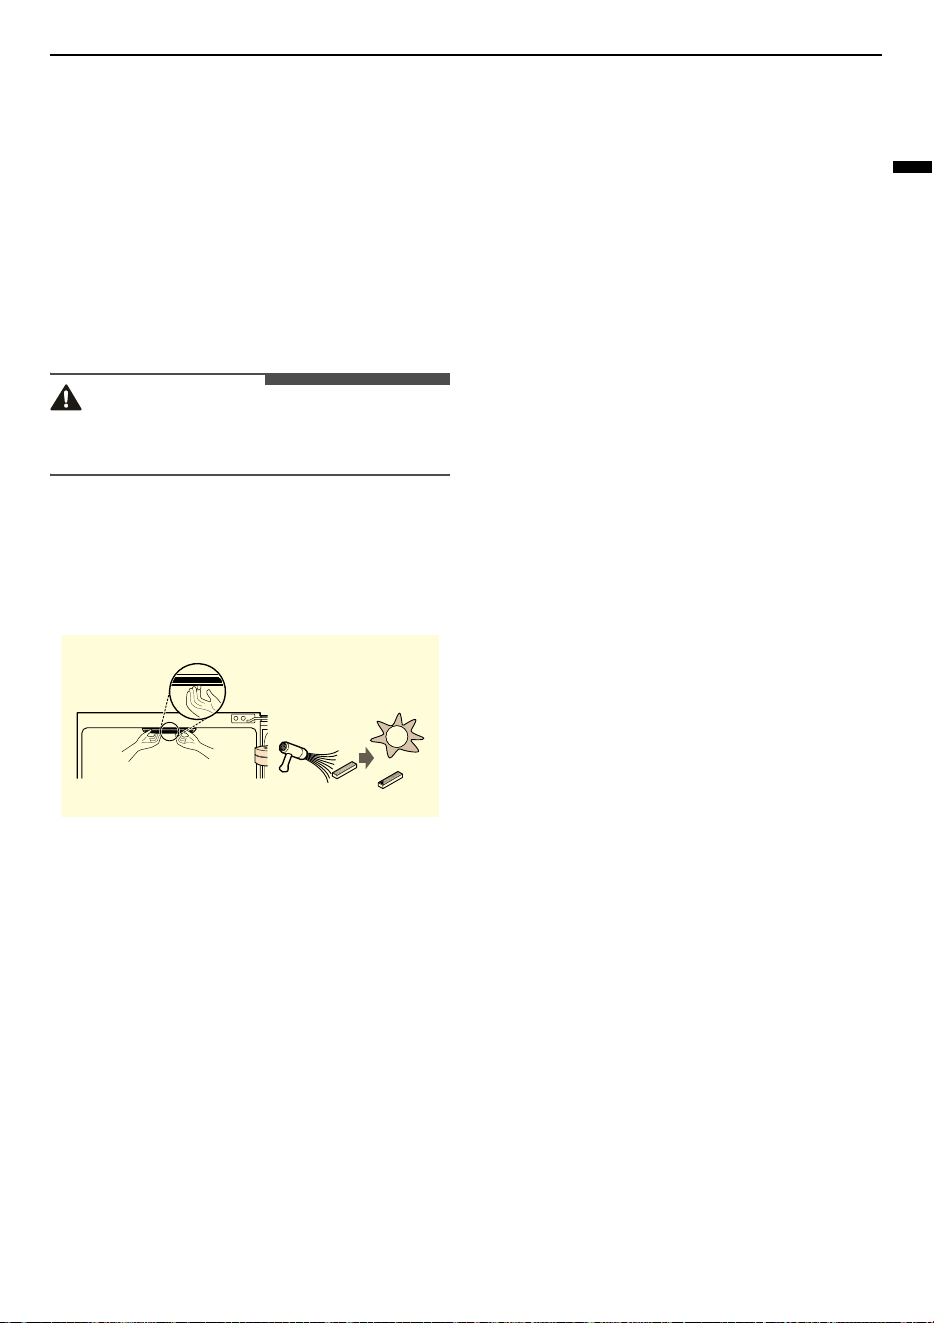
Deodorizer
This feature is only available on some models.
Reusing the Deodorizer
The deodorizer reduces unpleasant odours in the
fresh food compartment without harming you or
the food.
1
Remove the deodorizer from the ceiling of the
refrigerator compartment.
CAUTION
• Do not use a sharp tool as it could damage the
deodorizer.
2
Remove moisture and odors from the
deodorizer with the heat of a hair dryer or
leave it in a sunny spot and let the UV in
sunlight do it for you.

34
TROUBLESHOOTING
TROUBLESHOOTING
Before Calling for Service
Cooling
Symptoms Possible Cause & Solution
There is no
refrigeration or
freezing.
Is there a power interruption?
• Check the power of other appliances.
Appliance is unplugged.
• Plug the power plug in the outlet properly.
A fuse in your home may be blown or the circuit breaker tripped. Or the
appliance is connected to a GFCI (Ground Fault Circuit Interrupter)
outlet, and the outlet's circuit breaker has tripped.
• Check the main electrical box and replace the fuse or reset the circuit
breaker. Do not increase fuse capacity. If the problem is a circuit overload,
have it corrected by a qualified electrician.
• Reset the circuit breaker on the GFCI. If the problem persists, contact an
electrician.
There is poor
refrigeration or
freezing.
Is the fridge or freezer temperature set to its warmest setting?
• Set the fridge or freezer temperature to a colder setting.
Is the appliance in direct sunlight, or is it near a heat generating object
such as cooking oven or heater?
• Check the installation area and reinstall it away from heat generating
objects.
Did you store hot food without cooling it first?
• Cool the hot food first before putting it in the fridge or freezer
compartment.
Did you put in too much food?
• Maintain an appropriate space between food.
Are the appliance doors completely closed?
• Completely close the door and make sure that stored food is not
obstructing in the door.
Is there enough space around the appliance?
• Adjust the installation position to make enough space around the
appliance.
The appliance contains
a bad smell.
Is the fridge or freezer temperature set to 'Warm'?
• Set the fridge or freezer temperature to a colder setting.
35
TROUBLESHOOTING
ENGLISH
Condensation & Frost
Parts & Features
Noises
The appliance contains
a bad smell.
Did you put in food with a strong smell?
• Store foods with strong smells in sealed containers.
Vegetables or fruit may have spoiled in the drawer.
• Throw away rotten vegetables and clean the vegetable drawer. Do not
store vegetables too long in the vegetable drawer.
Symptoms Possible Cause & Solution
There is condensation
inside the appliance or
on the bottom of the
vegetable drawer
cover.
Did you store hot food without cooling it first?
• Cool the hot food first before putting it inside the fridge or freezer.
Did you leave the appliance door open?
• Although the condensation will disappear soon after you close the
appliance door, you can wipe it with a dry cloth.
Do you open and close the appliance door too frequently?
• Condensation can form due to the temperature difference from the
outside. Wipe out the dampness with a dry cloth.
Did you put warm or moist food inside without sealing it in a container?
• Store food in a covered or sealed container.
Symptoms Possible Cause & Solution
The inside lamp in the
appliance does not
turn on.
Lamp failure
• Close the door and re-open. If the lamp does not turn on, please contact
the LG Electronics customer information centre. Do not attempt removal
of the lamp.
Symptoms Possible Cause & Solution
The appliance is noisy
and generates
abnormal sounds.
Is the appliance installed on a weak floor or improperly levelled?
• Install the appliance on a solid and flat area.
Symptoms Possible Cause & Solution
36
TROUBLESHOOTING
Wi-Fi
The appliance is noisy
and generates
abnormal sounds.
Does the rear of the appliance touch the wall?
• Adjust the installation position to allow enough clearance around the
appliance.
Are objects scattered behind the appliance?
• Remove the scattered objects from behind the appliance.
Is there an object on top of the appliance?
• Remove the object on top of the appliance.
Symptoms Possible Cause & Solution
Your home appliance
and smartphone are
not connected to the
Wi-Fi network.
The password for the Wi-Fi that you are trying to connect to is incorrect.
• Find the Wi-Fi network connected to your smartphone and remove it, then
register your appliance on
LG ThinQ
.
Mobile data for your smartphone is turned on.
• Turn off the
Mobile data
of your smartphone and register the appliance
using the Wi-Fi network.
The wireless network name (SSID) is set incorrectly.
• The wireless network name (SSID) should be a combination of English
letters and numbers. (Do not use special characters.)
The router frequency is not 2.4 GHz.
• Only a 2.4 GHz router frequency is supported. Set the wireless router to 2.4
GHz and connect the appliance to the wireless router. To check the router
frequency, check with your Internet service provider or the router
manufacturer.
The distance between the appliance and the router is too far.
• If the distance between the appliance and the router is too far, the signal
may be weak and the connection may not be configured correctly. Move
the location of the router so that it is closer to the appliance.
Symptoms Possible Cause & Solution

37
APPENDIX
ENGLISH
APPENDIX
Warranty
Warranty and Service Information
The LG Refrigerator (hereinafter referred as product) comes with 1 year warranty on all Parts (except
Consumables, Bulb, Loose Plastic Parts, Glass) in the first year from the date of purchase on producing the
tax paid invoice provided always that the warranty card bears the rubber stamp, date and signature of our
Authorized Dealer showing the Additional warranty on compressor as specified below shall be on fulfilling
the above mentioned conditions.
9 (SELECTED MODEL) YEAR ADDITIONAL WARRANTY ON COMPRESSOR
The 9 Year warranty (Selected Model) on Compressor will continue even after expiry of 1 year period from
the date of purchase. This warranty covers Compressor only. Gas charging related gas and applicable
service charges will be charged to the customer. During the additional warranty period, it does not cover
any part such as PCB assembly, condenser, freezer, capillary, suction line, overload protector, relay,
thermostat etc., standard service charges will be applicable within the municipal limit of town where LG
Electronics India Ltd. (LGEIL) has its Authorized Service center, service outside municipal limit will attract
to and fro traveling, other incidental expenses in addition to standard service charges, as prevailing from
time to time.
TERMS & CONDITIONS
1) The warranty is confined to the first purchaser of the Refrigerator only & is non-transferable.
2) Repairs & replacements will be carried out by the dealer from whom the product has been purchased,
or through the Authorized Service Centers of LG Electronics. In case the customer shifts the place of
residence during warranty period, it is advised to contact Authorized Service Centre directly or call our
help line.
3) Repairs under warranty shall be carried out by an authorized service personnel only. The details of
centralized help lines are attached.
4) For units installed beyond municipal limits of the jurisdiction of company’s Authorized Service Center,
it is responsibility of the purchaser to contact the nearest authorized service center and bring the unit
to the authorized service center at its own cost and risk. All expenses incurred in collecting the units
or parts thereof from the company’s authorized service center, as well as expenses incurred with
deputing of service personnel/technicians towards conveyance and other incidentals etc. will be
borne by the customer. Local charges for transportation and handling charges may vary from location
to location. Customers are advised to verify before. In case the customer desires to bring the unit on
its own to the Authorized Service Centre, the same shall be at its own risks & consequences.
5) The concerned authorized service center will advise the customer whether to effect the repairs at site
or at the authorized service center.
6) Call registered with the centralized helpline/Authorized service center, wherein only cleaning of the
unit/parts in the unit due to dust accumulation on portions of the unit, general explanations/
returning, are not to be considered as defects.
7) In case of repairs or replacement of any part/s of the unit, this warranty will thereafter continue and
remain in force only for the unexpired period of the warranty. Replacement of parts would be purely
at the discretion of LGEIL alone. In case the replacement of the entire unit is being made, (subject to
the sole discretion of LGEIL), the same model shall be replaced and in the event such model has been
discontinued, it shall be replaced with the model of price equivalent at the time of purchase.

38
APPENDIX
8) In case of any damage to the product / customer abuse/ repairs by un-authorised personnel/ misuse
detected/ by the Authorized Service Center personnel, the warranty conditions are not applicable and
repairs will be done subject to availability of parts and on a chargeable basis only.
9) This warranty shall not cover any consequential or resulting liability, damage or loss to property or life
arising directly or indirectly out of any defect in the Refrigerator. The company’s obligation under this
warranty shall be limited to repair or providing replacement of defective parts only under the
warranty period.
10) The company or its Authorized Service Center reserves the right to retain any part/s or component
replaced at its discretion, in the event of a defect being noticed in the equipment during warranty
period.
11) While the company will make every effort to carry out repairs at the earliest, it however is made
expressly clear that the company is under no obligation to do so in a specified period of time.
12) In the event of any unforeseen circumstance, and spares not being available, the company's
prevailing depreciation rules may apply on the purchaser to accept as a commercial solution in lieu of
repairs.
13) Warranty does not cover accessories external to the equipment supplied by the dealer.
14) If any coloured internal or external components are replaced, there will be commitment to ensure
that the shades match with the original or other components. The replaced shades, patterns, tints
may vary from the customer’s unit due to continuous usage of the unit. Any matching components
changed at customer’s request will be on chargeable basis except the component which actually
needed.
15) Free Installation or Demo of the product, can be availed only once & within 3 months from the date
of purchase.
16) Any extended warranty offered by LGEIL has to be supported by relevant proof.
17) This warranty will automatically terminate on the expiry of the warranty period of 12 months, even if
the Refrigerator may not be in use for any time during the warranty period for any reason. The
warranty on compressor will automatically terminate on expiry of 9*(Selected Model) years (after 1
year warranty period) even if the Refrigerator may not be in use for any time during the said period
for any reason.
18) Only courts in state of Delhi and places where LGEIL has its branch office shall have the jurisdiction
for settling any claims, disputes arising under the warranty.
Warranty is not applicable in any of the following cases :
1) The warranty card is not completed properly at the time of purchase.
2) The completed warranty card is not presented to authorized service personnel at the time of service
of the product.
3) The product is not operated according to instructions given in the Operating Instruction Booklet.
4) The product is used for commercial purposes.
5) The product has failed under certain conditions like water logging, flood, fire, misuse etc.
6) Defects are caused by improper or reckless use, which shall be determined by the company
personnel.
7) Any repair work is carried out by persons other than authorized service personnel.
8) Defects are caused by due to causes beyond control like lightening, abnormal voltage, acts of God or
while in transit to service center or purchaser’s residence.
9) Any issue is caused by usage of 3rd party product like voltage stabilizer, power outlet socket, MCB,
extension board etc.
39
APPENDIX
ENGLISH
10) Defects/malfunction caused while in transit to service centre or purchaser's residence.
11) Defects caused by rodents bite or by pests and vermin ants/Insects/animals/birds etc.
12) The warranty is not valid in case, the serial number is deleted, defected or altered.
13) Damage to the product or any part/s due to transportation or shifting is not covered by warranty.
14) Use of knife or sharp instrument is used to remove the ice trays or Ice from the freezer or to remove
the frost mechanically and as a result Compressor, Evaporator, Condensers, capillary, suction line &
other related items get spoiled.
15) Any accessory external to the equipment are supplied by dealer or LG.
16) Any issue of Wi-Fi connectivity or compatibility with other products or software's is there.
17) Any loss of data.
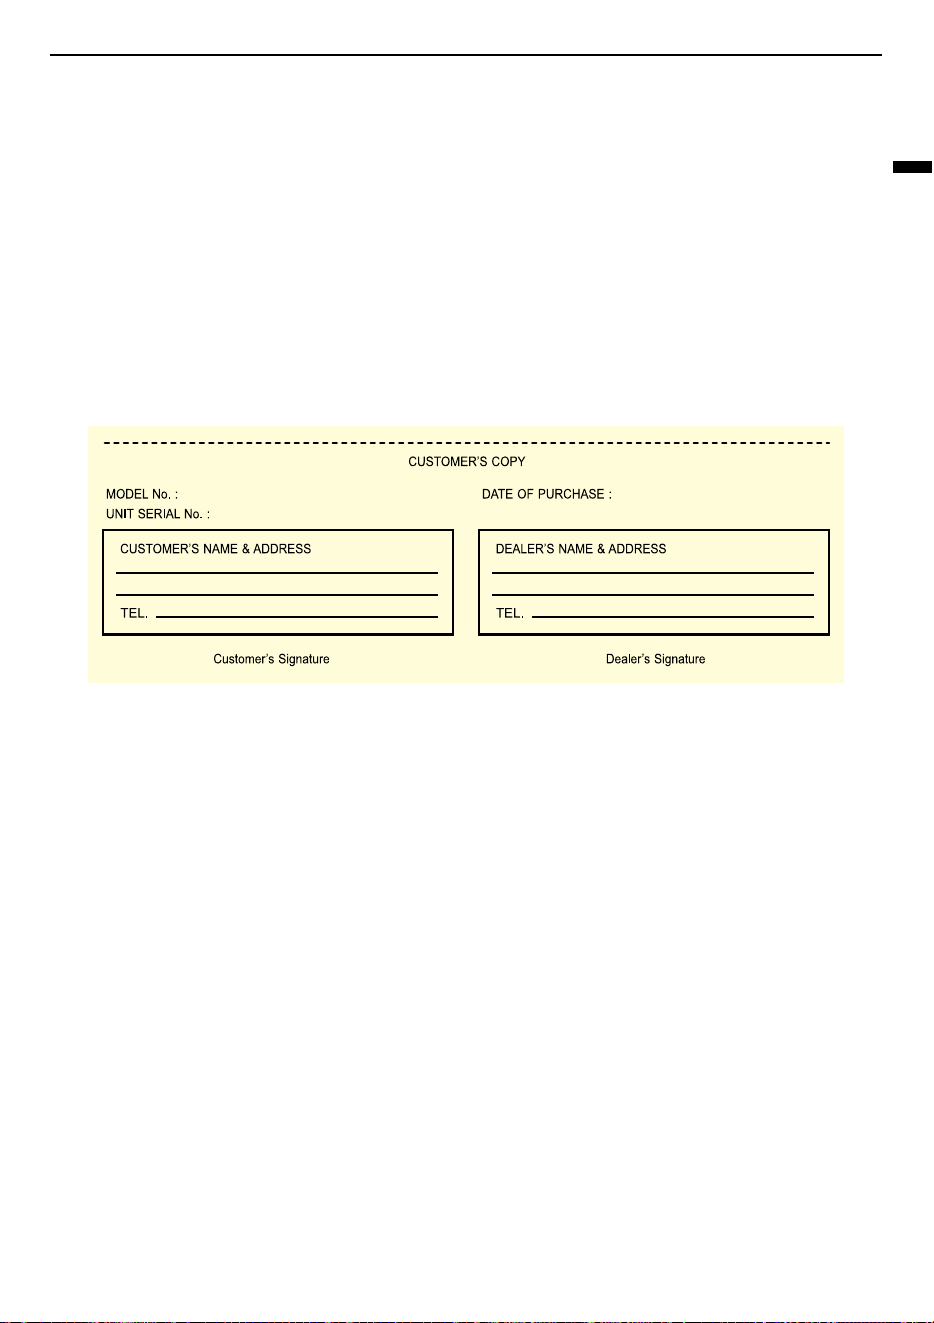
CUSTOMER'S COPY
This card is valid only if it is filled in and stamped by our authorised dealer on the date of purchase.

