OWNER’S MANUAL
MANUEL DU PROPRIÉTAIRE
*
*
*Trademark of Danby Products
* Marque de commerce de Danby Products
Danby Products Limited, Guelph, Ontario, Canada N1H 6Z9
Danby Products Inc. Findlay, Ohio, U.S.A. 45840
www.Danby.com
Printed in Turkey
Imprimé au Turquie
2023.07.25
TUMBLE DRYER
Owner’s Manual............................1 - 19
SÉCHOIR ÉLECTRIQUE
Manuel du propriétaire.................20 - 38

1
Welcome to the Danby family.
We are proud of our quality products and we believe in dependable service. We suggest
that you read this owner’s manual before plugging in your new appliance as it contains
important operation information, safety information, troubleshooting, and maintenance tips
to ensure the reliability and longevity of your appliance.
You are entitled to the warranty coverage as described in the owner’s manual provided with
your new appliance.
1. Please write down your appliance information below. You must keep the original proof
of purchase receipt to validate and receive warranty services.
2. Register your product online and receive a FREE 2 MONTH WARRANTY EXTENSION
after lling out a product survey, at www.danby.com/support/product-registration/
Need Help?
1. Read your Owner’s Manual for installation help, troubleshooting, and maintenance
assistance.
2. Visit www.Danby.com to access self-service tools, FAQs and much more by searching
your model number in the search bar.
3. For the Quickest Customer Service, please ll out the web form at www.danby.com/
support. Your submission will go directly to an expert on your particular appliance.
Our average response times are between 20 minutes and 2 hours, during EST business
hours.
4. Call 1-800-263-2629 - please note that during peak hours, hold times can exceed one
hour.
Model Number: ____________________________________________________
Serial Number: ____________________________________________________
Date of Purchase: __________________________________________________
SAVE THESE INSTRUCTIONS!
IMPORTANT WARNING
DANGER: Risk of child entrapment. Before
thowing away an old appliance:
• Remove the door or lid.
• Leave the shelves in place so that children
cannot easily climb into the appliance.
GROUNDING INSTRUCTIONS
This appliance must be grounded. In the event of an
electrical short circuit, grounding reduces the risk of
electrical shock by providing an escape wire for the
electrical current.
This appliance is equipped with a cord that has a
grounding wire with a grounding plug. The power
cord must be plugged into an outlet that is properly
grounded. If the outlet is a standard 2-prong wall
outlet, it is your responsibility to have it replaced
with a properly grounded wall outlet. The serial
rating plate indicates the voltage and frequency the
appliance is designed for.
WARNING - Improper use of the grounding
plug can result in a risk of electric shock.
Consult a qualied electrician or service agent
if the grounding instructions are not completely
understood, or if doubt exists as to whether the
appliance is properly grounded.
DO NOT USE AN EXTENSION CORD
Do not connect your appliance to extension cords
or together with another appliance in the same wall
outlet. Do not splice the power cord. Do not under
any circumstances cut or remove the third ground
prong from the power cord.
If the power supply cord is damaged, it must be
replaced by the manufacturer, its service agent or
similar qualied person in order to avoid hazard.
SAFETY REQUIREMENTS
Ensure that component parts are replaced with like
components and that servicing is done by factory
authorized service personnel, to minimize the risk of
possible ignition due to incorrect parts or improper
service.
This appliance is not intended for use by persons
(including children) whose physical, sensory or
mental capabilities may be dierent or reduced,
or who lack experience or knowledge, unless such
persons receive supervision or training to operate
the appliance by a person responsible for their
safety.
Children should be supervised to ensure that they
do not play with the appliance.
Do not place items exposed to cooking oils in the
dryer. Items contaminated with cooking oils may
contribute to a chemical reaction that could cause
a load to catch re. To reduce the risk of re due
to contaminated loads, the nal part of a tumble
dry cycle occurs without heat as a cool down
period. Avoid stopping the dryer before the end of
the drying cycle unless items can be immediately
removed and spread out to allow the accumulated
heat to dissipate.
Important Safety Information
READ AND FOLLOW ALL SAFETY INSTRUCTIONS
Items that have been soiled with oil products can ignite spontaneously, especially
when exposed to heat sources such as in a tumble dryer. The items become
warm, causing an oxidation reaction in the oil. Oxidation creates heat. If the heat
cannot escape, the items can become hot enough to catch re. Piling, stacking or
storing items that have been soiled with oil can prevent heat from escaping and
create a re hazard.
2

Important Safety Information
READ AND FOLLOW ALL SAFETY INSTRUCTIONS
• Do not dry articles that have been previously
cleaned in, washed in, soaked in or spotted
with gasoline, dry-cleaning solvents, or other
ammable or explosive substances, as they give
o vapours that could ignite or explode.
• Do not reach into the appliance if the drum is
moving.
• Do not install or store this appliance where it will
be exposed to the weather. This appliance is not
intended for use outdoors.
• Do not tamper with the controls.
• Do not use heat to dry articles containing
foam rubber or similarly textured rubber-like
materials.
• Clean the lint screen before and after each load.
• The interior of the appliance should be cleaned
periodically by qualied service personnel.
• Do not place the appliance or power cord near
heat sources such as radiators, heaters, air ducts
or direct sunlight. Do not place open ames such
as candles on or near the appliance.
• Do not block any ventilation openings. Ensure
that vents are not covered by newspapers,
tablecloths, curtains, carpeting, etc.
• Do not run the power cord under oor
coverings. Keep the power cord away from high
trac areas where it can become a tripping
hazard.
• Do not misuse the power cord. Never carry or
pull the appliance by the power cord. Never
pull the power cord to unplug it from the outlet,
instead, grasp the plug and pull to remove from
outlet.
• Do not operate the appliance if it has a
damaged power cord or plug. If the power
cord is damaged, it must be replaced by the
manufacturer, its service agent or similarly
qualied persons in order to avoid hazard.
SAVE THESE INSTRUCTIONS!
• Do not attempt to repair, disassemble or modify
the appliance. The warranty becomes void if
the unit is not serviced or repaired by qualied
personnel. There are no user-serviceable parts
inside.
• Do not over load the appliance.
• Ensure foreign objects do not nd their way into
the appliance. Remove all objects from pockets
such as lighters, matches, hairpins, coins, etc.
• The door window may be hot after a long drying
cycle. Ensure that children are kept away from
the appliance.
• Opening the door before the cooling process is
nished may expose you to hot air.
• If the dryer is not stack mounted using the
provided kit, ensure that it is placed on a at,
rm surface in a dry, well-ventilated place. Use
the adjustable front legs to assist in leveling
the appliance if necessary. Do not place the
appliance on any soft material such as foam,
plastic or carpeting.
• After turning the power o, wait 2 minutes
before attempting to turn the unit back on.
• Remove the transport packaging from the back
of the unit before rst use.
• Do not install this appliance behind a lockable
door, a sliding door or in such a way that opening
the dryer door is restricted. Do not install in a
tight tting cabinet.
• Use this appliance only for laundry with a label
that indicates it is suitable for drying.
• Never spray or pour water onto the dryer to clean
it.
3
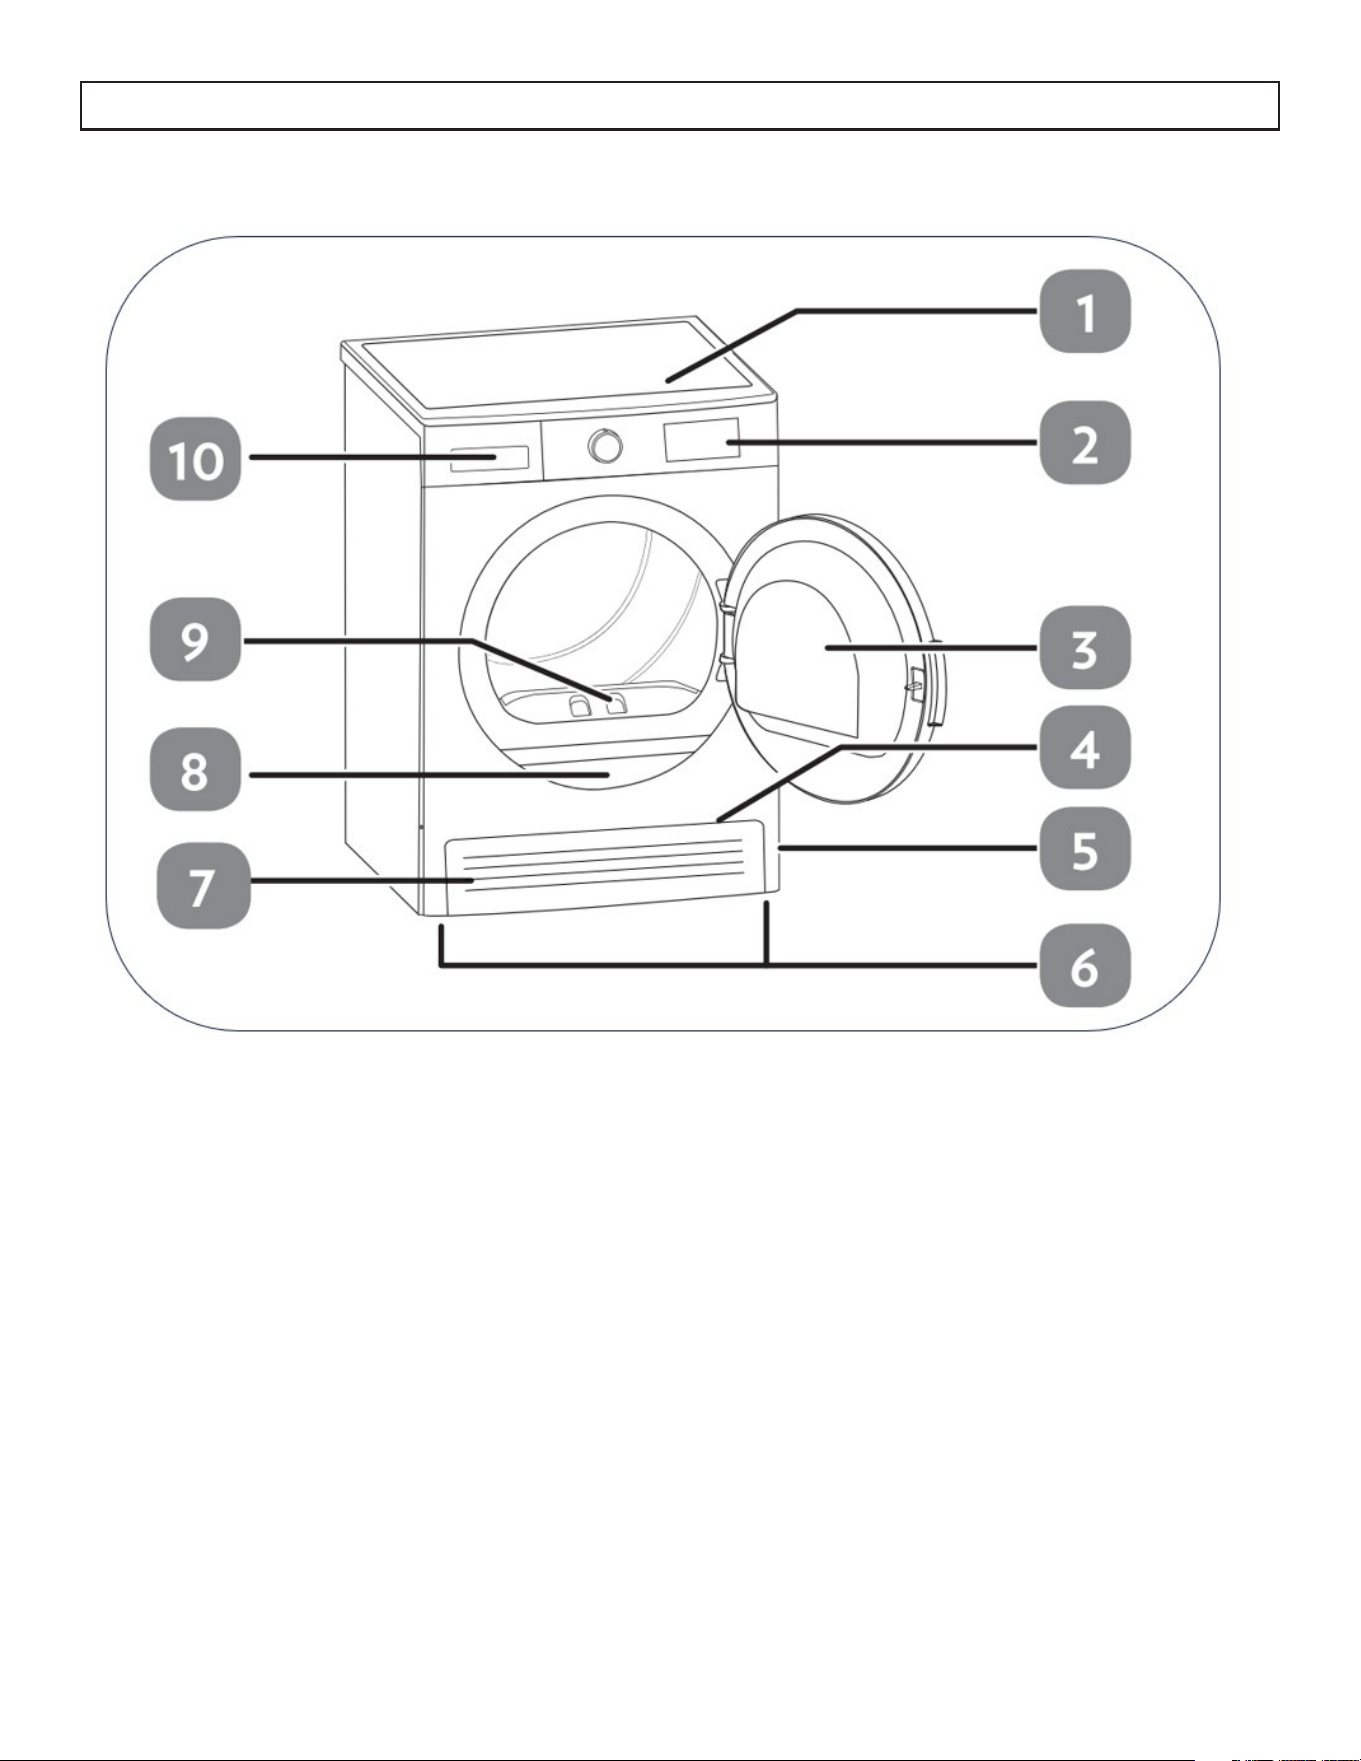
INSTALLATION INSTRUCTIONS
4
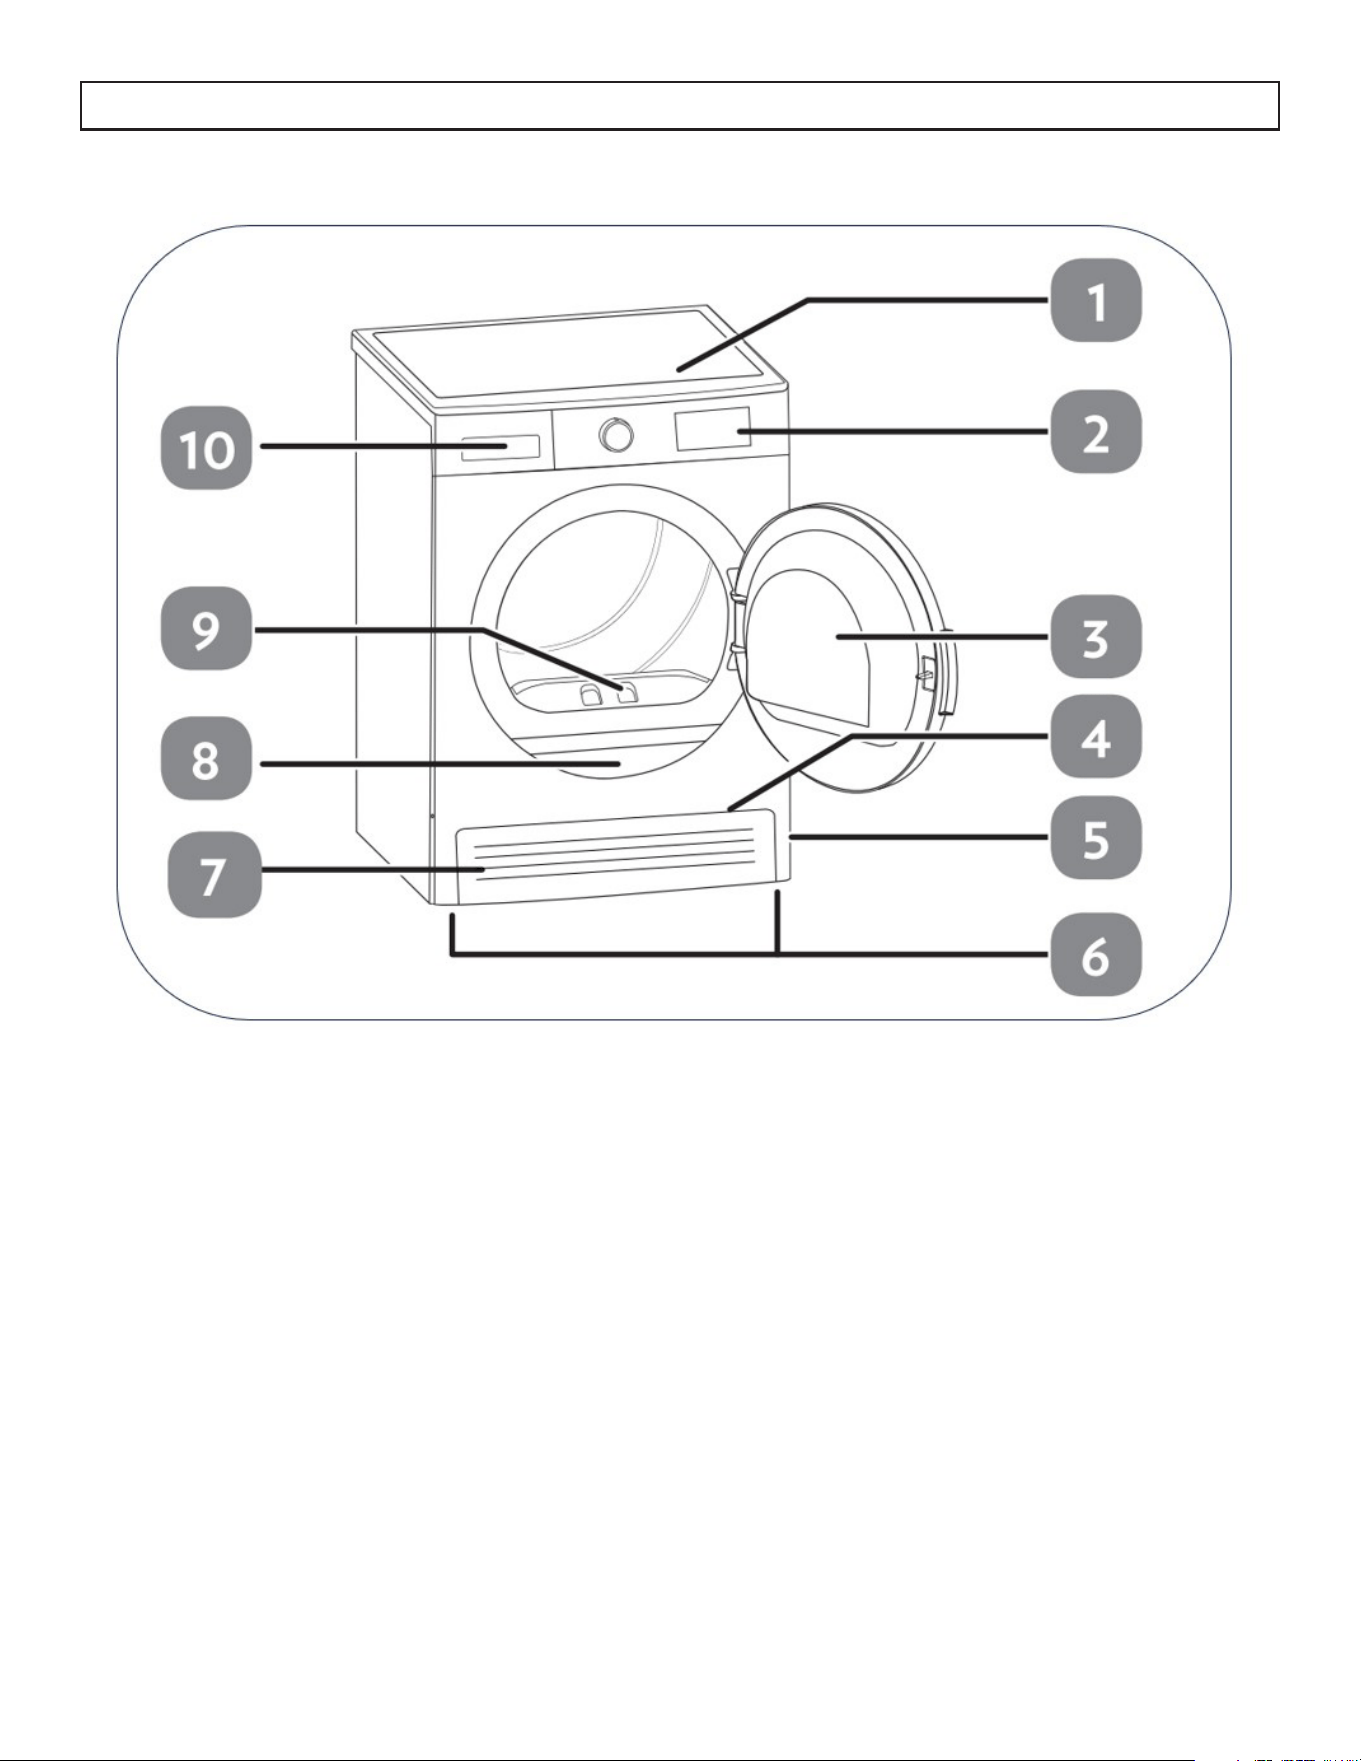
1. Dryer Top
2. Control Panel
3. Dryer Door
4. Ventilation Grills
5. Plinth Opening Slot
6. Leveling Legs
7. Plinth
8. Ratings Plate
9. Lint Filter
10. Drawer Cover

IMPORTANT
To stack the dryer on the washing machine, use the
stacking kit included with the dryer, between the
two appliances. The stacking kit must be attached
following the instructions provided.
For stacked installation, ONLY the provided stacking
kit & instructions, MUST be used. If a stacking kit
with instructions, was not included in the dryer
package, contact customer service to acquire.
INSTALLATION INSTRUCTIONS
LOCATION
Check the information in the user manual to make
sure that th electrical installation and water outlet
is suitable. If they are not, call a qualied electrician
and a plumber to have the necessary adjustments
made.
It is the customer’s responsibility to prepare the
dryer’s installation place, as well as the electricity
and waste water installation. Before installation,
check the dryer for damage. If damaged to not have
it installed. Damaged products may endanger your
health.
• Install the dryer on a stable and at surface.
• Run the dryer in a dust-free environment where
the air ventilation is good.
• The clearance between the dryer and the oor
should not be reduced with objects such as
carpets, wood or tape.
• Do not block the ventilation grills found on the
plinth of the tumble dryer.
• The appliance must not be installed behind a
lockable door, a sliding door or a door with a
hinge on the opposite side of the dryer, in such
a way that blocks the full opening of the dryer
door.
• Once installed, the connections must remain
stable. When installing the dryer, make sure that
the rear surface is not leaning on anything (e.g.
tap, socket).
• The operating temperature of the dryer is 41°F
to 95°F (5°C to 35°C). If operated out of this
temperature range, the performance of the dryer
will be aected negatively and the product will
be damaged.
• Be careful when carrying the product as it is
heavy. Always were safety gloves.
• Always install the product against a wall. The rear
surface of the product should be placed against
the wall.
• Leave at least 1 inch (3 cm) of space between the
sides and rear of the appliance.
5
• The dryer must be level to operate more
quietly and without vibration. Use a level when
adjusting the leveling legs.
• When the dryer is placed on a stable surface, to
ensure stability, use a level. If not level, adjust the
leveling legs to level the appliance. Repeat this
process every time you relocate the product.
• Do not place the dryer onto the power cable.
• Install the clothes dryer according to the
manufacturer’s instructions and local codes.
ELECTRICAL CONNECTION
The dryer is set to 208-240 V and 60 HZ.
The dryer cable is equipped with a special plug.
This plug must be connected to a grounded outlet
protected by a 16 Amp fuse or breaker as indicated
on the ratings plate. The fuse/breaker rating of the
power line to which the outlet is connected must
also be 16 Amps. Consult a qualied electrician if
you do not have the correct outlet, fuse, or breaker.
Our company cannot be held responsible for
damages resulting from usage with grounding.
INSTALLATION INSTRUCTIONS
6
CONNECTION TO WATER OUTLET (with
optional drain hose)
In appliances with a condenser unit, water
accumulates in the water tank during the drying
process. The accumulated water must be emptied
after each drying cycle. There is an option of using
a water drain hose to directly drain the water which
replaces the requirement to manually drain the
water tank.
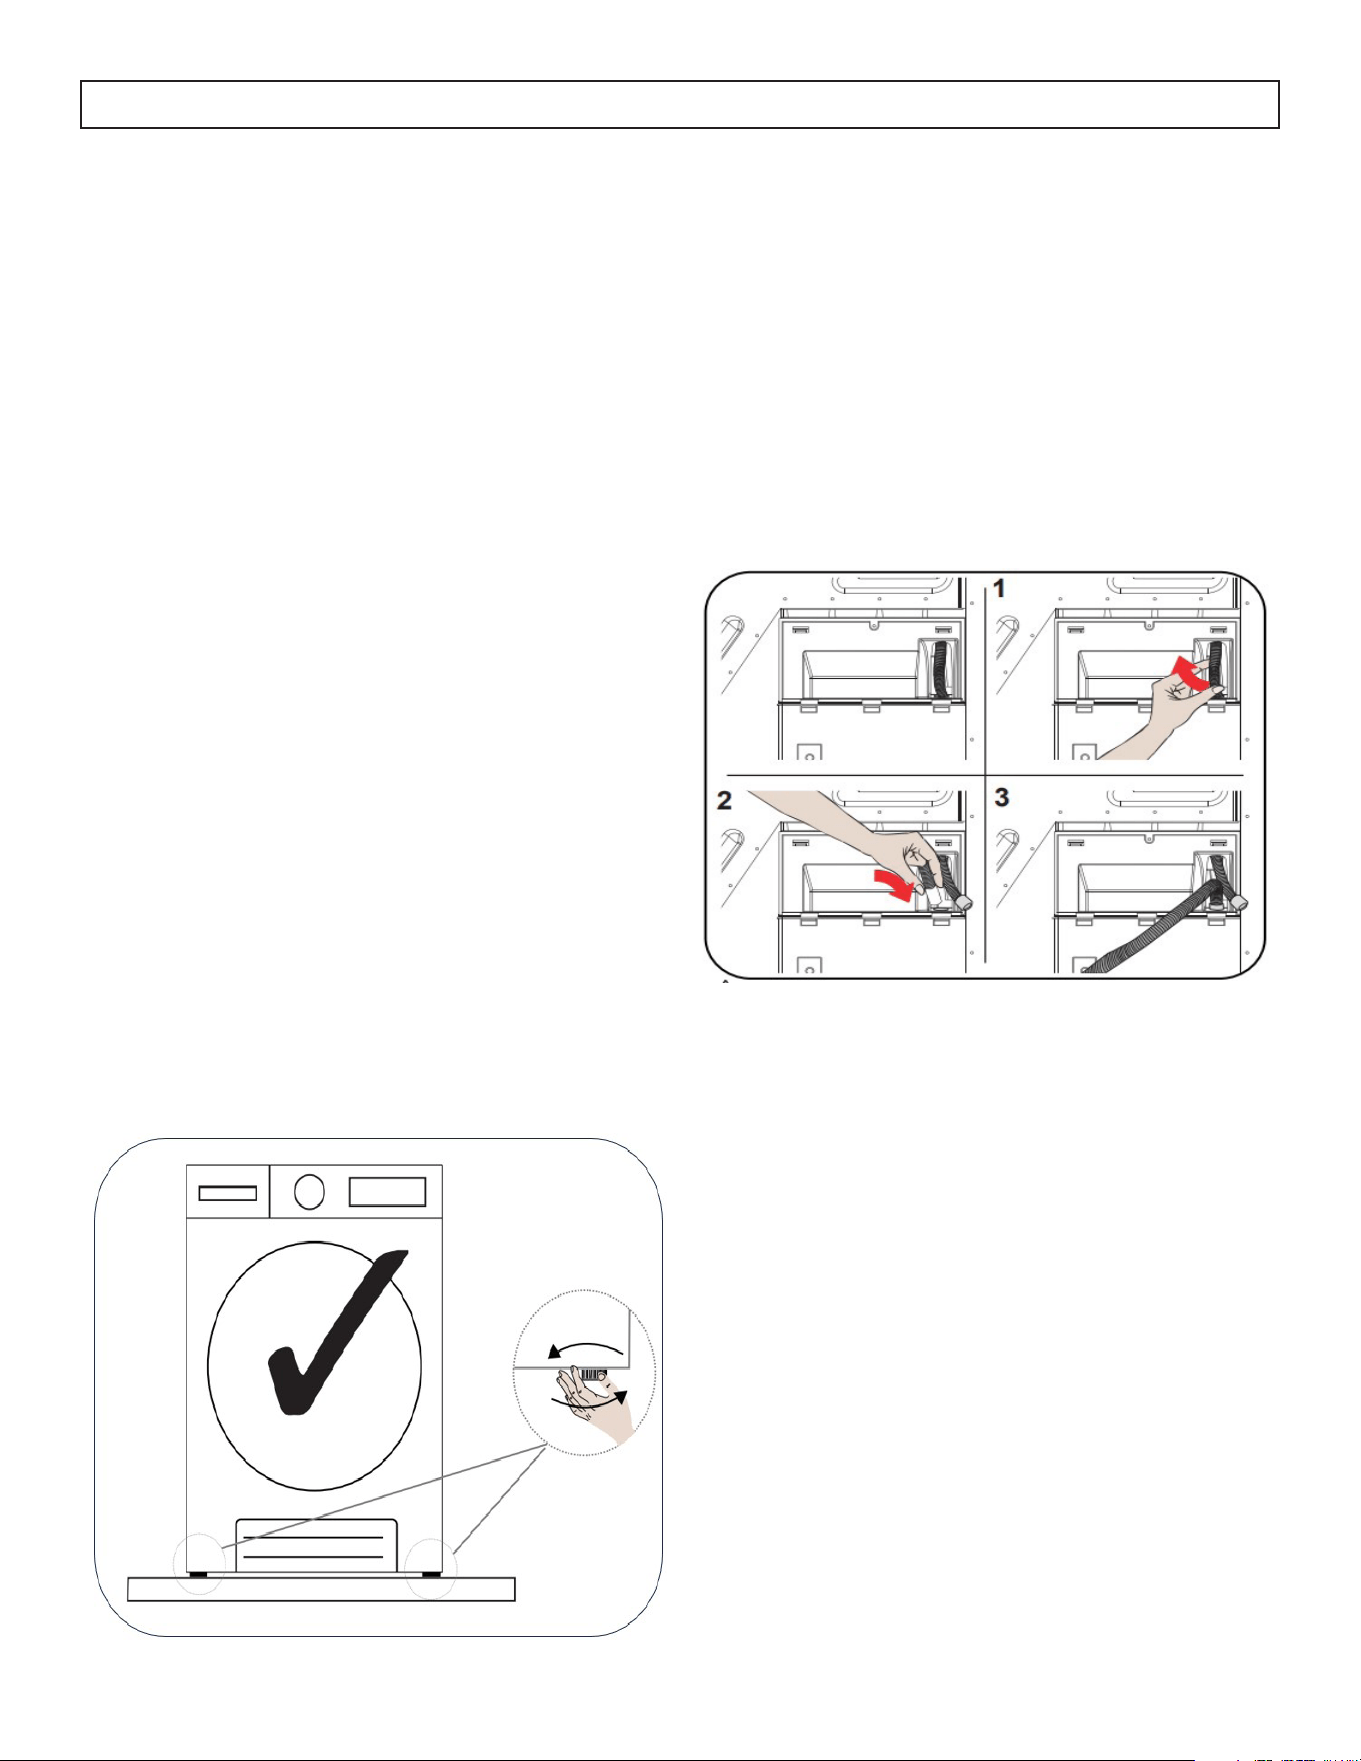
Connecting the Water Drain Hose
Pull and take out the end of the hose at the back of
the dryer. Do not use any tools to take out the hose.
Fit one end of water drain hose to the slot where you
removed the hose.
Fix the other end of the water drain hose directly to
the water oulet or sink.
NOTE:
The hose must be connected in a manner that it
cannot be displaced. If the hose is displaced while
draining it can result in ooding in the home.
NOTE:
The water drain hose must be installed at a height of
31.5 inches(80 cm) maximum.
NOTE:
The water drain hose must not be bent, folded or
stepped over.
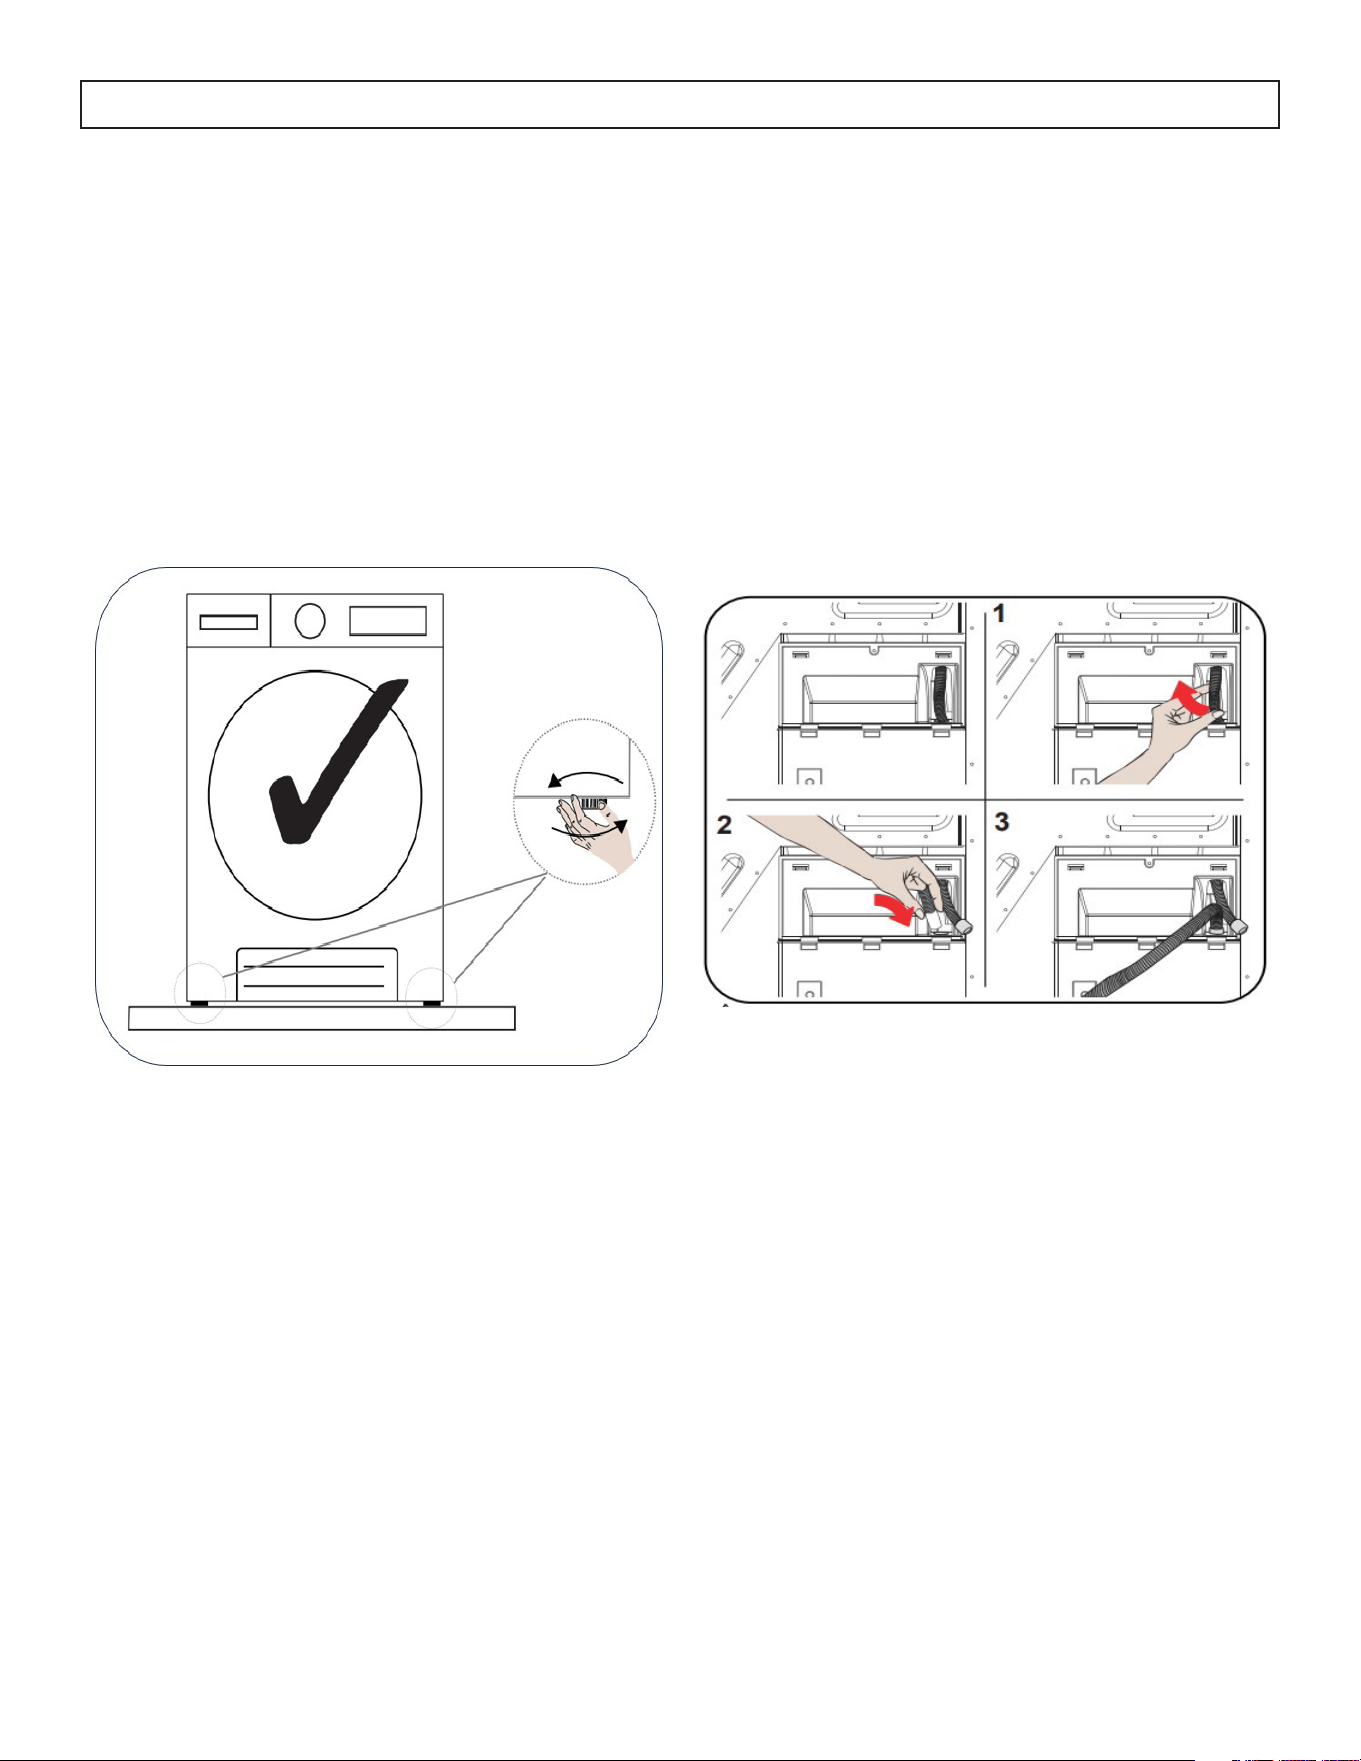
LEVEL THE APPLIANCE
There are four leveling legs, one the each of the four
corners of the appliance.
Adjust each leveling leg by turning it to the left or
right until the dryer is level and balanced.
The applianced should not be placed on sloping,
crooked or uneven oors.
7
OPERATING INSTRUCTIONS
OPERATING INSTRUCTIONS
• Dry items of similar fabric & fabric weight for
more even drying performance. If you must dry a
mixed fabric load, timed dry is recommended for
better drying performance.
• For best drying performance, do not dry small
items with bulky items such as duvets etc. It is
best to dry these in separate loads.
• It is recommended that items be added to the
dryer one at a time to avoid tangling which can
result in uneven drying.
• Check the pockets of all items to be dried, ensure
that foreign objects do not enter the unit such as
lighters, hair pins, coins, etc.
• Tie fabric belts, apron laces etc. to each other or
use a laundry bag.
• To get the best drying result, sort the laundry
according to the textile type and drying program.
• Dryer heat may permanently set stains, ensure all
stains are removed prior to putting items in the
dryer.
• Woven goods such as t-shirts and knit clothes
generally shrink in the rst drying. Use a
protective program.
• Do not over-dry synthetics. This will cause
creases.
• Do not add items to the dryer when it is in
operation.
• If drying large items such as blankets or heavy
loads of laundry, it is recommended that you
periodically pause the program, open the dryer
door, shake the large item or turn over the heavy
load and then restart the drying cycle. This will
ensure even drying.
• The appliance cannot function while the door is
open. Once the door is closed, press the Start/
Pause button to resume operation.
IMPORTANT
Delicate fabrics, embroidered fabrics, woolen/silk
fabrics, clothes made of delicate and expensive
fabrics, airtight clothes and tulle curtains are not
suitable for drying in the dryer.
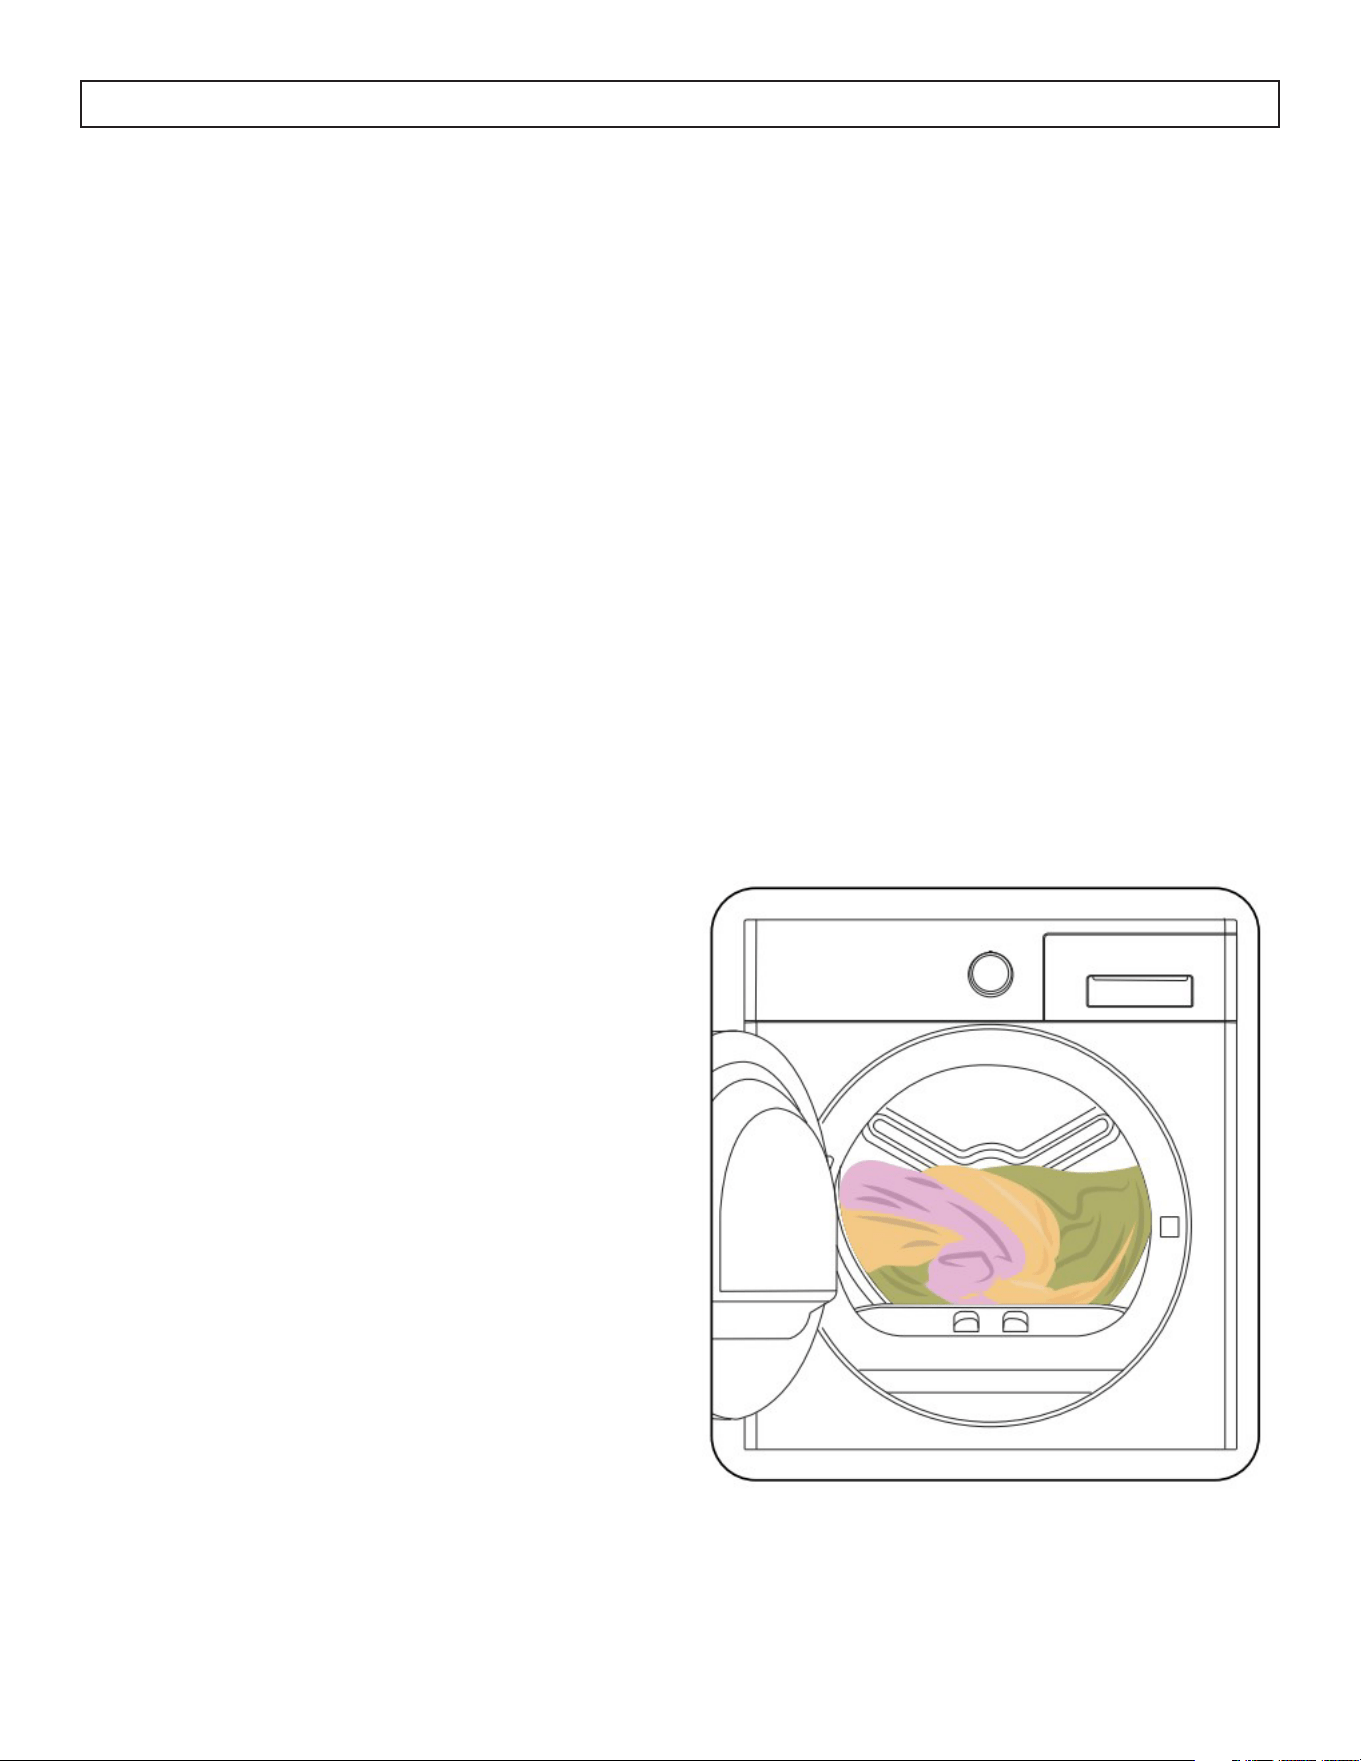
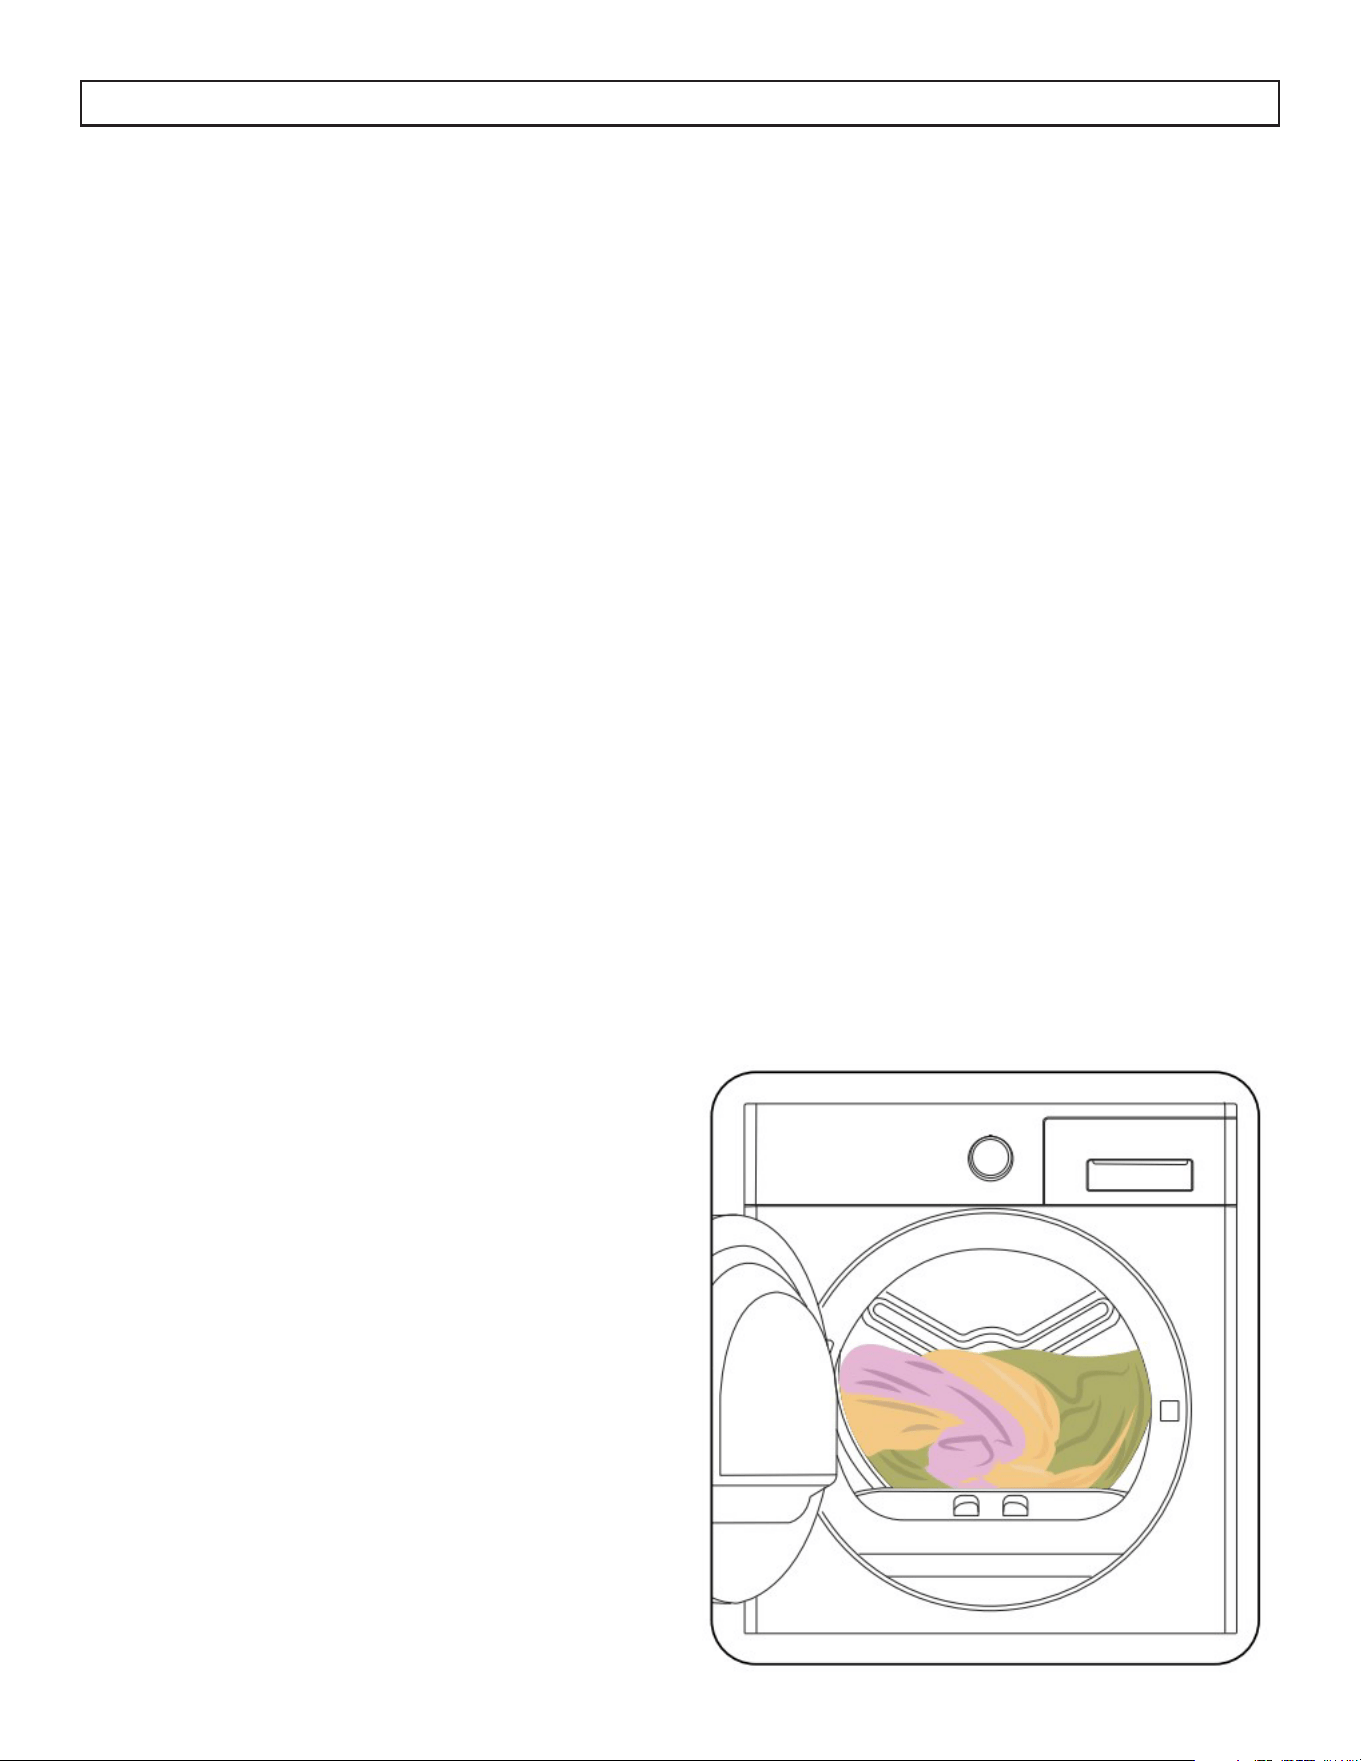
LOAD CAPACITY
It is not recommended to load the dryer with more
laundry than the amount shown in the gure below.
When overloaded, the drying performance of the
dryer will decrease resulting in possible damage to
the dryer and the laundry.
OPERATING INSTRUCTIONS
8
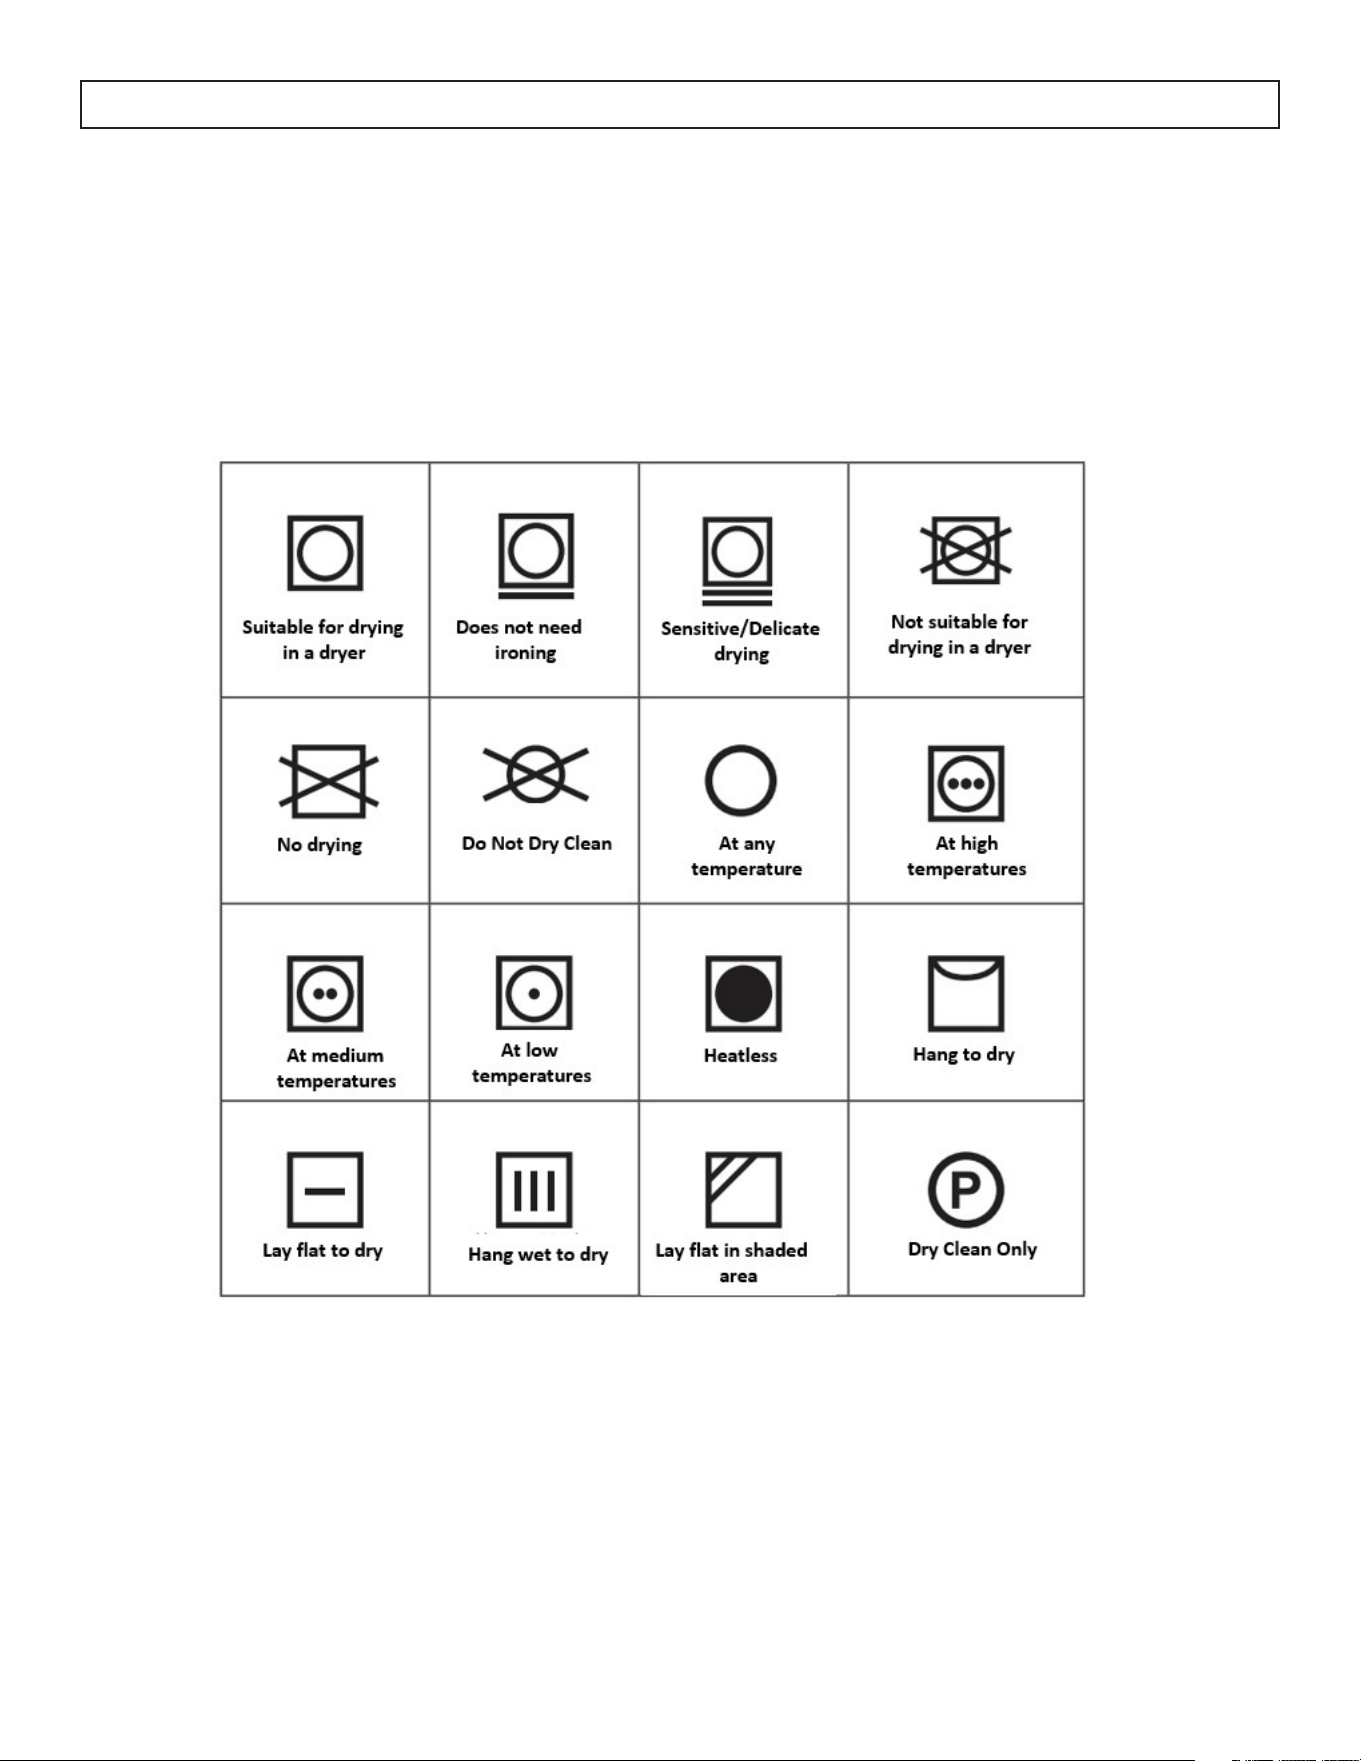
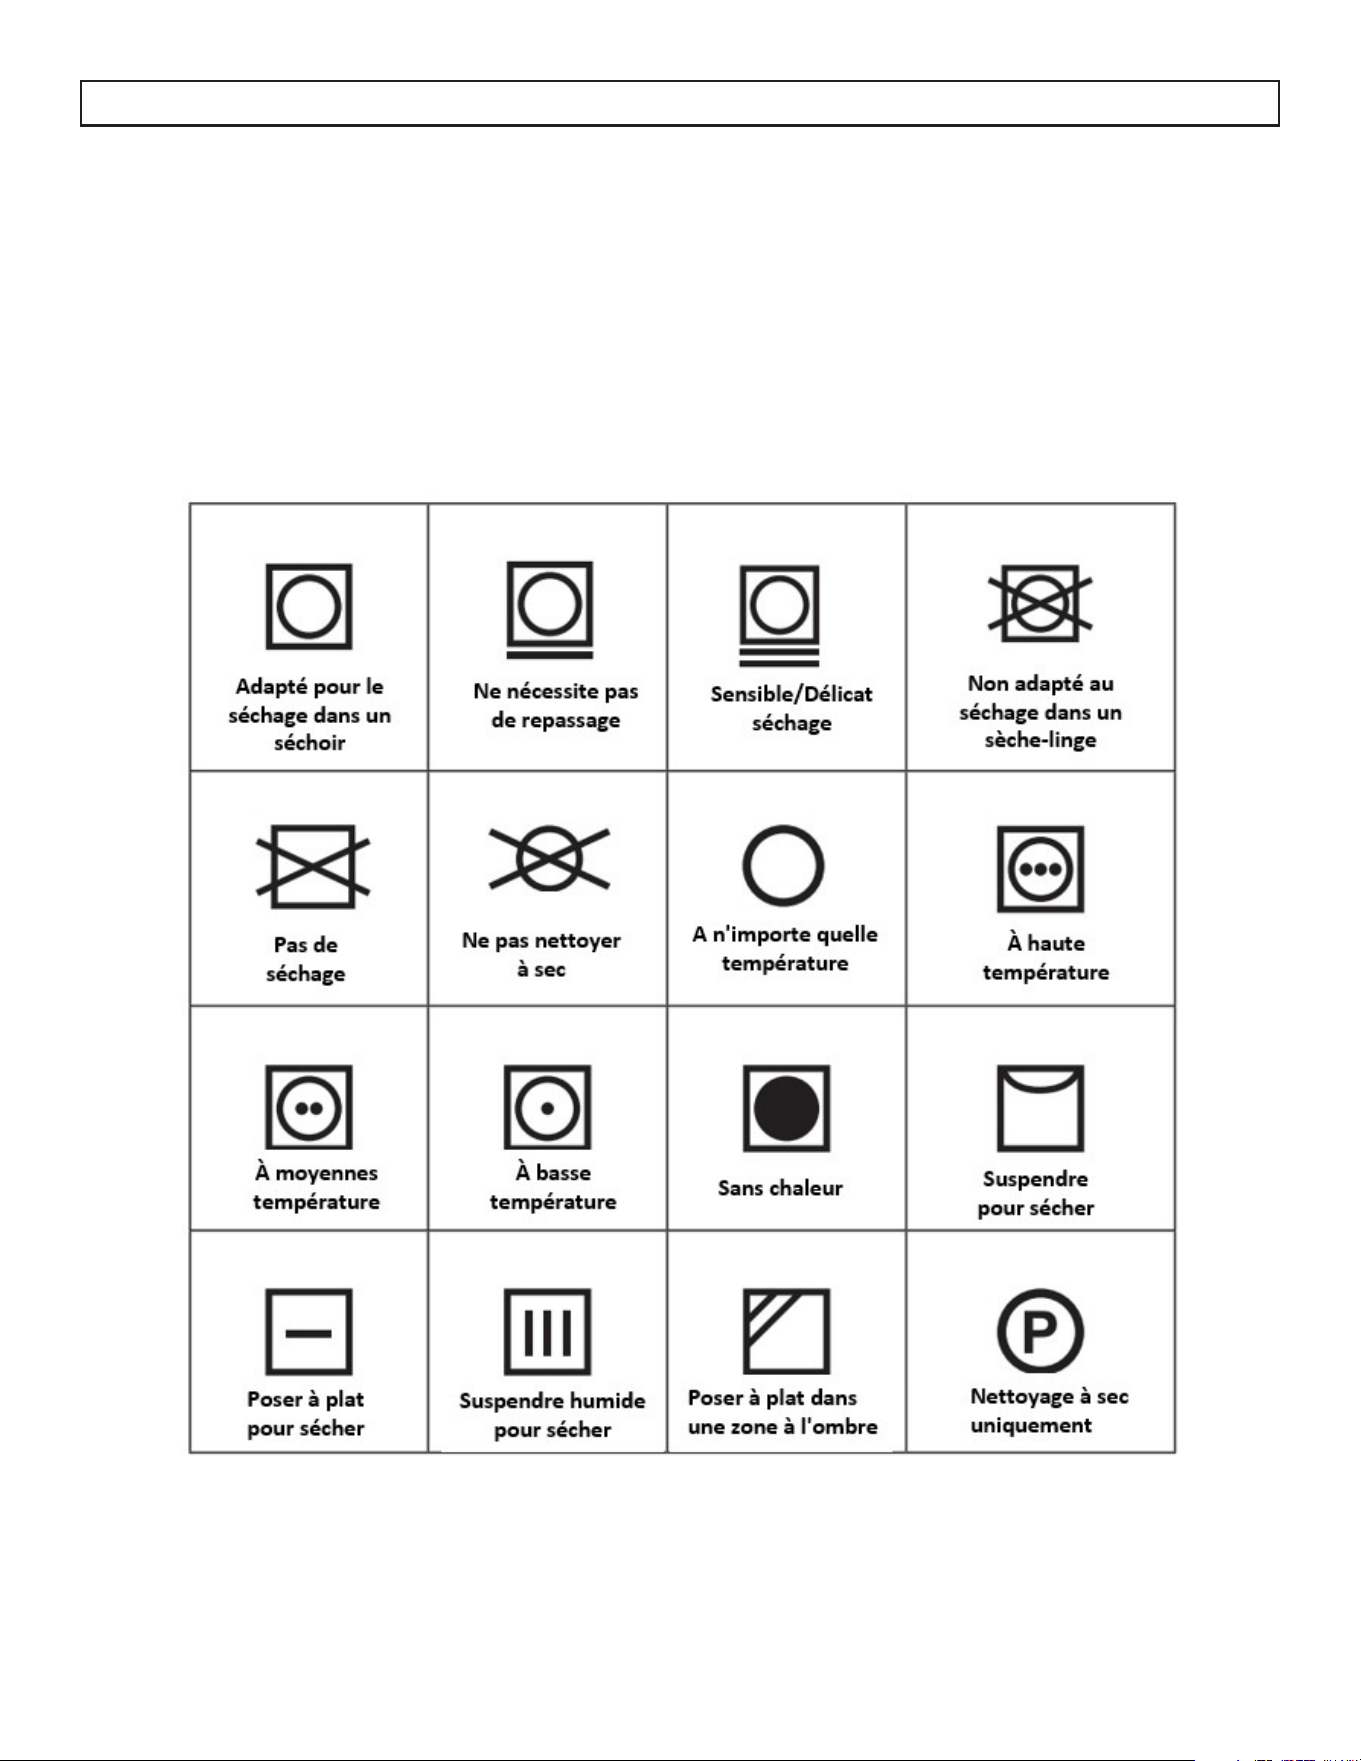
Follow the instuctions on the labels of the laundry to be dried. Only dry items that have a statement/symbol
that indicates they can be dried in a dryer.
OPERATING INSTRUCTIONS
9
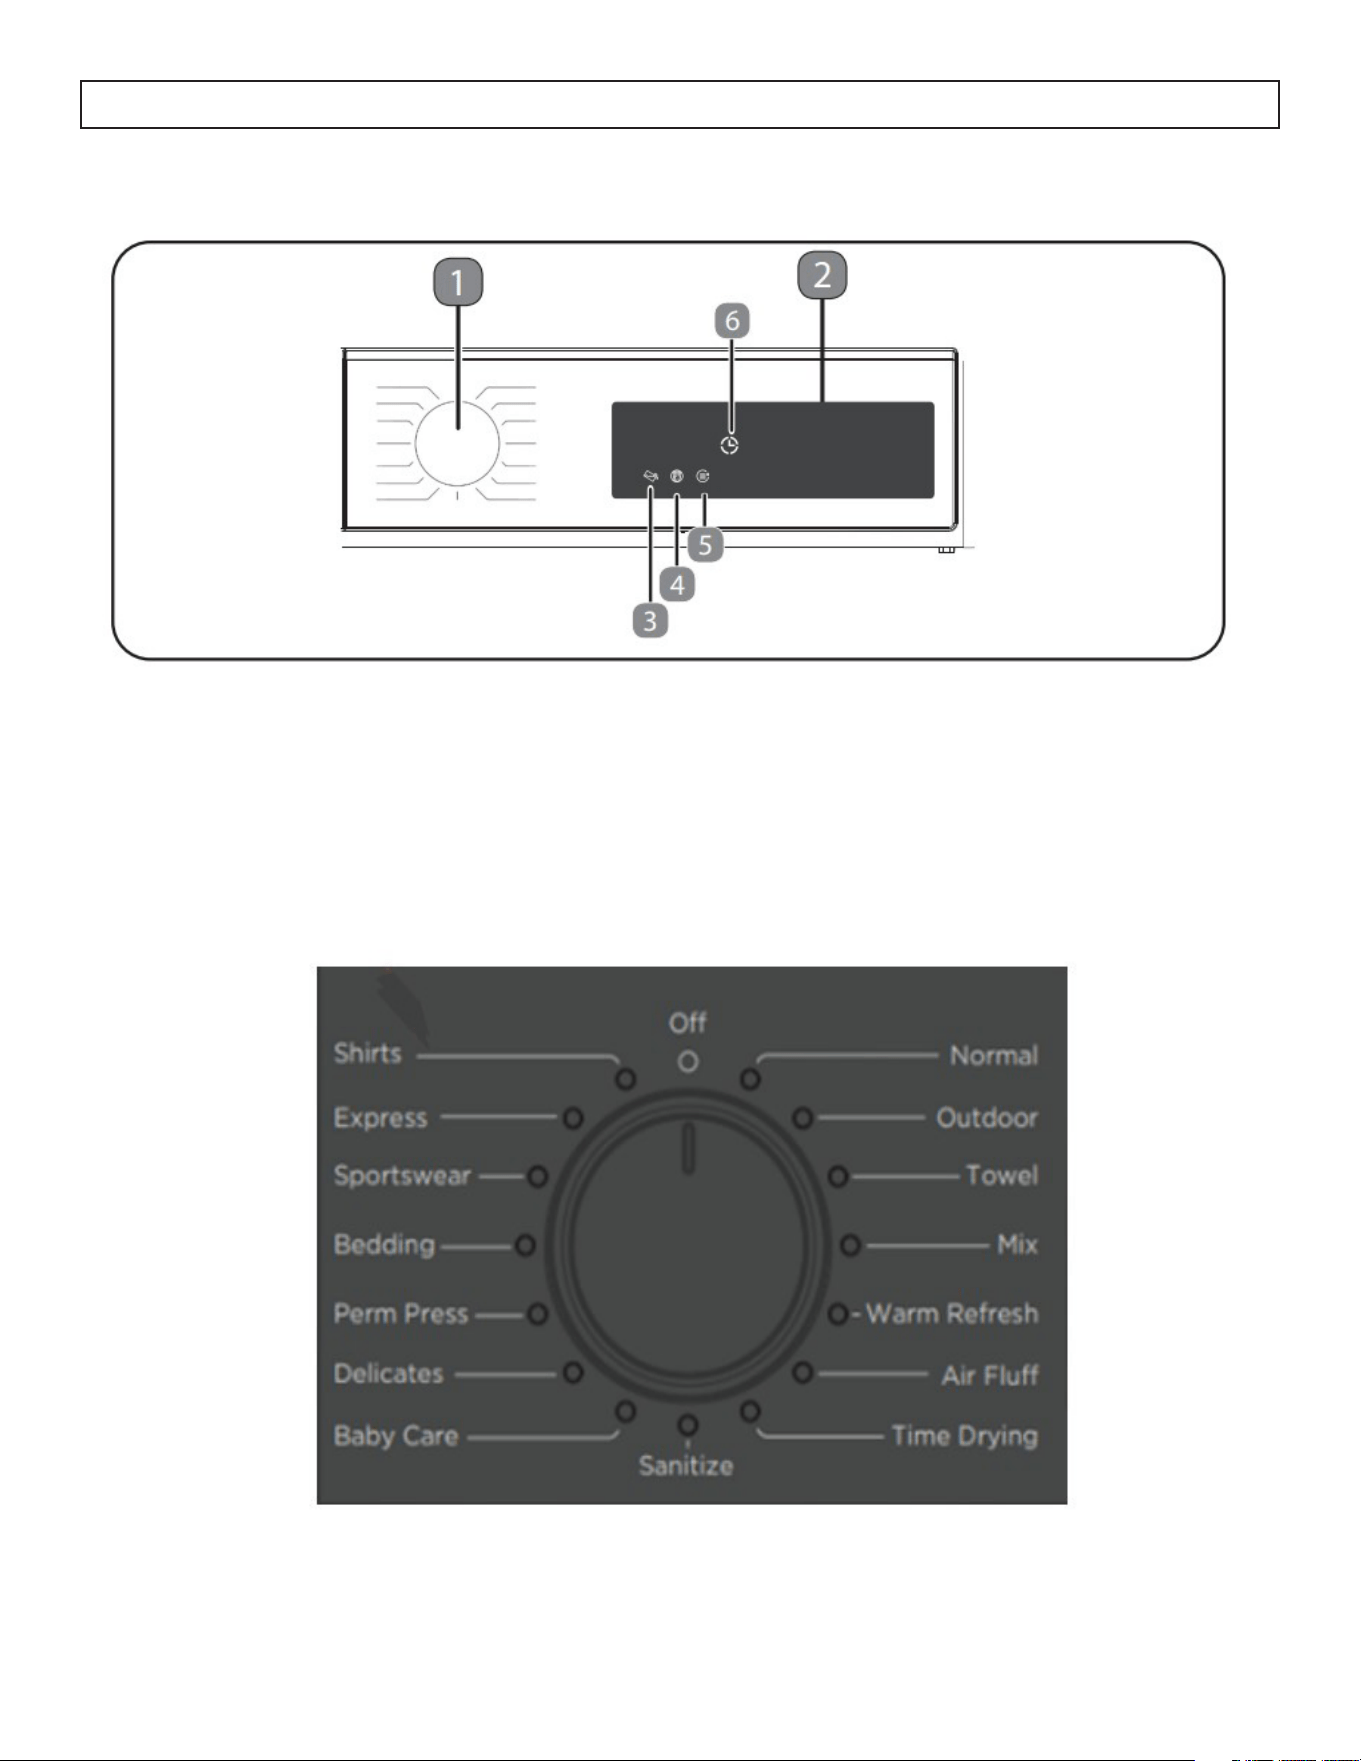
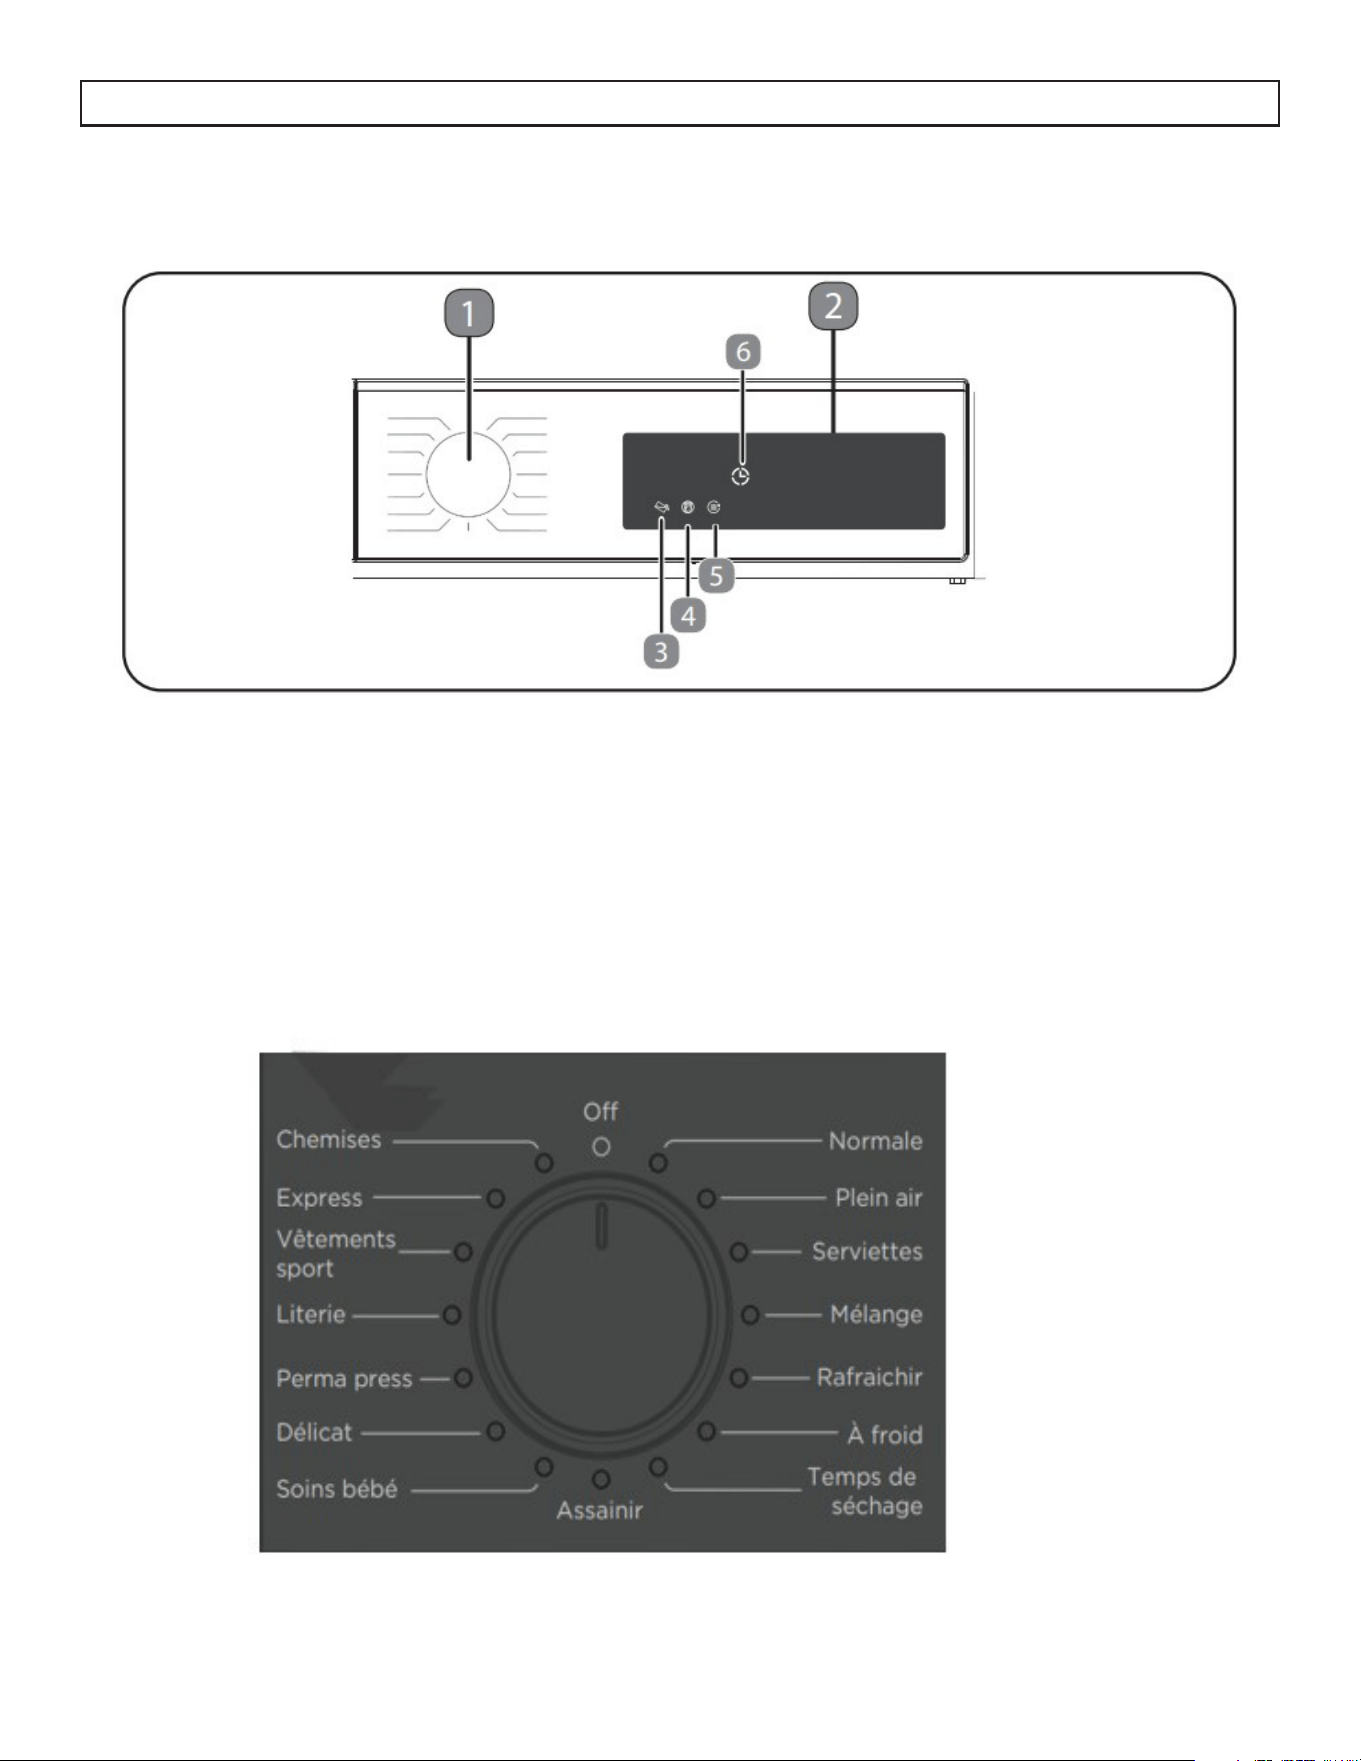
CONTROL PANEL
1. Program Selection Knob
• Use the program selection knob to select the desired drying program.
10
OPERATING INSTRUCTIONS
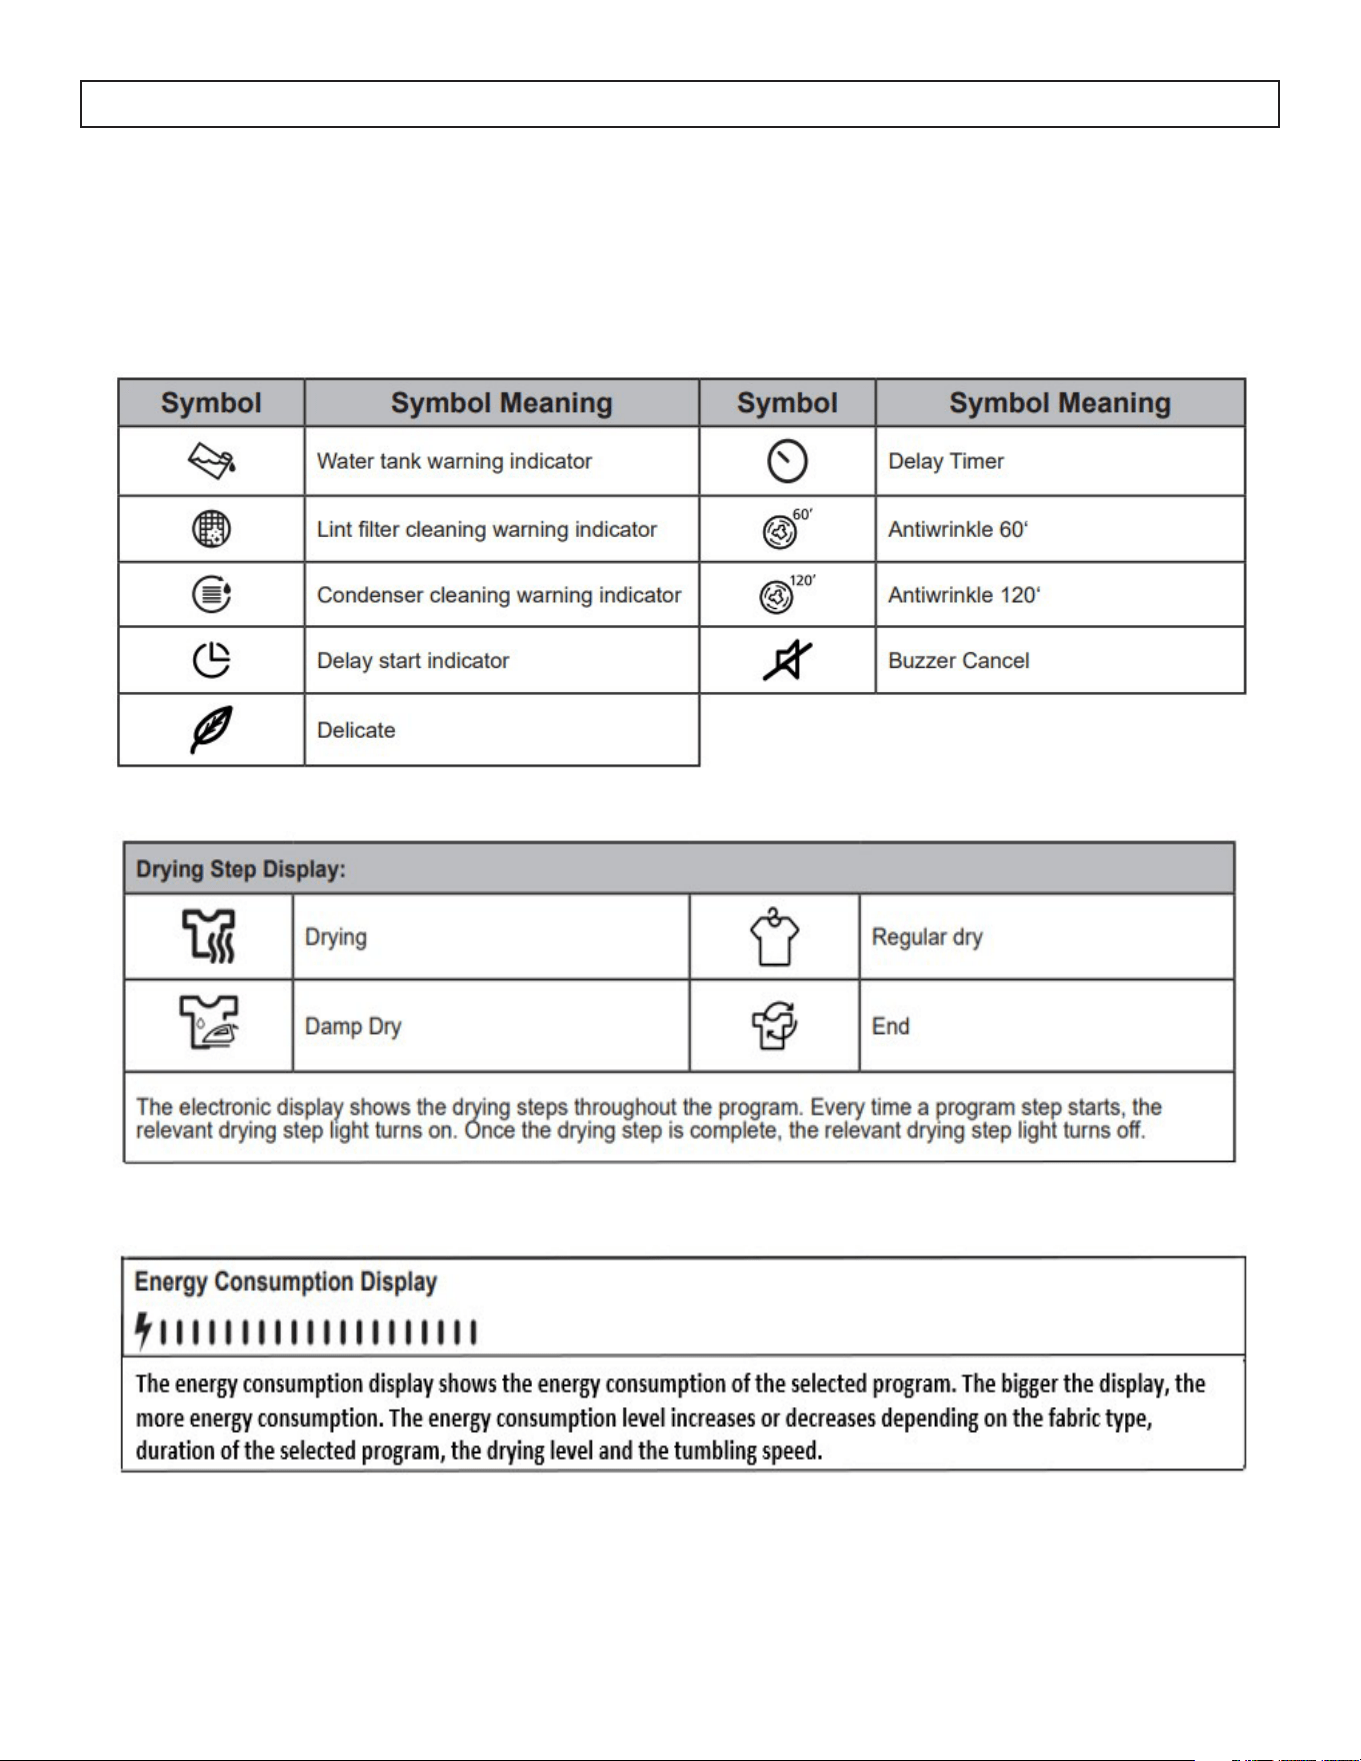
2. Electronic Indicator Display
OPERATING INSTRUCTIONS
11
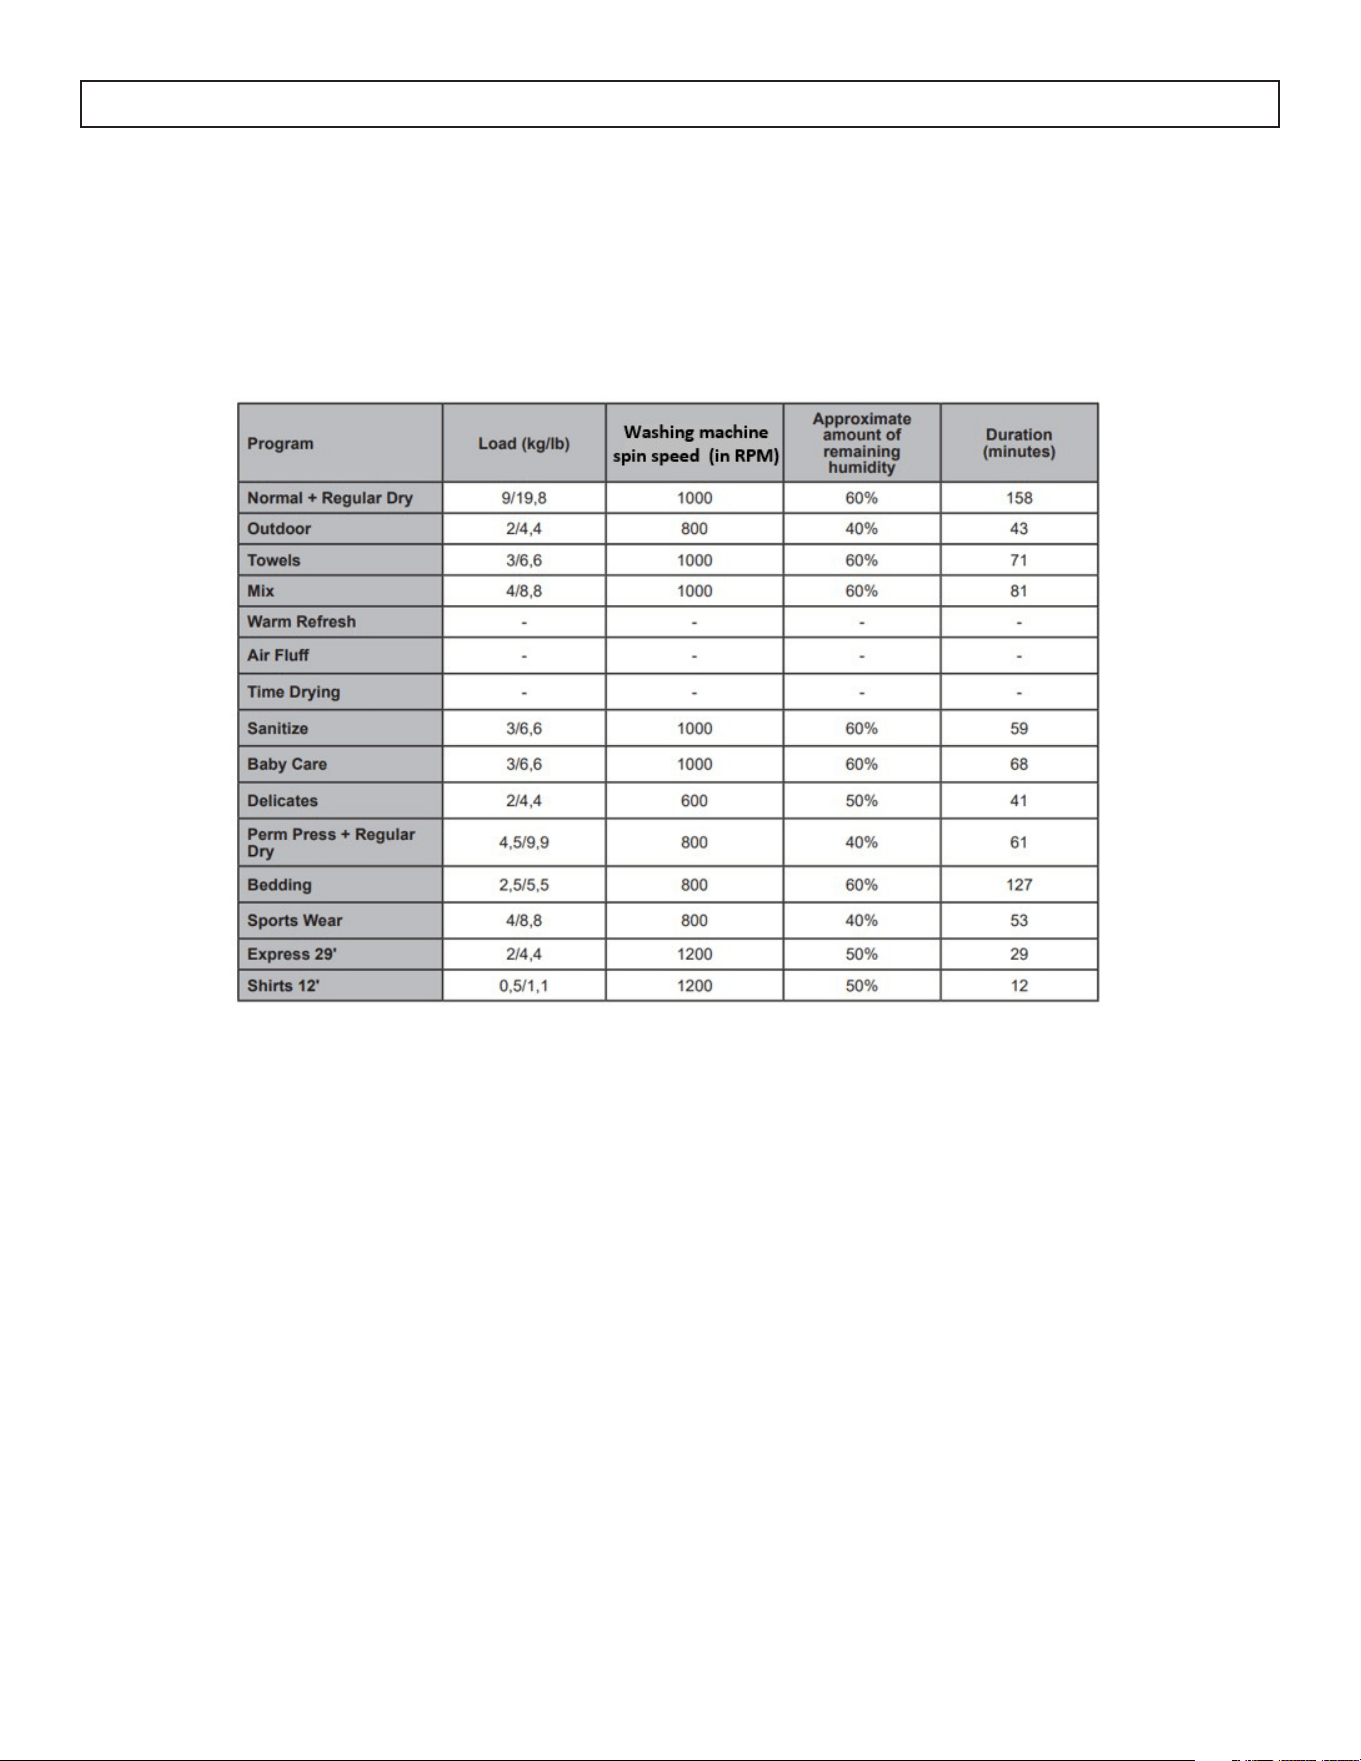
Program Selection and Consumption Table
Press the Start/Pause button to start the program. The Start/Pause LED that indicates the program has
started and the Drying LED will come on.
NOTE
Not all programs listed available on all dryers
Auxiliary Functions
Drying Level
Select the drying target suitable for your laundry.
• Select Extra Dry for thick and multilayer laundry that takes time to dry.
• Select Regular Dry for regular, single-layer laundry.
• Select Damp Dry for laundry that you wish to leave damp, ready for ironing.
Level Adjustment
The dampness level obtained after drying can be increased by another 3 levels in addition to the standard
setting. This way, it is ensured that the laundry is drier. Levels can be selected apart from the standard
setting.
+1 (low)
+2 (medium)
+3 (high)
After selection, the light of the relevant drying level illuminates.

12
OPERATING INSTRUCTIONS
Delicate Drying
Delicate fabrics are dried in a longer time at a low temperature.
Delayed Start
Delay the start of a program by selecting a time between 1 and 23 hours. You can press Start/Pause to
activate the desired delay time. When this time has elapsed, the selected program will start automatically.
During the delay time, options compatible with the program can be activated/deactivated. If you press and
hold the Delayed Start button, the delay time will change continuously.
Cancel Audible Warning
The dryer will give an audible warning when the buttons are pressed, when the program selection knob
is turned and when the program ends. To cancel the audible warnings, press and hold the “Antiwrinkle
Option” for 3 seconds. When you press this button, you will hear an audible warning that indicates that the
option has ben activated and the audible warnings stated will be cancelled.
Time Drying
If the program knob is turned to Time Drying, press the Time Drying option button to select it, pres Start/
Pause to start the program.
Child Lock
There is a child lock option to avoid changes in the selected program when keys are pressed during the
program cycle. To activate the child lock feature, press “Options” and “Anti-wrinkle” buttons simultaneiously
for 3 seconds. When the child lock is activated, all keys will be deactivated. Child lock is not automatically
deactivated at the end of the program.
To deactivate the child lock at the end of the program, set the program selection knob to the “O” position,
then to the rst position. Child Lock is still active. To deactivate , press “Options” and “Anti-wrinkle” buttons
simultaneously for 3 seconds. When activating/deactivating “CL will appeare on the display for 2 seconds
and then turns o. An audible warning will sound.
WARNING
When the dryer is running or the child lock is active, if you turn the program selection knob, you will hear
an audible warning and “CL” will visualize on the display for 2 seconds and then turn o. If you turn the
program selection knob, you will hear an audible warning. Even if you set the program knob to another
program, the previous program will continue to run. To select a new program, deactivate the child lock and
then set the program selection knob.
Anti-wrinkle
If you do not open the door of the dryer at the end of the program, the anti-wrinkle option will be active for
60 minutes except for the normal program. When the anti-wrinkle option is selected it, will be active for 120
minutes.
Temperature Level
For the laundry to be dried, temperature level can be adjusted with low, medium and high options.
NOTE
Not all options listed are available on all models

OPERATING INSTRUCTIONS
13
Starting the Program
The Start/Pause LED will ash during program
selection. Press the Start/Pause button to start the
program. The Start/Pause LED indicates that the
program has started and the drying LED will come
on.
NOTE
Not all programs listed available on all dryers
Normal
Suitable for cotton laundry including bedsheets,
pillowcases, pyjamas, underwear, tablecloths etc.
Outdoor
Suitable for outdoor clothing, waterproof jackets,
jackets with inner insulation, etc.
Towels
Suitable for thick cotton laundry such as towels,
bathrobe, etc.
Mix
Suitable for cotton-synthetic mixed garments that
do not discolour to make them ready to wear.
Warm Refresh
Helps wool textiles to remove excess water after
washing by applying low temperature and gentle
tumbling of the drum.
Air Flu
Used to remove bad odors with 10 minutes of
tumbling without heat.
Time Drying
To reach the required drying level at a low
temperature, you can use the time programs of 10
min. to 150 min. Regardless of the drying level, the
program stops at the desired time.
Sanitize
Suitable for fabrics which need hygiene
requirements.
Baby Care
Provides hygienic drying for delicate infant clothes at
a low temperature.
Delicates
This program dries delicate clothing/fabrics
like shirts, blouses, and silk garments at a low
temperature to make them ready to wear.
Perm Press
Dries synthetics such as shirts, t-shirts, blouses
at a lower temperature compared to the cottons
program.
Bedding
Used to dry single duvet with feathers, down or
synthetic llings.
Sports Wear
Used for synthetic sport garments like shorts, t-shirts
at low temperature.
Express
2 Kg (4.4 lbs) of cotton shirts spun at a hig speed in
the washing machine are dried in 29 minutes.
Shirts
2 - 3 shirts are ready to be ironed in 12 minutes.
IMPORTANT
Do not open the dryer door while the program is
running. If you have to open the door, do not keep it
open for a long time.

14
OPERATING INSTRUCTIONS
Selection Stand By
After 15 minutes without user action in selection
mode, the dryer goes to energy-saving mode
due to decreased energy consumption. No LED
activationon display. While in energy saving mode,
dial LED remains on while selection will not appear
in Display.
To restart the dryer it will be necessary to move
turn the knob to the OFF position and re-select the
program.
During the Program
If the door is opened while a program is running, the
dryer will switch to standby mode. Once the door
is closed, press the Start/Pause key to resume the
program.
Do not open the dryer door when the program is
running. If you have to open the door, do not keep it
open for a long time.
Program End
At the end of the drying cycle, the warning LEDs
for Start/Pause, water tank level, lter cleaning and
condenser cleaning will turn on and an audible
warning will sound. The laundry can now be
removed from the dryer.
NOTE
Clean the lter and empty the water tank after each
use.
NOTE
If the laundry is not removed from the dryer after the
program has ended, the 1-hour Anti-wrinkle cycle
will automatically be activated. This program roates
the drum at regular intervals to prevent creases.
Drum Light Information
This product includes an LED Drum Light. The light
works automatically when you open the door. It will
turn o automatically if door is left open.
NOTE
• The dryer light cannot be turned on or o by
user.
• Do not try to replace or modify the LED light.
15
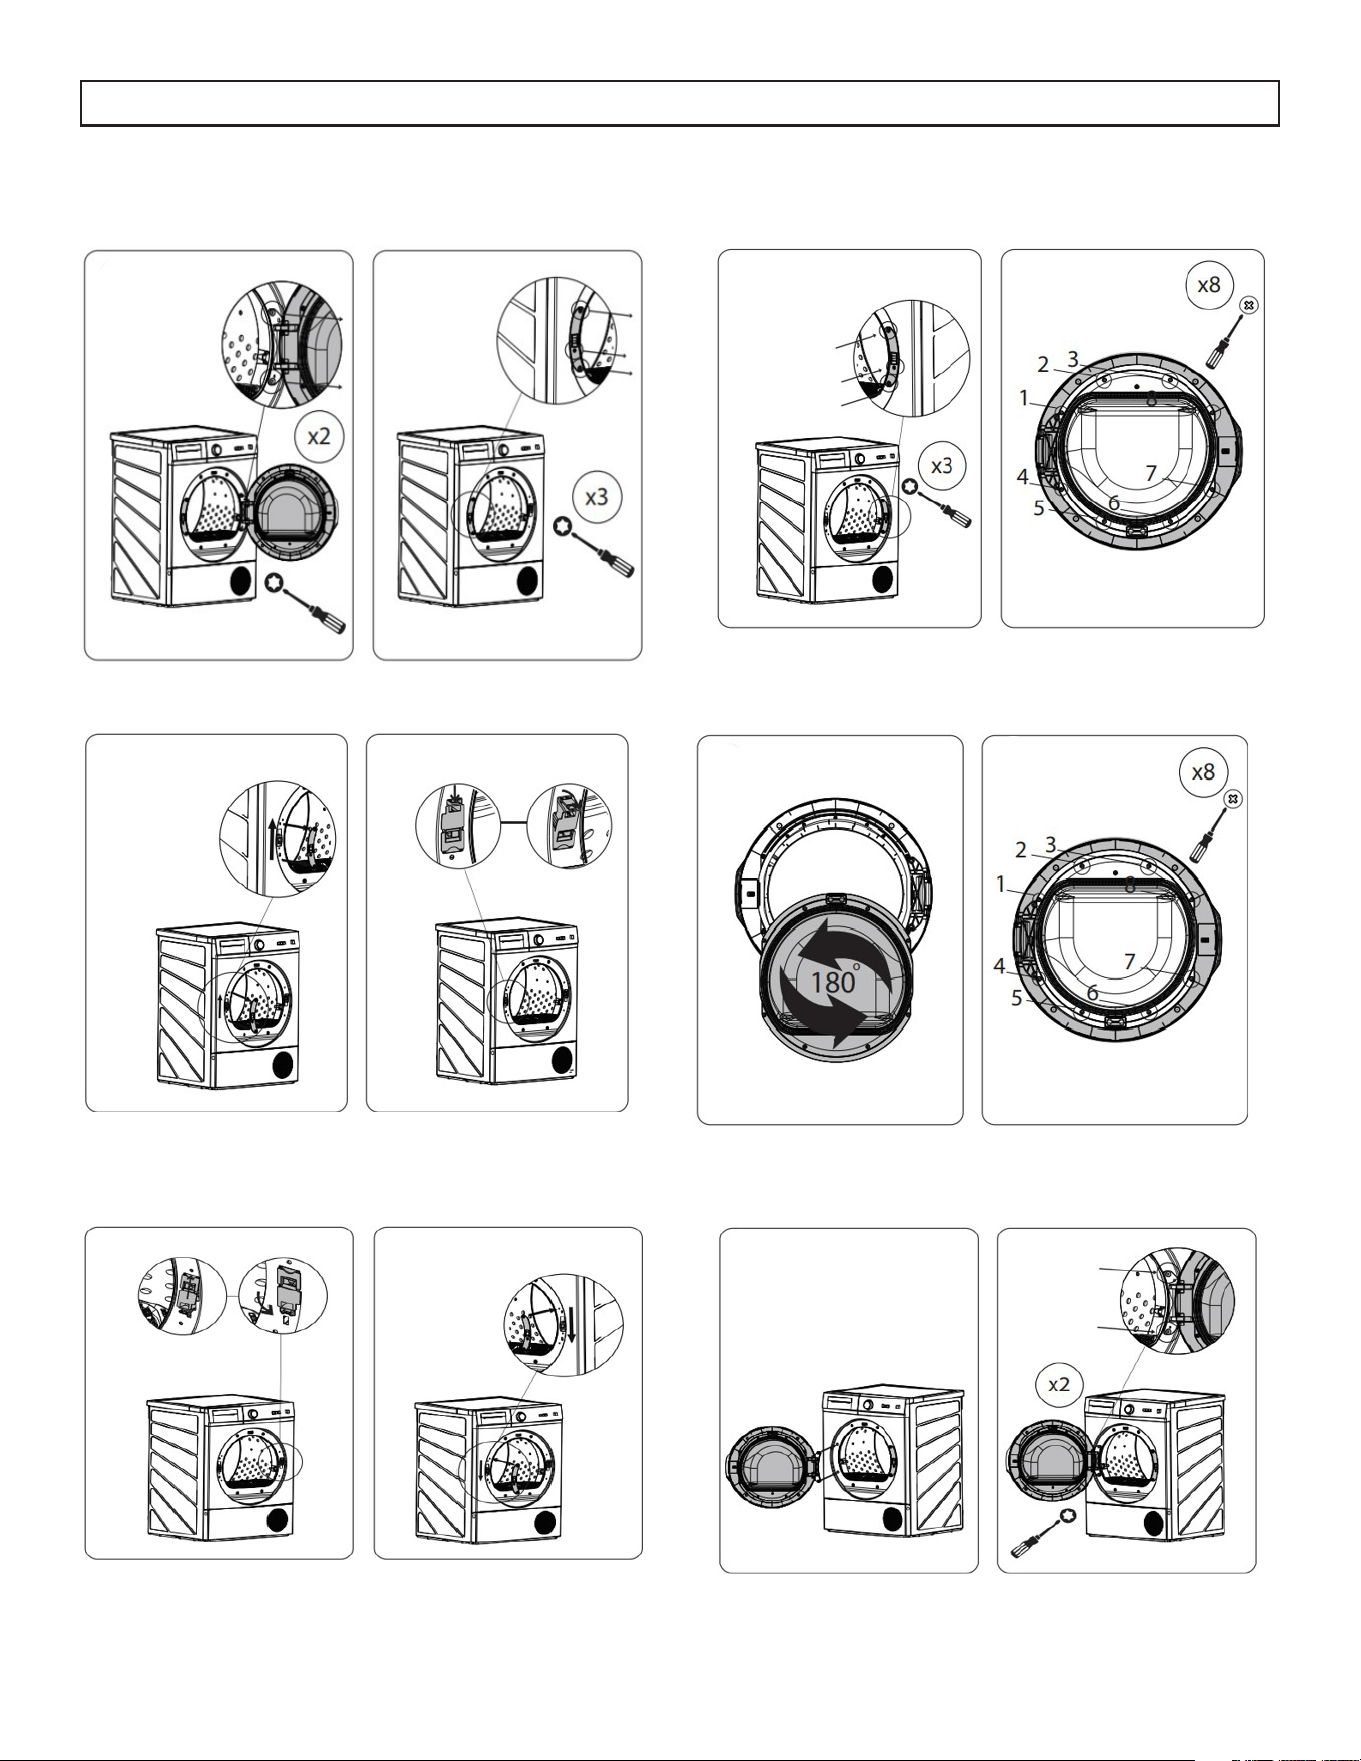
DOOR REVERSAL
1. Remove door and door hinge
2. Remove door closing mechanism
3. Install door hinge and closing mechanism on
opposite sides of door opening
4. Remove inner glass from door
5. Turn door 180 degrees and re-install the inner
glass
6. Re-install door
16
Cleaning the Inner Surface of the Dryer Door
Emptying the Water Tank
1. Pull the drawer cover, carefully take out the tank.
2. Empty the water in the tank.
3. If there is lint accumulated on the discharge cap
in the tank, clean it with water.
4. Replace the tank.
NOTE
• Do not remove the water tank when a program
is running. The water in the water tank is not
suitable for human consumption.
• The water tank MUST be emptied after each use.
NOTE
• Do not use industrial chemicals to clean your
dryer.
• Do not use a dryer that has been cleaned with
industrial chemicals.
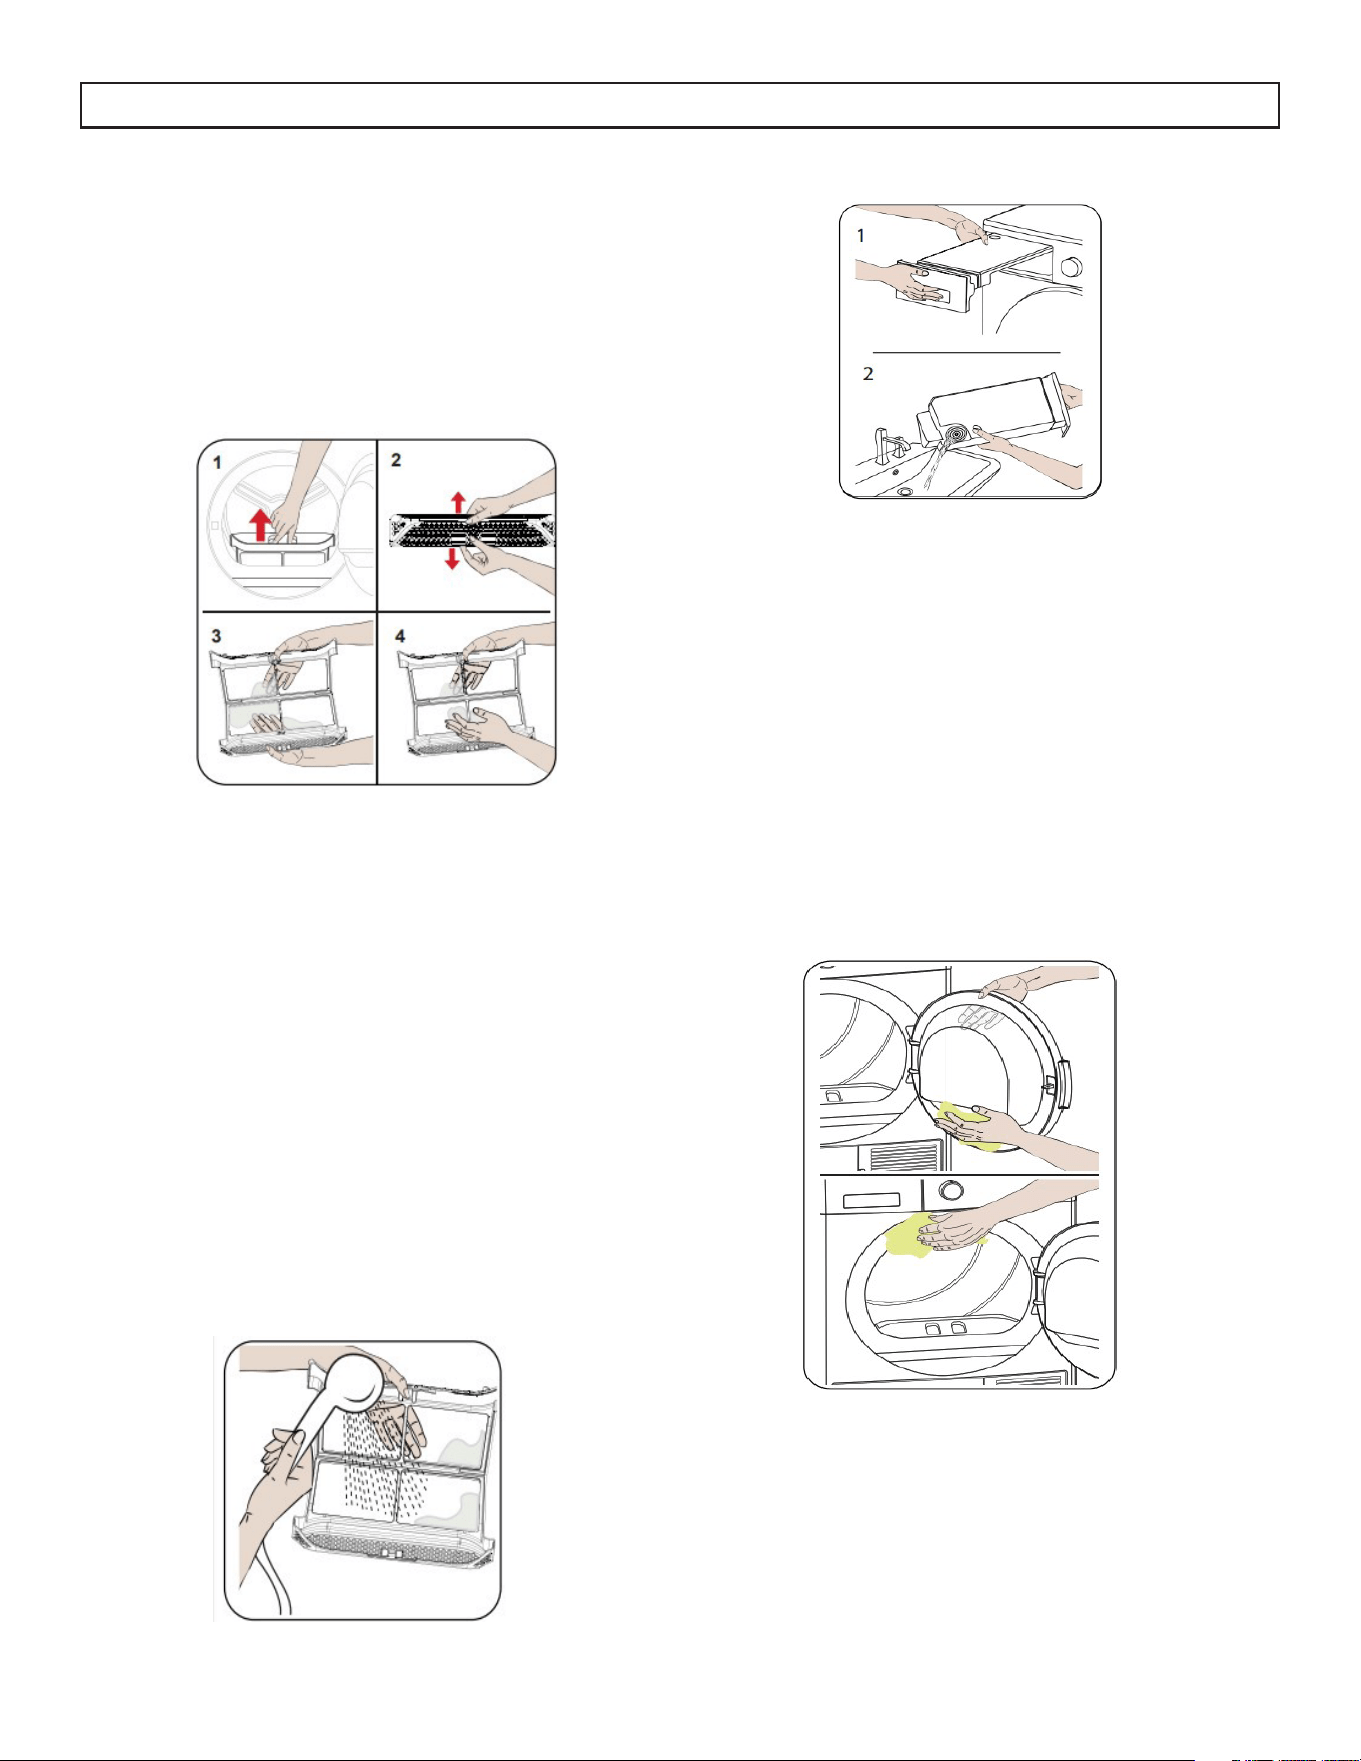
Cleaning the Lint Filter
1. Open the dryer door.
2. Pull up the lint lter to remove it.
3. Use your hands or a soft cloth to clean the lint.
4. Replace the lint lter and close the dryer door.
NOTE
The lint lter MUST be cleaned after every use.
After continued use, a build-up on the surface of the
lint lter that reduces airow, may occur. Wash the
lter with warm water to remove build-up.
CARE & MAINTENANCE
Open the dryer door and clean all of the inner
surfaces including the gasket with a soft, damp
17
CARE & MAINTENANCE
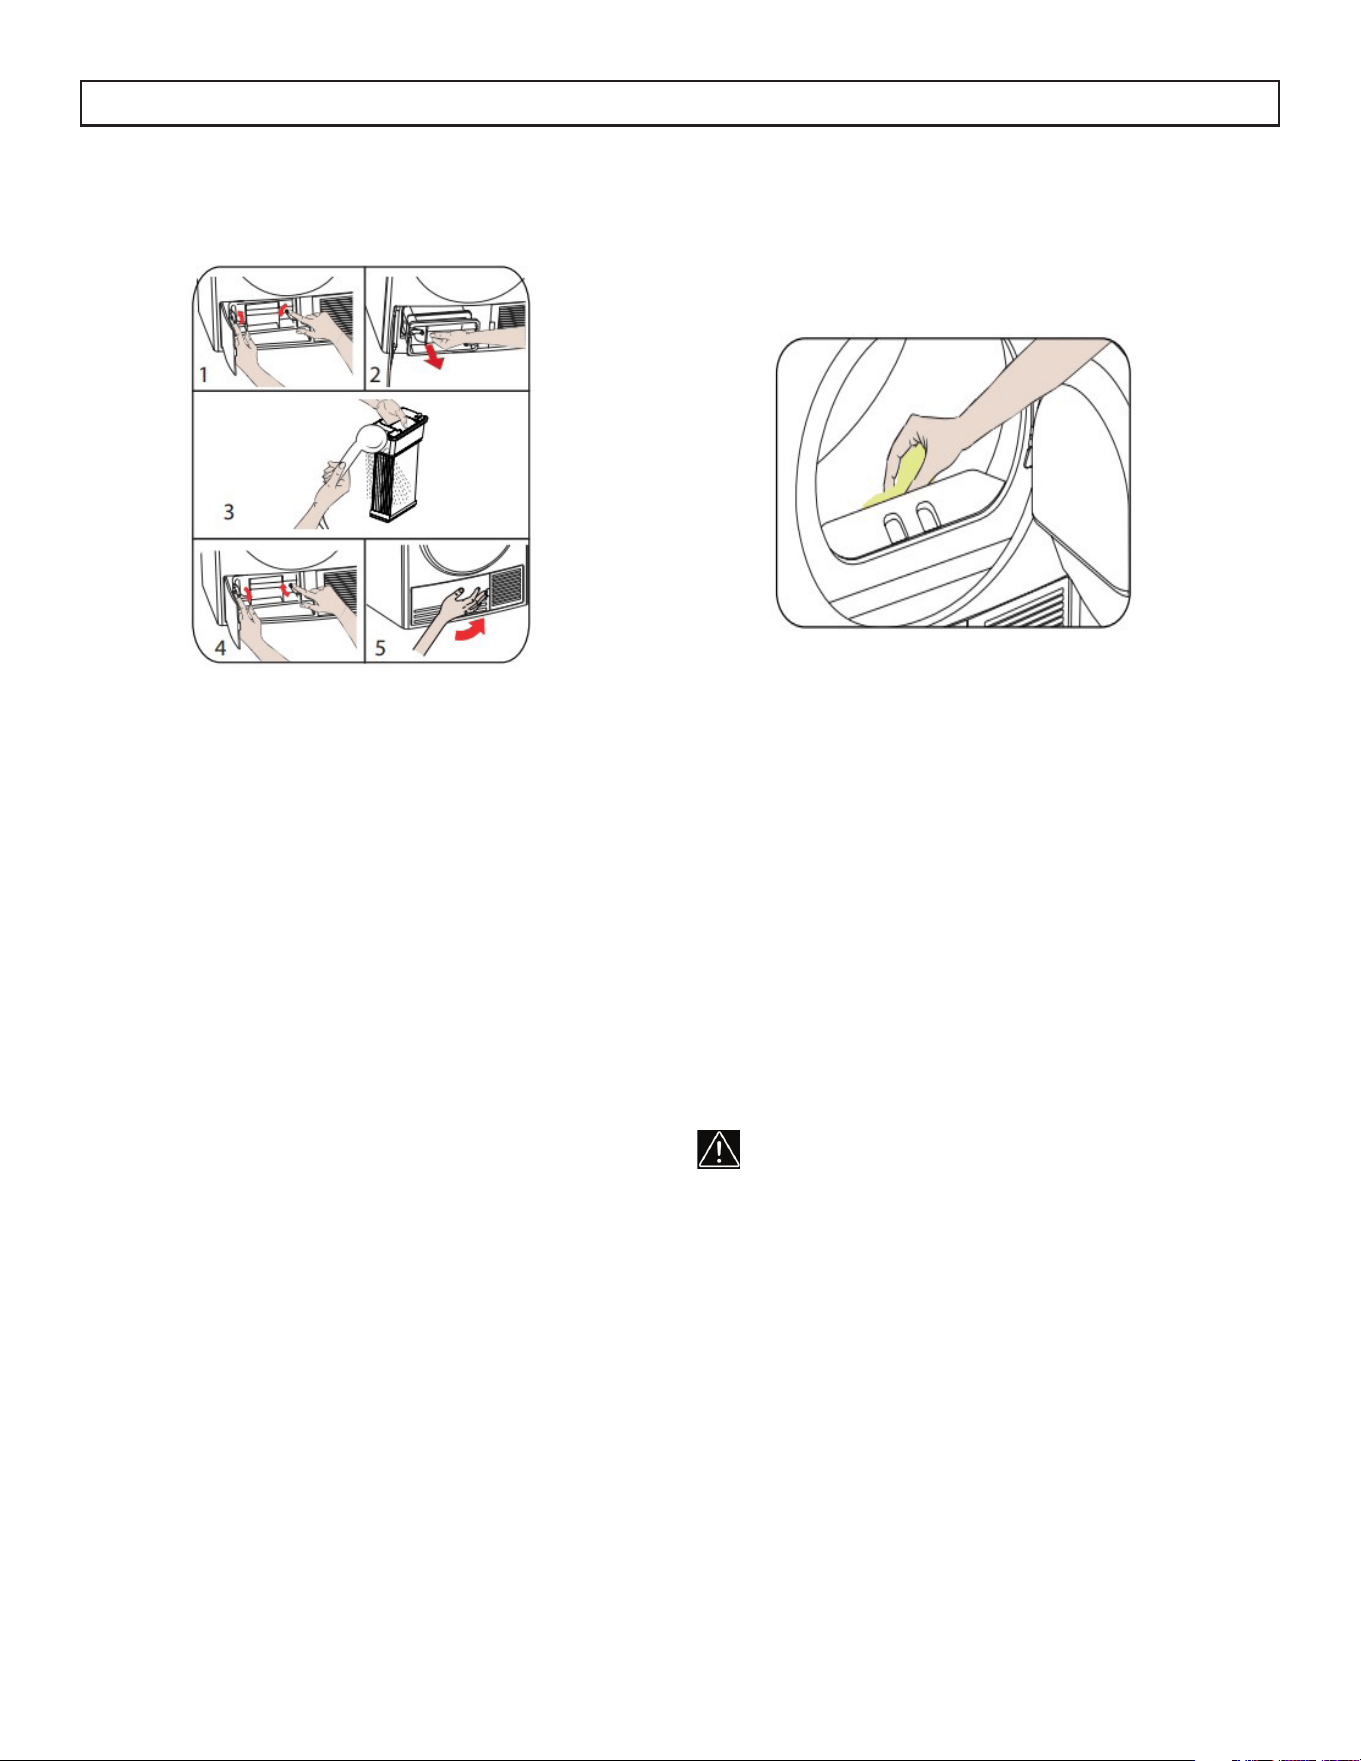
Cleaning the Condenser
If the drying process is completed, open the dryer
door and wait for it to cool down.
1. Open the plinth and release the 2 cover locks..
2. Hold the condenser by the plastic part and pull it
out.
3. Clean with a showerhead and wait for the water
to drain o.
4. Fully insert the condenser into its seat and lock
the 2 cover locks.
5. Close the plinth cover.
NOTE
Clean the condenser when you see the warning
“Condenser Cleaning”.
NOTE
The condenser should be cleaned after every 30
completed drying programs or once a month even if
the warning has not activated.
Cleaning the Humidity Sensor
Inside the dryer, there are humidity sensors that
detect whether the laundry is or is not dry.
1. Open the dryer door.
2. If the dryer is stil hot due to the drying process,
wait for it to cool down.
3. Using a soft cloth soaked in vinegar, wipe the
metal surfaces of the sensor and dry them.
4. Replace the lint lter and close the dryer door.
NOTE
Clean the metal surfaces of the sensor 4 times per
year.
NOTE
Do not use metal tools to clean the metal surfaces of
the sensor.
WARNING
Due to the risk of re and explosion, do not use
solution agents, cleaning agents or similar products
when cleaning the sensors.

PROBLEM POSSIBLE CAUSE
Dryer does not operate • The appliance is not plugged in.
• The circuit breaker tripped or a blown fuse.
Dryer drum does not turn. • The door is not fully closed.
• The power plug is unplugged.
• The outlet does not have power.
The laundry is not thoroughly dried.
• The lint lter is clogged.
• There is too much laundry in the dryer.
• Wet items were added during the drying cycle.
• The laundry has become twisted while drying.
• Dryer vent is blocked.
•
• The program may not be suitable for the type of laundry.
TROUBLESHOOTING
18
The dryer is tted with systems that continuously perform checks during the drying process to make
adjustments as required and warn of malfunctions.
The laundry that comes out hot at the end of the drying process generally feels more humid.
LIMITED IN-HOME APPLIANCE WARRANTY
This quality product is warranted to be free from manufacturer’s defects in material and workmanship, provided that the unit is used under the normal operating
conditions intended by the manufacturer.
This warranty is available only to the person to whom the unit was originally sold by Danby Products Limited (Canada) or Danby Products Inc. (U.S.A.) (hereafter
“Danby”) or by an authorized distributor of Danby, and is non-transferable.
TERMS OF WARRANTY
Plastic parts, are warranted for thirty (30) days only from purchase date, with no extensions provided.
First Year
During the rst twelve (12) months, any functional parts of this product found to be defective, will be repaired or replaced, at warrantor’s
option, at no charge to the ORIGINAL purchaser.
To obtain
Danby reserves the right to limit the boundaries of “In Home Service” to the proximity of an Authorized Service Depot. Any app liance
Service
requiring service outside the limited boundaries of “In Home Service” , it will be the consumer’s responsibility to transport the appliance (at
their own expense) to the original retailer (point of purchase) or a service depot for repair. See “Boundaries of In Home Serv ice”below.
Contact your dealer from whom your unit was purchased, or contact your nearest authorized Danby service depot, where service
must be performed by a qualied service technician.
If service is performed on the units by anyone other than an authorized service depot, or the unit is used for commercial appli cation, all
obligations of Danby under this warranty shall be void.
Boundaries of
If the appliance is installed in a location that is 100 kilometers (62 miles) or more from the nearest service center your unit must be
In Home Service
delivered to the nearest authorized Danby Service Depot, as service must only be performed by a technician qualied and certif ied for
warranty service by Danby. Transportation charges to and from the service location are not protected by this warranty and are t he
responsibility of the purchaser.
Nothing within this warranty shall imply that Danby will be responsible or liable for any spoilage or damage to food or other c ontents of this appliance, whether due
to any defect of the appliance, or its use, whether proper or improper.
EXCLUSIONS
Save as herein provided, Danby, there are no other warranties, conditions, representations or guarantees, express or implied, m ade or intended by Danby or its
authorized distributors and all other warranties, conditions, representations or guarantees, including any warranties, conditio ns, representations or guarantees
under any Sale of Goods Act or like legislation or statue is hereby expressly excluded. Save as herein provided, Danby shall no t be responsible for any damages
to persons or property, including the unit itself, howsoever caused or any consequential damages arising from the malfunction o f the unit and by the purchase of
the unit, the purchaser does hereby agree to indemnify and hold harmless Danby from any claim for damages to persons or propert y caused by the unit.
GENERAL PROVISIONS
No warranty or insurance herein contained or set out shall apply when damage or repair is caused by any of the following:
1) Power failure.
2) Damage in transit or when moving the appliance.
3) Improper power supply such as low voltage, defective house wiring or inadequate fuses.
4) Accident, alteration, abuse or misuse of the appliance such as inadequate air circulation in the room or abnormal operating con ditions
(extremely high or low room temperature).
5) Use for commercial or industrial purposes (ie. If the appliance is not installed in a domestic residence).
6) Fire, water damage, theft, war, riot, hostility, acts of God such as hurricanes, oods etc.
7) Service calls resulting in customer education.
8) Improper Installation (ie. Building-in of a free standing appliance or using an appliance outdoors that is not approved for out door application).
Proof of purchase date will be required for warranty claims; so, please retain bills of sale. In the event warranty service is required, present this document to our
AUTHORIZED SERVICE DEPOT.
Danby Products Limited
PO Box 1778, Guelph, Ontario, Canada N1H 6Z9
Telephone: (519) 837-0920 FAX: (519) 837-0449
Danby Products Inc.
PO Box 669, Findlay, Ohio, U.S.A. 45840
Telephone: (419) 425-8627 FAX: (419) 425-8629
04/09
1-800-263-2629
Warranty Service
In-home
Danby reserves the right to limit the boundaries of “In Home Service” to the proximity of an authorized service
depot. Any appliance requiring service outside the limited boundaries of “In Home Service”, will be the consumer’s
responsibility to transport at their own expense to the original point of purchase or a service depot for repair. If the
appliance is installed in a location that is 100 kilometers (62 miles) or more from the nearest service center, it must
be delivered to the nearest authorized Danby Service Depot by the purchaser.
Transportation charges to and from the service location are not protected by this warranty and are the
responsibility of the purchaser.
During the first twenty four (24) months, any functional parts of this product found to be defective, will be repaired
or replaced, at warrantor’s option, at no charge to the original purchaser.
Contact the dealer where the unit was purchased, or contact the nearest authorized Danby service depot, where
service must be performed by a qualified service technician. If service is performed on the unit by anyone other
than an authorized service depot, all obligations of Danby under this warranty shall be void.
First 24 months
To obtain service
Boundaries of
in-home service
LIMITED “IN HOME” WARRANTY
This quality product is warranted to be free from manufacturer’s defects in material and workmanship, provided that the unit is used
under the normal operating conditions intended by the manufacturer.
This warranty is available only to the person to whom the unit was originally sold by Danby Products Limited (Canada) or Danby
Products Inc. (U.S.A.) (hereafter “Danby”) or by an authorized distributor of Danby, and is non-transferable.
TERMS OF WARRANTY
Plastic parts are warranted for thirty (30) days from the date of purchase, with no extensions provided.
Nothing within this warranty shall imply that Danby will be responsible or liable for any spoilage or damage to food or other
contents of this appliance, whether due to any defect of the appliance, or its use, whether proper or improper.
EXCLUSIONS
Save as herein provided, by Danby, there are no other warranties, conditions, representations or guarantees, express or implied, made
or intended by Danby or its authorized distributors and all other warranties, conditions, representations or guarantees, including any
warranties, conditions, representations or guarantees under any Sale of Goods Act or like legislation or statute is hereby expressly
excluded. Save as herein provided, Danby shall not be responsible for any damages to persons or property, including the unit itself,
howsoever caused or any consequential damages arising from the malfunction of the unit and by the purchase of the unit, the
purchaser does hereby agree to indemnify and hold harmless Danby from any claim for damages to persons or property caused by
the unit.
GENERAL PROVISIONS
No warranty or insurance herein contained or set out shall apply when damage or repair is caused by any of the following:
1) Power failure.
2) Damage in transit or when moving the appliance.
3) Improper power supply such as low voltage, defective house wiring or inadequate fuses.
4) Accident, alteration, abuse or misuse of the appliance such as inadequate air circulation in the room or abnormal operating
conditions (ie. extremely high or low room temperature).
5) Use for commercial or industrial purposes (ie. If the appliance is not installed in a domestic residence).
6) Fire, water damage, theft, war, riot, hostility, acts of God such as hurricanes, floods etc.
7) Service calls resulting in customer education.
8) Improper Installation (ie. Building-in of a free standing appliance or using an appliance outdoors that is not approved for outdoor
application, including but not limited to: garages, patios, porches or anywhere that is not properly insulated or climate controlled).
Proof of purchase date will be required for warranty claims; retain bills of sale. In the event that warranty service is required, present
the proof of purchase to our authorized service depot.
Warranty Service
In Home
Danby Products Limited
PO Box 1778, Guelph, Ontario, Canada N1H 6Z9
Telephone: (519) 837-0920 FAX: (519) 837-0449
Danby Products Inc.
PO Box 669, Findlay, Ohio, U.S.A. 45840
Telephone: (419) 425-8627 FAX: (419) 425-8629
1-800-263-2629
04/17

20
Bienvenue dans la famille Danby.
Nous sommes ers de nos produits de qualité et nous croyons en un service able. Nous
vous suggérons de lire ce manuel du propriétaire avant de brancher votre nouvel appareil
car il contient des informations de fonctionnement importantes, des informations de
sécurité, des conseils de dépannage et d’entretien pour assurer la abilité et la longévité de
votre appareil.
Vous avez droit à la couverture de la garantie décrite dans le manuel du propriétaire fourni
avec votre nouvel appareil.
1. Veuillez noter ci-dessous les informations relatives à votre appareil. Vous devez
conserver la preuve d’achat originale pour valider et bénécier des services de
garantie.
2. Enregistrez votre produit en ligne et recevez une PROLONGATION DE GARANTIE
GRATUITE DE 2 MOIS après avoir rempli une enquête sur les produits, à l’adresse
www.danby.com/support/product-registration/
Besoin d’assistance?
1. Lisez votre manuel du propriétaire pour obtenir de l’aide à l’installation, au dépannage
et à la maintenance.
2. Visitez www.Danby.com pour accéder aux outils en libre-service, aux FAQ et bien plus
encore en recherchant votre numéro de modèle dans la barre de recherche.
3. Pour bénécier du service client le plus rapide, veuillez remplir le formulaire Web à
l’adresse www.danby.com/support. Votre soumission ira directement à un expert de
votre appareil particulier. Nos temps de réponse moyens sont compris entre 20 minutes
et 2 heures, pendant les heures ouvrables EST.
4. Composez le 1-800-263-2629 - veuillez noter que pendant les heures de pointe, les
temps d’attente peuvent dépasser une heure.
Numéro de modèle : _______________________________________________
Numéro de serie : _________________________________________________
Date d’achat : _____________________________________________________
AVERTISSEMENT IMPORTANT
DANGER : Risque de piéger un enfant. Avant
de jeter votre ancien appareil:
• Enlever la porte ou le couvercle.
• Laisser les tablettes en place an que les
enfants ne puissent pas facilement y entrer.
Consignes de sécurité importantes
LIRE ET SUIVRE TOUTES LES INSTRUCTIONS DE SÉCURITÉ
GARDER CES INSTRUCTIONS!
INSTRUCTIONS DE MISE À LA TERRE
Cet appareil doit être mis à la terre. En cas de
courtcircuit, la mise à la terre réduit les risques de
décharge électrique en fournissant un échappatoire
au courant électrique.
Cet appareil est équipé d’un cordon doté d’un l
de mise à la terre avec une che de mise à la terre.
Le cordon d’alimentation doit être branché sur une
prise correctement mise à la terre. Si la sortie est
une prise murale à 2 broches standard, il est de
votre responsabilité de la remplacer par une prise
murale à 3 broches correctement mise à la terre. La
tension et la fréquence requises pour cet appareil
sont indiquées sur la plaque d’identication.
AVERTISSEMENT - Une che de mise à la terre mal
branchée peut entraîner un risque d’incendie, de
choc électrique ou de blessures aux personnes qui
utilisent l’appareil. Si vous n’êtes pas certain que
l’appareil est correctement mis à la terre, consultez
un préposé du service qualié.
N’UTILISER JAMAIS DE FIL DE RALLONGE
Ne connectez pas votre appareil aux rallonges ou
avec un autre appareil dans la même prise murale.
Ne pas épisser le cordon d’alimentation. Ne coupez
ou retirez en aucun cas la troisième broche du
cordon d’alimentation.
Si le cordon d’alimentation est endommagé, il doit
être remplacé par le fabricant, son agent de service
ou une personne qualiée similaire an d’éviter tout
risque.
EXIGENCES DE SÉCURITÉ
Assurez-vous que les composants sont remplacés
par des composants similaires et que l’entretien
est eectué par le personnel de service autorisé en
usine, an de minimiser le risque d’allumage possi-
ble en raison de pièces incorrectes ou d’un mauvais
service.
Ce dispositif n’est pas désigné d’être utilisé
par des personnes (y compris enfants) dont le
développement et capacité physique, sensoriel
ou mental est diérente ou réduite, ou par
les personnes qui manquent expérience ou
connaissance sauf si ces personnes sont surveillés
ou formés par une personne responsable de leur
sécurité.
Les enfants doivent être surveillés pour s’assurer
qu’ils ne jouent pas avec l’appareil.
Ne placez pas les objets exposés aux huiles de
cuisson dans la sécheuse. Les articles contaminés
avec des huiles de cuisson peuvent contribuer à une
réaction chimique qui pourrait provoquer l’incendie
d’une charge. Pour réduire le risque d’incendie dû
à des charges contaminées, la partie nale d’un
cycle de séchage par culbutage se produit sans
chaleur pendant une période de refroidissement.
Évitez d’arrêter la sécheuse avant la n du cycle de
séchage, à moins que les articles ne puissent être
immédiatement enlevés et étalés pour permettre à la
chaleur accumulée de se dissiper.
Les articles qui ont été souillés avec des produits pétroliers peuvent s’enammer
spontanément, surtout lorsqu’ils sont exposés à des sources de chaleur comme
dans un séchoir à tambour. Les articles deviennent chauds, provoquant une
réaction d’oxydation dans l’huile. L’oxydation crée de la chaleur. Si la chaleur
ne peut pas s’échapper, les articles peuvent devenir assez chaud pour prendre
feu. Empiler, empiler ou entreposer des objets souillés d’huile peut empêcher la
chaleur de s’échapper et créer un risque d’incendie.
21

• Ne pas sécher les articles qui ont été
préalablement nettoyés, lavés, trempés ou tachés
à l’aide d’essence, de solvants de nettoyage
à sec ou d’autres substances inammables ou
explosives, car ils dégagent des vapeurs qui
pourraient s’enammer ou exploser.
• Ne pas mettre la main dans l’appareil si le
tambour est en mouvement.
• N’installez pas et ne rangez pas cet appareil
dans un endroit exposé aux intempéries. Cet
appareil n’est pas destiné à être utilisé à l
‘extérieur.
• Ne pas traquer les commandes.
• Ne pas utiliser de chaleur pour sécher des
articles contenant du caoutchouc mousse ou
des matériaux semblables à du caoutchouc de
texture similaire.
• Nettoyez le ltre à peluche avant et après
chaque charge.
• L‘intérieur de l’appareil et le conduit
d‘évacuation doivent être nettoyés
périodiquement par un personnel qualié.
• Ne placez pas l’appareil ou le cordon
d’alimentation près de sources de chaleur telles
que des radiateurs, des chauages, des conduits
d’air ou la lumière directe du soleil. Ne placez
pas de ammes nues telles que des bougies sur
ou près de l’appareil.
• Ne pas obstruer les ouvertures de ventilation.
Assurez-vous que les évents ne sont pas couverts
par les journaux, les nappes, les rideaux, les
tapis, etc.
• N’utilisez pas le cordon d’alimentation sous
les revêtements de sol. Gardez le cordon
d’alimentation à l’écart des zones à forte
circulation où il peut devenir un risque de
déclenchement.
• N’utilisez pas le cordon d’alimentation de
façon incorrecte. Ne jamais transporter ou tirer
l‘appareil par le cordon d’alimentation. Ne
tirez jamais sur le cordon d’alimentation pour le
débrancher de la prise, mais saisissez la che et
tirez pour la retirer de la prise.
• N’utilisez pas l‘appareil s’il présente un cordon
d’alimentation ou une prise endommagés. Si le
cordon d’alimentation est endommagé, il doit
être remplacé par le fabricant, son agent de
Consignes de sécurité importantes
LIRE ET SUIVRE TOUTES LES INSTRUCTIONS DE SÉCURITÉ
GARDER CES INSTRUCTIONS!
service ou des personnes qualiées de manière
similaire an d’éviter tout risque.
• N’essayez pas de réparer, de démonter ou de
modier l’appareil. La garantie devient nulle
si l’appareil n’est pas réparé ou réparé par
du personnel qualié. Il n’y a pas de pièces
réparables par l’utilisateur.
• Ne surchargez pas l’appareil.
• S’assurer que les objets étrangers ne se trouvent
pas dans l’appareil. Retirez tous les objets des
poches telles que briquets, allumettes, épingles à
cheveux, pièces de monnaie, etc.
• La fenêtre de porte peut être chaude après un
long cycle de séchage. Veillez à ce que les enfants
soient éloignés de l’appareil.
• L’ouverture de la porte avant la n du processus
de refroidissement peut vous exposer à de l’air
chaud.
• Si le sèche-linge n’est pas monté en pile à l’aide
du kit fourni, veillez à le placer sur une surface
plane et solide, dans un endroit sec et bien
ventilé. Utilisez les pieds avant réglables pour
aider à mettre l’appareil à niveau si nécessaire. Ne
placez pas l’appareil sur un matériau mou tel que
de la mousse, du plastique ou de la moquette..
• Après avoir mis l’appareil hors tension, attendez
2 minutes avant de remettre l’appareil sous
tension.
• Retirez l’emballage de transport de l’arrière de
l’appareil avant la première utilisation.
• N’installez pas cet appareil derrière une porte
verrouillable, une porte coulissante ou de façon à
ce que l’ouverture de la porte de la sécheuse soit
limitée. Ne pas installer dans un meuble.
• N’utilisez cet appareil que pour le linge dont
l’étiquette indique qu’il peut être séché.
• Ne jamais vaporiser ou verser de l’eau sur le
sèche-linge pour le nettoyer.
22
INSTRUCTIONS D’INSTALLATION
23
1. Dessus de séchoir
2. Control Panel
3. Panneau de Commande
4. Grilles de Ventilation
5. Fente d’ouverture du Socle
6. Pieds de Nivellement
7. Socle
8. Plaque Signalétique
9. Filtre à Charpies
10. Couvercle de Tiroir

INSTRUCTIONS D’INSTALLATION
24
EMPLACEMENT
Vériez les informations contenues dans le manuel
d’utilisation pour vous assurer que l’installation
électrique et la prise d’eau sont adaptées. Si ce
n’est pas le cas, faites appel à un électricien qualié
et à un plombier pour eectuer les ajustements
nécessaires.
Il incombe au client de préparer le lieu d’installation
du sèche-linge, ainsi que l’installation de l’électricité
et des eaux usées. Avant l’installation, vériez
que le sèche-linge n’est pas endommagé. S’il est
endommagé, ne le faites pas installer. Les produits
endommagés peuvent mettre votre santé en danger.
• Installer le sèche-linge sur une surface stable et
plane.
• Faites fonctionner le sèche-linge dans un
environnement exempt de poussière et où la
ventilation est bonne.
• L’espace entre le sèche-linge et le sol ne doit pas
être réduit par des objets tels que des tapis, du
bois ou du ruban adhésif.
• Ne pas obstruer les grilles d’aération situées sur
le socle du sèche-linge..
• L’appareil ne doit pas être installé derrière une
porte verrouillable, une porte coulissante ou une
porte à charnière du côté opposé au sèche-linge,
de manière à bloquer l’ouverture complète de la
porte du sèche-linge.
• Une fois installées, les connexions doivent rester
stables. Lors de l’installation du sèche-linge,
veillez à ce que la surface arrière ne s’appuie sur
rien (robinet, prise de courant, etc.).
• La température de fonctionnement du sèche-
linge est comprise entre 5°C et 35°C (41°F et
95°F). Si le sèche-linge est utilisé en dehors de
cette plage de température, ses performances en
seront aectées et le produit sera endommagé.
• Soyez prudent lorsque vous transportez le
produit car il est lourd. Portez toujours des gants
de sécurité.
• Installez toujours le produit contre un mur. La
face arrière du produit doit être placée contre le
mur.
• Laissez un espace d’au moins 1 pouce (3 cm)
entre les côtés et l’arrière de l’appareil.
• Le sèche-linge doit être de niveau pour
fonctionner plus silencieusement et sans
vibrations. Utilisez un niveau pour régler les
pattes de nivellement.
• Lorsque le sèche-linge est placé sur une surface
stable, utilisez un niveau pour assurer la stabilité
de l’appareil. S’il n’est pas à niveau, réglez les
pieds de nivellement pour mettre l’appareil à
niveau. Répétez cette opération chaque fois que
vous déplacez l’appareil.
• Ne placez pas le sèche-linge sur le câble
d’alimentation.
• Installez le sèche-linge conformément aux
instructions du fabricant et aux réglementations
locales..
IMPORTANTE
Pour superposer le sèche-linge sur le lave-
linge, utilisez le kit de superposition fourni avec
le sèche-linge, entre les deux appareils. Le kit
de superposition doit être xé en suivant les
instructions fournies.
Pour une installation superposée, SEUL le kit de
superposition et les instructions fournies DOIVENT
être utilisés. Si le kit d’empilage et les instructions
n’étaient pas inclus dans l’emballage du sèche-linge,
contactez le service clientèle pour en obtenir un.
INSTRUCTIONS D’INSTALLATION
25
CONNEXION ÉLECTRIQUE
Le sécheur est réglé sur 208-240 V et 60 HZ.
Le câble du sèche-linge est équipé d’une che
spéciale. Cette che doit être branchée sur une
prise de terre protégée par un fusible ou un
disjoncteur de 16 ampères, comme indiqué sur
la plaque signalétique. Le calibre du fusible ou
du disjoncteur de la ligne électrique à laquelle
la prise est connectée doit également être de 16
ampères. Consultez un électricien qualié si vous ne
disposez pas de la prise, du fusible ou du disjoncteur
appropriés.
Notre société ne peut être tenue responsable des
dommages résultant d’une utilisation sans mise à la
terre.
NIVELER L’APPAREIL
Il y a quatre pieds de nivellement, un à chacun des
quatre coins de l’appareil.
Réglez chaque pied de nivellement en le tournant
vers la gauche ou la droite jusqu’à ce que le sèche-
linge soit de niveau et équilibré.
Le sèche-linge ne doit pas être placé sur un sol
incliné, tordu ou irrégulier.
CONNEXION A LA SORTIE D’EAU (avec le
tuyau de vidange en option)
Dans les appareils équipés d’un condenseur, l’eau
s’accumule dans le réservoir d’eau pendant le
processus de séchage. L’eau accumulée doit être
vidée après chaque cycle de séchage. Il est possible
d’utiliser un tuyau d’évacuation d’eau pour vider
directement l’eau, ce qui remplace la nécessité de
vider manuellement le réservoir d’eau.
Raccordement du tuyau de vidange d’eau
Tirez et retirez l’extrémité du tuyau à l’arrière du
sèche-linge. Ne pas utiliser d’outils pour retirer le
tuyau.
Placez une extrémité du tuyau de vidange d’eau
dans la fente où vous avez retiré le tuyau.
Fixer l’autre extrémité du tuyau d’évacuation de l’eau
directement à la sortie d’eau ou à l’évier.
NOTE:
Le tuyau doit être raccordé de manière à ne pas être
déplacé. Si le tuyau est déplacé pendant la vidange,
cela peut entraîner une inondation dans la maison.
NOTE:
Le tuyau de vidange d’eau doit être installé à une
hauteur maximale de 31.5 po. (80 cm).
NOTE:
Le tuyau de vidange d’eau ne doit pas être plié,
replié ou enjambé.
26
INSTRUCTIONS D’UTILISATION
• Séchez des articles dont le tissu et le poids sont
similaires pour une performance de séchage
plus homogène. Si vous devez sécher une
charge de tissus mélangés, il est recommandé de
minuter le séchage pour obtenir de meilleures
performances de séchage.
• Pour un séchage optimal, ne séchez pas les petits
articles avec des articles volumineux tels que
les couettes, etc. Il est préférable de les sécher
séparément.
• Il est recommandé d’introduire les articles dans
le sèche-linge un par un an d’éviter qu’ils ne
s’emmêlent, ce qui pourrait entraîner un séchage
inégal.
• Vériez les poches de tous les articles à sécher
et assurez-vous que des objets étrangers ne
pénètrent pas dans l’appareil tels que briquets,
épingles à cheveux, pièces de monnaie, etc..
• Attachez les ceintures en tissu, les lacets de
tablier, etc. les uns aux autres ou utilisez un sac à
linge.
• Pour obtenir le meilleur résultat de séchage,
triez le linge en fonction du type de textile et du
programme de séchage.
• La chaleur du sèche-linge peut xer les taches
de façon permanente. Assurez-vous que toutes
les taches ont été enlevées avant de mettre les
articles dans le sèche-linge.
• Les articles tissés tels que les t-shirts et les
vêtements tricotés rétrécissent généralement
lors du premier séchage. Utiliser un programme
de protection.
• Ne pas trop sécher les matières synthétiques.
Cela provoquerait des plis.
• N’ajoutez pas d’articles dans le sèche-linge
lorsqu’il est en fonctionnement..
• Si vous séchez des articles volumineux tels
que des couvertures ou des charges de linge
lourdes, il est recommandé d’interrompre
périodiquement le programme, d’ouvrir la porte
du sèche-linge, de secouer l’article volumineux
ou de retourner la charge lourde, puis de
redémarrer le cycle de séchage. Cela permet
d’assurer un séchage uniforme.
• L’appareil ne peut pas fonctionner tant que
la porte est ouverte. Une fois la porte fermée,
appuyez sur la touche Démarrage/Pause pour
reprendre le fonctionnement de l’appareil..
CAPACITÉ DE CHARGE
Il n’est pas recommandé de charger le sèche-
linge avec une quantité de linge supérieure à
celle indiquée dans la gure ci-dessous. En cas de
surcharge, les performances de séchage du sèche-
linge diminuent, ce qui risque d’endommager le
sèche-linge et le linge.
CONSIGNES D’UTILISATION
IMPORTANTE
Les tissus délicats, les tissus brodés, les tissus
en laine/soie, les vêtements en tissus délicats et
coûteux, les vêtements hermétiques et les rideaux
en tulle ne conviennent pas au séchage dans le
sèche-linge.
27
Suivez les instructions gurant sur les étiquettes du linge à sécher. Ne séchez que les articles portant une
mention/un symbole indiquant qu’ils peuvent être séchés dans un sèche-linge.
CONSIGNES D’UTILISATION
28
CONSIGNES D’UTILISATION
PANNEAU DE COMMANDE
1. Bouton de Sélection des Programmes
• Utilisez le bouton de selection des programmes pour sélectionner le programme desire.
29
CONSIGNES D’UTILISATION
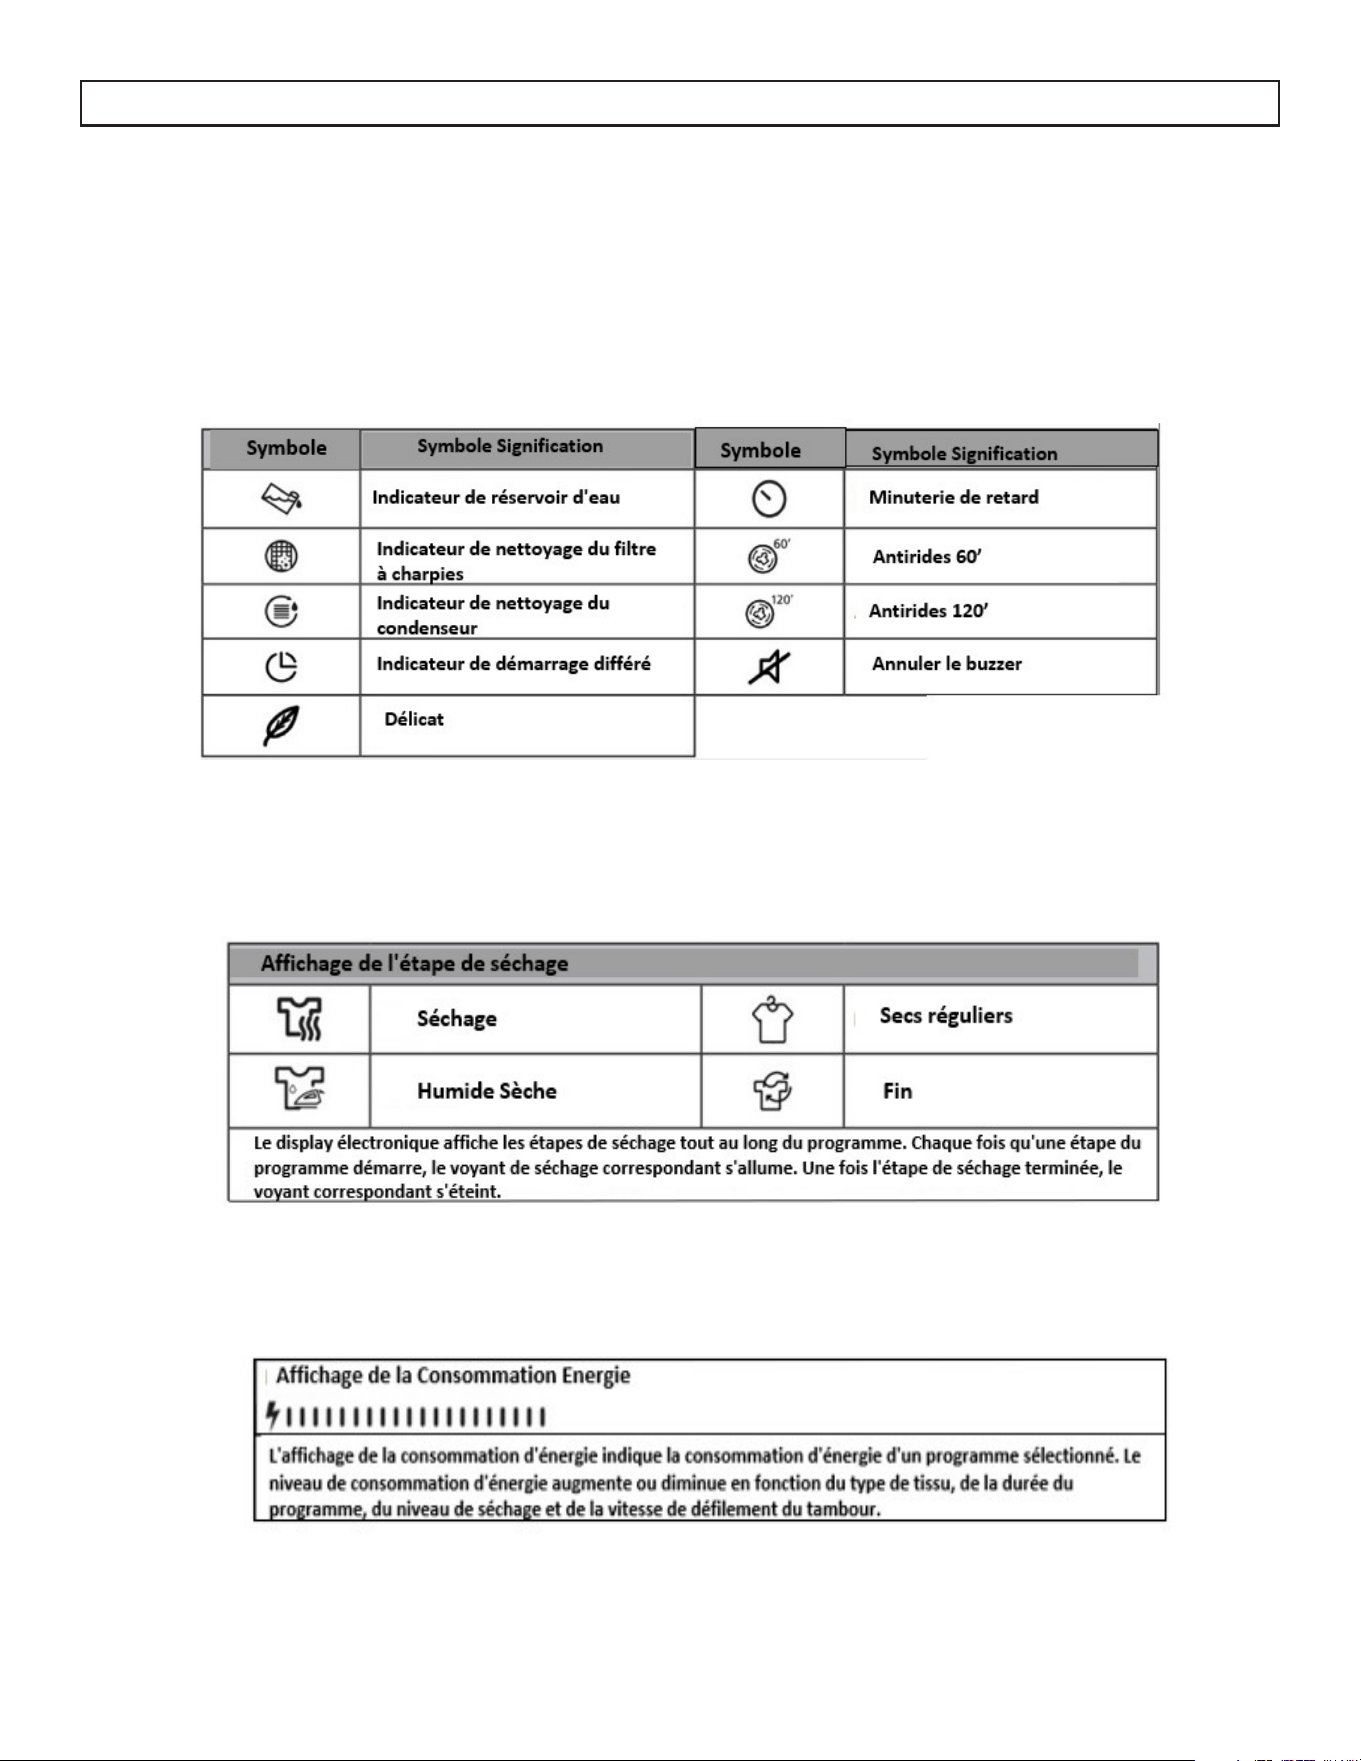
2. Achage d’indicateurs électroniques
30
CONSIGNES D’UTILISATION
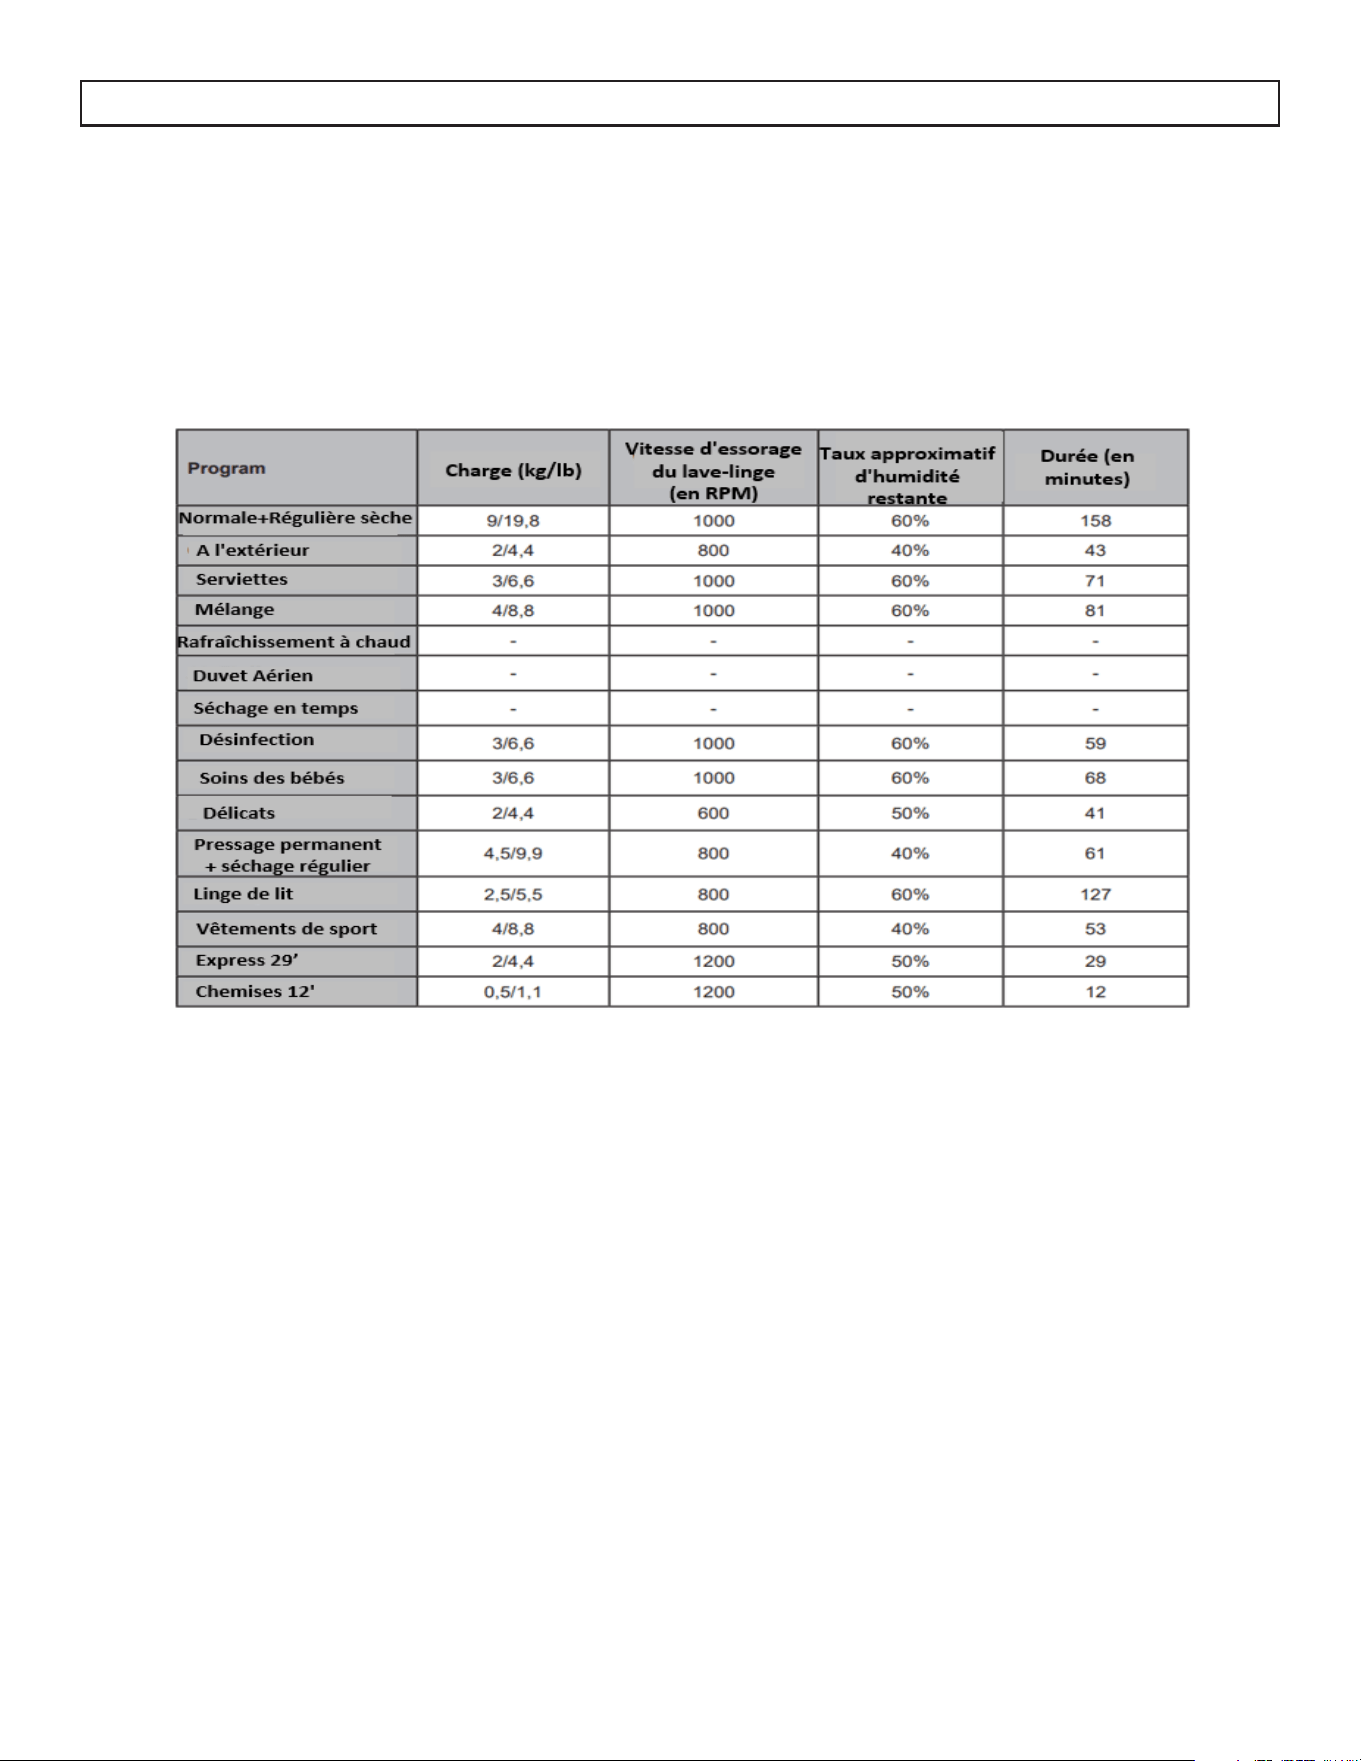
Tableau de sélection et de consommation des programmes
Appuyez sur la touche Start/Pause pour démarrer le programme. Le voyant Start/Pause qui indique que le
programme a démarré et le voyant Séchage s’allument.
NOTE
Tous les programmes énumérés ne sont pas disponibles sur tous les sèche-linge
Fonctions Auxiliaires
Niveau de Séchage
Sélectionnez la cible de séchage adaptée à votre linge.
• Sélectionnez Supplémentaire Sec pour le linge épais et multicouche qui prend du temps à sécher.
• Sélectionnez Séchage Régulier pour le linge ordinaire, en une seule couche.
• Sélectionnez Séchage humide pour le linge que vous souhaitez laisser humide, prêt à être repassé.
Réglage du Niveau
Le niveau d’humidité obtenu après le séchage peut être augmenté de 3 niveaux supplémentaires en plus
du réglage standard. De cette manière, on s’assure que le linge est plus sec. Les niveaux peuvent être
sélectionnés en plus du réglage standard.
+1 (bas)
+2 (moyen)
+3 (élevé)
Après la sélection, le voyant du niveau de séchage correspondant s’allume.

31
CONSIGNES D’UTILISATION
Séchage Délicat
Les tissus délicats sont séchés plus longtemps à basse température.
Départ Diéré
Retardez le début d’un programme en sélectionnant une durée comprise entre 1 et 23 heures. Vous pouvez
appuyer sur Start/Pause pour activer le délai souhaité. Une fois ce délai écoulé, le programme sélectionné
démarre automatiquement. Pendant le délai, les options compatibles avec le programme peuvent être
activées/désactivées. Si vous appuyez sur la touche Départ diéré et la maintenez enfoncée, la durée du
délai changera continuellement.
Annuler l’Alarme Sonore
Le sécheur émet un avertissement sonore lorsque vous appuyez sur les boutons, lorsque vous tournez le
bouton de sélection des programmes et lorsque le programme se termine. Pour annuler les avertissements
sonores, appuyez sur le bouton “Antiwrinkle Option” pendant 3 secondes. Lorsque vous appuyez sur ce
bouton, vous entendez un signal sonore indiquant que l’option a été activée et que les signaux sonores
indiqués sont annulés.
Séchage à Temps
Si le bouton du programme est tourné vers le séchage à temps, appuyez sur le bouton de l’option Séchage
à temps pour le sélectionner, puis appuyez sur Start/Pause pour démarrer le programme.
Verrouillage des Enfants
Il existe une option de verrouillage des enfants qui permet d’éviter de modier le programme sélectionné
lorsque les touches sont enfoncées pendant le cycle du programme. Pour activer la fonction de verrouillage
des enfants, appuyez simultanément sur les touches “Options” et “Anti-froissage” pendant 3 secondes.
Lorsque le verrouillage des enfants est activé, toutes les touches sont désactivées. Le verrouillage des
enfants n’est pas automatiquement désactivé à la n du programme.
Pour désactiver le verrouillage des enfants à la n du programme, placez le bouton de sélection des
programmes sur la position “O”, puis sur la première position. Le verrouillage des enfants reste actif. Pour
désactiver , appuyez simultanément sur les touches “Options” et “Anti-froissage” pendant 3 secondes. Lors
de l’activation/désactivation, “CL” apparaît sur l’écran pendant 2 secondes, puis s’éteint. Un avertissement
sonore retentit.
AVERTISSEMENT
Lorsque le sèche-linge est en marche ou que la sécurité enfants est activée, si vous tournez le bouton de
sélection des programmes, vous entendrez un avertissement sonore et “CL” s’achera à l’écran pendant
2 secondes, puis s’éteindra. Si vous tournez le bouton de sélection des programmes, vous entendrez un
avertissement sonore. Même si vous réglez le bouton de sélection de programme sur un autre programme,
le programme précédent continuera à fonctionner. Pour sélectionner un nouveau programme, désactivez la
sécurité enfants et réglez le bouton de sélection des programmes sur.
Antirides
Si vous n’ouvrez pas la porte du sèche-linge à la n du programme, l’option anti-froissage sera active
pendant 60 minutes, sauf pour le programme normal. Lorsque l’option anti-froissement est sélectionnée,
elle est active pendant 120 minutes.
Niveau de Température
Pour le séchage du linge, le niveau de température peut être réglé avec des options basses, moyennes et
élevées.
NOTE
Toutes les options énumérées ne sont pas disponibles sur tous les modèles

32
CONSIGNES D’UTILISATION
Démarrer le Programme
Le voyant Start/Pause clignote pendant la sélection
du programme. Appuyez sur la touche Start/Pause
pour démarrer le programme. Le voyant Start/Pause
indique que le programme a démarré et le voyant
de séchage s’allume..
NOTE
Tous les programmes énumérés ne sont pas
disponibles sur tous les séchoirs.
Normale + Séchage régulier
Adapté au linge en coton, notamment les draps, les
taies d’oreiller, les pyjamas, les sous-vêtements, les
nappes, etc.
Plein Air
Adapté aux vêtements de plein air, aux vestes
imperméables, aux vestes avec isolation intérieure,
etc..
Serviettes
Adapté au linge épais en coton tel que les serviettes,
les peignoirs, etc.
Mélange
Adapté aux vêtements mixtes coton-synthétique qui
ne se décolorent pas pour être prêts à être portés.
Rafrâichir
Rafrâichi les vêtements à l’air frâiche pour éliminer
les odeurs.
Temps de séchage
Pour atteindre le niveau de séchage souhaité à basse
température, vous pouvez utiliser les programmes
de temps de 10 min. à 150 min. Quel que soit
le niveau de séchage, le programme s’arrête au
moment voulu.
Assainir
Adapté aux tissus devant répondre à des exigences
en matière d’hygiène.
Bébé
Permet un séchage hygiénique à basse température
des vêtements délicats des nourrissons.
Délicats
Permet de sécher à basse température les vêtements
et tissus délicats tels que les chemises, les chemisiers
et les vêtements en soie an de les rendre prêts à
être portés.
Perma press
Pour sécher les vêtements traités pour éviter les rides
et faux plis..
Literie
Sèche les matières synthétiques telles que les
chemises, les t-shirts et les chemisiers à une
température inférieure à celle du programme pour
les cotons.
Vêtements de sport
Utilisé pour les vêtements de sport synthétiques tels
que les shorts et les t-shirts à basse température.
Express
2 Kg (4.4 lbs) des chemises en coton essorées à
grande vitesse dans la machine à laver sont séchées
en 29 minutes.
Chemises
2 - 3 chemises sont prêtes à être repassées en 12
minutes.
IMPORTANTE
N’ouvrez pas la porte du séchoir lorsque le
programme est en cours. Si vous devez ouvrir la
porte, ne la laissez pas ouverte longtemps.

33
CONSIGNES D’UTILISATION
Sélection En Attente
Après 15 minutes sans action de l’utilisateur en
mode sélection, le sèche-linge passe en mode
économie d’énergie en raison de la diminution de la
consommation d’énergie. Aucun voyant n’est activé
sur l’écran. En mode économie d’énergie, le voyant
du cadran reste allumé mais la sélection n’apparaît
pas sur l’écran.
Pour redémarrer le sèche-linge, il est nécessaire
de tourner le bouton sur la position OFF et de
sélectionner à nouveau le programme.
Durant le Programme
Si la porte est ouverte alors qu’un programme est en
cours, le sèche-linge passe en mode veille. Une fois
la porte fermée, appuyez sur la touche Start/Pause
pour reprendre le programme.
N’ouvrez pas la porte du sèche-linge lorsque le
programme est en cours. Si vous devez ouvrir la
porte, ne la laissez pas ouverte longtemps.
Fin du Programme
À la n du cycle de séchage, les voyants
d’avertissement Start/Pause, niveau du réservoir
d’eau, nettoyage du ltre et nettoyage du
condenseur s’allument et un signal sonore retentit.
Le linge peut maintenant être retiré du sécheur..
NOTE
Nettoyez le ltre et videz le réservoir d’eau après
chaque utilisation.
NOTE
Si le linge n’est pas retiré du sèche-linge à la n du
programme, le cycle anti-froissage d’une heure
est automatiquement activé. Ce programme fait
tourner le tambour à intervalles réguliers pour éviter
les faux plis.
Informations sur la Lumière du Tambour
Ce produit comprend une lampe DEL pour tambour.
La lumière fonctionne automatiquement lorsque
vous ouvrez la porte. Elle s’éteint automatiquement
si la porte reste ouverte.
NOTE
• La lumière du sèche-linge ne peut pas être
allumée ou éteinte par l’utilisateur.
• N’essayez pas de remplacer ou de modier la
lumière DEL.
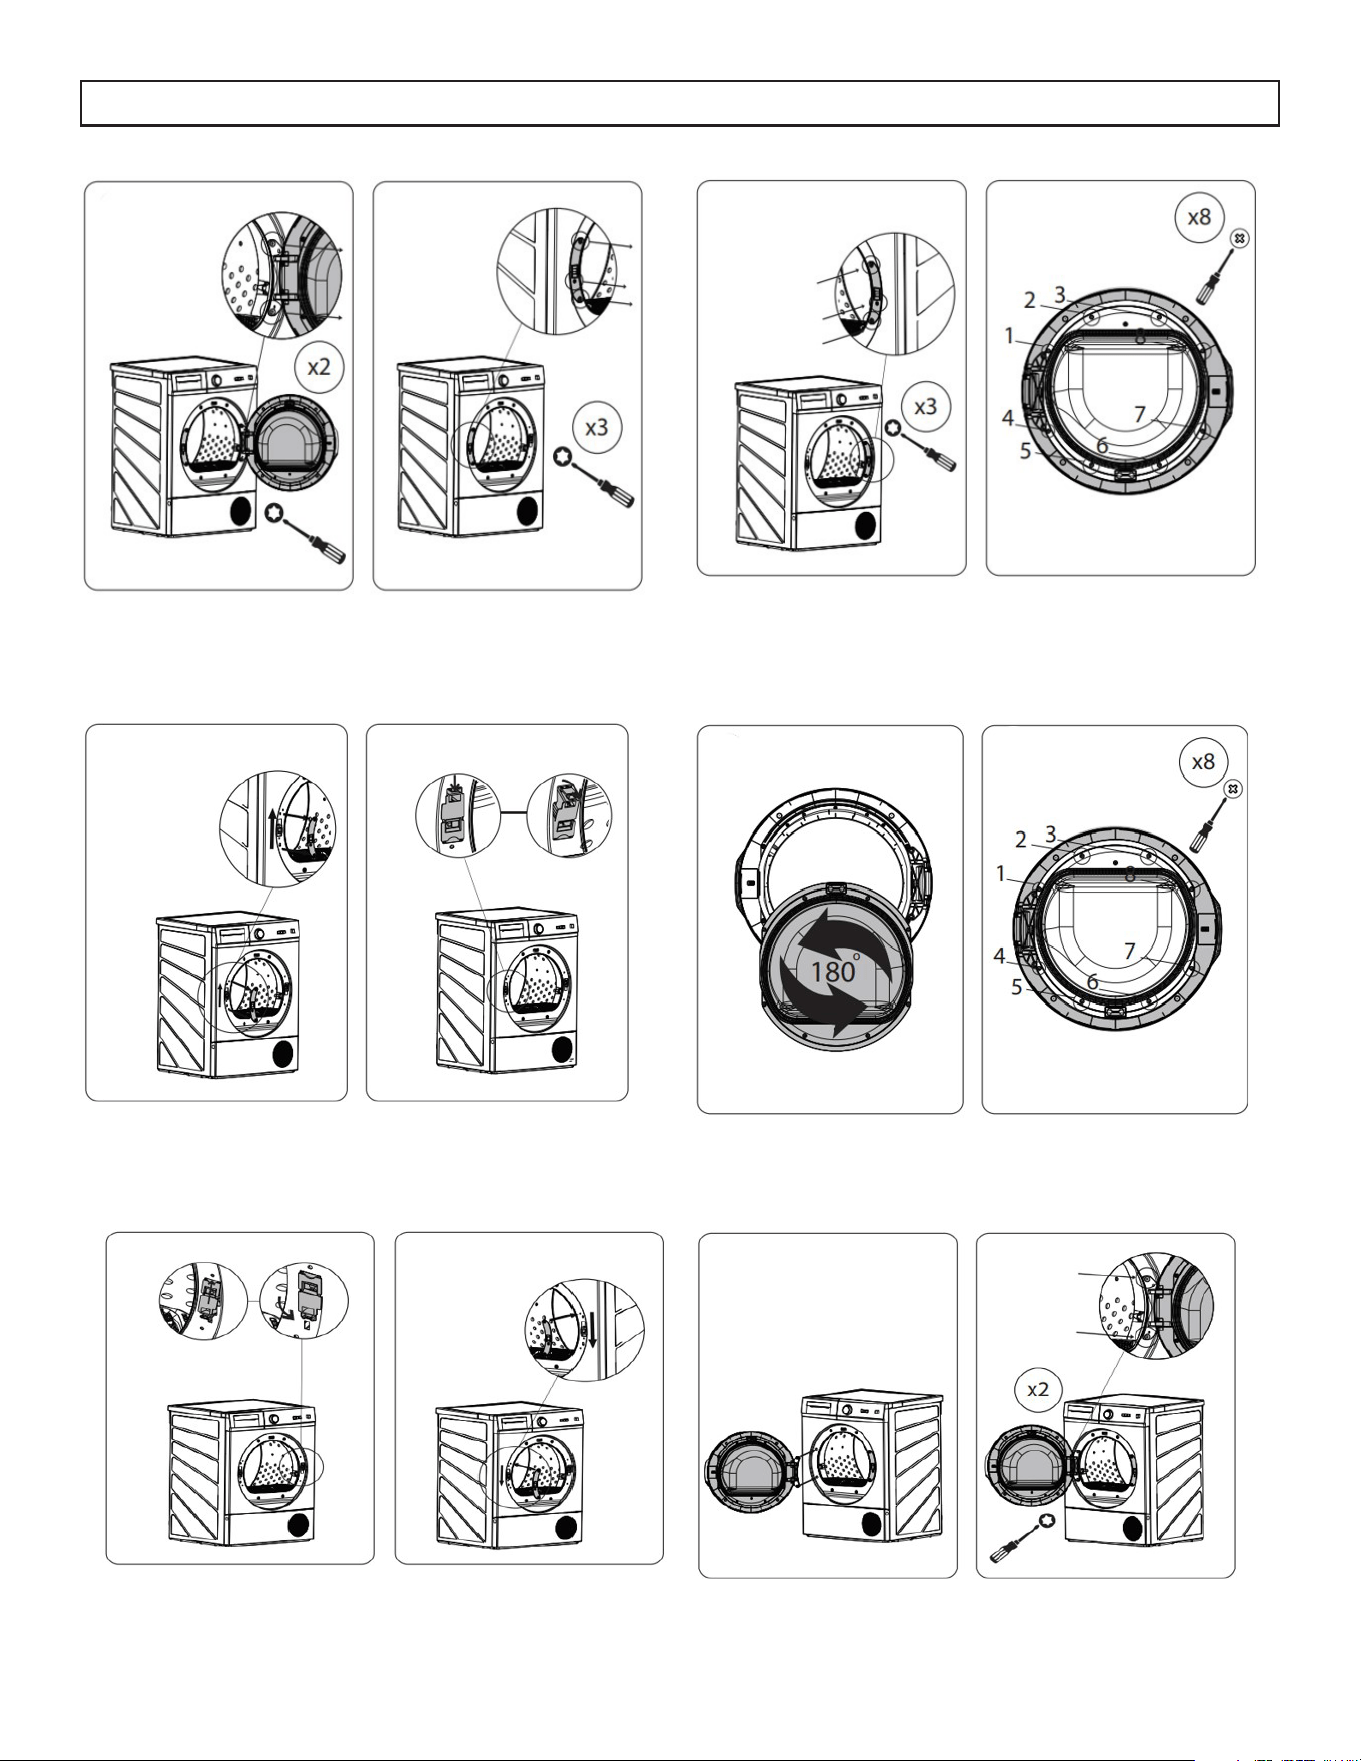
INSTRUCTIONS POUR INVERSION DE LA PORTE
1. Retirer la porte et ses charnières 4. Retirer la vitre intérieure de la porte
2. Retirer le mécanisme de fermeture de la porte
5.Tourner la porte de 180 degrés et réinstaller la vitre
intérieure
3. Installer les charnières et le mécanisme de
fermeture de la porte sur les côtés opposés de
l’ouverture de la porte
6. Remise en place de la porte
34
SOINS ET ENTRETIEN
NOTE
• N’utilisez pas de produits chimiques industriels
pour nettoyer votre sécheuse.
• N’utilisez pas une sécheuse qui a été nettoyé
avec des produits chimiques industriels.
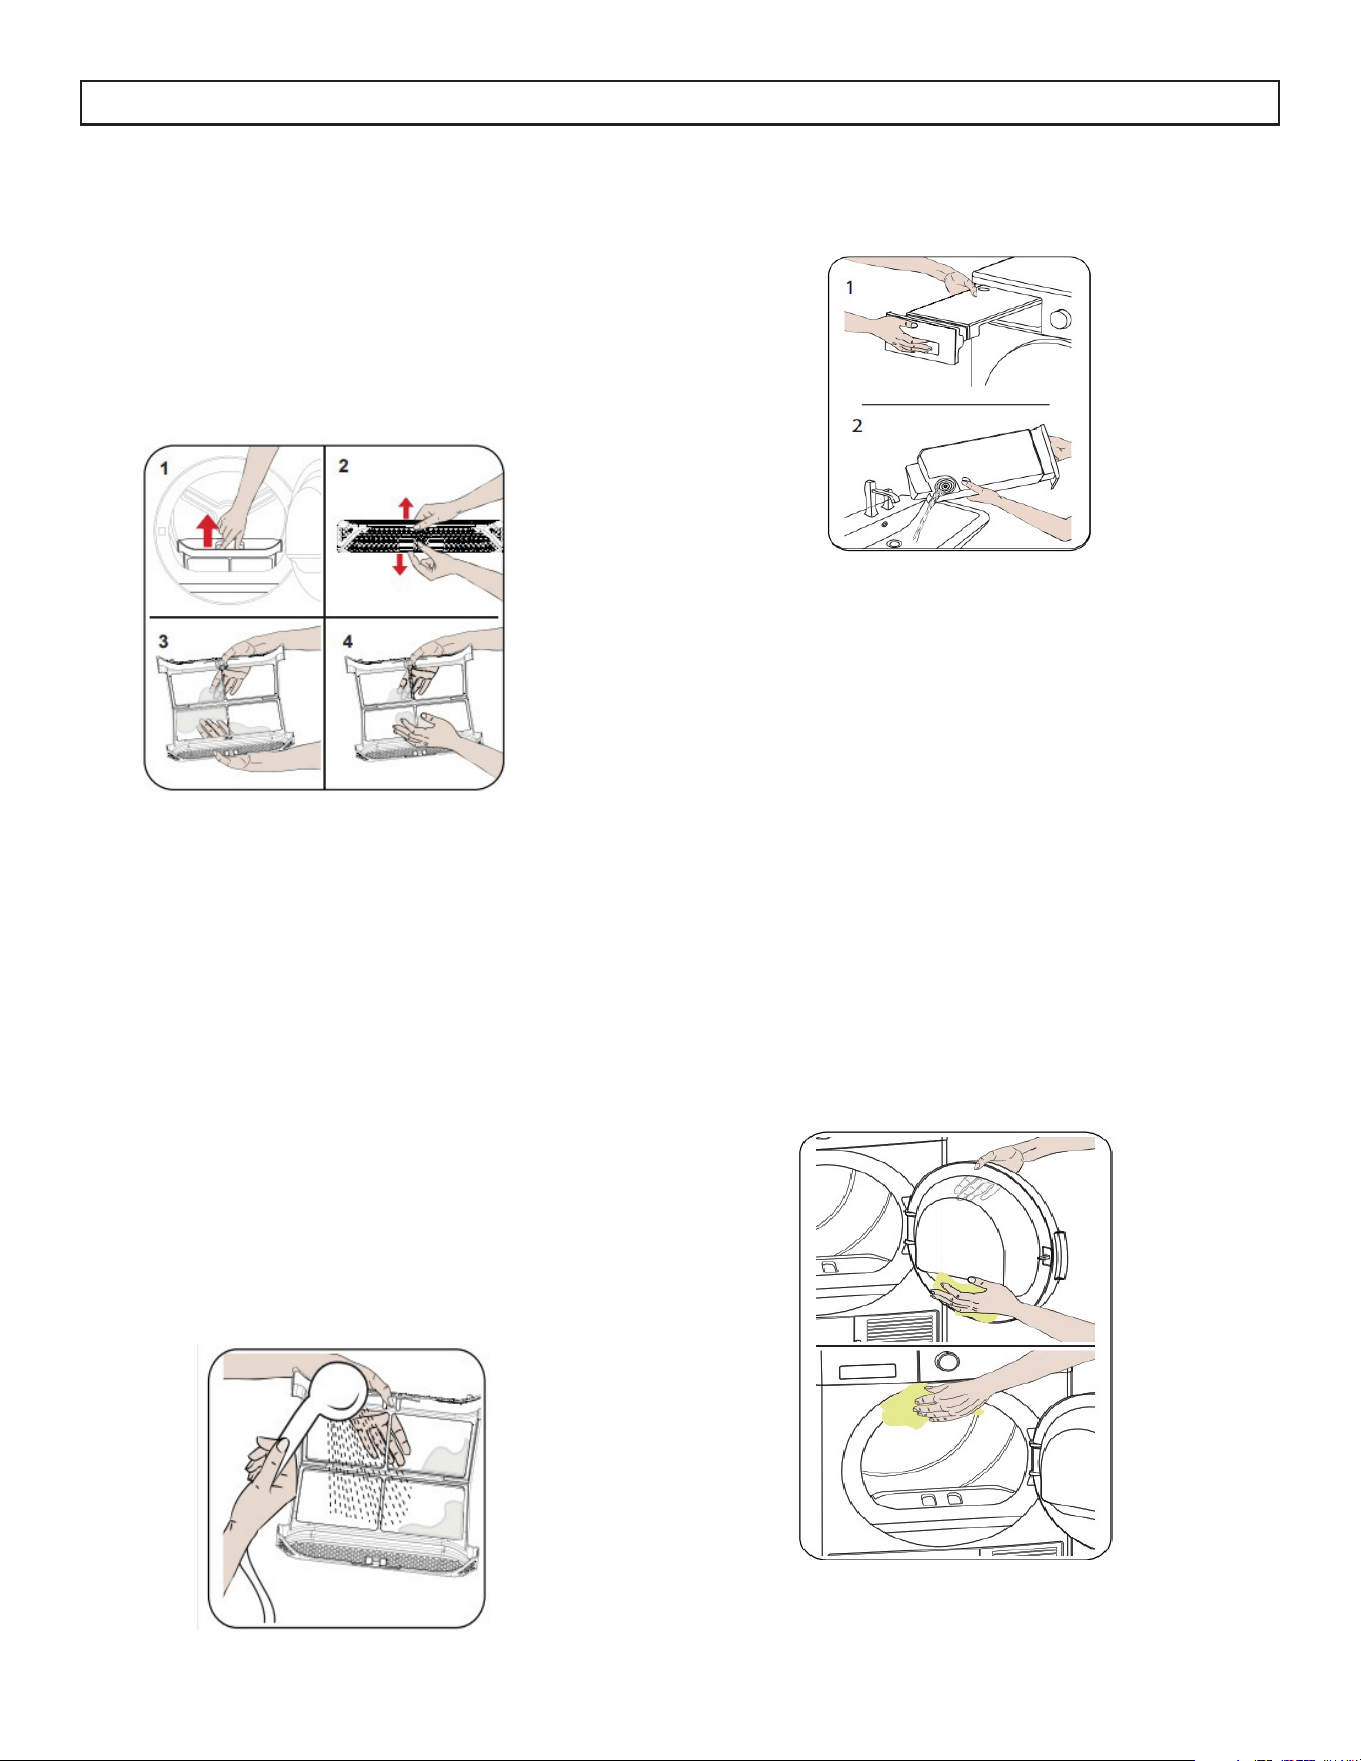
Nettoyage du Filtre à Charpies
1. Ouvrez la porte de la sécheuse.
2. Tirez le ltre à charpies vers le haut pour le retirer.
3. Utilisez vos mains ou un chion doux pour
nettoyer les charpies.
4. Remplacer le ltre à charpies et fermer la porte
de la sécheuse.
NOTE
Le ltre à charpies DOIT être nettoyé après chaque
utilisation.
Après une utilisation continue, une accumulation
sur la surface du ltre à chapies peut se produire et
réduire le débit d’air. Lavez le ltre à l’eau chaude
pour éliminer l’accumulation.
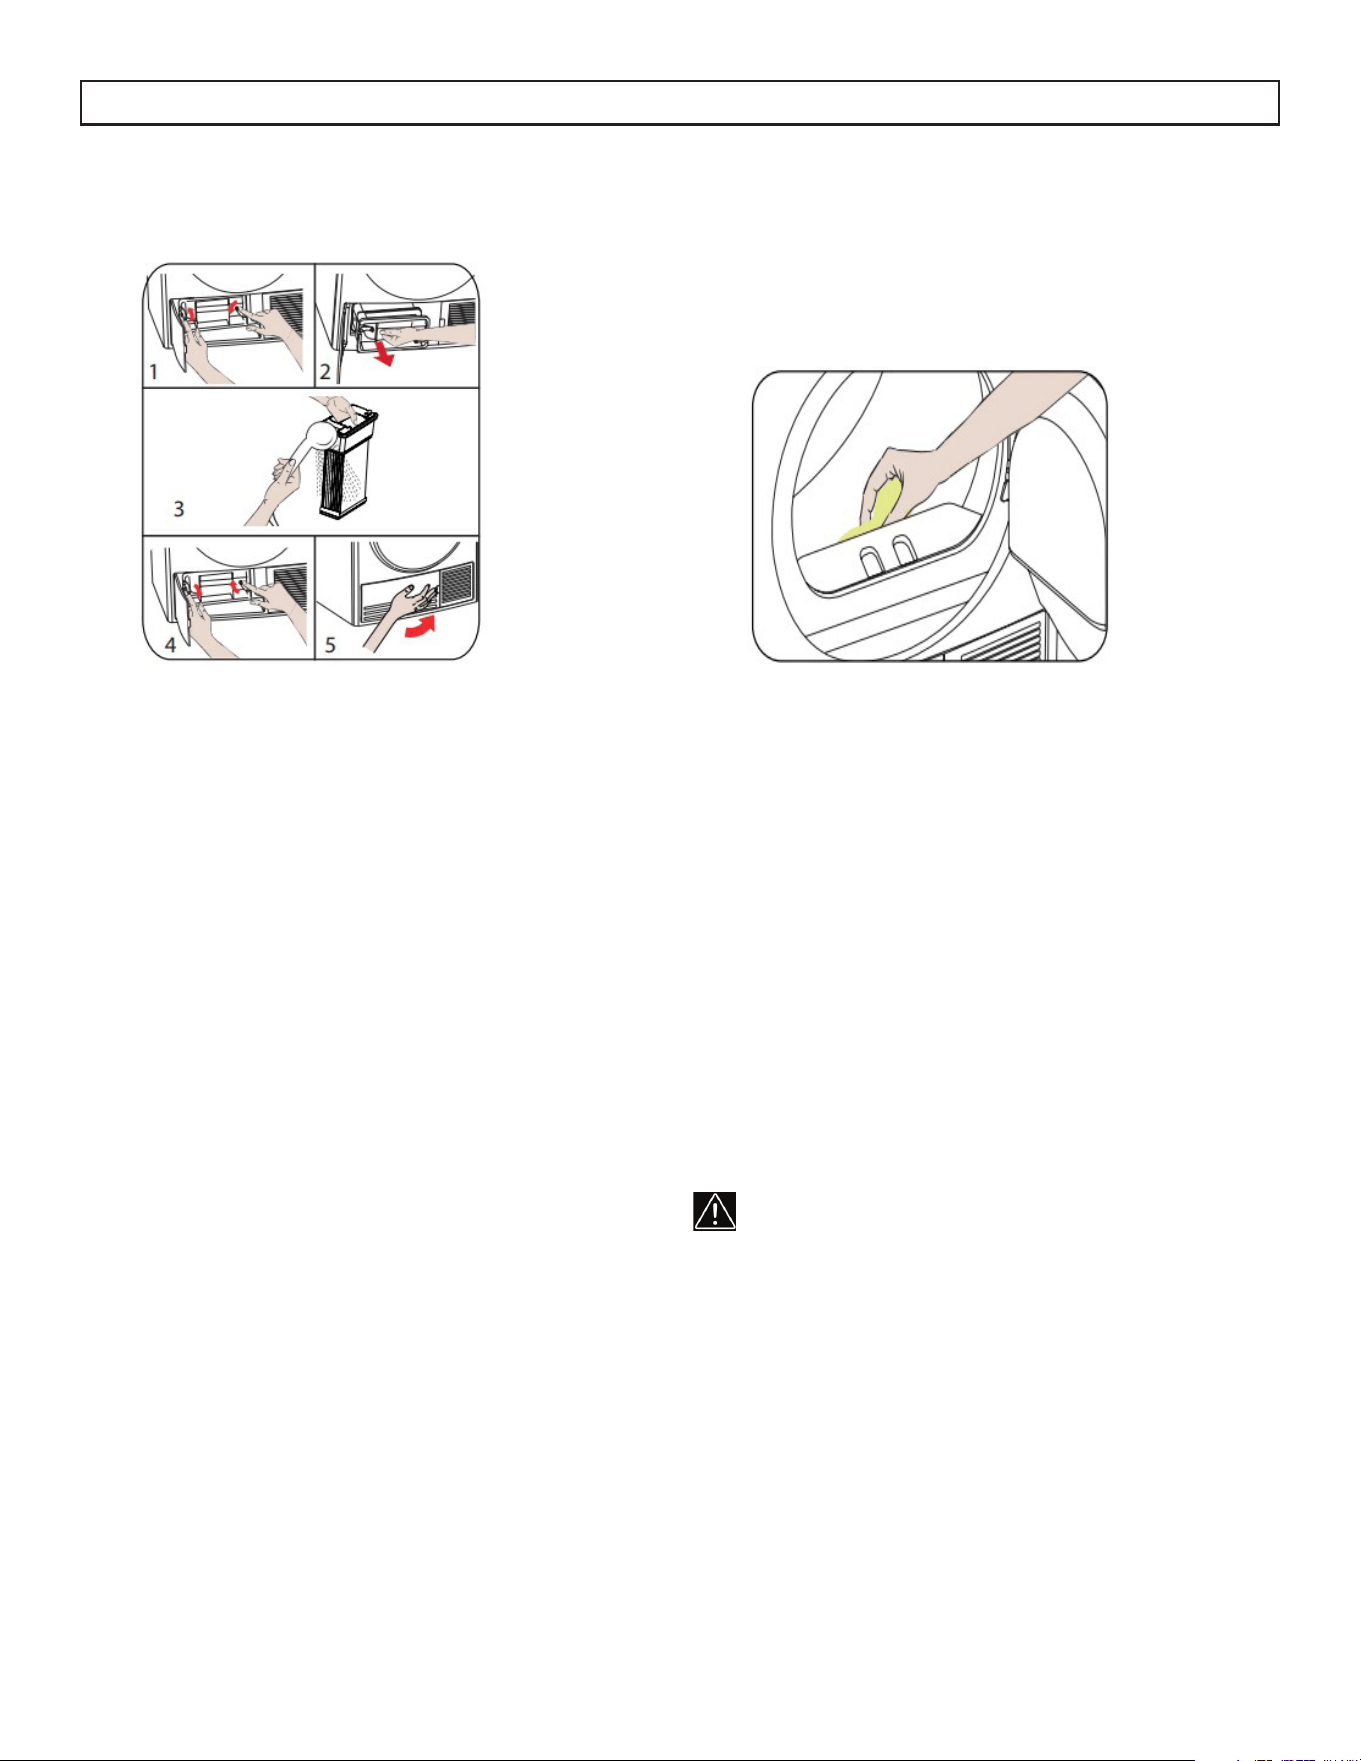
Vidange du réservoir d’eau
1. Tirez le couvercle du tiroir et sortez le réservoir
avec précaution.
2. Vider l’eau dans le réservoir.
3. Si des charpies se sont accumulées sur le
bouchon de vidange du réservoir, nettoyez-le
avec de l’eau.
4. Remplacer le réservoir.
NOTE
• Ne retirez pas le réservoir d’eau lorsqu’un
programme est en cours. L’eau contenue dans
le réservoir n’est pas propre à la consommation
humaine.
• Le réservoir d’eau DOIT être vidé après chaque
utilisation.
Nettoyage de l’intérieur de la porte
35
Ouvrez la porte de la sécheuse et nettoyez toutes les
surfaces intérieures, y compris le joint, à l’aide d’un
chion doux et humide.
SOINS ET ENTRETIEN
Nettoyage du Condenseur Nettoyage du capteur d’humidité
À l’intérieur de la sécheuse, des capteurs d’humidité
détectent si le linge est sec ou non.
Si le processus de séchage est terminé, ouvrez la
porte de la sécheuse et attendez qu’il refroidisse.
1. Ouvrir le socle et dégager les 2 verrous du
couvercle.
2. Tenir le condensateur par la partie en plastique
et l’extraire.
3. Nettoyer avec une pomme de douche et
attendre que l’eau s’écoule.
4. Insérez complètement le condenseur dans
son logement et verrouillez les 2 verrous du
couvercle.
5. Fermer le couvercle du socle
NOTE
Nettoyez le condenseur lorsque l’avertissement
“Nettoyage du condenseur” apparaît.
NOTE
Le condenseur doit être nettoyé tous les 30
programmes de séchage terminés ou une fois par
mois, même si l’avertissement ne s’est pas déclenché.
1. Ouvrez la porte de la sécheuse.
2. Si la sécheuse est encore chaud en raison du
processus de séchage, attendez qu’il refroidisse.
3. À l’aide d’un chion doux imbibé de vinaigre,
essuyez les surfaces métalliques du capteur et
séchez-les.
NOTE
Nettoyer les surfaces métalliques du capteur 4 fois
par an.
NOTE
Ne pas utiliser d’outils métalliques pour
nettoyer les surfaces métalliques du capteur.
AVERTISSEMENT
En raison du risque d’incendie et d’explosion,
n’utilisez pas de solutions, de produits de nettoyage
ou de produits similaires pour nettoyer les capteurs.
36
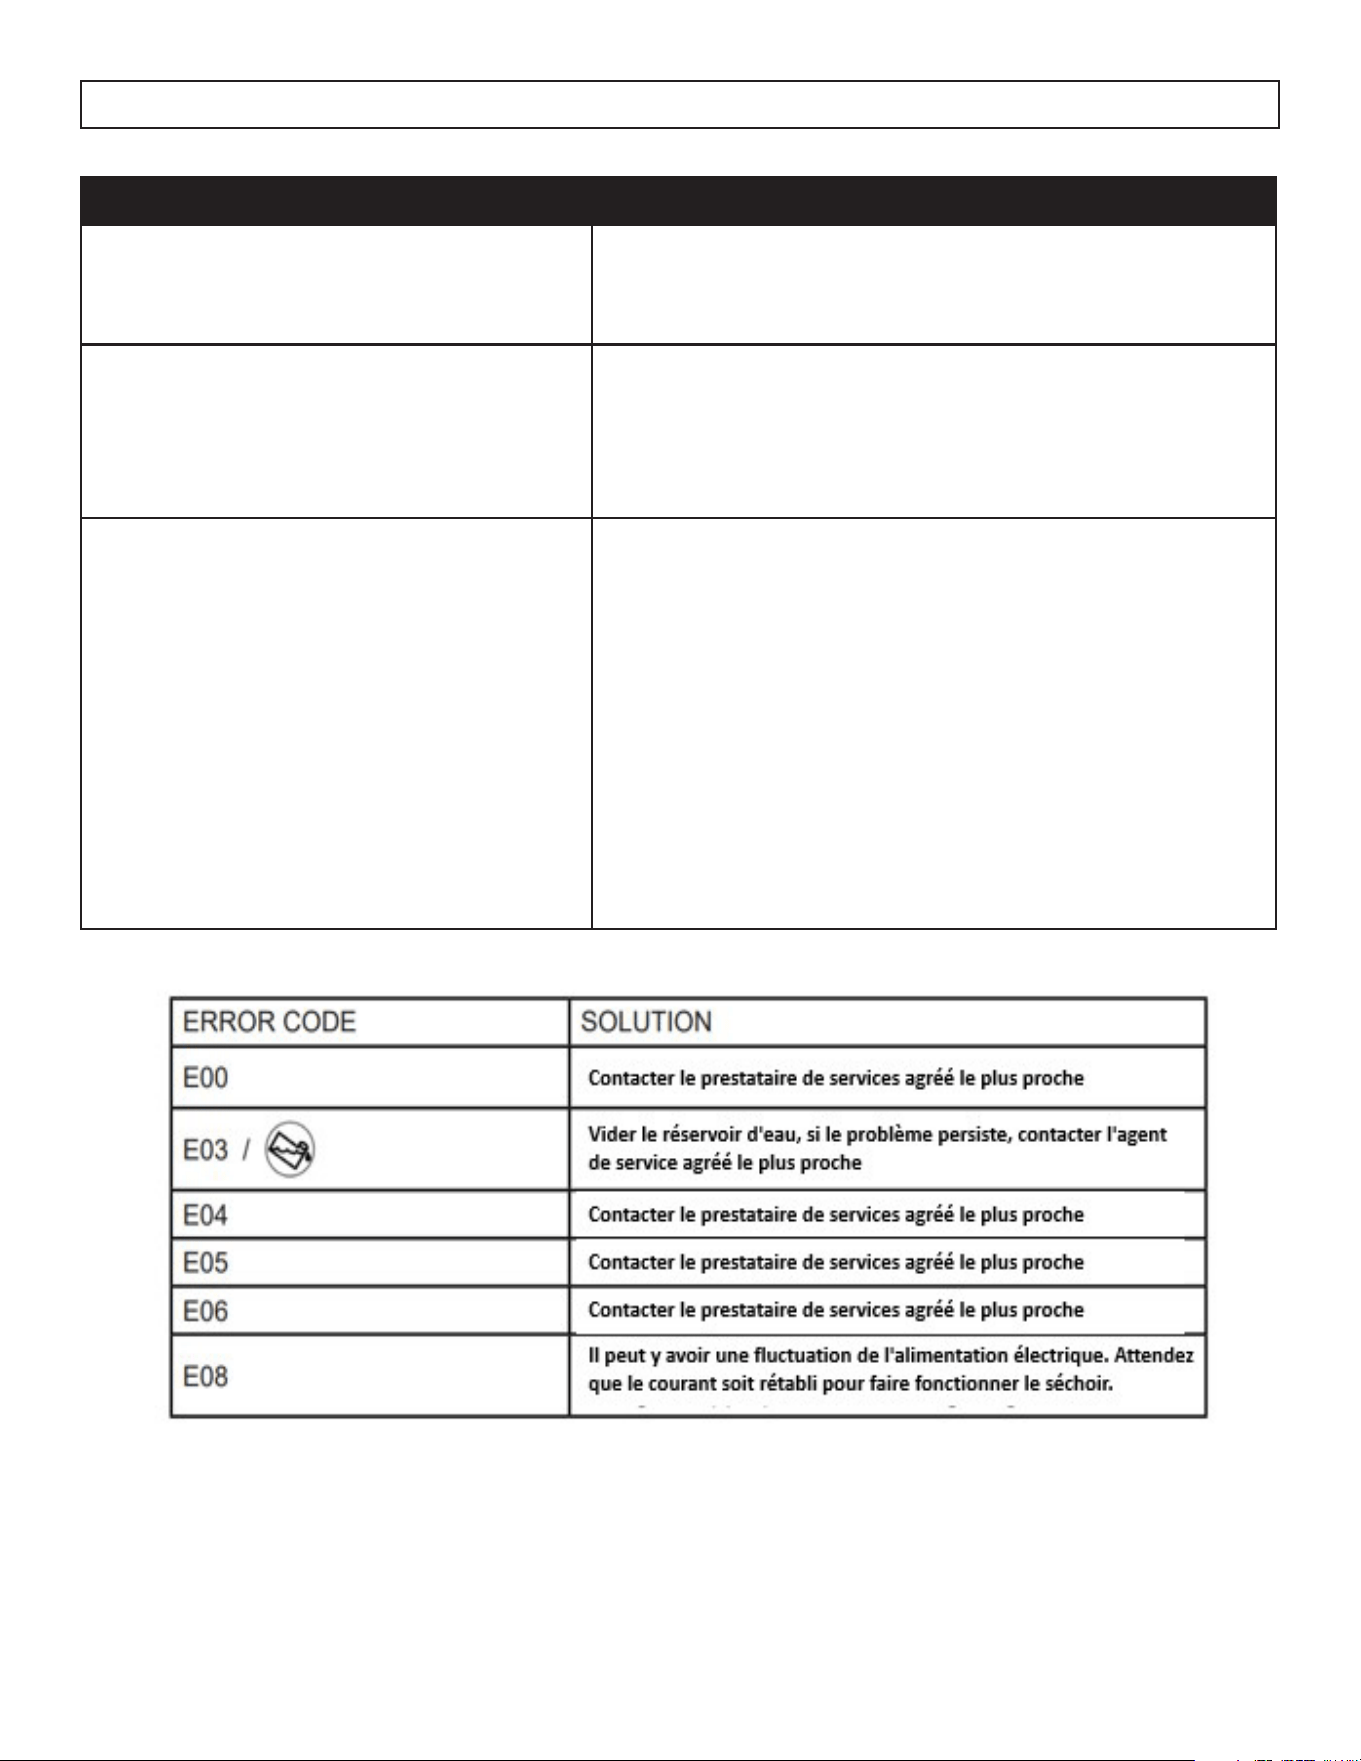
PROBLÈME CAUSE POSSIBLE
La sécheuse ne fonctionne pas • L’appareil n’est pas branché.
• Le disjoncteur a déclenché ou un fusible grillé.
Le tambour du séchoir ne tourne pas. • La porte n’est pas complètement fermée.
• La che d’alimentation est débranchée.
• La prise de courant n’est pas alimentée.
Le linge n’est pas complètement séché.
• Le ltre à charpies ou le ltre d’admission d’air sont
obstrués.
• Il ya trop de linge dans la sécheuse.
• Des articles humides ont été ajoutés pendant le cycle de
séchage.
• Le linge est devenu tordu pendant le séchage.
• La sécheuse a été placé dans un endroit peu ou mal
ventilé.
• L’évent de la sécheuse est bloqué.
DÉPANNAGE
37
LIMITED IN-HOME APPLIANCE WARRANTY
This quality product is warranted to be free from manufacturer’s defects in material and workmanship, provided that the unit is used under the normal operating
conditions intended by the manufacturer.
This warranty is available only to the person to whom the unit was originally sold by Danby Products Limited (Canada) or Danby Products Inc. (U.S.A.) (hereafter
“Danby”) or by an authorized distributor of Danby, and is non-transferable.
TERMS OF WARRANTY
Plastic parts, are warranted for thirty (30) days only from purchase date, with no extensions provided.
First Year
During the rst twelve (12) months, any functional parts of this product found to be defective, will be repaired or replaced, at warrantor’s
option, at no charge to the ORIGINAL purchaser.
To obtain
Danby reserves the right to limit the boundaries of “In Home Service” to the proximity of an Authorized Service Depot. Any app liance
Service
requiring service outside the limited boundaries of “In Home Service” , it will be the consumer’s responsibility to transport the appliance (at
their own expense) to the original retailer (point of purchase) or a service depot for repair. See “Boundaries of In Home Serv ice”below.
Contact your dealer from whom your unit was purchased, or contact your nearest authorized Danby service depot, where service
must be performed by a qualied service technician.
If service is performed on the units by anyone other than an authorized service depot, or the unit is used for commercial appli cation, all
obligations of Danby under this warranty shall be void.
Boundaries of
If the appliance is installed in a location that is 100 kilometers (62 miles) or more from the nearest service center your unit must be
In Home Service
delivered to the nearest authorized Danby Service Depot, as service must only be performed by a technician qualied and certif ied for
warranty service by Danby. Transportation charges to and from the service location are not protected by this warranty and are t he
responsibility of the purchaser.
Nothing within this warranty shall imply that Danby will be responsible or liable for any spoilage or damage to food or other c ontents of this appliance, whether due
to any defect of the appliance, or its use, whether proper or improper.
EXCLUSIONS
Save as herein provided, Danby, there are no other warranties, conditions, representations or guarantees, express or implied, m ade or intended by Danby or its
authorized distributors and all other warranties, conditions, representations or guarantees, including any warranties, conditio ns, representations or guarantees
under any Sale of Goods Act or like legislation or statue is hereby expressly excluded. Save as herein provided, Danby shall no t be responsible for any damages
to persons or property, including the unit itself, howsoever caused or any consequential damages arising from the malfunction o f the unit and by the purchase of
the unit, the purchaser does hereby agree to indemnify and hold harmless Danby from any claim for damages to persons or propert y caused by the unit.
GENERAL PROVISIONS
No warranty or insurance herein contained or set out shall apply when damage or repair is caused by any of the following:
1) Power failure.
2) Damage in transit or when moving the appliance.
3) Improper power supply such as low voltage, defective house wiring or inadequate fuses.
4) Accident, alteration, abuse or misuse of the appliance such as inadequate air circulation in the room or abnormal operating con ditions
(extremely high or low room temperature).
5) Use for commercial or industrial purposes (ie. If the appliance is not installed in a domestic residence).
6) Fire, water damage, theft, war, riot, hostility, acts of God such as hurricanes, oods etc.
7) Service calls resulting in customer education.
8) Improper Installation (ie. Building-in of a free standing appliance or using an appliance outdoors that is not approved for out door application).
Proof of purchase date will be required for warranty claims; so, please retain bills of sale. In the event warranty service is required, present this document to our
AUTHORIZED SERVICE DEPOT.
Danby Products Limited
PO Box 1778, Guelph, Ontario, Canada N1H 6Z9
Telephone: (519) 837-0920 FAX: (519) 837-0449
Danby Products Inc.
PO Box 669, Findlay, Ohio, U.S.A. 45840
Telephone: (419) 425-8627 FAX: (419) 425-8629
04/09
1-800-263-2629
Warranty Service
In-home
S’adresser au détaillant qui a vendu l’appareil, ou à la station technique agréée de service la plus proche, où
les réparations doivent être effectuées par un technicien qualifié. Si les réparations sont effectuées par
quiconque autre que la station de service agréée où à des fins commerciales, toutes les obligations de Danby
en vertu de cette garantie seront annulées.
Pendant les premiers vingt quatre (24) mois, toutes les pièces fonctionnelles de ce produit qui s’avèrent
défectueuses seront réparées ou remplacées, selon le choix du garant, sans frais à l’acheteur initial.
Danby se réserve le droit de limiter les limites de « Service au domicile » à proximité d'un dépôt de service
agréé. Pour tout appareil nécessitant le service hors des limites de "Service à domicile" il sera la responsabilité
du consommateur de transporter à ses frais au point d'achat d’origine ou un dépôt de service pour la réparation.
Si l'appareil est installé à plus de 100 kilomètres (62 milles) du centre de service le plus proche, il doit être livré
à l'atelier de réparation autorisé par Danby le plus proche, car l'entretien doit uniquement être réalisé par un
technicien qualifié et certifié pour effectuer un entretien couvert par la garantie de Danby.
Les frais de transport entre votre domicile et le lieu de l'entretien ne sont pas couverts par la présente garantie
et doivent être acquittés par l'acheteur.
Pour bénéficier
du service
Limites de l’entretien
à domicile
GARANTIE LIMITÉE « À DOMICILE »
Cet appareil de qualité est garanti exempt de tout vice de matière première et de fabrication, s’il est utilisé dans les conditions
normales recommandées par le fabricant.
Cette garantie n’est offerte qu’à l’acheteur initial de l’appareil vendu par Danby Products Limited (Canada) ou Danby Products Inc.
(É.-U.) (ci-après « Danby ») ou par l’un de ses distributeurs agréés et elle ne peut être transférée.
CONDITIONS
Les pièces en plastique sont garanties pendant trente (30) jours seulement à partir de la date de l’achat, sans aucune prolongation
prévue.
Aucune partie de la garantie ne prévoit implicitement que le fabricant sera tenu responsable des dommages subis par les aliments ou
d’autres types de contenu, qu’ils soient causés par la défectuosité de l’appareil ou par son usage adéquat ou inadéquat.
EXCLUSIONS
En vertu de la présente, il n’existe aucune autre garantie, condition ou représentation, qu’elle soit exprimée ou tacite, de façon
manifeste ou intentionnelle, par Danby ou ses distributeurs agréés. De même, sont exclues toutes les autres garanties, conditions ou
représentations, y compris les garanties, conditions ou représentations en vertu de toute loi régissant la vente de produits ou de toute
autre législation ou règlement semblable. En vertu de la présente, Danby ne peut être tenue responsable en cas de blessures
corporelles ou de dégâts matériels, y compris à l’appareil, quelle qu’en soit les causes. Danby ne peut pas être tenue responsable
des dommages indirects dus au fonctionnement défectueux de l’appareil. En achetant l’appareil, l’acheteur accepte de tenir sans
reproche et de dégager Danby de toute responsabilité en cas de réclamation pour toute blessure corporelle ou tout dégât matériel
causé par cet appareil.
CONDITIONS GÉNÉRALES
La garantie ou assurance ci-dessus ne s’applique pas si les dégâts ou réparations sont dus aux cas suivants :
1) Panne de courant.
2) Dommages subis pendant le transport ou le déplacement de l’appareil.
3) Alimentation électrique incorrecte (tension faible, câblage défectueux, fusibles incorrects).
4) Accident, modification, emploi abusif ou incorrect de l’appareil tel qu'une circulation d'air inadéquate dans la pièce ou des
conditions de fonctionnement anormales (température extrêmement élevée ou basse).
5) Utilisation dans un but commercial ou industriel (à savoir, si l'appareil n'est pas installé dans un domicile résidentiel).
6) Incendie, dommages causés par l’eau, le vol, la guerre, une émeute, des hostilités, ou en cas de force majeure (ouragan,
inondation, etc.).
7) Visites d’un technicien pour expliquer le fonctionnement de l’appareil au propriétaire.
8) Installation inappropriée (par exemple, encastrement d'un appareil autoportant, ou utilisation extérieure d'un appareil non conçu à
cet effet, y compris, mais sans s'y limiter : les garages, les patios, les porches ou ailleurs, qui ne sont pas correctement isolés ou
climatisés).
La preuve de la date d'achat sera requise pour les réclamations de garantie; conserver la facture de vente. Dans le cas où un service
de garantie est requis, présentez la preuve d'achat à notre dépôt de service agréé.
Service sous garantie
Service au domicile
Danby Products Limited
PO Box 1778, Guelph, Ontario, Canada N1H 6Z9
Téléphone : (519) 837-0920 Télécopieur : (519) 837-0449
Danby Products Inc.
PO Box 669, Findlay, Ohio, U.S.A. 45840
Téléphone : (419) 425-8627 Télécopieur : (419) 425-8629
1-800-263-2629
02/18
Premiers 24 mois

Mod el • M od èle • Modelo
Printed in Turkey
Imprimé en Turquie
Danby Products Limited, Guelph, ON, Canada N1H 6Z9
Danby Products Inc., Findlay, Ohio, USA 45840
*Trademarks of Danby Products Limited and/or its subsidiaries
* Marques de commerce de Danby Products Limited et / ou de ses filiales
