*
*
*Trademark of Danby Products
* Marque de commerce de Danby Products
* Marca comerciales de Danby Products
Danby Products Limited, Guelph, Ontario, Canada N1H 6Z9
Danby Products Inc. Findlay, Ohio, U.S.A. 45840
www.Danby.com
Printed in Turkey
Imprimé en Turquie
Impreso en Turquía
MODEL • MODELO
DDY040D4WDB
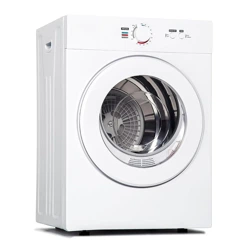
VENTLESS FRONT LOAD DRYER
Owner’s Manual............................1 - 21
SECADORA DE CARGA FRONTAL SIN
VENTILACIÓN
Manuel du propriétaire.................22 - 42
2023.10.05

1
Welcome to the Danby family.
We are proud of our quality products and we believe in dependable service. We suggest
that you read this owner’s manual before plugging in your new appliance as it contains
important operation information, safety information, troubleshooting, and maintenance tips
to ensure the reliability and longevity of your appliance.
You are entitled to the warranty coverage as described in the owner’s manual provided with
your new appliance.
1. Please write down your appliance information below. You must keep the original proof
of purchase receipt to validate and receive warranty services.
2. Register your product online and receive a FREE 2 MONTH WARRANTY EXTENSION
after filling out a product survey, at www.danby.com/support/product-registration/
Need Help?
1. Read your Owner’s Manual for installation help, troubleshooting, and maintenance
assistance.
2. Visit www.Danby.com to access self-service tools, FAQs and much more by searching
your model number in the search bar.
3. For the Quickest Customer Service, please fill out the web form at www.danby.com/
support. Your submission will go directly to an expert on your particular appliance.
Our average response times are between 20 minutes and 2 hours, during EST business
hours.
4. Call 1-800-263-2629 - please note that during peak hours, hold times can exceed one
hour.
Model Number: ____________________________________________________
Serial Number: ____________________________________________________
Date of Purchase: __________________________________________________
SAVE THESE INSTRUCTIONS!
IMPORTANT WARNING
DANGER: Risk of child entrapment. Before
thowing away an old appliance:
• Remove the door or lid.
• Leave the shelves in place so that children
cannot easily climb into the appliance.
GROUNDING INSTRUCTIONS
This appliance must be grounded. In the event of an
electrical short circuit, grounding reduces the risk of
electrical shock by providing an escape wire for the
electrical current.
ELECTRICAL INSTALLATION
The clothes dryer installation must be performed by
a qualified installer.
• Install the appliance according to the
manufacturer’s instructions and local codes.
• To reduce the risk of severe injury or death,
follow all installation instructions.
• If local codes do not permit the 3-wire power
supply cord connection, only 4-wire power
supply cord must be used.
WARNING - Improper use of the grounding
plug can result in a risk of electric shock.
Consult a qualified electrician or service agent
if the grounding instructions are not completely
understood, or if doubt exists as to whether the
appliance is properly grounded.
DO NOT USE AN EXTENSION CORD
Do not connect your appliance to extension cords
or together with another appliance in the same wall
outlet. Do not splice the power cord. Do not under
any circumstances cut or remove the third ground
prong from the power cord.
If the power supply cord is damaged, it must be
replaced by the manufacturer, its service agent or
similar qualified person in order to avoid hazard.
SAFETY REQUIREMENTS
Ensure that component parts are replaced with like
components and that servicing is done by factory
authorized service personnel, to minimize the risk of
possible ignition due to incorrect parts or improper
service.
This appliance is not intended for use by persons
(including children) whose physical, sensory or
mental capabilities may be different or reduced,
or who lack experience or knowledge, unless such
persons receive supervision or training to operate
the appliance by a person responsible for their
safety.
Children should be supervised to ensure that they
do not play with the appliance.
Do not place items exposed to cooking oils in the
dryer. Items contaminated with cooking oils may
contribute to a chemical reaction that could cause
a load to catch fire. To reduce the risk of fire due
to contaminated loads, the final part of a tumble
dry cycle occurs without heat as a cool down
period. Avoid stopping the dryer before the end of
the drying cycle unless items can be immediately
removed and spread out to allow the accumulated
heat to dissipate.
Important Safety Information
READ AND FOLLOW ALL SAFETY INSTRUCTIONS
Items that have been soiled with oil products can ignite spontaneously, especially
when exposed to heat sources such as in a tumble dryer. The items become
warm, causing an oxidation reaction in the oil. Oxidation creates heat. If the heat
cannot escape, the items can become hot enough to catch fire. Piling, stacking or
storing items that have been soiled with oil can prevent heat from escaping and
create a fire hazard.
2

Important Safety Information
READ AND FOLLOW ALL SAFETY INSTRUCTIONS
• Do not dry articles that have been previously
cleaned in, washed in, soaked in or spotted
with gasoline, dry-cleaning solvents, or other
flammable or explosive substances, as they give
off vapours that could ignite or explode.
• Do not reach into the appliance if the drum is
moving.
• Do not install or store this appliance where it will
be exposed to the weather. This appliance is not
intended for use outdoors.
• Do not tamper with the controls.
• Do not use heat to dry articles containing
foam rubber or similarly textured rubber-like
materials.
• Clean the lint screen before and after each load.
• The interior of the appliance should be cleaned
periodically by qualified service personnel.
• Do not place the appliance or power cord near
heat sources such as radiators, heaters, air ducts
or direct sunlight. Do not place open flames such
as candles on or near the appliance.
• Do not block any ventilation openings. Ensure
that vents are not covered by newspapers,
tablecloths, curtains, carpeting, etc.
• Do not run the power cord under floor
coverings. Keep the power cord away from high
traffic areas where it can become a tripping
hazard.
• Do not misuse the power cord. Never carry or
pull the appliance by the power cord. Never
pull the power cord to unplug it from the outlet,
instead, grasp the plug and pull to remove from
outlet.
• Do not operate the appliance if it has a
damaged power cord or plug. If the power
cord is damaged, it must be replaced by the
manufacturer, its service agent or similarly
qualified persons in order to avoid hazard.
SAVE THESE INSTRUCTIONS!
• Do not attempt to repair, disassemble or modify
the appliance. The warranty becomes void if
the unit is not serviced or repaired by qualified
personnel. There are no user-serviceable parts
inside.
• Do not over load the appliance.
• Ensure foreign objects do not find their way into
the appliance. Remove all objects from pockets
such as lighters, matches, hairpins, coins, etc.
• The door window may be hot after a long
drying cycle. Ensure that children are kept away
from the appliance.
• Opening the door before the cooling process is
finished may expose you to hot air.
• If the dryer is not stack mounted using the
provided kit, ensure that it is placed on a flat,
firm surface in a dry, well-ventilated place. Use
the adjustable front legs to assist in leveling
the appliance if necessary. Do not place the
appliance on any soft material such as foam,
plastic or carpeting.
• After turning the power off, wait 2 minutes
before attempting to turn the unit back on.
• Remove the transport packaging from the back
of the unit before first use.
• Do not install this appliance behind a lockable
door, a sliding door or in such a way that
opening the dryer door is restricted. Do not
install in a tight fitting cabinet.
• Use this appliance only for laundry with a label
that indicates it is suitable for drying.
• Never spray or pour water onto the dryer to
clean it.
3
INSTALLATION INSTRUCTIONS
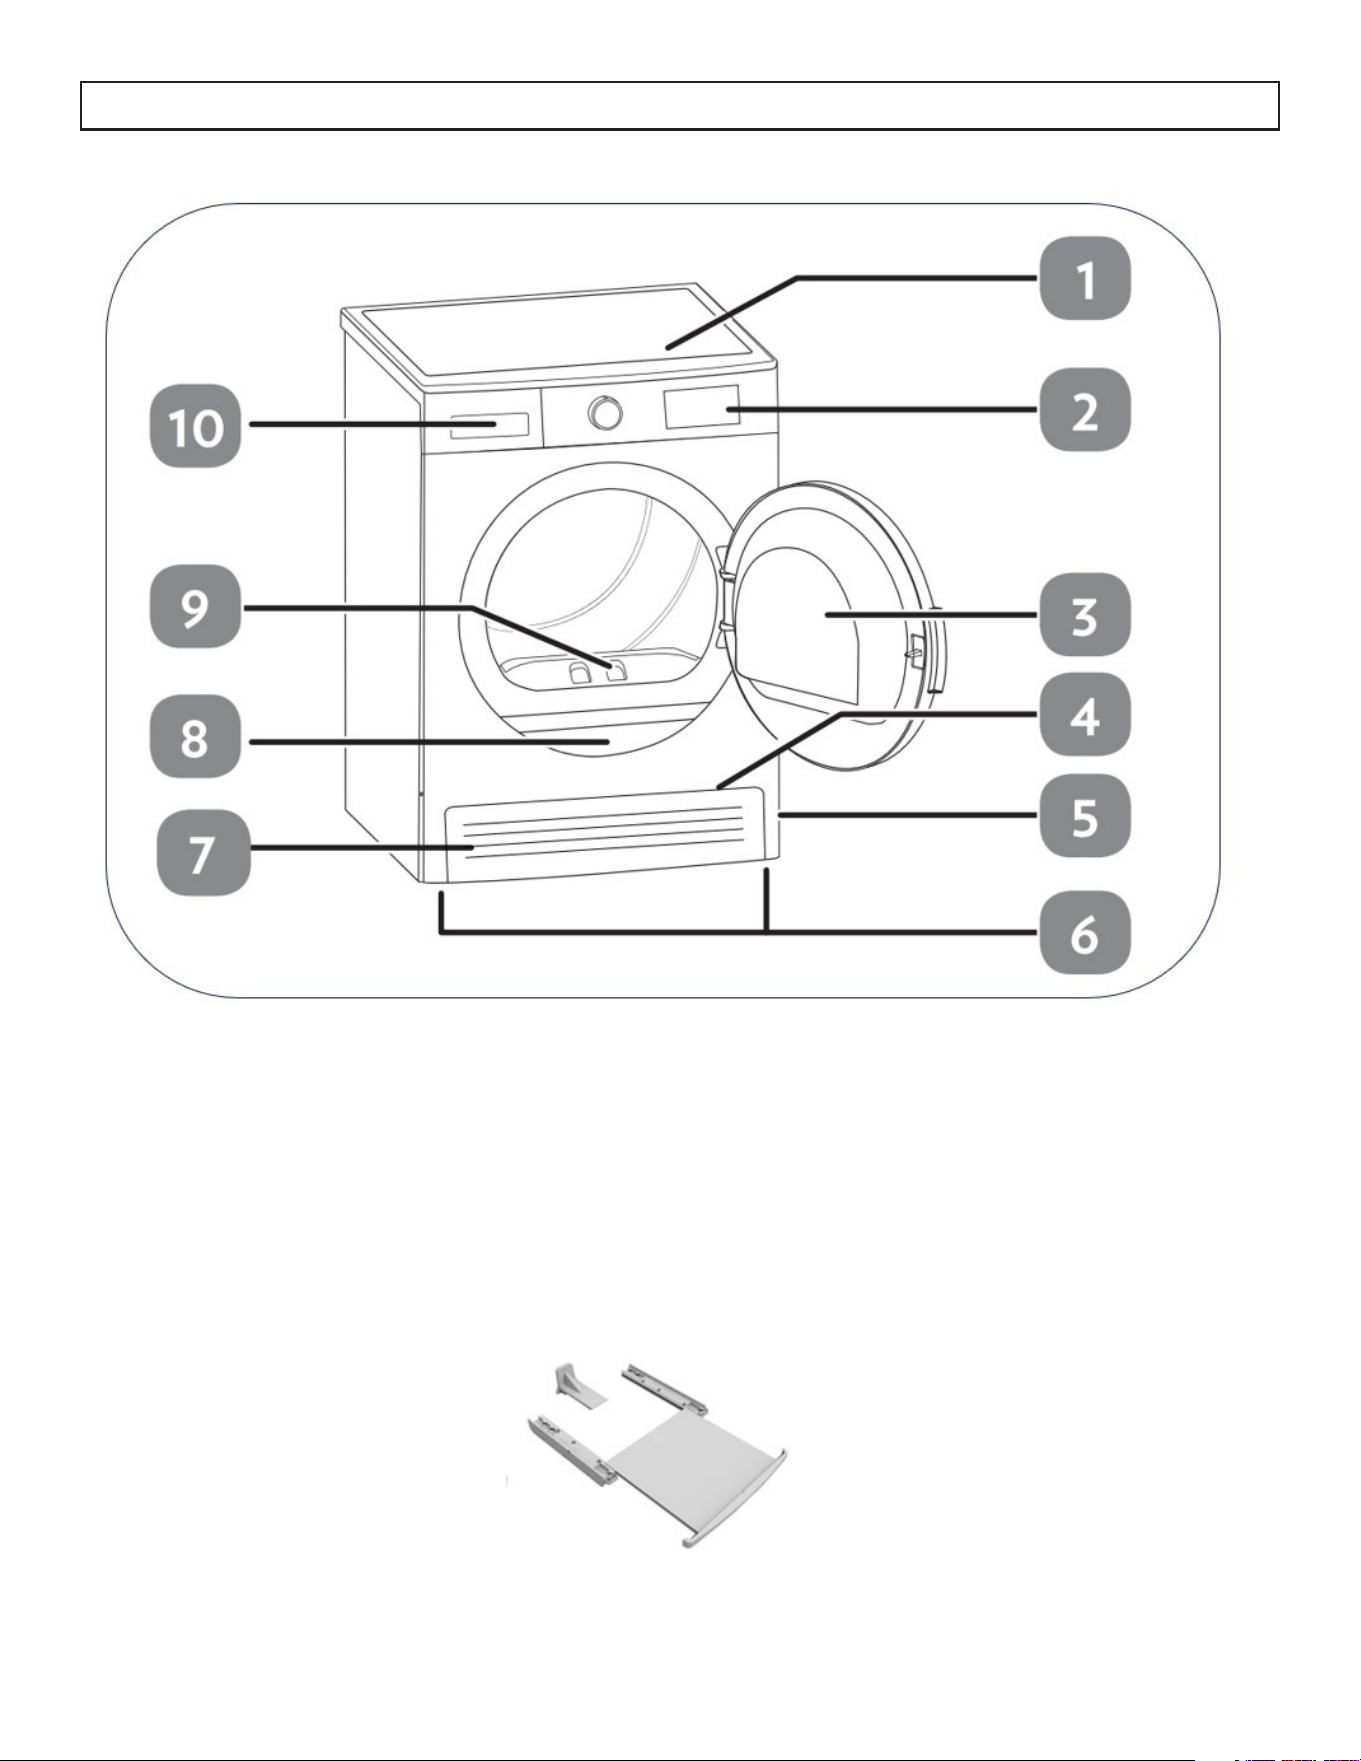
4
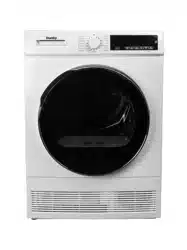
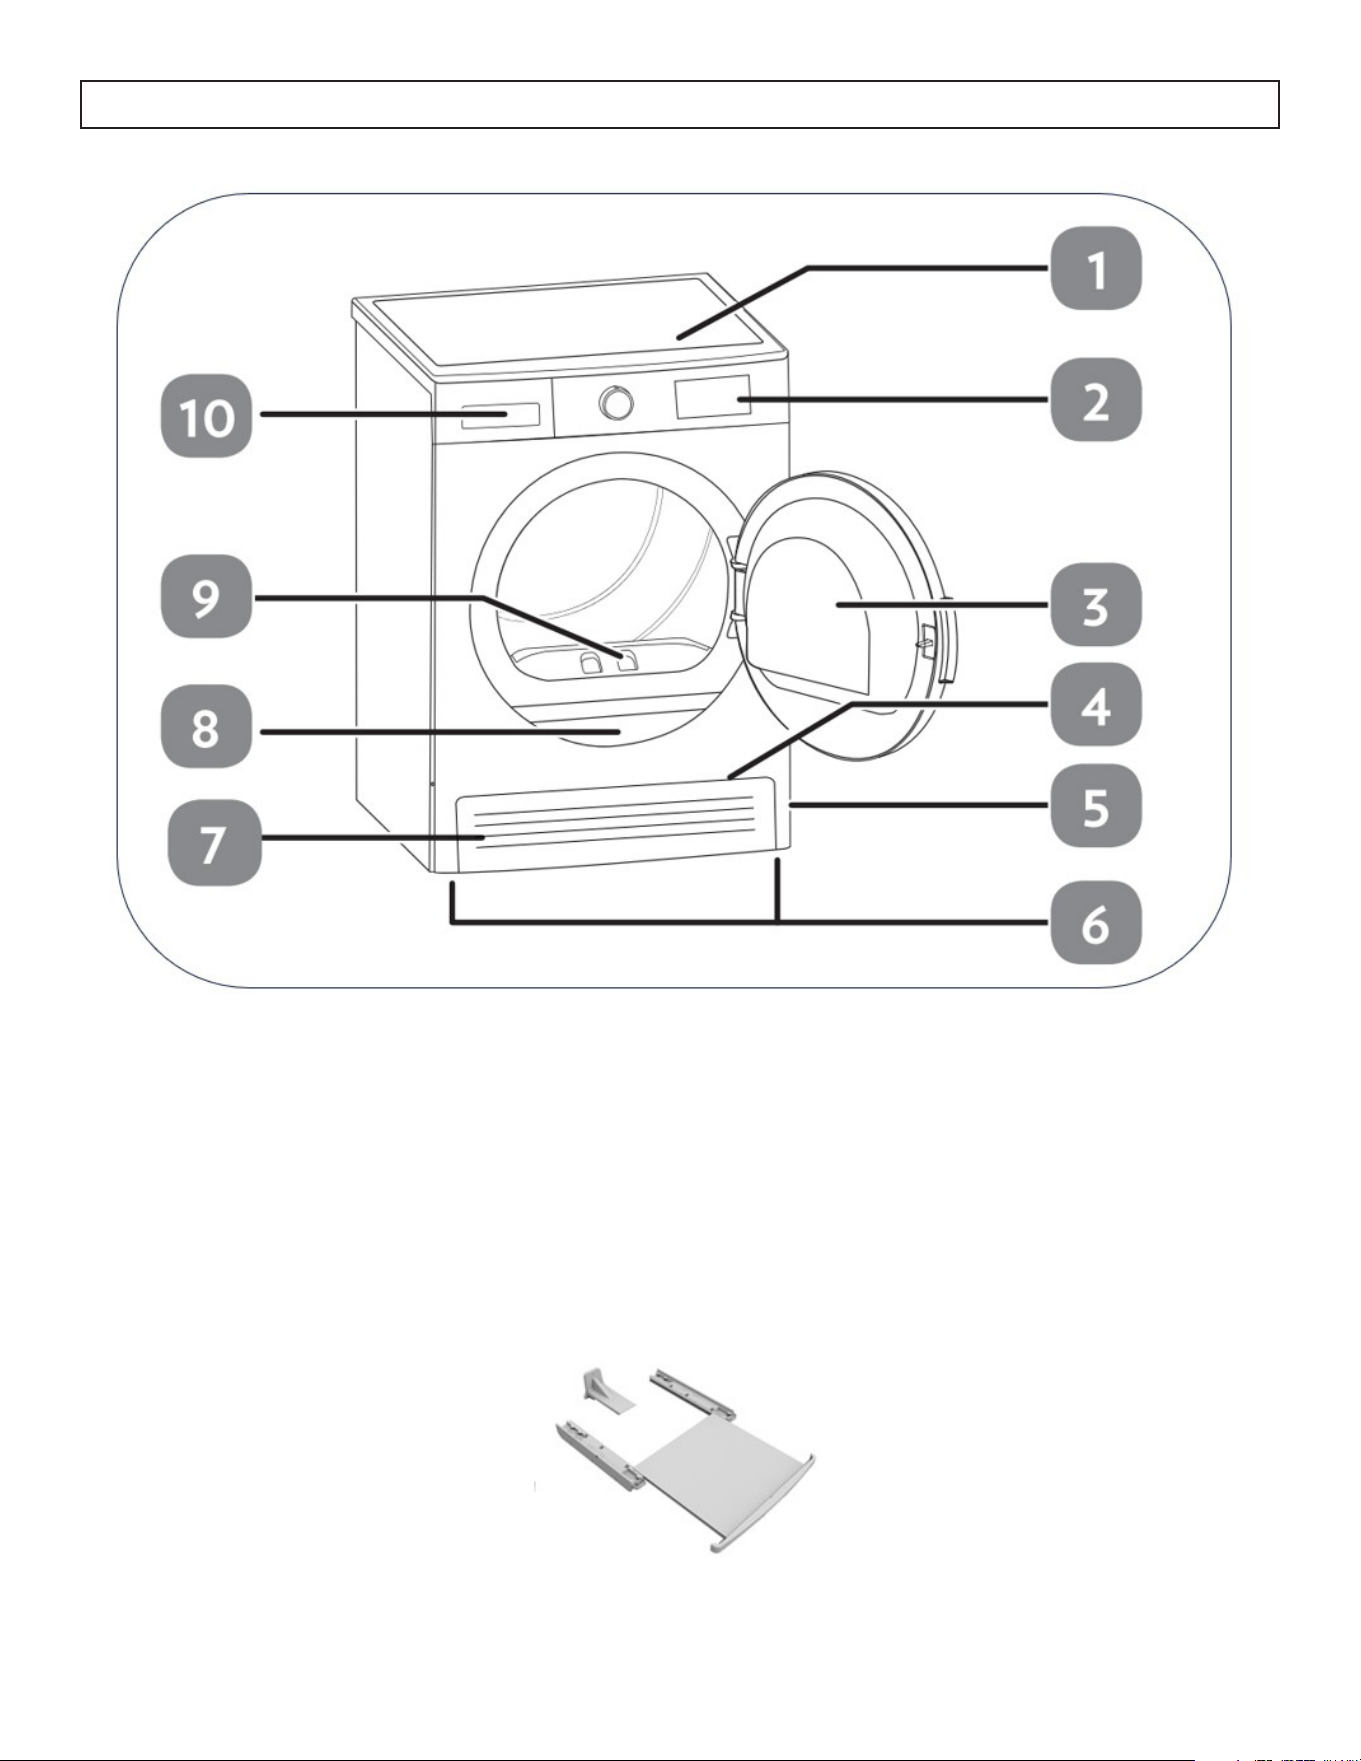
1. Dryer Top
2. Control Panel
3. Dryer Door
4. Ventilation Grills
5. Plinth Opening Slot
6. Leveling Legs
7. Plinth
8. Ratings Plate
9. Lint Filter
10. Drawer Cover
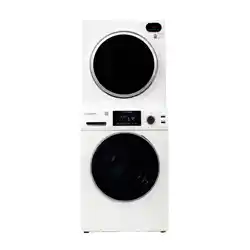
Stacking Kit with Drawer/Shelf
See instruction guide for more details

Under Counter Installation
• Leave at least 1 inch (3 cm) of space between
the side and rear walls of the product and the
underside of the worktop when installing the
dryer under a counter.
• Assembly/disassembly under the counter if
necessary must be done by authorized servicers.
INSTALLATION INSTRUCTIONS
LOCATION
Check the information in the user manual to make
sure that th electrical installation and water outlet is
suitable. If they are not, call a qualified electrician
and a plumber to have the necessary adjustments
made.
It is the customer’s responsibility to prepare the
dryer’s installation place, as well as the electricity
and waste water installation. Before installation,
check the dryer for damage. If damaged to not
have it installed. Damaged products may endanger
your health.
• Install the dryer on a stable and flat surface.
• Run the dryer in a dust-free environment where
the air ventilation is good.
• The clearance between the dryer and the floor
should not be reduced with objects such as
carpets, wood or tape.
• Do not block the ventilation grills found on the
plinth of the tumble dryer.
• The appliance must not be installed behind a
lockable door, a sliding door or a door with a
hinge on the opposite side of the dryer, in such
a way that blocks the full opening of the dryer
door.
• Once installed, the connections must remain
stable. When installing the dryer, make sure
that the rear surface is not leaning on anything
(e.g. tap, socket).
• The operating temperature of the dryer is 41°F
to 95°F (5°C to 35°C). If operated out of this
temperature range, the performance of the dryer
will be affected negatively and the product will
be damaged.
• Be careful when carrying the product as it is
heavy. Always were safety gloves.
• Always install the product against a wall. The
rear surface of the product should be placed
against the wall.
• Leave at least 1 inch (3 cm) of space between
the sides and rear of the appliance.
5
• The dryer must be level to operate more quietly
and without vibration. Use a level when
adjusting the leveling legs.
• When the dryer is placed on a stable surface,
to ensure stability, use a level. If not level, adjust
the leveling legs to level the appliance. Repeat
this process every time you relocate the product.
• Do not place the dryer onto the power cable.
• Install the clothes dryer according to the
manufacturer’s instructions and local codes.
IMPORTANT
To stack the dryer on the washing machine, use
the stacking kit with drawer/shelf included with the
dryer, between the two appliances. The stacking kit
with drawer/shelf must be attached following the
instructions provided.
For stacked installation, ONLY the provided stacking
kit & instructions, MUST be used. If a stacking kit
with instructions, was not included in the dryer
package, contact customer service to acquire.
INSTALLATION INSTRUCTIONS
6
CONNECTION TO WATER OUTLET (with
optional drain hose)
In appliances with a condenser unit, water
accumulates in the water tank during the drying
process. The accumulated water must be emptied
after each drying cycle. There is an option of using
a water drain hose to directly drain the water which
replaces the requirement to manually drain the
water tank.
Connecting the Water Drain Hose
Pull and take out the end of the hose at the back of
the dryer. Do not use any tools to take out the hose.
Fit one end of water drain hose to the slot where
you removed the hose.
Fix the other end of the water drain hose directly to
the water oulet or sink.
NOTE:
The hose must be connected in a manner that it
cannot be displaced. If the hose is displaced while
draining it can result in flooding in the home.
NOTE:
The water drain hose must be installed at a height
of 31.5 inches(80 cm) maximum.
NOTE:
The water drain hose must not be bent, folded or
stepped over.
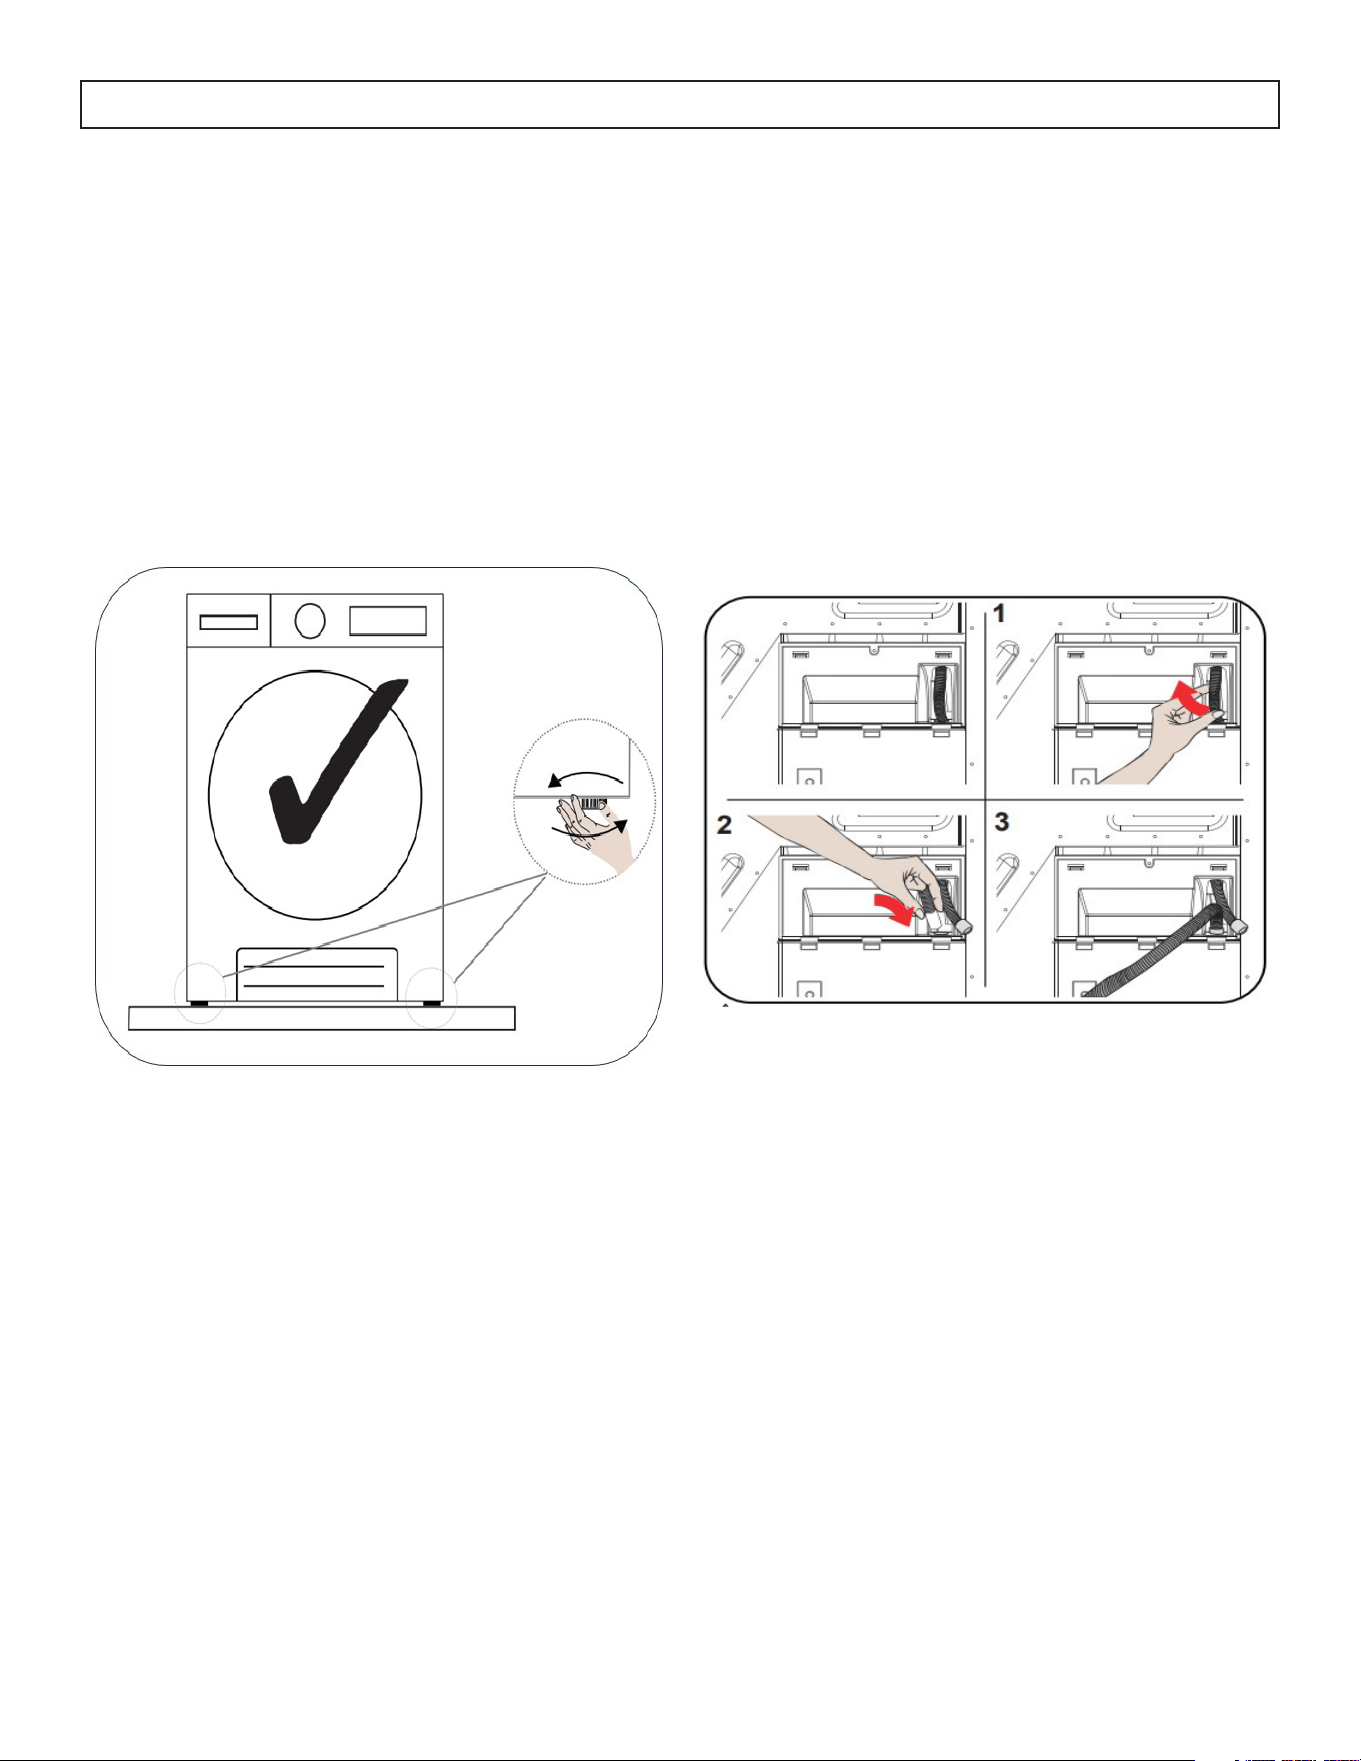
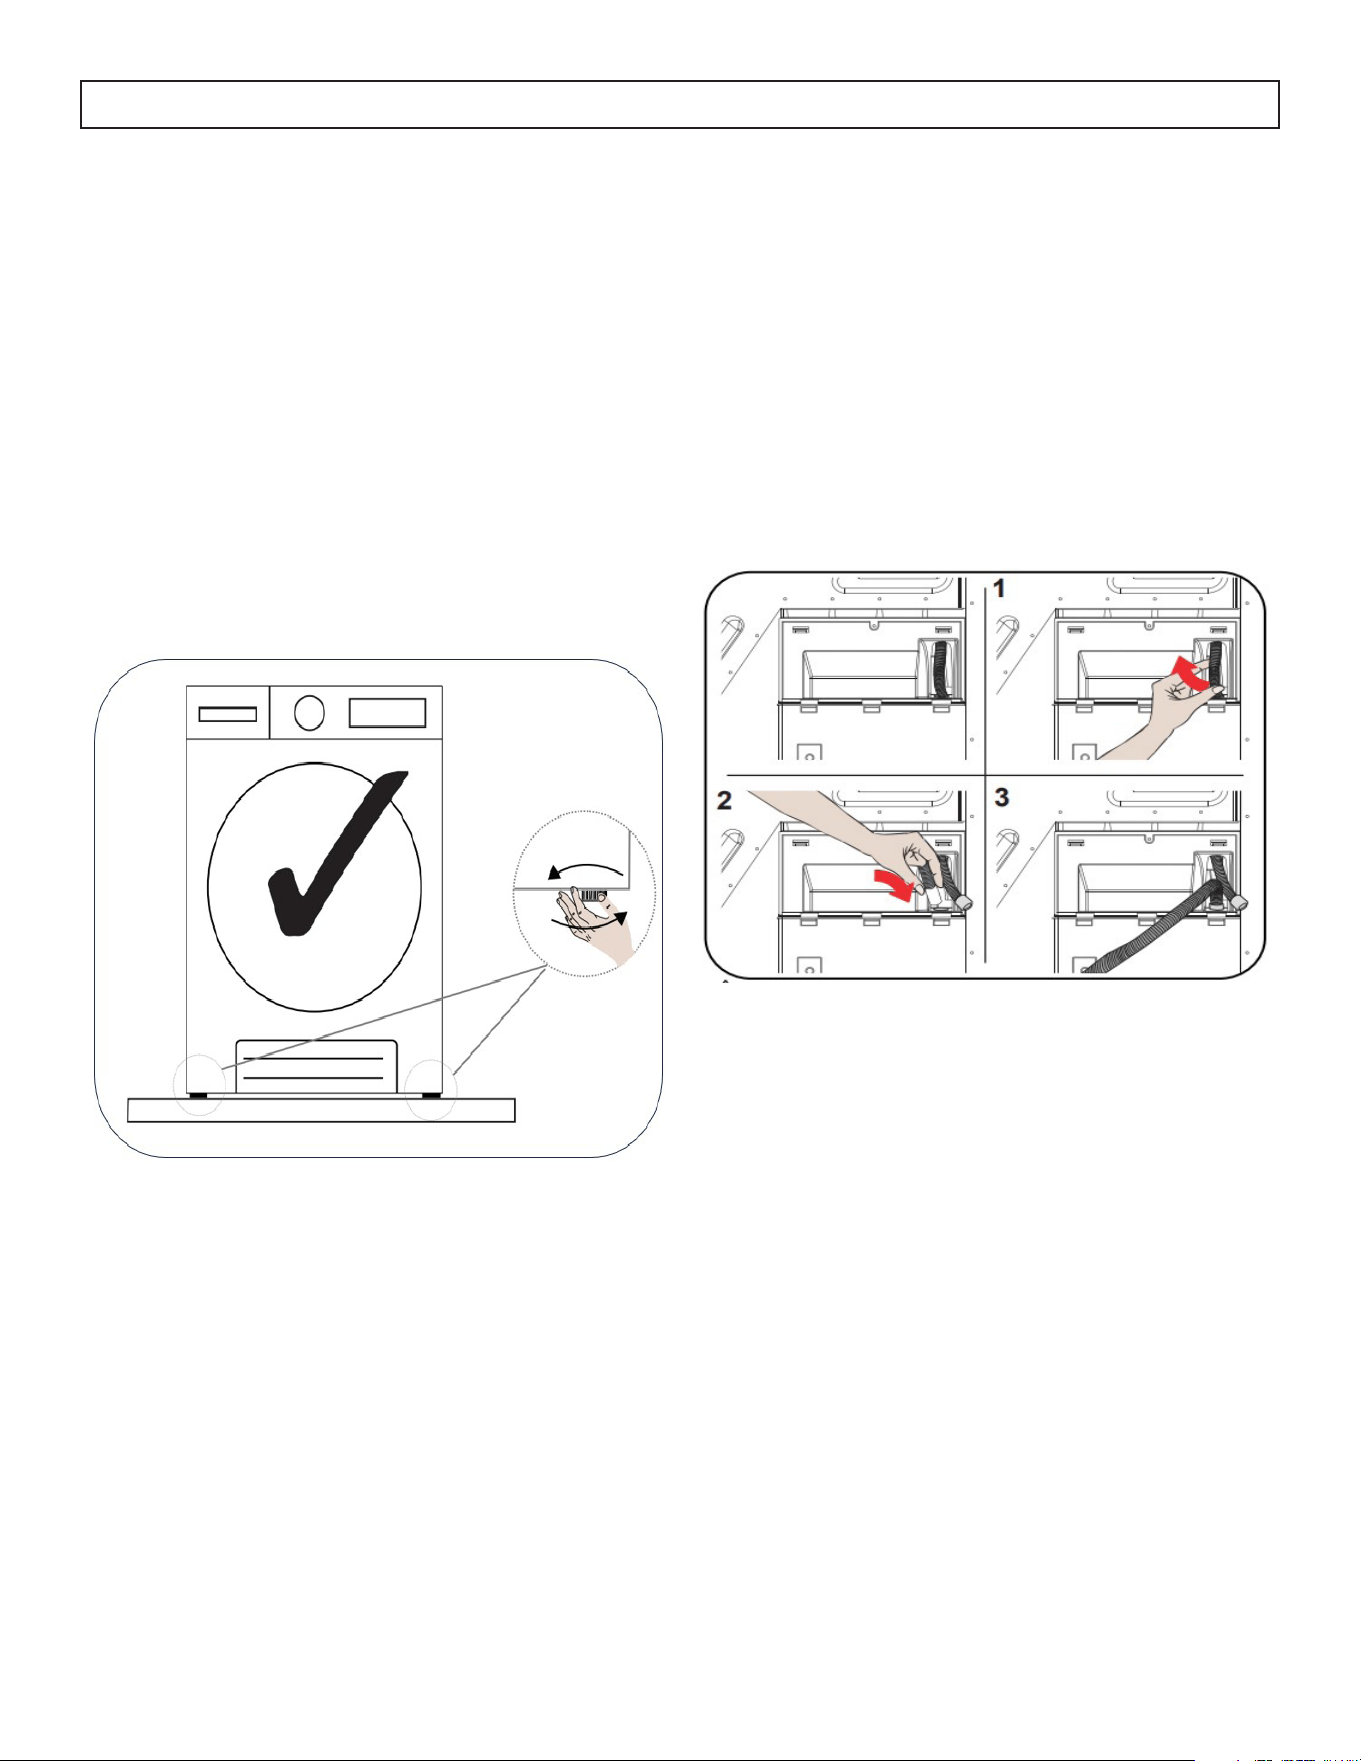
LEVEL THE APPLIANCE
There are four leveling legs, one the each of the four
corners of the appliance.
Adjust each leveling leg by turning it to the left or
right until the dryer is level and balanced.
The applianced should not be placed on sloping,
crooked or uneven floors.
INSTALLATION INSTRUCTIONS
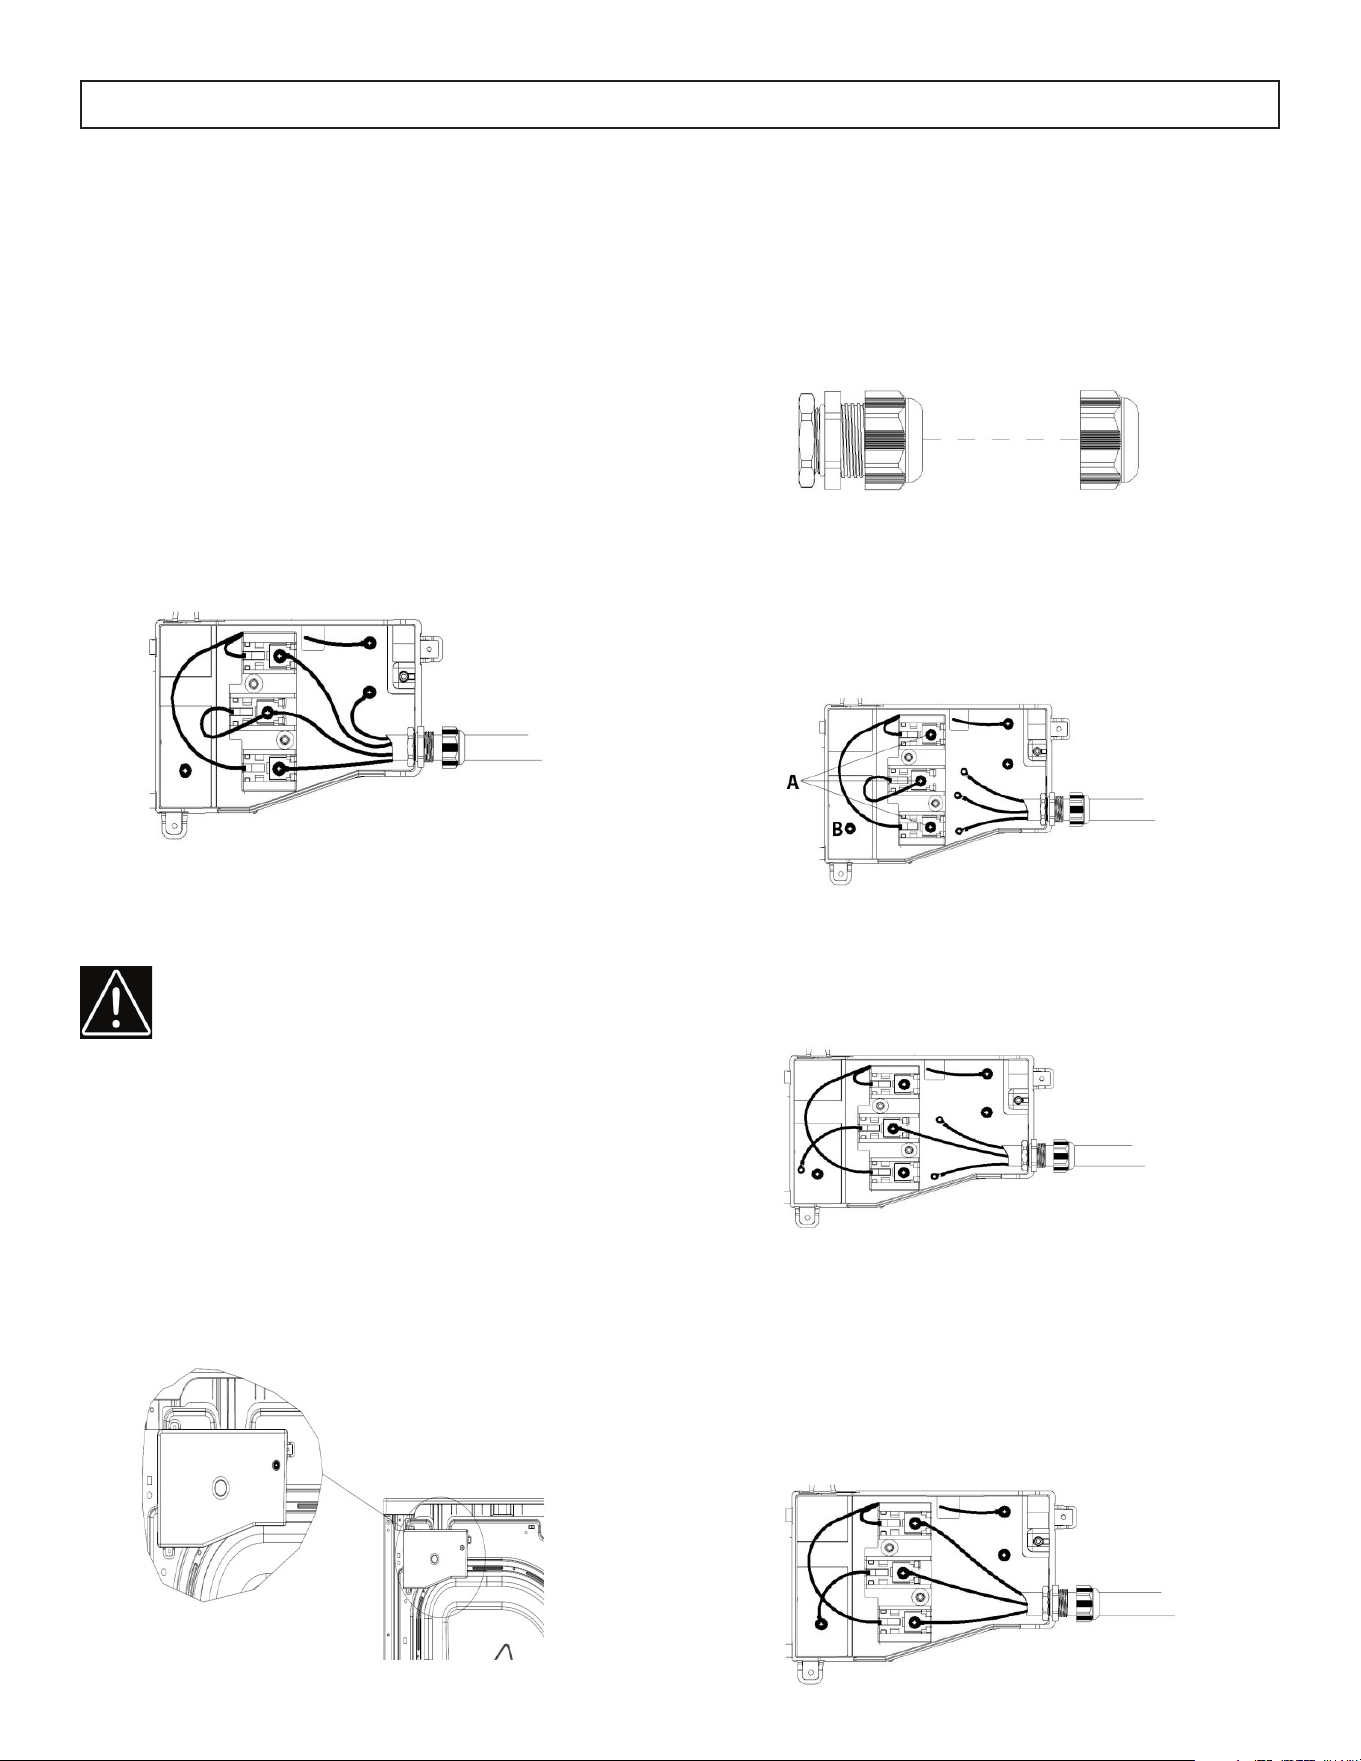
4-WIRE POWER SUPPLY CORD ELECTRICAL CONNECTION
The dryer is set to 208-240 V and 60 Hz.
The dryer requires a special plug. This plug must
be connected to a grounded outlet protected by a
16 Amp fuse or breaker as indicated on the ratings
plate. The fuse/breaker rating of the power line to
which the outlet is connected must also be 16 Amps.
Consult a qualified electrician if you do not have the
correct outlet, fuse, or breaker.
Our company cannot be held responsible for
damages resulting from usage with grounding.
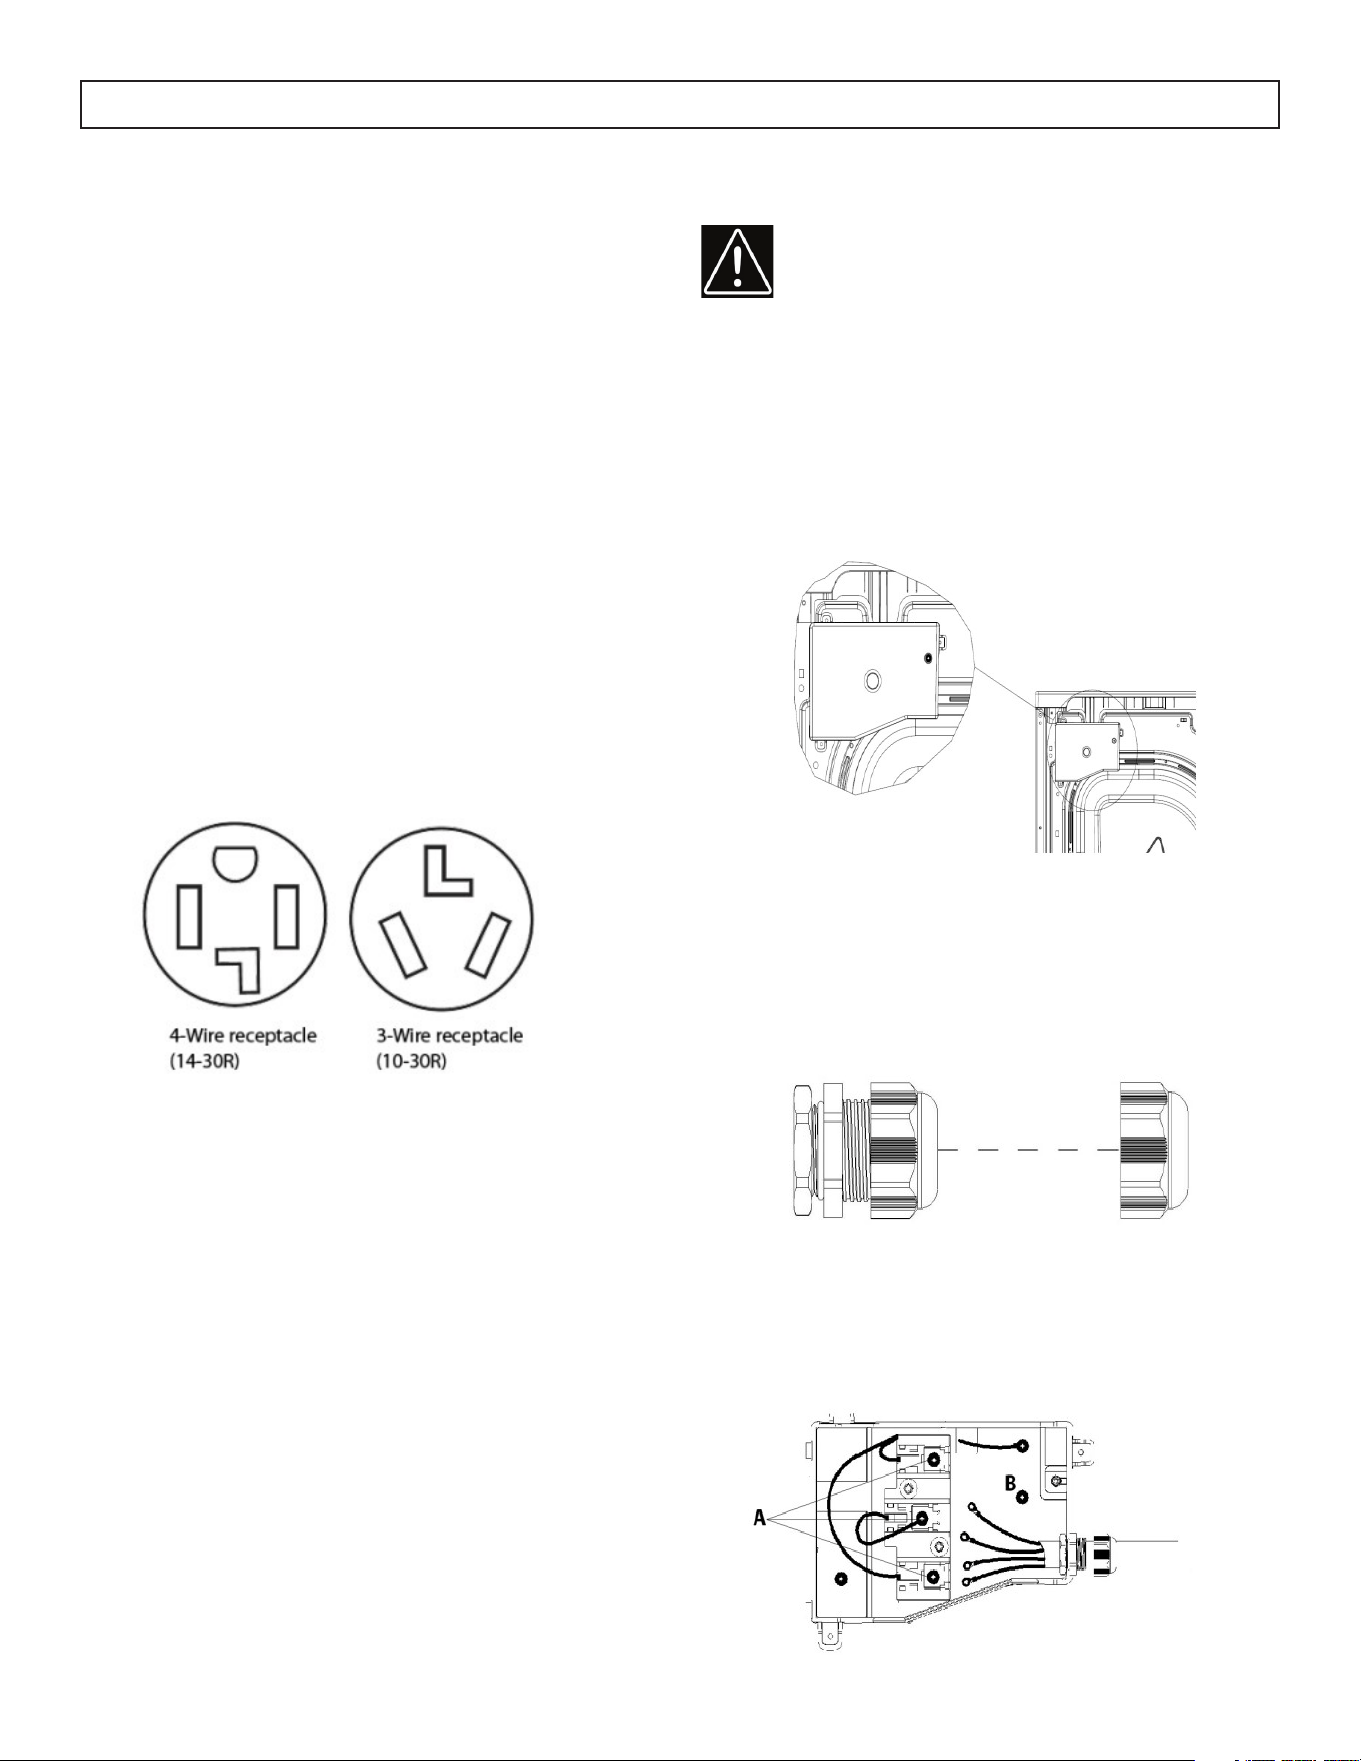
PLUG AND POWER CORD SELECTION
Select receptacle type.
4-WIRE RECEPTACLE
Requires UL listed NEMA 14-30P 240V / 30A
4-wire supply cord with ring terminals or spade
terminals with upturned ends. Supply cord must be
type SRDT and at least 5 feet (152.4 cm) in length.
3-WIRE RECEPTACLE
Requires UL listed NEMA 10-30P 240V / 30A
3-wire supply cord with ring terminals or spade
terminals with upturned ends. Supply cord must be
type SRDT and at least 5 feet (152.4 cm) in length.
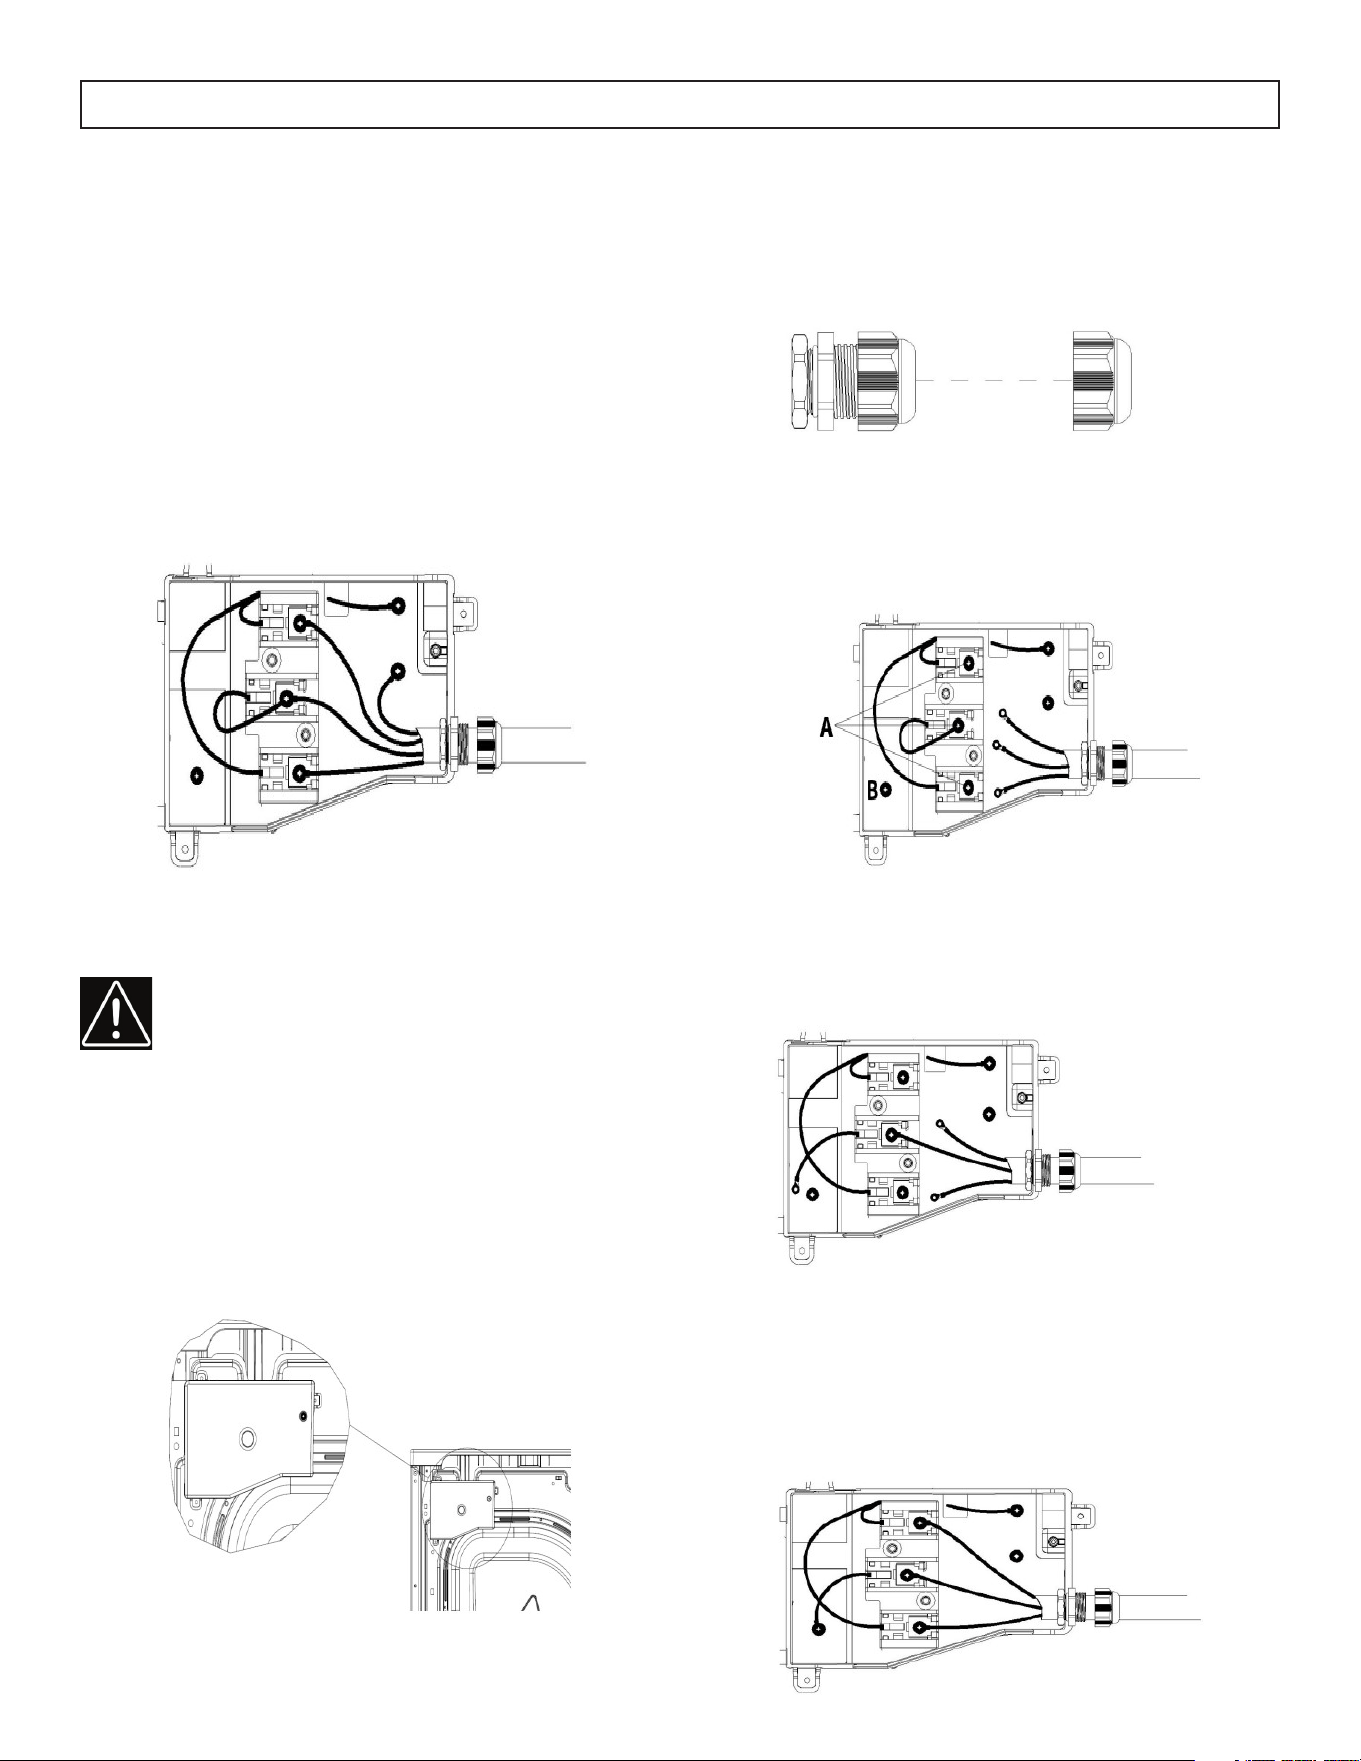
WARNING
• Before the connection, disconnect the power.
• Use UL listed 240V / 30A power supply cord.
The dryer is equipped with strain relief. Use this
strain relief for the connection.
1. Remove the screw and terminal box cover.
2. Remove the clamp of the strain relief which is
attached on our machine. Pass the clamp through
the supply cord and put the supply cord through
the main body of the strain relieve. Ensure the wire
insulation of the cord is inside the strain relief.
3. Remove the terminal block screws which are
indicated by A and the grounding screw which is
indicated by B. Neutral ground conductor (central
terminal) is provided in the dryer as a closed loop.
7 8
INSTALLATION INSTRUCTIONS
4. Connect the ground conductor (green wire)
under the terminal B. Then connect the neutral
wire (white wire) to center of the terminal. Neutral
ground conductor of the dryer should remain on
the center terminal. Ensure the neutral ground
conductor of the dryer and neutral wire of the
supply cord are connected to the center terminal
together. Tighten all screws.
5. Connect remaining wires under the outer
terminals of the block and tighten all screws. After
every connection is completed, tighten the strain
relief clamp in order to secure the supply cord.
Finally, cover up the box cover.
3-WIRE POWER SUPPLY CORD
WARNING
• Before the connection, disconnect the power.
• Use UL listed 240V / 30A power supply cord.
The dryer is equipped with strain relief. Use this
strain relief for the connection.
1. Remove the screw and terminal box cover.
2. Remove the clamp of the strain relief which is
attached on the machine. Pass the clamp through
the supply cord and put the supply cord through
the main body of the strain relief. Ensure the wire
insulation of the cord is inside the strain relief.
3. Remove the terminal block screws which are
indicated by A and the grounding screw which is
indicated by B. Neutral ground conductor (central
terminal) is provided in the dryer as a closed loop.
4. Remove the neutral ground conductor from the
central terminal and connect the neutral wire of the
supply cord under the central terminal of the block.
Tighten the screw.
5. Connect the neutral ground conductor under the
screw B. Then connect the remaining supply cord
wires under the outer terminals of the block. Tighten
all screws. After every connection is completed,
tighten the strain relief clamp in order to secure the
supply cord. Finally, cover up the box cover.
8
9
OPERATING INSTRUCTIONS
OPERATING INSTRUCTIONS
• Dry items of similar fabric & fabric weight for
more even drying performance. If you must dry
a mixed fabric load, timed dry is recommended
for better drying performance.
• For best drying performance, do not dry small
items with bulky items such as duvets etc. It is
best to dry these in separate loads.
• It is recommended that items be added to the
dryer one at a time to avoid tangling which can
result in uneven drying.
• Check the pockets of all items to be dried,
ensure that foreign objects do not enter the unit
such as lighters, hair pins, coins, etc.
• Tie fabric belts, apron laces etc. to each other or
use a laundry bag.
• To get the best drying result, sort the laundry
according to the textile type and drying
program.
• Dryer heat may permanently set stains, ensure
all stains are removed prior to putting items in
the dryer.
• Woven goods such as t-shirts and knit clothes
generally shrink in the first drying. Use a
protective program.
• Do not over-dry synthetics. This will cause
creases.
• Do not add items to the dryer when it is in
operation.
• If drying large items such as blankets or heavy
loads of laundry, it is recommended that you
periodically pause the program, open the dryer
door, shake the large item or turn over the heavy
load and then restart the drying cycle. This will
ensure even drying.
• The appliance cannot function while the door is
open. Once the door is closed, press the Start/
Pause button to resume operation.
IMPORTANT
Delicate fabrics, embroidered fabrics, woolen/silk
fabrics, clothes made of delicate and expensive
fabrics, airtight clothes and tulle curtains are not
suitable for drying in the dryer.
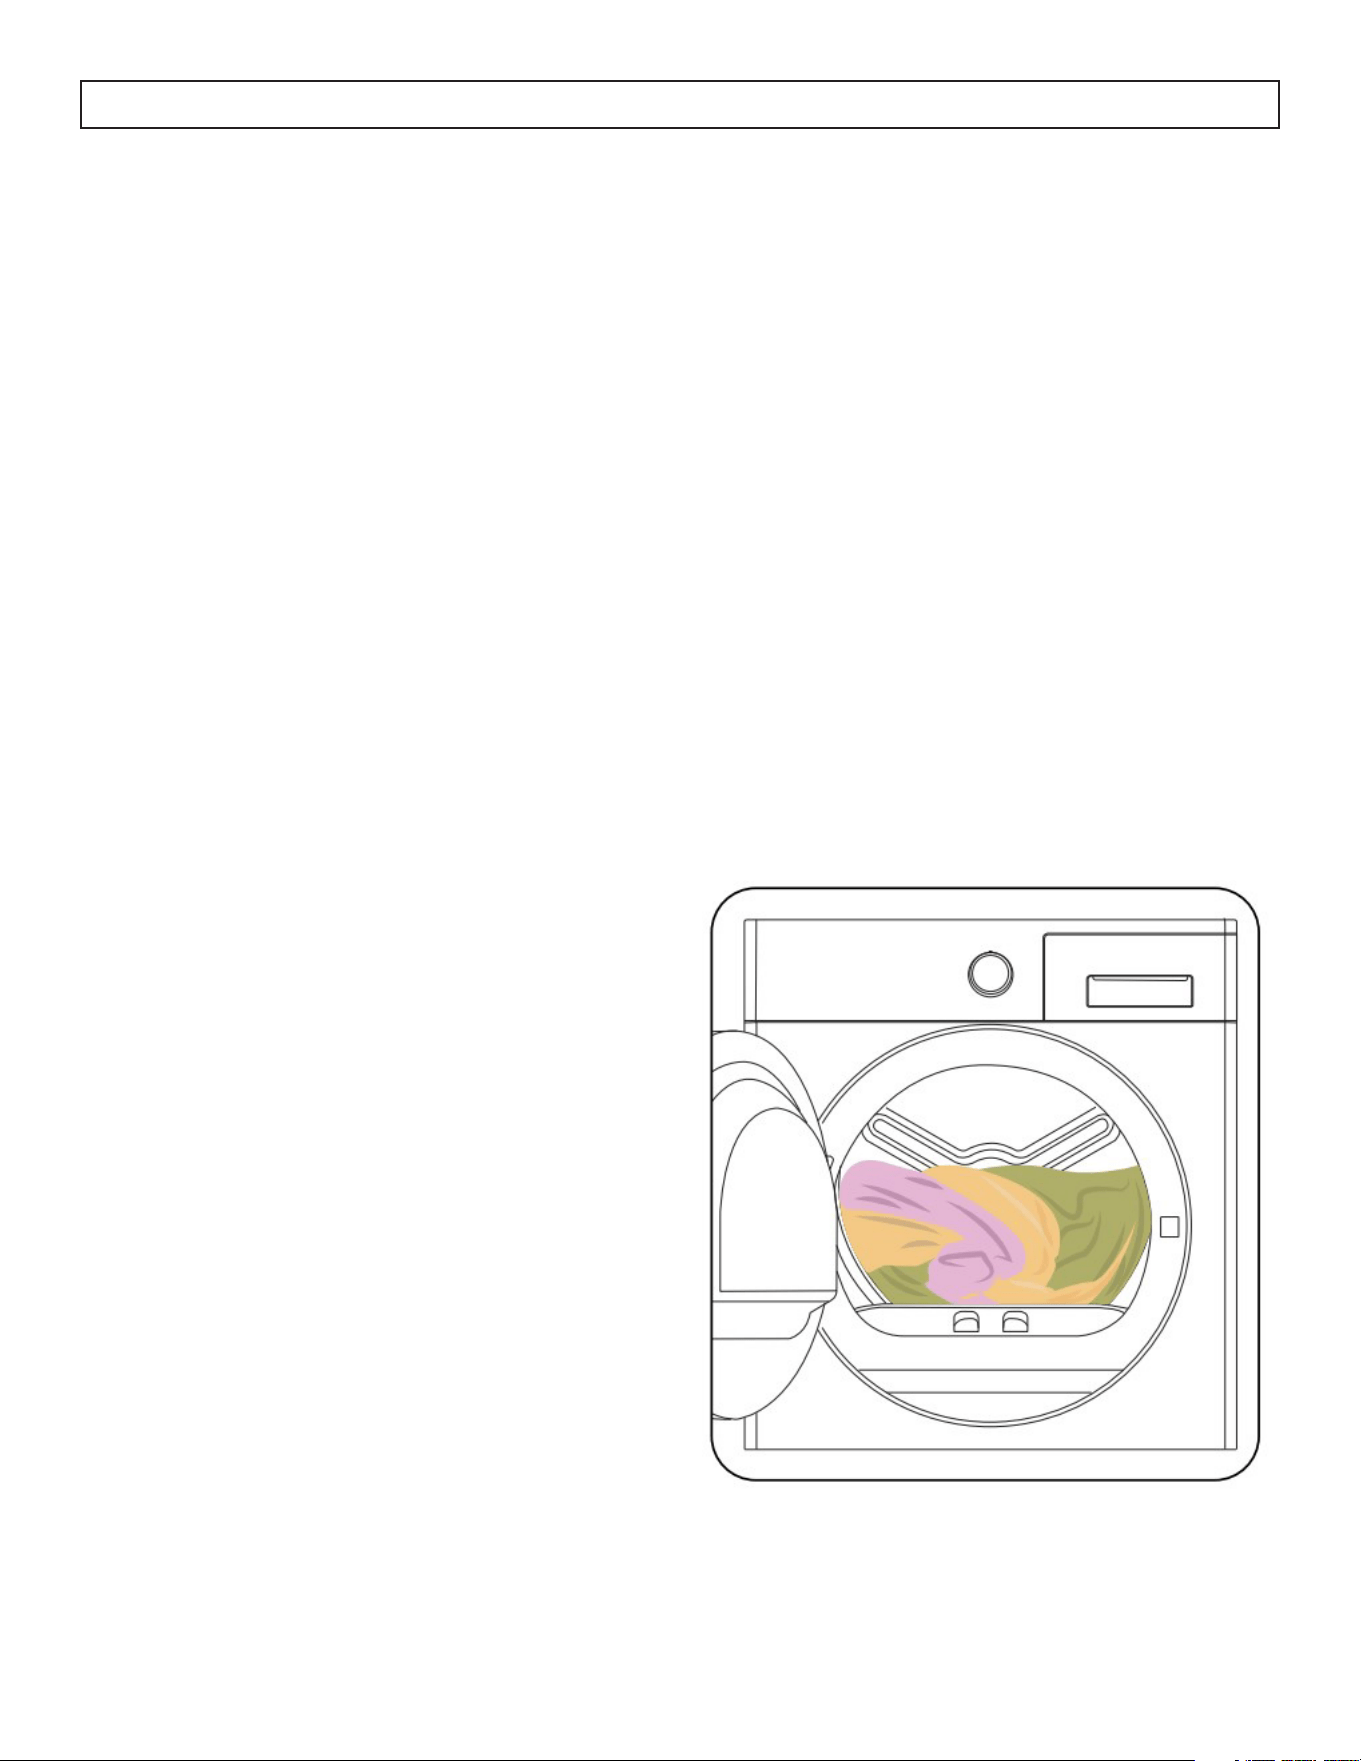
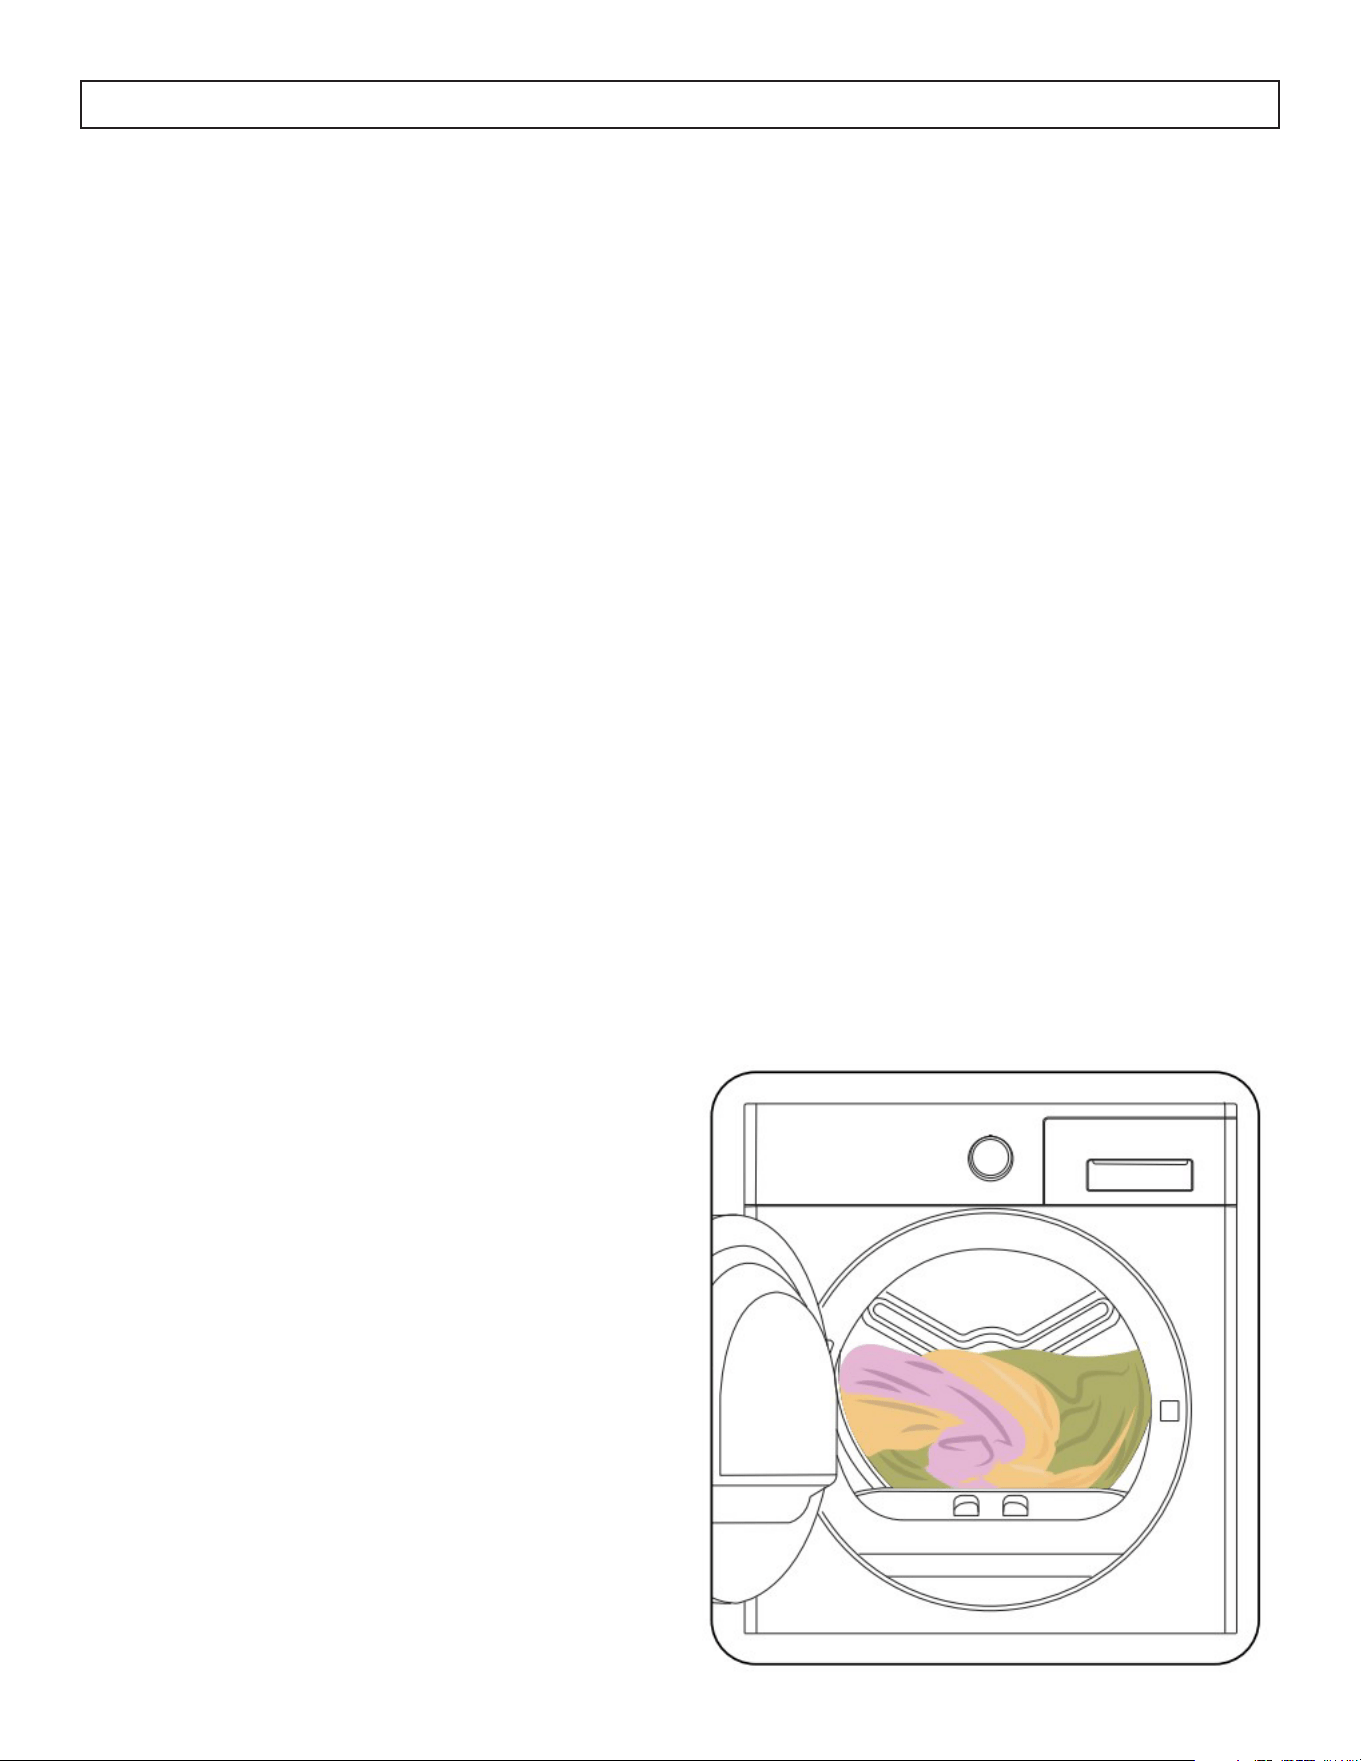
LOAD CAPACITY
It is not recommended to load the dryer with more
laundry than the amount shown in the figure below.
When overloaded, the drying performance of the
dryer will decrease resulting in possible damage to
the dryer and the laundry.
OPERATING INSTRUCTIONS
10
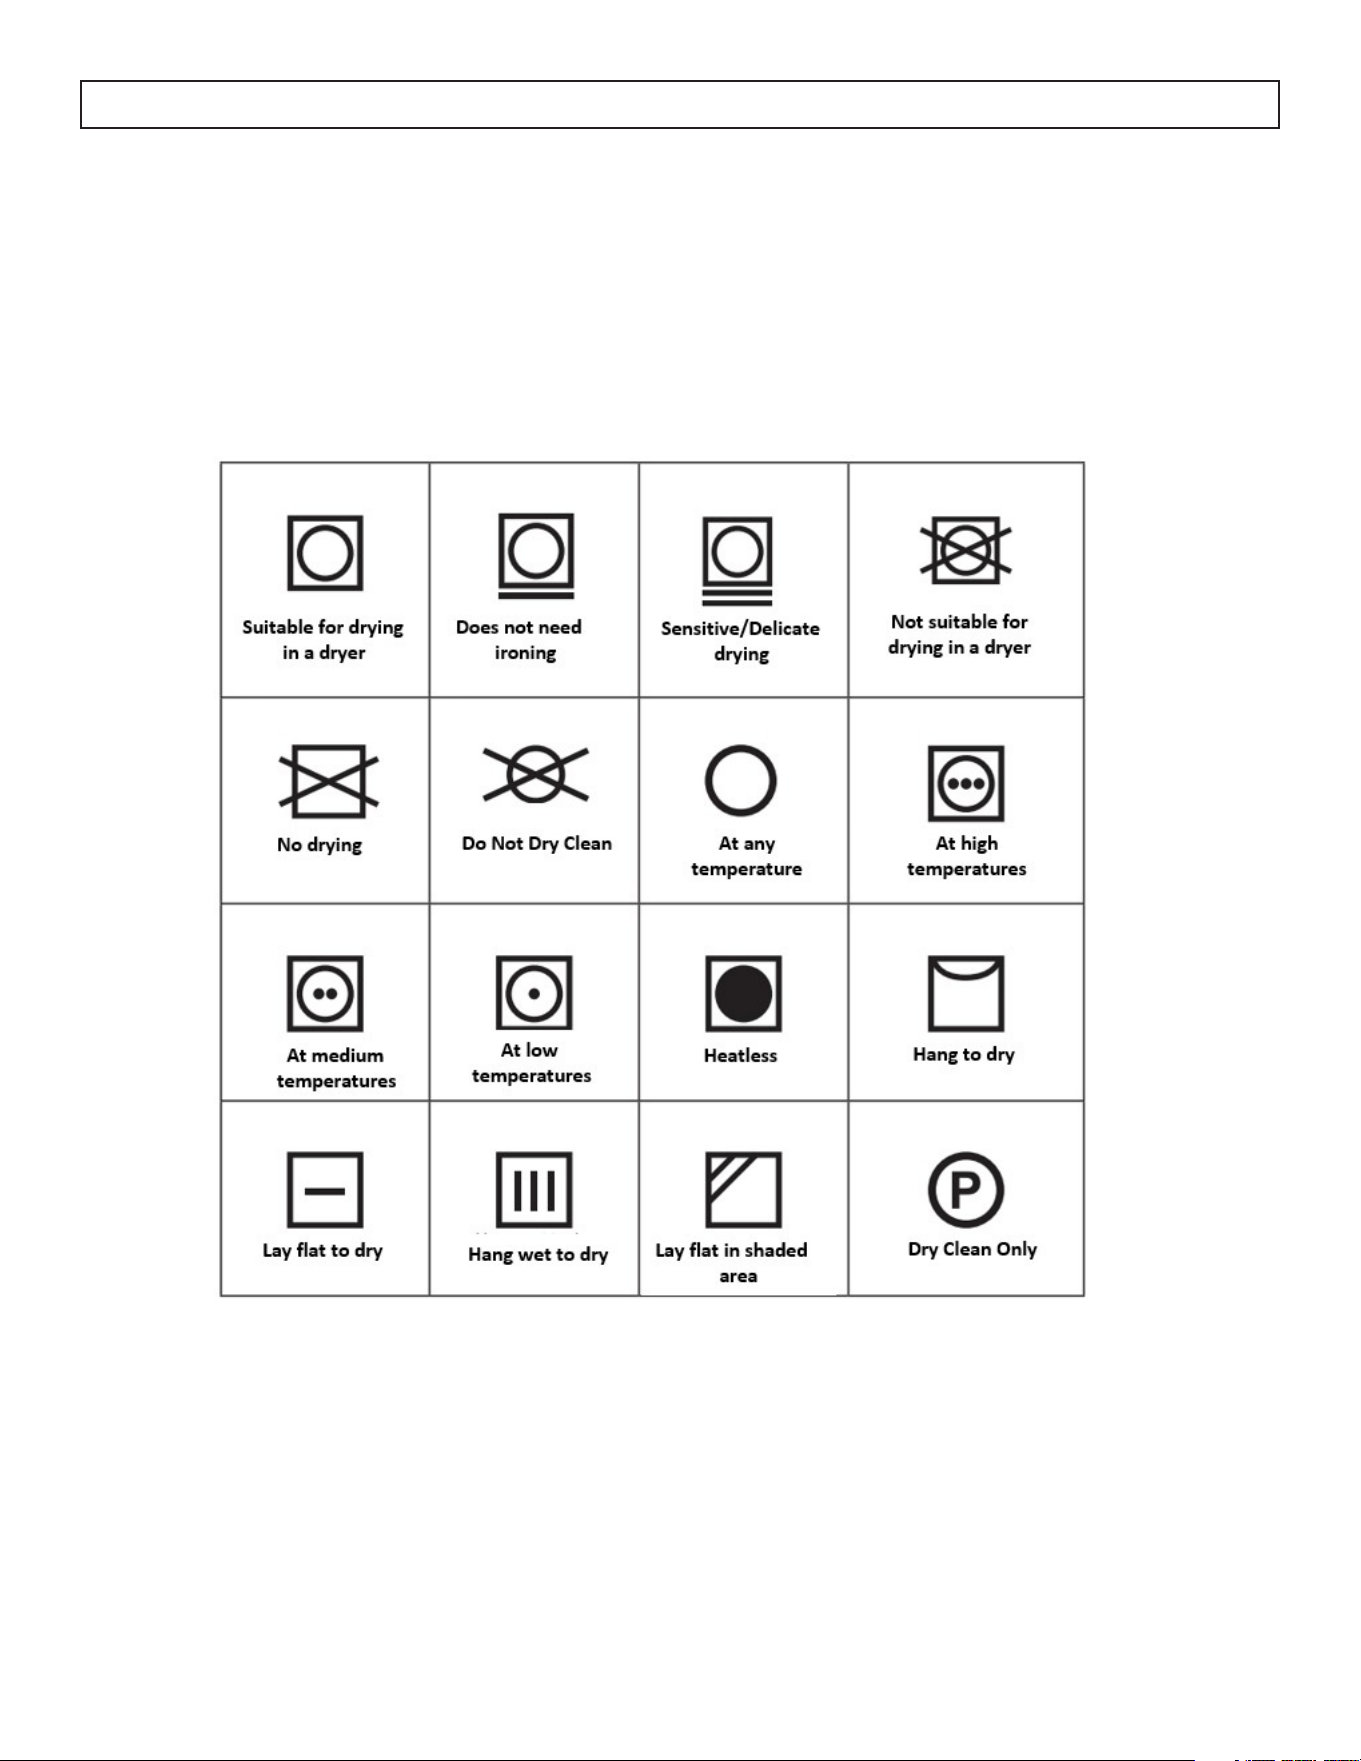
Follow the instructions on the labels of the laundry to be dried. Only dry items that have a statement/
symbol that indicates they can be dried in a dryer.
11
CONTROL PANEL
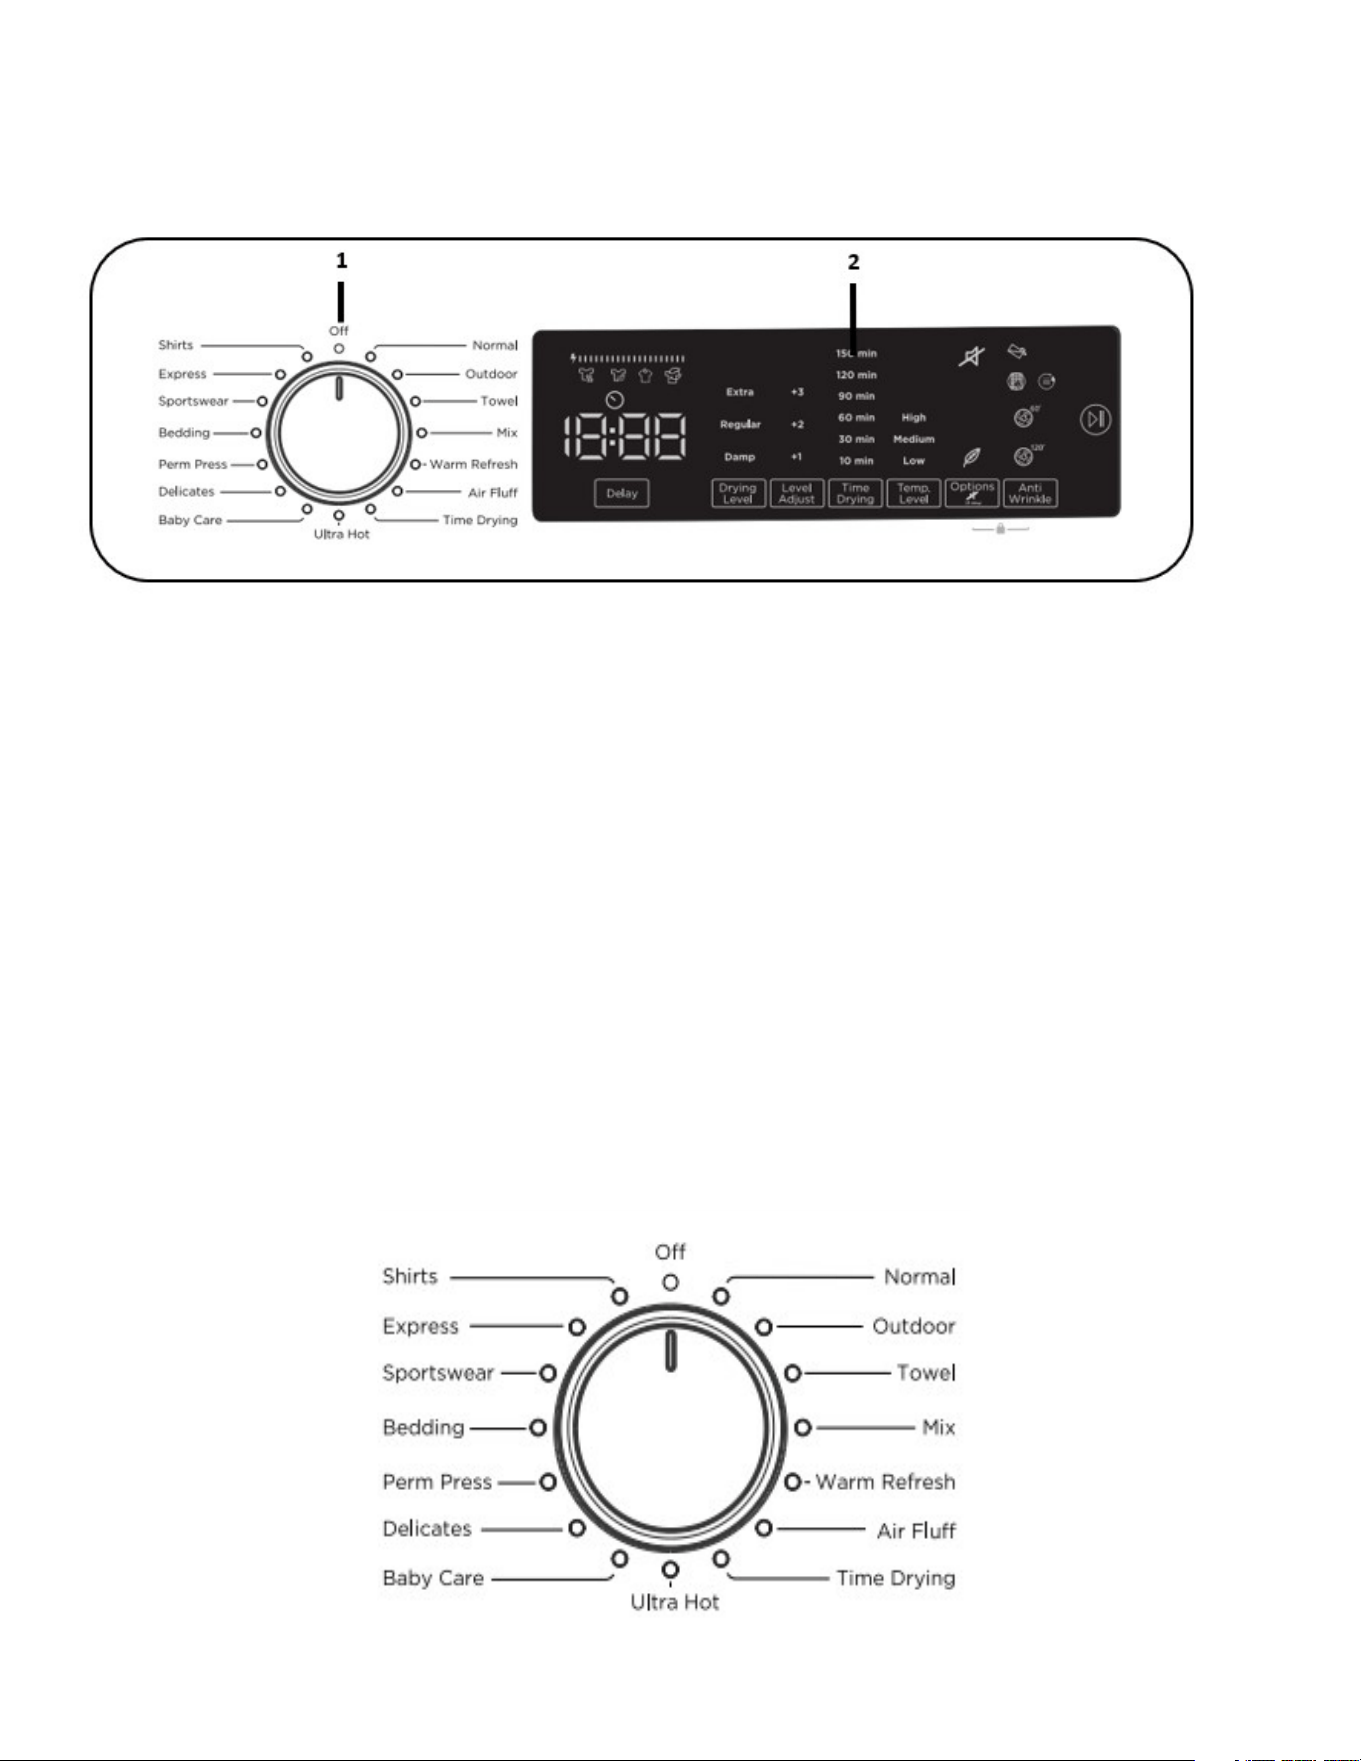
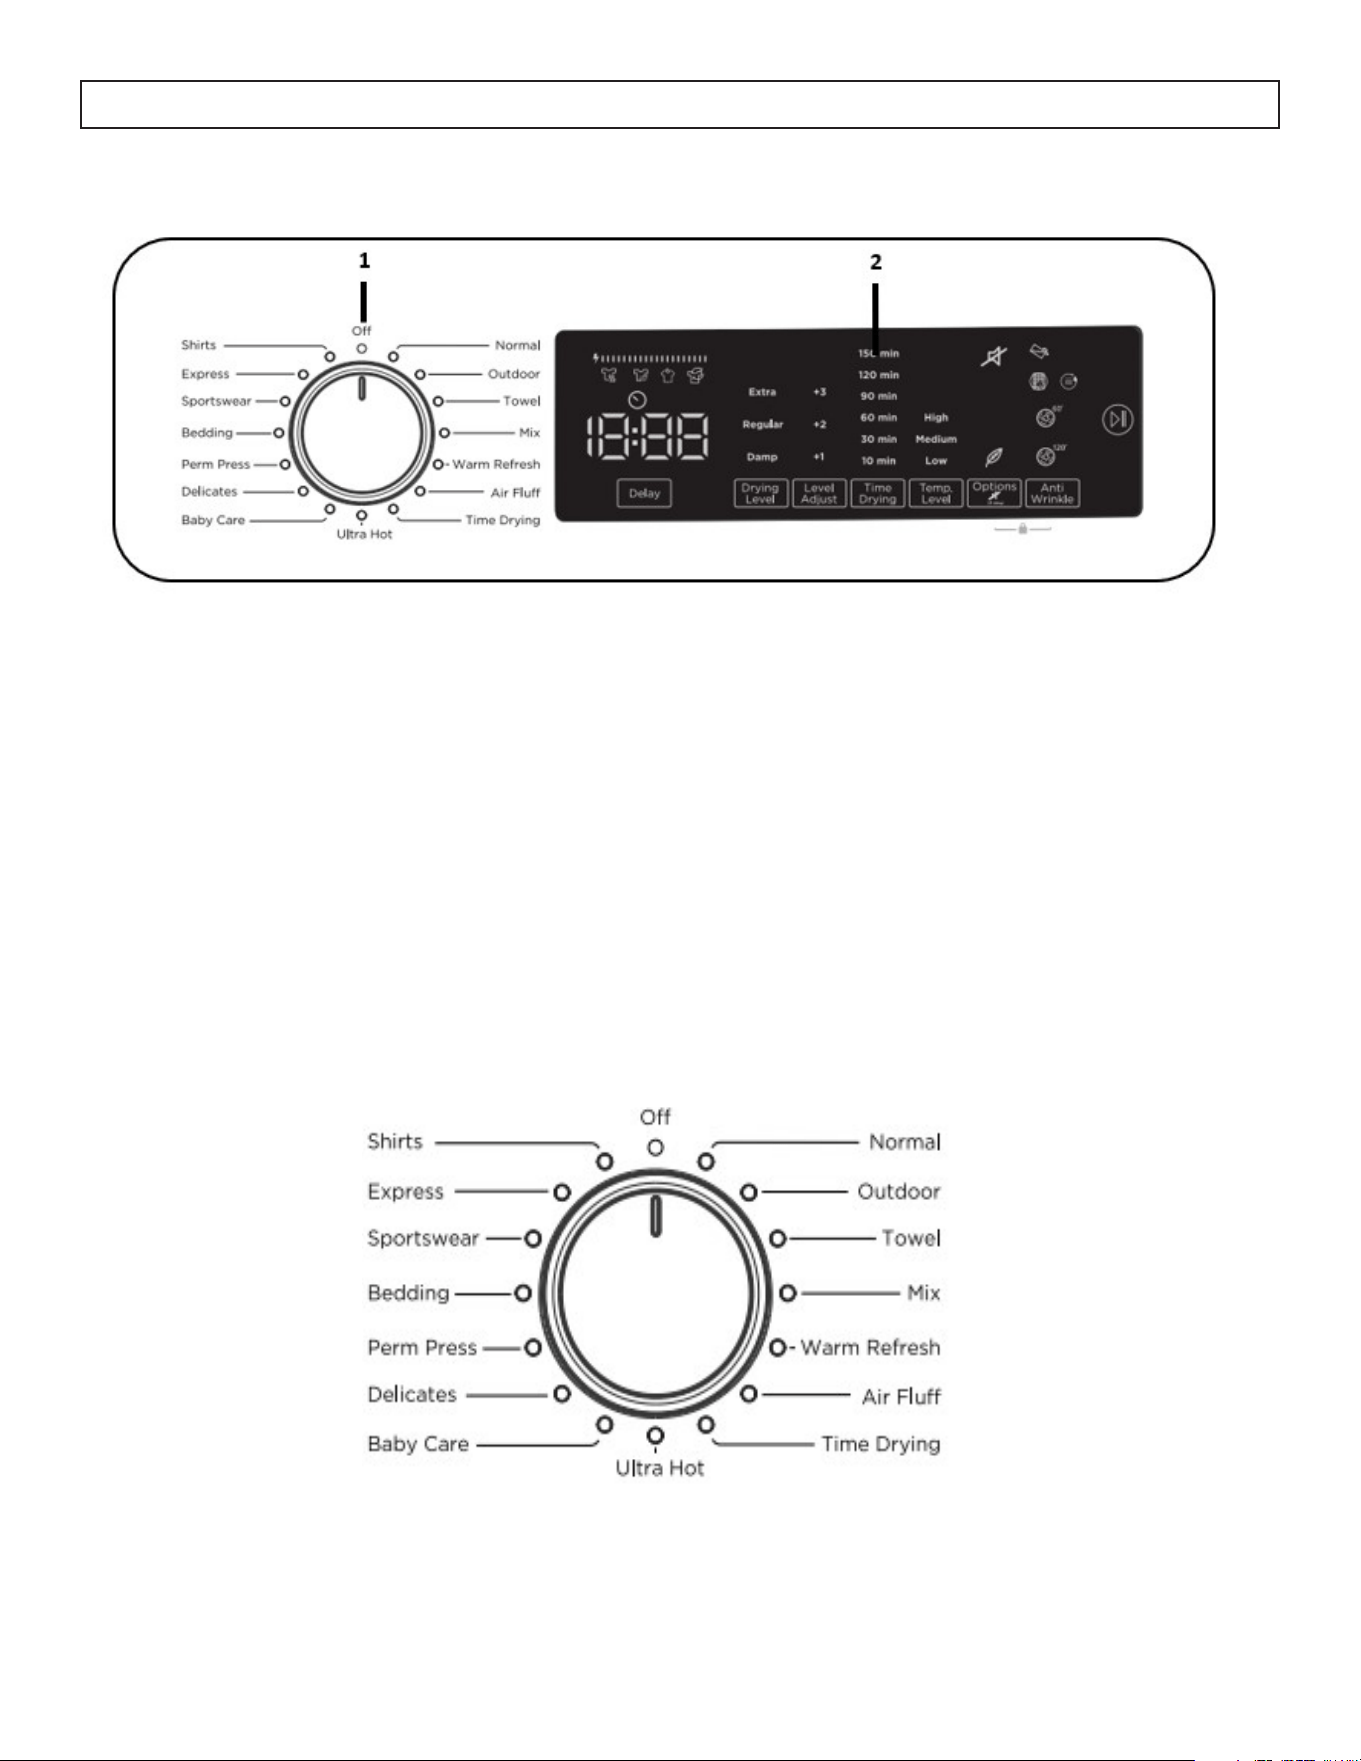
1. Program Selection Knob
• Use the program selection knob to select the desired drying program.
12
OPERATING INSTRUCTIONS
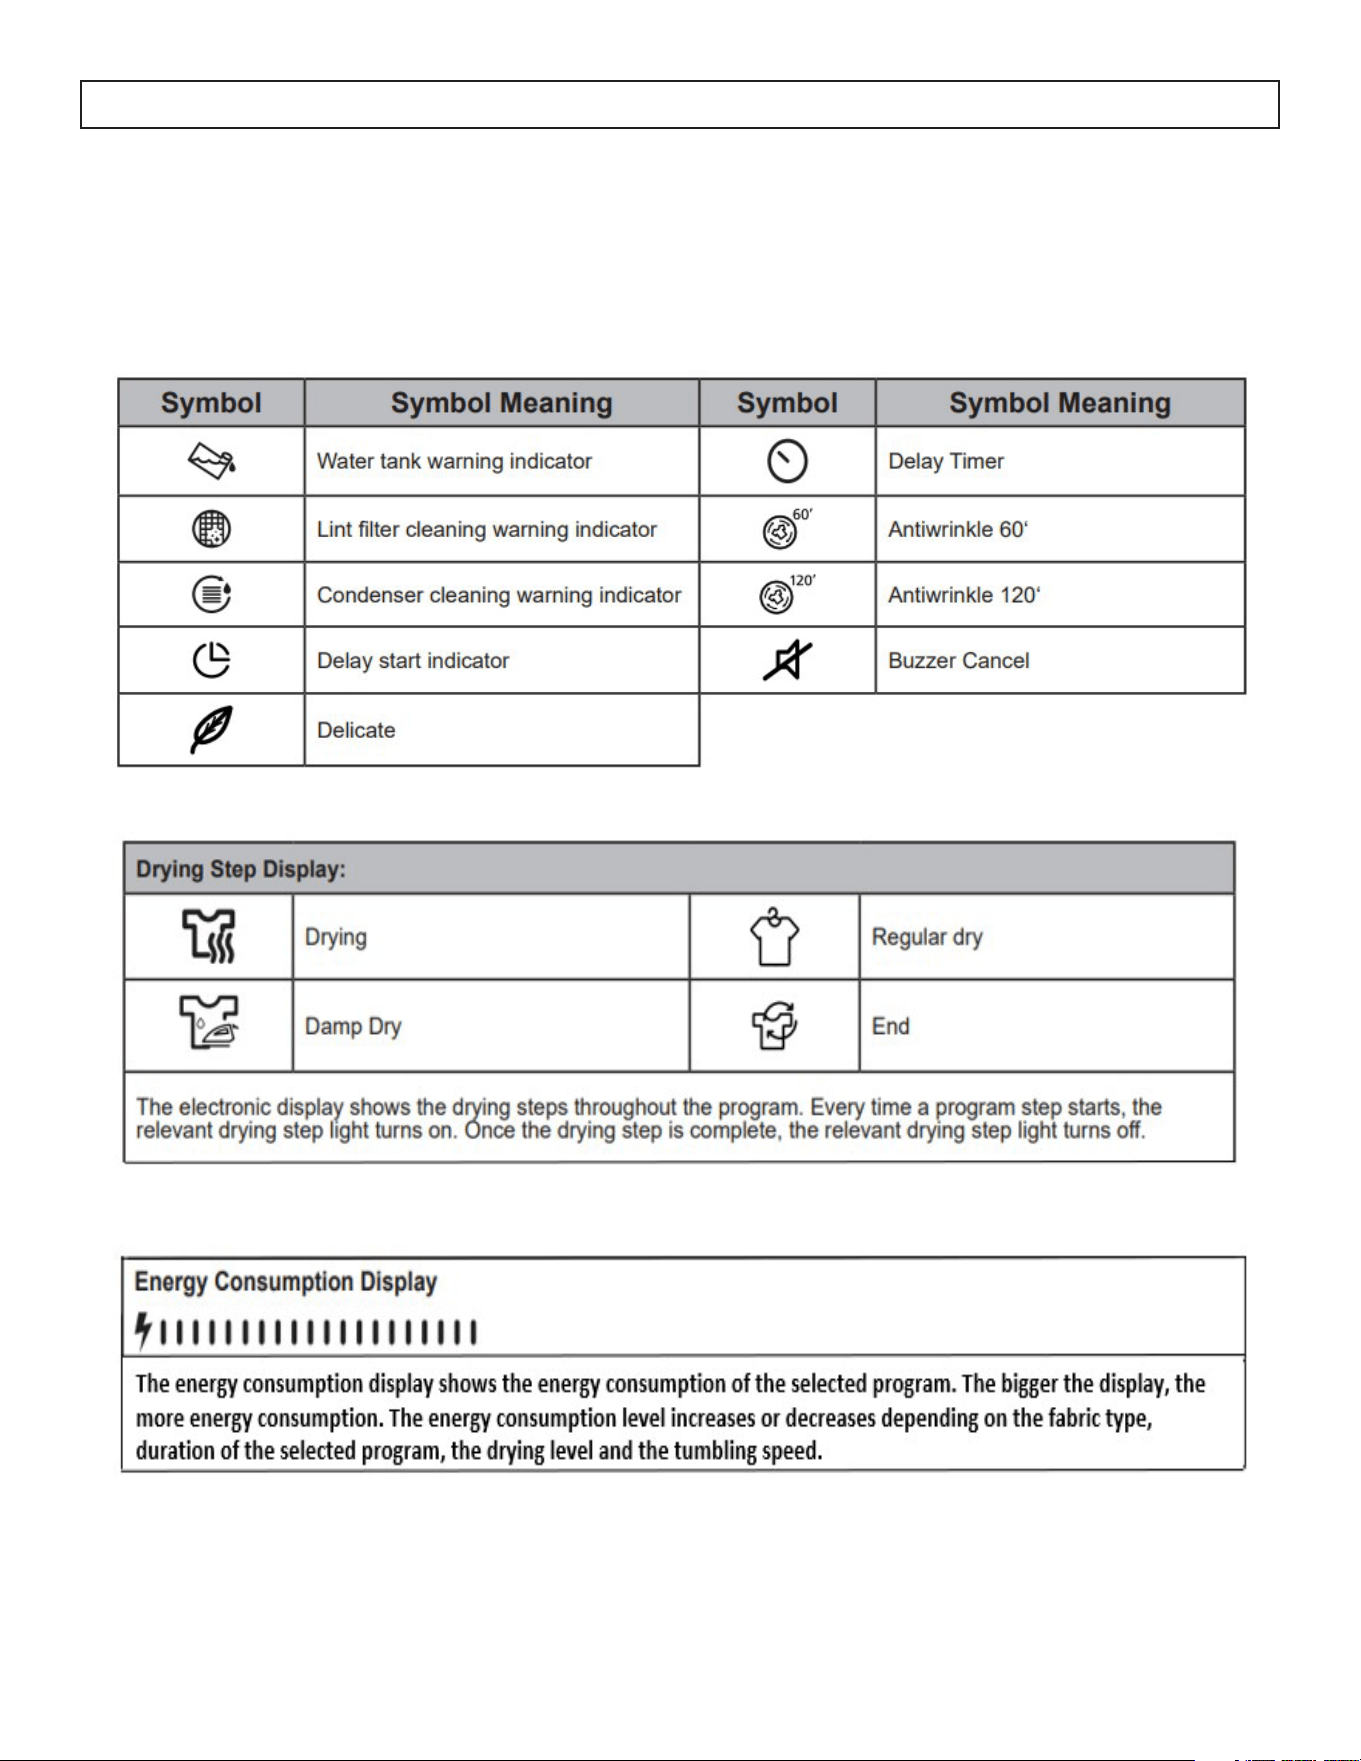
2. Electronic Indicator Display
OPERATING INSTRUCTIONS
13
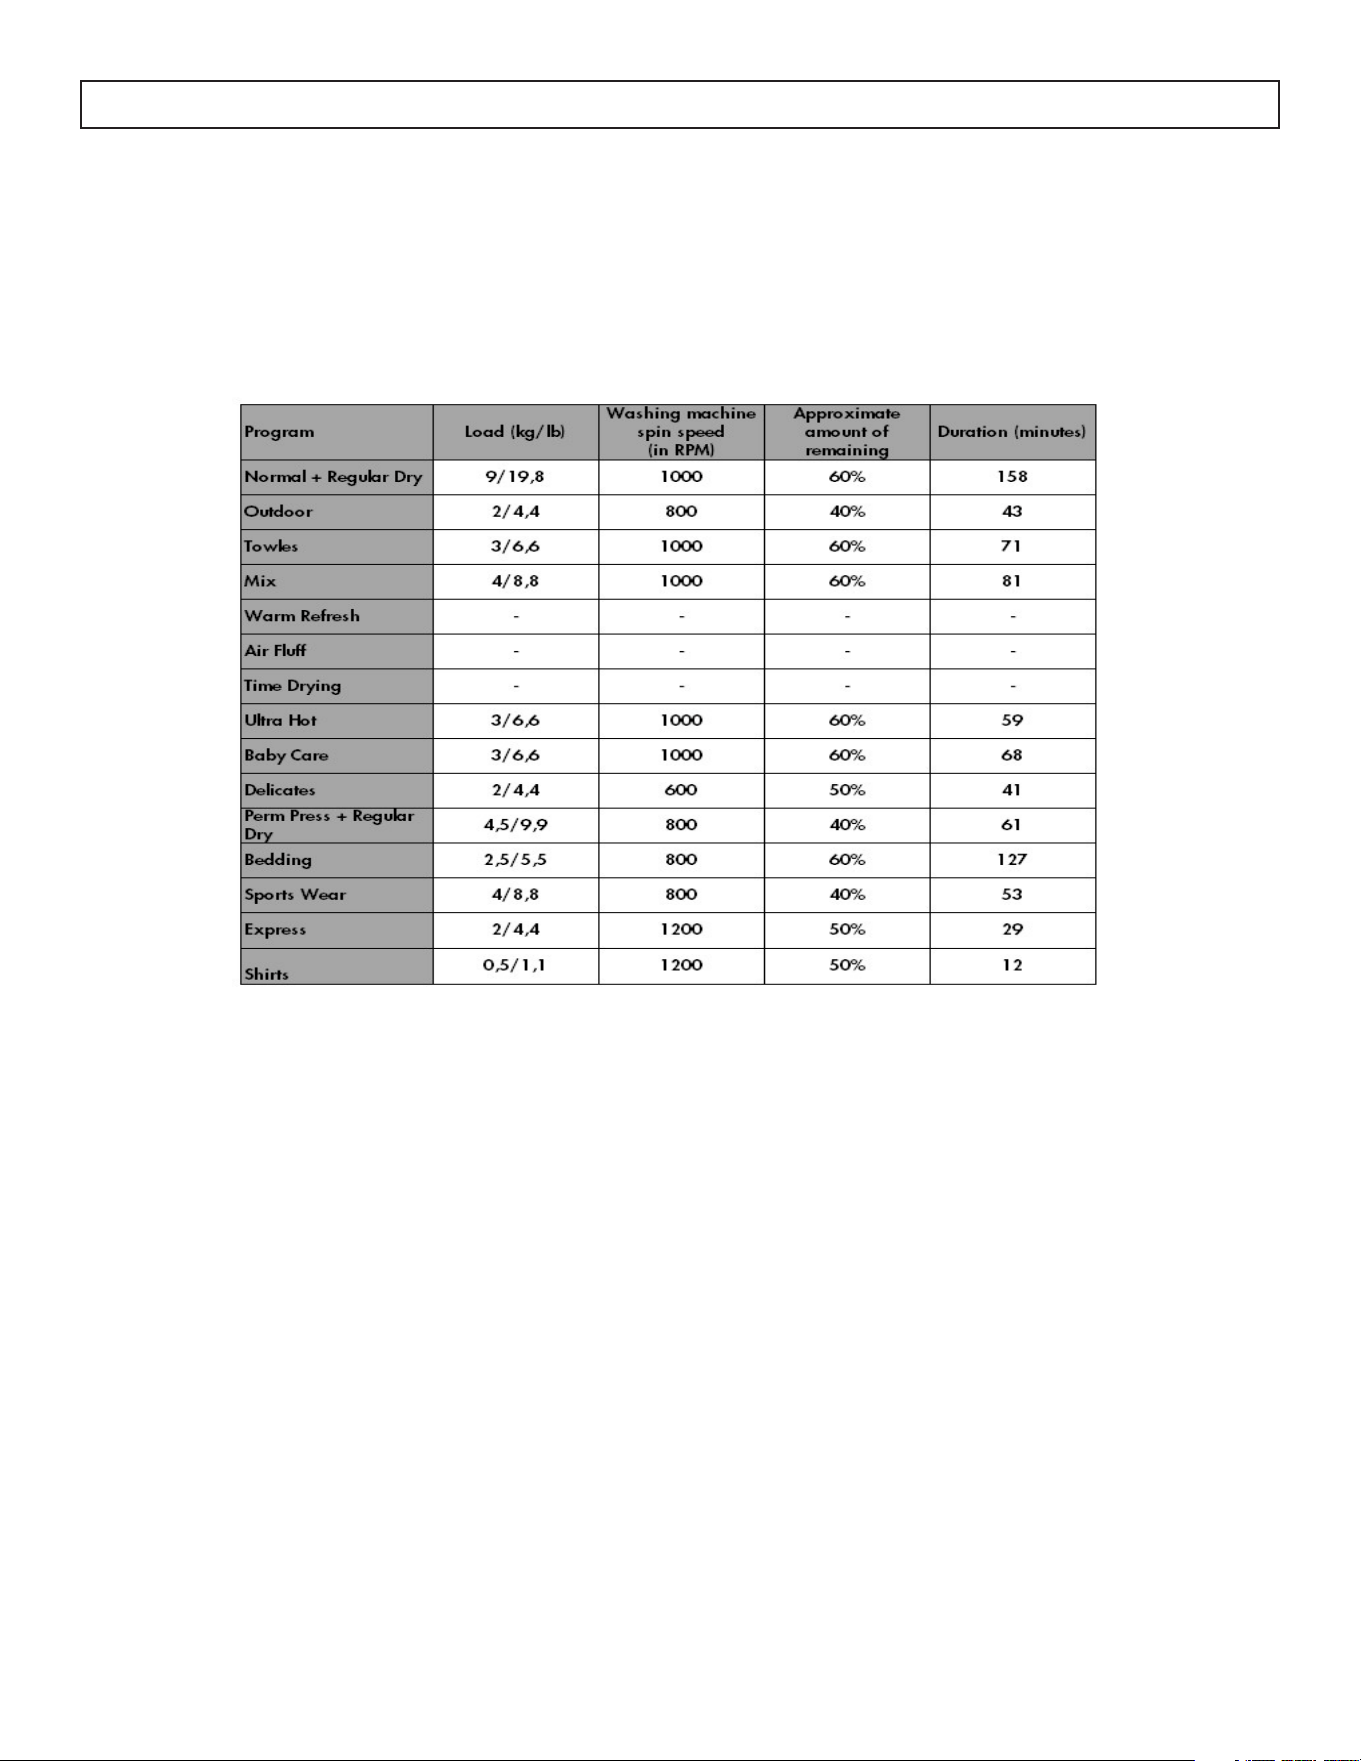
Program Selection and Consumption Table
Press the Start/Pause button to start the program. The Start/Pause LED that indicates the program has
started and the Drying LED will come on.
NOTE
Not all programs listed available on all dryers
Auxiliary Functions
Drying Level
Select the drying target suitable for your laundry.
• Select Extra Dry for thick and multilayer laundry that takes time to dry.
• Select Regular Dry for regular, single-layer laundry.
• Select Damp Dry for laundry that you wish to leave damp, ready for ironing.
Level Adjustment
The dampness level obtained after drying can be increased by another 3 levels in addition to the standard
setting. This way, it is ensured that the laundry is drier. Levels can be selected apart from the standard
setting.
+1 (low)
+2 (medium)
+3 (high)
After selection, the light of the relevant drying level illuminates.

14
OPERATING INSTRUCTIONS
Delicate Drying
Delicate fabrics are dried in a longer time at a low temperature.
Delayed Start
Delay the start of a program by selecting a time between 1 and 23 hours. You can press Start/Pause to
activate the desired delay time. When this time has elapsed, the selected program will start automatically.
During the delay time, options compatible with the program can be activated/deactivated. If you press
and hold the Delayed Start button, the delay time will change continuously.
Cancel Audible Warning
The dryer will give an audible warning when the buttons are pressed, when the program selection knob
is turned and when the program ends. To cancel the audible warnings, press and hold the “Antiwrinkle
Option” for 3 seconds. When you press this button, you will hear an audible warning that indicates that
the option has ben activated and the audible warnings stated will be cancelled.
Time Drying
If the program knob is turned to Time Drying, press the Time Drying option button to select it, pres Start/
Pause to start the program.
Child Lock
There is a child lock option to avoid changes in the selected program when keys are pressed during
the program cycle. To activate the child lock feature, press “Options” and “Anti-wrinkle” buttons
simultaneiously for 3 seconds. When the child lock is activated, all keys will be deactivated. Child lock is
not automatically deactivated at the end of the program.
To deactivate the child lock at the end of the program, set the program selection knob to the “Off”
position, then to the first position. Child Lock is still active. To deactivate , press “Options” and “Anti-
wrinkle” buttons simultaneously for 3 seconds. When activating/deactivating “CL will appeare on the
display for 2 seconds and then turns off. An audible warning will sound.
WARNING
When the dryer is running or the child lock is active, if you turn the program selection knob, you will hear
an audible warning and “CL” will visualize on the display for 2 seconds and then turn off. If you turn the
program selection knob, you will hear an audible warning. Even if you set the program knob to another
program, the previous program will continue to run. To select a new program, deactivate the child lock
and then set the program selection knob.
Anti-wrinkle
If you do not open the door of the dryer at the end of the program, the anti-wrinkle option will be active
for 60 minutes except for the normal program. When the anti-wrinkle option is selected it, will be active
for 120 minutes.
Temperature Level
For the laundry to be dried, temperature level can be adjusted with low, medium and high options.
NOTE
Not all options listed are available on all models

OPERATING INSTRUCTIONS
15
Starting the Program
The Start/Pause LED will flash during program
selection. Press the Start/Pause button to start the
program. The Start/Pause LED indicates that the
program has started and the drying LED will come
on.
NOTE
Not all programs listed available on all dryers
Normal
Suitable for cotton laundry including bedsheets,
pillowcases, pajamas, underwear, tablecloths etc.
Outdoor
Suitable for outdoor clothing, waterproof jackets,
jackets with inner insulation, etc.
Towels
Suitable for thick cotton laundry such as towels,
bathrobe, etc.
Mix
Suitable for cotton-synthetic mixed garments that do
not discolour to make them ready to wear.
Warm Refresh
Helps wool textiles to remove excess water after
washing by applying low temperature and gentle
tumbling of the drum.
Air Fluff
Used to remove bad odors with 10 minutes of
tumbling without heat.
Time Drying
To reach the required drying level at a low
temperature, you can use the time programs of 10
min. to 150 min. Regardless of the drying level, the
program stops at the desired time.
Ultra Hot
Suitable for fabrics which need hygiene
requirements.
Baby Care
Provides hygienic drying for delicate infant clothes
at a low temperature.
Delicates
This program dries delicate clothing/fabrics
like shirts, blouses, and silk garments at a low
temperature to make them ready to wear.
Perm Press
Dries synthetics such as shirts, t-shirts, blouses
at a lower temperature compared to the cottons
program.
Bedding
Used to dry single duvet with feathers, down or
synthetic fillings.
Sports Wear
Used for synthetic sport garments like shorts, t-shirts
at low temperature.
Express
2 Kg (4.4 lbs) of cotton shirts spun at a high speed
in the washing machine are dried in 29 minutes.
Shirts
2 - 3 shirts are ready to be ironed in 12 minutes.
IMPORTANT
Do not open the dryer door while the program is
running. If you have to open the door, do not keep
it open for a long time.

16
OPERATING INSTRUCTIONS
Selection Stand By
After 15 minutes without user action in selection
mode, the dryer goes to energy-saving mode due to
decreased energy consumption. No LED activation
on display. While in energy saving mode, dial
LED remains on while selection will not appear in
Display.
To restart the dryer it will be necessary to move
turn the knob to the OFF position and re-select the
program.
During the Program
If the door is opened while a program is running,
the dryer will switch to standby mode. Once the
door is closed, press the Start/Pause key to resume
the program.
Do not open the dryer door when the program is
running. If you have to open the door, do not keep
it open for a long time.
Program End
At the end of the drying cycle, the warning LEDs for
Start/Pause, water tank level, filter cleaning and
condenser cleaning will turn on and an audible
warning will sound. The laundry can now be
removed from the dryer.
NOTE
Clean the filter and empty the water tank after each
use.
NOTE
If the laundry is not removed from the dryer after
the program has ended, the 1-hour Anti-wrinkle
cycle will automatically be activated. This program
roates the drum at regular intervals to prevent
creases.
Drum Light Information
This product includes an LED Drum Light. The light
works automatically when you open the door. It will
turn off automatically if door is left open.
NOTE
• The dryer light cannot be turned on or off by
user.
• Do not try to replace or modify the LED light.
17
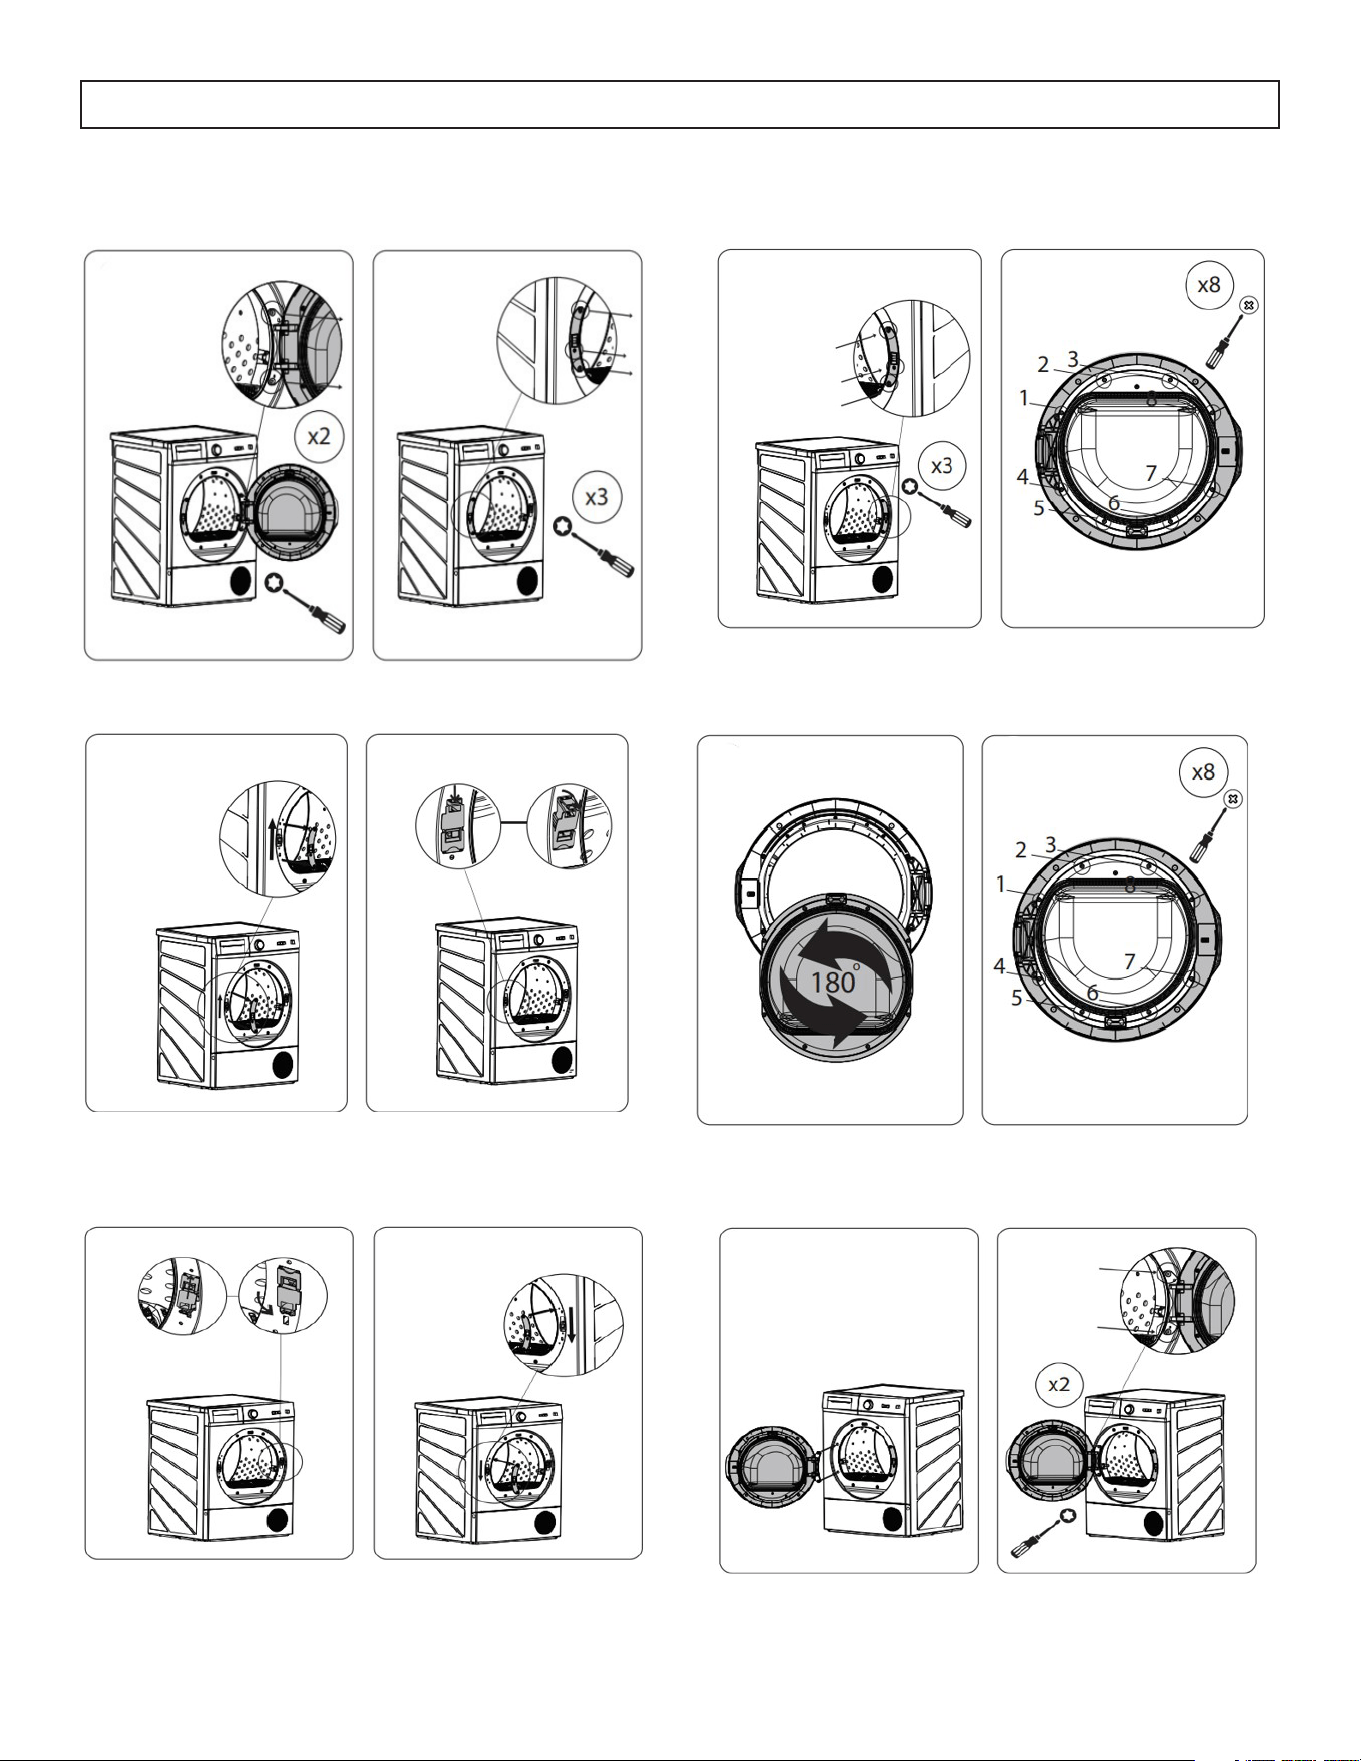
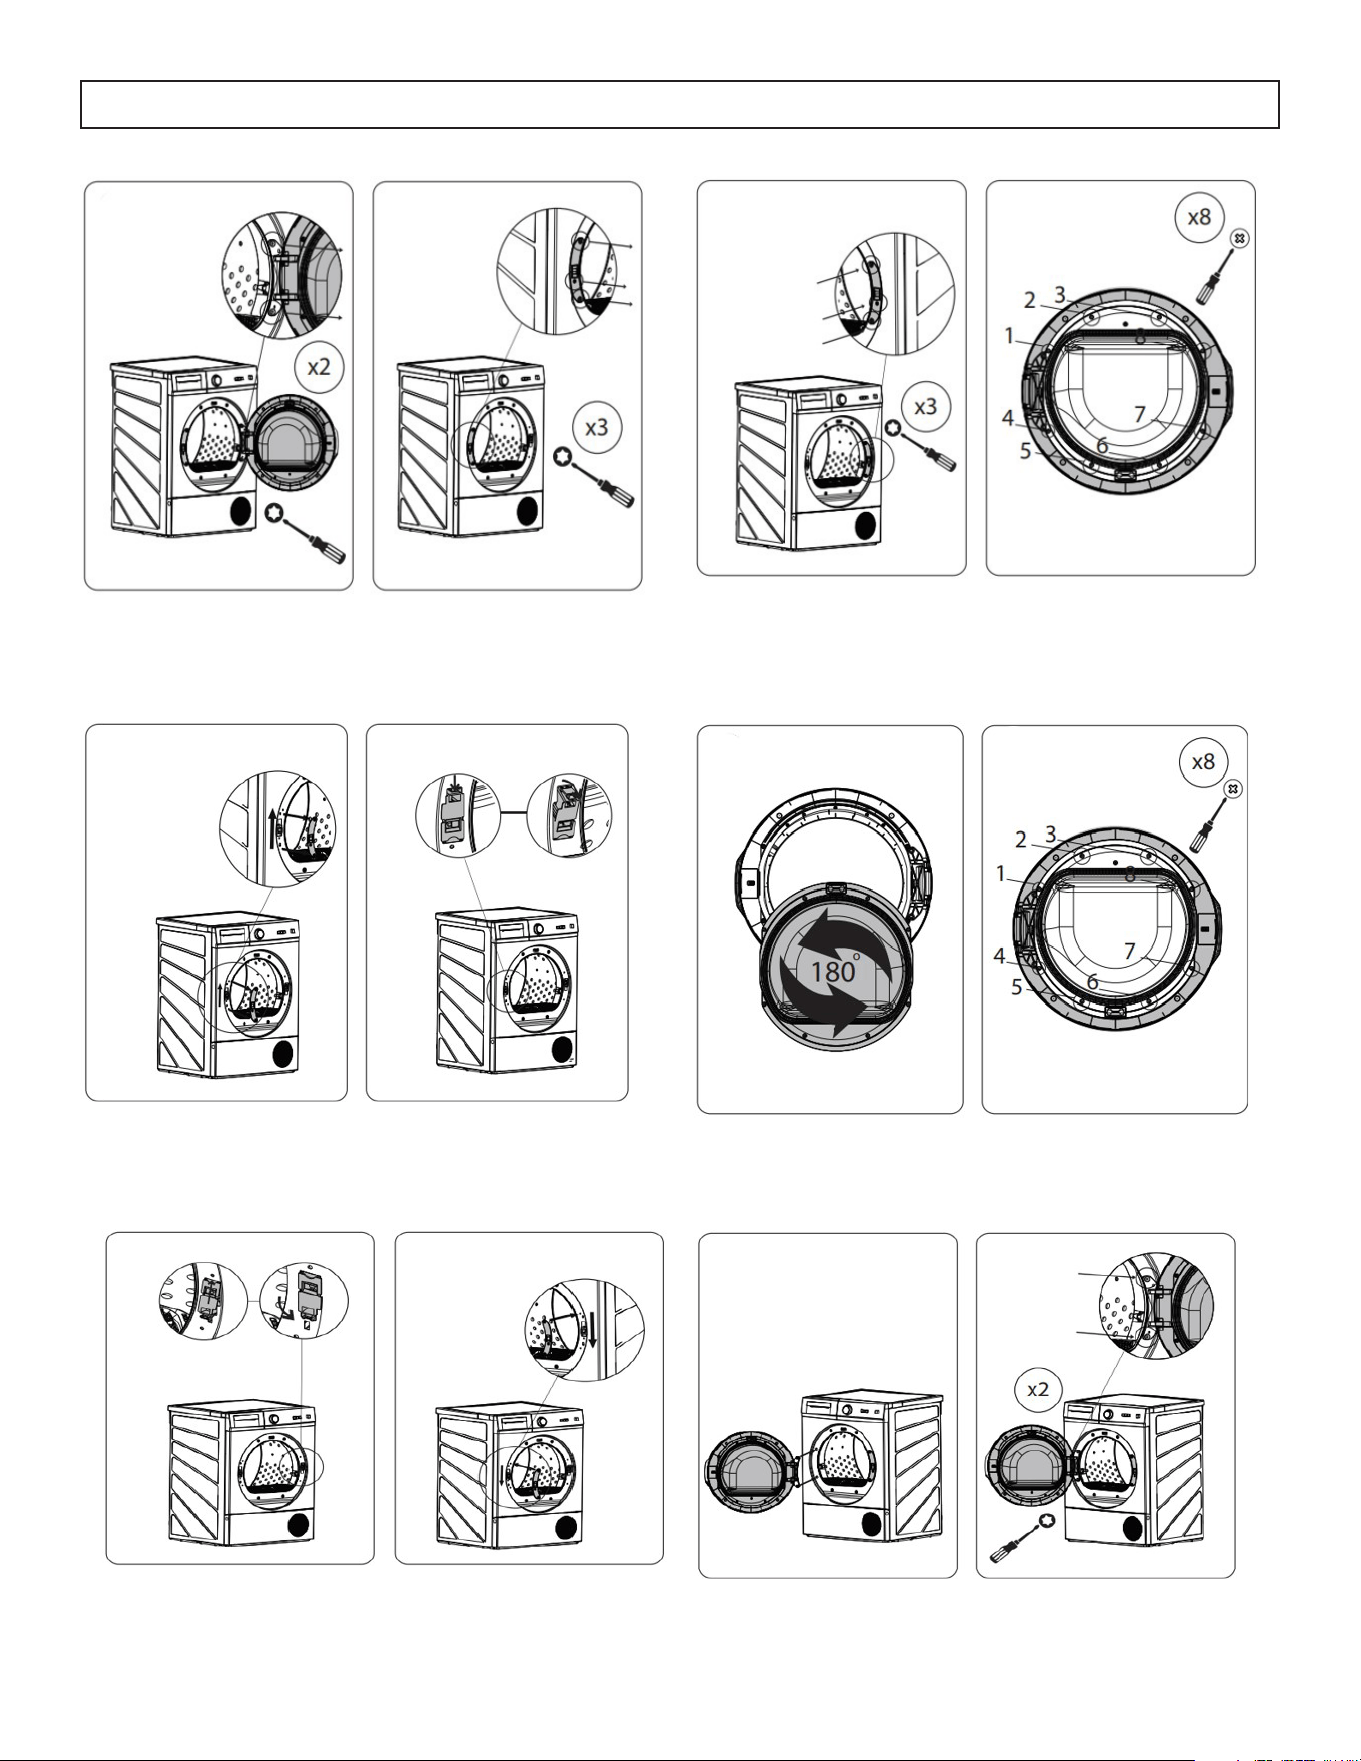
DOOR REVERSAL
1. Remove door and door hinge
2. Remove door closing mechanism
3. Install door hinge and closing mechanism on
opposite sides of door opening
4. Remove inner glass from door
5. Turn door 180 degrees and re-install the inner
glass
6. Re-install door
18
Cleaning the Inner Surface of the Dryer
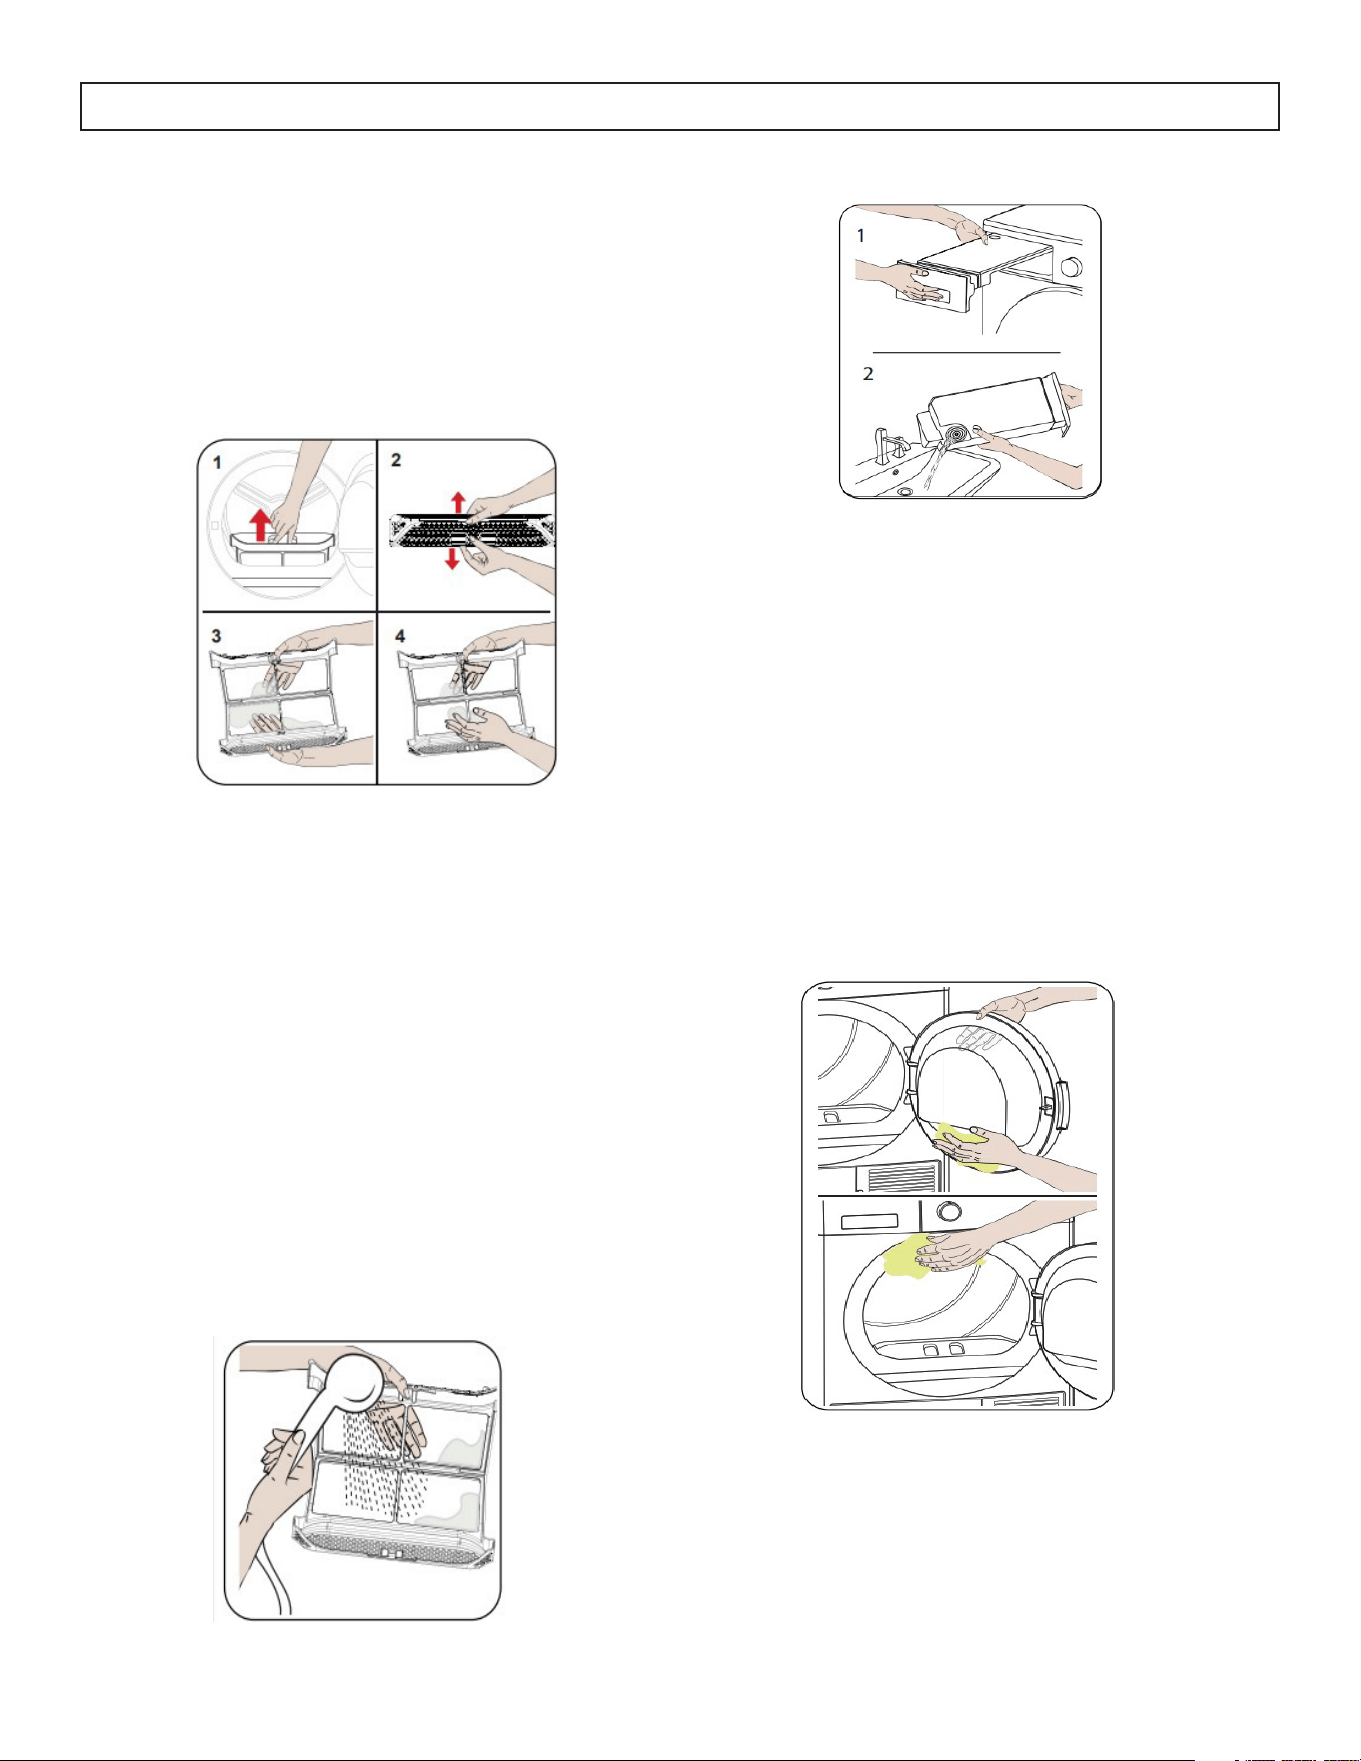
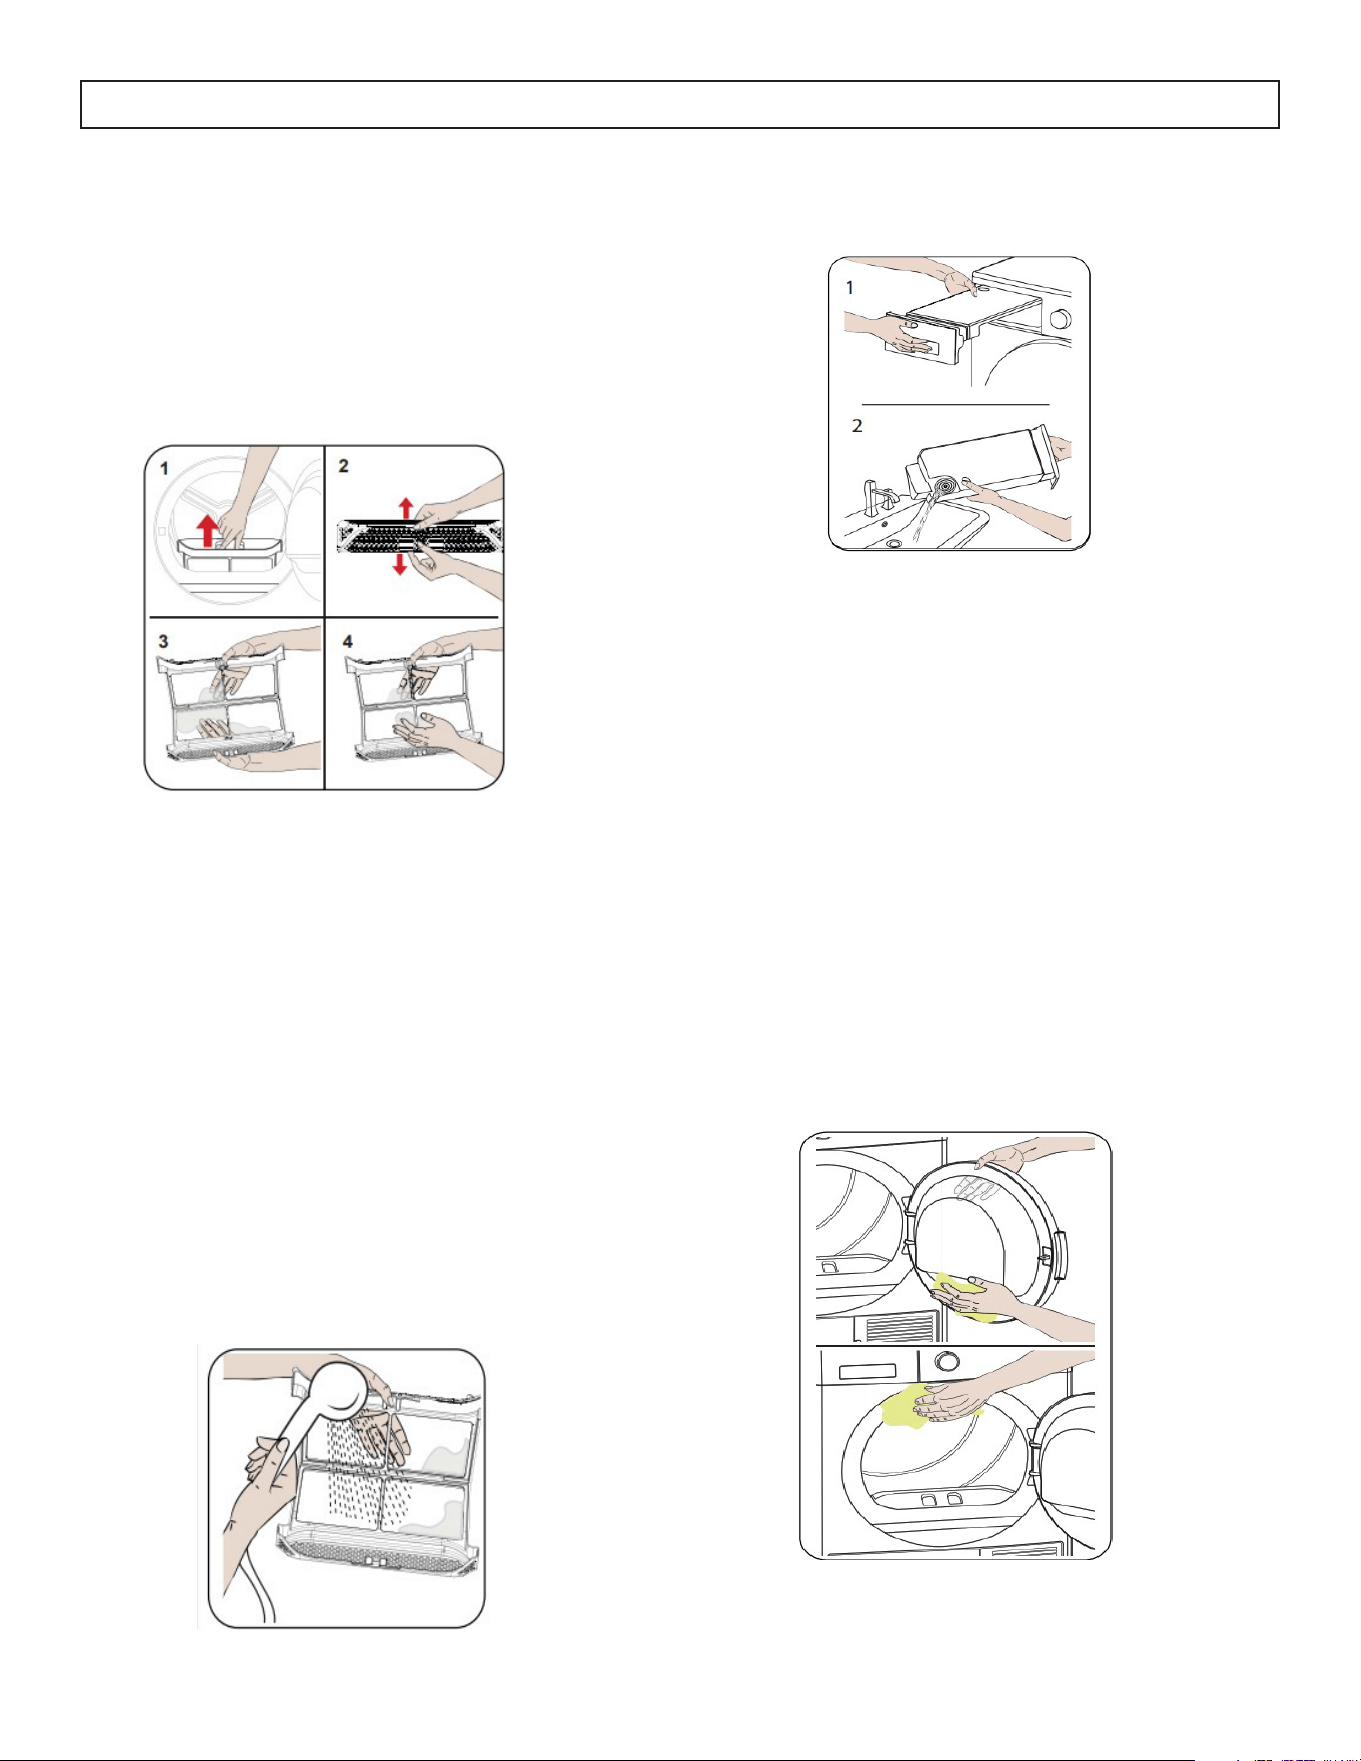
Emptying the Water Tank
1. Pull the drawer cover, carefully take out the tank.
2. Empty the water in the tank.
3. If there is lint accumulated on the discharge cap
in the tank, clean it with water.
4. Replace the tank.
NOTE
• Do not remove the water tank when a program
is running. The water in the water tank is not
suitable for human consumption.
• The water tank MUST be emptied after each use.
NOTE
• Do not use industrial chemicals to clean your
dryer.
• Do not use a dryer that has been cleaned with
industrial chemicals.
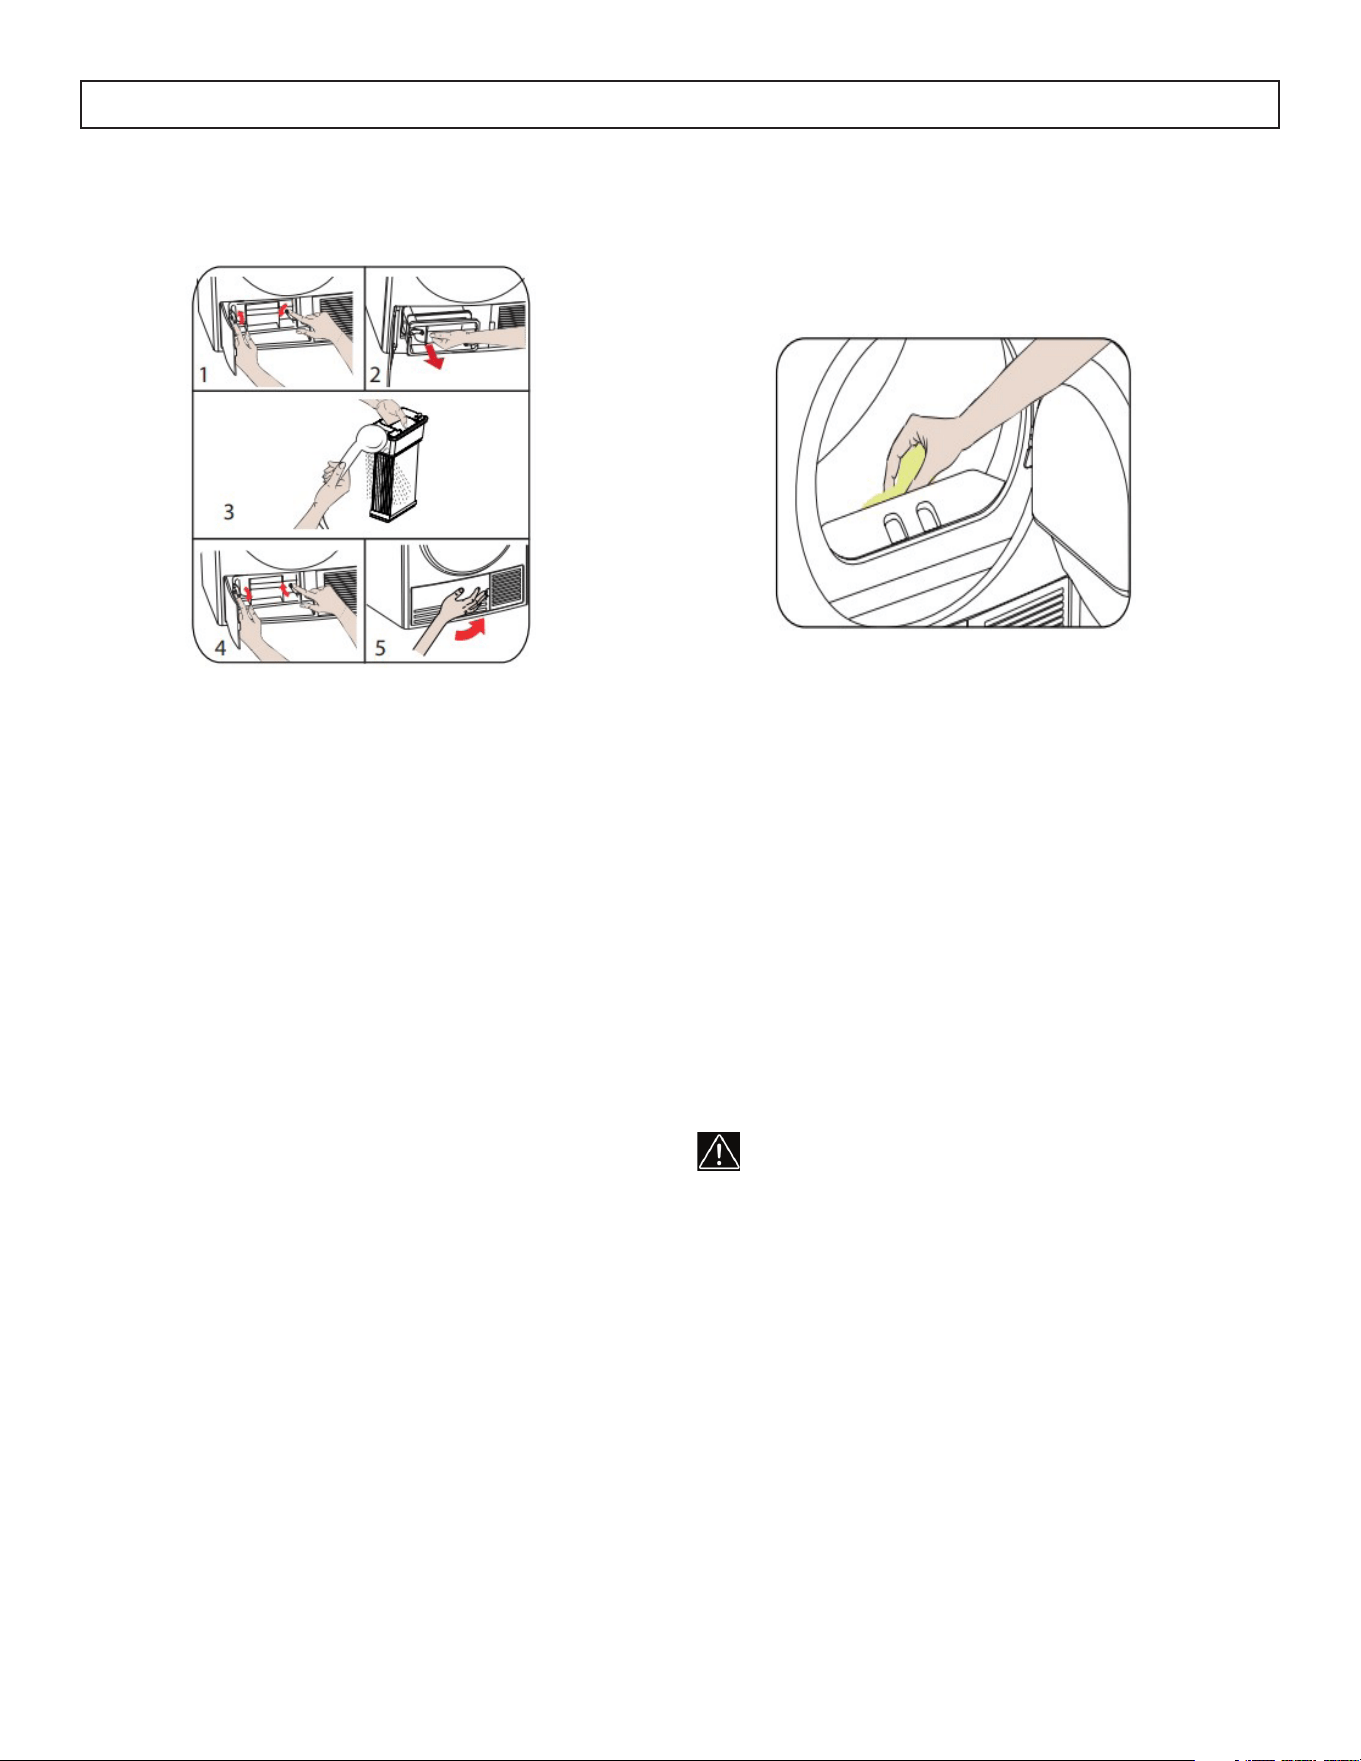
Cleaning the Lint Filter
1. Open the dryer door.
2. Pull up the lint filter to remove it.
3. Use your hands or a soft cloth to clean the lint.
4. Replace the lint filter and close the dryer door.
NOTE
The lint filter MUST be cleaned after every use.
After continued use, a build-up on the surface of the
lint filter that reduces airflow, may occur. Wash the
filter with warm water to remove build-up.
CARE & MAINTENANCE
Open the dryer door and clean all of the inner
surfaces including the gasket with a soft, damp
cloth.
19
CARE & MAINTENANCE
Cleaning the Condenser
If the drying process is completed, open the dryer
door and wait for it to cool down.
1. Open the plinth and release the 2 cover locks.
2. Hold the condenser by the plastic part and pull
it out.
3. Clean with a showerhead and wait for the water
to drain off.
4. Fully insert the condenser into its seat and lock
the 2 cover locks.
5. Close the plinth cover.
NOTE
Clean the condenser when you see the warning
“Condenser Cleaning”.
NOTE
The condenser should be cleaned after every 30
completed drying programs or once a month even if
the warning has not activated.
Cleaning the Humidity Sensor
Inside the dryer, there are humidity sensors that
detect whether the laundry is or is not dry.
1. Open the dryer door.
2. If the dryer is still hot due to the drying process,
wait for it to cool down.
3. Using a soft cloth soaked in vinegar, wipe the
metal surfaces of the sensor and dry them.
4. Replace the lint filter and close the dryer door.
NOTE
Clean the metal surfaces of the sensor 4 times per
year.
NOTE
Do not use metal tools to clean the metal surfaces of
the sensor.
WARNING
Due to the risk of fire and explosion, do not use
solution agents, cleaning agents or similar products
when cleaning the sensors.
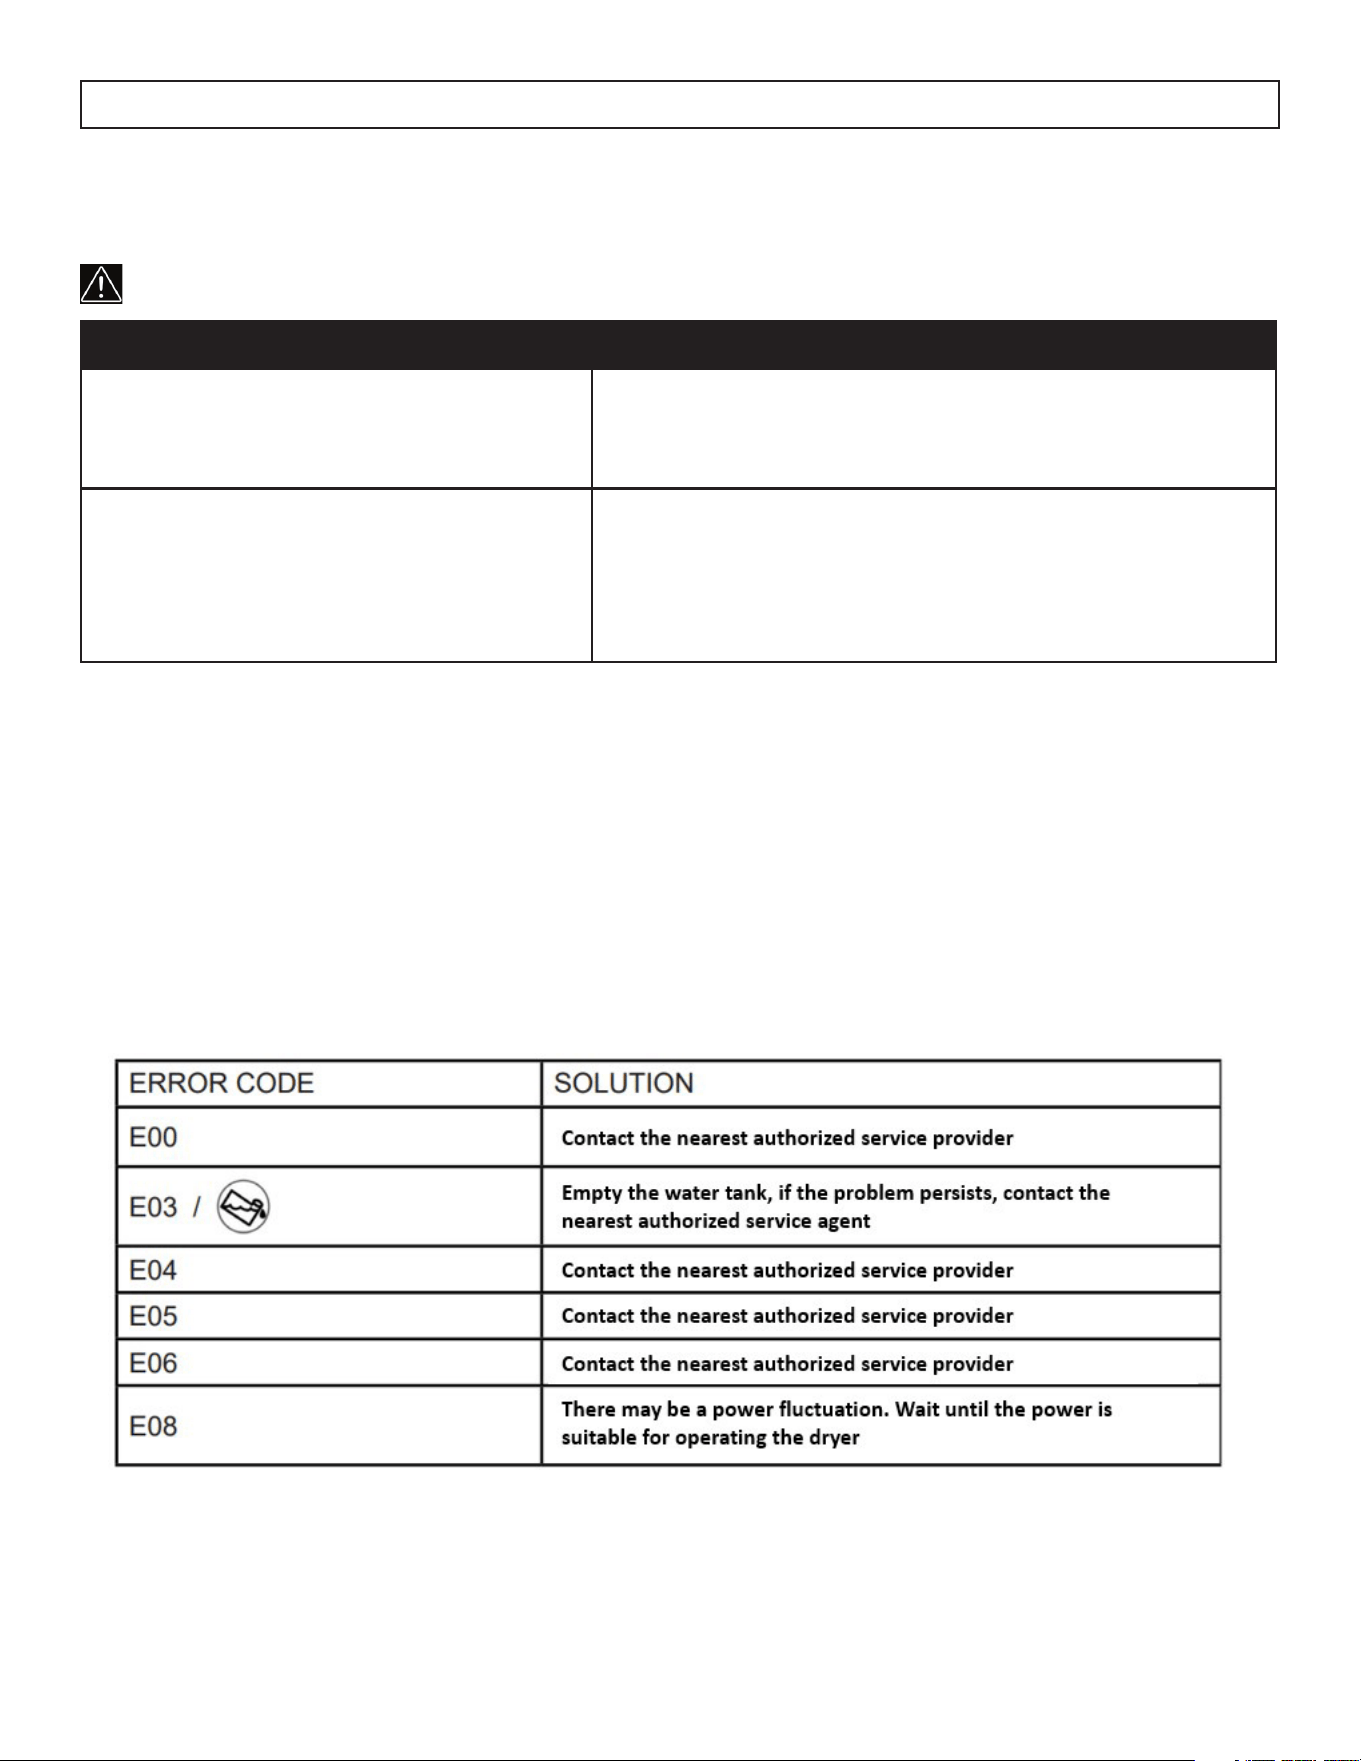
PROBLEM POSSIBLE CAUSE
Dryer does not operate • The appliance is not plugged in.
• The circuit breaker tripped or a blown fuse.
Dryer drum does not turn. • The door is not fully closed.
• The power plug is unplugged.
• The outlet does not have power.
TROUBLESHOOTING
20
The dryer is fitted with systems that continuously perform checks during the drying process to make
adjustments as required and warn of malfunctions.
The laundry that comes out hot at the end of the drying process generally feels more humid.
LIMITED IN-HOME APPLIANCE WARRANTY
This quality product is warranted to be free from manufacturer’s defects in material and workmanship, provided that the unit is used under the normal operating
conditions intended by the manufacturer.
This warranty is available only to the person to whom the unit was originally sold by Danby Products Limited (Canada) or Danby Products Inc. (U.S.A.) (hereafter
“Danby”) or by an authorized distributor of Danby, and is non-transferable.
TERMS OF WARRANTY
Plastic parts, are warranted for thirty (30) days only from purchase date, with no extensions provided.
First Year
During the rst twelve (12) months, any functional parts of this product found to be defective, will be repaired or replaced, at warrantor’s
option, at no charge to the ORIGINAL purchaser.
To obtain
Danby reserves the right to limit the boundaries of “In Home Service” to the proximity of an Authorized Service Depot. Any app liance
Service
requiring service outside the limited boundaries of “In Home Service” , it will be the consumer’s responsibility to transport the appliance (at
their own expense) to the original retailer (point of purchase) or a service depot for repair. See “Boundaries of In Home Serv ice”below.
Contact your dealer from whom your unit was purchased, or contact your nearest authorized Danby service depot, where service
must be performed by a qualied service technician.
If service is performed on the units by anyone other than an authorized service depot, or the unit is used for commercial appli cation, all
obligations of Danby under this warranty shall be void.
Boundaries of
If the appliance is installed in a location that is 100 kilometers (62 miles) or more from the nearest service center your unit must be
In Home Service
delivered to the nearest authorized Danby Service Depot, as service must only be performed by a technician qualied and certif ied for
warranty service by Danby. Transportation charges to and from the service location are not protected by this warranty and are t he
responsibility of the purchaser.
Nothing within this warranty shall imply that Danby will be responsible or liable for any spoilage or damage to food or other c ontents of this appliance, whether due
to any defect of the appliance, or its use, whether proper or improper.
EXCLUSIONS
Save as herein provided, Danby, there are no other warranties, conditions, representations or guarantees, express or implied, m ade or intended by Danby or its
authorized distributors and all other warranties, conditions, representations or guarantees, including any warranties, conditio ns, representations or guarantees
under any Sale of Goods Act or like legislation or statue is hereby expressly excluded. Save as herein provided, Danby shall no t be responsible for any damages
to persons or property, including the unit itself, howsoever caused or any consequential damages arising from the malfunction o f the unit and by the purchase of
the unit, the purchaser does hereby agree to indemnify and hold harmless Danby from any claim for damages to persons or propert y caused by the unit.
GENERAL PROVISIONS
No warranty or insurance herein contained or set out shall apply when damage or repair is caused by any of the following:
1) Power failure.
2) Damage in transit or when moving the appliance.
3) Improper power supply such as low voltage, defective house wiring or inadequate fuses.
4) Accident, alteration, abuse or misuse of the appliance such as inadequate air circulation in the room or abnormal operating con ditions
(extremely high or low room temperature).
5) Use for commercial or industrial purposes (ie. If the appliance is not installed in a domestic residence).
6) Fire, water damage, theft, war, riot, hostility, acts of God such as hurricanes, oods etc.
7) Service calls resulting in customer education.
8) Improper Installation (ie. Building-in of a free standing appliance or using an appliance outdoors that is not approved for out door application).
Proof of purchase date will be required for warranty claims; so, please retain bills of sale. In the event warranty service is required, present this document to our
AUTHORIZED SERVICE DEPOT.
Danby Products Limited
PO Box 1778, Guelph, Ontario, Canada N1H 6Z9
Telephone: (519) 837-0920 FAX: (519) 837-0449
Danby Products Inc.
PO Box 669, Findlay, Ohio, U.S.A. 45840
Telephone: (419) 425-8627 FAX: (419) 425-8629
04/09
1-800-263-2629
Warranty Service
In-home
Danby reserves the right to limit the boundaries of “In Home Service” to the proximity of an authorized service
depot. Any appliance requiring service outside the limited boundaries of “In Home Service”, will be the consumer’s
responsibility to transport at their own expense to the original point of purchase or a service depot for repair. If the
appliance is installed in a location that is 100 kilometers (62 miles) or more from the nearest service center, it must
be delivered to the nearest authorized Danby Service Depot by the purchaser.
Transportation charges to and from the service location are not protected by this warranty and are the
responsibility of the purchaser.
During the first twenty four (24) months, any functional parts of this product found to be defective, will be repaired
or replaced, at warrantor’s option, at no charge to the original purchaser.
Contact the dealer where the unit was purchased, or contact the nearest authorized Danby service depot, where
service must be performed by a qualified service technician. If service is performed on the unit by anyone other
than an authorized service depot, all obligations of Danby under this warranty shall be void.
First 24 months
To obtain service
Boundaries of
in-home service
LIMITED “IN HOME” WARRANTY
This quality product is warranted to be free from manufacturer’s defects in material and workmanship, provided that the unit is used
under the normal operating conditions intended by the manufacturer.
This warranty is available only to the person to whom the unit was originally sold by Danby Products Limited (Canada) or Danby
Products Inc. (U.S.A.) (hereafter “Danby”) or by an authorized distributor of Danby, and is non-transferable.
TERMS OF WARRANTY
Plastic parts are warranted for thirty (30) days from the date of purchase, with no extensions provided.
Nothing within this warranty shall imply that Danby will be responsible or liable for any spoilage or damage to food or other
contents of this appliance, whether due to any defect of the appliance, or its use, whether proper or improper.
EXCLUSIONS
Save as herein provided, by Danby, there are no other warranties, conditions, representations or guarantees, express or implied, made
or intended by Danby or its authorized distributors and all other warranties, conditions, representations or guarantees, including any
warranties, conditions, representations or guarantees under any Sale of Goods Act or like legislation or statute is hereby expressly
excluded. Save as herein provided, Danby shall not be responsible for any damages to persons or property, including the unit itself,
howsoever caused or any consequential damages arising from the malfunction of the unit and by the purchase of the unit, the
purchaser does hereby agree to indemnify and hold harmless Danby from any claim for damages to persons or property caused by
the unit.
GENERAL PROVISIONS
No warranty or insurance herein contained or set out shall apply when damage or repair is caused by any of the following:
1) Power failure.
2) Damage in transit or when moving the appliance.
3) Improper power supply such as low voltage, defective house wiring or inadequate fuses.
4) Accident, alteration, abuse or misuse of the appliance such as inadequate air circulation in the room or abnormal operating
conditions (ie. extremely high or low room temperature).
5) Use for commercial or industrial purposes (ie. If the appliance is not installed in a domestic residence).
6) Fire, water damage, theft, war, riot, hostility, acts of God such as hurricanes, floods etc.
7) Service calls resulting in customer education.
8) Improper Installation (ie. Building-in of a free standing appliance or using an appliance outdoors that is not approved for outdoor
application, including but not limited to: garages, patios, porches or anywhere that is not properly insulated or climate controlled).
Proof of purchase date will be required for warranty claims; retain bills of sale. In the event that warranty service is required, present
the proof of purchase to our authorized service depot.
Warranty Service
In Home
Danby Products Limited
PO Box 1778, Guelph, Ontario, Canada N1H 6Z9
Telephone: (519) 837-0920 FAX: (519) 837-0449
Danby Products Inc.
PO Box 669, Findlay, Ohio, U.S.A. 45840
Telephone: (419) 425-8627 FAX: (419) 425-8629
1-800-263-2629
04/17

22
Bienvenido a la familia Danby.
Estamos orgullosos de nuestros productos de calidad y creemos en un servicio
confiable. Le sugerimos que lea este manual del propietario antes de enchufar su nuevo
electrodoméstico, ya que contiene información importante de funcionamiento, información
de seguridad, solución de problemas y consejos de mantenimiento para garantizar la
confiabilidad y longevidad de su electrodoméstico.
Tiene derecho a la cobertura de la garantía como se describe en el manual del propietario
que se proporciona con su nuevo electrodoméstico.
1. Escriba la información de su aparato a continuación. Debe conservar el comprobante
de compra original para validar y recibir los servicios de garantía.
2. Registre su producto en línea y reciba una EXTENSIÓN DE GARANTÍA GRATUITA DE 2
MESES después de completar una encuesta sobre el producto, en
www.danby.com/support/product-registration/
Número de modelo: _______________________________________________
Número de serie: _________________________________________________
Fecha de compra: _________________________________________________
Necesitas ayuda?
1. Lea el manual del propietario para obtener ayuda con la instalación, resolución de
problemas y asistencia de mantenimiento.
2. Visite www.Danby.com para acceder a herramientas de autoservicio, preguntas
frecuentes y mucho más buscando su número de modelo en la barra de búsqueda.
3. Para obtener el servicio al cliente más rápido, complete el formulario web en www.
danby.com/support. Su envío irá directamente a un experto en su dispositivo en
particular. Nuestros tiempos de respuesta promedio son entre 20 minutos y 2 horas,
durante el horario comercial EST.
4. Llame al 1-800-263-2629; tenga en cuenta que durante las horas pico, los tiempos de
espera pueden exceder una hora.

ADVERTENCIA IMPORTANTE
INSTRUCCIONES DE CONEXIÓN A TIERRA
Este aparato debe conectarse a tierra. En caso de
cortocircuito, la conexión a tierra reduce el riesgo
de descarga eléctrica al proporcionar un cable de
escape para la corriente eléctrica.
INSTALACIÓN ELÉCTRICA
La instalación de la secadora de ropa debe ser
realizada por un instalador cualificado.
• Instale el aparato de acuerdo con las
instrucciones del fabricante y los códigos de
ubicación.
• Para reducir el riesgo de lesiones graves
o muerte, siga todas las instrucciones de
instalación.
• Si los códigos locales no permiten la conexión
de un cable de alimentación de 3 hilos, utilice
únicamente un cable de alimentación de 4 hilos.
ADVERTENCIA - El uso inadecuado de la clavija
de conexión a tierra puede provocar un riesgo
de descarga eléctrica. Consulte a un electricista
cualificado o a un agente de servicio si las
instrucciones de conexión a tierra no se entienden
completamente, o si existen dudas sobre si el
aparato está correctamente conectado a tierra.
NO UTILICE ALARGADORES
No conecte su aparato a alargadores ni junto con
otro aparato en la misma toma de corriente. No
empalme el cable de alimentación. En ningún caso
corte ni retire la tercera clavija de toma de tierra
del cable de alimentación.
REQUERIMIENTOS DE SEGURIDAD
Asegúrese de que los componentes se sustituyen por
otros similares y de que el mantenimiento lo realiza
personal de servicio autorizado por la f
ábrica, para minimizar el riesgo de una posible
ignición debida a piezas incorrectas o a un servicio
inadecuado.
Este aparato no está destinado a ser utilizado
por personas (incluidos niños) cuyas capacidades
físicas, sensoriales o mentales puedan ser diferentes
o reducidas, o que carezcan de experiencia o
conocimientos, a menos que dichas personas
reciban supervisión o formación para manejar el
aparato por parte de una persona responsable de
su seguridad.
Los niños deben ser vigilados para evitar que
jueguen con el aparato.
No coloque artículos expuestos a aceites de cocina
en la secadora. Los artículos contaminados con
aceites de cocina pueden contribuir a una reacción
química que podría provocar un incendio de la
carga. Para reducir el riesgo de incendio debido
a cargas contaminadas, la parte final de un ciclo
de secado en secadora se produce sin calor como
período de enfriamiento. Evite detener la secadora
antes de que finalice el ciclo de secado, a menos
que los artículos puedan retirarse inmediatamente
y extenderse para permitir que se disipe el calor
acumulado.
Los objetos manchados con productos derivados del petróleo pueden inflamarse
espontáneamente, sobre todo cuando se exponen a fuentes de calor como una
secadora. Los objetos se calientan, lo que provoca una reacción de oxidación
en el aceite. La oxidación genera calor. Si el calor no puede escapar, los objetos
pueden calentarse lo suficiente como para incendiarse. Amontonar, apilar o
almacenar objetos manchados de aceite puede impedir la salida del calor y crear
un riesgo de incendio.
23
Importantes Instrucciones de Seguridad
LEA Y SIGA TODAS LAS INSTRUCCIONES DE SEGURIDAD
¡GUARDE ESTAS INSTRUCCIONES!

• No seque artículos que hayan sido previamente
limpiados, lavados, empapados o manchados
con gasolina, disolventes de limpieza en seco
u otras sustancias inflamables o explosivas,
ya que desprenden vapores que podrían
inflamarse o explotar.
• No introduzca la mano en el aparato si el
tambor está en movimiento.
• No instale ni almacene este aparato en lugares
expuestos a la intemperie. Este aparato no está
diseñado para su uso en exteriores.
• No manipule los controles.
• No utilice calor para secar artículos que
contengan gomaespuma o materiales similares
con textura de goma.
• Limpie la rejilla de pelusa antes y después de
cada carga.
• El interior del aparato debe ser limpiado
periódicamente por personal cualificado.
• No coloque el aparato ni el cable de
alimentación cerca de fuentes de calor como
radiadores, calefactores, conductos de aire o la
luz solar directa. No coloque llamas abiertas,
como velas, sobre el aparato o cerca de él.
• No obstruya ninguna abertura de ventilación.
Asegúrese de que las rejillas de ventilación
no estén cubiertas por periódicos, manteles,
cortinas, alfombras, etc.
• No pase el cable de alimentación por debajo
del revestimiento del suelo. Mantenga el
cable de alimentación alejado de zonas muy
transitadas donde pueda suponer un peligro de
tropiezo.
• No utilice indebidamente el cable de
alimentación. No transporte ni tire nunca
del aparato por el cable de alimentación.
Nunca tire del cable de alimentación para
desenchufarlo de la toma de corriente; en su
lugar, sujete el enchufe y tire de él para sacarlo
de la toma.
• No utilice el aparato si el cable de alimentación
o el enchufe están dañados. Si el cable de
alimentación está dañado, debe ser sustituido
por el fabricante, su agente de servicio o
personas con cualificación similar con el fin de
evitar riesgos.
• No intente reparar, desmontar o modificar el
aparato. La garantía quedará anulada si el
aparato no es revisado o reparado por personal
cualificado. No hay piezas reparables por el
usuario en el interior.
• No sobrecargue el aparato.
• Asegúrese de que no entren objetos extraños
en el aparato. Retire todos los objetos de
los bolsillos, como encendedores, cerillas,
horquillas, monedas, etc.
• La ventana de la puerta puede estar caliente
después de un ciclo de secado largo. Asegúrese
de que los niños no se acerquen al aparato..
• Abrir la puerta antes de que finalice el proceso
de enfriamiento puede exponerle al aire
caliente..
• Si la secadora no se monta apilada utilizando el
kit suministrado, asegúrese de colocarla sobre
una superficie plana y firme en un lugar seco y
bien ventilado. Si es necesario, utilice las patas
delanteras ajustables para nivelar el aparato.
No coloque el aparato sobre ningún material
blando como espuma, plástico o moqueta.
• Después de apagar el aparato, espere 2
minutos antes de volver a encenderlo.
• Retire el embalaje de transporte de la parte
posterior de la unidad antes de utilizarla por
primera vez.
• No instale este aparato detrás de una puerta
con cerradura, una puerta corredera o de forma
que la apertura de la puerta de la secadora
quede restringida. No lo instale en un armario
de dimensiones reducidas.
• Utilice este aparato sólo para ropa con una
etiqueta que indique que es apta para el
secado.
• Nunca rocíe ni vierta agua sobre la secadora
para limpiarla.
24
Importantes Instrucciones de Seguridad
LEA Y SIGA TODAS LAS INSTRUCCIONES DE SEGURIDAD
¡GUARDE ESTAS INSTRUCCIONES!
25
1. Parte superior de la secadora
2. Panel de control
3. Puerta de la secadora
4. Rejillas de ventilación
5. Ranura de apertura del zócalo
6. Patas niveladoras
7. Zócalo
8. Placa de clasificación
9. Filtro de pelusa
10. Tapa del cajón
INSTRUCCIONES DE INSTALACIÓN
Kit apilable con cajón/estante
Consulte la guía de instrucciones para más detalles

26
UBICACIÓN
Comprueba la información del manual de usuario
para asegurarte de que la instalación eléctrica y la
toma de agua son adecuadas. Si no lo son, llame a
un electricista cualificado y a un fontanero para que
realicen los ajustes necesarios.
Es responsabilidad del cliente preparar el lugar
de instalación de la secadora, así como la
instalación eléctrica y de aguas residuales. Antes
de la instalación, compruebe que la secadora no
esté dañada. Si está dañada no la instale. Los
productos dañados pueden poner en peligro su
salud.
• Instale la secadora sobre una superficie estable
y plana.
• Utilice la secadora en un entorno libre de polvo
y con buena ventilación.
• La distancia entre la secadora y el suelo no
debe reducirse con objetos como alfombras,
madera o cinta adhesiva.
• No bloquee las rejillas de ventilación que se
encuentran en el zócalo de la secadora.
• El aparato no debe instalarse detrás de una
puerta con cerradura, una puerta corredera o
una puerta con bisagra en el lado opuesto de
la secadora, de forma que bloquee la apertura
total de la puerta de la secadora.
• Una vez instaladas, las conexiones deben
permanecer estables. Al instalar el secador,
asegúrese de que la superficie trasera no se
apoya en ningún elemento (por ejemplo, grifo,
enchufe).
• La temperatura de funcionamiento de la
secadora es de 5°C a 35°C (41°F a 95°F). Si
se opera fuera de este rango de temperatura,
el rendimiento de la secadora se verá afectado
negativamente y el producto se dañará.
• Tenga cuidado al transportar el producto, ya
que es pesado. Utilice siempre guantes de
seguridad.
• Instale siempre el producto contra una pared. La
superficie posterior del producto debe colocarse
contra la pared.
• Deje al menos 1 pulgada (3 cm) de espacio
entre los laterales y la parte trasera del aparato.
• La secadora debe estar nivelada para funcionar
de forma más silenciosa y sin vibraciones.
Utilice un nivel cuando ajuste las patas de
nivelación.
• Cuando coloque la secadora sobre una
superficie estable, para garantizar la
estabilidad, utilice un nivel. Si no está nivelada,
ajuste las patas niveladoras para nivelar el
aparato. Repita este proceso cada vez que
vuelva a colocar el producto.
• No coloque la secadora sobre el cable de
alimentación.
• Instale la secadora de ropa de acuerdo con
las instrucciones del fabricante y los códigos
locales.
IMPORTANTE
Para apilar la secadora sobre la lavadora, utilice
el kit de apilado con cajón/estante incluido
con la secadora, entre los dos aparatos. El kit
de apilamiento con cajón/estante debe fijarse
siguiendo las instrucciones suministradas.
Pour une installation superposée, SEUL le kit
de Para la instalación apilada, SÓLO DEBE
utilizarse el kit de apilamiento y las instrucciones
suministrados. Si no se incluye un kit de
apilamiento con instrucciones en el paquete de la
secadora, póngase en contacto con el servicio de
atención al cliente para adquirirlo.
Instalación bajo encimera
• Deje al menos 1 pulgada (3 cm) de espacio
entre las paredes laterales y trasera del
producto y la parte inferior de la encimera
cuando instale la secadora bajo un mostrador.
• El montaje/desmontaje bajo el mostrador, si
es necesario, debe ser realizado por personal
técnico autorizado.
INSTRUCCIONES DE INSTALACIÓN
27
NIVELE EL APARATO
Hay cuatro patas de nivelación, una en cada
esquina del aparato.
Ajuste cada pata niveladora girándola hacia la
izquierda o hacia la derecha hasta que la secadora
esté nivelada y equilibrada.
El aparato no debe colocarse en suelos inclinados,
torcidos o desiguales.
CONEXIÓN A LA SALIDA DE AGUA (con
manguera de desagüe opcional)
En los aparatos con unidad condensadora, el
agua se acumula en el depósito de agua durante
el proceso de secado. El agua acumulada debe
vaciarse después de cada ciclo de secado. Existe
la opción de utilizar una manguera de drenaje
de agua para vaciar directamente el agua, lo que
sustituye la necesidad de vaciar manualmente el
depósito de agua..
Conexión de la manguera de desagüe
Tire y saque el extremo de la manguera de la
parte trasera de la secadora. No utilice ninguna
herramienta para sacar la manguera.
Coloque un extremo de la manguera de drenaje de
agua en la ranura donde retiró la manguera.
Fije el otro extremo de la manguera de desagüe
directamente a la salida de agua o al fregadero.
NOTA:
La manguera debe conectarse de manera que no
pueda desplazarse. Si la manguera se desplaza
durante el vaciado puede producirse una
inundación en la vivienda.
NOTA:
La manguera de drenaje de agua debe instalarse a
una altura máxima de 31,5 pulgadas(80 cm).
NOTA:
La manguera de desagüe de agua no debe
doblarse, plegarse ni pisarse.
INSTRUCCIONES DE INSTALACIÓN

28
INSTRUCCIONES DE INSTALACIÓN
CONEXIÓN ELÉCTRICA
La secadora está ajustada a 208-240 V y 60 Hz.
La secadora requiere un enchufe especial. Este
enchufe debe conectarse a una toma de corriente
con conexión a tierra protegida por un fusible o
disyuntor de 16 amperios, tal como se indica en
la placa de características. El valor nominal del
fusible/disyuntor de la línea eléctrica a la que está
conectado el tomacorriente también debe ser de
16 amperios. Consulte a un electricista cualificado
si no dispone de la toma, el fusible o el disyuntor
correctos.
Nuestra empresa no se hace responsable de los
daños derivados del uso con toma de tierra.
SELECCIÓN DE ENCHUFE Y CABLE DE
ALIMENTACIÓN
Seleccione el tipo de receptáculo.
RECEPTÁCULO DE 4 CABLES
Requiere un cable de alimentación de 4 hilos
NEMA 14-30P 240 V / 30 A homologado por UL
con terminales de anillo o terminales de pala con
extremos hacia arriba. El cable de alimentación
debe ser del tipo SRDT y tener una longitud mínima
de 5 pies (152,4 cm).
RECEPTÁCULO DE 3 CABLES
Requiere un cable de alimentación de 3 hilos
NEMA 10-30P 240 V / 30 A homologado por UL
con terminales de anillo o terminales de pala con
extremos hacia arriba. El cable de alimentación
debe ser del tipo SRDT y tener una longitud mínima
de 5 pies (152,4 cm).
CONEXIÓN DEL CABLE DE ALIMENTACIÓN
DE 4 ALAMBRES
ADVERTENCIA
• Antes de la conexión, desconecte la
alimentación.
• Utilice un cable de alimentación de 240 V / 30
A homologado por UL.
El secador está equipado con una descarga de
tracción. Utilice esta descarga de tracción para la
conexión.
1. Retire el tornillo y la tapa de la caja de
terminales.
2. Retire la abrazadera del aliviador de tensión que
está fijado en nuestra máquina. Pase la abrazadera
a través del cable de alimentación y coloque el
cable de alimentación a través del cuerpo principal
del aliviador de tensión. Asegúrese de que el
aislamiento del cable está dentro del aliviador de
tensión.
3. Retire los tornillos del bloque de terminales que
se indican con A y el tornillo de conexión a tierra
que se indica con B. El conductor de tierra neutro
(terminal central) se proporciona en la secadora
como un bucle cerrado.
29
INSTRUCCIONES DE INSTALACIÓN
4. Conecte el conductor de tierra (cable verde)
debajo del terminal B. A continuación, conecte el
cable neutro (cable blanco) al centro del terminal.
El conductor neutro de tierra de la secadora debe
permanecer en el terminal central. Asegúrese de
que el conductor neutro de tierra de la secadora
y el cable neutro del cable de alimentación estén
conectados juntos al terminal central. Apriete todos
los tornillos.
5. Conecte los cables restantes bajo los terminales
exteriores del bloque y apriete todos los tornillos.
Una vez realizadas todas las conexiones, apriete la
abrazadera de descarga de tracción para fijar el
cable de alimentación. Por último, tape la tapa de
la caja.
CONEXIÓN DEL CABLE DE ALIMENTACIÓN
DE 3 ALAMBRES
ADVERTENCIA
• Antes de la conexión, desconecte la
alimentación.
• Utilice un cable de alimentación de 240 V / 30
A homologado por UL.
El secador está equipado con una descarga de
tracción. Utilice esta descarga de tracción para la
conexión.
1. Retire el tornillo y la tapa de la caja de
2. Retire la abrazadera de la descarga de tracción
que está fijada en la máquina. Pase la abrazadera
a través del cable de alimentación y coloque el
cable de alimentación a través del cuerpo principal
del aliviador de tensión. Asegúrese de que el
aislamiento del cable está dentro del aliviador de
tensión.
3. Retire los tornillos del bloque de terminales
indicados con A y el tornillo de conexión a tierra
indicado con B. El conductor de tierra neutro
(terminal central) se suministra en la secadora como
un bucle cerrado.
4. Retire el conductor neutro de tierra del borne
central y conecte el conductor neutro del cable
de alimentación bajo el borne central del bloque.
Apriete el tornillo.
5. Conecte el conductor neutro de tierra bajo el
tornillo B. A continuación, conecte el resto de los
hilos del cable de alimentación bajo los terminales
exteriores del bloque. Apriete todos los tornillos.
Una vez realizadas todas las conexiones, apriete la
abrazadera de descarga de tracción para fijar el
cable de alimentación. Por último, tape la tapa de
la caja.
30
INSTRUCCIONES DE OPERACIÓN
• Seque prendas de tejido y peso similares para
obtener un secado más uniforme. Si debe secar
una carga de tejidos mixtos, se recomienda el
secado programado para obtener un mejor
rendimiento de secado.
• Para un mejor secado, no seque prendas
pequeñas con prendas voluminosas, como
edredones, etc. Es mejor secarlos en cargas
separadas.
• Se recomienda introducir las prendas en la
secadora de una en una para evitar que se
enreden y se sequen de forma desigual.
• Compruebe los bolsillos de todos los artículos
que se van a secar, asegúrese de que no
entren objetos extraños en la unidad, como
encendedores, horquillas para el pelo,
monedas, etc.
• Ata entre sí cinturones de tela, cordones de
delantales, etc. o utiliza una bolsa para la ropa
sucia.
• Para obtener el mejor resultado de secado,
clasifique la colada según el tipo de tejido y el
programa de secado.
• El calor de la secadora puede fijar
permanentemente las manchas, asegúrese de
eliminar todas las manchas antes de meter las
prendas en la secadora.
• Los productos tejidos, como camisetas y prendas
de punto, suelen encoger en el primer secado.
Utilice un programa de protección.
• No seque en exceso los tejidos sintéticos. Esto
provocaría arrugas.
• No introduzca objetos en la secadora cuando
esté en funcionamiento.
• Si va a secar prendas de gran tamaño,
como mantas o cargas pesadas de ropa,
se recomienda pausar periódicamente el
programa, abrir la puerta de la secadora,
sacudir la prenda de gran tamaño o dar la
vuelta a la carga pesada y, a continuación,
reiniciar el ciclo de secado. Esto asegurará un
secado uniforme..
• El aparato no puede funcionar con la puerta
abierta. Una vez cerrada la puerta, pulse
el botón Inicio/Pausa para reanudar el
funcionamiento.
CAPACIDAD DE CARGA
No se recomienda cargar la secadora con más
ropa que la indicada en la figura siguiente. Si
se sobrecarga, el rendimiento de secado de la
secadora disminuirá, lo que podría dañar la
secadora y la ropa.
IMPORTANTE
Los tejidos delicados, los bordados, los tejidos de
lana/seda, la ropa de tejidos delicados y caros,
la ropa hermética y las cortinas de tul no son
adecuados para el secado en secadora.
INSTRUCCIONES DE OPERACIÓN
31
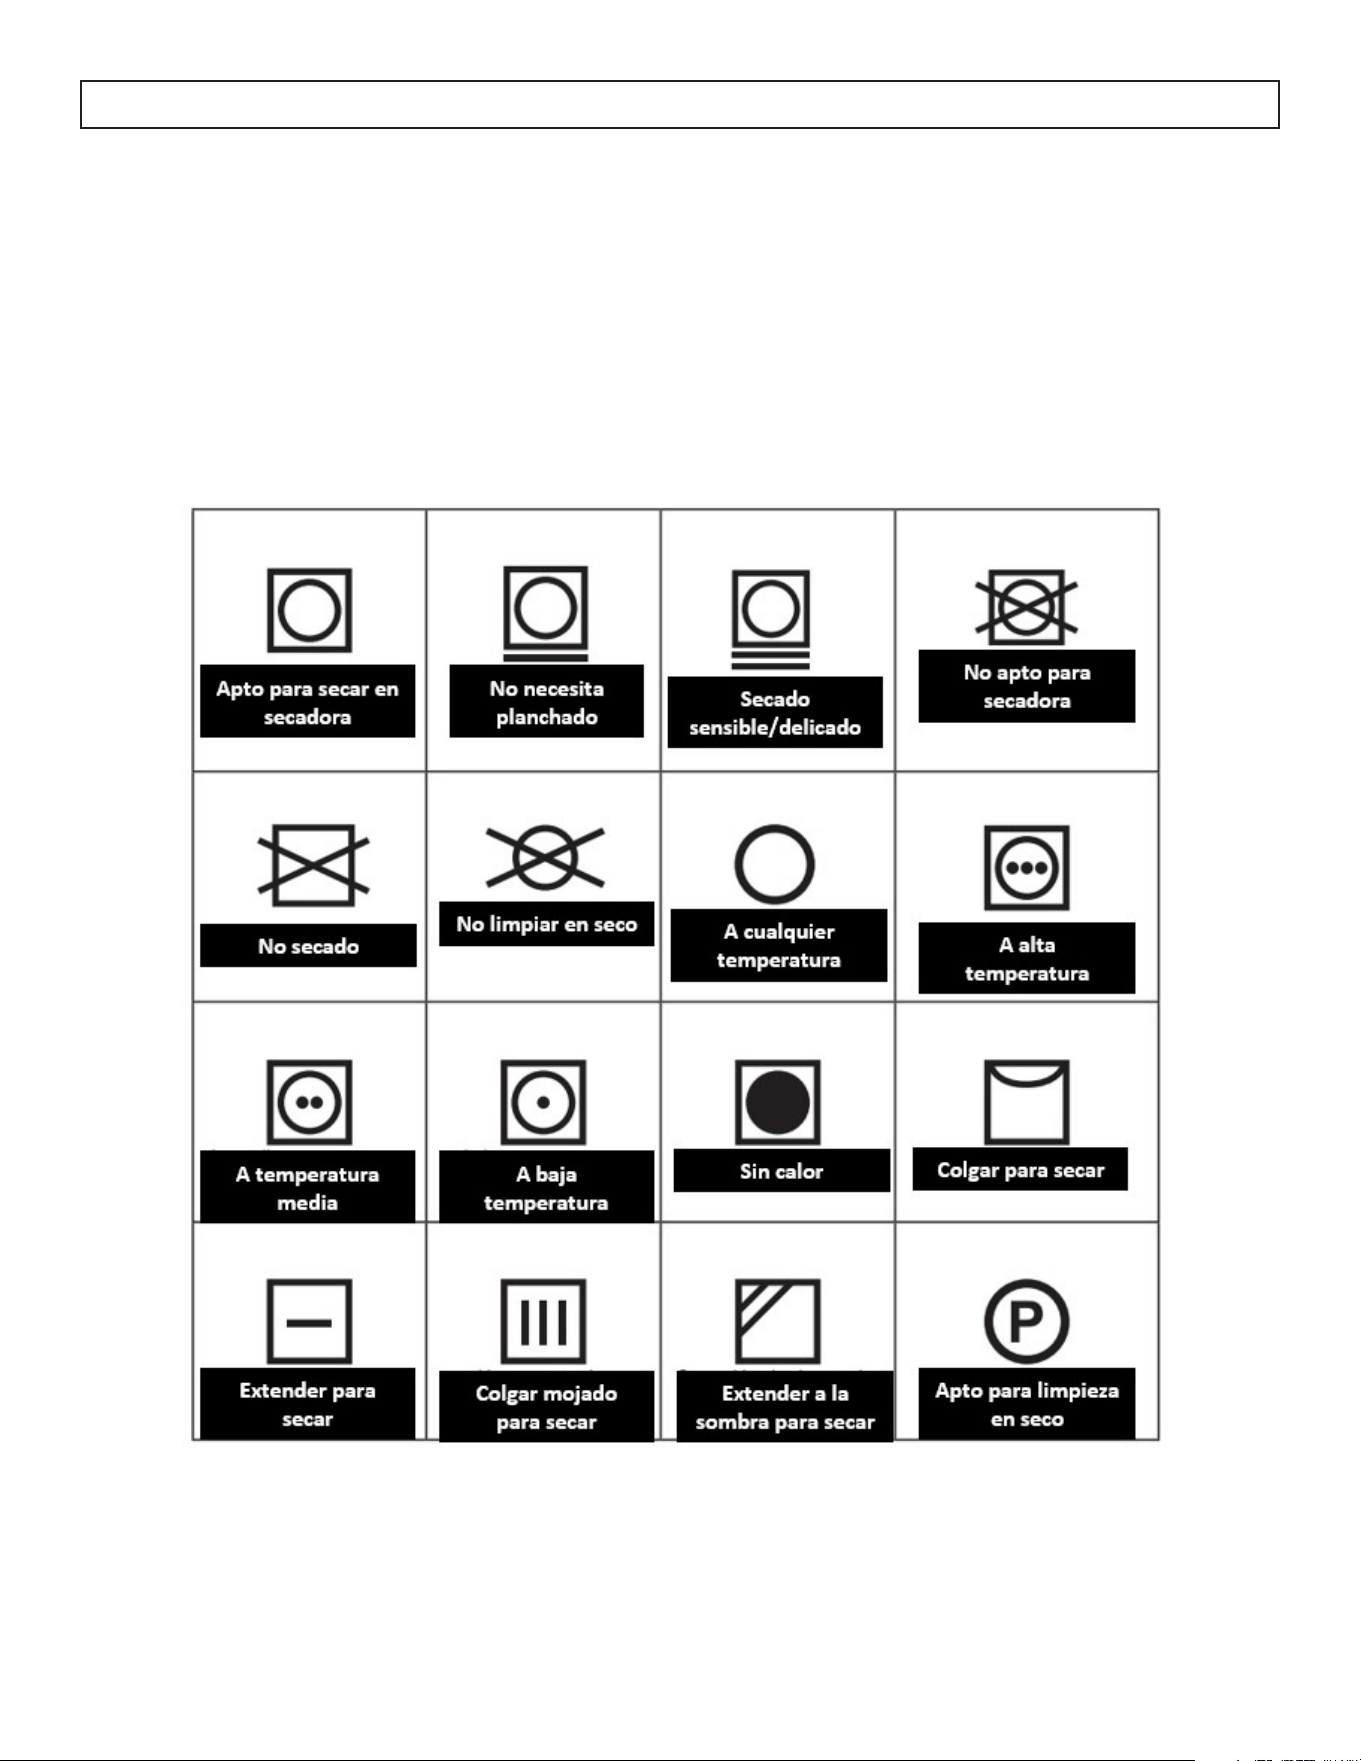
Siga las instrucciones de las etiquetas de la ropa que vaya a secar. Seque sólo las prendas que tengan un
símbolo que indique que se pueden secar en secadora.
INSTRUCCIONES DE OPERACIÓN
32
PANEL DE CONTROL
1. Botón de selección de programa
• Utilice el mando de selección de programas para seleccionar el programa de secado deseado..
INSTRUCCIONES DE OPERACIÓN
33
2. Indicador electrónico
INSTRUCCIONES DE OPERACIÓN
34
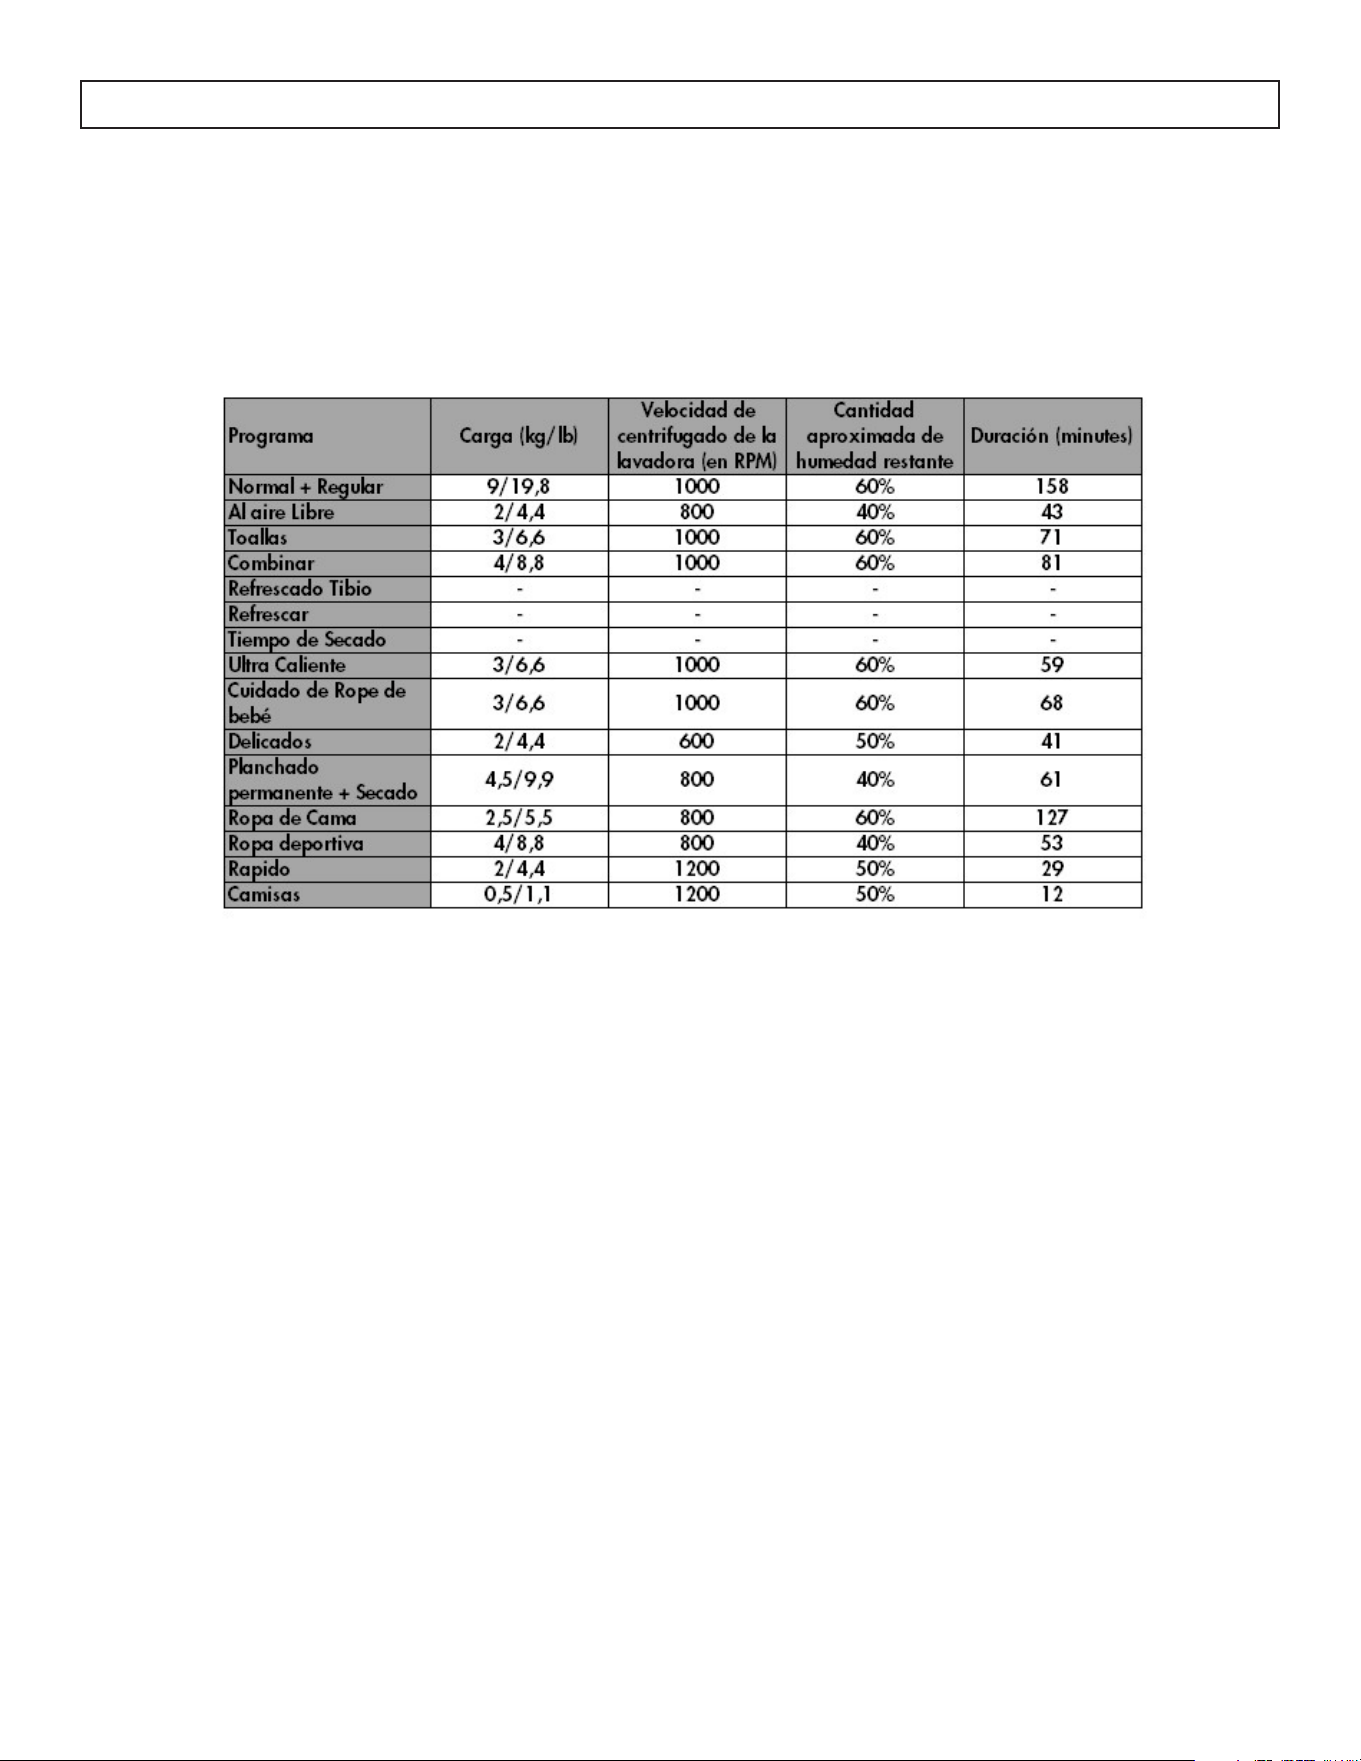
Tabla de selección de programas y consumo
Pulse el botón Inicio/Pausa para iniciar el programa. Se encenderá el LED de Inicio/Pausa que indica
que el programa ha comenzado y el LED de Secado.
NOTA
No todos los programas de la lista están disponibles en todas las secadoras
Funciones Auxiliares
Nivel de secado
Seleccione el objetivo de secado adecuado para su colada.
• Seleccione Secado Extra para ropa gruesa y de varias capas que tarde en secarse.
• Seleccione Secado Normal para ropa normal de una sola capa.
• Seleccione Secado en húmedo para la ropa que desee dejar húmeda, lista para planchar.
Ajuste de nivel
El nivel de humedad obtenido tras el secado puede aumentarse otros 3 niveles además del ajuste estándar.
De este modo, se garantiza que la colada esté más seca. Se pueden seleccionar niveles aparte del ajuste
estándar.
+1 (bajo)
+2 (medio)
+3 (alto)
Tras la selección, se enciende la luz del nivel de secado correspondiente.
INSTRUCCIONES DE OPERACIÓN

35
Secado Delicado
Los tejidos delicados se secan durante más tiempo a baja temperatura..
Inicio de Demora
Retrasa el inicio de un programa seleccionando un tiempo entre 1 y 23 horas. Puede pulsar Inicio/Pausa
para activar el tiempo de demora deseado. Una vez transcurrido este tiempo, el programa seleccionado
se iniciará automáticamente. Durante el tiempo de demora, se pueden activar/desactivar opciones
compatibles con el programa. Si mantiene pulsado el botón Inicio de Demora, el tiempo de demora
cambiará continuamente.
Cancelar Aviso Acústico
La secadora emitirá un aviso acústico al pulsar los botones, al girar el mando de selección de programas
y al finalizar el programa. Para cancelar los avisos acústicos, mantenga pulsado el botón “Opción
antiarrugas” durante 3 segundos. Al pulsar este botón, oirá un aviso acústico que indica que la opción se
ha ben activado y se cancelarán los avisos acústicos indicados.
Tiempo Secado
Si el mando de programas está en Secado por tiempo, pulse el botón de opción Secado por tiempo para
seleccionarlo, presione Inicio/Pausa para iniciar el programa.
Bloqueo para niños
Existe una opción de bloqueo infantil para evitar cambios en el programa seleccionado cuando se
pulsan teclas durante el ciclo del programa. Para activar el bloqueo para niños, pulse simultáneamente
las teclas “Opciones” y “Antiarrugas” durante 3 segundos. Cuando se active el bloqueo para niños,
se desactivarán todas las teclas. El bloqueo para niños no se desactiva automáticamente al final del
programa.
Para desactivar el bloqueo para niños al final del programa, coloque el mando de selección de
programas en la posición “Off” y, a continuación, en la primera posición. El bloqueo para niños sigue
activo. Para desactivarlo, pulse simultáneamente los botones “Opciones” y “Antiarrugas” durante 3
segundos. Al activar/desactivar “CL” aparecerá en la pantalla durante 2 segundos y luego se apagará.
Sonará un aviso acústico.
ADVERTENCIA
Cuando la secadora está en funcionamiento o el bloqueo para niños está activado, si gira el mando de
selección de programas, oirá un aviso acústico y “CL” se visualizará en la pantalla durante 2 segundos
y después se apagará. Si gira el mando de selección de programas, oirá un aviso acústico. Aunque
ponga el mando de programas en otro programa, el programa anterior seguirá funcionando. Para
seleccionar un nuevo programa, desactive el bloqueo para niños y, a continuación, ajuste el mando de
selección de programas.
Antiarrugas
Si no abre la puerta de la secadora al final del programa, la opción antiarrugas estará activa durante 60
minutos, excepto para el programa normal. Cuando se selecciona la opción antiarrugas, estará activa
durante 120 minutos.
Nivel de temperatura
Para el secado de la ropa, el nivel de temperatura se puede ajustar con opciones baja, media y alta.
NOTA
No todas las opciones enumeradas están disponibles en todos los modelos
INSTRUCCIONES DE OPERACIÓN

36
Inicio del programa
El LED de Inicio/Pausa parpadeará durante la
selección del programa. Pulse el botón Inicio/Pausa
para iniciar el programa. El LED Inicio/Pausa
indica que el programa ha comenzado y el LED de
secado se encenderá.
NOTA
No todos los programas de la lista están
disponibles en todas las secadoras
Normal + Regular Seco (Normal)
Adecuado para ropa de algodón, como sábanas,
fundas de almohada, pijamas, ropa interior,
manteles, etc.
Al aire libre (Outdoor)
Adapté aux vêtements de plein air, aux vestes
imperméables, aux vestes avec isolation intérieure,
etc.
Toallas (Towels)
Adecuado para ropa gruesa de algodón, como
toallas, albornoces, etc.
Combinar (Mix)
Adecuado para prendas mixtas de algodón y
sintético que no decoloran para dejarlas listas para
usar.
Refrescado Tibio (Warm Refresh)
Ayuda a los tejidos de lana a eliminar el exceso de
agua tras el lavado aplicando baja temperatura
con un movimiento suave del tambor.
Refrescar (Air Fluff)
Se utiliza para eliminar los malos olores con 10
minutos de volteo sin calor.
Tiempo de Secado (Time Drying)
Para alcanzar el nivel de secado deseado a baja
temperatura, puede utilizar los programas de
tiempo de 10 min. a 150 min. Independientemente
del nivel de secado, el programa se detiene a la
hora deseada.
Ultra Calienta (Ultra Hot)
Adecuado para tejidos que requieren requisitos de
higiene.
Cuidado de Rope de bebé (Baby Care)
Proporciona un secado higiénico de la ropa
delicada de los bebés a baja temperatura.
Delicados (Delicates)
Este programa seca prendas/tejidos delicados
como camisas, blusas y prendas de seda a baja
temperatura para dejarlas listas para usar.
Planchado Permanente (Perm Press)
Seca sintéticos como camisas, camisetas, blusas a
una temperatura más baja en comparación con el
programa de algodones.
Ropa de cama (Bedding)
Se utiliza para secar edredones individuales con
plumas, plumón o rellenos sintéticos.
Ropa deportiva (Sports Wear)
Se utiliza para prendas deportivas sintéticas como
pantalones cortos, camisetas a baja temperatura.
Rapido (Express)
2 Kg (4,4 libras) camisas de algodón hiladas a
gran velocidad en la lavadora se secan en 29
minutos.
Camisas (Shirts)
2 - 3 camisas están listas para planchar en 12
minutos.
IMPORTANTE
No abra la puerta de la secadora mientras el
programa esté en marcha. Si tiene que abrir la
puerta, no la mantenga abierta durante mucho
tiempo.
INSTRUCCIONES DE OPERACIÓN

37
Selección En espera
Después de 15 minutos sin acción del usuario en
el modo de selección, la secadora pasa al modo
de ahorro de energía debido a la disminución
del consumo de energía. No se activa el LED en
la pantalla. En el modo de ahorro de energía, el
LED del dial permanece encendido mientras que la
selección no aparece en la pantalla.
Para reiniciar la secadora será necesario mover el
mando a la posición OFF y volver a seleccionar el
programa.
Durante el Programa
Si se abre la puerta mientras se está ejecutando un
programa, la secadora pasará al modo de espera.
Una vez cerrada la puerta, pulse la tecla Inicio/
Pausa para reanudar el programa.
No abra la puerta de la secadora cuando el
programa esté en marcha. Si tiene que abrir la
puerta, no la mantenga abierta durante mucho
tiempo.
Fin de Programa
Al final del ciclo de secado, los indicadores
luminosos de Inicio/Pausa, nivel del depósito de
agua, limpieza del filtro y limpieza del condensador
se encenderán y sonará un aviso acústico. La
colada ya se puede sacar de la secadora.
NOTA
Limpie el filtro y vacíe el depósito de agua después
de cada uso.
NOTA
Si la colada no se retira de la secadora
una vez finalizado el programa, se activará
automáticamente el ciclo Antiarrugas de 1 hora.
Este programa gira el tambor a intervalos regulares
para evitar las arrugas.
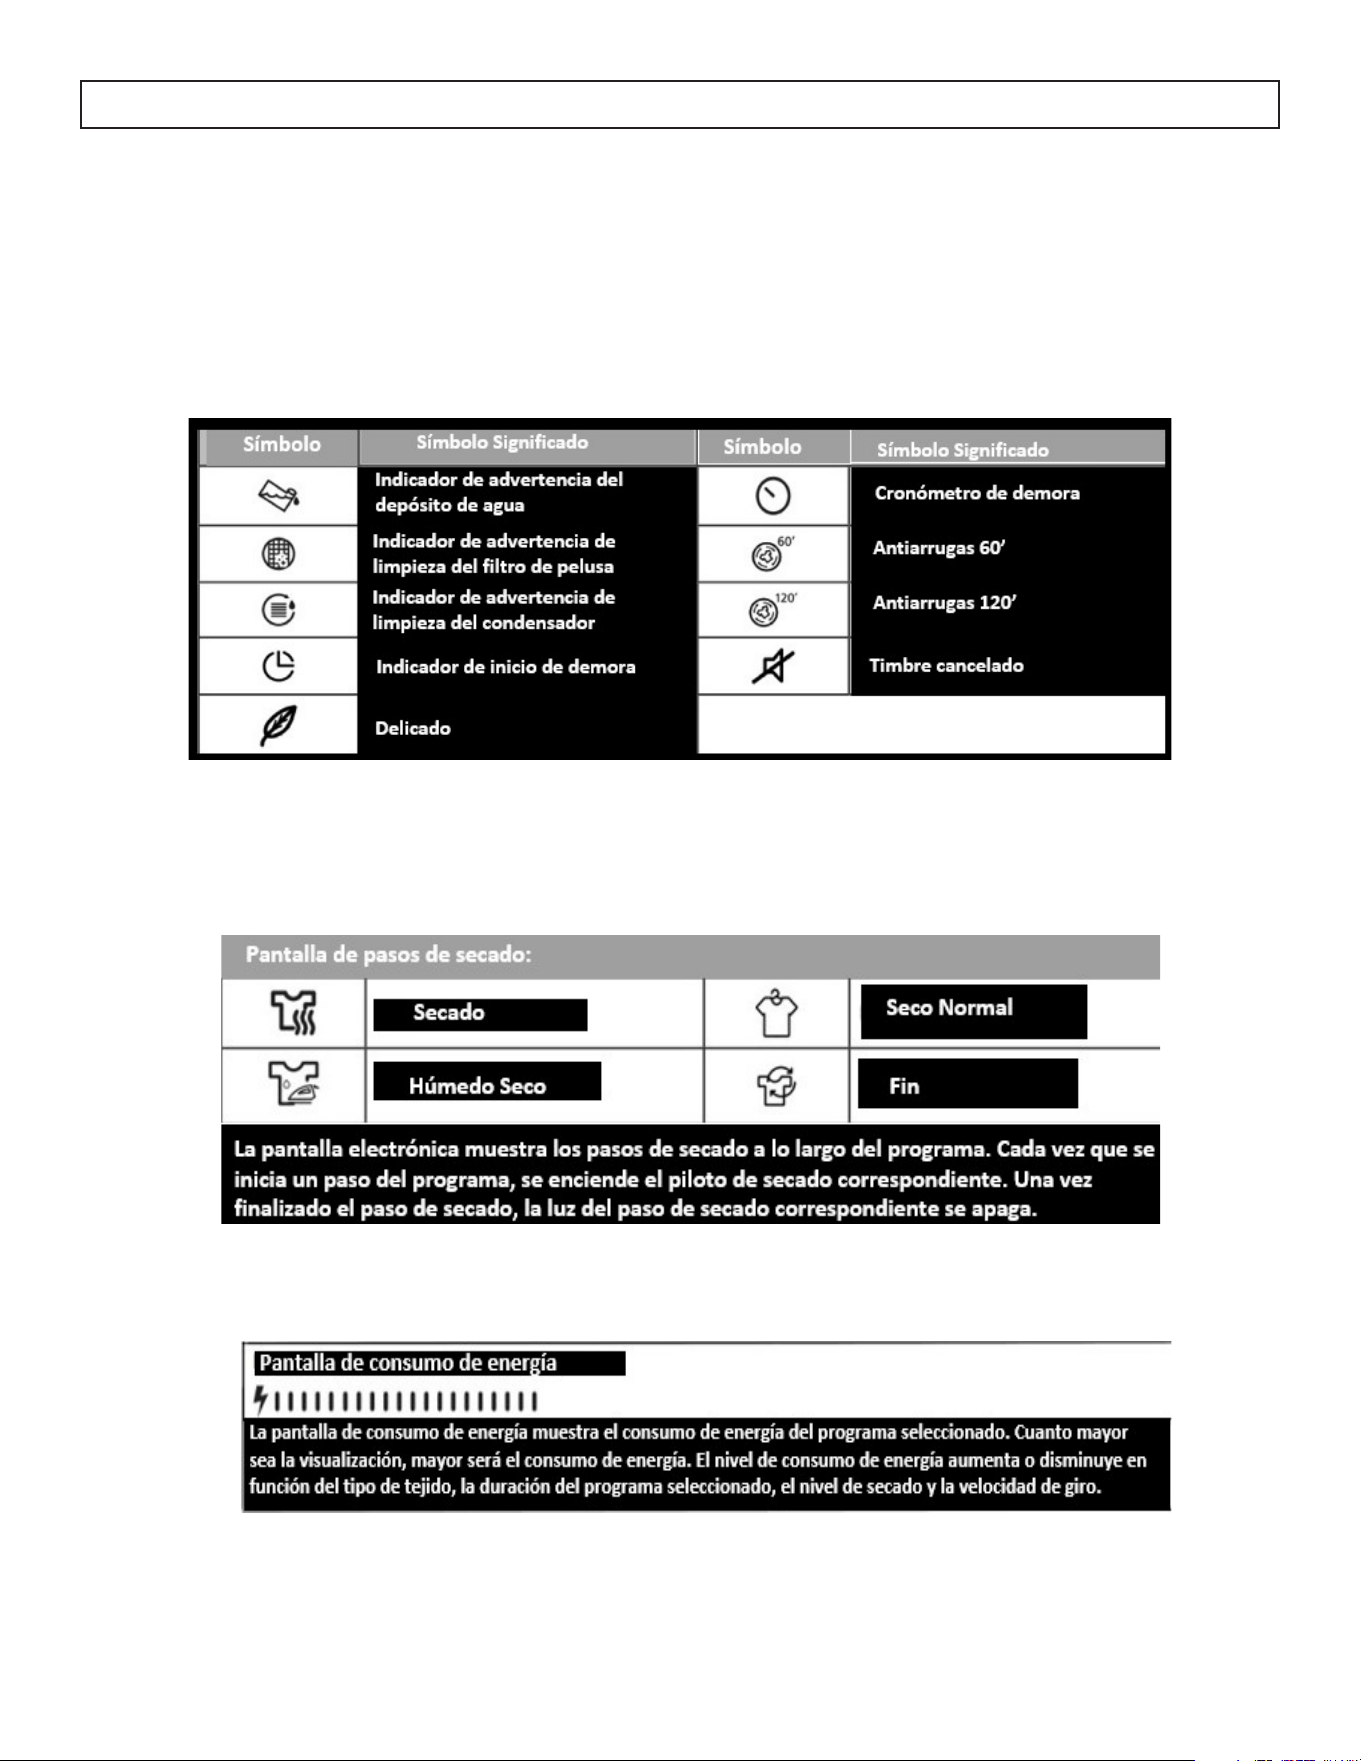
Información sobre la luz de tambor
Este producto incluye una luz de tambor LED. La
luz funciona automáticamente al abrir la puerta.
Se apagará automáticamente si la puerta se deja
abierta.
NOTA
• El usuario no puede encender ni apagar la luz
de la secadora.
• No intente sustituir o modificar la luz LED.
INSTRUCCIONES DE OPERACIÓN
INSTRUCTIONS POUR INVERSION DE LA PORTE
1. Quitar la puerta y la bisagra de la puerta
4. Retirar el cristal interior de la puerta
2. Retirar el mecanismo de cierre de la puerta
5. Gire la puerta 180 grados y vuelva a instalar el
cristal interior
3. Instale la bisagra de la puerta y el mecanismo
de cierre en los lados opuestos del hueco de la
puerta.
6. Vuelva a instalar la puerta
38
NOTA
• No utilice productos químicos industriales para
limpiar su secadora.
• No utilice un secador que haya sido limpiado
con productos químicos industriales.
Limpieza del filtro de pelusas
1. Abrir la puerta de la secadora
2. Tire hacia arriba del filtro de pelusa para
extraerlo.
3. Utilice las manos o un paño suave para limpiar
la pelusa.
4. Sustituya el filtro de pelusas y cierre la puerta de
la secadora.
NOTA
El filtro de pelusa DEBE limpiarse después de cada
uso.
Tras un uso continuado, puede producirse una
acumulación en la superficie del filtro de pelusa
que reduzca el flujo de aire. Lave el filtro con agua
caliente para eliminar la acumulación.
Vaciado del depósito de agua
1. Tire de la tapa del cajón, saque con cuidado el
depósito.
2. Vaciar el agua del depósito.
3. Si hay pelusa acumulada en la tapa de
descarga del depósito, límpiela con agua.
4. Sustituir el depósito.
NOTA
• No retire el depósito de agua mientras se esté
ejecutando un programa. El agua del depósito
de agua no es apta para el consumo humano.
• El depósito de agua DEBE vaciarse después de
cada uso.
Limpieza de la superficie interior de la
39
Abra la puerta de la secadora y limpie todas las
superficies interiores, incluida la junta, con un paño
suave y húmedo.
CUIDADO Y MANTENIMIENTO

Limpieza del condensador Limpieza del sensor de humedad
En el interior de la secadora hay sensores de
humedad que detectan si la ropa está o no seca.
Una vez finalizado el proceso de secado, abra la
puerta de la secadora y espere a que se enfríe.
1. Abra el zócalo y suelte los 2 cierres de la tapa.
2. Sujete el condensador por la parte de plástico y
tire de él.
3. Limpiar con una alcachofa de ducha y esperar a
que escurra el agua.
4. Inserte completamente el condensador en su
alojamiento y bloquee los 2 cierres de la tapa.
5. Cerrar la tapa del zócalo.
NOTA
Limpie el condensador cuando vea el aviso
“Limpieza del condensador”.
NOTA
El condensador debe limpiarse después de cada
30 programas de secado completados o una vez al
mes aunque no se haya activado la advertencia.
1. Abra la puerta de la secadora.
2. Si la secadora aún está caliente debido al
proceso de secado, espere a que se enfríe.
3. Con un paño suave empapado en vinagre,
limpie las superficies metálicas del sensor y
séquelas.
4. Sustituya el filtro de pelusas y cierre la puerta de
la secadora.
NOTA
Limpie las superficies metálicas del sensor 4 veces
al año.
NOTA
No utilice herramientas metálicas para
limpiar las superficies metálicas del sensor.
ADVERTENCIA
Debido al riesgo de incendio y explosión, no
utilice agentes disolventes, detergentes o productos
similares para limpiar los sensores.
40
CUIDADO Y MANTENIMIENTO
41
SOLUCIÓN SUGERIDA
La secadora está equipada con sistemas que realizan comprobaciones continuas durante el proceso de
secado para realizar los ajustes necesarios y avisar en caso de avería.
La ropa que sale caliente al final del proceso de secado suele estar más húmeda..
PROBLEMA POSIBLE CAUSA
La secadora no funciona. • El aparato no está enchufado.
• Se ha disparado el disyuntor o se ha fundido un
fusible.
El tambor de la secadora no gira. • La puerta no está completamente cerrada.
• El enchufe está desenchufado.
• La toma no tiene corriente.
LIMITED IN-HOME APPLIANCE WARRANTY
This quality product is warranted to be free from manufacturer’s defects in material and workmanship, provided that the unit is used under the normal operating
conditions intended by the manufacturer.
This warranty is available only to the person to whom the unit was originally sold by Danby Products Limited (Canada) or Danby Products Inc. (U.S.A.) (hereafter
“Danby”) or by an authorized distributor of Danby, and is non-transferable.
TERMS OF WARRANTY
Plastic parts, are warranted for thirty (30) days only from purchase date, with no extensions provided.
First Year
During the rst twelve (12) months, any functional parts of this product found to be defective, will be repaired or replaced, at warrantor’s
option, at no charge to the ORIGINAL purchaser.
To obtain
Danby reserves the right to limit the boundaries of “In Home Service” to the proximity of an Authorized Service Depot. Any app liance
Service
requiring service outside the limited boundaries of “In Home Service” , it will be the consumer’s responsibility to transport the appliance (at
their own expense) to the original retailer (point of purchase) or a service depot for repair. See “Boundaries of In Home Serv ice”below.
Contact your dealer from whom your unit was purchased, or contact your nearest authorized Danby service depot, where service
must be performed by a qualied service technician.
If service is performed on the units by anyone other than an authorized service depot, or the unit is used for commercial appli cation, all
obligations of Danby under this warranty shall be void.
Boundaries of
If the appliance is installed in a location that is 100 kilometers (62 miles) or more from the nearest service center your unit must be
In Home Service
delivered to the nearest authorized Danby Service Depot, as service must only be performed by a technician qualied and certif ied for
warranty service by Danby. Transportation charges to and from the service location are not protected by this warranty and are t he
responsibility of the purchaser.
Nothing within this warranty shall imply that Danby will be responsible or liable for any spoilage or damage to food or other c ontents of this appliance, whether due
to any defect of the appliance, or its use, whether proper or improper.
EXCLUSIONS
Save as herein provided, Danby, there are no other warranties, conditions, representations or guarantees, express or implied, m ade or intended by Danby or its
authorized distributors and all other warranties, conditions, representations or guarantees, including any warranties, conditio ns, representations or guarantees
under any Sale of Goods Act or like legislation or statue is hereby expressly excluded. Save as herein provided, Danby shall no t be responsible for any damages
to persons or property, including the unit itself, howsoever caused or any consequential damages arising from the malfunction o f the unit and by the purchase of
the unit, the purchaser does hereby agree to indemnify and hold harmless Danby from any claim for damages to persons or propert y caused by the unit.
GENERAL PROVISIONS
No warranty or insurance herein contained or set out shall apply when damage or repair is caused by any of the following:
1) Power failure.
2) Damage in transit or when moving the appliance.
3) Improper power supply such as low voltage, defective house wiring or inadequate fuses.
4) Accident, alteration, abuse or misuse of the appliance such as inadequate air circulation in the room or abnormal operating con ditions
(extremely high or low room temperature).
5) Use for commercial or industrial purposes (ie. If the appliance is not installed in a domestic residence).
6) Fire, water damage, theft, war, riot, hostility, acts of God such as hurricanes, oods etc.
7) Service calls resulting in customer education.
8) Improper Installation (ie. Building-in of a free standing appliance or using an appliance outdoors that is not approved for out door application).
Proof of purchase date will be required for warranty claims; so, please retain bills of sale. In the event warranty service is required, present this document to our
AUTHORIZED SERVICE DEPOT.
Danby Products Limited
PO Box 1778, Guelph, Ontario, Canada N1H 6Z9
Telephone: (519) 837-0920 FAX: (519) 837-0449
Danby Products Inc.
PO Box 669, Findlay, Ohio, U.S.A. 45840
Telephone: (419) 425-8627 FAX: (419) 425-8629
04/09
1-800-263-2629
Warranty Service
In-home
S’adresser au détaillant qui a vendu l’appareil, ou à la station technique agréée de service la plus proche, où
les réparations doivent être effectuées par un technicien qualifié. Si les réparations sont effectuées par
quiconque autre que la station de service agréée où à des fins commerciales, toutes les obligations de Danby
en vertu de cette garantie seront annulées.
Pendant les premiers vingt quatre (24) mois, toutes les pièces fonctionnelles de ce produit qui s’avèrent
défectueuses seront réparées ou remplacées, selon le choix du garant, sans frais à l’acheteur initial.
Danby se réserve le droit de limiter les limites de « Service au domicile » à proximité d'un dépôt de service
agréé. Pour tout appareil nécessitant le service hors des limites de "Service à domicile" il sera la responsabilité
du consommateur de transporter à ses frais au point d'achat d’origine ou un dépôt de service pour la réparation.
Si l'appareil est installé à plus de 100 kilomètres (62 milles) du centre de service le plus proche, il doit être livré
à l'atelier de réparation autorisé par Danby le plus proche, car l'entretien doit uniquement être réalisé par un
technicien qualifié et certifié pour effectuer un entretien couvert par la garantie de Danby.
Les frais de transport entre votre domicile et le lieu de l'entretien ne sont pas couverts par la présente garantie
et doivent être acquittés par l'acheteur.
Pour bénéficier
du service
Limites de l’entretien
à domicile
GARANTIE LIMITÉE « À DOMICILE »
Cet appareil de qualité est garanti exempt de tout vice de matière première et de fabrication, s’il est utilisé dans les conditions
normales recommandées par le fabricant.
Cette garantie n’est offerte qu’à l’acheteur initial de l’appareil vendu par Danby Products Limited (Canada) ou Danby Products Inc.
(É.-U.) (ci-après « Danby ») ou par l’un de ses distributeurs agréés et elle ne peut être transférée.
CONDITIONS
Les pièces en plastique sont garanties pendant trente (30) jours seulement à partir de la date de l’achat, sans aucune prolongation
prévue.
Aucune partie de la garantie ne prévoit implicitement que le fabricant sera tenu responsable des dommages subis par les aliments ou
d’autres types de contenu, qu’ils soient causés par la défectuosité de l’appareil ou par son usage adéquat ou inadéquat.
EXCLUSIONS
En vertu de la présente, il n’existe aucune autre garantie, condition ou représentation, qu’elle soit exprimée ou tacite, de façon
manifeste ou intentionnelle, par Danby ou ses distributeurs agréés. De même, sont exclues toutes les autres garanties, conditions ou
représentations, y compris les garanties, conditions ou représentations en vertu de toute loi régissant la vente de produits ou de toute
autre législation ou règlement semblable. En vertu de la présente, Danby ne peut être tenue responsable en cas de blessures
corporelles ou de dégâts matériels, y compris à l’appareil, quelle qu’en soit les causes. Danby ne peut pas être tenue responsable
des dommages indirects dus au fonctionnement défectueux de l’appareil. En achetant l’appareil, l’acheteur accepte de tenir sans
reproche et de dégager Danby de toute responsabilité en cas de réclamation pour toute blessure corporelle ou tout dégât matériel
causé par cet appareil.
CONDITIONS GÉNÉRALES
La garantie ou assurance ci-dessus ne s’applique pas si les dégâts ou réparations sont dus aux cas suivants :
1) Panne de courant.
2) Dommages subis pendant le transport ou le déplacement de l’appareil.
3) Alimentation électrique incorrecte (tension faible, câblage défectueux, fusibles incorrects).
4) Accident, modification, emploi abusif ou incorrect de l’appareil tel qu'une circulation d'air inadéquate dans la pièce ou des
conditions de fonctionnement anormales (température extrêmement élevée ou basse).
5) Utilisation dans un but commercial ou industriel (à savoir, si l'appareil n'est pas installé dans un domicile résidentiel).
6) Incendie, dommages causés par l’eau, le vol, la guerre, une émeute, des hostilités, ou en cas de force majeure (ouragan,
inondation, etc.).
7) Visites d’un technicien pour expliquer le fonctionnement de l’appareil au propriétaire.
8) Installation inappropriée (par exemple, encastrement d'un appareil autoportant, ou utilisation extérieure d'un appareil non conçu à
cet effet, y compris, mais sans s'y limiter : les garages, les patios, les porches ou ailleurs, qui ne sont pas correctement isolés ou
climatisés).
La preuve de la date d'achat sera requise pour les réclamations de garantie; conserver la facture de vente. Dans le cas où un service
de garantie est requis, présentez la preuve d'achat à notre dépôt de service agréé.
Service sous garantie
Service au domicile
Danby Products Limited
PO Box 1778, Guelph, Ontario, Canada N1H 6Z9
Téléphone : (519) 837-0920 Télécopieur : (519) 837-0449
Danby Products Inc.
PO Box 669, Findlay, Ohio, U.S.A. 45840
Téléphone : (419) 425-8627 Télécopieur : (419) 425-8629
1-800-263-2629
02/18
Premiers 24 mois

Printed in Turkey
Imprimé en Turquie
Impreso en Turquía
Danby Products Limited, Guelph, ON, Canada N1H 6Z9
Danby Products Inc., Findlay, Ohio, USA 45840
*Trademarks of Danby Products Limited and/or its subsidiaries
* Marques de commerce de Danby Products Limited et / ou de ses filiales
* Marcas comerciales de Danby Products Limited y / o sus subsidiarias