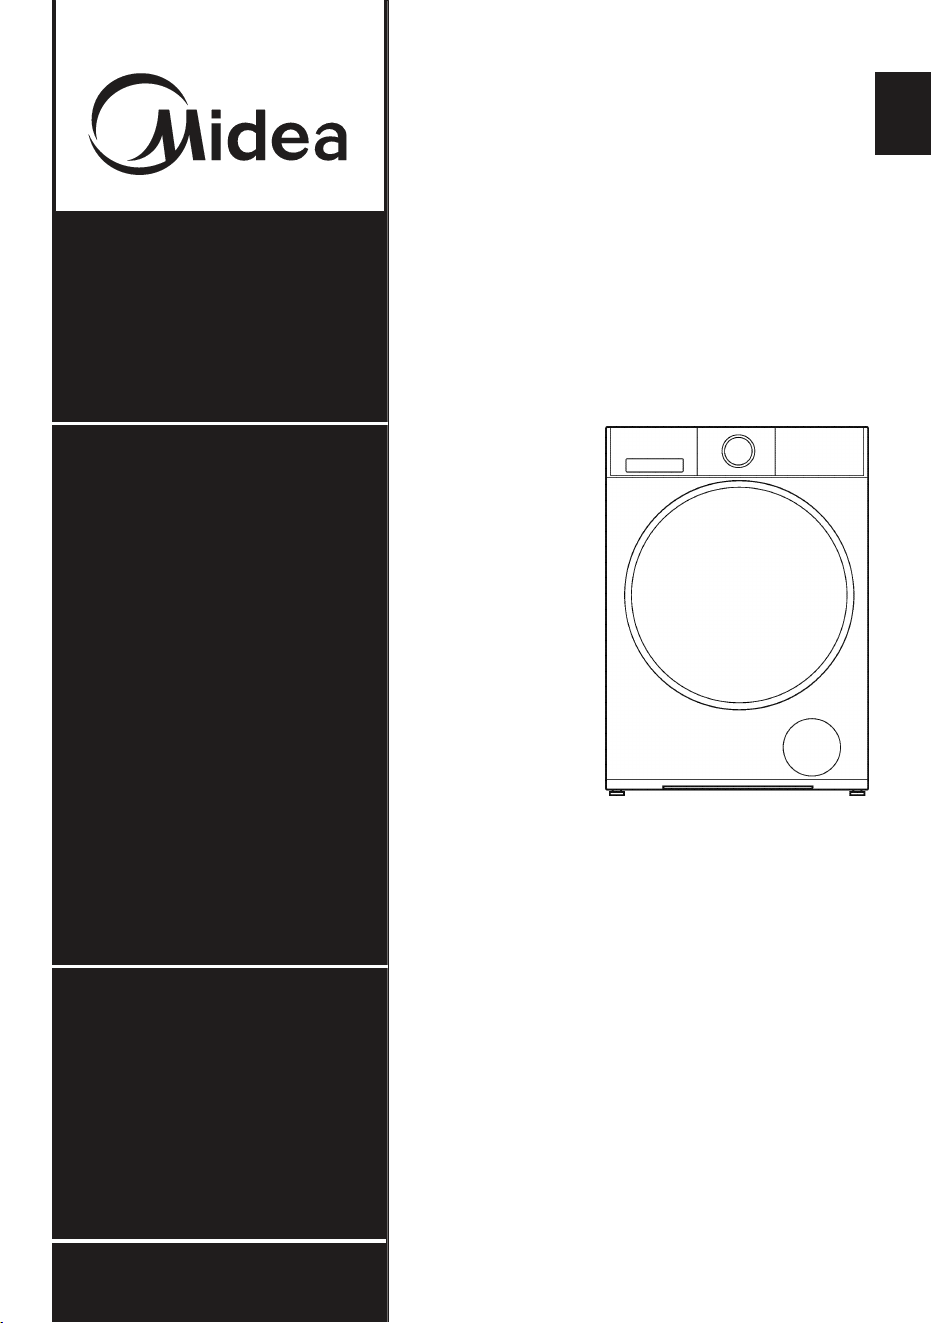
Front Loading Washer
Power supply: 120V~
Circuit: 11A
Warning:
Before using this product,
please read this manual
carefully and keep it for future
reference. The design and
specifications are subject to
change without prior notice
for product improvement.
Consult with your dealer or
manufacturer for details.
en
USER MANUAL &
INSTALLATION
INSTRUCTIONS
www.midea.com
MODEL NUMBER
MLHW27S7BWW
MLHW27S7BCG

01
Contents
02
03
06
06
06
06
07
08
08
08
09
09
09
10
10
11
11
11
11
11
12
13
13
14
14
14
17
19
20
21
22
23
25
29
30
31
32
33
34
Safety and Precautions........................................................................................... 02
Safety and precautions..................................................................................................................................
Important safety instructions......................................................................................................................
Grounding instructions..................................................................................................................................
Before operating this machine ..................................................................................................................
Protecting the Machine.................................................................................................................................
Handling the Machine....................................................................................................................................
Washing Clothes...............................................................................................................................................
Installation Requirements.......................................................................................
Tools and parts..................................................................................................................................................
Location requirements...................................................................................................................................
Installation clearances....................................................................................................................................
Electrical requirements..................................................................................................................................
Washer dimensions.........................................................................................................................................
Unpacking the washing machine...............................................................................................................
Installation Instructions...........................................................................................
Dispose of the packing materials..............................................................................................................
Remove transport and ............................................................................................................
Select the location...........................................................................................................................................
inlet pipe...........................................................................................................................................
Drain system options......................................................................................................................................
Level the washer...............................................................................................................................................
Electrical connection......................................................................................................................................
Operating Instructions............................................................................................
Prepare before washing clothes................................................................................................................
Control Panel.....................................................................................................................................................
Washing clothes for the first time............................................................................................................
Select the laundry cycle...............................................................................................................................
Table of washing procedures......................................................................................................................
Care and Cleaning ...................................................................................................
Troubleshooting Tips...............................................................................................
Error Codes................................................................................................................
Appendix.....................................................................................................................
Technical Specifications..........................................................................................
Thank You Letter....................................................................................................... 01
Installation requirements...............................................................................................................................
foam bolts
Connect
Operating Instructions...................................................................................................................................
Special Functions ...........................................................................................................................................
App setup and operation.............................................................................................................................
Certifications..............................................................................................................
Warranty......................................................................................................................
Thank you for choosing Midea! Before using your new Midea product,
please read this manual thoroughly to ensure that you know how to
operate the features and functions that your new appliance offers in a safe
way.
THANK YOU LETTER
Read all instructions and explanations before use. Follow the instructions carefully.
Keep the operation instructions handy for later use. If the appliance is sold or
passed on then ensure that the new owner always receives these operation
instructions.
Safety and Precautions
This manual contains important information on the installation, use, and care of your
appliance. Please read this manual carefully before installation and operation of this
machine to prevent injury and property damage.
WHAT YOU NEED TO KNOW ABOUT SAFETY INSTRUCTIONS
Warnings and important safety instructions in this manual DO NOT cover all possible conditions and
situations that may occur. It is your responsibility to use common sense, caution and care when
installing, maintaining and operating your washer.
IMPORTANT SAFETY SYMBOLS AND PRECAUTIONS
WARNING
This indicates that hazards or unsafe practices may cause
serious personal injury or death.
To reduce the risk of fire, explosion, electric shock, or
personal injury when using your washer, these basic safety
precautions SHOULD be followed.
State of California Proposition 65 Warnings
WARNING
The California Safe Drinking Water and Toxic Enforcement Act requires the Governor
of California to publish a list of substances known to the State of California to cause
cancer, birth defects, or other reproductive harm, and requires businesses to warn of
potential exposure to such substances.
This product contains a chemical known to the State of California to cause cancer,
birth defects, or other reproductive harm. This appliance can cause low-level
exposure to some of the substances listed, including lead, cadmium and phthalate.
Safety and precautions
02
Risk of reproductive harm from exposure to Lead.
See www.P65Warnings.ca.gov.

03
Safety and Precautions
Important safety instructions
SAVE THESE INSTRUCTIONS
WARNING
WARNING - To reduce the risk of fire, electric shock, or injury to persons
when using your appliance, follow basic precautions, including the following:
- Read all instructions before using the appliance.
- Do not wash articles that have been previously cleaned in, washed in, soaked
in, or spotted with gasoline, dry-cleaning solvents, or other flammable or
explosive substances, as they give off vapours that could ignite or explode.
- Do not add gasoline, dry-cleaning solvents, or other flammable or explosive
substances to the wash water. These substances give off vapours that could
ignite or explode.
- Under certain conditions, hydrogen gas may be produced in a hot-water
system that has not been used for 2 weeks or more. HYDROGEN GAS IS
EXPLOSIVE. If the hot-water system has not been used for such a period,
before using a washing machine, turn on all hot-water faucets and let the
water flow from each for several minutes. This will release any accumulated
hydrogen gas. As the gas is flammable, do not smoke or use an open flame
during this time.
- Always unplug the washing machine from the power supply before attempting
any service. Disconnect the power cord by grasping the plug, not the cord.
- To reduce the risk of fire, clothes, cleaning rags, mop heads and the like which
have traces of any flammable substance, such as vegetable oil, cooking oil,
petroleum based oils or distillates, waxes, fats, etc. must not be placed in the
washing machine. These items may contain flammable substances which ,
even after washing, may smoke or catch fire.
- Never place items in the washer that have been dampened with gasoline or
any combustible or explosive substance. Do not wash or dry anything that
has been soaked in or spotted with any type of oil (including cooking oils).
Doing so can result in fire , explosion, or death.
- Pets and kids may climb into the machine. Check the machine before every
operation.
- Glass door or protector may be very hot during the operation. Keep kids and
pets far away from the machine during the operation.
- This machine is not intended for use by persons (including kids) with reduced
physical, sensory or mental capabilities, or lack of experience and knowledge,
unless they have been given supervision or instruction concerning use of the
machine by a person responsible for their safety.
- Kids should be supervised to ensure that they do not play with the machine.
- When children become old enough to operate the appliance, it is the legal
responsibility of the parents or legal guardians to ensure that they are instructed
in safe practices by qualified persons.
- Risk of Suffocation and Injury from Entrapment: Do not allow children to play on or in
the appliance. Close supervision of children is necessary when the appliance is
used near children.

04
Safety and Precautions
Important safety instructions
SAVE THESE INSTRUCTIONS
WARNING
- Do not machine wash fiberglass materials (such as curtains and window
coverings that use fiberglass materials.)Small particles may remain in the
washing machine and stick to fabrics in subsequent wash loads causing skin
irritation.
- Before the appliance is removed from service or discarded, remove the door
and cut off the power cord.
- Do not reach into the appliance if the tub or agitator is moving.
- Do not install or store this appliance where it will be exposed to the weather.
- Do not tamper with controls.
- Do not repair or replace any part of the appliance or attempt any servicing
unless specifically recommended in the user-maintenance instructions or in
published user-repair instructions that you understand and have the skills to
carry out.
- Pull out its plug from the power socket before cleaning or maintenance.
- Make sure that all pockets are emptied.
-
.
- Pull out its plug and cut off water supply after the operation.
- Please check whether the water inside the drum has been drained before
opening its door. Please do not open the door if there is any water visible,
- Do not try to repair the machine by yourself.
- If the plug (power cord) is damaged, it shall be replaced by the manufacturer
or a service agent to avoid any danger.
- Take care that the power voltage and frequency shall be identical to those of
the washing machine.
- Do not use any socket with rated current less than that of the washing machine.
Never pull out the power cord plug with wet hands.
- To ensure your safety, the power cord plug must be inserted into an three-
pole socket. Check carefully and make sure that your socket is properly and
reliably .
- This machine shall be repaired only by an authorized service center and only
authentic accessories can be used.
Sharp or rigid items such as coins, nails, screws, or etc. may cause serious
damage to this machine
grounded
grounded
- An appliance shall be clearly and permanently marked with a warning that the
appliance is intended for use only with fabrics that have been washed with
water as a cleaning agent.
- Do not use replacement parts that have not been recommended by the manufacturer
(e.g. parts made at home using a 3D printer).

05
Safety and Precautions
Important safety instructions
SAVE THESE INSTRUCTIONS
- If connected to a circuit protected by fuses, use time-delay fuses with this
appliance.
- Do not dry articles that have been previously cleaned in, washed in, soaked in,
or spotted with gasoline, dry-cleaning solvents, or other flammable or explosive
substances, as they give off vapours that could ignite or explode.
- Do not use fabric softeners or products to eliminate static unless recommended
by the manufacturer of the fabric softener or product.
- Do not use heat to dry articles containing foam rubber or similarly textured
rubber-like materials.
The interior of the appliance should be cleaned periodically by qualified service
personnel.
- Do not place items exposed to cooking oils in your dryer. Items contaminated
with cooking oils may contribute to a chemical reaction that could cause a
load to catch fire.
WARNING
06
Protecting the Machine
Safety and Precautions
Grounding instructions
- This appliance must be grounded. In the event of a malfunction or breakdown,
grounding will reduce the risk of electric shock by providing a path of least
resistance for the electric current. This appliance is equipped with a cord that has
an equipment grounding conductor and a grounding plug. The plug must be plugged
into an appropriate outlet that is properly installed and grounded in accordance with all
local codes and ordinances.
WARNING-Improper connection of the equipment grounding conductor can result
in electric shock. Connect to individual branch circuit. Check with a qualified
electrician or serviceman if you are in doubt as to whether the washer is properly
grounded.
DO NOT modify the plug provided with the appliance if it will not fit the outlet .
Please have a proper outlet installed by a qualified electrician.
Before operating this machine
- Packing materials may be dangerous to children. Please keep all packing
materials (plastic bags, foams etc) far away from children.
- Do not install the washing machine in bathrooms, very wet rooms, or rooms that
contain explosive or caustic gases.
- Make sure that the water and electrical devices are connected by a qualified
technician in accordance with the manufacturer's instructions and local safety
regulations.
- Remove all packaging and transport bolts from the machine. Otherwise, washing
machine may be seriously damaged while washing the clothes.
- Before washing the clothes for the first time, run the washing machine with the
cotton and hot water cycles without clothes inside.
- This washing machine is for indoor use only.
WARNING
- Do not climb up and sit on top cover of the machine.
- Do not lean against machine door.
- Please do not close the door with excessive forces. If it is found difficult to close
the door, please check if the excessive clothes are put in or distributed well.
Handling the Machine
- Transport bolts shall be reinstalled to the machine by a specialized person.
- The accumulated water shall be drained out of the machine.
- Handle the machine carefully. Never hold each protruded part on the machine
while lifting.
Machine door can not be used as the handle during the conveyance.
WARNING
WARNING
WARNING

07
Safety and Precautions
Washing Clothes
- Connect cold water to the machine. Hot water may also be connected according to
local regulations and availability in your home.
- Your washing machine is only for home use and is only designed for the textiles
suitable for machine washing.
- Flammable and explosive or toxic solvents are forbidden. Gasoline and alcohol
etc. shall not be used as detergents. Please only select the detergents suitable
for machine washing, especially for front loading .
- Do not wash carpets with this machine.
- Be careful of burning when the washing machine drains hot washing water.
- Never refill the water by hand during washing.
- After the program is completed, please open the door after the bell or
disconnect the power supply to the machine.
- Please remember to disconnect water and power supply immediately after the
clothes are washed.
- Always follow the fabric care instructions recommended by the clothing
manufacturer.
- Do not use the washing machine if it has a worn power cord or loose plug.
Contact an authorized service agent.
- Do not operate the washing machine if any guards, panels and /or fasteners
except transport fixing bolts have been removed. Check the fill hose
connections on a regular basis to ensure that they are tight and not leaking.
- Do not operate the washing machine if parts are missing or broken.
- Do not touch the door if washing at high temperatures.
Note:
- The important safeguards and warnings indicated in this manual do not cover
all possible conditions which may occur. Common sense, caution and care
must be exercised when installing, maintaining or operating the washing
machine.
- Always contact your dealer, distributor, service agent or the manufacturer
about any problems or conditions that you do not understand.
WARNING
08
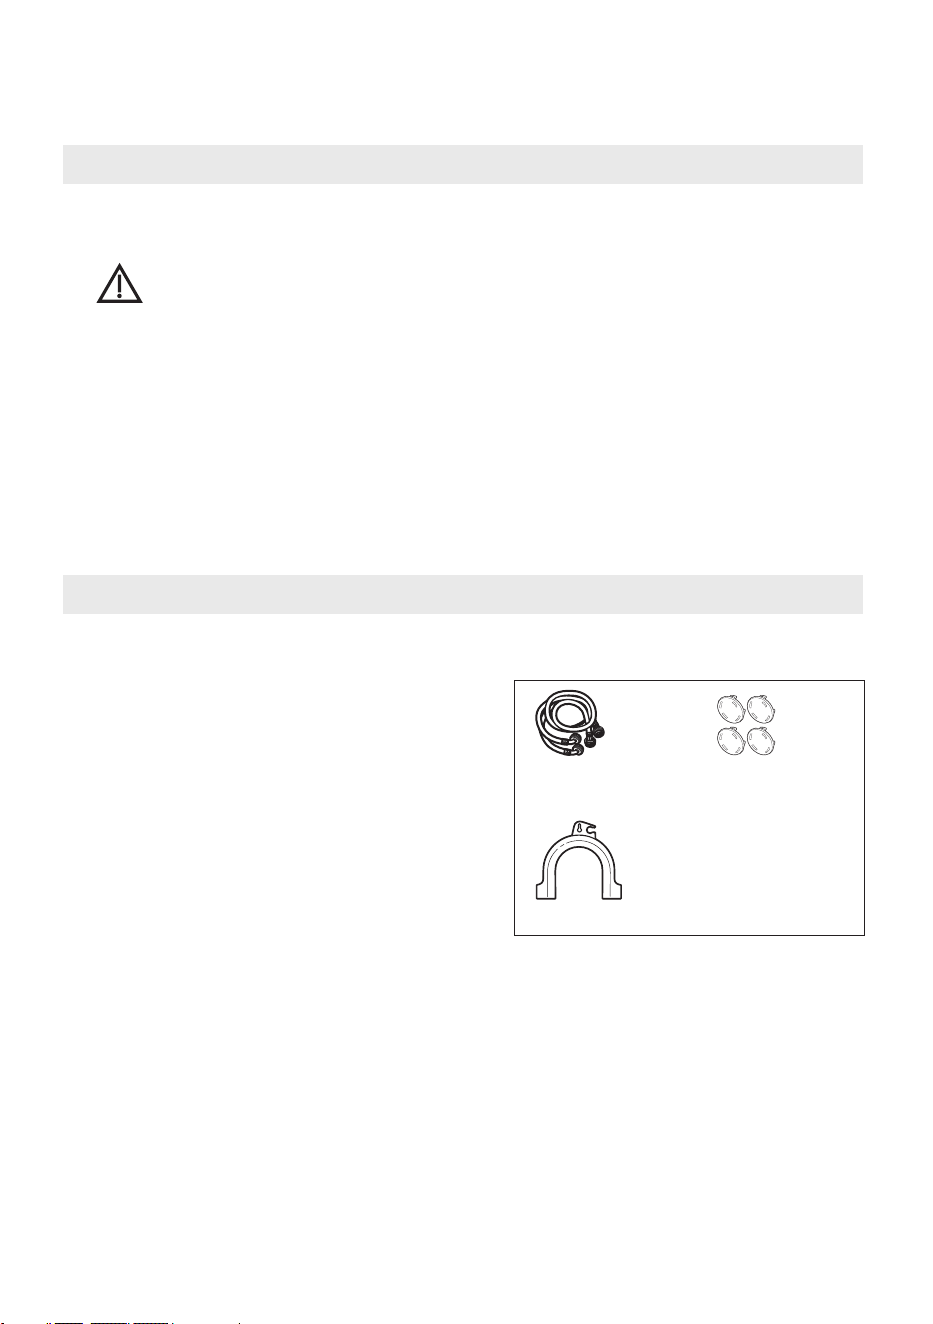
Gather the required tools and parts before starting installation. The parts supplied are in the
washer drum.
Installation Requirements
Transport Hole Plug
1/4" nut driver
3/8" socket with ratchet
3/8" open-end wrench
Adjustable wrench or 7/16" socket with ratchet
Adjustable wrench or 9/16" open-end wrench
Channel-lock adjustable pliers
Carpenter’s level
Water Hoses(2)
Failure to comply with these warnings could result in serious personal injuries.
Note: Environmental Protection
- If you plan to dispose of this machine, please comply with the local waste disposal
regulations. Cut off the power cord so that it will not be put into reuse.
Remove the door so that kids and animals will not be trapped in the machine.
- Do not use an excessive amount of detergent.
- Decontaminant and bleacher can be used to pre-treat the stains on the clothes
only when very necessary.
1. This machine must be grounded properly. If there is any short circuit, grounding can
reduce the danger of electrical shock.
This machine is equipped with power cord, which includes plug, grounding wire at
grounding terminal.
2. The washing machine shall be operated in a circuit separate from other electrical
appliances. Otherwise, the power protector may be tripped or a fuse may be burned
out.
Installation requirements
WARNING
Tools and parts
Drain Hose Guide
09
Installation Requirements
Location requirements
Selecting the proper location for your washer improves performance and minimizes noise
and possible washer “walk.” Your washer can be installed under a custom counter, or in a
basement, laundry room, closet, or recessed area. See “Drain System.” Companion
appliance location requirements should also be considered. Proper installation is your
responsibility.
You will need
0 0
1. A water heater set to deliver 120 F (49 C) water to the washer.
2. A grounded electrical outlet located within 6 ft. (1.8 m) of where the power cord is
attached to the back of the washer. See “Electrical Requirements.”
3. Hot and cold water faucets located within 4 ft.(1.2 m) of the hot and cold water fill
valves, and water pressure of 20-100 psi (137.9-689.6 kPa).
4. A level floor with a maximum slope of 1" (25 mm) under entire washer. Installing the washer
on soft floor surfaces, such as carpets or surfaces with foam backing is not recommended.
5. A sturdy and solid floor to support the washer, which has a total weight (water and load) of 200lbs.
0 0
6. Do not operate your washer in temperatures below 32 F (0 C). Some water can
remain in the washer and can cause damage in low temperatures.
Installation clearances
1. The location must be large enough to allow the washer door to be fully opened.
0
90
2. Additional spacing should be considered for ease of installation and servicing. The door
opens more than , and it is not reversible.
3. Additional clearances might be required for wall, door, and floor moldings.
4. Additional spacing of 25mm on all sides of the washer is recommended to reduce noise
transfer.
5. Companion appliance spacing should also be considered.
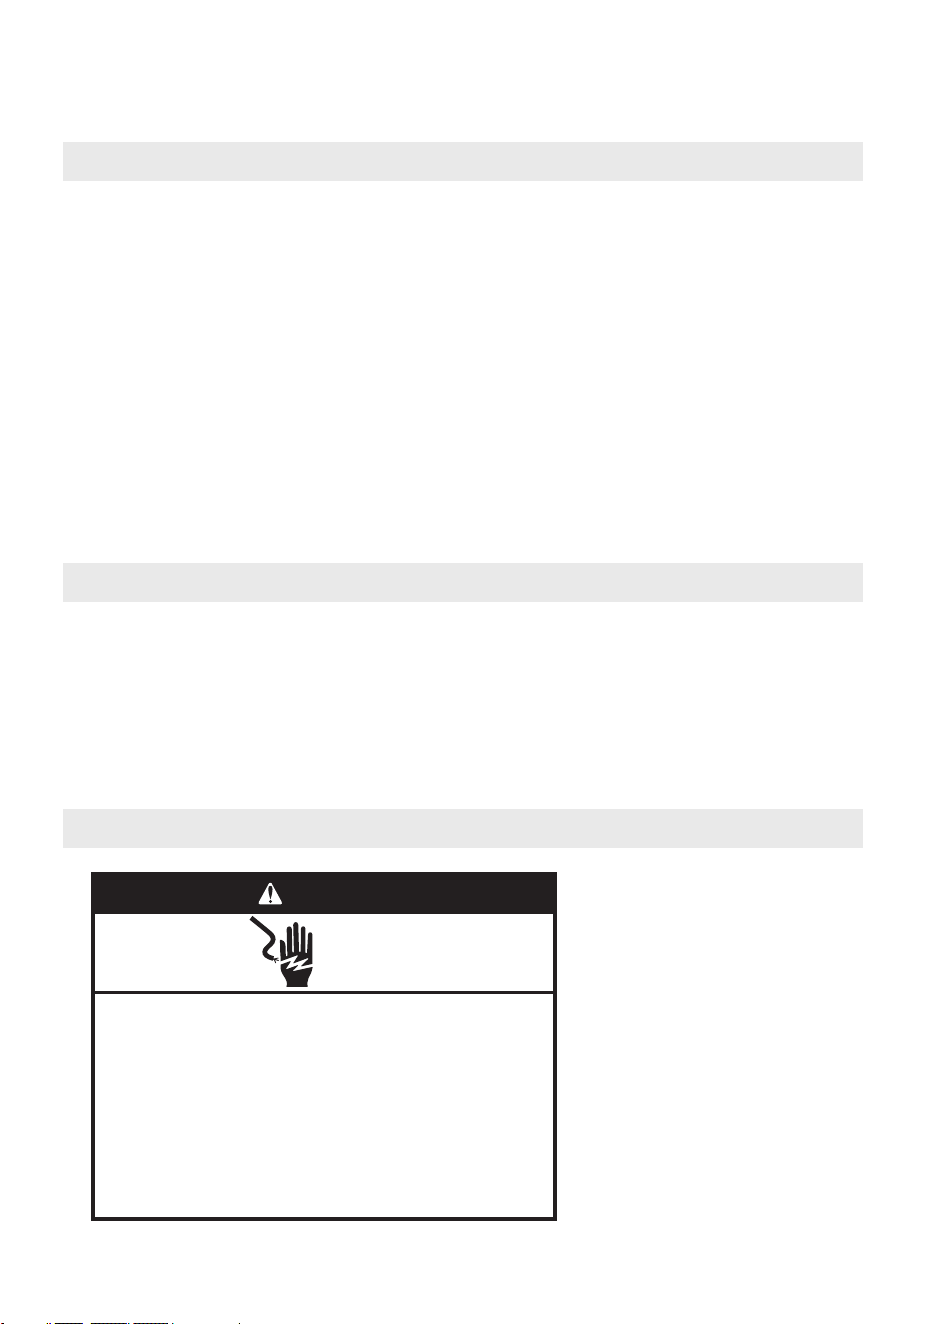
Electrical requirements
WARNING
Electrical Shock Harzard
Connect to grounded 3 prong outlet with an individual 15 amp
branch circuit protected by a 15 amp circuit breaker.
Connect to individual branch circuit.
Do not remove ground prong.
Do not use an adapter.
Do not use an extension cord.
Failure to follow these instructions can result in electrical
shock, fire, or death.
10
Installation Requirements
1. A 120V, 60 Hz, AC-only, 15- or 20-amp, fused electrical supply is required. Use a time-delay
fuse or circuit serving only this appliance.
2.This washer is equipped with a power supply cord with a 3-prong grounding plug.
3.To minimize possible shock hazard, the cord must be plugged into a mating, mating, 3-prong,
grounding type outlet, grounded in accordance with local codes and ordinances.
If a mating outlet is not available, it is the personal responsibility and obligation
of the customer to have the properly grounded outlet installed by a qualified electrician.
4.If codes permit and a separate ground wire is used, it is recommended that a qualified
electrician determine that the ground path is adequate.
5.Do not ground to a gas pipe.
6.Check with a qualified electrician if you are not sure the washer is properly grounded.
7.Do not have a fuse in the neutral or ground circuit.
Electrical requirements
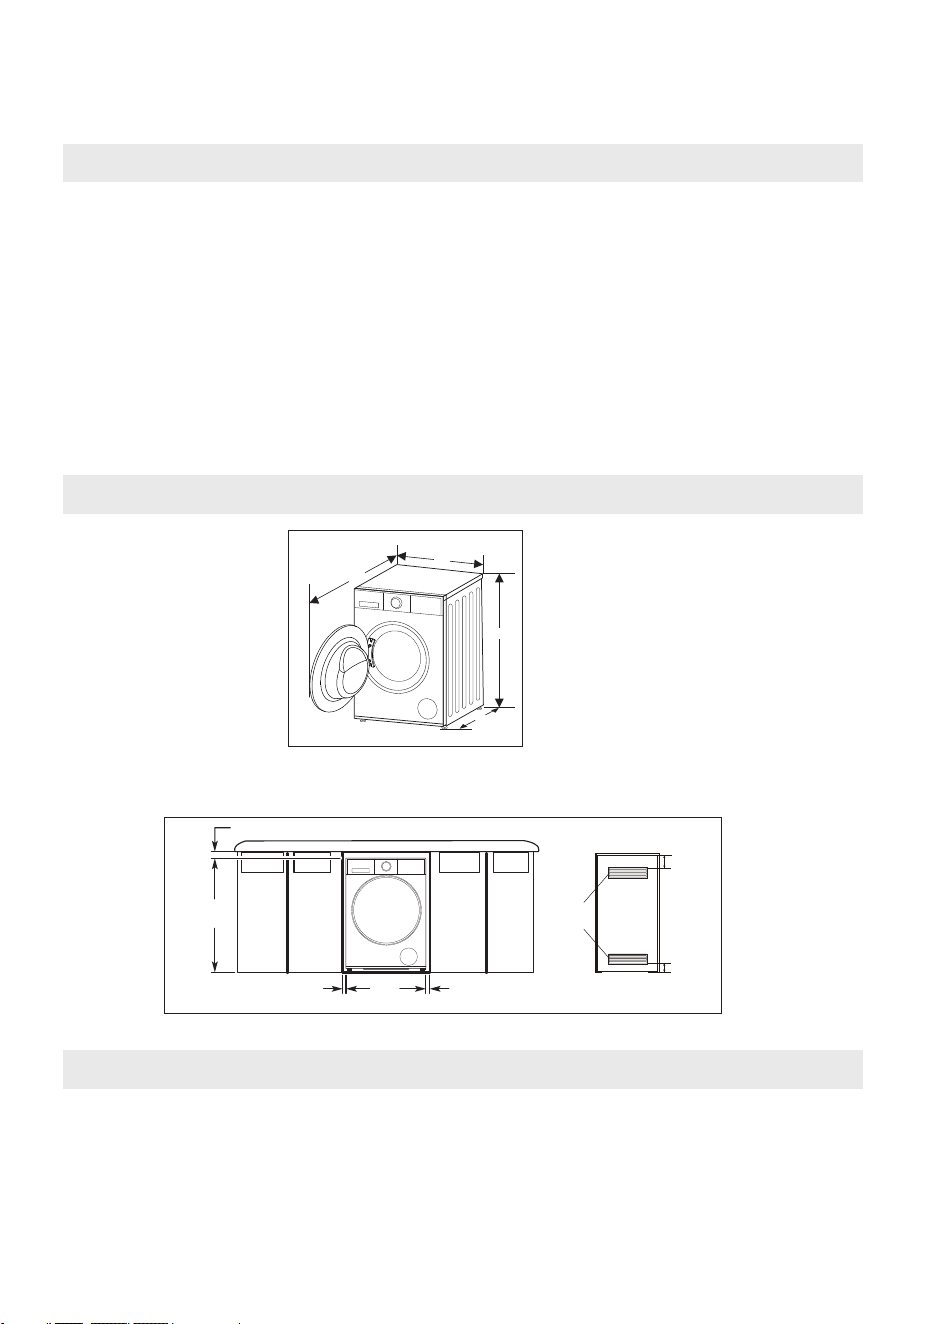
Washer dimensions
The dimensions shown are for the recommended spacing. Custom dercounter installation
(25mm)
2
(50 mm)
min.
(845 mm)
Unpacking the washing machine
Unpack your washing machine and check if there is any damage during the transportation.
Also make sure that all the items (as shown in “ ) in the attached bag are received.
If there is any damage to the washing machine during the transportation, or any item is
missing, please contact the local dealer immediately.
Tools and parts”
1 1
(25mm)(595mm)
(845mm)
34
/
33
127
(615mm)
(1110mm)
3
(76mm)
27
/
24
127
89
/
43
127
54
/
23
127
34
/
33
127
3
(76mm)
(595mm)
"
54
/
23
127
"
"
"
"
" "
"
"
"
"
60 sq in.
2
(38700mm )

11
Installation Instructions
Dispose of the packing materials
The packing materials of this machine may be dangerous to kids. Please dispose them
properly and avoid easy access by children. Please dispose of the related packing materials
according to the relevant local regulations. Please do not throw the packing materials away
together with other daily garbage.
Remove transport and foam bolts
Remove all foam from the machine. On the bottom side
of the unit, there is an additional small triangle of foam
that must be removed. Check to see if the small triangle
was removed with the foam on the bottom of the unit.
If you do not see the triangle, lay the unit down on the
side to remove the small triangle of foam manually.
Select the location
Please install the washing machine in a location with the following characteristics:
- Rigid, dry, and level surface (if not level, please see the Level the washer section for further
instructions).
- Avoid direct sunlight.
- Sufficient ventilation.
- Room temperature above 5℃.
- Far away from heat sources such as coal or gas.
Make sure that the washing machine will not stand on power cord.
Do not install the washing machine on a carpeted floor.
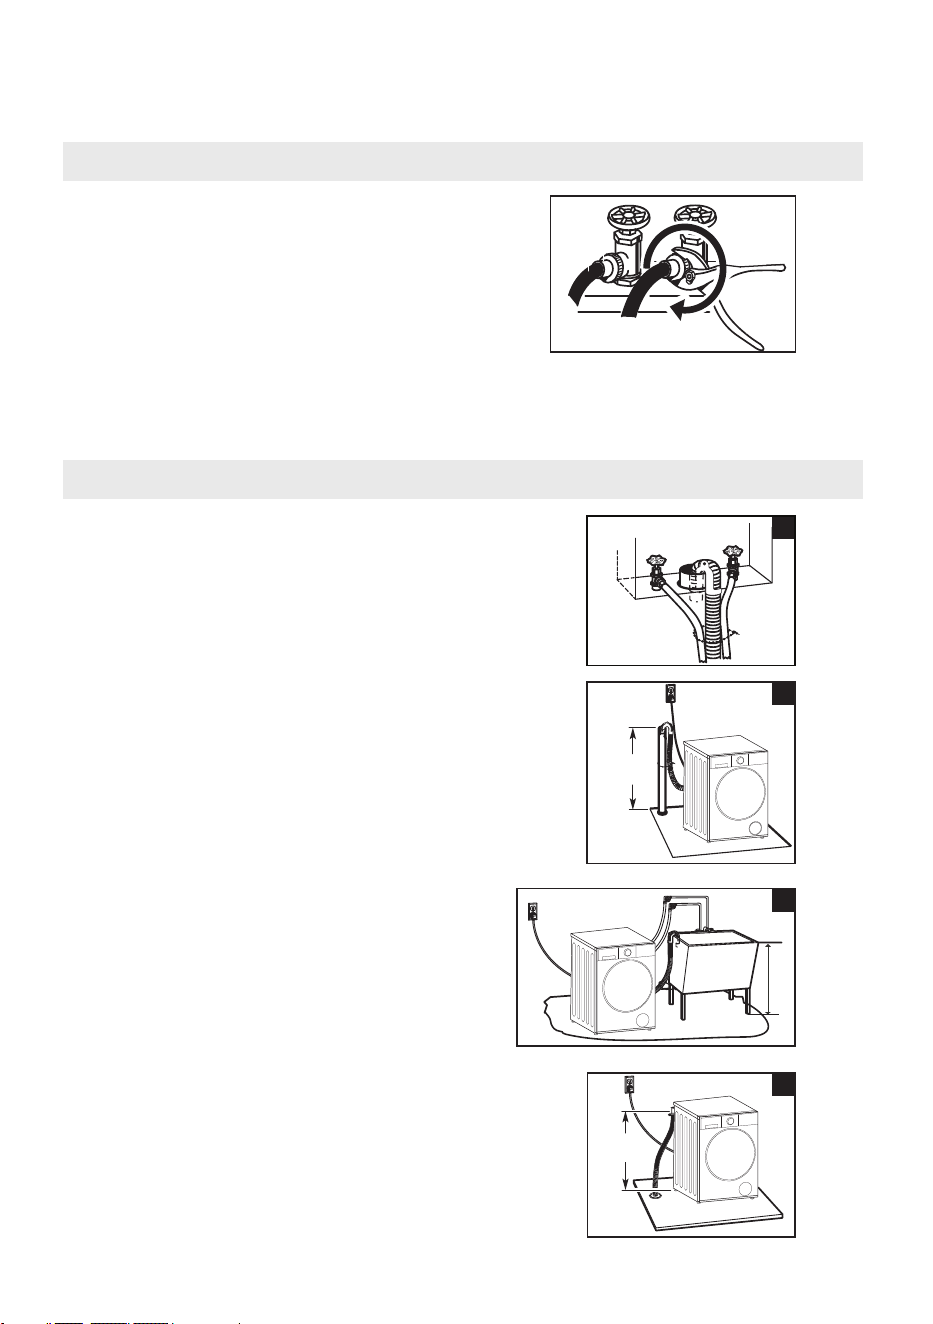
Connect inlet pipe
If applicable, please connect the hot water valve to a
hot water tap.
Connect the inlet pipe as indicated in the figure.
H
C
is labeled "C".
The hot inlet pipe is labeled "H" and the cold inlet pipe
Before using the washing machine, the transport bolts
must be removed from the backside of the machine.
Please take the following steps to remove the bolts:
1. Loosen all bolts
with a spanner, then remove them.
2. Cover the holes with the transport hole plugs.
3. Keep the transport bolts properly for future use.
and plastic spacers (including rubber
grommets)
12
inlet pipeConnect
1. Connect the elbow of the inlet pipe to the tap and
fasten it clockwise.
2. Connect the other ends of the inlet pipes to the inlet
valves at the back of the washing machine.
Fasten the pipe clockwise tightly.
Note: If there is any leakage after connection, please repeat the steps above to ensure that
the inlet pipe connections are tight. The provided inlet pipe should be compatible with the
most common type of tap. If the tap is too square or too big to connect to the inlet pipe,
please change the tap to a standard model.
Drain system options
Floor drain system (view D).
The floor drain system requires
a siphon break that may be purchased separately.
Please see Tools and Parts section for more information.
The siphon break must be a minimum of 28 (710 mm) from
the bottom of the washer.
Additional hoses might be needed.
"
Min 60cm
Max 100cm
B
Laundry tub drain system (view C).
The laundry tub needs a minimum 20 gal. (76 L)
capacity. The top of the laundry tub must be
at least 60cm above the floor.
Min. 60 cm
Max.1 00cm
28
min.
(710 mm)
Standpipe drain system - wall or floor (views A &B ).
The standpipe drain requires a minimum diameter
standpipe of 2 (50 mm). The minimum carry-away
capacity can be no less than 17 gal. (64 L) per minute.
The top of the standpipe must be between 60-100 cm
high (as measured from the bottom of the washer).
"
Installation Instructions
"
A
C
D
13
Installation Instructions
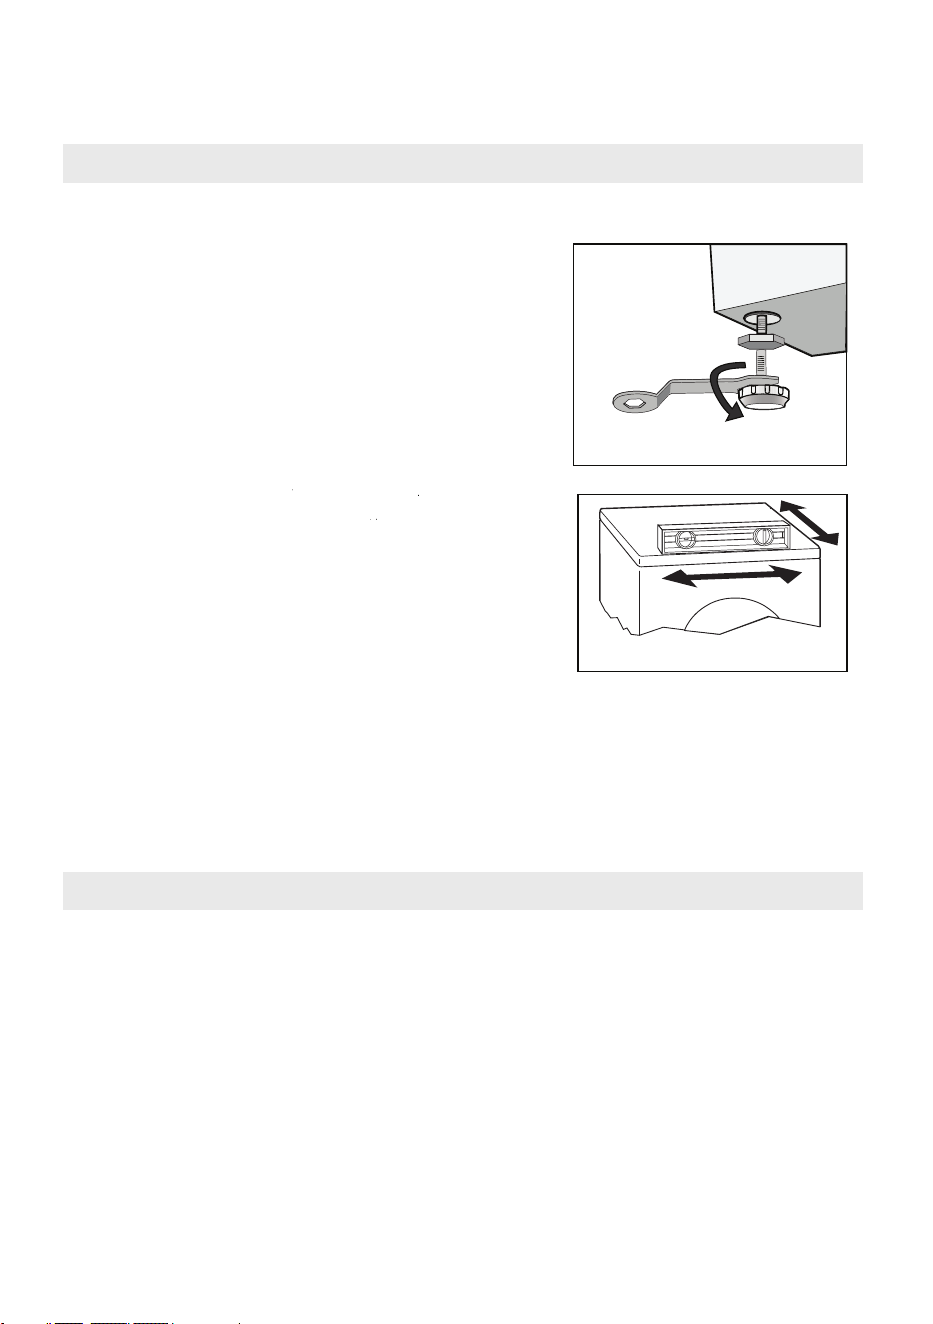
Level the washer
5. Put a solid cylinder (e.g. a soda can) at one edge of the top cover of the washing machine.
Repeat with all four sides. If the cylinder stays stable, the washing machine is level. If it rolls
downwards, the washing machine is not level. The cylinder will roll in the direction of lower
ground. Raise the two legs in the direction the cylinder rolled towards until the washing machine
is level. Repeat Steps 1-3 to make sure the bottom legs are flush against the ground and the lock
nuts are tightly locked.
3. Lock the washing machine legs in place. Loosen the
lock nut with a spanner and turn the leg with your
hand until it reaches the floor. Hold the leg stable with
one hand as you tightly fasten the lock nut to the
cabinet.
4. After all legs are locked, press the four corners of the
machine again, one by one. If any of the corners are
still unstable, repeat Steps 2 and 3.
1. When positioning the washing machine, please
first check if the legs are tightly attached to the
washing machine cabinet. If not, please use your
hands or a spanner to turn them to their original
positions, then tighten the nuts again with a
spanner.
2. After positioning the washing machine, check to
see if the legs are stable by pressing each of the
four corners of the machine. If the washing machine
wobbles when you press down on one of the corners,
adjust the leg for that corner.
Electrical connection
- As the maximum current through the unit is 12A when you are using its heating function,
please make sure the power supply system (current, power voltage and wire) at your
home can meet the normal loading requirements of the electrical appliance.
- Please connect the power to a socket which is correctly installed and properly grounded.
- Make sure the power voltage at your place is same as the voltage in the machine's rating label.
- The power plug must match the socket and cabinet must be properly and effectively .
- Do not use a multi-purpose plug or socket as extension cord.
- Do not connect and pull out plug with wet hands.
- When connecting and pulling out the plug, hold the plug tightly and then pull it out.
Do not pull the power cord forcibly.
- If the power cord is damaged or has any sign of being broken, a special power cord must be
selected or purchased from its manufacturer or service center for replacement.
grounded

14
Operating Instructions
WARNING
WARNING – To reduce the risk of fire, electric shock, or injury to
persons, read these IMPORTANT SAFETY INSTRUCTIONS before
operating this appliance.
Operating instructions
Prepare before washing clothes
Please read these instructions carefully to avoid damage to your washing machine or clothes.
Check if new clothes will lose their color.
Pour a teaspoon of liquid detergent onto a damp white towel. Rub a non-visible corner of the garment
with the towel, then check to see if the towel is stained with the garment's original color.
Hand-wash scarves and other clothes could easily lose color separately before putting them in the
washing machine.
Brush stains on collars, sleeves, and pockets gently
with liquid detergent before machine-washing for
the best results.
Wash temperature-sensitive clothes according to
their laundry labels to prevent color changes or
distortion.
Keep in Mind:
Never leave clothes in the washing machine for a
long period of time. If you do not wash clothes in
time, the clothes may become moldy and develop spots.
Clothes that cannot be washed by washing machine.
Ties, waistcoats, suits, and jackets may shrink or become damaged if immersed in water.
Clothes made up of blended and synthetic fibers may also be affected by color bleed.
Please check laundry care labels before machine-washing clothes.
Ruffles and intentional wrinkles, embossed details, and resin in garments may be damaged when
immersed in water. Silk, fur products, and fur decorations are also all easily damaged.
Clothes with many decorative details, long dresses, and traditionally-dyed clothing may all suffer from
color bleeding.
Please do not wash clothes without laundry care labels and washing requirements.
Never wash clothes stained with chemicals such as gasoline, petroleum, benzene, paint thinner and
alcohol.

15
Please pay attention with regard to detergents
Select low-foam detergent, washing powder, or special washing powder for drum washing according
to fiber types (cotton, synthetic fiber, soft products and wool products), colors, washing
temperatures, degrees of soil, and garment types. Choosing the wrong detergent can cause excessive
foaming and overflow, along with other similar accidents.
Bleach is highly alkaline and can damage clothes. Please use as little bleach as possible.
Powder detergents can easily leave residue in clothes, which can cause bad odors, so please ensure
they are sufficiently rinsed.
Detergent will not dissolve easily if there is too much detergent or too low of a water temperature.
Residual detergent can remain in clothes, pipes, and washing machines. Please ensure that you use
the correct amount of detergent.
Detergent amount should be determined by clothing weight, clothing cleanliness, and local water
hardness, as well as the recommendations from the detergent manufacturers. Please consult your
local water company if you do not know your water hardness.
Note:
Keep detergents and additives in safe and dry places, out of reach of children.
Please remove items from pockets.
Please check the pockets of clothes to be washed and empty them of rigid items, such as decorations
or coins, to prevent abnormal functioning or damage to the washing machine.
Separate laundry according to the following characteristics:
Fiber type: Laundry care labels will use symbol types to represent cotton, blended
fiber, synthetic fiber, silk, wool and artificial fiber.
Color: Separate white and colorful clothes. All new colorful clothes should be washed separately.
Size: Clothing articles of different sizes should be washed together for more effective washing.
Sensitivity: soft and delicate clothing should be washed separately. Select the DELICATES cycle for
new pure wool garments, curtains, silks, and other delicate items.
Check the laundry care labels for all clothes.
Sort through clothes and remove all hooks from curtains before washing.
Clothing decorations may damage the washing machine. Turn clothes with buttons or embroidery
inside-out before washing.
Prepare before washing clothes
Operating Instructions
16
Operating Instructions
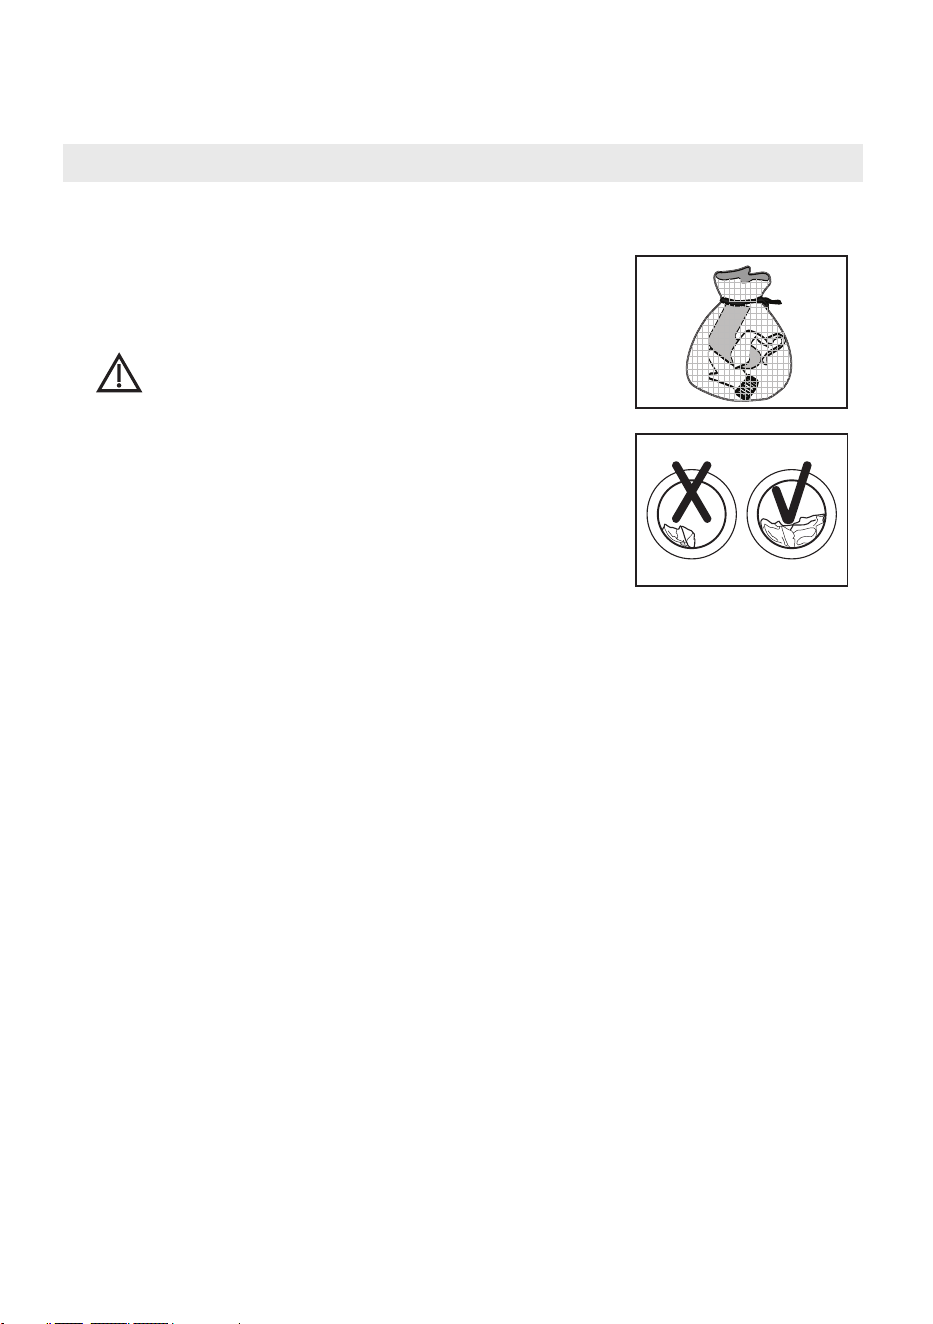
Tidy up fasteners:
Zip up zippers, tie loose bands or ribbons together, and close hooks, buttons, and other fastenings
before washing.
Fasten all bra hooks, buttons, or zips and place
bras in a closed delicates bag to prevent steel
wires from damaging the machine.
Place especially delicate garments, such as laced
curtains, straight jackets, and small articles
(tights, handkerchiefs, ties etc.), into a delicates
bag for washing.
When washing a single big and heavy garment,
such as Turkish towels, jeans, wadded jackets etc.,
the washing machine may behave abnormally due
to the lack of balance. Please add one or two more
items of clothing and wash them together to ensure
the machine drains smoothly.
Excessive dust, stains, and pet hair can cause friction that damages clothing and prevents the
washing machine from operating normally.
To protect baby skin.
Baby articles (baby clothes and towels) including napkins shall be washed separately.
Baby clothes may become unsanitary if washed together with adults' clothes. Increase the rinsing
time to ensure thorough rinsing and cleaning without detergent residue.
For the best results, hand-wash clothing parts that are easily stained, such as white socks, collars,
and sleeves, before machine-washing.
Please use powder or liquid detergent. Soap could leave residue on clothing if used.
Clean dust, stains, and pet hair before washing.
WARNING
Prepare before washing clothes
Clothes that pill easily should be turned inside-out before washing.
Clothes that pill easily should be washed separately to avoid leaving threads and residue on other
garments. Black clothes and cotton clothes should be washed separately, because they can easily
pick up threads and fabric residue if washed together. Please check before washing.
Do not wash waterproof materials (ski suits, placemats, shower curtains) with the washing machine.
Do not machine-wash clothes that cannot easily absorb water, or there may be a risk of overflow,
abnormal vibration, or damage to your clothes while rinsing and draining. Do not wash placemats,
raincoats, umbrellas, ski suits, car covers, or sleeping bags in the washing machine.
Cautions during Draining.
Normally, water from washing is drained through the drain hole. If waterproof items are washed in the
washing machine, water can gather or pool in a different direction, preventing draining and unbalancing
the washing machine.
17
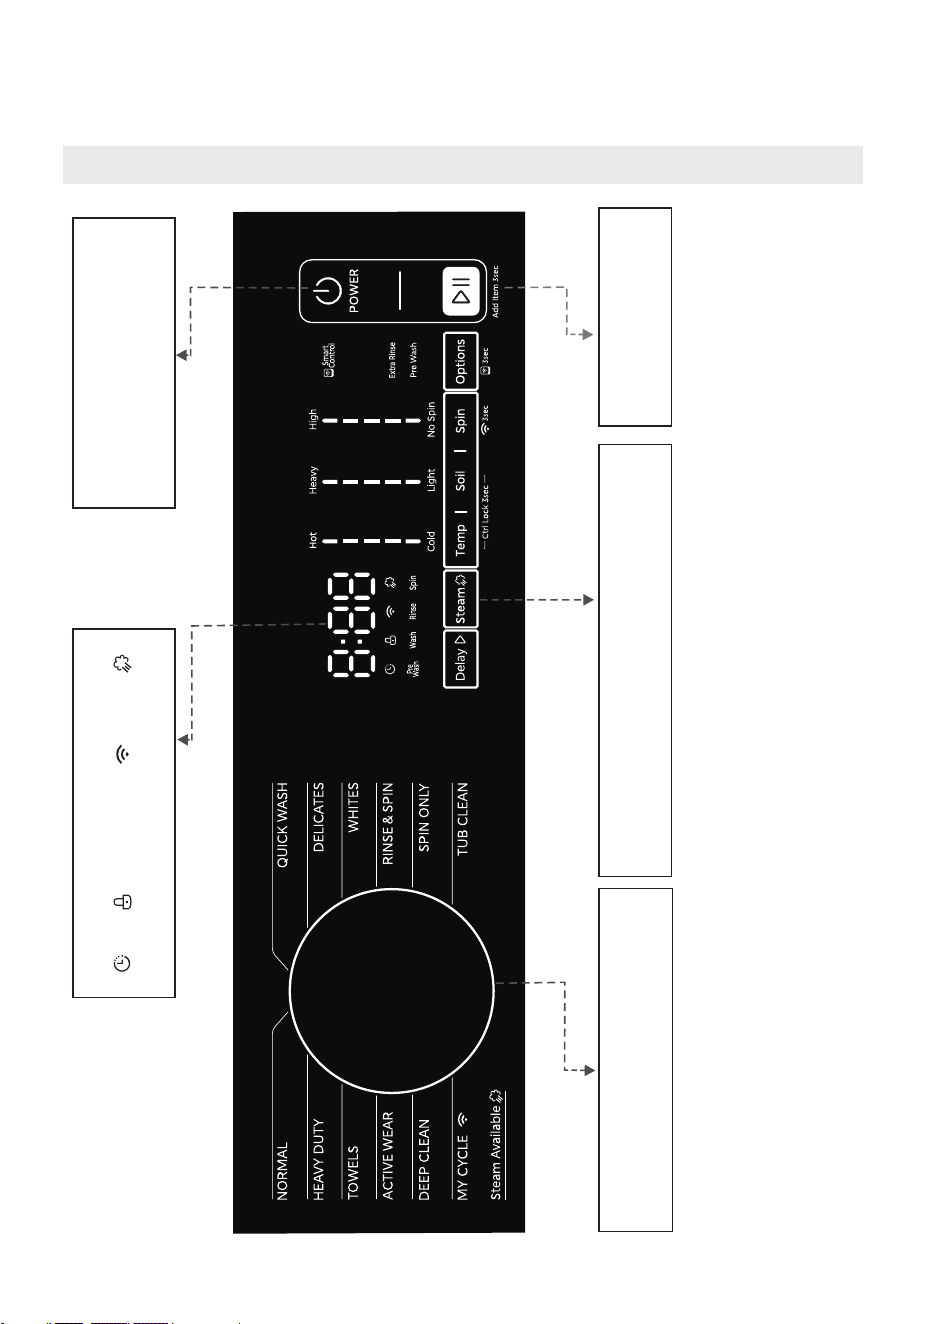
Control Panel
Operating Instructions
Notes: 1. The Control Panel diagram is just for reference. Please take the appearance of the actual product as the standard.
2. The design and specifications of this product are subject to change without written notice. Consult our website for details or
call the service line for assistance.
Display
Function settings
Press the buttons to adjust the water temp., washing
time, soil amount, spin speed, and other options.
Start/Pause
Press the button to start or
pause the wash cycle.
POWER
Press to turn the washing machine
on. Press again to turn the
washing machine off.
Program
Programs with preselected settings are
available for your convenience.
Wireless Network SteamDelay Door Kock

18
- QUICK WASH
Extra-short program suitable for lightly soiled clothing, such as small amounts of laundry.
- DELICATES
For delicate, washable textiles, e.g. silk, satin, synthetic fibres or blended fabrics.
- WHITES
Special cycle for white clothes.
- RINSE&SPIN
Extra rinse with spin.
Operating Instructions
Cycles and Options
Control Panel
- SPIN ONLY
Extra spin with selectable spin speed.
- TUB CLEAN
This program is specifically configured to clean the drum and tube. high-temperature sterilization to
make machine-washing more eco-friendly. Do not add clothes or other laundry during the Tub Clean
function. Customers can use the Tub Clean function regularly on an as-needed basis.
- NORMAL
For wear-resistant, heat-resistant textiles made of cotton or linen.
- HEAVY DUTY
For washing heavy laundry like comforters or towels.
-TOWELS
Optimized for towels. Uses higher water temperature and stronger washing to
remove dirt and ensure thorough cleaning.
- ACTIVE WEAR
Optimized for activewear.
- DEEP CLEAN
Deeply cleans dirt and stains effectively.
-MY CYCLE
By using the SmartHome App, you can download additional cycles for your appliance. The control
panel offers a limited number of cycles, but the app provides a wider selection. You can select a cycle
in the app and apply it directly to the appliance. The default setting course is DENIM.
- DENIM
A specialized washing program designed for denim fabrics. It ensures thorough cleaning while
preserving the color and texture of your jeans and other denim items.
-ECO COLD
An energy-saving washing program that uses cold water to efficiently clean clothes while reducing
energy consumption.
-JUICE&FOOD STAINS
A targeted washing program designed to effectively remove tough juice stains, food stains, and
other organic residue.
-OVERNIGHT WASH
A quiet and efficient washing program designed for overnight use, ensuring clean clothes by morning.
-SINGLE ITEM/SMALL LOAD
A quick and efficient washing program designed for single items or small loads, saving time and energy.
-SWEAT STAINS
Designed to remove sweat stains and odors, ensuring your clothes stay fresh and clean.
- SWIM WEAR
A gentle wash program designed for swim wear and delicate fabrics, using low temperature and mild
washing to protect elastic materials.
-PERM PRESS
A program set to wash at moderate strength. This function can be used to reduce the wrinkles of clothes.
-COLORS/DARK
Optimized for washing colored and dark fabrics, preserving vibrancy and preventing fading.

19
Special Functions
- Child Lock )
Use this function to prevent children from operating the machine during a washing procedure. When
Child Lock is selected, only the Power button works. You will be able to power the button on/off, but
you will not be able to select or adjust any washing functions.
After the machine has begun a laundry cycle, press the Temp and Soil buttons and hold for three
seconds. The buzzer will beep when Child Lock is activated, locking the Start/Pause button and the
function and cycle selectors. Press and hold Temp and Soil again to unlock and deactivate Child Lock.
Child Lock will remain even if the machine powers off and on again. The Child Lock function will not
unlock (unless deactivated manually) until the laundry cycle is complete.
-Delay
The Delay function allows you to delay starting a wash cycle for up to 24 hours.
Set the Delay function:
1. Select a laundry cycle.
2.Press the Delay button to choose the delay time within a range of 0-24 hours.
3.Press Start/Pause to begin the Delay timer. Once the timer runs out, the laundry cycle will begin.
Cancel the Delay function:
Before starting a laundry cycle, press the Delay button until the display reads 0H. If the laundry
cycle has already begun, press the button.
Notes: If there is a power outage while the washing machine is in operation, the selected cycle and
options will be remembered. When power is restored, the machine will continue with the remaining
time in the cycle.
- Add a garment
Additional clothes can be added during a laundry cycle. For safety reasons, the washing machine
door cannot be opened while the drum of the washing machine is rotating and there is a large amount
of high-temperature water inside.
To add clothes, follow the steps below:
1. Press Start/Pause for 3 seconds.
2. Wait until the drum stops rotating. The door lock will unlock.
3. Load your additional clothes and close the door.
4. Press the Start/Pause button again to resume the laundry cycle.
Ctrl Lock (
POWER
-Extra Rinse Press to select the Extra Rinse function.
-Soil Press to select different soil levels (from light to heavy).
The washing time will increase or decrease depending on the soil level.
-Temp Press to select the temperature (from cold to hot).
-Spin Press to change the spin speed (from no spin to high).
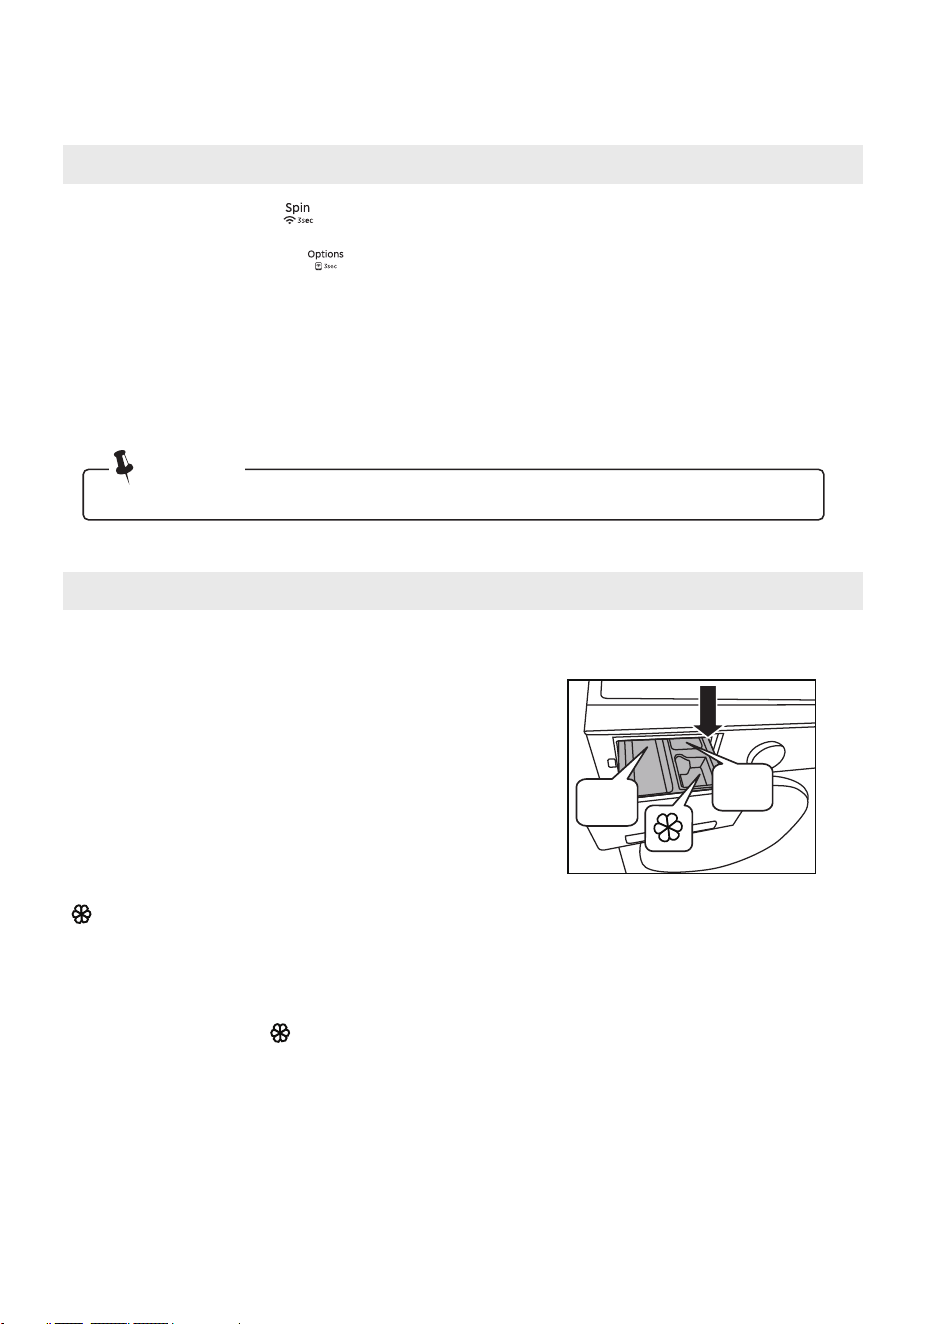
-Pre wash Press to add an extra wash before the main laundry cycle. This function is ideal for dust
and soil on the surface of the clothes. Add detergent to Compartment I (labeled in the image below)
when using this function.
-Steam Select to reduce the wrinkles of clothes.
-Options Press [Options] to select “Pre Wash” and “Extra Rinse”.
Operating Instructions
-DEEP WASH
Provides intensive cleaning for heavily soiled fabrics, ensuring a thorough wash.
These programs (DENIM/ ECO COLD/ JUICE&FOOD STAINS/ OVERNIGHT WASH/ SINGLE ITEM/
SMALL LOAD/SWEAT STAINS/ SWIM WEAR/ PERM PRESS/ COLORS/DARK/ DEEP WASH) can only
be selected by .the SmartHome app on your mobile phone
Control Panel
20
Operating Instructions
Washing clothes for the first time
Before washing, please make sure that the machine is installed properly. Your appliance was
thoroughly checked before it left the factory. To remove any residual water and to neutralize
potential odors, it’s recommended to clean your
appliance before first use. For this reason,
we recommend that you clean the inner drum by running the
Tub Clean or another program with high temperature before
using. Do not add laundry or detergent when running the
Tub Clean program.
The drawer is divided into the following compartments:
I: Pre-wash detergent or washing powder.
II: Main detergent, stain remover, or bleaching products.
:Washing additives, such as fabric softener.
Adding detergent to the washing machine:
1. Pull out the drawer.
2. Add pre-wash detergent into Case I (if necessary).
3. Add detergent into Case II.
4. Add softener into Case (if necessary).
Notes:
- If the detergent is clumped or ropy, please dilute it with some water before adding it to the
detergent box. This prevents the detergent box intake from becoming blocked and overflowing
while adding water.
- Please use the correct type of detergent for the washing temperature for the best effect, including
less water use, and minimal energy consumption.
After holding [ ] for 3 seconds, the mobile phone icon will light up in the machine,
indicating that it has entered the remote control state. Smartphone remote control should meet the
following conditions:
-Remote Control
-. The remote control function will automatically deactivate at the end of each cycle. You must
manually reactivate the remote control function to use it again.
-. If the door is opened at any time, the remote control function will be deactivated.
1. The appliance should be connected to the internet.
2. The door of drum should be closed.
Remark:
- Press [ ] for 3 seconds to connect the washing machine to the internet via
smartphone app. Go to the settings, turn on the wireless connection, and select an AP (Access Point).
Wireless Network
• The detail of connect wireless network, please check “ ” App Setup and Operation .
Note!
Ⅰ
Ⅱ
The Special function

21
Operating Instructions
Select the laundry cycle
The proper washing cycle should be selected based on the type, quantity, and soil level of the clothes
to be washed, along with the washing temperature table below (ranging from Hot to Cold in five levels).
5 ( Hot)
Maximum cleaning and sanitization for heavy soil and heat-resistant fabrics, such as
work uniforms, kitchen towels, and baby clothes.
Strong cleaning for heavy soil and heavy fabrics, such as towels, sportswear, and thick
linens.
Standard cleaning for moderate soil and durable fabrics, such as cotton shirts, bed
sheets, and pillowcases.
Start up washing machine
Connect the power supply. Check whether the water pipes are properly connected. Open the tap
completely. Put the clothes to be washed into the machine and add the detergent.
Then press the “Power” button, select the proper procedures and functions, and press
the “Start/Pause” button.
Washing clothes for the first time
Mild cleaning suitable for light to moderate soil and blended fabrics, such as cotton
blends and polyester.
Gentle cleaning for light soil and delicate fabrics, such as silk, wool, and lace.
4 ( )Warm+
3 ( )Warm
2 ( )Warm-
1 ( )Cold
22
Operating Instructions
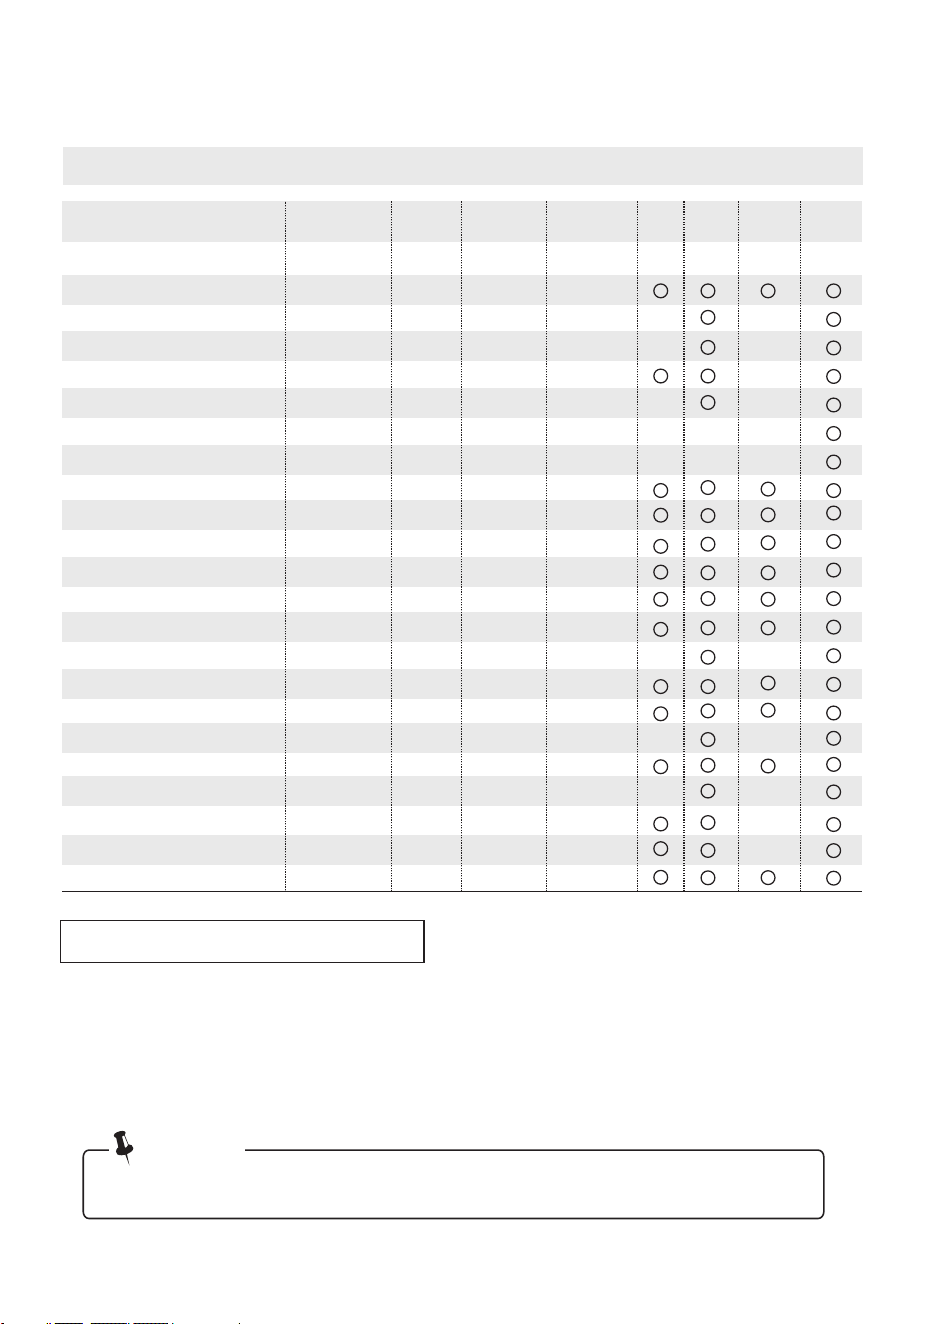
Table of washing procedures
Program
Default
Time (h:min.)
Temp
• The parameters in this table are only reference. The actual parameters may be different from the
parameters in the above table.
Note!
SpinSoil
Extra
Rinse
Steam
Pre
Wash
Delay
Energy test program: NORMAL
○ Optional
QUICK WASH
DELICATES
WHITES
RINSE & SPIN
SPIN ONLY
TUB CLEAN
MY CYCLE
ACTIVE WEAR
TOWELS
HEAVY DUTY
DENIM
ECO COLD
JUICE&FOOD STAINS
OVERNIGHT WASH
SINGLE ITEM/SMALL LOAD
SWEAT STAINS
SWIM WEAR
PERM PRESS
COLORS/DARK
DEEP WASH
NORMAL
0:15
0:48
1:07
0:20
0:12
1:28
1:45
2:18
1:02
1:03
1:35
1:45
1:01
1:34
0:58
0:45
1:29
0:47
0:57
1:09
1:12
0:55
Cold-Hot
1/2/3/4/5
1
2
3
--
--
5
2
5
3
3
4
2
1
3
3
2
3
1
3
1
4
3
Light-Heavy
1/2/3/4/5
1
3
3
--
--
--
3
5
3
3
5
3
3
5
3
1
5
1
3
3
3
3
4
3
4
4
4
--
3
4
3
4
5
3
4
3
3
3
3
3
2
3
4
4
No Spin-High
1/2/3/4/5
These programs (DENIM/ ECO COLD/ JUICE&FOOD STAINS/ OVERNIGHT WASH/ SINGLE ITEM/
SMALL LOAD/SWEAT STAINS/ SWIMWEAR/ PERM PRESS/ COLORS/DARK/ DEEP WASH) can
only be selected by the SmartHome app on your mobile phone.
Fill the tub with dry, unfolded clothes. Load the tub no more than 3/4 full. For best performance,
the maximum load size should be less than 7.94 Ibs. (3.6 kg ).
DEEP CLEAN
Operating Instructions
1. Your smartphone is connected to your home wireless network, and you know the network password.
2. Make sure you are near the home appliance.
3. The 2.4GHz band wireless signal is enabled on your wireless router.
Follow the below steps to enter the remote control state
Before you start, make sure that:
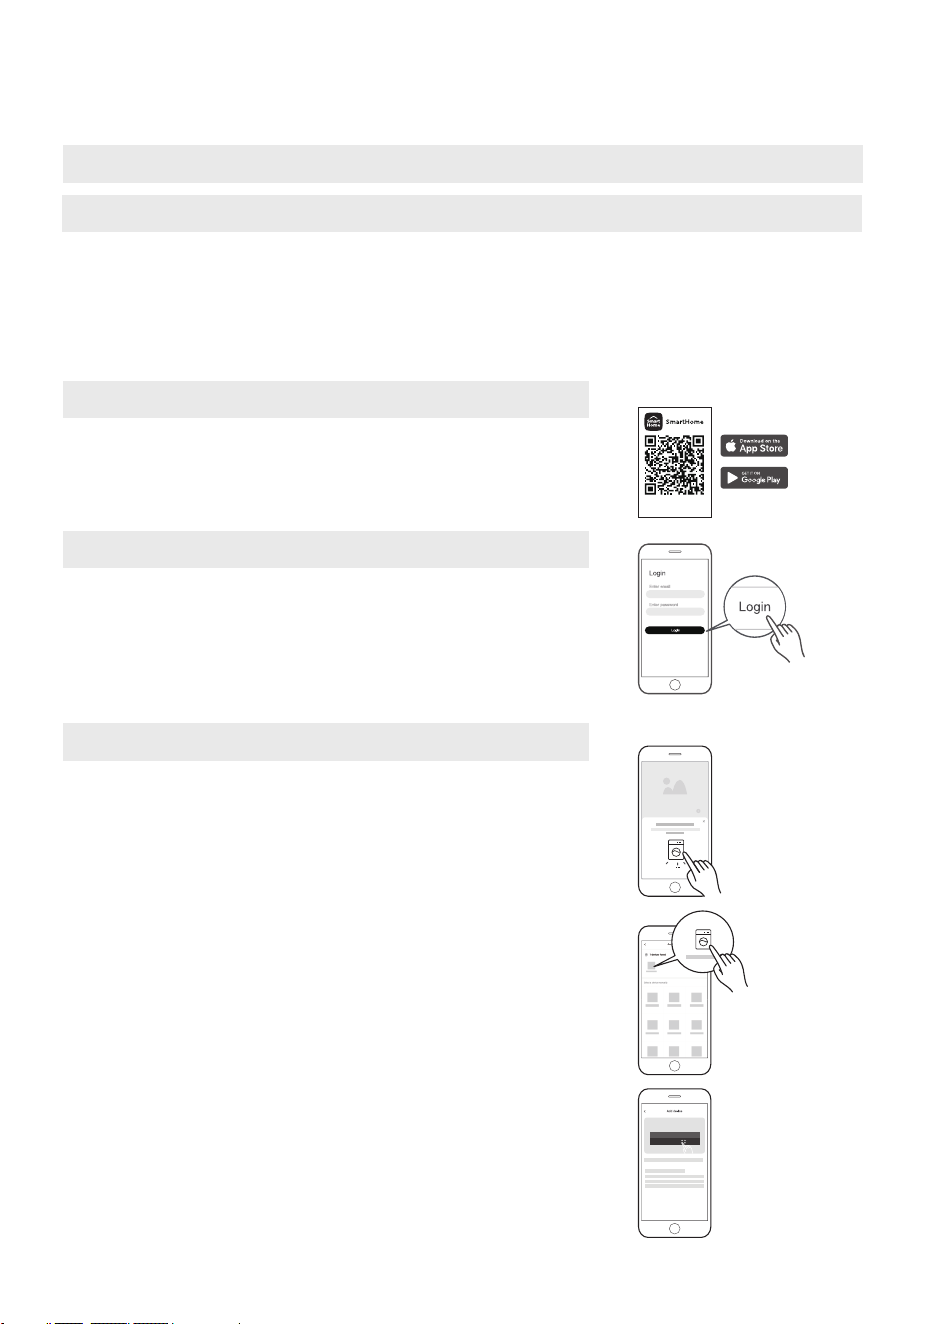
Use Your Appliance With the SmartHome App
Download the SmartHome App
On an app market (Google Play Store, Apple App Store),
search for "SmartHome*" and find the SmartHome
app. Download and install it on your phone. You can also
download the app by scanning the QR code below.
Register and Log In
Open the SmartHome app, and create a new account to
start (you can also register through a third-party account).
If you already have an existing account, use that account
to log in.
Connect Your Devices to SmartHome
1. Please make sure your mobile phone is connected to a
wireless network. If it is not, go to Settings and enable Wireless
Networks and Bluetooth.
2. Please power on your devices.
3. Open the SmartHome app on your phone.
4. If a "Smart devices discovered nearby"
message appears, click to add.
5. If no message appears, select "+" on the page and
select your device in the list of nearby devices available.
If your device is not listed, please add your device
manually with the device category and device model.
6. Connect your device to the wireless network
according to the instructions on the app. If the connection
fails, please follow the instructions provided by the app
to continue with the operation.
App Setup and Operation
8 : 8 8
Download the app
& activate product
23

Rotate the knob randomly to indicate one of the programs, and press [ ] continuously until the
remote control icon lights up, which means that the remote control function is active and you can
control your washing machine remotely.
Start the Remote Control
Wireless Network Status Light
Slowly flashing
Waiting for connection
Quickly flashing
Connecting
Quickly flashing solid
Connected to your wireless router
1. Make sure your devices are powered on.
2. Keep your mobile phone close enough to your device when you are connecting your device to the
network.
3. Connect your mobile phone to the wireless network at home, and make sure you know the
password of the wireless network.
4. Check if your wireless router supports 2.4 GHz band and turn it on. If you are not sure whether the
router supports 2.4
GHz band, please contact the router manufacturer.
5. The device cannot connect to a wireless network that requires authentication, which usually
appears in public areas such as hotels, restaurants, etc. Please connect to a wireless network that
does not require authentication.
6. Turn off the WLAN+ (Android) or WLAN Assistant (iOS) function of your mobile phone when
connecting your device to the network.
7. In the case that your device connected to a wireless network before but now needs to reconnect,
please click "+" on the Home page, and add your device again by the device category and model
according to the instructions on the app's.
Note!
24
Operating Instructions

25
Care and Cleaning
Care and cleaning
Before you start, please do pull out the power plug or disconnect power and close the tap.
WARNING
- Do not use solvents. Solvents may damage the washing machine or generate toxic,
explosive gases..
- Never use water to sprinkle and wash the washing machine.
- Do not use detergents that contain PCMX to clean the washing machine.
- Certain internal parts are intentionally not grounded and may present a risk of
electric shock only during servicing. Service Personnel-Do not contact the
following parts while the appliance is energized: Water Inlet Valve, Drain Pump,
Water Level Sensor and Door Lock
Cleaning and Maintenance of Washing Machine Cabinet
Proper maintenance on the washing machine can extend its working life. The surface can
be cleaned with diluted non-abrasive neutral detergents when necessary. If there is any
water overflow, use a wet cloth to wipe it off immediately. No sharp items are allowed to
strike the cabinet.
Notes: Do not use formic acid and its diluted solvents or equivalents.
Clean Internal Drum
The rusts left inside the drum by metal articles shall be removed immediately with
chlorine-free detergents.
Never use steel wool.
Restoring a Frozen Washing Machine
If the temperature drops below zero and the water in your washing machine gets frozen, follow the
directions below:
1. Disconnect the power supply for the washing machine.
2. Wash the tap with warm water to loosen the inlet pipe.
3. Take down the inlet pipe and immerse it in warm water.
4. Pour warm water into the washing drum and wait for 10 minutes.
5. Reconnect the inlet pipe to the tap and check whether the inlet and outlet are working normally.
Repeat with the other inlet pipe (if applicable).
Notes: When the washing machine is reactivated, make sure the ambient temperature is above 0°C.
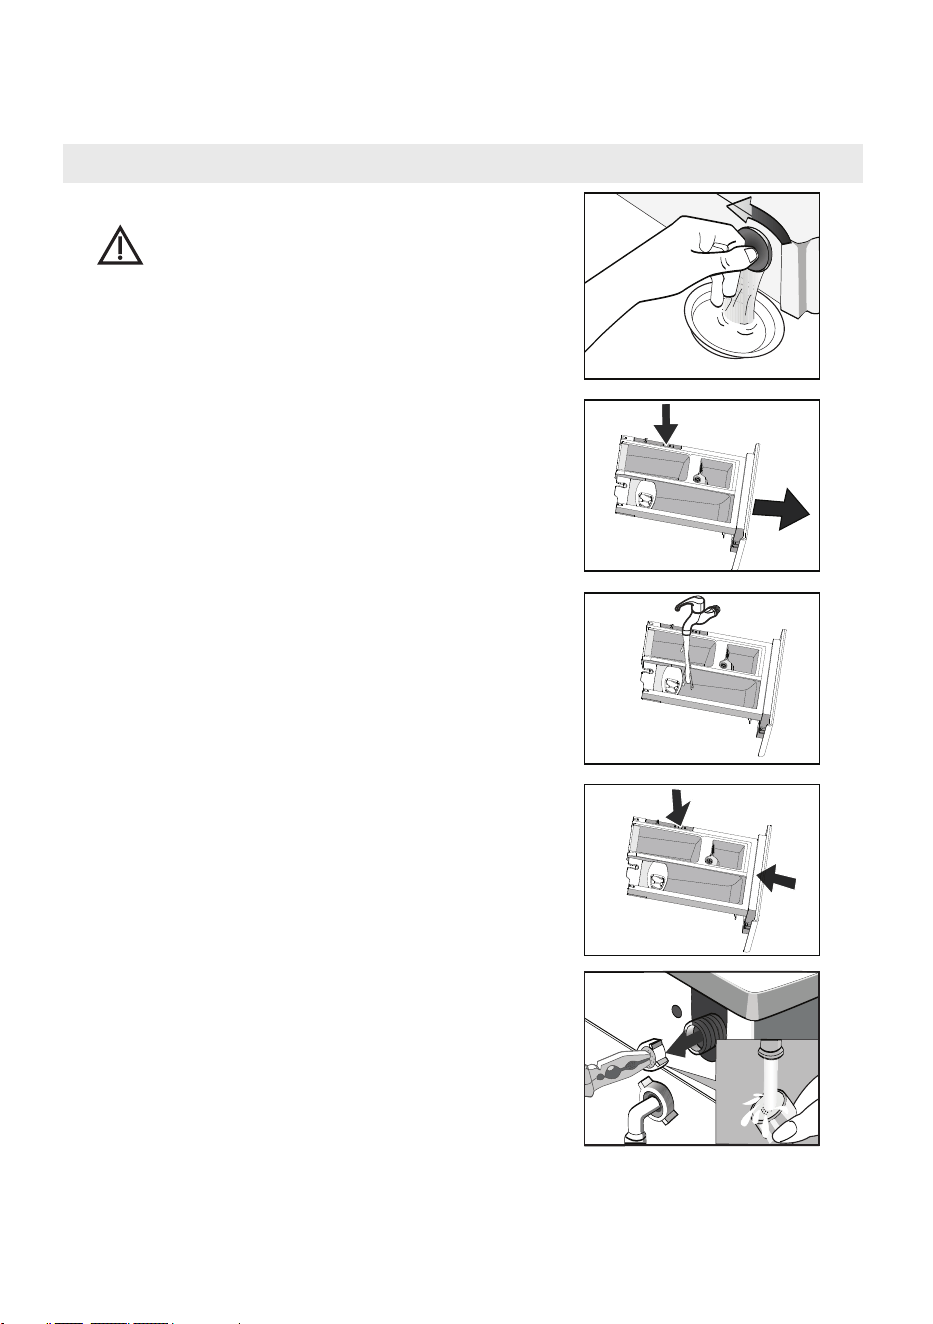
Freezing prevention measures
If your washing machine is located in the room where it can get frozen easily, please drain
the remaining water inside drain pipe and inlet pipe thoroughly.
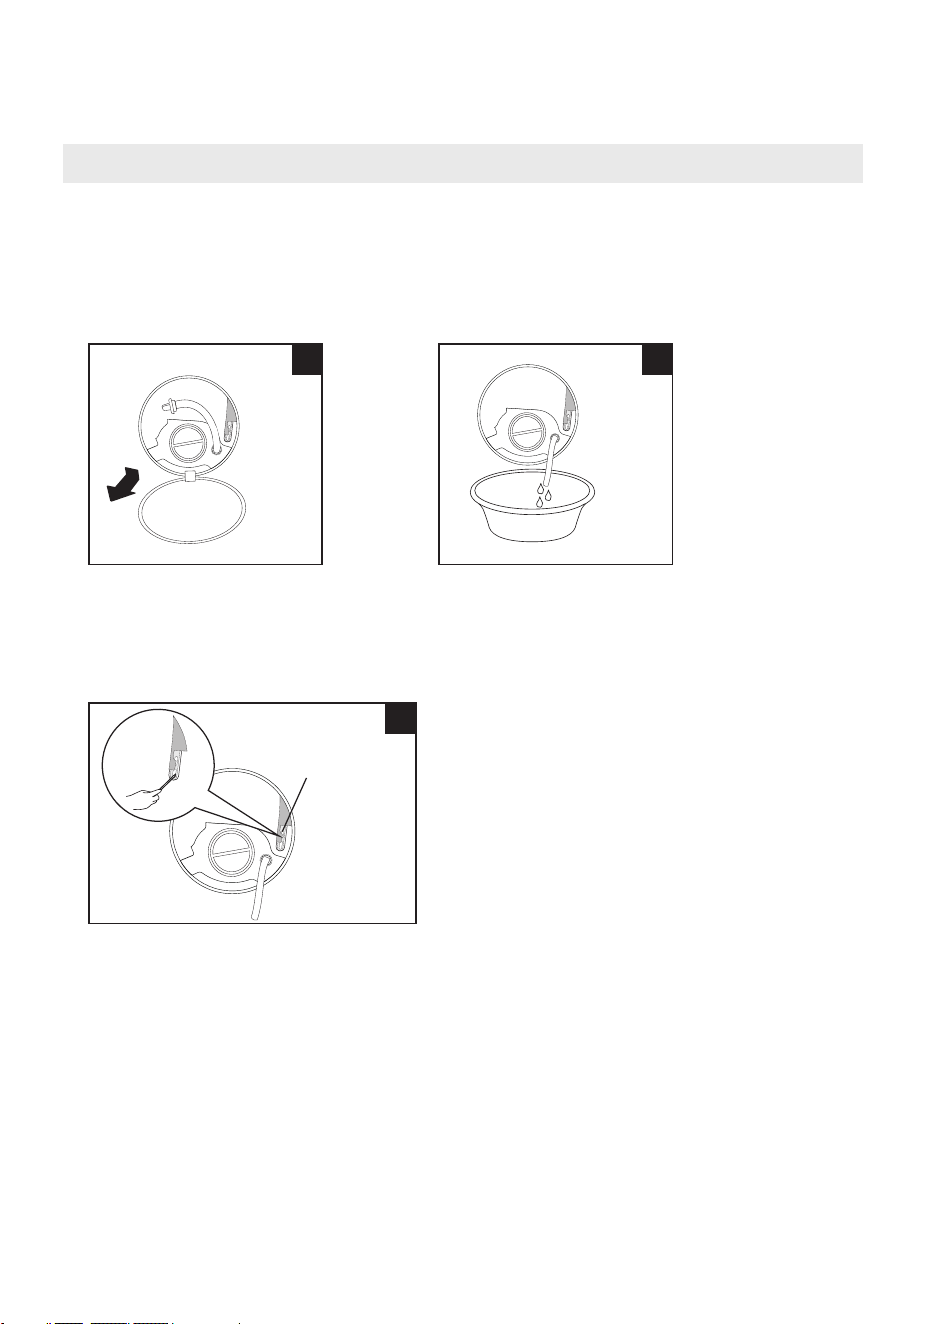
Remove the remaining water in inlet pipe:
1. Close the tap.
2. Screw off the inlet pipe from tap and put its end into a container.
3. Start up any cycle except a single Wash or Drain cycle. Any water will drain out of the inlet
within 40 seconds.
4. Reconnect the inlet pipe to the tap.
26
Care and Cleaning
Care and cleaning
Remove the remaining water in the drain pump
WARNING
Clean detergent drawer
1. Pull out the drawer and find the button A as shown
in the right .
Press down button A and take off the drawer along the
direction of the arrow
diagram
2.
shown in the right diagram.
3. Clean the dispenser drawer and the softener
cover under water.
4. Finish clean and push the drawer back into original position.
Clean inlet filter
Clean the inlet filter if there is no water or an insufficient
amount of water when the tap is opened.
Clean the tap filter:
1. Close the tap.
2. Select any cycle except for Wash or Drain.
3. Press the Start/Pause button and keep the
laundry cycle running for about 40 seconds.
4. Remove the inlet pipe from the tap.
5. Use water to wash the filter.
6. Reconnect the inlet pipe.
Wash the washing machine filter:
1. Unscrew the inlet pipe from the backside of the machine.
2. Pull out the filter with long-nose pliers.
3. Wash the filter.
4. Reinstall the filter.
5. Open the tap and make sure there is no water leakage.
6. Close the tap.
To avoid burning, only do this after the
hot water inside the machine cools down.
A
A
27
Care and Cleaning
Care and cleaning
WARNING
Pull out the power plug to avoid electrical shock before cleaning the machine.
After using the washing machine, pull out the power cord and close the door
tightly to ensure child safety.
Remove foreign matter
Drain Pump Filter:
The drain pump filter can filter out stray threads and small objects from your laundry.
Clean the filter periodically to ensure the normal operation of the washing machine.
Inspect and clean the filter regularly, depending on how frequently you use the
washing machine and the soil level of your clothes.
Inspect the filter if the machine does not empty or spin.
The machine may make unusual noises during draining due to objects such as
safety pins, coins, etc. blocking the pump filter.
WARNING
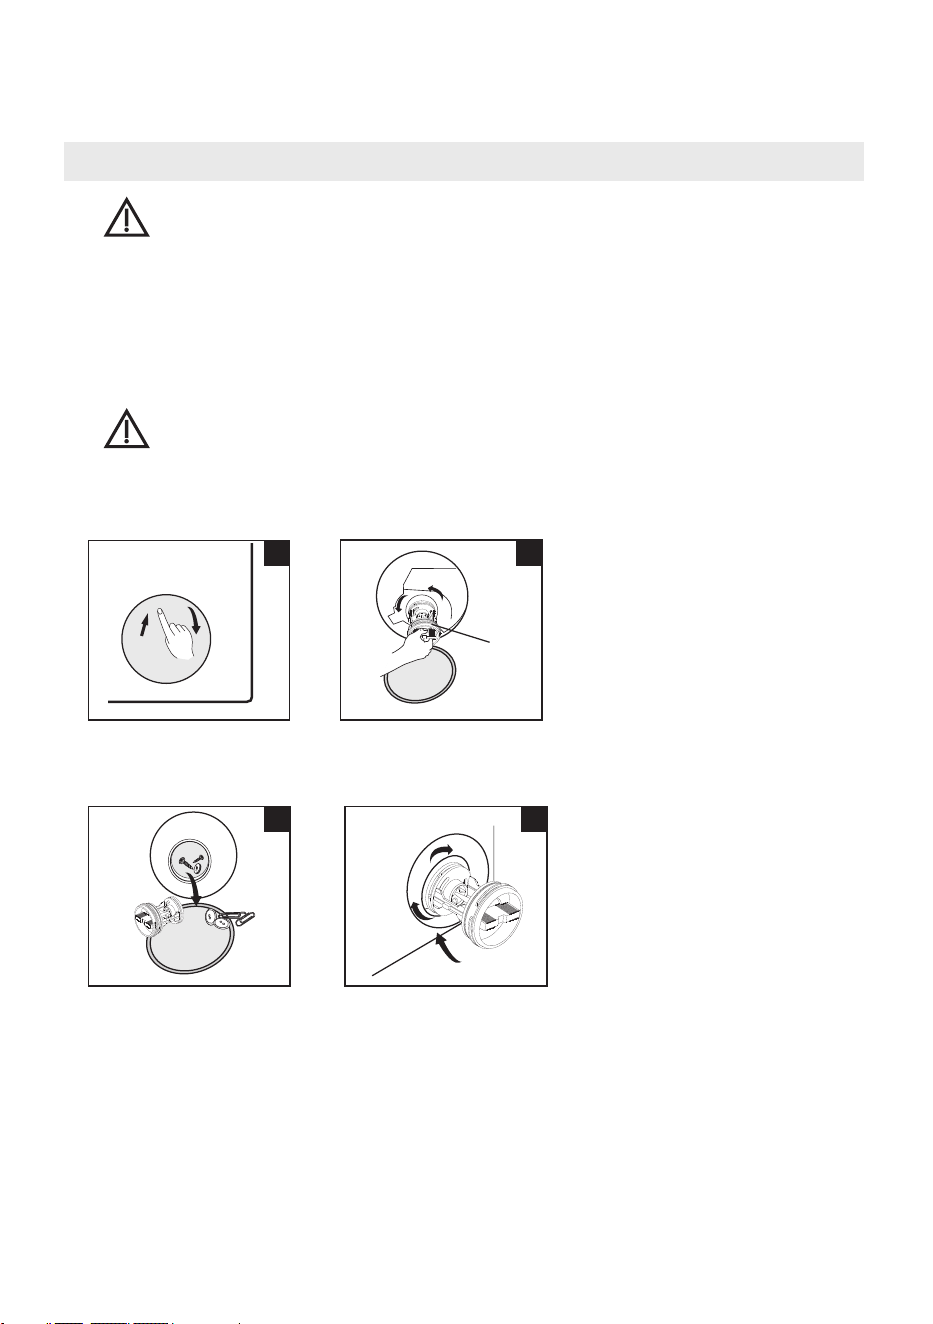
Clean the filter by following the instructions below:
Warning!
Open the lower cover cap.
Turn the filter cap
counterclockwise to remove
the filter.
Remove extraneous matter.
1
Replace the filter and turn
it counterclockwise to lock
it in place, then replace the
lower cover cap.
4
3
2
Filter cap
Depending on the laundry cycle selected, there may be hot water in the drain pump during
the laundry cycle.
Never remove the pump cover cap during a laundry cycle. Always wait until the cycle is
complete and the appliance is empty. When replacing the filter and cover, make sure they
are securely re-tightened.
28
Care and Cleaning
Emergency Door Release
Care and cleaning
In case of power failure or other circumstances where the door cannot be opened, there is an
emergency door release.
Pull down the emergency pull cord in the filter door and replace it after opening the door.
You cannot use the emergency door release during a laundry cycle. Open the door after the water
has cooled to avoid getting burned by the residual high-temperature water in the machine tub.
Warning!
1. Open the filter door.
2. Drain the cooled wat
er in
the drum.
1
2
3
3. Insert a tool into the pull ring
and pull it downward to unlock
the washing machine door.
Emergency door
opening pull cord
29
Check if the door is closed tightly.
Check if power plug is inserted well.
Check if the water supply tap is open.
Check if the POWER button was pressed.
Check if the Start/Pause was pressed.button
Check if the transport bolts have been
removed.
Check if the cabinet is installed on a solid and
level floor.
Check if there are any barrettes or metal
articles inside.
Check if the legs in the washing machine
are adjusted to be level.
You can only wash clothes without heating
the water.
Contact the service center promptly to
restore heating capabilities.
Clean and wipe the box.
Use detergent or special detergent for the
drum.
Check and fasten water pipes.
Clean up drain hose and ask a specialist to
repair it if necessary.
Check if the power is shut down and
power plug is connected correctly.
If that does not fix the issue, please call the
service line.
Select the correct laundry cycle.
Add the correct detergent quantity
according to the instructions on the
detergent package.
Disconnect the power and restart the
machine.
Fix the inlet pipe.
Replace the drain hose.
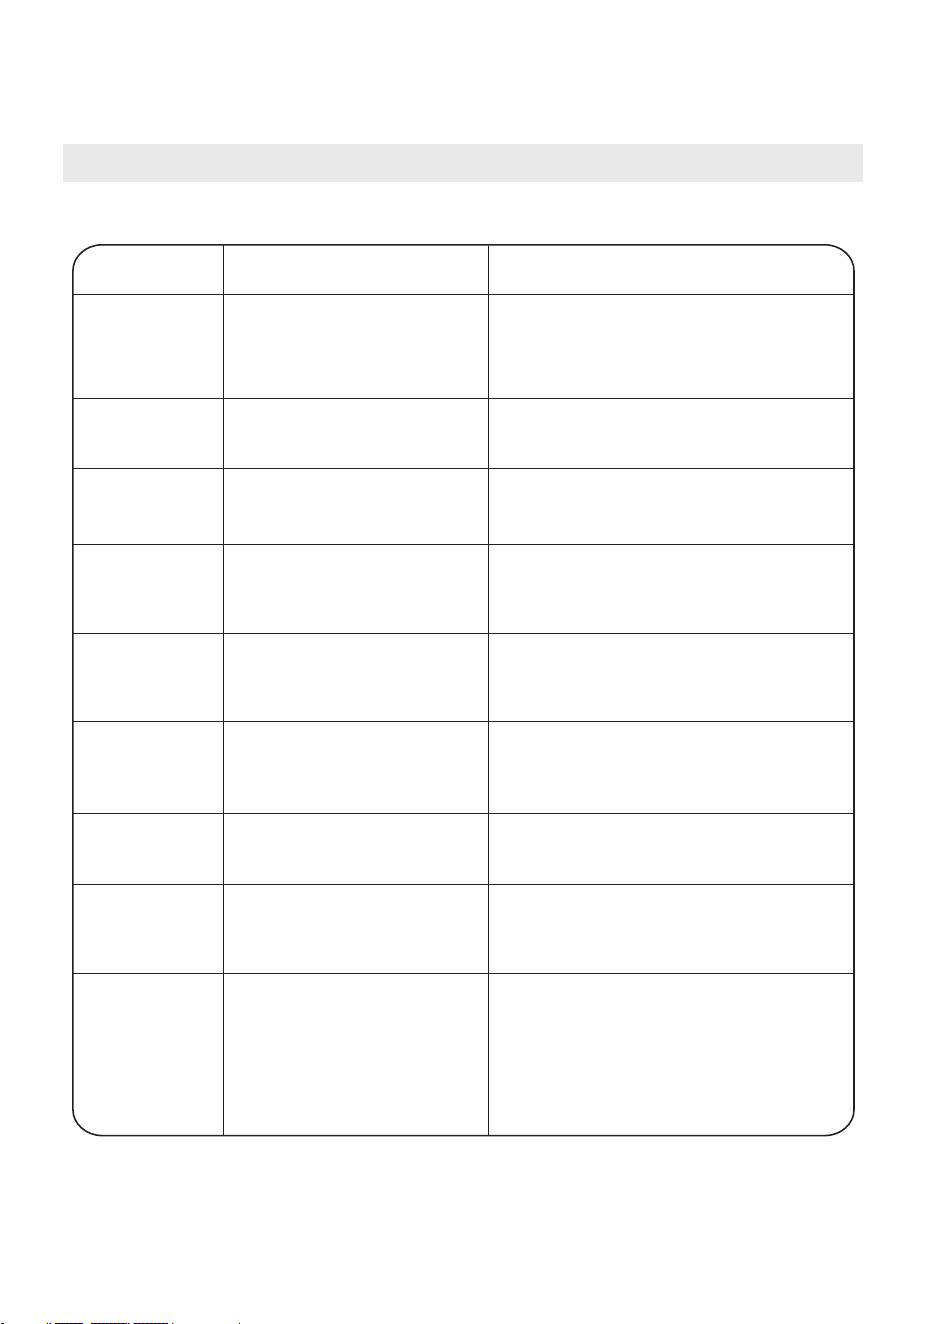
Solution
The inlet pipe, drain hose, tap,
and/or washing machine are
not tightly connected.
Drain pipe in the room is blocked.
The clothes are too dirty.
Insufficient detergent quantity.
The inlet pipe is not connected
tightly.
The drain hose has water leakage.
Washing powder is dampened
and clumps together.
NTC is damaged and/or the
heating pipe is aging.
Machine's safety protection
design is active.
Power is disconnected.
PC board has problems.
Harness has connection
problem.
Proper reason
Washing machine
cannot start up
Water overflows
from the bottom
of the machine
Door cannot be
opened
Detergent
residue in the
box
Clothes are still
dirty after washing
Abnormally loud
noise and/or
vibration
Heating fault
Water leakage
Indicator or
display does
not light
Troubles
Troubleshooting Tips
If the washing machine does not start or stops during operation, try to find a solution in the
table below. If your problem is still not resolved, call the service center for assistance.
Washing machine was not set
up properly.
Troubleshooting Tips
Inner drum is unbalanced.
30
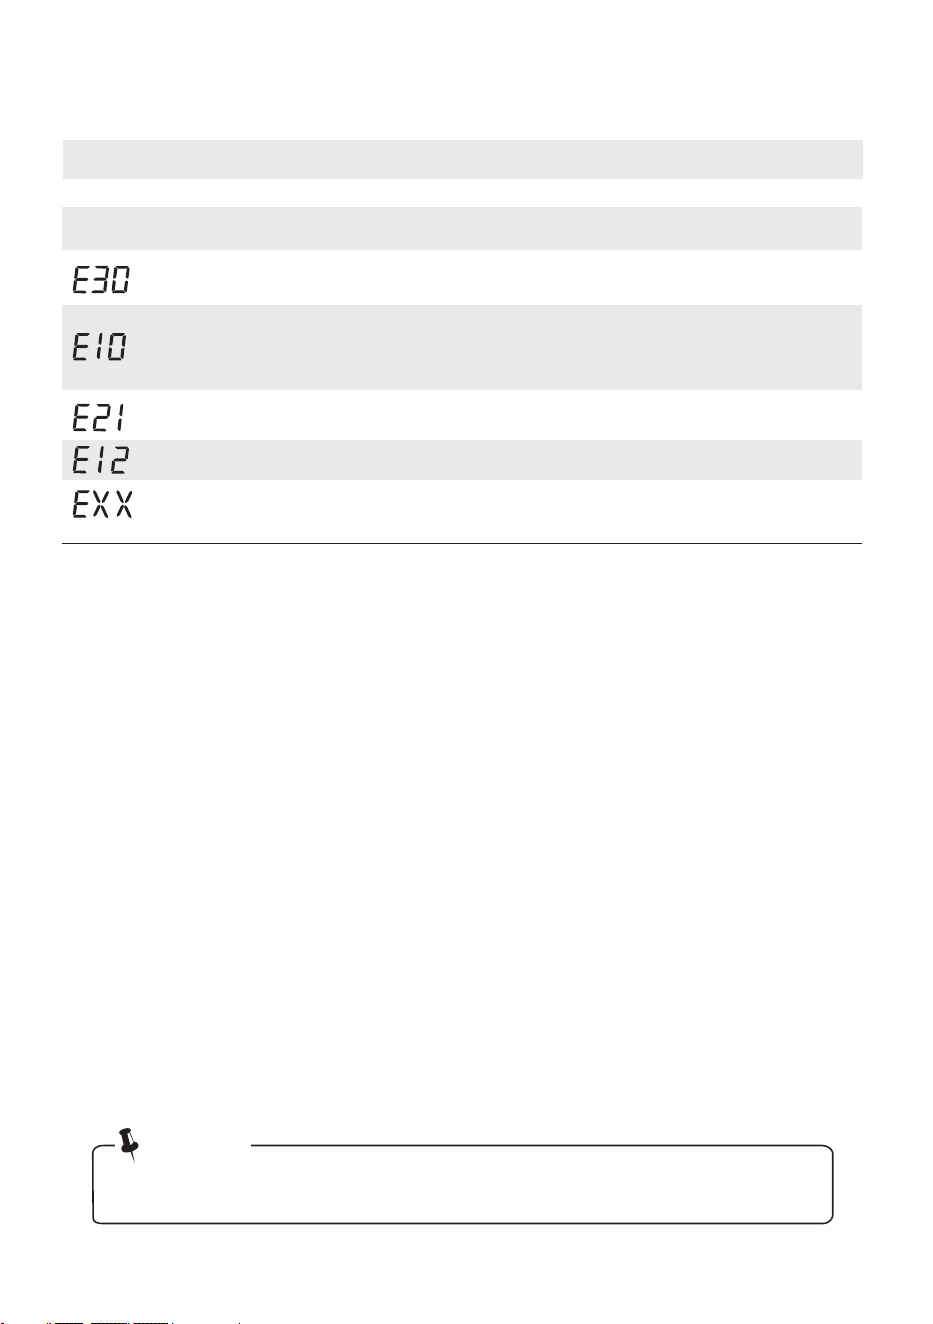
Error Codes
• After checking, reactivate the machine and retry your selected cycle. If the problem
occurs again or the display shows an error code, call the service line for assistance.
Note!
Description
Proper reason
Solution
Check if the water pressure is too low
Straighten the water pipe
Check if the inlet valve filter is blocked
Check if the drain hose is blocked
Water intake problem
while washing
Water draining taking too long
Please try again first. Call the service line if
you still experience issues.
Others
Water overflow
Restart the washer
Restart after the door is closed
Check if any clothes are stuck in the gap
Door is not closed properly
Error Codes
31
Appendix
Appendix
To avoid fire, electrical shock and other accidents, please remember the following
reminders:
- Only the voltage indicated in power label can be used. If you are not clear of
voltage in your home, please contact the local power bureau.
- When you are using the heating function, the maximum current through the
washing machine will reach 12A. Please make sure the power supply units
(current, voltage and cable) can meet the normal load requirements for the
machine.
- Protect the power cord properly. The power cord should be secured so that it
does not get damaged or become a tripping hazard. Pay special attention when
plugging the power cord into the socket and make sure it is secure.
- Do not overload a wall-mounted socket or use an extension cable.
Overloading the wiring may cause fire or electrical shock. Do not pull out
power plug with wet hand.
- To ensure your safety, power plug shall be inserted into an grounded three-pole
socket. Carefully check and ensure that your socket is properly and reliably
grounded.
the
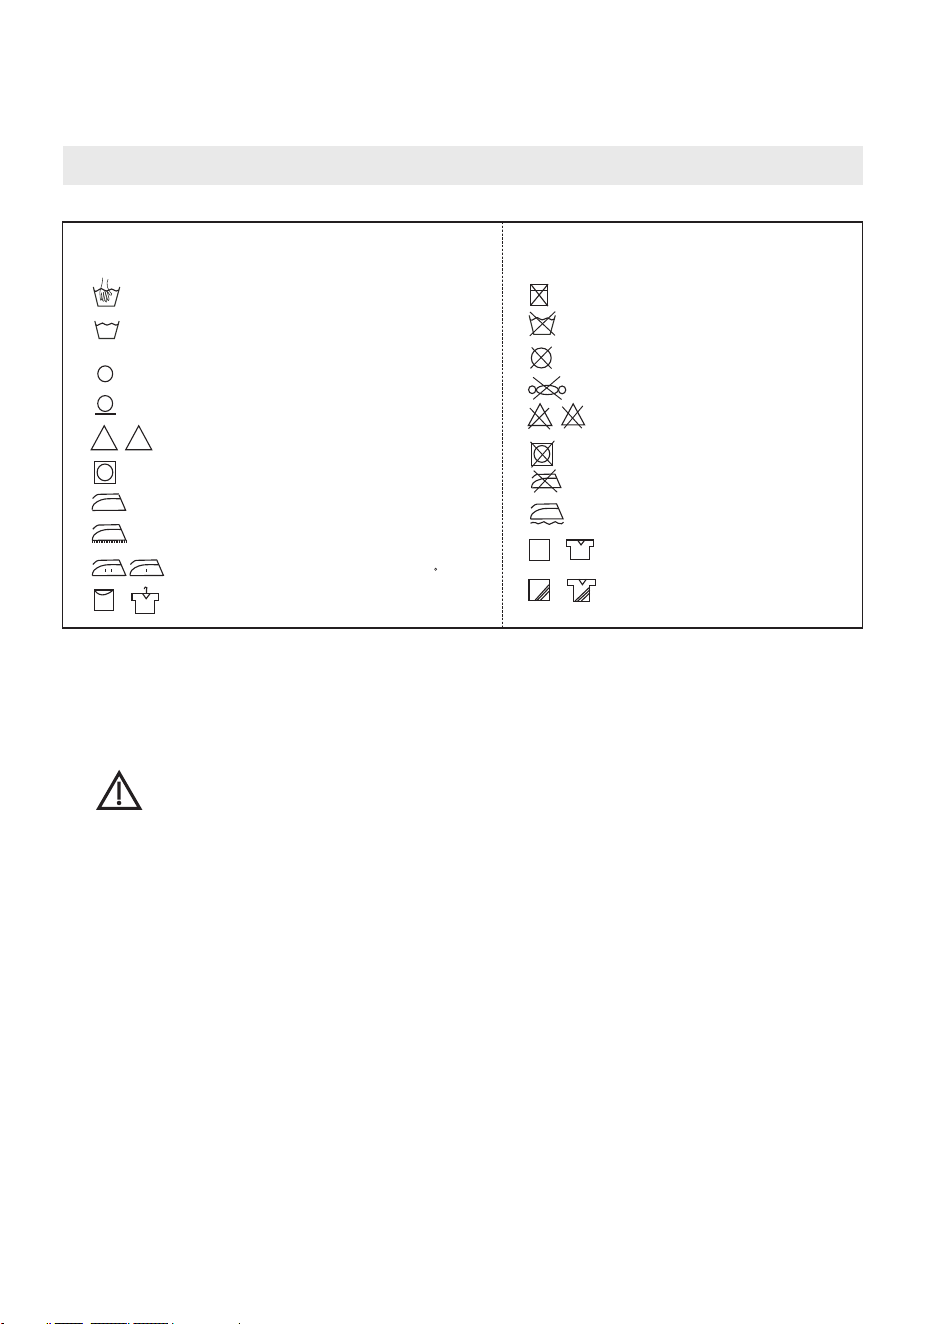
No Machine Wash
Do not Tumble Dry
Line Dry in Shade
No Dry Clean
Iron with Cloth
Dry after Wash
Illustration
Do not Wash
Do not Iron
No Wring
No Bleach
Graphic Symbol
CI
Washing (including Machine
Wash and Hand Wash)
Medium Temperature and
Max. Temperature 150 C
Warmly Dry Clean
Illustration
Hand Wash
Tumble dry
Dry Clean
Steam Iron
Bleach
Line Dry
Care Label
Iron
Graphic Symbol
CI
WARNING

Please note that changes or modifications of this product is not expressly approved by the party
responsible for compliance could void the user’s authority to operate the equipment.
This equipment complies with FCC’s RF radiation exposure limits set forth for an uncontrolled
environment.
The antenna(s) used for this transmitter must be installed and operated to provide a separation distance
of at least 20 cm from all persons and must not be collocated or operating in conjunction with any other
antenna or transmitter. Installers must ensure that 20cm separation distance will be maintained between
the device (excluding its handset) and users.
Federal Communications Commission (FCC) Compliance Statement for USA
This device complies with part 15 of the FCC rules. Operation is subject to the following two conditions:
(1) This device may not cause harmful interference, and (2) this device must accept any interference
received, including interference that may cause undesired operation.
Note: This equipment has been tested and found to comply with the limits for a Class B digital device,
pursuant to part 15 of the FCC rules. These limits are designed to provide reasonable protection against
harmful interference in a residential installation. This equipment generates, uses and can radiate radio
frequency energy and, if not installed and used in accordance with the instructions, may cause harmful
interference to radio communications. However, there is no guarantee that interference will not occur in
a particular installation. If this equipment does cause harmful interference to radio or television
reception, which can be determined by turning the equipment off and on, the user is encouraged to try
to correct the interference by one or more of the following measures:
Reorient or relocate the receiving antenna.
Increase the separation between the equipment and receiver.
Connect the equipment into an outlet on a circuit different from that to which the receiver is
connected.
Consult the dealer or an experienced radio/TV technician for help.
Industry Canada (IC) Compliance Statement for Canada
This device complies with Industry Canada license-exempt RSS standard(s). Operation is subject to the
following two conditions: (1) this device may not cause interference, and (2) this device must accept any
interference, including interference that may cause undesired operation of the device.
CAN ICES-003(B)/NMB-003(B)
Midea is not responsible for any changes or modifications not expressly approved by Midea. Such
modifications could void the user’s authority to operate the equipment.
For model: MWB-S-WB01
FCC ID:
IC ID:
•
•
•
•
This equipment complies with FCC radiation exposure limits set forth for an uncontrolled environment.
FCC Supplier’s Declaration of Conformity
Product Name: Front Load Washing Machine
Model number: MLHW27S7BWW/MLHW27S7BCG
Suppliers Name: Midea America Corp.
Suppliers Address (USA): 300 Kimball Dr. Parsippany, NJ 07054
Suppliers Website: http://midea.com/us
Contact Email/Telephone: 1-866-646-4332
2ADQOMWB-SWB01
12575A-WB01
Certifications
32
Certifications
33
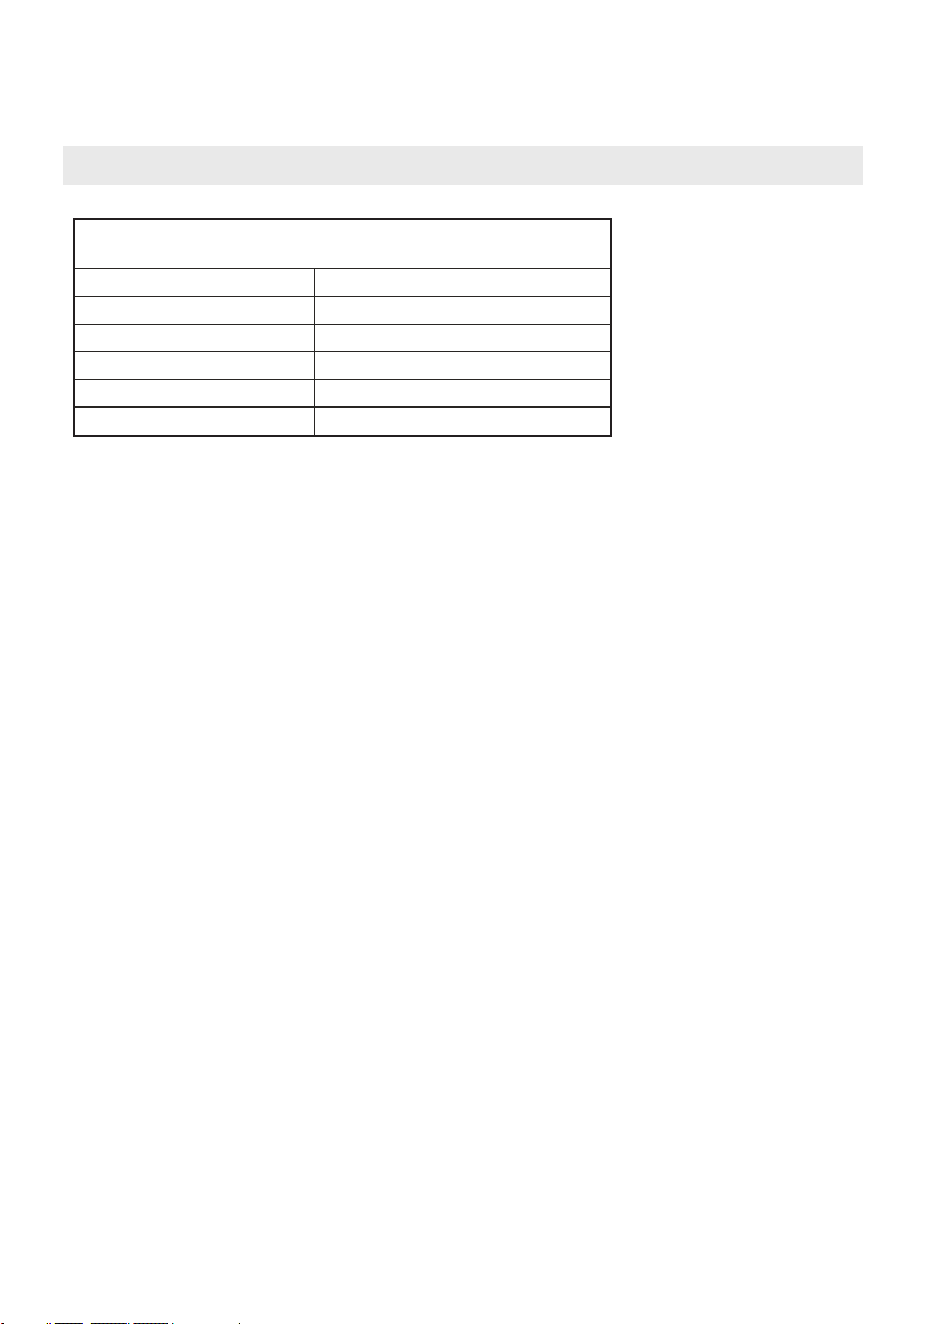
Technical Specifications
Technical specifications
Power Supply
Dimension(W*D*H)
Net Weight
Drum Size
Rated Current
Standard Water Pressure
120V~ , 60Hz
595*615*845mm
72kg (158.7Ib)
2.7 cu.ft.
11A
0.1-0.8MPa
Model:
MLHW27S7BWW/MLHW27S7BCG
Parameter

2 YEAR LIMITED WARRANTY
This warranty is provided to the original purchaser at retail (the “Purchaser” or “you”) by Midea America Corp.
(“Midea” or “we”), which warrants all parts of this Product, as described below. Midea warrants this Product to the
Purchaser for personal, family or household use. This warranty covers performance and quality issues in materials and
workmanship that appear under normal use and maintenance appearing within two years from the date of delivery.
This warranty gives you specific rights, and you may also have other rights that vary from state to state.
WARRANTY LIMITATIONS
This warranty is given only to the original purchaser at retail in either the United States or Canada and may not be
transferred to any subsequent buyer. This warranty does not apply to purchasers of our products for use or resale in a
business; a separate commercial warranty may protect those purchasers.
This warranty does not cover any Product failure caused by:
(a) Abuse, damage or use of the Product in violation of the Product instructions.
(b) Modification to any Product or part.
(c) Failure to maintain the Product or part as described in accordance with the Product instructions.
(d) Faulty installation or application.
(e) Use of parts or accessories not compatible with this Product.
(f) Floods, fires, winds, lightning, accidents, corrosive atmosphere, or other conditions beyond Midea’s control.
(g) Interruption in electrical service or inadequate electrical service.
(h) Replacement of fuses and replacement or resetting of circuit breakers.
(i) Frozen or broken water pipes, water damage, moisture intrusion, mold or other biological growth.
(j) The use, combination or linking of the Product to other products, processes or materials not provided by
Midea.
WARRANTY REMEDY
If any quality or performance issue covered by this warranty is discovered during the warranty period, we will, at our
option, repair or replace any such Product. This warranty is limited to Product repair or replacement by an
authorized Midea servicer or dealer and does not cover any shipping cost, labor cost, customs duties, inland
logistics cost, or cost of service, including any diagnostics, removal, transportation, or reinstallation costs. If we
ask, you must return the Product to us.
WARRANTY DISCLAIMER; EXCLUSION OF DAMAGES
This is the only express warranty to consumers that we offer on our Products. ANY IMPLIED WARRANTIES BY MIDEA,
INCLUDING BUT NOT LIMITED TO WARRANTIES OF MERCHANTABILITY AND FITNESS FOR PARTICULAR PURPOSE, ARE
LIMITED TO THE DURATION OF THIS EXPRESS WARRANTY. Some states and provinces do not allow the exclusion of
express warranties and/or limitations on how long an implied warranty lasts, so the above exclusion and/or limitation
may not apply to you.
THE REMEDY DESCRIBED ABOVE IS THE ONLY ONE THAT WE WILL PROVIDE, EITHER UNDER THIS WARRANTY OR
UNDER ANY WARRANTY ARISING BY OPERATION OF LAW. WE WILL NOT BE RESPONSIBLE FOR ANY CONSEQUENTIAL
OR INCIDENTAL DAMAGES ARISING FROM THE BREACH OF THIS WARRANTY OR ANY OTHER WARRANTY, WHETHER
EXPRESS OR IMPLIED, NEGLIGENCE OR OTHER TORT, OR ON ANY STRICT LIABILITY THEORY, INCLUDING BUT NOT
34

LIMITED TO LOST PROFITS. Some states do not allow the exclusion or limitation of incidental or consequential
damages, so the above exclusion may not apply to you.
WARRANTY CLAIMS PROCESS
For more information or to make a warranty claim, please visit:
https://www.midea.com/us/support
Or contact us at:
Telephone: 1-866-646-4332
Email: customerserviceusa@midea.com
You must have Your bill of sale, delivery slip, or appropriate proof of purchase to submit a warranty claim. The date
of delivery establishes the warranty period, should service be required.
DISPUTE RESOLUTION
ARBITRATION CLAUSE. IMPORTANT. PLEASE REVIEW THIS ARBITRATION CLAUSE. IT AFFECTS YOUR LEGAL RIGHTS.
(a) Parties: This arbitration clause (this “Arbitration Clause”) affects your rights against Midea and any of its
affiliates or employees or agents, successors, or assigns, all of whom together are referred to below as “we”
or “us” for ease of reference.
(b) ARBITRATION REQUIREMENT: EXCEPT AS STATED BELOW, ANY DISPUTE BETWEEN YOU AND ANY OF US
SHALL BE DECIDED BY NEUTRAL, BINDING ARBITRATION RATHER THAN IN COURT OR BY JURY TRIAL.
“Dispute” will be given the broadest possible meaning allowable by law. It includes any dispute, claim, or
controversy arising from or relating to your purchase of this Product, any warranty upon the Product, or the
Product’s condition. It also includes determination of the scope or applicability of this Arbitration Clause. The
arbitration requirement applies to claims in contract and tort, pursuant to statute, or otherwise.
(c) CLASS-ARBITRATION WAIVER: ARBITRATION IS HANDLED ON AN INDIVIDUAL BASIS. IF A DISPUTE IS
ARBITRATED, YOU AND WE EXPRESSLY WAIVE ANY RIGHT TO PARTICIPATE AS A CLASS REPRESENTATIVE OR
CLASS MEMBER ON ANY CLASS CLAIM YOU MAY HAVE AGAINST US OR WE AGAINST YOU, OR AS A PRIVATE
ATTORNEY GENERAL OR IN ANY OTHER REPRESENTATIVE CAPACITY, TO THE MAXIMUM EXTENT PERMITTED
BY LAW. YOU AND WE ALSO WAIVE ANY RIGHT TO CLASS ARBITRATION OR ANY CONSOLIDATION OF
INDIVIDUAL ARBITRATIONS.
(d) Discovery and Other Rights: Discovery and rights to appeal in arbitration are generally more limited than in a
lawsuit. This applies to both you and us. Other rights that you or we would have in court may not be available
in arbitration. Please read this Arbitration Clause and consult the rules of the arbitration organizations listed
below for more information.
(e) SMALL CLAIMS COURT OPTION: YOU MAY CHOOSE TO LITIGATE ANY DISPUTE BETWEEN YOU AND ANY OF
US IN SMALL CLAIMS COURT, RATHER THAN IN ARBITRATION, IF THE DISPUTE MEETS ALL REQUIREMENTS
TO BE HEARD IN SMALL CLAIMS COURT.
(f) Governing Law: For residents of the United States, the procedures and effect of the arbitration will be
governed by the Federal Arbitration Act (9 U.S.C. § 1 et seq.) rather than by state law concerning arbitration.
For residents of Canada, the procedures and effect of the arbitration will be governed by the applicable
arbitration law of the province in which you purchased your Product. The law governing your substantive
warranty rights and other claims will be the law of the state or province in which you purchased your Product.
Any court having jurisdiction may enter judgment on the arbitration award.
35

(g) Rules of the Arbitration: If the amount in controversy is less than $250,000, the arbitration will be decided by
a single arbitrator. If the amount in controversy is greater than or equal to $250,000, the arbitration will be
decided by a panel of three arbitrators. The arbitrator(s) will be chosen pursuant to the rules of the
administering arbitration organization. United States residents may choose JAMS (1920 Main Street, Ste. 300,
Irvine, CA 92614, www.jamsadr.com), or, subject to our approval, any other arbitration organization. In
addition, Canadian residents may choose the ADR Institute of Canada (234 Eglinton Ave. East, Suite 405,
Toronto, Ontario, M4P 1K5, www.amic.org). These organizations’ rules can be obtained by contacting the
organization or visiting its website. If the chosen arbitration organization’s rules conflict with this Arbitration
Clause, the provisions of this Arbitration Clause control. The award of the arbitrator(s) shall be final and
binding on all parties.
(h) Location of the Arbitration Hearing: Unless applicable law provides otherwise, the arbitration hearing for
United States residents will be conducted in the federal judicial district in which you reside (in your hometown
area) or, for Canadian residents, in the province in which you reside, and, if you choose, will be in-person.
(i) Costs of the Arbitration: Each party is responsible for its own attorney, expert, and other costs and fees unless
applicable law requires otherwise. Notwithstanding the preceding sentence, and unless applicable law
requires otherwise, if you are a consumer under the JAMS rules or the rules of another agreed upon arbitration
administrator, Midea will pay or reimburse you for all reasonable fees or costs to the extent required by law
or the applicable arbitration administrator’s rules. Whether or not required by law or such rules, if you prevail
at arbitration on any claim against Midea, Midea will reimburse you for any reasonable fees paid to the
arbitration administrator in connection with the arbitration proceedings. Under no circumstances will Midea
seek from you payment or reimbursement of any reasonable fees that Midea incurs in connection with the
arbitration. If you are required to advance any fees or costs to JAMS or other agreed upon arbitration
administrator, but you ask Midea to do so in your stead, Midea will consider and respond to your request.
(j) Survival and Enforceability of this Arbitration Clause: This Arbitration Clause shall survive the expiration or
termination, or any transfer, of the warranty on your Product. If any part of this Arbitration Clause, except
waivers of class-action rights, is found to be unenforceable for any reason, the remainder of this clause and
the warranty shall remain enforceable. If, in a case in which class-action allegations have been made, the
waiver of class-action rights under this warranty is found to be unenforceable with respect to any part of the
dispute, the parts of the dispute as to which the waiver of class-action rights have been found unenforceable
will be severed and will proceed in court without reference or application of this Arbitration Clause. Any
remaining parts will proceed in arbitration.
QUEBEC RESIDENTS
The arbitration provisions of this warranty shall not apply to residents of Quebec.
36

PRODUCT REGISTRATION CARD
STEP1
■
ke photo of purchase receipt
多
STEP2
■ Text to (844)224-1614
OR
■
Email to register@registrationplace.com
OR
■
Registration on www.midea.com/us/support/Product-registrat1on
Notice: Product registration is not mandatory. Failure to complete and return the card
or form does not diminish the consumer's warranty rights

r
、
�idea
尸尸气召
-
么
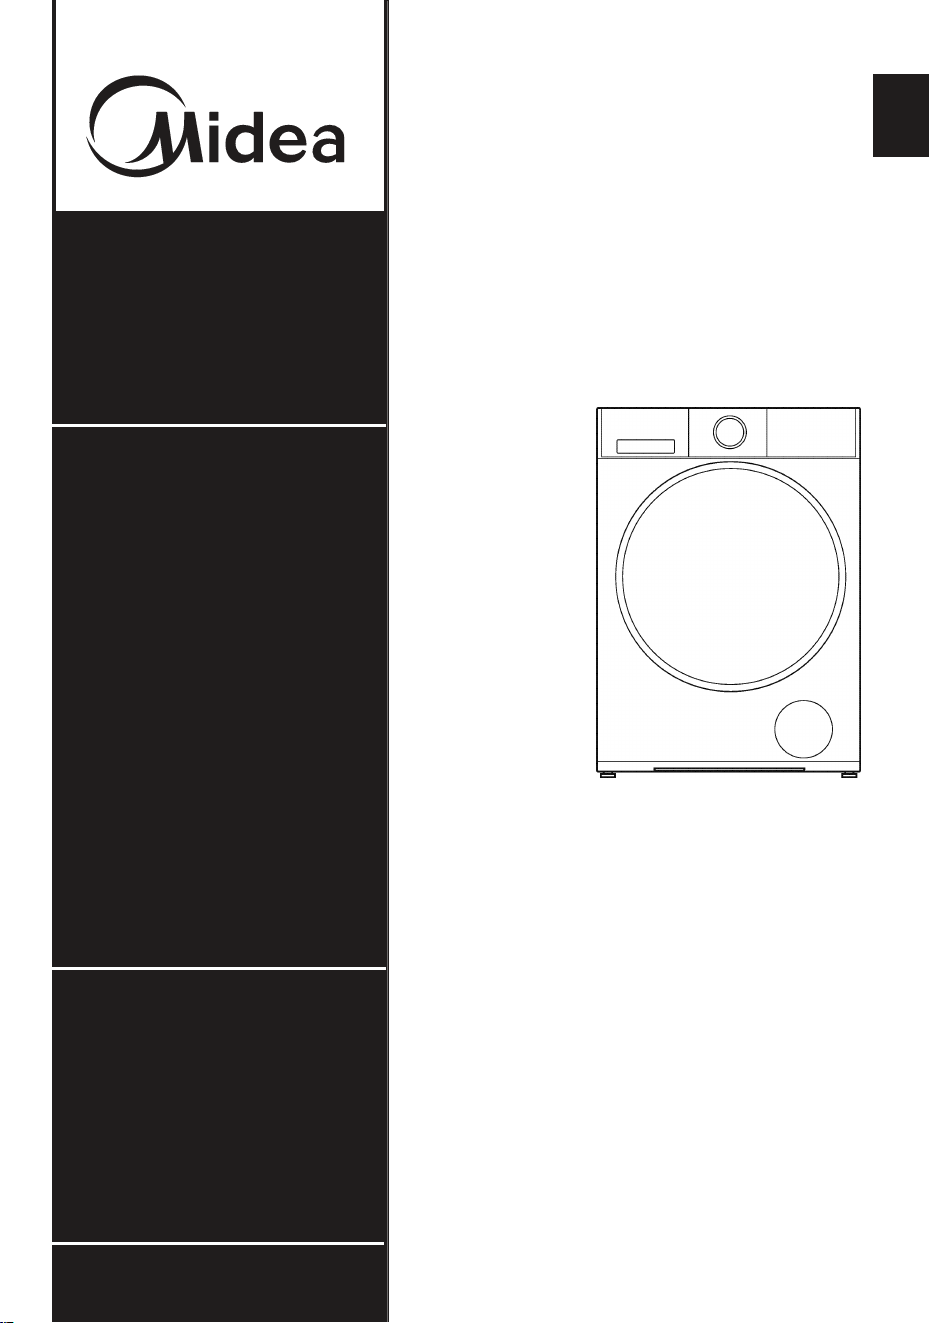
Lavadora de carga
frontal
Fuente de alimentación: 120V~
Circuito: 11A
Advertencia:
Antes de utilizar este producto,
lea detenidamente este manual
y guárdelo para consulta futura.
El diseño y las especificaciones
están sujetos a cambio sin
previo aviso para la mejora
del producto. Consulte con su
distribuidor o fabricante para
obtener más información.
esp
MANUAL DEL USUARIO
E INSTRUCCIONES DE
INSTALAC
NÚMERO DE MODELO
MLHW27S7BWW
MLHW27S7BCG
www.midea.com

01
Índice
Carta de agradecimiento ............................................................... 01
Seguridad y precauciones. .............................................................. 02
Seguridad y precauciones. ................................................................................
02
Instrucciones importantes de seguridad. ...........................................................
03
Instrucciones de conexión a tierra. ...................................................................
06
Antes de operar esta máquina .........................................................................
06
Protegiendo la máquina ..................................................................................
06
Manipulación de la máquina ..............................................................................
06
Lavado de ropa. ............................................................................................
07
Requisitos de instalación. ..............................................................
08
Requisitos de instalación. ................................................................................
08
Herramientas y piezas. ...................................................................................
08
Requisitos de ubicación. .................................................................................
09
Espacios de instalación. .................................................................................
09
Requisitos eléctricos. .....................................................................................
09
Dimensiones de la lavadora. ............................................................................
10
Desempaque de la lavadora .............................................................................
10
Instrucciones de instalación. .............................................................
11
Desecho de los materiales de embalaje. ............................................................
11
Retirar espuma y pernos de transporte
........................................................
1
.
1
Seleccionar la ubicación. .......................................................................................
11
Conectar la manguera de entrada............................................................................
11
Opciones del sistema de drenaje. .....................................................................
12
Nivelar la lavadora..........................................................................................
13
Conexión eléctrica. ...............................................................................................
13
Instrucciones de operación. ................................................................
14
Instrucciones de operación. .............................................................................
14
Preparación antes de lavar la ropa. ...................................................................
14
Panel de control. ..................................................................................................
17
Funciones especiales ......................................................................................
19
Lavar ropa por primera vez .......................................................................
20
Seleccionar el ciclo de lavado ..................................................................................
21
Tabla de procedimientos de lavado. ....................................................................
22
Configuración y operación de la aplicación. .........................................................
23
Cuidado y limpieza ........................................................................
25
Consejos de solución de problemas. ................................................
29
Códigos de error. ..........................................................................
30
Apéndice. .........................................................................................
31
Certificaciones. ..................................................................................
32
Especificaciones técnicas. ...............................................................
33
Garantía ......................................................................................
34
Lea todas las instrucciones y explicaciones antes de usar. Siga las
instrucciones cuidadosamente. Mantenga las instrucciones de
operación a mano para uso posterior. Si el electrodoméstico se
vende o se transfiere, asegúrese de que el nuevo propietario
siempre reciba estas instrucciones de operación.
CARTA DE AGRADECIMIENTO
¡Gracias por elegir Midea! Antes de usar su nuevo producto Midea, por
favor lea este manual detenidamente para asegurarse de que sabe cómo
operar de manera segura las funciones y características que su nuevo
electrodoméstico ofrece.
Seguridad y precauciones
02
ADVERTENCIA
Esto indica que los peligros o prácticas inseguras pueden
causar lesiones personales graves o la muerte.
Para reducir el riesgo de incendio, explosión, descarga
eléctrica o lesiones personales al usar su lavadora, DEBEN
seguirse estas precauciones básicas de seguridad.
Seguridad y precauciones
Este manual contiene información importante sobre la instalación, uso y cuidado de
su electrodoméstico. Por favor, lea este manual cuidadosamente antes de la
instalación y operación de esta máquina para prevenir lesiones y daños a la
propiedad.
LO QUE USTED NECESITA SABER SOBRE LAS INSTRUCCIONES DE
SEGURIDAD
Las advertencias e instrucciones de seguridad importantes en este manual NO cubren todas
las condiciones y situaciones posibles que puedan ocurrir. Es su responsabilidad usar sentido
común, precaución y cuidado al instalar, mantener y operar su lavadora.
SÍMBOLOS IMPORTANTES DE SEGURIDAD Y PRECAUCIONES
Advertencias de la Proposición 65 del Estado de California
La Ley de Agua Potable Segura y de Aplicación de Sustancias Tóxicas de
California requiere que el Gobernador de California publique una lista de
sustancias que el Estado de California reconoce como causantes de cáncer,
defectos de nacimiento u otros daños reproductivos, y requiere que las empresas
adviertan sobre la posible exposición a tales sustancias.
ADVERTENCIA Este producto contiene un químico que el Estado de California reconoce como
causante de cáncer, defectos de nacimiento u otros daños reproductivos. Este
electrodoméstico puede causar una exposición de bajo nivel a algunas de las
sustancias listadas, incluyendo benceno, formaldehído y monóxido de carbono
.
ADVERTENCIA: riesgo de daño reproductivo por exposición al plomo. Véase
www.P65Warnings.ca.gov.

Seguridad y precauciones
Instrucciones importantes de seguridad
GUARDE ESTAS INSTRUCCIONES
03
ADVERTENCIA
ADVERTENCIA - Para reducir el riesgo de incendio, descarga eléctrica o
lesiones a las personas al usar su electrodoméstico, siga precauciones
básicas, incluyendo lo siguiente
:
-
Lea todas las instrucciones antes de usar el electrodoméstico.
-
No lave artículos que hayan sido previamente limpiados en, lavados en,
remojados en, o manchados con gasolina, solventes de limpieza en seco u otras
sustancias inflamables o explosivas, ya que emiten vapores que podrían
encenderse o explotar.
-
No agregue gasolina, solventes de limpieza en seco u otras sustancias
inflamables o explosivas al agua de lavado. Estas sustancias emiten vapores que
podrían encenderse o explotar.
-
Bajo ciertas condiciones, se puede producir gas hidrógeno en un sistema de agua
caliente que no se ha utilizado durante 2 semanas o más. EL GAS HIDRÓGENO
ES EXPLOSIVO. Si el sistema de agua caliente no se ha utilizado durante tal
período, antes de usar una lavadora, abra todas las llaves de agua caliente y deje
que el agua fluya de cada una durante varios minutos. Esto liberará cualquier gas
hidrógeno acumulado. Como el gas es inflamable, no fume ni use una llama
abierta durante este tiempo
.
-
Siempre desenchufe la lavadora de la fuente de alimentación antes de intentar
cualquier servicio. Desconecte el cable de alimentación sujetando el enchufe, no
el cable.
-
Para reducir el riesgo de incendio, ropa, trapos de limpieza, cabezales de
trapeador y similares que tengan rastros de cualquier sustancia inflamable, como
aceite vegetal, aceite de cocina, aceites o destilados a base de petróleo, ceras,
grasas, etc. no deben colocarse en la lavadora. Estos artículos pueden contener
sustancias inflamables que, incluso después del lavado, pueden humear o
incendiarse
.
-
Nunca coloque artículos en la lavadora que hayan sido humedecidos con gasolina
o cualquier sustancia combustible o explosiva. No lave ni seque nada que haya
sido remojado o manchado con cualquier tipo de aceite (incluyendo aceites de
cocina). Hacerlo puede resultar en incendio, explosión o muerte
.
-
Riesgo de asfixia y lesiones por atrapamiento: No permita que los niños
jueguen en o dentro del electrodoméstico. Es necesaria la supervisión
cercana de los niños cuando el electrodoméstico se utiliza cerca de ellos
.
-
Mascotas y niños pueden trepar dentro de la máquina. Revise la máquina antes
de cada operación.
-
La puerta de vidrio o protector puede estar muy caliente durante la operación.
Mantenga a los niños y mascotas alejados de la máquina durante la operación.
-
Esta máquina no está destinada para ser utilizada por personas (incluyendo
niños) con capacidades físicas, sensoriales o mentales reducidas, o falta de
experiencia y conocimiento, a menos que se les haya dado supervisión o
instrucción respecto al uso de la máquina por una persona responsable de su
seguridad.
-
Los niños deben ser supervisados para asegurarse de que no jueguen con la
máquina.
-
Cuando los niños tengan la edad suficiente para operar el electrodoméstico, es la
responsabilidad legal de los padres o tutores legales asegurarse de que sean
instruidos en prácticas seguras por personas calificadas.

Seguridad y precauciones
Instrucciones importantes de seguridad
GUARDE ESTAS INSTRUCCIONES
04
ADVERTENCIA
-
No lave en máquina materiales de fibra de vidrio (como cortinas y cubiertas
de ventana que usen materiales de fibra de vidrio). Pequeñas partículas
pueden permanecer en la lavadora y adherirse a telas en cargas de lavado
posteriores causando irritación en la piel.
-
Antes de que el electrodoméstico sea retirado del servicio o desechado, retire la
puerta y corte el cable de alimentación
.
-
No meta la mano en el electrodoméstico si la tina o el agitador están en
movimiento.
-
No instale ni almacene este electrodoméstico donde esté expuesto a la
intemperie.
-
No manipule los controles.
-
No repare ni reemplace ninguna parte del electrodoméstico ni intente ningún
servicio a menos que esté específicamente recomendado en las instrucciones de
mantenimiento del usuario o en las instrucciones publicadas de reparación por el
usuario que usted entienda y tenga las habilidades para llevar a cabo.
-
Nunca detenga una secadora de tambor antes del final del ciclo. Una vez
finalizado el ciclo, extienda su ropa para que el calor se disipe
.
-
Desenchufe de la toma de corriente antes de la limpieza o mantenimiento.
-
Asegúrese de que todos los bolsillos estén vacíos.
-
Artículos afilados y rígidos como monedas, broches, clavos, tornillos o piedras,
etc. pueden causar daños graves a esta máquina
.
-
Desenchufe y corte el suministro de agua después de la operación.
-
Por favor verifique si el agua dentro del tambor ha sido drenada antes de abrir la
puerta. Por favor no abra la puerta si hay agua visible
,
-
No intente reparar la máquina usted mismo. La máquina puede resultar dañada o
puede ocasionar trabajos de reparación más problemáticos e incluso operaciones
peligrosas si es reparada por personal inexperto o no calificado
.
-
Si el enchufe (cable de alimentación) está dañado, debe ser reemplazado por el
fabricante o un agente de servicio para evitar cualquier peligro
.
-
Tenga cuidado de que el voltaje y la frecuencia de la energía eléctrica sean
idénticos a los de la lavadora.
-
No use ningún tomacorriente con corriente nominal inferior a la de la
lavadora.
Nunca saque el enchufe del cable de alimentación con las manos mojadas
.
-
Para garantizar su seguridad, el enchufe del cable de alimentación debe ser
insertado en un tomacorriente de tres polos con conexión a tierra. Verifique
cuidadosamente y asegúrese de que su tomacorriente esté correctamente y de
manera confiable conectado a tierra
.
-
Esta máquina solo debe ser reparada por un centro de servicio autorizado y
únicamente se pueden usar accesorios auténticos
.
-
Un electrodoméstico debe estar claramente y permanentemente marcado con
una advertencia de que el electrodoméstico está destinado para uso solo con
telas que hayan sido lavadas con agua como agente de limpieza.
-
Para reducir el riesgo de incendio, no seque artículos que contengan
gomaespuma o materiales de textura similar.
-
No use piezas de repuesto que no hayan sido recomendadas por el fabricante
(por ejemplo, piezas hechas en casa usando una impresora 3D).

Seguridad y precauciones
Instrucciones importantes de seguridad
GUARDE ESTAS INSTRUCCIONES
05
ADVERTENCIA
-
Si está conectado a un circuito protegido por fusibles, use fusibles de
retardo de tiempo con este electrodoméstico.
-
No seque artículos que hayan sido previamente limpiados en, lavados en,
remojados en, o manchados con gasolina, solventes de limpieza en seco u
otras sustancias inflamables o explosivas, ya que emiten vapores que podrían
encenderse o explotar.
-
No use suavizantes de telas o productos para eliminar la estática a menos que
lo recomiende el fabricante del suavizante o del producto.
-
No use calor para secar artículos que contengan gomaespuma o
materiales de textura similar a la goma.
El interior del electrodoméstico debe ser limpiado periódicamente por personal de
servicio calificado.
-
No coloque artículos expuestos a aceites de cocina en su secadora. Los
artículos contaminados con aceites de cocina pueden contribuir a una
reacción química que podría causar que una carga se incendie.
Seguridad y precauciones
06
Instrucciones de conexión a tierra
- Este electrodoméstico debe estar conectado a tierra. En caso de un mal
funcionamiento o avería, la conexión a tierra reducirá el riesgo de descarga
eléctrica proporcionando una ruta de menor resistencia para la corriente
eléctrica. Este electrodoméstico está equipado con un cable que tiene un
conductor de conexión a tierra del equipo y un enchufe de conexión a tierra.
El enchufe debe ser conectado a un tomacorriente apropiado que esté
debidamente instalado y conectado a tierra de acuerdo con todos los códigos
y ordenanzas locales
.
ADVERTENCIA - Una conexión inadecuada del conductor de conexión a tierra del
equipo puede resultar en descarga eléctrica. Conéctelo a un circuito derivado
individual. Consulte con un electricista calificado o técnico de servicio si tiene
dudas de si la lavadora está debidamente conectada a tierra.
NO modifique el enchufe provisto con el electrodoméstico si no encaja en el
tomacorriente. Por favor haga que un electricista calificado instale un
tomacorriente adecuado.
Antes de operar esta máquina
-
Los materiales de empaque pueden ser peligrosos para los niños. Por
favor mantenga todos los materiales de empaque (bolsas plásticas,
espumas, etc.) lejos de los niños.
-
No instale la lavadora en baños, habitaciones muy húmedas o habitaciones
que contengan gases explosivos o cáusticos.
-
Asegúrese de que el agua y los dispositivos eléctricos estén conectados por
un técnico calificado de acuerdo con las instrucciones del fabricante y las
regulaciones locales de seguridad.
-
Retire todo el empaque y los pernos de transporte de la máquina. De lo
contrario, la lavadora puede resultar seriamente dañada mientras lava la ropa
.
-
Antes de lavar la ropa por primera vez, haga funcionar la lavadora con
los ciclos de algodón y agua caliente sin ropa dentro.
-
Esta lavadora es solo para uso en interiores.
Protección de la máquina
-
No suba ni se siente sobre la tapa superior de la máquina.
-
No se apoye contra la puerta de la máquina.
-
Por favor no cierre la puerta con fuerzas excesivas. Si se encuentra difícil cerrar
la puerta, por favor verifique si se colocó ropa en exceso o si está bien distribuida.
Manipulación de la máquina
-
Los pernos de transporte deben ser reinstalados en la máquina por una persona
especializada.
-
El agua acumulada debe ser drenada de la máquina.
-
Manipule la máquina con cuidado. Nunca sostenga cada parte saliente de la máquina
mientras la levanta.
La puerta de la máquina no puede usarse como asa durante el transporte.
ADVERTENCIA
ADVERTENCIA
ADVERTENCIA
ADVERTENCIA

Seguridad y precauciones
07
Lavado de ropa
-
Conecte agua fría a la máquina. También se puede conectar agua caliente de
acuerdo con las regulaciones locales y la disponibilidad en su hogar
.
-
Su lavadora es solo para uso doméstico y está diseñada únicamente para
textiles adecuados para lavado en máquina.
ADVERTENCIA
-
Están prohibidos los solventes inflamables, explosivos o tóxicos. La gasolina
y el alcohol, etc. no deben usarse como detergentes. Por favor seleccione
únicamente los detergentes adecuados para lavado en máquina,
especialmente para carga frontal.
-
No lave alfombras con esta máquina.
-
Tenga cuidado de no quemarse cuando la lavadora drene agua caliente de lavado.
-
Nunca vuelva a llenar el agua a mano durante el lavado.
-
Después de que el programa se complete, por favor abra la puerta después de la
señal o desconecte la alimentación de la máquina.
-
Por favor recuerde desconectar el suministro de agua y energía
inmediatamente después de que la ropa esté lavada.
-
Siga siempre las instrucciones de cuidado de la tela recomendadas por el
fabricante de la ropa.
-
No use la lavadora si tiene un cable de alimentación desgastado o un enchufe
flojo. Contacte a un agente de servicio autorizado
.
-
No opere la lavadora si se han quitado protectores, paneles y/o sujetadores
excepto los pernos de fijación de transporte. Verifique regularmente las
conexiones de la manguera de llenado para asegurarse de que estén ajustadas y
no tengan fugas.
-
No opere la lavadora si faltan piezas o están rotas.
-
No toque la puerta si lava a altas temperaturas.
Nota:
-
Las protecciones y advertencias importantes indicadas en este manual no
cubren todas las condiciones posibles que puedan ocurrir. Deben ejercerse
sentido común, precaución y cuidado al instalar, mantener u operar la
lavadora.
-
Siempre contacte a su distribuidor, concesionario, agente de servicio o
al fabricante acerca de cualquier problema o condición que no entienda.
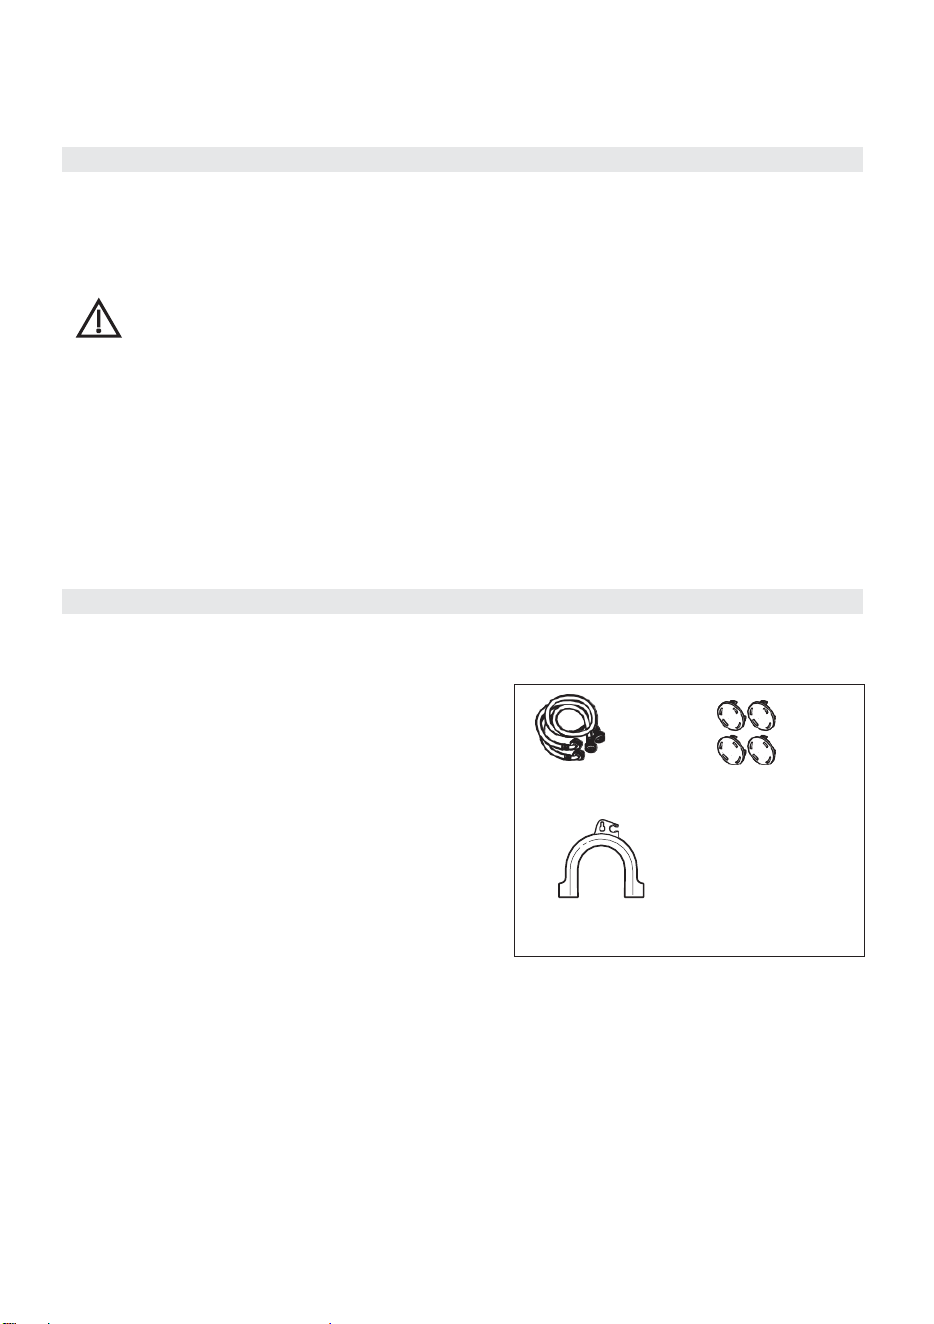
Requisitos de instalación
08
Requisitos de instalación
1.
Esta máquina debe estar conectada a tierra adecuadamente. Si hay algún
cortocircuito, la conexión a tierra puede reducir el peligro de descarga
eléctrica.
Esta máquina está equipada con cable de alimentación, que incluye enchufe, cable de
conexión a tierra en el terminal de tierra.
2.
La lavadora debe ser operada en un circuito separado de otros electrodomésticos. De
lo contrario, el protector de energía puede dispararse o un fusible puede quemarse.
ADVERTENCIA
El incumplimiento de estas advertencias podría resultar en lesiones personales graves.
Nota: protección ambiental
-
Si planea desechar esta máquina, por favor cumpla con las regulaciones
locales de eliminación de desechos. Corte el cable de alimentación para que
no pueda reutilizarse.
Retire la puerta para que los niños y animales no queden atrapados en la máquina.
-
No use una cantidad excesiva de detergente.
-
El descontaminante y el blanqueador pueden usarse para pretratar las
manchas en la ropa solo cuando sea muy necesario.
Herramientas y piezas
Reúna las herramientas y piezas requeridas antes de comenzar la instalación. Las
piezas suministradas están en el tambor de la lavadora.
Destornillador de tuercas de 1/4"
Llave de vaso de 3/8" con trinquete
Llave de boca de 3/8"
Llave ajustable o llave de vaso de 7/16" con
trinquete
Llave ajustable o llave de boca de 9/16"
Pinzas ajustables tipo canal
Nivel de carpintero
Mangueras Tapón de orificio
de agua (2) de transporte
Guía de manguera
de drenaje
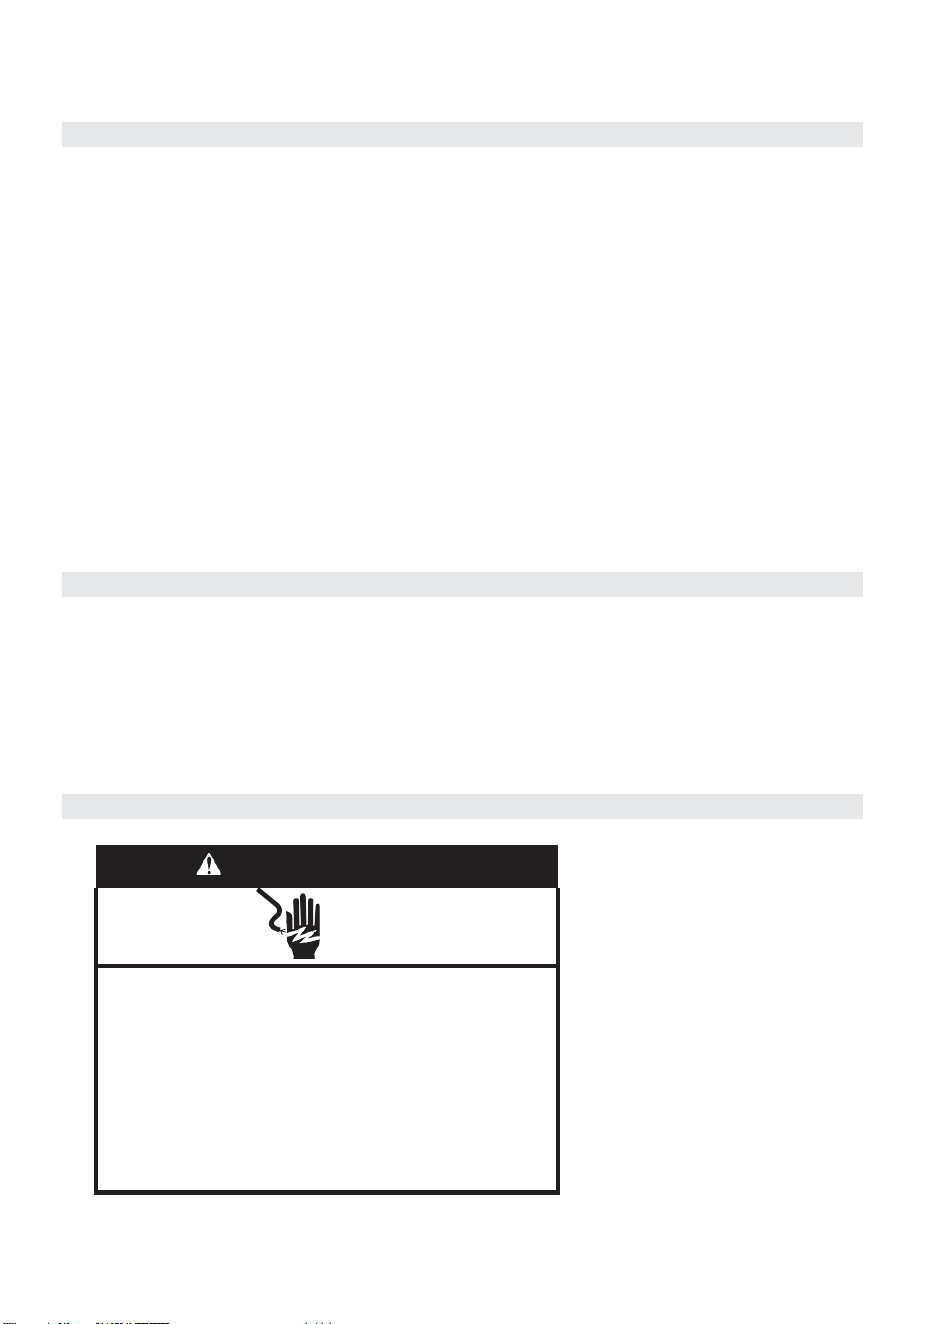
Requisitos de instalación
09
Requisitos de ubicación
Seleccionar la ubicación adecuada para su lavadora mejora el rendimiento y minimiza el ruido y
el posible “movimiento” de la lavadora. Su lavadora puede instalarse debajo de un mostrador
personalizado, o en un sótano, cuarto de lavado, armario o área empotrada. Véase “Sistema de
Drenaje”. También deben considerarse los requisitos de ubicación del electrodoméstico
complementario. La instalación adecuada es su responsabilidad.
Usted necesitará
1.
Un calentador de agua ajustado para entregar agua a 1200 F (490 C) a la lavadora.
2.
Un tomacorriente con conexión a tierra ubicado dentro de 6 ft. (1.8 m) de donde el cable de
alimentación está conectado en la parte trasera de la lavadora. Véase “Requisitos Eléctricos”.
3.
Llaves de agua caliente y fría ubicadas dentro de 4 ft. (1.2 m) de las válvulas de llenado de agua
caliente y fría, y presión de agua de 20-100 psi (137.9-689.6 kPa).
4.
Un piso nivelado con una pendiente máxima de 1" (25 mm) bajo toda la lavadora. No se
recomienda instalar la lavadora sobre superficies de piso suaves, como alfombras o superficies
con respaldo de espuma.
5.
Un piso resistente y sólido para soportar la lavadora, que tiene un peso total (agua y carga)
de 200 lbs.
6.
No opere su lavadora en temperaturas por debajo de 320 F (00 C). Algo de agua puede
permanecer en la lavadora y puede causar daños a bajas temperaturas.
Espacios de instalación
1.
La ubicación debe ser lo suficientemente grande para permitir que la puerta de la lavadora se
abra completamente.
2.
Debe considerarse un espacio adicional para facilitar la instalación y el servicio. La puerta se
abre más de 900, y no es reversible.
3.
Pueden requerirse espacios adicionales para molduras de pared, puerta y piso.
4.
Se recomienda un espacio adicional de 25 mm en todos los lados de la lavadora para reducir la
transferencia de ruido
.
5.
También debe considerarse el espacio de los electrodomésticos complementarios.
Requisitos eléctricos
ADVERTENCIA
Peligro de descarga eléctrica
Conecte a un tomacorriente con conexión a tierra de 3
clavijas con un circuito derivado individual de 12 amperios
protegido por un disyuntor de 12 amperios.
Conecte a un circuito derivado individual.
No retire la clavija de tierra.
No use un adaptador.
No use un cable de extensión.
El incumplimiento de estas instrucciones puede resultar en
descarga eléctrica, incendio o muerte.
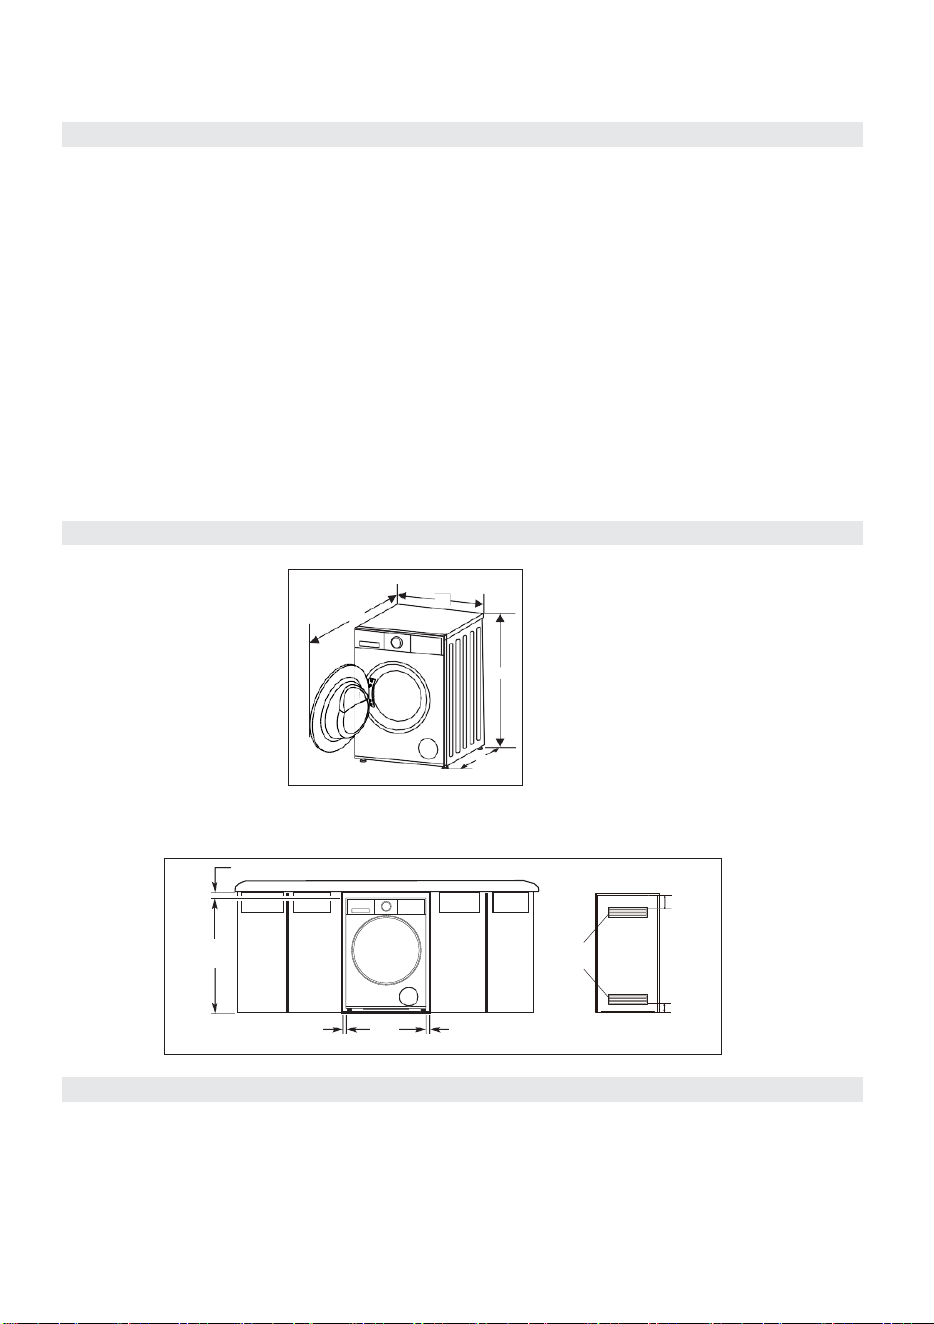
Requisitos de instalación
10
23
54
/
127"
(595mm )
43
89
/
127
"
(1110mm)
33
34
/
127
"
(845mm)
24
27
/
127
"
(615mm )
2
"
(50 mm)
3
"
(76mm)
33
34
/
127
"
min
.
(845 mm)
60 sq in.
(38700mm
2
)
3
"
(76mm)
1
"
23
54
/
127
"
(25mm)
(595mm)
1
"
(25mm)
Requisitos eléctricos
1.
Se requiere un suministro eléctrico de 120V, 60 Hz, solo CA, de 15 o 20 amperios, con
fusible. Use un fusible de retardo de tiempo o un circuito que sirva solo a este
electrodoméstico
.
2.
Esta lavadora está equipada con un cable de alimentación con un enchufe de conexión a
tierra de 3 clavijas.
3.
Para minimizar el posible riesgo de descarga, el cable debe estar enchufado en un
tomacorriente compatible, de 3 clavijas, tipo conexión a tierra, conectado a tierra de
acuerdo con los códigos y ordenanzas locales.
Si no hay un tomacorriente compatible disponible, es la responsabilidad y obligación
personal del cliente hacer que un electricista calificado instale el tomacorriente
debidamente conectado a tierra
.
4.
Si los códigos lo permiten y se usa un cable de tierra separado, se recomienda que un
electricista calificado determine que la ruta de tierra sea adecuada
5.
No conecte a tierra a una tubería de gas
6.
Consulte con un electricista calificado si no está seguro de que la lavadora esté
debidamente conectada a tierra.
7.
No coloque un fusible en el circuito neutro o de tierra
.
Dimensiones de la lavadora
Las dimensiones mostradas son para el espacio recomendado. Instalación personalizada bajo
mostrador
Desempaque de la lavadora
Desempaque su lavadora y verifique si hay algún daño durante el transporte. Asegúrese
también de que todos los artículos (como se muestra en “Herramientas y piezas”) en la bolsa
adjunta sean recibidos. Si hay algún daño en la lavadora durante el transporte, o falta algún
artículo, por favor contacte al distribuidor local inmediatamente.
.
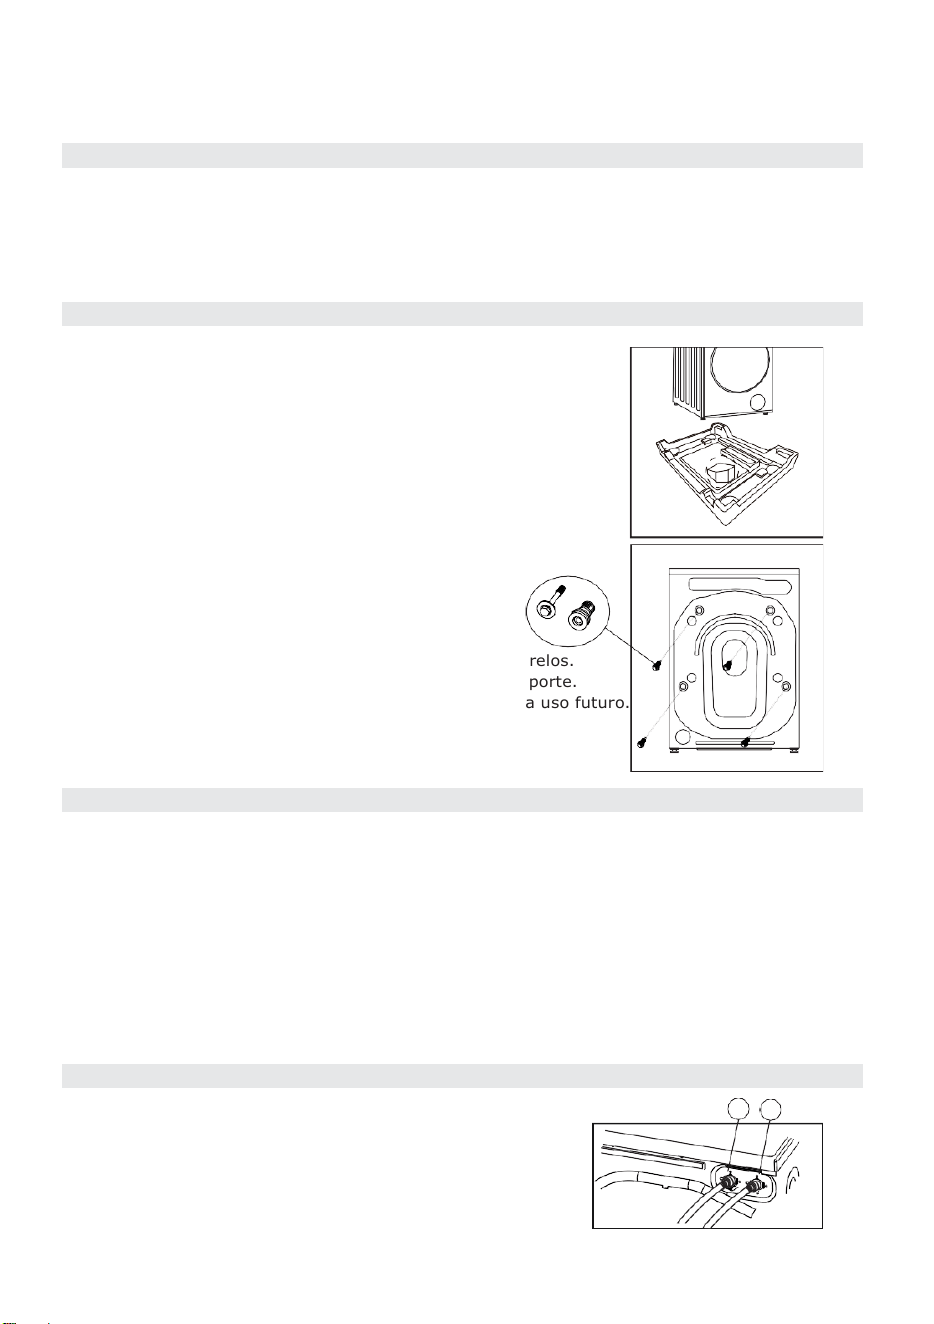
11
Instrucciones de instalación
Desecho de los materiales de empaque
Los materiales de empaque de esta máquina pueden ser peligrosos para los niños.
Por favor deséchelos adecuadamente y evite el fácil acceso de los niños. Por favor
deseche los materiales de empaque relacionados de acuerdo con las regulaciones
locales correspondientes. Por favor no tire los materiales de empaque junto con la
basura diaria.
Retire la espuma y los pernos de transporte
Retire toda la espuma de la máquina. En la parte
inferior de la unidad, hay un triángulo pequeño de
espuma adicional que debe retirarse. Verifique si el
triángulo pequeño fue retirado con la espuma en la
parte inferior de la unidad. Si no ve el triángulo,
acueste la unidad de lado para retirar el triángulo
pequeño de espuma manualmente
.
Antes de usar la lavadora, los pernos de transporte
deben ser retirados de la parte trasera de la
máquina. Por favor siga los siguientes pasos para
retirar los pernos:
1.
Afloje todos los pernos y espaciadores de plástico
(incluyendo ojales de goma) con una llave, luego retírelos.
2.
Cubra los orificios con los tapones de orificio de transporte.
3.
Guarde los pernos de transporte adecuadamente para uso futuro.
Seleccione la ubicación
Por favor instale la lavadora en una ubicación con las siguientes características:
-
Superficie rígida, seca y nivelada (si no está nivelada, por favor vea la sección
Nivelar la lavadora para más instrucciones).
-
Evite la luz solar directa.
-
Ventilación suficiente.
-
Temperatura ambiente por encima de 5℃.
-
Lejos de fuentes de calor tales como carbón o gas.
Asegúrese de que la lavadora no quede sobre el cable de alimentación.
No instale la lavadora sobre un piso alfombrado.
Conecte la manguera de entrada
Conecte la manguera de entrada como se indica en la figura.
Si aplica, por favor conecte la válvula de agua caliente a un
grifo de agua caliente.
La manguera de entrada de agua caliente está etiquetada
con "H" y la manguera de entrada de agua fría está
etiquetada con "C".
H
C
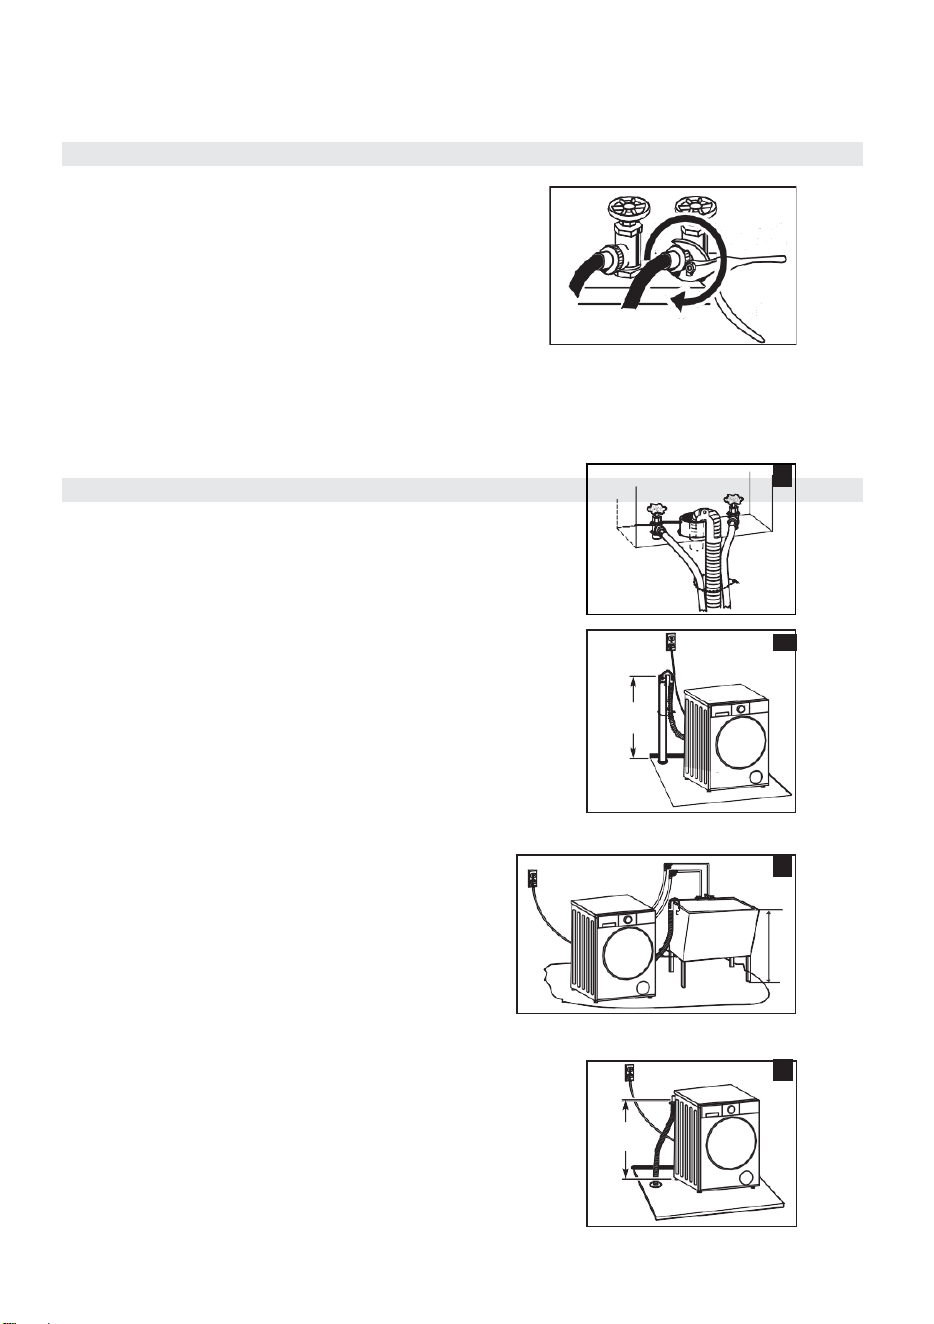
12
Instrucciones de instalación
Conecte la manguera de entrada
1.
Conecte el codo de la manguera de entrada al grifo y
ajústelo en el sentido de las agujas del reloj
.
2.
Conecte los otros extremos de las mangueras de
entrada a las válvulas de entrada en la parte trasera
de la lavadora.
Ajuste la manguera firmemente en el sentido de las
agujas del reloj.
Nota: si hay alguna fuga después de la conexión, por favor repita los pasos anteriores para
asegurarse de que las conexiones de la manguera de entrada estén firmes. La manguera de
entrada provista debe ser compatible con el tipo de grifo más común. Si el grifo es demasiado
cuadrado o demasiado grande para conectarse a la manguera de entrada, por favor cambie el
grifo a un modelo estándar
.
Opciones de sistema de drenaje
Sistema de drenaje de tubo vertical - pared o piso
(vistas A y B).
El tubo vertical de drenaje requiere un diámetro mínimo de
2" (50 mm). La capacidad mínima de desagüe no puede ser
menor de 17 gal. (64 L) por minuto. La parte superior del
tubo vertical debe estar entre 60-100 cm de altura
(medidos desde la parte inferior de la lavadora).
Sistema de drenaje de tina de lavandería (vista C).
La tina de lavandería necesita una capacidad mínima
de 20 gal. (76 L). La parte superior de la tina de
lavandería debe estar al menos a 60 cm sobre el
piso.
Sistema de drenaje de piso (vista D).
El sistema de drenaje de piso requiere un rompe-sifón
que puede ser comprado por separado. Por favor vea la
sección
Herramientas y Piezas
para más información.
El rompe-sifón debe estar a un mínimo de 28" (710 mm)
desde la parte inferior de la lavadora.
Pueden necesitarse mangueras adicionales.
A
B
Max 100cm
Min 60cm
C
D
28
"
min
.
(710 mm)
Min.60cm
Max.100cm
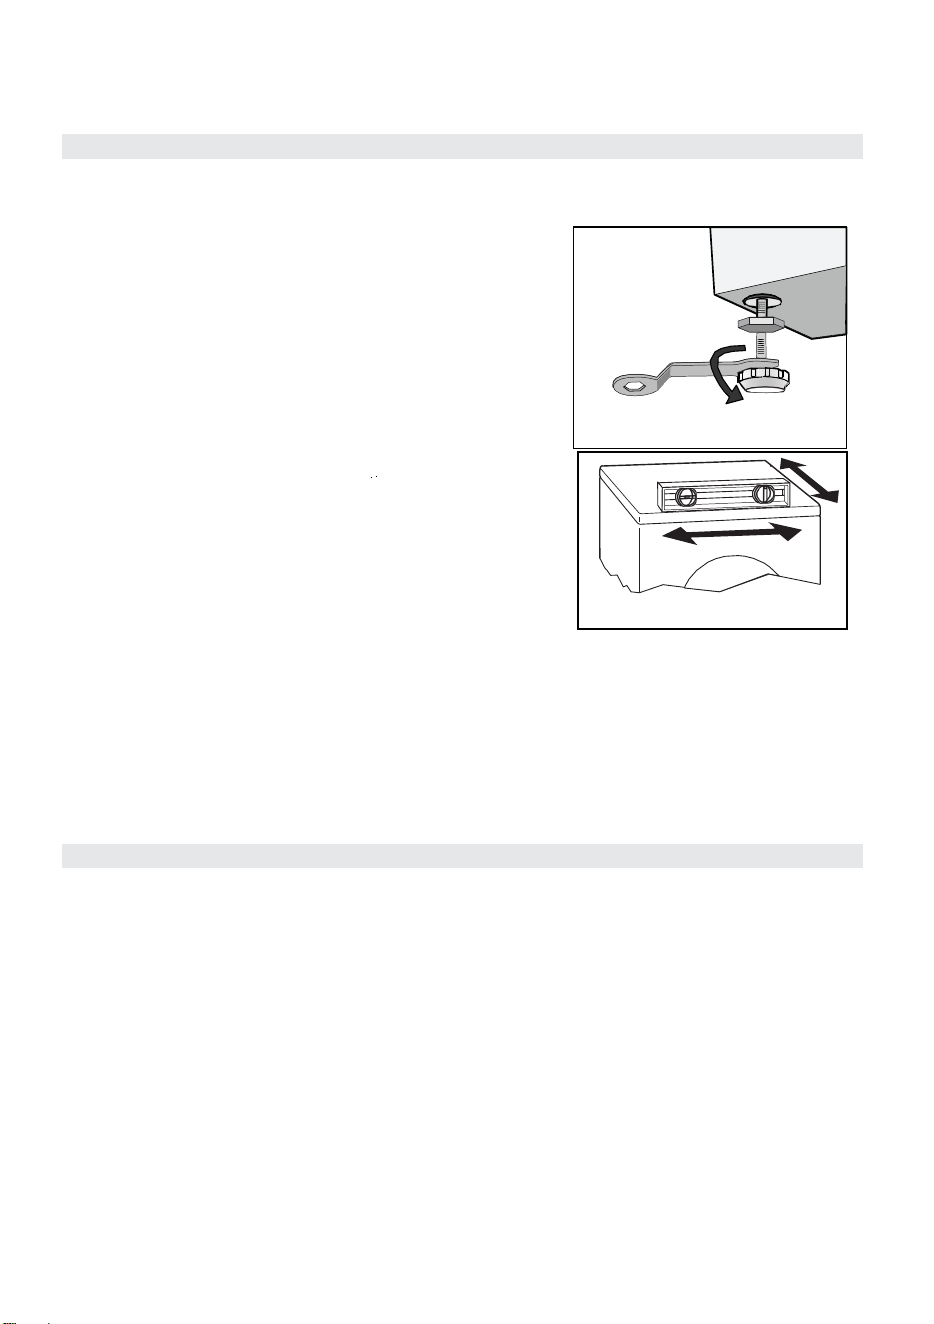
Instrucciones de instalación
13
Nivelar la lavadora
1.
Al colocar la lavadora, por favor primero verifique si las
patas están firmemente sujetas al gabinete de la
lavadora. Si no lo están, use sus manos o una llave para
girarlas a sus posiciones originales, luego vuelva a
ajustar las tuercas con una llave
.
2.
Después de colocar la lavadora, verifique si las patas
están estables presionando cada una de las cuatro
esquinas de la máquina. Si la lavadora se tambalea
cuando presiona hacia abajo una de las esquinas,
ajuste la pata de esa esquina
.
3.
Bloquee las patas de la lavadora en su lugar. Afloje la
contratuerca con una llave y gire la pata con su mano
hasta que toque el piso. Sostenga la pata estable con una
mano mientras ajusta firmemente la contratuerca al
gabinete.
4.
Después de que todas las patas estén bloqueadas,
presione nuevamente las cuatro esquinas de la
máquina, una por una. Si alguna de las esquinas aún
está inestable, repita los Pasos 2 y 3.
5.
Coloque un cilindro sólido (por ejemplo, una lata de refresco) en un borde de la tapa superior
de la lavadora. Repita en los cuatro lados. Si el cilindro se mantiene estable, la lavadora está
nivelada. Si rueda hacia abajo, la lavadora no está nivelada. El cilindro rodará en dirección al
terreno más bajo. Levante las dos patas en la dirección hacia la cual rodó el cilindro hasta que
la lavadora esté nivelada. Repita los Pasos 1-3 para asegurarse de que las patas inferiores
estén firmes contra el suelo y las contratuercas estén ajustadas firmemente
.
Conexión eléctrica
-
Como la corriente máxima a través de la unidad es de 12A cuando está usando su
función de calentamiento, por favor asegúrese de que el sistema de suministro
eléctrico (corriente, voltaje de energía y cable) en su hogar pueda cumplir con los
requisitos normales de carga del electrodoméstico.
-
Por favor conecte la energía a un tomacorriente que esté correctamente instalado y adecuadamente
conectado a tierra.
-
Asegúrese de que el voltaje eléctrico en su hogar sea el mismo que el voltaje en la etiqueta de
especificaciones de la máquina.
-
El enchufe de alimentación debe coincidir con el tomacorriente y el gabinete debe estar
correctamente y efectivamente conectado a tierra.
-
No use un enchufe o tomacorriente multipropósito como cable de extensión.
-
No conecte ni saque el enchufe con las manos mojadas.
-
Al conectar y sacar el enchufe, sujete firmemente el enchufe y luego sáquelo.
No tire del cable de alimentación con fuerza.
-
Si el cable de alimentación está dañado o muestra alguna señal de estar roto, se debe
seleccionar o comprar un cable de alimentación especial del fabricante o del centro de
servicio para reemplazo
.
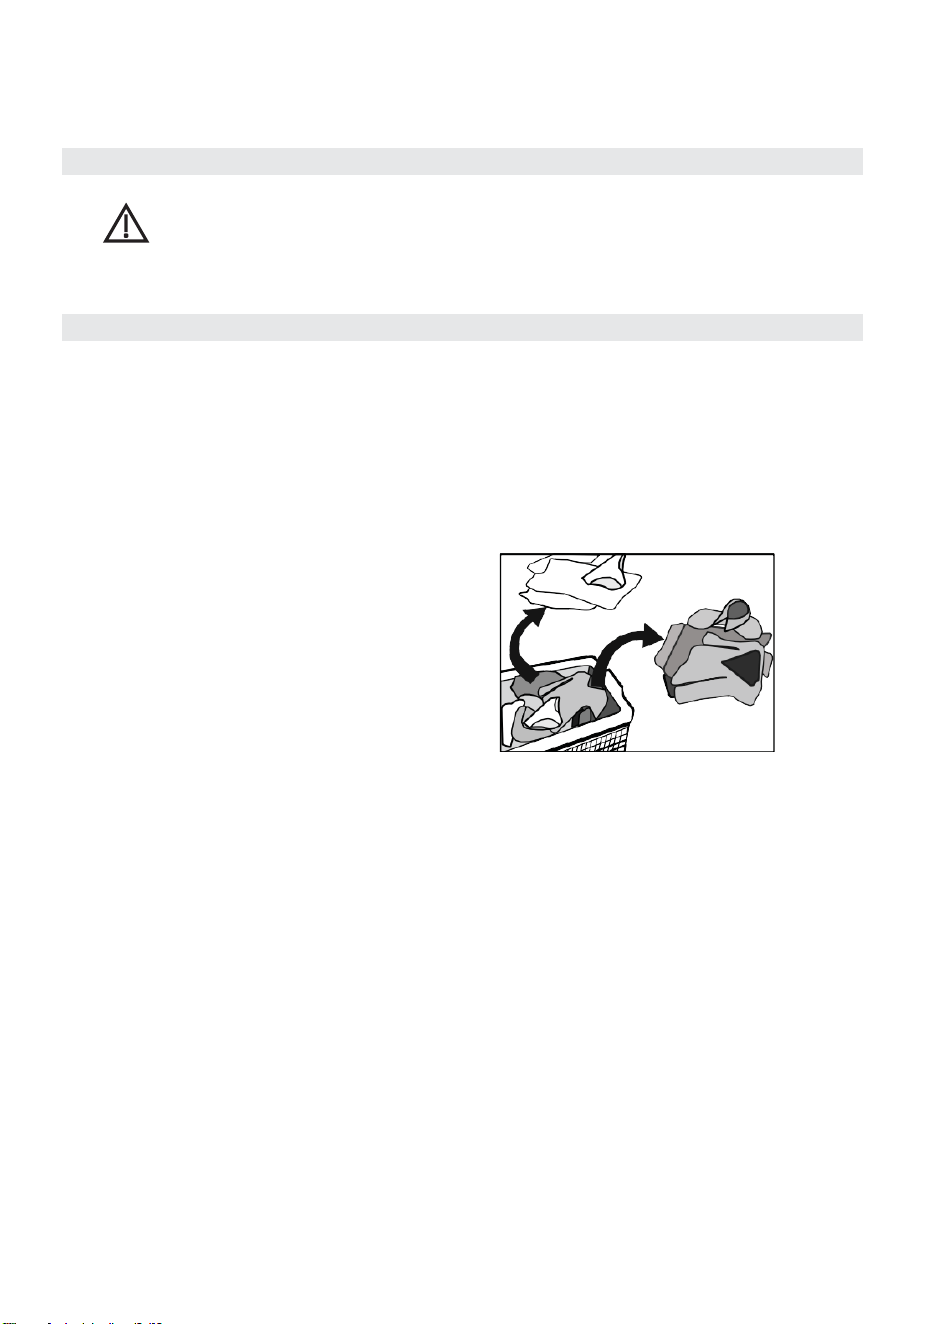
Instrucciones de operación
14
Instrucciones de operación
ADVERTENCIA – Para reducir el riesgo de incendio, descarga
eléctrica o lesiones a las personas, lea estas IMPORTANTES
INSTRUCCIONES DE SEGURIDAD antes de operar este
electrodoméstico
.
ADVERTENCIA
Preparación antes de lavar la ropa
Por favor lea estas instrucciones cuidadosamente para evitar daños a su lavadora o a la ropa.
Verifique si la ropa nueva perderá su color.
Vierta una cucharadita de detergente líquido sobre una toalla blanca húmeda. Frote una esquina no
visible de la prenda con la toalla, luego verifique si la toalla está manchada con el color original de la
prenda
.
Lave a mano las bufandas y otras prendas que fácilmente podrían perder color por separado antes
de ponerlas en la lavadora.
Cepille suavemente las manchas en cuellos,
mangas y bolsillos con detergente líquido antes
de lavar a máquina para obtener los mejores
resultados.
Lave la ropa sensible a la temperatura de
acuerdo con sus etiquetas de lavado para evitar
cambios de color o deformaciones.
Tenga en cuenta:
Nunca deje la ropa en la lavadora por un período
largo de tiempo. Si no lava la ropa a tiempo, la
ropa puede enmohecerse y desarrollar manchas.
Ropa que no puede ser lavada en la lavadora.
Las corbatas, chalecos, trajes y chaquetas pueden encogerse o dañarse si se sumergen
en agua. La ropa compuesta de fibras mixtas y sintéticas también puede verse afectada
por el sangrado de color. Por favor verifique las etiquetas de cuidado de la ropa antes
de lavar a máquina las prendas.
Los volantes y arrugas intencionales, los detalles en relieve y la resina en las prendas pueden
dañarse al sumergirse en agua. La seda, los productos de piel y las decoraciones de piel también
se dañan fácilmente. La ropa con muchos detalles decorativos, los vestidos largos y la ropa teñida
tradicionalmente pueden sufrir pérdida de color.
Por favor no lave ropa sin etiquetas de cuidado y requisitos de lavado.
Nunca lave ropa manchada con químicos como gasolina, petróleo, benceno, disolvente de pintura
y alcohol.

Instrucciones de operación
Preparaci
ó
n antes de lavar la ropa
15
Por favor preste atención respecto a los detergentes
Seleccione detergente de baja espuma, detergente en polvo o detergente especial para lavado en
tambor de acuerdo con los tipos de fibra (algodón, fibra sintética, productos delicados y productos
de lana), colores, temperaturas de lavado, grados de suciedad y tipos de prendas. Elegir el
detergente incorrecto puede causar exceso de espuma y desbordamiento, junto con otros
accidentes similares.
El blanqueador es altamente alcalino y puede dañar la ropa. Por favor use la menor cantidad
posible de blanqueador.
Los detergentes en polvo pueden dejar fácilmente residuos en la ropa, lo que puede causar malos
olores, así que por favor asegúrese de que estén suficientemente enjuagados.
El detergente no se disolverá fácilmente si hay demasiado detergente o la temperatura del agua es
demasiado baja. El detergente residual puede permanecer en la ropa, tuberías y lavadora. Por
favor asegúrese de usar la cantidad correcta de detergente.
La cantidad de detergente debe determinarse por el peso de la ropa, la limpieza de la ropa y la
dureza del agua local, así como por las recomendaciones de los fabricantes de detergentes. Por
favor consulte a su compañía local de agua si no conoce la dureza de su agua.
Nota:
Mantenga detergentes y aditivos en lugares seguros y secos, fuera del alcance de los niños
.
Por favor retire los artículos de los bolsillos.
Por favor revise los bolsillos de la ropa que se va a lavar y vacíelos de artículos rígidos, como
adornos o monedas, para evitar un funcionamiento anormal o daños a la lavadora
.
Separe la ropa de acuerdo con las siguientes características:
Tipo de fibra: Las etiquetas de cuidado de la ropa usarán símbolos para representar
algodón, fibra mixta, fibra sintética, seda, lana y fibra artificial.
Color: Separe ropa blanca y ropa de color. Toda ropa de color nueva debe lavarse por
separado.
Tamaño: Las prendas de diferentes tamaños deben lavarse juntas para un lavado más
efectivo.
Sensibilidad: La ropa delicada y suave debe lavarse por separado. Seleccione el ciclo
DELICADOS para prendas nuevas de lana pura, cortinas, sedas y otros artículos delicados.
Verifique las etiquetas de cuidado de todas las prendas.
Revise la ropa y retire todos los ganchos de las cortinas antes de lavarlas.
Los adornos de la ropa pueden dañar la lavadora. Dé la vuelta a la ropa con botones o
bordados antes de lavar.
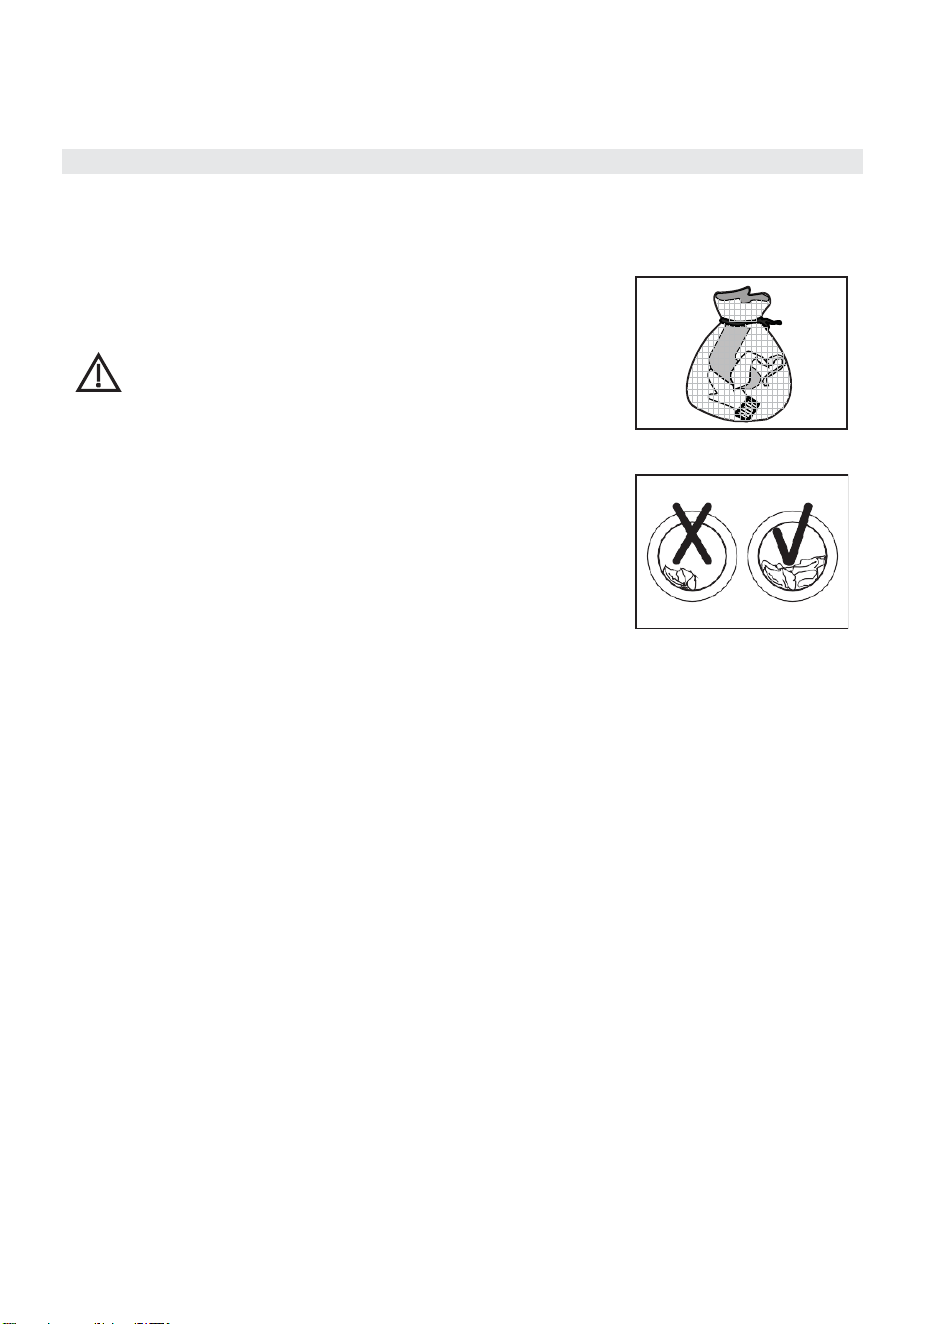
Instrucciones de operación
Preparaci
ó
n antes de lavar la ropa
16
Ordene los sujetadores:
Cierre cremalleras, ate las bandas o cintas sueltas, y cierre ganchos, botones y otros
sujetadores antes de lavar.
ADVERTENCIA
Abroche todos los ganchos, botones o
cremalleras de los sostenes y colóquelos en
una bolsa de delicados cerrada para evitar
que los aros de acero dañen la máquina.
Coloque las prendas especialmente delicadas,
tales como cortinas de encaje, camisas de
fuerza y artículos pequeños (pantimedias,
pañuelos, corbatas, etc.), en una bolsa de
delicados para lavarlas.
Al lavar una prenda grande y pesada, como toallas
turcas, jeans, chaquetas acolchadas, etc., la
lavadora puede comportarse de manera anormal
debido a la falta de balance. Por favor agregue una
o dos prendas más y lávelas juntas para asegurar
que la máquina drene sin problemas.
Limpie el polvo, las manchas y el pelo de mascotas antes de lavar.
El exceso de polvo, manchas y pelo de mascotas puede causar fricción que dañe la ropa e impida que la
lavadora funcione normalmente.
Para proteger la piel del bebé.
Los artículos para bebé (ropa de bebé y toallas), incluyendo pañales, deben lavarse por separado.
La ropa de bebé puede volverse insalubre si se lava junto con la ropa de adultos. Aumente el tiempo de
enjuague para asegurar un enjuague y limpieza completos sin residuos de detergente.
Para obtener los mejores resultados, lave a mano las partes de la ropa que se ensucian fácilmente,
como calcetines blancos, cuellos y mangas, antes de lavar a máquina.
Por favor use detergente en polvo o líquido. El jabón podría dejar residuos en la ropa si se usa.
La ropa que forma bolitas fácilmente debe darse la vuelta antes de lavar.
La ropa que forma bolitas fácilmente debe lavarse por separado para evitar que deje hilos
y residuos en otras prendas. La ropa negra y la ropa de algodón deben lavarse por
separado, porque pueden recoger fácilmente hilos y residuos de tela si se lavan juntas. Por
favor verifique antes de lavar
.
No lave materiales impermeables (trajes de esquí, manteles individuales, cortinas de baño)
con la lavadora. No lave a máquina ropa que no pueda absorber fácilmente el agua, o puede
haber riesgo de desbordamiento, vibración anormal o daño a su ropa durante el enjuague y el
drenaje. No lave manteles individuales, impermeables, paraguas, trajes de esquí, cubiertas de
automóvil o sacos de dormir en la lavadora.
Precauciones durante el drenaje.
Normalmente, el agua del lavado se drena a través del orificio de drenaje. Si se lavan artículos
impermeables en la lavadora, el agua puede acumularse o estancarse en una dirección diferente,
impidiendo el drenaje y desbalanceando la lavadora.

Program
Programas con configuraciones
preseleccionadas están disponibles
para su conveniencia.
Ajustes de función
Presione los botones para ajustar la temperatura
del agua, tiempo de lavado, nivel de suciedad,
velocidad de centrifugado y otras opciones.
Start/Pause
Presione el botón para
iniciar o pausar el ciclo de
lavado.
Notas: 1. El diagrama del Panel de Control es solo de referencia. Por favor tome la apariencia del producto real como el estándar.
2. El diseño y las especificaciones de este producto están sujetos a cambios sin previo aviso por escrito. Consulte nuestro
sitio web para más detalles o llame a la línea de servicio para asistencia.
POWER
Presione para encender la
lavadora. Presione nuevamente
para apagar la lavadora.
Pantalla
Delay Door Kock Wireless Network
Steam
Instrucciones de operaci
ó
n
P a n e l de co n t r o l
17

Instrucciones de operación
18
Panel de control
Ciclos y opciones
-
QUICK WASH
Programa extra corto adecuado para ropa ligeramente sucia, como pequeñas cantidades de ropa.
-
DELICATES
Para textiles delicados y lavables, por ejemplo, seda, satén, fibras sintéticas o telas mixtas.
-
WHITES
Ciclo especial para ropa blanca.
-
RINSE&SPIN
Enjuague adicional con centrifugado.
-
SPIN ONLY
Centrifugado adicional con velocidad de centrifugado seleccionable.
-
TUB CLEAN
Este programa está específicamente configurado para limpiar el tambor y el tubo. Esterilización a
alta temperatura para hacer el lavado en máquina más ecológico. No agregue ropa ni otra colada
durante la función Tub Clean. Los clientes pueden usar la función Tub Clean regularmente según
sea necesario.
-
NORMAL
Para textiles resistentes al desgaste y al calor hechos de algodón o lino.
-
HEAVY DUTY
Para lavar ropa pesada como edredones o toallas.
- TOWELS
Optimizado para toallas. Usa una temperatura de agua más alta y un lavado más fuerte para
eliminar la suciedad y asegurar una limpieza completa.
-
ACTIVE WEAR
Optimizado para ropa deportiva.
-
DEEP CLEAN
Limpia profundamente la suciedad y las manchas de manera efectiva.
-
MY CYCLE
Usando la aplicación SmartHome, puede descargar ciclos adicionales para su electrodoméstico. El
panel de control ofrece un número limitado de ciclos, pero la aplicación proporciona una selección
más amplia. Usted puede seleccionar un ciclo en la aplicación y aplicarlo directamente al
electrodoméstico. El ciclo predeterminado es DENIM.
-
DENIM
Un programa de lavado especializado diseñado para telas de mezclilla. Asegura una limpieza completa
mientras preserva el color y la textura de sus jeans y otras prendas de mezclilla.
-
ECO COLD
Un programa de lavado de ahorro de energía que usa agua fría para limpiar la ropa de manera eficiente
mientras reduce el consumo de energía
.
-
JUICE&FOOD STAINS
Un programa de lavado dirigido a eliminar efectivamente manchas difíciles de jugo, manchas de comida
y otros residuos orgánicos
.
-
OVERNIGHT WASH
Un programa de lavado silencioso y eficiente diseñado para uso nocturno, asegurando ropa limpia por la
mañana.
-
SINGLE ITEM/SMALL LOAD
Un programa de lavado rápido y eficiente diseñado para prendas individuales o cargas pequeñas,
ahorrando tiempo y energía.
-
SWEAT STAINS
Diseñado para eliminar manchas de sudor y olores, asegurando que su ropa se mantenga fresca y
limpia.
- SWIM WEAR
Un programa de lavado suave diseñado para ropa de baño y telas delicadas, usando baja temperatura y
lavado suave para proteger los materiales elásticos.
-
PERM PRESS
Un programa configurado para lavar a fuerza moderada. Esta función puede usarse para reducir las
arrugas de la ropa.
-
COLORS/DARK
Optimizado para lavar telas de colores y oscuras, preservando la viveza y evitando la decoloración.

Instrucciones de operación
19
Panel de control
-DEEP WASH
Proporciona limpieza intensiva para telas muy sucias, asegurando un lavado completo.
Estos programas (DENIM/ ECO COLD/ JUICE&FOOD STAINS/ OVERNIGHT WASH/ SINGLE ITEM/
SMALL LOAD/ SWEAT STAINS/ SWIM WEAR/ PERM PRESS/ COLORS/DARK/ DEEP WASH) solo
pueden seleccionarse mediante la aplicación SmartHome en su teléfono móvil
.
Funciones especiales
-Ctrl Lock ( Child Lock )
Use esta función para evitar que los niños operen la máquina durante un procedimiento de lavado.
Cuando se selecciona Child Lock, solo funciona el botón Power. Usted podrá encender/apagar, pero
no podrá seleccionar ni ajustar ninguna función de lavado
.
Después de que la máquina haya comenzado un ciclo de lavado, presione los botones Temp y
Soil y manténgalos presionados durante tres segundos. El timbre sonará cuando se active el
Child Lock, bloqueando el botón Start/Pause y los selectores de función y ciclo. Presione y
mantenga presionados Temp y Soil nuevamente para desbloquear y desactivar Child Lock.
Child Lock permanecerá incluso si la máquina se apaga y se enciende nuevamente. La función
Child Lock no se desbloqueará (a menos que se desactive manualmente) hasta que el ciclo de
lavado se complete.
-Delay
La función Delay le permite retrasar el inicio de un ciclo de lavado hasta por 24 horas.
Configure la función
Delay
:
1.
Seleccione un ciclo de lavado.
2.
Presione el botón Delay para elegir el tiempo de retraso dentro de un rango de 0-24 horas.
3.
Presione Start/Pause para iniciar el temporizador Delay. Una vez que el temporizador llegue a
cero, el ciclo de lavado comenzará.
Cancele la función Delay:
Antes de iniciar un ciclo de lavado, presione el botón
Delay
hasta que la pantalla muestre 0H.
Si el ciclo de lavado ya ha comenzado, presione el botón
POWER
.
Notas:
si hay un corte de energía mientras la lavadora está en operación, el ciclo y las
opciones seleccionadas serán recordados. Cuando se restablezca la energía, la máquina
continuará con el tiempo restante en el ciclo.
-
Add a garment
Pueden agregarse prendas adicionales durante un ciclo de lavado. Por razones de seguridad, la
puerta de la lavadora no puede abrirse mientras el tambor esté girando y haya una gran cantidad
de agua a alta temperatura dentro.
Para agregar ropa, siga los pasos a continuación:
1.
Presione Start/Pause durante 3 segundos.
2.
Espere hasta que el tambor se detenga. La cerradura de la puerta se desbloqueará.
3.
Cargue su ropa adicional y cierre la puerta.
4.
Presione nuevamente el botón Start/Pause para reanudar el ciclo de lavado.
- Extra Rinse
Presione para seleccionar la función Extra Rinse.
- Soil
Presione para seleccionar diferentes niveles de suciedad (de ligero a pesado).
El tiempo de lavado aumentará o disminuirá dependiendo del nivel de suciedad.
- Temp Presione para seleccionar la temperatura (de fría a caliente).
- Spin
Presione para cambiar la velocidad de centrifugado (de sin centrifugado a alta).
- Pre wash
Presione para agregar un lavado adicional antes del ciclo de lavado principal. Esta
función es ideal para polvo y suciedad en la superficie de la ropa. Agregue detergente al
Compartimiento I (etiquetado en la imagen a continuación) cuando use esta función.
- Steam
Seleccione para reducir las arrugas de la ropa.
- Options
Presione [Options] para seleccionar “Pre Wash” y “Extra Rinse”.
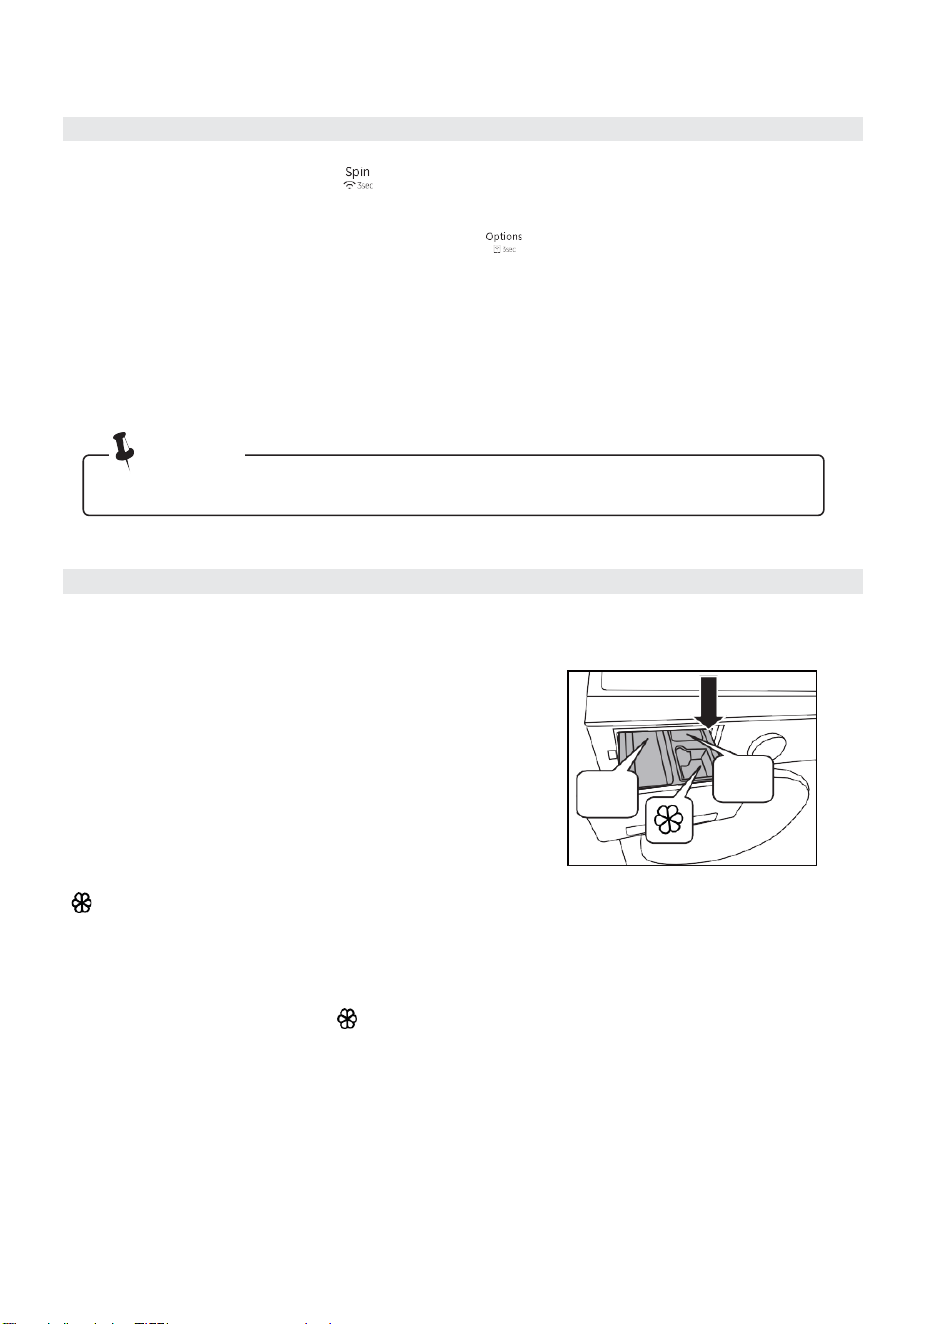
Instrucciones de operación
20
Ⅱ
Ⅰ
¡Nota!
•
Para más detalles de cómo conectar la red inalámbrica, por favor revise “Configuración y
operación de la aplicación”.
La función especial
-Wireless Network
Presione [
] durante 3 segundos para conectar la lavadora a internet
mediante la aplicación de teléfono inteligente. Vaya a los ajustes, encienda la conexión
inalámbrica y seleccione un AP (Punto de Acceso
).
-Remote Control
Después de mantener presionado [
] durante 3 segundos, el ícono del
teléfono móvil se iluminará en la máquina, indicando que ha entrado en el estado de control remoto.
El control remoto por teléfono inteligente debe cumplir las siguientes condiciones
:
1.
El electrodoméstico debe estar conectado a internet.
2.
La puerta del tambor debe estar cerrada.
Observación:
-. Si la puerta se abre en cualquier momento, la función de control remoto se desactivará.
-. La función de control remoto se desactivará automáticamente al final de cada ciclo. Usted debe
reactivar manualmente la función de control remoto para usarla nuevamente
.
Lavar ropa por primera vez
Antes de lavar, por favor asegúrese de que la máquina esté instalada correctamente. Su
electrodoméstico fue revisado minuciosamente antes de salir de fábrica. Para eliminar
cualquier agua residual y neutralizar olores potenciales, se
recomienda limpiar su electrodoméstico antes del primer
uso. Por esta razón, recomendamos que limpie el tambor
interior ejecutando el Tub Clean u otro programa a alta
temperatura antes de usar. No agregue ropa ni detergente
cuando ejecute el programa Tub Clean.
El cajón está dividido en los siguientes compartimentos:
I: detergente de prelavado o detergente en polvo.
II: Detergente principal, quitamanchas o productos blanqueadores.
:
aditivos de lavado, tales como suavizante de telas.
Agregar detergente a la lavadora:
1.
Saque el cajón.
2.
Agregue detergente de prelavado en el Caso I (si es necesario).
3.
Agregue detergente en el Caso II.
4.
Agregue suavizante en el Caso
(si es necesario).
Notas:
-
Si el detergente está apelmazado o viscoso, por favor dilúyalo con un poco de agua
antes de agregarlo a la caja de detergente. Esto evita que la entrada de la caja de
detergente se bloquee y se desborde al agregar agua.
-
Por favor use el tipo correcto de detergente para la temperatura de lavado para el mejor
efecto, incluyendo menor uso de agua y mínimo consumo de energía.

Instrucciones de operación
21
Lavar ropa por primera vez
Encender la lavadora
Conecte la fuente de alimentación. Verifique si las mangueras de agua están conectadas
adecuadamente. Abra el grifo completamente. Ponga la ropa a lavar en la máquina y agregue
el detergente.
Luego presione el botón “Power”, seleccione los procedimientos y funciones
apropiadas, y presione el botón “Start/Pause”.
Seleccionar el ciclo de lavado
El ciclo de lavado adecuado debe seleccionarse con base en el tipo, cantidad y nivel de suciedad de la
ropa a lavar, junto con la tabla de temperatura de lavado a continuación (que va de Caliente a Fría
en cinco niveles).
5 ( Hot)
Limpieza y desinfección máxima para suciedad fuerte y telas resistentes al calor,
tales como uniformes de trabajo, toallas de cocina y ropa de bebé
.
4 ( Warm+)
Limpieza fuerte para suciedad intensa y telas pesadas, tales como toallas, ropa
deportiva y sábanas gruesas.
3 ( Warm)
Limpieza estándar para suciedad moderada y telas duraderas, tales como
camisas de algodón, sábanas y fundas de almohada
.
2 ( Warm-)
Limpieza suave adecuada para suciedad ligera a moderada y telas mezcladas,
tales como mezclas de algodón y poliéster
.
1 ( Cold)
Limpieza delicada para suciedad ligera y telas delicadas, tales como seda, lana y
encaje.
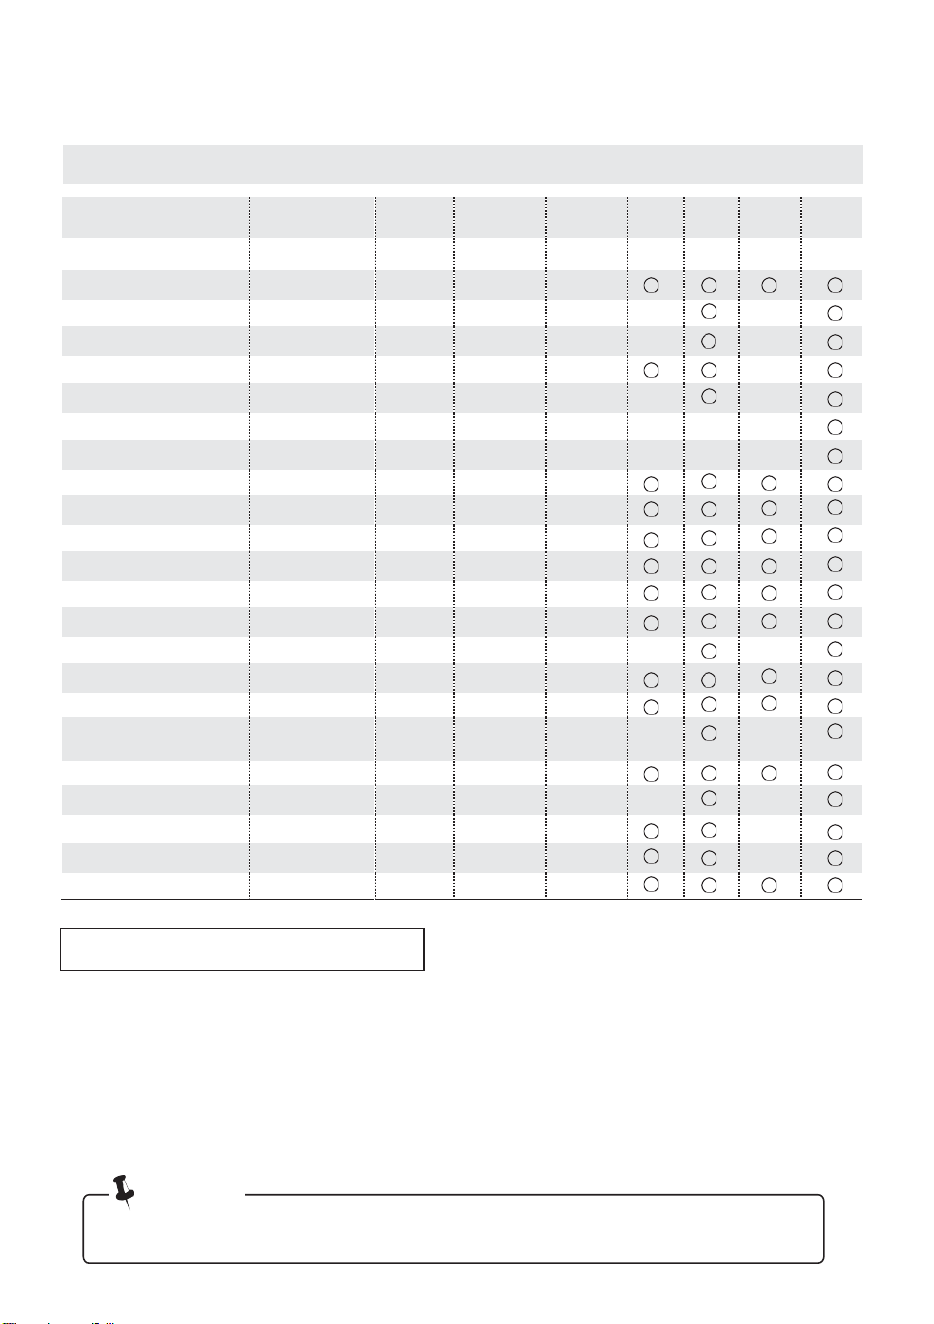
Instrucciones de operación
22
○ Opcional
¡Nota!
•
Los parámetros en esta tabla son solo de referencia. Los parámetros reales pueden ser
diferentes de los parámetros en la tabla anterior
.
Programa
Tiempo Pred.
(h:min.)
Temp
Soil
Spin
Pre
Wash
Extra
Rinse
Steam
Delay
Cold-Hot
1/2/3/4/5
Light-Heavy
1/2/3/4/5
No Spin-High
1/2/3/4/5
NORMAL
0:55
3
3
4
QUICK WASH
0:15
1
1
4
DELICATES
0:48
2
3
3
WHITES
1:07
3
3
4
RINSE & SPIN
0:20
--
--
4
SPIN ONLY
0:12
--
--
4
TUB CLEAN
1:28
5
--
--
MY CYCLE
1:45
2
3
3
DEEP CLEAN
2:18
5
5
4
ACTIVE WEAR
1:02
3
3
3
TOWELS
1:03
3
3
4
HEAVY DUTY
1:35
4
5
5
DENIM
1:45
2
3
3
ECO COLD
1:01
1
3
4
JUICE&FOOD STAINS
1:34
3
5
3
OVERNIGHT WASH
0:58
3
3
3
SINGLE ITEM/SMALL
LOAD
0:45
2
1
3
SWEAT STAINS
1:29
3
5
3
SWIM WEAR
0:47
1
1
3
PERM PRESS
0:57
3
3
2
COLORS/DARK
1:09
1
3
3
DEEP WASH
1:12
4
3
4
Programa de prueba de energía: NORMAL
Estos programas (DENIM/ ECO COLD/ JUICE&FOOD STAINS/ OVERNIGHT WASH/
SINGLE ITEM/ SMALL LOAD/ SWEAT STAINS/ SWIMWEAR/ PERM PRESS/
COLORS/DARK/ DEEP WASH) solo pueden seleccionarse mediante la aplicación
SmartHome en su teléfono móvil
.
Llene el tambor con ropa seca y sin doblar. Cargue el tambor no más de 3/4 de su
capacidad. Para el mejor rendimiento, el tamaño máximo de carga debe ser menor de 7.94
lbs. (3.6 kg).
Tabla de procedimientos de lavado
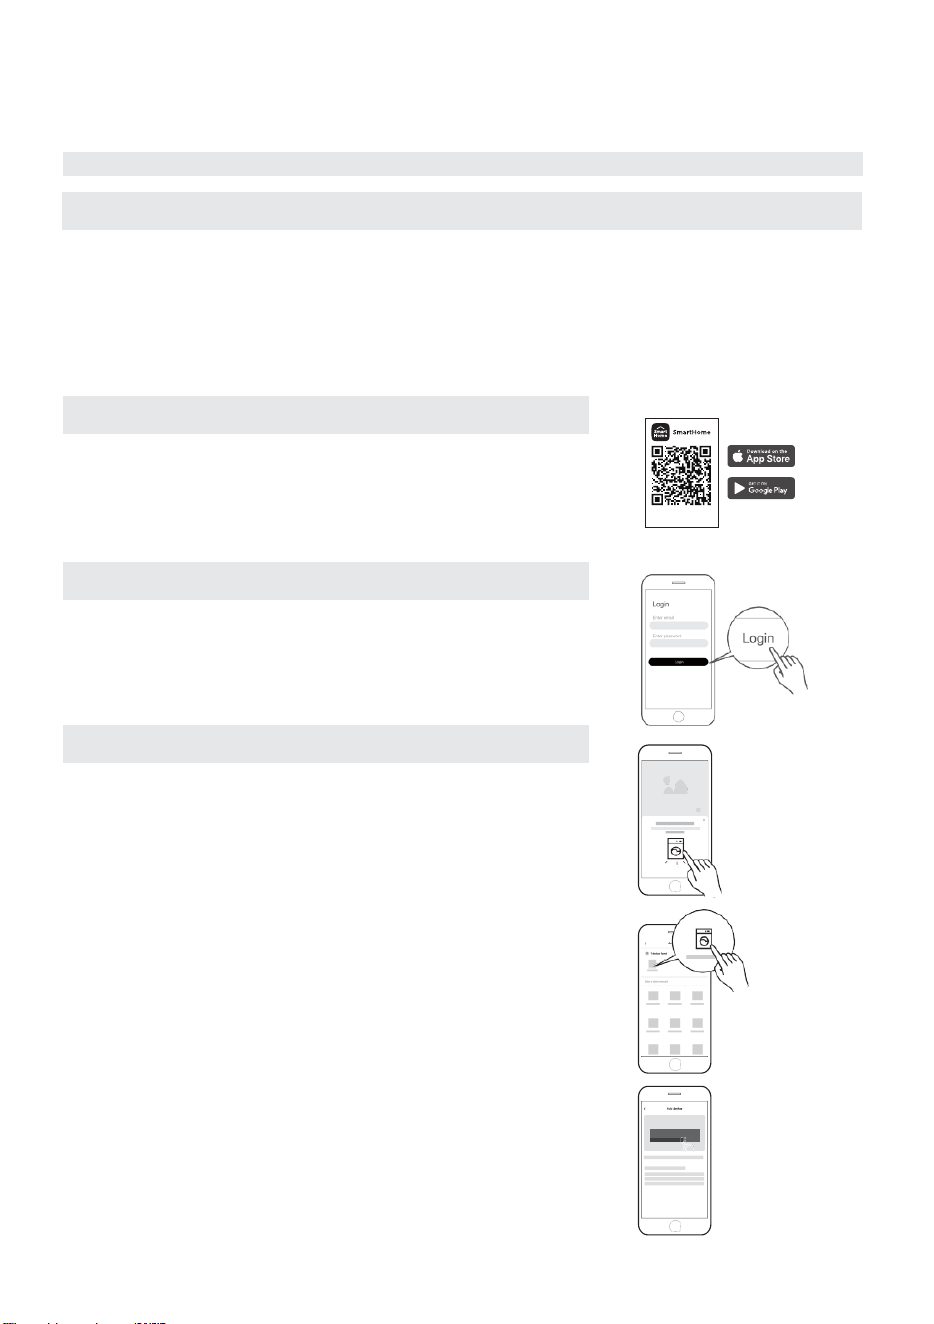
Instrucciones de operación
23
Use su electrodoméstico con la aplicación SmartHome
Descargue la aplicación SmartHome
Regístrese e inicie sesión
Conecte sus dispositivos a SmartHome
Configuración y operación de la aplicación
Antes de comenzar, asegúrese de que:
1.
Su teléfono inteligente esté conectado a su red inalámbrica doméstica y que conozca la
contraseña de la red.
2.
Asegúrese de estar cerca del electrodoméstico.
3.
La señal inalámbrica de banda de 2.4GHz esté habilitada en su enrutador inalámbrico.
Siga los pasos a continuación para entrar en el estado de control remoto
En un mercado de aplicaciones (Google Play Store,
Apple App Store), busque "SmartHome*" y encuentre la
aplicación SmartHome. Descárguela e instálela en su
teléfono. También puede descargar la aplicación
escaneando el código QR a continuación.
Abra la aplicación SmartHome y cree una nueva cuenta
para comenzar (también puede registrarse a través de
una cuenta de terceros). Si ya tiene una cuenta
existente, use esa cuenta para iniciar sesión.
1.
Por favor asegúrese de que su teléfono móvil esté conectado
a una red inalámbrica. Si no lo está, vaya a Configuración y
habilite Redes Inalámbricas y Bluetooth.
2.
Por favor encienda sus dispositivos.
3.
Abra la aplicación SmartHome en su teléfono.
4.
Si aparece un mensaje de "Dispositivos inteligentes detectados
cerca", haga clic para agregar.
5.
Si no aparece ningún mensaje, seleccione "+" en la página y
seleccione su dispositivo en la lista de dispositivos cercanos
disponibles. Si su dispositivo no aparece en la lista, por
favor agregue su dispositivo manualmente con la categoría
de dispositivo y modelo de dispositivo
.
6.
Conecte su dispositivo a la red inalámbrica de acuerdo con
las instrucciones de la aplicación. Si la conexión falla, por
favor siga las instrucciones proporcionadas por la aplicación
para continuar con la operación.
8 : 8 8
Download the app
& activate product
Instrucciones de operación
24
Iniciar el control remoto
Gire la perilla al azar para indicar uno de los programas y presione [
] continuamente hasta
que el ícono de control remoto se ilumine, lo que significa que la función de control remoto
está activa y usted puede controlar su lavadora de forma remota.
Luz de Estado de la Red Inalámbrica
Parpadeo lento
Esperando conexión
Parpadeo rápido
Conectando
Parpadeo rápido fijo
Conectado a su enrutador inalámbrico
¡Nota!
1.
Asegúrese de que sus dispositivos estén encendidos.
2.
Mantenga su teléfono móvil lo suficientemente cerca de su dispositivo cuando esté conectando
su dispositivo a la red.
3.
Conecte su teléfono móvil a la red inalámbrica de casa y asegúrese de conocer la
contraseña de la red inalámbrica
.
4.
Verifique si su enrutador inalámbrico admite banda de 2.4 GHz y enciéndalo. Si no está
seguro de si el enrutador admite banda de 2.4 GHz, por favor contacte al fabricante del
enrutador.
5.
El dispositivo no puede conectarse a una red inalámbrica que requiera autenticación, lo cual
usualmente ocurre en áreas públicas como hoteles, restaurantes, etc. Por favor conéctese a
una red inalámbrica que no requiera autenticación.
6.
Apague la función WLAN+ (Android) o WLAN Assistant (iOS) de su teléfono móvil al
conectar su dispositivo a la red.
7.
En el caso de que su dispositivo se haya conectado a una red inalámbrica anteriormente pero
ahora necesite reconectarse, por favor haga clic en "+" en la página de inicio y agregue su
dispositivo nuevamente por categoría de dispositivo y modelo de dispositivo de acuerdo con
las instrucciones de la aplicación.

Cuidado y limpieza
Cuidado y limpieza
25
Antes de comenzar, por favor saque el enchufe de alimentación o desconecte la energía y cierre el grifo.
ADVERTENCIA
-
No use solventes. Los solventes pueden dañar la lavadora o generar gases tóxicos,
explosivos.
-
Nunca use agua para rociar y lavar la lavadora.
-
No use detergentes que contengan PCMX para limpiar la lavadora.
-
Ciertas partes internas no están conectadas a tierra intencionalmente y pueden
presentar un riesgo de descarga eléctrica solo durante el servicio. Personal de
Servicio - No contacte las siguientes partes mientras el electrodoméstico esté
energizado: Válvula de Entrada de Agua, Bomba de Drenaje, Sensor de Nivel de
Agua y Cerradura de la Puerta.
Limpieza y mantenimiento del gabinete de la lavadora
Un mantenimiento adecuado de la lavadora puede prolongar su vida útil. La superficie puede
limpiarse con detergentes neutros no abrasivos diluidos cuando sea necesario. Si hay algún
desbordamiento de agua, use un paño húmedo para limpiarlo inmediatamente. No se permiten
objetos afilados que golpeen el gabinete
.
Notas:
no use ácido fórmico y sus solventes diluidos o equivalentes.
Limpieza del tambor interno
El óxido dejado dentro del tambor por artículos metálicos debe eliminarse inmediatamente con
detergentes sin cloro.
Nunca use lana de acero.
Restaurar una lavadora congelada
Si la temperatura baja de cero y el agua en su lavadora se congela, siga las instrucciones a
continuación:
1.
Desconecte la fuente de energía de la lavadora.
2.
Lave el grifo con agua tibia para aflojar la manguera de entrada.
3.
Quite la manguera de entrada e introdúzcala en agua tibia.
4.
Vierta agua tibia en el tambor de lavado y espere 10 minutos.
5.
Vuelva a conectar la manguera de entrada al grifo y verifique si la entrada y salida funcionan
normalmente. Repita con la otra manguera de entrada (si aplica).
Notas: cuando la lavadora se reactive, asegúrese de que la temperatura ambiente esté por encima
de 0°C.
Medidas de prevención contra congelamiento
Si su lavadora está ubicada en una habitación donde puede congelarse fácilmente, por favor drene
completamente el agua restante dentro de la manguera de drenaje y de la manguera de entrada
.
Retire el agua restante en la manguera de entrada:
1.
Cierre el grifo.
2.
Desenrosque la manguera de entrada del grifo y ponga su extremo dentro de un recipiente.
3.
Inicie cualquier ciclo excepto un ciclo de solo lavado o drenaje. Cualquier agua se drenará de
la manguera de entrada en 40 segundos.
4.
Vuelva a conectar la manguera de entrada al grifo.
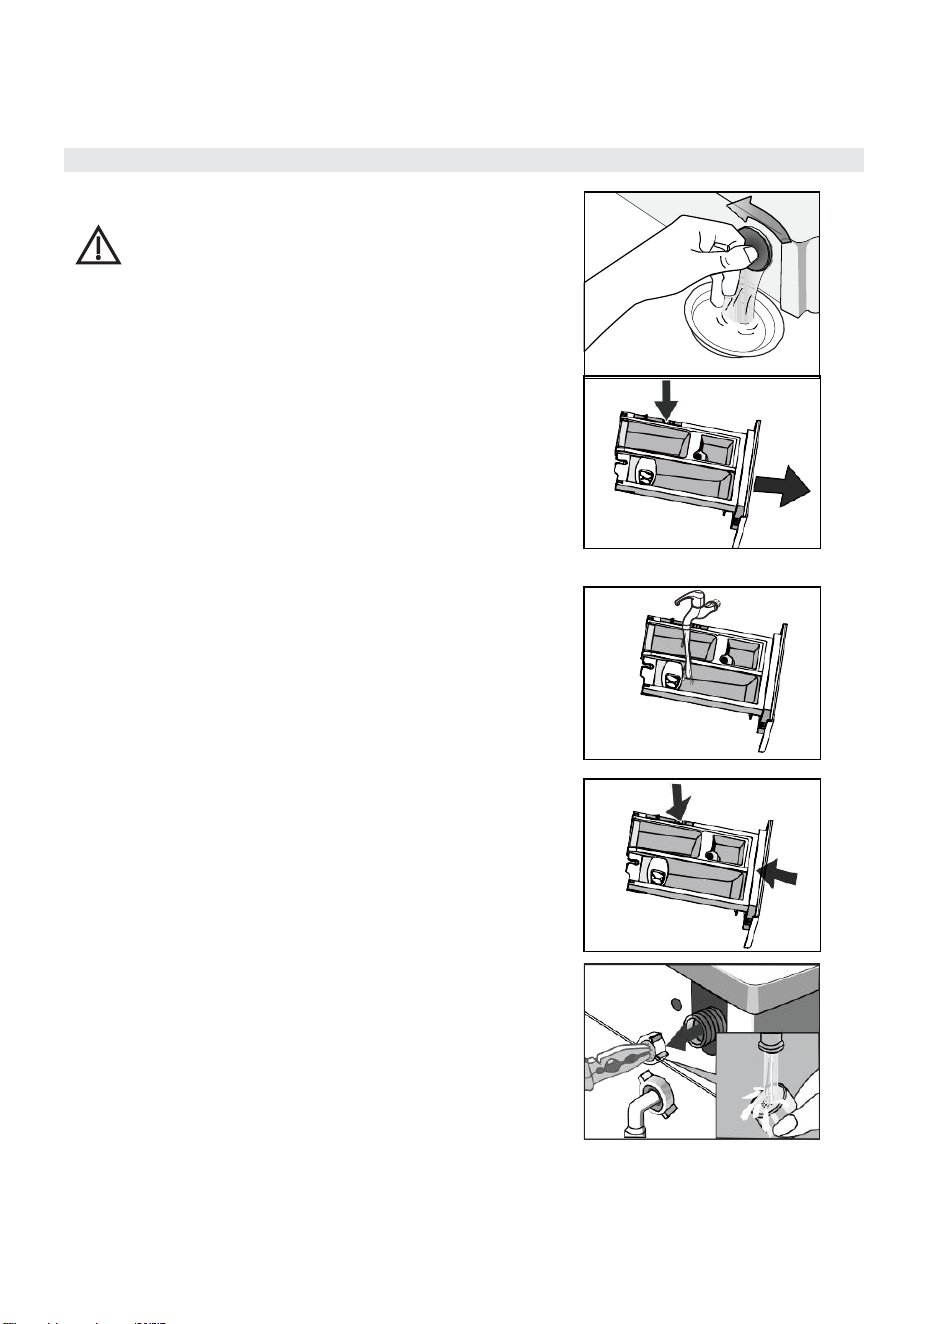
Cuidado y limpieza
Cuidado y limpieza
26
Retire el agua restante en la bomba de drenaje
ADVERTENCIA
Para evitar quemaduras, solo haga esto
después de que el agua caliente dentro de la
máquina se enfríe
.
Limpieza del cajón de detergente
1.
Saque el cajón y busque el botón A como se muestra en
el diagrama de la derecha.
2.
Presione el botón A y retire el cajón en la dirección de la
flecha que se muestra en el diagrama de la derecha.
3.
Limpie el cajón dispensador y la tapa del suavizante
bajo agua.
4.
Finalice la limpieza y empuje el cajón nuevamente a su
posición original.
Limpieza del filtro de entrada
Limpie el filtro de entrada si no hay agua o hay una
cantidad insuficiente de agua cuando se abre el grifo.
Limpieza del filtro del grifo:
1.
Cierre el grifo.
2.
Seleccione cualquier ciclo excepto Lavado o Drenaje.
3.
Presione el botón Start/Pause y mantenga el ciclo de
lavado funcionando por aproximadamente 40 segundos.
4.
Retire la manguera de entrada del grifo.
5.
Use agua para lavar el filtro.
6.
Vuelva a conectar la manguera de entrada.
Lave el filtro de la lavadora:
1.
Desenrosque la manguera de entrada de la parte trasera de
la máquina.
2.
Saque el filtro con pinzas de punta larga.
3.
Lave el filtro.
4.
Reinstale el filtro.
5.
Abra el grifo y asegúrese de que no haya fugas de agua.
6.
Cierre el grifo.
A
A
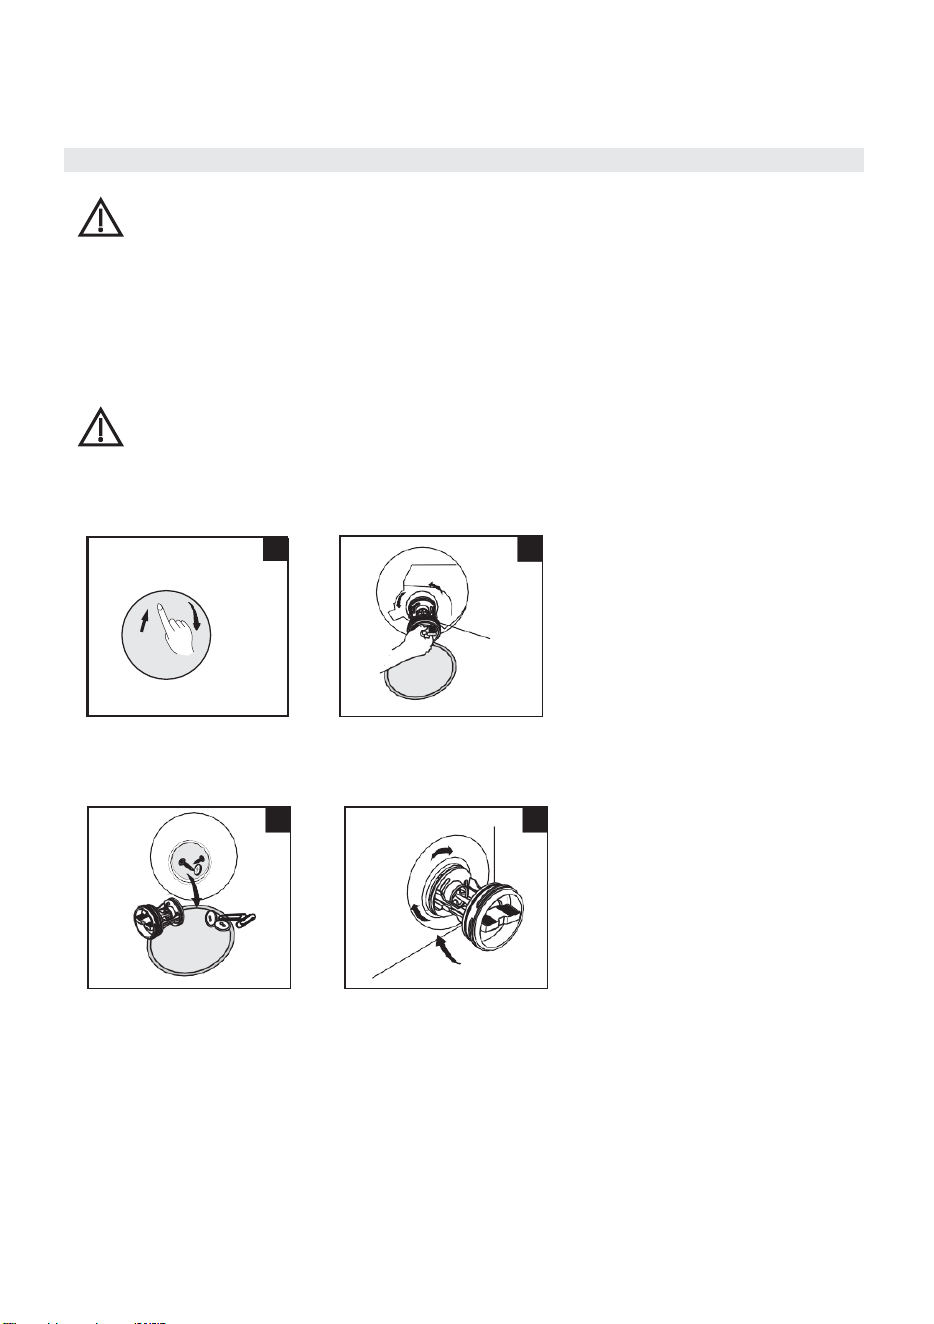
Cuidado y limpieza
Cuidado y limpieza
27
1
2
Filter cap
ADVERTENCIA
Saque el enchufe de alimentación para evitar descarga eléctrica antes de limpiar la
máquina. Después de usar la lavadora, saque el cable de alimentación y cierre la
puerta firmemente para garantizar la seguridad infantil.
Retire materia extraña
Filtro de la bomba de drenaje:
El filtro de la bomba de drenaje puede filtrar hilos sueltos y objetos pequeños de su ropa.
Limpie el filtro periódicamente para asegurar el funcionamiento normal de la lavadora
.
ADVERTENCIA
Inspeccione y limpie el filtro regularmente, dependiendo de qué tan
frecuentemente use la lavadora y el nivel de suciedad de su ropa.
Inspeccione el filtro si la máquina no vacía o no centrifuga.
La máquina puede hacer ruidos inusuales durante el drenaje debido a objetos como
imperdibles, monedas, etc. que bloqueen el filtro de la bomba.
Limpie el filtro siguiendo las instrucciones a continuación:
Abra la tapa de la cubierta Gire la tapa del filtro en
inferior.
sentido antihorario para
retirar el filtro
.
Retire la materia extraña.
¡Advertencia!
Reemplace el filtro y gírelo en
sentido antihorario para
bloquearlo en su lugar, luego
vuelva a colocar la tapa de la
cubierta inferior.
Dependiendo del ciclo de lavado seleccionado, puede haber agua caliente en la bomba de
drenaje durante el ciclo de lavado.
Nunca retire la tapa de la bomba durante un ciclo de lavado. Siempre espere hasta
que el ciclo esté completo y el electrodoméstico esté vacío. Al reemplazar el filtro y la
tapa, asegúrese de que estén bien ajustados nuevamente.
4
3
Tapa
del filtro
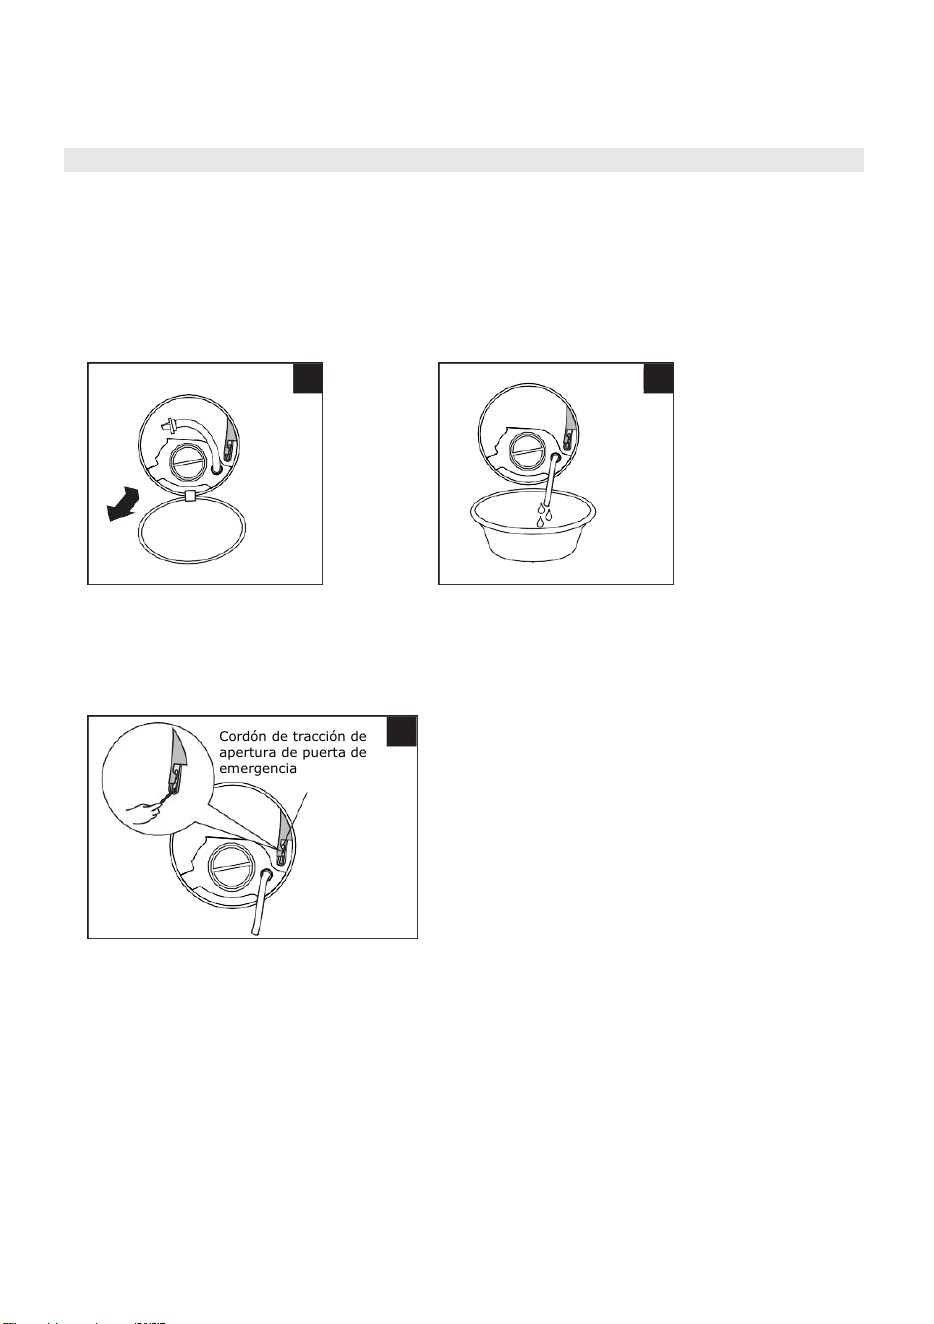
Cuidado y limpieza
Cuidado y limpieza
28
1
2
Liberación de Puerta de Emergencia
En caso de falla de energía u otras circunstancias en las que la puerta no pueda abrirse, hay una
liberación de puerta de emergencia.
Tire hacia abajo del cordón de tracción de emergencia en la puerta del filtro y reemplace después
de abrir la puerta.
1.
Abra la puerta del filtro.
2. Drene el agua enfriada
en el tambor.
3. Inserte una herramienta en
el anillo de tracción y jálela
hacia abajo para desbloquear
la puerta de la lavadora
.
¡Advertencia!
No puede usar la liberación de puerta de emergencia durante un ciclo de lavado. Abra la puerta
después de que el agua se haya enfriado para evitar quemaduras por el agua residual a alta
temperatura en el tambor de la máquina.
Cordón de tracción de
apertura de puerta de
emergencia
3
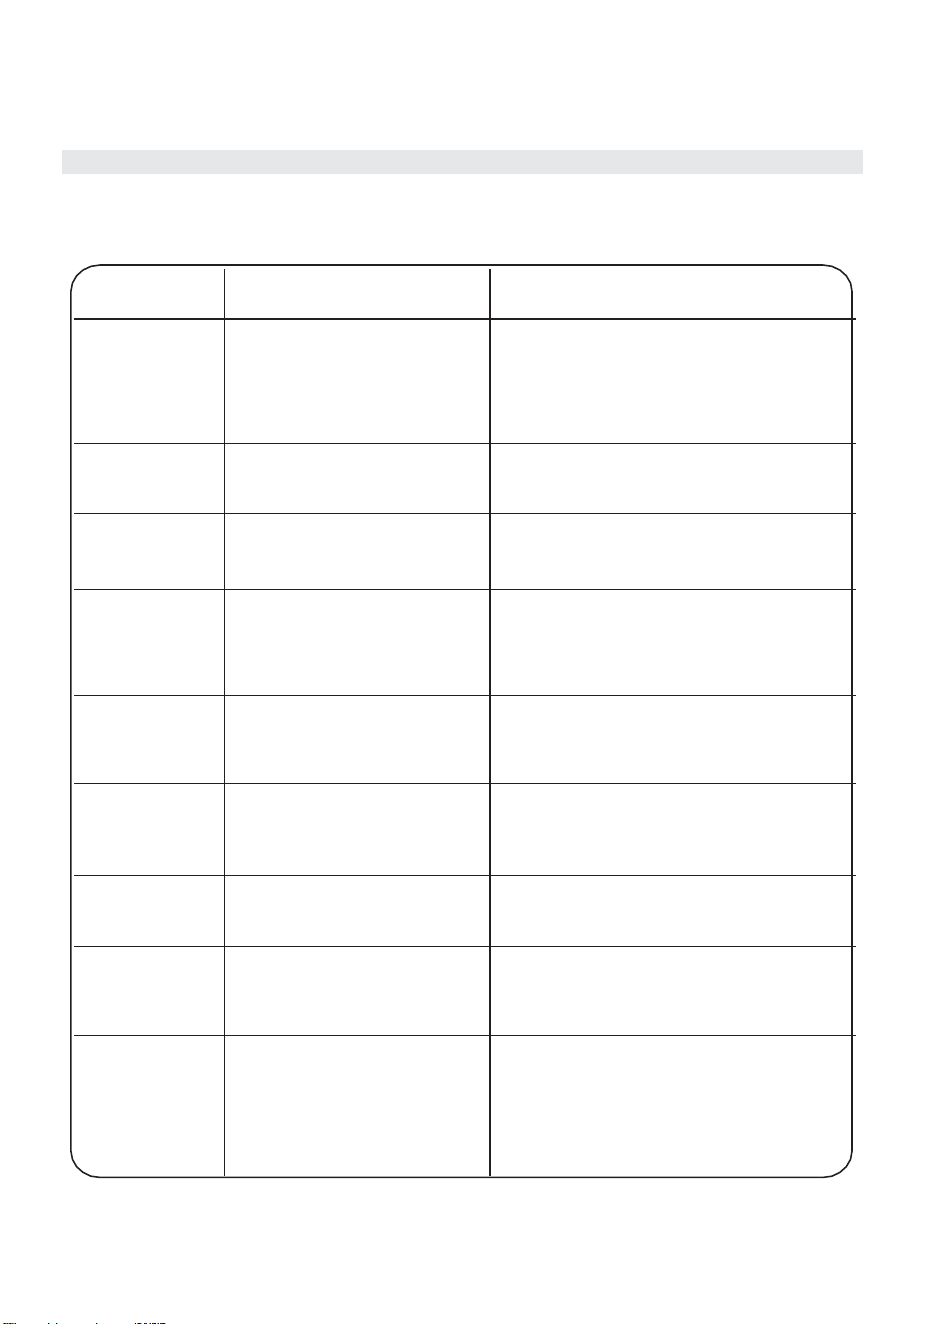
Consejos de solución de problemas
Consejos de solución de problemas
29
Si la lavadora no arranca o se detiene durante la operación, intente encontrar una solución en
la tabla a continuación. Si su problema aún no se resuelve, llame al centro de servicio para
asistencia.
Problema
Razón adecuada
Solución
La lavadora no
puede arrancar
La lavadora no se configuró
adecuadamente.
Verifique si la puerta está cerrada firmemente.
Verifique si el enchufe de alimentación está bien
insertado.
Verifique si el grifo de suministro de agua está
abierto.
Verifique si se presionó el botón POWER.
Verifique si se presionó el botón Start/Pause.
La puerta no puede
abrirse
El diseño de protección de
seguridad de la máquina está
activo.
Desconecte la energía y reinicie la máquina.
Falla de
calentamiento
NTC está dañado y/o la resistencia
de calentamiento está envejecida.
Usted solo puede lavar la ropa sin calentar el
agua.
Contacte al centro de servicio prontamente para
restaurar la capacidad de calentamiento.
Fuga de agua
La manguera de entrada, la
manguera de drenaje, el grifo y/o
la lavadora no están conectados
firmemente.
La tubería de drenaje en la
habitación está bloqueada.
Verifique y ajuste las mangueras de agua.
Limpie la manguera de drenaje y solicite a un
especialista que la repare si es necesario.
El agua se
desborda por la
parte inferior de la
máquina
La manguera de entrada no está
conectada firmemente.
La manguera de drenaje tiene
fugas de agua.
Ajuste la manguera de entrada.
Reemplace la manguera de drenaje.
El indicador o
pantalla no se
enciende
La energía está desconectada. La
placa PC tiene problemas.
El arnés tiene un problema de
conexión.
Verifique si la energía está apagada y el enchufe
de alimentación está conectado correctamente.
Si eso no resuelve el problema, por favor llame
a la línea de servicio.
Residuos de
detergente en la
caja
El detergente en polvo está
húmedo y se apelmaza.
Limpie y seque la caja.
Use detergente o detergente especial para el
tambor.
La ropa aún está
sucia después del
lavado
La ropa está demasiado sucia.
Cantidad insuficiente de
detergente.
Seleccione el ciclo de lavado correcto. Agregue
la cantidad correcta de detergente de acuerdo
con las instrucciones en el paquete del
detergente.
Ruido
anormalmente
fuerte y/o
vibración
El tambor interno está
desbalanceado.
Verifique si se retiraron los pernos de
transporte.
Verifique si el gabinete está instalado en un piso
sólido y nivelado.
Verifique si hay hebillas o artículos metálicos
dentro.
Verifique si las patas de la lavadora están
ajustadas para estar niveladas.
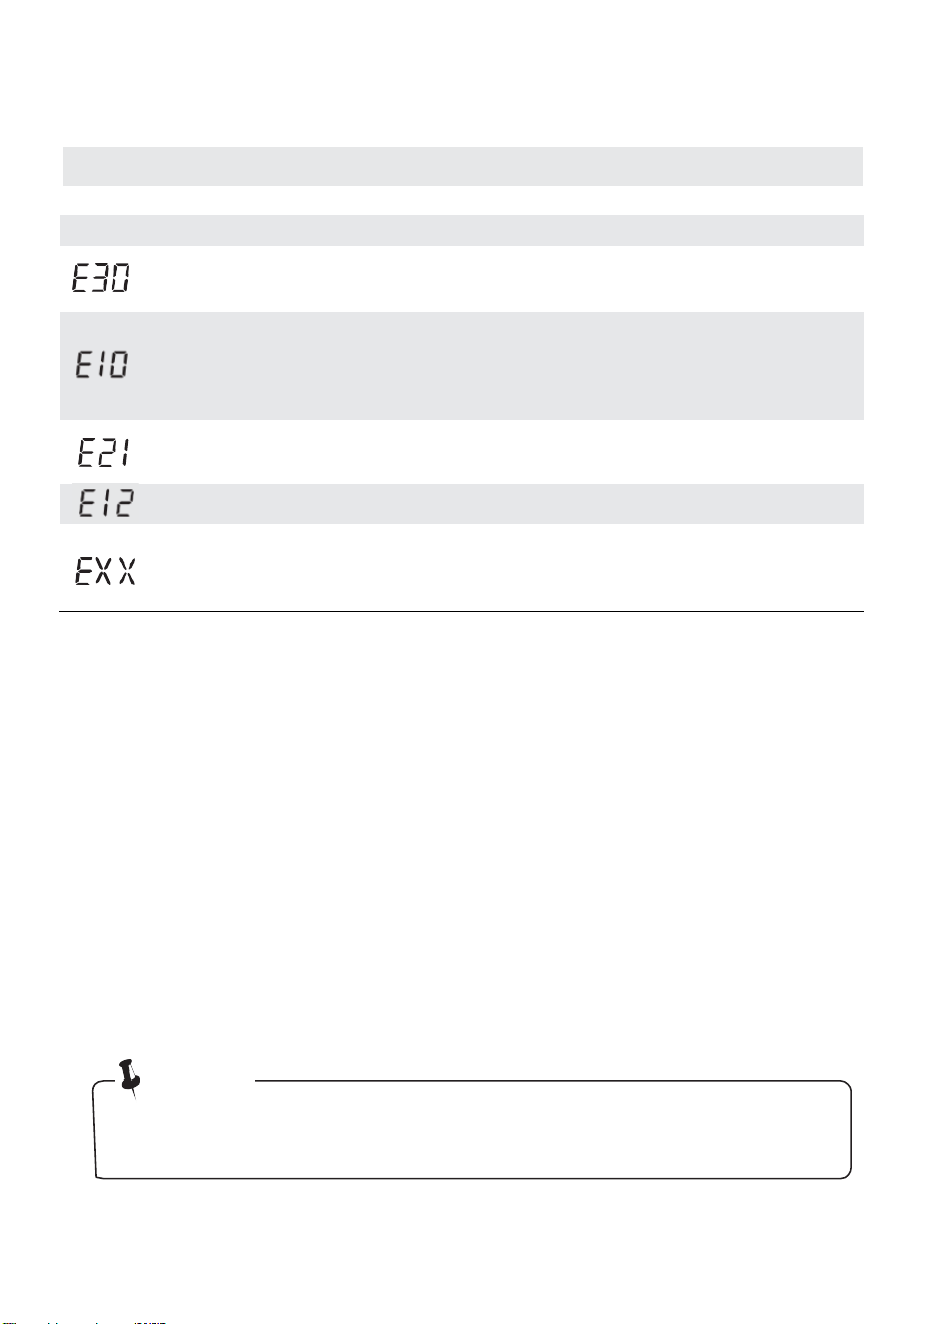
Códigos de error
30
¡Nota!
•
Después de verificar, reactive la máquina e intente nuevamente su ciclo
seleccionado. Si el problema ocurre otra vez o la pantalla muestra un código de
error, llame a la línea de servicio para asistencia
Descripción
Razón adecuada
Solución
La puerta no está cerrada
correctamente
Reinicie después de cerrar la puerta
Verifique si alguna prenda está atascada
en la ranura
Problema de entrada de agua
durante el lavado
Verifique si la presión de agua es
demasiado baja
Enderece la manguera de agua
Verifique si el filtro de la válvula de
entrada está bloqueado
Drenaje de agua demasiado
lento
Verifique si la manguera de drenaje está
bloqueada
Desbordamiento de agua
Reinicie la lavadora
Otros
Por favor intente nuevamente primero.
Llame a la línea de servicio si aún
experimenta problemas.
Códigos de error
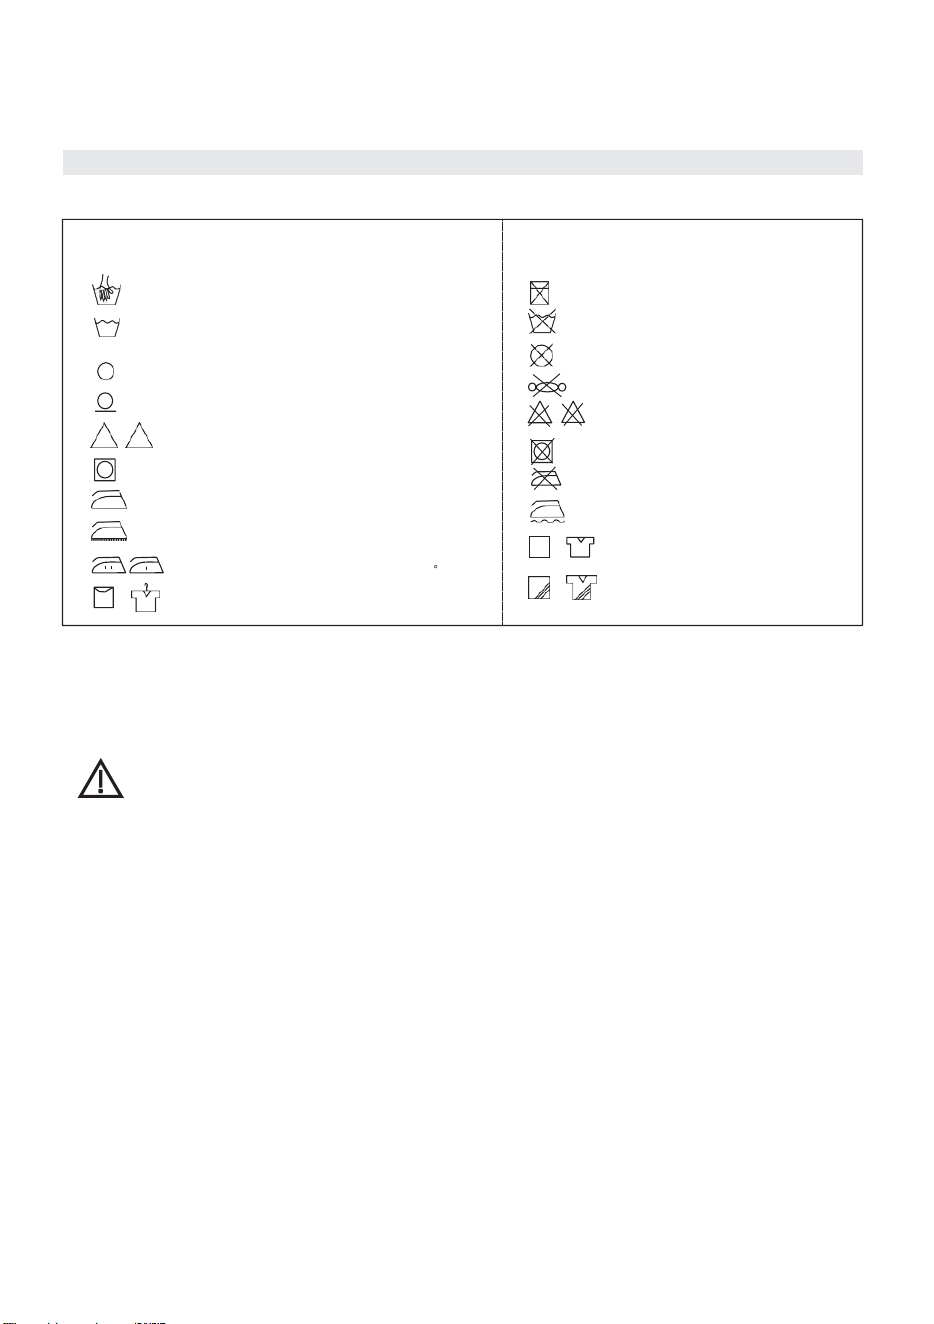
Apéndice
31
Símbolo gráfico Ilustración
CI
No Machine Wash
Do not Wash
No Dry Clean
No Wring
No Bleach
Do not Tumble Dry
Do not Iron
Iron with Cloth
Dry after Wash
Line Dry in Shade
Símbolo gráfico Ilustración
Hand Wash
Washing (incluyendo Machine
Wash y Hand Wash)
Dry Clean
Warmly Dry Clean
CI
Bleach
Tumble dry
Iron
Steam Iron
Temperatura media y
Máx. temperatura 150 C
Line Dry
Apéndice
Etiqueta de cuidado
ADVERTENCIA
Para evitar incendio, descarga eléctrica y otros accidentes, por favor recuerde los
siguientes recordatorios
:
-
Solo puede usarse el voltaje indicado en la etiqueta de potencia. Si no tiene
claro el voltaje en su hogar, por favor contacte a la oficina de energía local
.
-
Cuando esté usando la función de calentamiento, la corriente máxima a
través de la lavadora alcanzará 12A. Por favor asegúrese de que las
unidades de suministro de energía (corriente, voltaje y cable) puedan
cumplir con los requisitos normales de carga para la máquina.
-
Proteja el cable de alimentación adecuadamente. El cable de alimentación debe
estar asegurado para que no se dañe ni se convierta en un riesgo de tropiezo.
Preste especial atención al enchufar el cable de alimentación en el tomacorriente
y asegúrese de que esté seguro.
No sobrecargue un tomacorriente montado en la pared ni use un cable de
extensión. La sobrecarga del cableado puede causar incendio o descarga eléctrica.
No saque el enchufe de alimentación con la mano mojada
.
-
Para garantizar su seguridad, el enchufe de alimentación debe insertarse en un
tomacorriente de tres polos con conexión a tierra. Revise cuidadosamente y
asegúrese de que su tomacorriente esté correctamente y de manera confiable
conectado a tierra
.

Certificaciones
32
Certificaciones
Por favor tenga en cuenta que los cambios o modificaciones de este producto no expresamente
aprobados por la parte responsable del cumplimiento podrían anular la autoridad del usuario
para operar el equipo.
Este equipo cumple con los límites de exposición a radiación RF de la FCC establecidos para un
entorno no controlado.
La(s) antena(s) utilizada(s) para este transmisor debe(n) instalarse y operarse para proporcionar
una distancia de separación de al menos 20 cm de todas las personas y no debe(n) colocarse
junto a ni operar en conjunto con ninguna otra antena o transmisor. Los instaladores deben
asegurar que se mantenga una distancia de separación de 20 cm entre el dispositivo
(excluyendo su auricular) y los usuarios.
Declaración de Cumplimiento de la Comisión Federal de Comunicaciones (FCC) para EE. UU
Este dispositivo cumple con la parte 15 de las reglas de la FCC. La operación está sujeta a las
siguientes dos condiciones:
(1) Este dispositivo no puede causar interferencia dañina, y (2) este dispositivo debe aceptar
cualquier interferencia recibida, incluida la interferencia que pueda causar un funcionamiento
no deseado.
Nota: este equipo ha sido probado y cumple con los límites para un dispositivo digital de Clase
B, conforme a la parte 15 de las reglas de la FCC. Estos límites están diseñados para
proporcionar una protección razonable contra interferencia dañina en una instalación
residencial. Este equipo genera, utiliza y puede radiar energía de radiofrecuencia y, si no se
instala y usa de acuerdo con las instrucciones, puede causar interferencia dañina a las
comunicaciones de radio. Sin embargo, no hay garantía de que no ocurra interferencia en una
instalación en particular. Si este equipo causa interferencia dañina a la recepción de radio o
televisión, lo cual puede determinarse encendiendo y apagando el equipo, se recomienda al
usuario intentar corregir la interferencia con una o más de las siguientes medidas:
•
Reorientar o reubicar la antena receptora.
•
Aumentar la separación entre el equipo y el receptor.
•
Conectar el equipo a un tomacorriente en un circuito diferente al que está conectado el
receptor.
•
Consultar al distribuidor o a un técnico experimentado en radio/TV para obtener ayuda.
Este equipo cumple con los límites de exposición a radiación de la FCC establecidos para un
entorno no controlado.
Declaración de Conformidad del Proveedor de la FCC
Nombre del producto: Lavadora de carga frontal
Número de modelo: MLHW27S7BWW/MLHW27S7BCG
Nombre del Proveedor: Midea America Corp.
Dirección del Proveedor (EE. UU.): 300 Kimball Dr. Parsippany, NJ 07054
Sitio web del Proveedor: http://midea.com/us
Correo/Teléfono de Contacto: 1-866-646-4332
Declaración de Cumplimiento de Industry Canada (IC) para Canadá
Este dispositivo cumple con el(los) estándar(es) RSS exento(s) de licencia de Industry Canada.
La operación está sujeta a las siguientes dos condiciones: (1) este dispositivo no puede causar
interferencia, y (2) este dispositivo debe aceptar cualquier interferencia, incluida la interferencia
que pueda causar un funcionamiento no deseado del dispositivo.
CAN ICES-003(B)/NMB-003(B)
Midea no es responsable de ningún cambio o modificación no expresamente
aprobado por Midea. Tales modificaciones podrían anular la autoridad del
usuario para operar el equipo
.
Para el modelo: MWB-S-WB01
FCC ID: 2ADQOMWB-SWB01
IC ID: 12575A-WB01
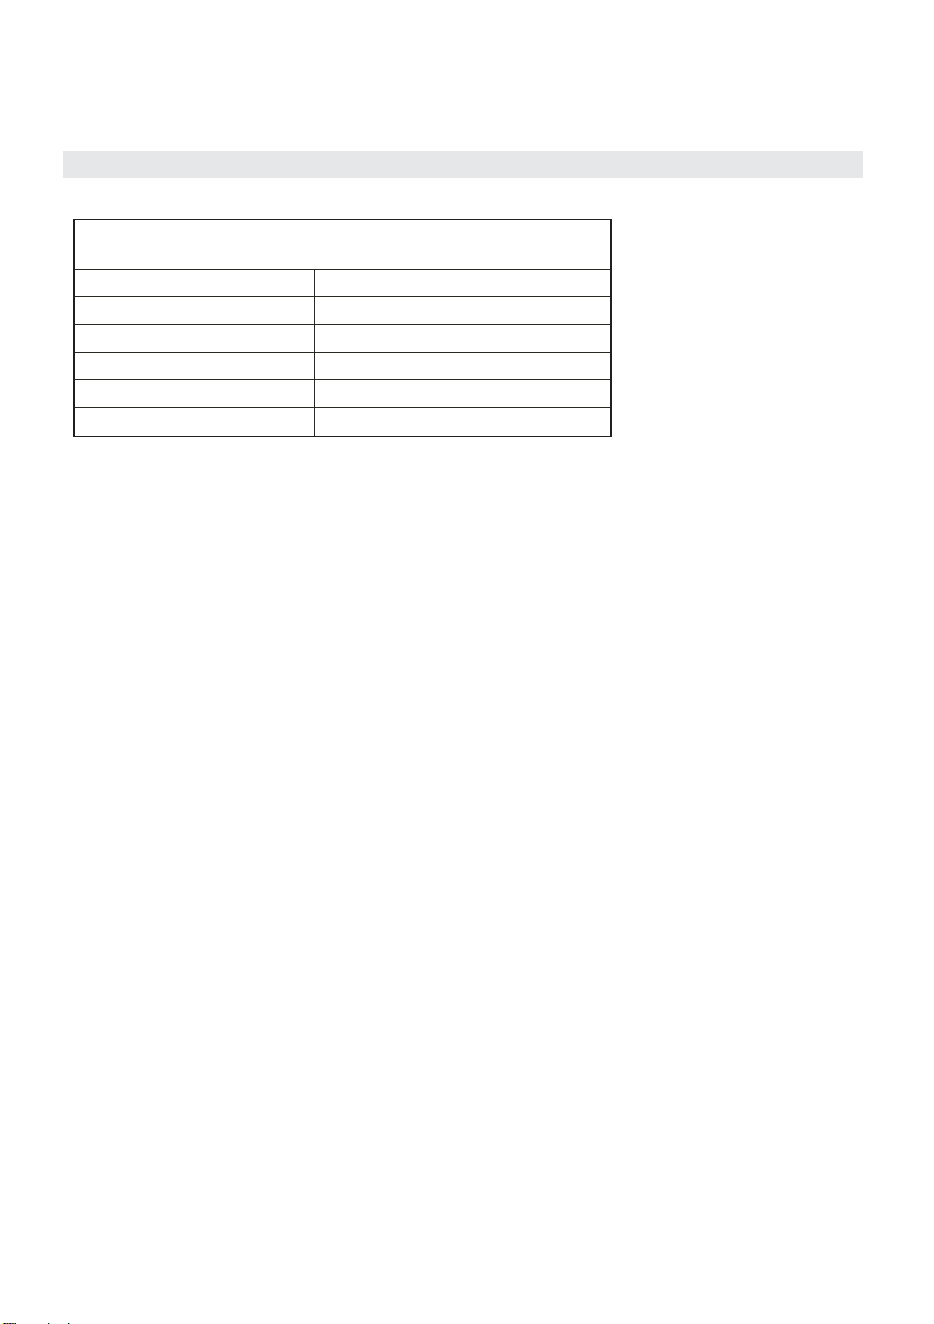
Especificaciones técnicas
33
Especificaciones técnicas
Modelo: MLHW27S7BWW/MLHW27S7BCG
Parámetro
Fuente de alimentación
120V~ , 60Hz
Dimensión (W*D*H)
595*615*845mm
Peso neto
72kg (158.7Ib)
Tamaño del tambor
2.7 cu.ft.
Corriente nominal
11A
Presión estándar de agua
0.1-0.8MPa
34
36

CARTE D'ENREGISTREMENT DU PRODUIT
ETAPE1
■
Prendre une photo du reu d'achat
4
丘TAPE2
■
Envoyer par messagerie texte au 1-844-2241614
OU
■
OU
■
Enregistrer a l'adresse www.midea.com/us/support/Product-registration
Remarque : L'enregistrement du produit n'est pas obligatoire. Le defaut de remplir et
de retourner la carte ou le formulaire ne diminue pas les droits de garantie
du consommateur.