[ WASHING MACHINE ]
5RP9
Model
Washing Machine
BEFORE USE, PLEASE READ AND FOLLOW ALL
SAFETY RULES AND OPERATING INSTRUCTIONS.
INSTRUCTION MANUAL
ECW2224EGW - ECW2224EGG
Address :
Phone number :
Fax :

Icon Type Meaning
WARNING Serious injury or death risk
RISK OF ELECTRIC SHOCK Dangerous voltage risk
FIRE Warning; Risk of fire / flammable materials
CAUTION Injury or property damage risk
IMPORTANT / NOTE Operating the system correctly
Thank you for choosing this product.
This User Manual contains important safety information and instructions on the operation
and maintenance of your appliance.
Please take the time to read this User Manual before using your appliance and keep this
book for future reference.

CONTENTS
1. SAFETY INSTRUCTIONS ............................................................................................... .1
1.1 General Safety WarnIngs ...............................................................................................4
1.2 DurIng Use ...................................................................................................................9
1.3 PackagIng and EnvIronment ........................................................................................10
1.4 SavIngs InformatIon .....................................................................................................10
2. TECHNICAL SPECIFICATIONS ......................................................................................11
2.1 General Appearance.................................................................................................... .11
2.2 Technical Specifications .............................................................................................. .11
3. INSTALLATION .............................................................................................................. .12
3.1 Removing the Transit Bolts...........................................................................................12
3.2 Adjusting the Feet / Adjusting Adjustable Stays............................................................12
3.3 Electrical Connection ....................................................................................................12
4. GROUNDING INSTRUCTIONS ..................................................................................... .13
4.1 Water Inlet Hose Connection ........................................................................................13
4.2 Water Discharge Connection ........................................................................................14
5. CONTROL PANEL OVERVIEW ..................................................................................... .14
5.1 Detergent Drawer .........................................................................................................15
5.2 Sections ...................................................................................................................15
5.3 Program Dial.................................................................................................................16
5.4 Electronic Display ........................................................................................................ .16
6. USING YOUR WASHING MACHINE ............................................................................. .16
6.1 Preparing Your Laundry ................................................................................................16
6.2 Putting Laundry in the Machine ................................................................................... .17
6.3 Adding Detergent to the Machine .................................................................................17
6.4 OPERATING INSTRUCTIONS ...............................................................................18
6.5 Selecting a Programme ............................................................................................... .18
6.6 Half-Load Detection System .........................................................................................18
6.7 Auxiliary Functions .......................................................................................................18
6.8 Child Lock . ..................................................................................................................22
6.9 If you want to pause/cancel a running program or add laundry: .................................22
6.10 Program End ..............................................................................................................22
7. PROGRAMME TABLE ................................................................................................... .23
8. User-maintenance instructions ................................................................................... .24
8.1 Warning . ..................................................................................................................24
8.2 Water Inlet Filters .........................................................................................................24
8.3 Pump Filter ...................................................................................................................25
8.4 Detergent Drawer .........................................................................................................25
9. Body / Drum .................................................................................................................. .26
10. TROUBLESHOOTING ................................................................................................. .27
11. AUTOMATIC FAULT WARNINGS AND WHAT TO DO .............................................. .28

1. SAFETY INSTRUCTIONS
Operating voltage / frequency
110 -120 V ~/60Hz
Total current (A) 10
Water pressure (Mpa) Maximum 1 Mpa /
Minimum 0. 1Mpa
Total power (W) 1200
Maximum washing capacity
(dry laundry) (kg / Ib)
10 / 22.05
• Do not install your machine on a carpet or such
grounds that would prevent the ventilation of its
base.
• The appliance is not intended for use by people
(including children) with reduced physical,
sensory or mental capabilities, or lack of
experience and knowledge unless they have been
given supervision or instruction concerning use
of the appliance by a person responsible for their
safety.
• Children of less than 3 years should be kept away
unless continuously supervised.
• Call the nearest authorized service centre for a
replacement if the power cord malfunctions.
• Use only the new water inlet hose coming
with your machine when making water inlet
connections to your machine. Never use old, used
or damaged water inlet hoses.
• Children should not play with the appliance.
Cleaning and user maintenance should not be
made by children without supervision.
EN - 1

NOTE: For a softcopy of this user
manual, please contact the following address:
“washingmachine@standardtest. info”. In your
e-mail, please provide the model name and serial
number (20 digits) which you can find on the
appliance door.
IMPORTANT SAFETY INSTRUCTIONS
WARNING: To reduce the risk of fire, electric
shock, or injury to persons when using your
appliance, follow basic precautions, including the
following:
1. Read all instructions before using the appliance.
SAVE THESE INSTRUCTIONS.
2. Do not wash articles that have been previously
cleaned in, washed in, soaked in, or spotted
with gasoline, dry-cleaning solvents, or other
flammable or explosive substances, as they give
off vapours that could ignite or explode.
3. Do not add gasoline, dry-cleaning solvents, or
other flammable or explosive substances to the
wash water. These substances give off vapours
that could ignite or explode.
4. Under certain conditions, hydrogen gas may
be produced in a hot-water system that has not
been used for 2 weeks or more. HYDROGEN
GAS IS EXPLOSIVE. If the hot-water system has
not been used for such a period, before using a
washing machine, turn on all hot-water faucets
and let the water flow from each for several
minutes. This will release any accumulated
hydrogen gas. As the gas is flammable, do not
EN - 2

smoke or use an open flame during this time.
5. Do not allow children to play on or in the
appliance. Close supervision of children is
necessary when the appliance is used near
children.
6. Before the appliance is removed from service or
discarded, remove the door.
7. Do not reach into the appliance if the tub or
agitator is moving.
8. Do not install or store this appliance where it will
be exposed to the weather.
9. Do not tamper with controls.
10. Do not repair or replace any part of the
appliance or attempt any servicing unless
specifically recommended in the user-
maintenance instructions or in published user-
repair instructions that you understand and have
the skills to carry out.
11. To reduce the risk of electric shock, disconnect
this appliance from the power supply before
attempting any user maintenance. Turning the
controls to the OFF position does not disconnect
this appliance from the power supply.
12. Do not wash or dry articles that have been
previously cleaned in, washed in, soaked in, or
spotted with gasoline, dry-cleaning solvents, other
flammable or explosive substances as they give
off vapors that could ignite or explode.
13. Do not allow children to play on or in the
appliance. Close supervision of children is
necessary when the appliance is used near
children.
WARNING: Improperconnectionofthe
EN - 3

equipment-groundingconductorcanresultinarisk
ofelectricshock.Checkwithaqualifiedelectrician
orservicemanifyouareindoubtastowhetherthe
applianceisproperlygrounded.
Donotmodifytheplugprovidedwiththeapplianceif
itwillnotfittheoutlet,haveaproperoutletinstalled
byaqualifiedelectrician.
Your machine is for domestic use only. Using
it for commercial purposes will cause your
warranty to be cancelled.
This manual has been prepared for more than
one model therefore your appliance may not
have some of the features described within.
For this reason, it is important to pay particular
attention to any figures whilst reading the
operating manual.
1.1 GENERAL SAFETY WARNINGS
• Thenecessaryambienttemperatureforoperation
ofyourWashingMachineis59-77 °F.
• Wherethetemperatureisbelow32 °F, hoses
maysplitortheelectroniccardmaynotoperate
correctly.
• Pleaseensurethatgarmentsloadedintoyour
WashingMachinearefreefromforeignobjects
suchasnails,needles,lightersandcoins.
• It is recommended that for your first wash,
you select the 90˚ Cotton programme without
laundry and half fill compartment II of the
detergent drawer with a suitable detergent.
EN - 4

• Residuemaybuildupondetergentandsofteners
exposedtoairforalongperiodoftime.Only
putsoftenerordetergentinthedraweratthe
beginningofeachwash.
• UnplugyourWashingMachineandswitchoff
thewatersupplyiftheWashingMachineisleft
unusedforalongtime.Wealsorecommendthat
youleavethedooropentopreventbuildupof
humidityinsidetheWashingMachine.
• SomewatermaybeleftinyourWashingMachine
asaresultofqualitychecksduringproduction.
ThiswillnotaffecttheoperationofyourWashing
Machine.
• Thepackagingofthemachinecouldbe
hazardoustochildren.Donotallowchildrento
playwiththepackagingorsmallpartsfromthe
WashingMachine.
• Keepthepackagingmaterialsinaplacewhere
childrencannotreachthem,ordisposeofthem
appropriately.
• Usepre-washprogramsonlyforverydirty
laundry.
Neveropenthedetergentdrawerwhilethe
machineisrunning.
• Intheeventofabreakdown,unplugthemachine
fromthemainssupplyandturnthewatersupply
off.Donotattempttocarryoutanyrepairs.
Alwayscontactanauthorisedserviceagent.
• Donotexceedthemaximumloadforthewashing
programme you have chosen.
NeverforcethedooropenwhenyourWashing
EN - 5

Machineisrunning.
• Washinglaundrycontainingflourmaydamage
yourmachine.
• Pleasefollowthemanufacturers’instructions
regardingtheuseoffabricconditionerorany
similarproductsthatyouintendtouseinyour
WashingMachine.
• Make sure that the door of your Washing Machine
is not restricted and can be opened fully.
• Install your machine in a location that can be
fully ventilated and preferably has constant air
circulation.
Door emergency opening function
When the machine is running, any power cut or
when the program is not yet complete, the door will
remain locked.
To open the door;
1. Please turn off the machine. Take off the power
plug from the mains socket.
2. To drain the waste water, follow the instructions
given in cleaning the pump filter section.
3. Pull the down the emergency opening
mechanism with the help of a tool and open the
door at the same time.
4. Doors, move the emergency opening handle
to the open position after being closed again,
if the door remains locked.
Read these warnings. Follow the advice given
to protect yourself and others from risks and
fatal injuries.
RISK OF BURNS
EN - 6
Do not touch the drain hose or any discharged
water while your Washing Machine is running. The
high temperatures involved pose a burn risk.
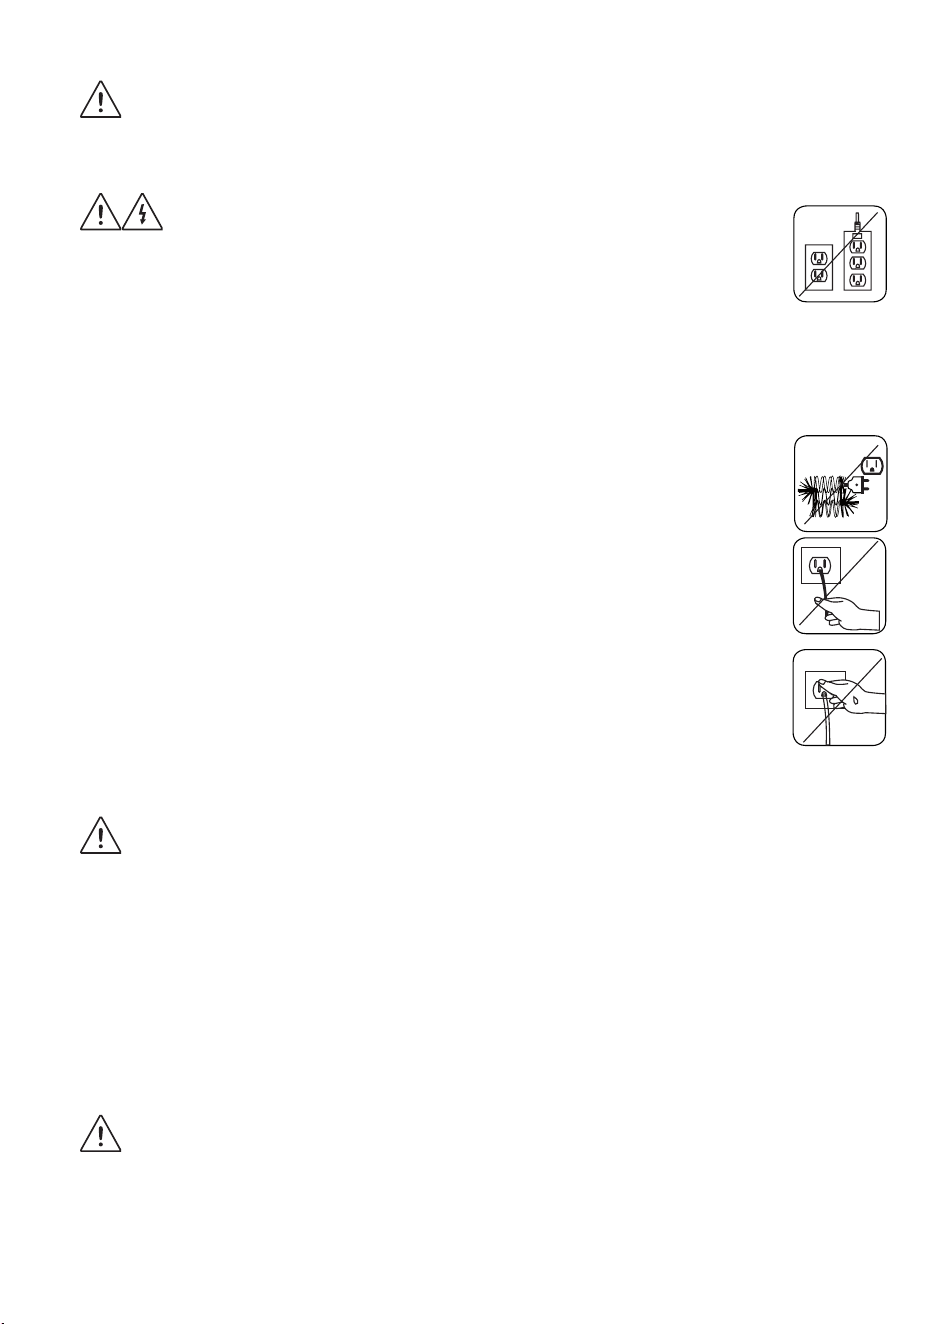
RISK OF DEATH FROM ELECTRICAL
CURRENT
• DonotconnectyourWashingMachinetothe
mainselectricitysupplyusinganextensionlead.
• Donotinsertadamagedplugintoasocket.
• Neverremovetheplugfromthesocketbypulling
the cord. Always hold the plug.
• Nevertouchthepowercord/plugwithwet
handsasthiscouldcauseashortcircuitor
electricshock.
• DonottouchyourWashingMachineifyour
hands or feet are wet.
• Adamagedpowercord/plugcancausefireor
giveyouanelectricshock.Whendamagedit
mustbereplaced,thisshouldonlybedoneby
qualifiedpersonnel.
• ConnectToIndividualBranch-Circuit.
Risk of flooding
• Checkthespeedofwaterflowbeforeplacingthe
drainhoseinasink.
• Take necessary measures to prevent the hose
fromslipping.
• Waterflowmaydislodgethehoseifitisnot
properlysecured.Makesurethepluginyoursink
does not block the plug hole.
Danger of Fire
• Donotstoreinflammableliquidsnearyour
machine.
EN - 7
• Thesulphurcontentofpaintremoversmaycause
corrosion.Neverusepaintremovingmaterialsin
yourmachine.
• Neveruseproductsthatcontainsolventsinyour
machine.
• Pleaseensurethatgarmentsloadedintoyour
WashingMachinearefreefromforeignobjects
suchasnails,needles,lightersandcoins.
Risk of falling and injury
• DonotclimbonyourWashingMachine.
• Makesurehosesandcablesdonotcauseatrip
hazard.
• DonotturnyourWashingMachineupsidedown
oronitsside.
• DonotliftyourWashingMachineusingthedoor
or detergent drawer.
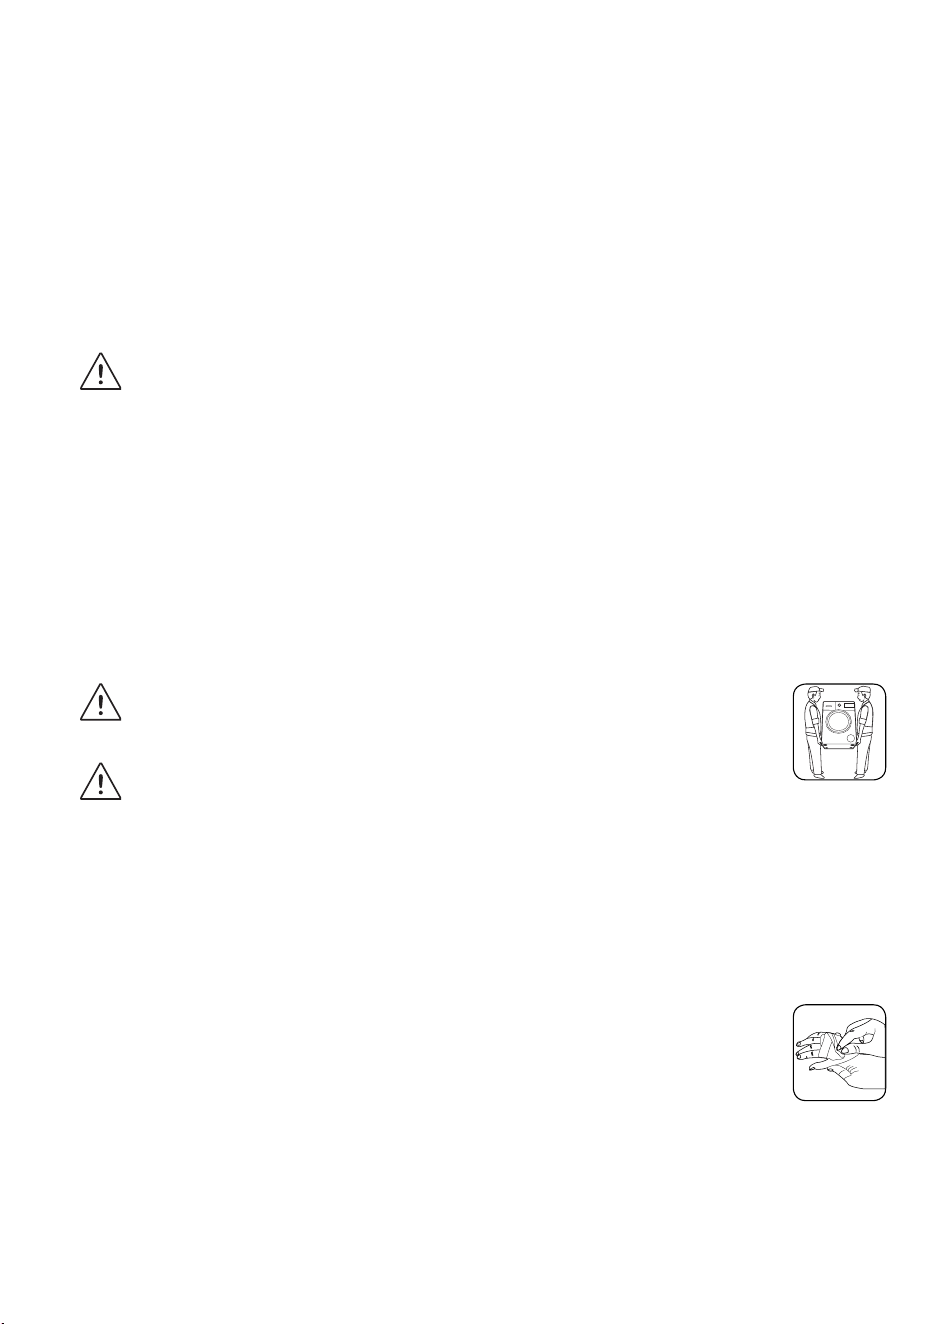
The machine must be carried by at least 2
people.
Child safety
• Donotleavechildrenunattendednearthe
machine.Childrenmightlockthemselvesinthe
machineresultinginriskofdeath.
• Donotallowchildrentotouchtheglassdoor
duringoperation.Thesurfacebecomesextremely
hotandmaycausedamagetoskin.
• Keeppackagingmaterialawayfromchildren.
• Poisoningandirritationmayoccurifdetergent
andcleaningmaterialsareconsumedor
comeintocontactwiththeskinandeyes.Keep
cleaningmaterialsoutofthereachofchildren.
EN - 8

1.2 DURING USE
• Keeppetsawayfromyourmachine.
• Pleasecheckthepackagingofyourmachine
beforeinstallationandtheoutersurfaceofthe
machineoncethepackaginghasbeenremoved.
Donotoperatethemachineifitappearsdamaged
orifthepackaginghasbeenopened.
• Yourmachinemustonlybeinstalledbyan
authorisedserviceagent.Installationbyanyone
otherthananauthorisedagentmaycauseyour
warrantytobevoid.
• This appliance can be used by children aged
8 years and above and persons with reduced
physical, sensory or mental capabilities or lack
of experience and knowledge if they have been
given supervision or instruction concerning use of
the appliance in a safe way and understand the
hazards involved. Children shall not play with the
appliance. Cleaning and user maintenance shall
not be done by children without supervision.
• Onlyuseyourmachineforlaundrythatislabelled
assuitableforwashingbythemanufacturer.
• Before operating the washing machine,
remove the 4 transit bolts and rubber spacers
from the rear of the machine. If the bolts are
not removed they may cause heavy vibration,
noise and malfunction of the machine and
cause the guarantee to be void.
• Your warranty does not cover damage caused by
externalfactorssuchasfire,floodingandother
sources of damage.
• Pleasedonotthrowawaythisusermanual;keep
itforfuturereferenceandpassitontothenext
owner.
EN - 9

NOTE: Specificationsforthemachinemayvary
dependingontheproductpurchased.
Replacement of drive belt, only by authorized
service.
Only original spare belt must use.
1.3 PACKAGING AND ENVIRONMENT
Removal of packaging materials
Packagingmaterialsprotectyourmachinefromany
damagethatmightoccurduringtransportation.The
packagingmaterialsareenvironmentallyfriendly
astheyarerecyclable.Useofrecycledmaterial
reducesrawmaterialconsumptionanddecreases
wasteproduction.
1.4 SAVINGS INFORMATION
Someimportantinformationtogetthemostefficient
useoutofyourmachine:
• Donotexceedthemaximumloadforthewashing
programmeyouhavechosen.Thiswillallowyour
machinetoruninenergysavingmode.
• Donotusethepre-washfeatureforlightlysoiled
laundry.Thiswillhelpyousaveontheamountof
electricityandwaterconsumed.
Disposal of your old machine
Thesymbolontheproductoronitspackagingindicatesthatthisproduct
maynotbetreatedashouseholdwaste.Insteaditshallbehandedoverto
theapplicablecollectionpointfortherecyclingofelectricalandelectronic
equipment.Byensuringthisproductisdisposedofcorrectly,youwillhelp
preventpotentialnegativeconsequencesfortheenvironmentandhuman
health,whichcouldotherwisebecausedbyinappropriatewastehandling
ofthisproduct.Formoredetailedinformationaboutrecyclingofthis
product,pleasecontactyourlocalcityoffice,yourhouseholdwastedisposalserviceor
the shop where you purchased the product.
EN - 10
EN - 11EN - 11
2. TECHNICAL SPECIFICATIONS
123
4
5
6
7
8
9
10
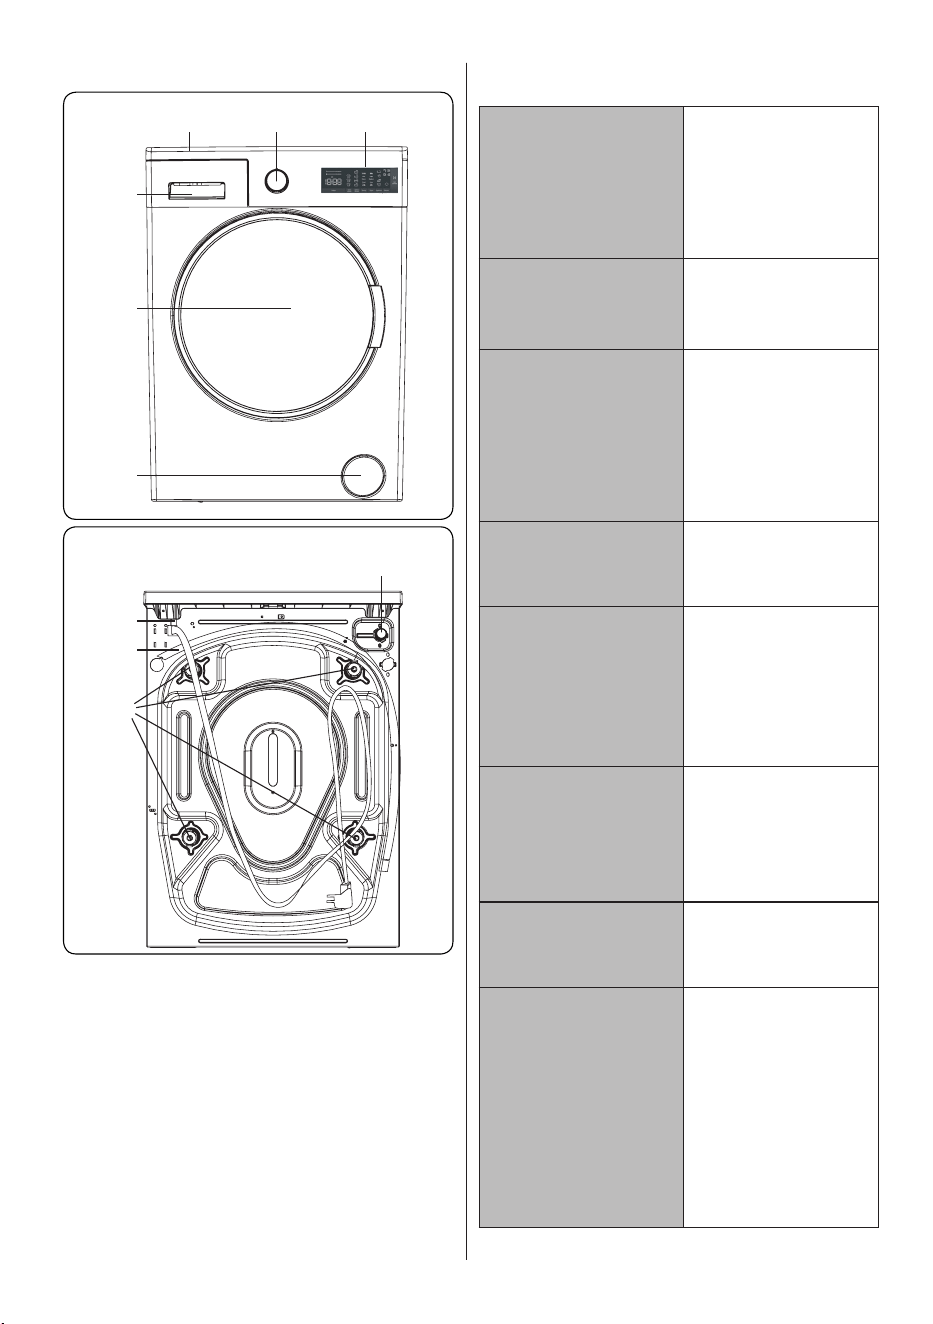
2.1 General Appearance
1. ElectronicDisplay
2. ProgrammeDial
3. Upper Tray
4. Detergent Drawer
5. Drum
6. PumpFilterCover
7. Water Inlet Valve
8. Power Cable
9. DischargingHose
10. TransitBolts
2.2 Technical Specifications
Operating
voltage /
frequency
(V/Hz)
110 -120 V
~/60Hz
Total current
(A)
10
Water
pressure
(Mpa)
Maximum:1
Mpa
Minimum:
0.1 Mpa
Total power
(W)
1200
Maximum
dry laundry
capacity
(kg /Ib)
10 / 22.05
Spinning
revolution
(rev/min)
Programme
number
15
Dimensions
(mm/inch)
Height
Width
Depth
845 / 33.26’’
597 / 23.46’’
582 / 22.91’’
1400
EN - 12EN - 12
3. INSTALLATION
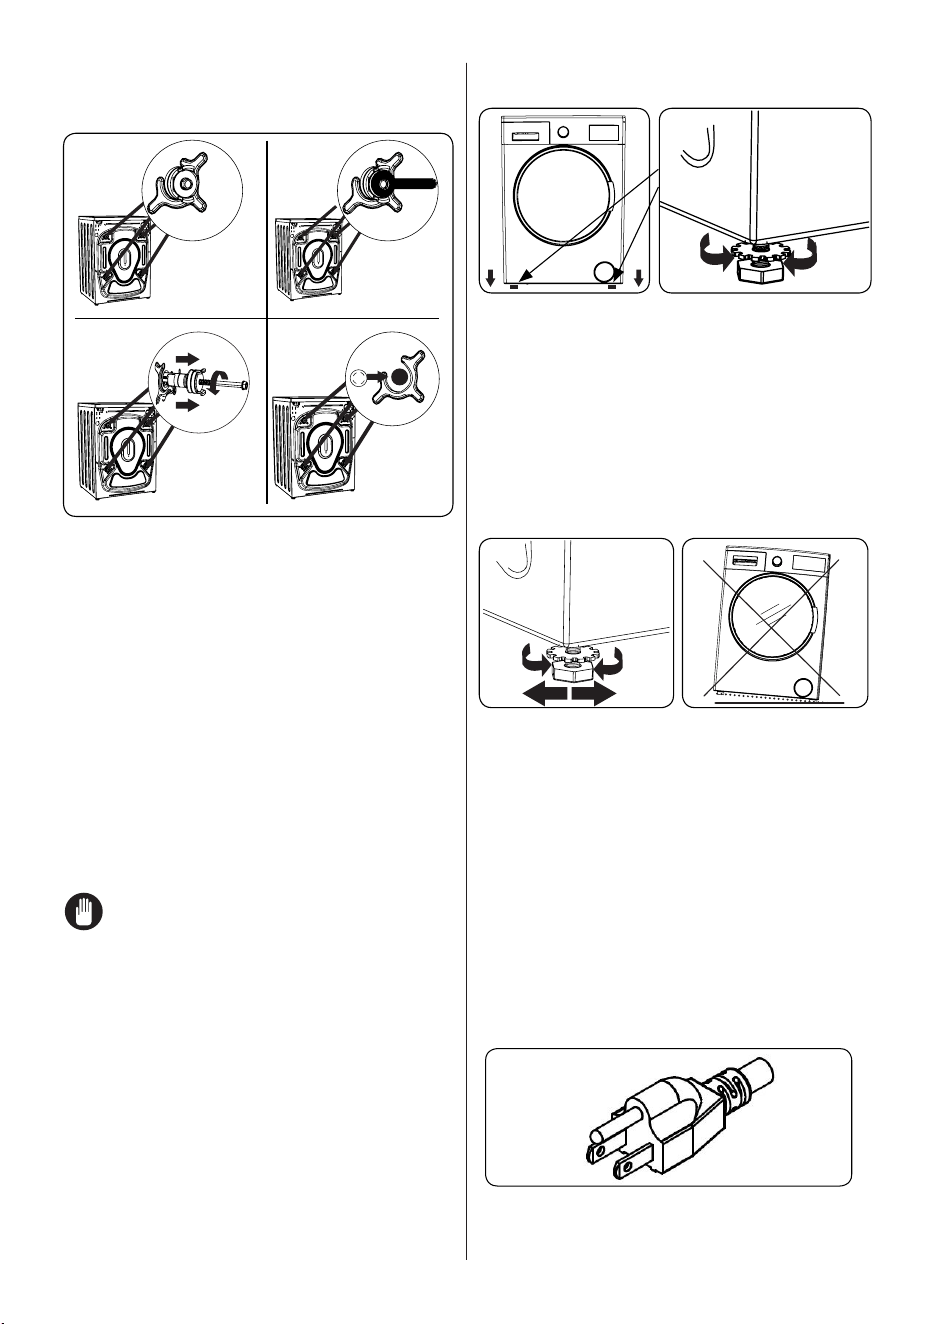
3.1 Removing the Transit Bolts
X X4 4
X
4
1
3
2
4
1. Beforeoperatingthewashingmachine,
removethe4transitboltsandrubber
spacersfromtherearofthemachine.
If the bolts are not removed, they
maycauseheavyvibration,noiseand
malfunctionofthemachineandvoidthe
warranty.
2. Loosenthetransitboltsbyturning
themanticlockwisewithanappropriate
spanner.
3. Removethetransitboltswithastraight
pull.
4. Fittheplasticblankingcapssuppliedin
theaccessoriesbagintothegapsleft
bytheremovalofthetransitbolts.The
transitboltsshouldbestoredforfuture
use.
NOTE: Removethetransitbolts
beforeusingthemachineforthefirsttime.
Faultsoccurringduetothemachinebeing
operatedwithtransitboltsfittedareoutof
the scope of the warranty.
3.2 Adjusting the Feet /
Adjusting Adjustable Stays
1
1. Donotinstallyourmachineonasurface
(such as carpet) that would prevent
ventilationatthebase.
• Toensuresilentandvibration-free
operationofyourmachine,installitona
firmsurface.
• Youcanlevelyourmachineusingthe
adjustable feet.
• Loosentheplasticlockingnut.
X
4
2 3
2. Toincreasetheheightofthemachine,
turnthefeetclockwise.Todecrease
theheightofthemachine,turnthefeet
anticlockwise.
• Oncethemachineislevel,tightenthe
lockingnutsbyturningthemclockwise.
3. Neverinsertcardboard,woodorother
similarmaterialsunderthemachineto
levelit.
• Whencleaningthegroundonwhich
themachineislocated,takecarenotto
disturbthelevelofthemachine.
3.3 Electrical Connection
• YourWashingMachinerequiresa110
-120 V ~/60Hz mainssupply.
EN - 13EN - 13
• Themainscordofyourwashing
machineisequippedwithanearthed
plug.Thisplugshouldalwaysbe
insertedtoanearthedsocketof10
amps.
• Ifconnectedtoacircuitprotectedby
fuses,usetime-delayfuseswiththis
appliance.
• Ifyoudonothaveasuitablesocketand
fuseconformingwiththis,pleaseensure
theworkiscarriedoutbyaqualified
electrician.
• Wedonottakeresponsibilityfor
damage that occurs due to the use of
ungroundedequipment.
4. GROUNDING INSTRUCTIONS
Thisappliancemustbegrounded.In
theeventofmalfunctionorbreakdown,
groundingwillreducetheriskofelectric
shockbyprovidingapathofleast
resistanceforelectriccurrent.This
applianceisequippedwithacordhaving
anequipment-groundingconductoranda
groundingplug.Theplugmustbeplugged
intoanappropriateoutletthatisproperly
installedandgroundedinaccordancewith
alllocalcodesandordinances.
WARNING: Improper
connectionoftheequipment-grounding
conductorcanresultinariskofelectric
shock.Checkwithaqualifiedelectrician
orservicemanifyouareindoubtasto
whethertheapplianceisproperlygrounded.
Donotmodifytheplugprovidedwiththe
appliance-ifitwillnotfittheoutlet,have
aproperoutletinstalledbyaqualified
electrician.
NOTE: Operatingyourmachine
withlowvoltagewillcausethelifecycle
ofyourmachinetobereducedandits
performancetoberestricted.
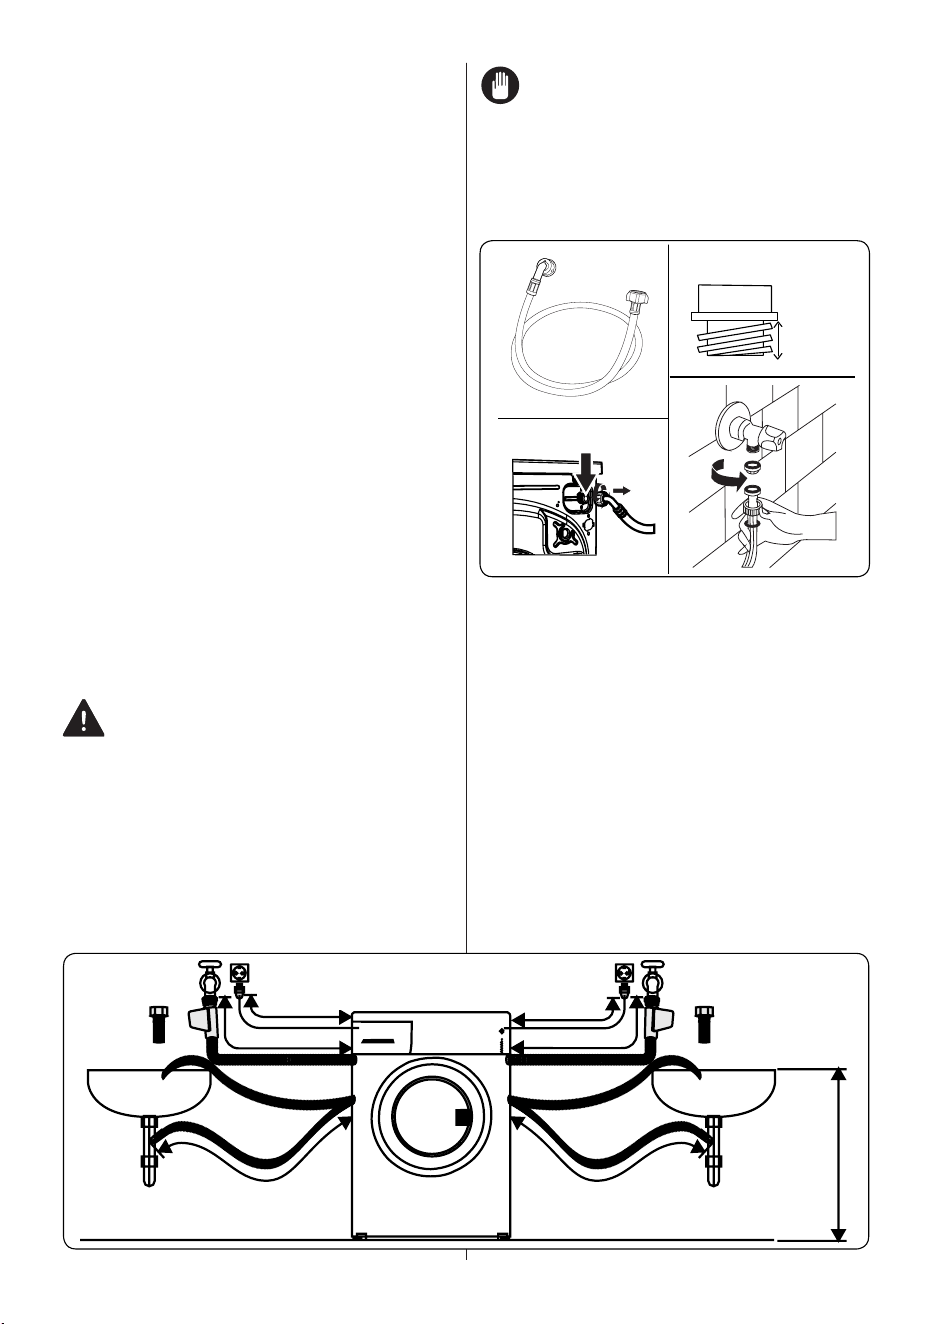
4.1 Water Inlet Hose Connection
3/4”
10 mm
1
3
2
4
1. Yourmachinehavedoublewaterinlet
connection(hotandcold).Thered
capped hose should be connected to
thehotwaterinlet.
• Topreventwaterleaksatthejoints,
either1or2nuts(dependingonyour
machine’sspecifications)aresupplied
inthepackagingwiththehose.Fitthese
nutstotheend(s)ofthewaterinlethose
that connect to the water supply.
2. Connectnewwaterinlethosestoa¾˝,
threaded tap.
• Connectthewhitecappedendofthe
waterinlethosetothewhitewaterinlet
valveontherearsideofthemachine
and the red capped end of the hose to
~ 95 cm
~ 95 cm
~ 145 cm ~ 95 cm
0 – max. 100 cm
˜
˜
37.5”
57” 37.5”
55”
37.5”
60”
39.5”

EN - 14EN - 14
theredwaterinletvalve(ifapplicable).
• Handtightentheconnections.Ifinany
doubt,consultaqualifiedplumber.
• Waterflowwithpressureof0.1-1Mpa
willallowyourmachinetooperateat
optimumefficiency(pressureof0.1
Mpameansthatmorethan8litresof
waterperminutewillflowthroughafully
opened tap).
3. Once you have made all of the
connections,carefullyturnthewater
supply on and check for leaks.
4. Ensurethatthenewwaterinlethoses
arenottrapped,kinked,twisted,folded
or crushed.
• Ifyourmachinehasahotwaterinlet
connection,thetemperatureofthehot
watersupplyshouldnotbehigherthan
158°F.
NOTE: YourWashingMachine
must only be connected to your water
supplyusingthesuppliednewfillhose.Old
hoses must not be reused.
4.2 Water Discharge Connection
• Connectthewaterdrainhosetoa
standpipeortotheoutletelbowof
ahouseholdsink,usingadditional
equipment.
• Neverattempttoextendthewaterdrain
hose.
• Donotputthewaterdrainhosefrom
yourmachineintoacontainer,bucketor
bathtub.
• Makesurethatthewaterdrainhoseis
not bent, buckled, crushed or extended.
• Thewaterdrainhosemustbeinstalled
atamaximumheightof39.5”fromthe
ground.
5. CONTROL PANEL OVERVIEW
1 2 3
1. Detergent Drawer
2. ProgrammeDial
3. ElectronicDisplay
EN - 15EN - 15
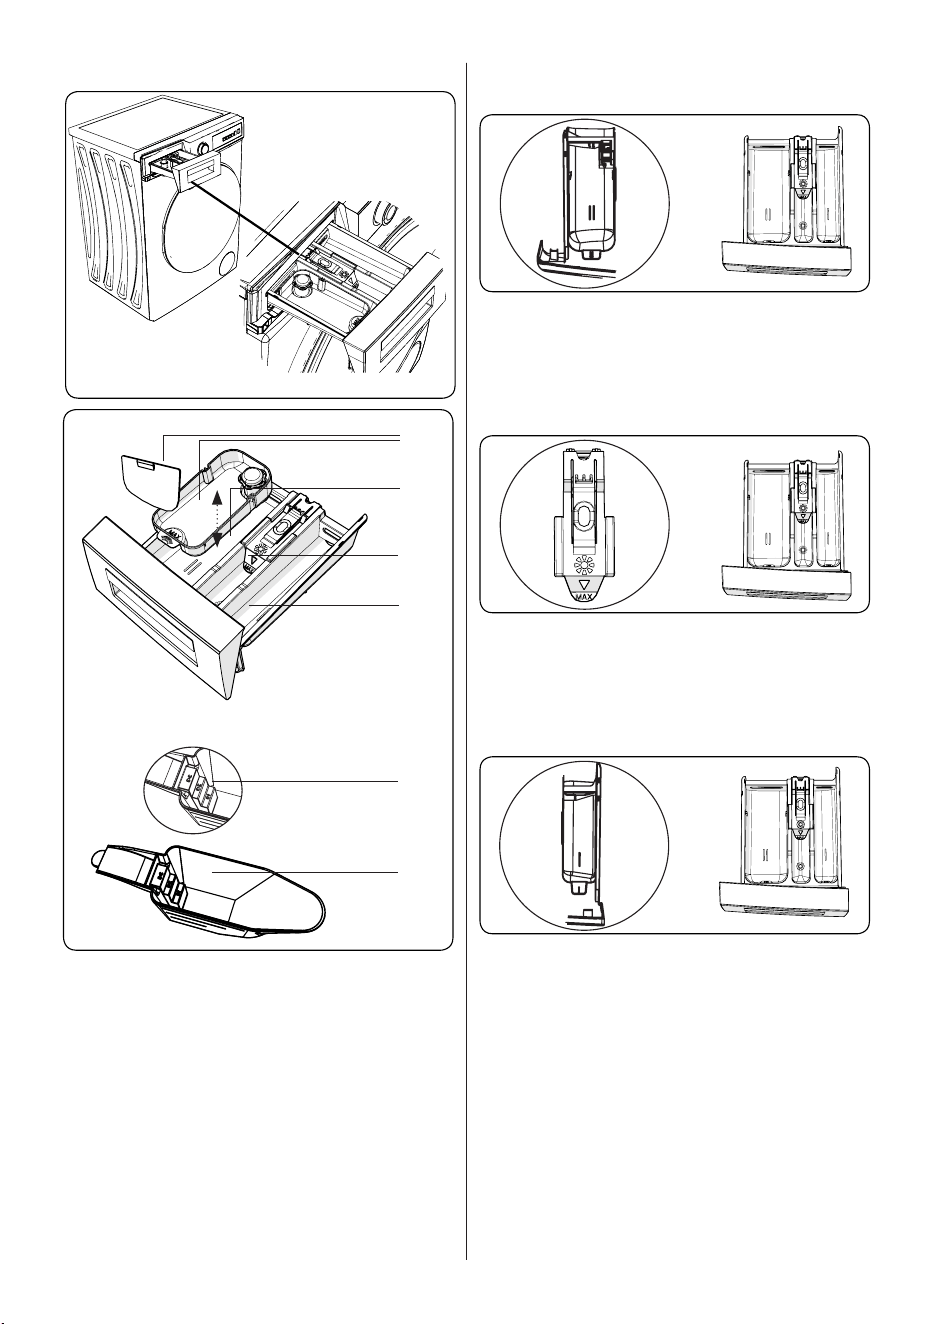
5.1 Detergent Drawer
1
2
3
4
5
6
1. LiquidDetergentAttachments(*)
2. MainWashDetergentCompartment
3. Softener Compartment
4. Pre-Wash Detergent Compartment
5. PowderDetergentLevels(*)
6. PowderDetergentScoop(*)
(*)Specificationsmayvarydependingon
themachinepurchased.
5.2 Sections
Main wash detergent compartment:
Thiscompartmentisforliquidorpowder
detergentsorlimescaleremover.Thefluid
detergentlevelplatewillbesuppliedinside
yourmachine.(*)
Fabric conditioner, starch, detergent
compartment:
Thiscompartmentisforsofteners,
conditionersorstarch.Followthe
instructionsonthepackaging.Ifsofteners
leaveresidueafteruse,trydilutingthemor
usingaliquidsoftener.
Pre-wash detergent compartment:
Thiscompartmentshouldbeusedonly
whenthepre-washfeatureisselected.We
recommendthatthepre-washfeatureis
usedonlyforverydirtylaundry.
(*)Specificationsmayvarydependingon
themachinepurchased.
EN - 16EN - 16
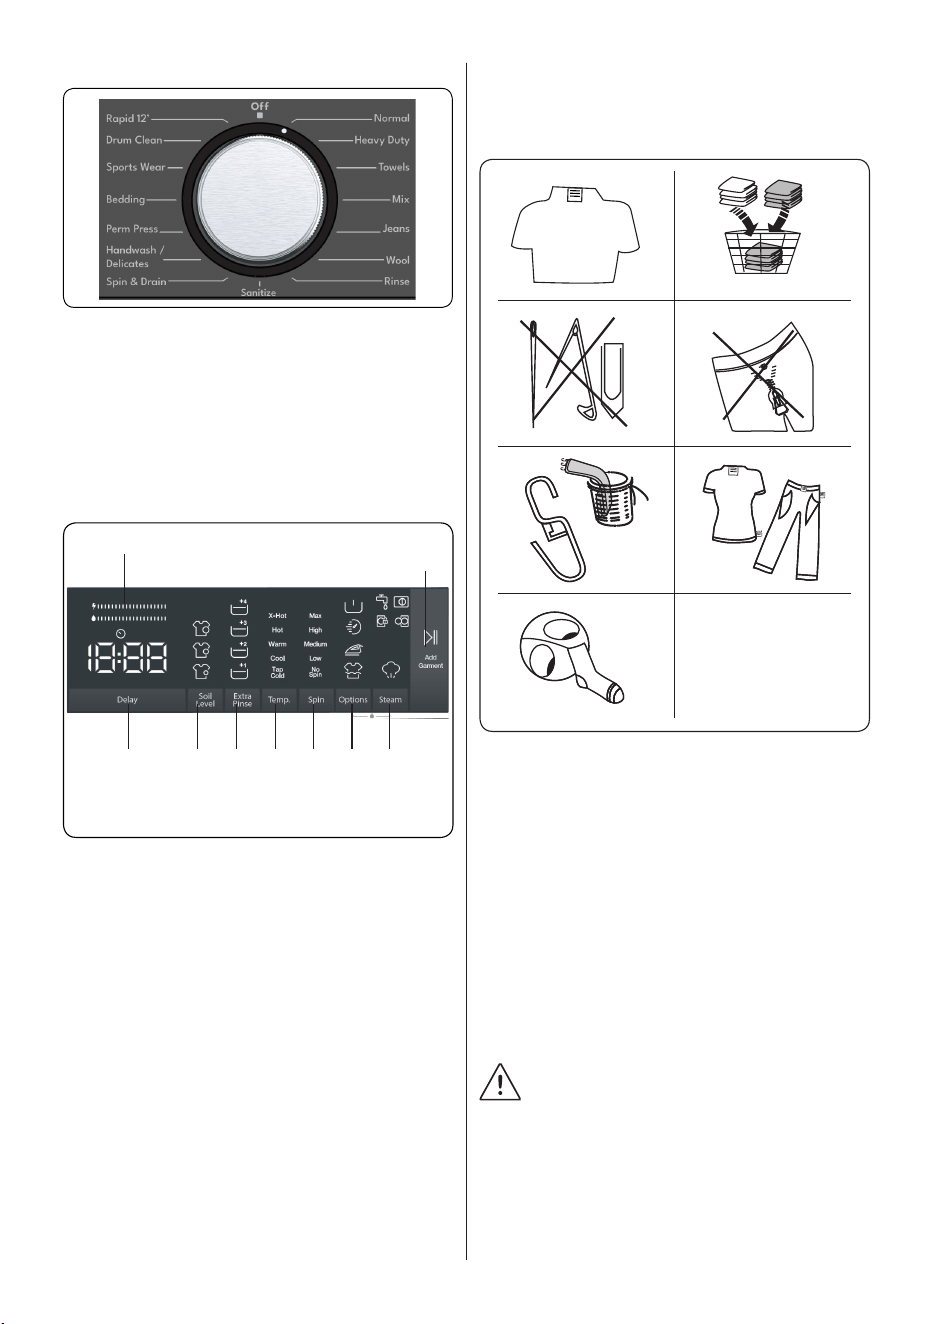
5.3 Program Dial
• Toselectthedesiredprogramme,turn
theprogrammedialeitherclockwiseor
anti-clockwiseuntilthemarkeronthe
programmedialpointstothechosen
programme.
• Makesurethattheprogrammedialis
set exactly to the programme you want.
5.4 Electronic Display
9
8
21 3 5
4 6
7
1. Delayedstartauxiliaryfunction
2. Selectingthelevelofsoiling
3. Extrarinseauxiliaryfunction
4. Selectingthewashingwater
temperature
5. Spinspeedselection
6. Options
7. Steamauxiliaryfunction
8. Start Pause Button
9. Energy/Water Efficiency Bar
6. USING YOUR
WASHING MACHINE
6.1 Preparing Your Laundry
1
3
5
7
2
4
6
1. Followtheinstructionsgiveninthecare
labelsontheclothing.
• Separateyourlaundryaccordingtotype
(cotton,synthetic,sensitive,wooletc.),
washingtemperatureandthedegreeof
dirtiness.
2. Neverwashcolouredandwhitelaundry
together.
• Darktextilesmaycontainexcessdye
and should be washed separately
severaltimes.
3. Ensurethattherearenometallic
materialsonyourlaundryorinthe
pockets;ifso,removethem.
CAUTION: Anymalfunctions
whichoccurduetoforeignmaterials
damagingyourmachinearenotcoveredby
the warranty.
4. Closezipsandfastenanyhooksand
eyes.
5. Removethemetallicorplastichooksof
curtainsorplacetheminawashingnet
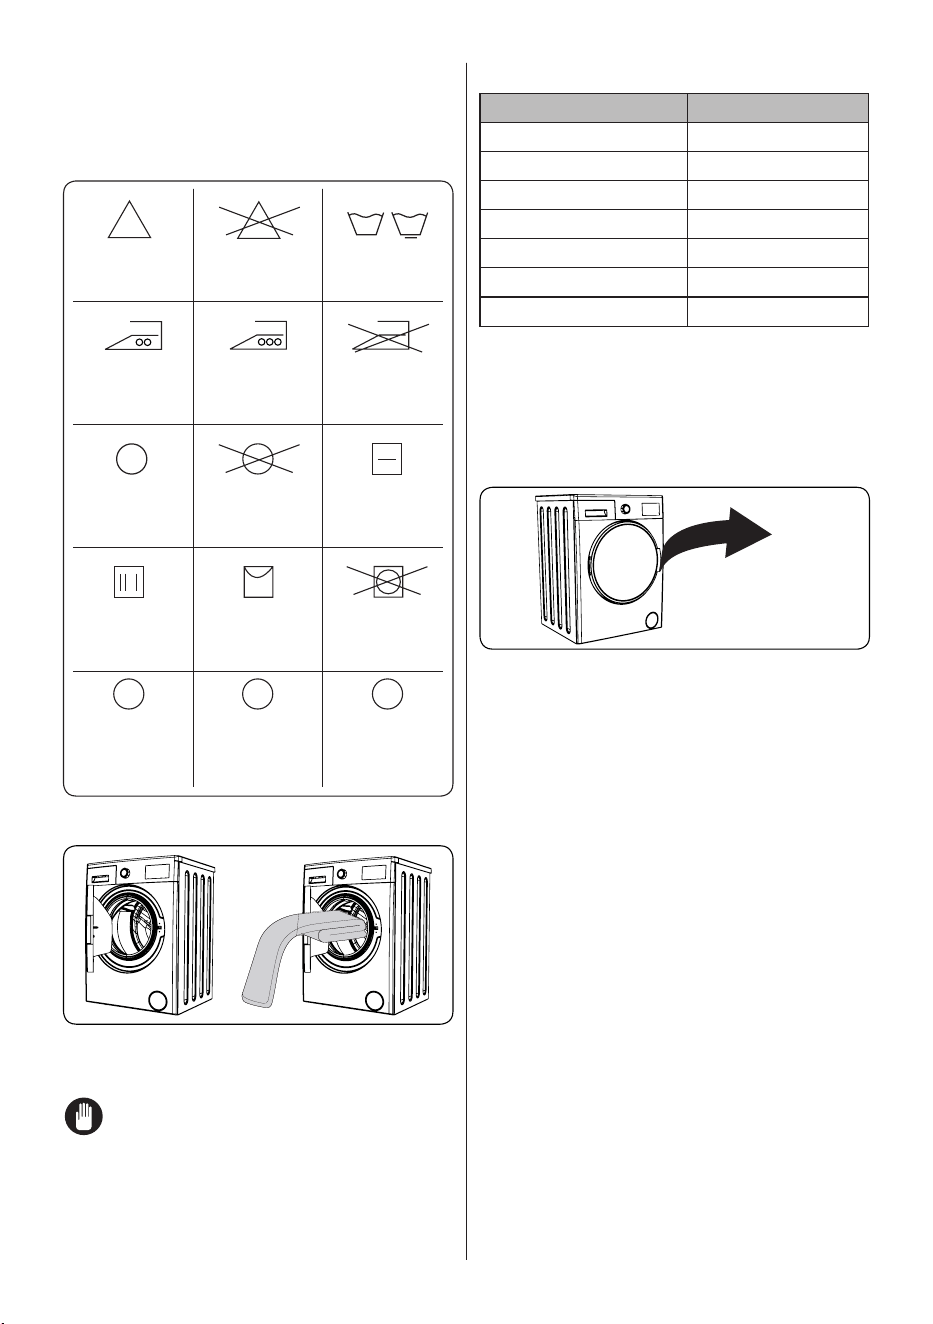
EN - 17EN - 17
or bag.
6. Reversetextilessuchaspants,
knitwear,t-shirtsandsweatshirts.
7. Washsocks,handkerchiefsandother
smallitemsinawashingnet.
Maximum
ironing
temperature
302°F
Cn be dry
cleaned
Dripdry
Drycleaning
ingasoil,
pure alcohol
andR113is
allowed
Maximum
ironing
temperature
392°F
No dry
cleaning
Hang to dry
Perchloroethylene
R11, R13,
Petroleum
Normal
washing
Donotiron
Dry flat
Do not tumble
dry
Perchlorinetyhlene
R11, R113, Gas
oil
Can be
bleached
Do not bleach
F P A
6.2 Putting Laundry in the Machine
• Openthedoorofyourmachine.
• Spreadyourlaundryevenlyinthe
machine.
NOTE: Take care not to exceed
themaximumloadofthedrumasthiswill
givepoorwashresultsandcausecreasing.
Refertothewashingprogrammetablesfor
informationonloadcapacities.
Thefollowingtableshowsapproximate
weightsoftypicallaundryitems:
LAUNDRY TYPE WEIGHT (gr)
Towel 200
Linen 500
Bathrobe 1200
Quiltcover 700
Pillowslip 200
Underwear 100
Tablecloth 250
• Loadeachitemoflaundryseparately.
• Checkthatnoitemsoflaundryare
trapped between the rubber seal and
the door.
• Gentlypushthedooruntilitclicksshut.
click
• Makesurethedoorisfullyclosed,
otherwisetheprogrammewillnotstart.
6.3 Adding Detergent to the Machine
Theamountofdetergentyouwillneedto
putinyourmachinewilldependonthe
followingcriteria:
• Ifyourclothesareonlyslightlysoiled,
do not pre-wash. Put a small amount
ofdetergent(asspecifiedbythe
manufacturer)intocompartmentIIofthe
detergent drawer.
• Ifyourclothesareexcessivelysoiled,
selectaprogrammewithpre-washand
put¼ofthedetergenttobeusedinto
compartment I of the detergent drawer
andtherestincompartmentII.
• Usedetergentsproducedforautomatic
washingmachines.Followthe
manufacturer’sinstructionsonthe
amount of detergent to use.
• In areas of hard water, more detergent
willberequired.
• Theamountofthedetergentrequired
willincreasewithhigherwashingloads.
• Putsoftenerinthemiddlecompartment
EN - 18EN - 18
of the detergent drawer. Do not exceed
the MAX level.
• Thicksoftenersmaycausecloggingof
thedrawerandshouldbediluted.
• Itispossibletousefluiddetergentsinall
programmeswithoutapre-wash.Todo
this,slidethefluiddetergentlevelplate
(*)intotheguidesincompartmentIIof
thedetergentdrawer.Usethelineson
theplateasaguidetofillthedrawerto
therequiredlevel.
(*)Specificationsmayvarydependingon
themachinepurchased.
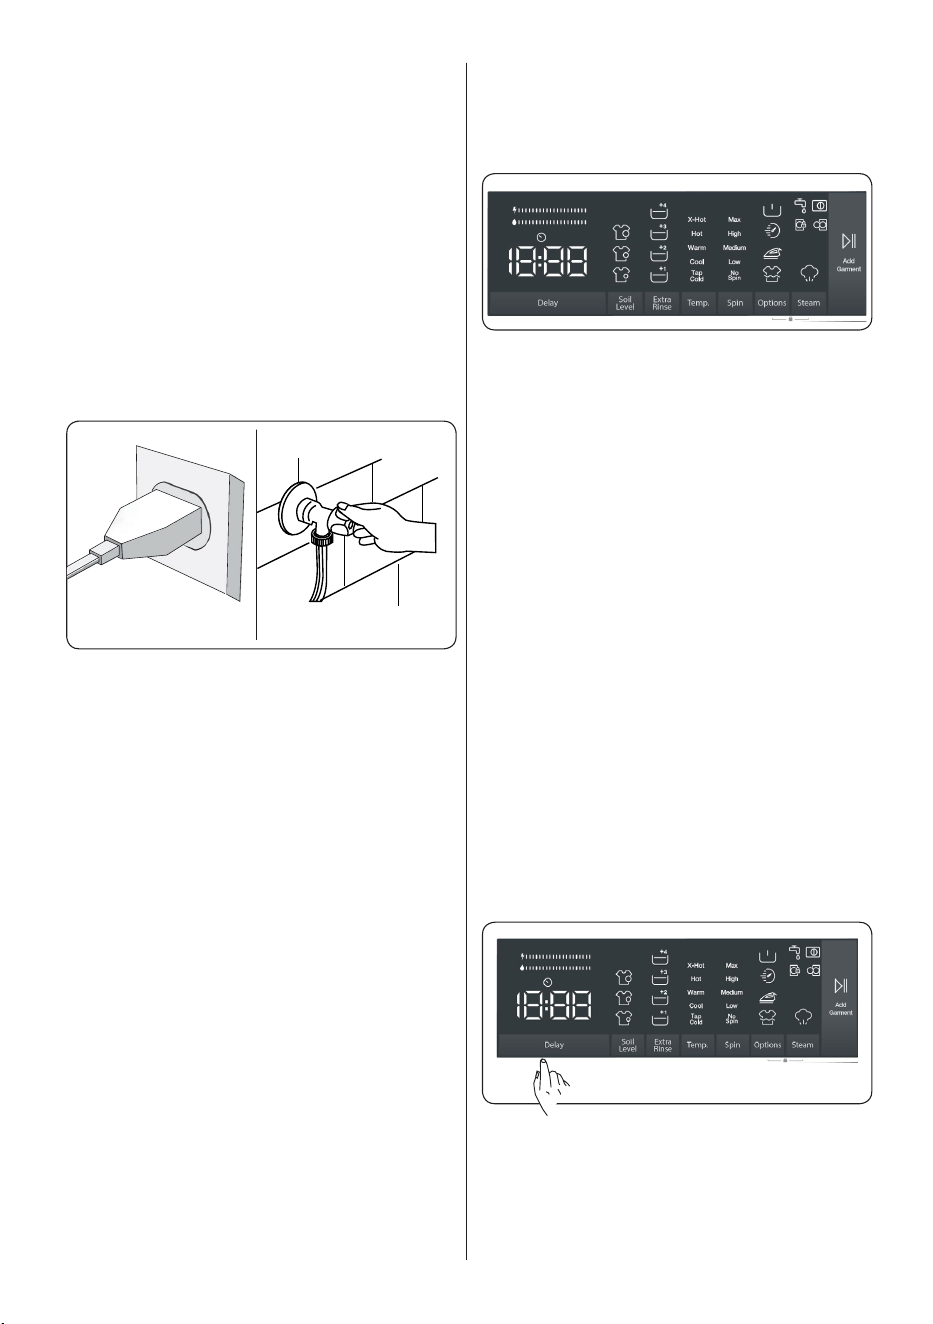
6.4 OPERATING INSTRUCTIONS
1 2
WARNING - To reduce the risk of fire,
electric shock, or injury to persons,
read the IMPORTANT SAFETY
INSTRUCTIONS before operating this
appliance.
1. Plugyourmachineintothemains
supply.
2. Turn on the water supply.
• Openthemachinedoor.
• Evenlyspreadyourlaundryinthe
machine.
• Gentlypushthedooruntilitclicksshut.
6.5 Selecting a Programme
Use the programme tables to select the
mostappropriateprogrammeforyour
laundry.
6.6 Half-Load Detection System
Yourmachinefeaturesahalf-loaddetection
system.
Ifyouputlessthanhalfthemaximum
loadoflaundryintoyourmachineitwill
automaticallysetthehalf-loadfunction,
regardless of the programme you selected.
Thismeansthattheselectedprogramme
willtakelesstimetocompleteandwilluse
less water and energy.
6.7 Auxiliary Functions
Beforestartingtheprogram,youcanselect
auxiliaryfunctionsifyouwishso.
• Pressthekeyoftheauxiliaryfunction
you want to select.
• Ifthesymboloftheauxiliaryfunctionis
continuouslyonintheelectronicdisplay,
theselectedauxiliaryfunctionwillbe
enabled.
• Ifthesymboloftheauxiliaryfunction
isflashingintheelectronicdisplay,the
selectedauxiliaryfunctionwillnotbe
enabled.
Reason for not enabling the function:
• Thatauxiliaryfunctionmightnotbe
availablefortheselectedwashing
program.
• Themachinemighthavepassedthe
stepwherethatauxiliaryfunctioncould
beapplied.
• Theauxiliaryfunctionmightbe
incompatiblewithanotherauxiliary
functionyouhavepreviouslyselected.
1. Delayed start auxiliary function
Youcanusethisauxiliaryfunctiontodelay
thestarttimeofthewashingcyclefor1to
23 hours.
Tousethedelayfunction:
• Press the delay key once.
EN - 19EN - 19
• “1h”willbedisplayed. willturnonin
theelectronicdisplay.
• Pressthedelaykeyuntilyoureachthe
timeafterwhichyouwantthemachine
tostartthewashingcycle.
• Ifyouhaveskippedthedelaytimeyou
wouldliketoset,youcankeeppressing
thedelaykeyuntilyoureachthattime
again.
• Tousethetimedelayfunction,youneed
to press the Start/Pause key to start the
machine.
NOTE: Afterselectingthedelay
function,youcanselectotherfunctions
withouttouchingthe“Start/Pause”key,and
then you can touch the “Start/Pause” key to
enabletimedelay.
To cancel the delay function:
• If you did not press the Start/Pause key,
keep touching the delay key until the
electronic display shows the duration
of the program you have selected.
Once you see the program time on the
electronic display, this means that the
delay has been cancelled.
• If you have pressed the Start/Pause key
to start the machine, you just need to
touch the delay key once. will go off
on the electronic display, press “Start/
Pause” key to start the washing cycle.
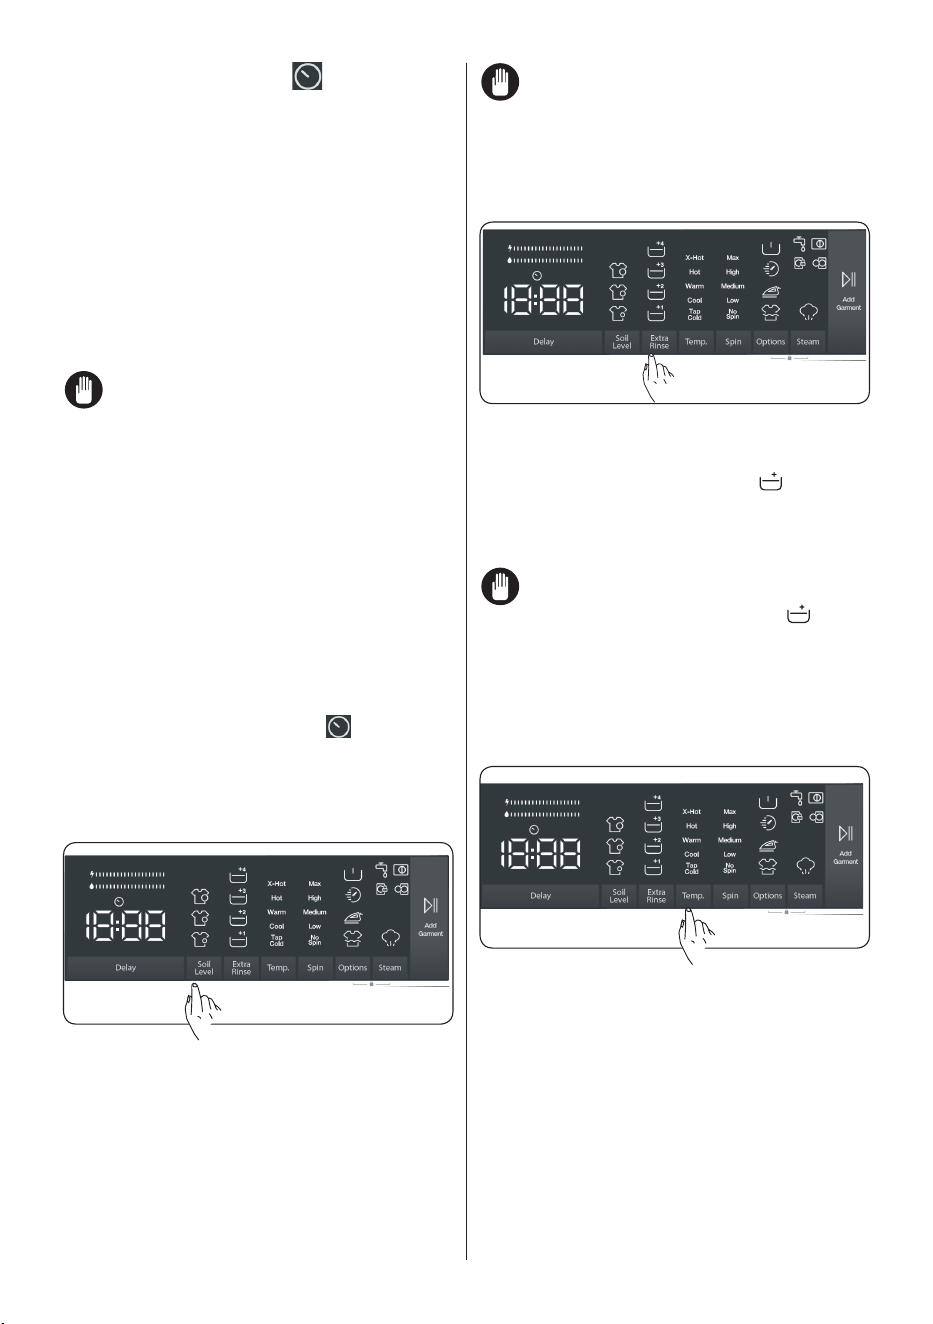
2. Selecting the level of soiling
Youcanwashyourlaundriesinshorter
orlongerdurations,atlowerorhigher
temperaturesbyselectingasoilinglevel
dependingonthesoilinglevelonyour
laundries.
Soilinglevelsareautomaticallysetinsome
programs. You can make changes at your
discretion.
NOTE: If there are no changes
inthelevelwhenyoutouchthesoiling
levelkey,itmeansthereisnosoilinglevel
selectionintheprogramyouhaveselected.
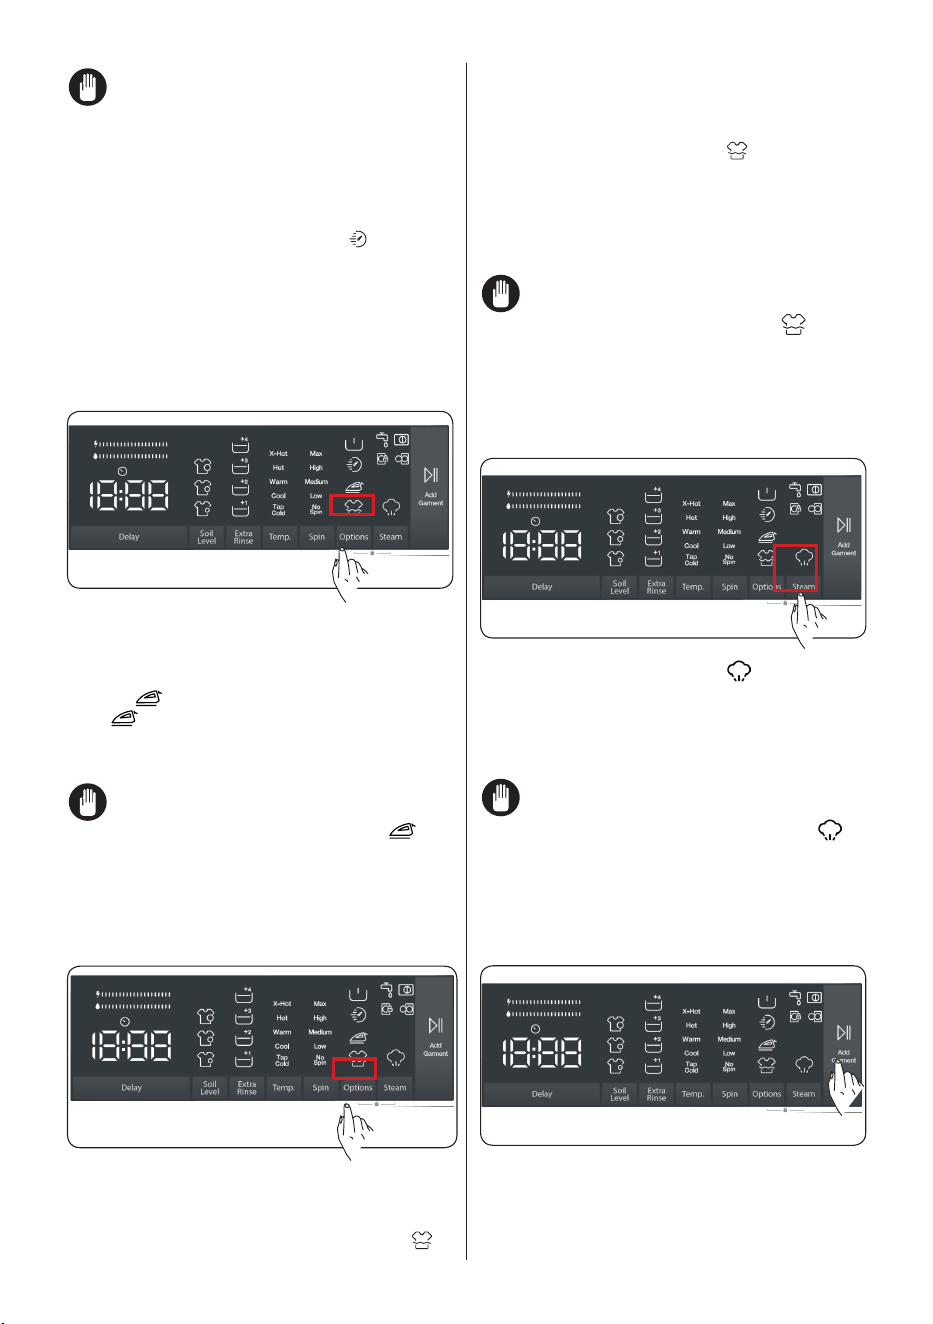
3. Extra rinse auxiliary function
You can use this auxiliary function for extra
rinsing on your laundry. To enable the extra
rinse function, keep pressing the options
key until the extra rinse symbol turns
on. If the extra rinse LED is constantly on
in the electronic display, it means that the
auxiliary function is selected.
NOTE: When you want to select
theextrarinseauxiliaryfunction,if does
notappearonthedisplay,thismeansthat
thisfeatureisnotavailableintheselected
washingprogram.
4. Selecting the washing water
temperature
Youcanusethewashingwatertemperature
settingkeytosetthetemperatureofthe
washingwaterforyourlaundry.
• When you select a new program,
theselectedprogram’smaximum
temperaturewillbedisplayedonthe
washingwatertemperaturedisplay.
• Youcanpressthewashingwater
temperaturesettingkeytodecrease
thewashingwatertemperature
graduallybetweenthemaximumwater
temperature of the selected program

EN - 20EN - 20
and cold water wash.
• Ifyouhaveskippedthewashingwater
temperature you wanted to set, keep
pressingthewashingwatertemperature
keytofindthedesiredtemperature
again.
5. Spin speed selection
Youcanusethespeedsettingkeytoset
thespinspeedforyourlaundry.When
you select a new program, the selected
program’smaximumspinspeedwillbe
displayedonthespinspeeddisplay.
Youcanpressthespinspeedsettingkeyto
decreasethespinspeedgraduallybetween
theselectedprogram’smaximumspin
speedandthespincancelledoption.
Ifyouhaveskippedthespinspeedyou
wantedtoset,youcankeeppressingthe
spinspeedkeytofindthedesiredspeed
again.
6. Options
Youcanuseauxiliaryfunctionstomakethe
bestwashingselectionforyourlaundry.To
dothis,youcantouchtheoptionskeyon
thedisplaypaneltoenablethefollowing:
6.1 Prewash auxiliary function
6.2 Rapid wash auxiliary function
6.3 Easy ironing auxiliary function
6.4 Rinse hold auxiliary function
6.1 Prewash auxiliary function
You can use this auxiliary function to
perform pre-wash before the main wash
cycle for your highly soiled laundry. When
you use this function, you need to add
detergent into the prewash dispenser of the
detergent drawer. To enable the prewash
auxiliary function, press the options key
until the prewash symbol turns on. If
the prewash LED is constantly on in the
electronic display, it means that the auxiliary
function is selected.
NOTE: When you want to select
theprewashauxiliaryfunction,if does
notappearonthedisplay,thismeansthat
thisfeatureisnotavailableintheselected
washingprogram.
6.2 Rapid wash auxiliary function
Youcanwashyourlaundryinashorter
time,usinglessenergyandwaterby
selectingthisadditionalfunction.To
enabletherapidwashauxiliaryfunction,
presstheoptionskeyuntiltherapidwash
symbol turnson.IftherapidwashLED
isconstantlyonintheelectronicdisplay,
itmeansthattheauxiliaryfunctionis
selected.
Werecommendthatyouonlyusethis
optionifyouarewashinglessthanhalf
themaximumdryloadfortheselected
programme.
EN - 21EN - 21
NOTE: If you put less than half
themaximumloadoflaundryintoyour
machinethehalf-loadfunctionwillbe
automaticallyset,someoftheprogramme
youselected.Thismeansthattheselected
programmewilltakelesstimetocomplete
andwilluselesswaterandenergy.When
yourmachinedetectshalfload, the
symbolisdisplayedautomatically.When
youwanttoselecttherapidwashauxiliary
function,ifdoesnotappearonthedisplay,
thismeansthatthisfeatureisnotavailable
intheselectedwashingprogram.
6.3 Easy ironing auxiliary function
This auxiliary function allows you to have
less creased clothes after washing. To
enable the easy ironing auxiliary function,
press the options key until the easy ironing
symbol turns on. If the easy ironing
LED is constantly on in the electronic
display, it means that the auxiliary function
is selected.
NOTE: When you want to select
theeasyironingauxiliaryfunction,if
doesnotappearonthedisplay,thismeans
thatthisfeatureisnotavailableinthe
selectedwashingprogram.
6.4 Rinse hold auxiliary function
It can be activated in programs where
the auxiliary function of soaking is valid.
You can understand that it has become
active by the lighting of the symbol on
the electronic display. When this function
is selected; Your machine keeps your
laundry in the last rinse water. While your
machine is keeping your laundry in the
last rinse water, the symbol will flash
on the electronic display. When you want
to empty your laundry; Press the “Start /
Pause” button. Your machine will empty the
water in it and finish the program without
spinning.
NOTE: When you want to select
therinseholdauxiliaryfunction,if does
notappearonthedisplay,thismeansthat
thisfeatureisnotavailableintheselected
washingprogram.
7. Steam auxiliary function
Owing to the steam system ironing has
become quick and as easy. The steam
used dream washing penetrates and
loosens the fibres, eliminates creases and
leaves our clothes soft and delicate.
NOTE: When you want to select
the steam systemauxiliaryfunction,if
doesnotappearonthedisplay,thismeans
thatthisfeatureisnotavailableinthe
selectedwashingprogram.
Start/Pause button
By pressing on the Start/Pause button, you
may start the programme you have
selected or suspend a running programme.
If you switch your machine to the standby
mode, the Start/Pause led on the electronic
EN - 22EN - 22
display will blink.
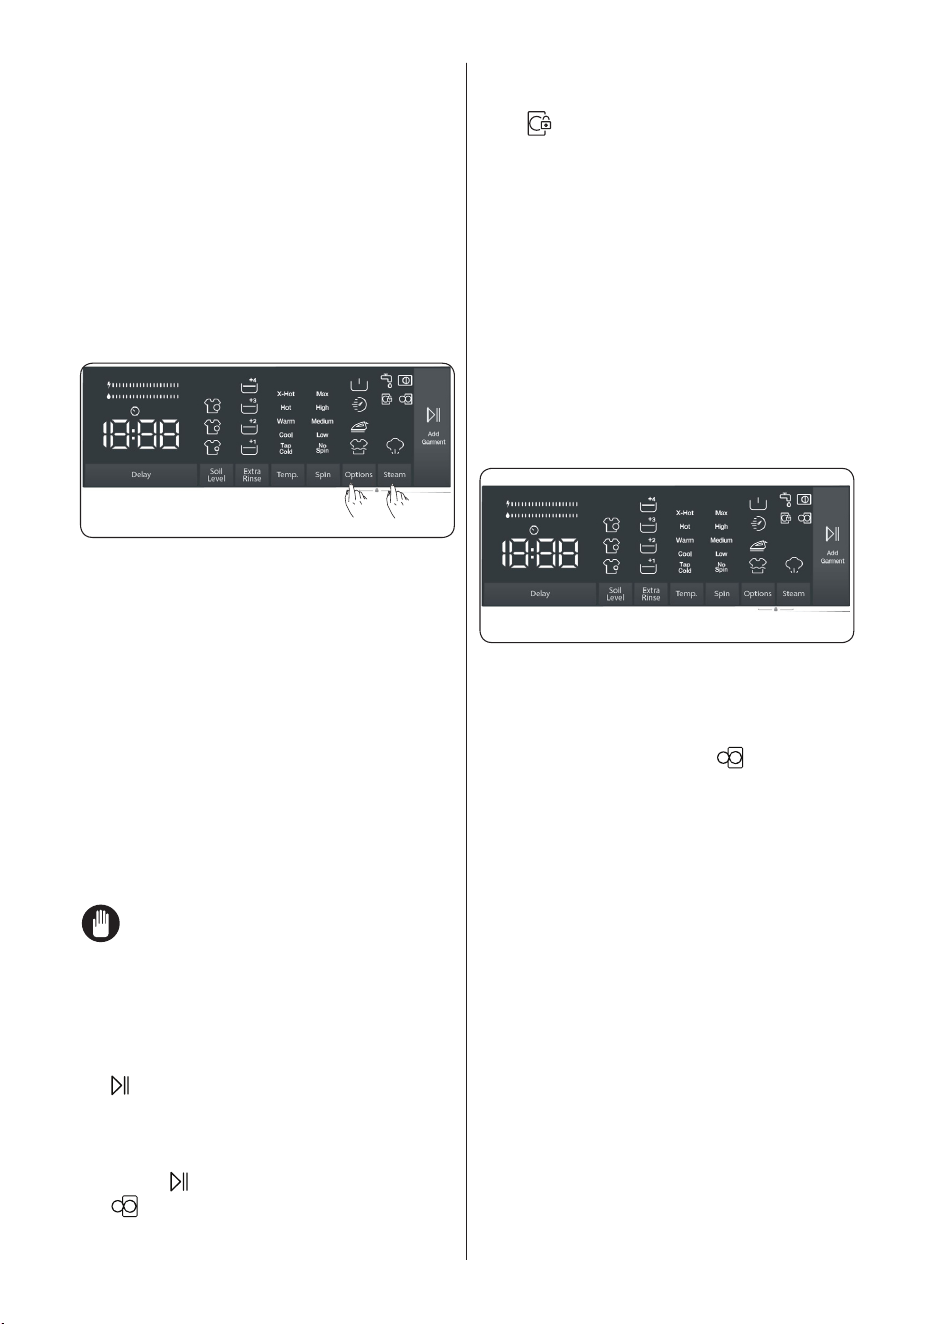
6.8 Child Lock
The Child Lock function allows you to
lock the buttons so that the wash cycle
you have chosen cannot be changed
unintentionally.
To activate child lock, press and hold
button 6 and 7 simultaneously for at
least 3 seconds. ‘’CL’’ will flash on the
electronic display for 2 seconds when the
child lock is activated.
6 7
If any button is pressed or selected
programme is changed by the programme
dial while the child lock is active, the “CL”
symbol will flash on the electronic display
for 2 seconds.
If the child lock function is active and
a programme is running, when the
programme dial is turned to the “Off”
position and another programme
is selected the previously selected
programme continues from where it was
left.
To deactivate the child lock, press and
hold button 6 and 7 simultaneously for at
least 3 seconds until the “CL” symbol on
the electronic display disappears.
NOTE: Doorremainsunlocked
incasewhenchildlockisactiveand
electricityiscutoff.
6.9 If you want to pause/cancel a
running program or add laundry:
• symbol key allows you to pause
or restart the selected program. When
you want to add laundry, you can use
thisfunction.
• Touch symbolbuttonforthis.If
isdisplayedonthescreen,you
canopentheloadingdoorandadd
laundry.
• If isdisplayedonthescreen,the
step where you can add laundry has
passed.
• Ifyouwanttocancelarunning
program, turn the program knob to
“CANCEL”position.Yourmachine
willstopwashingprocessandthe
programwillbecancelled.Todrain
thewaterinthemachine,turn
the program knob to any program
position.Yourmachinewilldrainthe
water and cancel the program. You
can select a new program and start
themachine.
6.10 Program End
Yourmachinewillautomaticallystop
when the selected program ends.
• “End”willappearontheelectronic
display.
• You can open the door and take
outthelaundry.Aftertakingoutthe
laundry, leave the door open so that
theinsideofthemachinecandry.
• Turn the program knob to CANCEL
position.
• Unplugthemachine.
• Turn off the water tap.

EN - 23
7. PROGRAMME TABLE
Programme
Washing
temperature
(°C)
Maximum
dry laundry
amount (kg
/ Ib)
Detergent
compartment
Programme
duration
(Min.)
Laundrytype/Descriptions
(**)
NORMAL
X-Hot-Hot-
Warm*-Cool-Tap
Cold
10 /
22.05
2 113
Normallysoiledcottonandlinenfabrics.
(Underwear,linen,tablecloth,towel(maximum
5 kg / 11 lb), bedclothes, etc. )
HEAVY
DUTY
X-Hot-Hot*-
Warm-Cool-Tap
Cold
10 /
22.05
2 131
Verydirtycottonandflaxtextiles.(Underwear,
linen,tablecloth,towel(maximum 5 kg / 11 lb),
bedclothes, etc.)
TOWELS
X-Hot-Hot*-
Warm-Cool-Tap
Cold
5 / 11.02 1&2 113
Dirtytowelandflaxtextiles.(Underwear,linen,
tablecloth,towel(maximum 2 kg / 5.5 lb),
bedclothes, etc.)
MIX
Hot*-Warm-Cool-
Tap Cold
3.5 /
7.716
2 118
Dirtymixfibres,synthetics,colourandflax
textilescanbewashedtogether.
JEANS
Warm*-Cool-Tap
Cold
3.5 /
7.716
2 100
Blackanddarkitems,mixedfibreorjeanswash
insideout.Jeansoftencontainsexcessdyeand
mayrunduringthefirstfewwashes.Washlight
anddarkcoloureditemsseparately.
WOOL
Warm*-Cool-Tap
Cold
2.5 /
5.512
2 58 Woollenlaundrieswithmachinewashlabels.
RINSE TapCold*
10 /
22.05
- 35
Providesanadditionalrinsetoanytypeof
laundryafterthewashingcycle.
Sanitize X-Hot* 5 / 11.02 2 200 Baby laundry
Spin&Drain *“--”
10 /
22.05
- 17
Youcanusethisprogramforanytypeof
laundryifyouwantanadditionalspinstep
afterthewashingcycle./Youcanusethedrain
programtodrainthewateraccumulatedinside
themachine(addingorremovinglaundry).To
enablethedrainprogram,turntheprogramknob
tothespin/drainprogram.Afteryouselect“spin
cancelled”usingtheauxiliaryfunctionkey,the
programwillstarttorun.
HAND
WASH /
DELICATES
Warm*-Cool-Tap
Cold
2.5 /
5.512
2 100
Laundry recommended for hand wash or
sensitivelaundry.
PERM
PRESS
Hot*-Warm-Cool-
Tap Cold
3.5 /
7.716
2 120 OutdoorClothing
BEDDING
Hot*-Warm-Cool-
Tap Cold
- 2 113
For washing a fibre duvet with a machine
washable label. (max.2,5 kg 5.5 lb)
SPORTS
WEAR
Warm*-Cool-Tap
Cold
3.5 /
7.716
2 100 Sportswear.
DRUM
CLEAN
X-Hot* - 2 90 Forcleaningthedrum.
(***)Quick
Wash
X-Hot-Hot-Warm-
Cool*-TapCold
2 / 4.409 2 12
Inashorttimeof12minutes,Lightlysoiled,
cotton,coloredandlinentextilesyourcanwash.
NOTE: PROGRAMME DURATION MAY CHANGE ACCORDING TO THE AMOUNT
OF LAUNDRY, TAP WATER, AMBIENT TEMPERATURE AND SELECTED ADDITIONAL
FUNCTIONS.
(*) Washing water temperature of the programme is the factory default.
(**) Normal program is most energy eiciency program with all wash temperature selections.
(***) Due to the short washing time of this programme, we recommend that less detergent is used. The
programme may last longer than 12 minutes if your machine detects an uneven load. You can open the door
of your machine 2 minutes after the completion of a washing operation. (The 2 minute period is not included
in the programme duration).
EN - 24EN - 24
8. USER-
MAINTENANCE
INSTRUCTIONS
8.1 Warning
To reduce the risk
of electric shock,
disconnect this
appliance from the
power supply before
attempting any user
maintenance. Turning
the controls to the
OFF position does
not disconnect this
appliance from the
power supply.
Turnyourmainspower
supply off and remove
the plug from the
socketbeforecarrying
outmaintenance
andcleaningofyour
machine.
Turn off the water
supplybeforestarting
maintenanceand
cleaningofyour
machine.
CAUTION: Do not
usesolvents,abrasive
cleaners, glass cleaners
orall-purposecleaning
agents to clean your
WashingMachine.They
maydamagetheplastic
surfaces and other
componentswiththe
chemicalstheycontain.
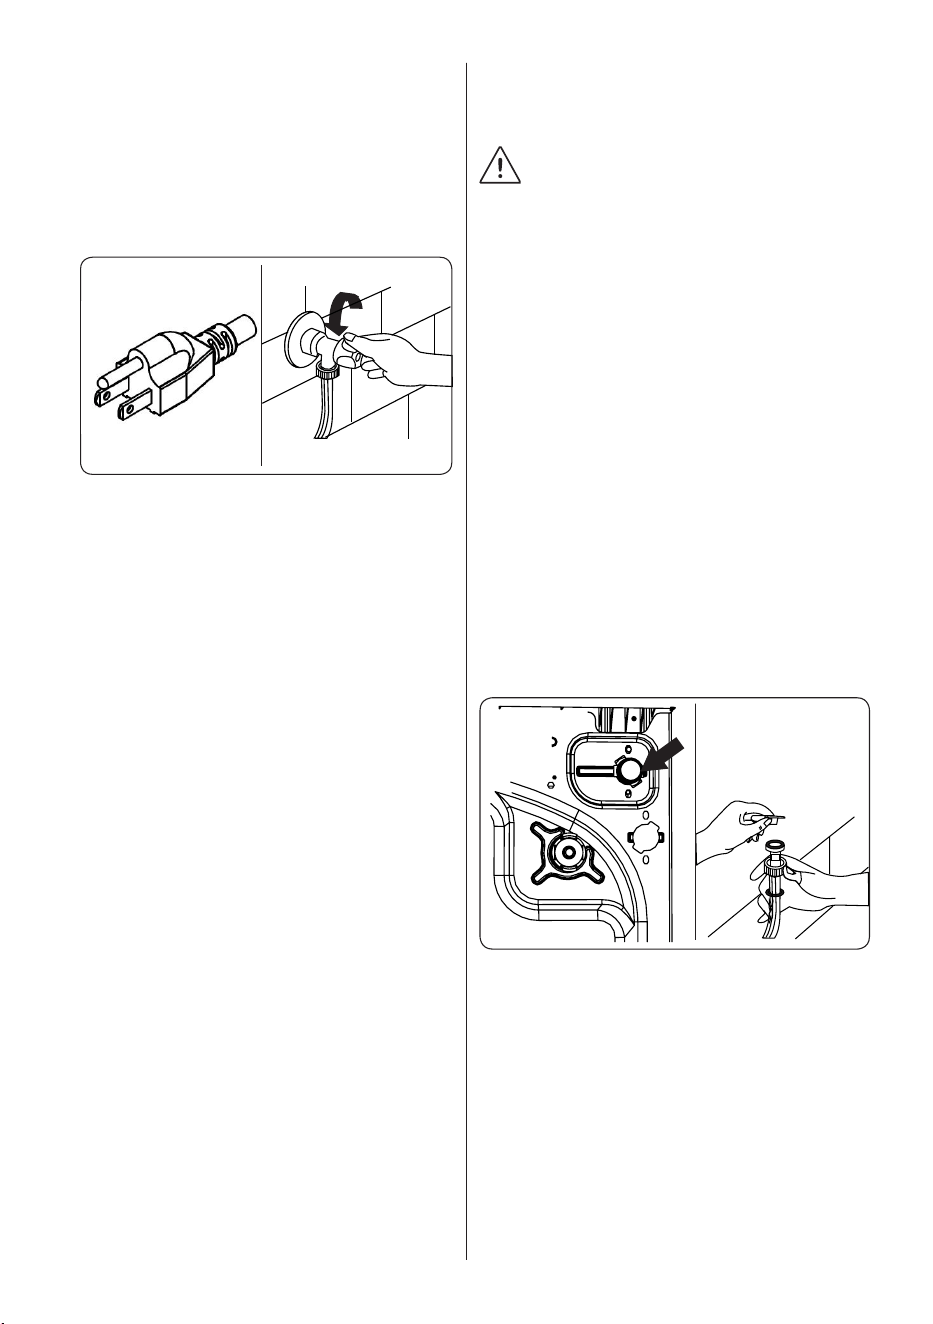
8.2 Water Inlet Filters
Waterinletfilterspreventdirtandforeign
materialsfromenteringyourmachine.
Werecommendthatthesefiltersare
cleanedwhenyourmachineisunable
toreceivesufficientwater,althoughyour
watersupplyisonandthetapisopen.
We recommend that you clean your water
inletfiltersevery2months.
• Unscrewthewaterinlethose(s)from
theWashingMachine.
• Toremovethewaterinletfilterfrom
thewaterinletvalve,useapairof
long-nosedplierstogentlypullonthe
plasticbarinthefilter.
• Asecondwaterinletfilterislocated
inthetapendofthewaterinlethose.
Toremovethesecondwaterinlet
filter,useapairoflong-nosedpliers
togentlypullontheplasticbarinthe
filter.
EN - 25EN - 25
• Cleanthefilterthoroughlywithasoft
brushandwashwithsoapywaterand
rinsethoroughly.Re-insertthefilterby
gentlypushingitbackintoplace.
CAUTION: Thefiltersatthe
waterinletvalvemaybecomeclogged
duetowaterqualityorlackofrequired
maintenanceandmaybreakdown.
Thismaycauseawaterleak.Anysuch
breakdowns are out of the scope of the
warranty.
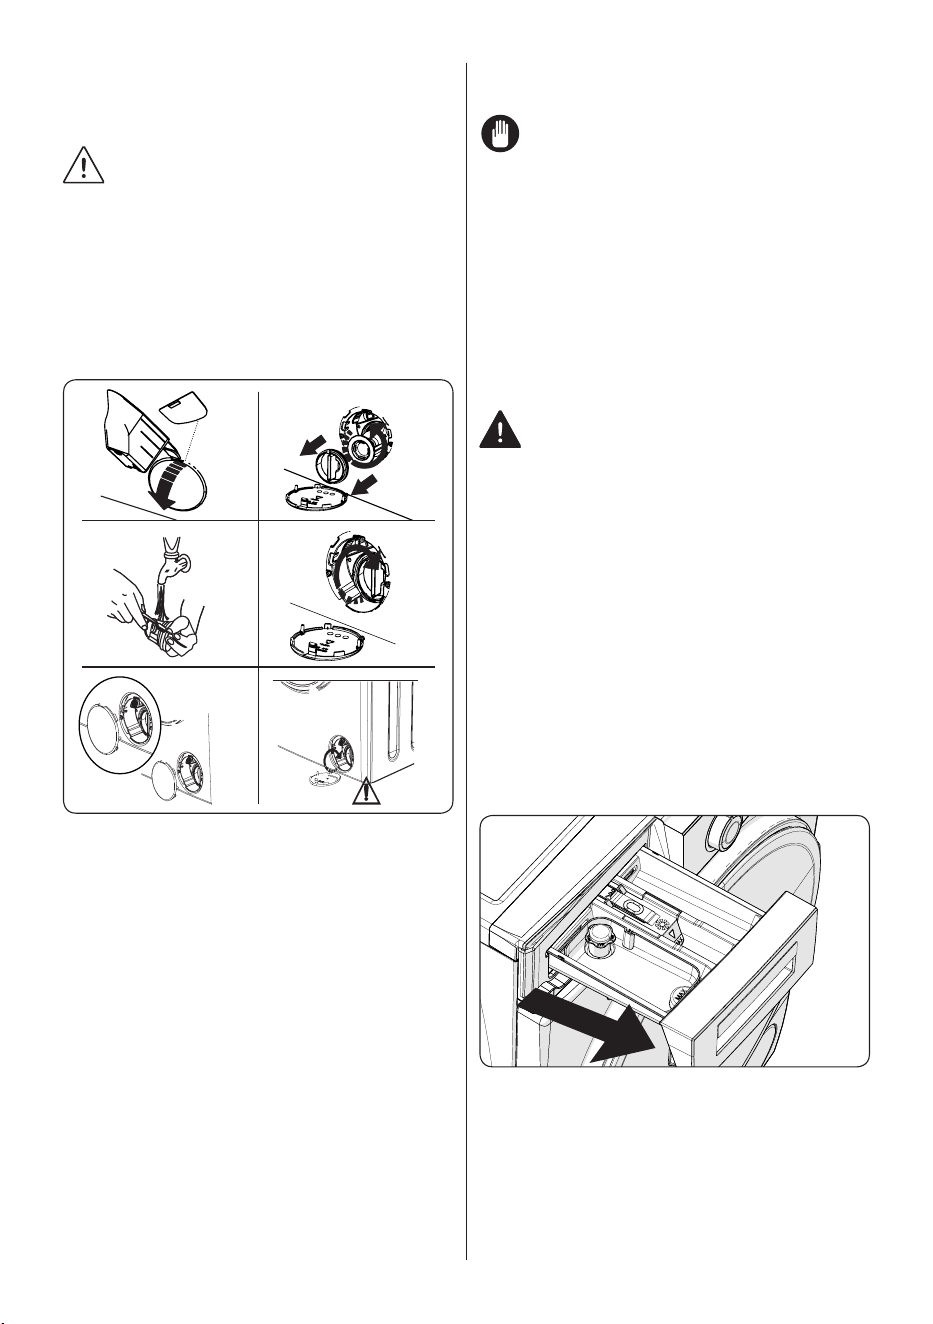
8.3 Pump Filter
1
3
5
2
4
6
ThepumpfiltersysteminyourWashing
Machineprolongsthelifeofthepumpby
preventinglintfromenteringyourmachine.
We recommend that you clean the pump
filterevery2months.
Thepumpfilterislocatedbehindthecover
onthefront-lowerrightcorner.
Tocleanthepumpfilter:
1. Youmayusethewashingpowderspade
(*)suppliedwithyourmachineorliquid
detergent level plate to open the pump
cover.
2. Lodge the end of the powder spade
orliquiddetergentlevelplateinthe
openingofthecoverandgentlypress
backwards.Thecoverwillopen.
• Beforeopeningthefiltercover,placea
containerunderthefiltercovertocollect
anywaterleftinthemachine.
• Loosenthefilterbyturninganticlockwise
andremovebypulling.Waitforthe
watertodrain.
NOTE: Dependingonthe
amountofwaterinsidethemachine,you
mayhavetoemptythewatercollection
containerafewtimes.
3. Removeanyforeignmaterialsfromthe
filterwithasoftbrush.
4. Aftercleaning,re-fitthefilterbyinserting
itandturningclockwise.
5. Whenclosingthepumpcover,ensure
thatthemountingsinsidethecover
meettheholesonthefrontpanelside.
6. Closethefiltercover.
WARNING: Thewaterinthe
pumpmaybehot,waituntilithascooled
downbeforecarryingoutanycleaningor
maintenance.
(*)Specificationsmayvarydependingon
themachinepurchased.
8.4 Detergent Drawer
Theuseofdetergentmaycauseresidual
buildupinthedetergentdrawerovertime.
We recommend that you remove the drawer
every 2 months to clean the accumulated
residue.
To remove the detergent drawer:
• Pullthedrawerforwardsuntilitisfully
extended.
• Press the region shown below inside
the detergent drawer you have pulled
all the way back, and continue pulling
and remove the detergent drawer from
its place
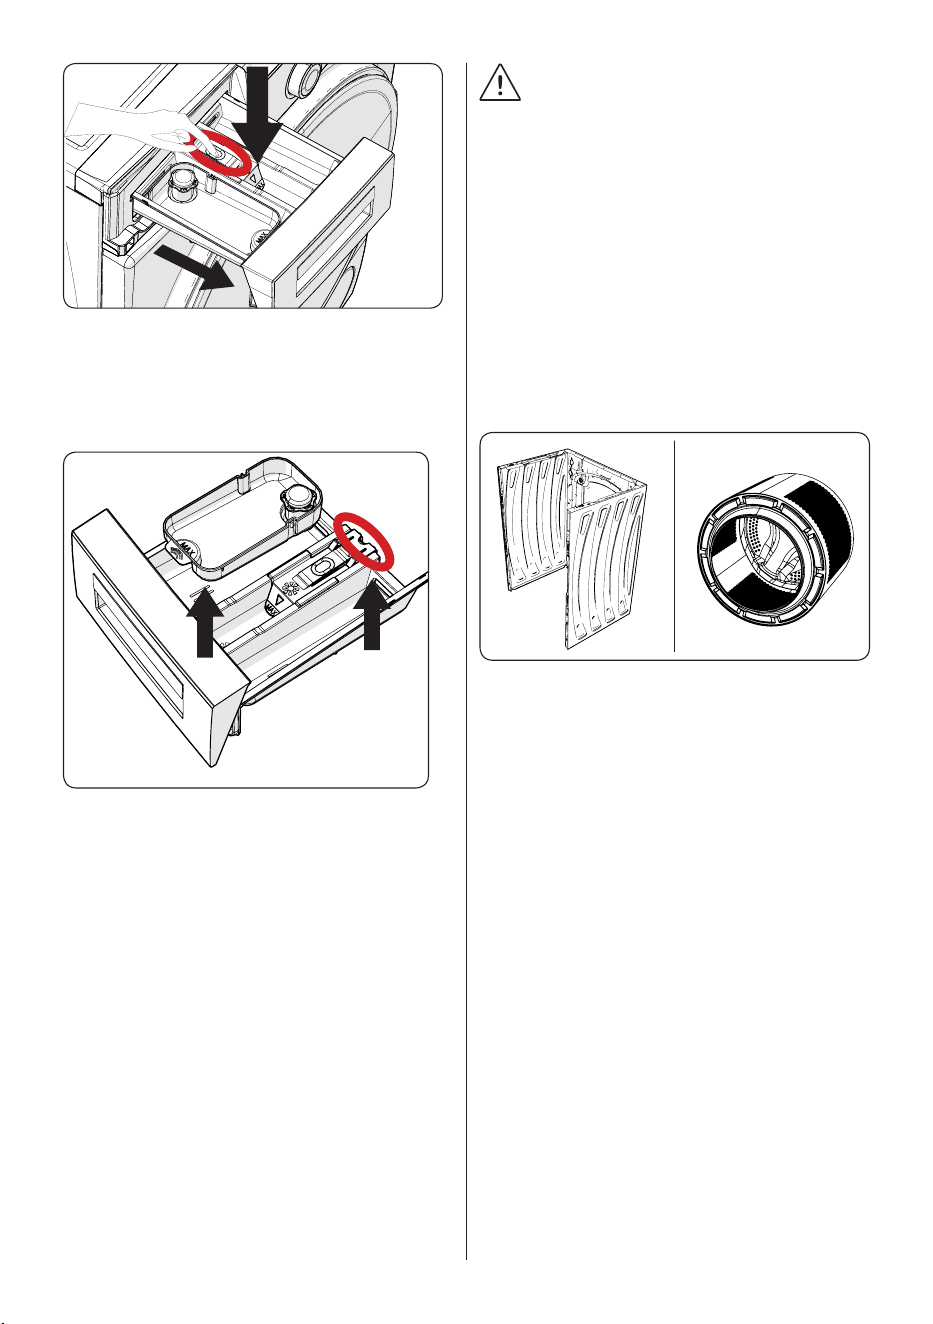
EN - 26EN - 26
• Remove the detergent drawer and
disassemble the flush stopper. Clean
thoroughly to completely remove any
softener residue. Refit the flush stopper
after cleaning and check that it is seated
properly.
• Rinse with a brush and lots of water.
• Collect the residues inside the detergent
drawer slot so that they don’t fall inside
your machine.
• Dry the detergent drawer with a towel or
dry cloth and place it back
Do not wash your detergent drawer
in a dishwasher.
Liquid detergent apparatus(*)
For the cleaning and maintenance of the
liquid level detergent apparatus, remove
the apparatus from its location as shown
in the picture below, and thoroughly clean
the remaining detergent residues. Replace
the apparatus. Make sure that no residual
material remains inside the siphon.
(*)Specificationsmayvarydependingon
themachinepurchased.
9. Body / Drum
1 2
1. Body
Useamild,non-abrasivecleaningagent,
or soap and water, to clean the external
casing.Wipedrywithasoftcloth.
2. Drum
Donotleavemetallicobjectssuchas
needles,paperclips,coinsetc.inyour
machine.Theseobjectsleadtothe
formationofruststainsinthedrum.To
cleansuchruststains,useanon-chlorine
cleaningagentandfollowtheinstructionsof
manufacturerofthecleaningagent.Never
usewirewoolorsimilarhardobjectsfor
cleaningruststains.
EN - 27
10. TROUBLESHOOTING
Repairofyourmachineshouldbecarriedoutbyanauthorisedservicecompany.
Ifyourmachinerequiresrepairorifyoucannotsolveanissuewiththeinformation
providedbelow,thenyoushould:
• Unplugyourmachinefromthemainspowersupply.
• Turn off the water supply.
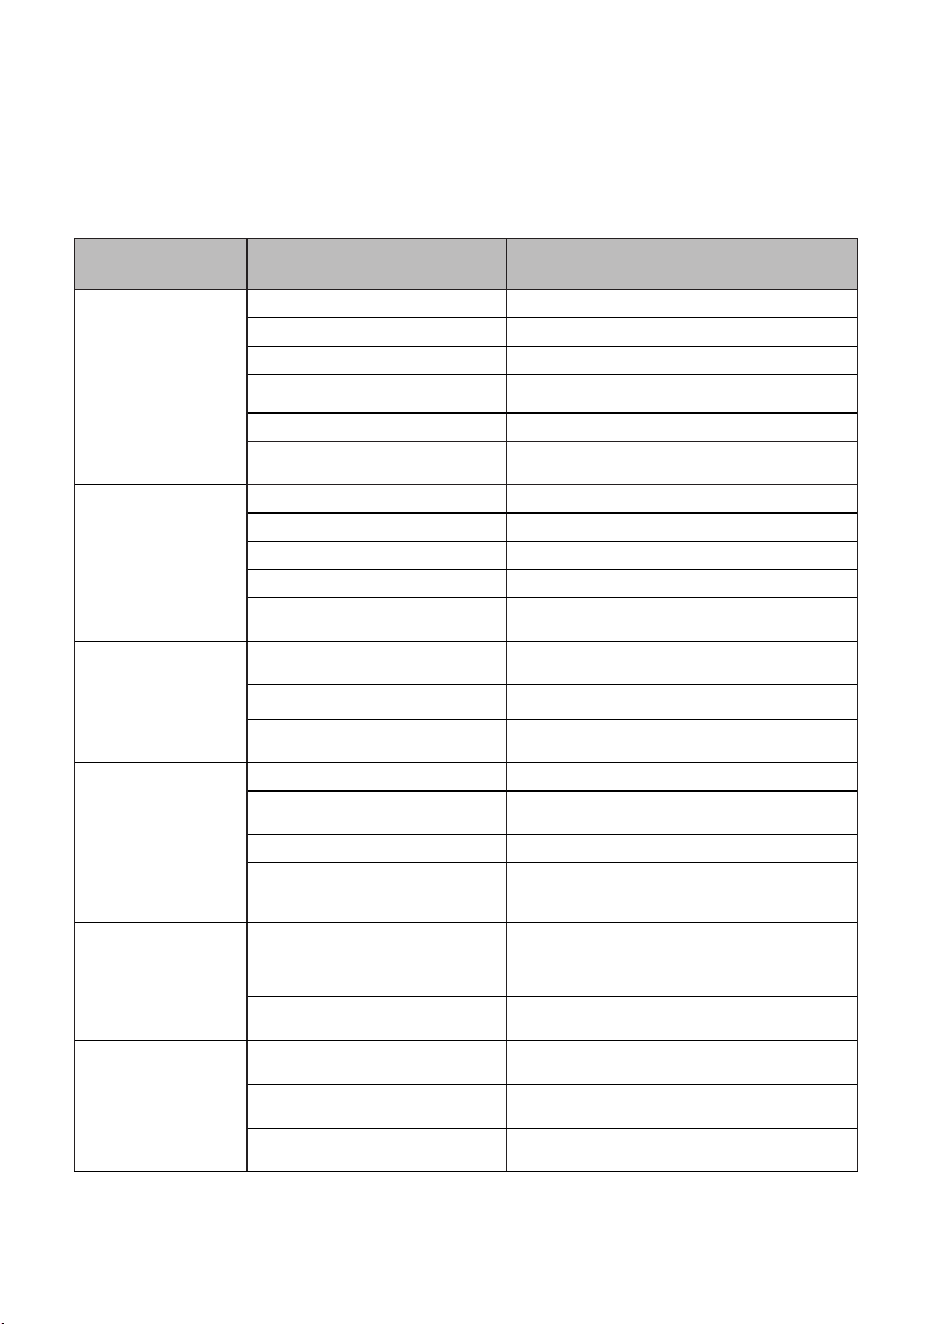
FAULT POSSIBLE CAUSE TROUBLESHOOTING
Yourmachinedoesnot
start.
Machinenotpluggedin. Plugmachinein.
Fuses are faulty. Replace the fuses.
Nomainspowersupply. Checkmainspower.
Start/Pause button not pressed. Press the Start/Pause button.
Programmedial‘stop’position. Turntheprogrammedialtothedesiredposition.
Themachinedoorisnotcompletely
closed.
Closethemachinedoor.
Yourmachinedoesnot
intakewater.
Watertapisturnedoff. Turn tap on.
Waterinlethosemaybetwisted. Checkwaterinlethoseanduntwist.
Waterinlethoseclogged. Cleanwaterinlethosefilters.(*)
Inletfilterclogged. Cleantheinletfilters.(*)
Themachinedoorisnotcompletely
closed.
Closethemachinedoor.
Yourmachinedoesnot
dischargewater.
Drainhosecloggedortwisted.
Checkthedrainhose,theneithercleanor
untwist.
Pumpfilterclogged. Cleanthepumpfilter.(*)
Laundryistootighlypacked
togetherinthedrum.
Spreadyourlaundryinthemachineevenly.
Yourmachinevibrates.
The feet have not been adjusted. Adjustthefeet.(**)
Transitboltsfittedfortransportation
have not been removed.
Removethetransitboltsfromthemachine.(**)
Smallloadinthedrum. Thiswillnotpreventoperationofyourmachine.
Yourmachineisoverloadedwith
laundryorlaundryisunevenly
spread.
Do not overload the drum. Spread laundry evenly
inthedrum.
Excessivefoamis
formedinthedetergent
drawer.
Excessiveamountofdetergent
used.
Press the Start/Pause button. To stop the foam,
diluteonetablespoonofsoftenerinto1/2litreof
waterandpourintothedetergentdrawer.Press
theStart/Pausebuttonafter5-10mins.
Wrong detergent used.
Onlyusedetergentsproducedforautomatic
WashingMachines.
Unsatisfactorywashing
result.
Yourwashingistoodirtyforthe
programme selected.
Usetheinformationintheprogrammetablesto
selectthemostappropriateprogramme.
Amount of detergent used
insufficient.
Usetheamountofdetergentasinstructedonthe
packaging.
Thereistoomuchlaundryinyour
machine.
Checkthatthemaximumcapacityforthe
selected programme has not been exceeded.
EN - 28
FAULT POSSIBLE CAUSE TROUBLESHOOTING
Unsatisfactorywashing
result.
Hard water.
Increasetheamountofdetergentfollowingthe
manufacturer’sinstructions.
Yourlaundryistootightlypacked
togetherinthedrum.
Checkthatyourlaundryisspreadout.
As soon as the
machineisloaded
withwater,water
discharges.
Theendofwaterdrainhoseistoo
lowforthemachine.
Checkthatthedrainhoseisatasuitableheight.
(**).
No water appears
inthedrumduring
washing.
Nofault.Waterisintheunseenpart
of the drum.
. . . . . . . . . . . . . . . . . . . . .
Laundry has
detergentresidue.
Non-dissolvingparticlesofsome
detergents may appear on your
laundryaswhitespots.
Performanextrarinse,orcleanyourlaundrywith
abrushafteritdries.
Grey spots appear on
the laundry.
Thereisuntreatedoil,creamor
ointmentonyourlaundry.
Usetheamountofdetergentasinstructedonthe
packaginginthenextwash.
Thespincycledoes
not take place or
takes place later than
expected.
No fault. The Unbalanced load
controlsystemhasbeenactivated.
TheUnbalancedloadcontrolsystemwilltryto
spreadyourlaundry.Thespinningcyclewillbegin
onceyourlaundryisspread.Loadthedrum
evenly for the next wash.
(*)Seethechapterregardingmaintenanceandcleaningofyourmachine.
(**)Seethechapterregardinginstallationofyourmachine.
11. AUTOMATIC FAULT WARNINGS AND WHAT TO DO
YourWashingMachineisequippedwithabuilt-infaultdetectionsystem,indicatedby
acombinationofflashingwashoperationlights.Themostcommonfailurecodesare
shown below.
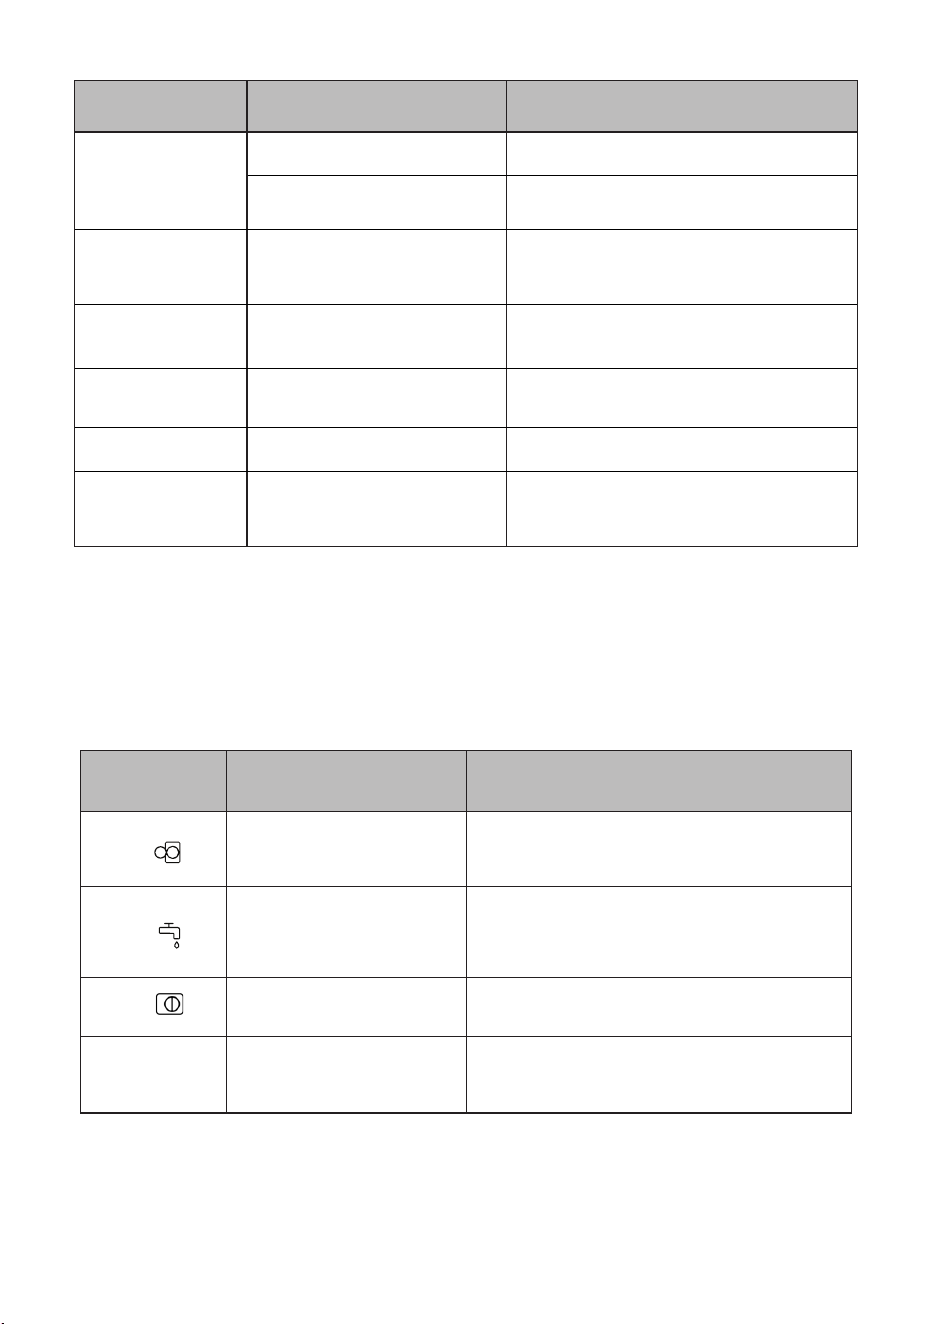
TROUBLE CODE POSSIBLE FAULT WHAT TO DO
E01
Thedoorofyourmachineisnot
shut properly.
Shutthedoorproperlyuntilyouhearaclick.Ifyour
machinepersiststoindicatefault,turnoffyour
machine,unplugitandcontactthenearestauthorised
serviceagentimmediately.
E02
The water pressure or the water
levelinsidethemachinemay
be low.
Checkthetapisfullyturnedon.Mainswatermaybe
cut-off.Iftheproblemstillcontinues,yourmachinewill
stopafterawhileautomatically.Unplugthemachine,
turnoffyourtapandcontactthenearestauthorised
serviceagent.
E03
Thepumpisfaultyorpump
filteriscloggedorelectrical
connectionofthepumpisfaulty.
Cleanthepumpfilter.Iftheproblempersists,contact
thenearestauthorisedserviceagent.(*)
E04
Yourmachinehasexcessive
amount of water.
Yourmachinewilldischargewaterbyitself.Oncethe
waterhasdrained,turnoffyourmachineandunplug
it.Turnoffthetapandcontactthenearestauthorised
serviceagent.
(*)Seethechapterregardingmaintenanceandcleaningofyourmachine.

EN - 29
Element Appliance Limited Warranty
(the “Products” or “Product” when referencing a singular product herein)
This Product (including any accessories included in the original packaging) as supplied
and distributed in new condition, is warranted by Element Appliance Company, LLC
(“Element”) to the original customer who purchases the Product from an authorized
Element retailer (the “Original Customer” or “you”) against defects in material and
workmanship under proper use, maintenance, and care according to the owner’s
manual, warnings, and instructions accompanying the Product (“Warranty”) as follows:
* PLEASE NOTE – Proof of purchase evidencing the date of purchase by the Original
Purchaser from an authorized Element retailer (“Valid Proof of Purchase”) is required
for all Warranty service. The express Warranty set forth herein is subject to all terms
and conditions set forth below.
1. WARRANTY SERVICE:
A. ONE-YEAR WARRANTY: Except as provided in subpart 1.B below, for a period
of one (1) year from the date of purchase by the Original Customer (the “Warranty
Period”), if the parts or components covered by this Warranty are determined by
Element or Element’s authorized service provider to be defective in material or
workmanship, Element will, at its sole and absolute discretion and option: (i) repair
the defective part or component at no charge to the Original Customer, (ii) replace the
defective Product with a new Product of similar or better quality, at no charge to the
Original Customer, or (iii) refund the documented purchase price paid by the Original
Customer (excluding tax) to the Original Customer upon return of the defective Product
as directed by Element. After the Warranty Period expires, the Original Customer
must pay for all parts, components, shipping and handling, labor, and replacement
costs associated with the Product or any part or component thereof, regardless of any
defects in the Product or any part or component thereof.
B. LIMITED EXTENDED WARRANTY THROUGH PRODUCT REGISTRATION: If
and only if the Original Customer registers the Product at www.elementelectronics.
com within ninety (90) days of the date of purchase by the Original Customer, then the
Warranty Period discussed in subpart 1.A. above shall be extended an additional one
(1) year to a new Warranty Period equaling two (2) years from the date of purchase by
the Original Customer. If the Product is not registered as provided for in this subpart
1.B, then the standard one-year Warranty Period set forth in subpart 1.A shall apply.
C. TIMING AND PROCEDURE: Before Warranty service can commence, the Original
Customer must contact either (i) the retailer from whom the Original Customer
purchased the Product, or (ii) Element directly, in either case for problem determination
and service procedures. Valid Proof of Purchase evidencing that the Product is within
the Warranty Period MUST be presented by Original Customer in order to obtain the
requested Warranty service. Please have your model and serial number available,
along with your date of purchase of the Product. To remain eligible for Warranty
service, Original Customer may not return the Product or any part or component
thereof to the retailer or Element without Element’s prior written consent.
1. EXCLUSIONS AND LIMITATIONS TO WARRANTY SERVICE
The Warranty covers manufacturing defects in materials and workmanship of the
Product encountered in the normal, non-commercial use of the Product, and does not
cover (a) damages or malfunctions resulting from improper or unreasonable use or
maintenance, abuse, negligence, failure to follow instructions contained in any written
materials that accompany the Product, deterioration by reason of excess moisture,
corrosive atmosphere, lightning, power surges, connections to improper voltage supply,

EN - 30
unauthorized alteration, or other external causes such as extremes in temperature or
humidity, modifications, scratches or discoloration; (b) any damage caused by using
non-authorized parts or service facilities for repair of Products (however, for avoidance
of doubt, using non-authorized parts or service facilities will not, in and of itself, void
the Warranty); (c) transportation, shipping, delivery, pickup, insurance, installation, or
set-up costs; (d) ordinary wear and tear, cosmetic damage, or damage due to acts of
nature, including but not limited to, water, floods, wind, storm, tornado, earthquake,
or fire, or due to damage caused by extraordinary impact events, such as dropping,
crushing, demolition or other extraordinary damage; (e) commercial use of the Product,
or use of the Product for anything other than single-family household or residential use;
or (f) modification of the Product or any part of the Product.
This Warranty is made to the Original Customer only and does not cover Products
sold AS IS or WITH ALL FAULTS. The Warranty is invalid if the factory-applied serial
number has been altered or removed from the Product. This Warranty is valid only
in the United States, and only applies to Product if it was purchased and serviced
in the United States. The addition of equipment or features to the Product that are
not manufactured or recommended by Element could affect the intended function
of the Product, and therefore may void the Warranty. Furthermore, the exposure
of the Product to chemicals, heat, cold, humidity, or other elements can affect the
Product components, and therefore, the Warranty does not cover discoloration, fading,
cosmetic changes, rust, or any damages or failure related to any such items. The
Warranty is contingent upon the proper use, maintenance, and care of the Product. The
Warranty may be void if the Product has been used in a manner contradictory to, or in
violation of, the terms of the user’s manual, warnings, or instructions accompanying the
Product.
THIS WARRANTY IS MADE IN LIEU OF AND SUPERSEDES ALL OTHER
WARRANTIES OR CONDITIONS OF MERCHANTABILITY OR FITNESS FOR A
PARTICULAR PURPOSE OR GENERAL USE, WHETHER EXPRESS, IMPLIED,
COLLATERAL, STATUTORY, OR PROVIDED BY COMMON LAW, THE UNIFORM
COMMERCIAL CODE, OR OTHERWISE. ELEMENT FURTHER DISCLAIMS
ALL WARRANTIES AFTER THE END OF THE WARRANTY TERM DEFINED
ABOVE. NO OTHER EXPRESS WARRANTY OR GUARANTY GIVEN BY ANY
OTHER PERSON, FIRM, OR ENTITY WITH RESPECT TO THE PRODUCT SHALL
BE BINDING ON ELEMENT. REPAIR, REPLACEMENT, OR REFUND OF THE
ORIGINAL PURCHASE PRICE, AT ELEMENT’S SOLE DISCRETION, ARE THE
EXCLUSIVE REMEDIES OF THE CUSTOMER.
ELEMENT SHALL NOT BE LIABLE FOR ANY INCIDENTAL OR CONSEQUENTIAL
DAMAGES CAUSED BY THE USE, MISUSE, OR INABILITY TO USE THE
PRODUCT. THESE INCLUDE, BUT ARE NOT LIMITED TO, ANY DAMAGES
IN THE FORM OF LOST PROFITS, LOSS OF USE, LEGAL FEES, ECONOMIC
LOSS, PERSONAL INJURIES, OR ANY OTHER DAMAGES CAUSED BY
CIRCUMSTANCES BEYOND THE CONTROL OF ELEMENT. NOTWITHSTANDING
THE FOREGOING, ELEMENT’S AGGREGATE LIABILITY TO ANY CUSTOMER
SHALL NOT EXCEED THE ORIGINAL PURCHASE PRICE OF THE PRODUCT.
THIS WARRANTY SHALL NOT EXTEND TO ANYONE OTHER THAN THE
ORIGINAL CUSTOMER WHO PURCHASED THE PRODUCT, AND IS NOT
TRANSFERRABLE. NO PERSON IS AUTHORIZED TO ALTER, EXTEND, OR
WAIVE THIS WARRANTY OR ANY OF ITS TERMS OR CONDITIONS.
Some states do not allow the exclusion or limitation of incidental or consequential
damages, or allow limitations on warranties, so the above limitations or exclusions
may not apply to you. This Warranty gives you specific rights, and you may have other
rights, which vary from state to state. The exclusions and limitations to the Warranty
apply to the maximum extent permitted by law and unless restricted or prohibited by
law. Where any term of this Warranty is prohibited by applicable law, it shall be null and
void, but the remainder of this Warranty shall remain in effect.

EN - 31
PLEASE DIRECT ALL CORRESPONDENCE TO:
Element Appliance Company, LLC
(888) 842-3577
https://elementelectronics.com

.................................................................................................................................................
.................................................................................................................................................
.................................................................................................................................................
.................................................................................................................................................
............................................................................................................................................. ...
.................................................................................................................................................
.................................................................................................................................................
.................................................................................................................................................
.................................................................................................................................................
.......................................................................................................................................... ......
.................................................................................................................................................
.................................................................................................................................................
.................................................................................................................................................
.................................................................................................................................................
....................................................................................................................................... .........
.................................................................................................................................................
.................................................................................................................................................
.................................................................................................................................................
.................................................................................................................................................
.................................................................................................................................... ............
.................................................................................................................................................
.................................................................................................................................................
.................................................................................................................................................
.................................................................................................................................................
................................................................................................................................. ...............
.................................................................................................................................................
.................................................................................................................................................
.................................................................................................................................................
.................................................................................................................................................
.............................................................................................................................. ..................
.................................................................................................................................................
.................................................................................................................................................
.................................................................................................................................................
.................................................................................................................................................
........................................................................................................................... .....................
.................................................................................................................................................
.................................................................................................................................................
.................................................................................................................................................
.................................................................................................................................................
........................................................................................................................ ........................
.................................................................................................................................................
.................................................................................................................................................
.................................................................................................................................................
.................................................................................................................................................
..................................................................................................................... ...........................
.................................................................................................................................................
.................................................................................................................................................
.................................................................................................................................................
.................................................................................................................................................
.................................................................................................................. ..............................
.................................................................................................................................................
.................................................................................................................................................
.................................................................................................................................................
.................................................................................................................................................
............................................................................................................... .................................
.................................................................................................................................................
.................................................................................................................................................
.................................................................................................................................................
.................................................................................................................................................
......................................................................................

52572560
Element, the Element Logo, and Bring it home are trademarks of Element Brand Holding,
LLC. All other trademarks are the property of their respective owner, who has not
sponsored, endorsed, or approved this product. ©2025 Element Appliance Company, LLC.
All rights reserved.
Distributed by Element Appliance Company, LLC
Augusta, GA 30909
For service, support and warranty information:
Call 888.842.3577, email us at [email protected] or visit www.
elementelectronics.com
WARNING: This product can expose you to
chemicals including Diisononyl Phthalate (DINP) which is
known to the State of California to cause cancer.
For more information go to www.P65Warnings.ca.gov