User Manual
Installation
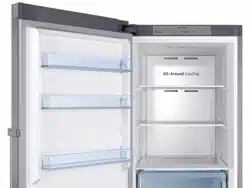
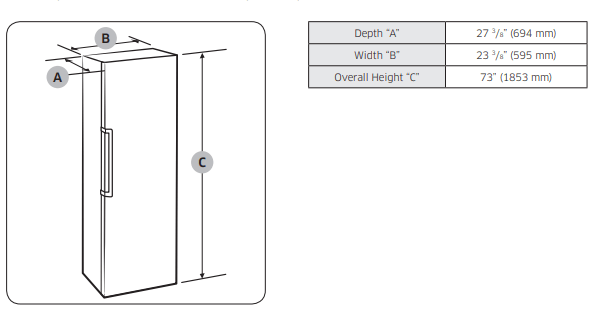
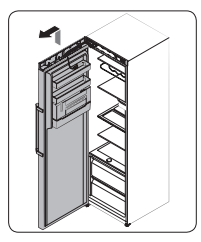
Refrigerator at a glance
The actual image and provided component parts of the refrigerator may differ, depending on the model and the country
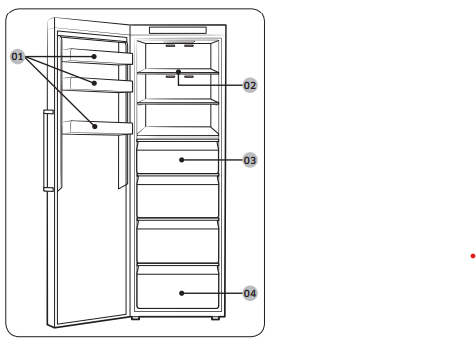
01 Door guard
02 Freezer shelf
03 Freezer drawer
04 Bottom drawer
NOTE
- For best energy efficiency, make sure all of shelves, drawers, and baskets are placed in their original position.
STEP 1 Select a site
Select a site that:
- Has a solid, level surface without carpeting or flooring that may obstruct ventilation
- Is away from direct sunlight
- Has adequate room for opening and closing the door
- Is away from any heat sources
- Provides room for maintenance and servicing • Has a temperature range between 50 °F (10 °C) and 109 °F (43 °C)
Clearance
See the pictures and table below for space requirements for installation.

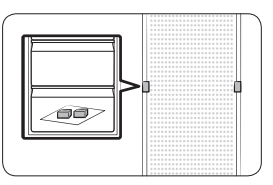
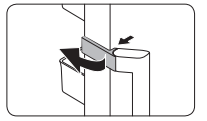
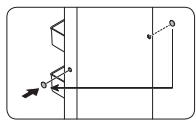
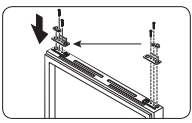
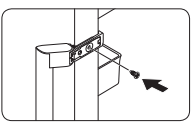
STEP 2 Spacing
- Open the door and locate the provided spacers (x2).
- Unpack both spacers and attach them to the rear of the refrigerator as shown. They help ventilate air to the rear wall and save power consumption
STEP 3 Flooring
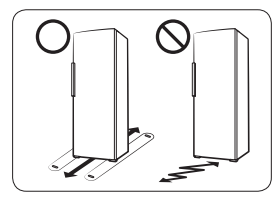
- The surface to install the refrigerator must support a fully loaded refrigerator.
- To protect the floor, put a large piece of cardboard on each foot of the refrigerator.
- Once the refrigerator is in its final position, do not move it unless necessary to protect the floor. If you have to, use a thick paper or cloth such as old carpet along the movement path
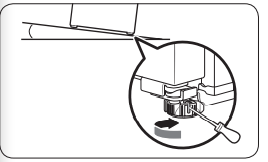
STEP 4 Adjust the levelling legs
CAUTION
- The refrigerator must be levelled on a flat, solid floor. Failing to do so can cause damage to the refrigerator or physical injury.
- Levelling must be performed with an empty refrigerator. Make sure no food items remain inside the refrigerator.
- For safety reasons, adjust the front side a little higher than the rear side. The refrigerator can be levelled using the front legs that have a special screw (leveller) for levelling purposes. Use a flat-head screwdriver for levelling.
To adjust the height of the left side: Insert a flat-head screwdriver into the leveller of the front left leg. Turn the leveller clockwise to raise, or turn it counter clockwise to lower.

To adjust the height of the right side: Insert a flat-head screwdriver into the leveller of the front right leg. Turn the leveller clockwise to raise, or turn it counter clockwise to lower.
STEP 5 Initial settings
By completing the following steps, the refrigerator should be fully functioning.
- Remove the PE foam sheet on each shelf corner, which is attached to protect the refrigerator during transportation.
- Plug the power cord into the wall socket to turn the refrigerator on .
- Open the door, and check if the interior light lights up.
- Set the temperature to the lowest, and wait until the refrigerator reaches the set temperature. Now the refrigerator is ready for use.
NOTE
When the refrigerator powers on, the alarm will sound. To turn off the alarm, press Freezer
STEP 6 Temperature Alarm (applicable models only)
- If the freezer temperature is too warm because there has been a power failure, the display blinks as shown in the figure.
- If you press Temp., the "warmest temperature" which has reached in the freezer is flashed on the display for 5 seconds.
- This warning may occur:
- When the appliance is turned on for the first time after the installation.
- If the freezer is too warm due to a power failure.
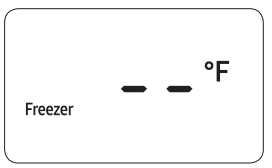
NOTE
This function is only available when the refrigerator is in the Freezer mode.
STEP 7 Final check
When installation is complete, confirm that:
- The refrigerator is plugged into an electrical outlet and grounded properly.
- The refrigerator is installed on a flat, level surface with a reasonable clearance from the wall or the cabinet.
- The refrigerator is level and is sitting firmly on the floor.
- The door opens and closes freely, and the interior light turns on automatically when you open the door.
Operations
Feature panel
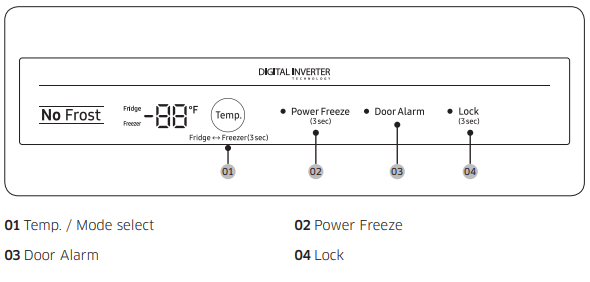
01 Temp. / Mode select
Temp.
Press to set the desired temperature.
- In Freezer mode, you can set the temperature between 5 °F (-15 °C) and -8 °F (-23 °C). (Default temperature is 0 °F (-18 °C))
- In Fridge mode, you can set the temperature between 44 °F (7 °C) and 34 °F (1 °C). (Default temperature is 37 °F (3 °C))
Mode select
Press for 3 seconds to switch the mode between Freezer and Fridge.
- Freezer indicator turns on when Freezer mode is selected.
- Fridge indicator turns on when Fridge mode is selected.
02 Power Freeze (3 sec)
Power Freeze speeds up the freezing process at maximum fan speed. The freezer keeps running at full speed for 50 hours and then returns to the previous temperature.
To activate Power Freeze, press and hold Freezer for 3 seconds. The corresponding indicator ( ) lights up, and the refrigerator will speed up the freezing process for you.
To deactivate, press and hold Freezer for 3 seconds again. The freezer returns to the previous temperature setting.
To freeze large amounts of food, activate Power Freeze for at least 20 hours before putting food in the freezer.
NOTE
- Using Power Freeze increases power consumption. Make sure you turn it off and return to the previous temperature if you do not intend to use it.
- To quickly freeze large quantities of food, remove the drawers and use the provided shelf
04 Lock (3 sec)
Lock
To prevent accidental setting changes, press and hold Lock for 3 seconds. The main panel will be disabled and the Lock indicator ( ) will turn on.
When the Lock function is on, the indicator blinks if any button on the main panel is pressed.
If you press and hold the button again for more than 3 seconds, the Lock function will be deactivated.
However, the Lock function will be reactivated if no button is pressed within 1 minute.
05 Cooling Off
Cooling Off
The Cooling Off mode (also called Shop mode) is designed for use by retailers when they are displaying refrigerators on a retail floor. In the Cooling Off mode, the refrigerator's fan motor and lights operate normally, but the compressors do not run so neither the fridge nor the freezer becomes cold. To enter or exit the Cooling Off mode, press and hold Temp., Power Freeze, and Lock simultaneously for 5 seconds. When the Cooling Off mode is on, the refrigerator chime sounds, and the refrigerator shows "oF" on the display.
Maintenance
Step-by-step instructions
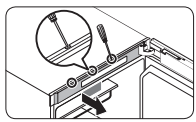
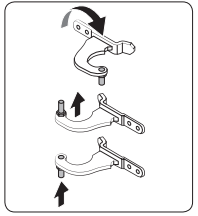
STEP 1 Remove the handle
1 Unlock the handle cap and put it aside.
2 Remove each screw on the upper and lower side of the handle.
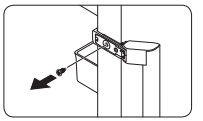
3 Use a flat-head screwdriver to remove the handle screw caps (x2). Then, insert the handle screw caps in the opposite side.
CAUTION
To prevent physical damage, use caution when removing the handle screw caps.
NOTE
Keep the handle safe for later use.
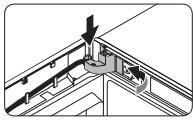
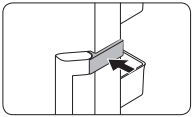
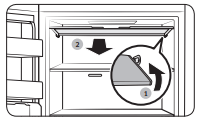
STEP 2 Remove the freezer door
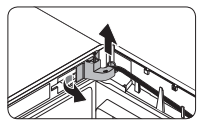
1 Open the dongle cover, and remove the space cover.
2 While holding down the lower areas marked in the figure) of the wire cover with both hands, lift up the wire cover.
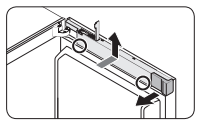
3 Turn the wire cover to the front by 90 degrees, and then push up to remove.
NOTE
Keep both the space cover and the wire cover in a safe place. They are necessary when you return the door to the initial position (before reversing the door).
NOTE
Put the dongle cover on the door guard for later use.
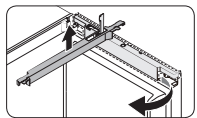
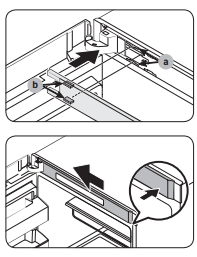
4 Use a flat-head screwdriver to insert in the holes one after another on the top of the door to remove the top frame cover.
NOTE
Start with the hole farthest from the hinge.
5 Pull out the left side of the hinge cover to remove, and then slightly lift up the bottom to pull out.
CAUTION
When removing the hinge cover, use caution not to damage the connectors and wires on or around the freezer door.
NOTE
Keep the hinge cover in a safe place. It is necessary when you return the door to the initial position (before reversing the door).
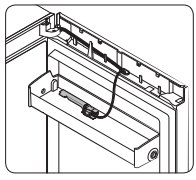
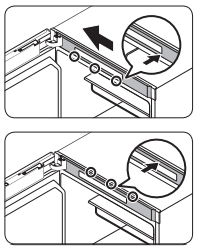
6 Disconnect the connectors on or around the freezer door. Loosen the screws from the top hinge to remove.
CAUTION
To prevent the freezer door from falling, make sure to hold the freezer door tight while removing the top hinge.
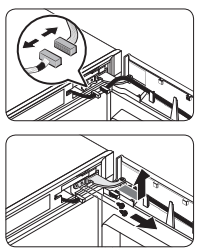
7 When the top hinge is removed, lift up to remove the freezer door. Keep the door in a safe place.
CAUTION
The door is heavy. To prevent damage or injury, use caution while removing the door.
STEP 3 Reverse the auto closer
- From the freezer door, remove the auto closer lever by loosening the screws on the lever and the screws in the opposite side.
- Insert the auto closer lever in the opposite side, and tighten the screws.
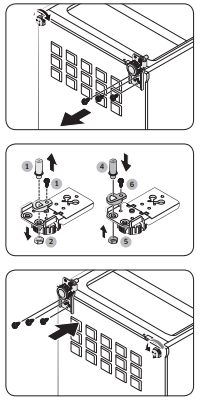
STEP 4 Reverse the bottom hinge
- Lay down the refrigerator with care. Then, remove the screws from the bottom hinge on the right side and the levelling leg on the left side, respectively.
- Use an 5/16" (8 mm) socket wrench to remove the rear bolt next to the shaft.
- Remove the shaft bolt beneath the bottom hinge.
- Use a Phillips screwdriver to remove the shaft.
- Insert the shaft in the opposite side.
- Reinsert and tighten the rear bolt.
- Reinsert and tighten the shaft bolt.
- Insert the bottom hinge in the opposite side and tighten with screws. Mount the levelling leg in the opposite side and tighten with screws.
- Stand the refrigerator with care.
STEP 5 Reattach the freezer door
1 Remove the screw and pull out the control cover.
2 Move the connectors and wires to the opposite side. Insert the control cover, and then tighten the screws on the opposite side.
3 Remove the shaft from the top hinge.
Then, reassemble the shaft as shown.
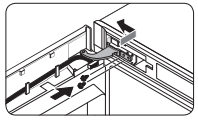
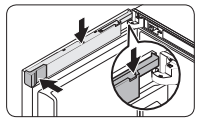
4 Insert the bottom of the door first into the main unit.
5 Insert the top hinge and tighten it with screws.
- Move the wires to the opposite side and fix them on the inner hook of the opposite side.
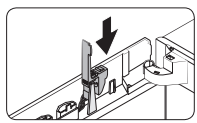
6 Reinsert the dongle cover in the original position.

7 Connect the connectors from the freezer door and the main unit. Then, fix the wires on the inner hook of the optional hinge cover (L).
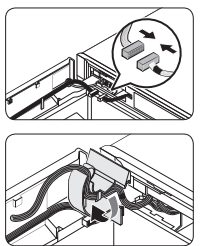
8 Insert the hinge cover in the top hinge with the right side first. Then, press the bottom of the cover to fit.
CAUTION
Make sure all of the wires and connectors are not stuck in the middle.
9 Insert the top frame cover with the part (b) fitting in the part (a) diagonally.
Then, slide the end of the cover to the left to lock.
- For models that have the display panel on the top of the freezer, push in the left end of the top frame cover then the right side by locking the lower and upper areas in this sequence.
10 Insert the wire cover through the opened dongle cover. Turn the cover by degrees to the front, and then push down to fit in.
11 Insert the space cover (L) into the original position, and then close the dongle cover.
NOTE
The appearance of the covers differ with the model.
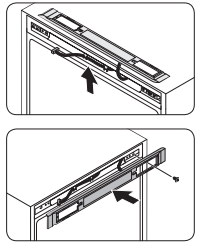
STEP 6 Reattach the handle
- Insert the handle in the opposite side, and then tighten the screw.
- Close the handle cover as shown.
NOTE
You might want to return the doors to the initial position (before reversing the door). In that case, refer to the instructions above but switch the doors, hinges, and covers back to the initial position.
Handle and care
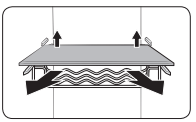
Shelves
Slightly lift up the rear side of the shelf to pull out.
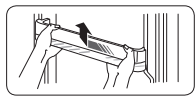
Door guards
Slightly lift up and pull out the door guard.
CAUTION
To prevent accidents, empty the door guards before removing.
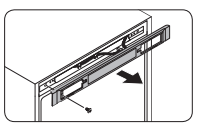
Top shelf cover
- Push the right side of the cover inwards to unhook the cover.
- Then, pull up the cover to the front to remove.
Cleaning
Interior and exterior
Regularly use a dry cloth to remove all foreign substances such as dust or water from the power plug terminals and contact points.
1. Unplug the power cord.
2. Use a moistened, soft, lint-free cloth or paper towel to clean the refrigerator’s interior and exterior.
3. When done, use a dry cloth or paper towel to dry well.
4. Plug in the power cord.
LED Lamps
To replace the lamps of the refrigerator, contact a local Samsung service center.
Troubleshooting
General
Temperature
Fridge/freezer does not operate. Fridge/freezer temperature is warm.
- Power cord is not plugged in properly.
- Properly plug in the power cord.
- Temperature control is not set correctly.
- Set the temperature lower.
- Refrigerator is located near a heat source or direct sunlight.
- Keep the refrigerator away from direct sunlight or a heat source.
- Not enough clearance between refrigerator and nearby walls or cabinets.
- Make sure there is a gap of at least 2.5 inches (5 cm) between the refrigerator back and sides and any nearby walls or cabinets.
- The refrigerator is overloaded. Food is blocking the refrigerator vents.
- Do not overload the refrigerator. Do not allow food to block vents.
Fridge/freezer is over-cooling.
- Temperature control is not set correctly.
- Set the temperature higher.
Interior wall is hot.
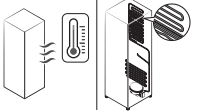
- Refrigerator has heat-proof piping in the interior wall.
- To prevent condensation from forming, the refrigerator has heat-proof piping in the front corners. If the ambient temperature rises, this equipment may not work effectively. This is not a system failure.
Odors
Refrigerator has odors.
- Spoiled food.
- Clean the refrigerator and remove any spoiled food.
- Food with strong odors.
- Make sure strong smelling food is wrapped airtight.
Frost
Frost around the vents.
- Food is blocking the vents.
- Make sure no food blocks the refrigerator vents.
Frost on interior walls.
- Door is not closed properly.
- Make sure food does not block the door. Clean the door gasket.
Fruits or vegetables are frozen.
- Fruits or vegetables are stored in the FlexZone™.
- Do not store most kinds of fruit or vegetables in the FlexZone™.
Condensation
Condensation forms on the interior walls.
- If door is left open, moisture enters the refrigerator.
- Remove the moisture and do not leave a door open for extended periods of time.
- Food with high moisture content.
- Make sure food is wrapped airtight.
Do you hear abnormal sounds from the refrigerator?
Before calling for service, review the information below. If you still have questions about sounds your refrigerator is making, please call Samsung Customer Care at 1-800-SAMSUNG (726-7864). Note that you will be charged for any service visits related to normal operating sounds in which no defects were found.
These sounds are normal.
- When starting or ending an operation, the refrigerator may make sounds similar to a car engine ignition. As the operation stabilizes, the sounds will decrease.

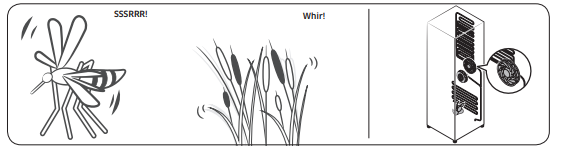
- While the fan is operating, these sounds may occur. When the refrigerator reaches the set temperature, the fan sound will stop.
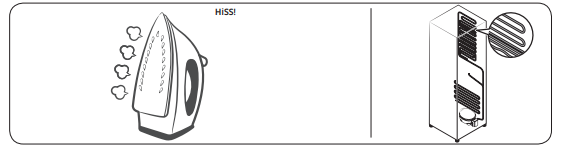
- During a defrost cycle, water may drip on the defrost heater, causing sizzling sounds.
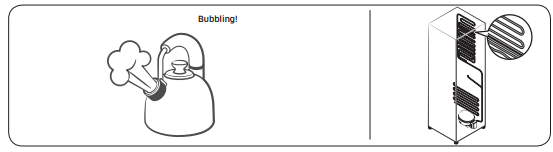
- As the refrigerator cools or freezes, refrigerant gas moves through sealed pipes, causing bubbling sounds. Bubbling!
- As the refrigerator temperature increases or decreases, plastic parts contract and expand, creating knocking noises. These noises occur during the defrosting cycle or when electronic parts are working.

- For ice maker models: When the water valve opens to fill the ice maker, you may hear a buzzing sound.
- Due to pressure equalizing when you open and close the refrigerator door, you may hear a whooshing sound