Owners' Guide Televisions
Connections
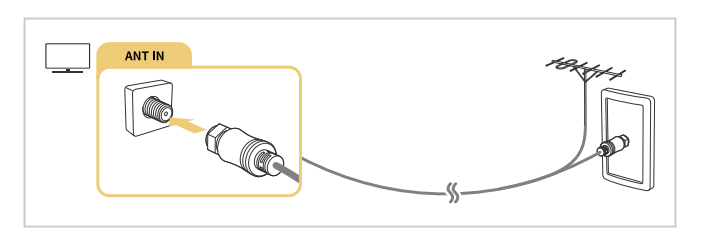
Connecting an Antenna
You can connect a coaxial cable to your TV.
An antenna connection is not necessary if you connect a cable box or satellite box.
Connecting to the Internet
You can get access to the Internet through your TV.
 Settings > General > Network > Open Network Settings (Try Now)
Configure network settings to connect to an available network.
Establishing a wired Internet connection
 Settings > General > Network > Open Network Settings > Wired
If you connect a LAN cable, the TV automatically accesses the Internet.
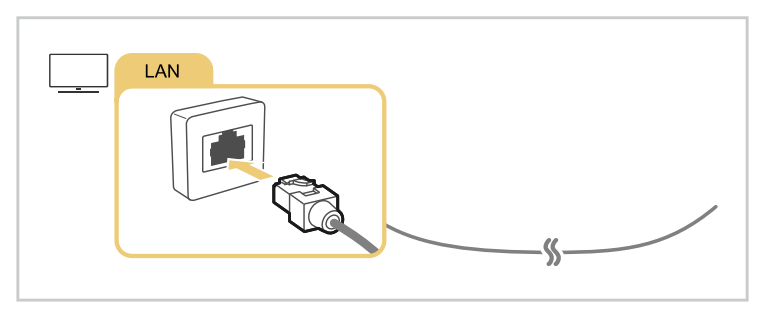
- If the TV does not automatically connect to the network, refer to "Network Issues" in "Troubleshooting."
- Use a CAT 7 (*STP type) cable for the connection.
* Shielded Twisted Pair
- The TV will not be able to connect to the Internet if your network speed is below 10 Mbps.
- This function may not be supported depending on the model.
Establishing a wireless Internet connection
 Settings > General > Network > Open Network Settings > Wireless
Make sure that you have the wireless access point's SSID (name) and password settings before attempting to connect. The network name (SSID) and security key are available on the wireless access point's configuration screen. See the wireless access point's user manual for more information.
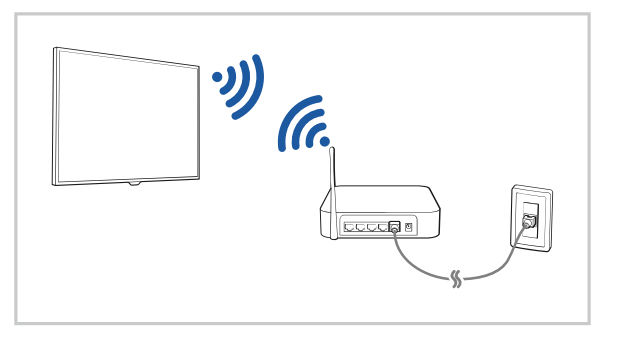
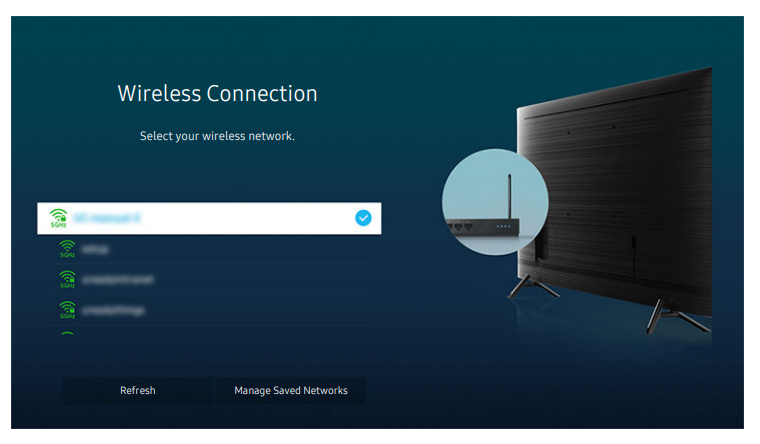
- The image on your TV may differ from the image above depending on the model and geographical area.
- If no wireless access point is found, select Add Network at the bottom of the list and enter the network name (SSID).
- If your wireless access point has a WPS or PBC button, select Use WPS at the bottom of the list, and then push the WPS or PBC button on your access point within 2 minutes. The TV will connect automatically.
- To view or delete previously connected network names (SSIDs), move the focus to Manage Saved Networks, and then press the Select button.
Checking the Internet connection status
 Settings > General > Network > Network Status (Try Now)
View the current network and Internet status.
Resetting Your Network
 Settings > General > Network > Reset Network (Try Now)
Restore the network settings to the factory default.
Turning on the TV with a mobile device
 Settings > General > Network > Expert Settings > Power On with Mobile
You can turn on the TV using a mobile device connected to the same network as the TV.
- This function is available with a mobile device connected to the TV through the SmartThings app or the Apple AirPlay function.
- Apple AirPlay may not be supported depending on the model or geographical area.
Connecting an IP control device to the TV
 Settings > General > Network > Expert Settings > IP Remote
You can connect an IP control device to the TV remotely to manage your IP device.
- To use this function, Power On with Mobile must be turned on.
- Turning this feature on may allow other IP control devices to control your TV. We recommend turning this feature on only if an authorized third-party custom controller is installed and configured specifically for a Samsung TV and if your Wi-Fi network is password protected.
- This function may not be supported depending on the model.
Changing the name of the TV
 Settings > General > System Manager > Device Name (Try Now)
You can change the name of the TV on the network. Select User Input at the bottom of the list and change the name.
Screen Sharing (Smart View) with your Mobile Device
You can watch the screen of your mobile device on the TV screen through Smart View or Tap View.
For information on how to share the screen with your mobile device, refer to  Source > Connection Guide > Smartphone > Screen Sharing (Smart View).
For more information in the Pro TV - Terrace Edition, refer to the provided user manual.
- To turn off Screen Sharing (Smart View), disconnect the mobile device or press the
 button on the remote control.
- Using the Smart View menu on your mobile device, you can change the settings such as aspect ratio.
- Use AirPlay if you are an iPhone or iPad user. For more information, refer to
 Source > Connection Guide > Smartphone > Apple AirPlay.
This function may not be supported depending on the model.
- The screen sharing function (Smart View/Apple AirPlay) on your mobile device appears on Multi View of the TV (or the screen on your mobile device).
Apple AirPlay may not be supported depending on the model or geographical area.
Using the Tap View
By tapping the mobile device on your TV, you can watch Multi View or mobile device's screen through the TV screen.
- This function may not be supported depending on the model.
- This function is available in Samsung mobile devices with Android 8.1 or higher.
- Enable Tap View on your mobile device.
For more information about configuration refer to 'Enabling the Tap View' below for how to set.
- Turn on the screen of your mobile device.
- Tap your mobile device on the TV. The TV screen switches to Multi View or mobile device's screen.
When you perform Tap View in Ambient Mode feature or Art mode (only in The Frame models), only the mobile device's screen appears on the TV.
- Watch Multi View or mobile device's screen on the TV screen.
- The displayed TV screen may differ depending on the model.
- This function enables mirroring (Smart View) by detecting vibrations generated when you tap the mobile device on the TV.
- Be sure to tap away from the TV screen and bezel corners. It may scratch or break the TV or mobile device screen.
- We recommend using your mobile device with the cover in place and lightly tap it on any external edge of the TV.
Enabling the Tap View
Enable Tap View in the SmartThings app.
- Depending on the SmartThings app version, you may need to register the TV with your mobile device.
- Launch the SmartThings app on your mobile device.
- Select Settings (
 ) in SmartThings app on your mobile device.
- Set the Tap View to on.
- Upon connection for the first time, select Allow on a pop-up window of the TV.
Using the Multi View
While watching the TV, you can see content from your mobile device through mirroring (Smart View/Apple AirPlay).
To start Multi View, run the screen sharing (Smart View/Apple AirPlay) for your mobile device. This function can be started or stopped by pressing the  button on the remote control.
- This function operates only by TV broadcasts, external devices, or apps that support Multi View.
- While running Multi View, app casting from your mobile device is run on Multi View. This function is not available in some apps.
- To stop this function, press and hold the
 button on the remote control.
- This function may not be supported depending on the model.
- In some models, you can view the image on the camera connected to the SmartThings app of your mobile device.
- Q-Symphony is not supported by Multi View.
- When an external device that connects to a receiver or Soundbar is used in Multi View, sound outputs from the TV speaker, not from the receiver or Soundbar.
- The following menus can be set by pressing the down directional button on the TV's remote control.
- When you press the Select button while running Multi View, the focused screen is viewed in the full screen.
Select Content
Selects content to be displayed on the left screen.
- Press the down directional button on the TV screen. Available content items appear.
Watch Mobile/Camera
Enjoy your mobile content by mirroring (Smart View).
You can view the camera video connected to the SmartThings app on your mobile.
Screen Size
Selects the desired size of Multi View.
PIP Position
Selects the position of a small screen on the full screen.
The focusing left or right screen appears as small window.
Sound Output
You will hear the sound of the selected screen through another speaker connected to the TV.
- This function may not be supported depending on the model.
Sound Distribution
You will hear the sound of both screens at the same time by adjusting the ratio of each screens sound.
- This function may not be supported depending on the model.
Connection Cables for External Devices
You can view detailed information about the connection cables for external devices that can be connected to the TV.
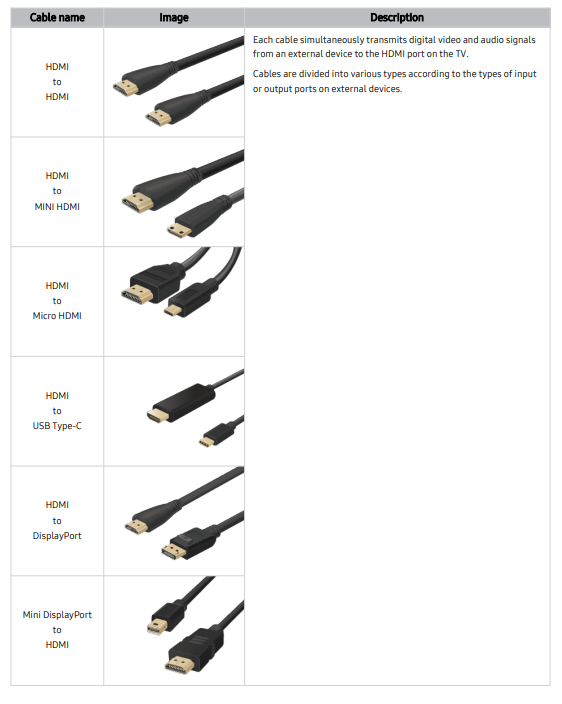

Available connection cables may differ depending on the model or geographical area.
Switching between external devices connected to the TV
You can switch between TV programs and the content of external devices.
 Source
When you select a connected external device on the Source screen, the output of the selected device is displayed on the TV's screen.
- To control a device (Blu-ray player, game console, etc.) that supports universal remote control with the TV's remote control, connect the device to an HDMI port on the TV, and then turn on the device. The output displayed on the TV is automatically switched to the output of the device or you can configure universal remote control for the device automatically. For more information, refer to "Controlling External Devices with a Samsung Remote Control - Using the Universal Remote."
- When a USB device is connected to the USB port, a pop-up message appears that lets you switch easily to the media content listed on the device.
- This function may not be supported depending on the device and geographical area.
Editing the name and icon of an external device
 Source
You can change the port name for a connected external device or add it to the Home Screen.

- The image on your TV may differ from the image above depending on the model and geographical area.
- Move the focus to a connected external device.
- Press the up directional button. The following functions become available:
- Available functions may differ depending on the port type.
- Universal Remote
You can control external devices connected to the TV using a Samsung remote control. To control external devices, register them by following the instructions on the screen.
-This function may not be supported depending on the model or geographical area.
-For more information, refer to "Controlling External Devices with a Samsung Remote Control - Using the Universal Remote."
- Edit
You can rename the input ports and change the device icons.
- Information
You can view detailed information about an external device.
- Add to Home
You can add the port of an external device to the Home Screen for quick switching.
Using additional functions
You can use the following features on the Source screen.
- Remote Access
Use the TV to access your PC via remote PC or Screen Sharing (Wireless).
-For more information, refer to "Using Remote Access."
- Connection Guide
Displays device connection instructions.
-For more information, refer to "Connection Guide."
- Universal Remote
Lets you register external devices to your Samsung remote control and control them using the Remote.
-This function may not be supported depending on the model or geographical area.
-For more information, refer to "Controlling External Devices with a Samsung Remote Control - Using the Universal Remote."
Connection Notes
When connecting an external device, note the following:
-The number of connectors, and their names and locations may differ with the model.
-Refer to the external device's operating manual when connecting it to the TV. The number of external device connectors, and their names and locations may differ with the manufacturer.
Connection notes for HDMI
- The following types of HDMI cables are recommended:
– High Speed HDMI Cable
– High Speed HDMI Cable with Ethernet
– Premium High Speed HDMI Cable
– Premium High Speed HDMI Cable with Ethernet
– Ultra High Speed HDMI Cable
- Use an HDMI cable with a thickness of 0.66 inches (17 mm) or less.
- Using a non-certified HDMI cable may result in a blank screen or a connection error.
- Some HDMI cables and devices may not be compatible with the TV due to different HDMI specifications.
- This TV does not support HDMI Ethernet Channel. Ethernet is a Local Area Network (LAN) built with coaxial cables standardized by the IEEE.
- Use a cable shorter than 10 feet (3 m) to get the best UHD viewing quality.
- Many computer graphics adaptors do not have HDMI ports, but have DVI or DisplayPort ports instead. If your PC does not support HDMI video out, connect your PC with a DVI to HDMI or HDMI to DisplayPort cable.
- When the TV is connected to an external device, such as a DVD/BD player or a set-top box via HDMI, power sync mode will be automatically activated. In the power sync mode, the TV continues to detect and connect external devices via HDMI cable. This function can be deactivated by removing the HDMI cable of the connected device.
This function may not be supported depending on the model.
Connection notes for audio devices
- For better audio quality, it is a good idea to use an AV receiver.
- If you connect an external audio device using an optical cable, the Sound Output setting is automatically changed to the connected device. However, to make this happen, you must turn on the external audio device before connecting the optical cable. To manually change the Sound Output setting, do one of the following:
– Use the Quick Settings screen to change to the connected device:
Use the Select button to select Optical on the Sound Output menu. ( Settings > up directional button > Sound Output).
– Use the Settings screen to change to the connected device:
Select Optical on the Sound Output menu. ( Settings > Sound > Sound Output). Refer to the sound bar's user manual when connecting it to the TV.
- An unusual noise coming from a connected audio device while you are using it may indicate a problem with the audio device itself. If this occurs, ask for assistance from the audio device's manufacturer.
- Digital audio is only available with 5.1 channel broadcasts.
Connection notes for computers
- For the resolutions supported by the TV, refer to "Read Before Connecting a Computer (Supported Resolutions)."
- If you want to connect your PC and TV wirelessly, both of them must be connected to each other on the same network.
- When sharing content with other network-based devices, such as those in an IP (Internet Protocol) storage system, sharing may not be supported due to the network’s configuration, quality, or functionality, for example, if the network has an NAS (Network-Attached Storage) device.
Connection notes for mobile devices
- To use the Smart View function, the mobile device must support a mirroring function, such as Screen Mirroring or Smart View. To check whether your mobile device supports the mirroring function, refer to the mobile device's user manual.
- To use Wi-Fi Direct, the mobile device must support the Wi-Fi Direct function. To check whether your mobile device supports Wi-Fi Direct function, refer to the mobile device's user manual.
- The mobile device and your Smart TV must be connected to each other on the same network.
- Use AirPlay if you are an iPhone or iPad user. For more information, refer to
 Source > Connection Guide > Smartphone > Apple AirPlay.
-This function may not be supported depending on the model.
- The video or audio may stop intermittently, depending on network conditions.
- When sharing content with other network-based devices, such as those in an IP (Internet Protocol) storage system, sharing may not be supported due to the network’s configuration, quality, or functionality, for example, if the network has an NAS (Network-Attached Storage) device.
Remote Control and Peripherals
You can control TV operations with your Samsung Smart Remote. Pair external devices, such as a keyboard, for ease of use.
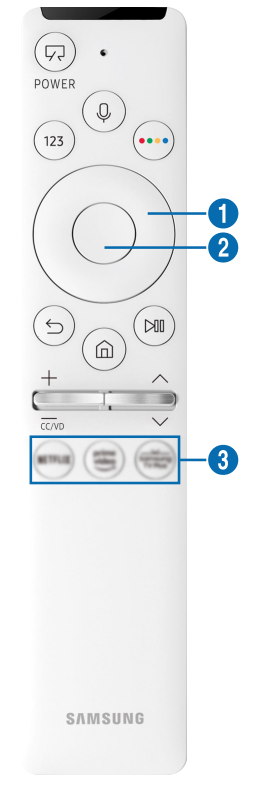
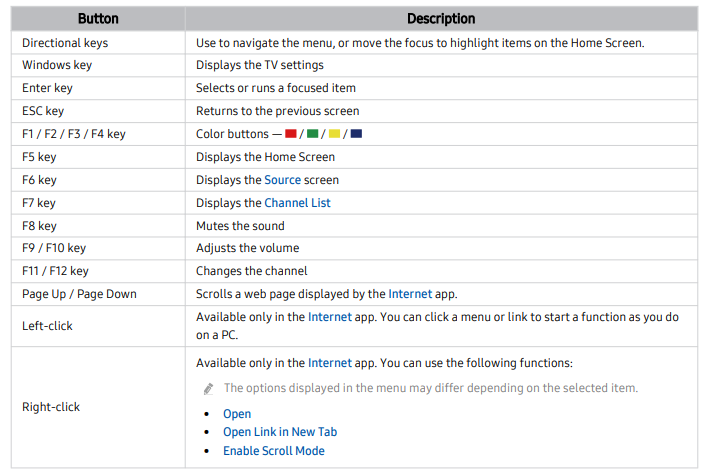
About the Samsung Smart Remote
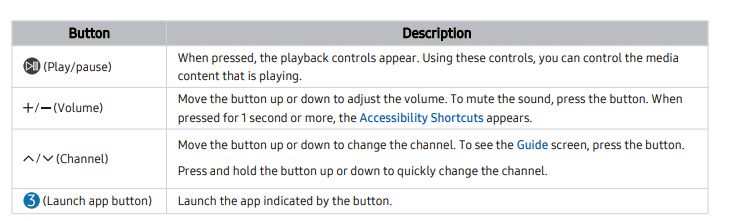
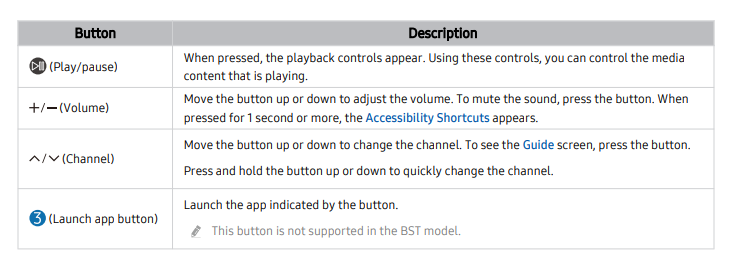
Learn about the buttons on the Samsung Smart Remote.
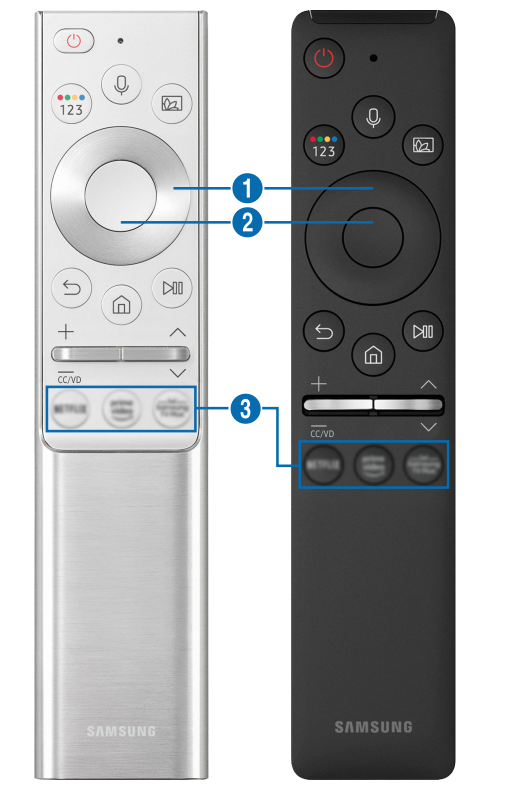
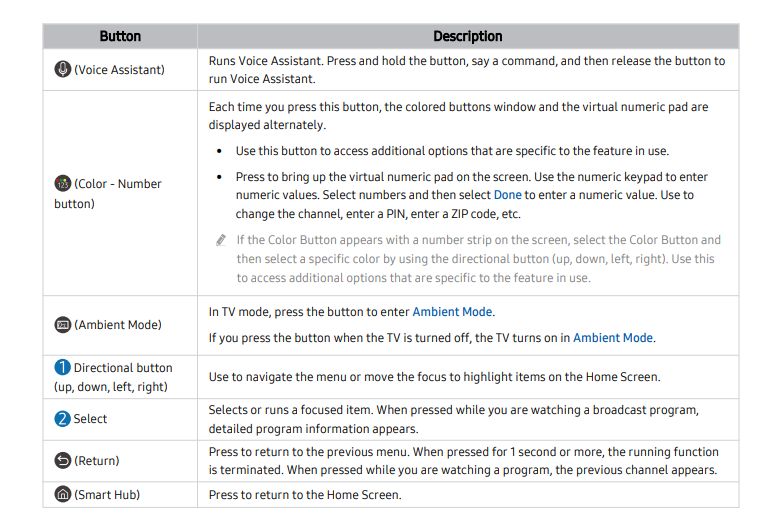

- Use the Samsung Smart Remote less than 20 feet (6 m) from the TV. The usable distance may vary with the wireless environmental conditions.
- The images, buttons, and functions of the Samsung Smart Remote may differ with the model or geographical area.
- To use the Samsung Smart Remote to control a compatible external device that does not support HDMI-CEC (Anynet+), you must ʀͱ͝fi˝Їθʪ universal remote control for the device. For more information, refer to "Controlling External Devices with a Samsung Remote Control - Using the Universal Remote."
- To use the Samsung Smart Remote to control a compatible external device that does support HDMI-CEC (Anynet+), connect the device to an HDMI port on the TV using an HDMI cable. For more information, refer to "Using Anynet+ (HDMI-CEC)."
About the Samsung Smart Remote (The Frame)
Learn about the buttons on the Samsung Smart Remote that comes with The Frame.

- Use the Samsung Smart Remote less than 20 feet (6 m) from the TV. The usable distance may vary with the wireless environmental conditions.
- The images, buttons, and functions of the Samsung Smart Remote may differ with the model or geographical area.
- To use the Samsung Smart Remote to control a compatible external device that does not support HDMI-CEC (Anynet+), you must ʀͱ͝fi˝Їθʪ universal remote control for the device. For more information, refer to "Controlling External Devices with a Samsung Remote Control - Using the Universal Remote."
- To use the Samsung Smart Remote to control a compatible external device that does support HDMI-CEC (Anynet+), connect the device to an HDMI port on the TV using an HDMI cable. For more information, refer to "Using Anynet+ (HDMI-CEC)."
About the Samsung Smart Remote (The Sero)
Learn about the buttons on the Samsung Smart Remote that comes with The Sero.


- Use the Samsung Smart Remote less than 20 feet (6 m) from the TV. The usable distance may vary with the wireless environmental conditions.
- The images, buttons, and functions of the Samsung Smart Remote may differ with the model or geographical area.
- To use the Samsung Smart Remote to control a compatible external device that does not support HDMI-CEC (Anynet+), you must configure universal remote control for the device. For more information, refer to "Controlling External Devices with a Samsung Remote Control - Using the Universal Remote."
- To use the Samsung Smart Remote to control a compatible external device that does support HDMI-CEC (Anynet+), connect the device to an HDMI port on the TV using an HDMI cable. For more information, refer to "Using Anynet+ (HDMI-CEC)."
- When you launch an app by pressing the button on the Samsung Smart Remote in Portrait Mode, some apps may switch to Landscape according to their app policy.
Connecting the Samsung Smart Remote to the TV
Connect the Samsung Smart Remote to your TV to operate the TV. When you turn on the TV for the first time, the Samsung Smart Remote pairs to the TV automatically. If the Samsung Smart Remote does not pair to the TV automatically, point it at the front of the TV, and then press and hold the  and
and  buttons simultaneously for 3 seconds or more.
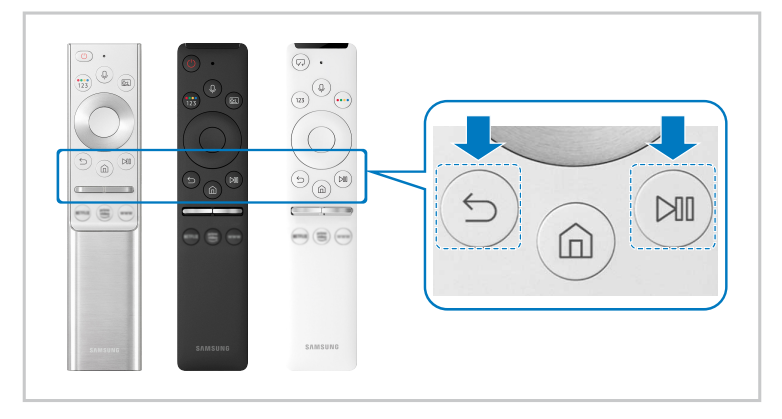
- The images, buttons, and functions of the Samsung Smart Remote may differ with the model or geographical area.
- For more information about the Samsung Smart Remote, refer to "About the Samsung Smart Remote."
- For more information about the Samsung Smart Remote that comes with The Frame, refer to "About the Samsung Smart Remote (The Frame)."
- For more information about the Samsung Smart Remote that comes with The Sero, refer to "About the Samsung Smart Remote (The Sero)."
Controlling External Devices with a Samsung Remote Control - Using the Universal Remote
Control the TV and connected external devices with a Samsung remote control.
 Source > Universal Remote
You can control external devices connected to the TV using a Samsung remote control. To control external devices, register them by following the instructions on the screen.
- This function may not be supported depending on the model or geographical area.
- You can also use the Anynet+ (HDMI-CEC) function to operate external Samsung devices with your TV's remote control without any additional setup. For more information, refer to "Using Anynet+ (HDMI-CEC)."
- Specific external devices connected to the TV may not support the universal remote feature.
- Do not place any obstacles in front of an external device and TV's logo. It may cause signals from the remote control to be transmitted improperly.
- The TV memorizes both the external device and its connection port (HDMI 1, HDMI 2, etc.).
- If you have difficulty controlling external devices with the Universal Remote, try adjusting the positions of the external devices.
- This function may not operate properly depending on the TV installation environment and the features of external devices.
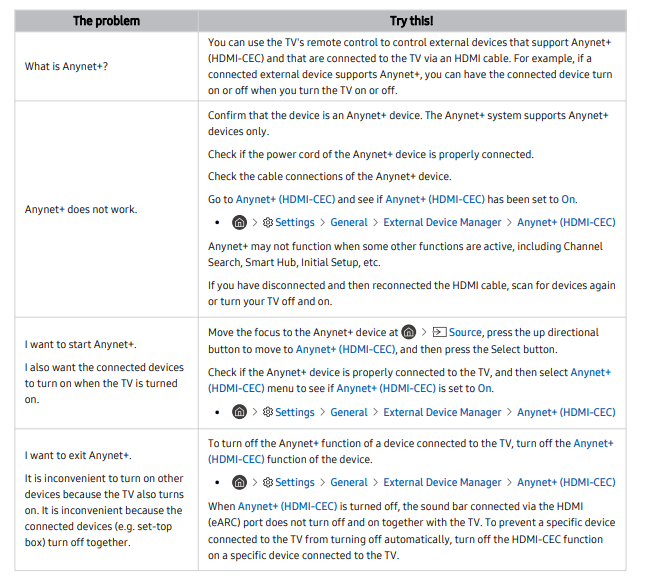
Using Anynet+ (HDMI-CEC)
Control an external device connected via Anynet+ (HDMI-CEC) with the remote control.
You can use the TV's remote control to control external devices that are connected to the TV by an HDMI cable and that support Anynet+ (HDMI-CEC). Note that you can only set up and operate Anynet+ (HDMI-CEC) with the remote control.
Connecting an external device through Anynet+ and using their menus
 Settings > General > External Device Manager > Anynet+ (HDMI-CEC) (Try Now)
- Set Anynet+ (HDMI-CEC) to On.
- Connect an HDMI-CEC-compliant device to the TV.
- Turn on the connected external device.
The device is automatically connected to the TV. After the connection process is finished you can access the menu of the connected device using your TV remote and control the device.
The connecting process can take up to 2 minutes to complete.
Read before connecting an Anynet+ (HDMI-CEC) device
- Anynet+ (HDMI-CEC)-enabled devices must be connected to the TV with an HDMI cable. Note that some HDMI cables may not support Anynet+ (HDMI-CEC).
- You can configure the TV's Universal Remote to control third-party cable boxes, Blu-ray players, and home theaters that do not support HDMI-CEC. For more information, refer to "Controlling External Devices with a Samsung Remote Control - Using the Universal Remote."
- Anynet+ cannot be used to control external devices that do not support HDMI-CEC.
- The TV remote control may not work under certain circumstances. If this occurs, set up the device as an Anynet+ (HDMI�CEC)-enabled device again.
- Anynet+ (HDMI-CEC) works only with external devices that support HDMI-CEC, and only when those devices are either in standby mode or turned on.
- Anynet+ (HDMI-CEC) can control up to 12 compliant external devices (up to 3 of the same type) except for home theaters.
- Anynet+ (HDMI-CEC) can control only one home theater system.
- To listen to 5.1 channel audio from an external device, connect the device to the TV via an HDMI cable and connect a 5.1 home theater system directly to the external device's digital audio output connector.
- If an external device has been set up for both Anynet+ and a universal remote control, the device can be controlled only with the universal remote control.
Controlling the TV with a Keyboard, Mouse, or Gamepad
Connecting a keyboard, mouse, or gamepad to make it easier to control the TV.
 Settings > General > External Device Manager > Input Device Manager (Try Now)
You can connect a keyboard, mouse, or gamepad to make it easier to control the TV.
Connecting a USB keyboard, mouse, or gamepad
Plug the keyboard, mouse or gamepad cable into the USB port.
- If you connect a mouse, it is available only in the Internet app and Remote Access function.
- XInput USB gamepads are supported.
- For more information, refer to Input Device in Connection Guide (
 Source > Connection Guide > Input Device).
Connecting a Bluetooth keyboard, mouse, or gamepad
 Settings > General > External Device Manager > Input Device Manager > Bluetooth Device List
- If your device was not detected, position the keyboard close to the TV, and then select Refresh. The TV scans for available devices again.
- If you connect a mouse, it is available only in the Internet app.
- For more information, refer to the Bluetooth device's user manual.
Using the keyboard and mouse
The key operation may differ depending on some apps or the keyboard.
Setting up the input devices
 Settings > General > External Device Manager > Input Device Manager
- Keyboard Settings
You can set up the keyboard with the Keyboard Language and Keyboard Type functions.
- Mouse Settings
You can set up the mouse with the Primary Button and Pointer Speed functions.
Entering Text using the On-Screen Virtual Keyboard
Use the virtual keyboard to enter text on your TV.

The image on your TV may differ from the image above depending on the model and geographical area.
- Recommended text
When you type a word you want to use as a search term, this function displays related suggestions from which you can choose one.
- Options
Select  on the virtual keyboard screen. The following options are available: The options available may differ depending on the function running currently. • Recommended text
• Reset Recommended Text Memory
• Accented Character Preview
• Predict Next Character (when using direction buttons)
• Language
- Predict Next Character
Each time you type a character on the virtual keyboard, the next characters predicted to be typed are displayed. You can use the directional buttons on the remote control to select one.
Entering Text using the remote control's microphone and the on-screen virtual keyboard
When the virtual keyboard is on the screen, press and hold the button  on the Samsung Smart Remote, speak into the microphone on the Samsung Smart Remote, and then release the button. What you say appears on the screen as text.
- Entering text with your voice may not be supported for some functions.
- This function may not be supported depending on the model or geographical area.
Troubleshooting
If you have a problem with your TV, you can access various solutions while watching TV. If your problem is not addressed in the Troubleshooting section, view the FAQ section or contact the Samsung Call Center.
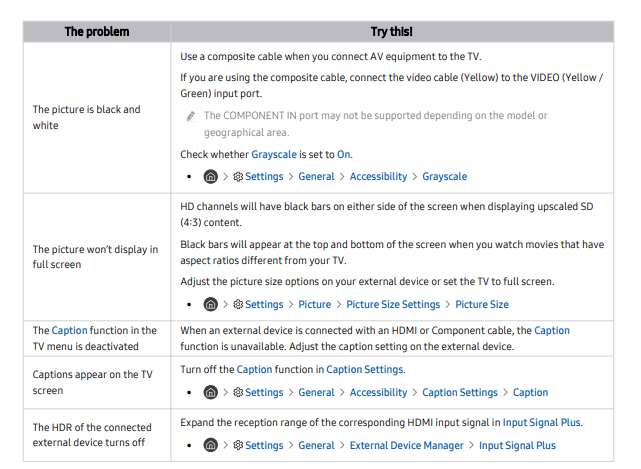
Picture Issues
When the TV has trouble with the picture, these steps may help resolve the problem.
Testing the picture
 Settings > Support > Device Care > Self Diagnosis > Picture Test (Try Now)
Before you review the list of problems and solutions below, use Picture Test to determine if the problem is caused by the TV. Picture Test displays a high definition picture you can examine for flaws or faults.

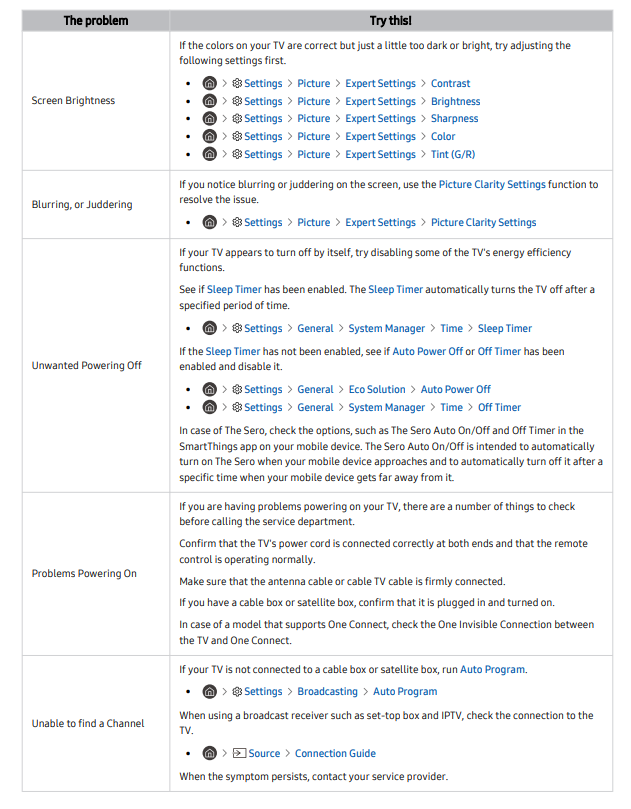

- If the test picture does not appear or there is noise or distortion, the TV may have a problem. Contact Samsung’s Call Center for assistance.
- If the test picture is displayed properly, there may be a problem with an external device. Please check the connections.
- If the problem persists, check the Signal Information or refer to the external device’s user manual.
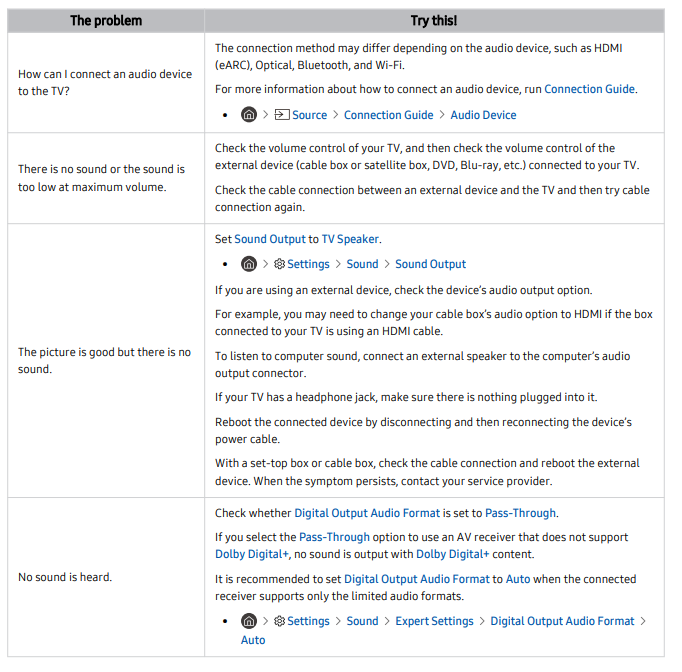
Sound and Noise Issues
When the TV has difficulties with sound, these steps may help resolve the problem.
Testing the sound
 Settings > Support > Device Care > Self Diagnosis > Sound Test (Try Now)
If the TV plays the Sound Test melody without distortion, there may be a problem with an external device or the broadcast signal's strength.
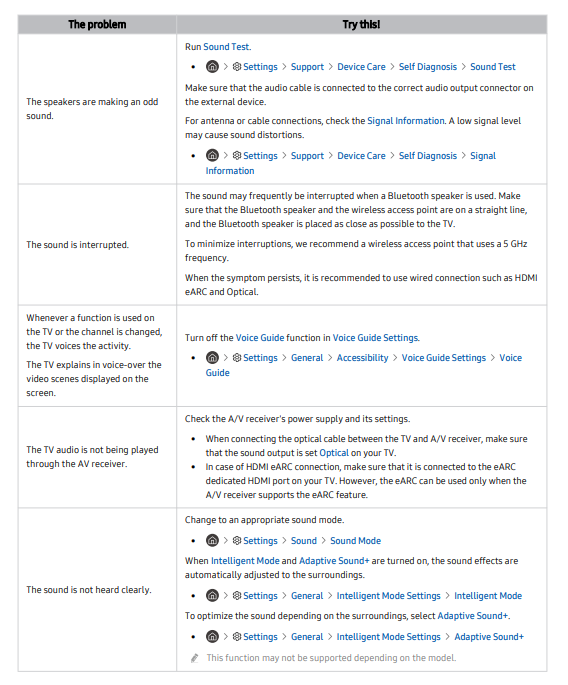
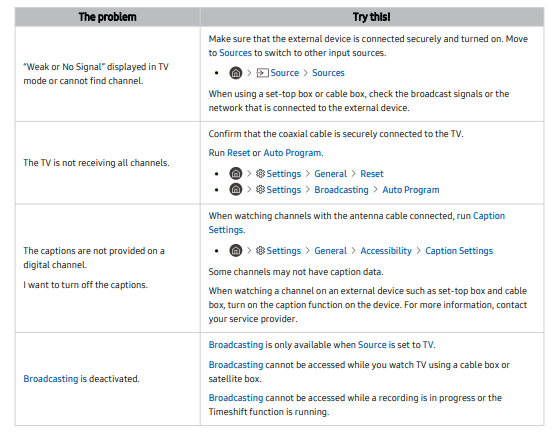
Channel and Broadcast Issues
When the TV has difficulties receiving broadcasts, these steps may help resolve the problem.
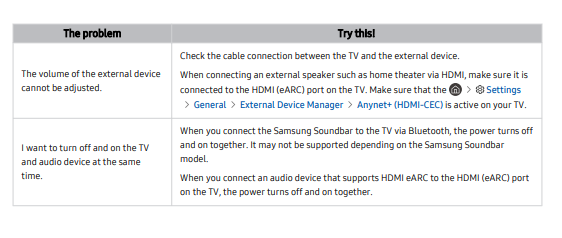
External Device Connectivity Issues
When the TV has difficulties connecting to external devices such as a PC, game console, or mobile device, these steps may help resolve the problem.


Network Issues
When the TV has difficulties connecting to the Internet, these steps may help resolve the problem.
 Settings > Support > Device Care > Self Diagnosis > Smart Hub Connection Test (Try Now)
If the TV has trouble with network connection or TV services, check the Smart Hub connection status.

Wired networks are not supported by some models.
Anynet+ (HDMI-CEC) Issues
When Anynet+ (HDMI-CEC) isn't working, these steps may help resolve the problem.

Remote Control Issues
When the remote control isn't working, these steps may help resolve the problem.

Recording Issues
When Timeshift or Schedule recording aren't working, these steps may help resolve the problem.
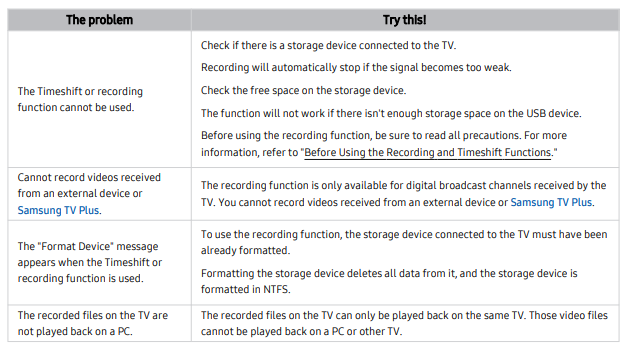
- This function is not available in the U.S.A. and Canada.
- This function may not be supported depending on the model or geographical area.
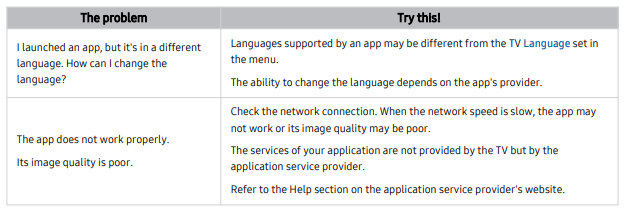
Apps
When apps aren't working, these steps may help resolve the problem.
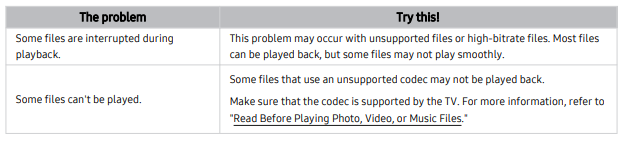
Media Files
When files don't play, this may help resolve the problem.
Voice Assistant Issues
When the Voice Assistant isn't working, these steps may help resolve the problem.
The Voice Wake-up function may not be supported depending on the model, Voice Assistant or geographical area.

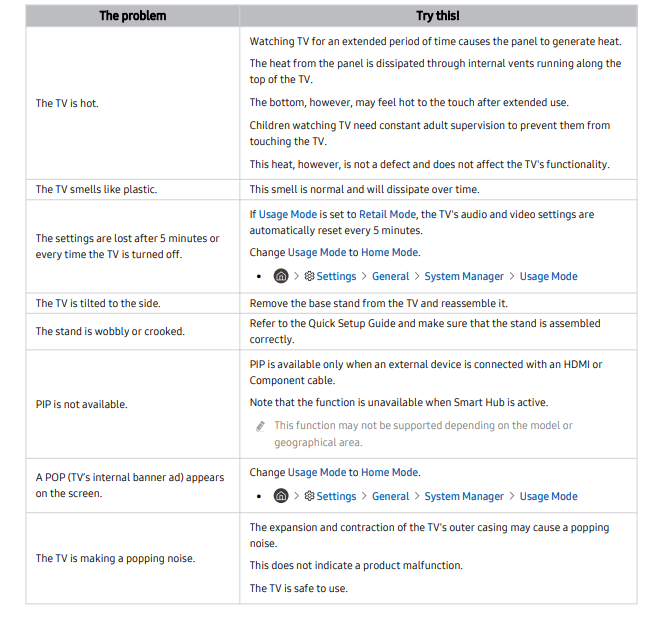
Other issues
Use these procedures to resolve other issues that may occur in relation to the product.

Diagnosing TV operational issues
You can diagnose issues with your TV and Smart Hub and run reset functions.
 Settings > Support > Device Care > Self Diagnosis (Try Now)
You can use the Picture Test to help diagnose video issues and the Sound Test to diagnose sound issues. You can also view signal strength information for over-the-air digital signals, test the Smart Hub Internet connection, and run the Smart Hub and TV factory reset functions.
- Video Test
- Picture Test
- Sound Test
- HDMI Troubleshooting
- Signal Information
- Smart Hub Connection Test
- Reset Smart Hub

Getting Support
Get help directly from Samsung if you have a problem with your TV.
Getting support through Remote Management
 Settings > Support > Remote Management (Try Now)
After consenting to our service agreement, you can use Remote Management to access Remote Support and have a Samsung service technician diagnose your TV, correct problems, and update your TV's software remotely via the web. You can also turn Remote Management on and off.
- This function requires an Internet connection.
Finding the contact information for service
 Settings > Support > About This TV (Try Now)
You can view the address of the Samsung website, the call center phone number, your TV's model number, your TV's software version, Open Source License and other information you may need to get service support from a Samsung call agent or the Samsung website.
- You can also view information by scanning the QR code of your TV.
- You can also start this function by pressing and holding the button for 5 or more seconds. Continue holding the
 button until the customer information pop-up window appears.
Requesting service
 Settings > Support > Device Care > Request Support (Try Now)
You can request service when you encounter a problem with the TV. Select the item matching the problem that you encountered, enter the required item, move the focus to Next, and then press the Select button. Select Request Now > Send or Schedule Appointment > Request > Send. Your service request will be registered. The Samsung Contact Center will contact you to set up or ʀͱ͝fiθ͔ your service appointment.
- You must agree to the terms and conditions for the service request.
- This function may not be supported depending on the geographical area.
- This function requires an Internet connection.