|
LOCK BEAN HOPPER' on LCD screen
|
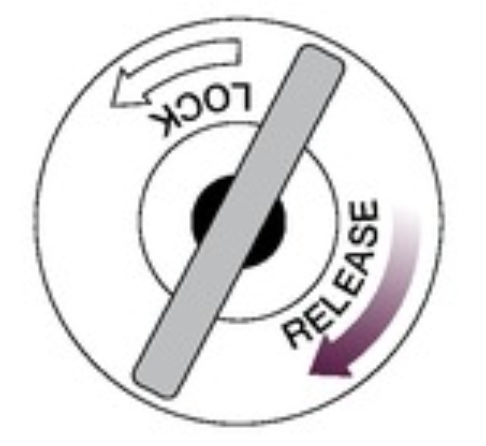
Hopper not locked in place.
|
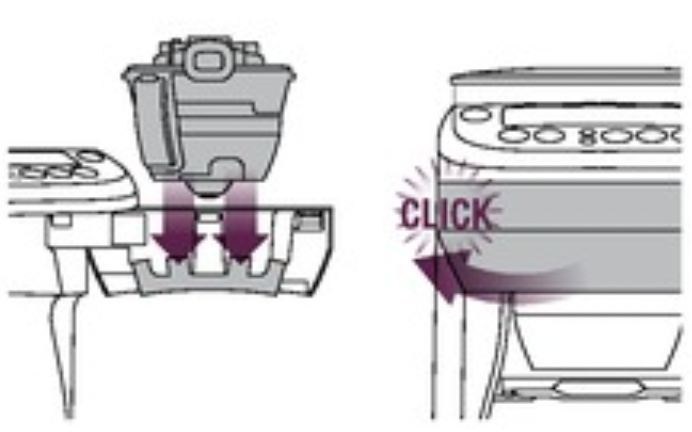
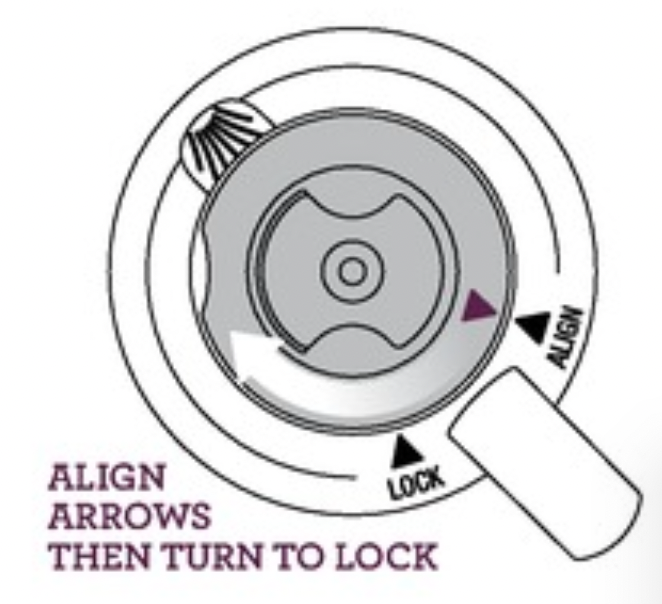
Turn the locking knob clockwise in the direction of the LOCK arrow until it clicks.
|
| Unable to lock bean hopper |
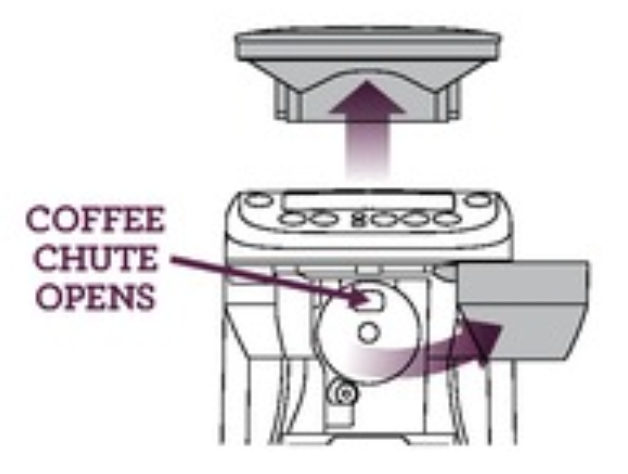
Coffee beans obstructing bean hopper locking device.
|
Remove bean hopper. Clear coffee beans from the grinding chamber and around the upper burr. Try re-locking the bean hopper.
|
| 'FILL TANK' on LCD screen |
Water tank is empty.
|
Press open the flip-top water tank lid. Pour the desired amount of cold, preferably filter water.
|
| EMPTY COFFEE FILTER' on LCD screen |
Coffee basket not in place or not correctly assembled.
|
Check that the coffee basket lid is closed and the coffee basket is firmly seated on the two door hooks.
|
|
Swing-out door not closed properly.
|
Close the door until it clicks shut.
|
|
Coffee basket not emptied of used grinds.
|
Remove the coffee basket and discard used grinds. Wash the coffee basket, taking particular care to rinse the chute area. Dry thoroughly (especially the chute area). Attach to the swing-out door. Close the door until it clicks shut.
|
| Grinder starts but operates with a loud noise. No coffee in the coffee basket. |
Grinder is blocked with a foreign item.
|
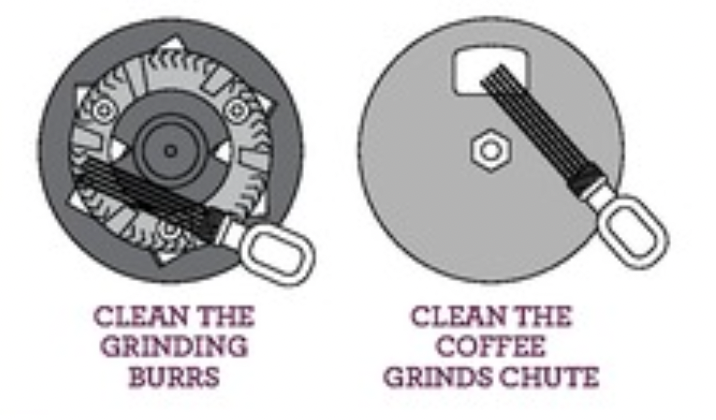
Check the bean hopper for any foreign body. If there is none, refer to 'Cleaning the Grinding Burrs and Coffee Grinds Chute', page 25.
|
| Moisture clogging grinder. |
Clean and thoroughly dry the grinding burrs and coffee grinds chute. Refer to 'Cleaning the Grinding Burrs and Coffee Grinds Chute', page 25. It is possible to use a hair dryer to blow air into the grinding chamber and dry the lower burr. Only re-commence use when the grinding chamber and grinding burrs are completely dry.
|
| Coffee grinds in coffee |
Using the gold tone filter. |
The gold tone filter will allow some fine coffee grinds to fall into the coffee. This is normal. Switch to using a paper filter (8-12 cup, flat base basket style with - 34"/8.25cm base) if you wish to eliminate all grinds.
|
|
Coffee basket has not been properly cleaned. Residual grinds from previous use.
|
After each use, wash the coffee basket, taking particular care to rinse the chute area. Dry thoroughly (especially the chute area). Ensure there are no grinds in the coffee basket before lining the coffee basket with the gold tone or paper filter.
|
| Coffee basket overflows |
The coffee basket is clogged. |
This can occur for a number of reasons:
- If using pre-ground coffee, ensure it is a drip coffee grind and not too fine. Never use Espresso grind.
- Check that the coffee basket is lined with only one paper filter.
- Check that either the gold tone filter or the paper filter is used. Do not use both together.
- Check that the gold tone filter mesh is clear and unclogged.
- Clean the coffee grinds chute. Refer to 'Cleaning the Grinding Burrs and Coffee Grinds Chute', page 25.
|
| Coffee basket drips |
Residual grinds in the drip stop outlet. |
With the coffee basket lid open, push up the drip stop outlet (the hemisphere on the underside of the coffee basket). A valve will rise inside the coffee basket. Ensure there are no grinds underneath this valve. Thoroughly dry the coffee basket (especially the chute area) before lining the coffee basket with the gold tone or paper filter.
|
| Carafe overflows |
Carafe was not completely empty before brewing.
|
Always ensure the carafe is completely empty before brewing.
|
| No coffee comes out |
The coffee basket is clogged. |
Never open the swing-out door and remove the coffee basket while brewing. Hot water and coffee can cause injury. Turn the POWER button off and remove the plug from the power outlet. Wait 10 minutes before opening the swing-out door and removing the coffee basket. Follow the solutions for 'Coffee basket overflows'.
|
| Coffee is watery |
Insufficient beans in the bean hopper. |
Fill the hopper with fresh beans. We recommend always keeping the hopper full (0.5lb maximum) to ensure there are sufficient beans.
|
|
Bean hopper and/or burr grinder is blocked.
|
Refer to 'Cleaning the Grinding Burrs and Coffee Grinds Chute', page 25.
|
| Beans are in the hopper but not feeding into the grinding burrs |
Dark, oily beans can stick to the sides of the hopper.
|
Stir the beans to loosen.
|
|
The hopper is over-packed and the grinder is jamming.
|
Remove some of the beans. Stir the remaining beans to loosen.
|
|
Coffee not strong enough/ too strong
|
Strength setting is incorrect. |
Check the selected strength setting displayed on the LCD screen. To change the strength setting, refer to 'Select the Brew Strength or PRE-GROUND Coffee Setting', page 15 and 18.
|
| Coffee not hot enough |
|
A pre-heated coffee basket, carafe or cup will help maintain the coffee's optimal temperature and keep coffee hotter for longer. Fill with hot water for about 30 seconds then discard the water.
|
|
I cannot select the 'FLAVOR' setting.
|
The 'FLAVOR' setting is only selectable in SINGLE CUP mode.
|
|
| Machine takes a long time to brew |
The Brew IQ® System will intelligently pre-heat and dose grinds for optimum temperature and taste. This may result in longer grinding, pre-heating and brewing times than what you are normally used to. |
If you would like to reduce the overall brewing time and are using SINGLE CUP mode, select a lower flavor setting. The 'LITE' setting will steep for less time, however this will produce a lighter flavored coffee.
|
| Machine yses a lot of coffee |
The Brew IQ® System has been calibrated to dose the optimum water to coffee grinds ratio to achieve the best flavor profile. Depending on the strength setting selected, this may result in more coffee being ground than what you are normally used to. However the result will be a bolder, more full-flavored coffee.
|
If you would like to use less coffee beans, select a lower strength setting.
|
| Amount brewed is too little / too much |
There is excessive mineral build-up affecting the performance of the machine.
|
De-scale the machine. Refer to 'Removing Calcium Build-Up', page 27.
|
| The volume calibrations need to be reset. |
Recalibrate the machine by flushing it twice. Refer to 'Using the YouBrew®-Carafe Mode. First Time Use Only', page 14.
|
|
The water tank was filled once the coffee machine had already started a brewing cycle.
|
Always fill the water tank before starting a brewing cycle.
|
|
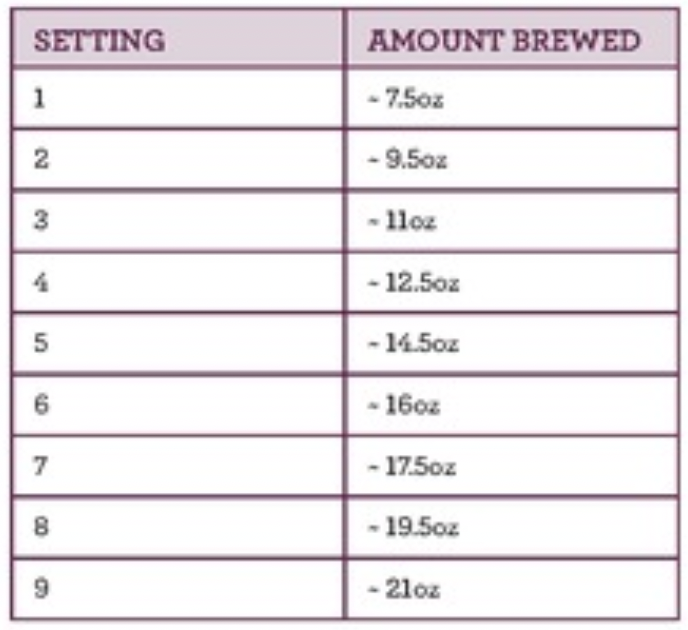
The brew sizes are approximate only. Actual amounts may vary due to the type of filter used, the coffee bean size, roast, blend and freshness, or amount and type of pre-ground coffee used. These factors affect the amount of water retained by the coffee grounds.
|
|
|
I cannot select a certain carafe amount
|
The minimum carafe amount is 2 cups, while the maximum is the number of cups of water in the tank, up to 12 cups. |
Press open the Hip-top water tank lid. Pour the desired amount of cold, preferably filter water. |
|
I can only select 9 cups
|
'INTENSE' strength setting selected. The maximum number of cups that can be brewed at the maximum strength is 9 cups. |
To brew 12 cups, select the 'STRONG' strength setting. |
|
My cup does not fit under the drip stop outlet.
|
The maximum cup or travel mug dimensions are 7.5" height, 2%" diameter. |
Remove the drip tray at the base of the machine. Press the OPEN button to open the swing-out door. Insert the cup/mug into the drip tray cavity before closing the swing. out door. |
| I regularly switch beans |
|
Buy an additional bean hopper to make transfer and storage of beans easier.
To grind out any residual coffee beans, lock an empty bean hopper onto the machine. Completely fill the water tank, select '12 CUPS' and the 'INTENSE' strength setting. Press the START | CANCEL button. When the grinder stops grinding, press the START |CANCEL button to cancel the cycle.Remove the coffee grinds from the coffee basket. |
|
'DE-SCALE' on LCD screen
|
There is excessive mineral build-up affecting the performance of the machine. |
Remove the 'DE-SCALE, icon by pressing the SINGLE CUP and CARAFE button together, then de-scale the machine. Refer to Removing Calcium Build-Up', page 27. |
|
I want to empty the water tank
|
|
Refer to 'Empty the Water Tank, page 27. |
|
Water is leaking from the back of the machine
|
Water tank is overfilled. |
Do not exceed the 12 cup maximum. The machine will beep when full and the water level float will rise to indicate the maximum level. |
|
Steam when grinding and brewing
|
This is normal.
It is the rear steam vent releasing steam.
|
|
|
Total brewing time on LCD screen changes mid-cycle or is different each time
|
The total brewing time displayed at the start of the cycle is an estimate only and may change mid-cycle or vary each time depending on the starting temperature of the water in the water tank.
|
|
|
Brewing cycle finishes before the ready signal
|
If using the gold tone filter, this is normal.
The total brewing time displayed on the LCD screen is calculated using paper filters as coffee passes through paper filters slower.
|
|
| 'CLEAN COFFEE CHUTE' on LCD screen |
Grinding burrs and coffee grinds chute need to be cleaned. We recommend doing this immediately to avoid clogging and overflowing of the coffee basket.
|
- Thoroughly clean the coffee basket and gold tone filter to ensure they are clear and unclogged of any coffee grinds.
- Check the bean hopper for any foreign body.
- Refer to 'Cleaning the GrindingBurrs and Coffee Grinds Chute', page 25.
|
| Machine beeps and displays '1' on the LCD screen |
There is an issue with the coffee grinds chute disc.
|
Remove the plug from the power outlet. Wait 10 seconds then reinsert. Check the coffee grinds chute disc for any build-up of coffee grinds. This is the stainless steel disc that is visible when the swing out door is opened. A build-up of grinds on this disc can affect the performance of the machine. Wipe the disc clean then dry thoroughly. If the problem persists, call Breville Consumer Service.
|
|
Machine beeps 20 times in fast succession and '2' is displayed on the LCD screen
|
|
Call Breville Consumer Service.
|
|
Water level on LCD screen is not moving or indicating correctly
|
Using de-mineralized or distilled water which is affecting how the coffee machine is designed to function. |
We recommend using cold, filtered water. We do not recommend using water with no/low mineral content such as de-mineralized or distilled water. If the problem persists, contact Breville Consumer Service.
|
 button
 button
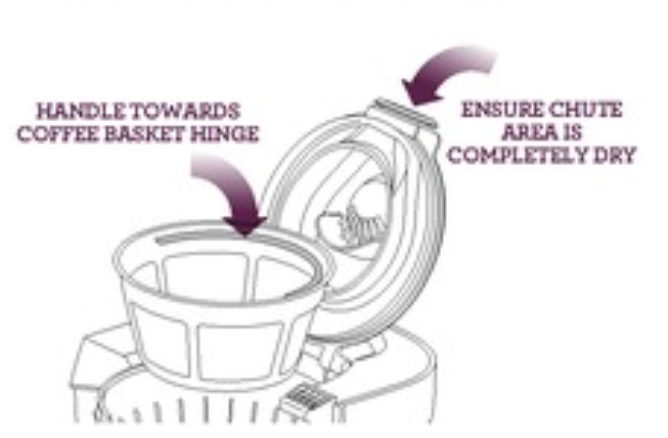
 and
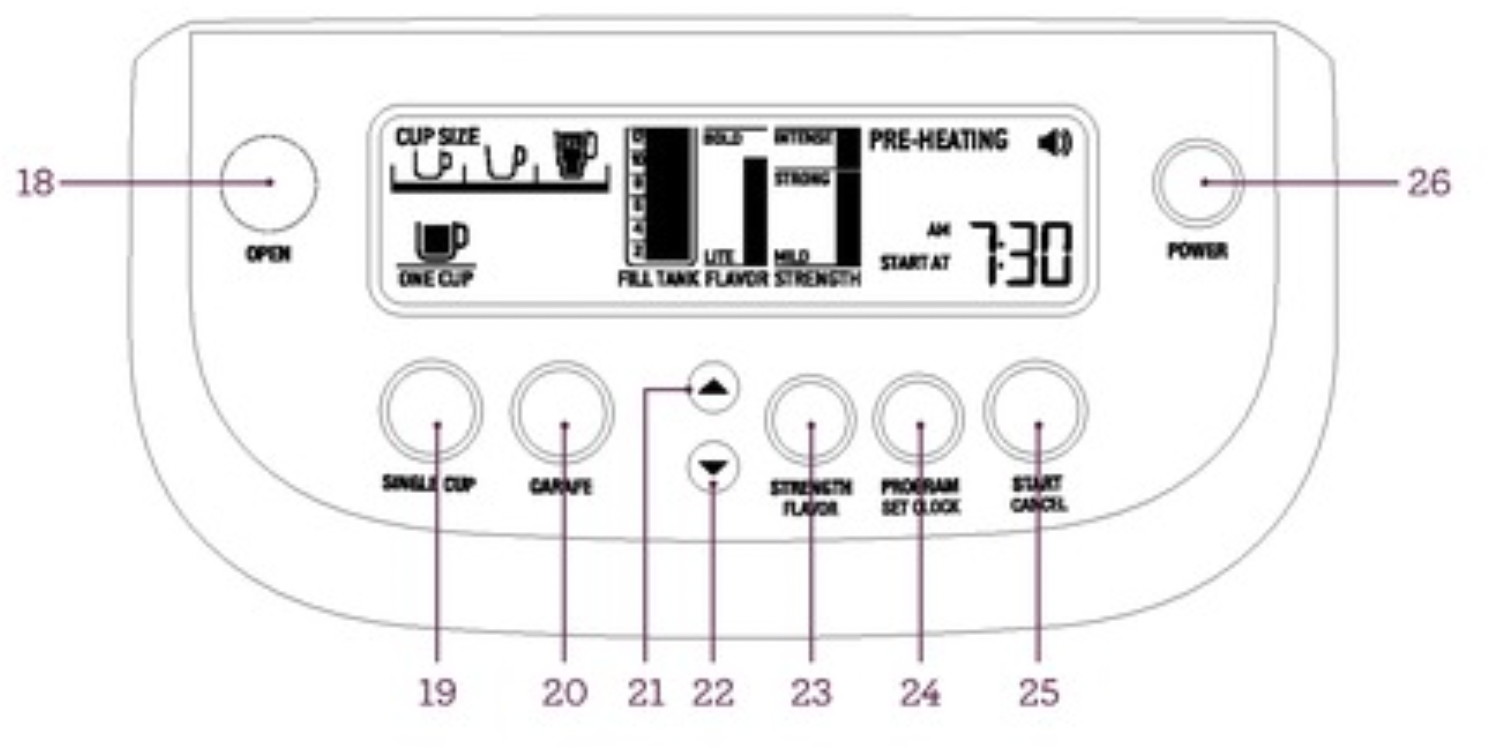
and  buttons will illuminate and flash. Use these buttons to cycle through 7 strength settings from 'MILD', 'STRONG' to 'INTENSE' or for the 'PRE-GROUND' coffee setting. When the 'INTENSE' strength setting is selected, the maximum number of cups that can be brewed is 9 cups. This ensures the maximum coffee to water ratio.
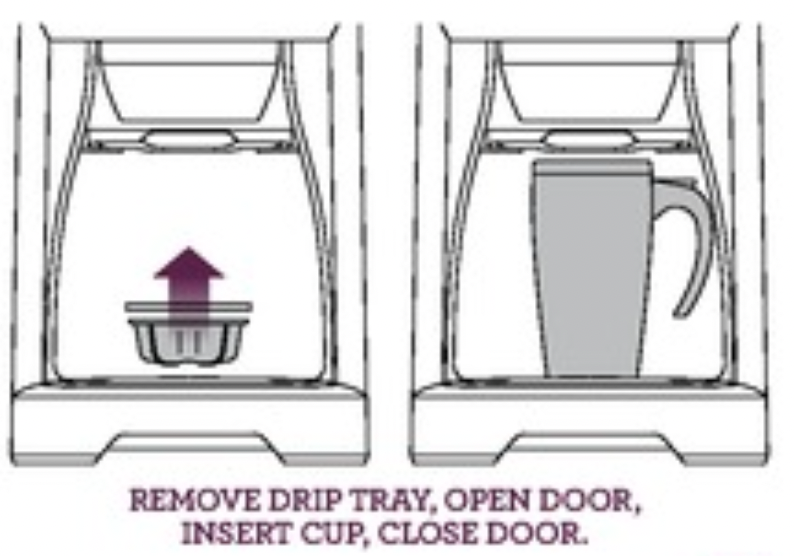
 and
and  buttons will illuminate and flash. Use these buttons to cycle through 7 strength settings from MILD', 'STRONG' to 'INTENSE' or for the 'PRE-GROUND' coffee setting.
 and
and  and
and  buttons to select either AM or PM.
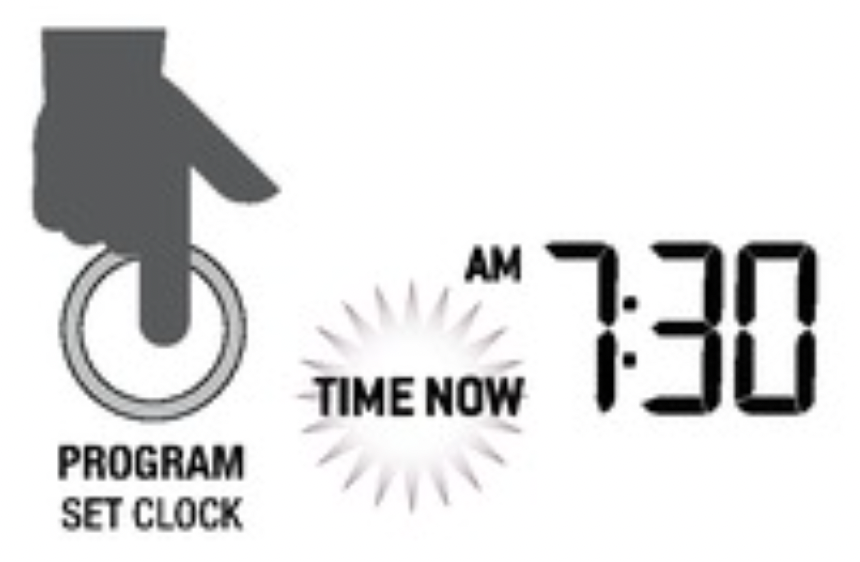
 and
and  buttons to select either AM or PM.
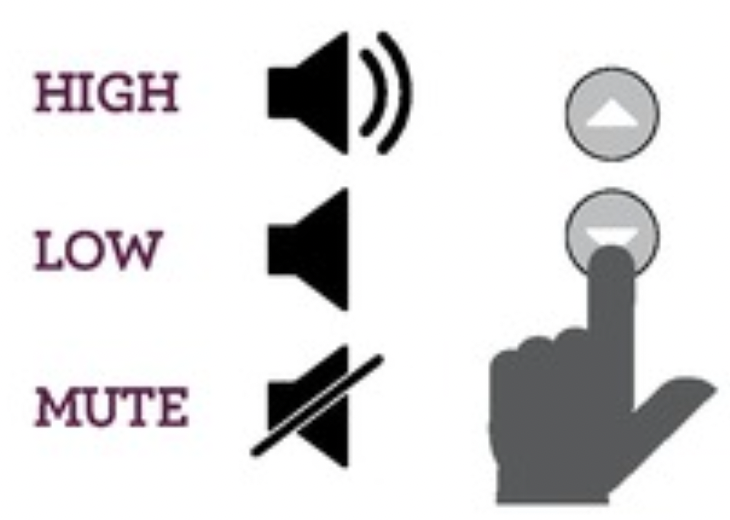
 or
or  button to select the desired volume. The volume is selected once the icon stops flashing.