Loading ...
Loading ...
Loading ...
En-4
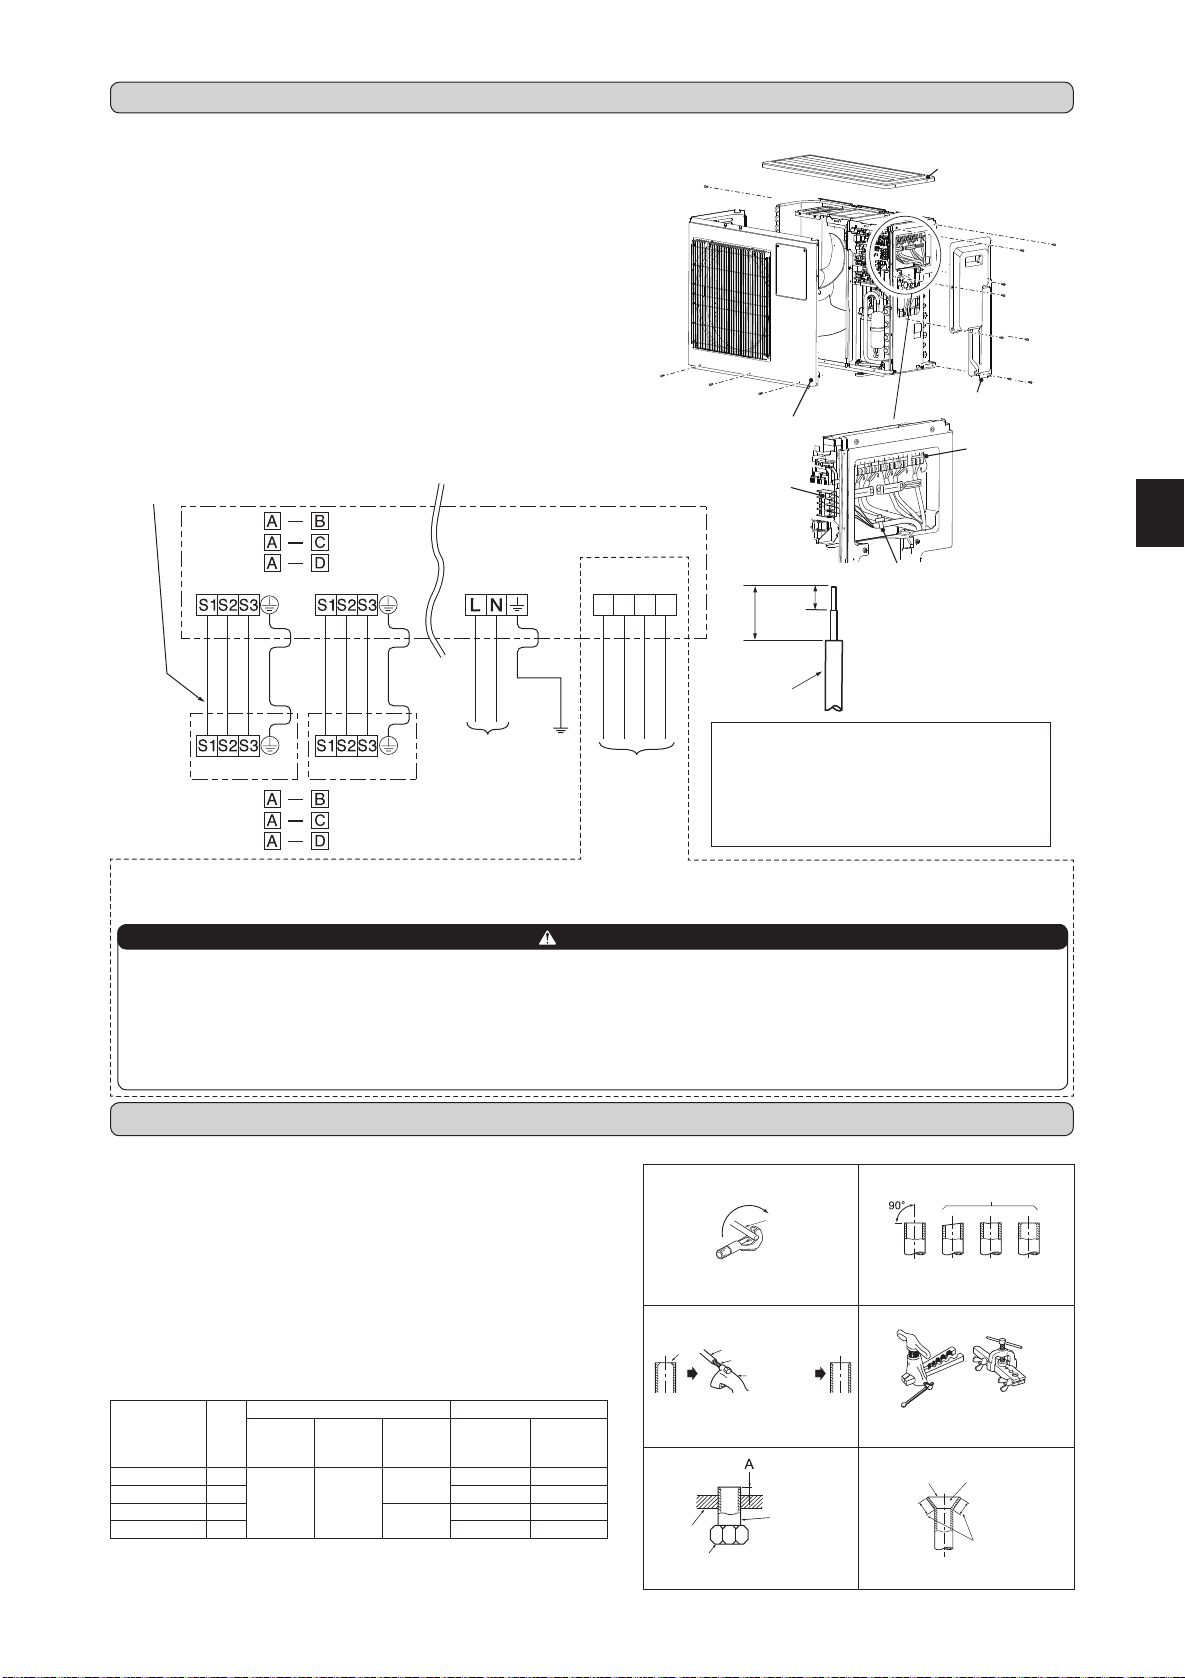
1 2 3 C
(MXZ-2E)
(MXZ-3E)
(MXZ-4E)
(MXZ-2E)
(MXZ-3E)
(MXZ-4E)
35mm
15mm
Leadwire
• Besuretoattacheachscrewtoitscorrespondent
terminalwhensecuringthecordand/orthewireto
theterminalblock.
• Makeearthwirealittlelongerthanothers.
(Morethan35mm)
• Forfutureservicing,giveextralengthtothecon-
nectingwires.
<OUTDOORUNIT>
Indoor/outdoorunit
connectingwire
<INDOORUNIT>
Terminalblock
Terminalblock Terminalblock
Terminalblockfor
powersupply
Terminalblock
2-1. CONNECTING WIRES FOR OUTDOOR UNIT
1)Removetheservicepanel,toppanel,frontpanel.
2)Loosenterminalscrew,andconnectindoor/outdoorunitconnectingwire(B)from
theindoorunitcorrectlyontheterminalblock.Becarefulnottomakemis-wiring.
Fixthewiretotheterminalblocksecurelysothatnopartofitscoreisappeared,
andnoexternalforceisconveyedtotheconnectingsectionoftheterminalblock.
3)Firmlytightentheterminalscrewstopreventthemfromloosening.Aftertightening,
pullthewireslightlytoconrmthattheydonotmove.
4)Perform2)and3)foreachindoorunit.
5)Connectpowersupplycord(A).
6)ConnectthedemandcontroltransmissioncabletotheterminalblockforDRED
Interface.
7)Fixindoor/outdoorunitconnectingwire(B)andpowersupplycord(A)withthe
cableclamps.
8)Fixthedemandcontroltransmissioncablewiththecablestrap.
9)Closetheservicepanel,toppanel,frontpanelsecurely.Makesurethat3-2.PIPE
CONNECTIONiscompleted.
•
Aftermakingconnectionsbetweenbothpowersupplycord(A)andindoor/outdoor
unitconnectingwire(B),besuretoxbothcableandwirewithcableclamps.
2. OUTDOOR UNIT INSTALLATION
POWERSUPPLY
~/N230V50Hz
ThisunithasdemandresponsecapabilitywhichiscompliantwithAS/NZS4755.3.1.Toactivatethisfunction,youneedtomakeacontractwithremote
agentssuchaselectricsupplycompany,thenthisunitshouldbeconnectedtoDemandresponseenablingdevise(DRED).Forfurtherinformation,
consultyourdealer.Thisunitsupports3DemandResponseModes(DRMs):DRM1,DRM2andDRM3.
CAUTION
•Topreventmalfunctioncausedbynoise,routethecordconnectingthisunittoDREDandthepowersupplycordasparallelaspossible.
•Donotconnectthedemandcontroltransmissioncabletotheterminalblockforpowersupply.
•Donotpull,extremelybendorapplystrongpressureonthewiretopreventfailure.
•DonotscrewDREDtooutdoorunit.
•DonotputDREDinoutdoorunit.
•Secureelectricalwiringaboveclamp.
•DonotgetDREDwirecaughtintheservicepanel.
1:DRM1
2:DRM2
3:DRM3
C:COMMON
AS/NZS4755
terminalblock
Fig.1 Fig.2
Fig.3 Fig.4
Fig.5 Fig.6
3-1. FLARING WORK
Pipediameter
(mm)
Nut
(mm)
A(mm) Tighteningtorque
Clutch
typetool
forR410A
Clutch
typetool
forR22
Wingnut
typetool
forR22
N•m kgf•cm
ø6.35(1/4”) 17
0to0.5 1.0to1.5
1.5to2.0
13.7to17.7 140to180
ø9.52(3/8”) 22 34.3to41.2 350to420
ø12.7(1/2”) 26
2.0to2.5
49.0to56.4 500to575
ø15.88(5/8”) 29 73.5to78.4 750to800
TiltedUnevenBurred
Good
Nogood
Burr
Copperpipe
Sparereamer
Pipecutter
Smoothall
around
Evenlength
allaround
Insideisshin-
ingwithoutany
scratches.
Flarenut
Die
Copperpipe
Clutchtype
Flaringtool
Wingnuttype
Copper
pipe
1)Cutthecopperpipecorrectlywithpipecutter.(Fig.1,2)
2)Completelyremoveallburrsfromthecutcrosssectionofpipe.(Fig.3)
• Aimthecopperpipedownwardwhileremovingburrstopreventburrsfrom
droppinginthepipe.
3)Removearenutsattachedtoindoorandoutdoorunits,thenputthemonpipe
havingcompletedburrremoval.(Notpossibletoputthemonafteraringwork.)
4)Flaringwork(Fig.4,5).Firmlyholdcopperpipeinthedimensionshowninthe
table.SelectAmmfromthetableaccordingtothetoolselected.
5)Check
• ComparethearedworkwithFig.6.
• Ifareisnotedtobedefective,cutoffthearedsectionanddoaringwork
again.
3. FLARING WORK AND PIPE CONNECTION
Terminalblock
forDREDInterface
Frontpanel
Servicepanel
Terminalblock
forpowersupply
Cablestrap
Thetipshouldbe
pointedupwards.
Toppanel
BN79A289H01_en.indd 4 2016/04/20 14:53:00
Loading ...
Loading ...
Loading ...