
imagine the possibilities
Thank you for purchasing this Samsung product.
To receive more complete service,
please register your product at
www.samsung.com/register
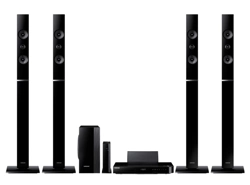
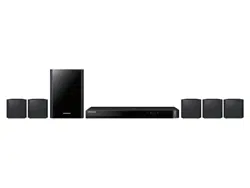
7.1CH Blu-ray™
Home Entertainment System
user manual
HT-H7750WM

2 - English
Safety Information
The slots and openings in the cabinet and in the back
or bottom are provided for necessary ventilation. To
ensure reliable operation of this apparatus, and to
protect it from overheating, these slots and openings
must never be blocked or covered.
- Do not place this apparatus in a confined space,
such as a bookcase, or built-in cabinet, unless
proper ventilation is provided.
- Do not place this apparatus near or over a radiator
or heat register, or where it is exposed to direct
sunlight.
- Do not place vessels (vases etc.) containing water
on this apparatus. A water spill can cause a fire or
electric shock.
Do not expose this apparatus to rain or place it near
water (near a bathtub, washbowl, kitchen sink, or
laundry tub, in a wet basement, or near a swimming
pool, etc.). If this apparatus accidentally gets wet,
unplug it and contact an authorized dealer immediately.
This apparatus uses batteries. In your community,
there might be environmental regulations that require
you to dispose of these batteries properly. Please
contact your local authorities for disposal or recycling
information.
Do not overload wall outlets, extension cords or
adaptors beyond their capacity, since this can result in
fire or electric shock.
Route power-supply cords so that they are not likely to
be walked on or pinched by items placed on or against
them. Pay particular attention to cords at the plug end,
at wall outlets, and the point where they exit from the
apparatus.
To protect this apparatus from a lightning storm, or
when it is left unattended and unused for long periods
of time, unplug it from the wall outlet and disconnect
the antenna or cable system. This will prevent damage
to the set due to lightning and power line surges.
Before connecting the AC power cord to the DC
adaptor outlet, make sure the voltage designation of
the DC adaptor corresponds to the local electrical
supply.
Never insert anything metallic into the open parts
of this apparatus. Doing so may create a danger of
electric shock.
To avoid electric shock, never touch the inside of this
apparatus. Only a qualified technician should open this
apparatus.
Make sure to plug the power cord in until it is firmly
seated. When unplugging the power cord from a wall
outlet, always pull on the power cord's plug. Never
unplug by pulling on the power cord. Do not touch the
power cord with wet hands.
If this apparatus does not operate normally - in
particular, if there are any unusual sounds or smells
coming from it - unplug it immediately and contact an
authorized dealer or service centre.
Maintenance of Cabinet.
- Before connecting other components to this
product, be sure to turn them off.
- If you move your product suddenly from a cold place
to a warm place, condensation may occur on the
operating parts and lens and cause abnormal disc
playback. If this occurs, unplug the product, wait for
two hours, and then connect the plug to the power
outlet. Then, insert the disc, and try to play back
again.
Be sure to pull the power plug out of the outlet if the
product is to remain unused or if you are leaving the
house for an extended period of time (especially when
children, elderly, or disabled people will be left alone in
the house).
- Accumulated dust can cause an electric shock, an
electric leakage, or a fire by causing the power cord
to generate sparks and heat or the insulation to
deteriorate.
Contact an authorized service centre for information
if you intend to install your product in a location with
heavy dust, high or low temperatures, high humidity,
chemical substances, or where it will operate 24 hours
a day such as in an airport, a train station, etc. Failing
to do so may lead to serious damage of your product.
CAUTION
CAUTION: TO REDUCE THE RISK OF ELECTRIC SHOCK, DO
NOT REMOVE THE COVER (OR BACK). THERE ARE NO USER
SERVICEABLE PARTS INSIDE. REFER ALL SERVICING TO
QUALIFIED PERSONNEL.
This symbol indicates that high voltage is
present inside. It is dangerous to make
any kind of contact with any internal part
of this product.
This symbol indicates that important
literature concerning operation and
maintenance has been included with this
product.

3 - English
Use only a properly grounded plug and wall outlet.
- An improper ground may cause electric shock or
equipment damage. (Class l Equipment only.)
To turn this apparatus off completely, you must
disconnect it from the wall outlet. Consequently, the
wall outlet and power plug must be readily accessible
at all times.
Do not allow children to hang on the product.
Store the accessories (battery, etc.) in a location safely
out of the reach of children.
Do not install the product in an unstable location such
as a shaky self, a slanted floor, or a location exposed
to vibration.
Do not drop or strike the product. If the product is
damaged, disconnect the power cord and contact a
service centre.
To clean this apparatus, unplug the power cord from
the wall outlet and wipe the product using a soft,
dry cloth. Do not use any chemicals such as wax,
benzene, alcohol, thinners, insecticide, air fresheners,
lubricants, or detergent. These chemicals can damage
the appearance of the product or erase the printing on
the product.
Do not expose this apparatus to dripping or splashing.
Do not put objects filled with liquids, such as vases on
the apparatus.
Do not dispose of batteries in a fire.
Do not plug multiple electric devices into the same wall
socket. Overloading a socket can cause it to overheat,
resulting in a fire.
There is danger of an explosion if you replace the
batteries used in the remote with the wrong type of
battery. Replace only with the same or equivalent type.
TO PREVENT THE SPREAD OF FIRE,
KEEP CANDLES AND OTHER ITEMS
WITH OPEN FLAMES AWAY FROM
THIS PRODUCT AT ALL TIMES.
This product is classified as a CLASS 1 LASER product.
Use of controls, adjustments or performance of
procedures other than those specified herein may result
in hazardous radiation exposure.
INVISIBLE LASER RADIATION WHEN OPEN AND
INTERLOCKS DEFEATED, AVOID EXPOSURE TO
BEAM.
CLASS 1 LASER PRODUCT
KLASSE 1 LASER PRODUKT
LUOKAN 1 LASER LAITE
KLASS 1 LASER APPARAT
PRODUCTO LÁSER CLASE 1
3D Precautions
IMPORTANT HEALTH AND SAFETY INFORMATION FOR
3D PICTURES.
Read and understand the following safety information
before using the 3D function.
Some viewers may experience discomfort while viewing
3D TV such as dizziness, nausea, and headaches.
If you experience any such symptom, stop viewing 3D
TV, remove the 3D Active Glasses, and rest.
Watching 3D images for an extended period of time
may cause eye strain. If you feel eye strain, stop
viewing 3D TV, remove your 3D Active Glasses, and
rest.
A responsible adult should frequently check on children
who are using the 3D function.
If there are any reports of tired eyes, headaches,
dizziness, or nausea, have the child stop viewing 3D
TV and rest.
Do not use the 3D Active Glasses for other purposes
(such as general eyeglasses, sunglasses, protective
goggles, etc.)
Do not use the 3D function or 3D Active Glasses while
walking or moving around. Using the 3D function or 3D
Active Glasses while moving around may cause you to
bump into objects, trip, and/or fall, and cause serious
injury.
If you want to enjoy 3D content, connect a 3D device
(3D compliant AV receiver or TV) to the product’s HDMI
OUT port using a high-speed HDMI cable. Put on 3D
glasses before playing the 3D content.
The product outputs 3D signals only through an HDMI
cable connected to the HDMI OUT port.
The video resolution in 3D play mode is fixed to the
resolution of the original 3D video. You can not change
the resolution.
Some functions such as BD Wise, screen size
adjustment, and resolution adjustment may not operate
properly in 3D play mode.
You must use a high-speed HDMI cable for proper
output of the 3D signal.
Stay at least three times the width of the screen from
the TV when watching 3D images. For example, if
you have a 46 inch screen, stay 3.5 meters from the
screen.
Place the 3D video screen at eye level for the best 3D
picture.
When the product is connected to some 3D devices,
the 3D effect may not function properly.
This product does not convert 2D content into 3D.
"Blu-ray 3D" and "Blu-ray 3D" logo are trademarks of
the Blu-ray Disc Association.

4 - English
Contents
5 Accessories
5 Speaker Components
6 Front Panel
6 Rear Panel
7 Remote Control
8 Connecting the Speakers
Attaching the Toroidal Ferrite Core to the Power
Cord of the Wireless Receiver Module (SWA-
6000)
Connecting to a TV and External Devices
Connecting to a Network Router
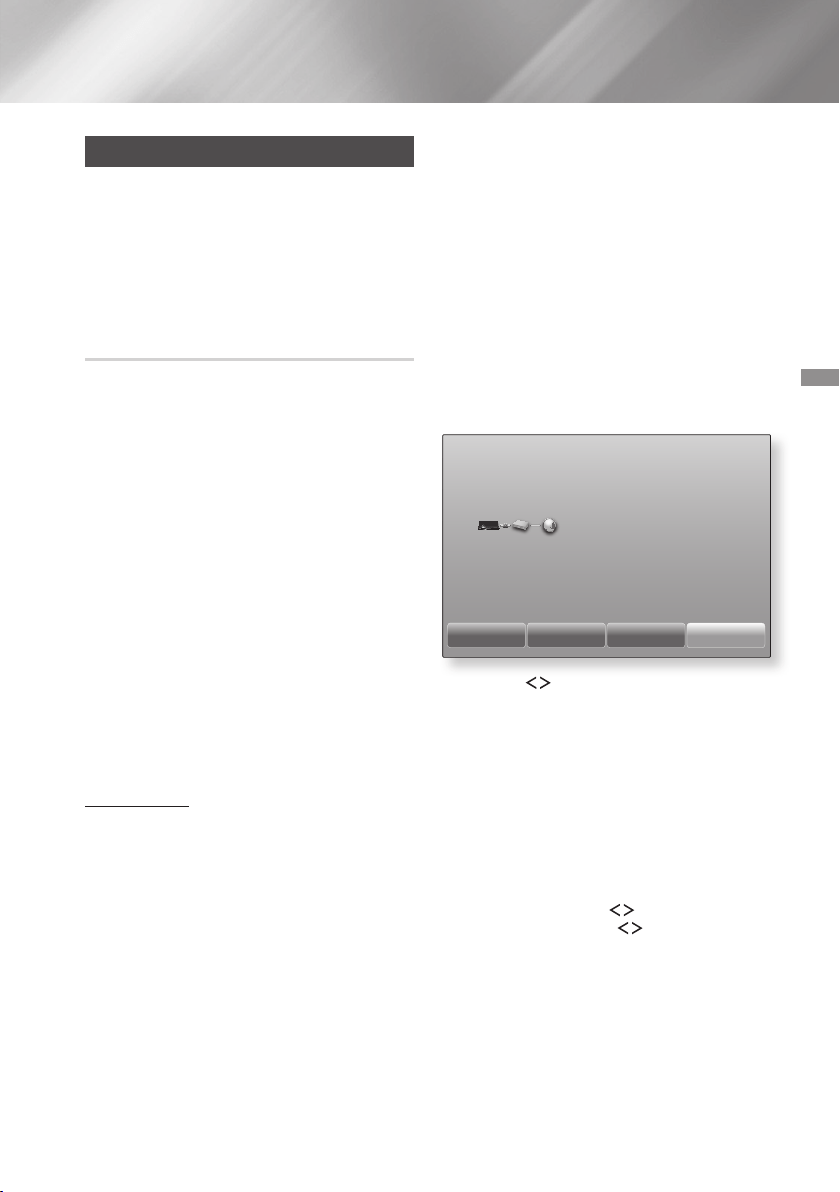
The Initial Settings Procedure
The Home Screen at a Glance
Accessing the Settings Screen
Settings Menu Functions
Network Setup
Wi-Fi Direct
Upgrading Software
Playing Commercial Discs
Playing Multimedia Files
Controlling Video Playback
Controlling Music Playback
Using Bluetooth
Playing Photo Contents
Listening to the Radio
Using the Special Effects Remote Control
Buttons
Logging In to Your Samsung Account
Adding a Credit Card
Before Using FILMS AND TV SHOWS or
SAMSUNG APPS
Using FILMS AND TV SHOWS
Using SAMSUNG APPS
Screen Mirroring
Using the Web Browser
Linking your Internet Service Accounts to the
Product
BD-LIVE™
Additional Information
Disk and Format Compatibility
58 Troubleshooting
Specifications
Licences
`
Figures and illustrations in this User Manual
are provided for reference only and may differ
from actual product appearance.
5 - English
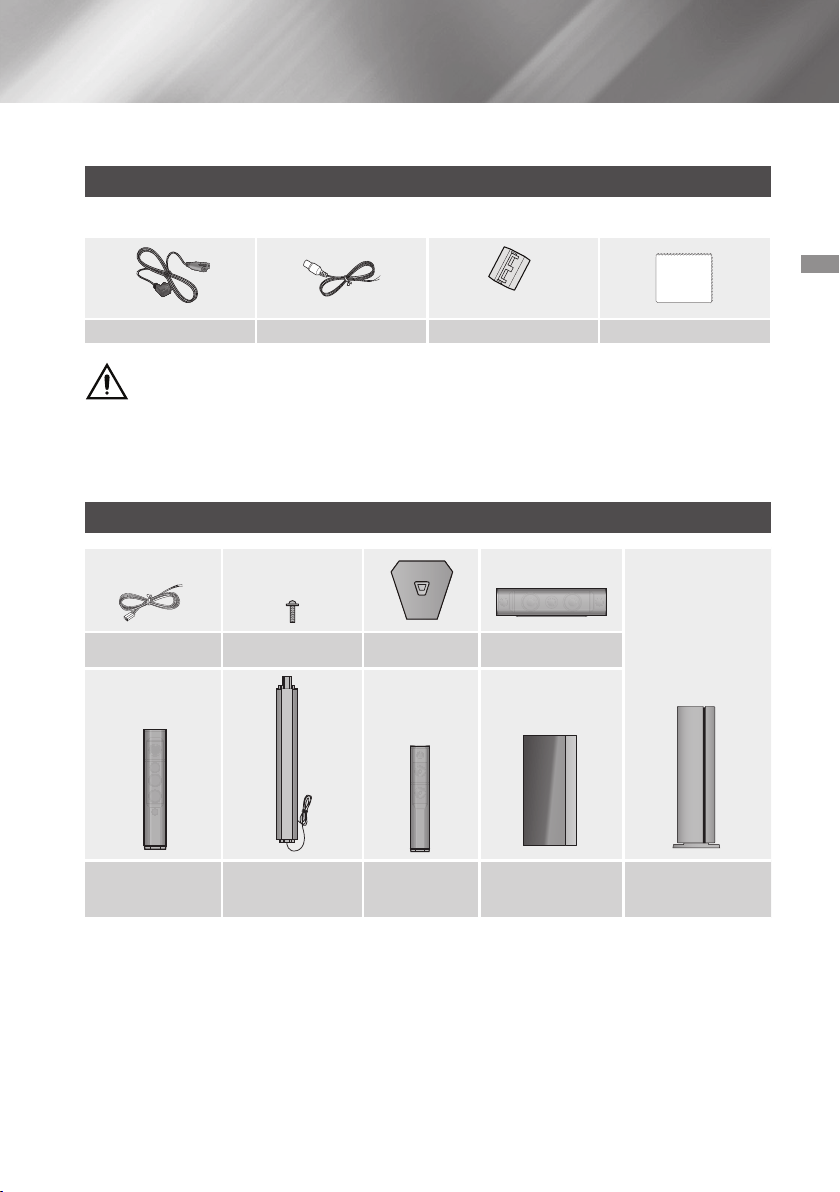
Check the box for the accessories and speaker components listed or shown below.
Accessories
(For Power cord)
WARNING, DO NOT INGEST BATTERY, CHEMICAL BURN HAZARD,
[The remote control supplied with] This product contains a coin/button cell battery.
If the coin/button cell battery is swallowed, it can cause severe internal burns in just 2 hours and
can lead to death. Keep new and used batteries away from children. If the battery compartment does not
close securely, stop using the product and keep it away from children. If you think batteries might have been
swallowed or placed inside any part of the body, seek immediate medical attention.
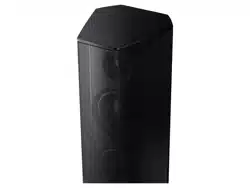
Speaker Components
(SWA-6000)
Getting Started
6 - English
Getting Started
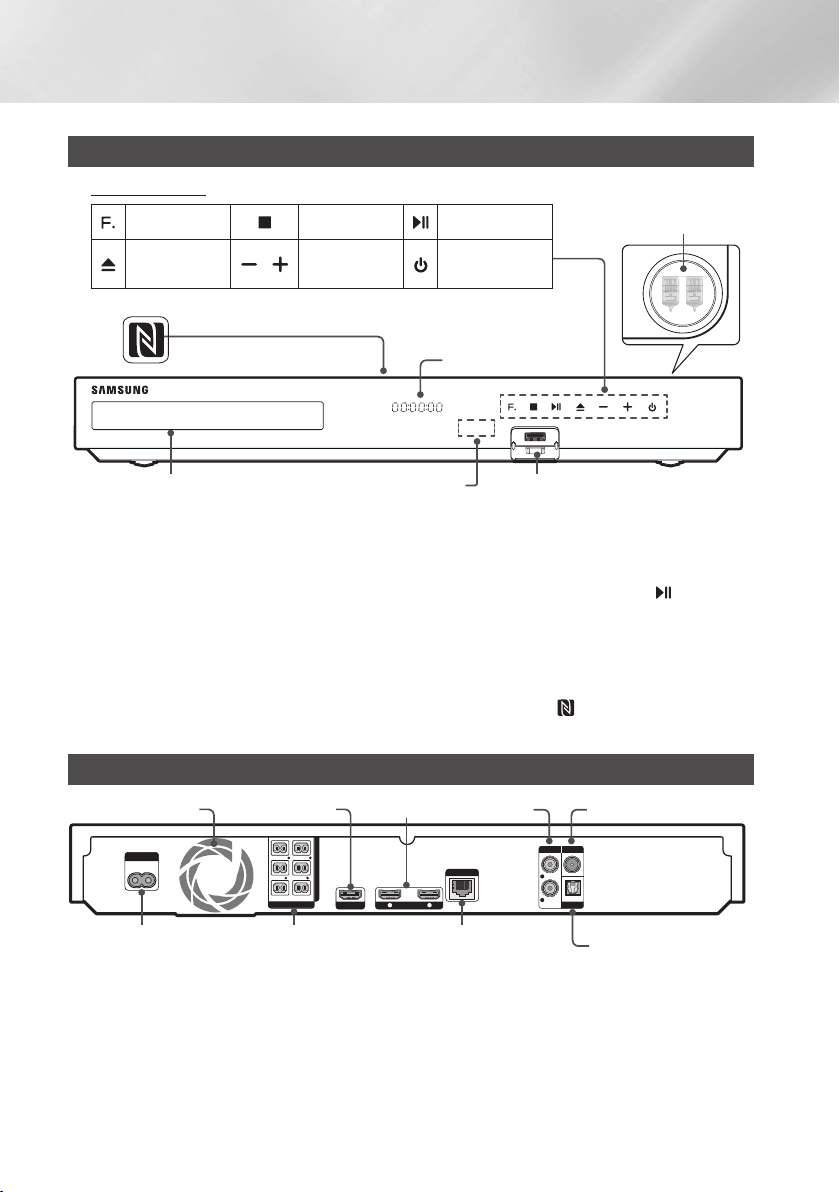
Front Panel
H
I
G
H
-
E
N
D
V
A
C
U
U
M
T
U
B
E
S
O
U
N
D
5V 0.5A
H
I
G
H
-
E
N
D
V
A
C
U
U
M
T
U
B
E
S
O
U
N
D
5V 0.5A
H
I
G
H
-
E
N
D
V
A
C
U
U
M
T
U
B
E
S
O
U
N
D
5V 0.5A
H
I
G
H
-
E
N
D
V
A
C
U
U
M
T
U
B
E
S
O
U
N
D
5V 0.5A
H
I
G
H
-
E
N
D
V
A
C
U
U
M
T
U
B
E
S
O
U
N
D
5V 0.5A
H
I
G
H
-
E
N
D
V
A
C
U
U
M
T
U
B
E
S
O
U
N
D
5V 0.5A
H
I
G
H
-
E
N
D
V
A
C
U
U
M
T
U
B
E
S
O
U
N
D
5V 0.5A
H
I
G
H
-
E
N
D
V
A
C
U
U
M
T
U
B
E
S
O
U
N
D
5V 0.5A
✎
Cellular phones or mobile devices placed near the vacuum tube amp or electronic products placed on the
top of the product can cause audio noise or distortion.
✎
When the product is on, do not let children touch the product's surface. It will be hot.
✎
To upgrade the product's software through the USB jack, you must use a USB flash drive.
✎
When the product displays a Blu-ray Disc menu, you cannot start the movie by pressing the
H
I
G
H
-
E
N
D
V
A
C
U
U
M
T
U
B
E
S
O
U
N
D
5V 0.5A
button on
the product or the remote. To play the movie, you must select Play Movie or Start in the disc menu, and then
press the
button.
✎
If you are using the Internet or are playing content from a USB device on your TV through the home cinema,
you cannot select the mode with the button. To select the mode, exit the
Internet or stop the content you are playing on the TV, and then select the mode.
✎
To use the function, tag the compatible Bluetooth source device to the on the top of the product
(See page 38).
Rear Panel
HDMI OUT
HDMI IN
1 2
LAN
POWER
SPEAKERS OUT
CENTER
SUBWOOFER
FRONT
L
FRONT
R
FRONT TOP
L
FRONT TOP
R
IMPEDANCE : 3Ω
AUX IN FM ANT
OPTICAL
DIGITAL
AUDIO IN
L
R
*
Connect the supplied FM antenna to the FM ANT Jack.
Slowly move the antenna wire around until you find a location where reception is good, then fasten it to a
wall or other rigid surface.
✎
Maintain a minimum of 10 cm of clear space on all sides of the home cinema to ensure adequate ventilation.
Do not obstruct the cooling fan or ventilation holes.
✎
This product does not receive AM broadcasts.
7 - English
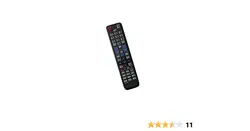
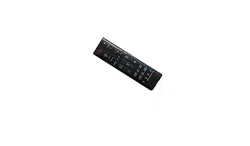
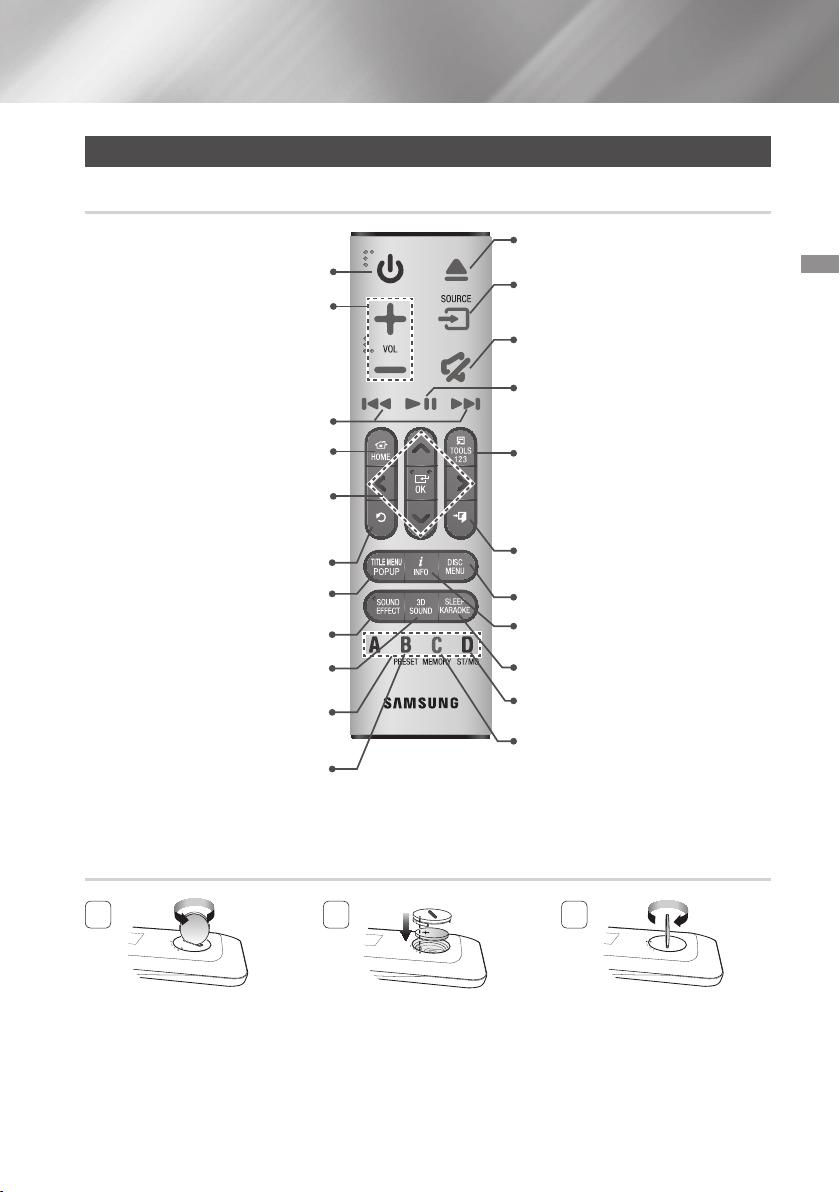
Remote Control
Turn the product on and off.
Adjust the volume.
Press to move to the Home screen.
Press to skip backwards(
[
) or
forwards(
]
)
or
Press and hold to search
backwards(
(
) or forwards(
)
).
Select on-screen menu items and
change menu values.
,.
:
Search for active FM stations
and to change channels.
Return to the previous menu.
Use to enter the Popup menu/Title
menu.
Press to apply sound effects.
Press to apply the DTS Neo:Fusion II
effect.
These buttons are used both for
menus on the product and also several
Blu-ray Disc functions.
Press to select MANUAL/PRESET in
the Tuner function.
Cut off the sound temporarily.
Press to play disc or files.
or
Press to pause playing.
Press to select the Home Cinema's
mode (HDMI, AUX, BD/DVD, etc.).
Press to use the Tools menu.
or
To display the number keypad (may
include function keys when applicable)
on the screen, press and hold the
button.
Press to stop the disc playing or to exist
the menu.
Use to display the playback information
when playing a Blu-ray/DVD disc or files.
Use to set a preset radio frequency.
Press to view the disc menu.
Set a Sleep time to shut off the product.
Press to open and close the disc tray.
Select STEREO or MONO for radio
broadcasts.
✎
While playing multimedia content in , press and hold
5
button on the remote to pause
playback. To stop playback, press and hold
e
() button on the remote.
Use a coin to turn the remote
control cover anti-clockwise to
remove it as shown in the figure
above.
Insert a 3V lithium battery. Keep
the positive (+) pole upward when
inserting the battery. Put the
battery cover on and align the '●'
marks side by side as shown in
the figure above.
Use a coin to turn the cover
clockwise as far as it will go to fix
it in place.
8 - English
Connections
This section describes various methods of connecting the product to other external components.
Before moving or installing the product, be sure to turn off the power and disconnect the power cord.
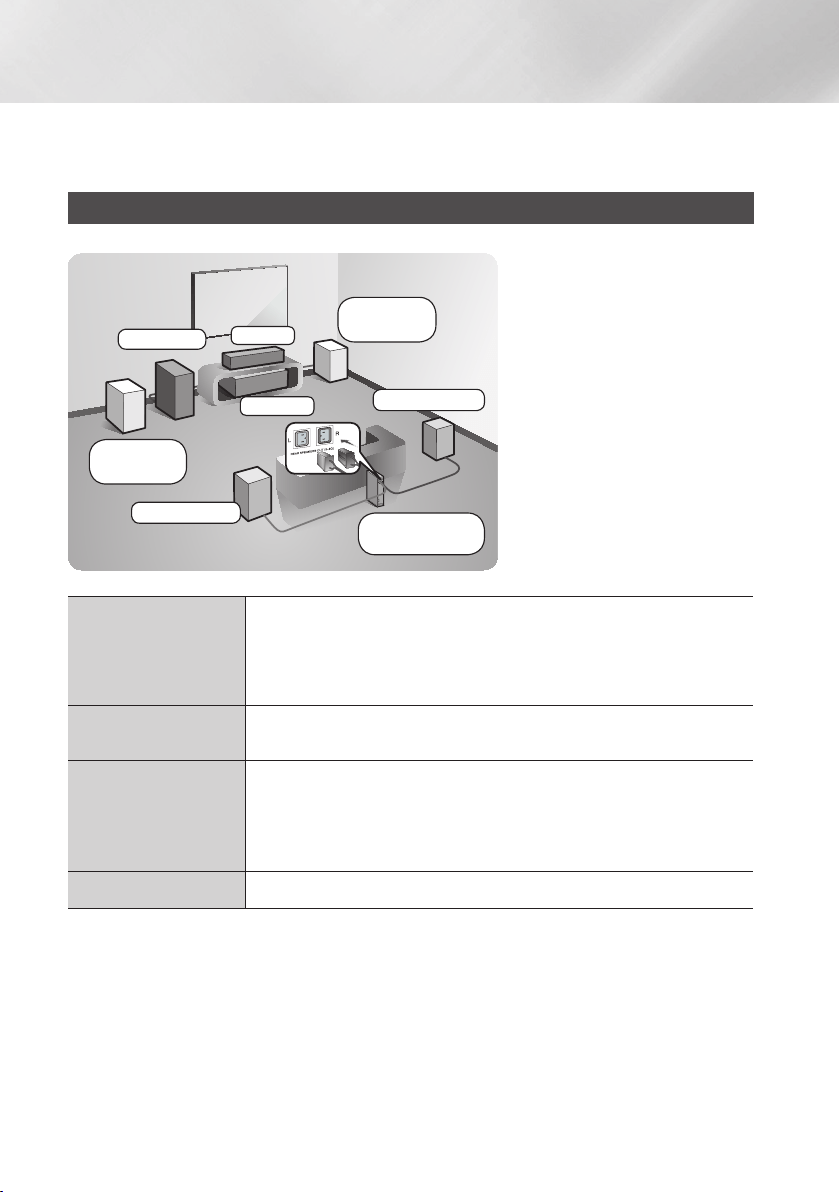
Connecting the Speakers
Place it on a stand or cabinet shelf, or
under the TV stand.
The listening position should be
located about 2.5 to 3 times the TV's
screen size away from the TV. For
example, if you have a 46 inch screen,
locate the listening position 2.92 to
3.50 meters from the screen.
Place these speakers in front of your listening position, facing inwards (about
45°) toward you. Place the front speakers so that their tweeters will be at the
same height as your ear. Align the front face of the front/front top speakers with
the front face of the centre speaker or place them slightly in front of the centre
speakers.
It is best to install the Centre Speaker at the same height as the front/front top
speakers. You can also install it directly over or under the TV.
Place these speakers to the side of your listening position. If there isn't enough
room, place these speakers so they face each other. Position them about 60 to
90cm above your ear, facing slightly downward.
* Unlike the front and centre speakers, the surround speakers are used mainly
for sound effects. Sound will not come from them all the time.
The position of the subwoofer is not so critical. Place it anywhere you like.
9 - English
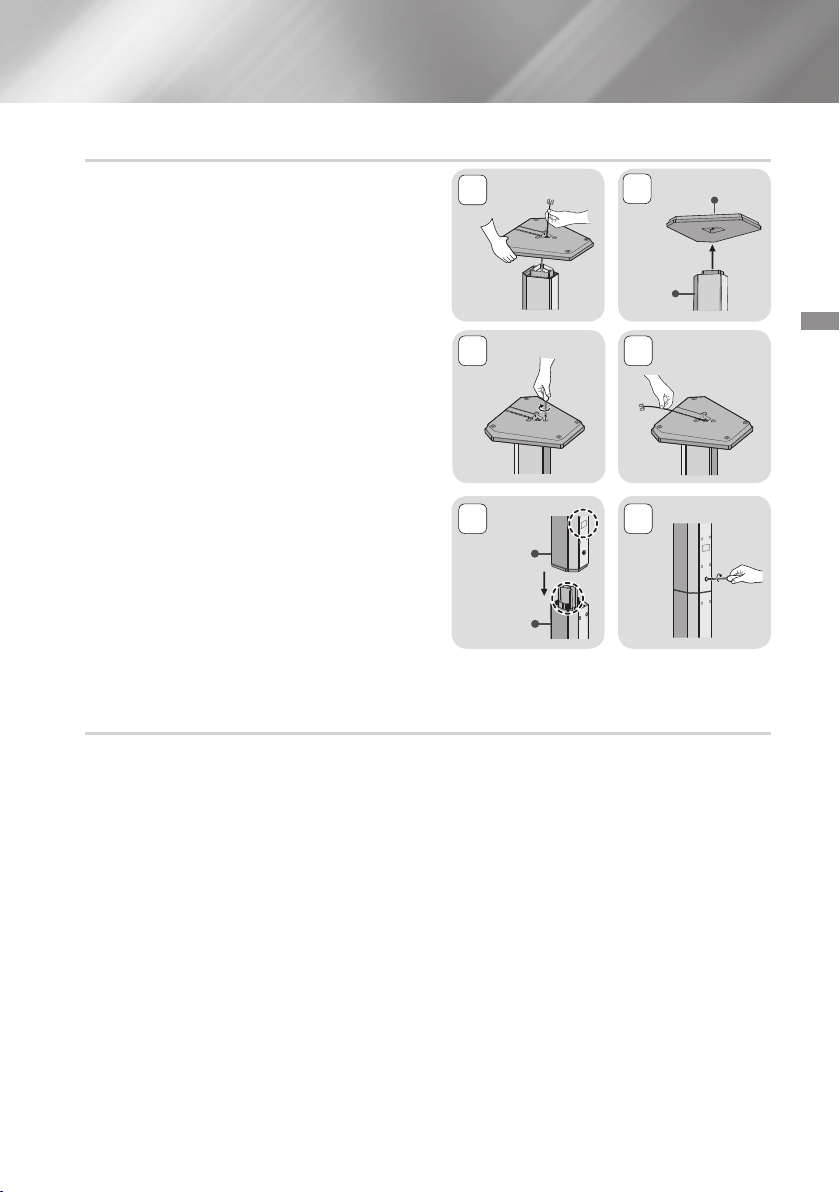
Find the speaker cable that is attached to the
Stand. Turn the Stand and Stand Base upside-
down, unravel the speaker cable, and then draw it
through the hole in the Stand Base.
✎
Handle the Stand carefully. It is heavy.
Connect the Stand Base to the bottom of the
Stand.
Insert three 5x20 screws into the marked holes
in the Stand Base, and then tighten them with a
screwdriver as shown in the illustration.
Place the speaker cable into the slot on the bottom
of the stand base.
Connect the assembled stand and a speaker
together by matching the labels on the stand and
speaker with each other as shown in the picture.
Insert a screw (5x20) into the hole on the rear of the
speaker and tighten by turning it clockwise with a
screwdriver.
Repeat steps 1 through 6 with the other speaker
and stand.
Match each speaker cable bundle to the correct speaker by matching the colour coded plug on each
bundle to the coloured sticker on the bottom or back of each speaker.
Connect the speaker wire plugs from each speaker to the back of the product by matching the colours of
the speaker plugs to the colours of the speaker jacks.
5 6
Speaker
Stand
Stand Base
Stand
10 - English
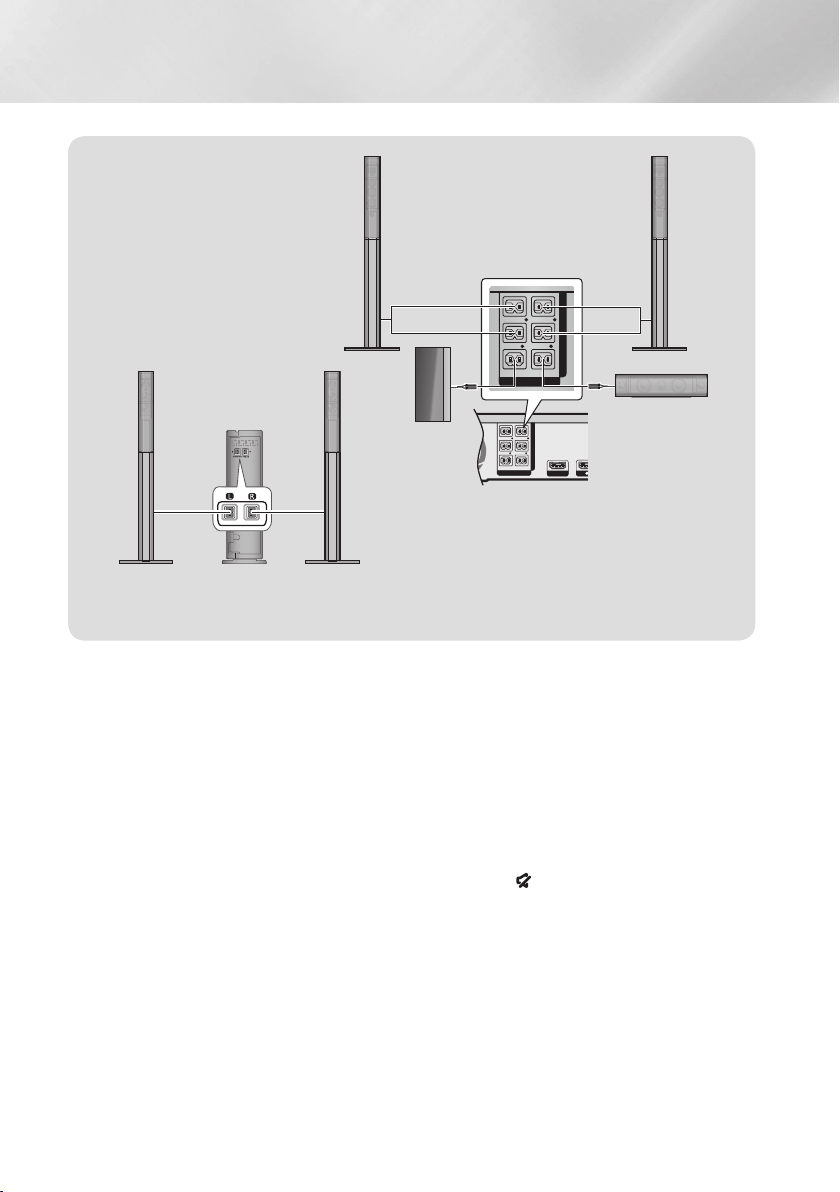
Connections
HDMI OUT
HDMI IN
1 2
LAN
POWER
AUX IN
L
R
SPEAKERS OUT
CENTER
SUBWOOFER
FRONT
L
FRONT
R
FRONT TOP
L
FRONT TOP
R
IMPEDANCE : 3Ω
SPEAKERS OUT
CENTER
SUBWOOFER
FRONT
L
FRONT
R
FRONT TOP
L
FRONT TOP
R
IMPEDANCE : 3Ω
Centre Speaker
Wireless Receiver
Module
Surround Speaker (L) Surround Speaker (R)
Front Top/
Front Speaker (L)
Front Top/
Front Speaker (R)
Subwoofer
* This product should be connected with the SWA-6000 only.
✎
If you place a speaker near your TV set, the screen colour may be distorted because of the magnetic field.
✎
Place the wireless receiver module at the rear of the listening position. If the wireless receiver module is too
close to the product, sound from the speakers may be disrupted because of interference.
✎
If you use a device such as a microwave oven, wireless LAN Card, Bluetooth device, or any other device
that uses the 2.4/5.8GHz frequencies near the product, sound from the speakers may be disrupted because
of interference.
✎
The maximum transmission distance from the product to the wireless receiver module is about 10m, but
may vary depending on your operating environment. If a steel-concrete wall or metallic wall is between the
product and the wireless receiver module, the system may not operate at all, because the radio waves
cannot penetrate metal.
✎
If the product doesn't make a wireless connection, you need to run an ID Set between the product and
wireless receiver module. With the product turned off, press and hold
(mute) button on the remote control
for 5 seconds. Turn on the wireless receiver module. Then, press and hold the "" button on the back
of the wireless receiver module for 5 seconds, and then turn the product on.
11 - English
\
If you want to install the speakers on the wall, fasten screws or nails (not provided) firmly to the wall wherever
you want to hang a speaker, and then, using the hole in the rear of each speaker, carefully hang each
speaker on a screw or nail.
\
Do not let children play with or near the speakers. They could get hurt if a speaker falls.
\
When connecting the speaker wires to the speakers, make sure that the polarity (+/ –) is correct.
\
Keep the subwoofer speaker out of reach of children to prevent children from inserting their hands or alien
substances into the duct (hole) of the subwoofer speaker.
\
Do not hang the subwoofer on the wall using the duct (hole).
\
The wireless receiving antenna is built into the wireless receiver module. Keep it away from water and
moisture.
\
For optimal listening performance, make sure that the area around the wireless receiver module location is
clear of any obstructions.
\
In 2-CH mode, you will hear no sound from the wireless surround speakers.
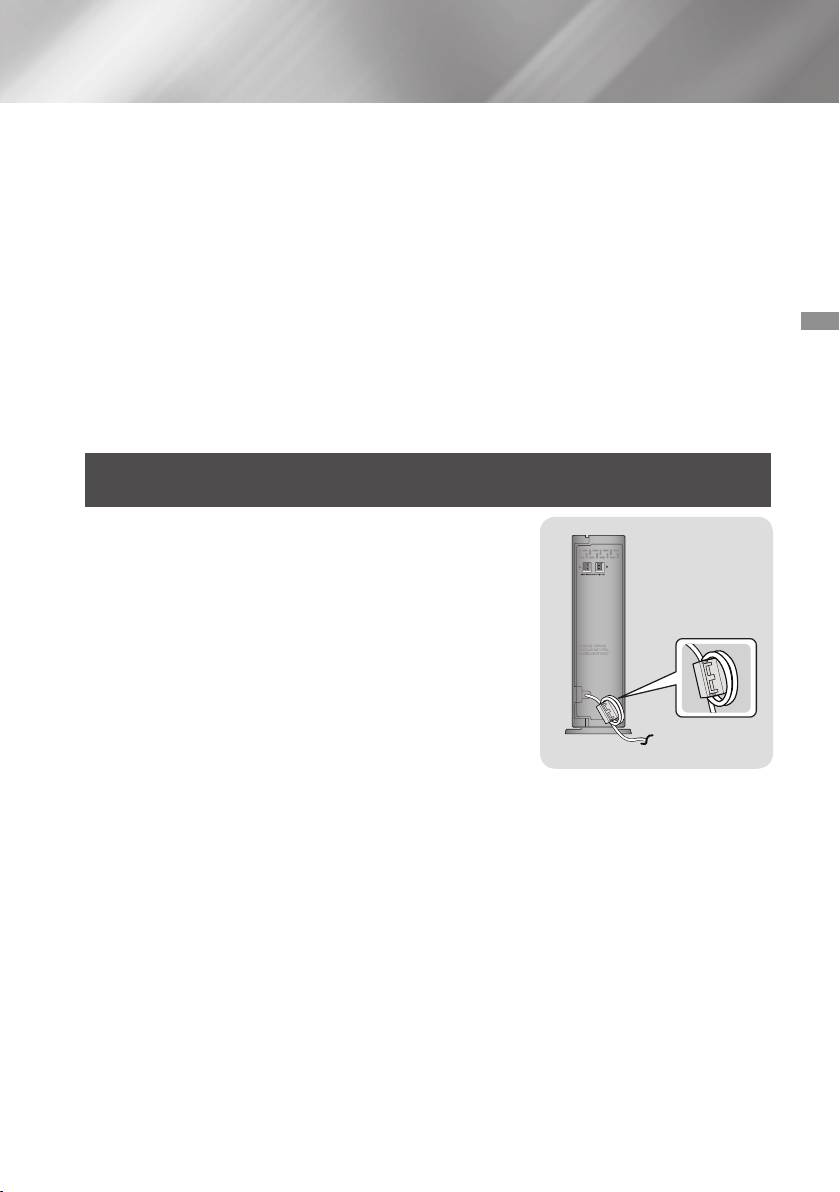
Attaching the Toroidal Ferrite Core to the Power Cord of the Wireless
Receiver Module (SWA-6000)
If you attach a Toroidal ferrite core to the power cord of the wireless
receiver module, it will help prevent RF interference from radio signals.
Pull the fixing tab of the Toroidal ferrite core to open it.
Make two loops in the wireless receiver module power cord.
Attach the Toroidal ferrite core to the wireless receiver module's
power cord as shown in the figure on the right, and then close it
by pressing it until it clicks.
Attach the ferrite core as close to the Wireless Receiver Module
as possible.
12 - English
Connections
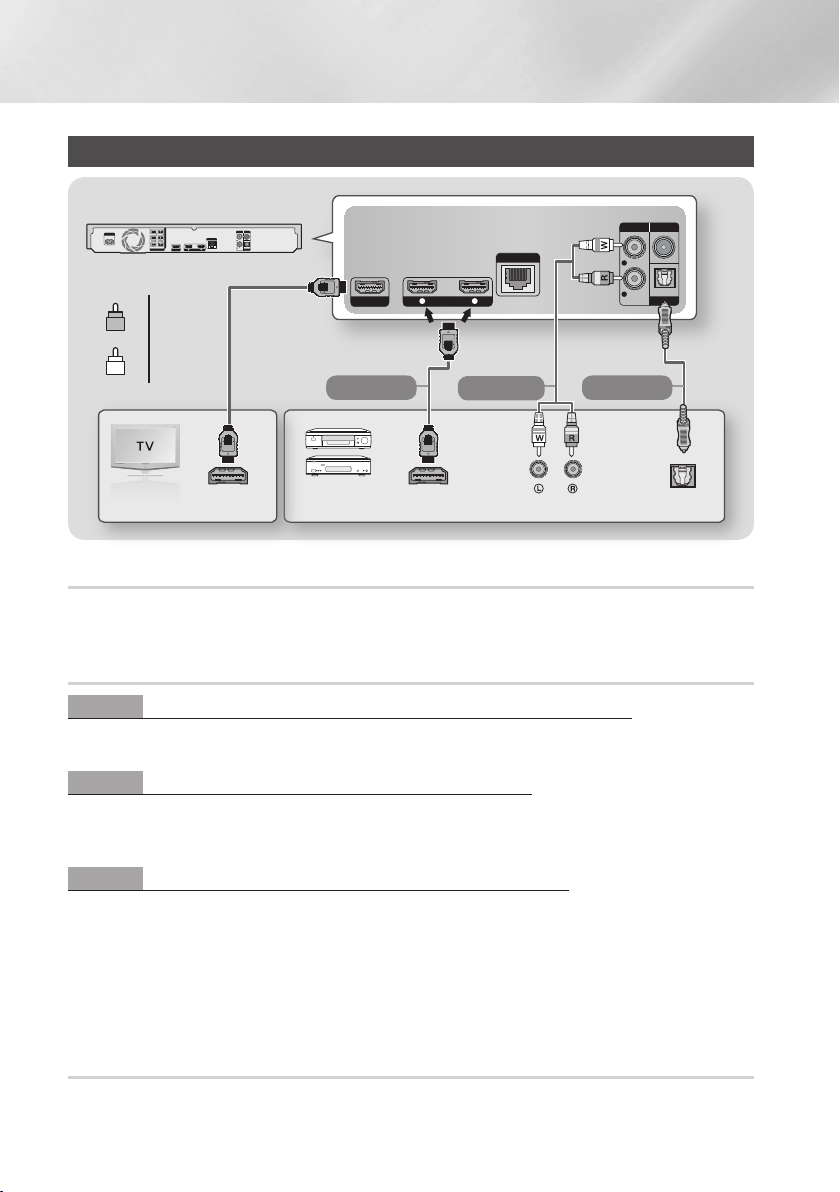
Connecting to a TV and External Devices
HDMI OUT
HDMI IN
1 2
LAN
AUX IN FM ANT
OPTICAL
DIGITAL
AUDIO IN
L
R
OPTICAL OUT
AUDIO OUTHDMI OUTHDMI IN
HDMI OUT
HDMI IN
1 2
LAN
POWER
AUX IN FM ANT
OPTICAL
DIGITAL
AUDIO IN
L
R
SPEAKERS OUT
CENTER
SUBWOOFER
FRONT
L
FRONT
R
FRONT TOP
L
FRONT TOP
R
IMPEDANCE : 3Ω
R
W
Connect an HDMI cable (not supplied) from the HDMI OUT jack on the back of the product to the HDMI IN jack on
your TV. If the TV supports ARC, you can hear the audio from your TV through the home cinema with only this cable
connected. See page 17 in this manual and the section on ARC in your TV's user's manual for details.
Connect an HDMI cable (not supplied) from the HDMI IN jack on the back of the product to the HDMI OUT jack
on your digital device.
Select the or mode.
Using an RCA audio cable (not supplied), connect the AUDIO In jack on the product to the AUDIO Out jack on
the external analogue component.
Select the mode.
Be sure to match the colours on the cable plugs to the colours on the input and output jacks.
Use to connect the digital audio output of digital signal components such as Cable Boxes and Satellite
Receivers (Set-Top-Boxes) to the home cinema. Using a digital optical cable (not supplied), connect the Optical
Digital Audio In jack on the product to the Digital Optical Out jack of the external digital device using a digital
optical cable.
Select the mode.
✎
To see video from your Cable Box/Satellite receiver, you must connect its video output directly to your TV.
✎
This system supports Digital sampling frequencies of 32 kHz or higher from external digital components.
✎
This system supports only DTS and Dolby Digital audio. MPEG audio, a bitstream format, is not supported.
To select an external device after you have connected it, press the button. Each time you press the
button, the mode changes in this order :
;
;
;
;
;
;

13 - English
Connecting to a Network Router
You can connect your product to your network router
using one of the methods illustrated below.
HDMI OUT
HDMI IN
1 2
LAN
POWER
AUX IN FM ANT
OPTICAL
DIGITAL
AUDIO IN
L
R
SPEAKERS OUT
CENTER
SUBWOOFER
FRONT
L
FRONT
R
FRONT TOP
L
FRONT TOP
R
IMPEDANCE : 3Ω
✎
Your router or your Internet Service Provider's
policies may prevent the product from accessing
Samsung's software update server. If this occurs,
contact your Internet Service Provider (ISP) for
more information.
✎
DSL users, please use a router to make a network
connection.
✎
To use the DLNA function, you must connect your
PC to your network as shown in the illustrations
above.
The connection can be wired or wireless.
✎
If your wireless IP router supports DHCP, this
product can use a DHCP or static IP address to
connect to the wireless network.
✎
Set your wireless IP router to Infrastructure mode.
Ad-hoc mode is not supported.
✎
The product supports only the following wireless
security key protocols:
- WEP (OPEN/SHARED), WPA-PSK (TKIP/AES),
WPA2-PSK (TKIP/AES)
✎
Select a channel on the wireless IP router that is
not currently being used. If the channel set for
the wireless IP router is currently being used by
another device nearby, it will result in interference
and communication failure.
✎
In compliance with the newest Wi-Fi certification
specifications, Samsung home cinemas do not
support WEP, TKIP, or TKIP-AES (WPS2 Mixed)
security encryption in networks running in the
802.11n mode.
✎
Wireless LAN, by its nature, may cause
interference, depending on the operating
conditions (AP performance, distance, obstacles,
interference by other radio devices, etc).
14 - English
Settings
The Initial Settings Procedure
The Home menu will not appear if you do not
configure the initial settings.
The OSD (On Screen Display) may change in
this product after you upgrade the software
version.
The access steps may differ depending on the
menu you selected.
After you have finished connecting the home cinema
to your TV, turn on the TV, and then turn on the
home cinema. The first initial setup screen appears.
The setup screens appear in this order: Language,
Network Configuration, Terms and Conditions, Screen
Resolution (Aspect Ratio), and Speaker Layout.
Depending on the software version installed on your
home cinema, you may also see the Software Update
screen. Follow the instructions displayed on each
screen, which will guide you through the easy setup
procedure.
If you are not ready to set up the network
configuration or it is problematic, you can select
and set it up later.
(See page 21)
✎
To edit your settings after the initial setup, select
> > in the Home screen
or select the option. (See page 20)
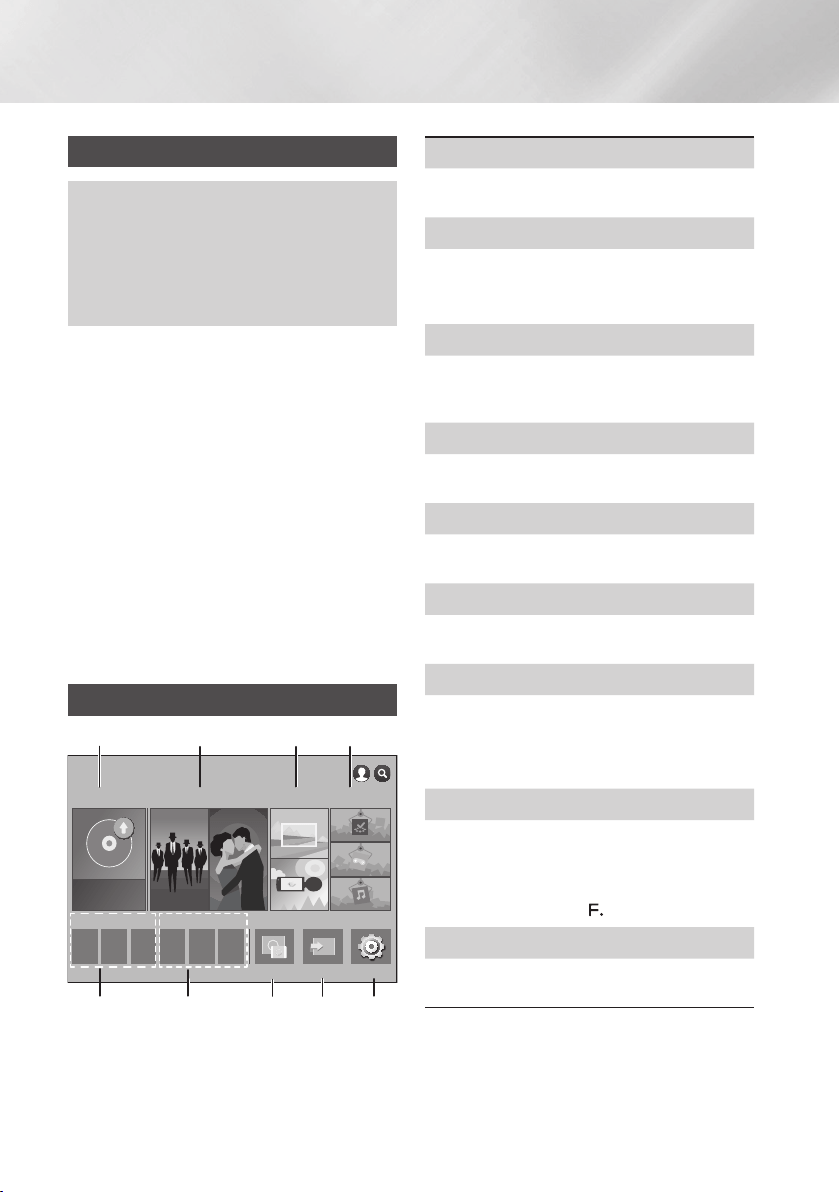
The Home Screen at a Glance
1 2 3 4
5 6 8 97
1
Displays information about the disc currently in the
disc tray. Press to start playing the disc.
2
Download movies and TV Shows from the Internet.
✎
Depending on your country, this menu function
may not be supported.
3
Play photos, videos, or music content from Discs,
USB devices, PCs, mobile devices, or cloud
services.
4
Download/Access various for pay or free-of-charge
applications.
5
A list of useful and popular apps we recommend
you download.
6
Displays downloaded and installed apps. You can
change the display order. (See page 44)
7
Set up the wireless mirroring function between the
home cinema and a smart phone or tablet.
✎
Depending on your country, this menu function
may not be supported.
8
Use to switch between external devices connected
to Digital In, Aux, HDMI 1, or HDMI 2, to switch to
the Tuner, or to switch to a connected Bluetooth
device. You can also use the remote's
button or the main unit's
H
I
G
H
-
E
N
D
V
A
C
U
U
M
T
U
B
E
S
O
U
N
D
5V 0.5A
button.
9
Set various functions to suit your personal
preferences.
15 - English
`
Selecting an Option on the Home Screen
To select an option on the Home screen, move
the cursor using the
,.
buttons until it
highlights the option of your choice, and then
press the button.
✎
If you leave the product in the stop mode for more
than 5 minutes without using it, a screen saver
will appear on your TV. If the product is left in the
screen saver mode for more than 20 minutes, the
power will automatically turn off.
Accessing the Settings Screen
Select on the Home screen, and then
press . The screen appears.
To access the menus, sub-menus, and options
on the Settings screen, please refer to the
remote control illustration below.
2
4
1
3
1
Button : Press to move to the Home
screen.
2
'
() Button : Press to return to the
previous menu.
3
/ Button :
Press
,.
to move the cursor or
select an item.
Press the button to activate the
currently selected item or confirm a
setting.
4
e
() Button : Press to exit the current
menu.
Each function, menu item, and individual
option is explained in detail on-screen. To view an
explanation, use the
,.
buttons to select the
function, menu item, or option. The explanation will
usually appear on the right of the screen.
A short description of each function
starts below. Additional information on some of the
functions is also in the Appendix of this manual.
Settings Menu Functions
This option outputs HDMI video at UHD (Ultra High
Definition) resolution. This is only available when
Movie Frame is set to .
✎
To use this feature, you must connect the
product to a device that supports UHD
resolution and you must have content that
plays at 24Fs (film speed).
Set up the 3D related functions.
: Select whether to
play a Blu-ray Disc with 3D contents in 3D Mode. If
you move to the Home or Smart Hub Home menu
while in 3D mode, the product will switch to 2D
automatically.
: Enter the size of the TV attached to
the product. The product will automatically adjust
the 3D output to the screen size of the TV.
✎
Carefully read the health and safety information
before viewing
3D content. (See page 3)

16 - English
Settings
Lets you adjust the output of the product to the
screen size of your TV. (See page 50)
is Samsung’s latest inter-connectivity
feature.
When you connect a Samsung product and a
Samsung TV with to each other via
HDMI, and is on in both the product
and TV, the product outputs video at the video
resolution and frame rate of the Blu-ray/DVD Disc.
Lets you set the output resolution of the HDMI
video signal to
.The number indicates the
number of lines of video per frame. The i and
p indicate interlaced and progressive scan,
respectively.
The more lines, the higher quality.
Setting the feature to
lets the product adjust its HDMI output to
24 frames per second automatically for improved
picture quality if attached to a 24Fs compatible TV.
You can enjoy the feature
only on a TV supporting this frame rate.
Movie Frame is only available when the product
is in the HDMI 1080p output resolution modes.
Converts DVD playback to 24 frames per second
and outputs it via HDMI. This option is only
available when is set to on.
Lets you select the optimal size for the Smart Hub
or Screen.
Lets you set the colour space format for the HDMI
output to match the capabilities of the connected
device (TV, monitor, etc).
Lets you set the product to output video from the
HDMI OUT jack with Deep Colour. Deep Colour
provides more accurate colour reproduction with
greater colour depth.
Lets you improve picture quality when viewing
DVDs.
: Lets you select which speakers
are active, either the TV's speakers or the home
cinema's speakers.
: Lets you
adjust the following speaker settings and turn the
test tone on and off so you can test the speakers.
-
:
Lets you adjust the relative
loudness of each speaker from 6dB to -6dB.
For example, if you like deep bass, you can
increase the loudness of the subwoofer by
6dB.
-
:
Lets you adjust the relative
distance of each speaker from the listening
position up to
10 meters
. The farther the
distance, the louder the speaker will be.
-
:
Begins a test to set the best
surround sound configuration. Press
to stop the test while it is in progress.
: You can enjoy sound
through a remote speaker that is connected to
the home cinema through your home network.
To use the network speaker, select .
If there is a network speaker available, it will
appear on the screen.
- : The network speaker is not used.
- : The network speaker outputs
audio. All network speakers output the same
audio regardless of channel using the PCM
format only.
✎
and are not
applied if is set to on.

17 - English
✎
The network speaker is not available when
is active.
✎
For further details, refer to the Multiroom Link
manual from the web site.
www.samsung.com > Support > Search for the
product name > Multiroom Link > Download PDF
Sound Customiser lets you calibrate the home
cinema for the optimal sound quality based on
your hearing level and the ambient conditions.
To create a Custom Sound Profile, follow these
steps:
In the Menu, select
.
On the next screen, select . The
screen appears.
Select to preview the Test Sound.
Select , and then press to continue.
A 6-step test will start. During each stage,
the TV will sound a test tone at a different
frequency. The tone will begin softly and
increase in volume. Select when you can
hear the test tone. If you want to listen to it
again, select . Each time you select
, the TV will move on to the next tone.
Once the test is complete, a screen appears
that lets you compare the original sound to
the calibrated sound.
Select , and then press the button to
continue. The on-screen keyboard appears
with a default profile name.
Enter a name for the calibrated sound profile
or accept the default name, select , and
then press the button.
Select on the next screen, and then
press the button. The
screen reappears.
: Select a Sound Profile
you created to activate it. Or select
, a Custom Sound Profile especially
composed of large sounds for those with hearing
disorders,
✎
If there are more than 3 Custom Sounds
registered, mode will be activated which
is composed of the average value of all registered
profiles.
: Create and add a new
. See the instructions
above.
: Choose a
to modify it. Follow the same steps you
used when creating a sound profile. This function is
only available if you have added a
using . (See above.)
: Rename or delete
Custom Sound Profiles. This function is only
available if you have added a
using . To select a
profile, highlight the check box to the right of the
profile, and then select or .
Lets you configure the settings manually.
Lets you set the product so that the volume
remains stable when a scene change occurs or
when you change the channel.
Lets you direct the sound from the TV to the Home
Cinema speakers. Requires an HDMI connection
and an (ARC) compatible
T V.
If is set to and you
are using an HDMI cable to connect the product
to the TV, digital optical input is disabled.
If is set to and you
are using an HDMI cable to connect the product
to the TV, ARC or digital optical input is selected
automatically.
Lets you set the to match the
capabilities of the AV receiver you’ve connected to
the product. For more details, please refer to the
digital output selection table. (See page 56)

18 - English
Settings
Lets you apply dynamic range control to Dolby
Digital, Dolby Digital Plus, and Dolby TrueHD audio.
: Automatically controls the dynamic range
of Dolby TrueHD audio, based on information in
the Dolby TrueHD soundtrack. Also turns dynamic
range control off for Dolby Digital and Dolby Digital
Plus.
: Leaves the dynamic range uncompressed,
letting you hear the original sound.
: Turns dynamic range control on for all three
Dolby formats. Quieter sounds are made louder
and the volume of loud sounds is reduced.
Lets you select the multi-channel downmix method
that is compatible with your stereo system. You
can choose to have the product downmix to
or to .
When the product is attached to a digital TV, lets
you adjust the audio delay so that the audio syncs
with the video. You can set the delay between 0
and 300 milliseconds.
✎
The function in is guaranteed
to work only with a Samsung TV that supports
the ARC function (the Anynet+ function).
Lets you check the current network and Internet
status.
Lets you configure the network connection so
you can enjoy various features such as Internet
services or AllShare Wi-Fi functionality, and perform
software upgrades.
Lets you connect a device to the
product using a peer-to-peer network, without the
need for a wireless router. Note that if the product
is connected to a wireless network, it may be
disconnected when you use . (See
page 23)
✎
Text files, such as files with a .TXT or .DOC
extension, will not display when you are using the
function.
Allow other devices on your network, such as smart
phones and tablets, to share content with your
product.
Lets you assign an identifying name to the product.
You use this name to identify the product when
you are connecting external Wi-Fi devices (smart
phones, tablets, etc.) to it.
Lets you set various BD-Live functions. BD-Live
allows you to access extra features available on
some Blu-ray Discs if you are connected to the
Internet.
: Lets you fully
allow, partly allow, or prohibit a BD-Live Internet
connection.
: Manage BD data
downloaded from a BD-Live service or Blu-ray
Disc.
✎
To use BD-Live, you must insert a USB storage
device into the home cinema's USB port.

19 - English
Lets you lock access to Video on Demand (VOD)
content based on its rating. To use, you must enter
the security PIN.
Press and hold the button until
the Num pad appears on the screen. When the Num
pad appears, select a number using the
,.
button and then press the
button.
✎
The default security PIN is 0000.
✎
Depending on your country, this menu function
may not be supported.
Use to modify captions on VOD playback that
supports closed captions. Lets you change
displayed caption's font colour and size.
✎
The function does not work with VOD
services that don't support closed captions.
For some VOD services that do support closed
captions, the functions settings may not be applied.
✎
Depending on your country, this menu function
may not be supported.
You can view the terms of use and privacy policy
for Smart Hub, Samsung accounts, and various
other services.
Resets all Smart Hub settings to their default
settings. To use, you must enter the security PIN.
Press and hold the button until the Num pad
appears on the screen. When the Num pad
appears, select a number using the
,.
button and then press the button.
✎
The default security PIN is 0000.
Lets you re-run the Initial Settings procedure.
Refer to the descriptions displayed on the screen.
Lets you set the product to turn on quickly by
decreasing the boot time.
✎
If this function is set to , Standby power
consumption will increase. (About 12W ~ 20W)
Lets you select the language you prefer for the on-
screen menu, disc menu, audio, subtitles, etc.
The language you select for the disc menu,
disc audio, or subtitles will only appear if it is
supported on the disc.
Lets you connect a wireless USB keyboard or
mouse to the USB port on the front of the product.
Lets you configure a
wireless USB keyboard connected to the
product.
✎
You can use the keyboard only when a
keyboard screen or window appears
in the Web Browser.
Lets you configure a wireless
USB mouse connected to the product. You can
use the mouse in the product's menu in the
same way you use a mouse on your PC.
`
To use a mouse with the product's menu:
Connect the USB mouse to the
product
.
Click the primary button you selected in
. The Simple Menu appears.
Click the menu options you want.
✎
Some USB HID keyboards and mice may not be
compatible with your product.
✎
Some HID keyboard keys may not work.
✎
Wired USB keyboards are not supported.
✎
Some applications may not be supported.
✎
If a wireless HID Keyboard does not operate
because of interference, move the keyboard closer
to the
product.
Press and hold the button until the Num pad
appears on the screen. When the Num pad appears,
select a number using the
,.
button and then
press the
button.
The default security PIN is
0000. Enter the default PIN to access the security
function if you haven't created your own PIN.
: Prevents playback of
Blu-ray Discs with a rating equal to or above a
specific age rating you have set unless you enter
the PIN.

20 - English
Settings
: Prevents playback of
DVDs with a rating above a specific numerical
rating you have set unless you enter the PIN.
: Lets you change the 4-digit PIN
used to access security functions.
`
If you forget your PIN
Remove any disc or USB storage device.
Press and hold the
@
button on the front
panel for 5 seconds or more.
All settings will revert to the factory default
settings.
✎
When the factory default settings are restored,
all the user stored BD data is deleted.
Lets you specify the display brightness and time
zone.
:Lets you change the brightness
of the front panel.
:You can specify the time zone that
is applicable to your area.
:Lets you adjust the
transparency of the menu box.
Anynet+ is a convenient function that offers linked
operations with other Samsung products that have
the Anynet+ feature, and lets you control those
products with one Samsung TV remote. To operate
this function, you must connect this product to an
Anynet+ Samsung TV using an HDMI cable.
To use an function, follow
the instructions below.
1) Connect the product to an
-compliant Samsung TV using HDMI
Cable.
2) Set the feature to
in both the TV and the product.
3) Search for and then select the product in the
TV's list. For more
exact instructions, see the Anynet+ section of
the TV's user's manual.
View DivX® VOD Registration Codes to purchase
and play DivX® VOD contents.
When activated, lets Samsung Call Centre agents
diagnose and fix problems with the product
remotely. Requires an active Internet connection.
service might not be
available in some countries.
For more information about the
function, see "Upgrading Software" on page 24.
Lets you set the . If you are using the
home cinema at home, always select .
is for retail display settings only.
Provides contact information for assistance with
your product.
Reverts all settings to their defaults except for the
network and Smart Hub settings. Requires that
you enter your security PIN.
Press and hold the
button until the Num pad appears on the screen.
When the Num pad appears, select a number using
the
,.
button and then press the
button.
The default security PIN is 0000.
21 - English
Network Setup
When you connect this product to a network, you
can use network based applications and functions
such as Smart Hub and BD-LIVE, and upgrade the
product's software through the network connection.
For more information about accessing and using
Internet services, see the Network Services chapter
of this manual on pages 42~49. Instructions for
configuring the network connection start below.
If you didn't configure your network connection during
the initial settings procedure or you need to reset the
network connection, follow the directions below.
Before you begin, contact your Internet Service
Provider to find out if your IP address is static or
dynamic. If it is dynamic, and you have a wired
or wireless network, we recommend using the
Automatic configuration procedures described below.
If you are connecting to a wired network, connect the
product to your router using a LAN cable before you
start the configuration procedure.
To begin configuring your network connection, follow
these steps:
In the Home screen, select , and then
press the button.
Select , and then press the button.
Select , and then press the
button.
Go to the instructions for Wired networks
starting or the instructions for Wireless networks
starting on page 22.
Ğ
After following Steps 1 to 3 above:
In the screen, change
to . Then, select
and press the button. The product detects
the wired connection, verifies the network
connection, and then connects to the network.
When it is done, highlight , and then press
button.
Ğ
If you have a static IP address or the automatic
procedure does not work, you'll need to set the
values manually.
After following Steps 1 to 3 above:
In the screen, change
to . Then, select
and press the button.
The product searches for a network, and then
displays the connection failed message.
✎
If it is possible to connect the home cinema to
your network wirelessly, select
at this point, change the to
, and then go to the instructions for
wireless networks on the next page.
Use the buttons to select , and
then press the button. The
screen appears.
Select the field, and then set it to
.
Select a parameter to enter (, for
example), and then press . Use the
,.
buttons on the remote control to enter the
numbers for the parameter.
Or use the Num
keypad to enter a parameter number.
Press and
hold the button until the Num pad appears on
the screen. When the Num pad appears, select a
number using the
,.
button and then press
the
button.
Use the buttons on the
remote control to move from entry field to entry
field within a parameter. When done with one
parameter, press the button.
Press the
,
or
.
button to move to another
parameter, and then enter the numbers for that
parameter following the instructions in Step 4.
Repeat Steps 4 and 5 until you have filled in all
parameters.
22 - English
Settings
✎
You can get the network parameter values from
your Internet provider.
When finished entering all the parameter values,
select , and then press the button. The
home cinema verifies the network connection
and then connects to the network.
You can set up a wireless network connection in three
ways:
- Wireless Automatic
- Wireless Manual
- WPS(PBC)
Before you configure the wireless network
connection, disconnect any wireless network devices
currently connected to the product or, if applicable,
the product's current wired connection.
Ğ
After following Steps 1 to 3 in "Configuring Your
Network Connection" on page 21:
In the screen, change
to . The product
searches for and then displays a list of the
available networks.
Select the desired network, and then press the
button.
On the Security screen, enter your network's
security code or pass phrase.
Enter letters by selecting a letter with
,.
buttons, and then pressing button.
When finished, select , and then press the
button. The product verifies the network
connection and then connects to the network.
✎
You should be able to find the security code or
pass phrase on one of the set up screens you
used to set up your router or modem.
Ğ
If you have a static IP address or the Automatic
procedure does not work, you'll need to set the
Network Settings values manually.
After following Steps 1 to 3 in "Configuring Your
Network Connection" on page 21:
In the screen, change
to . The product
searches for and then displays a list of the
available networks.
Scroll through the list, select the desired network
or , and then press the button.
If you selected a network in Step 2, go to Step 6.
If you selected , go to Step 4.
Enter your wireless network or wireless router's
name.
Enter letters by selecting a letter with the
,.
buttons, and then pressing the
button.
To display capital letters (or redisplay lower
case letters if capital letters are displayed),
select
, and then press the button.
To display symbols and punctuation, select
, and then press the button. To
redisplay letters, select , and then press
the button.
When finished, select , and then press the
button.
On the screen that appears,
use the
,.
buttons to select the network's
, and then press the button.
On the next screen, enter your network's
security code or pass phrase.
Enter letters by selecting a letter with the
,.
buttons, and then pressing the
button.
When finished, select , and then press
the button. The product searches for the
network.
The Network connection fail screen appears.
Use
buttons to select , and
then press the button.

23 - English
Select the field, and then set it to
.
Select a network parameter to enter (
, for example), and then press
button. Use the
,.
buttons on the remote
control to enter the numbers for the parameter.
Or use the Num keypad to enter a parameter
number.
Press and hold the button until the
Num pad appears on the screen. When the Num
pad appears, select a number using the
,.
button and then press the
button.
Use the
buttons on the remote control to move from
entry field to entry field within a parameter. When
done with one value, press the button.
Press the
,
or
.
button to move to another
parameter, and then enter the numbers for that
parameter following the instructions in Step 8.
Repeat Steps 8 and 9 until you have filled in all
parameters.
✎
You can get the Network parameter values from
your Internet provider.
When finished, select , and then press the
button. The Security screen appears.
On the Security screen, enter your network's
security code or pass phrase. Enter letters by
selecting a letter with the
,.
buttons, and
then pressing the button.
When finished, select at the right of the
screen, and then press the button. The
product verifies the network connection and
then connects to the network.
After the home cinema verifies the network,
select , and then press the button.
✎
You can also begin the Manual Network setup by
going to .
Ğ
One of the easiest ways to set up the wireless
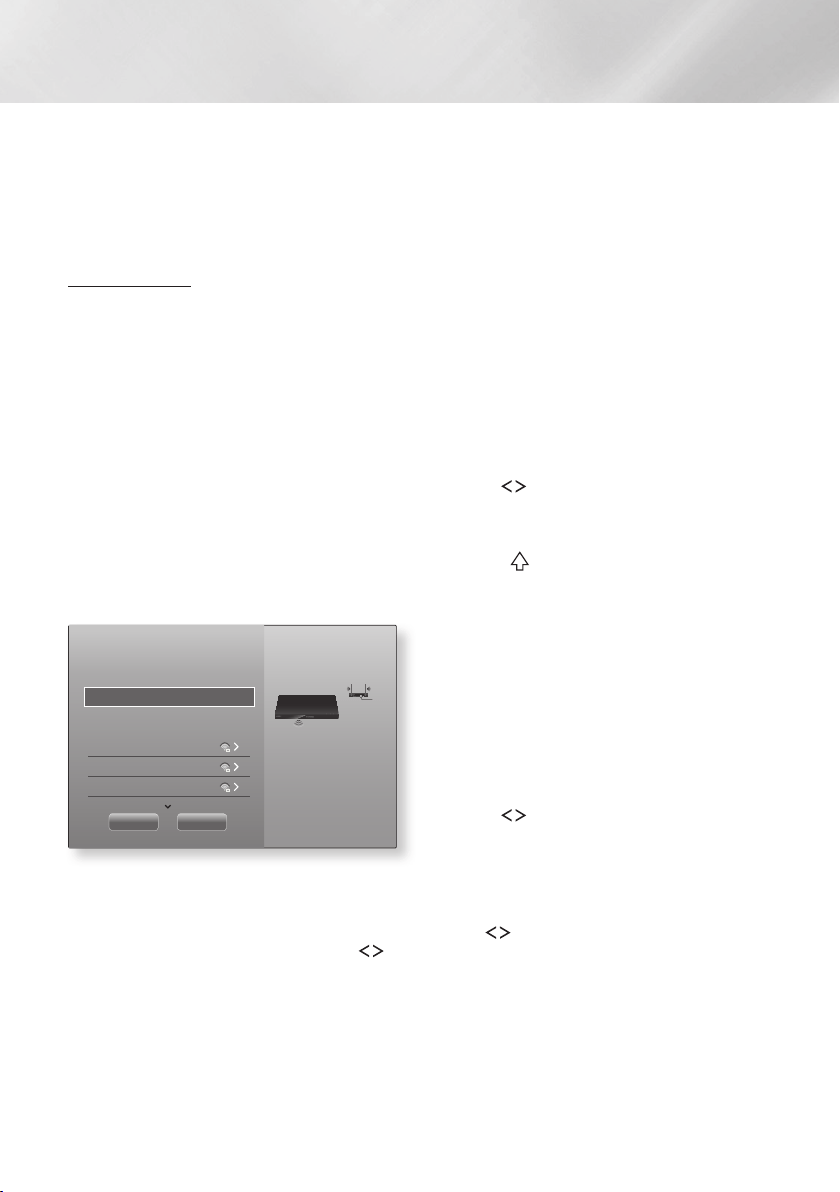
network connection is using the function.
If your wireless router has a button, follow
these steps:
After following Steps 1 to 3 in "Configuring Your
Network Connection" on page 21:
In the screen, change
to . The product
searches for and then displays a list of the
available networks.
Scroll the list down, select , and then
press the button.
Press the button on your router
within two minutes. Your product automatically
acquires all the network settings values it needs
and connects to your network after the network
connection is verified.
When it is done, highlight , and then press
the button.
✎
For a WPS connection, set your wireless router’s
security encryption to AES. WEP security
encryption does not support a WPS connection.
Wi-Fi Direct
The function allows you to connect
devices to the product and each other
using a peer-to-peer network, without a wireless
router.
✎
Some devices may not support the
AllShare function if connected via . If
this is the case, change the network connection
method you used to connect the device to the
home cinema.
✎
transmissions can interfere with
Bluetooth signals. Before you use the Bluetooth
function, we strongly recommend that you turn off
the function on any device in which
it is currently on.
Turn on the device and activate its
function.
In the Home screen, select , and then
press the button.
Select , and then press the button.
Select , and then press the
button.
The devices that you can connect
the home cinema to appear.

24 - English
Settings
You have three ways to complete the Wi-Fi
connection:
Through the Wi-Fi device.
Through the product using PBC.
Through the product using a PIN.
Each is covered below.
On the Wi-Fi device, follow the device's
procedure for connecting to another
device. See the device's user manual for
instructions.
When you have completed the procedure, you
should see a pop-up on your TV screen saying
that a device that supports has
requested to connect. Select , and then
press the button to accept.
The Connecting pop-up appears, followed by
the Connected pop-up. When it closes, you
should see the device listed on the
screen as connected.
The PBC and PIN procedures connect devices
automatically.
Select the device you want to
connect to this product, and then press the
button.
The Connecting pop-up appears, followed by
the Connected pop-up. When it closes, you
should see the device listed on the
screen as connected.
Select the device you want to
connect to this product, and then press the
button.
The PIN pop-up appears.
Note the PIN code in the pop-up, and then enter
it into the appropriate field in the
device you want to connect.
The Connecting pop-up appears, followed by
the Connected pop-up. When it closes, you
should see the device listed on the
screen as connected.
✎
The current wired or wireless network connection
will be disconnected when you use the
function.
✎
Text files, such as files with a .TXT or .DOC
extension, will not display when you are using the
function.
Upgrading Software
The menu allows you to upgrade
the product’s software for performance improvements
or additional services.
Never turn the product off or back on manually
during the update process.
In the Home menu, select , and then
press the button.
Select , and then press the button.
Select , and then press the
button.
To download update software and update now,
select , and then press the
button. See "Update now" on the next page for
details.
To let the product download update software
automatically when available, select
, and then press the button. (See
page 25)
✎
The upgrade is complete when the product turns
off, and then turns on again by itself.
✎
Samsung Electronics takes no legal responsibility
for product malfunction caused by an unstable
Internet connection or consumer negligence
during a software upgrade.
✎
If you want to cancel the upgrade while the
upgrade software is downloading, press the
button.
✎
When a system upgrade is in progress, "UPDATE"
is displayed on the front panel.

25 - English
You can use to update the software
through your network connection or by using a USB
flash drive. The network instructions are below. The
USB flash drive instructions are on this page.
Select , and then press the
button. The Update now pop-up appears.
The product searches on line for the latest
software version.
If it does not find an update, the "There are no
new updates for you at the moment." pop-up
appears. Press the button to exit.
If it finds a new version, the Update Request
pop-up appears.
Select . The product upgrades the software,
turns off, and then turns on automatically.
If you do not select or in one minute,
the product stores the new upgrade software.
You can upgrade the software later using
.
If you select , the product cancells the
upgrade.
✎
When the system upgrade is done, check the
software details in the Product Information section
of the Contact Samsung screen.
✎
Do not turn off the product during the Software
Upgrade. It may cause the product to malfunction.
You can set the function so that the
product downloads new upgrade software when it is
in mode.
In mode, the product is on, but its
Internet connection is active. This allows the product to
download upgrade software automatically, when you
are not using it.
Press the
,.
buttons to select
mode, and then press the button.
Select or .
If you select , the product will automatically
download new upgrade software when it is
in Auto update mode with the power on. If it
downloads new upgrade software, the product
will ask you if you want to install it when you turn
the product on.
✎
To use the function, your product
must be connected to the Internet.
Visit www.samsung.com.
Click on the top right of the page.
Enter the product's model number into the
search field. As you enter the model number, a
drop down will display products that match the
model number.
Left click your product's model number in the
drop down list.
On the page that appears, scroll down to and
then click .
Click in the centre of the page.
Click the button in the File column on the
right side of the page.
Click in the first pop-up that appears.
Click in the second pop-up to download and
save the firmware file to your PC.
Unzip the zip archive to your computer. You
should have a single folder with the same name
as the zip file.
Copy the folder to a USB flash drive.
Make sure no disc is inserted in the product,
and then insert the USB flash drive into the USB
port of the product.
In the product’s menu, go to
.
Select .
The product searches for the software on the
USB drive. When it finds the software, the
Update Request pop-up appears.
Select . The product upgrades the software,
turns off, and then turns on automatically.
There should be no disc in the product when
you upgrade the software using the USB jack.
✎
When the system upgrade is done, check the
software details in the Product Information section
of the Contact Samsung screen.
✎
Do not turn off the product during the software
upgrade. It may cause the product to malfunction.
✎
Software upgrades using the USB jack must be
performed with a USB flash drive only.
26 - English
Playing Content
Your home cinema can play content located on
Blu-ray/DVD/CD discs, USB devices, PCs, smart
phones, tablets, and on the Web.
To play content located on your PC or a mobile
device, you must connect the PC or mobile device
and the product to your network. To play content on
your PC, you must also download and install AllShare
network software or already have DLNA network
software on your PC.
✎
PCs running Windows 7 and Windows 8 have
DLNA software (Play To) built in.
Playing Commercial Discs
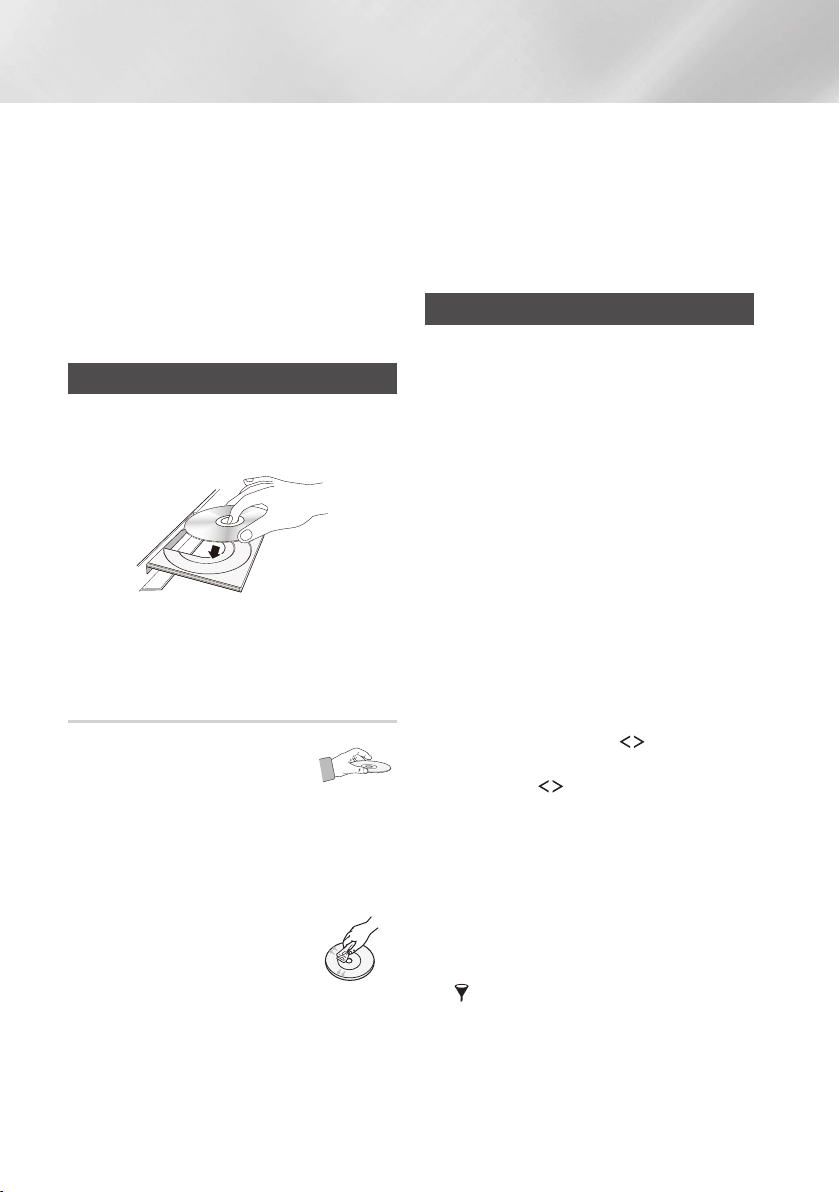
Press the
^
button to open the disc tray.
Place a disc gently into the disc tray with the
disc’s label facing up.
Press the
^
button to close the disc tray.
Playback starts automatically.
If playback does not start automatically, press
the
p
button on the remote.
Holding Discs
- Fingerprints or scratches on
a disc may reduce sound and
picture quality or cause skipping.
- Avoid touching the surface of a disc where data
has been recorded.
- Hold the disc by the edges so that fingerprints
will not get on the surface.
- Do not stick paper or tape on the disc.
Cleaning Discs
- If you get fingerprints or dirt on a
disc, clean it with a mild detergent
diluted in water and wipe with a
soft cloth.
- When cleaning, wipe gently from the inside to the
outside of the disc.
- Disc Storage
`
Do not keep in direct sunlight.
`
Keep in a cool ventilated area.
`
Keep in a clean protective jacket and store
vertically.
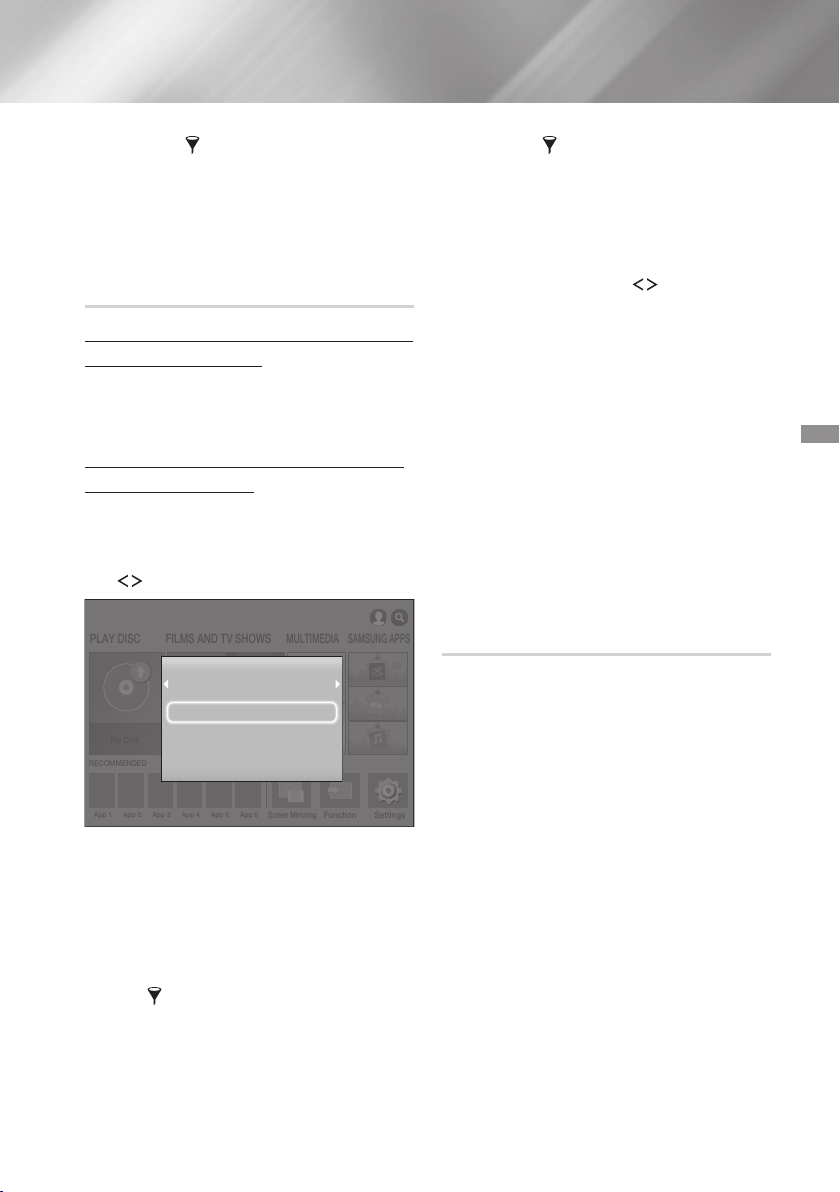
Playing Multimedia Files
In the Home screen, select , and
then press the button. The Recently Played
screen appears.
Select , ,or
at the bottom of the screen.
- Displays storage devices connected
to the product.
- Displays mobile devices,
PCs, tablets, and similar devices connected
through the network.
- Displays the cloud services
you are logged in to.
✎
When you select an item, information about the
item scrolls across the bottom of the item's listing
window.
Select an item or device, and then press the
button. A screen appears listing the contents
of the item or device. Depending on how the
contents are arranged, you will see either
folders, individual files, or both.
If necessary, use the
,.
buttons to select
a folder, and then press the button.
Use the
,.
buttons to select a file to view
or play, and then press the button.
The selected file plays.
Press the
'
() button to exit a folder
or the
e
() button to return to the Home
screen.
Go to pages 28~40 for instructions that
explain how to control playback of videos,
music, and pictures on a storage device.
✎
To list only one type of media file, use the
function in the top-right corner of the item or
device screen.
27 - English
✎
In the drop down, select ,
, or .
✎
Even though the product will display folders that
contain all content types, it will only display files
of the content type you selected For example, if
you selected , you will only be able to see
music files.
Turn the product on.
Follow the directions in “Playing Multimedia
Files” on page 26. In Step 2, select .
Connect the storage device to the product. (a
recorded CD, a USB device, etc.) The "
" pop-up appears. If two or
more storage devices are connected, use the
buttons to switch between devices.
✎
If the pop-up does not appear, go to Method 1.
Use the
,.
buttons to select
, or , and then press the
button. Depending on how the contents are
arranged, you will see either folders, individual
files, or both.
✎
To list only one type of media file, use the
function in the top-right corner of the
item or device screen.
✎
In the drop down, select ,
, or .
✎
Even though the product will display folders that
contain all content types, it will only display files
of the content type you selected For example, if
you selected , you will only be able to see
music files.
If necessary, use the
,.
buttons to select
a folder, and then press the button.
Select a file to view or play, and then press the
button.
Press the
'
() button to exit a folder
or the
e
() button to return to the Home
screen.
Go to pages 28~40 for instructions that
explain how to control playback of videos,
music, and pictures on a storage device.
✎
If you insert a disc when playing a USB device
or phone, the device mode changes to "Disc"
automatically.
✎
If your cellular phone is DLNA compatible, you
can play contents without connecting a USB
cable.
You can play media content on the Home cinema that
is stored on a computer or mobile device connected
to the same network as the Home cinema.
✎
Samsung Link software must be installed on
the computer that contains the content you
want to play on the Home cinema. The mobile
device must support Samsung Link. For more
information, visit Samsung’s content and service
portal at http://link.samsung.com.
✎
You may experience compatibility issues when
attempting to play media files via a third-party
DLNA server.
✎
The content shared by a computer or a mobile
device may not play depending on the encoding
type and file format of the content. In addition,
some functions may not be available.
✎
The media content may not smoothly play
depending on the network status. If this is the
case, use a USB storage device.

28 - English
Playing Content
In the Home screen, select , and
then press the button.
Select at the bottom of the
screen, and then press the button. Storages
devices connected to the same network as the
Home cinema are listed.
Select a storage device, and then press the
button. The folders and files shared by the
selected storage device are listed.
If necessary, use the
,.
buttons to select
a folder, and then press the button.
Select a file to view or play, and then press the
button.
Press the
'
() button to exit a folder
or the
e
() button to return to the Home
screen.
Go to pages 28~40 for instructions that
explain how to control playback of videos,
music, and pictures on a storage device.
✎
To list only one type of media file, use the
function in the top-right corner of the
item or device screen.
✎
In the drop down, select ,
, or .
✎
Even though the product will display folders that
contain all content types, it will only display files
of the content type you selected For example, if
you selected , you will only be able to see
music files.
✎
Alternatively, move to the media content to play
and press the button to play the content.
Dropbox and SkyDrive and other cloud services save
user content such as photos, videos, and music files
on a remote server accessible through the Internet.
When your home cinema is connected to the Internet,
you can view or play the media content saved in a
cloud service through the home cinema.
✎
To play the content in a cloud service, you must
log into your Samsung account and link the
Samsung account to the cloud service account.
For the information about linking your Samsung
account to a cloud service account, refer to the
"Logging In to Your Samsung Account" section.
In the Home screen, move to and
press button.
Select at the bottom of the
screen.
The cloud services linked with your Samsung
account appear.
Select a cloud service. The folders and files in
the selected cloud service are listed.
If necessary, use the
,.
buttons to select
a folder, and then press the button.
Select a file to view or play, and then press the
button.
Press the
'
() button to exit a folder
or the
e
() button to return to the Home
screen.
Go to pages 28~40 for instructions that
explain how to control playback of videos, music,
and pictures located in a .
Controlling Video Playback
You can control the playback of video content located
on a Blu-ray/DVD disc, USB device, mobile device,
or PC. Depending on the disc or contents, some of
the functions described in this manual may not be
available.
1
2
1
During playback, press this button to display the
Disc menu.
29 - English
During playback, press this button to display the
Title menu or Popup menu.
If your disc has a playlist, press the
button to go to the playlist.
2
The product does not play sound in Search, or
Slow mode.
To return to normal speed playback, press the
p
button.
p
Starts/Pauses playback.
e
()
Stops playback.
During playback, press and hold
the
[
or
]
button.
Each time you press and hold the
[
or
]
button, the playback
speed will change.
In pause mode, press and hold
the
]
button.
Each time you press and hold the
]
button, the playback speed
will change.
During playback, press the
[
or
]
button.
Each time you press the
[
or
]
button, the disc moves to the
previous or next chapter or file.
During playback, press the button.
During playback, press the button.
Use the
buttons to select
T
in the
upper right corner, and then press the button.
Select to return to the beginning of the movie, and
then press the button.
Use menu to select the or
option if the 3D content currently playing
does not appear properly in 3D mode.
✎
Use menu for 3D content only. If you apply
the
or
format to 2D
content, it will not be displayed properly.
You can use the function during
playback to view or start a movie from the scene
of your choice.
✎
If the index information in the file is damaged or
the file does not support indexing, you will not
be able to use the Select Scene function.
✎
If you are using the DLNA function after
connecting to a computer through your
network, Select Scene may not be supported.
If there is more than one movie
on the disc or device, select to start a different
title.
Select , and then press the
button.
Use the
,.
buttons to select a title, and
then press the button.
Select to play the chapter of
your choice.
Select , and then press the
button.
Use the
,.
buttons to select a chapter,
and then press the button.
Select to play the movie from
a selected time point.
Select , and then press
the button.
Press and hold the button until the Num
pad appears on the screen. When the Num
pad appears, select a number using the
,.
button and then press the
button.
✎
You can also
use the
:;
buttons to advance
or rewind the movie. The movie advances or
rewinds one minute each time you press the
:;
buttons.

30 - English
Playing Content
Lets you repeat a title, chapter, or specific section.
- : Select to return to normal playback.
- : Choose to repeat a selected title.
- : Choose to repeat a specific chapter.
- : Choose to repeat a specific
section.
Press the button at the point where you
want repeat play to start (A).
Press the button at the point where you
want repeat play to stop (B).
✎
Depending on the disc, the screen may not
display all repeat options.
✎
, , and appear
when you play a video recorded as a digital file.
✎
The screen may not display or
immediately. Continue to press the
,.
buttons until your choice is inside the
applicable field.
✎
The screen may not display
immediately. Continue to press the
,.
buttons until is inside the
applicable field.
✎
You must set point (B) at least 5 seconds of
playing time after point (A).
Lets you set the .
- : Increases sharpness and brightness.
- : Choose this setting for most viewing
applications.
- : The best setting for watching movies.
- : Lets you adjust the sharpness and noise
reduction function respectively.
✎
When you use the function, this
menu will not appear.
Set Equalizer Mode on to use the equalizer.
Lets you set the equalizer.
✎
Equaliser Settings only appears when
is .
Select to set the desired audio language.
In some cases when the product is connected to
a digital TV, the audio signal may not synchronize
with the video signal. If this occurs, use Audio
Sync to adjust the audio delay time to match the
video signal.
Lets you set the desired subtitle language.
Lets you set the desired subtitle options.
To view a scene from another angle. The
option displays the number of angles available to
view (1/1, 1/2, 1/3, etc.).
Lets you set the desired Bonusview option.
You can rotate the screen clockwise or
counterclockwise by 90 degrees.
Lets you set the size of the video image. Choose
, (larger), or (largest).
Select to view video file information.
✎
Depending on the disc or storage device, the
Tools menu may differ.
✎
Video files with high bitrates of 20Mbps or more
strain the product’s capabilities and may stop
playing during playback.

31 - English
Select the function, and then to
display videos only.
✎
Even though the product will display folders that
contain all content types, it will only display files
of the content type you selected For example, if
you selected , you will only be able to see
video files.
On the screen that lists the video files, use the
,.
buttons to select or in the
upper right, and then press the button.
`
Displays all the folders with videos by date. If
you select a folder, and then press button,
displays all the video files in the folder by date.
`
Displays all the video files on the media or
storage device by title.
`
Displays all the folders on the media or storage
device.
`
lets you create a playlist by
selecting specific files to play. It works essentially
the same way for all media. See "Using Play
Selected with a Commercial CD" on page 34.
`
Select to upload selected files to on-line
sites (Picasa, Facebook, etc.) or to devices.
To use with an on-line site, you need to
establish an account with the on-line site, and
then log in using the Log In function. works
essentially the same way for music, photos, and
videos. For general instructions, see "Using the
Send Function" on page 40.
✎
Depending on the disc or storage device, the
and menus may differ. All
options may not be displayed.
✎
The and menus are usually
available when you are viewing video files on
a USB flash drive, a PC, a disc you recorded
yourself, or a mobile device. They are usually not
available if you are viewing a commercial Blu-ray,
DVD, or CD disc.
Controlling Music Playback
You can control the playback of music content
located on a DVD, CD, USB, mobile device, or
PC. Depending on the disc or contents, some of
the functions described in this manual may not be
available.
1
4
3
2
1
[
]
buttons : Move to the previous/
next track.
2
e
() button : Stops a track.
3
During playback, press and hold the
[
or
]
button.
Each time you press and hold the
[
or
]
button, the playback speed will
change.
4
p
button : Plays/Pause a track.
32 - English
Playing Content
00:00/00:00
The Track List screen appears initially, and the first
track begins to play. If you are playing a commercially
recorded disk and don't press a button on the remote
momentarily, the Playback screen appears. To return
to the Track List screen, press the
'
()
button.
00:00:40 00:03:35
On the Track List screen, use
,.
buttons to move
the highlight to the track you want. Press the
button to play the track.
1
Pause a track.
1
Play a track.
1
Move to the previous track.
1
Move to the next track.
1
Rewind the track.
1
Advance the track.
1
,
1
Repeat one track or all tracks.
1
Play tracks in random order.
Display the Equaliser.
On the Music
List screen
only.
: Adjust the
equalizer manually. (Available only
when is on)
:
lets you select specific files to
play. It works essentially the same
way for all media. See "Using
Play Selected with Self-Recorded
Media (CDs, USB Devices, etc.)"
on page 34.
:
The Ripping function
converts CD audio to the mp3
format and saves the converted
files on a USB device or a mobile
device connected to the product.
See Ripping on page 36.
Select files to be ripped
from the list.
Select at the bottom-
left of the screen. Ripping is
completed.
:
Shows the track
information.
To access the controls, play a track, and then use the
,.
buttons to move to the control of your
choice.
✎
The music screen controls are only accessible
when a track is playing.
✎
All controls do not appear at the same time.
✎
For file-based contents, the available
options will differ.
Select the function, and then to
display music files only.
✎
Even though the product will display folders that
contain all content types, it will only display files
of the content type you selected For example, if
you selected , you will only be able to see
music files.
33 - English
On the screen that lists the music files, use the
,.
buttons to select or in the
upper right, and then press the button.
`
Displays all the music tracks on the media or
storage device.
`
Displays all the music on the media or storage
device by album.
`
Displays all the music files on the media or
storage device by artist
`
Displays all music on the media or storage
device by genre.
`
Displays all the folders on the media or storage device.
`
lets you select specific files
to play. It works essentially the same way for
all media. See "Using Play Selected with a
Commercial CD" on page 34 and "Using Play
Selected with Self-Recorded Media (CDs, USB
Devices, etc.)" on page 34.
`
Select to upload selected files to on line
sites (Picasa, Facebook, etc.) or to devices. To
use , you need to establish an account
with the on-line site, and then log in using
the Log In function. works essentially
the same way for music, photos, and videos.
For general instructions, see "Using the Send
Function" on page 40.
`
Select to manage the text encoding options.
`
Lets you modify the name of a playlist.
`
Lets you delete a playlist.
`
Lets you add additional files to a playlist.
✎
Depending on the disc or storage device, the
menu may differ. All options may not be
displayed.
✎
and appear only
if a playlist exists.
You can set the product to repeat tracks on an audio
CD (CD-DA/MP3).
On the Track List screen during playback, use
the
,.
buttons to select
1
in the lower
left corner of the screen, and then press the
button.
Use the
,.
to select the Repeat mode you
want - , , or - and then press
the button.
00:00/00:00
00:00:40 00:03:35
Press the
'
() button on the remote to
return to the Track List screen.

34 - English
Playing Content
You can set the product to play tracks on an audio
CD (CD-DA/MP3) at random.
During playback, use the
,.
buttons to
select
1
in the lower left corner of the screen,
and then press the button.
Use the
,.
to set the mode or ,
and then press the button.
On the Track List screen, select on
the bottom left, and then press the button.
The menu appears.
Select , and then press the
button. The screen appears.
Use the
,.
buttons to select a track, and then
press the button. A check appears to the left
of the track.
Repeat Step 3 to select and check additional
tracks.
To remove a track from the list, move to the
track, and then press the button again. The
check on the track is removed.
When done, select on the bottom left, and
then press the button. The Track List screen
reappears listing only the tracks you checked.
The selected tracks play automatically.
To cancel the list, select
on the bottom left of the Track list screen.
On the Settings menu select . The Track
List screen reappears with all tracks on the CD
listed.
✎
You can select up to 99 tracks from an Audio CD
(CD-DA) using Play Selected.
✎
On the screen, you can also
choose , , and .
- Use to select all tracks. This cancels
your individual track selections. When you
press the
'
() button on your remote
or select and then press the button,
all tracks will appear on the Track List screen,
and the product will begin to play all tracks from
Track 001.
- Use to deselect all selected tracks
at once. Then, select individual tracks or use
to select all the tracks, and then press
the
'
() button on your remote or
select and then press the button. If you
do not use or select individual tracks,
the list will not change.
- cancels any changes you made on the
screen. When you return to the
Track List screen, the list will be
unchanged.
Insert a self-recorded CD or USB device with
self-recorded files into the home cinema. The
pop-up appears.
Select , and then press the button
on your remote. The File List screen appears
displaying icons for tracks, folders, or both.
If necessary, use the
,.
buttons to select
a folder, and then press the button.
When the tracks you want to play are displayed,
select in the upper right, and then press
the button.
Select , and then press the
button. Check boxes appear on the upper left
sides of the track icons.
Use the
,.
buttons to select a track, and
then press the button. A check appears in
the check box.
Repeat Step 6 to check and select additional
tracks.
To remove a track from the list, move to the
track, and then press the button again. The
check on the track is removed.
When done, select , and then press the
button. The Track List screen appears listing only
the tracks you checked. The selected tracks
play automatically.
To cancel the list, press the
'
() button or the
e
() button. If you
press
'
(), you return to the File List
screen. If you press
e
(), you go to the
Home screen.
35 - English
✎
If you want to use to watch videos,
use the
function to select
instead of .
✎
Select or depending
on the media you are using.
- If you selected , the Track List screen
appears. Use the
function to select
, and then follow the directions starting at
Step 3 above.
- If you selected , select or
on the screen.
Then, select your storage media on the
screen or device on the
screen. The File List screen appears. Use the
function to select , and then
follow the directions starting at Step 3 above.
Connect a USB device with stored music to the
home cinema's USB jack, and then turn on the
home cinema.
On the Home screen, select , and
then press the button.
On the screen, select ,
and then press the button.
Select the USB device, and then press the
button.
At the top of the screen, select
;
.
After the screen re-displays, select
;
.
On the next screen, select an existing playlist,
and then press the button.
Select , and then press the
button. If you selected an existing playlist, go to
Step 9. If you selected , go to Step
8.
On the on-screen keyboard, accept the default
name for the new playlist or enter a new name.
When finished, select , press , and then
go to Step 9.
Navigate to the screen that displays the music
you want to put into the playlist.
Use the
,.
buttons to select a track, and
then press the button. A check appears in
the check box on the left side of the track icon.
Repeat Step 10 to check and select additional
tracks.
To remove a track from the list, move to the
track, and then press the button again. The
check on the track is removed.
When finished, select at the top of the
screen, and then press the button. The
playlist is saved to the USB device and the
Added pop-up appears. Press the button.
Connect the USB device with the playlist to the
home cinema's USB port.
Navigate to the playlist (Home screen
;
;
;
USB device
;
playlist).
Select the playlist, and then press . The Track
List screen appears and the first track of the
playlist starts to play.
While playing a playlist, select
;
at the bottom-left corner of the
Track List screen.
Use the
,.
buttons to select a track, and
then press the button. A check mark
appears next to the track.
To cancel a selection, select the track again, and
then press the button.
✎
To select all tracks at once, use . To
cancel all selections at once, use .
When finished, select at the bottom left
of the screen, and then press the button.
A confirmation pop-up appears.

36 - English
Playing Content
Select , and then press the button.
✎
Deleting all files included in a playlist will delete the
playlist itself, too.
✎
You can save up to 5 playlists.
Insert a USB device into the USB jack on the
front of the product. This is the device you will
rip the files to.
Put a music CD into the home cinema. In a few
moments, the Track List screen appears.
On the Track List screen, select
on
the lower left of the screen, and then press the
button. The Settings menu appears.
Use the
,.
buttons to select , and
then press the button. The Ripping screen
appears.
Use the
,.
buttons to select a track, and then
press the button. A check appears to the left
of the track.
Repeat Step 5 to select and check additional
tracks.
✎
To select all tracks at once, select on
the bottom left of the screen, and then press the
button.
To remove a track from the list, move to the
track, and then press the button again. The
check on the track is removed.
When done, select the button using the
,.
buttons, and then press the button. The Rip
pop-up appears.
Use the
,.
buttons to select the device to
store the ripped files to, and then press the
button. Ripping begins.
✎
Do not disconnect the device while ripping is in
progress.
If you want to cancel ripping after ripping has
begun, press the button and then select
. Select to continue ripping.
When ripping is complete, the "
" message appears. Press the
button. The Track List screen reappears.
Using Bluetooth
You can use a Bluetooth device to enjoy music with
high quality stereo sound, all without wires!
Bluetooth is a technology that enables Bluetooth-
compliant devices to interconnect with each other
easily using a short, wireless connection.
A Bluetooth device may hum or malfunction:
- When a part of your body is in contact with the
receiving/transmitting system of the Bluetooth
device or the Home Cinema.
- When it is subject to electrical variation from
obstructions caused by a wall, corner, or office
partitioning.
- When it is exposed to electrical interference from
same frequency-band devices including medical
equipment, microwave ovens, and wireless
LANs.
Pair the Home Cinema with the Bluetooth device
while the two are close together.
The further the distance is between the Home
Cinema and the Bluetooth device, the worse the
quality is.
If the distance exceeds the Bluetooth operational
range, the connection is lost.
In poor reception areas, the Bluetooth connection
may not work properly.
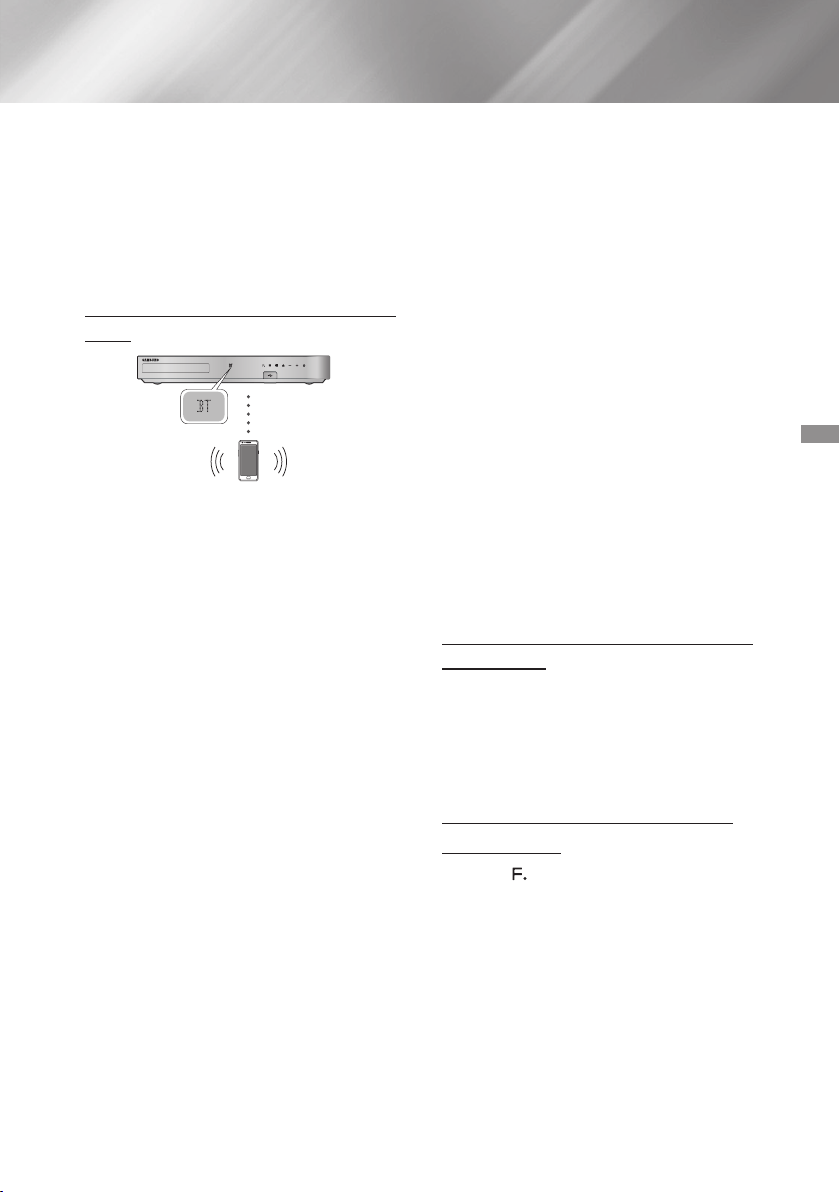
37 - English
The Home Cinema has an effective reception range
of up to 10 meters in all directions if there are no
obstacles. The connection will be automatically
cut off if the device is out of this range. Even within
this range, the sound quality may be degraded by
obstacles such as walls or doors.
This wireless device may cause electrical
interference. during its operation.
Before you begin, confirm that the Bluetooth device
supports the Bluetooth compliant stereo headset
function.
Press the button on the remote
control to display the message.
Select the Bluetooth menu on the Bluetooth
device you want to connect. For instructions,
refer to the Bluetooth device's manual.
Select the Stereo headset menu on the
Bluetooth device.
You will see a list of devices.
Select "
" from the searched list.
When the Home Cinema is connected to the
Bluetooth device, the device name of the
connected Bluetooth device, followed by the
name of home cinema will appear on the front
display of home cinema.
Play music on the connected device.
You can listen to the music playing on the
connected Bluetooth device over the Home
Cinema system.
✎
The Home Cinema only supports Middle
Quality SBC data (up to 237kbps@48kHz),
and does not support High Quality SBC data
✎
The AVRCP feature is supported. It's functionality
will differ, depending on the specifications of the
connected device.
✎
Connect only to a Bluetooth device that supports
the A2DP Profile.
✎
Only one Bluetooth device can be paired at a
time.
✎
The search or connection functions may not work
properly in the following cases:
- If there a strong electric field near or around the
home cinema.
- If several Bluetooth devices are simultaneously
paired with product.
- If the Bluetooth device is turned off, not in place,
or malfunctions.
- Note that such devices as microwave ovens,
wireless LAN adapters, fluorescent lights, and
gas stoves use the same frequency range as
the Bluetooth device, and can cause electric
interference.
✎
For a more reliable connection to a Bluetooth
device or to other devices such as a smart phone,
we recommend you update the device's software
to the most current version.
You can disconnect the Bluetooth device from the
Home Cinema. For instructions, refer to the Bluetooth
device's manual.
When the Home Cinema is disconnected from the
Bluetooth device, the Home Cinema will display
on the front display.
Press the (
H
I
G
H
-
E
N
D
V
A
C
U
U
M
T
U
B
E
S
O
U
N
D
5V 0.5A
) button on the front panel of the Home
Cinema to switch from to another mode or turn
off the Home Cinema.
Except when you disconnect the Home Cinema
by changing functions, the connected Bluetooth
device will wait a certain time for a response
from the Home Cinema before terminating the
connection. (Disconnection time may differ,
depending on the Bluetooth device.)
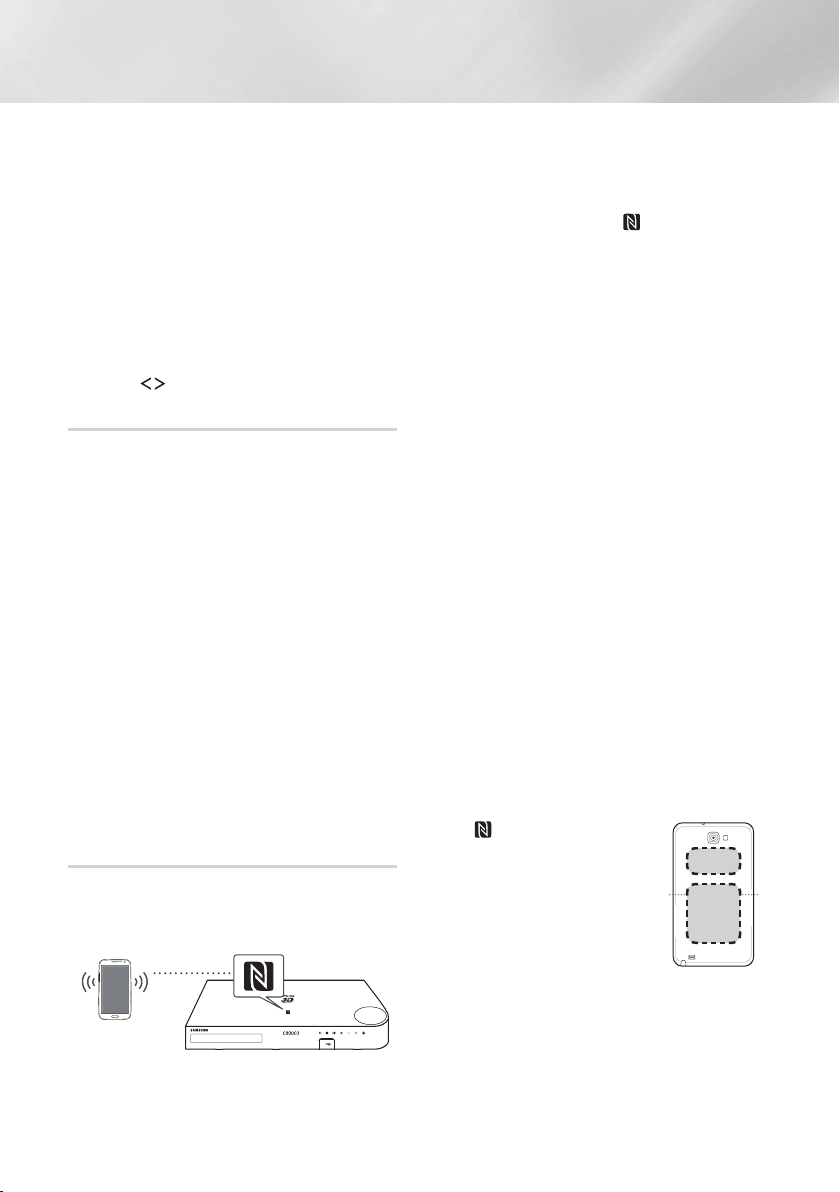
38 - English
Playing Content
✎
In Bluetooth connection mode, the Bluetooth
connection will be lost if the distance between the
Home Cinema System and the Bluetooth device
exceeds 10 meters. When the Bluetooth device
comes back into effective range or you restart the
Bluetooth device, you have to pair the device and
home cinema again to reconnect.
✎
In Bluetooth mode, the screen saver will start if
the Bluetooth device stays in the Ready state for
5 minutes. To reconnect the Bluetooth device,
turn off the screen saver, and then connect the
device. To turn off the screen saver, press any
button on the remote control (the Volume button,
an
,.
buttons, etc.)
When the home cinema is turned off, connecting a
previously connected smart device to the product via a
Bluetooth connection can turn the home cinema on.
✎
The home cinema must be plugged in for
to work.
✎
To use this function, set > >
to .
✎
To use this function, the Bluetooth connection
between the Home cinema and your smart device
must have been established previously, and the
Home cinema must be on your smart phone's list
of known Bluetooth devices.
Connect your previously connected smart device
to the product via Bluetooth. (For information
on Bluetooth connections, refer to your smart
device’s manual.)
Once connected, the home cinema turns itself
on automatically in BT mode.
Select the desired music to play on your smart
device.
Connect your NFC compatible device via Bluetooth to
the Home Cinema using this simple set-up procedure.
You can play music from the smart phone through the
Home Cinema.
Turn on the NFC function on the smart phone
and make sure the screen lock function on the
smart phone is off. The smart phone's NFC
function will
not work if screen lock is on.
Gently touch the NFC logo on the top of the
Home Cinema with the NFC supported device.
If the Home Cinema is off, it will turn on
automatically.
A pop-up asking whether to proceed with the
Bluetooth connection appears on the smart
phone. Select 'Yes'.
When the connection is complete, the
'connected' message appears.
To disconnect the NFC device, touch the device
to the Home Cinema's top panel again.
To connect another NFC device while the first
smart phone is still connected, touch that
device to the Home Cinema's top panel. The
Home Cinema will disconnect the first smart
phone and connect to the second smart
phone.
✎
The NFC function is built into Android devices
running Android OS 4.1 Jellybean or later.
- If your device is running an Android OS earlier
than Android OS 4.1 Jellybean, you must
download the 'Samsung NFC Connection'
application from Android market to use the NFC
function.
✎
The position of the NFC antenna differs on smart
phones. Check where the NFC antenna is located
before connecting. Refer to the user manual
of your mobile phone to check the antenna’s
location before making the connection.
✎
If your smart phone is covered with a thick case,
the connection may not succeed.
✎
The is a trademark or
registered trademark of NFC
Forum, Inc. in the United States
and in other countries.
✎
NFC tagging for Bluetooth
connection cannot be established
while powering on and off.
✎
NFC tagging for Bluetooth
connection will not work while the battery
indicator is blinking.
39 - English
Playing Photo Contents
You can play photo contents located on a DVD, USB,
mobile device, or PC.
While displaying a photo, press the button on
the remote.
Select
T
in the upper right corner of the
screen, and then press the button. The Tools
menu drop down list appears.
`
: Select to set a slide show's speed.
`
: Select to set a slide show's special
effects.
Select to rotate the picture. (This will rotate the
picture either clockwise or counter clockwise.)
Select to enlarge the current picture. (Enlarge up to
4 times)
`
: Choose to increase sharpness.
`
: Choose for most viewing
applications.
`
: This is the best setting for watching
movies.
`
: Lets you adjust the sharpness and noise
reduction function respectively.
Select to listen to music while viewing a slide show.
Set to to use the equalizer. Customize your
own personal sound preferences using the
equalizer settings.
This function is only available when
is .
Select to upload selected files to on-line
sites (Picasa, Facebook, etc.) or devices. To use
with an on-line site, you need to establish
an account with the on-line site, and then log in
using the Log In function. works essentially
the same way for music, photos, and videos. For
general instructions, see "Using the Send Function"
on page 40.
Displays the picture information.
✎
Depending on the disc or storage device, the
menu may differ. All options may not be
displayed.
✎
To enable the function, the
photo file must be in the same storage media as
the music file. However, the sound quality can be
affected by the bitrate of the MP3 file, the size of
the photo, and the encoding method.
✎
You can't enlarge the subtitle and PG graphic in
the full screen mode.
Select the function, and then to
display photos only.
✎
Even though the product will display folders that
contain all content types, it will only display files
of the content type you selected For example, if
you selected , you will only be able to see
photo files.
On the screen that lists the photo files, use the
,.
buttons to select or in the
upper right, and then press the button.
`
Groups all the photo files on the media or
storage device by date. Click a group to see the
photos in that group.
`
Displays all the photo files on the media or
storage device by title.
`
Displays all the folders on the media or storage
device.

40 - English
Playing Content
`
Starts the slide show. Shows all the files in the
current folder, one after another. If you want to
create a slide show with a selected group of
photos, see Play Selected below.
`
lets you select specific files to
play. It works essentially the same way for all
media. See "Using Play Selected with Self-
Recorded Media (CDs, USB Devices, etc.)" on
page 34.
`
Select to upload selected files to on line
sites (Picasa, Facebook, etc.) or to devices.
To use
with an on-line site,
you need to
establish an account with the on-line site, and
then log in using the Log In function.
✎
Depending on the disc or storage device, the
menu may differ. All options may not be
displayed.
Use the
,.
buttons to select , and then
press the button. The Selection screen
appears.
Use the
,.
buttons to select a picture, and
then press the button. A check appears to
the left of the picture.
Repeat Step 2 to select and check additional
pictures.
To remove a picture from the list, move to the
picture, and then press the button again.
The check on the picture is removed.
When done, press the
,.
button to select
, and then press the button. The Send
pop-up appears listing the on-line sites (Picasa,
Facebook, etc.) or devices that you can send
the photos to.
Select a destination, and then press the
button.
If you are sending the photos to an on-line site,
the site starts. Log in and follow the directions
on the screen.
✎
To send photos to an on-line site, you must have
an account with that site.
Listening to the Radio
To listen to the radio, you must connect the
supplied FM antenna.
Press the button to select .
Tune to the desired station.
Preset Tuning 1 : Press the button
to select , and then press the
,.
buttons to select a preset station.
- Before you can tune to preset stations, you
must add preset stations to the product's
memory.
Manual Tuning : Press the button
to select , and then press the
,.
buttons to tune to a lower or higher frequency.
Automatic Tuning : Press the button
to select , and then press and hold
the
,.
buttons to automatically search the
band.
Press the button.
Each time you press the button, the sound
switches between and .
In a poor reception area, select for a clear,
interference-free broadcast.
Example : Presetting FM 89.10 into memory.
Press the button to select .
Press the
,.
buttons to select <89.10>.
Press the button.
NUMBER flashes on the display.
Press the button again.
Press the button before NUMBER
disappears from the display on its own.
After you press the button,
NUMBER disappears from the display and the
station is stored in memory.
41 - English
To preset another station, repeat steps 2 to 4.
To tune to a preset station, press the
button to select , and then press the
,.
buttons to select the preset station.
Using the Special Effects Remote
Control Buttons
Lets you select a mode that optimizes the sound.
Press the button.
Press the
,.
buttons to select the desired
mode: , ,, or
.
Press the
buttons to select the desired
sound effect.
Ğ
z
: Helps enhance your sound
experience (ex. mp3 music). You can upscale
your MP3 level sound (24 kHz, 8bit) to CD level
sound (44.1 kHz, 16bit).
z
: Increases the volume level of bass
tones and provides thudding sound effects.
z
: Select for normal listening.
Ğ
You can set a two-channel input source to produce
sound in 5.1 channel surround mode.
Ğ
z
: Provides a
clear vocal as if listening in a concert hall.
z
: Also
provides a clear vocal as if listening in a concert
hall, but less powerful than HALL1.
z
: Recommended setting
for Jazz.
z
: Gives the feel of being in a
grand church.
z
: Recommended setting
for Rock.
z
: Select for normal listening.
Ğ
z
: Emphasizes the commentator's
voice during a sports game to increase your
absorption in the game.
z
: Emphasizes spectators' cheering
during a sports game to add immediacy.
z
: Select for normal listening.
You can enjoy more natural and vivid surround
sound with enriched tones by adjusting the depth
of sound using the level options.

42 - English
Network Services
You can enjoy various network services such as
streaming video or on-line apps by connecting the
product to your network.
To use network services, you must first:
Connect the product to a network.
(See page 13)
Configure the network settings.
(See pages 21~23)
Logging In to Your Samsung
Account
Before you access or
, we suggest you log in to your
Samsung account.
✎
If you do not have a Samsung account, create
one by selecting .
To create a Samsung account, follow these steps:
With the Home screen displayed, press the
button. The screen appears.
Select the ID field, and then press the
button. The keyboard pop-up appears.
Using the keyboard, enter your e-mail address.
When finished, select the button, and then
press the button. The screen re-
appears.
Select the Password field, and then press the
button. The keyboard pop-up appears.
Using the keyboard, enter your password. When
finished, select the button, and then press
the button. The screen re-appears.
To make the log in process easier next time,
select , and then
press the button.
Select , and then press the
button.
The
screen appears.
Select , and then press the
button.
Select an image you want to use to identify your
account, and then press the button.
Select .
✎
If you selected , the
next time you log in, the product will automatically
enter your e-mail and password. All you need to
do is select .
✎
If you press the button after you have logged
in, the screen appears. You can select
, , ,
and .
Adding a Credit Card
To add a credit card to your account, follow these
steps:
Select the
in the upper right of the Home
Screen, and then press the button. The
Account screen appears.
Sign in to your account if you are not signed in.
The Home Screen reappears. If you are already
signed in, go to Step 4.
Select the
again, and then press the
button. The Account screen appears.
On the Account screen, select
, and then press the button. The on-
screen keyboard appears.
Enter your account password. When finished,
select , and then press the button. The
screen appears.
Select , and then press the button.
The Add Card pop-up appears.
Read the Add Card text, and then press the
button. The screen appears.
Enter the requested credit card information.
When done, select , and then press the
button.
Before Using FILMS AND TV
SHOWS or SAMSUNG APPS
If you haven’t set up Smart Hub, when you use
or for
the first time, the product will ask you to perform the
Smart Hub set up procedure.
On the Home screen, select either
or , and then press the
button.
If you selected , the
Smart Hub pop-up appears asking if you want
to set up Smart Hub. Select , and then press
the button. The Welcome screen appears.

43 - English
Select , and then press the button. The
Smart Hub Terms & Conditions, Privacy Policy
screen appears.
On the
screen, you must review and agree to both
the Smart Hub Terms and Conditions and the
Privacy Policy to use Smart Hub.
Scroll down, and then click the
buttons to review the full documents.
✎
You do not need to consent to the Supplemental
Privacy Notice, but one or more Smart TV features
or functionalities may not be available if you do
not.
Select , and then press the
button. The Setup Complete screen appears.
Press the button.
Using FILMS AND TV SHOWS
Through the screen, you
can stream movies and TV shows and watch them
on your TV.
To stream and watch most movies and TV shows,
you need a Samsung account with a registered credit
card. To register a card, see page 42.
✎
Depending on your country, this menu function
may not be supported.
On the Home screen, select
, and then press the button.
Select one of the Recommended Movies or
TV Shows, and then press the button. The
Information screen for that movie appears.
✎
As you highlight each movie or TV show, the icons
for the apps you can use to stream the movie
or show appear at the bottom of each movie or
show selection icon.
. Alternately, select , ,
or and
then press the button.
On the page that appears, use the
,.
buttons to select a show, movie, or trailer, and
then press the button.
On the or screen, you can
also select or to see more
available shows or films. On the screen,
use the
,.
buttons to select a genres,
and then press the button.
To make a selection on a page displaying movies
or TV shows, use the
,.
buttons to make
a selection, and then press the button.
If you have downloaded and installed one of the
video streaming apps that you can use to stream
the movie or show, select , and
then press the button. The app launches.
Follow the directions on the screen to watch the
movie or show you have chosen. If you have not
downloaded one of the apps, go to Step 4.
If you have not downloaded one of the video
streaming apps, appears on the
screen instead of . Select one of the
video streaming apps to the right of ,
and then press the Button.
You will be asked if you want to install the app
now. Select , press the button, and
then follow the directions on the screen to install
the app. You can also select
to view information about the app. The
screen lets you download the app as
well.
Once the app is installed, select , and then
press to launch the app. Alternately, you
can press the
'
() button to go back
to the screen, select
the show or movie again, and then follow the
directions in Step 3 to watch the movie or show.
✎
Contents items and the corresponding bottom
menu in differ between
countries.

44 - English
Network Services
✎
On the each movie or show information screen,
the button is displayed only after
you have download one of the video streaming
apps you can use to stream that particular movie
or show. appears if you have not
downloaded the necessary video streaming app.
To the right of is a listing of the video
streaming apps you can use to stream the movie
or show. Select an app icon to download and
install the app.
✎
will not appear unless you have
tagged one or more films or TV shows as a
favourites. To tag a movie or show as a favorite,
select the show. The Detail screen appears.
Select the heart symbol, and then press the
button.
Using SAMSUNG APPS
Through the screen, you can
download applications from the Internet, and launch
and run downloaded applications on your TV. To
access some applications, you need to have a
Samsung account.
✎
While playing multimedia content in
, press and hold
5
button on the remote
to pause playback. To stop playback, press and
hold
e
() button on the remote.
2
3
4
5
5 6 7 98 10
1 2
3
1
: Displays recommended
contents managed by Samsung. You cannot
delete Recommended Apps.
2
: Displays your personal gallery
of applications modifiable on the
screen.
3
and :
Select to view and download additional apps.
The first time you open the screen,
the Home cinema automatically downloads a group of
free apps. Once these apps have been downloaded,
they appear on the screen. To see
additional apps, select , ,
or on the bottom of the screen, and then
press the button.
displays the most popular apps,
the newest. displays a
series of icons representing categories such as
, , and . Select a category icon,
and then press the button. The Home cinema
displays the apps in that category.
Select , , or
, and then press the button.
If you selected , select a category
icon, and then press the
button.
Otherwise, go to Step 3.
✎
On the , , and
screens, a green arrow is displayed
on apps you have already downloaded.
Select an app you want to download, and then
press the
button. The Detail Information
screen for the App appears.
Select the button on the screen, and
then press the button. changes
to and the app begins to download.
If you want to cancel the download, select
, and then press the button.
When the download is complete,
changes to . Select , and then press
the button to start the application.
Alternately, press the
'
() button until
the screen reappears. The
app you downloaded will be displayed on the
App screen under .
Select on the Home screen,
and then press the button.
On the screen, use the
,.
buttons to select an app, and then
press the button. The app starts.

45 - English
The Option menu lets you add apps to and delete
apps from . It also lets you change the
position of an app in and update apps.
On the screen, select the app you
want to move, and then press the button for
3 seconds. The Option menu appears.
Select , and then press the
button.
Use the
,.
buttons to move the app.
When the app is where you want it, press the
or
e
() button.
On the screen, select the app you
want to delete, and then press the button for
3 seconds. The Option menu appears.
Select , and then press the
button .
Use the
buttons to select , and then
press the button.
On the screen, select an app you
want to delete and then press the button for
3 seconds. The Options menu appears.
Select the , and then press the
button.
Use the
,.
buttons to select apps you
want to delete, and then press the button.
Use the
.
button to select , and then
press the button.
On the screen, select the app you
want to see detailed information for, and then
press the button for 3 seconds. The Option
menu appears.
Select , and then press the
button.
On the screen, select an app, and
then press the button for 3 seconds. The
Option menu appears.
Select , and then press the
button. If the current view is Most Played, you
will be asked if you want to change to Custom
View. If the current view is Custom View, you
will be asked if you want to change the view to
Most Played. Most Played sorts the apps by
the number of times you ran each app. Custom
View lets you arrange the apps to your liking.
Select , and then press the button to
change the view.
Locking an app makes it more difficult to delete
accidently.
On the screen, select the app you
want to lock, and then press the button for 3
seconds. The Option menu appears.
Select , and then press the
button.
The PIN input pop-up appears. Enter your PIN.
Press and hold the button until the Num pad
appears on the screen. When the Num pad
appears, select a number using the
,.
button and then press the
button.
If you
haven't set a PIN, enter the default PIN: 0000.
A checkbox appears on each app icon. Use the
,.
button to move to the app you want to
lock, and then press the button to select it.
A check mark appears on the icon.
Repeat Step 4 to select other apps. Use
or on the bottom of the screen
to select or deselect all apps at once. To
deselect individual apps, select the app again,
and then press the button. The check mark
disappears.
When you have finished marking your selections,
move to on the bottom of the screen, and
then press the
button.
A lock mark appears on the selected app’s icon.
You will be prompted to enter the PIN number to
delete or unlock a locked app.
On the screen, select any app, and
then press the button for 3 seconds. The
Option menu appears.
Select , and then press the
button.

46 - English
Network Services
The screens lists all the apps that
have updates available. Select each app you
want to update, and then press the button.
You can also choose to update all the
apps listed.
Select , and then press the button.
Screen Mirroring
The function lets you view the
screen of your smart phone or android tablet on the
TV you have connected to the product.
In the Home screen, select ,
and then press the button.
Launch or on
your device.
On your device, find the name of the product in
the list of available devices and then select it.
The TV displays a connecting message (for
example, Connecting to Android_92gb...) and
then displays the connected message.
In a few moments, the screen of your device
appears on the TV screen.
To stop , press the
e
()
or
'
() button on the remote control,
or exit the function on your
smart phone.
✎
You can connect to a device that supports
AllShare Cast. Note that all devices that have
AllShare Cast may not be fully supported,
depending on the manufacturer. For further
information on mobile connection support, refer to
the manufacturer’s web site.
✎
When you are using the
function, video stuttering or audio dropouts may
occur, depending on your environment.
✎
Bluetooth transmissions can interfere with the
signal. Before using the
function, we strongly recommend that
you turn off the Bluetooth function on your smart
phone or smart device (tablet, etc.).
Using the Web Browser
You can access the Internet using the Web Browser
application.
Select on the Home screen
and then press the button.
On the screen, select
, and then press the button.
✎
When you run the Web Browser with the product
connected by HDMI to a compatible TV
- and is on - the browser is maximized
to fill the screen and the TV's resolution is set to
the optimal resolution automatically.
✎
The Web Browser is not compatible with Java
applications.
✎
If you attempt to download a file, and the file
cannot be saved, an error message will appear.
✎
E-commerce (purchasing products online) is not
supported.
✎
ActiveX is not supported.
✎
Access may be blocked to some websites or to
web browsers operated by certain businesses.
The Web Browser provides two types of browsing,
Pointer Browsing and Link Browsing. When you
launch the browser for the first time, Pointer Browsing
is active. If you are using a mouse to navigate in
the Web Browser, we recommend leaving Pointer
Browsing active. With Pointer Browsing, you move
the pointer using the directional arrow keys on your
remote. The pointer moves freely around the screen,
much like the pointer on a computer when you use a
mouse. With Link Browsing, you use the directional
arrow keys to move a highlight from one link, button,
or entry field to the next. The highlight is restricted to
the links, buttons, and entry fields.
To activate Link Browsing, follow these steps:
Use the
,.
buttons on your remote to
move the pointer to the Link Browser icon on
the top right of the screen. The Link Browser
icon is the third icon from the right.
The pointer will be in the correct position if the
icon turns blue and the words “Link Browsing”
appear on the screen.
Press the button. Link Browsing is activated
and will remain active whenever you bring up
the Web Browser or until you change to Pointer
Browsing.
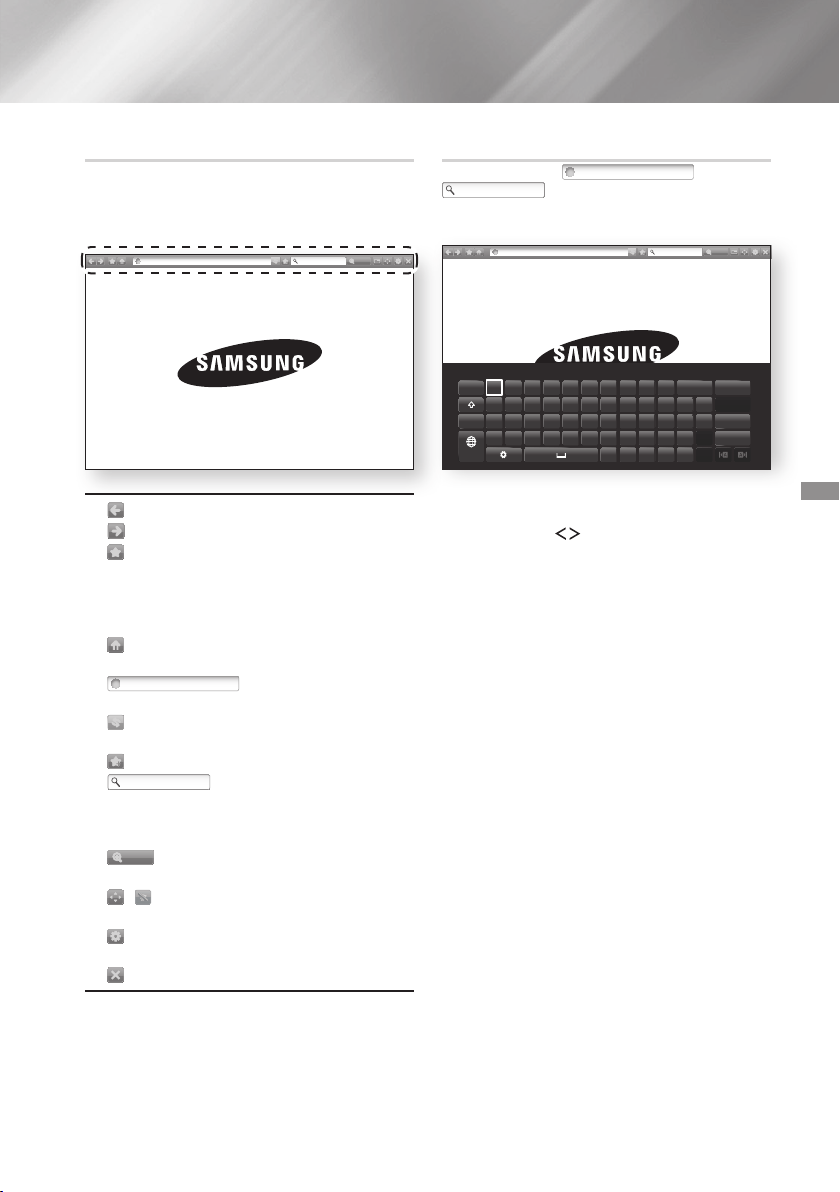
47 - English
The Control Panel, which runs across the top of the
screen, has a series of icons which start a number
of useful functions. The icons are described below,
starting with the icon on the far left of the screen.
http://www.samsung.com
100%
http://www.samsung.com
100%
: Moves to the previous page.
http://www.samsung.com
100%
: Moves to the next web page.
http://www.samsung.com
100%
: Displays the Bookmarks and History
screen. You can bookmark the current page,
select an existing bookmark, and edit and delete
bookmarks. You can also view your browsing
history and select a page to revisit.
http://www.samsung.com
100%
: Moves to the Home screen of the Web
Browser.
http://www.samsung.com
100%
: Lets you enter a page
address manually using the keyboard pop-up.
http://www.samsung.com
100%
: Reloads the current page so that it is
refreshed on the screen.
http://www.samsung.com
100%
: Adds the current page to your bookmarks.
http://www.samsung.com
100%
: Lets you search for
information by entering words or characters
using the keyboard pop-up. See Using the
Keyboard Popup on this page.
http://www.samsung.com
100%
: Lets you enlarge or shrink the screen
by various percentages.
http://www.samsung.com
100%
/
: Lets you switch between Pointer
Browsing and Link Browsing.
http://www.samsung.com
100%
: Lets you configure the Browser’s settings.
See “Using the Settings Menu” on page 48.
http://www.samsung.com
100%
: Closes the Web Browser.
When you click the
http://www.samsung.com
100%
, the
http://www.samsung.com
100%
or access a data or text entry field,
and then press the button, the keyboard pop-up
appears.
http://www.samsung.com
:
d
f
g
h
j
k
l
~
@ !
100%
To use the keyboard pop-up with your remote, follow
these steps:
Use the
,.
buttons on your remote to
move the highlight to a letter or number of your
choice.
Press the button to enter the letter or
number into the entry field.
To access capital letters, move the highlight to
the key on the top left, and then press
the button. Press the button again with
the key highlighted to access small letters
again.
To access symbols and additional punctuation
marks, highlight the button on the left,
and then press the button.
To delete a character you entered, move the
highlight to the
:
button, and then press the
button.
To delete all the characters you entered, move
the highlight to the button, and then press
the button.
When finished entering, move the highlight to
the button, and then press the button.
✎
If you have a wireless keyboard connected to your
product, you can use the wireless keyboard to
enter letters, numbers, symbols, and punctuation.
Note that the wireless keyboard will work only
when the keyboard popup appears and can only
be used to enter letters, numbers, symbols, and
punctuation.
48 - English
Network Services
To access the keyboard pop-up options, highlight the
http://www.samsung.com
100%
button on the bottom left of the keyboard, and
then press the button.
Select the language for the keyboard. You can
select English, French, Russian, etc.
The keyboard suggests recommended words as
you enter text. You can turn this function or
.
Reset erases the Samsung Keyboard's memory.
Select to erase everything that the Samsung
Keyboard has learned about your writing style,
including any new words you have used.
The keyboard will predict the next letter as you
enter letters. The predictions appear in a ring
around the letter you have just entered. You can
select a predicted letter or move to another letter.
You can turn this function or .
Select if you want to type letters with accent
marks.
The Settings menu contains functions that control
how the Browser operates and Browser security
functions. To open the Settings menu, highlight the
http://www.samsung.com
100%
icon in the Control Panel, and then press the
button. To select an option in the Settings menu,
highlight the option, and then press the button.
100%
Turns the Grabber function on and off. When the
Grabber function is on, you can move a web page
up and down without dragging the scroll bar.
The Grabber function is only available in Pointer
Browsing.
Lets you restrict your children’s access to
inappropriate web pages by allowing access only
to the web sites you have registered.
Every time you access this function, the PIN screen
appears.
Press and hold the button until the
Num pad appears on the screen. When the Num pad
appears, select a number using the
,.
button
and then press the
button.
The first time you
access this function, enter the default PIN, 0000.
You can change the PIN using the Reset password
for the Approved Sites function. See below.
`
: Turns the Approved
Sites function on or off.
`
: Change
the Approved Sites password.
`
: Lets you add the currently
displayed web site to the Approved Sites list.
`
: Lets you key in URLs
to add to the Approved Sites List and delete
sites from the Approved Sites list. If you turn
this function on and have not added any sites to
the Approved Sites list, you will not be able to
access any Internet sites.
Enable or disable the Privacy mode. When the
Privacy mode is enabled, the browser does not
retain the URLs of sites you visit. If you want to
enable Privacy mode, select .
If the Privacy mode is running, the “Stop” icon
appears in front of the URL at the top of the
screen. To disable Privacy mode, select it again
when Privacy mode is enabled.
You can set the desired Search Engine.

49 - English
`
: You can set the Browser's
home page.
`
: Turns the Pop-up Block on and
off.
`
: You can determine whether to
block advertisements and select the URLs for
which advertisements are blocked.
`
: You can delete personal in information
such as website history and browsing data
(cookies, etc.), and reset all web browser
settings to their factory defaults. You can also
set the .
✎
Set the to to avoid
accessing malicious/phishing sites and prevent
malicious code from running.
`
: You can set the Encoding setting for
web pages to Automatic or select the encoding
format manually from a list.
`
: You can set the speed of the cursor
when the cursor is set to Pointer Browsing.
`
: Displays the version
number and copyright information for the Web
Browser.
Provides basic information about the operation of
the Web Browser.
✎
Depending on the web site, some of the
functions may not be activated.
Functions that are not activated are greyed out
and cannot be used.
Linking your Internet Service
Accounts to the Product
The Link Accounts function lets you link your product
to your accounts with Internet services such as
Pandora so that the product can log you in to the
service automatically when you start the app for that
service.
To create a service account link, follow these steps:
On the Home screen, select the
button in
the upper right corner, and then press the
button to log in to your Samsung Account.
After you have logged in, select the button
again, and then press the button.
Select in the My Account screen,
and then press the button.
On the screen, select the service
you want to link to the product, and then press
the button.
In the ID and Password screen, enter the ID you
use to log in to the service you selected using
the pop-up keyboard. When finished, select
, and then press the button.
Repeat the same process for the password.
When finished select , and then press the
button.
Select , and then press the button.
BD-LIVE™
Once the product is connected to your network, you
can enjoy various movie-related service contents
available on BD-LIVE compliant discs.
Attach a USB flash drive to the USB jack
on the front of the product, and then check
its remaining memory. The memory device
must have at least 1GB of free space to
accommodate the BD-LIVE services.
Select on the Home screen, and then
press the button.
Select , and then press the button.
Select , and then press the
button.
Select , and then press
the button.
Select , and then press the
button.
Select USB device, and then press the
button.
Insert a Blu-ray Disc that supports BD-LIVE.
Select an item from the list of BD-LIVE service
contents provided by the disc manufacturer.
✎
The way you use BD-LIVE and the provided
contents may differ, depending on the disc
manufacturer.

50 - English
Appendix
Additional Information
Certain HDMI output resolutions may not work,
depending on your TV.
You must have an HDMI connection to enjoy videos
with 3D technology.
A long HDMI cable may cause screen noise. If this
occurs, set to in the menu.
For some 3D discs, to stop a movie during 3D
playback, press the
e
()
button once.
The movie stops and the 3D mode option is de-
activated.
To change a 3D option selection when you are
playing a 3D movie, press the
e
()
button
once. The Blu-ray menu appears. Press the
e
()
button again, then select in the
Blu-ray menu.
Depending on the content and the position of the
picture on your TV screen, you may see vertical
black bars on the left side, right side, or both sides.
Depending on the disc type, some aspect ratios
may not be available.
If you select an aspect ratio and option which is
different than the aspect ratio of your TV screen, the
picture might appear to be distorted.
If you select , your TV may display
(black bars on the sides of the picture).
When is , the setting
automatically defaults to and
appears in the menu.
If the product is connected to a device that does
not support , you cannot use the
function.
For proper operation of , set the
option in both the product and the TV to .
Be sure to select the correct or you
will hear no sound or just loud noise.
If the HDMI device (AV receiver, TV) is not
compatible with compressed formats (Dolby Digital,
DTS), the audio signal outputs as PCM.
Regular DVDs do not have BONUSVIEW audio and
Navigation Sound Effects.
Some Blu-ray Discs do not have BONUSVIEW
audio and Navigation Sound Effects.
This setup does not affect the
analogue (L/R) audio or HDMI audio output to your
T V.
It affects the optical and HDMI audio output when
your product is connected to an AV receiver.
If you play MPEG audio soundtracks, the audio
signal outputs as PCM regardless of your
selections (PCM or Bitstream).
can be activated when
is set to .
The Internet connection may be restricted while you
are using BD-LIVE contents.
Depending on your TV, certain HDMI output
resolutions may not work. Please refer to the user
manual of your TV.
This function is not available if the HDMI cable does
not support CEC.
If your Samsung TV has an Anynet+ logo, then it
supports the Anynet+ function.
In the external memory mode, disc playback may
be stopped if you disconnect the USB device in the
middle of playback.
Only those USB devices formatted in the FAT file
system (DOS 8.3 volume label) are supported.
We recommend you use USB devices that support
the USB 2.0 protocol with 4 MB/sec or faster read/
write speeds.
The Resume Play function may not work after you
format the storage device.
The total memory available to
may differ, depending on conditions.
For more information about DivX(R) VOD, visit
“http://vod.divx.com”.
51 - English
You cannot change the brightness of the
H
I
G
H
-
E
N
D
V
A
C
U
U
M
T
U
B
E
S
O
U
N
D
5V 0.5A
button
and the , button.
When is set to , audio is
produced by the TV speakers.
When HDMI audio is output to the TV speakers, it is
automatically down-mixed to 2 channels.
When is , the
function is not available.
Using an HDMI cable not certified for ARC (Audio
Return Channel) may cause a compatibility problem.
The ARC function is only available if an ARC-
compliant TV is connected.
Video files with high bitrates of 20Mbps or more
strain the product’s capabilities and may stop
playing during playback.
The ◄► indicator will not appear on the screen
if the BONUSVIEW section does not contain any
BONUSVIEW audio settings.
The languages available through the Audio
Language function depend on the languages that
are encoded on the disc. This function or certain
languages may not be available.
Some Blu-ray Discs may allow you to select either
the PCM or Dolby Digital audio English soundtrack.
Depending on the Blu-ray Disc/DVD, you may be
able to change the subtitle language in the Disc
Menu. Press the button.
This function depends on the selection of subtitles
that are encoded on the disc and may not be
available on all Blu-ray Discs/DVDs.
Information about the main feature BONUSVIEW
mode will also appear if the Blu-ray Disc has a
BONUSVIEW section.
This function changes both the primary and
secondary subtitles at the same time.
The total number of primary and secondary
subtitles, respectively, is displayed.
You can’t enlarge the subtitle and PG graphics in
the full screen mode.
If the home cinema is connected to a BD Wise
compliant TV that has , the
Settings menu will not appear.
The function will not work
unless the music file and the photo file are located
on the same storage media. Also, sound quality can
be impacted by the bitrate of the MP3 music file,
the size of the photos, and the encoding method.
Disk and Format Compatibility
VIDEO
Blu-ray Disc
3D Blu-ray Disc
BD-ROM or BD-RE/-R
disc recorded in the BD-
RE format.
DVD-VIDEO,
DVD-RW,
DVD-R,
DVD+RW,
DVD+R
DVD-VIDEO, recorded
DVD+RW/DVD-RW(V)/
DVD-R/+R discs that
have been recorded and
finalised, or a USB storage
media containing DivX,
MKV, MP4 contents.
MUSIC
CD-RW/-R,
DVD-RW/-R,
BD-RE/-R
Music recorded on CD-
RW/-R, DVD-RW/-R, BD-
RE/-R discs or a USB
storage media containing
MP3 or WMA contents.
PHOTO
CD-RW/-R,
DVD-RW/-R,
BD-RE/-R
Photos recorded on CD-
RW/-R, DVD-RW/-R, BD-
RE/-R discs or a USB
storage media containing
JPEG contents.

52 - English
Appendix
✎
The product may not play certain CD-RW/-R and
DVD-R because of the disc type or recording
conditions.
✎
If a DVD-RW/-R disc has not been recorded properly
in DVD video format, it will not be playable.
✎
Your product will not play content that has been
recorded on a DVD-R at a bitrate that exceeds 10
Mbps.
✎
Your product will not play content that has been
recorded on a BD-R or USB device at a bitrate that
exceeds 30 Mbps.
✎
Playback may not work for some types of discs, or
when you use specific operations, such as angle
change and aspect ratio adjustment. Information
about the discs is written in detail on the disc box.
Please refer to this if necessary.
✎
When you play a BD-J title, loading may take longer than
a normal title or some functions may perform slowly.
HD DVD
DVD-ROM/PD/MV-Disc,
etc
DVD-RW(VR mode)
CVD/CD-ROM/CDV/
CD-G/CD-I/LD
(CD-Gs play audio only,
not graphics.)
DVD-RAM
Super Audio CD
(except CD layer)
3.9 GB DVD-R Disc for
Authoring.
✎
This product may not respond to all operating
commands because some Blu-ray Disc, DVD, and
CD discs allow specific or limited operation and
provide only certain features during playback.
Please note that this is not a defect in the product.
✎
Samsung cannot guarantee that this product will
play every disc bearing the Blu-ray Disc, DVD, or CD
logo because disc formats evolve, and problems and
errors may occur during the creation of Blu-ray Disc,
DVD, and CD software and/or the manufacture of
discs.
✎
Please contact the SAMSUNG Customer Care
Centre at, if you have questions or encounter difficulty
when playing Blu-ray Disc, DVD, or CD discs in this
product. Also, refer to rest of this user manual for
additional information on playback restrictions.
✎
Some commercial discs and DVD discs purchased
outside your region may not play on this product.
Blu-ray Disc 3D Blu-ray Disc
BD-LIVE Dolby
DTS
Java DivX
PAL broadcast system in
U.K, France, Germany, etc.
Both products and discs are coded by region. These
regional codes must match for a disc to play. If the codes
do not match, the disc will not play.
The Region Number for this product is displayed on the
rear panel of the product.
A
North America, Central America,
South America, Korea, Japan,
Taiwan, Hong Kong and South
East Asia.
B
Europe, Greenland, French
territories, Middle East, Africa,
Australia and New Zealand.
C
India, China, Russia, Central
and South Asia.
53 - English
1
The U.S., U.S. territories and
Canada
2
Europe, Japan, the Middle East,
Egypt, Africa, Greenland
3
Taiwan, Korea, the Philippines,
Indonesia, Hong Kong
4
Mexico, South America,
Central America, Australia,
New Zealand, Pacific Islands,
Caribbean
5
Russia, Eastern Europe, India,
North Korea, Mongolia
6
China
✎
If the Region number of a Blu-ray Disc/DVD does
not correspond to the Region number of this
product, the product cannot play the disc.
This product can play back AVCHD format discs.
These discs are normally recorded and used in
camcorders.
The AVCHD format is a high definition digital video
camera format.
The MPEG-4 AVC/H.264 format compresses images
with greater efficiency than the conventional image
compressing format.
Some AVCHD discs use the “x.v.Colour” format. This
product can play back AVCHD discs that use the
“x.v.Colour” format.
“x.v.Colour” is a trademark of Sony Corporation.
“AVCHD” and the AVCHD logo are trademarks of
Matsushita Electronic Industrial Co., Ltd. and Sony
Corporation.
✎
Some AVCHD format discs may not play, depending
on the recording conditions.
✎
AVCHD format discs need to be finalised.
✎
“x.v.Colour” offers a wider colour range than normal
DVD camcorder discs.
✎
Some DivX, MKV and MP4 format discs may not play,
depending on their video resolution and frame rate.
Your product supports USB storage media, MP3
players, digital cameras, and USB card readers.
The product does not support folder or file names
longer than 128 characters.
Some USB/digital camera devices may not be
compatible with the product.
Your product supports the FAT 16, FAT 32, and NTFS
file systems.
Connect USB devices directly to the product’s USB
port. Connecting through a USB cable may cause
compatibility problems.
Inserting more than one memory device into a
multi-card reader may cause the reader to operate
improperly.
The product does not support the PTP (Peer to Peer)
protocol.
Do not disconnect a USB device while it is transferring
or recording data.
The bigger the image resolution, the longer the image
takes to display.
This product cannot play MP3 files with DRM (Digital
Rights Management) downloaded from commercial
sites.
Your product only supports video that is under 30fps
(frame rate).
Your product only supports USB Mass Storage Class
(MSC) devices such as thumb drives and USB HDD.
(HUB is not supported.)
Certain USB HDD Devices, multi-card readers and
thumb drives may not be compatible with this product.
If some USB devices require excessive power, they
may be limited by the circuit safety device.
If playback from a USB HDD is unstable, provide
additional power by plugging the HDD into a wall
socket. If the problem continues, contact the USB
HDD manufacturer.
SAMSUNG is not responsible for any data file damage
or data loss.

54 - English
Appendix
*.avi
*.mkv
*.asf
*.wmv
*.mp4
*.mov
*.3gp
*.vro
*.mpg
*.mpeg
*.ts
*.tp
*.trp
*.mov
*.flv
*.vob
*.svi
*.m2ts
*.mts
*.divx
*.ps
AVI
MKV
ASF
MP4
3GP
MOV
FLV
VRO
VOB
PS
TS
SVAF
MVC
1920x1080
24/25/30 60
AC3
LPCM
ADPCM
(IMA, MS)
AAC
HE-AAC
WMA
DD+
MPEG(MP3)
DTS
(Core, LBR)
Motion JPEG
FHD :
MAX 30
HD :
MAX 60
30
H.264 BP/MP/HP
Divx 3.11 / 4 / 5 / 6
MPEG4 SP/ASP
Window Media Video
v9(VC1)
AVS
MPEG2
MPEG1
Microsoft MPEG-4 v3
1280x720
MAX 30
Window Media Video
v7(WMV1), v8(WMV2)
H 263 Sorrenson
720x576
Microsoft MPEG-4 v1, v2
VP6 640x480
6~30 4
*.webm
WebM VP8 1920x1080
6~30 20 Vorbis
*.rmvb
RMVB RV8/9/10 (RV30/40) 1920x1080
6~30 20 RealAudio 6
`
Limitations
- Files are not supported if there are some issues with
contents among the supported codecs listed above.
- Normal playback is not guaranteed if the file's container
information is wrong or the file itself is corrupted.
- Sound or video play may cutoff for contents with
bitrate/frame rates that are above standard.
- The seek (skip) function is not available if the file's
index table is damaged.
- Depending on your network status, play may become
disrupted when playing contents from the network.
- Some USB/Digital camera devices may not be
compatible with the product.
- RMVB format is supported in China and Hong Kong
only
- AVS codec is supported for contents for China only
- *.ps extension is supported for contents for China only
- DivX codec is not supported for contents in the US
`
Video decoder
- Supports up to H.264 Level 4.1 (except for FMO/ASO/
RS)
- Does not support VC1 AP L4
- Except for WMV v7, v8, MSMPEG4 v3, MVC, VP6
Below 1280 X 720: 60 frame max
Above 1280 X 720: 30 frame max
- Does not support GMC 2 or higher
- Supports SVAF Top/Bottom, Side by Side, Left/Right
view sequence type(2 ES) Only
- Supports BD MVC Spec Only
`
Audio decoder
- Supports WMA 10 Pro (Up to 5.1)
- Does not support WMA lossless audio.
- Supports M2 profile
- ReadlAudio 10 lossless is not supported for contents
for China and Hong Kong
- Does not support QCELP, AMR NB/WB
- vorbis : Supported up to 5.1 channel
- DD+ : Supported up to 7.1ch
- DTS LBR codec is supported in MKV/MP4/TS
containers only

55 - English
*.mp3
MPEG
MPEG1 Audio Layer 3 -
*.m4a
*.mpa
*.aac
MPEG4
AAC -
*.flac
FLAC
FLAC Supports up to 2ch
*.ogg
OGG
Vorbis Supports up to 2ch
*.wma
WMA
WMA
Supports WMA 10 Pro (Up to 5.1) Does
not support WMA lossless audio
Supports up to M2 profile
*.wav
wav
wav -
*.mid
*.midi
midi
midi
type 0 and type 1
Seek not supported
Supported on USB only
*.ape
ape
ape NonSmart not supported
*.aif
*.aiff
AIFF
AIFF -
*.m4a
ALAC
ALAC -
*.jpg
*.jpeg
JPEG
15360x8640 -
*.png
PNG
4096x4096 -
*.bmp
BMP
4096x4096 -
*.mpo
MPO
15360x8640 -
56 - English
Appendix
Audio
Stream on
Blu-ray Disc
PCM Up to PCM 7.1ch PCM
DTS re-encoded
Re-encoded
Dolby Digital *
Dolby Digital Up to PCM 5.1ch Dolby Digital
Dolby Digital
Plus
Up to PCM 7.1ch
Dolby Digital Plus
Dolby
TrueHD
Dolby TrueHD
DTS DTS
DTS-
HD High
Resolution
Audio
DTS-HD High
Resolution Audio
DTS-HD
Master
Audio
DTS-HD Master
Audio
Audio
Stream on
DVD
PCM PCM 2ch
Dolby Digital Up to PCM 5.1ch Dolby Digital
DTS Up to PCM 7.1ch DTS
Definition for
Blu-ray Disc
Any
Decodes the main
feature audio and
BONUSVIEW audio
stream together
into PCM audio and
adds Navigation
Sound Effects.
Outputs only the
main feature audio
stream so that your
AV receiver can
decode the audio
bitstream.
You will not hear
BONUSVIEW audio
or Navigation Sound
Effects.
Decodes the main
feature audio and
BONUSVIEW audio
stream together
into PCM audio and
adds Navigation
Sound Effects, then
re-encodes the
PCM audio into DTS
bitstream.
Decodes the main
feature audio and
BONUSVIEW audio
stream together
into PCM audio and
adds Navigation
Sound Effects, then
re-encodes the PCM
audio into Dolby
Digital bitstream or
PCM.
`
If the Source Stream is 2ch or mono, “Re-encoded Dolby D” Setting are not applied. Output will be PCM 2ch.
Blu-ray Discs may include three audio streams :
- Main Feature Audio : The audio soundtrack of the main feature.
- BONUSVIEW audio : An additional soundtrack such as the director or actor’s commentary.
- Navigation Sound Effects : When you choose some menu navigation options, Navigation Sound Effects may sound.
Navigation Sound Effects are different on each Blu-ray Disc.
57 - English
BD Wise Resolution of Blu-ray Disc 1080p@60F
Auto
Movie Frame : Auto
UHD Output : Auto 2160p@24F 2160p@24F
UHD Output : Off 1080p@24F 1080p@24F
Movie Frame : Off Max. Resolution of TV input Max. Resolution of TV input
Movie Frame : Auto (24Fs)
1080p only
1080p@24F 1080p@24F
1080p 1080p@60F 1080p@60F
1080i 1080i 1080i
720p 720p 720p
576p/480p 576p/480p 576p/480p
BD Wise 576i/480i
Auto
Movie Frame : Auto
DVD 24fps Conversion : Auto
UHD Output : Auto 2160p@24F
UHD Output : Off 1080p@24F
DVD 24fps Conversion : Off Max. Resolution of TV input
Movie Frame : Off Max. Resolution of TV input
Movie Frame : Auto (DVD 24fps Conversion : Auto)
1080p only
1080p@24F
1080p 1080p@60F
1080i 1080i
720p 720p
576p/480p 576p/480p
✎
If the TV you connected to the product does not support Movie Frame or the resolution you selected, the message
"If no pictures are shown after selecting 'Yes', please wait for 15 seconds to return to the previous resolution. Do
you want to change the resolution?" appears. If you select Yes, the TV's screen will go to blank for 15 seconds, and
then the resolution will revert to the previous resolution automatically.
✎
If the screen stays blank after you have changed the resolution, remove all discs, and then press and hold the
@
button on the top of the product for more than 5 seconds. All settings are restored to the factory default. Run the
Initial Settings procedure again. Then, go to > > in the Menu, and select the correct
resolution for your TV.
✎
When you run the Initial Settings procedure, re-select the language and aspect ratio (screen size and format) only.
Resetting does not affect your network settings, so you should be able to skip Network Setup and Software Update.
✎
When the factory default settings are restored, all stored user BD data will be deleted.
✎
The Blu-ray Disc must have the 24 frame feature for the product to use the Movie Frame (24fps) mode.

58 - English
Appendix
Troubleshooting
Refer to the table below when this product does not function properly. If the problem you are experiencing is not listed
below or if the instructions below do not help, turn off the product, disconnect the power cord and contact the nearest
authorized dealer or Samsung Electronics Service Centre.
Is the power cord plugged securely into the outlet?
Turn off the power, and then turn it back on.
Check the region number of the Blu-ray/DVD disc.
Blu-ray/DVD disc purchased from abroad may not be playable.
CD-ROMs and DVD-ROMs cannot be played on this product.
Make sure that the rating level is correct.
p
Are you using a deformed disc or a disc with scratches on the surface?
Wipe the disc clean.
The home cinema does not play sound during fast playback, slow playback, and
step motion playback.
Are the speakers connected properly? Is the speaker setup correctly customized?
Is the disc severely damaged?
On certain Blu-ray/DVD discs, sound is output from the front speakers only.
Check if the speakers are connected properly.
Adjust the volume.
When playing audio from a CD, the radio, or a TV, the unit outputs sound to the
front speakers only.
Is there "Dolby Digital 7.1 CH" marked on the disc? Dolby Digital 7.1 CH Surround
Sound is produced only if the disc is recorded with 7.1 channel sound.
Is the audio language correctly set to Dolby Digital 7.1-CH in the information
display?
Are you operating the remote within its operational range and within the proper
angle relative to the sensor?
Are the batteries drained?
Is the TV power on?
Are the video cables connected properly?
Is the disc dirty or damaged?
A poorly manufactured disc may not be playable.
The Audio Language and subtitle functions will not work if the disc does not
contain them.

59 - English
Are you using a disc that does not contain menus?
You can play 16:9 Blu-ray/DVD discs in 16:9 Full mode, 4:3 Letter Box mode, or 4:3
Pan-Scan mode, but 4:3 Blu-ray/DVD discs are played in 4:3 mode only. Refer to
the Blu-ray Disc jacket, and then select the appropriate function.
Press and hold the remote control's
e
() button for 5 seconds in STANDBY
mode. This will reset the unit.
- Using the RESET function will erase all stored settings.
Do not use this function unless necessary.
With no disc in the product, press and hold the product's
@
button for longer than
5 seconds. appears on the display and all settings will return to their default
values.
- Using the RESET function will erase all stored settings.
Do not use this function unless necessary.
Is the antenna connected properly?
If the antenna's input signal is weak, install an external FM antenna in an area with
good reception.
If you press the
^
button while listening to TV audio using the
D. IN or AUX functions, the Blu-ray/DVD disc functions are turned on and the TV
audio is muted.
The features or action cannot be completed at this time because:
1. The Blu-ray/DVD disc's software restricts it.
2. The Blu-ray/DVD disc's software doesn’t support the feature (e.g., angles)
3. The feature is not available at the moment.
4. You’ve requested a title or chapter number or search time that is out of range.
Press and hold the
@
button on front panel for more than 5 seconds with no disc
in the product. All settings will revert to their factory settings.
Check the connection between the TV and the HDMI jack of the product.
Check if your TV supports 576p/480p/720p/1080i/1080p HDMI input resolution.
If random noise appears on the screen, it means that TV does not support HDCP
(High-bandwidth Digital Content Protection).

60 - English
Appendix
AllShare only shows Video, Photo, and Music files. Other types of files are not
displayed.
Check if the network is stable.
Check if the network cable is properly connected and if the network is overloaded.
The wireless connection between the DLNA compatible device and the product is
unstable.
Check the connection.
IP addresses under the same subnetwork should be unique, otherwise IP collision
can results in such a phenomenon.
Check if you have a firewall enabled.
If so, disable the firewall function.
Test whether the network connection is active by using the Network Status
function.
Check whether a USB memory device is connected to the product.
The memory device must have at least 1GB of free space to accommodate the
BD-LIVE service.
You can check the available size in . (See page 50)
See if the option is set to .
If all above fails, contact the contents provider or update to the latest firmware.
The USB memory device must have at least 1GB of free space to accommodate
the BD-LIVE service.
You can check the available size in . (See page 50)
✎
When the factory default settings are restored, all stored user BD data is deleted.

61 - English
Specifications
General
Weight 2.7 kg
Dimensions 430.0 (W) x 55.0 (H) x 312.0 (D) mm
Operating Temperature Range +5°C to +35°C
Operating Humidity Range 10 % to 75 %
FM Tuner
Signal/noise ratio 55 dB
Usable sensitivity 12 dB
Total harmonic distortion 0.5 %
HDMI
Video
2D : 2160p, 1080p, 1080i, 720p, 576p/480p
3D : 1080p, 720p
Audio PCM multichannel audio, Bitstream audio, PCM audio
Amplifier
Front speaker output 165W x 2(3Ω)
Front Top speaker output 165W x 2(3Ω)
Centre speaker output 170W(3Ω)
Surround speaker output 165W x 2(3Ω)
Subwoofer speaker output 170W(3Ω)
Frequency response
Analogue input : 20Hz~20kHz (±3dB)
Digital input : 20Hz~40kHz (±4dB)
S/N Ratio 70dB
Channel separation 60dB
Input sensitivity (AUX)500mV
62 - English
Appendix
Speaker (7.1ch speaker system)
Speaker
system
Impedance
Frequency
range
Output sound
pressure level
Rated
input
Maximum
input
Dimensions
(W x H x D) (Unit : mm)
Weights
(Unit : kg)
Front/
Front Top
3 Ω
140Hz~
20kHz
87dB/W/M
165W 330W
95.0 x 1215.0 x 101.0
(Stand base: 276.0 x 23.0 x
264.0)
5.01
Surround
95.0 x 1160.0 x 101.0
(Stand base: 276.0 x 23.0 x
264.0)
4.73
Centre
170W 340W
320.0 x 80.5 x 101.0 1.02
Subwoofer
40Hz ~
160Hz
88dB/W/M 200.0 x 390.0 x 350.0 5.75
Network speeds equal to or below 10Mbps are not supported.
Samsung Electronics Co., Ltd reserves the right to change the specifications without notice.
Weight and dimensions are approximate.
Design and specifications are subject to change without prior notice.
For the power supply and Power Consumption, refer to the label attached to the product.
Ğ
Weight 1.1 kg
Dimensions (W x H x D) 76.2 x 228.6 x 152.4 mm
Operating Temperature Range +5°C to +35°C
Operating Humidity Range 10 % to 75 %
Output 165W x 2 CH
Frequency range 20Hz~20KHz
S/N Ratio 65dB
63 - English
Licences
Manufactured under license from Dolby Laboratories. Dolby and the double-D symbol are
trademarks of Dolby Laboratories.
For DTS patents, see http://patents.dts.com. Manufactured
under license from DTS Licencing Limited. DTS, DTS-HD, the
Symbol, DTS and the Symbol together, & DTS-HD and the
Symbol together are registered trademarks of DTS, Inc. DTS-HD Master Audio | Essential and DTS Neo:Fusion II are
trademarks of DTS, Inc. © DTS, Inc. All Rights Reserved.
ABOUT DIVX VIDEO: DivX® is a digital video format created by DivX, LLC, a subsidiary
of Rovi Corporation. This is an official DivX Certified® device that has passed rigorous
testing to verify that it plays DivX video. Visit divx.com for more information and software
tools to convert your files into DivX videos.
ABOUT DIVX VIDEO-ON-DEMAND: This DivX Certified® device must be registered in order to play purchased
DivX Video-on-Demand (VOD) movies. To obtain your registration code, locate the DivX VOD section in your
device setup menu. Go to vod.divx.com for more information on how to complete your registration.
DivX Certified® to play DivX® video up to HD 1080p, including premium content.
DivX®, DivX Certified® and associated logos are trademarks of Rovi Corporation or its subsidiaries and are
used under licence.
Covered by one or more of the following U.S. patents : 7,295,673; 7,460,668; 7,515,710; 7,519,274
The terms HDMI and HDMI High-Definition Multimedia Interface, and the HDMI Logo are
trademarks or registered trademarks of HDMI Licencing LLC in the United States and other
countries.
Oracle and Java are registered trademarks of Oracle and/or its affiliates. Other names may be trademarks
of their respective owners.
This item incorporates copy protection technology that is protected by U.S. patents and other intellectual property
rights of Rovi Corporation. Reverse engineering and disassembly are prohibited.
Blu-ray Disc™, Blu-ray™, and the logos are trademarks of Blu-ray Disc Association.
This product uses Cinavia technology to limit the use of unauthorized copies of some commercially-produced film and
videos and their soundtracks. When a prohibited use of an unauthorized copy is detected, a message will be displayed
and playback or copying will be interrupted.
More information about Cinavia technology is provided at the Cinavia Online Consumer Information Centre at http://
www.cinavia.com. To request additional information about Cinavia by mail, send a postcard with your mailing address
to: Cinavia Consumer Information Centre, P.O. Box 86851, San Diego, CA, 92138, USA."
This product incorporates proprietary technology under license from Verance Corporation and is protected by U.S.
Patent 7,369,677 and other U.S. and worldwide patents issued and pending as well as copyright and trade secret
protection for certain aspects of such technology. Cinavia is a trademark of Verance Corporation. Copyright 2004-
2010 Verance Corporation. All rights reserved by Verance. Reverse engineering or disassembly is prohibited.
- Open Source Licence Notice
In the case of using open source software, Open Source Licences are available on the product menu.
If you have any questions or comments relating to Samsung products, please contact the SAMSUNG customer
care centre.
Area Contact Centre
Web Site
`
Asia Pacific
AUSTRALIA 1300 362 603 www.samsung.com/au/support
NEW ZEALAND 0800 SAMSUNG (0800 726 786) www.samsung.com/nz/support
CHINA 400-810-5858 www.samsung.com/cn/support
HONG KONG (852) 3698 4698
www.samsung.com/hk/support (Chinese)
www.samsung.com/hk_en/support (English)
INDIA
1800 3000 8282 - Toll Free
1800 266 8282 - Toll Free
30308282 - Non Toll Free
www.samsung.com/in/support
INDONESIA
0800112888
021-56997777
www.samsung.com/id/support
JAPAN 0120-327-527 www.samsung.com/jp/support
MALAYSIA 1800-88-9999 www.samsung.com/my/support
PHILIPPINES
1-800-10-7267864 [PLDT]
1-800-8-7267864 [Globe landline and Mobile]
02-4222111 [Other landline]
www.samsung.com/ph/support
SINGAPORE 1800-SAMSUNG(726-7864) www.samsung.com/sg/support
THAILAND
0-2689-3232,
1800-29-3232
www.samsung.com/th/support
TAIWAN 0800-32-9999 www.samsung.com/tw/support
VIETNAM 1800 588 889 www.samsung.com/vn/support