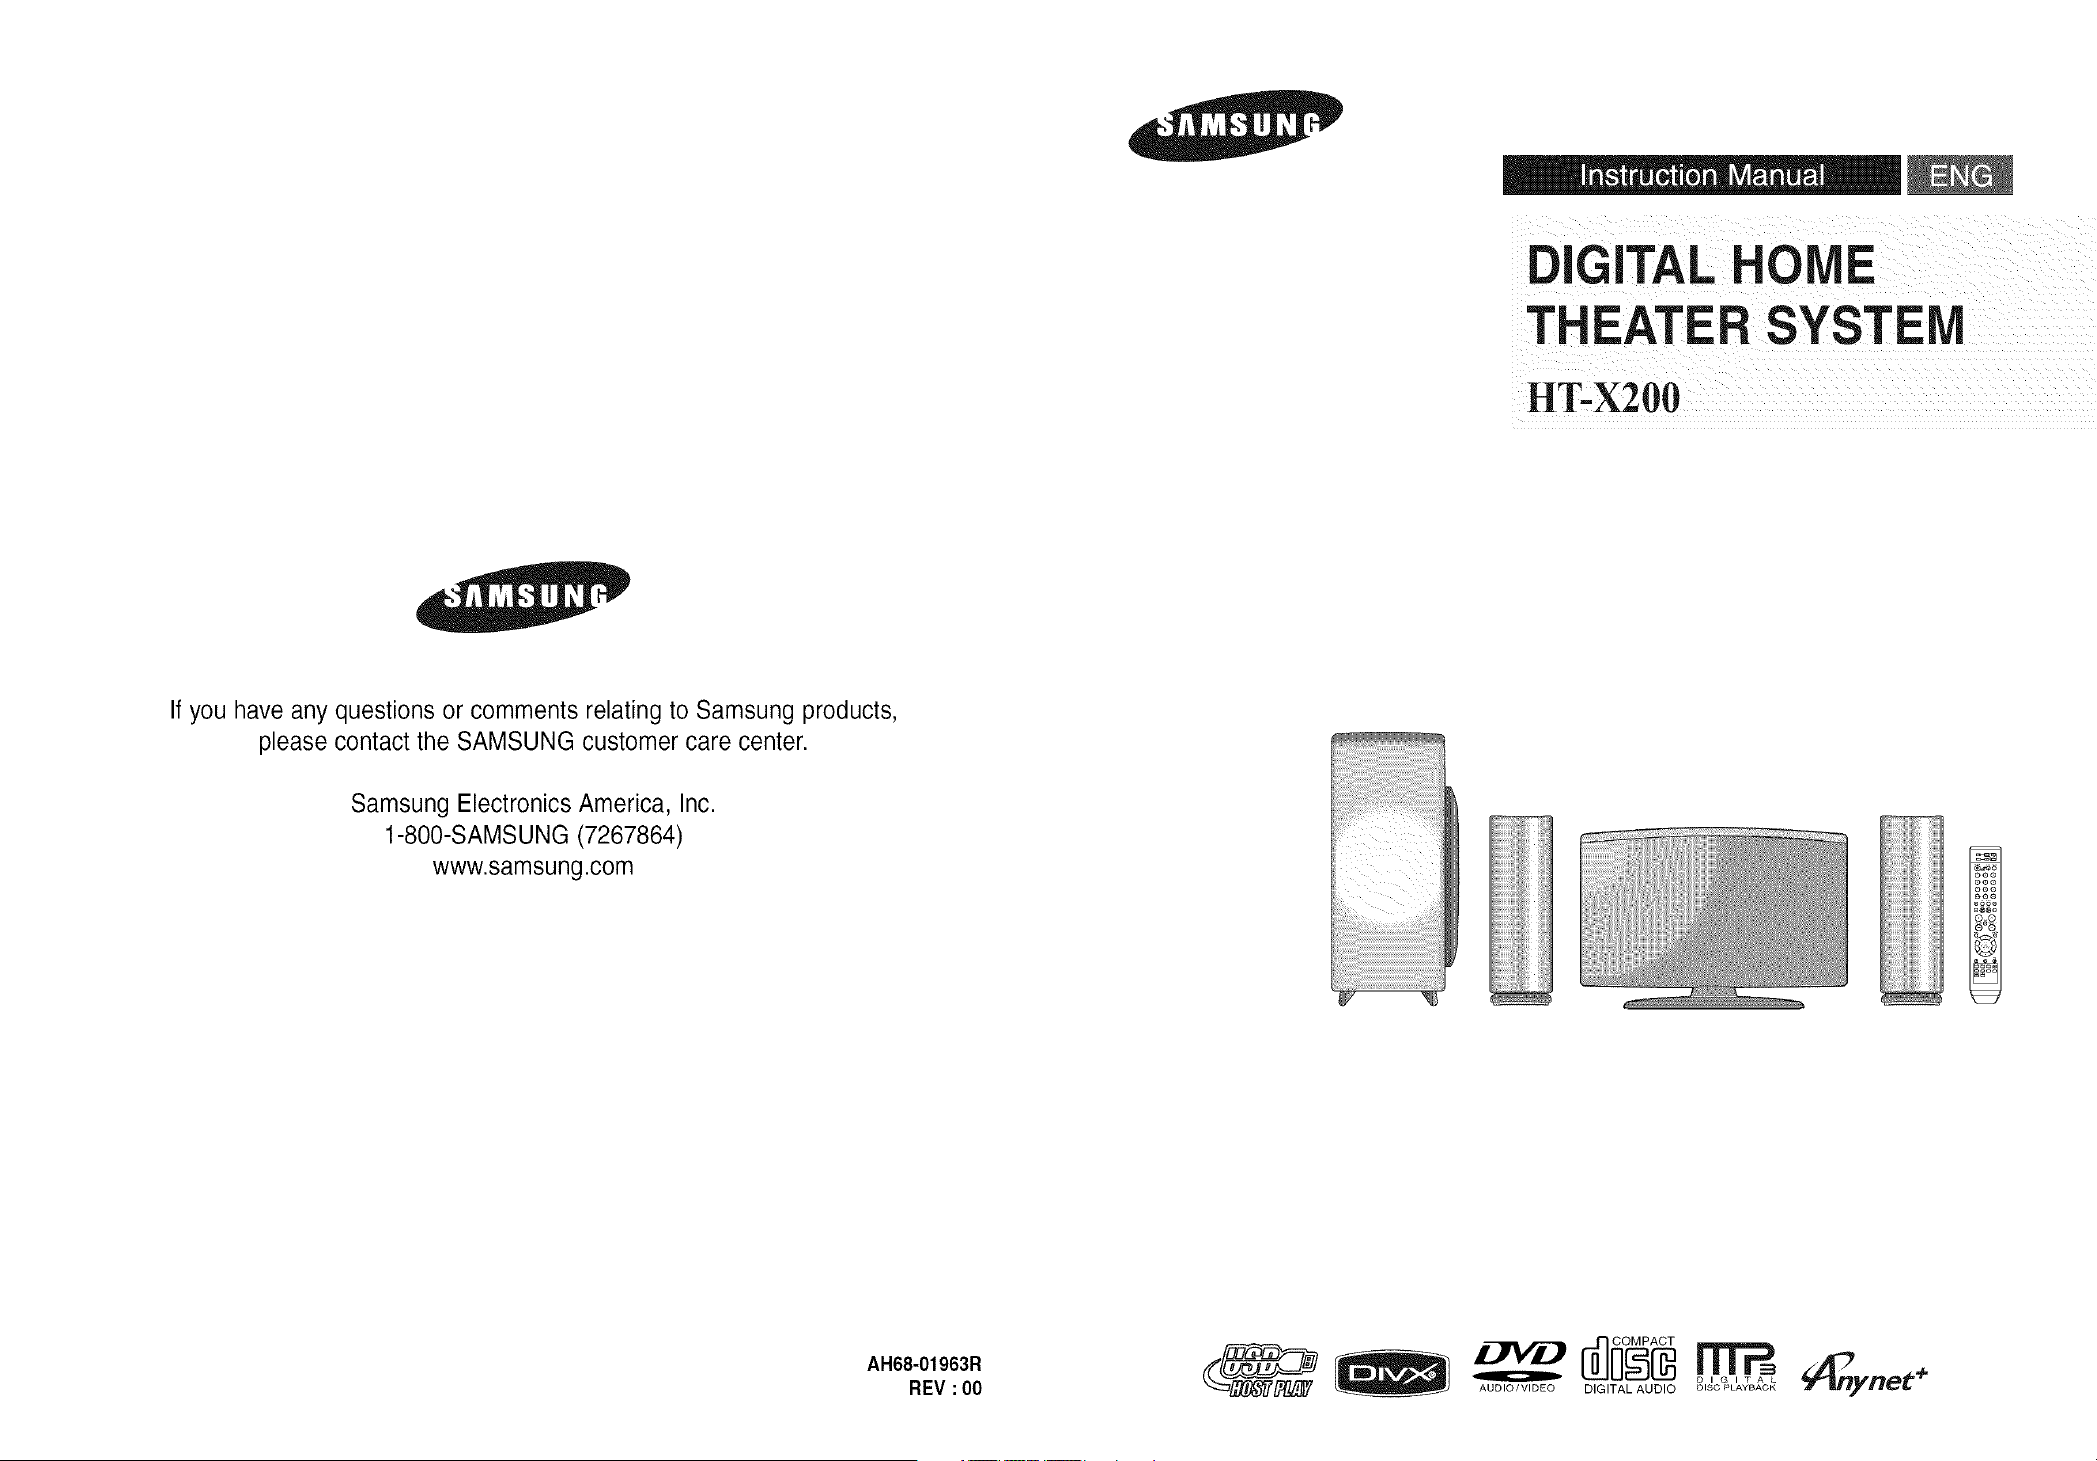
GITAL HOME
HT-X200
If you have any questions orcomments relating to Samsung products,
please contact theSAMSUNG customer care center.
Samsung Electronics America, Inc.
1-800-SAMSUNG (7267864)
www.samsung.com
=
oe®
oeo
oo®
o_o
®®
AH68-01963R
REV :00
AUDIO/VIDEO DIGITAL AUDIO DISC PLAYBACK
Safety Warnings
z_ 1 RISK OF ELECTRIC SHOCK.
+.*_ll i [o]+
DONOT OPEN
TO REDUCE THE RISK OF ELECTRIC SHOCK,
DO NOT REMOVE REAR COVER (or BACK).
NO USER SERVICEABLE PARTS INSIDE.
REFER SERVICING TO QUALIFIED SERVICE
PERSONNEL.
This symbol indicates "dangerousvoltage"
insidethe product that presentsa risk of
electric shock orpersonal injury.
This symbol indicates important instructions
accompanyingthe product.
CLASS 1 LASER PRODUCT
This Compact Disc player isclassifiedas a CLASS 1
LASER product.
I CLASS 1 LASER PRODUCT 1
KLASSE 1 LASER PRODUKT
LUOKAN 1 LASER LAITE
KLASS 1 LASER APPARAT
PRODUCTO LASER CLASE 1
Use ofcontrols, adjustments or performance of
procedures other than those specified herein may result
in hazardous radiation exposure.
CAUTION : INVISIBLE LASER RADIATIONWHEN OPEN
AND INTERLOCKS DEFEATED, AVOID
EXPOSURE TO BEAM.
Noteto CATVsystem installer
This reminder isprovided to call the CATV system
installer's attention to Section 820-40 ofthe NEC
which provides guidelines for proper grounding and,
in particular, specifies that the cable ground shall
beconnected to the grounding system of the building,
as close to the point of cable entry as practical.
WARNING
To reduce the risk of fire or electric shock, do notexpose
this appliance to rain or moisture.
CAUTION
Apparatus shall not beexposed todripping or splashing
and no objects filled with liquids, suchasvases, shall
beplacedon theapparatus.
Important Safety Instructions
Read these operating instructions carefullybefore using
the unit.Follow all the safety instructions listed below.Keep
theseoperating instructions handyfor future
reference.
1) Read these instructions.
2) Keep these instructions.
3) Heed all warnings.
4) Follow all instructions.
5) Do not usethis apparatus nearwater.
6) Clean onlywith dry cloth.
7) Do not blockanyventilation openings, Installin
accordance with the manufacturer'sinstructions.
8) Do not install near anyheatsources such as
radiators, heatregisters, or other apparatus (including
amplifiers)that produce heat.
9) Do notdefeat thesafety purpose ofthe polarized or
grounding- type plug. A polarized plughas two blades
with one widerthan theother.A grounding type plug
hastwo blades and a third grounding prong.Thewide
bladeorthe third prong are provided for your safety.
If theprovided plug does notfit into youroutlet,
consult anelectrician for replacement of the obsolete
outlet.
10)Protect the powercord from being walkedon or
pinched particularly atplugs, convenience
receptacles, and the point wherethey exit from
the apparatus.
11)Only use attachments/accessories specified by
the manufacturer.
12)Use onlywith the cart, stand,
tripod, bracket, or table specifi ed
by themanufacturer, or sold
with theapparatus.When a cart
isused, usecaution whenmoving
the cart/apparatus combination toavoidinjury from
tip-over.
13)Unplug this apparatus during lightningstorms or when
unused for longperiods of time.
14)Refer all servicingto qualified service personnel.
Servicing isrequired when the apparatus hasbeen
damaged in anyway, such as the power-supply cord
or plugis damaged, liquid hasbeen spilledor objects
have fallen intothe apparatus. Service isalso required
ifthe apparatus hasbeenexposed to rain or moisture,
does not operate normally, or has beendropped.
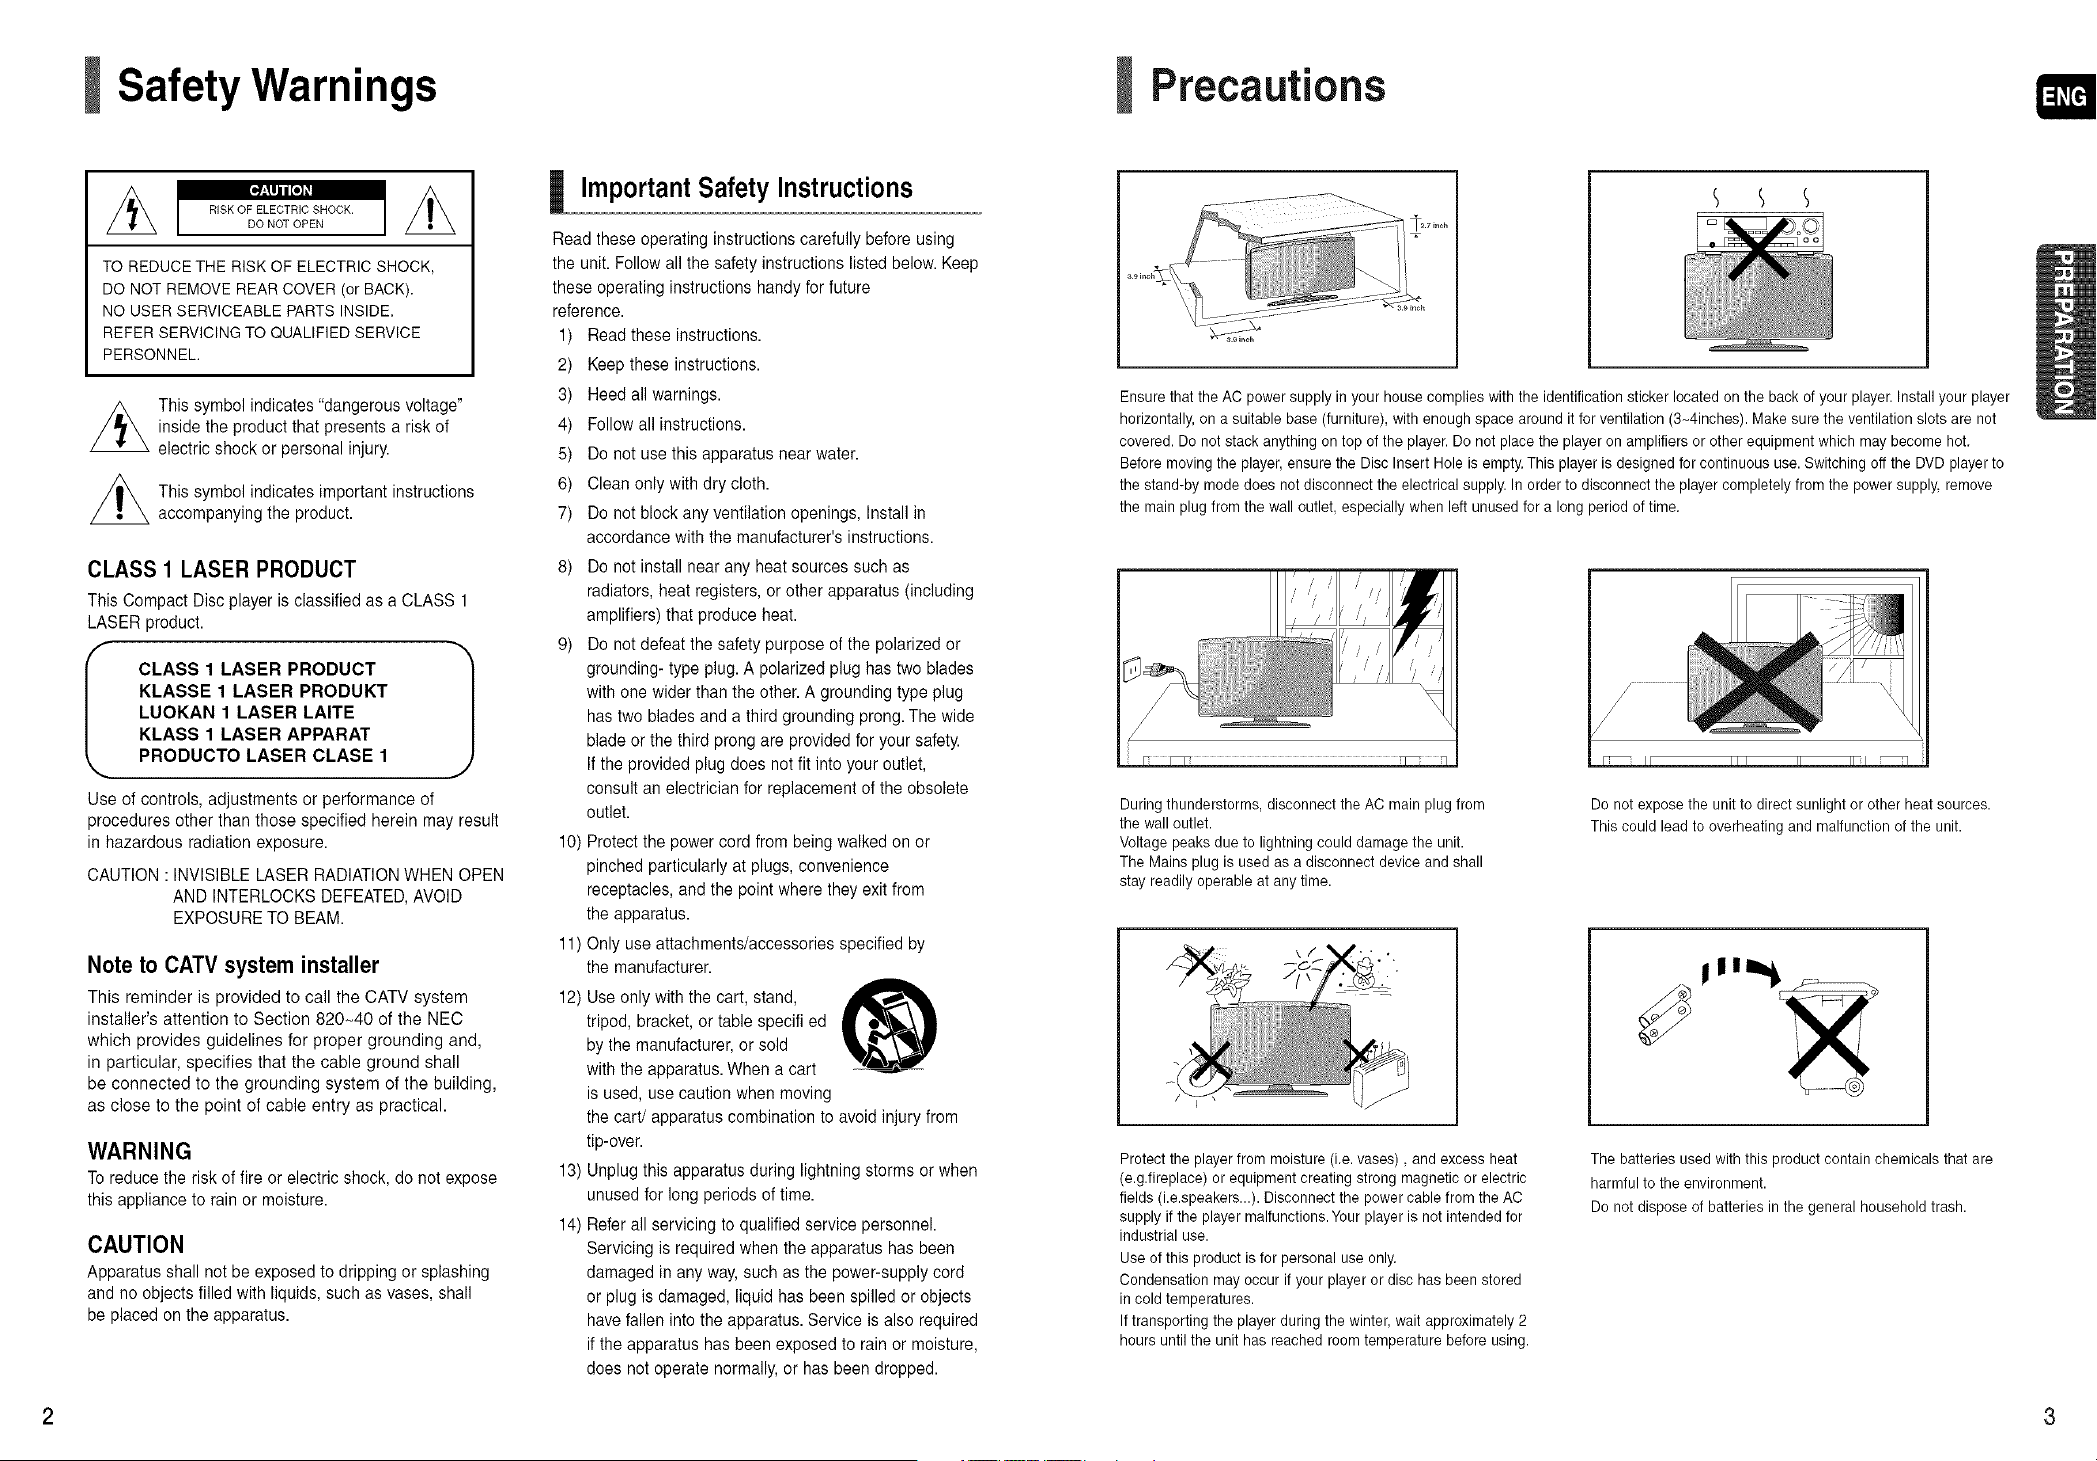
Precautions
Ensurethat the AC powersupply in your house complies with the identification sticker located on the back ofyour player.Installyour player
horizontally, on a suitable base(furniture), with enough space around it forventilation (3_4inches). Makesure the ventilation slots are not
covered. Do not stack anything on top ofthe player.Do not place the playeron amplifiersor other equipment which may become hot.
Before moving the player,ensure the Disc Insert Hole is empty. This playeris designed forcontinuous use. Switching off the DVDplayerto
the stand-by mode does not disconnect the electrical supply.Inorder to disconnect the playercompletely from the powersupply, remove
the mainplug from the walloutlet, especially when left unused fora long period of time.
During thunderstorms, disconnect the AC main plugfrom
the wall outlet.
Voltage peaks due to lightning could damage the unit.
The Mains plug is usedas a disconnect device and shall
stay readily operable atany time.
Donotexposethe unittodirectsunlightor otherheatsources.
Thiscouldleadtooverheatingand malfunctionoftheunit.
\/
Protectthe playerfrom moisture (i.e. vases), and excess heat
(e.g.fireplace) or equipment creatingstrong magnetic or electric
fields (i.e.speakers...). Disconnect the power cable from the AC
supply if the playermalfunctions.Your playeris not intended for
industrial use.
Use ofthis product isfor personal use only.
Condensation may occurif your player ordisc has been stored
in cold temperatures.
If transporting the playerduring the winter, wait approximately 2
hours until the unit has reached roomtemperature before using.
The batteries used with this product contain chemicals that are
harmful tothe environment.
Donot dispose ofbatteries in the general household trash.
2 3
Features
Multi-Disc Playback & FM Tuner
The HT-X200 combines the convenience of multi-disc playback capability, including DVD-AUDIO, DVD-VlDEO, CD,
MP3-CD, WMA-CD, DivX, CD-R/RW, and DVD+ R/RW, with a sophisticated FM tuner, all in a single player.
DVD-Audio compatible
Experience the super high-quality audio performance of DVD-Audio.
The on-board 24-bit/192kHz DAC enables this player to deliver exceptional sound quality in terms of dynamic range,
low-level resolution and high-frequency detail.
USB Host support
You can connect and play files from external USB storage devices such as MP3 players, USB flash memory, etc. using
the Home Theater's USB HOST function.
TV Screen Saver Function
Ifthe main unit remains in Stop mode for 3 minutes, the Samsung logo appears on TV screen.
The HT-X200 automatically switches itself into the power saving mode after 20 minutes in the Screen Saver mode.
Power Saving Function
The HT-X200 automatically shuts itself off after 20 minutes in Stop mode.
Customized TV Screen Display
The HT-X200 allows you to select your favorite image during JPEG, DVD playback and set it as your background wallpaper.
HDMI
HDMI transmits DVD video and audio signals simultaneously, and provides a clearer picture.
Anynet+(HDMI-CEC) Function
Anynet+ is a function that can be used to operate the main unit using a Samsung TV remote control, by connecting the
Home Theater to a SAMSUNG TV using an HDMI Cable. (This is only available with SAMSUNG TVs that support
Anynet+.)
Contents
SafetyWarnings............................................................. 2
Precautions.................................................................... 3
Features ......................................................................... 4
Notes on Discs.............................................................. 6
Description..................................................................... 8
Connecting the Speakers ............................................ 12
Installing the MainUnit ................................................ 14
Connecting the Video Out to your TV.......................... 16
HDMIFunction ............................................................. 17
Connecting Audiofrom External Components ............18
Connecting the FMAntenna ........................................20
Before Reading the User's Manual..............................21
Before UsingYour HomeTheater ................................22
Disc Playback .............................................................. 23
MP3/WMA-CD Playback.............................................. 24
JPEG File Playback..................................................... 25
DivX Playback.............................................................. 26
Usingthe Playback Function....................................... 28
Displaying Disc Information ....................................28
Checkingthe Remaining Time ................................29
Fast Playback ......................................................... 29
SlowPlayback......................................................... 29
SkippingScenes/Songs.......................................... 30
Repeat Playback..................................................... 31
ToSelect a Repeat Playback Mode inthe Disc
Information Screen................................................. 31
A-B Repeat Playback .............................................. 32
Step Function.......................................................... 32
Angle Function ........................................................ 33
Zoom(Screen Enlarge) Function ...........................33
EZVIEW Function ..................................................34
BonusGroup........................................................... 34
Navigating Pages ....................................................34
Audio Language Selection Function .......................35
Subtitle Language Selection Function .................... 35
Moving Directly to aScene/Song ...........................36
Usingthe Disc Menu............................................... 37
Usingthe Title Menu............................................... 37
Playing MediaFiles using the USB Host feature ........38
Settings........................................................................ 40
Setting the Language............................................. 40
Setting TV Screen type.......................................... 41
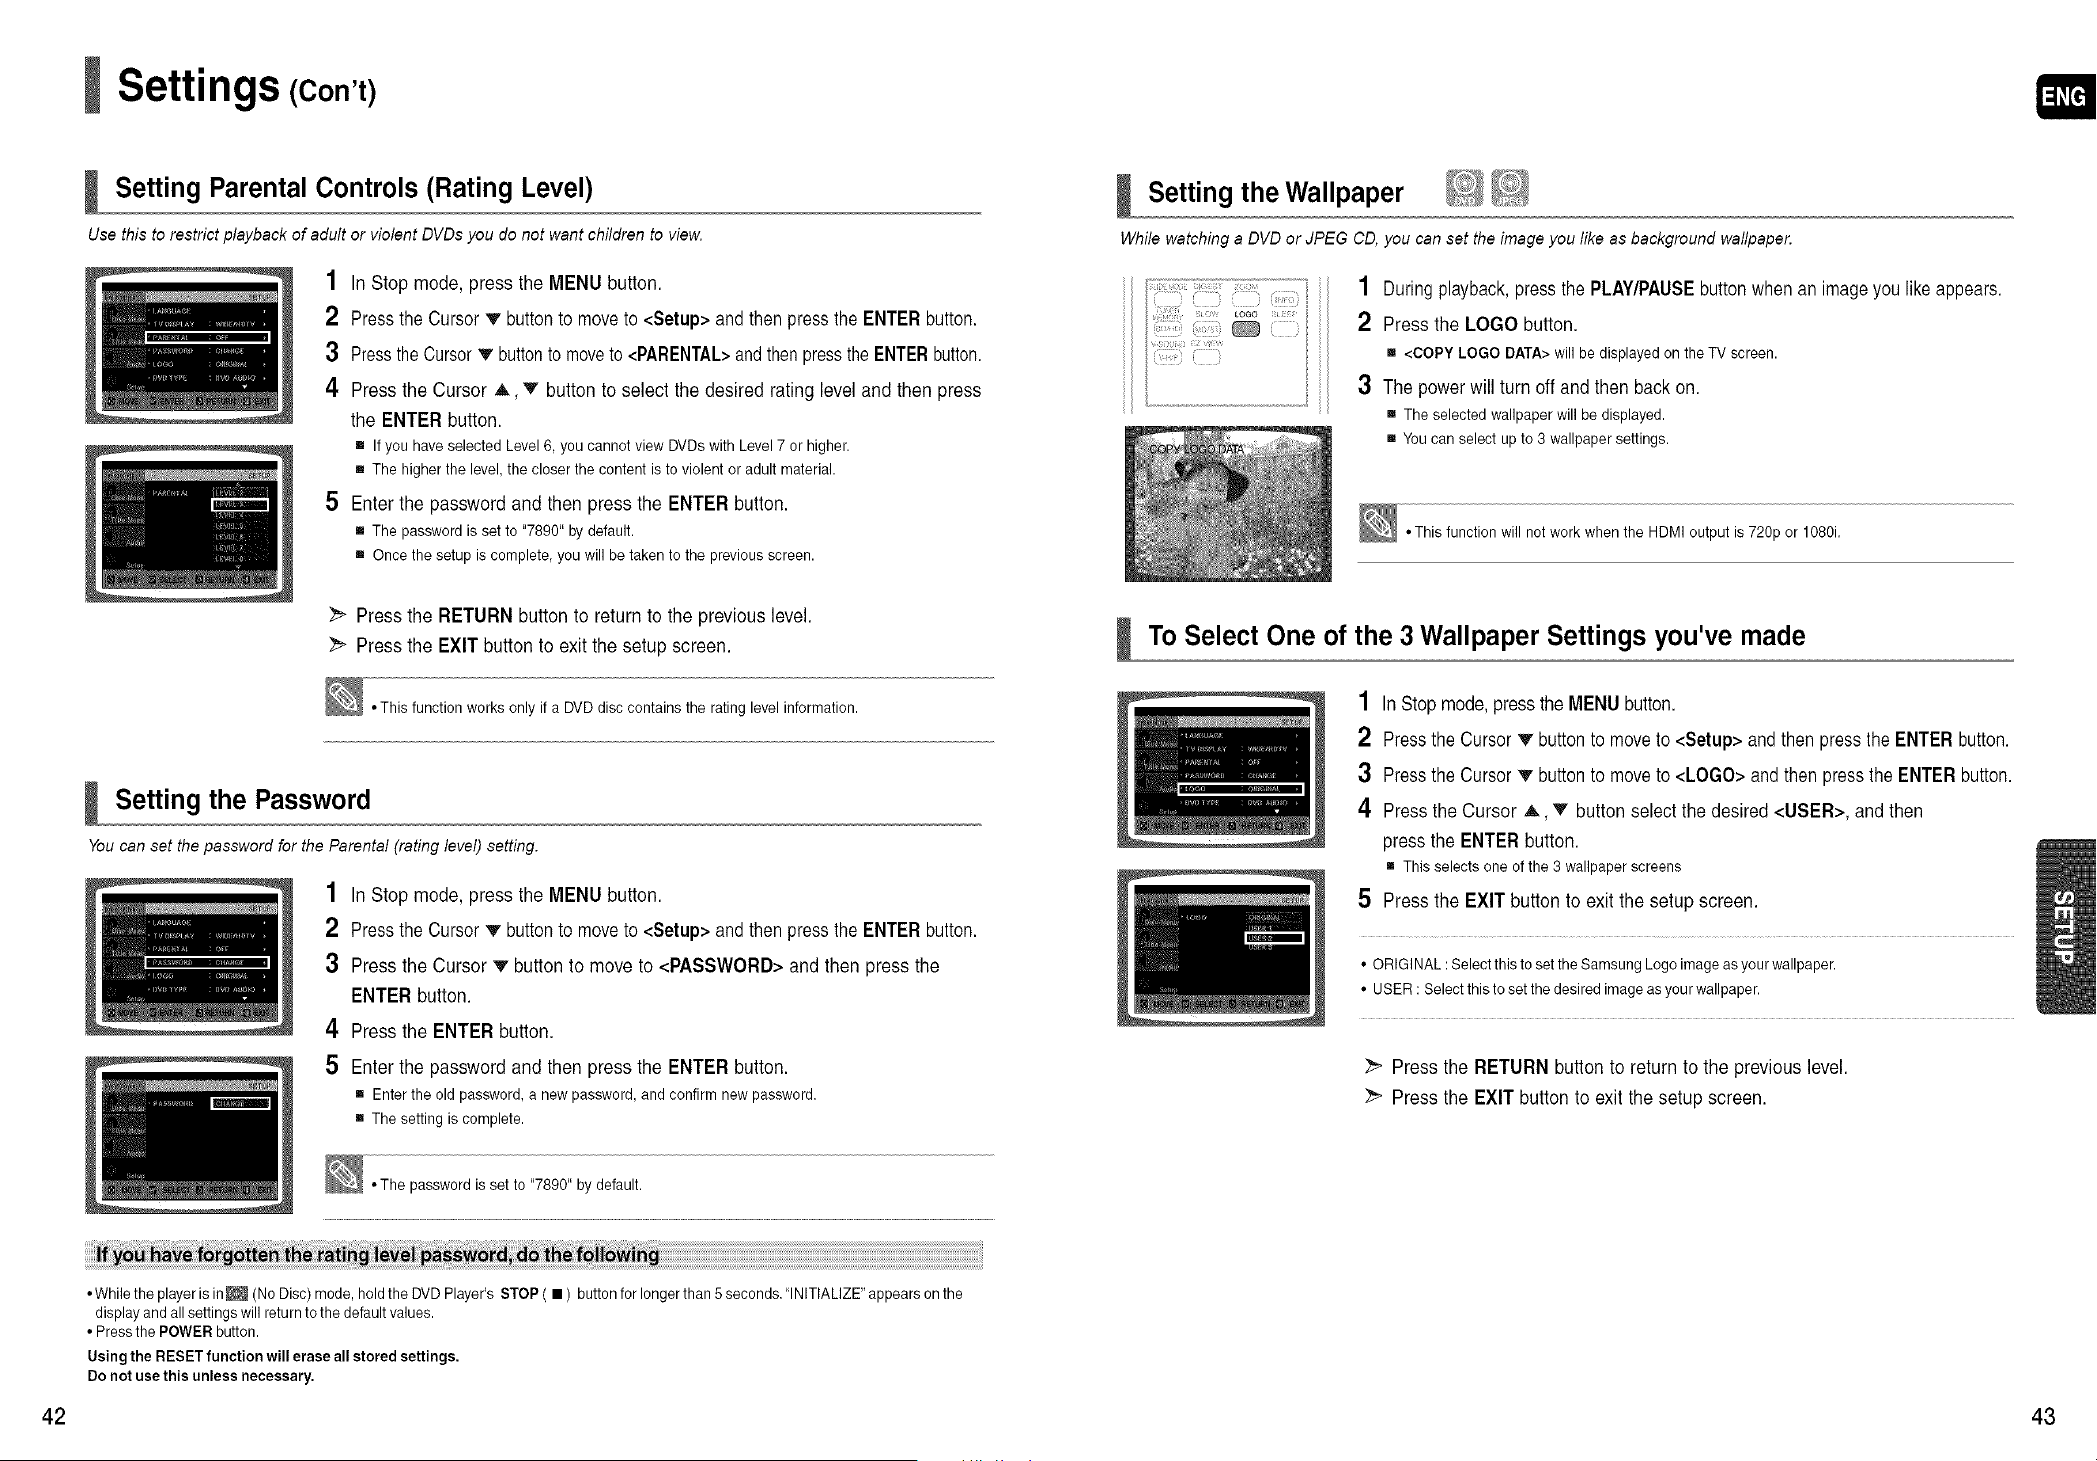
Setting Parental Controls (Rating Level)................42
Setting the Password ............................................. 42
Setting the Wallpaper ............................................. 43
ToSelect One of the 3Wallpaper Settings
you've made ...........................................................43
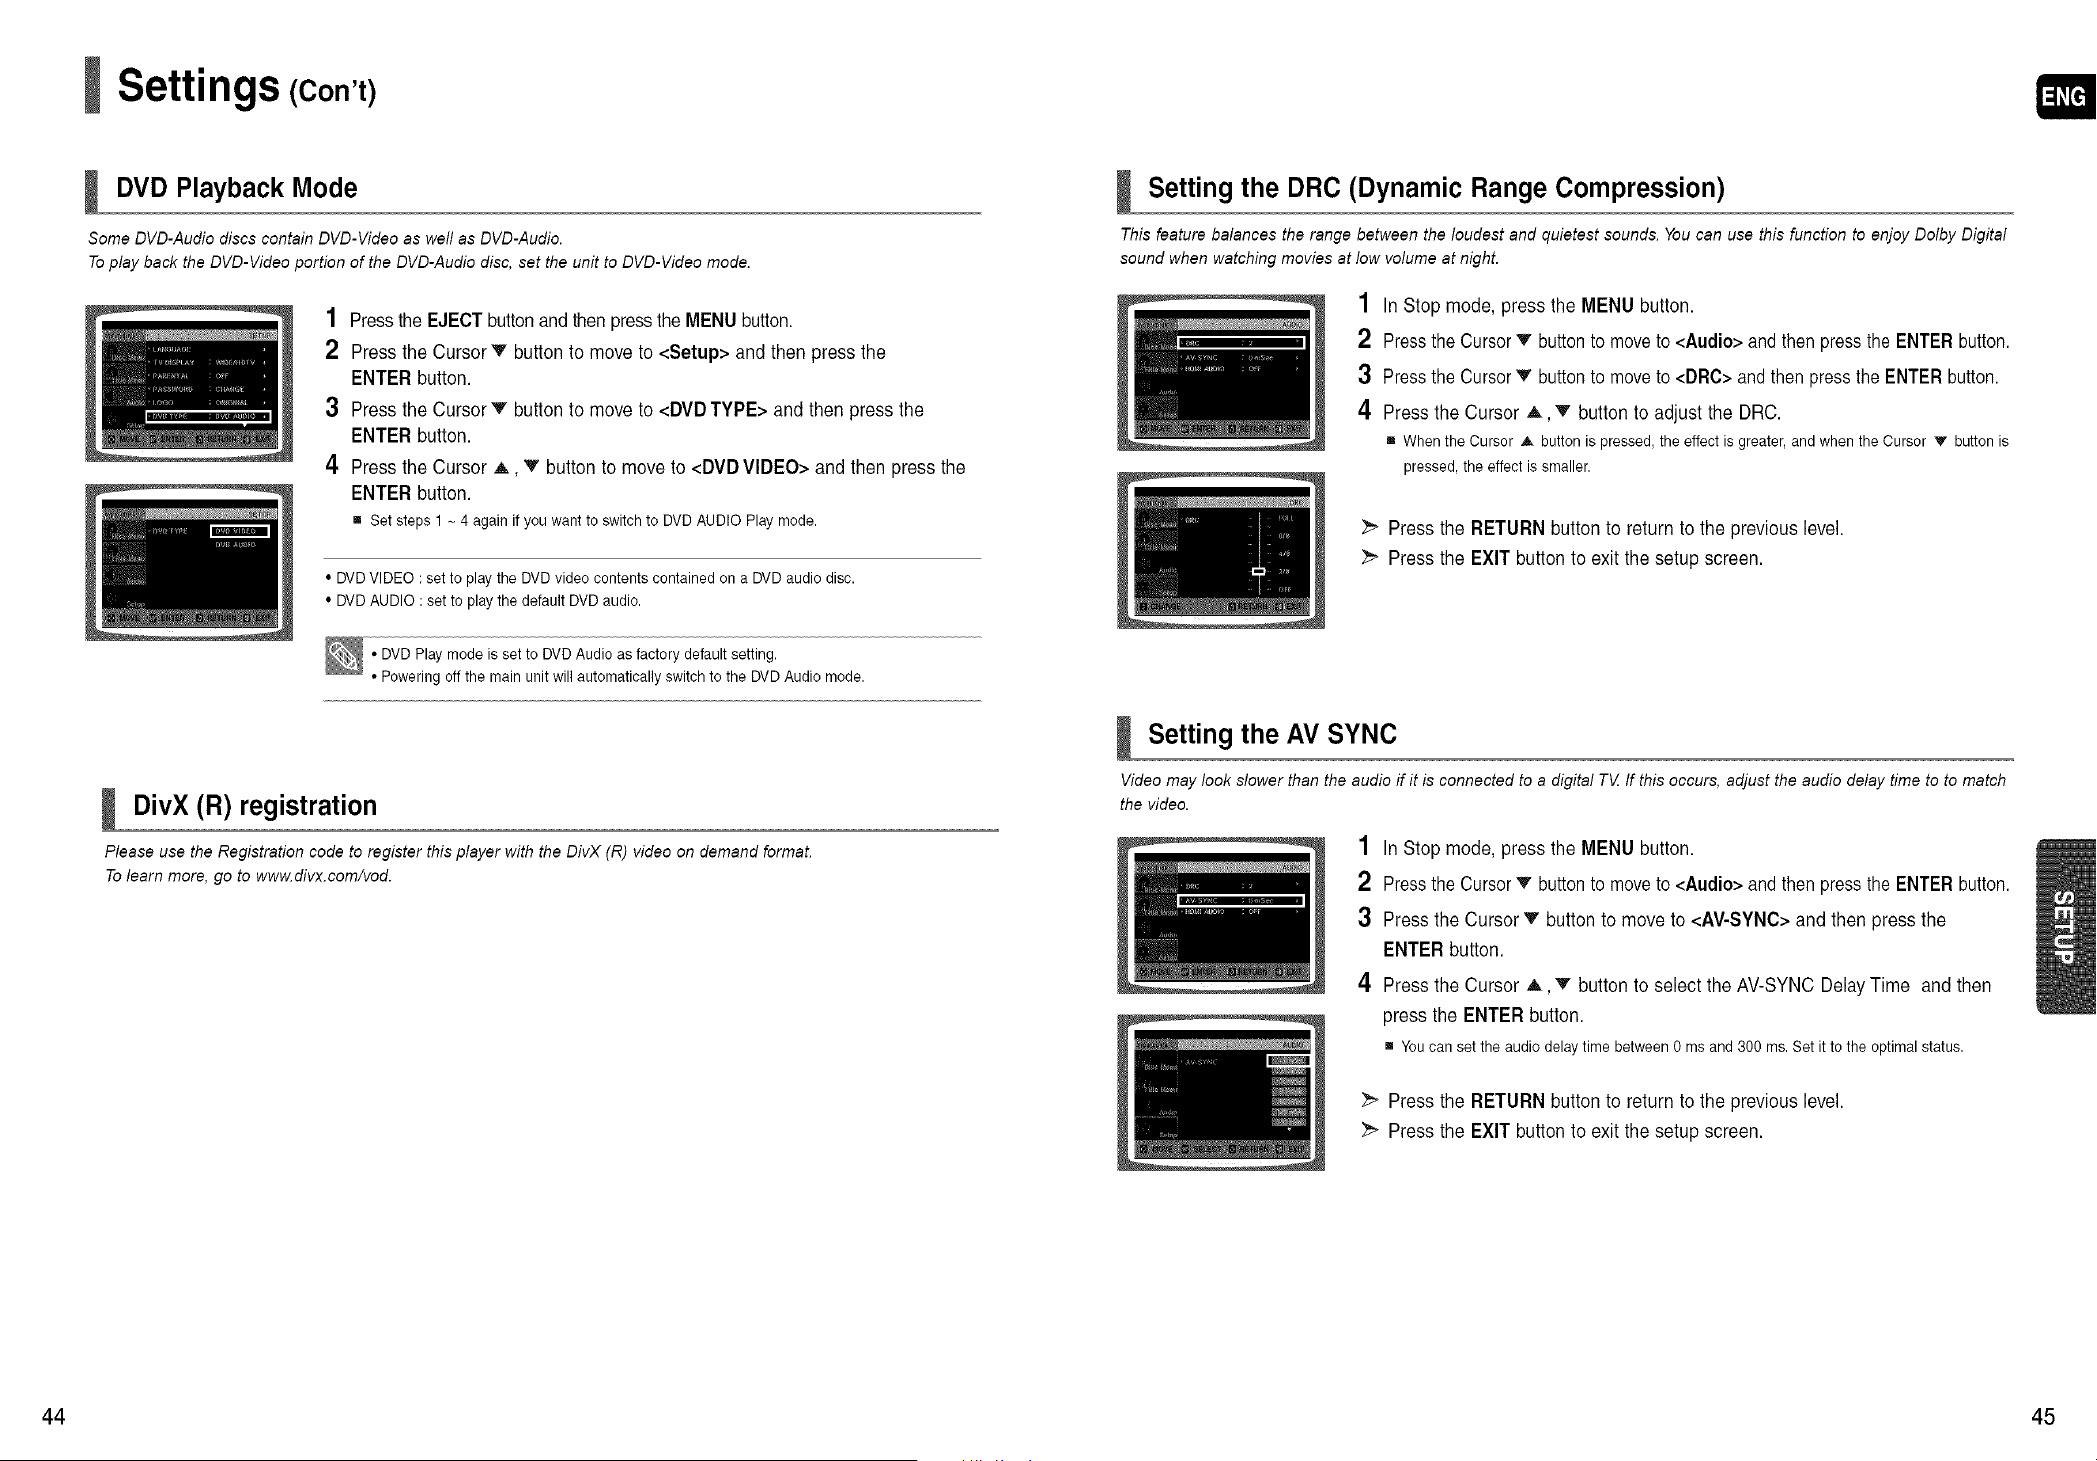
DVD Playback Mode .............................................. 44
DivX (R) registration ............................................... 44
Setting the DRC(Dynamic Range Compression) ...45
Setting the AV SYNC............................................. 45
Setting the HDMI Audio......................................... 46
Listening toRadio........................................................47
Convenient Functions .................................................. 49
Operating aTV with the Remote Control ....................51
Troubleshooting ........................................................... 53
Cautions on Handling and Storing Discs..................... 55
Language Code List ....................................................56
USB Host Feature Supported Products ...................... 57
Specifications............................................................... 58
4 5
Notes on Discs
DVD players and the discs are coded by region.These regional codes must match in order
forthe disc to play. If the codes do not match, the disc will not play.
The Region Number for this player isgiven on the rear panel ofthe player.
(YourDVDplayerwill only play DVDsthat are labeledwithidentical regioncodes.)
Playable Discs
Disc Type
DVD-AUDIO
DVD-VIDEO
AUDIO-CD
Divx
Mark (Logo)
o
AUOIO'VlOEO
DIGITAL AUDIO
RecordedSignals
Audio + Video
Audio
Audio + Video
Disc Size
5 inch
3 1/2 inch
5 inch
3 1/2 inch
5 inch
3 1/2 inch
Max. Playing Time
Approx.240rnin.(single-sided)
Approx.480rain.(double-sided)
Approx.80rnin.(single-sided)
Approx.160rain.(double-sided)
74 min.
20 min.
74 min.
20 min.
Do notuse the following types of disc!
• LD, CD-G,CD-I, CD-ROM and DVD-ROM discscannot be played on this player.
If such discsare played, a <WRONG DISCFORMAT>messageappears on theTVscreen.
• DVD discs purchased abroad may notplayon this player.
if such discsare played, a <CAN'T PLAY THIS DISCPLEASE,CHECK REGIONCODE> message
appearson theTVscreen.
Copy Protection
Many DVDdiscs are encoded with copyprotection. Because of this, you should only connect your DVD
player directly to your TV, not to a VCR. Connecting to a VCR results in adistorted
picturefrom copy-protected DVDdiscs.
This product incorporates copyright protection technologythat isprotected by methods claimsofcertain U.S.
patents and other intellectual property rights owned by Macrevision Corporation and other rights owners.
Use ofthis copyright protection technology must be authorized by Macrovision Corporation, and isintended
for home and other limitedviewing usesonly unless otherwise authorized by MacrovisionCorporation.
Reverseengineering or disassembly isprohibited.
This product is covered by one or more of the following U.S. patents:
5,060,220 5,457,669 5,561,649 5,705,762 5,987,417 6,043,912 6,222,983 6,272,096 6,377,524 6,377,531
6,385,587 6,389,570 6,408,408 6,466,532 6,473,736 6,477,501 6,480,829 6,556,520 6,556,521 6,556,522
6,578,163 6,594,208 6,631,110 6,658,588 6,674,697 6,674,957 6,687,455 6,697,307 6,707,985 6,721,243
6,721,493 6,728,474 6,741,535 6,744,713 6,744,972 6,765,853 6,765,853 6,771,890 6,771,891 6,775,465
6,778,755 6,788,629 6,788,630 6,795,637 6,810,201 6,862,256 6,868,054 6,894,963 6,937,552
This product is covered by the following U.S. patents:
US4,930,158 US4,930,160
Disc Recording Format
This product does not support Secure (DRM) Media flies.
CD-R Discs
• Some CD-R discs maynot beplayabledepending on the disc recording device (CD-Recorderor PC)and the condition of
the disc.
• Use a 650MB/74 minuteCD-R disc.
Do not useCD-R discs over 700MB/80 minute as they maynot beplayback.
• Some CD-RW(Rewritable) media, maynot beplayable.
• Only CD-Rs that are properly "closed" canbefully played.If the session isclosed but the disc isleft open,you may not
be abletofully playthe disc.
CD-R MP3 Discs
• Only CD-R discs with MP3 files in ISO9660or Jolietformat canbe played.
• MP3 file names should be 8 characters or lessin length and containno blankspaces or special characters (./ = +).
• Use discs recorded with a compression/decompression data rategreater than 128Kbps.
• Only files with the "rap3" and extensions canbe played.
• Only a consecutively written multisessiondisc can be played. Ifthere isa blank segment in the Multisession disc,
the disc canbe playedonly uptothe blanksegment.
• If the disc isnot closed, itwill take longerto begin playback and not all of the recorded files may be played.
• Forfiles encoded in Variable Bit Rate (VBR)format, i.e. files encoded in both lowbitrateand highbit rate
(e.g., 32Kbps - 320Kbps), the sound may skip during playback.
• A maximum of 500 tracks can be played perCD.
• A maximum of 300 folders can beplayedper CD.
CD-R JPEG Discs
• Only files with the "jpg" extensions canbe played.
• If the disc isnot closed, itwill take longerto start playing and not all of the recorded files may beplayed.
• Only CD-R discs with JPEGfiles in ISO9660 or Jolietformatcan be played.
• JPEGfile namesshould be8characters or less in lengthand contain noblank spaces or specialcharacters (. / = +).
• Only a consecutively written multisessiondisc can be played. Ifthere isa blank segment in the multisession disc,
the disc canbe playedonly uptothe blanksegment.
• A maximum of 9,999 imagescan bestored ona single CD.
• When playing a Kodak/FujiPicture CD, only the JPEGfiles in the picturefolder canbe played.
• Picture discs other than Kodak/Fuji PictureCDs maytake longer to start playing or may notplayatall.
DVD± R/RW, CD-R/RW DivX Discs
• Since this productonly provides encoding formats authorized by DivXNetworks, Inc., a DivXfile createdby the user
mightnet play.
• Software updates for incompatibleformats arenotsupported.
(Example :QPEL,GMC, resolution higher than 800 x 600 pixels,etc.)
• Sections with a highframe ratemightnot beplayedwhile playing a DivXfile.
• Fer more informationaboutthe formats authorized by DivX Networks, Inc., please visit"www.divxnetwerks.net".
6 7
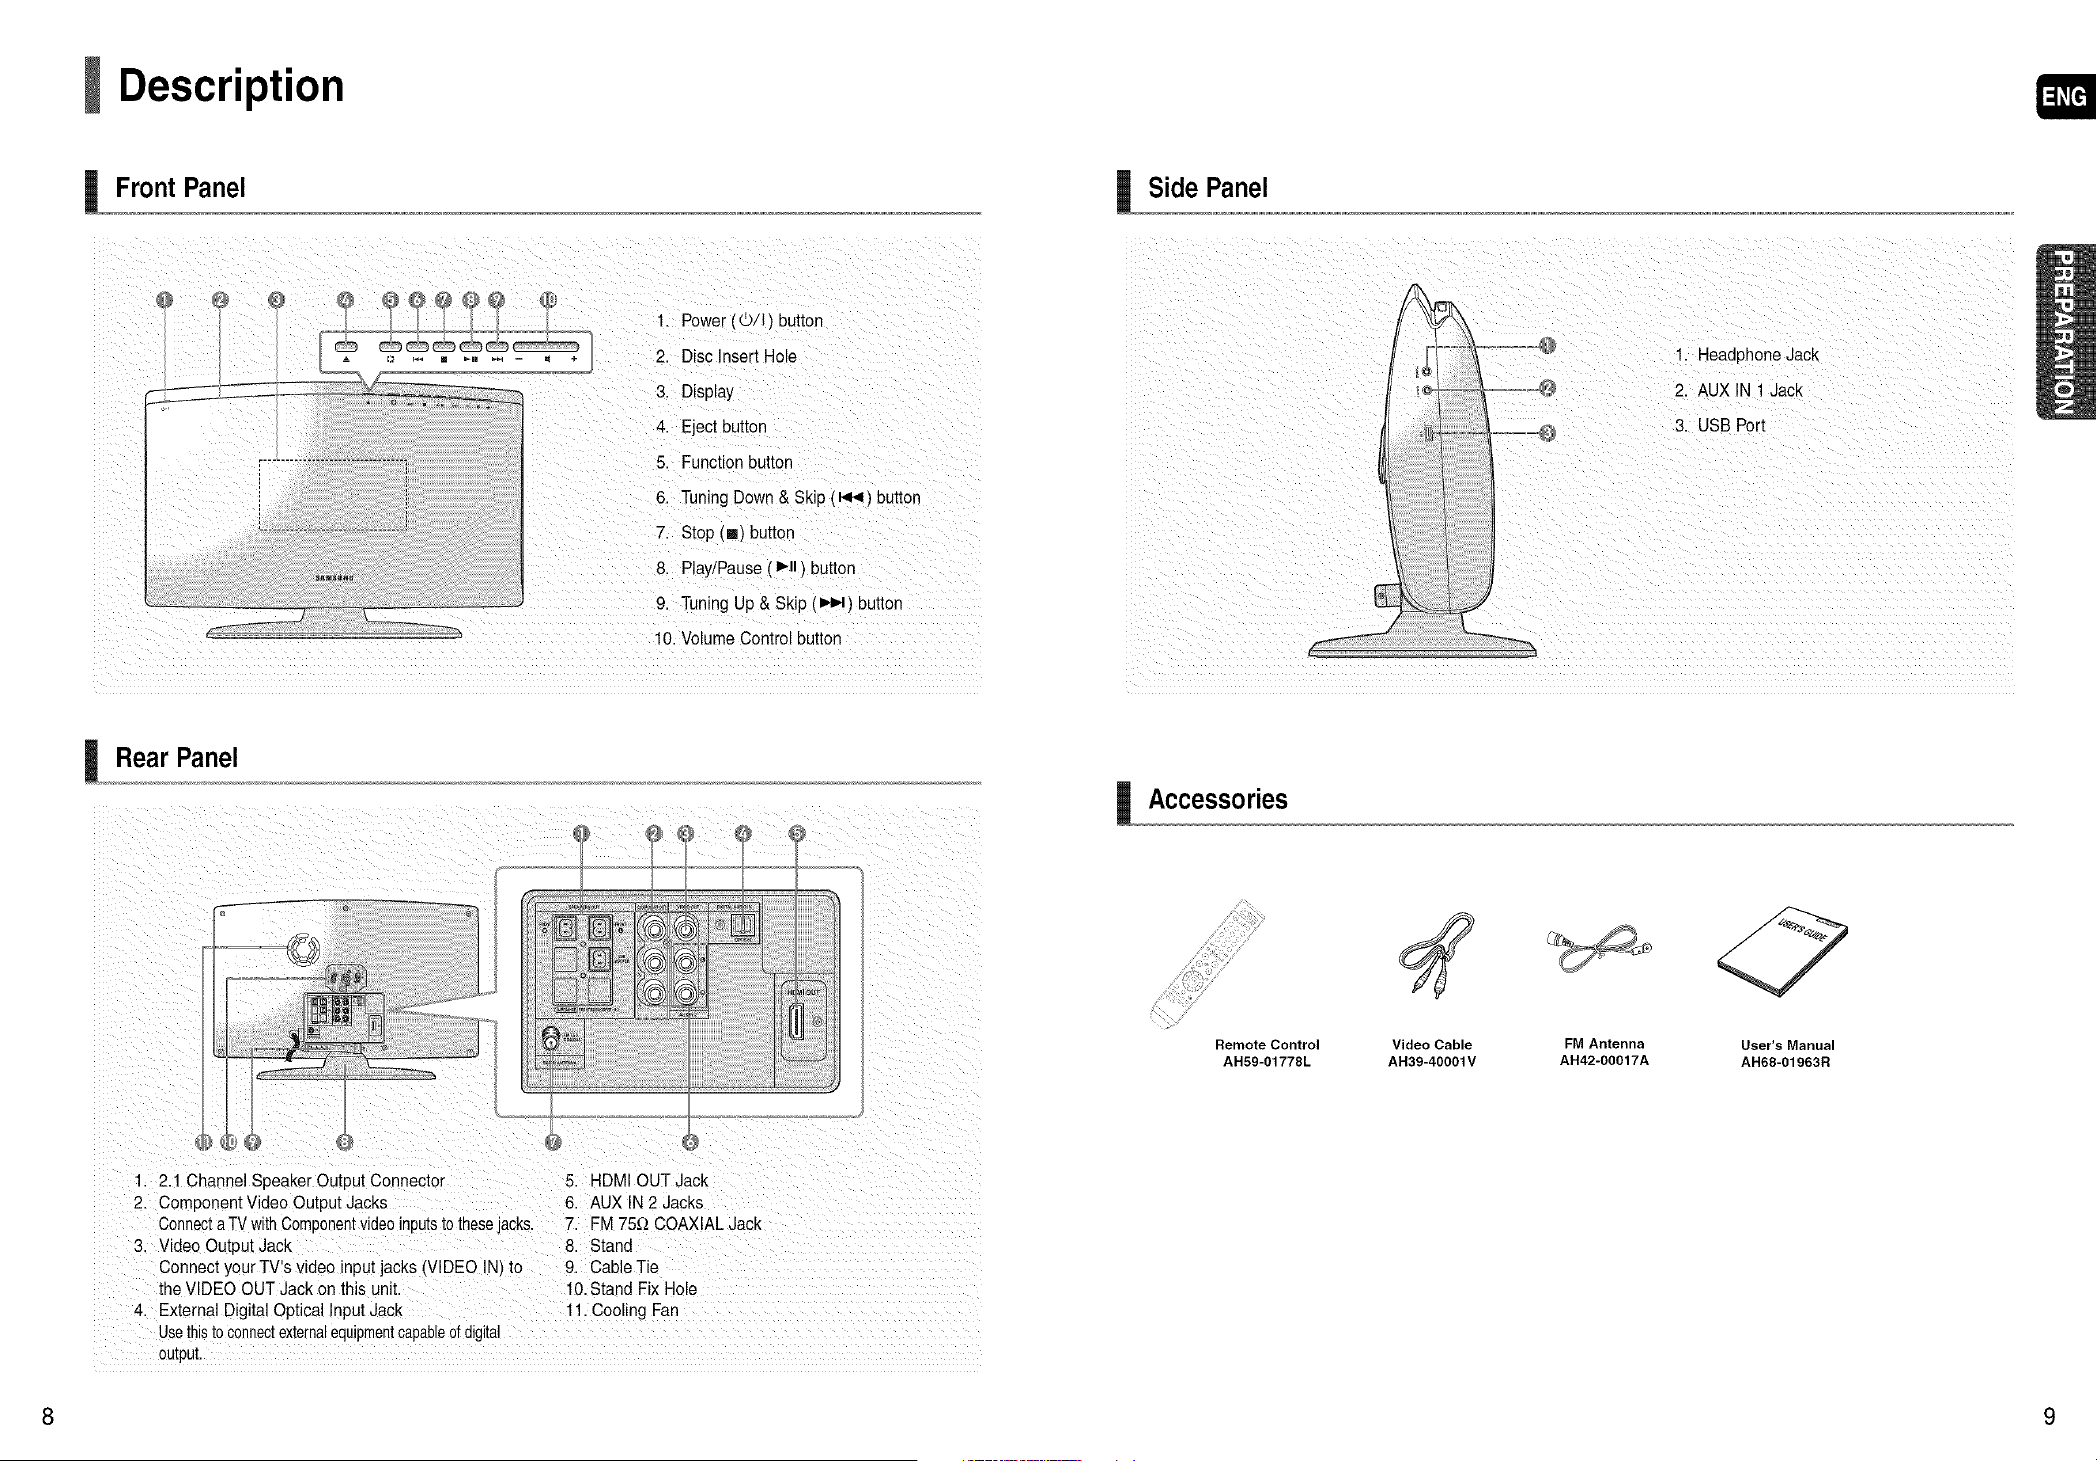
Description
FrontPanel
1. Power l©ll) button
2. Disc Insert Hole
3. Display
4. Eject button
5. Function button
6. Tuning Down& Skip (_ql_) button
7. Stop (m)button
8. Play/Pause ( I_11 ) button
9. Tuning Up&Skip (_) button
10. Volume Controlbutton
RearPanel
1,2.1 ChannelSpeakerOutput Connector 5: HDMI OUTJack
2, Component Video Output Jacks 6. AUX IN2 Jacks
ConnectaTV WithComponentVideoinputst0 thesejacks. 7.FM 75__COAXIAL Jack
3, Video Output Jack &Stand
Connect your TV s video input jacks (VIDEO IN)to 9. CableTie
theVlDEO OUTJackon this unit. 10.Stand Fix Hole
&External Digital Optical InputJack !1_ Cooling Fan
Usethisto connectexternalequipmentcapable ofdigital
output:
Side Panel
Accessories
Remote Control User's Manual
AH59-01778L AH68-01963R
Video Cable FM Antenna
AH39-40001V AH42-00017A
8 9

Description (Con't)
1. DVDRECEIVERbutton
2. TV button
3. TVNIDEO button
4. POWER button
5. Number (0-9) buttons
POWER 6. REMAINbutton
EJf;_CT _ MMER
@o_ o°°@ O _ 7. STEP button
©C)©
C)
©@G
@G
®®@®
@ _UN,NG,q-
O
Remote Control
MENU RETURN
@
r
8. Tuning Preset/CD Skipbuttons
9. VOLUME button
10.MENU button
11.AUDIO button
12. DIGESTbutton
13.SLIDE MODE button
14.TUNER MEMORY,SD(Standard
Definition)/HD(High Definition) button
15.V-SOUND(Virtual Sound),
V-H/P(Virtual Headphone) button
16.SLOW,MO/ST button
17. _ DVDbutton
TUNER button
USB
@ USB, AUXbutton
18. EJECT button
19.DIMMERbutton
20.CANCEL button
21. REPEAT button
22. @ PLAY/PAUSEbutton
@ STOP button
@ @ SEARCH buttons
23.TUNING/CH button
24. MUTE button
25. RETURN button
26. Cursor/ENTER button
27. SUBTITLE button
28. EXITbutton
29. ZOOM button
30. INFO button
31. SLEEP button
32. LOGO button
33. EZ VIEW button
InsertRemoteBatteries
1 Removethebatterycover in the direction ofthearrow.
2 Inserttwo 1.5V AAA batteries, payingattentiontothecorrect polarities
(+and -).
3 Replace the batterycover.
Followthese precautions to avoid leaking or cracking cells:
• Place batteries inthe remote control so they match the polarity :(+) to (+) and (-) to (-).
• Usethecorrect type of batteries. Batteries that looksimilar may differ involtage.
• Always replace both batteries atthe same time.
• Do not expose the batteries to heat oraflame.
OperationRange of theRemote Control
The remote control can be used up to approximately 23 feet (7 meters) in a straight line. It can also be operated
at a horizontal angle of up to 30 ° from the remote control sensor,
10 11
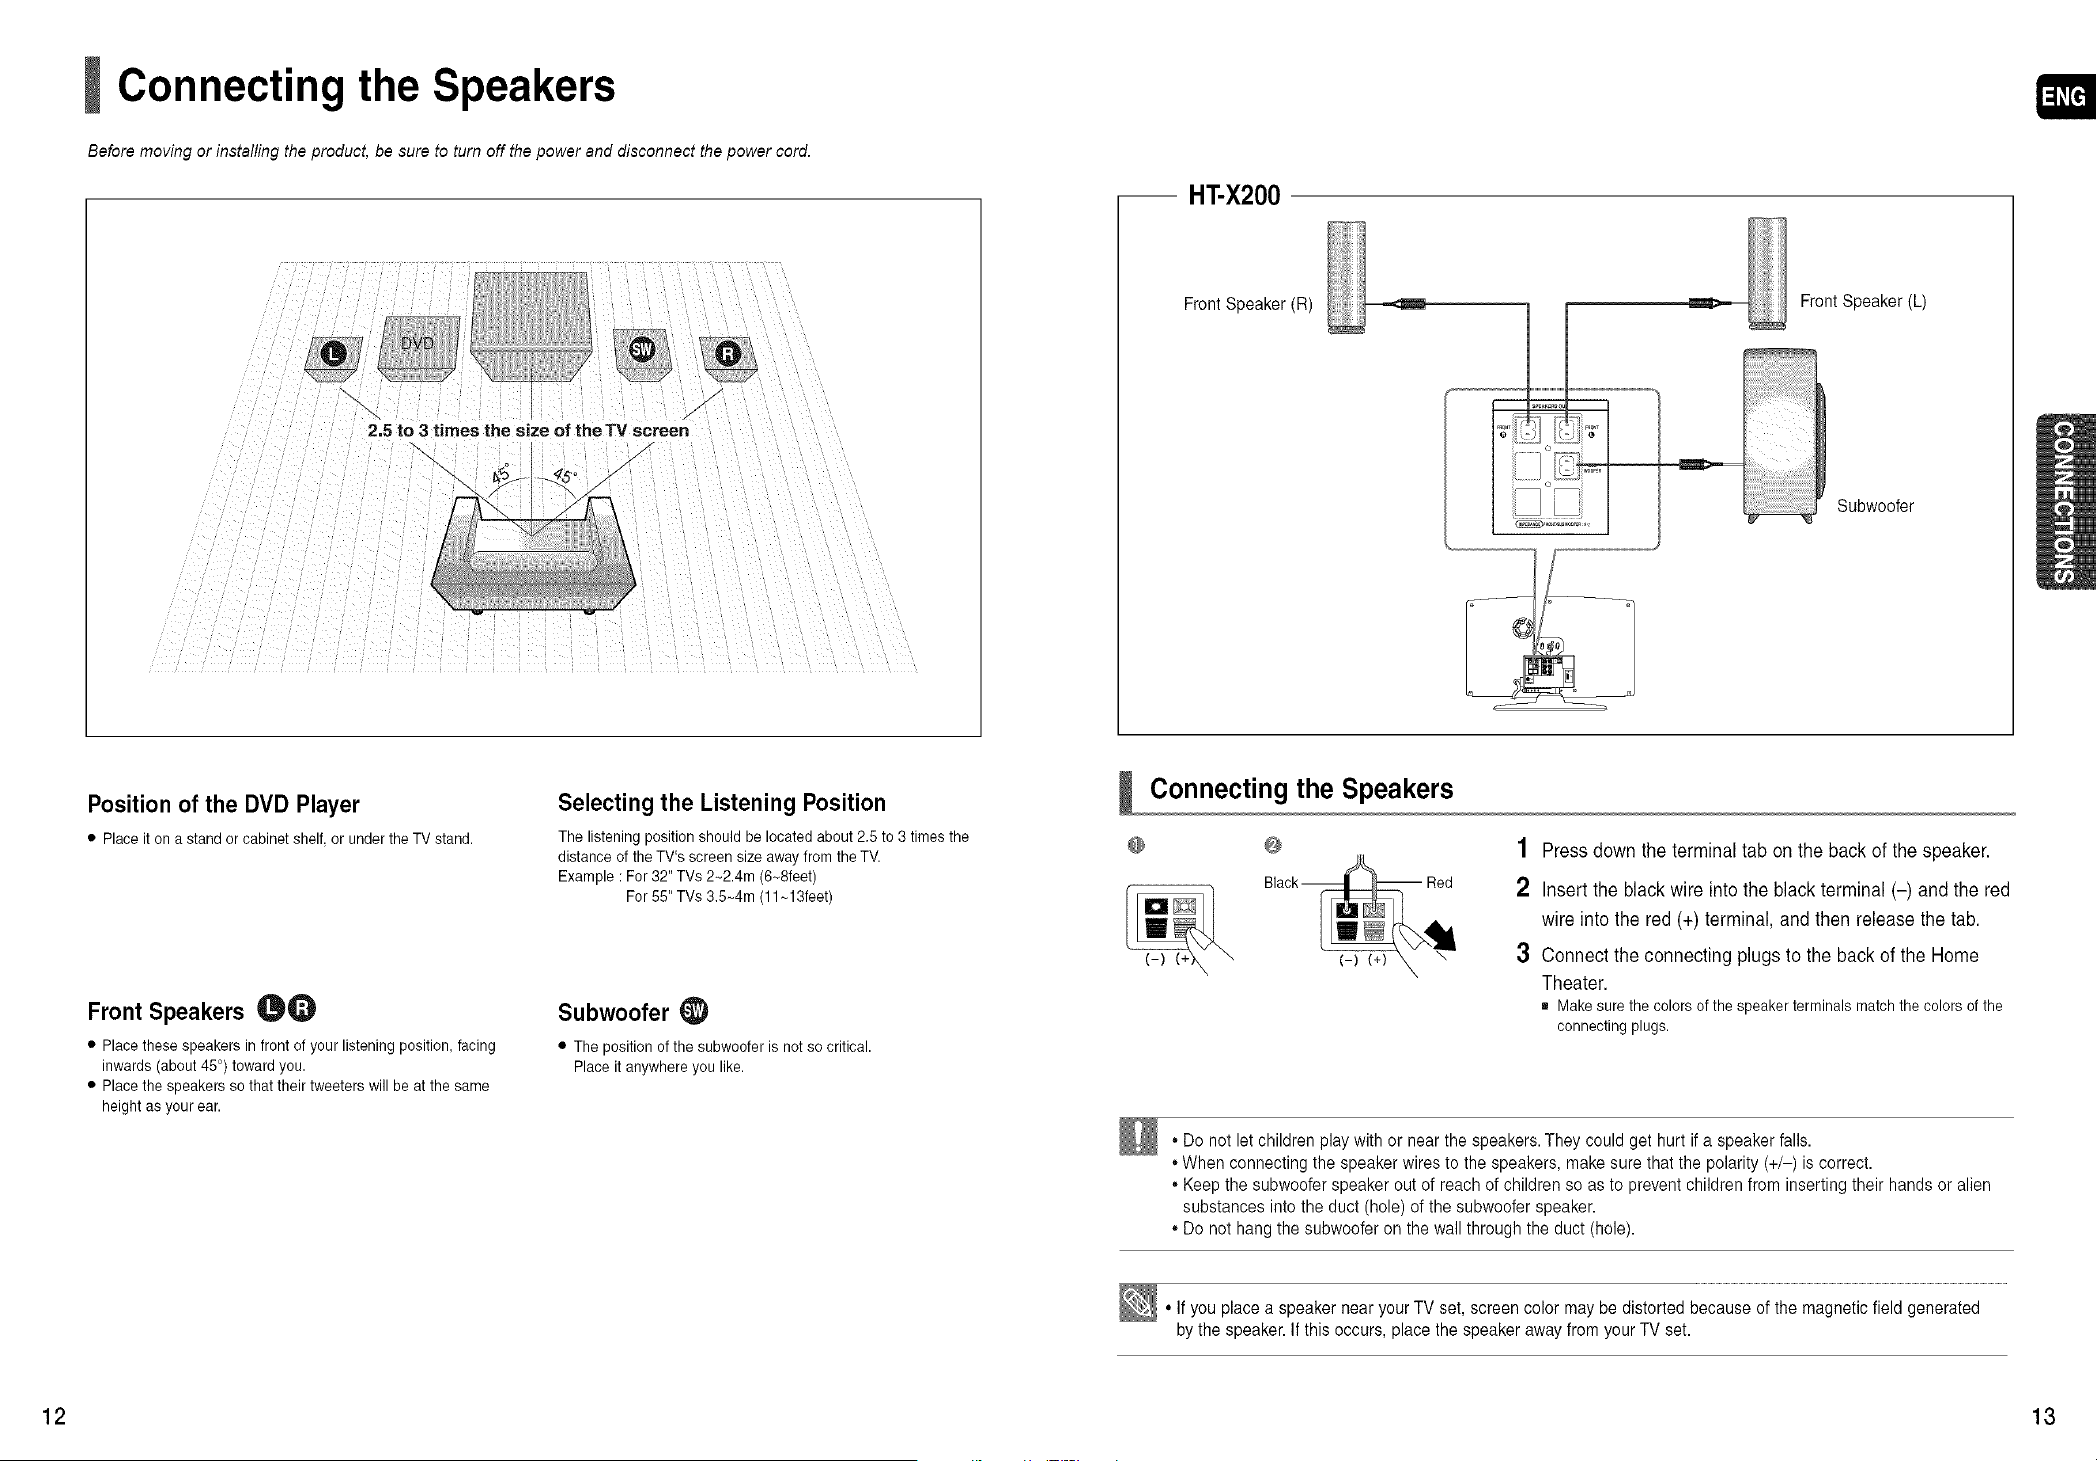
Connecting the Speakers
Before moving or installing the product, be sure to turn off the power and disconnect the power cord.
/
\ f
2,5 to 3 times the size of the TV screen
\\ x
Position of the DVD Player
• Place it on a standor cabinet shelf, or under the TV stand.
Selecting the Listening Position
The listening position should be located about 2.5 to3 times the
distance ofthe TV's screen size awayfrom the TV.
Example :For32" TVs 2~2.4m (6~8feet)
For 55"TVs 3,5_4m (11_13feet)
Front Speakers _Q
• Place these speakers in frontof your listening position, facing
inwards (about 45°) towardyou.
• Place the speakers so that their tweeters will be atthe same
height as your ear.
Subwoofer_)
• The position of the subwoofer isnot so critical.
Place it anywhere you like.
-- HT-X200
Front Speaker (R)
FrontSpeaker(L)
= "?,'t?<
!] i! J
Subwoofer
Connecting the Speakers
@ @
1 Press downtheterminal tab on the back ofthe speaker.
2 Inserttheblack wire intotheblack terminal (-) and the red
wireintothe red (+) terminal,and thenreleasethe tab.
3 Connecttheconnecting plugstothe back ofthe Home
Theater.
= Make sure the colors of the speakerterminals match the colors of the
connecting plugs.
• Do not let children play with or near thespeakers.Theycould get hurt if a speaker falls.
•When connecting the speaker wires to the speakers, make sure that the polarity(+/-) iscorrect.
• Keep the subwooferspeaker out of reachofchildren so as to prevent children from inserting their handsor alien
substances intothe duct (hole) ofthe subwooferspeaker.
• Do not hangthe subwooferon thewallthrough the duct(hole).
• If youplace a speaker nearyourTV set,screen color may be distortedbecause of themagneticfield generated
by the speaker.If this occurs,place the speaker awayfromyourTV set.
12 13
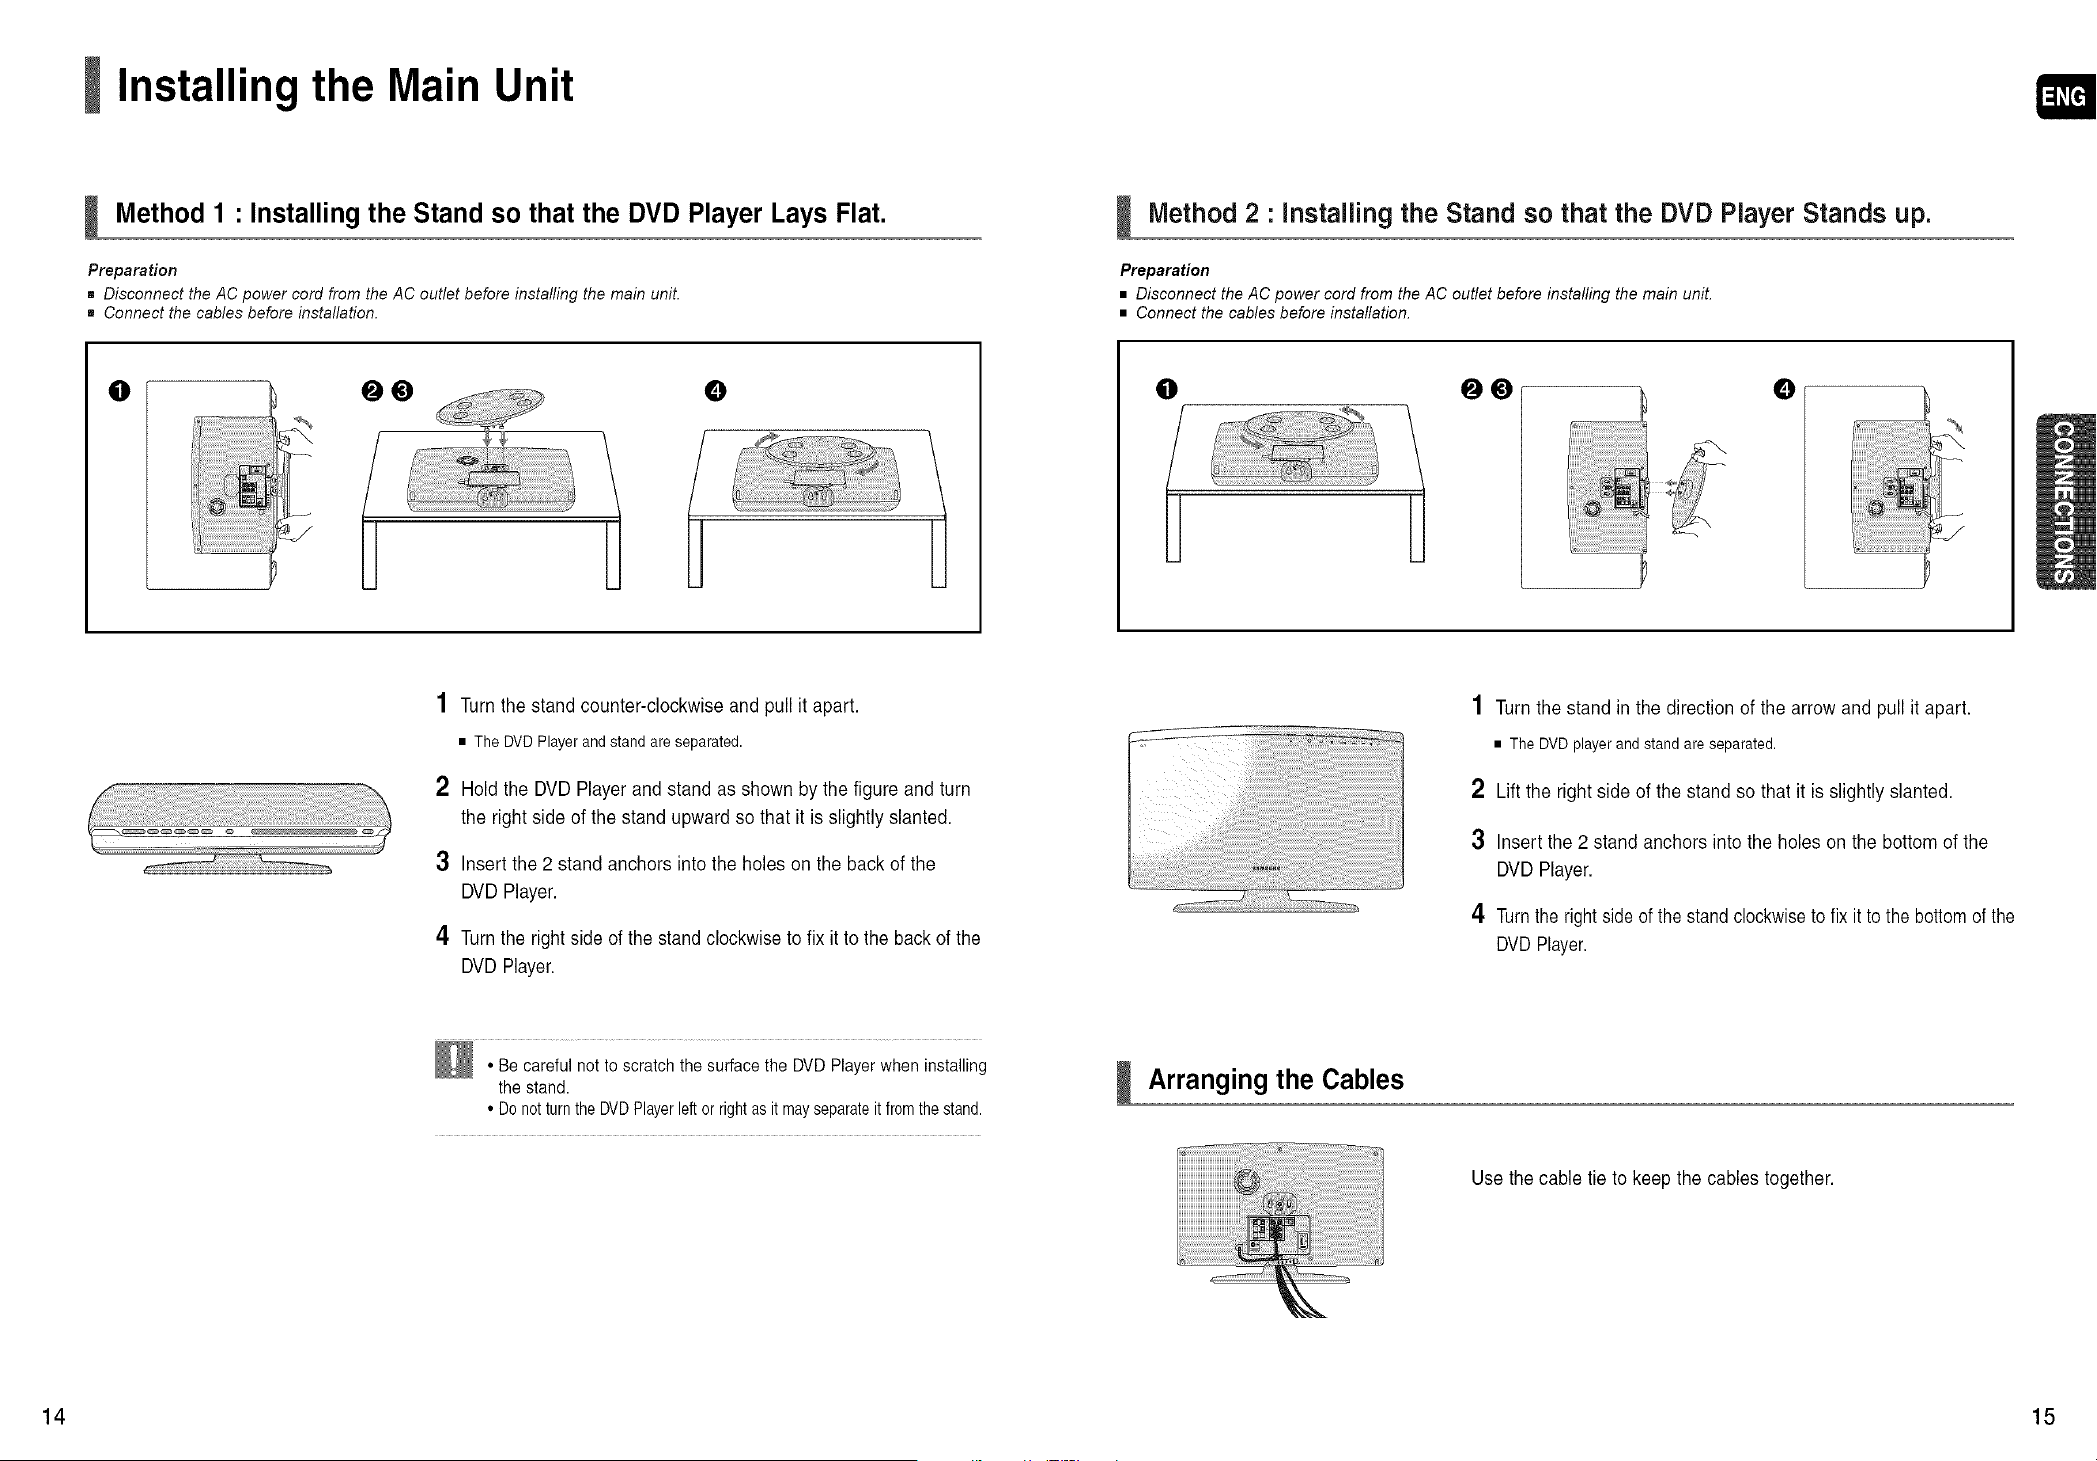
Installing the Main Unit
Method 1 • Installing the Stand so that the DVD Player Lays Flat.
Preparation
= Disconnect the AC power cord from the AC outlet before installing the main unit.
= Connect the cables before installation.
Method 2 • Installing the Stand so that the DVD Player Stands up.
Preparation
• Disconnect the AC power cord from the AC outlet before installing the main unit.
• Connect the cables before installation.
0 00 0
I 1
0 00 0
I 1
1 Turn thestand counter-clockwiseand pull itapart.
• TheDVD Player and stand areseparated.
2 Holdthe DVD Player and stand asshown bythefigureand turn
the rightsideofthestand upwardsothat itisslightlyslanted.
3 Insert the2 stand anchors intothe holeson theback of the
DVD Player.
4 Turn therightsideof the stand clockwise tofix it tothe back ofthe
DVD Player.
1 Turn the stand in thedirection ofthe arrowand pull itapart.
• The DVD playerand stand are separated.
2 Lift the rightsideofthestand so that it isslightlyslanted.
3 Insertthe2 stand anchors intotheholeson the bottomofthe
DVD Player.
4 Turn the right sideof thestandclockwiseto fix it tothebottomofthe
DVDPlayer.
• Becareful not toscratchthe surface the DVDPlayerwhen installing
the stand.
• Donotturn the DVDPlayerleftorrightas itmayseparateitfrom thestand.
Arranging theCables
Usethecabletieto keepthecables together.
14 15
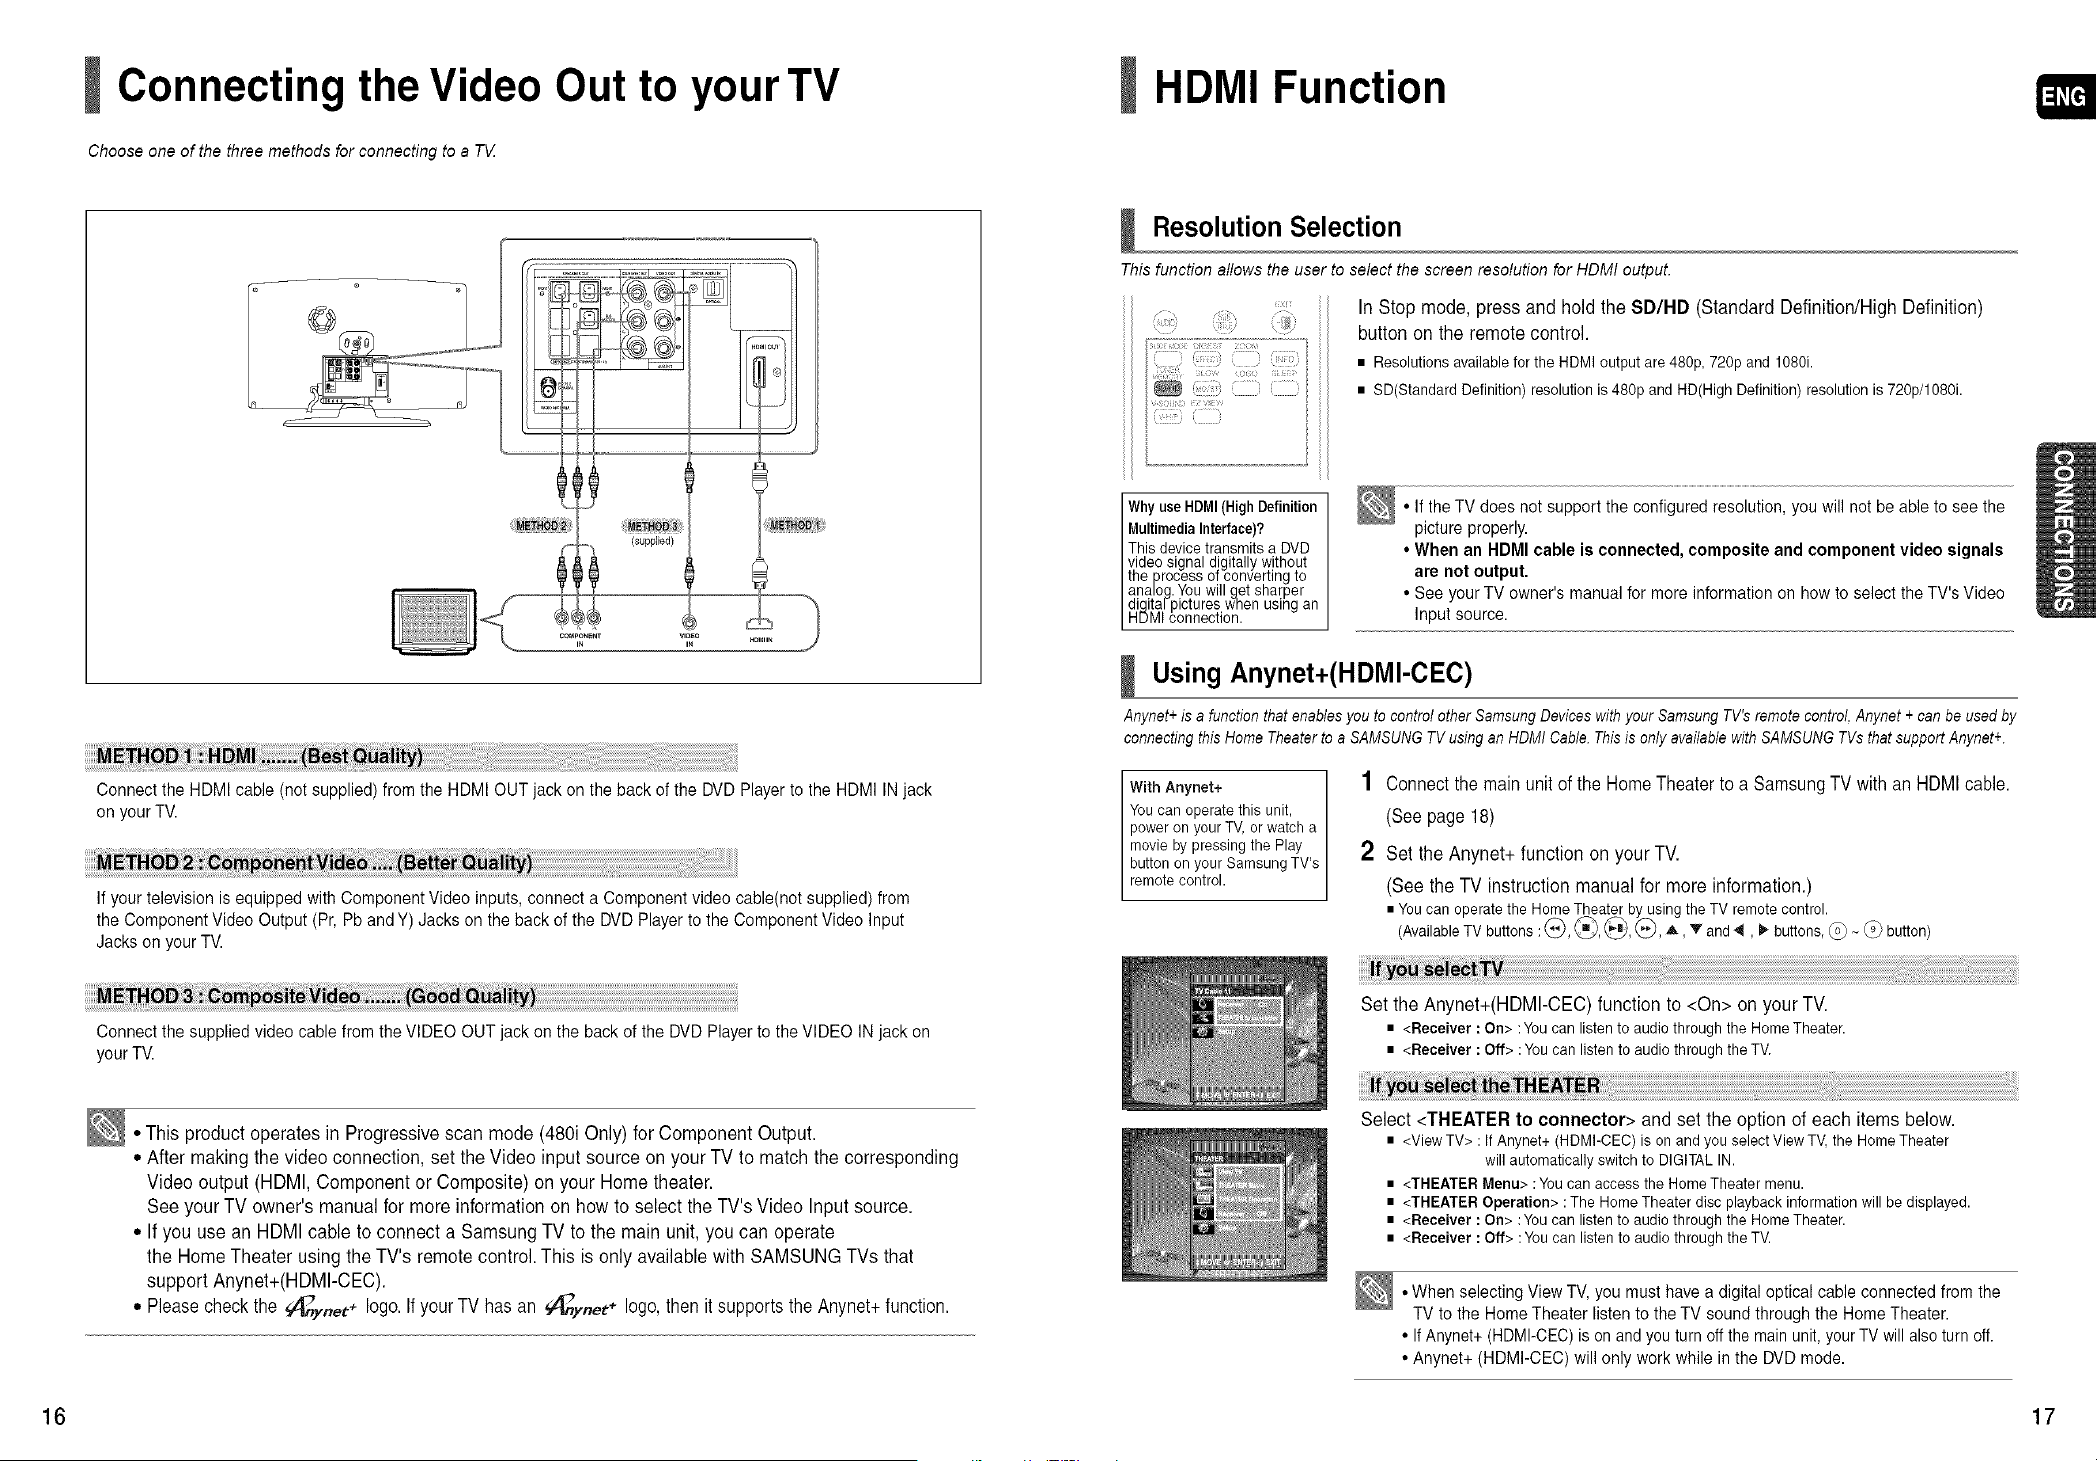
Connecting the Video Out to your TV
Choose one of the three methods for connecting to a T_Z
Connectthe HDMI cable (not supplied)fromthe HDMI OUTjack onthe backofthe DVDPlayer to the HDMI IN jack
onyourTV.
If your television isequipped with Component Video inputs, connect a Component video cable(not supplied) from
the Component Video Output (Pr,Pband Y) Jacks onthe backofthe DVDPlayer tothe Component Video Input
Jacks onyour TV.
Connectthe supplied video cable from theVIDEO OUTjack on the backofthe DVDPlayertothe VIDEO INjack on
your TV.
• This product operates in Progressive scan mode(480i Only)forComponent Output.
° After making thevideoconnection, set the Video input source on yourTVtomatchthe corresponding
Video output (HDMI,Componentor Composite) on your Home theater.
See yourTVowner'smanualfor moreinformationon howtoselecttheTV'sVideo Input source.
° If youusean HDMI cabletoconnecta Samsung TV tothemain unit, youcan operate
the Home Theater usingthe TV's remote control. This isonlyavailablewith SAMSUNGTVs that
support Anynet+(HDMI-CEC).
• Pleasecheckthe _ynet+ logo.Ifyour TVhas an _/_ynet+ logo,thenit supports the Anynet+function.
HDMI Function
I Resolution Selection
This function allows the user to select the screen resolution for HDMI output.
•t ; \ /
i: i( ()t
(:) i:!i:
ill)
:£
i
InStopmode, press and hold theSD/HD (Standard Definition/HighDefinition)
button on theremote control.
• Resolutions available forthe HDMI output are 480p, 720p and 1080i.
• SD(Standard Definition) resolution is480p and HD(High Definition) resolution is720p/1080i.
IWhy use (High
HDMI Definition
MultimediaInterface)?
This device transmits a DVD
video signal digitally without
the process of converting to
analog.You will get sharper
digita/pictures wnen using an
HDMIconnection.
• If theTV does not supportthe configured resolution,youwill not beable to see the
pictureproperly.
• When an HDMI cable isconnected, composite and component video signals
are not output.
• See your TV owner's manual for more information on howto select the TV'sVideo
Inputsource.
I Using Anynet+(HDMl-CEC)
Anynet+ isa function that enables you tocontrol other Samsung Devices with your Samsung TV's remote control,Anynet +can be used by
connecting this Home Theater to aSAMSUNG TVusing an HDMI Cable. Thisisonly available with SAMSUNG TVsthatsupport Anynet+.
With Anynet+
You can operate this unit,
poweron your TV,or watch a
movie by pressing the Play
button onyour Samsung TV's
remote control.
1 Connectthemain unit oftheHomeTheatertoa SamsungTV with an HDMI cable.
(See page 18)
2 Set theAnynet+ functionon yourTV.
(See theTVinstruction manualformore information.)
• Youcan operate the Home Theater by using the TV remote control.
(Available TV buttons: (_), _, @, (_A, V and 4, _"buttons,(_ ~_9_button)
SettheAnynet+(HDMI-CEC)functionto <On>on yourTV.
• <Receiver : On> :You can listen toaudio through the Home Theater.
• <Receiver : Off> :Youcan listen to audiothrough theTV.
Select <THEATER to connector> and set the optionofeach itemsbelow.
• <ViewTV> :If Anynet+ (HDMFCEC) ison and you select View TV, the Home Theater
will automatically switch to DIGITALIN.
• <THEATER Menu> : You can access the Home Theater menu.
• <THEATER Operation> :The Home Theater disc playback information will bedisplayed.
• <Receiver : On> :Youcan listen to audio through the Home Theater.
• <Receiver : Off> :Youcan listen to audiothrough theTV.
•When selecting View TV, youmust have a digitaloptical cable connectedfrom the
TV tothe Home Theater listen to theTV soundthrough the Home Theater.
• If Anynet+ (HDMI-CEC)is onand youturnoff the main unit,your TV will also turnoff.
• Anynet+ (HDMI-CEC) will onlywork while in the DVDmode.
16 17

Connecting Audio from External Components
AUX1 : Side Panel AUX2 : Rear Panel
AudioCable
(not supplied)
If the external analog
component has only one
Audio Out, connect either left
or right._
f
J
AUX1 • Connecting an External Component/MP3 player
1 ConnectAUXIN 1 (Audio) on theHome Theater totheAudio Outofthe external component/MP3 player.
2 Press theAUXbutton on the remote control toselect <AUXl> input.
• Youcan alsousethe FUNCTION button onthe main unit.
Themode switches as follows : DVD-_ D.IN -_ AUX 1 -* AUX 2 -* USB -_ FM.
AUX2 • Connecting an External Analog Component
Analog signal components such as a VCR.
1 ConnectAUXIN 2 (Audio) on theHome Theater totheAudio Outofthe external analog component.
• Be sure to match connector colors.
2 Press theAUXbutton on the remote control toselect <AUX2> input.
• Youcan alsousethe FUNCTION button onthe main unit.
Themode switches as follows : DVD-* D.IN -* AUX 1 -_AUX 2 -_ USB -* FM.
•Youcan connect the Video Outputjack ofyour VCR tothe TV, and connect the Audio Outputjacks of theVCR
tothis product.
OPTICAL : Rear Panel
_ Optical Cable "'I
(n°!supP!ied! J
OPTICAL • Connecting an External Digital Component
Digital signal components such as a Cable Box/Satellite receiver (Set-Top Box).
1 Connectthe Digital Input (OPTICAL)on theHome Theater tothe Digital Output ofthe external digital
component.
2 Press the AUX button on the remote control toselect <D.IN>.
• Youcan also usethe FUNCTION button en the mainunit.
The mode switches as follows : DVD -_ D.IN -* AUX 1 -_ AUX 2-* USB -* FM.
18 19
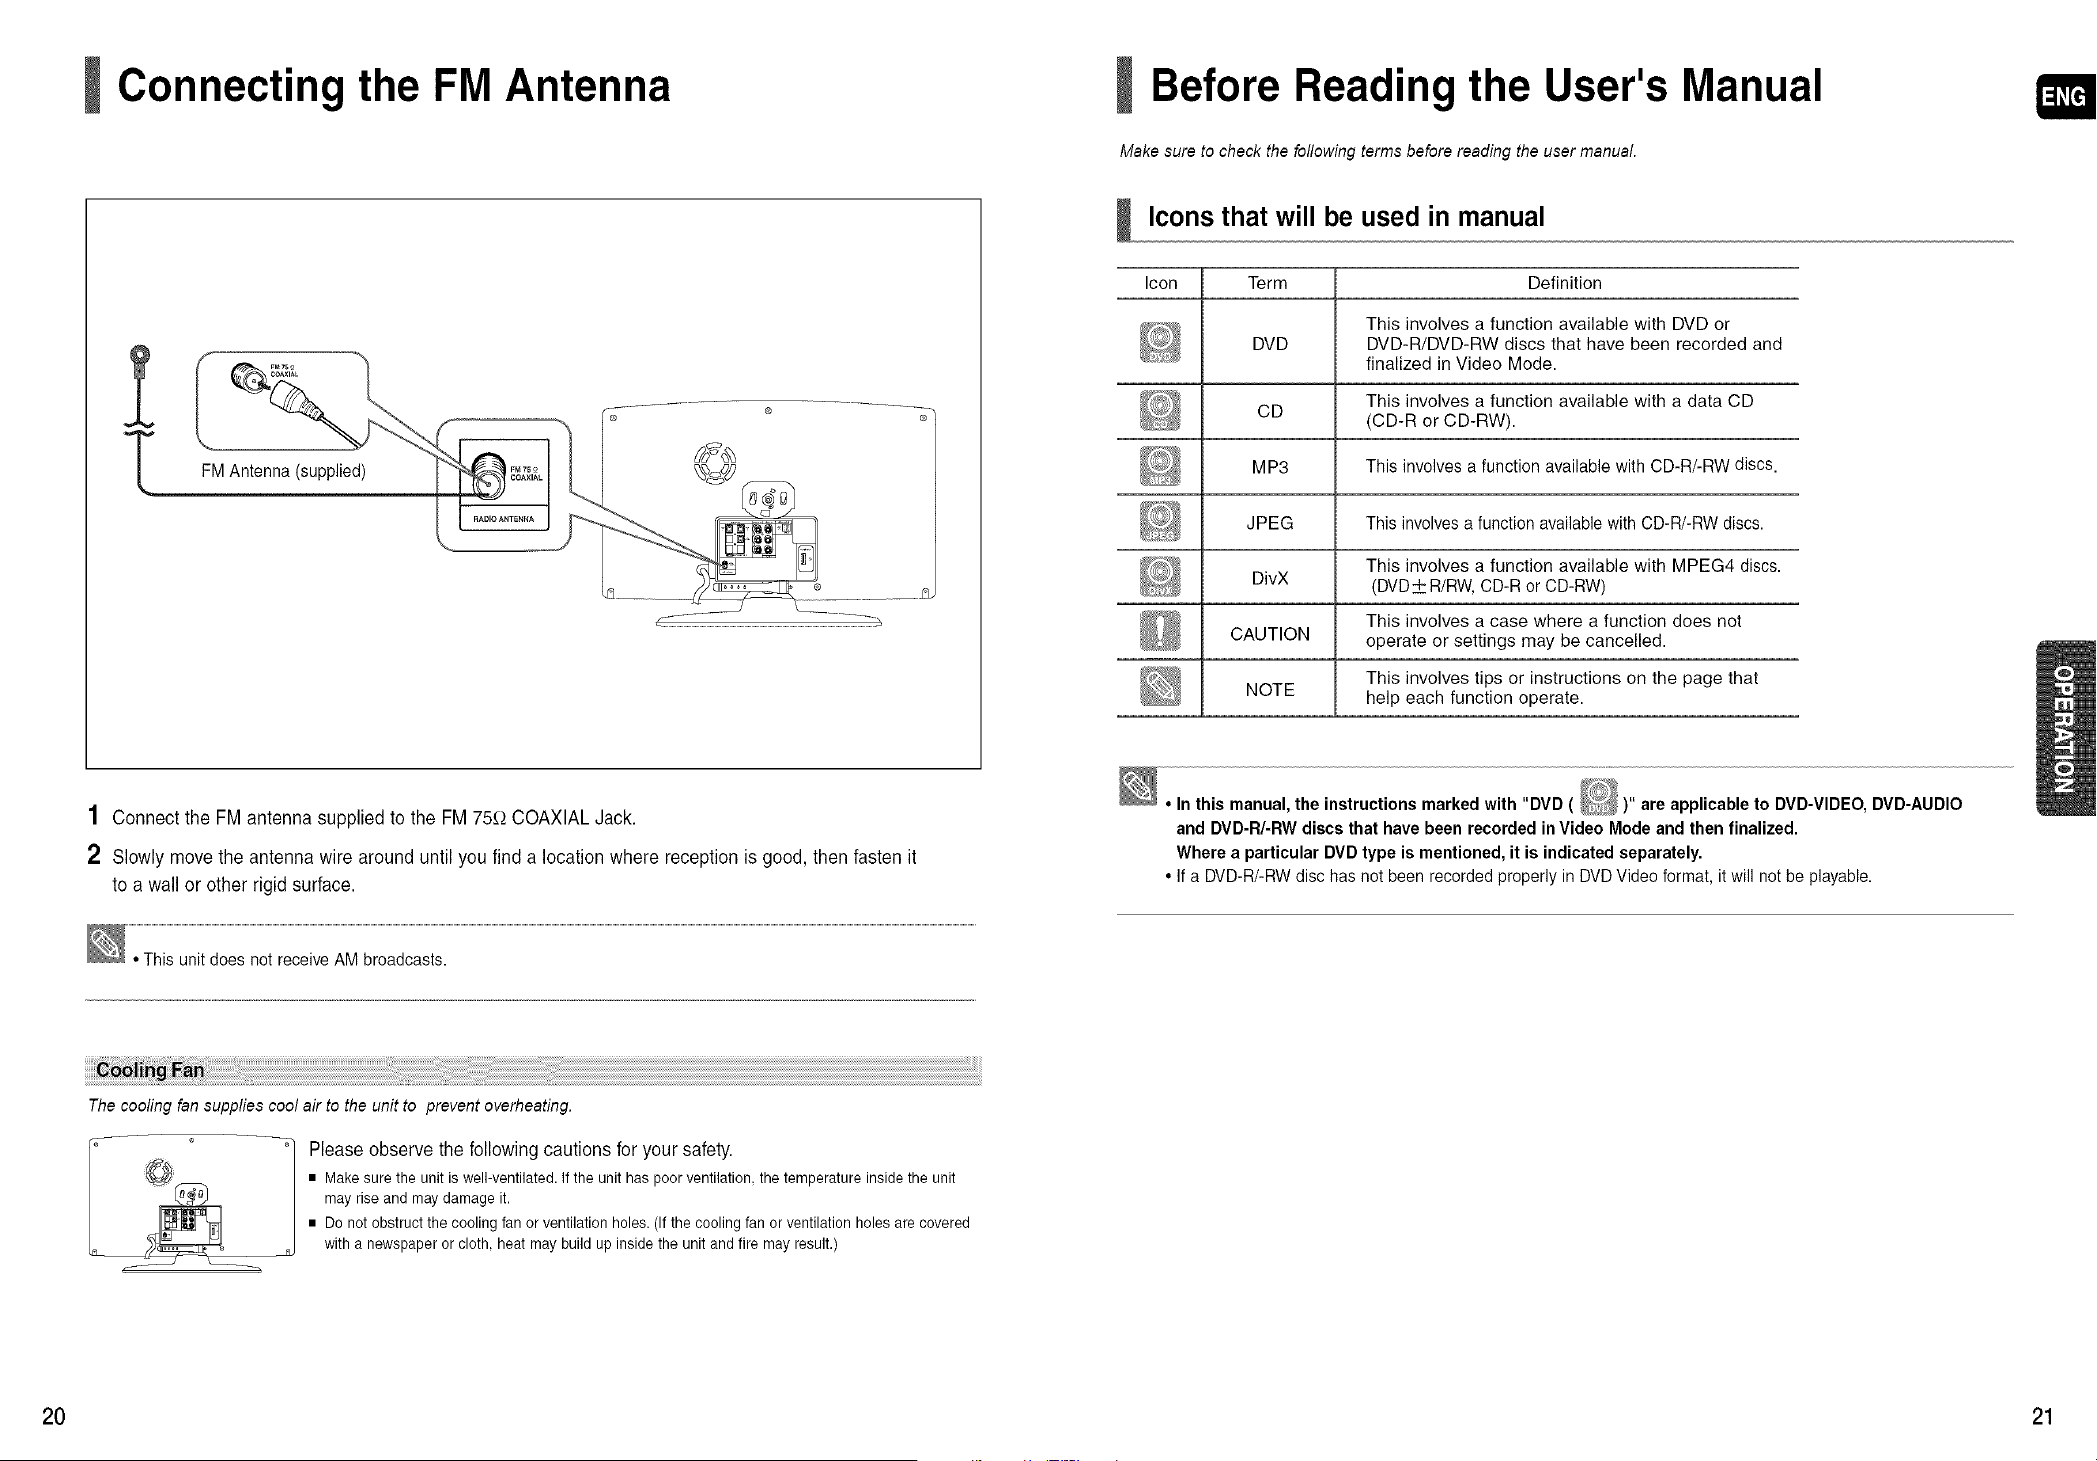
Connecting the FM Antenna
FM Antenna (supplied)
1 Connectthe FM antennasuppliedto the FM 75_-_COAXIAL Jack.
2 Slowly move theantennawire around untilyou finda location where reception isgood,thenfastenit
toa wallor otherrigid surface.
•This unit does not receiveAMbroadcasts.
The cooling fan supplies cool air to the unit to prevent overheating.
f
Please observe the following cautions for your safety.
• Makesurethe unit is well-ventilated.If the unit haspoor ventilation,thetemperatureinsidetheunit
mayriseand maydamageit.
• Donotobstructthecoolingfanor ventilationholes.(Ifthecoolingfanorventilationholesarecovered
witha newspaperorcloth,heat maybuild up insidethe unit andfire mayresult.)
Before Reading the User's Manual
Make sure to check the following terms before reading the user manual.
Icons that will be used in manual
Icon Term Definition
This involves a function available with DVD or
DVD DVD-R/DVD-RW discs that have been recorded and
finalized in Video Mode.
This involves a function available with a data CD
CD (CD-R or CD-RW).
MP3 This involves a function available with CD-R/-RW discs.
JPEG This involvesa function availablewith CD-R/-RW discs.
This involves a function available with MPEG4 discs.
DivX (DVD_ R/RW,CD-Ror CD-RW)
This involves a case where a function does not
CAUTION operate or settings may be cancelled.
This involves tips or instructions on the page that
NOTE help each function operate.
• Inthis manual, the instructionsmarked with "DVDt )"
, _ areapplicable to DVD-VIDEO, DVD-AUDIO
and DVD-R/-RW discs that have beenrecorded inVideo Modeand thenfinalized.
Where a particular DVD type is mentioned, it isindicated separately.
• If a DVD-R/-RW disc has not beenrecordedproperly in DVD Video format, itwill notbe playable.
20 21
Before UsingYour Home Theater Disc Playback
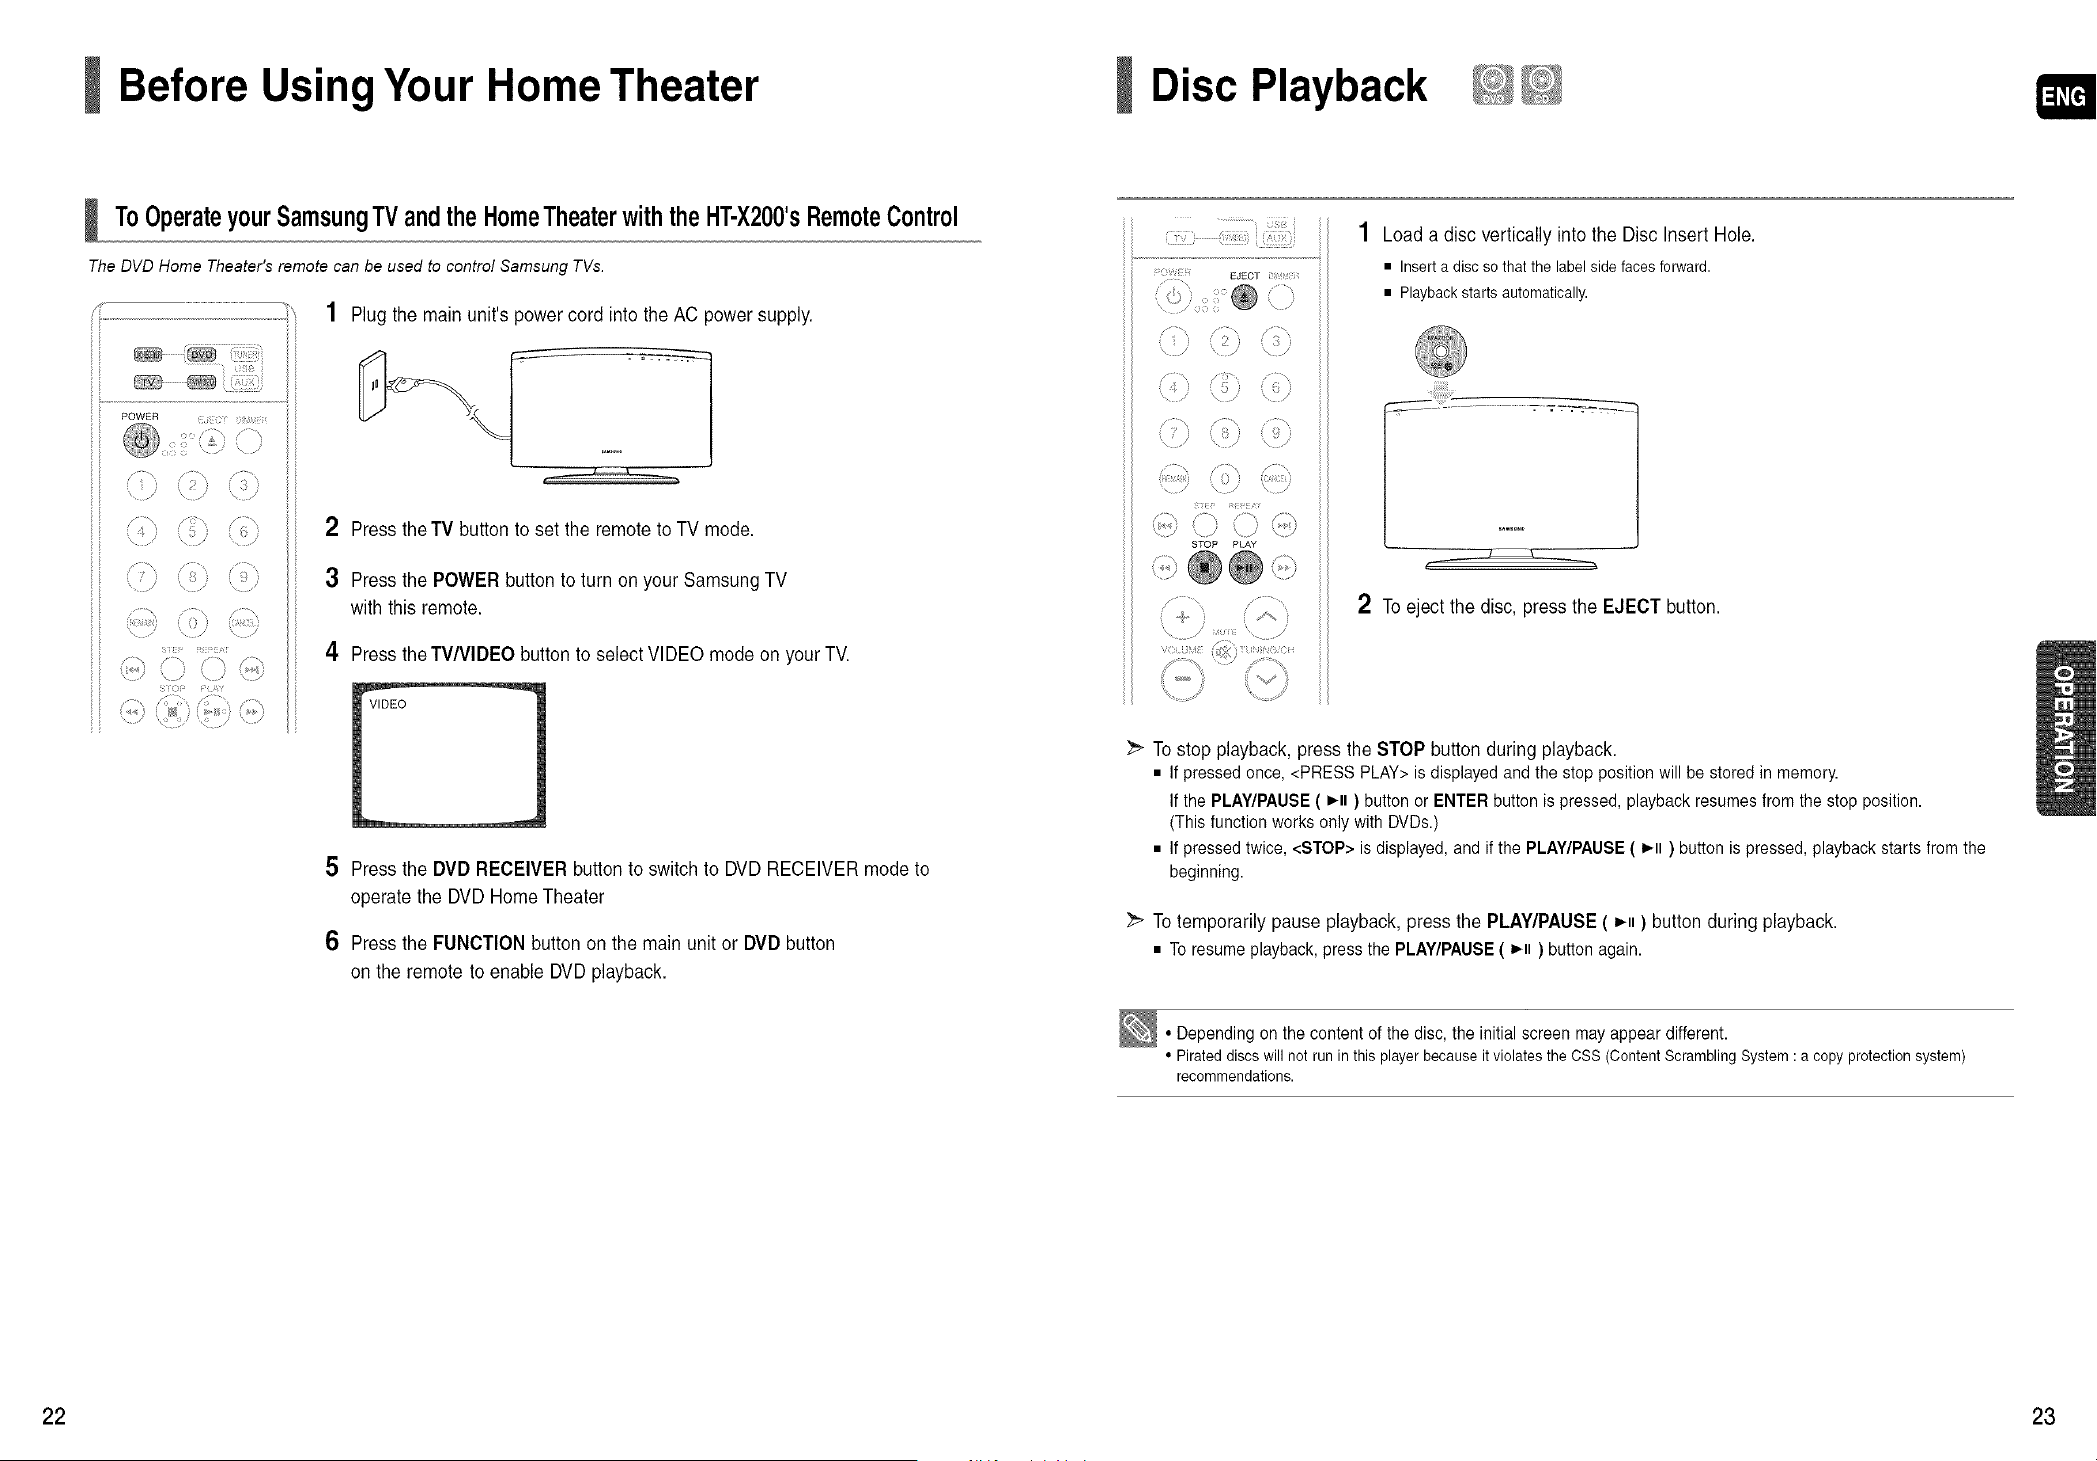
ToOperateyourSamsungTVandtheHomeTheaterwiththeHT-X200'sRemoteControl
The DVD Home Theater's remote can be used to control Samsung TVs.
/?..................................................................................................................................................
,' iii
¢ )
+: r
/5 x
1 Plug themainunit's power cord intotheAC power supply.
2 Press theTV button toset the remote toTVmode.
3 Press thePOWER button toturn on yourSamsung TV
with this remote.
4 Press theTV/VlDEO button to select VIDEO modeon yourTV.
5 Press theDVD RECEIVER button to switch to DVD RECEIVER modeto
operatethe DVD Home Theater
6 Press theFUNCTIONbutton on the mainunitor DVD button
on theremote to enable DVD playback.
STOP PI AY
ii
1 Load a disc vertically intothe DiscInsert Hole.
• Insert a disc sothat the label side faces forward.
• Playback starts automatically.
2 Toeject the disc,press the EJECT button.
To stop playback, press the STOP button during playback.
• If pressed once, <PRESSPLAY> isdisplayedand the stopposition will be stored in memory.
If the PLAY/PAUSE( i'll )button orENTER button ispressed, playback resumesfrom the stop position.
(This functionworks onlywith DVDs.)
• If pressed twice, <STOP> is displayed, and if the PLAY/PAUSE( i-ll )button ispressed, playback starts from the
beginning.
_ To temporarilypauseplayback, press the PLAY/PAUSE( i-nn) button during playback.
• Toresumeplayback,pressthe PLAY/PAUSE( i-ll ) buttonagain.
• Depending on the content of the disc, the initial screen may appear different.
• Pirated discswill not runin this playerbecause it violates the CSS (Content Scrambling System :a copy protection system)
recommendations.
22 23
24
MP3/WMA-CD Playback
Data CDs (CD-R, CD-RW) encoded in MP3/WMA format can be played.
si()i ¸¸_ _/c_,
/
10 U i i 'i(+_ i
io<i_
SO.T.G_ I W J _,s_r,rr_vl
1 Load theMP3disc.
• The MP3/WMA menu screen will appear and playback will start.
• The appearance of the menu depends on the MP3/WMA disc.
• WMA-DRM files cannot be played.
2 InStop mode, usetheCursor A V, 4, _ button toselectthe album,
and then press the ENTER button.
• Use the Cursor,A, V button to select the track.
3 Tochange thealbum, usetheCursor ,_, V, 4, _ button toselectanother
albumin Stopmode, and then press the ENTERbutton.
• Toselect another albumand track, repeat Steps 2and 3above.
4 Press theSTOP(m) button to stop playback.
• Depending on the recording mode, someMP3/WMA-CDs maynot play.
•Table ofcontents of a MP3-CDvaries depending on the MP3/WMA track format
recordedon the disc.
To playa fileiconin thescreen,
PresstheCursor A y, 4, _ buttonwhenit is in Stopmodeandselectadesirediconfromthetoppartof themenu.
Music FileIcon :To playmusicfiles only,selectthe _ Icon.
Image File Icon: Toview imagefiles only, select the _ Icon.
Movie File Icon : To viewmovie files only,select the _ Icon.
AllFileIcon: To view movie files only,selectthe _ Icon.
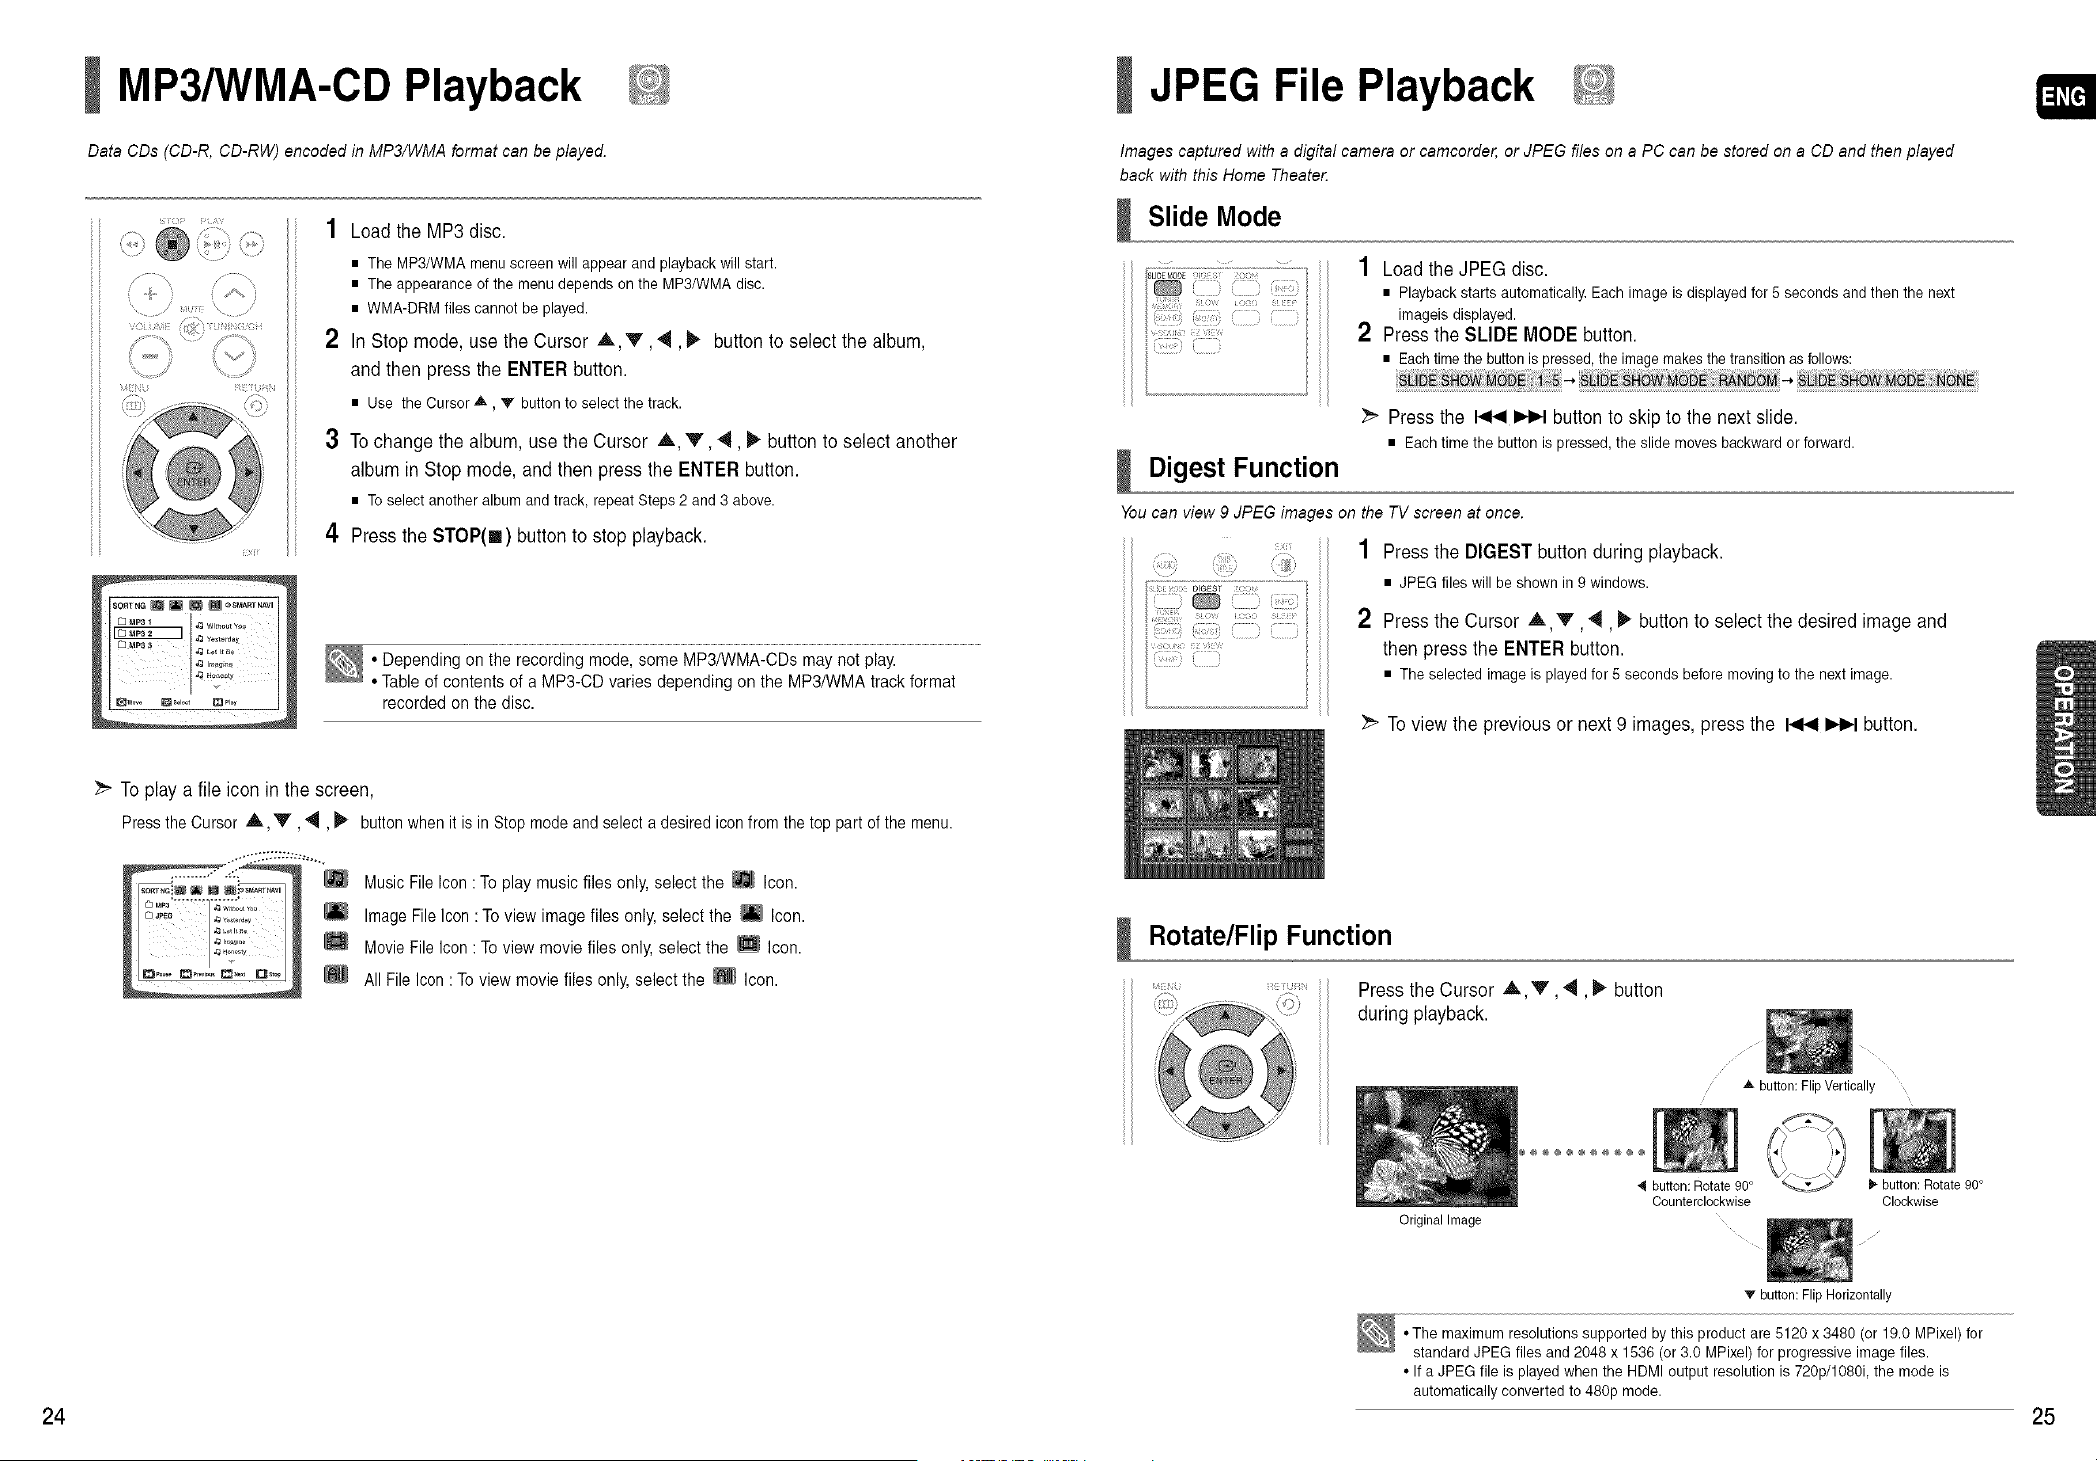
JPEG File Playback
Images captured with a digital camera or camcorder, or JPEG files on a PC can be stored on a CD and then played
back with this Home Theate_
Slide Mode
Digest Function
1 Load the JPEGdisc.
• Playback starts automatically. Each image isdisplayed for5seconds and then the next
imageis displayed.
2 Press the SLIDE MODE button.
• Each timethe buttonispressed,the imagemakes the transition as follows:
-4, -4,
_" Press the _ _ button toskip tothe next slide.
• Eachtime the button is pressed,the slide moves backward or forward.
You can view 9 JPEG images on the TV screen at once.
....... 1 Press the DIGESTbutton during playback.
• JPEG files will be shown in 9windows.
2 Press the Cursor ,_,,V, _, _ button to selectthedesired imageand
, thenpress theENTER button.
• The selected image isplayed for5 seconds before moving to the next image.
To view theprevious or next 9 images,press the I._1_11_.1button.
Rotate/Flip Function
i i L ,,i
Press theCursor A_,._, _,. button
during playback.
Original Image
,_button:FlipVertically
÷@@@@@÷@
button:Rotate90°
Counterclockwise
_-button: Rotate 90°
Clockwise
'_" button: Flip Horizontally
• The maximum resolutions supported by this product are 5120 x 3480 (or 19.0 MPixel)for
standard JPEG files and 2048 x 1536 (or 3.0 MPixel) forprogressive image files.
• If aJPEG file isplayed when the HDMI output resolution is 720p/1080i, the mode is
automatically converted to 480p mode.
25

26
DivX Playback
The functions on this page apply to DivX disc playback.
/.............
/
_Lj_ _ ii ¸¸'
I Skip Forward/Back
Duringplayback, press the t,_1_1,_ button.
• Goes to the nextfile whenever you pressthe IIH_-Ibutton, if there are over 2 files in the disc.
• Goes to the previous file wheneveryou pressthe _ button, if there areover 2 files inthedisc.
Fast Playback
To playbackthe disc at a fasterspeed,pressthe _ or _ buttonduringplayback.
• Eachtime youpress either button, the playback speed will change as follows:
2x _ 4x _ 8x_ 32x -_ Normal.
5 Minute Skip function
Duringplayback, press theCursor 4, _ button.
• Playback skips 5minutes forward whenever you press the Cursor _" button.
• Playback skips 5minutes back whenever you press the Cursor 4 button.
Zoom Function
1 Press the ZOOM button.
• Eachtime you pressthe button,your selection will toggle between <ZOOMX2> and
<ZOOM OFF>.
2 PresstheCursor A ,V, _, _ buttontomovetothe area you want to enlarge.
• A DivX file can bezoomed onlyin ZOOMX2 mode.
• DivX files have.Avi file extensions, however,notall .Avi files areDivX and may not be
playable in this unit.
211
:? ....
i
I Audio Display
Press theAUDIO button.
• If there are multiple audiotracks on adisc, youcan toggle between them.
_rm
• Eachtime youpress the button,yourselection will toggle between <AUDIO(l/N, 2/N ...)>and _ .
• [_/ isdisplayed when there is one supported language in the disc.
LJ
i .....
))) i?
L J
J Subtitle Display
Press theSUBTITLE button.
• Each time you press the button, your selection will toggle between <SUBTITLE (l/N, 2/N ...)>
and <SUBTITLE OFF>.
• If the disc hasonly one subtitle file, it will be played automatically.
• See number 2(Caption Function) belowfor more details concerning Subtitle usage with DivX
discs.
J lf the Disc has more than One Subtitle File
If thedisc has more than one subtitle file, the default subtitle may notmatchthe
movie and you willhavetoselectyoursubtitle language asfollows:
1 InStopmode, press theCursor _,'V" button,selectthedesired subtitle(_])
from theTV screen,and thenpress theENTERbutton.
2 Whenyou selectthedesired DivX filefrom theTVscreen,the movie will be
playednormally.
DivX is a video file format developed by Microsoft and is based on MPEG4 compression technology to provide audio and
video data over the Intemet in real-time.
MPEG4 is used for video encoding and MP3 for audio encoding so that the users can watch a movie at near DVD-quafity
video and audio.
1. Supported Formats
This product only supports the following media formats. If both video and audio formats are not supported, the user may
experience problems such as broken images or no sound.
Supported Video Formats
t Format AV, u °vn
SupportedVersions DivX3.11~DivX5.1, XviD Vl/V2/V3/V7
SupportedAudioFormats
Format MP3 WMA
BitRate 80~384kbps 56~128kbps
SamplingFrequency 44.1khz
AC3
128~384kbps
44.1/48khz
• Aspect Ratio:Althoughthe default DivX resolutionis640x480 pixels (4:3),this product supports upto800x600 pixels
(16:9).TV screen resolutions higher than 800 will not be supported.
• When youplay a disc whose sampling frequency ishigherthan 48khz or 320kbps, youmay experience shakingon
the screen during playback.
Caption Function
•You must have some experience with video extraction and editing inorder tousethis feature properly.
•To usethe captionfunction, save the captionfile (*.smi) in the same file nameasthat of the DivX mediafile (*.avi)
within the same folder.
Example. Root Samsung 0O7CDl.avi
SamsungOO7CD1 .smi
•Up to 60alphanumeric characters or 30 East Asian characters (2 byte characters suchas Koreanand Chinese)for the
file name.
27
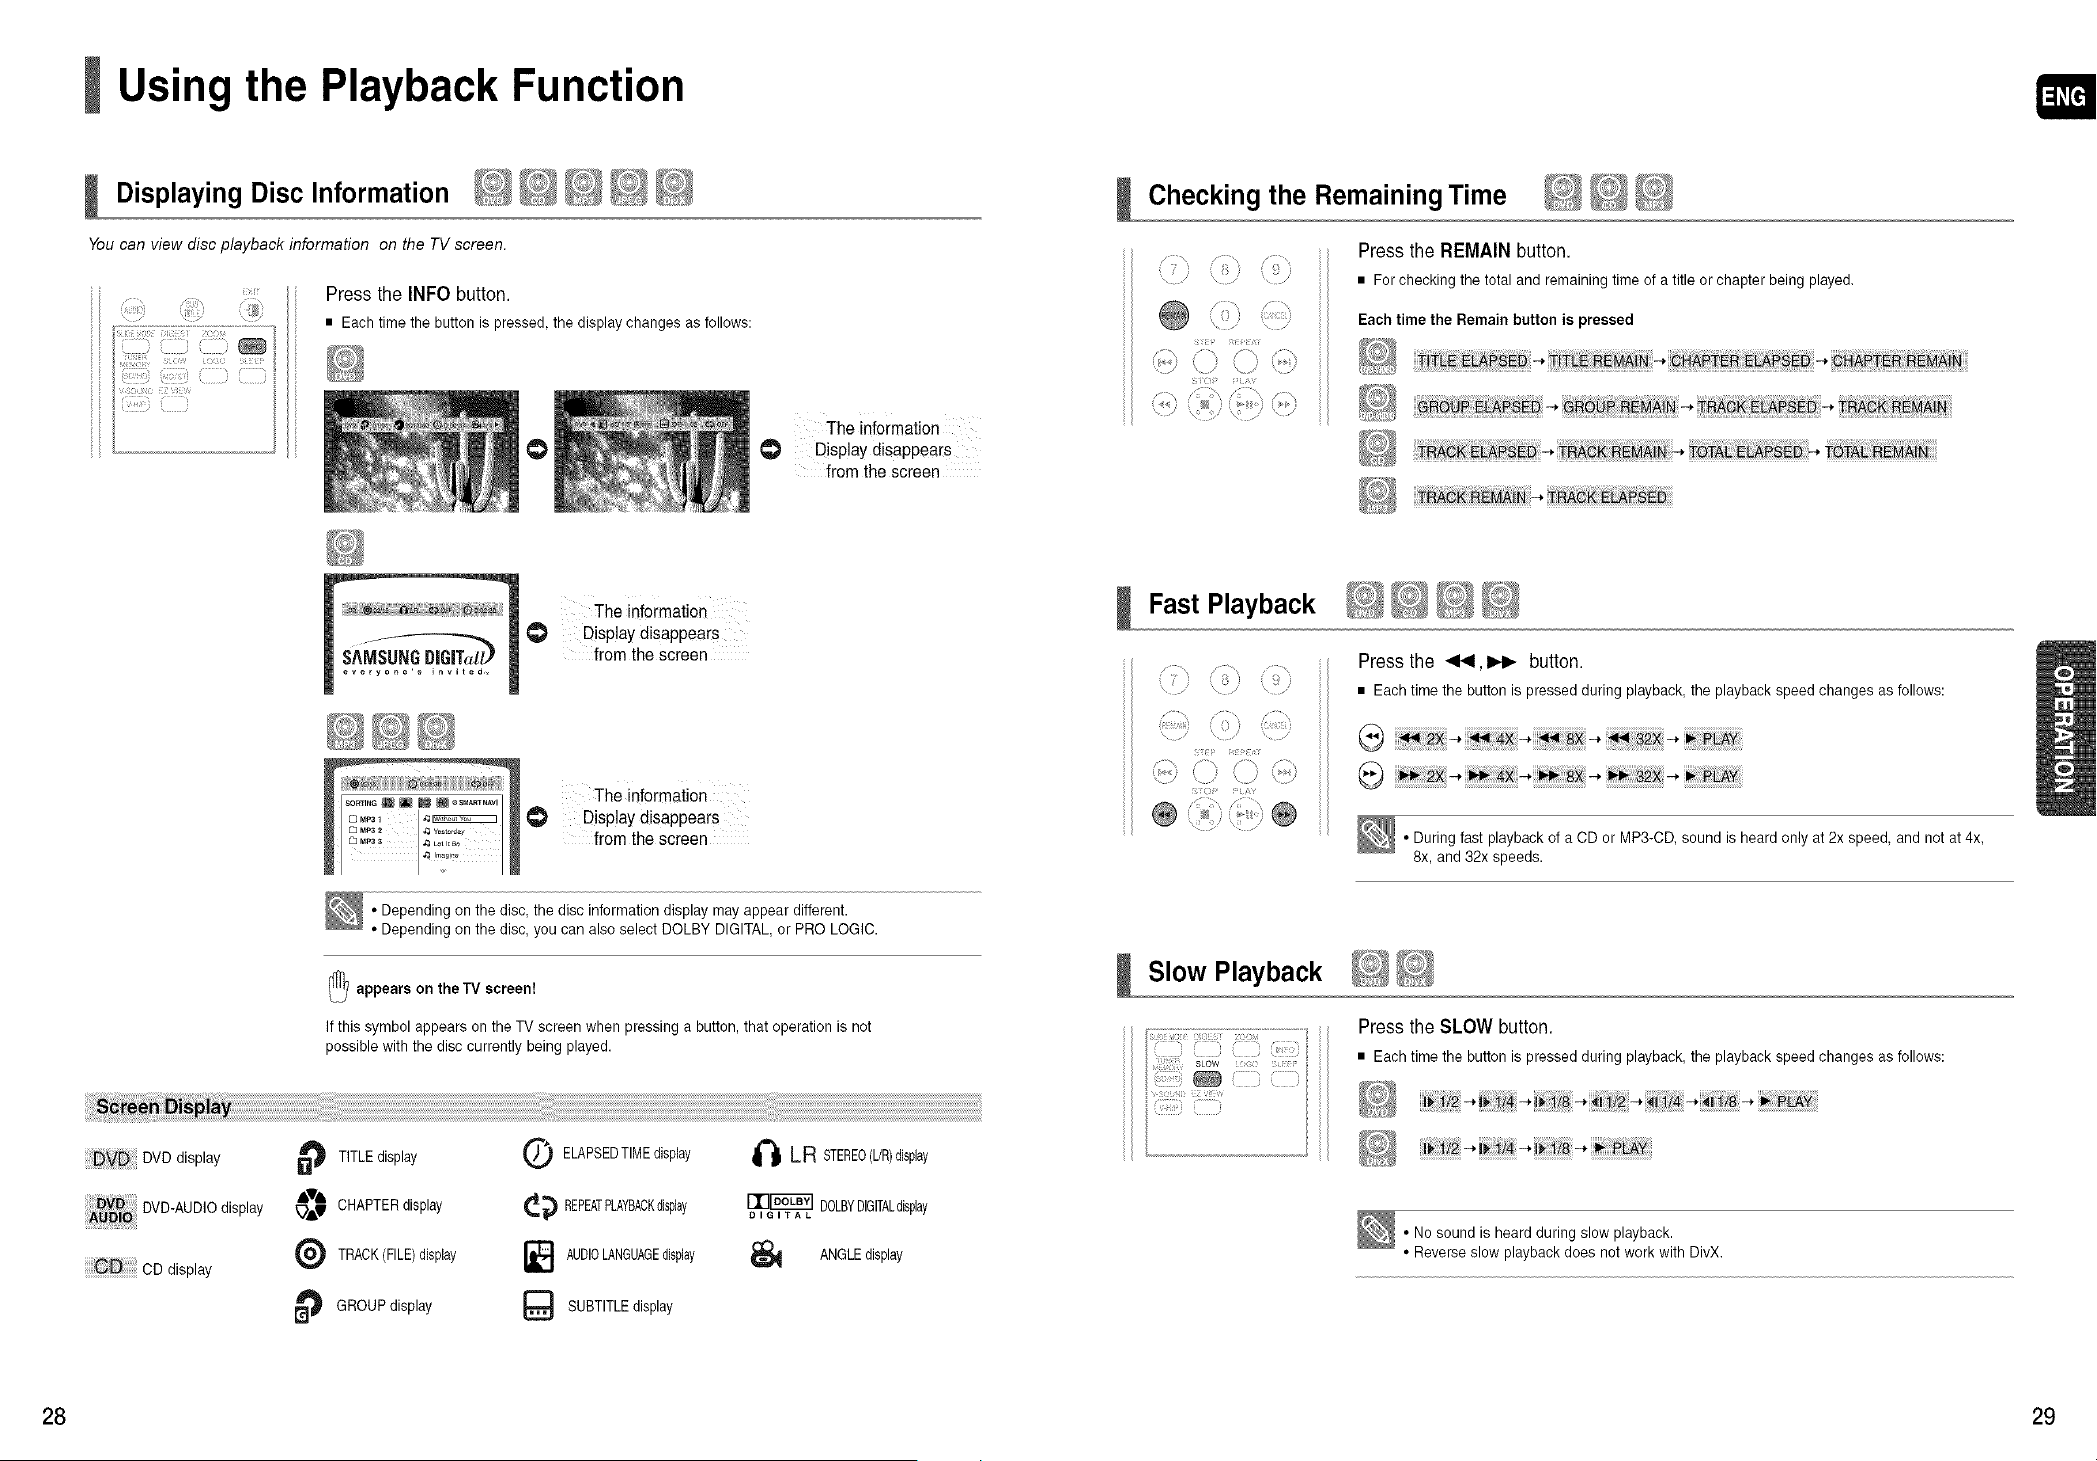
Using the Playback Function
Displaying Disc Information
You can view disc playback information on the TV screen.
Press the INFObutton.
• Eachtime the button is pressed,the display changes as follows:
O
The information
(_ Display disappears
from the screen
The information
Display disappears
from the screen
The information
Display disappears
from the screen
• Depending on the disc, the disc information display mayappear different.
• Depending en the disc, you can alsoselect DOLBY DIGITAL,or PRO LOGIC.
_ appears on theTV screen!
If this symbol appears on the TV screen when pressing a button,that operation isnot
possible with the disc currently being played.
DVD display
DVD-AUDIOdisplay
CD display
TITLEdisplay
,'V&
_m,V CHAPTERdisplay
TRACK(FILE)display
_ GROUP display
ELAPSEDTIMEdisplay
_ REPEATPLAYBACKdlsphy
AUDIOLANGUAGEdisplay
SUBTITLEdisplay
t'_ LR STEREO(L/R)display
[][]F65C_] DOLBYDIGITALdisplay
DIGITAL
ANGLEdisplay
Checking the Remaining Time
J........,iiiiiii_,:it
\ /
¢i* ¢i k
s i( /
"/
Press the REMAIN button.
• For checking the total and remaining time of a title orchapter being played,
Eachtime the Remain button is pressed
Fast Playback
/ .........
I
/
,, / ..... _ ]
f)* Li;
/:
Press the _1_, I_ button.
• Each time the button ispressed during playback, the playback speed changes as follows:
@
• During fast playback ef a CDor MP3-CD sound is heard only at 2x speed, and net at 4x,
8x, and 32x speeds.
Slow Playback
Press theSLOW button.
• Each time the button ispressed during playback, the playback speed changes as follows:
_/2-*-* -* -* -* _ i/8-_ _LAY
• No sound is heardduring slow playback.
• Reverse slow playback does not work with DivX,
28 29
Using the Playback Function (Con't)
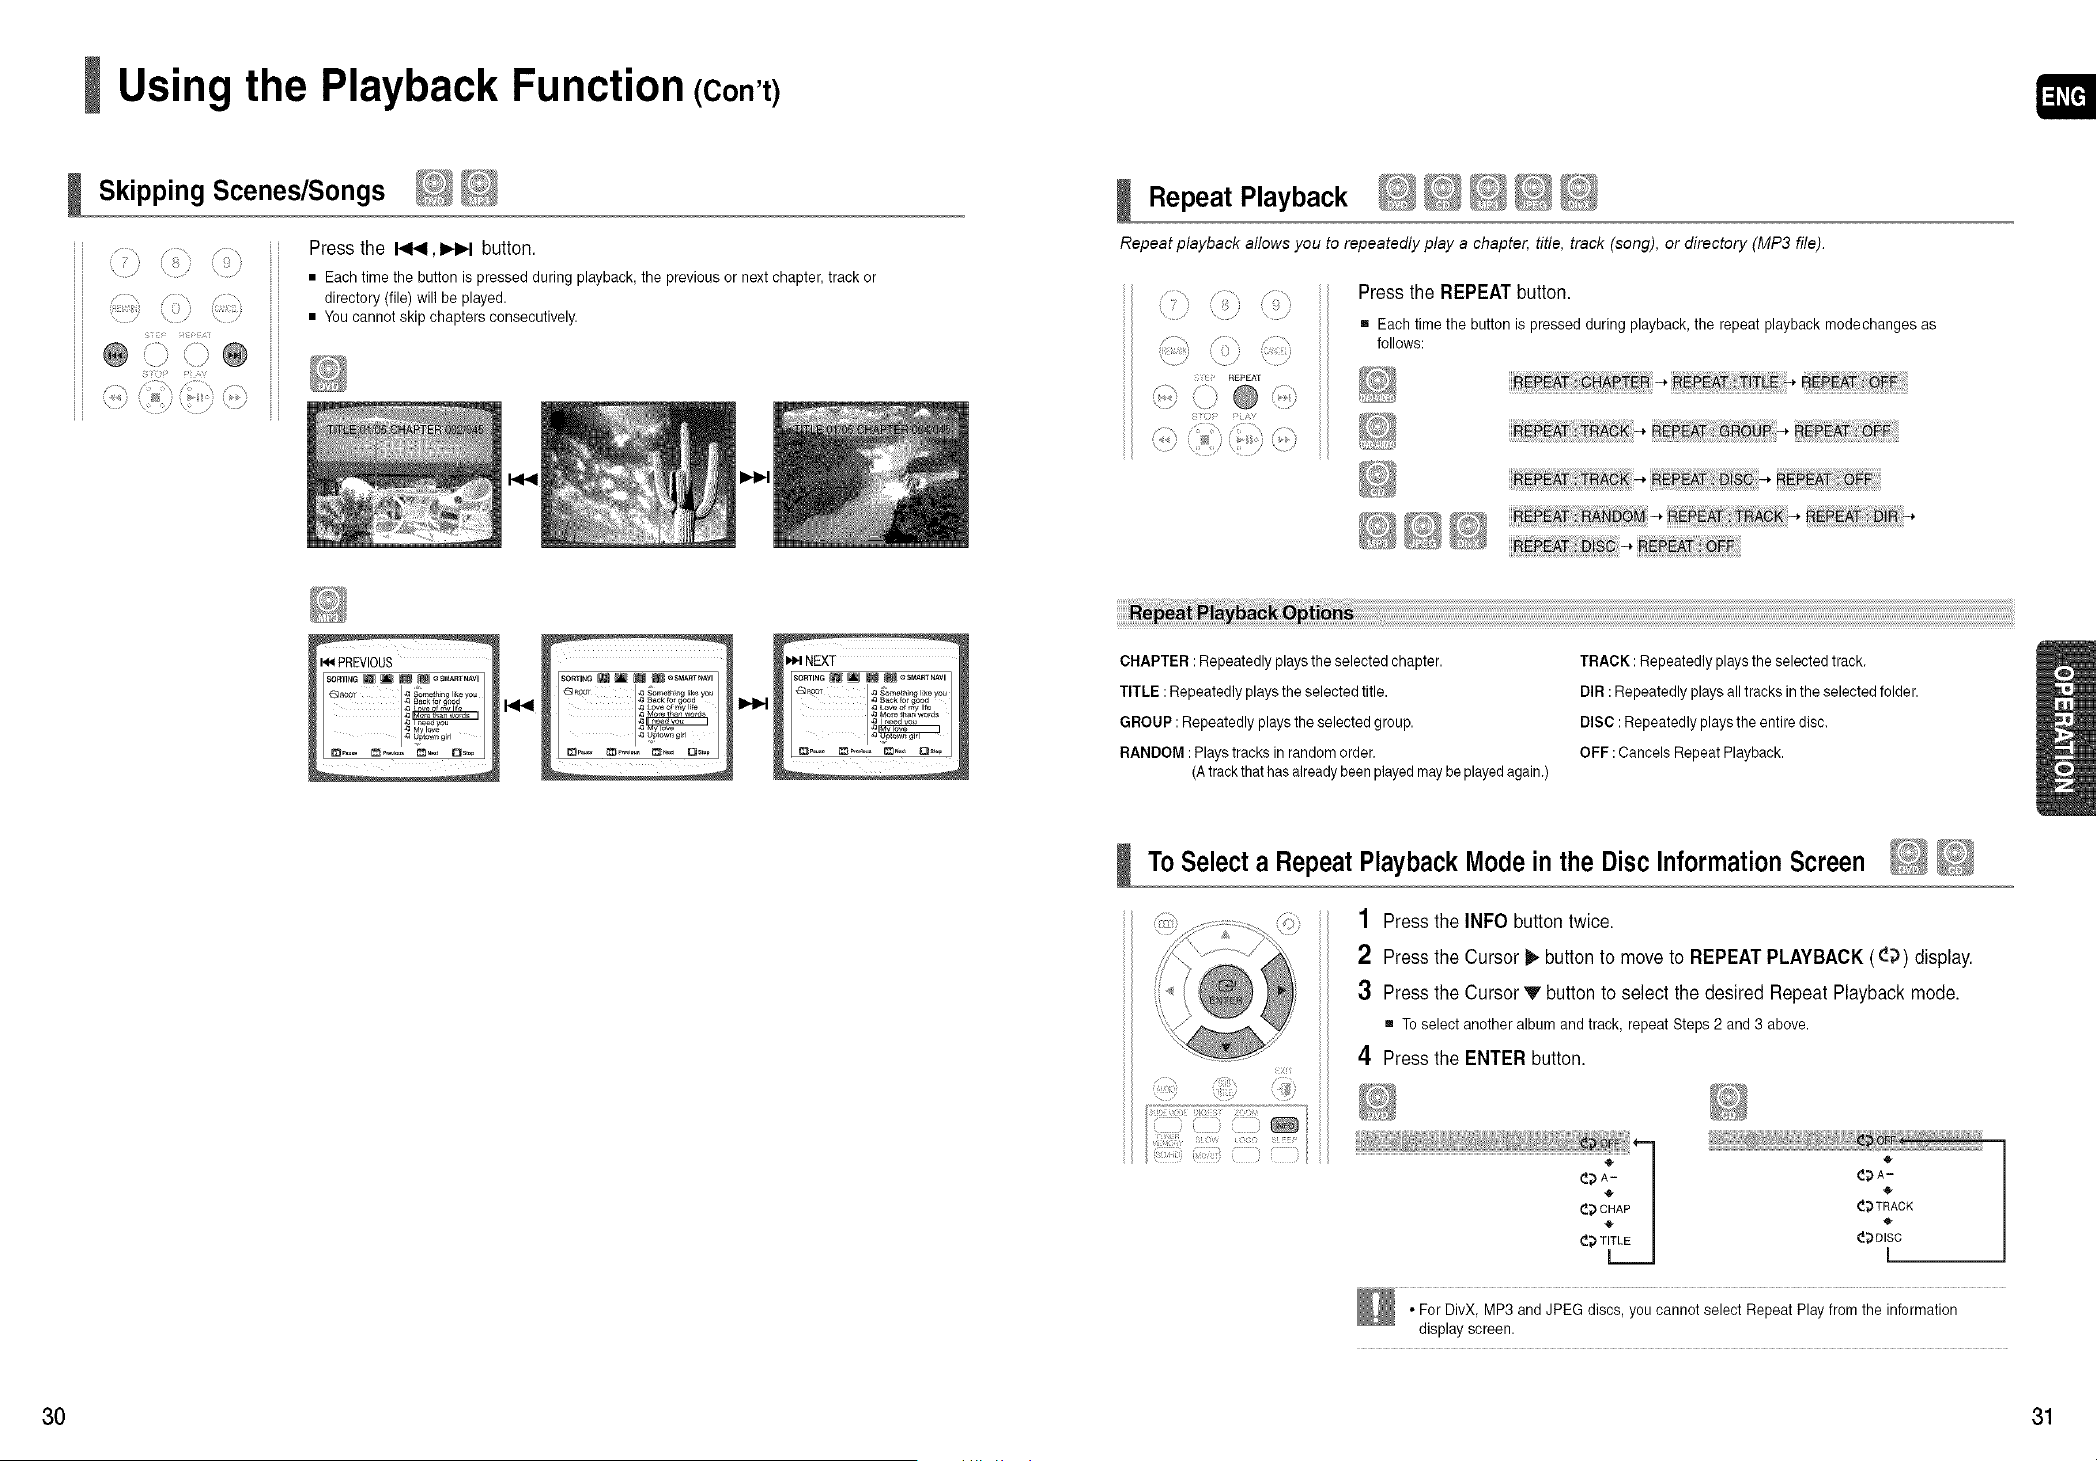
Skipping Scenes/Songs
,..........
}
.... /
........J .........." ii
@ i
,, iI
? /:
o \
(m' )( /"
...../ / ? / " _ i
Press the t,_1_1,_ button.
• Each time the button ispressed during playback, the previous ornext chapter,track or
directory (file) will be played.
• Youcannotskip chapters consecutively.
PREVIOUS
SO_I_G_ _ _ _ OS_TNAVI
Repeat Playback
Repeat playback allows you to repeatedly play a chapter, title, track (song), or directory (MP3 file).
j........
( ,
......... \/
f REPEA_
\ ..........
Press the REPEAT button.
[] Each timethe button ispressed during playback, the repeat playback modechanges as
follows:
_AT: _:AC_:-,_AT _ _AT
CHAPTER :Repeatedly playstheselectedchapter.
TITLE :Repeatedly playstheselectedtitle.
GROUP :Repeatedly playstheselectedgroup.
RANDOM : Playstracks inrandomorder.
(Atrackthat hasalreadybeenplayed maybe played again.)
TRACK :Repeatedly playstheselectedtrack.
DIR :Repeatedly playsalltracks in theselectedfolder.
DISC :Repeatedly playstheentire disc.
OFF :Cancels Repeat Playback.
To Select a RepeatPlaybackMode in the Disc InformationScreen
1 Press the INFObutton twice.
2 Press the Cursor _ button to move toREPEAT PLAYBACK (_;_) display.
3 Press the Cursor V button toselectthe desired Repeat Playbackmode.
[] Toselect another albumand track, repeat Steps2 and 3 above.
4 Press the ENTERbutton.
_:!:7
• For DivX, MP3 and JPEG discs, youcannot select Repeat Play from the information
display screen.
30 31
Using the Playback Function (Con't)
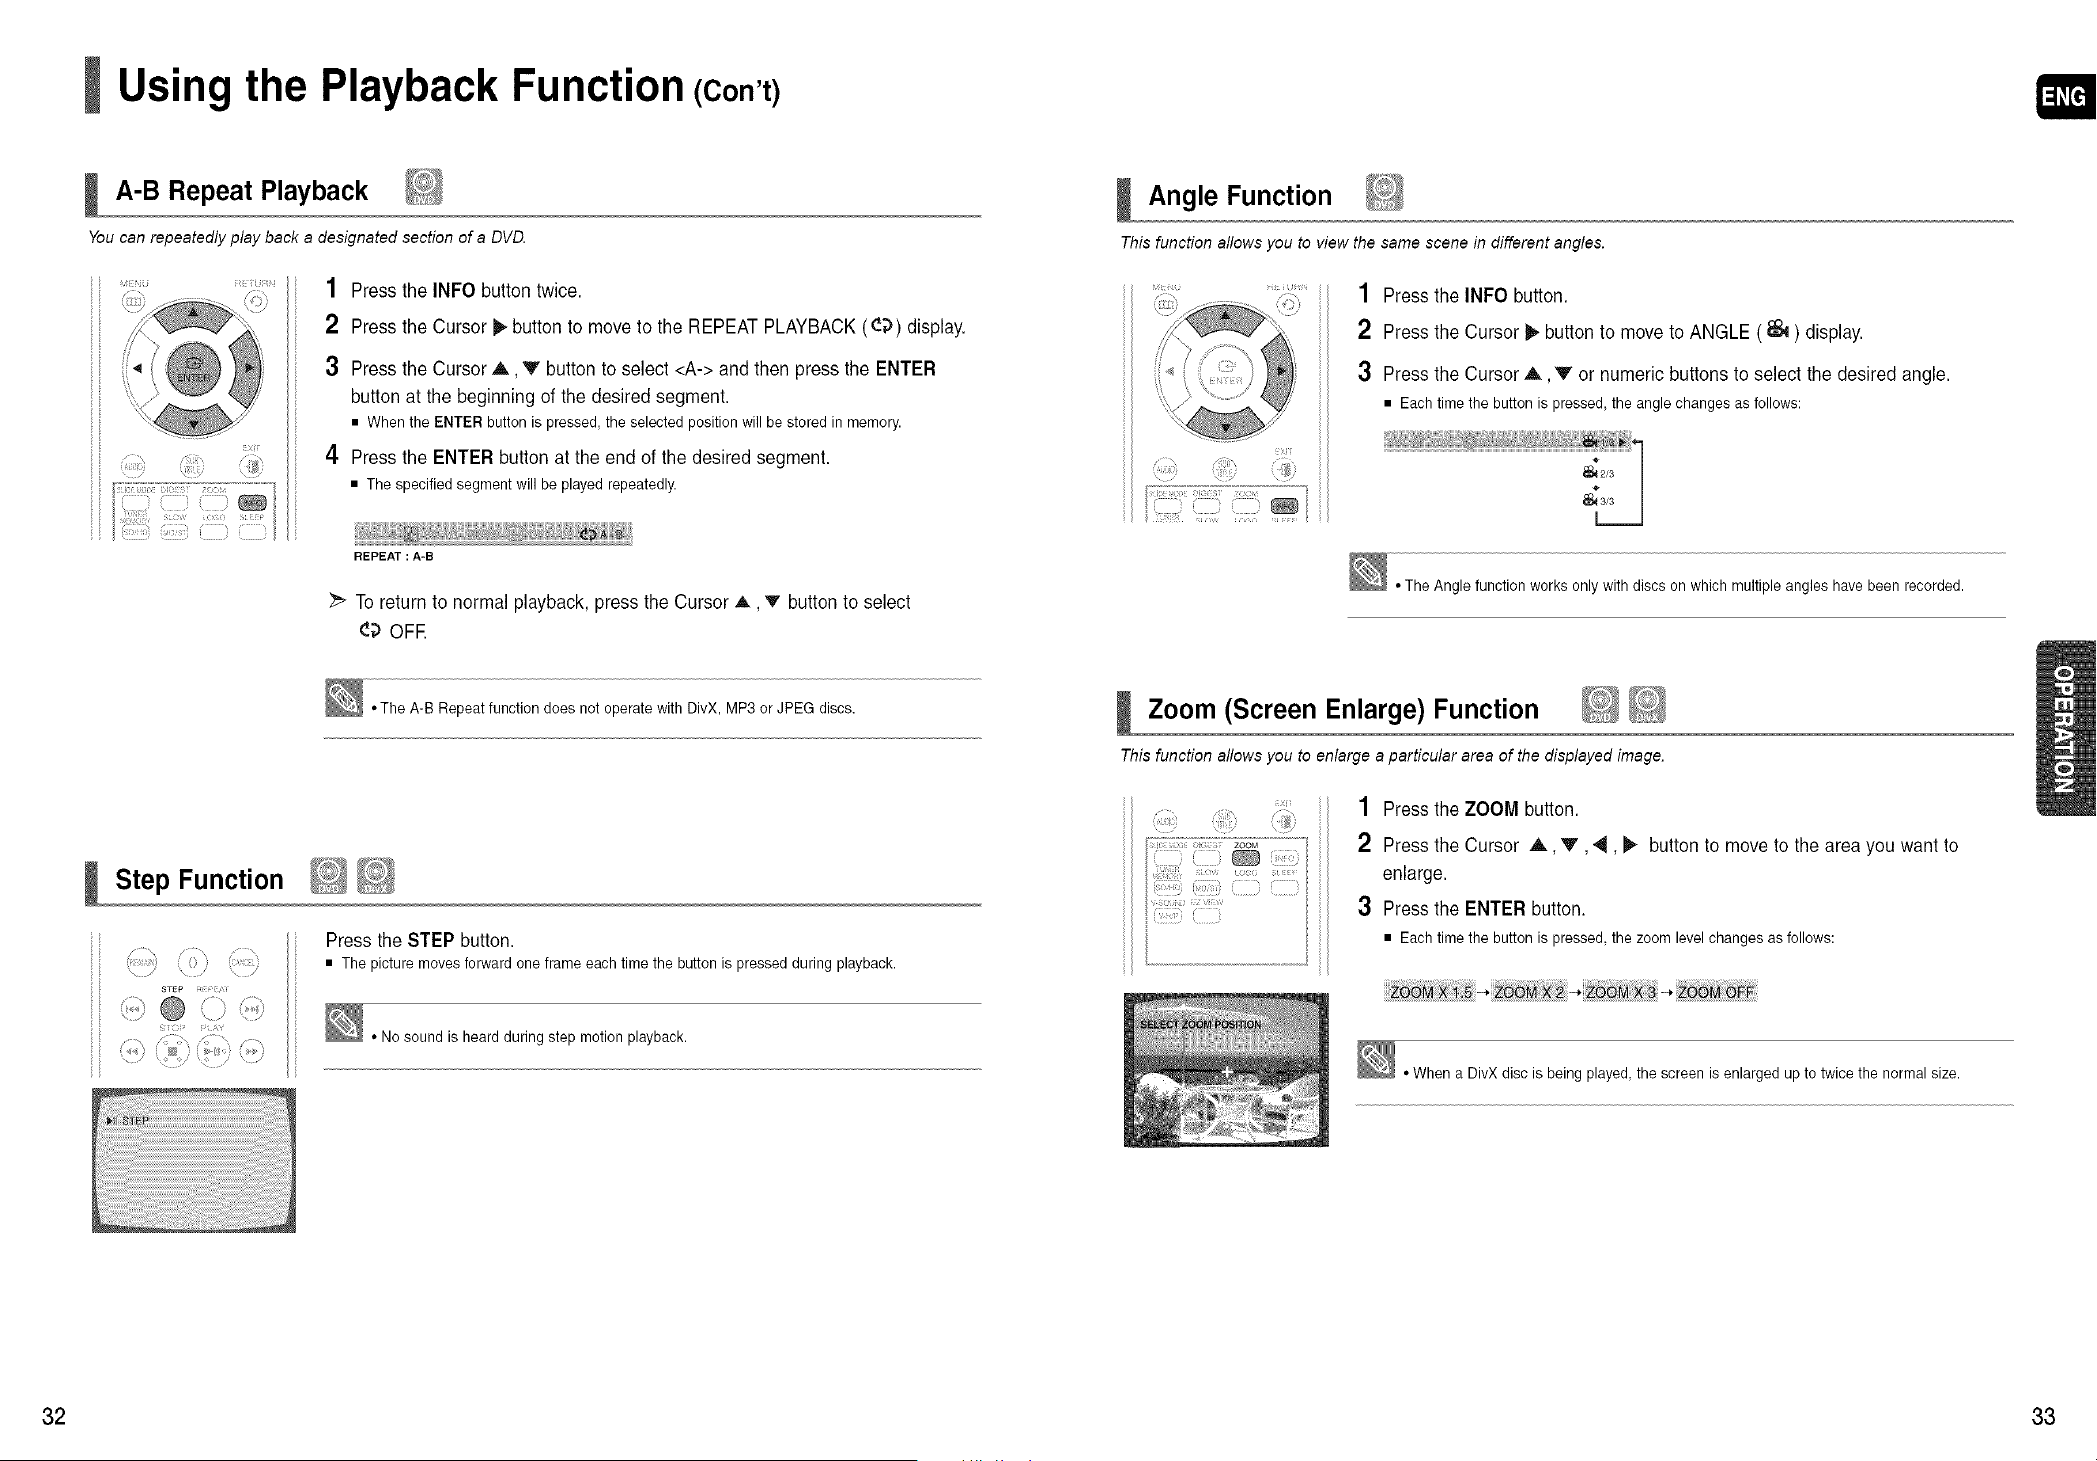
A-B Repeat Playback
You can repeatedly play back adesignated section of a DVD.
iiii_ii!_,_!!!ii__i!_i_
1
2
3
4
Press the INFObutton twice.
Press the Cursor _ button tomove to the REPEAT PLAYBACK ((_;))display.
Press the Cursor A V button toselect <A->and then press the ENTER
button atthebeginning ofthedesired segment.
• When the ENTER button is pressed,the selected positionwill bestored in memory.
Press theENTERbutton attheend ofthe desiredsegment.
• Thespecified segment will be played repeatedly.
i_iiiiiiiiiiii i;iiii_'_iiiiiiiUJJiiiiiiiiiiiiiiiiiiii!iiiiii/iiiiiiiii_iiiigiiiH_iiiii_iiiiiiiiiiiiiii_Uiii;iiiii_iiiiii
REPEAT :A-B
Toreturn tonormal playback, press the Cursor A, v button to select
4;) OFE
Angle Function
This function allows you to view the same scene in different angles.
!!!b!i!
1 Press the INFObutton.
2 Press the Cursor i_-button to move toANGLE ( _ ) display.
3 Press the Cursor A, V or numeric buttonstoselect thedesiredangle.
• Eachtimethe button is pressed, theangle changes as follows:
• TheAngle function works only with discs onwhich multiple angles havebeen recorded.
Step Function
STEP i
..........@ (::>.........
t i t*
(} ¢
't
• TheA-B Repeat function does not operate with DivX, MP3 or JPEG discs,
Press theSTEP button.
• The picture moves forward one frame each time the button is pressed during playback.
• No sound isheard during step motionplayback.
Zoom (Screen Enlarge) Function
This function allows you to enlarge aparticular area of the displayed image.
..............
1 Press the ZOOM button.
2 Press the Cursor ,A., _, _, _ button to move tothe area youwant to
enlarge.
3 Press the ENTERbutton.
• Eachtimethe button is pressed, thezoom level changes as follows:
• When aDivX disc isbeing played, the screen isenlarged up to twicethe normal size.
32 33
Using the Playback Function (Con't)
EZ VIEW Function
Press the EZ VIEW button.
[] Each time the button ispressed, the zoom function will switch between On and Off.
[] When a movie isplayed in Widescreen format, black bars atthe top and bottom ofthe TV
screen can be removed by pressing the EZ VIEW button.
• Thisfunction will net work if the DVD isrecorded with multi-camera angle format.
• Black bars may not disappear because some DVD discs have a built-in horizontal to
vertical ratio.
• Thisfeature is not supported for DivX discs.
• During the EZ View operation, some of the left and right sides may be cut slightly.
Bonus Group
Some DVD-Audio discs have an extra 'bonus'group that requires a 4-digit key number to access. See the disc packaging for
details and the key number.
Whenyou playa DVD-Audio disc that hasa bonusgroup,thekey number
inputscreen appears automatically.
• If you eject the disc,switch the poweroff, or unplugthe player,you will need to re-enter
the keynumber.
Navigating Pages
M_'_ R_E¸_U_'_,_
Duringplayback, press the v,^ button on theremote control.
• Youcan select the desired imagefrom aDVD-Audio disc containing stillimages.
• With some discs, you maynotbe abletoselect images.
Audio Language Selection Function
"(!i,
i!!? ;!
?r)
i) il)
1 Press the INFObutton twice.
2 Press the Cursor A, V button or numeric buttonstoselectthe desiredaudio
language.
• Dependingen the number ef languages en aDVD disc, a different audio language (ENGLISH,
SPANISH, FRENCH, etc.) isselected eachtime the button ispressed.
Subtitle Language Selection Function
/" " @ "- ":i'!!'!i:
'_ii!iiii"i!!!!i!!!!...........
(
1 Press the INFObutton twice.
2 Press the Cursor _,button to move toSUBTITLE (_) display.
3 Press the Cursor V button or numeric buttons to selectthedesiredsubtitle.
• Tooperate thisfunction, youcan also pressthe AUDIO or SUBTITLE buttons on the
remote control.
• Depending en the disc,the Subtitle and Audio Languagefunctions maynot beavailable.
34 35

Using the Playback Function (Con't)
Moving DirectlytoaScene/Song
ii
i_;i;:_;i;iii::iiii
1 Press theINFObutton.
2 Press theCursor A, v button or numeric buttonstoselectthe
desiredtitle/track (a_) and thenpress the ENTERbutton.
3 Press theCursor 41,1) button tomove to theChapter (_'J) display.
4 Press theCursor _,, v button or numeric buttonstoselectthe
desiredchapter and thenpress the ENTERbutton.
5 Press theCursor 4,1_ button tomove to time (O) display.
6 Press thenumeric buttonstoselectthedesired time and then press
the ENTERbutton.
Using the Disc Menu
You can use the menus for the audio language, subtitle language, profile, etc.
DVD menu contents differ from disc to disc.
MENU ;
EXIT
....
1 InStopmode, press theMENUbutton.
2 Press the Cursor A v button to move tothe<DISC MENU> and then
press the ENTERbutton.
• When you select Disc Menu and it is not supported by thedisc, the <This menu isnet
supported> message appears on the screen.
3 Press the Cursor ,&T, _, _ button toselect thedesireditem.
4 Press the ENTERbutton.
_ Press the EXIT button toexit the setup screen.
• Thedisc menu display may be different depending on the disc.
Press the numeric buttons.
• The selected filewill be played.
• When playingan MP3 or JPEG disc, youcannot use the Cursor A V button to moveto afolder.
Tomove a folder, pressSTOP(II) and then pressthe Cursor A Y button.
*You can pressthe _ _ button on the remotecontrolto move directlyto the desired
title,chapter, or track.
• Depending on the disc,you may not beable tomoveto the selected title or time.
Using the Title Menu
ForDVDs containingmultiple titles,youcan viewthe title ofeachmovie. Depending onthe disc, the availability of this feature
may vary.
MENU L: J
EXM
1 InStopmode, press theMENUbutton.
2 Press the Cursor A T button to move tothe <Title Menu>.
3 Press the ENTERbutton.
• Thetitle menu appears.
_" Press the EXIT button toexit the setup screen.
• TheTitle menu display maybedifferent depending en the disc.
36 37
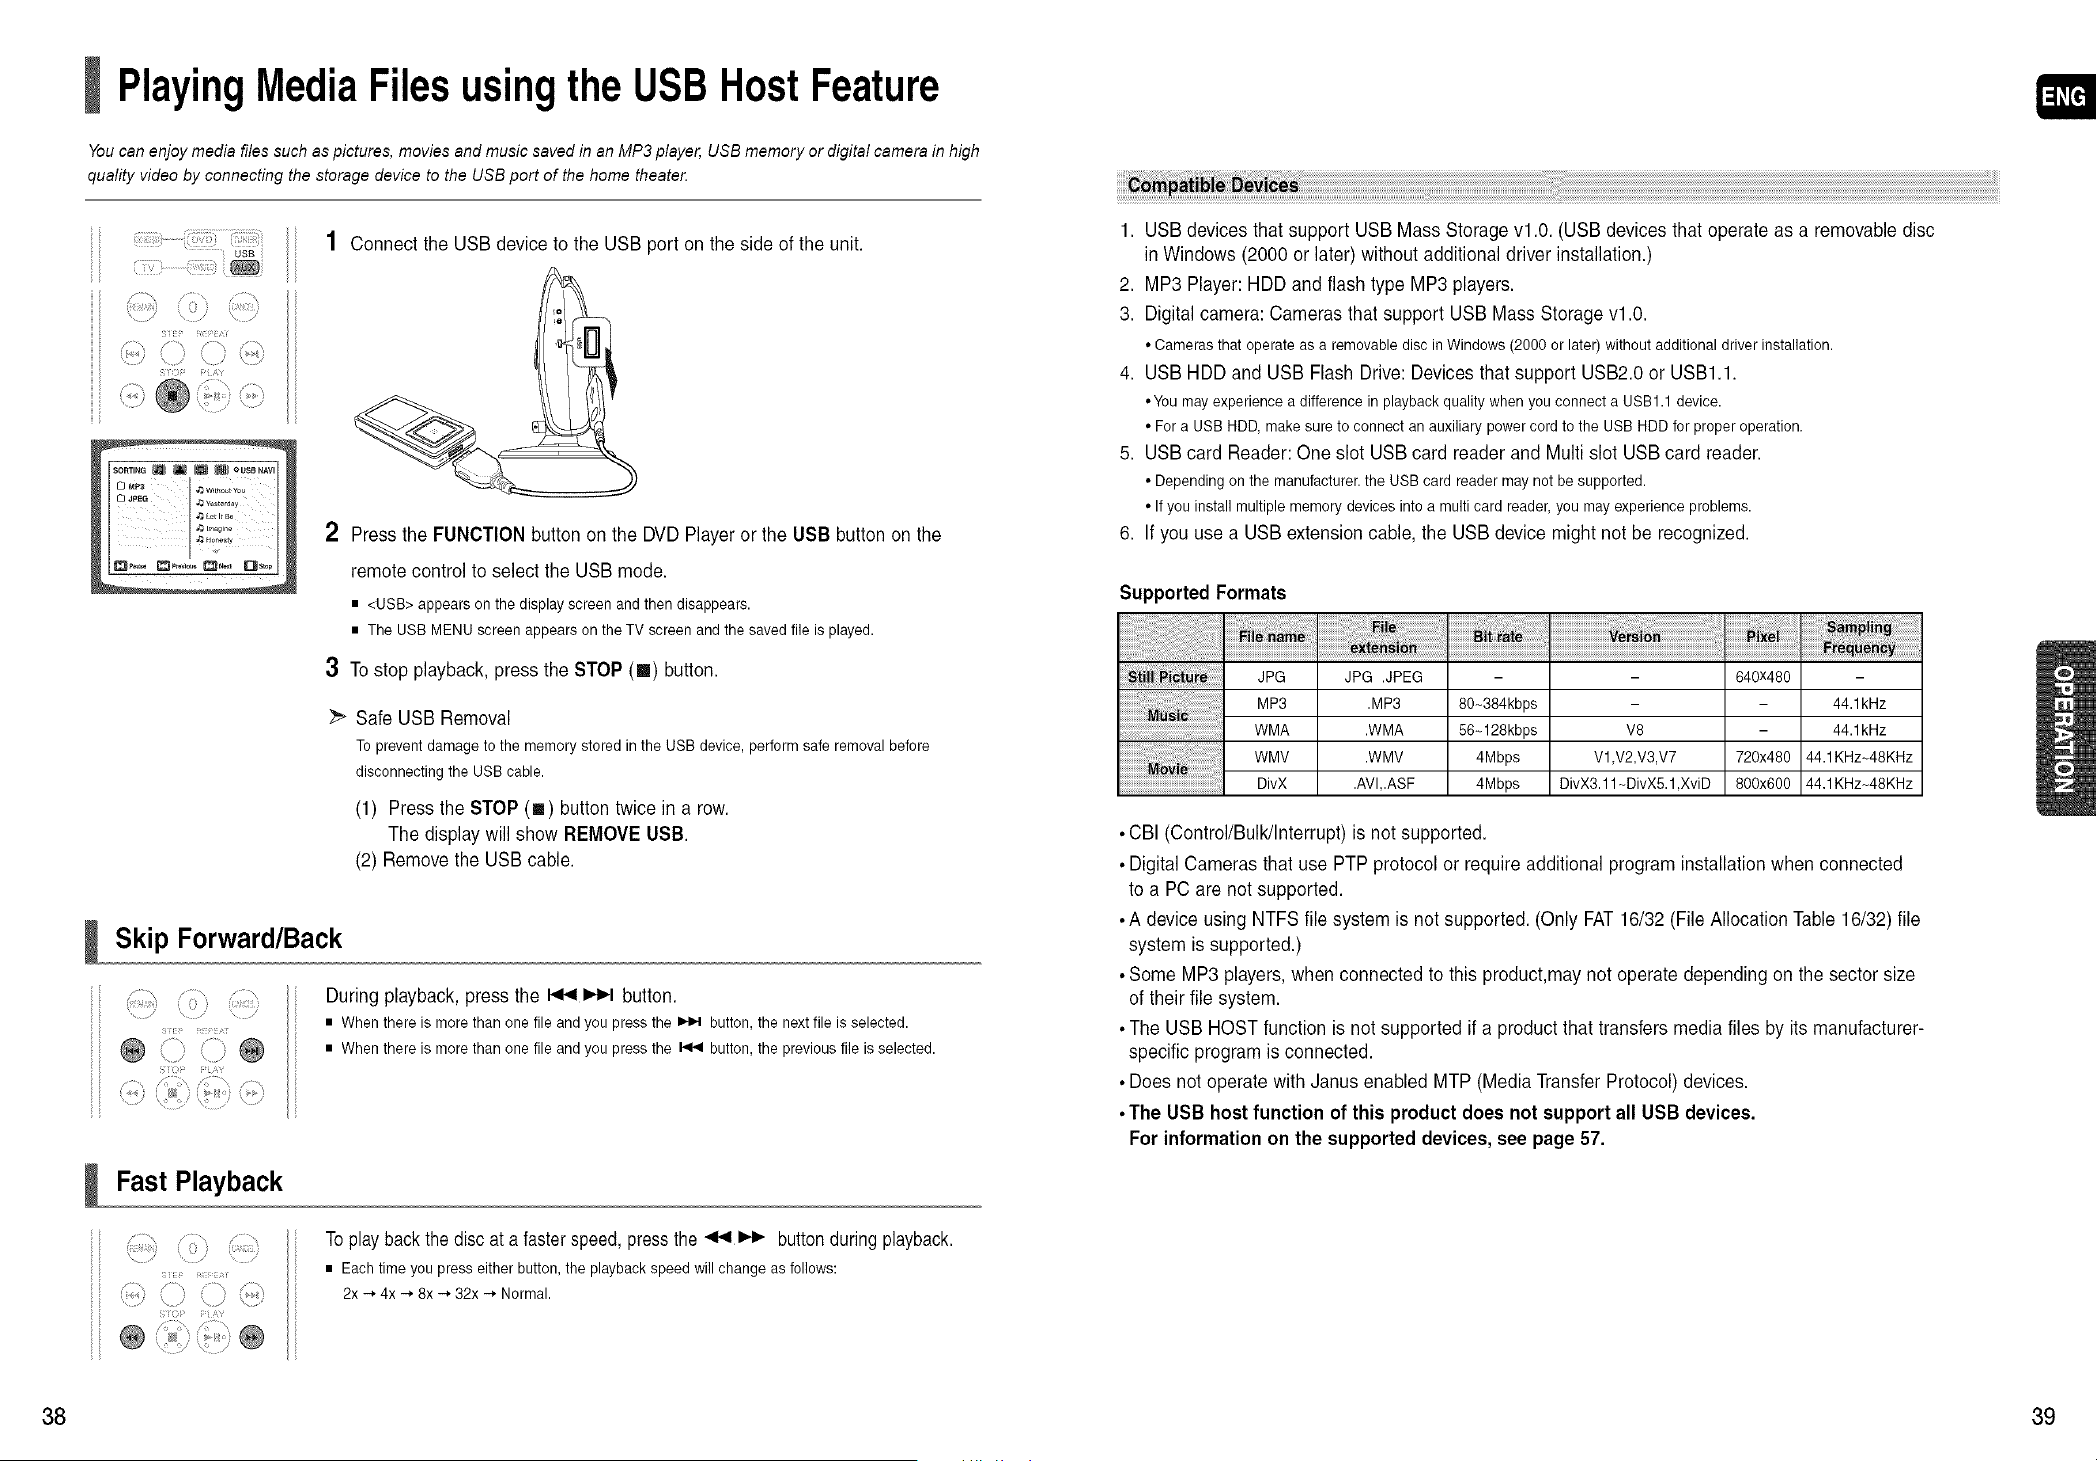
PlayingMediaFilesusingthe USBHostFeature
You can enjoy media files such as pictures, movies and music saved in an MP3 player, USB memory or digital camera in high
quality video by connecting the storage device to the USB port of the home theater.
1
usB
/ '
}
Connectthe USBdevice tothe USBport on the sideofthe unit.
2 Press theFUNCTIONbutton on the DVD Playeror the USB button on the
remote control toselect the USBmode.
• <USB> appears on the display screen and then disappears.
• The USB MENU screen appears onthe TV screen and the saved file isplayed.
3 Tostop playback, press the STOP(m) button.
Safe USBRemoval
To preventdamage tothe memory stored in the USB device, perform safe removalbefore
disconnecting the USB cable.
(1) Press the STOP(I) button twicein a row.
Thedisplay will show REMOVE USB.
(2) RemovetheUSBcable.
Skip Forward/Back
/ ,/
@ .........@
I )
77;i b' i i'i
i ....... T >_:;7
ii=
i \
Duringplayback, press the _ I,,1_1button.
• When there is morethan one file and you pressthe _ button, the nextfile isselected.
• When there is morethan one file and you pressthe _ button, the previous file isselected.
Fast Playback
sii!_ ¸ Fi!r _]_r
..........i)) '..................'
t 0 ;T i7
11 11\
D/ /
To play back the disc ata faster speed,pressthe_ l,i,- buttonduring playback.
• Eachtime youpress either button, the playback speed will change as follows:
2x H,4x H,8x H,32x -_ Normal.
1. USBdevicesthat support USBMassStoragevl.0. (USB devicesthat operateas a removabledisc
in Windows(2000 or later)withoutadditionaldriver installation.)
2. MP3Player: HDDand flash type MP3players.
3. Digital camera:Camerasthat support USB MassStoragevl.0.
• Cameras that operate as aremovable disc in Windows (2000 orlater) without additional driver installation.
4. USBHDDand USB Flash Drive:Devices that support USB2.0 or USBI.1.
• You may experience adifference in playback quality when you connect a USB1.1 device.
• For aUSB HDD,make sure to connect an auxiliary powercord tothe USB HDD forproper operation.
5. USBcard Reader: One slot USB card reader and Multi slot USBcard reader.
• Depending en the manufacturer,the USB card readermay not besupported.
• If yeu install multiplememory devices into a multi card reader,you mayexperience problems.
6. If you usea USBextensioncable, the USBdevice might notbe recognized.
Supported Formats
i_i_)!_i_i_i_i_i_i_i_i_i_iiiiiiiiiiiii_i_i_i_i_i_i_i_i_i_i_iiiiiiiiiiiiiiiiiii_!i_!_;_;_;_;_;_;_;_;_;_;_;_;_7_ii
illlllllllllll_l_lilli_7l7lilii_l!l_l!llillillllllllllllllll_l_l_l_l_l_l_lilililli
iiiiiiiiiiiiiiiiiiiiiiiiiiiiiiiovil!!!!!!!!!!!!!i
JPG
MP3
WMA
WMV
DivX
JPG .JPEG
.MP3
.WMA
.WMV
.AVl,.ASF
80_384kbps
56_128kbps
4Mbps
4Mbps
- 640x480 -
- - 44.1kHz
V8 - 44.1kHz
Vl,V2,V3,V7 720x480 44.1KHz_48KHz
DivX3.11-DivXS.1,XviD 800x600 44,1KHz_48KHz
• CBI (Control/Bulk/Interrupt) isnotsupported.
• Digital Camerasthat usePTPprotocol or require additional programinstallationwhenconnected
toa PCare notsupported.
• A device using NTFSfilesystemis notsupported.(OnlyFAT 16/32 (FileAllocation Table 16/32)file
systemissupported.)
• SomeMP3 players, whenconnectedto this product,maynotoperatedepending on the sectorsize
oftheirfile system.
• TheUSB HOST function isnotsupported ifa product that transfers mediafiles byits manufacturer-
specific programisconnected.
• Does notoperatewith Janus enabled MTP (MediaTransfer Protocol) devices.
• The USB host functionofthis product does not support all USB devices.
Forinformationon thesupported devices,see page 57.
38 39

Settings
Setting the Language
OSD(On-Screen Display) language is set to English by default.
1 InStop mode, press theMENUbutton.
2 PresstheCursorv buttontomoveto<Setup> and then press the ENTER button.
3 Select <LANGUAGE>and then press the ENTERbutton.
4 Press theCursor A, T button toselect <OSD LANGUAGE>and then press
the ENTERbutton.
5 Press theCursor A, '_ button toselect thedesired language and thenpress
the ENTERbutton.
[] Once the setup iscomplete, the OSD will be English if English has been selected as language.
_" Press the RETURNbutton to returntothe previous level.
_" Press the EXIT button toexit thesetup screen.
,, OSD LANGUAGE :Selecting the OSDLanguage
,, AUDIO : Selecting the Audio Language (recorded on the disc)
,, SUBTITLE : Selecting the Subtitle Language (recorded on the disc)
,, DISC MENU :Selecting the Disc Menu Language (recorded on the disc)
Ifthe language you selected isnot recorded onthe disc, the menu language will not change even
if you set it toyour desired language.
,, OTHER :Toselect another language, select OTHER and enterthe language codeof your country.
(See page 56 for language codes)AUDIO, SUBTITLE and DISC MENU languagecan be
selected.
Setting TV Screen type
Depending on your TV type (Wide Screen or conventional 4.3), you can select the TV's aspect ratio.
1 InStopmode, press theMENUbutton.
2 PresstheCursorv buttontomoveto<Setup> and then presstheENTER button.
3 Press the Cursor v' button tomove to <TV DISPLAY> and thenpress the
ENTERbutton.
4 Press the Cursor ,J,, v button toselect thedesireditem and thenpress the
ENTERbutton.
[] Once the setup is complete, you will be takento the previous screen.
Press the RETURNbutton to returntothe previous level.
Press the EXIT button toexit the setup screen.
Thehorizontal tovertical screen size ratio of conventional TVs is 4:3, while that of widescreen and high definition TVs is 16:9. This ratio is
called the aspect ratio. Whenplaying DVDsrecorded in different screensizes, you should adjust the aspect ratio to fit your TV or monito_
For astandard TV, select either <4:3PS> or <4:3LB> option according to personal preference. Select <WIDE/HDTV> if you havea
widescreen TV.
4:3PS(4:3 Pan&Scan)
Select thisto playa 16:9 picturein the pan & scan mode ona conventionalTV.
uYou cansee the central portion of the screen only (with the sides of the 16:9 picturecut off).
4:3LB (4:3 Letterbox)
Select thisto playa 16:9 picturein the letter box mode on a conventionalTV.
,,,Black bars will appearat the top and bottom of the screen.
WIDE/HDTV
Select thisto viewa 16:9 picturein the full-screen mode onyour widescreen TV.
,,You can enjoy the widescreen aspect.
• If a DVD is inthe4:3 ratio, you cannot view it in widescreen.
• Since DVD discs are recorded in various image formats, they will look different depending onthe software,
the type of TV, and the TV aspect ratio setting.
• In HDMI operation, the screen isautomatically converted to Wide mode.
40 41
Settings (Con't)
Setting Parental Controls (Rating Level)
Use this torestrict playback of adult or violent DVDs you do not want children to view.
1 InStop mode, press theMENUbutton.
2 PresstheCursorv buttontomoveto<Setup> and then presstheENTER button.
3 PresstheCursor_' buttontomoveto <PARENTAL>andthenpressthe ENTERbutton.
4 Press theCursor A v button toselect thedesired ratinglevel and thenpress
the ENTERbutton.
m If you haveselected Level 6,you cannot view DVDswith Level 7or higher.
m The higherthe level,thecloser the content isto violent oradult material.
5 Enterthe password and then press the ENTERbutton.
[] The passwordisset to "7890" by default.
[] Once the setup iscomplete, you will be taken tothe previous screen.
_ Press the RETURNbutton to returntothe previous level.
Press the EXIT button toexit thesetup screen.
• Thisfunction works only if a DVD disc contains the rating levelinformation.
Setting the Password
You can set the password for the Parental (rating level) setting.
1 InStop mode, press theMENUbutton.
2 PresstheCursorv buttontomoveto<Setup> and then press the ENTER button.
3 Press theCursor v button tomove to<PASSWORD> and thenpress the
ENTERbutton.
4 Press theENTERbutton.
5 Enterthe password and then press the ENTERbutton.
[] Enter the old password, a new password, and confirm new password.
[] The setting iscomplete.
• The password isset to "7890" by default.
• While theplayerisin_ (NoDisc)mode, holdthe DVD Player's STOP(• ) button for longer than 5 seconds,"1NITIALIZE"appearsonthe
display and all settings will return to the defaultvalues.
• Press the POWER button.
Using the RESETfunction willerase allstored settings.
Donot use this unless necessary.
Setting the Wallpaper
While watching a DVD or JPEG CD, you can set the image you like as background wallpaper.
1 During playback,pressthePLAY/PAUSEbutton when an imageyoulike appears.
2 Press the LOGO button.
[] <COPY LOGO DATA> will be displayed on the TV screen.
3 Thepowerwillturnoff and then back on.
[] The selected wallpaper will be displayed.
[] You can select up to 3 wallpaper settings.
• Thisfunction will not work when the HDMI output is 720p or 1080i.
To Select One of the 3Wallpaper Settings you've made
1 In Stop mode,presstheMENU button.
2 PresstheCursorv buttontomoveto<Setup> and then presstheENTER button.
3 PresstheCursorv buttontomoveto<LOGO> andthenpresstheENTER button.
4 PresstheCursor A, v button select thedesired <USER>, and then
press theENTER button.
[] Thisselects one of the 3wallpaper screens
5 Press the EXIT button toexit thesetup screen.
• ORIGINAL : Select thisto set the Samsung Logo imageasyour wallpaper.
• USER:Select this to set the desired imageas your wallpaper.
Press theRETURN button to returntotheprevious level.
Press theEXIT button toexit thesetup screen.
42 43
Settings (Con't)
DVD Playback Mode
Some DVD-Audio discs contain DVD-Video as well as DVD-Audio.
Toplay back the DVD-Video portion of the DVD-Audio disc, set the unit to DVD-Video mode.
1 Pressthe EJECT button and then presstheMENUbutton.
2 Press theCursor v button tomove to<Setup> and thenpress the
ENTERbutton.
3 Press theCursor v button tomove to<DVD TYPE>and thenpress the
ENTERbutton.
4 Press theCursor ,_, v button to move to<DVD VIDEO>and thenpress the
ENTERbutton.
[] Set steps 1 - 4again if you want to switch to DVD AUDIO Play mode.
• DVD VIDEO :setto playthe DVD video contents contained on aDVD audiodisc.
• DVD AUDIO :set to playthe default DVD audio.
• DVD Play mode is set to DVD Audio asfactory default setting.
• Powering off the mainunit will automatically switch to the DVD Audio mode.
I DivX (R) registration
Please use the Registration code to register this player with the DivX (R) video on demand format.
To learn more, go to www.divx.com/vod.
Setting the DRC (Dynamic Range Compression)
This feature balances the range between the loudest and quietest sounds. You can use this function to enjoy Dolby Digital
sound when watching movies at low volume at night.
1 InStopmode, press theMENUbutton.
2 PresstheCursor'V buttontomove to<Audio>and thenpresstheENTER button.
3 PresstheCursor_' buttontomove to<DRC>and then presstheENTERbutton.
4 Press the Cursor A, T button toadjust the DRC.
[] When the Cursor A button is pressed,the effect isgreater, and when the Cursor v button is
pressed, the effect issmaller.
Press the RETURNbutton to returntothe previous level.
Press the EXIT button toexit the setup screen.
Setting the AVSYNC
Video may look slower than the audio if it is connected to a digital T_ZIf this occurs, adjust the audio delay time to to match
the video.
1 InStopmode, press theMENUbutton.
2 PresstheCursor_" buttontomoveto<Audio>and thenpress the ENTER button.
3 Press the Cursor v button tomove to <AV-SYNC> and thenpress the
ENTERbutton.
4 Press the Cursor A, v button toselect theAV-SYNC DelayTime and then
press the ENTERbutton.
[] You can setthe audio delay time between 0 ms and 300 ms.Set ittothe optimal status.
Press the RETURNbutton to returntothe previous level.
Press the EXIT button toexit the setup screen.
44 45
Settings (Con't) Listening to Radio
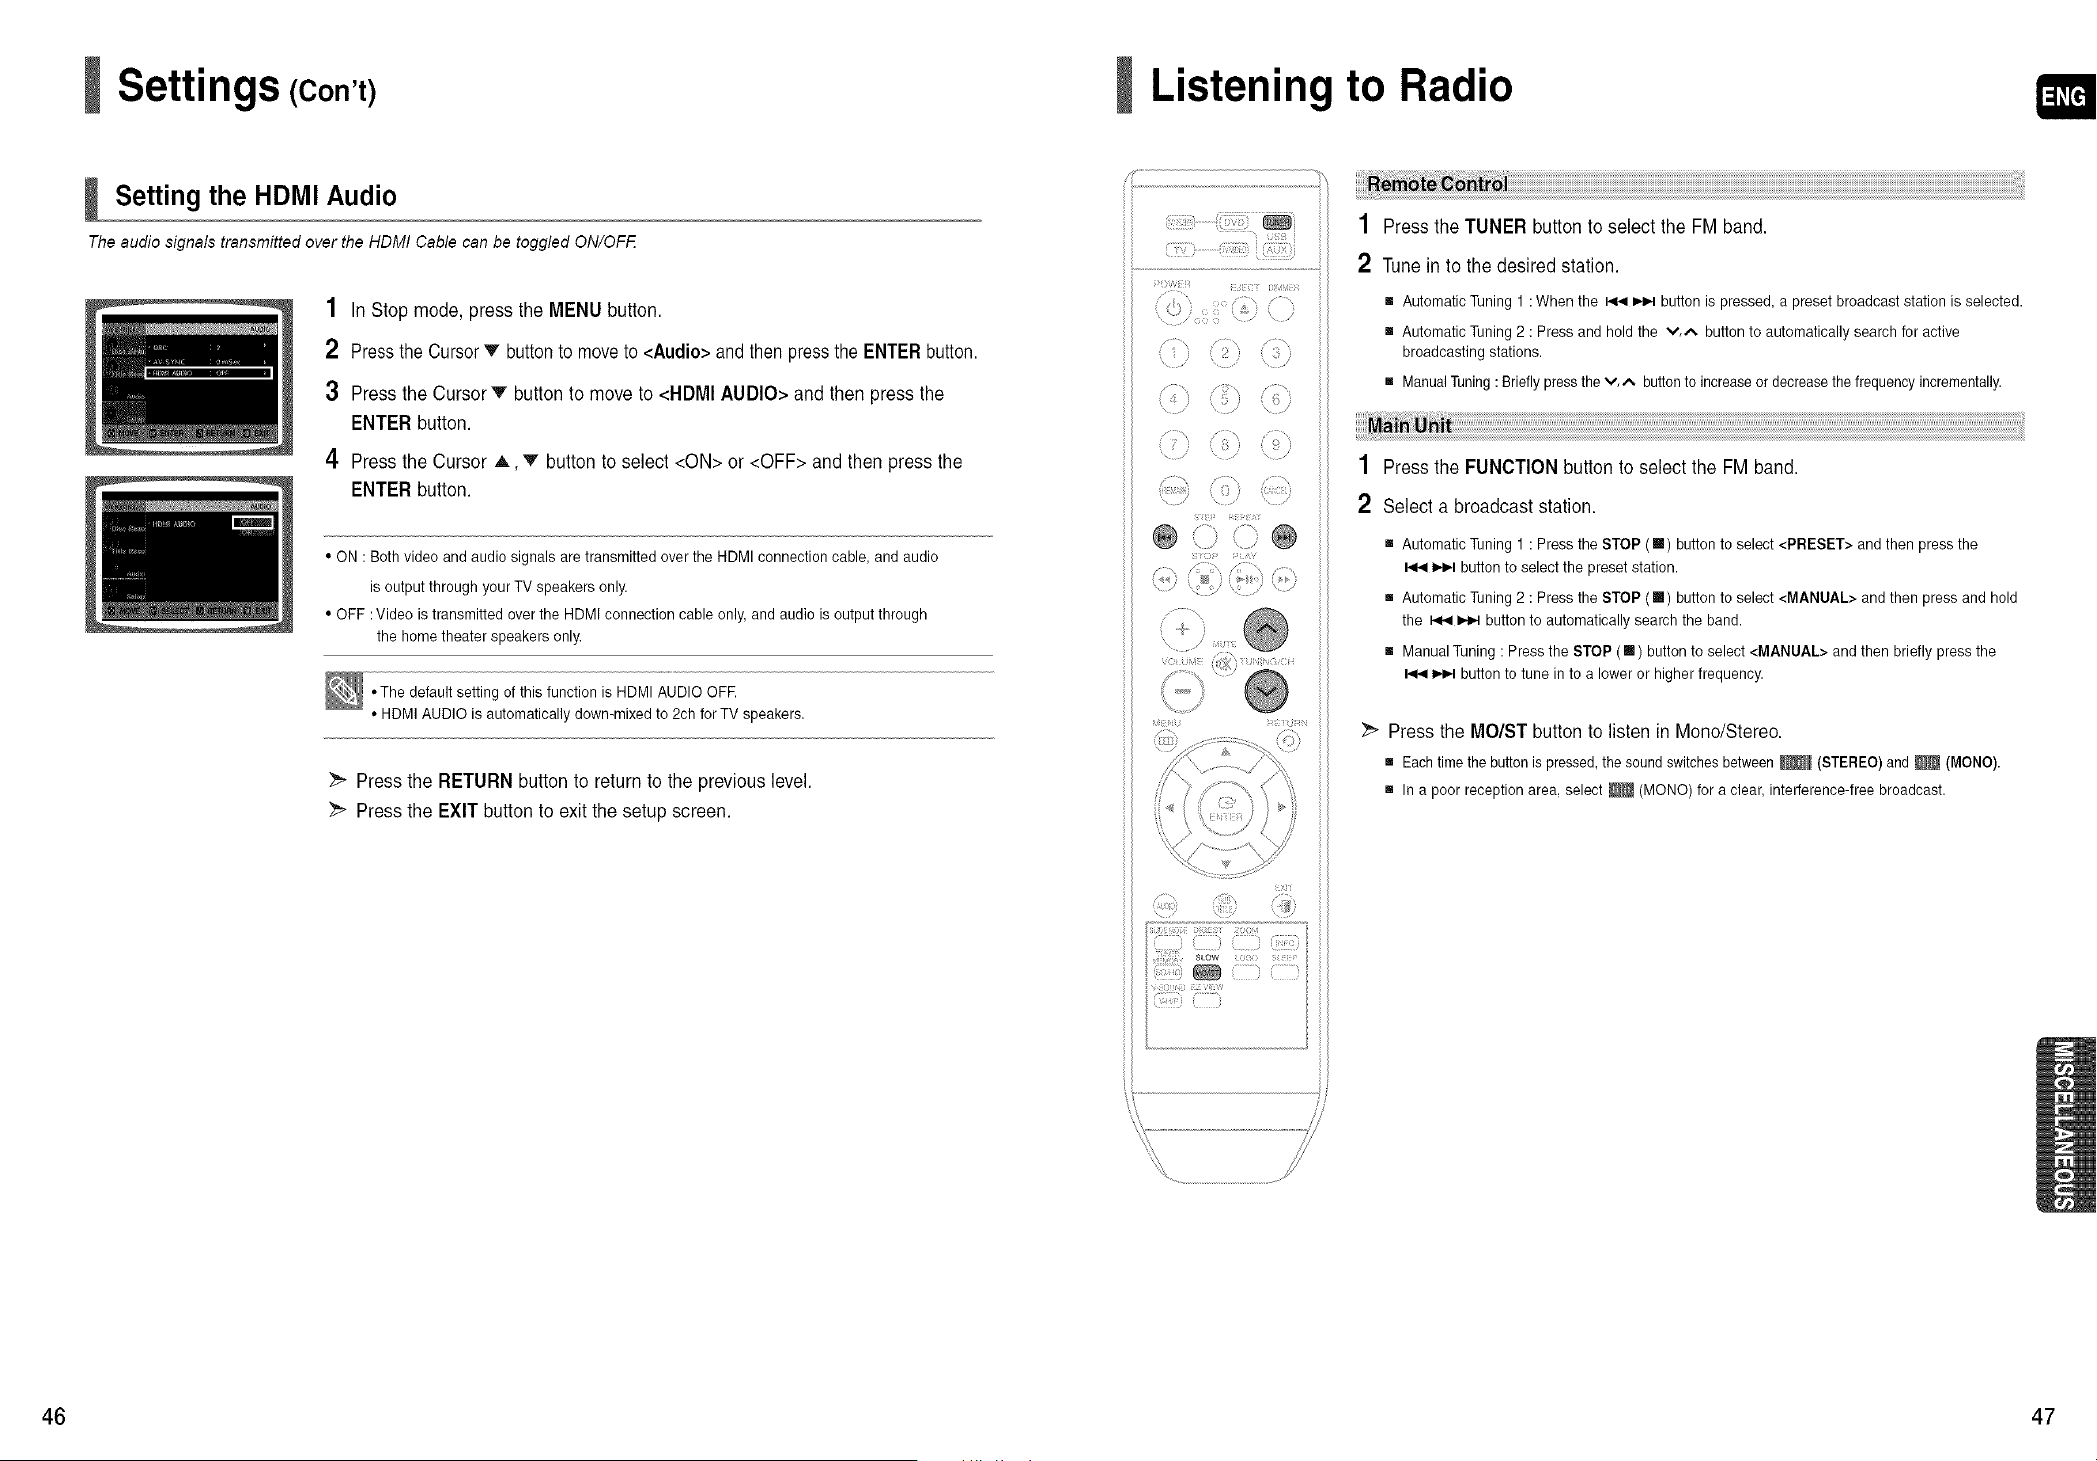
Setting the HDMI Audio
The audio signals transmitted over the HDMI Cable can be toggled ON/OFF
1 InStop mode, press theMENUbutton.
2 PresstheCursorv button tomoveto<Audio>and thenpressthe ENTER button.
3 Press theCursor v button tomove to<HDMI AUDIO>and then press the
ENTERbutton.
4 Press theCursor A,'V button toselect <ON> or <OFF> and then press the
ENTERbutton.
• ON :Bothvideo and audio signals aretransmitted over the HDMI connectioncable, and audio
isoutput through your TV speakers only.
• OFF : Video istransmitted over the HDMI connection cable only,and audio is output through
the home theater speakers only.
,,The default setting of this function is HDMI AUDIO OFE
• HDMI AUDIO is automatically down-mixed to 2chfor TVspeakers.
Press the RETURNbutton to returntothe previous level.
_ Press the EXIT button toexit thesetup screen.
/.......,,? ,,;;
(?!:
,Ji s,_;, i;ii!i;i;i
i! "_ i ;
1 Press the TUNER button toselect theFM band.
2 Tunein tothe desiredstation.
[] Automatic Tuning 1: When the _ _ button ispressed, apreset broadcast station isselected.
[] Automatic Tuning 2:Press and hold the v.,_. button to automatically search for active
broadcasting stations.
[] ManualTuning:Briefly pressthe v.,*, buttontoincreaseor decrease the frequency incrementally.
1 Press the FUNCTIONbutton to selectthe FM band.
2 Select a broadcaststation.
[] Automatic Tuning 1:Press the STOP ([]) button to select <PRESET> and then pressthe
IJ.l_lbutton to select the preset station.
[] Automatic Tuning 2:Press the STOP ([]) button to select <MANUAL> and then pressand hold
the _ _ button to automatically searchthe band.
[] ManualTuning:Pressthe STOP ([] ) button to select <MANUAL> and then briefly pressthe
_,_,,-tbutton to tune in toa lower or higher frequency.
_" Press the MOISTbutton to listen in Mono/Stereo.
[] Each timethebuttonispressed, the soundswitches between_ (STEREO)and _ (MONO).
[] In apoor reception area, select _ (MONO) foraclear, interference-free broadcast.
46 47

Listening to Radio (Con't)
PresettingStations
ii f J i
;:x}f
'h!i!; _!!7;
i ; z s1
Tulsa
MEMORy fTi i; t
1
1
1
/
Example: PresettingFM 89.10inthememory
1 Press theTUNER button to selectthe FM band.
2
3
4
Press the v,^ button toselect <89.10>.
Press theTUNER MEMORYbutton.
m<01> flashes in the display.
Press the _._ _ button toselect preset number.
[] You canselect between 1and 15 presets.
5 Press theTUNER MEMORYbutton again.
[] Press the TUNER MEMORY button before "number" disappears from the display.
[] "number" disappears from the display and the station isstored in memory.
6 To preset anotherstation, repeatsteps2 to5.
To tune in to a preset station, press the _ _ button on the remote
control toselect a channel.
• This unitdoes not receive AM broadcasts.
Convenient Functions
Sleep Timer Function
You can set the time that the Home Theater will shut itself off
:77:) ',ttJ
,77;;;7;';;77........
() ( )
; t? SLEEP
i;): ®
(?i? ?
Press theSLEEP button.
m Each time the button ispressed, the preset time changes as follows :
10 _ 20 -* 30 -* 60 _ 90 -* 120 -* 150 -* OFE
_ To confirmthesleep timer setting, press theSLEEP button.
[] The remaining time before the Home Theater will shut itself off isdisplayed.
[] Pressingthe button againchanges the sleep time from what you haveset earlier.
_ To cancel the sleeptimer,press theSLEEP button until<OFF>appears on
thedisplay.
Adjusting Display Brightness
You can adjust the brightness of the display on the main unit so it won't interfere with your movie viewing.
i7: {i: i,: _:
: [ i:C DIMMER
<,: @
/>i_; /
, / \ ,
Press the DIMMERbutton.
[] Each timethe button ispressed, the brightness offront display will be adjusted.
Mute Function
This is useful when answering a doorbell or telephone call.
Press the MUTEbutton.
[] <MUTE> appears in the display.
[] Torestore the sound, press the MUTE button again.
48 49
Convenient Functions (Con't)
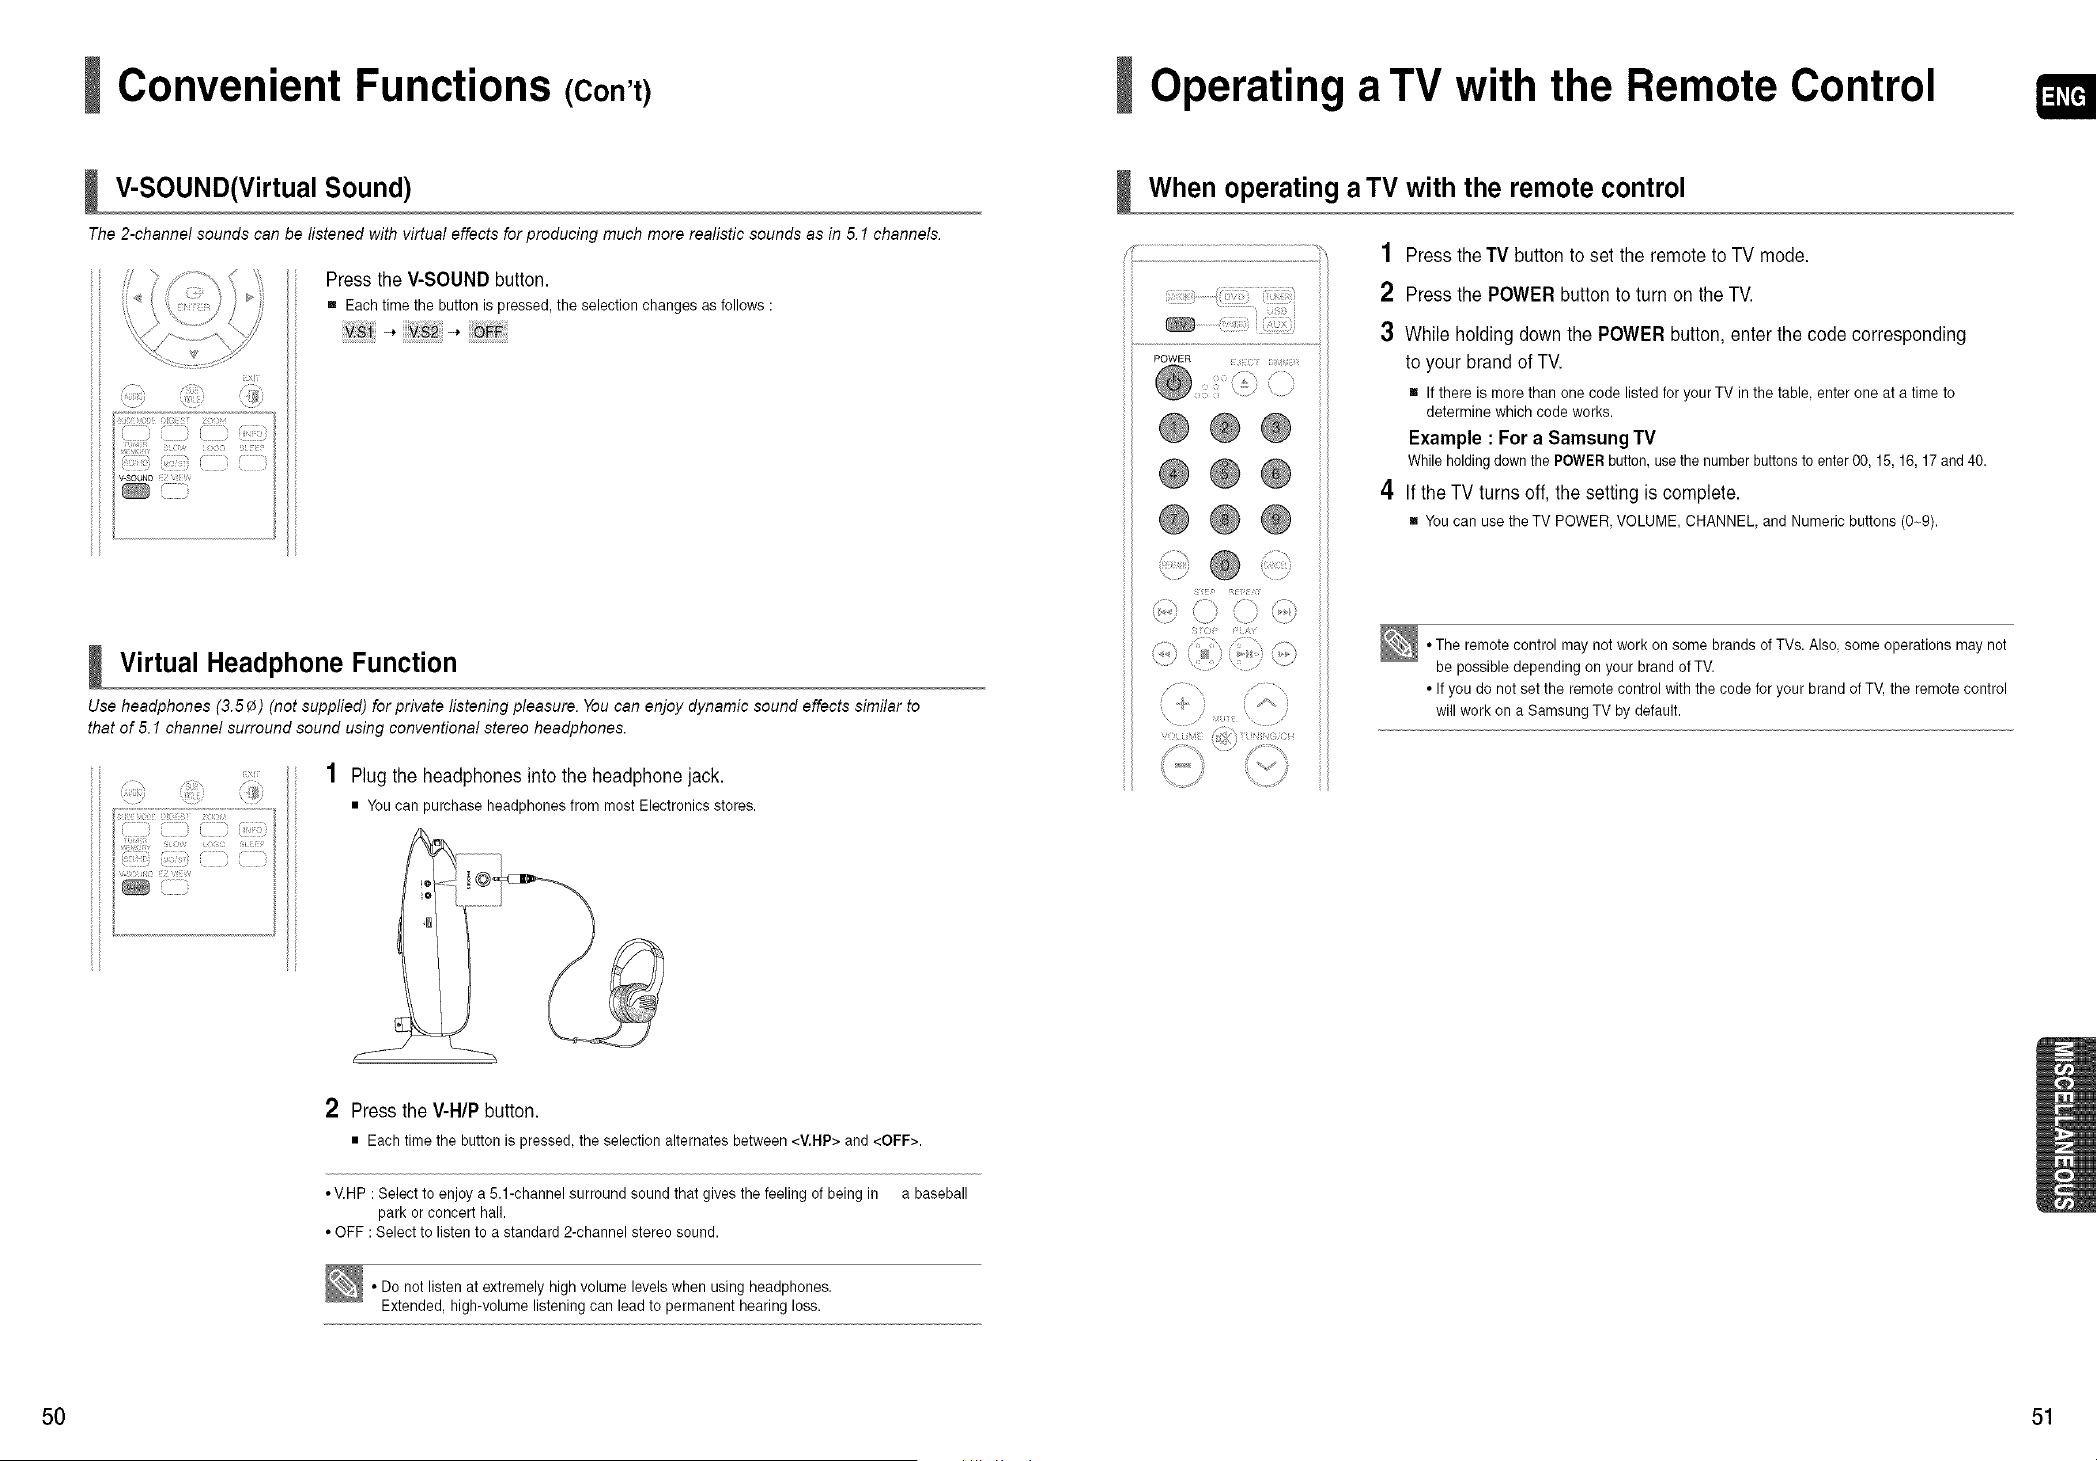
V-SOUND(Virtual Sound)
The 2-channel sounds can be listened with virtual effects for producing much more realistic sounds as in 5.1 channels.
_ ),,- I i¸_¸ z¸
; (71Jk5)
i! f ;
fiL 7{ ] {:]i i
.... r ¢
1 V-SOUND f! s
/
)
Press theV-SOUNDbutton.
m Each time the button ispressed, the selection changes as follows :
v.-> v._-, #:
I Virtual Headphone Function
Use headphones (3.5¢) (not supplied) for private listening pleasure. You can enjoy dynamic sound effects similar to
that of 5.1 channel surround sound using conventional stereo headphones.
,y
7 )s ; i ; I
i { ) i j Jro
(()( l l{ i ;
77trJ{7 ] ] ]i]{ { ]
( )] ()
;] 71110
..........................................................................................
Plug theheadphonesintothe headphone jack.
• Youcan purchase headphones from mostElectronics stores.
2 Press theV-HIP button.
• Eachtime the button is pressed,the selection alternates between <V.HP> and <OFF>.
• V.HP:Select toenjoy a 5.1-channel surround soundthat gives the feeling ofbeing in abaseball
park orconcert hall.
• OFF : Select to listen to astandard 2-channel stereo sound.
• Do notlisten atextremely high volume levelswhen using headphones.
Extended, high-volume listening can leadtopermanent hearing loss.
Operating a TV with the Remote Control
When operating a TV with the remote control
1 Press the TV button toset the remote toTVmode.
2 Press thePOWER button toturn on the TV.
3 Whileholding downthePOWER button,enterthecodecorresponding
toyour brand ofTV.
[] If there ismorethan one code listedfor your TV in the table, enterone at a time to
determine which codeworks.
Example :For a Samsung TV
While holdingdown the POWERbutton,usethe number buttons toenter 00, 15, 16, 17 and 40.
4 If theTVturns off,thesetting iscomplete.
[] You can usetheTV POWER, VOLUME, CHANNEL, and Numeric buttons (0-9).
• The remote control may not work on some brands of TVs. Also, some operations may not
be possible depending on your brand ofTV.
• If you donot setthe remote control with thecode foryour brandof TV, the remotecontrol
will work on a Samsung TV by default.
50 51
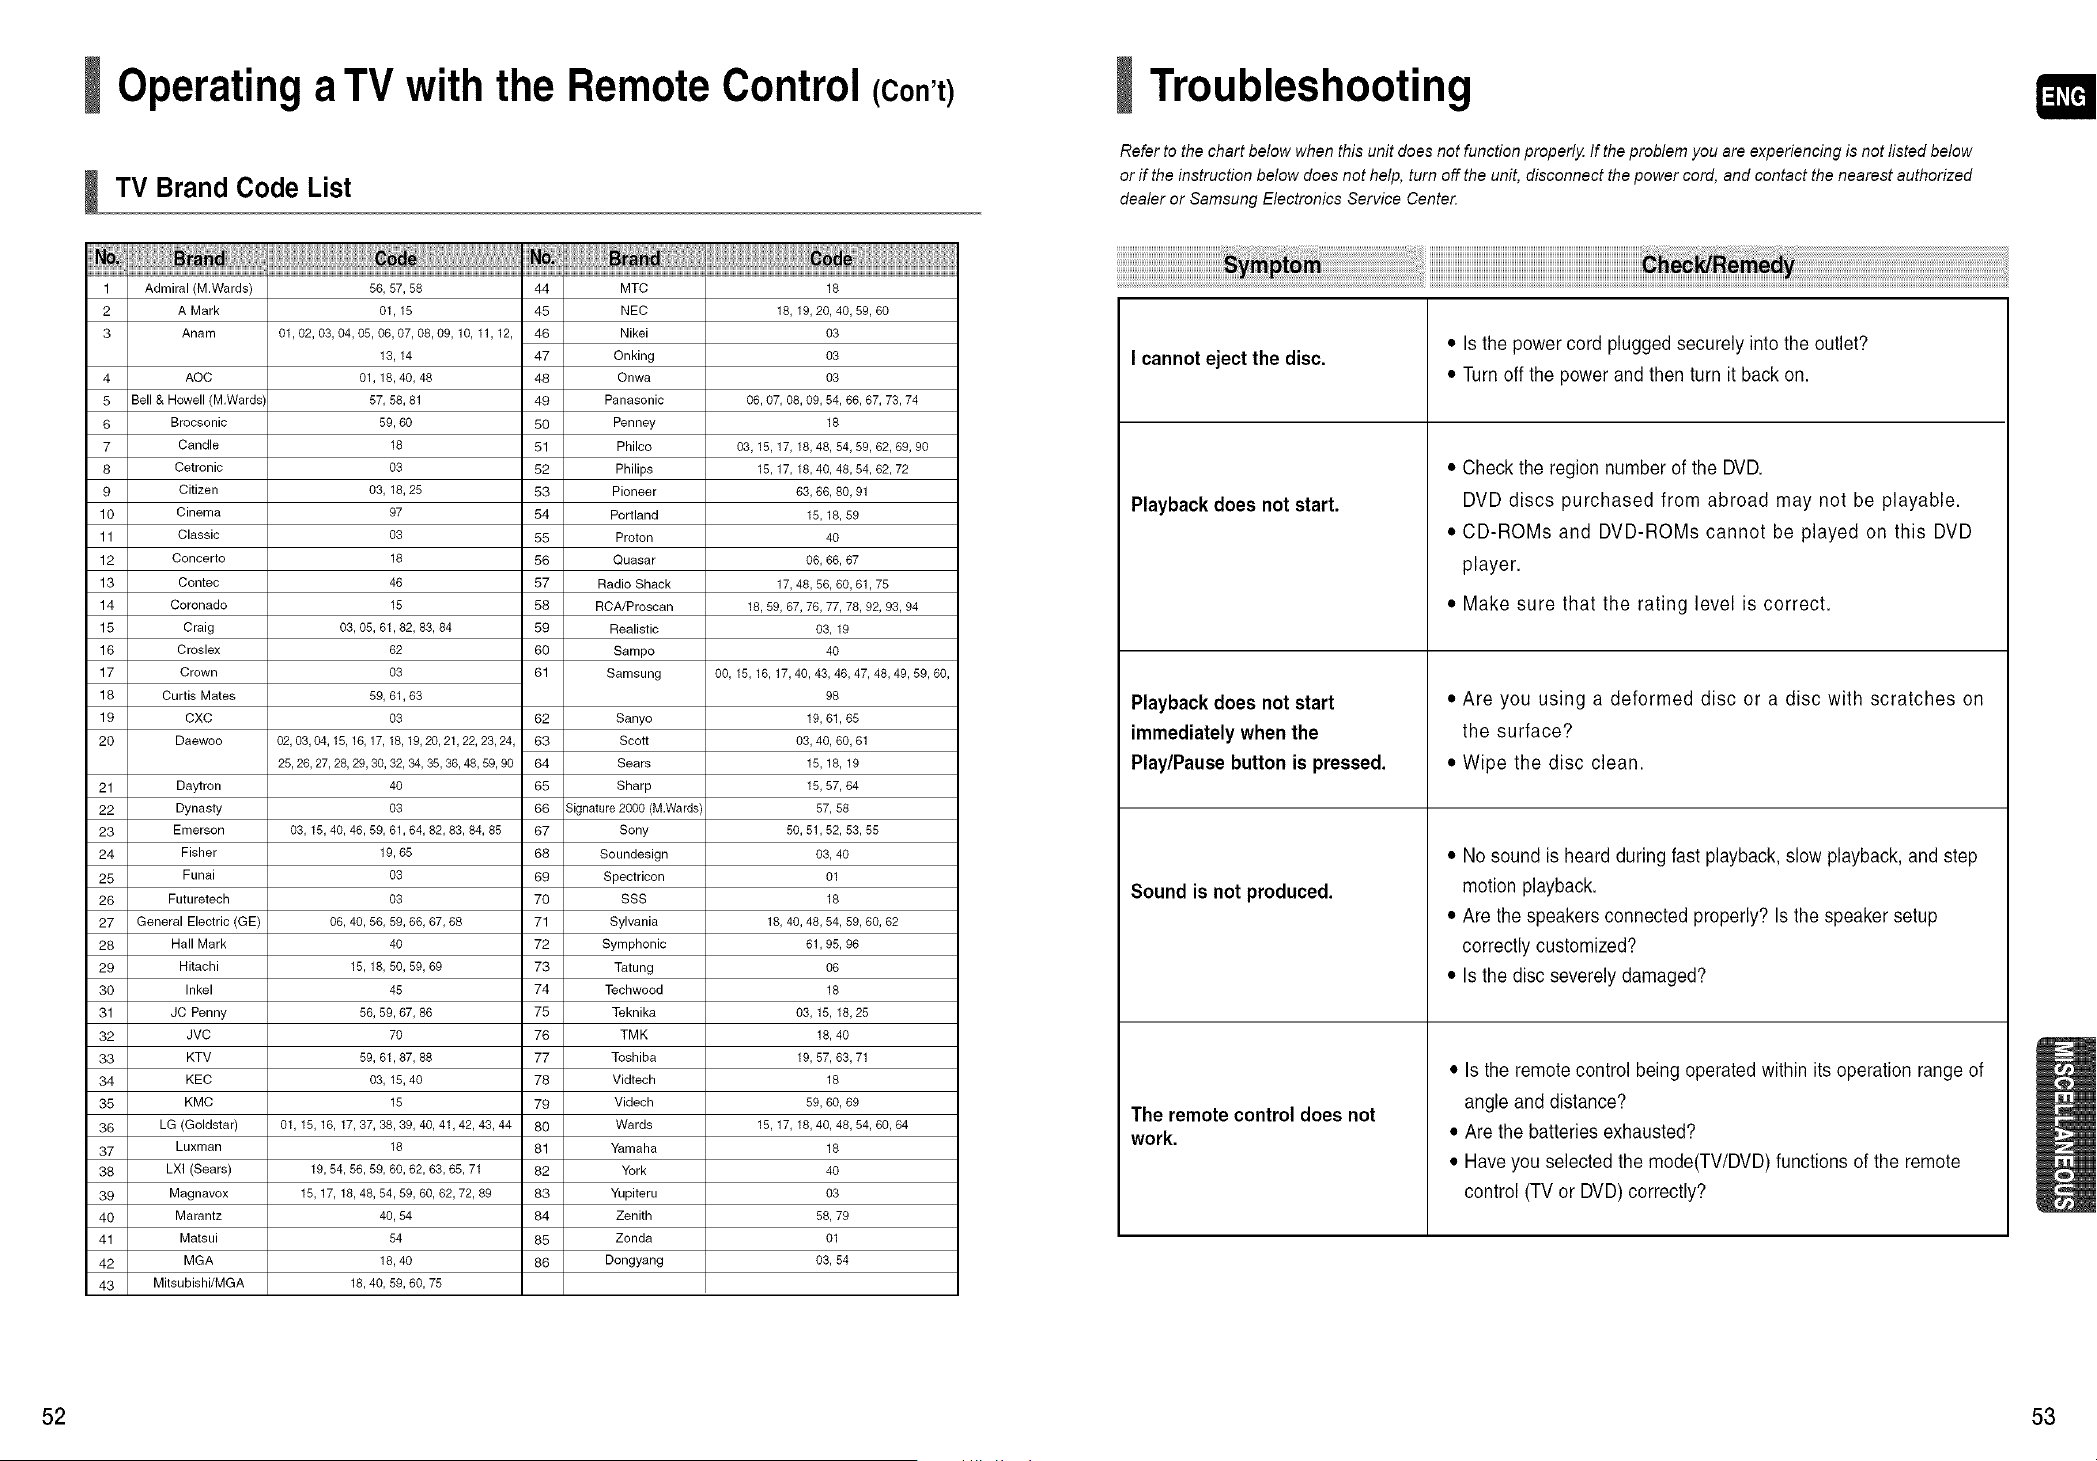
Operating a TV with the Remote Control (Con't)
TV Brand Code List
1 Adrniral (M:Wards) 561 57, 58 44 MTC 18
2 A Mark 01, 15 45 NEC 18, 19, 20, 40, 59, 60
3 Anam 01,02, 03, 04, 05, 06, 07, 08, 09, 10, 11, 12, 46 Nikei 03
13, 14 47 Onking 03
4 AOC 01, 18, 40, 48 48 Onwa 03
5 Bell & Howell (M.Wards) 57, 58, 81 49 Panasonic 06, 07, 08, 09, 54, 66, 67, 73, 74
6 Brecsonic 59, 60 50 Penney 18
7 Candle 18 51 Philco 03, 15, 17, 18, 48, 54, 59, 62, 69, 90
8 Cetronic 03 52 Philips 15, 17, 18, 40, 48, 54, 62, 72
9 Citizen 03, 18, 25 53 Pioneer 63, 66, 80, 91
10 Cinema 97 54 Portland 15, 18, 59
11 Classic 03 55 Proton 40
12 Concerto 18 56 Quasar 06, 66, 67
13 Contec 46 57 Radio Shack 17, 48, 56, 60, 61, 75
14 Coronado 15 58 RCA/Proscan 18, 59, 67, 76, 77, 78, 92, 93, 94
15 Craig 03, 05, 61,82, 83, 84 59 Realistic 03, 19
16 Creslex 62 60 Sampo 40
17 Crown 03 61 Samsung 00, 15, 16, 17, 40, 43, 46, 47, 48, 49, 59, 60,
18 Curtis Mates 59, 61,63 98
19 CXC 03 62 Sanyo 19, 61, 65
20 Daeweo 02,03,04,15,16,17,18,19,20,21,22,23,24, 63 Scott 03,40,60,61
25,26,27,28,29,30,32,34,35,36,48,59,90 64 Sears 15,18,19
21 Daytren 40 65 Sharp 15, 57, 64
22 Dynasty 03 66 Signature 2000 (M.Wards) 57, 58
23 Emerson 03, 15, 40, 46, 59, 61,64, 82, 83, 84, 85 67 Sony 50, 51, 52, 53, 55
24 Fisher 19, 65 68 Soundesign 03, 40
25 Funai 03 69 Spectricon 01
26 Futuretech 03 70 SSS 18
27 General Electric (GE) 06, 40, 56, 59, 66, 67, 68 71 Sylvania 18, 40, 48, 54, 59, 60, 62
28 Hall Mark 40 72 Symphonic 61, 95, 96
29 Hitachi 15, 18, 50, 59, 69 73 Tatung 06
30 Inkel 45 74 Techwoed 18
31 JC Penny 56, 59, 67, 86 75 Teknika 03, 15, 18, 25
32 JVC 70 76 TM K 18, 40
33 KTV 59, 61,87, 88 77 Toshiba 19, 57, 63, 71
34 KEC 03, 15, 40 78 Vidtech 18
35 KMC 15 79 Videch 59, 60, 69
36 LG (Goldstar) 01, 15, 16, 17, 37, 38, 39, 40, 41,42, 43, 44 80 Wards 15, 17, 18, 40, 48, 54, 60, 64
37 Luxman 18 81 Yamaha 18
38 LXI (Sears) 19, 54, 56, 59, 60, 62, 63, 65, 71 82 York 40
39 Magnavex 15, 17, 18, 48, 54, 59, 60, 62, 72, 89 83 Yupiteru 03
40 Marantz 40, 54 84 Zenith 58, 79
41 Matsui 54 85 Zonda 01
42 MGA 18, 40 86 Dongyang 03, 54
43 Mitsubishi/MGA 18, 40, 59, 60, 75
Troubleshooting
Refer to the chart below when this unit does not function properly. If the problem you are experiencing is not listed below
or if the instruction below does not help, turn off the unit, disconnect the power cord, and contact the nearest authorized
dealer or Samsung Electronics Service Cente_
Icannotejectthe disc.
Playback does not start.
Playback does not start
immediately when the
Play/Pausebutton is pressed.
Sound isnot produced.
The remote control does not
work,
• Is the powercordplugged securelyintothe outlet?
• Turn off thepowerand thenturn itback on.
• Checktheregion numberofthe DVD.
DVD discs purchased from abroad may not be playable.
• CD-ROMs and DVD-ROMs cannot be played on this DVD
player.
• Make sure that the rating level is correct.
• Are you using a deformed disc or a disc with scratches on
the surface?
• Wipe the disc clean.
• Nosoundis heard during fastplayback, slow playback, and step
motion playback.
• Are the speakersconnectedproperly? Is thespeaker setup
correctly customized?
• Is the disc severelydamaged?
• Is the remote control being operatedwithin its operationrange of
angle and distance?
• Are the batteriesexhausted?
• Have youselectedthe mode(TV/DVD) functions ofthe remote
control (TVor DVD)correctly?
52 53
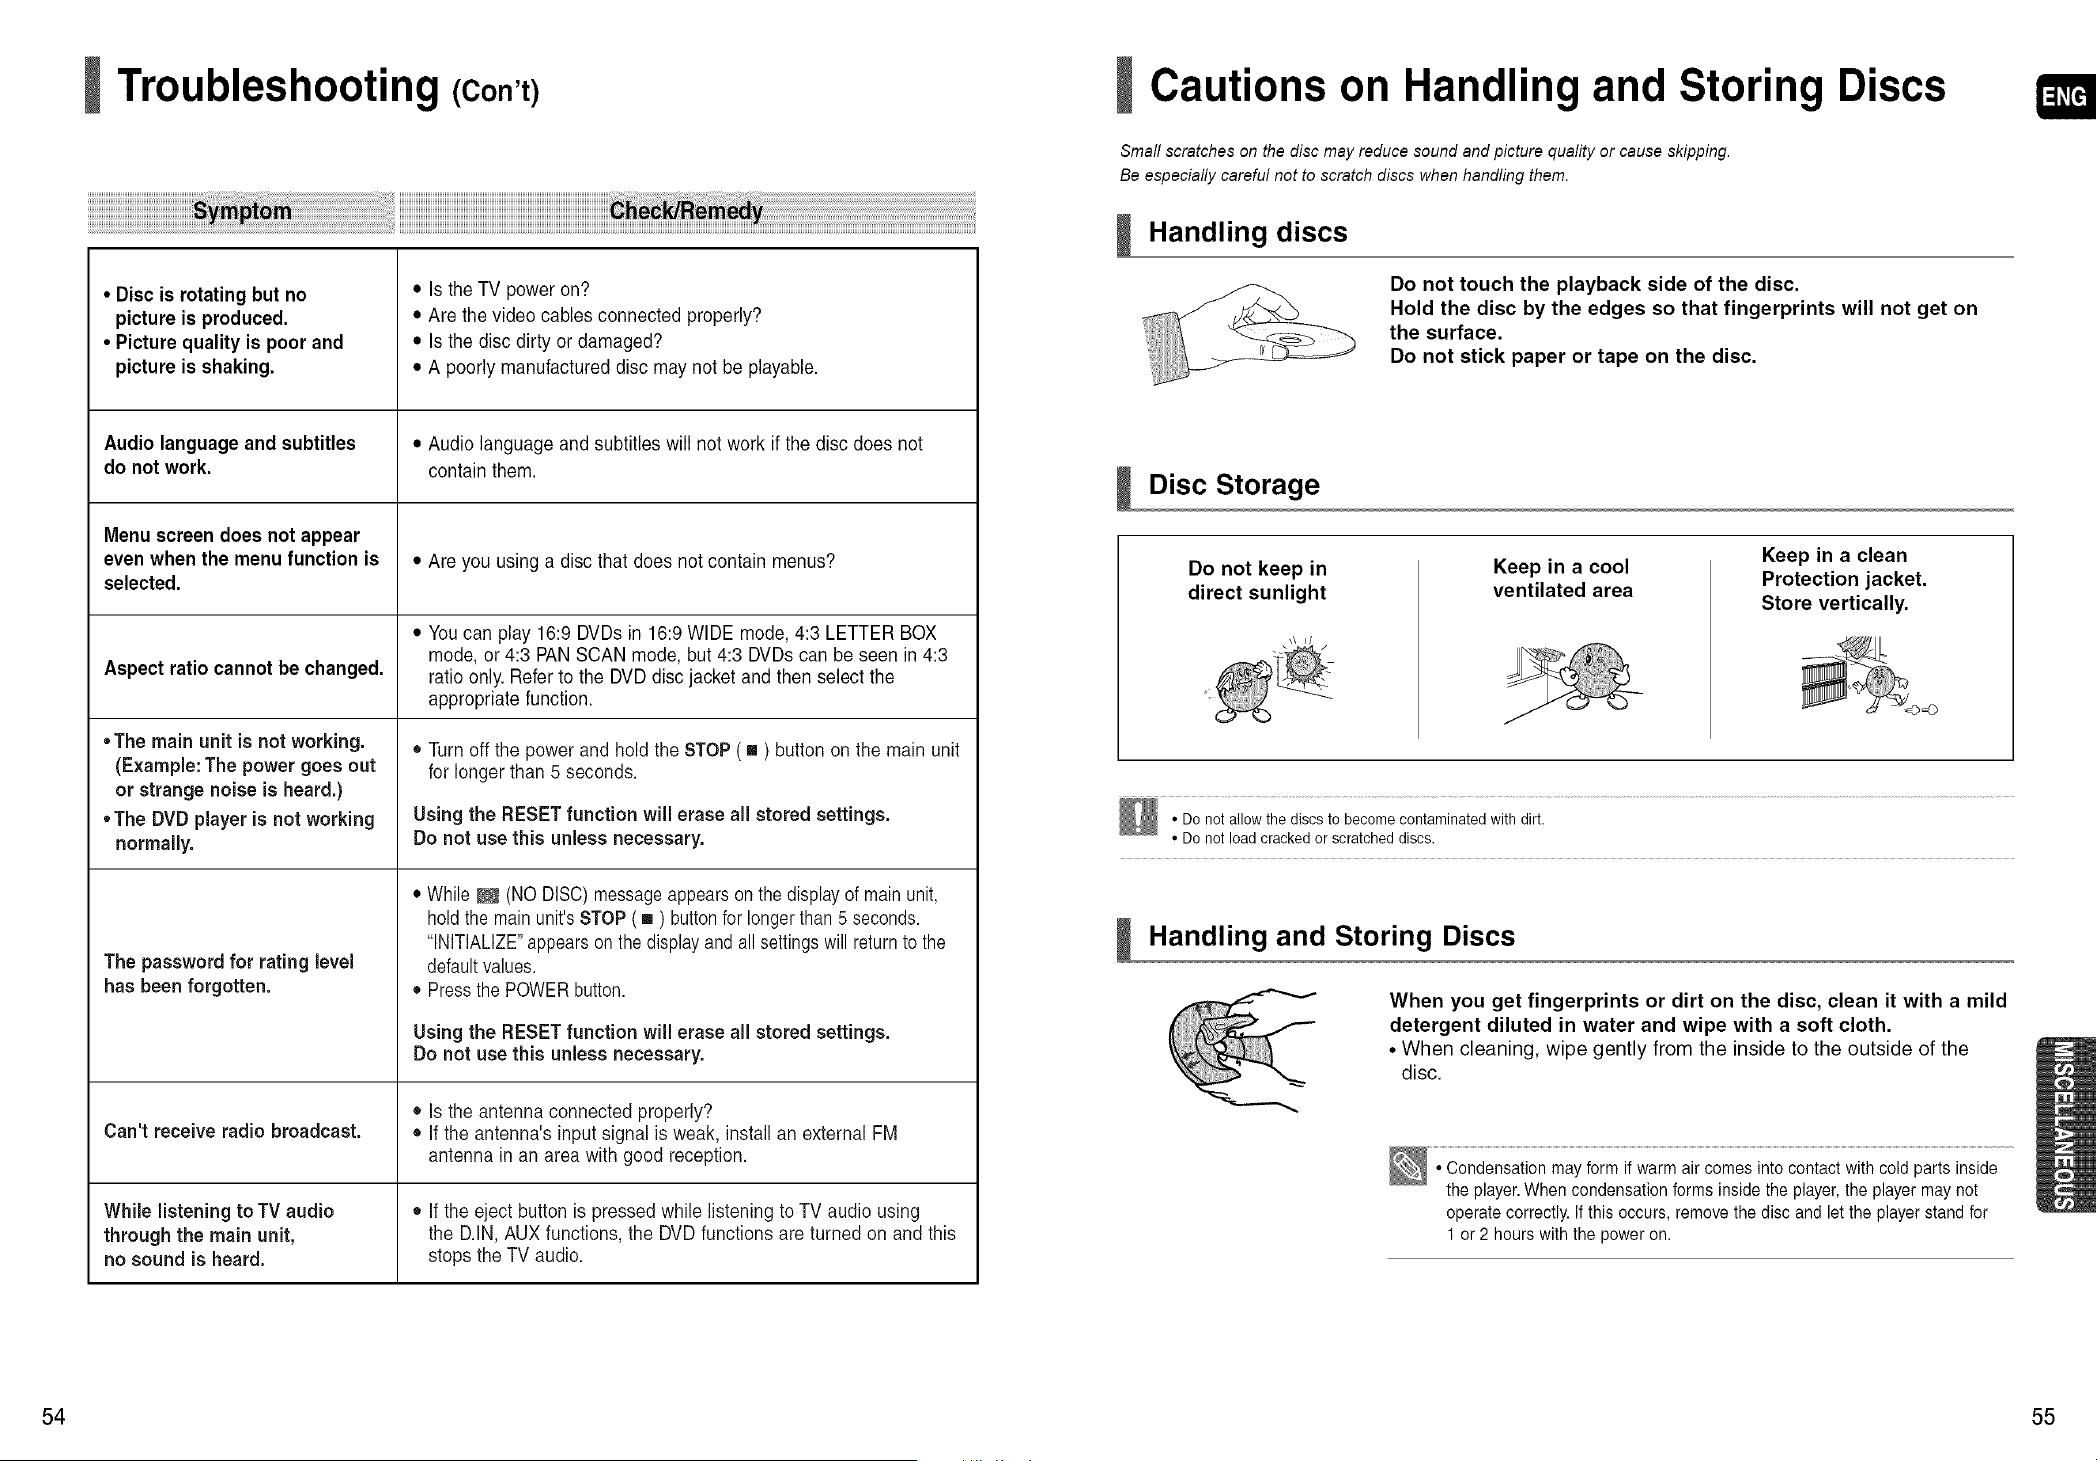
Troubleshooting (Con't) Cautions on Handling and Storing Discs
Small scratches on the disc may reduce sound and picture quality or cause skipping.
Be especially careful not to scratch discs when handling them.
• Disc is rotatingbut no
picture isproduced.
• Picturequality ispoor and
picture isshaking.
Audiolanguageand subtitles
do not work.
Menuscreen does not appear
even when the menu function is
selected.
Aspect ratio cannotbechanged.
• The main unit is not working.
(Example: The power goes out
or strange noise isheard.)
• The DVD player isnot working
normally.
The passwordfor rating level
hasbeen forgotten.
Can't receive radio broadcast.
While listening toTV audio
through the main unit,
no sound is heard.
• Is the TV poweron?
• Are thevideo cables connected properly?
• Is thedisc dirty or damaged?
• A poorlymanufactured disc may notbe playable.
• Audio language and subtitles will notwork ifthedisc doesnot
contain them.
• Are you usinga disc that doesnotcontain menus?
• You can play16:9DVDsin 16:9 WIDE mode, 4:3LETTER BOX
mode, or 4:3 PAN SCAN mode, but4:3 DVDs canbe seenin 4:3
ratioonly. Refer tothe DVD disc jacketand thenselectthe
appropriatefunction.
• Turn off thepowerand hold theSTOP ( [] ) button on the mainunit
forlonger than 5 seconds.
Using the RESET function will erase all stored settings.
Donot usethis unless necessary,
• While_ (NO DISC)messageappears on the displayofmain unit,
hold themain unit's STOP( [] ) buttonfor longerthan5 seconds.
"INITIALIZE"appears on the displayand all settingswillreturn tothe
defaultvalues.
• Press the POWERbutton.
Using the RESET function will erase all stored settings.
Donot use this unless necessary.
• Is theantennaconnected properly?
• If theantenna's input signal isweak,install an external FM
antennain an area with good reception.
• If theeject button is pressed whilelistening toTVaudio using
the D.IN,AUXfunctions,the DVD functions are turned on and this
stopstheTVaudio.
Handling discs
Do not touch the playback side of the disc.
Hold the disc by the edges so that fingerprints will not get on
the surface.
Do not stick paper or tape on the disc.
Disc Storage
Do not keep in
direct sunlight
Keep in a cool
ventilated area
Keep in a clean
Protection jacket.
Store vertically.
• Do notallow the discsto become contaminated with dirt.
• Do notload cracked orscratched discs.
Handling and Storing Discs
When you get fingerprints or dirt on the disc, clean it with a mild
detergent diluted in water and wipe with a soft cloth.
• When cleaning, wipe gently from the inside to the outside of the
disc.
• Condensation mayform if warm aircomes intocontact with cold parts inside
the player. When condensation forms insidethe player,the player may not
operate correctly. If this occurs, remove the disc and let the playerstandfor
1 or2hours with the poweron.
54 55
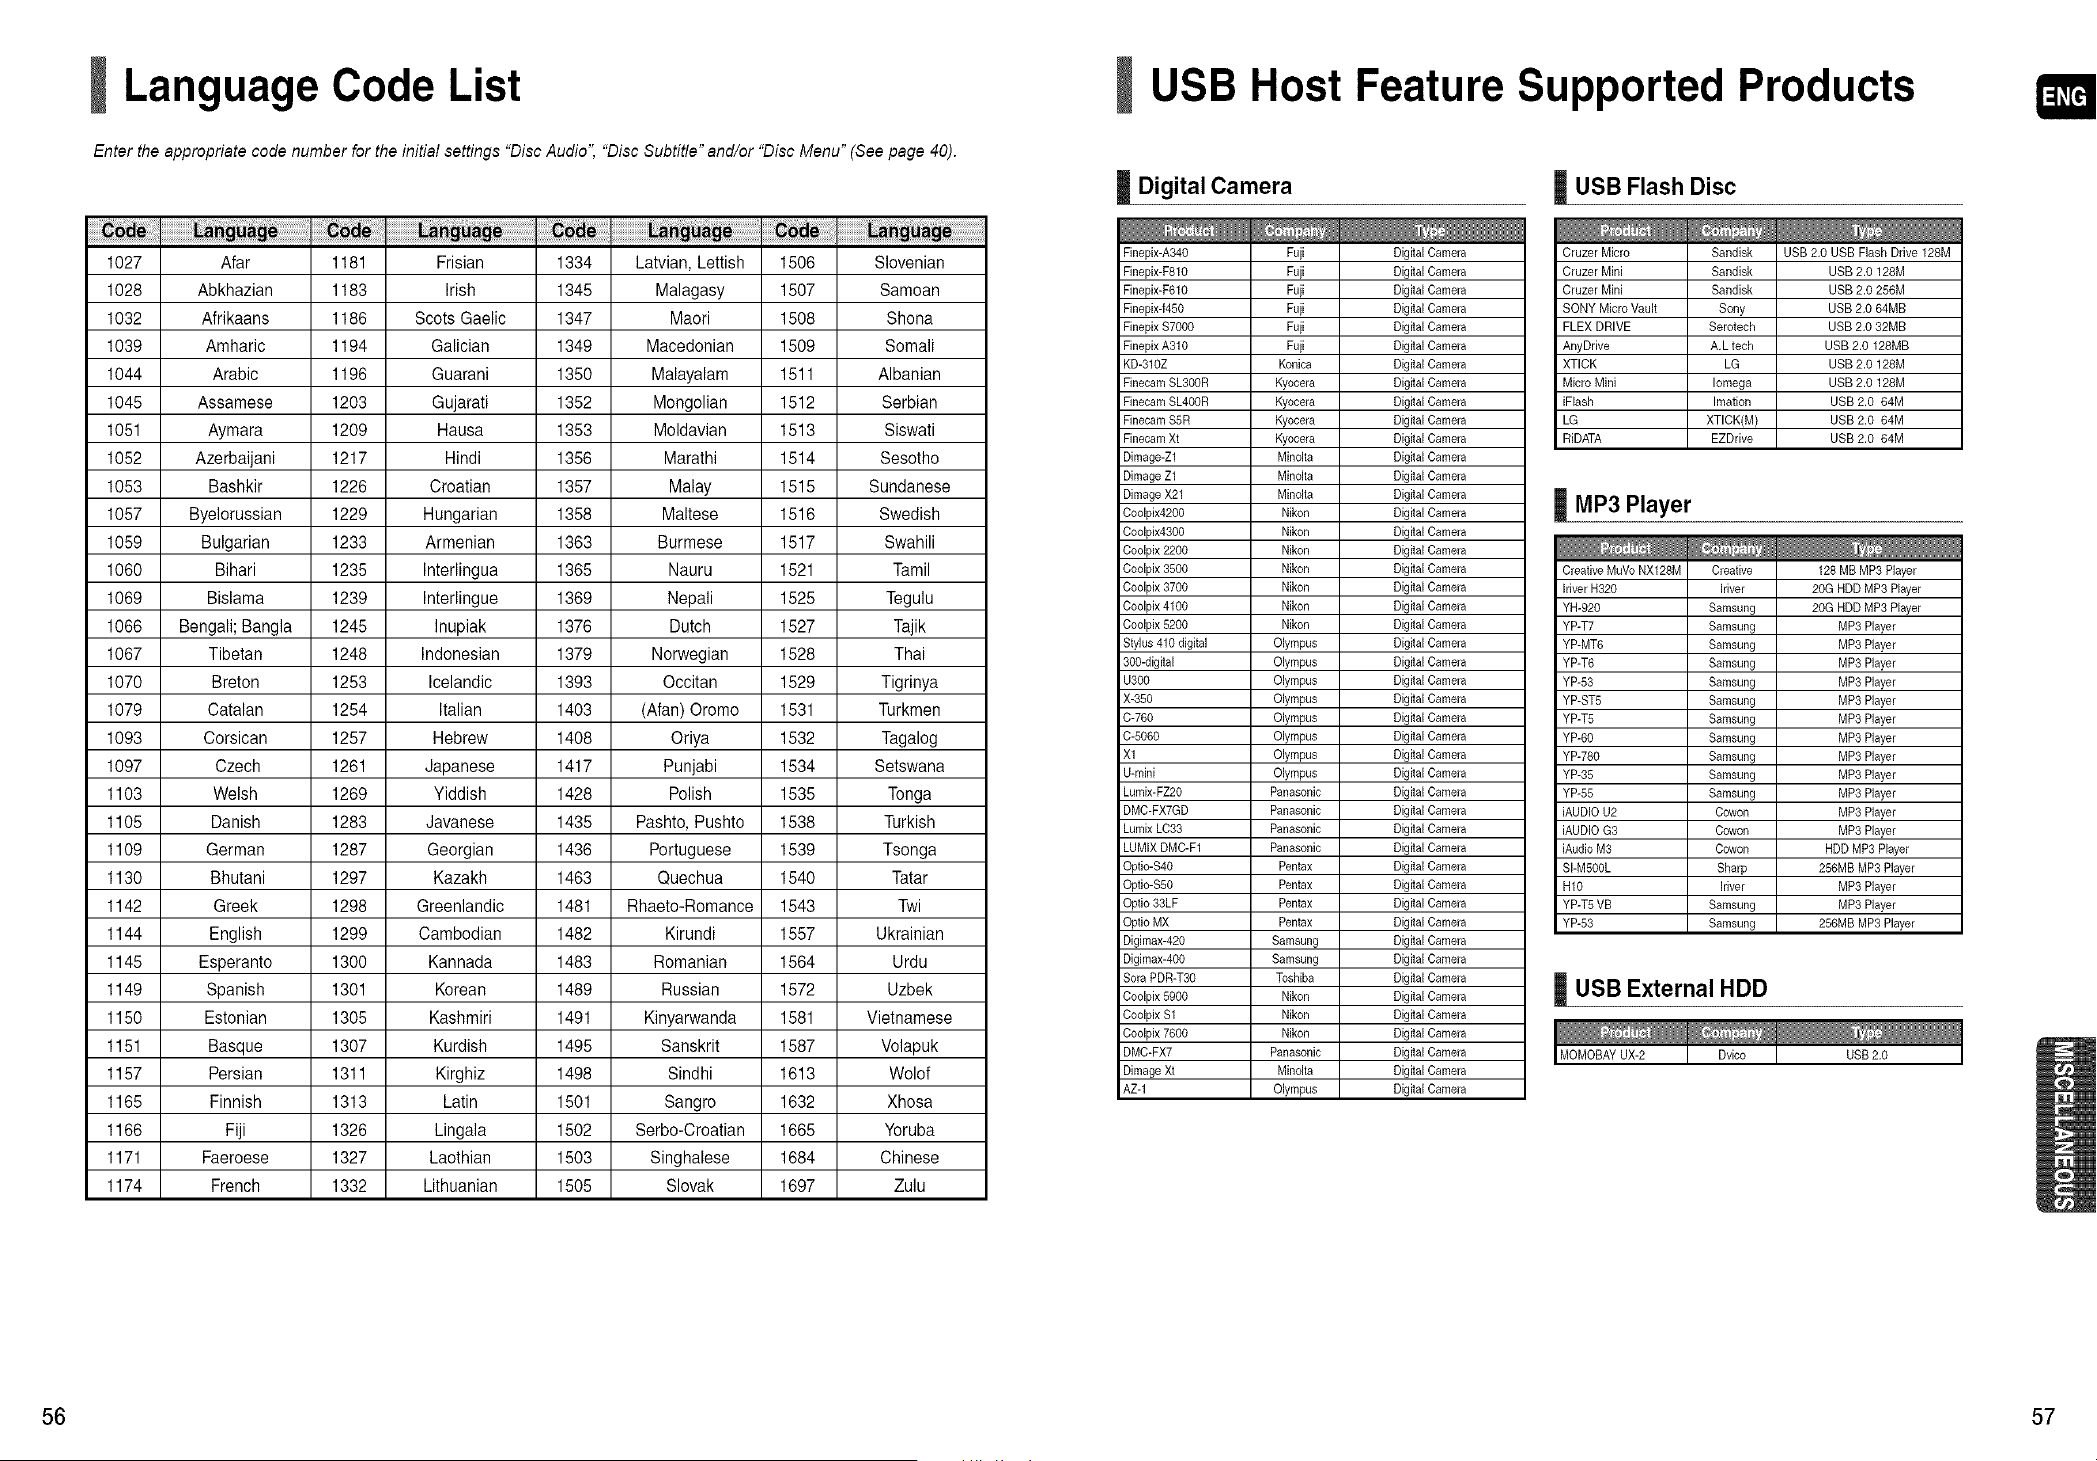
Language Code List
Enter the appropriate code number for the initial settings "Disc Audio", "Disc Subtitle" and/or "Disc Menu" (See page 40).
USB Host Feature Supported Products
I Digital Camera | USB Flash Disc
1027 Afar 1181 Frisian 1334 Latvian, Lettish 1506 SIovenian
1028 Abkhazian 1183 Irish 1345 Malagasy 1507 Samoan
1032 Afrikaans 1186 Scots Gaelic 1347 Maori 1508 Shona
1039 Amharic 1194 Galician 1349 Macedonian 1509 Somali
1044 Arabic 1196 Guarani 1350 Malayalam 1511 Albanian
1045 Assamese 1203 Gujarati 1352 Mongolian 1512 Serbian
1051 Aymara 1209 Hausa 1353 Moldavian 1513 Siswati
1052 Azerbaijani 1217 Hindi 1356 Marathi 1514 Sesotho
1053 Bashkir 1226 Croatian 1357 Malay 1515 Sundanese
1057 Byelorussian 1229 Hungarian 1358 Maltese 1516 Swedish
1059 Bulgarian 1233 Armenian 1363 Burmese 1517 Swahili
1060 Bihari 1235 Interlingua 1365 Nauru 1521 Tamil
1069 Bislama 1239 Interlingue 1369 Nepali 1525 Tegulu
1066 Bengali;Bangla 1245 Inupiak 1376 Dutch 1527 Tajik
1067 Tibetan 1248 Indonesian 1379 Norwegian 1528 Thai
1070 Breton 1253 Icelandic 1393 Occitan 1529 Tigrinya
1079 Catalan 1254 Italian 1403 (Afan) Oromo 1531 Turkmen
1093 Corsican 1257 Hebrew 1408 Oriya 1532 Tagalog
1097 Czech 1261 Japanese 1417 Punjabi 1534 Setswana
1103 Welsh 1269 Yiddish 1428 Polish 1535 Tonga
1105 Danish 1283 Javanese 1435 Pashto, Pushto 1538 Turkish
1109 German 1287 Georgian 1436 Portuguese 1539 Tsonga
1130 Bhutani 1297 Kazakh 1463 Quechua 1540 Tatar
1142 Greek 1298 Greenlandic 1481 Rhaeto-Romance 1543 Twi
1144 English 1299 Cambodian 1482 Kirundi 1557 Ukrainian
1145 Esperanto 1300 Kannada 1483 Romanian 1564 Urdu
1149 Spanish 1301 Korean 1489 Russian 1572 Uzbek
1150 Estonian 1305 Kashmiri 1491 Kinyarwanda 1581 Vietnamese
1151 Basque 1307 Kurdish 1495 Sanskrit 1587 Volapuk
1157 Persian 1311 Kirghiz 1498 Sindhi 1613 Wolof
1165 Finnish 1313 Latin 1501 Sangro 1632 Xhosa
1166 Fiji 1326 Lingala 1502 Serbo-Croatian 1665 Yoruba
1171 Faeroese 1327 Laothian 1503 Singhalese 1684 Chinese
1174 French 1332 Lithuanian 1505 Slovak 1697 Zulu
Finepix-A340 Fuji Digital Camera
Finepix-F810 Fuji Digital Camera
Finepix-F610 Fuji Digital Camera
Finepix-f450 Fuji Digital Camera
Finepix $7000 Fuji Digital Camera
Finepix A310 Fuji Digital Camera
KD-310Z Konica Digital Camera
Finecam SL300R Kyocera Digital Camera
Finecam SL400R Kyocera Digital Camera
Finecam S5R Kyocera Digital Camera
Finecam Xt Kyocera Digital Camera
Dimage-Zl Minolta Digital Camera
Dimage Zl Minolta Digital Camera
Dimage X21 Minolta Digital Camera
Coolpix4200 Nikon Digital Camera
Coolpix4300 Nikon Digital Camera
Coolpix 2200 Nikon Digital Camera
Coolpix 3500 Nikon Digital Camera
Coolpix 3700 Nikon Digital Camera
Coolpix 4100 Nikon Digital Camera
Coolpix 5200 Nikon Digital Camera
Stylus 410 digital Olympus Digital Camera
300-digital Olympus Digital Camera
U300 Olympus Digital Camera
X-350 Olympus Digital Camera
C-760 Olympus Digital Camera
C-5060 Olympus Digital Camera
Xl Olympus Digital Camera
U-mini Olympus Digital Camera
Lumix-FZ20 Panasonic Digital Camera
DMC-FX7GD Panasonic Digital Camera
Lumix LC33 Panasonic Digital Camera
LUMIX DMC-F1 Panasonic Digital Camera
Optic-S40 Pentax Digital Camera
Optic-S50 Pentax Digital Camera
Optic 33LF Pentax Digital Camera
Optic MX Pentax Digital Camera
Digimax-420 Samsung Digital Camera
Digimax-400 Samsung Digital Camera
Sofa PDR-T30 Toshiba Digital Camera
Coolpix 5900 Nikon Digital Camera
Coolpix Sl Nikon Digital Camera
Coolpix 7600 Nikon Digital Camera
DMC-FX7 Panasonic Digital Camera
Dimage Xt Minolta Digital Camera
AZ-1 Olympus Digital Camera
Cruzer Micro Sandisk USB 2,0 USB Flash Drive 128M
Cruzer Mini Sandisk USB 2.0 128M
Cruzer Mini Sandisk USB 2.0 256M
SONY Micro Vault Sony USB 2.0 64MB
FLEX DRIVE Serotech USB 2.0 32MB
AnyDrive A.L tech USB 2.0 128MB
XTICK LG USB 2.0 128M
Micro Mini Iomega USB 2.0 128M
iFlash Imation USB 2.0 64M
LG XTICK(M) USB 2.0 64M
RiDATA EZDrive USB 2.0 64M
MP3 Player
Creative MuVo NX128M Creative 128 MB MP3 Player
Iriver H320 Iriver 20G HDD MP3 Player
YH-920 Samsung 20G HDD MP3 Player
YP-T7 Samsung MP3 Player
YP-MT6 Samsung MP3 Player
YP-T6 Samsung MP3 Player
YP-53 Samsung MP3 Player
YP-ST5 Samsung MP3 Player
YP-T5 Samsung MP3 Player
YP-60 Samsung MP3 Player
YP-780 Samsung MP3 Player
YP-35 Samsung MP3 Player
YP-55 Samsung MP3 Player
iAUDIO U2 Cowon MP3 Player
iAUDIO G3 Cowon MP3 Player
iAudio M3 Cowon HDD MP3 Player
SI-M500L Sharp 256MB MP3 Player
H10 Iriver MP3 Player
YP-T5 VB Samsung MP3 Player
YP-53 Samsung 256MB MP3 Player
USB External HDD
56 57
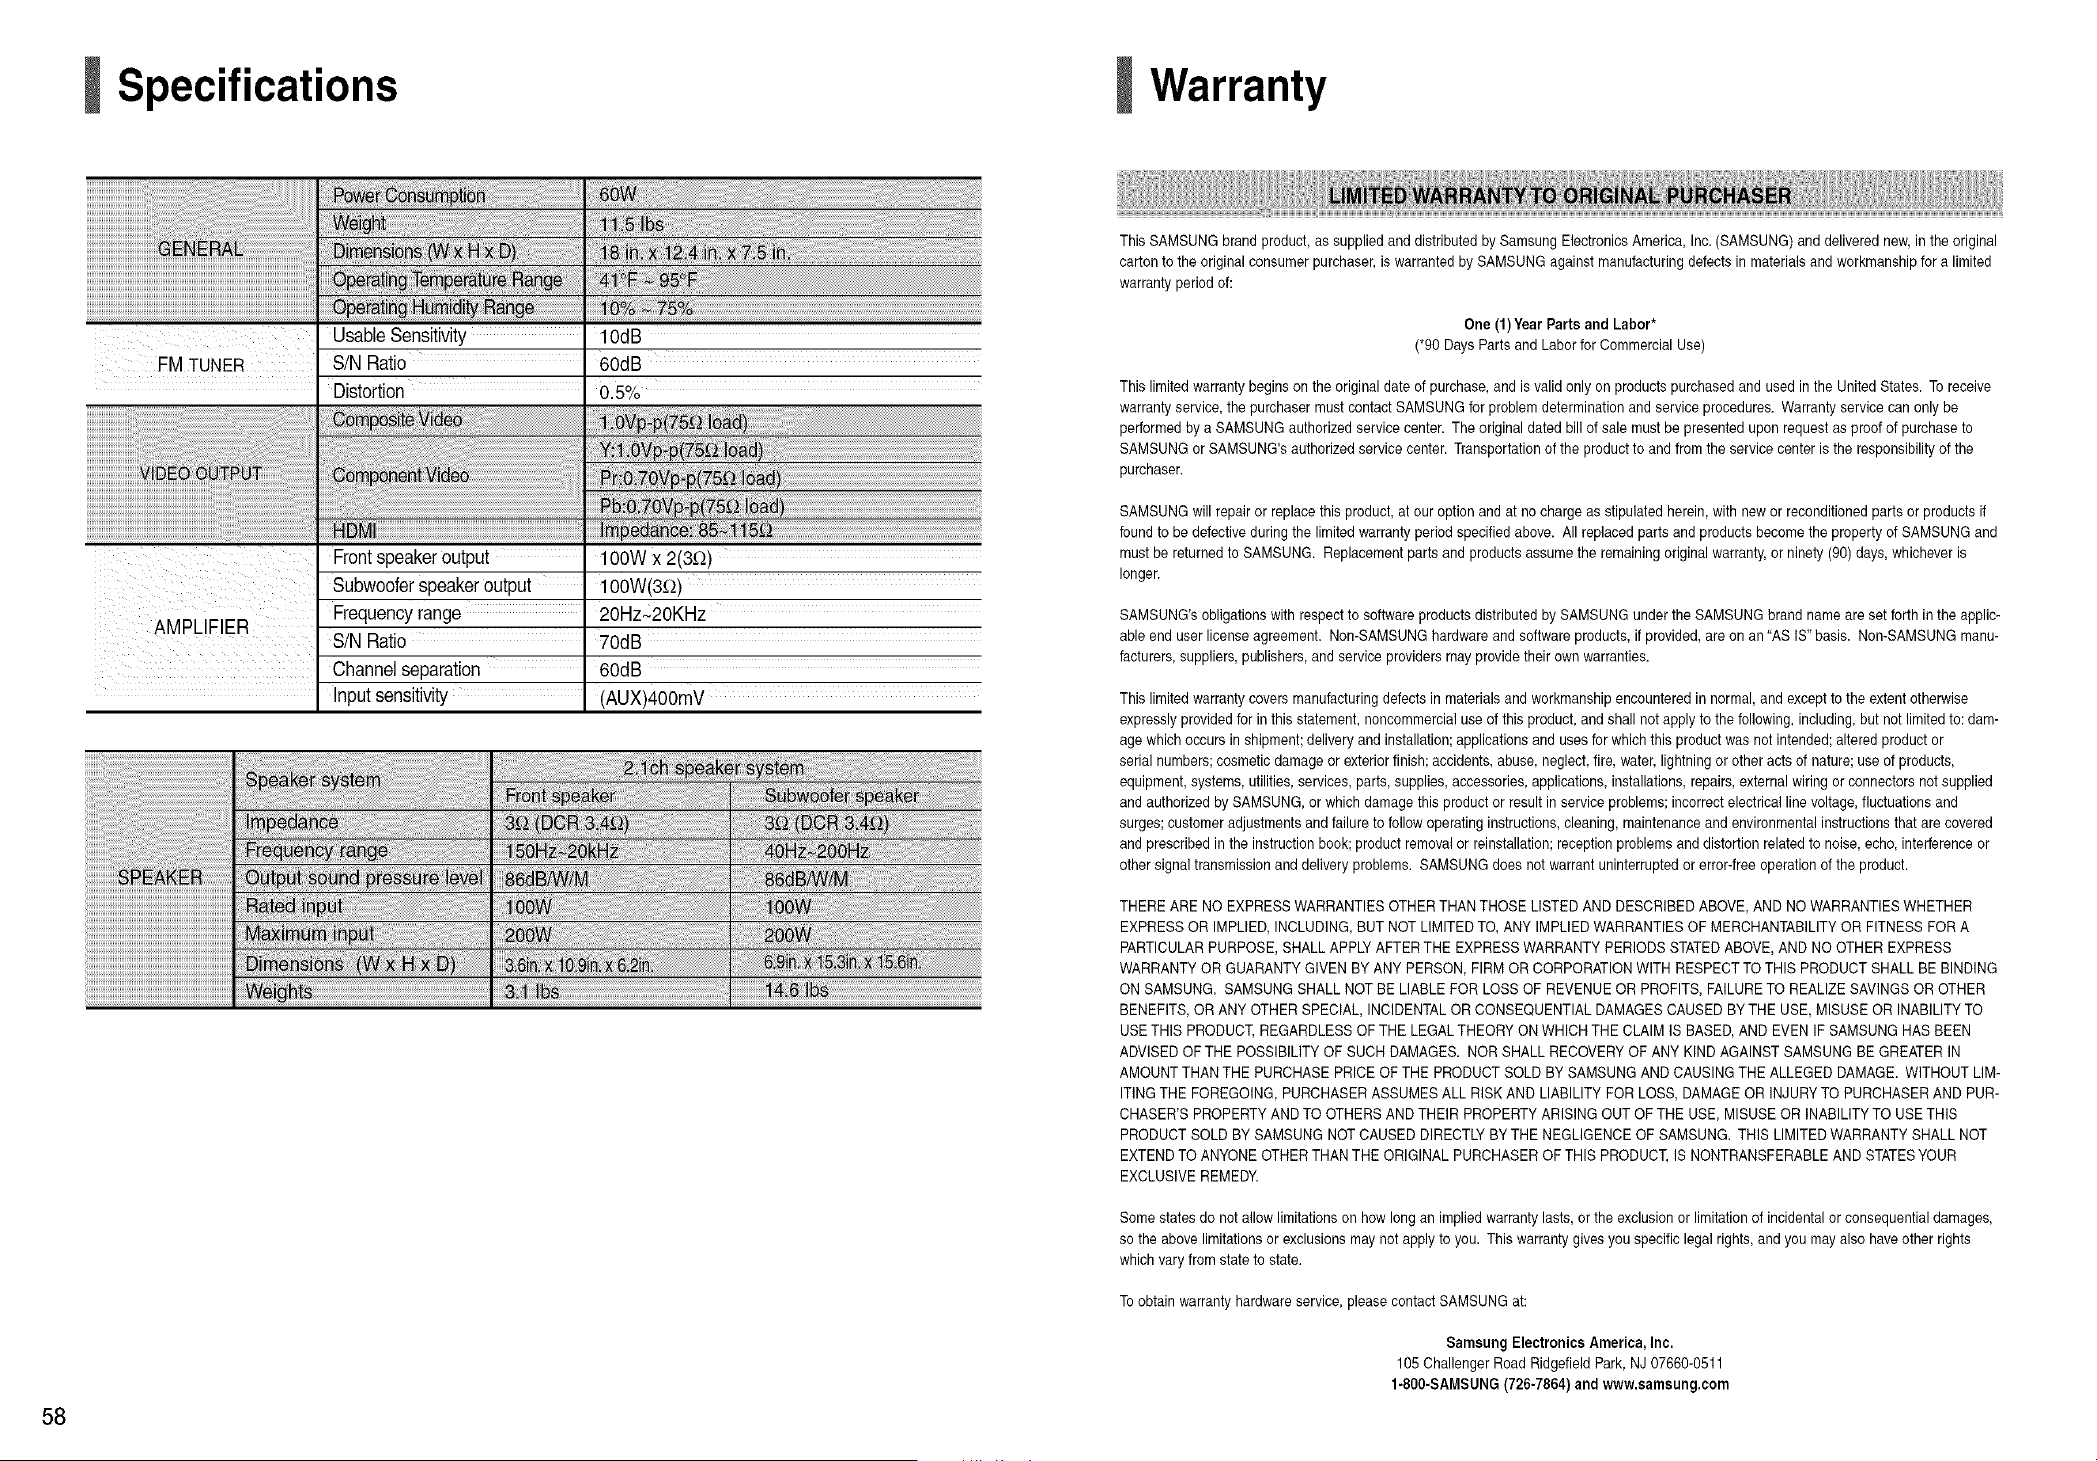
58
Specifications
FM TUNER
AMPLIFIER
UsableSensitivity 10dB
S/N Ratio 60dB
0.5%
HDMI ImpedanCe:85_115.__
Frontspeakeroutput 100Wx2(3_)
Subwooferspeakeroutput 100W(3£2)
Frequencyrange 20Hz~2OKHz
SiNRatio 70dB
Channelseparation 60dB
Inputsensitivity (AUX)4OOmV
iiiiiiiiiiiiiiiiiiiiiiiiiiiiiiiiiiiiiiiiiiiiiiiiiiiiiiiiiiiiiiiiiiiiiiiiiiiiiiiiii
iiiiiiiiiiiiiiiiiiiiiiiiiiiiiiiiiiiiiiiiiiiiiiiiiiiiiiiiiiiiiiiiiiiiiiiiiiiiiiiiiiiiii! i!i!iiiiiiiiiiii!ili!i i!i !ii ii i! !i iiiiiiiii i ii i
Warranty
ThisSAMSUNG brandproduct,as suppliedand distributedbySamsung ElectronicsAmerica, Inc.(SAMSUNG)and delivered new,in the original
carton tothe original consumer purchaser,iswarrantedbySAMSUNGagainst manufacturingdefects in materialsand workmanshipfora limited
warranty period of:
One(1)Year Partsand Labor*
(*90Days Partsand Labor forCommercial Use)
Thislimited warranty begins on theoriginal date of purchase, and is valid onlyon products purchasedand usedin the UnitedStates.Toreceive
warranty service,the purchasermustcontact SAMSUNG for problemdeterminationand serviceprocedures.Warrantyservicecan only be
performed by aSAMSUNGauthorizedservicecenter. Theoriginal dated bill of salemustbe presentedupon requestas proof ofpurchase to
SAMSUNG orSAMSUNG'sauthorized service center. Transportationof the productto and fromthe servicecenter istheresponsibilityof the
purchaser.
SAMSUNG will repair or replace this product,at ouroptionand at no charge as stipulated herein,with new or reconditionedparts orproducts if
found tobe defective during thelimitedwarranty period specified above. All replaced parts and products become the property of SAMSUNGand
mustbereturnedto SAMSUNG. Replacementparts andproducts assumetheremaining originalwarranty, orninety (90) days, whichever is
longer.
SAMSUNG'sobligations with respecttosoftwareproductsdistributedby SAMSUNG underthe SAMSUNGbrand name areset forth inthe applic-
ableenduser license agreement. Non-SAMSUNGhardwareand softwareproducts,ifprovided,areon an "AS IS" basis. Non-SAMSUNG manu-
facturers,suppliers,publishers, and serviceproviders may providetheir own warranties.
Thislimited warranty covers manufacturingdefects in materialsand workmanshipencountered in normal,and exceptto theextent otherwise
expressly providedforin thisstatement, noncommercialuse ofthis product,and shall not apply tothe following,including,but not limitedto: dam-
age which occurs in shipment;deliveryand installation;applicationsand uses forwhich thisproductwas netintended;altered product or
serial numbers;cosmeticdamageorexterior finish;accidents, abuse,neglect, fire, water,lightning orotheracts ofnature; useofproducts,
equipment, systems, utilities,services, parts, supplies, accessories, applications,installations,repairs,externalwiringorconnectors not supplied
and authorized bySAMSUNG,orwhichdamagethisproductor resultin serviceproblems;incorrect electrical linevoltage,fluctuations and
surges;customer adjustmentsand failuretofollow operatinginstructions,cleaning,maintenance and environmental instructionsthat arecovered
and prescribed intheinstruction book;productremovalorreinstallation;reception problemsand distortion related tonoise, echo,interference or
othersignaltransmission and deliveryproblems. SAMSUNGdoesnot warrantuninterruptedorerror-freeoperationof the product.
THERE ARE NO EXPRESSWARRANTIES OTHERTHANTHOSELISTED AND DESCRIBED ABOVE,AND NO WARRANTIESWHETHER
EXPRESSOR IMPLIED, INCLUDING,BUTNOT LIMITEDTO, ANY IMPLIEDWARRANTIESOFMERCHANTABILITYORFITNESS FOR A
PARTICULARPURPOSE,SHALLAPPLYAFTER THEEXPRESSWARRANTYPERIODSSTATEDABOVE,AND NO OTHER EXPRESS
WARRANTYOR GUARANTYGIVEN BY ANY PERSON, FIRMOR CORPORATIONWITH RESPECTTO THISPRODUCT SHALLBE BINDING
ON SAMSUNG. SAMSUNGSHALLNOTBELIABLE FOR LOSS OF REVENUEOR PROFITS,FAILURETO REALIZESAVINGSOROTHER
BENEFITS,OR ANY OTHER SPECIAL, INCIDENTALOR CONSEQUENTIALDAMAGES CAUSEDBYTHE USE,MISUSE OR INABILITYTO
USETHISPRODUCT,REGARDLESSOF THELEGALTHEORYON WHICH THECLAIMIS BASED,ANDEVENIFSAMSUNGHASBEEN
ADVISEDOFTHEPOSSIBILITYOFSUCH DAMAGES. NOR SHALL RECOVERYOF ANY KIND AGAINST SAMSUNGBE GREATERIN
AMOUNTTHAN THEPURCHASEPRICEOF THEPRODUCTSOLDBYSAMSUNGANDCAUSINGTHEALLEGED DAMAGE. WITHOUT LIM-
ITINGTHEFOREGOING, PURCHASERASSUMESALL RISKAND LIABILITYFOR LOSS, DAMAGEOR INJURYTO PURCHASERANDPUR-
CHASER'SPROPERTYAND TO OTHERSAND THEIRPROPERTYARISING OUTOF THE USE,MISUSE OR INABILITYTO USETHIS
PRODUCTSOLDBYSAMSUNG NOT CAUSEDDIRECTLYBY THENEGLIGENCE OF SAMSUNG.THISLIMITEDWARRANTYSHALLNOT
EXTENDTO ANYONEOTHERTHAN THEORIGINAL PURCHASEROF THIS PRODUCT,IS NONTRANSFERABLEAND STATESYOUR
EXCLUSIVEREMEDY.
Somestates donot allowlimitationson how long animpliedwarranty lasts,or the exclusionor limitationofincidental orconsequentialdamages,
so the abovelimitationsorexclusions maynot apply to you. Thiswarranty givesyouspecific legalrights, and you mayalso haveotherrights
which varyfromstate to state.
Toobtainwarranty hardwareservice,please contact SAMSUNGat:
Samsung Electronics America,Inc.
105 Challenger Road RidgefieldPark, NJ 07660-0511
1-800-SAMSUNG(726-7864) and www.samsung.com
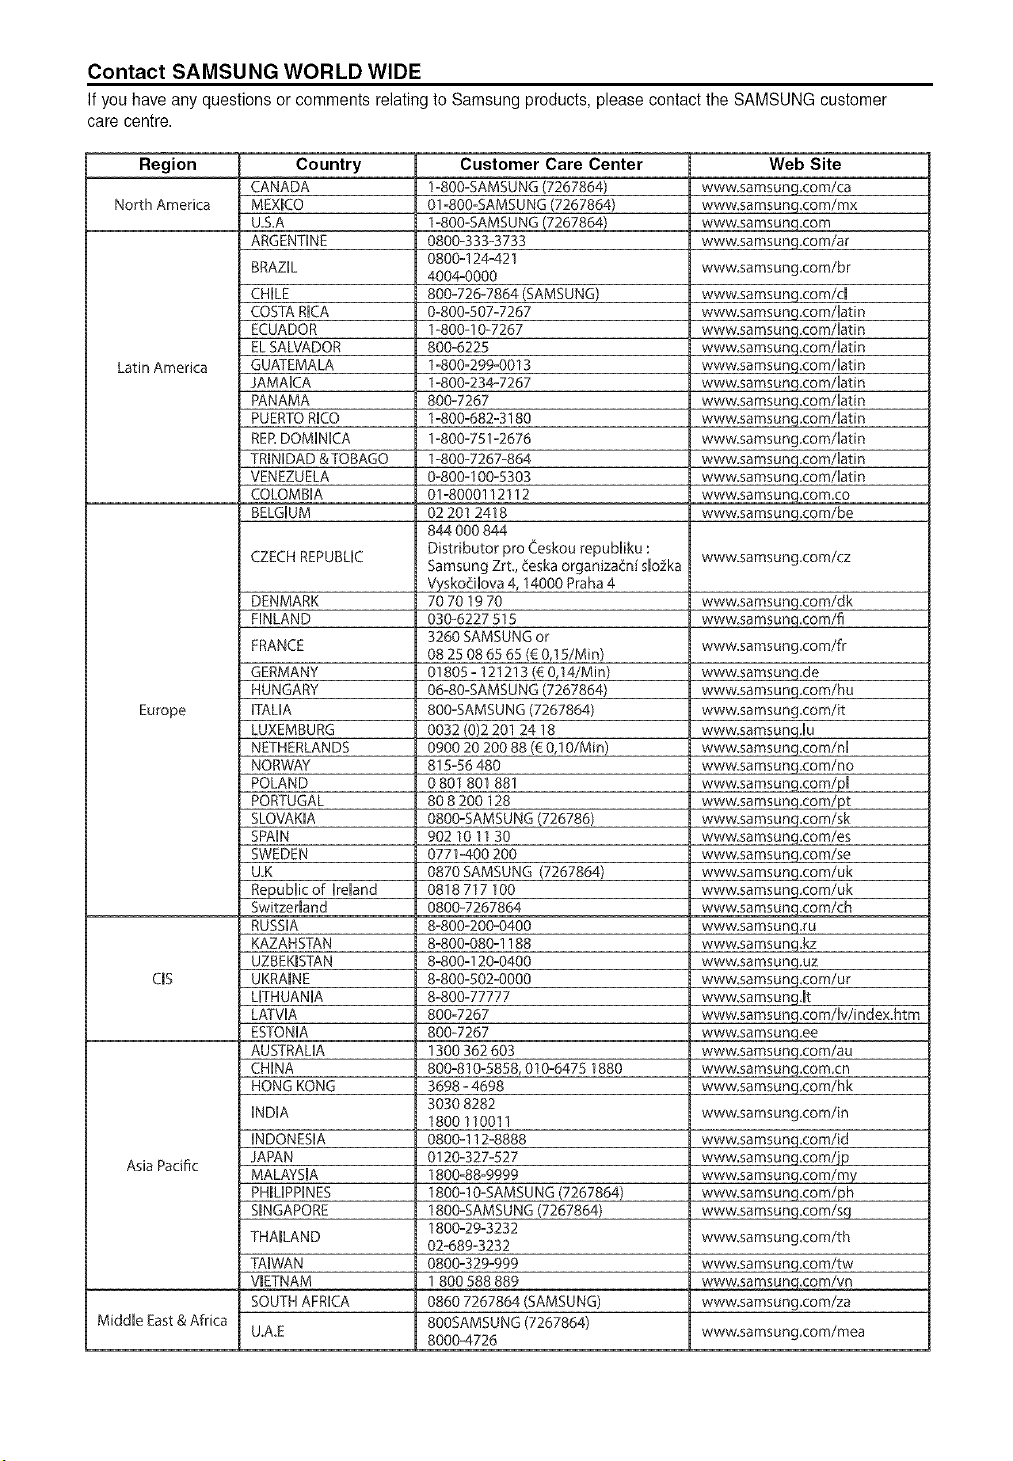
Contact SAMSUNG WORLD WIDE
Ifyou haveany questionsor commentsrelatingtoSamsungproducts,pleasecontactthe SAMSUNGcustomer
care centre.
Region
North America
Latin America
Europe
CIS
Asia Pacific
Country
CANADA
MEXICO
U.S,A
ARGENTUNE
BRAZIL
CHILE
COSTARICA
ECUADOR
EL SALVADOR
GUATEMALA
JAMAICA
PANAMA
PUERTORICO
REP.DOMMCA
TRINDAD &TOBAGO
VENEZUELA
COLOMBIA
BELGIUM
CZECHREPUBLIC
DENMARK
FINLAND
FRANCE
GERMANY
HUNGARY
FAUA
LUXEMBURG
NETHERLANDS
NORWAY
POLAND
PORTUGAL
SLOVAKUA
SPAIN
SWEDEN
U.K
RepubUicof keUand
Switzerland
RUSSUA
KAZAHSTAN
UZBEKmSTAN
UKRAINE
LITHUANIA
LATVUA
ESTONIA
AUSTRAUA
CHINA
HONGKONG
INDIA
UNDONESUA
JAPAN
MALAYSIA
PHILIPPINES
SmNGAPOR[
THAILAND
TAmWAN
VIETNAM
SOUTHAFRUCA
Web Site
www samsung corn/ca
wwwsamsung corn/rex
wwwsamsunq.com
www.samsung.com/ar
wwwsamsung,com/br
wwwsamsung.com/c[
www.samsung.com/latin
www.sa msung.com/latin
www,samsuncj,com/latin
wwwsamsung,com/latin
www samsung corn/latin
www,samsung,com/latin
www.samsung.com/latin
wwwsamsung.com/latin
www.samsung.com/latin
www.samsung.com/latin
wwwsamsun_.com.co
www,samsung.com/be
Customer Care Center
I=800=SAMSUNG(7267864)
01=800=SAMSUNG(7267864)
1=800=SAMSUNG(7267864)
0800-333-3733
0800=124-421
4004-0000
800°726=7864(SAMSUNG)
0=800=507=7267
1-800-I0-7267
800=6228
1-800=299-0013
I=800=234°7267
800=7267
1=800=682=3180
1=800=751=2676
1-800-7267-864
0=800=100=5303
01=8000112112
02 201 2418
844 000 844
Distributor pro Ceskou repubbku :
Samsung Zrt, _eska organiza_ni s[o2ka
Vyskoeilova 4,14000Praha 4
70701970
030=6227 815
3260 SAMSUNGor
08 25 0865 65(€0,t 5/Min)
01805 = 121213 (€0,14/Min)
06=80=SAMSUNG(7267864}
800=SAMSUNG(7267864)
0032 (0)2 201 24 18
0900 20 200 88 (€0,10/Min)
815=56480
0 801 801 881
80 8 200 128
0800=SAMSUNG(726786)
902 I0 1130
0771 =400200
0870 SAMSUNG (7267864)
0818717 100
0800-7267864
8=800-200-0400
8=800=080=I188
8=800=I20=0400
8=800=502=0000
8=800=77777
800=7267
800-7267
1300 362603
800=810=5858,010=64751880
3698=4698
3030 8282
1800110011
0800ol 12=8888
0120=327=527
1800=88=9999
1800o!0=SAMSUNG(7267864)
1800=SAMSUNG(7267864)
1800°29=3232
02°689=3232
0800=329=999
I 800 588 889
0860 7267864 (SAMSUNG)
800SAMSUNG(7267864)
8000-4726
www.samsung.com/cz
www,samsung.com/dk
www samsunq,com/fi
www.samsung com/fr
www.samsung.de
www.samsung.com/hu
www,samsung corn/it
www.samsunqJu
wwwsamsung,com/nl
www.samsung.com/no
www.samsung.com/p[
www.samsung.com/pt
wwwsamsung,com/sk
wwwsamsung.com/es
www,samsung.com/se
wwwsamsung=com/uk
www.samsung.com/uk
www.samsung.com/ch
www samsung.ru
wwwsamsungAz
www.samsung.uz
wwwsamsung,com/ur
www,samsungJt
www.samsung.com/b/index.ht m
www.samsunq.ee
www samsung com/au
wwwsamsung.com.cn
www,samsung.com/hk
wwwsamsung.com/in
www,samsuncj.com/id
wwwsamsung,com/jp
wwwsamsung.com/my
www,samsung com/ph
wwwsamsung=com/sg
www,samsung com/th
www,samsung.com/tw
www,samsunq com/vn
wwwsamsung.com/za
Middle East& Africa
U.A.E www samsung.com/mea

