Samsung NP730QDA-KA1US Galaxy Book
Product's Documents
Below are documents related to this product, you can read online or download:
- Owner's manual - (English) Read Online | Download pdf
Owners' Guide Computing
NOTE:
Front view

| Number/Name | Description |
| 1 Microphone | You can use the built-in microphone. |
| 2 Camera | Using this camera, you can take still pictures and record video. |
| 3 Camera indicator light | This indicates the camera operating status. |
| 4 LCD/Touch screen (optional) |
The screen’s images are displayed here. Recognizes touch interactions (Only for touch screen models). |
| 5 Operating status LED and Illumination sensor | Shows the operating status of the computer. |
| 6 Keyboard | Enter text or control computer functions. |
| 7 Fingerprint recognition sensor | The fingerprint recognition sensor recognizes fingerprints. Scans a fingerprint to sign in to Windows, apps, and services. |
| 8 Touchpad |
Moves the cursor and selects options. Functions as a mouse. |
Operating status LED and Illumination sensor

| Number/Name | Description |
| 1 Operating status LED | Shows the operating status of the computer. – Blue: Turned on |
| 2 Illumination sensor |
The sensor detects the ambient light. If the ambient light level becomes too low, the computer’s backlight will automatically turn on. If there is sufficient ambient lighting, the computer’s backlight will automatically turn off. NOTE: Do not block the sensor. |
Right view

| Number/Name | Description |
| 1 Power button | Turns the computer on and off. |
| 2 Memory card slot | Insert a memory card. |
| 3 USB 3.0 port | Connect various peripheral devices, such as a mouse, camera, or keyboard. |
Left view

| Number/Name | Description |
| 1 DC jack | This jack connects to the AC adapter to supply power to the computer. |
| 2 HDMI port | Used to connect an HDMI cable to an external device. |
| 3 USB Type-C port | This port allows to charge USB Type-C devices or to connect external display devices |
| 4 Earpiece/ Headset jack | Connect an earpiece or a headset to the computer to listen to audio. |
Bottom view

| Number/Name | Description |
| 1 Fan vents |
Sucks in outside air and discharges heat generated inside the computer through these holes. If the vents are blocked the computer may overheat. Avoid blocking the vents as this may be dangerous. |
| 2 Internal battery |
Provides power to the computer when not connected to an AC adapter. To remove or replace the internal battery, take it to a Samsung Service Center. You will be charged for this service. |
NOTE: If the case on the bottom of the device is replaced, the laser-carved model name, serial number, and various logos will not be displayed anymore.
For more information, contact a Samsung Service Center.
WARNING: Fully charge the battery using the AC adapter before using the computer for the first time.
Turning the computer on


Set the device to not turn on the computer automatically when the LCD panel is opened.
 ) → Samsung Settings.
About Windows Activation
When you turn the computer on for the first time, the Windows activation screen appears.
Follow the activation procedures according to the instructions on the screen to use the computer.
The computer’s date and time may be incorrect when you turn it on for the first time. They may also be incorrect if the battery has been fully discharged or removed. To set the date and time, go to the desktop taskbar and right-click the date and clock area. Then, select Adjust date/time and set the current date and time.
Turning the computer off
 ).
). → Shut down.
NOTE: Save all data before turning off the computer.
To unlock the lock screen, do one of the following:
If the account has a password, enter the password to log in after unlocking the screen.
Microsoft Windows is an operating system that is used to control a computer.
Configuring the Windows Settings
You can configure the basic system settings, such as installing or uninstalling apps and managing accounts, on the Windows Settings screen.
Select the Start button ( ) →
) →  .
.
Then, select an option you want to change after the Windows Settings screen appears.
You can also configure the settings from the Control Panel like previous OS versions. Select the Start button ( ) → Windows System → Control Panel.
Action Center
The Windows 10 action center allows you to receive system notifications, such as updates, and push notifications, such as emails and SNS updates. You can also adjust settings conveniently. For example, you can select wireless network options or adjust the volume and screen brightness via quick actions in the action center.
Checking notifications
 on the taskbar.
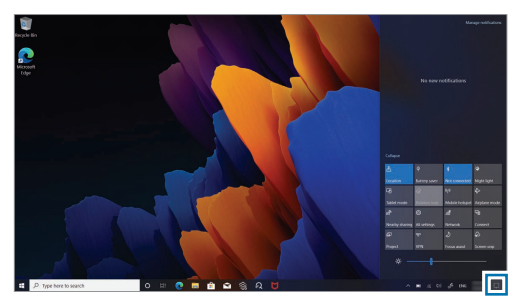
NOTE:
 ) →
) → → System → Notifications & actions.
You can use the computer as a tablet by folding the LCD panel behind the keyboard.


You can also switch the computer’s display to tablet mode without rotating the LCD panel.
 on the taskbar.
Active Pen

| Name | Functions |
| Active Pen nib | Use the Active Pen to write, draw, or perform touch actions on the screen. Hover the Active Pen over items on the screen to access additional Active Pen features. |
| Right-click button | If you select a folder or file while holding down the button, the right mouse button function will be displayed. |
| Eraser button | While running certain applications, the erase function will be displayed when you select the part you want to delete while pressing the button. |
Inserting a battery into the Active Pen

Using the Active Pen button
Pressing the Right-click button
If you select a folder or file while holding down the Right-click button, the shortcut menu of the program is displayed along with the right mouse button function.
Pressing the Eraser button
While running an application like Samsung Notes, when you select the part you want to delete while pressing the Eraser button, the selected part will be erased.
NOTE: This feature may not be available in some apps or functions.
Replacing the Active Pen nib
If the nib is dull, replace it with a new one.

WARNING:
NOTE:
Samsung Notes
Introduction
Create notes by entering text from the keyboard or by handwriting or drawing on the screen. You can also insert images or voice recordings into your notes.
Creating notes
 ) → Samsung Notes →
  and create a note. Select an input method from the toolbar at the top of the screen or on the right side of the screen.
 to save it. If you want to save the note in another file format, tap
  → Save as file.
Deleting notes
Right-click a note or tap a note while holding down the Right-click button of your Active Pen to delete and select Delete.
Composing notes with handwriting
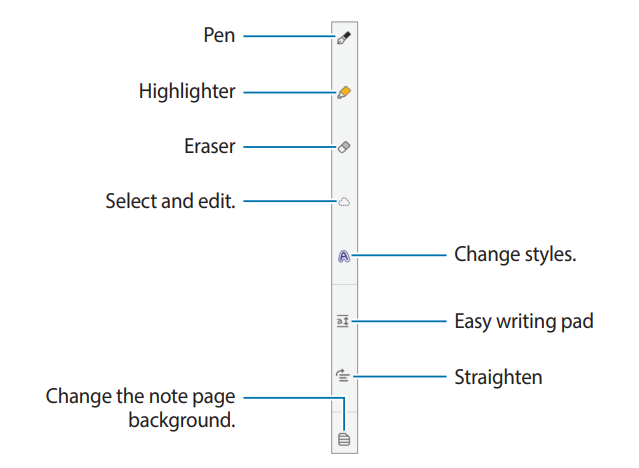
On the note composer screen, select a tool on the right side of the screen to write or draw with the Active Pen.
You can enter your handwriting more easily if you magnify the screen by spreading two fingers on it.
Using the eraser
When you want to erase handwriting from a note, select  and select an area to erase. Alternatively, select an area while holding down the Eraser button of your Active Pen.
NOTE: Even with a smaller eraser, you may still not be able to precisely erase the intended part.
Editing handwritten notes
Edit handwritten notes using various editing options, such as cutting, moving, or resizing.
 . You can also change the shape of the selection.
Changing styles
You can change the style of your handwriting and drawings.
After writing or drawing on the screen, select  and select a color or line thickness you want. Then, tap where you want to change the style with the Active Pen.

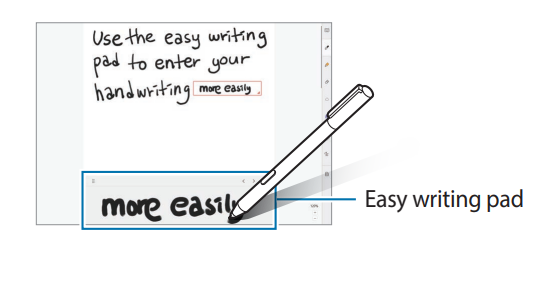
Using the easy writing pad
Use the easy writing pad to enter your handwriting more easily.
On the note composer screen, select  . The input field will be magnified and appear as the easy writing pad.
Straightening content horizontally
You can horizontally straighten your handwriting and drawings. After writing or drawing on the screen, select  .
.
Changing the note page background
You can change the note page background by applying a pattern or color you want. You can also add your own background image.
On the note composer screen, select  .
.
Recording voice to notes
Make a recording of your voice while creating a note, and then the content will be synchronised with the recording.
On the note composer screen, select  and create a note.
Select a note from the list and select  to play the recording. Then the content you created while recording will be displayed on the screen along with the recording.
Adding memos to PDF files
On the note composer screen. select  , and the select a PDF file. You can add memos to the PDF file.
Use your fingers on the touch screen to perform actions.
Touch screen gestures
Tapping
To select menus, options, or applications, tap the touch screen.

Double-tapping
To open files or items, double-tap the touch screen.

Tapping and holding (right-clicking)
To use additional options of an item, tap and hold it on the touch screen.

Dragging
To move an item to another location, tap and hold it, and then drag it on the touch screen to the desired location.

Scrolling
To scroll up, down, left, or right, swipe on the touch screen.

Spreading and pinching
To zoom in, spread two fingers apart on an image or text. Pinch to zoom out.

WARNING:
NOTE:
Entering text
Use the on-screen keyboard to enter text.
To open the on-screen keyboard, select  on the taskbar.

NOTE:
 → Tablet mode in the taskbar.
Changing the keyboard layout
To change the keyboard layout, select  and select one of the following:
 : Simplified QWERTY keyboard
 : Mini keyboard
 : Split QWERTY keyboard for entering text with two hands
 : Standard QWERTY keyboard
 : Handwriting keyboard used to enter text from written words
 : Fixed keyboard
 : Floating keyboard
| Number | Description |
| 1 | Delete a preceding character. |
| 2 | Move to the next line. |
| 3 | Create an uppercase character. For all caps, tap it twice. |
| 4 | Change the keyboard language. |
| 5 | Move the cursor. |
| 6 | Enter a space. |
| 7 | Enter emoticons. |
| 8 | Enter numerals and punctuation marks. |
| 9 | Change the keyboard layout. |
| 10 | Add an item from the clipboard. |
Entering uppercase
Select  before entering a character. For all caps, tap it twice.
Changing language keyboards
Add keyboards to enter text in other languages. Select  →
→ , select Add a language under Preferred languages, and then select a language. You can change the input language by selecting the input language key on the on-screen keyboard.
Handwriting
Select  →
→  , and then write a word in the on-screen text input field.
NOTE: Handwriting is not supported for some languages.
Copying and pasting
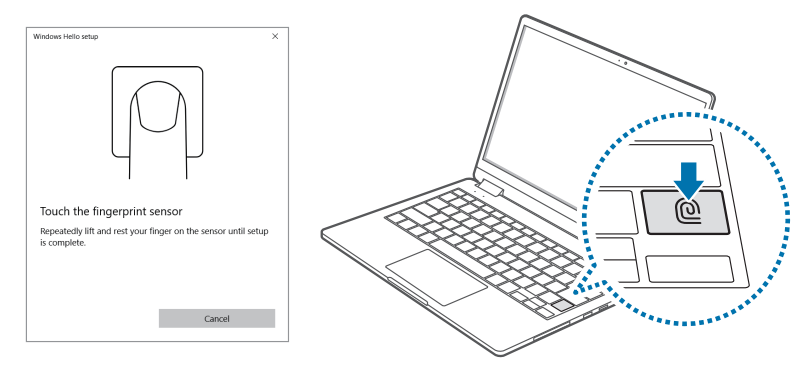
You can sign in to Windows, apps, and services by teaching Windows to recognize your fingerprint.
Registering your fingerprint
Create a password and PIN first to use the fingerprint scan feature.
 ) →
) → → Accounts → Sign-in options.
Removing a fingerprint
 ) →
) →  → Accounts → Sign-in options.
Unlocking the screen with a fingerprint
You can unlock the screen by resting your fingerprint on the fingerprint recognition sensor.
Place a registered finger on the fingerprint recognition sensor.
The screen will be unlocked if the fingerprint is scanned correctly.
For better fingerprint recognition
Connecting the computer to an external display device can be useful for presentations or when watching a movie. The cables required to connect an external display are sold separately. The computer supports HDMI cables and USB Type-C cables.
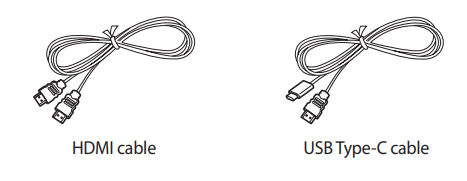
NOTE: Check the available ports on the display device to ensure that it is compatible with the computer.
Connecting to a display
NOTE: The method for connecting to an external display may differ depending on cable or adapter types. The following actions are based on using an HDMI cable.


NOTE:
You can also select the display mode in Windows settings.
Select the Start button ( ) →
) →  → System → Display, and then select Detect on the Multiple displays option.
Use Bluetooth to listen to music or exchange data or media files with other Bluetooth-enabled devices.
WARNING:
Pairing with other Bluetooth devices
 on the taskbar.
 ) →
) →  → Devices → Bluetooth & other devices → Add Bluetooth or other device.
Unpairing Bluetooth devices
 ) →
) →  → Devices. Your computer will display the paired devices.
NOTE:
Adjust the LCD brightness to reduce eye strain and save power.
Controlling brightness using the keyboard


Controlling brightness using the taskbar
 .
.
NOTE: The LCD screen is automatically set to the brightest level when the AC adapter is connected. The LCD screen automatically becomes dimmer when the AC adapter is disconnected.
Changing display mode
NOTE: Select the optimal screen settings based on your activity. Some options may not be available depending on the model.
 ) → Samsung Settings.
Optimizing the full screen color balance
Optimize the screen color by adjusting the color tones to your preference.
 ) → Samsung Settings.
Adjust the system volume or sound volume when playing music or video.
Controlling volume using the keyboard

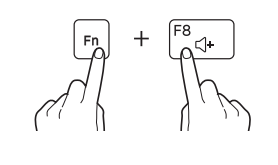

Controlling volume using the taskbar
 on the taskbar.
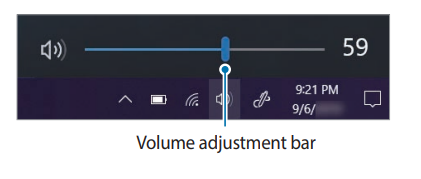
Fully charge the battery using the AC adapter before using the computer for the first time.
WARNING:
NOTE: To restore the battery power after cutting it, connect the AC adapter.
Charging the battery
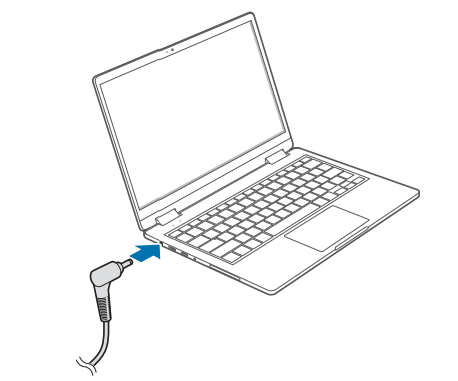
WARNING: Do not allow the adapter to make contact with your skin for a long time. A low-temperature burn may result.
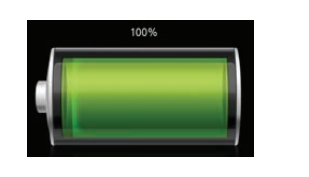
Battery status
When the AC adapter is removed, move the cursor over the battery icon on the taskbar to view the current battery charge.

Viewing the current battery charge when the computer is turned off
Connect or disconnect the AC adapter to the computer to view the current battery charge when the computer is turned off.
Saving battery power
On the taskbar, select  → Battery saver.
Battery saver mode is activated.
NOTE: Battery saver mode is disabled when the AC adapter is connected.
Battery usage time
Batteries are replaceable items and over time the battery’s capacity to hold a charge and its power level is reduced. If a battery can only hold its charge for half of the time that it could when new, it is recommended to purchase a new, replacement battery.
Checking battery life instruction messages
When the battery has expired, an instruction message may appear on the screen. To prevent the computer from losing data and to use the computer safely, follow the on-screen instructions.
When battery expiration is imminent
Batteries are consumable parts and the remaining battery life is currently low. Continued use may result in charge or discharge failures. Whether or not batteries can be used is determined based on safety evaluations. Please replace it with a new battery (genuine) to prevent data loss and ensure safe usage.
When the battery has expired
Batteries are consumable parts and the current battery cannot be used as the battery life has expired. Please replace it with a new battery (genuine) to prevent data loss and ensure safe usage. Whether or not batteries can be used is determined based on safety evaluations. To prevent data loss while replacing batteries, please be sure to save your work first.
NOTE: Instruction messages related to battery life are displayed properly when the Samsung Settings application is installed on your computer. The messages may vary depending on the model and software version.
When a problem occurs with the computer, it is easy to restore the computer back to the factory default settings by using the Samsung Recovery application (Recovery/Backup). It is also possible to restore the computer to a previously backed up point. Back up important data regularly before a problem occurs with the computer.
NOTE:
Recovering to factory default
You can restore the computer to its factory default settings. If necessary, back up important data to an external storage device before restoring the system. See Backing up data.
 ) → Samsung Recovery.
Backing up data
Back up important data to an alternate internal drive or an external storage device regularly to prevent data loss.
Backing up the current system
You can back up the factory default system or current system to an alternate internal drive or an external storage device.
 ) → Samsung Recovery → Back up computer.
Backing up user data
You can back up data files and folders.
Recovering after a backup
Select a backup point saved on an alternate internal drive or an external storage device to recover the computer to that point.
 ) → Samsung Recovery
Copying the drive (making a disk image)
To replace the drive, move the data to the new drive by making a disk image. The new drive must be large enough to hold the data from the current drive. Purchase an external hard drive connector separately to connect the new drive to the computer.
NOTE: When Windows is installed on a non-user replaceable disk, such as an eMMC, you cannot copy the drive.
 ) → Samsung Recovery.
If the Samsung Recovery application is not supported by the computer, reinstall Windows using the recovery function of Windows.
WARNING: Reinstalling Windows will erase all data saved on the computer. Back up applications and personal data to an external storage device before reinstalling Windows.
 ) →
) →  → Update & Security → Recovery.
NOTE: After the system is recovered, select the Start button (  ) → Samsung Update to install the required Samsung applications.
When experiencing problems with the computer, try these solutions.
Windows
How can I uninstall an application?
 ) →
) →  → Apps → Apps & features.
Samsung Recovery
What is a Recovery Area?
The computer has an additional partition for restoring data or saving backup files (only for models with the Samsung Recovery application). This partition is called a Recovery Area and it includes a recovery image comprised of the operating system and applications.
Why is the capacity representation of the hard disk drive (HDD) in Windows different from the product specifications?
The capacity of the storage device (HDD or SSD) of the manufacturer is calculated assuming that 1 KB = 1,000 Bytes. However, the operating system (Windows) calculates the storage device capacity assuming that 1 KB = 1,024 Bytes, and therefore the capacity representation of the HDD in Windows is smaller than the actual capacity. The capacity representation in Windows may be smaller than the actual capacity because some applications occupy a certain area of the HDD outside of Windows.
For models with the Samsung Recovery application, the HDD capacity representation in Windows may be smaller than the actual capacity because the Samsung Recovery application uses a hidden area of 5–20 GB of the HDD to save the recovery image, and that hidden area is not counted towards the total size available to Windows. The size of the Samsung Recovery application varies by model.
What is a recovery image?
This refers to the operating system, drivers, and software that are converted to a data image. It is required to recover the computer and is embedded in the computer’s HDD. However, this is not provided for storage devices where the capacity is less than 64 GB.
How can I restore a computer that does not have the Samsung Recovery application?
Restore the computer with the recovery function provided by Windows. Refer to the Recover Functionality item in the help for more details.
Miscellaneous
The camera and the microphone are not working. How do I turn them on again?
When recording protect mode is activated, the camera and microphone will not work.
Select the Start button (  ) → Samsung Security → Block Recording and tap the switch to turn the features off.
The computer does not turn on automatically when the LCD panel is opened.
To turn on the computer, the LCD panel should be opened greater than a certain angle.
The angle may differ depending on the model.
If the computer LED does not turn on automatically, press the Power button.
The system specifications may differ depending on the derived model. For detailed system specifications, refer to the product catalog.

NOTE:
Maintaining proper posture during computer use is very important to prevent physical injury. Improper or prolonged keyboard use may result in repetitive strain injury. Viewing the monitor screen for extended periods of time may result in eye strain. Therefore, please follow these guidelines carefully when setting up and using the computer.
Back and neck

NOTE:
Arms and hands

Eye position and display illumination

Hearing and volume control

Operating conditions
Use caution when exposed to flashing lights.
Reduce the risk of repetitive motion injuries.
When you repetitively perform actions, such as pressing keys, drawing characters on a touch screen with your fingers, or playing games, you may experience occasional discomfort in your hands, neck, shoulders, or other parts of your body. When using your computer for extended periods, hold the computer with a relaxed grip, press the keys lightly, and take frequent breaks. If you continue to have discomfort during or after such use, stop using the computer and consult a physician.